9/16"
7/16"
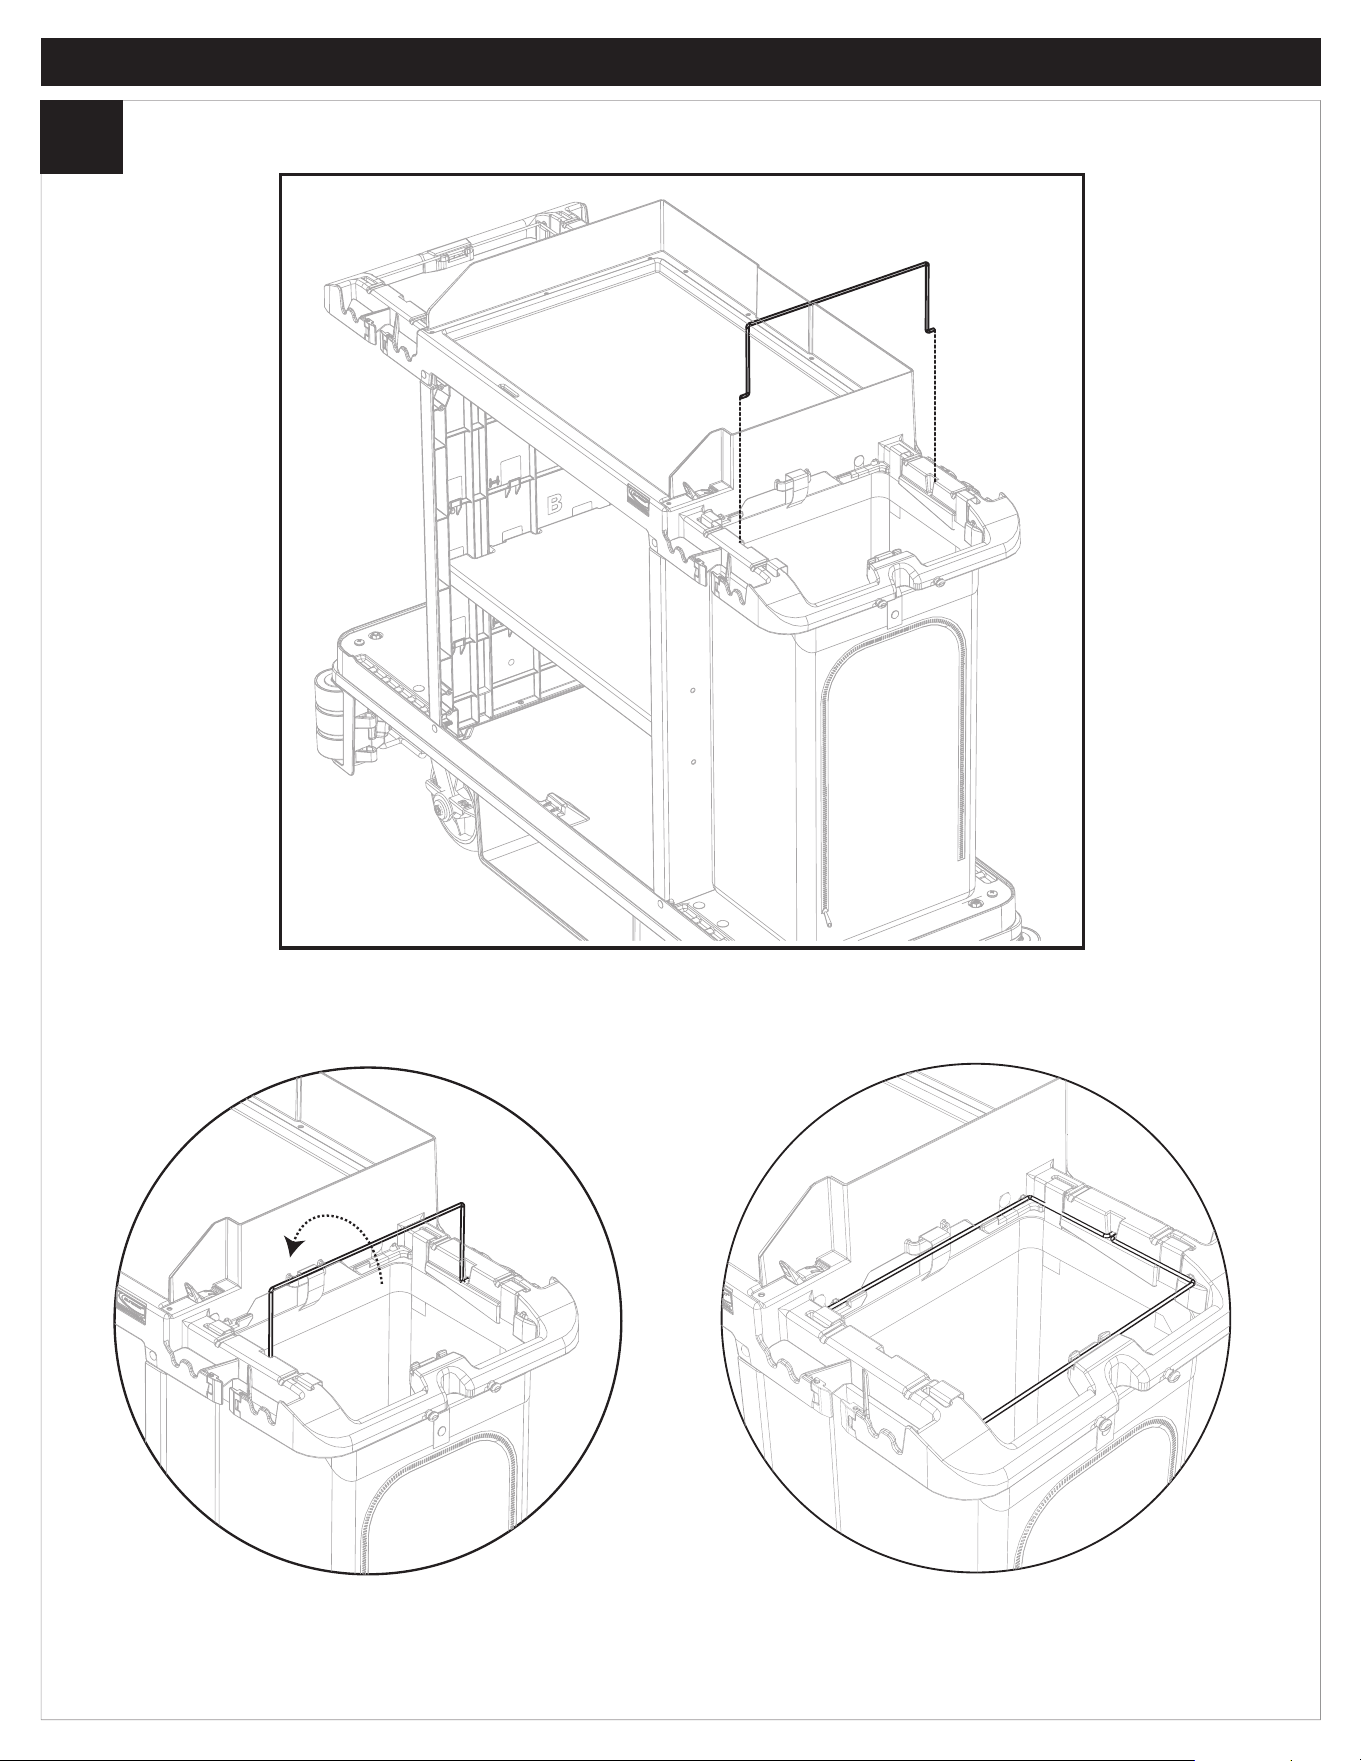
Tip #2&3
To learn about other Suncast products, please call
1-855-477-1260 or 1-630-879-2050.
Product Feedback? Go To: Suncastcommercial.com/feedback
OR email us at: [email protected]
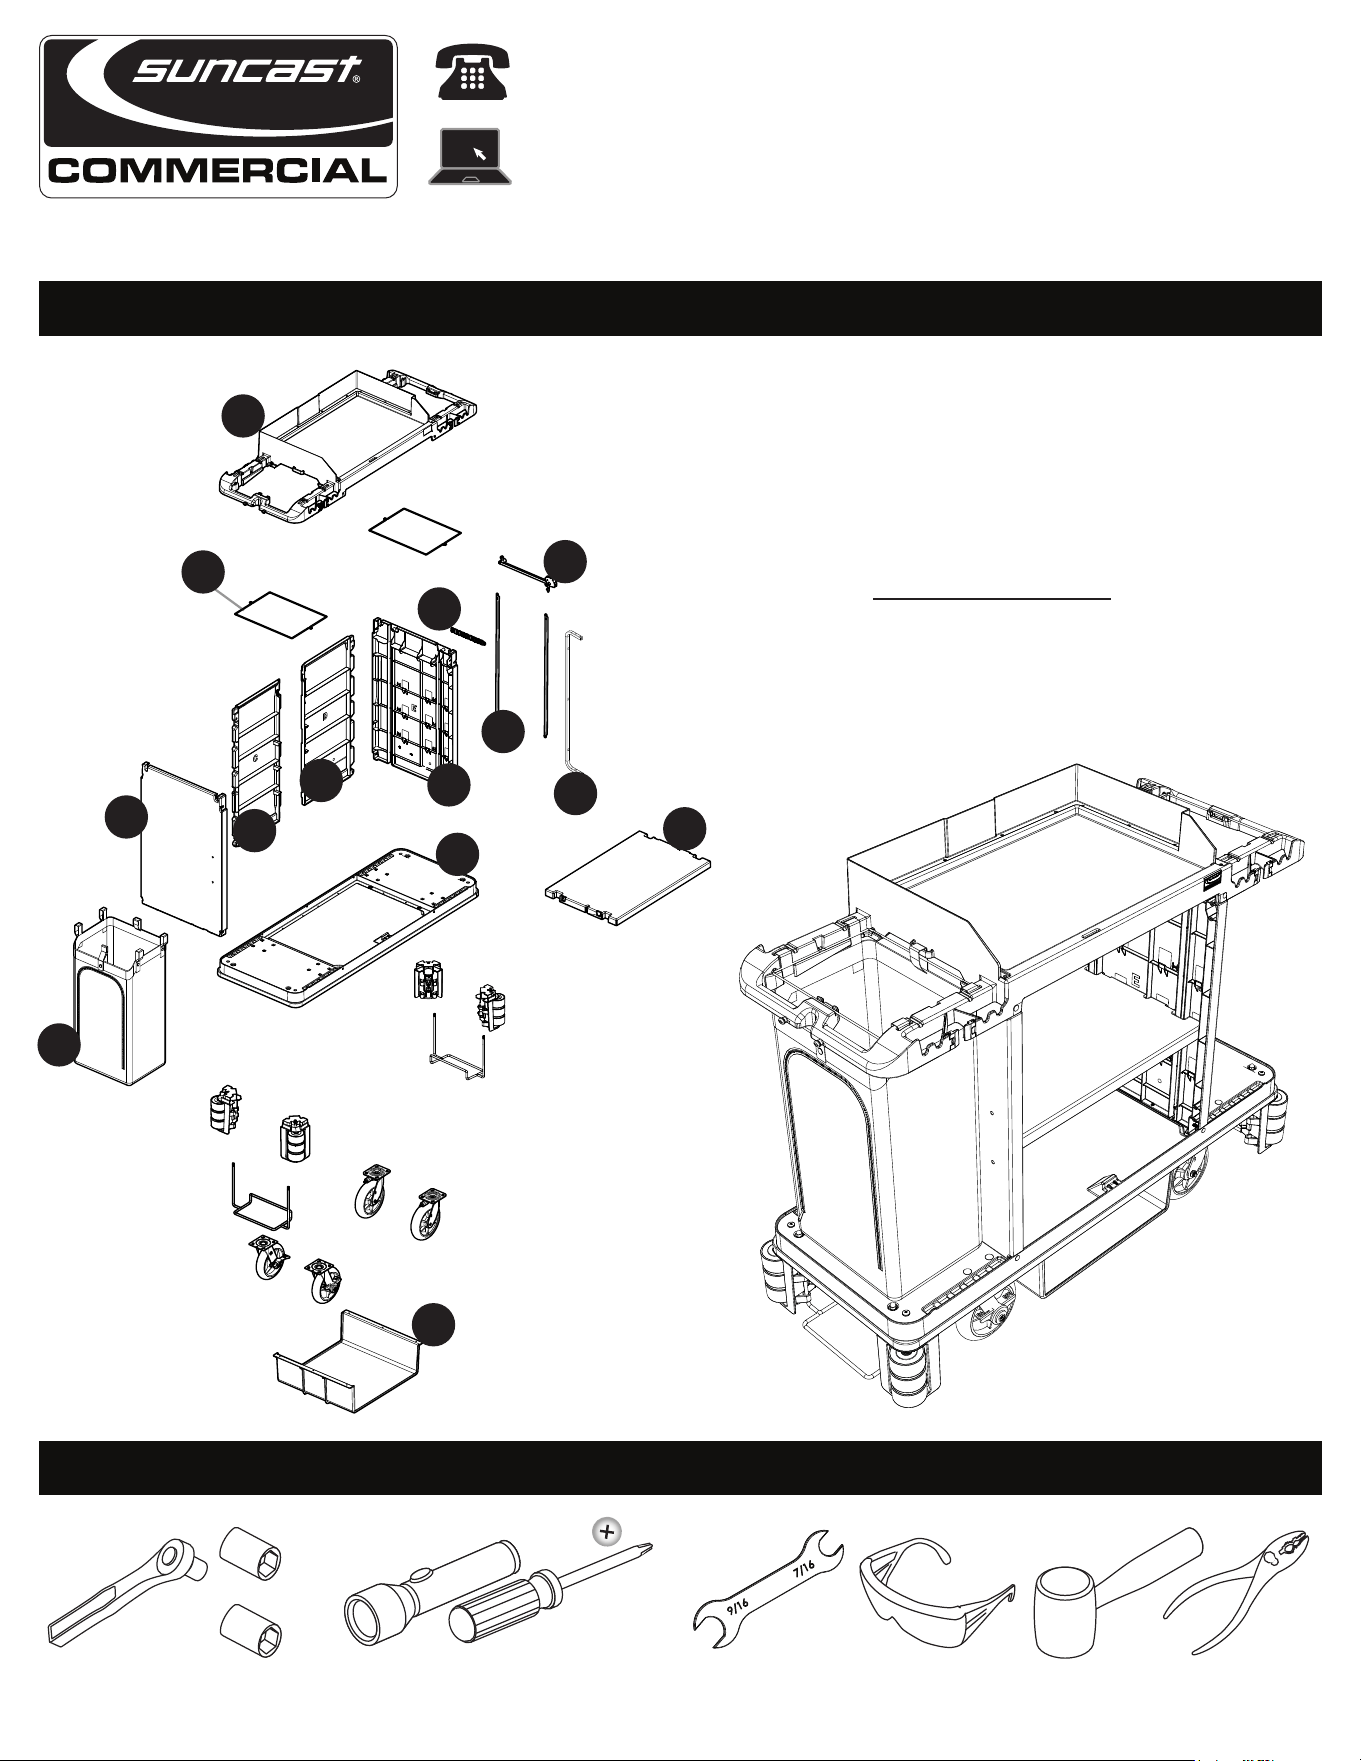
ITEM NUMBER: HKC2002 (Black) and HKC2052 (Platinum)
PARTS
TOOLS NEEDED
© 2020 Suncast Corporation, Batavia, IL 0361504A
F
G
B
E
D
C
H
I
M
L
K
R
A
OO
x2
x2
x2
*
See pages
5,6,9, &16
x2
(SLO)
IMPORTANT
SOME PARTS SHOWN ON PARTS
PAGE ARE PRE-ASSEMBLED TO
THE BOTTOM PANEL
BEFORE YOU BEGIN
• Read instructions thoroughly prior to assembly.
This kit contains parts that can be damaged if assembled incorrectly or in the wrong sequence.
• Please follow instructions.
Suncast is not responsible for replacing parts lost or damaged due to incorrect assembly.
• Assistance is required during parts of the assembly.
IMPORTANT
OPEN ALL BOXES FIRST AND NEATLY LAYOUT PARTS. SMALL PARTS MAY BE CONTAINED IN EACH BOX.
PLEASE REFERENCE THE PARTS LIST WITHIN THIS MANUAL TO VERIFY ALL PARTS ARE PRESENT.
CAUTION
• Not intended for usage by children.
• This product may become susceptible to impact damage in freezing temperatures.
• Do not store near excessive heat.
• Exercise caution when moving fully loaded product. This product is not intended for transporting heavy objects.
• Do not store items on top.
CARE AND CLEANING
• To maintain the look of your product, we recommend cleaning it each year with mild soap and water. DO NOT use bleach, ammonia, or other
caustic cleaners, and DO NOT use stiff bristle brushes. Failure to perform annual cleaning could result in permanent staining of the plastic. This is
not a manufacturing defect and is not covered under warranty.
2
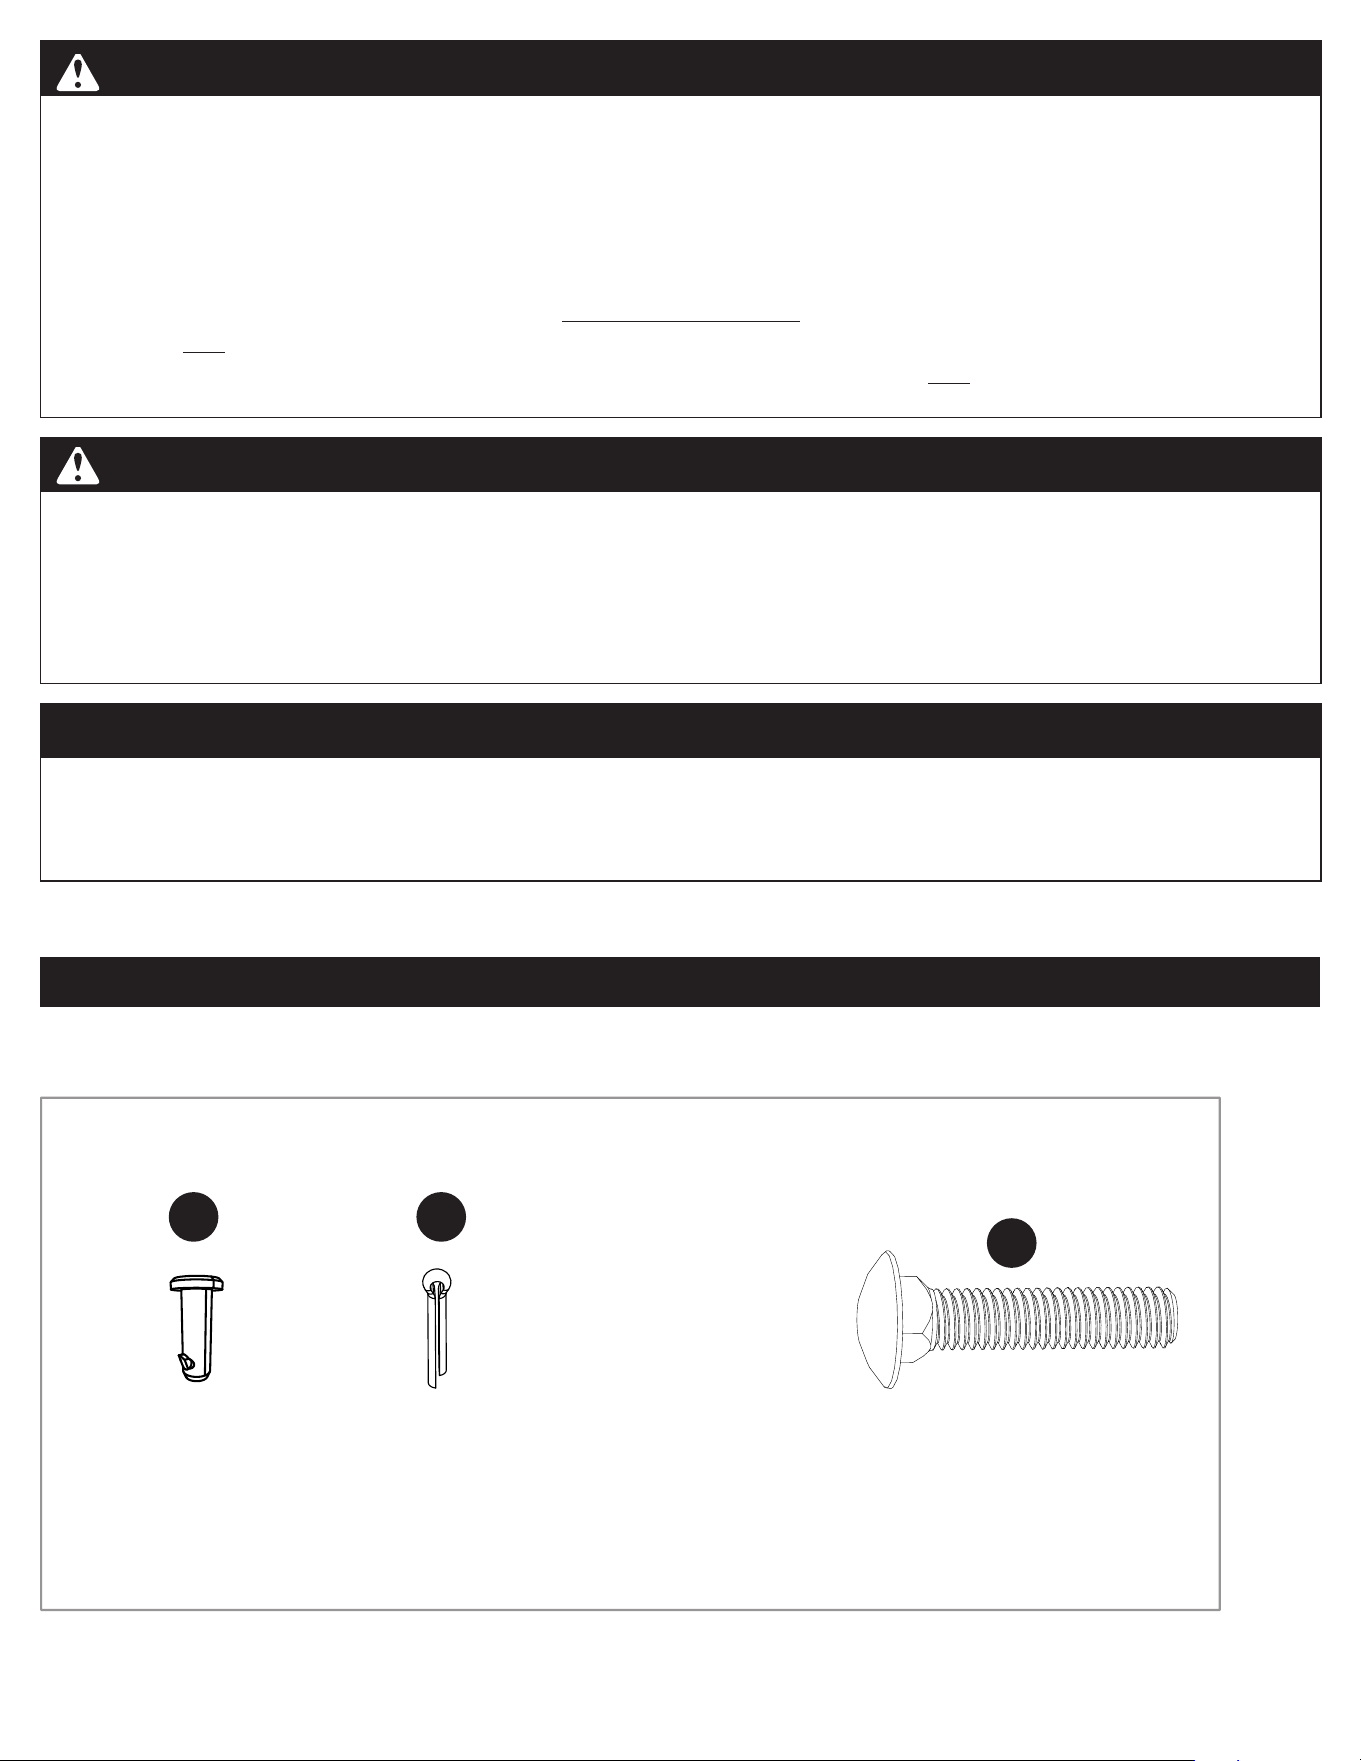
Hardware
BB
II LL
0510874
.588"L
pin
x3
0631452
.692 Long
Cotter Pin
x3
0631463
3/8" x 1 3/4"
Bolt
x3
0480436
0671172 0671173

KK
MM
0631178
3/8"
washer
x4
0631459
1/4"-20 nut
x9
NN
0631535
cap
x14
0480466
CC
DD
EE
HH
0631456
¼" x 1 ½"
Bolt
x4
0631457
¼" x 2"
Bolt
x 4
0631462
¼" x 1"
Bolt
x1
0631506
1/4 x ¾"
screw
x14
RR
0631536
¼" x ½"
screw
x4
0480467
Hardware shown at actual size *(Unless otherwise noted). Extra hardware provided. Not all are used.
Hardware continued...
4
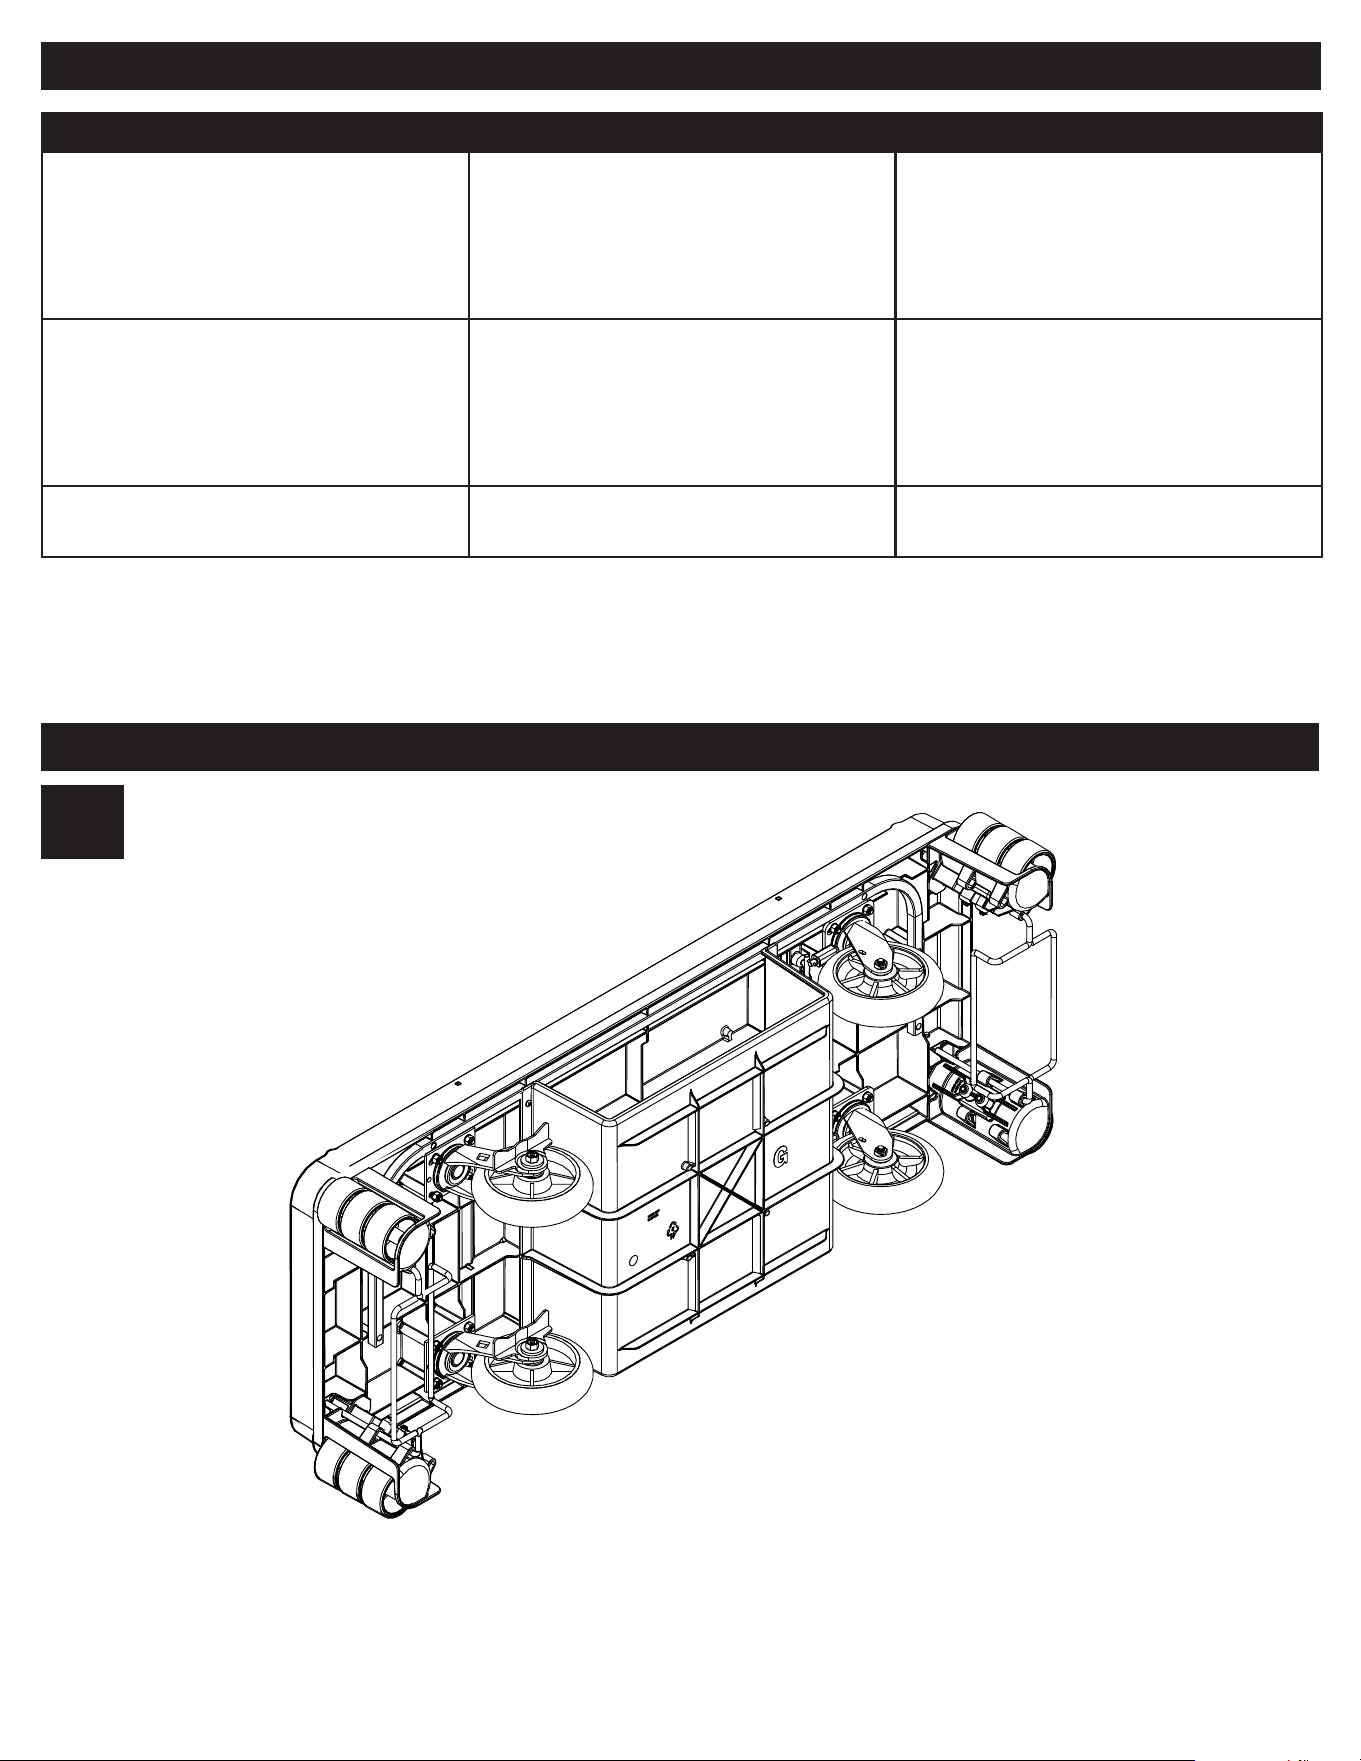
Unpack all contents of box, and confirm bottom panel is pre-assembled as shown. Continue to step 2 .
4
FRONT
Assembly
1
Troubleshooting
Problem Possible Cause Possible Solution
Casters are not locking or unlocking. Placement of Casters. Loosen the bolts on the casters and slide
the casters towards the center of the cart.
Moving the casters toward the center of
the cart will increase the engagement of
the (LSLO) and caster connection.
Red lower swivel lockout (LSLO) straps are
too tight.
Remove the two black metal straps and
rotate the red straps so the screws can be
accessed. If the rods do not rotate freely
then loosen the screws, just to the point
that the rods will rotate freely.
Hex bolt on inside of cabinet that secures
the red upper lever may be too tight.
Loosen hex bolt accordingly to free up the
lever.
B
C
5
5
Assembly
2
D
E
D
C
B
E
3
4
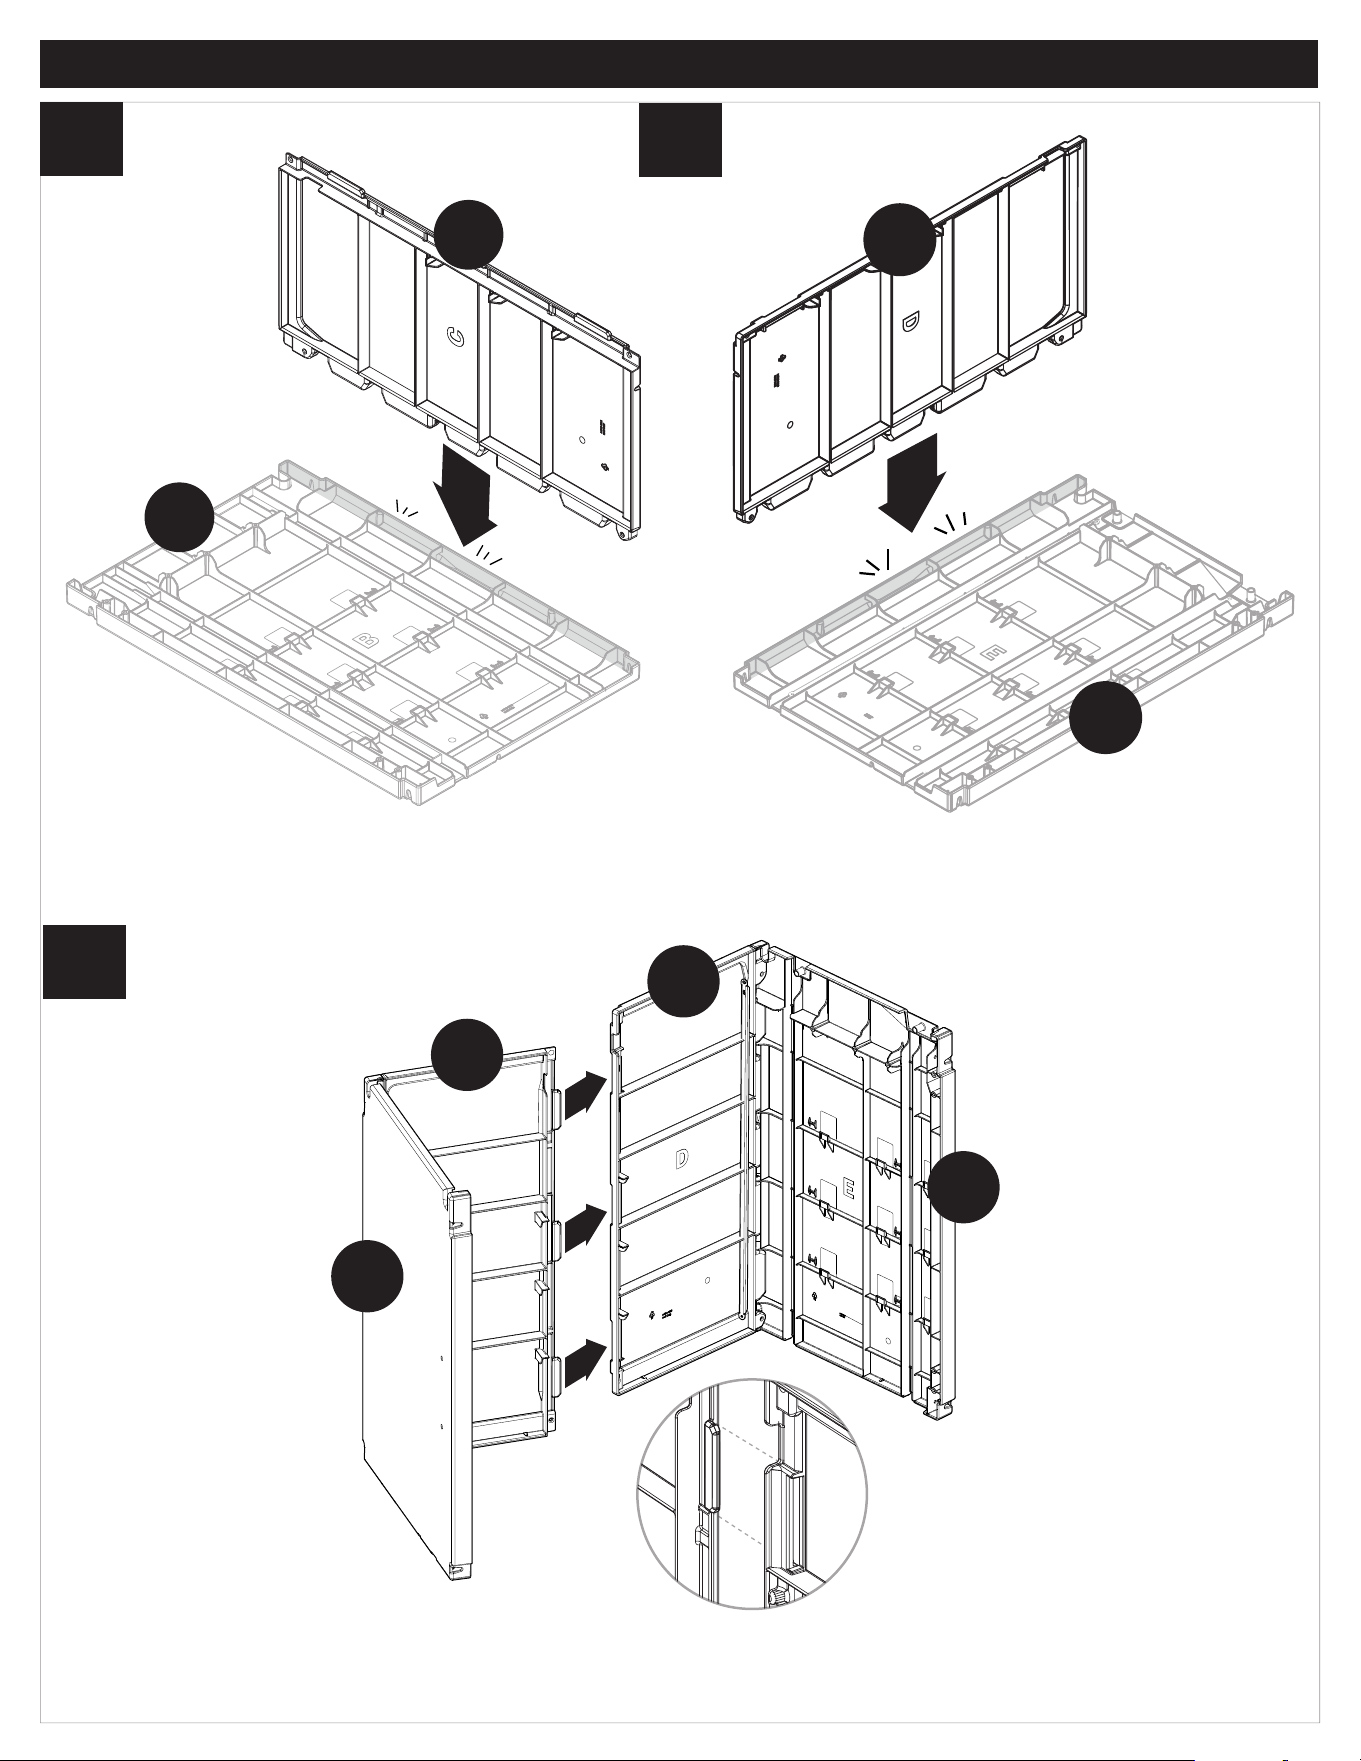
Insert back left panel (C) into left side panel (B) until secure. Insert back right panel (D) into right side panel (E) until secure.
Insert Left back panel tabs (B/C) into slots on right back panel (D/E) on an angle and push together.
6
DD
CC
EE
EE
x2
MM
x5
x2
DD
5
Assembly
5
6
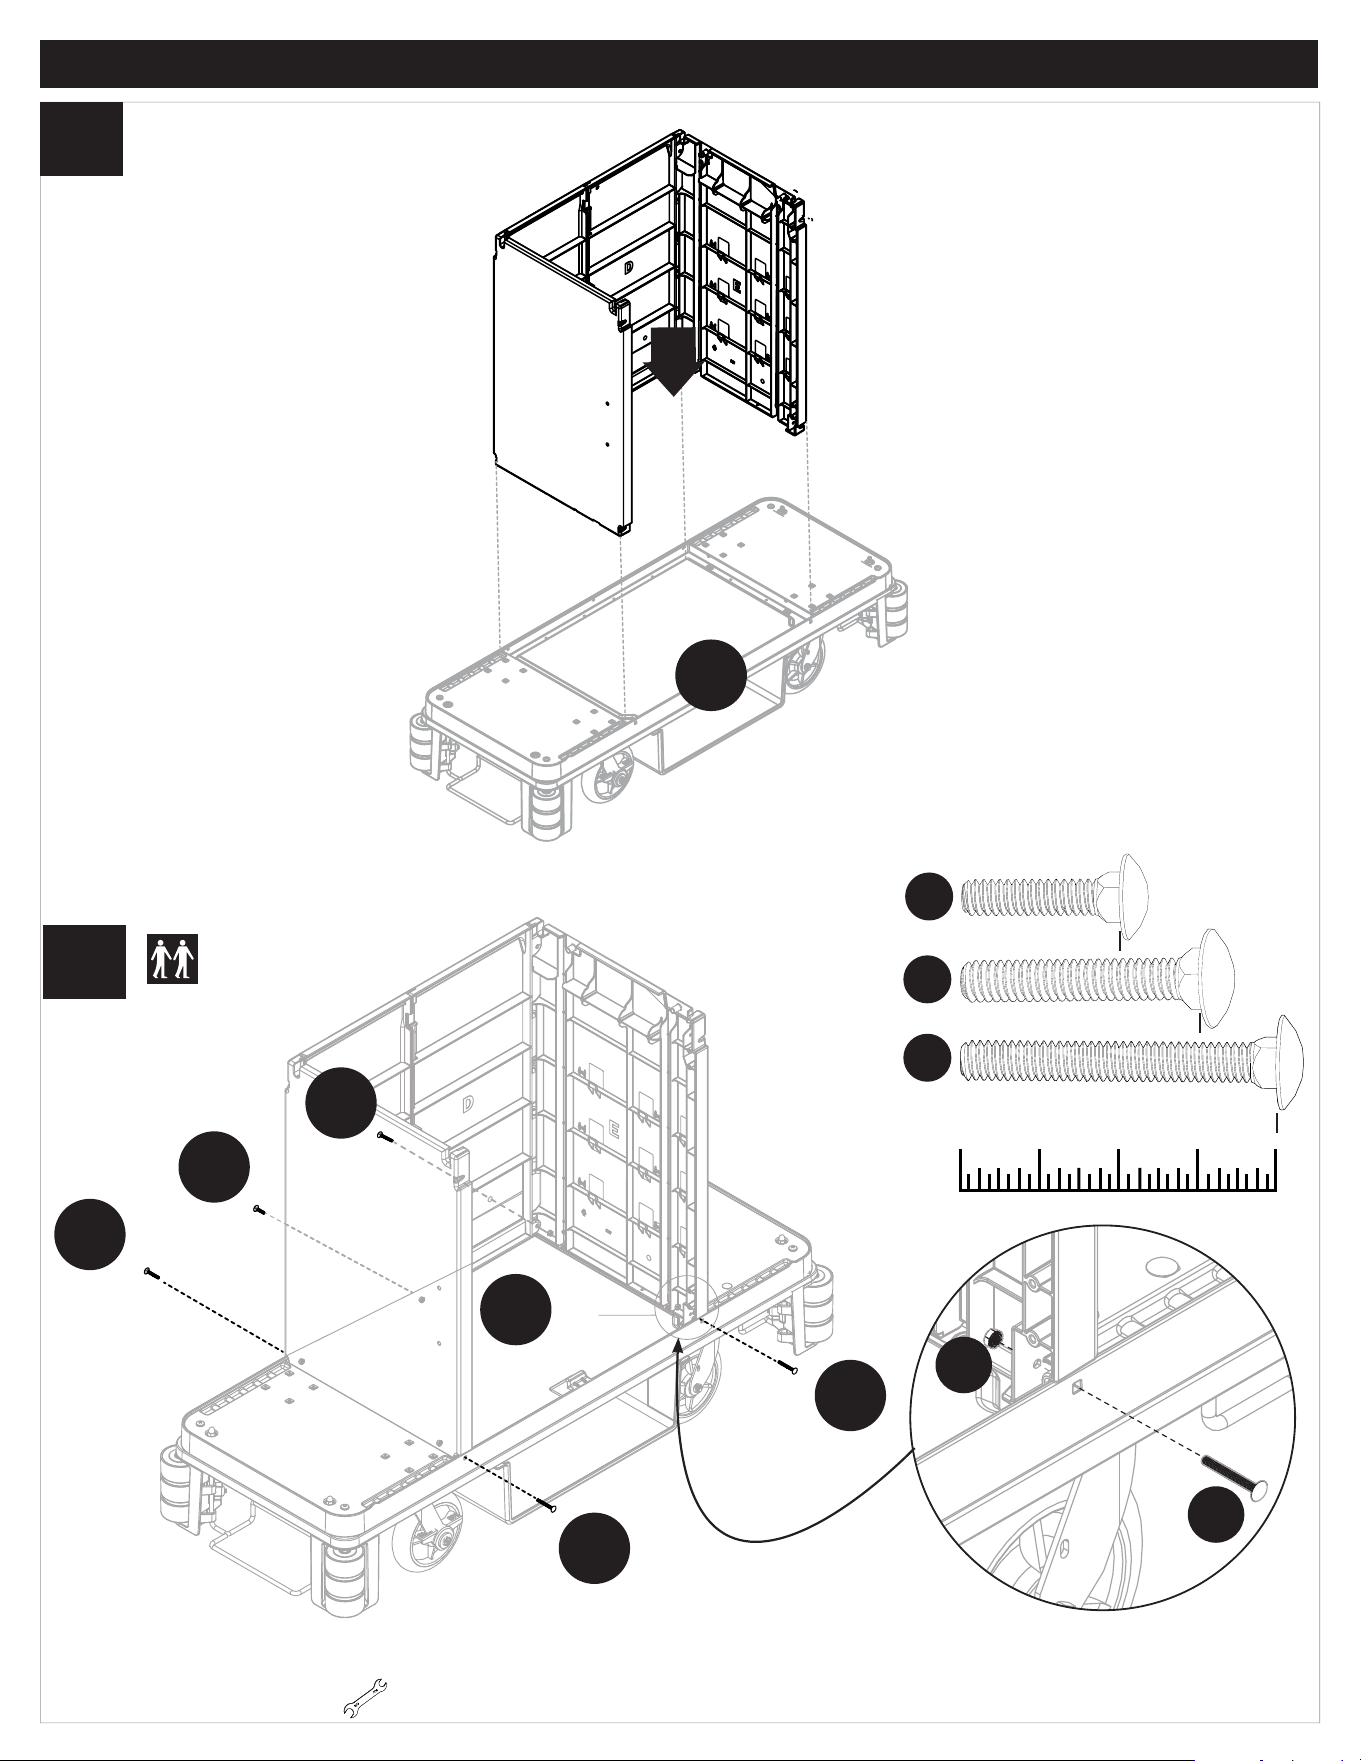
Lower assembled panel down onto top of cart (A). Place in center rectangular area.
Attach sides to cart in four corners and center using five screws (CC /DD / & EE) and five nuts (MM).
Note: Use supplied wrench *
EE
MM
A
1
2
In
DD
EE
CC
7
Assembly
8
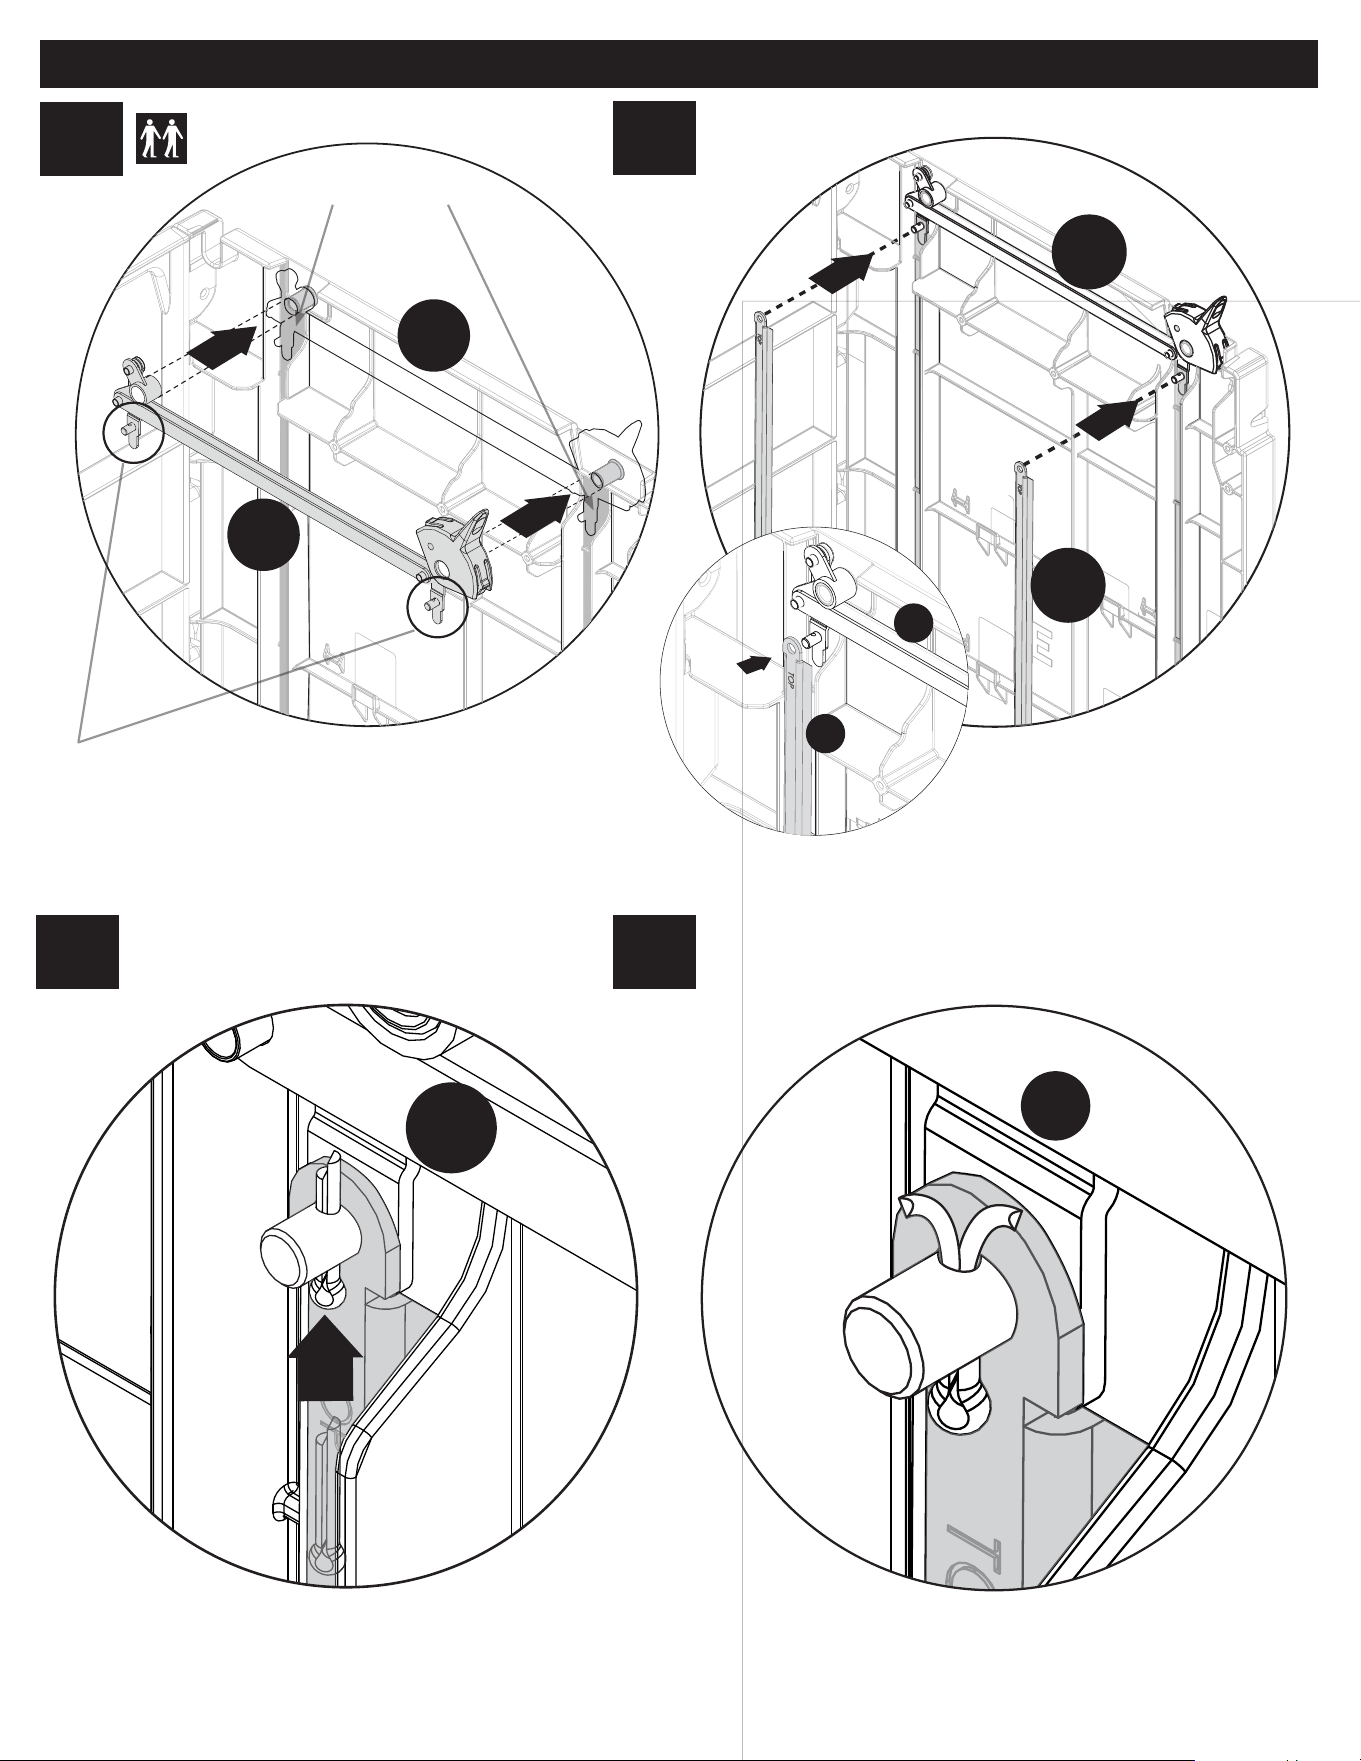
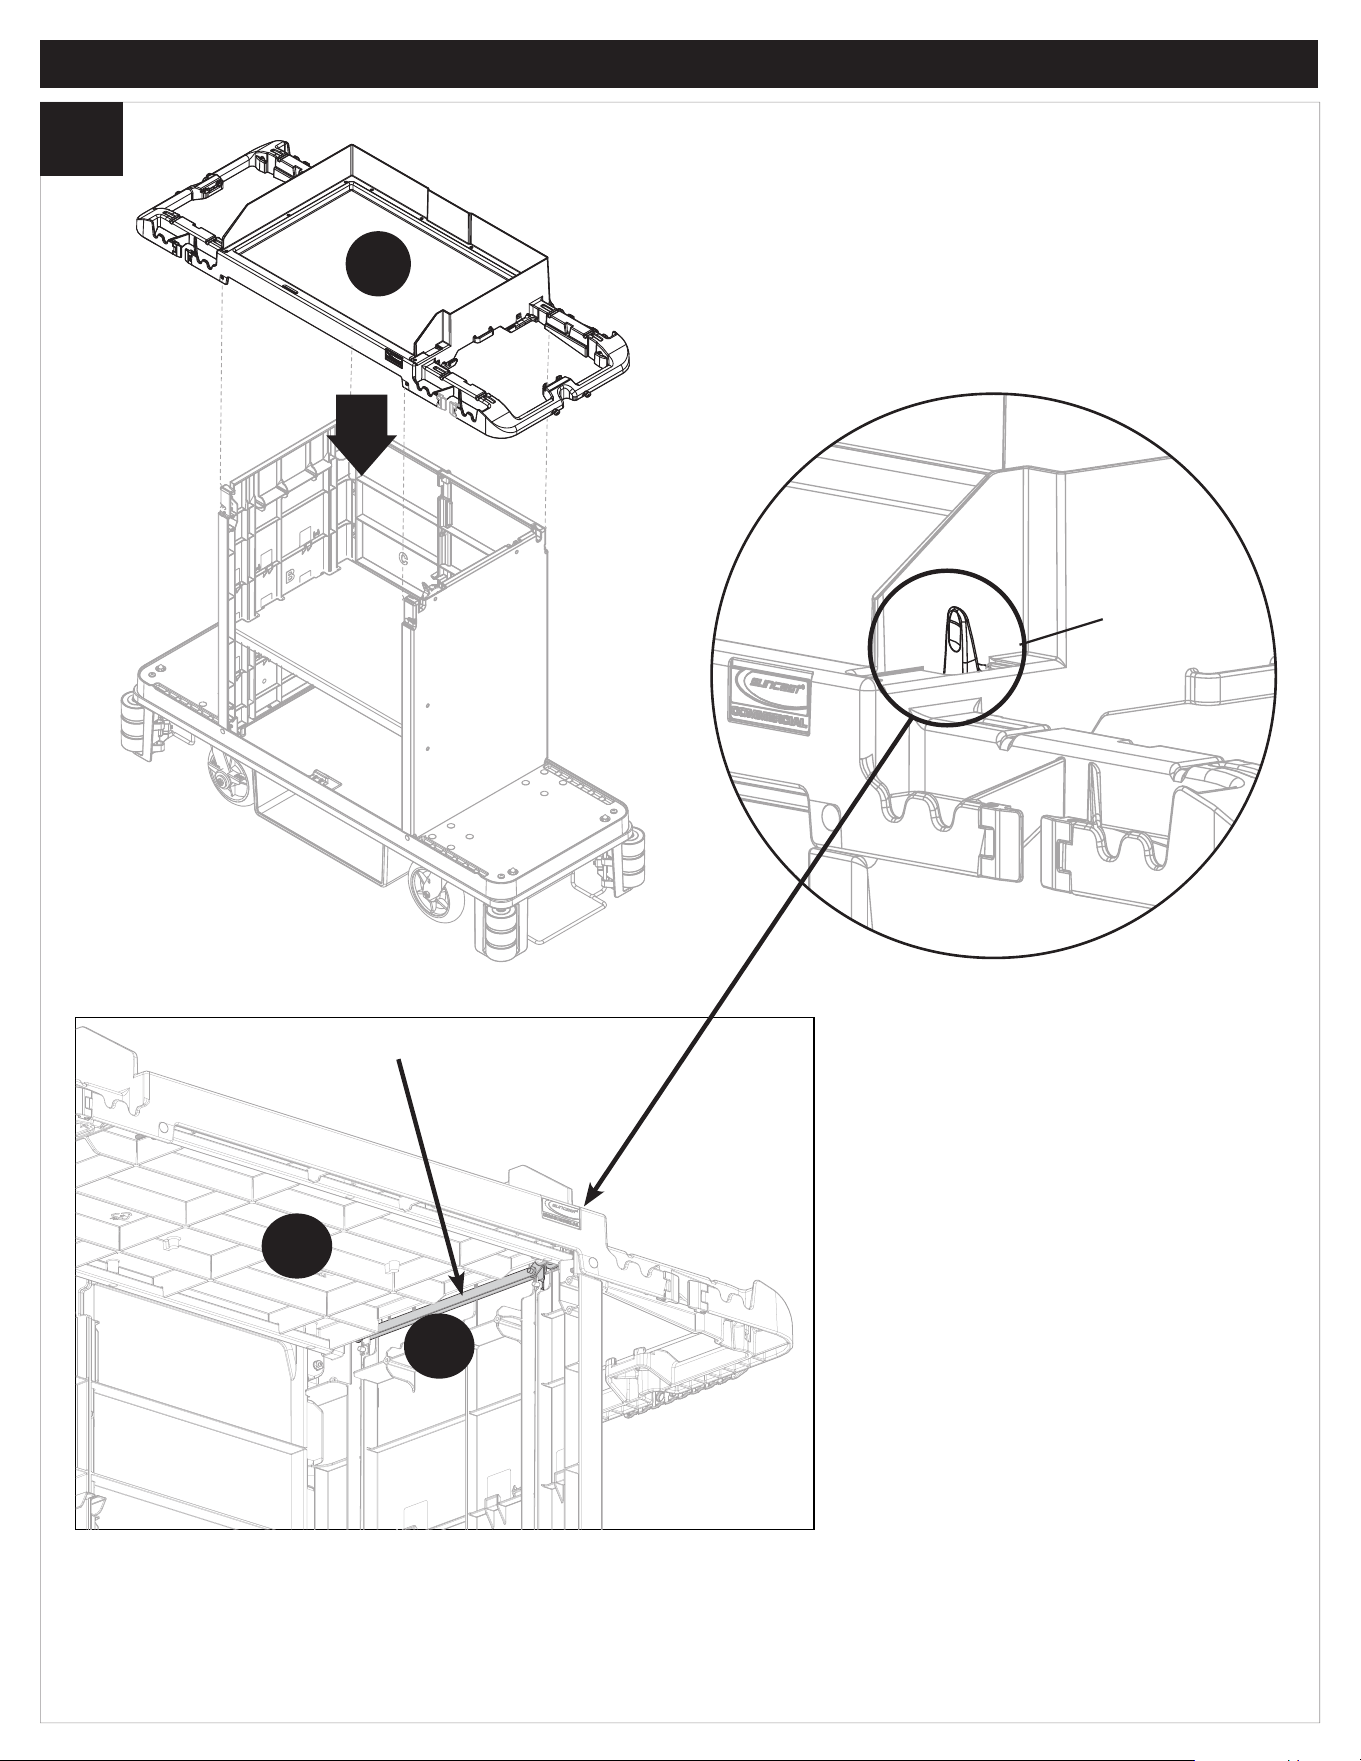
Insert two holes on Swivel Lockout Mechanism (M) onto two pegs on side panel (E). Slide linkage arm (L) onto pin using the side with the larger
hole also stamped “top”. Slide all the way to the back. Attach by placing cotter pin (LL) through hole. Fold Cotter pin over using a needle nosed
pliers. Repeat other side.
7
E
M
x2
L
E
LL
8
9
10
Important:
Make sure these legs fall within rib channels
Rib Channels
Make sure top end
of rod faces up.
LL
x2
L
E
8
Assembly
8
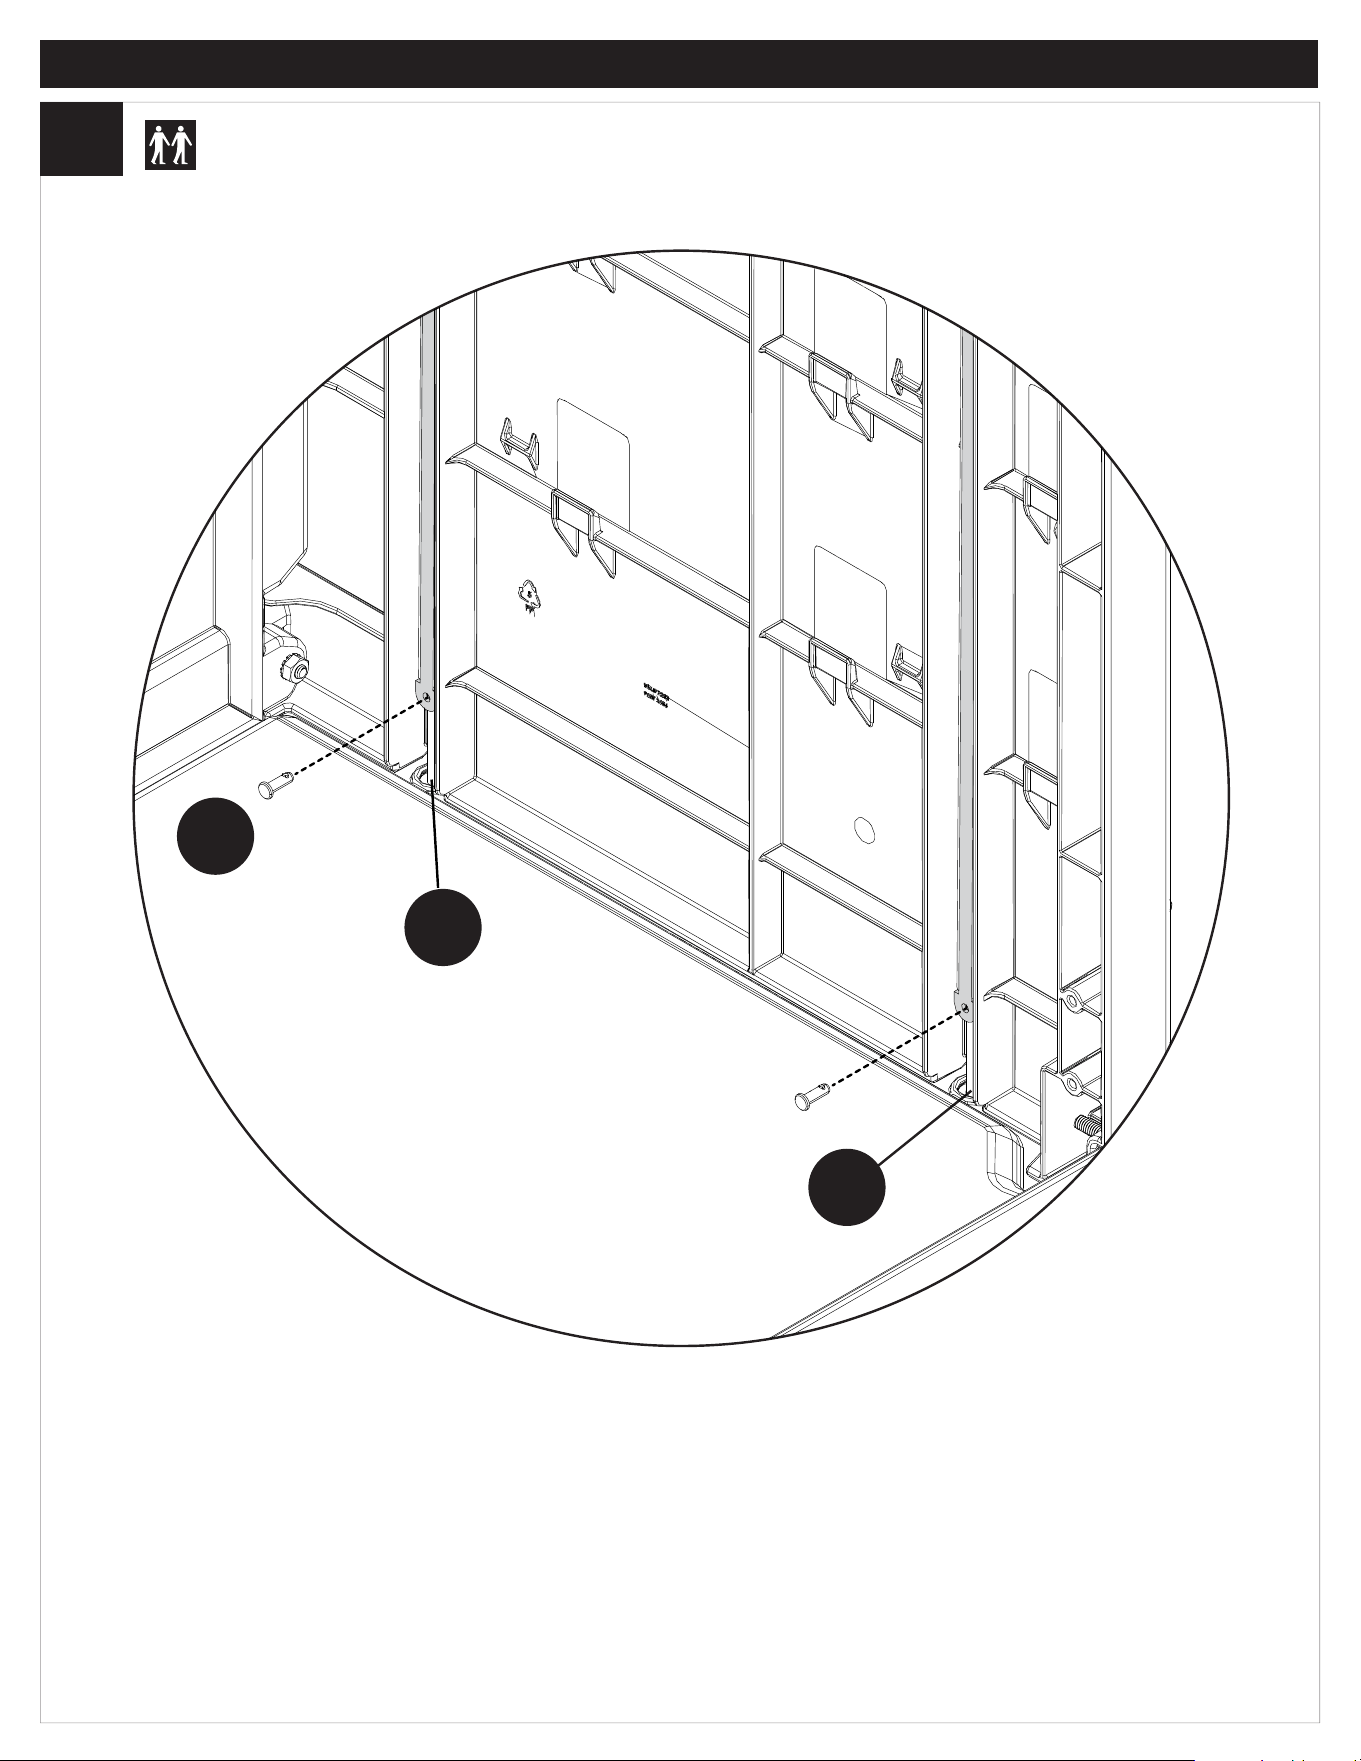
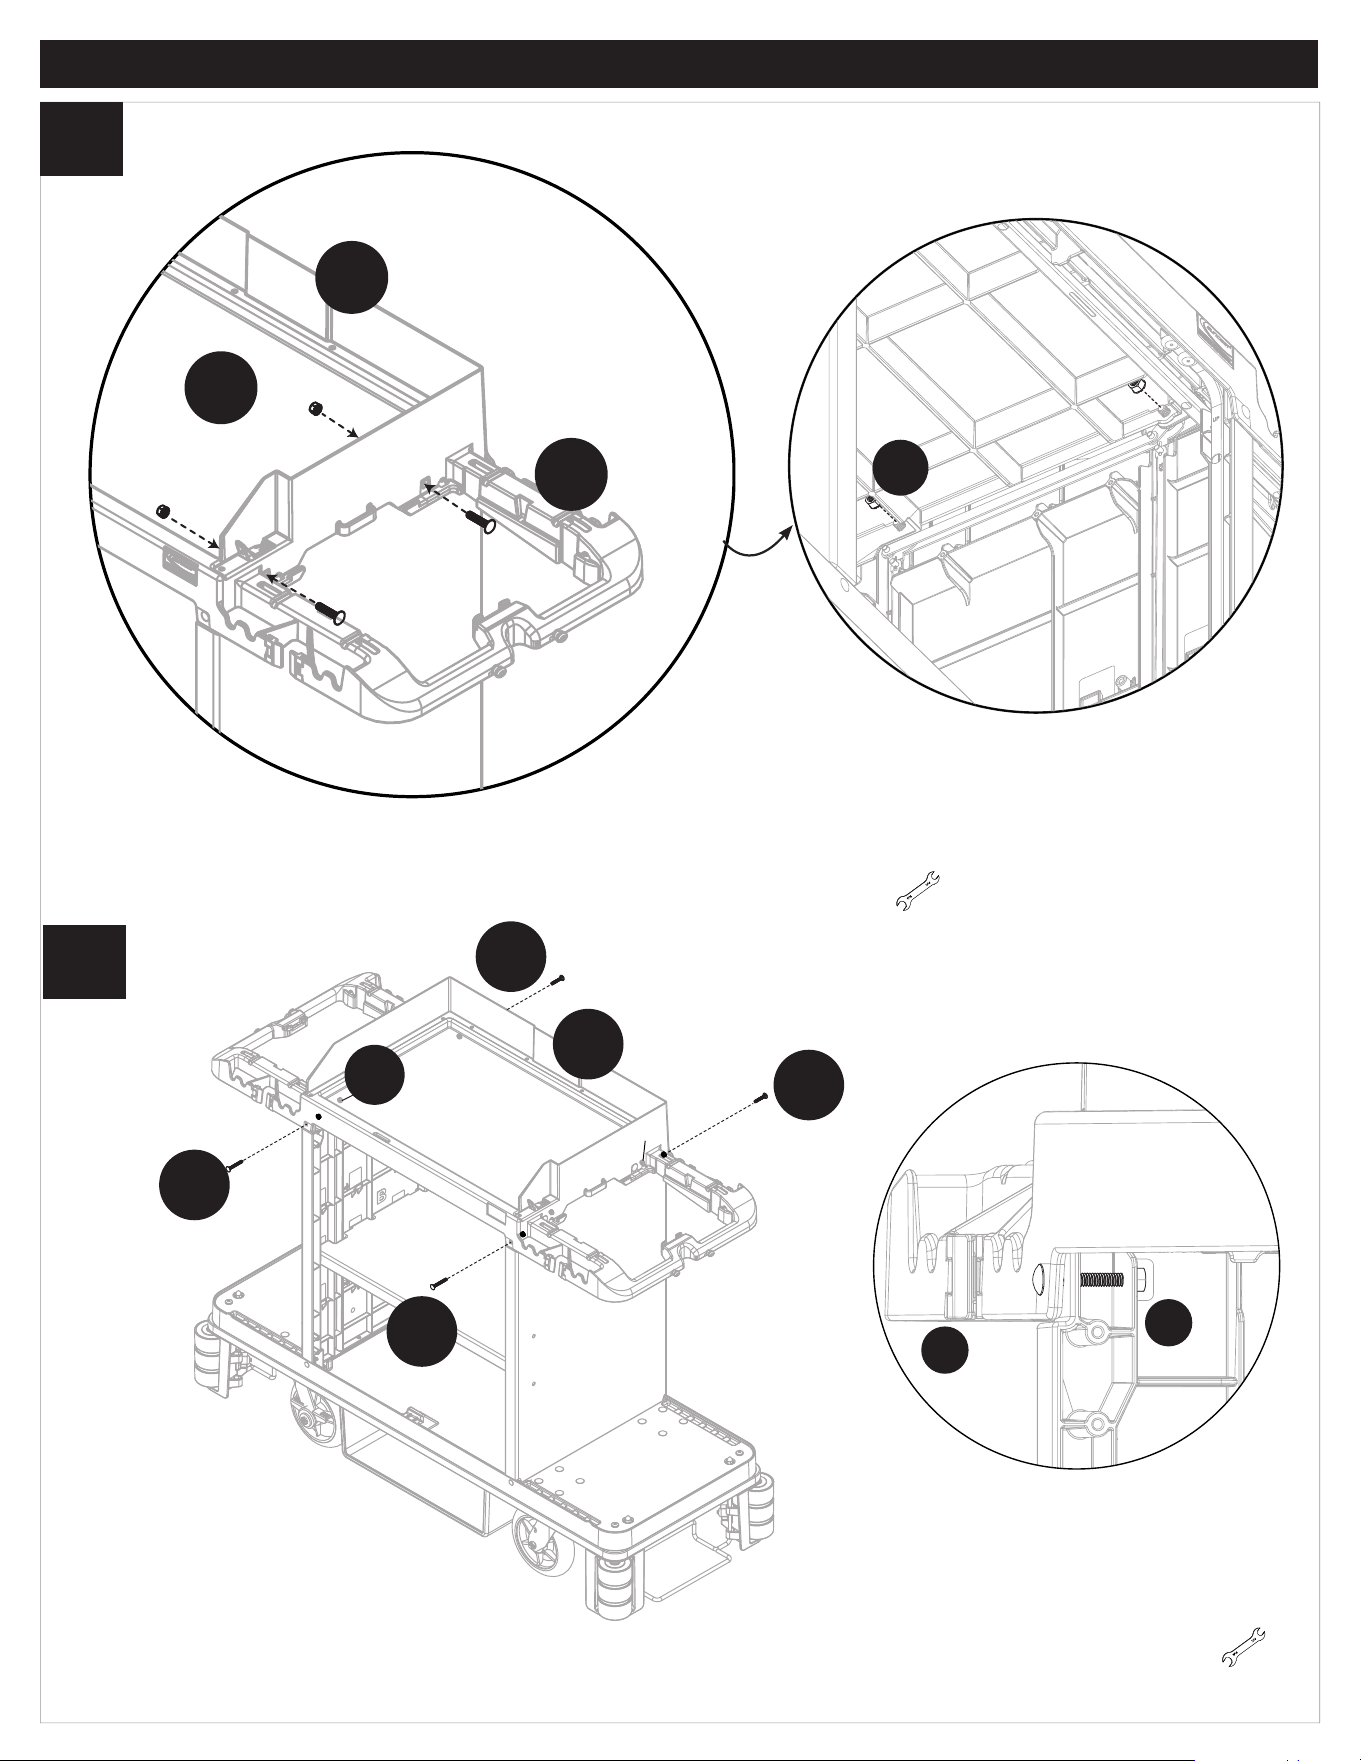
Attach lower Swivel Lockout Bar (Q) (Refer to step 3 for reference) to linkage arm (L) using pin (II). Repeat other side. NOTE: You
may have to hold upper Swivel Lockout Bar in place with one hand while attaching pin.
11
x2
Q
Q
II
x2
Bottom
Right Side Panel
9
Assembly
812
I
3
2
1
13
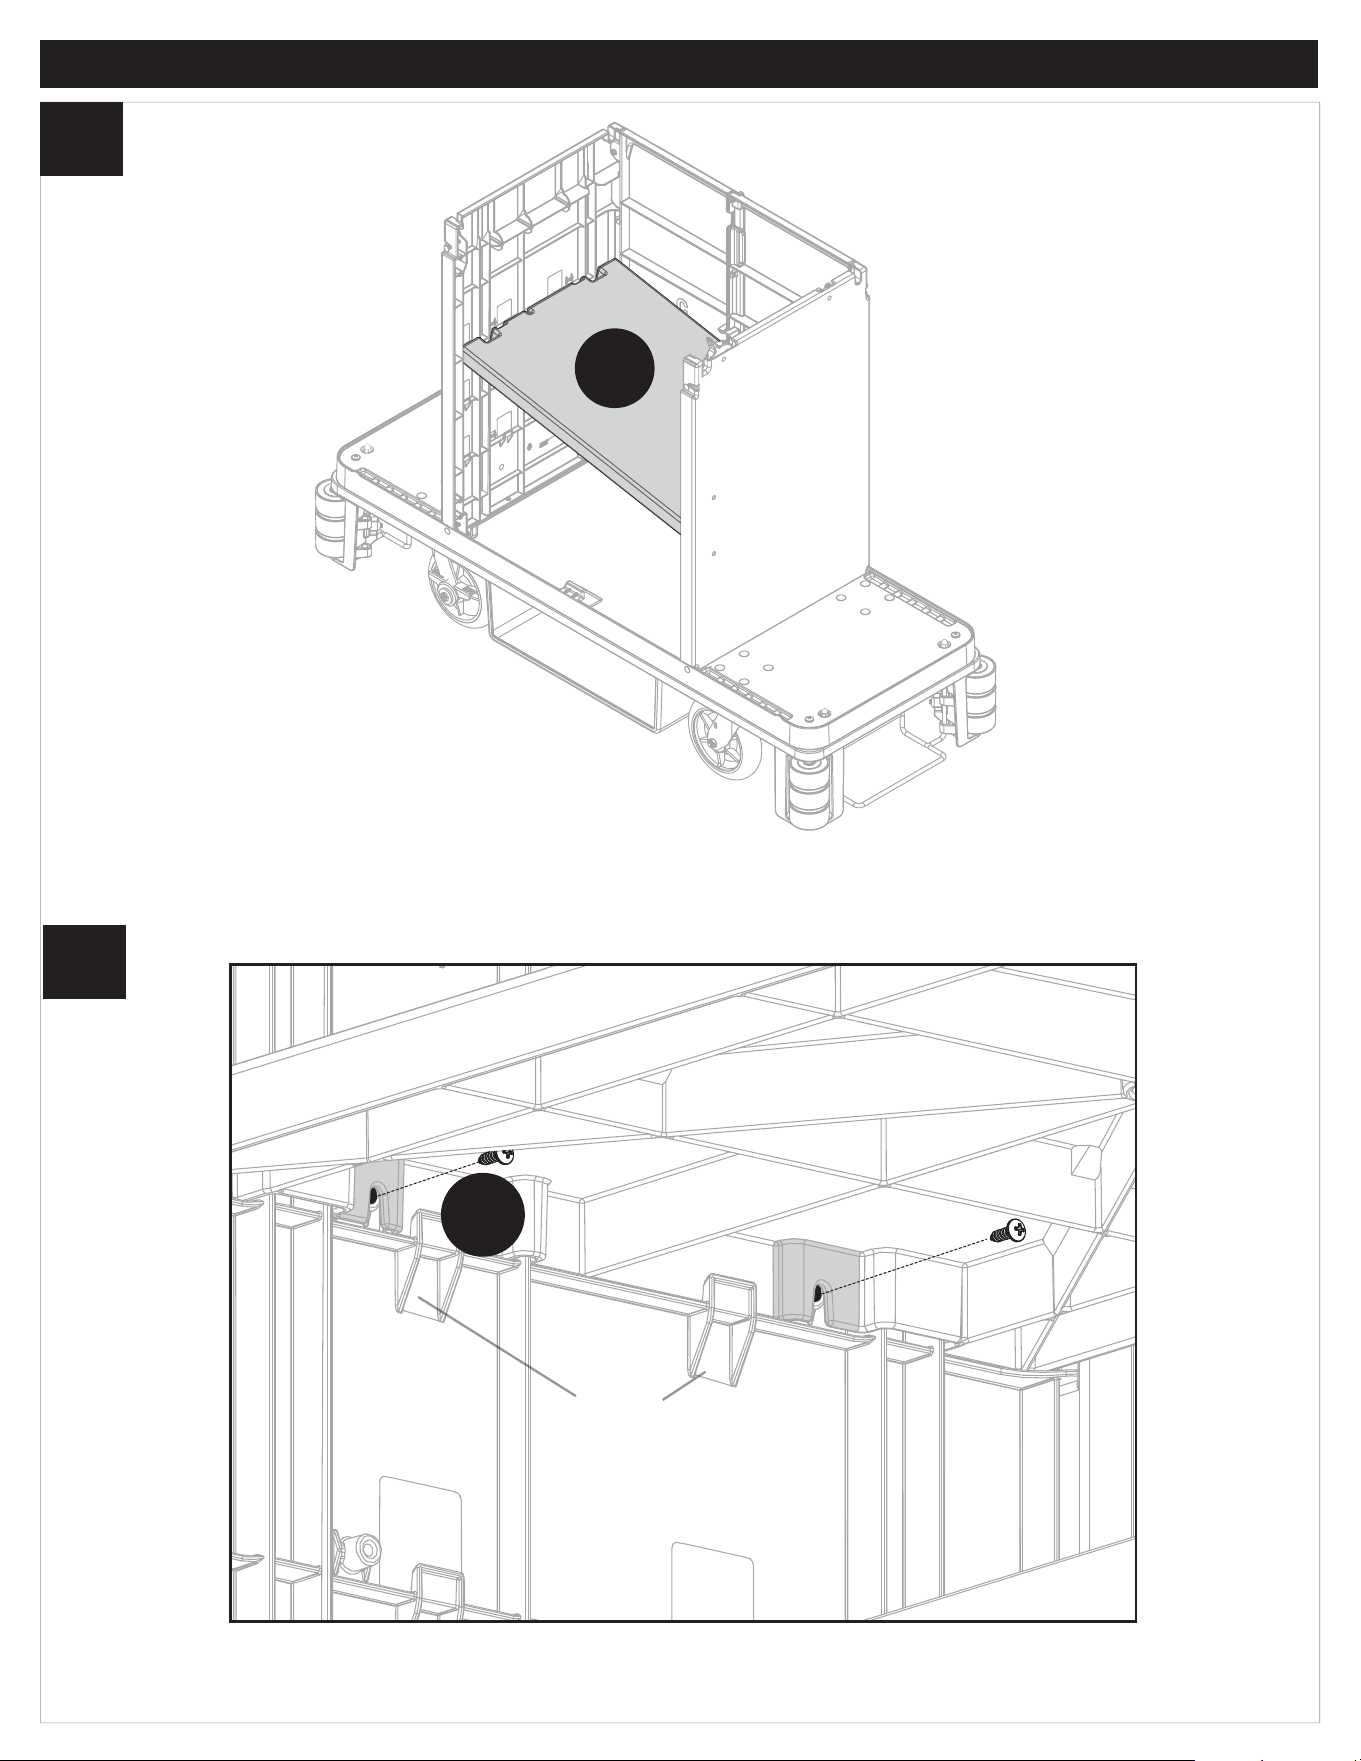
Insert shelf (I) into cart at an angle in one of three positions.
RR
x2
Tabs
Push down till sides of shelf engage with tabs on sides of cart. Attach shelf to sides using two screws (RR). Repeat other side.
10
OO
x2
HH
x3
NN
x3
B
OO
x2
HH
NN
x2
Assembly
814
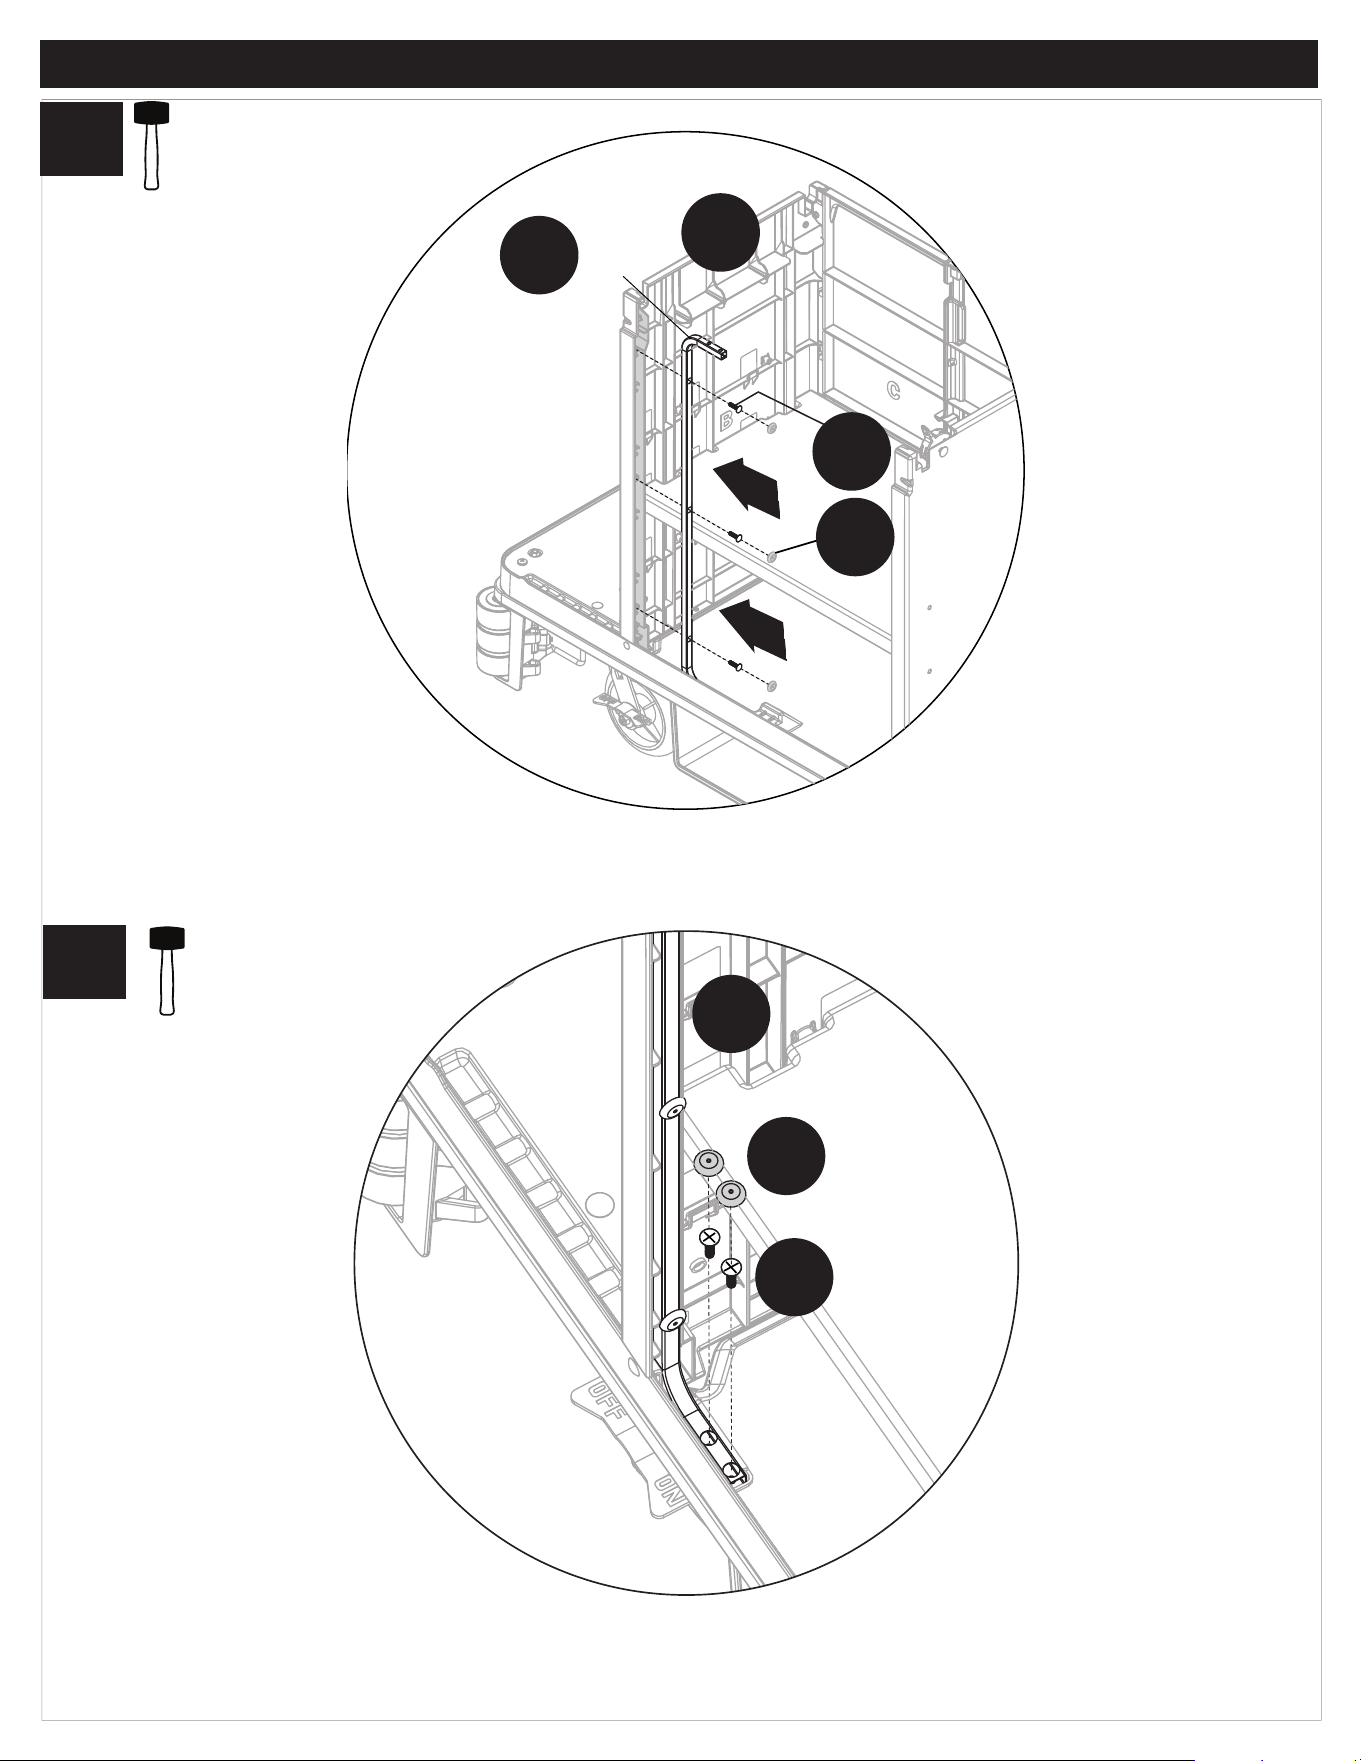
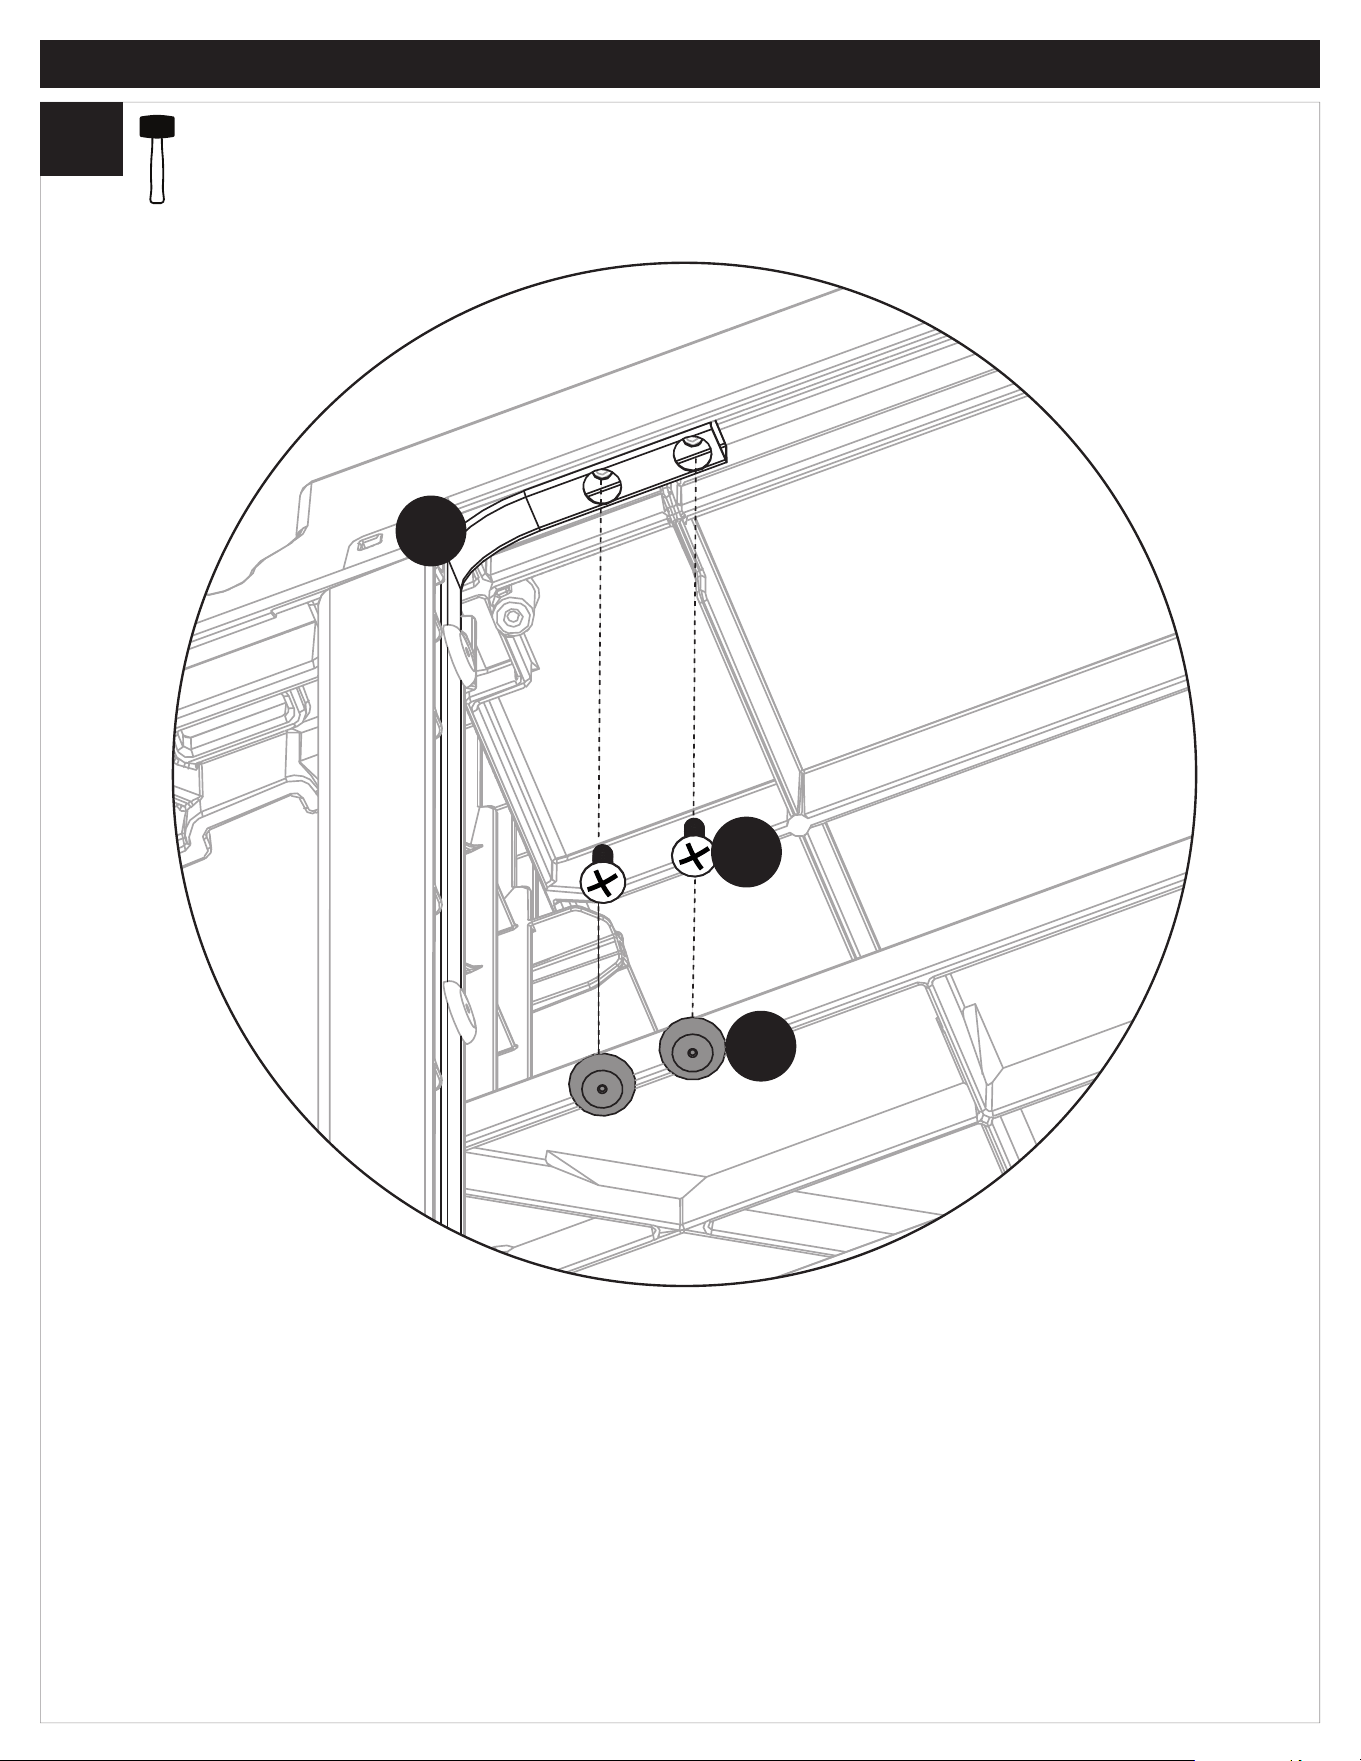
Insert tube (OO) into pocket in (B) and attach using three screws (HH) and three caps (NN). Repeat on right side. Use a mallet to attach caps
(NN).
Attach (OO) to bottom using two screws (HH) and two caps (NN). Repeat on right side. Note: Do Not attach top of tube (OO) to lid until after
step (21). Use a mallet to attach caps (NN).
15
F
11
Assembly
8
Lower top (F) to top of cart. Make sure the upper Swivel Lockout Bar (M) stays in position. The red lever should remain vertical so it
fits properly through the hole on the lid (F). Lid (F) should cover part of upper Swivel Lockout Bar (M) on the inside.
16
M
F
Swivel Lockout Mechanism
Lever
To attach lid (F) insert bolt (BB) through hole on side of cart and attach from underneath lid using nut (JJ). Repeat other side.
Note: Close up views have had shelf taken out for clarity. Note: Use supplied wrench *
EE
MM
x2
F
EE
DD
DD
x2
x4
12
Assembly
817
18
JJ
x2
x2
x2
JJ
F
BB
x2
EE
MM
x2
Left Side
To attach lid (F) insert screw (EE / DD) through lid and attach nut (MM) from underneath lid. Note: Use supplied wrench *
13
x2
NN
x2
HH
OO
Assembly
Attach tube (OO) to top using two screws (HH) and two caps (NN). Use a mallet to attach caps (NN). Repeat other side.
19
18
14
21
H
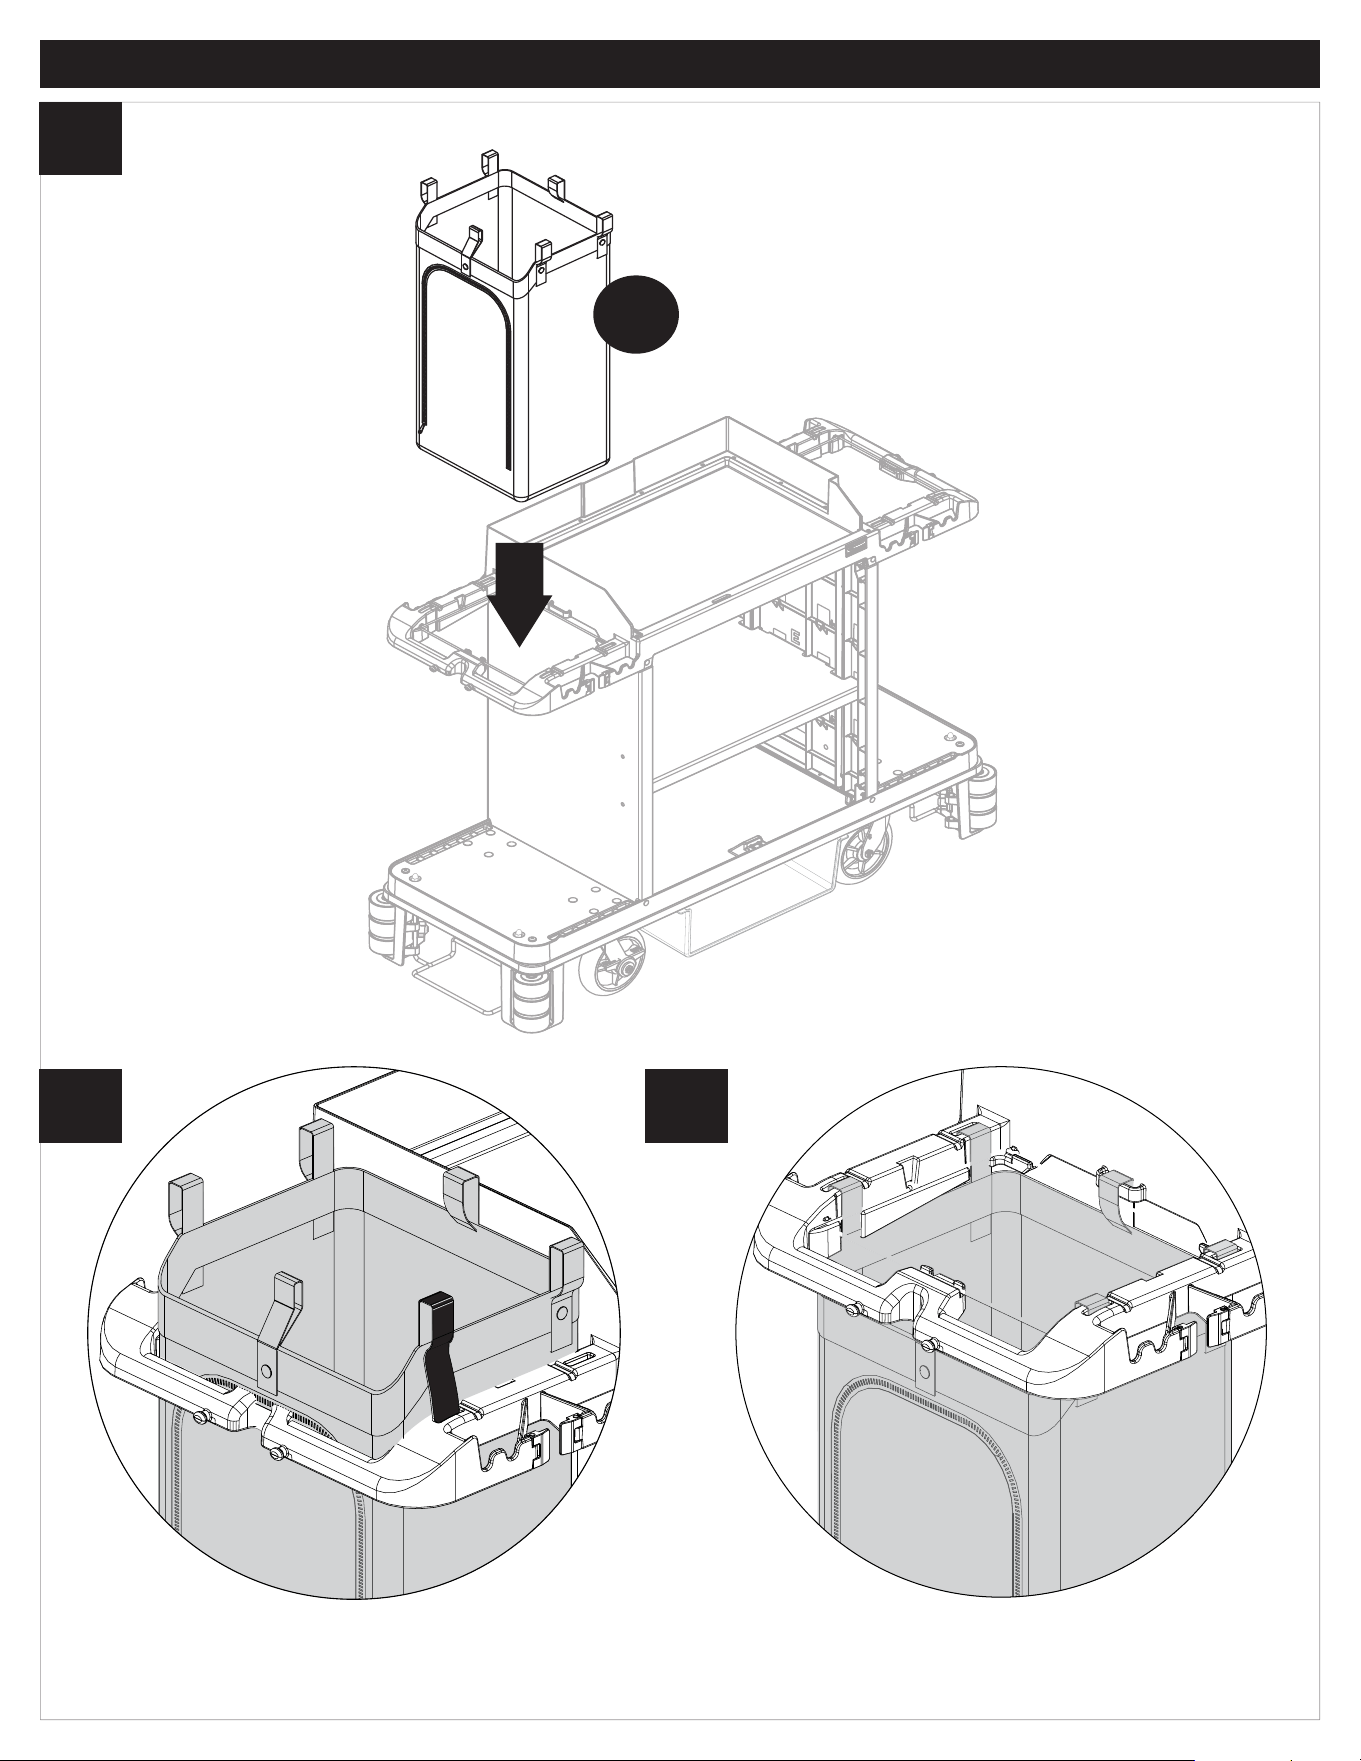
Lower garbage bag (H) through frame of cart. Unsnap and feed through the six slots on frame. Re-snap the bag once strap is
through each slot. Note: Bag can be switched to other side if necessary.
21 22
20
Assembly
Assembly
23
Assembly
Lower garbage bag rim (R) and insert into two center slots provided. Guide rim into position. Repeat with right rim. Note: Rims can
be put on both sides.
15

Assembly
24
K
Attach rubber strap (K) over two knobs on side of cart to secure vacuum cleaner. Vacuum cleaner not included.
16