9/16"
7/16"
Tip #2&3
To learn about other Suncast products, please call
1-800-846-2345 or 1-630-879-2050.
Product Feedback? Email us at: feedback@suncastcommercial.com
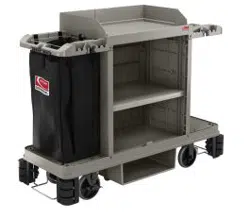
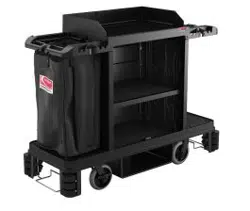
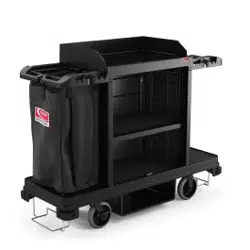
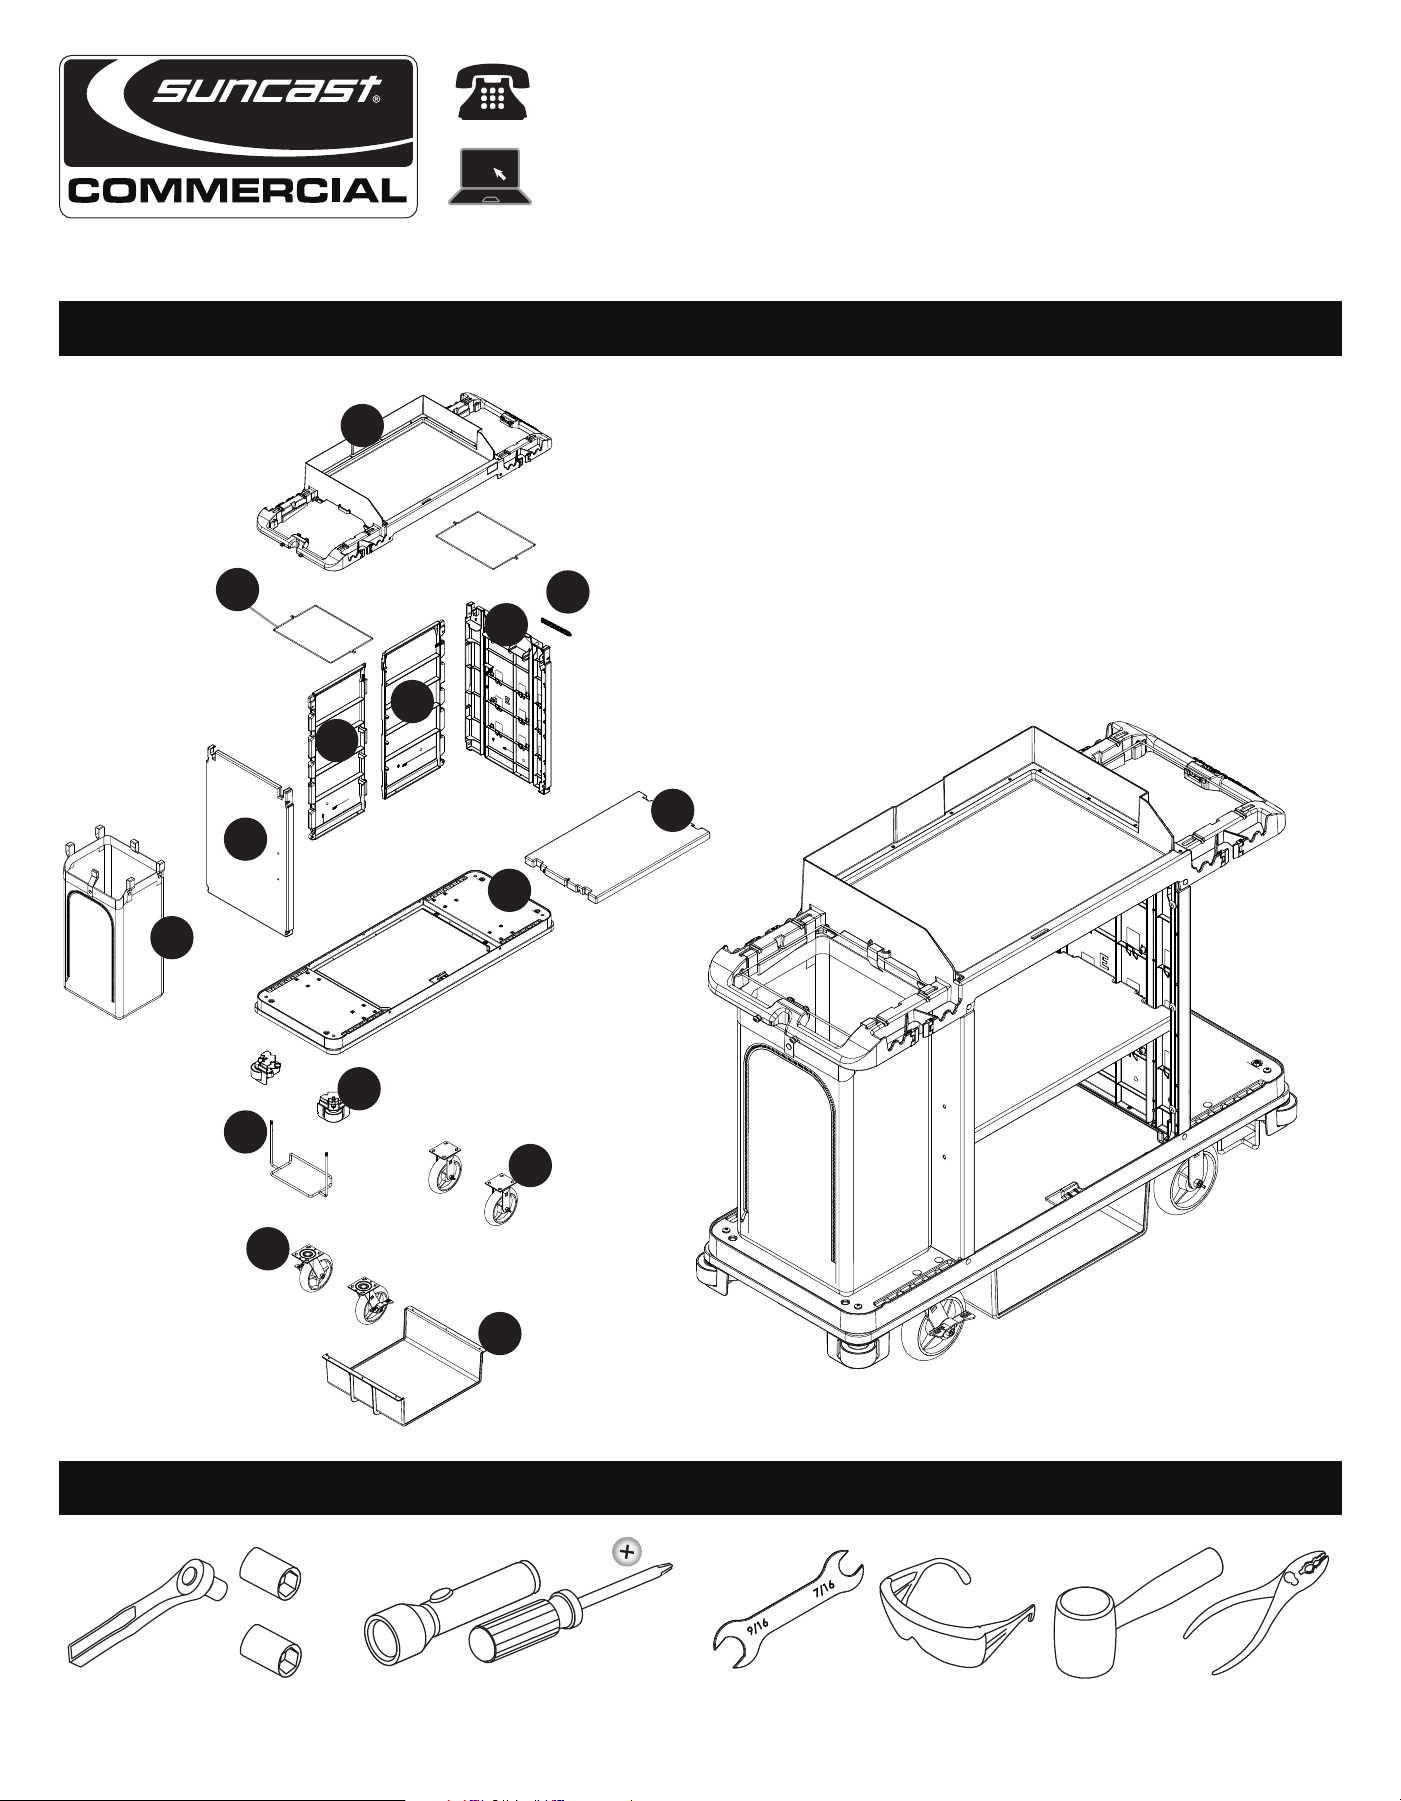
ITEM NUMBER: HKC1000
PARTS
TOOLS NEEDED
© 2019 Suncast Corporation, Batavia, IL 0361415D
G
B
R
J
N
O
P
x2
x2
x4
F
I
E
D
C
H
A
x2
*
See pages
4,5,7,11,&12
K
Bag sold
Separately
BEFORE YOU BEGIN
• Read instructions thoroughly prior to assembly.
This kit contains parts that can be damaged if assembled incorrectly or in the wrong sequence.
• Please follow instructions.
Suncast is not responsible for replacing parts lost or damaged due to incorrect assembly.
• Assistance is required during parts of the assembly.
IMPORTANT
OPEN ALL BOXES FIRST AND NEATLY LAYOUT PARTS. SMALL PARTS MAY BE CONTAINED IN EACH BOX.
PLEASE REFERENCE THE PARTS LIST WITHIN THIS MANUAL TO VERIFY ALL PARTS ARE PRESENT.
CAUTION
• Not intended for usage by children.
• This product may become susceptible to impact damage in freezing temperatures.
• Do not store near excessive heat.
• Exercise caution when moving fully loaded product. This product is not intended for transporting heavy objects.
CARE AND CLEANING
• To maintain the look of your product, we recommend cleaning it each year with mild soap and water. DO NOT use bleach, ammonia, or other
caustic cleaners, and DO NOT use stiff bristle brushes. Failure to perform annual cleaning could result in permanent staining of the plastic. This is
not a manufacturing defect and is not covered under warranty.
2
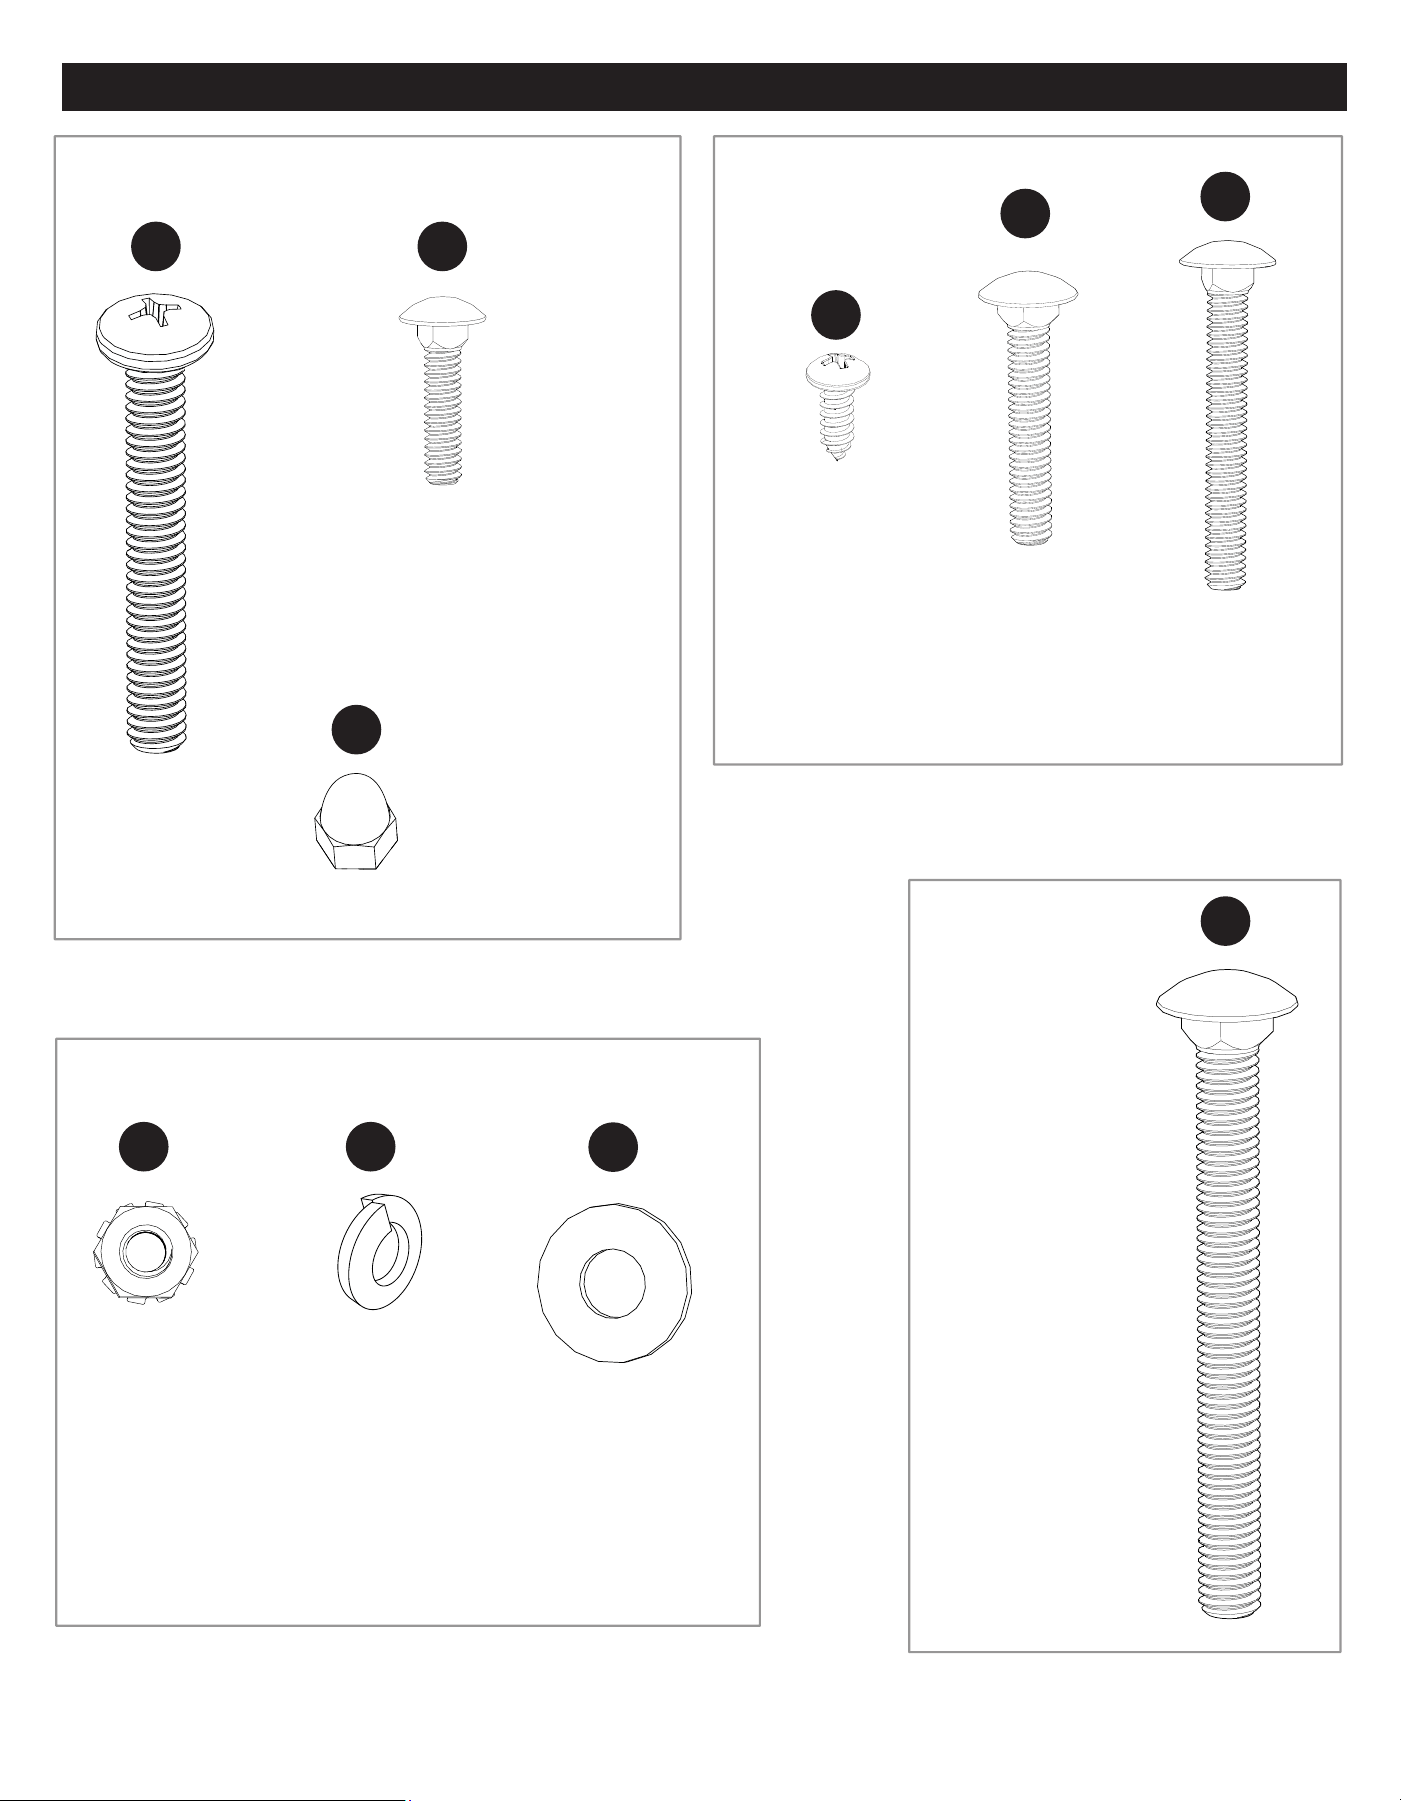
HARDWARE
0480512
JJ
0631458
3/8"-16 inch
nut
x4
0671174A
0671301
0671211
GG
0631869
3/8"-16 inch
locknut
x18
0631903
1/4 x 1½"
screw
x6
QQ
3
Hardware shown at actual size *(Unless otherwise noted). Extra hardware provided. Not all are used.
AA CC
PP
0631454
3/8" x 2 1/2"
Bolt
x4
0631462
1/4" x 1"
Bolt
x1
0631508
3/8"-16
acorn nut
x2
0671302
DD
EE
0631456
1/4" x 1 1/2"
Bolt
x4
0631457
1/4" x 2"
Bolt
x 4
RR
0631536
1/4" x 1/2"
screw
x4
0671177
HARDWARE
0480435A (Continued)
0480412B
FF
0631455
3/8" x 3 3/4"
Bolt
x16
0480511
0671178
MM
0631459
1/4"-20 nut
x10
06711216
KK
0631178
3/8"
washer
x4
0480435 Continued
0631013
3/8" split washer
x18
SS
0671179A
O
PP
x2
FRONT
A
JJ
KK
J
AA
A
4
ASSEMBLY
1
2
KK
JJ
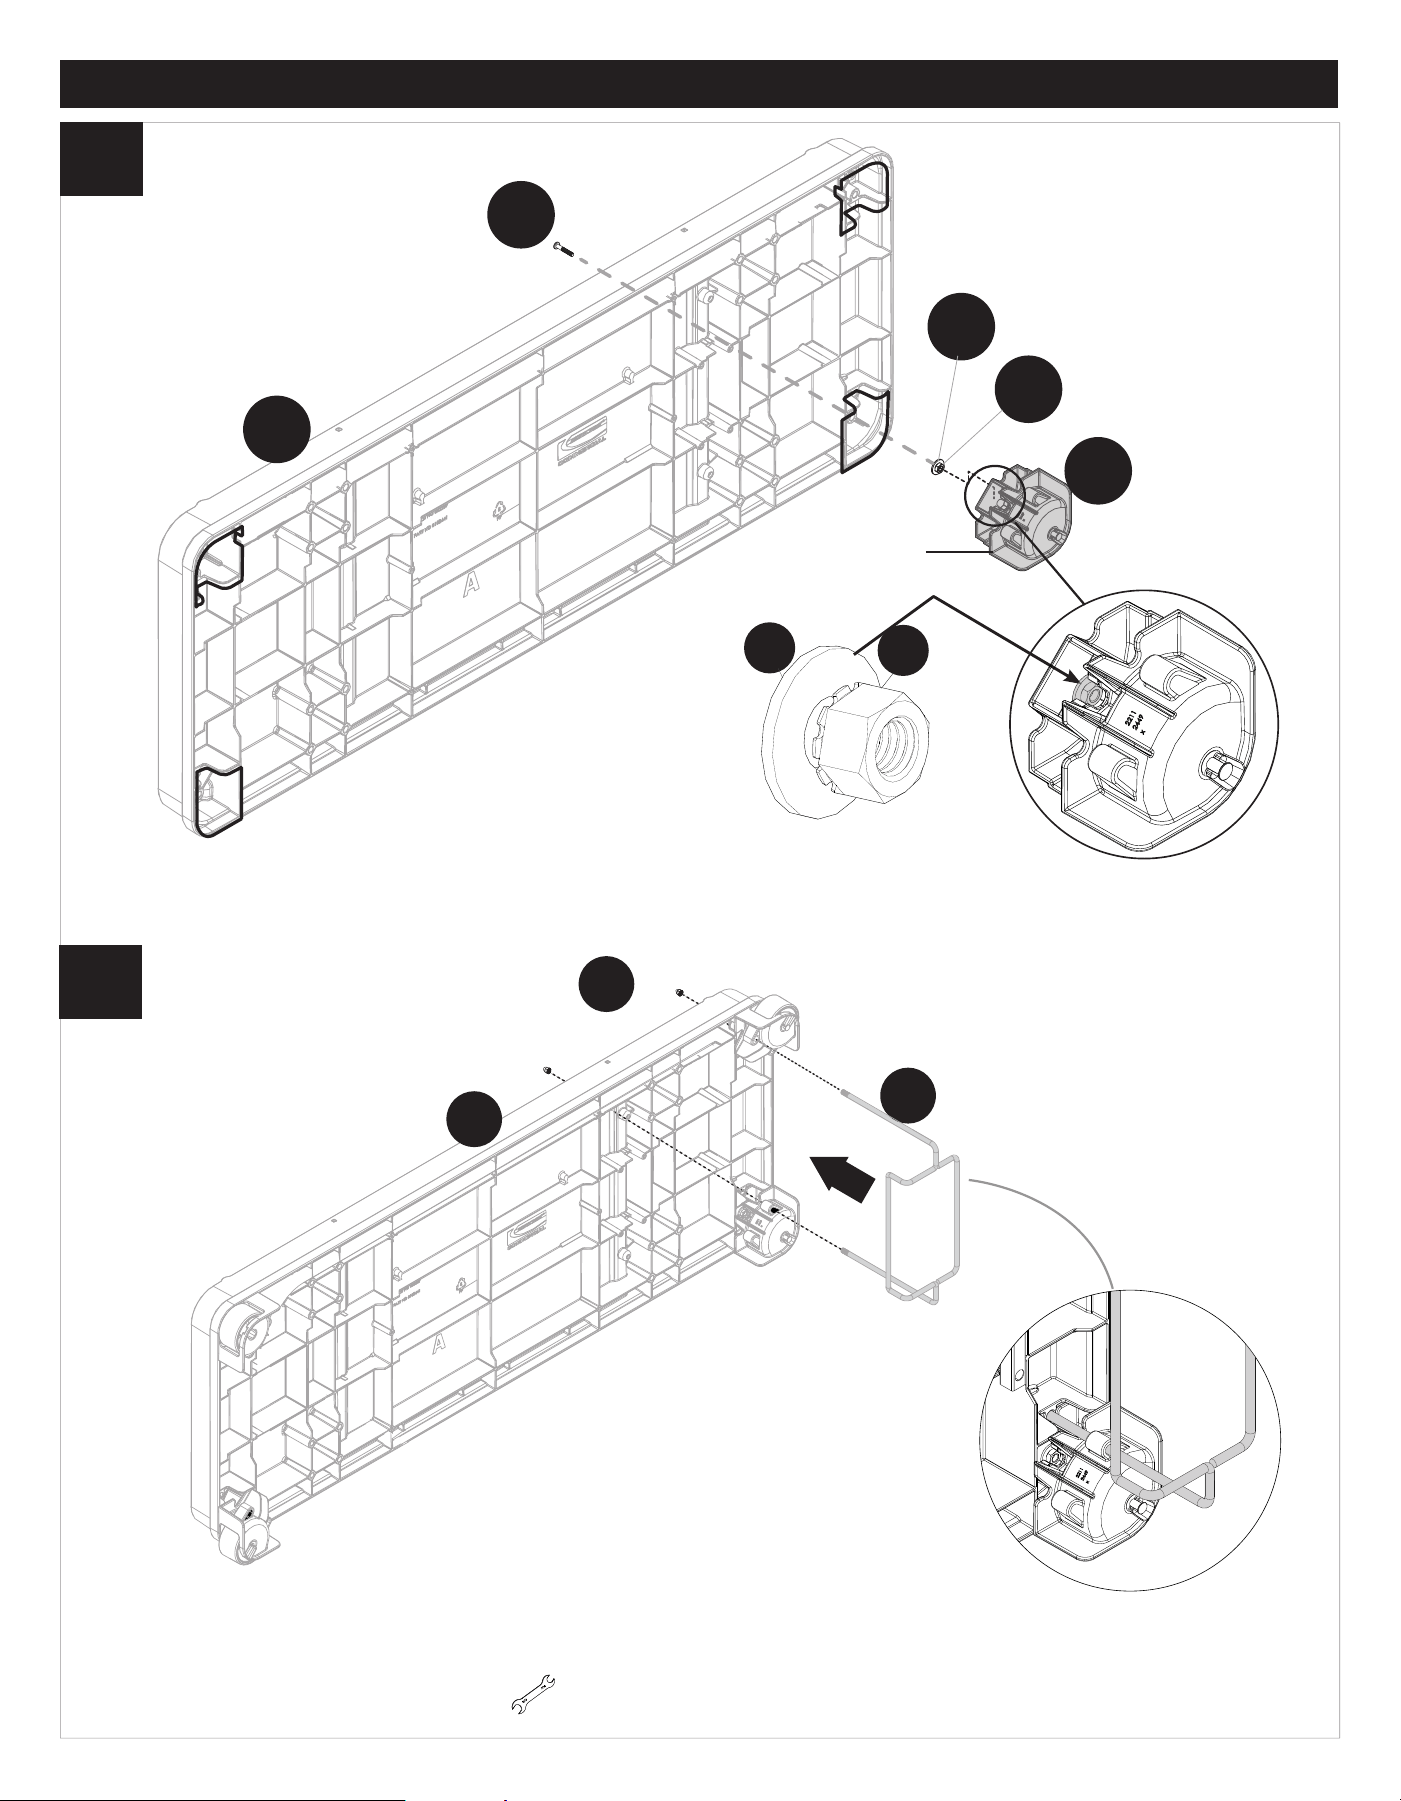
Bumper
EN: Insert both washer (KK) and nut (JJ) into slot inside bumper then attach to bottom (A) using bolt (AA). Repeat with other bumpers.
Make sure nut is inserted all the way to allow bolt to thread through nut.
EN: Insert vacuum rim (O) through inside holes on bumpers and through bottom (A). Attach from other side using Acorn nut (PP).
Tighten nuts (PP). Note: Use supplied wrench *
5
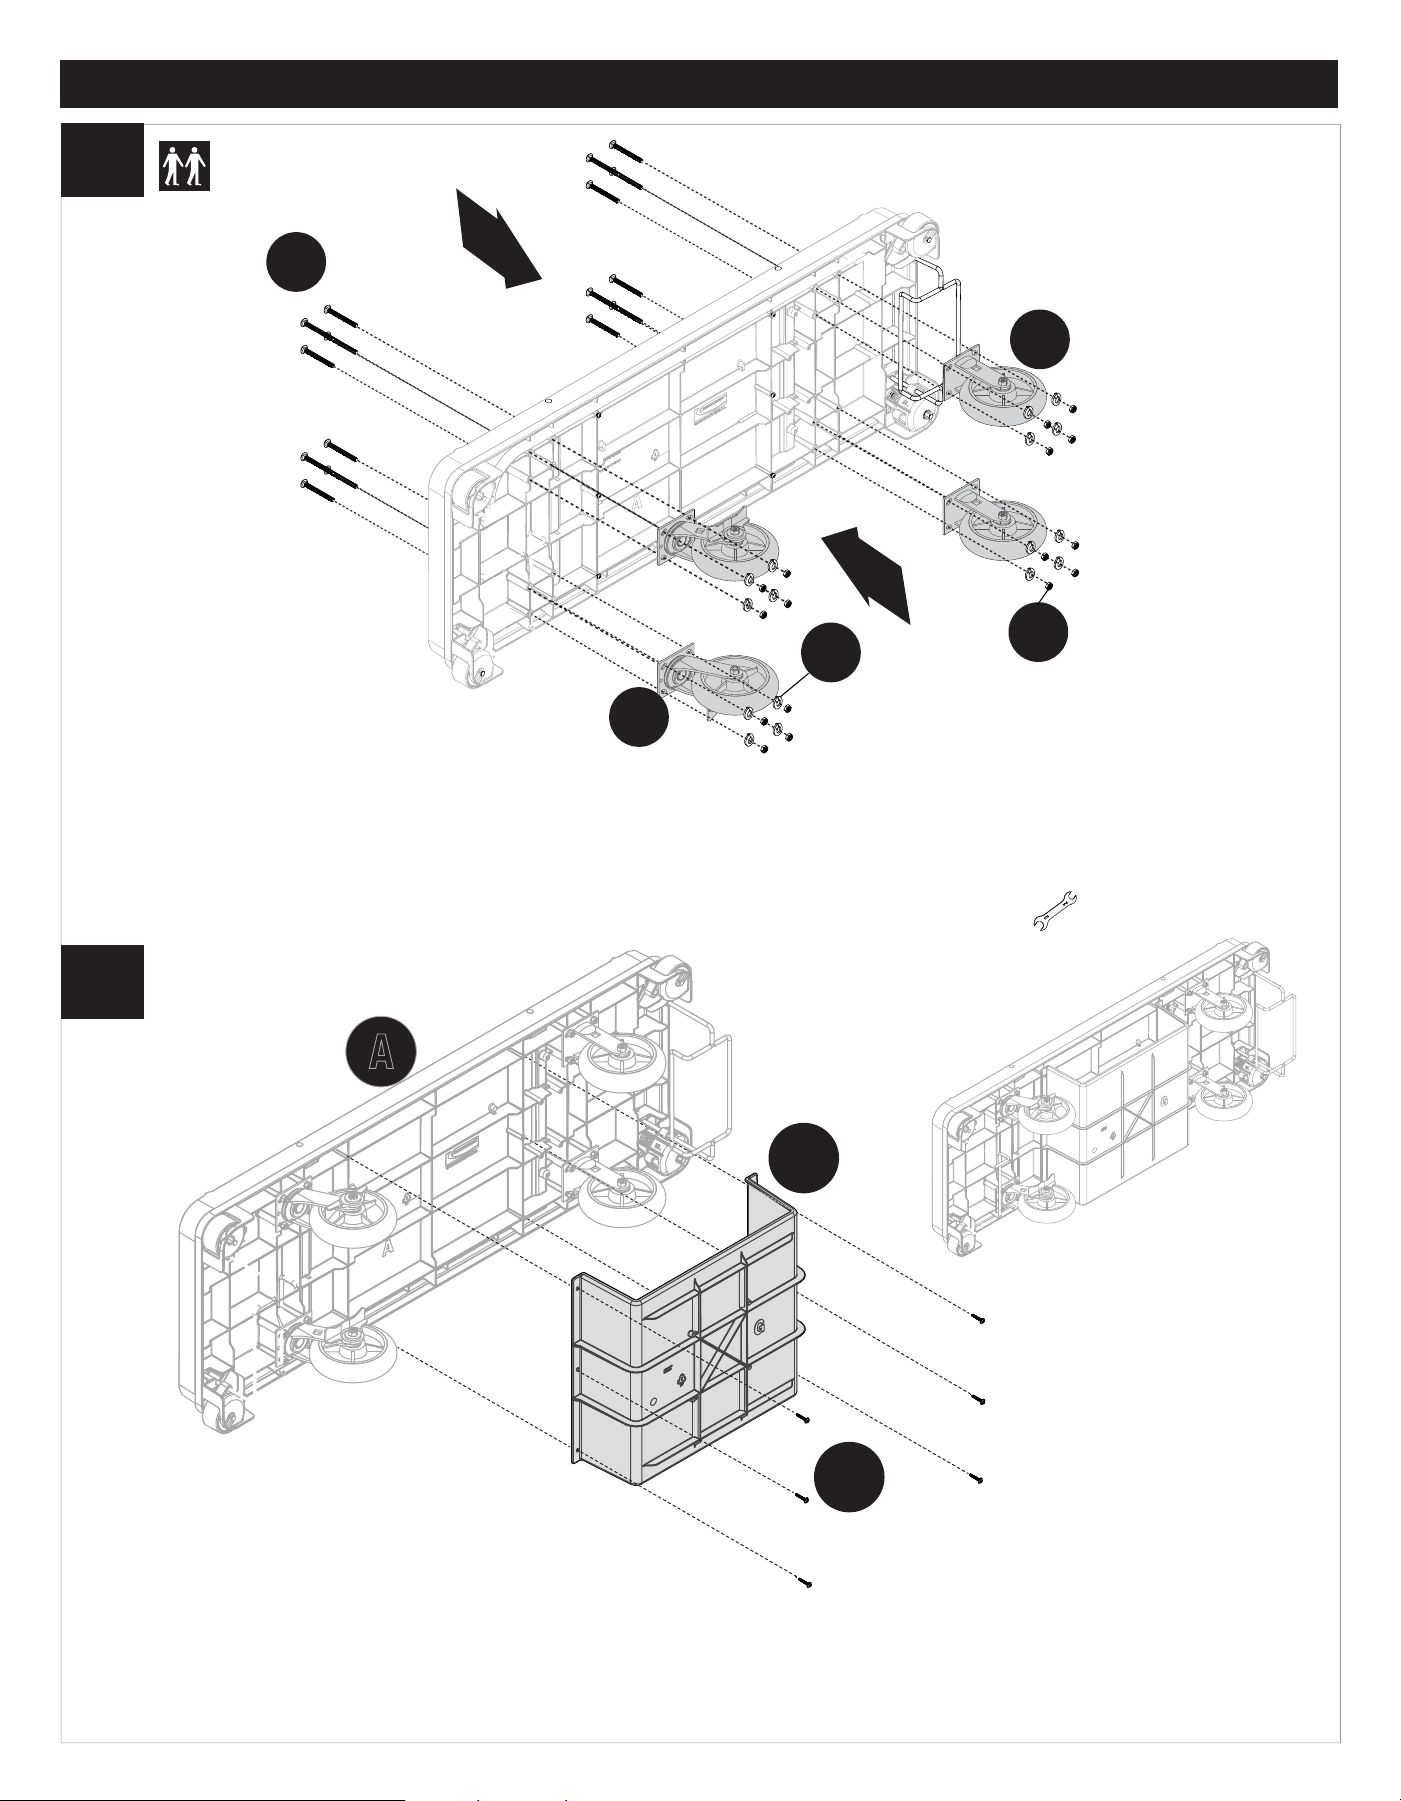
EN: Attach front/back casters (P and N) to under side of cart using sixteen bolts (FF) sixteen washers (SS) and sixteen nuts (GG).
Attach braking casters (P) to the front. Attach fixed casters (N) to the back. Note: Use supplied wrench *
5
4
FRONT
FF
x16
SS
x16
P
x2
N
x2
GG
x16
3
ASSEMBLY
(Continued)
4
EN: Attach dish rack (G) to bottom of the cart (A) using six screws (QQ).
G
A
QQ
x6
IMPORTANT NOTE:
DO NOT over tighten bolt.
Head must not deform the
top surface.
B
C
6
5
ASSEMBLY
(Continued)
5
D
E
D
C
B
E
6
7
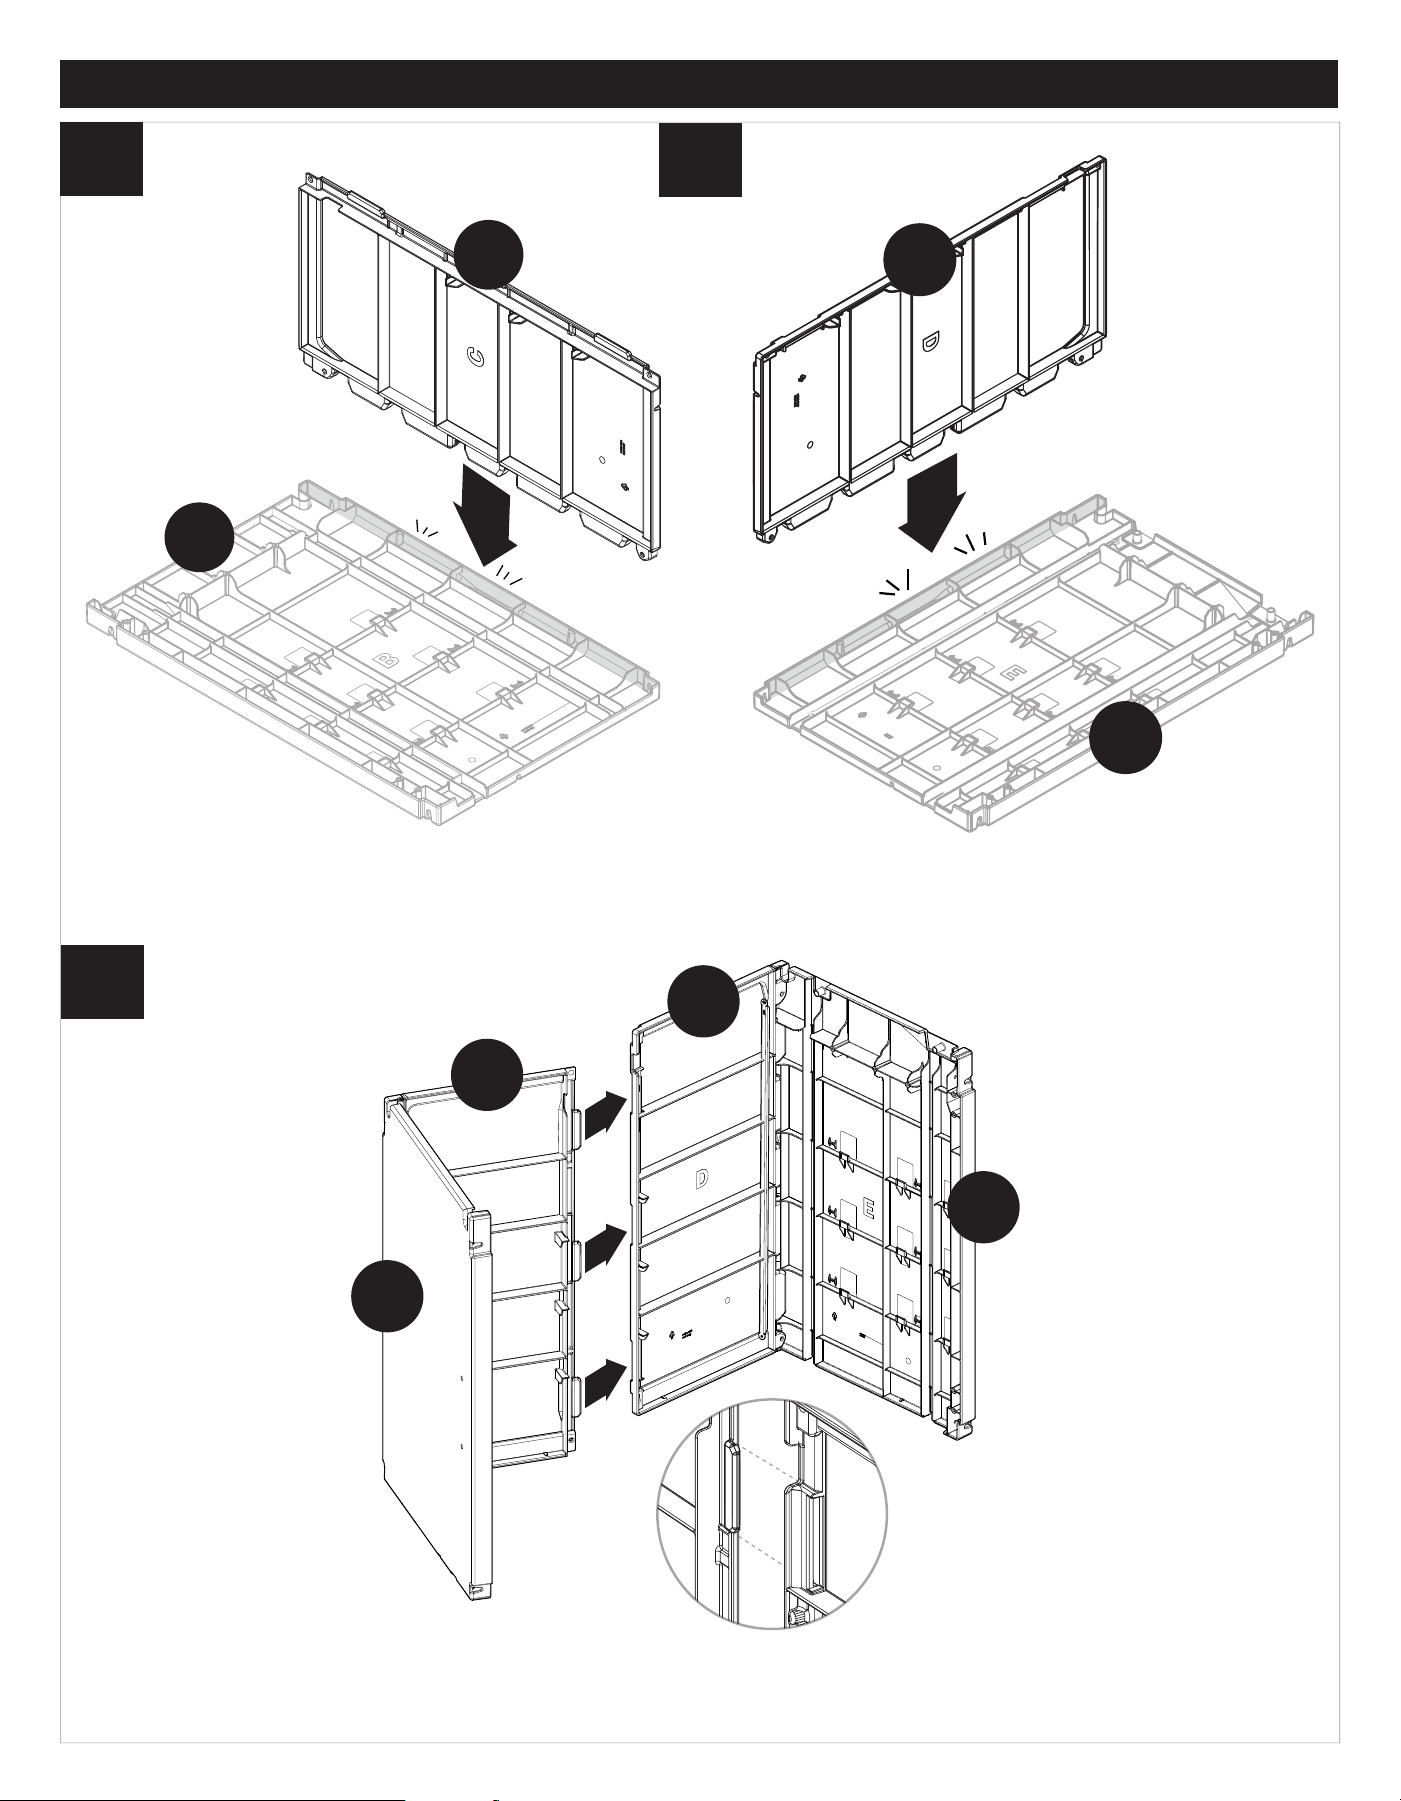
EN: Insert back left panel (C) into left side panel (B) until secure. Insert back right panel (D) into right side panel (E) until secure.
EN: Insert Left back panel tabs (B/C) into slots on right back panel (D/E) on an angle and push together.
DD
CC
EE
EE
x2
MM
x5
x2
DD
77
5
ASSEMBLY
(Continued)
8
9
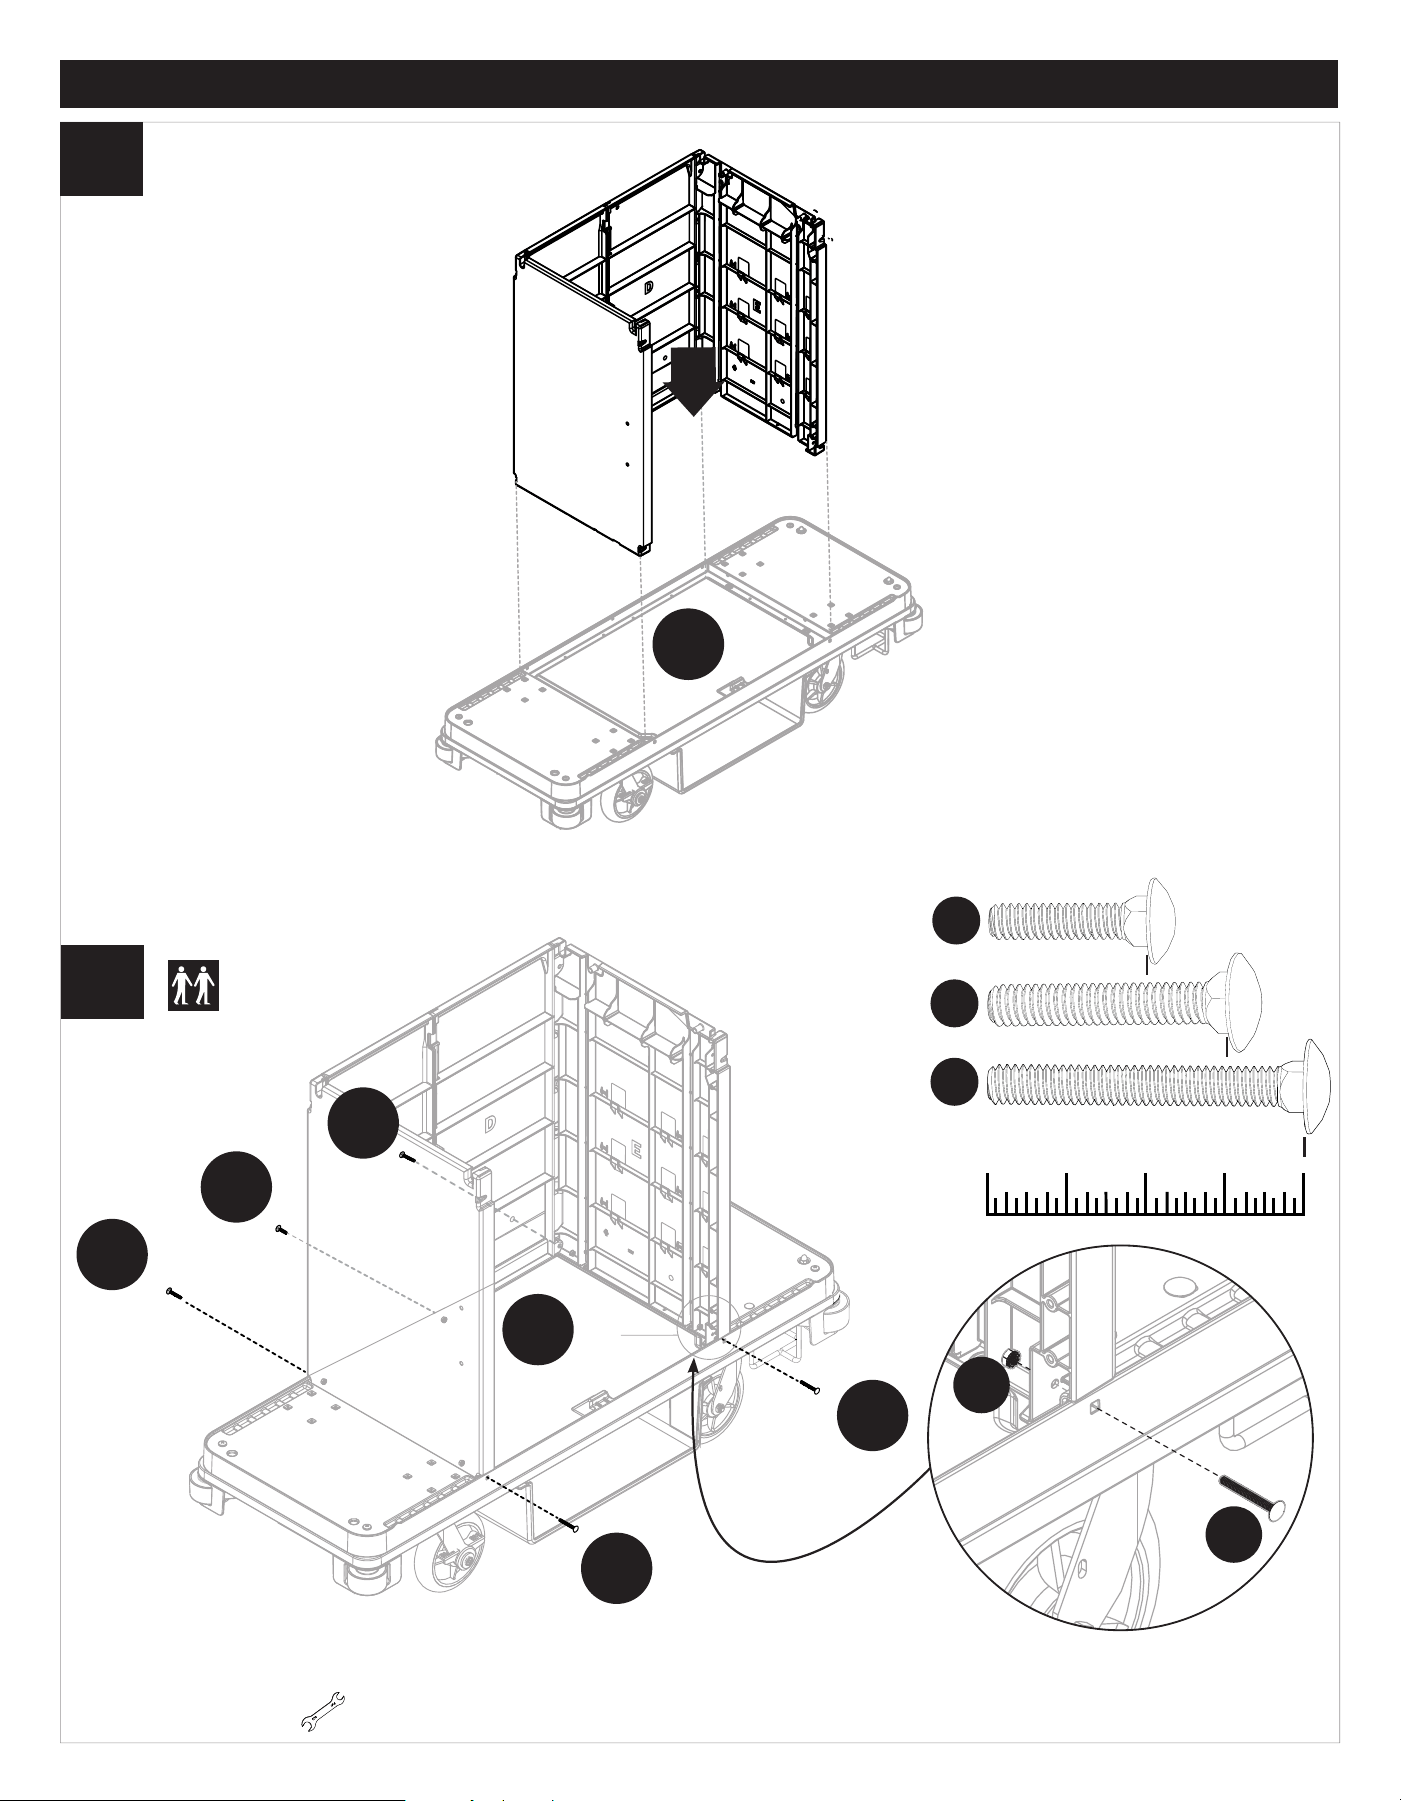
EN: Lower assembled panel down onto top of cart (A). Place in center rectangular area.
EN: Attach sides to cart in four corners using five screws (CC /DD /& EE) and five nuts (MM).
Note: Use supplied wrench *
A
EE
MM
1
2
In
DD
EE
CC
8
ASSEMBLY
(Continued)
810
I
3
2
1
11
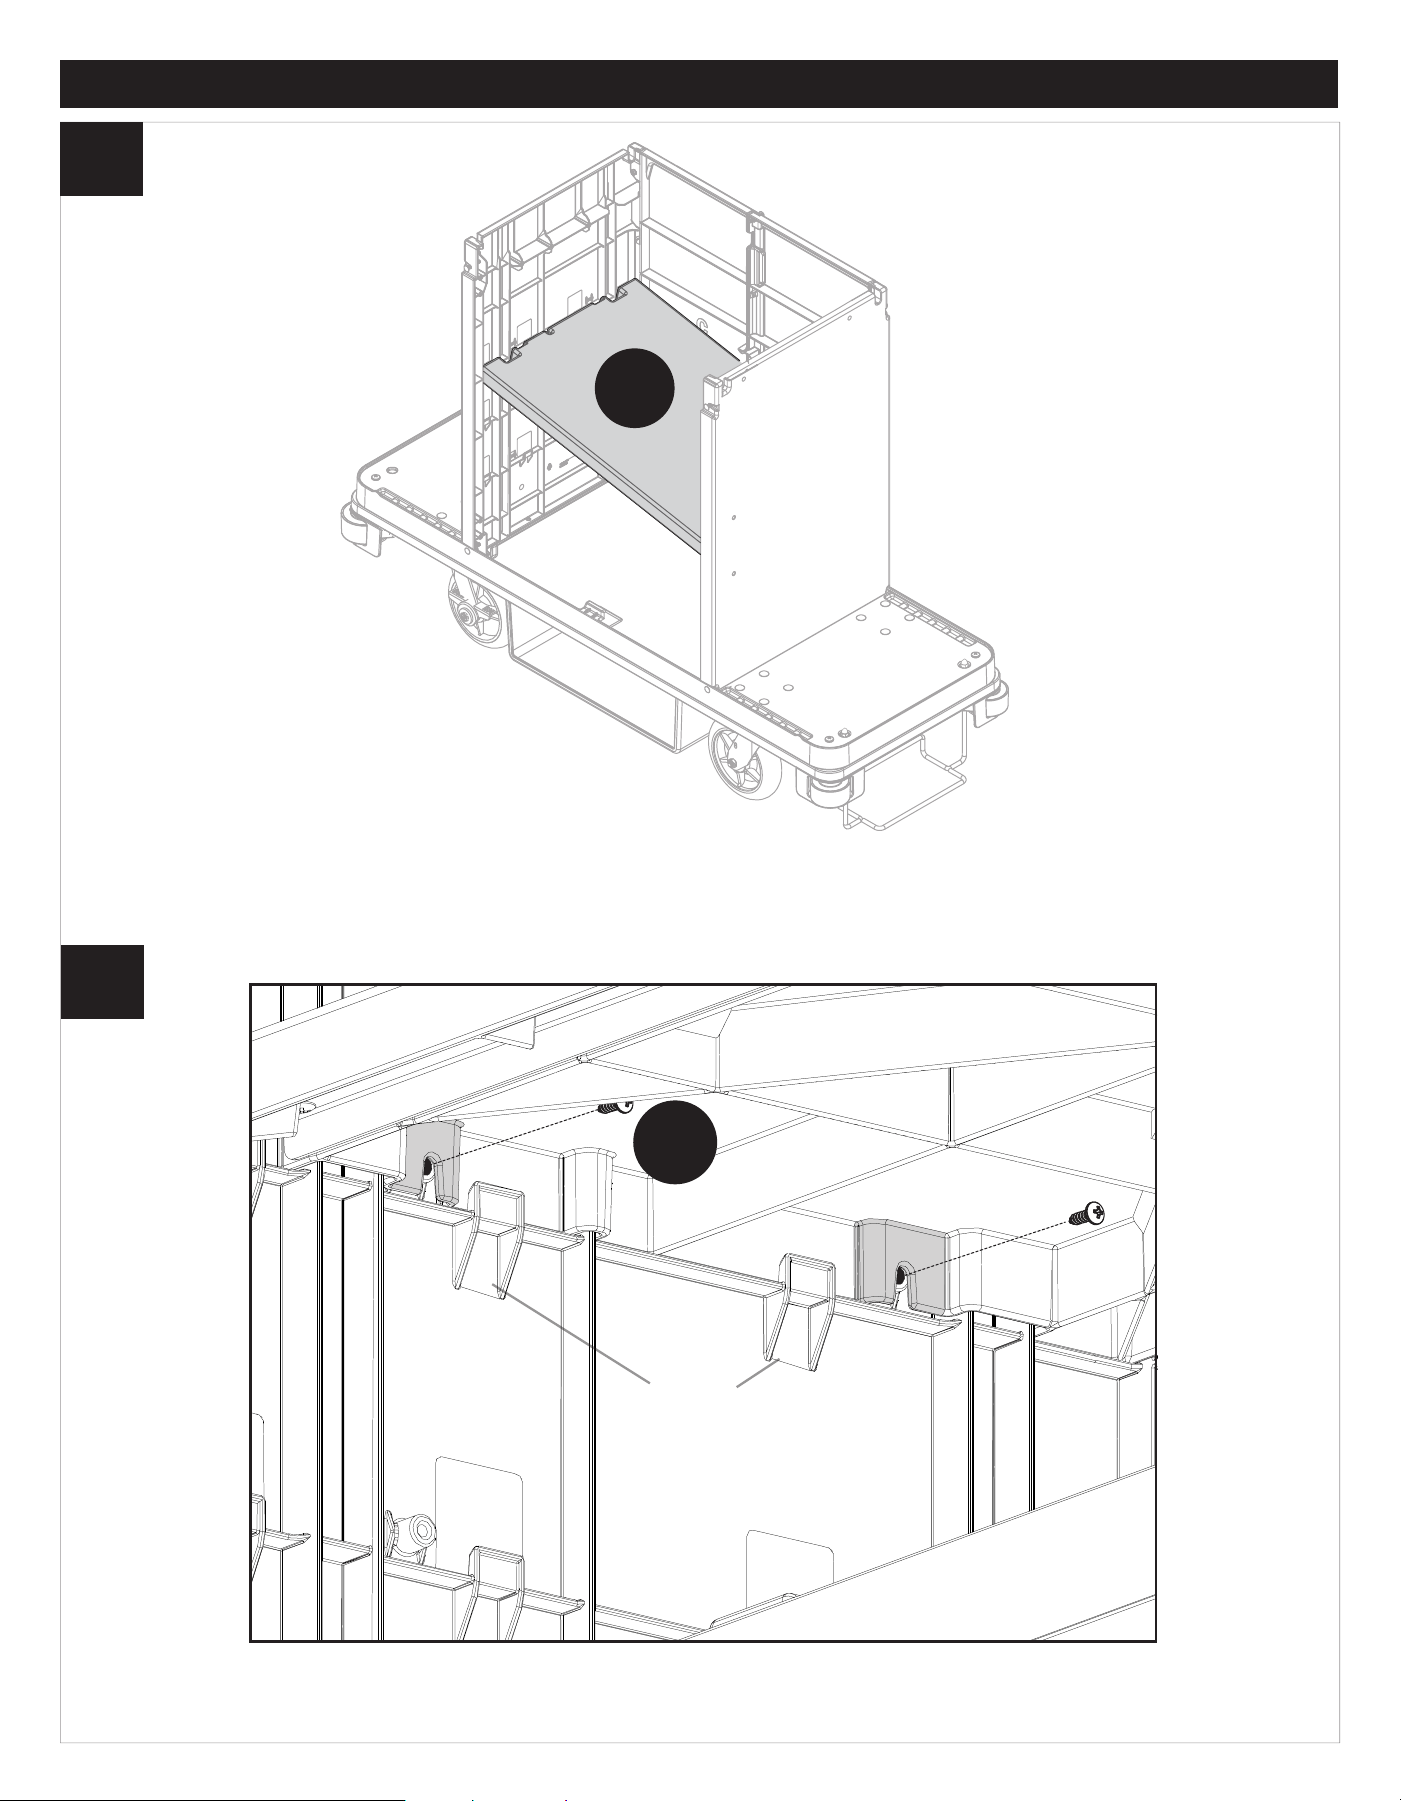
EN: Insert shelf (I) into cart at an angle in one of three positions.
RR
x2
Tabs
EN: Push down till sides of shelf engage with tabs on sides of cart. Attach shelf to sides using two screws (RR). Repeat other side.
9
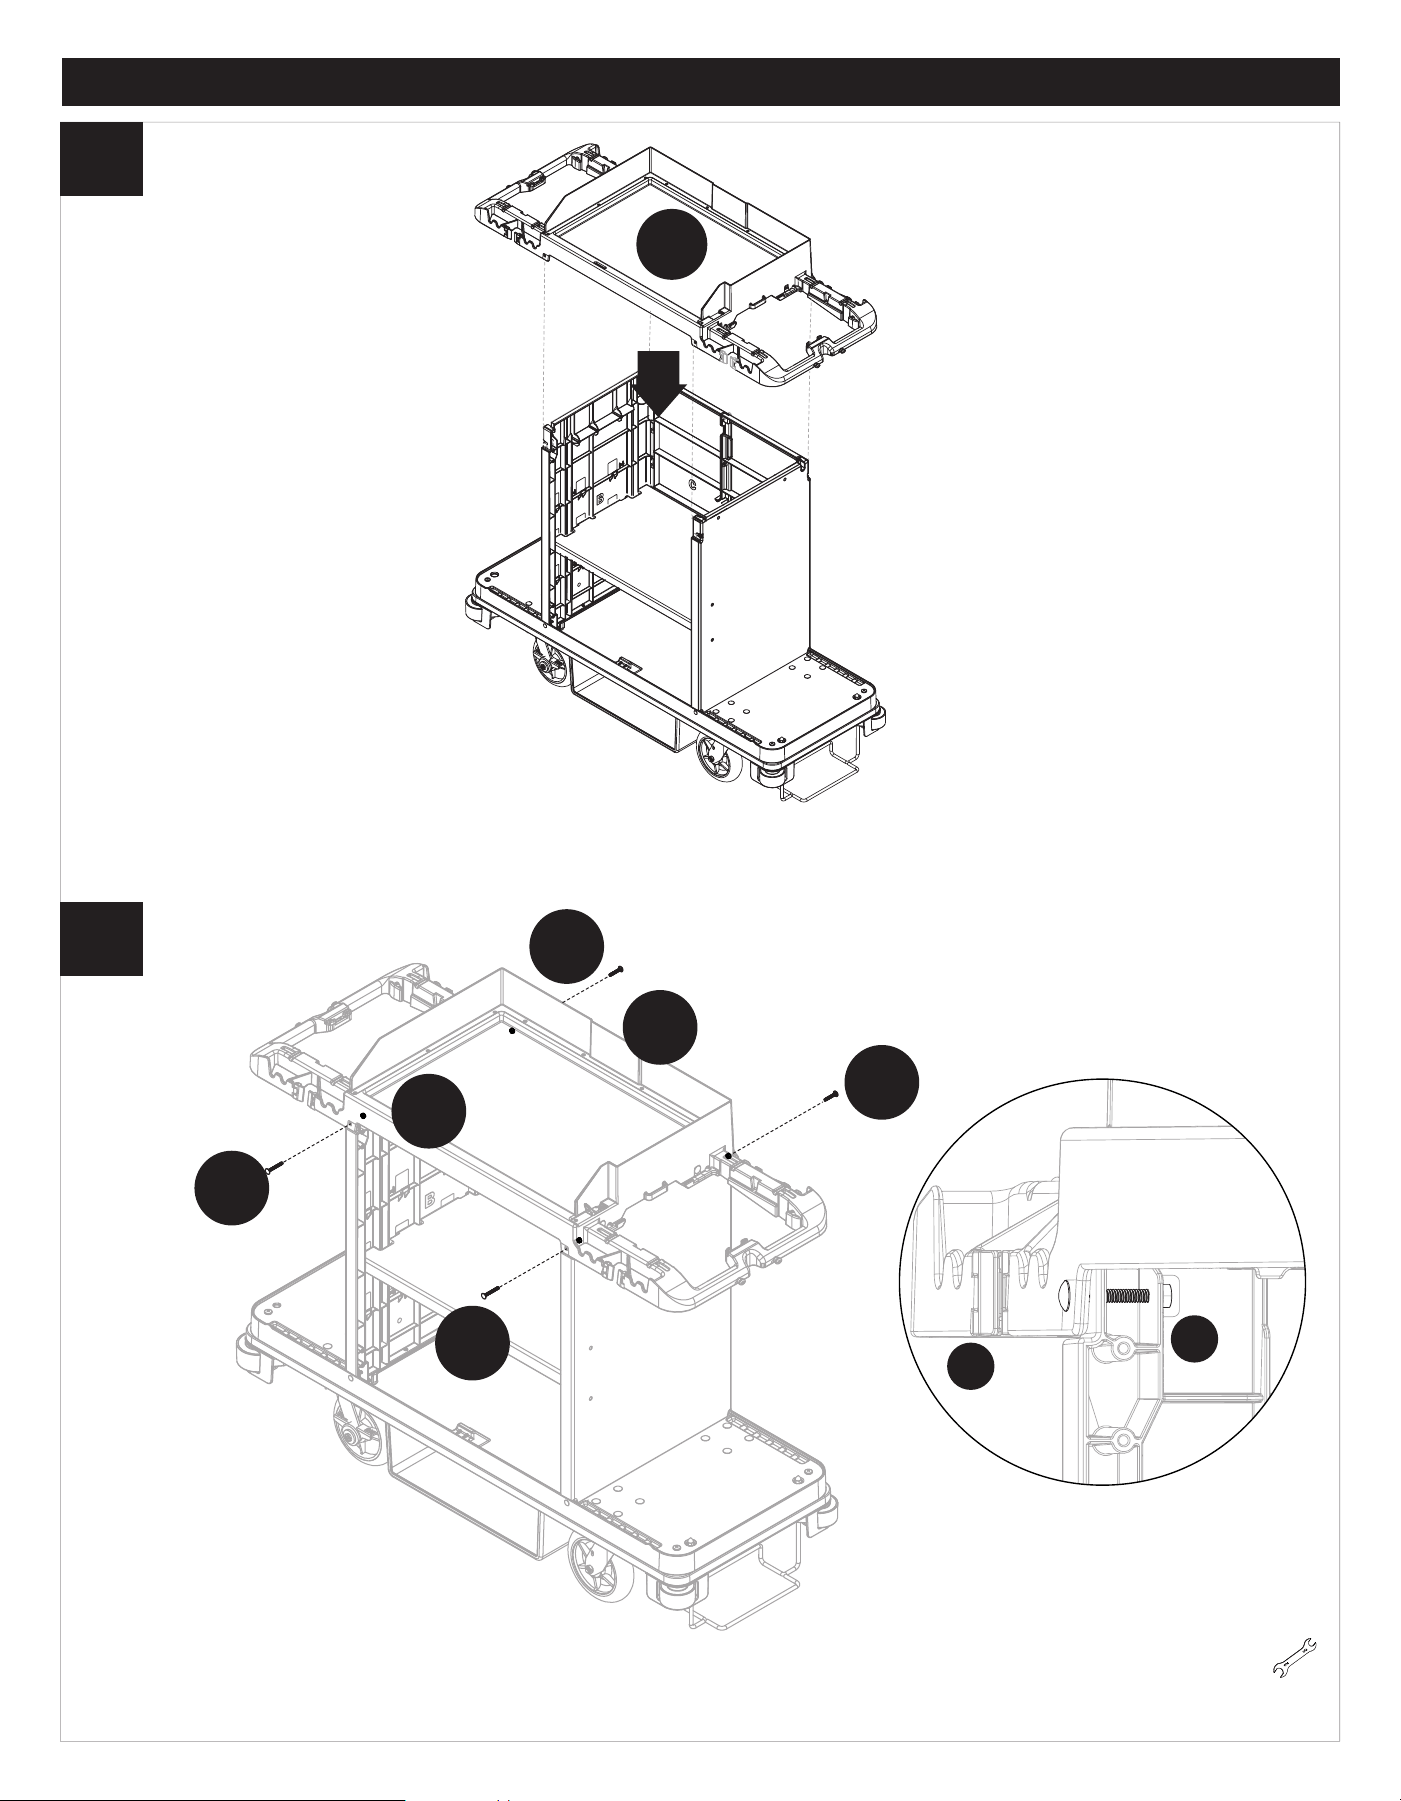
EN: Lower top (F) to top of cart.
12
F
EE
EE
DD
DD
MM
F
x2
x2
x4
x2
EE
MM
x2
Left Side
EN: To attach lid (F) insert screw (EE / DD) through lid and attach nut (MM) from underneath lid. Note: Use supplied wrench *
13
ASSEMBLY
(Continued)
Assembly
21
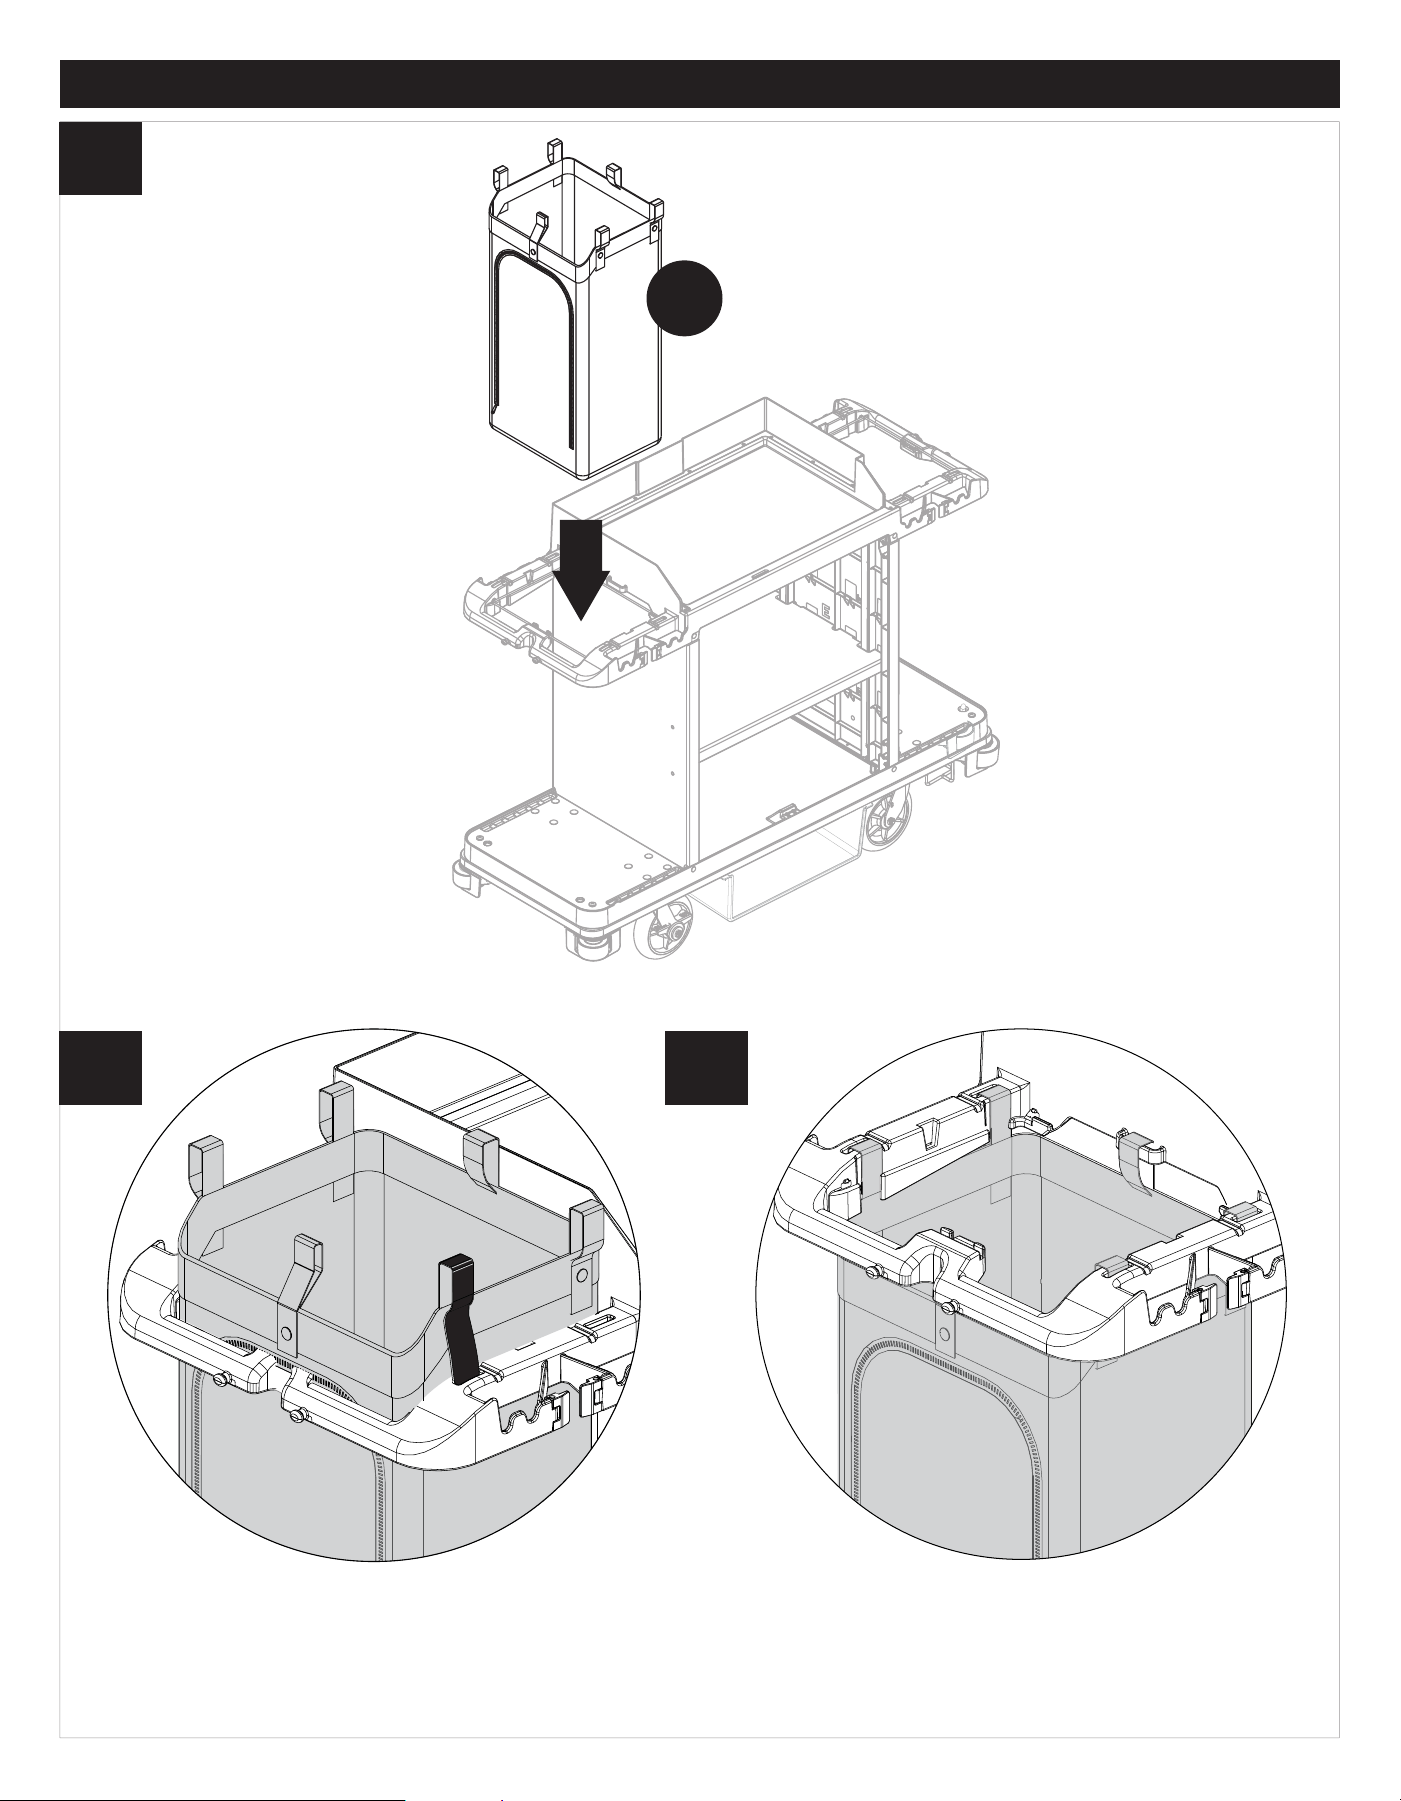
EN: Lower garbage bag (H) through frame of cart. Unsnap and feed through the six slots on frame. Re-snap the bag once strap is
through each slot. Note: Bag can be switched to other side if necessary.
15 16
14
ASSEMBLY
(Continued)
10
H
ASSEMBLY
(Continued)
11
17
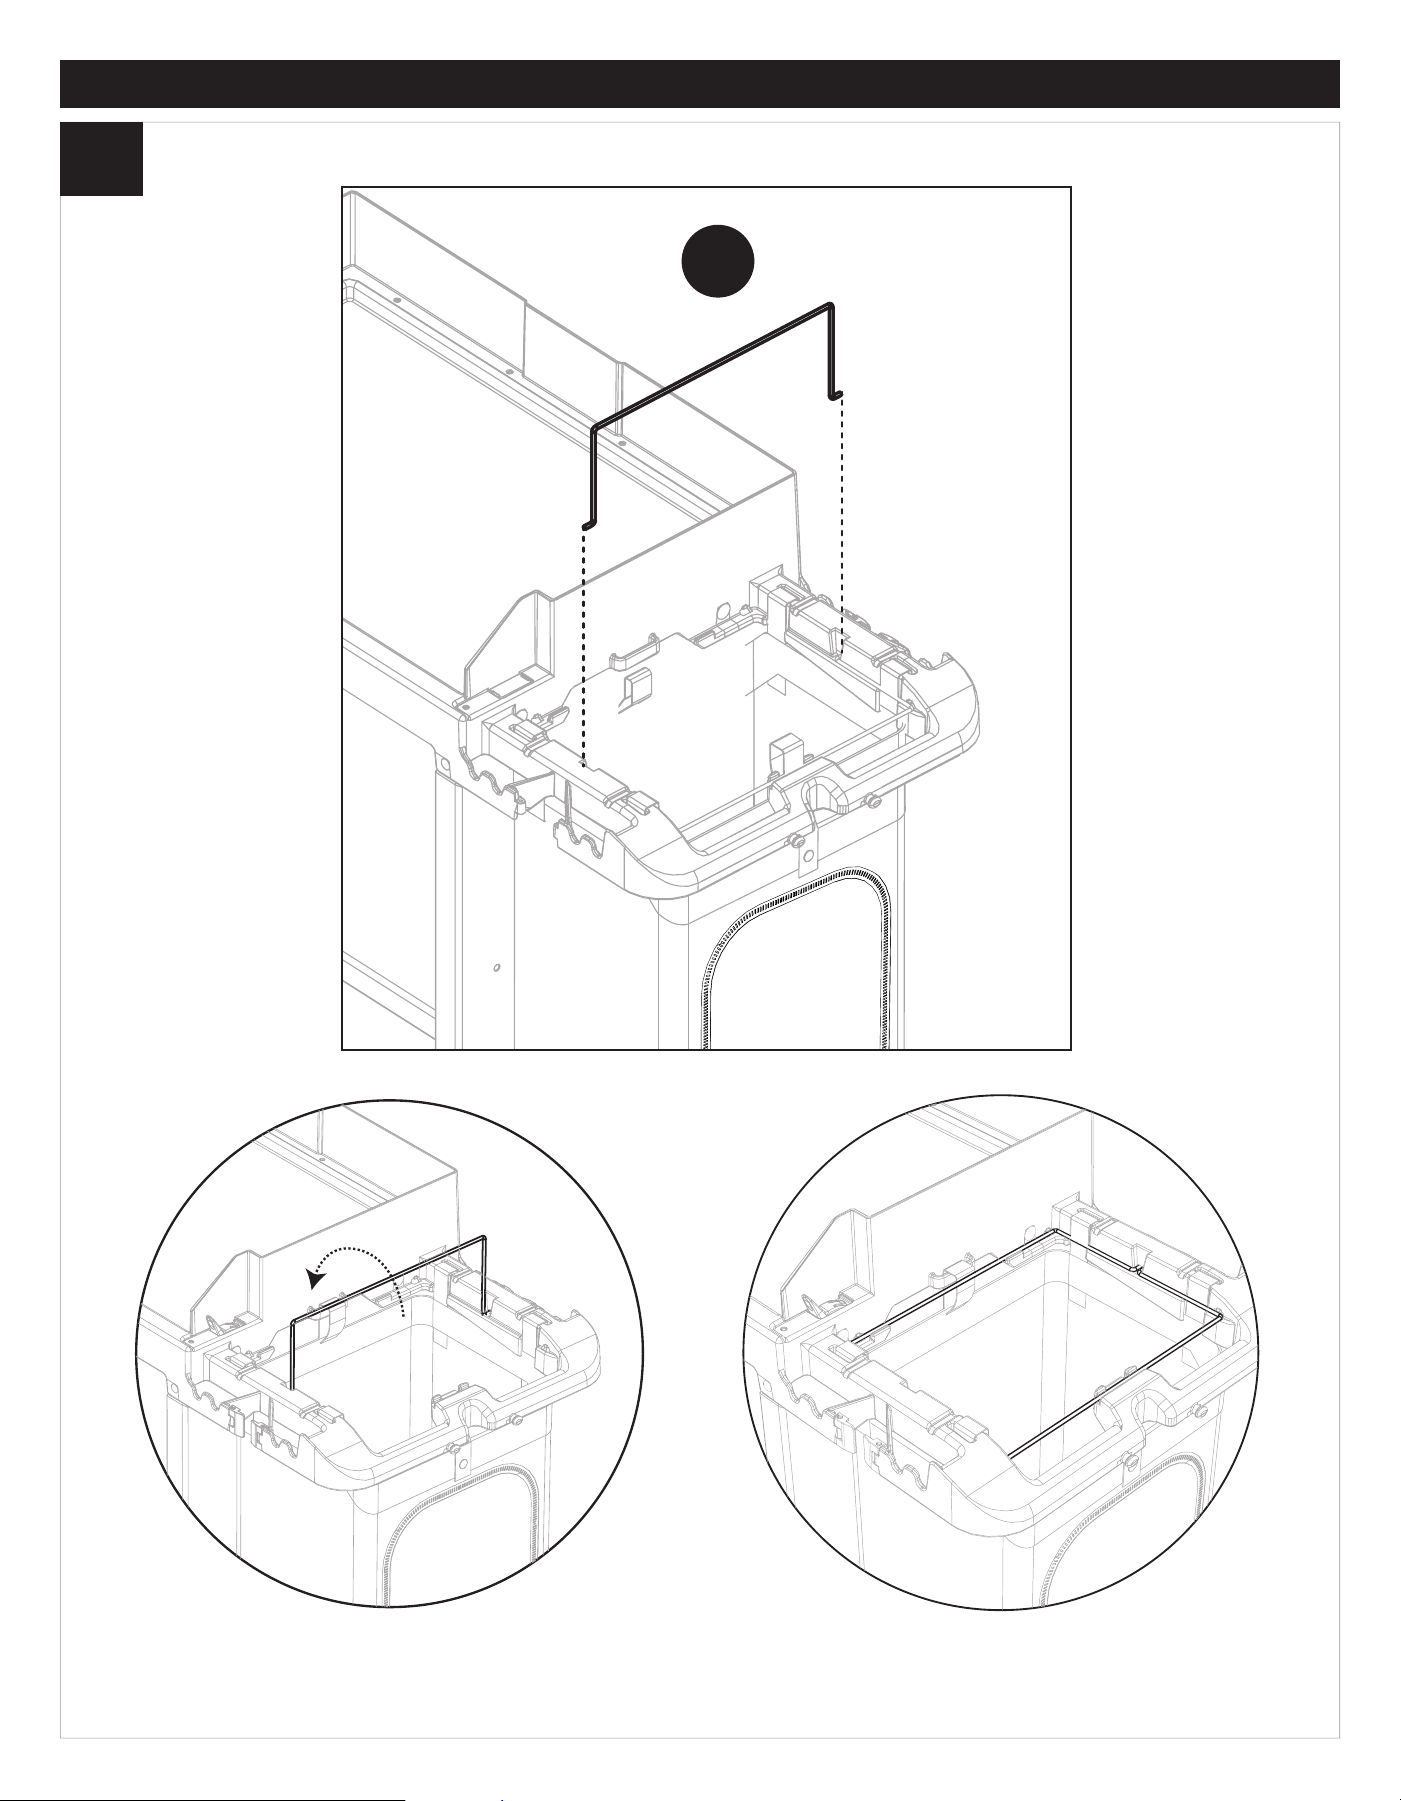
EN: Lower garbage bag rim (R) and insert into two center slots provided. Guide rim into position. Repeat with right rim. Note: Rims
can be put on both sides.
x2
R
18
K
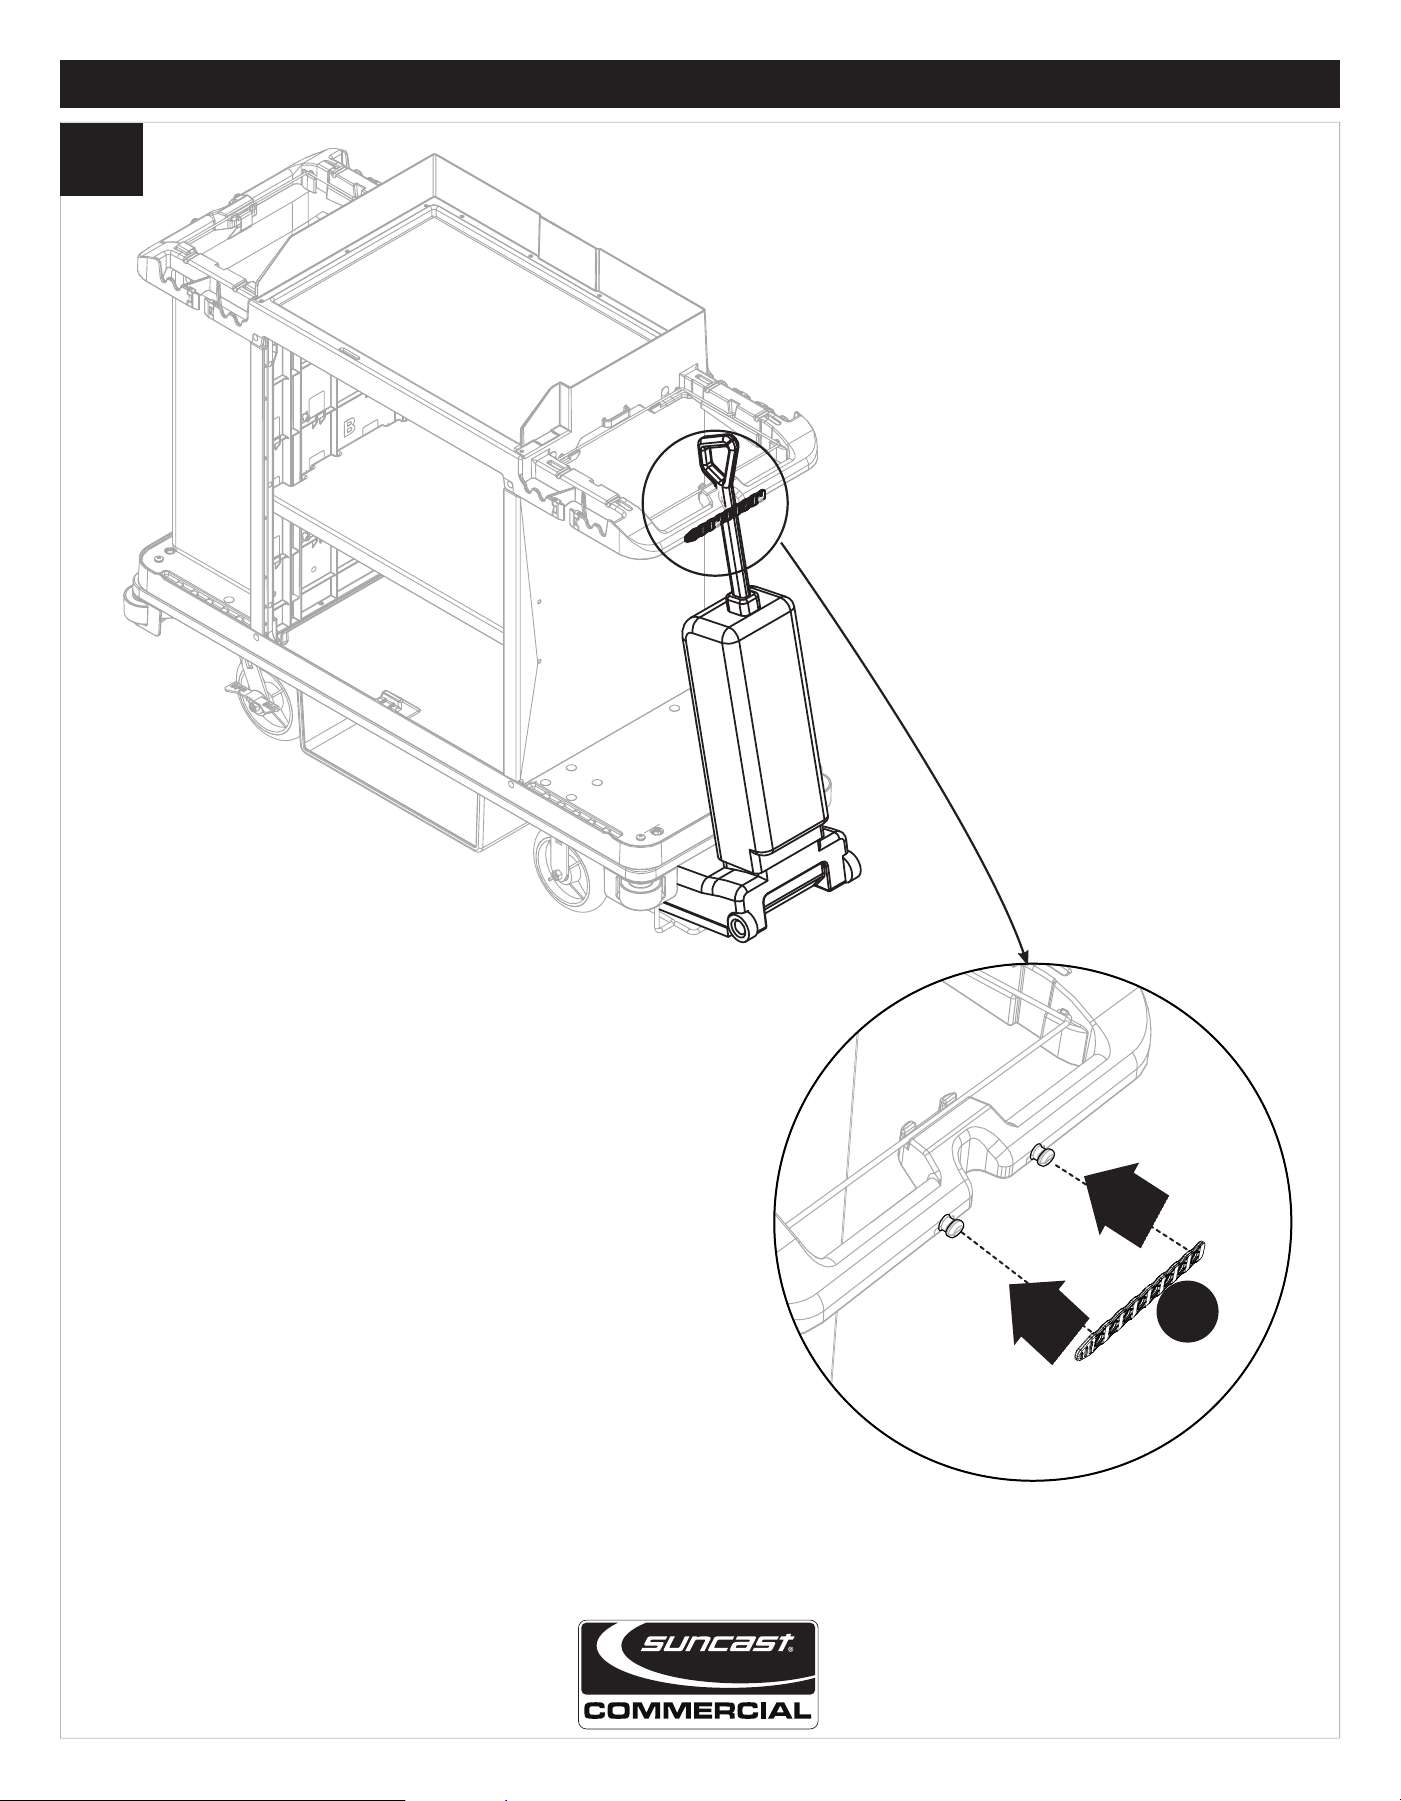
EN: Attach rubber strap (K) over two knobs on side of cart to secure vacuum cleaner. Vacuum cleaner is not included.
ASSEMBLY
(Continued)