pasapair
INSTRUCTION MANUAL
PORTABLE AIR CONDITONER
MODEL: OL-A011D1-06CD
115V 60Hz 965W
PLEASE READ INSTRUCTIONS CAREFULLY BEFORE ASSEMBLY
RETAIN THIS MANUAL FOR FUTURE REFERENCE

2
CONTENTS
I. SAFETY INSTRUCTIONS..........................................................................3
II. SPECIFICATIONS...................................................................................... 6
IILCOMPONENTES..........................................................................................7
IV. INSTALLATION....................................................................................... 8
V. OPERATION............................................................................................13
VI. DRAINAGE............................................................................................. 18
VII. MAINTENANCE....................................................................................19
VIII. TROUBLESHOOTING......................................................................... 22
IX. STORAGE............................................................................................. 23
X. DISPOSAL............................................................................................... 24
XI. WARRANTY........................................................................................... 25
3
I. SAFETY INSTRUCTIONS
Please read the operating instructions carefully before using your air
conditioners for the first time.
Read the USER MANUAL carefully before operation.
Before installing the appliance,read the MANUAL carefully.
Service personnel are required to carefully read the MANUAL
before operation.
1. INTENDED USE
The Air Conditioner is designed only for use with R410a as the designated
refrigerant. It provides great cooling solutions for single rooms, creating a
comfortable atmosphere in your space. It also has ventilation and dehumidifying
function for circulating air and removal of moisture. It is self- contained systems
that does not require any permanent installation allowing you to move to the space
in which it is most needed. It is commonly used in kitchen, temporary-resided,
computer rooms, garages, and many other places where installation of
Air-conditioner Outdoor Unit is limited.
This appliance is not intended for use by persons(including children) with reduced
physical,sensory or mental capabilities, or lack of experience and knowledge,
unless they have been given supervision or instruction concerning use of the
appliance by a person responsible for their safety. Cleaning and user maintenance
shall not be made by children without supervision.
2. CABLES AND PLUGS
Check to ensure your electricity supply matches that shown on the rating
plate.The appliance must only be used as rated.

4
If the supply cord is damaged, it must be replaced by the manufacturer, its
service agent or similarly qualified persons in order to avoid a hazard.
The appliance shall be disconnected from its power source during
maintenance.
Always operate the unit from a power source of equal voltage, frequency and
rating as indicated on the product identification plate.
Always use a power outlet that is grounded.
Unplug the power cord when cleaning or when not in use.
Do not operate with wet hands. Prevent water from spilling onto the unit.
Do not unplug while the unit is operating.
Do not unplug by pulling on the power cord.
Do not use an extension cord or an adapter plug.
3. RISK OF PERSONAL INJURY
Failure to abide by this warning could result in an explosion, death, injury
and property damage.
This appliance is intended to be used by expert or trained users in shops, in
light industry and on farms, or for commercial use by lay persons.
The refrigerant loop is sealed. Only a qualified technician should attempt to
service!
Do not let any persons back into the room until the qualified service technician
has arrived and that technician advises that it is safe to return to the store.
No open flames, cigarettes or other possible sources of ignition should be used
inside or in the vicinity of the units.
Component parts shall only be replaced with identical repair parts.
Do not immerse or expose the unit to rain, moisture or any other liquid.
Do not leave the unit running unattended. Do not tilt or turn over the unit.
Do not put objects on the unit.
Do not climb or sit on the unit.
5
Do not insert fingers or other objects into the air outlet.
Do not touch the air inlet or the aluminum fins of the unit.
Do not operate the unit if it is dropped, damaged or showing signs of product
malfunction.
Do not clean the appliance with any chemicals.
The unit shall be installed in accordance with national wiring regulations.
Do not use means to accelerate the defrosting process or to clean, other than
those recommended by the manufacture.
The appliance shall be stored in a room without continuously operation
sources (for example: open flames, an operating gas appliance or an operating
electric heater).
The appliance shall be stored so as to prevent mechanical damage from
occurring.
Any person who is involved with working on or breaking into a
refrigerant circuit should hold a current valid certificate from an industry-
accredited assessment authority, which authorizes their competence to handle
refrigerants safely in accordance with an industry, recognized assessment
specification.
If you don't understand something or need help, please contact the dealer services.
6
II. SPECIFICATIONS
MODEL
OL-A011D1-06CD
Rated Voltage
AC115V 60Hz
Cooling Rated Input Power
965W
Cooling Rated Input Current
8.6A
Cooling Capacity
10000Btu/h
Refrigerant Charge
R410a
Net weight
24.5kg
High Side Pressure
580psi
Compressor input
RLA
:
6.7A/LRA:35A
Fan Motor Power
0.236HP
IP Code
IPX1
7
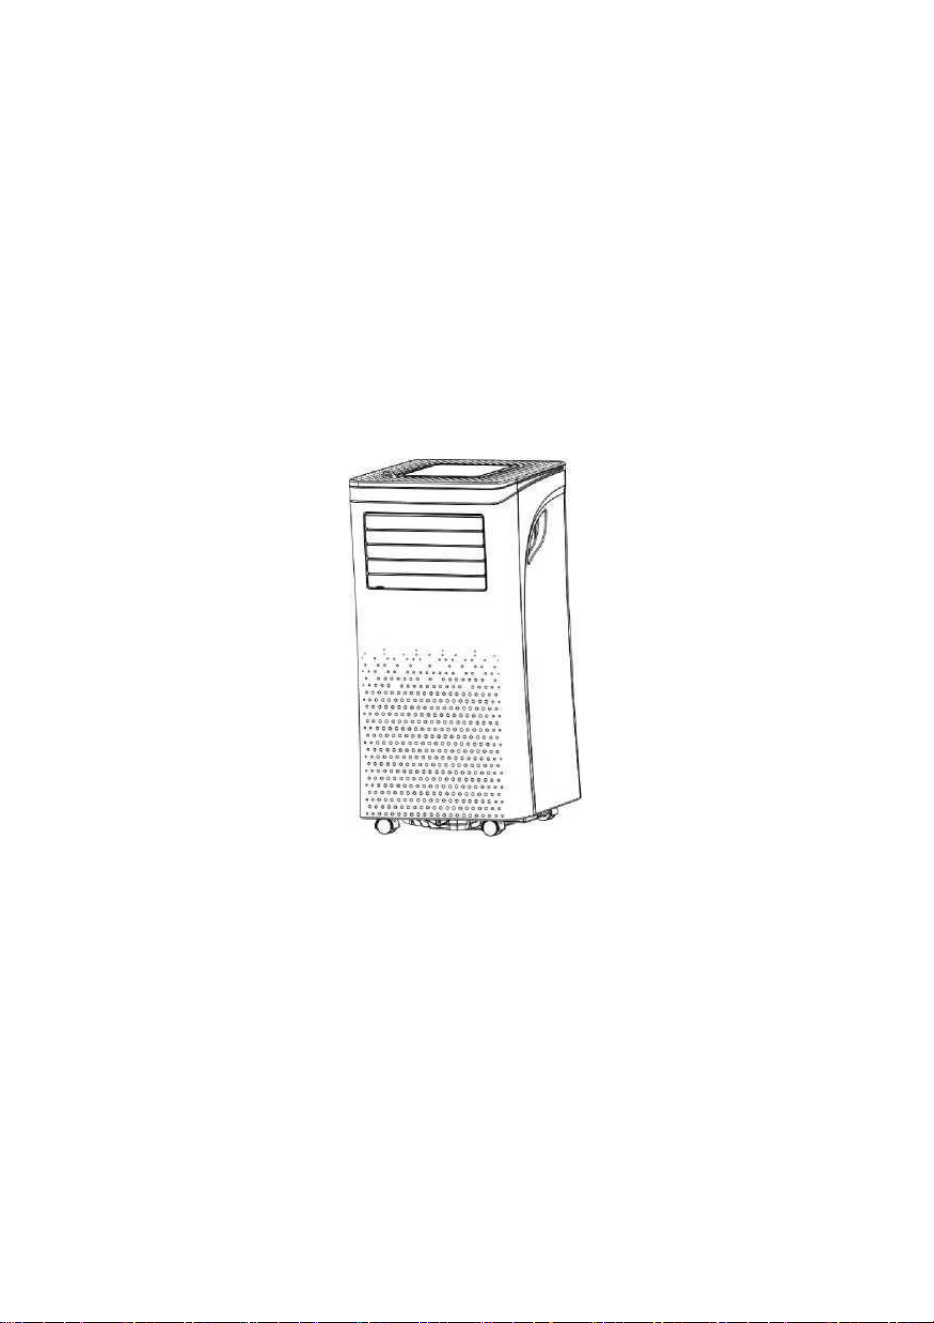
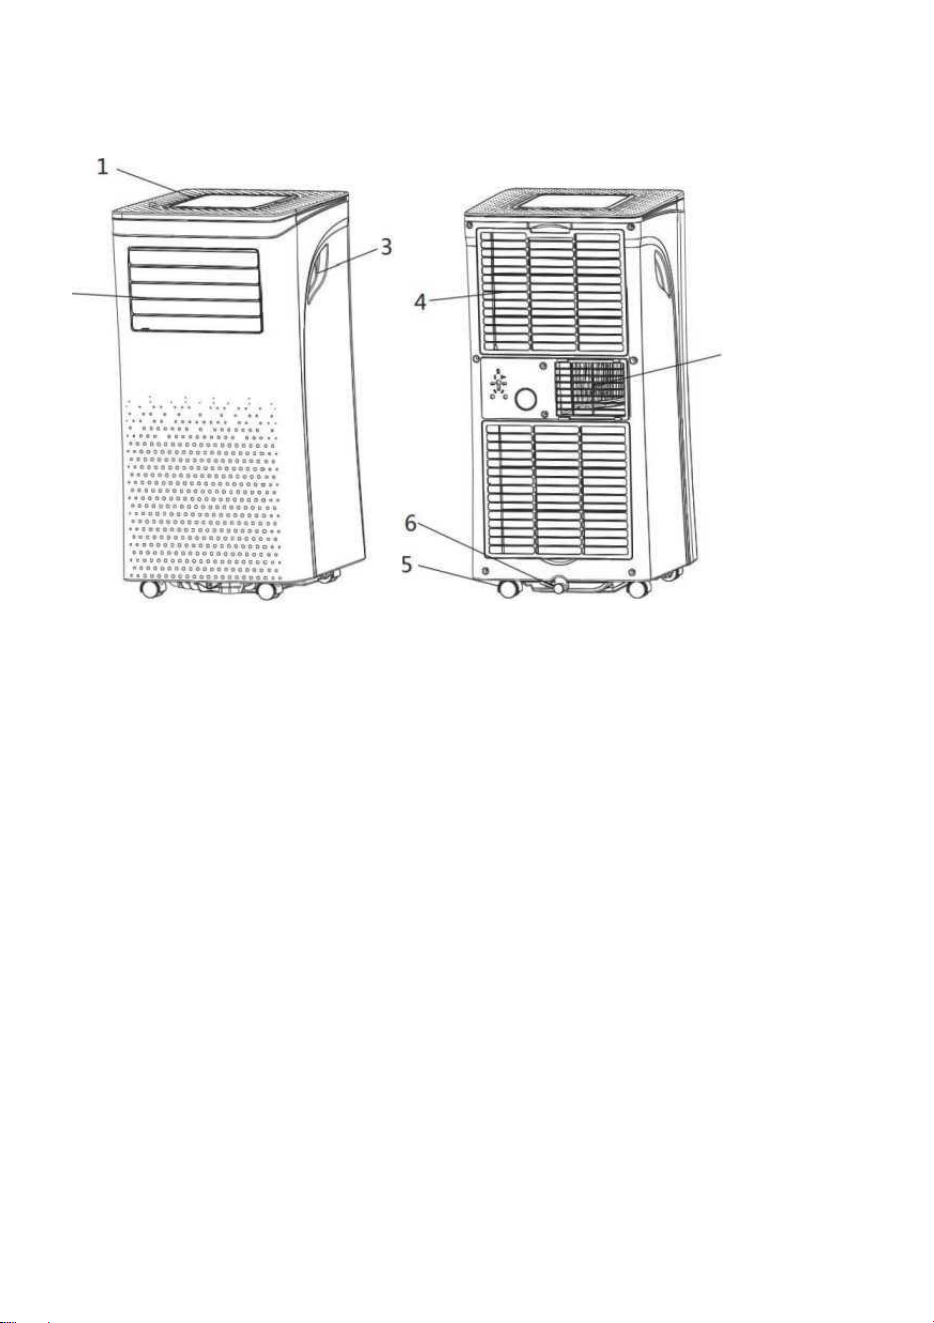
III.COMPONENTES
1. Control panel
2. Air outlet with adjustable louver
3. Handle
4. Air inlet with air filter
5. Caster
6. Drainage Hole
7. Air Exhaust
2
7

8
IV.INSTALLATION
UNPACKING
Unpack the carton and take the appliance and accessories (see below)out.
Check the device after unpacking for any damage or scratches on it.
Accessories:
■ 1. Exhaust hose
■ 2. Hose connector
■ 3. Window kit adapter
■ 4. Remote control
■ 5. Window kit
9
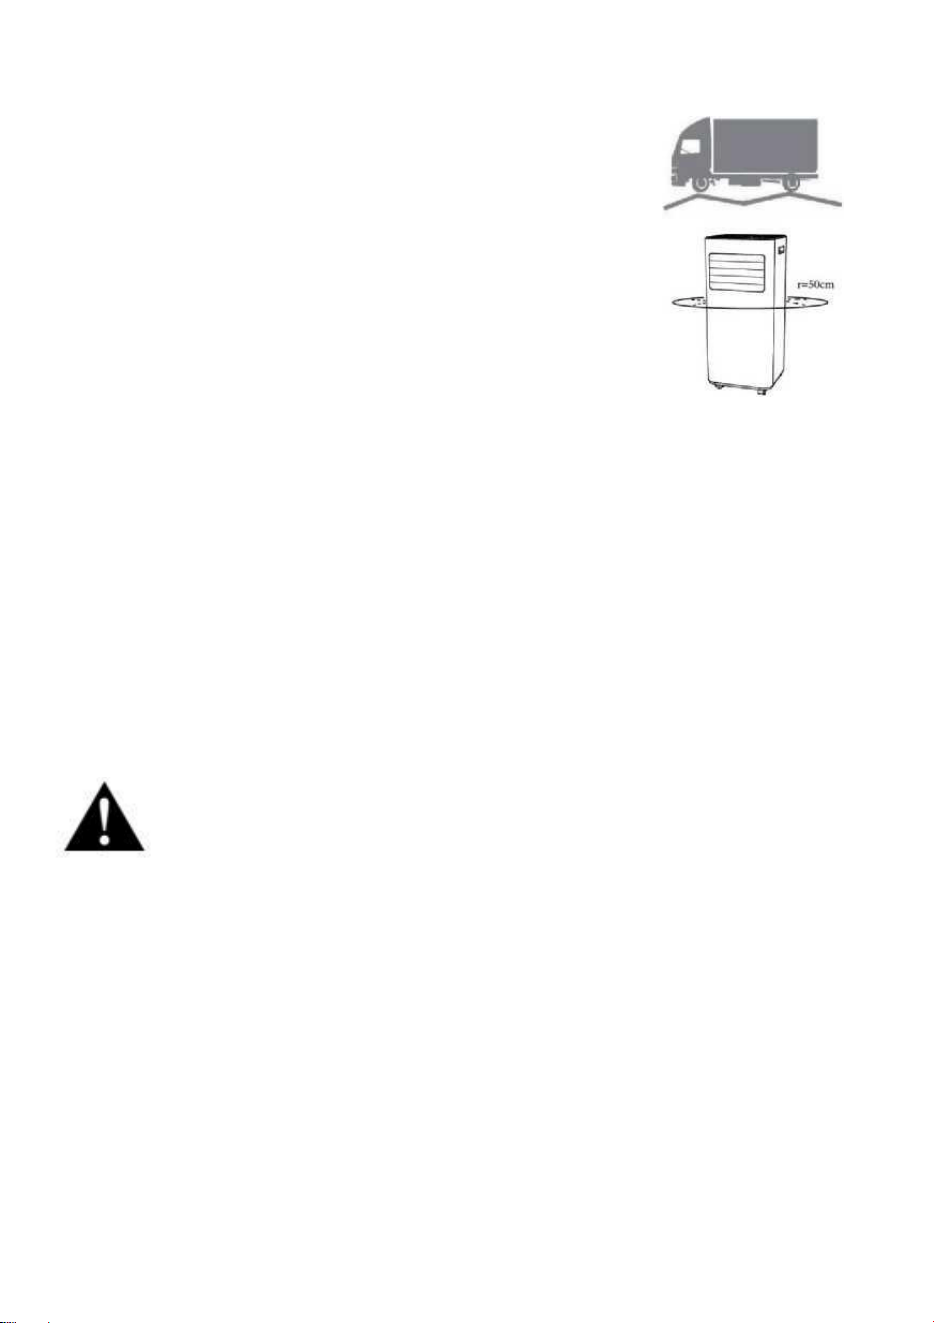
LOCATION
If tipped more than 45°, allow the unit to set upright for
at least 24 hours before start up.
Place the unit on a firm, level surface in an area with at
least 50cm of free space around it to allow for proper
air circulation.
Do not operate in close proximity to walls, curtains, or
other objects that may block air inlet and outlet. Keep
the air inlet and outlet free of obstacles.
Never install the unit where it could be subject to:
Heat sources such as radiators, heat registers, stoves or other products that
generate heat.
Direct sunlight
In an area where oil or water can be splashed
Mechanical vibration or shock
Excessive dust
Lack of ventilation, such as cabinet or bookcase
Uneven surface
WARNING!
Install the unit in rooms which exceed 7 m
2
.
Do not install the unit in a place where inflammable gas may leak.
10
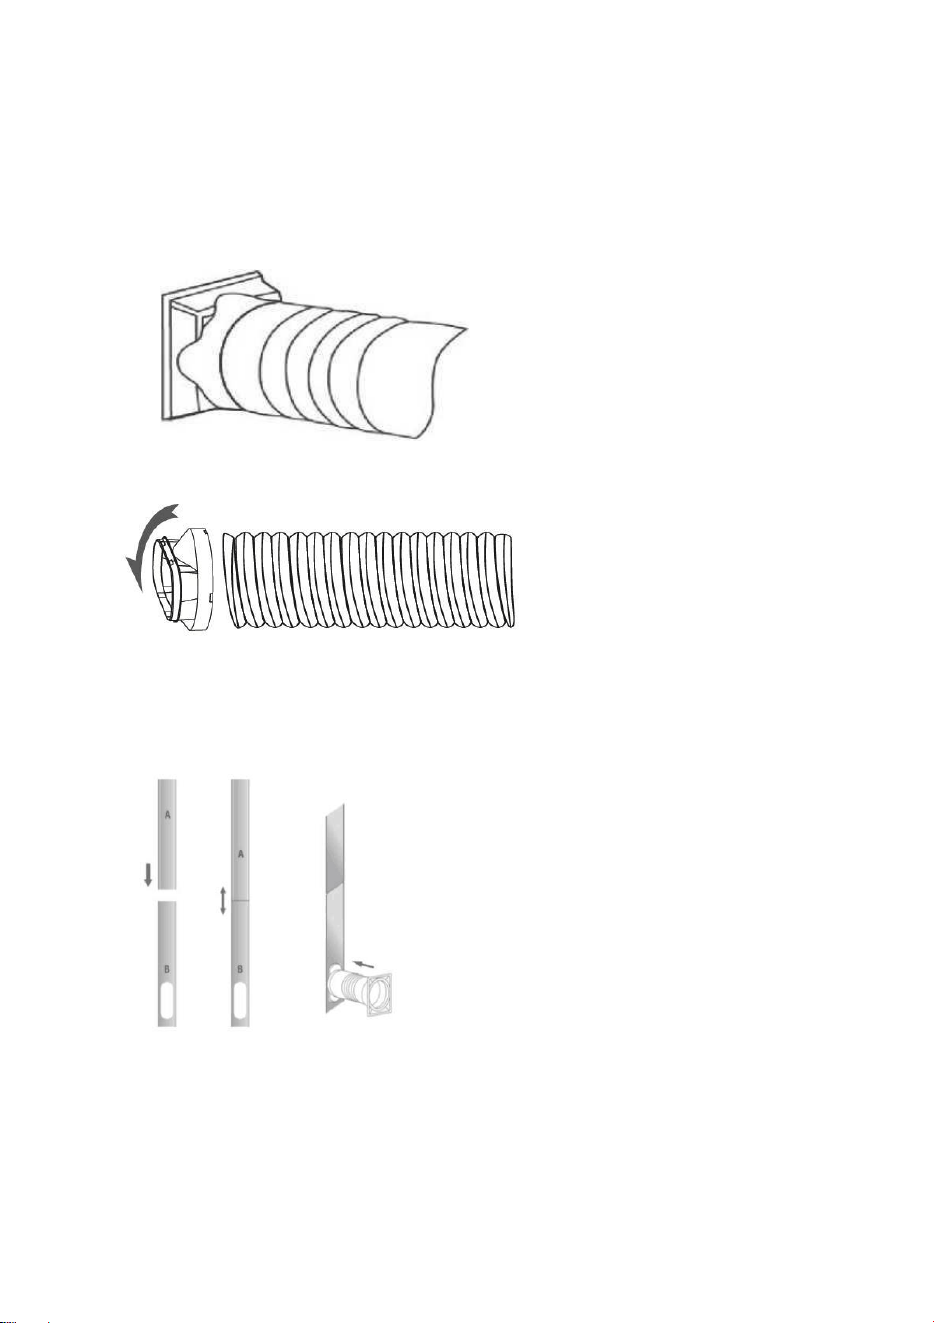
ATTACH THE EXHAUST HOSE
The air conditioner requires being vented outside so that the exhaust air can escape
the room which coming from the appliance contains waste heat and moisture.
Do not replace or extend exhaust hose which will result in decreased efficiency,
even worse shut down the unit due to low backpressure.
Step 1: Connect the hose connector to one end of the exhaust hose.
Step 2: Connect the windows kit adapter to the other end of the exhaust hose.
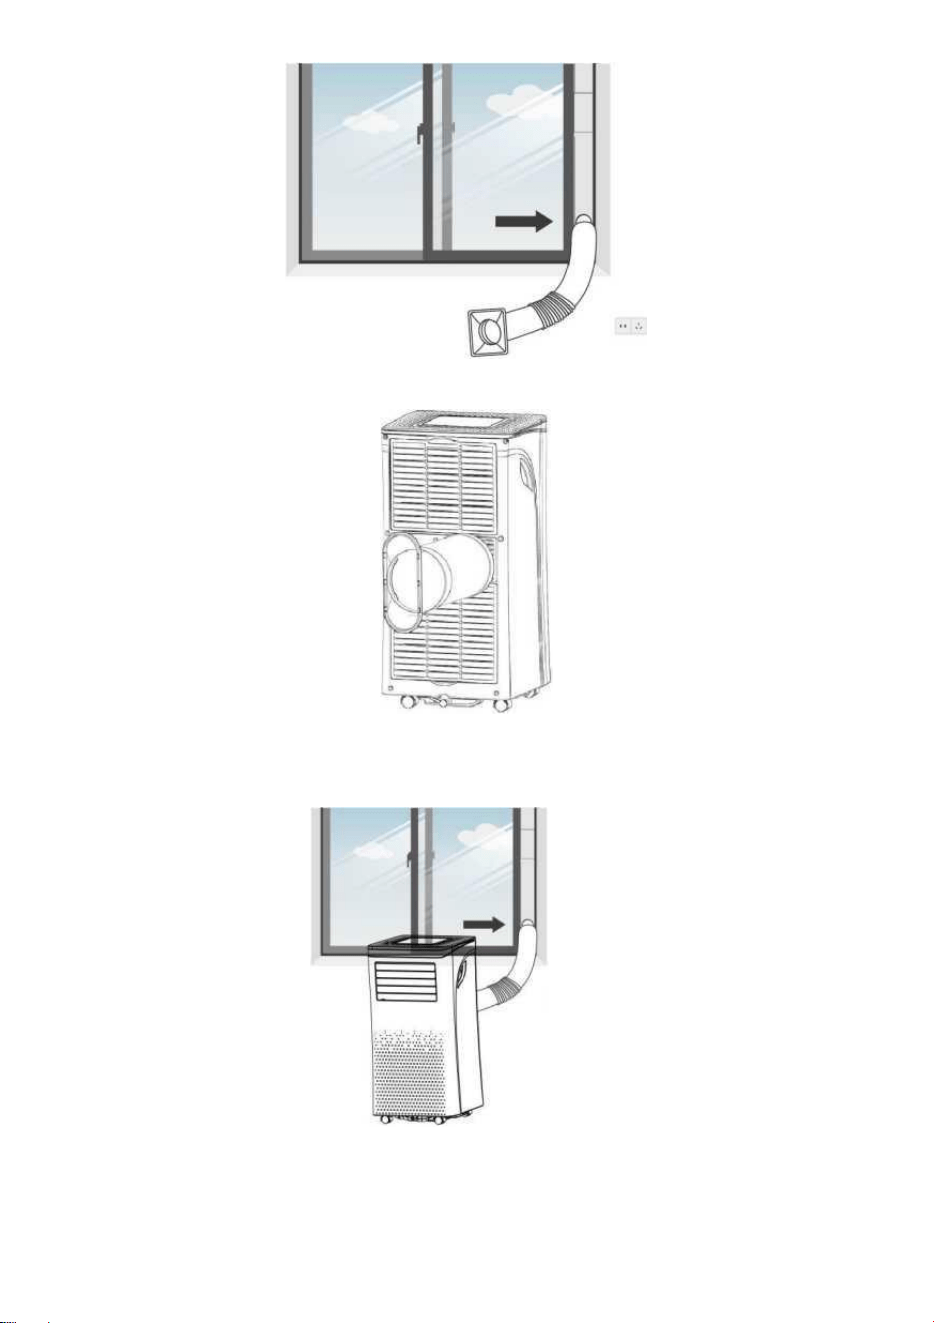
Step 3: Extend the adjustable window kit the length of your window. Connect
the exhaust hose to the window kit.
Step 4: Close your window to secure the kit in place. It needs to hold the
windows kit firmly in place, secure the window kit with duct tape if
required. It is recommended that the gap between the adapter and the
sides of the window should be sealed off for maximum efficiency.
11
Step 5: Attach the hose connector to the exhaust air outlet of unit.
Step 6: Adjusting the length of the flexible exhaust hose, and avoid bends
in the hose. Then place the appliance near an electrical outlet.
Step 7: Adjust the louver at the air outlet, and then switch on the unit.
12
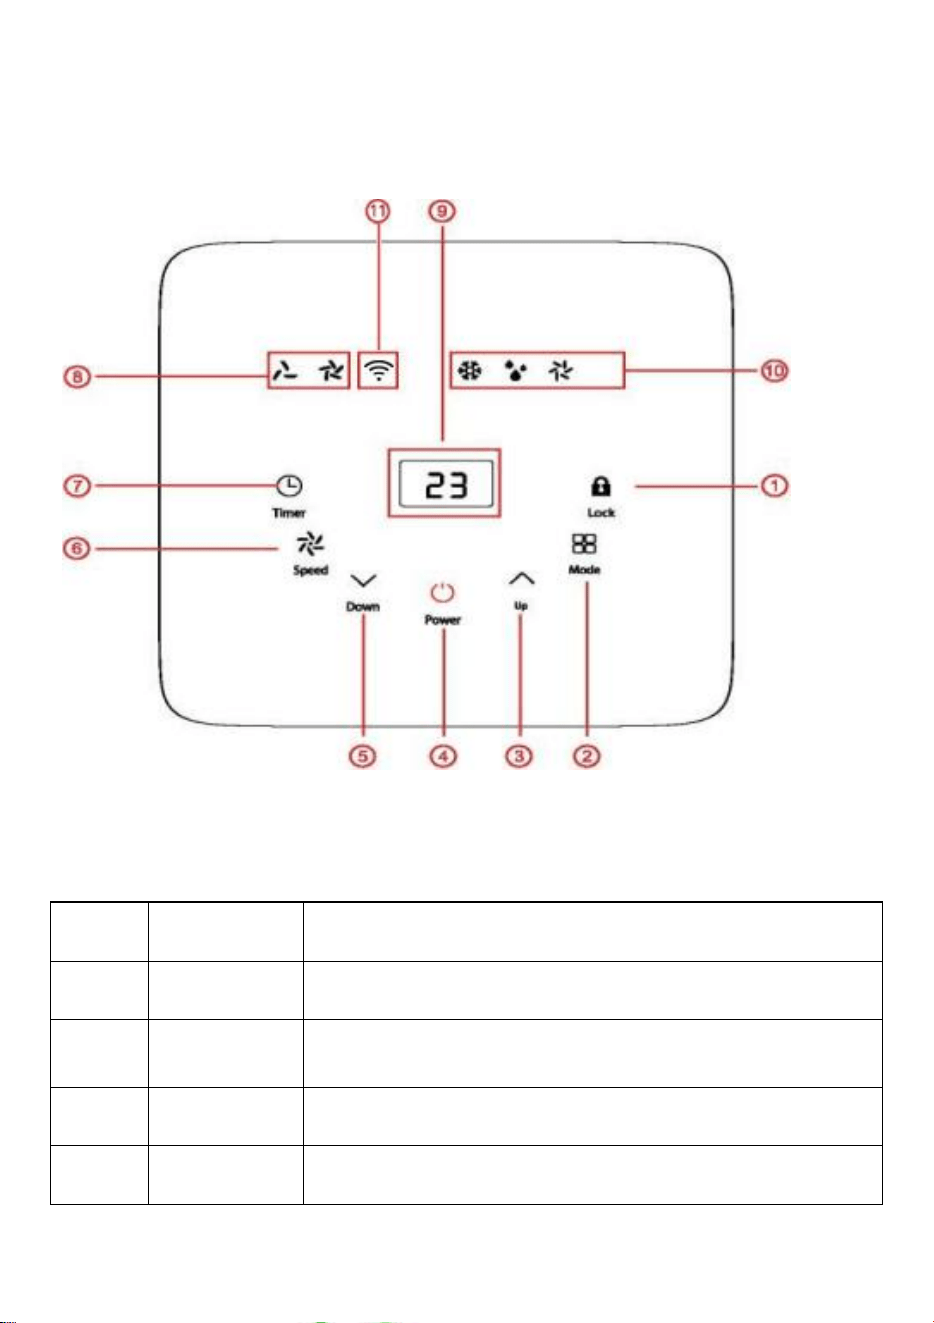
V. OPERATION
CONTROL PANEL AND DISPLAY
1
LOCK
Press to turn on or turn off the child lock function.
2
MODE
Press to switch the operation mode between cooling,
dehumidifier and fan.
3
UP
Increasing the desired temperature(16°C ~ 32°C) or timer
setting.
4
POWER
Press to turn on/off the appliance.
5
DOWN
Decreasing the desired temperature or timer setting.
13
6
SPEED
Press to cycle the fan speed between High and Low.
7
TIMER
Sets a time for the unit to automatically start or stop.
8
FAN SPEED
Indicator
Indicates the current fan speed.
9
Digital
Display
Displays timer setting and room temperature.
10
MODE
Indicator
Indicates the corresponding mode: cooling,
dehumidifier(dry) and fan.
11
WiFi
Direct operation from your mobile phone.
APP CONTROL
Download the “QZsmart” App
Scan the QR Code below with your smartphone or search it in the App Store or Google Play
to download the “QZsmart”app .
NOTE: Allow the app to access network,location and Bluetooth services for best use.
Create New Account
• Open the “QZsmart” app, Press “Sign Up” ,then sign in with your account details are on
the app.
Add Device
1.When connecting for the first time, press and hold "Timer" on the panel until you hear a
beep, the “WIFI” light starts blinking,then the reset is successful.
14
2.From the Home Page, press “Add Device” or press “+” in the top right corner of the
screen. (If you already have a device added to your account, the “Add Device” button will
not appear.)
3.Connecting
Auto-connect:The app will automatically search when wifi and Bluetooth are
switched on, so you can add the corresponding product directly from the automatic
search.
- Press “Add”.
- Select your Wi-Fi network.
- Enter your router password.
Manual connection:Select your air conditioner model from the device menu.
- Select your Wi-Fi network.
- Enter your router password.
NOTE: Connection may take up to 60 seconds.
• Once complete, the “WIFI” light will stop blinking and remain lit.
• Once the device is added, you can use the menu of the app to change the name of the
device.
• When you are finished, press “Done”.
Note:Your mobile device is connected to a 2.4GHz Wi-Fi network when pairing with
the app. You select the 2.4 GHz network when selecting a Wi-Fi network on the app
during setup.
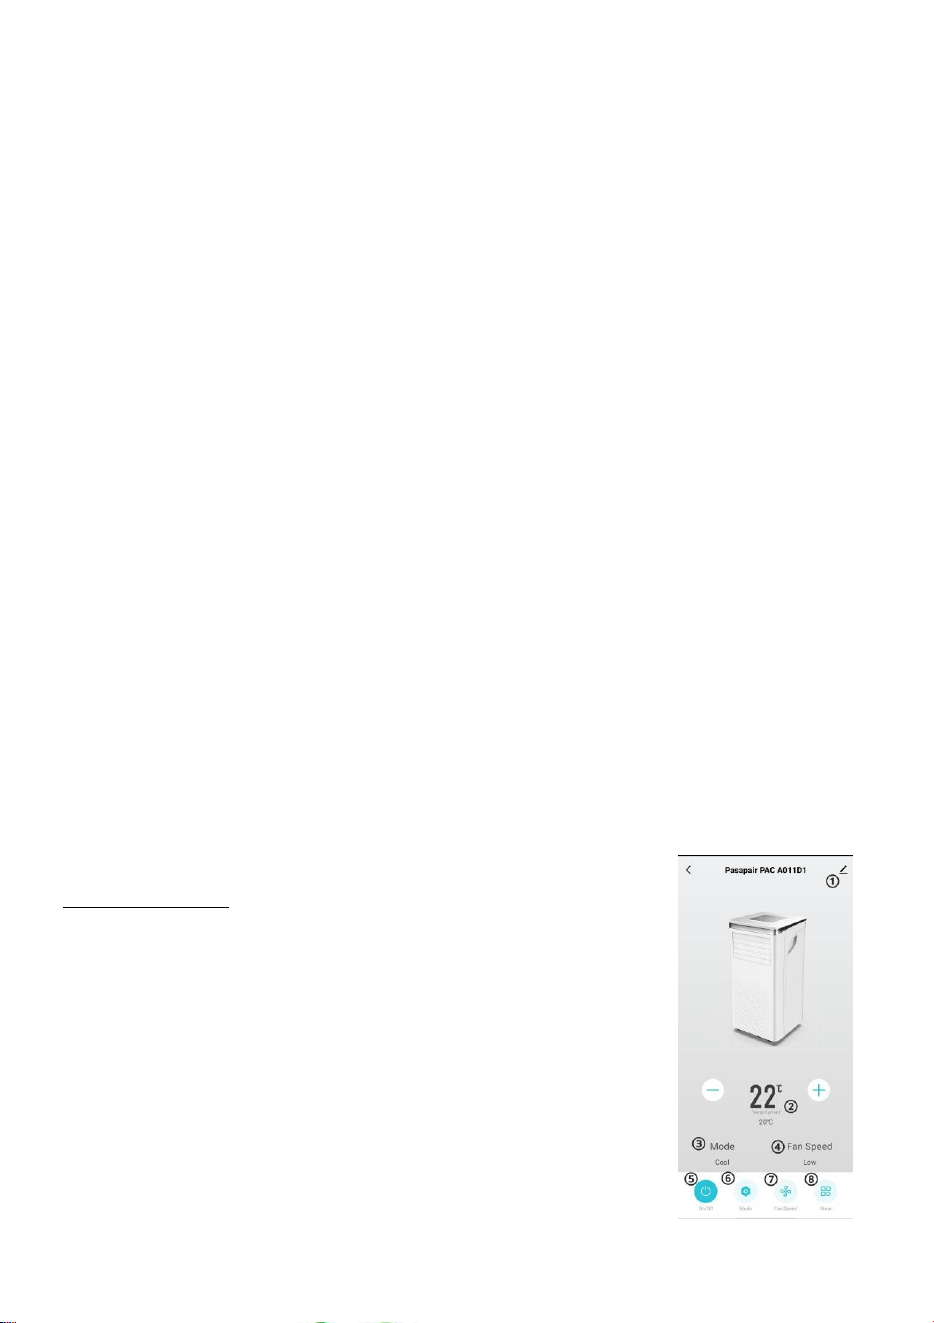
Using the My App
1. Device Settings
Access device name, location, and sharing settings
2. Temperature Display
The temperature can be switched by clicking on "+" or "-".
3. Mode displays
Displays your device’s current operating settings
4.Fan Speed displays
Displays your device’s current fan speed
5.On/Off
15
Power your device on or off
6.Mode
Toggle between cool, dry and fan modes
7. Fan
Select the fan speed
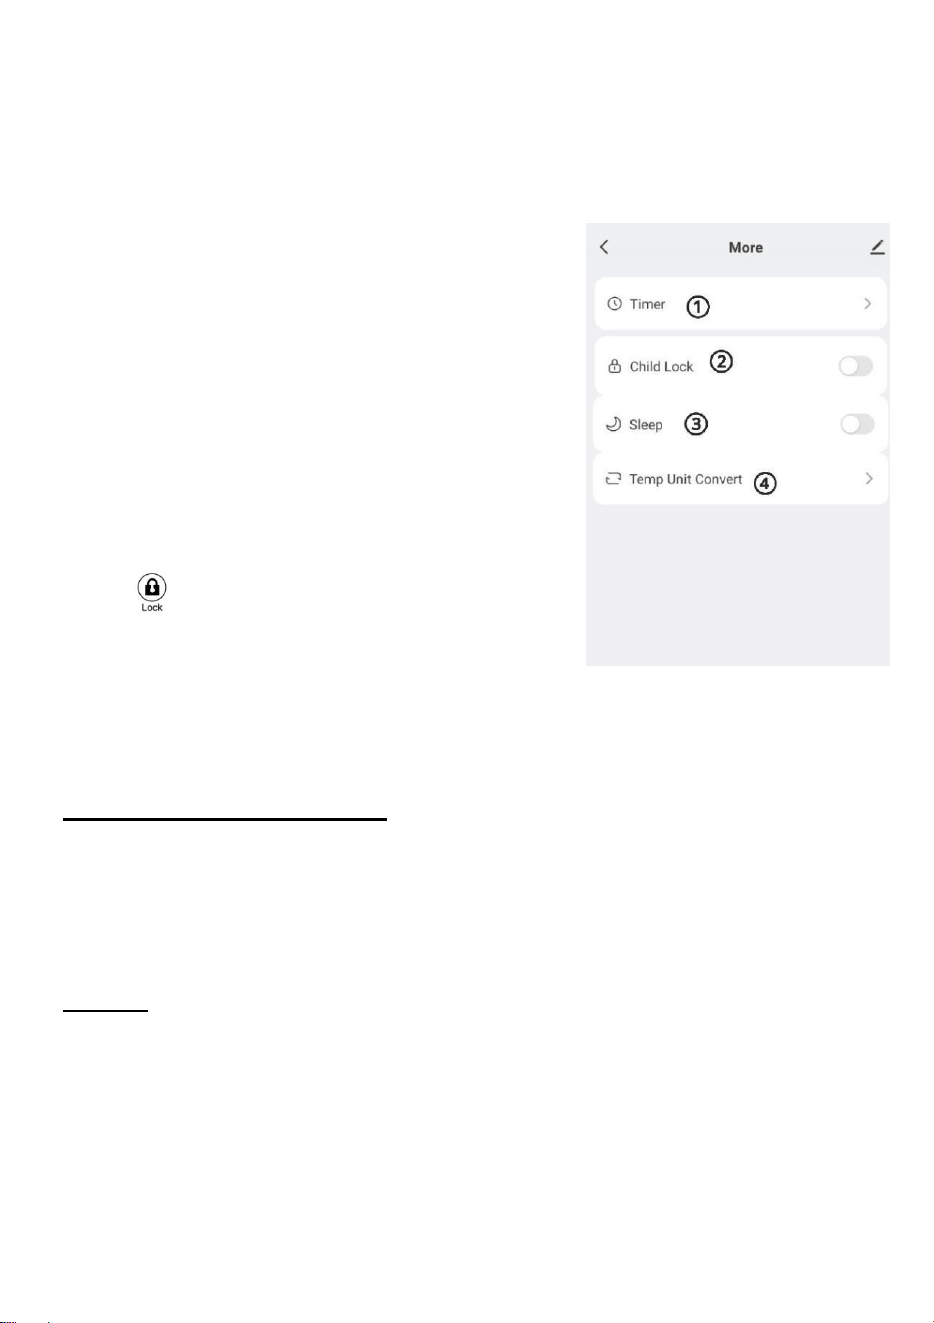
8. More settings
①Timer
Set a timer for when your device turns on/off
②Child Lock
Toggle “Child Lock” Mode on and off
After operating the child lock function on the APP,the
mobile air conditioner can only controlled by the
APP,Unless first unlocked via the phone or by clicking
on the " ".
③Sleep
Toggle Night Mode on and off (This function can only be used in cooling mode)
④Temp Unit Convert
Toggle between Celsius and Fahrenheit
How to unbind the air conditioner
Only one unit can be connected to an air conditioner.
If you want to connect to another phone you have to unbind it from the previous one, you
can simply long press “Timer”on the panel to unbind the air conditioner,after hearing a beep,
the “WIFI” light starts blinking.
Cautions
A)There will be a delay in operating the machine on the mobile phone, about 1-3
minutes,please be patient.
B)The language of the APP automatically switches with the language of the mobile system.
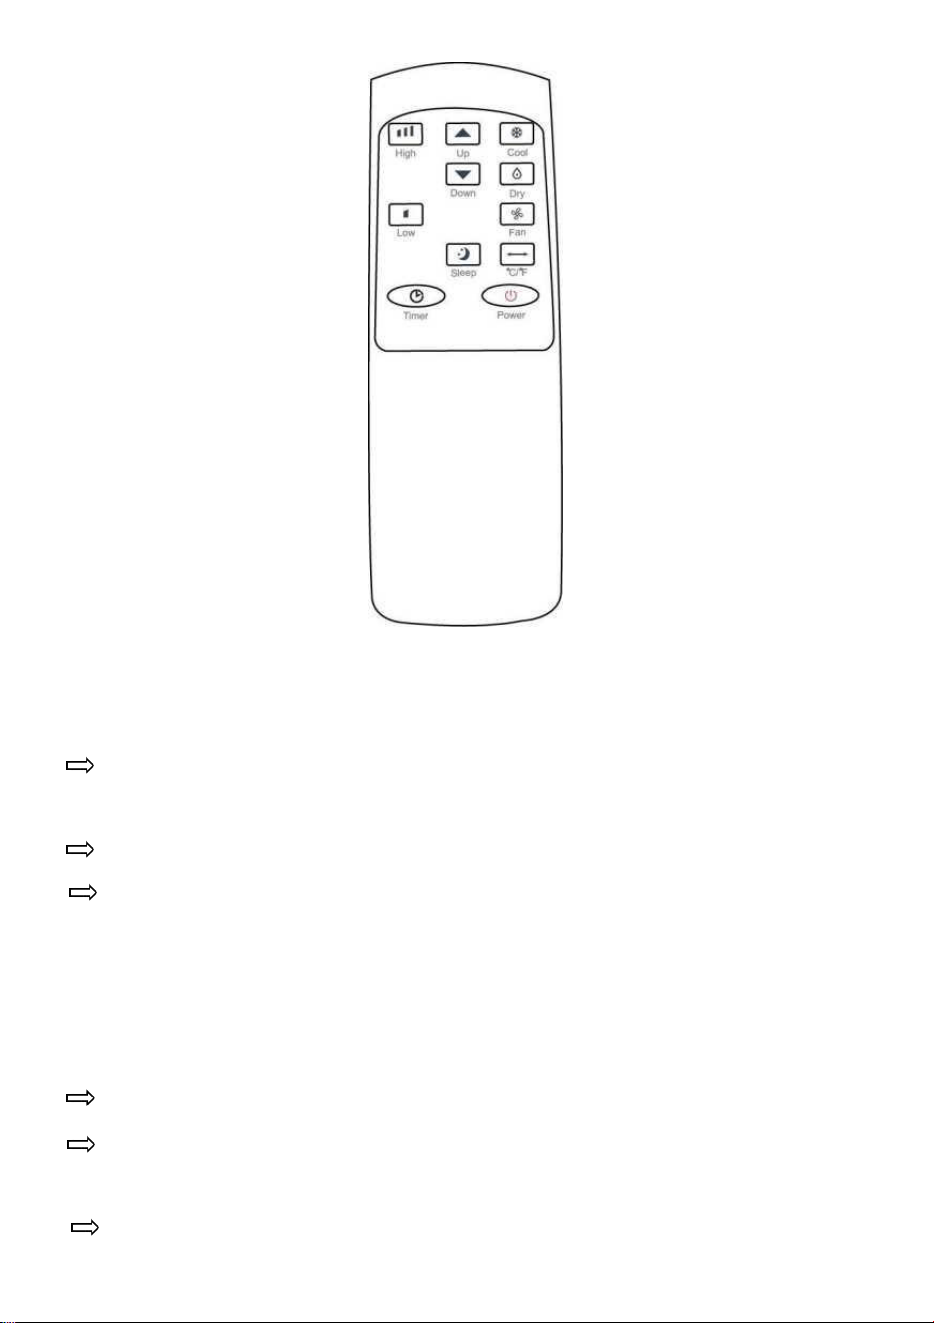
REMOTE CONTROL
16
SETTINGS
1 .Start-up and Shutdown
Press POWER to turn the unit on.
The unit runs in in FAN as default
Press MODE button to select the desired operation mode.
Press POWER again to turn off the power.
2.Operation mode
The unit has four operation modes: Cool, dry, fan, sleep.
A. Cooling your room
Select the cool mode to lower the temperature in your room.
Press MODE button repeatedly until the COOL indicator lights up.
Press Up/Down button to adjust the temperature which is displayed on
the screen. The temperature can be set between 16°C and 32°C.
Press SPEED button repeatedly until the desired fan speed indicator lights up.
17
To control the direction of the air flow horizontally, please adjust the inner
louver by hand.
Note:The air conditioner stops if the room temperature is lower than selected
temperature.
B. Ventilating your room
Press MODE button repeatedly until FAN indicator lights up lights up. In
ventilation mode the room air is circulated, but not cooled.
Press SPEED button repeatedly to select the fan speed as desired.
C. Drying your room
Press MODE button repeatedly until the dry indicator lights up. The fan speed
switches to low and could not be adjusted in this mode. User should connect
the hose to the drain outlet at the bottom of the unit
D. Sleep mode ( this function can only be used with a remote control)
The sleep mode can be activated when in cool mode.
■ In cool mode :
After 1 hour the preset temperature is increased by 1 °C, after another hour the
preset temperature will again be increased by 1 °C.
3.Timer Setting
The timer can be set for up to 24hrs.
The timer has two ways of operation:
To turn off
(When power on)
Press Timer key to turn
on the timer function.
Press Up /Down
repeatedly to set the
delay OFF time.
To turn on
(When power off)
Press Timer key to turn
on the timer function.
Press Up /Down
repeatedly to set the
delay ON time.
Cancel timer
Press
Up/Down
repeatedly until the LED shows '00'.
Note: when press POWER will also exit the timer setting.

18
4.Automatic Defrost
At low room temperatures, frost may buildup at the evaporator during operation.
The unit will automatically start defrosting and the POWER LED blinking.
5.Overload Protection
There is a protective 3-minutes time delay of the compressor. Wait 3 minutes for
the appliance to resume operation.
VI. DRAINAGE
Self- evaporating system
The self-evaporating system uses the collected water to cool the condenser coils
for better efficient performance. It is no need to empty the drainage tank in
cooling operation except in heating operation, drying operation and high
humidity conditions. The condensate water evaporates at the condenser and
evacuated through the exhaust hose.
For continuous operation or unattended operating in drying operation, please
connect the attached drain hose to the unit. Condensate water can be
automatically flow into a bucket or drain by gravity.
19
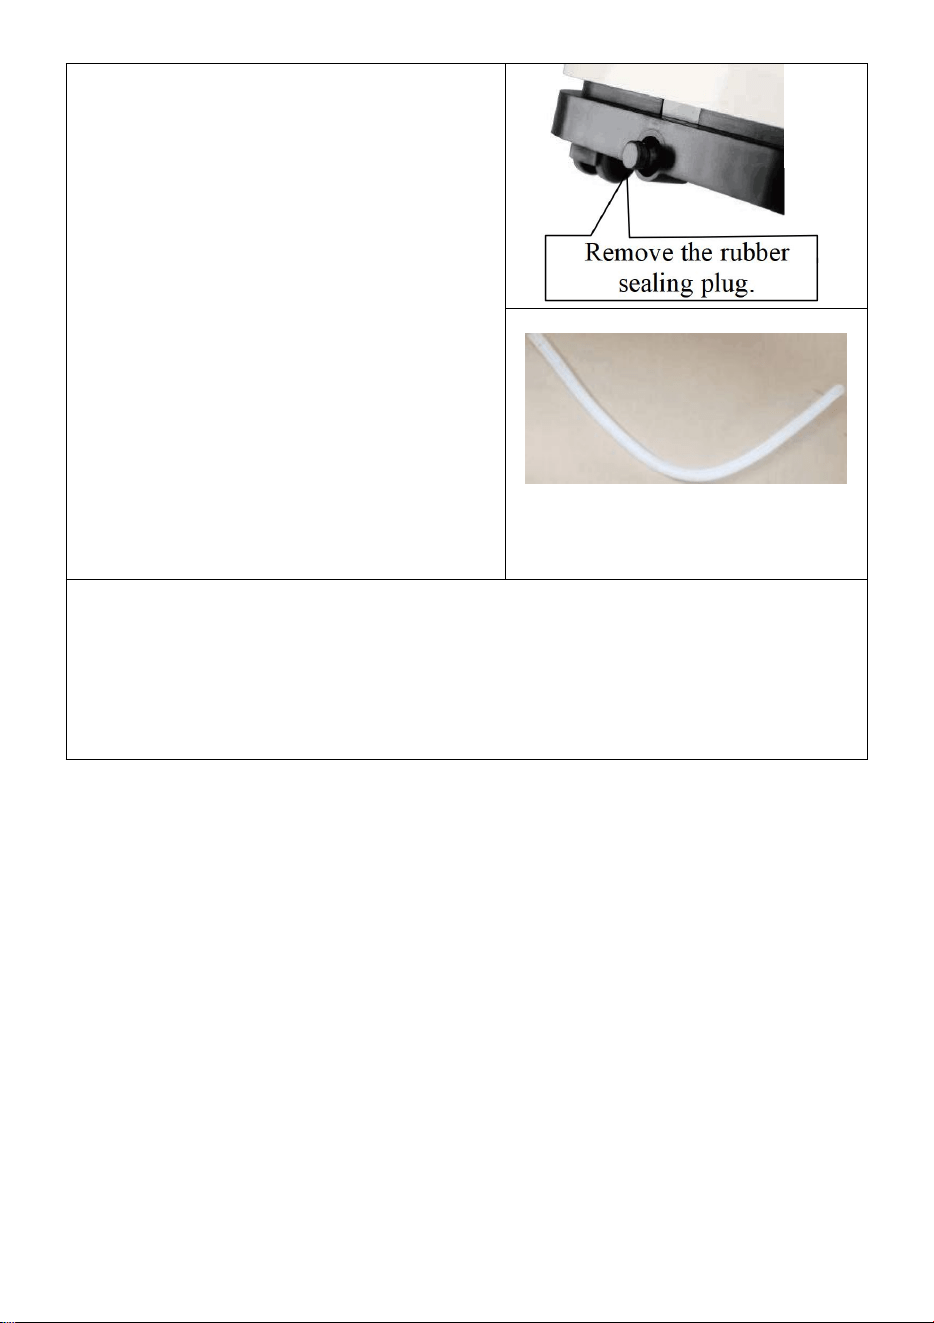
Switch off the unit before operating.
Remove the plug of the water outlet
opening, and keep it in safe area.
Securely and properly connect the drain
hose and make sure it is not kinked and
clear of obstruction.
Place the outlet of hose over a drain or
bucket and ensure that water could
freely flow out of the unit.
Do not submerge the end of hose into
water; otherwise it can cause "Air Lock"
in the hose.
Remove the rubber
sealing plug.
Continuous drain hose
To avoid water spillage:
As the negative pressure of condensate drain pan is large, tilt the drain hose
downward toward the floor. It is appropriate that the degree of inclination
should exceed 20 degrees.
Straighten the hose to avoid a trap existing in the hose.
VII. MAINTENANCE
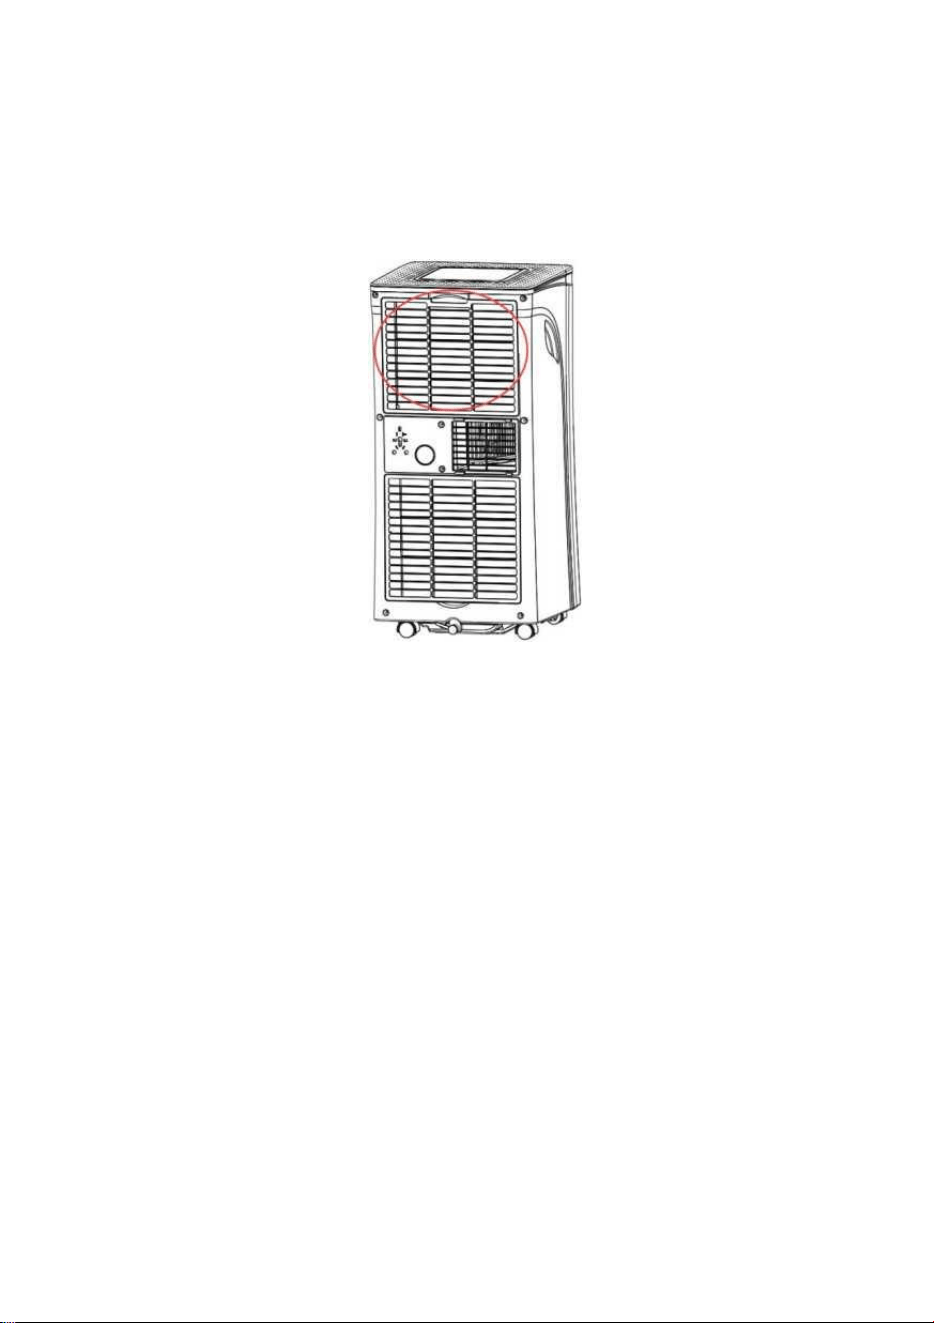
CLEAN THE AIR FILTER (every two weeks)
Dust collects on the filter and restricts the airflow. The restricted airflow reduces
the efficiency of the system and if it becomes blocked it can cause damage to the
unit.
The air filter requires regular cleaning. The air filter is removable for easy
cleaning. Do not operate the unit without an air filter, or the evaporator may be
contaminated.
1. Press POWER button to switch off the unit and unplug the power cord.
2. Remove the filter mesh from the unit.
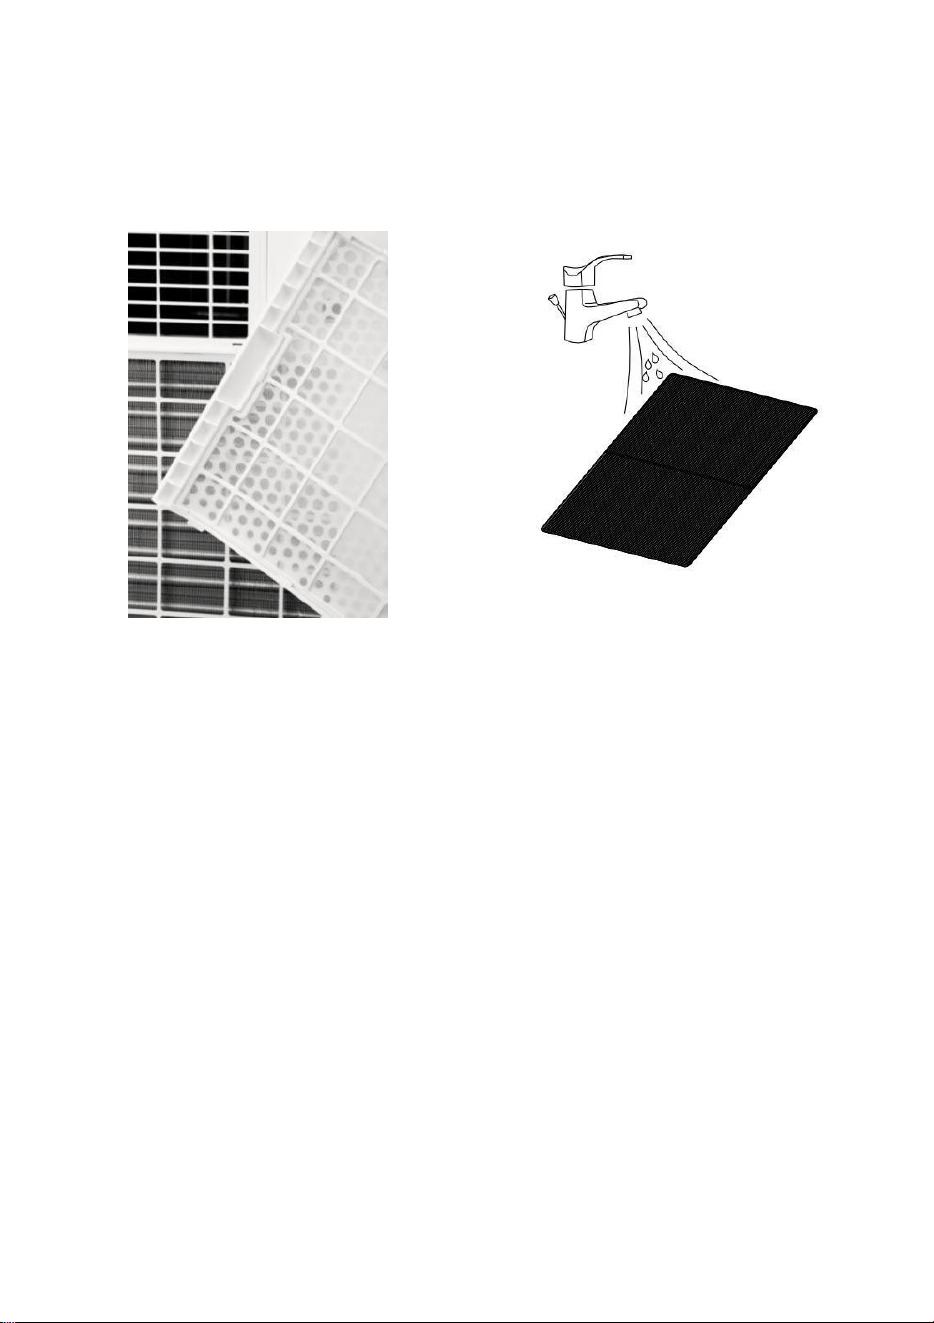
20
3. Use a vacuum cleaner to suck dust from the filter.
4. Turn the filter over and rinse the air filter under running water. Let the water run
through the filter in the opposite direction of air flow. Set aside and allow the
filter to air dry completely before reinstalling.
Pic1. Switch off the unit and remove
the two air filters.
Pic 2.Rinse the air filter under running
water
WARNING: Do not touch the evaporator surface with bare-hand, or could cause
injury of your fingers.
21
REPLACE THE CHARCOAL FILTER
This filter will be packed with the product and need to be installed by the users.
When place it on the unit, please open the frame on the back side of the unit as
below:
Note:
This filter cannot be washed or cleaned in any other way. For maximum
effectiveness, we recommend you change your filter at least once every three
months.
CLEANING UP OF REFRIGERANT
General Measures:
1. Gas/vapor heavier than air. May accumulate in confined spaces, particularly at
or below ground level.
2. Eliminate every possible source of ignition.
3. Use appropriate personal protection equipment (PPE).
4. Evacuate unnecessary personnel, isolate, and ventilate area.
5. Do not get in eyes, on skin, or on clothing. Do not breathe vapors or gas.
6. Prevent entry to sewers and public waters.
22
7. Stop the source of the release, if safe to do so. Consider the use of water spray
to disperse vapors.
8. Isolate the area until gas has dispersed. Ventilate and gas test area before
entering. Contact competent authorities after a spill.
VIII. TROUBLESHOOTING
Symptom
Inspection
Solution
The unit is
not
operating.
Check the power connection
in securely.
Insert the power cord
securely into the wall Outlet.
Check if the water level
indicator lights up?
Empty the drain pan by
remove the rubber plug.
Check the room temperature.
The range of operating
temperature is 5-35°C.
The unit
Works with
reduced
capacity.
Check the air filter for dirt.
Clean the air filter as
necessary.
Check if the air duct is
blocked.
To clear the obstacle.
Check if the room door or
window is open.
Keep the door and windows
closed.
Check if the desired
operating mode is selected and
the temperature is properly set.
Set the mode and
temperature at proper setpoint
The exhaust hose is detached.
Make sure the exhaust hose
is securely attached.
Water
Leakage
Overflow while moving the
unit.
Empty the water tank before
transport.
Check if the drain hose is
kinked or bends.
Straighten the hose to avoid a
trap existing.
Excessive
Noise
Check if the unit is securely
positioned.
Place the unit on horizontal
and firm ground.
Check if any loose, vibrating
parts.
Secure and tight the parts.
23
Noise sounds like water
flowing.
Noise comes from flowing
refrigerant. This is normal.
Error
Codes
E0
Communication faults betwe
en main PCB and display PCB.
Check the wire harness of the
display PCB for damage.
E1
Ambient temperature sensor
failure
Check connection or replace
it. To clean or replace the
temperature sensor.
E2
Coil temperature sensor
failures.
Check connection or replace
it. To clean or replace the
temperature sensor.
Ft
Condensate water high level
alarm.
Empty the drain pan by
removal the rubber plug.
IX. STORAGE
Long-Term Storage - If you will not be using the unit for an extended period
of time (more than a few weeks) it is best to clean the unit and dry it out
completely. Please store the unit per the following steps:
1. Unplug the unit and remove exhaust hose and window kit store with the
unit
2. Drain the remaining water from the unit.
3. Clean the filter and let the filter dry completely in a shaded area.
4. Re-install the filter at its position.
5. The unit must be kept in upright position when in storage.
6. Preserving the machine in ventilating, dry, non- corrosive gas and safe
place indoor.
ATTENTION:
The evaporator inside the machine has to be dried out before the unit is packed to
avoid component damage and molds. Unplug the unit and place it in a dry open
area for days to dry it out.

24
X. DISPOSAL
Releasing refrigerant into atmosphere is strictly forbidden!
Do not dispose of electrical appliances as unsorted municipal waste, use separate
collection facilities. Contact your local government for information regarding the
collection systems available. If electrical appliances are disposed of in landfills or
dumps, hazardous substances can leak into the groundwater and get into the food
chain, damaging your health and wellbeing.

25
XI. WARRANTY
Thank you for choosing PASAPAIR product. We sincerely hope that you are
satisfied with it.
The manufacturer's warranty covers the product for a period of 24 months from the
date of purchase against manufacturing faults. All warranties are automatically kept
track of in our system, so there is no need to register your product.
Agent/Distributor is welcome to contact us. Email:info@pasapairhome.com.
Any help or questions during use, please contact us via website
we will service you within 24 hours. We suggest to provide a warranty card, a photo
or a video if there’s broken spare part or not working machine so that we can be
much more clear about your problems and offer you the best solution.
Please fill in the table and email it within 10 days from the date of purchase.