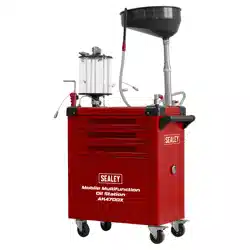
MOBILE MULTI-FUNCTION OIL STATION
WITH 61PC TOOL SET
MODEL NO: AK470DX
Thank you for purchasing a Sealey product. Manufactured to a high standard, this product will, if used according to these
instructions, and properly maintained, give you years of trouble free performance.
IMPORTANT: PLEASE READ THESE INSTRUCTIONS CAREFULLY. NOTE THE SAFE OPERATIONAL REQUIREMENTS, WARNINGS & CAUTIONS. USE
THE PRODUCT CORRECTLY AND WITH CARE FOR THE PURPOSE FOR WHICH IT IS INTENDED. FAILURE TO DO SO MAY CAUSE DAMAGE AND/OR
PERSONAL INJURY AND WILL INVALIDATE THE WARRANTY. KEEP THESE INSTRUCTIONS SAFE FOR FUTURE USE.
1. SAFETY
WARNING! Ensure Health & Safety, local authority, and general workshop practice regulations are adhered to when using this
equipment.
9 Familiarise yourself with the application and limitations of the oil drainer, as well as the potential hazards.
WARNING! Disconnect the drainer from the air supply before changing accessories, servicing or performing any maintenance.
9 Maintain the drainer in good condition (contact your local Sealey stockist).
9 Replace or repair damaged parts. Use genuine parts only. Unauthorised parts may be dangerous and will invalidate the warranty.
9 Keep the work area clean, uncluttered and ensure there is adequate lighting.
9 Keep the drainer clean for best and safest performance.
9 Maintain correct balance and footing. Ensure the floor is not slippery and wear non-slip shoes.
WARNING! While extracting high temperature oils, keep hands, face and body protected using suitable personal protective
equipment (PPE).
8 DO NOT Extract caustic or flammable products.
9 Keep children and unauthorised persons away from the working area.
WARNING! Ensure correct air pressure is maintained and not exceeded.
9 Keep air hose away from heat, oil and sharp edges. Check air hose for wear before each use, and ensure that all connections are
secure.
8 DO NOT use the drainer for any purpose other than that for which it is designed.
8 DO NOT operate the drainer if any parts are damaged or missing as this may cause failure and/or personal injury.
8 DO NOT stand on the drainer.
8 DO NOT adjust or tamper with the safety valve.
8 DO NOT move the drainer by the hose, or yank the hose from the air supply.
8 DO NOT place attachments close to your face (especially eyes, ears, etc.) and DO NOT point hose at other persons or animals.
8 DO NOT allow untrained persons to operate the drainer.
8 DO NOT operate the drainer when you are tired or under the influence of alcohol, drugs or intoxicating medication.
8 DO NOT leave the drainer operating unattended.
8 DO NOT direct air from the air hose at yourself or others.
9 When not in use disconnect from the air supply, vent reservoir and store in a safe, dry, childproof area.
9 Dispose of waste oil in accordance with local authority regulations.
WARNING! DO NOT pollute the environment by allowing uncontrolled discharge of waste oil.
▲ DANGER! DO NOT release drain pan clamp lever when there is pressure in the reservoir as pipe and drain pan will be propelled
upward with force. This could result in damage and/or serious injury.
1.1. GENERAL SAFETY
9 Air compressor must maintain stable 7 bar+ pressure.
9 The air supply pipe requires a diameter of 10mm.
9 Ensure your air compressor produces dry air.
9 Waste oil should be properly disposed of/recycled according to relevant regulations.
9 For repair services, please contact your Sealey stockist. DO NOT attempt to repair it yourself.
8 DO NOT use the lifting rod as a handle.
9 Immediately shut off the air supply and inspect for leaks if detected during operation.
9 Handle extracted waste oil with care (40~80°C) to prevent burns. Wear gloves and goggles for eye and hand protection.
9 Always keep the engine off during operation.
9 Avoid extracting petrol, diesel, or liquids with methanol, ketones, or flammables.
9 After draining the used oil, make sure to quickly pour it from the measuring cup into the tank to keep the cup in good shape and make
it last longer.
9 Closing the measuring cup drain valve after emptying waste oil isn’t required.
9 After operation, release equipment pressure, clean it, and handle carefully to prevent damage or injury.
AK470DX Issue 1 06/11/24
Original Language Version
© Jack Sealey Limited
Refer to
instructions
Wear eye
protection
Wear protective
gloves
Wear protective
clothing
2. INTRODUCTION
Three drawer mobile oil station keeps everything close to hand. 61pc Oil lter tool set included for removing all types of oil lters,
and ve suction wands for extracting oil via dipstick port. (Fits most vehicles) Clear measuring tank, making extracted oil visible
for inspection and measuring for draining into the sump tank. 70L Sump tank capacity allowing multiple oil changes. An air supply is
required.
3. SPECIFICATION
4. CONTENTS
1.Instruction manual
2.Measuring cup
3. Oil catch pan x1
4. Silencer x1
5. Handle x1
6. Oil suction wands x5
7. Lifting wands x1
8. Oil storage tank x1
9. Swivel casters x2
10. Fixed casters x2
5. ASSEMBLY
5.1. Attach wheels.
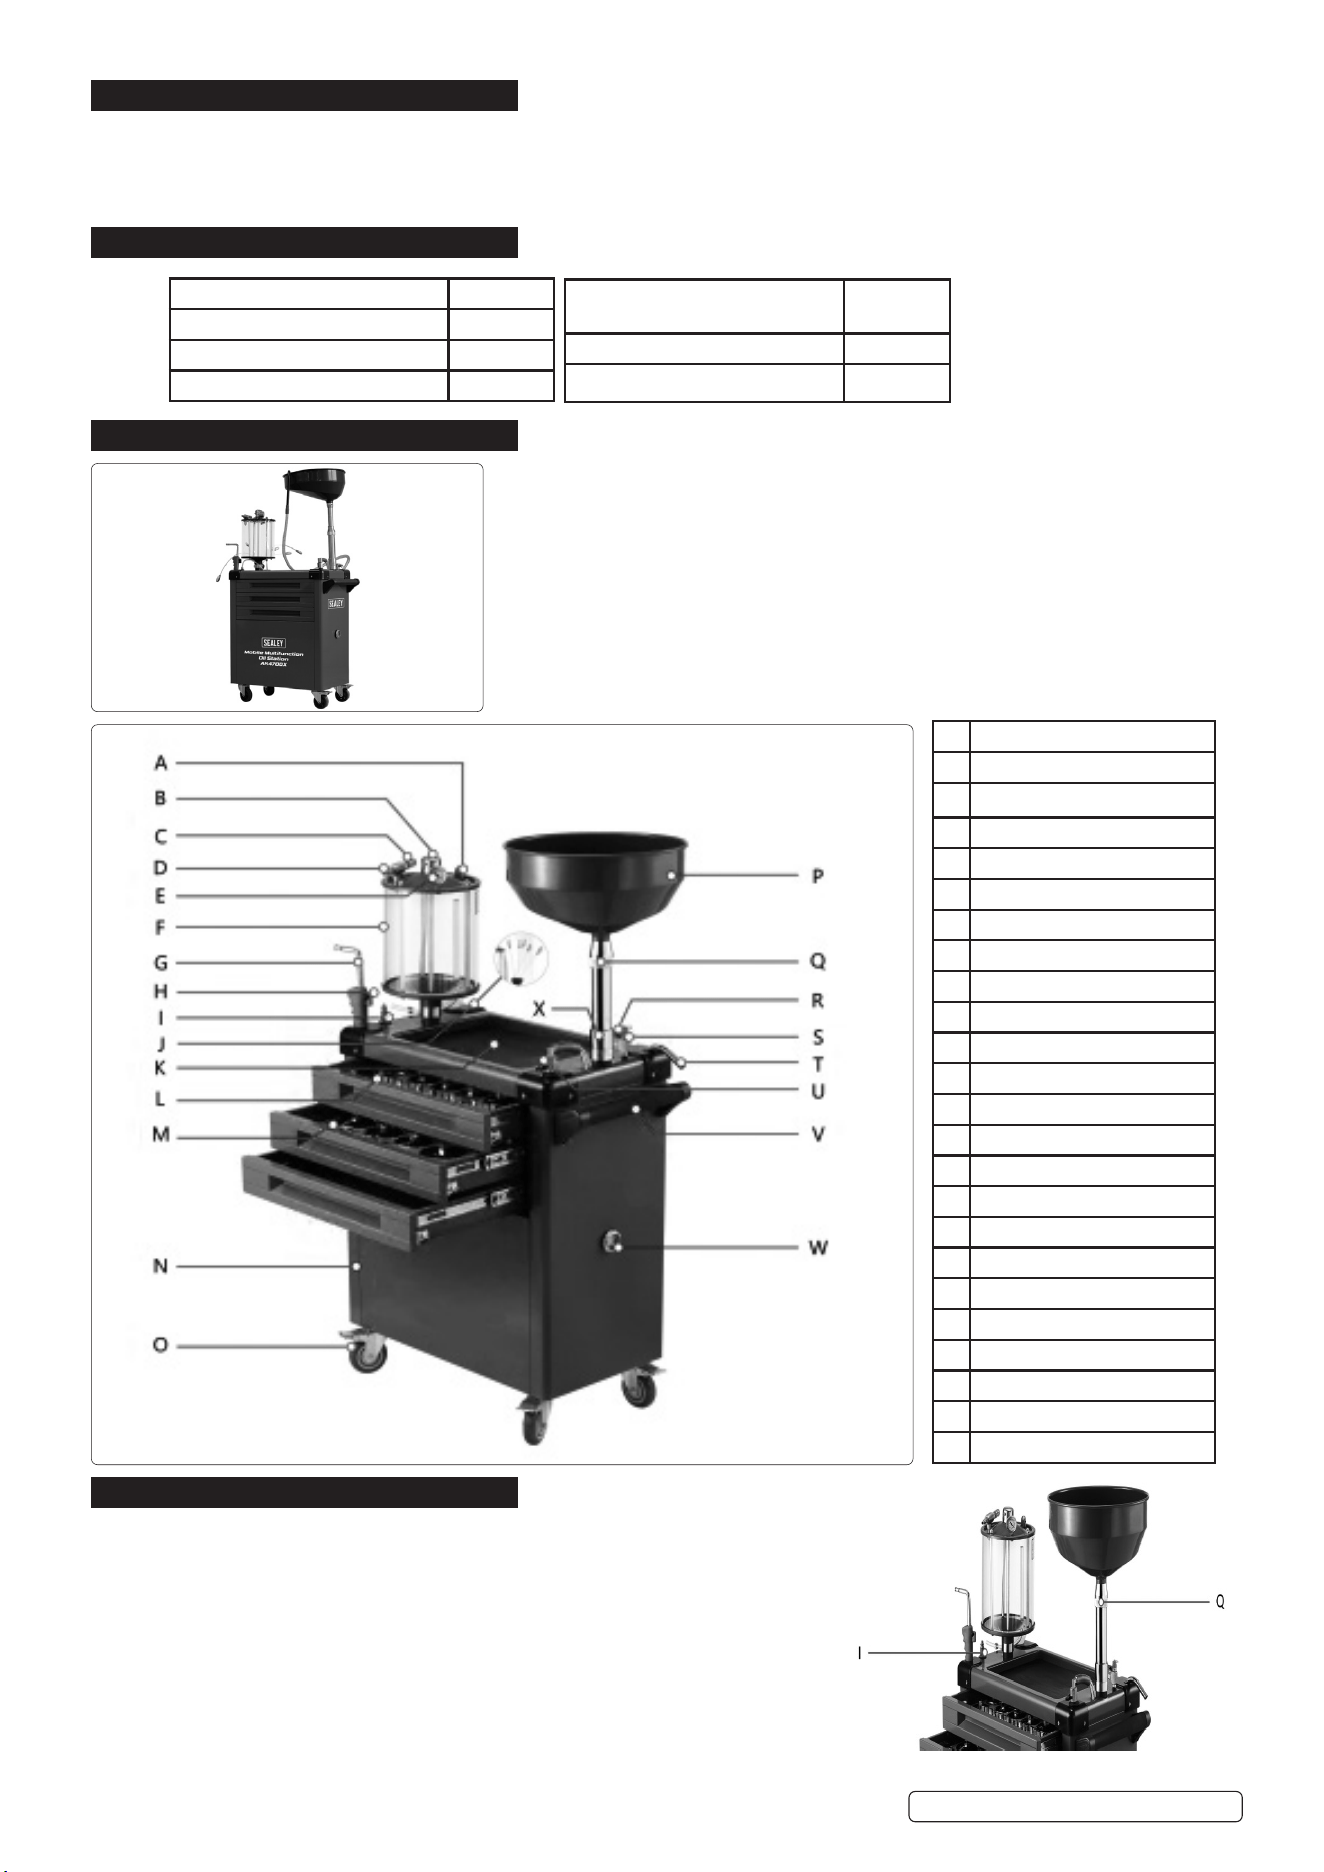
5.2. Rotate the measuring cup assembly in a clockwise direction to mount it onto
the positioning seat of the oil storage tank. Fix it in place after conrmed the correct
orientation of the measuring cup assembly.
5.3. Attach hose (I) to the measuring cup.
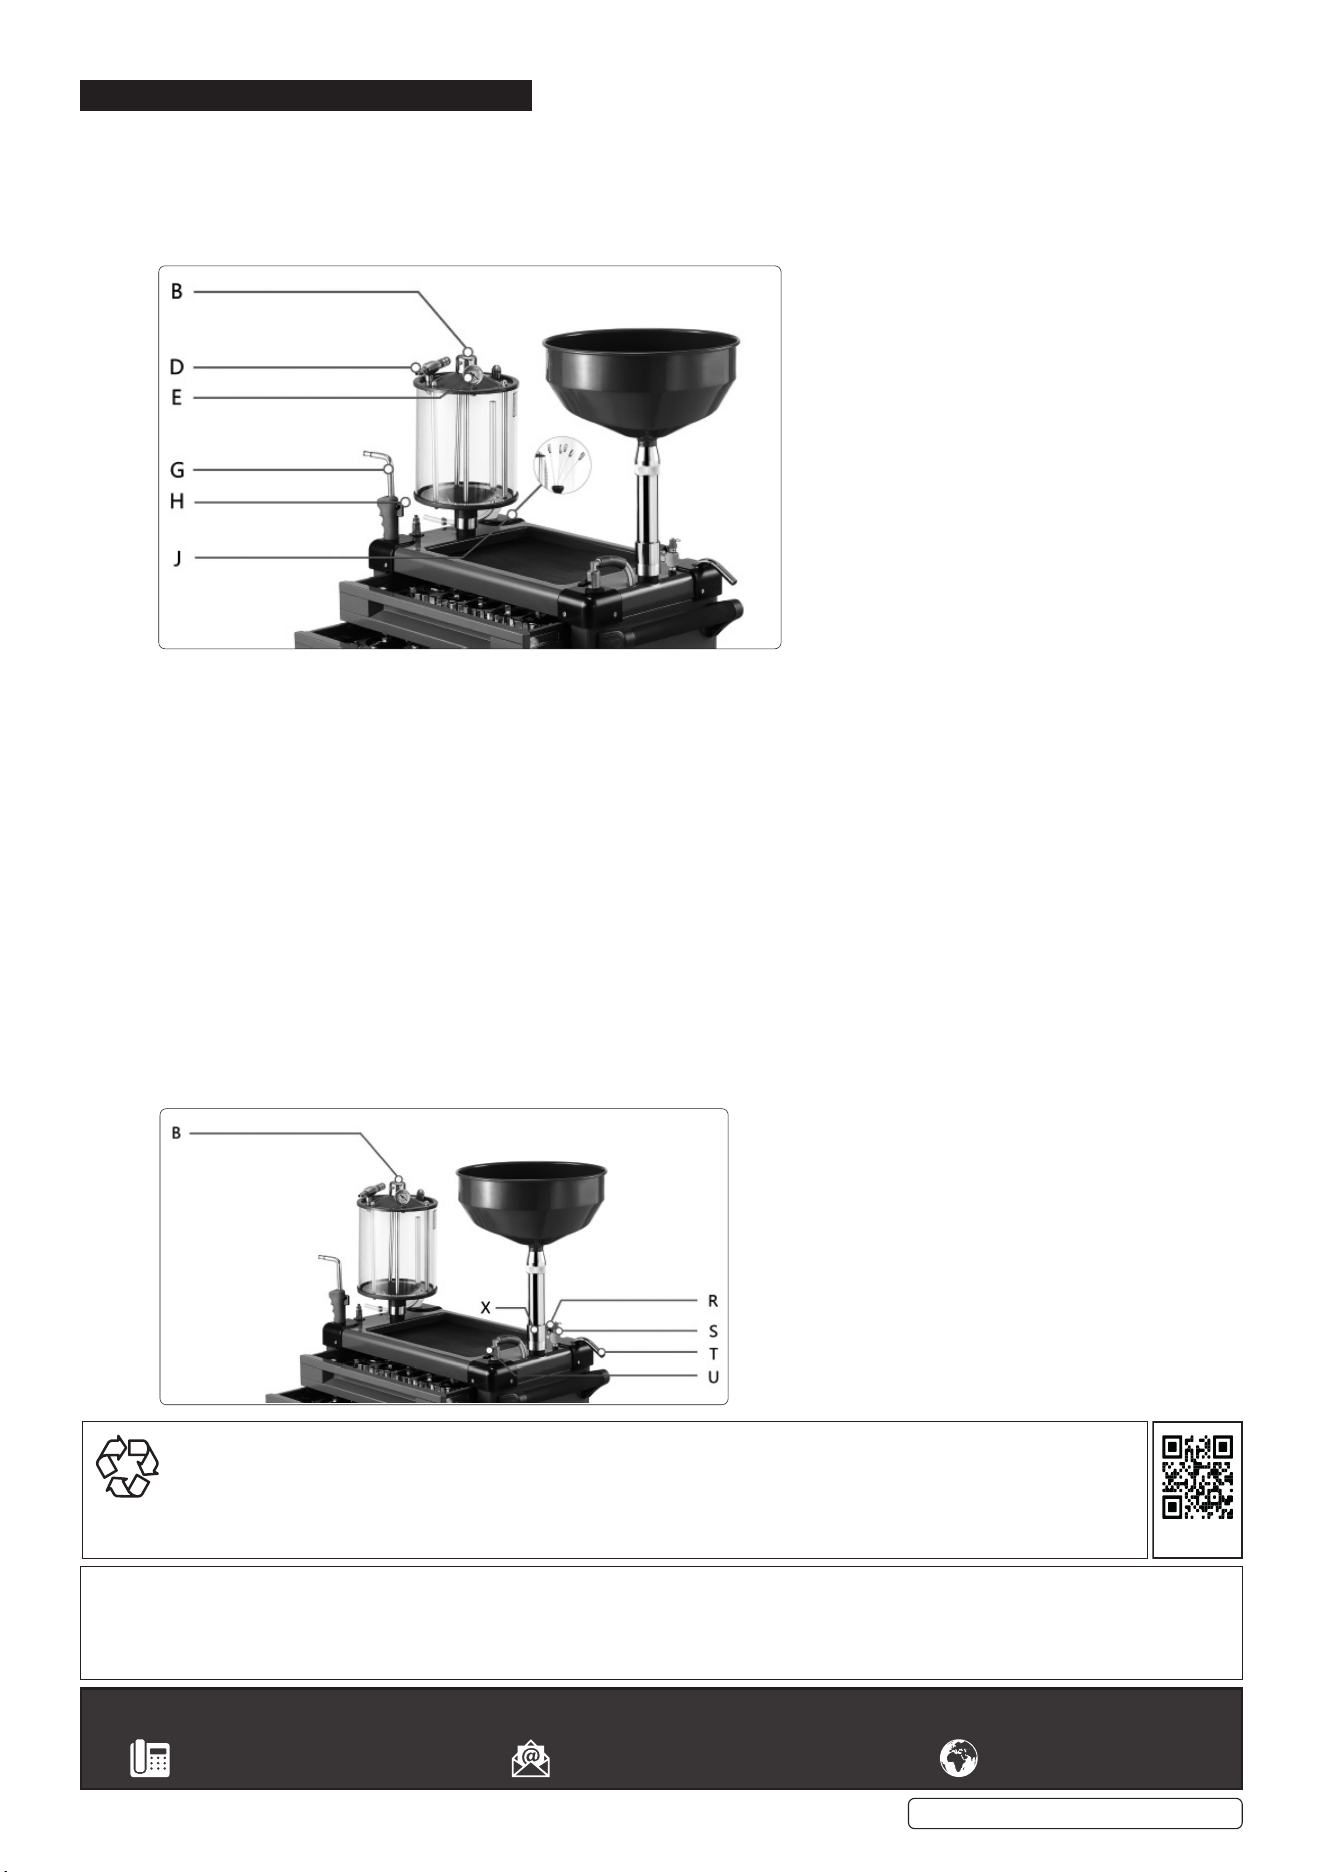
5.4. Secure the lifting rod (Q) and tray by turning them clockwise.
5.5. After installation, ensure lifting rod is perpendicular to the equipment.
5.6. Adjust the height of the lifting rod tray by clockwise rotation for locking,
counterclockwise rotation for releasing.
Model No AK470DX
Air Consumption 150L/Min
Minimum/Maximum Air Pressure 6~8bar
Nett Weight 83.5kg
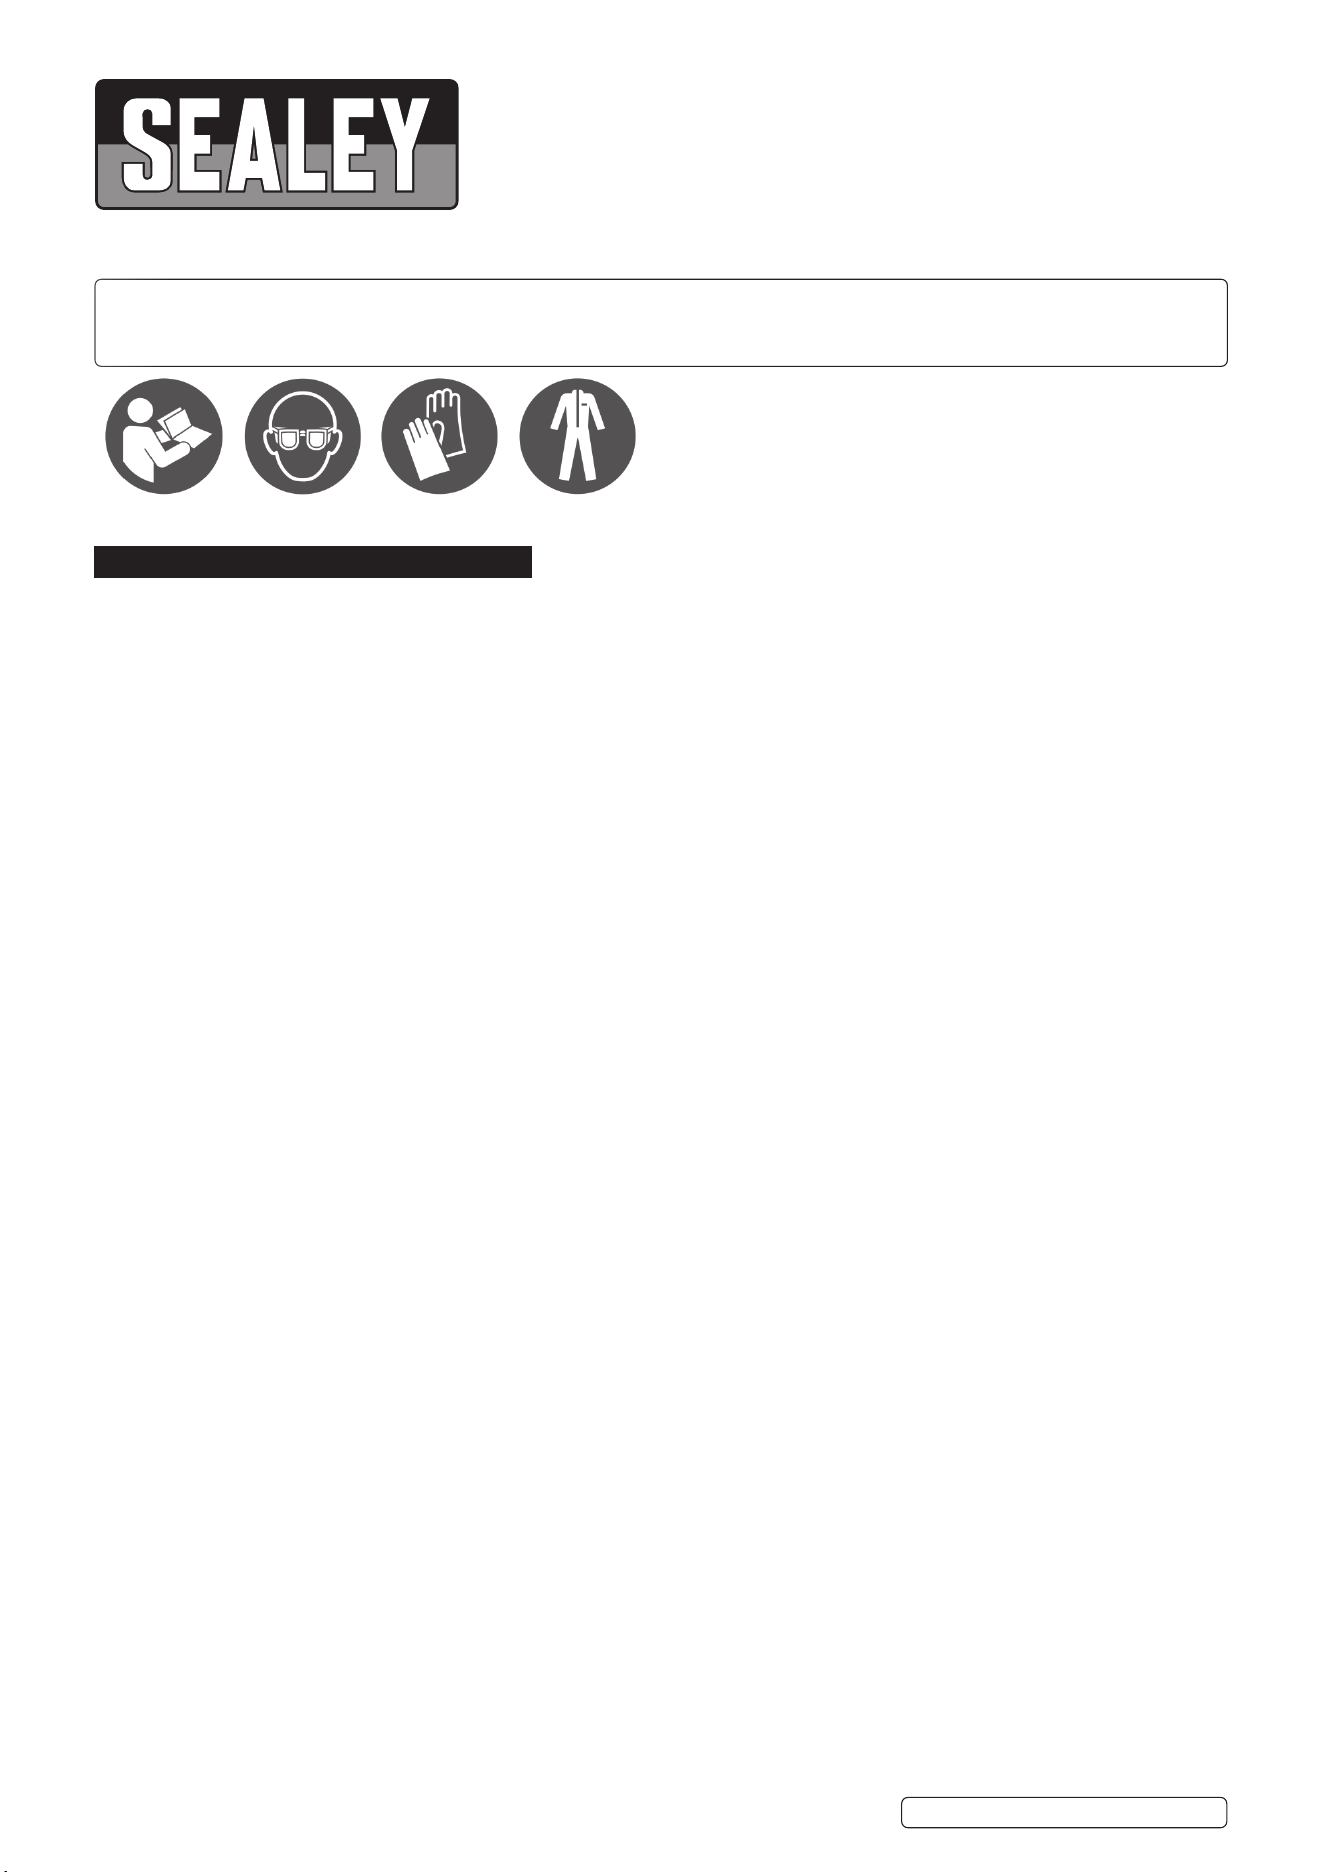
A Safety Valve
B Measuring cup press valve
C Silencer
D Air inlet
E Negative pressure gauge
F Measuring cup
G Oil suction hose
H Oil suction hose valve
I Transparent hose
J Oil suction wands
K Tool tray
L Oil ller wrench set 1
M Oil lter wrench set 2
N Tank
O Wheels
P Oil catch pan
Q Lifting rod
R Tank air inlet
S Safety valve
T Oil discharge hose
U Oil discharge valve
V Handle
W Oil level sight window
X None-return safety valve
AK470DX Issue 1 06/11/24
Original Language Version
© Jack Sealey Limited
OIl catch pan and measuring
cup capacity
10L
Tank Volume 70L
Vacuum degree 0~65cmHg
6. OPERATION
6.1. HOW TO EXTRACT OIL WITH THE MEASURING CUP
6.1.1. Press and rotate the measuring cup valve (B) to the middle slot position to close.
6.1.2. Close the oil extraction valve (H) and attach the oil suction wand (J) for the corresponding model.
6.1.3. Attach the air supply to the air inlet (D).
6.1.4. The negative pressure gauge (E) should move to 0.06 - 0.08 Mpa, then stops pressurisation.
6.1.5. Insert the oil suction wands (J) into the engine compartment and open the oil suction valve (H) for extracting the oil.
6.2. HOW TO DISCHARGE THE OIL FROM MEASURING CUP TO TANK
6.2.1. 1. When the oil level in the cup reaches the warning line, discharge the waste oil to tank.
6.2.2. Press and rotate to open valve (B), waste oil ows into the tank.
NOTE: To extend the life of the measuring cup do not close the oil suction and discharge valve if not discharging.
NOTE: If oil temperature exceeds 80°C, it may damage the equipment components.
6.3. HOW TO COLLECT THE WASTE OIL FROM VEHICLE
6.3.1. Use lifting equipment to lift the car to an appropriate height.
6.3.2. Clear a safe working area, move the equipment under the vehicle engine, and align the pan with the engine oil discharge hole.
6.3.3. Unscrew the sump plug of the vehicle engine to discharge the oil.
6.4. HOW TO DISCHARGE THE OIL FROM TANK
6.4.1. Press and rotate the measuring cup press valve (B) to the middle slot position to close the valve.
6.4.2. Close discharge hose valve (U).
6.4.3. Close the air inlet valve (R).
6.4.4. Attach the air supply to air inlet.
6.4.5. Open tank air inlet valve promptly to pressurize the oil tank. Once the oil tank pressure reaches a certain level, the safety valve(S) will
pop up and close automatically. Then open discharge hose valve (U) for discharging.
6.4.6. When pressure surpasses the threshold set for safety valve (X), it automatically releases pressure, closes the air inlet valve(R), and
stops pressurisation.
6.4.7. After discharging, unplug the air source and release tank pressure by opening inlet valve(R).
Sealey Group, Kempson Way, Suffolk Business Park, Bury St Edmunds, Suffolk. IP32 7AR
01284 757500 sales@sealey.co.uk www.sealey.co.uk
ENVIRONMENT PROTECTION
Recycle unwanted materials instead of disposing of them as waste. All tools, accessories and packaging should be sorted,
taken to a recycling centre and disposed of in a manner which is compatible with the environment. When the product
becomes completely unserviceable and requires disposal, drain any fluids (if applicable) into approved containers and
dispose of the product and fluids according to local regulations.
AK470DX Issue 1 06/11/24
Original Language Version
© Jack Sealey Limited
Note: It is our policy to continually improve products and as such we reserve the right to alter data, specifications and component parts without prior
notice.
Important: No Liability is accepted for incorrect use of this product.
Warranty: Guarantee is 12 months from purchase date, proof of which is required for any claim.
REGISTER YOUR
PURCHASE HERE