
Technical Support and E-Warranty Certificate
www.vevor.com/support
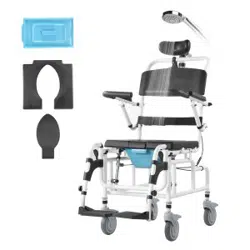
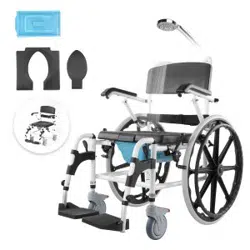
Bathroom Wheelchairs
MODEL: HFK-3301-24
We continue to be committed to provide you tools with competitive price.
"Save Half", "Half Price" or any other similar expressions used by us only represents an
estimate of savings you might benefit from buying certain tools with us compared to the major
top brands and does not necessarily mean to cover all categories of tools offered by us. You
are kindly reminded to verify carefully when you are placing an order with us if you are
actually saving half in comparison with the top major brands.

- 1 -
MODEL: HFK-3301-24
Have product questions? Need technical support? Please feel free to
contact us:
Technical Support and E-Warranty Certificate
www.vevor.com/support
NEED HELP? CONTACT US!
This is the original instruction, please read all manual instructions
carefully before operating. VEVOR reserves a clear interpretation of our
user manual. The appearance of the product shall be subject to the
product you received. Please forgive us that we won't inform you again if
there are any technology or software updates on our product.
Bathroom Wheelchairs
- 2 -
Note: When you open the packing box, please take care to protect all
the spare parts in the box. If assembled on the ground, put the paper
or carpet on the ground first to prevent scratching. Please pay
attention to distinguish the spare parts, and then put them well.
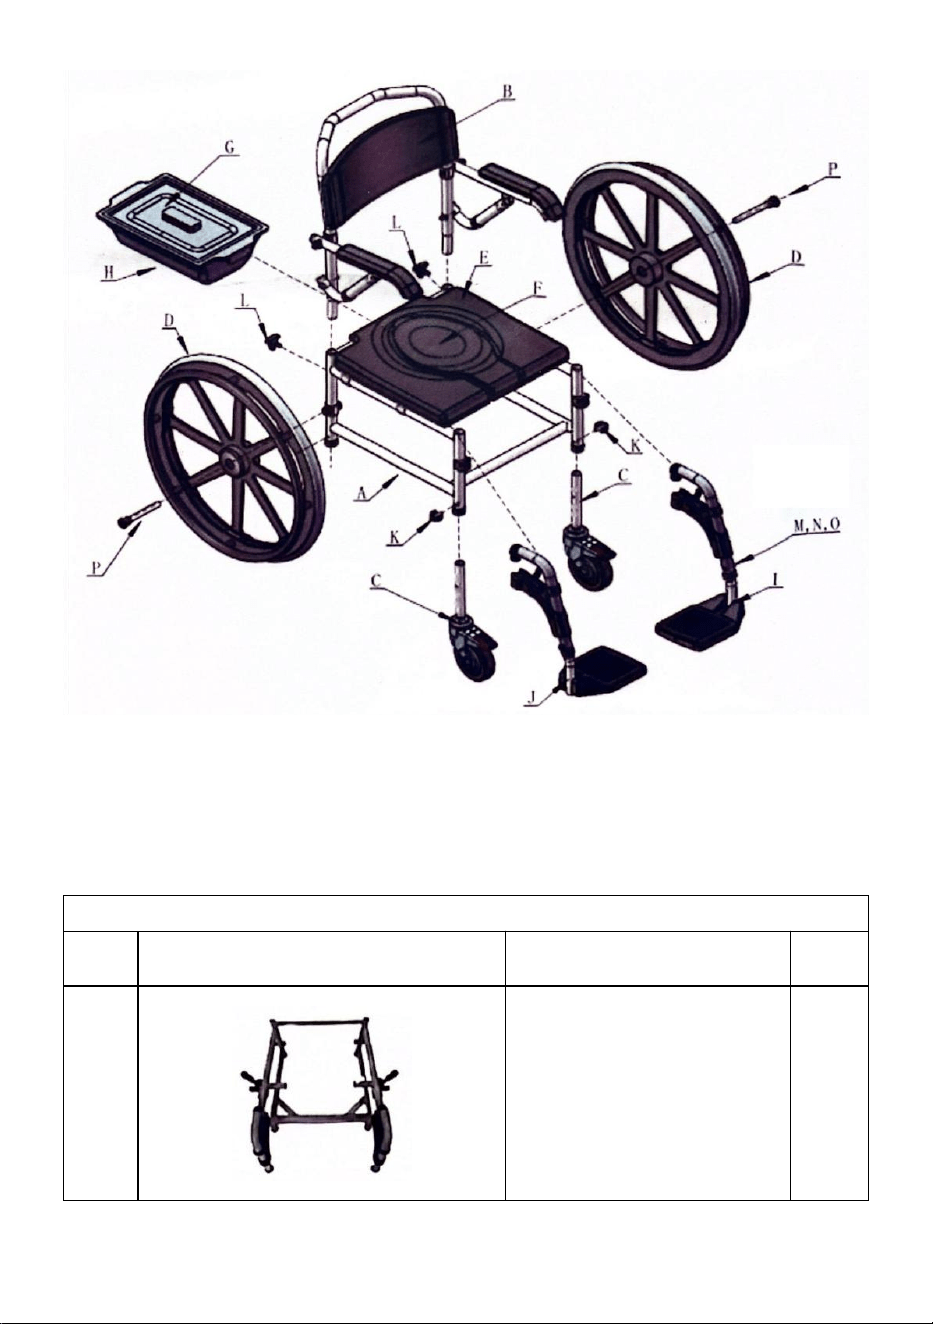
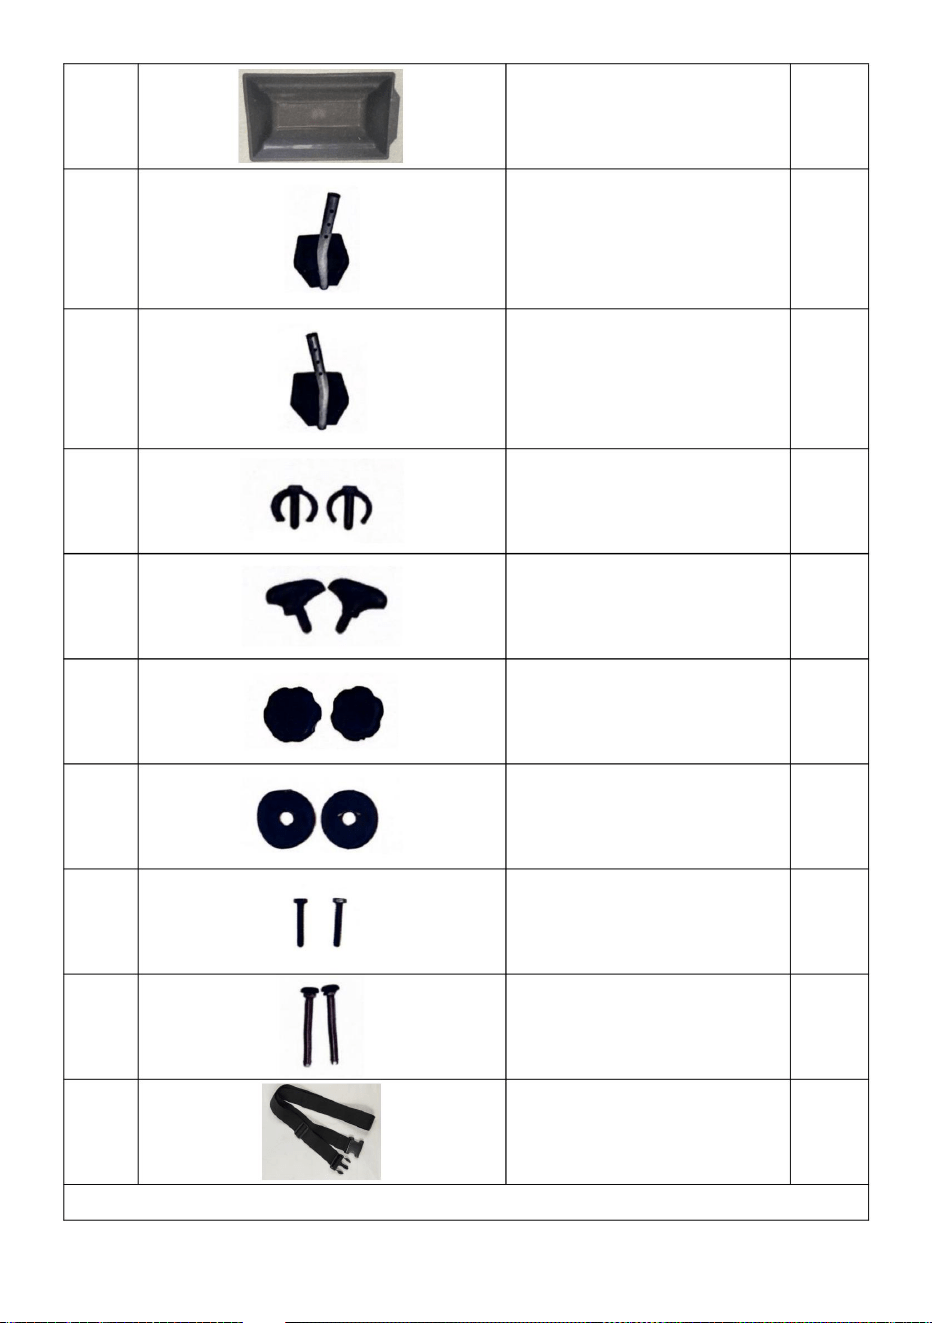
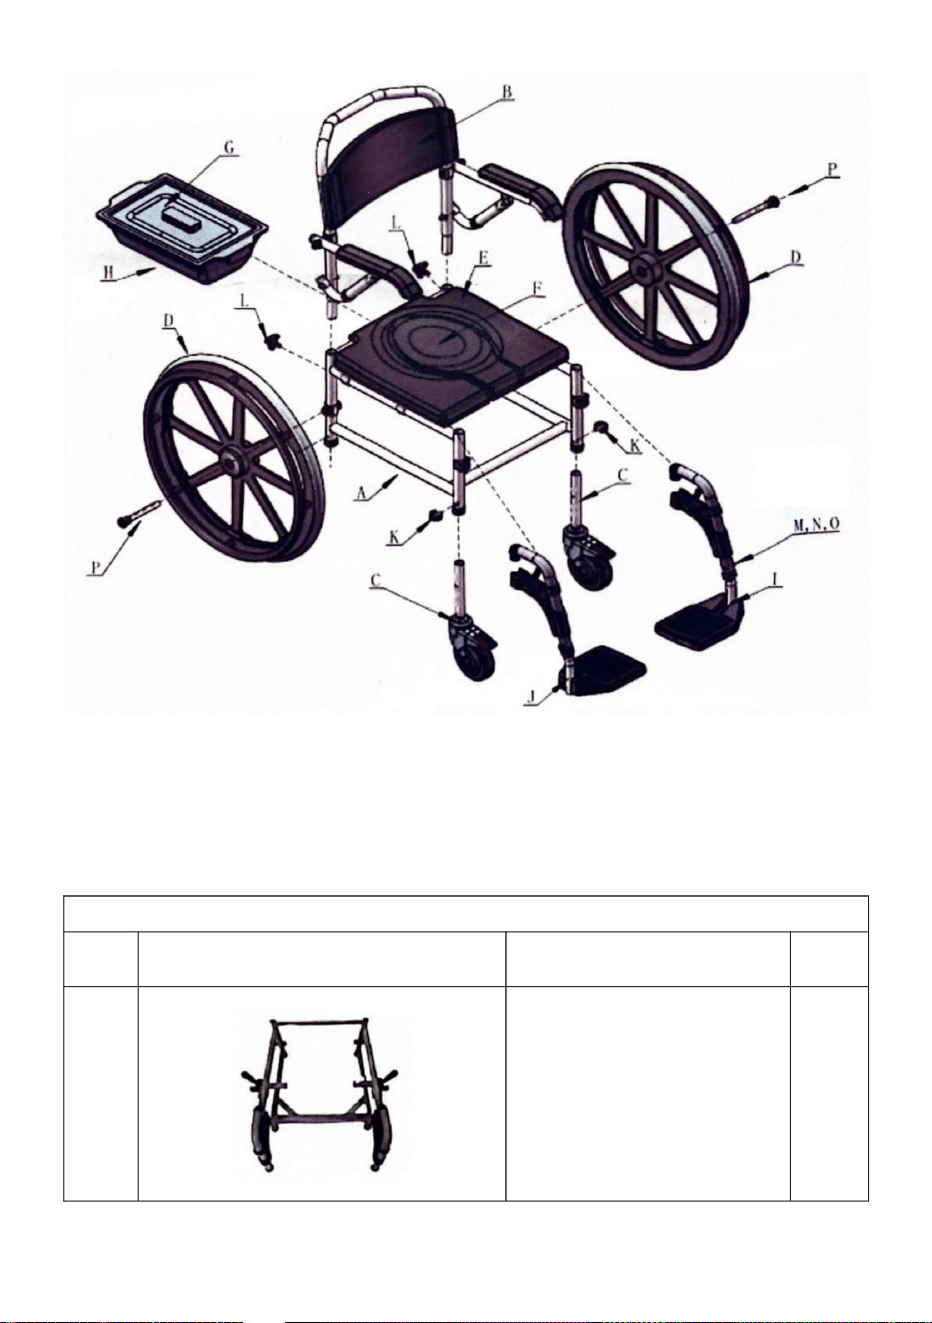
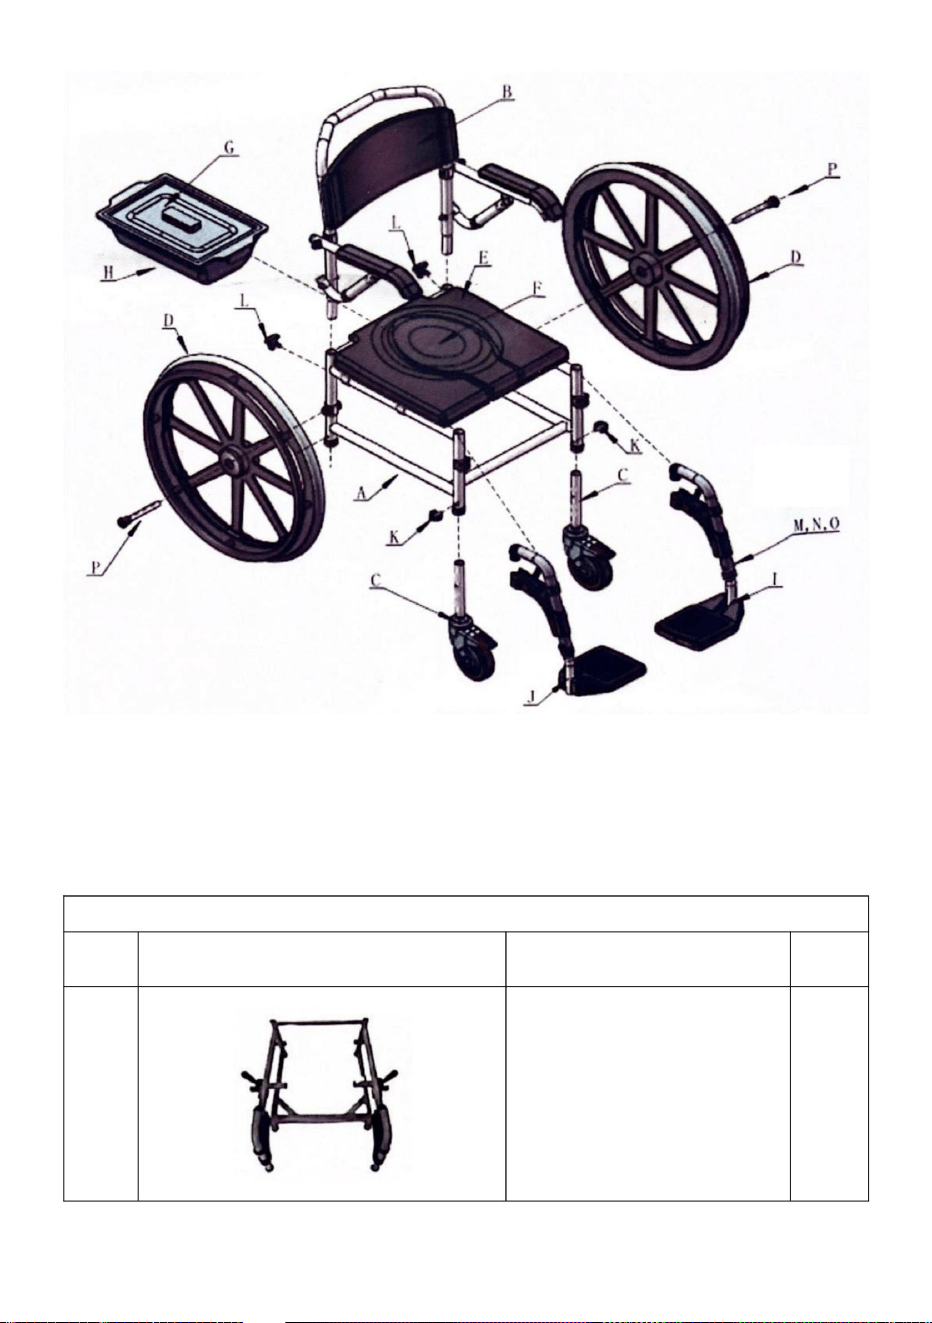
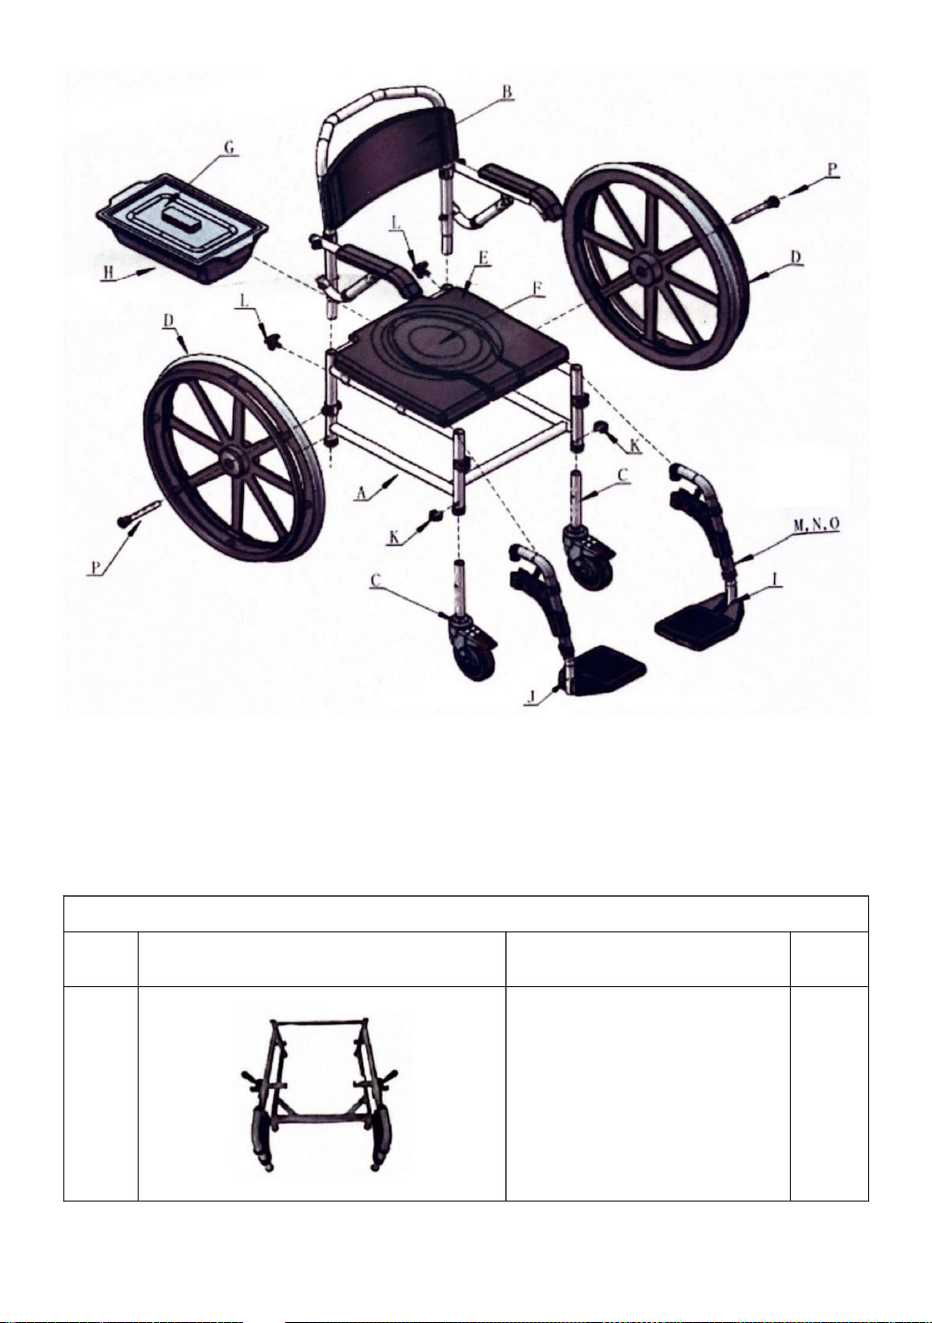
Part List
No.
Picture
Name
QTY.
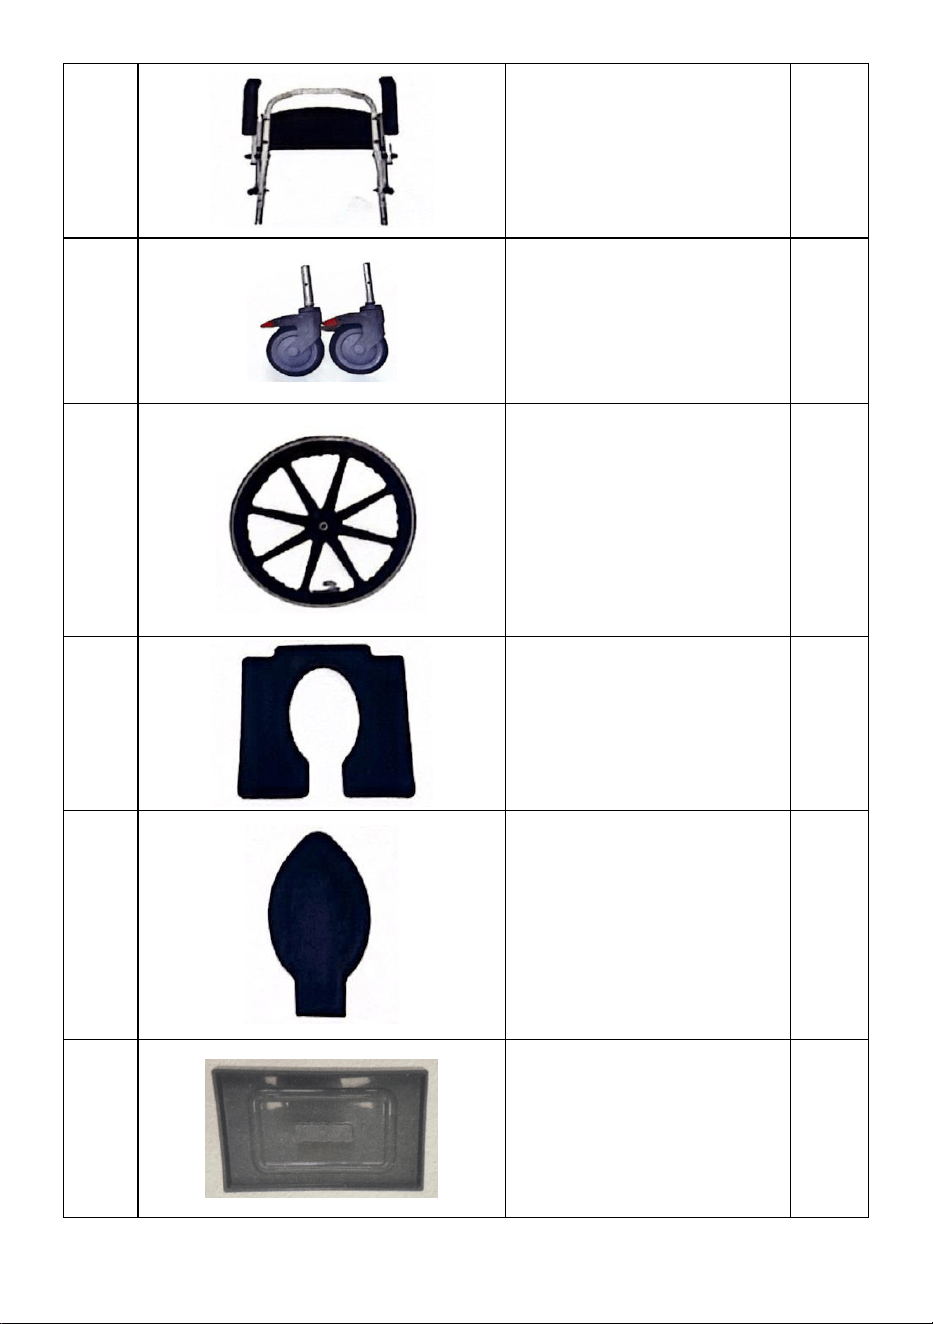
A
Main Frame
1
- 3 -
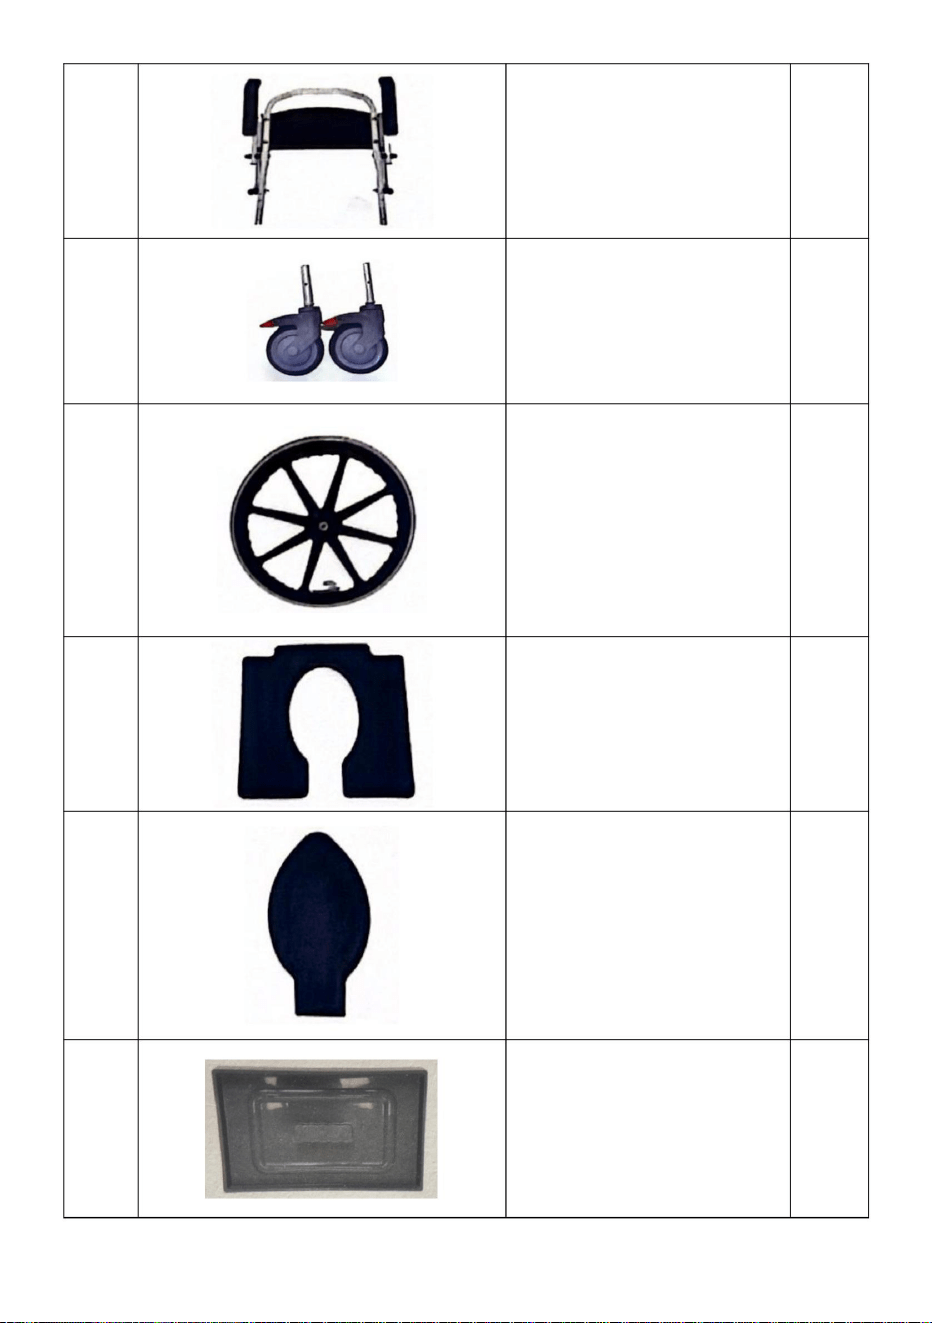
B
Backrest Set
1
C
Casters
2+2
D
Drive Wheels
2
E
Seat Pad Set
1
F
Seat Lid
1
G
Bucket Lip
1
- 4 -
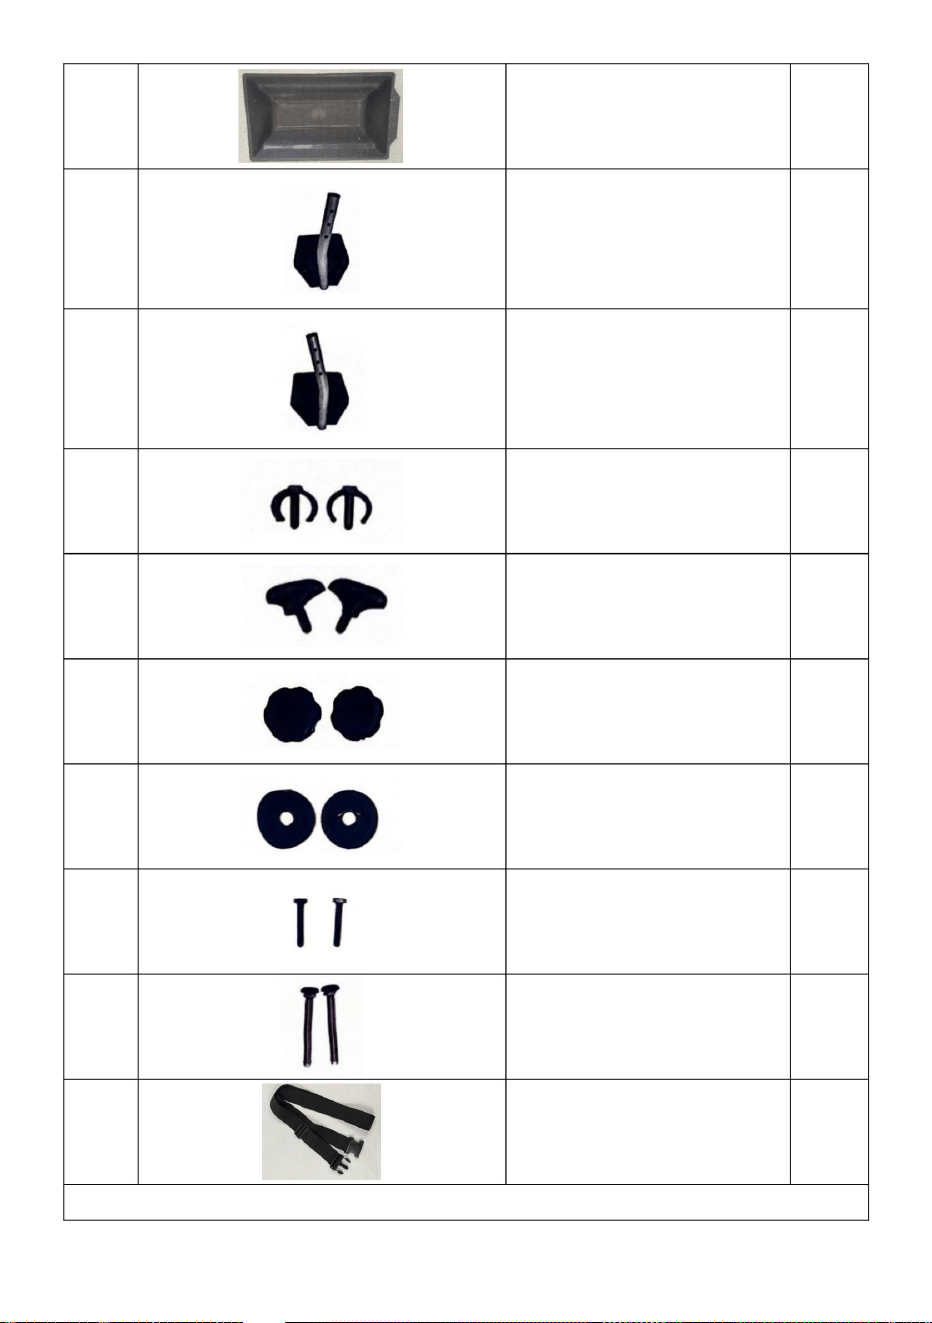
H
Bucket
1
I
Left Footrest
1
J
Right Footrest
1
K
C-shaped Buckle
(Installed on Main Frame)
2
L
M8 Screw
(Installed on Main Frame)
2
M
M6 Screw
(Installed on Footrest)
2
N
Shim-Screw
(Installed on Footrest)
2
O
Screw
(Installed on Footrest)
2
P
Quick Release Device
2
Q
Blet
1
Tip:“+” is extra spare parts.
- 5 -
Assembly Description
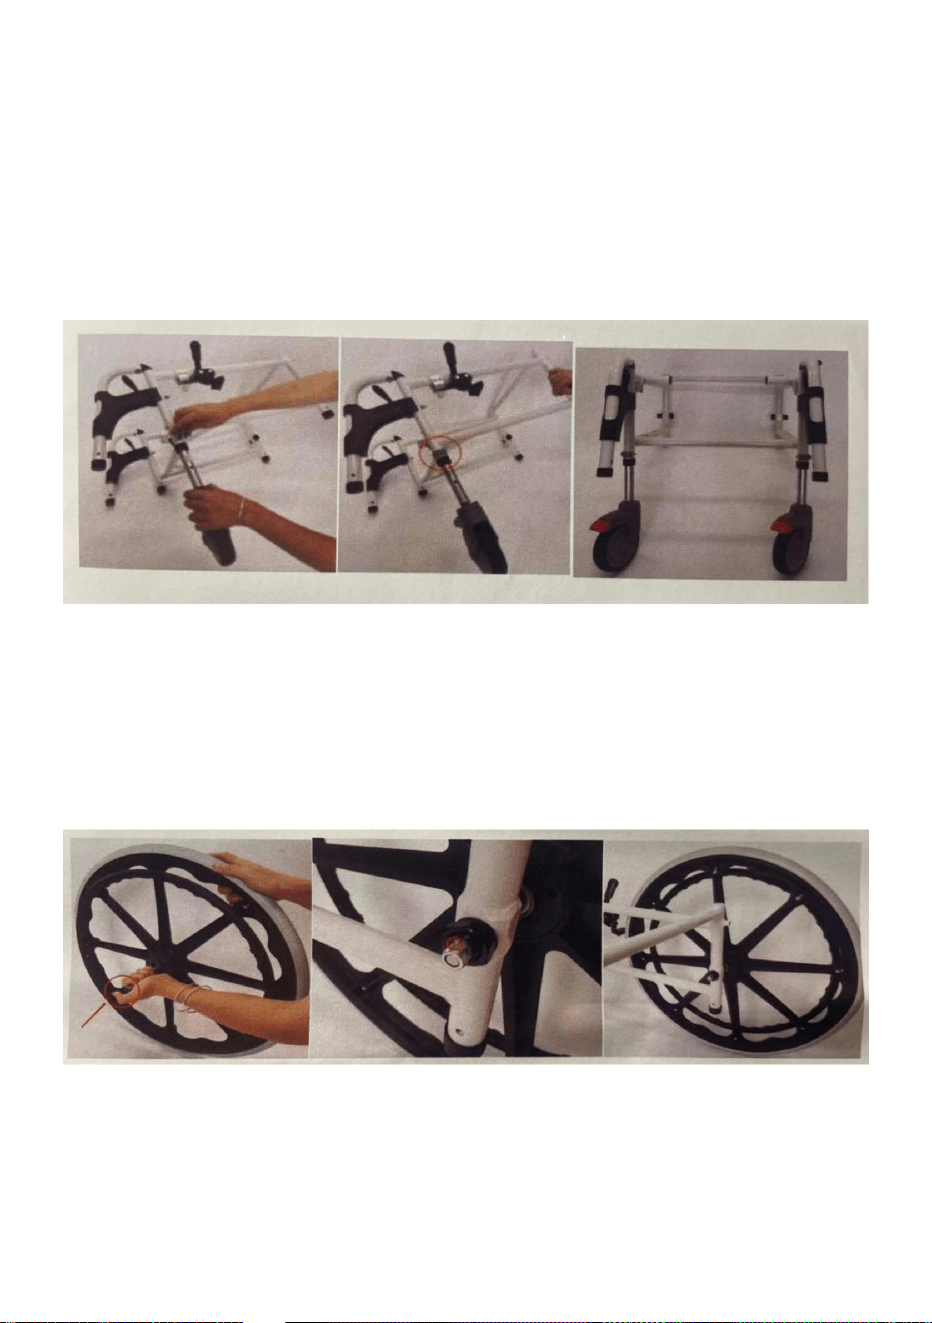
1.Open the carton, take out all the parts,and check whether all the parts
are intact.
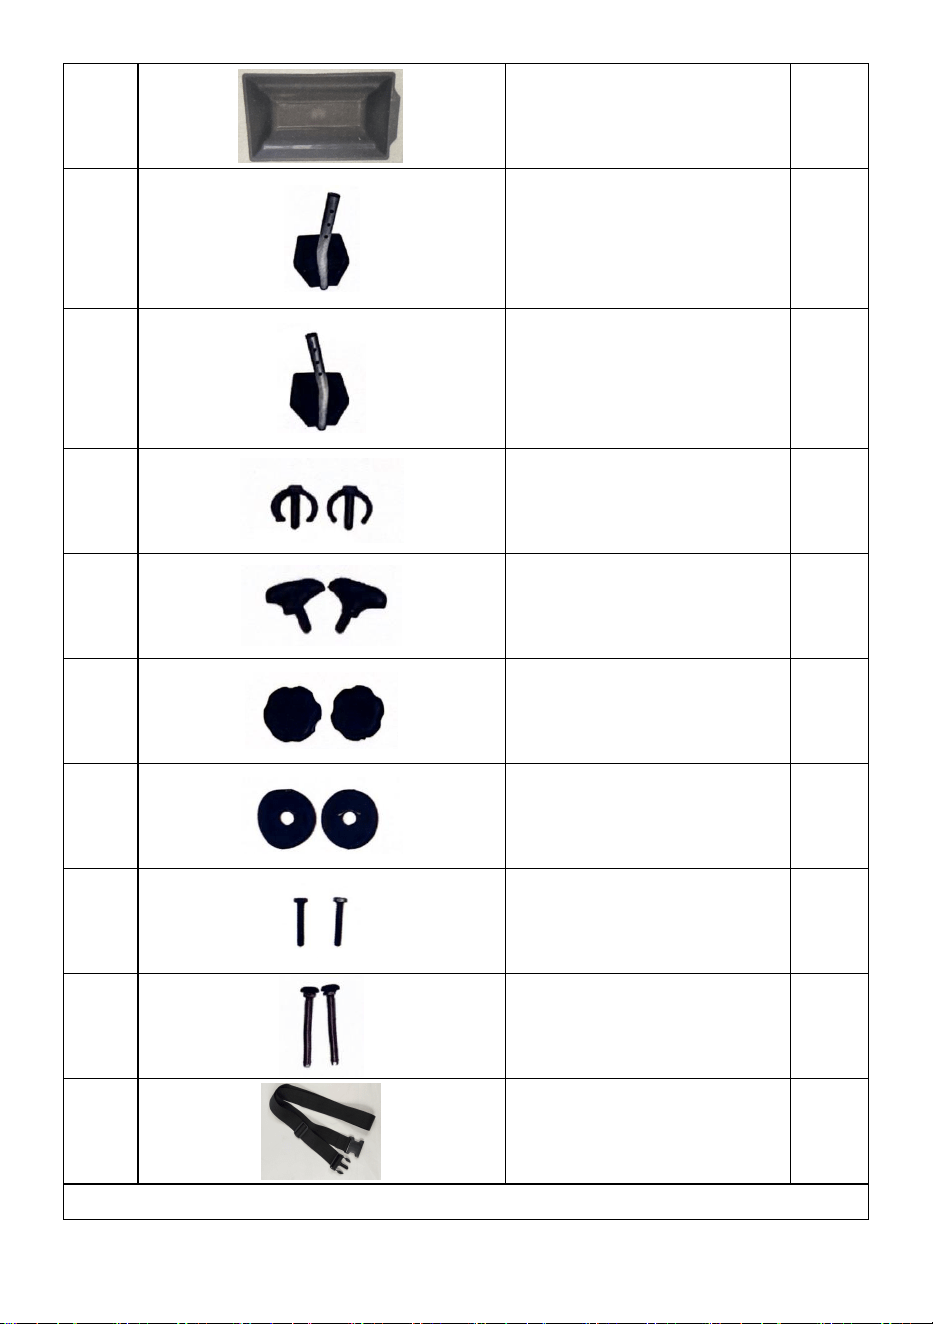
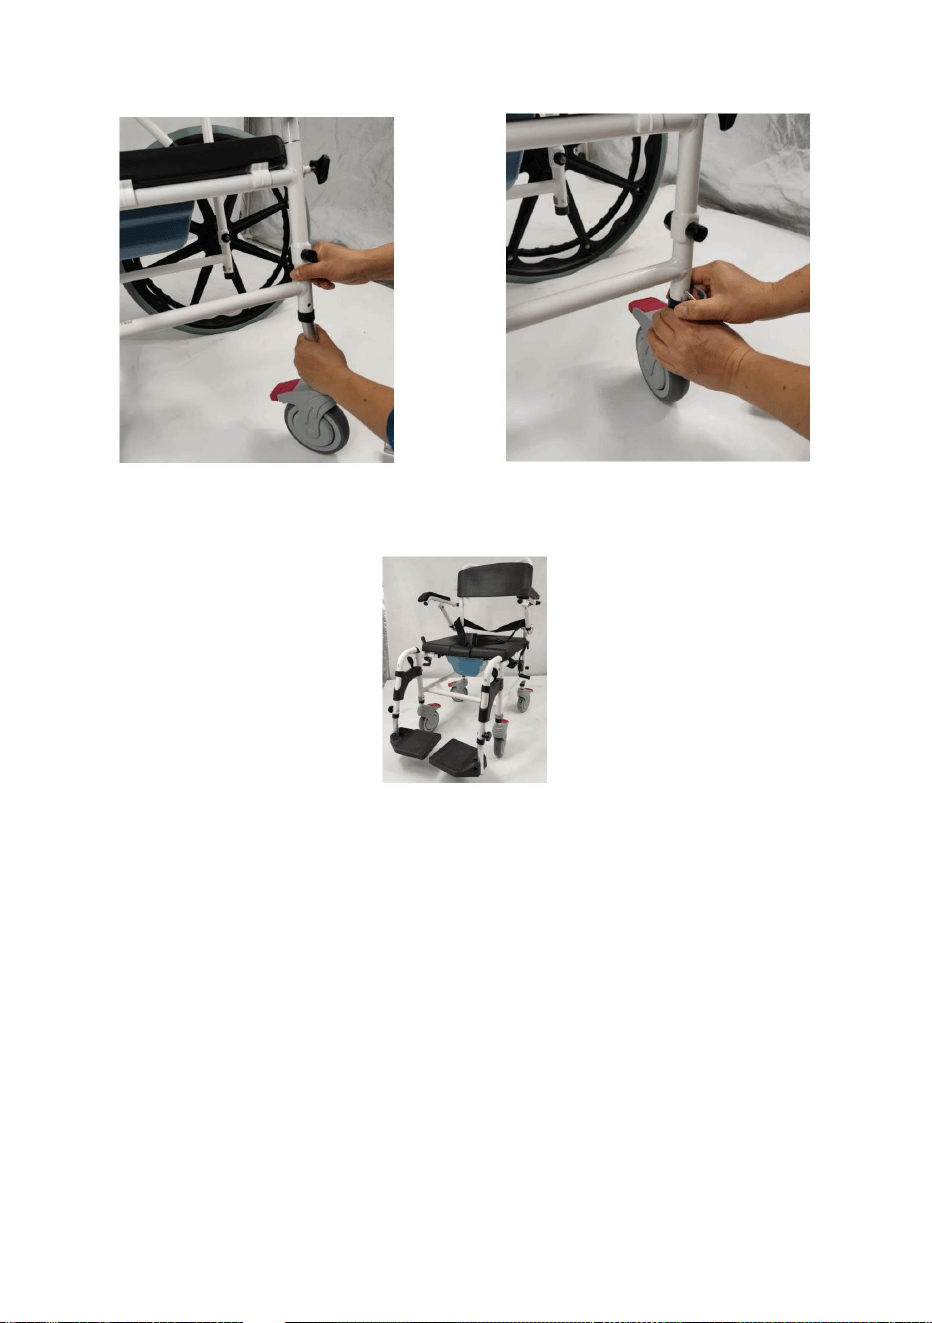
Caster assembly: lay down the mainframe and insert the caster mounting
rod into the white tube, then press c-clip to fix it. Repeat this step for
another caster. (Accessories to use: C-shaped buckle)
2.Drive wheel assembly: firstly press the quick release device and slide it
into the center of the drive wheel, then insert it into the hole in the back of
the mainframe. Make sure that the push pin has been locked and the
hand-wheel is on the outside. (To remove the rear wheel, press and hold
the quick release device at the center of the wheel.)
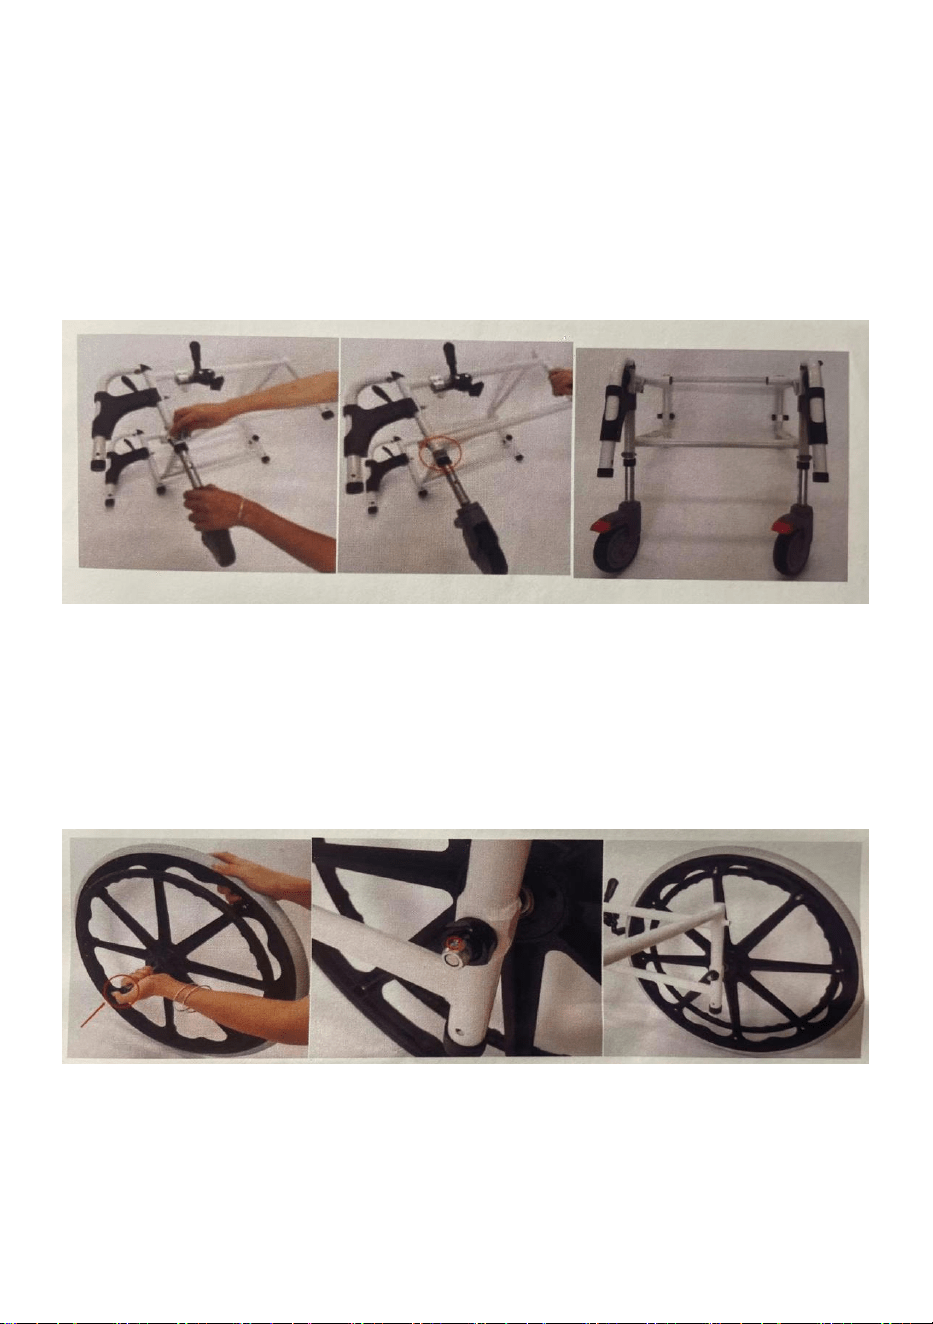
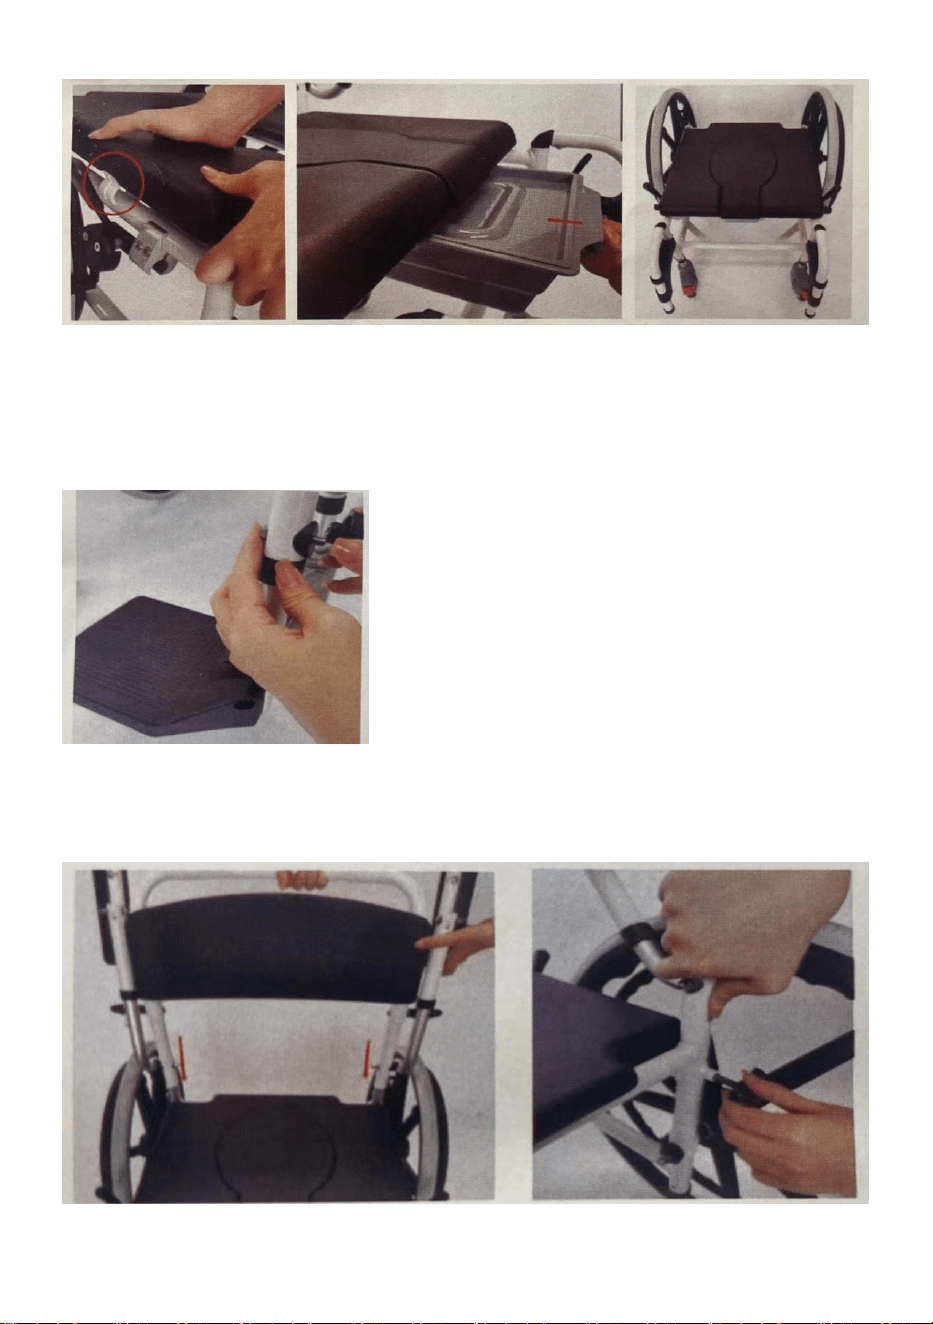
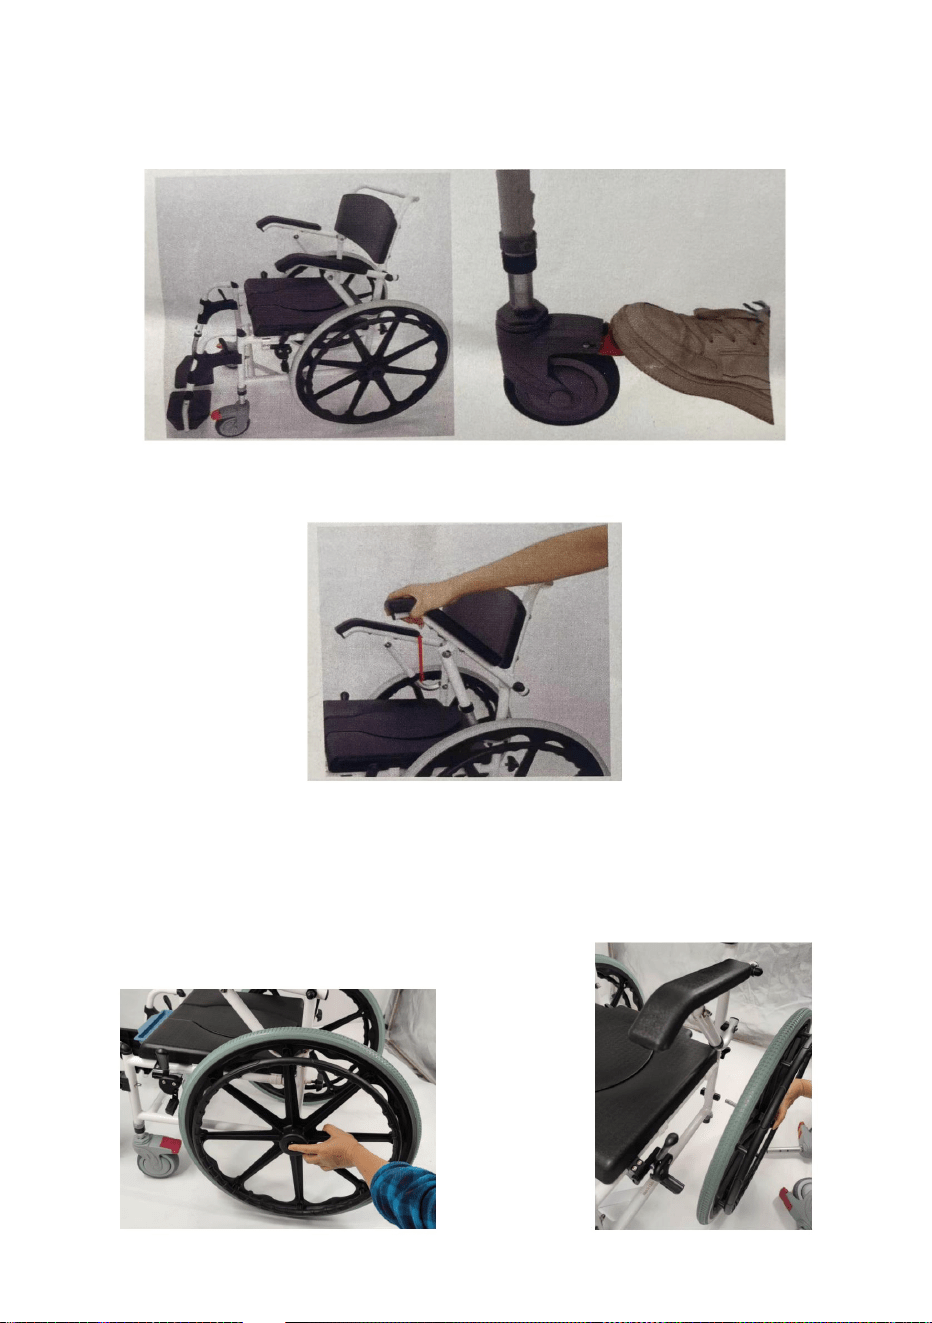
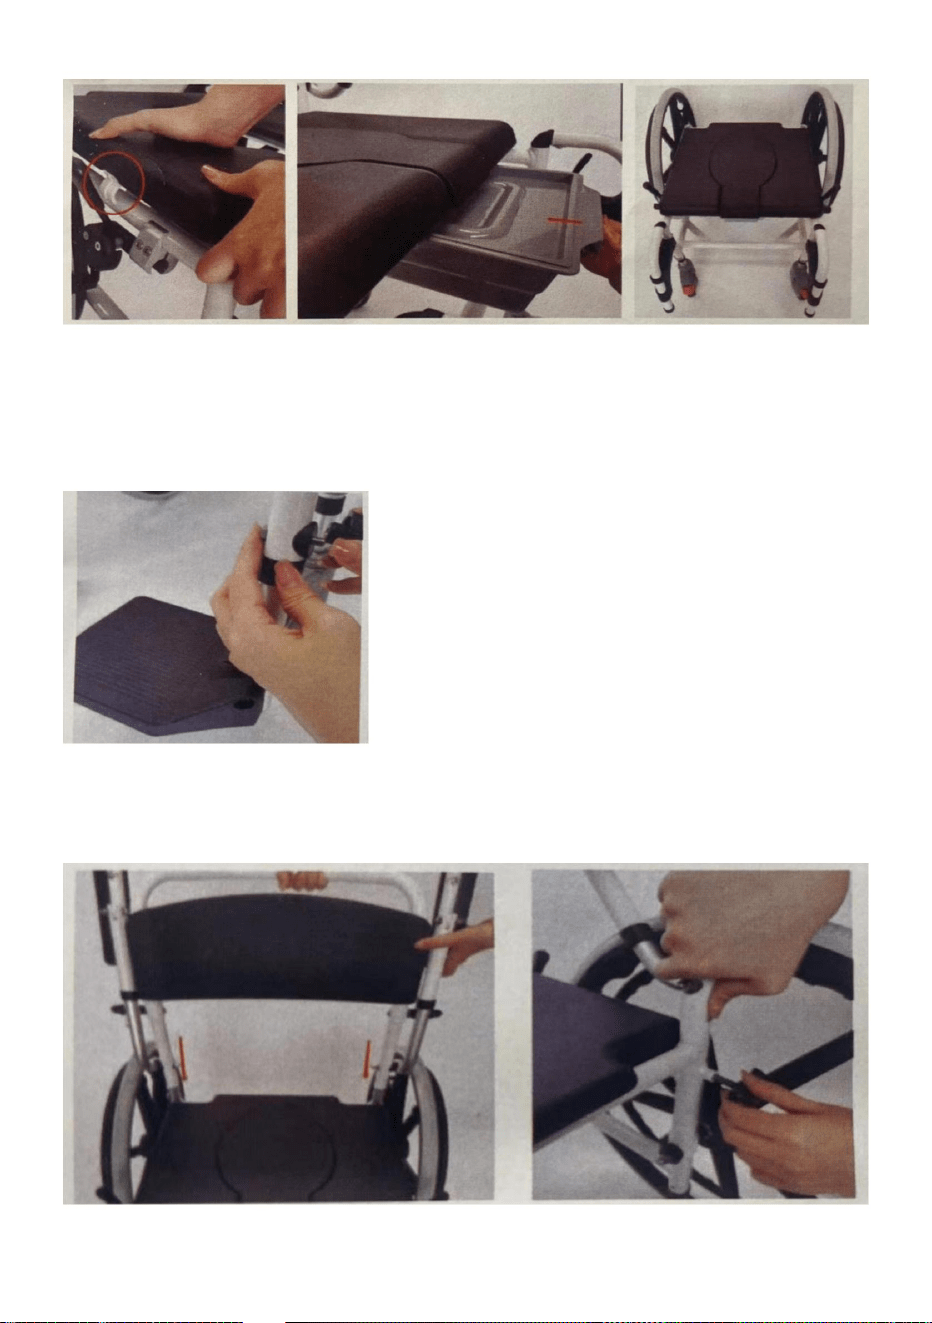
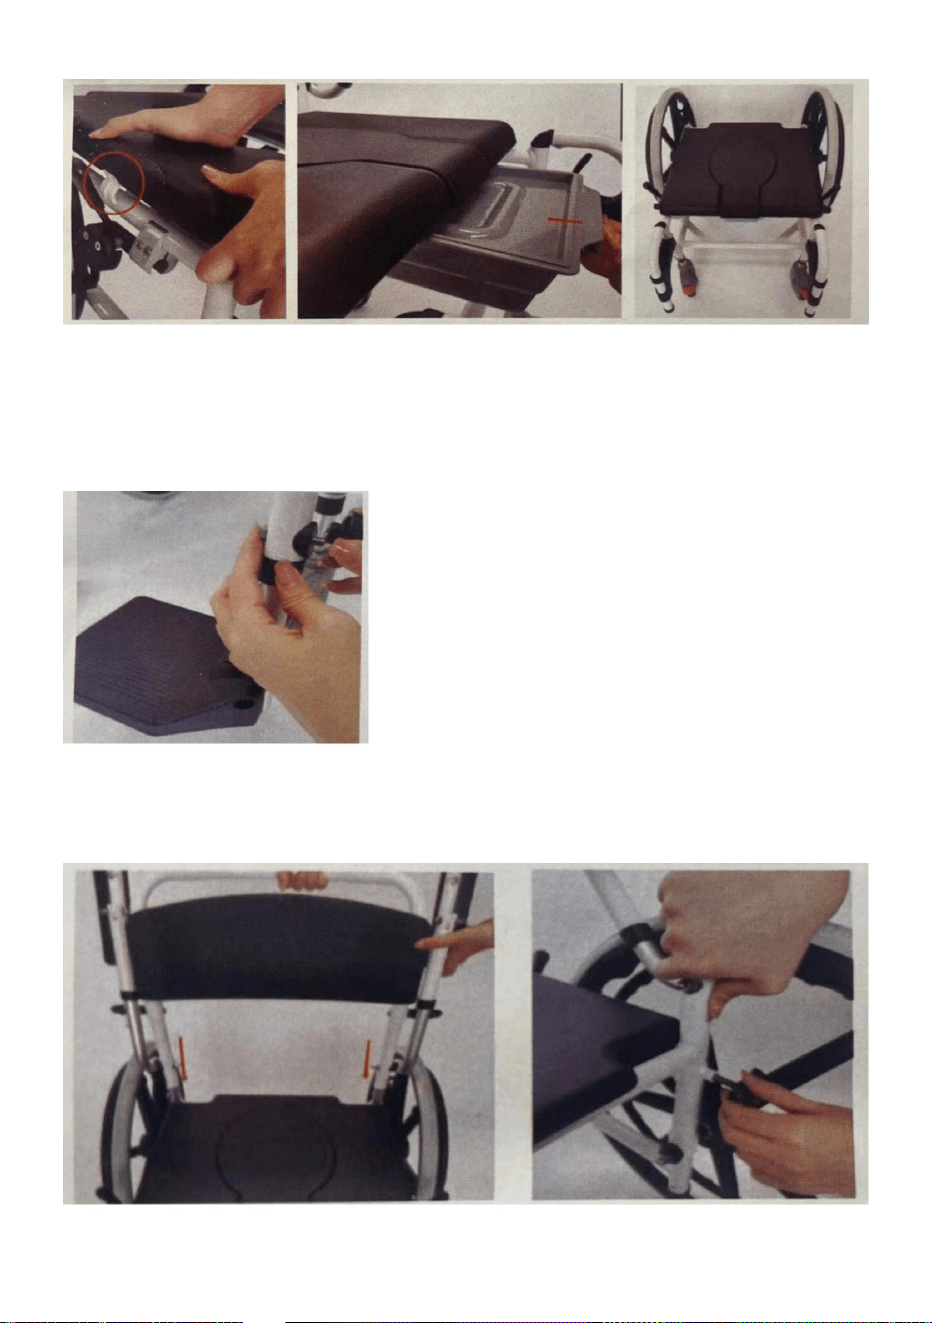
3.Seat assembly: after installing all the front and rear wheels, put the
product upright. Install the seat and slide the bucket in place.
- 6 -
4.Footrest assembly: align the left and right foot removal components with
the pipe holes in front of the seat frame, then press down and lock them.
(Accessories to use: screw, shim screw, M6 screw)
5.Backrest assembly: align the backrest set with the pine holes in the back
and then press M8 screw to fix it.

- 7 -
6.At this point, congratulations on completing all installation steps of the
product. Press the red brake on the front wheel or pull up the brake lever
on the rear wheel to fix the brake.
7.The armrests are foldable.
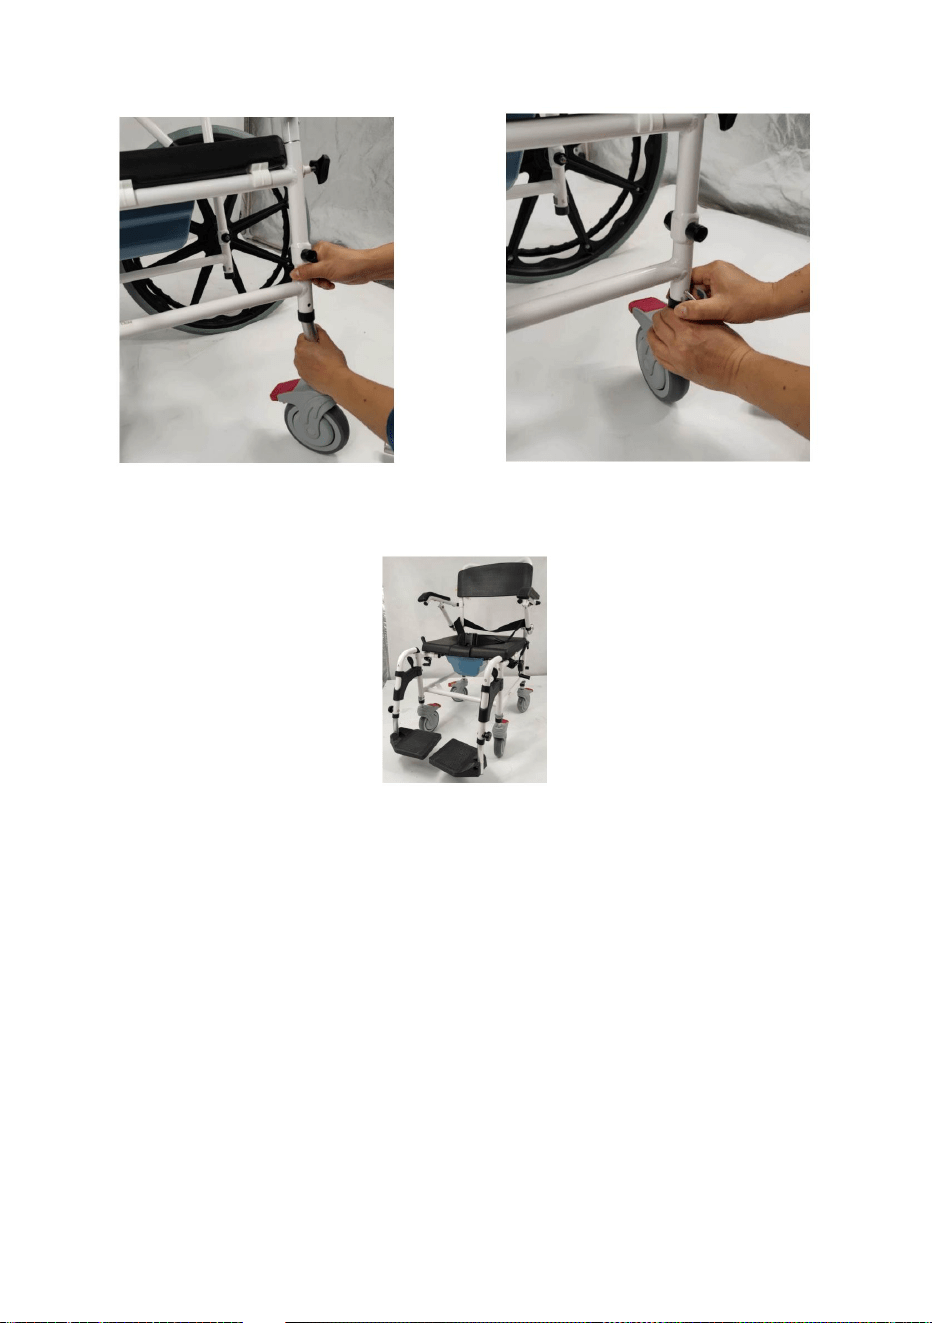
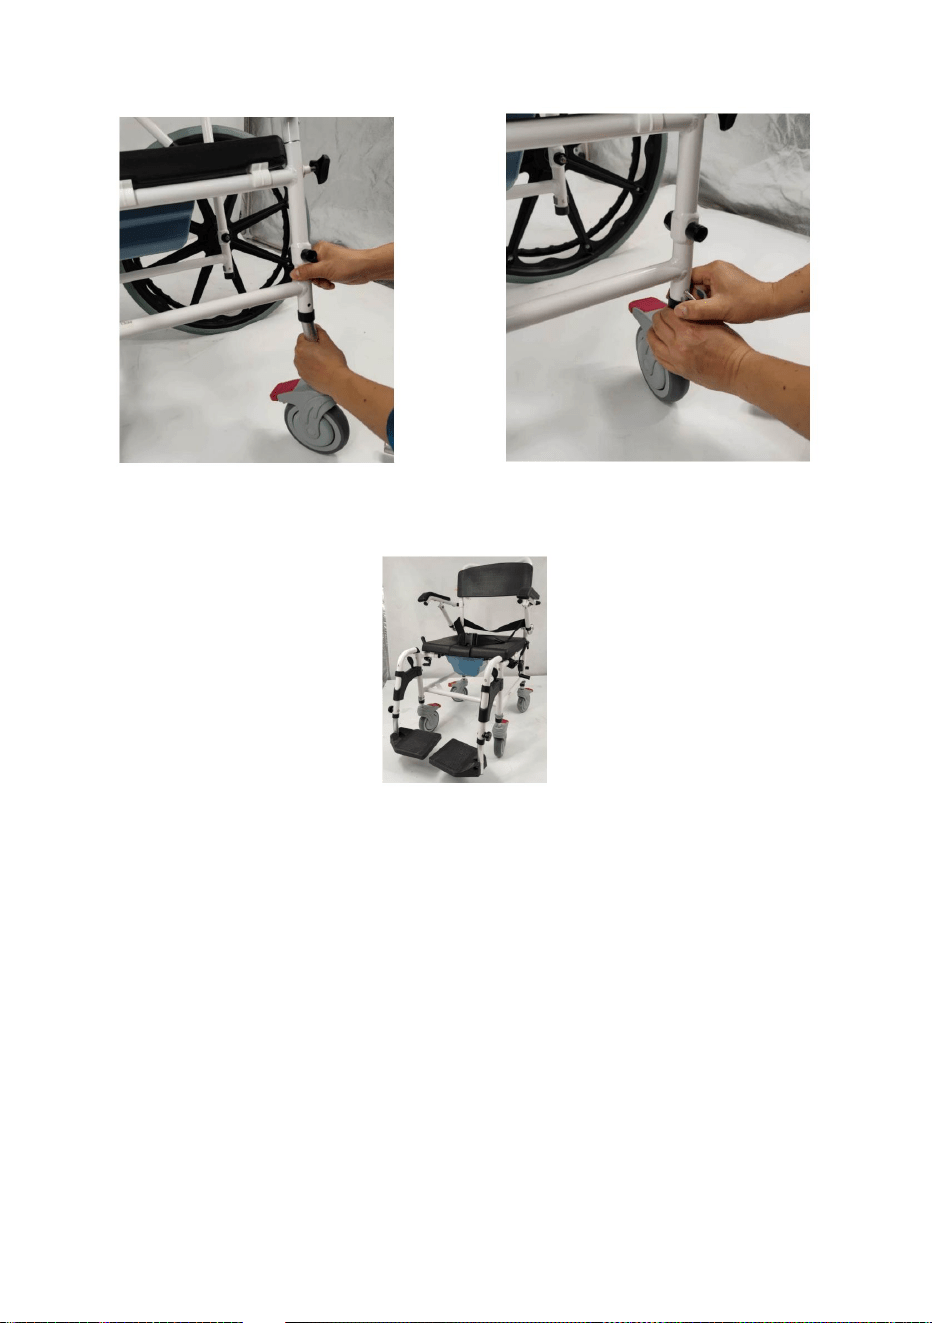
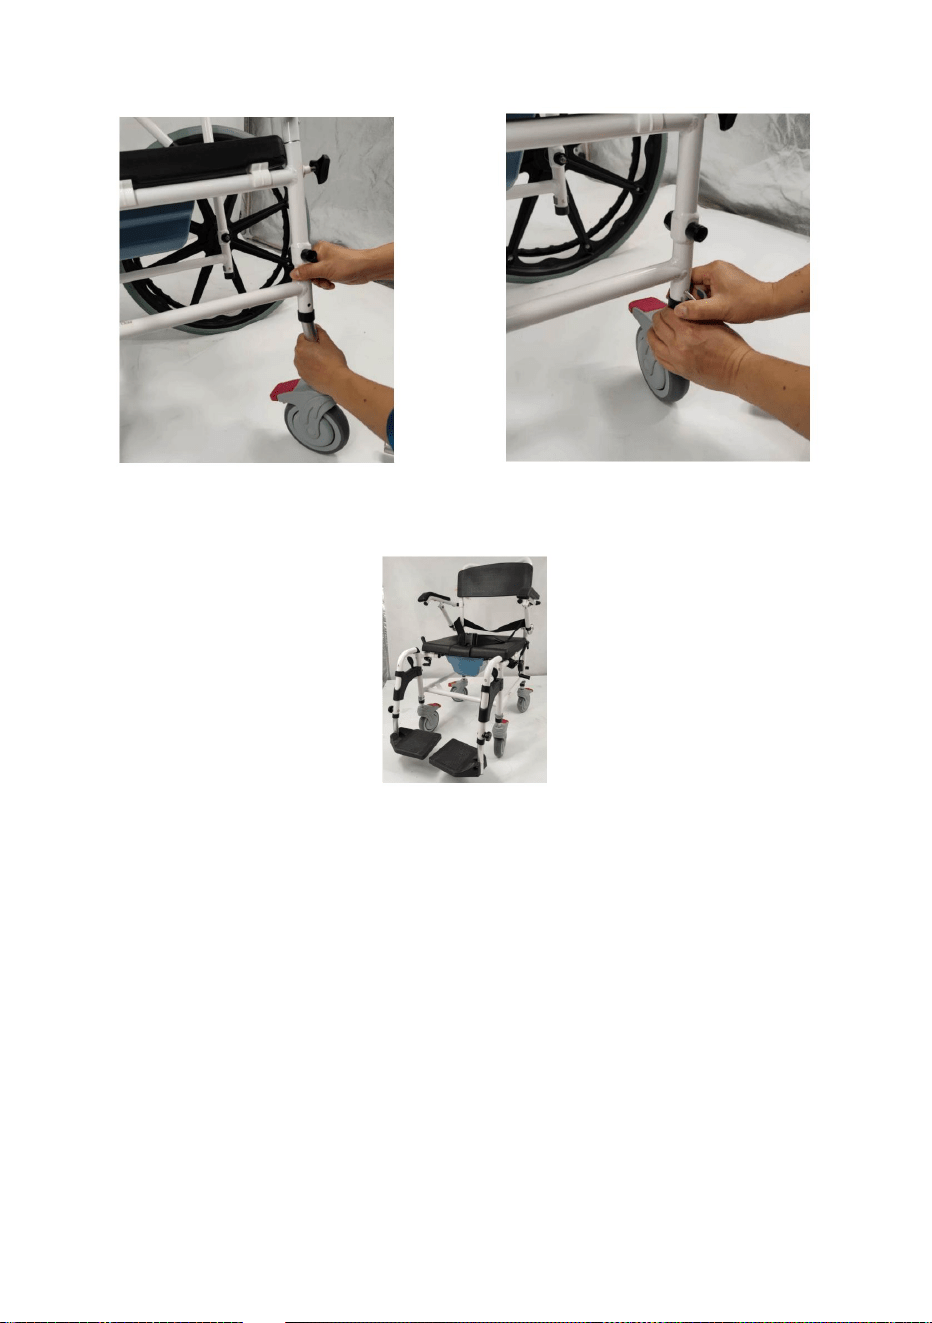
Change Wheel
1. Press and hold the quick release device at the center of the drive wheel,
then pull out the wheel.

- 8 -
2. Insert the caster mounting rod into the tube and install the latch.
3. Follow the preceding steps on the other side to complete the
replacement.
Warning: Drive wheels and rear casters cannot be installed
simultaneously on the wheelchair! Otherwise interference will occur
when turning around.
Post-installation inspection:
1) Please refer to the manual diagram to check whether the installation is
correct.
2) Verify that all accessories are fully assembled.
3) Check whether there is any looseness. If so, be sure to re-tighten it.
4) Check whether the appearance of all parts is skewed and make
adjustments.

- 9 -
Safety Warning:
1. Make sure to depress the brakes before use.
2. Check whether the backrest and foot pads are safe before use.
3. Make sure that the wheels, casters and the feetrests are aligned!
4. Check whether the bucket is firmly fixed in its position, if necessary,
cover the softseat.
5. When using, make sure that the armrest is folded up. Prevent being
trapped!
6. Make sure that the foot pads are folded when the patient is using the
shower and toilet. Otherwise, there is a danger of tripping and injury!
7. The maximum allowable load is 300LBS!
8. Do not use the wheelchair, if you find the chair is damaged, please
contact your professional dealer!
9. Don't stand on the footrests. Don't lean on the armrests! Otherwise,
there is a danger of falling!
10. Do not stand on the wheelchair, and do not let unattended children use
it! Prevent injuries!
Clean:
1. Clean the wheelchair regularly with a mild soap solution and clean water.
Wipe drywith a soft cloth. Do not use any corrosive cleaners.
2. The detachable seat can be cleaned under running water and then
sterilized. The toilet mustbe cleaned and disinfected in the same way after
each use. Use a commercially available disinfectant to disinfect the seat.
3. Do not use high-pressure or steam cleaners for cleaning!
4. lf the wheels are dirty, clean the wheels with a soft brush or cloth and a
mild soap solution and then dry them with the cloth.

- 10 -
Multi-purpose:
The shower wheelchairs are for daily use. Can be used by multiple people.
When used by multiple people, clean and disinfect thoroughly before use to
prevent the spread of germs (contamination). Please use professional
disinfectants when disinfecting.
Product Storage:
When using in the bathroom, you must ensure good ventilation to avoid dust
accumulation. lt must be dried after use. Be sure to wipe it dry and pack it in a
plastic bag and cardboard box before store it. Store it in a dry place, away from
sunlight.
Manufacturer: Shanghaimuxinmuyeyouxiangongsi
Address: Shuangchenglu 803nong11hao1602A-1609shi, baoshanqu,
shanghai 200000 CN.
Imported to AUS: SIHAO PTY LTD. 1 ROKEVA STREETEASTWOOD
NSW 2122 Australia
Imported to USA: Sanven Technology Ltd. Suite 250, 9166 Anaheim
Place, Rancho Cucamonga, CA 91730
REP
UK
YH CONSULTING LIMITED.
C/O YH Consulting Limited Office 147,
Centurion House, London Road,
Staines-upon-Thames, Surrey, TW18 4AX
REP
EC
E-CrossStu GmbH
Mainzer Landstr.69,
60329 Frankfurt am Main.


Fauteuilsroulantsdesalledebain
MODÈLE:HFK330124
Assistancetechniqueetcertificatdegarantieélectronique
www.vevor.com/support
"Économisezlamoitié","Moitiéprix"outouteautreexpressionsimilairequenousutilisonsnereprésente
qu'uneestimationdeséconomiesdontvouspourriezbénéficierenachetantcertainsoutilscheznouspar
rapportauxgrandesmarquesetnesignifiepasnécessairementcouvrirtouteslescatégoriesd'outilsproposés.
parnous.Nousvousrappelonsdevérifierattentivementlorsquevouspassezunecommandechez
noussivouséconomisezréellementlamoitiéparrapportauxgrandesmarques.
Nouscontinuonsànousengageràvousfournirdesoutilsàdesprixcompétitifs.
Machine Translated by Google

BESOIND'AIDE?CONTACTEZNOUS!
1
Vousavezdesquestionssurlesproduits?Besoind'uneassistancetechnique?N'hésitez
pasànous
contacter:Supporttechniqueetcertificatdegarantieélectronique
www.vevor.com/support
MODÈLE:HFK330124
Ils'agitdesinstructionsoriginales,veuillezlireattentivementtouteslesinstructions
dumanuelavantdel'utiliser.VEVORseréserveuneinterprétationclairedenotremanuel
d’utilisation.L'apparenceduproduitdépendduproduitquevousavezreçu.Veuillez
nouspardonnerquenousnevousinformeronspluss'ilyadesmisesàjourtechnologiquesou
logiciellessurnotreproduit.
Fauteuilsroulantsdesalledebain
Machine Translated by Google

2
QTÉ.
Non.
Listedespièces
Image
ouuntapissurlesolenpremierpouréviterlesrayures.Payezs'ilvousplait
attentionàdistinguerlespiècesdétachées,puisàbienlesmettre.
lespiècesderechangedanslaboîte.Siassembléausol,mettrelepapier
Remarque:Lorsquevousouvrezlecartond'emballage,veillezàtoutprotéger
Nom
Cadreprincipal
1UN
Machine Translated by Google
3
Roulettes
Couvercledesiège
2+2
1
1
1
C
F
2
1
B
ET
Ensemblededossier
Ensembledecoussinsdesiège
D
g
Rouesmotrices
Lèvredegodet
Machine Translated by Google

(Installésurlereposepieds)
(Installésurlecadreprincipal)
(Installésurlecadreprincipal)
4
(Installésurlereposepieds)
(Installésurlereposepieds)
Seau
M
1
VisM6
Astuce:«+»correspondàdespiècesderechangesupplémentaires.
J.
L
2
Blet
1
VisM8
2
K
1
2
P.
Ô
H
BoucleenformedeC
2
Reposepiedsdroit
Vis
1
je
Q
N
Visdecale
Reposepiedsgauche
2
2
Dispositifdedégagementrapide
Machine Translated by Google

2.Ensemblerouemotrice:appuyezd'abordsurledispositifdedégagementrapideetfaitesle
glisseraucentredelarouemotrice,puisinsérezledansletrouàl'arrièreduchâssisprincipal.
Assurezvousquelagoupilleestverrouilléeetquelevolantestàl'extérieur.(Pourretirer
larouearrière,appuyezetmaintenezledispositifdedégagementrapideaucentredelaroue.)
Ensemblederoulettes:posezlechâssisprincipaletinsérezlatigedemontagedelaroulette
dansletubeblanc,puisappuyezsurleclipenCpourlefixer.Répétezcetteétapepour
unautrelanceurdesorts.(Accessoiresàutiliser:boucleenformedeC)
1.Ouvrezlecarton,retireztouteslespiècesetvérifiezsitouteslespiècessontintactes.
3.Assemblagedusiège:aprèsavoirinstallétouteslesrouesavantetarrière,remettezleproduit
àlaverticale.Installezlesiègeetfaitesglisserlebaquetenplace.
Descriptiondel'assemblage
5
Machine Translated by Google

6
(Accessoiresàutiliser:vis,viscale,visM6)
4.Ensemblereposepieds:alignezlescomposantsderetraitdespiedsgaucheet
droitaveclestrousdetuyaudevantlecadredusiège,puisappuyezetverrouillezles.
5.Assemblagedudossier:alignezledossieraveclestrousenpinàl'arrière,puis
appuyezsurlavisM8pourlefixer.
Machine Translated by Google

1.Appuyezetmaintenezledispositifdedégagementrapideaucentredelaroue
motrice,puisretirezlaroue.
6.Àcestade,félicitationspouravoirterminétouteslesétapesd'installationduproduit.Appuyezsurlefrein
rougedelaroueavantoutirezlelevierdefreindelarouearrièrepourfixerlefrein.
7.Lesaccoudoirssontpliables.Rouedechangement
7
Machine Translated by Google
Inspectionaprèsinstallation:
enseretournant.
1)Veuillezvousréférerauschémamanuelpourvérifiersil'installationest
simultanémentsurlefauteuilroulant!Sinon,desinterférencesseproduiront
ajustements.
remplacement.
Attention:lesrouesmotricesetlesroulettesarrièrenepeuventpasêtreinstallées
3.Suivezlesétapesprécédentesdel'autrecôtépourterminerle
2.Insérezlatigedemontagedelaroulettedansletubeetinstallezleloquet.
4)Vérifiezsil'apparencedetouteslespiècesestfausséeetfaites
3)Vérifiezs'ilyadujeu.Sic'estlecas,assurezvousdeleresserrer.
2)Vérifiezquetouslesaccessoiressontentièrementassemblés.
correct.
8
Machine Translated by Google

4.Vérifiezsileseauestfermementfixédanssaposition,sinécessaire,recouvrezlesiège
souple.
ilyaunrisquedechute!
3.N'utilisezpasdenettoyeursàhautepressionouàvapeurpourlenettoyage!
5.Lorsdel'utilisation,assurezvousquel'accoudoirestreplié.Empêcherd'être
10.Nemontezpassurlefauteuilroulantetnelaissezpaslesenfantssanssurveillancel'utiliser.
4.Silesrouessontsales,nettoyezlesavecunebrosseouunchiffondouxetun
2.Vérifiezsiledossieretlesreposepiedssontsûrsavantutilisation.
contactezvotrerevendeurprofessionnel!
stérilisé.Lestoilettesdoiventêtrenettoyéesetdésinfectéesdelamêmemanièreaprès
3.Assurezvousquelesroues,roulettesetlesreposepiedssontalignés!
9.Nevoustenezpasdeboutsurlesreposepieds.Nevousappuyezpassurlesaccoudoirs!Sinon,
doucheettoilettes.Sinon,ilyaunrisquedetrébuchementetdeblessure!
1.Nettoyezrégulièrementlefauteuilroulantavecunesolutionsavonneusedouceetdel'eaupropre.
chaqueutilisation.Utilisezundésinfectantdisponibledanslecommercepourdésinfecterlesiège.
7.Lachargemaximaleautoriséeestde300LBS!
Essuyezavecunchiffondoux.N'utilisezpasdenettoyantscorrosifs.
1.Assurezvousd'appuyersurlesfreinsavantutilisation.
8.N'utilisezpaslefauteuilroulant.Sivousconstatezquelefauteuilestendommagé,veuillez
piégé!
il!Évitezlesblessures!
2.Lesiègeamoviblepeutêtrenettoyésousl'eaucourante,puis
6.Assurezvousquelesreposepiedssontpliéslorsquelepatientutilisele
solutionsavonneusedoucepuisséchezlesaveclechiffon.
Faireleménage:
Alertedesécurité:
9
Machine Translated by Google

Stockageduproduit:
REPRÉSENTANTCE
REPRÉSENTANTDUROYAUMEUNI
accumulation.Ildoitêtreséchéaprèsutilisation.Assurezvousdel'essuyeretdel'emballerdansun
sacenplastiqueetboîteencartonavantdeleranger.Conservezledansunendroitsec,àl'abri
désinfectantslorsdeladésinfection.
lumièredusoleil.
empêcherlapropagationdesgermes(contamination).Veuillezutiliserunprofessionnel
Lorsdel'utilisationdanslasalledebain,vousdevezassurerunebonneventilationpouréviterlapoussière
Lorsqu'ilestutiliséparplusieurspersonnes,nettoyeretdésinfectersoigneusementavantutilisationpour
Lesfauteuilsdedouchesontdestinésàunusagequotidien.Peutêtreutiliséparplusieurspersonnes.
Polyvalent:
dix
ImportéauxÉtatsUnis:SanvenTechnologyLtd.Suite250,9166Anaheim
NSW2122Australie
Lieu,RanchoCucamonga,CA91730
C/OYHConsultingLimitedBureau147,
ImportéenAustralie:SIHAOPTYLTD.1RUEROKEVAASTWOOD
YHCONSULTINGLIMITÉE.
Adresse:Shuangchenglu803nong11hao1602A1609shi,baoshanqu,Shanghai
200000CN.
Fabricant:Shanghaimuxinmuyeyouxiangongsi
MaisonCenturion,LondonRoad,
StainesuponThames,Surrey,TW184AX
MainzerLandstr.69,
60329FrancfortsurleMain.
ECrossStuGmbH
Machine Translated by Google


Badezimmerrollstühle
MODELL: HFK-3301-24
Technischer Support und E-Garantiezertifikat
www.vevor.com/support
„Sparen Sie die Hälfte“, „Halber Preis“ oder andere ähnliche von uns verwendete Ausdrücke stellen lediglich
eine Schätzung der Einsparungen dar, die Sie durch den Kauf bestimmter Werkzeuge bei uns im Vergleich zu den
großen Top-Marken erzielen könnten, und bedeuten nicht unbedingt, dass alle angebotenen Werkzeugkategorien
abgedeckt werden von uns. Bitte prüfen Sie bei Ihrer Bestellung sorgfältig, ob Sie im Vergleich zu den Top-
Marken tatsächlich die Hälfte sparen.
Wir sind weiterhin bestrebt, Ihnen Werkzeuge zu wettbewerbsfähigen Preisen anzubieten.
Machine Translated by Google

BRAUCHEN SIE HILFE? KONTAKTIERE UNS!
Haben Sie Fragen zum Produkt? Benötigen Sie technische Unterstützung? Bitte kontaktieren
Sie uns:
Technischer Support und E-Garantiezertifikat www.vevor.com/
support
MODELL: HFK-3301-24
Dies ist die Originalanleitung. Bitte lesen Sie alle Bedienungsanleitungen sorgfältig
durch, bevor Sie das Gerät in Betrieb nehmen. VEVOR behält sich eine klare Auslegung
unserer Bedienungsanleitung vor. Das Aussehen des Produkts hängt von dem Produkt
ab, das Sie erhalten haben. Bitte entschuldigen Sie, dass wir Sie nicht erneut informieren, wenn
es zu unserem Produkt technische oder Software-Updates gibt.
Badezimmerrollstühle
- 1 -
Machine Translated by Google

- 2 -
Stückliste
MENGE.
NEIN. Name
Die Ersatzteile im Karton. Wenn es auf dem Boden montiert ist, legen Sie das Papier ein
Achten Sie darauf, die Ersatzteile zu unterscheiden, und legen Sie sie dann gut ein.
oder Teppich zuerst auf den Boden legen, um Kratzer zu vermeiden. Bitte zahlen Sie
Hinweis: Achten Sie beim Öffnen des Verpackungskartons bitte darauf, alles zu schützen
A
Hauptrahmen
1
Bild
Machine Translated by Google

- 3 -
D
G
Antriebsräder
Eimerlippe
2
1
B
UND
Sitzpolsterset
Rückenlehnen-Set
1
1
C
F
Rollen
Sitzdeckel
2+2
1
Machine Translated by Google
(Montiert auf der Fußstütze)
(Montiert auf der Fußstütze)
(Auf dem Hauptrahmen installiert)
(Auf dem Hauptrahmen installiert)
(Montiert auf der Fußstütze)
- 4 -
Tipp: „+“ steht für zusätzliche Ersatzteile.
Linke Fußstütze
2
2
Passschraube
Schnellverschlussvorrichtung
ICH
Q
N
Rechte Fußstütze
2
Schrauben
1
Ö
H
C-förmige Schnalle
1
K
2
P
1
M8-Schraube
2
J
L
2
Blet
Eimer
1
M6-Schraube
M
Machine Translated by Google

Rollenmontage: Legen Sie den Hauptrahmen ab und stecken Sie die Rollenmontagestange in das
weiße Rohr. Drücken Sie dann den C-Clip, um sie zu befestigen. Wiederholen Sie diesen
Schritt für einen anderen Zauberer. (Zu verwendendes Zubehör: C-förmige Schnalle)
3.Sitzmontage: Stellen Sie das Produkt nach der Montage aller Vorder- und Hinterräder aufrecht.
Installieren Sie den Sitz und schieben Sie den Eimer hinein.
2.Antriebsradmontage: Drücken Sie zuerst auf die Schnellspannvorrichtung und schieben Sie sie in
die Mitte des Antriebsrads. Führen Sie sie dann in das Loch auf der Rückseite des Hauptrahmens ein.
Stellen Sie sicher, dass der Druckstift verriegelt ist und das Handrad außen liegt. (Um das
Hinterrad zu entfernen, drücken und halten Sie die Schnellspannvorrichtung in der Mitte des Rades.)
1. Öffnen Sie den Karton, nehmen Sie alle Teile heraus und prüfen Sie, ob alle Teile intakt sind.
Montagebeschreibung
- 5 -
Machine Translated by Google

- 6 -
(Zu verwendendes Zubehör: Schraube, Passschraube, M6-Schraube)
4.Fußstützenmontage: Richten Sie die linken und rechten Fußentfernungskomponenten an den Rohrlöchern vor dem
Sitzrahmen aus, drücken Sie sie dann nach unten und verriegeln Sie sie.
5.Rückenlehnenmontage: Richten Sie das Rückenlehnenset an den Kiefernlöchern auf der Rückseite aus und drücken
Sie dann die M8-Schraube fest, um es zu befestigen.
Machine Translated by Google

- 7 -
1. Drücken und halten Sie die Schnellspannvorrichtung in der Mitte des Antriebsrads und
ziehen Sie dann das Rad heraus.
6. An dieser Stelle herzlichen Glückwunsch zum Abschluss aller Installationsschritte des
Produkts. Drücken Sie die rote Bremse am Vorderrad oder ziehen Sie den Bremshebel am
Hinterrad nach oben, um die Bremse zu fixieren.
7.Die Armlehnen sind klappbar.Rad wechseln
Machine Translated by Google

Inspektion nach der Installation:
gleichzeitig im Rollstuhl! Andernfalls kommt es zu Störungen
beim Umdrehen.
1) Bitte sehen Sie sich das Handbuchdiagramm an, um zu überprüfen, ob die Installation korrekt ist
richtig.
Ersatz.
Achtung: Antriebsräder und hintere Rollen können nicht montiert werden
3. Befolgen Sie die vorherigen Schritte auf der anderen Seite, um den Vorgang abzuschließen
2. Führen Sie die Lenkrollen-Befestigungsstange in das Rohr ein und installieren Sie die Verriegelung.
2) Stellen Sie sicher, dass alle Zubehörteile vollständig montiert sind.
3) Überprüfen Sie, ob Lockerheit vorhanden ist. Wenn ja, ziehen Sie es unbedingt wieder fest.
Anpassungen.
4) Überprüfen Sie, ob das Erscheinungsbild aller Teile verzerrt ist und korrigieren Sie es
- 8 -
Machine Translated by Google

4. Wenn die Räder verschmutzt sind, reinigen Sie sie mit einer weichen Bürste oder einem Tuch und a
gefangen!
Es! Verletzungen vorbeugen!
milde Seifenlösung und trocknen Sie sie anschließend mit dem Tuch ab.
6. Stellen Sie sicher, dass die Fußpolster eingeklappt sind, wenn der Patient das benutzt
Dusche und Toilette. Es besteht sonst Stolper- und Verletzungsgefahr!
1. Reinigen Sie den Rollstuhl regelmäßig mit einer milden Seifenlösung und klarem Wasser.
7. Die maximal zulässige Belastung beträgt 300 Pfund!
Mit einem weichen Tuch trockenwischen. Verwenden Sie keine ätzenden Reinigungsmittel.
1. Stellen Sie sicher, dass Sie vor dem Gebrauch die Bremsen betätigen.
8. Benutzen Sie den Rollstuhl nicht. Wenn Sie feststellen, dass der Stuhl beschädigt ist, wenden Sie sich bitte an uns
2. Der abnehmbare Sitz kann anschließend unter fließendem Wasser gereinigt werden
2. Prüfen Sie vor dem Gebrauch, ob die Rückenlehne und die Fußpolster sicher sind.
Kontaktieren Sie Ihren Fachhändler!
sterilisiert. Die Toilette muss anschließend auf die gleiche Weise gereinigt und desinfiziert werden
3. Stellen Sie sicher, dass die Räder, Rollen und Fußstützen ausgerichtet sind!
9. Stellen Sie sich nicht auf die Fußstützen. Nicht auf die Armlehnen stützen! Ansonsten,
jede Verwendung. Zur Desinfektion des Sitzes verwenden Sie ein handelsübliches Desinfektionsmittel.
4. Prüfen Sie, ob der Eimer fest in seiner Position sitzt, ggf. decken Sie den Softseat ab.
Es besteht Absturzgefahr!
3. Zur Reinigung keine Hochdruck- oder Dampfreiniger verwenden!
5. Achten Sie beim Gebrauch darauf, dass die Armlehne hochgeklappt ist. Das Sein verhindern
10. Steigen Sie nicht auf den Rollstuhl und lassen Sie ihn nicht von unbeaufsichtigten Kindern benutzen
Sauber:
Sicherheitswarnung:
- 9 -
Machine Translated by Google

Produktlagerung:
EG-REP
UK REP
Bei der Verwendung im Badezimmer ist auf eine gute Belüftung zu achten, um Staub zu vermeiden
Akkumulation. Nach Gebrauch muss es getrocknet werden. Wischen Sie es unbedingt trocken und verpacken Sie es in einem
Plastiktüte und Karton, bevor Sie es aufbewahren. Bewahren Sie es an einem trockenen Ort auf, entfernt von
Sonnenlicht.
die Verbreitung von Keimen (Kontamination) verhindern. Bitte verwenden Sie einen Fachmann
Desinfektionsmittel beim Desinfizieren.
Bei Verwendung durch mehrere Personen vor Gebrauch gründlich reinigen und desinfizieren
Die Duschrollstühle sind für den täglichen Gebrauch bestimmt. Kann von mehreren Personen genutzt werden.
Mehrzweck:
- 10 -
NSW 2122 Australien
In die USA importiert: Sanven Technology Ltd. Suite 250, 9166 Anaheim
YH CONSULTING LIMITED.
C/O YH Consulting Limited Büro 147,
Adresse: Shuangchenglu 803nong11hao1602A-1609shi, baoshanqu, Shanghai
200000 CN.
Place, Rancho Cucamonga, CA 91730
Importiert nach AUS: SIHAO PTY LTD. 1 ROKEVA STREETEASTWOOD
Hersteller: Shanghaimuxinmuyeyouxiangongsi
Centurion House, London Road,
Staines-upon-Thames, Surrey, TW18 4AX
Mainzer Landstr.69,
60329 Frankfurt am Main.
E-CrossStu GmbH
Machine Translated by Google


Sedie a rotelle da bagno
MODELLO: HFK-3301-24
Supporto tecnico e certificato di garanzia
elettronica www.vevor.com/support
"Risparmia la metà", "Metà prezzo" o qualsiasi altra espressione simile da noi utilizzata rappresenta
solo una stima del risparmio che potresti trarre dall'acquistare determinati strumenti con noi rispetto ai
principali marchi più importanti e non significa necessariamente coprire tutte le categorie di strumenti
offerti da noi. Ti ricordiamo di verificare attentamente quando effettui un ordine con noi se stai
effettivamente risparmiando la metà rispetto ai migliori marchi principali.
Continuiamo a impegnarci per fornirvi strumenti a prezzi competitivi.
Machine Translated by Google

HO BISOGNO DI AIUTO? CONTATTACI!
- 1 -
Hai domande sul prodotto? Hai bisogno di supporto tecnico? Non esitate a contattarci:
Supporto
tecnico e certificato di garanzia elettronica www.vevor.com/
support
MODELLO: HFK-3301-24
Queste sono le istruzioni originali, leggere attentamente tutte le istruzioni del manuale
prima dell'uso. VEVOR si riserva una chiara interpretazione del nostro manuale d'uso. L'aspetto
del prodotto sarà soggetto al prodotto ricevuto. Ti preghiamo di perdonarci se non ti
informeremo più se sono presenti aggiornamenti tecnologici o software sul nostro prodotto.
Sedie a rotelle da bagno
Machine Translated by Google

Elenco delle parti
attenzione a distinguere i pezzi di ricambio, e poi a inserirli bene.
QUANTITÀ.
Telaio principale
o prima il tappeto a terra per evitare di graffiarsi. Per favore paga
NO.
i pezzi di ricambio nella scatola. Se montato a terra, mettere la carta
Nota: quando si apre la scatola di imballaggio, fare attenzione a proteggerla tutta
Nome
UN
Immagine
1
-2-
Machine Translated by Google

Ruote motrici
Labbro della benna
D
G
Insieme dello schienale
Set di cuscini per sedile
2
1
B
E
C
F
1
1
2+2
1
Ruote
Coperchio del sedile
- 3 -
Machine Translated by Google

ÿInstallato sul poggiapiediÿ
ÿInstallato sul poggiapiediÿ
ÿInstallato sul telaio principaleÿ
ÿInstallato sul telaio principaleÿ
ÿInstallato sul poggiapiediÿ
-4-
M
2
Vite di spessore
Poggiapiedi sinistro
2
Dispositivo a sgancio rapido
IO
Q
N
2
Poggiapiedi destro
Vite
1
H
Fibbia a forma di C
O
K
1
2
P
1
2
Vite M8
J
l
2
Blet
Suggerimento: "+" indica pezzi di ricambio aggiuntivi.
1
Vite M6
Secchio
Machine Translated by Google

2. Gruppo ruota motrice: premere innanzitutto il dispositivo di sgancio rapido e farlo scorrere al
centro della ruota motrice, quindi inserirlo nel foro nella parte posteriore del telaio principale.
Assicurarsi che la puntina sia bloccata e che il volantino sia all'esterno. (Per rimuovere la
ruota posteriore, tenere premuto il dispositivo di sgancio rapido al centro della ruota.)
3. Montaggio del sedile: dopo aver installato tutte le ruote anteriori e posteriori, posizionare il
prodotto in posizione verticale. Installare il sedile e far scorrere il secchio in posizione.
Assemblaggio delle rotelle: adagiare il telaio principale e inserire l'asta di montaggio delle rotelle
nel tubo bianco, quindi premere la clip a C per fissarla. Ripeti questo passaggio per
un'altra ruota. (Accessori da utilizzare: fibbia a forma di C)
1.Aprire la scatola, estrarre tutte le parti e controllare che tutte le parti siano intatte.
Descrizione dell'assemblaggio
-5-
Machine Translated by Google

-6-
(Accessori da utilizzare: vite, vite rasamento, vite M6)
4. Montaggio del poggiapiedi: allineare i componenti per la rimozione del piede sinistro e destro
con i fori del tubo davanti al telaio del sedile, quindi premerli verso il basso e bloccarli.
5. Montaggio dello schienale: allineare il set dello schienale con i fori per i pini nella parte
posteriore, quindi premere la vite M8 per fissarlo.
Machine Translated by Google

-7-
7. I braccioli sono pieghevoli. Cambia ruota
6.A questo punto, congratulazioni per aver completato tutte le fasi di installazione del prodotto.
Premi il freno rosso sulla ruota anteriore o tira la leva del freno sulla ruota posteriore per
fissare il freno.
1. Tenere premuto il dispositivo di sgancio rapido al centro della ruota motrice,
quindi estrarre la ruota.
Machine Translated by Google
-8-
contemporaneamente sulla sedia a rotelle! Altrimenti si verificheranno interferenze
Avvertenza: le ruote motrici e le rotelle posteriori non possono essere installate
quando si gira.
4) Controllare se l'aspetto di tutte le parti è distorto e farlo
sostituzione.
1) Fare riferimento allo schema manuale per verificare se l'installazione è corretta
3. Seguire i passaggi precedenti sull'altro lato per completare il file
2. Inserire l'asta di montaggio della ruota nel tubo e installare il fermo.
aggiustamenti.
corretto.
2) Verificare che tutti gli accessori siano completamente assemblati.
3) Controllare se c'è qualche allentamento. Se è così, assicurati di stringerlo nuovamente.
Ispezione post-installazione:
Machine Translated by Google

-9-
Pulito:
Avvertenza di sicurezza:
6. Assicurarsi che i poggiapiedi siano piegati quando il paziente utilizza
3. Non utilizzare pulitori ad alta pressione o a vapore per la pulizia!
intrappolato!
Esso! Prevenire gli infortuni!
soluzione di sapone neutro e poi asciugarli con il panno.
Asciugare con un panno morbido. Non utilizzare detergenti corrosivi.
1. Assicurarsi di premere i freni prima dell'uso.
8. Non utilizzare la sedia a rotelle, se trovi che la sedia è danneggiata, per favore
doccia e WC. In caso contrario sussiste il pericolo di inciampare e ferirsi!
1. Pulire regolarmente la sedia a rotelle con una soluzione di sapone neutro e acqua pulita.
7. Il carico massimo consentito è 300 libbre!
2. Il sedile staccabile può essere pulito sotto l'acqua corrente e poi
3. Assicurarsi che le ruote, le rotelle e i poggiapiedi siano allineati!
9. Non salire sui poggiapiedi. Non appoggiarsi ai braccioli! Altrimenti,
ogni utilizzo. Utilizzare un disinfettante disponibile in commercio per disinfettare il sedile.
2. Controllare se lo schienale e i poggiapiedi sono sicuri prima dell'uso.
contatta il tuo rivenditore professionale!
sterilizzato. Successivamente la toilette deve essere pulita e disinfettata allo stesso modo
5. Durante l'utilizzo, assicurarsi che il bracciolo sia ripiegato. Prevenire l'essere
10. Non salire sulla sedia a rotelle e non lasciare che i bambini la utilizzino senza sorveglianza
4. Se le ruote sono sporche, pulirle con una spazzola morbida o un panno e a
4. Controllare se il secchio è fissato saldamente nella sua posizione, se necessario
coprire il sedile morbido.
c'è pericolo di cadere!
Machine Translated by Google

Quando si utilizza in bagno, è necessario garantire una buona ventilazione per evitare la polvere
accumulo. Deve essere asciugato dopo l'uso. Assicurati di asciugarlo e di imballarlo in a
sacchetto di plastica e scatola di cartone prima di riporlo. Conservarlo in un luogo asciutto, lontano da
prevenire la diffusione di germi (contaminazione). Si prega di utilizzare un prodotto professionale
disinfettanti durante la disinfezione.
Se utilizzato da più persone, pulire e disinfettare accuratamente prima dell'uso
Le sedie a rotelle per doccia sono per l'uso quotidiano. Può essere utilizzato da più persone.
luce del sole.
Luogo, Rancho Cucamonga, CA 91730
YH CONSULTAZIONE LIMITATA.
Importato negli Stati Uniti: Sanven Technology Ltd. Suite 250, 9166 Anaheim
E-CrossStu GmbH
Importato in AUS: SIHAO PTY LTD. 1 ROKEVA STREETEASTWOOD
NSW 2122Australia
Indirizzo: Shuangchenglu 803nong11hao1602A-1609shi, baoshanqu, shanghai
200000 CN.
Produttore: Shanghaimuxinmuyeyouxiangongsi
Casa del Centurione, London Road,
Staines-upon-Thames, Surrey, TW18 4AX
Mainzer Landstr.69,
60329 Francoforte sul Meno.
C/O YH Consulting Limited Ufficio 147,
Conservazione del prodotto:
Multiuso:
- 10 -
REP.CE
REP. DEL REGNO UNITO
Machine Translated by Google


Sillasderuedasdebaño
MODELO:HFK330124
Soportetécnicoycertificadodegarantíaelectrónica
www.vevor.com/support
"Ahorreamitaddeprecio","Amitaddeprecio"ocualquierotraexpresiónsimilarutilizadapornosotrossolo
representaunaestimacióndelosahorrosquepodríabeneficiarsealcomprarciertasherramientasconnosotrosen
comparaciónconlasprincipalesmarcasynosignificanecesariamentecubrirtodaslascategoríasdeherramientas
ofrecidas.pornosotros.Lerecordamosque,cuandorealiceunpedidoconnosotros,verifiquecuidadosamente
sirealmenteestáahorrandolamitadencomparaciónconlasprincipalesmarcas.
Seguimoscomprometidosaproporcionarleherramientasaprecioscompetitivos.
Machine Translated by Google

¿NECESITASAYUDA?¡CONTÁCTENOS!
¿Tienepreguntassobreelproducto?¿Necesitasoportetécnico?Nodudeencontactarnos:
Soporte
técnicoycertificadodegarantíaelectrónicawww.vevor.com/support
MODELO:HFK330124
Estassonlasinstruccionesoriginales;leaatentamentetodaslasinstruccionesdel
manualantesdeoperar.VEVORsereservaunainterpretaciónclaradenuestromanualde
usuario.Laaparienciadelproductoestarásujetaalproductoquerecibió.Perdoneque
noleinformaremosnuevamentesihayactualizacionesdetecnologíaosoftwareennuestro
producto.
Sillasderuedasdebaño
1
Machine Translated by Google
2
CANT.
No.
Listade
Imagen
oalfombraenelsueloprimeroparaevitarrayones.Porfavorpague
Atenciónparadistinguirlosrepuestosyluegocolocarlosbien.
losrepuestosenlacaja.Siestámontadoenelsuelo,coloqueelpapel
Nota:Cuandoabralacajadeembalaje,tengacuidadodeprotegertodos
1
Marcoprincipal
A
Nombre
Machine Translated by Google

3
Ruedas
Tapadelasiento
2+2
1
1
1
C
F
2
1
B
Y
Conjuntoderespaldo
Juegodealmohadillasparaasiento.
D
GRAMO
Ruedasmotrices
Labiodelcubo
Machine Translated by Google

(Instaladoenelreposapiés)
(Instaladoenelmarcoprincipal)
(Instaladoenelmarcoprincipal)
4
(Instaladoenelreposapiés)
(Instaladoenelreposapiés)
Balde
METRO
1
TornilloM6
Consejo:“+”sonrepuestosadicionales.
j
l
2
blete
1
TornilloM8
2
k
1
2
PAG
oh
h
HebillaenformadeC
2
Reposapiésderecho
Tornillo
1
I
q
norte
Tornillodecuña
Reposapiésizquierdo
2
2
Dispositivodeliberaciónrápida
Machine Translated by Google
2.Conjuntodelaruedamotriz:primeropresioneeldispositivodeliberaciónrápidaydeslícelo
enelcentrodelaruedamotriz,luegoinsérteloenelorificioenlaparteposteriordelbastidor
principal.Asegúresedequeelpasadordeempujeestébloqueadoyqueelvolante
estéenelexterior.(Paraquitarlaruedatrasera,presioneymantengapresionadoel
dispositivodeliberaciónrápidaenelcentrodelarueda).
Conjuntoderuedas:coloquelaestructuraprincipaleinsertelavarillademontajedelas
ruedaseneltuboblanco,luegopresioneelclipenCparafijarlo.Repitaestepaso
paraotrarueda.(Accesoriosautilizar:hebillaenformadeC)
1.Abralacaja,saquetodaslaspiezasycompruebesitodasestánintactas.
3.Montajedelasiento:despuésdeinstalartodaslasruedasdelanterasytraseras,coloqueel
productoenposiciónvertical.Instaleelasientoydesliceelcuboensulugar.
Descripcióndelensamblaje
5
Machine Translated by Google

6
(Accesoriosautilizar:tornillo,tornillodecuña,tornilloM6)
4.Ensamblajedelreposapiés:alineeloscomponentesdeextraccióndelpieizquierdoyderecho
conlosorificiosparatubosenfrentedelmarcodelasiento,luegopresionehaciaabajoybloquéelos.
5.Montajedelrespaldo:alineeelconjuntodelrespaldoconlosorificiosdepinoenlaparteposterior
yluegopresioneeltornilloM8parafijarlo.
Machine Translated by Google
7
7.Losreposabrazossonplegables.Cambioderueda
6.Llegadosaestepunto,felicidadesporcompletartodoslospasosdeinstalacióndel
producto.Presioneelfrenorojoenlaruedadelanteraolevantelapalancadelfrenoenla
ruedatraseraparafijarelfreno.
1.Mantengapresionadoeldispositivodeliberaciónrápidaenelcentrodelarueda
motrizyluegoextraigalarueda.
Machine Translated by Google
8
aldarlavuelta.
1)Consulteeldiagramadelmanualparaverificarsilainstalaciónescorrecta.
simultáneamenteenlasilladeruedas!Delocontrarioseproduciráninterferencias
correcto.
reemplazo.
Advertencia:Nosepuedeninstalarruedasmotricesniruedastraseras.
3.Sigalospasosanterioresenelotroladoparacompletarel
2.Insertelavarillademontajedelaruedaeneltuboeinstaleelpestillo.
3)Compruebesihayholgura.Siesasí,asegúresedevolveraapretarlo.
4)Compruebesilaaparienciadetodaslaspiezasestásesgadayhaga
ajustes.
2)Verifiquequetodoslosaccesoriosesténcompletamenteensamblados.
Inspecciónposterioralainstalación:
Machine Translated by Google

9
Limpio:
Advertenciadeseguridad:
4.Compruebesielcuboestáfirmementefijadoensuposición;siesnecesario,cubraelasiento
blando.
¡Existepeligrodecaída!
3.¡Noutilicelimpiadoresdealtapresiónnidevaporparalalimpieza!
5.Cuandoloutilice,asegúresedequeelreposabrazosestéplegado.Prevenirser
10.Nosesubaalasilladeruedasnipermitaquelautilicenniñosdesatendidos.
4.Silasruedasestánsucias,límpielasconuncepilloopañosuaveyun
2.Compruebesielrespaldoylasalmohadillasparalospiessonsegurosantesdeusarlos.
¡Contactacontudistribuidorprofesional!
esterilizado.Elinodorodebelimpiarseydesinfectarsedelamismamaneradespués
3.¡Asegúresedequelasruedas,lasruedasylosreposapiésesténalineados!
9.Notesubasalosreposapiés.¡Noteapoyesenlosreposabrazos!Delocontrario,
duchayWC.¡Delocontrarioexistepeligrodetropiezoylesiones!
1.Limpielasilladeruedasperiódicamenteconunasolucióndejabónsuaveyagualimpia.
cadauso.Utiliceundesinfectantedisponiblecomercialmenteparadesinfectarelasiento.
7.¡Lacargamáximapermitidaes300LBS!
Sequeconunpañosuave.Noutilicelimpiadorescorrosivos.
1.Asegúresedepresionarlosfrenosantesdeusarlo.
8.Noutilicelasilladeruedas.Siencuentraquelasillaestádañada,porfavor
¡atrapado!
¡él!¡Prevenirlesiones!
2.Elasientodesmontablesepuedelimpiarconaguacorrienteyluego
6.Asegúresedequelasalmohadillasparalospiesesténplegadascuandoelpacienteestéusandoel
solucióndejabónsuaveyluegoséquelosconelpaño.
Machine Translated by Google

acumulación.Debesecarsedespuésdesuuso.Asegúresedesecarloyempacarloenun
bolsadeplásticoycajadecartónantesdeguardarlo.Guárdeloenunlugarseco,lejosde
desinfectantesaldesinfectar.
Cuandoloutilicenvariaspersonas,límpieloydesinféctelominuciosamenteantesdeusarlopara
Cuandoloutiliceenelbaño,debegarantizarunabuenaventilaciónparaevitarelpolvo.
prevenirlapropagacióndegérmenes(contaminación).Porfavoruseprofesional
Lassillasderuedasparaduchasondeusodiario.Puedeserutilizadoporvariaspersonas.
luzdesol.
REPRESENTANTEDELACE
REPRESENTANTEDELREINOUNIDO
Almacenamientodelproducto:
Demúltiplesfines:
10
ImportadoaEE.UU.:SanvenTechnologyLtd.Suite250,9166Anaheim
NuevaGalesdelSur2122Australia
Lugar,RanchoCucamonga,CA91730
ECrossStuGmbH
ImportadoaAUS:SIHAOPTYLTD.1ROKEVACALLEASTWOOD
YHCONSULTINGLIMITADO.
Dirección:Shuangchenglu803nong11hao1602A1609shi,baoshanqu,shanghai
200000CN.
Fabricante:Shanghaimuxinmuyeyouxiangongsi
CasaCenturión,LondonRoad,
StainesuponThames,Surrey,TW184AX
MainzerLandstr.69,
60329FráncfortdelMeno.
C/OYHConsultingLimitedOficina147,
Machine Translated by Google


Łazienkowe wózki inwalidzkie
Wsparcie techniczne i certyfikat e-gwarancji
www.vevor.com/support
MODEL: HFK-3301-24
„Zaoszczędź o połowę”, „o połowę ceny” lub inne podobne wyrażenia używane przez nas przedstawiają jedynie
szacunkową oszczędność, jaką możesz zyskać kupując u nas określone narzędzia w porównaniu z głównymi najlepszymi
markami i niekoniecznie oznaczają uwzględnienie wszystkich kategorii oferowanych narzędzi przez nas. Przypominamy,
aby podczas składania zamówienia u nas dokładnie sprawdzić, czy faktycznie oszczędzasz połowę w porównaniu
z czołowymi markami.
Nadal dokładamy wszelkich starań, aby zapewnić Państwu narzędzia w konkurencyjnej cenie.
Machine Translated by Google

POTRZEBUJĘ POMOCY? SKONTAKTUJ SIĘ Z NAMI!
- 1 -
Masz pytania dotyczące produktu? Potrzebujesz wsparcia technicznego? Prosimy o kontakt:
Wsparcie
techniczne i certyfikat e-gwarancji www.vevor.com/support
MODEL: HFK-3301-24
To jest oryginalna instrukcja. Przed przystąpieniem do obsługi prosimy o dokładne
zapoznanie się ze wszystkimi instrukcjami. VEVOR zastrzega sobie jasną interpretację naszej
instrukcji obsługi. Wygląd produktu zależy od produktu, który otrzymałeś. Proszę
wybaczyć nam, że nie będziemy ponownie informować Państwa, jeśli pojawią się jakieś
aktualizacje technologii lub oprogramowania naszego produktu.
Łazienkowe wózki inwalidzkie
Machine Translated by Google
Zwróć uwagę, aby rozróżnić części zamienne, a następnie dobrze je ułóż.
Lista części
NIE. Zdjęcie
części zamienne w pudełku. W przypadku montażu na ziemi połóż papier
ILOŚĆ.
lub najpierw połóż dywan na podłodze, aby zapobiec zarysowaniom. Proszę zapłacić
Uwaga: Po otwarciu pudła do pakowania należy zadbać o zabezpieczenie wszystkich elementów
Nazwa
A
Główna rama
1
- 2 -
Machine Translated by Google

I
1
C
F
1
1
2+2
1
Kółka
Pokrywa siedziska
Warga Wiadra
Koła napędowe
D
G
Zestaw oparcia
Zestaw podkładek do siedzenia
2
B
- 3 -
Machine Translated by Google

Zainstalowany na podnóżku
Zainstalowany na podnóżku
Zainstalowany na ramie głównej
Zainstalowany na ramie głównej
Zainstalowany na podnóżku
- 4 -
Q
J
L
2
Blet
Śruba M6
1
Wskazówka: „+” to dodatkowe części zamienne.
Wiaderko
M
1
K
2
P
1
Śruba M8
2
Prawy podnóżek
2
Śruba
1
Klamra w kształcie litery C
O
H
2
Lewy podnóżek
Śruba podkładkowa
2
Urządzenie szybkiego uwalniania
I
N
Machine Translated by Google

2. Montaż koła napędowego: najpierw naciśnij szybkozamykacz i wsuń go na środek koła
napędowego, a następnie włóż go do otworu w tylnej części komputera typu mainframe.
Upewnij się, że trzpień został zablokowany, a pokrętło znajduje się na zewnątrz. (Aby
zdjąć tylne koło, naciśnij i przytrzymaj szybkozamykacz na środku koła.)
3.Montaż siedziska: po zamontowaniu wszystkich kół przednich i tylnych ustaw produkt w pozycji
pionowej. Zamontuj siedzisko i wsuń wiadro na miejsce.
Montaż kółek: połóż ramę główną i włóż pręt montażowy kółka do białej rurki, a następnie
naciśnij zacisk C, aby go zamocować. Powtórz ten krok dla innego rzucającego. (Akcesoria
do użycia: klamra w kształcie litery C)
1. Otwórz karton, wyjmij wszystkie części i sprawdź, czy wszystkie części są nienaruszone.
Opis montażu
- 5 -
Machine Translated by Google

- 6 -
5.Montaż oparcia: dopasuj zestaw oparcia do sosnowych otworów z tyłu, a następnie wciśnij śrubę
M8, aby go zamocować.
4. Montaż podnóżka: dopasuj elementy do demontażu lewej i prawej stopy do otworów na rury
przed ramą siedziska, a następnie dociśnij je i zablokuj.
(Akcesoria do zastosowania: śruba, śruba podkładkowa, śruba M6)
Machine Translated by Google

- 7 -
1. Naciśnij i przytrzymaj szybkozamykacz na środku koła napędowego, a
następnie wyciągnij koło.
6. W tym momencie gratulujemy ukończenia wszystkich etapów instalacji produktu. Naciśnij
czerwony hamulec na przednim kole lub pociągnij dźwignię hamulca na tylnym kole, aby
zablokować hamulec.
7. Podłokietniki są składane. Zmień koło
Machine Translated by Google

- 8 -
Ostrzeżenie: Nie można zamontować kół napędowych ani tylnych kółek
jednocześnie na wózku inwalidzkim! W przeciwnym razie wystąpią zakłócenia
1) Proszę zapoznać się ze schematem instrukcji, aby sprawdzić, czy instalacja jest prawidłowa
prawidłowy.
3. Wykonaj powyższe kroki po drugiej stronie, aby zakończyć
podczas odwracania się.
wymiana.
2. Włóż drążek montażowy kółka do rurki i zamontuj zatrzask.
2) Sprawdź, czy wszystkie akcesoria są w pełni zmontowane.
3) Sprawdź, czy nie ma luzów. Jeśli tak, pamiętaj o ponownym dokręceniu.
4) Sprawdź, czy wygląd wszystkich części jest przekrzywiony i poprawny
korekty.
Kontrola pomontażowa:
Machine Translated by Google

- 9 -
Czysty:
Ostrzeżenie dotyczące bezpieczeństwa:
1. Regularnie czyść wózek inwalidzki łagodnym roztworem mydła i czystą wodą.
każde użycie. Do dezynfekcji fotelika należy używać dostępnych w handlu środków dezynfekcyjnych.
3. Upewnij się, że koła, kółka i podnóżki są ustawione w jednej linii!
9. Nie stawaj na podnóżkach. Nie opieraj się o podłokietniki! W przeciwnym razie,
skontaktuj się ze swoim profesjonalnym sprzedawcą!
2. Przed użyciem sprawdź czy oparcie i podnóżki są bezpieczne.
5. Podczas użytkowania upewnij się, że podłokietnik jest złożony. Zapobiegaj byciu
10. Nie stawaj na wózku inwalidzkim i nie pozwalaj na korzystanie z niego dzieciom bez opieki
wysterylizowany. Po kąpieli toaletę należy wyczyścić i zdezynfekować w ten sam sposób
4. Jeżeli koła są brudne, wyczyść je miękką szczoteczką lub szmatką i a
4. Sprawdź czy wiadro jest stabilnie zamocowane na swoim miejscu, w razie potrzeby zakryj miękkie
siedzisko.
istnieje niebezpieczeństwo upadku!
3. Do czyszczenia nie używać myjek wysokociśnieniowych ani parowych!
6. Upewnij się, że podkładki pod stopy są złożone, gdy pacjent korzysta z
uwięziony!
To! Zapobiegaj kontuzjom!
łagodnym roztworem mydła, a następnie osusz je szmatką.
Wycierać do sucha miękką szmatką. Nie używaj żrących środków czyszczących.
1. Przed użyciem pamiętaj o wciśnięciu hamulców.
8. Nie korzystaj z wózka inwalidzkiego, jeśli stwierdzisz, że jest on uszkodzony, prosimy
2. Zdejmowane siedzisko można następnie umyć pod bieżącą wodą
prysznic i toaleta. W przeciwnym razie istnieje niebezpieczeństwo potknięcia się i obrażeń!
7. Maksymalne dopuszczalne obciążenie wynosi 300 funtów!
Machine Translated by Google

Podczas używania w łazience należy zapewnić dobrą wentylację, aby uniknąć kurzu
plastikową torebkę i kartonowe pudełko przed przechowywaniem. Przechowuj go w suchym miejscu, z dala od
akumulacja. Po użyciu należy go wysuszyć. Pamiętaj, aby wytrzeć go do sucha i zapakować w
światło słoneczne.
zapobiegać rozprzestrzenianiu się zarazków (zanieczyszczeniu). Proszę używać profesjonalnego
środki dezynfekcyjne podczas dezynfekcji.
W przypadku używania przez wiele osób należy dokładnie wyczyścić i zdezynfekować przed użyciem
Wózki inwalidzkie pod prysznic służą do codziennego użytku. Może być używany przez wiele osób.
Import do USA: Sanven Technology Ltd. Suite 250, 9166 Anaheim
Place, Rancho Cucamonga, Kalifornia 91730
YH CONSULTING SPÓŁKA Z OGRANICZONĄ ODPOWIEDZIALNOŚCIĄ.
C/O YH Consulting Limited Biuro 147,
Adres: Shuangchenglu 803nong11hao1602A-1609shi, baoshanqu, szanghaj
200000 CN.
Nowa Południowa Walia 2122 Australia
Import do AUS: SIHAO PTY LTD. 1 ROKEVA STREETEASTWOOD
Producent: Shanghaimuxinmuyeyouxiangongsi
Dom Centuriona, London Road,
Staines-upon-Thames, Surrey, TW18 4AX
Mainzer Landstr.69,
60329 Frankfurt nad Menem.
E-CrossStu GmbH
Przechowywanie produktu:
Różnego przeznaczenia:
REPREZENT KE
REPUBLIKA Wielkiej Brytanii
- 10 -
Machine Translated by Google


Badkamerrolstoelen
MODEL: HFK-3301-24
Technische ondersteuning en e-
garantiecertificaat www.vevor.com/support
"Bespaar de helft", "Halve prijs" of andere soortgelijke uitdrukkingen die door ons worden gebruikt vertegenwoordigt
slechts een schatting van de besparingen die u zou kunnen profiteren als u bepaalde gereedschappen bij ons koopt in
vergelijking met de grote topmerken en betekent niet noodzakelijkerwijs dat deze alle categorieën van aangeboden
gereedschappen omvatten door ons. Wij verzoeken u vriendelijk om bij het plaatsen van een bestelling bij ons
goed na te gaan of u daadwerkelijk de helft bespaart in vergelijking met de grote topmerken.
We blijven ons inzetten om u gereedschap tegen een concurrerende prijs te bieden.
Machine Translated by Google

HULP NODIG? NEEM CONTACT MET ONS OP!
- 1 -
Heeft u productvragen? Technische ondersteuning nodig? Neem gerust contact met ons op:
Technische
ondersteuning en e-garantiecertificaat www.vevor.com/
support
MODEL: HFK-3301-24
Dit is de originele instructie. Lees alle instructies in de handleiding zorgvuldig door
voordat u ermee aan de slag gaat. VEVOR behoudt zich een duidelijke interpretatie van onze
gebruikershandleiding voor. Het uiterlijk van het product is afhankelijk van het product
dat u heeft ontvangen. Vergeef ons alstublieft dat we u niet opnieuw zullen informeren als er
technologie- of software-updates zijn voor ons product.
Badkamerrolstoelen
Machine Translated by Google
Onderdelen lijst
aandacht om de reserveonderdelen te onderscheiden en ze vervolgens goed te plaatsen.
AANTAL.
Afbeelding
of tapijt eerst op de grond om krassen te voorkomen. Betaal alsjeblieft
Nee.
de reserveonderdelen in de doos. Indien gemonteerd op de grond, plaats het papier
Let op: Wanneer u de verpakking opent, zorg er dan voor dat u alles beschermt
Naam
Hoofdframe
1A
- 2 -
Machine Translated by Google

Aandrijfwielen
Emmer lip
D
G
Rugleuningset
2
Zitkussenset
1
B
EN
C
F
1
1
2+2
1
Zwenkwielen
Zitting deksel
- 3 -
Machine Translated by Google
M
2
Shim-schroef
Linker voetsteun
2
Snelontgrendelingsapparaat
I
Q
N
2
Rechter voetsteun
Schroef
1
H
C-vormige gesp
O
K
1
2
P
1
2
M8 schroef
J
L
2
Blet
Tip: “+” is extra reserveonderdelen.
1
M6-schroef
Emmer
(Geïnstalleerd op voetsteun)
(Geïnstalleerd op voetsteun)
(Geïnstalleerd op hoofdframe)
(Geïnstalleerd op hoofdframe)
(Geïnstalleerd op voetsteun)
- 4 -
Machine Translated by Google

- 5 -
Montagebeschrijving
2. Aandrijfwielmontage: druk eerst op de snelontgrendeling en schuif deze in het midden van het
aandrijfwiel. Steek deze vervolgens in het gat aan de achterkant van het hoofdframe. Zorg ervoor
dat de punaise vergrendeld is en dat het handwiel zich aan de buitenkant bevindt. (Om het
achterwiel te verwijderen, houdt u de snelontgrendeling in het midden van het wiel ingedrukt.)
3. Montage van de stoel: plaats het product rechtop nadat u alle voor- en achterwielen hebt
geïnstalleerd. Installeer de stoel en schuif de emmer op zijn plaats.
Montage van de zwenkwielen: leg het hoofdframe neer en steek de bevestigingsstang van het
zwenkwiel in de witte buis en druk vervolgens op de c-clip om deze vast te zetten. Herhaal
deze stap voor een ander zwenkwiel. (te gebruiken accessoires: C-vormige gesp)
1. Open de doos, haal alle onderdelen eruit en controleer of alle onderdelen intact zijn.
Machine Translated by Google
5. Montage van de rugleuning: lijn de rugleuningset uit met de dennengaten aan de achterkant en druk
vervolgens op de M8-schroef om deze te bevestigen.
4. Voetsteunmontage: lijn de onderdelen voor het verwijderen van de linker- en rechtervoet uit met de
pijpgaten aan de voorkant van het stoelframe, druk ze vervolgens naar beneden en vergrendel ze.
(te gebruiken accessoires: schroef, vulschroef, M6-schroef)
- 6 -
Machine Translated by Google

- 7 -
7.De armleuningen zijn opvouwbaar.Verander het wiel
6. Gefeliciteerd met het voltooien van alle installatiestappen van het product. Druk de rode rem
op het voorwiel in of trek de remhendel op het achterwiel omhoog om de rem vast te zetten.
1. Houd de snelontgrendeling in het midden van het aandrijfwiel ingedrukt
en trek het wiel eruit.
Machine Translated by Google

- 8 -
tegelijk op de rolstoel! Anders zal er interferentie optreden
Waarschuwing: Aandrijfwielen en achterzwenkwielen kunnen niet worden geïnstalleerd
bij het omdraaien.
4) Controleer of het uiterlijk van alle onderdelen scheef is en maak
vervanging.
1) Raadpleeg het handmatige diagram om te controleren of de installatie correct is
3. Volg de voorgaande stappen aan de andere kant om het proces te voltooien
2. Steek de bevestigingsstang van het zwenkwiel in de buis en installeer de grendel.
aanpassingen.
juist.
2) Controleer of alle accessoires volledig gemonteerd zijn.
3) Controleer of er sprake is van losheid. Als dit het geval is, zorg er dan voor dat u deze opnieuw vastdraait.
Inspectie na installatie:
Machine Translated by Google

- 9 -
Schoon:
Veiligheidswaarschuwing:
6. Zorg ervoor dat de voetzolen zijn opgevouwen wanneer de patiënt de voetkussentjes gebruikt
3. Gebruik voor het reinigen geen hogedruk- of stoomreinigers!
gevangen!
Het! Voorkom blessures!
milde zeepoplossing en droog ze daarna met de doek.
Droogwrijven met een zachte doek. Gebruik geen bijtende schoonmaakmiddelen.
8. Gebruik de rolstoel niet als u merkt dat de stoel beschadigd is
1. Zorg ervoor dat u vóór gebruik de remmen indrukt.
douche en toilet. Anders bestaat er gevaar voor struikelen en letsel!
1. Maak de rolstoel regelmatig schoon met een milde zeepoplossing en schoon water.
7. De maximaal toegestane belasting is 300LBS!
2. De afneembare zitting kan vervolgens onder stromend water worden gereinigd
3. Zorg ervoor dat de wielen, zwenkwielen en de voetsteunen in lijn liggen!
9. Ga niet op de voetsteunen staan. Leun niet op de armleuningen! Anders,
elk gebruik. Gebruik een in de handel verkrijgbaar desinfectiemiddel om de stoel te desinfecteren.
2. Controleer voor gebruik of de rugleuning en voetkussens veilig zijn.
neem contact op met uw professionele dealer!
gesteriliseerd. Het toilet moet daarna op dezelfde manier worden gereinigd en gedesinfecteerd
5. Zorg er bij gebruik voor dat de armleuning omhoog is geklapt. Voorkom het zijn
10. Ga niet op de rolstoel staan en laat kinderen er niet zonder toezicht gebruik van maken
4. Als de wielen vuil zijn, reinig ze dan met een zachte borstel of doek en a
4. Controleer of de bak stevig op zijn plaats zit, dek eventueel de softseat af.
er bestaat gevaar voor vallen!
Machine Translated by Google

Bij gebruik in de badkamer moet u voor een goede ventilatie zorgen om stof te voorkomen
accumulatie. Na gebruik moet het worden gedroogd. Zorg ervoor dat u het droog veegt en in een verpakking verpakt
plastic zak en kartonnen doos voordat u deze opbergt. Bewaar het op een droge plaats, uit de buurt van
de verspreiding van ziektekiemen (besmetting) te voorkomen. Gebruik alstublieft professioneel
ontsmettingsmiddelen bij het desinfecteren.
Bij gebruik door meerdere personen vóór gebruik grondig reinigen en desinfecteren
De doucherolstoelen zijn voor dagelijks gebruik. Kan door meerdere personen gebruikt worden.
zonlicht.
Plaats, Rancho Cucamonga, CA 91730
YH CONSULTING LIMITED.
Geïmporteerd in de VS: Sanven Technology Ltd. Suite 250, 9166 Anaheim
C/O YH Consulting Limited Kantoor 147,
Adres: Shuangchenglu 803nong11hao1602A-1609shi, baoshanqu, shanghai
200000 CN.
NSW 2122 Australië
Geïmporteerd naar AUS: SIHAO PTY LTD. 1 ROKEVA STREETEASTWOOD
Fabrikant: Shanghaimuxinmuyeyouxiangongsi
Centurion House, Londen Road,
Staines-upon-Thames, Surrey, TW18 4AX
E-CrossStu GmbH
Mainzer Landstr.69,
60329 Frankfurt am Main.
Productopslag:
Multifunctioneel:
- 10 -
Britse REP
EG REP
Machine Translated by Google


"Spara hälften", "halva priset" eller andra liknande uttryck som används av oss representerar
bara en uppskattning av besparingar du kan dra nytta av att köpa vissa verktyg hos oss jämfört med
de stora toppmärkena och betyder inte nödvändigtvis att täcka alla kategorier av verktyg som erbjuds
av oss. Du påminns vänligen om att noggrant kontrollera när du gör en beställning hos oss om
du faktiskt sparar hälften i jämförelse med de främsta stora varumärkena.
Vi fortsätter att vara engagerade i att ge dig verktyg till konkurrenskraftiga priser.
MODELL: HFK-3301-24
Teknisk support och e-garanticertifikat
www.vevor.com/support
Badrum rullstolar
Machine Translated by Google

Har du produktfrågor? Behöver du teknisk support? Kontakta oss gärna: Teknisk support och
e-
garanticertifikat www.vevor.com/support
MODELL: HFK-3301-24
Detta är den ursprungliga instruktionen, läs alla instruktioner noggrant innan du
använder den. VEVOR reserverar sig för en tydlig tolkning av vår användarmanual. Utseendet
på produkten är beroende av den produkt du fått. Ursäkta oss att vi inte kommer att
informera dig igen om det finns någon teknik eller mjukvaruuppdateringar på vår produkt.
BEHÖVS HJÄLP? KONTAKTA OSS!
Badrum rullstolar
- 1 -
Machine Translated by Google

Dellista
ANTAL.
Nej. Bild
eller matta på marken först för att förhindra repor. Var snäll och betala
uppmärksamma att särskilja reservdelarna, och sedan sätta dem väl.
reservdelarna i lådan. Om det är monterat på marken, lägg papperet
Obs: När du öppnar förpackningen, se till att skydda alla
1
Huvudram
namn
A
- 2 -
Machine Translated by Google

Drivhjul
Sittlock
Hjul
2+2
1
1
1
C
F
B
OCH
2
Ryggstödset
Sittdynor set
1
D
G
Bucket Lip
- 3 -
Machine Translated by Google

H
C-format spänne
O
Skruva
Höger fotstöd
2
1
N
jag
F
2
Shim-Screw
Vänster fotstöd
2
Snabbkopplingsenhet
Tips: "+" är extra reservdelar.
1
Hink
M6 Skruv
M
Blet
J
L
2
2
M8 Skruv
1
K
1
2
P
(Installerad på fotstöd)
(Installerad på fotstöd)
(Installerad på huvudramen)
(Installerad på huvudramen)
(Installerad på fotstöd)
- 4 -
Machine Translated by Google

- 5 -
Monteringsbeskrivning
2. Drivhjulsmontering: tryck först på snabbkopplingsanordningen och skjut in den i
mitten av drivhjulet, för sedan in den i hålet på baksidan av huvudramen. Se till att
tryckstiftet är låst och att handratten är på utsidan. (För att ta bort bakhjulet,
tryck och håll in snabbkopplingsanordningen i mitten av hjulet.)
Hjulmontering: lägg ner huvudramen och sätt in hjulets monteringsstång i det vita
röret, tryck sedan på c-clips för att fixera det. Upprepa detta steg för en annan
hjul. (Tillbehör att använda: C-format spänne)
1. Öppna kartongen, ta ut alla delar och kontrollera om alla delar är intakta.
3. Säte montering: efter att ha installerat alla fram- och bakhjul, ställ produkten
upprätt. Montera sitsen och skjut skopan på plats.
Machine Translated by Google
(Tillbehör att använda: skruv, mellanläggsskruv, M6-skruv)
4.Fotstödsmontering: rikta in de vänstra och högra fotborttagningskomponenterna med
rörhålen framför sitsramen, tryck sedan ner och lås dem.
5. Ryggstödsmontering: rikta in ryggstödssatsen med furuhålen på baksidan och tryck
sedan på M8-skruven för att fixera den.
- 6 -
Machine Translated by Google

- 7 -
7.Armstöden är fällbara. Byt hjul
6. Vid det här laget, grattis till att du har slutfört alla installationssteg för produkten. Tryck på den
röda bromsen på framhjulet eller dra upp bromsspaken på bakhjulet för att fixera bromsen.
1. Tryck och håll fast snabbkopplingen i mitten av drivhjulet och dra sedan ut
hjulet.
Machine Translated by Google
Inspektion efter installation:
samtidigt på rullstolen! Annars uppstår störningar
när man vänder sig om.
1) Se det manuella diagrammet för att kontrollera om installationen är
3) Kontrollera om det finns någon löshet. Om så är fallet, se till att dra åt den igen.
ersättning.
Varning: Drivhjul och bakre länkhjul kan inte installeras
3. Följ de föregående stegen på andra sidan för att slutföra
2. Sätt in hjulets monteringsstång i röret och installera spärren.
korrekt.
4) Kontrollera om utseendet på alla delar är skevt och gör
justeringar.
2) Kontrollera att alla tillbehör är helt monterade.
- 8 -
Machine Translated by Google

6. Se till att trampdynorna är vikta när patienten använder
det finns risk att falla!
4. Kontrollera om skopan är ordentligt fixerad i sitt läge, täck vid behov över det mjuka
sätet.
3. Använd inte högtrycks- eller ångtvätt för rengöring!
4. Om hjulen är smutsiga, rengör hjulen med en mjuk borste eller trasa och en
5. Se till att armstödet är uppfällt vid användning. Förhindra att vara
10. Stå inte på rullstolen och låt inte obevakade barn använda den
kontakta din professionella återförsäljare!
2. Kontrollera om ryggstödet och fotkuddarna är säkra före användning.
steriliserad. Toaletten ska rengöras och desinficeras på samma sätt efteråt
varje användning. Använd ett kommersiellt tillgängligt desinfektionsmedel för att desinficera sitsen.
3. Se till att hjulen, hjulen och fotstöden är i linje!
9. Stå inte på fotstöden. Luta dig inte på armstöden! Annat,
7. Den maximala tillåtna belastningen är 300 LBS!
dusch och toalett. Annars finns risk för snubbling och skador!
1. Se till att trycka ner bromsarna innan användning.
8. Använd inte rullstolen, om du upptäcker att stolen är skadad, tack
1. Rengör rullstolen regelbundet med en mild tvållösning och rent vatten.
Torka av med en mjuk trasa. Använd inga frätande rengöringsmedel.
2. Det löstagbara sätet kan rengöras under rinnande vatten och sedan
instängd!
Det! Förebygg skador!
mild tvållösning och torka dem sedan med trasan.
Rena:
Säkerhetsvarning:
- 9 -
Machine Translated by Google

Produktförvaring:
desinfektionsmedel vid desinfektion.
Vid användning i badrummet måste du säkerställa god ventilation för att undvika damm
plastpåse och kartong innan du förvarar den. Förvara den på en torr plats, borta från
solljus.
förhindra spridning av bakterier (kontamination). Använd professionell
ackumulation. Den måste torkas efter användning. Se till att torka den torr och packa den i en
När den används av flera personer, rengör och desinficera noggrant före användning
Duschrullstolarna är för dagligt bruk. Kan användas av flera personer.
Multifunktion:
EC REP
UK REP
Importerad till USA: Sanven Technology Ltd. Suite 250, 9166 Anaheim
Place, Rancho Cucamonga, CA 91730
YH CONSULTING LIMITED.
C/O YH Consulting Limited Office 147,
Importerad till AUS: SIHAO PTY LTD. 1 ROKEVA STREETEASTWOOD
NSW 2122 Australien
Adress: Shuangchenglu 803nong11hao1602A-1609shi, baoshanqu, shanghai
200000 CN.
Tillverkare: Shanghaimuxinmuyeyouxiangongsi
Staines-upon-Thames, Surrey, TW18 4AX
E-CrossStu GmbH
Mainzer Landstr.69,
60329 Frankfurt am Main.
Centurion House, London Road,
- 10 -
Machine Translated by Google