PANEL READY KITCHEN
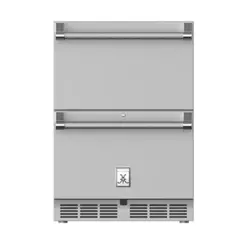
Model: KM-BIR1D1F-PR, M-BIR2D-PR
KoolMore Panel Ready Drawer
Refrigerator and(/or) Freezer
USER MANUAL

Stay informed with the latest information
for your KoolMore Appliance.
If you need any assistance or have questions, our customer
support team is here to help.

INSTALLER: Leave these instructions with the appliance.
CUSTOMER: Read this manual carefully before installing and starting up, and save it for future use. If you
pass on the product to another person, hand over this instruction manual along with it. Retain your sales
receipt or canceled check. Proof of original purchase date is required for warranty service.
Have the complete model and serial number identification of your appliance ready. These numbers are
found on the rating label located inside the door. Record these numbers below for easy access.
Model number ________________
Serial number ________________
Date of purchase ________________
Since we continually improve the quality and performance of our products, we may make changes to the
appliance without updating this manual.
ABOUT SAFETY INSTRUCTIONS
Your safety and the safety of others are very important in this manual and on your appliance. Messages
we have provided many important safety messages. And have provided on your appliance. Always read
and obey all safety messages. The Important Safety Instructions and warnings in this manual are not
meant to cover all possible problems and situations that can occur. Use common sense and caution
when installing, maintaining or operating this or any other appliance.
Always contact the Customer Service Team about problems or situations that you do not understand.
Lorem ipsum
Lorem ipsumLorem ipsum
INTRODUCTION
DANGER
IMPORTANT - Risk of child entrapment!
Child entrapment and suffocation are not problems
of the past. Junked or abandoned appliances are
still dangerous, even if they will "just sit in the
garage a few days".
Before you throw away your old refrigerator or
freezer:
ƒ Take off the doors.
ƒ Leave the shelves in place so that children
may not easily climb inside.
ƒ Cut the prongs off the power plug and
discard them.
ƒ Cut the power cable off and discard it
separately from the old appliance.
IMPORTANT: To avoid the possibility of explosion or
fire, do not store or use combustible (flammable) or
explosive vapors and liquids, such as gasoline
inside or in the vicinity of this or any other
FUUQNFSHJ
WARNING
IMPORTANT: This appliance is equipped with a
three-prong grounding electric plug for protection
against possible electric shock hazards. It must be
plugged into a dedicated, grounded electrical outlet.
If only a two-prong electrical outlet is available, it is
the responsibility of the customer to have it
replaced with a dedicated, properly grounded three
prong electrical outlet.
ƒ DO NOT cut or remove the third (ground)
prong from the power cord.
ƒ DO NOT use an adapter.
ƒ DO NOT use a power cord that is frayed or
damaged.
ƒ DO NOT use extension cords.
ƒ Keep the power cord away from heated
surfaces.
NOTE: Use of an electrical outlet with a ground fault
interrupter (GFI) is not recommended.
State of California Proposition 65 Warnings:
WARNING: This product may contain one or more chemicals known to the State of California to cause cancer.
WARNING: This product may contain one or more chemicals known to the State of California to cause birth defects or
TYMJWWJUWTIZHYN[JMFWR
2

Lorem ipsum
Lorem ipsumLorem ipsum
SAFETY
To reduce the risk of fire, electrical shock or injury when using the appliance, follow basic precautions,
NSHQZINSLYMJKTQQT\NSL
WARNINGS
ƒ If you receive a damaged product, immediately contact your dealer or builder. Do not install or use
a damaged appliance.
ƒ Use this appliance only for its intended purposes. Do not use it to store beverage products, the
storage of wine and perishable food, medicine or other medical products if they are not pharmacy
appliances. It is not intended for commercial or industrial use for household use only units.
ƒ Make sure that this appliance has been properly installed according to the installation section.
Make sure you know the location of the electrical outlet so that you know where and how to
disconnect power. Making sure the appliance is properly installed is the responsibility of the
customer.
ƒ This appliance is not designed for installation in a recreational vehicle or boat. To prevent personal
injury, property damage or damage to the unit, this appliance should only be unpacked and set up
by two people according to the installation section.
ƒ Do not install or use outdoors or in wet conditions for indoor use only units.
ƒ Do not place another appliance on top of the appliance.
ƒ Keep packaging materials away from children. Plastic sheets and bags can cause suffocation.
ƒ Connect this appliance to a 115 Vac, 15 Amp, circuit that is controlled by a circuit breaker or fuse.
This appliance should have its own separate grounded circuit.
ƒ Do not kink or pinch the power supply cord of the appliance. Never unplug the appliance by pulling
on the power cord. Always grip the plug firmly and pull straight out from the electrical outlet.
ƒ To avoid and electric shock hazard, do not operate this appliance with wet hands, or while
standing in water or on a wet surface. Disconnect this appliance when not in use.
ƒ Do not install, repair or replace any part of the appliance unless specifically recommended in the
literature accompanying it. A qualified service technician should perform all other service.
ƒ Before performing any type of service, disconnect the unit from the electrical outlet. If the power
cord is damaged, it must be replaced by the manufacturer, its service agent or similar qualified
person in order to avoid a hazard.
ƒ Do not tamper with the controls.
ƒ This appliance is not intended for use by persons (including children) with reduced physical,
sensory or mental capabilities, or lack of experience and knowledge, unless they have been given
supervision or instruction concerning use of the appliance by a person responsible for their safety.
Children should be supervised to ensure that they do not play with the appliance.
ƒ Never allow anyone, including children to sit, stand or climb on any part of the appliance, including
the door. Doing so may cause damage, serious injury or death.
Warning: Risk of Fire / Flammable Materials.
ƒ This appliance is CFC and HFC free and contains small quantities of Isobutane (R600a) which is
environmentally friendly, but flammable. Great must be taken during transportation and setting up
of the appliance so that no parts of the cooling system are damaged. Leaking coolant can ignite
and may damage the eyes. In the event of any damage:
ƒ Avoid open flames and anything which creates a spark.
ƒ Disconnect the power cord from the electrical outlet.
ƒ Air the room in which the appliance is located for several minutes and contact the Customer
Service for advice.
ƒ The more coolant there is in an appliance, the larger the room it should be installed in. In the event
of a leakage, the appliance is in a small room, there is the danger of combustible gases building
up. For every ounce of coolant, at least 325 cubic feet of room space is required. The amount of
coolant in the appliance is stated on the data label inside the door. It is hazardous for anyone
other than factory authorized service personnel to carry out service or repairs on this appliance.
ƒ Replacing component parts and servicing shall be done by factory authorized service personnel,
so as to minimize the risk of possible ignition due to incorrect parts or improper service.
ƒ Take serious care when handling, moving, and using the appliance to avoid either damaging the
refrigerant tubing, or increasing the risk of a leak.
ƒ Keep ventilation openings, in the appliance enclosure or in the built-in structure, clear of obstruc-
tion. No liability will be accepted for any damage incurred owing to misuse of the appliance or as a
result of repairs carried out by unqualified personnel. In this case neither the guarantee nor any
other liability claims will apply.
ƒ Do not use mechanical devices or other means to accelerate the defrosting process, other than
those recommended by the manufacturer.
ƒ The appliance shall be stored in a room without continuously operating ignition sources (for
example: open flames, an operating gas appliance or an operating electric heater.
ƒ Do not pierce or burn. Do not damage the refrigerant circuit. Never use an appliance with a
damaged circuit.
ƒ Be aware that refrigerants may not contain an odour.
ƒ Do not use any electrical appliance inside the food storage compartment of the appliance, unless
they are of the type recommended by the manufacturer.
ƒ Do not store explosive substances such as aerosol cans with a flammable propellant in this
appliance.
ƒ To avoid a hazard due to instability of the appliance, it must be fixed in accordance with the
instructions.
ƒ Danger of injury from LED lamp. If the cover is defective: do not look directly into the illumination.
The optical lenses from [plastic, possibly with eyes can be injured.
ƒ When positioning the appliance, ensure the supply cord is not trapped or damaged.
ƒ Do not locate multiple portable socket-outlets or portable power supplies at the rear of the
appliance.
ƒ Glass breakage. Danger of injury from broken glass. If installed at altitudes above 1500m there is
a risk of the glass in the door breaking because of changes in air pressure. Shards of glass can
cause severe injury if not handled with care.
ƒ To avoid contamination of food, please respect the following instructions:
ƒ Opening the door for long periods can cause a significant increase of the temperature in the
compartments of the appliance.
ƒ Clean regularly surfaces that can come in contact with food and accessible drainage system.
ƒ Clean water tanks if they have not been used for 48 hours, flush the water system connected to a
water supply if water has not been drawn for 5 days.
ƒ Store raw meat and fish in suitable containers in the refrigerator, so that it is not in contact with or
drip onto other food.
ƒ Two-star frozen-food compartments are suitable for storing pre-frozen food, storing or making ice
cream and making ice cubes.
ƒ One, two, and three-star compartments are not suitable for the freezing of fresh food.
ƒ If the refrigerating appliance is left empty for long periods, switch off, defrost, clean, dry, and leave
the door open to prevent mould developing within the appliance.
CAUTION
ƒ Keep fingers out of the "pinch point" areas. Clearances between the doors and between the doors
and cabinet are necessarily small. Be careful closing doors when children are in the area.
ƒ Do not cover shelves with aluminum foil or any other shelf material which may prevent air
circulation.
ƒ In the event of a power outage, minimize opening the door.
ƒ Never clean appliance parts with flammable fluids. These fumes can create a fire hazard or
explosion. And do not store or use gasoline or other flammable vapors and liquids in the vicinity of
this or any other appliance. The fumes can create a fire hazard or explosion.
ƒ Do not use solvent-based cleaning agents or abrasives on the interior. These cleaners may
damage or discolor the interior.
ƒ Please keep the products away from the fire or similar glowing substance before you dispose the
appliance.
ƒ Regarding the information pertaining to the use of the appliance, thanks to refer to the below
paragraph of the manual.
ƒ Regarding the method for replacing illuminating lamps (if the lamps can be replaced by the user),
thanks to refer to the below paragraph of the manual.
ƒ This appliance is intended to be used in household and similar applications such as:
ƒ staff kitchen areas in shops, offices and other working environments;
ƒ farm houses and by clients in hotels, motels and other residential type environments;
ƒ bed and breakfast type environments;
ƒ catering and similar non-retail applications.
ƒ If you have a lockable appliance, do not keep the key near the appliance or within reach of
children.
ƒ It is recommended that a separate circuit serving only your appliance be provided. Use receptacles
that cannot be turned off by a switch or pull chain.
Disposal:
Dispose of your appliance packaging properly. Ensure that any plastic wrappings, bags etc. are
disposed of safely and kept out of the reach of babies and young children. Danger of suffocation!
Refrigeration equipment must be properly disposed of in a professional and appropriate way, in
accordance with the current local regulations and laws which protects the environment this applies to
your old appliance and to your new unit once it has reached the end of its service life.
WARNING: Please ensure that old, worn appliances are rendered unusable before disposal by removing
the doors, removing the plug, cutting the network cable, and removing or destroying any snap fastenings
or bolts. You will thus prevent children from locking themselves in the appliance during play (risk of
suffocation) or endangering their lives in any other way. DO NOT dispose of the appliance in landfill as
the insulation (Cyclopentane) and refrigerant gas (R600a) contained in these appliances are flammable.
Disposal instructions:
ƒ The appliance must not be disposed of in the dustbin or with normal household rubbish.
ƒ The coolant circuit, particularly the heat exchanger at the back/bottom of the unit, must not be
damaged.
ƒ The appliance is not to be handled as normal household waste but is to be taken to a recycling
collection point for electrical and electronic goods. By correctly disposing of this product you are
contributing to the protection of the environment and to the health of your fellow human beings.
Improper disposal endangers health and the environment. Further information about the recycling
of the product may be obtained from your town hall, refuse collection department or the store
where you purchased the product.
3

To reduce the risk of fire, electrical shock or injury when using the appliance, follow basic precautions,
NSHQZINSLYMJKTQQT\NSL
WARNINGS
ƒ If you receive a damaged product, immediately contact your dealer or builder. Do not install or use
a damaged appliance.
ƒ Use this appliance only for its intended purposes. Do not use it to store beverage products, the
storage of wine and perishable food, medicine or other medical products if they are not pharmacy
appliances. It is not intended for commercial or industrial use for household use only units.
ƒ Make sure that this appliance has been properly installed according to the installation section.
Make sure you know the location of the electrical outlet so that you know where and how to
disconnect power. Making sure the appliance is properly installed is the responsibility of the
customer.
ƒ This appliance is not designed for installation in a recreational vehicle or boat. To prevent personal
injury, property damage or damage to the unit, this appliance should only be unpacked and set up
by two people according to the installation section.
ƒ Do not install or use outdoors or in wet conditions for indoor use only units.
ƒ Do not place another appliance on top of the appliance.
ƒ Keep packaging materials away from children. Plastic sheets and bags can cause suffocation.
ƒ Connect this appliance to a 115 Vac, 15 Amp, circuit that is controlled by a circuit breaker or fuse.
This appliance should have its own separate grounded circuit.
ƒ Do not kink or pinch the power supply cord of the appliance. Never unplug the appliance by pulling
on the power cord. Always grip the plug firmly and pull straight out from the electrical outlet.
ƒ To avoid and electric shock hazard, do not operate this appliance with wet hands, or while
standing in water or on a wet surface. Disconnect this appliance when not in use.
ƒ Do not install, repair or replace any part of the appliance unless specifically recommended in the
literature accompanying it. A qualified service technician should perform all other service.
ƒ Before performing any type of service, disconnect the unit from the electrical outlet. If the power
cord is damaged, it must be replaced by the manufacturer, its service agent or similar qualified
person in order to avoid a hazard.
ƒ Do not tamper with the controls.
ƒ This appliance is not intended for use by persons (including children) with reduced physical,
sensory or mental capabilities, or lack of experience and knowledge, unless they have been given
supervision or instruction concerning use of the appliance by a person responsible for their safety.
Children should be supervised to ensure that they do not play with the appliance.
ƒ Never allow anyone, including children to sit, stand or climb on any part of the appliance, including
the door. Doing so may cause damage, serious injury or death.
Warning: Risk of Fire / Flammable Materials.
ƒ This appliance is CFC and HFC free and contains small quantities of Isobutane (R600a) which is
environmentally friendly, but flammable. Great must be taken during transportation and setting up
of the appliance so that no parts of the cooling system are damaged. Leaking coolant can ignite
and may damage the eyes. In the event of any damage:
ƒ Avoid open flames and anything which creates a spark.
ƒ Disconnect the power cord from the electrical outlet.
ƒ Air the room in which the appliance is located for several minutes and contact the Customer
Service for advice.
ƒ The more coolant there is in an appliance, the larger the room it should be installed in. In the event
of a leakage, the appliance is in a small room, there is the danger of combustible gases building
up. For every ounce of coolant, at least 325 cubic feet of room space is required. The amount of
coolant in the appliance is stated on the data label inside the door. It is hazardous for anyone
other than factory authorized service personnel to carry out service or repairs on this appliance.
ƒ Replacing component parts and servicing shall be done by factory authorized service personnel,
so as to minimize the risk of possible ignition due to incorrect parts or improper service.
ƒ Take serious care when handling, moving, and using the appliance to avoid either damaging the
refrigerant tubing, or increasing the risk of a leak.
ƒ Keep ventilation openings, in the appliance enclosure or in the built-in structure, clear of obstruc-
tion. No liability will be accepted for any damage incurred owing to misuse of the appliance or as a
result of repairs carried out by unqualified personnel. In this case neither the guarantee nor any
other liability claims will apply.
ƒ Do not use mechanical devices or other means to accelerate the defrosting process, other than
those recommended by the manufacturer.
ƒ The appliance shall be stored in a room without continuously operating ignition sources (for
example: open flames, an operating gas appliance or an operating electric heater.
ƒ Do not pierce or burn. Do not damage the refrigerant circuit. Never use an appliance with a
damaged circuit.
ƒ Be aware that refrigerants may not contain an odour.
ƒ Do not use any electrical appliance inside the food storage compartment of the appliance, unless
they are of the type recommended by the manufacturer.
ƒ Do not store explosive substances such as aerosol cans with a flammable propellant in this
appliance.
ƒ To avoid a hazard due to instability of the appliance, it must be fixed in accordance with the
instructions.
ƒ Danger of injury from LED lamp. If the cover is defective: do not look directly into the illumination.
The optical lenses from [plastic, possibly with eyes can be injured.
ƒ When positioning the appliance, ensure the supply cord is not trapped or damaged.
ƒ Do not locate multiple portable socket-outlets or portable power supplies at the rear of the
appliance.
ƒ Glass breakage. Danger of injury from broken glass. If installed at altitudes above 1500m there is
a risk of the glass in the door breaking because of changes in air pressure. Shards of glass can
cause severe injury if not handled with care.
ƒ To avoid contamination of food, please respect the following instructions:
ƒ Opening the door for long periods can cause a significant increase of the temperature in the
compartments of the appliance.
ƒ Clean regularly surfaces that can come in contact with food and accessible drainage system.
ƒ Clean water tanks if they have not been used for 48 hours, flush the water system connected to a
water supply if water has not been drawn for 5 days.
ƒ Store raw meat and fish in suitable containers in the refrigerator, so that it is not in contact with or
drip onto other food.
ƒ Two-star frozen-food compartments are suitable for storing pre-frozen food, storing or making ice
cream and making ice cubes.
ƒ One, two, and three-star compartments are not suitable for the freezing of fresh food.
ƒ If the refrigerating appliance is left empty for long periods, switch off, defrost, clean, dry, and leave
the door open to prevent mould developing within the appliance.
CAUTION
ƒ Keep fingers out of the "pinch point" areas. Clearances between the doors and between the doors
and cabinet are necessarily small. Be careful closing doors when children are in the area.
ƒ Do not cover shelves with aluminum foil or any other shelf material which may prevent air
circulation.
ƒ In the event of a power outage, minimize opening the door.
ƒ Never clean appliance parts with flammable fluids. These fumes can create a fire hazard or
explosion. And do not store or use gasoline or other flammable vapors and liquids in the vicinity of
this or any other appliance. The fumes can create a fire hazard or explosion.
ƒ Do not use solvent-based cleaning agents or abrasives on the interior. These cleaners may
damage or discolor the interior.
ƒ Please keep the products away from the fire or similar glowing substance before you dispose the
appliance.
ƒ Regarding the information pertaining to the use of the appliance, thanks to refer to the below
paragraph of the manual.
ƒ Regarding the method for replacing illuminating lamps (if the lamps can be replaced by the user),
thanks to refer to the below paragraph of the manual.
ƒ This appliance is intended to be used in household and similar applications such as:
ƒ staff kitchen areas in shops, offices and other working environments;
ƒ farm houses and by clients in hotels, motels and other residential type environments;
ƒ bed and breakfast type environments;
ƒ catering and similar non-retail applications.
ƒ If you have a lockable appliance, do not keep the key near the appliance or within reach of
children.
ƒ It is recommended that a separate circuit serving only your appliance be provided. Use receptacles
that cannot be turned off by a switch or pull chain.
Disposal:
Dispose of your appliance packaging properly. Ensure that any plastic wrappings, bags etc. are
disposed of safely and kept out of the reach of babies and young children. Danger of suffocation!
Refrigeration equipment must be properly disposed of in a professional and appropriate way, in
accordance with the current local regulations and laws which protects the environment this applies to
your old appliance and to your new unit once it has reached the end of its service life.
WARNING: Please ensure that old, worn appliances are rendered unusable before disposal by removing
the doors, removing the plug, cutting the network cable, and removing or destroying any snap fastenings
or bolts. You will thus prevent children from locking themselves in the appliance during play (risk of
suffocation) or endangering their lives in any other way. DO NOT dispose of the appliance in landfill as
the insulation (Cyclopentane) and refrigerant gas (R600a) contained in these appliances are flammable.
Disposal instructions:
ƒ The appliance must not be disposed of in the dustbin or with normal household rubbish.
ƒ The coolant circuit, particularly the heat exchanger at the back/bottom of the unit, must not be
damaged.
ƒ The appliance is not to be handled as normal household waste but is to be taken to a recycling
collection point for electrical and electronic goods. By correctly disposing of this product you are
contributing to the protection of the environment and to the health of your fellow human beings.
Improper disposal endangers health and the environment. Further information about the recycling
of the product may be obtained from your town hall, refuse collection department or the store
where you purchased the product.
4

To reduce the risk of fire, electrical shock or injury when using the appliance, follow basic precautions,
NSHQZINSLYMJKTQQT\NSL
WARNINGS
ƒ If you receive a damaged product, immediately contact your dealer or builder. Do not install or use
a damaged appliance.
ƒ Use this appliance only for its intended purposes. Do not use it to store beverage products, the
storage of wine and perishable food, medicine or other medical products if they are not pharmacy
appliances. It is not intended for commercial or industrial use for household use only units.
ƒ Make sure that this appliance has been properly installed according to the installation section.
Make sure you know the location of the electrical outlet so that you know where and how to
disconnect power. Making sure the appliance is properly installed is the responsibility of the
customer.
ƒ This appliance is not designed for installation in a recreational vehicle or boat. To prevent personal
injury, property damage or damage to the unit, this appliance should only be unpacked and set up
by two people according to the installation section.
ƒ Do not install or use outdoors or in wet conditions for indoor use only units.
ƒ Do not place another appliance on top of the appliance.
ƒ Keep packaging materials away from children. Plastic sheets and bags can cause suffocation.
ƒ Connect this appliance to a 115 Vac, 15 Amp, circuit that is controlled by a circuit breaker or fuse.
This appliance should have its own separate grounded circuit.
ƒ Do not kink or pinch the power supply cord of the appliance. Never unplug the appliance by pulling
on the power cord. Always grip the plug firmly and pull straight out from the electrical outlet.
ƒ To avoid and electric shock hazard, do not operate this appliance with wet hands, or while
standing in water or on a wet surface. Disconnect this appliance when not in use.
ƒ Do not install, repair or replace any part of the appliance unless specifically recommended in the
literature accompanying it. A qualified service technician should perform all other service.
ƒ Before performing any type of service, disconnect the unit from the electrical outlet. If the power
cord is damaged, it must be replaced by the manufacturer, its service agent or similar qualified
person in order to avoid a hazard.
ƒ Do not tamper with the controls.
ƒ This appliance is not intended for use by persons (including children) with reduced physical,
sensory or mental capabilities, or lack of experience and knowledge, unless they have been given
supervision or instruction concerning use of the appliance by a person responsible for their safety.
Children should be supervised to ensure that they do not play with the appliance.
ƒ Never allow anyone, including children to sit, stand or climb on any part of the appliance, including
the door. Doing so may cause damage, serious injury or death.
Warning: Risk of Fire / Flammable Materials.
ƒ This appliance is CFC and HFC free and contains small quantities of Isobutane (R600a) which is
environmentally friendly, but flammable. Great must be taken during transportation and setting up
of the appliance so that no parts of the cooling system are damaged. Leaking coolant can ignite
and may damage the eyes. In the event of any damage:
ƒ Avoid open flames and anything which creates a spark.
ƒ Disconnect the power cord from the electrical outlet.
ƒ Air the room in which the appliance is located for several minutes and contact the Customer
Service for advice.
ƒ The more coolant there is in an appliance, the larger the room it should be installed in. In the event
of a leakage, the appliance is in a small room, there is the danger of combustible gases building
up. For every ounce of coolant, at least 325 cubic feet of room space is required. The amount of
coolant in the appliance is stated on the data label inside the door. It is hazardous for anyone
other than factory authorized service personnel to carry out service or repairs on this appliance.
ƒ Replacing component parts and servicing shall be done by factory authorized service personnel,
so as to minimize the risk of possible ignition due to incorrect parts or improper service.
ƒ Take serious care when handling, moving, and using the appliance to avoid either damaging the
refrigerant tubing, or increasing the risk of a leak.
ƒ Keep ventilation openings, in the appliance enclosure or in the built-in structure, clear of obstruc-
tion. No liability will be accepted for any damage incurred owing to misuse of the appliance or as a
result of repairs carried out by unqualified personnel. In this case neither the guarantee nor any
other liability claims will apply.
ƒ Do not use mechanical devices or other means to accelerate the defrosting process, other than
those recommended by the manufacturer.
ƒ The appliance shall be stored in a room without continuously operating ignition sources (for
example: open flames, an operating gas appliance or an operating electric heater.
ƒ Do not pierce or burn. Do not damage the refrigerant circuit. Never use an appliance with a
damaged circuit.
ƒ Be aware that refrigerants may not contain an odour.
ƒ Do not use any electrical appliance inside the food storage compartment of the appliance, unless
they are of the type recommended by the manufacturer.
ƒ Do not store explosive substances such as aerosol cans with a flammable propellant in this
appliance.
ƒ To avoid a hazard due to instability of the appliance, it must be fixed in accordance with the
instructions.
ƒ Danger of injury from LED lamp. If the cover is defective: do not look directly into the illumination.
The optical lenses from [plastic, possibly with eyes can be injured.
ƒ When positioning the appliance, ensure the supply cord is not trapped or damaged.
ƒ Do not locate multiple portable socket-outlets or portable power supplies at the rear of the
appliance.
ƒ Glass breakage. Danger of injury from broken glass. If installed at altitudes above 1500m there is
a risk of the glass in the door breaking because of changes in air pressure. Shards of glass can
cause severe injury if not handled with care.
ƒ To avoid contamination of food, please respect the following instructions:
ƒ Opening the door for long periods can cause a significant increase of the temperature in the
compartments of the appliance.
ƒ Clean regularly surfaces that can come in contact with food and accessible drainage system.
ƒ Clean water tanks if they have not been used for 48 hours, flush the water system connected to a
water supply if water has not been drawn for 5 days.
ƒ Store raw meat and fish in suitable containers in the refrigerator, so that it is not in contact with or
drip onto other food.
ƒ Two-star frozen-food compartments are suitable for storing pre-frozen food, storing or making ice
cream and making ice cubes.
ƒ One, two, and three-star compartments are not suitable for the freezing of fresh food.
ƒ If the refrigerating appliance is left empty for long periods, switch off, defrost, clean, dry, and leave
the door open to prevent mould developing within the appliance.
CAUTION
ƒ Keep fingers out of the "pinch point" areas. Clearances between the doors and between the doors
and cabinet are necessarily small. Be careful closing doors when children are in the area.
ƒ Do not cover shelves with aluminum foil or any other shelf material which may prevent air
circulation.
ƒ In the event of a power outage, minimize opening the door.
ƒ Never clean appliance parts with flammable fluids. These fumes can create a fire hazard or
explosion. And do not store or use gasoline or other flammable vapors and liquids in the vicinity of
this or any other appliance. The fumes can create a fire hazard or explosion.
ƒ Do not use solvent-based cleaning agents or abrasives on the interior. These cleaners may
damage or discolor the interior.
ƒ Please keep the products away from the fire or similar glowing substance before you dispose the
appliance.
ƒ Regarding the information pertaining to the use of the appliance, thanks to refer to the below
paragraph of the manual.
ƒ Regarding the method for replacing illuminating lamps (if the lamps can be replaced by the user),
thanks to refer to the below paragraph of the manual.
ƒ This appliance is intended to be used in household and similar applications such as:
ƒ staff kitchen areas in shops, offices and other working environments;
ƒ farm houses and by clients in hotels, motels and other residential type environments;
ƒ bed and breakfast type environments;
ƒ catering and similar non-retail applications.
ƒ If you have a lockable appliance, do not keep the key near the appliance or within reach of
children.
ƒ It is recommended that a separate circuit serving only your appliance be provided. Use receptacles
that cannot be turned off by a switch or pull chain.
Disposal:
Dispose of your appliance packaging properly. Ensure that any plastic wrappings, bags etc. are
disposed of safely and kept out of the reach of babies and young children. Danger of suffocation!
Refrigeration equipment must be properly disposed of in a professional and appropriate way, in
accordance with the current local regulations and laws which protects the environment this applies to
your old appliance and to your new unit once it has reached the end of its service life.
WARNING: Please ensure that old, worn appliances are rendered unusable before disposal by removing
the doors, removing the plug, cutting the network cable, and removing or destroying any snap fastenings
or bolts. You will thus prevent children from locking themselves in the appliance during play (risk of
suffocation) or endangering their lives in any other way. DO NOT dispose of the appliance in landfill as
the insulation (Cyclopentane) and refrigerant gas (R600a) contained in these appliances are flammable.
Disposal instructions:
ƒ The appliance must not be disposed of in the dustbin or with normal household rubbish.
ƒ The coolant circuit, particularly the heat exchanger at the back/bottom of the unit, must not be
damaged.
ƒ The appliance is not to be handled as normal household waste but is to be taken to a recycling
collection point for electrical and electronic goods. By correctly disposing of this product you are
contributing to the protection of the environment and to the health of your fellow human beings.
Improper disposal endangers health and the environment. Further information about the recycling
of the product may be obtained from your town hall, refuse collection department or the store
where you purchased the product.
5

• Installation type varies: can be integrated (built-in) or stand alone (free-standing), contingent upon
the specific model.
• Offers a continuous variable electronic temperature regulation, with a digital interface and
touchpad for input.
• Temperature settings are adaptable to either Fahrenheit or Celsius units.
• Utilizes a dynamic compressor mechanism that promotes consistent airflow within, achieving a
uniform temperature distribution.
• Equipped with a gentle LED light inside, featuring a switch that includes a standard operation
mode and an exhibition (Showcase) mode.
• Comes with a door-open and malfunction alert system.
• Features a Shabbos mode, designed to keep the lighting off during certain religious days of
observance.
• Boasts a temperature memory feature that resumes operation at the previous temperature setting
after a power interruption (such as a power outage or tripping of a circuit breaker).
• Integrates an automatic defrost function that operates through defrost water evaporation.
• The door is reversible to suit various layouts.
• The exterior is finished with a matte steel frame, available in black/white, and is complemented by
an interior liner that ensures durability and structural integrity.
• Offers an upgrade option to a stainless steel door with a corresponding handle.
• The door is designed to close by itself.
• Uses eco-friendly refrigerant and insulation foam.
• An optional security feature includes a lock and key system.
Please note, the features and specifications mentioned can be updated or modified without prior notice.
Lorem ipsum
Lorem ipsum
FEATURES
6

Before First Use:
• Remove all packing materials and wash the inside with lukewarm water and mild detergent. Odors
from manufacturing will dissipate after the appliance begins cooling.
• After delivery, let the appliance stand upright for at least 24 hours before powering it on to ensure
proper oil distribution within the compressor.
• If the door hinge needs to be switched from one side to the other, refer to the manual for
instructions on how to reverse the door. Attach the door handle if it's not already in place.
Installation Tips:
WARNING
This appliance must be installed in accordance with all local codes and ordinances.
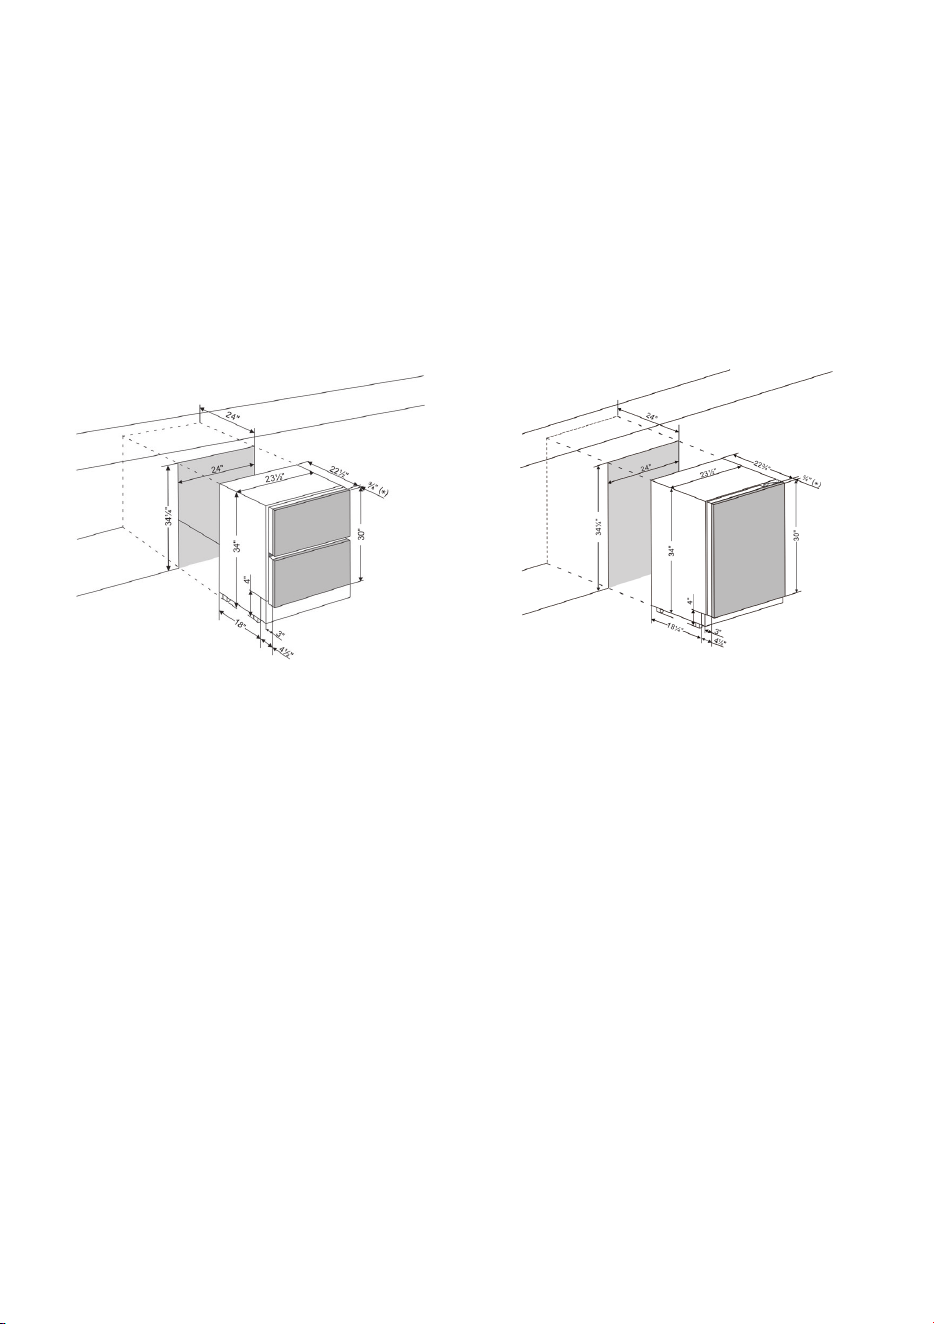
1. The appliances are designed to be built-in or recessed or free-standing installation.
2. CAUTION: This appliance is designed for storing and cooling wines, beverages and drinks. Do not
store perishable food, medicine or other medical products.
3. Place your appliance on a floor/surface that is strong enough to support it when it is fully loaded.
To level your unit, adjust the front adjustable legs at the bottom of the unit.
4. For freestanding installation, 5 inches (127mm) of space between the back and sides of the unit are
suggested, which allows the proper air circulation to cool the compressor and condenser for energy
saving. Even with built-in installation, it is a must to keep ¼” (5mm) space on each side and at the
top to ensure proper service access and ventilation. Take care that the air vent at the front of the
appliance must never be covered or blocked in any way.
5. Locate the unit away from direct sunlight and sources of heat (stove, heater, radiator, etc.). Direct
sunlight may affect the acrylic coating and heat sources may increase electrical consumption.
Extreme cold ambient temperatures may also cause the unit not to perform properly.
6. Avoid locating the unit in damp areas.
7. Plug the unit into an exclusive, easily accessible and properly grounded wall outlet. Do not under
any circumstances cut or remove the third (ground) prong from the power cord. Any questions
concerning power and/or grounding should be directed towards a qualified electrician or an
authorized products service centre.
8. The appliance must be installed to all electrical, plumbing, water and drain connections in
accordance with state and local codes.
9. IMPORTANT: HIGH HUMID CLIMATE. During periods of high humidity, some condensation may
appear on outside surface of glass door. This condensation will disappear when humidity levels
drop. For prevention, it is advisable to install the appliance with sufficient ventilation in a dry and/or
air-conditioned environment.
10. The appliance has a power switch and/or OFF position for energy saving and safety reasons.
Built-Under Installation:
The appliance should not block the front ventilation. The space between the worktop and the unit should
be 31.5 to 35.43 inches for proper airflow. Adjust the front grille as necessary using the screws provided.
Lorem ipsum
Lorem ipsum
INSTALLATION
BUILT-UNDER INSTRUCTIONS
Make sure your installation does not block the front ventilation grille.
If the unit is fully integrated to be installed for fitting kitchen plinth, make sure that the ventilation gaps in
the plinth are at least 300 square centimeters and remove the ventilation grilles, so that warm air can
disperse unhindered. Otherwise, the appliance has to work harder, resulting in an increase in electricity
consumption.
NOTE: When pushing the appliance into the niche, make sure that the mains cable does not get trapped.
7
Before First Use:
• Remove all packing materials and wash the inside with lukewarm water and mild detergent. Odors
from manufacturing will dissipate after the appliance begins cooling.
• After delivery, let the appliance stand upright for at least 24 hours before powering it on to ensure
proper oil distribution within the compressor.
• If the door hinge needs to be switched from one side to the other, refer to the manual for
instructions on how to reverse the door. Attach the door handle if it's not already in place.
Installation Tips:
WARNING
This appliance must be installed in accordance with all local codes and ordinances.
1. The appliances are designed to be built-in or recessed or free-standing installation.
2. CAUTION: This appliance is designed for storing and cooling wines, beverages and drinks. Do not
store perishable food, medicine or other medical products.
3. Place your appliance on a floor/surface that is strong enough to support it when it is fully loaded.
To level your unit, adjust the front adjustable legs at the bottom of the unit.
4. For freestanding installation, 5 inches (127mm) of space between the back and sides of the unit are
suggested, which allows the proper air circulation to cool the compressor and condenser for energy
saving. Even with built-in installation, it is a must to keep ¼” (5mm) space on each side and at the
top to ensure proper service access and ventilation. Take care that the air vent at the front of the
appliance must never be covered or blocked in any way.
5. Locate the unit away from direct sunlight and sources of heat (stove, heater, radiator, etc.). Direct
sunlight may affect the acrylic coating and heat sources may increase electrical consumption.
Extreme cold ambient temperatures may also cause the unit not to perform properly.
6. Avoid locating the unit in damp areas.
7. Plug the unit into an exclusive, easily accessible and properly grounded wall outlet. Do not under
any circumstances cut or remove the third (ground) prong from the power cord. Any questions
concerning power and/or grounding should be directed towards a qualified electrician or an
authorized products service centre.
8. The appliance must be installed to all electrical, plumbing, water and drain connections in
accordance with state and local codes.
9. IMPORTANT: HIGH HUMID CLIMATE. During periods of high humidity, some condensation may
appear on outside surface of glass door. This condensation will disappear when humidity levels
drop. For prevention, it is advisable to install the appliance with sufficient ventilation in a dry and/or
air-conditioned environment.
10. The appliance has a power switch and/or OFF position for energy saving and safety reasons.
Built-Under Installation:
The appliance should not block the front ventilation. The space between the worktop and the unit should
be 31.5 to 35.43 inches for proper airflow. Adjust the front grille as necessary using the screws provided.
BUILT-UNDER INSTRUCTIONS
Make sure your installation does not block the front ventilation grille.
If the unit is fully integrated to be installed for fitting kitchen plinth, make sure that the ventilation gaps in
the plinth are at least 300 square centimeters and remove the ventilation grilles, so that warm air can
disperse unhindered. Otherwise, the appliance has to work harder, resulting in an increase in electricity
consumption.
NOTE: When pushing the appliance into the niche, make sure that the mains cable does not get trapped.
02'.7(57
KM-BIR1D1F-PR, KIM-BIR2D-PR
ELECTRICAL CONNECTION
Check that the voltage marked on the product corresponds with your supply voltage.
WARNING
Improper use of the grounded plug can result in the risk of electrical shock. If the power cord is
damaged, have it replaced by a qualified electrician or an authorized service center.
This appliance should be properly grounded for your safety. The power cord of this appliance is
equipped with a three-prong plug which mates with standard three-prong wall outlets to minimize the
possibility of electrical shock.
Do not under any circumstances cut or remove the third (ground) prong from the power cord
supplied. For personal safety, this appliance must be properly grounded.
This appliance requires a standard 115/120 Volt AC ~ 60Hz three-prong grounded electrical outlet.
Have the wall outlet and circuit checked by a qualified electrician to make sure the outlet is properly
grounded. When a standard 2-prong wall outlet is encountered, it is your responsibility and obligation
to have it replaced with a properly grounded 3-prong wall outlet.
To prevent accidental injury, the cord should be secured behind the appliance and not left exposed or
dangling.
The appliance should always be plugged into its own individual electrical outlet which has a voltage
rating that matches the rating label on the appliance. This provides the best performance and also
prevents overloading house wiring circuits that could cause a fire hazard from overheating. Never
unplug the appliance by pulling on the power cord. Always grip the plug firmly and pull straight out
from the receptacle. Replace or replace immediately all power cords that have become frayed or
otherwise damaged. Do not use a cord that shows cracks or abrasion damage along its length or at
either end. When moving the appliance, be careful not to damage the power cord.
EXTENSION CORD
Because of potential safety hazards under certain conditions, it is strongly recommended that you
do not use an extension cord with this appliance. However, if you must use an extension cord it is
absolutely necessary that it be a UL-CUL-listed, 3-wire grounding type appliance extension cord
having a grounding type plug and outlet and that the electrical rating of the cord be 115 volts and at
least 10 amperes.
REVERSING THE DOOR HINGE
It is possible to reverse the door on this
appliance, if required.
To do so, follow the steps below:
Note: All parts removed must be saved to do
the reinstallion of door.
WARNING
Use extreme caution with the articulated hinges. The hinge is self-closing and many pinch points
exist prior to built-in installation.
1. Remove the cover cap (3) and then remove the glass door by unscrewing the four screws (1)
and (2). Be careful to hold the glass door firmly after removing the screws and place it on a
padded surface to avoid the risk of damage.
2. Pop out the cover caps on the left side of cabinet and use them to cover the screw holes on the
right hand side.
3. Rotate the glass door 180° and refit the glass door to the opposite side. Then screw and tighten
it after the door is leveled.
ANTI-TIP BRACKET INSTALLATION
To reduce the risk of tipping the unit by abnormal usage or improper loading, the appliance must be
secured by properly installing the anti-tip device (if your model supplied with it) packed with the
appliance.
ƒ Place the anti-tip bracket on the floor
as shown in the figure. An anti-tip
bracket can be installed at the left side.
ƒ Mark the locations of the 4 holes of the
anti-tip bracket on the floor.
ƒ Use an 8mm / 5/16" masonry drill bit
and insert plastic anchors.
ƒ Secure bracket to floor using screws.
ƒ Slide appliance into position and make
sure the leg engages the anti-tip
bracket.
NOTE: If the unit is relocated, the bracket must be removed and installed in the new location.
8*(:7.3,9-*&551.&3(*
Pop out the two cover caps on the opposite
side of hinge and secure the appliance in
the niche by tightening the screws through
the attachment bracket if the unit is
provided with an attachment bracket.
OVERLAY PANEL DOOR DESIGN GUIDE
Model: KM-BIR5C-PR
Door panel preparation:
Depending on the model prepare the overlay
panel to the dimensions shown below. Then
attach the handle to the overlay panel by
using the flat head screws and drive the
screws flush with the panel if needed.
NOTE:
1. H = Height of door ± 2mm [3/40"], W = Width of door + 4mm [5/32"].
2. Weight of the overlay panel should not exceed 7 kilograms.
3. It is important to ensure that all drilled holes are drilled to the correct depth in order to avoid
splits in the wood when hardware is installed.
4. Drill the handle installation holes in the overlay panel according to the handle you are planning
to use.
5. For model KM-BIR5C-PR, don't cut the window in the panel.
Door panel installation
1. Remove the door gasket (4) completely from glass
door (2). Start in a corner and pull outward. This may
take some force. Set gasket down on a flat surface
for later installation.
2. Attach the wood overlay panel (1) on the glass door
(2) by using the eight wood screws ST4x30 Type AB
Philips (3).
3. Install the wood overlay glass door on the unit as
normal.
Model: KM-BIR1DF-PR and KM-BIR2D-PR
Door panel preparation
Depending on the model prepare the overlay panel to the dimensions shown below. Then attach the
handle to the overlay panel by using the flat head screws and drive the screws flush with the panel.
NOTE:
1. H = Height of door + 1mm [3/80"], W = Width of door
+ 4mm [5/32"].
2. Weight of the overlay panel should not exceed 7
kilograms.
3. It is important to ensure that all drilled holes are drilled to the correct depth in order to avoid
splits in the wood when hardware is installed.
4. Drill the handle installation holes in the overlay panel according to the handle you are planning
to use.
Door panel installation
1. Attach two wood mounting brackets
(3) to the prepared wood overlay panel
(1) by using 4 wood screws ST4x10
Type AB Philips (2) (Fig. 1).
2. Gently slide the overlay panel on the
door (4) (Fig. 2).
3. Fix the wood overlay panel on the door
by using 4 screws ST4x10 Type AB
Philips (8). Attach the decorative side
trims (5) to the mounting brackets (3).
(Fig. 3)
7KHFXVWRPSDQHODQGKDQGOHDUHQRWSURYLGHG
8
ELECTRICAL CONNECTION
Check that the voltage marked on the product corresponds with your supply voltage.
WARNING
Improper use of the grounded plug can result in the risk of electrical shock. If the power cord is
damaged, have it replaced by a qualified electrician or an authorized service center.
This appliance should be properly grounded for your safety. The power cord of this appliance is
equipped with a three-prong plug which mates with standard three-prong wall outlets to minimize the
possibility of electrical shock.
Do not under any circumstances cut or remove the third (ground) prong from the power cord
supplied. For personal safety, this appliance must be properly grounded.
This appliance requires a standard 115/120 Volt AC ~ 60Hz three-prong grounded electrical outlet.
Have the wall outlet and circuit checked by a qualified electrician to make sure the outlet is properly
grounded. When a standard 2-prong wall outlet is encountered, it is your responsibility and obligation
to have it replaced with a properly grounded 3-prong wall outlet.
To prevent accidental injury, the cord should be secured behind the appliance and not left exposed or
dangling.
The appliance should always be plugged into its own individual electrical outlet which has a voltage
rating that matches the rating label on the appliance. This provides the best performance and also
prevents overloading house wiring circuits that could cause a fire hazard from overheating. Never
unplug the appliance by pulling on the power cord. Always grip the plug firmly and pull straight out
from the receptacle. Replace or replace immediately all power cords that have become frayed or
otherwise damaged. Do not use a cord that shows cracks or abrasion damage along its length or at
either end. When moving the appliance, be careful not to damage the power cord.
EXTENSION CORD
Because of potential safety hazards under certain conditions, it is strongly recommended that you
do not use an extension cord with this appliance. However, if you must use an extension cord it is
absolutely necessary that it be a UL-CUL-listed, 3-wire grounding type appliance extension cord
having a grounding type plug and outlet and that the electrical rating of the cord be 115 volts and at
least 10 amperes.
REVERSING THE DOOR HINGE
It is possible to reverse the door on this
appliance, if required.
To do so, follow the steps below:
Note: All parts removed must be saved to do
the reinstallion of door.
WARNING
Use extreme caution with the articulated hinges. The hinge is self-closing and many pinch points
exist prior to built-in installation.
1. Remove the cover cap (3) and then remove the glass door by unscrewing the four screws (1)
and (2). Be careful to hold the glass door firmly after removing the screws and place it on a
padded surface to avoid the risk of damage.
2. Pop out the cover caps on the left side of cabinet and use them to cover the screw holes on the
right hand side.
3. Rotate the glass door 180° and refit the glass door to the opposite side. Then screw and tighten
it after the door is leveled.
ANTI-TIP BRACKET INSTALLATION
To reduce the risk of tipping the unit by abnormal usage or improper loading, the appliance must be
secured by properly installing the anti-tip device (if your model supplied with it) packed with the
appliance.
ƒ Place the anti-tip bracket on the floor
as shown in the figure. An anti-tip
bracket can be installed at the left side.
ƒ Mark the locations of the 4 holes of the
anti-tip bracket on the floor.
ƒ Use an 8mm / 5/16" masonry drill bit
and insert plastic anchors.
ƒ Secure bracket to floor using screws.
ƒ Slide appliance into position and make
sure the leg engages the anti-tip
bracket.
1
2
1 2
3
3
NOTE: If the unit is relocated, the bracket must be removed and installed in the new location.
8*(:7.3,9-*&551.&3(*
Pop out the two cover caps on the opposite
side of hinge and secure the appliance in
the niche by tightening the screws through
the attachment bracket if the unit is
provided with an attachment bracket.
OVERLAY PANEL DOOR DESIGN GUIDE
Model: KM-BIR5C-PR
Door panel preparation:
Depending on the model prepare the overlay
panel to the dimensions shown below. Then
attach the handle to the overlay panel by
using the flat head screws and drive the
screws flush with the panel if needed.
NOTE:
1. H = Height of door ± 2mm [3/40"], W = Width of door + 4mm [5/32"].
2. Weight of the overlay panel should not exceed 7 kilograms.
3. It is important to ensure that all drilled holes are drilled to the correct depth in order to avoid
splits in the wood when hardware is installed.
4. Drill the handle installation holes in the overlay panel according to the handle you are planning
to use.
5. For model KM-BIR5C-PR, don't cut the window in the panel.
Door panel installation
1. Remove the door gasket (4) completely from glass
door (2). Start in a corner and pull outward. This may
take some force. Set gasket down on a flat surface
for later installation.
2. Attach the wood overlay panel (1) on the glass door
(2) by using the eight wood screws ST4x30 Type AB
Philips (3).
3. Install the wood overlay glass door on the unit as
normal.
Model: KM-BIR1DF-PR and KM-BIR2D-PR
Door panel preparation
Depending on the model prepare the overlay panel to the dimensions shown below. Then attach the
handle to the overlay panel by using the flat head screws and drive the screws flush with the panel.
NOTE:
1. H = Height of door + 1mm [3/80"], W = Width of door
+ 4mm [5/32"].
2. Weight of the overlay panel should not exceed 7
kilograms.
3. It is important to ensure that all drilled holes are drilled to the correct depth in order to avoid
splits in the wood when hardware is installed.
4. Drill the handle installation holes in the overlay panel according to the handle you are planning
to use.
Door panel installation
1. Attach two wood mounting brackets
(3) to the prepared wood overlay panel
(1) by using 4 wood screws ST4x10
Type AB Philips (2) (Fig. 1).
2. Gently slide the overlay panel on the
door (4) (Fig. 2).
3. Fix the wood overlay panel on the door
by using 4 screws ST4x10 Type AB
Philips (8). Attach the decorative side
trims (5) to the mounting brackets (3).
(Fig. 3)
9
The appliance should always be plugged into its own individual electrical outlet which has a voltage
rating that matches the rating label on the appliance. This provides the best performance and also
prevents overloading house wiring circuits that could cause a fire hazard from overheating. Never
unplug the appliance by pulling on the power cord. Always grip the plug firmly and pull straight out
from the receptacle. Replace or replace immediately all power cords that have become frayed or
otherwise damaged. Do not use a cord that shows cracks or abrasion damage along its length or at
either end. When moving the appliance, be careful not to damage the power cord.
EXTENSION CORD
Because of potential safety hazards under certain conditions, it is strongly recommended that you
do not use an extension cord with this appliance. However, if you must use an extension cord it is
absolutely necessary that it be a UL-CUL-listed, 3-wire grounding type appliance extension cord
having a grounding type plug and outlet and that the electrical rating of the cord be 115 volts and at
least 10 amperes.
REVERSING THE DOOR HINGE
It is possible to reverse the door on this
appliance, if required.
To do so, follow the steps below:
Note: All parts removed must be saved to do
the reinstallion of door.
WARNING
Use extreme caution with the articulated hinges. The hinge is self-closing and many pinch points
exist prior to built-in installation.
1. Remove the cover cap (3) and then remove the glass door by unscrewing the four screws (1)
and (2). Be careful to hold the glass door firmly after removing the screws and place it on a
padded surface to avoid the risk of damage.
2. Pop out the cover caps on the left side of cabinet and use them to cover the screw holes on the
right hand side.
3. Rotate the glass door 180° and refit the glass door to the opposite side. Then screw and tighten
it after the door is leveled.
ANTI-TIP BRACKET INSTALLATION
To reduce the risk of tipping the unit by abnormal usage or improper loading, the appliance must be
secured by properly installing the anti-tip device (if your model supplied with it) packed with the
appliance.
▪ Place the anti-tip bracket on the floor
as shown in the figure. An anti-tip
bracket can be installed at the left side.
▪ Mark the locations of the 4 holes of the
anti-tip bracket on the floor.
▪ Use an 8mm / 5/16" masonry drill bit
and insert plastic anchors.
▪ Secure bracket to floor using screws.
▪ Slide appliance into position and make
sure the leg engages the anti-tip
bracket.
ELECTRICAL CONNECTION
Check that the voltage marked on the product corresponds with your supply voltage.
WARNING
Improper use of the grounded plug can result in the risk of electrical shock. If the power cord is
damaged, have it replaced by a qualified electrician or an authorized service center.
This appliance should be properly grounded for your safety. The power cord of this appliance is
equipped with a three-prong plug which mates with standard three-prong wall outlets to minimize the
possibility of electrical shock.
Do not under any circumstances cut or remove the third (ground) prong from the power cord
supplied. For personal safety, this appliance must be properly grounded.
This appliance requires a standard 115/120 Volt AC ~ 60Hz three-prong grounded electrical outlet.
Have the wall outlet and circuit checked by a qualified electrician to make sure the outlet is properly
grounded. When a standard 2-prong wall outlet is encountered, it is your responsibility and obligation
to have it replaced with a properly grounded 3-prong wall outlet.
To prevent accidental injury, the cord should be secured behind the appliance and not left exposed or
dangling.
The appliance should always be plugged into its own individual electrical outlet which has a voltage
rating that matches the rating label on the appliance. This provides the best performance and also
prevents overloading house wiring circuits that could cause a fire hazard from overheating. Never
unplug the appliance by pulling on the power cord. Always grip the plug firmly and pull straight out
from the receptacle. Replace or replace immediately all power cords that have become frayed or
otherwise damaged. Do not use a cord that shows cracks or abrasion damage along its length or at
either end. When moving the appliance, be careful not to damage the power cord.
EXTENSION CORD
Because of potential safety hazards under certain conditions, it is strongly recommended that you
do not use an extension cord with this appliance. However, if you must use an extension cord it is
absolutely necessary that it be a UL-CUL-listed, 3-wire grounding type appliance extension cord
having a grounding type plug and outlet and that the electrical rating of the cord be 115 volts and at
least 10 amperes.
REVERSING THE DOOR HINGE
It is possible to reverse the door on this
appliance, if required.
To do so, follow the steps below:
Note: All parts removed must be saved to do
the reinstallion of door.
WARNING
Use extreme caution with the articulated hinges. The hinge is self-closing and many pinch points
exist prior to built-in installation.
1. Remove the cover cap (3) and then remove the glass door by unscrewing the four screws (1)
and (2). Be careful to hold the glass door firmly after removing the screws and place it on a
padded surface to avoid the risk of damage.
2. Pop out the cover caps on the left side of cabinet and use them to cover the screw holes on the
right hand side.
3. Rotate the glass door 180° and refit the glass door to the opposite side. Then screw and tighten
it after the door is leveled.
ANTI-TIP BRACKET INSTALLATION
To reduce the risk of tipping the unit by abnormal usage or improper loading, the appliance must be
secured by properly installing the anti-tip device (if your model supplied with it) packed with the
appliance.
ƒ Place the anti-tip bracket on the floor
as shown in the figure. An anti-tip
bracket can be installed at the left side.
ƒ Mark the locations of the 4 holes of the
anti-tip bracket on the floor.
ƒ Use an 8mm / 5/16" masonry drill bit
and insert plastic anchors.
ƒ Secure bracket to floor using screws.
ƒ Slide appliance into position and make
sure the leg engages the anti-tip
bracket.
NOTE: If the unit is relocated, the bracket must be removed and installed in the new location.
8*(:7.3,9-*&551.&3(*
Pop out the two cover caps on the opposite
side of hinge and secure the appliance in
the niche by tightening the screws through
the attachment bracket if the unit is
provided with an attachment bracket.
OVERLAY PANEL DOOR DESIGN GUIDE
Model: KM-BIR5C-PR
Door panel preparation:
Depending on the model prepare the overlay
panel to the dimensions shown below. Then
attach the handle to the overlay panel by
using the flat head screws and drive the
screws flush with the panel if needed.
NOTE:
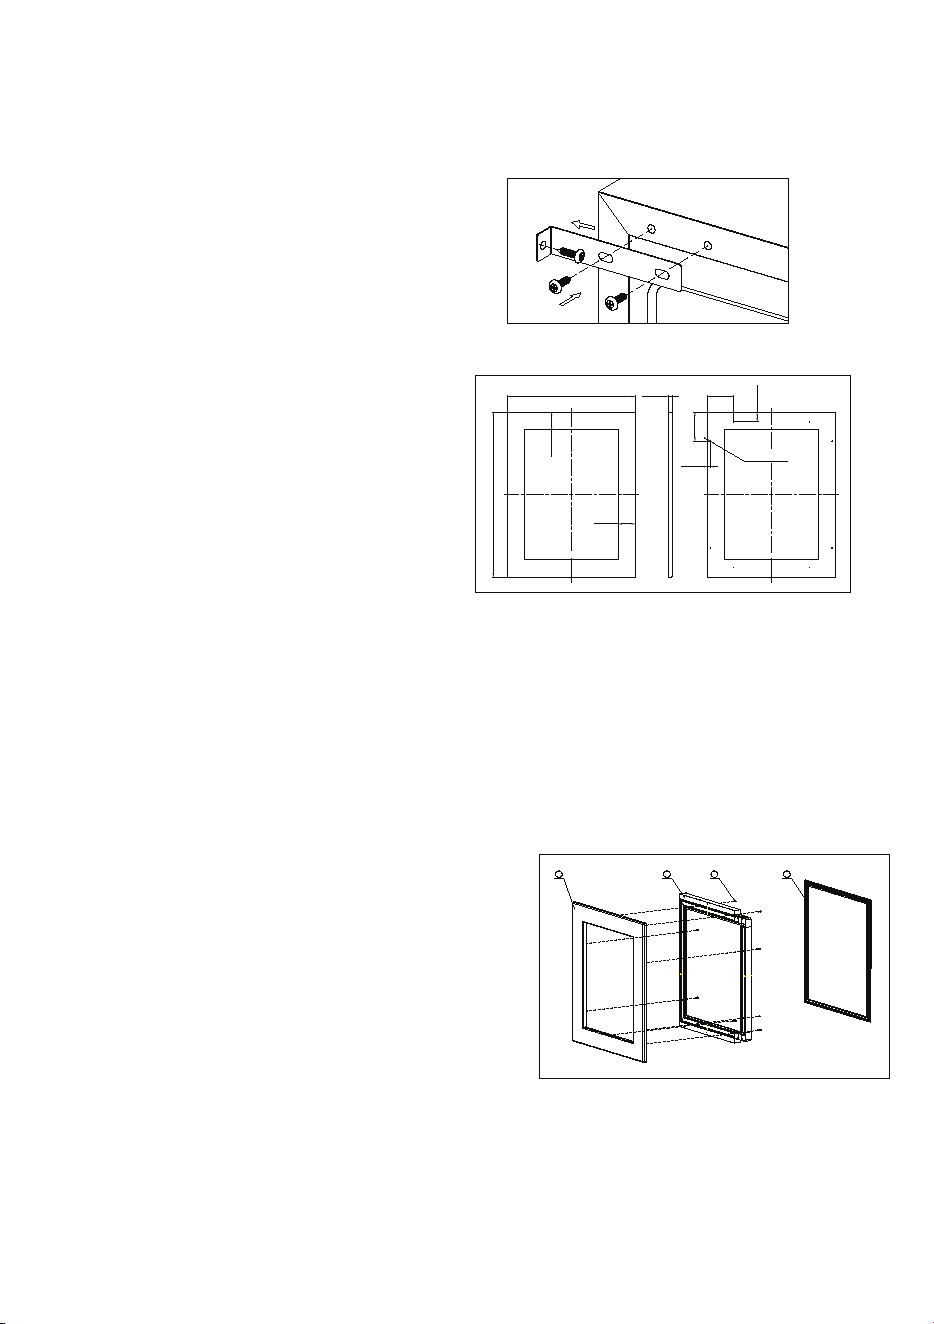
H = Height of door 2mm [3/40"], W = Width of door + 4mm [5/32"].
Weight of the overlay panel should not exceed 7 kilograms.
It is important to ensure that all drilled holes are drilled to the correct depth in order to avoid
splits in the wood when hardware is installed.
Drill the handle installation holes in the overlay panel according to the handle you are
planning to use.
For model KM-BIR5C-PR, don't cut the window in the panel.
Door panel installation
1. Remove the door gasket (4) completely from glass
door (2). Start in a corner and pull outward. This may
take some force. Set gasket down on a flat surface
for later installation.
2. Attach the wood overlay panel (1) on the glass door
(2) by using the eight wood screws ST4x30 Type AB
Philips (3).
3. Install the wood overlay glass door on the unit as
normal.
Model: KM-BIR1DF-PR and KM-BIR2D-PR
Door panel preparation
Depending on the model prepare the overlay panel to the dimensions shown below. Then attach the
handle to the overlay panel by using the flat head screws and drive the screws flush with the panel.
NOTE:
H
w
18mm
[45/64"]
8-§ ¶2.5mm [3/32"],
7mm [9/32"] Deep
FRONT VIEW REAR VIEW
120mm
[4 23/32"]
135mm
[5 5/16"]
13.5mm
[17/32"]
45mm
[1 49/64"]
ı
82mm
[3 15/64"]
ı
52mm
[2 3/64"]
1 2 3
4
1. H = Height of door + 1mm [3/80"], W = Width of door
+ 4mm [5/32"].
2. Weight of the overlay panel should not exceed 7
kilograms.
3. It is important to ensure that all drilled holes are drilled to the correct depth in order to avoid
splits in the wood when hardware is installed.
4. Drill the handle installation holes in the overlay panel according to the handle you are planning
to use.
Door panel installation
1. Attach two wood mounting brackets
(3) to the prepared wood overlay panel
(1) by using 4 wood screws ST4x10
Type AB Philips (2) (Fig. 1).
2. Gently slide the overlay panel on the
door (4) (Fig. 2).
3. Fix the wood overlay panel on the door
by using 4 screws ST4x10 Type AB
Philips (8). Attach the decorative side
trims (5) to the mounting brackets (3).
(Fig. 3)
10
NOTE: If the unit is relocated, the bracket must be removed and installed in the new location.
Pop out the two cover caps on the opposite
side of hinge and secure the appliance in
the niche by tightening the screws through
the attachment bracket if the unit is
provided with an attachment bracket.
OVERLAY PANEL DOOR DESIGN GUIDE
Model: KM-BIR5C-PR
Door panel preparation:
Depending on the model prepare the overlay
panel to the dimensions shown below. Then
attach the handle to the overlay panel by
using the flat head screws and drive the
screws flush with the panel if needed.
NOTE:
1. H = Height of door ± 2mm [3/40"], W = Width of door + 4mm [5/32"].
2. Weight of the overlay panel should not exceed 7 kilograms.
3. It is important to ensure that all drilled holes are drilled to the correct depth in order to avoid
splits in the wood when hardware is installed.
4. Drill the handle installation holes in the overlay panel according to the handle you are planning
to use.
5. For model KM-BIR5C-PR, don't cut the window in the panel.
Door panel installation
1. Remove the door gasket (4) completely from glass
door (2). Start in a corner and pull outward. This may
take some force. Set gasket down on a flat surface
for later installation.
2. Attach the wood overlay panel (1) on the glass door
(2) by using the eight wood screws ST4x30 Type AB
Philips (3).
3. Install the wood overlay glass door on the unit as
normal.
Model: KM-BIR1DF-PR and KM-BIR2D-PR
Door panel preparation
Depending on the model prepare the overlay panel to the dimensions shown below. Then attach the
handle to the overlay panel by using the flat head screws and drive the screws flush with the panel.
NOTE:
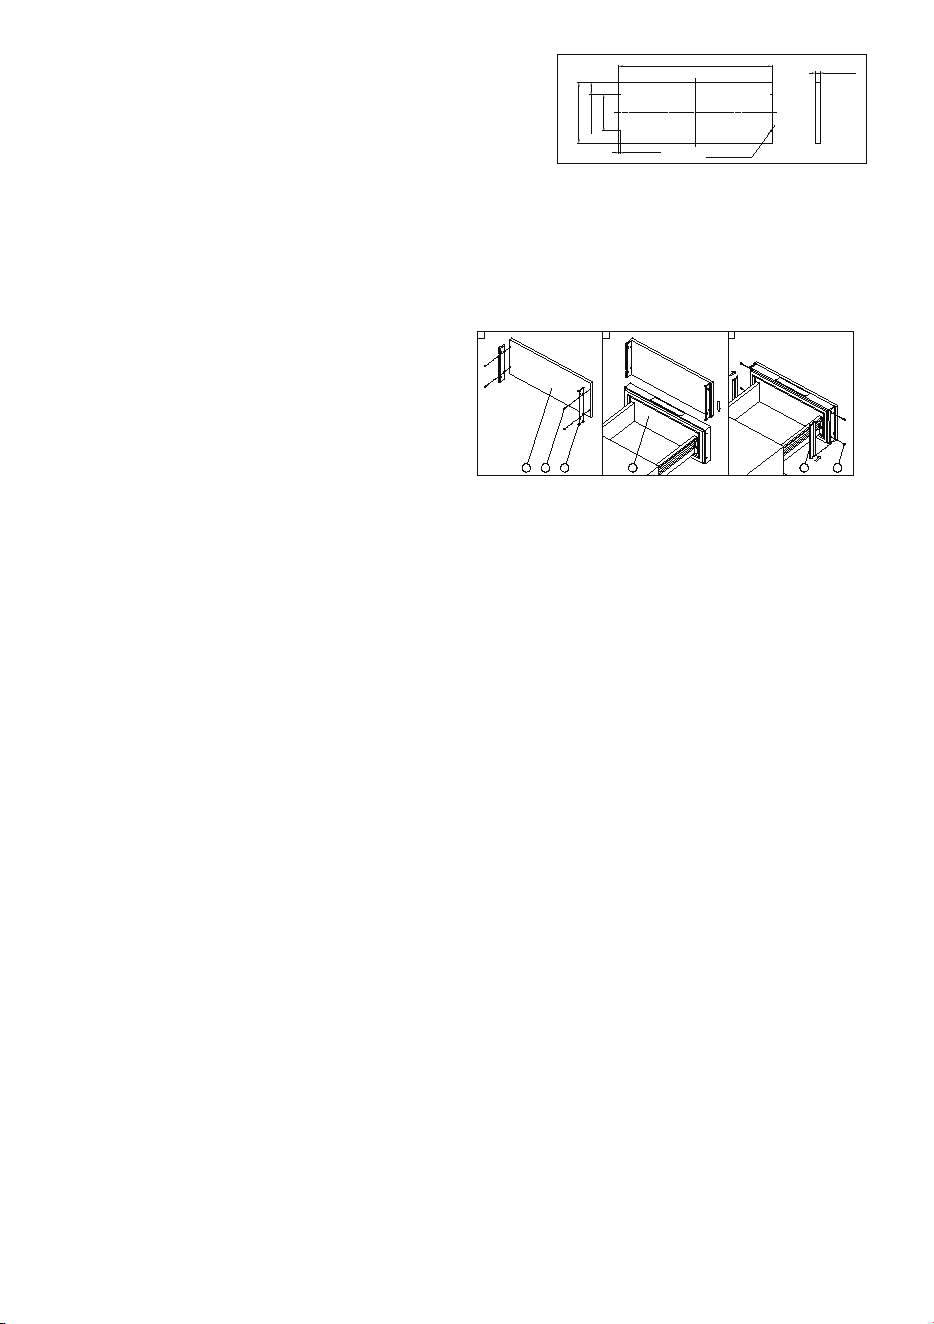
H
W
19mm [3/4"]
4-Φ 2.5mm [Ф1/10”]
6mm[15/64''] DEEP
50mm [1 31/32"]
7mm [9/32"]
150mm [5 29/32"]
1. H = Height of door + 1mm [3/80"], W = Width of door
+ 4mm [5/32"].
2. Weight of the overlay panel should not exceed 7
kilograms.
3. It is important to ensure that all drilled holes are drilled to the correct depth in order to avoid
splits in the wood when hardware is installed.
4. Drill the handle installation holes in the overlay panel according to the handle you are planning
to use.
Door panel installation
1. Attach two wood mounting brackets
(3) to the prepared wood overlay panel
(1) by using 4 wood screws ST4x10
Type AB Philips (2) (Fig. 1).
2. Gently slide the overlay panel on the
door (4) (Fig. 2).
3. Fix the wood overlay panel on the door
by using 4 screws ST4x10 Type AB
Philips (8). Attach the decorative side
trims (5) to the mounting brackets (3).
(Fig. 3)
1 2
1
4
4
5
6
2
3
11

The appliance should be placed in a position where the ambient temperature is between 60ºF and
95ºF. If the ambient temperature is above or below this range, the performance of the unit may be
affected. For example, placing your unit in extreme cold or hot conditions may cause NSYJWNTW
YJRUJWFYZWJXYTܫZHYZFYJ9MJWFSLJNKYMJXJYYJRUJWFYZWJRF^STYGJWJFHMJI
NOTE:
<MJS^TZZXJYMJFUUQNFSHJKTWYMJܪWXYYNRJTWWJXYFWYYMJFUUQNFSHJFKYJWMF[NSLGJJSXMZYTKKKTWF
long time, there could be a few degrees variance between the temperature you select, and the one
indicated on the LED readout. This is normal and it is due to the length of the activation time. Once
the unit is running for a few hours everything will be back to normal.
If the unit is unplugged, has lost power, or is turned off, you must wait 3 to 5 minutes before restarting
the unit. If you attempt to restart before this time delay, the unit will not start.
REFRIGERATOR
KM-BIR2D-PR , KM-BIR5C-PR
USE AND CONTROL
POWER
To turn the appliance off, press and hold the
key for 5 seconds until temperature display goes
out. To turn the appliance on, press and hold the
key for 1 second until temperature display lights
up.
NOTE: Pressing the key once can switch off the
audible alarm when the alarm is on.
LIGHT
Used to turn the inner light on/off.
To turn the interior light on/off, lightly touch and hold the key for 5 seconds. The interior light
NSINHFYTW\NQQQNLMYZUTWLTTZYYTHTSܪWRYMJXJQJHYNTS
The interior light indicator is the dot at the bottom right of the display.
UP
Used to increase (warm) the set temperature by 1°F.
DOWN
Used to decrease (cool) the set temperature by 1°F.
Display
Display the digital temperature and service indicators.
Indicator Light / Multi-key Function
7KHLQGLFDWRUOLJKWLVWKHGRWORFDWHGDWWKHERWWRPULJKWFRUQHURIWKHGLVSOD\7KHLQGLFDWRUOLJKW
ZLOOEHRQRUIODVKZKHQDPXOWLNH\IXQFWLRQLVVHOHFWHG7RSHUIRUPDPXOWLNH\IXQFWLRQ
WRXFKDQGKROGWKHILUVWNH\WKHQWRXFKWKHUHVWNH\IRUDWOHDVWVHFRQGVDQGWKHQUHOHDVHDOOWKH
NH\V
To turn the appliance on, press and hold the key for 1 seconds until temperature display lights up.
NOTE: Pressing the key once can switch off the audible alarm when the alarm is on.
UP
To increase (warm) the set temperature by 1°C or 1°F.
DOWN
To decrease (cool) the set temperature by 1°C or 1°F.
°F/°C Selector
Select the temperature display setting in Fahrenheit or Celsius degree.
Child Lock
If in 2 minutes or longer without touching any key, the child lock will be activated automatically. To
cancel the lock, touch the UP and DOWN keys at the same time for at least 5 seconds and the
NSINHFYTWQNLMY\NQQܫFXMYMWJJYNRJXYTHTSܪWRYMJFHYNTSNKYMJRTIJQNX\NYM(MNQI1THPKZSHYNTS
Indicator Light / Multi-key Function
The indicator light is the dot located at the bottom right corner of the display. The indicator light will
GJTS\MJSFRZQYNPJ^KZSHYNTSNXXJQJHYJI9TUJWKTWRFRZQYNPJ^KZSHYNTSYTZHMFSIMTQIYMJܪWXY
key, then touch the rest key for at least 5 seconds and then release all the keys.
Interior LED Light
The appliance is equipped with an interior LED light system which will be turned ON when a door is
opened. The interior light will go out approx. 5 seconds after the door is closed.
The unit is equipped with the LED type lights and they are designed for extremely long life. They are
not user serviceable. To change them pls contact the service department.
IMPORTANT:XJTSQ^YMJTWNLNSFQ1*)QNLMYܪYYNSLXUWT[NIJIG^YMJRFSZKFHYZWJW
Setting the Temperature Control
ƒ The unit has two separate temperature compartments. You can set the temperature of the
bottom/left compartment (freezer) by touching the left UP and DOWN symbols and set the
temperature of the top/right compartment (refrigerator) by touching the right UP and DOWN
X^RGTQX<MJS^TZYTZHMJNYMJWPJ^KTWYMJܪWXYYNRJYMJ1*)WJFITZY\NQQXMT\YMJTWNLNSFQ
temperature set previously. (The temperature preset at the factory is 0°F/-18°C for freezer
compartment and 38°F/3°C or 39°F/4°C for refrigerator compartment.)
ƒ The temperature you are setting will increase by one degree each time you touch the UP symbol,
and will decrease by one degree each time you touch the DOWN symbol.
ƒ The range of the temperature control is from -11°F/-24°C to 11°F/-12°C for freezer compartment
and from 36°F/2°C to 43°F/6°C for refrigerator compartment.
ƒ To view the set temperature at any time, touch the UP or DOWN symbol. The set temperature will
YJRUTWFWNQ^ܫFXMNSYMJINXUQF^\NSIT\KTWXJHTSIX9MJSYMJINXUQF^XMT\XYMJHZWWJSYNSSJW
temperature again.
OPERATION
YTZHMFSIMTQIYMJܪWXYPJ^YMJSYTZHMYMJWJXYPJ^KTWFYQJFXYXJHTSIXFSIYMJSWJQJFXJFQQYMJ
keys.
°F/°C Selector
Select the temperature display setting in Fahrenheit or Celsius degree. To change the temperature
from Fahrenheit to Celsius or from Celsius to Fahrenheit, press and hold the LIGHT key for 5 seconds
for models without key.
Child Lock
If the child lock or longer without touching any key, the child lock will be activated automatically for
models with the control outside of cabinet. To cancel the lock, touch the UP and DOWN keys
simultaneously for at least 5 seconds.
Interior LED Light
The interior light makes it easy to view your items. Pressing the LIGHT key toggles between 2 modes
of operation for the internal lights: functional (default) mode and showcase mode. If you are in
functional (default) mode, the lights will turn on only when the door is open. The interior light will go
out approx. 5 seconds after the door is closed. If you are in showcase mode, the lights will be on
whether or not the door is open.
The appliance is equipped with an interior LED light system which will be turned ON when a door is
opened. The interior light will go out approx. 5 seconds after the door is closed.
The unit is equipped with the LED type lights and they are designed for extremely long life. They are
not user serviceable. To change them pls contact the service department.
IMPORTANT:XJTSQ^YMJTWNLNSFQ1*)QNLMYܪYYNSLXUWT[NIJIG^YMJRFSZKFHYZWJW
Setting the Temperature Control
ƒ You can set the temperature by touching the UP and DOWN keys. When you press either of the
Y\TPJ^XKTWYMJܪWXYYNRJYMJ1*)WJFITZY\NQQXMT\YMJTWNLNSFQYJRUJWFYZWJXJYUWJ[NTZXQ^
(The temperature preset at the factory is 38°F/3°C or 39°F/4°C).
ƒ The temperature will increase 1°C/1°F if you press the UP key once, or the temperature will
IJHWJFXJr(r+NK^TZUWJXXYMJ)4<3PJ^TSHJ9MJINXUQF^ܫFXMJX\MNQJ^TZRFPJYMJ
setting. After the temperature has been set, the display shows the current inner temperature.
ƒ The range of set temperatures is from 38°F to 43°F (3°C to 6°C) or from 38°F to 54°F (3°C to
12°C) for the bottom zone for the zone designed from 25°F to 43°F (-4°C to 6°C) depending on
the model.
ƒ To view the set temperature at any time, press the UP or DOWN key, the display will blink twice
YJRUTWFWNQ^ܫFXMNSYMJXJYYJRUJWFYZWJ9MJSYMJINXUQF^XMT\XYMJHZWWJSYNSSJWYJRUJWFYZWJ
again.
REFRIGERATOR/FREEZER
KM-BIR1D1F-PR
USE AND CONTROL
The Controls of Your Unit
Power
To turn the appliance off, press and hold the key for 5 seconds until temperature display goes out.
12

The appliance should be placed in a position where the ambient temperature is between 16°C and
35°C (60ºF and 95ºF). If the ambient temperature is above or below this range, the performance of
the unit may be affected. For example, placing your unit in extreme cold or hot conditions may cause
NSYJWNTWYJRUJWFYZWJXYTܫZHYZFYJ9MJWFSLJNKYMJXJYYJRUJWFYZWJRF^STYGJWJFHMJI
NOTE:
<MJS^TZZXJYMJFUUQNFSHJKTWYMJܪWXYYNRJTWWJXYFWYYMJFUUQNFSHJFKYJWMF[NSLGJJSXMZYTKKKTWF
long time, there could be a few degrees variance between the temperature you select, and the one
indicated on the LED readout. This is normal and it is due to the length of the activation time. Once
the unit is running for a few hours everything will be back to normal.
If the unit is unplugged, has lost power, or is turned off, you must wait 3 to 5 minutes before restarting
the unit. If you attempt to restart before this time delay, the unit will not start.
REFRIGERATOR
KM-BIR2D-PR , KM-BIR5C-PR
USE AND CONTROL
POWER
To turn the appliance off, press and hold the
key for 5 seconds until temperature display goes
out. To turn the appliance on, press and hold the
key for 1 second until temperature display lights
up.
NOTE: Pressing the key once can switch off the
audible alarm when the alarm is on.
LIGHT
**Used to turn the inner light on/off.
To turn the interior light on/off, lightly touch and hold the key for 5 seconds. The interior light
NSINHFYTW\NQQQNLMYZUTWLTTZYYTHTSܪWRYMJXJQJHYNTS
The interior light indicator is the dot at the bottom right of the display.
UP
Used to increase (warm) the set temperature by 1°C/1°F.
DOWN
Used to decrease (cool) the set temperature by 1°C/1°F.
Display
Display the digital temperature and service indicators.
Indicator Light / Multi-key Function
The indicator light is the dot located at the bottom right corner of the display. The indicator light will
be on(** and ***TWܫFXM*) when a multi-key function is selected. To perform a multi-key function,
To turn the appliance on, press and hold the key for 1 seconds until temperature display lights up.
NOTE: Pressing the key once can switch off the audible alarm when the alarm is on.
UP
To increase (warm) the set temperature by 1°C or 1°F.
DOWN
To decrease (cool) the set temperature by 1°C or 1°F.
°F/°C Selector
Select the temperature display setting in Fahrenheit or Celsius degree.
Child Lock
If in 2 minutes or longer without touching any key, the child lock will be activated automatically. To
cancel the lock, touch the UP and DOWN keys at the same time for at least 5 seconds and the
NSINHFYTWQNLMY\NQQܫFXMYMWJJYNRJXYTHTSܪWRYMJFHYNTSNKYMJRTIJQNX\NYM(MNQI1THPKZSHYNTS
Indicator Light / Multi-key Function
The indicator light is the dot located at the bottom right corner of the display. The indicator light will
GJTS\MJSFRZQYNPJ^KZSHYNTSNXXJQJHYJI9TUJWKTWRFRZQYNPJ^KZSHYNTSYTZHMFSIMTQIYMJܪWXY
key, then touch the rest key for at least 5 seconds and then release all the keys.
Interior LED Light
The appliance is equipped with an interior LED light system which will be turned ON when a door is
opened. The interior light will go out approx. 5 seconds after the door is closed.
The unit is equipped with the LED type lights and they are designed for extremely long life. They are
not user serviceable. To change them pls contact the service department.
IMPORTANT:XJTSQ^YMJTWNLNSFQ1*)QNLMYܪYYNSLXUWT[NIJIG^YMJRFSZKFHYZWJW
Setting the Temperature Control
ƒ The unit has two separate temperature compartments. You can set the temperature of the
bottom/left compartment (freezer) by touching the left UP and DOWN symbols and set the
temperature of the top/right compartment (refrigerator) by touching the right UP and DOWN
X^RGTQX<MJS^TZYTZHMJNYMJWPJ^KTWYMJܪWXYYNRJYMJ1*)WJFITZY\NQQXMT\YMJTWNLNSFQ
temperature set previously. (The temperature preset at the factory is 0°F/-18°C for freezer
compartment and 38°F/3°C or 39°F/4°C for refrigerator compartment.)
ƒ The temperature you are setting will increase by one degree each time you touch the UP symbol,
and will decrease by one degree each time you touch the DOWN symbol.
ƒ The range of the temperature control is from -11°F/-24°C to 11°F/-12°C for freezer compartment
and from 36°F/2°C to 43°F/6°C for refrigerator compartment.
ƒ To view the set temperature at any time, touch the UP or DOWN symbol. The set temperature will
YJRUTWFWNQ^ܫFXMNSYMJINXUQF^\NSIT\KTWXJHTSIX9MJSYMJINXUQF^XMT\XYMJHZWWJSYNSSJW
temperature again.
q*q'7IPIGXSV
6HOHFWWKHWHPSHUDWXUHGLVSOD\VHWWLQJLQ)DKUHQKHLWRU&HOVLXVGHJUHH7RFKDQJHWKHWHPSHUDWXUH
IURP)DKUHQKHLWWR&HOVLXVRUIURP&HOVLXVWR)DKUHQKHLWSUHVVDQGKROGWKH/,*+7NH\IRU
VHFRQGVIRUPRGHOVZLWKRXWNH\
'LMPH0SGO
,ILQPLQXWHVRUORQJHUZLWKRXWWRXFKLQJDQ\NH\WKHFKLOGORFNZLOOEHDFWLYDWHGDXWRPDWLFDOO\
IRUPRGHOVZLWKWKHFRQWURORXWVLGHRIFDELQHW7RFDQFHOWKHORFNWRXFKWKH83DQG'2:1NH\V
VLPXOWDQHRXVO\IRUDWOHDVWVHFRQGV
-RXIVMSV0)(0MKLX
7KHLQWHULRUOLJKWPDNHVLWHDV\WRYLHZ\RXULWHPV
3UHVVLQJWKH/,*+7NH\WRJJOHVEHWZHHQPRGHVRIRSHUDWLRQIRUWKHLQWHUQDOOLJKWVIXQFWLRQDO
GHIDXOWPRGHDQGVKRZFDVHPRGH,I\RXDUHLQIXQFWLRQDOGHIDXOWPRGHWKHOLJKWVZLOOWXUQRQ
RQO\ZKHQWKHGRRULVRSHQ7KHLQWHULRUOLJKWZLOOJRRXWDSSUR[VHFRQGVDIWHUWKHGRRULVFORVHG
,I\RXDUHLQVKRZFDVHPRGHWKHOLJKWVZLOOEHRQZKHWKHURUQRWWKHGRRULVRSHQ
7KHDSSOLDQFHLVHTXLSSHGZLWKDQLQWHULRU/('OLJKWV\VWHPZKLFKZLOOEHWXUQHG21ZKHQDGRRU
LVRSHQHG7KHLQWHULRUOLJKWZLOOJRRXWDSSUR[VHFRQGVDIWHUWKHGRRULVFORVHG
7KHXQLWLVHTXLSSHGZLWKWKH/('W\SHOLJKWVDQGWKH\DUHGHVLJQHGIRUH[WUHPHO\ORQJOLIH7KH\
DUHQRWXVHUVHUYLFHDEOH7RFKDQJHWKHPSOJFVJFRQWDFWWKHVHUYLFHGHSDUWPHQW
-14368%288VHRQO\WKHRULJLQDO/('OLJKWWWLQJVSURYLGHGE\WKHPDQXIDFWXUHU
7IXXMRKXLI8IQTIVEXYVI'SRXVSP
v <RXFDQVHWWKHWHPSHUDWXUHE\WRXFKLQJWKH83DQG'2:1NH\V:KHQ\RXSUHVVHLWKHURI
WKHWZRNH\VIRUWKHILUVWWLPHWKH/('UHDGRXWZLOOVKRZWKHRULJLQDOWHPSHUDWXUHVHW
SUHYLRXVO\7KHWHPSHUDWXUHSUHVHWDWWKHIDFWRU\LVRUr)
v 7KHWHPSHUDWXUHZLOOLQFUHDVH|)LI\RXSUHVVWKH83NH\RQFHRUWKHWHPSHUDWXUHZLOO
GHFUHDVH|)LI\RXSUHVVWKH'2:1NH\RQFH7KHGLVSOD\IODVKHVZKLOH\RXPDNHWKH
VHWWLQJ$IWHUWKHWHPSHUDWXUHKDVEHHQVHWWKHGLVSOD\VKRZVWKHFXUUHQWLQQHUWHPSHUDWXUH
v 7KHUDQJHRIVHWWHPSHUDWXUHVLVIURPr)WRr)RUIURPr)WRr)RUIURPr)WRr)
RUIURPr)WRr)GHSHQGLQJRQWKHPRGHO
v 7RYLHZWKHVHWWHPSHUDWXUHDWDQ\WLPHSUHVVWKH83RU'2:1NH\WKHVHWWHPSHUDWXUHZLOO
WHPSRUDULO\DVKLQWKHGLVSOD\IRUVHFRQGV7KHQWKHGLVSOD\VKRZVWKHFXUUHQWLQQHU
WHPSHUDWXUHDJDLQ
REFRIGERATOR/FREEZER
KM-BIR1D1F-PR
USE AND CONTROL
The Controls of Your Unit
Power
7RWXUQWKHDSSOLDQFHRIISUHVVDQGKROGWKHNH\IRUVHFRQGVXQWLOWHPSHUDWXUHGLVSOD\
JRHVRXW7RWXUQWKHDSSOLDQFHRQSUHVVDQGKROGWKHNH\IRUVHFRQGVXQWLO
WHPSHUDWXUHGLVSOD\OLJKWVXS
127(3UHVVLQJWKHNH\RQFHFDQVZLWFKRIIWKHDXGLEOHDODUPZKHQWKHDODUPLVRQ
13

The appliance should be placed in a position where the ambient temperature is between 16°C and
35°C (60ºF and 95ºF). If the ambient temperature is above or below this range, the performance of
the unit may be affected. For example, placing your unit in extreme cold or hot conditions may cause
NSYJWNTWYJRUJWFYZWJXYTܫZHYZFYJ9MJWFSLJNKYMJXJYYJRUJWFYZWJRF^STYGJWJFHMJI
NOTE:
<MJS^TZZXJYMJFUUQNFSHJKTWYMJܪWXYYNRJTWWJXYFWYYMJFUUQNFSHJFKYJWMF[NSLGJJSXMZYTKKKTWF
long time, there could be a few degrees variance between the temperature you select, and the one
indicated on the LED readout. This is normal and it is due to the length of the activation time. Once
the unit is running for a few hours everything will be back to normal.
If the unit is unplugged, has lost power, or is turned off, you must wait 3 to 5 minutes before restarting
the unit. If you attempt to restart before this time delay, the unit will not start.
REFRIGERATOR
KM-BIR2D-PR , KM-BIR5C-PR
USE AND CONTROL
POWER
To turn the appliance off, press and hold the
key for 5 seconds until temperature display goes
out. To turn the appliance on, press and hold the
key for 1 second until temperature display lights
up.
NOTE: Pressing the key once can switch off the
audible alarm when the alarm is on.
LIGHT
**Used to turn the inner light on/off.
To turn the interior light on/off, lightly touch and hold the key for 5 seconds. The interior light
NSINHFYTW\NQQQNLMYZUTWLTTZYYTHTSܪWRYMJXJQJHYNTS
The interior light indicator is the dot at the bottom right of the display.
UP
Used to increase (warm) the set temperature by 1°C/1°F.
DOWN
Used to decrease (cool) the set temperature by 1°C/1°F.
Display
Display the digital temperature and service indicators.
Indicator Light / Multi-key Function
The indicator light is the dot located at the bottom right corner of the display. The indicator light will
be on(** and ***TWܫFXM*) when a multi-key function is selected. To perform a multi-key function,
83
7RLQFUHDVHZDUPWKHVHWWHPSHUDWXUHE\r)
'2:1
7RGHFUHDVHFRROWKHVHWWHPSHUDWXUHE\r)
q*q'7IPIGXSV
6HOHFWWKHWHPSHUDWXUHGLVSOD\VHWWLQJLQ)DKUHQKHLWRU&HOVLXVGHJUHH
'LMPH0SGO
,ILQPLQXWHVRUORQJHUZLWKRXWWRXFKLQJDQ\NH\WKHFKLOGORFNZLOOEHDFWLYDWHGDXWRPDWLFDOO\
7RFDQFHOWKHORFNWRXFKWKH83DQG'2:1NH\VDWWKHVDPHWLPHIRUDWOHDVWVHFRQGVDQGWKH
LQGLFDWRUOLJKWZLOOIODVKWKUHHWLPHVWRFRQILUPWKHDFWLRQLIWKHPRGHOLVZLWK&KLOG/RFNIXQFWLRQ
-RHMGEXSV0MKLX1YPXMOI]*YRGXMSR
7KHLQGLFDWRUOLJKWLVWKHGRWORFDWHGDWWKHERWWRPULJKWFRUQHURIWKHGLVSOD\7KHLQGLFDWRUOLJKWZLOO
EHRQZKHQDPXOWLNH\IXQFWLRQLVVHOHFWHG7RSHUIRUPDPXOWLNH\IXQFWLRQWRXFKDQGKROGWKH
ILUVWNH\WKHQWRXFKWKHUHVWNH\IRUDWOHDVWVHFRQGVDQGWKHQUHOHDVHDOOWKHNH\V
-RXIVMSV0)(0MKLX
7KHDSSOLDQFHLVHTXLSSHGZLWKDQLQWHULRU/('OLJKWV\VWHPZKLFKZLOOEHWXUQHG21ZKHQDGRRULV
RSHQHG7KHLQWHULRUOLJKWZLOOJRRXWDSSUR[VHFRQGVDIWHUWKHGRRULVFORVHG
7KHXQLWLVHTXLSSHGZLWKWKH/('W\SHOLJKWVDQGWKH\DUHGHVLJQHGIRUH[WUHPHO\ORQJOLIH7KH\DUH
QRWXVHUVHUYLFHDEOH7RFKDQJHWKHPSOVFRQWDFWWKHVHUYLFHGHSDUWPHQW
-14368%289WISRP]XLISVMKMREP0)(PMKLXƼXXMRKWTVSZMHIHF]XLIQERYJEGXYVIV
7IXXMRKXLI8IQTIVEXYVI'SRXVSP
v 7KHXQLWKDVWZRVHSDUDWHWHPSHUDWXUHFRPSDUWPHQWV<RXFDQVHWWKHWHPSHUDWXUHRIWKH
ERWWRPOHIWFRPSDUWPHQWIUHH]HUE\WRXFKLQJWKHOHIW83DQG'2:1V\PEROVDQGVHWWKH
WHPSHUDWXUHRIWKHWRSULJKWFRPSDUWPHQWUHIULJHUDWRUE\WRXFKLQJWKHULJKW83DQG'2:1
V\PEROV:KHQ\RXWRXFKHLWKHUNH\IRUWKHILUVWWLPHWKH/('UHDGRXWZLOOVKRZWKHRULJLQDO
WHPSHUDWXUHVHWSUHYLRXVO\7KHWHPSHUDWXUHSUHVHWDWWKHIDFWRU\LVr)IRUIUHH]HU
FRPSDUWPHQWDQGr)RUr)IRUUHIULJHUDWRUFRPSDUWPHQW
v 7KHWHPSHUDWXUH\RXDUHVHWWLQJZLOOLQFUHDVHE\RQHGHJUHHHDFKWLPH\RXWRXFKWKH83
V\PERODQGZLOOGHFUHDVHE\RQHGHJUHHHDFKWLPH\RXWRXFKWKH'2:1V\PERO
v 7KHUDQJHRIWKHWHPSHUDWXUHFRQWUROLVIURPr)WRr)IRUIUHH]HUFRPSDUWPHQWDQG
IURPr)WRr)IRUUHIULJHUDWRUFRPSDUWPHQW
v 7RYLHZWKHVHWWHPSHUDWXUHDWDQ\WLPHWRXFKWKH83RU'2:1V\PERO7KHVHW
WHPSHUDWXUHZLOOWHPSRUDULO\IODVKLQWKHGLVSOD\ZLQGRZIRUVHFRQGV7KHQWKHGLVSOD\
VKRZVWKHFXUUHQWLQQHUWHPSHUDWXUHDJDLQ
YTZHMFSIMTQIYMJܪWXYPJ^YMJSYTZHMYMJWJXYPJ^KTWFYQJFXYXJHTSIXFSIYMJSWJQJFXJFQQYMJ
keys.
°F/°C Selector
Select the temperature display setting in Fahrenheit or Celsius degree. To change the temperature
from Fahrenheit to Celsius or from Celsius to Fahrenheit, press and hold the LIGHT key for 5 seconds
for models without key.
Child Lock
If the child lock or longer without touching any key, the child lock will be activated automatically for
models with the control outside of cabinet. To cancel the lock, touch the UP and DOWN keys
simultaneously for at least 5 seconds.
Interior LED Light
The interior light makes it easy to view your items. Pressing the LIGHT key toggles between 2 modes
of operation for the internal lights: functional (default) mode and showcase mode. If you are in
functional (default) mode, the lights will turn on only when the door is open. The interior light will go
out approx. 5 seconds after the door is closed. If you are in showcase mode, the lights will be on
whether or not the door is open.
The appliance is equipped with an interior LED light system which will be turned ON when a door is
opened. The interior light will go out approx. 5 seconds after the door is closed.
The unit is equipped with the LED type lights and they are designed for extremely long life. They are
not user serviceable. To change them pls contact the service department.
IMPORTANT:XJTSQ^YMJTWNLNSFQ1*)QNLMYܪYYNSLXUWT[NIJIG^YMJRFSZKFHYZWJW
Setting the Temperature Control
ƒ You can set the temperature by touching the UP and DOWN keys. When you press either of the
Y\TPJ^XKTWYMJܪWXYYNRJYMJ1*)WJFITZY\NQQXMT\YMJTWNLNSFQYJRUJWFYZWJXJYUWJ[NTZXQ^
(The temperature preset at the factory is 38°F/3°C or 39°F/4°C).
ƒ The temperature will increase 1°C/1°F if you press the UP key once, or the temperature will
IJHWJFXJr(r+NK^TZUWJXXYMJ)4<3PJ^TSHJ9MJINXUQF^ܫFXMJX\MNQJ^TZRFPJYMJ
setting. After the temperature has been set, the display shows the current inner temperature.
ƒ The range of set temperatures is from 38°F to 43°F (3°C to 6°C) or from 38°F to 54°F (3°C to
12°C) for the bottom zone for the zone designed from 25°F to 43°F (-4°C to 6°C) depending on
the model.
ƒ To view the set temperature at any time, press the UP or DOWN key, the display will blink twice
YJRUTWFWNQ^ܫFXMNSYMJXJYYJRUJWFYZWJ9MJSYMJINXUQF^XMT\XYMJHZWWJSYNSSJWYJRUJWFYZWJ
again.
REFRIGERATOR/FREEZER
KM-BIR1D1F-PR
USE AND CONTROL
The Controls of Your Unit
Power
To turn the appliance off, press and hold the key for 5 seconds until temperature display goes out.
14

v /LJKWO\WRXFKDQGKROGWKH83NH\IRUVHFRQGVWRHQWHU6HWWLQJVPRGH
v 8VHWKH83DQG'2:1NH\VWRVHOHFWWKHWHPSHUDWXUHGLVSOD\VHWWLQJLQ)DKUHQKHLW
RU&HOVLXVGHJUHH
v 7RXFKDQGKROGWKH83NH\IRUVHFRQGVWRFRQILUPWKHVHOHFWLRQ
238))RUFRQWUROSDQHOVPDUNHGZLWK
7IXXMRKWQSHI
&HUWDLQVHWWLQJVRQWKHZLQHFDELQHWFDQRQO\EHVHOHFWHGLQ6HWWLQJVPRGH,Q6HWWLQJVPRGH
RQO\WKH83DQG'2:1NH\VRIORZHU]RQHDUHIXQFWLRQDO
7RXFKDQGKROGWKH83NH\IRUVHFRQGVWRHQWHUDQGOHDYH6HWWLQJVPRGH7KHDSSOLDQFHZLOO
OHDYH6HWWLQJVPRGHDXWRPDWLFDOO\DIWHUDSSUR[LPDWHO\RQHPLQXWH
{*{'7IPIGXMSR
(MWTPE]&VMKLXRIWW
v /LJKWO\WRXFKDQGKROGWKH83NH\IRUVHFRQGVWRHQWHU6HWWLQJVPRGHDQGWKHQWRXFK
WKH32:(5NH\RQFH
v 8VHWKH83DQG'2:1NH\VWRVHOHFWWKHEULJKWQHVVRIWKHGLVSOD\ZKHQWKHGRRULVFORVH
GRII
GGLPPHVWVHWWLQJGHIDXOW
GPHGLXPVHWWLQJ
GEULJKWHVWVHWWLQJVDPHOHYHODVZKHQGRRULVRSHQHG
v 7RXFKDQGKROGWKH83NH\IRUVHFRQGVWRFRQILUPWKHVHOHFWLRQ
-RXIVMSV0MKLXMRK&VMKLXRIWW
/LJKWO\WRXFKDQGKROGWKH83NH\IRUVHFRQGVWRHQWHU6HWWLQJVPRGHDQGWKHQWRXFK
WKH32:(5NH\WZLFH
8VHWKH83DQG'2:1NH\VWRVHOHFWWKHEULJKWQHVVRIWKHLQWHULRUOLJKWLQJZKHQWKHGRRU
LVFORVH
/RIIZKHQWKHGRRULVFORVHRURSHQ
/GLPPHVWVHWWLQJ
/PHGLXPVHWWLQJ
/EULJKWHVWVHWWLQJGHIDXOWVDPHOHYHODVZKHQGRRULVRSHQHG
7RXFKDQGKROGWKH83NH\IRUVHFRQGVWRFRQILUPWKHVHOHFWLRQ
*ER1SHI
/LJKWO\WRXFKDQGKROGWKH83NH\IRUVHFRQGVWRHQWHU6HWWLQJVPRGHDQGWKHQWRXFK
WKH32:(5NH\WKUHHWLPHV
8VHWKH83DQG'2:1NH\VWRVHOHFWWKHIDQPRGH
)6LOHQWPRGH(QHUJ\VDYLQJPRGHGHIDXOW
)'\QD&OLPDPRGHKDOIWLPH
)'\QD&OLPDPRGHIXOOWLPH
7RXFKDQGKROGWKH83NH\IRUVHFRQGVWRFRQILUPWKHVHOHFWLRQ
%YHMFPI8SRIW
v /LJKWO\WRXFKDQGKROGWKH83NH\IRUVHFRQGVWRHQWHU6HWWLQJVPRGHDQGWKHQWRXFK
WKH32:(5NH\IRXUWLPHV
v 8VHWKH83DQG'2:1NH\VWRVHOHFWWKHDXGLEOHWRQHV
6NH\SDGWRQH21DODUPWRQH2))
6NH\SDGWRQH21DODUPWRQH21GHIDXOW
6NH\SDGWRQH2))DODUPWRQH2))
6NH\SDGWRQH2))DODUPWRQH21
v 7RXFKDQGKROGWKH83NH\IRUVHFRQGVWRFRQILUPWKHVHOHFWLRQ
15

-RXIVMSV0MKLX
7KHLQWHULRUOLJKWLQJPDNHVLWHDV\WRYLHZLWHPVDQGHQKDQFHVWKHGLVSOD\RI\RXUFROOHFWLRQ
7RXFKLQJDQGKROGLQJWKH/,*+7NH\IRUVHFRQGVWRJJOHVEHWZHHQPRGHVRIRSHUDWLRQIRU
WKHLQWHULRUOLJKWVIXQFWLRQDOGHIDXOWPRGHDQGVKRZFDVHPRGH,I\RXDUHLQIXQFWLRQDO
GHIDXOWPRGHWKHOLJKWVZLOOWXUQRQRQO\ZKHQWKHGRRULVRSHQ7KHLQWHULRUOLJKWZLOOJRRXW
DSSUR[VHFRQGVDIWHUWKHGRRULVFORVHG,I\RXDUHLQVKRZFDVHPRGHWKHOLJKWVZLOOEHRQ
ZKHWKHURUQRWWKHGRRULVRSHQ
(]REQMG'SSPMRK7MPIRX1SHI
7KHDSSOLDQFHKDVWZRGLIIHUHQWUXQQLQJPRGHV,Q6LOHQWPRGHRQFHWKHUHTXLUHGWHPSHUDWXUH
LVUHDFKHGWKHDSSOLDQFHZLOOUXQZLWKRXWWKHIDQ,Q'\QDPLF&RROLQJPRGHWKHIDQF\FOHVRQ
DQGRIIWRFLUFXODWHWKHDLUHYHQDIWHUWKHUHTXLUHGWHPSHUDWXUHLVUHDFKHG7KLVHQVXUHV
FRQVLVWHQWKXPLGLW\DQGWHPSHUDWXUHGLVWULEXWLRQLQWKHXQLW
8VLQJWKHG\QDPLFPRGHLQFUHDVHVWKHOHYHORIQRLVHLQRSHUDWLRQ
7MFGGTX1SHI
6MFGGTXPRGHLVDYDLODEOHIRUWKHREVHUYDQFHRIFHUWDLQUHOLJLRXVKROLGD\V7KLVPRGHWXUQVRII
WKHGLVSOD\VLQWHULRUOLJKWDQGDXGLEOHDODUPVDQGSUHYHQWVWKHPIURPWXUQLQJRQDJDLQ1RUPDO
FRROLQJRSHUDWLRQVZLOOVWLOOWDNHSODFH
7RLQLWLDWH6MFGGTXPRGHSUHVVWKH32:(5DQG/,*+7NH\VRUWKH32:(5DQG|&)NH\VDWWKH
VDPHWLPHDQGKROGIRUDWOHDVWVHFRQGV7KHGLVSOD\VDQGLQWHULRUOLJKWVZLOOJRRXWWRFRQILUP
WKH6MFGGTXPRGHLV218MFGGTXPRGHFDQEHFDQFHOHGE\UHSHDWLQJWKHDERYHSURFHVV7KH
6MFGGTX0RGHZLOODXWRPDWLFDOO\WXUQRIIDIWHUKRXUV
8IQTIVEXYVI1IQSV]*YRGXMSR
,QWKHHYHQWRIDSRZHULQWHUUXSWLRQSRZHUVXUJHEUHDNHUVZLWFKHWFWKHXQLWFDQUHPHPEHU
WKHSUHYLRXVWHPSHUDWXUHVHWWLQJVDQGZKHQWKHSRZHULVUHFRYHUHGWKHFDELQHWWHPSHUDWXUH
ZLOOUHWXUQWRWKHVDPHVHWWLQJWHPSHUDWXUHDVEHIRUHSRZHURII
()*6378-2+
v 8QGHUQRUPDORSHUDWLQJFRQGLWLRQVWKHXQLWUHTXLUHVQRPDQXDOGHIURVWLQJ
v 7KHHYDSRUDWRUEHKLQGWKHUHDUZDOORIWKHXQLWGHIURVWVDXWRPDWLFDOO\7KHFRQGHQVDWH
FROOHFWVLQWKHGUDLQDJHFKDQQHOEHKLQGWKHUHDUZDOORIWKHXQLWDQGIORZVWKURXJKWKH
GUDLQDJHKROHLQWRWKHGULSWUD\RYHUE\WKHFRPSUHVVRUZKHUHLWHYDSRUDWHV
v +RZHYHUIURVWPD\DFFXPXODWHRQWKHHYDSRUDWRULIWKHXQLWLVUHSHDWHGO\RSHQHGLQ
KLJKKHDWRUKLJKKXPLGLW\ORFDWLRQV,IWKLVIURVWSDWWHUQGRHVQRWFOHDUZLWKLQKRXUV
\RXUXQLWZLOOUHTXLUHPDQXDOGHIURVWLQJ
8IQTIVEXYVI%PEVQERHHSSVEPEVQ
v $QDXGLEOHDODUPVRXQGVLIWKHVWRUDJHWHPSHUDWXUHLVQRWFROGHQRXJK7KH
WHPSHUDWXUHGLVSOD\IODVKHVDWWKHVDPHWLPH
v 7KHFDXVHRIWKHWHPSHUDWXUHEHLQJWRRKLJKPD\EH
:DUPLWHPVZHUHSODFHGLQVLGH
7RRPXFKZDUPDPELHQWDLUIORZHGLQZKHQUHDUUDQJLQJDQGUHPRYLQJFRQWHQWV
3RZHUIDLOXUHIRUVRPHWLPH
7KHDSSOLDQFHLVIDXOW\
16

v 7KHDXGLEOHDODUPLVDXWRPDWLFDOO\VLOHQFHGDQGWKHWHPSHUDWXUHGLVSOD\VWRSV
IODVKLQJZKHQWKHWHPSHUDWXUHLVVXIILFLHQWO\FROGDJDLQ
v ,IWKHGRRUKDVEHHQOHIWRSHQIRUPRUHWKDQVHFRQGVWKHDODUPZLOOVRXQG
3UHVVLQJWKH32:(5NH\RQFHZLOOVZLWFKRIIWKHDXGLEOHDODUP
97-2+8,)*6))>)6-*%:%-0%&0)
v 7KHIUHHzHULVGHVLJQHGIRUWKHORQJWHUPVWRUDJHRIIURzHQIRRGSWRUDJHWLPHLVXSWR
WKUHHPRQWKV
v 7KHVWRUDJHOLIHRIIUR]HQIRRGVYDULHVDQGWKHUHFRPPHQGHGVWRUDJHWLPHVKRXOGQRW
EHH[FHHGHG
v 3UHSDFNDJHGFRPPHUFLDOO\IUR]HQIRRGVKRXOGEHVWRUHGLQDFFRUGDQFHZLWKWKH
IUR]HQIRRGVPDQXIDFWXUHUVLQVWUXFWLRQVIRUDWKUHHVWDUIUR]HQIRRGVWRUDJH
FRPSDUWPHQWRUKRPHIUHH]HU
v 3ODFHIUR]HQIRRGLQWRWKHIUHH]HUDVTXLFNO\DVSRVVLEOHDIWHUSXUFKDVH,IWKHUHDUH
LQVWUXFWLRQVRQWKHSDFNHWFDUHIXOO\IROORZWKHVHLQVWUXFWLRQVUHJDUGLQJVWRUDJHWLPHV
)GS(IQSQSHI
(FR'HPRPRGHFDQEHDFWLYDWHGE\SUHVHQWLQJWKHDSSOLDQFHDWH[KLELWLRQVRULQ
VDOHVURRPV,Q(FR'HPRPRGHWKHFRPSUHVVRUDQGDOOIDQPRWRUVDUHVZLWFKHG2))$OVRLW
LVSHUIHFWDVDFOHDQLQJPRGH7KHUHIULJHUDWLRQVZLWFKHVRIIZKLOHWKHOLJKWVVWD\RQ
%\SUHVVLQJDQGKROGLQJWKH83'2:1DQG/,*+7RU|)|&6HOHFWRUDWWKHVDPH
WLPHIRUDWOHDVWVHFRQGVWKHLQGLFDWRUOLJKWZLOOIODVKILYHWLPHVWRFRQILUPWKHLQSXWDQGWKH
XQLWZLOORSHUDWHLQ(FR'HPRPRGH(FR'HPRPRGHFDQEHFDQFHOHGE\UHSHDWLQJWKHDERYH
SURFHVV
3TIVEXMRK2SMWIW
7KHXQLWLVFRROHGE\DFRPSUHVVRUUHIULJHUDWLRQDJJUHJDWH7KHFRPSUHVVRUSXPSVFRRODQW
WKURXJKWKHFRROLQJV\VWHPSURGXFLQJRSHUDWLQJQRLVH(YHQZKHQWKHFRPSUHVVRUFXWVRXW
QRLVHVFDXVHGE\FKDQJHVLQWHPSHUDWXUHDQGSUHVVXUHDUHXQDYRLGDEOH2SHUDWLQJQRLVHZLOO
EHPRVWDXGLEOHLPPHGLDWHO\DIWHUWKHFRPSUHVVRUFXWVLQ,WEHFRPHVTXLHWHUDVWKH
RSHUDWLQJSHULRGFRQWLQXHV
7KHIROORZLQJQRLVHVDUHQRUPDODQGRFFXUIURPWLPHWRWLPH
v *XUJOLQJVRXQGFDXVHGE\WKHUHIULJHUDQWIORZLQJWKURXJKWKHDSSOLDQFHVFRLOV
v +XPPLQJQRLVHPDGHE\WKHPRWRUFRPSUHVVRU7KLVQRLVHFDQJHWORXGHUIRUEULHI
SHULRGVZKHQWKHPRWRULVVZLWFKLQJRQ
v &UDFNOLQJSRSSLQJVRXQGVUHVXOWLQJIURPWKHPDWHULDOVFRQWUDFWLRQDQGH[SDQVLRQ
GXHWRWHPSHUDWXUHYDULDWLRQV
v )DQRSHUDWLQJVRXQGWRFLUFXODWHWKHDLUZLWKLQWKHZLQHFDELQHW
8QXVXDOQRLVHLVQRUPDOO\WKHUHVXOWRILPSURSHULQVWDOODWLRQ8QGHUQRFLUFXPVWDQFHVPXVW
WXELQJFRPHLQWRFRQWDFWZLWKDZDOORWKHUIXUQLWXUHRUZLWKRWKHUWXELQJ
:KHUHWKHXQLWLVLQVWDOOHGLQDQRSHQSODQNLWFKHQRULQSDUWLWLRQZDOOVWKHOHYHORIRSHUDWLQJ
QRLVHZLOOEHKHDUGPRUHDFXWHO\+RZHYHUWKLVLVGXHWRWKHVXUURXQGLQJDUFKLWHFWXUHDQG
QRWWRWKHXQLW
$QLQGLYLGXDOVSHUFHSWLRQRIQRLVHLVGLUHFWO\OLQNHGWRWKHHQYLURQPHQWLQZKLFKWKHXQLWLV
ORFDWHGDVZHOODVWKHVSHFLILFW\SHRIPRGHO2XUDSSOLDQFHVDUHLQOLQHZLWKLQWHUQDWLRQDO
VWDQGDUGVIRUVXFKDSSOLDQFHVDQGLQOLQHZLWKWKHODWHVWWHFKQLFDOGHYHORSPHQWV%XWSOHDVH
UHPHPEHUWKDWWKHQRLVHRIWKHFRPSUHVVRUDQGWKHFRRODQWFLUFXODWLQJLQWKHV\VWHPLV
XQDYRLGDEOH
17
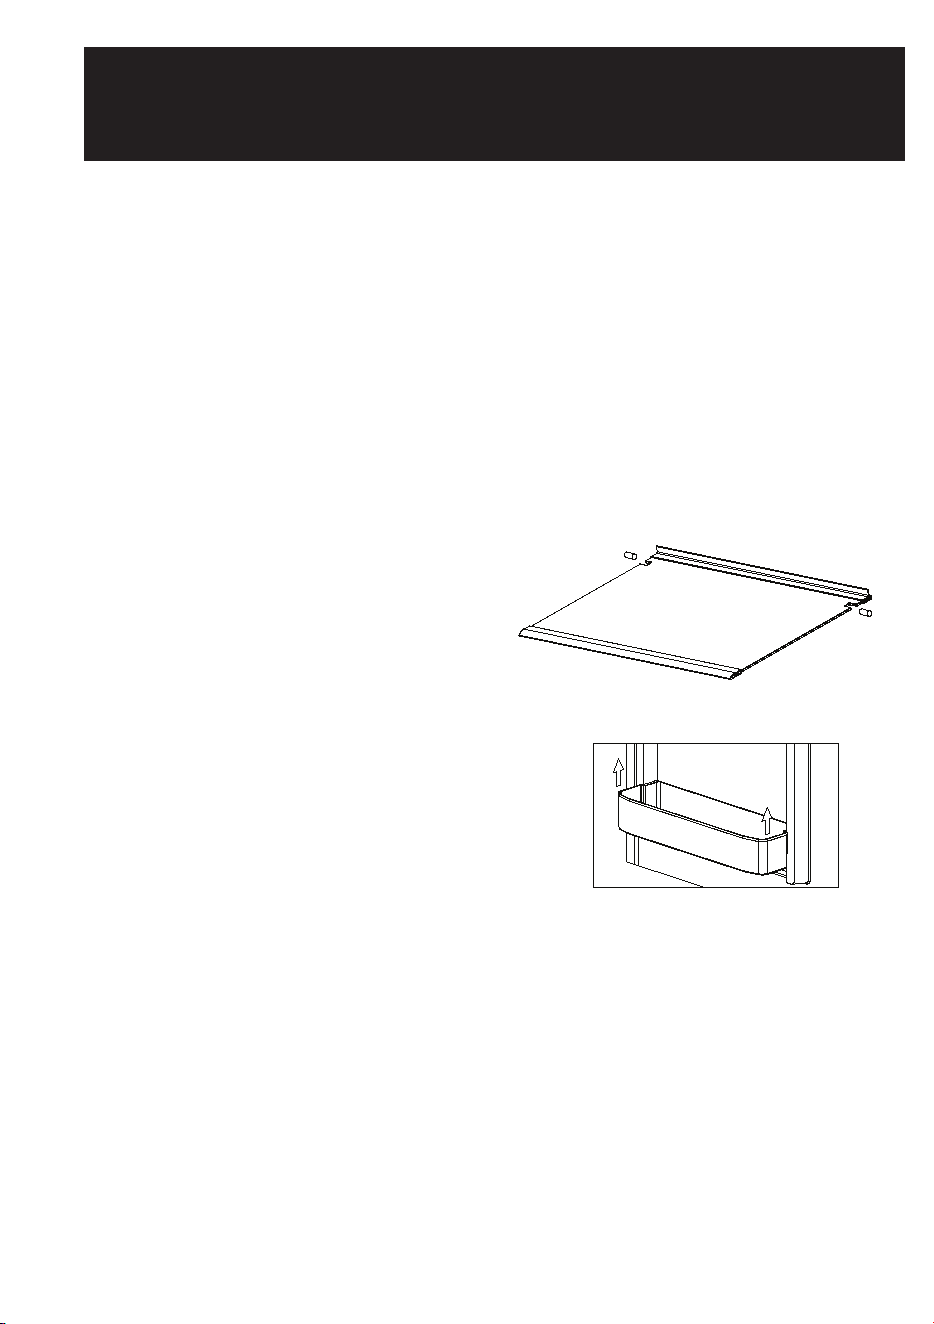
WARNING!
ƒ To avoid possible injury due to electric shock, disconnect the power cord or turn off power at the
circuit breaker panel or fuse box before cleaning the appliance.
ƒ Clean only the parts of the appliance listed in this manual. Clean them only in the manner
XUJHNܪJI
ƒ Do not use a steam cleaner to clean this appliance. Steam could penetrate the electrical compo-
nents and cause a short circuit.
ƒ )TSTYFQQT\\FYJWTWHQJFSNSLܫZNIXYTUJSJYWFYJNSYTYMJJQJHYWNHFQHTRUTSJSYXTW[JSYNQFYNTSLWNQQ
ƒ :XJTSQ^YMJY^UJXTKHQJFSNSLXTQZYNTSXXUJHNܪJINSYMNXRFSZFQ3*;*7HQJFSFUUQNFSHJUFWYX
\NYMܫFRRFGQJܫZNIX
ƒ Do not use abrasives such as steel wool, scouring pads, rough sponges or scrub brushes.
REMOVING SHELVES
To prevent damaging the door gasket, make sure to have the door all the way open when pulling the
shelves out of the rail compartment.
ƒ For easy access to the stored contents, you
can pull the shelf approximately halfway out
of the rail compartment. However this unit
was designed with a plastic post on each
side of the shelf track to prevent shelf
contents from falling.
ƒ When removing the shelf from the inner rails,
RFPJXZWJYTWJRT[JFQQXMJQKHTSYJSYXܪWXY
Then move the shelf to the position where the
notches in the shelf are exactly aligned with
the plastic posts and lift the shelf. In order to
replace the shelf, repeat this procedure in
reverse.
DOOR RACKS
To remove, lift it up and then pull out straight.
DOOR LOCK
If the unit is provided with a lock system, the keys are located inside the plastic bag that contains the
Owner's Manual. Insert the key into the lock, push in and turn it counterclockwise to unlock the door.
To lock the door do the reverse operation making sure metal pin is engaged completely. Remove the
key and place it in a secure place for safekeeping.
CLEANING YOUR APPLIANCE
ƒ Turn off the power, unplug the appliance, and remove all items including shelves.
ƒ Wash the inside surfaces with a warm water and baking soda solution. The solution should be
about 2 tablespoons of baking soda to a quart of water.
ƒ Wash the shelves with a mild detergent solution. Wring excess water out of the sponge or cloth
when cleaning any area of the controls.
ƒ The sealing gasket around the door must be cleaned regularly to prevent discolouration and
prolong service life. Use clean water. After cleaning the sealing gasket, check that it continues to
provide a tight seal.
ƒ Wash the outside cabinet with warm water and mild liquid detergent. Rinse well and wipe dry
with a clean soft cloth.
ƒ Do not clean the stainless steel with steel wool pads. We suggest using an all-in-one stainless
MAINTENANCE
steel cleaner to clean the stainless steel. Always clean in the direction of the grain.
PREVENTING STAINLESS STEEL RUST
Use non-abrasive tools to clean stainless steel products. Soft cloths and plastic scouring pads will
not harm the steel’s passive layer.
Clean with polish lines. Some stainless steels have visible polishing lines or “grain”. When visible lines
are present, always scrub in a motion parallel to the lines. When the grain cannot be seen, polish in a
consistent straight pattern and not in a circular motion.
Use alkaline, alkaline chlorinated or non-chloride containing cleaners. While many traditional cleaners
are loaded with chlorides, the industry is providing an ever-increasing choice of non-chloride cleaners.
If you are not sure of chloride content in the cleaner being used, contact your cleaner supplier. If your
present cleaner contains chlorides, ask your supplier for an alternative. Avoid cleaners containing
quaternary salt; it also can attack stainless steel and cause pitting and rusting.
Keep food equipment clean. Use alkaline, alkaline chlorinated or non-chloride cleaners at recommend-
ed strength. Clean frequently to avoid build-up of hard, stubborn stains. The single most likely cause
of damage is chlorides in the water. Remember, adding heat to cleaners that contain chlorides
dramatically increases their effect on stainless steel.
If chlorinated cleaners are used, immediately rinse and wipe equipment and supplies dry. The sooner
you wipe standing water, especially when it contains cleaning agents, the better. After wiping
JVZNURJSYIT\SFQQT\NYYTFNWIW^4]^LJSMJQUXRFNSYFNSYMJXYFNSQJXXXYJJQUFXXN[JܪQR
POWER FAILURE
In the event of a power interruption, all previous temperature settings are automatically memorized. If
power is interrupted (power surge, breaker switch, etc.) and then powered up again, the unit will
operate with the last temperature set-point.
Most power failures are corrected within a few hours and should not affect the temperature of your
appliance if you minimize the number of times the door is opened. If the power is going to be off for a
longer period of time, you need to take the proper steps to protect your contents.
VACATION TIME
Short holidays: Leave the appliance in operation for holidays of less than three weeks.
Long absences: If the appliance will not be used for several months, remove all items, turn off the
appliance and unplug. Clean and dry the interior thoroughly. To prevent odor and mold growth, leave
the door open slightly, blocking it open if necessary.
MOVING YOUR APPLIANCE
ƒ Unplug the power plug from the electrical outlet.
ƒ Remove the contents from the racks and all moving parts from inside.
ƒ Raise the adjustable legs up to the base to avoid damage.
ƒ Tape the door shut and lock it if with a lock system.
ƒ Transport the appliance only in the upright position. Also protect the outside of the appliance
with a blanket or similar item.
ENERGY SAVING TIPS
ƒ Should the unit be left empty for long periods of time, it is suggested that the appliance is
unplugged, and after careful cleaning, leave the door ajar to allow air to circulate inside the
cabinet in order to avoid possible condensation, mold or odors forming.
ƒ The appliance should be installed in the coolest area of the room, away from heat producing
appliances, and out of the direct sunlight.
ƒ Ensure that the unit is adequately ventilated. Never cover air vents. Clean dust and dirt from the
condenser at regular intervals.
ƒ Only open the door for as long as necessary and for as short a time as possible.
ƒ Let hot foods cool to room temperature before placing in the unit. Overloading the unit forces
the compressor to run longer.
ƒ Be sure to wrap foods properly, and wipe containers dry before placing them in the unit. This
cuts down on frost build-up inside the unit.
ƒ Unit shelves and storage bins should not be lined with aluminum foil, wax paper, or paper
YT\JQNSL1NSJWXNSYJWKJWJ\NYMHTQIFNWHNWHZQFYNTSRFPNSLYMJZSNYQJXXJKܪHNJSY
ƒ Organize and label food to reduce door openings and extended searches. Remove as many
items as needed at one time, and close the door as soon as possible.
ƒ 9TFQQT\FNWYTHNWHZQFYJITSTYT[JWܪQQYMJFUUQNFSHJ
18

WARNING!
ƒ To avoid possible injury due to electric shock, disconnect the power cord or turn off power at the
circuit breaker panel or fuse box before cleaning the appliance.
ƒ Clean only the parts of the appliance listed in this manual. Clean them only in the manner
XUJHNܪJI
ƒ Do not use a steam cleaner to clean this appliance. Steam could penetrate the electrical compo-
nents and cause a short circuit.
ƒ )TSTYFQQT\\FYJWTWHQJFSNSLܫZNIXYTUJSJYWFYJNSYTYMJJQJHYWNHFQHTRUTSJSYXTW[JSYNQFYNTSLWNQQ
ƒ :XJTSQ^YMJY^UJXTKHQJFSNSLXTQZYNTSXXUJHNܪJINSYMNXRFSZFQ3*;*7HQJFSFUUQNFSHJUFWYX
\NYMܫFRRFGQJܫZNIX
ƒ Do not use abrasives such as steel wool, scouring pads, rough sponges or scrub brushes.
REMOVING SHELVES
To prevent damaging the door gasket, make sure to have the door all the way open when pulling the
shelves out of the rail compartment.
ƒ For easy access to the stored contents, you
can pull the shelf approximately halfway out
of the rail compartment. However this unit
was designed with a plastic post on each
side of the shelf track to prevent shelf
contents from falling.
ƒ When removing the shelf from the inner rails,
RFPJXZWJYTWJRT[JFQQXMJQKHTSYJSYXܪWXY
Then move the shelf to the position where the
notches in the shelf are exactly aligned with
the plastic posts and lift the shelf. In order to
replace the shelf, repeat this procedure in
reverse.
DOOR RACKS
To remove, lift it up and then pull out straight.
DOOR LOCK
If the unit is provided with a lock system, the keys are located inside the plastic bag that contains the
Owner's Manual. Insert the key into the lock, push in and turn it counterclockwise to unlock the door.
To lock the door do the reverse operation making sure metal pin is engaged completely. Remove the
key and place it in a secure place for safekeeping.
CLEANING YOUR APPLIANCE
ƒ Turn off the power, unplug the appliance, and remove all items including shelves.
ƒ Wash the inside surfaces with a warm water and baking soda solution. The solution should be
about 2 tablespoons of baking soda to a quart of water.
ƒ Wash the shelves with a mild detergent solution. Wring excess water out of the sponge or cloth
when cleaning any area of the controls.
ƒ The sealing gasket around the door must be cleaned regularly to prevent discolouration and
prolong service life. Use clean water. After cleaning the sealing gasket, check that it continues to
provide a tight seal.
ƒ Wash the outside cabinet with warm water and mild liquid detergent. Rinse well and wipe dry
with a clean soft cloth.
ƒ Do not clean the stainless steel with steel wool pads. We suggest using an all-in-one stainless
steel cleaner to clean the stainless steel. Always clean in the direction of the grain.
PREVENTING STAINLESS STEEL RUST
Use non-abrasive tools to clean stainless steel products. Soft cloths and plastic scouring pads will
not harm the steel’s passive layer.
Clean with polish lines. Some stainless steels have visible polishing lines or “grain”. When visible lines
are present, always scrub in a motion parallel to the lines. When the grain cannot be seen, polish in a
consistent straight pattern and not in a circular motion.
Use alkaline, alkaline chlorinated or non-chloride containing cleaners. While many traditional cleaners
are loaded with chlorides, the industry is providing an ever-increasing choice of non-chloride cleaners.
If you are not sure of chloride content in the cleaner being used, contact your cleaner supplier. If your
present cleaner contains chlorides, ask your supplier for an alternative. Avoid cleaners containing
quaternary salt; it also can attack stainless steel and cause pitting and rusting.
Keep food equipment clean. Use alkaline, alkaline chlorinated or non-chloride cleaners at recommend-
ed strength. Clean frequently to avoid build-up of hard, stubborn stains. The single most likely cause
of damage is chlorides in the water. Remember, adding heat to cleaners that contain chlorides
dramatically increases their effect on stainless steel.
If chlorinated cleaners are used, immediately rinse and wipe equipment and supplies dry. The sooner
you wipe standing water, especially when it contains cleaning agents, the better. After wiping
JVZNURJSYIT\SFQQT\NYYTFNWIW^4]^LJSMJQUXRFNSYFNSYMJXYFNSQJXXXYJJQUFXXN[JܪQR
POWER FAILURE
In the event of a power interruption, all previous temperature settings are automatically memorized. If
power is interrupted (power surge, breaker switch, etc.) and then powered up again, the unit will
operate with the last temperature set-point.
Most power failures are corrected within a few hours and should not affect the temperature of your
appliance if you minimize the number of times the door is opened. If the power is going to be off for a
longer period of time, you need to take the proper steps to protect your contents.
:%'%8-328-1)
7LSVXLSPMHE]WLeave the appliance in operation for holidays of less than three weeks.
Long absences: If the appliance will not be used for several months, remove all items, turn off the
appliance and unplug. Clean and dry the interior thoroughly. To prevent odor and mold growth, leave
the door open slightly, blocking it open if necessary.
MOVING YOUR APPLIANCE
ƒ Unplug the power plug from the electrical outlet.
ƒ Remove the contents from the racks and all moving parts from inside.
ƒ Raise the adjustable legs up to the base to avoid damage.
ƒ Tape the door shut and lock it if with a lock system.
ƒ Transport the appliance only in the upright position. Also protect the outside of the appliance
with a blanket or similar item.
ENERGY SAVING TIPS
ƒ Should the unit be left empty for long periods of time, it is suggested that the appliance is
unplugged, and after careful cleaning, leave the door ajar to allow air to circulate inside the
cabinet in order to avoid possible condensation, mold or odors forming.
ƒ The appliance should be installed in the coolest area of the room, away from heat producing
appliances, and out of the direct sunlight.
ƒ Ensure that the unit is adequately ventilated. Never cover air vents. Clean dust and dirt from the
condenser at regular intervals.
ƒ Only open the door for as long as necessary and for as short a time as possible.
ƒ Let hot foods cool to room temperature before placing in the unit. Overloading the unit forces
the compressor to run longer.
ƒ Be sure to wrap foods properly, and wipe containers dry before placing them in the unit. This
cuts down on frost build-up inside the unit.
ƒ Unit shelves and storage bins should not be lined with aluminum foil, wax paper, or paper
YT\JQNSL1NSJWXNSYJWKJWJ\NYMHTQIFNWHNWHZQFYNTSRFPNSLYMJZSNYQJXXJKܪHNJSY
ƒ Organize and label food to reduce door openings and extended searches. Remove as many
items as needed at one time, and close the door as soon as possible.
ƒ 9TFQQT\FNWYTHNWHZQFYJITSTYT[JWܪQQYMJFUUQNFSHJ
19

WARNING!
ƒ To avoid possible injury due to electric shock, disconnect the power cord or turn off power at the
circuit breaker panel or fuse box before cleaning the appliance.
ƒ Clean only the parts of the appliance listed in this manual. Clean them only in the manner
XUJHNܪJI
ƒ Do not use a steam cleaner to clean this appliance. Steam could penetrate the electrical compo-
nents and cause a short circuit.
ƒ )TSTYFQQT\\FYJWTWHQJFSNSLܫZNIXYTUJSJYWFYJNSYTYMJJQJHYWNHFQHTRUTSJSYXTW[JSYNQFYNTSLWNQQ
ƒ :XJTSQ^YMJY^UJXTKHQJFSNSLXTQZYNTSXXUJHNܪJINSYMNXRFSZFQ3*;*7HQJFSFUUQNFSHJUFWYX
\NYMܫFRRFGQJܫZNIX
ƒ Do not use abrasives such as steel wool, scouring pads, rough sponges or scrub brushes.
REMOVING SHELVES
To prevent damaging the door gasket, make sure to have the door all the way open when pulling the
shelves out of the rail compartment.
ƒ For easy access to the stored contents, you
can pull the shelf approximately halfway out
of the rail compartment. However this unit
was designed with a plastic post on each
side of the shelf track to prevent shelf
contents from falling.
ƒ When removing the shelf from the inner rails,
RFPJXZWJYTWJRT[JFQQXMJQKHTSYJSYXܪWXY
Then move the shelf to the position where the
notches in the shelf are exactly aligned with
the plastic posts and lift the shelf. In order to
replace the shelf, repeat this procedure in
reverse.
DOOR RACKS
To remove, lift it up and then pull out straight.
DOOR LOCK
If the unit is provided with a lock system, the keys are located inside the plastic bag that contains the
Owner's Manual. Insert the key into the lock, push in and turn it counterclockwise to unlock the door.
To lock the door do the reverse operation making sure metal pin is engaged completely. Remove the
key and place it in a secure place for safekeeping.
CLEANING YOUR APPLIANCE
ƒ Turn off the power, unplug the appliance, and remove all items including shelves.
ƒ Wash the inside surfaces with a warm water and baking soda solution. The solution should be
about 2 tablespoons of baking soda to a quart of water.
ƒ Wash the shelves with a mild detergent solution. Wring excess water out of the sponge or cloth
when cleaning any area of the controls.
ƒ The sealing gasket around the door must be cleaned regularly to prevent discolouration and
prolong service life. Use clean water. After cleaning the sealing gasket, check that it continues to
provide a tight seal.
ƒ Wash the outside cabinet with warm water and mild liquid detergent. Rinse well and wipe dry
with a clean soft cloth.
ƒ Do not clean the stainless steel with steel wool pads. We suggest using an all-in-one stainless
steel cleaner to clean the stainless steel. Always clean in the direction of the grain.
PREVENTING STAINLESS STEEL RUST
Use non-abrasive tools to clean stainless steel products. Soft cloths and plastic scouring pads will
not harm the steel’s passive layer.
Clean with polish lines. Some stainless steels have visible polishing lines or “grain”. When visible lines
are present, always scrub in a motion parallel to the lines. When the grain cannot be seen, polish in a
consistent straight pattern and not in a circular motion.
Use alkaline, alkaline chlorinated or non-chloride containing cleaners. While many traditional cleaners
are loaded with chlorides, the industry is providing an ever-increasing choice of non-chloride cleaners.
If you are not sure of chloride content in the cleaner being used, contact your cleaner supplier. If your
present cleaner contains chlorides, ask your supplier for an alternative. Avoid cleaners containing
quaternary salt; it also can attack stainless steel and cause pitting and rusting.
Keep food equipment clean. Use alkaline, alkaline chlorinated or non-chloride cleaners at recommend-
ed strength. Clean frequently to avoid build-up of hard, stubborn stains. The single most likely cause
of damage is chlorides in the water. Remember, adding heat to cleaners that contain chlorides
dramatically increases their effect on stainless steel.
If chlorinated cleaners are used, immediately rinse and wipe equipment and supplies dry. The sooner
you wipe standing water, especially when it contains cleaning agents, the better. After wiping
JVZNURJSYIT\SFQQT\NYYTFNWIW^4]^LJSMJQUXRFNSYFNSYMJXYFNSQJXXXYJJQUFXXN[JܪQR
POWER FAILURE
In the event of a power interruption, all previous temperature settings are automatically memorized. If
power is interrupted (power surge, breaker switch, etc.) and then powered up again, the unit will
operate with the last temperature set-point.
Most power failures are corrected within a few hours and should not affect the temperature of your
appliance if you minimize the number of times the door is opened. If the power is going to be off for a
longer period of time, you need to take the proper steps to protect your contents.
VACATION TIME
Short holidays: Leave the appliance in operation for holidays of less than three weeks.
Long absences: If the appliance will not be used for several months, remove all items, turn off the
appliance and unplug. Clean and dry the interior thoroughly. To prevent odor and mold growth, leave
the door open slightly, blocking it open if necessary.
MOVING YOUR APPLIANCE
ƒ Unplug the power plug from the electrical outlet.
ƒ Remove the contents from the racks and all moving parts from inside.
ƒ Raise the adjustable legs up to the base to avoid damage.
ƒ Tape the door shut and lock it if with a lock system.
ƒ Transport the appliance only in the upright position. Also protect the outside of the appliance
with a blanket or similar item.
ENERGY SAVING TIPS
ƒ Should the unit be left empty for long periods of time, it is suggested that the appliance is
unplugged, and after careful cleaning, leave the door ajar to allow air to circulate inside the
cabinet in order to avoid possible condensation, mold or odors forming.
ƒ The appliance should be installed in the coolest area of the room, away from heat producing
appliances, and out of the direct sunlight.
ƒ Ensure that the unit is adequately ventilated. Never cover air vents. Clean dust and dirt from the
condenser at regular intervals.
ƒ Only open the door for as long as necessary and for as short a time as possible.
ƒ Let hot foods cool to room temperature before placing in the unit. Overloading the unit forces
the compressor to run longer.
ƒ Be sure to wrap foods properly, and wipe containers dry before placing them in the unit. This
cuts down on frost build-up inside the unit.
ƒ Unit shelves and storage bins should not be lined with aluminum foil, wax paper, or paper
YT\JQNSL1NSJWXNSYJWKJWJ\NYMHTQIFNWHNWHZQFYNTSRFPNSLYMJZSNYQJXXJKܪHNJSY
ƒ Organize and label food to reduce door openings and extended searches. Remove as many
items as needed at one time, and close the door as soon as possible.
ƒ 9TFQQT\FNWYTHNWHZQFYJITSTYT[JWܪQQYMJFUUQNFSHJ
20

130#-&.4 8*5) :063 "11-*"/$&
You can solve many common problems easily, saving you the cost of a possible service call. Try the suggestions
below to see if you can solve the problem before calling customer service.
130#-&.
1044*#-& $"64&
3&.&%:
Appliance does not
operate.
Appliance is not connected to a power
supply.
The appliance is turned off.
Circuit breaker has tripped or a fuse has
blown.
Connect the appliance.
Switch on the appliance.
Switch on circuit breaker or
replace fuse.
Appliance is not
cold enough.
The temperature is not set correctly.
The ambient temperature could require a
different temperature setting.
The door was opened too often.
The door was not closed completely.
Door is not hermetically sealed.
The condenser is too dirty.
The ventilation opening is blocked or too
dusty.
Check the set temperature.
Set a different temperature.
Do not open the door more often
than necessary.
Close door properly.
Check the door seal and clean
or replace.
Clean the condenser when
necessary.
Clear the obstructions and clean
off the dust.
Appliance turns
itself on and off
frequently.
The room temperature is higher than
average.
A large amount of bottles has been added
to the unit.
The door is opened too often.
The door is not closed completely.
The door gasket does not seal properly.
Put the appliance in a cooler
place.
Leave the appliance to work for
a while until the set temperature
has been reached.
Do not open the door more often
than necessary.
Close door properly.
Check the door seal and clean
or replace.
The light does not
work.
Appliance is not connected to a power
supply.
Circuit breaker has tripped or a fuse has
blown.
The light was switched off on the control
panel.
Connect the appliance.
Switch on circuit breaker or
replace fuse.
Switch on the light.
Vibrations.
The appliance is not properly level.
Level the appliance with the
adjustable feet.
The appliance
seems to make too
much noise.
The rattling noise may come from the flow of the refrigerant, which is normal. As each
cycle ends, you may hear gurgling sounds caused by the flow of refrigerant in your
appliance.
If temperature fluctuations occur, the contraction and expansion of the inner walls may
cause popping and crackling noises.
The appliance is not properly level.
Level the appliance with the
adjustable feet.
The door will not
close properly.
The appliance is not properly level.
The door was reversed and not properly re-
installed.
The gasket is dirty.
The shelves are out of position.
Level the appliance with the
adjustable feet.
Check the door hinge and
reassemble correctly.
Clean the door gasket.
Check the shelves and refit
correctly.
& & & & &
& & & & PS
& appears on the
display.
Error codes.
Try resetting the controls by
disconnecting power to the unit
for 5 minutes, then reconnect. If
error code returns, problem
cannot be resolved by user. Call
TROUBLESHOOTING
21

'LVSOD\ ³(´ ³(´
³(´ ³(´ ³(´
³(´ ³(´ RU ³(´
x
³(´ LQGLFDWHV D FRPPXQLFDWLRQ HUURU IRU
]RQH PRGHOV
x ³(´ RU ³(´ LQGLFDWHV WKDW WKH DLU WHPSHUDWXUH
VHQVRU KDV IDLOHG
x ³(´ RU ³(´ LQGLFDWHV WKDW WKH GHIURVW VHQVRU
LQ WKH HYDSRUDWRU KDV IDLOHG
x
³(´ LQGLFDWHV D GHIURVW KHDWHU IDLOXUH
x
³(´ LQGLFDWHV D VROHQRLG YDOYH IDLOXUH
x
³(´ LQGLFDWHV D GRRU VZLWFK IDLOXUH
x
&DOO IRU VHUYLFH
7KH DODUP VRXQGV
DQG WKH WHPSHUDWXUH
GLVSOD\ IODVKHV
x +DV WKH DSSOLDQFH GRRU EHHQ RSHQ IRU ORQJHU
WKDQ VHFRQGV" ,I QRW WKHQ WKH
WHPSHUDWXUH KDV ULVHQ KLJKHU RU IDOOHQ ORZHU
WKDQ WKH WHPSHUDWXUH WKDW KDV EHHQ VHW 7KLV
FRXOG EH GXH WR
7KH DSSOLDQFH GRRU EHLQJ RSHQHG WRR
RIWHQ
7KH YHQWLODWLRQ RSHQLQJ EHLQJ FRYHUHG RU
WRR GXVW\
$ OHQJWK\ LQWHUUXSWLRQ WR WKH SRZHU VXSSO\
$ ODUJH DPRXQW RI ERWWOHV KDV EHHQ DGGHG
WR WKH XQLW
x ,I \HV FORVH WKH GRRU
'R QRW RSHQ WKH GRRU PRUH
RIWHQ WKDQ QHFHVVDU\
&OHDU WKH REVWUXFWLRQV DQG
FOHDQ WKH GXVW
/HDYH WKH DSSOLDQFH WR
ZRUN IRU D ZKLOH XQWLO WKH
VHW WHPSHUDWXUH KDV EHHQ
UHDFKHG
7KH LFRQ ³´ LV OLW XS
DQG IODVKLQJ LQ WKH
WHPSHUDWXUH GLVSOD\
x 7KH GLVSOD\ WHPSHUDWXUH LV RXW RI WKH UDQJH
x 2QO\WHPSHUDWXUHVZLWKLQWKH
GLVSOD\UDQJHa)FDQEH
VKRZQ,IWKHWHPSHUDWXUHLVQRW
ZLWKLQWKLVUDQJHWKHLFRQ³´
ZLOOEHGLVSOD\HGLQVWHDG7KDWLV
QRUPDO
22

Koolmore Supply, Inc. extends a limited warranty to the original purchaser, guaranteeing that this
Koolmore
product is free from manufacturing defects in material or workmanship for one year from the date of
purchase.
Should you discover any such defect within the warranty period, Koolmore Supply, Inc., reserves the
right to
repair or replace the product without charge, or to cover the cost of replacement parts and repair labor
needed
to correct defects present at the time of purchase or resulting from regular usage, when the appliance
has been
installed, operated, and maintained as per the instructions provided.
At its sole discretion, Koolmore Supply Inc. may decide to replace the product. In such an event, your
replacement
appliance will carry the warranty for the remaining term of the original unit's warranty period.
This warranty is valid exclusively to the original purchaser of the product and only applicable within the
United
States. The warranty commences from the date of original consumer purchase. Proof of the original
purchase
date will be required to obtain service under this warranty.
Under this limited warranty, your sole and exclusive remedy will be product repair, as outlined above. All
services must be provided by a Koolmore-designated service company.
To claim warranty or request repair service:
Email [email protected]. Please include your name, address, phone number, warranty repair
request,
and a copy of your proof of purchase receipt. Alternatively, visit koolmore.com and use the contact us
page. A
Koolmore customer service representative will promptly arrange service for your appliance.
We thank you for choosing Koolmore.
This limited warranty will not cover:
1. Failure of the product to perform during power failures or interruptions,
or due to inadequate electrical service.
2. Damage incurred during transportation or handling.
3. Damage caused by accidents, vermin, lightning, winds, re, oods, or acts of God.
4. Damage resulting from accidents, alterations, misuse, abuse, improper installation, repair, or
maintenance.
This includes using any external device that alters or converts the voltage or frequency of
electricity.
5. Unauthorized product modications, repairs by unauthorized centers, or use of non-approved
replacement parts.
6. Abnormal cleaning and maintenance not aligned with the user's manual.
7. Use of incompatible accessories or components.
8. Any costs associated with repairs or replacements under these excluded circumstances shall be the
responsibility of the consumer.
23

238)7
24

238)7
25

238)7
26