
Installaon
Operaon
and
Maintenance
Instrucons
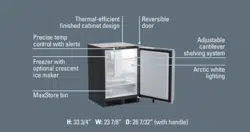
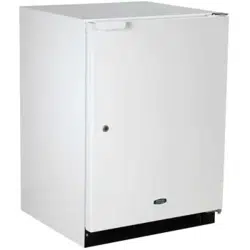
Combinaon
Refrigerator / Freezer
6CRF
8CRF
CONTENTS
Important Safety Instrucons
Warnings and safety instrucons appearing in this guide are not
meant to cover all possible condions and situaons that may
occur. Common sense, cauon, and care must be exercised when
installing, maintaining, or operang this appliance.
Recognize Safety Symbols,
Words, and Labels.
WARNING-Hazards or unsafe pracces which could result in
personal injury.
CAUTION-Hazards or unsafe pracces which could result in
personal injury or property or product damage.
NOTE
NOTE-Important informaon to make a problem free installa-
on.
Unpacking your refrigerator .................................................
Removing the packaging .....................................................
Warranty registraon .........................................................
Installing your refrigerator ...................................................
Select locaon ....................................................................
Cabinet clearances .............................................................
Leveling legs .......................................................................
Grounding method .............................................................
Electrical requirements ......................................................
Handle installaon ...............................................................
Door alignment ....................................................................
Dimensions for 6CRF solid door ...........................................
Rough in opening dimensions for 6CRF solid door .............
Dimensions for 6CRF glass door ...........................................
Rough in opening dimensions for 6CRF glass door..............
Dimensions for 8CRF solid door ...........................................
Rough in opening dimensions for 8CRF solid door .............
Adjusng the temperature control.......................................
Defrosng instrucons .......................................................
Energy Saving Tips ................................................................
Care and Cleaning ................................................................
Trouble shoong your refrigerator ......................................
Obtaining service .................................................................
Commercial product warranty .............................................
3
3
3
4
4
4
4
5
5
6
6
7
7
8
8
9
9
10
10
11
12
13
14
15
2

Remove Packaging
Your refrigerator has been packed for shipment with all parts
that could be damaged by movement securely fastened. Cut
the banding material at the boom of the carton, unfold the
carton at the boom and remove the carton from the appliance.
Remove the plasc bag, styrofoam corner posts, and any tape
holding the door closed and internal components in place. The
owners manual is shipped inside the refrigerator in a plasc bag
along with the warranty registraon card.
Important
Keep your carton packaging unl your refrigerator has been
thoroughly inspected and found to be in good condion. If there
is damage, the packaging will be needed as proof of damage
in transit. Aerwards please dispose of all items responsibly in
parcular the plasc bags which can be a suocaon hazard.
Note to Customer
This merchandise was carefully packed and thoroughly inspected
before leaving our plant. Responsibility for its safe delivery
was assumed by the retailer upon acceptance of the shipment.
Claims for loss or damage sustained in transit must be made to
the retailer.
DO NOT RETURN DAMAGED MERCHANDISE TO THE MANUFAC-
TURER - FILE THE CLAIM WITH THE RETAILER.
Help Prevent Tragedies
Child entrapment and suocaon are not problems of the past.
Junked or abandoned refrigerators are sll dangerous, even if
they sit out for “just a few days”.
If you are geng rid of your old refrigerator, please follow the
instrucons below to help prevent accidents.
Before you throw away your old refrigerator or freezer:
• Take o the doors or remove the drawers.
• Leave the shelves in place so children may not easily climb
inside.
If the unit was shipped or has been laying on its back for any
period of me allow the refrigerator to sit upright for a period of
at least 24 hours before plugging in. This will assure oil returns
to the compressor. Plugging the refrigerator in immediately may
cause damage to internal parts.
It is important you send in your warranty registraon card im-
mediately aer taking delivery of your refrigerator or you can
register online at www.marvelrefrigeraon.com.
The following informaon will be required when registering your
unit.
Model Number
Serial Number
Date of Purchase
Dealer’s name and address
The model number and serial number can be found on the serial
plate which is located inside the cabinet on the le side near the
top.
Warranty Registraon
NOTE
UNPACKING YOUR REFRIGERATOR
3
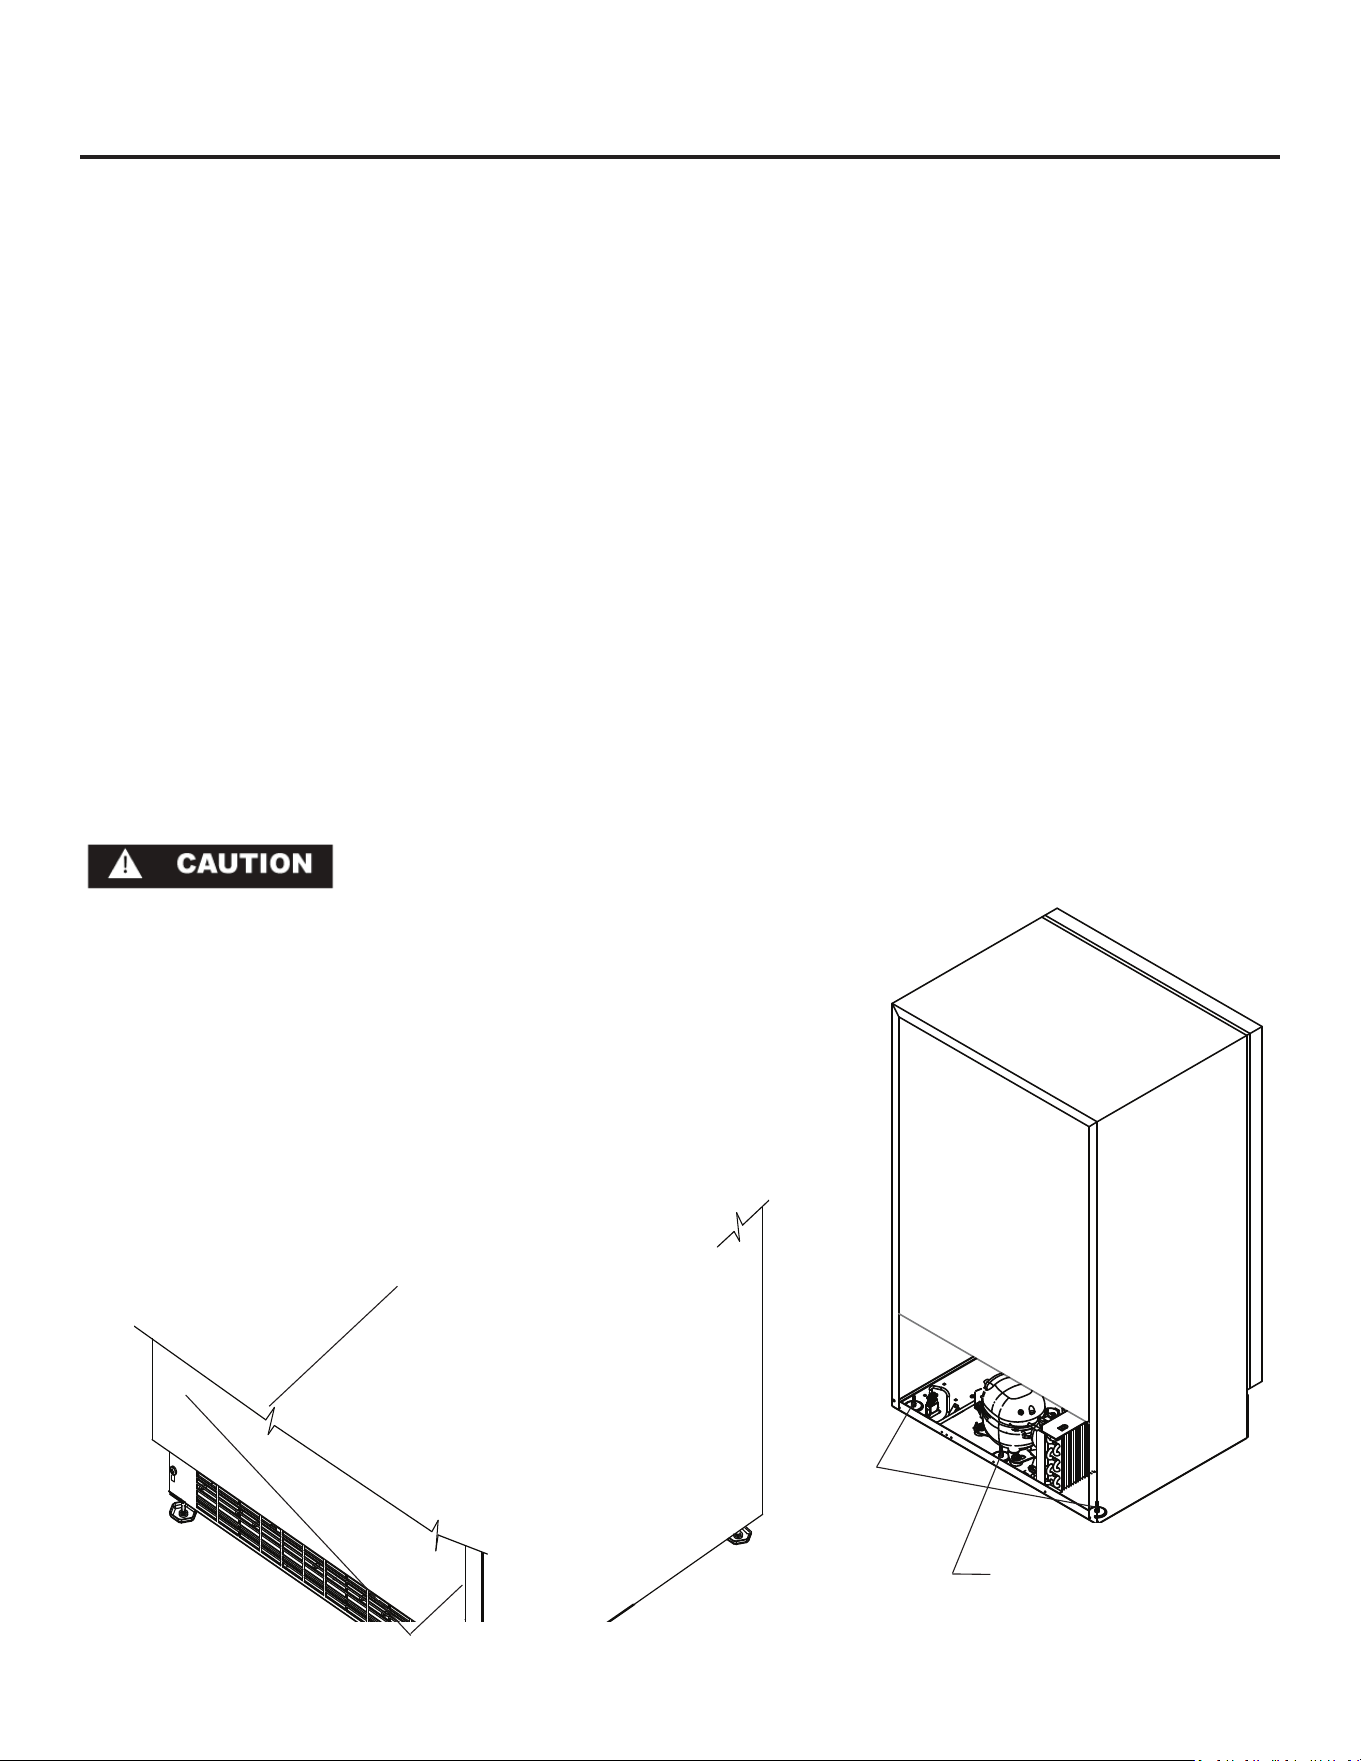
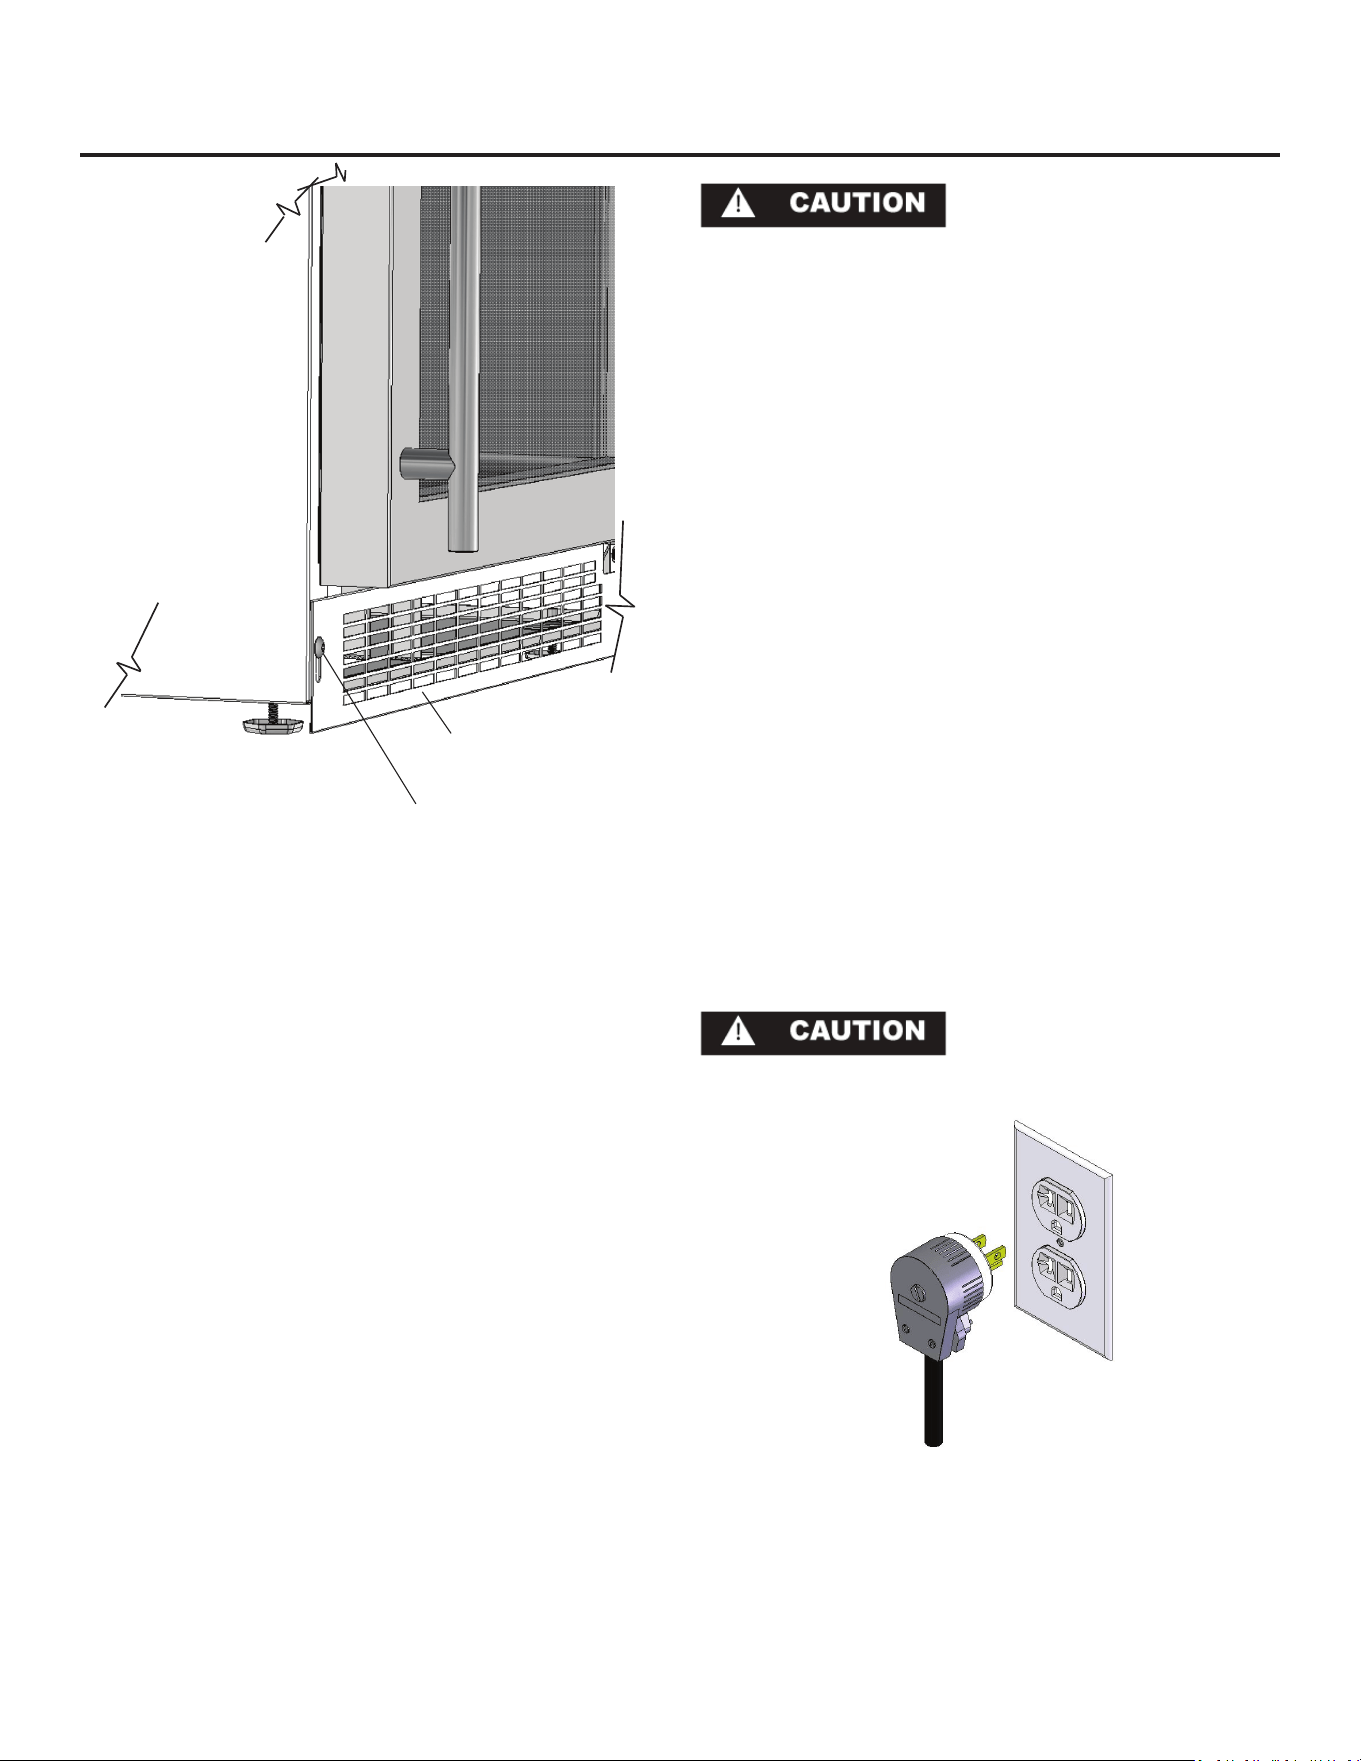
Leveling Legs
Front Grille, keep
this area open.
Figure 1
Select Locaon
The proper locaon will ensure peak performance of your ap-
pliance. We recommend a locaon where the unit will be out
of direct sunlight and away from heat sources. To assure your
product performs to specicaons the recommended installaon
locaon temperature range is from 65 to 90°F (18 to 32°C).
Cabinet Clearance
Venlaon is required from the boom front secon of the unit.
Keep this area open and clear of any obstrucons. Adjacent
cabinets and counter top can be installed around the unit as long
as the grille and door access remain unobstructed.
INSTALLING YOUR REFRIGERATOR
Figure 2
Rear of unit
Rear leveling legs
at outside corners
Center rear leveling leg
on 30” wide units only.
Access cover
removed
Leveling Legs
Adjustable legs at the front and rear corners of the unit should
be set so the unit is rmly posioned on the oor and level from
side to side and front to back. The overall height of your Marvel
refrigerator may be adjusted from 33-3/4” (85.7cm) with the
leveling legs turned in, and up to 34-3/4” (88.3cm) with the lev-
eling legs extended. The 80 cabinets (30” wide) have a center leg
at the rear of the cabinet that must also be used to stabilize the
cabinet. (See Figure 2).
To adjust the leveling legs, place the refrigerator on a solid sur-
face and protect the oor beneath the legs to avoid scratching
the oor. With the assistance of another person, lean the refrig-
erator back enough to access the front leveling legs and remove
the weight. Raise or lower the legs to the required dimension
by turning the legs. Repeat this process for the rear by lng
the refrigerator forward using cauon to prevent the door from
opening. On a level surface check the refrigerator for levelness
and adjust accordingly.
The front grille (toe kick) screws may be loosened and adjusted
to the desired height. When adjustment is complete ghten the
two toe kick screws. (See Figure 3).
4
Front Grille
Do not obstruct the front grill. The openings within the front grill
allow air to ow through the condenser heat exchanger. Restric-
ons to this air ow will result in increased energy usage and
loss of cooling capacity. For this reason it is important this area
to not be obstructed and the grill openings kept clean. Marvel
does not recommend the use of custom made grills as air ow
may be restricted because of inadequate openings. (See Figure
1).
• Do not splash or spray water from a hose on the refrigera-
tor! Doing so may cause an electrical shock, which may
result in severe injury or death.
• This unit should not, under any circumstances, be installed
to an un-grounded electrical supply.
Grounding Method
This product is factory equipped with a power supply cord that
has a three-pronged, grounded plug. It must be plugged into a
mang grounding type receptacle in accordance with the Na-
onal Electrical Code and applicable local codes and ordinances
(see Figure 4). If the circuit does not have a grounding type re-
ceptacle, it is the responsibility and obligaon of the customer to
provide the proper power supply. The third ground prong should
not, under any circumstances, be cut or removed.
Electrical Requirements
Electrical Requirements: A 115 volt, 15 amp dedicated circuit is
required. A 3 prong grounded receptacle is required.
The unit must be installed according to your local building codes
and ordinances.
Do not use an extension cord with
this appliance.
Figure 4
GROUNDING METHOD AND ELECTRICAL REQUIREMENTS
Figure 3
Toe kick (Front Grille)
Toe kick screw
5
HANDLE INSTALLATION AND DOOR ALIGNMENT PROCEDURE
Figure 6
Door should be
parallel to top
and sides of
refrigerator.
9/32”
(7.1mm)
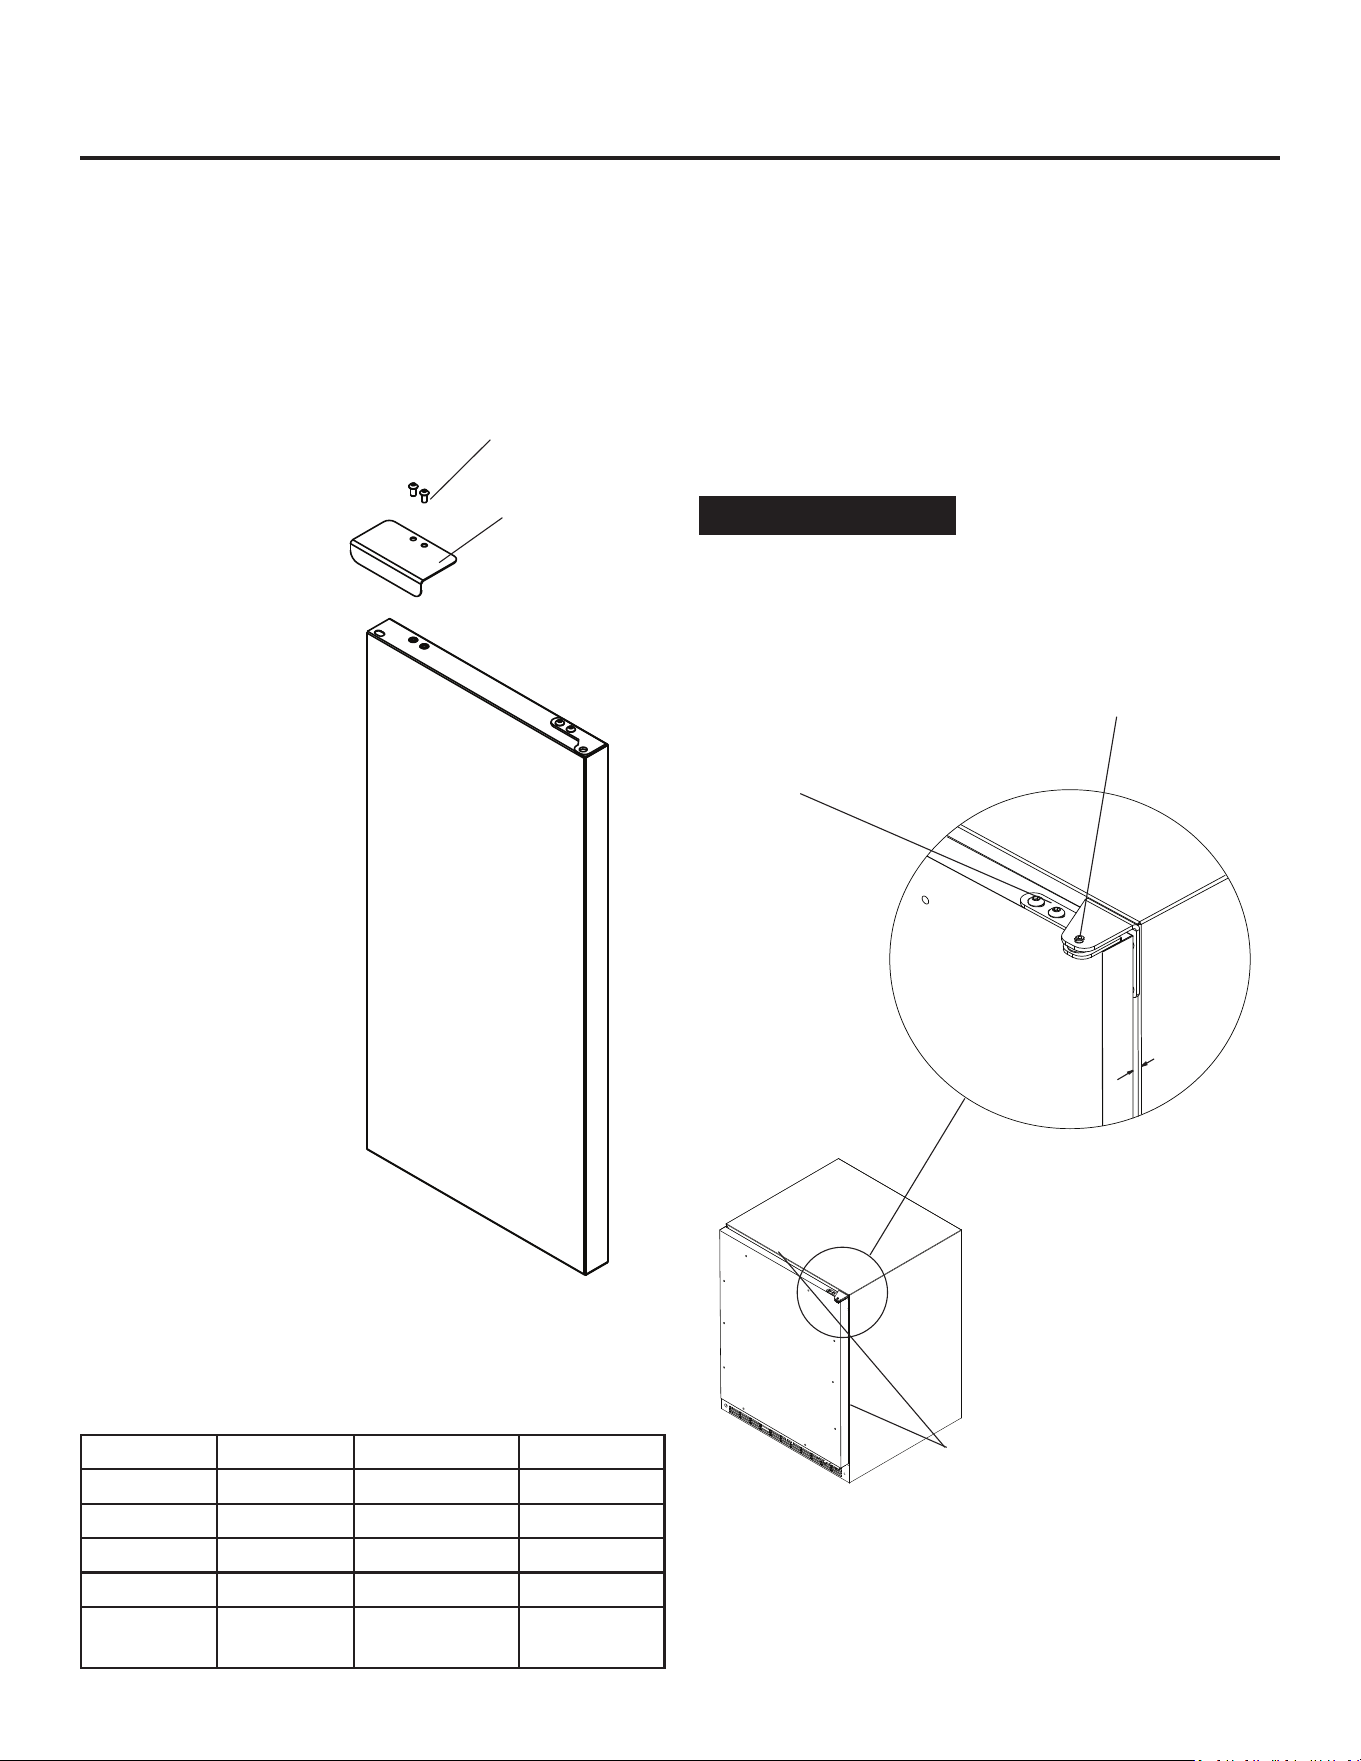
Door Alignment Procedure
The door should be parallel to the sides and top of the refrig-
erator. If alignment is necessary the door may be adjusted
by loosening the 2 screws which secure the hinge adapter
brackets on the top and boom of the door and adjusng the
door side to side. Use a 5/32” allen wrench for this procedure.
(See Figure 6 below). When nished aligning the door, ghten
the screws securely.
NOTE
Hinge Color Door Color Right Hand Le Hand
Chrome Black 42247595 42247599
Chrome White 42247639 42247640
Black Black 42247596 42247600
White White 42247597 42247601
Stainless
Steel
Stainless
Steel
42247598 42247602
Door Reversal
It is possible to reverse the door (change from right hand swing
to le hand swing or vice versa) if you wish. To do so it will be
necessary to order one of the service kits below.
Screws
Handle
Figure 5
Right hand hinged
door shown
Handle Installaon (Solid Door Models)
1. Remove the handle, (2) screws, and 5/32” hex key wrench
from the bag shipped inside the cabinet.
2. Locate handle opposite the hinges and secure in place using
the (2) screws and the hex key wrench. (See Figure 5).
6
For the door to close properly, it is necessary to maintain a
minimum space of 9/32” (7mm) between the door and cabinet
ange (See Figure 6). This space can be adjusted by adjusng the
top and boom hinge adapter brackets.
Hinge adapter bracket lo-
cated on the top and boom
of the door.
Remove top
hinge pin to re-
move the door.
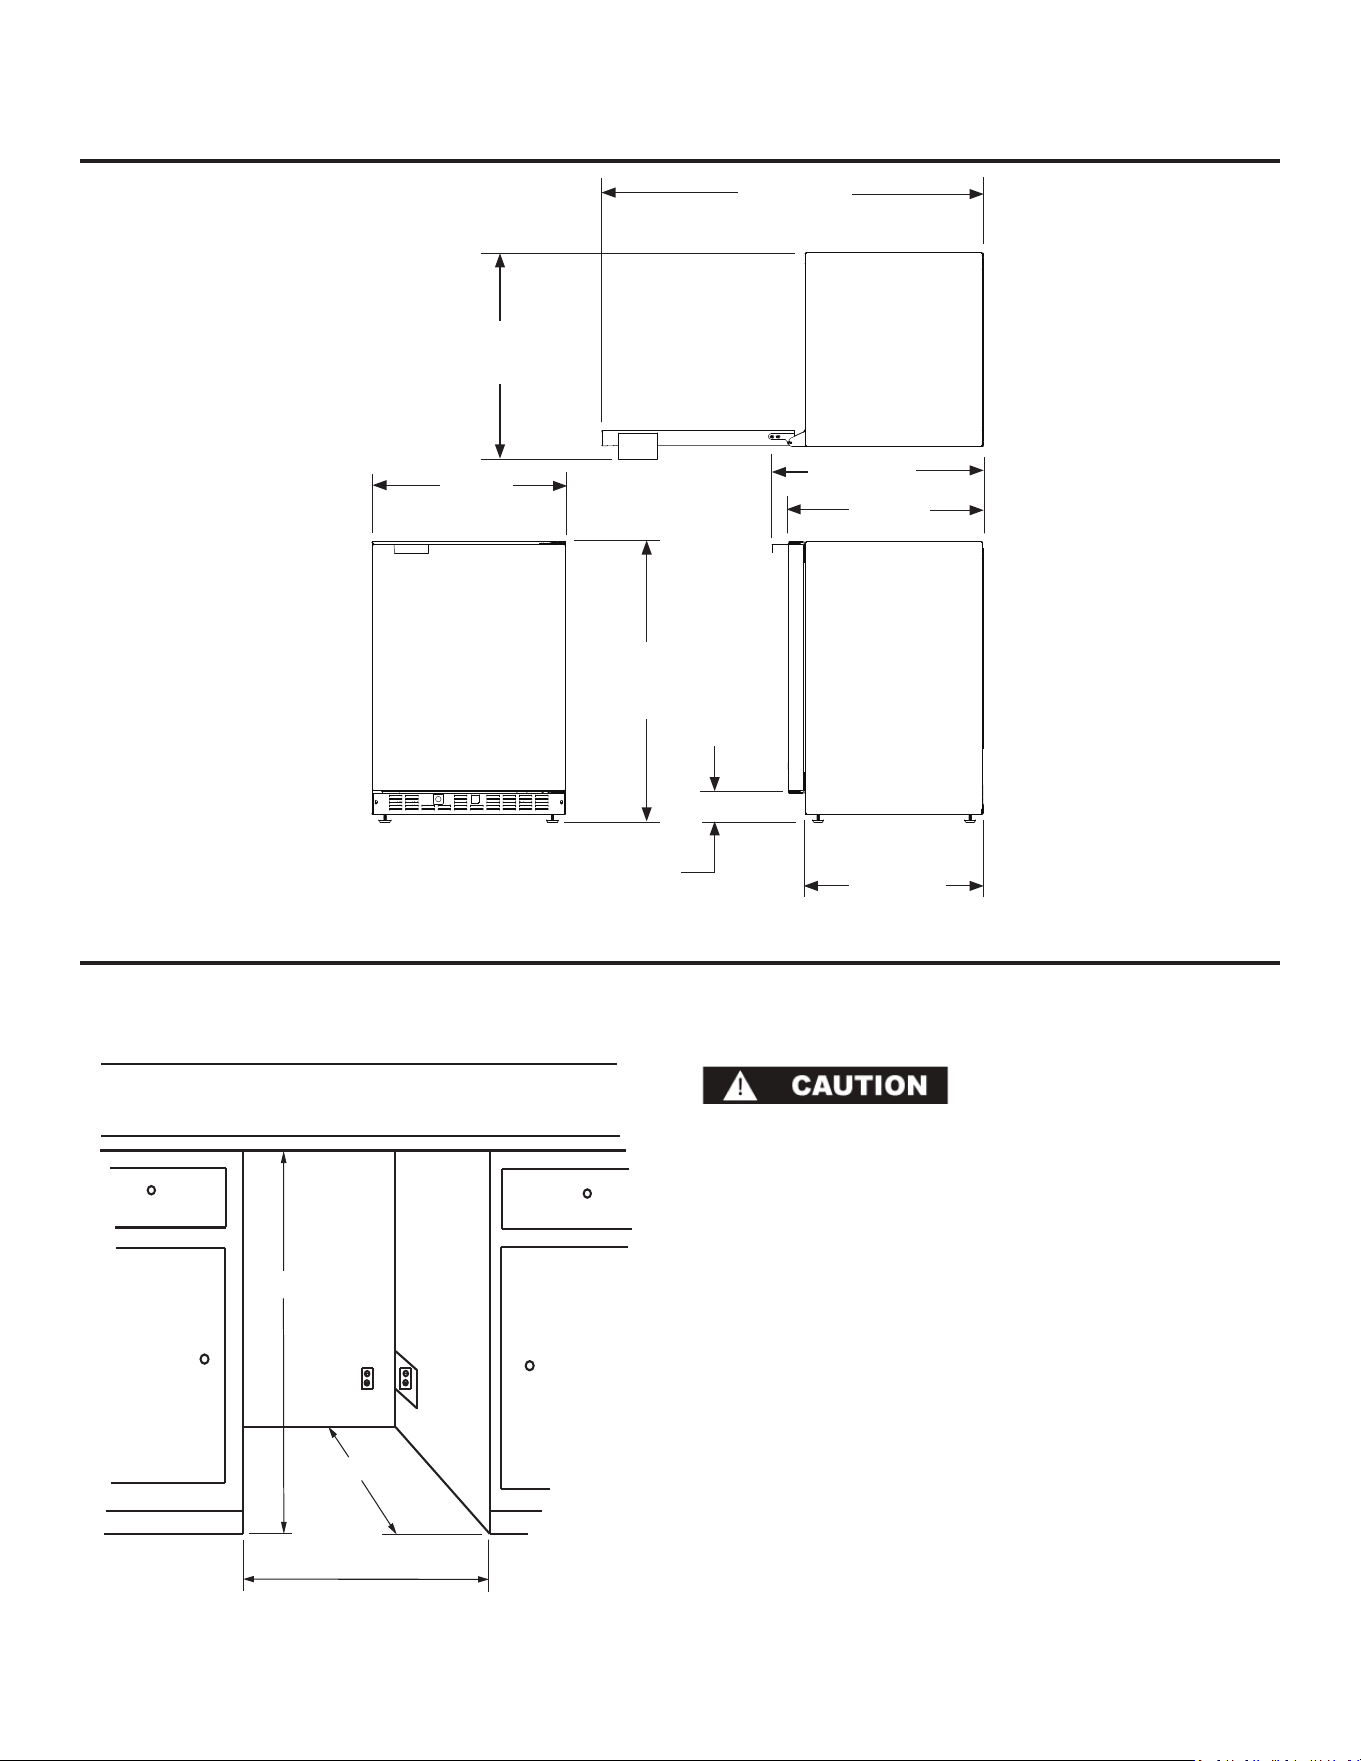
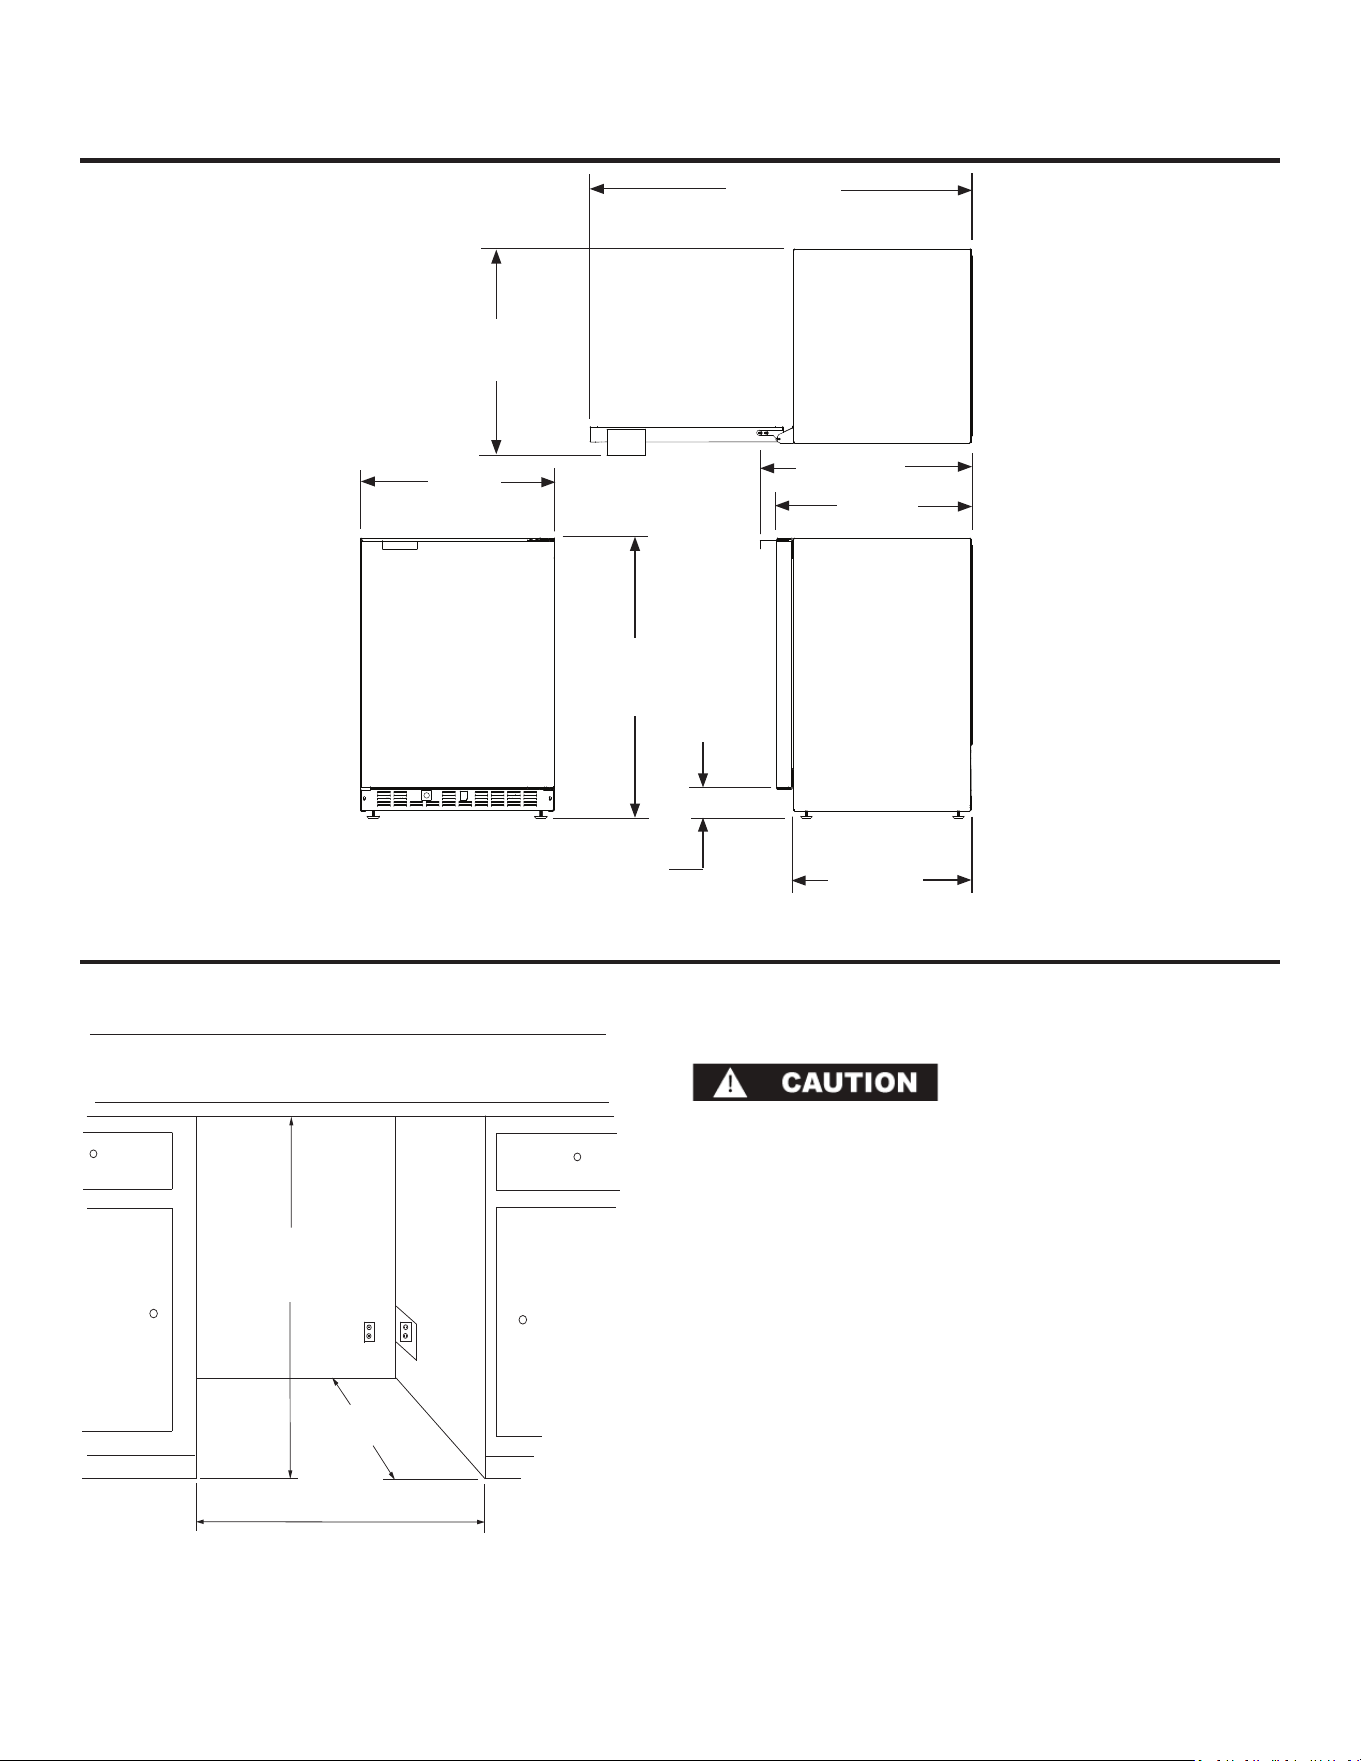
*24” (61 cm)
standard cabinet
depth
24” (61 cm)
* Depth dimension may vary depending on
each individual installaon.
Electrical Requirements:
Electrical Requirements: A 115 volt, 15 amp dedicated circuit is
required. A 3 prong grounded receptacle is required.
Power outlet can be located in the back wall behind unit. Add 1”
to depth for thickness of plug, or recess outlet 1” into the wall.
Power outlet can also be installed in adjacent cabinetry with a
cutout for roung of power cord. Follow all local building codes
when installing electrical and unit.
Product weight = 120 lbs. (54.5 kg.)
DIMENSIONS FOR 6CRF WITH SOLID DOOR
ROUGH IN OPENING FOR 6CRF WITH SOLID DOOR
23-7/8”
(60.7CM)
22”
(55.9cm)
24-3/32”
(64.19cm)
25-11/32”
(64.36cm)
33-3/4” to 34-3/4”
(85.7 to 88.3cm)
3” to 4”
(7.6 to 10.2cm)
47-3/32”
(119.61cm)
24-7/8”
(63.20cm)
7
** Minimum rough in opening required is to be
larger than the adjusted height of the cabinet.
** 34” to 35”
(86.36 to 88.9cm)
* Depth dimension may vary depending on
each individual installaon.
Electrical Requirements:
Electrical Requirements: A 115 volt, 15 amp dedicated circuit is
required. A 3 prong grounded receptacle is required.
Power outlet can be located in the back wall behind unit. Add 1”
to depth for thickness of plug, or recess outlet 1” into the wall.
Power outlet can also be installed in adjacent cabinetry with a
cutout for roung of power cord. Follow all local building codes
when installing electrical and unit.
Product weight = 120 lbs. (54.5 kg.)
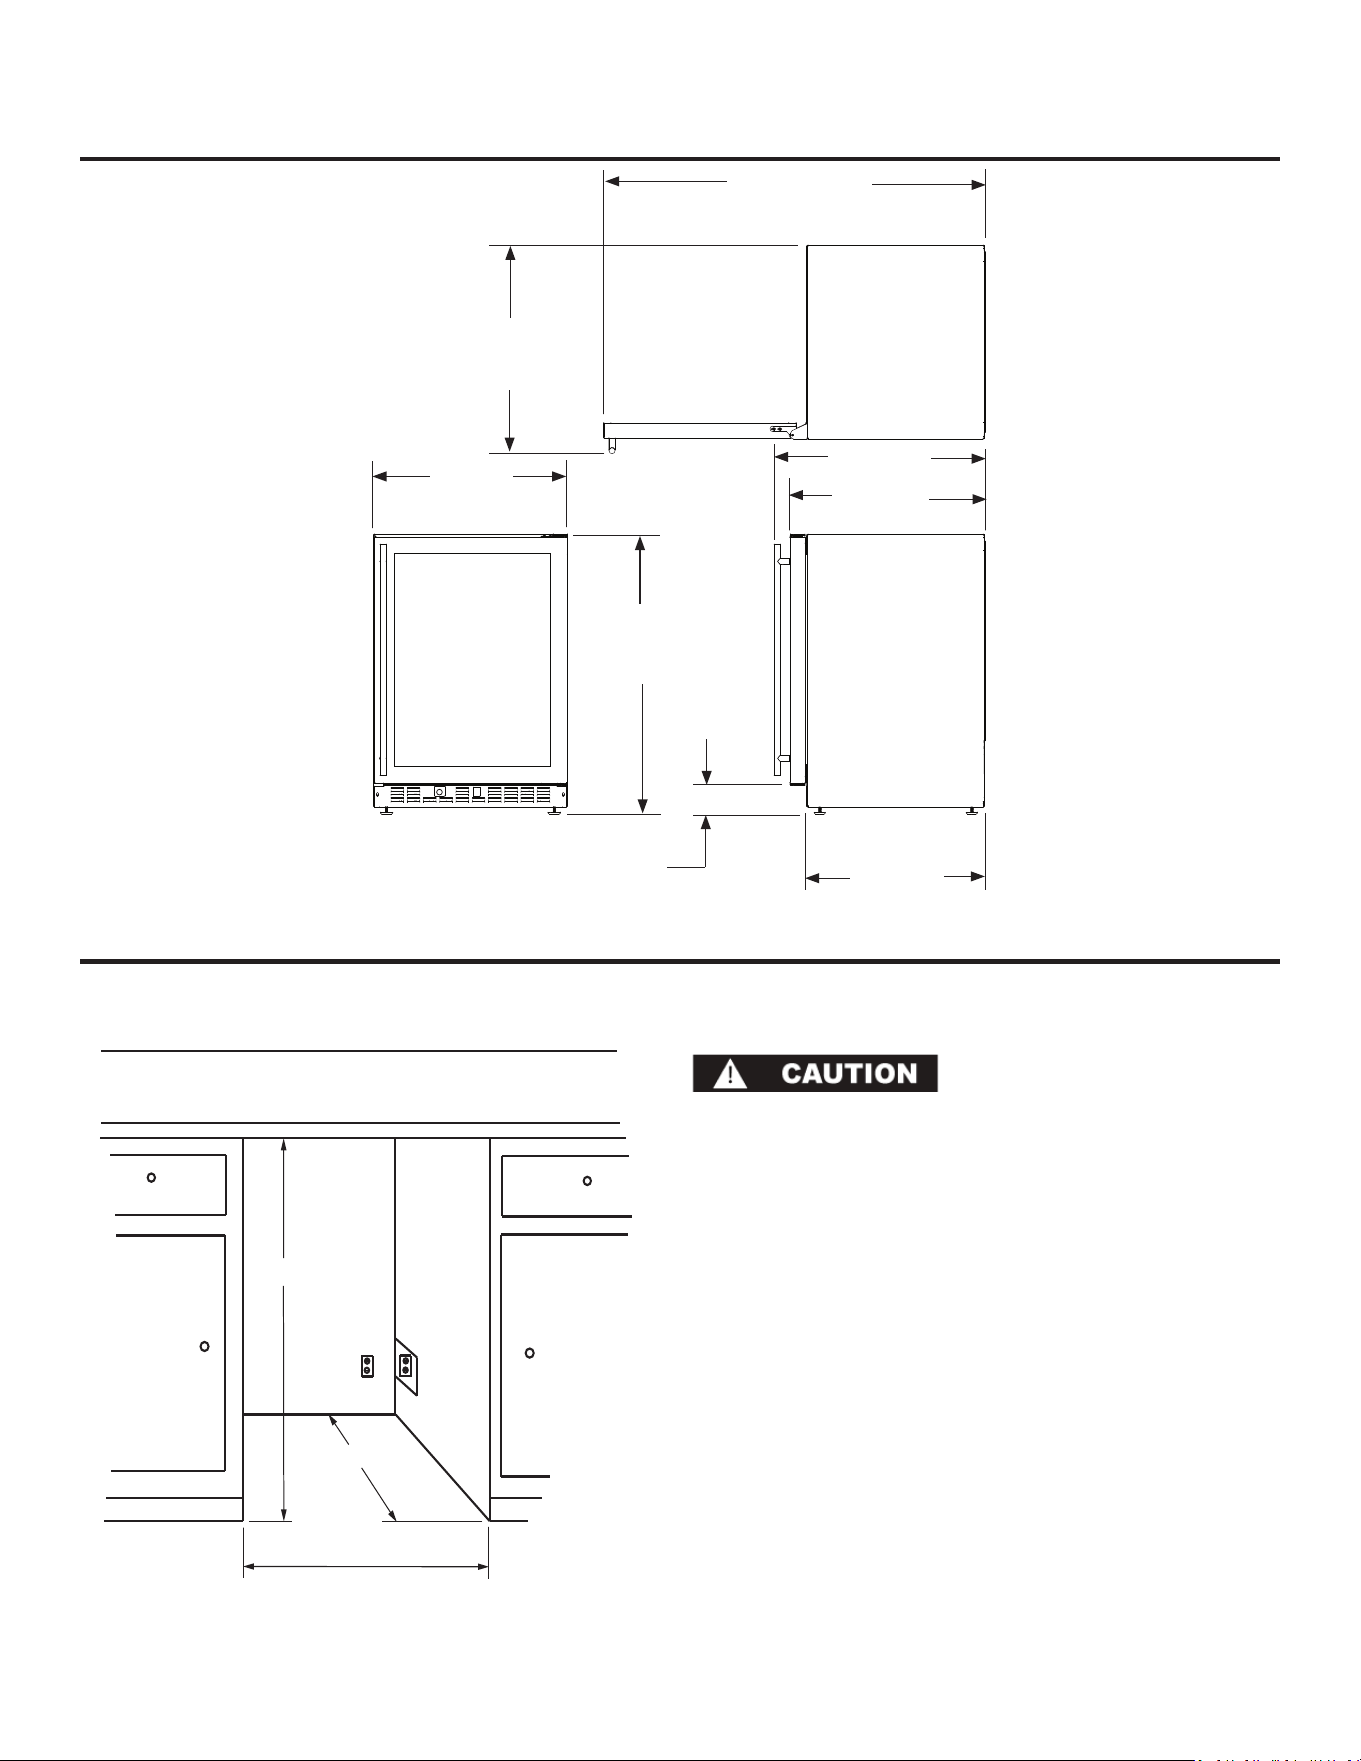
*24” (61 cm)
standard cabinet
depth
24” (61 cm)
ROUGH IN OPENING FOR 6CRF WITH GLASS DOOR
DIMENSIONS FOR 6CRF WITH GLASS DOOR
23-7/8”
(60.7CM)
22”
(55.9cm)
33-3/4” to 34-3/4”
(85.7 to 88.3cm)
3” to 4”
(7.6 to 10.2cm)
24-3/32”
(61.19cm)
26-1/32”
(66.12cm)
46-7/8”
(119.08cm)
25-19/32”
(65.0cm)
8
** 34” to 35”
(86.36 to 88.9cm)
** Minimum rough in opening required is to be
larger than the adjusted height of the cabinet.
DIMENSIONS FOR 8CRF WITH SOLID DOOR
* Depth dimension may vary depending on
each individual installaon.
Electrical Requirements:
Electrical Requirements: A 115 volt, 15 amp dedicated circuit is
required. A 3 prong grounded receptacle is required.
Power outlet can be located in the back wall behind unit. Add 1”
to depth for thickness of plug, or recess outlet 1” into the wall.
Power outlet can also be installed in adjacent cabinetry with a
cutout for roung of power cord. Follow all local building codes
when installing electrical and unit.
Product weight = 135 lbs. (61.4 kg.)
*24” (61 cm)
standard cabinet
depth
30” (76.2 cm)
ROUGH IN OPENING FOR 8CRF WITH SOLID DOOR
29-7/8”
(75.9CM)
33-3/4” to 34-3/4”
(85.7 to 88.3cm)
3” to 4”
(7.6 to 10.2cm)
52-15/16”
(134.47cm)
25-11/32”
(64.36cm)
24-3/32”
(61.19cm)
22”
(55.9cm)
30-7/8”
(78.44cm)
9
** 34” to 35”
(86.36 to 88.9cm)
** Minimum rough in opening required is to be
larger than the adjusted height of the cabinet.

ADJUSTING THE TEMPERATURE CONTROL
C
O
L
D
E
R
Adjusng the temperature control
Aer plugging in the units power cord set the temperature con-
trol midway between the numbers. Aer 2 hours adjust to the
temperature that suits you. The higher the number you select,
the cooler the temperature. (See Figure 7).
The temperature control knob is located at the boom, front of
the cabinet, just behind the square opening near the middle of
the grille.
Figure 7
Defrosng Instrucons
Never use a scraper or any tool that might scratch or pierce the
cooling plate. Follow these steps whenever 1/4 inch or more of
frost accumulates.
1. Disconnect the power cord and set the temperature control
knob to the “OFF” posion.
2. Remove the contents from the unit.
3. Place pans of hot water on the cooling plate if you wish to
speed up defrosng.
4. Wipe out the interior and replace the contents.
5. Connect the power cord to the outlet.
6. Set the temperature control to the desired level.
In the Event of a Power Failure
Minimize the number of door openings to prevent a gradual rise
in temperature while the power is o.
NOTE: If a power interrupon occurs, the unit may take ve (5) to
ten (10) minutes to restart.
10

ENERGY SAVING TIPS
Energy Saving Tips
The following suggesons will minimize the cost of operang
your refrigeraon appliance.
1. Do not install your appliance next to a hot appliance, (ovens,
glassware washers, etc.). heang air duct, or other heat
sources.
2. Install product out of direct sunlight.
3. Assure the toe grille vents at front of unit beneath door are
not obstructed and kept clean to allow venlaon for the
refrigeraon system to expel heat.
4. Plug your appliance into a dedicated power circuit. (Not
shared with other appliances).
5. When inially loading your new product, or whenever large
quanes of warm contents are placed within refrigerated
storage compartment, minimize door openings for the next
12 hours to allow contents to pull down to compartment
set-point temperature.
6. Maintaining a relavely full storage compartment will re-
quire less appliance run me than an empty compartment.
7. Assure door closing is not obstructed by contents stored in
your appliance.
8. Allow hot items to reach room temperature before placing
in product.
9. Minimize door openings and duraon of door openings.
10. Use the warmest temperature control set-point that pro-
vides the proper storage for your stored contents.
11. Set the control to the “o” posion if cleaning the unit
requires the door to be open for an extended period of
me.
12. Annually clean condenser heat exchange coil located
in machine compartment underneath unit, (see “Care
and Cleaning” page 12).
11
Cleaning instrucons
Condenser
The condenser underneath the cabinet does not require fre-
quent cleaning; however, sasfactory cooling depends on ad-
equate venlaon over this heat exchanger. It is recommended
to annually clean the condenser by vacuuming and brushing.
To access the condenser, the unit must be pulled out from the
installaon, and the lower machine compartment access cover
removed.
Disconnect the power cord before cleaning the condenser.
Be sure that nothing obstructs the required air ow openings
in front of the cabinet. At least once or twice a year, brush or
vacuum lint and dirt from the front grille area (see page 4).
Cabinet
The painted cabinet can be washed with mild soap and water and
thoroughly rinsed with clear water. NEVER use abrasive scouring
cleaners.
Interior
Wash interior compartment with mild soap and water. DO NOT
use an abrasive cleaner, solvent, polish cleaner, or undiluted de-
tergent.
Glass Door (oponal)
Use a glass cleaner or mild soap and water, and so cloth to clean
the glass door model. DO NOT use any abrasive cleaners.
Door Gasket
The vinyl gasket may be cleaned with mild soap and water, a bak-
ing soda soluon, or a mild scouring powder.
CARE AND CLEANING
12
Problem Possible Cause Remedy
Unit not cold enough. • Control set too warm.
• Airow to front grille blocked.
• Excessive usage or prolonged door
openings.
• Door gasket not sealing properly.
• Adjust temperature colder. (See
“Adjusng the temperature control”
on page 10). Allow 24 hours for tem-
perature to stabilize.
• Airow must not be obstructed to
front grille. See “clearances” on page
4.
• Allow temperature to stabilize for at
least 24 hours.
• Check door alignment and/or adjust
or replace door gasket.
Unit too cold. • Control set too cold. • Adjust temperature warmer. (See
“Adjusng the temperature control”
on page 10). Allow 24 hours for tem-
perature to stabilize.
Noise or Vibraon. • Unit not level. • Level unit, see “Leveling Legs” on
page 4.
Unit will not run. • Unit turned o.
• Power cord not plugged in.
• No power at outlet.
• Turn unit on. See “Adjusng the tem-
perature control” on page 10.
• Plug in power cord.
• Check house circuit.
Before You Call for Service
If the unit appears to be malfunconing, read through this
manual rst. If the problem persists, check the troubleshoong
guide below. Locate the problem in the guide and refer to the
cause and its remedy before calling for service. The problem may
be something very simple that can be solved without a service
call. However, it may be required to contact your dealer or a
qualied service technician.
TROUBLESHOOTING YOUR REFRIGERATOR
13
Electrocuon Hazard - Never aempt to repair or perform main-
tenance on the unit unl the main electrical power has been
disconnected. Turning the unit control “OFF” does not remove
electrical power from the units wiring.
OBTAINING SERVICE
For Your Records
Date of Purchase
Dealer’s name
Dealer’s Address
Dealer’s City
Dealer’s State
Dealer’s Zip Code
Appliance Serial Number
Appliance Model Number
Date Warranty Card Sent (Must be
within 10 days of purchase).
If Service is Required:
• If the product is within the rst year warranty period please
call Marvel Customer Service at 800.223.3900 for direcons
on how to obtain warranty coverage in your area.
• If the product is outside the rst year warranty period,
Marvel Customer Service can provide recommendaons of
service centers in your area. A lisng of authorized service
centers is also available at www.marvelrefrigeraon.com
under the service and support secon.
• In all correspondence regarding service, be sure to give the
model number, serial number, and proof of purchase.
• Try to have informaon or descripon of nature of the prob-
lem, how long the unit has been running, the room temper-
ature, and any addional informaon that may be helpful in
quickly solving the problem.
• Table A is provided for recording pernent informaon
regarding your product for future reference.
14
Table A

COMMERCIAL PRODUCT WARRANTY
15
Marvel Refrigeraon (Marvel) Limited Warranty
ONE YEAR LIMITED PARTS & LABOR WARRANTY
For one year from the date of original purchase, this warranty covers all parts and labor to repair or replace any part of the product that
proves to be defecve in materials or workmanship. For products installed and used for normal residenal use, material cosmec defects
are included in this warranty, with coverage limited to 60 days from the date of original purchase. All service provided by Marvel under the
above warranty must be performed by a Marvel factory authorized servicer, unless otherwise specied by Marvel. Service provided during
normal business hours.
TWO YEAR LIMITED PARTS & LABOR WARRANTY (MARVEL PROFESSIONAL PRODUCTS)
For two years from the date of original purchase, this warranty covers all parts and labor to repair or replace any part of the product that
proves to be defecve in materials or workmanship. For products installed and used for normal residenal use, material cosmec defects
are included in this warranty, with coverage limited to 60 days from the date of original purchase. All service provided by Marvel under the
above warranty must be performed by a Marvel factory authorized servicer, unless otherwise specied by Marvel. Service provided during
normal business hours.
AVAILABLE THIRD YEAR LIMITED WARRANTY (MARVEL PROFESSIONAL PRODUCTS)
For designated Marvel Professional product, Marvel oers a one year extension of the two year warranty coverage from the date of
purchase, free of charge. To take advantage of this third year warranty, you must register your product with Marvel within 60 days from the
date of purchase at marvelrefrigeraon.com and provide proof of purchase.
LIMITED FIVE YEAR SEALED SYSTEM WARRANTY
For ve years from the date of original purchase, Marvel will repair or replace the following parts, labor not included, that prove to be
defecve in materials or workmanship: compressor, condenser, evaporator, drier, and all connecng tubing. All service provided by Marvel
under the above warranty must be performed by a Marvel factory authorized servicer, unless otherwise specied by Marvel. Service
provided during normal business hours.
WARRANTY TERMS
These warranes apply only to products installed in any one of the y states of the United States, the District of Columbia, or the ten
provinces of Canada. The warranes do not cover any parts or labor to correct any defect caused by negligence, accident or improper use,
maintenance, installaon, service, repair, acts of God, re, ood or other natural disasters. The product must be installed, operated, and
maintained in accordance with the Marvel User Guide.
The remedies described above for each warranty are the only ones that Marvel will provide, either under these warranes or under any
warranty arising by operaon of law. Marvel will not be responsible for any consequenal or incidental damages arising from the breach
of these warranes or any other warranty, whether express, implied, or statutory. Some states do not allow the exclusion or limitaon of
incidental or consequenal damages, so the above limitaon or exclusion may not apply to you. These warranes give you specic legal
rights, and you may also have other rights which vary from state to state.
Any warranty that may be implied in connecon with your purchase or use of the product, including any warranty of merchantability or
any warranty t for a parcular purpose is limited to the duraon of these warranes, and only extends to ve years in duraon for the
parts described in the secon related to the ve year limited warranty above. Some states do not allow limitaons on how long an implied
warranty lasts, so the above limitaons may not apply to you.
• The warranes only apply to the original purchaser and are non-transferable.
• These warranes cover products installed and used for normal residenal use only.
• The warranes apply to units operated outside only if designed for outdoor use by model and serial number.
• Replacement water lters, light bulbs, and other consumable parts are not covered by these warranes.
• The start of Marvel’s obligaon is limited to four years aer the shipment date from Marvel.
• In-home instrucon on how to use your product is not covered by these warranes.
• Food, beverage, and medicine loss are not covered by these warranes.
• If the product is located in an area where Marvel factory authorized service is not available, you may be responsible for a trip charge or
you may be required to bring the product to a Marvel factory authorized service locaon at your own cost and expense.
• Units purchased aer use as oor displays, and/or cered recondioned units, are covered by the limited one year warranty only and
no coverage is provided for cosmec defects.
• Signal issues related to Wi-Fi connecvity are not covered by these warranes.
For parts and service assistance, or to nd Marvel factory authorized service near you, contact Marvel Refrigeraon:
MarvelRefrigeraon.com • techsupport@MarvelRefrigeraon.com • +616.754.5601
1260 E. Van Deinse St., Greenville, MI 48838

All specicaons and product designs subject to change without noce. Such revisions do not entle the
buyer to corresponding changes, improvements, addions, replacements or compensaon for previously
purchased products.
www.marvelrefrigeraon.com
1260 E. VanDeinse St.
Greenville MI 48838
800.223.3900
41011887-EN Rev K
1/14/20
Marvel Refrigeraon