
Technical Support and E-Warranty Certificate www.vevor.com/support
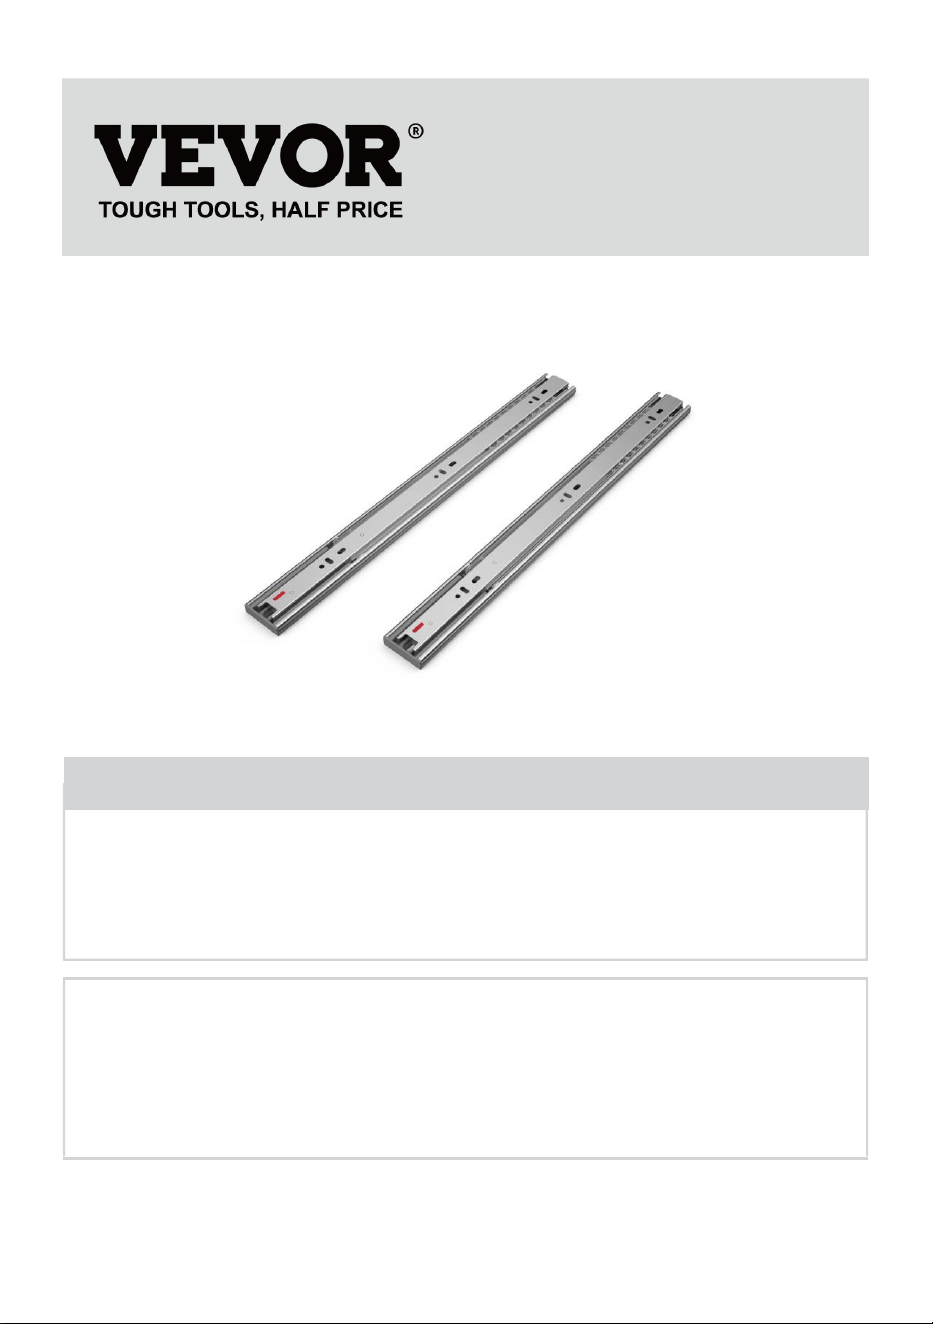
DRAWER SLIDES
MODEL:4605S2
We continue to be committed to provide you tools with competitive price.
"Save Half", "Half Price" or any other similar expressions used by us only represents an
estimate of savings you might benefit from buying certain tools with us compared to the major
top brands and dose not necessarily mean to cover all categories of tools offered by us. You
are kindly reminded to verify carefully when you are placing an order with us if you are
actually saving half in comparison with the top major brands.
- 1 -
MODEL:4605S2
Have product questions? Need technical support? Please feel free to
contact us:
Technical Support and E-Warranty Certificate
www.vevor.com/support
NEED HELP? CONTACT US!
This is the original instruction, please read all manual instructions
carefully before operating. VEVOR reserves a clear interpretation of our
user manual. The appearance of the product shall be subject to the
product you received. Please forgive us that we won't inform you again if
there are any technology or software updates on our product.
DRAWER SLIDES
- 2 -
Warning-To reduce the risk of injury, user must read
instructions manual carefully.
WARNING:
1. Please assemble the product in strict accordance with the instructions.
Incorrect assembly could be hazardous.
2. Please wear safety goggles and work gloves properly during assembly.
3. Do not try to assemble the product when feeling tired or when under the
influence of alcohol, drugs, or medication.
4. Load-bearing capacity and other product parameters are applied to the
properly and completely assembled product only.
5. Separate and count all parts and hardware.
6. Prepare the following tool: Philips Head Screwdriver.
7. If using power tools, please be careful to slow down and stop when
needed.
8. Two people are required for assembly.
9. Follow the intended uses only.
Save the instructions.
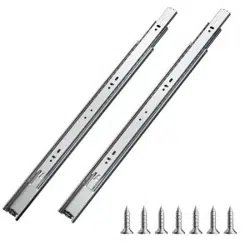
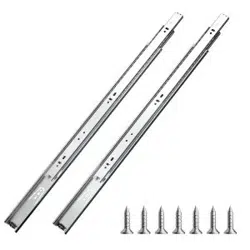
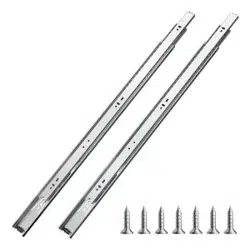
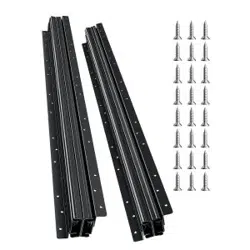
Product Introduction
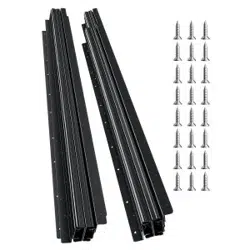
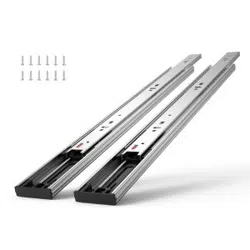
Part List (pcs)
Item
Model
Slide
Screws
4605S2.350-10
10
120
4605S2.350-6
6
72
4605S2.400-10
10
120
4605S2.400-6
6
72
4605S2.450-10
10
120
4605S2.450-6
6
72
- 3 -
4605S2.500-10
10
120
4605S2.500-6
6
72
4605S2.550-10
10
120
4605S2.550-6
6
72
4605S2.600-10
10
120
4605S2.600-6
6
72
Model
Applicable Drawer
Length (inch)
Sliding Length
(mm)
Max. Load
(kg / lbs)
4605S2.350-10
14
325
100 / 45.4
4605S2.350-6
14
325
4605S2.400-10
16
400
4605S2.400-6
16
400
4605S2.450-10
18
450
4605S2.450-6
18
450
4605S2.500-10
20
500
4605S2.500-6
20
500
4605S2.550-10
22
550
4605S2.550-6
22
550
4605S2.600-10
24
600
4605S2.600-6
24
600
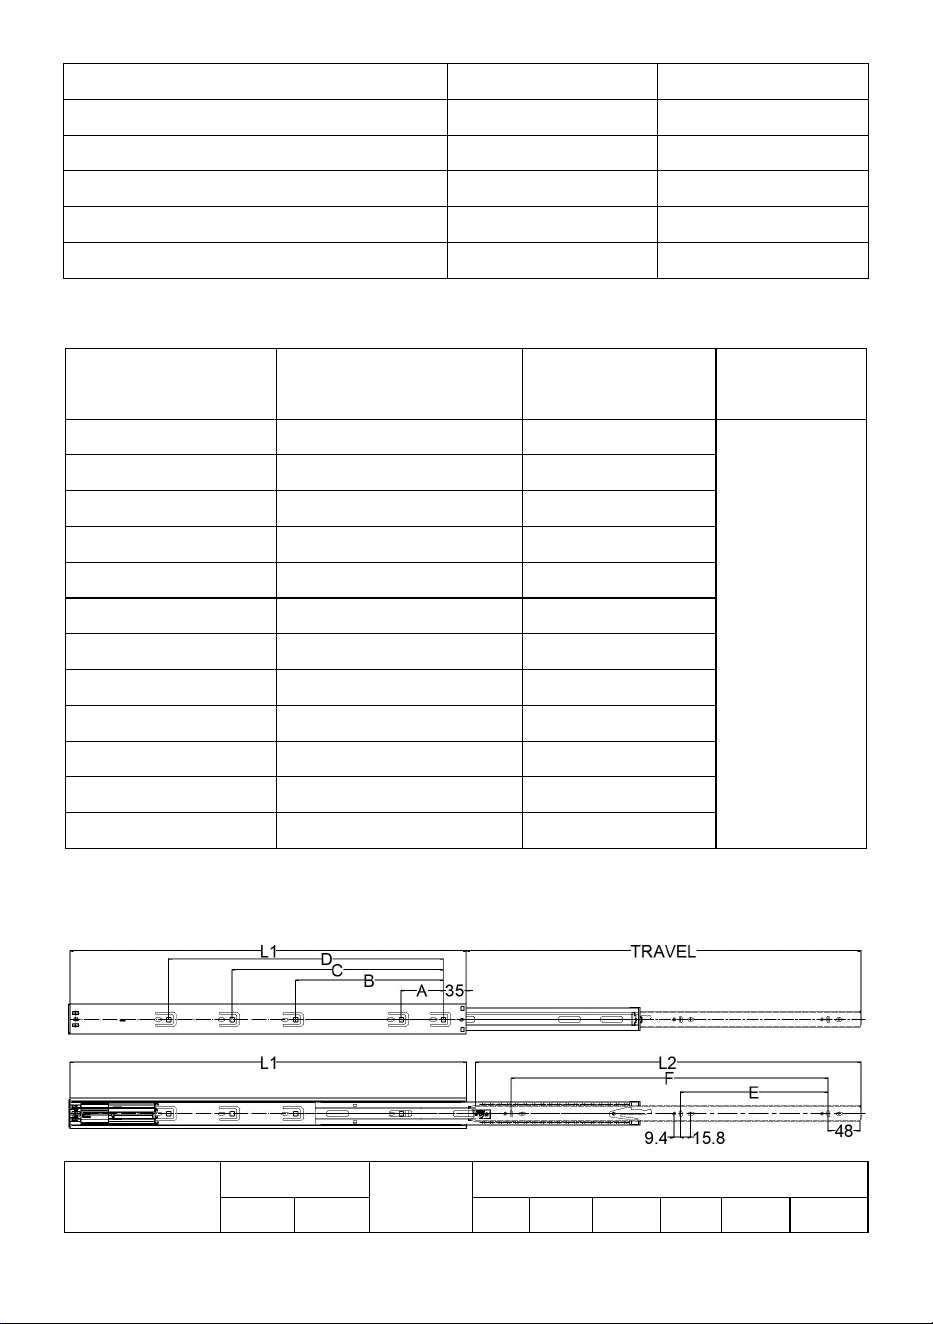
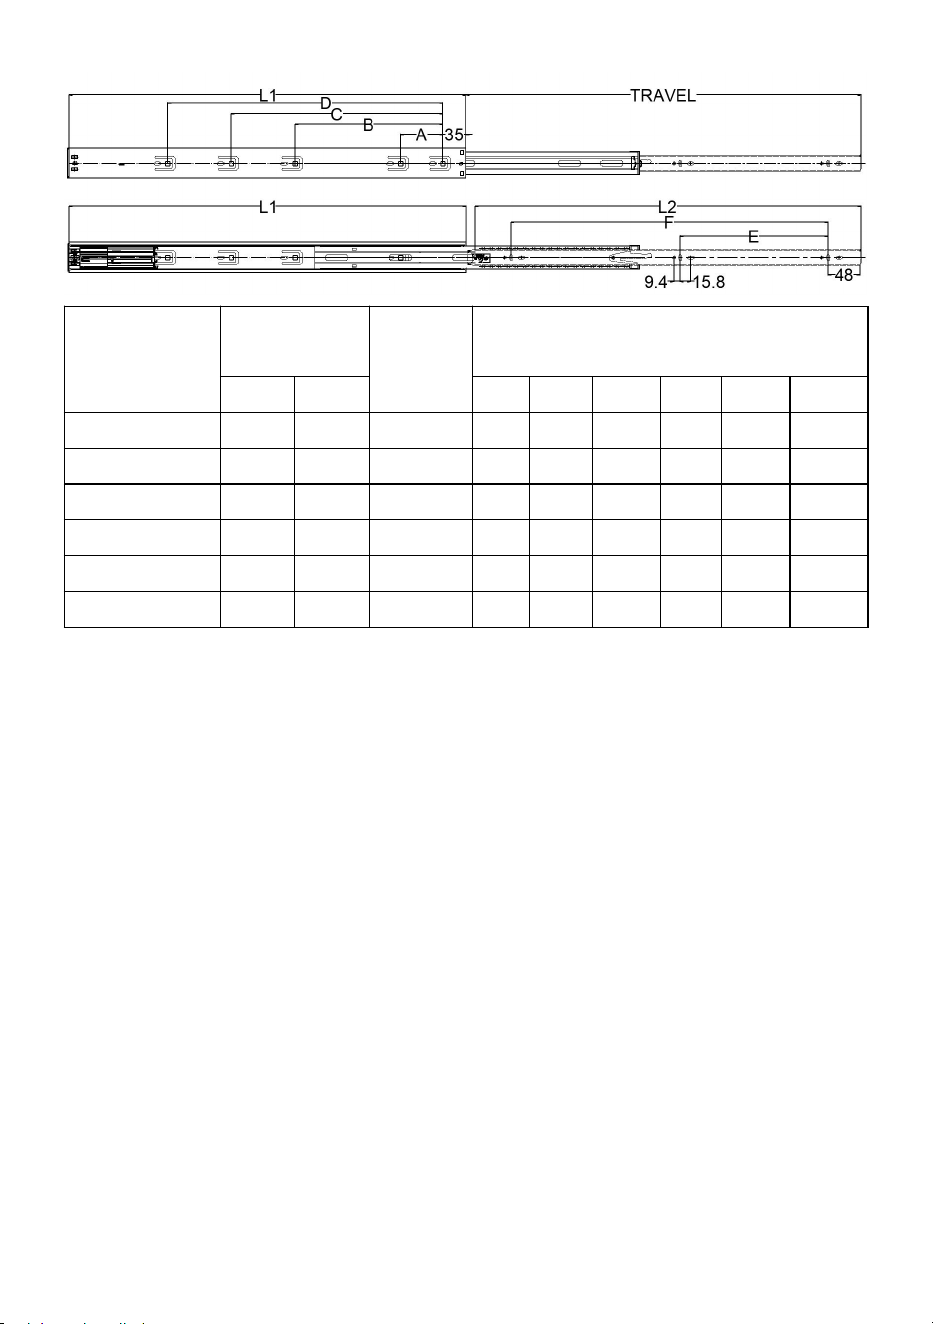
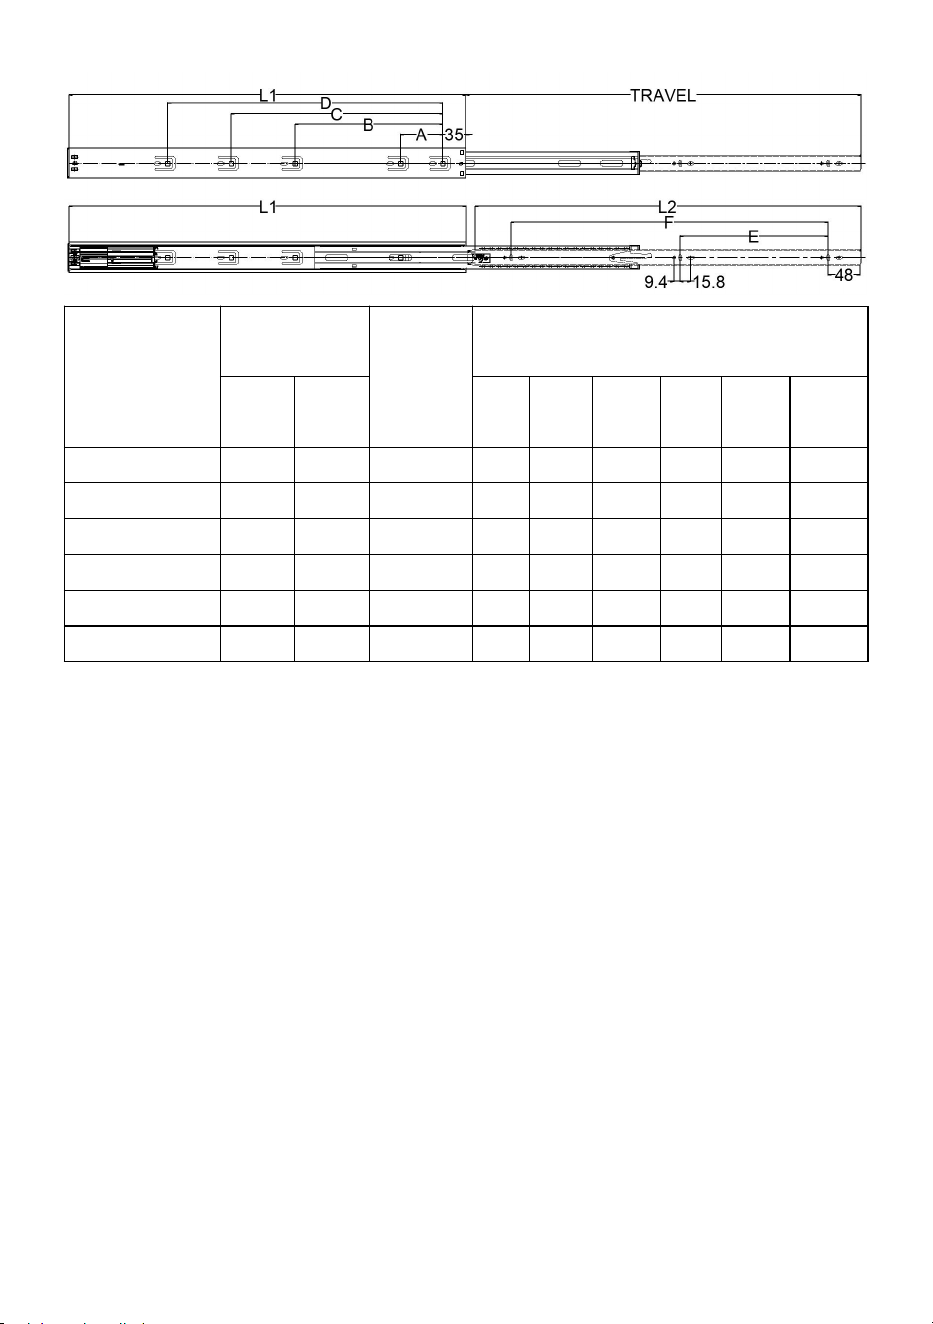
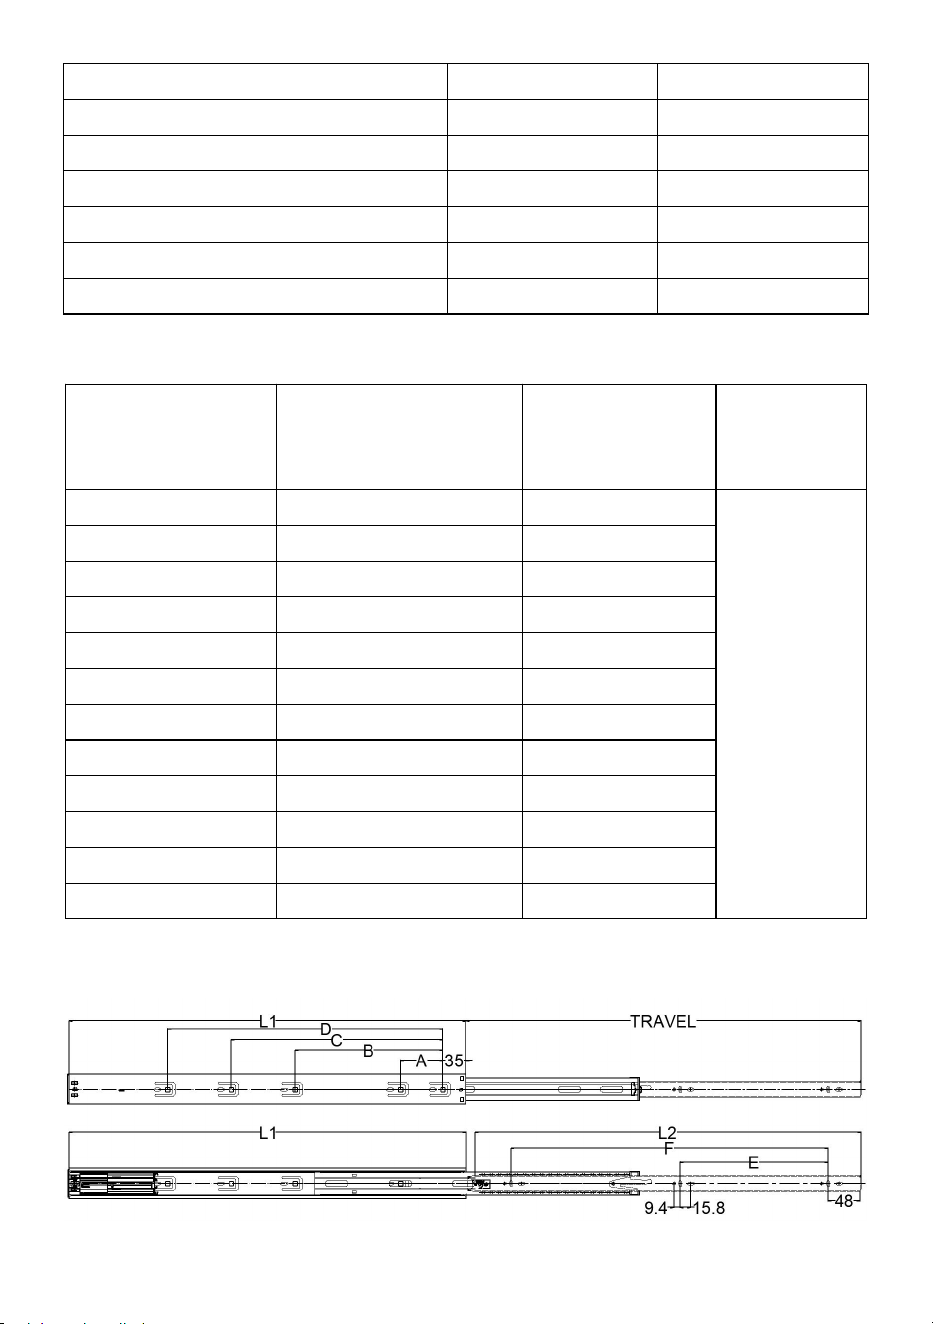
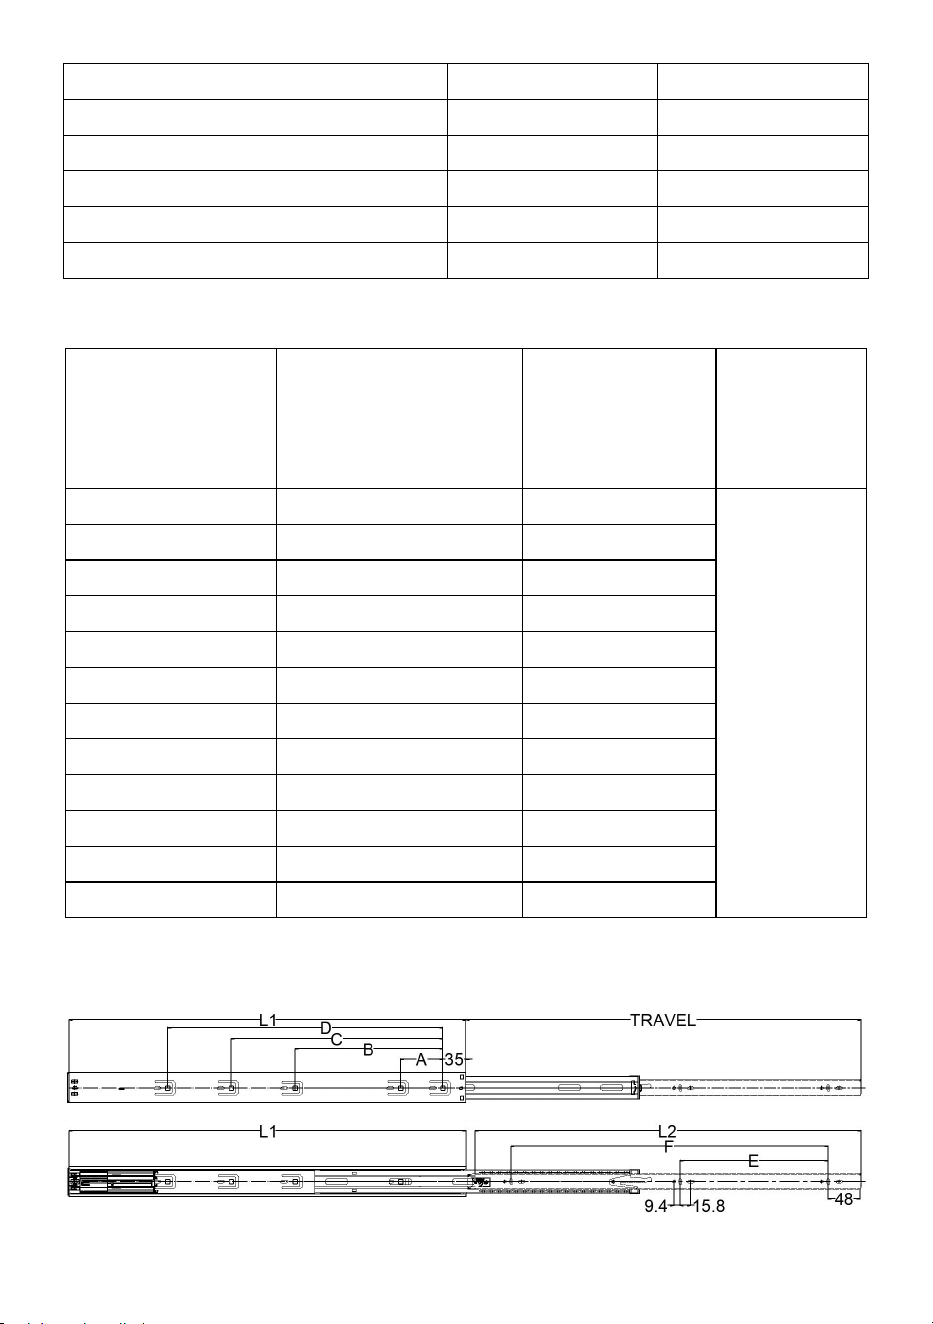
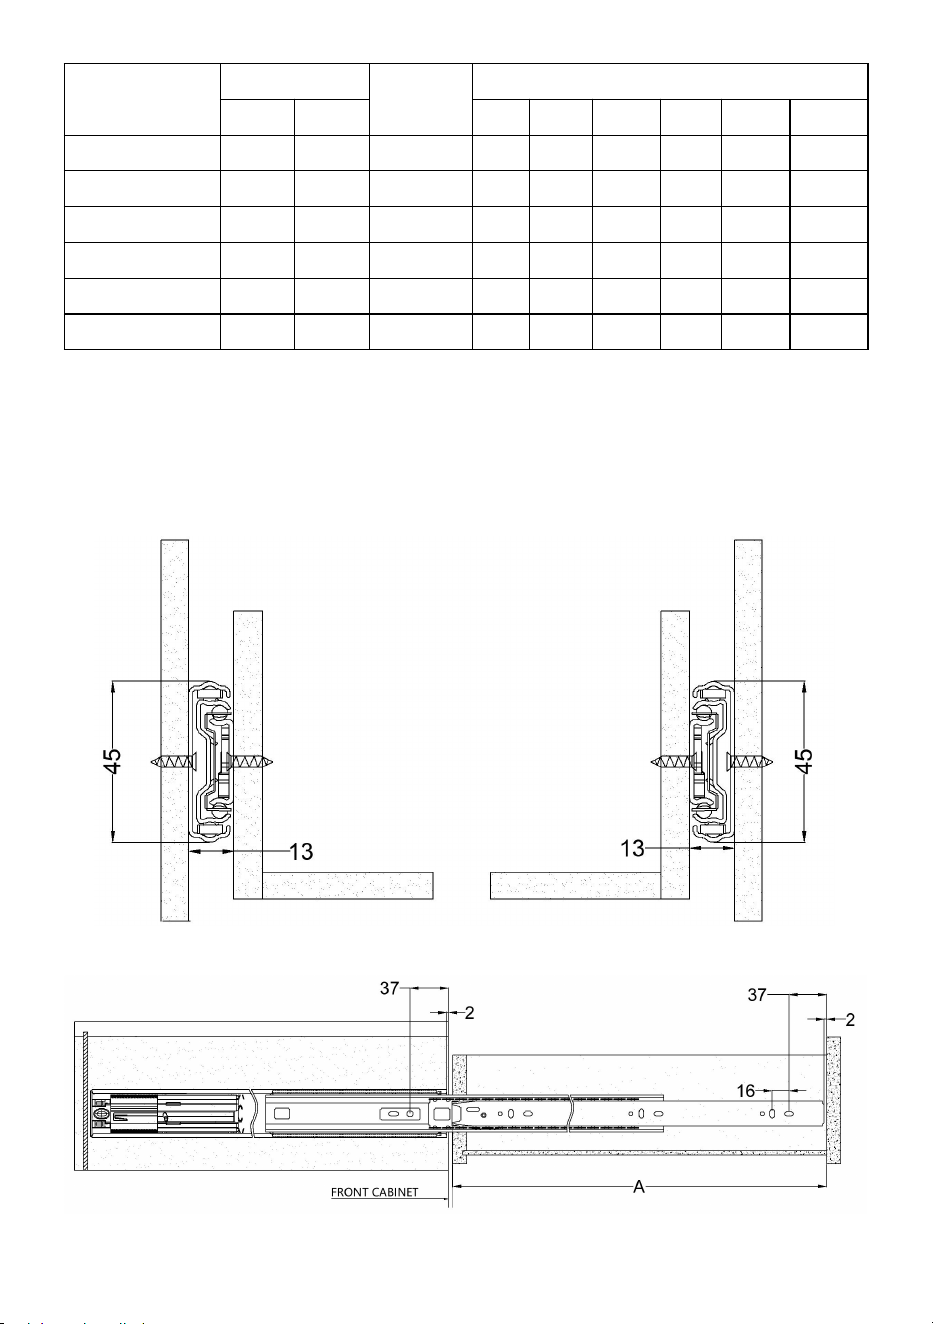
Installation Dimensions (mm)
Model
Size (mm)
Travel
(mm)
Hole Pattern (mm)
L1
L2
A
B
C
D
E
F
- 4 -
4605S2.350
350
332
325
64
192
/
/
128
241
4605S2.400
400
382
400
64
224
/
/
160
288
4605S2.450
450
432
450
64
224
288
/
160
320
4605S2.500
500
482
500
64
224
320
/
192
384
4605S2.550
550
532
550
64
224
384
/
192
416
4605S2.600
600
582
600
64
224
352
416
224
480
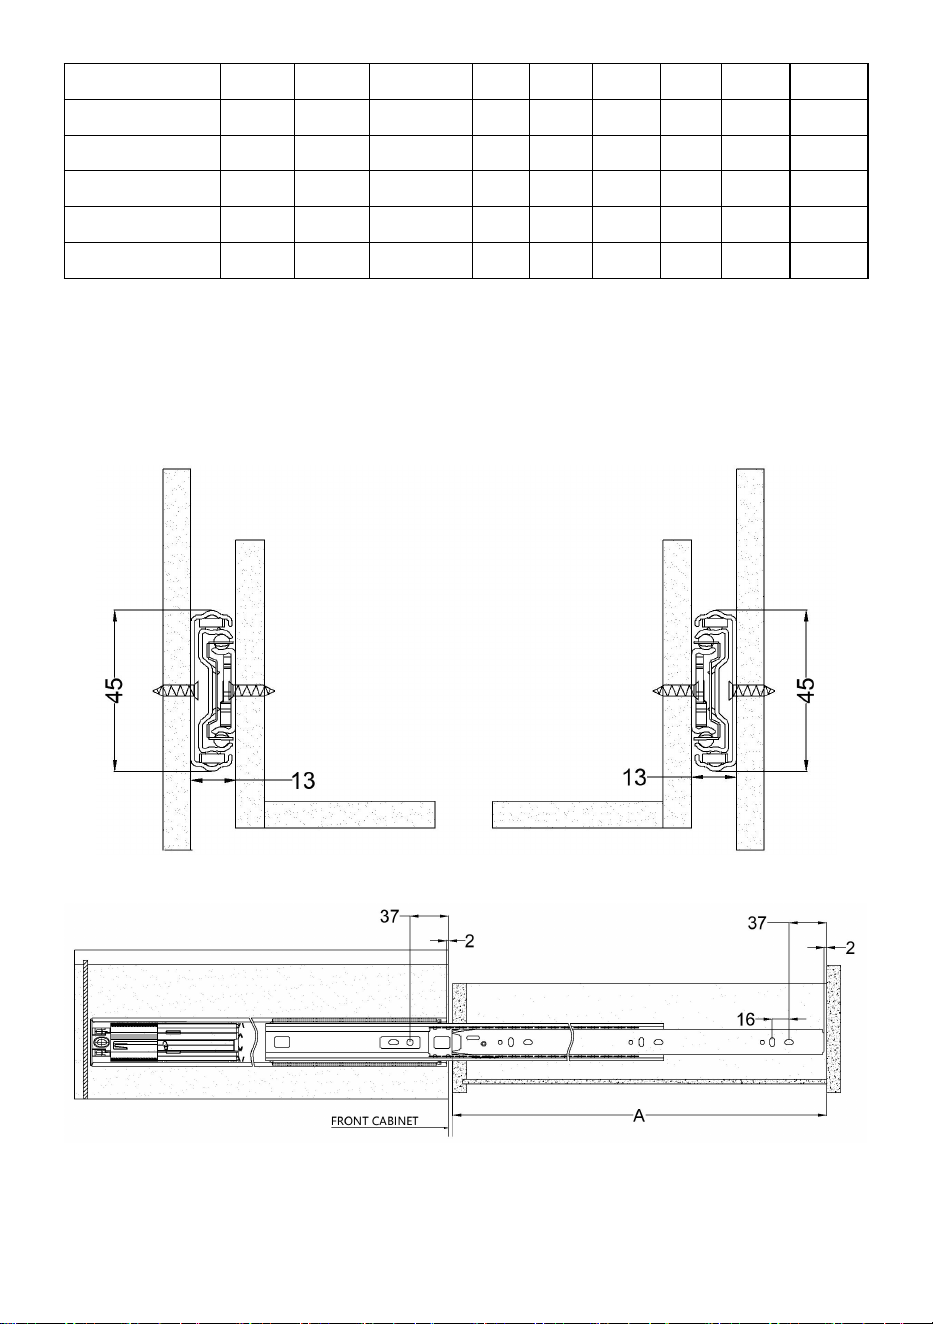
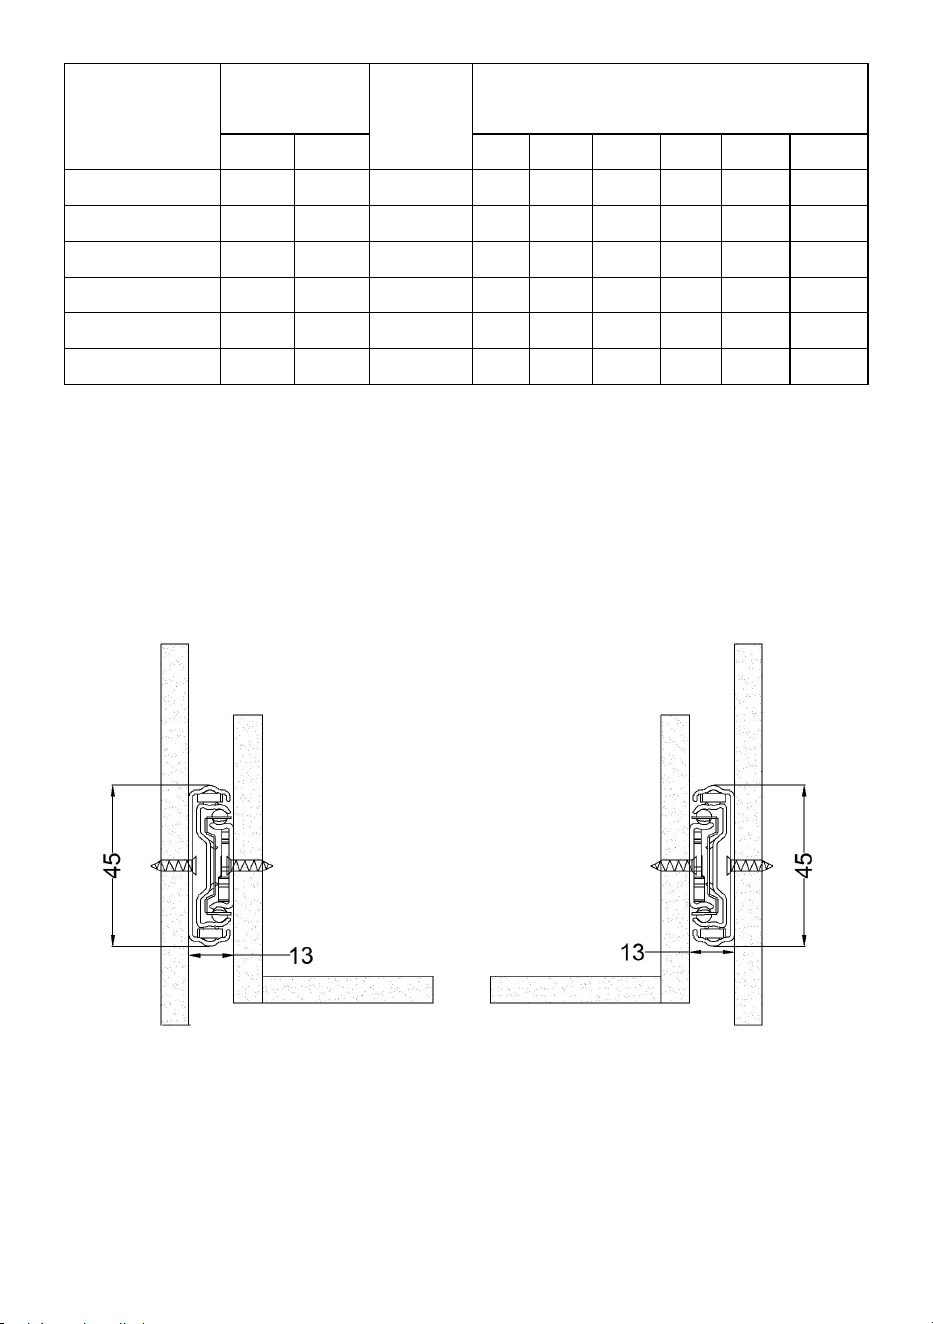
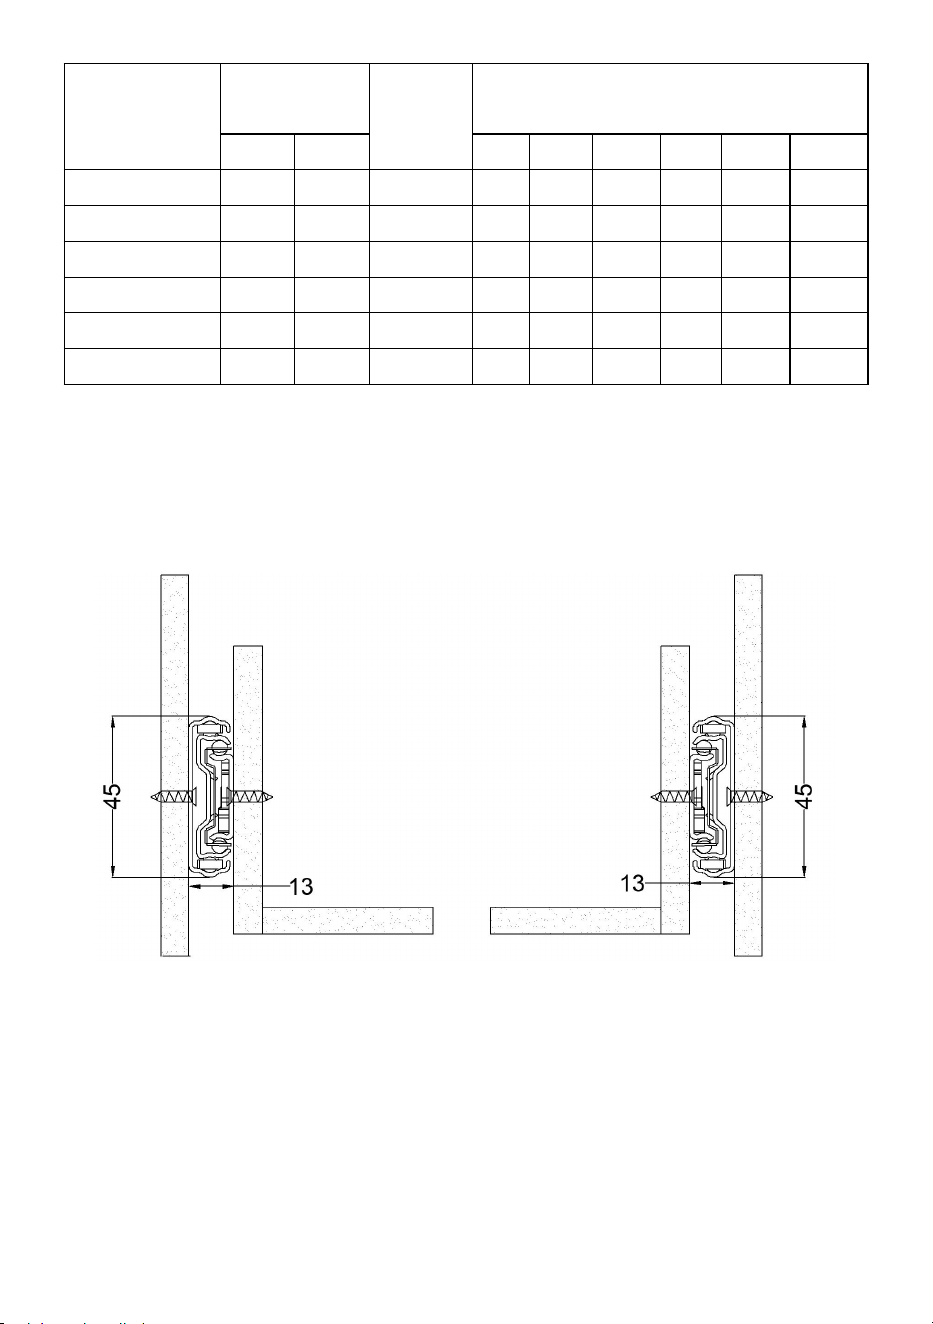
Installation Procedure
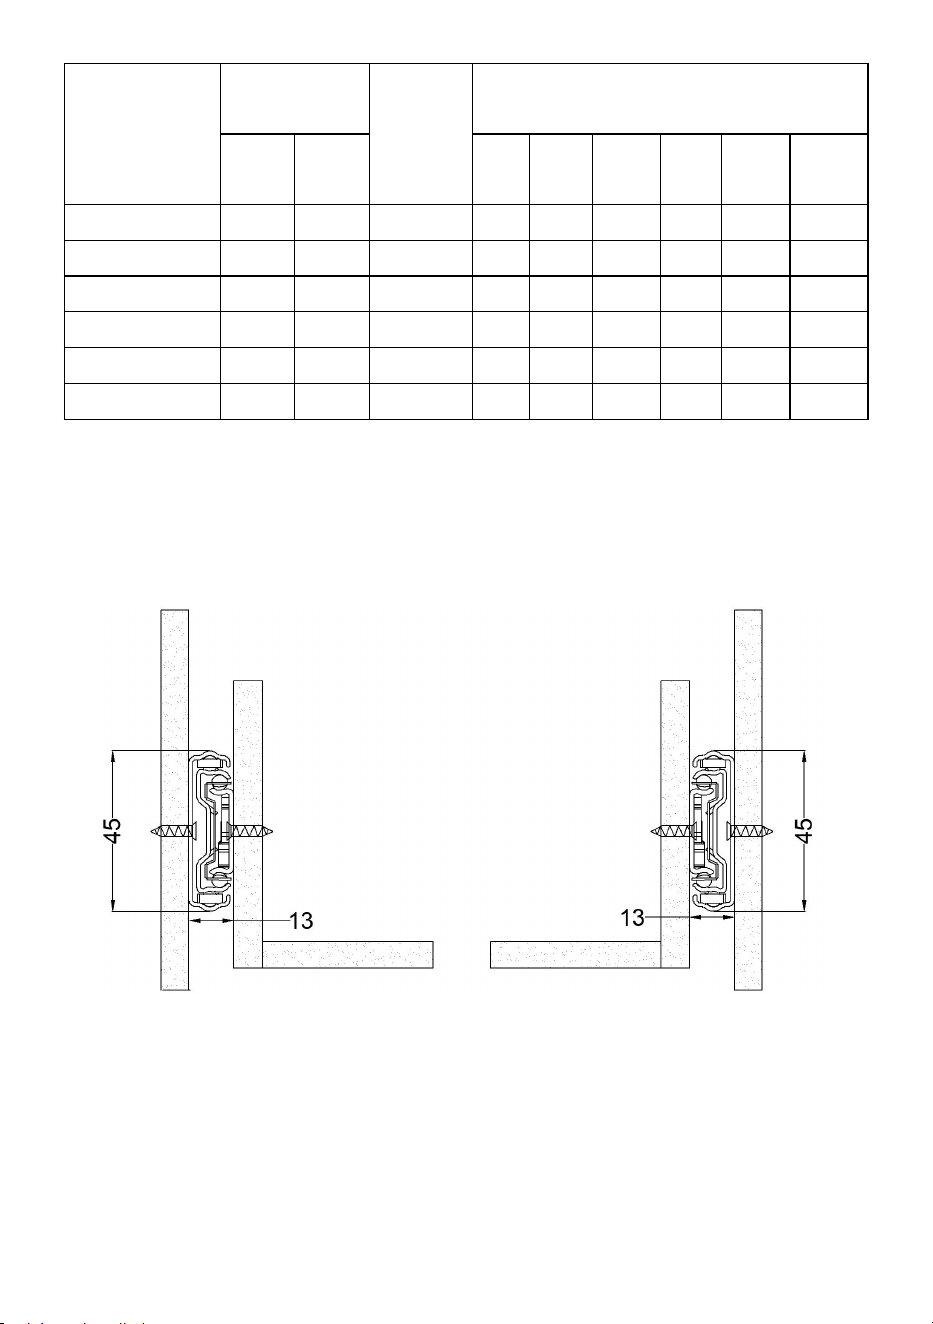
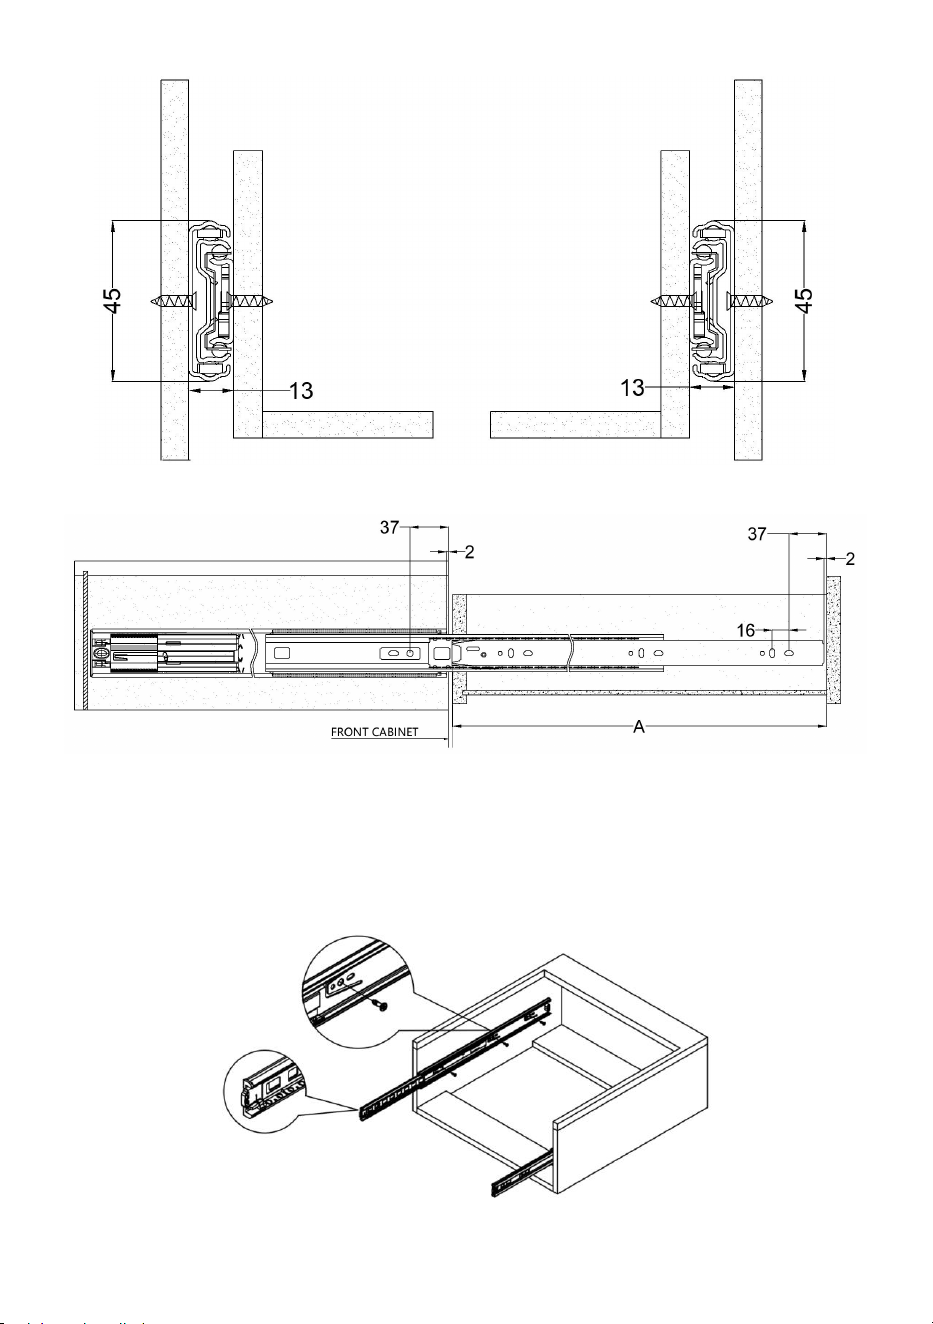
Note the following two points during installation:
1.Pay attention to the installation space on both sides.(Units:mm)
2.2mm away from the front end of the cabinet.(Units:mm)
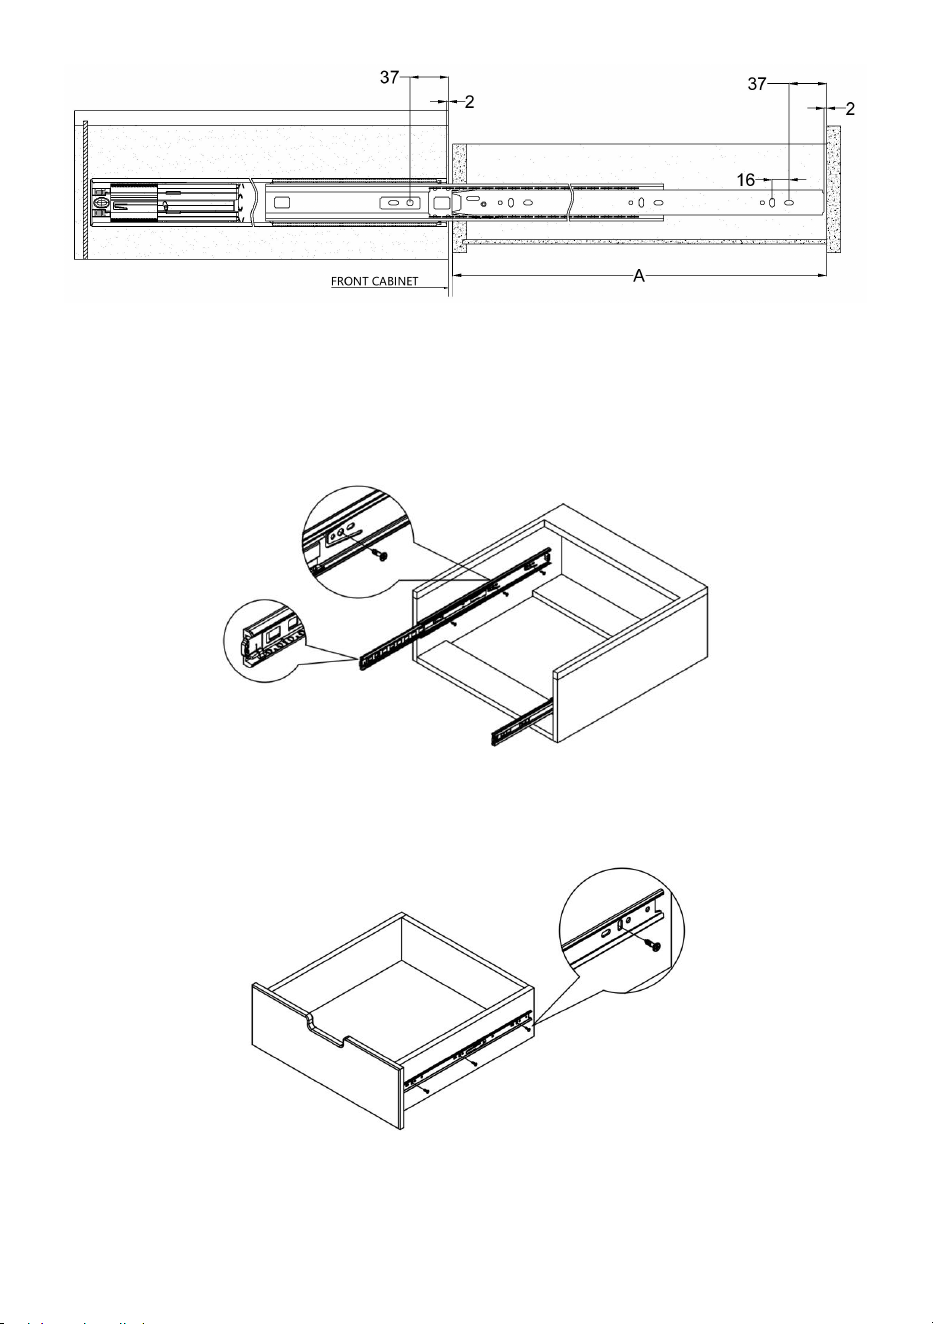
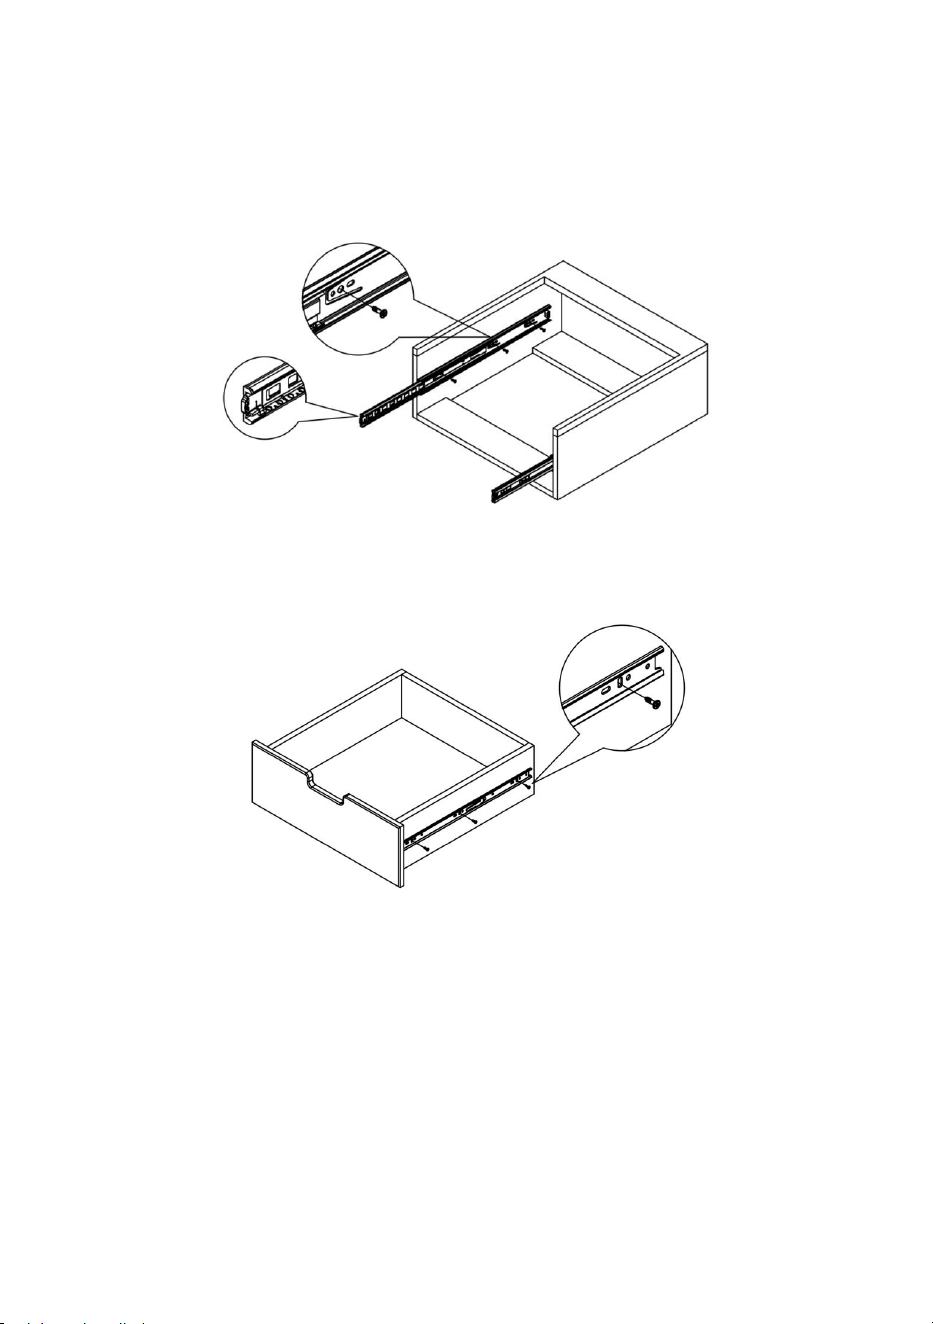
STEP1:Cabinet Installation For Ball Bearing
1. Install the steel ball rail to the inside of the cabinet according to the large
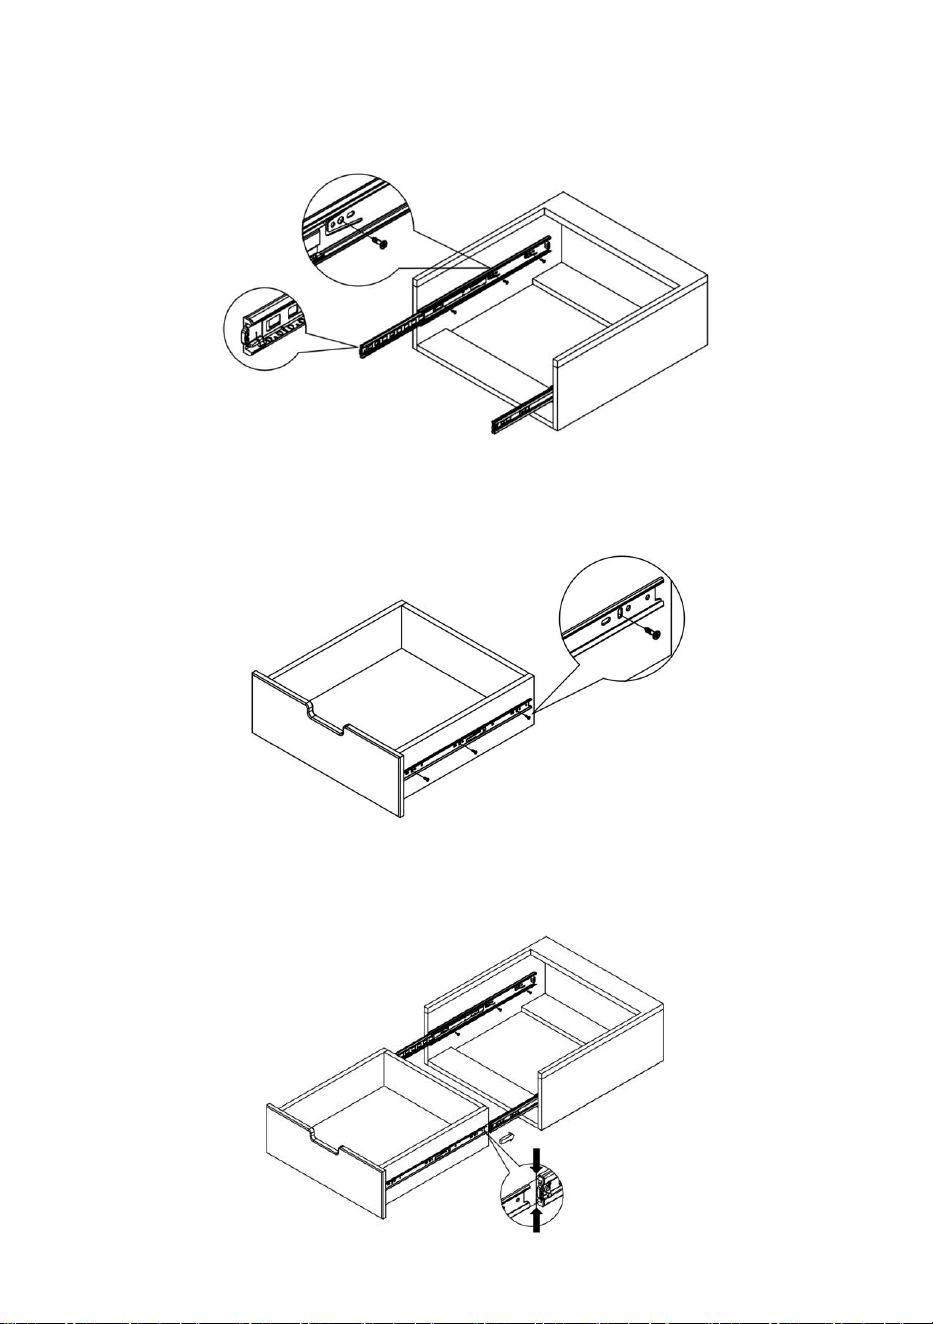
- 5 -
drawing of the screw.
2. The bead frame should be pushed flat with the file glue to facilitate the
installation of the drawer.
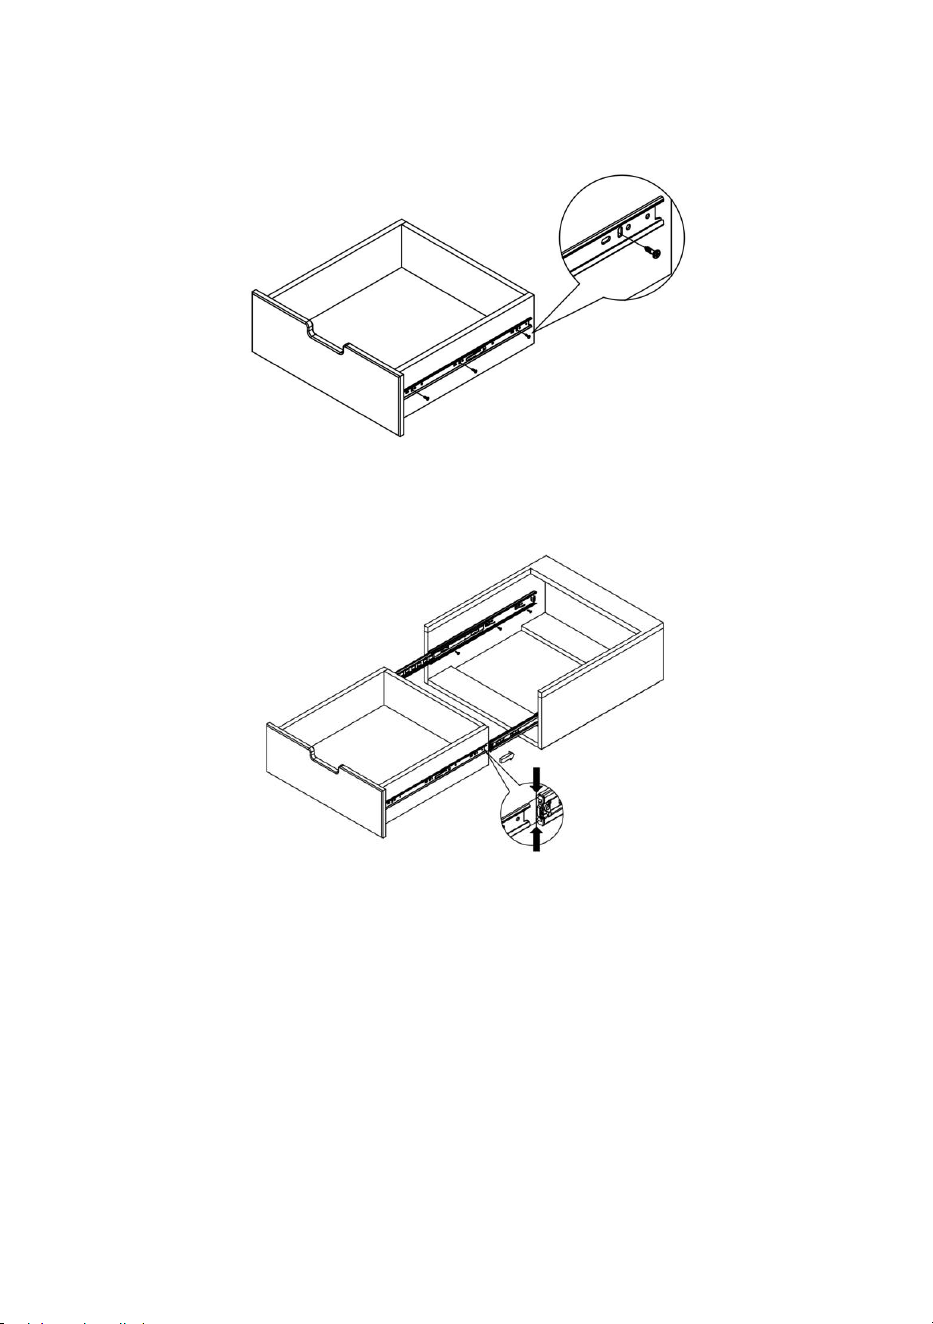
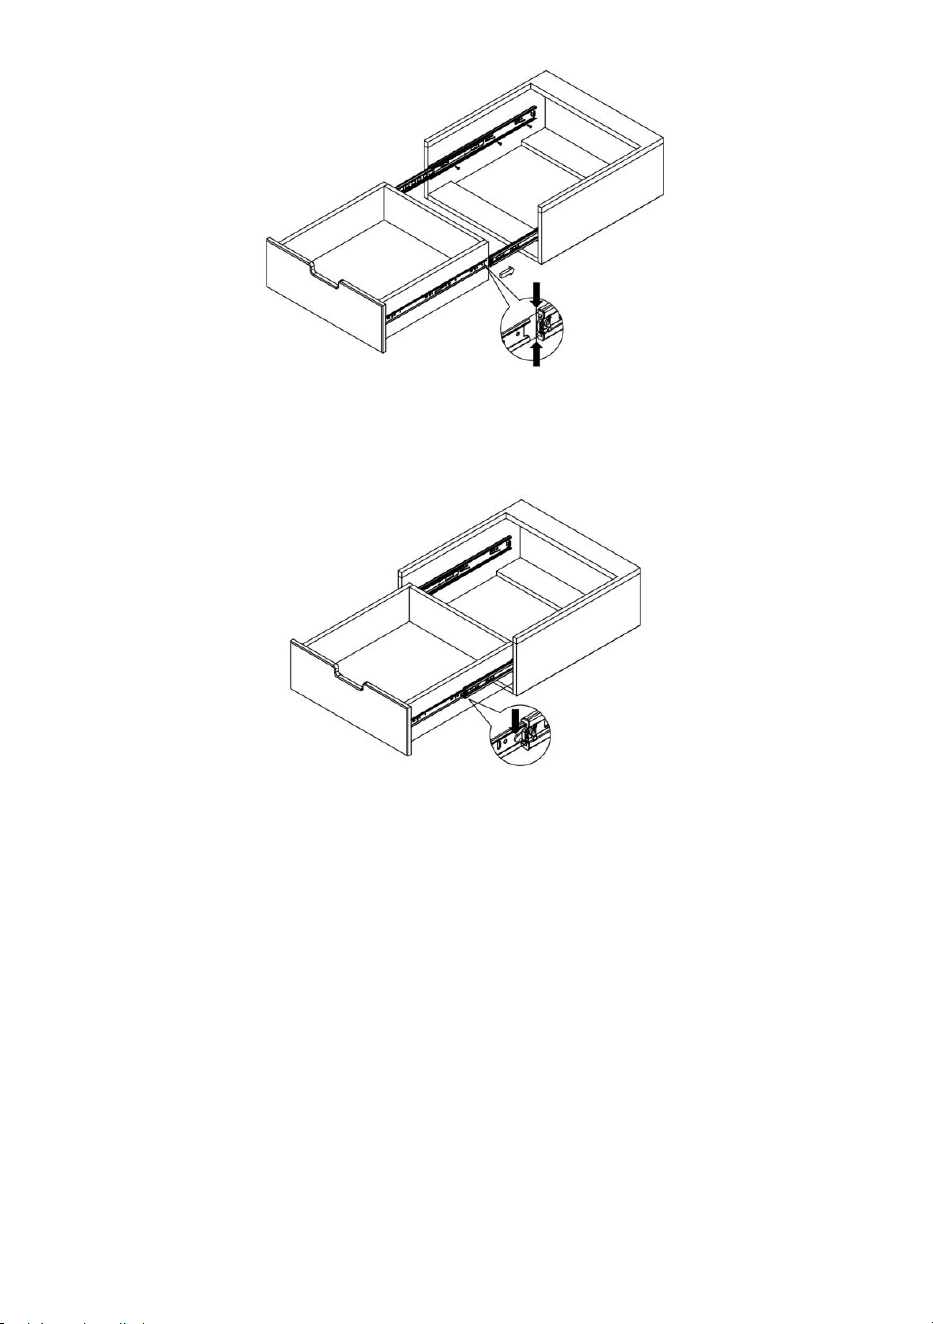
STEP2:Drawer Slide Installation
Screw the ball rail to the outside of the drawer as shown in the layout
diagram.
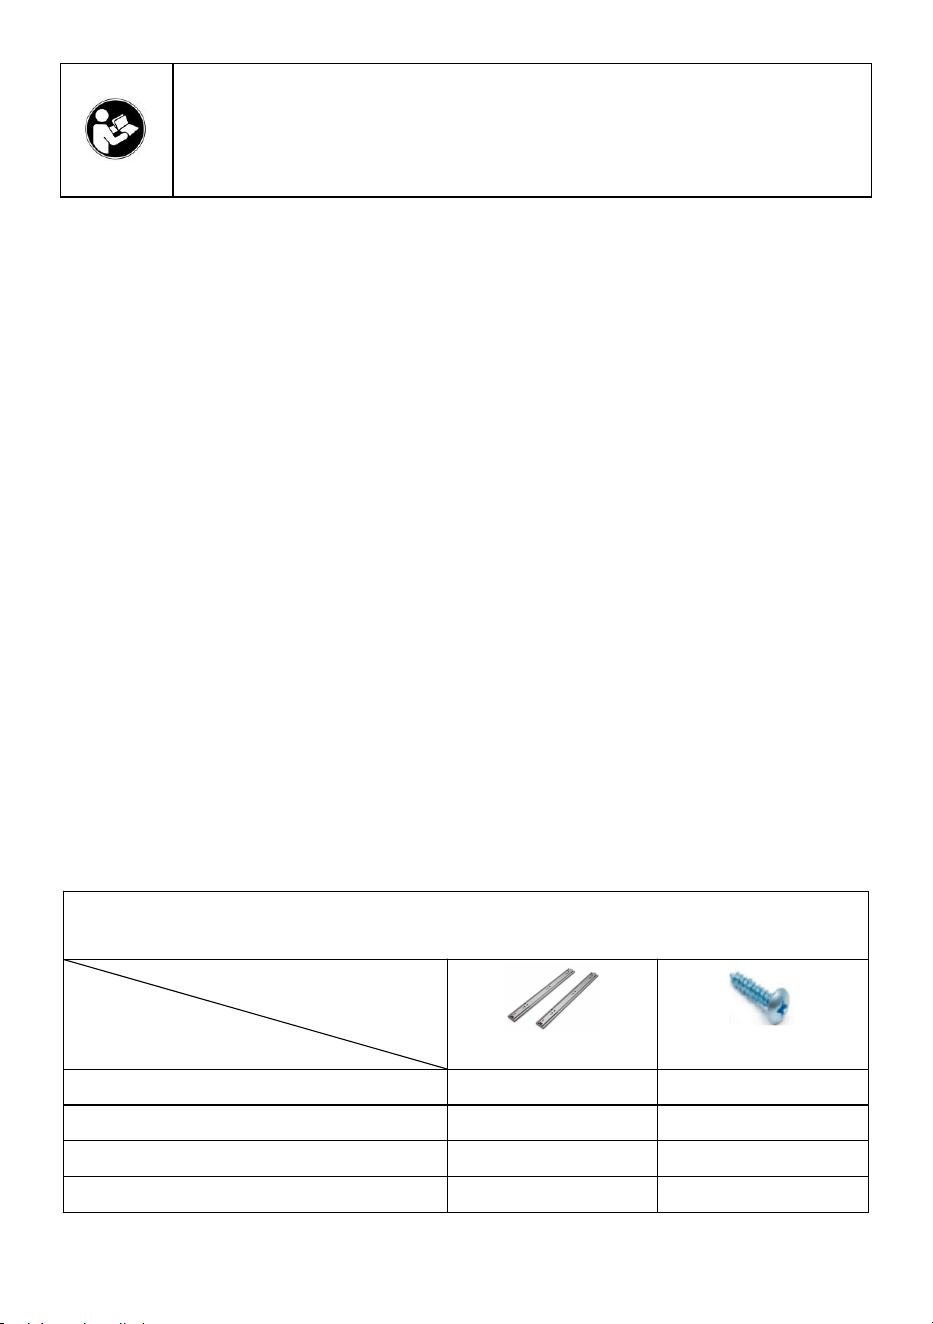
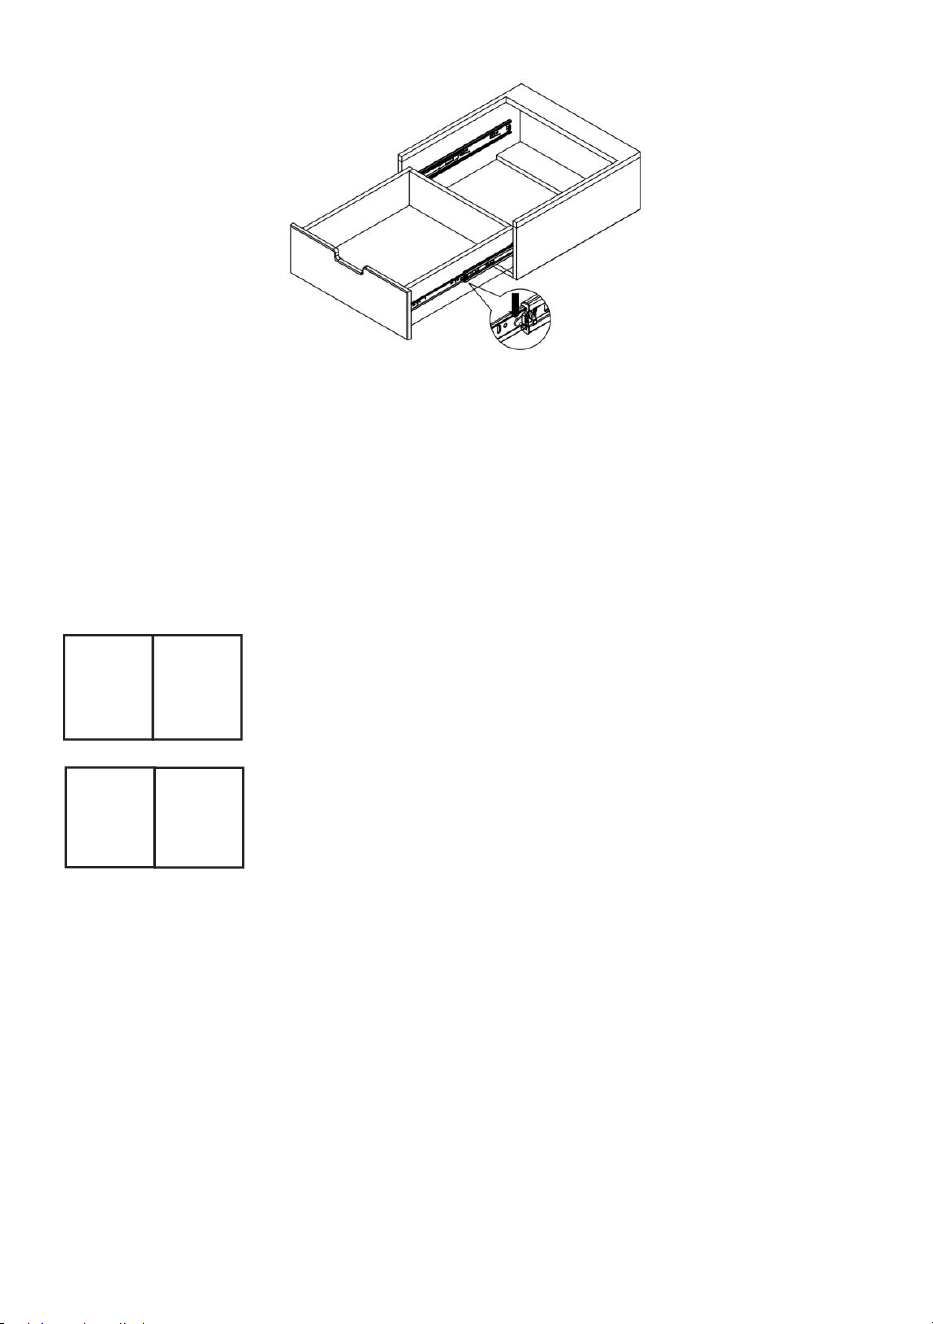
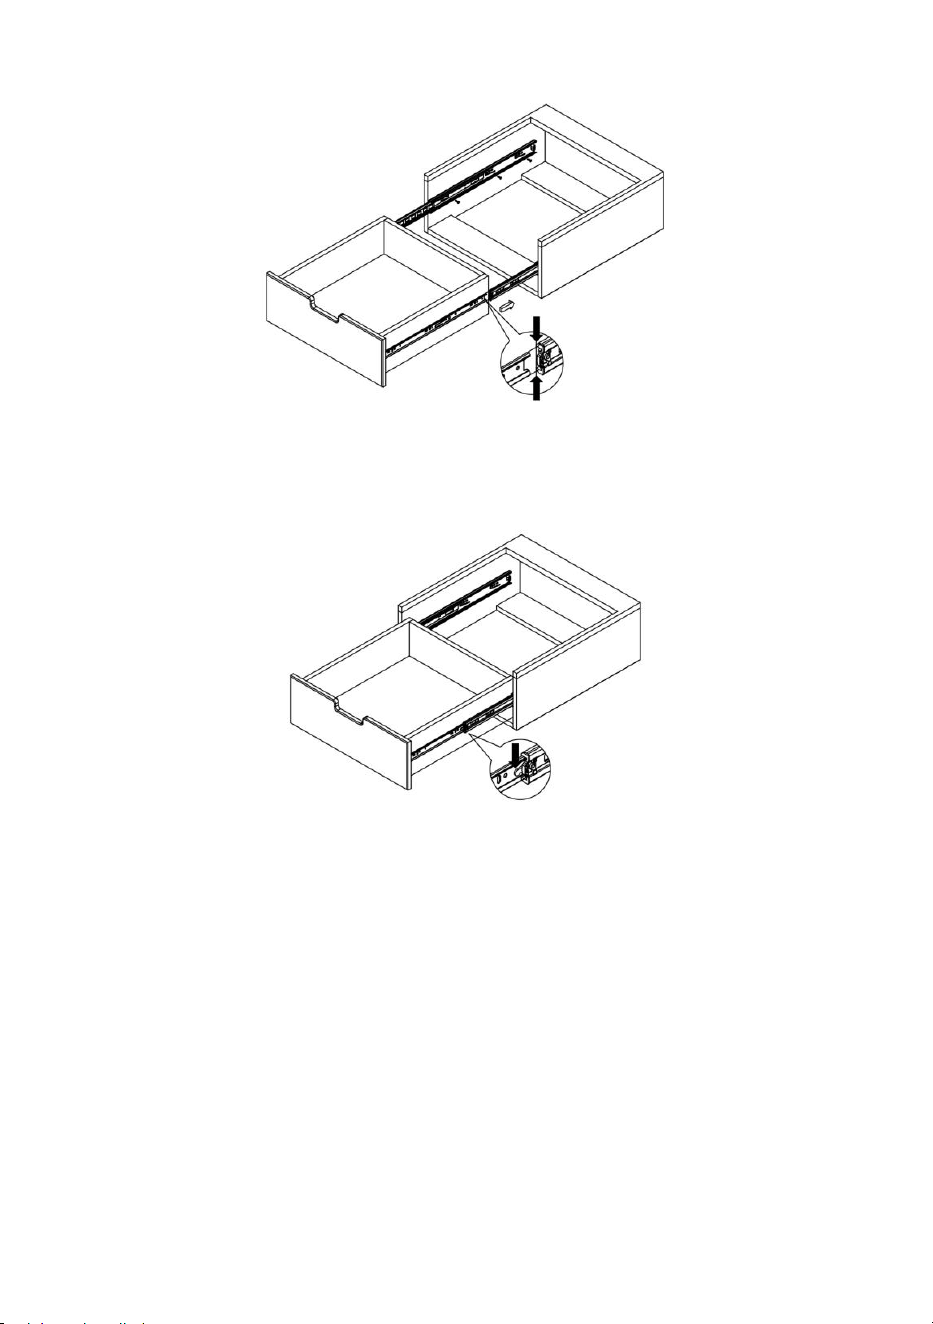
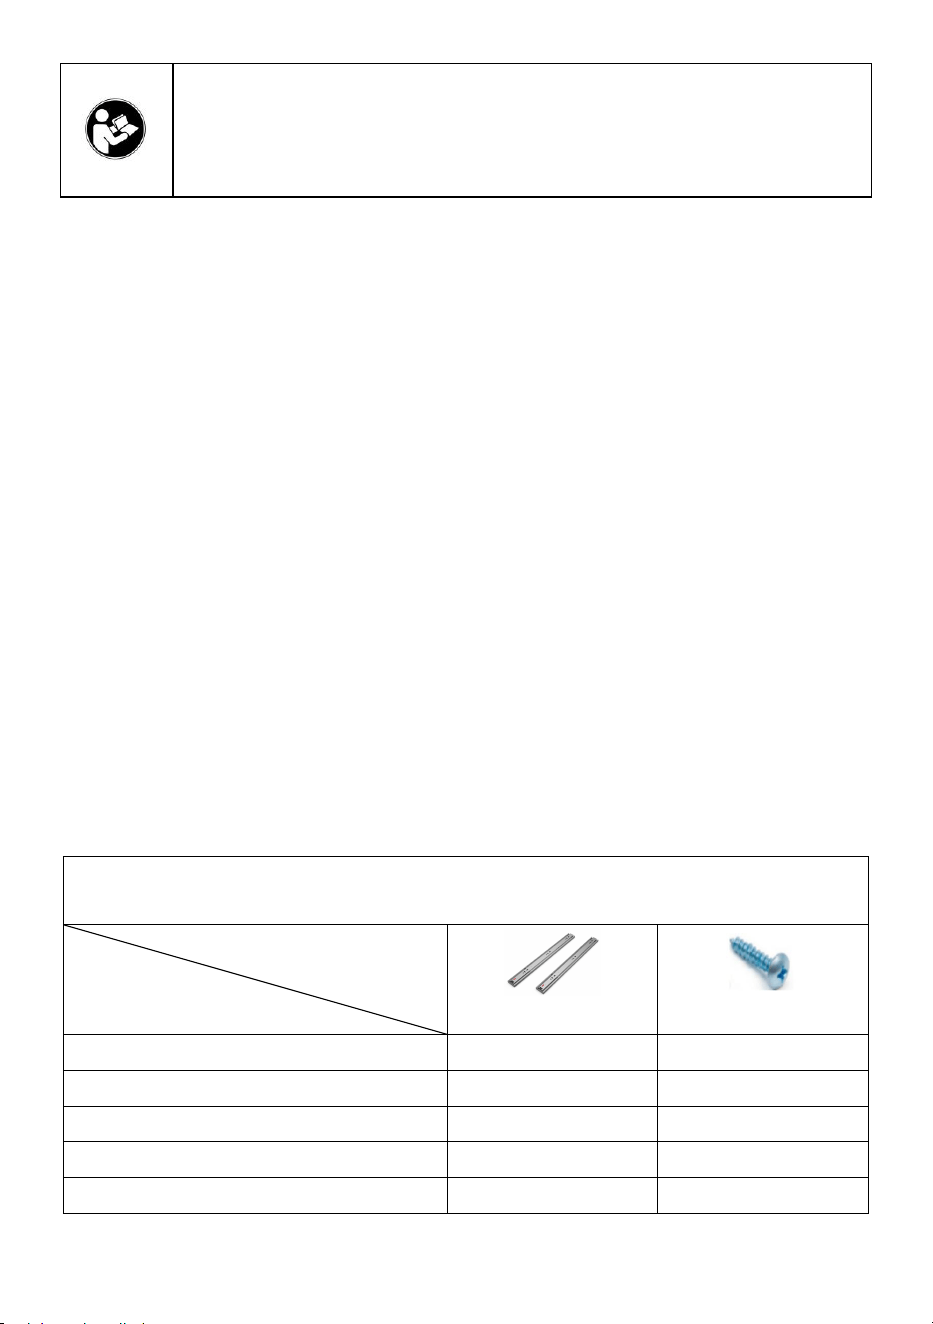
STEP3:Drawer Installation
On both sides of the inner rail to the upper middle rail file glue through the
slot to install the drawer on.
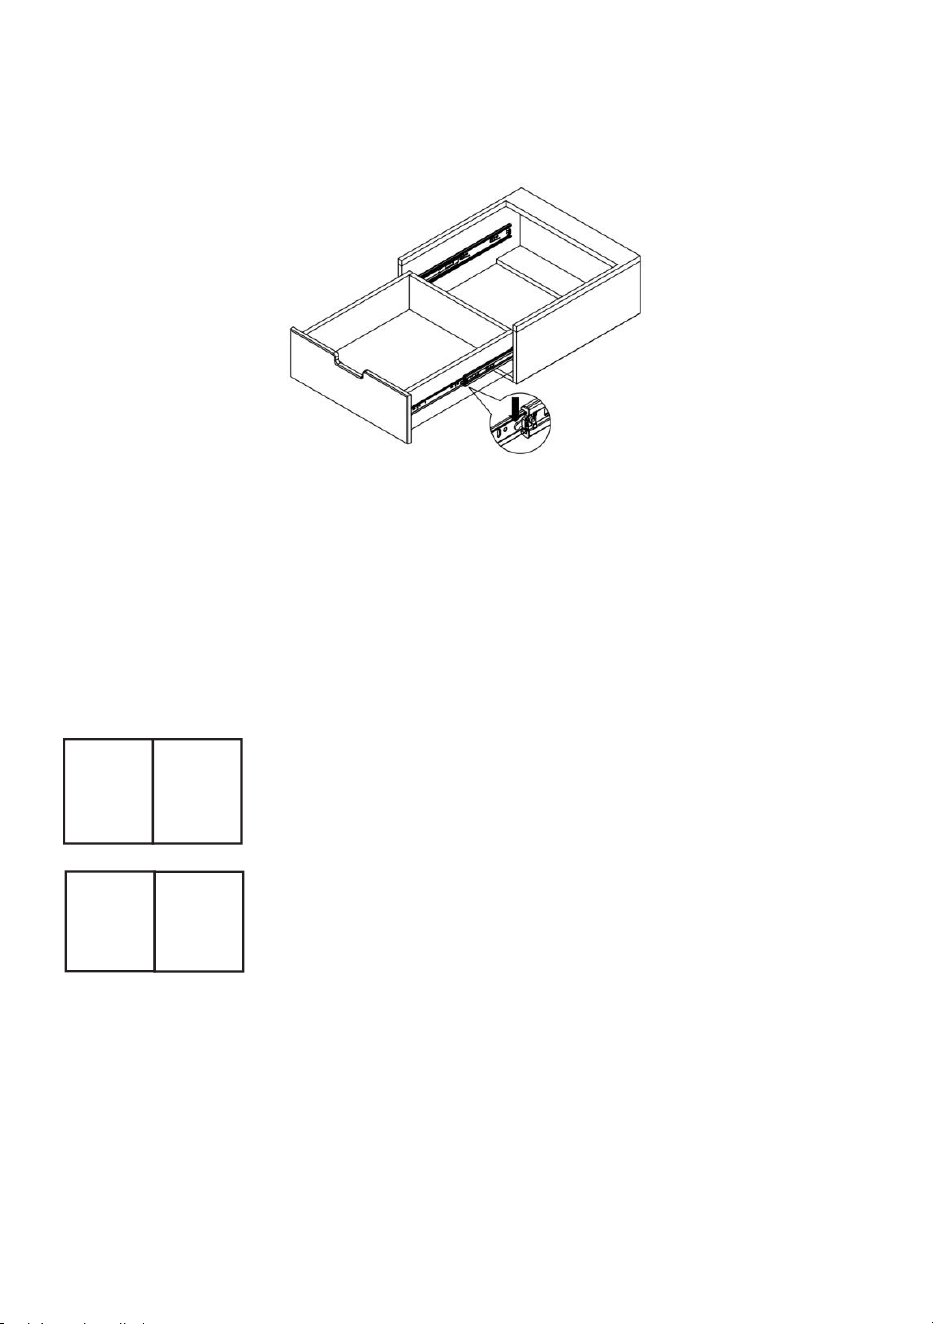
- 6 -
STEP4:Disassembel Drawer
When removing the drawer, pull the drawer out by using the fork in the
enlarged image to pull it out completely.
Address:Baoshanqu Shuangchenglu 803long 11hao 1602A-1609shi
Shanghai
Imported to AUS: SIHAO PTY LTD. 1 ROKEVA STREETEASTWOOD
NSW 2122 Australia
Imported to USA: Sanven Technology Ltd.Suite 250, 9166 Anaheim Place,
Rancho Cucamonga, CA 91730
REP
UK
Pooledas Group Ltd
Unit 5 Albert Edward House, The Pavilions
Preston, United Kingdom
REP
EC
SHUNSHUN GmbH
Römeräcker 9 Z2021, 76351
Linkenheim-Hochstetten, Germany
Made In China


- 2 -
Technique Assistance et certificat de garantie électronique
www.vevor.com/support
GLISSIÈRES DE TIROIR
MODÈLE:4605S2
We continue to be committed to provide you tools with competitive price.
"Save Half", "Half Price" or any other similar expressions used by us only represents an
estimate of savings you might benefit from buying certain tools with us compared to the major
top brands and dose not necessarily mean to cover all categories of tools offered by us. You
are kindly reminded to verify carefully when you are placing an order with us if you are
actually saving half in comparison with the top major brands.

- 3 -

- 1 -
MODÈLE:4605S2
Have product questions? Need technical support? Please feel free to
contact us:
Technical Support and E-Warranty Certificate
www.vevor.com/support
NEED HELP? CONTACT US!
This is the original instruction, please read all manual instructions
carefully before operating. VEVOR reserves a clear interpretation of our
user manual. The appearance of the product shall be subject to the
product you received. Please forgive us that we won't inform you again if
there are any technology or software updates on our product.
DRAWER SLIDES

- 2 -
Avertissement : Pour réduire le risque de blessure, l'utilisateur
doit lire attentivement le manuel d'instructions.
AVERTISSEMENT:
1. Veuillez assembler le produit en stricte conformité avec les instructions.
Un assemblage incorrect pourrait être dangereux.
2. Veuillez porter correctement des lunettes de sécurité et des gants de
travail pendant l'assemblage.
3. N'essayez pas d'assembler le produit lorsque vous vous sentez fatigué
ou sous l'influence de l'alcool, de drogues ou de médicaments.
4. La capacité de charge et les autres paramètres du produit sont
appliqués uniquement au produit correctement et complètement assemblé.
5. Séparez et comptez toutes les pièces et le matériel.
6. Préparez l'outil suivant : Tournevis cruciforme.
7. Si vous utilisez des outils électriques, veillez à ralentir et à vous arrêter
si nécessaire.
8. Deux personnes sont nécessaires pour le montage.
9. Suivez uniquement les utilisations prévues.
Enregistrez les instructions.
Présentation du produit
Liste des pièces (pièces)
Article
Modèle
Glisser
Des vis
4605S2.350-10
dix
120
4605S2.350-6
6
72
4605S2.400-10
dix
120
4605S2.400-6
6
72
4605S2.450-10
dix
120

- 3 -
4605S2.450-6
6
72
4605S2.500-10
dix
120
4605S2.500-6
6
72
4605S2.550-10
dix
120
4605S2.550-6
6
72
4605S2.600-10
dix
120
4605S2.600-6
6
72
Modèle
Longueur de tiroir
applicable
( pouces )
Longueur
coulissante
(mm)
Max.
Charger
(kg/livres)
4605S2.350-10
14
325
100 / 45,4
4605S2.350-6
14
325
4605S2.400-10
16
400
4605S2.400-6
16
400
4605S2.450-10
18
450
4605S2.450-6
18
450
4605S2.500-10
20
500
4605S2.500-6
20
500
4605S2.550-10
22
550
4605S2.550-6
22
550
4605S2.600-10
24
600
4605S2.600-6
24
600
Dimensions d'installation (mm)
- 4 -
Modèle
Taille
(mm)
Voyag
e
(mm)
Modèle de trou (mm)
L1
L2
U
N
B
C
D
E
F
4605S2.350
350
332
325
64
192
/
/
128
241
4605S2.400
400
382
400
64
224
/
/
160
288
4605S2.450
450
432
450
64
224
288
/
160
320
4605S2.500
500
482
500
64
224
320
/
192
384
4605S2.550
550
532
550
64
224
384
/
192
416
4605S2.600
600
582
600
64
224
352
416
224
480
P rocédure d'installation
Notez les deux points suivants lors de l'installation :
1. Faites attention à l'espace d'installation des deux côtés. (Unités : mm)
À 2,2 mm de l’extrémité avant de l’armoire.
(
Unités
:
mm
)
- 5 -
1 : Installation de l'armoire pour le roulement à billes
3. Installez le rail à billes en acier à l'intérieur de l'armoire selon le grand
dessin de la vis .
4. Le cadre en perles doit être poussé à plat avec la colle à lime pour
faciliter l'installation du tiroir.
ÉTAPE 2 : Installation de la glissière du tiroir
Vissez le rail à billes à l'extérieur du tiroir comme indiqué sur le schéma
d'implantation.
ÉTAPE 3 : Installation du tiroir
Des deux côtés du rail intérieur, collez le rail central supérieur à travers la

- 6 -
fente pour installer le tiroir.
ÉTAPE 4 : Démonter le tiroir
Lorsque vous retirez le tiroir, retirez-le en utilisant la fourchette sur l'image
agrandie pour le retirer complètement.
Adresse : Baoshanqu Shuangchenglu 803long 11hao 1602A-1609shi
Shanghai
Importé en Australie : SIHAO PTY LTD . 1 ROKEVA STREETASTWOOD
NSW 2122 Australie
Importé aux États-Unis : Sanven Technology Ltd. Bureau 250, 9166
Anaheim Place, Rancho Cucamonga, CA 91730

- 7 -
REP
UK
Pooledas Group Ltd
Unit 5 Albert Edward House, The Pavilions
Preston, United Kingdom
REP
EC
SHUNSHUN GmbH
Römeräcker 9 Z2021, 76351
Linkenheim-Hochstetten, Germany
Fabriqué en Chine


- 2 -
Technisch Support- und E-Garantie-Zertifikat www.vevor.com/support
SCHUBLADENFÜHRUNGEN
MODELL: 4605S2
We continue to be committed to provide you tools with competitive price.
"Save Half", "Half Price" or any other similar expressions used by us only represents an
estimate of savings you might benefit from buying certain tools with us compared to the major
top brands and dose not necessarily mean to cover all categories of tools offered by us. You
are kindly reminded to verify carefully when you are placing an order with us if you are
actually saving half in comparison with the top major brands.

- 3 -

- 1 -
MODELL: 4605S2
Have product questions? Need technical support? Please feel free to
contact us:
Technical Support and E-Warranty Certificate
www.vevor.com/support
NEED HELP? CONTACT US!
This is the original instruction, please read all manual instructions
carefully before operating. VEVOR reserves a clear interpretation of our
user manual. The appearance of the product shall be subject to the
product you received. Please forgive us that we won't inform you again if
there are any technology or software updates on our product.
DRAWER SLIDES
- 2 -
Warnung: Um das Verletzungsrisiko zu verringern, muss der
Benutzer die Bedienungsanleitung sorgfältig lesen.
WARNUNG:
1. Bitte bauen Sie das Produkt unter strikter Einhaltung der Anweisungen
zusammen. Eine falsche Montage kann gefährlich sein.
2. Bitte tragen Sie bei der Montage ordnungsgemäß eine Schutzbrille und
Arbeitshandschuhe.
3. Versuchen Sie nicht, das Produkt zusammenzubauen, wenn Sie sich
müde fühlen oder unter dem Einfluss von Alkohol, Drogen oder
Medikamenten stehen.
4. Tragfähigkeit und sonstige Produktparameter beziehen sich
ausschließlich auf das ordnungsgemäß und vollständig montierte Produkt.
5. Trennen und zählen Sie alle Teile und Hardware.
6. Bereiten Sie das folgende Werkzeug vor: Kreuzschlitzschraubendreher.
7. Wenn Sie Elektrowerkzeuge verwenden, achten Sie bitte darauf,
langsamer zu fahren und bei Bedarf anzuhalten.
8. Für den Aufbau sind zwei Personen erforderlich.
9. Befolgen Sie nur die vorgesehenen Verwendungszwecke.
Bewahren Sie die Anweisungen auf.
Produkteinführung
Teileliste (Stück)
Artikel
Modell
Gleiten
Schrauben
4605S2.350-10
10
120
4605S2.350-6
6
72
4605S2.400-10
10
120
4605S2.400-6
6
72

- 3 -
4605S2.450-10
10
120
4605S2.450-6
6
72
4605S2.500-10
10
120
4605S2.500-6
6
72
4605S2.550-10
10
120
4605S2.550-6
6
72
4605S2.600-10
10
120
4605S2.600-6
6
72
Modell
Anwendbare
Schubladenlänge
( Zoll )
Gleitlänge
(mm)
Max.
Belastung
(kg / lbs)
4605S2.350-10
14
325
100 / 45,4
4605S2.350-6
14
325
4605S2.400-10
16
400
4605S2.400-6
16
400
4605S2.450-10
18
450
4605S2.450-6
18
450
4605S2.500-10
20
500
4605S2.500-6
20
500
4605S2.550-10
22
550
4605S2.550-6
22
550
4605S2.600-10
24
600
4605S2.600-6
24
600
Einbaumaße (mm)
- 4 -
Modell
Größe
(mm)
Feder
weg
(mm)
Lochmuster (mm)
L1
L2
A
B
C
D
E
F
4605S2.350
350
332
325
64
192
/
/
128
241
4605S2.400
400
382
400
64
224
/
/
160
288
4605S2.450
450
432
450
64
224
288
/
160
320
4605S2.500
500
482
500
64
224
320
/
192
384
4605S2.550
550
532
550
64
224
384
/
192
416
4605S2.600
600
582
600
64
224
352
416
224
480
Installationsvorgang _ _
Beachten Sie bei der Installation die folgenden zwei
Punkte
:
1. Achten Sie auf den Installationsraum auf beiden Seiten. (Einheiten: mm)
- 5 -
2,2 mm vom vorderen Ende des Gehäuses entfernt. (Einheiten: mm)
SCHRITT 1 : Schrankinstallation für alle B - Lager _
5. Montieren Sie die Stahlkugelschiene gemäß der großen Zeichnung der
Schraube an der Innenseite des Schranks .
6. Der Sickenrahmen sollte mit dem Feilenkleber flach gedrückt werden,
um den Einbau der Schublade zu erleichtern.

- 6 -
SCHRITT 2: Installation der Schubladenführung
Schrauben Sie die Kugelschiene wie im Aufbauplan dargestellt an der
Außenseite der Schublade fest.
SCHRITT 3: Schubladeninstallation
Feilen Sie auf beiden Seiten der Innenschiene bis zur oberen Mittelschiene
Kleber durch den Schlitz, um die Schublade darin zu installieren.
SCHRITT 4: Schublade demontieren
Wenn Sie die Schublade herausnehmen, ziehen Sie sie mit der Gabel im
vergrößerten Bild heraus, um sie vollständig herauszuziehen.
- 7 -
Adresse: Baoshanqu Shuangchenglu 803long 11hao 1602A-1609shi
Shanghai
Importiert nach AUS: SIHAO PTY LTD . 1 ROKEVA
STREETEASTWOOD NSW 2122 Australien
Importiert in die USA: Sanven Technology Ltd. Suite 250, 9166 Anaheim
Place, Rancho Cucamonga, CA 91730
REP
UK
Pooledas Group Ltd
Unit 5 Albert Edward House, The Pavilions
Preston, United Kingdom
REP
EC
SHUNSHUN GmbH
Römeräcker 9 Z2021, 76351
Linkenheim-Hochstetten, Germany
In China hergestellt


- 2 -
Tecnico Supporto e certificato di garanzia elettronica www.vevor.com/support
GUIDE PER CASSETTI
MODELLO:4605S2
We continue to be committed to provide you tools with competitive price.
"Save Half", "Half Price" or any other similar expressions used by us only represents an
estimate of savings you might benefit from buying certain tools with us compared to the major
top brands and dose not necessarily mean to cover all categories of tools offered by us. You
are kindly reminded to verify carefully when you are placing an order with us if you are
actually saving half in comparison with the top major brands.

- 3 -

- 1 -
MODELLO:4605S2
Have product questions? Need technical support? Please feel free to
contact us:
Technical Support and E-Warranty Certificate
www.vevor.com/support
NEED HELP? CONTACT US!
This is the original instruction, please read all manual instructions
carefully before operating. VEVOR reserves a clear interpretation of our
user manual. The appearance of the product shall be subject to the
product you received. Please forgive us that we won't inform you again if
there are any technology or software updates on our product.
DRAWER SLIDES

- 2 -
Avvertenza: per ridurre il rischio di lesioni, l'utente deve
leggere attentamente il manuale di istruzioni.
AVVERTIMENTO:
1. Si prega di assemblare il prodotto attenendosi rigorosamente alle
istruzioni. Un montaggio errato potrebbe essere pericoloso.
2. Indossare correttamente occhiali protettivi e guanti da lavoro durante il
montaggio.
3. Non tentare di montare il prodotto quando ci si sente stanchi o sotto
l'influenza di alcol, droghe o farmaci.
4. La capacità di carico e altri parametri del prodotto si applicano solo al
prodotto correttamente e completamente assemblato.
5. Separare e contare tutte le parti e l'hardware.
6. Preparare il seguente strumento: cacciavite a croce.
7. Se si utilizzano utensili elettrici, fare attenzione a rallentare e fermarsi
quando necessario.
8. Per il montaggio sono necessarie due persone.
9. Seguire solo gli usi previsti.
Salva le istruzioni.
introduzione al prodotto
Elenco delle parti (pezzi)
Articolo
Modello
Diapositiva
Viti
4605S2.350-10
10
120
4605S2.350-6
6
72
4605S2.400-10
10
120
4605S2.400-6
6
72
4605S2.450-10
10
120

- 3 -
4605S2.450-6
6
72
4605S2.500-10
10
120
4605S2.500-6
6
72
4605S2.550-10
10
120
4605S2.550-6
6
72
4605S2.600-10
10
120
4605S2.600-6
6
72
Modello
Lunghezza
cassetto
applicabile
( pollici )
Lunghezza
scorrevole
(mm)
Massimo.
Carico
(kg/libbre)
4605S2.350-10
14
325
100/45.4
4605S2.350-6
14
325
4605S2.400-10
16
400
4605S2.400-6
16
400
4605S2.450-10
18
450
4605S2.450-6
18
450
4605S2.500-10
20
500
4605S2.500-6
20
500
4605S2.550-10
22
550
4605S2.550-6
22
550
4605S2.600-10
24
600
4605S2.600-6
24
600
Dimensioni di installazione (mm)
- 4 -
Modello
Dimensio
ni (mm)
Corsa
(mm)
Schema fori (mm)
L1
L2
U
N
B
C
D
E
F
4605S2.350
350
332
325
64
192
/
/
128
241
4605S2.400
400
382
400
64
224
/
/
160
288
4605S2.450
450
432
450
64
224
288
/
160
320
4605S2.500
500
482
500
64
224
320
/
192
384
4605S2.550
550
532
550
64
224
384
/
192
416
4605S2.600
600
582
600
64
224
352
416
224
480
Procedura di installazione
Notare i seguenti due punti durante l'installazione
:
1.Prestare attenzione allo spazio di installazione su entrambi i lati.
(
Unità:mm
)

- 5 -
2,2 mm di distanza dall'estremità anteriore del mobile. (Unità: mm)
PASSO 1: Installazione del mobile F o B con tutti i cuscinetti
7. Installare la guida a sfera in acciaio all'interno dell'armadio secondo il
grande disegno della vite .
8. Il telaio del tallone deve essere piatto con la colla per lima per facilitare
l'installazione del cassetto.
- 6 -
PASSO 2: Installazione della guida del cassetto
Avvitare la guida a sfera all'esterno del cassetto come mostrato nello
schema di disposizione.
PASSO 3: Installazione del cassetto
Su entrambi i lati del binario interno fino al binario centrale superiore,
incollare la colla attraverso la fessura per installare il cassetto.
PASSO 4: smontare il cassetto
Quando si rimuove il cassetto, estrarre il cassetto utilizzando la forchetta
nell'immagine ingrandita per estrarlo completamente.

- 7 -
Indirizzo: Baoshanqu Shuangchenglu 803long 11hao 1602A-1609shi
Shanghai
Importato in AUS: SIHAO PTY LTD . 1 ROKEVA STREETEASTWOOD
NSW 2122 Australia
Importato negli Stati Uniti: Sanven Technology Ltd. Suite 250, 9166
Anaheim Place, Rancho Cucamonga, CA 91730
REP
UK
Pooledas Group Ltd
Unit 5 Albert Edward House, The Pavilions
Preston, United Kingdom
REP
EC
SHUNSHUN GmbH
Römeräcker 9 Z2021, 76351
Linkenheim-Hochstetten, Germany
Made in China


- 2 -
Técnico Soporte y certificado de garantía electrónica www.vevor.com/support
GUÍAS PARA CAJONES
MODELO: 4605S2
We continue to be committed to provide you tools with competitive price.
"Save Half", "Half Price" or any other similar expressions used by us only represents an
estimate of savings you might benefit from buying certain tools with us compared to the major
top brands and dose not necessarily mean to cover all categories of tools offered by us. You
are kindly reminded to verify carefully when you are placing an order with us if you are
actually saving half in comparison with the top major brands.

- 3 -

- 1 -
MODELO: 4605S2
Have product questions? Need technical support? Please feel free to
contact us:
Technical Support and E-Warranty Certificate
www.vevor.com/support
NEED HELP? CONTACT US!
This is the original instruction, please read all manual instructions
carefully before operating. VEVOR reserves a clear interpretation of our
user manual. The appearance of the product shall be subject to the
product you received. Please forgive us that we won't inform you again if
there are any technology or software updates on our product.
DRAWER SLIDES

- 2 -
Advertencia: para reducir el riesgo de lesiones, el usuario
debe leer atentamente el manual de instrucciones.
ADVERTENCIA:
1. Ensamble el producto estrictamente de acuerdo con las instrucciones.
El montaje incorrecto podría ser peligroso.
2. Utilice gafas de seguridad y guantes de trabajo correctamente durante
el montaje.
3. No intente montar el producto cuando se sienta cansado o bajo la
influencia del alcohol, drogas o medicamentos.
4. La capacidad de carga y otros parámetros del producto se aplican
únicamente al producto ensamblado de manera adecuada y completa.
5. Separe y cuente todas las piezas y herrajes.
6. Prepare la siguiente herramienta: Destornillador Philips.
7. Si utiliza herramientas eléctricas, tenga cuidado de reducir la velocidad
y detenerse cuando sea necesario.
8. Para el montaje se necesitan dos personas.
9. Siga únicamente los usos previstos.
Guarde las instrucciones.
Introducción del producto
Lista de piezas (piezas)
Artículo
Modelo
Deslizar
Tornillos
4605S2.350-10
10
120
4605S2.350-6
6
72
4605S2.400-10
10
120
4605S2.400-6
6
72
4605S2.450-10
10
120
- 3 -
4605S2.450-6
6
72
4605S2.500-10
10
120
4605S2.500-6
6
72
4605S2.550-10
10
120
4605S2.550-6
6
72
4605S2.600-10
10
120
4605S2.600-6
6
72
Modelo
Longitud de cajón
aplicable
( pulgadas )
Longitud de
deslizamiento
(mm)
Máx.
Carga
(kg/libras)
4605S2.350-10
14
325
100 / 45,4
4605S2.350-6
14
325
4605S2.400-10
dieciséis
400
4605S2.400-6
dieciséis
400
4605S2.450-10
18
450
4605S2.450-6
18
450
4605S2.500-10
20
500
4605S2.500-6
20
500
4605S2.550-10
22
550
4605S2.550-6
22
550
4605S2.600-10
24
600
4605S2.600-6
24
600
Dimensiones de instalación (mm)

- 4 -
Modelo
Tamaño
(mm)
Recorr
ido
(mm)
Patrón de agujeros (mm)
L1
L2
A
B
C
D
mi
F
4605S2.350
350
332
325
64
192
/
/
128
241
4605S2.400
400
382
400
64
224
/
/
160
288
4605S2.450
450
432
450
64
224
288
/
160
320
4605S2.500
500
482
500
64
224
320
/
192
384
4605S2.550
550
532
550
64
224
384
/
192
416
4605S2.600
600
582
600
64
224
352
416
224
480
Procedimiento de instalación
Tenga en cuenta los dos puntos siguientes durante la
instalación
:
1.Preste atención al espacio de instalación en ambos lados. (Unidades:
mm)
A 2,2 mm del extremo frontal del gabinete. (Unidades: mm)

- 5 -
PASO 1 : Instalación del gabinete para todos los rodamientos
9. Instale el riel de bolas de acero en el interior del gabinete de acuerdo
con el dibujo grande del tornillo .
10. El marco de cuentas debe quedar plano con pegamento para limas
para facilitar la instalación del cajón.
PASO 2: Instalación de correderas para cajones
Atornille el riel de bolas al exterior del cajón como se muestra en el
diagrama de distribución.
PASO 3: Instalación del cajón
En ambos lados del riel interior hasta el riel medio superior, pegue el
- 6 -
pegamento a través de la ranura para instalar el cajón.
PASO 4: Desmontar el cajón
Al retirar el cajón, sáquelo utilizando el tenedor en la imagen ampliada
para sacarlo por completo.
Dirección: Baoshanqu Shuangchenglu 803long 11hao 1602A-1609shi
Shanghai
Importado a AUS: SIHAO PTY LTD . 1 ROKEVA STREET ASTWOOD
NSW 2122 Australia
Importado a EE. UU.: Sanven Technology Ltd. Suite 250, 9166 Anaheim
Place, Rancho Cucamonga, CA 91730

- 7 -
REP
UK
Pooledas Group Ltd
Unit 5 Albert Edward House, The Pavilions
Preston, United Kingdom
REP
EC
SHUNSHUN GmbH
Römeräcker 9 Z2021, 76351
Linkenheim-Hochstetten, Germany
Hecho en china


- 2 -
Techniczny Certyfikat wsparcia i e-gwarancji www.vevor.com/support
PROWADNICE SZUFLAD
MODEL: 4605S2
We continue to be committed to provide you tools with competitive price.
"Save Half", "Half Price" or any other similar expressions used by us only represents an
estimate of savings you might benefit from buying certain tools with us compared to the major
top brands and dose not necessarily mean to cover all categories of tools offered by us. You
are kindly reminded to verify carefully when you are placing an order with us if you are
actually saving half in comparison with the top major brands.

- 3 -

- 1 -
MODEL: 4605S2
Have product questions? Need technical support? Please feel free to
contact us:
Technical Support and E-Warranty Certificate
www.vevor.com/support
NEED HELP? CONTACT US!
This is the original instruction, please read all manual instructions
carefully before operating. VEVOR reserves a clear interpretation of our
user manual. The appearance of the product shall be subject to the
product you received. Please forgive us that we won't inform you again if
there are any technology or software updates on our product.
DRAWER SLIDES

- 2 -
Ostrzeżenie — aby zmniejszyć ryzyko obrażeń, użytkownik
musi uważnie przeczytać instrukcję obsługi.
OSTRZEŻENIE:
1. Prosimy o złożenie produktu ściśle według instrukcji. Nieprawidłowy
montaż może być niebezpieczny.
2. Podczas montażu należy nosić okulary ochronne i rękawice robocze.
3. Nie próbuj składać produktu będąc zmęczonym lub będąc pod wpływem
alkoholu, narkotyków lub leków.
4. Nośność i inne parametry produktu odnoszą się wyłącznie do produktu
prawidłowo i całkowicie zmontowanego.
5. Oddziel i policz wszystkie części i osprzęt.
6. Przygotuj następujące narzędzie: Śrubokręt Philips.
7. Jeśli korzystasz z elektronarzędzi, pamiętaj, aby zwolnić i zatrzymać się,
jeśli zajdzie taka potrzeba.
8. Do montażu potrzebne są dwie osoby.
9. Postępuj zgodnie z przeznaczeniem.
Zapisz instrukcje.
Wprowadzenie produktów
Lista części (szt.)
Przedmiot
Model
Slajd
Śruby
4605S2.350-10
10
120
4605S2.350-6
6
72
4605S2.400-10
10
120
4605S2.400-6
6
72
4605S2.450-10
10
120
4605S2.450-6
6
72
- 3 -
4605S2.500-10
10
120
4605S2.500-6
6
72
4605S2.550-10
10
120
4605S2.550-6
6
72
4605S2.600-10
10
120
4605S2.600-6
6
72
Model
Odpowiednia
długość szuflady
( cale )
Długość
przesuwna
(mm)
Maks.
Obciążeni
e
(kg / funty)
4605S2.350-10
14
325
100 / 45,4
4605S2.350-6
14
325
4605S2.400-10
16
400
4605S2.400-6
16
400
4605S2.450-10
18
450
4605S2.450-6
18
450
4605S2.500-10
20
500
4605S2.500-6
20
500
4605S2.550-10
22
550
4605S2.550-6
22
550
4605S2.600-10
24
600
4605S2.600-6
24
600
Wymiary montażowe (mm)
- 4 -
Model
Rozmiar
(mm)
Skok
(mm)
Wzór otworów (mm)
L1
L2
A
B
C
D
mi
F
4605S2.350
350
332
325
64
192
/
/
128
241
4605S2.400
400
382
400
64
224
/
/
160
288
4605S2.450
450
432
450
64
224
288
/
160
320
4605S2.500
500
482
500
64
224
320
/
192
384
4605S2.550
550
532
550
64
224
384
/
192
416
4605S2.600
600
582
600
64
224
352
416
224
480
Procedura instalacji _
Podczas instalacji zwróć uwagę na następujące dwa
punkty
:
1. Zwróć uwagę na przestrzeń montażową po obu stronach. (Jednostki:
mm)
2,2 mm od przodu obudowy.
(
Jednostki: mm
)

- 5 -
KROK 1: Montaż szafki F lub B , wszystkie łożyska
11. Zamontuj stalową szynę kulkową wewnątrz szafy zgodnie z dużym
rysunkiem śruby .
12. Ramkę listwy należy docisnąć na płasko za pomocą kleju do pilników,
aby ułatwić montaż szuflady.
KROK 2: Instalacja prowadnicy szuflady
Przykręć szynę kulową do zewnętrznej strony szuflady, jak pokazano na
schemacie rozmieszczenia.
KROK 3: Instalacja szuflady
Po obu stronach wewnętrznej szyny do górnej środkowej szyny przyklej

- 6 -
plik przez szczelinę, aby zainstalować szufladę.
KROK 4: Zdemontuj szufladę
Wyjmując szufladę, wyciągnij ją całkowicie za pomocą widełek
pokazanych na powiększonym obrazie.
Adres: Baoshanqu Shuangchenglu 803long 11hao 1602A-1609shi
Szanghaj
Import do AUS: SIHAO PTY LTD . 1 ROKEVA STREETEASTWOOD
NSW 2122 Australia
Import do USA: Sanven Technology Ltd. Apartament 250, 9166 Anaheim
Place, Rancho Cucamonga, Kalifornia 91730

- 7 -
REP
UK
Pooledas Group Ltd
Unit 5 Albert Edward House, The Pavilions
Preston, United Kingdom
REP
EC
SHUNSHUN GmbH
Römeräcker 9 Z2021, 76351
Linkenheim-Hochstetten, Germany
Wyprodukowano w Chinach


- 2 -
Technisch Ondersteuning en e-garantiecertificaat www.vevor.com/support
LADEGELEIDERS
MODEL:4605S2
We continue to be committed to provide you tools with competitive price.
"Save Half", "Half Price" or any other similar expressions used by us only represents an
estimate of savings you might benefit from buying certain tools with us compared to the major
top brands and dose not necessarily mean to cover all categories of tools offered by us. You
are kindly reminded to verify carefully when you are placing an order with us if you are
actually saving half in comparison with the top major brands.

- 3 -

- 1 -
MODEL:4605S2
Have product questions? Need technical support? Please feel free to
contact us:
Technical Support and E-Warranty Certificate
www.vevor.com/support
NEED HELP? CONTACT US!
This is the original instruction, please read all manual instructions
carefully before operating. VEVOR reserves a clear interpretation of our
user manual. The appearance of the product shall be subject to the
product you received. Please forgive us that we won't inform you again if
there are any technology or software updates on our product.
DRAWER SLIDES

- 2 -
Waarschuwing-Om het risico op letsel te verminderen, moet
de gebruiker de handleiding zorgvuldig lezen.
WAARSCHUWING:
1. Monteer het product strikt volgens de instructies. Een onjuiste montage
kan gevaarlijk zijn.
2. Draag tijdens de montage een veiligheidsbril en werkhandschoenen.
3. Probeer het product niet in elkaar te zetten als u zich moe voelt of onder
invloed bent van alcohol, drugs of medicijnen.
4. Draagvermogen en andere productparameters gelden alleen voor het
correct en compleet gemonteerde product.
5. Scheid en tel alle onderdelen en hardware.
6. Houd het volgende gereedschap gereed: kruiskopschroevendraaier.
7. Als u elektrisch gereedschap gebruikt, zorg er dan voor dat u langzamer
gaat rijden en stopt wanneer dat nodig is.
8. Voor de montage zijn twee personen nodig.
9. Volg uitsluitend het beoogde gebruik.
Bewaar de instructies.
product Introductie
Onderdelenlijst (stuks)
Item
Model
Dia
Schroeven
4605S2.350-10
10
120
4605S2.350-6
6
72
4605S2.400-10
10
120
4605S2.400-6
6
72
4605S2.450-10
10
120
4605S2.450-6
6
72

- 3 -
4605S2.500-10
10
120
4605S2.500-6
6
72
4605S2.550-10
10
120
4605S2.550-6
6
72
4605S2.600-10
10
120
4605S2.600-6
6
72
Model
Toepasselijke
ladelengte ( duim )
Glijdende
lengte
(mm)
Max.
Laden
(kg / lbs)
4605S2.350-10
14
325
100 / 45,4
4605S2.350-6
14
325
4605S2.400-10
16
400
4605S2.400-6
16
400
4605S2.450-10
18
450
4605S2.450-6
18
450
4605S2.500-10
20
500
4605S2.500-6
20
500
4605S2.550-10
22
550
4605S2.550-6
22
550
4605S2.600-10
24
600
4605S2.600-6
24
600
Installatieafmetingen (mm)
Model
Grootte
Reis
Gatenpatroon (mm)
- 4 -
(mm)
(mm)
L1
L2
A
B
C
D
E
F
4605S2.350
350
332
325
64
192
/
/
128
241
4605S2.400
400
382
400
64
224
/
/
160
288
4605S2.450
450
432
450
64
224
288
/
160
320
4605S2.500
500
482
500
64
224
320
/
192
384
4605S2.550
550
532
550
64
224
384
/
192
416
4605S2.600
600
582
600
64
224
352
416
224
480
Installatieprocedure _ _
Let tijdens de installatie op de volgende twee punten
:
1. Let op de installatieruimte aan beide zijden. (Eenheden: mm)
2,2 mm verwijderd van de voorkant van de kast. (Eenheden: mm)
- 5 -
STAP1 : Installatie van de kast met volledige lagers _
13. Installeer de stalen kogelrail aan de binnenkant van de kast volgens
de grote tekening van de schroef .
14. Het kralenframe moet plat worden gedrukt met de vijllijm om de
installatie van de lade te vergemakkelijken.
STAP2: Installatie van ladegeleiders
Schroef de kogelrail aan de buitenkant van de lade, zoals weergegeven in
het lay-outschema.
STAP3: Ladeinstallatie
Lijm aan beide zijden van de binnenrail tot aan de bovenste middenrail
door de gleuf om de lade op te installeren.
- 6 -
STAP4:Demonteer de lade
Wanneer u de lade verwijdert, trekt u de lade naar buiten door de vork in
de vergrote afbeelding volledig naar buiten te trekken.
Adres: Baoshanqu Shuangchenglu 803long 11hao 1602A-1609shi
Shanghai
Geïmporteerd naar AUS: SIHAO PTY LTD . 1 ROKEVA
STREETEASTWOOD NSW 2122 Australië
Geïmporteerd naar de VS: Sanven Technology Ltd. Suite 250, 9166
Anaheim Place, Rancho Cucamonga, CA 91730

- 7 -
REP
UK
Pooledas Group Ltd
Unit 5 Albert Edward House, The Pavilions
Preston, United Kingdom
REP
EC
SHUNSHUN GmbH
Römeräcker 9 Z2021, 76351
Linkenheim-Hochstetten, Germany
Gemaakt in China


- 2 -
Teknisk Support och e-garanticertifikat www.vevor.com/support
UTDRAGSLÅDOR
MODELL: 4605S2
We continue to be committed to provide you tools with competitive price.
"Save Half", "Half Price" or any other similar expressions used by us only represents an
estimate of savings you might benefit from buying certain tools with us compared to the major
top brands and dose not necessarily mean to cover all categories of tools offered by us. You
are kindly reminded to verify carefully when you are placing an order with us if you are
actually saving half in comparison with the top major brands.

- 3 -

- 1 -
MODELL: 4605S2
Have product questions? Need technical support? Please feel free to
contact us:
Technical Support and E-Warranty Certificate
www.vevor.com/support
NEED HELP? CONTACT US!
This is the original instruction, please read all manual instructions
carefully before operating. VEVOR reserves a clear interpretation of our
user manual. The appearance of the product shall be subject to the
product you received. Please forgive us that we won't inform you again if
there are any technology or software updates on our product.
DRAWER SLIDES
- 2 -
Varning - För att minska risken för skada måste användaren
läsa instruktionerna noggrant.
VARNING:
1. Vänligen montera produkten i strikt enlighet med instruktionerna.
Felaktig montering kan vara farligt.
2. Använd skyddsglasögon och arbetshandskar ordentligt under
monteringen.
3. Försök inte att sätta ihop produkten när du känner dig trött eller är
påverkad av alkohol, droger eller medicin.
4. Bärförmåga och andra produktparametrar tillämpas endast på den
korrekt och färdigmonterade produkten.
5. Separera och räkna alla delar och hårdvara.
6. Förbered följande verktyg: Philips huvudskruvmejsel.
7. Om du använder elverktyg, var noga med att sakta ner och stanna vid
behov.
8. Två personer krävs för montering.
9. Följ endast avsedd användning.
Spara instruktionerna.
produkt introduktion
Dellista (st)
Artikel
Modell
Glida
Skruvar
4605S2.350-10
10
120
4605S2.350-6
6
72
4605S2.400-10
10
120
4605S2.400-6
6
72
4605S2.450-10
10
120

- 3 -
4605S2.450-6
6
72
4605S2.500-10
10
120
4605S2.500-6
6
72
4605S2.550-10
10
120
4605S2.550-6
6
72
4605S2.600-10
10
120
4605S2.600-6
6
72
Modell
Tillämplig lådlängd
( tum )
Glidlängd
(mm)
Max.
Ladda
(kg / lbs)
4605S2.350-10
14
325
100/45,4
4605S2.350-6
14
325
4605S2.400-10
16
400
4605S2.400-6
16
400
4605S2.450-10
18
450
4605S2.450-6
18
450
4605S2.500-10
20
500
4605S2.500-6
20
500
4605S2.550-10
22
550
4605S2.550-6
22
550
4605S2.600-10
24
600
4605S2.600-6
24
600
Installationsmått (mm)
- 4 -
Modell
Storlek
(mm)
Resa
(mm)
Hålmönster (mm)
L1
L2
A
B
C
D
E
F
4605S2.350
350
332
325
64
192
/
/
128
241
4605S2.400
400
382
400
64
224
/
/
160
288
4605S2.450
450
432
450
64
224
288
/
160
320
4605S2.500
500
482
500
64
224
320
/
192
384
4605S2.550
550
532
550
64
224
384
/
192
416
4605S2.600
600
582
600
64
224
352
416
224
480
Installationsprocedur _ _
Observera följande två punkter under installationen
:
1. Var uppmärksam på installationsutrymmet på båda sidor.
(
Enheter
:
mm
)
2,2 mm från den främre änden av skåpet.
(
Enheter
:
mm
)

- 5 -
STEG 1: Skåp I nstallation F eller B all B öring
15. Montera stålkulskenan på insidan av skåpet enligt skruvens stora
ritning .
16. Pärlramen ska skjutas platt med fillimmet för att underlätta
monteringen av lådan.
STEG 2: Installation av utdragslådor
Skruva fast kulskenan på utsidan av lådan som visas i layoutdiagrammet.
STEG 3: Installation av lådor
På båda sidor av den inre skenan till den övre mittskenan limma genom
skåran för att installera lådan på.

- 6 -
STEG 4: Demontera lådan
När du tar bort lådan, dra ut lådan genom att använda gaffeln i den
förstorade bilden för att dra ut den helt.
Adress: Baoshanqu Shuangchenglu 803long 11hao 1602A-1609shi
Shanghai
Importerad till AUS: SIHAO PTY LTD . 1 ROKEVA STREETEASTWOOD
NSW 2122 Australien
till USA: Sanven Technology Ltd. Suite 250, 9166 Anaheim Place, Rancho
Cucamonga, CA 91730

- 7 -
REP
UK
Pooledas Group Ltd
Unit 5 Albert Edward House, The Pavilions
Preston, United Kingdom
REP
EC
SHUNSHUN GmbH
Römeräcker 9 Z2021, 76351
Linkenheim-Hochstetten, Germany
Tillverkad i Kina