User Manual
Dual Gang 40m/131ft@4k 60 4:4:4 & HDR HDBaseT Kit
with PoH and
Bi-Directional USB
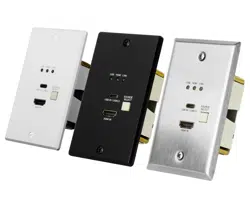
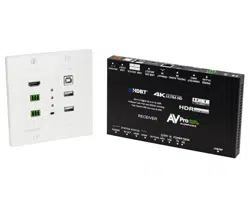
AC-CXWP-KVM-KIT
1

INTRODUCTION ������������������������������������������������������������������������������������������������������3
FEATURES ��������������������������������������������������������������������������������������������������������������3
WHATS IN THE BOX ������������������������������������������������������������������������������������������������3
SPECIFICATIONS �����������������������������������������������������������������������������������������������������4
KEY BENEFITS ���������������������������������������������������������������������������������������������������������5
DEVICE OVERVIEW - TRANSMITTER FRONT �����������������������������������������������������������6
DEVICE OVERVIEW - TRANSMITTER TOP ���������������������������������������������������������������7
DEVICE OVERVIEW - TRANSMITTER BACK �������������������������������������������������������������8
DEVICE OVERVIEW - RECEIVER FRONT ������������������������������������������������������������������9
DEVICE OVERVIEW - RECEIVER BACK ������������������������������������������������������������������ 10
RS-232 CONFIGURATION ��������������������������������������������������������������������������������������� 11
USB PORTS ������������������������������������������������������������������������������������������������������������ 11
EXAMPLE APPLICATION DIAGRAMS ���������������������������������������������������������������������� 12
EXAMPLE APPLICATION DIAGRAM USB EXTENSION ��������������������������������������������� 14
MAINTENANCE ����������������������������������������������������������������������������������������������������� 16
DAMAGE REQUIRING SERVICE ������������������������������������������������������������������������������ 16
SUPPORT ��������������������������������������������������������������������������������������������������������������� 17
WARRANTY ����������������������������������������������������������������������������������������������������������� 17
2
Introduction
The AC-CXWP-KVM-KIT is a 4K60 4:4:4 18Gbps supported HDBaseT wall plate extender kit over single CAT UTP/STP.
This device can take in any HDMI signal and transfer it long distances; simultaneously, it’s able to send a USB 2.0 sig-
nal (bi-directionally) through the same cable. This makes for the ideal solution for classrooms and conference rooms
to work with modern laptops and desktop computers.
Features
· HDMI 2.0(a/b)
· Bi-Directional USB Support
· Sleek Wall Plate Finish
· 18Gbps Bandwidth Support
· 4K --> 1080P Down-scaling for mixed systems
· EDID Management and EDID emulate
· 2Ch Audio Extraction on the Transmitter
· 40M 4K (up to 4K60 4:4:4, HDR) (Cat6a)
· Full HDR Support (HDR, HDR10+ and HLG)
· Audio Return Channel on HDMI
· 4K & HD Test Patterns built into Tx and Rx for trouble-
shooting
· HDCP 2.2 (and all earlier versions supported)
· CEC Pass Through
· 3D Support
· Bi-directional 48v PoH (Power Over HDBaseT, only one
Power Supply Needed)
· Bi Directional RS232 Transport
· LED Status, Link, Power indication lights
· Use single UTP/STP LAN cable (Cat6a) with substitute
HDMI cable to achieve long distance transmission
· Supports uncompressed PCM 2- Ch., LPCM 5.1 & 7.1,
Dolby Digital, DTS, Dolby TrueHD, DTS HD-Master
Audio, Atmos on HDMI
· ESD protection circuitry (Inputs & Outputs) to 7KV
Whats in the box
· AC-CXWP-KVM-T (Transmitter)
· AC-CXWP-KVM-R (Receiver)
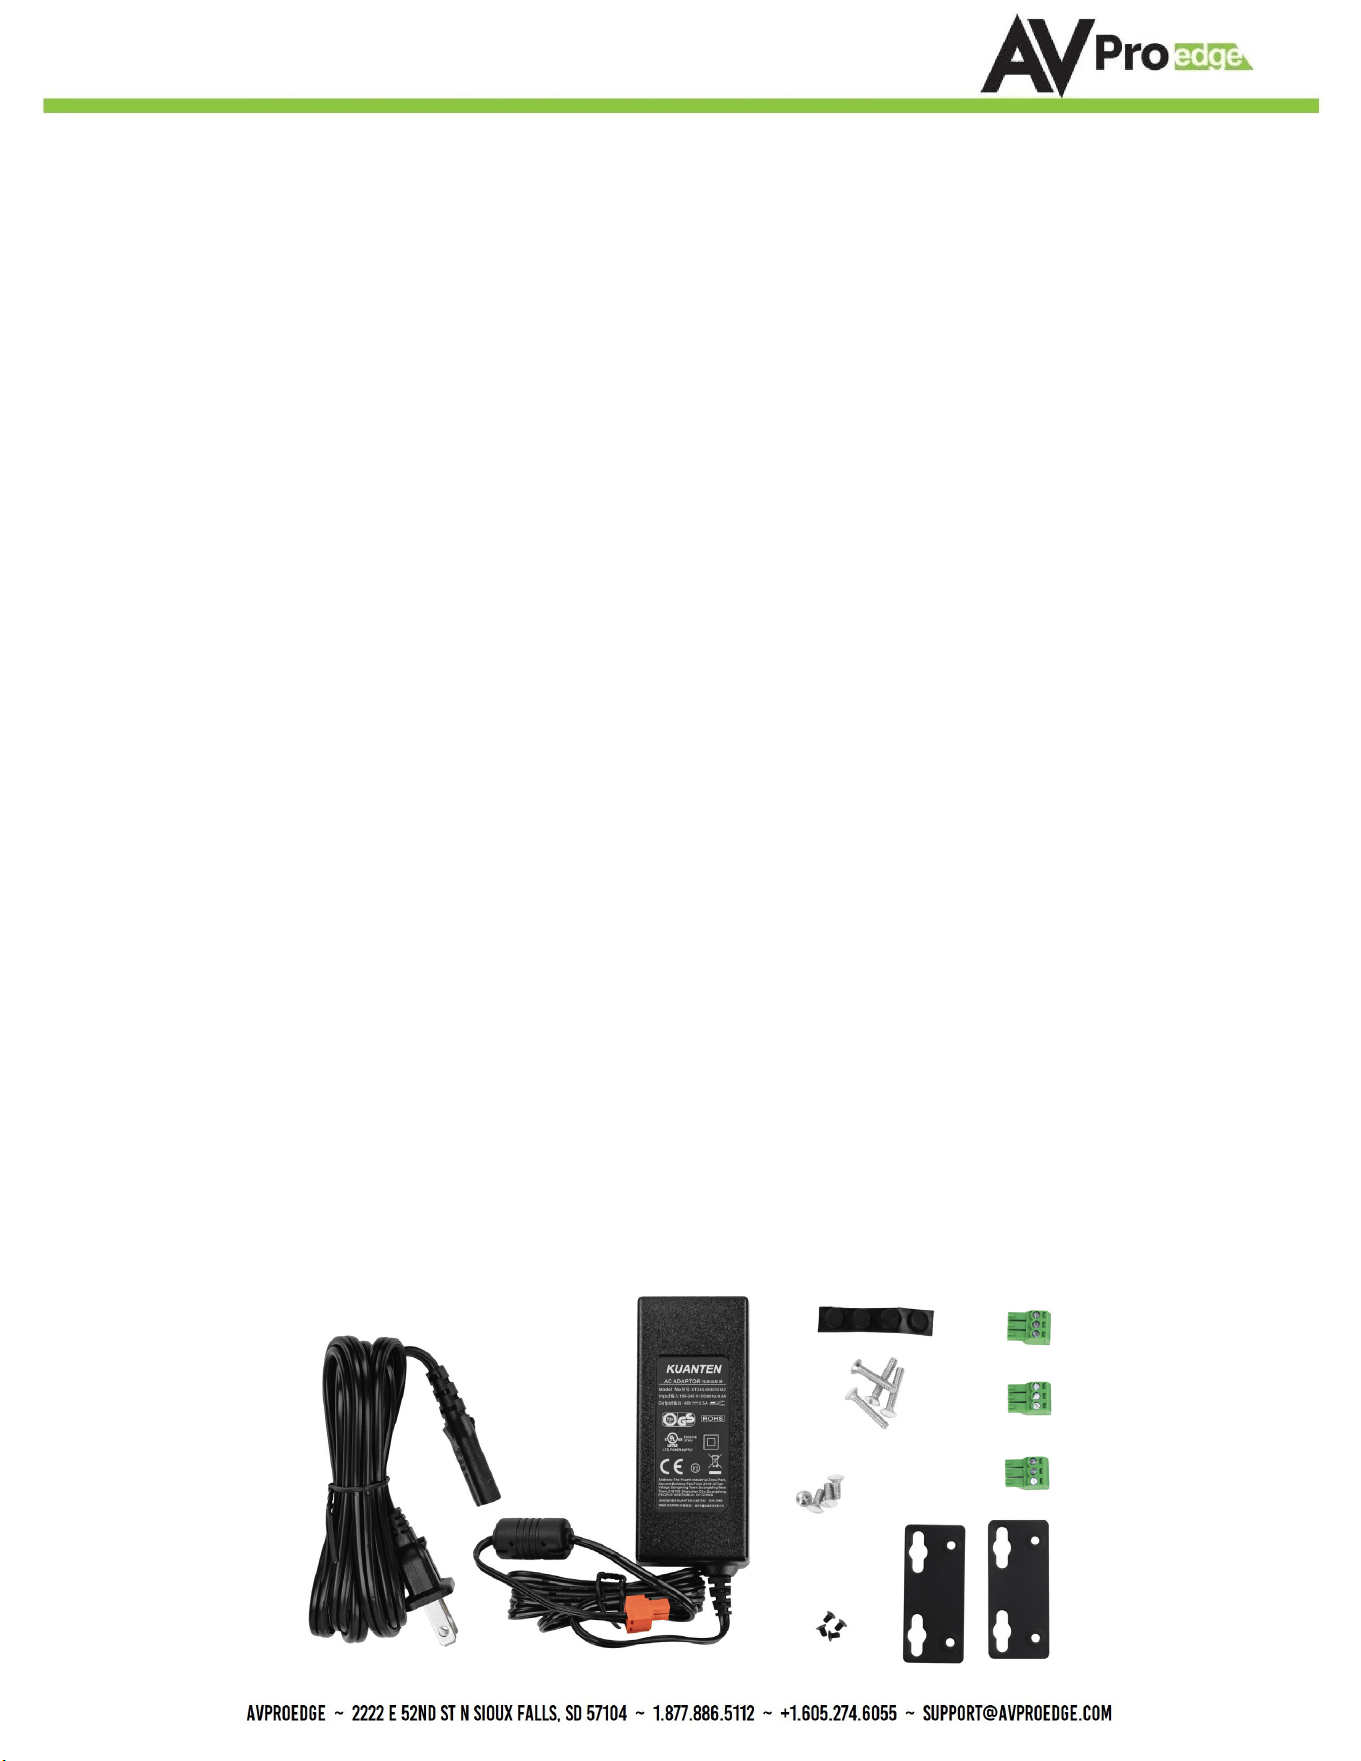
· 48V Power Supply (One supplied)
· 3 Pin Terminal blocks for Audio and RS232 Ports
· Mounting Ears and hardware for HDBaseT Receiver
3
Specications
4

Key Benets
· Invisible Compression Technology: ICT is a revolution in HDMI extension technology, it allows AVPro Edge
Products to deliver high bandwidth 4K signals over category cable. Normally when this is done, the video is
left with compression artifacts and banding. Using AVPro Edge’s proprietary ICT solution allows us to deliver a
stable picture without any degradation.
· USB 2.0 and KVM Integration: The AC-CXWP-KVM-KIT supports the extension of USB signals, which may be
switched and routed over the HDBaseT link along with the other AV signals and can be managed separately
via a control system. USB 2.0 host and device ports are provided on both the TX and RX units, allowing you to
connect a USB mouse, keyboard, USB microphone, or any other USB device to be connected at one unit and
routed to a computer or other host at another unit.
· Down Scaling: The AC-CXWP-KVM-KIT has a scaling circuit built into the transmitter. The scaler can scale 4K
to 1080P. Essential when working with projectors or displays that are only 1080p.
· Total EDID Management: The AC-CXWP-KVM-KIT has robust EDID control. EDID management allows you
to manage the input device and request specic video resolutions and/or audio codecs. The following EDID
options are available:
· EDID Bypass
· 1080P 2CH Audio
· 1080P 8CH Audio
· 4K60 4:2:0 2CH Audio
· 4K60 4:2:0 8CH Audio
· 4K60 4:4:4 HDR 2CH Audio
· 4K60 4:4:4 HDR 8CH Audio
· USER EDID – EDID Copy
· The EDID Copy Function allows you to copy and save from any display or projector you want to.
· Audio Return Channel (ARC): The Audio Return Channel in HDMI 1.4 and 2.0 enables a TV, via a single HDMI
cable or Toslink, to send audio data “upstream” to an A/V receiver or surround audio controller, our extender
will continue the upstream audio all the way to the Transmitter. There it can be connected via HDMI ARC.
· On Board Troubleshooting: This unit allows you to generate a 1080P test pattern to identify external problems
(source, repeater, displays, etc.). You can now be sure that your wiring is correct and get to the bottom of
problems quickly should they arise, without having to worrying if the source or sink is working properly. You
can generate a test pattern from the Transmitter so you can verify total system infrastructure integrity
· Both the Transmitter and Receiver are compatible with the AC-CX42-AUHD, AC-CX62-AUHD, and AC-CX100-
RAMP.
5
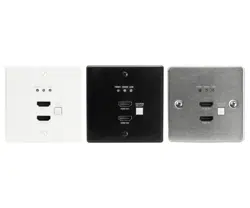
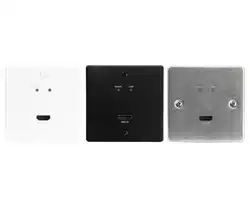
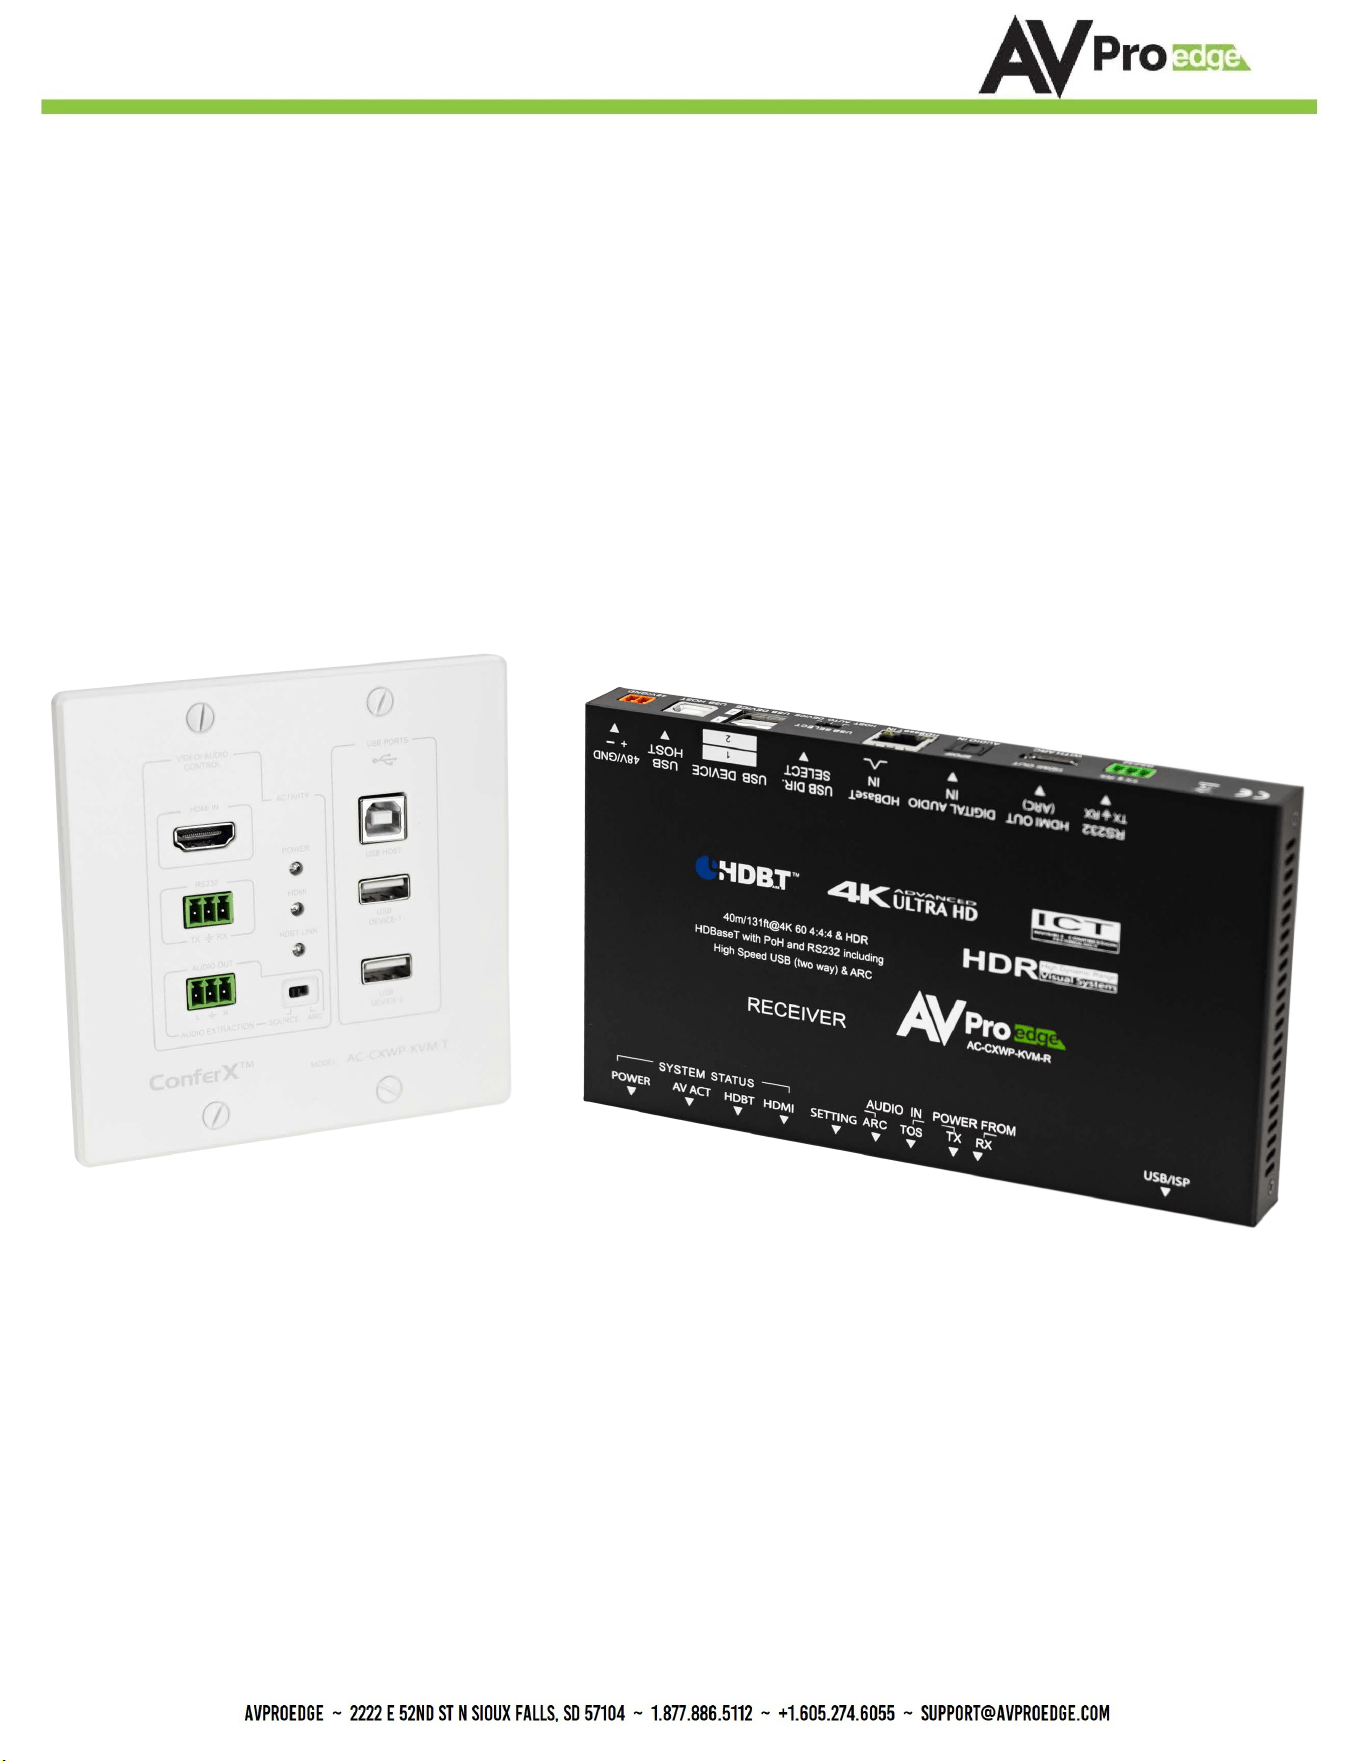
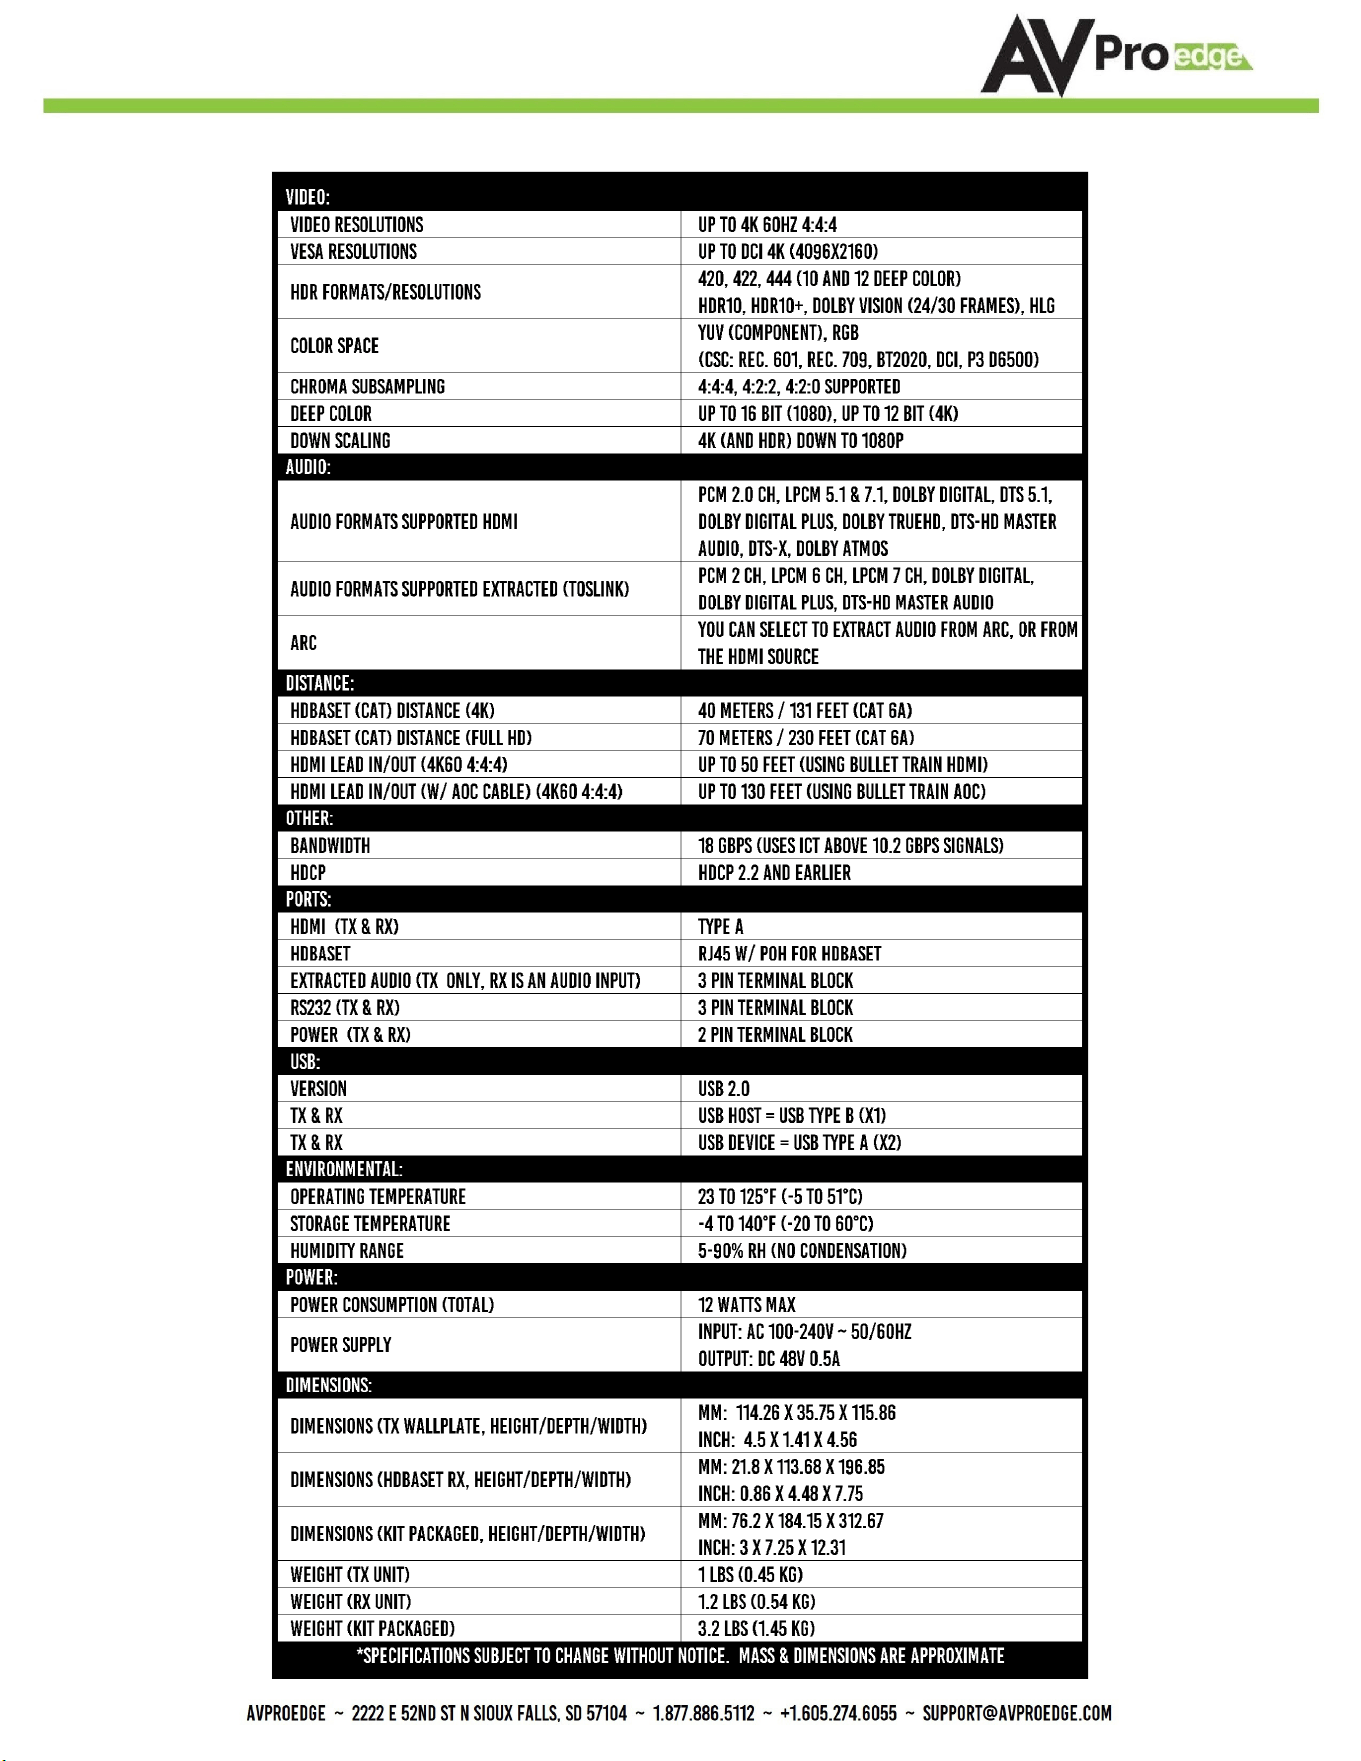
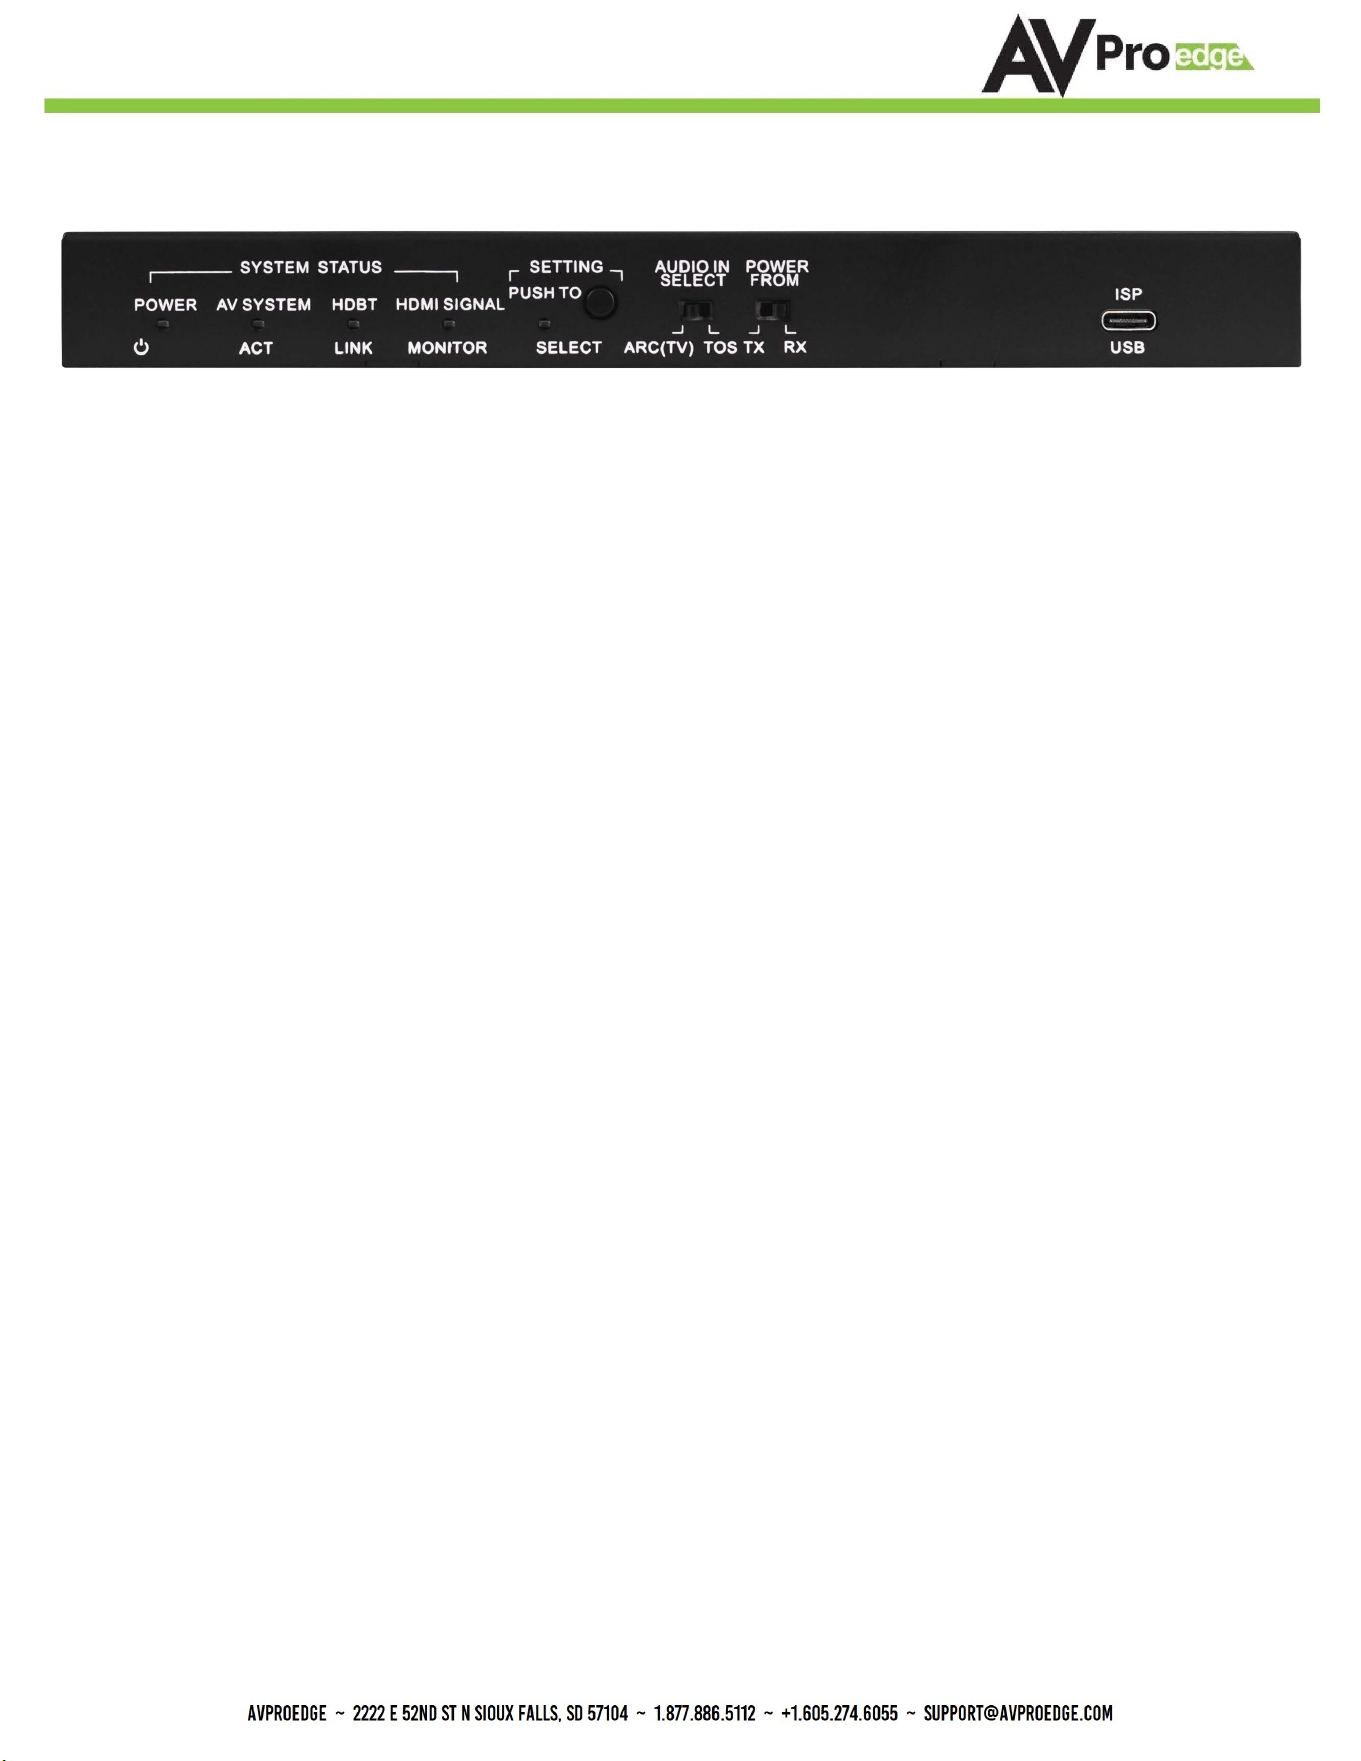
Device Overview - Transmitter Front
Video/Audio Control
HDMI IN
• For connecting to an HDMI source.
RS-232
• 3 pin terminal for device control and RS-232 pass-
through.
Audio Out
• 3 pin terminal for extracting 2Ch audio.
Audio Extraction
• Audio Source selectable switch. Choose where you want
the extracted audio to originate from. The HDMI Source
device or ARC (Audio Return Channel) from sync device.
Note the extracted audio port is 2Ch only, this unit does
not down-mix.
Activity Lights
Power
• Red LED indicates if power is present (on)
• Red LED o means no power
HDMI
• Green LED indicates connection to HDMI source (on)
• Green LED o means no HDMI source detected
HDBT Link
• Green LED indicates connection to HDBaseT Receiver (on)
• Green LED o means HDBaseT Receiver is not detected
6
*NOTE: ARC must be enabled on the display/sync, and the
output should be set to PCM.
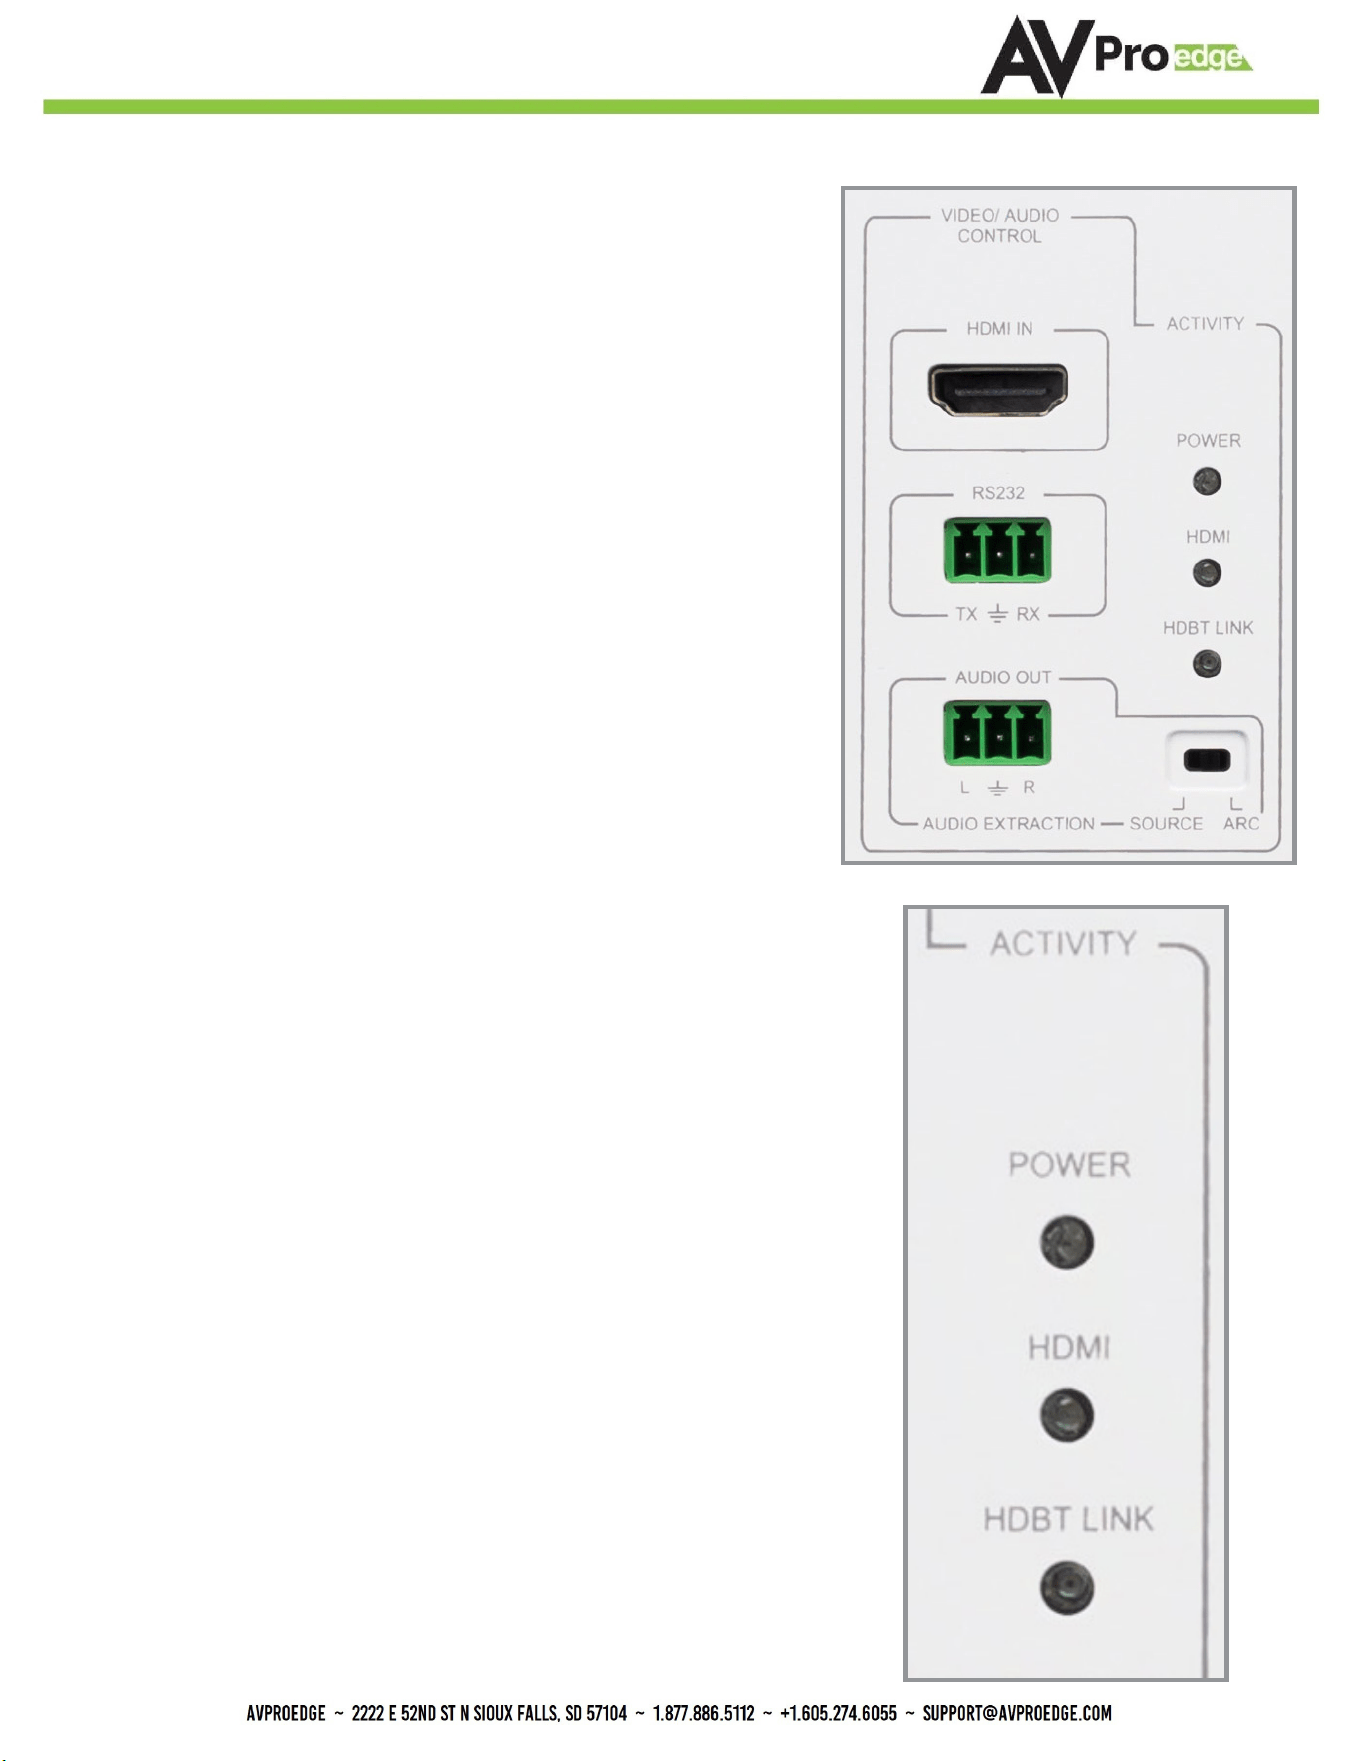
USB Ports
USB Host
• Type B for connecting to Host Device typically a PC
USB Device-1
• Type A for connecting USB devices like Mice, Keyboards, etc. Provides 5V
USB Device-2
• Second type A for connecting USB devices like Mice, Keyboards, etc. Also
supplies 5V power
*NOTE: See USB SELECT under Device Overview - Receiver Back on page 10
*NOTE: See page 12-14 for diagram/application examples.
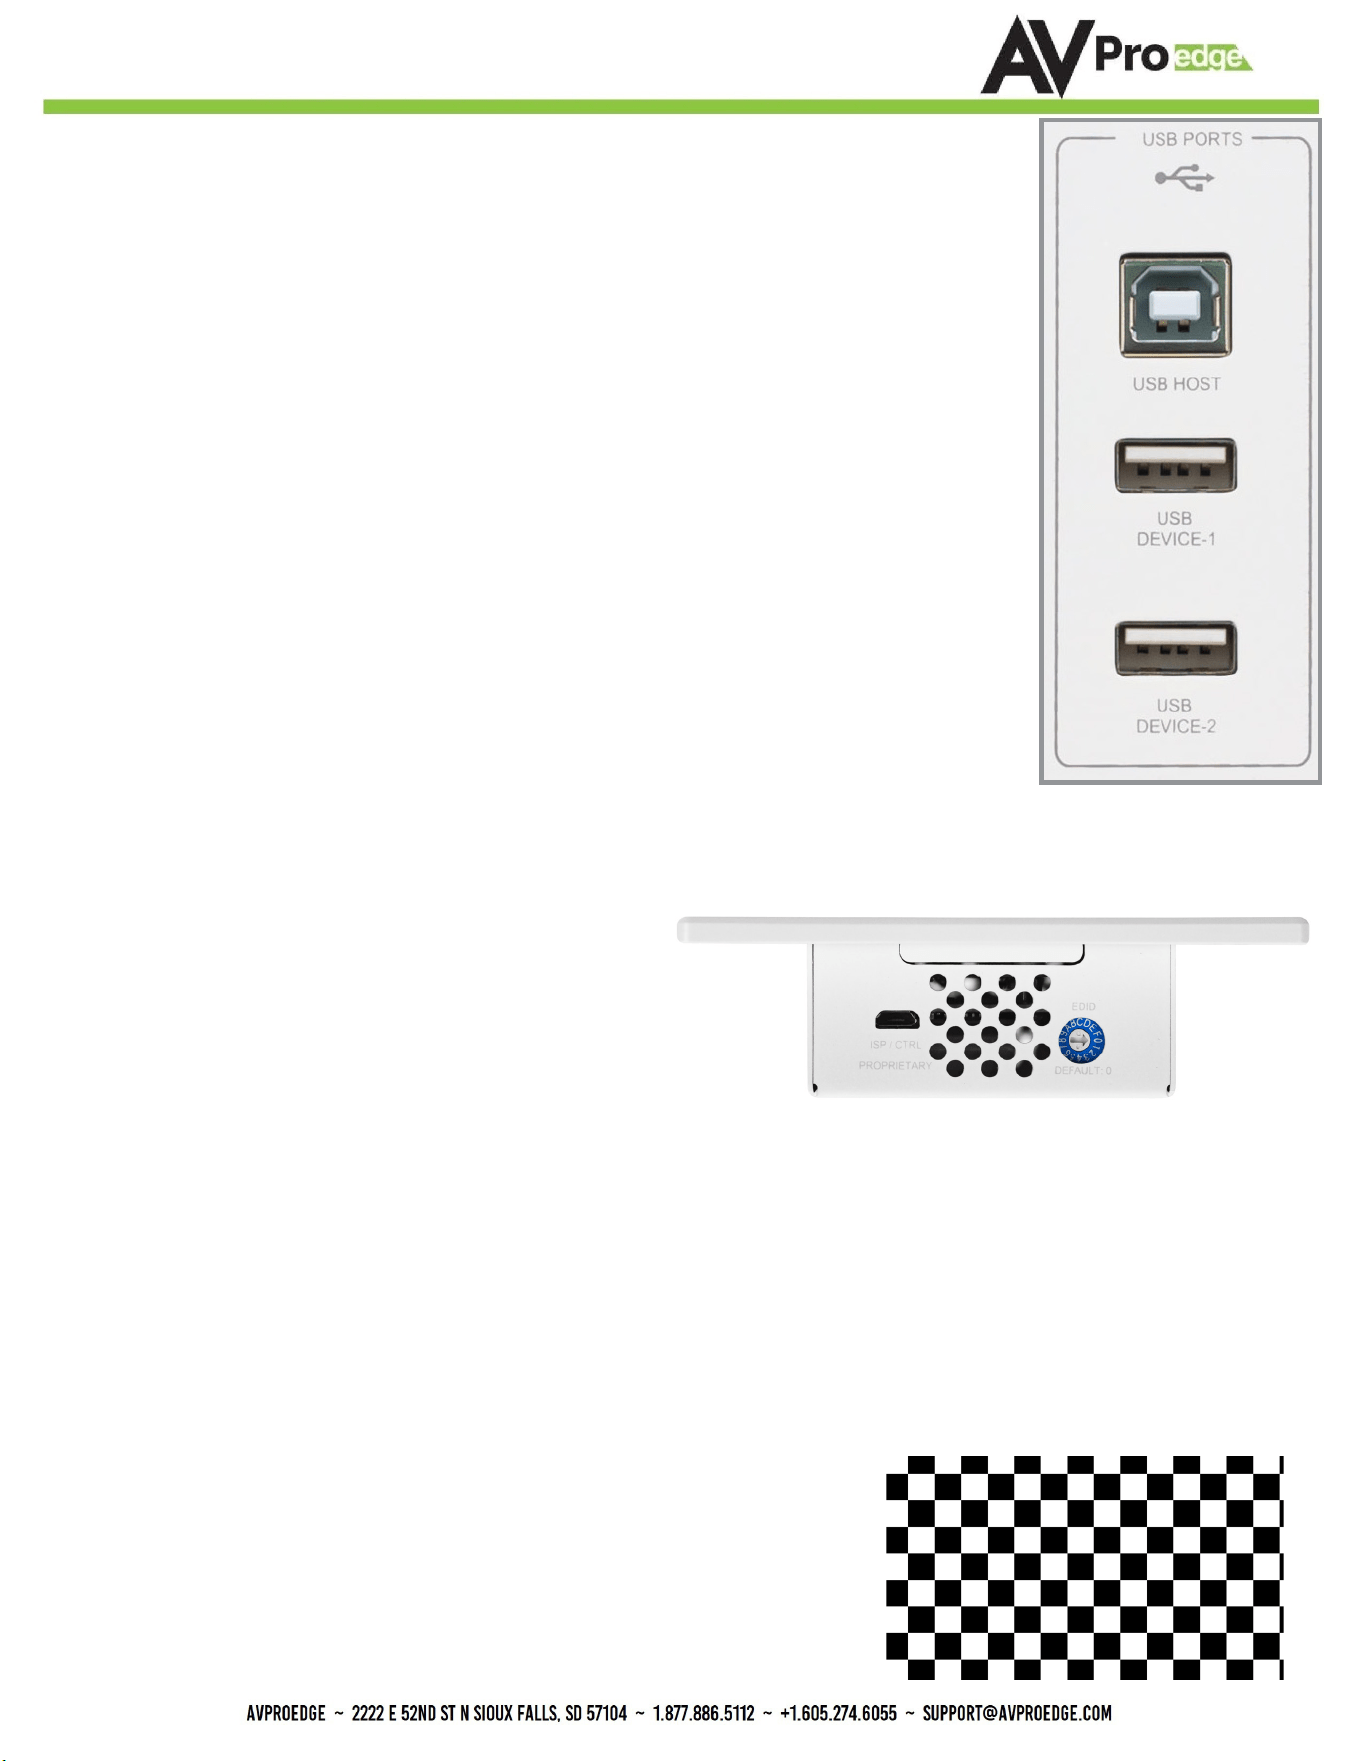
Device Overview - Transmitter Top
Micro USB Port for Firmware updates
EDID Selection Dial
0 - BYPASS (default)
1 - 1920x1200 -2CH
2 - 1920x1200 DVI
3 - 1080p-2Ch
4 - 1080p-8Ch
5 - 4k@60Hz-YC420-3D-2Ch
6 - 4k@60Hz-YC420-3D-8Ch
7 - 4k@60Hz-YC444-3D-2Ch
8 - 4k@60Hz-YC444-3D-8Ch
9 - USER EDID
A - 4k@60Hz-YC420-3D-2Ch Downscaled to 1080p
B - 4k@60Hz-YC420-3D-8Ch Downscaled to 1080p
C - 4k@60Hz-YC444-3D-2Ch Downscaled to 1080p
D - 4k@60Hz-YC444-3D-8Ch Downscaled to 1080p
E - USER EDID Downscaled to 1080p
F - Test Pattern (1080P Checkerboard Pattern)
7
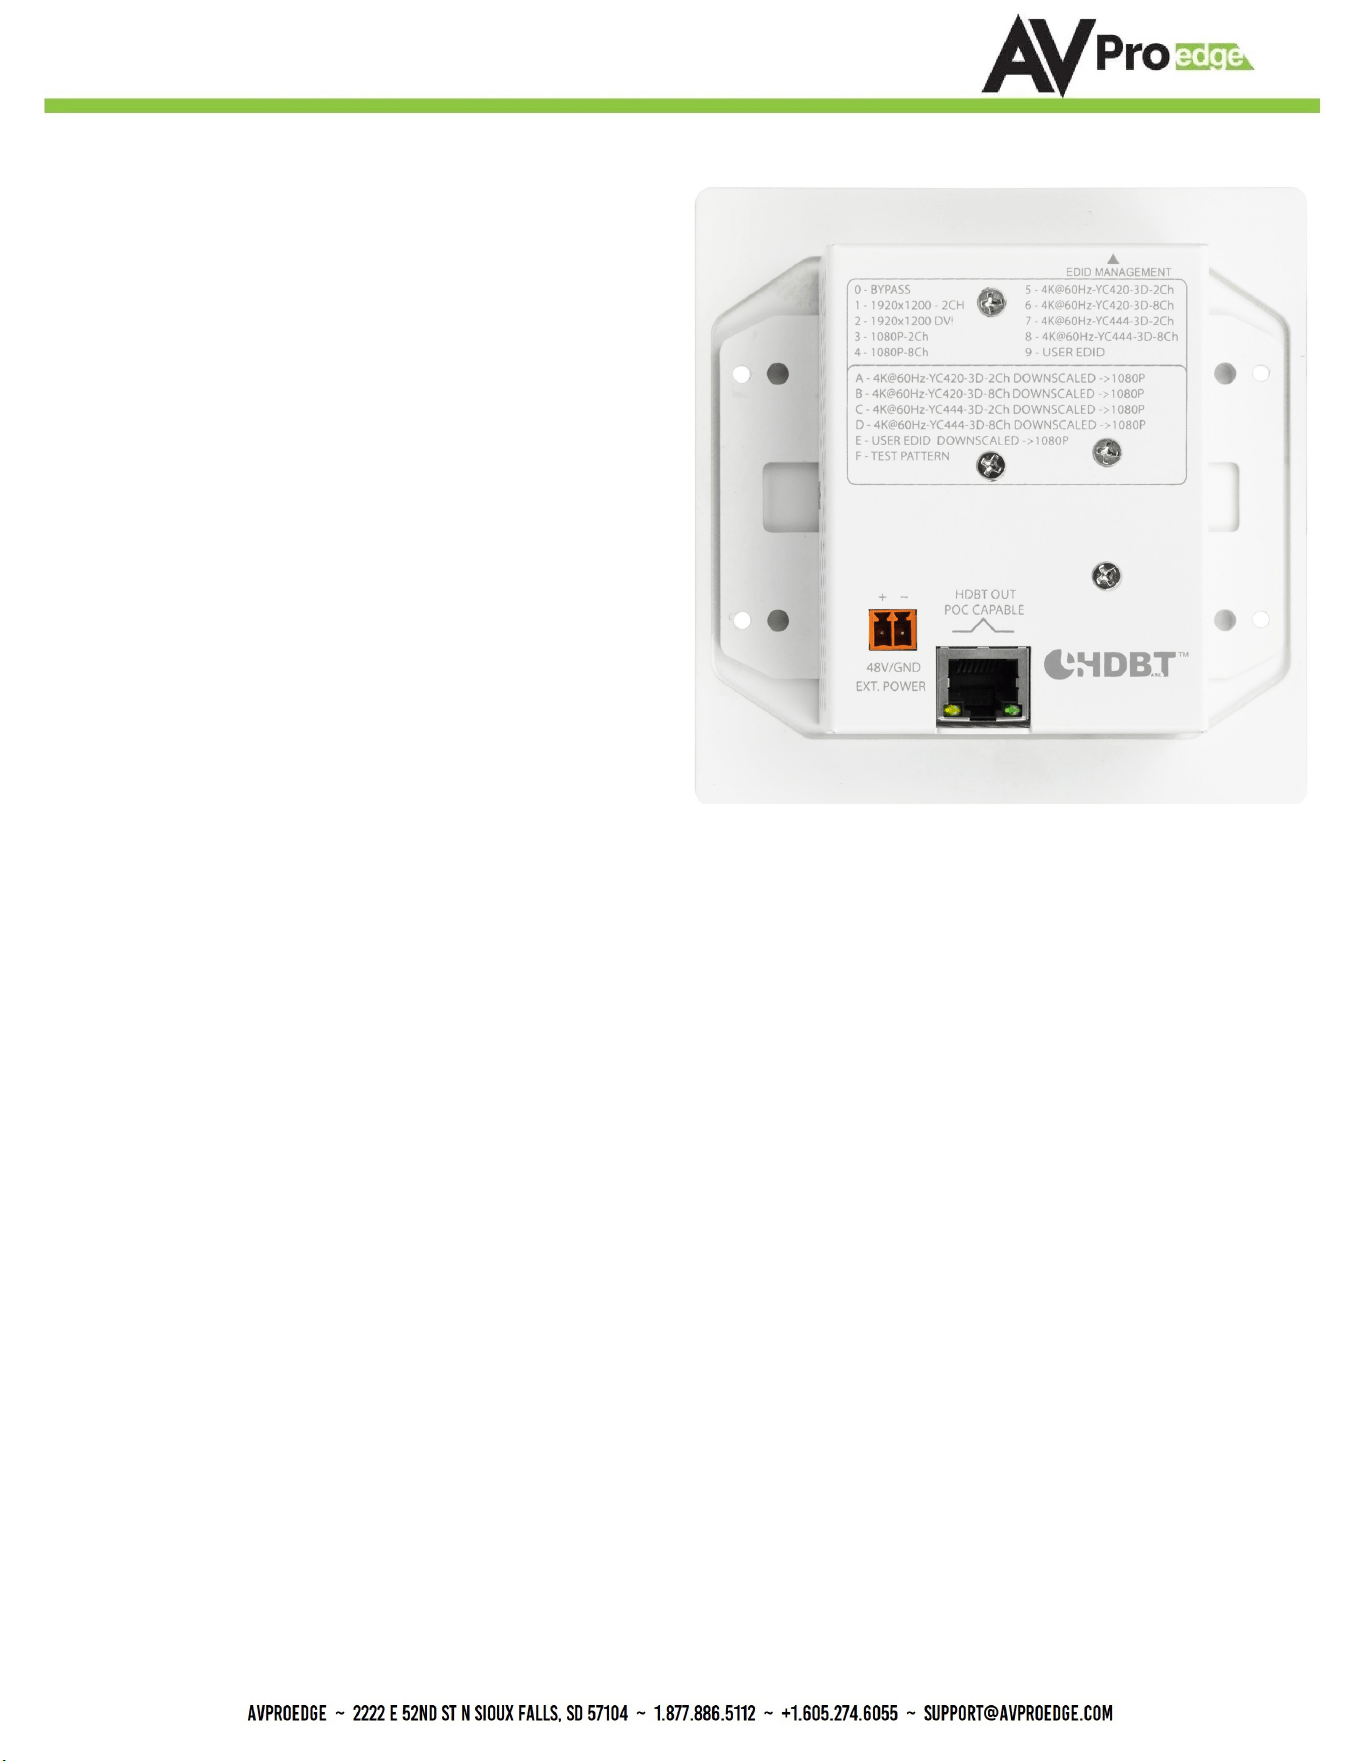
2 Pin Terminal Block
There are two options for power, you can power the
Transmitter and the Receiver will be powered over the
Category cable. Or you can power the Receiver and
power will be provided to the Transmitter over the
Category cable.
*NOTE: See “Power From” under Receiver for more details Pg 9
Available EDIDs that correspond to the EDID Selection
dial on the top of the Transmitter are printed here.
RJ45 For HDBaseT
Connect a category cable to this port and the other
end to the HDBaseT IN port of the Receiver.
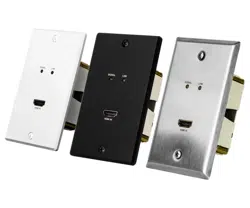
Device Overview - Transmitter Back
8
Device Overview - Receiver Front
System Status LED Indicator Lights
Power
• Red LED indicates if power is present (on)
• Red LED o means no power
AV System ACT
• Blue LED will ash along with the Amber LED light on the HDBaseT IN port on the back.
HDBT Link
• Blue LED indicates a solid link with the HDBaseT Transmitter (wall plate). It corresponds to the
Green LED light on the HDBaseT IN port on the back.
HDMI Signal Monitor
• Blue LED on indicates a solid link with the HDMI Display. Light is o, no display is detected
Audio Input Selection Switch
• Use this switch to select where you want the Extracted 2Ch audio (on the Transmitter) to originate
from. ARC (TV) will use the ARC enabled port of the display, if the display does not have ARC but
has Toslink select TOS and connect a Toslink cable from the Display to the AUDIO IN port on the
back of the Receiver
Power From Selection Switch.
• Here you select where the power is originating from. If you are plugging powering into the Trans-
mitter select “TX”. If you are plugging powering into the Receiver select “RX”.
USB-C Port
• USB-C port for Firmware updates
9
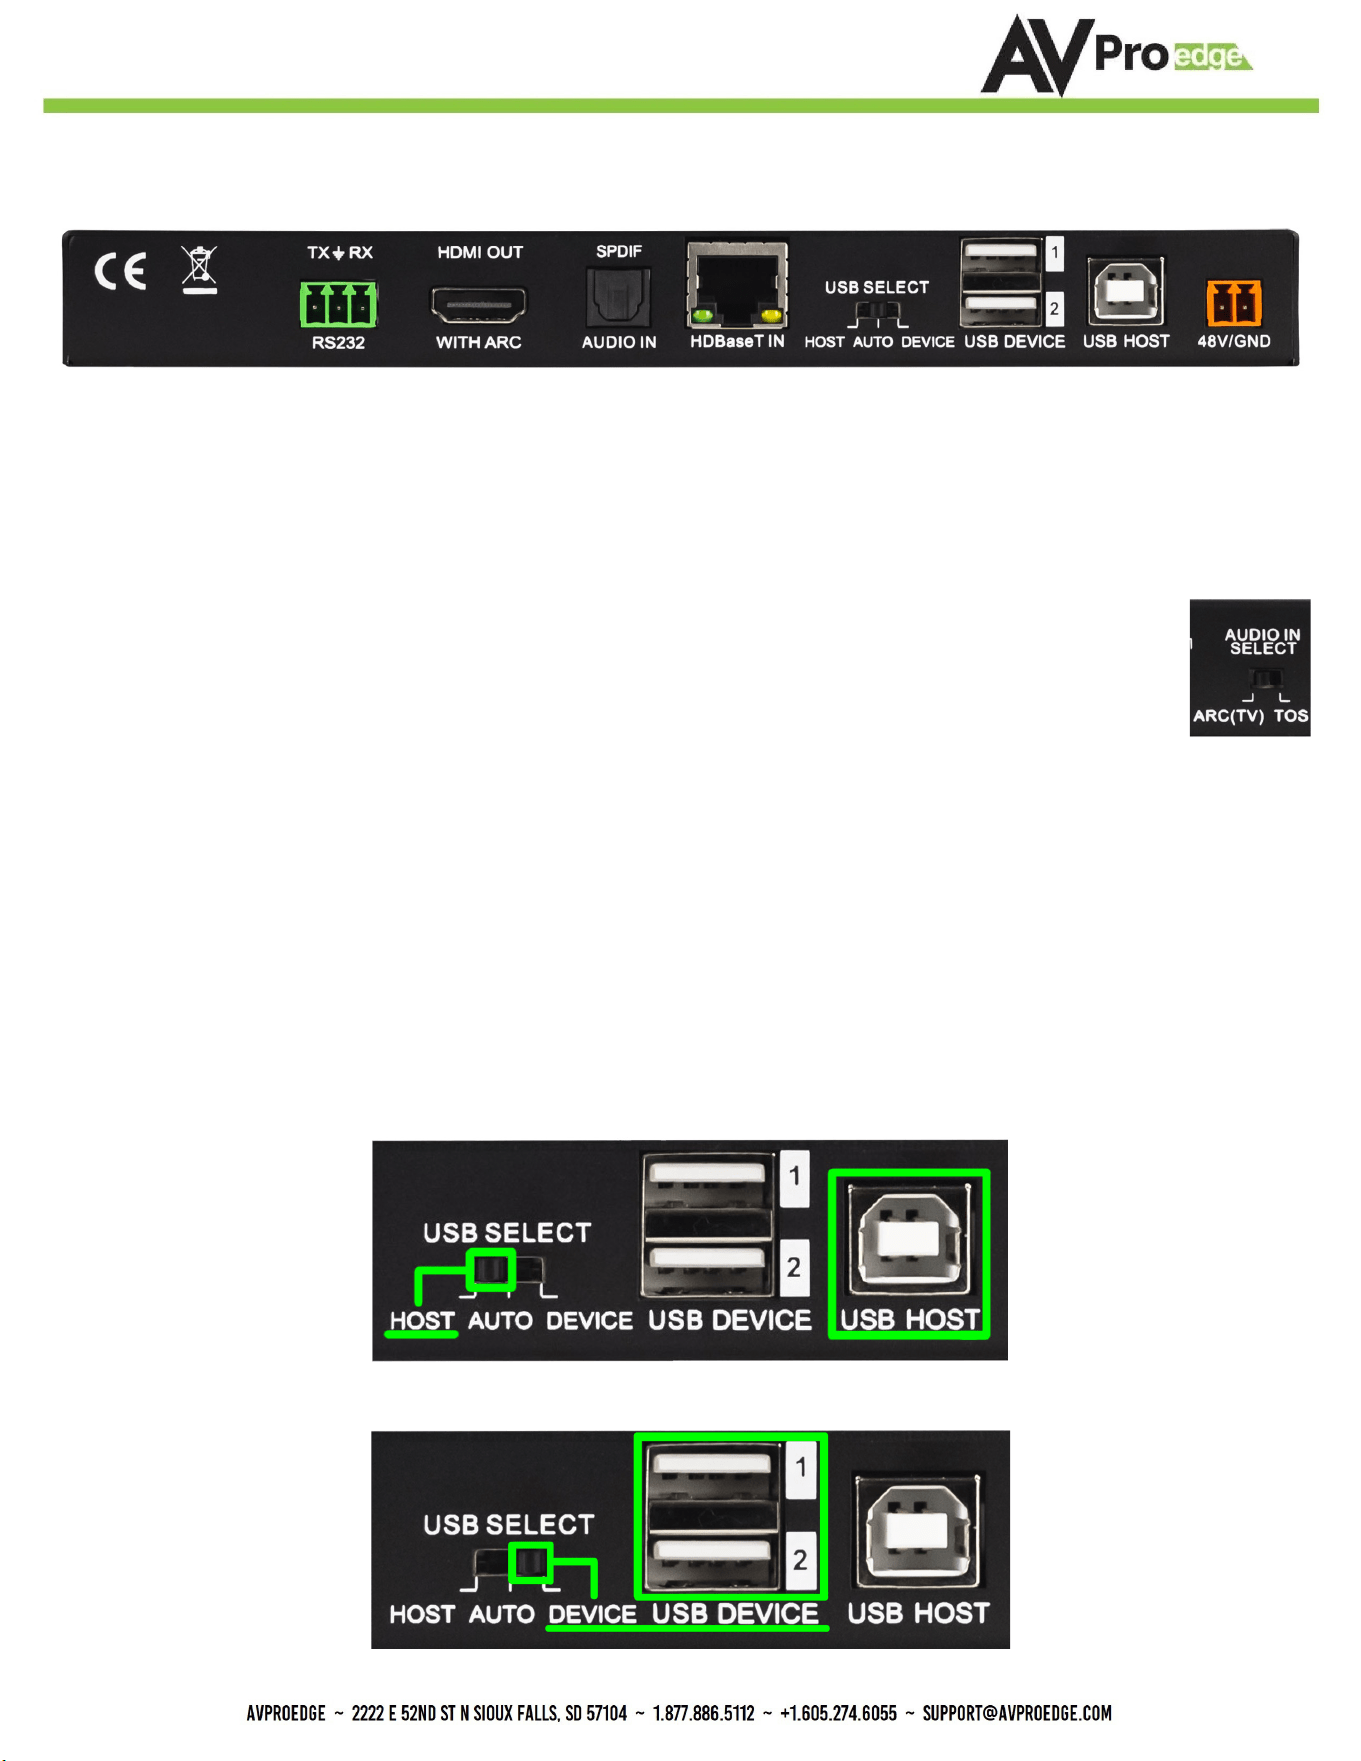
RS-232
• 3 pin terminal for device control and RS-232 pass-through.
HDMI OUT
• For connecting to an HDMI Display.
SPDIF / AUDIO IN
• Connect a Toslink cable to this port and on the front move the AUDIO IN SELECT switch
to TOS
HDBaseT IN
• Connect a category cable to this port and the other end to the HDBaseT OUT port on the back of
the Transmitter.
USB SELECT
• Use this switch (3 positions) to select what you want the Receiver to be. Auto is the default (mid-
dle position) this will automatically detect what ports you are using. If there are any issues try
selecting one of the other two options, Host or Device.
• Select HOST if you are plugging into the USB HOST port on the Receiver (Type B)
• Select DEVICE if you are plugging into the USB DEVICE port (Type A)
Device Overview - Receiver Back
10
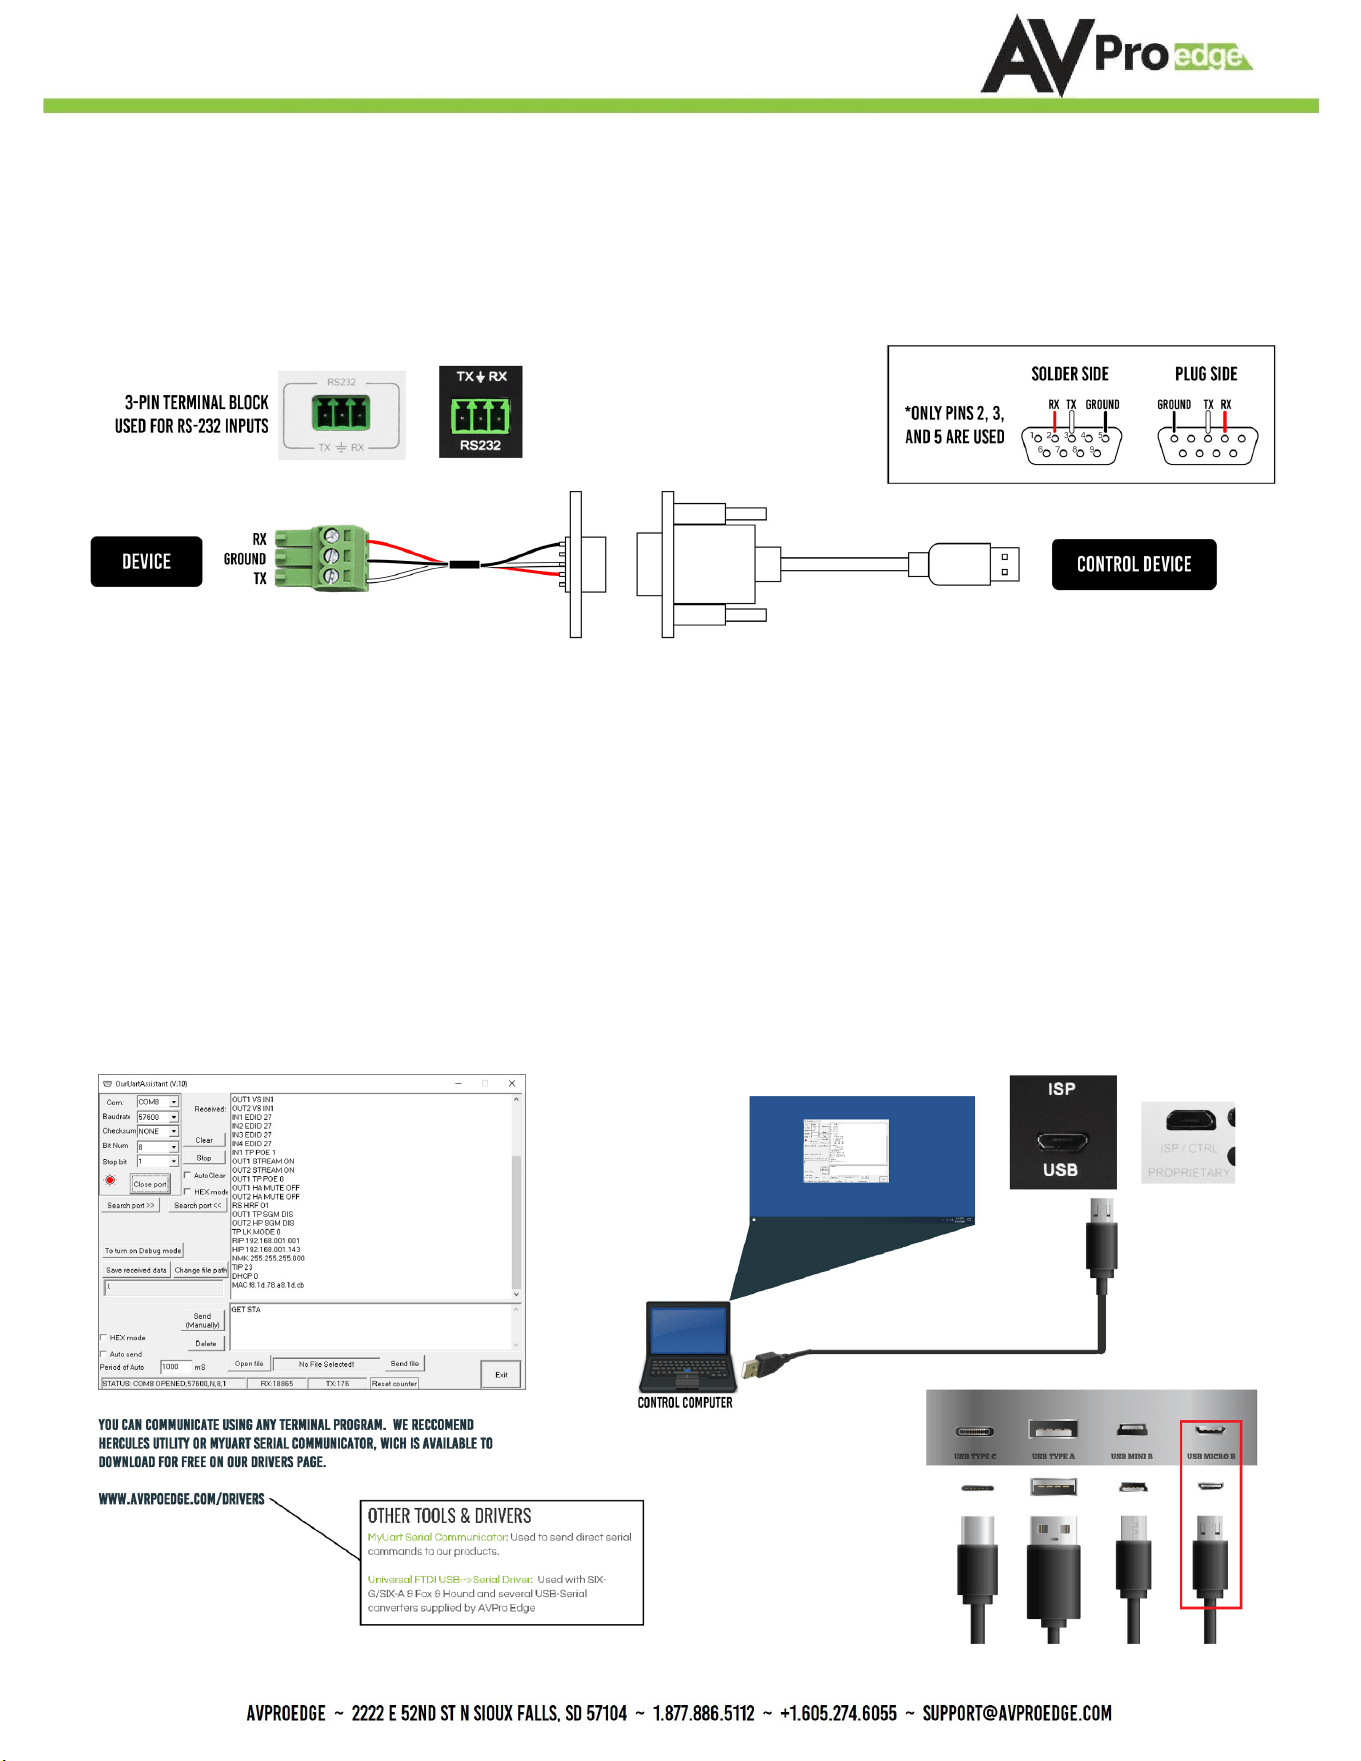
RS-232 Conguration
11
In order to control via RS-232, follow the wiring information below. Connecting to a DB9 only pins 2, 3,
and 5 are used. If your control device does not have a DB9 port, a USB to DB9 adapter may be required.
AVProEdge has these cables available (AC-USB-DB9-ADPT).
USB Ports
1212
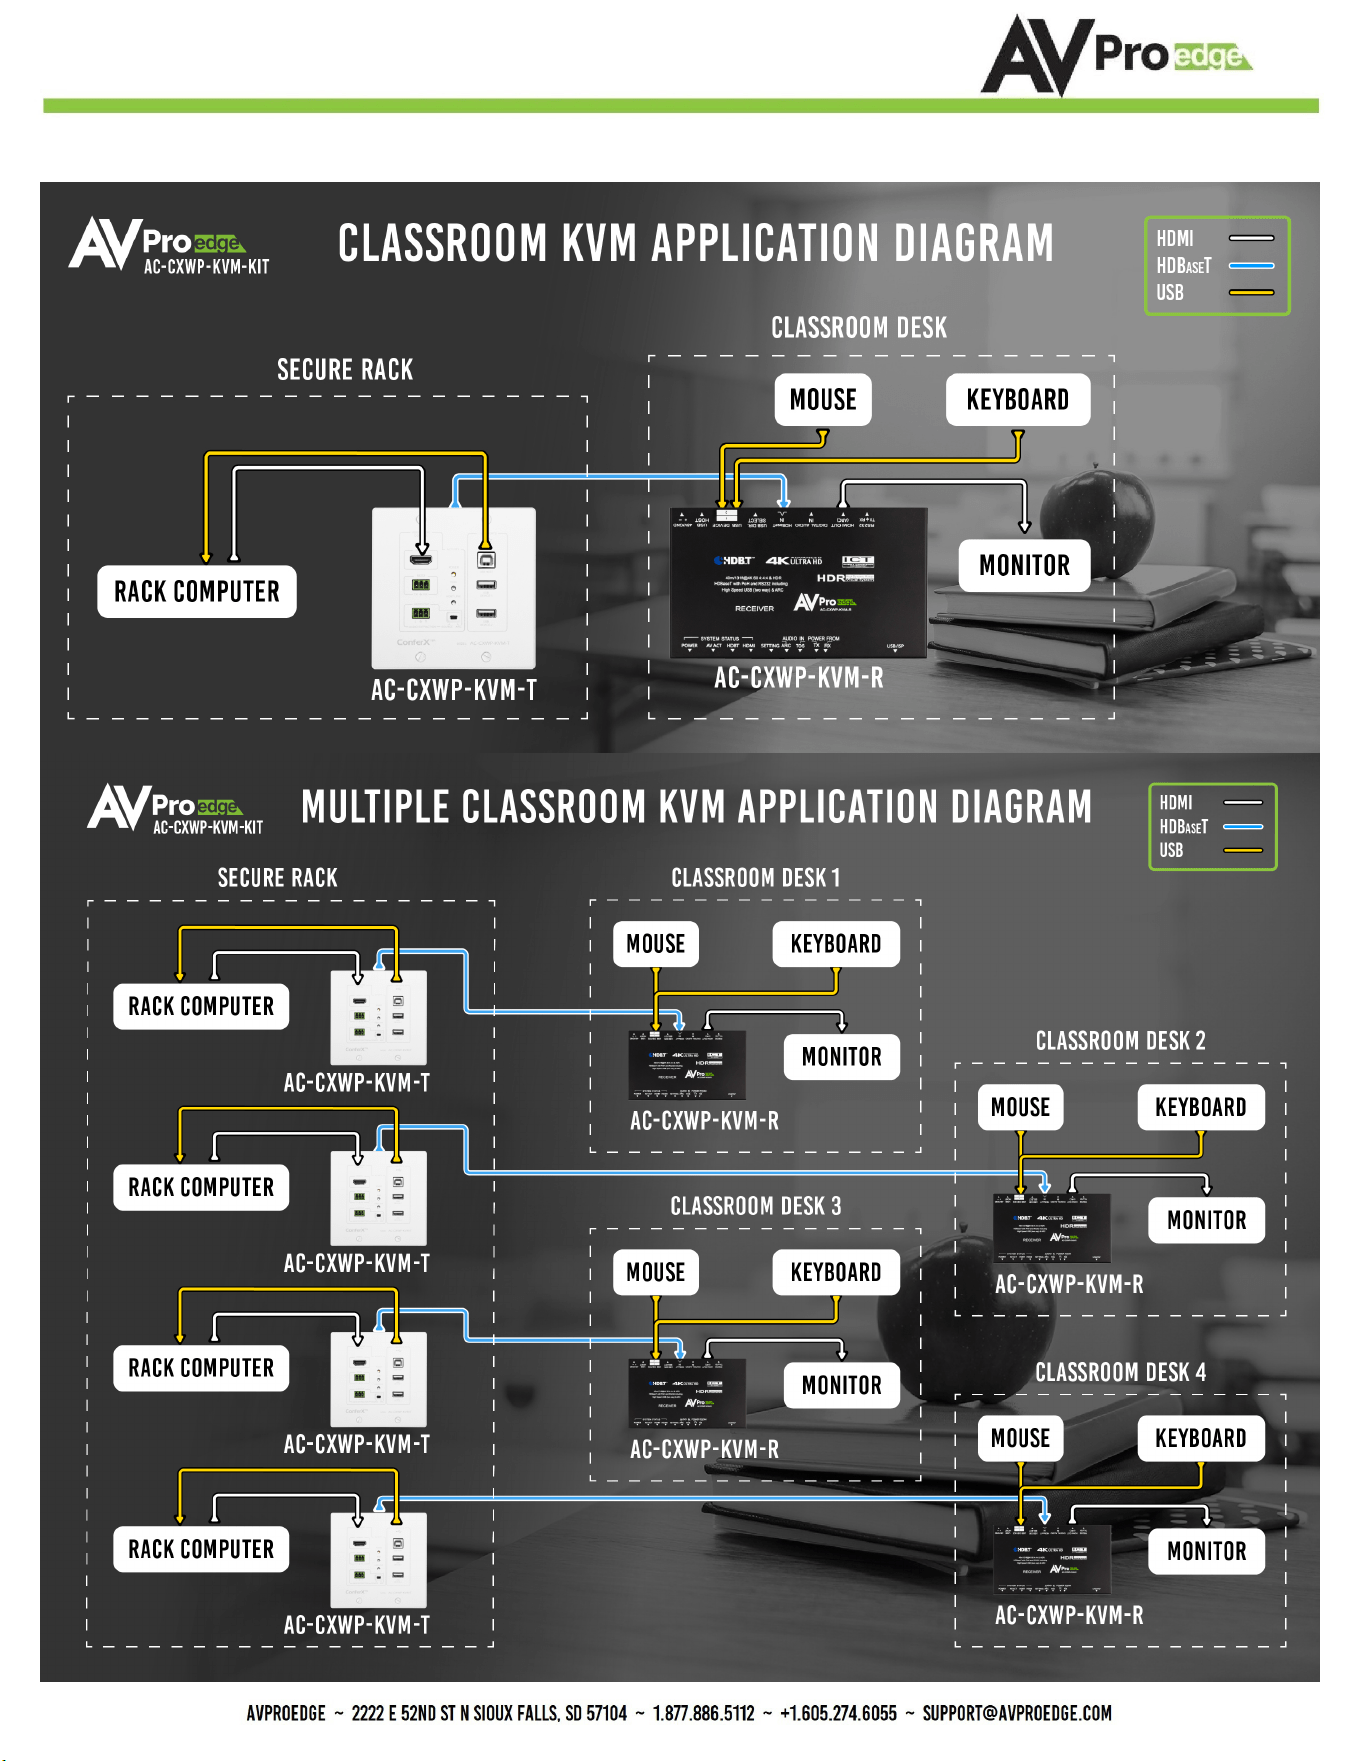
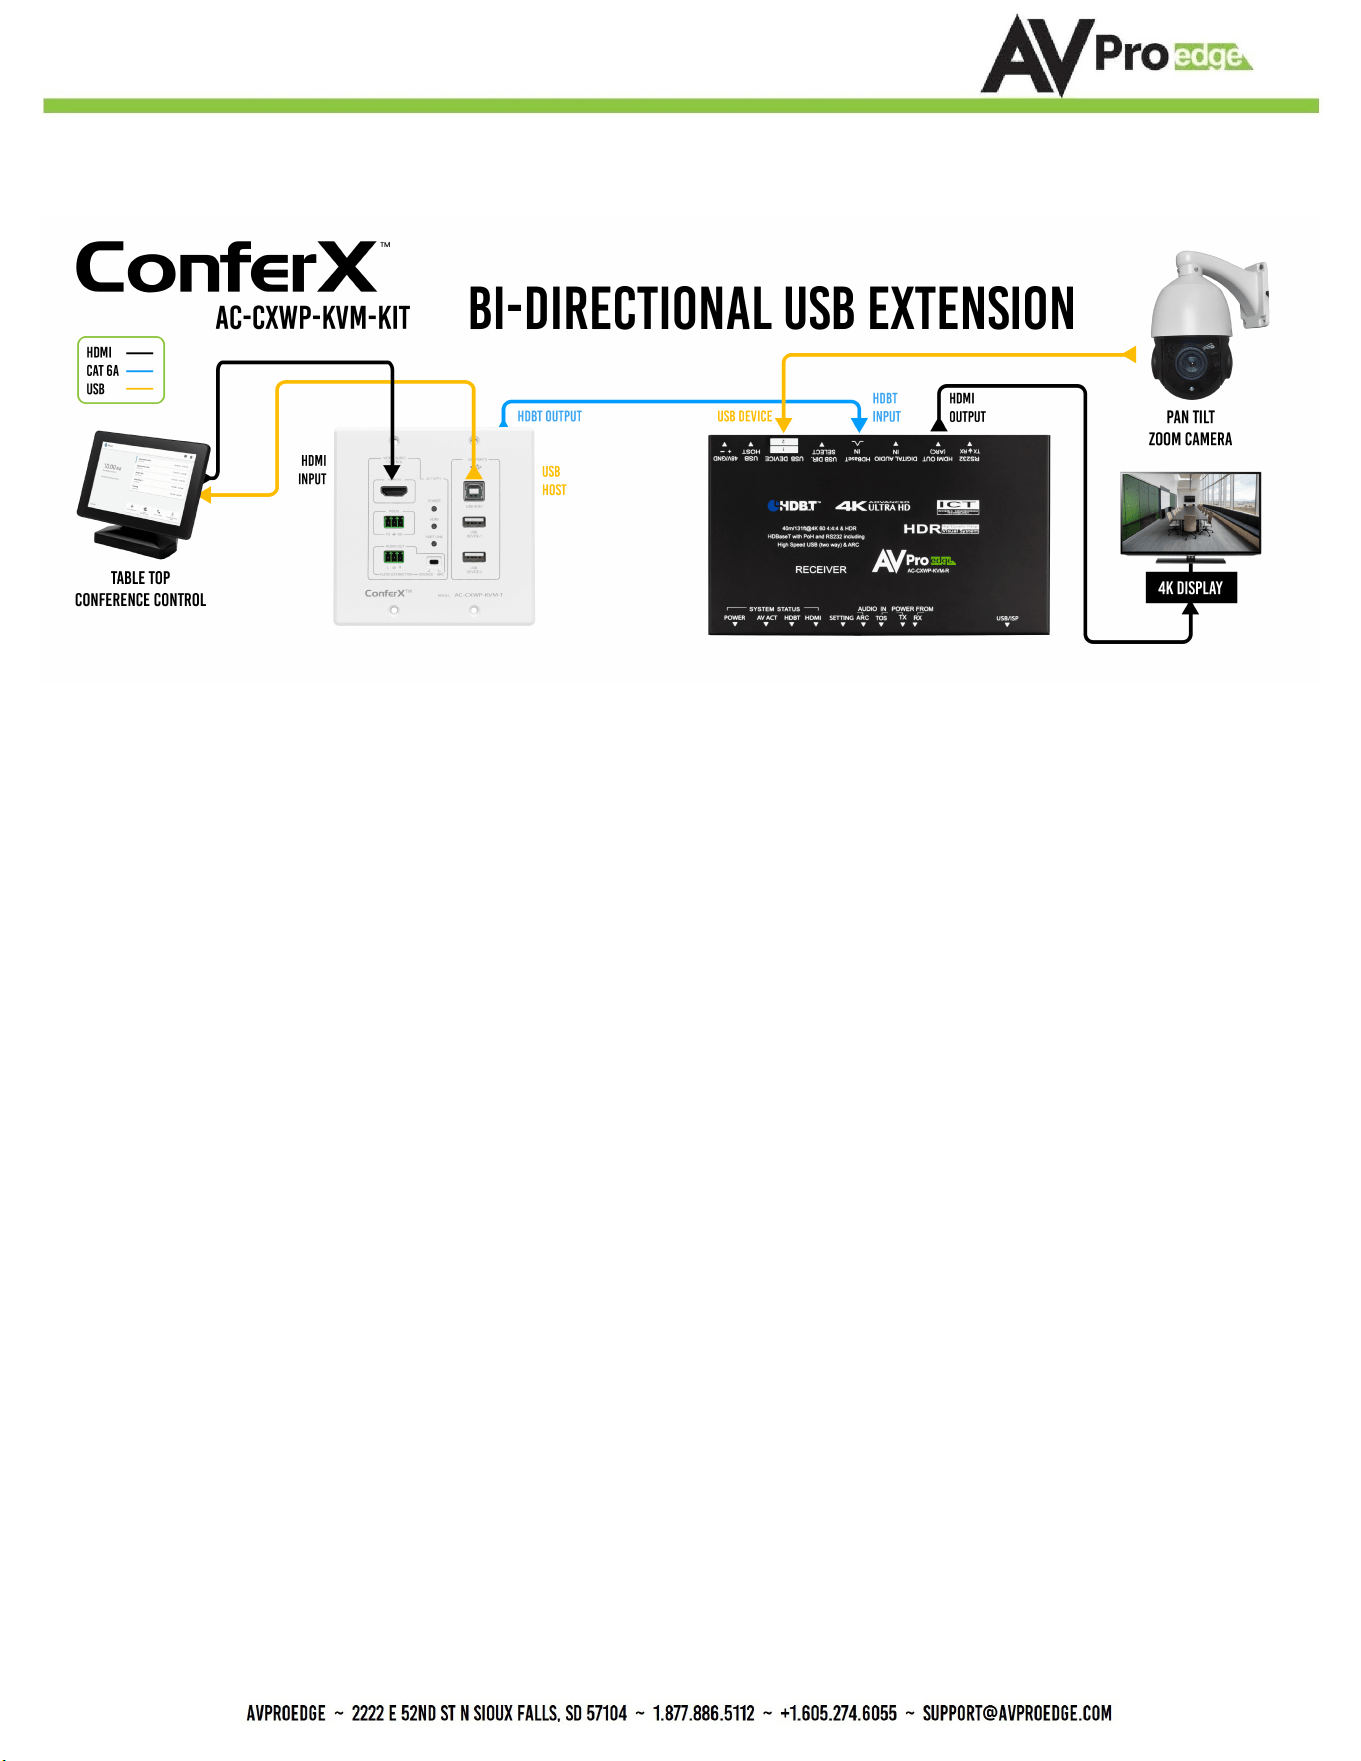
Example Application Diagrams

1313
14
Example Application Diagram USB Extension

15
Verify Power - Page 9 “Device Overview - Receiver Front”
• If you having issues with power, verify the POWER FROM switch on the receiver is correct.
Verify Connections - Check that all cables are properly connected.
• Refer to “Device Overview - Transmitter Front”, Activity Lights Page 6
• Refer to “Device Overview - Receiver Front”, System Status LED Indicator Lights Page 9
Not passing video,intermittent video, color-space issues? This may be an EDID issue. Out of the box the
Transmitter dial is set to “0 - Bypass”, this will pass the EDID from the Display through the chain back to
the sync device. See “Device Overview - Transmitter Top” on page 7 for list of available EDIDs.
You can also use the “USER EDID” slots (9, and E) to copy the Displays EDID. Simply move the dial to
either 9 or E while the connected HDMI Display is powered on, this will copy and store that EDID on the
Transmitter. To re-copy move the dial away from position 9 or E, and them back with the connected HDMI
Display powered on.
You can also select position F to enable the built in 1080p test pattern that originates at the Transmitter,
this can help verify a solid connection from the Transmitter down the line to the display.
USB Connection issues, default out of the box the HDBaseT Receiver’s USB SELECT switch is set to AUTO.
Try setting to HOST or DEVICE, see “Device Overview - Receiver Back” on page 10 for more information.
Extracted Audio Issues using the 3 pin terminal connector on the front of the Transmitter will only extract
2Ch PCM audio this unit does not down-mix. Verify connected source is set to 2Ch PCM audio.
*NOTE: ARC must be enabled on the display/sync, and the output should be set to PCM.
Still having issues after troubleshooting, feel free to contact our Tech Support Department.
• Email [email protected]
• Web page support.avproedge.com
• Support Direct +1-605-977-3477
• Support Toll Free +1-877-886-5112
• All other Inquiries +1-605-274-6055

16
Maintenance
To ensure reliable operation of this product as well as protecting the safety of any person using or handling
this device while powered, please observe the following instructions.
·Use the power supplies provided. If an alternate supply is required, check voltage, polarity and that it
has sucient power to supply the device it is connected to.
·Do not operate these products outside the specied temperature and humidity range given in the
above specications.
·Ensure there is adequate ventilation to allow this product to operate eciently.
·Repair of the equipment should only be carried out by qualied professionals as these products con-
tain sensitive components that may be damaged by any mistreatment.
·Only use this product in a dry environment. Do not allow any liquids or harmful chemicals to come
into contact with these products.
·Clean this unit with a soft, dry cloth. Never use alcohol, paint thinner or benzene to clean this unit.
Damage Requiring Service
The unit should be serviced by qualied service personnel if:
·The DC power supply cord or AC adapter has been damaged
·Objects or liquids have gotten into the unit
·The unit has been exposed to rain
·The unit does not operate normally or exhibits a marked change in performance
·The unit has been dropped or the housing damaged

Support
Should you experience any problems while using this product, rst, refer to the Troubleshooting section of
this manual before contacting Technical Support. When calling, the following information should be provid-
ed:
·Product name and model number
·Product serial number
·Details of the issue and any conditions under which the issue is occurring
·Clean this unit with a soft, dry cloth. Never use alcohol, paint thinner or benzene to clean this unit.
Warranty
If your product does not work properly because of a defect in materials or
workmanship, AVProEdge (referred to as “the warrantor”) will, for the length of the period indicated as be-
low, (Parts/Labor (10) Years), which starts with the date of original purchase (“Limited Warranty period”),
at its option either (a) repair your product with new or refurbished parts, or (b) replace it with a new or a
refurbished product. The decision to repair or replace will be made by the warrantor. During the “Labor”
Limited Warranty period there will be no charge for labor. During the “Parts” warranty period, there will be
no charge for parts. You must mail-in your product during the warranty period. This Limited Warranty is
extended only to the original purchaser and only covers product purchased as new. A purchase receipt or
other proof of original purchase date is required for Limited Warranty service.
This warranty extends to products purchased directly from AVPro or an authorized dealer. AVPro is not lia-
ble to honor this warranty if the product has been used in any application other than that for which it was
intended, has been subjected to misuse, accidental damage, modication or improper installation proce-
dures, unauthorized repairs or is outside of the warranty period. Please direct any questions or issues you
may have to your local dealer before contacting AVPro.
17


19

20
Thank you for choosing AVProEdge!
Please contact us with any questions, we
are happily at your service!
AVProEdge
2222 E 52nd St N ~ Sioux Falls, SD 57104
1-877-886-5112 ~ 605-274-6055