(Save the Instructions For Future Reference)
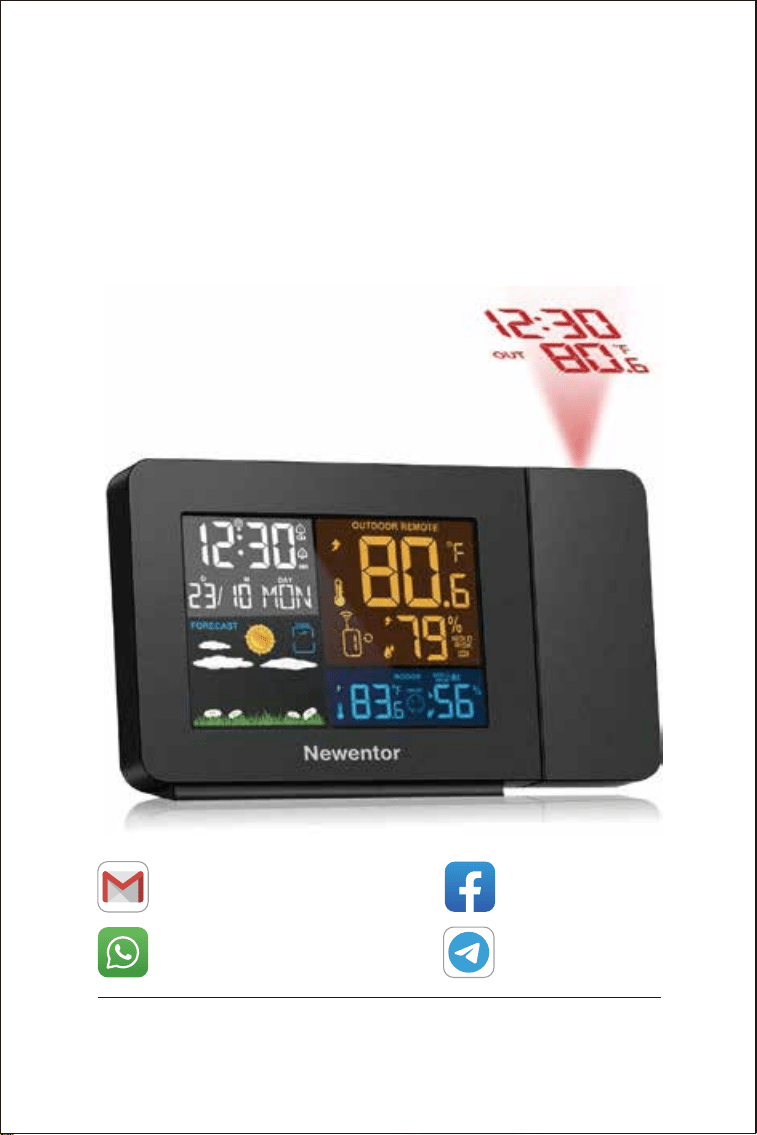
Projection Alarm Clock
+8613410031201
WhatsApp
Email
Search: Newentor
Facebook
NEWENTOR
Telegram
Weather station is a functional product, if you have any questions
of using it, contact us through above ways to get support.

1
1. PROJECTION ALARM CLOCK FEATURES
1.1 Package List ······················································ 2
1.2 Projection Alarm Clock Appearance ······························ 3
1.3 Button Function ·················································· 6
2. INITIAL OPERATION ········································ 7
3. TIME SETTING
3.1 Set Time Manually ················································ 8
3.2 Set Time Automatically ··········································· 9
4. ALARM CLOCKS
4.1 Alarm Clock ON and OFF ········································ 11
4.2 Set the Daily Alarms ············································· 11
4.3 Snooze Function ················································ 12
5. DISPLAYING TEMPERATURE/HUMIDITY AND
TEMPERATURE/HUMIDITY TREND ······················· 13
6. °C OR °F TEMPERATURE DISPLAY ···················· 13
7. MAXIMUM/MINIMUM TEMPERATURE/HUMIDITY AND
DEW POINT TEMPERATURE AND HEAT INDEX ······· 13
8. OUTDOOR REMOTE TEMPERATURE FROST ALERT · 14
9. OUTDOOR REMOTE MOLD RISK ····················· 14
10. COMFORT LEVEL ········································ 14
11. WEATHER FORECAST ·································· 15
12. PROJECTION DESCRIPTION ··························· 16
13. BACKGROUND LIGHTING ······························ 16
14. LOW BATTERY ············································· 17
15. PRODUCT SPECIFICATION ····························· 17
TABLE OF CONTENTS
2
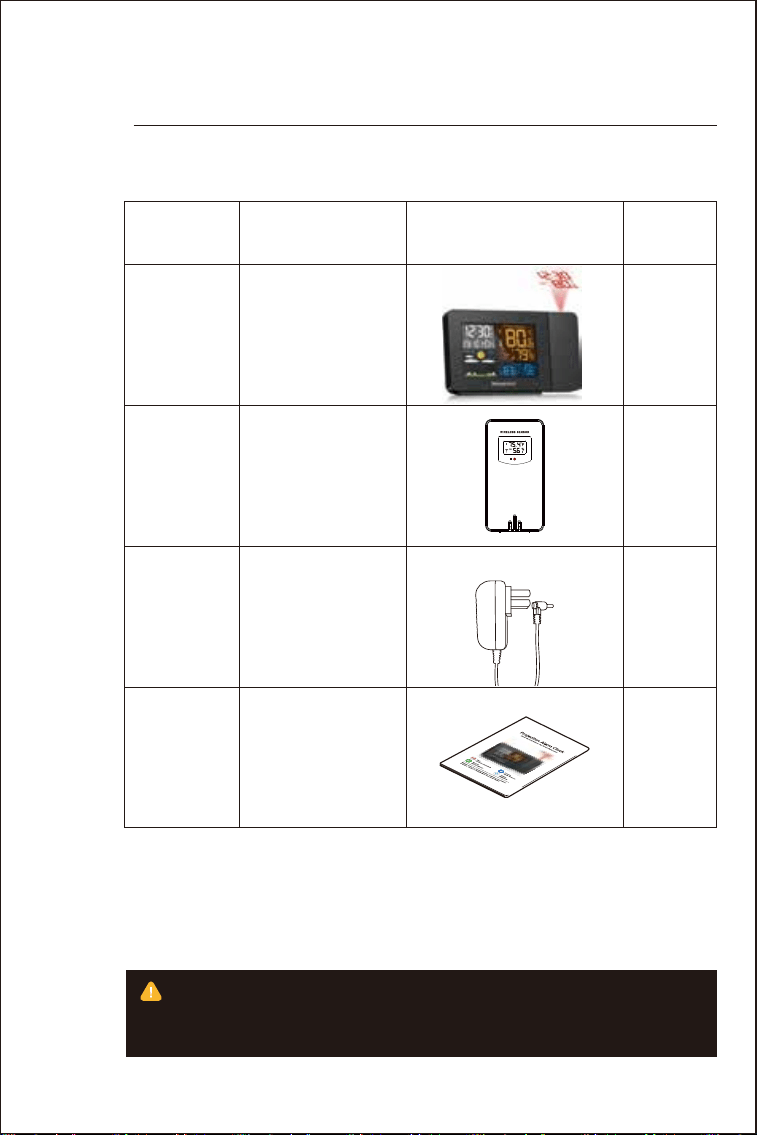
1.1 Package List
01
PROJECTION ALARM
CLOCK FEATURES
ITEM NO
1
2
3
4
1
1
1
1
PART NAME IMAGE QTY
Projection
Alarm Clock
Outside Sensor
Power Charger
User Manual
During the reception of WWVB, the backlight will be closed
automatically to prevent the interference of the radio wave. After the
reception, the device will return to its original brightness.
3
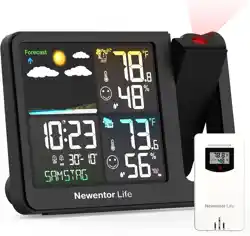
1.2 Projection Alarm Clock Appearance
Part A-Positive LCD
6. Choose a correct time zone ( PST MST CST EST AST HAT and AKT) to
set time correctly.
13&23. There may be 1℃ deviation when temperature is 0℃~40℃, while 2
℃ in -9.9℃~0℃ or 40℃~50℃.
17&22. There may be 5% deviation when humidity is 40%~80%, while 8%
deviation in 20%~40% or 80%~95%.
124567
8
9
10
13 14 15 16 17 18
19
20
21
22
23
24
25
1211
3
1: Snooze Mode ( 12th)
2: Alarm 2 ( 11th)
3: Alarm 1 ( 11th)
4: DST ( 8th)
5: Radio Mast Icon ( 9th)
6: Time ( 8th)
7: AM/PM ( 8th)
8: Date and Week ( 8th)
9: Weather Forecast ( 15th)
10: Barometric Trend ( 13th)
11: Temperature Trend ( 13th)
12: Maximum/Minimum Tempera-
ture &Humidity Display ( 13th)
13: Indoor Temperature ( 13th)
14: Low Battery Reminder ( 17th)
15: Comfort Level ( 14th)
16: Humidity Trend ( 13th)
17: Indoor Humidity ( 17th)
18: MOLD RISK ( 14th)
19: ICE Alert ( 14th)
20: Channel ( 7th)
21: CYCLE Symbol ( 7th)
22: Outdoor Humidity ( 17th)
23: Outdoor Temperature ( 17th)
24: HEAT INDEX ( 13th)
25: DEW POINT ( 13th)
5
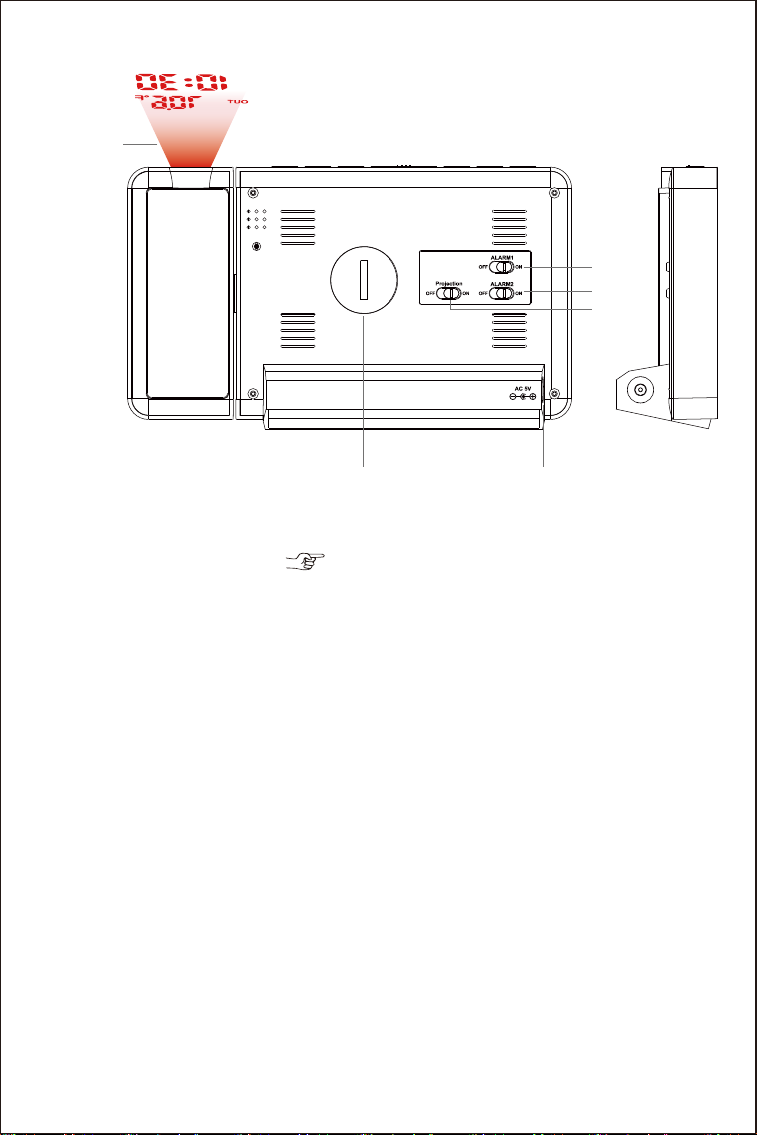
Part B – Backbuttonand power
4
1
2 3
4
5
6
1: Projection Display ( 16th)
2: Battery Compartment Cover
3: Power Supply Socket
4: Projection ON/OFF Shift Switch
5: Alarm2 ON/OFF Shift Switch
6: Alarm1 ON/OFF Shift Switch
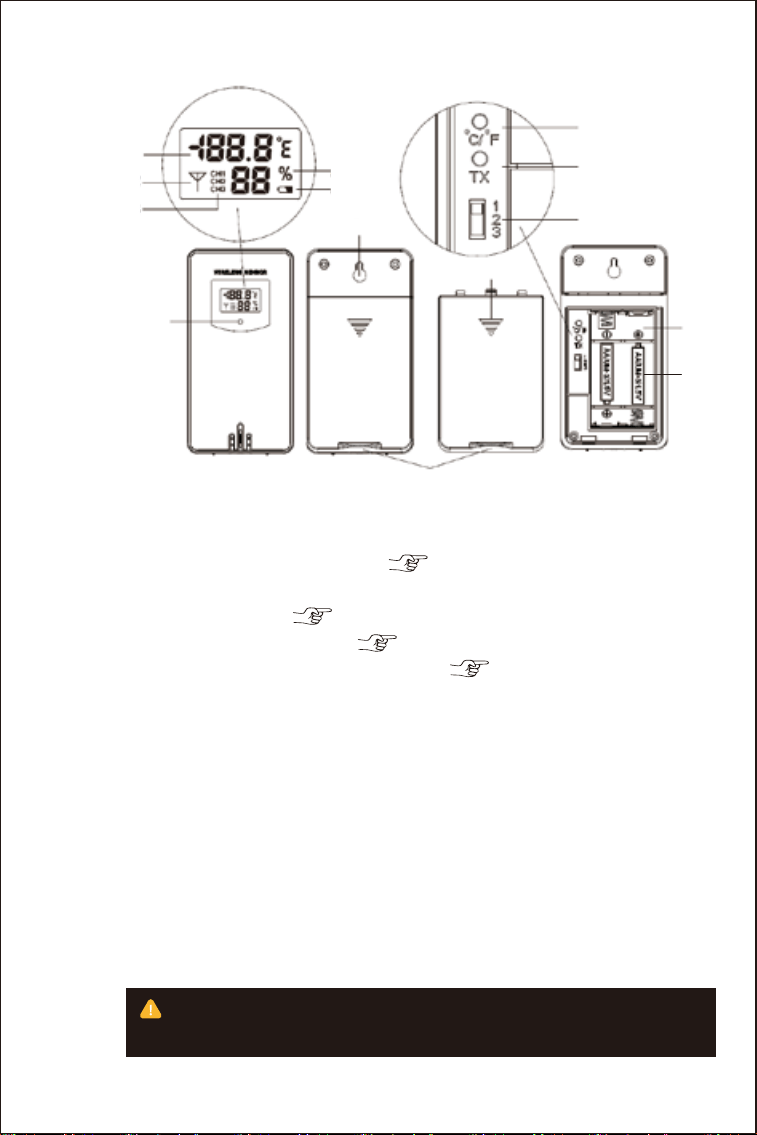
55
To make sure your remote sensor more accurate, put it away from
direct rain, sunny or close to the place where will affect the sense result.
10
12
11
14
Part C –Wireless Remote Sensor
1
2
3
4
5
6
7
8
9
13
1: Remote sensor temperature ( 17th)
2: Emission symbols
3: Channel number ( 7th)
4: Remote sensor humidity ( 17th)
5: Remote sensor low battery indicate ( 17th)
6: °C /°F unit transfer button
7: Manual transmitter button
8: Channel switch
9: Transmit indicating lamp
10: Wall mounting hole
11: Stand cover
12: Battery compartment cover
13: Battery compartment
14: Remote sensor battery
6
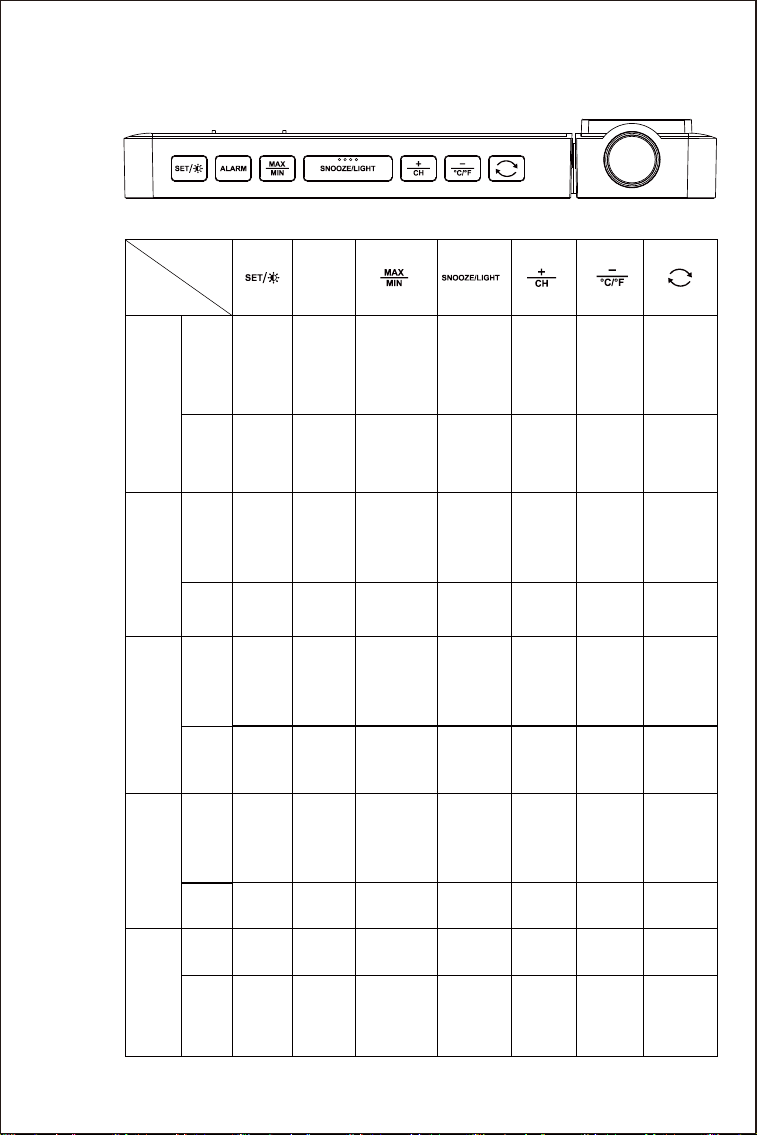
1.3 Button Function
Button
Function
ALARM
Hold
Press
Time
Setting
Hold
Press
Hold
Press
Hold
Hold
Press
/
//
/
/
/
/
/
/
/
/
/
/
/
/
/
/
/ / / /
/ /
/
/
/
/
/
//
/
/
/
Display
Alarm
Time
Alarm
Setting
Select
channel
°C/°F
Switch
Projection
direction
conversion
Adjust
Bright-
ness
of
Backlight
Channel
searching
Start/-
cancel
WWVB
searching
Adjust
projection
brightness
Time
Setting
Confirm
and go
next
steps
Increase
Decrease
Increase Decrease
Increase
Continu-
ously
Decrease
Continu-
ously
Increase
Continu-
ously
Decrease
Continu-
ously
Exist auto
time mode
Turn off
the alarm
Turn off
the alarm
Turn off
the alarm
Turn off
the alarm
Turn off
the alarm
Turn off
the alarm
Press
Turn on
projection
for 15
seconds
Turn on
projection
for 15
seconds
Turn off
the alarm
Alarm
Mode
Turn off
the alarm/
exist
Snooze
mode
Auto
Time
Mode
Wake up
backlight &
Turn on
projection
for 15
seconds
Confirm
and go
next
steps
Alarm
Setting
Exit setting
mode &
Turn on
projection
for 15
seconds
Exit setting
mode &
Turn on
projection
for 15
seconds
Re-record
MAX/MIN
temperature
&
humidity
Normal
Mode
MAX/MIN
temperature
&Humidi-
ty/DEW
POINT/HEAT
INDEX

7
02
INITIAL
OPERATION
· The Weather Stations can receive up to 3 channels of remote
sensors.
· When entering the radio control time receiving mode, the backlight
will turn off automatically. After receiving, the backlight will light up
automatically.
· If the cycle symbol “ " is displayed on the screen, the device will
display the temperature and humidity of CH1, CH2, CH3... in turn, you
can press the “ " button to cancel the CYCLE mode.
F.Y.I
· Plug in the power cord or open main unit battery compartment
cover according to the direction label, insert 1x CR2032 battery.
· After the main unit is powered on, all icons on the LCD display will
light up for 3 seconds, you will hear a beep, and the weather station
will start to detect the room temperature and humidity.
· Open the cover of remote sensor, choose a channel for remote
sensor(1,2 or 3, press button to set the channel of the main unit
match to the remote sensor’s) and insert 2 x AA batteries observing
polarity [ “+” and “-” marks], all the icon on the LCD display will
briefly light up for 3 seconds, the remote sensor will start to detect
the temperature and humidity. The LED light flashes once to indicate
that the remote sensor sends a wireless signal once.
· Then main unit will start to make a connection to the remote sensor
-- RF receiving mode. This process takes about 3 minutes and is
displayed by a flashing reception RF antenna symbol “ ” in the
“OUTDOOR REMOTE” display area on the main unit.
· If all channels are received in 3 minutes, the device will enter radio
control time receiving mode automatically, at this time the backlight
will go off.
8
03
3.1 Set Time Manually
TIME
SETTING
· Press and hold “ SET/ " button more than 3 seconds, the RCC
icon display starts to flash. Use the “ " and “ " buttons to set
the radio control time receive function to ON or OFF.
· Press “ SET/ " to confirm your setting, the Time Zone starts to
flash, Use “ " and “ " buttons to choose the correct time zone
(PST MST CST EST AST HAT and AKT).
· Press “ SET/ ” to confirm your setting, the DST icon starts to
flash. Use“ " and “ " buttons to choose the DST to ON or OFF.
· Press “ SET/ ” to confirm your setting, the 12/24Hr display starts
to flash. Use the “ " and “ " buttons to choose 12/24 hour
mode you like.
· Press “ SET/ ” to confirm your setting, the Hour display starts to
flash. Use “ " and “ " buttons to choose the correct hour.
· Press “ SET/ ” to confirm your setting, the Minute displays starts
to flash. Use “ " and “ " buttons to choose the correct minute.
· Press “ SET/ ” button to confirm your setting, the Year display
starts to flash, Use “ " and “ " buttons to choose the correct year.
· Press “ SET/ ” button to confirm your setting, the Month display
starts to flash. Use “ " and “ " buttons to choose the correct month.
· Press “ SET/ ” button to confirm your setting, the Date display
starts to flash. Use “ " and “ " buttons to choose the correct date.
· Press “ SET/ ” button to confirm your setting, the Month/Date
icon display starts to flash. Use “ " and “ " buttons to set the
date display on Month/Date or Date/Month.
· Press “ SET/ ” button to confirm your setting, the weather
forecast pattern display starts to flash. Use “ " and “ " buttons
to choose the current weather pattern.
· Press “ SET/ ” to confirm your setting and end the setting
procedure, then enter the clock mode.

9
3.2 Set Time Automatically
F.Y.I.
· After 30 seconds without pressing any buttons, the clock switches
from Set Mode to Normal Time Mode automatically.
· America time zone:
AST: Atlantic Standard Time -4
EST: Eastern Standard Time -5
CST: Central Standard Time -6
MST: Mountain Standard Time -7
PST: Pacific Standard Time -8
AKT: Alaska Standard Time -9
HAT: Hawaii-Aleutian Standard Time -10
· The time zone must be set correctly according to the weather station
area, or when the time signal is received, the time will be incorrect.
· When the Daylight saving time system is not implemented in this area,
please set DST to OFF.
·
Before searching Radio signal (WWVB signal), choose a right
Time Zone according to your location.
· After RF receiving mode, the clock will start to search WWVB signal
and the radio mast icon starts to flash. If the signal is weak, the icon
will be showed as , if the signal is strong, the icon will be showed
as . This process lasts up to 7 minutes. Then the radio mast icon
will disappear.
· If the signal is not received successfully, the system will automati-
cally attempt another synchronization at the next full one hour. If the
reception is successful, this step will not be performed.
· When turn ON radio control time receive function, at every 1:00
/2:00 / 3:00 am, the clock will carry out the synchronization proce-
dure with the WWVB signal to correct any deviations to the exact
time automatically. If fail, the system will automatically attempt
another synchronization at the next full one hour. This procedure is
repeated up to total 5 times automatically.
· To start manual WWVB signal reception, choose a time zone first,
then press and hold “ " button more than 3 seconds.
· During the radio control time receiving reception,to stop searching
WWVB signal, press and hold “ " button more than 3 seconds.

10
F.Y.I.
· A flashing radio mast icon indicates that the device is searching
WWVB signal.
· During the radio control time receiving mode,onlythe“ ”
buttonand SNOOZE/LIGHT button can work.
· After resetting or replacing the battery, the device will search for
the WWVB signal automatically.
· The device can be connected to 3 remote sensor at the same time.
Press the “ " button can switch the display of different channels’
reading. When there is a “ " icon, it means the device enters the
CYCLE mode, the 3 channels will take turns to display the readings
every 5 seconds. You can press “ " button to exist the CYCLE
mode.
· If the Weather Station failed to receive transmission from outdoor
sensor (“--” display on the LCD), press and hold “” button for 3
seconds to receive transmission manually.
We recommend
· A minimum distance of 8.2ft (2.5 meters) to all sources of interfer-
ence, such as televisions or computer monitors.
· Radio reception is weaker in rooms with concrete walls (e.g.: in
cellars) and in offices. In such extreme circumstances, place the
system close to the window.
11
4.1 Alarm Clock ON and OFF
04
ALARM
CLOCKS
· The alarm switch is behind the device. When the switch is pushed
to the ON position, alarm clock icon “ ” or “ ” will be displayed
on the screen, at this time, the alarm 1 or alarm 2 function is open.
Alarm 1 and Alarm 2 can be turned on at the same time.
· When the switch is pushed to the OFF position, the “ ” or “ ”
icon will disappear, the alarm 1 or alarm 2 function is close.
4.2 Set the Daily Alarms
· Press the “ALARM” button to switch between displaying the time
of ALARM 1 or ALARM 2.
· Press and hold down “ALARM” button more than 3 seconds until
the Hour of the Alarm 1 starts to flash. Use the “ ” and “ ”
buttons to choose the required hour.
· Press “ALARM” button to confirm your setting. The Minute of the
Alarm 1 starts to flash. Use the “ ” and “ ” buttons to choose
the required minute.
· Press “ALARM” button to confirm your setting. The Repeat icon of
the Alarm 1 starts to flash. Use the “ ” and “ ” buttons to
choose the alarm repeat in “M-F” or “S-S” or “M-F” & “S-S”.
· Press “ALARM” button to confirm your setting. The Snooze time of
the Alarm 1 starts to flash. Use the “ ” and “ ” buttons to
choose the minute of snooze time you need.
· Press “ALARM” button to confirm your setting. The Hour of the
Alarm 2 starts to flash. Use the “ ” and “ ” buttons to choose
the required hour.
· Press “ALARM” button to confirm your setting. The Minute of the
Alarm 2 starts to flash. Use the “ ” and “ ” buttons to choose
the required minute.
· Press “ALARM” button to confirm your setting. The Repeat icon of
the Alarm 2 starts to flash. Use the “ ” and “ ” buttons to
choose the alarm repeat in “M-F” or “S-S” or “M-F” & “S-S”.
· Press “ALARM” button to confirm your setting. The Snooze Time
of the Alarm 2 starts to flash. Use the “ ” and “ ” buttons to
choose the minute of snooze time you need.
· Press “ALARM” button to confirm your setting and to end the
setting procedure.

12
F.Y.I.
· M-F: from Monday to Friday
S-S: from Saturday to Sunday
· After 30 seconds without pressing any button the clock switches
from Set Mode to Normal Time Mode automatically.
· The alarm will sound for 2 minutes if you do not deactivate it by
pressing any button. In this case the alarm will be repeated after 24
hours automatically .
· The alarm is set to M-F, the alarm function will be activated from
Monday to Friday. The alarm is set to S-S, and the alarm function will
be activated from Saturday to Sunday. When the alarm is set to
display both M-F and S-S, the alarm function will be activated
throughout the week.
· When an alarm signal is heard, the rising alarm sound (crescendo,
duration: 2 minutes) will change the volume 4 times.
· The snooze time setting range: 5 ~ 60 minutes, OFF. When the
snooze time is set to OFF, means no snooze function.
4.3 Snooze Function
· Press the “SNOOZE/LIGHT” button, the device will enter the
snooze mode, and the alarm will ring again after reaching the set
snooze time.
· In snooze mode, press any button except the “SNOOZE/LIGHT”
button or press hold the “SNOOZE/LIGHT” button for 2 seconds to
exit the snooze mode.
· Press any button except the “SNOOZE/LIGHT” button to stop the
alarm signal, and the alarm clock will ring again at the set time
tomorrow.
13
05
DISPLAYING TEMPERATURE/HUMIDITY
AND TEMPERATURE/HUMIDITY TREND
· The current indoor temperature/humidity and the temperature/humidity
trend (indoors) are shown in the LCD display.
· After successfully connecting with the remote sensor, the main unit can
display the remote temperature/humidity and the temperature/humidity
trend (remote).
: The temperature/humidity continuously rises to a value exceeding
1℃(1.8℉)/5%RH
: The temperature/humidity continuously drops to a value exceeding
1℃( 1.8℉)/5%RH
No display: The accumulated value of temperature/humidity rise or fall
within 1 hour continuously does not exceed 1℃(1.8℉)/5%RH
06
°C OR °F
TEMPERATURE DISPLAY
· Press the “ " button to select ℃ or ℉ units.
F.Y.I.
· If the temperature reading is below ranges, the screen will display
LL. L. If the temperature reading is above ranges, the screen will
display HH.H.
07
MAXIMUM/MINIMUM TEMPERATURE/HUMIDITY
AND DEW POINT TEMPERATURE AND HEAT INDEX
· In normal mode, press the button to display “ ” button to
display Maximum temperature&humidity indoors and outdoors,
Minimum temperature&humidity indoors and outdoors, outdoor
remote dew point temperature date, heat index.
· Press and hold down the “ ” button more than 2 seconds to
reset and Re-record the maximum/minimum temperature.
14
08
OUTDOOR REMOTE
TEMPERATURE FROST ALERT
· When the temperature of outdoor is from –1°C to + 3°C or from
+30°F to + 37°F, the frost alarm will be activated, the frost alert icon
“ " will be flashing.
09
OUTDOOR REMOTE
MOLD RISK
· There are 3 levels of mold risk: LO ME and HI. When the level is HI,
please pay attention to the items and the room to pay attention the
dehumidification of items and rooms.
10
COMFORT
LEVEL
The temperature and humidity is dry (When the humidity is below 40%).
The temperature and humidity is comfort (When the temperature in
20~28℃ and the humidity is 40~70%).
The temperature and humidity is wet (When the humidity is above 70%).
F.Y.I.
When the temperature is not 20~28℃ and the humidity is 40~70%, the
comfort level icon will not be displayed.

15
11
WEATHER
FORECAST
· The weather station calculates a weather forecast for about the
next 6-12 hours based on the barometric pressure trend, NOT the
current weather. Of course this forecast can’t compare to that of
professional weather services supported by satellites and high
performance computers, but merely provides an approximate indica-
tion of current developments. Please take the weather forecast from
your local weather forecasting service into account as well as the
forecast from your weather station. If there are discrepancies between
the information from your device and from the local weather forecast-
ing service, please take the advice of the latter as authoritative.
· The weather station displays the following weather symbols:
·
The weather station can display the barometric pressure trend.
When the current pressure is higher than 1hPa in the past 1 hour.
When the current pressure does not exceed 1hPa from the
pressure change in the past 1 hour.
When the current pressure is lower than 1hPa in the past 1 hour.
Sunny Slightly cloudy Cloudy Rainy Heavy rainy Snowy
16
12
PROJECTION
DESCRIPTION
· The projection switch is behind the device. When the button is
pushed to the ON position, the projection display will light up.
· When the button is pushed to the OFF position, the projection
display will be closed.
· Press and hold “ ” button more than 3 seconds set the brightness
of the projection.
· The effective distance of projection display is from1M(3.3ft) to
3M(9.8ft). At night, walls or ceilings without light can clearly display
the projected readings.
· The readings of the projection display are time and indoor/outdoor
temperature. The display of indoor/outdoor temperature is switching
display, which is switched and displayed once every 5 seconds
· Press “” button To change the projection display direction, 2 angles
can be changed.
F.Y.I.
· During the reception of the time radio wave signal, the projection
display will be automatically closed to prevent the interference of the
radio wave.
13
BACKGROUND
LIGHTING
· When plug in, the battery will disconnect the power supply
automatically, and the backlight will stay on. Press the “SET/ ”
button can adjust the brightness of the backlight, there are 4
brightness mode: Brightest → Medium Bright → Low Bright → No
Bright. When the display gets to full dark,you can press
“SNOOZE/LIGHT” button to wake up the backlight for 15 seconds.To
get back to continued full brightness,press “SET/ ” button again.
F.Y.I.
· During the reception of WWVB, the backlight will be closed
automatically to prevent the interference of the radio wave. After
the reception, the device will return to its original brightness.

17
14
LOW
BATTERY
15
PRODUCT
SPECIFICATION
· If the “INDOOR” area displays the battery icon “ ”, this is to
remind you that you need to replace the battery of the main unit as
soon as possible.
· If the “OUTDOOR REMOTE” are displays the battery icon “ ”,
this is to remind you that you need to replace the remote sensor
battery of this channel as soon as possible.
· Perpetual Calendar Up to Year 2099
· Product size: 120x120x24.5mm (4.72x4.72x0.96inch)
· LCD screen size: 95x98mm (3.74x3.85inch)
· Humidity: Indoor & Outdoor measurement range: 20%RH ~ 95%RH
· Temperature:
— Indoor temperature measurement range: 15°F (-9.9°C) to 122°F
(50°C)
— Outdoor temperature measurement range: -40°F (-40°C) to 158°F
(70°C)
— Temperature unit: °F or °C.
· Wireless Outdoor Sensor:
— 433.92MHz RF transmitting frequency
— 200 ft transmission range in an open area
· Temperature and humidity detection cycle
—INDOOR: 60S
—433MHz ASK RF receiving remote sensor.
—Update time: CH1: 68S, CH2: 72S, CH3: 76S
· Power Supply
Projection Alarm clock:
Battery: 1x CR2032 3.0V
DC-POWER: AC5.0V 150mA
Wireless Remote Sensor:
Battery: 2 x LR06 AA 1.5V