UV
2A
2A
7
1
10
14
11
12
13
15
Control Panel Close-up
6
5
4
3
2
8
9
3
2
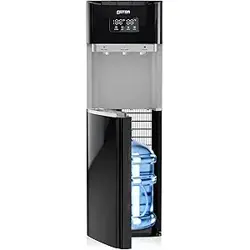
Self-Filtering Bottom Loading
Water Cooler
Instruction Manual
To ensure proper use and for your safety,
please read the following instructions
completely before operating this appliance.
Congratulations, you have acquired a high quality Emeril Lagasse
Water Cooler - which uses 3 or 5 gal jugs of water. This product allows
you to enjoy a cold drink or a hot beverage and has many features
that you will find convenient to use. Record the model number, serial
number (located on Energy Star label), and the manufacture date, all
of which can be found on the label on the back of the unit.
_________________________________________________________________
model number serial number purchase date manufacture date
READ ALL INSTRUCTIONS BEFORE USING!
SAVE THIS MANUAL FOR FUTURE USE!
No product registration is required for this unit. When making a customer
service call, please have the model number, manufacture date, and serial
number (7 digit number on the Energy Star Label) on hand.
CUSTOMER SERVICE: 1-888-724-4108
BUILT WITH DURABLE BPA-FREE COMPONENTS!
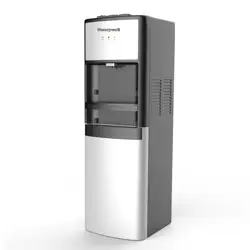
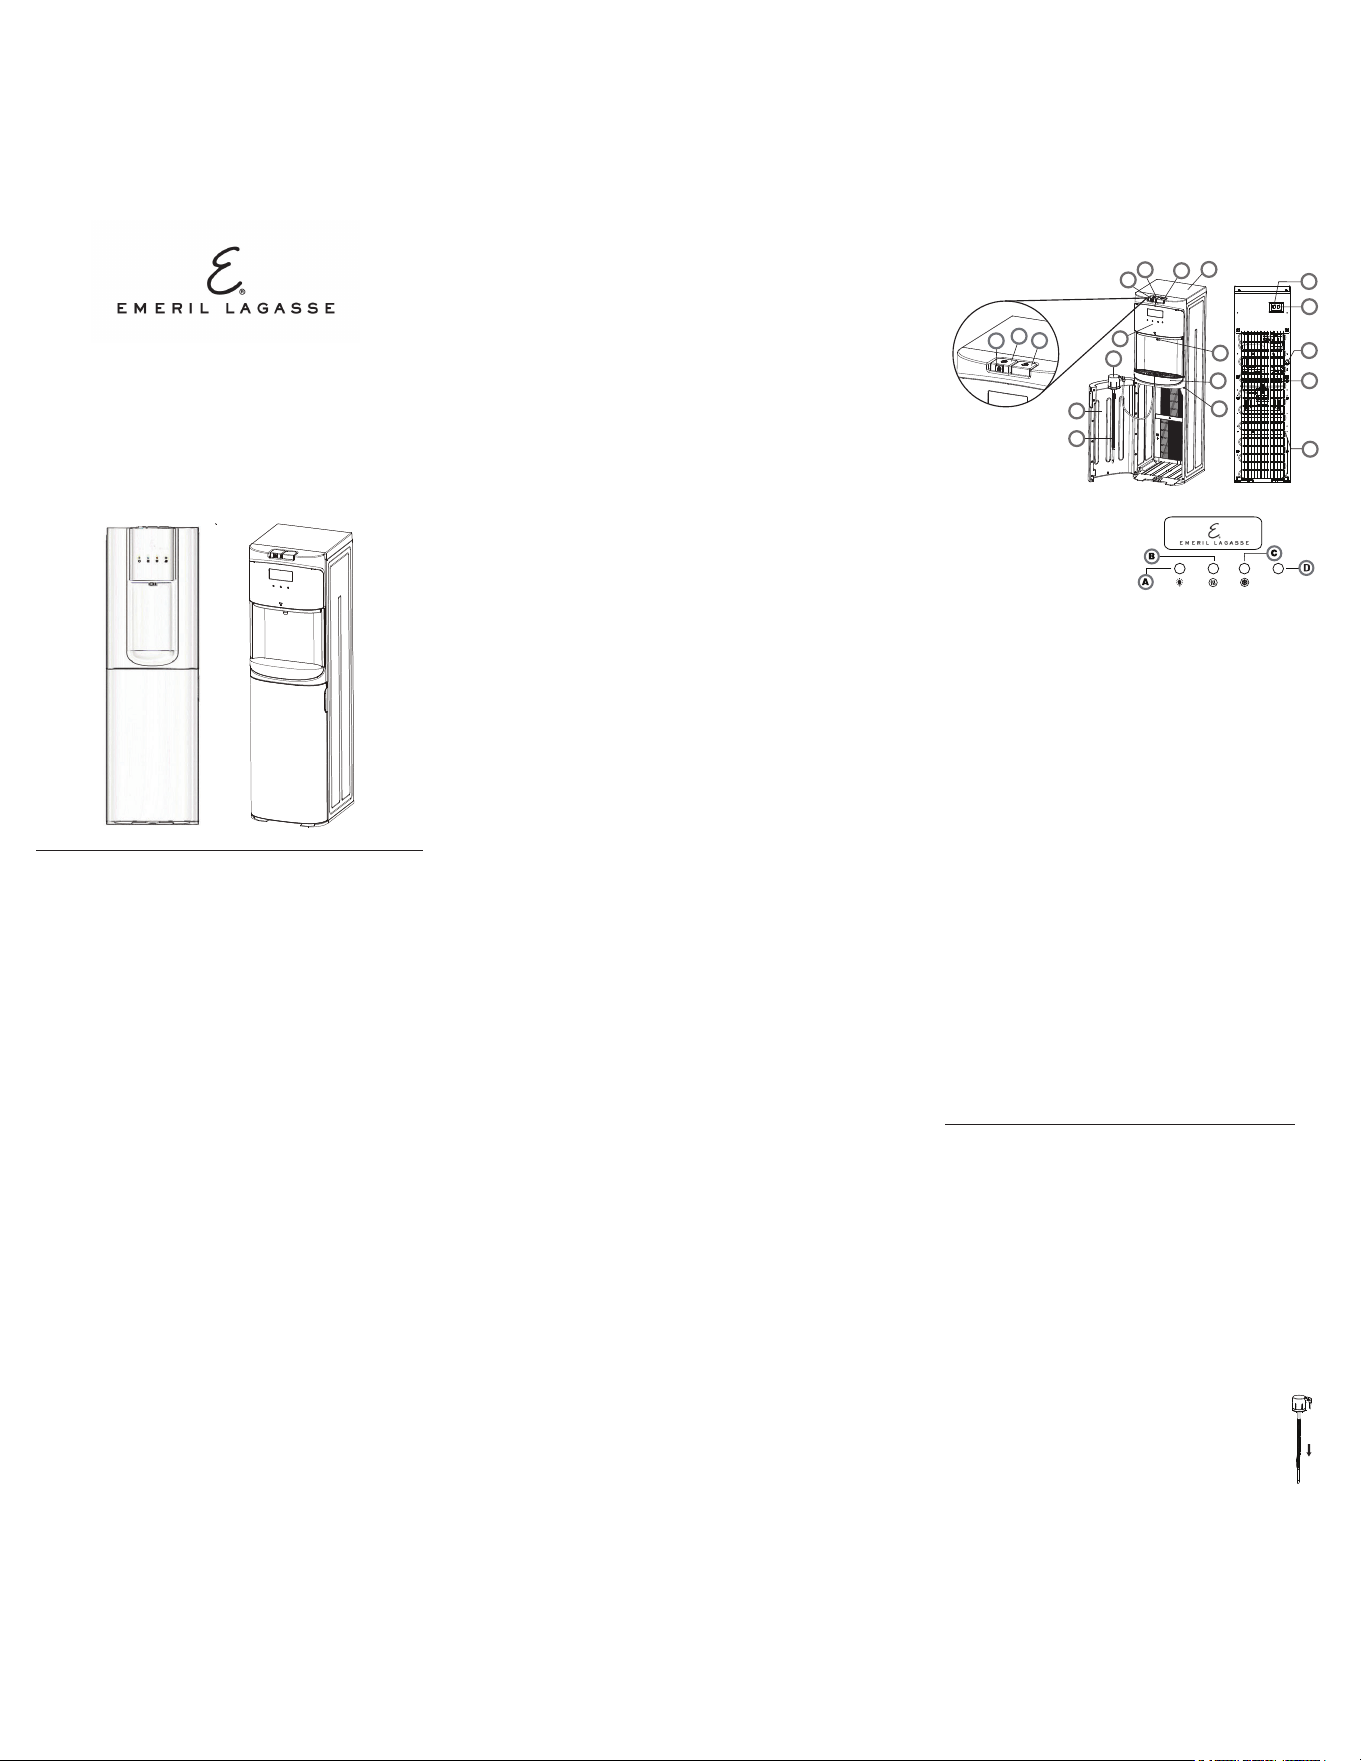
Parts and Features
1 Control Panel
(see Close-up)
2 Hot Water
Dispensing Button
2A
Child Safety Lock
3 Cold Water Dispensing
Button
4 Top Cover
5 Water Dispensing Spigot
6 Removable Drip Tray and
Insert
7 Jug Cap
8 Lower Door
9 Water Straw
(pumps water from jug
into the unit)
10 Door Switch
(controls pump operation)
11 Condenser Coils
12 Cold Water On/Off
Switch (Energy Saver)
13 Hot Water On/Off
Switch (Energy Saver)
14 Drain Valve
15 Power Cord
Important Safeguards
• When using electrical appliances, basic safety precautions should be
followed, including the following:
• WARNING: BURN HAZARD. The product heats water to a temperature
of approximately 95° C / 203° F. Water temperatures above 52° C / 125° F
can cause severe burns or death from scalding. Children should be
supervised by an adult when using this product.
• WARNING: FIRE HAZARD. Do not store or use gasoline or other
flammable vapors and liquids in the vicinity of this or any other appliance.
Do not operate the cooler with a damaged cord. Do not use with an
under rated extension cord or an extension cord without a ground.
• WARNING: SHOCK HAZARD. Unplug the water cooler before
cleaning or wiping up spilled water on unit. Do not attempt to service
the cooler. Do not operate cooler with a damaged cord.
• NOTE: The water pump system includes a special safety feature that
prevents operation when the water jug is empty. Water pump
operation is also linked to the Door Switch (see # 10 on the Parts and
Features list) mounted inside of the lower storage compartment. When
you replace the water jug, remember to close the Lower Door (see #
8 on the Parts and Features list).
• Never turn the product upside down or tilt more than 45 degrees. If the
unit has been resting on its side or upside down for a long period of
time, the unit must be put in the upright position for approximately 12
hours before turning it on.
• Never use this cooler with water that is unsafe to drink or is from an
unknown source.
• Never use any other liquids in this cooler other than jug water.
• Install this water cooler in a dry place away from direct sunlight. For
indoor use only.
• Leave a minimum of 2” (5 cm) around the back and sides of the
cooler for proper ventilation.
Grounding Instructions
WARNING: Modifying or defeating of the grounding plug can result in
a risk of electric shock.
• This appliance must be grounded. In the event of an electrical
short circuit, grounding reduces the risk of electric shock.
• This appliance is equipped with a power cord that has a grounding
wire with a grounding plug. The cord must be plugged into a 3
prong outlet that is properly installed and grounded.
• Consult a qualified electrician if the grounding instructions are not
completely understood, or if doubt exists as to whether the
appliance is properly grounded.
• Do not under any circumstances cut or remove the third ground
prong from the power cord.
• Do not use an extension cord or an outlet converter with this
appliance. If the power cord is too short, have a qualified electrician
install an outlet near the appliance.
• For best operation, plug the appliance securely into its own
electrical outlet on a dedicated circuit not shared with any other
appliances to prevent blowing a fuse or tripping the circuit breaker.
Getting familiar with your Emeril Lagasse
Water Cooler
Features
• Designed for home and office use.
• Fits 3 or 5 gallon water jugs.
• Two high-flow water dispensing buttons - Red for hot water, and
Blue for cold water.
• Energy Saver switches located on the back of the appliance. Switch
Red control to OFF to stop heating and Blue control to OFF to stop
cooling.
Proper Installation and Location
• This cooler is for indoor use only. Do not use outdoors.
• Place the cooler on a level surface that can support its weight
with a full water jug installed.
• To ensure that your water cooler works at the maximum
efficiency, leave at least 2 inches (5 cm) of clearance between all
sides of the cooler and any walls.
• To prevent damage to the cooler, do not plug cooler into the
power outlet until you read the instructions first!
Preparing, Loading and Operating your Water Cooler
For use with 3 and 5 gallon (12 and 19L) water jugs.
DO NOT PLUG IN POWER CORD UNTIL WATER JUG IS LOADED!
IMPORTANT: Always wash your hands before handling water jug.
Clean the top of the water jug with a damp cloth.
1. Make sure the Lower Door (see # 8 on the Parts and Features list)
is open. This will prevent activation of the water pump. Open the
Lower Door by pulling on the right side of the door.
Note: The Lower Door is covered by a thin layer of plastic film used to
protect the door during shipment. Please remove the plastic layer
prior to first use.
2. Place fresh water jug outside of the jug storage area.
3. Set empty Jug on floor in front of any faucet. Insert one end of the
“Easy Fill Hose” into the empty 3 gallon or 5 gallon jug, and hold
the other end under the faucet directly in the stream of cold water.
Your empty water jug will fill in a few minutes. When jug is almost
full, pull the end of the Easy Fill Hose away from the stream of
water and allow all the water in the hose to drain into the jug.
4. Clean outside of new jug with a cloth.
5. Place the Water Straw into the water jug, lower
the straw to the bottom of the jug, and clasp the
Jug Cap (see # 7 on the Parts and Features list)
down onto the neck of the water jug so that the
Jug Cap is tightly secured to the jug (fig. 2 and fig. 3).
A Power
Light on = Power is on.
Light off = Power is off.
B Hot Water Indicator Light
Light on = Water is heating.
Light off = Hot water is ready
to dispense.
C Cold Water Indicator Light
Light on = Water is cooling.
Light off = Cold water is ready
to dispense.
D Jug Empty / Change Filter
Light on = Fill empty jug.
Light on and jug is not empty
= replace filter.
fig. 1
DO NOT PLUG IN POWER CORD UNTIL WATER JUG IS LOADED!
3
4 5
1 2
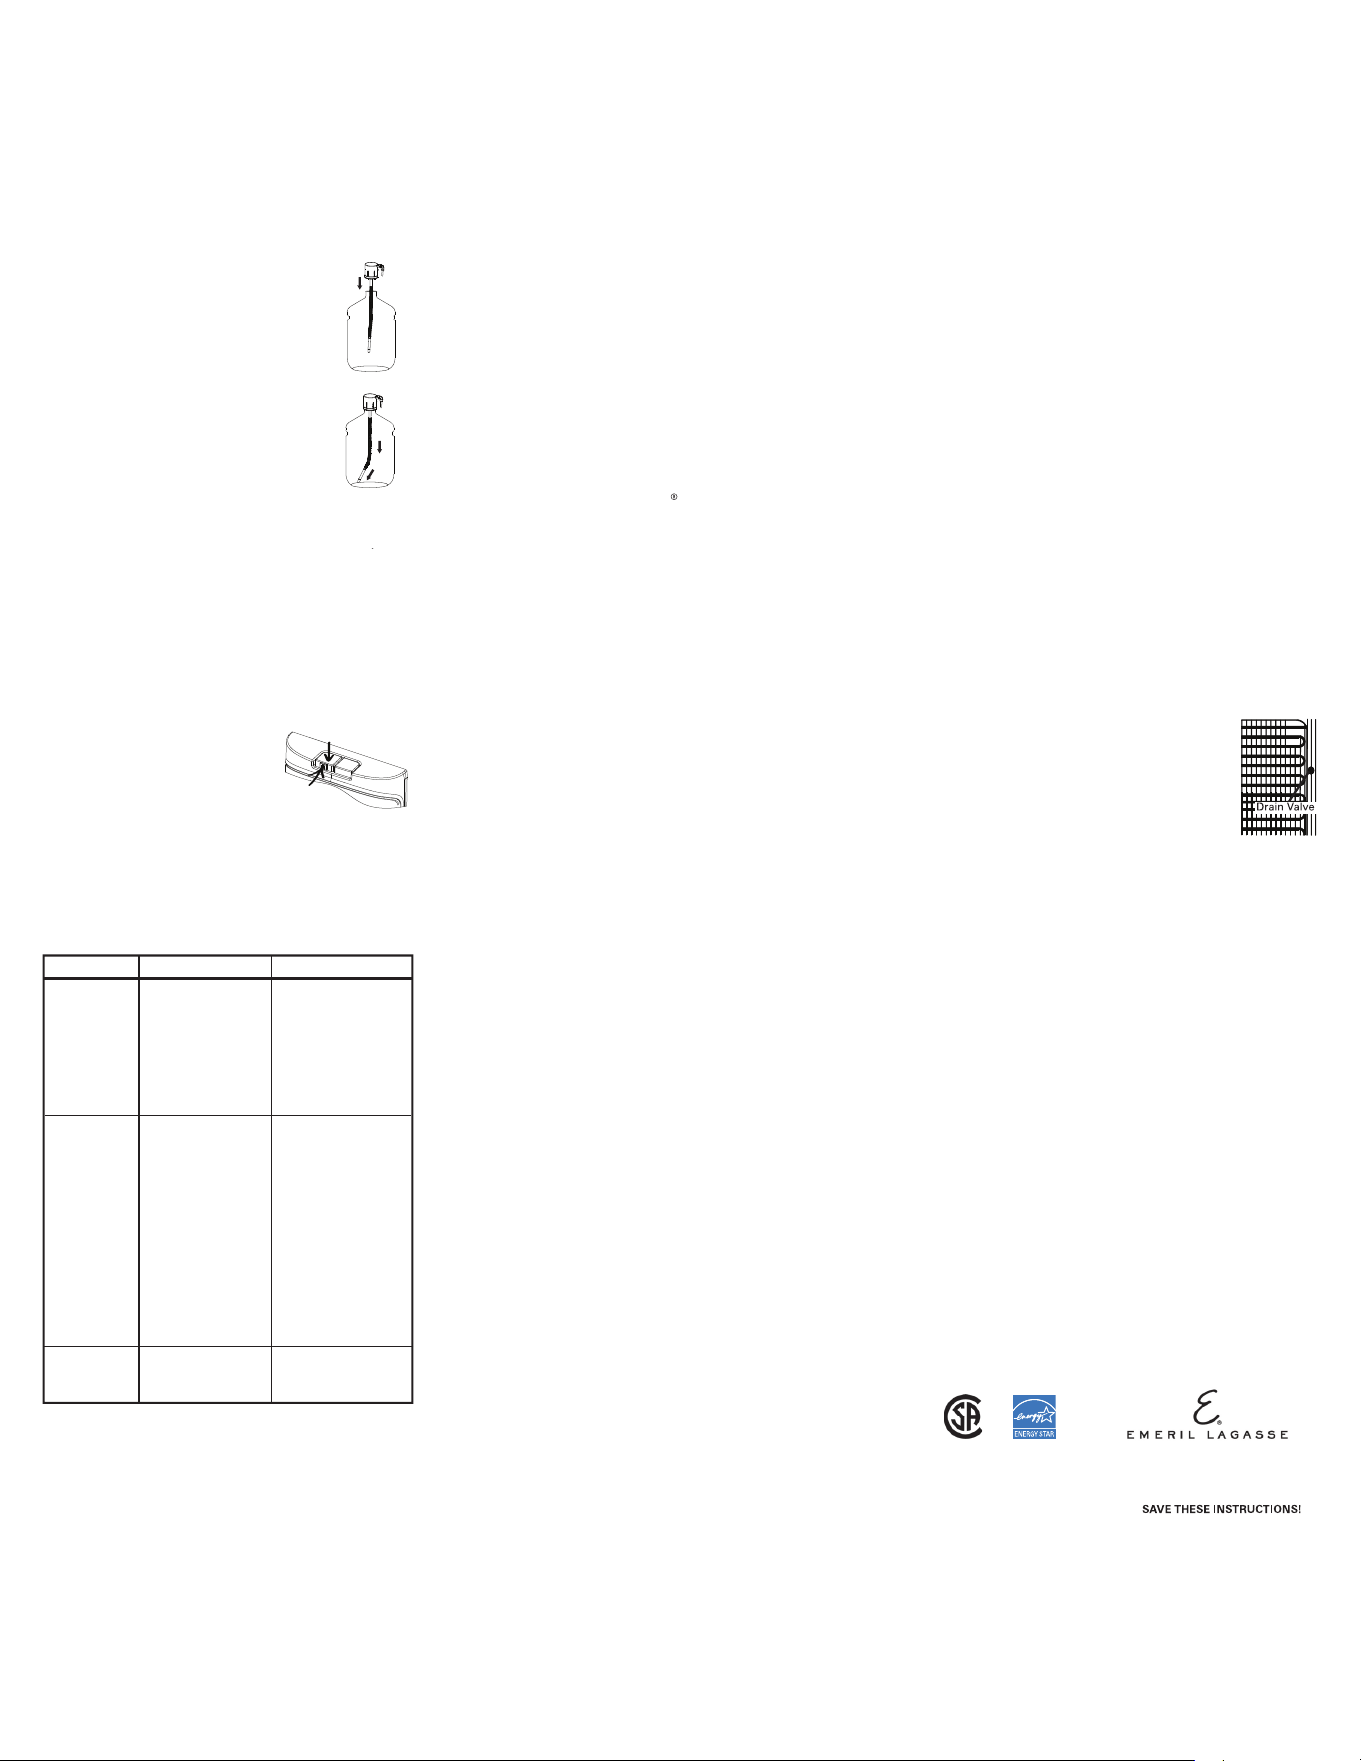
7. Make sure the bottom end of the Water Straw
reaches the lowest part of the water jug (fig. 3).
Straw reaches the side of the jug at its lowest
point to ensure all of the water can be utilized.
Note: Most standard shaped water jugs have a
raised center at the very bottom. For maximum
efficiency, make sure the Water Straw reaches the
side of the jug at its lowest point to ensure all of
the water can be utilized (fig. 3).
8. Slide jug into the storage area and close
the Lower Door.
9. Plug cord into a properly grounded wall outlet.
The pump will now turn on and take up to 4
minutes to fill the internal tanks for the first time.
The pump will stop automatically when filled.
10. When the pump has stopped running turn the Hot Water and Cold
Water ON/OFF Switches (see # 12 and 13 on the Parts and
Features list) to the ON position. The Hot and Cold Water Indicator
Lights (see A and C on the Parts and Features list) will illuminate.
Note: Allow up to 1 hour for heating and cooling cycles to complete
and water to reach the proper hot and cold temperatures. The Hot and
Cold Water Indicator Lights will shut off when each cycle is complete.
11. Place a glass under the Water Dispensing Spigot (see # 5 on the
Parts and Features list).
12. After inserting a new filter, there may be a few bits of black
activated charcoal from the new filter present in the water glass.
This is common with new filters.
13. For cold water, press/hold the Cold Water Dispensing Button (see
#3 on the Parts and Features list) until the desired amount of
water has been dispensed, then release.
13. The Hot Water dispensing button
features a Child Safety Lock. To dispense
hot water, push the red safety lock in,
then push/hold the dispensing button
down until the desired amount of
water has been dispensed, then release.
Refilling an Empty Jug
When the water jug is empty, the cooler will attempt to pump water
for 2 minutes. After this time, the pump will stop and light the furthest
right on the upper panel will be on. This is your notification to refill
the empty jug. If this light is on and jug is not empty, it is notification
to change the filter.
1. Open the Lower Door.
2. Remove Water Straw and take empty jug out of the cooler.
3. Install a new jug by following the instructions for "Refill empty jug"
(Page 5).
Filter Replacement
• Replacement Cartridge BRITA Model No. FR-200
For use in the Self-Filtering water cooler.
Thank you for choosing the world’s No. 1 brand of household water
filtration. Certified water filtration systems turn ordinary tap water into
cleaner, great-tasting drinking water. Just follow these easy
instructions to quickly install your replacement filter.
Replacing the filter is easy. On the upper panel of your water cooler,
the furthest light to the right is the indicator for 2 functions: 1) It will
blink when your water jug is empty and needs to be refilled. 2) If your
water jug is not empty and the light furthest to the right on the upper
panel is blinking, it means that it is time to replace your filter. Prompt
filter replacement helps to assure you of cleaner, great-tasting water
.
Filter Replacement
1. The unit does not need to be unplugged, just slide the large water
jug out from behind the bottom door.
2. Holding the filter at the top with your fingers, gently pivot only the
filter toward you. It will easily pivot down when gently pulling on
only the filter, at the top, and pulling filter toward you.
Draining the Reservoirs
WARNING: BURN HAZARD. The product heats water to a temperature
of approximately 95° C / 203° F. Water temperatures above 52° C / 125° F
can cause severe burns or death from scalding. Children should be
supervised by an adult when using this product.
Drain the reservoirs before and after cleaning, before long vacations
or if not using the cooler for a long period of time.
1. Unplug the cooler.
2. Open the Lower Door and remove jug from cooler.
3. Remove the Water Straw from the water jug.
4. Place a container under the Water Dispensing Spigot. Press and
hold the Hot and Cold Dispensing Buttons until water no longer
comes out.
5. Place a container directly under the Drain Valve
(#14 on the Parts and Features list) on the back of
the cooler.
6. Remove the Drain Valve cap and drain valve
plug and let the water flow into the container.
7. Replace the Drain Valve cap and plug.
8. Replace the water jug.
9. Plug in the cooler.
LIMITED WARRANTY
This warranty applies to products purchased and used in the U.S. and
Canada. This is the only expressed warranty for this product and is in lieu of
any other warranty or condition.
This product is warranted to be free from defects in material and
workmanship for a period of one (1) year from the date of original purchase.
During this period, your exclusive remedy is replacement of this product or
any component found to be defective at our option; however, you are
responsible for all costs associated with returning the product to us and our
returning a product or component under this warranty to you. If the product
or component is no longer available, we will replace with a similar one of
equal or greater value.
This warranty does not cover glass, filters, wear from normal use, use not in
conformity with the printed directions, or damage to the product resulting
from accident, alteration, abuse, or misuse. This warranty extends only to the
original consumer purchaser or gift recipient. Keep the original sales receipt,
as proof of purchase is required to make a warranty claim. This warranty is
void if the product is used for other than single-family household use or
subjected to any voltage and waveform other than as specified on the rating
label (e.g., 115V ~ 60 Hz).
We exclude all claims for special, incidental, and consequential damages
caused by breach of express or implied warranty. All liability is limited to the
amount of the purchase price. Every implied warranty, including any
statutory warranty or condition of merchantability or fitness for a particular
purpose, is disclaimed except to the extent prohibited by law, in which case
such warranty or condition is limited to the duration of this written
warranty. This warranty gives you specific legal rights. You may have other
legal rights that vary depending on where you live. Some states or provinces
do not allow limitations on implied warranties or special, incidental, or
consequential damages, so the foregoing limitations may not apply to you.
To make a warranty claim, do not return this appliance to the store.
Call Emeril Lagasse Customer Service at 888-724-4108 in the U.S. and
Canada. For faster service, locate the model #, serial #, and manufacture date
on your appliance.
Problem
No hot and/or
cold water.
No water
dispenses from
spigot.
Water Cooler
leaks.
Possible Causes
1. Cooler is
unplugged.
2. The Cold and/or
Hot Water ON/OFF
Switches (see # 12
and 13 on the
Parts and Features
list) are in the OFF
position.
1. Cooler is
unplugged.
2. Cold and/or Hot
Water Dispensing
Buttons are
disconnected on
inside of unit.
3. The circuit breaker
is tripped.
Cold tank lid is loose.
Solution
1. Push plug completely
into outlet.
2. Turn the Cold and/or
Hot Water ON/OFF
Switches to the ON
position.
1. Push plug completely
into outlet.
2. Remove Top Cover
and reconnect
button components.
See additional
troubleshooting
guide or call
Customer Service.
3a. Replace fuse or
reset circuit breaker.
3b. If too many items
are plugged into a
single outlet, move
some items to a
different outlet.
Remove Top Cover
and make sure cold
tank lid is secure.
1-888-724-4108
Cleaning the Condenser
To improve cooling and efficiency, vacuum or sweep away the dust
from the Condenser Coils (see # 11 on the Parts and Features list) on
the back of the cooler. You can purchase a brush designed
specifically for this purpose from your local appliance store.
Troubleshooting the Water Cooler
1. Push red Child Safety Lock in.
2. Press the Hot Water Button down
while holding Child Safety Lock in.
1
2
fig. 3
fig. 2
Nighthawk Technologies LLC,
300 Hylan Drive, Ste 198, Rochester, NY 14623
Emeril Lagasse is a registered trademark
of Nighthawk Technologies LLC.
3. Reverse the process in #2 above to replace the old filter with a
new filter, finishing with pivoting the new filter, already attached to
the base, into its upright position. It will “click” into place when it
is in its correct upright position.
4. Slide the water jug back into place, and be sure to close the door
all the way. If the door is not closed completely, the unit will not
pump water, so be sure to close the door completely.
9
10
6
7 8