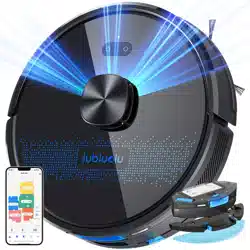
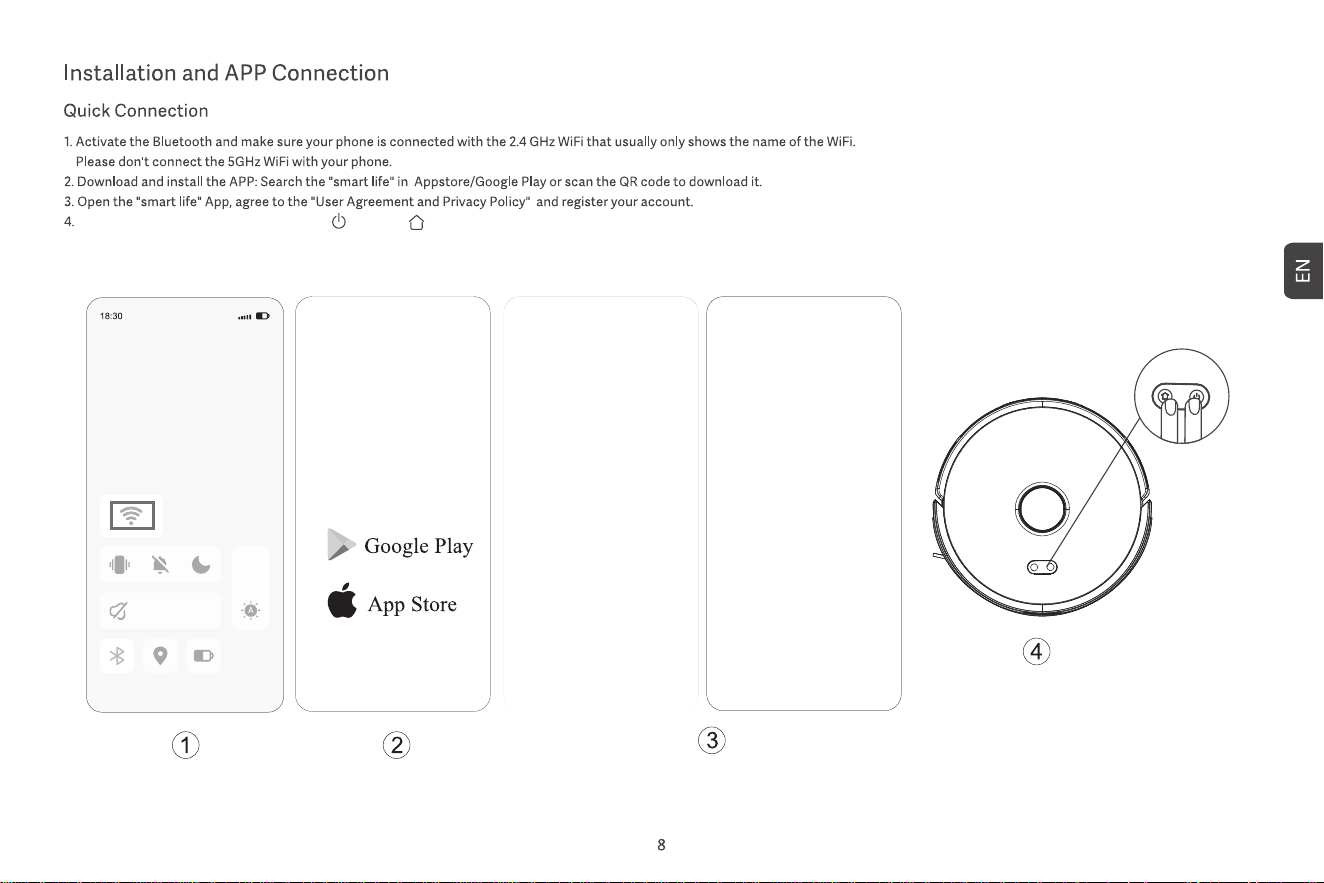
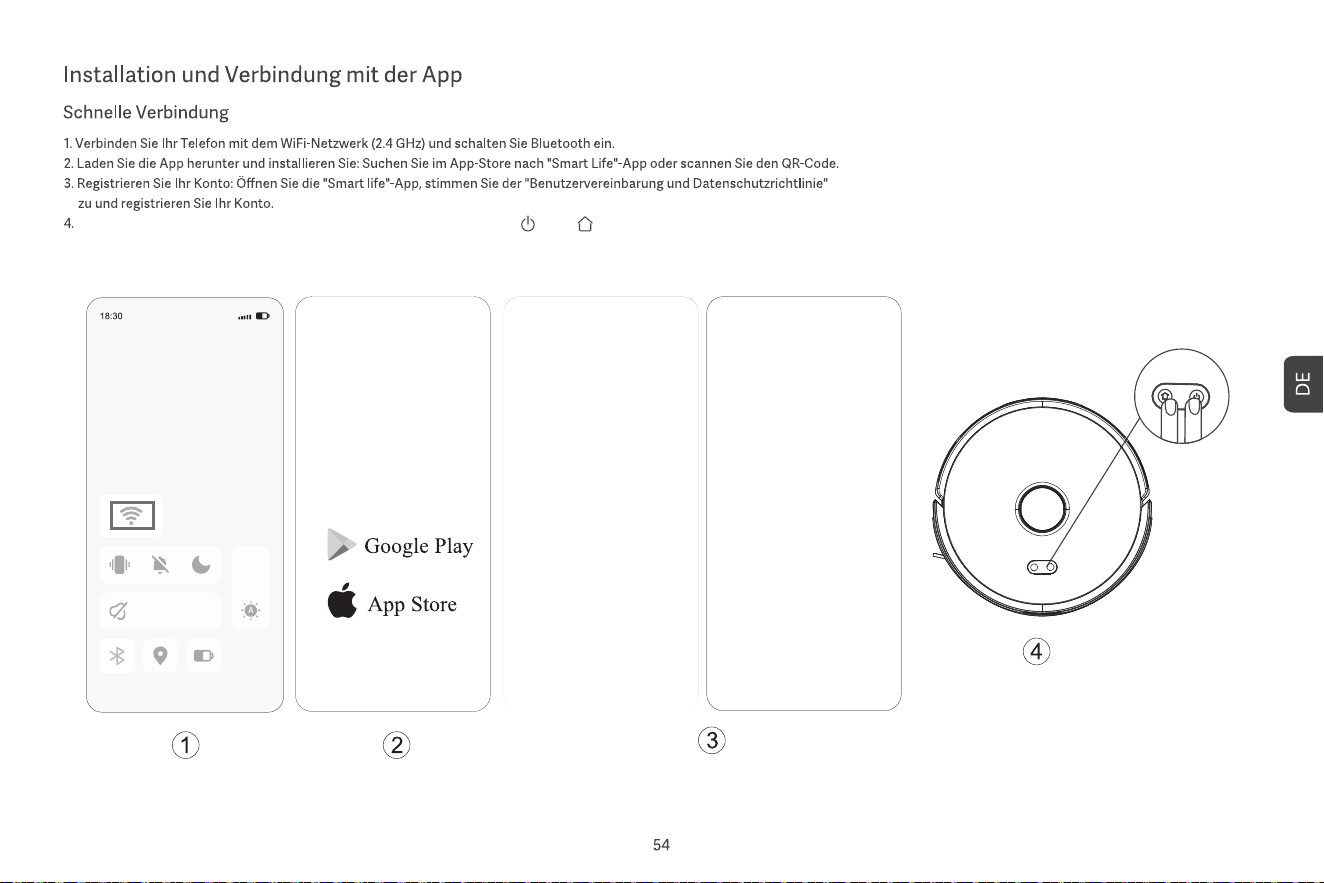
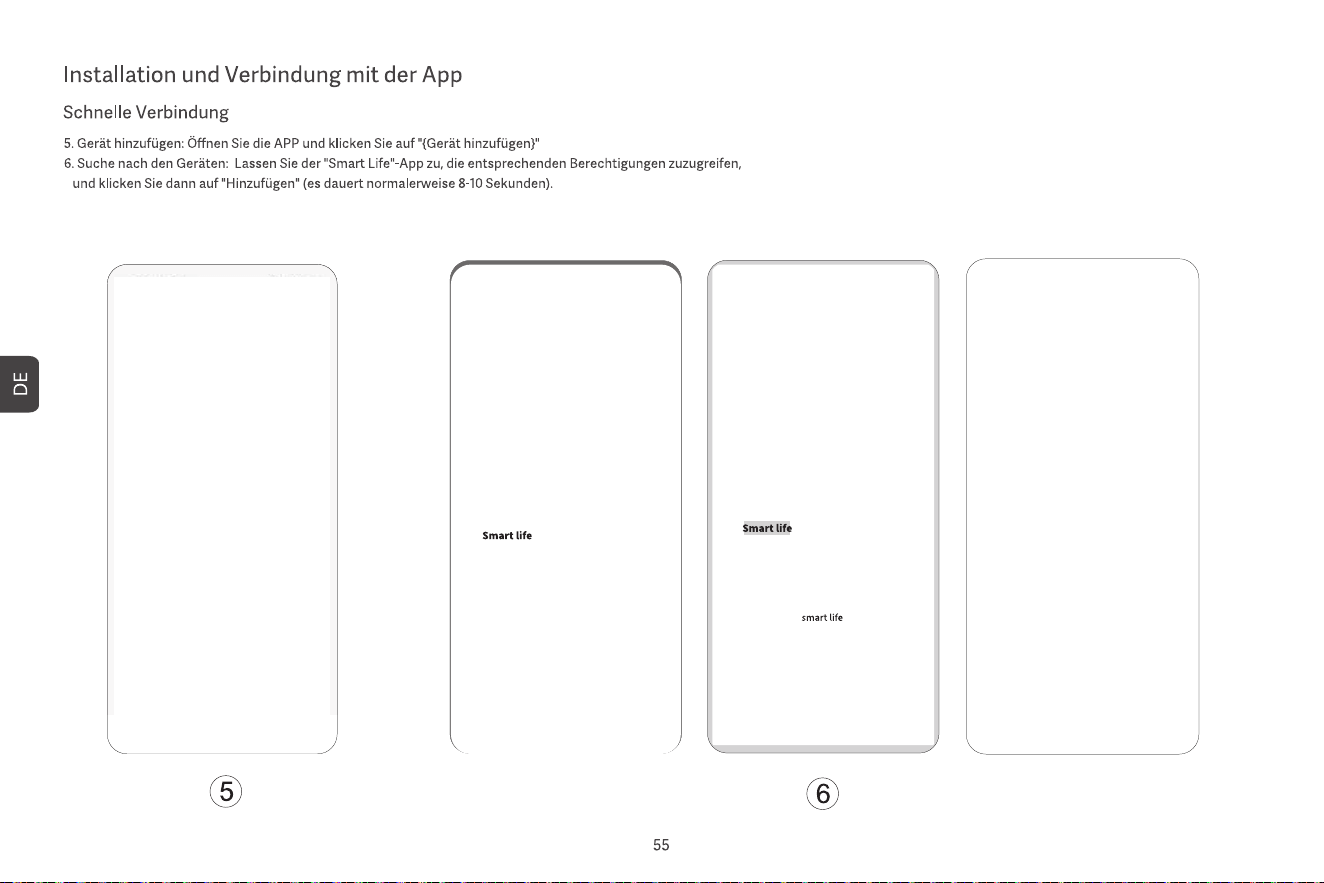
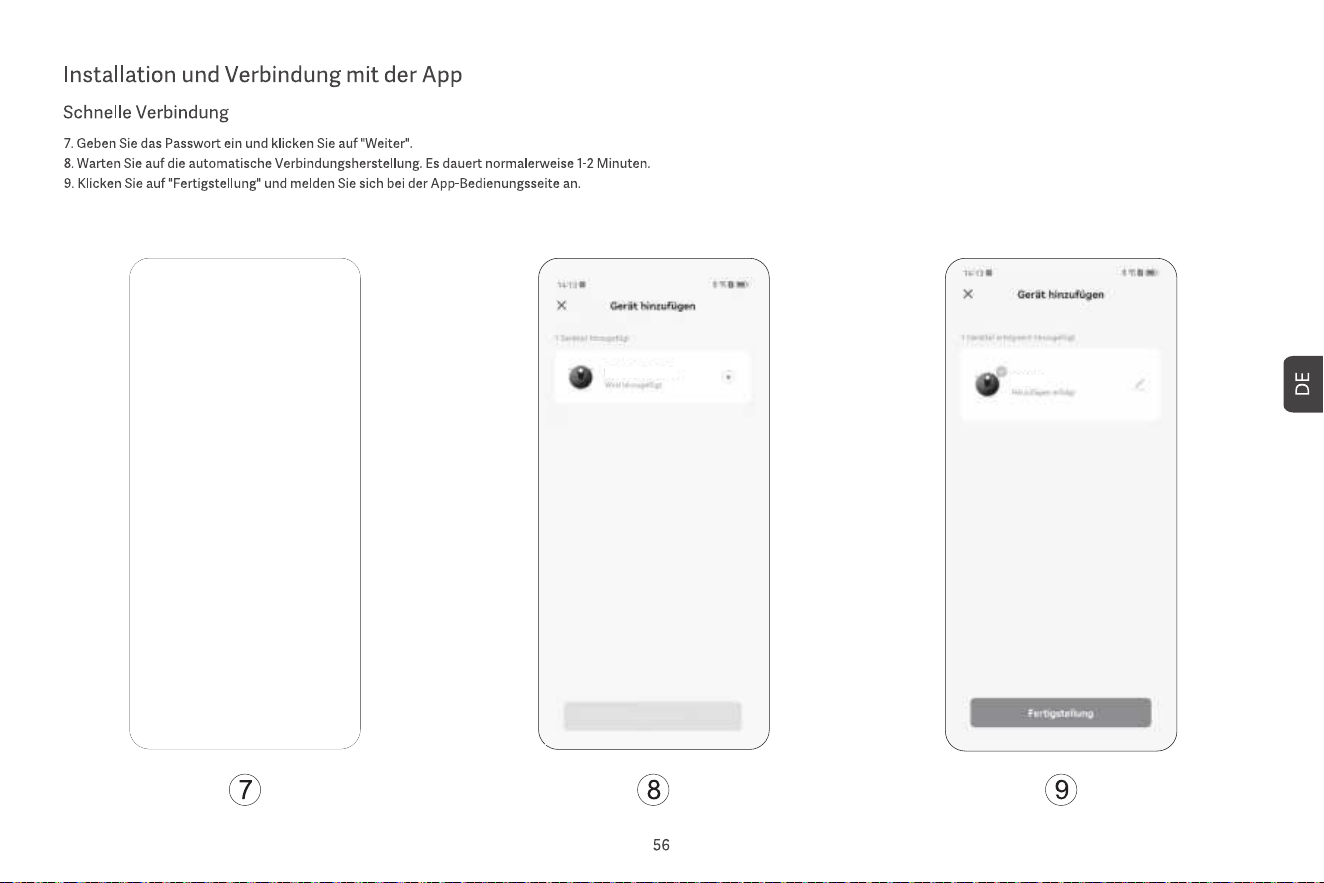
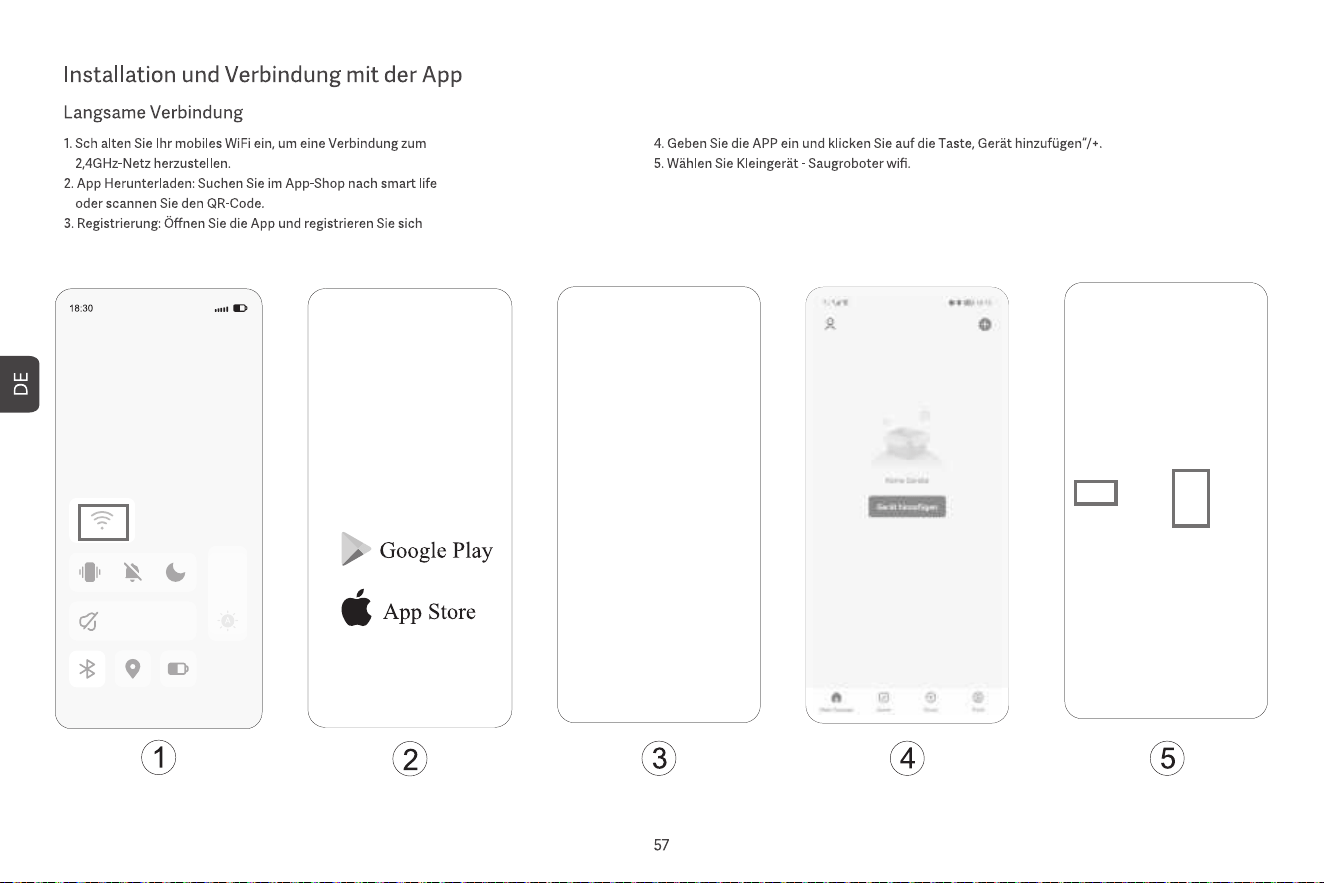
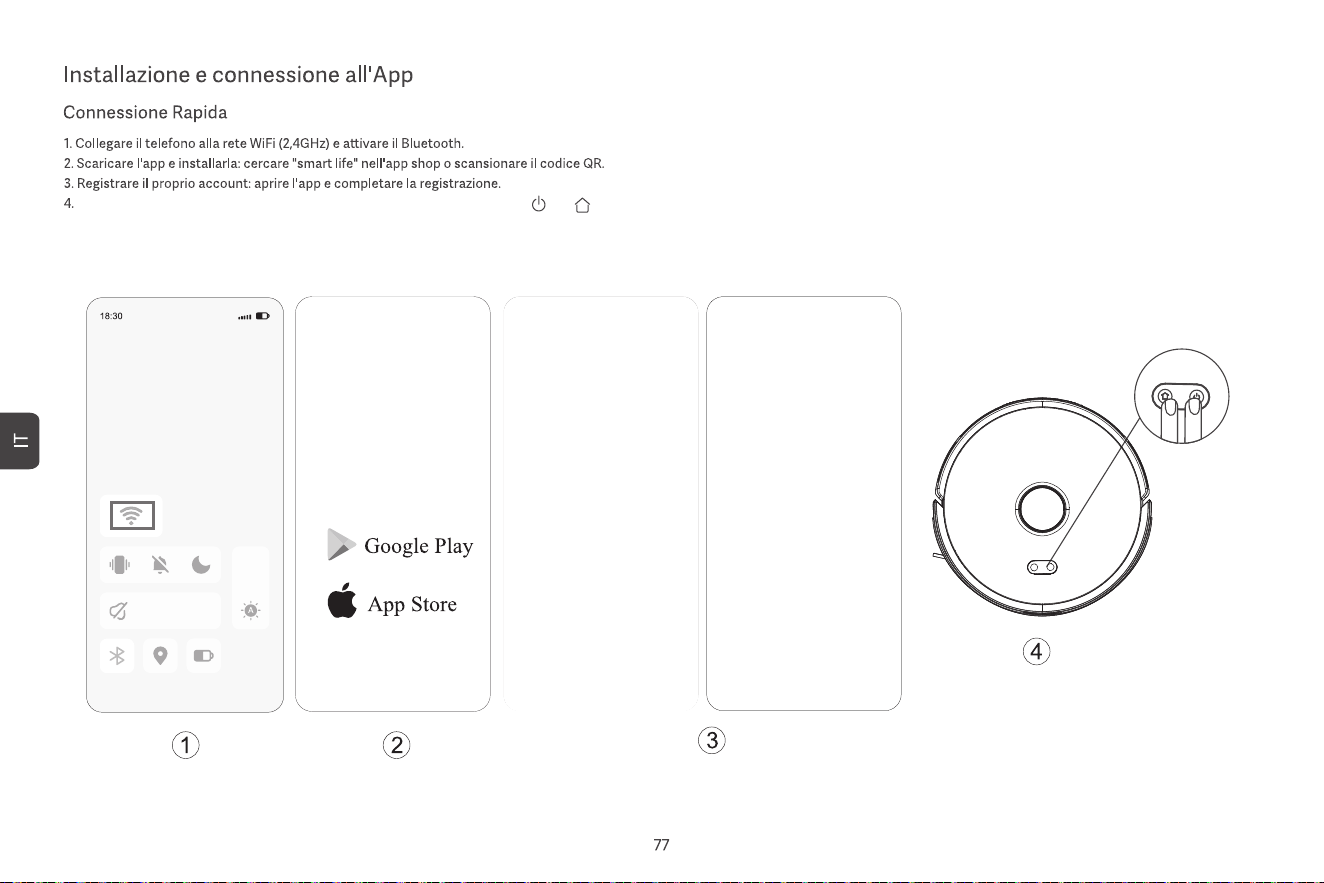
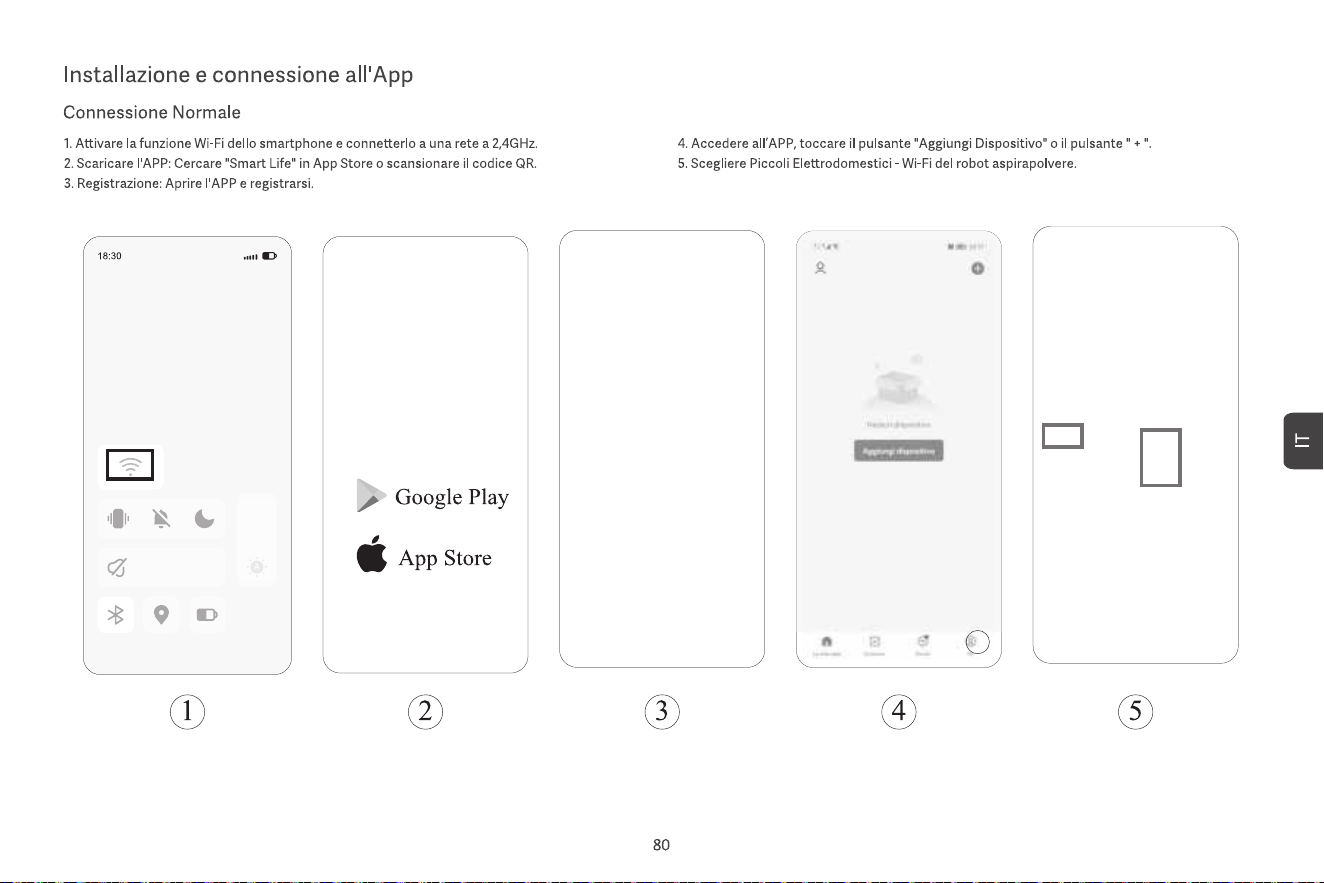
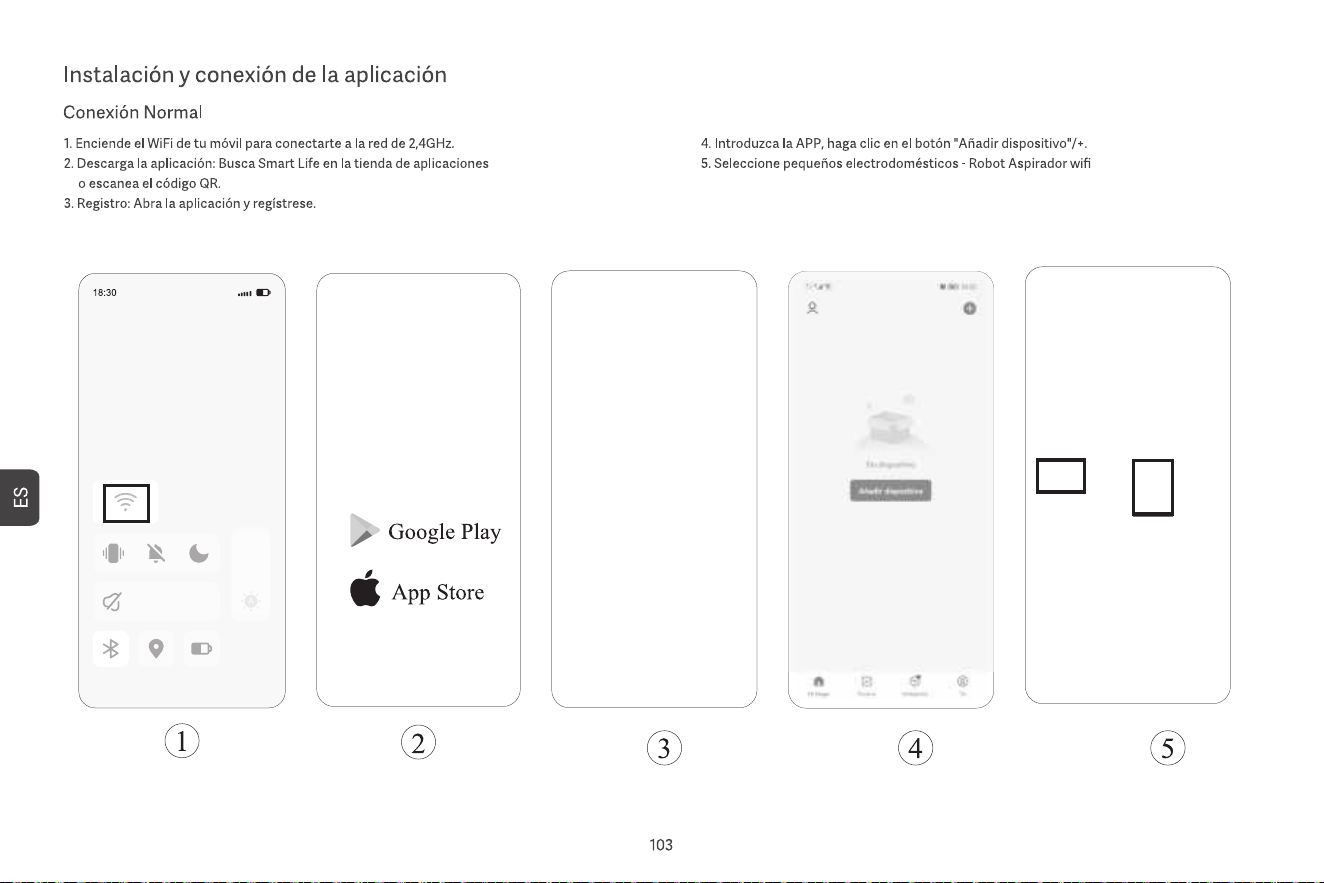
APP DownloadRobot vacuum-15 series
Any after-sales questions, scan it!
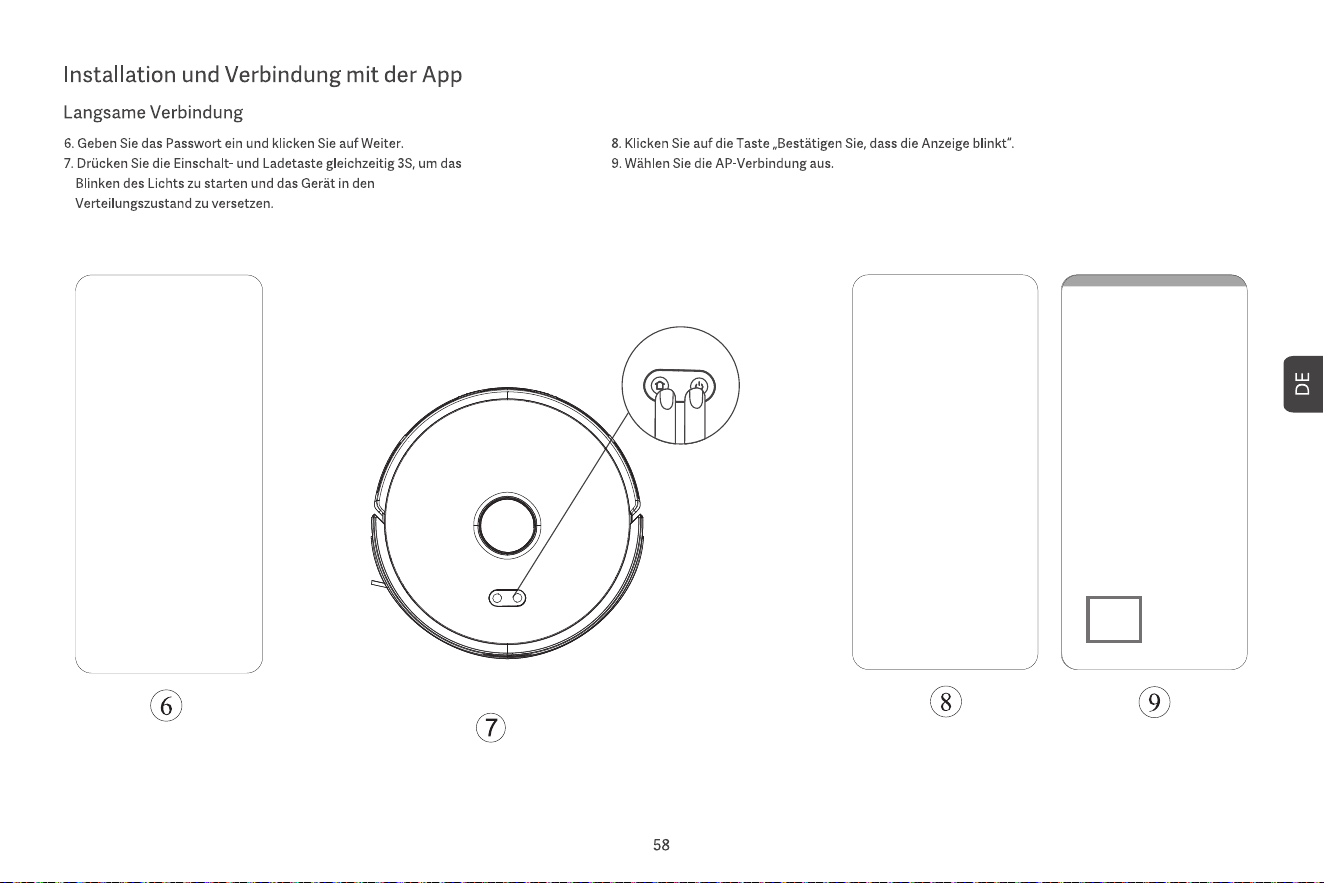
• Press and hold the two buttons simultaneously for 3 seconds
to reset Wi-Fi and enter network settings
• Press and hold the two buttons for 20 seconds until you hear
aprompt for afactory reset
• Press the button to pause during operation
• Press the button to return to recharge during pause
• Press the button to start/pause cleaning
Power button
Power button + Recharge button
Recharge button
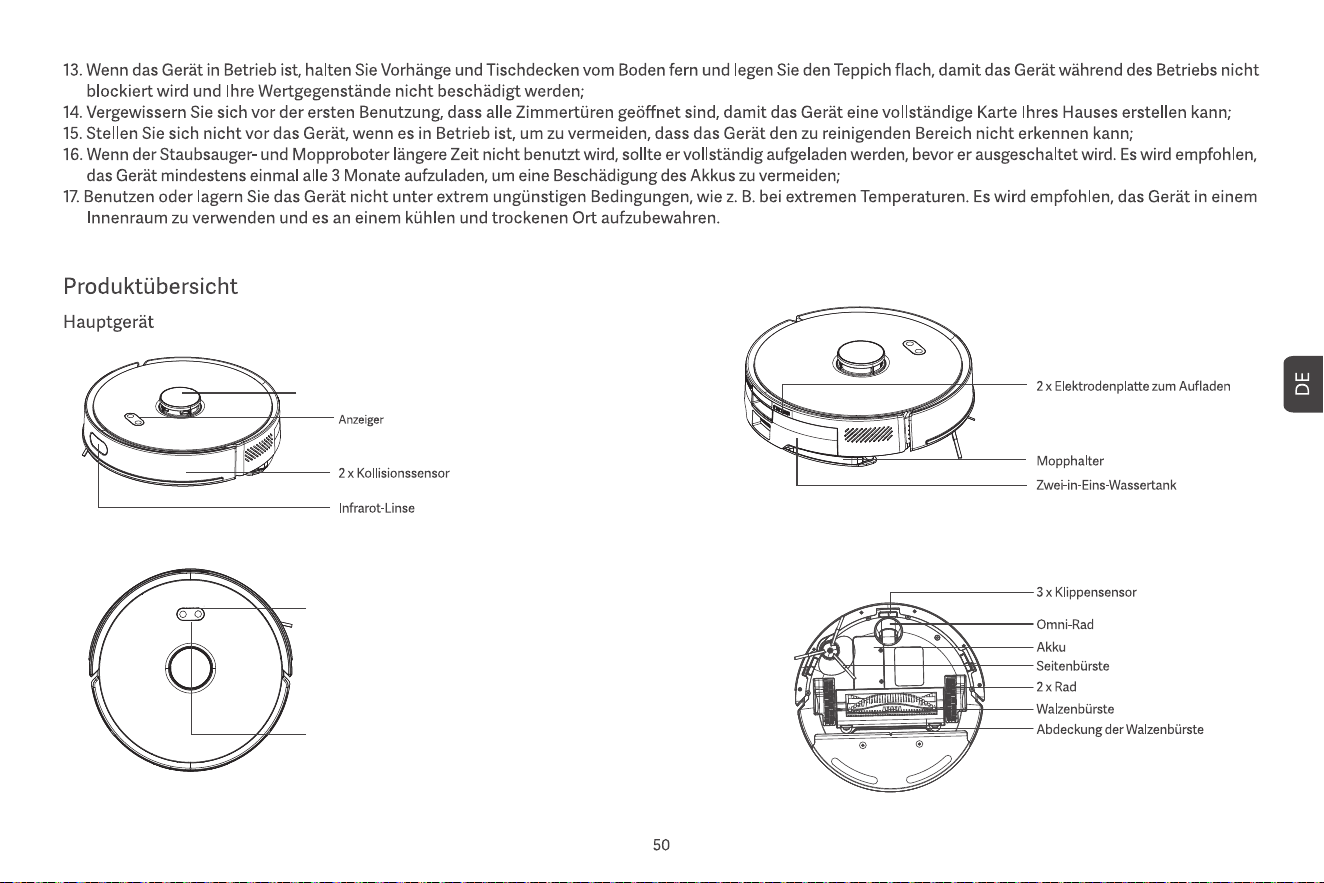
Laser sensor
Charging station
0.5m
0.5m
1.5m
Turn on the robot vacuum, then press the " "and the " "button meantime for at least 3 seconds until the white slow flashes.
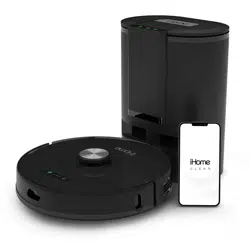
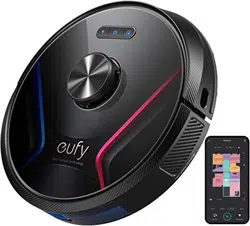
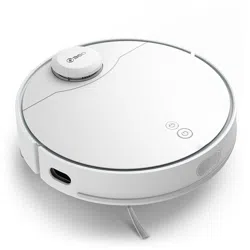
ROBOT VACUUM CLEANER
ROBOT VACUUM CLEANER
Please connect to Wi-Fi
Please connect to Wi-Fi
Please connect to Wi-Fi
Please connect to Wi-Fi
ROBOT VACUUM CLEANER

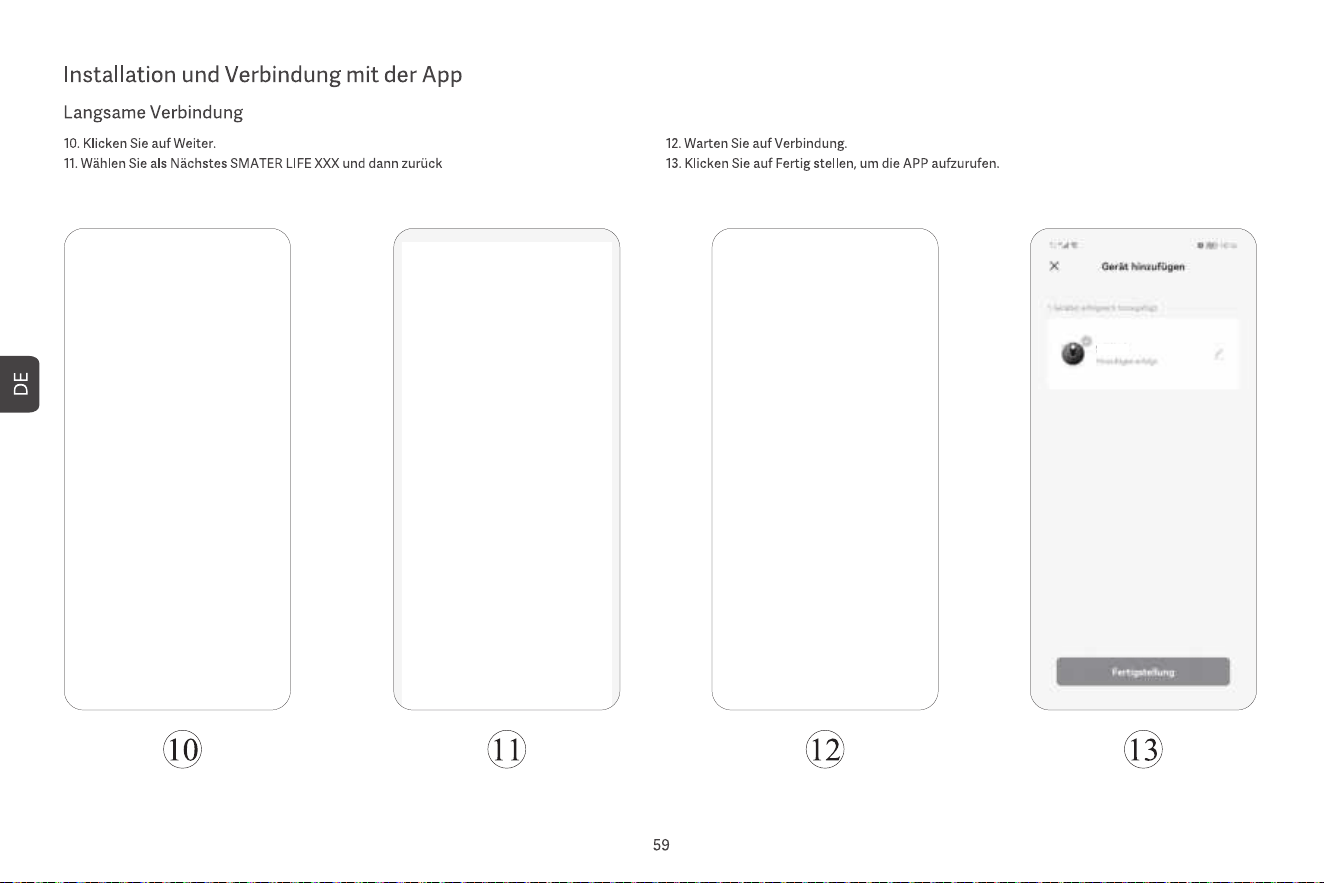
5. Plan cleaning
Start full house cleaning through the app or by pressing the power button. The main unit will
first carry out edge cleaning, then carry out full house cleaning along a set path, and
automatically return to the charging station to recharge after the cleaning is fihished.
7. Fixed-point cleaning
Select fixed-point cleaning in the app, then set the target point on the map. The main unit will
automatically plan the route to the target point and clean in a 1.5x1.5 m square area with the
target point as the centre. The main unit will automatically return to the charging station to
recharge after the cleaning is finished.
8. Scheduled cleaning
Use the app to set the time of scheduled cleaning, and the main unit will automatically start
cleaning at the specified time and automatically return to the charging station after the
cleaning is finished.
If the Do-Not-Disturb Mode is enabled, the scheduled cleaning will not be executed during the
Do-Not-Disturb period.
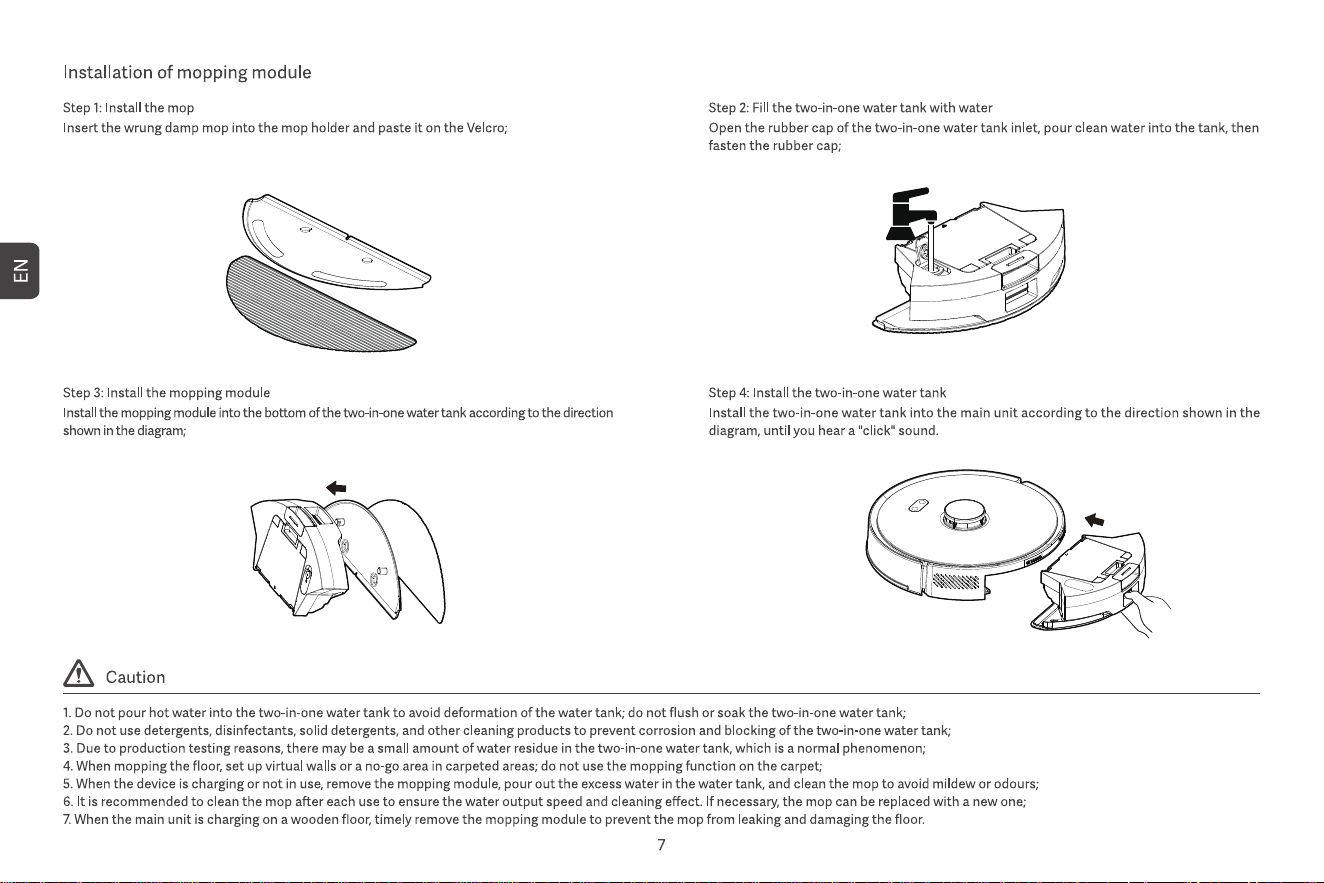
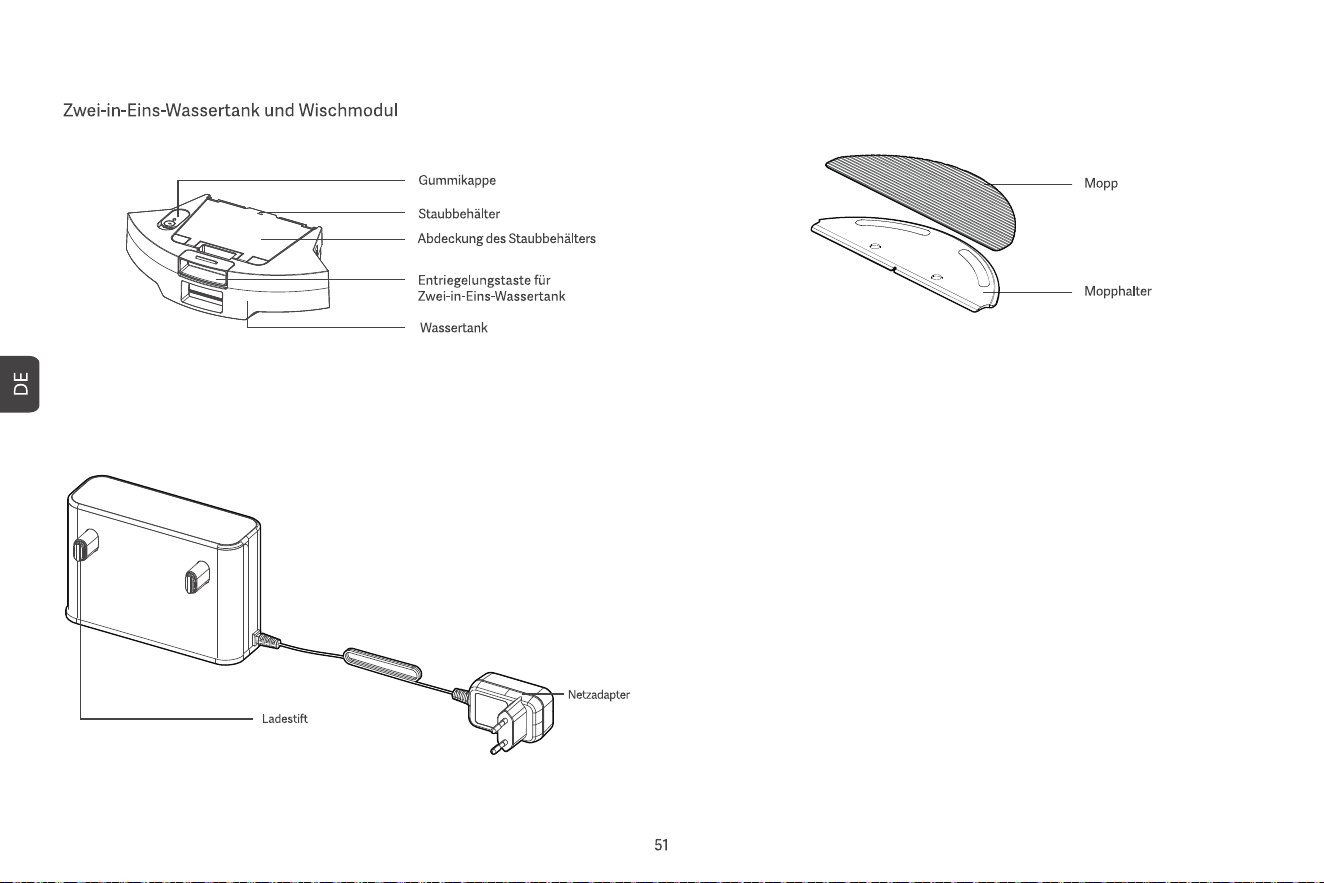
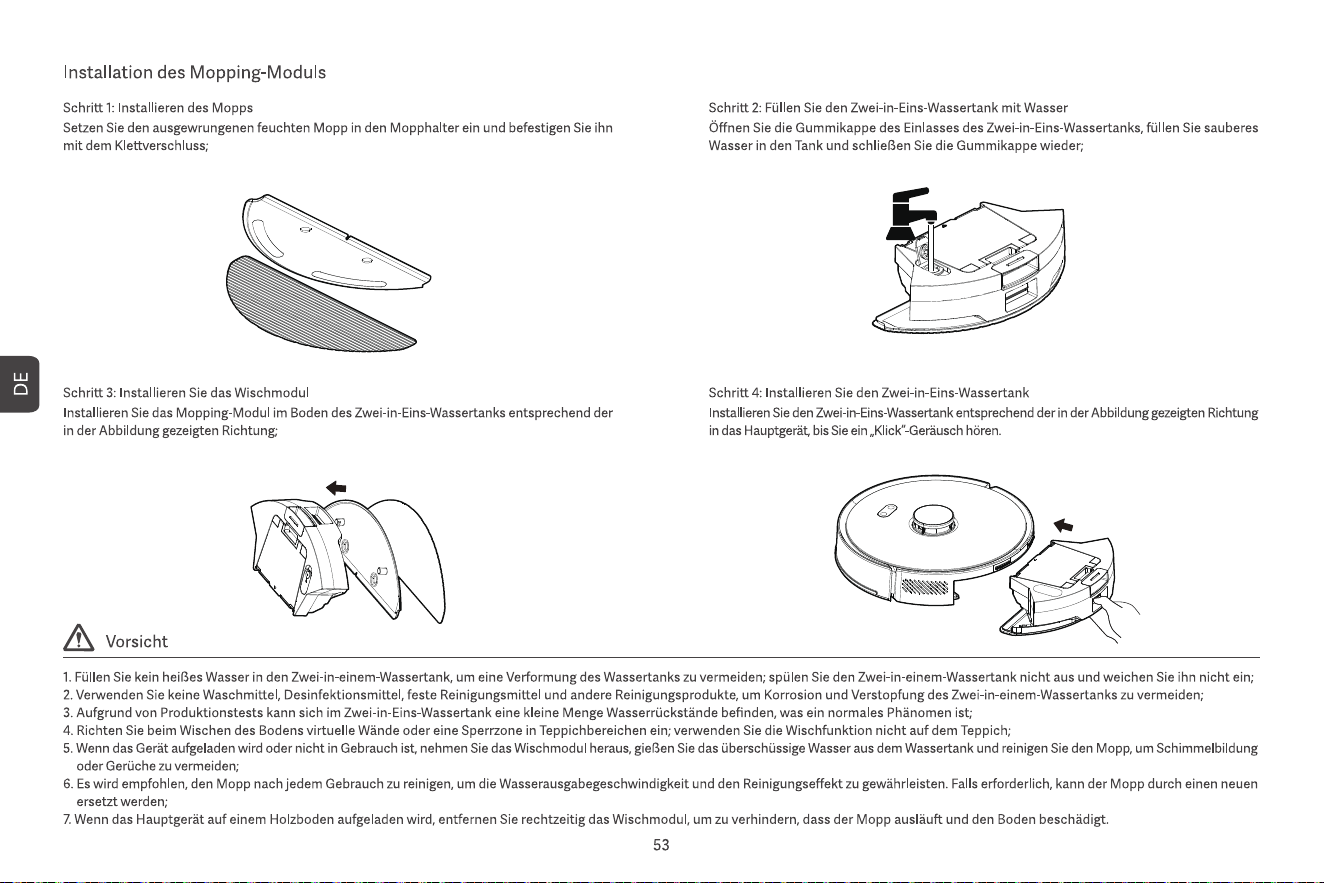
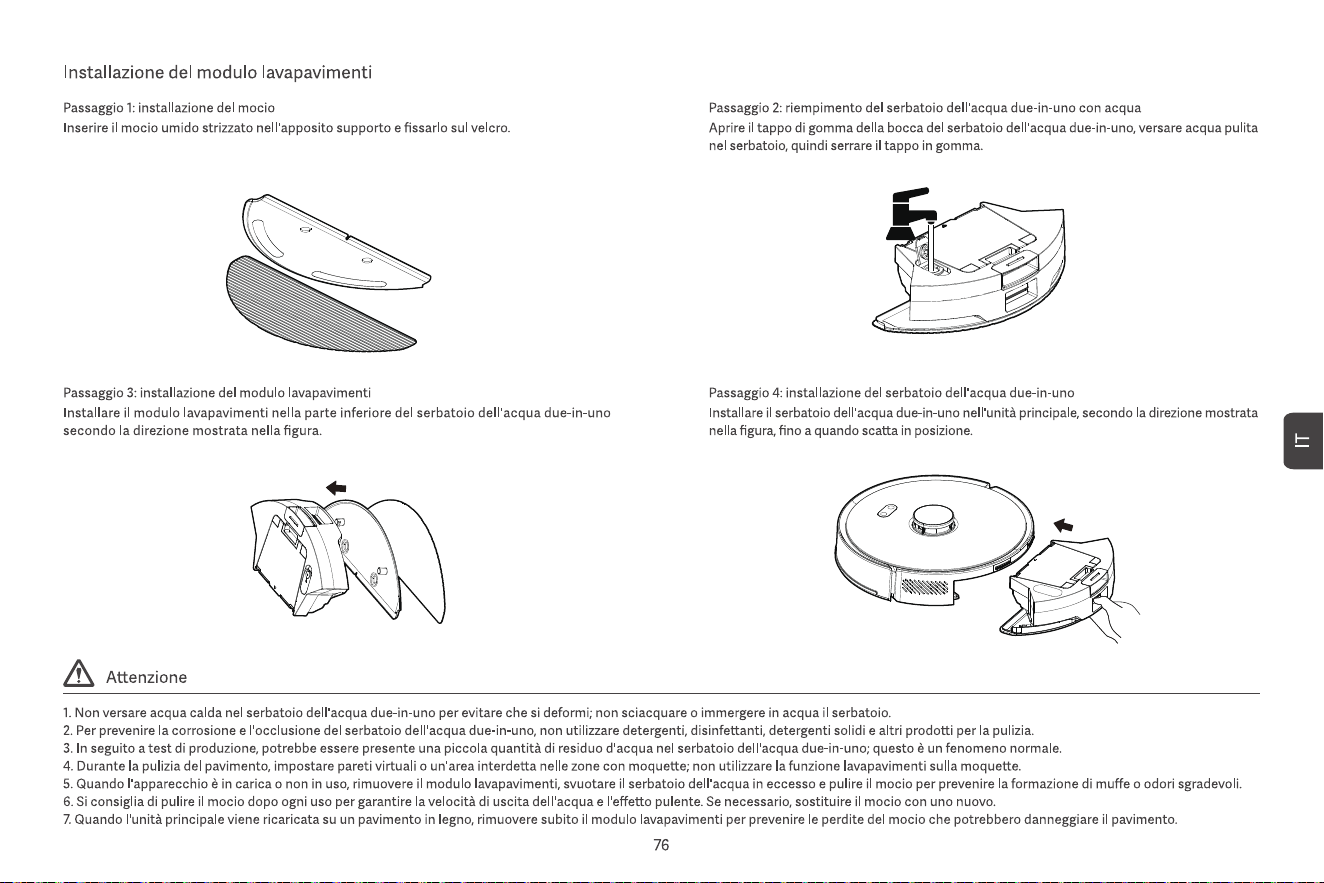
9. Add water or clean the mop during operation
During the cleaning process, if you need to add water or clean the mop, pause the device by
pressing the power button, remove the two-in-one water tank and mopping module, add water
or clean the mop, and then install the two-in-one water tank and mopping module. Finally,
press the power button to continue working.
10. Sleep mode
If the main unit is not charging and there is no operation for more than10 minutes, it will
automatically enter sleep mode. If it stays in sleep mode for more than 4 hours, it will
automatically turn off.
To wake up the main unit, press any button or use the app.
11. Resume cleaning
During the cleaning process, if the battery is low, the main unit will automatically return to the
charging station to recharge. After recharging, the main unit wil automatically return to where it
left off and continue the cleaning process. If you maniually stop cleaning, then move or
operate the main unit during the charging process, the resume cleaning will be cancelled.
12. Virtual wall/No-go area
In the app, you can set up virtual walls or no-go areas to prevent the main unit from entering
areas that do not need to be cleaned.
Before using the virtual wall/no-go area function, you need to save the map in the app. Moving
the main unit or major changes in the environment can cause the original map to become
invalid and result in the loss of virtual walls/no-go areas.
1. Power on/off
Press and hold the power button for 3 seconds. The power button indicator turns on, and the
main unit enters standby mode. When the main unit is stationary, press and hold the power
button to turn it off, and the indicator will turn off.
When the main unit is in operation, pressing any button will pause the main unit. After a
pause, press the power button again to continue cleaning.
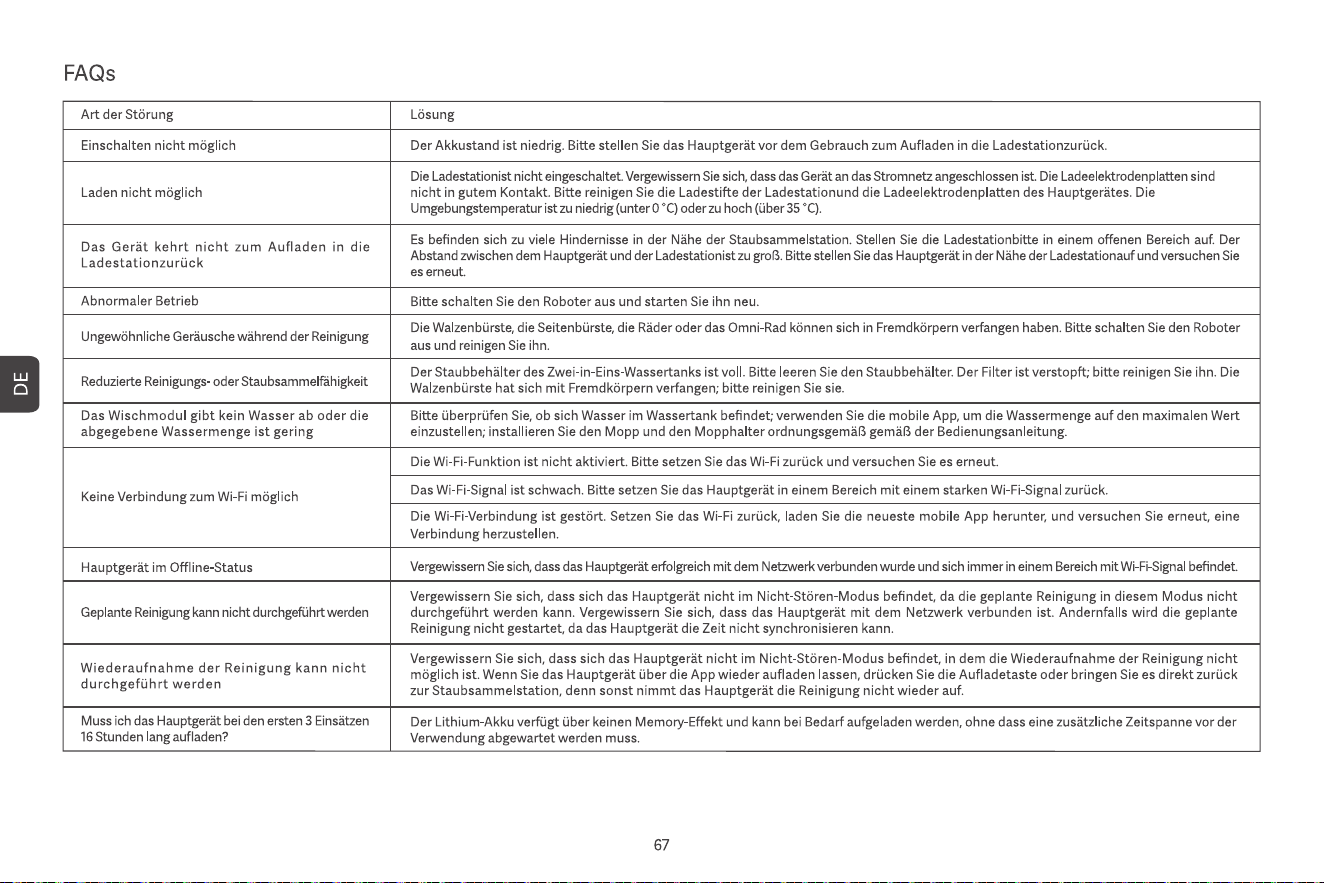
2. Return to recharge
In standby mode, press the recharge button, and the main unit will return to the charging
station to recharge. When the main unit has finished cleaning, it will automatically return to
the charging station to recharge, and the indicator will white light on. If the battery is low
during cleaning, it will automatically return to the charging station to recharge.
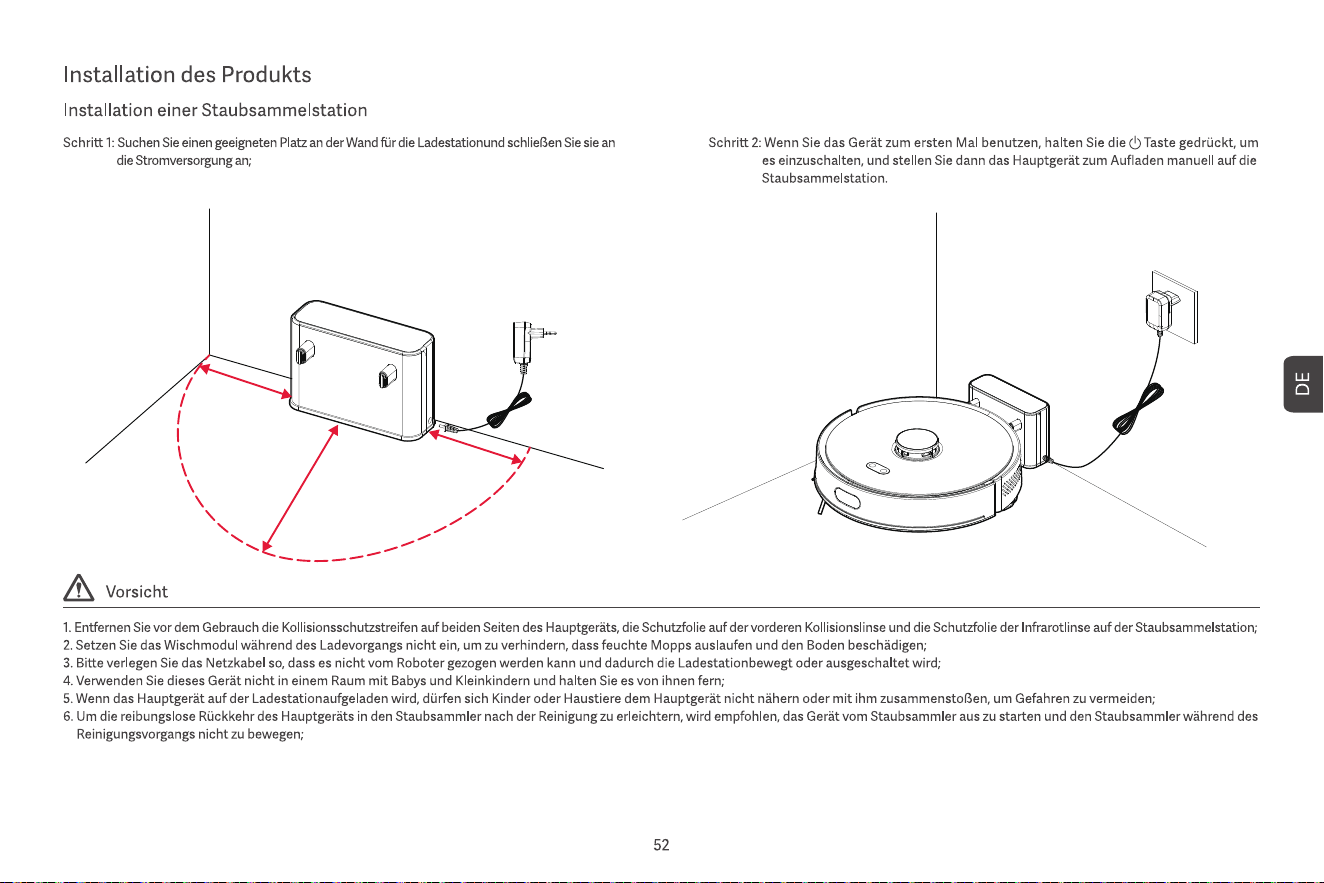
3. Quick map building
When the main unit is powered on for the first time, there is no map in the app. Place the
main unit into the charging station, select quick map building in the app, and the main unit
will build a map without cleaning. After the main unit automatically returns to the charging
station, the map will be completed and saved automatically.
4. Memory map
After the main unit successfully completes a quick map building or cleaning and returns to the
charging station to recharge, the app will automatically save and update the map. After the
map is successfully built, you can divide, merge areas or customise room names in the app.
6. Area cleaning
After setting the area cleaning in the app, the main unit will clean according to the planned
area and automatically return to the charging station to recharge after the cleaning is finished.
Turning on/off and cleaning modes
13. Do-Not-Disturb Mode
During the Do-Not-Disturb period, the main unit will not execute resume cleaning and scheduled
cleaning or actively broadcast voice prompts. The Do-Not-Disturb Mode is enabled by default from
22:00 to 8:00. You can enable/disable the Do-Not-Disturb Mode or set the time period of the mode.
14. Reset Wi-Fi
When the mobile phone cannot connect to the main unit after resetting the password or for
other reasons, reset the Wi-Fi connection by following the acticons in the app download of this
manual.
15. Factory reset
Press and hold the two buttons for 20 seconds until you hear a prompt. The main unit needs to
reconnect to the app, and all related settings in the app will be cleared.
16. Firmware upgrade
The device's firmware can be upgraded through the app. During the upgrade process, the main
unit must be in the charging station or have a battery power more than 30%. It is not allowed to
start cleaning during the upgrade process.
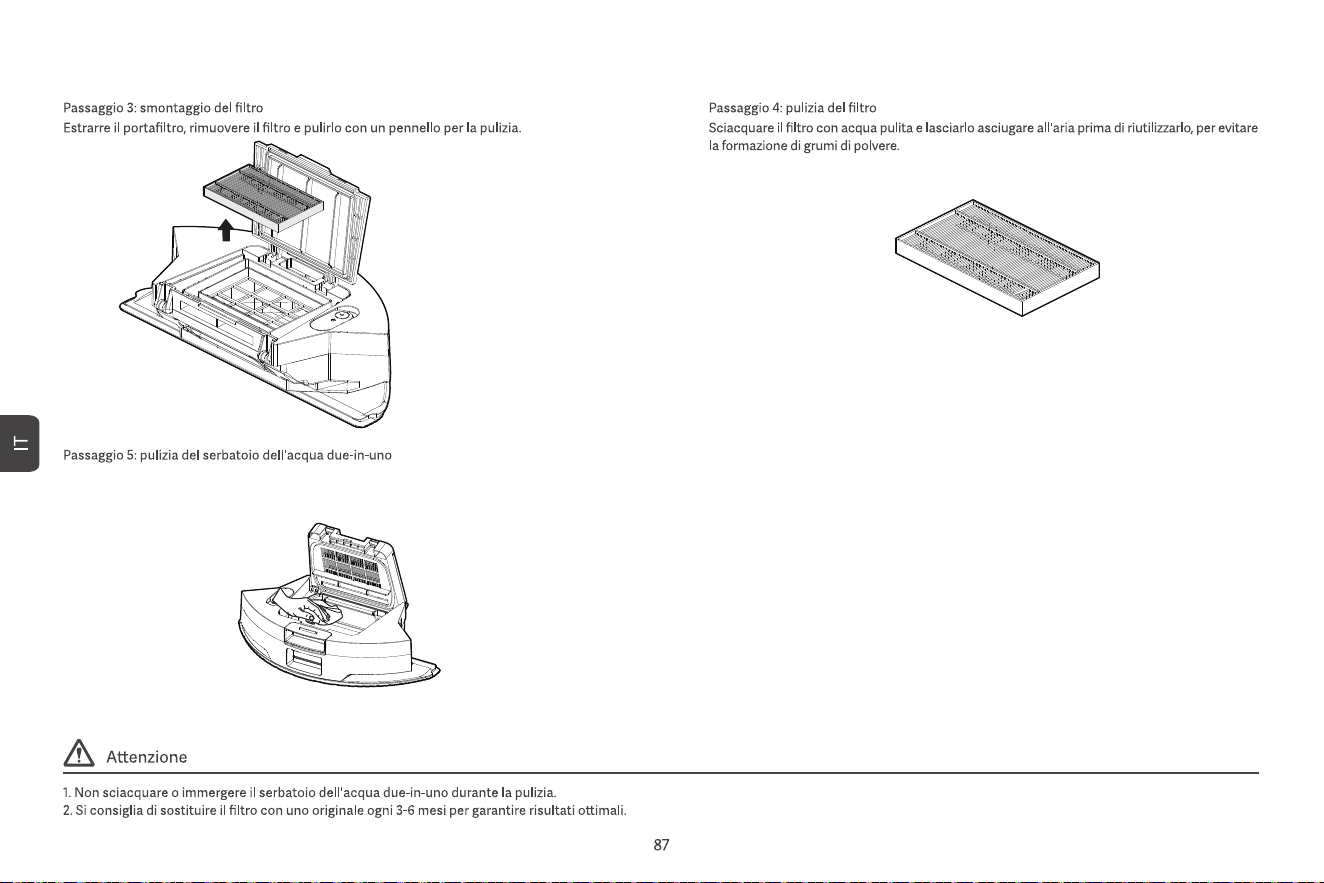
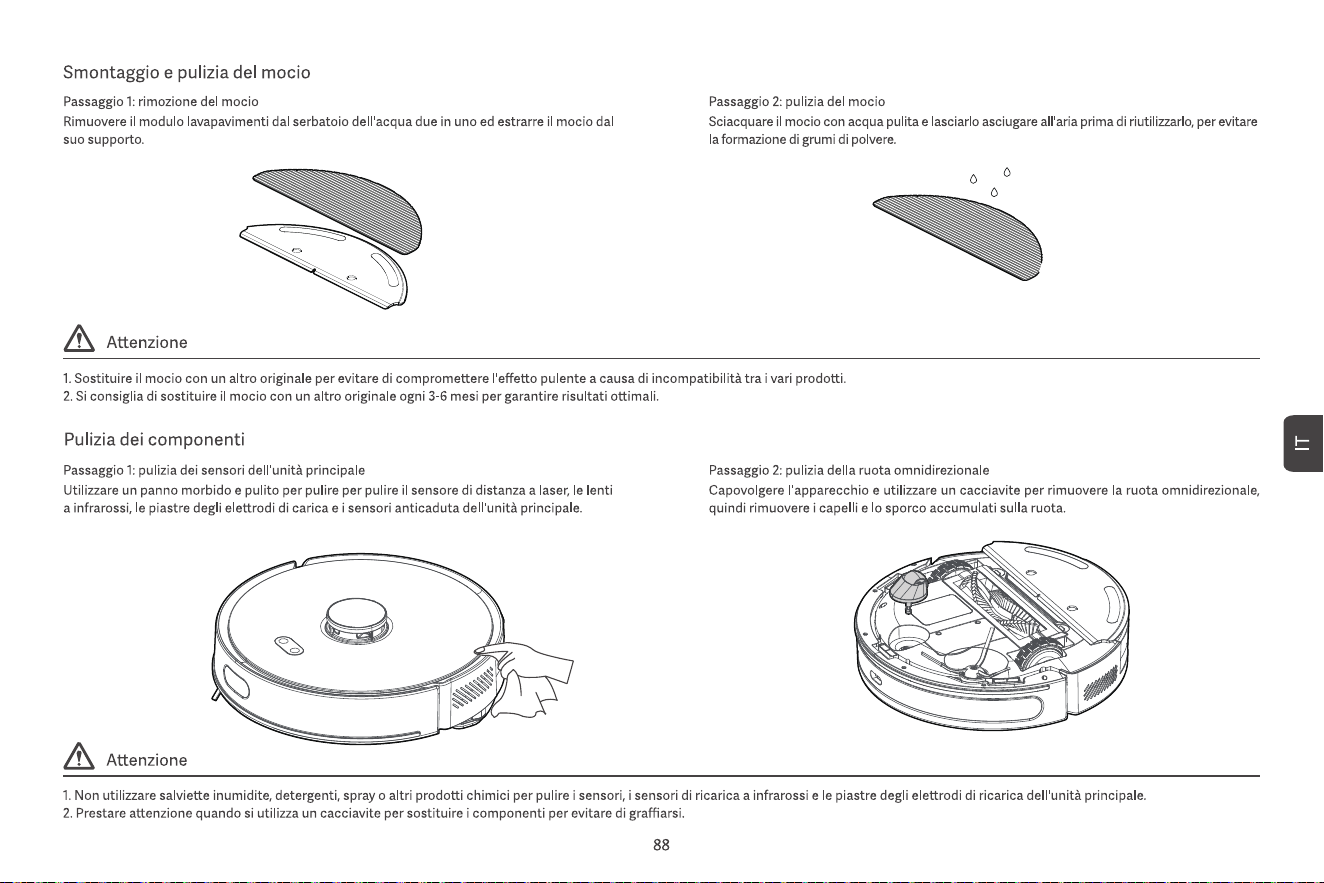
Wipe the 2-in-1 Tank Dust Collector with a damp paper towel and air dry for 24 hours before using
again to prevent dust clumping.
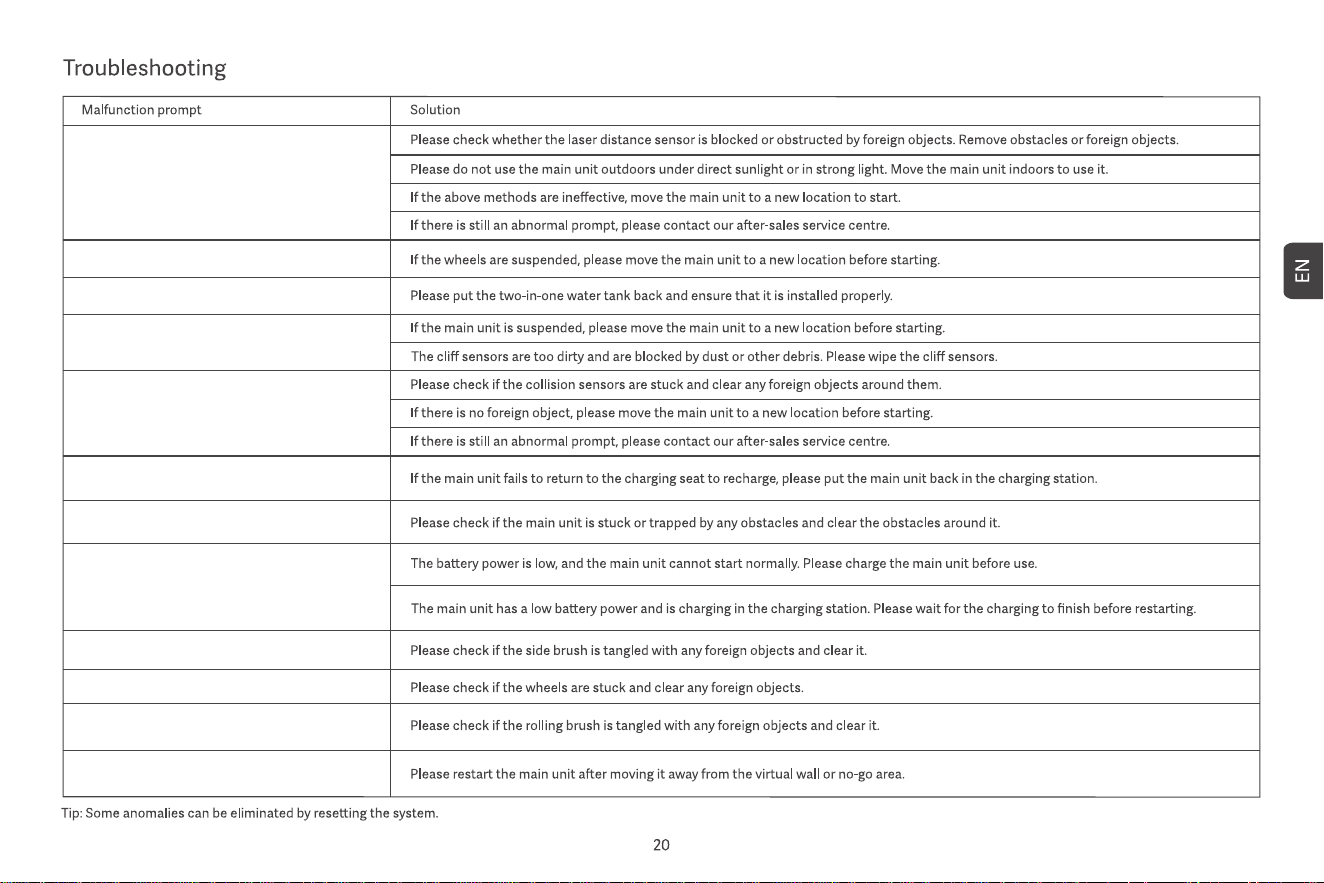
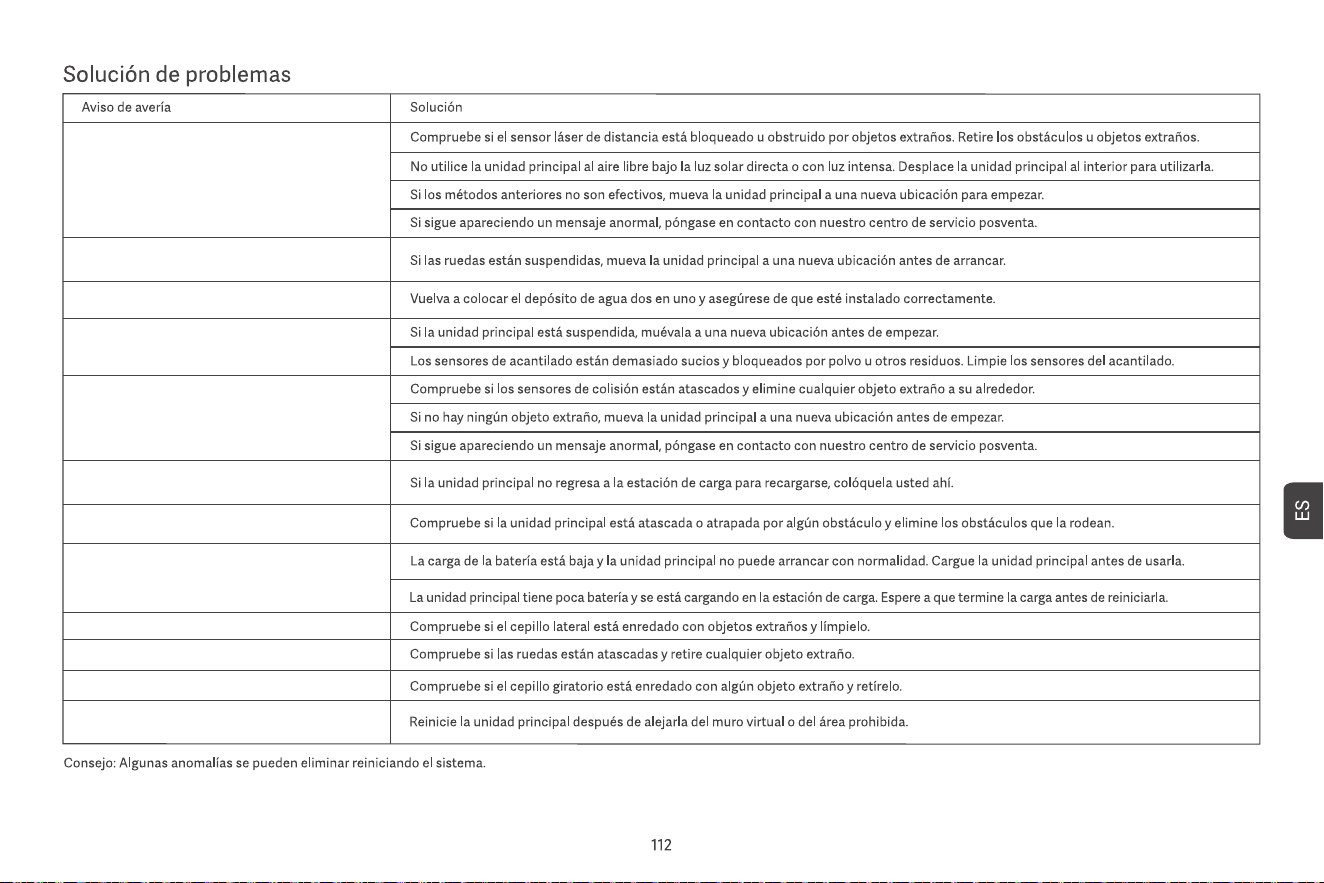
seems something wrong with the radar
Please place the machine on level ground to start
please put back the dust box
Please check if the crash barrier is stuck
Recharge failed, dust collection charging
dock not found
The machine is trapped, please move
battery is too low, please charge first
Please check if the side brush is stuck
Seems something wrong with the main wheel
Please check if the main brush is stuck
Please stay away from the restricted area
before starting
Please wipe the cliff sensor and start away
from the danger area
Point laser
• Appuyez et maintenez les deux boutons simultanément pendant 3
secondes pour réinitialiser le Wi-Fi et accéder aux paramètres réseau.
• Appuyez et maintenez les deux boutons pendant 20 secondes jusqu’à ce
que vous entendiez une invite pour une réinitialisation d’usine.
• Appuyez sur le bouton pour mettre en pause pendant l’opération.
• Appuyez sur le bouton pour retourner à la recharge pendant la pause.
• Appuyez sur le bouton pour démarrer/mettre en pause le nettoyage.
Bouton d’alimentation
Bouton d’alimentation + Bouton de recharge
Bouton de recharge
Capteur radar
Station de charge
0.5m
0.5m
1.5m
Allumez le robot aspirateur, puis appuyez simultanément sur les boutons « » et « » pendant au moins 3 secondes jusqu’à ce que le voyant blanc clignote lentement.
ASPIRATEUR ROBOT
Veuillez vous connecter au Wi-Fi
Veuillez vous connecter au Wi-Fi
ASPIRATEUR ROBOT
Veuillez vous connecter au Wi-Fi
Veuillez vous connecter au Wi-Fi
ASPIRATEUR ROBOT

7. Nettoyage localisé
Sélectionnez le nettoyage localisé dans l’application, puis définissez le point cible sur la carte.
L’unité principale planifiera automatiquement l’itinéraire jusqu’au point cible et nettoiera une
zone carrée de 1,5 x 1,5 m avec le point cible comme centre. Une fois le nettoyage terminé,
l’unité principale retournera automatiquement à la station de charge pour se recharger.
8. Nettoyage programmé
Utilisez l’application pour définir l’heure du nettoyage programmé, et l’unité principale
commencera automatiquement le nettoyage à l’heure spécifiée et retournera automatique-
ment à la station de charge une fois le nettoyage terminé.
Si le mode « Ne pas déranger » est activé, le nettoyage programmé ne sera pas exécuté
pendant la période de « Ne pas déranger ».
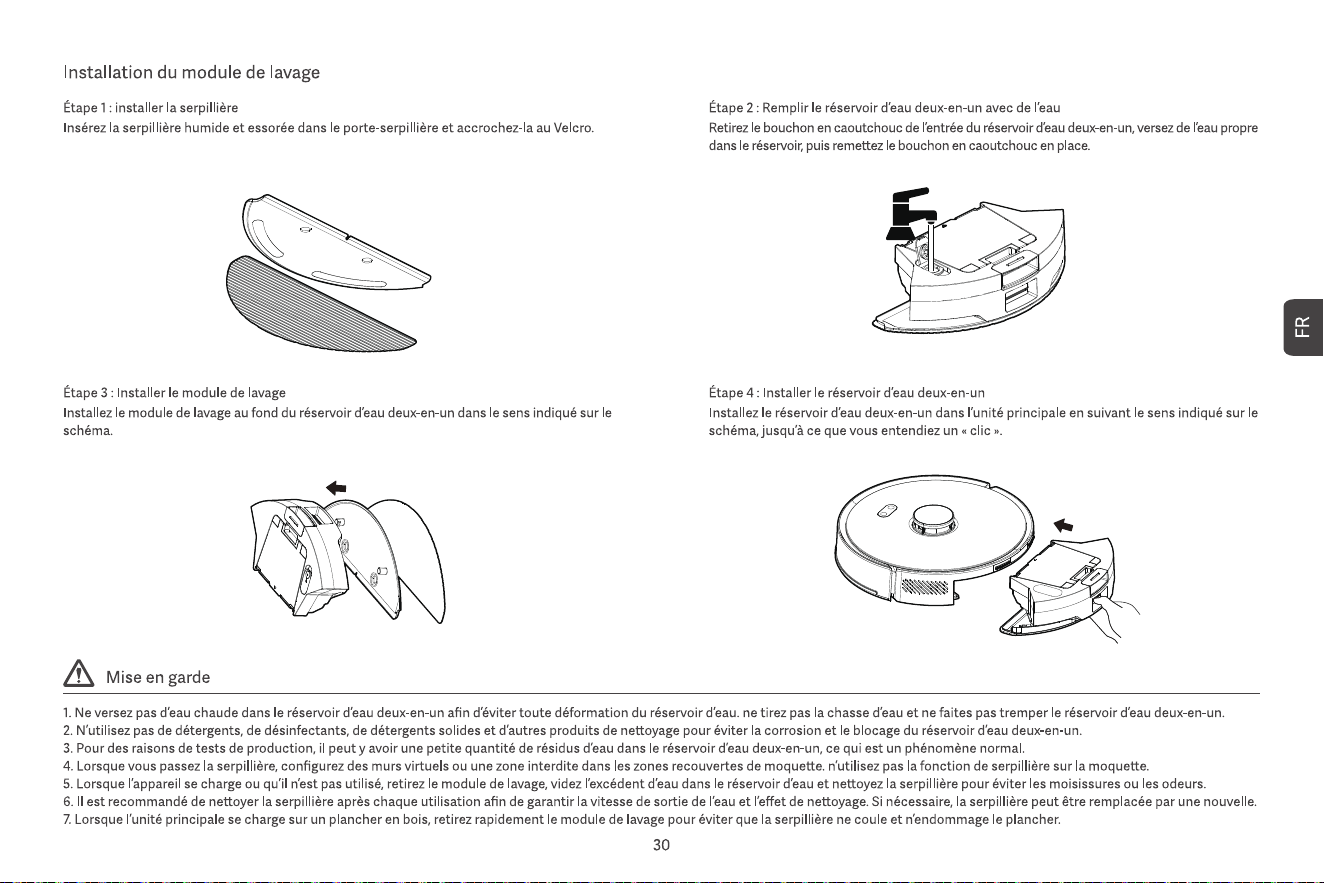
9. Ajouter de l’eau ou nettoyer la serpillière pendant le fonctionnement
Pendant le processus de nettoyage, si vous devez ajouter de l’eau ou nettoyer la serpillière,
mettez l’appareil en pause en appuyant sur le bouton d’alimentation, retirez le réservoir d’eau
deux-en-un et le module de nettoyage, ajoutez de l’eau ou nettoyez la serpillière, puis
réinstallez le réservoir d’eau deux-en-un et le module de nettoyage. Enfin, appuyez sur le
bouton d’alimentation pour reprendre le travail.
10. Mode veille
Si l’unité principale n’est pas en charge et qu’il n’y a aucune opération pendant plus de 10
minutes, elle entre automatiquement en mode veille. Si elle reste en mode veille pendant plus
de 4 heures, elle s’éteindra automatiquement.
Pour réveiller l’unité principale, appuyez sur n’importe quel bouton ou utilisez l’application.
11. Reprendre le nettoyage
Pendant le processus de nettoyage, si la batterie est faible, l’unité principale retournera
automatiquement à la station de charge pour se recharger. Après la recharge, l’unité principale
reviendra automatiquement à l’endroit où elle s’était arrêtée et poursuivra le nettoyage. Si
vous arrêtez manuellement le nettoyage et déplacez ou manipulez l’unité principale pendant le
processus de charge, la reprise du nettoyage sera annulée.
12. Mur virtuel / Zone interdite
Dans l’application, vous pouvez configurer des murs virtuels ou des zones interdites pour
empêcher l’unité principale d’entrer dans des zones qui ne doivent pas être nettoyées.
Avant d’utiliser la fonction du mur virtuel/de la zone interdite, vous devez enregistrer la carte
dans l’application. Déplacer l’unité principale ou apporter des modifications importantes à
l’environnement peut rendre la carte d’origine invalide et entraîner la perte des murs
virtuels/des zones interdites.
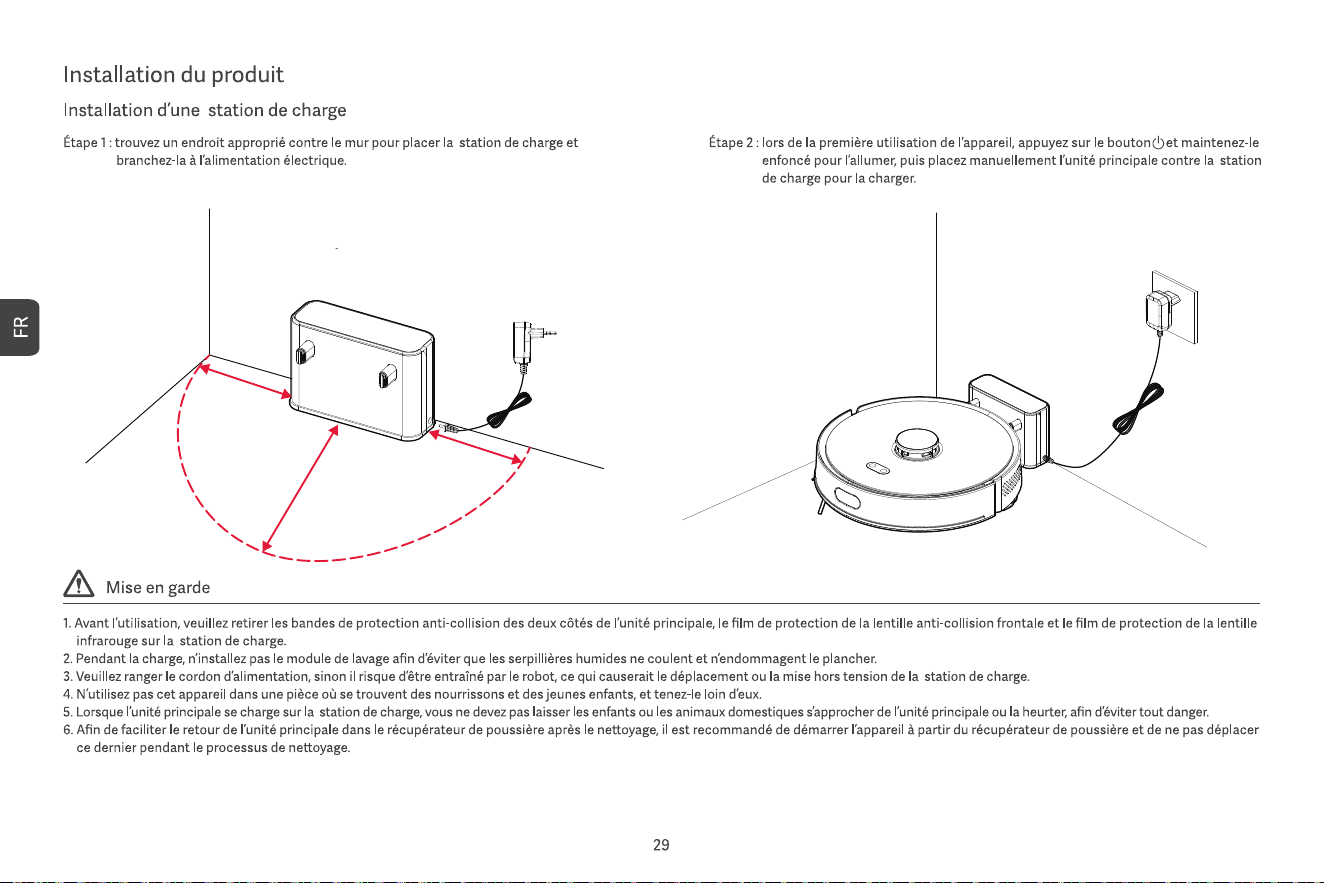
1. Mise sous/hors tension
Appuyez et maintenez le bouton d’alimentation pendant 3 secondes. L’indicateur du bouton
d’alimentation s’allume et l’unité principale entre en mode veille. Lorsque l’unité principale est
immobile, appuyez et maintenez le bouton d’alimentation pour l’éteindre, et l’indicateur s’éteindra.
Lorsque l’unité principale est en fonctionnement, appuyer sur n’importe quel bouton mettra l’unité
en pause. Après une pause, appuyez à nouveau sur le bouton d’alimentation pour reprendre le
nettoyage.
2. Retour à la recharge
En mode veille, appuyez sur le bouton de recharge, et l’unité principale retournera à la station de
charge pour se recharger. Une fois le nettoyage terminé, l’unité principale retournera
automatiquement à la station de charge pour se recharger, et l’indicateur s’allumera en blanc. Si
la batterie est faible pendant le nettoyage, l’unité principale retournera automatiquement à la
station de charge pour se recharger.
3. Construction rapide de la carte
Lorsque l’unité principale est mise sous tension pour la première fois, il n’y a pas de carte dans
l’application. Placez l’unité principale sur la station de charge, sélectionnez la cartographie rapide
dans l’application, et l’unité principale construira une carte sans nettoyage. Après le retour
automatique de l’unité principale à la station de charge, la carte sera complétée et enregistrée
automatiquement.
4. Carte mémoire
Après que l’unité principale ait terminé avec succès une construction rapide de carte ou un
nettoyage et soit retournée à la station de charge pour se recharger, la carte sera automatiquement
sauvegardée et mise à jour dans l’application. Une fois la carte créée avec succès, vous pouvez
diviser, fusionner des zones ou personnaliser les noms des pièces dans l’application.
5. Nettoyage planifié
Démarrez un nettoyage complet de la maison via l’application ou en appuyant sur le bouton
d’alimentation. L’unité principale effectuera d’abord un nettoyage des bords, puis un
nettoyage complet de la maison selon un chemin prédéfini. Après la fin du nettoyage, elle
retournera automatiquement à la station de charge pour se recharger.
6. Nettoyage par zone
Après avoir défini le nettoyage par zone dans l’application, l’unité principale nettoiera selon la
zone planifiée et retournera automatiquement à la station de charge pour se recharger une
fois le nettoyage terminé.
Mise en marche/arrêt et modes de nettoyage
13. Mode Ne Pas Déranger
Pendant la période de Ne Pas Déranger, l’unité principale n’exécutera pas de reprise de
nettoyage ou de nettoyage programmé et ne diffusera pas de messages vocaux actifs.
Le mode Ne Pas Déranger est activé par défaut de 22h00 à 8h00. Vous pouvez
activer/désactiver ce mode ou définir la période de ce mode.
14. Réinitialiser le Wi-Fi
Lorsque le téléphone mobile ne peut pas se connecter à l’unité principale après la
réinitialisation du mot de passe ou pour d’autres raisons, réinitialisez la connexion Wi-Fi en
suivant les actions de l’application à télécharger dans ce manuel.
15. Réinitialisation d’usine
Appuyez et maintenez les deux boutons pendant 20 secondes jusqu’à ce que vous
entendiez une invite. L’unité principale devra se reconnecter à l’application, et tous les
paramètres associés dans l’application seront effacés.
16. Mise à jour du firmware
Le firmware de l’appareil peut être mis à jour via l’application. Pendant le processus de mise à
jour, l’unité principale doit être dans la station de charge ou avoir une batterie chargée à plus
de 30 %. Il n’est pas permis de démarrer le nettoyage pendant la mise à jour.
Essuyez le dépoussiéreur de réservoir 2 en 1 avec une serviette en papier humide et laissez-le sécher à
l'air libre pendant 24 heures avant de l'utiliser à nouveau pour éviter que la poussière ne s'agglomère.
il semble que quelque chose ne va pas
avec le radar
Veuillez placer la machine sur un sol
plat pour démarrer
s'il te plaît, remets le bac à poussière
Veuillez vérifier si la barrière de sécurité
est coincée
La recharge a échoué, la station de chargement
pour dépoussiérage est introuvable
La machine est coincée, veuillez vous déplacer
la batterie est trop faible, veuillez d'abord la charger
Veuillez vérifier si la brosse latérale est coincée
Il semble y avoir un problème avec la roue principale
Veuillez vérifier si la brosse principale est coincée
Veuillez rester à l'écart de la zone réglementée
avant de commencer
Veuillez essuyer le capteur de falaise et
partir loin de la zone de danger.
Laser ponctuel
Laser-Sensor
• Halten Sie beide Tasten gleichzeitig 3 Sekunden lang gedrückt, um das
Wi-Fi zurückzusetzen und die Netzwerkeinstellungen zu öffnen.
• Halten Sie beide Tasten 20 Sekunden lang gedrückt, bis Sie eine
Aufforderung für einen Werkseinstellungs-Rücksetzvorgang hören.
• Drücken Sie die Taste, um während des Betriebs zu pausieren.
• Drücken Sie die Taste, um während der Pause zur Ladestation zurückzukehren.
• Drücken Sie die Taste, um die Reinigung zu starten/pausieren.
Power-Taste
Power-Taste + Lade-Taste
Lade-Taste
Ladestation
0.5m
0.5m
1.5m
Schalten Sie den Saugroboter ein und drücken Sie gleichzeitig die Tasten „ “ und „ “ mindestens 3 Sekunden lang, bis die weiße LED langsam blinkt.
ROBOTER-STAUBSAUGER
ROBOTER-STAUBSAUGER
Bitte mit Wi-Fi verbinden
Bitte mit Wi-Fi verbinden
Bitte mit Wi-Fi verbinden
Bitte mit Wi-Fi verbinden
ROBOTER-STAUBSAUGER

7. Punktuelle Reinigung
Wählen Sie in der App die punktuelle Reinigung aus und legen Sie den Zielpunkt auf der Karte
fest. Das Hauptgerät plant automatisch die Route zum Zielpunkt und reinigt einen Bereich von
1,5 x 1,5 m mit dem Zielpunkt als Zentrum. Nach Abschluss der Reinigung kehrt das
Hauptgerät automatisch zur Ladestation zurück, um aufzuladen.
8. Geplante Reinigung
Verwenden Sie die App, um die Zeit für die geplante Reinigung festzulegen. Das Hauptgerät
startet die Reinigung automatisch zur festgelegten Zeit und kehrt nach Abschluss der
Reinigung automatisch zur Ladestation zurück.
Wenn der „Nicht stören“-Modus aktiviert ist, wird die geplante Reinigung während der „Nicht
stören“-Zeit nicht ausgeführt.
9. Wasser nachfüllen oder den Mop während des Betriebs reinigen
Während des Reinigungsprozesses, wenn Sie Wasser nachfüllen oder den Mop reinigen
müssen, pausieren Sie das Gerät, indem Sie die Ein-/Aus-Taste drücken, entfernen Sie den
Zwei-in-Eins-Wassertank und das Wischmodul, füllen Sie Wasser nach oder reinigen Sie den
Mop und installieren Sie dann den Zwei-in-Eins-Wassertank und das Wischmodul wieder.
Drücken Sie abschließend die Ein-/Aus-Taste, um die Arbeit fortzusetzen.
10. Schlafmodus
Wenn das Hauptgerät nicht aufgeladen wird und mehr als 10 Minuten keine Aktion erfolgt,
geht es automatisch in den Schlafmodus. Wenn es sich mehr als 4 Stunden im Schlafmodus
befindet, wird es automatisch ausgeschaltet.
Um das Hauptgerät wieder zu aktivieren, drücken Sie eine beliebige Taste oder verwenden
Sie die App.
11. Reinigung fortsetzen
Während des Reinigungsprozesses, wenn der Akku schwach ist, kehrt das Hauptgerät
automatisch zur Ladestation zurück, um aufzuladen. Nach dem Aufladen kehrt das Hauptgerät
automatisch dorthin zurück, wo es aufgehört hat, und setzt den Reinigungsprozess fort. Wenn
Sie das Reinigen manuell stoppen und das Hauptgerät während des Ladevorgangs bewegen
oder bedienen, wird das Fortsetzen der Reinigung abgebrochen.
12. Virtuelle Wand/No-Go-Bereich
In der App können Sie virtuelle Wände oder No-Go-Bereiche einrichten, um zu verhindern,
dass das Hauptgerät in Bereiche gelangt, die nicht gereinigt werden müssen.
Bevor Sie die Funktion der virtuellen Wand/des No-Go-Bereichs verwenden, müssen Sie die
Karte in der App speichern. Das Bewegen des Hauptgeräts oder größere Änderungen in der
Umgebung können dazu führen, dass die ursprüngliche Karte ungültig wird, was zum Verlust
der virtuellen Wände/no-go-Bereiche führen kann.
1. Ein-/Ausschalten
Halten Sie die Einschalttaste 3 Sekunden lang gedrückt. Die Anzeige der Einschalttaste leuchtet
auf, und das Hauptgerät wechselt in den Standby-Modus. Wenn das Hauptgerät stillsteht, halten
Sie die Einschalttaste gedrückt, um es auszuschalten, und die Anzeige erlischt.
Wenn das Hauptgerät in Betrieb ist, wird es durch Drücken einer beliebigen Taste angehalten.
Nach einer Pause drücken Sie die Einschalttaste erneut, um die Reinigung fortzusetzen.
2. Zurück zur Ladestation
Im Standby-Modus drücken Sie die Aufladetaste, und das Hauptgerät kehrt zur
Ladestation zurück, um aufzuladen. Wenn das Hauptgerät die Reinigung abgeschlossen
hat, kehrt es automatisch zur Ladestation zurück, um aufzuladen, und die Anzeige leuchtet
weiß. Wenn der Akku während der Reinigung schwach ist, kehrt das Gerät automatisch
zur Ladestation zurück, um aufzuladen.
3. Schnelles Kartenaufbauen
Wenn die Haupteinheit zum ersten Mal eingeschaltet wird, gibt es in der App keine Karte.
Setzen Sie die Haupteinheit in die Ladestation, wählen Sie in der App die Schnellkartener-
stellung, und die Haupteinheit wird eine Karte ohne Reinigung erstellen. Nachdem die
Haupteinheit automatisch zur Ladestation zurückgekehrt ist, wird die Karte abgeschlossen
und automatisch gespeichert.
4. Speicherkarte
Nachdem das Hauptgerät erfolgreich eine schnelle Kartenerstellung oder Reinigung
abgeschlossen und zur Ladestation zurückgekehrt ist, um aufzuladen, wird die Karte in der
App automatisch gespeichert und aktualisiert. Nach erfolgreichem Aufbau der Karte können
Sie in der App Bereiche teilen, zusammenführen oder Raumnamen individuell anpassen.
5. Geplante Reinigung
Starten Sie die vollständige Hausreinigung über die App oder durch Drücken der
Einschalttaste. Das Hauptgerät führt zunächst eine Kantenreinigung durch, anschließend
reinigt es das gesamte Haus entlang eines festgelegten Pfades. Nach Abschluss der
Reinigung kehrt es automatisch zur Ladestation zurück, um sich aufzuladen.
6. Bereichsreinigung
Nach dem Festlegen der Bereichsreinigung in der App reinigt das Hauptgerät gemäß dem
geplanten Bereich und kehrt nach Abschluss der Reinigung automatisch zur Ladestation
zurück, um aufzuladen.
Ein-/Ausschalten und Reinigungsmodi
13. Nicht-Stören-Modus
Während der Nicht-Stören-Zeit führt das Hauptgerät keine Wiederaufnahme der Reinigung oder
geplante Reinigungen durch und gibt keine Sprachansagen aktiv aus. Der Nicht-Stören-Modus
ist standardmäßig von 22:00 bis 8:00 Uhr aktiviert. Sie können den Nicht-Stören-Modus
aktivieren/deaktivieren oder den Zeitraum des Modus festlegen.
14. Wi-Fi zurücksetzen
Wenn das Mobiltelefon nach dem Zurücksetzen des Passworts oder aus anderen Gründen
keine Verbindung zum Hauptgerät herstellen kann, setzen Sie die Wi-Fi-Verbindung zurück,
indem Sie den Anweisungen in der App, die in diesem Handbuch zum Herunterladen
bereitgestellt wird, folgen.
15. Werkseinstellungen zurücksetzen
Halten Sie beide Tasten 20 Sekunden lang gedrückt, bis Sie eine Aufforderung hören. Das
Hauptgerät muss erneut mit der App verbunden werden, und alle zugehörigen Einstellungen in
der App werden gelöscht.
16. Firmware-Upgrade
Die Firmware des Geräts kann über die App aktualisiert werden. Während des Upgrade-Prozesses
muss sich das Hauptgerät in der Ladestation befinden oder über eine Batteriekapazität von mehr
als 30 % verfügen. Es ist während des Upgrade-Prozesses nicht erlaubt, mit der Reinigung zu
beginnen.
Wischen Sie den 2-in-1-Tank mit einem feuchten Papiertuch ab und lassen Sie ihn 24 Stunden lang an
der Luft trocknen, bevor Sie ihn wieder benutzen, um Staubklumpen zu vermeiden.

Scheint etwas mit dem Radar nicht zu stimmen
Bitte stellen Sie die Maschine zum Starten
auf einen ebenen Boden
Bitte setzen Sie den Staubbehälter wieder ein
Bitte prüfen Sie, ob die Leitplanke festsitzt
Aufladen fehlgeschlagen, Staubsammel-Lades-
tation nicht gefunden
Die Maschine ist eingeklemmt. Bitte
bewegen Sie sie
Der Akku ist zu schwach, bitte laden Sie ihn
zuerst auf
Bitte prüfen Sie, ob die Seitenbürste festsitzt
Es scheint ein Problem mit dem Hauptrad zu geben
Bitte prüfen Sie, ob die Hauptbürste festsitzt
Bitte halten Sie sich vor Beginn vom
Sperrbereich fern
Bitte wischen Sie den Abgrundsensor ab und
verlassen Sie den Gefahrenbereich
Punktlaser

Sensore laser
• Premere e tenere premuti entrambi i pulsanti per 3 secondi per resettare il
Wi-Fi e accedere alle impostazioni di rete.
• Premere e tenere premuti entrambi i pulsanti per 20 secondi fino a sentire
un avviso per il ripristino delle impostazioni di fabbrica.
• Premere il pulsante per mettere in pausa durante l’operazione.
• Premere il pulsante per tornare alla ricarica durante la pausa.
• Premere il pulsante per avviare/pausare la pulizia.
Pulsante di accensione
Pulsante di accensione + Pulsante di ricarica
Pulsante di ricarica
Stazione di ricarica
0.5m
0.5m
1.5m
Accendi il robot aspirapolvere, quindi premi contemporaneamente i pulsanti " " e " " per almeno 3 secondi finché la luce bianca non lampeggia lentamente.
ROBOT ASPIRAPOLVERE
ROBOT ASPIRAPOLVERE
Collegarsi al Wi-Fi
Collegarsi al Wi-Fi

Collegarsi al Wi-Fi
Collegarsi al Wi-Fi

ROBOT ASPIRAPOLVERE

7. Pulizia a punto fisso
Selezionare la pulizia a punto fisso nell’app e impostare il punto di destinazione sulla mappa.
L’unità principale pianificherà automaticamente il percorso verso il punto di destinazione e pulirà
un’area quadrata di 1,5 x 1,5 m con il punto di destinazione al centro. Dopo aver completato la
pulizia, l’unità principale tornerà automaticamente alla stazione di ricarica per ricaricarsi.
8. Pulizia programmata
Utilizzare l’app per impostare l’orario della pulizia programmata, e l’unità principale avvierà
automaticamente la pulizia all’orario specificato e tornerà automaticamente alla stazione di
ricarica una volta completata la pulizia.
Se è attivata la modalità “Non disturbare”, la pulizia programmata non verrà eseguita durante il
periodo di “Non disturbare”.
9. Aggiungere acqua o pulire il mop durante l'operazione
Durante il processo di pulizia, se è necessario aggiungere acqua o pulire il mop, mettere in
pausa l’apparecchio premendo il pulsante di accensione, rimuovere il serbatoio d’acqua 2-in-1
e il modulo per il lavaggio, aggiungere acqua o pulire il mop e poi reinstallare il serbatoio
d’acqua 2-in-1 e il modulo per il lavaggio. Infine, premere il pulsante di accensione per
riprendere il lavoro.
10. Modalità di sospensione
Se l’unità principale non è in carica e non viene effettuata alcuna operazione per più di 10
minuti, entrerà automaticamente in modalità di sospensione. Se rimane in modalità di
sospensione per più di 4 ore, si spegnerà automaticamente.
Per riattivare l’unità principale, premere qualsiasi pulsante o utilizzare l’app.
11. Riprendere la pulizia
Durante il processo di pulizia, se la batteria è scarica, l’unità principale tornerà automatica-
mente alla stazione di ricarica per ricaricarsi. Dopo la ricarica, l’unità principale tornerà
automaticamente al punto in cui si era fermata e riprenderà il processo di pulizia. Se
interrompete manualmente la pulizia e spostate o manovrate l’unità principale durante il
processo di ricarica, il ripristino della pulizia verrà annullato.
12. Muro virtual / Zona vietata
Nell’app, puoi configurare muri virtuali o zone vietate per impedire che l’unità principale entri in
aree che non devono essere pulite.
Prima di utilizzare la funzione del muro virtuale/della zona vietata, è necessario salvare la
mappa nell’app. Spostare l’unità principale o apportare modifiche significative all’ambiente può
rendere la mappa originale non valida e causare la perdita dei muri virtuali/delle zone vietate.
1. Accensione/Spegnimento
Premere e tenere premuto il pulsante di accensione per 3 secondi. L’indicatore del pulsante di
accensione si accenderà e l’unità principale entrerà in modalità standby. Quando l’unità principale
è ferma, tenere premuto il pulsante di accensione per spegnerla e l’indicatore si spegnerà.
Quando l’unità principale è in funzione, premere qualsiasi pulsante per mettere in pausa l’unità.
Dopo una pausa, premere nuovamente il pulsante di accensione per riprendere la pulizia.
2. Ritorno alla ricarica
In modalità standby, premere il pulsante di ricarica e l’unità principale tornerà alla stazione
di ricarica per ricaricarsi. Quando l’unità principale ha terminato la pulizia, tornerà
automaticamente alla stazione di ricarica per ricaricarsi, e l’indicatore si illuminerà di
bianco. Se la batteria è scarica durante la pulizia, l’unità principale tornerà automatica-
mente alla stazione di ricarica per ricaricarsi.
3. Creazione rapida della mappa
Quando l'unità principale viene accesa per la prima volta, non c'è alcuna mappa nell'app.
Posizionare l'unità principale sulla stazione di ricarica, selezionare la mappatura rapida
nell'app e l'unità principale creerà una mappa senza pulire. Dopo che l'unità principale è
tornata automaticamente alla stazione di ricarica, la mappa verrà completata e salvata
automaticamente.
4. Mappa di memoria
Dopo che l’unità principale ha completato con successo la creazione rapida della mappa o la
pulizia ed è tornata alla stazione di ricarica, la mappa verrà automaticamente salvata e
aggiornata nell’app. Dopo che la mappa è stata creata con successo, è possibile dividere,
unire aree o personalizzare i nomi delle stanze nell’app.
5. Pulizia programmata
Avvia la pulizia completa della casa tramite l’app o premendo il pulsante di accensione.
L’unità principale eseguirà prima la pulizia dei bordi, poi pulirà l’intera casa seguendo un
percorso prestabilito. Al termine della pulizia, tornerà automaticamente alla stazione di ricarica
per ricaricarsi.
6. Pulizia per aree
Dopo aver impostato la pulizia per aree nell’app, l’unità principale pulirà in base all’area
pianificata e tornerà automaticamente alla stazione di ricarica per ricaricarsi una volta
completata la pulizia.
Accensione/spegnimento e modalità di pulizia
13. Modalità Non Disturbare
Durante il periodo Non Disturbare, l’unità principale non eseguirà la ripresa della pulizia né le
pulizie programmate e non trasmetterà attivamente messaggi vocali. La Modalità Non
Disturbare è abilitata di default dalle 22:00 alle 8:00. È possibile abilitare/disabilitare questa
modalità o impostarne il periodo.
14. Ripristinare Wi-Fi
Quando il telefono mobile non riesce a connettersi all'unità principale dopo aver reimpostato la
password o per altri motivi, ripristina la connessione Wi-Fi seguendo le azioni nell'app da
scaricare in questo manuale.
15. Ripristino delle impostazioni di fabbrica
Premere e tenere premuti entrambi i pulsanti per 20 secondi finché non si sente un
messaggio. L’unità principale dovrà essere ricollegata all’app e tutte le impostazioni correlate
nell’app verranno cancellate.
16. Aggiornamento del firmware
Il firmware del dispositivo può essere aggiornato tramite l’app. Durante il processo di
aggiornamento, l’unità principale deve essere nella stazione di ricarica o avere una batteria con
più del 30 % di carica. Non è consentito avviare la pulizia durante il processo di aggiornamento.
Pulire il raccoglitore di polvere per serbatoi 2 in 1 con un panno di carta umido e farlo asciugare all'aria
per 24 ore prima di utilizzarlo di nuovo per evitare che la polvere si ammassi.
sembra che ci sia qualcosa che non va nel radar
Si prega di posizionare la macchina su un
terreno pianeggiante per iniziare
si prega di rimettere a posto il contenitore
della polvere
Si prega di verificare se la barriera di
protezione è bloccata
Ricarica non riuscita, base di ricarica per
la raccolta della polvere non trovata
La macchina è intrappolata, spostatevi
la batteria è troppo scarica, caricarla prima
Controllare se la spazzola laterale è bloccata
Sembra che ci sia qualcosa di sbagliato
con la ruota principale
Controlla se la spazzola principale è bloccata
Si prega di stare lontano dall'area riservata
prima di iniziare
Si prega di pulire il sensore di dislivello e di
allontanarsi dall'area di pericolo
Laser puntiforme
Sensor láser
• Mantenga presionados los dos botones simultáneamente durante 3
segundos para restablecer Wi-Fi y acceder a la configuración de red.
• Mantenga presionados los dos botones durante 20 segundos hasta que
escuche una advertencia para un restablecimiento de fábrica.
• Presione el botón para pausar durante la operación.
• Presione el botón para regresar a la recarga durante la pausa.
• Presione el botón para iniciar/pausar la limpieza.
Botón de encendido
Botón de encendido + Botón de recarga
Botón de recarga
Estación de carga
0.5m
0.5m
1.5m
Encienda el robot aspirador, luego presione los botones " " y " " al mismo tiempo durante al menos 3 segundos hasta que la luz blanca parpadee lentamente.
Collegarsi al Wi-Fi
Collegarsi al Wi-Fi
ROBOT ASPIRAPOLVERE
ROBOT ASPIRAPOLVERE
Collegarsi al Wi-Fi
Collegarsi al Wi-Fi
ROBOT ASPIRAPOLVERE

7. Limpieza puntual
Seleccione la limpieza puntual en la aplicación y luego configure el punto objetivo en el mapa.
La unidad principal planificará automáticamente la ruta hasta el punto objetivo y limpiará un
área cuadrada de 1,5 x 1,5 m con el punto objetivo como centro. Después de que termine la
limpieza, la unidad principal regresará automáticamente a la estación de carga para recargarse.
8. Limpieza programada
Utilice la aplicación para establecer la hora de la limpieza programada, y la unidad principal
comenzará automáticamente a limpiar en la hora especificada y regresará automáticamente a
la estación de carga una vez que termine la limpieza.
Si el modo “No molestar” está activado, la limpieza programada no se ejecutará durante el
período de “No molestar”.
9. Agregar agua o limpiar el trapo durante la operación
Durante el proceso de limpieza, si necesita agregar agua o limpiar el trapo, pause el
dispositivo presionando el botón de encendido, retire el tanque de agua dos en uno y el
módulo de trapeado, agregue agua o limpie el trapo y luego instale nuevamente el tanque de
agua dos en uno y el módulo de trapeado. Finalmente, presione el botón de encendido para
continuar trabajando.
10. Modo de reposo
Si la unidad principal no está cargando y no hay operación durante más de 10 minutos,
entrará automáticamente en modo de reposo. Si permanece en modo de reposo durante más
de 4 horas, se apagará automáticamente.
Para despertar la unidad principal, presione cualquier botón o utilice la aplicación.
11. Reanudar la limpieza
Durante el proceso de limpieza, si la batería está baja, la unidad principal regresará
automáticamente a la estación de carga para recargarse. Después de recargarse, la unidad
principal regresará automáticamente al lugar donde lo dejó y continuará con el proceso de
limpieza. Si detiene manualmente la limpieza y mueve o opera la unidad principal durante el
proceso de carga, la reanudación de la limpieza será cancelada.
12. Muro virtual / Zona de no acceso
En la aplicación, puede configurar muros virtuales o zonas de no acceso para evitar que la
unidad principal entre en áreas que no necesitan ser limpiadas.
Antes de usar la función de muro virtual/zona de no acceso, debe guardar el mapa en la
aplicación. Mover la unidad principal o realizar cambios importantes en el entorno puede
hacer que el mapa original se vuelva inválido y provoque la pérdida de los muros
virtuales/zona de no acceso.
1. Encendido/Apagado
Mantenga presionado el botón de encendido durante 3 segundos. El indicador del botón de
encendido se encenderá, y la unidad principal entrará en modo de espera. Cuando la unidad
principal esté inmóvil, mantenga presionado el botón de encendido para apagarla, y el indicador se
apagará.
Cuando la unidad principal esté en funcionamiento, presionar cualquier botón pausará la unidad.
Después de una pausa, presione nuevamente el botón de encendido para continuar con la limpieza.
2. Regreso a la recarga
En modo de espera, presione el botón de recarga, y la unidad principal regresará a la
estación de carga para recargarse. Cuando la unidad principal haya terminado de limpiar,
regresará automáticamente a la estación de carga para recargarse, y el indicador se
encenderá con luz blanca. Si la batería está baja durante la limpieza, regresará
automáticamente a la estación de carga para recargarse.
3. Construcción rápida de mapas
Cuando la unidad principal se enciende por primera vez, no hay un mapa en la aplicación.
Coloque la unidad principal en la estación de carga, seleccione el mapeo rápido en la
aplicación, y la unidad principal creará un mapa sin limpiar. Después de que la unidad principal
regrese automáticamente a la estación de carga, el mapa se completará y se guardará
automáticamente.
4. Mapa de memoria
Después de que la unidad principal complete con éxito la construcción rápida de un mapa o una
limpieza y regrese a la estación de carga para recargarse, el mapa se guardará y actualizará
automáticamente en la aplicación. Una vez que el mapa se haya construido con éxito, puede
dividir, fusionar áreas o personalizar los nombres de las habitaciones en la aplicación.
5. Limpieza programada
Inicie la limpieza completa de la casa a través de la aplicación o presionando el botón de
encendido. La unidad principal primero realizará una limpieza de bordes y luego limpiará toda la
casa siguiendo una ruta establecida. Una vez finalizada la limpieza, regresará automáticamente
a la estación de carga para recargarse.
6. Limpieza por áreas
Después de configurar la limpieza por áreas en la aplicación, la unidad principal limpiará
según la zona planificada y regresará automáticamente a la estación de carga para
recargarse una vez que termine la limpieza.
Encendido/apagado y modos de limpieza
13. Modo No Molestar
Durante el período de No Molestar, la unidad principal no realizará la reanudación de la
limpieza ni las limpiezas programadas y no emitirá mensajes de voz de manera activa.
El modo No Molestar está activado de manera predeterminada de 22:00 a 8:00. Puede
activar/desactivar este modo o establecer el período de tiempo del modo.
14. Restablecer Wi-Fi
Cuando el teléfono móvil no puede conectarse a la unidad principal después de restablecer la
contraseña o por otros motivos, restablezca la conexión Wi-Fi siguiendo las acciones en la
aplicación que se descarga desde este manual.
15. Restablecimiento de fábrica
Mantenga presionados los dos botones durante 20 segundos hasta que escuche un aviso. La
unidad principal deberá volver a conectarse a la aplicación, y todos los ajustes relacionados
en la aplicación serán borrados.
16. Actualización de firmware
El firmware del dispositivo se puede actualizar a través de la aplicación. Durante el proceso de
actualización, la unidad principal debe estar en la estación de carga o tener más del 30 % de
batería. No se permite iniciar la limpieza durante el proceso de actualización.
Limpie el depósito colector de polvo 2 en 1 con una toalla de papel húmeda y déjelo secar al aire
durante 24 horas antes de volver a utilizarlo para evitar que el polvo se apelmace.
Parece que algo anda mal con el radar.
Coloque la máquina en un terreno nivelado
para comenzar.
por favor devuelva la caja de polvo
Por favor, compruebe si la barrera
protectora está atascada.
Falló la recarga, no se encontró la base
de carga de recolección de polvo
La máquina está atrapada, por favor muévase.
La batería está demasiado baja, cárguela primero.
Compruebe si el cepillo lateral está atascado.
Parece haber algo mal con la rueda principal
Compruebe si el cepillo principal está atascado.
Manténgase alejado del área restringida
antes de comenzar.
Limpie el sensor de desnivel y aléjese del
área de peligro.
Láser puntual
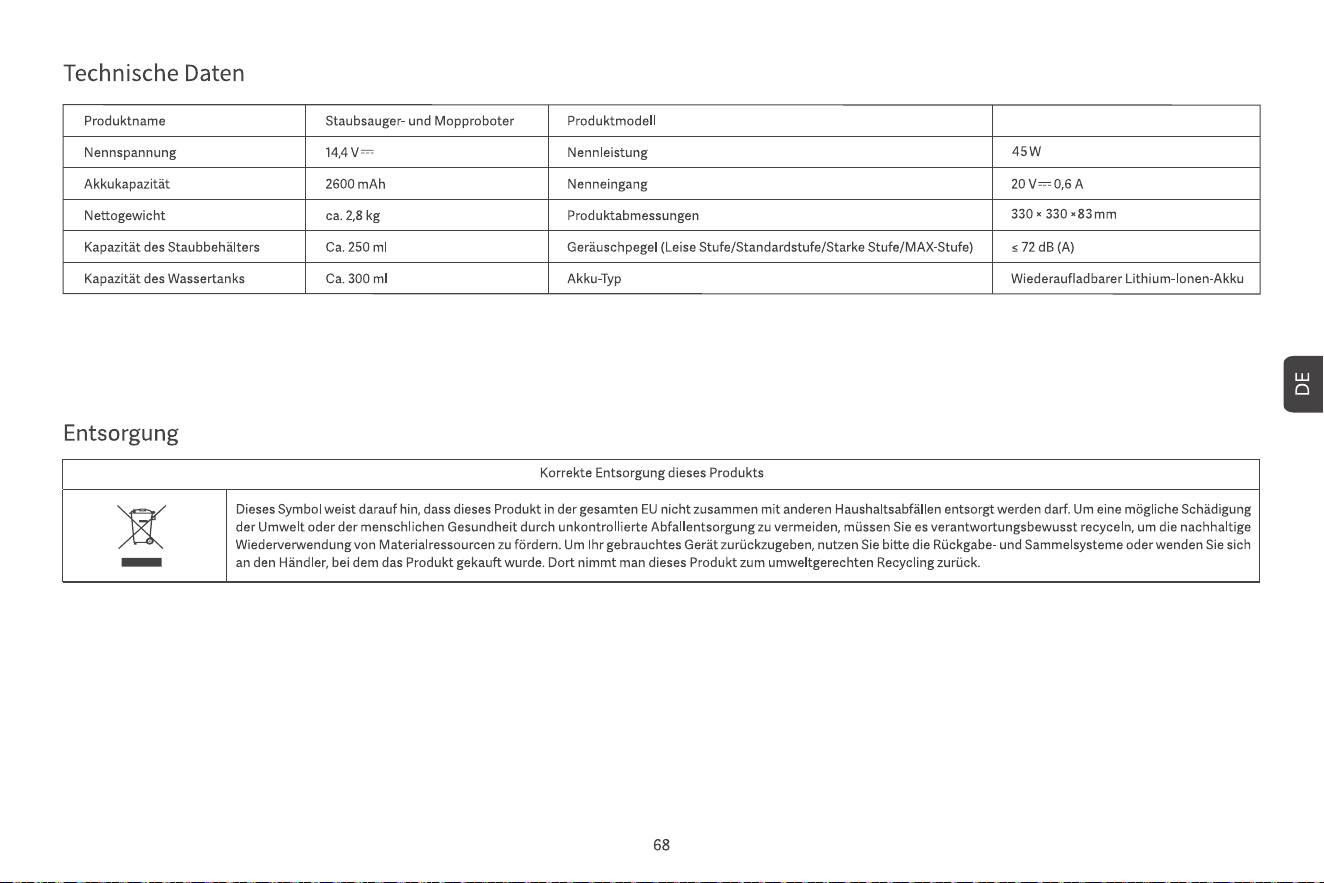
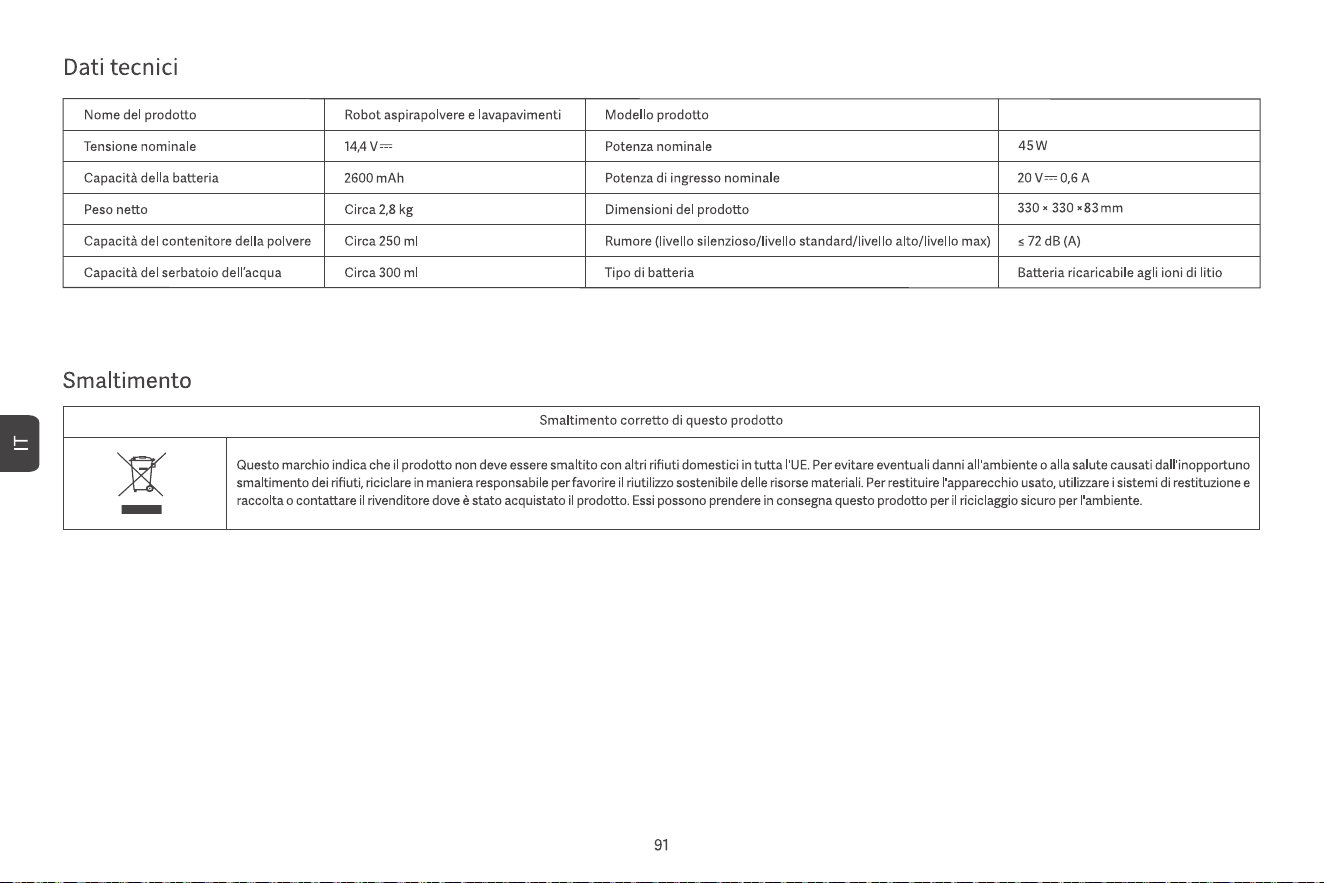
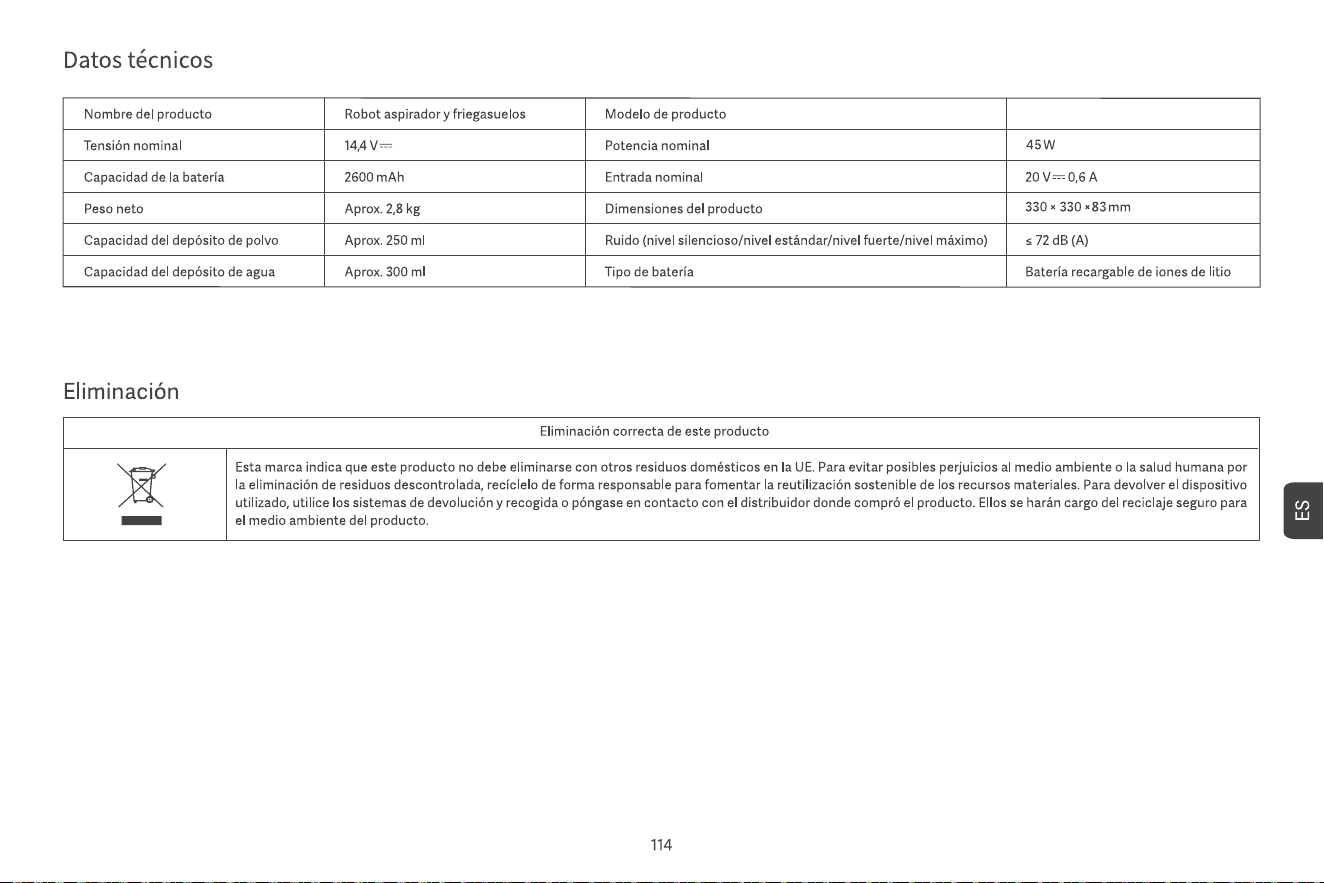
14.4V
45W
20.0V 0.6A
2600mAh
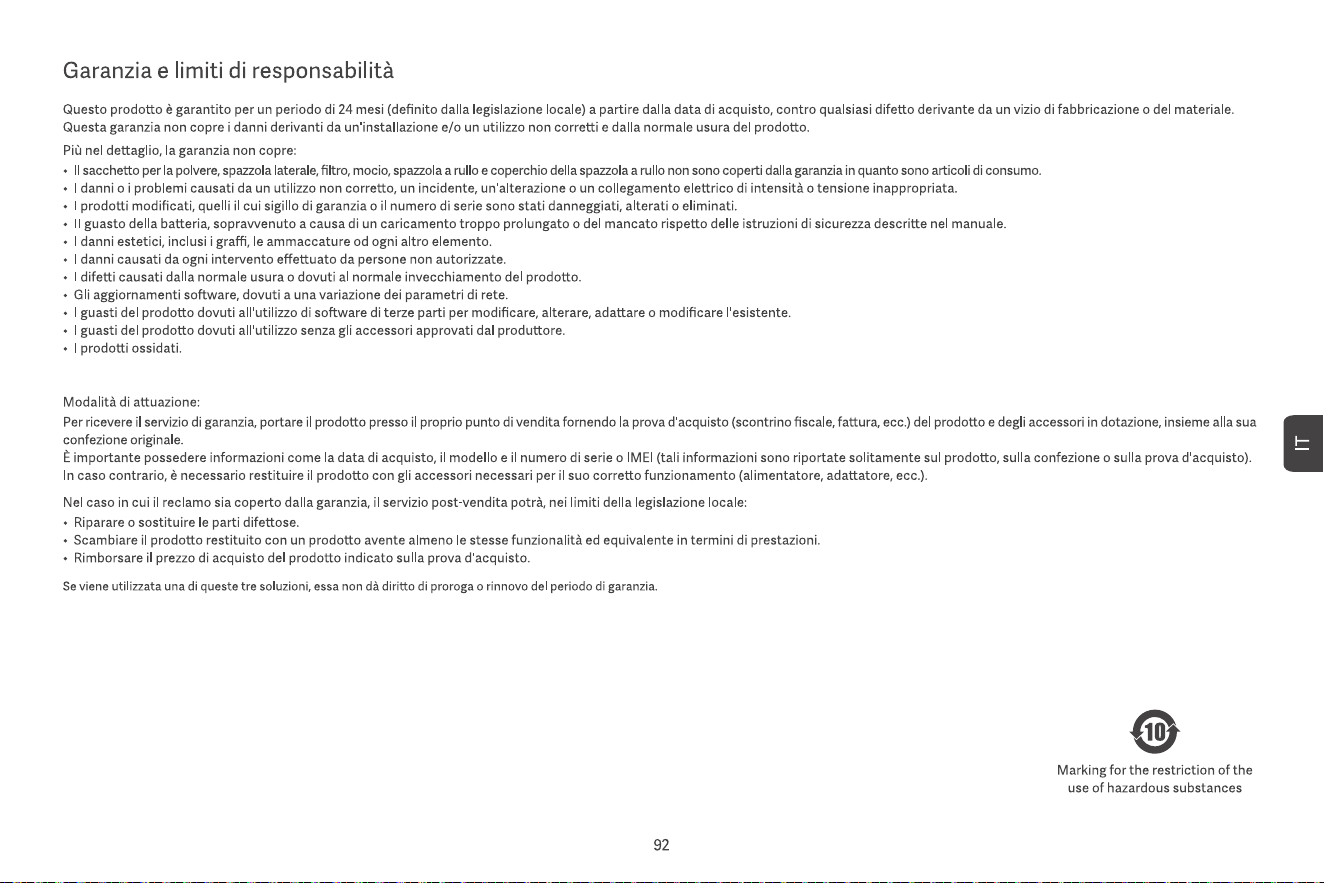
EN: Not suitable for children under 36 months.
DE: Nicht geeignet für Kinder unter 36 Monaten.
FR:Ne convient pas aux enfants de moins de 36 mois.
IT: Non adatto ai bambini di età inferiore ai 36 mesi.
ES: No apto para niños menores de 36 meses.
NL:Niet geschikt voor kinderen onder de 36 maanden.
SE: Svenska: Inte lämplig för barn under 36 månader.
PL: Nieodpowiednie dla dzieci poniżej 36 miesięcy.
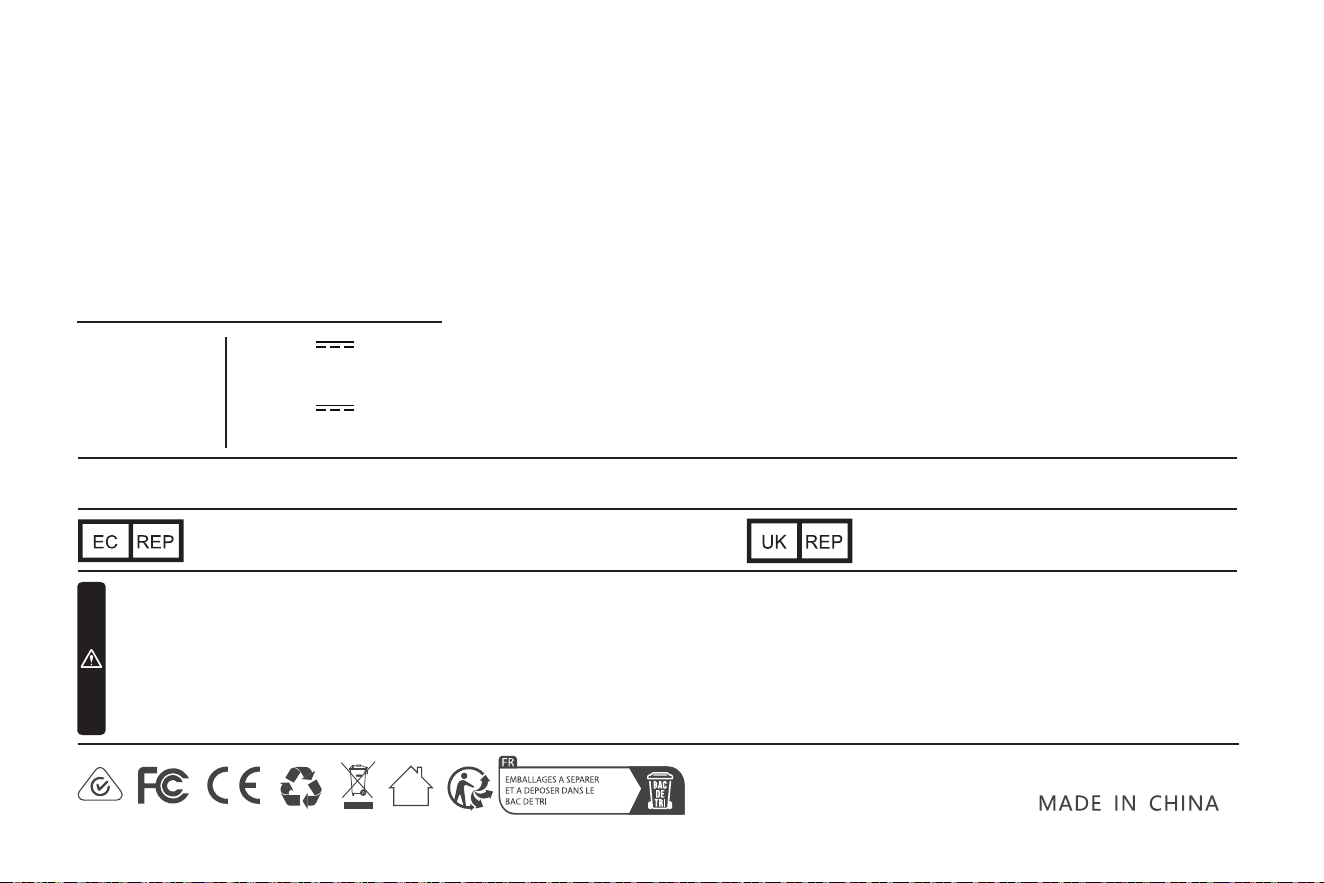
Manufacturer: Dongguan Ce Link Limited
Address: No. 22, Dongkang Road, Baihuadong Village, Dalingshan Town, Dongguan
Name: GAVIMOSACONSULTORIA,SOCIEDADLIMITADA
Address: CASTELLANA 9144, 28046 Madrid
Email: [email protected]
Name: Sea&Mew Accounting Ltd
Address: ElectricAvenueVision25,London,EnfieldEN37GD
Email: [email protected]
CUSTOMER SERVICE
Please contact us if you need any help as following:
▪ Technical Support
▪ Package is NOT in perfect condition
▪ Parts missing
▪ Any other quality issues
If the above problem occurs look at the bottom of the robot and scan QR code
Robot Vacuum Cleaner
Rated Voltage
Rated Power
Input
Battery