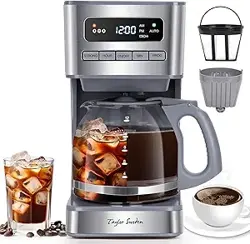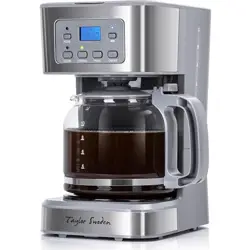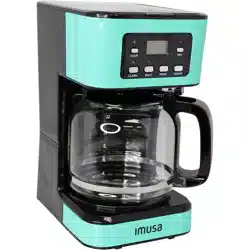
12 Cup Programmable Coffeemaker
USE AND CARE INSTRUCTIONS
Cafetera de 12 Tazas Programable
MANUAL DE INSTRUCCIONES
MODEL/MODELO: GAU-18225T
Please Read and Save this Use and Care Manual
Por Favor Lea y Guarde este Instructivo Antes de Usar el Producto

CAFETERA DE 12 TAZAS PROGRAMABLE
MANUAL DE INSTRUCCIONES
2
Table of Contents
Important Safeguards.........................................................................................................................3
Polarized Plug.....................................................................................................................................5
Extension Cord Use.............................................................................................................................5
Electric Power.....................................................................................................................................5
Tamper-Resistant Screw......................................................................................................................5
Learning About Your Coffeemaker........................................................................................................6
Before First Use..................................................................................................................................7
How to Use your Coffeemaker.............................................................................................................8
Suggested Coffee Brewing................................................................................................................11
Care and Cleaning.............................................................................................................................12
Storage and Maintenance..................................................................................................................13
Need Help?.......................................................................................................................................14
Warranty...........................................................................................................................................14
Page

12 CUP PROGRAMMABLE COFFEEMAKER
USE AND CARE INSTRUCTIONS
3
IMPORTANT SAFEGUARDS
When using electrical appliances, basic safety precautions should always be followed, including the
following:
• Read all instructions before use.
• Do not touch hot surfaces. Use handles or knobs.
• To protect against electric shock, do not immerse cord, plug, variable temperature control, or
appliance in water or any other liquid.
• Close supervision is necessary when any appliance is used near children.
• Unplug from outlet when not in use and before cleaning. Allow to cool before putting on or taking off
parts, and before cleaning the appliance.
• Do not operate any appliance with a damaged cord or plug or after the appliance malfunctions or
has been damaged in any manner.
• This appliance is not intended for use by persons (including children) with reduced physical,
sensory or mental capabilities, or lack of experience and knowledge, unless they have been given
supervision or instruction concerning use of the appliance by a person responsible for their
safety.
• The use of attachments not recommended by the appliance manufacturer may cause fire, electric
shock or injuries.
• Do not use outdoors.
• Do not let cord hang over edge of table or counter or touch hot surfaces.
• Do not place on or near a hot gas or electric burner, or in a heated oven.
• To disconnect the appliance, turn any control to off (if applicable), then remove plug from wall
outlet.
• Do not use appliances for anything other than their intended use.
• Keep lid closed on the coffeemaker when in use.
• Scalding may occur if the lid is removed during the brewing cycles.
• The carafe is designed for use only with this appliance.
• Do not set a hot carafe on a wet or cold surface.

CAFETERA DE 12 TAZAS PROGRAMABLE
MANUAL DE INSTRUCCIONES
4
• Do not use a cracked carafe or a carafe having a loose or weakened handle.
• Do not clean carafe with cleansers, steel wool pads or other abrasive material.
• Never stir inside of the carafe with a spoon or other utensils.
• Use only water in this appliance. Do not put any other liquids or foods in the water reservoir.
SAVE THESE INSTRUCTIONS
THIS PRODUCT IS INTENDED FOR HOUSEHOLD USE ONLY

12 CUP PROGRAMMABLE COFFEEMAKER
USE AND CARE INSTRUCTIONS
5
POLARIZED PLUG
This appliance has a polarized plug (one blade is wider than the other). To reduce the risk of electric
shock, this plug will fit into a polarized outlet only one way. If the plug does not fit correctly into the out-
let, flip it. If it still does not fit, contact a qualified electrician. Do not attempt to defeat this safety feature
by modifying the plug in any way.
EXTENSION CORD USE
A short power-supply cord is provided to reduce the risk resulting from becoming entangled or tripping
over a longer cord.
The use of an extension cord is not recommended. However, longer extension cords may be used if care
is exercised.
• If an extension cord is used,
a) The marked electrical rating of the cord set or extension cord should be at least as great as
the electrical rating of the appliance.
b) The cord should be arranged so that it will not drape over the countertop or tabletop where it
can be pulled on by children or tripped over unintentionally.
ELECTRIC POWER
If the electrical circuit is overloaded with other appliances, your appliance may not operate properly. It
should be operated on a separate electrical circuit from other appliances.
TAMPER-RESISTANT SCREW
Warning: This appliance is equipped with a tamper-resistant screw to prevent removal of the outer
cover. To reduce the risk of fire or electric shock, do not attempt to remove the outer cover. There are
no user serviceable parts inside.
CAFETERA DE 12 TAZAS PROGRAMABLE
MANUAL DE INSTRUCCIONES
6
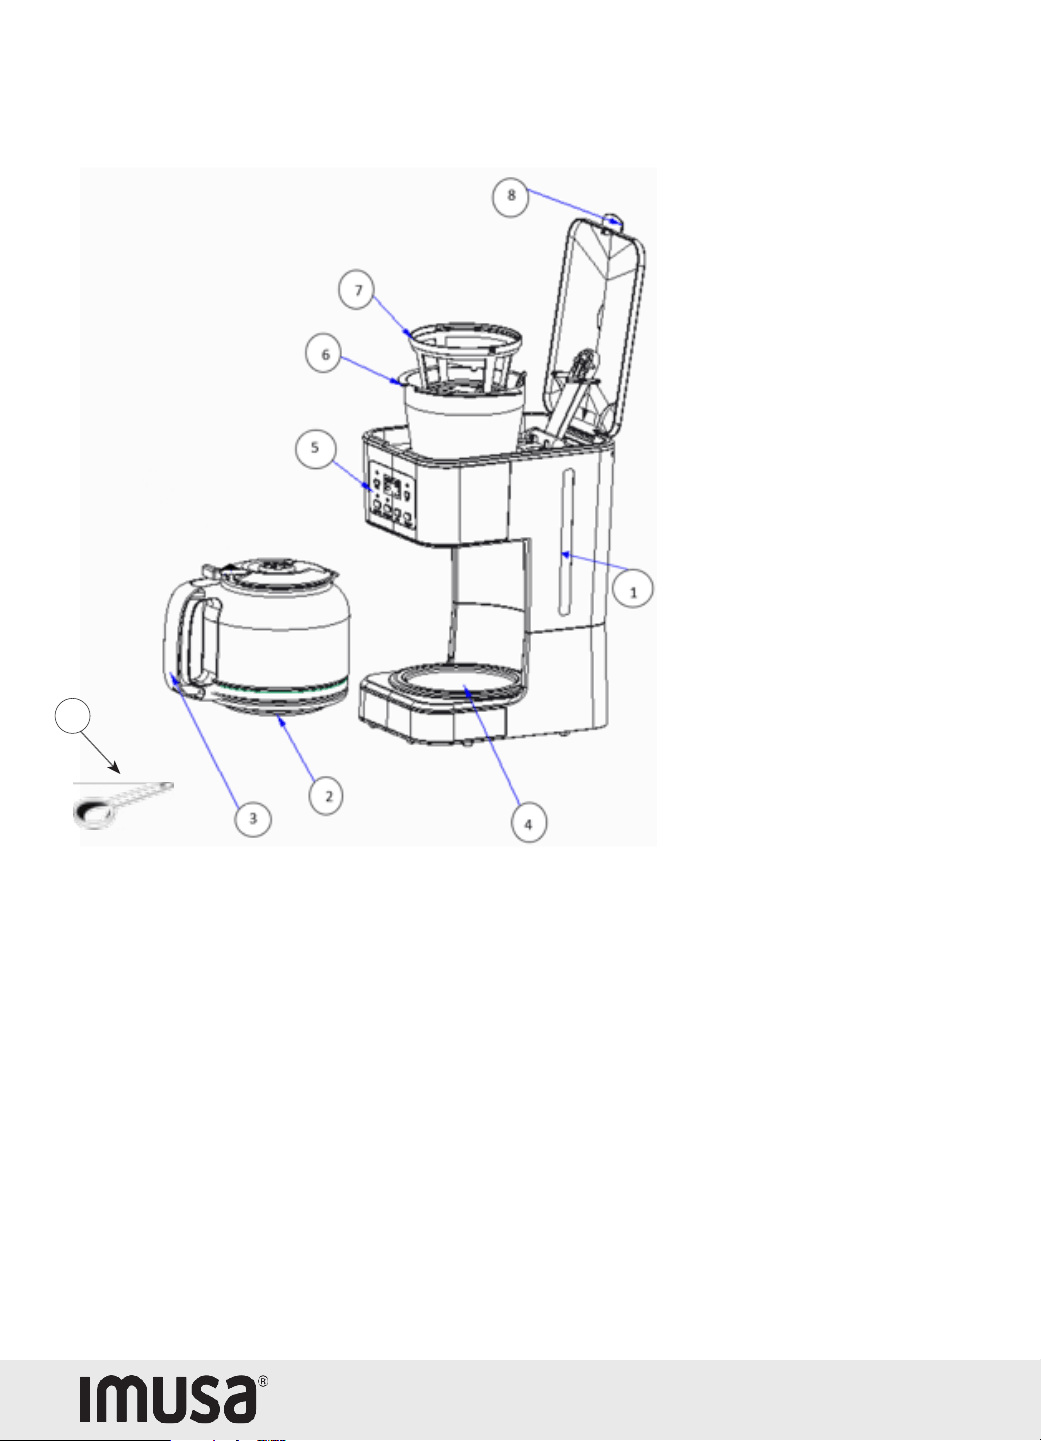
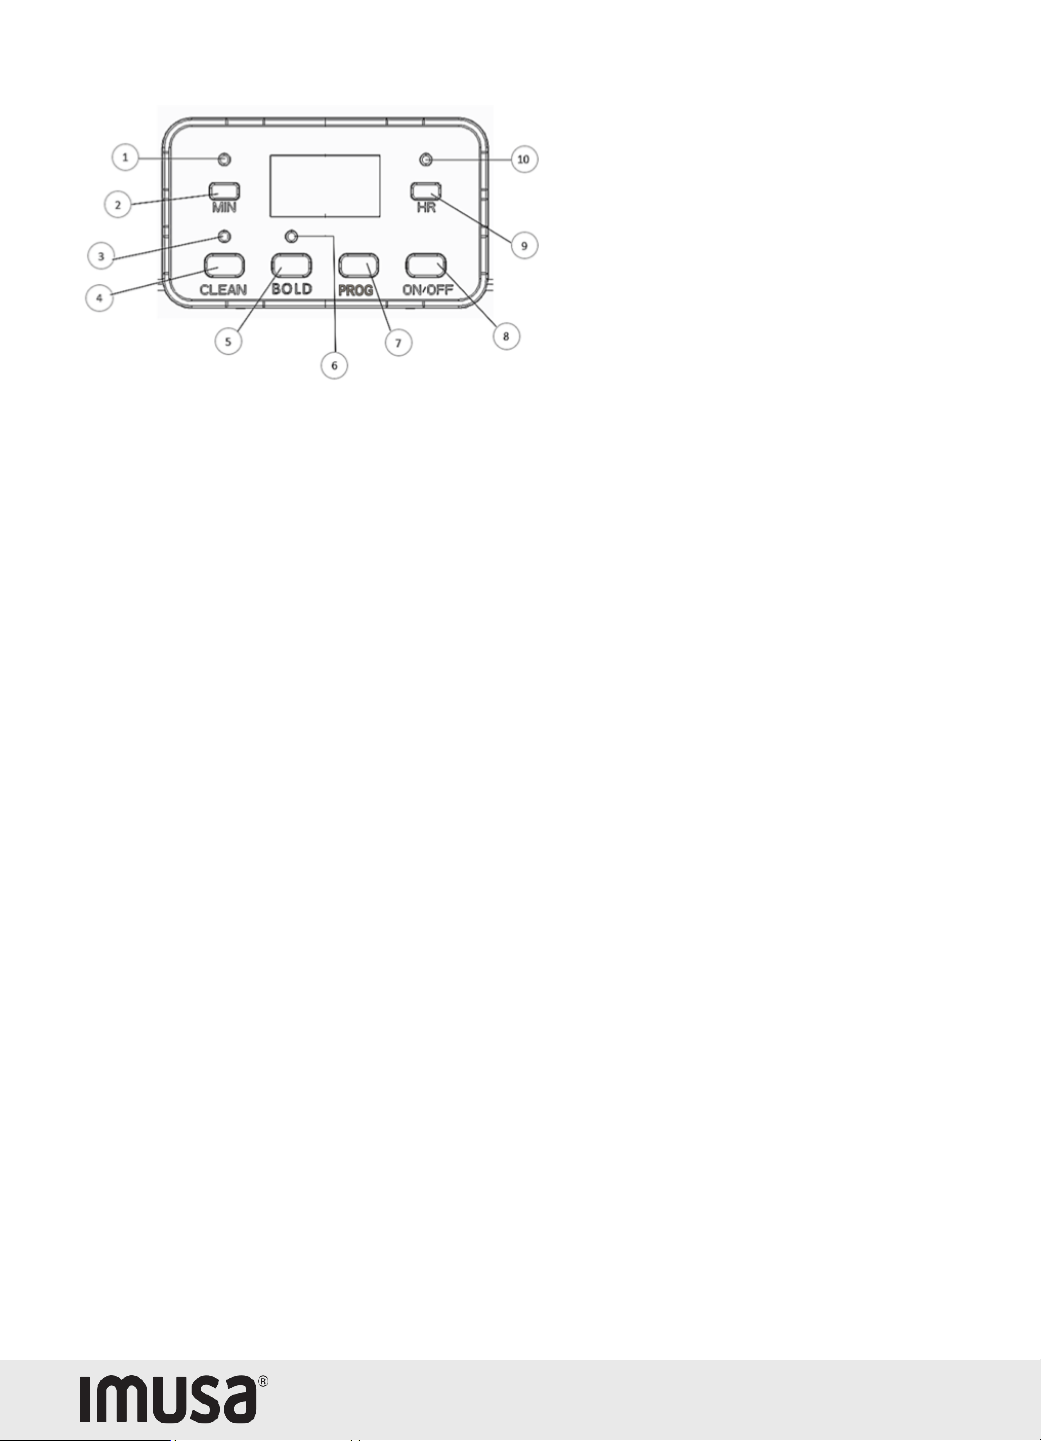
LEARNING ABOUT YOUR COFFEEMAKER
Product may vary slightly from what is illustrated.
1. Water Window with Level Mark
2. Carafe
3. Carafe Handle
4. Warming Plate
5. Control Panel
6. Removable Filter Basket
7. Reusable Filter
8. Coffeemaker Lid
9. Measuring Scoop
9
12 CUP PROGRAMMABLE COFFEEMAKER
USE AND CARE INSTRUCTIONS
7
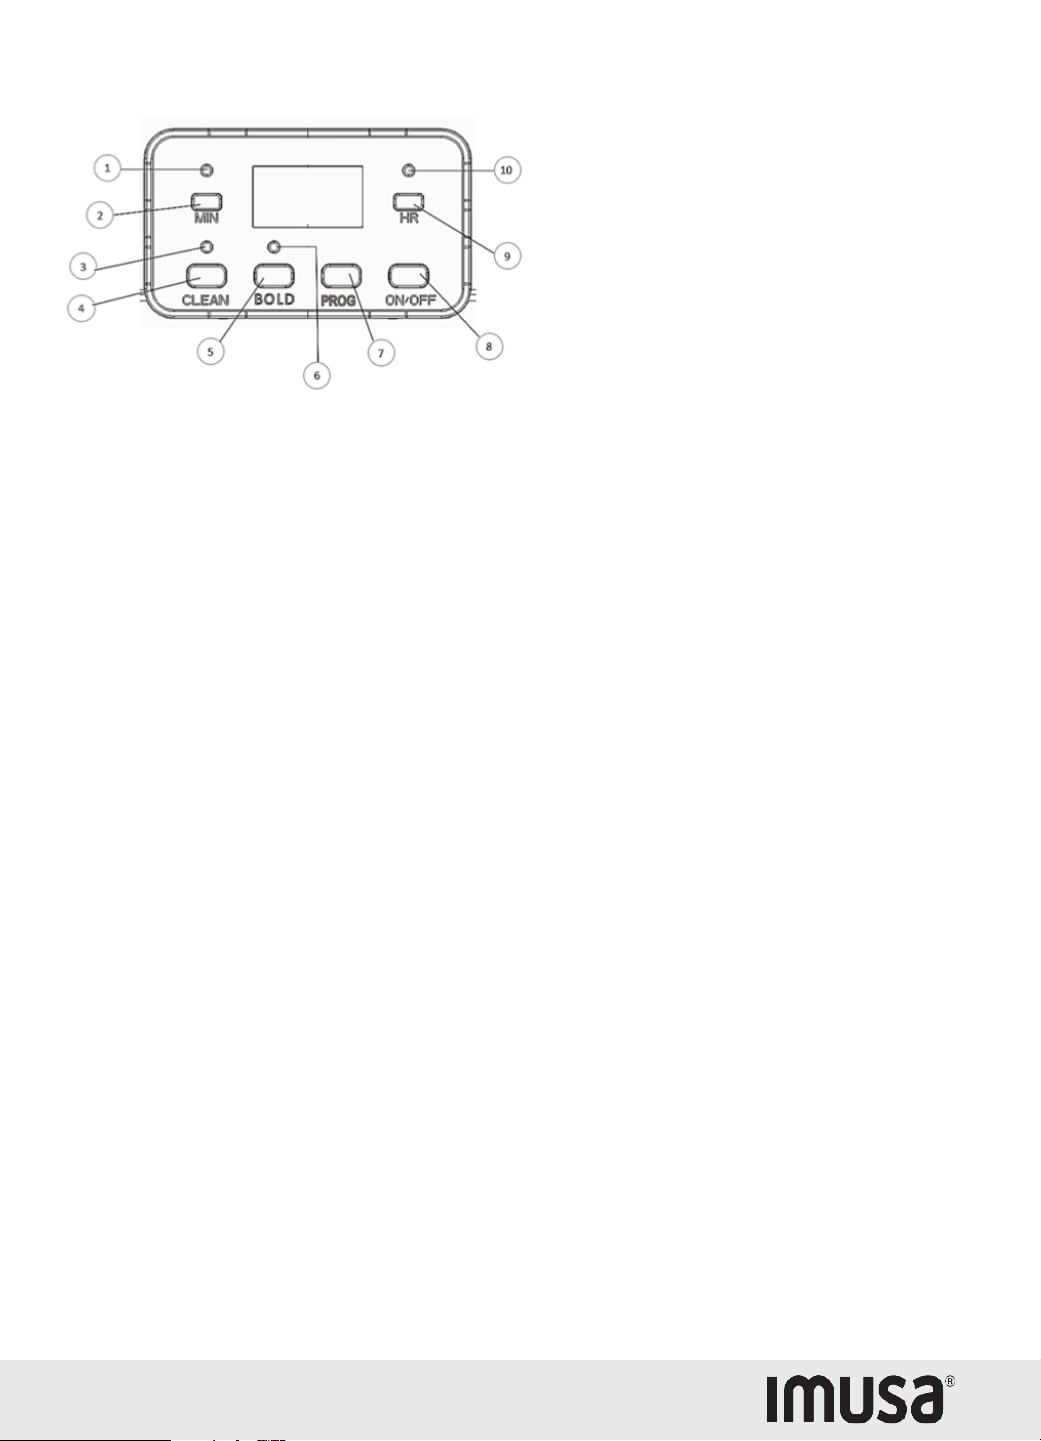
Control Panel
1. AUTO Indicator Light (GREEN)
2. Minute Button (MIN)
3. Cleaning Indicator Light
4. Cleaning Button (CLEAN)
5. Brew Button (BOLD)
6. Brew Indicator Light
7. Program Button (PROG)
8. Power Button (ON/OFF)
9. Hour Button (HR)
10. Power Indicator Light (RED)
BEFORE FIRST USE
• Remove all packing material and stickers from the product and save instruction manual.
Caution: Tear up all plastic bags as they can pose a risk to children.
• Cut and remove tie wrap located between the electric plug blades.
• Before using your new appliance, wipe the body of the coffeemaker with a damp cloth.
Note: Before the first use, it is suggested that you clean your new coffeemaker. Simply run through 2
brew cycles as described below without using coffee or a coffee filter.
• Clean removable filter basket and carafe. Both items are top rack dishwasher safe, or they may be
hand washed in warm soapy water.
• Place appliance on a flat stable surface.
Caution: Because some countertop finishes are more sensitive than others, use care not to place

CAFETERA DE 12 TAZAS PROGRAMABLE
MANUAL DE INSTRUCCIONES
8
coffeemaker on surfaces where heat may cause damage.
• First, brew water through appliance without adding coffee grounds. This removes any dust or
residue that may remain in the system during the manufacturing process.
• Pour water into the water reservoir up to 12 cup mark.
Note: During regular brewing, it is not recommended to brew less the 4 cups.
• Place reusable filter or empty paper filter into removable filter basket.
• Place the filter basket into the coffeemaker.
• (After initial cleaning process) Add coffee using the measuring scoop provided. Brew coffee
with the coffee water ratio you normally use when you prepare ground coffee. Do not exceed
the Max level.
• Place empty carafe on warming plate directly under the brew basket opening.
Caution: To avoid filter basket overflow, the carafe must fit securely into the coffee maker with the lid on.
If not properly positioned on the warming plate it could cause hot water or hot coffee to overflow.
• Plug into a standard 120 Volt AC outlet.
• Close the coffeemaker lid.
• With the Top Lid firmly closed and the carafe securely in place, press the “ON” button. The red
color LED light will light up and flash, to indicate the brew cycle has started.
Caution: Never open the top lid during the brewing cycle; even if no water is draining from the fun-
nel. Extremely hot water/coffee can spill out from the basket and cause injuries. If water/coffee is not
draining from the filter basket, IMMEDIATELY unplug the unit and wait 10 minutes before opening and
checking the filter.
• When the brewing process ends, and the water level indicator is empty, hot liquid will still be
remaining in the filter basket. Wait a few minutes for the rest of the liquid to drip through into
the carafe.
• After coffee grounds have cooled, open the top lid and carefully remove the filter by grasping
the handle and lifting straight up from the funnel compartment. Discard used coffee
filter and grounds.
Caution: Coffeemaker becomes very hot during the brew cycle. Please handle with extreme care.
• Always switch the coffee maker to OFF when the carafe is empty, or you no longer want to
keep coffee hot. The coffee maker will shut off automatically after 40 minutes.
Note: The warming plate will operate as long as the switch is on.
Note: If two (2) or more pots of coffee are to be made it is recommended that the coffee maker be

12 CUP PROGRAMMABLE COFFEEMAKER
USE AND CARE INSTRUCTIONS
9
allowed to cool for 10 minutes between each brewed pot. The filter should also be rinsed out after each
brew cycle.
• Unplug unit.
Setting the Clock
• Plug appliance into a standard 120 Volt AC outlet.
• Press the HOUR and then the MIN buttons to set the current time. Press and hold the buttons
to scroll through numbers quickly.
• When the number displayed approaches the desired setting, press and release the button to
advance one digit at a time.
Note: If the power is interrupted or unit is unplugged, the time will need to be reset.
HOW TO USE YOUR COFEEMAKER
• Fill the water reservoir with the desired amount of cold fresh water. Do not exceed the 12-cup
maximum level. Minimum amount recommended is 4 cups.
Note: The amount of brewed coffee will be less than the water placed in the coffeemaker since about
10% is absorbed by the coffee grounds and the filter.
• Place reusable filter or paper filter in the removable filter basket.
• Add the desired amount of ground coffee to the filter by using the measuring scoop provided.
• Gently shake the filter basket to level the ground coffee that’s in the filter.
• Place the filter basket into the coffeemaker.
• Close the coffeemaker lid.
• Place empty carafe on the warming plate.
Brewing Coffee Now
• Follow the same steps as “Water and Coffee” instructions.
• Press ON/OFF button.
• The ON/OFF indicator light will start to blink, and brewing will begin.
Caution: Make sure the carafe is accurately centered on the warming plate, or the water grounds will
overflow from the brew basket. An overflow may cause personal injury or damage to property.
Caution: To reduce the risk of damaging the carafe and/or the risk of personal injury, do not add cold
water to the carafe if the carafe is already hot. Allow the carafe to cool before filling with cold water.

CAFETERA DE 12 TAZAS PROGRAMABLE
MANUAL DE INSTRUCCIONES
10
Caution: Do not brew coffee while the coffeemaker lid is open.
• Once brewing cycle is complete, place carafe on warming plate between servings to keep
it hot.
• Coffeemaker will automatically turn off after 40 minutes.
Caution: If the brew basket overflows or fails to empty into the carafe, do not open the brew basket.
Unplug the coffeemaker and wait for the contents to cool before handling.
Brewing Coffee Later
• Follow the same steps as “Water and Coffee” instructions.
• To set the desired auto brew start time, first press the PROG button.
• You can set the time you want coffee to begin brewing by using the HOUR and MIN buttons.
Following the same directions for “Setting the Clock”.
• After setting brew time, a green light will flash, and the word” AUTO” will show in the
LCD screen.
• Your coffee maker will automatically begin brewing at the pre-set time. When the brew cycle
begins, the red light will flash to indicate the coffee maker is in operation.
• Press the PROG button for about 3 second to cancel the Pre-set Mode.
BOLD Function
• This function is to lengthen the brewing time in order to make stronger tasting coffee.
• Press the “ON/OFF” button, then press the “BOLD” button.
• You will notice an indicator LED light over the “BOLD” button that will turn green.
Note: This function will work immediately.
Note: You may press the “BOLD” button during normal brewing to shift over to this function.
Pause and Serve Function
• This function allows you to pour a cup of coffee from the carafe while the coffee is brewing.
When the carafe is removed, the brewing process is paused. Just place the carafe on
the warming plate again and the brewing will resume.
12 CUP PROGRAMMABLE COFFEEMAKER
USE AND CARE INSTRUCTIONS
11
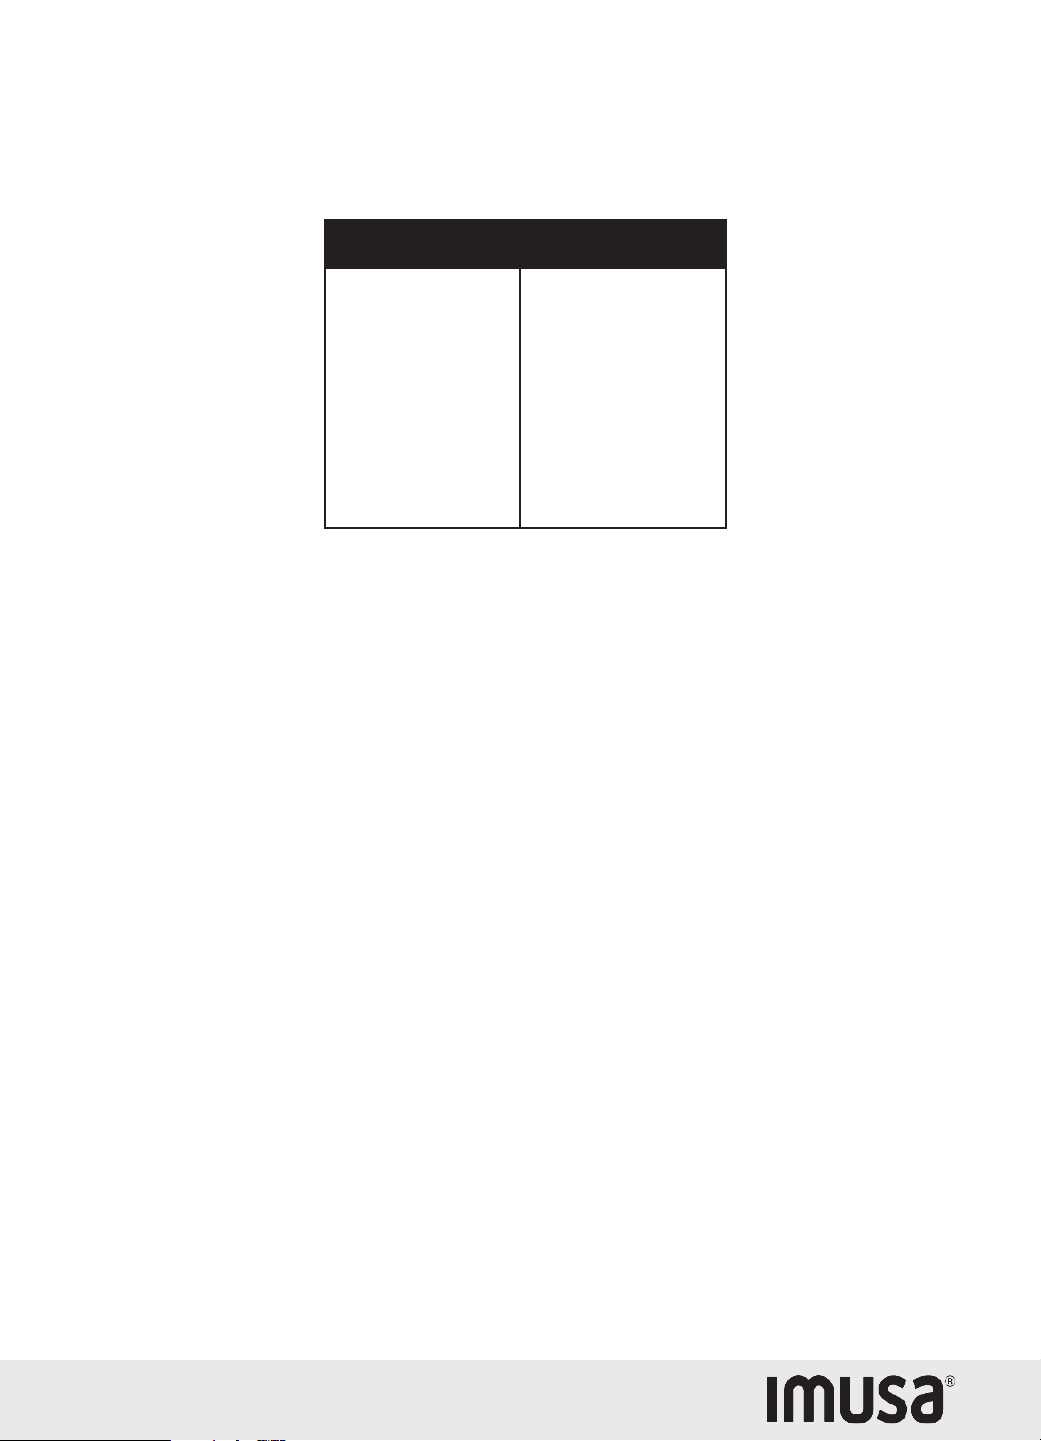
SUGGESTED COFFEE BREWING
For best results, use ground coffee meant for automatic drip coffeemakers. The chart below indicates
suggested amounts of ground coffee by using the measuring scoop provided.
Note: 1 cup = 5 ounces of brewed coffee
2 cups
4 cups
6 cups
8 cups
10 cups
12 cups
1 ½ scoops
2 ½ scoops
3 scoops
3 ½ scoops
4 ½ scoops
5 ½ scoops
To Brew Ground Coffee

CAFETERA DE 12 TAZAS PROGRAMABLE
MANUAL DE INSTRUCCIONES
12
CARE AND CLEANING
Coffeemaker
• Unplug the cord and wait for appliance to cool completely before cleaning.
• Carefully open the coffeemaker lid. Using basket handle, remove and discard used grounds
and paper filter; or if using the reusable filter, wash thoroughly, then close the lid.
• Wash removable filter basket and reusable filter in warm sudsy water.
• The coffeemaker’s exterior may be cleaned with a soft damp cloth.
• To clean the inside of the coffeemaker lid, open the lid allowing it to rest in the open position
and wipe the surfaces with a clean damp cloth.
• Never immerse the coffeemaker in water or other liquids.
• Coffeemaker is NOT dishwasher safe.
• Do not use any abrasive cleaners or metal pads to clean the coffeemaker.
• Never spray or apply cleaner directly onto or into the coffeemaker.
Carafe
• Hand wash in warm sudsy water.
• Do not use any abrasive cleaners or metal pads to clean the carafe.
Note: A damaged carafe may result in burns from hot liquid.
To avoid breaking:
• Do not allow all liquid to evaporate from the carafe while on the warming plate.
• Do not heat the carafe while empty.
• Discard the carafe if chipped, cracked or damaged in any manner.
• Do not place the carafe on or near a gas or electric burner, in a heated oven, or in a microwave
oven.
• Avoid rough handling and sharp blows.
Decalcifying (Clean function)
Your coffeemaker must be cleaned when you notice any of the following conditions:
a) Increased brew cycle times.

12 CUP PROGRAMMABLE COFFEEMAKER
USE AND CARE INSTRUCTIONS
13
b) Excessive steaming.
c) The brewing process stops before all of the water has been pumped from the reservoir.
• Add two tablespoons of cooking white vinegar to one carafe of cold water into the water reser
voir up to the 6-cup mark on the water window.
• Put the reusable filter or a paper filter in the filter basket and close the lid.
• Place the empty carafe on the warming plate.
Caution: Make sure to accurately place the carafe on the warming plate to avoid the possibility of over-
flow.
• Press the “CLEAN” button
• When the brew cycle is finished, empty the carafe and rinse with water.
• Refill the water reservoir with cold water only and repeat the brew cycle with water only, twice
more. This will rinse out any remaining vinegar solution.
Note: We recommend you do this at least 4 times a year.
• Wash the filter basket and carafe as instructed in the CARE AND CLEANING section.
Note:
a) After 60 cycles, the “CLEAN” light will start flashing (green) as a reminder that the coffee
maker needs to be cleaned.
b) Press “CLEAN” button to clean the machine (in standby mode). Otherwise the Green light will
not stop flashing.
STORAGE AND MAINTENANCE
• Always allow the coffeemaker to completely cool before storing.
• Wind the electrical cord into a coil and secure with a twist fastener.
• Store your coffeemaker in a dry location, such as on a tabletop, countertop, or on a cupboard
shelf.
• Other than recommended cleaning, no further user maintenance should be necessary.

CAFETERA DE 12 TAZAS PROGRAMABLE
MANUAL DE INSTRUCCIONES
14
NEED HELP?
For service, repairs, or any questions regarding your appliance, call the number on the last page of this
manual. Please DO NOT return the product to the place of purchase. Also, please DO NOT mail product
back to manufacturer. You may also want to consult the website listed on the last page of this manual.
1 YEAR LIMITED WARRANTY
What does it cover?
• Manufacturer defects in materials or workmanship (returns will only be accepted if due to a manu
facturer defect and will not be accepted after 1 year from date of purchase. Returns will only be
accepted with original receipt).
• Applies only to products purchased and used in the United States, Hawaii or Alaska.
How do you get service?
• Save your receipt as proof of date of purchase.
• Email customerser[email protected], or call 1-800-850-2501.
• If you need parts or accessories, please contact us via email or phone.
Warranty does NOT cover:
• Damage from commercial use.
• Damage from misuse, abuse, or neglect.
• Products that have been modified in any way.
• Glass or other accessory items that are packed with the unit.
• Damage due to accidents or repairs.

12 CUP PROGRAMMABLE COFFEEMAKER
USE AND CARE INSTRUCTIONS
15
Indice
Instrucciones Importantes de Seguridad.......................................................................................16-17
Enchufe Polarizado...........................................................................................................................18
Uso de un Cable de Extensión...........................................................................................................18
Cable Eléctrico..................................................................................................................................18
Tornillo de Seguridad..........................................................................................................................18
Aprenda Acerca de su Cafetera..........................................................................................................19
Antes de Usar por Primera Vez..........................................................................................................20
Como Usar su Cafetera.....................................................................................................................21
Recomendaciones para Preparar Café ...............................................................................................24
Cuidado y Limpieza..........................................................................................................................25
Almacenamiento y Mantenimiento.....................................................................................................27
¿Necesita Ayuda?.............................................................................................................................28
Garantía............................................................................................................................................28
Página
´

CAFETERA DE 12 TAZAS PROGRAMABLE
MANUAL DE INSTRUCCIONES
16
INSTRUCCIONES IMPORTANTES DE SEGURIDAD
Cuando se utilizan electrodomésticos, siempre se deben respetar ciertas medidas de seguridad
incluyendo las siguientes:
• Lea todas las instrucciones antes de utilizar el producto.
• No toque las superficies calientes. Utilice las manijas o las perillas.
• Con el objetivo de disminuir el riesgo de una descarga eléctrica, no sumerja el cable, el enchufe, el
control de temperatura variable o la base del aparato en agua ni en ningún otro líquido.
• Todo aparato eléctrico usado cerca de los niños requiere la supervisión de un adulto.
• Desconecte el aparato de la toma de corriente cuando no esté en uso y antes de limpiarlo. Espere
que el aparato se enfríe antes de instalar, retirar las partes o limpiarlo.
• No utilice ningún aparato si el cable o el enchufe se encuentra dañado, si el aparato no funciona
correctamente, o si ha sufrido algún daño en general.
• Este aparato no está diseñado para ser usado por personas (incluyendo niños) con capacidad
física limitada, mental o sensoriales disminuidas y falta de experiencia o conocimiento que
les impida utilizar el aparato con toda seguridad sin supervisión
o instrucción.
• El uso de accesorios no recomendados por el fabricante puede causar riesgo de incendio, des
carga eléctrica o lesiones personales.
• No utilice este aparato en exteriores.
• No permita que el cable del aparato cuelgue del borde de la mesa o del mostrador ni que entre en
contacto con las superficies calientes.
• No coloque el aparato sobre, ni cerca de una hornilla de gas, eléctrica o de un horno caliente.
• Para desconectar, coloque el control en off (si aplica) y luego remueva el enchufe de la toma de
corriente.
• Este aparato se debe utilizar únicamente para el fin previsto.
• Mantenga la tapa de la cafetera cerrada cuando está en uso.
• Pueden ocurrir quemaduras si se abre la tapa durante los ciclos de preparación.
• La jarra está diseñada solo para usarla en esta cafetera.

12 CUP PROGRAMMABLE COFFEEMAKER
USE AND CARE INSTRUCTIONS
17
• No coloque una jarra caliente sobre una superficie húmeda o fría.
• No use una jarra quebrada o una jarra que tenga el asa suelto o partido.
• No limpie la jarra con limpiadores, lana de acero u otro material abrasivo.
• Nunca remueva el café dentro de la jarra con una cuchara u otro utensilio.
• Use solamente agua. No coloque otro líquido o alimento en el tanque de agua.
CONSERVE ESTAS INSTRUCCIONES
ESTE APARATO ES PARA USO DOMÉSTICO ÚNICAMENTE

CAFETERA DE 12 TAZAS PROGRAMABLE
MANUAL DE INSTRUCCIONES
18
ENCHUFE POLARIZADO
Este aparato tiene un enchufe polarizado (un contacto es más ancho que el otro). Para reducir el riesgo de
choque eléctrico, este enchufe entra en un contacto polarizado de una sola manera. Si el enchufe no entra
correctamente, inviértalo. Si aún así no encaja, busque la ayuda de un electricista calificado. No intente
hacerle ninguna modificación al enchufe.
USO DE UN CABLE DE EXTENSIÓN
El producto viene con un cable corto de suministro de potencia para reducir el riesgo que resulta de
enredarse o tropezarse con un cable más largo.
No se recomienda el uso de un cable de extensión. Sin embargo, puede usarse un cable de extensión si
se emplea el cuidado requerido.
• Si se usa un cable de extensión:
a) El voltaje eléctrico del cable de extensión debe ser como mínimo igual al voltaje del aparato.
b) El cable de extensión debe acomodarse de modo que no cuelgue del mostrador o de la mesa,
para evitar que un niño tire del mismo o se tropiece sin intención.
CABLE ELÉCTRICO
Si se recarga el circuito eléctrico con otros electrodomésticos, es posible que este aparato no funcione
correctamente. Se debe utilizar en un circuito eléctrico separado de los otros electrodomésticos.
TORNILLO DE SEGURIDAD
Advertencia: Este aparato cuenta con un tornillo de seguridad para evitar que se remueva de la cubierta
exterior del mismo. A fin de reducir el riesgo de incendio o descarga eléctrica, por favor no trate de re-
mover la cubierta exterior. Este producto no contiene piezas reemplazables en su interior.

12 CUP PROGRAMMABLE COFFEEMAKER
USE AND CARE INSTRUCTIONS
19
APRENDA ACERCA DE SU CAFETERA
El producto puede variar ligeramente al ilustrado.
Cafetera
1. Ventana de Nivel de Líquido
2. Jarra
3. Manija de la jarra
4. Plato Térmico de calentamiento
5. Panel de control
6. Cesta removible para el filtro
7. Filtro reusable
8. Tapa de la cafetera
9. Cuchara para Medir
9
CAFETERA DE 12 TAZAS PROGRAMABLE
MANUAL DE INSTRUCCIONES
20
Panel de Control
1. Luz Indicadora de la Función Automática (VERDE)
2. Botón de Minutos (MIN)
3. Luz Indicadora de Limpieza
4. Botón de Limpieza (CLEAN)
5. Botón de Preparación de Café Oscuro (BOLD)
6. Luz Indicadora de Preparación de Café Oscuro
7. Botón de Programación (PROG)
8. Botón de Encender y Apagar (ON/OFF)
9. Botón de Hora (HR)
10. Luz Indicadora de encendido (ROJO)
ANTES DE UTILIZAR POR PRIMERA VEZ
• Retire todo el material de empaque y las calcomanías adheridas al producto y conserve el manual
de instrucciones.
Advertencia: Rompa todas las bolsas de plástico ya que pueden representar un riesgo para los niños.
• Corte y retire la banda plástica que pasa por los contactos del enchufe.
• Antes de usar la cafetera, limpie toda la superficie con un paño húmedo.
Nota: Antes del primer uso, se sugiere que limpie su nueva cafetera. Simplemente ejecute 2 ciclos de
preparación como se describe a continuación sin usar café o un filtro de café.
• Limpie la cesta del filtro extraíble y la jarra. Ambos artículos son aptos para lavavajillas en la rejilla
superior, o se pueden lavar a mano en agua jabonosa tibia.
• Coloque el producto sobre una superficie plana y estable

12 CUP PROGRAMMABLE COFFEEMAKER
USE AND CARE INSTRUCTIONS
21
Advertencia: Debido a que el terminado de ciertos mostradores puede ser afectado más que otros,
asegúrese de no colocar la cafetera sobre superficies susceptibles al calor.
• Primero prepare agua a través del aparato sin agregar café molido. Esto elimina cualquier polvo o
residuo que pueda permanecer en el sistema durante el proceso de fabricación.
• Coloque agua fría dentro del tanque de agua hasta llegar a la marca de 12 tazas
Nota: Durante preparación de café regular, no se recomienda preparar menos de 4 tazas.
• Coloque un filtro de papel o el filtro reusable dentro de la cesta removible.
• Coloque la cesta removible dentro de la cafetera.
• Cierre la tapa de la cafetera.
• Coloque la jarra sobre el plato térmico, justo debajo de la abertura del soporte de la cesta.
• Enchufe en un tomacorriente de 120 Voltios de CA.
• Con la tapa superior firmemente cerrada y la jarra firmemente en su lugar, presione el botón “ON”.
La luz LED de color rojo se iluminará y parpadeará para indicar que el ciclo de preparación ha
comenzado.
Precaución: Nunca abra la tapa superior durante el ciclo de preparación; incluso si no sale agua del em-
budo. Se puede derramar agua / café extremadamente caliente de la canasta y causar lesiones. Si no sale
agua / café de la canasta del filtro, desenchufe INMEDIATAMENTE la unidad y espere 10 minutos antes
de abrir y revisar el filtro.
• Cuando finaliza el proceso de preparación y el indicador de nivel de agua está vacío, todavía habrá
líquido caliente en la canasta del filtro. Espere unos minutos para que el resto del líquido gotee
en la jarra.
• Después de que el café molido se haya enfriado, abra la tapa superior y retire con cuidado el filtro
agarrando la manija y levantándolo directamente del compartimento del embudo.
• Deseche el filtro de papel con café y los granos usados.
Precaución: la cafetera se calienta mucho durante el ciclo de preparación. Manejar con extremo cuidado.
• Siempre apague la cafetera cuando la jarra esté vacía, o si ya no desea mantener el café caliente.
La cafetera se apagará automáticamente después de 40 minutos.
Nota: El plato térmico para permanecer caliente funcionará mientras el interruptor esté encendido.
Nota: Para preparar café más de una vez, se recomienda que la cafetera se enfríe durante 10 minutos

CAFETERA DE 12 TAZAS PROGRAMABLE
MANUAL DE INSTRUCCIONES
22
Café y Agua
• Llene el tanque de agua con agua fría según la cantidad deseada. No exceda el límite máximo de
12 tazas. La cantidad mínima recomendada es de 4 tazas.
Nota: La cantidad de café colado tiende a ser menos que el agua agregada en el tanque, alrededor de
un 10% del agua es absorbida por el café y el filtro.
• Coloque el filtro de papel o el filtro reusable dentro de la cesta removible.
• Agregue la cantidad deseada de café dentro del filtro usando la cuchara de medida provista.
• Agite la cesta removible para nivelar la cantidad de café que está dentro del filtro.
• Coloque la cesta removible dentro de la cafetera.
• Cierre la tapa de la cafetera.
• Coloque la jarra sobre el plato térmico, justo debajo de la abertura del soporte de la cesta.
Colando Café Ahora
• Siga los pasos anteriores en las instrucciones de Café y Agua.
• Presione el botón de encender y apagar (ON/OFF).
• La luz indicadora de la función de encender y apagar (ON/OFF) se prenderá intermitentemente y
comenzará el proceso de colado.
Advertencia: Asegúrese que la jarra está colocada en el centro del plato térmico, o el agua se des-
bordará de la cesta para el filtro. Un desbordamiento puede causar lesiones personales o daños a la
propiedad.
Advertencia: Para reducir el riesgo de dañar la jarra y/o causar lesiones personales, no agregue
agua fría a la jarra si ésta se encuentra caliente. Espere que la jarra se enfríe completamente antes de
agregar agua fría.
Advertencia: No cuele café mientras la tapa de la cafetera este abierta.
• Una vez que el ciclo de colado termine, coloque la jarra en el plato térmico entre cada servida de
café para mantener el café caliente.
• La cafetera se apagará automáticamente luego de 40 minutos.
Advertencia: Si la cesta donde va el filtro se desborda o no logra vaciarse en la jarra, no levante la
tapa. Desenchufe la cafetera y espere a que el contenido se enfríe antes manipularla.

12 CUP PROGRAMMABLE COFFEEMAKER
USE AND CARE INSTRUCTIONS
23
Colando Café Luego
• Siga los pasos anteriores en las instrucciones de Café y Agua.
• Primero presione el botón “PROG”, para configurar la hora en la que desee que empiece la
preparación automática del café.
• Configure la hora a la que desea que el café comience a prepararse utilizando los botones “HOUR”
y “MIN”. Seguir las mismas instrucciones para “Configurar el reloj”.
• Después de la configuración, la luz verde parpadeará y la palabra “AUTO” se mostrará en la pan
talla LCD.
• Su cafetera comenzará a prepararse automáticamente a la hora preestablecida. Cuando comienza
el ciclo de preparación, la luz roja parpadeará para indicar que la cafetera está en funcionamiento.
• Presione el botón “PROG” durante aproximadamente 3 segundos para cancelar la hora
preestablecida.
Función BOLD
• Esta función es para alargar el tiempo de preparación para que el café tenga un sabor más
fuerte.
• Presione el botón “ON / OFF”, luego presione el botón “BOLD”.
• Notará una luz LED indicadora sobre el botón “BOLD” que se enciende de color verde.
Nota: Esta función funcionará de inmediato.
Nota: Puede presionar el botón “BOLD” durante la preparación normal para cambiar a la función
“BOLD”.
Función de servir y pausar
• Esta función le permite servir una taza de café de la jarra mientras se prepara el café. Cuando la
jarra es removida, el proceso de colado se interrumpe. Simplemente vuelva a colocar
la jarra en el plato térmico y espere para comenzar de nuevo el proceso de colado.
PRECAUCIÓN: Puede sacar la jarra, y servir en cualquier momento. El aparato dejará de gotear au-
tomáticamente. Pero el tiempo no puede exceder de 30 segundos.
• Asegúrese de colocar la jarra en la posición correcta dentro de la cafetera.
CAFETERA DE 12 TAZAS PROGRAMABLE
MANUAL DE INSTRUCCIONES
24
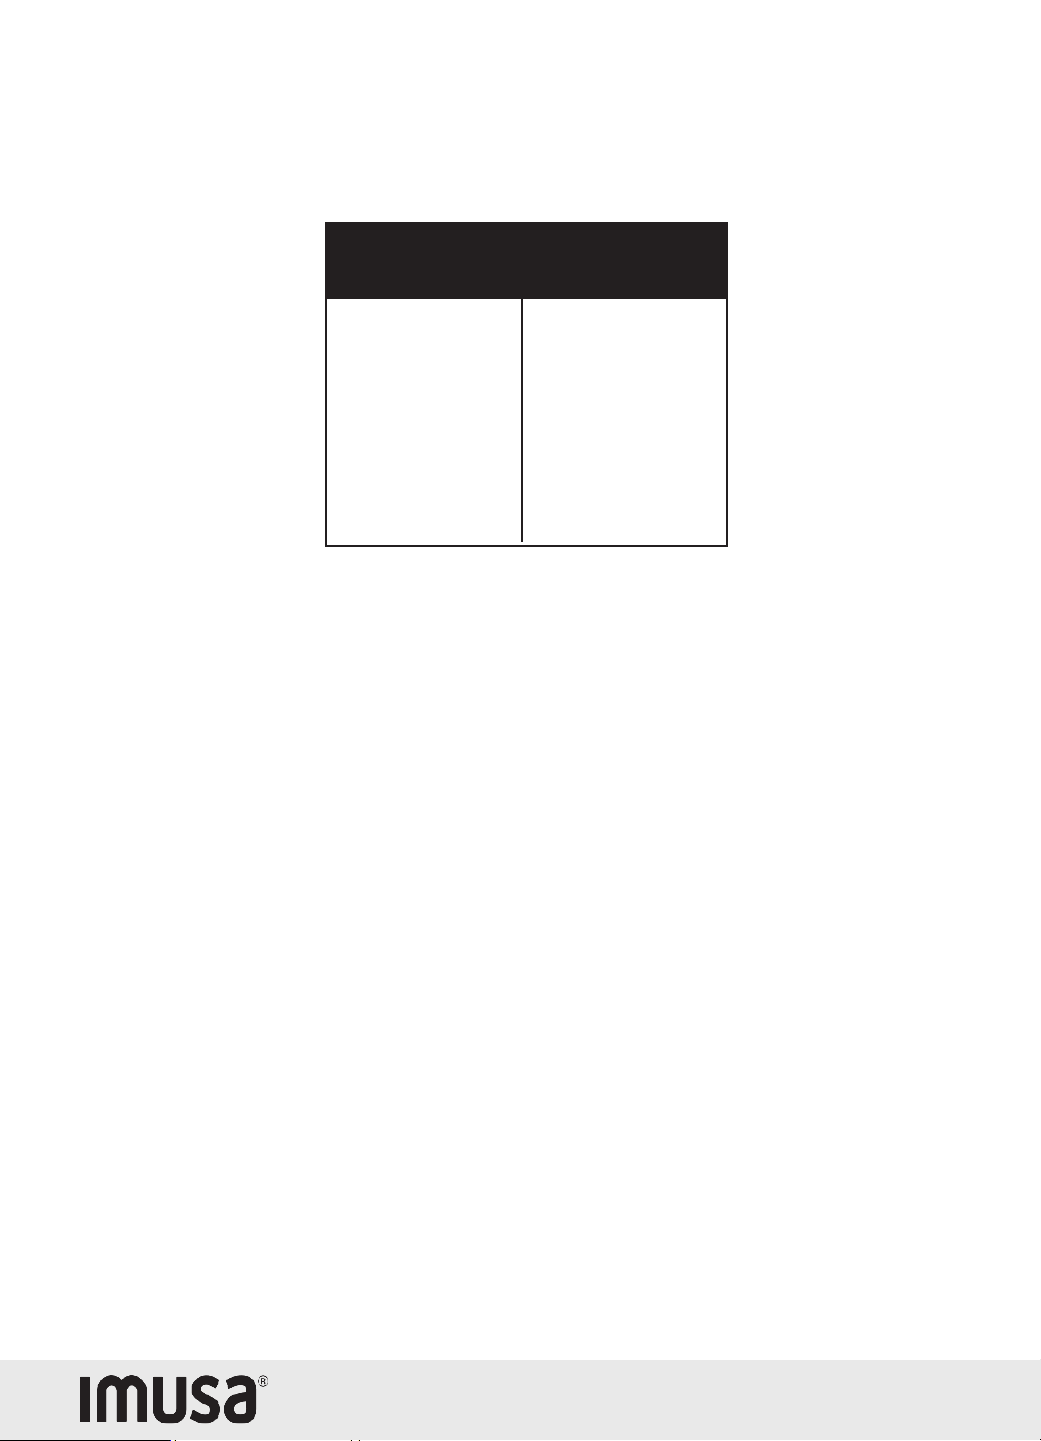
RECOMENDACIONES PARA PREPARAR CAFE
Para mejores resultados, use café molido para cafeteras automáticas. La tabla siguiente indica canti-
dades sugeridas de café molido usando la cuchara para medir provista.
Para Colar Café Molido
Nota: 1 taza = 5 onzas de café colado
2 tazas
4 tazas
6 tazas
8 tazas
10 tazas
12 tazas
1 ½ cucharadas
1 ½ cucharadas
2 ½ cucharadas
3 cucharadas
3 ½ cucharadas
4 ½ cucharadas
5 ½ cucharadas

12 CUP PROGRAMMABLE COFFEEMAKER
USE AND CARE INSTRUCTIONS
25
CUIDADO Y LIMPIEZA
Este producto no contiene piezas reparables por el consumidor.
La Cafetera
• Desconecte el cable del tomacorriente. Espere que la cafetera se enfríe por completo antes de
limpiarla.
• Levante la tapa de la cafetera con cuidado. Deseche el café molido, el filtro de papel o el filtro
reusable, y luego vuelva a cerrar la tapa.
• Lave el filtro reusable y la cesta removible para el filtro con agua tibia y jabón.
• La superficie exterior de la cafetera puede ser lavada con un paño suave y húmedo.
• Para limpiar el interior de la tapa de la cafetera, abra la tapa hasta que llegue a la posición de
reposo, luego limpie con un paño suave y húmedo.
• Nunca sumerja la cafetera en agua ni en ningún otro líquido.
• La cafetera no es apta para el lavaplatos automático.
• No use limpiadores abrasivos ni almohadillas de fibra metálicas para limpiar la cafetera.
• Nunca rocíe o apliques limpiadores directamente sobre o dentro de la cafetera.
La Jarra
• Lavar la jarra a mano con agua tibia y jabón.
• No use limpiadores abrasivos ni almohadillas de fibra metálicas para limpiar la jarra.
Nota: Una jarra dañada puede causar quemaduras por derrame de líquido caliente.
Para prevenir que la jarra se dañe:
• No deje que todo el líquido que se encuentre en la jarra se evapore mientras esté sobre el plato
térmico.
• No caliente la jarra si está vacía.
• Deseche la jarra si está agrietada o dañada de alguna manera.
• No coloque la jarra sobre, ni cerca de una hornilla de gas, eléctrica o de un horno caliente.
• Evite el manejo brusco y los golpes.
Descalcificación
Si usted nota alguna de las siguientes condiciones, debe limpiar su cafetera:
a) Aumento de tiempo que tarda colando café.

CAFETERA DE 12 TAZAS PROGRAMABLE
MANUAL DE INSTRUCCIONES
26
b) Vapor excesivo.
c) El proceso de preparación se detiene antes de que toda el agua haya sido bombeada del
tanque de agua.
• Agregue dos cucharadas de vinagre blanco de cocción a una jarra de agua fría.
• Coloque la mezcla de agua y vinagre en el tanque de agua hasta la marca de 6 tazas.
• Coloque un filtro de papel o el filtro reusable en la cesta para el filtro. Luego coloque la cesta
dentro de la cafetera y cierre la tapa.
• Coloque la jarra sobre el plato térmico, justo debajo de la abertura del soporte de la cesta.
• Presione el botón de limpiar “CLEAN”
• Cuando finalice el ciclo de limpieza, vacíe la jarra y enjuague con agua.
• Llenar nuevamente el depósito de agua solo con agua fría y repita el ciclo de limpieza solo con
agua, dos veces más. Esto enjuagará cualquier solución de vinagre restante.
Nota: Le recomendamos que haga esto al menos 4 veces al año.
• Lave la cesta y la jarra como se indica en la sección de “CUIDADO Y LIMPIEZA”.
Nota:
a) Después de cada 60 ciclos, la luz de limpieza “CLEAN” comenzará a parpadear (verde) como
un recordatorio de que la cafetera debe limpiarse.
b) Presione el botón “CLEAN” para limpiar la máquina (en modo de espera), o la luz verde no
dejará de parpadear.
ALMACENAMIENTO Y MANTENIMIENTO
• Siempre deje enfriar completamente la cafetera antes de guardarla.
• Enrolle el cable eléctrico en espiral y asegúrelo con una atadura.
• Guarde la cafetera en un lugar seco, por ejemplo, encima de la mesa, el mostrador o en un
estante del armario.
• Adicional a la limpieza recomendada, no se requiere ningún mantenimiento especial.

12 CUP PROGRAMMABLE COFFEEMAKER
USE AND CARE INSTRUCTIONS
27
¿NECESITA AYUDA?
Para servicio, reparaciones o cualquier pregunta relacionada con su electrodoméstico, llame al número
que se encuentra en la última página de este manual. NO devuelva el producto al lugar de compra. NO
envíe el producto por correo al fabricante. También puedes consultar el sitio web que se encuentra en la
última página de este manual.
1 AÑO DE GARANTÍA LIMITADA
¿Qué cubre la garantía?
• Cualquier defecto de materiales o de mano de obra (devoluciones sólo se aceptarán si se debe a
un defecto del fabricante, y no serán aceptadas después de 1 año desde la fecha de compra.
Devoluciones sólo se aceptarán con el recibo original).
• Aplica solo a productos comprados y usados en los Estados Unidos, Hawaii o Alaska.
¿Cómo se obtiene servicio?
• Conserve el recibo original de la compra.
• Escriba un correo electrónico a customerser[email protected], o llame a
1-800-850-2501.
• Si necesita partes o accesorios por favor llámenos o escríbanos un correo electrónico.
Esta garantía NO cubre:
• Daños ocasionados por el uso comercial del producto.
• Daños por mal uso, abuso o negligencia.
• Productos que han sido alterados de alguna manera.
• Otros accesorios empacados con el aparato.
• Daños ocasionados por accidentes o reparaciones.

12 CUP GROGRAMMABLE COFFEEMAKER
CAFETERA DE 12 TAZAS PROGRAMABLE
INSTRUCTION MANUAL
MANUAL DE INSTRUCCIONES
If you have any questions, please contact
us at:
Para mayor información puede contactar-
nos a:
IMUSA USA, LLC
Doral, FL 33178
1-800-850-2501
www.imusausa.com
MADE IN CHINA / HECHO EN CHINA
950W120V60Hz