SCE 1000BK
EN
PORTABLE COLD BREW COFFEE
MAKER
Translation of the original manual
SCE 1000BK

A
6
7
8
1
2
3
4
5
9
10
B
B1 B2
B3 B4

- 1 -
02/2026
2026, .
EN
Portable Cold Brew Coffee Maker
User Manual
IMPORTANT SAFETY INSTRUCTIONS
READ CAREFULLY AND STORE FOR FUTURE USE.
• This appliance may be used by children 8 years of age and older and by persons with physical,
sensory or mental impairments or by inexperienced persons, if they are properly supervised or
have been informed about how to use the product in asafe manner and understand the potential
dangers.
• Children must not play with the appliance.
• Cleaning and maintenance must not be performed by unsupervised children.
• Keep the appliance and charging cable out of reach of children under 8 years of age.
• If the charging cable is damaged, have it replaced in aprofessional service centre in order
to prevent adangerous situation. It is forbidden to use the appliance with the charging cable
damaged.
• Always clean the parts of the appliance that come into contact with food with clean warm water
and alittle neutral dishwashing liquid, rinse them with clean water and wipe dry.
• Incorrect use may lead to injury.
• Ensure that the appliance is switched off and the charging cable is disconnected when left
unattended and before assembly, disassembly, or cleaning.
• This appliance is intended for household use. It is also suitable for personal non-commercial use
in spaces such as:
– kitchenettes in stores, offices and other workplaces;
– spaces in agriculture;
– hotels, motels and other residential spaces;
– bed and breakfast establishments.
• The main unit must not be immersed in water during cleaning.
• This appliance is designed for preparing cold coffee. The appliance is not intended for heating
water or other liquids. Do not pour any liquids other than clean cold water into the appliance.
• We recommend using ground coffee for drip coffee makers. Ground coffee for espresso or instant
coffee is not suitable for preparing cold coffee.
• Do not use the appliance for commercial purposes, in an industrial environment. Use the
appliance only for its intended purpose.
• Before switching on the appliance, make sure it is correctly assembled.
• Do not place the appliance on windowsills, sink drain trays or unstable surfaces. Always place
the appliance on astable, flat and dry surface.
• Do not place the appliance on an electric or gas stove or near an open flame.
• Never use the appliance in the immediate vicinity of abath, shower or swimming pool.
• Use the appliance only with the original accessories supplied with it.
• Do not use the appliance if it is not working properly or shows signs of damage.
PORTABLE COLD BREW COFFEE MAKER

- 2 -
02/2026
2026, .
• Keep the appliance and its accessories in clean condition. Perform the cleaning and maintenance
following the instructions in the CLEANING AND MAINTENANCE section.
• To avoid the risk of electric shock, do not repair or modify the appliance yourself. All repairs
should be carried out by an authorised service centre. Tampering with the appliance may result
in the loss of your legal rights regarding faulty performance or warranty for quality.
• Keep packaging material (plastic bags, polystyrene mouldings, etc.) out of the reach of children.
Special Instructions for Charging the Appliance
• Use the supplied charging cable to charge the appliance. You may also use another suitable
cable with aUSB-C connector for charging.
• Before connecting the charging cable to the charging source (USB charging adapter, not
included), make sure that the input rated voltage stated on the appliance'srating label matches
the voltage on the adapter'srating label.
• Make sure that the charging cable does not hang over the edge of the table or touch hot surfaces
or sharp objects.
• Disconnect the charging cable from the appliance by pulling the connector. Do not pull the
charging cable.
• Only handle the charging adapter with dry andclean hands.
• Do not cover the appliance or the charging cable during charging.
• The appliance, charging cable or adapter may heat up while charging. This is normal. Make sure
to leave aclear space around the appliance to allow proper dissipation of excess heat. Do not
charge the appliance if it is located inan enclosed area.
• After charging the appliance, disconnect the charging cable from the appliance connector andthe
charging source. Let it cool before storing. Always store in adry andwell-ventilated place.
• If you will not be using the appliance for an extended period of time (longer than 3 months), we
recommend recharging it regularly anyway to extend the life of the built-in battery.
Special Safety Instructions for the Li-ion Battery
• The Li-ion battery is built into the appliance andis an integral part of it, which the user is not
allowed to remove.
• Follow all the instructions provided in this user'smanual.
• Avoid using or storing the appliance in environments where flammable, volatile, or explosive
substances are used and/or stored.
• Inthe event of abattery fluid (electrolyte) leak, do not touch the battery with your bare hands.
Use protective aids (gloves, aprotective mask, goggles, etc.). The liquid inside the battery is toxic
andmay cause health problems even with slight contact of the bare skin withit.
• We recommend opening windows or doors to ensure adequate ventilation of the space.
• Contact aspecialist hazardous waste disposal company or use ahazardous waste collection
facility. Do not dispose of the damaged battery or accumulator in ordinary household waste.
• In case of skin or eye splashes, rinse with plenty of water and seek medical attention. If ingestion
occurs, seek immediate professional medical help.
. . . . . . . . . . . . . . . . . . . . . . . . . . . . . . . . . . . . . . . . . . . . . . . . . . . . . . . . . . . . . . . . . . . . . . . . . . . . . . . . . . . . . . . . . . . . .
- 3 -
02/2026
2026, .
EXPLANATION OF SYMBOLS PLACED ON THE PRODUCT OR INTHE
ACCOMPANYING DOCUMENTATION
The product meets all the basic requirements of the applicable EU directives.
This symbol on products or accompanying documents means that used electric or
electronic products must not be added to ordinary municipal waste.
This symbol on the accumulator or battery means that the used battery must not be
added to normal municipal waste.
. . . . . . . . . . . . . . . . . . . . . . . . . . . . . . . . . . . . . . . . . . . . . . . . . . . . . . . . . . . . . . . . . . . . . . . . . . . . . . . . . . . . . . . . . . . . .
- 4 -
02/2026
2026, .
• Thank you for purchasing our SENCOR
product; we hope it will serve to your
satisfaction.
• Prior to using this appliance, please read
the user manual thoroughly, even in cases
when you are already familiar with the
use of similar types of appliances. Use
the appliance only as described in this
user manual. Keep the manual for future
reference. If you pass the appliance on to
another person, ensure that this user manual
is included.
• Carefully unpack the appliance and
make sure not to discard any part of the
packaging material until you have removed
all its components. It is recommended that
you keep the original packaging, packing
material, receipt and confirmation of the
extent of the seller'sliability or warranty
certificate at least for the duration of the
legal right to file adefect claim or the quality
warranty. When transporting the appliance,
we recommend repackaging it in the original
box provided by the manufacturer.
. . . . . . . . . . . . . . . . . . . . . . . . . . . . . . . . . . . . . . . . . . . . .
DESCRIPTION OF THE COFFEE
MACHINE
A1 Main unit
A2 Ice cup
A3 Cup for ground
coffee
A4 Carafe
A5 Screw base of
the carafe
A6 BREW button to
start the coffee
machine
A7 LED indicator
light
A8 USB-C port with
cover
A9 Ventilation
opening
A10 Carafe lid
with silicone
dispensing hole
cover
Without illustration: charging cable
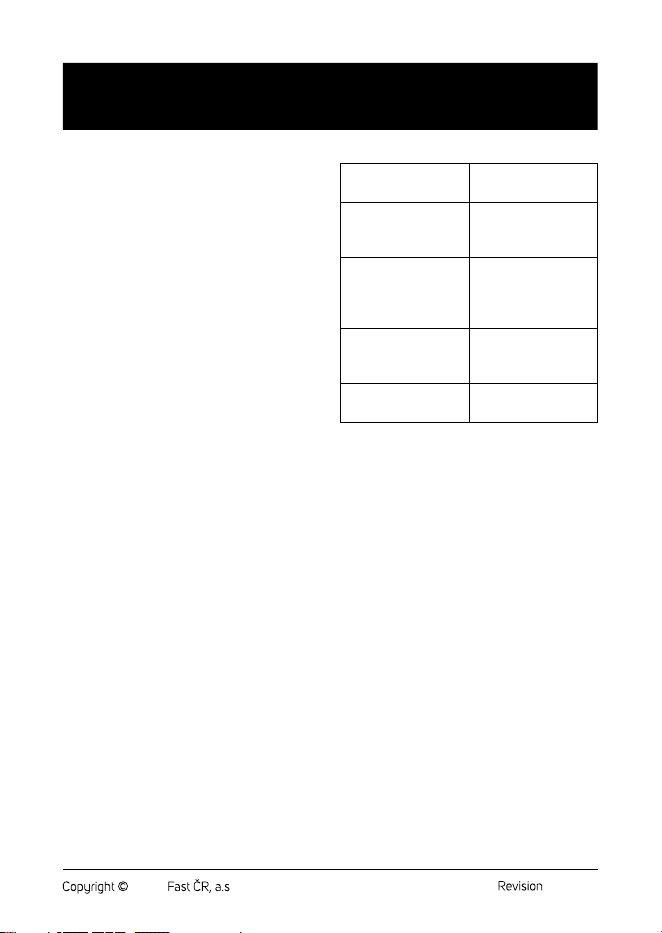
LED indicator light
The LED is off. The coffee machine
is turned off.
The LED lights
up green during
operation.
The coffee machine
is charged and
running.
The LED flashes red
during operation.
The coffee machine
is on, but it is almost
flat. It needs to be
charged.
The LED is red when
charging.
The coffee machine
is charging or running
out of power.
The LED lights up
green when charging.
The coffee machine
is charged.
. . . . . . . . . . . . . . . . . . . . . . . . . . . . . . . . . . . . . . . . . . . . .
INTENDED USE
• Cold Brew machine Sencor SCE 1000BK is
used toprepare acold coffee drink (without
heating the water). We recommend using
ground coffee for drip coffee makers. Ground
coffee for espresso or instant coffee is not
suitable for preparing cold coffee.
• This type of coffee machine is not intended
for thethermal preparation of coffee.
. . . . . . . . . . . . . . . . . . . . . . . . . . . . . . . . . . . . . . . . . . . . .
BEFORE FIRST USE
• Before first use, remove the coffee machine
and its accessories from the packaging and
discard all promotional labels and tags.
Check that neither the coffee machine nor
any of its components are damaged.
• Wash the carafe, screw bottom, ice cup,
ground coffee cup and carafe lid inwarm
water withalittle kitchen detergent using
asoft sponge. Then rinse with clean water
and dry.
• Wipe the main unit with adry cloth.
EN
Portable Cold Brew Coffee Maker
User Manual
- 5 -
02/2026
2026, .
. . . . . . . . . . . . . . . . . . . . . . . . . . . . . . . . . . . . . . . . . . . . .
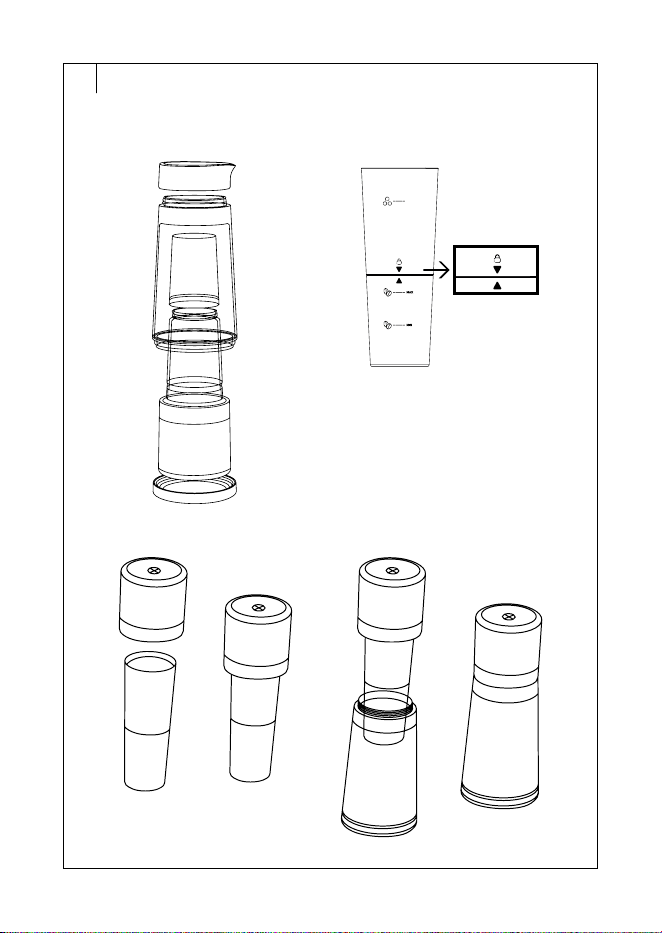
ASSEMBLING THE COFFEE
MACHINE
• The coffee machine is supplied folded for
transport purposes and must be assembled
to the operating position before use. Refer
to Fig. B1 for an example of afolded coffee
machine.
1. Unscrew the carafe lid andbottom.
2. Remove the main unit andboth cups from
the inside of the carafe.
3. Unscrew the ice cup fromthe main unit to
remove the ground coffee cup.
4. Screw the bottom of the carafe back onto
the carafe andmake sure that it is properly
screwed in.
5. Screw the ice cup on top of the ground
coffee cup andtighten until the arrows on
the cups are aligned – see Figure B2.
6. Place the ice cup on the bottom of the
main unit andscrew it toit – see Figure B3.
Tighten thoroughly.
7. Put this assembly into the carafe andscrew
the main unit onto the carafe – see figure B4.
• The coffee machine is now ready for use.
. . . . . . . . . . . . . . . . . . . . . . . . . . . . . . . . . . . . . . . . . . . . .
CHARGING THE COFFEE
MACHINE
• The coffee machine is equipped with
arechargeable battery and must be charged
before first use.
• Plug the USB-Aconnector of the charging
cable into the connector on your computer,
power bank, or power adapter (not included;
recommended parameters: 5 V/ 1 A). Plug
the adapter plug into aproperly grounded
power outlet.
• Open the cover andinsert the USB-C
connector into the socket inthe main unit.
The coffee machine starts charging. The
LED indicator light A7 will be red during
charging. When it lights up green, the coffee
machine is fully charged.
• Disconnect the charging cable from the main
unit and the charging source. Remove the
adapter from the power socket if you have
used it forcharging.
• The charging time is approximately 2
hours. However, the charging time varies
depending on the current charge level.
• When the charge level is low, the A7 LED
indicator light flashes red. In this case, leave
the coffee maker to charge.
Note:
Do not leave the coffee machine
connected to the charging source
longer than necessary to fully
charge it.
Note:
The coffee machine cannot be used
while charging.
. . . . . . . . . . . . . . . . . . . . . . . . . . . . . . . . . . . . . . . . . . . . .
COFFEE PREPARATION
1. Screw the bottom of the carafe onto the
carafe andmake sure that it is properly
screwed.
2. Pour fresh cold water into the carafe up to
the ICE MAX line (if you will be preparing
coffee with ice cubes) or up to the MAX line
(if you will be preparing coffee without ice
cubes).
Note:
Only pour clean cold water into the
carafe. Never pour hot or warm water
or any other liquid into it. This could
damage the coffee machine.
3. Pour amaximum of 40 g of ground coffee
into the ground coffee cup. The level of
ground coffee should reach at least the MIN
line, but should not exceed the MAX. We
recommend using ground coffee intended
for coffee drippers.
4. Screw the ice cup on top of the ground
coffee cup andtighten until the arrows on
the cups are aligned – see Figure B2.
5. Pour ice cubes into the ice cup up to the
maximum fill line marked on the cup.
- 6 -
02/2026
2026, .
Note:
It is not always necessary to use ice
cubes. Coffee can also be prepared
without them. Ice cubes will make the
brewed coffee cooler.
6. Keep the connected cups straight. Place
the ice cup on the bottom of the main unit
andscrew it toit – see Figure B3. Tighten
thoroughly.
7. Put this assembly into the carafe andscrew
the main unit onto the carafe – see figure B4.
Note:
After inserting the assembly into the
carafe, the water level in thecarafe will
rise. This is anormal occurrence and is
nothing to be concerned about.
8. Press the BREW button once briefly and the
coffee maker will start. One standard coffee
brewing cycle usually takes 15 minutes. Let
the coffee machine fully complete the coffee
making cycle.
Caution:
Do not block the vent (A9) with,
for example, your finger, hand or
aforeign object while brewing
coffee.
9. When the coffee making process is finished,
the LED indicator will turn off.
10. Carefully unscrew the main unit from
thecarafe.
11. Carefully remove the main unit with the cups
attached from thecarafe. We recommend
moving the coffee machine over the drip tray
of the sink, as drops of finished coffee could
stain the surface. Alternatively, you can wipe
the cups with apaper towel.
12. Carefully release andunscrew the ground
coffee cup from the ice cup. Compost the
used ground coffee or throw it in mixed
waste.
13. Carefully release andunscrew the ice cup
from the bottom of the main unit.
14. Screw the lid on the carafe if you need to
transport the finished coffee or enjoy it on the
road, for example by car; or pour the finished
coffee into cups and enjoy it.
15. Clean all parts of the coffee machine after
each use according to the instructions in the
CLEANING AND MAINTENANCE section.
BREW Button
• One short press starts the standard coffee
cycle, which usually lasts 15 minutes.
• Two short presses start the shortened coffee
cycle, which usually takes 5 minutes. This
cycle is suitable e.g. for stronger coffee or
amore intense coffee taste.
• Press andhold for 2 seconds to start
draining water from the cup, which usually
takes 30 seconds.
• To turn off the coffee machine, press it for
along time andthe preparation process
will be over.
Coffee Brewing Cycle
• The coffee brewing cycle consists of two
phases: the pumping phase and the re-
pumping phase. These two phases alternate
throughout the coffee brewing cycle,
circulating the water in the carafe andin the
cups, andextracting the coffee drink.
• During the pumping phase, theair from the
cups and carafe is sucked out, pumping
water into the cups andsoaking the ground
coffee andcooling the water after pumping
into acup withice.
• In the repumping phase, air is reintroduced
into the cups andcarafe, releasing water
from the cups into the carafe space. Atthis
stage you may notice bubbles forming inside
the carafe. This is normal.
TIPS AND TRICKS
• Use ground coffee fromhigh-quality freshly
roasted coffee beans.
• The degree of grinding should correspond to
the ground coffee for the drip coffee. Too fine
coffee (e.g. for Espresso) could block the filter
bottom of the ground coffee cup.
- 7 -
02/2026
2026, .
• We recommend the use of honey or syrup to
sweeten the coffee. Granulated sugar may
take longer to dissolve in cold coffee.
• To achieve iced coffee, you can add new
ice cubes to the carafe or cup after the
preparation is complete.
• Add milk, cinnamon, cloves, nutmeg or other
flavourings andingredients once the coffee
is ready.
. . . . . . . . . . . . . . . . . . . . . . . . . . . . . . . . . . . . . . . . . . . . .
CLEANING AND MAINTENANCE
Before cleaning, make sure that the coffee
machine is turned off and the charging cable is
not plugged in.
Clean the coffee machine after each use.
Compost the used ground coffee or throw it in
mixed waste.
Warning:
To prevent the risk of electric
shock, do not immerse the main
unit or charging cable in water or
other liquids.
Caution:
Do not use abrasive cleaning
agents, solvents, etc. to clean any
parts of the appliance, as these
could damage the surface. The
main unit is not dishwasher safe.
Main Unit
• Wipe the main unit with adry cloth.
• You can wipe any dirt (e.g. dried coffee
drops) with aslightly damp cloth. However,
do not allow water to enter the BREW button
or the charging socket.
Carafe andCups
• Wash the carafe, screw bottom, ice cup,
ground coffee cup and carafe lid inwarm
water withalittle kitchen detergent using
asoft sponge. Then rinse with clean water
and dry.
• You can also wash the carafe, the screw
bottom, the ice cup, the ground coffee cup
and the carafe lid in the upper dishwasher
basket.
Storage
• If the coffee machine will not be used
for along time, clean it according to the
instructions in theprevious section of the
manual.
• Fully charge the coffee machine before
storing. If you will not be using the coffee
machine for more than 3 months, we
recommend charging it regularly to extend
the life of the built-in battery.
• The coffee machine can be assembled as
it was packed for transport purposes – see
figure B1. Proceed as follows:
1. Unscrew the bottom of the carafe.
2. Place the ground coffee cup in the ice cup
and screw it to the main unit.
3. Put the main unit with the cups into the
carafe (cups first into the wider end of the
carafe) andscrew the bottom of the carafe
back in.
4. Screw the lid on the narrow end of the
carafe.
• Store the coffee machine in adry, clean, and
well-ventilated place away from extreme
temperatures and out of the reach of children
or pets.
- 8 -
02/2026
2026, .
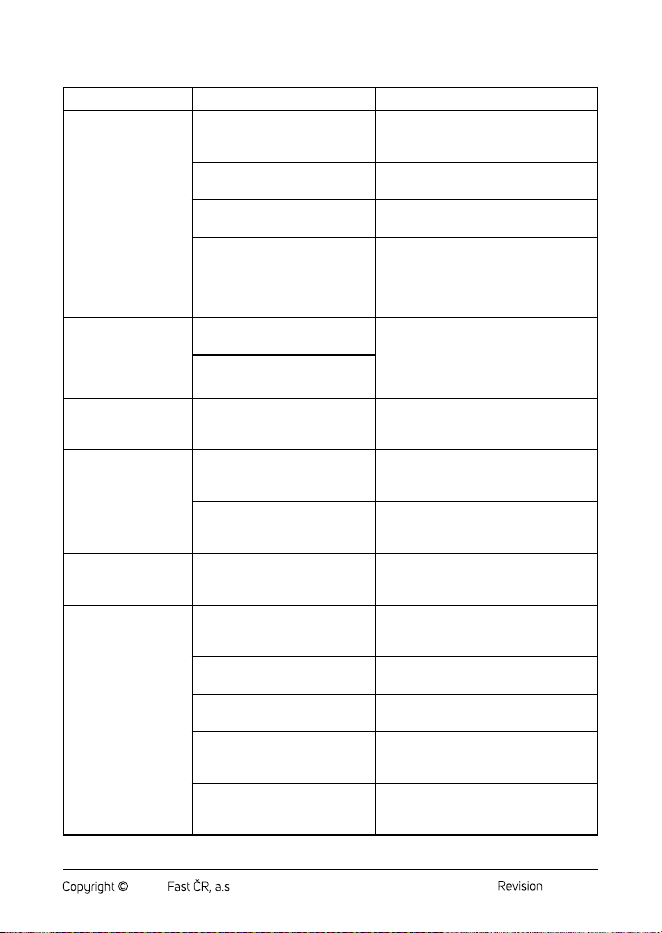
Troubleshooting
Problem Cause Solution
The water in the
carafe overflows
during use.
There is too much water in the
carafe or there is alot of ice in
the cup.
Always observe the maximum filling
level when filling the carafe or ice cup.
Insufficient ground coffee
added.
The ground coffee must reach at least
the MIN line marked on the cup.
The ground coffee was damp
before being placed in the cup.
Use only dry, freshly ground coffee.
You have poured adifferent
liquid than water (e.g.
carbonated water) into the
carafe, or the ice cubes are
prepared fromflavoured water.
Fill the carafe only with clean cold
water and prepare the ice fromclean
water.
The prepared coffee
or water remains
inside the ice cup or
the ground coffee
cup.
The coffee making process was
prematurely completed.
Press the BREW button for 2 seconds
and the coffee machine will start
draining the water from the cups for
30 seconds.
You left the cups inthe carafe
for too long after making coffee.
Water escapes from
the bottom of the
carafe.
The bottom of the carafe is not
correctly screwed or the gasket
is not correctly inserted.
Pour the water, loosen the bottom and
screw it back in, or check the gasket in
the bottom.
The main unit
will sway during
preparation.
The main unit is not correctly
fixed or the gasket is not
correctly fitted.
Release the main unit andre-screw it
onto the carafe, or check the gasket of
the main unit.
The ice cup is not properly
attached tothe main unit.
Carefully release the ice cup
andreattach it from below to themain
unit.
The coffee machine
shut off during
preparation.
The coffee machine is almost
out of power.
Allow it to charge.
Water does not
circulate up
anddown during
preparation.
The ground coffee is too fine. Use ground coffee for drip coffee.
Coffee that is ground too finely can
clog the filter at the bottom of the cup.
The coffee machine is almost
out of power.
Allow it to charge.
The gasket in the bottom part of
the ice cup is not properly fitted.
Check the gasket at the bottom of the
ice cup to see if it is correctly fitted.
The ground coffee cup is
not properly attached to the
ice cup.
Release the ground coffee cup
andreattach it to the ice cup.
The ventilation opening is
blocked.
Check the cause of the blockage
andensure that the ventilation opening
is not blocked.
- 9 -
02/2026
2026, .
If the problem is not listed in the table or if the
problem persists, switch off the coffee machine,
disconnect it from the power source, and contact
an authorised service centre.
. . . . . . . . . . . . . . . . . . . . . . . . . . . . . . . . . . . . . . . . . . . . .
TECHNICAL SPECIFICATIONS
Input voltage ................................................5 V= 1.0 A
Power consumption ..............................................4 W
Battery .................................Li-Ion, 3.7 V1.200 mAh
Charging time ............................................... 2,5 hours
Usage time per 1 charge ............................approx. 14
.................................................................brewing cycles
Noise level ....................................................<60dB(A)
Maximum carafe volume......560 ml (water only)
...................................................... 480 ml (water + ice)
Maximum amount of ice inacup ....................80 g
Maximum amount of ground coffee ...............40 g
Coffee temperature .......................................10–17 °C
(dependingon the temperature of the water and
the use of ice cubes)
The declared noise emission value of this
appliance is ≤60 dB(A), which represents the
Asound power level relative to areference
sound power of 1 pW.
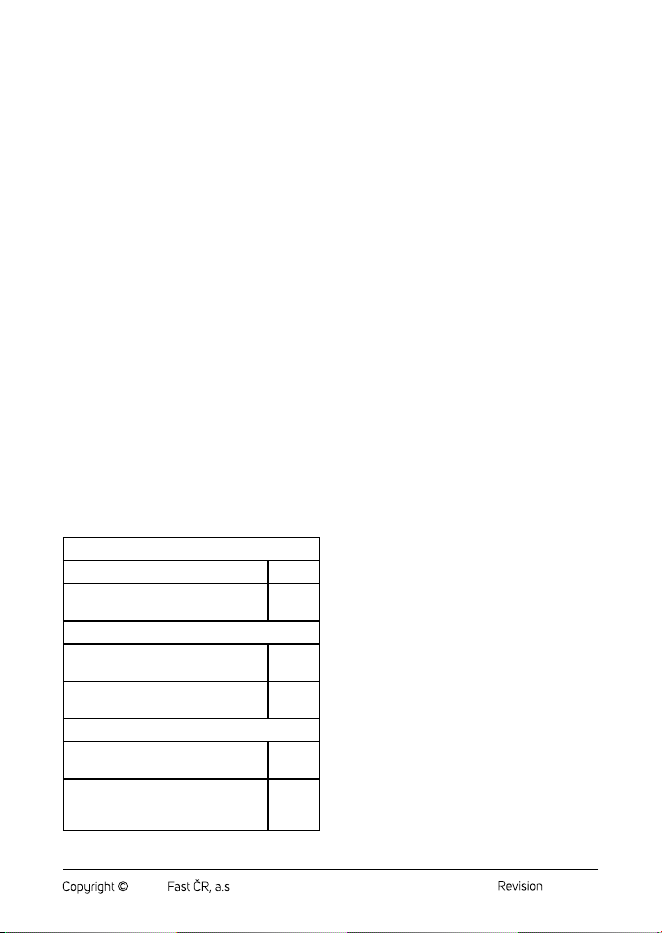
Values Provided according to
Commission Regulation EU 2023/826
Off Mode
Power consumption in off mode 0 W
Time needed for the equipment to
automatically reach off mode
0 min
Standby Mode
Power consumption in Standby
mode
–
Time needed for the equipment to
automatically reach standby mode
–
Networked Standby Mode (Wi-Fi)
Power consumption in networked
standby
–
Time needed for the equipment
to automatically reach networked
standby mode
–
. . . . . . . . . . . . . . . . . . . . . . . . . . . . . . . . . . . . . . . . . . . . .
INSTRUCTIONS AND
INFORMATION ON DISPOSAL OF
USED PACKAGING MATERIAL
Dispose of used packaging material at the
designated municipal waste disposal site.
. . . . . . . . . . . . . . . . . . . . . . . . . . . . . . . . . . . . . . . . . . . . .
DISPOSAL OF USED ELECTRICAL
AND ELECTRONIC EQUIPMENT
Used electrical andelectronic products must
not be disposed of in ordinary municipal waste.
To enable the proper disposal, renewal and
recycling of these products, deliver them to the
designated collection points. Alternatively, in
some European Union states or other European
countries the products can be returned to the
local retailer when buying an equivalent new
product. By disposing of this product correctly,
you help to conserve valuable natural resources
and prevent any potential adverse impact on the
environment and human health that could result
from improper waste disposal. For more details,
contact your local authority or nearest collection
point. Fines may be imposed for the improper
disposal of this type of waste as per national
regulations.
For business entities in European Union
States
If you wish to dispose of electrical and electronic
equipment, please request the necessary
information from your retailer or supplier.
Disposal in other countries outside the
European Union
To dispose of this product elsewhere, request
the necessary information on the correct
disposal method from local authorities or your
retailer.
. . . . . . . . . . . . . . . . . . . . . . . . . . . . . . . . . . . . . . . . . . . . .
Changes to text and technical parameters are
reserved.