USER GUIDE
EXTENDED WARRANTY
IF YOU REGISTER YOUR WARRANTY ONLINE WITHIN 14 DAYS OF PURCHASE, WE WILL EXTEND THE
1 YEAR WARRANTY TO A 2 YEAR WARRANTY.
To activate your extended warranty visit www.tevo.co.za, click the “Register warranty” tab
at the top of the page, then complete the form provided.
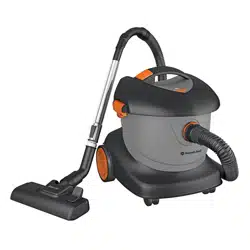
DYNAMITE
ULTRA-POWERFUL COMPACT VACUUM

1
Thank you for purchasing a BENNETT READ
DYNAMITE vacuum.
Your DYNAMITE vacuum incorporates the latest technological
advances in home cleaning systems. It imitates the most powerful
forces of nature in a sleek, elegant cleaning system to ensure that
your home is easily and properly cleaned.
Your new vacuum is manufactured to a high standard of quality and
is backed by a one year warranty by Tevo. If you register your
warranty online within 14 days of purchase, we will extend the
warranty to 2 years. To activate your extended warranty visit
www.tevo.co.za, click the “Register warranty” tab at the top of the
page, then complete the form provided.
We also stand behind it with a knowledgeable, dedicated Customer
Care department, so should you ever have a problem, you'll receive
fast, considerate assistance.
Should you need any support from us, please visit
www.tevo.co.za or call 0861 77 88 88.
PLEASE KEEP THIS USER GUIDE IN A SAFE PLACE AND
READ IT CAREFULLY BEFORE USING YOUR BENNETT READ
DYNAMITE VACUUM FOR THE FIRST TIME.

2
• This vacuum is for household use only
• Use only indoors on dry surfaces
• Do not immerse any part of the system in
water or any other liquids
• Do not operate the system if the appliance
or any other part of the system has been
dropped or damaged
• Do not disassemble or attempt to repair
your vacuum. Return the unit for
examination and repair
• Do not use the vacuum to pick up
ammable or combustible liquids such as
gasoline and do not use it in areas where
they may be present
• Do not use the vacuum to pick up anything
that is burning or smoking such as
cigarettes, matches or hot ashes
• Use extra care when cleaning on stairs
• Do not use your vacuum without the
lters in place
• Do not leave your vacuum plugged in
when unattended
• Unplug the electrical cord when not in
use and before cleaning or servicing
• Keep loose clothing, hair and all parts of
body away from openings and moving
parts
• Not intended for use by persons (including
children) with reduced physical, sensory
or mental capabilities, or lack of
experience and knowledge
• Keep out of reach of children
• Do not allow your vacuum to be used as a
toy
• Extra care is necessary when using your
vacuum near children, animals or plants
• Do not pull the electrical cord or use the
cord as a handle
• Take care to not close doors on the
electrical cord and do not pull the cord
around sharp edges or corners
• Do not run the vacuum over it’s own
electrical cord
• Do not allow the cord to touch hot surfaces
• Turn off all controls as applicable before
unplugging from the electrical outlet
• To unplug your vacuum, grasp the
plug, do not unplug by pulling on the
electrical cord
• Do not handle the plug or vacuum with
wet hands
• Do not operate your vacuum while
barefoot
• Do not put any objects into the vacuum
openings
• Do not use your vacuum while any
opening is blocked
• Keep your vacuum free of dust, lint, hair
or anything else which may reduce airow
• Keep your work area well lit
• Using improper voltage may result in
damage to the motor and possible injury
to the user. The correct voltage is listed
on the rating label. For operation on
220-240V, 50/60Hz power supply only
• Only use the accessories supplied with
your vacuum
• Only use spare parts recommended by
Bennett Read and Tevo
• Store your vacuum indoors in a cool, dry
area
IMPORTANT SAFETY INSTRUCTIONS
BASIC SAFETY PRECAUTIONS
SHOULD BE OBSERVED WHEN
USING YOUR DYNAMITE,
INCLUDING THE FOLLOWING:
TO REDUCE THE RISK OF FIRE,
ELECTRIC SHOCK, OR INJURY:
!
WARNING
SAVE THESE INSTRUCTIONS
FOR FUTURE USE
FOR HOUSEHOLD USE ONLY
3
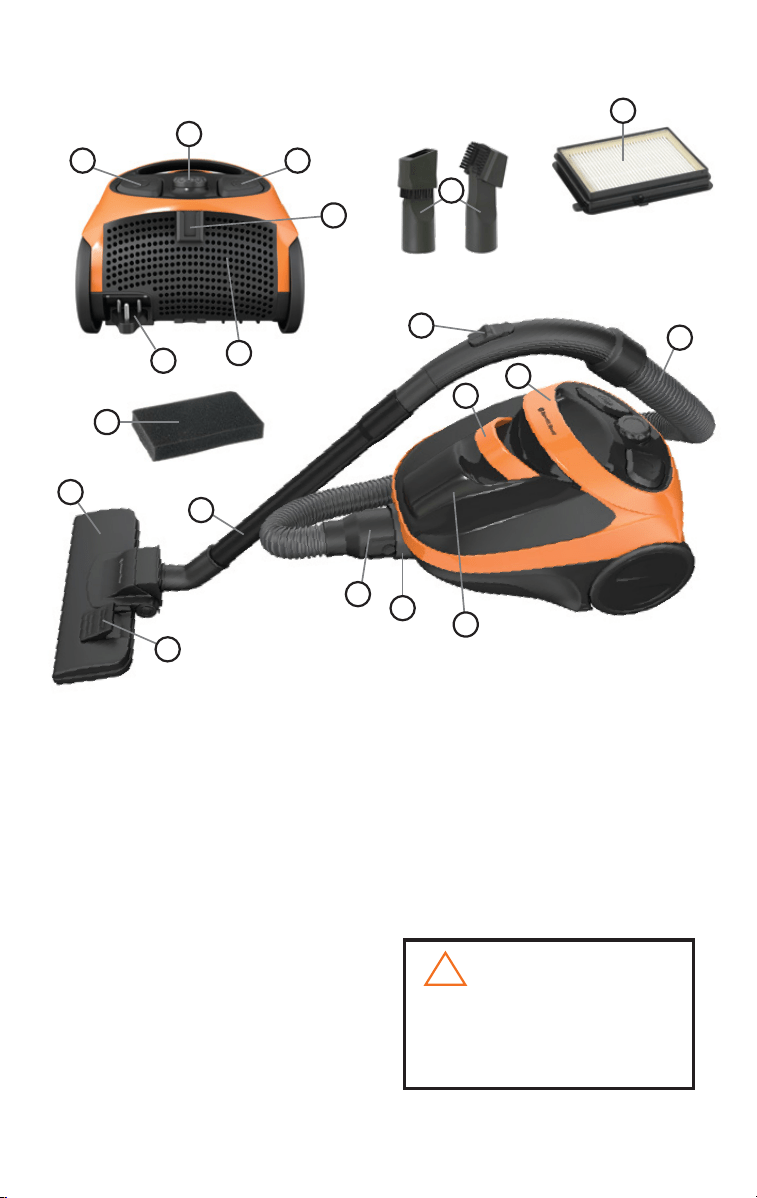
PRODUCT VIEW
1. Multi-surface oor nozzle
2. Brush switch
3. Extension wands (x2)
4. Dusting brush/Crevice tool
5. Air ow regulator
6. Hose
7. Carry handle
8. Dirt container release handle
9. Hose connector
10. Suction inlet
11. Power button
12. Electronic variable suction
control dial
13. Auto-cord rewind button
14. Dirt container microparticle lter
15. Dirt container
16. Post-motor lter door
17. Post-motor lter
18. Floor nozzle storage slot
19. Power cord and plug
Do not plug in your vacuum
cleaner until you are familiar
with all instructions and
operating procedures.
!
CAUTION:
1
2
4
7
8
9
11
6
13
12
18
15
19
10
16
5
3
14
17
4
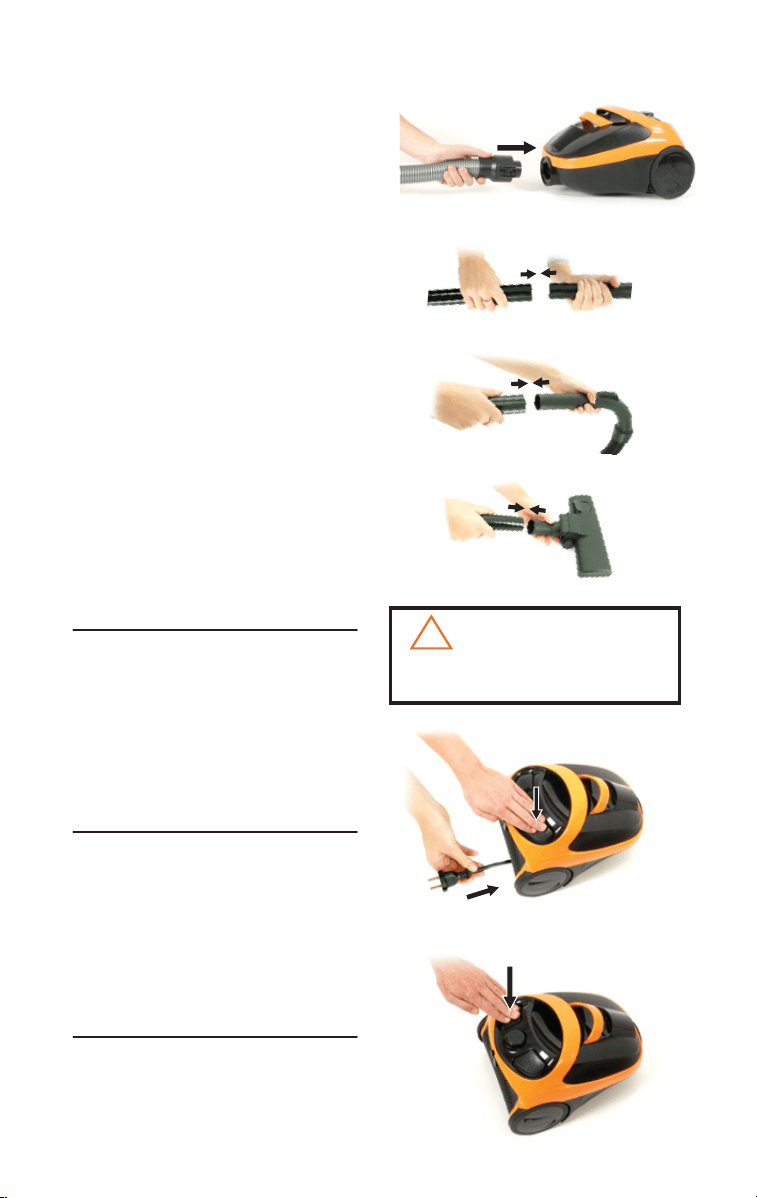
ASSEMBLY
A. Connect the hose (6) to the vacuum by
inserting the hose connector (9) into the
suction inlet (10). You will hear a ‘click’
when it is securely in place
B. Attach the extension wands (3) together
by inserting one into the other. Twist
slightly to tighten the connection
C. Connect the hose handle to the
end of the extension wand and twist
slightly to tighten
D. Connect the oor nozzle (1) to the
other end of the extension wand and
twist slightly to tighten
E. Once assembled, you can store your
vacuum by inserting the storage clip
(located on the back of the oor nozzle)
into the storage slot (18) on the rear of
the vacuum
OPERATIONS
POWER CORD
The power cord (19) is located at the rear of
the vacuum. Gently pull out the power cord.
Stop pulling the cord when the yellow line is
visible. There is also a red line which
indicates the end of the usable cord. Do not
pull the power cord out beyond the red line.
AUTO-CORD REWIND
Your vacuum is equipped with an automatic
cord rewind. When cleaning is nished,
press the power button (11) OFF and grasp
the plug to disconnect from the electrical
outlet. Hold the plug and press the auto-cord
rewind button (13) to rewind the cord
automatically.
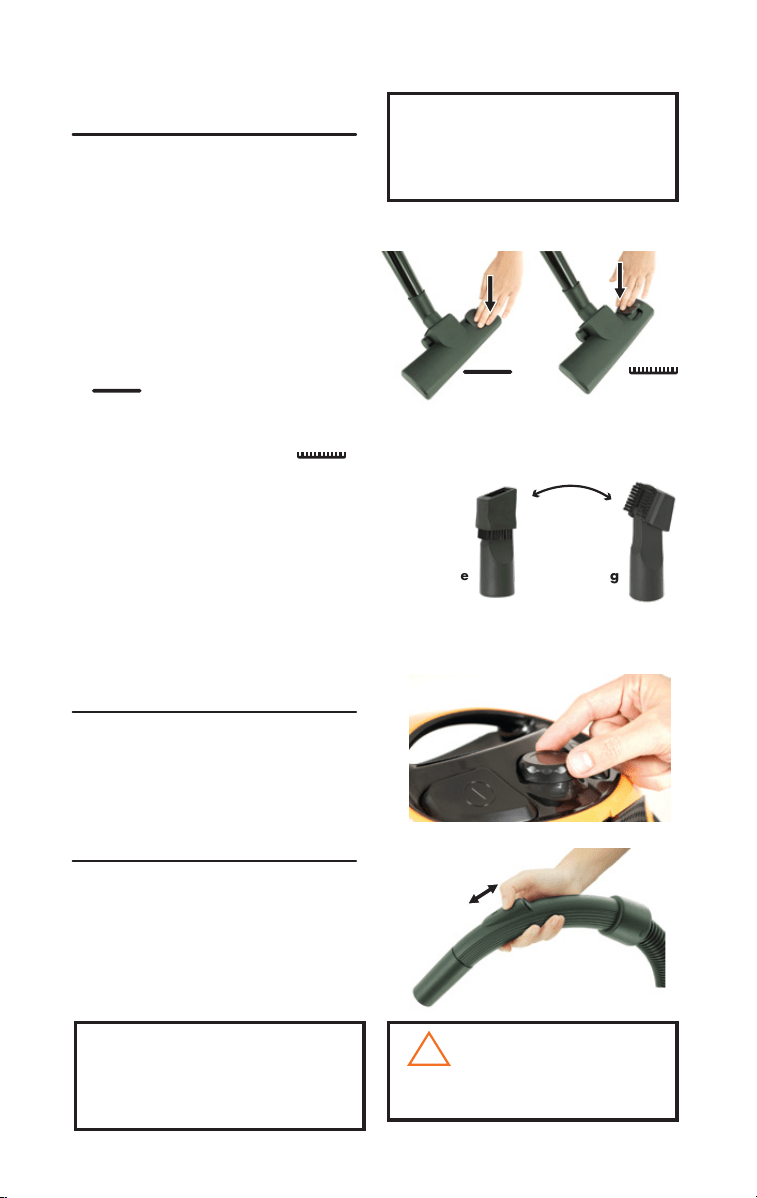
POWER BUTTON
Turn the power ON or OFF by pressing
lightly downward on the power button (11).
A.
B.
C.
D.
The power cord retracts very quickly.
Take care to avoid injury.
!
CAUTION:
Auto cord
rewind
Power
Button
5
To avoid injury, turn cleaner OFF and
unplug cord from wall when not in use.
!
WARNING:
Before cleaning under low furniture, check
area rst for objects that might harm the unit
or block the hose.
TIP:
Hair, string and small objects can block the
hose and tools. Check them occasionally for
obstructions.
TIP:
AIR FLOW REGULATOR
Open the air ow regulator (5) by sliding the
regulator down towards the extension wand
to an open position. This will reduce the
suction power for vacuuming delicate fabrics.
For full suction power, close the air ow
regulator by sliding the regulator up to the
closed position.
ELECTRONIC VARIABLE
SUCTION CONTROL DIAL
To reduce the suction power for vacuuming
delicate fabrics, turn the Electronic Variable
Suction Control Dial (12) anticlockwise. To
increase the suction power, turn the Electronic
Variable Suction Control Dial clockwise.
OPERATIONS
SPECIAL TOOLS
Your BENNETT READ DYNAMITE vacuum is
not only a powerful carpet and rug cleaner,
it’s also a versatile bare oor and above oor
vacuum cleaner when you select one of the
special tools.
FLOOR NOZZLE
Use to vacuum carpets, rugs and bare oors.
The swivel head turns to get into tight spaces
and ts under cabinets
1. To vacuum carpets and rugs, push the
brush switch to the carpet position
[ ]. This will pull the brushes up
into the oor nozzle.
2. To vacuum bare oors, push the brush
switch to the bare oor position [ ].
This will extend the brushes
down from the oor nozzle.
CREVICE TOOL/DUSTING BRUSH
To vacuum in narrow spaces, use the Crevice
Tool. To convert to the Dusting Brush, ip the
brush over for cleaning curtains, draperies,
cushions and fabrics.
Brush up Brush down
1. 2.
Air ow regulator
Dusting
brush
Crevice
tool
6
MAINTENANCE AND CARE
To reduce the risk of injury from moving parts
and/or electrical shock, turn Power Switch
OFF and disconnect plug from electrical outlet
before performing maintenance checks.
!
WARNING:
EMPTYING THE DIRT CONTAINER
Empty the dirt container as soon as
the dirt reaches the “max” line on the
sides of the dirt container (15).
STEP 1:
Unplug the vacuum from the electrical
outlet
STEP 2:
Remove the hose by pressing the securing
clips inward and pulling the hose
connector out from the suction inlet. Set the
hose aside
STEP 3:
Lift the dirt container release handle in
front of the carry handle to remove the dirt
container
STEP 4:
Open the dirt container lid by pressing the
button below the release handle and lifting
the lid upwards
STEP 5:
Remove the dirt container lid
STEP 6:
Shake out the dirt container over a rubbish
bin
STEP 7:
Replace the lid on the dirt container
STEP 8:
Replace the dirt container by placing it
back into the vacuum and pushing down
on the dirt container until it clicks back into
place
To maintain maximum performance from your vacuum, perform these maintenance checks:
STEP 2
STEP 3
STEP 4
STEP 5
STEP 6
7
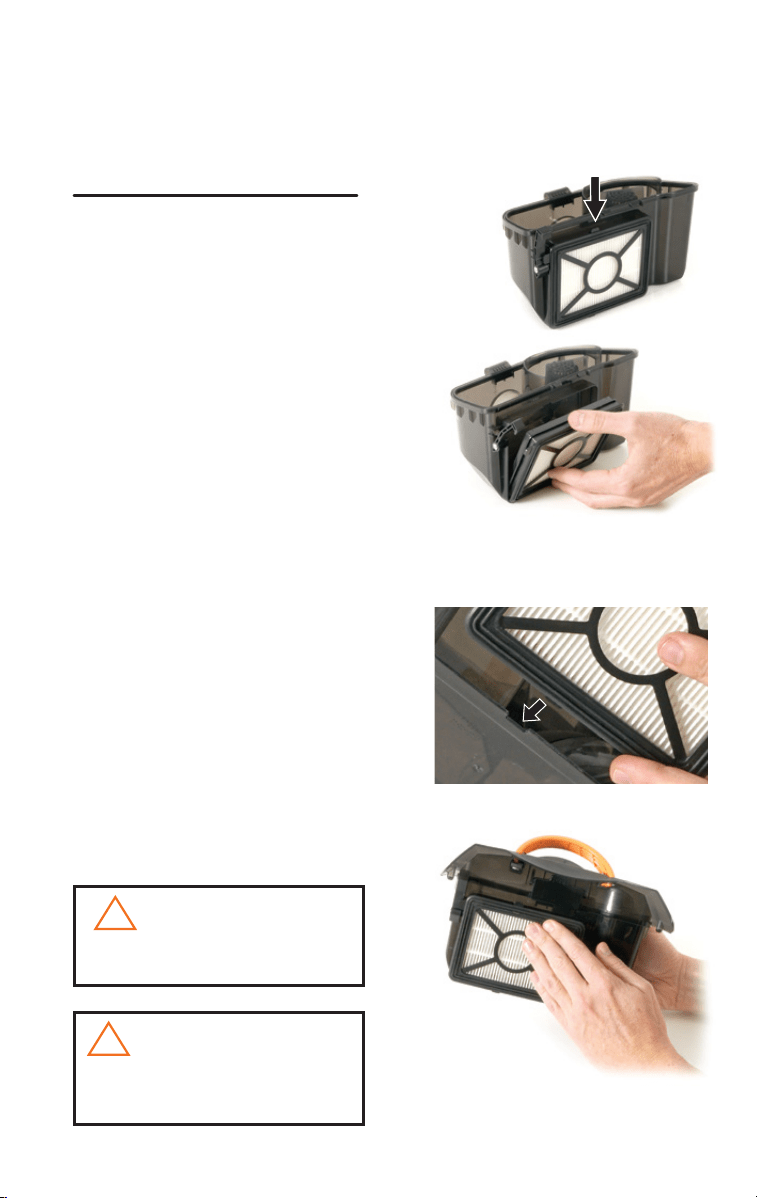
MAINTENANCE AND CARE
CLEANING THE DIRT
CONTAINER FILTER
(MICROPARTICLE FILTER)
The key to maximum performance
is a clean lter. Cleaning the lters
after each use will help your
DYNAMITE vacuum operate at peak
efciency.
STEP 1:
Remove and open the dirt container (follow
steps 1 to 3 on page 6)
STEP 2:
Remove the Microparticle Filter (14) from
the back of the Dirt Container by gently
pulling the tab
STEP 3:
The Microparticle Filter can be hand
washed in cold water with a mild
detergent.
Rinse the lter well and air dry
COMPLETELY before placing back
into the Dirt Container.
STEP 4:
Insert the Microparticle Filter back into the
Dirt Container by lining up the bottom tab
rst, then gently pushing the lter securely
into place from the top
Never operate your DYNAMITE vacuum without all
the lters in place. Doing so may damage the motor
and void the guarantee.
!
CAUTION:
Never operate your DYNAMITE
vacuum with damp or wet lters.
!
WARNING:
STEP 4
STEP 2
STEP 2
STEP 3
8
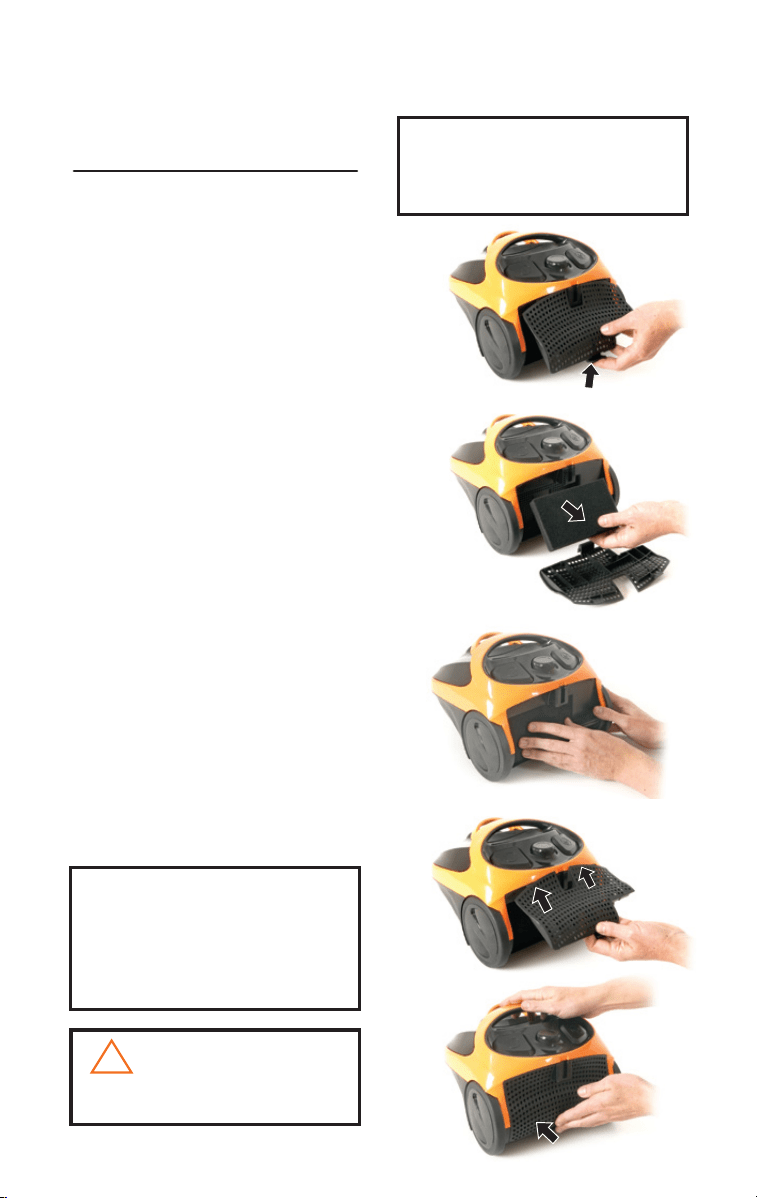
MAINTENANCE AND CARE
CLEANING THE
POST-MOTOR FILTER
The post-motor lter (17) assists in
the ltration process to return
cleaner air into the room
STEP 1:
Unplug the vacuum from the electrical
outlet
STEP 2:
Remove the lter door (16) by pulling up
on the tab, then pulling out and away from
the vacuum
STEP 3:
Remove the post-motor lter from the
vacuum
STEP 4:
The post-motor lter can be hand washed
in cold water with a mild detergent.
Rinse well and air dry completely
before placing back into the vacuum
STEP 5:
When dry, replace the post-motor lter into
the lter cavity
STEP 6:
Replace the lter door by placing the two
tabs on the top of the lter door into the
notches on the top of the post-motor lter
compartment and pushing the tab forward
into the vacuum to lock into place.
For maximum cleaning performance check the
lters often and clean or replace them regularly.
TIP:
Never operate your DYNAMITE vacuum with
damp or wet lters, or without all lters in place.
!
WARNING:
This product is intended for household use only
and not for commercial or industrial use.
Vacuuming of dust from products like plaster,
concrete or ashes will damage the motor and
void the guarantee.
NOTICE:
STEP 6
STEP 5
STEP 7
TROUBLESHOOTING
9
MAINTENANCE AND CARE
CLEARING BLOCKAGES
FROM THE DIRT CONTAINER
1. Unplug the vacuum from the electrical
outlet
2. Follow steps 1 to 4 on page 6 to
remove and open the dirt container
3. Follow step 2 on page 7 to remove the
Microparticle Filter
4. Tap the dirt container over a garbage
bin
5. Clear the dirt container of any dirt or
debris
6. Check if there are any blockages in
the suction inlet
7. After clearing any dirt or debris
from the dirt container, replace the
dirt container assembly into the dirt
container
Vacuum cleaner
won't run
Problem Possible causes Solution
1. Power cord not rmly plugged in
1. Check electrical plug
2. Power button not pressed down 2. Press power button
Vacuum cleaner
doesn't vacuum
effectively
2. Filters are dirty 2. Follow instructions
for cleaning lters
on pages 7 - 8
1. Tools, hose or extension wands
are blocked
1. Remove each part
and check for
blockages
3. Follow instructions
for emptying the dirt
container on page 6
3. Dirt container is full
4. Check that hose
connector is locked
into suction inlet
4. Hose connector not securely
attached to suction inlet
5. Check hose and
replace if necessary
5. Crack or hole in hose
6. Change to closed or
maximum setting
6. Air ow regulator is set to open
or minimum setting
7. Clear blockage from
the dirt container
following steps 1 to
7 at the top of this
page.
7. Blocked dirt container
To reduce the risk of electric shock, turn Power
Switch OFF and disconnect plug from electrical
outlet before performing troubleshooting checks.
!
WARNING:
10
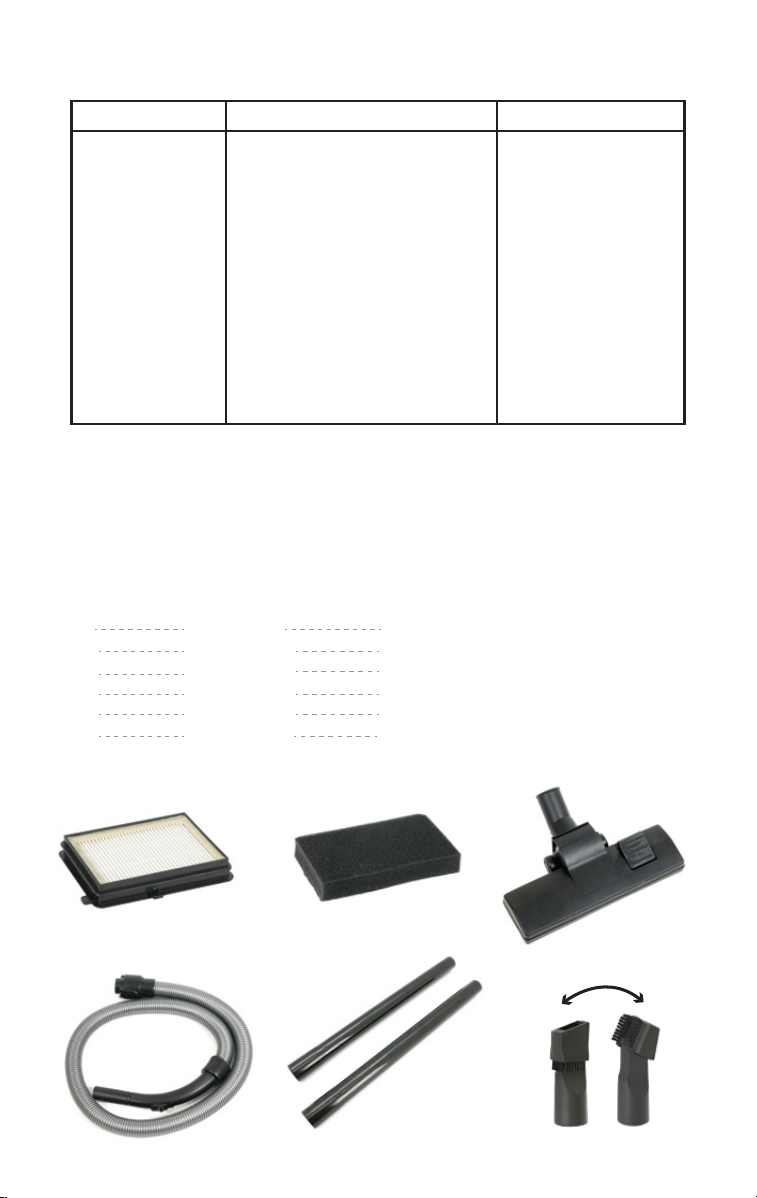
REPLACEMENT PARTS
The items below are available for purchase as accessories for your BENNETT READ DYNAMITE
vacuum. To purchase contact Tevo customer care in your area. Contact details on back cover.
Item Part name
TROUBLESHOOTING CONTINUED
Problem Possible causes Solution
Dust blows out
of the air vents
1. Dirt container is full 1. Empty the dirt
container
2. Filters missing or installed
incorrectly
2. Check all lters for
correct installation
3. Filters are dirty 3. Check and clean or
replace all lters
4. Hose connector is blocked 4. Remove hose and
check for blockages
5. Hose connector is not securely
attached to the suction inlet
5. Make sure the hose
connector is locked
into the suction inlet
6. Crack or hole in hose 6. Check hose and
replace if necessary
Other maintenance or service not included in the manual must be performed by an authorized Tevo service
representative. For any questions or concerns, contact customer care on 0861 77 88 88.
Part #
1. HVC29C01 Dirt container Microparticle lter
2. ZHVC12902 Post-motor lter
3. ZHVC12903 Floor nozzle
4. ZHVC12904 Hose with handle
5. ZHVC12905 Extension wands (2)
6. ZHVC12906 Crevice tool/Dusting brush Combo Tool
2. 3.
4. 5.
1.
6.

CONSUMER WARRANTY
Your BENNETT READ DYNAMITE vacuum is warranted against manufacture
faults for a period of 1 year. If you register your warranty online at
www.tevo.co.za within 14 days of purchase, then your warranty will be
extended to 2 years. Tevo undertakes to repair or replace this product at no
charge if found to be defective due to a manufacturing fault during the
warranty period. This warranty excludes damage caused by misuse, neglect,
shipping accident, commercial use, incorrect installation, or unauthorized
repair. This guarantee does not apply to routine maintenance components
such as, but not limited to, lters and brushes. Tevo is not liable for incidental
or consequential damages of any nature associated with the use of this
product. Tevo’s liability will not exceed the purchase price of this product.
PLEASE KEEP YOUR RECEIPT TO VERIFY YOUR WARRANTY.
Warranty and service enquiries can be made by contacting:
Tevo (Pty) Ltd
Gauteng 086 111 8386 or 012 740 5000
Durban (031) 570 5900
Cape Town (021) 380 0038/9
Customer Service Help Line 0861 77 88 88
www.tevo.co.za
TECHNICAL SPECIFICATIONS:
Nominal voltage: 220-240 V AC
Nominal frequency: 50/60 Hz
Rated Power Output : 1400 W
Model: V8251-8
ENVIRONMENTALLY FRIENDLY DISPOSAL
Do not dispose of electrical appliances with general municipal waste. Hazardous
substances can leak and contaminate the groundwater, affecting the food chain
and ultimately damaging the environment and your health. Contact your local
municipality for information on safe disposal in your area.
Please think of the environment and recycle all plastic and paper in accordance
with your local recycling program.
PLEASE RECYCLE