Compact Automatic
Bread Maker
CBK-110 SERIES
For your safety and continued enjoyment of this product, always
read the instruction book carefully before using.
Instruction and
Recipe Booklet

1
IMPORTANT SAFEGUARDS
When using electrical appliances, especially when children
are present, basic safety precautions should always be taken,
including the following:
1. READ ALL INSTRUCTIONS, PRODUCT LABELS AND
WARNINGS BEFORE USING THIS BREAD MAKER.
2. Do not touch hot surfaces; carry the unit by plastic base.
Always use oven mitts when handling hot material, and allow
metal parts to cool before cleaning. Allow the bread maker to
cool thoroughly before putting on or taking off parts.
3. When unit is not in use and before cleaning, unplug the
bread maker from wall outlet. Let the bread maker cool down
completely before assembling or disassembling it.
4. To protect against risk of electric shock, do not immerse the
appliance or plugs in water or other liquids.
5. Close supervision is always necessary when this or any appliance
is used near children or incapacitated persons.
6. Do not allow anything to rest on the power cord. Do not plug
in cord where people may walk or trip on it. Unplug this bread
maker from the wall outlet before you leave for a trip or go out
for a long period of time.
7. Do not operate this or any appliance with a frayed or damaged
cord or plug, or after the appliance malfunctions or is dropped or
has been damaged in any manner. Take appliance to the nearest
authorized service facility for examination, repair, or electric or
mechanical adjustment.
8. Do not let the cord dangle over the edge of a table or counter or
touch hot surfaces. Do not place on an unsteady or cloth-covered
surface.
9. Avoid contact with moving parts.
10. Do not use attachments not recommended by the manufacturer.
They may cause fire, electric shock or injury.
11. Do not use outdoors or for commercial purposes.
12. Do not place the appliance near a hot gas or electric burner,
or in a heated oven.
13. Keep power cord away from the hot surface of this bread maker.
Do not put any flammable objects on the hot surface of this bread
maker.
14. Place this bread maker a minimum of 2 inches away from any wall
or other object.
15. Do not use this bread maker for other than its intended use.
16. When plugging or unplugging this bread maker, be sure not to
touch the plug blades with your fingers.
17. Before unplugging, press and hold the START/STOP button for
1 to 3 seconds to cancel any programs, then grip plug and pull
from wall outlet. Never pull on the cord.
18. Use of extension cords: A short power-supply cord has been
provided to reduce the risk of injury resulting from becoming
entangled in or tripping over a longer cord. Extension cords may
be used with care. The marked electrical rating of the extension
cord should be at least as great as the electrical rating of the
appliance. The cord should be arranged so that it will not drape
over the counter or tabletop where it can be pulled by children or
tripped over accidentally. If the appliance is of the grounded type,
the extension cord should be a grounding-type 3-wire cord.
19. If electric circuit is overloaded with other appliances, your bread
maker may not operate properly. This bread maker should be
operated on a separate electrical circuit from other operating
appliances.
20. Do not operate your appliance in an appliance garage or under
a wall cabinet. When storing in an appliance garage, always
unplug the unit from the electrical outlet. Not doing so could
create a risk of fire, especially if the appliance touches the walls
of the garage or the door touches the unit as it closes.
21. Preheating of the appliance is necessary

2
22. For household use only
23. This appliance is not intended for use by persons (including
children) with reduced physical, sensory or mental capabilities,
or lack of experience and knowledge, unless they have been
given supervision or instruction concerning use of the appliance
by a person responsible for their safety.
24. Children should be supervised to ensure thatthey do not play
with the appliance.
25. Appliances are not intended to be operated by means of an
external timer or seperate remote-control system.
SAVE THESE INSTRUCTIONS
FOR HOUSEHOLD USE ONLY
SPECIAL CORD SET INSTRUCTIONS
NOTICE
This appliance has a polarized plug (one blade is wider than the
other). To reduce the risk of electric shock, this plug will fit in a
polarized outlet only one way. If the plug does not fit fully in the
outlet, reverse the plug. If it still does not fit, contact a qualified
electrician. Do not modify the plug in any way.
CONTENTS
Important Safeguards .................................. 1
Before First Use....................................... 2
Parts and Features .................................... 3
Control Panel......................................... 4
Operating Instructions ................................. 5
Power Failure Backup.................................. 7
Types of Breads and Programs .......................... 8
Programs & Timing .................................. 9-10
Measuring Ingredients ................................ 11
Loading Ingredients into the Bread Pan .................. 11
Measurement/Conversion Chart ........................ 11
Cleaning and Care.................................... 12
Tips and Hints ....................................... 12
Bread Maker Pantry/Gluten-Free Ingredients ............ 14-16
Troubleshooting...................................... 17
Warranty............................................ 18
BEFORE FIRST USE
Remove all packing material and any promotional labels or stickers
from your bread maker. Be sure that all parts of your new bread
maker have been unpacked before discarding any packing materials.
You may want to keep the box and packing materials for use at a
later date.
Wipe housing with a damp cloth to remove any dust from the
warehouse or shipping. Wash inside of lid with sponge or damp
cloth. Wash kneading paddle and bread pan with warm, soapy water
and dry completely.

3
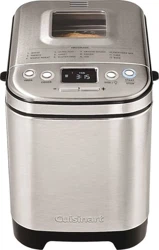
PARTS AND FEATURES
1. Lid
With viewing window
2. Control panel with LCD display
See details on next page
3. Baking chamber
a. Removable bread pan with handle
Vertical loaf, nonstick coating
b. Kneading paddle
Removable, nonstick paddle
c. Heating element (not shown)
4. Power cord (not shown)
5. Paddle removal hook
Helpful tool for removing kneading paddle from
baked bread
6. BPA free
All materials that come in contact with food
are BPA free
1
2
3a
3b
5
4
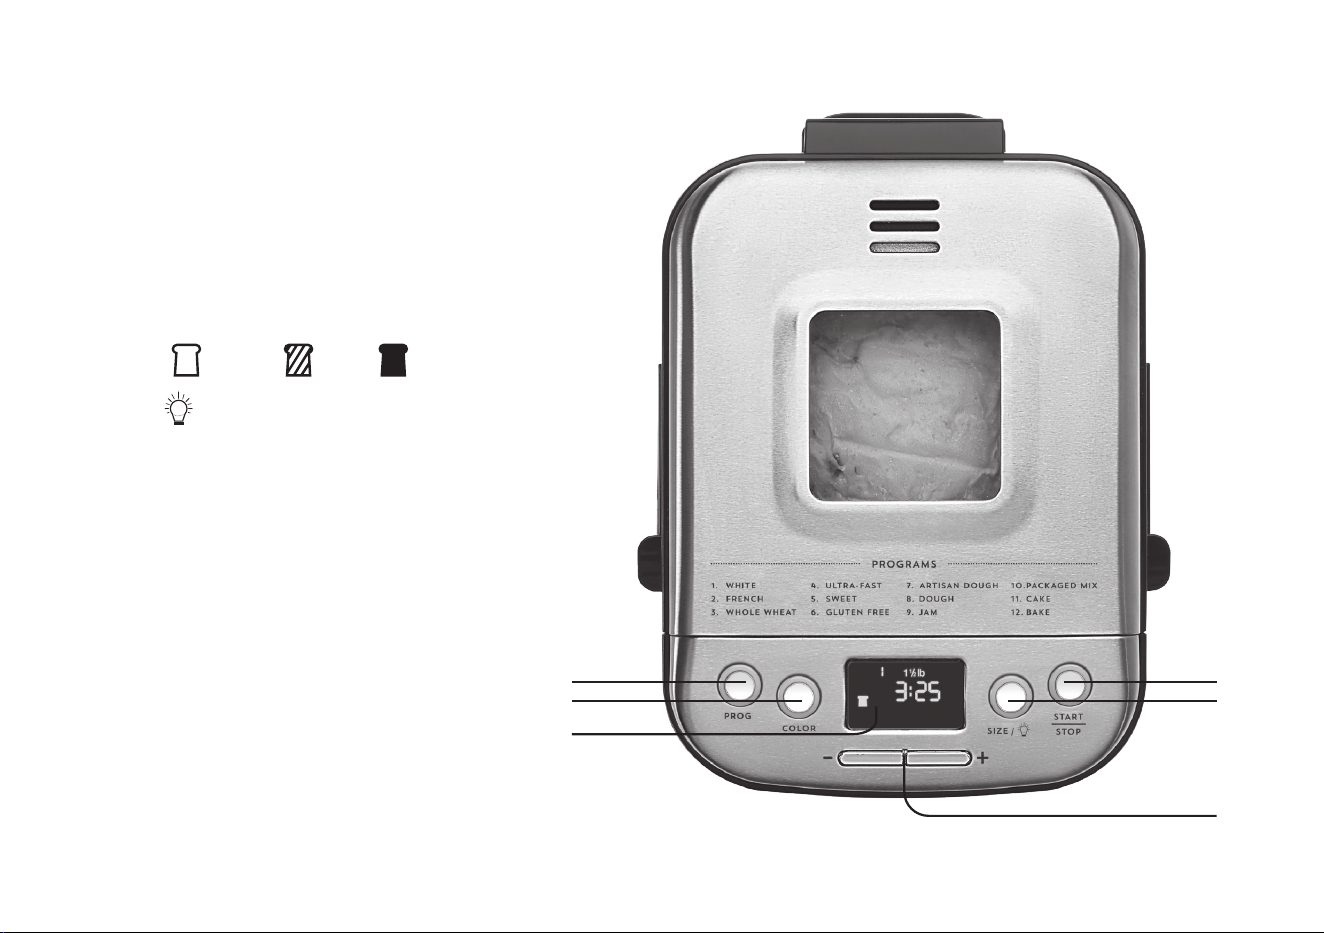
CONTROL PANEL
1. LCD Display – Displays your loaf size and crust
color selection along with the current program.
Also used to view cycle timing and delay
start timing.
2. PROG Button – Select a program; refer to the program
list above display for options.
3. COLOR Button – Select a light, medium or dark crust.
Light: Medium: Dark:
4. SIZE / – a. Select a 1-lb., 1½-lb. or 2-lb. loaf.
b. Enables internal chamber light.
NOTE: Some program selections are limited
to certain crust colors and loaf sizes. The LCD
will display accordingly. Please see Programs &
Timing on page 9 for all available combinations.
5. START/STOP Button – Starts and stops the
bread-making process. Also controls Pause function.
6.
–
/
+
Buttons – Adjust time for bake program and
delay timer.
2
3
1
5
4
6
5
OPERATING INSTRUCTIONS
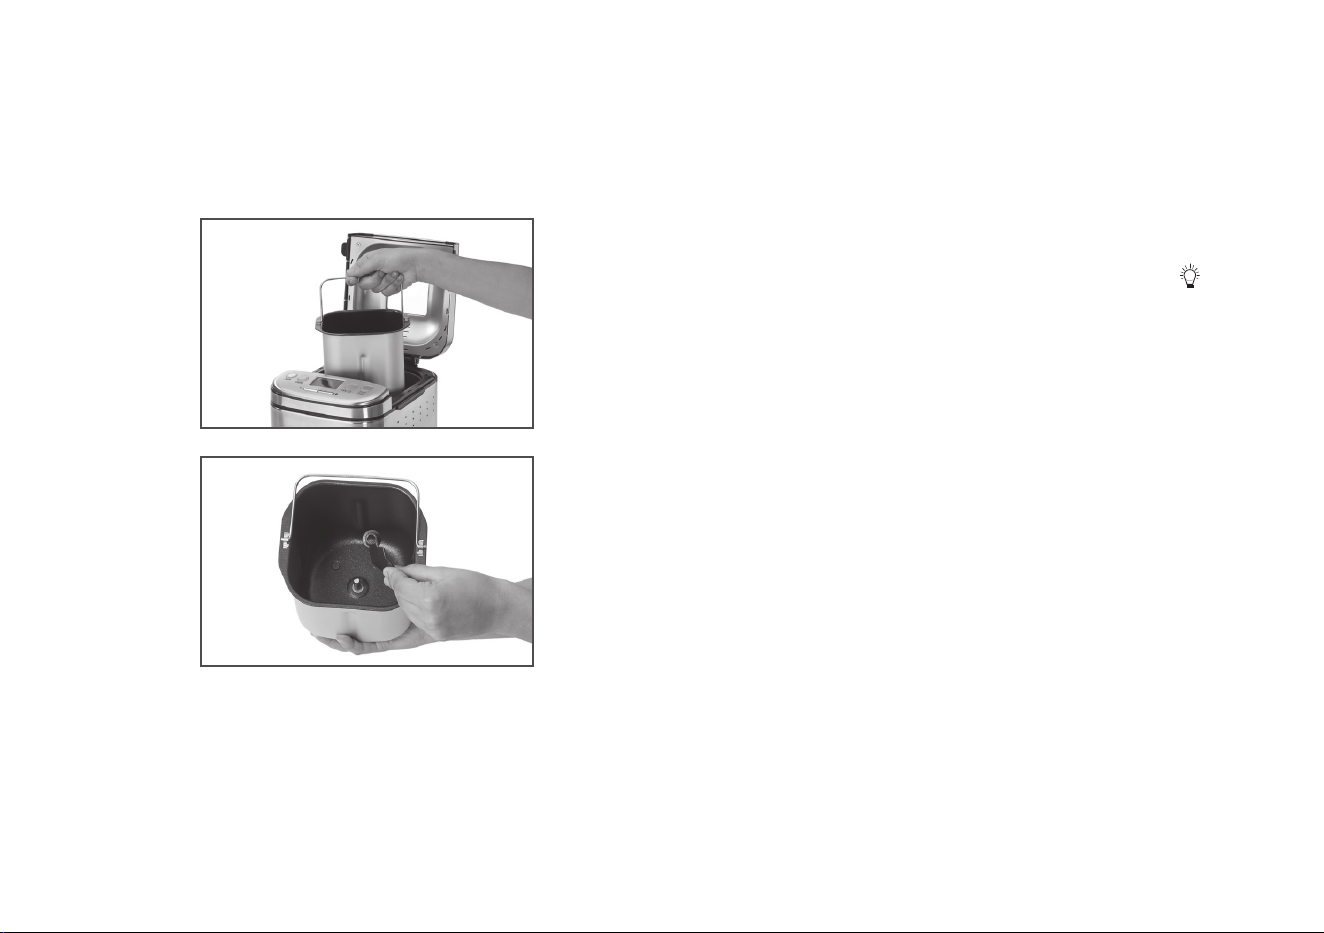
1. Remove bread pan by grasping the handle, turning the pan
counterclockwise and lifting up. It may be helpful to first lift the handle
of the bread pan by using the paddle removal hook. Attach kneading
paddle (see figures 1a and 1b).
2. Properly measure all ingredients and put into the bread pan in
the exact order they are listed. Always put the liquids in first, the dry
ingredients in next, and the yeast last. Yeast should not touch wet
ingredients. Please refer to the Measuring and Loading Ingredients
sections (page 11) for instructions.
3. Insert the bread pan back into the baking chamber, turning clockwise
to lock in place.
4. Close the lid and connect power cord to a standard electrical outlet.
5. Select your program by pressing the PROG button until your desired
program is displayed. (The pre-programmed menu selections
are listed on the control panel for easy reference.) For more information
on each program, see pages 9-10.
6. Select your crust color (light, medium or dark) by pressing the COLOR
button. Your current selection will be displayed on the LCD panel. (If no
crust color is selected, the unit will automatically default to dark crust.)
7. Select your loaf size (1-lb., 1½-lb. or 2-lb.) by pressing the SIZE/
button. Your current selection will be displayed on the LCD panel.
(If no loaf size is selected, the unit will automatically default to a 1½-lb.
loaf size.)
8. If you would like the bread-making process to start immediately, press
the START/STOP button now. To cancel the process, press and hold the
START/STOP button for 3 seconds.
Delay Start Timer
The Cuisinart
®
Compact Automatic Bread Maker gives you the convenient
option of choosing the exact time your bread will be fresh, warm and ready
to eat! It can be programmed up to 13 hours in advance. For example, you
can program your bread maker at 8pm to finish baking at 9am. Be sure to
set your timer based on when you would like your bread to be complete.
NOTE: Do not use perishable ingredients such as milk, eggs, cheese and
yogurt with the delay start function.
To set the Delay Start:
1. Add ingredients.
2. Select program, loaf size and crust color.
3. Set the number of hours ahead that you want the loaf to finish. By
pressing the + or – buttons you can set time for completion up to
13 hours later. Press to increase or decrease time by 10-minute
increments or hold either button down to scroll faster.
4. Press the START/STOP button to begin the delay start countdown.
1a.
1b.

6
During Bread Making
The Process
Once you start a selected program, the unit will automatically take care of
each step of the bread-making process until the loaf finishes baking. An
indicator on the LCD will display the current function: Knead, Rise, Bake,
or Keep Warm.
Knead – Most bread types use 2 Knead cycles. The first Knead cycle
quickly mixes the main ingredients. The second Knead cycle is longer, which
continues the mixing process. The dough is “punched down” before the
longer cycle begins, prior to removing the kneading paddle.
Rise – Rise cycles help to ensure the perfect consistency of all yeast breads.
During the Rise cycle, your bread maker will appear to be inactive.
The display will show it is actually in Rise mode.
Bake – This bread maker is fully automatic. That means it will consistently
regulate both baking time and temperature according to the recipe
you select.
Keep Warm – Allows you to leave the finished bread in the machine to serve
warm for up to 60 minutes. It also helps to keep the crust from becoming
soggy if bread is not removed from the machine immediately after baking.
Some crusts will darken slightly in Keep Warm.
Options:
1. Lights: Press and hold SIZE/ for 3 seconds to turn on the internal
chamber light at any time. The light will automatically turn off after 30
seconds, or press and hold again to turn off.
2. Add-ins: An audible signal of 4 sets of 5 long beeps each will sound to
remind you to add any additional ingredients your recipe requires. To do
so, open the lid and add additional ingredients. Be sure to close the lid,
once finished. This typically occurs during the second knead. The display
will show “add-in” for a few minutes during the Knead cycle in case you
miss the initial beeps.
3. Removing kneading paddle: After mixing/kneading is complete,
there will be an audible signal of 10 short beeps before the last Rise
cycle, indicating the point at which the mixing/kneading is complete
(the display will show “paddle” for one minute in case you miss the initial
beeps). At this point in the bread-making process, you have the option
of removing the kneading paddle (to avoid a small hole in the bottom
of your baked loaf), and/or re-shaping the dough, though neither is
necessary. To do so:
a. Press START/STOP to pause the program.
b. Open the lid and remove the bread pan by the handle.
c. Take the dough from the pan and remove the kneading paddle.
d. Form the dough into a neat ball and place in the center of the
bread pan.
e. Replace the bread pan into the machine and turn clockwise to lock
the bread pan into the unit. Close the lid.
f. Press START/STOP to resume the program.
NOTE: If you plan to remove the dough and reshape it in another pan for
baking in your conventional oven, this is the time to do so. Be sure to
press and hold the START/STOP button to reset the machine, so it does
not automatically resume the bread making process after 15 minutes.
After Bread Making
There will be 10 beeps to signal the end of the Baking cycle; the LCD display
window will read 00:00 and the unit will be in the Keep Warm cycle. Your
7
bread will be kept warm for 60 minutes to prevent it from becoming soggy.
There will be one long beep at the end of the Keep Warm cycle. For optimal
results, we recommend removing the loaf as soon as the Baking cycle is
complete and letting it cool on a baking rack. If you would like to take the
bread out (before Keep Warm cycle), switch the program off with START/
STOP button.
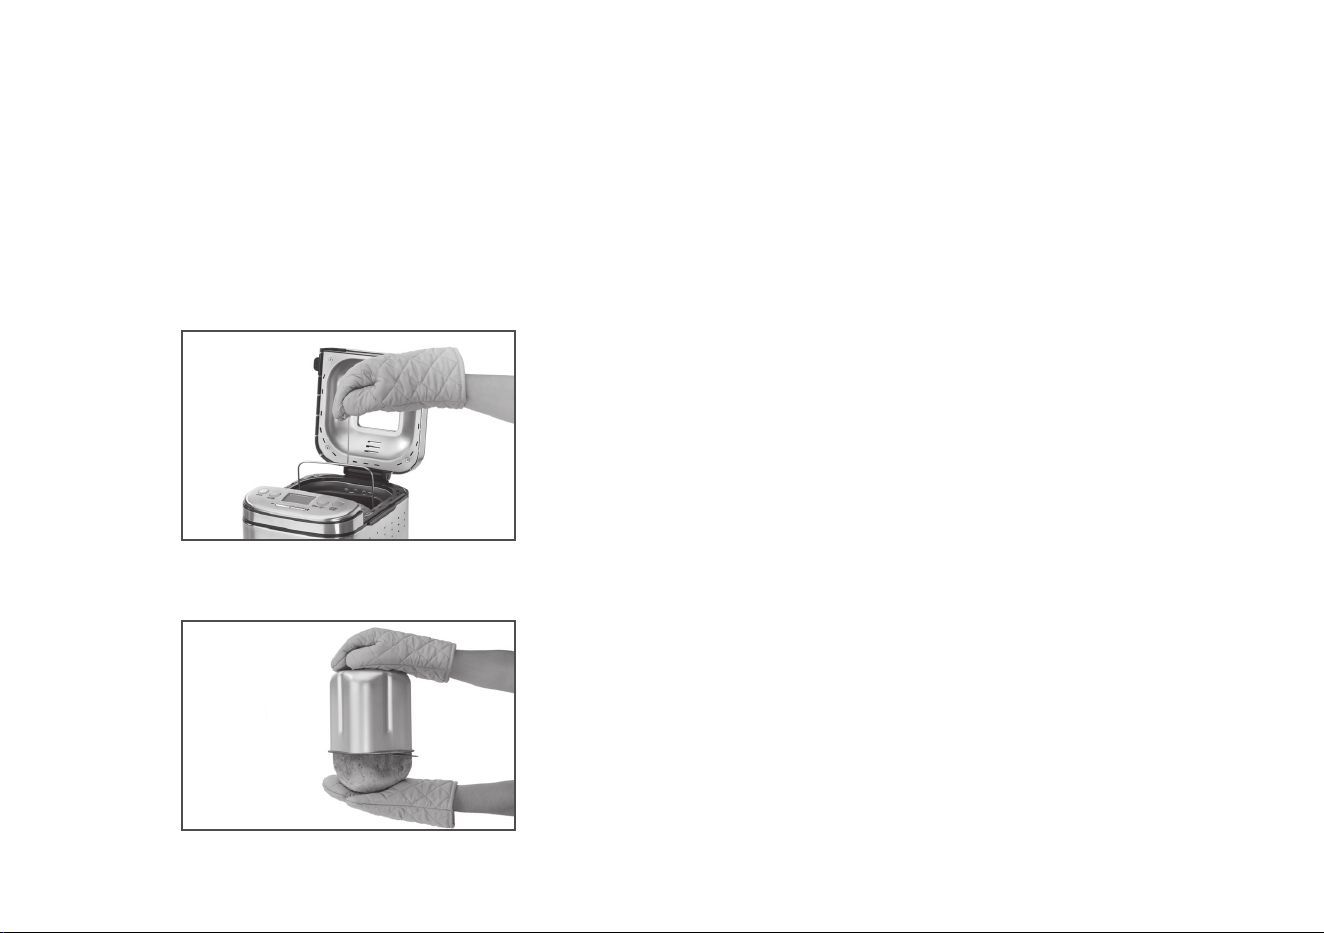
To remove bread from the pan:
a. Open the lid and with oven mitts, use the paddle removal hook, to lift the
bread pan handle. Remove the bread pan by turning counterclockwise by the
handle.
b. Still using the oven mitts, hold the bottom of the bread pan, move the
handle aside, and shake until the bread is released.
c. For best results, allow the loaf to cool on a wire rack for 20 to 30 minutes
prior to slicing.
NOTE: If you have not removed the kneading paddle before baking, be sure
to remove the kneading paddle from the finished loaf. The Paddle Removal
Hook is helpful in removing the paddle from the baked bread. Insert the
hook so the end sits on top of the paddle and gently pull. Use caution; the
kneading paddle will be extremely hot.
POWER FAILURE BACKUP
This unit is equipped with a power failure backup system. In case of
any disruption of the power supply, the unit will store in memory the stage
of bread-making cycle and resume once power is restored. The power
backup feature can maintain memory for a power failure up to 15 minutes.

8
TYPES OF BREADS AND PROGRAMS
1. White – The White cycle uses primarily all-purpose or bread flour.
2. French – French breads require special timing and temperatures to
achieve that wonderful, crispy crust. Because they traditionally lack
sugars or large amounts of fat, they tend to be lighter in color.
3. Whole Wheat – Whole-wheat bread is a yeast bread that is made
with a significant portion of whole-wheat flour (50% or more), rather
than with 100% all-purpose or white bread flour. Breads made from
whole-wheat flour are more nutritious because the flour is milled from
the entire wheat berry (including the bran and the germ). Using whole
wheat flour produces a bread that is brown to dark brown in color, and
the breads are more flavorful and healthful than breads made with refined
white flours (even though “lost” nutrients are added back into white
flours). Many times they are denser than 100% white breads.
4. Ultra-Fast – The Ultra-Fast cycle must be used with a recipe using
rapid rise yeast, or the bread will not rise and bake properly. Almost
any recipe can be modified by replacing standard yeast with an equal or
larger amount of rapid rise yeast. NOTE: This program cannot be used
with the gluten-free recipes.
5. Sweet – The Sweet bread program is specifically designed to bake
breads with high amounts of sugar, fats and proteins. These added
ingredients tend to increase the height and browning of the finished
loaves.
6. Gluten-Free – Since gluten is found in most flours used in traditional
bread baking, the ingredients to create gluten-free breads are unique.
While they are “yeast breads,” the doughs are generally wet and have a
batter-like consistency. It is also important not to over-mix or over-knead
gluten-free doughs. NOTE: For list of Gluten-Free ingredients, refer to
pages 15–16.
7. Artisan Dough – This cycle allows the preparation of artisan doughs.
There are several long, slow, cool rises that will enhance the development
of texture, taste and crust in the final shaped and baked bread. This
isa dough ONLY program. It can be baked using the Bake program, or
shaped and baked in a conventional oven.
8. Dough – There are two ways to prepare dough in the bread maker if
you wish to bake it in a conventional oven. One way is by using our
Dough program. It mixes ingredients, kneads and takes the dough
through the two rises. It is appropriate for almost any dough recipe
(except gluten free) and ideal for pizza dough. It is intended that the
dough will be removed and shaped by hand and allowed to rise 1 or
2 more times out of the bread maker. Alternatively, you can choose a
specific bread program from the menu options, and remove the dough
when the Remove Paddle signal tones. This will take you through two rise
cycles. This method is suitable for any alternative loaf shape, dinner rolls,
braided challah bread, and so on. Last rise will take place outside the
bread maker.
9. Jam – The bread maker is a great cooking environment for homemade
jams and compotes. The paddle automatically keeps the ingredients
stirring through the process. The heating element is placed in a way that
the contents will not get burned. The program starts in a heating phase.
It will start mixing about 10 minutes into the program. We provide recipes
to get you started. They make a wonderful complement to freshly baked
bread!
10. Packaged Mix – This program is meant for prepackaged yeast
bread mixes intended for the bread machine. Dough mixes for 1½ and
2 pounds work best.
11. Cake – Cake-like in texture, recipes for this program, are usually baked
in a shaped pan such as a loaf pan or muffin tin. They are a batter-type
bread rather than a yeast dough, and get their leavening from baking
powder, baking soda and eggs. Mix-ins must be added at the very
beginning of the cycle with other basic ingredients. If the finished bread
is a little moist on top when baking is complete (moisture will depend on
ingredients of the quick bread), leave it in the bread maker on Keep Warm
for 10 to 15 minutes with no heat, and it will continue baking – this is
called “after cooking.”
12. Bake – This menu setting activates the bread maker for Bake function
only. You can use this setting if you want the finished loaf to have a
darker crust color (this will only require a few extra minutes, so keep
your eye on the loaf). Bake function only can also be used to bake store-
purchased doughs.

9
2. FRENCH I
Size: Total
Time:
Add-Ins Remove Paddle
Displayed Time Elapsed Time Displayed Time Elapsed Time
1-lb. 4:05 2:55 1 hr 10 mins 2:15 1 hr 50 mins
1½-lb. 4:15 3:00 1 hr 15 mins 2:20 1 hr 55 mins
2-lb. 4:20 3:05 1 hr 15 mins 2:25 1 hr 55 mins
3. WHOLE WHEAT I Color:
Size: Total
Time:
Add-Ins Remove Paddle
Displayed Time Elapsed Time Displayed Time Elapsed Time
1-lb. 3:57 3:10 47 mins 2:25 1 hr 32 mins
1½-lb. 4:05 3:15 50 mins 2:30 1 hr 35 mins
2-lb. 4:10 3:20 50 mins 2:35 1 hr 35 mins
1. WHITE I Color:
Size: Total
Time:
Add-Ins Remove Paddle
Displayed Time Elapsed Time Displayed Time Elapsed Time
1-lb. 3:18 2:40 38 mins 2:05 1 hr 13 mins
1½-lb. 3:25 2:45 40 mins 2:10 1 hr 15 mins
2-lb. 3:30 2:50 40 mins 2:15 1 hr 15 mins
4. ULTRA-FAST I Color:
Size: Total
Time:
Add-Ins Remove Paddle
Displayed Time Elapsed Time Displayed Time Elapsed Time
1-lb. 1:53 1:40 13 mins 1:35 18 mins
1½-lb. 2:03 1:50 13 mins 1:45 18 mins
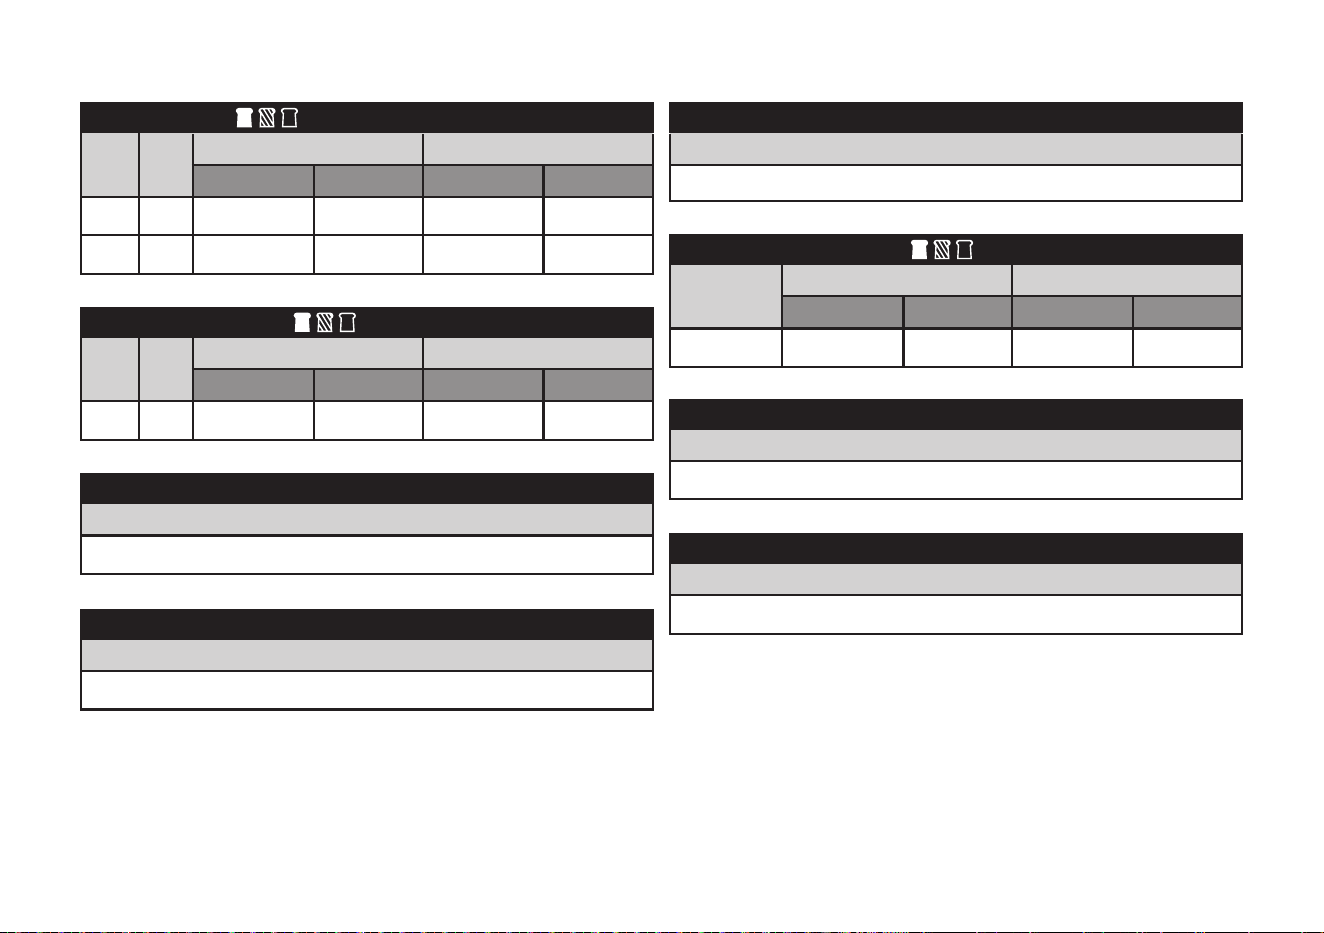
PROGRAMS & TIMING
For each program, there are two times listed under ADD-INS and under REMOVE PADDLE. The Displayed Time is what you will see in the countdown timer
window. The Elapsed Time under ADD-INS and REMOVE PADDLE is the number of minutes that have passed since you pressed start. Elapsed Times are listed
to let you know when you should return.
NOTE: Removing the paddle is an optional step. See page 6 for more details.
10
7. ARTISAN DOUGH I
Total Time:
5:05
10. PACKAGED MIX I Color:
Total
Time:
Add-Ins Remove Paddle
Displayed Time Elapsed Time Displayed Time Elapsed Time
2:34 2:14 20 mins 1:04 1 hr 30 mins
8. DOUGH I
Total Time:
1:30
9. JAM I
Total Time:
1:20
12. BAKE I
Total Time:
1:40
5. SWEET I Color:
Size: Total
Time:
Add-Ins Remove Paddle
Displayed Time Elapsed Time Displayed Time Elapsed Time
1-lb. 3:15 2:45 30 mins 2:05 1 hr 10 mins
1½-lb. 3:20 2:50 30 mins 2:10 1 hr 10 mins
6. GLUTEN-FREE I Color:
Size: Total
Time:
Add-Ins Remove Paddle
Displayed Time Elapsed Time Displayed Time Elapsed Time
1½-lb. 2:15 1:55 20 mins 1:40 35 mins
11. CAKE I
Total Time:
1:52

11
MEASURING INGREDIENTS
Important Note: The MOST important rule of making bread:
Use exact measurements. This is the key to successful bread baking.
When measuring wet ingredients, use only liquid measuring cups with the cups/
ounces marked clearly on the side. After filling the measuring cup, place it on a flat
surface and view it at eye level to make sure the amount
of liquid is exact. Most recipes require liquids to be at room temperature.
When measuring dry ingredients, fill a dry measuring cup with a spoon
and then level off the measurement with the back of a knife or a spatula to make
sure the measurement is exact. Never use the cup to scoop the ingredients
directly from container (for example, flour). By scooping, you could add up to one
tablespoon of extra ingredients. Do not pack down, unless otherwise noted.
LOADING INGREDIENTS INTO
THE BREAD PAN
Important Note: The SECOND MOST important rule of making bread:
Put the ingredients into the bread maker in the EXACT order given in
the recipe. This means, in most cases:
— FIRST, liquid ingredients
— SECOND, dry ingredients
— LAST, yeast – Yeast must be separate from wet ingredients. Create a small
crater in dry ingredients using your finger or a spoon, and place yeast within the
crater. Make sure yeast is fresh.
Also, make sure ALL ingredients are at room temperature, unless otherwise noted
(that is, between 75˚F– 90˚F). Temperatures too cool or too warm can affect the way
the bread rises and bakes. NOTE: Water should not be warm, or it will affect rising.
Last, it is a good idea to start with fresh ingredients. Fresh flour and fresh yeast are
critical.
See Troubleshooting section (page 17) to learn more.
MEASUREMENT/CONVERSION CHART
1
1
⁄2 teaspoons =
1
⁄2 tablespoon 8 tablespoons =
1
⁄2 cup
3 teaspoons = 1 tablespoon 12 tablespoons =
3
⁄4 cup
1
⁄2 tablespoon = 1
1
⁄2 teaspoons 16 tablespoons = 1 cup
2 tablespoons =
1
⁄8 cup
3
⁄8 cup =
1
⁄4 cup + 2 tablespoons
4 tablespoons =
1
⁄4 cup
5
⁄8 cup =
1
⁄2 cup + 2 tablespoons
5 tablespoons + 1 teaspoon =
1
⁄3 cup
7
⁄8 cup =
3
⁄4 cup + 2 tablespoons
Yeast/Baking Powder or Baking Soda
Dry Ingredients
Water or Liquids

12
CLEANING AND CARE
Caution: Unplug machine before cleaning. Do not put the bread maker in water or
in a dishwasher. Do not use scrubbing brushes or chemical cleaners, as these will
damage the machine. Use only a mild, nonabrasive cleanser to clean the outside of
the bread maker.
Bread pan and kneading paddle – Pan and kneading paddle should be hand-
washed with warm water and soap. Do not use metal utensils with the baking pans
as they will damage the nonstick surface.
Baking chamber – Remove all bread crumbs by wiping them away with
a slightly damp cloth or clean pastry brush. DO NOT bend the heating
element, which is located on the inside of the bread maker.
Lid – Wipe inside of lid with sponge or damp cloth. Lid should not be immersed in
water.
Outer housing – Use only a mild, nonabrasive cleanser to clean the outside of the
bread maker.
Control panel – Wipe with a slightly damp cloth as necessary. Take care not to
allow water or cleaning fluids under buttons of control panel.
Maintenance – Any other servicing should be performed by an authorized service
representative.
Keep your bread maker clean at all times.
Don’t worry if the color of the exterior of the baking pan changes over time. The
color change is a result of steam and other moisture and does not affect the
machine’s performance.
If you have trouble removing the kneading paddle from bread pan,
place warm, soapy water in the bread pan for 10 to 15 minutes – this will
loosen the paddle.
TIPS AND HINTS
Important: If using perishable, fresh ingredients such as dairy products,
eggs, chopped fruits or vegetables, do not use the Delay Start Timer feature.
Some dairy products and eggs may be substituted by using dried ingredients such
as dried egg powders, dried buttermilk, or dry milk. Add the water to
the machine first, then add the dried substitution after the flour to keep
them separate. If you substitute these dried ingredients and have no other fresh,
perishable ingredients in your bread recipe, you may then use the
Delay Start Timer feature.
Add ingredients to the pan in this order – liquids, melted or softened butter, salt and
sugars (including honey, molasses, syrup), herbs, flours, dried milk, vital wheat gluten
(if using), yeast. Do not allow the yeast to touch the wet ingredients. See detailed
instructions on page 11.
Use top-quality ingredients to make your bread-maker breads.
Giving the kneading paddle a light coating with a nonstick cooking spray
or vegetable oil may make it easier to remove if it bakes into a loaf.
Scrape down sides of pan if ingredients are sticking to the sides.
For higher altitudes – Flour is drier at higher altitude levels and will absorb more
liquid, so use less flour in the recipe. Pay attention to the dough as it mixes and
kneads – if it appears dry, add more of the same liquid used in
the recipe.
Doughs prepared and baked at higher altitude levels will tend to rise faster – use
about
1
/
3
less yeast to help counteract this phenomenon.
Adding less sugar (where applicable) also helps in producing the proper dough and
bread. Reduce sugar or sweetner by about ¼.
Also, adding a little more salt will retard the yeast action and promote slower,
more even rising. Add no more than ¼ teaspoon of additional salt. Start with one of
these changes to determine the best results.
Humidity
Bread-machine baking is affected by the temperature and humidity of the
day – this is often the cause of varied dough consistency and results. On a humid
day, you may need additional flour. Pay attention to the dough during the kneading
process and if sticky, add flour 1 teaspoon at a time. Alternately, if it is especially dry,

13
you may need to add additional liquid.
Dough should be smooth and not cling to fingers when touched. Additional amounts
of flour or liquid should be added 1 teaspoon at a time.
Measure all ingredients accurately and have them ready before adding to bread pan.
This helps to ensure that you measure each ingredient correctly, and do not find that
you get down to the last (or nearly last) ingredient and discover that it is not available
in the pantry.
When measuring ingredients, use liquid measuring cups for liquids and
dry measures for dry ingredients. Stir all flours first, spoon into dry measure and level
off using the flat side of a knife or spatula – do not pack down.
Temperature of ingredients is important in bread-machine baking. Ideal
temperatures are between 75°F–90°F. Use an instant-read thermometer
to check the temperatures. Cold ingredients should be allowed to come to room
temperature.
Vital wheat gluten can be added to recipes to improve loaf height, texture and
structure – particularly with whole-grain flours, or breads using whole wheat, oat
flour or rye flour. It also aids in rising when using the Ultra-Fast program.
It is especially important to keep yeast separate from salt if using Delay
Start Timer feature – add salt with the liquids and the yeast last, on top of the flour.
Nuts and seeds, raisins and other dried fruits, shredded cheeses, chocolate morsels,
and any other additions to the dough should be added when
the Add-In signal sounds, except for the Cake program.
For a more uniform loaf of bread, remove the dough when you hear the Remove
Paddle signal, then remove the kneading paddle and reshape the dough into a neat
loaf. This will ensure a more uniformly shaped loaf of bread, particularly with the
smaller 1- and 1
1
⁄2-pound loaves.
Use the Whole Wheat program when baking breads containing not only
whole-wheat flour, but other heavy flours that will require a longer knead
and rise – for example, pumpernickel bread.
All breads slice best when allowed to cool for a minimum of 30 minutes
(preferably longer) before slicing. If you wish to serve bread warm, wrap
in foil and heat in oven.
For cake/quick breads, spray the bottom and halfway up the sides
of the bread pan with cooking spray before adding ingredients, to assist in release.
Loosen the loaf with a heatproof plastic spatula before turning out.
If bread bakes over the bread pan handle, let it cool, then remove bread from pan
in unit.
Amounts/Sizes/Ingredients
For white breads and any recipe calling for a white flour, the best flour to use is
unbleached, all-purpose flour. Doughs made using the Artisan program should use
bread flour, which has a higher protein makeup.
A general formula for a 1
1
⁄2-pound bread machine loaf is: 3 cups flour,
1 to 1
1
⁄4 cups liquid, 1 to 1½ teaspoons salt, 1 to 2 teaspoons sugar, 1½ to
2 teaspoons yeast. Use this as your basic formula and make adjustments
from there.
In general, a 2-cup flour recipe will produce a loaf that is about 1 pound, a
3-cup flour recipe will produce a loaf that is about 1
1
⁄2 pounds, and a 4-cup flour
recipe will produce a loaf that is about 2 pounds. Some recipes will
have slightly larger or smaller amounts of flour for each size, and with
mix-ins, they may weigh more than their specified weight.
You should not use more than 4½ cups flour total in the bread machine.
If you are adapting a recipe, and your mathematical measurements become
something odd, such as half of an egg, whisk your egg well and then measure out
half. A large egg is generally equal to about
1
⁄4 cup.
It is important to measure ingredients accurately – do not be tempted to omit small
amounts such as
1
⁄8 teaspoon. Baking is chemistry, and changing the formula by
even this small amount can change the final product significantly.

14
BREAD MAKER PANTRY
To be able to prepare breads quickly and easily in your Cuisinart
®
Compact Automatic Bread Maker, we suggest keeping some basics on hand.
Depending on the types of breads you and your family prefer, you may also want to
have some of the other items readily available. Not all the ingredients listed are in the
recipes, but can be added to improve taste and texture.
Storing Ingredients
Flours and other bread-making ingredients are prone to rancidity and
should be stored properly. It is best to buy them in smaller quantities and purchase
as needed. Many flours can be stored at room temperature, but more whole-grain
and gluten-free flours are best in the freezer (in airtight bags/containers). Always
mark the date on the bag/container so you can keep track. Freezers can often
impart flavors onto what is frozen in there,
so be sure it is well sealed.
White Flours (all-purpose, bread and cake): These should be stored in a
dark, cool place for up to 1 year (but best to go by the use-by date on the bag).
These can also be put in the freezer for a year as well, but be sure to wrap well so
they do not pick up any flavors or odors from the freezer.
Whole-Grain and most Gluten-Free Flours: In a cool, dark place for up to
3 months, or in the freezer for up to 6 months.
Nut Flours: These are very prone to spoiling, so store in the refrigerator for
up to 3 months or in the freezer for up to 6 months.
Starches and Gums: More stable than flours, these can be stored in a cool, dark
place for at least a year.
Yeast: Always store in the refrigerator and check the expiration date prior
to using.
All-Purpose Flour – Can be bleached or unbleached – we prefer unbleached. For
the bread machine, all-purpose flour is used for most
yeast and quick breads.
Baking Powder – Baking powder is a combination of baking soda and acid, so this
leavener can be used in baked goods where there is no existing acid. Be sure to
read the label because some baking powders use starches to keep the compound
dry, which may affect those with gluten allergies.
Baking Soda – Baking soda is a chemical leavener that requires an acidic ingredient
to activate. Examples include brown sugar, buttermilk, yogurt, etc. Not only does
baking soda provide lift to your baked product, but it also improves browning.
Bread Flour – An unbleached flour high in protein and gluten. This is best for
artisan-style breads. This flour can be used as a substitute for all-purpose flour and
will give the baked bread more volume.
Cake Flour – A very soft flour with low protein. Do not use cake flour for yeast
breads unless a recipe specifically requires it. It is most often used
to make very tender cakes and pastries.
Eggs – Add taste, richness and color to breads. They act as emulsifiers
and aid in keeping breads fresh and moist. They also work as a leavener
and help with the volume of the bread. Do not ever use with Delay Start feature
unless using powdered egg or powdered egg white and adding
with flour. Egg washes (egg beaten with water or milk) are used with some Dough
Only recipes to brush on shaped dough after rising, before baking,
to add color and shine to finished baked goods. All recipes included use large eggs.
Fats (assorted) – Add flavor, nutrition and texture to breads. May be added to just
about any bread recipe where such flavors are appropriate.
Nonfat Dry Milk – When loading ingredients, add powdered milk along with flour.
Using dry milk instead of fresh milk enables you to use the Delay Start feature. Dry
milk is also added to breads (often along with fresh milk/milk products) to produce a
softer crumb.
Nuts, Seeds, Raisins – Add flavor, nutrition and texture to breads. May be added to
just about any bread recipe where such flavors are appropriate.
Powdered Buttermilk – A shelf staple, this is essence of buttermilk without the milk
solids. Acts as a preservative and retards the growth of bacteria and mold.
Salt – Salt is a necessary part of a yeast bread recipe – it not only adds or enhances
flavor, but it controls the yeast and aids in the rising of the dough. We use kosher
salt in all of the recipes.

15
Sweeteners – Granulated sugar, brown sugar, honey, molasses, maple
syrup, golden syrup and others, stimulate yeast growth and development.
Vital Wheat Gluten – A very high-protein flour made from hard wheat and
treated to remove most of the starch. For regular yeast bread baking, vital
wheat gluten is used primarily as an additive to enhance doughs made with
low glutens, such as whole-wheat and other grains. When making Ultra-Fast
breads, vital wheat gluten can provide a better rise in a shorter rising time.
Whole-Wheat Flour – Contains the wheat germ of the flour, giving it a
higher fiber, nutritional, and fat content. Once thought of as “health food,”
breads that were heavy and dense, breads made with all or part whole-
wheat flour are the most nutritious and can be light textured and appealing.
Purchase good quality whole-wheat flour, and store in a refrigerator or freezer
to prevent from turning rancid. Bring to room temperature before using for
bread machine recipes.
Yeast – For most bread machine recipes, we recommend active dry, instant
or bread machine yeast. The “Instant” type yeast is milled slightly finer and
produced at lower temperatures, resulting in fewer “dead” cells. It gives very
good results in the bread machine. Rapid rise yeast or quick rise yeast is
specifically for the shorter/rapid/last-minute cycles, as it helps to shorten
the rising cycle – adding vital wheat gluten as well, will aid in its rise.
GLUTEN-FREE INGREDIENTS
If you thought regular baking was a science, gluten-free baking has its
own rules! To make gluten-free bread, a variety of flours and ingredients
is necessary to develop a stable and desirable bread that can be used for
slicing, toasting, and making sandwiches. We developed recipes that have
a good balance of protein, fat and starch to create a delicious end result.
All of the following ingredients can be found either in the baking or gluten-
free section of your local grocery store or in your local natural food market.
They can also be easily found and ordered online. There are several
commercial brands of gluten-free, all-purpose flour blends that can be used
successfully.
Almond Flour – Almond flour adds a lot of protein to your bread, but is
better left for savory and sweet cakes rather than yeast breads. You can
use either almond flour or almond meal, as long as it is finely ground.
Baking Powder – Baking powder is a combination of baking soda and
acid, so this leavener can be used in baked goods where there is no
existing acid. Be sure to read the label because some baking powders use
starches to keep the compound dry, which may affect those with gluten
allergies.
Baking Soda – Baking soda is a chemical leavener that requires an acidic
ingredient to activate. Examples include brown sugar, buttermilk, yogurt,
etc. Not only does baking soda provide lift to your baked product, but it
also improves browning.
Buckwheat Flour – Buckwheat is not actually wheat at all. Buckwheat flour
has a high protein content and a pleasant nutty flavor. It does need to be
combined with other flours to produce a baked item with good structure.
Cornstarch – Cornstarch is a way to add structure and stability to a
gluten-free bread that is otherwise provided by gluten. Be sure not to go
overboard, or your finished bread will have a very starchy and unpleasant
flavor.
Flax Seeds (ground) – When ground, flax seeds are even more nutritious
and act as a binder to produce a stable structure in baked goods.
Garbanzo Bean Flour – Milled from garbanzo beans (chickpeas) and high
in protein, garbanzo bean flour imparts a rich and sweet flavor in baked

16
goods. Some find it to be overpowering, so it is better to use this flour with
more savory breads.
Guar Gum – Guar gum, similar to xantham gum, and interchangeable,
is another thickening agent that helps with the structure of the bread. It
should be used sparingly because it does impart a starchier flavor to the baked
good than other gums or thickeners do.
Gluten-Free All-Purpose Flour Blend – There are a number of these blends on the
market now and they all work well. We have found in our testing that the ones with
the higher percentage of rice flours tend to be the most neutral in flavor.
Nonfat Milk Powder – Nonfat milk powder adds structure to breads by acting as
an emulsifier by linking gluten-free flours to fats. The milk proteins also increase
browning.
Powdered Psyllium Husk – Full of fiber, powdered psyllium husk
(or psyllium husk powder) works similarly to a gum. We have found it
to be the best way to add structure and bind ingredients together in
gluten-free recipes.
Oat Flour – Oat flour is very high in protein and is inexpensive to purchase prepared,
or you can make your own (process rolled oats in a blender, food processor, or spice
grinder until finely ground). This flour will add a slight nuttiness to baked breads.
Potato Starch – Another starch option for gluten-free breads to contribute to the
structure of the loaf. It is also a good tenderizer and is best used with doughs that
are higher in moisture.
Brown Rice Flour – Milled from the whole rice kernel (still contains the bran), brown
rice flour is high in fiber and has a nuttier flavor than white rice flour. You want to use
a flour that is as finely ground as possible – it should have a smooth, sandy texture.
This flour is high in protein, 7.5%, so it is a good base for gluten-free baking.
White Rice Flour – Milled from polished white rice (where the bran and
germ have been removed), white rice flour is considered to be very versatile in
gluten-free baking because it has a rather mild, undetectable flavor. It is
a bit lower in protein than brown rice flour, closer to 5%, but it blends well with other
flours.
Sweet White Rice Flour – A starchier version of white rice flour (not actually sweet),
it is ground from glutinous rice and is a better binder than brown or white rice flours.
Only a small amount is needed and is a great addition when making your own
gluten-free flour blend.
Sorghum Flour – This is a flour that is high in protein and fiber and is a
good substitution for oat flour. Look for “sweet” white sorghum flour for
best recipes.
Teff Flour – Very high in protein, it is a great addition to gluten-free breads.
It has an earthy flavor, similar to whole-wheat flour.
Tapioca Starch (Flour) – This starch is a great binder for gluten-free breads and
gives the finished breads good structure. Do not use too much of it or the bread will
be too elastic.
Xantham Gum – Similar to guar gum, and interchangeable, xantham gum is a
thickening agent and helps stabilize gluten-free breads. You only need a small
amount to see the effects.
Yeast – Crucial to most breads, yeast is what brings your bread to life.
There are many types, and in most cases we call for active, dry yeast or bread
machine yeast, but when using the Ultra-Fast program, it is necessary to use rapid
rise yeast. Always store yeast in the refrigerator and check the expiration date prior
to using.

17
TROUBLESHOOTING
Question Answer
Why did my dough/bread not
rise well?
There are a number of factors that could result in a short rise. Be sure that the yeast is fresh and that all ingredients are room
temperature (75ºF to 90°F). If the liquids are too warm or too cold, they will not activate the yeast properly. Be sure the ingredients
are put into the baking pan in the correct order. The salt should be as far away from the yeast as possible. Note that not all breads
rise as much as others. Whole-wheat or whole-grain breads tend to be shorter than white breads. Also, breads with more sugar
or sweeteners, and ones that are enriched with eggs, will be taller than regular white breads.
Why is my bread sunken/uneven
on the top?
Humidity and room temperature can greatly affect the results of baked yeast breads. Keep the bread maker away from direct
sunlight. If the humidity is especially high, add an additional teaspoon per cup of flour used in the recipe.
Why does my yeast bread have an
under-baked/gummy texture?
The dough was too wet, or possibly does not have enough white flour (for gluten development). Add a bit more flour, 1 tablespoon
per cup, or reduce the amount of whole-wheat/grain flours in the recipe and substitute white flour.
Why does the interior of my yeast
bread have excessive holes?
This would happen if either the bread is too wet or if too much yeast was used. Double-check the recipe and, if necessary, make
changes by either adding a small amount of flour or reducing the yeast slightly.
Why is my yeast bread heavy
and dense?
This could be one of a few different issues. The mixture may be too dry as a result of not enough liquid or because lower fat
substitutes were used. Another reason may be not using enough yeast. If this is occurring in whole-wheat/grain bread, you may
need to use vital wheat gluten to help with the structure of the finished bread.
Why are the corners/edges of the
bread full of extra flour/not evenly
mixed?
Sometimes ingredients will stick to the corners of the pan, most commonly in the cake/quick bread or gluten-free bread (both have
more batter-like consistencies than a dough). Check the bread about 10 minutes into the kneading/mixing time and pause to scrape
down if necessary. Lightly coating the bread pan with nonstick cooking spray will help to prevent this from happening as well.
How do I get the kneading paddle
out of the loaf?
There are two options. In most programs you can remove the paddle after you hear the Remove Paddle signal (prior to the final
rise). If this is not an option, or you were not present to remove it, wait until the bread is cooled and then, with the help of the paddle
removal hook, carefully take out the paddle.
Why is the unit smoking/producing
a burning smell?
Most likely this is from ingredients that fell into the bottom of the bread machine or onto the heating element. If it is excessive,
unplug the unit and once cool, clean the interior of the unit. Plug the unit back in and resume the program (the program will be
stored in memory for a maximum of 15 minutes). In most cases, the smoke/odor will be minimal and it will dissipate.
What do the error codes mean? The display shows “HHH” (accompanied by beeps) The unit’s internal temperature is too high. This usually occurs when trying
to make two successive loaves. Open the lid and allow the unit to cool 10-20 minutes. The display shows “LLL” (accompanied by
beeps) The unit’s internal temperature is too low to bake bread. Stop the beeps by pressing the START/STOP button. The display
shows “EEO” or “EEI” (accompanied by beeps) Unplug the unit and contact your nearby service center.

18
WARRANTY
Limited Three-Year Warranty
This warranty is available only to U.S. consumers who purchase products
directly from Cuisinart
®
or an authorized Cuisinart
®
reseller.
You are a consumer if you own a Cuisinart
®
Compact Automatic Bread
Maker that was purchased at retail for personal, family or household
use. Except as otherwise required under applicable law, this warranty is
not available to retailers or other commercial purchasers or owners or
consumers who purchase from unauthorized Cuisinart
®
resellers. We
warrant that your Cuisinart
®
Compact Automatic Bread Maker will be free of
defects in materials and workmanship under normal home use for 3 years
from the date of original purchase.
We recommend that you visit our website, our website at https://cuisinart.
registria.com for a fast, efficient way to complete your product registration.
However, product registration does not eliminate the need for the consumer
to maintain the original proof of purchase in order to obtain the warranty
benefits. In the event that you do not have proof of purchase date, the
purchase date for purposes of this warranty will be the date of manufacture.
CALIFORNIA RESIDENTS ONLY
California law provides that for In-Warranty Service, California residents
have the option of returning a nonconforming product (A) to the store where
it was purchased or (B) to another retail store that sells Cuisinart products
of the same type. The retail store shall then, according to its preference,
either repair the product, refer the consumer to an independent repair
facility, replace the product, or refund the purchase price less the amount
directly attributable to the consumer’s prior usage of the product. If neither
of the above two options results in the appropriate relief to the consumer,
the consumer may then take the product to an independent repair facility,
if service or repair can be economically accomplished. Cuisinart and
not the consumer will be responsible for the reasonable cost of such
service, repair, replacement, or refund for nonconforming products under
warranty. California residents may also, according to their preference, return
nonconforming products directly to Cuisinart for repair or, if necessary,
replacement by calling our Consumer Service Center toll-free at 1-800-726-0190.
Cuisinart will be responsible for the cost of the repair, replacement, and
shipping and handling for such nonconforming products under warranty.
HASSLE-FREE REPLACEMENT WARRANTY
Your ultimate satisfaction in Cuisinart products is our goal, so if your
Cuisinart
®
Compact Automatic Bread Maker should fail within the
generous warranty period, we will repair it or, if necessary, replace
it at no cost to you. To obtain a return shipping label, visit us at
https://www.cuisinart.com/customer-care/product-assistance/
product-inquiry. Or call our toll-free customer service department
at 1-800-726-0190 to speak with a representative.
Your Cuisinart
®
Compact Automatic Bread Maker has been manufactured
to the strictest specifications and has been designed for use only in 120-
volt outlets and only with authorized accessories and replacement parts.
This warranty expressly excludes any defects or damages caused by
attempted use of this unit with a converter, as well as use with accessories,
replacement parts or repair service other than those authorized by
Cuisinart. This warranty does not cover any damage caused by accident,
misuse, shipment or other than ordinary household use. This warranty
excludes all incidental or consequential damages. Some states do not allow
the exclusion or limitation of these damages, so these exclusions may not
apply to you. You may also have other rights, which vary from state to state.
Important: If the nonconforming product is to be serviced by someone
other than Cuisinart’s Authorized Service Center, please remind the servicer
to call our Consumer Service Center at 1-800-726-0190 to ensure that the
problem is properly diagnosed, the product is serviced with the correct
parts, and to ensure that the product is still under warranty.
© 2024 Cuisinart
Glendale, AZ 85307
Printed in China
24CE090783
IB-14957-ESP

19
Get ready to enjoy warm, fresh, homemade bread
whenever you want it!
Your new Cuisinart
®
Compact Automatic Bread Maker makes it easy – it will make a luscious, nished loaf of bread
from raw ingredients or prepare enough dough for artisan and specialty breads for baking in a traditional oven. It even
lets you set the nish time for some breads up to 13 hours in advance. Decide which of our fabulous recipes
you want to try, or use a family favorite. Then just add ingredients and select a program option, crust color and loaf size.
We’ll do the rest! We’ve included a variety of bread recipes, plus gluten-free doughs and jam options.

20
Contents
WHITE Program:
Basic White Bread ......................................... 21
Oatmeal Bread ............................................ 22
Cinnamon Swirl Bread ...................................... 23
Rye Bread ............................................... 25
Jalapeño Cheddar Bread .................................... 26
French/Italian Program:
French Bread Loaf ........................................ 28
Rustic Italian Loaf.......................................... 29
Country French Bread with Olives & Rosemary .................. 30
Parmesan Peppercorn French Bread .......................... 32
Semolina Bread with Fennel & Golden Raisins ................... 33
Whole Wheat Program:
Basic Whole-Wheat Bread .................................. 34
Multigrain Cereal Wheat Bread ............................... 35
Nutty Whole-Wheat Bread ................................... 36
Wheat Bran Bread ..........................................37
Sweet PROGRAM:
Challah Loaf ............................................. 38
Brioche Loaf .............................................. 39
Panettone Loaf ............................................ 40
Chocolate Cherry Loaf ..................................... 42
Babka ................................................... 44
GLUTEN FREE Program:
Sandwich Bread .......................................... 46
Multigrain Bread ............................................47
Cinnamon Swirl Bread .......................................48
Pizza Dough ...............................................50
ARTISAN DOUGH Program:
Sourdough Loaf and Boule .................................. 52
Sourdough Starter ......................................... 53
Ciabatta ................................................. 54
Dough Program:
French Baguettes ......................................... 55
Cheddar Breadsticks ....................................... 56
Pizza Dough .............................................. 57
Herb Focaccia ............................................ 58
Pretzels.................................................. 59
Whole-Wheat Kalamata Rolls .................................60
Garlic, Herb and Cheese Knots ............................... 61
Cinnamon Swirl Rolls ....................................... 62
Basic Sweet Dough .........................................64
Raspberry Cheese Danish ....................................65
JAM Program:
Strawberry Rhubarb Jam ................................... 67
Pear & Ginger Preserves .................................... 68
Blueberry Lime Jam ........................................ 69
Mixed Berry Jam .......................................... 70
CAKE Program:
Banana Walnut Bread ...................................... 71
Sour Cream Chocolate Bread .................................72
Zucchini Bread .............................................73
BONUS RECIPES:
Breadcrumbs ............................................. 74
Croutons................................................. 74
Challah French Toast....................................... 75
Berry Brioche Bread Pudding ................................ 76
Pizza Margherita ...........................................77

21
Basic White Bread
White Program
Delay Start Timer - Yes
Ingredients Large 2-pound loaf Medium 1½-pound loaf Small 1-pound loaf
Water, room temperature 1
1
⁄2 cups 1 cup + 2 tablespoons
3
⁄4 cup
Unsalted butter, room temperature,
cut into
1
⁄2 -inch pieces 3 tablespoons 3 tablespoons 2 tablespoons + 1 teaspoon 1
1
⁄2 teaspoons
Granulated sugar 1 tablespoon 2 teaspoons 1
1
⁄2 teaspoons
Kosher salt 1
1
⁄2 teaspoons 1¼ teaspoons
3
⁄4 teaspoon
Unbleached, all-purpose flour 4 cups 3 cups 2 cups
Nonfat dry milk
1
⁄4 cup 3 tablespoons 2 tablespoons
Yeast, active dry, instant or bread machine 1
1
⁄2 teaspoons 1 teaspoon
3
⁄4 teaspoon
1. Put all of the ingredients, in the order listed, into the bread pan tted with the kneading paddle. Secure the bread pan into the Cuisinart
®
Bread Maker.
2. Press the PROG button to select the White program. Press Crust Color and Loaf Size to select both crust and size preference.
Press START/STOP to begin the bread-making process.
3. If desired, when paddle signal sounds, press START/STOP to pause the unit; remove dough and kneading paddle, reshape dough and replace
in bread pan. Press START/STOP to continue.
4. When the cycle is complete, remove the bread pan from the machine and transfer the bread to a wire rack to cool completely before slicing.
Nutritional information per serving (2-ounce slice):
Calories 96 (15% from fat) • carb. 18g • pro. 3g • fat 2g • sat. fat 1g • chol. 5mg • sod. 189mg • calc. 10mg • ber 0g
To Prepare Using the Ultra-Fast Program (1 and 1½ pound loaves only)
Prepare ingredients for the 1 or 1½-pound loaf, replacing the yeast with 1¾ teaspoons of rapid rise yeast for the 1-lb loaf, or 2½ teaspoons of rapid rise
yeast for the 1½-lb. loaf. Secure the bread pan into the unit and select the Ultra-Fast program. Press START/STOP to begin the bread-making process
and then continue to Step 3 in recipe above.

22
Oatmeal Bread
White Program
Delay Start Timer - No
Ingredients Large 2-pound loaf Medium 1½-pound loaf Small 1-pound loaf
Whole milk, room temperature 1¼ cups 1 cup ¾ cup
Unsalted butter, room temperature, 2½ tablespoons 2 tablespoons 1½ tablespoons
cut into
1
⁄2 -inch pieces
Maple syrup* (or honey) 2 tablespoons 1½ tablespoons 1 tablespoon
Kosher salt 1¼ teaspoons 1 teaspoon ¾ teaspoon
Unbleached, all-purpose flour 3¾ cups 3 cups 2¼ cups
Old-fashioned oats* (not quick cooking) 1 cup ¾ cup ½ cup
Yeast, active dry, instant or bread machine 2¼ teaspoons 2 teaspoons 1¾ teaspoons
* For a sweeter bread, increase the maple syrup by ½ tablespoon, substitute your favorite granola for the oats, and add ½ teaspoon ground cinnamon.
1. Put all of the ingredients, in the order listed, into the bread pan tted with the kneading paddle. Secure the bread pan into the Cuisinart
®
Bread Maker.
2. Press the PROG button to select the White program. Press Crust Color and Loaf Size to select both crust and size preference.
Press START/STOP to begin the bread-making process.
3. If desired, when paddle signal sounds, press START/STOP to pause the unit; remove dough and kneading paddle, reshape dough and replace
in bread pan. Press START/STOP to continue.
4. When the cycle is complete, remove the bread pan from the machine and transfer bread to a wire rack to cool completely before slicing.
Nutritional information per serving (2-ounce slice):
Calories 117 (17% from fat) • carb. 21g • pro. 3g • fat 2g • sat. fat 1g • chol. 6mg • sod. 134mg • calc. 21mg • ber 1g
To Prepare Using the Ultra-Fast Program (1 and 1½ pound loaves only)
Prepare ingredients for the 1 or 1½-pound loaf, replacing the yeast with 1¾ teaspoons of rapid rise yeast for the 1-lb loaf, or 2½ teaspoons of rapid rise
yeast for the 1½-lb. loaf. Secure the bread pan into the unit and select the Ultra-Fast program. Press START/STOP to begin the bread-making process
and then continue to Step 3 in recipe above.

23
Cinnamon Swirl Bread
White Program
Delay Start Timer - No
Ingredients Large 2-pound loaf Medium 1½-pound loaf Small 1-pound loaf
DOUGH:
Whole milk, room temperature 1¼ cups 1 cup ¾ cup
Unsalted butter, room temperature, 2½ tablespoons 2 tablespoons 1½ tablespoons
cut into ½-inch pieces
Egg, large, room temperature 1 1 1
Kosher salt 1 teaspoon 1 teaspoon ½ teaspoon
Granulated sugar 1½ tablespoons 1 tablespoon 1 tablespoon
Unbleached, all-purpose flour 4 cups 3½ cups 2½ cups
Yeast, active dry, instant or bread machine 2 teaspoons 2 teaspoons 1¾ teaspoons
Cinnamon Swirl:
Granulated sugar
1
/
3
cup ¼ cup 3 tablespoons
Ground cinnamon 2½ teaspoons 2 teaspoons 1½ teaspoons
Raisins (optional) 1¼ cups 1 cup ¾ cup
1. Put all of the dough ingredients, in the order listed, into the bread pan tted with the kneading paddle. Secure the bread pan into the
Cuisinart
®
Bread Maker.
2. Press the PROG button to select the White program. Press Crust Color and Loaf Size to select both crust and size preference.
Press START/STOP to begin the bread-making process.
3. While the dough is mixing and resting, prepare the Cinnamon Swirl: In a small bowl, combine the Cinnamon Swirl ingredients, including the raisins,
if using. Reserve.
4. When paddle signal sounds, press START/STOP to pause the unit; remove dough and kneading paddle. Place the dough on a oured surface.
Roll the dough away from you, out into a rectangle, about ¼ inch thick and 16 inches in length, with the short side facing away from you. Sprinkle the entire
CONTINUED...

24
surface with the Cinnamon Swirl mixture. Roll the dough into a tight cylinder from one short side to the other. Tuck the ends underneath the dough and t
back into the bread pan with the kneading paddle removed. Press START/STOP to continue.
5. When the cycle is complete, remove the bread pan from the machine and transfer bread to a wire rack to cool completely before slicing.
Nutritional information per serving (2-ounce slice):
Calories 141 (13% from fat) • carb. 28g • pro. 4g • fat 2g • sat. fat 1g • chol. 16mg • sod. 139mg • calc. 24mg • ber 1g
To Prepare Using the Ultra-Fast Program
(1 and 1½ pound loaves only)
Prepare ingredients for the 1 or 1½-pound loaf, replacing the yeast with 1¾ teaspoons of rapid rise yeast for the 1-lb loaf, or 2½ teaspoons of rapid rise
yeast for the 1½-lb. loaf. Secure the bread pan into the unit and select the Ultra-Fast program. Press START/STOP to begin the bread-making process
and then continue to Step 3 in recipe above.
B
R
EAD
B
R
EAK
more

25
Rye Bread
White Program
Delay Start Timer - Yes
Ingredients Large 2-pound loaf Medium 1½-pound loaf Small 1-pound loaf
Water, room temperature 1
2
⁄3 cups 1¼ cups 1 cup
Kosher salt 1¼ teaspoons 1 teaspoon ¾ teaspoon
Unbleached, all-purpose flour 3 cups 1¾ cups 1¼ cups
Rye flour 2 cups 1¼ cups ¾ cup
Caraway seeds (optional) 1 tablespoon 2 teaspoons 1½ teaspoons
Yeast, active dry, instant or bread machine 1 tablespoon 2 teaspoons 1½ teaspoons
1. Put all of the ingredients, in the order listed, into the bread pan tted with the kneading paddle. Secure the bread pan into the Cuisinart
®
Bread Maker.
2. Press the PROG button to select the White program. Press Crust Color and Loaf Size to select both crust and size preference.
Press START/STOP to begin the bread-making process.
3. If desired, when paddle signal sounds, press START/STOP to pause the unit; remove dough and kneading paddle, reshape dough and replace in
bread pan. Press START/STOP to continue.
4. When the cycle is complete, remove the bread pan from the machine and transfer bread to a wire rack to cool completely before slicing.
Nutritional information per serving (2-ounce slice):
Calories 66 (5% from fat) • carb. 15g • pro. 2g • fat 0g • sat. fat 0g • chol. 0mg • sod. 127mg • calc. 1mg • ber 2g
To Prepare Using the Ultra-Fast Program
(1 and 1½ pound loaves only)
Prepare ingredients for the 1 or 1½-pound loaf, replacing the yeast with 1¾ teaspoons of rapid rise yeast for the 1-lb loaf, or 2½ teaspoons of rapid rise
yeast for the 1½-lb. loaf. Secure the bread pan into the unit and select the Ultra-Fast program. Press START/STOP to begin the bread-making process
and then continue to Step 3 in recipe above.

26
Jalapeño Cheddar BREAD
White Program
Delay Start Timer - No
Ingredients Large 2-pound loaf Medium 1½-pound loaf Small 1-pound loaf
Buttermilk, room temperature 1½ cups 1 cup
3
⁄4 cup
Hot pepper sauce ¾ teaspoon ½ teaspoon ¼ teaspoon
Unsalted butter, room temperature, 3 tablespoons 2 tablespoons + 1 teaspoon 1½ tablespoons
cut into ½-inch pieces
Granulated sugar 1 tablespoon 2 teaspoons 1½ teaspoons
Kosher salt 1 teaspoon ¾ teaspoon ½ teaspoon
Unbleached, all-purpose flour 4 cups 3 cups 2 cups
Yeast, active dry, instant or bread machine 1½ teaspoons 1 teaspoon
3
⁄4 teaspoons
Jalapeño chile, seeded and finely chopped 2 chiles 1½ chiles 1 chile
Sharp Cheddar, shredded 1 cup ¾ cup ½ cup
1. Put all of the ingredients (except for the jalapeño and Cheddar), in the order listed, into the bread pan tted with the kneading paddle. Secure the bread pan
into the Cuisinart
®
Bread Maker.
2. Press the PROG button to select the White program. Press Crust Color and Loaf Size to select both crust and size preference. Press START/STOP
to begin the bread-making process.
3. When the add-in signal sounds, add the jalapeño and cheese to the kneading bread dough.
4. If desired, when paddle signal sounds, press START/STOP to pause the unit; remove dough and kneading paddle, reshape dough and replace in
bread pan. Press START/STOP to continue.
5. When the cycle is complete, remove the bread pan from the machine and transfer bread to a wire rack to cool completely before slicing.
Nutritional information per serving (2-ounce slice):
Calories 108 (26% from fat) • carb. 16g • pro. 4g • fat 3g • sat. fat 2g • chol. 9mg • sod. 132mg • calc. 45mg • ber 0g
CONTINUED...

27
To Prepare Using the Ultra-Fast Program (1 and 1½ pound loaves only)
Prepare ingredients for the 1 or 1½-pound loaf, replacing the yeast with 1¾ teaspoons of rapid rise yeast for the 1-lb loaf, or 2½ teaspoons of rapid rise
yeast for the 1½-lb. loaf. Secure the bread pan into the unit and select the Ultra-Fast program. Press START/STOP to begin the bread-making process
and then continue to Step 3 in recipe above.

28
French Bread Loaf
French Program
Delay Start Timer - Yes
Ingredients Large 2-pound loaf Medium 1½-pound loaf Small 1-pound loaf
Water, room temperature 1½ cups 1¼ cups 1 cup + 1 tablespoon
Kosher salt 1½ teaspoons 1½ teaspoons ¾ teaspoon
Unbleached, all-purpose flour 4 cups 3¼ cups 2¼ cups + 2 tablespoons
Yeast, active dry, instant or bread machine 1½ teaspoons 1¼ teaspoons 1 teaspoon
1. Put all of the ingredients, in the order listed, into the bread pan tted with the kneading paddle. Secure the bread pan into the Cuisinart
®
Bread Maker.
2. Press the PROG button to select the French program. Press Loaf Size to select size preference. Press START/STOP to begin the bread-making process.
3. If desired, when paddle signal sounds, press START/STOP to pause the unit; remove dough and kneading paddle, reshape dough and replace
in bread pan. Press START/STOP to continue.
4. When the cycle is complete, remove the bread pan from the machine and transfer bread to a wire rack to cool completely before slicing.
Nutritional information per serving (2-ounce slice):
Calories 73 (0% from fat) • carb. 13g • pro. 2g • fat 0g • sat. fat 0g • chol. 0mg • sod. 159mg • calc. 1mg • ber 0g
To Prepare Using the Ultra-Fast Program (1 and 1½ pound loaves only)
Prepare ingredients for the 1 or 1½-pound loaf, replacing the yeast with 1¾ teaspoons of rapid rise yeast for the 1-lb loaf, or 2½ teaspoons of rapid rise
yeast for the 1½-lb. loaf. Secure the bread pan into the unit and select the Ultra-Fast program. Press START/STOP to begin the bread-making process
and then continue to Step 3 in recipe above.

29
Rustic Italian Loaf
French Program
Delay Start Timer - Yes
Ingredients Large 2-pound loaf Medium 1½-pound loaf Small 1-pound loaf
Water, room temperature 1½ cups 1 cup ¾ cup
Olive oil 2 tablespoons 1½ tablespoons 1 tablespoon
Kosher salt 2 teaspoons 1½ teaspoons 1 teaspoon
Granulated sugar 1 teaspoon ¾ teaspoon ½ teaspoon
Unbleached, all-purpose flour 4 cups 3 cups 2 cups
Wheat bran (unprocessed, coarse) ½ cups
1
⁄3 cup ¼ cup
Yeast, active dry, instant or bread machine 1½ teaspoons 1¼ teaspoons 1 teaspoons
Sesame seeds, optional 1 tablespoon 2 teaspoons 1½ teaspoons
1. Put all of the ingredients (except for the optional sesame seeds), in the order listed, into the bread pan tted with the kneading paddle. Secure the bread
pan into the Cuisinart
®
Bread Maker.
2. Press the PROG button to select the French program. Press Loaf Size to select size preference. Press START/STOP to begin the bread-making process.
3. If desired, when paddle signal sounds, press START/STOP to pause the unit; remove dough and kneading paddle, reshape dough and replace
in bread pan. Sprinkle with sesame seeds, if desired, and press START/STOP to continue rising and baking.
4. When the cycle is complete, remove the bread pan from the machine and transfer bread to a wire rack to cool completely before slicing.
Nutritional information per serving (2-ounce slice):
Calories 112 (9% from fat) • carb. 24g • pro. 2g • fat 1g • sat. fat 0g • chol. 0mg • sod. 191mg • calc. 1mg • ber 1g
To Prepare Using the Ultra-Fast Program (1 and 1½ pound loaves only)
Prepare ingredients for the 1 or 1½-pound loaf, replacing the yeast with 1¾ teaspoons of rapid rise yeast for the 1-lb loaf, or 2½ teaspoons of rapid rise
yeast for the 1½-lb. loaf. Secure the bread pan into the unit and select the Ultra-Fast program. Press START/STOP to begin the bread-making process
and then continue to Step 3 in recipe above.TOP to begin the bread-making process
and then continue to Step 3 in recipe above.

30
Country French Bread with Olives & Rosemary
French Program
Delay Start Timer - Yes, but must be present to add olives
Ingredients Large 2-pound loaf Medium 1½-pound loaf Small 1-pound loaf
Water, room temperature 1½ cups 1 cup + 2 tablespoons ¾ cup
Olive oil 1 tablespoon 2 teaspoons 1½ teaspoons
Kosher salt 1½ teaspoons 1¼ teaspoons ¾ teaspoon
Honey 1 teaspoon 1 teaspoon ½ teaspoon
Rosemary, fresh and chopped 1 tablespoon 2 teaspoons 1 teaspoon
Unbleached, all-purpose flour 2½ cups 2 cups 1½ cups
Whole wheat flour 1½ cups 1 cup ½ cup
Rye flour
1
⁄3 cup ¼ cup 3 tablespoons
Yeast, active dry, instant or bread machine 1½ teaspoons 1¼ teaspoons 1 teaspoon
Kalamata olives, pitted, drained, 1 cup ¾ cup ½ cup
patted dry, and halved
1. Put all of the ingredients (except for the olives), in the order listed, into the bread pan tted with kneading paddle. Secure the bread pan into the
Cuisinart
®
Bread Maker.
2. Press the PROG button to select the French program. Press Loaf Size to select size preference. Press START/STOP to begin the bread-making process.
3. When the add-in signal sounds, add the olives. If desired, when paddle signal sounds, press START/STOP to pause the unit; remove dough and kneading
paddle, reshape dough and replace in bread pan. Press START/STOP to continue.
4. When the cycle is complete, remove the bread pan from the machine and transfer bread to a wire rack to cool completely before slicing.
Nutritional information per serving (2-ounce slice):
Calories 81 (14% from fat) • carb. 15g • pro. 2g • fat 1g • sat. fat 0g • chol. 0mg • sod. 184mg • calc. 4mg • ber 1g
CONTINUED...

31
To Prepare Using the Ultra-Fast Program (1 and 1½ pound loaves only)
Prepare ingredients for the 1 or 1½-pound loaf, replacing the yeast with 1¾ teaspoons of rapid rise yeast for the 1-lb loaf, or 2½ teaspoons of rapid rise
yeast for the 1½-lb. loaf. Secure the bread pan into the unit and select the Ultra-Fast program. Press START/STOP to begin the bread-making process
and then continue to Step 3 in recipe above.
•
C
O
M
P
A
C
T
•
FULL
SIZE
RESULTS
F
O
O
T
P
R
I
N
T

32
Parmesan Peppercorn French Bread
French Program
Delay Start Timer - No
Ingredients Large 2-pound loaf Medium 1½-pound loaf Small 1-pound loaf
Water, room temperature 1¼ cups 1 cup ¾ cup
Olive oil ¼ cup 3 tablespoons 2 tablespoons
Kosher salt 1¼ teaspoons 1 teaspoon ¾ teaspoon
Unbleached, all-purpose flour 3¾ cups 3 cups 2¼ cups
Parmesan cheese, grated
2
⁄3 cup ½ cup
1
⁄3 cup
Black pepper, freshly ground ¾ teaspoon ½ teaspoon ¼ teaspoon
Yeast, active dry, instant or bread machine 1½ teaspoons 1¼ teaspoons 1 teaspoon
1. Put all of the ingredients, in the order listed, into the bread pan tted with the kneading paddle. Secure the bread pan into the Cuisinart
®
Bread Maker.
2. Press the PROG button to select the French program. Press Loaf Size to select size preference. Press START/STOP to begin the bread-making process.
3. If desired, when paddle signal sounds, press START/STOP to pause the unit; remove dough and kneading paddle, reshape dough and replace
in bread pan. Press START/STOP to continue.
4. When the cycle is complete, remove the bread pan from the machine and transfer bread to a wire rack to cool completely before slicing.
Nutritional information per serving (2-ounce slice):
Calories 101 (29% from fat) • carb. 15g • pro. 4g • fat 3g • sat. fat 1g • chol. 3mg • sod. 184mg • calc. 41mg • ber 0g
To Prepare Using the Ultra-Fast Program (1 and 1½ pound loaves only)
Prepare ingredients for the 1 or 1½-pound loaf, replacing the yeast with 1¾ teaspoons of rapid rise yeast for the 1-lb loaf, or 2½ teaspoons of rapid rise
yeast for the 1½-lb. loaf. Secure the bread pan into the unit and select the Ultra-Fast program. Press START/STOP to begin the bread-making process
and then continue to Step 3 in recipe above.

33
Semolina Bread with Fennel & Golden Raisins
French Program
Delay Start Timer - Yes, but must be present to add raisins
Ingredients Large 2-pound loaf Medium 1½-pound loaf Small 1-pound loaf
Water, room temperature 1
2
⁄3 cups 1¼ cups + 1 tablespoon ¾ cup + 2 tablespoons
Kosher salt 2 teaspoons 1½ teaspoons 1 teaspoon
Fennel seeds 2 teaspoons 1½ teaspoons 1 teaspoon
Granulated sugar 1 teaspoon ¾ teaspoon ½ teaspoon
Semolina flour 3 cups 2¼ cups 1½ cups
Unbleached, all-purpose flour 1 cup ¾ cup ½ cup
Yeast, active dry, instant or bread machine 1½ teaspoons 1¼ teaspoons 1 teaspoon
Golden raisins ¾ cup
2
⁄3 cup ½ cup
1. Put all of the ingredients (except for the raisins), in the order listed, into the bread pan tted with the kneading paddle. Secure the bread pan into the
Cuisinart
®
Bread Maker.
2. Press the PROG button to select the French program. Press Loaf Size to select size preference. Press START/STOP to begin the bread-making process.
3. When the add-in signal sounds, add the raisins. If desired, when paddle signal sounds, press START/STOP to pause the unit; remove dough and kneading
paddle, reshape dough and replace in bread pan. Press START/STOP to continue.
4. When the cycle is complete, remove the bread pan from the machine and transfer bread to a wire rack to cool completely before slicing.
Nutritional information per serving (2-ounce slice):
Calories 106 (3% from fat) • carb. 23g • pro. 3g • fat 1g • sat. fat 0g • chol. 0mg • sod. 192mg • calc. 7mg • ber 1g
To Prepare Using the Ultra-Fast Program (1 and 1½ pound loaves only)
Prepare ingredients for the 1 or 1½-pound loaf, replacing the yeast with 1¾ teaspoons of rapid rise yeast for the 1-lb loaf, or 2½ teaspoons of rapid rise
yeast for the 1½-lb. loaf. Secure the bread pan into the unit and select the Ultra-Fast program. Press START/STOP to begin the bread-making process
and then continue to Step 3 in recipe above.

34
Basic Whole Wheat Bread
Whole Wheat Program
Delay Start Timer - Yes
Ingredients Large 2-pound loaf Medium 1½-pound loaf Small 1-pound loaf
Water, room temperature 1¼ cups 1 cup ¾ cup
Kosher salt 1¼ teaspoons 1 teaspoon ¾ teaspoon
Unsalted butter, room temperature, 2½ tablespoons 2 tablespoons 1½ tablespoons
cut into ½-inch pieces
Granulated sugar 2 tablespoons 1½ tablespoons 1 tablespoon
Whole wheat flour 2¼ cups 2 cups 1½ cups
Unbleached, all-purpose flour 1½ cups 1 cup + 2 tablespoons ¾ cup + 2 tablespoons
Rye flour 2 tablespoons 1½ tablespoons 1 tablespoon
Yeast, active dry, instant or bread machine 1 tablespoon 2¼ teaspoons 2 teaspoons
1. Put all of the ingredients, in the order listed, into the bread pan tted with the kneading paddle. Secure the bread pan into the Cuisinart
®
Bread Maker.
2. Press the PROG button to select the Whole Wheat program. Press Crust Color and Loaf Size to select both crust and size preference.
3. Press START/STOP to begin the bread-making process. If desired, when paddle signal sounds, press START/STOP to pause the unit; remove dough
and kneading paddle, reshape dough and replace in bread pan. Press START/STOP to continue.
4. When the cycle is complete, remove the bread pan from the machine and transfer bread to a wire rack to cool completely before slicing.
Nutritional information per serving (2-ounce slice):
Calories 77 (20% from fat) • carb. 13g • pro. 2g • fat 1g • sat. fat 1g • chol. 3mg • sod. 127mg • calc. 10mg • ber 2g
To Prepare Using the Ultra-Fast Program (1 and 1½ pound loaves only)
Prepare ingredients for the 1 or 1½-pound loaf, replacing the yeast with 1¾ teaspoons of rapid rise yeast for the 1-lb loaf, or 2½ teaspoons of rapid rise
yeast for the 1½-lb. loaf. Secure the bread pan into the unit and select the Ultra-Fast program. Press START/STOP to begin the bread-making process
and then continue to Step 3 in recipe above.

35
Multigrain Cereal Wheat Bread
Whole Wheat Program
Delay Start Timer - No
Ingredients Large 2-pound loaf Medium 1½-pound loaf Small 1-pound loaf
Water, room temperature 1¼ cups ¾ cup + 3 tablespoons ½ cup + 2 tablespoons
Plain, fat-free yogurt
1
/
3
cup ¼ cup 3 tablespoons
Unsalted butter, room temperature, 3 tablespoons 2 tablespoons 1½ tablespoons
cut into ½-inch pieces
Light brown sugar, packed 2 tablespoons 4 teaspoons 1 tablespoon
Kosher salt 1½ teaspoons 1 teaspoon ¾ teaspoon
Whole wheat flour 2 cups 1½ cups 1 cup
Unbleached, all-purpose flour 2 cups 1½ cups 1 cup
Multigrain cereal flakes 2
2
/
3
cups 2 cups 1
1
/
3
cups
Yeast, active dry, instant or bread machine 2½ teaspoons 2 teaspoons 1¼ teaspoons
1. Put all of the ingredients, in the order listed, into the bread pan tted with the kneading paddle. Secure the bread pan into the Cuisinart
®
Bread Maker.
2. Press the PROG button to select the Whole Wheat program. Press Crust Color and Loaf Size to select both crust and size preference.
3. Press START/STOP to begin the bread-making process. If desired, when paddle signal sounds, press START/STOP to pause the unit; remove dough
and kneading paddle, reshape dough and replace in bread pan. Press START/STOP to continue.
4. When the cycle is complete, remove the bread pan from the machine and transfer bread to a wire rack to cool completely before slicing.
Nutritional information per serving (2-ounce slice):
Calories 84 (15% from fat) • carb. 16g • pro. 3g • fat 1g • sat. fat 1g • chol. 3mg • sod. 130mg • calc. 12mg • ber 2g
To Prepare Using the Ultra-Fast Program (1 and 1½ pound loaves only)
Prepare ingredients for the 1 or 1½-pound loaf, replacing the yeast with 1¾ teaspoons of rapid rise yeast for the 1-lb loaf, or 2½ teaspoons of rapid rise
yeast for the 1½-lb. loaf. Secure the bread pan into the unit and select the Ultra-Fast program. Press START/STOP to begin the bread-making process
and then continue to Step 3 in recipe above.

36
Nutty Whole Wheat Bread
Whole Wheat Program
Delay Start Timer - No
Ingredients Large 2-pound loaf Medium 1½-pound loaf Small 1-pound loaf
Low-fat buttermilk, room temperature 1½ cups 1¼ cups 1 cup
Kosher salt 1 teaspoon ¾ teaspoon ½ teaspoon
Unsalted butter, room temperature, 1½ tablespoons 1 tablespoon 1 tablespoon
cut into ½-inch pieces
Maple syrup 1½ tablespoons 1 tablespoon 1 tablespoon
Whole wheat flour 2¼ cups 2 cups 1½ cups
Unbleached, all-purpose flour 1¼ cups 1 cup ¾ cup
Yeast, active dry, instant or bread machine 1 tablespoon 2¼ teaspoons 2 teaspoons
Mixed nuts and seeds (e.g., walnuts, pecans, ¾ cup ¾ cup ½ cup
pumpkin seeds, sunflower seeds)
1. Put all of the ingredients (except the mixed nuts and seeds), in the order listed, into the bread pan tted with the kneading paddle. Secure the bread pan
into the Cuisinart
®
Bread Maker.
2. Press the PROG button to select the Whole Wheat program. Press Crust Color and Loaf Size to select both crust and size preference.
3. Press START/STOP to begin the bread-making process.
4. When the add-in signal sounds, add the mixed nuts and seeds. If desired, when paddle signal sounds, press START/STOP to pause the unit;
remove dough and kneading paddle, reshape dough and replace in bread pan. Press START/STOP to continue.
5. When the cycle is complete, remove the bread pan from the machine and transfer bread to a wire rack to cool completely before slicing.
Nutritional information per serving (2-ounce slice):
Calories 129 (30% from fat) • carb. 19g • pro. 4g • fat 5g • sat. fat 1g • chol. 3mg • sod. 103mg • calc. 32mg • ber 2g
To Prepare Using the Ultra-Fast Program (1 and 1½ pound loaves only)
Prepare ingredients for the 1 or 1½-pound loaf, replacing the yeast with 1¾ teaspoons of rapid rise yeast for the 1-lb loaf, or 2½ teaspoons of rapid rise
yeast for the 1½-lb. loaf. Secure the bread pan into the unit and select the Ultra-Fast program. Press START/STOP to begin the bread-making process
and then continue to Step 3 in recipe above.

37
Wheat Bran Bread
Whole Wheat Program
Delay Start Timer - Yes
Ingredients Large 2-pound loaf Medium 1½-pound loaf Small 1-pound loaf
Water, room temperature 1½ cups 1 cup + 2 tablespoons 1 cup
Kosher salt 1¼ teaspoons 1 teaspoon ¾ teaspoon
Unsalted butter, room temperature, 1½ tablespoons 1 tablespoon 1 tablespoon
cut into ½-inch pieces
Molasses 2 tablespoons 1½ tablespoons 1 tablespoon
Whole wheat flour 2¼ cups 2 cups 1½ cups
Unbleached, all-purpose flour 1½ cups 1 cup ¾ cup
Oats, not quick cooking
1
⁄3 cup + 2 tablespoons
1
⁄3 cup ¼ cup
Wheat bran
1
⁄3 cup + 2 tablespoons
1
⁄3 cup ¼ cup
Yeast, active dry, instant or bread machine 1 tablespoon 2¼ teaspoons 2 teaspoons
1. Put all of the ingredients, in the order listed, into the bread pan tted with the kneading paddle. Secure the bread pan into the Cuisinart
®
Bread Maker.
2. Press the PROG button to select the Whole Wheat program. Press Crust Color and Loaf Size to select both crust and size preference.
Press START/STOP to begin the bread-making process.
3. If desired, when paddle signal sounds, press START/STOP to pause the unit; remove dough and kneading paddle, reshape dough and replace
in bread pan. Press START/STOP to continue.
4. When the cycle is complete, remove the bread pan from the machine and transfer bread to a wire rack to cool completely before slicing.
Nutritional information per serving (2-ounce slice):
Calories 99 (11% from fat) • carb. 19g • pro. 3g • fat 1g • sat. fat 1g • chol. 2mg • sod. 128mg • calc. 13mg • ber 3g
To Prepare Using the Ultra-Fast Program (1 and 1½ pound loaves only)
Prepare ingredients for the 1 or 1½-pound loaf, replacing the yeast with 1¾ teaspoons of rapid rise yeast for the 1-lb loaf, or 2½ teaspoons of rapid rise
yeast for the 1½-lb. loaf. Secure the bread pan into the unit and select the Ultra-Fast program. Press START/STOP to begin the bread-making process
and then continue to Step 3 in recipe above.

38
Challah Loaf
Sweet Program
Delay Start Timer - No
Ingredients Medium 1½-pound loaf Small 1-pound loaf
Water, room temperature ¾ cup ½ cup
Unsalted butter, room temperature, 5 tablespoons 4 tablespoons
cut into ½-inch pieces
Large egg, room temperature 1 egg 1 egg
Kosher salt 1 teaspoon ¾ teaspoon
Granulated sugar 3 tablespoons 2½ tablespoons
Unbleached, all-purpose flour 3 cups 2¼ cups
Yeast, active dry, instant or bread machine 1½ teaspoons 1¼ teaspoons
1. Put all of the ingredients, in the order listed, into the bread pan tted with the kneading paddle. Secure the bread pan into the Cuisinart
®
Bread Maker.
2. Press the PROG button to select the Sweet program. Press Crust Color and Loaf Size to select both crust and size preference.
Press START/STOP to begin the bread-making process.
3. If desired, when paddle signal sounds, press START/STOP to pause the unit; remove dough and kneading paddle, reshape dough and replace
in bread pan. Press START/STOP to continue.
4. When the cycle is complete, remove the bread pan from the machine and transfer bread to a wire rack to cool completely before slicing.
Nutritional information per serving (2-ounce slice):
Calories 108 (28% from fat) • carb. 17g • pro. 2g • fat 3g • sat. fat 2g • chol. 19mg • sod. 131mg • calc. 2mg • ber 0g
To Prepare Using the Ultra-Fast Program (1 and 1½ pound loaves only)
Prepare ingredients for the 1 or 1½-pound loaf, replacing the yeast with 1¾ teaspoons of rapid rise yeast for the 1-lb loaf, or 2½ teaspoons of rapid rise
yeast for the 1½-lb. loaf. Secure the bread pan into the unit and select the Ultra-Fast program. Press START/STOP to begin the bread-making process
and then continue to Step 3 in recipe above.

39
Brioche Loaf
Sweet Program
Delay Start Timer - No
Ingredients Medium 1½-pound loaf Small 1-pound loaf
Whole milk, room temperature
1
⁄3 cup ¼ cup
Unsalted butter, room temperature, 6 tablespoons 4 tablespoons
cut into ½-inch pieces
Large egg, room temperature 3 eggs 2 eggs
Kosher salt 1 teaspoon ¾ teaspoon
Granulated sugar 1½ tablespoons 1 tablespoon
Nonfat powdered milk 1½ tablespoons 1 tablespoon
Unbleached, all-purpose flour 2¾ cups plus 1 tablespoon 2 cups
Yeast, active dry, instant or bread machine 2¼ teaspoons 1¾ teaspoons
1. Put all of the ingredients, in the order listed, into the bread pan tted with the kneading paddle. Secure the bread pan into the Cuisinart
®
Bread Maker.
2. Press the PROG button to select the Sweet program. Press Crust Color and Loaf Size to select both crust and size preference. Press START/STOP
to begin the bread-making process.
3. If desired, when paddle signal sounds, press START/STOP to pause the unit; remove dough and kneading paddle, reshape dough and replace in bread
pan. Press START/STOP to continue.
4. When the cycle is complete, remove the bread pan from the machine and transfer bread to a wire rack to cool completely before slicing.
Nutritional information per serving (2-ounce slice):
Calories 120 (36% from fat) • carb. 16g • pro. 4g • fat 5g • sat. fat 3g • chol. 42mg • sod. 145mg • calc. 20mg • ber 0g
To Prepare Using the Ultra-Fast Program (1 and 1½ pound loaves only)
Prepare ingredients for the 1 or 1½-pound loaf, replacing the yeast with 1¾ teaspoons of rapid rise yeast for the 1-lb loaf, or 2½ teaspoons of rapid rise
yeast for the 1½-lb. loaf. Secure the bread pan into the unit and select the Ultra-Fast program. Press START/STOP to begin the bread-making process
and then continue to Step 3 in recipe above.

40
Panettone Loaf
Sweet Program
Delay Start Timer - No
Ingredients Medium 1½-pound loaf Small 1-pound loaf
Whole milk, room temperature ½ cup
1
⁄3 cup
Unsalted butter, room temperature, 4 tablespoons 2 tablespoons
cut into ½-inch pieces
Large egg, room temperature 2 eggs 1 egg
Kosher salt ¾ teaspoon ½ teaspoon
Granulated sugar ¼ cup 3 tablespoons
Unbleached, all-purpose flour 2¾ cups 2 cups
Grated orange zest 1 tablespoon 2 teaspoons
Anise seed 1 teaspoon ¾ teaspoon
Ground nutmeg ½ teaspoon 1¾ teaspoons
Yeast, active dry, instant or bread machine 2 teaspoons 1¼ teaspoons
Mixed dried fruit (such as currants ¾ cup ½ cup
and/or candied citrus)
1. Put all of the ingredients (except for the dried fruit), in the order listed, into the bread pan tted with the kneading paddle. Secure the bread pan into the
Cuisinart
®
Bread Maker.
2. Press the PROG button to select the Sweet program. Press Crust Color and Loaf Size to select both crust and size preference. Press START/STOP to
begin the bread-making process.
3. When the add-in signal sounds, add the dried fruit. If desired, when paddle signal sounds, press START/STOP to pause the unit; remove dough and
kneading paddle, reshape dough and replace in bread pan. Press START/STOP to continue.
4. When the cycle is complete, remove the bread pan from the machine and transfer loaf to a wire rack to cool completely before slicing.
CONTINUED...

41
Nutritional information per serving (2-ounce slice):
Calories 126 (23% from fat) • carb. 21g • pro. 3g • fat 3g • sat. fat 2g • chol. 28mg • sod. 107mg • calc. 17mg • ber 1g
To Prepare Using the Ultra-Fast Program (1 and 1½ pound loaves only)
Prepare ingredients for the 1 or 1½-pound loaf, replacing the yeast with 1¾ teaspoons of rapid rise yeast for the 1-lb loaf, or 2½ teaspoons of rapid rise
yeast for the 1½-lb. loaf. Secure the bread pan into the unit and select the Ultra-Fast program. Press START/STOP to begin the bread-making process
and then continue to Step 3 in recipe above.
THINK BEYOND BREAD.

42
Chocolate Cherry Loaf
Sweet Program
Delay Start Timer - No
Ingredients Medium 1½-pound loaf Small 1-pound loaf
Whole milk, room temperature ½ cup
1
⁄3 cup
Unsalted butter, room temperature, ¼ cup 2 tablespoons
cut into ½-inch pieces
Large egg, room temperature 2 eggs 1 egg
Kosher salt ¾ teaspoon ½ teaspoon
Granulated sugar 3 tablespoons 2 tablespoons
Unbleached, all-purpose flour 3 cups 2¼ cups
Yeast, active dry, instant or bread machine 1¾ teaspoons 1½ teaspoons
Bittersweet chocolate, roughly chopped
2
⁄3 cup ½ cup
Dried cherries ½ cup
1
⁄3 cup
1. Put all of the ingredients (except for the chocolate and cherries), in the order listed, into the bread pan tted with the kneading paddle. Secure the bread
pan into the Cuisinart
®
Bread Maker.
2. Press the PROG button to select the Sweet program. Press Crust Color and Loaf Size to select both crust and size preference. Press START/STOP
to begin the bread-making process.
3. When paddle signal sounds, press START/STOP to pause the unit; remove dough and kneading paddle. Place the dough on a oured surface.
Roll the dough out into a rectangle, about ¼ inch thick and 16 inches in length. Sprinkle the chocolate and cherries evenly over the surface of the dough.
Roll the dough into a tight cylinder beginning with the shorter side, making sure the ends are tucked in and sealed. Place dough back into the bread pan
(make sure the kneading paddle is removed) and press START/STOP to continue.
4. When the cycle is complete, remove the bread pan from the machine and transfer loaf to a wire rack to cool completely before slicing.
CONTINUED...

43
Nutritional information per serving (2-ounce slice):
Calories 155 (33% from fat) • carb. 23g • pro. 4g • fat 6g • sat. fat 3g • chol. 28mg • sod. 107mg • calc. 13mg • ber 1g
To Prepare Using the Ultra-Fast Program (1 and 1½ pound loaves only)
Prepare ingredients for the 1 or 1½-pound loaf, replacing the yeast with 1¾ teaspoons of rapid rise yeast for the 1-lb loaf, or 2½ teaspoons of rapid rise
yeast for the 1½-lb. loaf. Secure the bread pan into the unit and select the Ultra-Fast program. Press START/STOP to begin the bread-making process
and then continue to Step 3 in recipe above.
O
V
E
R
5
0
D
E
L
I
C
I
O
U
S
R
E
C
I
P
E
S
I
H
O
M
E
M
A
D
E
B
R
E
A
D
S
I
3
L
O
A
F
-
S
I
Z
E
O
P
T
I
O
N
S
I
F
R
E
S
H
B
R
E
A
D

44
Babka
Sweet Program
Delay Start Timer - No
Ingredients Medium 1½-pound loaf Small 1-pound loaf
Dough:
Whole milk, room temperature
2
⁄3 cup ½ cup
Unsalted butter, room temperature, 4 tablespoons 3 tablespoons
cut into ½-inch pieces
Large egg, room temperature 2 eggs 1 egg
Pure vanilla extract 1 teaspoon ¾ teaspoon
Granulated sugar 3 tablespoons 2 tablespoons
Kosher salt 1 teaspoon ¾ teaspoon
Unbleached, all-purpose flour 3 cups 2 cups
Ground nutmeg ¼ teaspoon 1 to 2 pinches
Yeast, active dry, instant or bread machine 2 teaspoons 1½ teaspoons
Filling:
Granulated sugar ¼ cup 3 tablespoons
Ground cinnamon 2 teaspoons 1½ teaspoons
Cocoa powder 1 tablespoon 2 teaspoons
Kosher salt Pinch Pinch
Glaze:
Granulated sugar ½ cup ½ cup
Water
1
⁄3 cup
1
⁄3 cup
1. Put all of the dough ingredients, in the order listed, into the bread pan tted with the kneading paddle. Secure the bread pan into the Cuisinart
®
Bread
Maker.
2. Press the PROG button to select the Sweet program. Press Crust Color and Loaf Size to select both crust and size preference. Press START/STOP
to begin the bread-making process.
CONTINUED...

45
3. While the dough is mixing and resting, prepare the lling. Put the lling ingredients into a small bowl and whisk to combine; reserve.
4. When paddle signal sounds, press START/STOP to pause the unit; remove dough and kneading paddle. Place the dough on a oured surface.
Roll the dough out into a rectangle, about ¼ inch thick and 16 inches in length. Sprinkle the lling mixture evenly over the surface of the dough. Roll the
dough into a tight cylinder beginning with the shorter side, making sure the ends are tucked in and sealed. Place dough back into the bread pan (make sure
the kneading paddle is removed) and press START/STOP to continue.
5. While the bread is baking, prepare the glaze. Combine the sugar and water in a small saucepan set over medium-high heat. Heat the mixture until the
sugar is completely dissolved; reserve.
6. When the cycle is complete, remove the bread pan from the machine and transfer babka to a wire rack. Immediately brush the sugar syrup glaze over the
warm babka (any additional syrup can be cooled completely and stored in the refrigerator in an airtight container for up to 2 weeks).
7. Cool the babka completely before slicing.
Nutritional information per serving (2-ounce slice):
Calories 147 (17% from fat) • carb. 26g • pro. 3g • fat 3g • sat. fat 2g • chol. 28mg • sod. 147mg • calc. 16mg • ber 1g
To Prepare Using the Ultra-Fast Program (1 and 1½ pound loaves only)
Prepare ingredients for the 1 or 1½-pound loaf, replacing the yeast with 1¾ teaspoons of rapid rise yeast for the 1-lb loaf, or 2½ teaspoons of rapid rise
yeast for the 1½-lb. loaf. Secure the bread pan into the unit and select the Ultra-Fast program. Press START/STOP to begin the bread-making process
and then continue to Step 3 in recipe above.

46
Sandwich Bread
Gluten Free Program
Delay Start Timer - No
Makes one 1½-pound loaf
1 cup water, room temperature
4 tablespoons (½ stick) unsalted butter, room temperature, cut into ½-inch pieces
3 large eggs, room temperature
1¼ teaspoons kosher salt
3 tablespoons granulated sugar
3¼ cups gluten-free, all-purpose our blend*
3 tablespoons psyllium husk powder**
2 teaspoons yeast, active dry, instant or bread machine
1. Put all of the ingredients, in the order listed, into the bread pan tted with the kneading paddle. Secure the bread pan into the Cuisinart
®
Bread Maker.
2. Press the PROG button to select the Gluten Free program. Press START/STOP to begin the bread-making process.
3. If desired, when paddle signal sounds, press START/STOP to pause the unit; remove dough and kneading paddle, reshape dough and replace in bread
pan. Press START/STOP to continue.
4. When the cycle is complete, remove the bread pan from the machine and transfer the bread to a wire rack to cool completely before slicing.
* There are a variety of gluten-free, all-purpose blends on the market that can be found in the baking section of most grocery stores. If you prefer to make
your own gluten-free blend, use the following: 1½ cups brown rice our; 1 cup white rice our; ½ cup arrowroot our; ¼ cup tapioca starch.
** Psyllium husk powder can be found in the baking section of specialty grocery stores, or in the nutrition/health section of grocery stores (near ber
supplements). Do not use “whole psyllium husk” or the texture of the bread will be quite different.
Nutritional information per serving (2-ounce slice):
Calories 139 (24% from fat) • carb. 24g • pro. 3g • fat 4g • sat. fat 2g • chol. 38mg • sod. 172mg • calc. 8mg • ber 1g

47
Multigrain Bread
Gluten Free Program
Delay Start Timer - No
Makes one 1½-pound loaf
1 cup water, room temperature
4 tablespoons (½ stick) unsalted butter, room temperature, cut into ½-inch pieces
3 large eggs, room temperature
1¼ teaspoons kosher salt
3 tablespoons granulated sugar
2 cups gluten-free, all-purpose our blend*
1 cup oat our
¼ cup ground ax seed
2 tablespoons psyllium husk powder**
2 teaspoons yeast, active dry, instant or bread machine
1. Put all of the ingredients, in the order listed, into the bread pan tted with the kneading paddle. Secure the bread pan into the Cuisinart
®
Bread Maker.
2. Press the PROG button to select the Gluten Free program. Press START/STOP to begin the bread-making process.
3. If desired, when paddle signal sounds, press START/STOP to pause the unit; remove dough and kneading paddle, reshape dough and replace in bread
pan. Press START/STOP to continue.
4. When the cycle is complete, remove the bread pan from the machine and transfer the bread to a wire rack to cool completely before slicing.
* There are a variety of gluten-free, all-purpose blends on the market that can be found in the baking section of most grocery stores. If you prefer
to make your own gluten-free blend, use the following: 1 cup brown rice our; ½ cup white rice our;
1
/
3
cup arrowroot our; 3 tablespoons
tapioca starch.
** Psyllium husk powder can be found in the baking section of specialty grocery stores, or in the nutrition/health section of grocery stores (near ber
supplements). Do not use “whole psyllium husk” or the texture of the bread will be quite different.
Nutritional information per serving (2-ounce slice):
Calories 105 (31% from fat) • carb. 16g • pro. 2g • fat 4g • sat. fat 2g • chol. 38mg • sod. 172mg • calc. 7mg • ber 1g

48
Cinnamon Swirl Bread
Gluten Free Program
Delay Start Timer - No
Makes one 1½-pound loaf
Dough:
1 cup water, room temperature
4 tablespoons (½ stick) unsalted butter, room temperature, cut into ½-inch pieces
3 large eggs, room temperature
1¼ teaspoons kosher salt
3 tablespoons granulated sugar
3¼ cups gluten-free, all-purpose our blend*
3 tablespoons psyllium husk powder**
2 teaspoons yeast, active dry, instant or bread machine
Cinnamon Swirl:
¼ cup granulated sugar
2 teaspoons ground cinnamon
1. Put all of the dough ingredients, in the order listed, into the bread pan tted with the kneading paddle. Secure the bread pan into the Cuisinart
®
Bread Maker.
2. Press the PROG button to select the Gluten Free program. Press START/STOP to begin the bread-making process.
3. While the bread is kneading and rising, put the Cinnamon Swirl ingredients into a small bowl and whisk to blend; reserve.
4. When paddle signal sounds, press START/STOP to pause the unit; remove dough and kneading paddle. Put dough out onto a counter heavily dusted with
gluten-free our (either the blend or white rice our). Roll the dough away from you, out into a rectangle, about ¼ inch thick and 16 inches in length, with
the short sides facing away from you. Sprinkle the entire surface with the Cinnamon Swirl mixture. Tightly roll from one short end to the other, and then
tuck the ends underneath the dough and t into the bread pan (without the kneading paddle). Press START/STOP to continue.
5. When the cycle is complete, remove the bread pan from the machine and transfer the bread to a wire rack to cool completely before slicing.
* There are a variety of all-purpose, gluten-free blends on the market that can be found in the baking section of most grocery stores. If you prefer to make
your own gluten-free blend, use the following: 1 cup brown rice our; 1 cup white rice our; ½ cup arrowroot our; ¼ cup tapioca starch.
CONTINUED...

49
** Psyllium husk powder can be found in the baking section of specialty grocery stores, or in the nutrition/health section of grocery stores (near ber
supplements). Do not use “whole psyllium husk” or the texture of the bread will be quite different.
Nutritional information per serving (2-ounce slice):
Calories 135 (24% from fat) • carb. 23g • pro. 2g • fat 4g • sat. fat 2g • chol. 38mg • sod. 172mg • calc. 8mg • ber 1g

50
Pizza Dough
Gluten Free Program
Delay Start Timer - No
Makes one, 2-pound dough (enough for two 12-inch round pizzas or four 6-inch personal pizzas)
1¼ cups water, room temperature
¼ cup olive oil
2 teaspoons granulated sugar
2 teaspoons kosher salt
1 cup brown rice our
1 cup white rice our
½ cup arrowroot our
1
/3 cup ground ax seeds
1
/3 cup quinoa our
¼ cup tapioca our
3 tablespoons psyllium husk powder*
2½ teaspoons baking powder
1 teaspoon yeast, active dry, instant or bread machine
Olive oil, for brushing dough
Desired pizza toppings
1. Preheat oven to 400°F with one rack in the lower third and one in the upper third positions.
2. Put all of the ingredients, in the order listed, into the bread pan tted with the kneading paddle. Secure the bread pan into the Cuisinart
®
Bread Maker.
3. Press the PROG button to select the Gluten Free program. Press START/STOP to begin the dough-making process.
4. When paddle signal sounds, hold down the START/STOP until the unit beeps to stop the dough-making process.
5. Remove dough, and shape and roll into desired pizza size, either two 12-inch rounds or four 6-inch rounds (if you do not need all at once, you can
refrigerate the extra overnight, or freeze it for up to one month).
6. Brush the outer edge of the dough with olive oil. Put into preheated oven, in the lower position. Bake for 15 minutes, or until the dough is just starting to
get rm at the edges, but shows little to no color. Remove dough and then top as desired. Put back into the oven, this time in the upper position. Bake until
edges are browned and toppings are hot, an additional 10 minutes.
CONTINUED...

51
* Psyllium husk powder can be found in the baking section of specialty grocery stores, or in the nutrition/health section of grocery stores (near ber
supplements). Do not use “whole psyllium husk” or the texture of the bread will be quite different.
Nutritional information per serving (based on 12 servings):
Calories 194 (30% from fat) • carb. 31g • pro. 3g • fat 7g • sat. fat 1g • chol. 0mg • sod. 484mg • calc. 21mg • ber 3g

52
Sourdough Loaf and Boule
Artisan Dough Program
Makes 1½-pound loaf/boule
3 tablespoons water, cool
2 cups sourdough starter*, room temperature
2½ cups bread our
1 teaspoon granulated sugar
1½ teaspoons kosher salt
2 teaspoons yeast, active dry, instant or bread machine
Cornmeal for dusting (for boule only)
1. Put all of the ingredients (except for the cornmeal), in the order listed, into the bread pan tted with the kneading paddle. Secure the bread pan into the
Cuisinart
®
Bread Maker.
2. Press the PROG button to select the Artisan Dough program. Press START/STOP to begin the dough-making process.
3. When cycle is complete, you may now make either a loaf or a boule. To prepare the loaf, which bakes in the unit, switch to the Bake program (remove the
paddle rst), and set for 60 minutes.
4. To prepare the boule, transfer the dough to a lightly oured surface. Shape dough into a 10-inch round and cover loosely with plastic wrap. Allow to rest for
20 to 30 minutes. Preheat oven to 425°F with the rack in the middle position.
5. Transfer dough to a baking sheet lined with parchment paper and lightly dusted with cornmeal. Dust dough gently with our. Using a serrated knife, make
an “X” in the top of the boule, ¼ inch deep. Bake bread in preheated oven 25 to 30 minutes, until browned and hollow sounding when tapped. Cool on a
wire rack. Bread slices best when allowed to cool completely.
* Sourdough starters can be purchased online, or made at home. Note that the older the starter, the more avorful it will be. To prepare your own starter, see
the following recipe.
Nutritional information per serving (2 ounce slice):
Calories 81 (1% from fat) • carb. 18g • pro. 3g • fat 0g • sat. fat 0g • chol. 0mg • sod. 195mg • calc. 1mg • ber 1g

53
SOURDOUGH STARTER
4 ounces* water, room temperature
2 ounces* unbleached, all-purpose our
2 ounces* whole-wheat our
1. Put the water and our in a glass or ceramic mixing bowl. Stir until smooth, then cover loosely with either plastic wrap or a damp kitchen towel.
2. Allow to sit in the same spot, at room temperature, for 24 hours. After 1 day, check in on the starter. Add an additional 4 ounces each of water and our and
mix until smooth. Cover again and repeat this process for 5 days.
3. After the 5th day, the starter should be ready – it will have doubled in size with various-sized bubbles, and should have a sweet, yeasty smell. Stir well and
remove half of the starter (discard or share the rest with a friend), and then add equal parts water and our (2 ounces each). Stir until smooth.
4. You may now use the starter in your bread. If not using immediately, the starter can be stored in the refrigerator – it needs to be fed once a week, adding 2
ounces water and our, in the same manner, to keep it alive. Always bring to room temperature for 12 to 24 hours before using in a recipe.
* These measurements are in weight not volume. Weighing ingredients for the starter is the best way to ensure the perfect starter, but if you do not have a
kitchen scale, you can measure the ingredients. Use ½ cup water, ½ cup less 1 tablespoon of all-purpose our, and ½ cup less 1½ tablespoons whole-
wheat our. When measuring dry ingredients, ll a dry measuring cup with a spoon and then level off the measurement with the back of a knife or a spatula
to make sure the measurement is exact. Never use the cup to scoop the ingredients directly from the our container. By scooping, you could add up to one
tablespoon of extra ingredients. Do not pack down.

54
Ciabatta
Artisan Dough Program
Makes 1½-pound loaf
Overnight Sponge:
¾ cup bread our
½ cup water
Pinch yeast, active dry or instant
Dough:
Overnight sponge, proofed
¾ cup water, cool
3 tablespoons olive oil
2½ cups bread our
1½ teaspoons kosher salt
2 teaspoons yeast, active dry, instant or bread machine
1. Prepare the sponge: Put the our, water and yeast into a large bowl. Mix until smooth. Cover loosely with plastic wrap or with a damp towel.
Let sit at room temperature, overnight or up to 24 hours to proof. It will have small bubbles and a pleasant, sour aroma.
2. Put all of the dough ingredients, starting with the proofed overnight sponge, in the order listed, into the bread pan tted with the kneading paddle.
Secure the bread pan into the Cuisinart
®
Bread Maker.
3. Press the PROG button to select the Artisan Dough program. Press START/STOP to begin the dough-making process.
4. When cycle is complete, transfer the dough to a parchment-lined baking pan. Shape into an oblong oval shape, about 12 inches in length.
Cover loosely with plastic wrap and allow to rest for about 20 minutes.
5. Preheat oven to 425°F with a rack in the middle position. Once oven is preheated, uncover dough and dust lightly with additional our. Bake until lightly
browned and hollow sounding when tapped about 30 minutes. Cool on a wire rack. Bread slices best when allowed to cool completely.
Nutritional information per serving (2-ounce slice):
Calories 63 (21% from fat) • carb. 16g • pro. 3g • fat 2g • sat. fat 0g • chol. 0mg • sod. 194mg • calc. 1mg • ber 1g

55
French Baguettes
Dough Program
Makes 1½ pounds of dough, 2 baguettes
1 cup plus 2 tablespoons water, room temperature
1½ teaspoons kosher salt
¾ teaspoon granulated sugar
3 cups bread our
2 tablespoons wheat germ
1¾ teaspoons yeast, active dry, instant or bread machine
Cornmeal for dusting
1. Put all of the ingredients (except for the cornmeal), in the order listed, into the bread pan tted with the kneading paddle. Secure the bread pan into the
Cuisinart
®
Bread Maker.
2. Press the PROG button to select the Dough program. Press START/STOP to begin the dough-making process.
3. When the cycle is complete, remove dough and transfer to a lightly oured surface. Punch to deate and let rest, covered with plastic wrap, for 10 minutes.
4. Divide dough into two equal pieces. Shape each piece of dough into a long, narrow baguette, about 12 inches in length, and place on a baking sheet that
has been dusted with cornmeal. Cover loosely with plastic wrap and let rise 30 to 40 minutes. While baguettes are rising, place a pan (a roasting pan works
well) of hot water on the bottom rack of the oven and preheat to 425°F.
5. Dust dough gently with additional our. Using a serrated knife make 4 diagonal slashes in each loaf, about ¼ inch deep. Bake bread in preheated oven for
25 to 30 minutes, until browned and hollow sounding when tapped. Cool on a wire rack. Bread slices best when allowed to cool completely.
Nutritional information per serving (2-ounce slice):
Calories 70 (1% from fat) • carb. 15g • pro. 2g • fat 0g • sat. fat 0g • chol. 0mg • sod. 191mg • calc. 1mg • ber 1g

56
Cheddar Breadsticks
Dough Program
Makes about 30 breadsticks
¾ cup water, room temperature
1
⁄
3
cup olive oil, plus additional 1 tablespoon for brushing
1½ teaspoons kosher salt
½ teaspoon granulated sugar
3 cups bread our
1 cup sharp Cheddar, shredded
1 teaspoon paprika
2¼ teaspoons yeast, active dry, instant or bread machine
1. Put all of the ingredients (except for the 1 tablespoon of olive oil), in the order listed, into the bread pan tted with the kneading paddle. Secure the bread
pan into the Cuisinart
®
Bread Maker.
2. Press the PROG button to select the Dough program. Press START/STOP to begin the dough-making process.
3. When the cycle is complete, remove dough from machine and transfer to a lightly oured surface. Punch down to deate. Line 2 baking sheets with
parchment paper.
4. Roll the dough out into a rectangle, about ¼ inch thick, 10 inches long and 22 inches wide. Roll the rectangle so that its width runs from left to right. With
a pizza cutter or sharp knife, cut strips that are each ½ inch wide. Twist each strip so it resembles a cheese straw (a tight spiral). Transfer to the prepared
baking sheets, leaving about a ½- to 1-inch space between each piece. Cover with plastic wrap and allow to rest for about 30 minutes.
5. Preheat oven to 375°F with racks in the lower and upper positions of the oven.
6. Once breadsticks have rested, brush with olive oil and bake until golden, about 15 to 20 minutes, rotating pans halfway through baking.
7. Allow to cool slightly and serve.
Nutritional information per breadstick:
Calories 61 (26% from fat) • carb. 9g • pro. 3g • fat 2g • sat. fat 1g • chol. 4mg • sod. 142mg • calc. 27mg • ber 1g

57
Pizza Dough
Dough Program
Makes 1½ pounds of dough
1 cup water, room temperature
1 teaspoon honey
1½ teaspoons kosher salt
1½ tablespoons extra virgin olive oil
2
2
⁄3 cups bread our*
½ cup plus 1 tablespoon whole-wheat our*
1¾ teaspoons yeast, active dry, instant or bread machine
1. Put all of the ingredients, in the order listed, into the bread pan tted with the kneading paddle. Secure the bread pan into the Cuisinart
®
Bread Maker.
2. Press PROG to select the Dough program. Press START/STOP to begin the dough-making process.
3. When the cycle is complete, remove dough and follow your favorite pizza recipe, or see page 60 for our delicious Pizza Margherita.
* You may use all bread our rather than using part whole wheat our.
Nutritional information per serving (based on 16 servings):
Calories 95 (13% from fat) • carb. 13g • pro. 2g • fat 1g • sat. fat 0g • chol. 0mg • sod. 218mg • calc. 2mg • ber 1g

58
Herb Focaccia
Dough Program
Makes a 12 x 8-inch focaccia
Crust:
1 cup plus 2 tablespoons water, room temperature
2 tablespoons plus 1 teaspoon extra virgin olive oil
2¼ teaspoons dry Italian herb blend*
1½ teaspoons kosher salt
3 cups plus 3 tablespoons bread our
1½ teaspoons yeast, active dry, instant or bread machine
Olive oil for pan
Cornmeal for dusting pan
Topping:
3 tablespoons extra virgin olive oil
¾ teaspoon kosher salt
1
⁄3 cup grated Parmesan
¼ cup chopped fresh herbs (any combination: parsley, basil, oregano, thyme, and/or marjoram), loosely packed
1. Put all of the crust ingredients, in the order listed, into the bread pan tted with the kneading paddle. Secure the bread pan into the Cuisinart
®
Bread Maker.
2. Press the PROG button to select the Dough program. Press START/STOP to begin the dough-making process.
3. When the cycle is complete, remove dough and transfer to a lightly oured surface. Punch down to deate and let rest 10 minutes before continuing.
4. Brush a shallow rimmed baking pan with olive oil and sprinkle with cornmeal. After dough has rested, roll out to the appropriate size and place on prepared
pan. Cover loosely with plastic wrap and let rise in a warm place until about doubled, about 40 to 50 minutes.
5. Preheat oven to 450°F with the rack in the middle position. While oven is preheating, assemble the focaccia with the topping ingredients. With oiled
ngertips, press indentations into the dough about 1 inch apart and ½ inch deep. Drizzle with olive oil. Sprinkle evenly with salt, Parmesan and fresh
herbs. Put in preheated oven and bake until deep golden and puffed with a crispy crust, about 20 to 25 minutes.
* This herb blend can be found in the spice section of most grocery stores. If you would like to make your own, use equal parts dried basil, oregano, marjoram
and thyme, with a pinch of garlic powder.
Nutritional information per serving (based on 12 servings):
Calories 169 (32% from fat) • carb. 24g • pro. 6g • fat 1g • sat. fat 1g • chol. 3mg • sod. 487mg • calc. 47mg • ber 1g

59
Pretzels
Dough Program
Makes 12 pretzels
1 cup water, room temperature
2 teaspoons kosher salt
1 tablespoon packed light brown sugar
3¼ cups bread our
2¼ teaspoons yeast, active dry, instant or bread machine
2 cups water
2 tablespoons baking soda
Coarse salt, for sprinkling
1. Put the 1 cup of water, salt, brown sugar, our and yeast into the bread pan tted with the kneading paddle. Secure bread pan into the Cuisinart
®
Bread Maker.
2. Press the PROG button to select the Dough program. Press START/STOP to begin the dough-making process. Line two baking sheets with parchment
paper; reserve.
3. When the cycle is complete, remove dough and transfer to a lightly oured surface. Divide dough into 12 equal pieces, about 2 ounces each; cover loosely
with plastic wrap. Working with one piece at a time, roll each ball into a thin rope. Twist dough into a pretzel shape and transfer to the prepared baking
sheets. Cover loosely with plastic wrap and repeat with remaining pieces. Allow pretzels to rest for about 20 to 30 minutes.
4. Stir together the 2 cups of water and baking soda in a small bowl.
5. Put a 6-quart saucepan lled with water over high heat and bring to a boil. Preheat oven to 425°F.
6. Once pretzels have rested and water comes to a boil, carefully slide one pretzel into the boiling water at a time, ipping each after 1½ minutes.
Boil for 3 minutes total. Allow pretzels to drain on a wire cooling rack. Dip each pretzel into the stirred baking soda solution and place on prepared
baking sheet.
7. Sprinkle each pretzel with the coarse salt. Bake in the preheated oven until dark and golden, approximately 15 to 20 minutes. When pretzels are nished,
transfer to a wire rack to cool slightly before serving.
Nutritional information per pretzel:
Calories 115 (0% from fat) • carb. 25g • pro. 4g • fat 0g • sat. fat 0g • chol. 0mg • sod. 428mg • calc. 1mg • ber 1g

60
Whole Wheat Kalamata Rolls
Dough Program
Makes 12 rolls
½ cup whole milk, room temperature
¼ cup plus 2 tablespoons water, room temperature
1 tablespoon olive oil
½ teaspoon kosher salt
1 tablespoon granulated sugar
1½ cups whole wheat our
1½ cups bread our
½ cup Kalamata olives, pitted and roughly chopped
1 teaspoon herbes de Provence
2¼ teaspoons yeast, active dry, instant or bread machine
1. Put all of the ingredients, in the order listed, into the bread pan tted with the kneading paddle. Secure the bread pan into the Cuisinart
®
Bread Maker.
2. Press the PROG button to select the Dough program. Press START/STOP to begin the dough-making process.
3. When the cycle is complete, remove dough and transfer to a lightly oured surface. Line a baking sheet with parchment paper.
4. Divide the dough into 12 equal pieces. Roll each piece into an oval and put on the prepared baking sheet; cover with plastic wrap. Allow to rest for about 30
minutes, or until the rolls have about doubled in size. Preheat oven to 350°F.
5. Once rolls have risen, use a serrated knife to cut 2 small slashes across each roll. Dust with whole-wheat our. Bake in preheated oven for about 15 to 20
minutes, or until they are a dark golden color. Once nished, transfer rolls to a wire rack to cool before serving.
Note: This recipe can also be shaped into one large oval loaf. Follow the same instructions and then bake for an additional 10 minutes.
Nutritional information per roll:
Calories 147 (17% from fat) • carb. 26g • pro. 5g • fat 3g • sat. fat 0g • chol. 1mg • sod. 141mg • calc. 22mg • ber 3g

61
Garlic, HERB AND CHEESE Knots
Dough Program
Makes 12 knots
Dough:
1 cup water, room temperature
1½ tablespoons olive oil
1 teaspoon kosher salt
3 cups bread our
¼ cup nonfat dry milk powder
2 tablespoons potato akes
2 teaspoons yeast, active dry, instant or bread machine
2 teaspoons garlic powder
Seasoning:
2 tablespoons unsalted butter
3 large garlic cloves, nely chopped
1 tablespoon fresh, mixed herbs (oregano, thyme and parsley), nely chopped
¼ teaspoon kosher salt
1. Put all of the dough ingredients, in the order listed, into the bread pan tted with the kneading paddle. Secure the bread pan into the Cuisinart
®
Bread Maker.
2. Press the PROG button to select the Dough program. Press START/STOP to begin the dough-making process.
3. When the cycle is complete, remove dough and transfer to a lightly oured surface. Sprinkle all sides of the dough with garlic powder. Line a baking sheet
with parchment paper.
4. Divide the dough into 12 equal pieces; cover loosely with plastic wrap. Roll each into a 10-inch rope and shape into a knot. Transfer to the prepared baking
sheet, cover loosely with plastic wrap. Rest for approximately 30 minutes. Preheat oven to 350°F.
5. While garlic knots are resting, prepare the seasoning: Put the butter in a small saucepan set over medium heat. Melt the butter and then remove from heat;
stir in the chopped garlic, herbs and salt. Reserve for the baked knots.
6. Bake the knots in the preheated oven for 15 to 18 minutes, or until lightly browned. Remove from oven and immediately brush with reserved butter/herb
mixture; let cool 5 to 10 minutes before serving.
Nutritional information per knot:
Calories 148 (22% from fat) • carb. 25g • pro. 5g • fat 4g • sat. fat 1g • chol. 6mg • sod. 258mg • calc. 38mg • ber 1g

62
Cinnamon Swirl Rolls
Dough Program
Makes 16 rolls
Dough:
½ cup low-fat milk, room temperature
2 large eggs, room temperature
4 tablespoons unsalted butter, room temperature, cubed
1
⁄3 cup granulated sugar
¾ teaspoon kosher salt
1 teaspoon pure vanilla extract
3 cups bread our
1
⁄3 cup cornstarch
1¾ teaspoons yeast, active dry, instant or bread machine
Filling:
1
⁄3 cup packed light brown sugar
3 tablespoons granulated sugar
2 teaspoons ground cinnamon
Frosting:
3 ounces cream cheese, room temperature
3 tablespoons unsalted butter, room temperature
¾ teaspoon pure vanilla extract
1 cup plus 2 tablespoons confectioners’ sugar, sifted
2 teaspoons low-fat milk
3 tablespoons unsalted butter, melted
Nonstick cooking spray
1. Put all of the dough ingredients, in the order listed, into the bread pan tted with the kneading paddle. Secure the bread pan into the Cuisinart
®
Bread
Maker.
2. Press the PROG button to select the Dough program. Press START/STOP to begin the dough-making process.
CONTINUED...

63
3. While dough is mixing, stir together the sugars and cinnamon for the lling in a small bowl and reserve. Prepare the frosting. Process all of the frosting
ingredients together with either a Cuisinart
®
food processor, stand or hand mixer. Frosting should be completely smooth; reserve.
4. When the cycle is complete, remove dough and transfer to a lightly oured surface and punch down to deate. Divide dough into 2 equal pieces and let
rest covered in plastic wrap, for 10 minutes. Lightly coat a 13x9-inch baking pan with cooking spray.
5. Roll each piece of dough out into a rectangle, 12 inches wide and ½ inch thick. Brush each rectangle with melted butter, leaving a 1-inch border along one
long side, and brushing to the edges of the remaining sides. Sprinkle evenly with the cinnamon sugar lling. Roll the dough tightly, from one long side to
the other (toward the unbuttered edge). Pinch along long side to seal. Cut 8 slices from each with a serrated knife. Arrange in prepared pan, cover with
plastic wrap and let rise for 30 minutes. Preheat oven to 350°F with the rack in the middle position.
6. Bake for 30 to 35 minutes, until rolls are puffed with lightly golden tops.
7. Let cool for 20 to 25 minutes before frosting. Spread or drizzle frosting as desired.
Nutritional information per cinnamon roll:
Calories 243 (28% from fat) • carb. 34g • pro. 5g • fat 8g • sat. fat 5g • chol. 43mg • sod. 161mg • calc. 44mg • ber 1g

64
Basic Sweet Dough
Dough Program
Makes a 1½-pound dough
¼ cup plus 2 tablespoons water, room temperature
2 large eggs, room temperature
½ teaspoon kosher salt
¼ cup sour cream, room temperature
¼ cup unsalted butter, room temperature and cubed
¼ cup granulated sugar
3 cups bread our
2¼ teaspoons yeast, active dry, instant or bread machine
1. Put all of the ingredients, in the order listed, into the bread pan tted with the kneading paddle. Secure the bread pan into the Cuisinart
®
Bread Maker.
Press PROG to select the Dough program. Press START/STOP to begin the dough-making process.
2. When the cycle is complete, remove dough and transfer to a lightly oured surface, punch to deate and let rest 10 minutes before using.
This dough is perfect to make your favorite sweet breakfast/brunch treats, such as our Raspberry Cheese Danish on the following page.
Nutritional information per serving (based on 24 servings):
Calories 87 (27% from fat) • carb. 13g • pro. 3g • fat 2g • sat. fat 2g • chol. 22mg • sod. 57mg • calc. 4mg • ber 1g

65
Raspberry Cheese Danish
Dough Program
Makes 2 large Danish
1 recipe Basic Sweet Dough (see previous recipe)
6 ounces cream cheese, room temperature and cubed
3 tablespoons confectioners’ sugar, sifted
Pinch kosher salt
1 large egg, room temperature
¾ teaspoon pure vanilla extract
½ cup seedless raspberry preserves
Egg wash – 1 large egg beaten with ½ teaspoon water
Vanilla Glaze (optional):
¾ cup confectioners’ sugar, sifted
½ teaspoon pure vanilla extract
Low-fat milk (approximately ¼ cup)
1. Prepare Basic Sweet Dough according to recipe. Line two baking sheets with parchment paper.
2. While dough is in the bread maker, prepare the cream cheese lling. Put the cream cheese, sugar, salt, egg and vanilla extract into a Cuisinart
®
food processor tted with the metal chopping blade. Process until completely smooth. Reserve in the refrigerator until ready to use.
3. Divide the dough into 2 equal pieces. Roll out each piece into a rectangle approximately 14 x 10 inches and place each on the prepared baking
pans. Spread the cream cheese lling evenly down the length of the center of each rectangle. Top each with the raspberry preserves.
4. Cut ½-inch wide strips on either side of the dough, cutting from the edge of the dough to the edge of the lling. Fold the top strips together,
making an “X” and meeting the opposite strips across the lling. Be sure the opposite dough strips are touching in the middle. Continue with alternating
strips until the bottom is reached. Preheat oven to 350°F.
5. Cover Danish loosely with plastic wrap and allow to rise until nearly doubled. Brush with egg wash. Bake for about 30 to 40 minutes until golden brown and
lling is set.
6. While Danish are baking, prepare the vanilla glaze, if using. Place sifted sugar and vanilla extract in a bowl. Whisk the milk into mixture, a few drops at a
time, until mixture becomes a consistency that can be drizzled.
CONTINUED...

66
7. Remove Danish from oven. Slide parchment and Danish onto a wire rack and pull parchment out from under the Danish (this prevents the bottoms from
getting soggy). Allow to cool. Serve plain, dusted with confectioners’ sugar, or drizzled with the vanilla glaze.
Nutritional information per serving (based on 24 servings with glaze):
Calories 152 (31% from fat) • carb. 23g • pro. 5g • fat 5g • sat. fat 3g • chol. 38mg • sod. 93mg • calc. 9mg • ber 1g
40+
TASTY
RECIPES

67
Strawberry Rhubarb Jam
Jam Program
Makes about 4 cups
4 cups (1 pound) fresh strawberries, stemmed and quartered or halved if small
12 ounces fresh rhubarb, cut in ½-inch slices
1 cup granulated sugar
1 tablespoon powdered pectin
1 teaspoon fresh lemon juice
Pinch kosher salt
1
/3 cup fresh basil, thinly sliced (optional)
1. Put all of the ingredients, in the order listed, into the bread pan tted with the kneading paddle. Secure the bread pan into the Cuisinart
®
Bread Maker.
2. Press the PROG button to select the Jam program. Press START/STOP to begin the jam-making process.
3. For best mixing results, scrape the pan 10 to 15 minutes after the program has started.
4. When cycle is complete, spoon into clean, dry jars. Let cool, then cover. Store in refrigerator for up to 3 weeks.
Nutritional information per serving (2 tablespoons):
Calories 32 (2% from fat) • carb. 8g • pro. 0g • fat 0g • sat. fat 0g • chol. 0mg • sod. 6mg • calc. 12mg • ber 1g

68
Pear & Ginger Preserves
Jam Program
Makes 3 cups
4 medium to large pears, about 1¾ pounds, peeled, cored, and diced
1 teaspoon grated fresh ginger
1 cup granulated sugar
1 (¼ cup) packet powdered pectin
1 tablespoon fresh lemon juice
2 tablespoons chopped candied ginger
Pinch kosher salt
1. Put all of the ingredients, in the order listed, into the bread pan tted with the kneading paddle. Secure the bread pan into the Cuisinart
®
Bread Maker.
2. Press the PROG button to select the Jam program. Press START/STOP to begin the jam-making process.
3. For best mixing results, scrape the pan 10 to 15 minutes after the program has started.
4. When cycle is complete, spoon into clean, dry jars. Let cool, then cover. Store in refrigerator for up to 3 weeks.
Nutritional information per serving (2 tablespoons):
Calories 57 (1% from fat) • carb. 15g • pro. 0g • fat 0g • sat. fat 0g • chol. 0mg • sod. 111mg • calc. 3mg • ber 1g

69
Blueberry Lime Jam
Jam Program
Makes about 4
1
⁄3 cups
6 cups fresh blueberries
1¼ cups granulated sugar
1 tablespoon powdered pectin
¼ cup fresh lime juice
1 teaspoon grated lime zest
Pinch kosher salt
1. Put all of the ingredients, in the order listed, into the bread pan tted with the kneading paddle. Secure the bread pan into the Cuisinart
®
Bread Maker.
2. Press the PROG button to select the Jam program. Press START/STOP to begin the jam-making process.
3. For best mixing results, scrape the pan 10 to 15 minutes after the program has started.
4. When cycle is complete, spoon into clean, dry jars. Let cool, then cover. Store in refrigerator for up to 3 weeks.
Nutritional information per serving (2 tablespoons):
Calories 43 (2% from fat) • carb. 11g • pro. 0g • fat 0g • sat. fat 0g • chol. 0mg • sod. 5mg • calc. 2mg • ber 1g

70
Mixed Berry Jam
Jam Program
Makes about 5 cups
4 cups fresh strawberries, stemmed and quartered or halved if small
2 cups raspberries
2 cups blueberries
1 cup granulated sugar
1 tablespoon powdered pectin
1 teaspoon fresh lemon juice
1. Put all of the ingredients, in the order listed, into the bread pan tted with the kneading paddle. Secure the bread pan into the Cuisinart
®
Bread Maker.
2. Press the PROG button to select the Jam program. Press START/STOP to begin the jam-making process.
3. For best mixing results, scrape the pan 10 to 15 minutes after the program has started.
4. When cycle is complete, spoon into clean, dry jars. Let cool, then cover. Store in refrigerator for up to 3 weeks.
Nutritional information per serving (2 tablespoons):
Calories 77 (17% from fat) • carb. 13g • pro. 2g • fat 1g • sat. fat 1g • chol. 3mg • sod. 116mg • calc. 16mg • ber 0g

71
Banana Walnut BREAD
Cake Program
Delay Start Timer - No
Makes one 2
1
/3 -pound loaf
Nonstick cooking spray
½ cup low-fat buttermilk, room temperature
½ cup unsalted butter, room temperature, cut into ½-inch pieces
2 large eggs, room temperature
1 teaspoon pure vanilla extract
1¼ cups mashed, ripe bananas (about 3 medium)
¾ teaspoon kosher salt
1 cup granulated sugar
2 cups unbleached, all-purpose our
1 teaspoon baking soda
¾ teaspoon baking powder
2
/3 cup chopped walnuts
1. Coat the inside of the bread pan tted with the kneading paddle with nonstick cooking spray.
2. Put all of the ingredients, in the order listed, into the bread pan and secure into the Cuisinart
®
Bread Maker.
3. Press the PROG button to select the Cake program. Press START/STOP to begin the bread-making process.
4. While the batter is mixing, scrape the sides of the bread pan with a rubber spatula to fully incorporate ingredients.
5. When cycle is complete, remove the bread pan from the machine and transfer bread to a wire rack to cool completely before slicing.
Nutritional information per serving (based on 12 servings):
Calories 285 (38% from fat) • carb. 39g • pro. 5g • fat 12g • sat. fat 5g • chol. 52mg • sod. 296mg • calc. 30mg • ber 2g

72
Sour Cream Chocolate BREAD
Cake Program
Delay Start Timer - No
Makes one 1½-pound loaf
Nonstick cooking spray
½ cup plus 1 tablespoon low-fat milk, room temperature
½ cup sour cream, room temperature
2 large eggs, room temperature
¾ teaspoon pure vanilla extract
½ cup granulated sugar
1
/3 cup packed light brown sugar
1
1
/3 cups unbleached, all-purpose our
¾ teaspoon baking powder
½ teaspoon baking soda
½ teaspoon kosher salt
¾ cup chocolate chips
1
/3 cup chopped walnuts
1. Coat the inside of the bread pan tted with the kneading paddle with nonstick cooking spray.
2. Put all of the ingredients, in the order listed, into the bread pan and secure into the Cuisinart
®
Bread Maker. Press the PROG button to select the
Cake program. Press START/STOP to begin the bread-making process.
3. While the batter is mixing, scrape the sides of the bread pan with a rubber spatula to fully incorporate ingredients.
4. When the cycle is complete, remove the bread pan from the machine and transfer bread to a wire rack to cool completely before slicin
g.
Nutritional information per serving (based on 12 servings):
Calories 226 (34% from fat) • carb. 34g • pro. 4g • fat 9g • sat. fat 41g • chol. 38mg • sod. 199mg • calc. 33mg • ber 1g

73
Zucchini Bread
Cake Program
Delay Start Timer - No
Makes one 1½-pound loaf
Nonstick cooking spray
1
/3 cup vegetable oil
¾ cup shredded zucchini
2 large eggs, room temperature
1
/3 cup packed light brown sugar
3 tablespoons granulated sugar
1½ cups unbleached, all-purpose our
¾ teaspoon kosher salt
¾ teaspoon ground cinnamon
¼ teaspoon ground allspice
½ teaspoon baking soda
½ teaspoon baking powder
1
/3 cup walnuts
1
/3 cup raisins
1. Coat the inside of the bread pan tted with the kneading paddle with nonstick cooking spray.
2. Put all of the ingredients, in the order listed, into the bread pan and secure into the Cuisinart
®
Bread Maker. Press the PROG button to select the
Cake program. Press START/STOP to begin the bread-making process.
3. While the batter is mixing, scrape the sides of the bread pan with a rubber spatula to fully incorporate ingredients.
4. When the cycle is complete, remove the bread pan from the machine and transfer bread to a wire rack to cool completely before slicing.
Nutritional information per serving (based on 12 servings):
Calories 183 (43% from fat) • carb. 23g • pro. 4g • fat 9g • sat. fat 1g • chol. 31mg • sod. 228mg • calc. 15mg • ber 1g

74
Breadcrumbs
1-pound loaf makes 4 cups of breadcrumbs
1 loaf Basic White Bread
1. Break loaf into large pieces and leave uncovered at room temperature overnight.
2. Put pieces into a Cuisinart® food processor tted with the chopping blade. Pulse to break up and then process until nely ground,
about 40 to 60 seconds.
TIP: For seasoned breadcrumbs, add ¼ teaspoon each dried oregano, dried basil, garlic powder, and ground onion akes to bread pieces
and process as above.
Nutritional information per serving (2 tablespoons):
Calories 48 (15% from fat) • carb. 9g • pro. 1g • fat 1g • sat. fat 1g • chol. 2mg • sod. 95mg • calc. 5mg • ber 0g
Croutons
1-pound loaf makes 6 cups of croutons
1 loaf Basic White Bread
1 to 2 tablespoons olive oil
Pinch kosher salt
1. Preheat oven to 325ºF.
2. Cut bread into ½-inch cubes. Put into a large mixing bowl and toss with the oil. Spread on a rimmed baking sheet (be sure that they are not overlapping;
you may need to divide between 2 pans) and sprinkle evenly with salt.
3. Bake in preheated oven until golden brown, about 20 minutes.
Nutritional information per serving (¼ cup):
Calories 69 (22% from fat) • carb. 12g • pro. 2g • fat 2g • sat. fat 1g • chol. 3mg • sod. 132mg • calc. 7mg • ber 0g

75
Challah French Toast
Makes 8 to 10 slices
8 large eggs
2 cups milk (we used reduced fat, but any variety will do)
1 tablespoon pure vanilla extract
2 tablespoons pure maple syrup
1 teaspoon ground cinnamon
Pinch ground nutmeg
1 to 2 pinches kosher salt
8 to 10 slices challah bread, ¾ inch thick
Unsalted butter or coconut oil, for griddle
Confectioners’ sugar for serving
Fresh fruit for serving
1. Put the eggs, milk, vanilla extract, maple syrup, cinnamon, nutmeg and salt into a medium bowl. Whisk to fully combine and pour into a 13 x 9-inch
baking dish.
2. Soak half of the bread in the milk mixture, turning so both sides are saturated.
3. While the bread is soaking, put a griddle over medium/medium-high heat. Put butter/oil on the griddle, about 1 tablespoon, depending on the
size of the griddle.
4. Once the griddle is hot, put the soaked bread on the hot griddle. Cook 3½ to 4 minutes per side. Soak remaining bread while rst batch of French toast
is cooking.
5. Remove and reserve the cooked French toast in a warm oven and then repeat with remaining soaked bread.
6. To serve, dust with confectioners’ sugar and top with fresh fruit and maple syrup, if desired.
Nutritional information per serving (based on 10 slices):
Calories 189 (37% from fat) • carb. 23g • pro. 6g • fat 8g • sat. fat 4g • chol. 170mg • sod. 174mg • calc. 81mg • ber 1g

76
Berry Brioche Bread Pudding
Makes 6 to 8 servings
1 loaf (1 pound) brioche bread, cut into 1-inch cubes (about 10 cups)
4 large eggs, lightly beaten
¼ cup granulated sugar
½ teaspoon kosher salt
1½ cups whole milk
1½ cups heavy cream
2 teaspoons pure vanilla extract
1 cup mixed berry jam (either homemade or store bought)
Nonstick cooking spray or unsalted butter, softened
Freshly whipped cream, for serving
1. Put the bread cubes in a large bowl; reserve.
2. Put the eggs, sugar and salt into a mixing bowl and whisk until light and frothy. Add the milk, heavy cream and vanilla extract and continue to
whisk until well combined. Pour liquid mixture over the bread. Gently stir to fully coat. Cover with plastic wrap and allow to rest in the refrigerator for a
minimum of 3 hours, and up to overnight.
3. Bring bread mixture to room temperature prior to baking. Add the jam to the soaked mixture and gently fold in to combine.
4. Preheat oven to 350°F with the rack in the lower third of the oven.
5. Lightly coat a 9-inch round baking pan with the nonstick spray (or brush with butter). Transfer the soaked bread mixture into the pan.
Lightly cover with aluminum foil and bake for 1 hour. Remove foil and bake for an additional 15 minutes, or until top is nicely puffed.
6. Bread pudding is done when the internal temperature registers 160°F. Serve immediately with freshly whipped cream.
Nutritional information per serving (based on 8 servings):
Calories 507 (46% from fat) • carb. 56g • pro. 10g • fat 25g • sat. fat 16g • chol. 215mg • sod. 418mg • calc. 94mg • ber 1g

1
78
Pizza Margherita
Makes 9 servings
3 tablespoons olive oil, divided
Cornmeal, for dusting pan
1 recipe Pizza Dough, room temperature (see recipe on page 57)
½ teaspoon dried basil
¼ teaspoon dried oregano
¼ teaspoon crushed red pepper
1 large can (28 ounces) whole peeled tomatoes, drained
½ teaspoon kosher salt
8 ounces fresh mozzarella, cut into 9 slices
Basil leaves, for garnish
1. Preheat oven to 450°F with the rack in the lower third position.
2. Brush a rimmed baking tray with a teaspoon of the olive oil and then sprinkle with cornmeal. Stretch the dough and spread it evenly
into the prepared pan. Cover with plastic wrap and allow to rise for 30 minutes.
3. While dough is rising, prepare the sauce: Put 2 tablespoons of the oil, dried basil, oregano and red pepper into a small saucepan set over medium-high
heat. Once hot, carefully add the drained tomatoes. While cooking, smash down with a wooden spoon. Once tomatoes reach a simmer, reduce heat to
medium to maintain simmer, and cook to reduce slightly and develop avor, about 20 to 30 minutes. Remove from heat and stir in salt.
4. Once dough has risen, cover with the sauce, leaving a 1-inch border at the edges of the dough. Arrange the cheese in 3 rows of 3. Brush the pizza dough
edges with the remaining oil. Bake until cheese has melted, crust is golden and bottom is crispy, about 25 minutes.
Nutritional information per serving:
Calories 306 (36% from fat) • carb. 37g • pro. 12g • fat 12g • sat. fat 4g • chol. 13mg • sod. 750mg • calc. 70mg • ber 3g
77
Máquina para hacer pan
automática compacta
CBK-1 1 0
Para su seguridad y para disfrutar plenamente de este producto, siempre
lea las instrucciones cuidadosamente antes de usarlo.
Manual de instruccionesy
libro de recetas

1
MEDIDAS DE SEGURIDAD
IMPORTANTES
Al usar aparatos eléctricos, especialmente en presencia de niños,
siempre debe tomar precauciones
básicas de seguridad, incluso las
siguientes:
1. LEA TODAS LAS INSTRUCCIONES Y ADVERTENCIAS ANTES
DE USAR ESTE PRODUCTO.
2. No toque las superficies calientes; agarre la unidad por la base de
plástico.
Siempre tenga puestos guantes para el horno/manoplas para
manipular materiales calientes y permita que las partes metálicas
se enfríen antes de limpiarlas. Permita que el aparato se enfríe
completamente antes de instalar/sacar piezas.
3. Desenchufe el aparato cuando no está en uso y antes de limpiarlo.
Permita que el aparato se enfríe completamente antes de
ensamblar/desensamblarlo.
4. Para reducir el riesgo de descarga eléctrica, no sumerja el aparato,
el cable ni la clavija en agua ni en ningún otro líquido.
5. Supervise el uso de este aparato cuidadosamente cuando sea
usado cerca de niños o personas discapacitadas.
6. No deje que nada descanse sobre el cable eléctrico. No enchufe el
cable en un lugar donde pueda causar tropezones. Desenchufe el
aparato antes de salir de paseo o de viaje.
7. No utilice este aparato si el cable o el enchufe están dañados,
después de un mal funcionamiento, después de que se haya caído
o si está dañado; regréselo a un centro de servicio autorizado para
su revisión, reparación o ajuste.
8. No permita que el cable cuelgue del borde de la encimera o de la
mesa, ni que tenga contacto con superficies calientes. No coloque
el aparato sobre una superficie inestable o cubierta con alguna
tela.
9. Evite el contacto con las piezas móviles.
10. Solo use accesorios recomendados por el fabricante. Usar otros
accesorios presenta un riesgo de incendio, descarga eléctrica o
heridas.
11. No lo utilice en exteriores, ni a fines comerciales.
12. No coloque el aparato sobre o cerca de un quemador a gas o de
una hornilla eléctrica caliente, ni en un horno caliente.
13. Mantenga el cable alejado de las superficies calientes del aparato.
Tampoco coloque ningún objeto inflamable en ellas.
14. Deje un espacio de al menos 2 pulgadas (5 cm) entre el aparato y
la pared o cualquier otro objeto.
15. No utilice el aparato para ningún fin que no sea el indicado.
16. Tenga cuidado de no tocar las patas del enchufe al conectar/
desconectar el cable de la toma de corriente.
17. Antes de desenchufar el aparato: mantenga oprimido el botón
START/STOP por 1 a 3 segundos para apagarlo. Luego, agarre el
cable por el enchufe y jale este de la toma de corriente. Nunca jale
el cable.
18. Uso de extensiones: el cable provisto con este aparato es corto,
para reducir el peligro de que alguien se enganche o tropiece con
un cable más largo. Puede usarse una extensión eléctrica, con
cuidado. La clasificación nominal de la extensión debe ser por lo
menos igual a la del aparato. Coloque el cable sobre la encimera
o la mesa de tal forma que niños no puedan jalar o tropezar con
este. Si el cable del aparato está dotado de un enchufe con puesta
a tierra, la extensión también debe serlo.
19. Procure no conectar y hacer funcionar al mismo tiempo varios
aparatos en el mismo circuito eléctrico; esto puede provocar una
sobrecarga y hacer que el aparato no funcione correctamente. Le
aconsejamos que enchufe el aparato en una toma de corriente
operada por un circuito eléctrico independiente.

2
20. No haga funcionar el aparato debajo o dentro de un armario/
gabinete. Siempre desconecte el aparato antes de guardarlo
en un armario/gabinete. Dejar el aparato conectado presenta un
riesgo de incendio, especialmente si este toca las paredes o la
puerta del armario/gabinete cuando cierra.
21. Este aparato se debe precalentar.
22. Para uso doméstico solamente
23. Los niños o las personas que carezcan de la experiencia o de los
conocimientos necesarios para manipular el aparato, o aquellas
cuyas capacidades físicas, sensoriales o mentales estén limitadas,
no deben utilizar el aparato sin la supervisión o la dirección de
una persona responsable por su seguridad.
24. No permita que los niños jueguen con este aparato.
25. Este aparato no ha sido diseñado para ser puesto en marcha
mediante un temporizador o control remoto independiente.
GUARDE ESTAS INSTRUCCIONES
PARA USO DOMÉSTICO
SOLAMENTE
USO DE EXTENSIONES
AVISO
El cable de este aparato está dotado de una clavija polarizada
(una pata es más ancha que la otra). Como medida de seguridad,
se podrá enchufar de una sola manera en la toma de corriente
polarizada. Si no entra en la toma de corriente, inviértala. Si aun así
no entra completamente, comuníquese con un electricista. No intente
modificarla.
ÍNDICE
Medidas de seguridad importantes ........................1
Antes del primer uso....................................2
Piezas y características ................................ 3
Panel de control .......................................4
Instrucciones de operación ............................. 5
Memoria en caso de interrupción del suministro eléctrico .....7
Tipos de panes y programas .............................8
Opciones de programación/tiempo ........................9
Medición de los ingredientes ............................11
Adición de los ingredientes al molde......................11
Tabla de equivalencia (sistema imperial)...................11
Limpieza y mantenimiento ............................. 12
Consejos y sugerencias ................................12
Ingredientes básicos...................................14
Ingredientes sin gluten .................................15
Resolución de problemas.............................. 18
Garantía ............................................ 19
ANTES DEL PRIMER USO
Retire el aparato del material de embalaje y quite las etiquetas
promocionales pegadas a su cuerpo. Asegúrese de que todas
las piezas inclusas en la sección “Piezas y características” están
incluidas. Le aconsejamos que guarde el material de embalaje.
Limpie el cuerpo del aparato con un paño humedecido para
eliminar el polvo acumulado durante la fabricación y el transporte.
Limpie el interior de la tapa con una esponja o un paño ligeramente
humedecidos. Lave la paleta amasadora y el molde en agua
jabonosa tibia y séquelos bien.
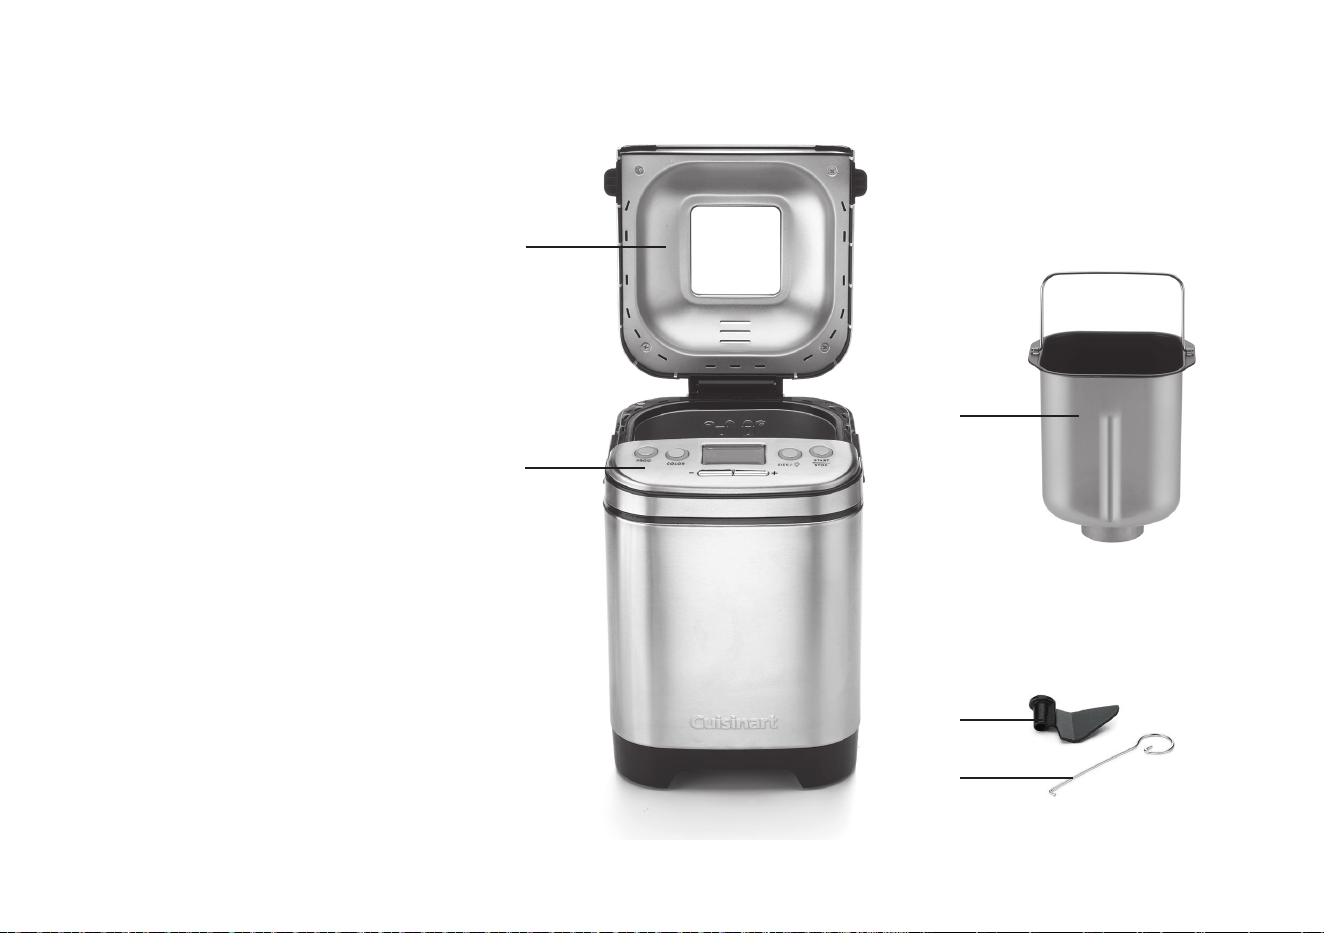
3
PIEZAS Y CARACTERÍSTICAS
1. Tapa
Tapa con ventanilla transparente
2. Panel de control con pantalla LCD
Véase los detalles en la página siguiente
3. Cámara de horneado
a. Molde removible con asa
Diseño vertical; revestimiento antiadherente
b. Paleta amasadora
Paleta antiadherente removible
c. Resistencia (no ilustrada)
4. Cable (no ilustrado)
5. Gancho para sacar la paleta amasadora
Herramienta útil para sacar la paleta amasadora del
pan horneado
6.
Sin BPA
Ninguna de las piezas en contacto con los alimentos
contiene bisfenol A (BPA).
1
2
3a
3b
5

4
PANEL DE CONTROL
1. Pantalla LCD – Muestra el tamaño de la barra de pan, la
opción de dorado y el programa usado.
También se usa para ver el tiempo de horneado y el tiempo
de inicio diferido (función “Delay Start”).
2. Botón PROG – Permite elegir un programa entre la lista de
programas en la tapa.
3. Botón COLOR
– Permite elegir el grado de dorado del
pan: claro, medio u oscuro.
Claro: Medio: Oscuro:
4. Botón SIZE / – a. Permite elegir el tamaño del pan
entre 1 libra (455 g), 1½ libras
(680g) y 2 libras (910 g).
b. Enciende la luz interior.
NOTA: algunos programas limitan las opciones
de grado de dorado y de tamaño. La pantalla LCD
mostrará las opciones disponibles. Véase las
combinaciones disponibles en la sección “Opciones de
programación/Tiempo”
en las páginas 9–10.
5. Botón START/STOP – Enciende y apaga el ciclo de
preparación del pan. También controla la función de pausa.
6.
Botones –
/
+
Permiten ajustar el tiempo de horneado y el inicio diferido
(función “Delay Start”).
2
3
1
5
4
6
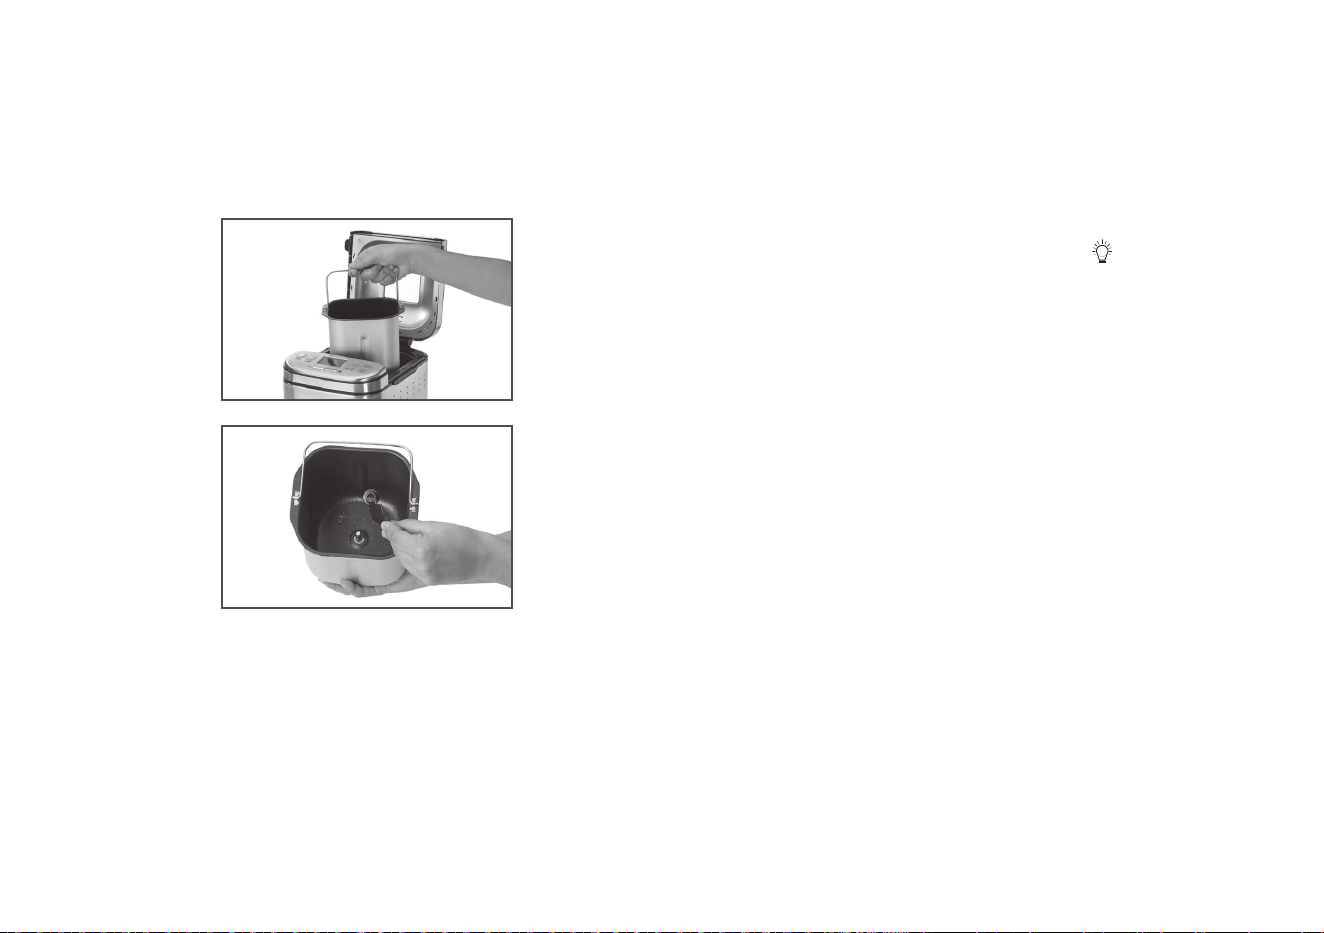
5
INSTRUCCIONES DE OPERACIÓN
1. Saque el molde, agarrando el asa, girando el molde en sentido
antihorario y levantándolo. Si no logra agarrar el asa, intente hacerlo con
el gancho para sacar la paleta amasadora. Fije la paleta amasadora .
2. Mida cuidadosamente los ingredientes y colóquelos en el molde, en el
orden indicado en la receta. Siempre agregue los líquidos primero, luego
los ingredientes secos, y la levadura de último. La levadura no debe
tocar los ingredientes líquidos. Consulte las secciones “Medición de los
ingredientes” y “Adición de los ingredientes” en la página 11 para más
información.
3. Coloque el molde en la cámara de horneado, girando el molde en
sentido horario para sujetarlo.
4. Cierre la tapa y enchufe el cable en una toma de corriente estándar.
5. Elija el programa deseado, presionando el botón PROG hasta que
el programa deseado aparezca en la pantalla. Nota: la lista de los
programas está impresa en la tapa. Para más información acerca de
cada programa, véase la página 10.
6. Elija el grado de dorado deseado (claro, medio u oscuro), presionando
el botón COLOR. Su selección aparecerá en la pantalla LCD. Nota: si no
elige ninguna opción, la máquina elegirá “medio”, la opción por defecto.
7. Elija el tamaño de barra, presionando el botón SIZE/. Puede elegir
entre: 1 libra (455 g), 1½ libras (680 g) y 2 libras (910 g). Su selección
aparecerá en la pantalla LCD.
Nota: si no elige ninguna opción, la máquina elegirá 1½ libras (680 g),
la opción por defecto.
8. Si desea que el proceso de preparación empiece inmediatamente,
presione el botón START/STOP. Para cancelar la preparación, mantenga
oprimido el botón START/STOP por 3 segundos.
Temporizador/función de inicio diferido
¡La máquina para hacer pan automática compacta Cuisinart
®
permite elegir
la hora exacta en que la máquina terminará el ciclo de horneado, para poder
disfrutar de pan fresco y caliente a la hora que le conviene! La hora puede
ser programada con hasta 13 horas de antelación. Por ejemplo, puede
programar la máquina a las 8 de la noche para que el pan esté listo a las 9
de la mañana. Cerciórese de usar el temporizador para programar la hora de
fin de ciclo (es decir, la hora a la cual el pan está listo).
NOTA: no use ingredientes perecederos tales como leche, huevos, queso o
yogurt si usa la función de inicio diferido.
Para fijar la hora de inicio diferido:
1. Agregue los ingredientes.
2. Elija el programa, el tamaño de barra de pan y el grado de dorado.
3. Presione los botones + o – para fijar la hora de fin de ciclo deseada,
hasta 13 horas más tarde. Presione repetidamente el botón para
subir/bajar en incrementos de 10 minutos, o mantenga el botón
oprimido para desplazarse más rápido.
4. Presione el botón START/STOP para empezar la cuenta regresiva del
inicio diferido.
1a.
1b.
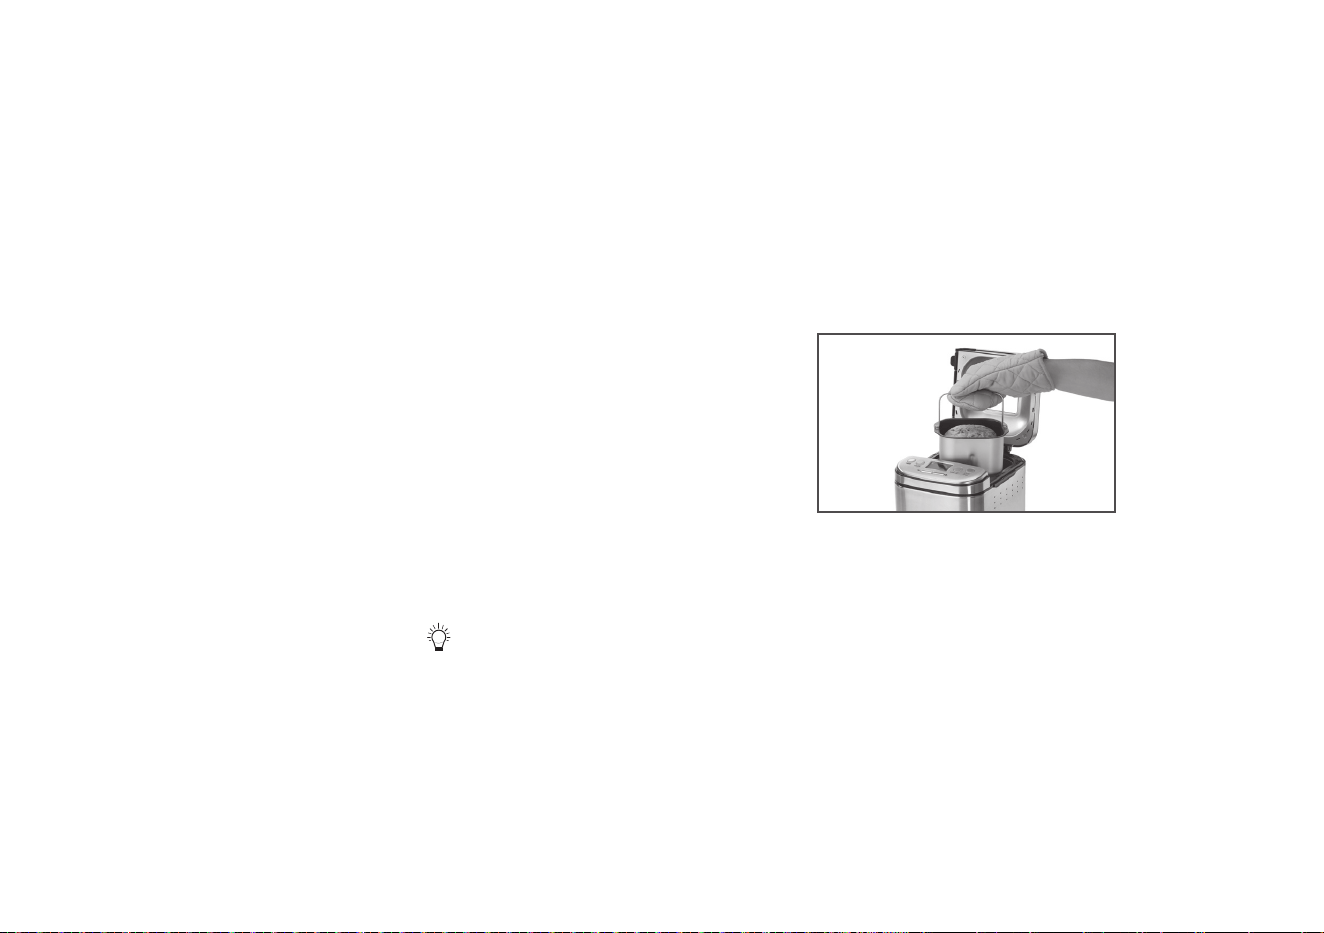
6
Durante el proceso de fabricación del pan
El proceso
Tras haber elegido el programa deseado, la unidad se encargará
automáticamente de cada paso hasta que el pan esté listo. Un indicador en
la pantalla LCD indicará el ciclo actual: KNEAD (amasado), RISE (leudado),
BAKE (horneado) o KEEP WARM (mantener caliente).
KNEAD (amasado) – La mayoría de los panes requieren 2 ciclos de
amasado. El primer ciclo de amasado mezcla rápidamente los ingredientes
principales. El segundo ciclo de amasado es más largo y continúa el
proceso. Se “aplasta” la masa para desinflarla antes de que el ciclo más
largo comience y antes de sacar la paleta amasadora.
RISE (leudado) – El ciclo de leudado ayuda los panes con levadura a
conseguir la consistencia perfecta. Durante el ciclo de leudado, la máquina
parecerá inactiva, pero la pantalla indicará que está en el ciclo de leudado.
BAKE (horneado) – Esta máquina para hacer pan es completamente
automática. Esto significa que regulará automáticamente el tiempo de
horneado y la temperatura de horneado dependiendo del tipo de pan
seleccionado.
KEEP WARM (mantener caliente) – Permite dejar el pan horneado en la
máquina y mantenerlo caliente por hasta 60 minutos. También evita que la
corteza se ponga blanda si no saca el pan de la máquina inmediatamente
después de hornearlo. Nota: algunas cortezas seguirán dorándose
ligeramente durante el ciclo “mantener caliente”.
Opciones:
1. Luces: mantenga oprimido el botón SIZE/ por 3 segundos para
encender la luz interior en cualquier momento. La luz se apagará
automáticamente después de 30 segundos. Para apagarla antes de este
tiempo, mantenga oprimido el botón otra vez.
2. Adiciones: la unidad emitirá 4 series de 5 pitidos largos para indicar
en qué momento puede añadir ingredientes adicionales. Después de la
señal, simplemente abra la tapa y agregue los ingredientes adicionales.
Luego, cerciórese de cerrar la tapa. Por lo general, los ingredientes
adicionales se añaden durante el segundo ciclo de amasado. Por
si no escucha la señal, el mensaje “ADD-IN” (adición) aparecerá y
permanecerá en la pantalla por 5 minutos durante el ciclo de amasado.
3. Señal para sacar la paleta amasadora: antes de empezar el último
ciclo de leudado, la unidad emitirá una serie de 10 pitidos cortos
para indicar que el proceso de mezclado/amasado ha terminado. Por
si no escucha la señal, el mensaje “PADDLE” (paleta) aparecerá y
permanecerá en la pantalla por un minuto. En este punto del proceso de
fabricación del pan, tiene la opción de sacar la paleta amasadora (para
evitar que la barra final tenga un pequeño hueco en la parte de abajo)
y volver a dar forma a la masa, aunque no es necesario. Para sacar la
paleta amasadora:
a. Presione el botón START/STOP para poner el programa en pausa.
b. Abra la tapa y retire el molde de la unidad, agarrándolo por el asa.
c. Retire la masa del molde y saque la paleta amasadora.
d. De forma de bola a la masa y colóquela de vuelta en el molde, en el
centro.
e. Coloque el molde en la máquina, girando en sentido horario para
bloquearlo. Cierre la tapa.
f. Presione el botón START/STOP para continuar el programa.
NOTA: si prefiere hornear el pan en un horno convencional, también
lo puede hacer cuando escuche esta señal. Cerciórese de presionar
el botón START/STOP para reiniciar la máquina, para que no continúe
automáticamente el proceso de fabricación del pan después de 15
minutos.
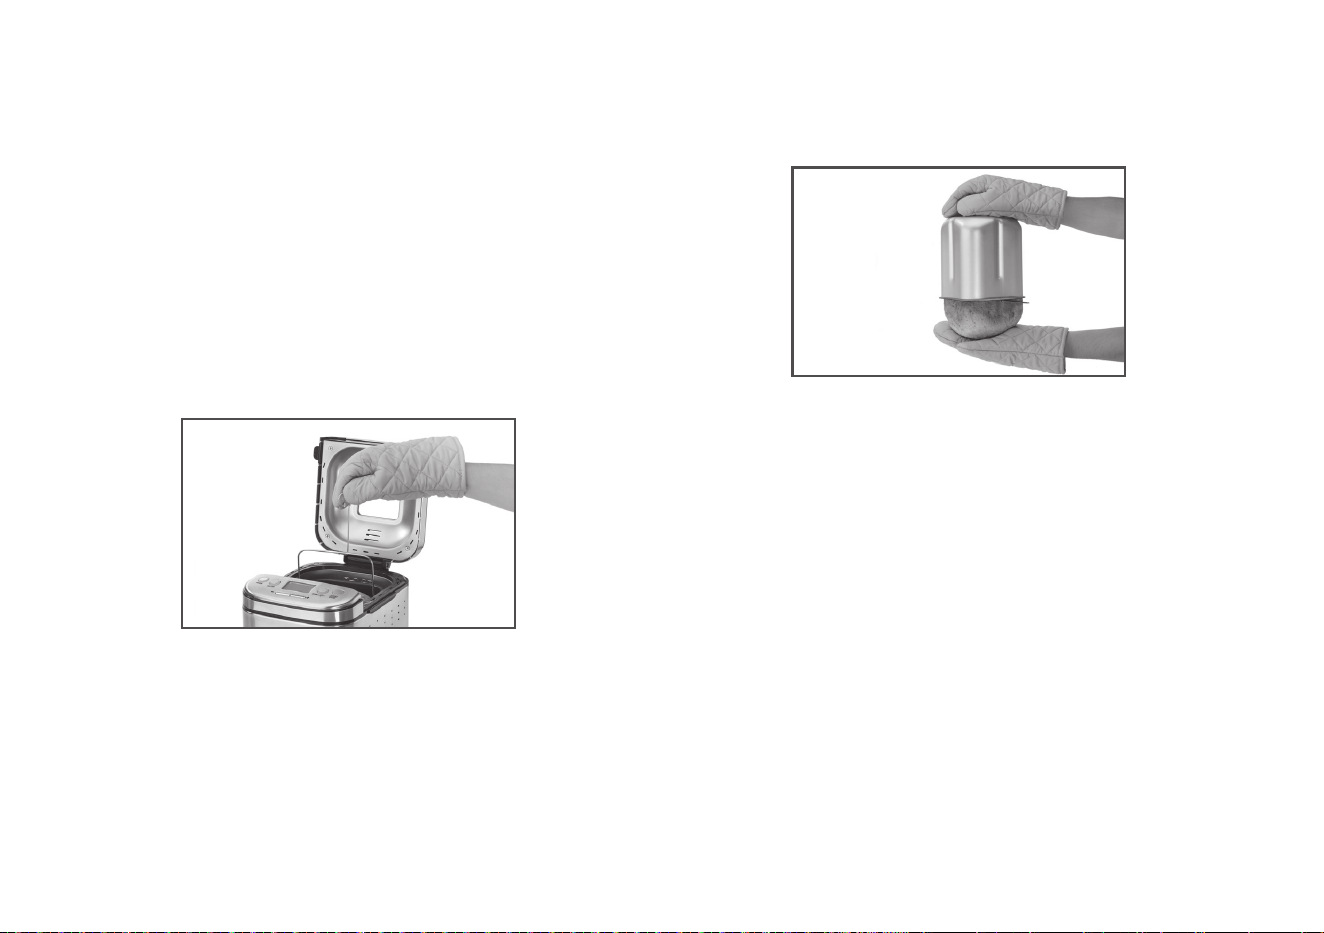
7
Después de la fabricación del pan
Al final del ciclo de horneado, la unidad emitirá una serie de 10 pitidos para
indicar que el ciclo de horneado ha terminado. La pantalla mostrará “00:00”
y la unidad ingresará al modo “mantener caliente”. La máquina mantendrá
el pan caliente por hasta 60 minutos para evitar que se ponga blando. Al
final del ciclo “mantener caliente”, la unidad emitirá un pitido largo. Para
resultados óptimos, le recomendamos que saque el pan tan pronto se haya
completado el ciclo de horneado, y que lo deje enfriar sobre una rejilla.
Si desea sacar el pan de la máquina antes del final del ciclo “mantener
caliente”, presione el botón START/STOP para apagar la unidad.
Para sacar el pan del molde:
a. Abra la tapa y, usando guantes para el horno y el gancho, alce el asa del
molde. Gire el molde en sentido antihorario para sacarlo.
b. Aún con los guantes puestos, sostenga el molde por la parte inferior,
mueva el asa a un lado y agite el molde para soltar el pan.
c. Para mejores resultados, permita que el pan se enfríe sobre una rejilla por
20 a 30 minutos antes de cortarlo.
NOTA: si no ha sacado la paleta amasadora antes del horneado, cerciórese
de hacerlo después del ciclo de horneado. El gancho le ayudará a sacar la
paleta del pan cocido. Introduzca el gancho en el pan de manera que quede
asentada en la parte superior de la paleta y jale suavemente. Precaución: la
paleta amasadora estará extremadamente caliente.
MEMORIA EN CASO DE INTERRUPCIÓN DEL
SUMINISTRO ELÉCTRICO
Esta unidad cuenta con un sistema de respaldo que guardará en memoria
el estado del ciclo de preparación en caso de interrupción del suministro
eléctrico, y continuará automáticamente el ciclo cuando regrese la corriente.
Este sistema de respaldo mantiene la memoria por hasta 15 minutos.

8
TIPOS DE PANES Y PROGRAMAS
1. WHITE (pan blanco) – El pan blanco usa principalmente harina común o harina
para hacer pan.
2. FRENCH (pan francés) – El pan francés requiere un tiempo y temperaturas
especiales para conseguir su maravillosa corteza crujiente. Puesto que no
contiene mucho azúcar y poca grasa, tiende a ser más claro.
3. WHOLE WHEAT (pan de trigo integral) – El pan integral (también conocido
como pan de grano entero) es un pan de levadura hecho con un 50% o más
de harina integral (en lugar de solo harina común o harina blanca para hacer
pan). Los panes integrales son más nutritivos, porque la harina proviene
de granos completos de trigo (es decir, granos que incluyen el salvado y
el germen). La harina integral produce un pan de color café claro a oscuro.
Los panes integrales tienen más sabor y son más saludables que los panes
hechos con harinas blancas refinadas (incluso cuando se agregan nutrientes a
las harinas blancas). Muchas veces, también son más densos que los panes
blancos.
4.
ULTRA-FAST (pan ultrarrápido) – Este programa solo debe usarse con recetas
que incluyen levadura de crecimiento rápido, o el pan no leudará ni se horneará
adecuadamente. Casi cualquier receta puede ser modificada, sustituyendo la
levadura estándar con una cantidad más grande de levadura de crecimiento
rápido. NOTA: este programa no puede usarse con recetas sin gluten.
5. SWEET (pan dulce) – Este programa está especialmente diseñado para hacer
panes con un alto contenido de azúcar, grasa y proteínas. Por lo general, estos
ingredientes añadidos hacen que el pan leude más y sea más dorado.
6. GLUTEN-FREE (pan sin gluten) – La mayoría de las harinas tradicionales
para hacer pan contienen gluten. Por lo tanto, los ingredientes de los panes
sin gluten son únicos. Si bien los panes sin gluten son “panes de levadura,” su
masa es por lo general más húmeda y se aparenta más a mezcla de pastel. Es
importante no mezclar o amasar demasiado las masas sin gluten. NOTA: véase
las páginas 15–17 para una lista de ingredientes sin gluten.
7. ARTISAN DOUGH (pan artesanal) – Este programa permite preparar panes
artesanales perfectos. Cuenta con varios ciclos de leudado lentos, largos
y menos calientes, para mejorar la textura, el sabor y la corteza del pan
horneado. Este programa SOLO es un programa de amasado y leudado. Para
hornear el pan, deberá elegir manualmente el programa de horneado (“BAKE”)
u hornear el pan un horno convencional.
8. DOUGH (masa) – La máquina para hacer pan ofrece dos opciones si desea
hornear el pan en un horno convencional. La primera opción consiste en usar
el programa “DOUGH” (masa). Este programa mezcla los ingredientes, amasa
la masa y lleva a cabo dos ciclos de leudado. Este método es adecuado para
la mayoría de las masas (excepto la masa sin gluten) y es ideal para la masa de
pizza. Si usa este método, deberá dar forma manualmente a la masa y dejarla
leudar 1 o 2 veces más fuera de la máquina. La segunda opción consiste
en elegir un programa para un tipo de pan específico y sacar la masa de la
máquina antes del último ciclo leudado, cuando escuche la señal que indica
que hay que sacar la paleta amasadora. De esta manera, la masa leudará dos
veces en la máquina. Este método es ideal para cualquier tipo de pan que
tenga una forma alterna, tal como hogazas redondas, pancitos/panecillos, pan
Jalá trenzado, etc. El último leudado ocurrirá fuera de la máquina para hacer
pan.
9. JAM (mermelada) – La máquina para hacer pan proporciona el ambiente
ideal para preparar mermeladas y compotas caseras. La paleta revuelve
automáticamente los ingredientes durante el proceso y la ubicación de la
resistencia evita que el contenido del molde se queme. Nota: el programa
empieza con una fase de calentamiento; empezará el amasado después
de unos 10 minutos. Incluimos algunas recetas en el libro de recetas. ¡Las
mermeladas/compotas acompañan deliciosamente el pan fresco!
10. PACKAGED MIX (mezcla preparada) – Este programa está especialmente
diseñado para hacer pan con mezclas preparadas para máquina para hacer
pan. Es perfecto para panes de 1½ libras (680g) y 2 libras (910 g).
11. CAKE (bizcocho) – Los bizcochos tienen una textura parecida a la de un
pastel. Por lo general, son horneados en forma de “muffin” o barra/bollo.
Su mezcla se parece a mezcla de pastel y leuda gracias a polvo de hornear,
bicarbonato de sodio y huevos. Los ingredientes adicionales deben ser
agregados al principio del ciclo, junto con los ingredientes básicos. Si, al
terminar el ciclo de horneado, el pan está un poco húmedo en la parte superior
(esto dependerá de los ingredientes usados), déjelo en la máquina por 10 a 15
minutos adicionales, en el ciclo “mantener caliente”; seguirá horneándose (esto
se llama el “post-horneado”).
12. BAKE (horneado) – Este programa activa la función de horneado solamente.
Es perfecta para hornear el pan durante unos minutos más, para conseguir
una corteza más oscura (esto requiere poco tiempo, así cuide el pan), o para
hornear masas compradas.

9
2. FRENCH (pan francés)
Tamaño: Tiempo
total:
Señal para añadir
ingredientes
Señal para sacar la paleta
Tiempo en
la pantalla
Tiempo
transcurrido
Tiempo en
la pantalla
Tiempo
transcurrido
1 lb 4:05 2:55 1 h 10 min 2:15 1 h 50 min
1½ lb 4:15 3:00 1 h 15 min 2:20 1 h 55 min
2 lb 4:20 3:05 1 h 15 min 2:25 1 h 55 min
3. WHOLE WHEAT (pan de trigo integral) I Color:
Tamaño: Tiempo
total:
Señal para anadir
ingredientes
Señal para sacar la paleta
Tiempo en
la pantalla
Tiempo
transcurrido
Tiempo en
la pantalla
Tiempo
transcurrido
1 lb 3:57 3:10 47 min 2:25 1 h 32 min
1½ lb 4:05 3:15 50 min 2:30 1 h 35 min
2 lb 4:10 3:20 50 min 2:35 1 h 35 min
1. WHITE (pan blanco) I Color:
Tamaño: Tiempo
total:
Señal para añadir
ingredientes
Señal para sacar la paleta
Tiempo en
la pantalla
Tiempo
transcurrido
Tiempo en
la pantalla
Tiempo
transcurrido
1 lb 3:18 2:40 38 min 2:05 1 h 13 min
1½ lb 3:25 2:45 40 min 2:10 1 h 15 min
2 lb 3:30 2:50 40 min 2:15 1 h 15 min
4. ULTRA-FAST (pan ultrarrápido) I Color:
Tamaño: Tiempo
total:
Señal para anadir
ingredientes
Señal para sacar la paleta
Tiempo en
la pantalla
Tiempo
transcurrido
Tiempo en
la pantalla
Tiempo
transcurrido
1 lb 1:53 1:40 13 min 1:35 18 min
1½ lb 2:03 1:50 13 min 1:45 18 min
OPCIONES DE PROGRAMACIÓN/TIEMPO
Para cada programa, dos tiempos están indicados para añadir ingredientes) y sacar la paleta: el “tiempo en la pantalla” es el tiempo indicado por el
temporizador de cuenta regresiva; el “tiempo transcurrido” es el tiempo transcurrido desde que empezó el programa de preparación (le deja saber cuándo
tiene que regresar.
NOTA: sacar la paleta es opcional (véase la página 6 para más detalles).

10
7. ARTISAN DOUGH (pan artesanal)
Tiempo total:
5:05
10. PACKAGED MIX (mezcla preparada)
Tiempo
total:
Señal para anadir ingredientes Señal para sacar la paleta
Tiempo en la
pantalla
Tiempo
transcurrido
Tiempo en la
pantalla
Tiempo
transcurrido
2:34 2:14 20 min 1:04 1 h 30 min
8. DOUGH (masa)
Tiempo total:
1:30
9. JAM (mermelada)
Tiempo total:
1:20
12. BAKE (horneado)
Tiempo total:
1:40
5. SWEET (pan dulce) I Color:
Tamaño: Tiempo
total:
Señal para anadir
ingredientes
Señal para sacar la paleta
Tiempo en
la pantalla
Tiempo
transcurrido
Tiempo en
la pantalla
Tiempo
transcurrido
1 lb 3:15 2:45 30 min 2:05 1 h 10 min
1½ lb 3:20 2:50 30 min 2:10 1 h 10 min
6. GLUTEN-FREE (pan sin gluten) I Color:
Tamaño: Tiempo
total:
Señal para anadir
ingredientes
Señal para sacar la paleta
Tiempo en
la pantalla
Tiempo
transcurrido
Tiempo en
la pantalla
Tiempo
transcurrido
1 lb 2:15 1:55 20 min 1:40 35 min
11. CAKE (bizcocho)
Tiempo total:
1:52

11
MEDICIÓN DE LOS INGREDIENTES
Importante: la regla MÁS importante para hacer pan es: medir
precisamente los ingredientes. Esta es la clave para conseguir pan
perfecto.
Para medir ingredientes líquidos, utilice solamente tazas/vasos para medir
líquidos, con el volumen claramente marcado en el costado. Después de
llenar la taza/el vaso, coloque esta/este sobre una superficie plana y mire el
contenido al nivel de la vista para asegurarse de que la cantidad es exacta.
La mayoría de las recetas requieren que los líquidos sean a temperatura
ambiente.
Para medir ingredientes secos, utilice preferiblemente una balanza. Si no
tiene balanza, utilice un vaso medidor para ingredientes secos: llene el vaso
con una cuchara y luego nivele el contenido con el filo de un cuchillo o una
espátula para asegurarse de que la cantidad es exacta. Nunca utilice el vaso
medidor para tomar los ingredientes directamente del envase (p. ej., harina);
al hacer esto, podría agregar una cucharada extra del ingrediente. No
apisone los ingredientes, salvo indicación contraria en la receta.
ADICIÓN DE LOS INGREDIENTES
AL MOLDE
Importante: la SEGUNDA regla MÁS importante para hacer pan es:
hay que agregar los ingredientes en la máquina en el orden EXACTO
indicado en la receta. En la mayoría de los casos, esto significa:
— PRIMERO, los ingredientes líquidos;
— SEGUNDO, los ingredientes secos;
— POR ÚLTIMO, la levadura, sin permitir que tenga contacto con los
ingredientes líquidos/frescos. Forme una abolladura en el centro de
los ingredientes secos, usando su dedo o una cuchara, y coloque la
levadura en ella. Nota: primero, asegúrese de que la levadura está fresca.
También cerciórese de que TODOS los ingredientes están a temperatura
ambiente, o sea entre 75°F (34°C) y 90°F (32°C), salvo indicación contraria
en la receta. Temperaturas muy frías/calientes pueden afectar el leudado y el
horneado. NOTA: no utilice agua tibia; esto afectará el leudado.
Finalmente, es imprescindible utilizar ingredientes frescos, especialmente
harina fresca y levadura fresca.
Véase la sección RESOLUCIÓN DE PROBLEMAS en la página 18 para más
información.
TABLA DE EQUIVALENCIA
(SISTEMA IMPERIAL)
1
1
⁄2 cucharaditas =
1
⁄2 cucharada 8 cucharaditas =
1
⁄2 taza
3 cucharaditas = 1 cucharada 12 cucharadas =
3
⁄4 de taza
1
⁄2 cucharada = 1
1
⁄2 cucharaditas 16 cucharadas = 1 taza
2 cucharadas =
1
⁄8 de taza
3
⁄8 de taza =
1
⁄4 de taza + 2 cucharadas
4 cucharadas =
1
⁄4 de taza
5
⁄8 de taza =
1
⁄2 taza + 2 cucharadas
5 cucharadas + 1 cucharadita =
1
⁄3 de taza
7
⁄8 de taza =
3
⁄4 de taza + 2 cucharadas
Levadura/Polvo de hornear/
Bicarbonato de sodio
Ingredientes secos
Agua o líquidos

12
LIMPIEZA Y MANTENIMIENTO
Precaución: desenchufe el aparato antes de limpiarlo. No coloque la
máquina en agua o en el lavavajillas. No utilice limpiadores químicos o
cepillo para restregar para limpiar la unidad; esto puede dañarla. Limpie la
carcasa con un limpiador suave no abrasivo.
Molde y paleta amasadora – Lave el molde y la paleta amasadora en agua
jabonosa tibia No utilice utensilios metálicos, ya que esto puede dañar el
revestimiento antiadherente.
Cámara de horneado – Quite las migajas con un paño ligeramente
humedecido o una brocha limpia. Tenga cuidado de NO doblar la resistencia
ubicada en la cámara de horneado.
Tapa – Limpie el interior de la tapa con una esponja o un paño ligeramente
humedecido. No sumerja la tapa en agua.
Carcasa – Limpie la parte externa de la carcasa con un limpiador suave no
abrasivo.
Panel de control – De ser necesario, limpie el panel de control con un
paño ligeramente humedecido. Tenga cuidado de no permitir que agua o
limpiadores penetren debajo de los botones.
Mantenimiento – Cualquier otro servicio debe ser realizado por un técnico
autorizado.
Siempre mantenga la máquina limpia.
Puede que el color del exterior del molde cambie con el tiempo; esto es
normal (está causado por el vapor y la húmeda) y no afectará el rendimiento
de la máquina, ni la calidad del pan.
Si no puede sacar la paleta amasadora del molde, vierta un poco de agua
jabonosa tibia en este y deje remojar por 10 a 15 minutos; esto aflojará la
paleta.
CONSEJOS Y SUGERENCIAS
Importante: si la receta incluye ingredientes frescos perecederos, tales
como productos lácteos, huevos, frutas o vegetales picados, no use la
opción de inicio diferido.
Algunos productos lácteos y huevos pueden ser sustituidos con ingredientes
secos tales como huevos en polvo, suero de leche en polvo, o leche en
polvo. Agregue el agua a la máquina primero, luego la harina, y por último
el sustituto seco, para mantenerlo separado del agua. Si sustituye todos los
ingredientes frescos perecederos de esta manera, puede usar la opción de
inicio diferido sin peligro.
Siempre agregue los ingredientes al molde en el orden siguiente: líquidos,
mantequilla derretida o suave, sal y azucares/edulcorantes (incluso miel,
melaza, jarabe de cebada), hierbas, harinas, leche en polvo, gluten de trigo
(si lo usa) y levadura. No permita que la levadura tenga contacto con los
ingredientes líquidos/frescos. Véase la página 11 para más información.
Utilice ingredientes de la mejor calidad para hacer pan en su máquina.
Engrase ligeramente la paleta amasadora con spray vegetal o aceite vegetal
para facilitar su retiro si no la saca antes del ciclo de horneado.
Raspe el interior del molde si hay ingredientes pegados en los lados.
Ajustes para hornear a altas altitudes – La harina es más seca a altas
altitudes y absorberá más líquido. Por lo tanto, deberá usar menos harina
que la cantidad indicada en la receta. Preste atención a la masa durante el
amasado. Si parece muy seca, agregue más líquido
Masas preparadas a altas altitudes suelen leudar más y más rápido.
Por lo tanto, utilice aproximadamente
1
/
3
menos levadura para ayudar a
contrarrestar este fenómeno.
También puede ayudar reducir la cantidad de azúcar (si corresponde).
Reduzca la cantidad de azúcar o edulcorante en aproximadamente un
cuarto.
Otro truco es agregar un poco más de sal, el cual retardará la acción de la
levadura y promoverá un leudado más lento y uniforme. Pero no agregue
más de ¼ de cucharada de sal adicional. Empiece con solamente uno de
estos cambios para determinar los mejores resultados.

13
Humedad
La temperatura y el nivel de humedad del aire pueden afectar la textura
de la masa y el resultado final. En un día húmedo, puede que necesite
añadir harina a la receta. Póngale atención a la masa durante el proceso de
amasado; si está pegajosa, agregue harina, una cucharadita a la vez. Por
otro lado, si está muy seca, puede agregar más líquido.
La masa debe estar suave y no colgar de los dedos. Si es necesario agregar
más harina o líquido, haga esto una cucharadita a la vez.
Mida todos los ingredientes con precisión y téngalos listos. Esta técnica,
conocida como “mise en place” asegura que los ingredientes están medidos
correctamente y evita llegar al final de la receta solo para darse cuenta que
no tiene el/los últimos(s) ingredientes(s).
Utilice utensilios de medición de volumen para medir los líquidos y utensilios
de medición de peso para medir los ingredientes secos. Revuelva la harina
antes de medir/pesarla. Si no tiene balanza, utilice un vaso medidor para
ingredientes secos: llene el vaso con una cuchara y luego nivele el contenido
con el filo de un cuchillo o una espátula para asegurarse de que la cantidad
es exacta. No apisone/compacte la harina.
La temperatura de los ingredientes es importante. La temperatura ideal
es entre 75°F (34°C) y 90°F (32°C). Utilice un termómetro instantáneo/
termómetro de cocina para averiguar la temperatura. Deje que los
ingredientes fríos se entibien a temperatura ambiente antes de usarlos.
Gluten de trigo puede ser agregado a cualquier receta para mejorar la altura,
la textura y la estructura del pan, especialmente si usa harina integral, harina
de avena o harina de centeno. También ayuda al leudado cuando utiliza el
programa “ULTRA-FAST” (pan ultrarrápido).
Es imprescindible mantener la levadura separada de la sal cuando usa la
opción de inicio diferido (“Delay Start”). Agregue la sal junto con los líquidos,
y la levadura de último, por encima de la harina.
Las nueces y semillas, pasas y frutas secas, quesos rallados, chispas de
chocolate y cualquier otro ingrediente extra deben agregarse cuando suene
la señal de la opción para añadir ingredientes, excepto cuando usa el
programa “CAKE” (bizcocho).
Para conseguir resultados más uniforme, saque la masa del molde
cuando escuche la señal para sacar la paleta amasadora, luego de
forma manualmente a la masa. Esto resultará en un pan más uniforme,
particularmente con las barras pequeñas de 1 libra (455 g) y 1
1
⁄2 libras
(680 g).
Utilice el programa “WHOLE WHEAT” (pan integral) para hornear no solo
panes hechos con harina integral, sino también panes hechos con otros
tipos de harina pesadas que requieren tiempos de amasado y leudado más
largos, p. ej., el pan de centeno.
Todos los panes son más fáciles de cortar cuando se les deja enfriar por
un mínimo de 30 minutos (preferiblemente más tiempo) antes de cortar. Si
desea servir pan caliente, envuélvalo en papel de aluminio y recaliéntelo al
horno.
Para preparar bizcochos y panes sin levadura, rocíe el fondo y las paredes
del molde con spray vegetal antes de agregar los ingredientes, para que se
le haga más fácil desmoldar el pan. Suelte el pan con una espátula plástica a
prueba de calor antes de desmoldarlo.
Si el asa está cubierta con pan cocido, permita que el pan se enfríe antes de
desmoldarlo.
Cantidades/Tamaños/Ingredientes
Utilice harina común para preparar pan blanco o cualquier receta que incluya
harina blanca de trigo. Para hacer panes con el programa “ARTISAN” (pan
artesanal), utilice harina panera/harina para hacer pan, la cual contiene más
proteína.
Por lo general, un pan de 1
1
⁄2 libras (680 g) lleva: 3 tazas (375 g) de harina,
1 a 1
1
⁄4 tazas (235 ml a 295 ml) de líquido, 1 a 1½ cucharaditas de sal, 1 a
2 cucharaditas de azúcar y 1½ a 2 cucharaditas de levadura. Utilice estas
proporciones como base y haga los ajustes partiendo de allí.
Por lo general, una receta que lleva 2 tazas (275 g) de harina produce una
barra de aproximadamente 1 libra (455 g); una receta que lleva 3 tazas
(410 g) de harina produce una barra de aproximadamente 1
1
⁄2 libras (680 g);
y una receta que lleva 4 tazas (550 g) de harina produce una barra de
aproximadamente 2 libras (910g). Algunas recetas incluirán más o menos

14
harina para cada tamaño de barra y, con las adiciones, pueden rendir barras
más pesadas de lo indicado.
Nunca coloque más de 4½
tazas (550 g) de harina en la máquina.
Si adapta una receta y sus medidas matemáticas son extrañas, como p. ej.,
“medio huevo”, utilice un huevo pequeño en lugar de medio huevo. Por lo
general, un huevo grande equivale a
1
⁄4 de taza de huevo.
Es importante medir los ingredientes de manera precisa. No omita
pequeñas cantidades, tales como
1
⁄8 de cucharadita; esto puede cambiar
significativamente el resultado final.
INGREDIENTES BÁSICOS
Para poder preparar panes rápida y fácilmente en su máquina para hacer
pan automática compacta Cuisinart
®
, le sugerimos mantener algunos
ingredientes básicos a mano. Dependiendo del tipo de pan que usted y su
familia prefieran, los siguientes artículos son aconsejables. Nota: no todos
los ingredientes enumerados están incluidos en las recetas, pero pueden ser
agregados para mejorar su sabor y textura.
Almacenaje de los ingredientes
Las harinas y algunos otros ingredientes para hacer pan tienden a ponerse
rancios y por eso deben guardarse apropiadamente. Es preferible comprar
pequeñas cantidades a la vez. Muchas harinas pueden conservarse a
temperatura ambiente, pero es preferible congelar (en bolsas/recipientes
herméticos) la harina de trigo integral y las harinas sin gluten. Siempre anote
la fecha en la bolsa o el recipiente. Muchas veces, el congelador puede dar
un sabor desagradable a los alimentos. Por lo tanto, cerciórese de que las
harinas están debidamente selladas.
Harinas blancas (común, para hacer pan o de repostería): estas harinas se
deben almacenar en un lugar oscuro y fresco. Pueden conservarse por hasta
un año, pero es preferible referirse a la fecha de vencimiento en la bolsa.
También las puede conservar en el congelador (por hasta un año también),
pero cerciórese de envolverlas bien para que no adquieran sabores u olores
desagradables.
Harina de trigo integral y la mayoría de las harinas sin gluten: guárdelas en
un lugar fresco y oscuro, por hasta 3 meses, o en el congelador por hasta 6
meses.
Harinas de nueces: estas harinas pueden conservarse en el refrigerador por
hasta 3 meses, o en el congelador por hasta 6 meses.
Féculas y gomas: más estables que las harinas, pueden conservarse en un
lugar fresco y oscuro por al menos un año.
Levadura: siempre guárdela en el refrigerador y averigüe la fecha de
vencimiento antes de usarla.
Harina común – La harina común, también conocida como “harina todo
uso” o “harina multiusos”, puede ser blanqueada o no (preferimos la
segunda) Por lo general, la harina común sirve para hacer panes de levadura
y bizcochos/panes rápidos.
Polvo de hornear – El polvo de hornear es una mezcla de bicarbonato de
sodio y ácido. Por lo tanto, este agente leudante puede usarse en productos
de panadería que no contienen ácido. Cerciórese de leer la etiqueta, ya
que algunos polvos para hornear contienen féculas/almidones para ayudar
a mantener el polvo seco, lo que puede afectar a las personas alérgicas al
gluten.
Bicarbonato de sodio – El bicarbonato de sodio es un agente leudante
químico que requiere un ingrediente ácido para activarse. Ejemplos de
ingredientes ácidos incluyen el azúcar moreno, el suero de leche, el yogur,
etc. El bicarbonato no solo ayuda a que el producto de panadería leude, sino
también a que se dore.
Harina para hacer pan – La harina para hacer pan, también conocida como
“harina panadera”, es una harina no blanqueada con alto contenido de
proteínas y gluten Es la mejor harina para hacer panes artesanales. Puede
usarse en vez de harina común, y darán más volumen a los panes.
Harina de repostería – La harina de repostería, también conocida como
“harina pastelera”, es una harina muy suave y baja en proteínas. No utilice
harina de repostería para hacer panes de levadura, a menos que la receta
lo especifique. Por lo general, la harina de repostería se emplea para hacer
pasteles/bizcochos y hojaldres suaves.

15
Huevos – Los huevos mejoran el sabor, la textura y el color del pan. Actúan
como emulsionantes, ayudando a mantener los panes frescos y húmedos.
También trabajan como agentes leudantes, ayudando a dar volumen al pan.
Nunca utilice la opción de inicio diferido (“Delay Start”) con huevos frescos;
solamente con sustituto de huevo/huevo en polvo o clara en polvo (y añada
estos con la harina). Algunas recetas que usan el programa DOUGH (masa)
incluyen un barniz de huevo (huevo batido con agua o leche) que se cepilla
en la masa antes del horneado para dar más color al producto final. Todas
nuestras recetas usan huevos grandes.
Grasa (todos tipos) – Agrega sabor, nutrición y textura a los panes. Puede
ser agregada a casi cualquier receta de pan, siempre que su sabor combine
con el sabor del pan.
Leche descremada en polvo – Agréguela al mismo tiempo que la harina.
Usar leche en polvo en vez de leche regular permite usar la opción de inicio
diferido (“Delay Start”) sin miedo que la leche se corte. La leche en polvo
también puede ser agregada a la receta (junto con leche fresca/productos
lácteos) para mejorar el valor nutritivo del pan.
Nueces, semillas, pasas, etc. – Estos ingredientes agregan sabor, nutrición
y textura a los panes. Puede ser agregada a casi cualquier receta de pan,
siempre que su sabor combine con el sabor del pan.
Suero de leche en polvo – El suero de leche en polvo es una esencia
de suero de leche que no contiene los sólidos de la leche. Actúa como
conservante y retarda el crecimiento de bacterias y moho.
Sal – La sal es un componente esencial del pan de levadura. No solo realza
el sabor, sino también controla la levadura y ayuda al leudado de la masa.
Usamos sal kosher en todas nuestras recetas.
Edulcorantes – Los edulcorantes (azúcar granulado, azúcar moreno, miel de
abeja, melaza, jarabe de arce, jarabe de malta de cebada, jarabe de azúcar,
etc.) estimulan el crecimiento y el desarrollo de la levadura.
Gluten de trigo – El gluten de trigo es una harina con alto contenido
proteico, hecha con trigo duro y tratada para quitar la mayoría del almidón.
El gluten de trigo es utilizado como aditivo en los panes de levadura, para
mejorar las masas hechas con harina de centeno y otras harinas bajas
en gluten. Cuando se usa para hacer panes ultrarrápidos, logra un mejor
leudado en menos tiempo.
Harina de trigo integral – Contiene germen de trigo, dándole más fibra,
contenido nutricional y contenido graso al producto final. Antiguamente, los
panes integrales eran densos y pesados. Hoy en día, los panes hechos total
o parcialmente con harina integral son los más nutritivos y pueden tener
una textura suave y atractiva. Compre harina de trigo integral de buena
calidad y consérvela en el refrigerador o en congelador para mantenerle
fresca. A menos que use la opción de inicio diferido (“Delay Start”), llévela a
temperatura ambiente antes de usarla.
Levadura – Le aconsejamos que use levadura seca activa, levadura
instantánea o levadura para máquina de pan en la mayoría de las recetas
de pan de levadura. La levadura instantánea es ligeramente más fina y
crece a temperaturas más bajas, lo que resulta en menos células “muertas”
(inactivas). Da excelentes resultados en la máquina para hacer pan. La
levadura rápida (o levadura de crecimiento rápido) es ideal para los ciclos
cortos (p. ej., para los panes rápidos/de último minuto) porque reduce la
duración del leudado; agregar gluten de trigo a la masa ayudará a que leude.
INGREDIENTES SIN GLUTEN
Hornear pan sin gluten es una ciencia aún más exacta que hornear
pan regular, y tiene sus propias reglas. Para hacer pan sin gluten, es
imprescindible usar harinas e ingredientes especiales que resultarán en un
pan estable que se puede rebanar y tostar. Nuestras recetas incluyen un
buen balance de proteína, grasa y fécula para producir deliciosos resultados.
Los ingredientes a continuación pueden encontrarse en las secciones
“productos de panadería” o “productos sin gluten” de su supermercado
local, o en las tiendas de productos naturales. También los puede encontrar
en línea. Algunas marcas comerciales también ofrecen mezclas de harina sin
gluten todo uso que producen excelentes resultados.
Harina de almendra – La harina de almendra añade un montón de proteína
al pan, pero es preferible usarla para hacer bizcochos salados y dulces más
que panes de levadura. Puede sustituirla con almendra en polvo/molida,
siempre que sea muy finamente molida.

16
Polvo de hornear – El polvo de hornear es una mezcla de bicarbonato de
sodio y ácido. Por lo tanto, este agente leudante puede usarse en productos
de panadería que no contienen ácido. Cerciórese de leer la etiqueta, ya
que algunos polvos para hornear contienen féculas/almidones para ayudar
a mantener el polvo seco, lo que puede afectar a las personas alérgicas al
gluten.
Bicarbonato de sodio – El bicarbonato de sodio es un agente leudante
químico que requiere un ingrediente ácido para activarse. Ejemplos de
ingredientes ácidos incluyen el azúcar moreno, el suero de leche, el yogur,
etc. El bicarbonato no solo ayuda a que el producto de panadería leude, sino
también a que se dore.
Harina de trigo sarraceno – El trigo sarraceno no es trigo, sino alforfón. La
harina de trigo sarraceno tiene un alto contenido proteico y un agradable
sabor a nuez. No es necesario mezclarla con otras harinas para producir
productos de panadería con una buena estructura.
Maicena – La maicena, o harina/almidón de maíz, es una buena opción para
agregar estructura y estabilidad a los panes sin gluten. Pero cerciórese de
no añadir demasiado, o el producto final tendrá una textura muy harinosa y
un sabor desagradable.
Linaza molida – La linaza molida (semillas de linaza molidas) es aún más
nutritiva que las semillas de linaza enteras y actúa como aglutinante para
ligar los ingredientes y producir una estructura estable.
Harina de garbanzo – La harina de garbanzo tiene un alto contenido
proteico y da un sabor rico y dulce a los productos horneados. El sabor
puede parecerle muy fuerte a algunas personas; por lo tanto, es preferible
usarla para panes más salados.
Goma guar – La goma guar, similar e intercambiable con la goma xantana,
es otro agente espesante que ayuda con la estructura del pan. Debe usarse
con moderación, porque da a los productos horneados un sabor más
harinoso que otras gomas o agentes espesantes.
Harina sin gluten – Hoy en día, hay muchas harinas sin gluten, y todas dan
buenos resultados. Nos parece que el sabor de las harinas sin gluten con un
porcentaje más alto de harina de arroz suele ser más neutro.
Leche descremada en polvo – La leche descremada en polvo actúa como
emulsionante, ligando las harinas sin gluten con las grasas, para dar más
estructura a los productos horneados sin gluten. Las proteínas de leche
ayudan a que el producto final sea más dorado.
Cáscara de “psyllium” en polvo – La cáscara de “psyllium” (psilio) en polvo
está llena de fibra y actúa de manera simular a una goma. Nos parece la
mejor manera de agregar estructura y ligar ingredientes en las recetas sin
gluten.
Harina de avena – La harina de avena tiene un contenido proteico muy
alto. Es cara, pero puede hacer su propia harina de avena moliendo copos
de avena en una procesadora de alimentos o una moledora de especias
hasta que esté finamente molida. Esta harina da un ligero sabor a nuez a los
panes.
Almidón de papa – El almidón de papa, o fécula de papa, es otra opción
para dar estructura a los panes sin gluten. Un buen agente suavizante, es
mejor para las masas más húmedas.
Harina de arroz integral – La harina de arroz integral se obtiene moliendo
arroz integral (arroz con salvado). Es alta en fibra y tiene un sabor a nuez
un poco más fuerte que la harina de arroz blanco. Procure comprar harina
molida muy fina (debe tener una textura suave y arenosa) Esta harina es alta
en proteína (contiene un 7.5%) y por lo tanto, es una buena base para los
productos horneados sin gluten.
Harina de arroz blanco – Hecha de arroz blanco pulido y molido, la harina
de arroz blanco también es considerada como una harina muy versátil para
productos sin gluten porque tiene un sabor suave indetectable. Tiene un
poco menos proteína que la harina de arroz integral (contiene un 5%), pero
se mezcla bien con otras harinas.
Harina de arroz glutinoso – La harina de arroz glutinoso (conocida como
“sweet white rice flour” en inglés, o harina de arroz blanco dulce), contiene
más almidón que la harina de arroz blanco y es un mejor aglutinante que la
harina de arroz blanco o la harina de arroz integral. Se requiere solamente
una pequeña cantidad y es perfecta para hacer su propia harina sin gluten.

17
Harina de sorgo – Esta harina alta en proteína y fibra es un buen sustituto
de la harina de avena. Para obtener resultados óptimos, compre harina de
sorgo blanco “dulce”.
Harina de tef – Muy alta en proteína, la harina de tef (o teff) es una excelente
adición a los panes sin gluten.
Tiene un sabor orgánico similar al de la harina de trigo integral.
Almidón de tapioca – El almidón (o fécula) de tapioca es un excelente
aglutinante para los panes sin gluten, que da una buena estructura a los
productos finales. Procure no usar mucho, o el pan resultará demasiado
elástico.
Goma xantana – La goma xantana (o xantano), similar e intercambiable con
la goma guar, es un agente espesante que ayuda a estabilizar los panes sin
gluten. Se requiere solamente una pequeña cantidad para ver los efectos.
Levadura – Esencial para la mayoría de los panes, la levadura es lo que
“da vida” al pan. Hay muchos tipos de levadura. En la mayoría de nuestras
recetas, usamos levadura seca activa, pero cuando usa el programa ULTRA-
FAST (pan ultrarrápido), es necesario usar levadura rápida (o levadura de
crecimiento rápido). Siempre guarde la levadura en el refrigerador y averigüe
la fecha de vencimiento antes de usarla.

18
Pregunta Respuesta
¿Por qué mi masa/pan
no leudó?
Algunos factores pueden influir en que la masa no leude correctamente. Cerciórese de que la levadura está fresca y de que los ingredientes están a temperatura ambiente
(desde 75ºF/24°C hasta 90°F/32°C). Si los líquidos están demasiado calientes o fríos, no activarán la levadura propiamente. Cerciórese de añadir los ingredientes en el
orden correcto. La sal debe encontrarse lo más lejos posible de la levadura. Tenga presente que algunos panes no leudan tanto como otros. Por ejemplo, los panes de
trigo integral y de granos enteros tienden a leudar menos que los panes blancos. Los panes que contienen más azúcar/edulcorantes o huevos leudan más que los
demás panes.
¿Porque la parte
superior de mi pan está
hundida/desigual?
El nivel de humedad en el aire y la temperatura ambiente afectan grandemente los panes de levadura. Mantenga la máquina para hacer pan lejos de la luz directa del sol.
Si la humedad es muy alta, agregue una cucharada adicional de harina por cada taza (125 g) de harina en la receta.
¿Por qué mi pan tiene
una textura gomosa/
medio cocida?
Puede que la masa haya sido demasiado húmeda, o que posiblemente no haya añadido suficiente harina blanca (necesaria para el desarrollo del gluten). Agregue un poco más
de harina (1 cucharada por cada taza/125 g de harina) o reduzca la cantidad de harinas de trigo integral/granos enteros y sustitúyalas con harina blanca.
¿Por qué el interior del
pan de levadura tiene
una cantidad excesiva
de “burbujas”?
Esto puede ocurrir cuando el pan está demasiado húmedo o cuando se usa demasiada levadura. Averigüe la receta y, de ser necesario, agregue una pequeña cantidad de
harina o reduzca la cantidad de levadura.
¿Por qué mi pan de
levadura está denso y
pesado?
Esto puede deberse a varios factores. Puede que la masa haya sido demasiada seca, debido a una falta de líquido o porque se usó materia grasa con menos grasa de lo
indicado en la receta. También puede que no haya usado suficiente levadura. Si esto pasa con panes de trigo integral/granos enteros, intente añadir gluten de trigo para
mejorar la estructura del producto final.
¿Por qué las esquinas
del pan están llenas de
harina/no mezcladas
uniformemente?
Esto puede pasar, especialmente cuando usa el programa CAKE (bizcocho) o GLUTEN FREE (pan sin gluten) para hornear panes cuya consistencia es más parecida a una
mezcla que a una masa. Revise la masa después de aproximadamente 10 minutos de amasado, pausando el ciclo de preparación para raspar el molde si es necesario.
Engrasar ligeramente el molde con spray vegetal también ayudará a evitar que esto ocurra.
¿Cómo se saca la
paleta amasadora de la
barra de pan?
Hay dos opciones: con la mayoría de los programas, puede sacar la paleta después de la señal que indica que lo puede hacer (antes del leudado final). Si esto no es una
opción, o no pudo hacerlo en este momento, permita que el pan se enfríe y saque cuidadosamente la paleta, usando el gancho provisto.
¿Por qué la unidad
emite humo o un olor a
quemado?
Lo más probable, es que ingredientes que se cayeron en el fondo de la máquina o en las resistencias. Si el humeado/olor a quemado es excesivo, desenchufe la máquina,
permita que se enfríe, y luego limpie el interior de la unidad. Vuelva a enchufar la unidad y continúe el programa. Nota: la máquina guardará el programa en la memoria por
un máximo de 15 minutos. En la mayoría de los casos, el humo/olor serán mínimos y se disiparán rápido.
¿Qué significan los
códigos de error?
“HHH” (junto con pitidos) significa que la temperatura interna de la máquina está demasiado alta. Por lo general, esto ocurre cuando intenta hacer dos panes, uno tras
otro. Abra la tapa y permita que la unidad se enfríe por 10 a 20 minutos. “LLL” (junto con pitidos) significa que la temperatura interna de la máquina está demasiado baja
para hacer pan. Presione el botón START/STOP para parar el pitido. “EEO” (junto con pitidos) significa que la máquina tiene un problema. Desenchúfela y comuníquese
con el centro de servicio más cercano.
RESOLUCIÓN DE PROBLEMAS

19
GARANTÍA
GARANTÍA LIMITADA DE TRES AÑOS
Esta garantía es para los consumidores solamente. Usted es un consumidor
si posee un aparato Cuisinart
®
que fue comprado en una tienda para uso
personal, familiar o casero. A excepción de los estados donde la ley lo
permita, esta garantía no es para los detallistas, los demás comerciantes
ni los dueños. Cuisinart garantiza este aparato contra todo defecto de
materiales o fabricación durante 3 años después de la fecha de compra
original, siempre que el aparato haya sido utilizado para uso doméstico y
según las instrucciones.
Le aconsejamos que llene el formulario de registro disponible en www.
cuisinart.com a fin de facilitar la verificación de la fecha de compra original.
Sin embargo, no es necesario registrar el producto para recibir servicio bajo
esta garantía. En ausencia del recibo de compra, el período de garantía será
calculado a partir de la fecha de fabricación.
RESIDENTES DE CALIFORNIA SOLAMENTE
La ley del estado de California ofrece dos opciones bajo el período de
garantía. Los residentes del estado de California pueden (A) regresar el
producto defectuoso a la tienda donde lo compraron o (B) a otra tienda que
venda productos Cuisinart
®
de este tipo. La tienda, a su opción, reparará
el producto, referirá al consumidor a un centro de servicio independiente,
cambiará el producto o reembolsará al consumidor el precio original del
producto, menos la cantidad imputable al uso del producto por el consumidor
hasta que este se dañe. Si estas dos opciones no satisfacen al consumidor,
podrá llevar el aparato a un centro de servicio independiente, siempre que
se pueda ajustar o reparar el aparato de manera económica. Cuisinart será
responsable por los gastos de servicio, reparación, reemplazo o reembolso
de los productos defectuosos durante el período de garantía. Los residentes
de California también pueden, si lo desean, mandar el aparato defectuoso
directamente a Cuisinart para que lo reparen o lo cambien. Para esto, se
debe llamar a nuestro servicio posventa al 800-726-0190. Cuisinart será
responsable por los gastos de reparación, reemplazo, manejo y envío de los
productos defectuosos durante el período de garantía.
ANTES DE HACER REPARAR SU APARATO
Si este aparato presentara algún defecto de materiales o fabricación durante
el período de garantía, la reparemos o reemplazaremos (a nuestra opción).
Para obtener servicio bajo esta garantía, llame a nuestra línea directa gratuita
al 1-800-726-0190 o regrese el aparato defectuoso a: Cuisinart, 7475 North
Glen Harbor Blvd. Glendale, AZ 85307. Regrese el producto defectuoso, junto
con su recibo de compra y un cheque o giro postal de US$10.00 para cubrir
los gastos de manejo y envío. Los residentes de California solo necesitan
dar una prueba de compra y deben llamar al 1-800-726-0190 para recibir
instrucciones de envío. Recuerde incluir su nombre, dirección y teléfono, la
descripción del problema, así como cualquier información pertinente. Por
favor incluya un cheque o giro postal a nombre de Cuisinart. NOTA: para
mayor seguridad, le aconsejamos que mande su paquete por un método
de entrega con seguro y seguimiento. Cuisinart no será responsable por los
daños ocurridos durante el transporte o por los paquetes mandados a una
dirección equivocada. Los productos perdidos o dañados durante el envío no
serán cubiertos bajo esta garantía.
Este aparato satisface las más altas exigencias de fabricación y ha sido diseñado
para uso sobre corriente de 120 V, usando accesorios y piezas de repuesto
autorizados solamente. Esta garantía excluye expresamente los daños causados
por accesorios, piezas o reparaciones no autorizados por Cuisinart, así como
los daños causados por el uso de un convertidor de voltaje. Esta garantía no
cubre el uso institucional o comercial del producto, y no es válida en caso de
daños causados por mal uso, negligencia o accidente. Esta garantía excluye
expresamente todos los daños incidentales o consecuentes. Algunos Estados
no permiten la exclusión o limitación de daños incidentales o consecuentes,
de modo que las limitaciones mencionadas pueden no regir para usted. Esta
garantía le otorga derechos específicos y usted puede tener otros derechos que
varían de un Estado a otro.
Importante: si debe llevar el producto defectuoso a un centro de servicio
no autorizado, por favor informe al personal del centro de servicio que
deberían llamar al servicio posventa de Cuisinart al 1-800-726-0190 a fin
de diagnosticar el problema correctamente, usar las piezas correctas para
repararlo y asegurarse de que el producto esté bajo garantía.
© 2024 Cuisinart
Glendale, AZ 85307
Impreso en China
24CE090783
IB-14957-ESP

20
¡Prepárese para disfrutar de pan casero caliente y fresco cuando lo desee!
Su nueva máquina para hacer pan automática compacta Cuisinart
®
hace que sea fácil hacer pan casero. Preparará
y horneará automáticamente sabrosos panes a partir de ingredientes crudos, o preparará suficiente masa para hacer
panes artesanales o especiales en su horno tradicional. Incluso permite programar la hora a la cual el pan estará listo,
hasta 13 horas por adelantado. Simplemente decida cuál de nuestras fabulosas recetas probar o utilice una de sus
recetas familiares favoritas. Luego, simplemente agregue los ingredientes y seleccione el programa, el grado de dorado
de la corteza y el tamaño de la barra de pan deseados. ¡La máquina se encargará del resto! Hemos incluido una
variedad de recetas de pan, masas sin gluten y mermeladas.

21
Índice
Programa WHITE (pan blanco):
Pan blanco básico ......................................... 22
Pan de avena ............................................. 23
Pan de canela ............................................ 24
Pan de centeno ........................................... 26
Pan de queso Cheddar con jalapeño........................... 27
Programa FRENCH (pan francés):
Hogaza de pan francés ..................................... 29
Pan italiano rústico......................................... 30
“Pain de campagne” (pan de campaña francés) con aceitunas y romero.. 31
Pan francés de queso Parmesano y pimienta ................... 32
Pan de sémola con semillas de hinojo y pasas doradas............ 33
Programa WHOLE WHEAT (pan de trigo integral):
Pan de trigo integral básico ................................. 35
Pan multigrano con cereales ................................. 36
Pan de trigo integral con nueces y semillas ..................... 37
Pan de salvado de trigo .....................................38
Programa SWEET (pan dulce):
Pan Jalá ................................................. 39
“Brioche”................................................. 40
“Panettone”............................................... 41
Pan de chocolate con cerezas ............................... 43
“Babka” (baba) ............................................ 45
Programa GLUTEN FREE (sin gluten):
Pan para sándwiches ...................................... 47
Pan multigrano .............................................48
Pan de canela .............................................49
Masa de pizza .............................................51
Programa ARTISAN DOUGH (pan artesanal):
Barra o “boule” de pan de masa fermentada..................... 53
Masa madre .............................................. 54
Ciabatta ................................................. 55
Programa DOUGH (masa):
“Baguettes” francesas ...................................... 56
Palitos de pan de queso Cheddar ............................. 57
Masa de pizza ............................................ 58
Focaccia de hierbas ....................................... 59
“Pretzels” ................................................ 60
Pancitos de trigo integral con aceitunas negras ...................61
Nudos de pan al ajo, hierbas y queso .......................... 62
Pancitos de canela......................................... 63
Masa dulce básica ..........................................65
Trenza danesa rellena con queso crema y mermelada de frambuesa ...66
Programa JAM (mermelada):
Mermelada de fresa y ruibarbo ............................... 68
Dulce de pera y jengibre .................................... 69
Mermelada de arándanos azules y lima ........................ 70
Mermelada de frutas del bosque ............................. 71
Programa CAKE (bizcochos):
Pan de banana y nueces ................................... 72
Bizcocho de chocolate con crema agria .........................73
Bizcocho de calabacín/calabacita ..............................74
RECETAS EXTRA:
Pan rallado .............................................. 75
Picatostes................................................ 75
Tostadas francesas de pan Jalá .............................. 76
Budín de “Brioche” con mermelada de frutas del bosque .......... 77
Pizza Margarita ............................................78

22
Pan blanco básico
Programa: WHITE (pan blanco)
Opción de inicio diferido: sí
Ingredientes Pan de 2 libras (910 g) Pan de 1½ libras (680 g) Pan de 1 libra (455 g)
Agua, a temperatura ambiente 1
1
⁄2 tazas (235 ml) 1 taza + 2 cucharadas (265 ml)
3
⁄4 de taza (175 ml)
Mantequilla sin sal, a temperatura ambiente, 3 cucharadas (45 g) 2 cucharadas 1
1
⁄2 cucharadas (25 g)
en pedacitos de
1
⁄2pulgada (1.5 cm) + 1 cucharadita (35 g)
Azúcar granulada 1 cucharada (15 g) 2 cucharadas (10 g) 1
1
⁄2 cucharaditas (5 g)
Sal kosher 1
1
⁄2 cucharaditas 1¼ cucharaditas
3
⁄4 de cucharadita
Harina común 4 tazas (500 g) 3 tazas (375 g) 2 tazas (250 g)
Leche descremada en polvo
1
⁄4 de taza (15 g) 3 cucharadas (15 g) 2 cucharadas (10 g)
Levadura seca activa, instantánea o para 1
1
⁄2 cucharaditas 1 cucharadita
máquina para hacer pan
1. Colocar todos los ingredientes en el molde (con la paleta amasadora puesta), en el orden indicado. Colocar el molde en la máquina para hacer pan
Cuisinart
®
.
2. Presionar el botón PROG y elegir el programa “WHITE” (pan blanco). Presionar el botón COLOR y elegir el grado de dorado deseado. Presionar el
botón SIZE y elegir el tamaño de barra deseado. Presionar el botón START/STOP para iniciar el ciclo de preparación.
3. Si desea, cuando escuche la señal que indica que es tiempo de sacar la paleta amasadora, presionar el botón START/STOP, sacar la masa y la paleta
amasadora, dar forma a la masa y volver a colocarla en el molde.
Presionar el botón START/STOP para continuar.
4. Al final del ciclo, sacar el pan de la máquina, colocarlo en una rejilla y permitir que se enfríe por completo antes de rebanarlo.
Información nutricional por rebanada de 2 onzas (55 g):
Calorías 96 (15 % de grasa) • Carbohidratos 18 g • Proteínas 3 g • Grasa 2 g • Grasa saturada 1 g • Colesterol 5 mg • Sodio 189 mg • Calcio 10 mg • Fibra 0 g
Para preparar este pan con el programa ULTRA-FAST (pan ultrarrápido)
(panes de 1 libra/455 g) y 1½ libras/680 g solamente) Preparar los ingredientes para pan de 1 libra (455 g) o 1½ libras (680 g). Sustituir la levadura con 1¾
cucharadita de levadura rápida (para pan de 1 libra/455 g) o 2½ cucharaditas de levadura rápida (para el pan de 1½ libras/680 g). Colocar el molde en la unidad
y elegir el programa ULTRA-FAST (pan ultrarrápido). Presionar el botón START/STOP para iniciar el ciclo de preparación y seguir el paso 3 en
la receta más arriba.

23
Pan de avena
Programa: WHITE (pan blanco)
Opción de inicio diferido: sí
Ingredientes Pan de 2 libras (910 g) Pan de 1½ libras (680 g) Pan de 1 libra (455 g)
Leche entera, a temperatura ambiente 1¼ tazas (295 ml) 1 taza (235 ml) ¾ de taza (175 ml)
Mantequilla sin sal, a temperatura ambiente, 2½ cucharadas (35 g) 2 cucharadas (30 g) 1½ cucharadas (25 g)
en pedacitos de
1
⁄2 pulgada (1.5 cm)
Jarabe de arce/maple* (o miel) 2 cucharadas 1½ cucharadas 1 cucharada
Sal kosher 1¼ cucharaditas 1 cucharadita ¾ de cucharadita
Harina común 3¾ tazas (470 g) 3 tazas (375 g) 2¼ tazas (280 g)
Copos de avena* (no utilice avena instantánea) 1 taza (80 g) ¾ de taza (60 g) ½ taza (40 g)
Levadura seca activa, instantánea o para 2¼ cucharaditas 2 cucharaditas 1¾ cucharaditas
máquina para hacer pan
*Si desea que el pan sea más dulce, agregar a la masa ½ cucharada de jarabe de arce/maple, sustituir la avena con su muesli/granola favorito y agregar
½ cucharadita de canela en polvo.
1. Colocar todos los ingredientes en el molde (con la paleta amasadora puesta), en el orden indicado. Colocar el molde en la máquina para hacer pan Cuisinart
®
.
2. Presionar el botón PROG y elegir el programa “WHITE” (pan blanco). Presionar el botón COLOR y elegir el grado de dorado deseado. Presionar el
botón SIZE y elegir el tamaño de barra deseado. Presionar el botón START/STOP para iniciar el ciclo de preparación.
3. Si desea, cuando escuche la señal que indica que es tiempo de sacar la paleta amasadora, presionar el botón START/STOP, sacar la masa y la paleta
amasadora, dar forma a la masa y volver a colocarla en el molde. Presionar el botón START/STOP para continuar.
4. Al final del ciclo, sacar el pan de la máquina, colocarlo en una rejilla y permitir que se enfríe por completo antes de rebanarlo.
Información nutricional por rebanada de 2 onzas (55 g):
Calorías 117 (17 % de grasa) • Carbohidratos 21 g • Proteínas 3 g • Grasa 2 g • Grasa saturada 1 g • Colesterol 6 mg • Sodio 134 mg • Calcio 21 mg
Fibra 1 g
Para preparar este pan con el programa ULTRA-FAST (pan ultrarrápido) (panes de 1 libra/455 g)
y 1½ libras/680 g solamente)
Preparar los ingredientes para pan de 1 libra (455 g) o 1½ libras (680 g). Sustituir la levadura con 1¾ cucharadita de levadura
rápida (para pan de 1 libra/455 g) o 2½ cucharaditas de levadura rápida (para el pan de 1½ libras/680 g). Colocar el molde en la unidad y elegir el programa
ULTRA-FAST (pan ultrarrápido). Presionar el botón START/STOP para iniciar el ciclo de preparación y seguir el paso 3 en la receta más arriba.

24
Pan de canela
Programa: WHITE (pan blanco)
Opción de inicio diferido: sí
Ingredientes Pan de 2 libras (910 g) Pan de 1½ libras (680 g) Pan de 1 libra (455 g)
MASA:
Leche entera, a temperatura ambiente 1¼ tazas (295 ml) 1 taza (235 ml) ¾ de taza (175 ml)
Mantequilla sin sal, a temperatura ambiente, 2½ cucharadas (35 g) 2 cucharadas (30 g) 1½ cucharadas (25 g)
en pedacitos de ½ pulgada (1.5 cm)
Huevo grande, a temperatura ambiente 1 1 1
Sal kosher 1 cucharadita 1 cucharadita ½ cucharadita
Azúcar granulada 1½ cucharadas 1 cucharada 1 cucharada
Harina común 4 tazas (500 g) 3½ tazas (435 g) 2½ tazas (310 g)
Levadura seca activa, instantánea o para 2 cucharaditas 2 cucharaditas 1¾ cucharaditas
máquina para hacer pan
Mezcla de canela:
Azúcar granulada
1
/
3
de taza (65 g) ¼ de taza (50 g) 3 cucharadas (35 g)
Canela en polvo 2½ cucharaditas 2 cucharaditas 1½ cucharaditas
Pasas (opcional) 1¼ tazas (200 g) 1 taza (165 g) ¾ de taza (125 g)
1. Colocar todos los ingredientes de la masa en el molde (con la paleta amasadora puesta), en el orden indicado. Colocar el molde en la máquina para
hacer pan Cuisinart
®
.
2. Presionar el botón PROG y elegir el programa “WHITE” (pan blanco). Presionar el botón COLOR y elegir el grado de dorado deseado. Presionar el
botón SIZE y elegir el tamaño de barra deseado. Presionar el botón START/STOP para iniciar el ciclo de preparación.
3. Durante la preparación, preparar la mezcla de canela: colocar los ingredientes de la mezcla de canela (incluso las pasas, si desea usarlas) en un tazón
pequeño; revolver para mezclar. Reservar.
CONTINÚA EN LA PÁGINA SIGUIENTE...

25
4. Cuando escuche la señal que indica que es tiempo de sacar la paleta amasadora, presionar el botón START/STOP y sacar la masa y la paleta
amasadora. Colocar la masa sobre una superficie enharinada. Estirar la masa para formar un rectángulo de aproximadamente ¼ de pulgada (5 mm) de
grueso por 16 pulgadas (40 cm) de largo. Rociar la superficie enterade la masa con la mezcla de canela. Enrollar la barra a lo ancho, formando un rollo
apretado. Meter las extremidades por debajo de la masa y colocarla en el molde. Presionar el botón START/STOP para continuar.
5. Al final del ciclo, sacar el pan de la máquina, colocarlo en una rejilla y permitir que se enfríe por completo antes de rebanarlo.
Información nutricional por rebanada de 2 onzas (55 g):
Calorías 141 (13 % de grasa) • Carbohidratos 28 g • Proteínas 4 g • Grasa 2 g • Grasa saturada 1 g • Colesterol 16 mg • Sodio 139 mg • Calcio 24 mg
Fibra 1 g
Para preparar este pan con el programa ULTRA-FAST (pan ultrarrápido)
(panes de 1 libra/455 g) y 1½ libras/680 g solamente) Preparar los ingredientes para pan de 1 libra (455 g) o 1½ libras (680 g). Sustituir la levadura con 1¾
cucharadita de levadura rápida (para pan de 1 libra/455 g) o 2½ cucharaditas de levadura rápida (para el pan de 1½ libras/680 g). Colocar el molde en la unidad
y elegir el programa ULTRA-FAST (pan ultrarrápido). Presionar el botón START/STOP para iniciar el ciclo de preparación y seguir el paso 3 en la receta más
arriba.
P
A
N
C
O
RTE
más

26
Pan de centeno
Programa: WHITE (pan blanco)
Opción de inicio diferido: sí
Ingredientes Pan de 2 libras (910 g) Pan de 1½ libras (680 g) Pan de 1 libra (455 g)
Agua, a temperatura ambiente 12⁄3 tazas (265 ml) 1¼ tazas (250 ml) 1 taza (235 ml)
Sal kosher 1¼ cucharaditas 1 cucharadita ¾ de cucharadita
Harina común 3 tazas (375 g) 1¾ tazas (220 g) 1¼ tazas (155 g)
Harina de centeno 2 tazas (205 g) 1¼ tazas (125 g) ¾ de taza (75 g)
Alcaravea/Carvi/Comino de prado 1 cucharada 2 cucharaditas 1½ cucharaditas
Levadura seca activa, instantánea o para 1 cucharada 2 cucharaditas 1½ cucharaditas
máquina para hacer pan
1. Colocar todos los ingredientes en el molde (con la paleta amasadora puesta), en el orden indicado. Colocar el molde en la máquina para hacer pan
Cuisinart
®
.
2. Presionar el botón PROG y elegir el programa “WHITE” (pan blanco). Presionar el botón COLOR y elegir el grado de dorado deseado. Presionar el
botón SIZE y elegir el tamaño de barra deseado. Presionar el botón START/STOP para iniciar el ciclo de preparación.
3. Si desea, cuando escuche la señal que indica que es tiempo de sacar la paleta amasadora, presionar el botón START/STOP, sacar la masa y la paleta
amasadora, dar forma a la masa y volver a colocarla en el molde. Presionar el botón START/STOP para continuar.
4. Al final del ciclo, sacar el pan de la máquina, colocarlo en una rejilla y permitir que se enfríe por completo antes de rebanarlo.
Información nutricional por rebanada de 2 onzas (55 g):
Calorías 66 (5 % de grasa) • Carbohidratos 15 g • Proteínas 2 g • Grasa 0 g • Grasa saturada 0 g • Colesterol 0 mg • Sodio 127 mg • Calcio 1 mg • Fibra 2 g
Para preparar este pan con el programa ULTRA-FAST (pan ultrarrápido)
(panes de 1 libra/455 g) y 1½ libras/680 g solamente) Preparar los ingredientes para pan de 1 libra (455 g) o 1½ libras (680 g). Sustituir la levadura con 1¾
cucharadita de levadura rápida (para pan de 1 libra/455 g) o 2½ cucharaditas de levadura rápida (para el pan de 1½ libras/680 g). Colocar el molde en la unidad
y elegir el programa ULTRA-FAST (pan ultrarrápido). Presionar el botón START/STOP para iniciar el ciclo de preparación y seguir el paso 3
en la receta más arriba.

27
Pan de queso Cheddar con jalapeño
Programa: WHITE (pan blanco)
Opción de inicio diferido: sí
Ingredientes Pan de 2 libras (910 g) Pan de 1½ libras (680 g) Pan de 1 libra (455 g)
Suero de leche, a temperatura ambiente 1½ tazas (365 g) 1 taza (245 g) 3⁄4 de taza (185 g)
Salsa de ají picante ¾ de cucharadita ½ cucharadita ¼ de cucharadita
Mantequilla sin sal, a temperatura ambiente, 3 cucharadas (45 g) 2 cucharadas 1½ cucharadas (25 g)
en pedacitos de ½ pulgada (1.5 cm) + 1 cucharadita (35 g)
Azúcar granulada 1 cucharada 2 cucharaditas 1½ cucharaditas
Sal kosher 1 cucharadita ¾ de cucharadita ½ cucharadita
Harina común 4 tazas (500 g) 3 tazas (375 g) 2 tazas (250 g)
Levadura seca activa, instantánea o para 1½ cucharaditas 1 cucharadita ¾ de cucharadita
máquina para hacer pan
Jalapeño, sin semillas y finamente picado 2 1½ 1
Queso Cheddar fuerte, rallado 1 taza (120 g) ¾ de taza (90 g) ¼ taza (60 g)
1. Colocar todos los ingredientes (excepto el jalapeño y el queso) en el molde (con la paleta amasadora puesta), en el orden indicado. Colocar el molde en
la máquina para hacer pan Cuisinart
®
.
2. Presionar el botón PROG y elegir el programa “WHITE” (pan blanco). Presionar el botón COLOR y elegir el grado de dorado deseado. Presionar el
botón SIZE y elegir el tamaño de barra deseado. Presionar el botón START/STOP para iniciar el ciclo de preparación.
3. Cuando escuche la señal que es tiempo de agregar los ingredientes adicionales, agregar el jalapeño y el queso a la masa.
4. Si desea, cuando escuche la señal que indica que es tiempo de sacar la paleta amasadora, presionar el botón START/STOP, sacar la masa y la paleta
amasadora, dar forma a la masa y volver a colocarla en el molde. Presionar el botón START/STOP para continuar.
5. Al final del ciclo, sacar el pan de la máquina, colocarlo en una rejilla y permitir que se enfríe por completo antes de rebanarlo.
CONTINÚA EN LA PÁGINA SIGUIENTE...

28
Información nutricional por rebanada de 2 onzas (55 g):
Calorías 108 (26 % de grasa) • Carbohidratos 16 g • Proteínas 4 g • Grasa 3 g • Grasa saturada 2 g • Colesterol 9 mg • Sodio 132 mg • Calcio 45 mg
Fibra 0 g
Para preparar este pan con el programa ULTRA-FAST (pan ultrarrápido)
(panes de 1 libra/455 g) y 1½ libras/680 g solamente) Preparar los ingredientes para pan de 1 libra (455 g) o 1½ libras (680 g). Sustituir la levadura con 1¾
cucharadita de levadura rápida (para pan de 1 libra/455 g) o 2½ cucharaditas de levadura rápida (para el pan de 1½ libras/680 g). Colocar el molde en la unidad
y elegir el programa ULTRA-FAST (pan ultrarrápido). Presionar el botón START/STOP para iniciar el ciclo de preparación y seguir el paso 3 en la
receta más arriba.

29
Hogaza de pan francés
Programa FRENCH (pan francés)
Opción de inicio diferido: sí
Ingredientes Pan de 2 libras (910 g) Pan de 1½ libras (680 g) Pan de 1 libra (455 g)
Agua, a temperatura ambiente 1½ tazas (355 ml) 1¼ tazas (295 ml) 1 taza + 1 cucharada (250 ml)
Sal kosher 1½ cucharaditas 1½ cucharaditas ¾ de cucharadita
Harina común 4 tazas (500 g) 3¼ tazas (405 g) 2¼ tazas + 2 cucharadas
(295 g)
Levadura seca activa, instantánea o para 1½ cucharaditas 1¼ cucharaditas 1 cucharadita
máquina para hacer pan
1. Colocar todos los ingredientes en el molde (con la paleta amasadora puesta), en el orden indicado. Colocar el molde en la máquina para hacer pan
Cuisinart
®
.
2. Presionar el botón PROG y elegir el programa “FRENCH” (pan francés). Presionar el botón SIZE y elegir el tamaño de barra deseado. Presionar el botón
START/STOP para iniciar el ciclo de preparación.
3. Si desea, cuando escuche la señal que indica que es tiempo de sacar la paleta amasadora, presionar el botón START/STOP, sacar la masa y la paleta
amasadora, dar forma a la masa y volver a colocarla en el molde. Presionar el botón START/STOP para continuar.
4. Al final del ciclo, sacar el pan de la máquina, colocarlo en una rejilla y permitir que se enfríe por completo antes de rebanarlo.
Información nutricional por rebanada de 2 onzas (55 g):
Calorías 73 (0 % de grasa) • Carbohidratos 13 g • Proteínas 2 g • Grasa 0 g • Grasa saturada 0 g • Colesterol 0 mg • Sodio 159 mg • Calcio 1 mg • Fibra 0 g
Para preparar este pan con el programa ULTRA-FAST (pan ultrarrápido)
(panes de 1 libra/455 g) y 1½ libras/680 g solamente.) Preparar los ingredientes para pan de 1 libra (455 g) o 1½ libras (680 g). Sustituir la levadura con 1¾
cucharadita de levadura rápida (para pan de 1 libra/455 g) o 2½ cucharaditas de levadura rápida (para el pan de 1½ libras/680 g). Colocar el molde en la unidad
y elegir el programa ULTRA-FAST (pan ultrarrápido). Presionar el botón START/STOP para iniciar el ciclo de preparación y seguir el paso 3 en la receta más
arriba.

30
Pan italiano rústico
Programa FRENCH (pan francés)
Opción de inicio diferido: sí
Ingredientes Pan de 2 libras (910 g) Pan de 1½ libras (680 g) Pan de 1 libra (455 g)
Agua, a temperatura ambiente 1¼ tazas (295 ml) 1 taza (235 ml) ¾ de taza (175 ml)
Aceite de oliva 2 cucharadas 1½ cucharadas 1 cucharada
Sal kosher 2 cucharaditas 1½ cucharaditas 1 cucharadita
Azúcar granulada 1 cucharadita ¾ de cucharadita ½ cucharadita
Harina común 4 tazas (500 g) 3 tazas (375 g) 2 tazas (250 g)
Salvado de trigo (grueso, sin procesar) 1½ tazas (85 g)
1
⁄
3
taza (20 g) ¼ de taza (15 g)
Levadura seca activa, instantánea o para 2 cucharaditas 1¼ cucharaditas 1¼ cucharaditas
máquina para hacer pan
Semillas de ajonjolí/sésamo (opcional) 1 cucharada 2 cucharaditas 1½ cucharaditas
1. Colocar todos los ingredientes (excepto las semillas de ajonjolí/sésamo) en el molde (con la paleta amasadora puesta), en el orden indicado. Colocar el
molde en la máquina para hacer pan Cuisinart
®
.
2. Presionar el botón PROG y elegir el programa “FRENCH” (pan francés). Presionar el botón SIZE y elegir el tamaño de barra deseado. Presionar el botón
START/STOP para iniciar el ciclo de preparación.
3. Si desea, cuando escuche la señal que indica que es tiempo de sacar la paleta amasadora, presionar el botón START/STOP, sacar la masa y la paleta
amasadora, dar forma a la masa y volver a colocarla en el molde. Rociar con semillas de ajonjolí/sésamo y, si desea, presionar el botón START/STOP
para continuar con el leudado y el horneado.
4. Al final del ciclo, sacar el pan de la máquina, colocarlo en una rejilla y permitir que se enfríe por completo antes de rebanarlo.
Información nutricional por rebanada de 2 onzas (55 g):
Calorías 112 (9 % de grasa) • Carbohidratos 24 g • Proteínas 2 g • Grasa 1 g • Grasa saturada 0 g • Colesterol 0 mg • Sodio 191 mg • Calcio 1 mg • Fibra 1 g
Para preparar este pan con el programa ULTRA-FAST (pan ultrarrápido)
(panes de 1 libra/455 g) y 1½ libras/680 g solamente) Preparar los ingredientes para pan de 1 libra (455 g) o 1½ libras (680 g). Sustituir la levadura con 1¾ cucharadita
de levadura rápida (para pan de 1 libra/455 g) o 2½ cucharaditas de levadura rápida (para el pan de 1½ libras/680 g). Colocar el molde en la unidad y elegir el
programa ULTRA-FAST (pan ultrarrápido). Presionar el botón START/STOP para iniciar el ciclo de preparación y luego, seguir el paso 3 en la receta más arriba.

31
“Pain de campagne” (pan de campaña francés)
con aceitunas y romero
Programa: FRENCH (pan francés)
Opción de inicio diferido: sí, pero deberá estar presente para añadir las aceitunas
Ingredientes Pan de 2 libras (910 g) Pan de 1½ libras (680 g) Pan de 1 libra (455 g)
Agua, a temperatura ambiente 1½ tazas (355 ml) 1 taza + 2 cucharadas (265 ml) ¾ de taza (175 ml)
Aceite de oliva 1 cucharada 2 cucharaditas 1½ cucharaditas
Sal kosher 1½ cucharaditas 1¼ cucharaditas ¾ de cucharadita
Miel 1 cucharadita 1 cucharadita ½ cucharadita
Romero fresco picado 1 cucharada 2 cucharaditas 1 cucharadita
Harina común 2½ tazas (310 g) 2 tazas (250 g) 1½ tazas (185 g)
Harina de trigo integral 1½ tazas (180 g) 1 taza (120 g) ½ taza (60 g)
Harina de centeno 1/3 de taza (35 g) ¼ de taza (25 g) 3 cucharadas (20 g)
Levadura seca activa, instantánea o para 1½ cucharaditas 1¼ cucharaditas 1 cucharadita
máquina para hacer pan
aceitunas negras “Kalamata” deshuesadas, 1 taza (200 g) ¾ de taza (175 g) ½ taza (100 g)
escurridas, secadas con papel absorbente
y partidas a la mitad
1. Colocar todos los ingredientes (excepto las aceitunas) en el molde (con la paleta amasadora puesta), en el orden indicado. Colocar el molde en la
máquina para hacer pan Cuisinart
®
.
2. Presionar el botón PROG y elegir el programa “FRENCH” (pan francés). Presionar el botón SIZE y elegir el tamaño de barra deseado. Presionar el botón
START/STOP para iniciar el ciclo de preparación.
3. Cuando escuche la señal que es tiempo de agregar las ingredientes adicionales, agregar las aceitunas. Si desea, cuando escuche la señal que indica
que es tiempo de sacar la paleta amasadora, presionar el botón START/STOP, sacar la masa y la paleta amasadora, dar forma a la masa y volver a
colocarla en el molde. Presionar el botón START/STOP para continuar.
4. Al final del ciclo, sacar el pan de la máquina, colocarlo en una rejilla y permitir que se enfríe por completo antes de rebanarlo.
CONTINÚA EN LA PÁGINA SIGUIENTE...

32
Información nutricional por rebanada de 2 onzas (55 g):
Calorías 81 (14 % de grasa) • Carbohidratos 15 g • Proteínas 2g • Grasa 1g • Grasa saturada 0g • Colesterol 0 mg • Sodio 184 mg • Calcio 4 mg • Fibra 1 g
Para preparar este pan con el programa ULTRA-FAST (pan ultrarrápido)
(panes de 1 libra/455 g) y 1½ libras/680 g solamente) Preparar los ingredientes para pan de 1 libra (455 g) o 1½ libras (680 g). Sustituir la levadura con 1¾
cucharadita de levadura rápida (para pan de 1 libra/455 g) o 2½ cucharaditas de levadura rápida (para el pan de 1½ libras/680 g). Colocar el molde en la unidad
y elegir el programa ULTRA-FAST (pan ultrarrápido). Presionar el botón START/STOP para iniciar el ciclo de preparación y seguir el paso 3 en la
receta más arriba.
D
i
s
e
Ñ
o
GRANDES
RESULTADOS
•
C
O
M
P
A
C
T
O
•

33
Pan francés de queso Parmesano y pimienta
Programa FRENCH (pan francés)
Opción de inicio diferido: sí
Ingredientes Pan de 2 libras (910 g) Pan de 1½ libras (680 g) Pan de 1 libra (455 g)
Agua, a temperatura ambiente 1¼ tazas (295 ml) 1 taza (235 ml) ¾ de taza (175 ml)
Aceite de oliva ¼ de taza (60 ml) 3 cucharadas 2 cucharadas
Sal kosher 1¼ cucharaditas 1 cucharadita ¾ de cucharadita
Harina común 3¾ tazas (470 g) 3 tazas (375 g) 2¼ tazas (280 g)
Queso Parmesano rallado
2
⁄
3
de taza (65 g) ½ taza (50 g) 1⁄3 de taza (35 g)
Pimienta negra recién molida ¾ de cucharadita ½ cucharadita ¼ de cucharadita
Levadura seca activa, instantánea o para 1½ cucharaditas 1¼ cucharaditas 1 cucharadita
máquina para hacer pan
1. Colocar todos los ingredientes en el molde (con la paleta amasadora puesta), en el orden indicado. Colocar el molde en la máquina para hacer pan
Cuisinart
®
.
2. Presionar el botón PROG y elegir el programa “FRENCH” (pan francés). Presionar el botón SIZE y elegir el tamaño de barra deseado. Presionar el botón
START/STOP para iniciar el ciclo de preparación.
3. Si desea, cuando escuche la señal que indica que es tiempo de sacar la paleta amasadora, presionar el botón START/STOP, sacar la masa y la paleta
amasadora, dar forma a la masa y volver a colocarla en el molde. Presionar el botón START/STOP para continuar.
4. Al final del ciclo, sacar el pan de la máquina, colocarlo en una rejilla y permitir que se enfríe por completo antes de rebanarlo.
Información nutricional por rebanada de 2 onzas (55 g):
Calorías 101 (29 % de grasa) • Carbohidratos 15 g • Proteínas 4 g • Grasa 3 g • Grasa saturada 1 g • Colesterol 3 mg • Sodio 184 mg • Calcio 41 mg * Fibra 0 g
Para preparar este pan con el programa ULTRA-FAST (pan ultrarrápido)
(panes de 1 libra/455 g) y 1½ libras/680 g solamente) Preparar los ingredientes para pan de 1 libra (455 g) o 1½ libras (680 g). Sustituir la levadura con 1¾
cucharadita de levadura rápida (para pan de 1 libra/455 g) o 2½ cucharaditas de levadura rápida (para el pan de 1½ libras/680 g). Colocar el molde en la unidad
y elegir el programa ULTRA-FAST (pan ultrarrápido). Presionar el botón START/STOP para iniciar el ciclo de preparación y seguir el paso 3
en la receta más arriba.

34
Pan de sémola con semillas de hinojo y pasas doradas
Programa: FRENCH (pan francés)
Opción de inicio diferido: sí, pero deberá estar presente para añadir las pasas
Ingredientes Pan de 2 libras (910 g) Pan de 1½ libras (680 g) Pan de 1 libra (455 g)
Agua, a temperatura ambiente 12⁄3 tazas (265 ml) 1¼ tazas + 1 cucharada (265 ml) ¾ de taza + 2 cucharadas
(205 ml)
Sal kosher 2 cucharaditas 1½ cucharaditas 1 cucharadita
Semillas de hinojo 2 cucharaditas 1½ cucharaditas 1 cucharadita
Azúcar granulada 1 cucharadita ¾ de cucharadita ½ cucharadita
Sémola 3 tazas (500 g) 2¼ tazas (375 g) 1½ tazas (250g)
Harina común 1 taza (125 g) ¾ de taza (95 g) ½ taza (60 g)
Levadura seca activa, instantánea o para 1½ cucharaditas 1¼ cucharaditas 1 cucharadita
máquina para hacer pan
Pasas doradas ¾ de taza (120 g)
2
⁄
3
de taza (100 g) ½ taza (80 g)
1. Colocar todos los ingredientes (excepto las pasas) en el molde (con la paleta amasadora puesta), en el orden indicado. Colocar el molde en la máquina
para hacer pan Cuisinart
®
.
2. Presionar el botón PROG y elegir el programa “FRENCH” (pan francés). Presionar el botón SIZE y elegir el tamaño de barra deseado. Presionar el botón
START/STOP para iniciar el ciclo de preparación.
3. Cuando escuche la señal que es tiempo de agregar las ingredientes adicionales, agregar las pasas. Si desea, cuando escuche la señal que indica
que es tiempo de sacar la paleta amasadora, presionar el botón START/STOP, sacar la masa y la paleta amasadora, dar forma a la masa y volver a
colocarla en el molde. Presionar el botón START/STOP para continuar.
4. Al final del ciclo, sacar el pan de la máquina, colocarlo en una rejilla y permitir que se enfríe por completo antes de rebanarlo.
Información nutricional por rebanada de 2 onzas (55 g):
Calorías 106 (3 % de grasa) • Carbohidratos 23 g • Proteínas 3 g • Grasa 1 g • Grasa saturada 0 g • Colesterol 0 mg • Sodio 192 mg • Calcio 7 mg • Fibra 1 g
Para preparar este pan con el programa ULTRA-FAST (pan ultrarrápido)
(panes de 1 libra/455 g) y 1½ libras/680 g solamente) Preparar los ingredientes para pan de 1 libra (455 g) o 1½ libras (680 g). Sustituir la levadura con 1¾ cucharadita
de levadura rápida (para pan de 1 libra/455 g) o 2½ cucharaditas de levadura rápida (para el pan de 1½ libras/680 g). Colocar el molde en la unidad y elegir el
programa ULTRA-FAST (pan ultrarrápido). Presionar el botón START/STOP para iniciar el ciclo de preparación y seguir el paso 3 en la receta más arriba.

35
Pan de trigo integral básico
Programa: WHOLE WHEAT (pan de trigo integral)
Opción de inicio diferido: sí
Ingredientes Pan de 2 libras (910 g) Pan de 1½ libras (680 g) Pan de 1 libra (455 g)
Agua, a temperatura ambiente 1¼ tazas (395 ml) 1 taza (235 ml) ¾ de taza (175 ml)
Sal kosher 1¼ cucharaditas 1 cucharadita ¾ de cucharadita
Mantequilla sin sal, a temperatura ambiente, 2½ cucharadas (35 g) 2 cucharadas (30 g) 1½ cucharadas (25 g)
en pedacitos de ½ pulgada (1.5 cm)
Azúcar granulada 2 cucharadas 1½ cucharadas 1 cucharada
Harina de trigo integral 2¼ tazas (270 g) 2 tazas (240 g) 1½ tazas (180 g)
Harina común 1½ tazas (185 g) 1 taza + 2 cucharadas (135 g) ¾ de taza
+ 2 cucharadas (110 g)
Harina de centeno 2 cucharadas 1½ cucharadas 1 cucharada
Levadura seca activa, instantánea o para 1 cucharada 2¼ cucharaditas 2 cucharaditas
máquina para hacer pan
1. Colocar todos los ingredientes en el molde (con la paleta amasadora puesta), en el orden indicado. Colocar el molde en la máquina para hacer pan Cuisinart
®
.
2. Presionar el botón PROG y elegir el programa “WHOLE WHEAT” (pan de trigo integral). Presionar el botón COLOR y elegir el grado de dorado deseado.
Presionar el botón SIZE y elegir el tamaño de barra deseado.
3. Presionar el botón START/STOP para iniciar el ciclo de preparación. Si desea, cuando escuche la señal que indica que es tiempo de sacar la paleta
amasadora, presionar el botón START/STOP, sacar la masa y la paleta amasadora, dar forma a la masa y volver a colocarla en el molde. Presionar el
botón START/STOP para continuar.
4. Al final del ciclo, sacar el pan de la máquina, colocarlo en una rejilla y permitir que se enfríe por completo antes de rebanarlo.
Información nutricional por rebanada de 2 onzas (55 g):
Calorías 77 (20 % de grasa) • Carbohidratos 13 g • Proteínas 2 g • Grasa 1 g • Grasa saturada 1 g • Colesterol 3 mg • Sodio 127 mg • Calcio 10 mg • Fibra 2 g
Para preparar este pan con el programa ULTRA-FAST (pan ultrarrápido) (panes de 1 libra/455 g)
y 1½ libras/680 g solamente) Preparar los ingredientes para pan de 1 libra (455 g) o 1½ libras (680 g). Sustituir la levadura con 1¾ cucharadita de levadura
rápida (para pan de 1 libra/455 g) o 2½ cucharaditas de levadura rápida (para el pan de 1½ libras/680 g). Colocar el molde en la unidad y elegir el programa
ULTRA-FAST (pan ultrarrápido). Presionar el botón START/STOP para iniciar el ciclo de preparación y seguir el paso 3 en la receta más arriba.

36
Pan multigrano con cereales
Programa: WHOLE WHEAT (pan de trigo integral)
Opción de inicio diferido: no
Ingredientes Pan de 2 libras (910 g) Pan de 1½ libras (680 g) Pan de 1 libra (455 g)
Agua, a temperatura ambiente 1¼ tazas (295 ml) ¾ de taza + 3 cucharadas (205 ml) ½ taza + 2 cucharadas
(150 ml)
Yogur natural sin grasa 1/3 de taza (80 ml) ¼ de taza (60 ml) 3 cucharadas (45 ml)
Mantequilla sin sal, a temperatura ambiente, 3 cucharadas (45 g) 2 cucharadas (30 g) 1½ cucharadas (25 g)
en pedacitos de ½ pulgada (1.5 cm)
Azúcar rubia (azúcar de caña integral) 2 cucharadas 4 cucharaditas 1 cucharada
Sal kosher 1½ cucharaditas 1 cucharadita ¾ de cucharadita
Harina de trigo integral 2 tazas (240 g) 1½ tazas (180 g) 1 taza (120 g)
Harina común 2 tazas (250 g) 1½ tazas (185 g) 1 taza (125 g)
Copos de cereales multigranos 22/3 tazas (100 g) 2 tazas (75 g) 11/3 tazas (50 g)
Levadura seca activa, instantánea o para 2½ cucharaditas 2 cucharaditas 1¼ cucharaditas
máquina para hacer pan
1. Colocar todos los ingredientes en el molde (con la paleta amasadora puesta), en el orden indicado. Colocar el molde en la máquina para hacer pan Cuisinart
®
.
2. Presionar el botón PROG y elegir el programa “WHOLE WHEAT” (pan de trigo integral). Presionar el botón COLOR y elegir el grado de dorado deseado.
Presionar el botón SIZE y elegir el tamaño de barra deseado.
3. Presionar el botón START/STOP para iniciar el ciclo de preparación. Si desea, cuando escuche la señal que indica que es tiempo de sacar la paleta
amasadora, presionar el botón START/STOP, sacar la masa y la paleta amasadora, dar forma a la masa y volver a colocarla en el molde. Presionar el
botón START/STOP para continuar.
4. Al final del ciclo, sacar el pan de la máquina, colocarlo en una rejilla y permitir que se enfríe por completo antes de rebanarlo.
Información nutricional por rebanada de 2 onzas (55 g):
Calorías 84 (15 % de grasa) • Carbohidratos 16 g • Proteínas 3 g • Grasa 1 g • Grasa saturada 1 g • Colesterol 3 mg • Sodio 130 mg • Calcio 12 mg • Fibra 2 g
Para preparar este pan con el programa ULTRA-FAST (pan ultrarrápido) (panes de 1 libra/455 g)
y 1½ libras/680 g solamente) Preparar los ingredientes para pan de 1 libra (455 g) o 1½ libras (680 g). Sustituir la levadura con 1¾ cucharadita de levadura
rápida (para pan de 1 libra/455 g) o 2½ cucharaditas de levadura rápida (para el pan de 1½ libras/680 g). Colocar el molde en la unidad y elegir el programa
ULTRA-FAST (pan ultrarrápido). Presionar el botón START/STOP para iniciar el ciclo de preparación y seguir el paso 3 en la receta más arriba.

37
Pan de trigo integral con nueces y semillas
Programa: WHOLE WHEAT (pan de trigo integral) Opción de inicio diferido: no
Ingredientes Pan de 2 libras (910 g) Pan de 1½ libras (680 g) Pan de 1 libra (455 g)
Suero de leche bajo en grasa, 1½ tazas (365 g) 1¼ tazas (305 g) 1 taza (245 g)
a temperatura ambiente
Sal kosher 1 cucharadita ¾ de cucharadita ½ cucharadita
Mantequilla sin sal, a temperatura ambiente, 1½ cucharadas (25 g) 1 cucharada (15 g) 1 cucharada (15 g)
en pedacitos de ½ pulgada (1.5 cm)
Jarabe de arce/maple 1½ cucharadas 1 cucharada 1 cucharada
Harina de trigo integral 2¼ tazas (270 g) 2 tazas (240 g) 1½ tazas (180 g)
Harina común 1¼ tazas (155 g) 1 taza (125 g) ¾ de taza (95 g)
Levadura seca activa, instantánea o para 1 cucharada 2¼ cucharaditas 2 cucharaditas
máquina para hacer pan
Mezcla de nueces y semillas (p. ej. nueces,
pacanas, semillas de girasol, semillas de calabaza) ¾ de taza (120 g) ¾ de taza (120 g) ½ taza (80 g)
1. Colocar todos los ingredientes (excepto las nueces/semillas) en el molde (con la paleta amasadora puesta), en el orden indicado. Colocar el molde en la
máquina para hacer pan Cuisinart
®
.
2. Presionar el botón PROG y elegir el programa “WHOLE WHEAT” (pan de trigo integral). Presionar el botón COLOR y elegir el grado de dorado deseado.
Presionar el botón SIZE y elegir el tamaño de barra deseado.
3. Presionar el botón START/STOP para iniciar el ciclo de preparación.
4. Cuando escuche la señal que indica que puede añadir los ingredientes adicionales, agregar las nueces y las semillas. Si desea, cuando escuche la
señal que indica que es tiempo de sacar la paleta amasadora, presionar el botón START/STOP, sacar la masa y la paleta amasadora, dar forma a la
masa y volver a colocarla en el molde. Presionar el botón START/STOP para continuar.
5. Al final del ciclo, sacar el pan de la máquina, colocarlo en una rejilla y permitir que se enfríe por completo antes de rebanarlo.
Información nutricional por rebanada de 2 onzas (55 g):
Calorías 129 (30 % de grasa) • Carbohidratos 19 g • Proteínas 4 g • Grasa 5 g • Grasa saturada 1 g • Colesterol 3 mg • Sodio 103 mg • Calcio 32 mg • Fibra 2 g
Para preparar este pan con el programa ULTRA-FAST (pan ultrarrápido) (panes de 1 libra/455 g) y 1½ libras/680
g solamente) Preparar los ingredientes para pan de 1 libra (455 g) o 1½ libras (680 g). Sustituir la levadura con 1¾ cucharadita de levadura rápida (para pan
de 1 libra/455 g) o 2½ cucharaditas de levadura rápida (para el pan de 1½ libras/680 g). Colocar el molde en la unidad y elegir el programa ULTRA-FAST (pan
ultrarrápido). Presionar el botón START/STOP para iniciar el ciclo de preparación y seguir el paso 3 en la receta más arriba.

38
Pan de salvado de trigo
Programa: WHOLE WHEAT (pan de trigo integral) Opción de inicio diferido: sí
Ingredientes Pan de 2 libras (910 g) Pan de 1½ libras (680 g) Pan de 1 libra (455 g)
Agua, a temperatura ambiente 1½ tazas (355 ml) 1 taza + 2 cucharadas (265 ml) 1 taza (235 ml)
Sal kosher 1¼ cucharaditas 1 cucharadita ¾ de cucharadita
Mantequilla sin sal, a temperatura ambiente, 1½ cucharadas (25 g) 1 cucharada (15 g) 1 cucharada (15 g)
en pedacitos de ½ pulgada (1.5 cm)
Melaza 2 cucharadas 1½ cucharadas 1 cucharada
Harina de trigo integral 2¼ tazas (270 g) 2 tazas (240 g) 1½ tazas (180 g)
Harina común 1½ tazas (185 g) 1 taza (125 g) ¾ de taza (95 g)
Copos de avena (no utilice avena instantánea)
1
⁄
3
de taza + 2 cucharadas (30 g)
1
⁄
3
de taza (25 g) ¼ de taza (20 g)
Salvado de trigo
1
⁄
3
de taza + 2 cucharadas (35 g)
1
⁄
3
de taza (20 g) ¼ de taza (15 g)
Levadura seca activa, instantánea o para 1 cucharada 2¼ cucharaditas 2 cucharaditas
máquina para hacer pan
1. Colocar todos los ingredientes en el molde (con la paleta amasadora puesta), en el orden indicado. Colocar el molde en la máquina para hacer pan
Cuisinart
®
.
2. Presionar el botón PROG y elegir el programa “WHOLE WHEAT” (pan de trigo integral). Presionar el botón COLOR y elegir el grado de dorado deseado.
Presionar el botón SIZE y elegir el tamaño de barra deseado. Presionar el botón START/STOP para iniciar el ciclo de preparación.
3. Si desea, cuando escuche la señal que indica que es tiempo de sacar la paleta amasadora, presionar el botón START/STOP, sacar la masa y la paleta
amasadora, dar forma a la masa y volver a colocarla en el molde. Presionar el botón START/STOP para continuar.
4. Al final del ciclo, sacar el pan de la máquina, colocarlo en una rejilla y permitir que se enfríe por completo antes de rebanarlo.
Información nutricional por rebanada de 2 onzas (55 g):
Calorías 99 (11 % de grasa) • Carbohidratos 19 g • Proteínas 3 g • Grasa 1 g • Grasa saturada 1 g • Colesterol 2 mg • Sodio 128 mg • Calcio 13 mg • Fibra 3 g
Para preparar este pan con el programa ULTRA-FAST (pan ultrarrápido)
(panes de 1 libra/455 g) y 1½ libras/680 g solamente) Preparar los ingredientes para pan de 1 libra (455 g) o 1½ libras (680 g). Sustituir la levadura con 1¾ cucharadita
de levadura rápida (para pan de 1 libra/455 g) o 2½ cucharaditas de levadura rápida (para el pan de 1½ libras/680 g). Colocar el molde en la unidad y elegir el
programa ULTRA-FAST (pan ultrarrápido). Presionar el botón START/STOP para iniciar el ciclo de preparación y seguir el paso 3 en la receta más arriba.

39
Pan Jalá
Programa: SWEET (pan dulce)
Opción de inicio diferido: no
Ingredientes Pan de 1½ libras (680 g) Pan de 1 libra (455 g)
Agua, a temperatura ambiente ¾ de taza (175 ml) ½ taza (120 ml)
Mantequilla sin sal, a temperatura ambiente, 5 cucharadas (70 g) 4 cucharadas (55 g)
en pedacitos de ½ pulgada (1.5 cm)
Huevo grande, a temperatura ambiente 1 1
Sal kosher 1 cucharadita ¾ de cucharadita
Azúcar granulada 3 cucharadas 2½ cucharadas
Harina común 3 tazas (375 g) 2¼ tazas (280 g)
Levadura seca activa, instantánea o para 1½ cucharaditas 1¼ cucharaditas
máquina para hacer pan
1. Colocar todos los ingredientes en el molde (con la paleta amasadora puesta), en el orden indicado. Colocar el molde en la máquina para hacer pan
Cuisinart
®
.
2. Presionar el botón PROG y elegir el programa “SWEET” (pan dulce). Presionar el botón COLOR y elegir el grado de dorado deseado. Presionar el botón
SIZE y elegir el tamaño de barra deseado. Presionar el botón START/STOP para iniciar el ciclo de preparación.
3. Si desea, cuando escuche la señal que indica que es tiempo de sacar la paleta amasadora, presionar el botón START/STOP, sacar la masa y la paleta
amasadora, dar forma a la masa y volver a colocarla en el molde. Presionar el botón START/STOP para continuar.
4. Al final del ciclo, sacar el pan de la máquina, colocarlo en una rejilla y permitir que se enfríe por completo antes de rebanarlo.
Información nutricional por rebanada de 2 onzas (55 g):
Calorías 108 (28 % de grasa) • Carbohidratos 17 g • Proteínas 2 g • Grasa 3 g • Grasa saturada 2 g • Colesterol 19 mg • Sodio 131 mg • Calcio 2 mg • Fibra 0 g
Para preparar este pan con el programa ULTRA-FAST (pan ultrarrápido)
(panes de 1 libra/455 g) y 1½ libras/680 g solamente) Preparar los ingredientes para pan de 1 libra (455 g) o 1½ libras (680 g). Sustituir la levadura con 1¾ cucharadita
de levadura rápida (para pan de 1 libra/455 g) o 2½ cucharaditas de levadura rápida (para el pan de 1½ libras/680 g). Colocar el molde en la unidad y elegir el
programa ULTRA-FAST (pan ultrarrápido). Presionar el botón START/STOP para iniciar el ciclo de preparación y seguir el paso 3 en la receta más arriba.

40
“Brioche”
Programa: SWEET (pan dulce)
Opción de inicio diferido: no
Ingredientes Pan de 1½ libras (680 g) Pan de 1 libra (455 g)
Leche entera, a temperatura ambiente
1
⁄
3
de taza (90 ml) ¼ de taza (60 ml)
Mantequilla sin sal, a temperatura ambiente, 6 cucharadas (85 g) 4 cucharadas (55 g)
en pedacitos de ½ pulgada (1.5 cm)
Huevos grande, a temperatura ambiente 3 2
Sal kosher 1 cucharadita ¾ de cucharadita
Azúcar granulada 1½ cucharadas 1 cucharada
Leche descremada en polvo 1½ cucharadas 1 cucharada
Harina común 2¾ tazas + 1 cucharada (350 g) 2 tazas (250 g)
Levadura seca activa, instantánea o para 2¼ cucharaditas 1¾ cucharaditas
máquina para hacer pan
1. Colocar todos los ingredientes en el molde (con la paleta amasadora puesta), en el orden indicado. Colocar el molde en la máquina para hacer pan
Cuisinart
®
.
2. Presionar el botón PROG y elegir el programa “SWEET” (pan dulce). Presionar el botón COLOR y elegir el grado de dorado deseado. Presionar el botón
SIZE y elegir el tamaño de barra deseado. Presionar el botón START/STOP para iniciar el ciclo de preparación.
3. Si desea, cuando escuche la señal que indica que es tiempo de sacar la paleta amasadora, presionar el botón START/STOP, sacar la masa y la paleta
amasadora, dar forma a la masa y volver a colocarla en el molde. Presionar el botón START/STOP para continuar.
4. Al final del ciclo, sacar el pan de la máquina, colocarlo en una rejilla y permitir que se enfríe por completo antes de rebanarlo.
Información nutricional por rebanada de 2 onzas (55 g):
Calorías 120 (36 % de grasa) • Carbohidratos 16 g • Proteínas 4 g • Grasa 5 g • Grasa saturada 3 g • Colesterol 42 mg • Sodio 145 mg Calcio 20 mg • Fibra 0 g
Para preparar este pan con el programa ULTRA-FAST (pan ultrarrápido) (panes de 1 libra/455 g) y 1½ libras/680 g
solamente) Preparar los ingredientes para pan de 1 libra (455 g) o 1½ libras (680 g). Sustituir la levadura con 1¾ cucharadita de levadura rápida (para pan de
1 libra/455 g) o 2½ cucharaditas de levadura rápida (para el pan de 1½ libras/680 g). Colocar el molde en la unidad y elegir el programa ULTRA-FAST (pan
ultrarrápido). Presionar el botón START/STOP para iniciar el ciclo de preparación y seguir el paso 3 en la receta más arriba.

41
“Panettone”
Programa: SWEET (pan dulce)
Opción de inicio diferido: no
Ingredientes Pan de 1½ libras (680 g) Pan de 1 libra (455 g)
Leche entera, a temperatura ambiente ½ taza (120 ml)
1
⁄
3
de taza (80 ml)
Mantequilla sin sal, a temperatura ambiente, 4 cucharadas (55 g) 2 cucharadas (30 g)
en pedacitos de ½ pulgada (1.5 cm)
Huevos grande, a temperatura ambiente 2 1
Sal kosher ¾ de cucharadita ½ cucharadita
Azúcar granulada ¼ de taza (50 g) 3 cucharadas (35 g)
Harina común 2¾ tazas (345 g) 2 tazas (250 g)
Ralladura de naranja 1 cucharada 2 cucharaditas
Semillas de anís 1 cucharadita ¾ de cucharadita
Nuez moscada rallada ½ cucharadita 1¾ cucharaditas
Levadura seca activa, instantánea o para 2 cucharaditas 1¼ cucharaditas
máquina para hacer pan
Frutas secas (p. ej., pasas de Corinto) ¾ de taza (120 g) ½ taza (80 g)
o cítricos confitados
1. Colocar todos los ingredientes (excepto las frutas secas) en el molde (con la paleta amasadora puesta), en el orden indicado. Colocar el molde en la
máquina para hacer pan Cuisinart
®
.
2. Presionar el botón PROG y elegir el programa “SWEET” (pan dulce). Presionar el botón COLOR y elegir el grado de dorado deseado. Presionar el botón
SIZE y elegir el tamaño de barra deseado. Presionar el botón START/STOP para iniciar el ciclo de preparación.
3. Cuando escuche la señal que es tiempo de agregar las ingredientes adicionales, agregar las frutas secas. Si desea, cuando escuche la señal que indica
que es tiempo de sacar la paleta amasadora, presionar el botón START/STOP, sacar la masa y la paleta amasadora, dar forma a la masa y volver a
colocarla en el molde. Presionar el botón START/STOP para continuar.
4. Al final del ciclo, sacar el pan de la máquina, colocarlo en una rejilla y permitir que se enfríe por completo antes de rebanarlo.
CONTINÚA EN LA PÁGINA SIGUIENTE...

42
Información nutricional por rebanada de 2 onzas (55 g):
Calorías 126 (23 % de grasa) • Carbohidratos 21 g • Proteínas 3 g • Grasa 3 g • Grasa saturada 2 g • Colesterol 28 mg • Sodio 107 mg • Calcio 17 mg
Fibra 1 g
Para preparar este pan con el programa ULTRA-FAST (pan ultrarrápido)
(panes de 1 libra/455 g) y 1½ libras/680 g solamente) Preparar los ingredientes para pan de 1 libra (455 g) o 1½ libras (680 g). Sustituir la levadura con 1¾
cucharadita de levadura rápida (para pan de 1 libra/455 g) o 2½ cucharaditas de levadura rápida (para el pan de 1½ libras/680 g). Colocar el molde en la unidad
y elegir el programa ULTRA-FAST (pan ultrarrápido). Presionar el botón START/STOP para iniciar el ciclo de preparación y seguir el paso 3 en la receta más
arriba.
PAN
Y MUCHO
MÁS.

43
Pan de chocolate con cerezas
Programa: SWEET (pan dulce)
Opción de inicio diferido: no
Ingredientes Pan de 1½ libras (680 g) Pan de 1 libra (455 g)
Leche entera, a temperatura ambiente ½ taza (120 ml)
1
⁄3 de taza (80 ml)
Mantequilla sin sal, a temperatura ambiente, ¼ de taza (55 g) 2 cucharadas (30 g)
en pedacitos de ½ pulgada (1.5 cm)
Huevos grande, a temperatura ambiente 2 1
Sal kosher ¾ de cucharadita ½ cucharadita
Azúcar granulada 3 cucharadas 2 cucharadas
Harina común 3 tazas (375 g) 2¼ tazas (280 g)
Levadura seca activa, instantánea o para 1¾ cucharaditas 1½ cucharaditas
máquina para hacer pan
Chocolate semiamargo, picado grueso
2
⁄3 de taza (130 g) ½ taza (100 g)
Cerezas secas ½ tazas (80 g)
1
⁄3 de taza (55 g)
1. Colocar todos los ingredientes (excepto el chocolate y las cerezas) en el molde (con la paleta amasadora puesta), en el orden indicado. Colocar el
molde en la máquina para hacer pan Cuisinart
®
.
2. Presionar el botón PROG y elegir el programa “SWEET” (pan dulce). Presionar el botón COLOR y elegir el grado de dorado deseado. Presionar el botón
SIZE y elegir el tamaño de barra deseado. Presionar el botón START/STOP para iniciar el ciclo de preparación.
3. Cuando escuche la señal que indica que es tiempo de sacar la paleta amasadora, presionar el botón START/STOP y sacar la masa y la paleta
amasadora. Colocar la masa sobre una superficie enharinada.
Estirar la masa para formar un rectángulo de aproximadamente ¼ de pulgada (5 mm) de grueso por 16 pulgadas (40 cm) de largo. Esparcir el chocolate
y las cerezas sobre toda la superficie de la masa.
Enrollar la masa a lo ancho, formando un rollo apretado, y meter las extremidades por debajo de la masa para sellar. Colocar la masa en el molde (sin
la paleta amasadora puesta) y presionar el botón START/STOP para continuar.
4. Al final del ciclo, sacar el pan de la máquina, colocarlo en una rejilla y permitir que se enfríe por completo antes de rebanarlo.
CONTINÚA EN LA PÁGINA SIGUIENTE...

44
Información nutricional por rebanada de 2 onzas (55 g):
Calorías 155 (33 % de grasa) • Carbohidratos 23 g • Proteínas 4 g • Grasa 6 g • Grasa saturada 3 g • Colesterol 28 mg • Sodio 107mg • Calcio 13 mg
Fibra 1 g
Para preparar este pan con el programa ULTRA-FAST (pan ultrarrápido) (panes de 1 libra/455 g)
y 1½ libras/680 g solamente) Preparar los ingredientes para pan de 1 libra (455 g) o 1½ libras (680 g). Sustituir la levadura con 1¾ cucharadita de levadura
rápida (para pan de 1 libra/455 g) o 2½ cucharaditas de levadura rápida (para el pan de 1½ libras/680 g). Colocar el molde en la unidad y elegir el programa
ULTRA-FAST (pan ultrarrápido). Presionar el botón START/STOP para iniciar el ciclo de preparación y seguir el paso 3 en la receta más arriba.
M
Á
S
D
E
5
0
D
E
L
I
C
I
O
S
A
S
R
E
C
E
T
A
S
I
P
A
N
E
S
C
A
S
E
R
O
S
I
3
O
P
C
I
O
N
E
S
D
E
T
A
M
A
Ñ
O
I
U
N
P
R
O
G
R
A
M
A
P
A
R
A
P
A
N
P
A
N
F
R
E
S
C
O

45
“Babka” (baba)
Programa: SWEET (pan dulce)
Opción de inicio diferido: no
Ingredientes Pan de 1½ libras (680 g) Pan de 1 libra (455 g)
Masa:
Leche entera, a temperatura ambiente 2⁄3 de taza (160 ml) ½ taza (120 ml)
Mantequilla sin sal, a temperatura ambiente, 4 cucharadas (55 g) 3 cucharadas (45 g)
en pedacitos de ½ pulgada (1.5 cm)
Huevo grande, a temperatura ambiente 2 1
Extracto natural de vainilla 1 cucharadita ¾ de cucharadita
Azúcar granulada 3 cucharadas 2 cucharadas
Sal kosher 1 cucharadita ¾ de cucharadita
Harina común 3 tazas (375 g) 2 tazas (250 g)
Nuez moscada rallada ¼ de cucharadita 1 a 2 pizcas
Levadura seca activa, instantánea o para 2 cucharaditas 1½ cucharaditas
máquina para hacer pan
Relleno:
Azúcar granulada ¼ de taza (50 g) 3 cucharadas (35 g)
Canela en polvo 2 cucharaditas 1½ cucharaditas
Cacao en polvo 1 cucharada 2 cucharaditas
Sal kosher 1 pizca 1 pizca
Glaseado:
Azúcar granulada ½ taza (100 g) ½ taza (100 g)
Agua
1
⁄
3
de taza (80 ml)
1
⁄
3
de taza (80 ml)
CONTINÚA EN LA PÁGINA SIGUIENTE...

46
1. Colocar todos los ingredientes de la masa en el molde (con la paleta amasadora puesta), en el orden indicado. Colocar el molde en la máquina para
hacer pan Cuisinart
®
.
2. Presionar el botón PROG y elegir el programa “SWEET” (pan dulce). Presionar el botón COLOR y elegir el grado de dorado deseado. Presionar el botón
SIZE y elegir el tamaño de barra deseado. Presionar el botón START/STOP para iniciar el ciclo de preparación.
3. Mientras la máquina está amasando la masa, preparar el relleno: Colocar los ingredientes del relleno en un tazón pequeño y batir para revolver;
reservar.
4. Cuando escuche la señal que indica que es tiempo de sacar la paleta amasadora, presionar el botón START/STOP y sacar la masa y la paleta
amasadora. Colocar la masa sobre una superficie enharinada.
Estirar la masa para formar un rectángulo de aproximadamente ¼ de pulgada (5 mm) de grueso por 16 pulgadas (40 cm) de largo. Esparcir el relleno
sobre toda la superficie de la masa. Enrollar la masa a lo ancho, formando un rollo apretado, y meter las extremidades por debajo de la masa para
sellar. Colocar la masa en el molde (sin la paleta amasadora puesta) y presionar el botón START/STOP para continuar.
5. Mientras el pan se está horneando, preparar el glaseado: colocar el azúcar y el agua en una cacerola pequeña, Calentar a fuego medio-alto, hasta que
el azúcar se haya disuelto por completo; reservar.
6. Al final del ciclo, sacar el baba de la máquina y colocarlo sobre una rejilla. Cepillar inmediatamente con el glaseado de jarabe. Nota: dejar que el jarabe
restante se enfríe y refrigérelo para otro uso; se conservará por hasta 2 semanas en un recipiente hermético.
7. Permitir que el baba se enfríe por completo antes de rebanarlo.
Información nutricional por rebanada de 2 onzas (55 g):
Calorías 147 (17 % de grasa) • Carbohidratos 26 g • Proteínas 3 g • Grasa 3 g • Grasa saturada 2 g • Colesterol 28 mg • Sodio 147 mg • Calcio 16 mg
Fibra 1 g
Para preparar este pan con el programa ULTRA-FAST (pan ultrarrápido) (panes de 1 libra/455 g)
y 1½ libras/680 g solamente) Preparar los ingredientes para pan de 1 libra (455 g) o 1½ libras (680 g). Sustituir la levadura con 1¾ cucharadita de levadura
rápida (para pan de 1 libra/455 g) o 2½ cucharaditas de levadura rápida (para el pan de 1½ libras/680 g). Colocar el molde en la unidad y elegir el programa
ULTRA-FAST (pan ultrarrápido). Presionar el botón START/STOP para iniciar el ciclo de preparación y seguir el paso 3 en la receta más arriba.

47
Pan para sándwiches
Programa: GLUTEN FREE (sin gluten)
Opción de inicio diferido: no
Rinde una barra de 1½ libras (680 g)
1 taza (235 ml) de agua, a temperatura ambiente
4 cucharadas (55 g) de mantequilla sin sal, a temperatura ambiente, en pedazos de ½ pulgada (1.5 cm)
3 huevos grandes, a temperatura ambiente
1¼ cucharaditas de sal kosher
3 cucharadas de azúcar granulada
3¾ tazas (405 g) de harina sin gluten*
3 cucharadas de cáscara de psyllium (psilio) en polvo**
2 cucharaditas de levadura seca activa, levadura instantánea o levadura para máquina para hacer pan
1. Colocar todos los ingredientes en el molde (con la paleta amasadora puesta), en el orden indicado. Colocar el molde en la máquina para hacer pan
Cuisinart
®
.
2. Presionar el botón PROG y elegir el programa “GLUTEN FREE” (pan sin gluten). Presionar el botón START/STOP para iniciar el ciclo de preparación.
3. Si desea, cuando escuche la señal que indica que es tiempo de sacar la paleta amasadora, presionar el botón START/STOP, sacar la masa y la paleta
amasadora, dar forma a la masa y volver a colocarla en el molde. Presionar el botón START/STOP para continuar.
4. Al final del ciclo, sacar el pan de la máquina, colocarlo en una rejilla y permitir que se enfríe por completo antes de rebanarlo.
* Hay una variedad de mezclas sin gluten, disponibles en la sección de pastelería de la mayoría de los supermercados. Si prefiere hacer su propia mezcla
sin gluten, puede usar los ingredientes siguientes: 1½ tazas (235 g) de harina de arroz integral, 1 taza (160 g) de harina de arroz blanco, ¼ de taza (30
g) de harina de arrurruz y ¼ de taza (30 g) de almidón/fécula de tapioca.
** La cáscara de “psyllium” (psilio) en polvo está disponible en las secciones “pastelería” o “nutrición/salud” de los supermercados especializados (cerca de
los suplementos de fibra). Nota: no utilice cáscara de psyllium integral para hacer pan, o la textura del pan será muy diferente.
Información nutricional por rebanada de 2 onzas (55 g):
Calorías 139 (24 % de grasa) • Carbohidratos 24 g • Proteínas 3 g • Grasa 4 g • Grasa saturada 2 g • Colesterol 38 mg • Sodio 172 mg • Calcio 8 mg
Fibra 1 g

48
Pan multigrano
Programa: GLUTEN FREE (sin gluten)
Opción de inicio diferido: sí: no
Rinde una barra de 1½ libras (680 g)
1 taza (235 ml) de agua, a temperatura ambiente
4 cucharadas (55 g) de mantequilla sin sal, a temperatura ambiente, en pedazos de ½ pulgada (1.5 cm)
3 huevos grandes, a temperatura ambiente
1¼ cucharaditas de sal kosher
3 cucharadas de azúcar granulada
2 tazas (250 g) de harina sin gluten*
1 taza (105 g) de harina de avena
¼ taza (50 g) de semillas de linaza en polvo
2 cucharadas de cáscara de psyllium (psilio) en polvo**
2 cucharaditas de levadura seca activa, levadura instantánea o levadura para máquina para hacer pan
1. Colocar todos los ingredientes en el molde (con la paleta amasadora puesta), en el orden indicado. Colocar el molde en la máquina para hacer pan
Cuisinart
®
.
2. Presionar el botón PROG y elegir el programa “GLUTEN FREE” (pan sin gluten). Presionar el botón START/STOP para iniciar el ciclo de preparación.
3. Si desea, cuando escuche la señal que indica que es tiempo de sacar la paleta amasadora, presionar el botón START/STOP, sacar la masa y la paleta
amasadora, dar forma a la masa y volver a colocarla en el molde. Presionar el botón START/STOP para continuar.
4. Al final del ciclo, sacar el pan de la máquina, colocarlo en una rejilla y permitir que se enfríe por completo antes de rebanarlo.
* Hay una variedad de mezclas sin gluten, disponibles en la sección de pastelería de la mayoría de los supermercados. Si prefiere hacer su propia mezcla
sin gluten, puede usar los ingredientes siguientes: 1 taza (160 g) de harina de arroz integral; ½ taza (80 g) de harina de arroz blanco,
1
∕
3
de taza (40 g) de
harina de arrurruz y 3 cucharadas de almidón/fécula de tapioca.
** La cáscara de “psyllium” (psilio) en polvo está disponible en las secciones “pastelería” o “nutrición/salud” de los supermercados especializados (cerca de
los suplementos de fibra). Nota: no utilice cáscara de psyllium integral para hacer pan, o la textura del pan será muy diferente.
Información nutricional por rebanada de 2 onzas (55 g):
Calorías 105 (31 % de grasa) • Carbohidratos 16 g • Proteínas 2 g • Grasa 4 g • Grasa saturada 2 g • Colesterol 38 mg • Sodio 172mg • Calcio 7 mg • Fibra 1 g

49
Pan de canela
Programa: GLUTEN FREE (sin gluten)
Opción de inicio diferido: no
Rinde una barra de 1½ libras (680 g)
Masa:
1 taza (235 ml) de agua, a temperatura ambiente
4 cucharadas (55 g) de mantequilla sin sal, a temperatura ambiente, en pedazos de ½ pulgada (1.5 cm)
3 huevos grandes, a temperatura ambiente
1¼ cucharaditas de sal kosher
3 cucharadas de azúcar granulada
3¾ tazas (405 g) de harina sin gluten*
3 cucharadas de cáscara de psyllium (psilio) en polvo**
2 cucharaditas de levadura seca activa, levadura instantánea o levadura para máquina para hacer pan
Mezcla de canela:
¼ taza (50 g) de azúcar granulada
2 cucharaditas de canela en polvo
1. Colocar todos los ingredientes de la masa en el molde (con la paleta amasadora puesta), en el orden indicado. Colocar el molde en la máquina para
hacer pan Cuisinart
®
.
2. Presionar el botón PROG y elegir el programa “GLUTEN FREE” (pan sin gluten). Presionar el botón START/STOP para iniciar el ciclo de preparación.
3. Mientras la masa se está amasando y está leudando, colocar los ingredientes de la mezcla de canela en un tazón pequeño y batir para mezclar;
reservar.
4. Cuando escuche la señal que indica que es tiempo de sacar la paleta amasadora, presionar el botón START/STOP y sacar la masa y la paleta
amasadora. Colocar la masa sobre una encimera generosamente enharinada con harina sin gluten (la mezcla o harina de arroz blanco). Estirar la masa
para formar un rectángulo de aproximadamente
¼ de pulgada (5 mm) de grueso por 16 pulgadas (40 cm) de largo. Rociar la superficie entera de la
masa con la mezcla de canela. Enrollar la masa a la ancho, formando un rollo apretado. Meter las extremidades por debajo de la masa y colocar el pan
en el molde (sin la paleta amasadora puesta). Presionar el botón START/STOP para continuar.
5. Al final del ciclo, sacar el pan de la máquina, colocarlo en una rejilla y permitir que se enfríe por completo antes de rebanarlo.
CONTINÚA EN LA PÁGINA SIGUIENTE...

50
* Hay una variedad de mezclas sin gluten multiuso, disponibles en la sección de pastelería de la mayoría de los supermercados. Si prefiere hacer su propia
mezcla sin gluten, puede usar los ingredientes siguientes: 1 taza (160 g) de harina de arroz integral, 1 taza (160 g) de harina de arroz blanco, ½ de taza
(60 g) de harina de arrurruz y ¼ de taza (30 g) de almidón/fécula de tapioca.
** La cáscara de “psyllium” (psilio) en polvo está disponible en las secciones “pastelería” o “nutrición/salud” de los supermercados especializados (cerca de
los suplementos de fibra). Nota: no utilice cáscara de psyllium integral para hacer pan, o la textura del pan será muy diferente.
Información nutricional por rebanada de 2 onzas (55 g):
Calorías 135 (24 % de grasa) • Carbohidratos 23 g • Proteínas 2 g • Grasa 4 g • Grasa saturada 2 g • Colesterol 38 mg • Sodio 172 mg • Calcio 8 mg
Fibra 1 g

51
Masa de pizza
Programa: GLUTEN FREE (sin gluten)
Opción de inicio diferido: no
Rinde 2 libras (910 g) de masa, suficiente como para preparar dos pizzas de 12 pulgadas (22 cm) o cuatro pizzas personales de 6
pulgadas (15 cm)
1¼ tazas (295 ml) de agua, a temperatura ambiente
¼ taza (60 ml) de aceite de oliva
2 cucharaditas de azúcar granulada
2 cucharaditas de sal kosher
1 taza (125 g) de harina de arroz integral
1 taza (125 g) de harina de arroz blanco
½ taza (60 g) de harina de arrurruz
1
/3 taza (65 g) de semillas de linaza en polvo
1
/3 taza (40 g) de harina de quinua
¼ taza (30 g) de harina de tapioca
3 cucharadas de cáscara de psyllium (psilio) en polvo**
2½ cucharaditas de polvo de hornear
1 cucharadita de levadura seca activa, levadura instantánea o levadura para máquina para hacer pan
Aceite de oliva para cepillar la masa
Cobertura de pizza deseada
1. Colocar una rejilla del horno en el tercio inferior y una en el medio. Precalentar el horno a 400 °F (200°C).
2. Colocar todos los ingredientes en el molde (con la paleta amasadora puesta), en el orden indicado. Colocar el molde en la máquina para hacer pan Cuisinart
®
.
3. Presionar el botón PROG y elegir el programa “GLUTEN FREE” (pan sin gluten). Presionar el botón START/STOP para iniciar el ciclo de preparación.
4. Cuando escuche la señal que indica que es tiempo de sacar la paleta amasadora, presionar el botón START/STOP hasta que el pitido se detenga para
parar el proceso de fabricación de la masa.
5. Sacar la masa del molde y estirarla para darle el tamaño deseado. Esta receta rinde suficiente masa como para preparar dos pizzas de 12 pulgadas
(22 cm) o cuatro pizzas de 6 pulgadas (15 cm). Si no utiliza toda la masa, refrigere o congele la masa restante.
La masa se conservará en el
refrigerador por hasta 24 horas, o en el congelador por hasta un mes.
CONTINÚA EN LA PÁGINA SIGUIENTE...

52
6. Cepillar la orilla de la masa con aceite de oliva. Hornear, en la posición inferior. Hornear por 15 minutos, o hasta que la orilla empiece a ponerse firme
pero no se dore. Sacar la masa del horno y agregar la cobertura deseada. Regresar la masa al horno, esta vez en la posición superior. Hornear por 10
minutos adicionales, hasta que la masa esté dorada y que la cobertura esté caliente.
* La cáscara de “psyllium” (psilio) en polvo está disponible en las secciones “pastelería” o “nutrición/salud” de los supermercados especializados (cerca de
los suplementos de fibra). Nota: no utilice cáscara de psyllium integral para hacer pan, o la textura del pan será muy diferente.
Información nutricional por porción (basada en 12 porciones):
Calorías 194 (30 % de grasa) • Carbohidratos 31 g • Proteínas 3 g • Grasa 7 g • Grasa saturada 1 g • Colesterol 0 mg • Sodio 484 mg • Calcio 21 mg • Fibra 3 g

53
Barra o “boule” de pan de masa fermentada
Programa: ARTISAN DOUGH (pan artesanal)
Rinde una barra o “boule” de 1½ libras (680 g)
3 cucharadas de agua, enfriada
2 tazas (400 g a 475 g) de masa madre, a temperatura ambiente
2½ tazas (340 g) de harina para hacer pan
1 cucharadita de azúcar granulada
1½ cucharaditas de sal kosher
2 cucharaditas de levadura seca activa, levadura instantánea o levadura para máquina para hacer pan
Harina de maíz para espolvorear (para la bola solamente)
1. Colocar todos los ingredientes (excepto la harina de maíz) en el molde (con la paleta amasadora puesta), en el orden indicado. Colocar el molde en la
máquina para hacer pan Cuisinart
®
.
2. Presionar el botón PROG y elegir el programa “ARTISAN DOUGH” (pan artesanal). Presionar el botón START/STOP para iniciar el ciclo de preparación.
3. Al final del ciclo, puede elegir entre hacer una barra o una bola (“boule”). Para hacer una barra, dejar la masa en la máquina (sacar la paleta
amasadora), elegir el programa BAKE (horneado) y fijar el tiempo en 60 minutos.
4. Para hacer una bola (“boule”), sacar la masa del molde y colocarla en una superficie ligeramente enharinada. Formar una bola de 10 pulgadas (25 cm)
de diámetro y cubrir sin apretar con papel film/plástico. Dejar reposar por 20 a 30 minutos. Poner la rejilla del horno en el centro del mismo y precalentar
el horno a 425°F (180°C).
5. Colocar la masa sobre una placa para horno forrada con papel sulfurizado ligeramente enharinado con harina de maíz. Espolvorear ligeramente
con harina. Usando un cuchillo serrado, cortar una “X” de ¼ de pulgada (0.5 cm) de profundidad en la parte superior de la bola. Hornear por 25 a
30 minutos, hasta dorarse (el pan debería sonar huevo al golpearlo). Dejar enfriar sobre una rejilla. Nota: el pan es más fácil de cortar cuando está
totalmente frío.
* Puede comprar masa madre en línea o hacerla en casa. Tenga presente que cuanto más vieja la masa madre, más sabroso será el pan. Para preparar su
propia masa madre, véase la receta a continuación.
Información nutricional por rebanada de 2 onzas (55 g):
Calorías 81 (1 % de grasa) • Carbohidratos 18 g • Proteínas 3 g • Grasa 0 g • Grasa saturada 0 g • Colesterol 0mg • Sodio 195 mg • Calcio 1 mg • Fibra 1 g

54
MASA MADRE
4 onzas* (115 g) de agua, a temperatura ambiente
2 onzas* (55 g) de harina común
2 onzas* (55 g) de harina de trigo integral
1. Colocar el agua y la harina en un tazón de vidrio o de cerámica. Revolver hasta que la mezcla esté suave, y luego cubrir sin apretar con papel film/
plástico o una toalla de cocina humedecida.
2. Dejar reposar a temperatura ambiente, sin moverlo, por 24 horas. Después de 24 horas, revisar la masa madre. Agregar 4 onzas (120 ml) de agua y 4
onzas (115 g) de harina; revolver hasta que esté suave. Cubrir y dejar reposar otra vez. Repetir este proceso por 5 días.
3. Después de 5 días, la masa madre debería estar lista. Habrá leudado al doble de su volumen, tendrá burbujas de varias tallas, y tendrá un olor dulce a
levadura. Revolver bien, sacar la mitad de la masa madre (tirarla o regalarla a otra persona), y luego agregar 2 onzas (60 ml) de agua y 2 onzas (55 g)
de harina. Revolver hasta que la mezcla esté suave.
4. Ahora puede usar la masa madre para hacer pan. Si no la usa inmediatamente, refrigerarla. Nota: deberá “nutrir” la masa madre una vez por semana,
agregándole 2 onzas (60 ml) de agua y 2 onzas (55 g) de harina, para mantenerla viva. Siempre llevarla a temperatura ambiente por 12 a 24 horas
antes de usarla en una receta.
* Las cantidades indicadas están en peso, no en volumen. Pesar los ingredientes de la masa madre es la mejor manera de asegurar resultados perfectos,
pero si no tiene balanzas/básculas de cocina, puede medir los ingredientes con un vaso medidor. Utilice ½ taza (120 ml) de agua, ½ taza menos 1
cucharada (55 g) de harina común y ½ taza menos 1½ cucharadas (110 g) de harina de trigo integral. Para medir ingredientes secos, llene el vaso
medidor con una cuchara y luego nivele el contenido con el filo de un cuchillo o una espátula para asegurarse de que la cantidad es exacta. Nunca utilice
el vaso medidor para tomar los ingredientes directamente de la bolsa de harina. Al hacer esto, podría agregar una cucharada extra del ingrediente. No
apisone/compacte los ingredientes.

55
Ciabatta
Programa: ARTISAN DOUGH (pan artesanal)
Rinde una barra de 1½ libras (680 g)
Masa madre rápida:
¾ taza (100 g) de harina para hacer pan
½ taza (120 ml) de agua
1 pizca de levadura seca activa o instantánea
Masa:
Masa madre rápida fermentada
¾ taza (175 ml) de agua
3 cucharadas de aceite de oliva
2½ tazas (340 g) de harina para hacer pan
1½ cucharaditas de sal kosher
2 cucharaditas de levadura seca activa, levadura instantánea o levadura para máquina para hacer pan
1. Preparar la masa madre rápida: colocar la harina, el agua y la levadura en un tazón grande. Mezclar hasta obtener una mezcla suave. Cubrir sin apretar
con papel film/plástico o una toalla de cocina húmeda.
Dejar reposar a temperatura ambiente por una noche, o hasta 24 horas, hasta que se fermente. Tendrá pequeñas burbujas y un olor agrio agradable.
2. Colocar todos los ingredientes de la masa, empezando con la masa madre rápida, en el molde (con la paleta amasadora puesta), en el orden indicado.
Colocar el molde en la máquina para hacer pan Cuisinart
®
.
3. Presionar el botón PROG y elegir el programa “ARTISAN DOUGH” (pan artesanal). Presionar el botón START/STOP para iniciar el ciclo de preparación.
4. Al final del ciclo, colocar la masa sobre una placa para horno forrada con papel sulfurizado. Formar una barra ovalada de aproximadamente 12 pulgadas
(30 cm) de largo.
Cubrir sin apretar con papel film/plástico y dejar reposar por 20 minutos.
5. Poner la rejilla del horno en el centro del mismo y precalentar el horno a 425°F (220°C). Cuando el horno esté caliente, quitar el papel film/plástico de
la masa y espolvorearla ligeramente con harina. Hornear por aproximadamente 30 minutos, hasta dorarse (el pan debería sonar huevo al golpearlo).
Dejar enfriar sobre una rejilla. Nota: el pan es más fácil de cortar cuando está totalmente frío.
Información nutricional por rebanada de 2 onzas (55 g):
Calorías 63 (21 % de grasa) • Carbohidratos 16 g • Proteínas 3 g • Grasa 2 g • Grasa saturada 0 g • Colesterol 0mg • Sodio 194 mg • Calcio 1mg • Fibra 1g

56
“Baguettes” francesas
Programa: DOUGH (masa)
Rinde 1½ libras (680 g) de masa, suficiente para 2 “baguettes”
1 taza + 2 cucharadas (265 ml) de agua, a temperatura ambiente
1½ cucharaditas de sal kosher
¾ cucharadita de azúcar granulada
3 tazas (410 g) de harina para hacer pan
2 cucharadas de germen de trigo
1¾ cucharaditas de levadura seca activa, levadura instantánea o levadura para máquina para hacer pan
Harina de maíz para espolvorear
1. Colocar todos los ingredientes (excepto la harina de maíz) en el molde (con la paleta amasadora puesta), en el orden indicado. Colocar el molde en la
máquina para hacer pan Cuisinart
®
.
2. Presionar el botón PROG y elegir el programa “DOUGH” (masa). Presionar el botón START/STOP para iniciar el ciclo de preparación.
3. Al final del ciclo, sacar la masa del molde y colocarla sobre una superficie ligeramente enharinada. Aplastar la masa para desinflarla, cubrirla sin apretar
con papel film/plástico y dejar reposar por 10 minutos.
4. Dividir la masa en dos porciones iguales. Formar una “baguette” de 12 pulgadas (30 cm) de largo con cada porción y colocarlas sobre una placa para
horno enharinada con harina de maíz. Cubrir sin apretar con papel film/plástico y dejar leudar por 30 a 40 minutos. Mientras tanto, colocar una charola
en la rejilla inferior del horno y llenarla con agua caliente. Precalentar el horno a 425°F (220°C).
5. Antes de hornear, espolvorear ligeramente la masa con harina. Usando un cuchillo serrado, hacer 4 cortes diagonales de ¼ de pulgada (0.5 cm) de
profundidad en la parte superior de cada pan. Hornear por 25 a 30 minutos, hasta dorarse (el pan debería sonar huevo al golpearlo). Dejar enfriar sobre
una rejilla. Nota: el pan es más fácil de cortar cuando está totalmente frío.
Información nutricional por rebanada de 2 onzas (55 g):
Calorías 70 (1 % de grasa) • Carbohidratos 15 g • Proteínas 2 g • Grasa 0 g • Grasa saturada 0 g • Colesterol 0 mg • Sodio 191 mg • Calcio 1mg • Fibra 1g

57
Palitos de pan de queso Cheddar
Programa: DOUGH (masa)
Rinde aproximadamente 30 palitos de pan
¾ taza (175 ml) de agua, a temperatura ambiente
1
⁄
3
taza (80 ml) de aceite de oliva + 1 cucharada para cepillar
1½ cucharaditas de sal kosher
½ cucharadita de azúcar granulada
3 tazas (410 g) de harina para hacer pan
1 taza (120 g) de queso Cheddar fuerte, triturado
1 cucharadita de páprika
2¼ cucharaditas de levadura seca activa, levadura instantánea o levadura para máquina para hacer pan
1. Colocar todos los ingredientes (excepto 1 cucharada del aceite de oliva) en el molde (con la paleta amasadora puesta), en el orden indicado. Colocar el
molde en la máquina para hacer pan Cuisinart
®
.
2. Presionar el botón PROG y elegir el programa “DOUGH” (masa). Presionar el botón START/STOP para iniciar el ciclo de preparación.
3. Al final del ciclo, sacar la masa del molde y colocarla sobre una superficie ligeramente enharinada. Aplastar para desinflar. Forrar dos placas para horno
con papel sulfurizado.
4. Estirar la masa para formar un rectángulo de aproximadamente ¼ de pulgada (5 mm) de grueso por 10 pulgadas (25 cm) a 22 pulgadas (55 cm) de
largo (estirar la masa con rodillo de la izquierda a la derecha). Usando un cortador de pizza o un cuchillo afilado, cortar la mas en tiras de ½ pulgada
(1.5 cm) de ancho. Torcer cada tira sobre sí misma para formar un espiral apretado. Disponer las tiras en las placas preparadas, dejando un espacio de
½ a 1 pulgada (1.5 cm a 2.5 cm) entre ellas. Cubrir sin apretar con papel film/plástico y dejar reposar por 30 minutos.
5. Poner la rejilla del horno en la posición superior y precalentar el horno a 375 °F (190 °C).
6. Después del reposo, cepillar las tiras con aceite de oliva y hornearlas por 15 a 20 minutos, girando las placas a la mitad del tiempo.
7. Dejar enfriar ligeramente antes de servir.
Información nutricional por palito de pan:
Calorías 61 (26 % de grasa) • Carbohidratos 9 g • Proteínas 3 g • Grasa 2 g • Grasa saturada 1 g • Colesterol 4 mg • Sodio 142 mg • Calcio 27 mg • Fibra 1 g

58
Masa de pizza
Programa: DOUGH (masa)
Rinde 1½ libras (680 g) de masa
1 taza (235 ml) de agua, a temperatura ambiente
1 cucharadita de miel
1½ cucharaditas de sal kosher
1½ cucharadas de aceite de oliva virgen extra
2
2
⁄3 tazas (365 g) de harina para hacer pan*
½ taza + 1 cucharada (125 g) de harina de trigo integral*
1¾ cucharaditas de levadura seca activa, levadura instantánea o levadura para máquina para hacer pan
1. Colocar todos los ingredientes en el molde (con la paleta amasadora puesta), en el orden indicado. Colocar el molde en la máquina para hacer pan
Cuisinart
®
.
2. Presionar el botón PROG y elegir el programa “DOUGH” (masa). Presionar el botón START/STOP para iniciar el ciclo de preparación.
3. Al final del ciclo, sacar la masa del molde y seguir la receta de su pizza favorita (o véase nuestra deliciosa receta de pizza margarita en la página 56).
*Si desea, puede sustituir la harina integral con harina para hacer pan.
Información nutricional por porción (basada en 16 porciones):
Calorías 95 (13 % de grasa) • Carbohidratos 13 g • Proteínas 2 g • Grasa 1 g • Grasa saturada 0 g • Colesterol 0 mg • Sodio 218 mg • Calcio 2 mg • Fibra 1 g

59
Focaccia de hierbas
Programa: DOUGH (masa)
Rinde una focaccia de 12 x 8 pulgadas (30 cm x 20 cm)
Fondo de tarta:
1 taza + 2 cucharadas (265 ml) de agua, a temperatura ambiente
2 cucharadas + 1 cucharadita de aceite de oliva virgen extra
2¼ cucharaditas de hierbas italianas secas*
1½ cucharaditas de sal kosher
3 tazas (410 g) de harina para hacer pan
1½ cucharaditas de levadura seca activa, levadura instantánea o levadura para máquina para hacer pan Aceite de oliva para engrasar la placa
Harina de maíz para enharinar la placa
Cobertura:
3 cucharadas de aceite de oliva virgen extra
¾ cucharadita de sal kosher
1
⁄3 taza (35 g) de queso Parmesano rallado
¼ taza (35 g) de hierbas frescas picadas (cualquier combinación: perejil, albahaca, orégano, tomillo o mejorana)
1. Colocar todos los ingredientes del pan en el molde (con la paleta amasadora puesta), en el orden indicado. Colocar el molde en la máquina para hacer pan Cuisinart
®
.
2. Presionar el botón PROG y elegir el programa “DOUGH” (masa). Presionar el botón START/STOP para iniciar el ciclo de preparación.
3. Al final del ciclo, sacar la masa del molde y colocarla sobre una superficie ligeramente enharinada. Aplastar para desinflar y dejar reposar por 10
minutos antes de continuar.
4. Engrasar una charola para hornear con aceite de oliva y espolvorear con harina de maíz. Estirar la masa hasta que tenga el tamaño deseado y colocarla
en la charola. Cubrir sin apretar con papel film/plástico y dejar leudar en un lugar templado por 40 a 50 minutos, al doble de su volumen.
5. Poner la rejilla del horno en el centro del mismo y precalentar el horno a 450 °F (220°C). Mientras el horno se está precalentando, terminar de preparar
la focaccia. Con la punta de los dedos aceitada, presionar la masa para crear abolladuras de ½ pulgada (1.5 cm) de profundidad, 1 pulgada (2.5 cm)
aparte una de otra. Rociar con aceite de oliva. Espolvorear uniformemente con la sal, el queso Parmesano y las hierbas frescas. Hornear por 20 a 25
minutos, hasta esté muy dorada, hinchada y crujiente.
* Esta mezcla de hierbas está disponible en la sección de especias de la mayoría de los supermercados. Si prefiere hacer su propia mezcla, mezcle en
partes iguales albahaca seca, orégano, mejorana y tomillo y añada una pizca de ajo en polvo.
Información nutricional por porción (basada en 12 porciones):
Calorías 169 (32 % de grasa) • Carbohidratos 24 g • Proteínas 6 g • Grasa 1 g • Grasa saturada 1 g • Colesterol 3 mg • Sodio 487 mg • Calcio 47 mg * Fibra 1 g

60
“Pretzels”
Programa: DOUGH (masa)
Rinde 12 “pretzels”
1 taza (235 ml) de agua, a temperatura ambiente
2 cucharaditas de sal kosher
1 cucharada llena de azúcar rubia (azúcar de caña integral)
3¼ tazas (445 g) de harina para hacer pan
2¼ cucharaditas de levadura seca activa, levadura instantánea o levadura para máquina para hacer pan
2 tazas (475 ml) de agua
2 cucharadas de bicarbonato de sodio
Sal gruesa para rociar
1. Colocar 1 taza (235 ml) de agua, la sal, el azúcar, la harina y la levadura en el molde (con la paleta amasadora puesta). Colocar el molde en la máquina
para hacer pan Cuisinart
®
.
2. Presionar el botón PROG y elegir el programa “DOUGH” (masa). Presionar el botón START/STOP para iniciar el ciclo de preparación. Forrar dos placas
para horno con papel sulfurizado; reservar.
3. Al final del ciclo, sacar la masa del molde y colocarla sobre una superficie ligeramente enharinada. Dividir la masa en 12 porciones de aproximadamente
2 onzas (55 g); cubrir sin apretar con papel film/plástico. Trabajando con una bola a la vez, estirar la masa para formar una “soga” delgada. Dar forma
de “pretzel” a la soga y disponer este sobre las placa preparadas. Cubrir sin apretar con papel film/plástico y repetir con el resto de las bolas. Dejar
reposar por 20 a 30 minutos.
4. Colocar las 2 tazas (475 ml) de agua y el bicarbonato en un tazón pequeño.
5. Llenar una cacerola grande con agua y ponerla a calentar a fuego alto hasta que el agua hierva. Precalentar el horno a 425°F (180°C).
6. Después del reposo, colocar cuidadosamente los “pretzels” en el agua hirviendo, uno a la vez.
Hervir cada “pretzel” por 3 minutos, dándole la vuelta a la mitad del tiempo. Dejar escurrir los “pretzels” sobre una rejilla. Mojar cada “pretzel” en la
mezcla de agua con bicarbonato y colocarlos en la placa preparada.
7. Rociar cada “pretzel” con sal gruesa. Hornear por 15 a 20 minutos, hasta dorarse bien. Dejar enfriar ligeramente sobre una rejilla antes de servir.
Información nutricional por “pretzel”:
Calorías 115 (0 % de grasa) • Carbohidratos 25 g • Proteínas 4 g • Grasa 0 g • Grasa saturada 0 g • Colesterol 0 mg • Sodio 428 mg • Calcio 1 mg • Fibra 1 g

61
Pancitos de trigo integral con aceitunas negras
Programa: DOUGH (masa)
Rinde 12 pancitos
½ taza (120 ml) de leche entera, a temperatura ambiente
¼ taza + 2 cucharadas (90 ml) de agua, a temperatura ambiente
1 cucharada de aceite de oliva
½ cucharadita de sal kosher
1 cucharada (10 g) de azúcar granulada
1½ tazas (180 g) de harina de trigo integral
1½ tazas (205 g) de harina para hacer pan
½ taza (100 g) de aceitunas negras “Kalamata” deshuesadas, picadas grueso
1 cucharadita de hierbas provenzales (“Herbes de Provence”)
2¼ cucharaditas de levadura seca activa, levadura instantánea o levadura para máquina para hacer pan
1. Colocar todos los ingredientes en el molde (con la paleta amasadora puesta), en el orden indicado. Colocar el molde en la máquina para hacer pan
Cuisinart
®
.
2. Presionar el botón PROG y elegir el programa “DOUGH” (masa). Presionar el botón START/STOP para iniciar el ciclo de preparación.
3. Al final del ciclo, sacar la masa del molde y colocarla sobre una superficie ligeramente enharinada. Forrar una placa para horno con papel sulfurizado.
4. Dividir la masa en 12 porciones iguales. Hacer rodar cada porción para formar una barra ovalada, colocarla en la placa preparada y cubrir sin apretar
con papel film/plástico. Dejar reposar por aproximadamente 30 minutos, al doble de su volumen. Precalentar el horno a 350 °F (180°C).
5. Usando un cuchillos serrado, hacer dos cortes pequeños en la parte superior de cada pancito. Rociar con un poco de harina de trigo integral. Hornear
por 15 a 20 minutos, hasta dorarse bien. Dejar enfriar sobre una rejilla antes de servir.
Nota: también puede dar a la masa forma de barra ovalada grande y hornearla por 10 minutos adicionales.
Información nutricional por pancito:
Calorías 147 (17 % de grasa) • Carbohidratos 26 g • Proteínas 5 g • Grasa 3 g • Grasa saturada 0 g • Colesterol 1 mg • Sodio 141 mg • Calcio 22 mg
Fibra 3 g

62
Nudos de pan al ajo, hierbas y queso
Programa: DOUGH (masa)
Rinde 12 nudos
Masa:
1 taza (235 ml) de agua, a temperatura ambiente
1½ cucharadas de aceite de oliva
1 cucharadita de sal kosher
3 tazas (410 g) de harina para hacer pan
¼ taza (25 g) de leche sin grasa/descremada en polvo
2 cucharadas de hojuelas de papa
2 cucharaditas de levadura seca activa, levadura instantánea o levadura para máquina para hacer pan
2 cucharaditas de ajo en polvo
Aliño:
2 cucharadas (30 g) de mantequilla sin sal
3 diente grande de ajo, finamente picado
1 cucharada de hierbas (orégano, tomillo y perejil) finamente picadas
¼ cucharadita de sal kosher
1. Colocar todos los ingredientes de la masa en el molde (con la paleta amasadora puesta), en el orden indicado. Colocar el molde en la máquina para
hacer pan Cuisinart
®
.
2. Presionar el botón PROG y elegir el programa “DOUGH” (masa). Presionar el botón START/STOP para iniciar el ciclo de preparación.
3. Al final del ciclo, sacar la masa del molde y colocarla sobre una superficie ligeramente enharinada. Rociar todos los lados de la masa con ajo en polvo.
Forrar una placa para horno con papel sulfurizado.
4. Dividir la masa en 12 porciones iguales; cubrir sin apretar con papel film/plástico. Formar una “soga” de 10 pulgadas (25 cm) de largo con cada porción
y hacer un nudo. Colocarlos en la bandeja preparada y cubrir sin apretar con papel film/plástico. Dejar reposar por aproximadamente 30 minutos.
Precalentar el horno a 350 °F (180°C).
5. Preparar el aliño: derretir la mantequilla a fuego medio, en una cacerola mediana. Cuando la mantequilla esté derretida, retirarla del fuego y agregar el
ajo picado, las hierbas y la sal. Reservar.
6. Hornear los nudos por 15 a 18 minutos, hasta dorarse ligeramente. Sacar del horno y cepillar inmediatamente con la mezcla de mantequilla/hierbas.
Dejar enfriar por 5 a 10 minutos antes de servir.
Información nutricional por nudo:
Calorías 148 (22 % de grasa) • Carbohidratos 25 g • Proteínas 5 g • Grasa 4 g • Grasa saturada 1 g • Colesterol 6 mg • Sodio 258 mg • Calcio 38 mg * Fibra 1 g

63
Pancitos de canela
Programa: DOUGH (masa)
Rinde 16 pancitos
Masa:
½ taza (120 ml) de leche baja en grasa/semidescremada, a temperatura ambiente
2 huevos grandes, a temperatura ambiente
4 cucharadas (55 g) de mantequilla sin sal, a temperatura ambiente
1
⁄3 taza (65 g) de azúcar granulada
¾ cucharadita de sal kosher
1 cucharadita de extracto natural de vainilla
3 tazas (410 g) de harina para hacer pan
1
⁄3 taza (65 g) de maicena
1¾ cucharaditas de levadura seca activa, levadura instantánea o levadura para máquina para hacer pan
Relleno:
1
⁄3 taza (65 g) de azúcar rubia (azúcar de caña integral)
3 cucharadas de azúcar granulada
2 cucharaditas de canela en polvo
Cobertura:
3 onzas (85 g) de queso crema, a temperatura ambiente
3 cucharadas (45 g) de mantequilla sin sal, a temperatura ambiente
¾ cucharadita de extracto natural de vainilla
1 taza + 2 cucharadas (130 g) de azúcar glasé, tamizado
2 cucharadas (30 ml) de leche baja en grasa/semidescremada
3 cucharadas (45 g) de mantequilla sin sal, derretida
Spray vegetal
1. Colocar todos los ingredientes de la masa en el molde (con la paleta amasadora puesta), en el orden indicado. Colocar el molde en la máquina para
hacer pan Cuisinart
®
.
2. Presionar el botón PROG y elegir el programa “DOUGH” (masa). Presionar el botón START/STOP para iniciar el ciclo de preparación.
3. Preparar el relleno, mezclando el azúcar y la canela. Preparar la cobertura: procesar los ingredientes de la cobertura con una procesadora de alimentos,
una batidora de pie o una batidora de mano Cuisinart
®
, hasta obtener una mezcla muy suave; reservar.
CONTINÚA EN LA PÁGINA SIGUIENTE...

64
4. Al final del ciclo, sacar la masa del molde, colocarla sobre una superficie ligeramente enharinada y aplastarla para desinflarla. Dividir la masa en 2
porciones iguales, cubrir sin apretar con papel film/plástico y dejar reposar por 10 minutos. Engrasar ligeramente una bandeja de 13 x 9 pulgadas (33 x
23 cm) con spray vegetal.
5. Estirar cada porción de masa para formar un rectángulo de 12 pulgadas (30 cm) de largo por ½ pulgada (1.5 cm) de grueso. Cepillar cada rectángulo
con mantequilla derretida, dejando un borde de 1 pulgada (2.5cm) en uno de los lados largos (cepillar las orillas de los otros bordes). Espolvorear
uniformemente con la mezcla de azúcar con canela. Enrollar la masa a lo ancho hacia el borde sin mantequilla, formando un rollo apretado. Pellizcar a
lo largo del lado largo para sellar. Usando un cuchillo serrado, cortar cada rollo en 8 rodajas. Colocar las rodajas en las bandejas preparadas, cubrir sin
apretar con papel film/plástico y dejar leudar por 30 minutos. Poner la rejilla del horno en el centro del mismo y precalentar el horno a 350 °F (180°C).
6. Hornear por 30 a 35 minutos, hasta que los rollos estén hinchados y ligeramente dorados.
7. Dejar enfriar por 20 a 25 minutos antes de glasear. Esparcir o rociar la cobertura, como prefiere.
Información nutricional por pancito:
Calorías 243 (28 % de grasa) • Carbohidratos 34 g • Proteínas 5 g • Grasa 8 g • Grasa saturada 5 g • Colesterol 43 mg • Sodio 161 mg
Calcio 44 mg • Fibra 1 g

65
Masa dulce básica
Programa: DOUGH (masa)
Rinde una barra de 1½ libras (680 g)
¼ taza + 2 cucharadas (90 ml) de agua, a temperatura ambiente
2 huevos grandes, a temperatura ambiente
½ cucharadita de sal kosher
¼ taza (60 ml) de crema agria, a temperatura ambiente
¼ taza (55 g) de mantequilla sin sal a temperatura ambiente, en pedacitos
¼ taza (50 g) de azúcar granulada
3 tazas (410 g) de harina para hacer pan
2¼ cucharaditas de levadura seca activa, levadura instantánea o levadura para máquina para hacer pan
1. Colocar todos los ingredientes en el molde (con la paleta amasadora puesta), en el orden indicado. Colocar el molde en la máquina para hacer pan
Cuisinart
®
. Presionar el botón PROG y elegir el programa “DOUGH” (masa). Presionar el botón START/STOP para iniciar el ciclo de preparación.
2. Al final del ciclo, sacar la masa del molde, colocarla sobre una superficie ligeramente enharinada, aplastarla para desinflarla y dejar reposar por 10
minutos antes de continuar.
Esta masa es perfecta para preparar sus panes dulces favoritos para el desayuno o el desayuno-almuerzo, tales como la trenza danesa rellena con queso
crema y mermelada de frambuesa en la página siguiente.
Información nutricional por porción (basada en 24 porciones):
Calorías 87 (27 % de grasa) • Carbohidratos 13 g • Proteínas 3 g • Grasa 2 g • Grasa saturada 2 g • Colesterol 22 mg • Sodio 57 mg • Calcio 4 mg • Fibra 1 g

66
Trenza danesa rellena con queso crema y mermelada de frambuesa
Programa: DOUGH (masa)
Rinde 2 trenzas danesas grandes
1 receta de masa dulce básica (ver la receta anterior)
6 onzas (170 g) de queso crema, a temperatura ambiente
3 cucharadas de azúcar glasé, tamizado
1 pizca de sal kosher
1 huevo grande, a temperatura ambiente
¾ cucharadita de extracto natural de vainilla
½ (120 ml) de mermelada de frambuesa sin semillas
Barniz de huevo: 1 huevo grande ligeramente batido + ½ cucharada de agua
Glaseado de vainilla (opcional):
¾ taza (90 g) de azúcar glasé, tamizado
½ cucharadita de extracto natural de vainilla
¼ taza (60 ml) de leche baja en grasa/semidescremada
1. Preparar la masa dulce básica de acuerdo con la receta. Forrar dos placas para horno con papel sulfurizado.
2. Mientras la masa está en la máquina, preparar el relleno de queso crema: colocar el queso crema, el azúcar, la sal, el huevo y la vainilla en el bol de
una procesadora de alimentos Cuisinart
®
equipada con cuchilla de metal. Procesar hasta obtener una mezcla muy suave. Refrigerar hasta el momento
de usar.
3. Dividir la masa en 2 porciones iguales. Formar un rectángulo de aproximadamente 14 x 10 pulgadas (35 cm x 25 cm) con cada porción y colocar
estos en las placas preparadas. Esparcir el relleno de queso crema en el centro de cada rectángulo, a lo largo. Cubrir el relleno con la mermelada de
frambuesas.
4. En cada lado del relleno, cortar la masa en tiras horizontales de ½ pulgada (1.5cm) de ancho. Empezando arriba, doblar las tiras por encima del
relleno de manera que las puntas de las tiras opuestas formen una “X”. Nota: cerciorarse de que las tiras opuestas se toquen en el centro. Continuar,
alternando las tiras, hasta llegar abajo. Precalentar el horno a 350 °F (180°C).
5. Cubrir la trenza danesa sin apretar con papel film/plástico y dejar leudar al doble de su volumen. Cepillar con huevo para barnizar. Hornear por 30 a 40
minutos, hasta que la corteza esté bien dorada y que el relleno esté cuajado.
CONTINÚA EN LA PÁGINA SIGUIENTE...

67
40+
DELICIOSAS
RECETAS
6. Preparar el glaseado de vainilla (opcional): colocar el azúcar glasé y la vainilla en un bol. Batir para revolver. Sin dejar de batir, agregar leche, unas
cuantas gotas a la vez, hasta conseguir un glaseado suave que pueda rociarse.
7. Sacar la trenza danesa del horno. Deslizar el papel sulfurizado y las trenzas en una rejilla, y luego jalar el papel de por debajo de la trenza (esto evitará
que la parte inferior de la trenza se ponga blanda). Dejar enfriar. Espolvorear con azúcar glasé o rociar con el glaseado de vainilla.
Información nutricional por porción (basado en 24 porciones, usando glaseado):
Calorías 152 (31 % de grasa) • Carbohidratos 23 g • Proteínas 5 g • Grasa 5 g • Grasa saturada 3 g • Colesterol 38 mg • Sodio 93 mg • Calcio 9 mg • Fibra 1 g

68
Mermelada de fresa y ruibarbo
Programa: JAM (mermelada)
Rinde aproximadamente 4 tazas (945 ml)
4 tazas (455 g) de fresas, limpias y cortadas en cuartos o a la mitad si son pequeñas
12 onzas (340 g) de ruibarbo fresco, en rodajas de ½ pulgada (1.5 cm)
1 taza (200 g) de azúcar granulada
1 cucharada de pectina en polvo
1 cucharadita de jugo de limón fresco
1 pizca de sal kosher
1
/3 taza (20 g) de albahaca fresca, finamente rebanada (opcional)
1. Colocar todos los ingredientes en el molde (con la paleta amasadora puesta), en el orden indicado. Colocar el molde en la máquina para hacer pan
Cuisinart
®
.
2. Presionar el botón PROG y elegir el programa “JAM” (mermelada). Presionar el botón START/STOP para iniciar el ciclo de preparación.
3. Para conseguir mejores resultados, raspar el molde 10 a 15 minutos después del inicio del programa.
4. Al final del ciclo, sacar la mermelada con una cuchara y colocarla en frascos limpios y secos. Dejar enfriar, y luego tapar. Conservar en el refrigerador
por hasta 3 semanas.
Información nutricional por porción (2 cucharadas):
Calorías 32 (2 % de grasa) • Carbohidratos 8 g • Proteínas 0 g • Grasa 0 g • Grasa saturada 0 g • Colesterol 0 mg • Sodio 6 mg • Calcio 12 mg • Fibra 1 g

69
Dulce de pera y jengibre
Programa: JAM (mermelada)
Rinde aproximadamente 3 tazas (710 ml)
4 peras medianas a grandes (aproximadamente 1¾ libras/795 g), peladas, descarozadas y cortadas en cubitos
1 cucharadita de jengibre fresco rallado
1 taza (200 g) de azúcar granulada
¼ taza (30 g) de pectina en polvo (1 paquete)
1 cucharada de jugo de limón fresco
2 cucharadas de jengibre cristalizado picado
1 pizca de sal kosher
1. Colocar todos los ingredientes en el molde (con la paleta amasadora puesta), en el orden indicado. Colocar el molde en la máquina para hacer pan
Cuisinart
®
.
2. Presionar el botón PROG y elegir el programa “JAM” (mermelada). Presionar el botón START/STOP para iniciar el ciclo de preparación.
3. Para conseguir mejores resultados, raspar el molde 10 a 15 minutos después del inicio del programa.
4. Al final del ciclo, sacar la mermelada con una cuchara y colocarla en frascos limpios y secos. Dejar enfriar, y luego tapar. Conservar en el refrigerador
por hasta 3 semanas.
Información nutricional por porción (2 cucharadas):
Calorías 57 (1 % de grasa) • Carbohidratos 15 g • Proteínas 0 g • Grasa 0 g • Grasa saturada 0 g • Colesterol 0 mg • Sodio 111 mg • Calcio 3 mg • Fibra 1 g

70
Mermelada de arándanos azules y lima
Programa: JAM (mermelada)
Rinde aproximadamente 4
1
⁄3 tazas (1 L)
6 tazas (850 g) de arándanos azules frescos
1¼ tazas (250 g) de azúcar granulada
1 cucharada de pectina en polvo
¼ taza (60 ml) de juego de lima/limón verde fresco
1 cucharadita de ralladura de lima/limón verde
1 pizca de sal kosher
1. Colocar todos los ingredientes en el molde (con la paleta amasadora puesta), en el orden indicado. Colocar el molde en la máquina para hacer pan
Cuisinart
®
.
2. Presionar el botón PROG y elegir el programa “JAM” (mermelada). Presionar el botón START/STOP para iniciar el ciclo de preparación.
3. Para conseguir mejores resultados, raspar el molde 10 a 15 minutos después del inicio del programa.
4. Al final del ciclo, sacar la mermelada con una cuchara y colocarla en frascos limpios y secos. Dejar enfriar, y luego tapar. Conservar en el refrigerador
por hasta 3 semanas.
Información nutricional por porción (2 cucharadas):
Calorías 43 (2 % de grasa) • Carbohidratos 11 g • Proteínas 0 g • Grasa 0 g • Grasa saturada 0 g • Colesterol 0 mg • Sodio 5 mg • Calcio 2 mg • Fibra 1 g

71
Mermelada de frutas del bosque
Programa: JAM (mermelada)
Rinde aproximadamente 5 tazas (1.2 L)
4 tazas (455 g) de fresas, limpias y cortadas en cuartos o a la mitad si son pequeñas
2 tazas (250 g) de frambuesas frescas
2 tazas (280 g) de arándanos azules frescos
1 taza (200 g) de azúcar granulada
1 cucharada de pectina en polvo
1 cucharadita de jugo de limón fresco
1. Colocar todos los ingredientes en el molde (con la paleta amasadora puesta), en el orden indicado. Colocar el molde en la máquina para hacer pan
Cuisinart
®
.
2. Presionar el botón PROG y elegir el programa “JAM” (mermelada). Presionar el botón START/STOP para iniciar el ciclo de preparación.
3. Para conseguir mejores resultados, raspar el molde 10 a 15 minutos después del inicio del programa.
4. Al final del ciclo, sacar la mermelada con una cuchara y colocarla en frascos limpios y secos. Dejar enfriar, y luego tapar. Conservar en el refrigerador
por hasta 3 semanas.
Información nutricional por porción (2 cucharadas):
Calorías 77 (17 % de grasa) • Carbohidratos 13 g • Proteínas 2 g • Grasa 1 g • Grasa saturada 1 g • Colesterol 3 mg • Sodio 116 mg • Calcio 16 mg • Fibra 0 g

72
Pan de banana y nueces
Programa: CAKE (bizcocho)
Opción “Delay Start” (inicio diferido): no
Rinde una barra de 2
1
/3 (1 kg)
Spray vegetal
½ taza (120 ml) de leche baja en grasa/semidescremada, a temperatura ambiente
½ taza (115 g) de mantequilla sin sal a temperatura ambiente, en pedacitos
2 huevos grandes, a temperatura ambiente
1 cucharadita de extracto natural de vainilla
3 bananas maduras, aplastadas
¾ cucharadita de sal kosher
1 taza (200 g) de azúcar granulada
2 tazas (250 g) de harina común
1 cucharadita de bicarbonato de sodio
¾ cucharadita de polvo de hornear
2
/3 taza (100 g) de nueces picadas
1. Engrasar el molde (con la paleta amasadora puesta) con spray vegetal.
2. Colocar todos los ingredientes en el molde, en el orden indicado, y colocar el molde en la máquina para hacer pan Cuisinart
®
.
3. Presionar el botón PROG y elegir el programa “CAKE” (bizcocho). Presionar el botón START/STOP para iniciar el ciclo de preparación.
4. Durante el amasado, raspar el molde con una espátula de caucho para asegurarse de que los ingredientes están completamente incorporados.
5. Al final del ciclo, sacar el pan de la máquina, colocarlo en una rejilla y permitir que se enfríe por completo antes de rebanarlo.
Información nutricional por porción (basada en 12 porciones):
Calorías 285 (38 % de grasa) • Carbohidratos 39 g • Proteínas 5 g • Grasa 12 g • Grasa saturada 5 g • Colesterol 52 mg • Sodio 296 mg • Calcio 30 mg • Fibra 2 g

73
Bizcocho de chocolate con crema agria
Programa: CAKE (bizcocho)
Opción “Delay Start” (inicio diferido): no
Rinde una barra de 1½ libras (680 g)
Spray vegetal
½ taza + 1 cucharada (130 ml) de leche baja en grasa/semidescremada, a temperatura ambiente
½ taza (120 ml) de crema agria, a temperatura ambiente
2 huevos grandes, a temperatura ambiente
¾ cucharadita de extracto natural de vainilla
½ taza (100 g) de azúcar granulada
1
⁄3 taza (65 g) de azúcar rubia (azúcar de caña integral)
1
1
/3 tazas (165 g) de harina común
¾ cucharadita de polvo de hornear
½ cucharadita de bicarbonato de sodio
½ cucharadita de sal kosher
¾ taza (130 g) de chispas de chocolate
1
/3 taza (100 g) de nueces picadas
1. Engrasar el molde (con la paleta amasadora puesta) con spray vegetal.
2. Colocar todos los ingredientes en el molde, en el orden indicado, y colocar el molde en la máquina para hacer pan Cuisinart
®
. Presionar el botón PROG
y elegir el programa “CAKE” (bizcocho). Presionar el botón START/STOP para iniciar el ciclo de preparación.
3. Durante el amasado, raspar el molde con una espátula de caucho para asegurarse de que los ingredientes están completamente incorporados.
4. Al final del ciclo, sacar el pan de la máquina, colocarlo en una rejilla y permitir que se enfríe por completo antes de rebanarlo
.
Información nutricional por porción (basada en 12 porciones):
Calorías 226 (34 % de grasa) • Carbohidratos 34 g • Proteínas 4 g • Grasa 9 g • Grasa saturada 41 g • Colesterol 38 mg • Sodio 199 mg • Calcio 33 mg • Fibra 1 g

74
Bizcocho de calabacín/calabacita
Programa: CAKE (bizcocho)
Opción “Delay Start” (inicio diferido): no
Rinde una barra de 1½ libras (680 g)
Spray vegetal
1
/3 taza (160 ml) de aceite vegetal
¾ taza (95 g) de calabacín/calabacita (“zucchini”) rallado
2 huevos grandes, a temperatura ambiente
1
⁄3 taza (65 g) de azúcar rubia (azúcar de caña integral)
3 cucharadas de azúcar granulada
1½ tazas (185 g) de harina común
¾ cucharadita de sal kosher
¾ cucharadita de canela en polvo
¼ cucharadita de pimienta de Jamaica en polvo
½ cucharadita de bicarbonato de sodio
½ cucharadita de polvo de hornear
1
/3 taza (40 g) de nueces picadas
1
/3 taza (50 g) de pasas
1. Engrasar el molde (con la paleta amasadora puesta) con spray vegetal.
2. Colocar todos los ingredientes en el molde, en el orden indicado, y colocar el molde en la máquina para hacer pan Cuisinart
®
. Presionar el botón PROG
y elegir el programa “CAKE” (bizcocho). Presionar el botón START/STOP para iniciar el ciclo de preparación.
3. Durante el amasado, raspar el molde con una espátula de caucho para asegurarse de que los ingredientes están completamente incorporados.
4. Al final del ciclo, sacar el pan de la máquina, colocarlo en una rejilla y permitir que se enfríe por completo antes de rebanarlo.
Información nutricional por porción (basada en 12 porciones):
Calorías 183 (43 % de grasa) • Carbohidratos 23 g • Proteínas 4 g • Grasa 9 g • Grasa saturada 1 g • Colesterol 31 mg • Sodio 228 mg
Calcio 15 mg • Fibra 1 g

75
Pan rallado
Una barra de 1 libra (455 g) rinde 4 tazas de pan rallado
1 barra de pan blanco básico
1. Romper la barra de pan en pedazos y dejarlos a temperatura ambiente, sin tapar, por una noche.
2. Colocar los pedazos en el bol de una procesadora de alimentos Cuisinart
®
equipada con cuchilla de metal. Pulsar varias veces, y luego procesar por 40
a 25 segundos, hasta que esté finamente rallado.
CONSEJO: para preparar pan rallado sazonado, agregar (antes de procesar) ¼ de cucharadita de cada uno de los ingredientes siguientes: orégano seco,
albahaca seca, ajo en polvo y cebolla en polvo.
Información nutricional por porción (2 cucharadas):
Calorías 48 (15 % de grasa) • Carbohidratos 9 g • Proteínas 1 g • Grasa 1 g • Grasa saturada 1 g • Colesterol 2 mg • Sodio 95 mg • Calcio 5 mg • Fibra 0 g
Picatostes
Una barra de 1 libra (455 g) rinde 6 tazas de picatostes
1 barra de pan blanco básico
1 a 2 cucharadas (10 ml a 20 ml) de aceite de oliva
1 pizca de sal kosher
1. Precalentar el horno a 325ºF (160°C).
2. Cortar el pan en cubitos de ½ pulgada (1.5 cm). Colocarlos en un tazón grande y agregar el aceite de oliva; revolver. Disponer los cubitos en una capa
sobre una (puede que necesite dos) placas para horno y rociar uniformemente con sal.
3. Hornear por aproximadamente 20 minutos, hasta dorarse bien.
Información nutricional por porción de ¼ de taza:
Calorías 69 (22 % de grasa) • Carbohidratos 12 g • Proteínas 2 g • Grasa 2 g • Grasa saturada 1 g • Colesterol 3 mg • Sodio 132 mg • Calcio 7 mg • Fibra 0 g

76
Tostadas francesas de pan Jalá
Rinde 8 a 10 rebanadas
8 huevos grandes
2 tazas (475 ml) de leche baja en grasa o regular
1 cucharada de extracto natural de vainilla
2 cucharadas de jarabe de arce/maple puro
1 cucharadita de canela en polvo
1 pizca de nuez moscada rallada
1 a 2 pizcas de sal kosher
8 a 10 rebanadas gruesas de pan Jalá
Mantequilla sin sal o aceite de coco para engrasar las placas
Azúcar glasé, para servir
Frutas frescas, para servir
1. Colocar los huevos, la leche, la vainilla, el jarabe de arce/maple, la canela, la nuez moscada y la sal en un tazón mediano. Batir para revolver y verter la
mezcla en un molde de 13 x 9 pulgadas (32 cm x 22cm).
2. Remojar la mitad del pan en la mezcla de leche, dando vuelta a las rebanadas para que ambos lados estén saturados.
3. Mientras el pan se está remojando, poner una plancha a calentar a fuego medio/medio-alto. Engrasar la plancha, usando aproximadamente 1 cucharada
(5 g) de mantequilla, dependiendo del tamaño de la plancha.
4. Colocar las rebanadas de pan remojadas en la plancha caliente. Cocinar por 3½ a 4 minutos por lado. Mientras las tostadas francesas se están
cocinando, poner a remojar las rebanadas restantes.
5. Retirar y reservar las tostadas francesas cocinadas; repetir con el resto del pan.
6. Para servir: espolvorear con azúcar glasé y servir con frutas frescas y jarabe de arce/maple si desea.
Información nutricional por rebanada (basada en 10 porciones):
Calorías 189 (37% de grasa) • Carbohidratos 23 g • Proteínas 6 g • Grasa 8 g • Grasa saturada 4 g • Colesterol 170 mg • Sodio 174 mg • Calcio 81 mg • Fibra 1 g

77
Budín de “brioche” con mermelada de frutas del bosque
Rinde 6 a 8 porciones
1 barra de pan Jalá (“Challah”) de 1 libra (455 g), en pedazos
4 huevos grandes, ligeramente batidos
¼ taza (50 g) de azúcar granulada
½ cucharadita de sal kosher
1½ tazas (355 ml) de leche entera
1½ tazas (355 ml) de crema líquida para batir (“heavy cream”)
2 cucharaditas de extracto natural de vainilla
1 taza (235 ml) de mermelada de frutas del bosque (hecha en casa o comprada)
Spray vegetal o mantequilla a temperatura ambiente
Crema batida fresca, para servir
1. Colocar los cubos de pan en un tazón grande; reservar.
2. Colocar los huevos, el azúcar y la sal en un tazón; batir hasta obtener una mezcla ligera y espumosa. Agregar la leche, la crema y la vainilla; seguir
batiendo para mezclar bien. Verter el líquido por encima del pan. Revolver suavemente para mezclar. Cubrir con papel film/plástico y refrigerar por 3 a
12 horas.
3. Llevar la mezcla a temperatura ambiente antes de hornear. Incorporar suavemente la mermelada a la mezcla.
4. Poner la rejilla del horno en el tercio inferior del horno y precalentar el horno a 350 °F (180°C).
5. Engrasar ligeramente un molde redondo de 9 pulgadas (22 cm) con spray vegetal o mantequilla. Colocar la mezcla en el molde.
Cubrir sin apretar con papel de aluminio y hornear por 1 hora, Quitar el papel de aluminio y hornear por 15 minutos adicionales, hasta que la parte
superior esté bien hinchada.
6. El budín está listo cuando la temperatura interna alcanza 160°F (71°C). Servir inmediatamente, con crema batida fresca.
Información nutricional por porción (basada en 8 porciones):
Calorías 507 (46 % de grasa) • Carbohidratos 56 g • Proteínas 10 g • Grasa 25 g • Grasa saturada 16 g • Colesterol 215 mg • Sodio 418 mg
Calcio 94 mg Fibra 1 g

1
78
Pizza Margarita
Rinde 9 porciones
3 cucharadas de aceite de oliva
Harina de maíz para enharinar la placa
1 receta de masa de pizza, a temperatura ambiente (página 28)
½ cucharadita de albahaca seca
¼ cucharadita de orégano seco
¼ cucharadita de hojuelas de pimiento rojo
1 lata de 28 onzas (795 g) de tomates enteros cocidos (sin piel), escurrida
½ cucharadita de sal kosher
8 onzas (225 g) de queso Mozzarella fresco, en 9 rebanadas
Hojas de albahaca, para decorar
1. Poner la rejilla del horno en el tercio superior del mismo y precalentar el horno a 450 °F (230 °C).
2. Engrasar una placa para horno con una cucharadita del aceite de oliva y espolvorear con la harina de maíz. Estirar la masa uniformemente de manera
que cubra el fondo de la placa preparada. Cubrir con papel film/plástico y dejar leudar por 30 minutos.
3. Preparar la salsa: colocar 2 cucharadas del aceite, la albahaca seca, el orégano y las hojuelas de pimiento rojo en una cacerola pequeña; poner a
calentar a fuego medio-alto. Cuando esté caliente, agregar cuidadosamente los tomates escurridos. Aplastar los tomates con un cucharón de madera
mientras se están cociendo. Cuando la mezcla empiece a hervir, reducir el fuego y seguir cociendo a fuego medio para mantener una ebullición suave.
Cocinar por 20 a 30 minutos para reducir ligeramente y desarrollar el sabor. Retirar del fuego y agregar la sal.
4. Después del leudado, cubrir la masa con la salsa, dejando una orilla de 1 pulgada (2.5 cm) todo alrededor. Disponer el queso en 3 filas de 3 rebanadas.
Cepillar la orilla de la pizza con el aceite restante. Hornear por aproximadamente 25 minutos, hasta que el queso esté derretido, que la masa esté
dorada, y que el fondo esté crujiente.
Información nutricional por porción:
Calorías 306 (36 % de grasa) • Carbohidratos 37 g • Proteínas 12 g • Grasa 12 g • Grasa saturada 4 g • Colesterol 13 mg • Sodio 750 mg • Calcio 70 mg Fibra 3 g