
1 EN
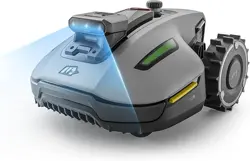
Dreame Roboticmower A1 Pro
User Manual

EN
.........................................................................P05~P39
DE
.........................................................................P40~P75
FR
.......................................................................P76~P113
IT
.....................................................................P114~P148
ES
.....................................................................P149~P183
NL
.....................................................................P184~P218

DECLARATION OF CONFORMITY
Dreame Trading (Tianjin) Co., Ltd.
No. 1-1-2112, Financial and Trade Center South Zone, 6975 Asia Road,
Tianjin Pilot Free Trade Zone (Dongjiang Bonded Port Zone),Tianjin 300461, P.R. China
On behalf of Dreame declare that the product
Description Robotic Lawnmower
Type MLLA7210
Function Cutting grass
Complies with the following Directives
2006/42/EC, 2014/30/EU, 2014/35/EU, 2011/65/EU&(EU)2015/863,2014/53/EU
Standards conform to,
EN 60335-1:2012+A11+A13+A1+A14+A2:2019+A15:2021, EN 50636-2-107:2015+A1+A2:2020+A3: 2021,
EN 60335-2-29:2004+A2+A11:2018, EN 62233:2008, EN 55014-1:2017+A11:2020,
EN 55014-2:2015, EN IEC 61000-3-2:2019, EN 6 1000-3-3:2013+A1:2019, EN ISO 3744:2005,
EN300 328V2.2.2, EN 301 489-1V2.2.3, EN 301 489-17 V3.2.4, EN IEC 62311:2020,
EN 61558-1:2005+A1:2009, EN 61558-2-16:2 009+A1:2013, EN 55011:2016+A11:2020,
EN 303 447 V1.1.1, EN 55032:2015+A11:2020, EN 55035:2017+A11:2020
Manufacturers authorized EU Representative
EUREP GmbH
Unterlettenweg 1a, 85051 Ingolstadt,Germany
eurep@eurep-gmbh.com
+49 841 8869 7744
No. 1-1-2112, Financial and Trade Center South Zone, 6975 Asia Road,
Tianjin Pilot Free Trade Zone (Dongjiang Bonded Port Zone),Tianjin 300461, P.R. China
Place of Issue: Suzhou
Date of Issue: 05/01/2024
Issuer's signature:
Name of Issuer: Bird Liu
Position of the issuer: Quality Director

5 EN
1 Safety Instructions ...................................................................................... P06
2 What's in the Box ....................................................................................... P10
3 Product Overview ...................................................................................... P11
4 Installation ................................................................................................ P12
5 Preparations before Use ............................................................................. P14
6 Map Your Garden ....................................................................................... P17
7 Operation .................................................................................................. P23
8 Dreamehome App ...................................................................................... P28
9 Maintenance .............................................................................................. P28
10 Battery .................................................................................................... P30
11 Winter Storage ......................................................................................... P34
12 Transport ................................................................................................. P34
13 Troubleshooting ....................................................................................... P35
14 Specications .......................................................................................... P38
Table of Contents
Original Instructions

6EN
1.1 General safety instructions
1 Safety Instructions
• Carefully read and understand the user manual before using the product.
• Only use the equipment recommended by Dreame with the product. Any other usage is incorrect.
• Do not allow children to be in the vicinity or play with the machine when it is operating.
• Do not use the product in areas where people are unaware of its presence.
• When manually operating the product with the Dreamehome App, do not run. Always walk, watch your steps
on slopes, and maintain balance at all times.
• Avoid using the product when there are people, especially children or animals, in the work area.
• If operating the product in public areas, place warning signs around the work area with the following text:
"Warning! Automatic lawn mower! Keep away from the machine! Supervise children!"
• Wear sturdy footwear and long trousers when operating the product.
• To prevent damage to the product and accidents involving vehicles and individuals, do not set work areas or
transport paths across public pathways.
• Do not touch moving hazardous parts, such as the blade disc, before it has come to a complete stop.
• Seek medical aid in case of injury or accidents.
• Set the product to OFF before clearing blockages, performing maintenance, or examining the product. If the
product vibrates abnormally, inspect it for damage before restarting. Do not use the product if any parts are
defective.
• Do not install the main cable in areas where the product will cut. Follow the instructions provided for cable
installation.
• Only use the charging station included in the package to charge the product. Incorrect use may result in
electric shock, overheating, or corrosive liquid leakage from the battery. In case of electrolyte leakage, ush with
water/neutralizing agent and seek medical aid if the corrosive liquid comes into contact with your eyes.
• When connecting the main cable to the power outlet, use a residual-current device (RCD) with a maximum
tripping current of 30 mA.
• Only use original batteries recommended by Dreame. The safety of the product cannot be guaranteed with
non-original batteries. Do not use non-rechargeable batteries.
• Keep extension cords away from moving hazardous parts to avoid damage to the cords which can lead to
contact with live parts.
• The illustrations used in this document are for reference only. Please refer to the actual products.
• Never allow children, persons with reduced physical, sensory or mental capabilities or lack of experience and
knowledge or people unfamiliar with these instructions to use the machine, local regulations may restrict the
age of the operator.
• Do not connect or touch a damaged cable until it is disconnected from the power outlet. If the cable becomes
damaged during operation, disconnect the plug from the power outlet. A worn or damaged cable increases
the risk of electrical shock and should be replaced by service personnel.
• Do not push the product forcefully or quickly, as this may damage the product.
• To maintain compliance with the RF exposure requirement, a separation distance of 35 cm between the device
and the human should be maintained.
• For the purposes of recharging the battery, only use the detachable supply unit provided with this appliance.
• Avoid installing the charging station in areas where people may trip over it.
• Do not install the charging station in areas where there is a risk of standing water.
• Do not install the charging station, including any accessories, within 60 cm/24 in of any combustible material.
Malfunctioning or overheating of the charging station and power supply can pose a re hazard.
1.2 Safety instructions for installation

7 EN
• Keep your hands and feet away from the rotating blades. Do not place your hands or feet near or below the
product when it is turned on.
• Do not lift or move the product when it is turned on.
• Use the park mode or set the product to OFF when there are people, especially children or animals, in the
work area.
• Ensure that there are no objects such as stones, branches, tools, or toys on the lawn. Otherwise, the blades
may be damaged when they come into contact with an object.
• Do not put objects on top of the product or charging station.
• Do not use the product if the STOP button is not functioning.
• Avoid collisions between the product and people or animals. If a person or animal comes in the path of the
product, stop it immediately.
• Always set the product to OFF when it is not in operation.
• Do not use the product simultaneously with a pop-up sprinkler. Utilize the Schedule function to ensure that the
product and pop-up sprinkler do not operate at the same time.
• Avoid placing a connection channel where pop-up sprinklers are installed.
• Do not operate the product in the presence of standing water in the work area, such as during heavy rain or
water pooling.
• Set the product to OFF when performing maintenance.
• After washing, ensure that the product is placed on the ground in its normal orientation, not upside down.
• Do not reverse the product to clean the chassis. If you do reverse it for cleaning purposes, make sure to restore
it to its proper orientation afterward. This precaution is necessary to prevent water from entering the motor and
potentially aecting normal operation.
Lithium-ion batteries can explode or cause a re if disassembled, short-circuited, exposed to water, re, or high
temperatures. Handle them with care, do not dismantle or open the battery, and avoid any form of electrical/
mechanical abuse. Store them away from direct sunlight.
1. Only use the battery charger and power supply provided by the Manufacturer. The use of an inappropriate
charger and power supply can cause electric shocks and / or overheating.
2. DO NOT ATTEMPT TO REPAIR OR MODIFY BATTERIES! Repair attempts may result in severe personal injury, due
to explosion or electrical shock. If a leak develops, released electrolytes are corrosive and toxic.
3. This appliance contains batteries that are only replaceable by skilled persons.
To avoid injuries, wear protective gloves when replacing the blades.
1.3 Safety instructions for operation
1.4 Safety instructions for maintenance
1.5 Battery safety
1.6 Residual risks
• Disconnect the plug from the charging station or remove the disabling device before cleaning or performing
maintenance on the charging station.
• Do not use a high-pressure washer or solvents to clean the product.
• For users in the USA/Canada: If installing the power supply outdoors, there is a risk of electric shock. Only
install it in a covered Class A GFCI receptacle (RCD) with a weatherproof enclosure, ensuring that the attachment
plug cap is inserted or removed.
8EN
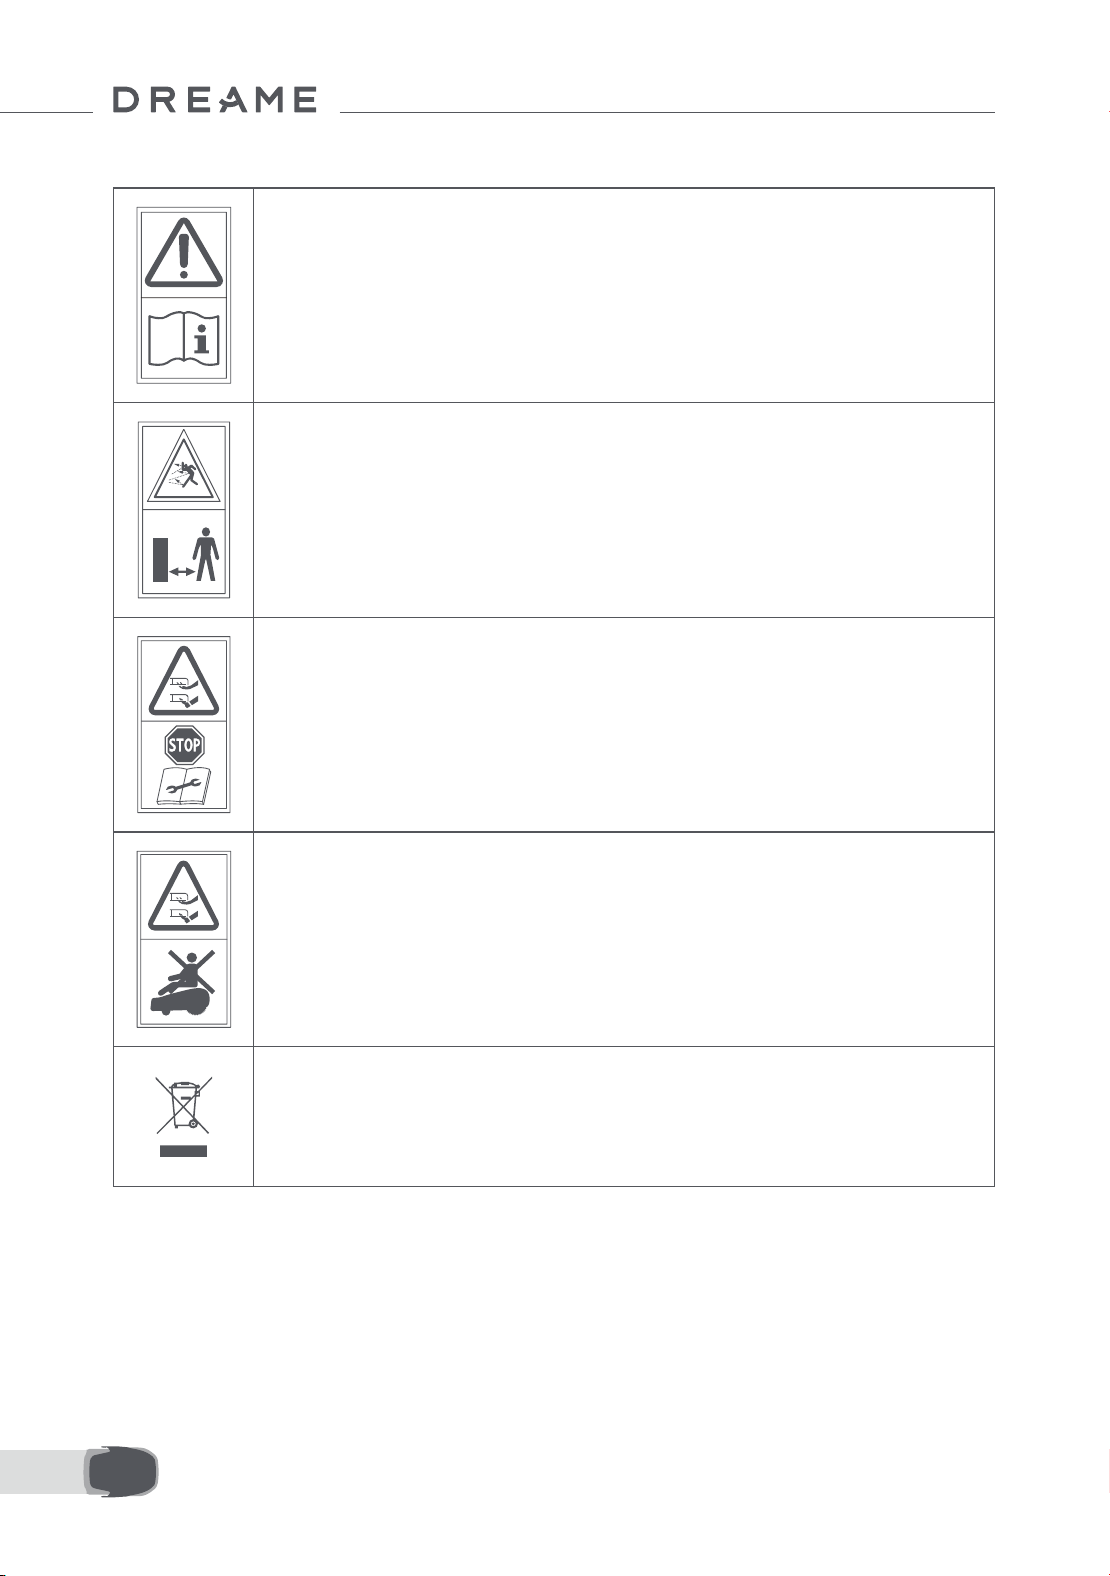
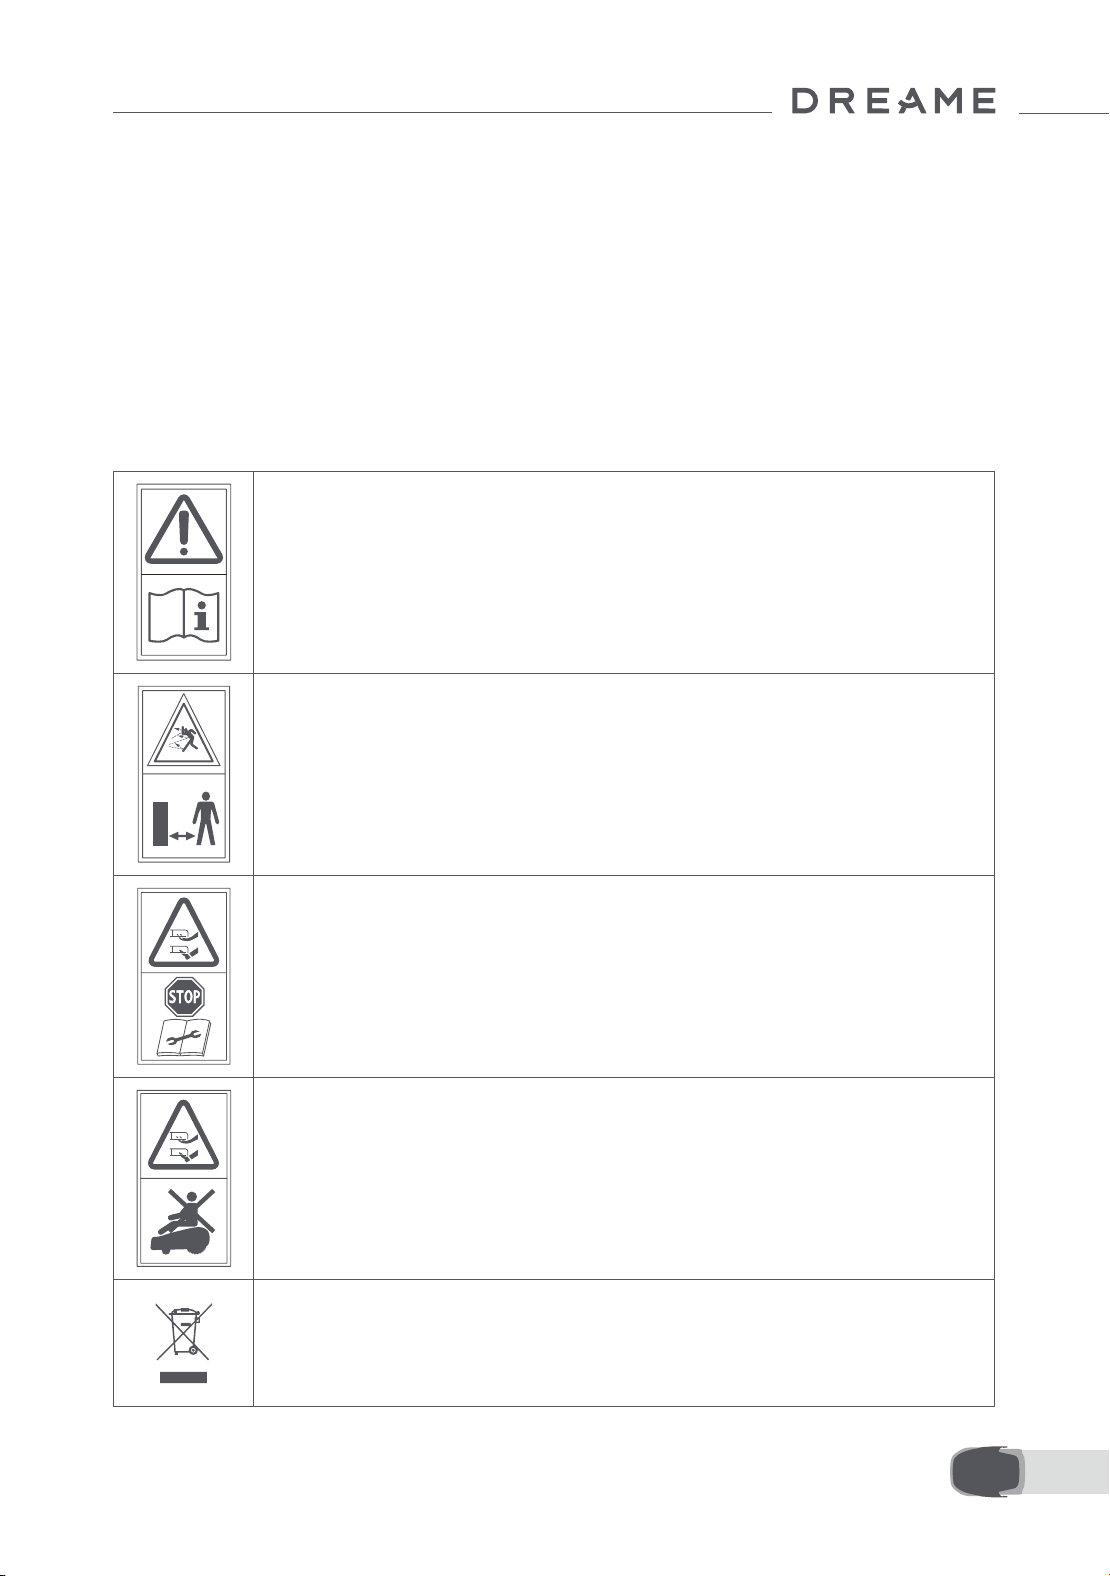
1.7 Symbols and Decals
WARNING –
Read user instructions before operating the machine.
WARNING –
Keep a safe distance from the machine when operating.
WARNING –
Operate the disabling device before working on or lifting the
machine.
WARNING –
Do not ride on the machine.
WARNING –
It is not permitted to dispose of this product as normal household
waste. Ensure that the product is recycled in accordance with local
legal requirements.
9 EN
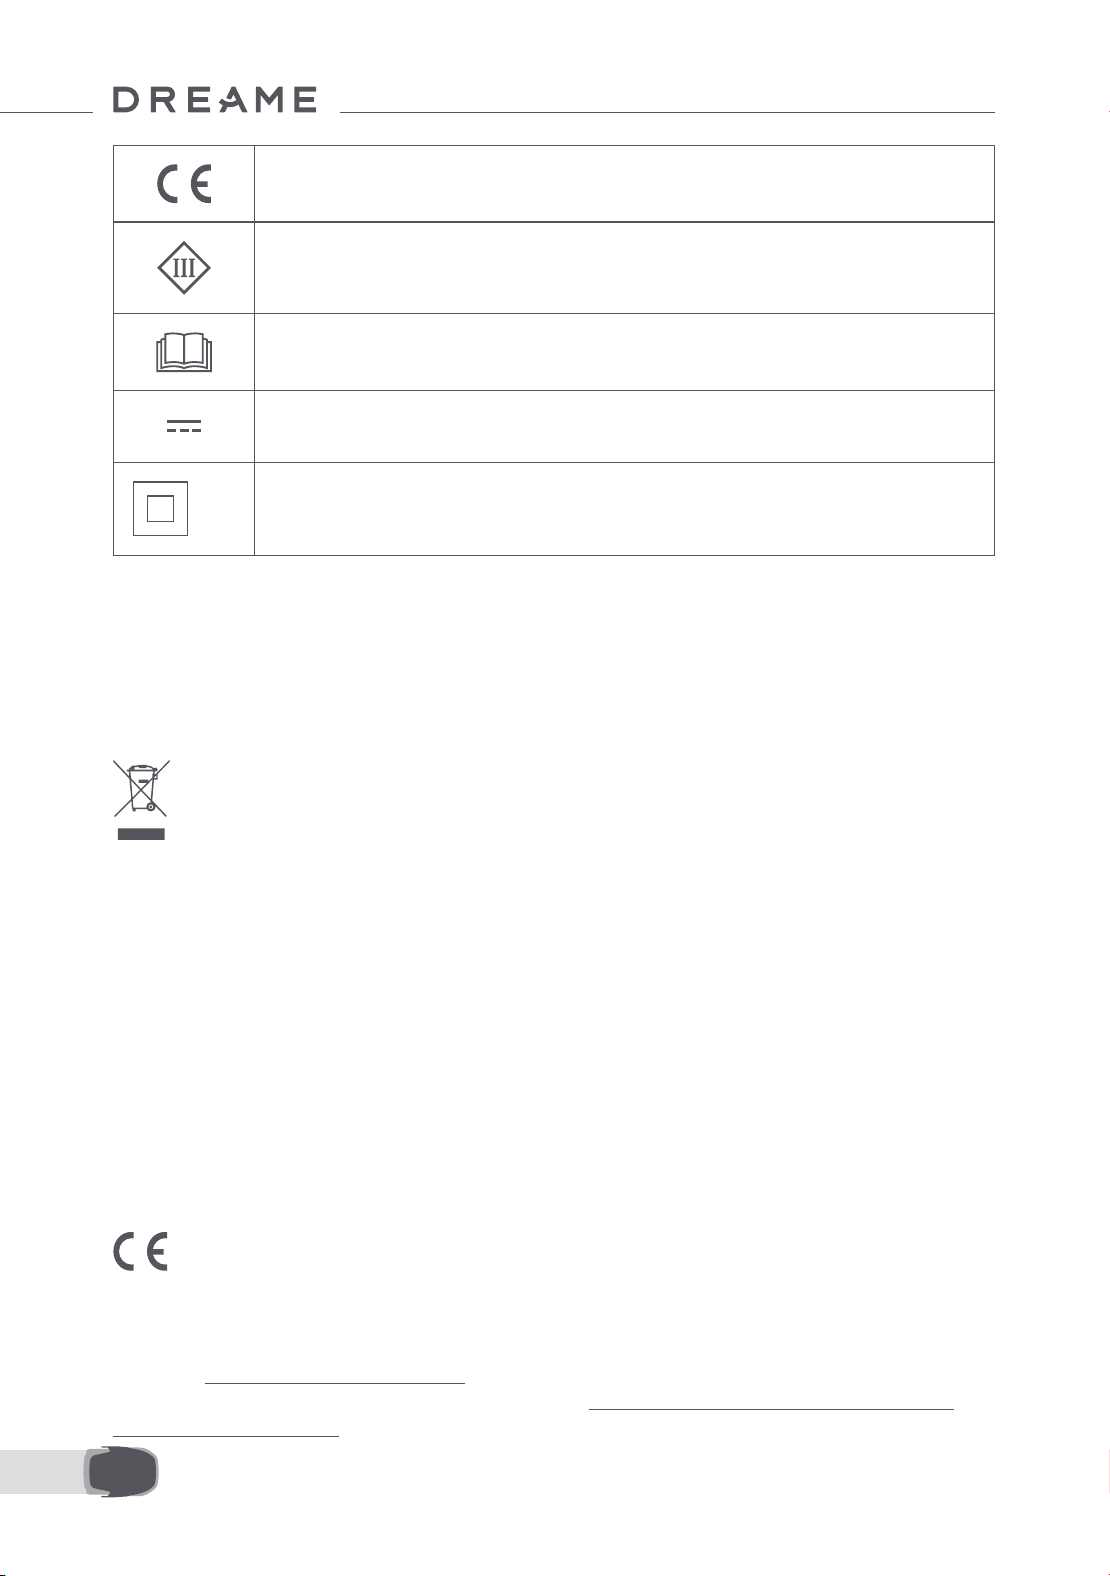
This product conforms to the applicable EC Directives.
Class Ⅲ
Before charging, read the instructions.
Direct current
Class Ⅱ
Hereby, Dreame Trading (Tianjin) Co., Ltd. declares that the radio equipment model Dreame Roboticmower
MLLA7210 is in compliance with Directive 2014/53/EU. The full text of the EU declaration of conformity is
available at the following internet address: https://global.dreametech.com
INTENDED USE
The garden product is intended for domestic lawn mowing. It is designed to mow often, maintaining a
healthier and better looking lawn than ever before. Depending on the size of your lawn, your mower may be
programmed to operate at any time or frequency. It is impossible for digging, sweeping or snow cleaning.
The product is in compliance with UK PSTI regulations, the full text of declaration of conformity is available
at the following internet address: https://global.dreametech.com
For detailed e-manual, please go to https://dreametech.zendesk.com/hc/en-us/categories/7968864195993-
User-Manual
10EN
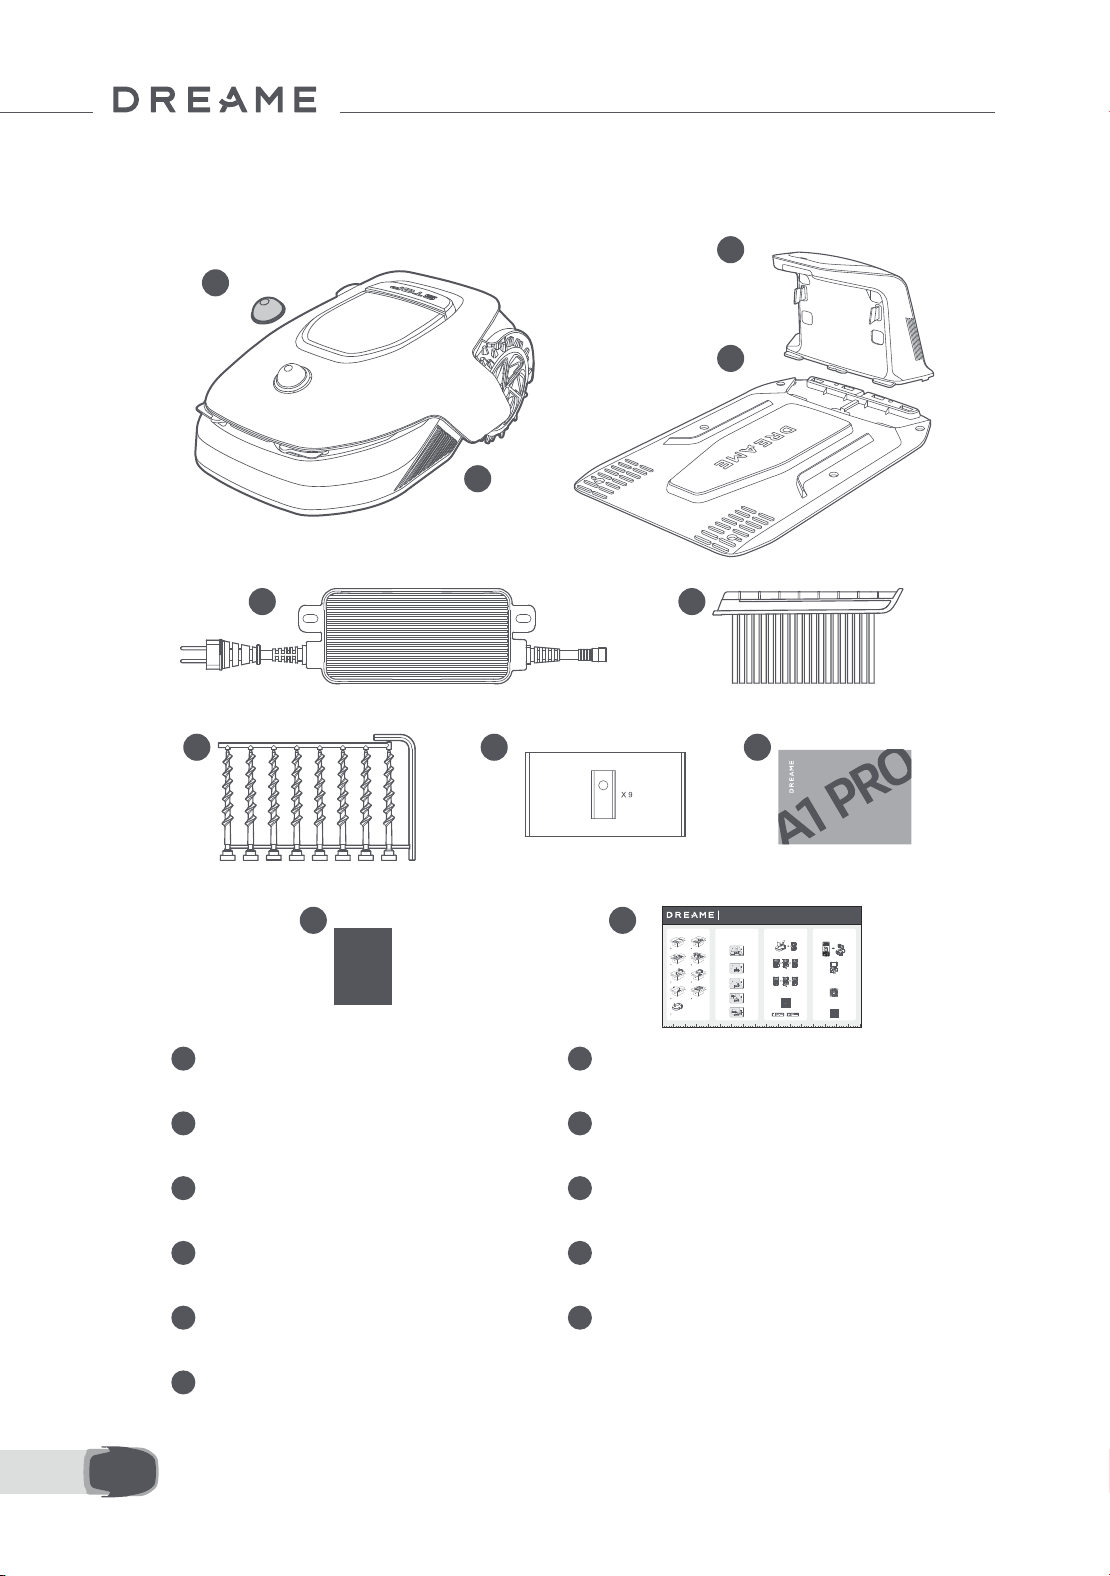
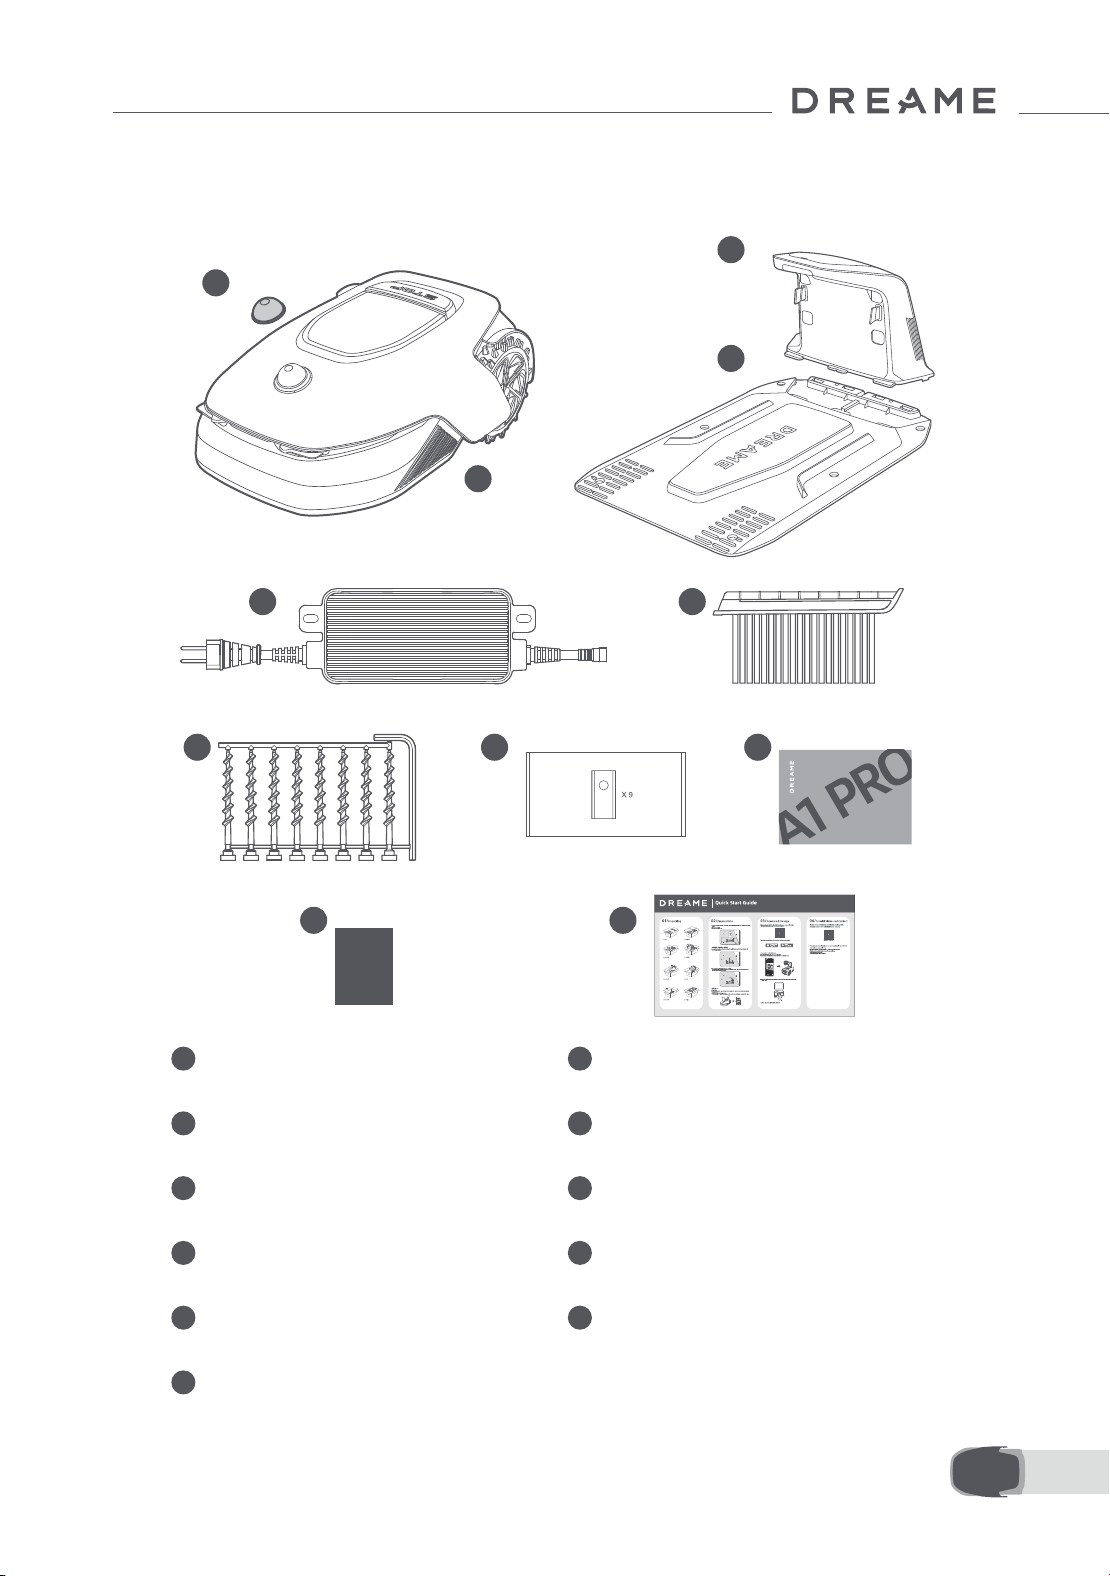
2 What's in the Box
11 Quick start guide
1
LiDAR protective cover 2 A1 Pro
3
Charging tower
(with a 10 m extension cable)
4 Baseplate
5 Power supply 6 Cleaning brush
7 Screws × 8, Hex key
8
Spare blade × 9
9 User manual 10 Lint-free cloth
1
2
3
4
5 6
8 97
10 11
Dreame Roboticmower A1 Pro
User Manual
01/ 02/
1
Open the box carefully.
Auspacken
Déballage
Die Box bitte vorsichtig önen.
Ouvrez la boîte avec précaution.
2
Take out the accessory box.
Nehmen Sie die Zubehörbox heraus.
Sortez le coret d'accessoires.
• An open and at area, with no obstacles within 1 m to the left, right and in front of the charging
station.
Eine oene, ache Fläche mit keinen Hindernissen innerhalb von 1 m links, rechts und vor der Ladestation.
Une zone ouverte et plate, sans obstacles à 1 m à gauche, à droite et en face de la station de charge.
• Near a power outlet.
In der Nähe eines Steckdosen.
Près d'une prise électrique.
• With strong Wi-Fi signal.
Mit starkem Wi-Fi Signal.
Avec un fort signal Wi-Fi.
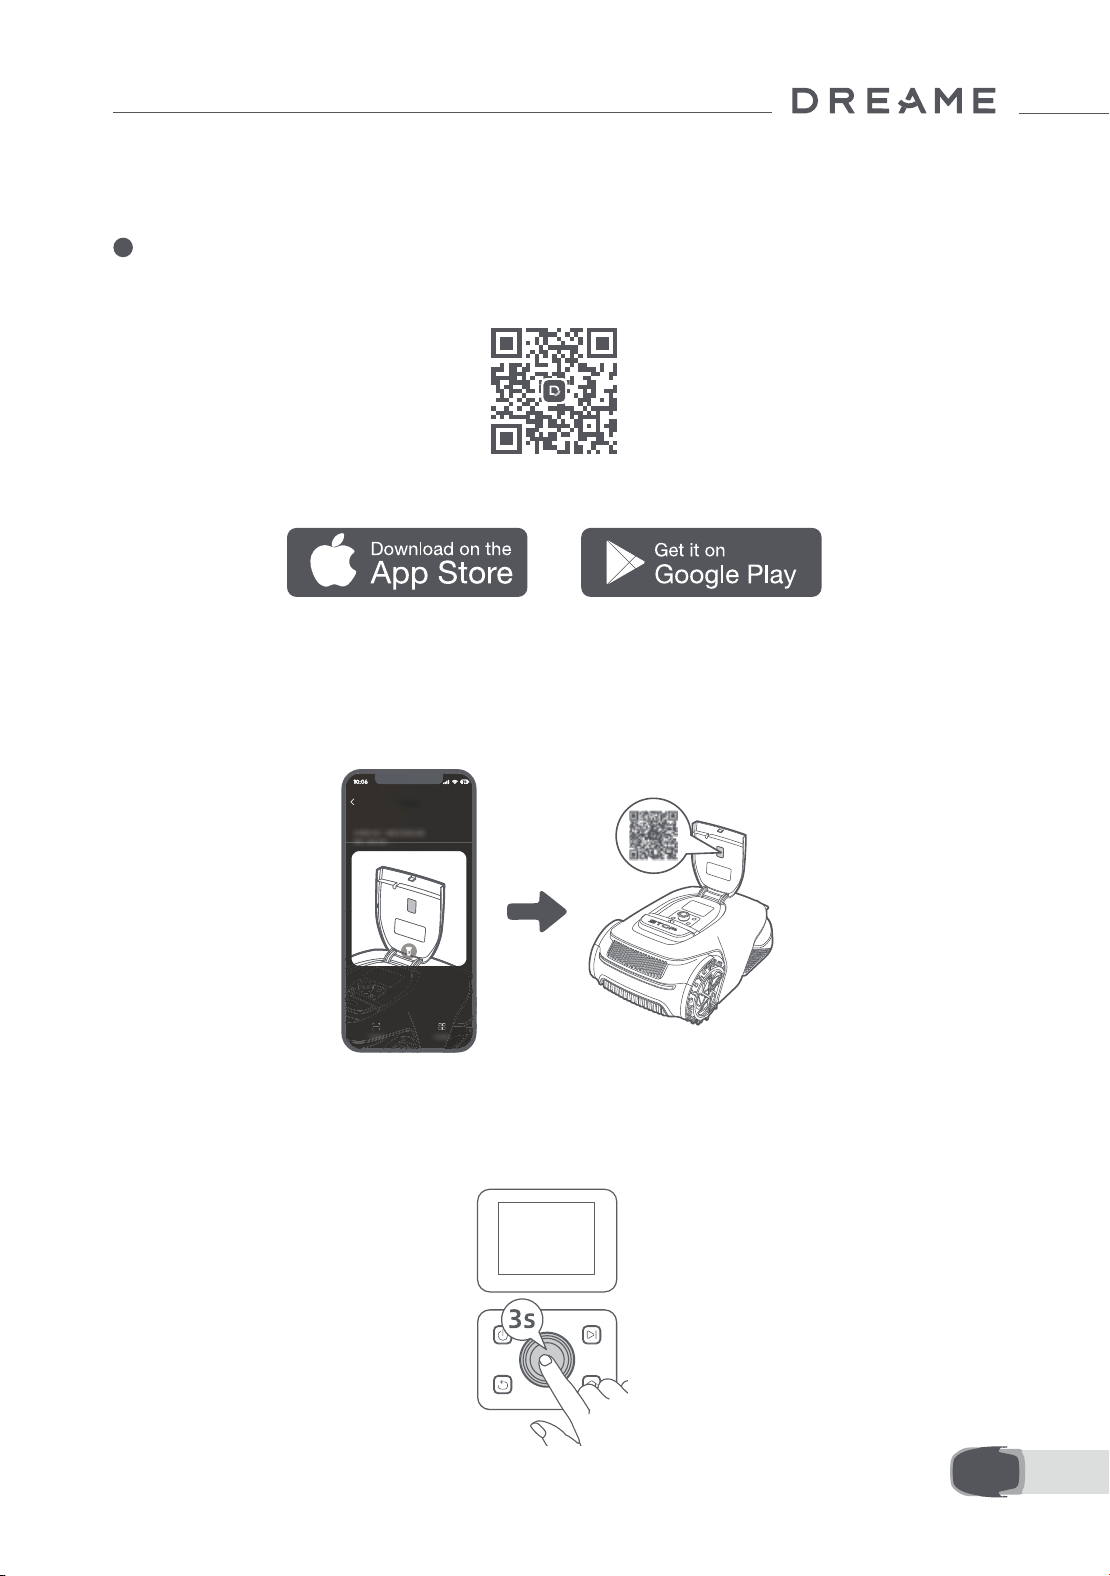
Please scan the QR code to download the Dreamehome app on your mobile device.
After the installation, please create an account and log in.
You can also download Dreamehome app from App Store or Google Play
Install the charging station
Installation der Ladestation / Installer la station de chargement
1. Secure the baseplate to the ground with supplied screws using the hex key.
Befestigen Sie die Basisplatte mit den mitgelieferten Schrauben und dem Sechskantschlüssel auf dem Boden.
Fixer la plaque de base au sol avec les vis fournies en utilisant la clé hexagonale.
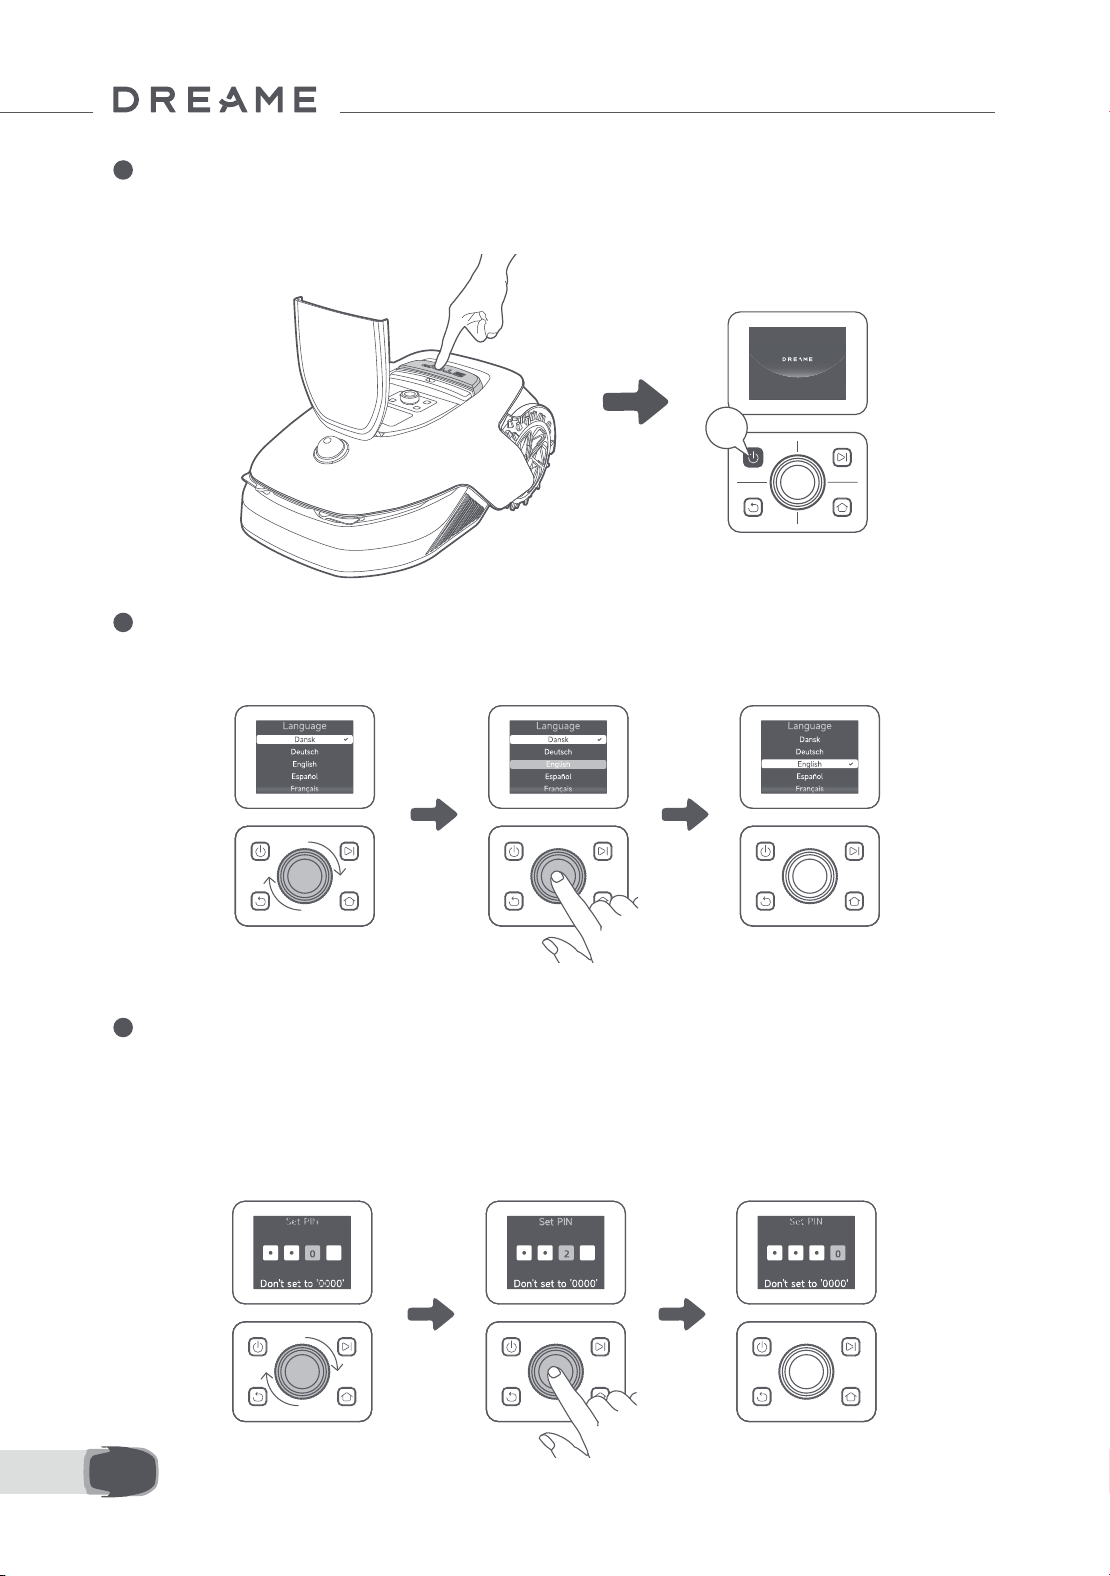
1. Press Stop button to open the cover of the control panel. Press and hold the Power button on the
control panel for 2 seconds to turn on A1 Pro.
Drücken Sie die Stopptaste, um die Abdeckung des Bedienfelds zu önen. Halten Sie die Einschalttaste auf dem Bedienfeld 2
Sekunden lang gedrückt, um A1 Pro einzuschalten.
Appuyer sur le bouton Arrêt pour ouvrir le couvercle du panneau de contrôle. Appuyer sans relâcher sur le panneau de contrôle
pendant 2 secondes pour allumer l'A1 Pro.
2. Turn the knob clockwise to go down and anticlockwise to go up to select your language. Press
the knob to conrm.
Drehen Sie den Drehknopf im Uhrzeigersinn nach unten und gegen den Uhrzeigersinn nach oben, um Ihre Sprache auszuwählen.
Drücken Sie den Drehknopf zur Bestätigung.
Tourner le bouton dans le sens horaire pour descendre, dans le sens anti-horaire pour monter, et sélectionner votre langue.
Appuyer sur le bouton pour conrmer.
3. Turn the knob to select number from 0 to 9. Turn it clockwise to increase the number from 0 to 9
and turn it anticlockwise to decrease the number. Press the knob to set the next digit.
Drehen Sie den Drehknopf, um eine Zahl zwischen 0 und 9 auszuwählen. Drehen Sie ihn im Uhrzeigersinn, um die Zahl von 0 bis
9 zu erhöhen, und gegen den Uhrzeigersinn, um die Zahl zu verringern. Drücken Sie den Drehknopf, um die nächste Zier
einzustellen.
1. Enable Bluetooth function on your mobile device.
Aktivieren Sie die Bluetooth-Funktion auf Ihrem mobilen Gerät.
Activer la fonction Bluetooth sur votre appareil portable.
2. Scan the QR code inside the cover or select A1 Pro manually via the App.
Scannen Sie den QR-Code auf der Innenseite der Abdeckung oder wählen Sie A1 Pro manuell über die App aus.
Scanner le QR code à l'intérieur du couvercle ou sélectionner manuellement l'A1 Pro via l'application.
3. Press and hold the knob on the control panel for 3 seconds and A1 Pro will enter Bluetooth pairing
mode.
Halten Sie den Drehknopf auf dem Bedienfeld 3 Sekunden lang gedrückt, woraufhin A1 Pro in den Bluetooth-Kopplungsmodus wechselt.
Appuyer sans relâcher le bouton sur le panneau de contrôle pendant 3 secondes et l'A1 Pro entrera en mode d'association Bluetooth.
4. Pair A1 Pro with your mobile device via Bluetooth.
Wenn Sie Probleme haben, während Sie es verwenden, bitte schauen Sie sich das folgende Tutorial-Video an.
Si vous rencontrez des problèmes lors de l'utilisation, veuillez regarder la vidéo tutoriel ci-dessous.
Tourner le bouton pour sélectionner un nombre entre 0 et 9. Le tourner dans le sens horaire pour augmenter le nombre de 0 à 9,
et dans le sens anti-horaire pour le diminuer. Appuyer sur le bouton pour régler le chire suivant.
Bitte scannen Sie den QR-Code, um die Dreamehome App auf Ihr mobiles Gerät herunterzuladen.
Nach der Installation erstellen Sie bitte ein Konto und melden sich an.
Sie können die Dreamehome App auch im App Store oder bei Google Play herunterladen.
Vous pouvez également télécharger l'application Dreamehome de l'App Store ou Google Play.
Scanner le QR code pour télécharger l'application Dreamehome sur votre téléphone portable.
Après l'installation, créez un compte et connectez-vous.
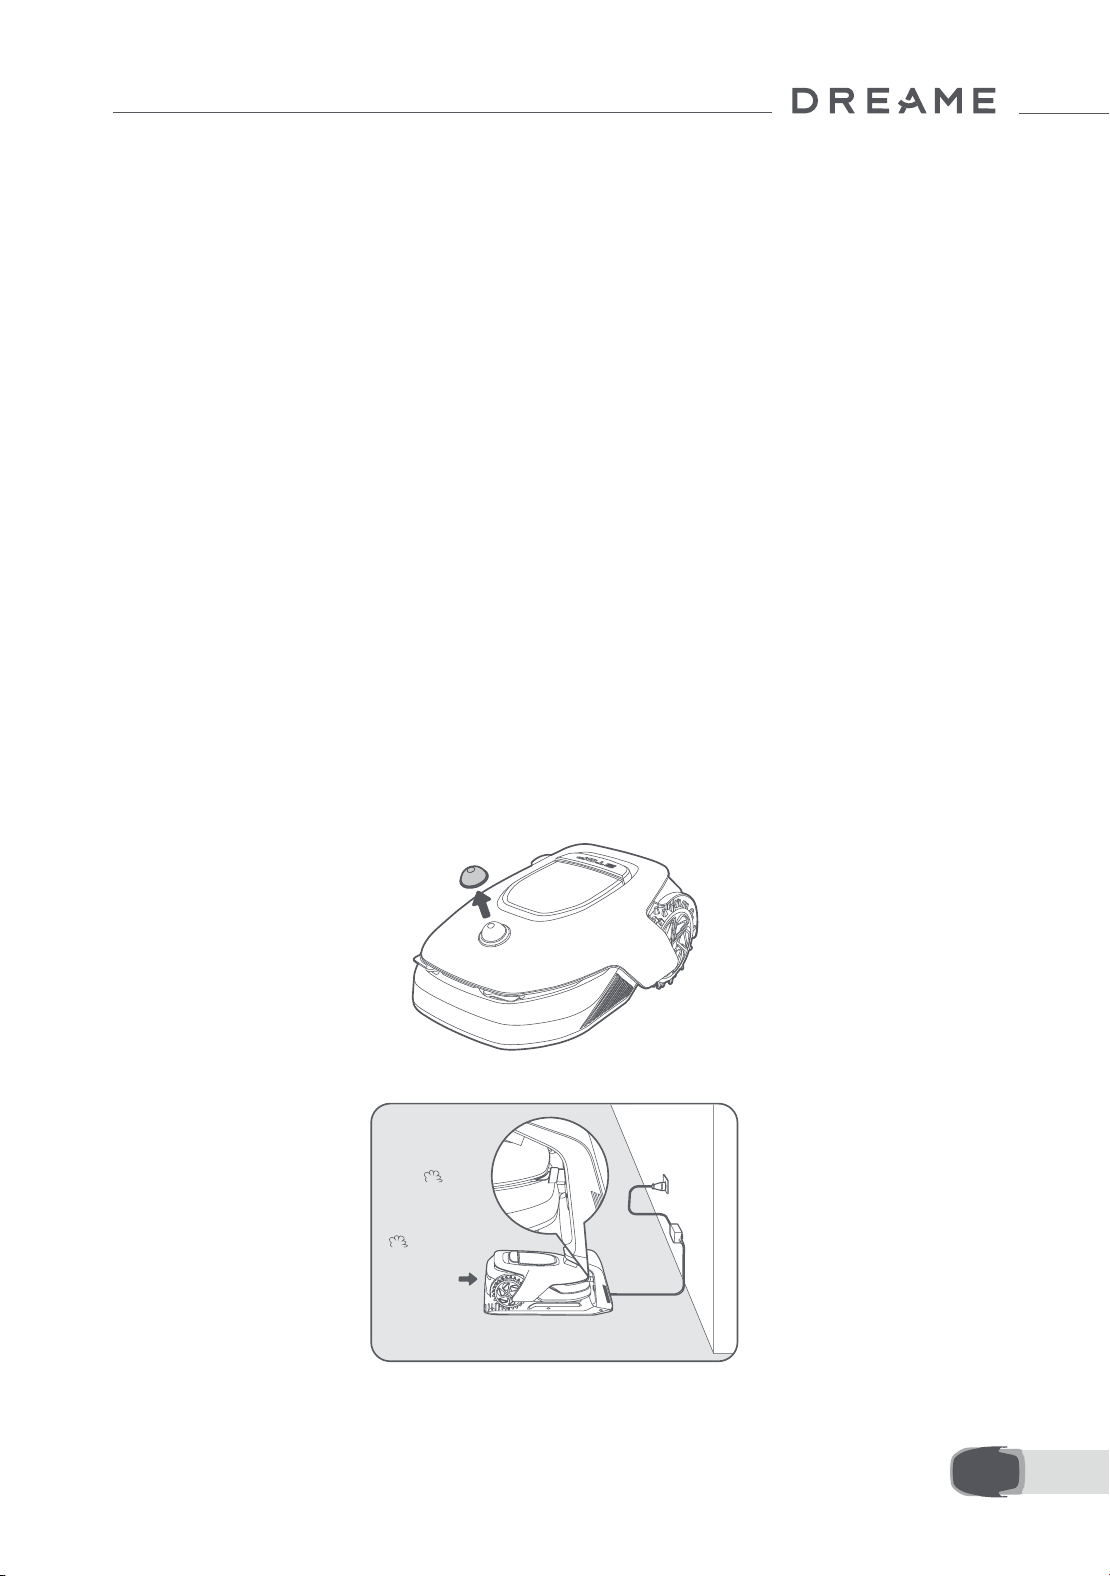
Setzen Sie die Reinigungsbürste in die Ladesäule ein und richten Sie dabei die Zunge an der Nut aus.
Insérer la brosse de nettoyage dans la tour de chargement en alignant la languette sur la rainure.
Verbinden Sie das Netzteil mit dem Verlängerungskabel und schließen Sie es an eine Steckdose an.
Raccorder l'alimentation à la rallonge et la brancher sur la prise d'alimentation.
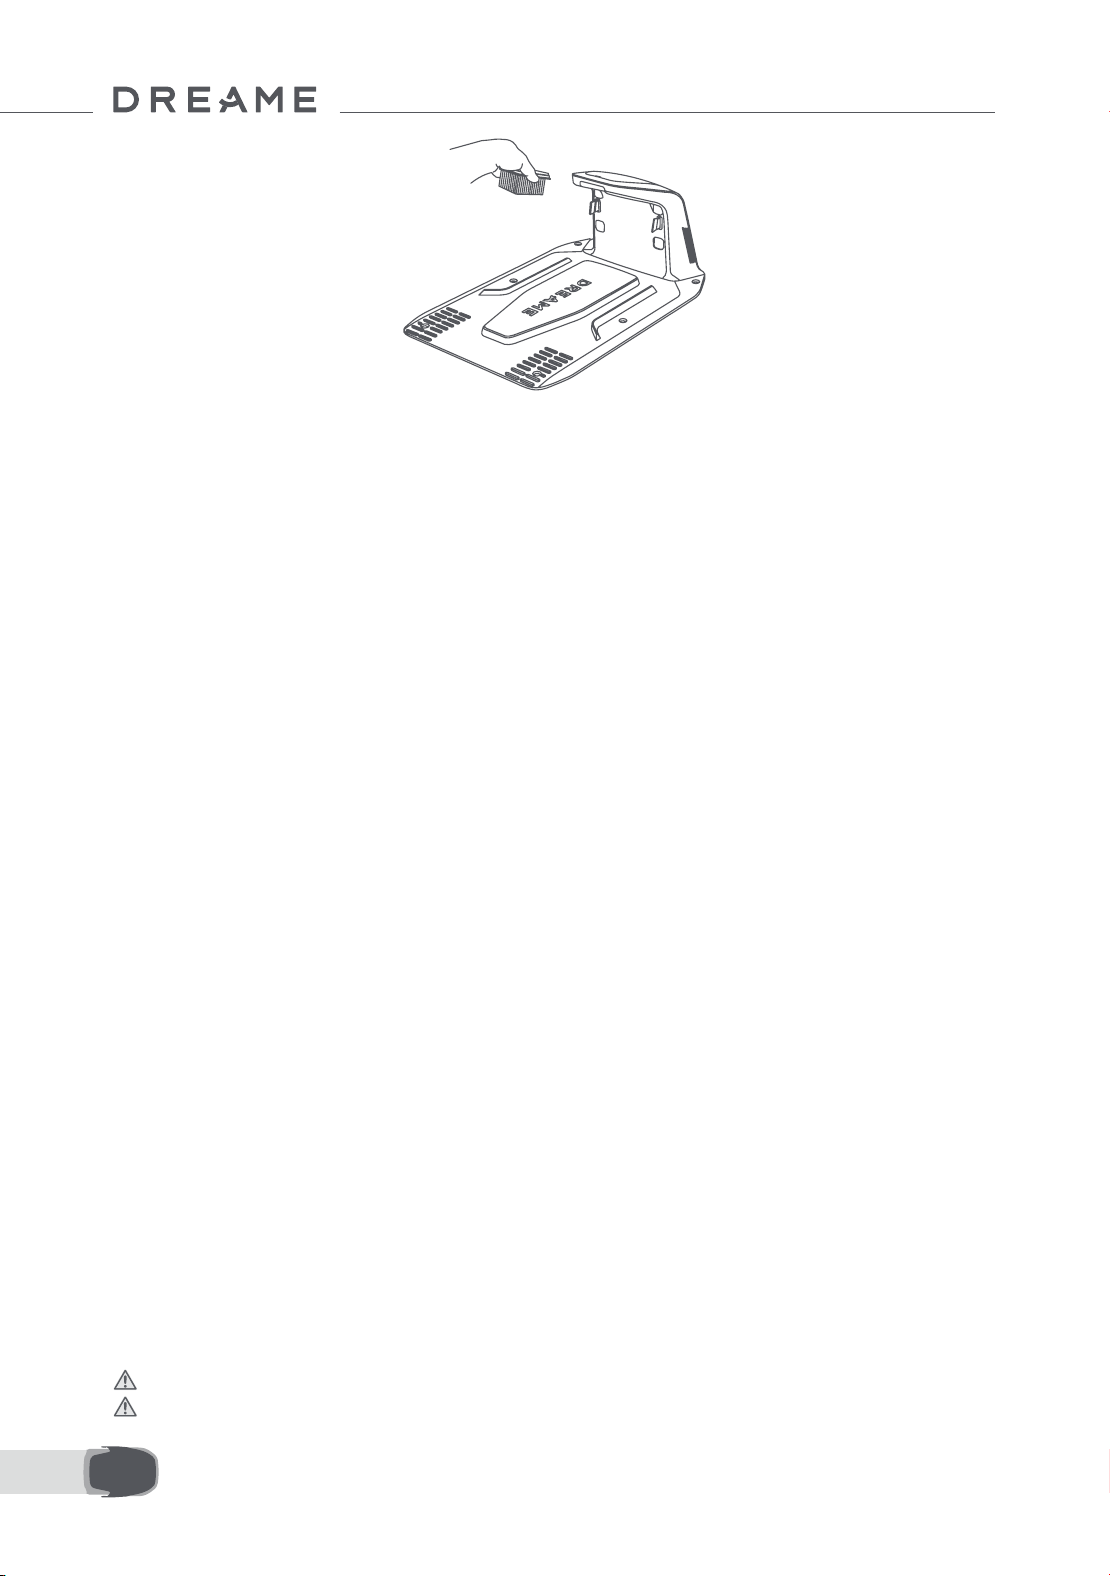
3. Insert the cleaning brush into the charging tower by aligning the tongue with the groove.
Insert the charging tower to the baseplate until you hear the click.
Insérer la tour de chargement sur la plaque de base jusqu'à ce que vous entendiez le clic.
2. Insert the charging tower to the baseplate until you hear the click.
4. Connect the power supply to the extension cable and then connect to a power outlet.
3
Extract the power supply unit.
4
Lift out the charging station.
Entfernen Sie die Netzteil. Hieven Sie die Ladestation heraus.
Retirez l'unité d'alimentation. Leverez le station de charge.
5
Clear away all protective materials.
6
Take out A1 Pro.
Entfernen Sie alle Schutzmaterialien. Nehmen Sie A1 Pro heraus.
Enlevez toutes les matériaux de protection. Sortez la A1 Pro.
7
Take out the cleaning brush.
8
Finally, take out the baseplate.
Nehmen Sie die Reinigungsbürste heraus. Schließlich nehmen Sie die Basisplatte heraus.
Sortez le balai de nettoyage.
9
Remove the protective cover.
Entfernen Sie die Schutzabdeckungen.
Retirez les couvertures protectrices.
Enn, sortez la plaque de base.
2s
A1 Pro aktivieren / Activer A1 Pro A1 Pro mit dem Internet verbinden / Raccorder l'A1 Pro à Internet
Activate A1 Pro Connect A1 Pro to the internet
Quick Start Guide
Unpacking
Vorbereitungen
Préparatifs
Preparations
03/
Laden Sie die App herunter
Téléchargez l'application
Download the App
04/
If you encounter any problems during use,
please watch the tutorial video below.
Please do not hesitate to contact us if you have
any other questions.
Bitte zögern Sie nicht, uns zu kontaktieren, wenn Sie weitere Fragen haben.
N'hésitez pas à nous contacter si vous avez d'autres questions.
Email:a[email protected]
Website: https://global.dreametech.com
Join our ocial Facebook group
where you can discuss your questions with other fellow users.
Tutorial-Video und Kontakt
Vidéo de tutoriel et contact
Tutorial Video and Contact
video below
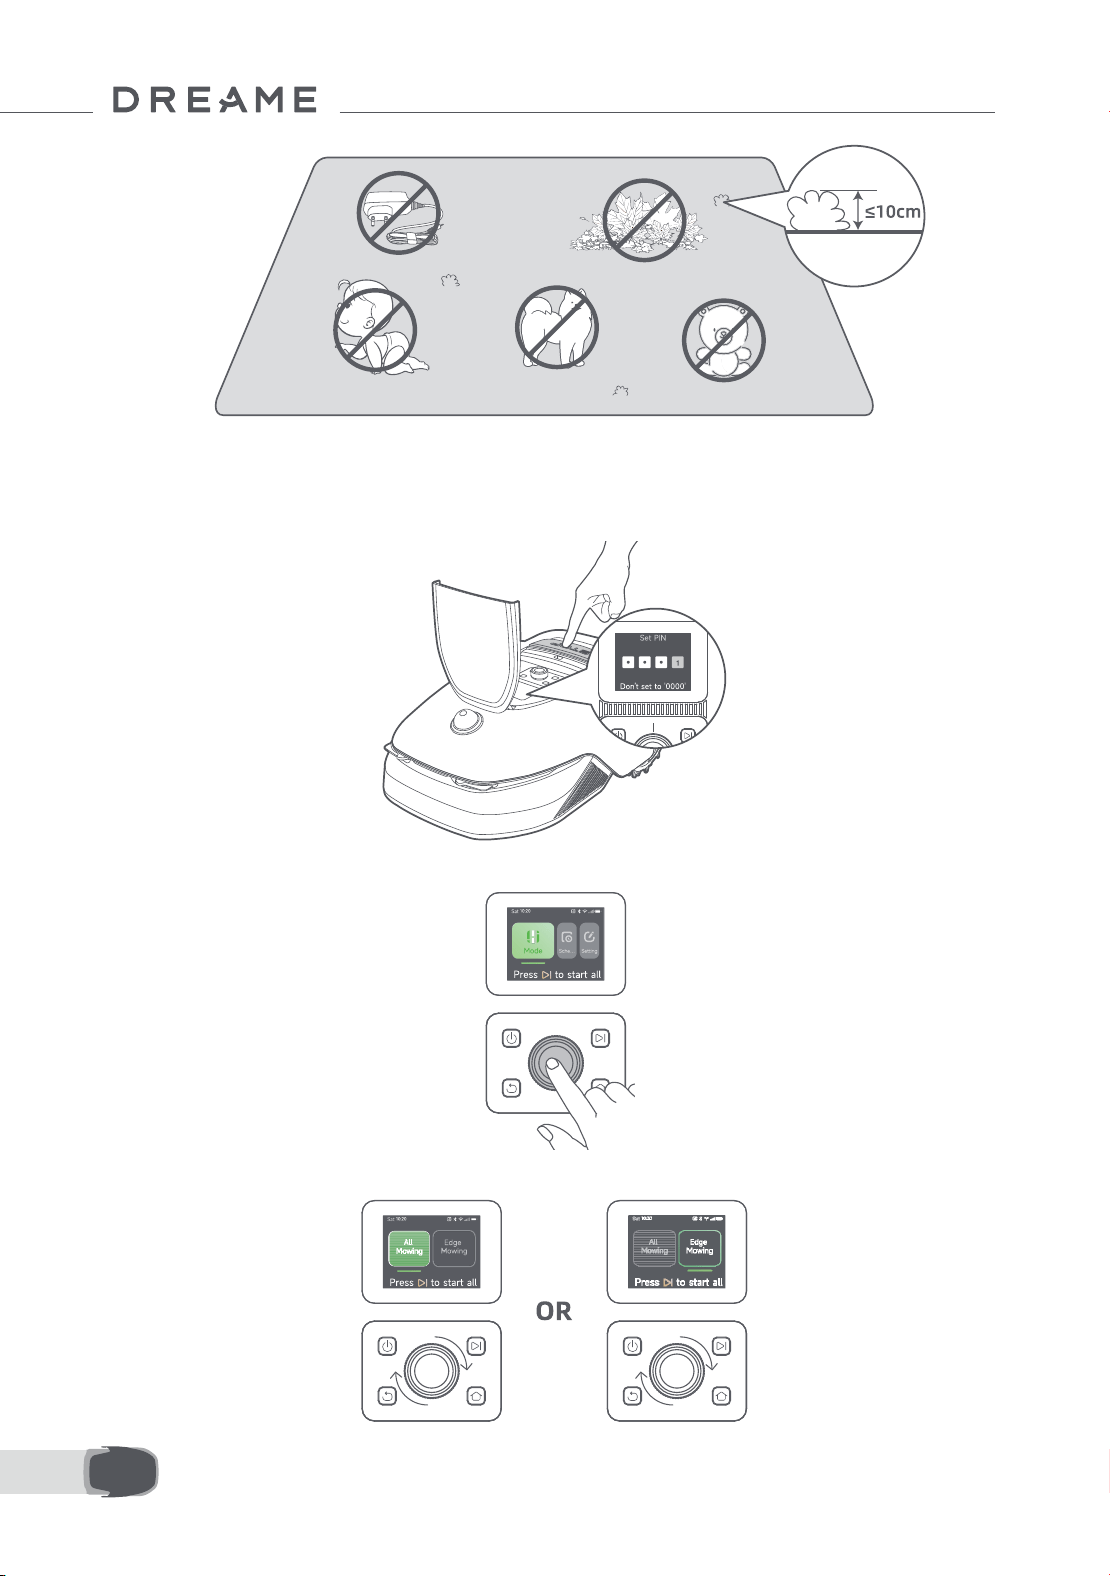
10CM5CM 15CM 20CM 25CM 30CM 35CM 40CM 45CM 50CM 55CM 60CM 65CM 70CM 75CM 80CM 85CM
11 EN
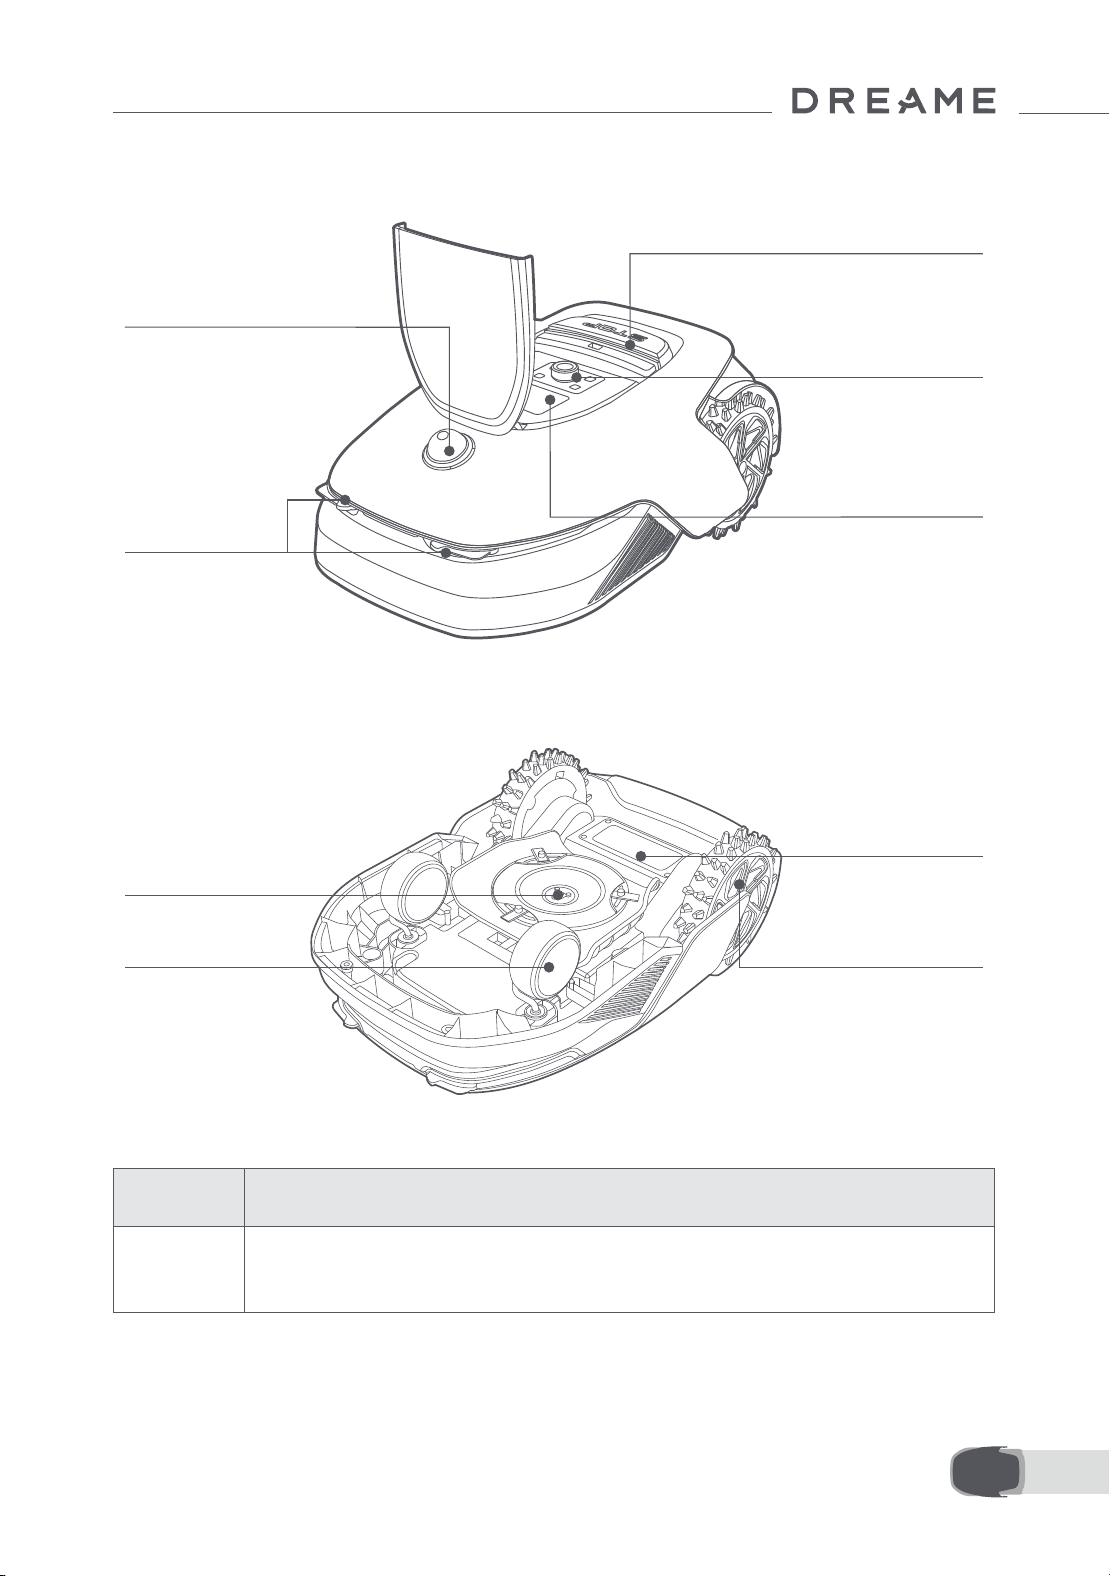
3 Product Overview
Charging contacts
Battery compartment
Blade disc
Front wheel
O-road drive wheel
LiDAR
Display
Knob
Stop button
Sensor
Name Description
LiDAR
Obtains environmental information and facilitates A1 Pro's positioning, obstacle
avoidance and sensing of water and dirt.
Detection range: 70 m with 360° horizontal and 59° vertical wide angle.
12EN
4 Installation
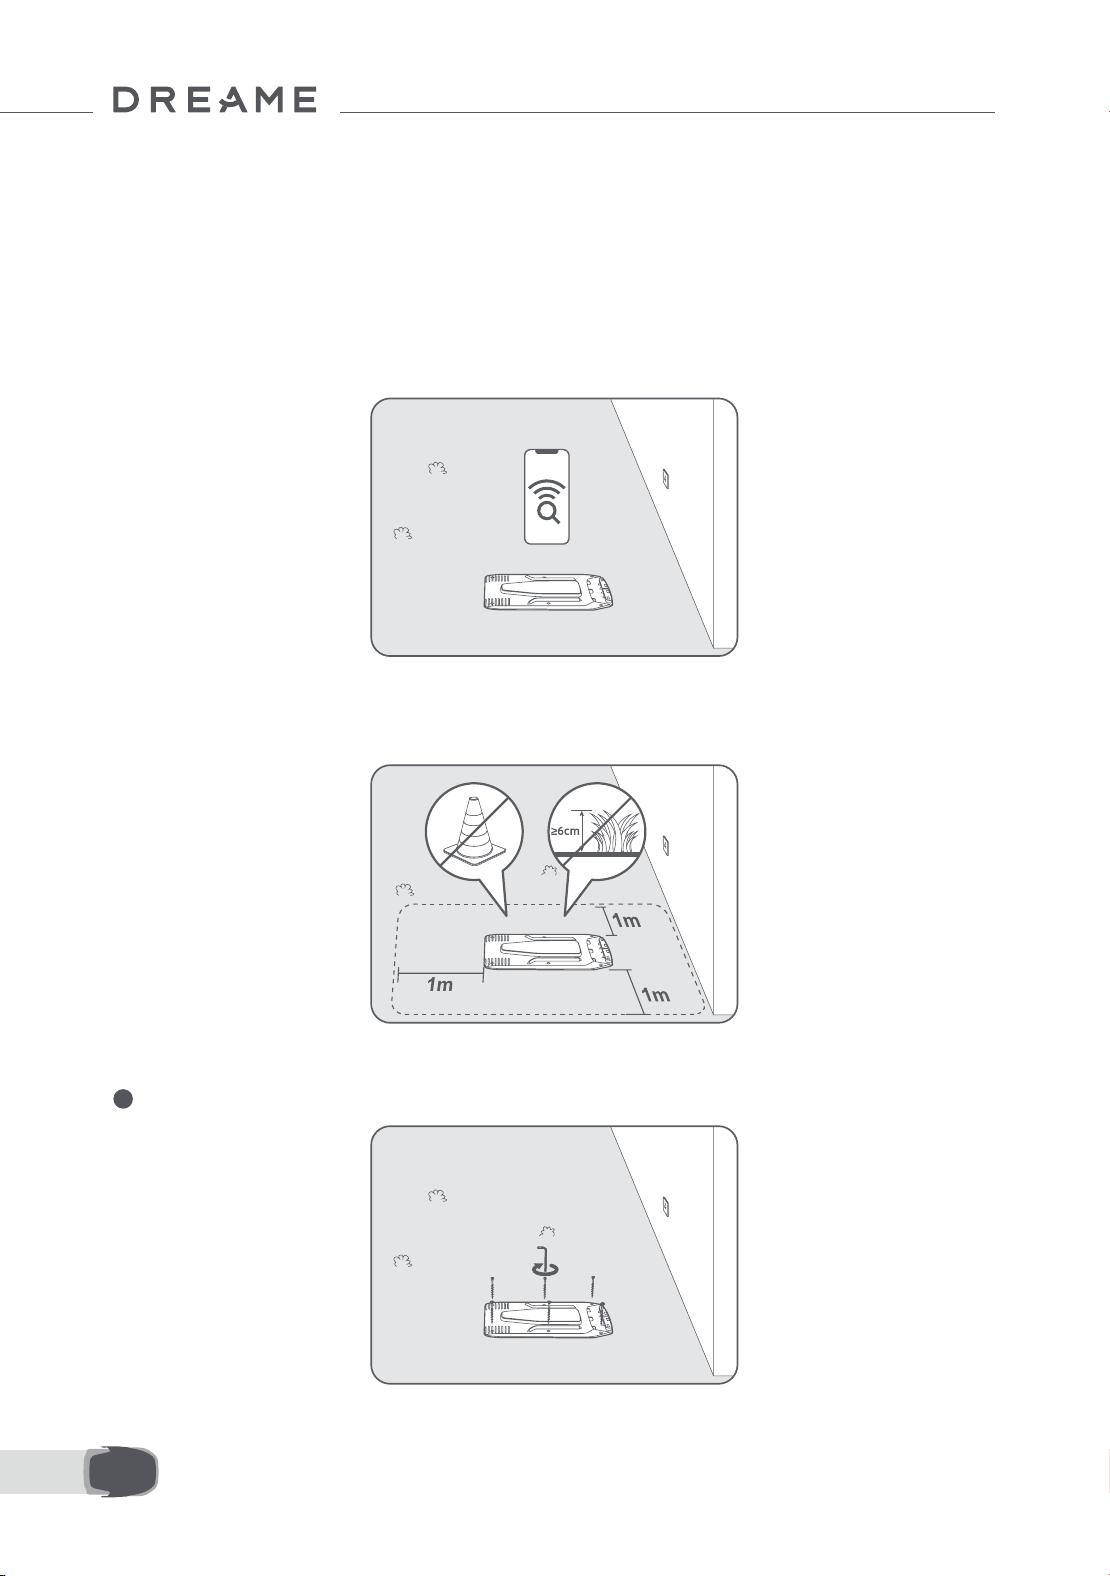
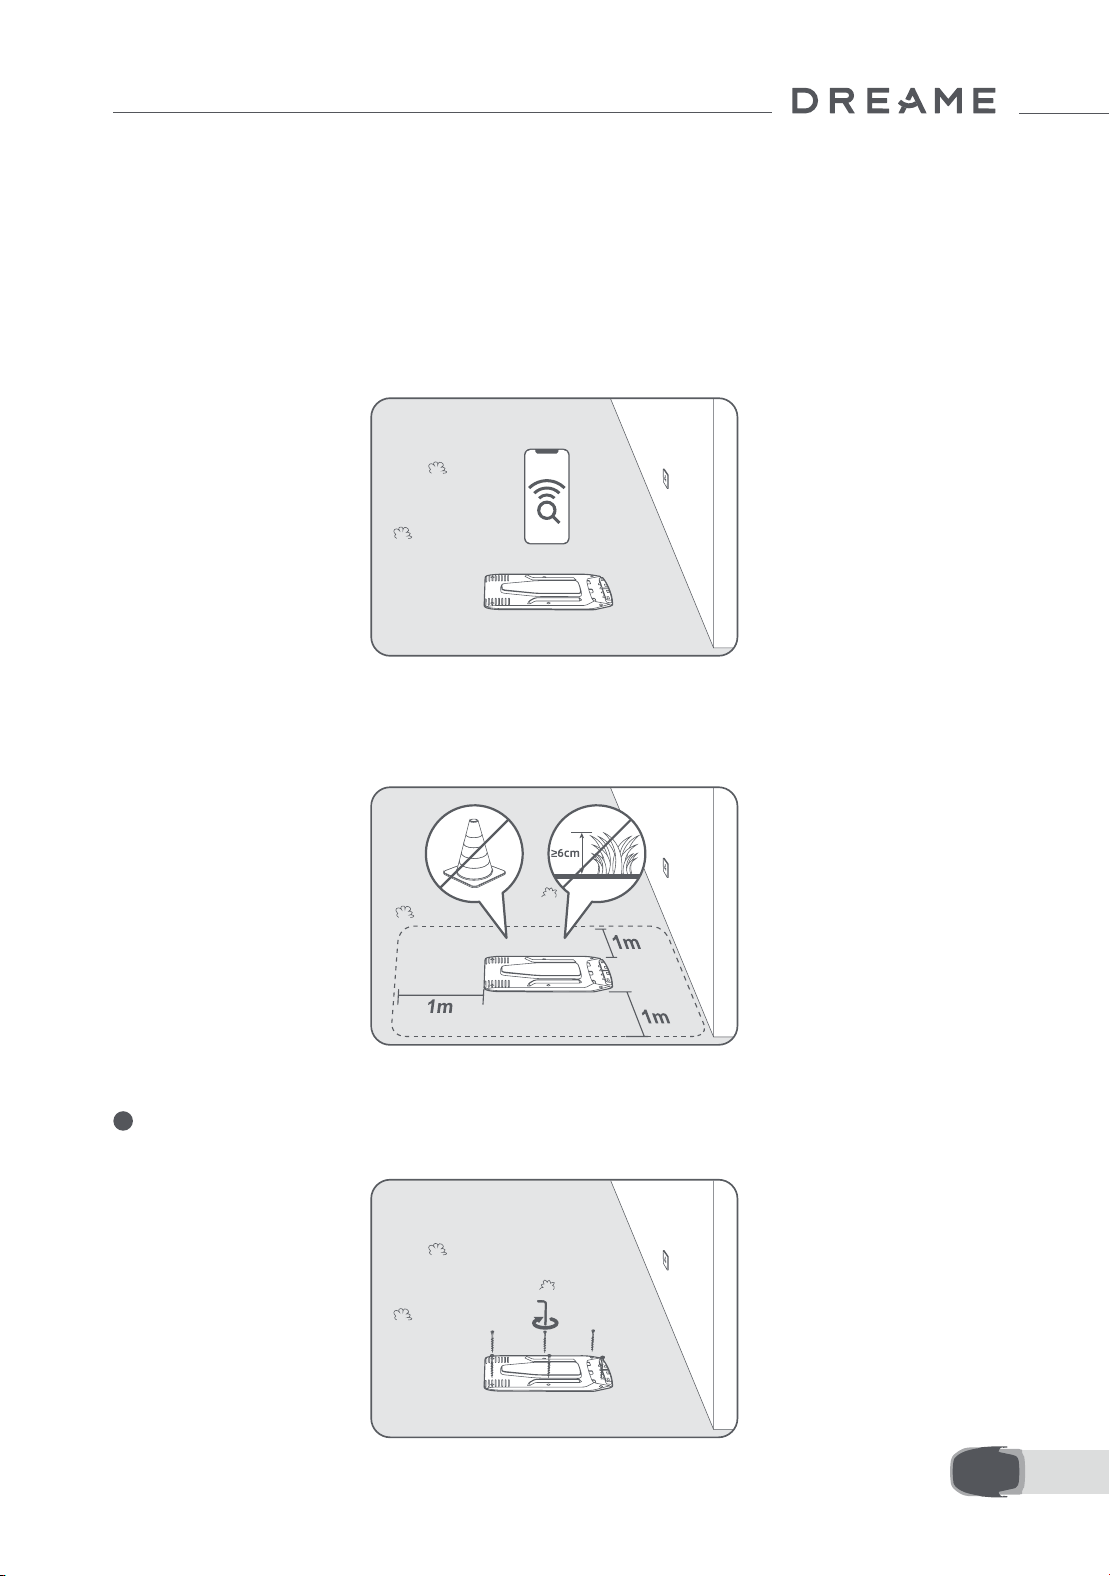
4.1 Select a suitable location
• Place the charging station on a level surface near the edge of the lawn and a power outlet. It is
recommended to place the charging station in an area with good Wi-Fi signal strength.
Note: Use your mobile device to help check the Wi-Fi signal strength of the location. Good Wi-Fi signal
strength improves the stability of connection between A1 Pro and the app.
Note: Make sure the ground is soft enough to allow screw installation.
• Keep at least 1 m of free space with no obstacles to the left, right and in front of the charging station. Make
sure that the grass around the location is shorter than 6 cm. If the grass is taller, please mow it with a push
mower rst. Tall grass may make it dicult for A1 Pro to return to the charging station.
4.2 Install the charging station
1 Secure the baseplate to the ground with supplied screws using the hex key.
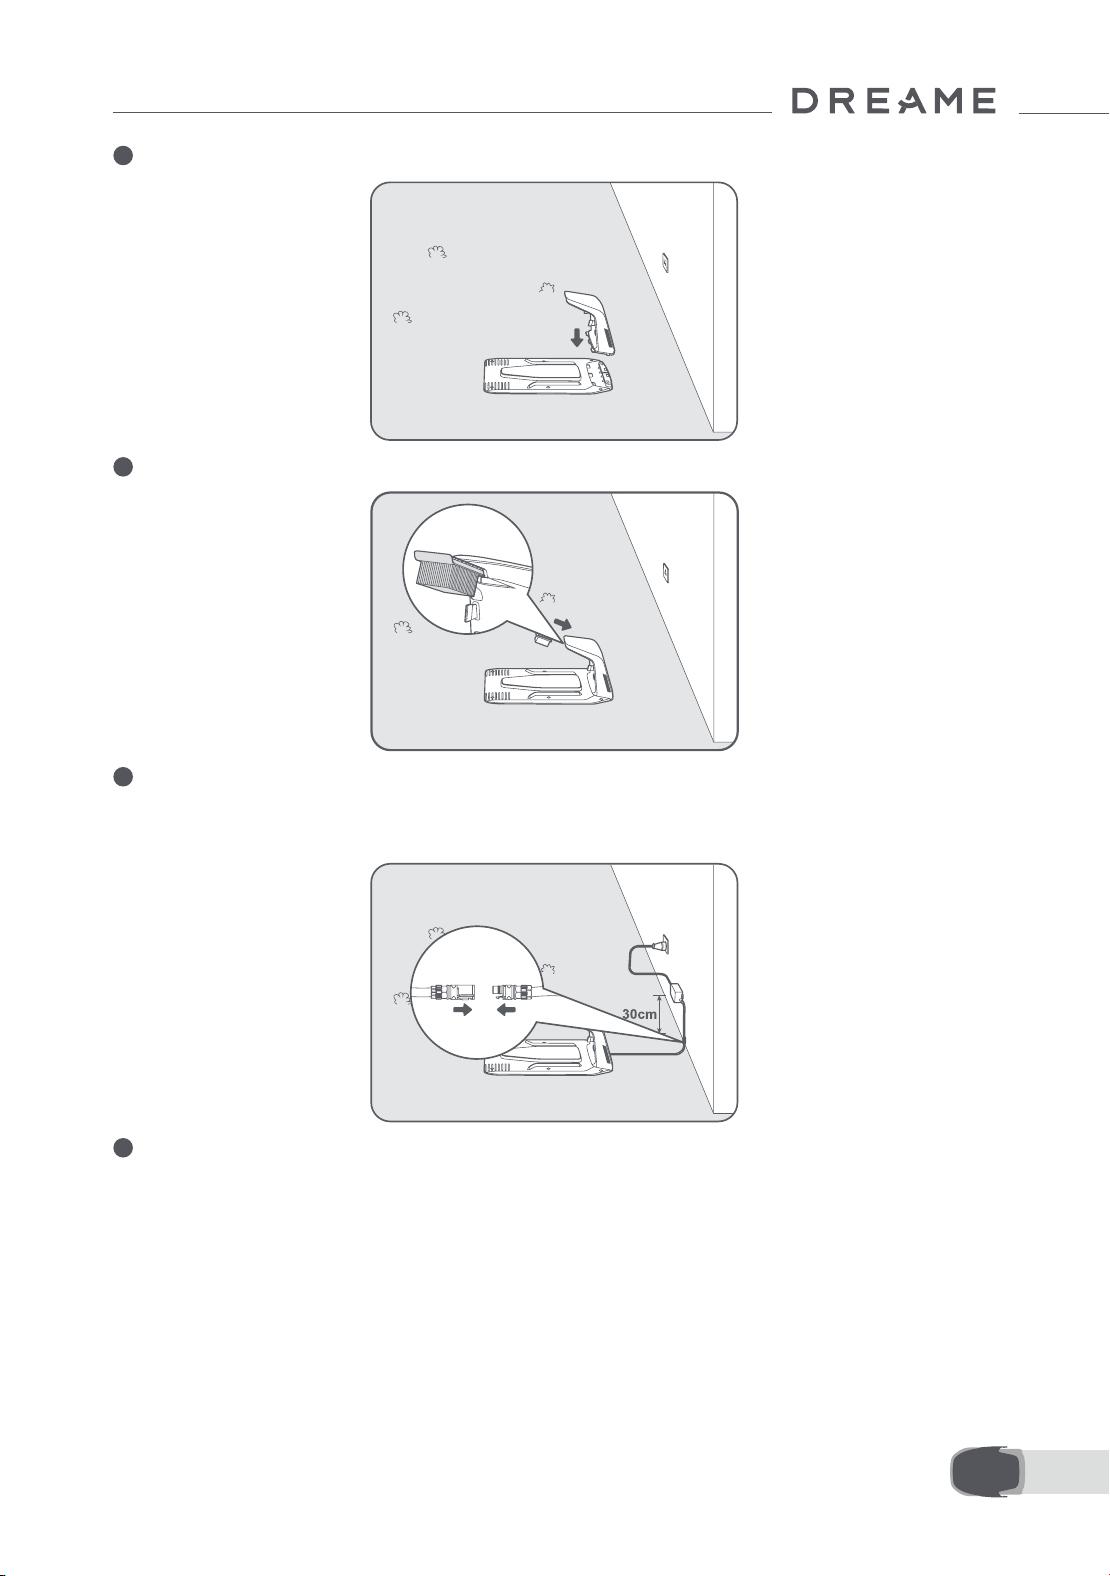
13 EN
2 Insert the charging tower to the baseplate until you hear the click.
3 Insert the cleaning brush into the charging tower by aligning the tongue with the groove.
4 Connect the power supply to the extension cable and then connect to a power outlet. Please keep the
power supply at least 30 cm above the ground.
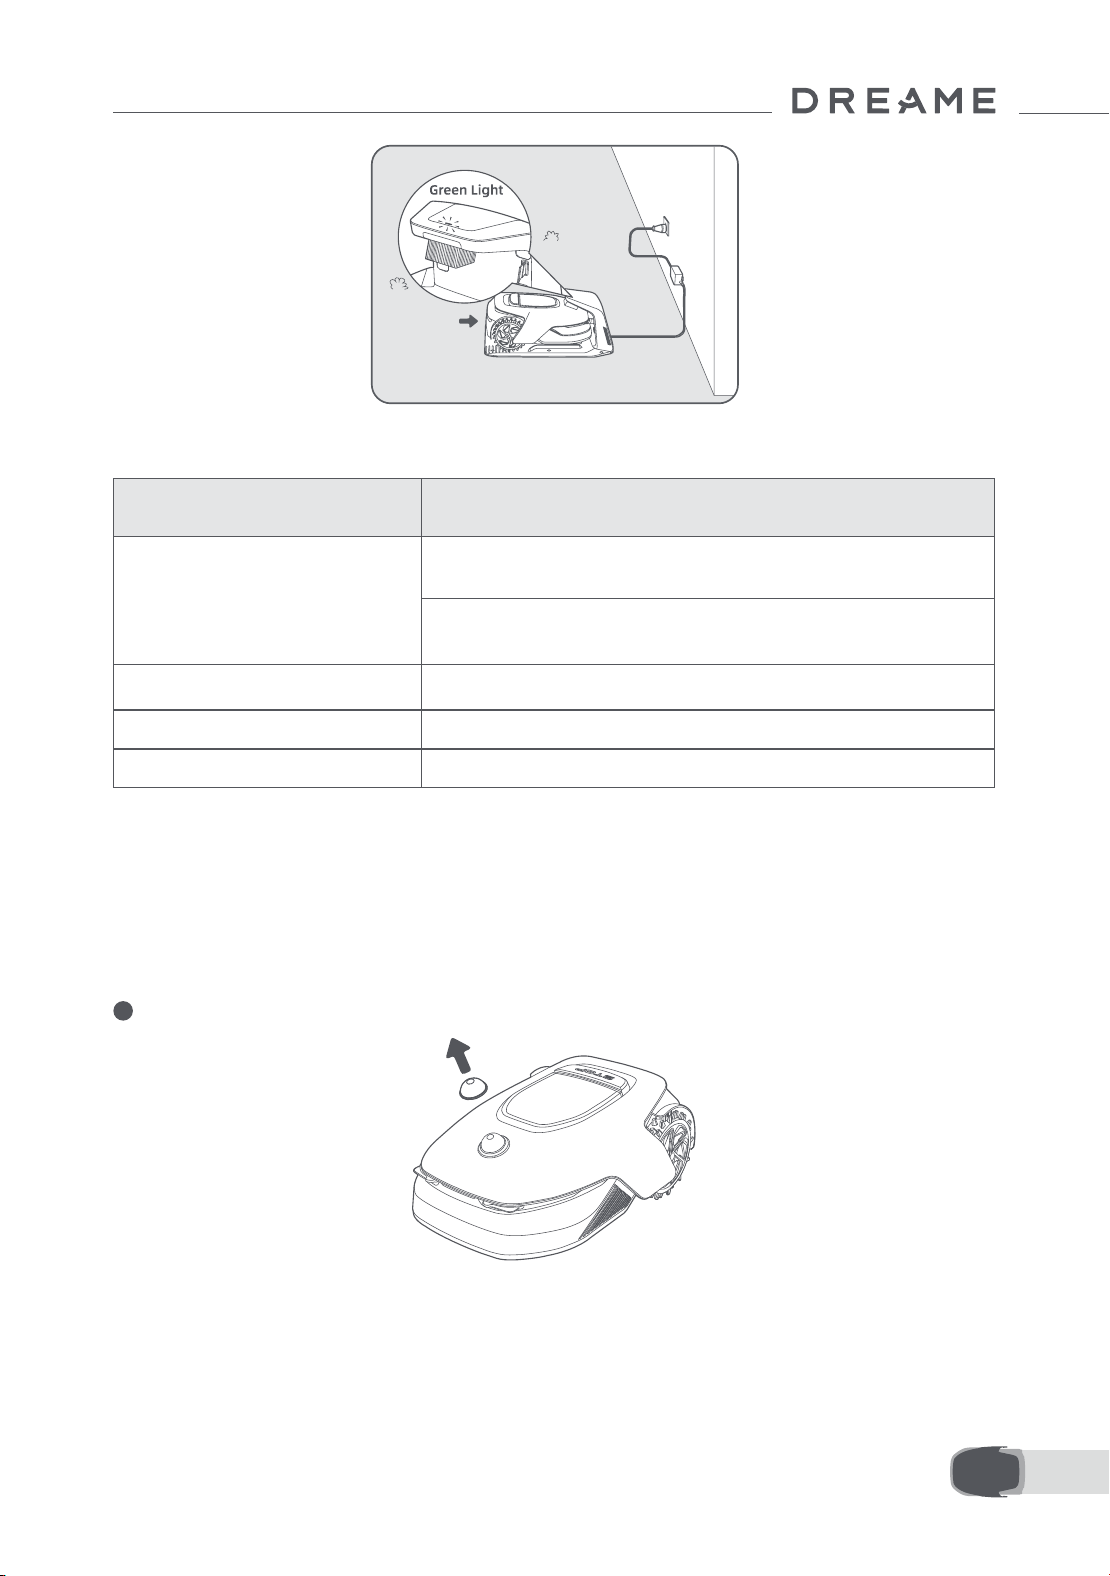
Note: The LED indicator on the charging station will be constant blue if there is power.
5 Put A1 Pro in the charging station to charge. Make sure the charging contacts on A1 Pro and the
charging station are connected correctly.
Note: The indicator light will blink green if A1 Pro is charging successfully in the charging station.
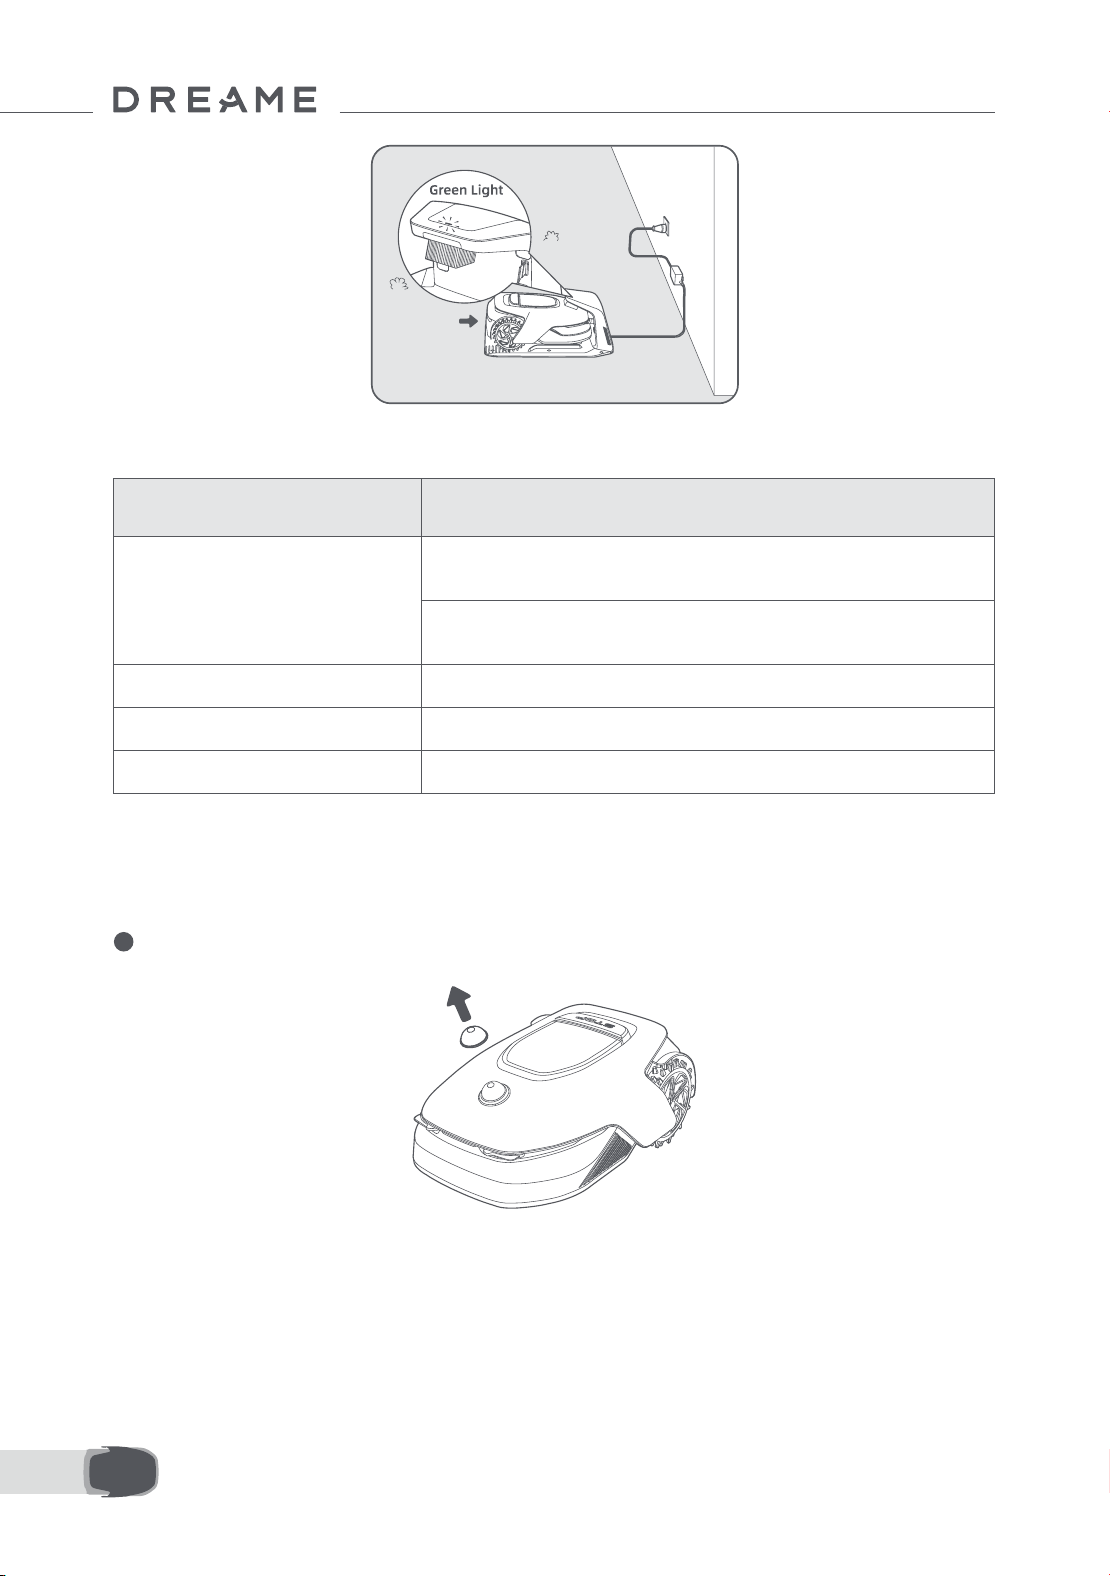
14EN
LED Indicator on the charging station
When A1 Pro is turned on for the rst time, there are some basic settings to do before A1 Pro is ready to start
working.
5 Preparations before Use
LED Indicator Light Colour Meaning
Blinking/solid red
1. Charging station has a problem (for example a charging current or
voltage problem).
2. A1 docks in the charging station but the charging is abnormal
(for example charging contacts have a short circuit).
Solid blue The charging station has power. A1 Pro is not in the charging station.
Blinking green A1 Pro is charging in the charging station.
Solid green A1 Pro is in the charging station and fully charged.
1 Remove the LiDAR protective cover.
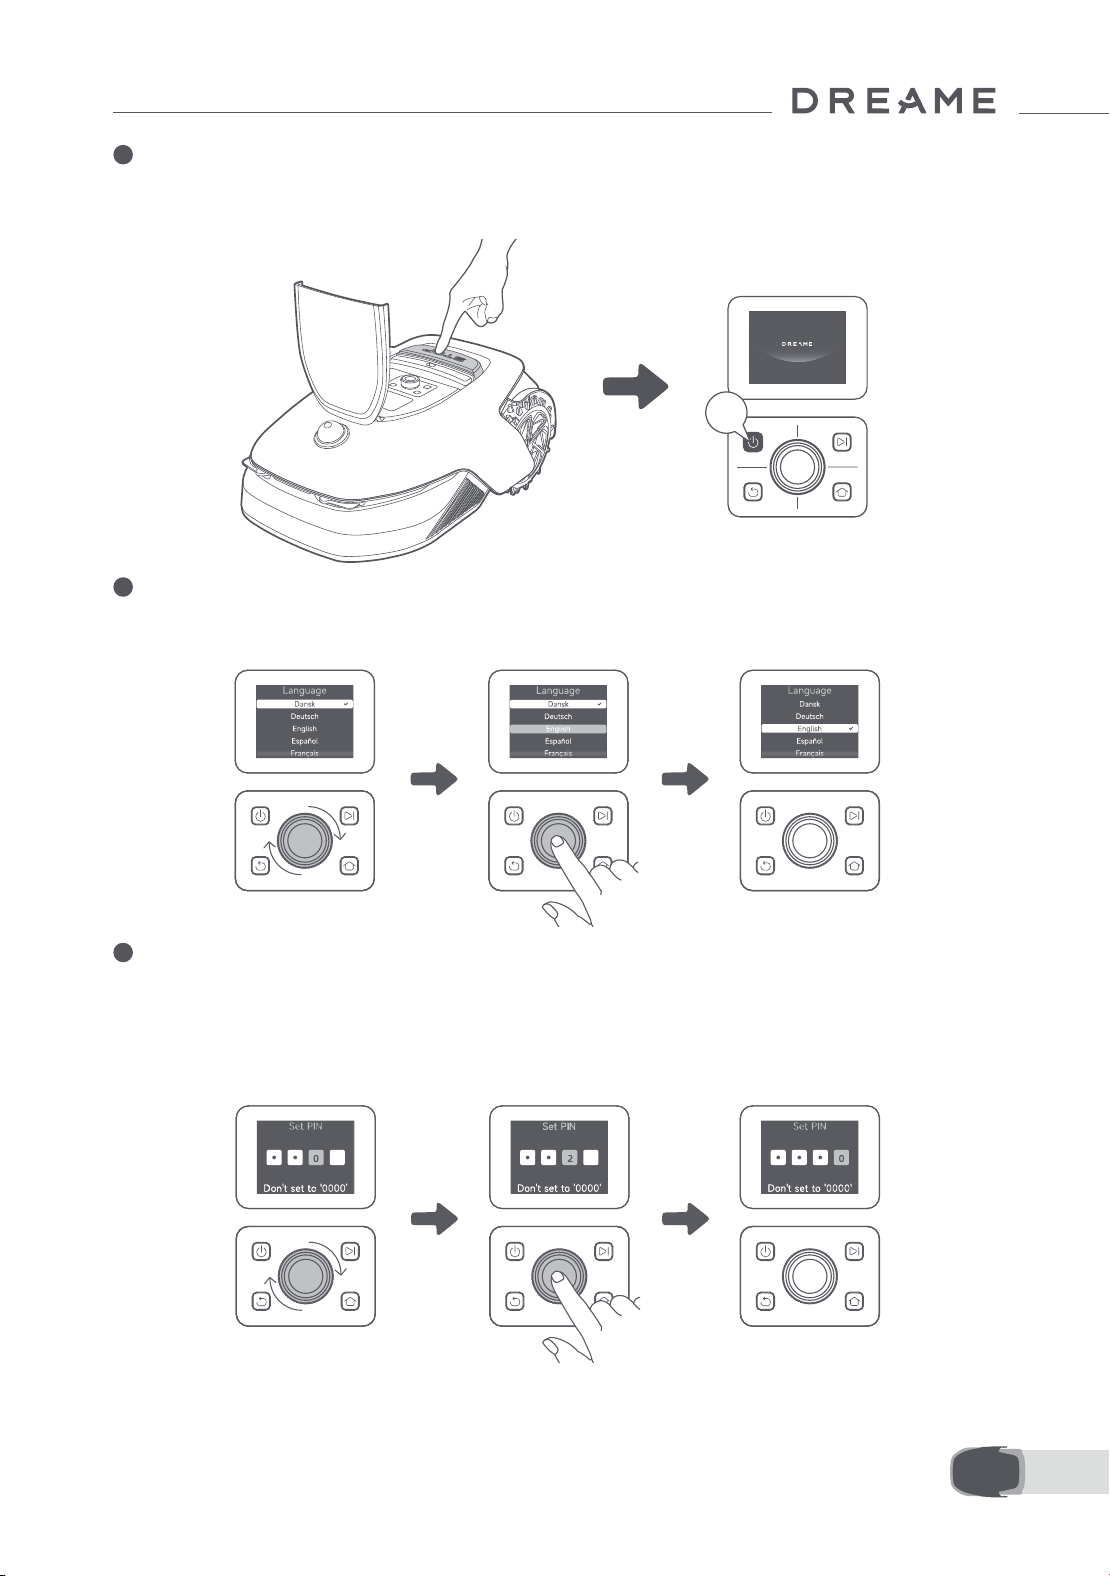
15 EN
2 Press Stop button to open the cover of the control panel. Press and hold the Power button on the control
panel for 2 seconds to turn on A1 Pro.
Note: A1 Pro will automatically turn on when it docks in the charging station.
3 Select the language you prefer
Turn the knob clockwise to go down and anticlockwise to go up to select your language. Press the knob to
conrm.
4 Set PIN code
1. Turn the knob to select number from 0 to 9. Turn it clockwise to increase the number from 0 to 9 and turn it
anticlockwise to decrease the number. Press the knob to set the next digit. To modify the previous digit, turn
the knob anticlockwise until the number becomes 0 and keep turning it one time more.
Note: Please do not set the PIN code to "0000".
2s
16EN
2. Enter the PIN code again to complete setting the PIN code.
Note: If two passwords do not match, please set the new password again.
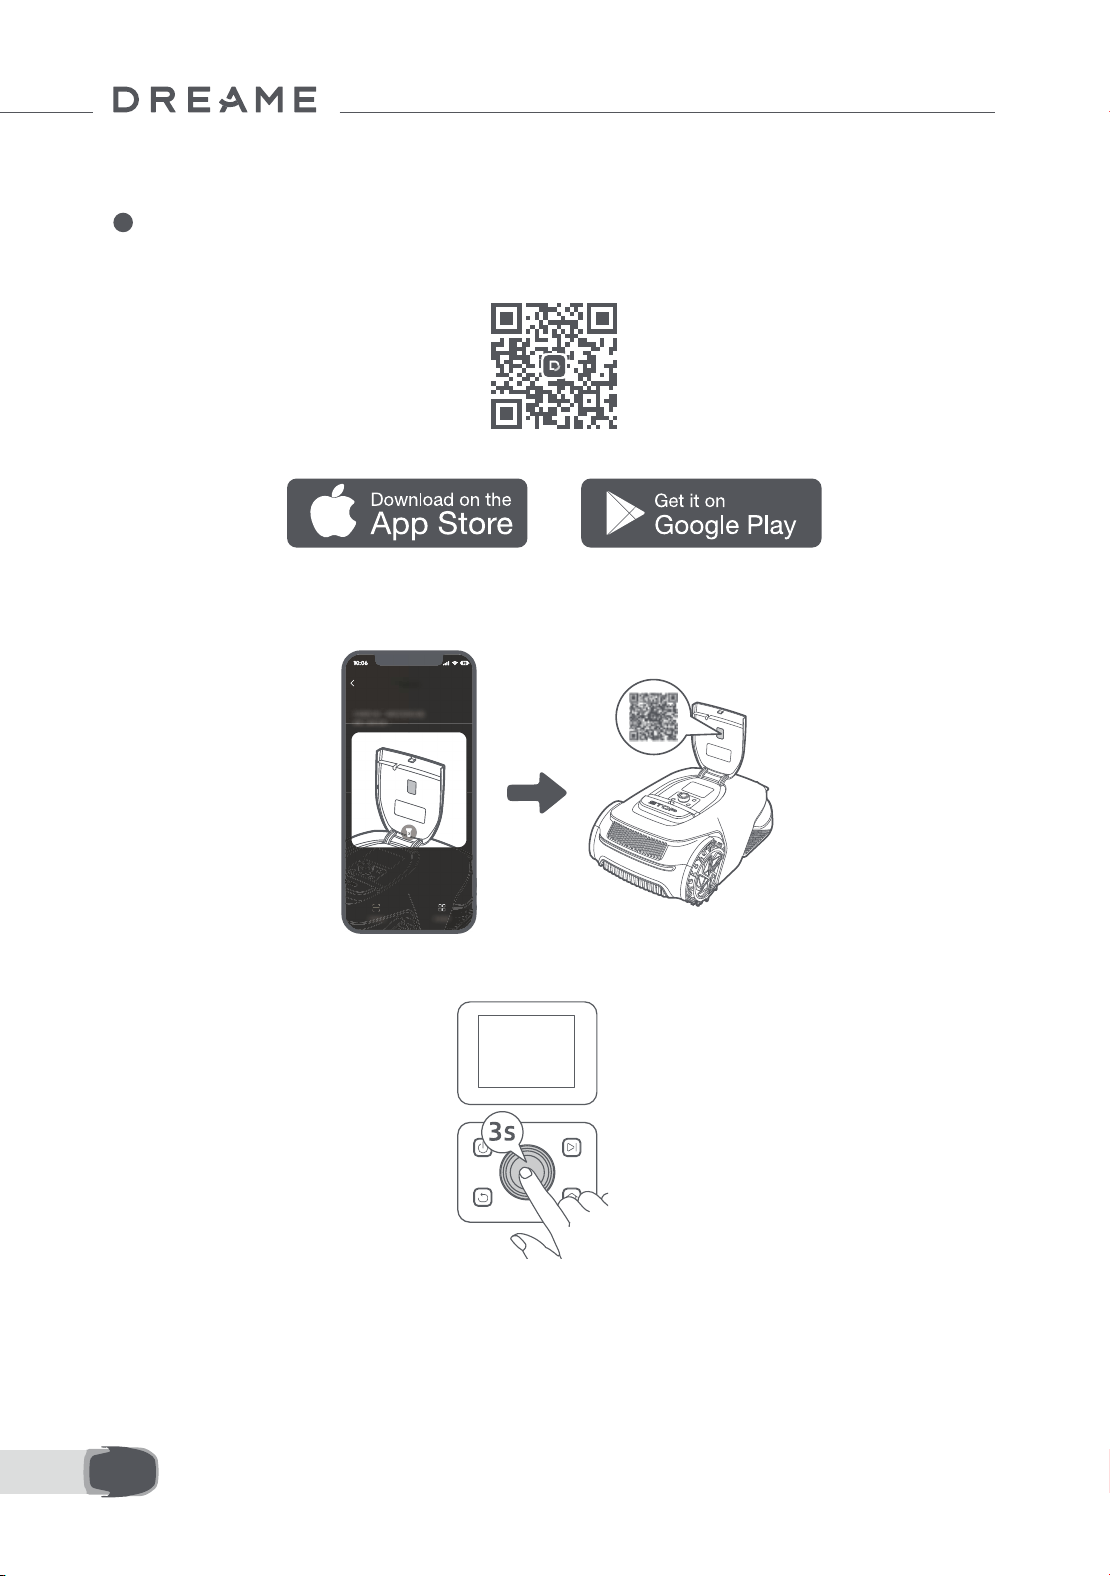
5 Connect A1 Pro to the internet
Please scan the QR code to download the Dreamehome app on your mobile device. After the installation,
please create an account and log in.
You can also download Dreamehome app from App Store or Google Play.
1) Bluetooth connection
1. Enable Bluetooth function on your mobile device.
2. Scan the QR code inside the cover or select A1 Pro manually via the App.
3. Press and hold the knob on the control panel for 3 seconds and A1 Pro will enter Bluetooth pairing mode.
17 EN
4. Pair A1 Pro with your mobile device via Bluetooth.
Note: Make sure that your mobile device is within 10 m of A1 Pro.
2) Wi-Fi connection
Make sure A1 Pro and your mobile device are on the same Wi-Fi network. Please follow the in-app guidance
to complete the connection.
Note: Please use a single-band network of 2.4 GHz frequency or dual-band network of 2.4/5 GHz frequency.
Note: You can also purchase the Link Module to remotely control A1 Pro without Wi-Fi connection.
How to unbind A1 Pro?
A1 Pro is automatically bound to the Dreamehome account once pairing is successful. Each device can only
be bound to one account. It cannot be bound to another account at the same time.
To pair A1 Pro with a new account, you need to unbind it rst. You can go to “Device”, and tap More >
Delete in the upper right corner to unbind the device.
How to log out of your Dreamehome account or delete it?
To log out, go to Me > Settings > Account > Log Out. To delete the account, go to Me > Settings > Account
> Delete Account.
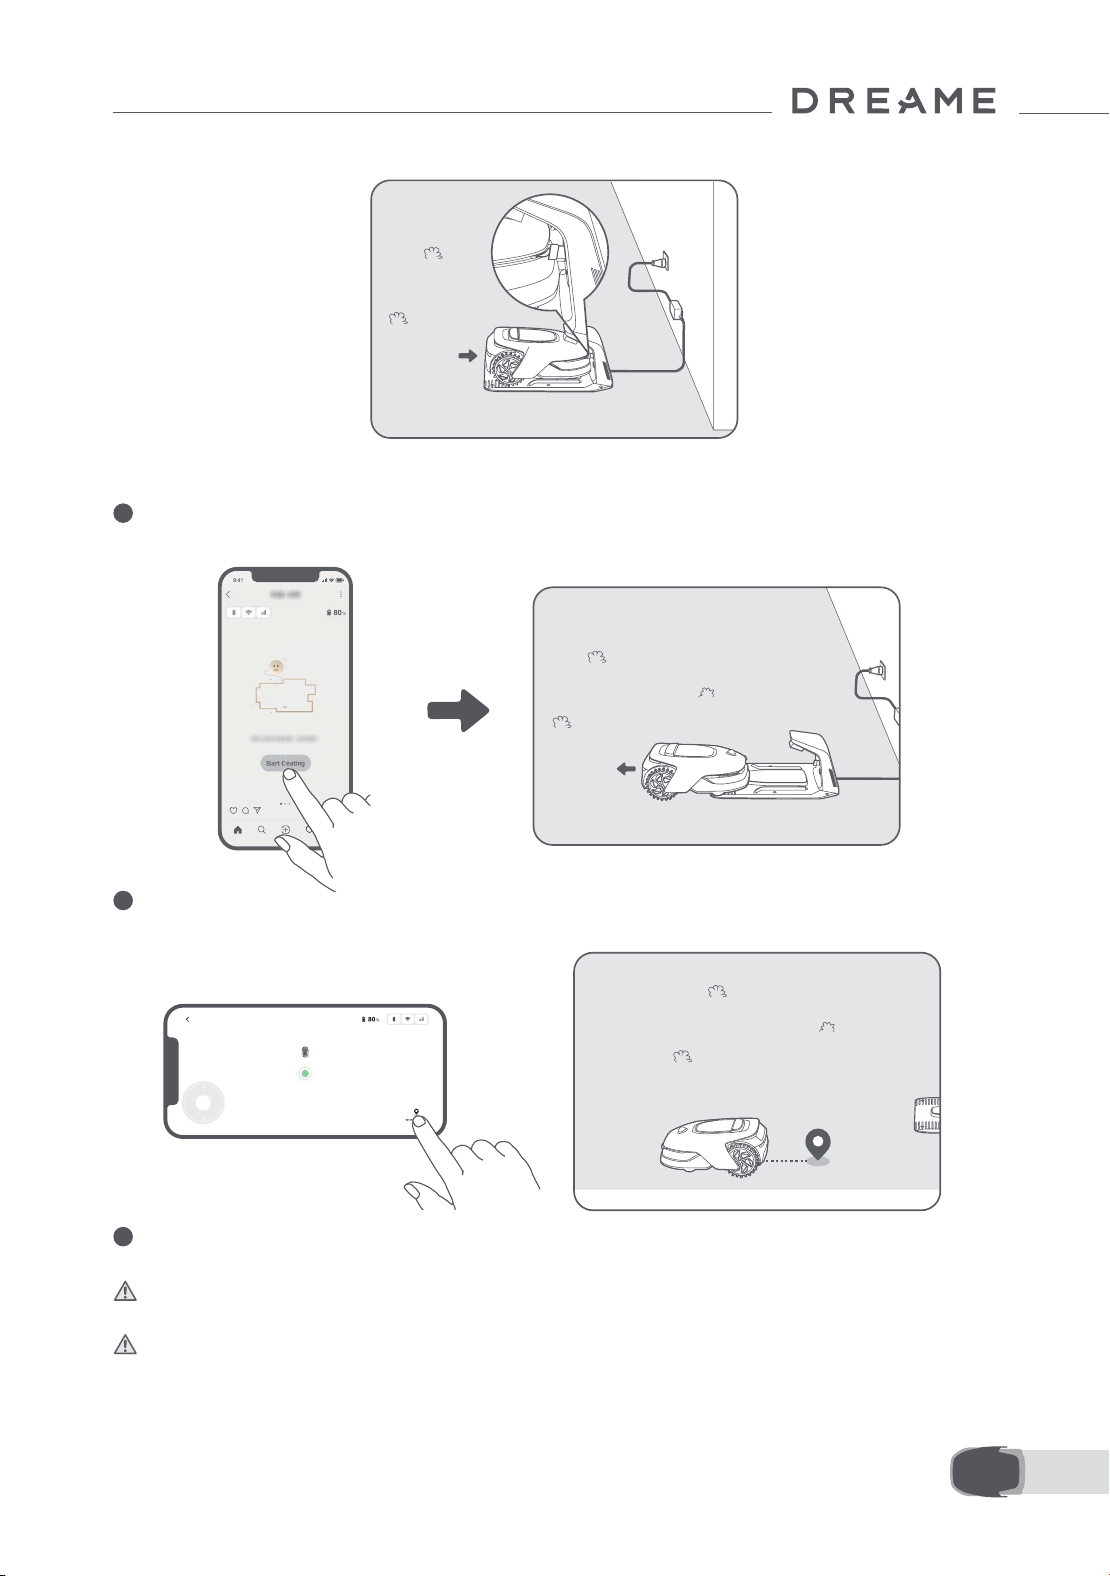
Before mapping, please check the following:
• The battery level of A1 Pro is more than 50%.
• Protective cover of the LiDAR is removed.
6 Map Your Garden
• A1 Pro correctly docks in the charging station.
18EN
6.1 Create the boundary
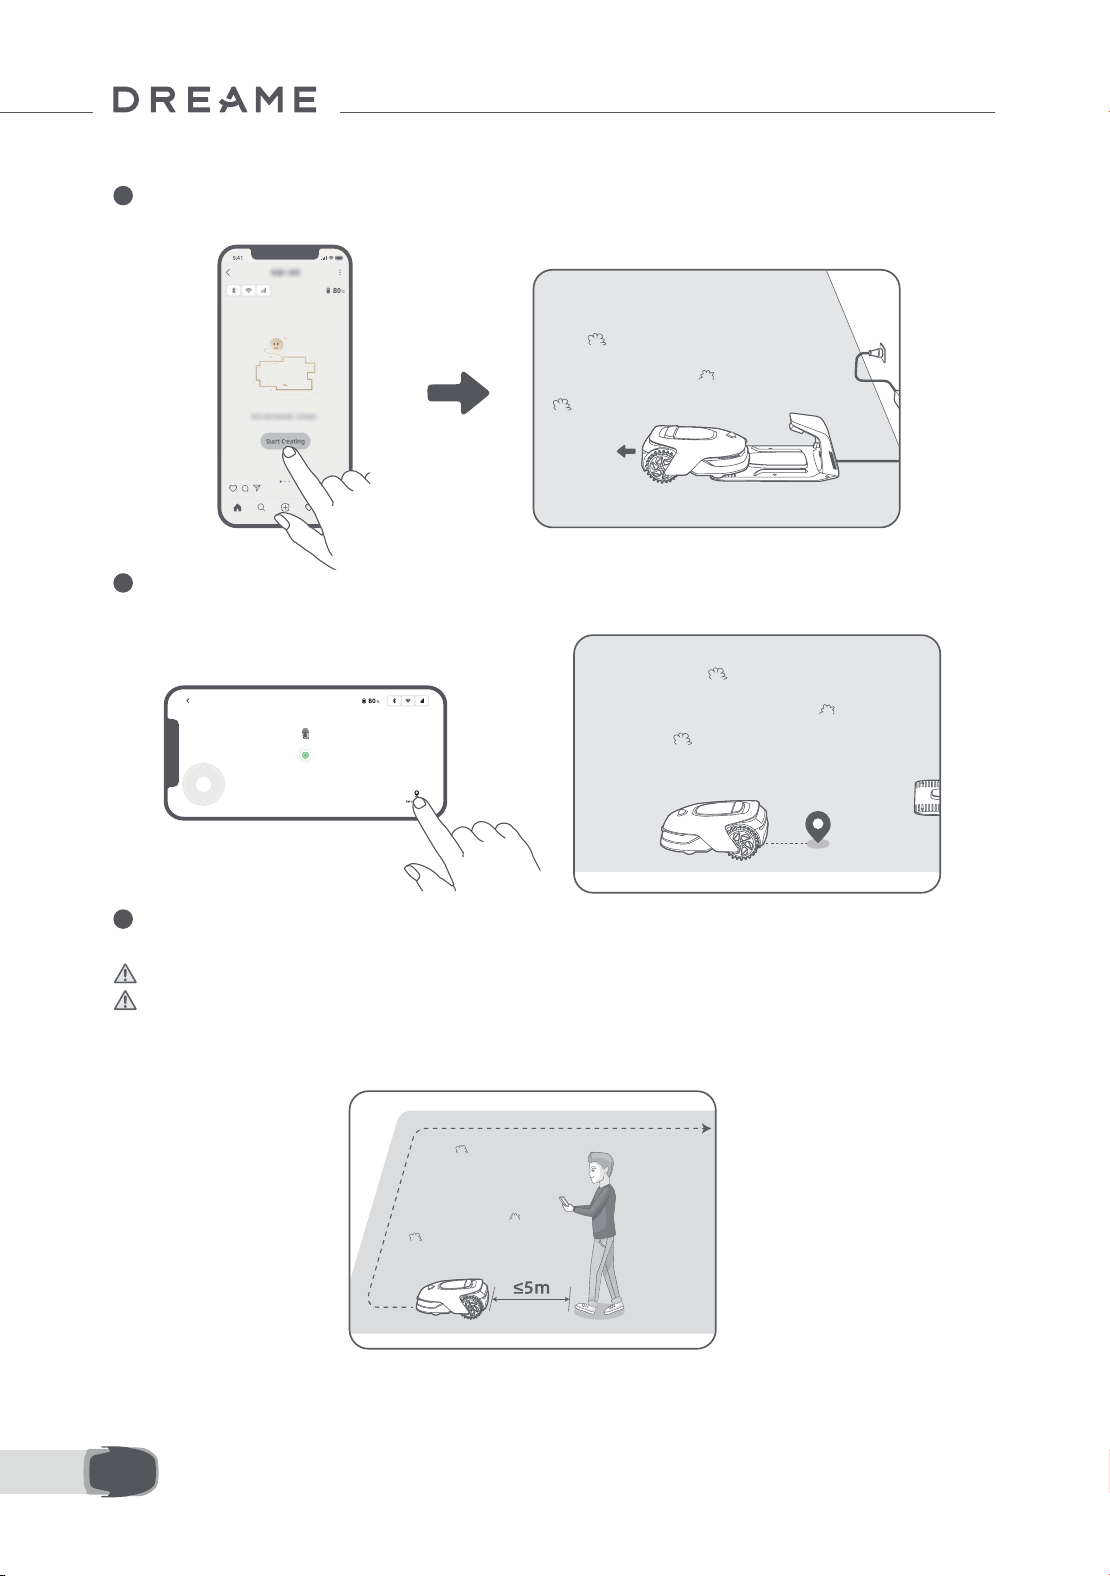
1 Tap "Start Creating" via the app, and A1 Pro will check its status and calibrate. It will automatically
leave the charging station to do the calibration. Please be careful.
2 Remote control A1 Pro to the edge of your lawn and tap "Set Starting Point" to conrm the starting
point of the boundary.
3 Remote control A1 Pro to move along the edge of your lawn to create the work area. When remotely
controlling A1 Pro to create the boundary, please bear in mind:
Warning: Do not manually move A1 Pro when creating the boundary, otherwise the mapping may fail.
Warning: When mapping begins via remote control, do not remotely dock A1 Pro in the charging station
until the mapping is complete. Otherwise, the LiDAR may be blocked, which can cause the mapping to fail.
• Walk within 5 m behind A1 Pro when remotely controlling it.
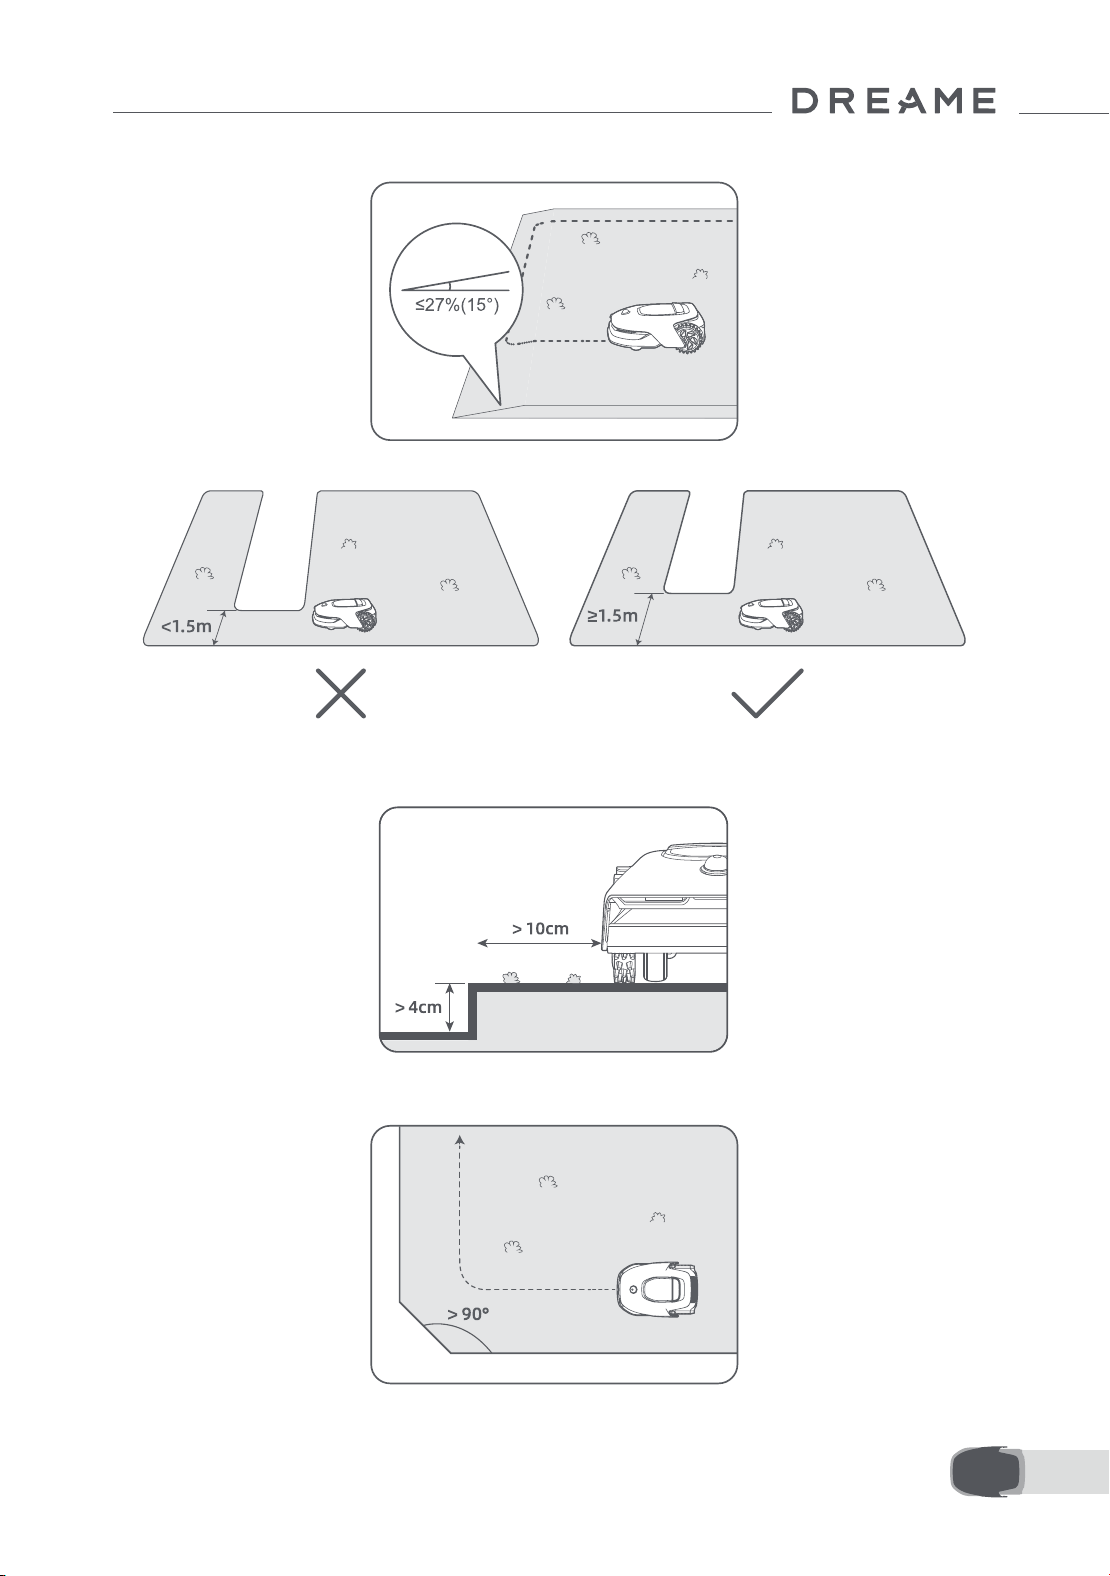
19 EN
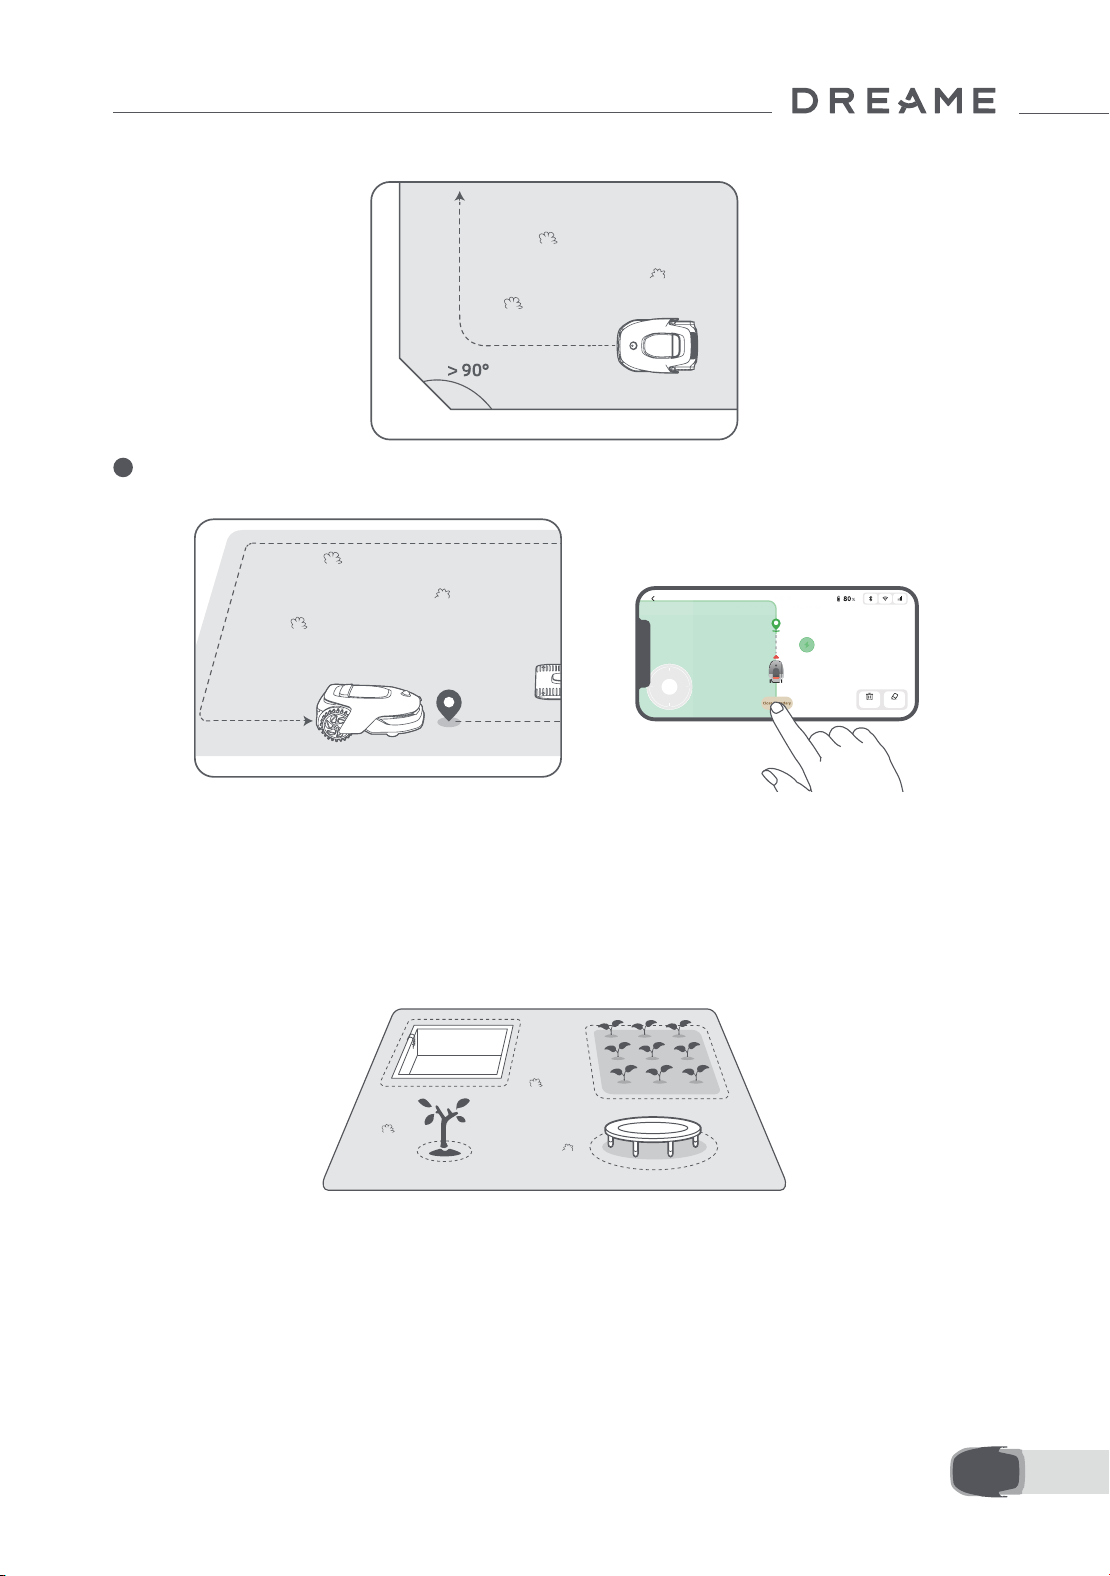
• Do not create the boundary on a slope that exceeds 27%.
• If there is a height dierence of more than 4 cm between the edge of your lawn and the adjacent ground,
please keep A1 Pro at least 10 cm from the edge of your lawn.
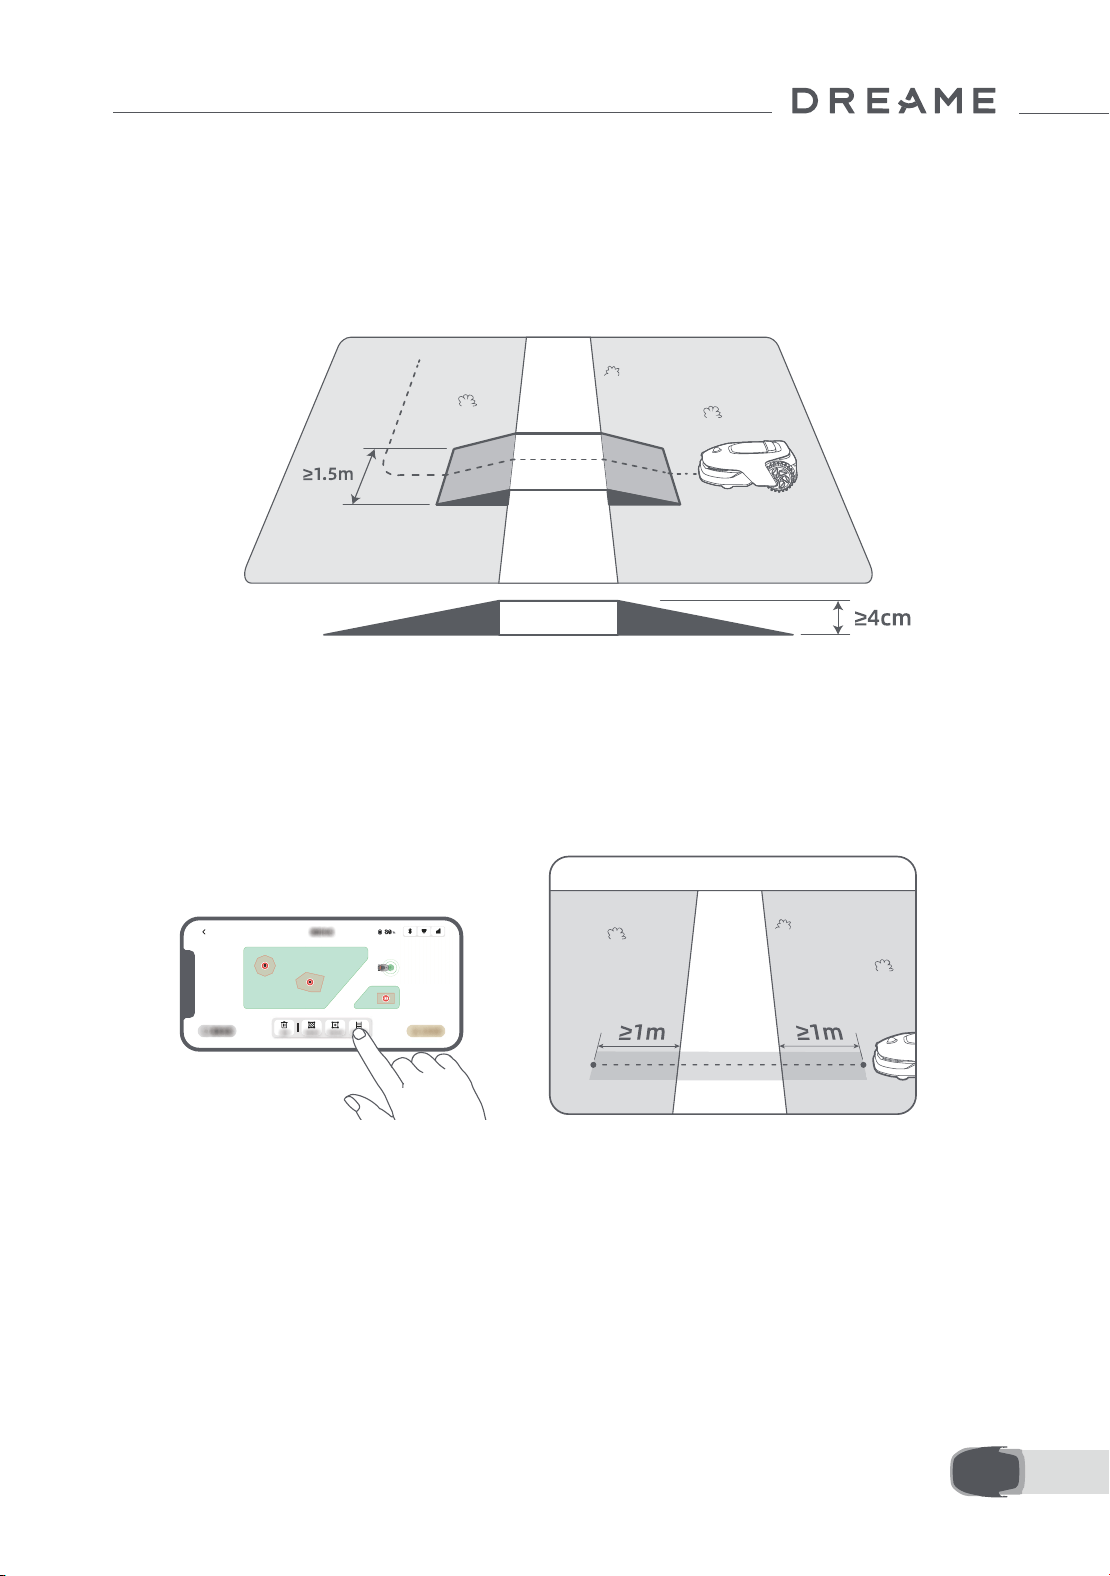
• Avoid creating boundaries inside corridors narrower than 1.5 m.
• Make sure the turning angles are greater than 90° .
20EN
4 When A1 Pro returns to the place 1 m near the starting point, you can tap "Close Boundary" and the
boundary will automatically be completed.
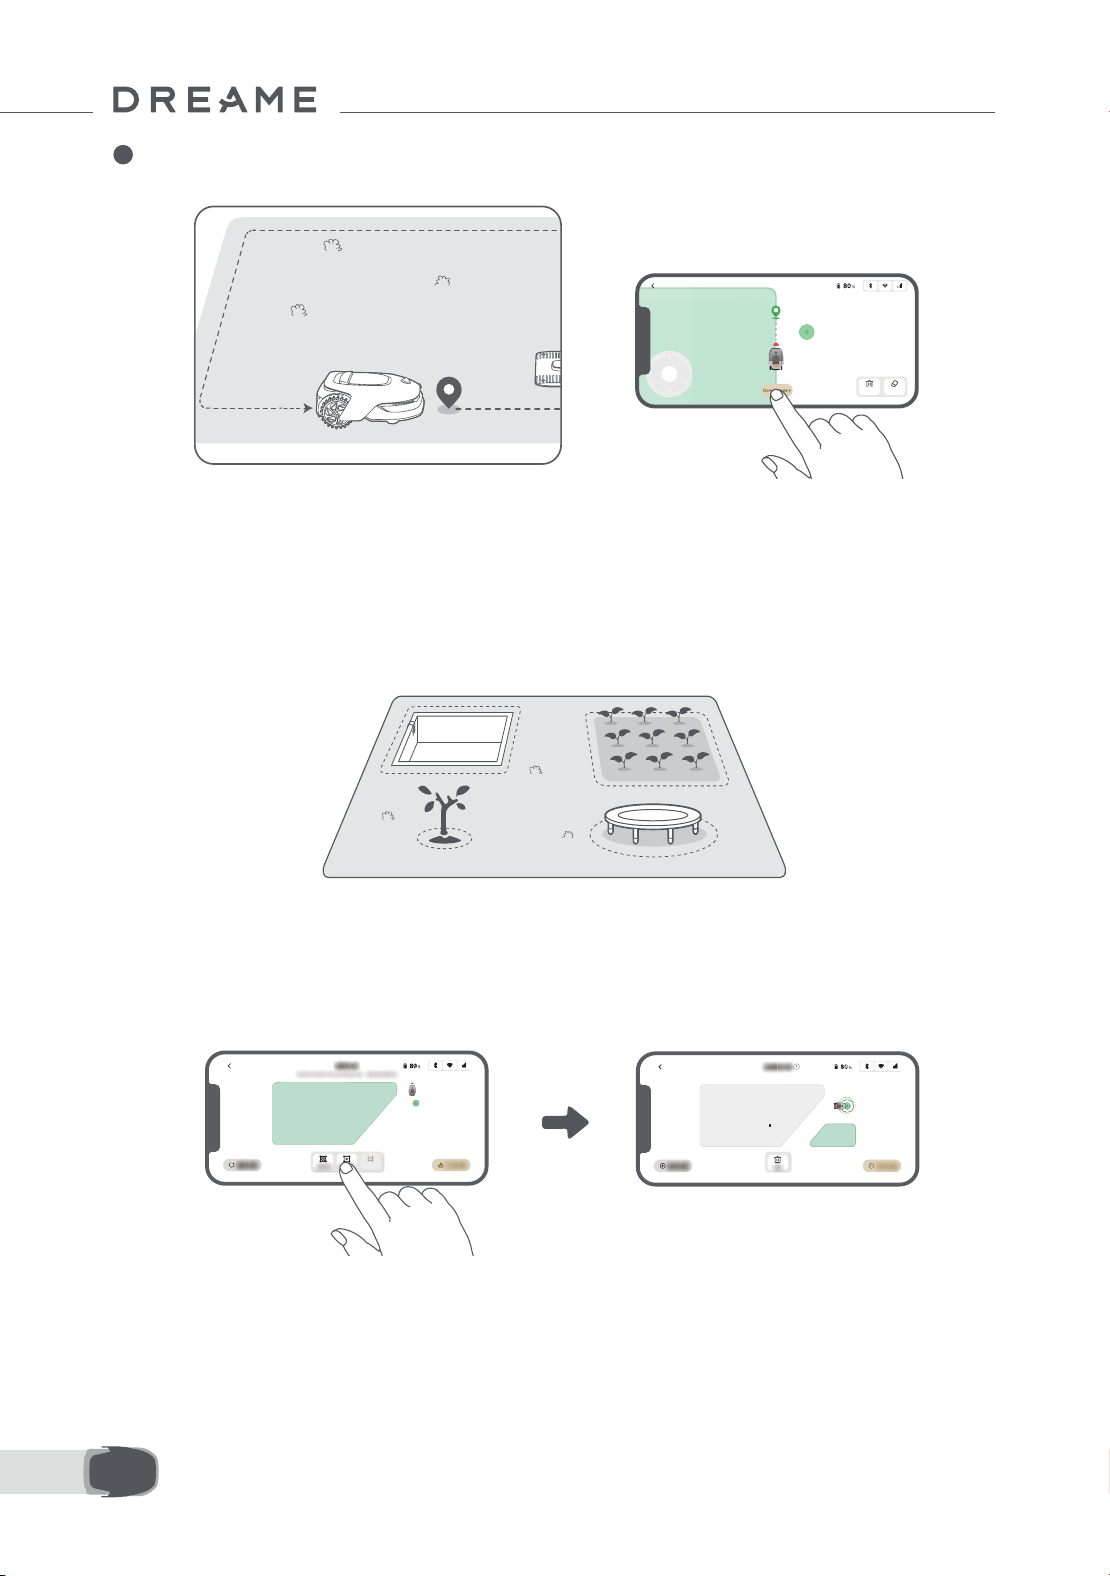
6.2 Set no-go zone
Though A1 Pro can automatically avoid obstacles, it is still necessary to set areas with a risk of falling, such
as swimming pools and sandpits, as no-go zones. For objects you want to protect (such as a owerbed, a
trampoline, a vegetable patch or a naked tree root), please set them as no-go zones. You can remote control
A1 Pro to create no-go zones via the app, or go to "Map Editing" to directly draw or delete no-go zones on
the map.
6.3 Set multiple zones
If your lawn is separated by roads or you have several isolated lawns, you can tap "Work zone" in the app
to continue creating work area via remote control. You can also add, delete or modify the zones in "Map
Editing" when the map is nished.
21 EN
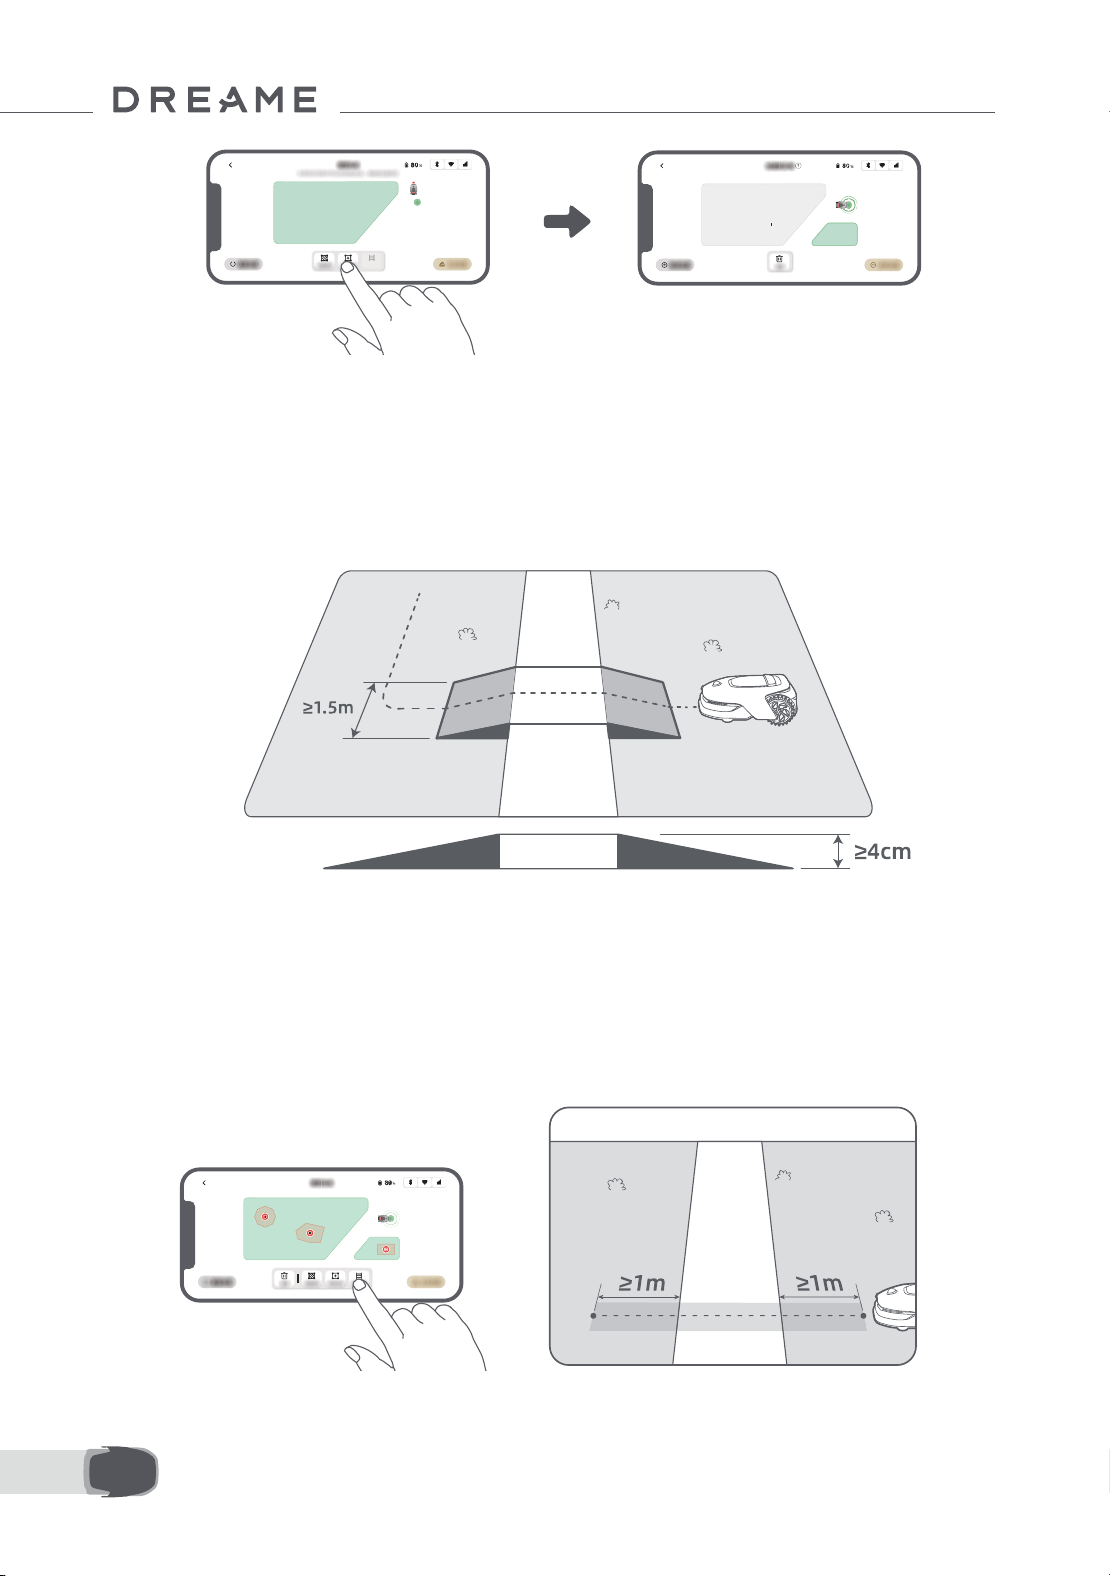
6.4 Set path
• To connect two isolated work zones
If there is overlap space between new area(s) and the original area, they will be automatically combined.
For isolated areas, please create paths to connect them, otherwise they will be inaccessible to A1 Pro. Tap
"Path" and remote control A1 Pro to create a path.
Note: Make sure the beginning and end of the path are in the work area. Keep at least 1 m distance
between the beginning/end of the path and the boundary.
For isolated zones, please create a path to connect them. Isolated zones without a path will be inaccessible
to A1 Pro.
Note: By default, A1 Pro only moves along the path without mowing the grass.
Note: If your lawn is divided by passages higher than 4 cm, place an object with a slope equal in height to
the passage (such as a ramp).
22EN
6.5 Finish map
Tap "Finish Map" when work areas, paths and no-go zones are completed. A1 Pro should be inside the map
when the map is nished, otherwise you will be prompted to remote control it to move back inside the map.
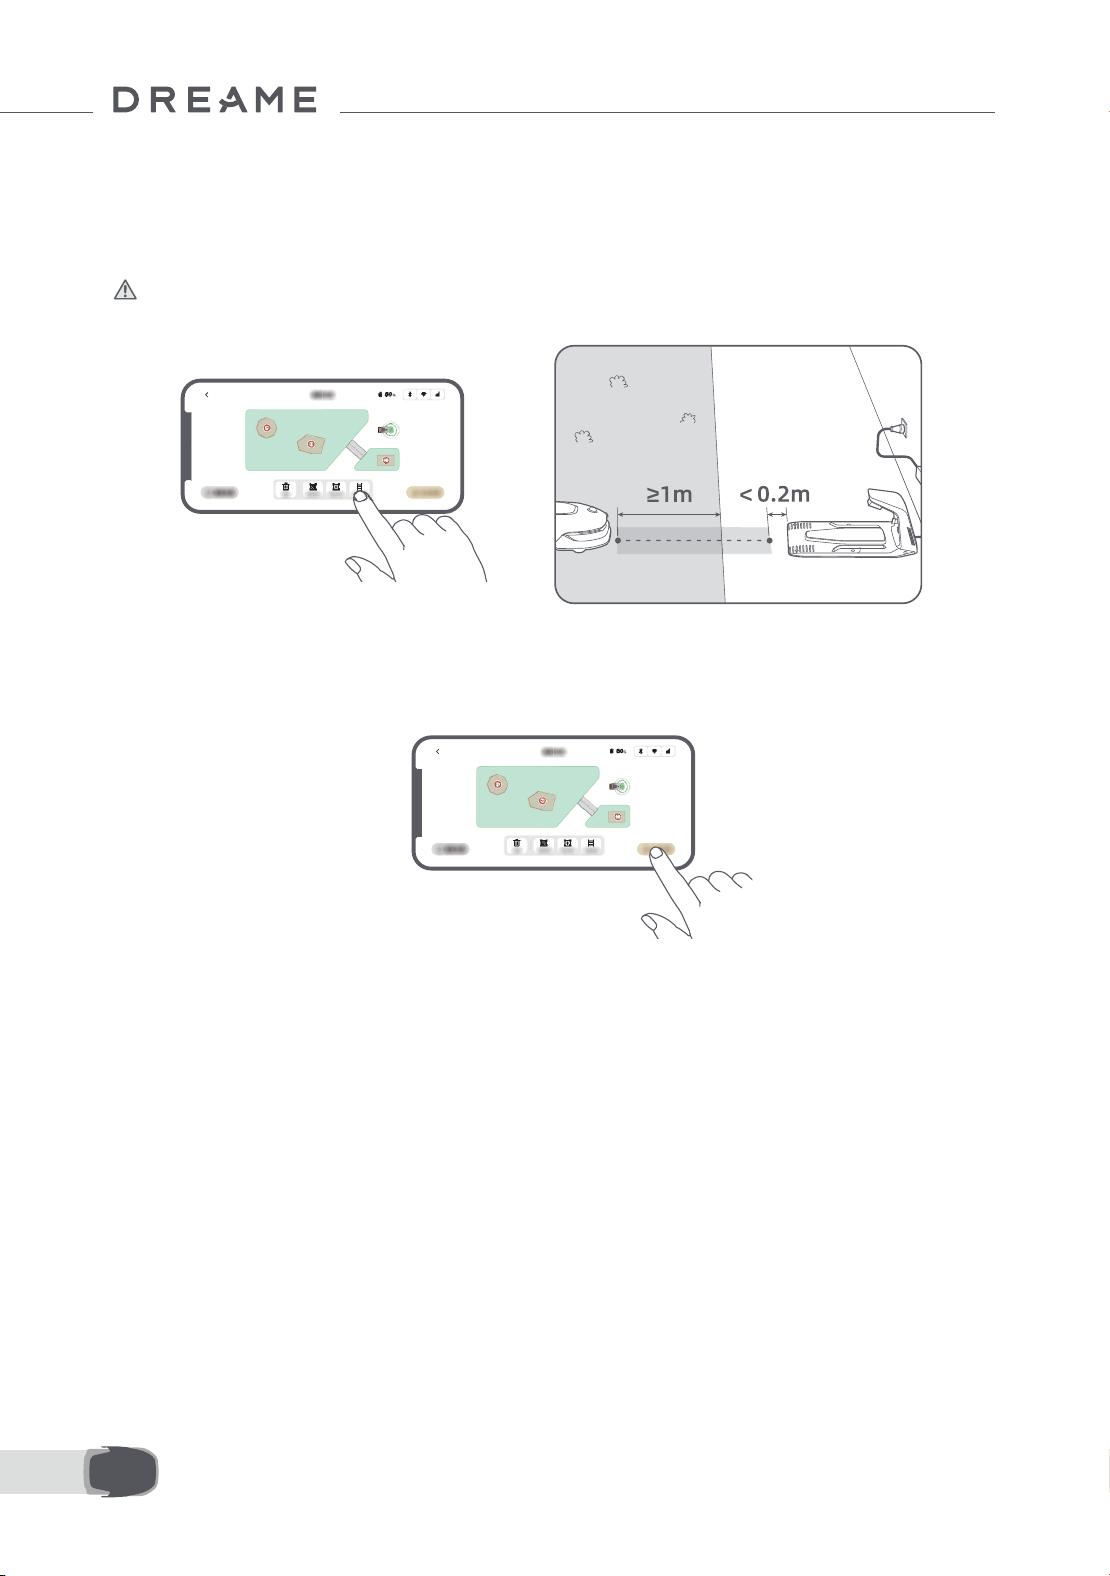
• To connect the work area and the charging station
If your charging station is not in the work area, a path should be created to connect it to the work area. Tap
"Path", and remote control A1 Pro to create a path that allows it to return to the charging station.
Note: When creating a path, ensure that one end overlaps with the work area by at least 1 metre ( ≥ 1 m),
and the other end is less than 0.2 metres ( < 0.2 m) in front of the charging station.
Warning: When creating paths to connect the work area and the charging station, do not remotely dock
A1 Pro in the charging station. Otherwise, the LiDAR may be blocked, which can cause the mapping to fail.
23 EN
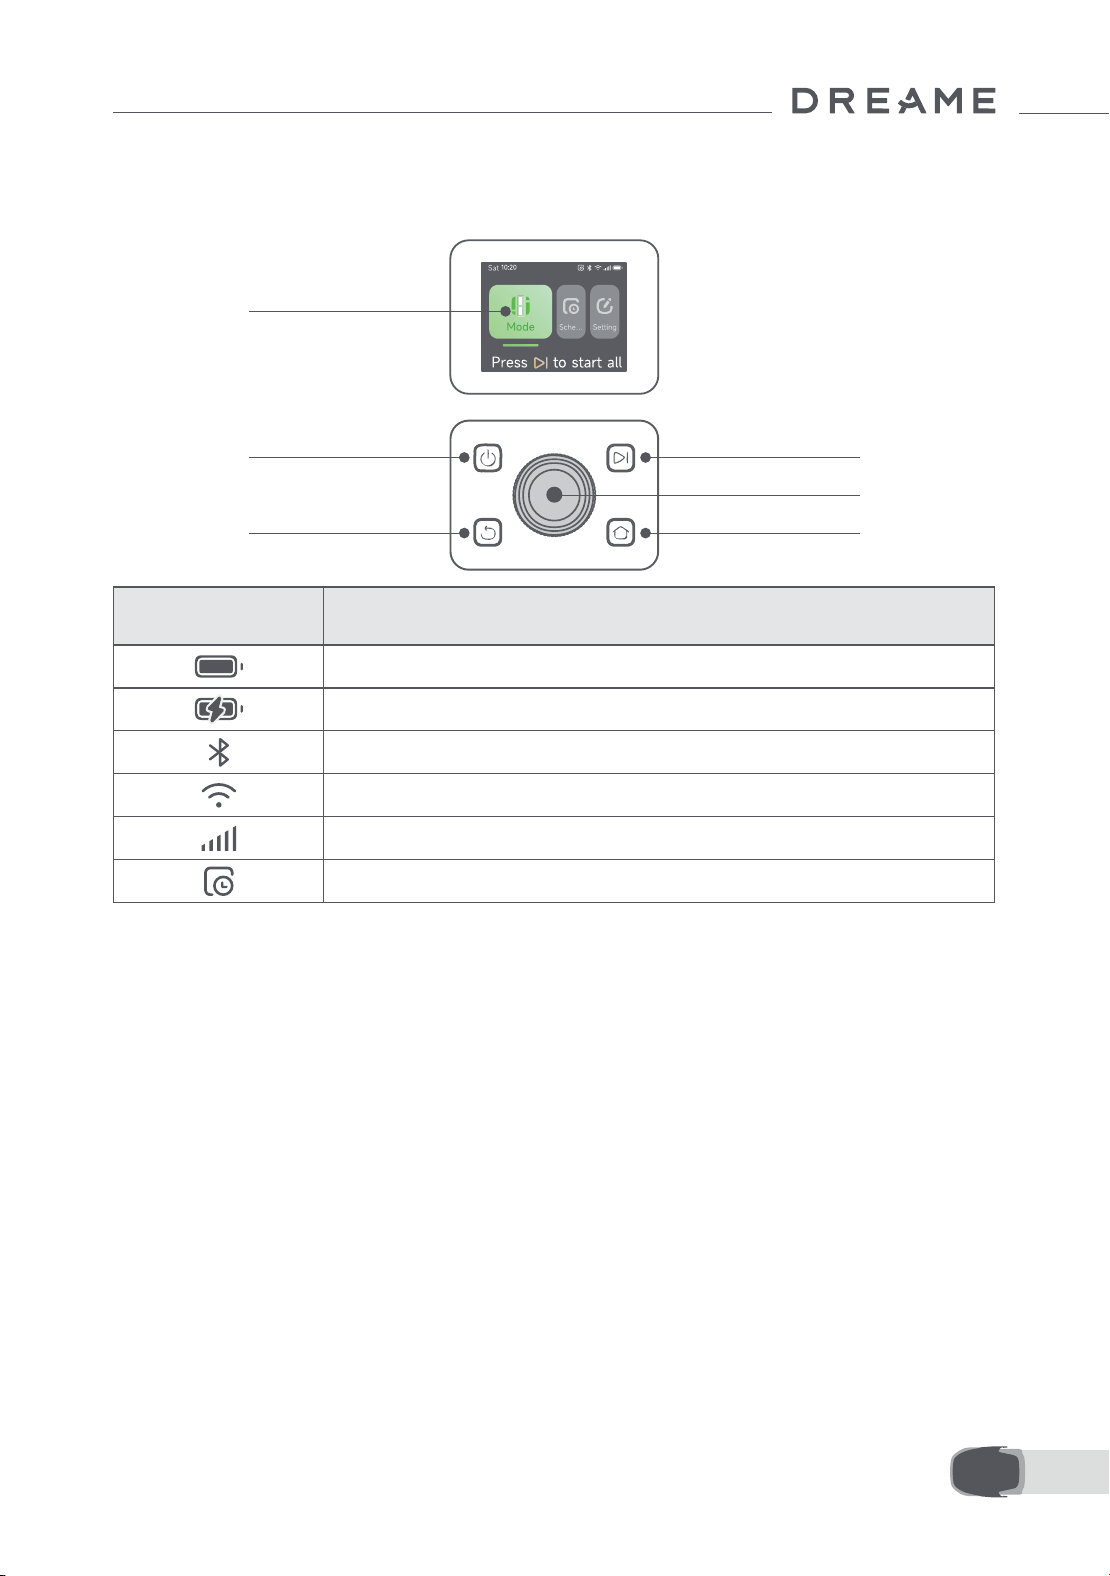
7.1 Get familiar with the control panel
7 Operation
Power on/o
Display
Back
Start
Knob
Home
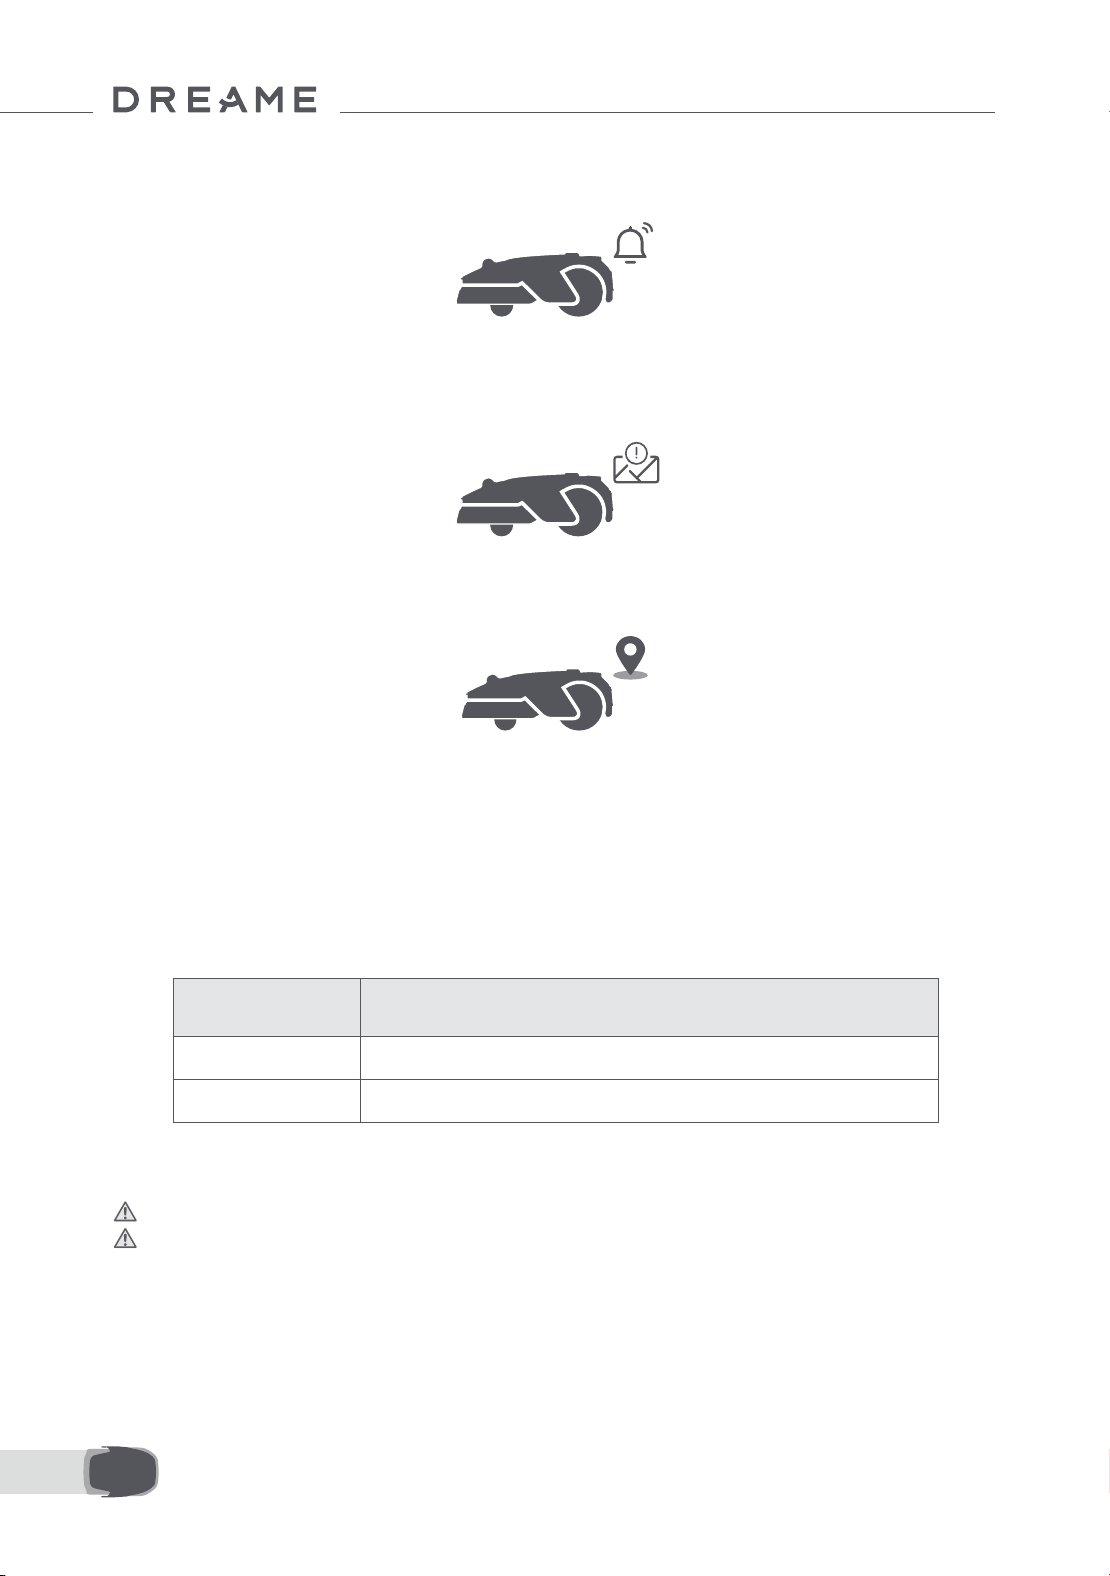
Icon Status
Battery level (Shows the current battery level.)
Charging (A1 Pro successfully docks in the charging station.)
Bluetooth (A1 Pro is connected to the app via Bluetooth.)
Wi-Fi (A1 Pro is connected to the app via a Wi-Fi network.)
Link service (Link service is activated.)
Schedule (A task is scheduled for today and has not started yet.)
24EN
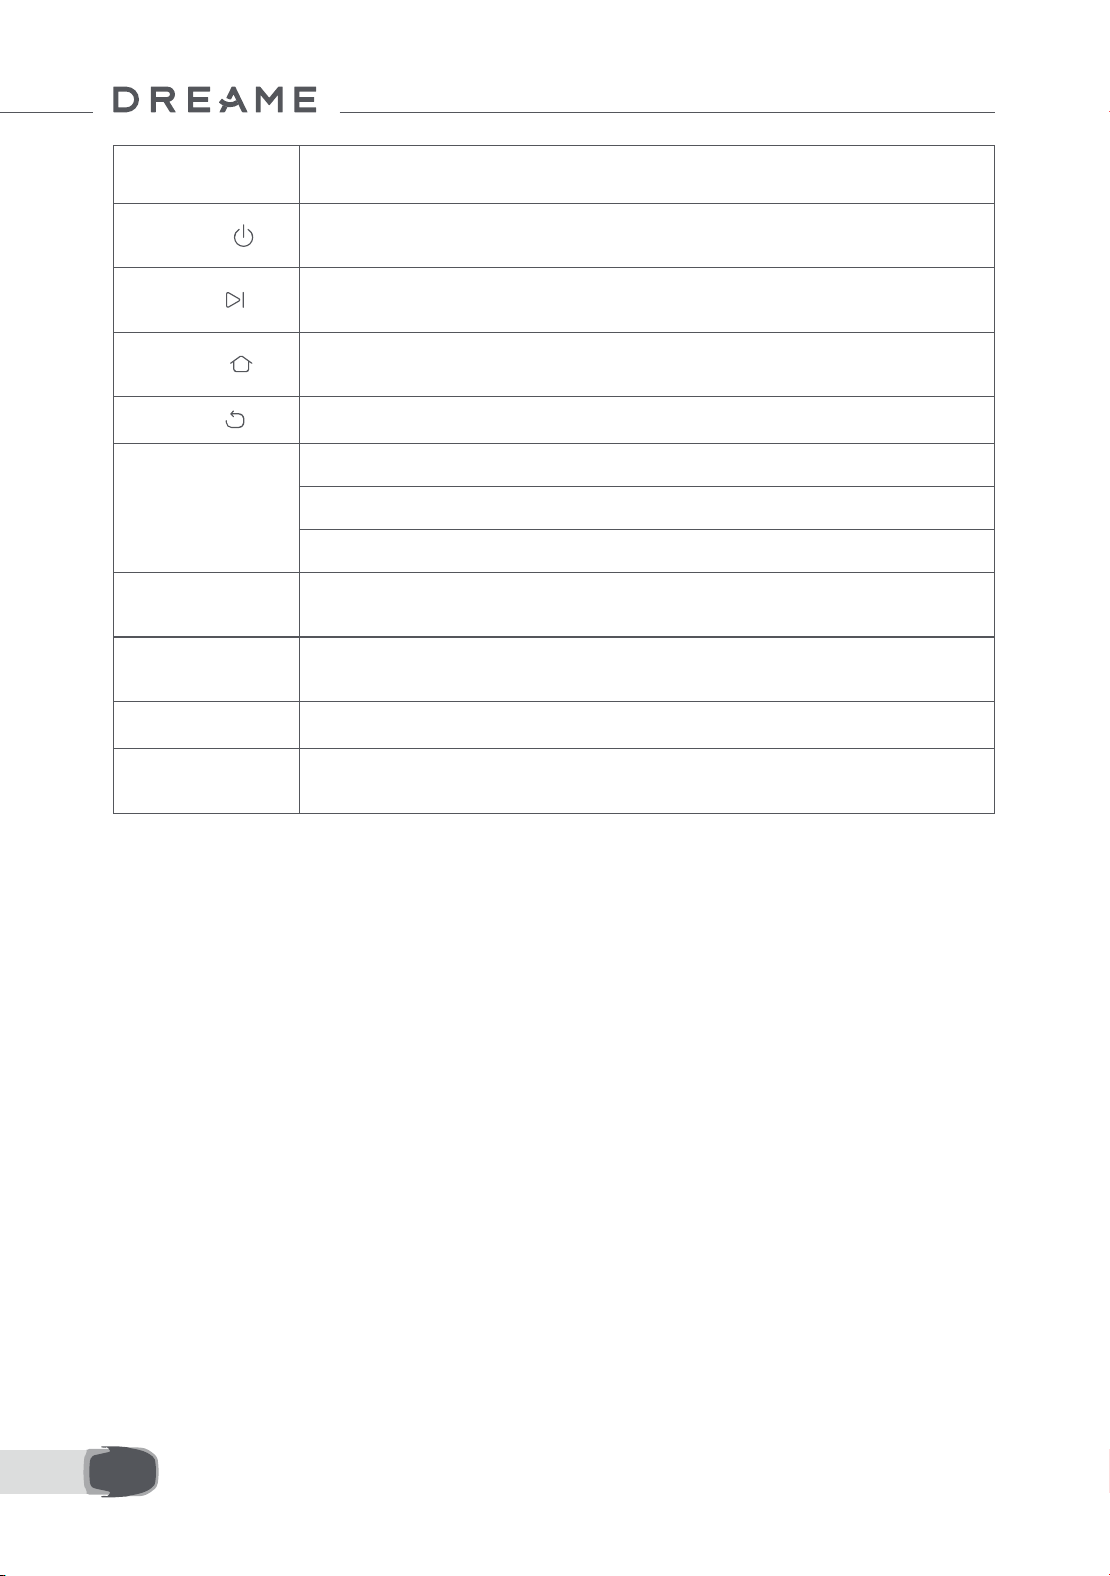
Button Function
Power
Ensure that A1 Pro is outside the charging station. Press and hold the Power button for 2
seconds to turn it on or o.
Start
Press Start button and close the cover in 5 seconds to start mowing. The task will be
cancelled if the cover is not closed in 5 seconds.
Home
Press Home button and close the cover in 5 seconds to send A1 Pro back to the charging
station to charge. The task will be cancelled if the cover is not closed in 5 seconds.
Back
Press Back button to go back to the previous page.
Knob
Press the knob to conrm the selection in the menus.
Press and hold the knob for 3 seconds to enable Bluetooth pairing mode on A1 Pro.
Turn the
knob clockwise/anticlockwise to navigate the menu.
Start + Back
Press and hold Start button and Back button together for 3 seconds to factory reset A1
Pro. The PIN code will not be erased.
Home + Back
Press and hold Home button and
Back button together for 3 seconds to enter the About
page in Settings. The About page will disappear in 5 seconds.
Knob + Back
Press and hold the knob and
Back button together for 3 seconds to reset PIN code.
Stop
Press Stop button to open the cover of the control panel and stop A1 Pro. PIN code must
be entered on the control panel to resume the operation of A1 Pro.
25 EN
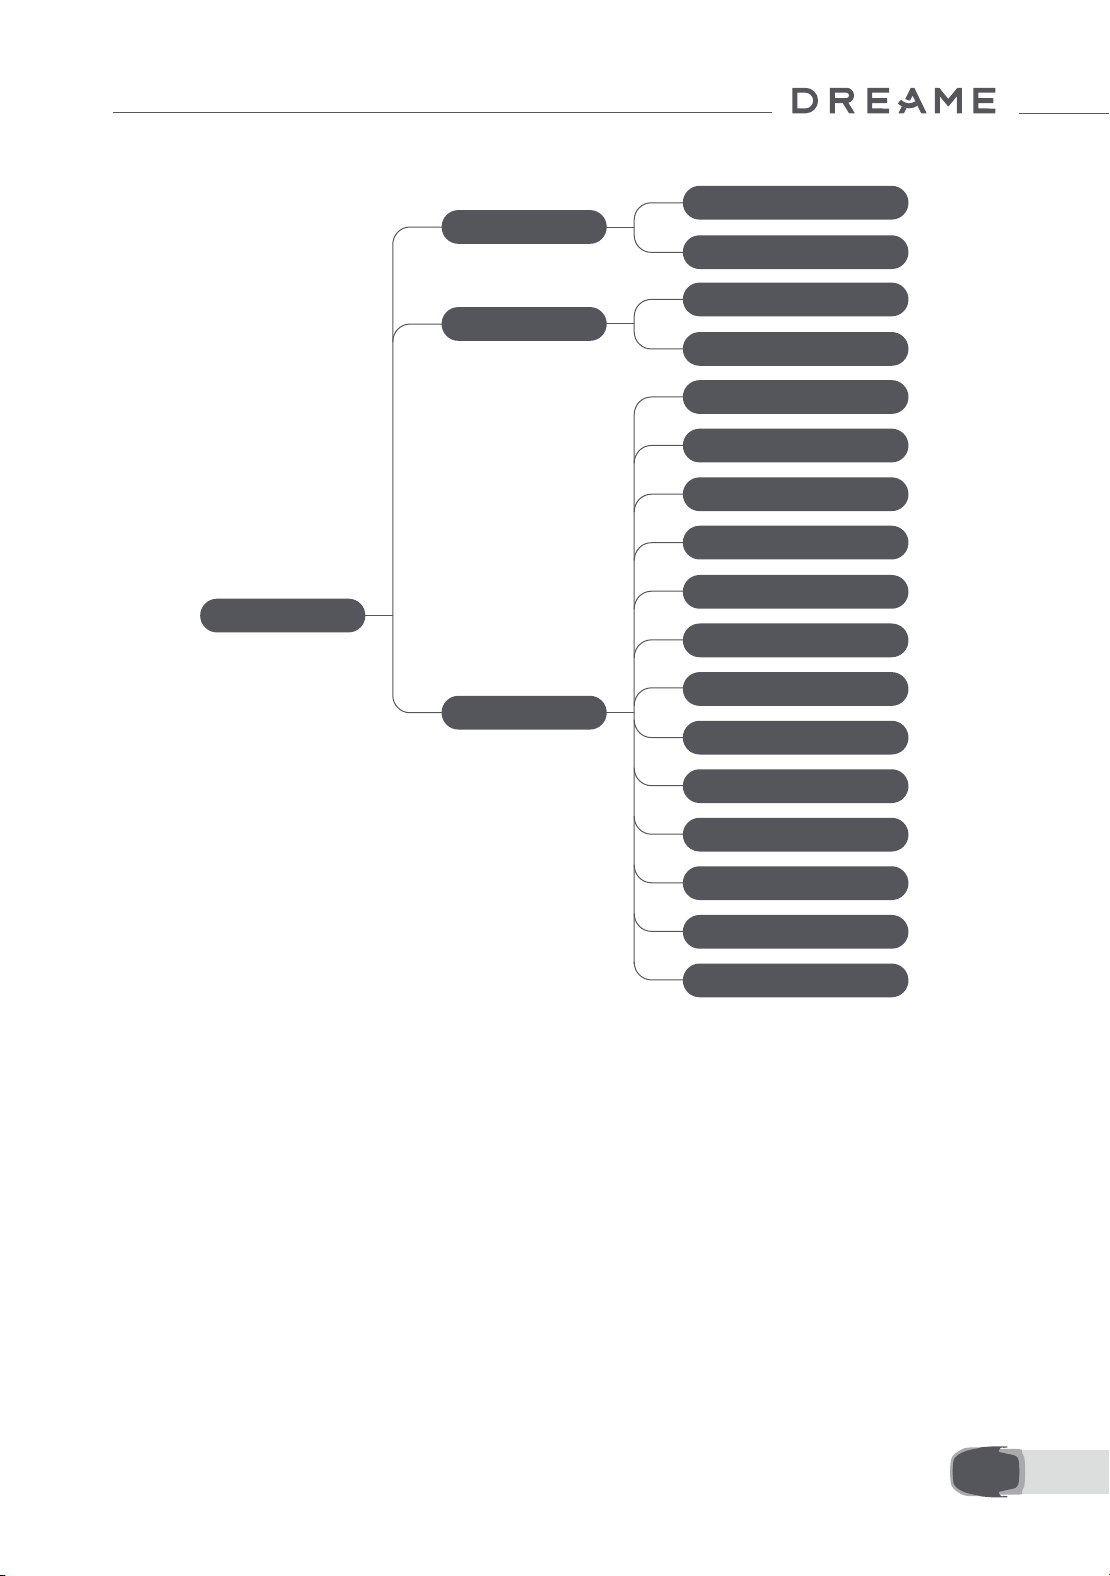
Overview of the display menu structure
*It might be updated depending on the software version.
7.2 Start mowing for the rst time
Tips before mowing:
• Use a push mower to mow the grass to a height of no more than 10 cm.
• Clear the obstacles including debris, leaf piles, toys, wires and stones from the lawn. Make sure no children
or pets are on the lawn when A1 Pro is mowing.
• Fill in the holes in the lawn.
• Set your mowing preferences in the app in advance (such as mowing eciency, mowing height and
mowing direction).
Main Page
Schedule
Settings
Modes
All-Area Mowing
Edge Mowing
View Schedule
Turn on/o Schedule
Mowing Eciency
Mowing Height
Obstacle Avoidance Height
Do Not Disturb Mode
Rain Protection
Frost Protection
Lift Alarm
O-Map Alarm
Change PIN Code
Volume
Language
Reset the Robot
About
26EN
Press Start button on the control panel and close the top cover in 5 seconds. A1 Pro will leave the charging
station and start mowing. You can also tap "Start" in the app to start mowing.
• Start via the control panel
1. Press Stop button to open the cover and enter the PIN code.
2. Select "Modes" on the display and press the knob.
3. Turn the knob to select the mowing mode.

27 EN
4. Press Start button and close the top cover in 5 seconds. A1 Pro will start mowing.
• Start via the app
1. Open the app.
2. Select a mowing mode and tap "Start" to start mowing.
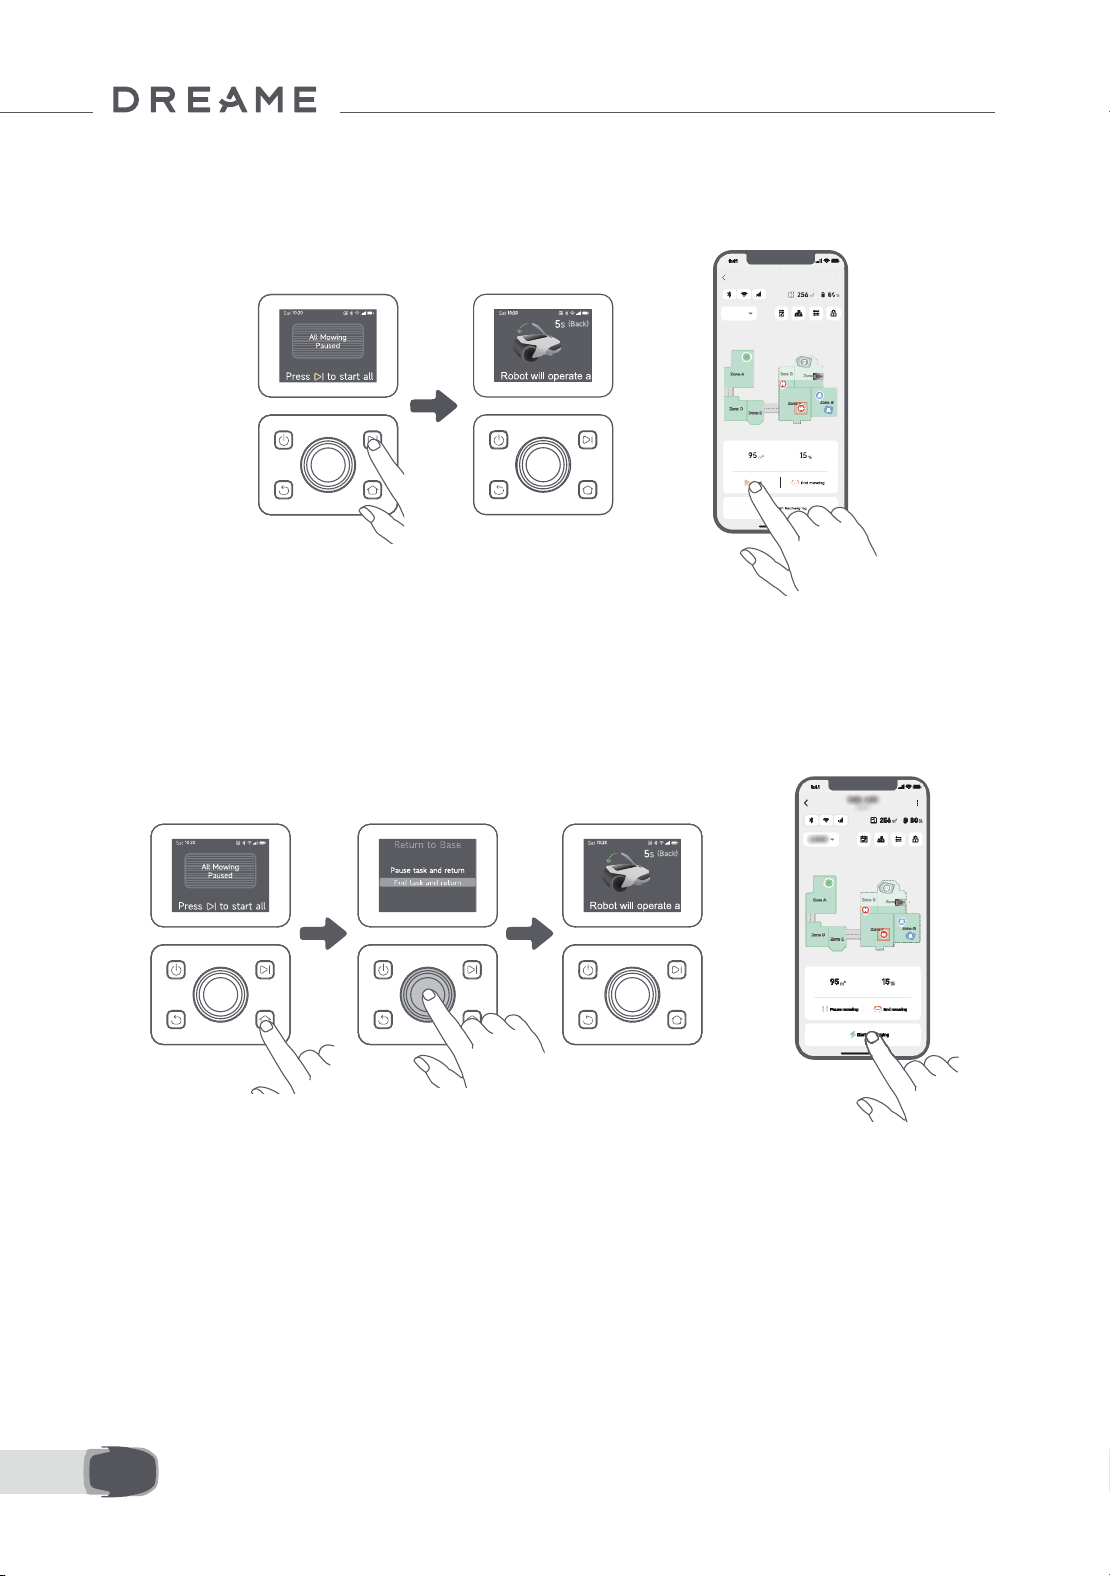
7.3 Pause
OR
To pause the current mowing task, you can press the Stop button on A1 Pro or tap "Pause" in the app.
Note: A1 Pro will be locked and cannot be started directly through app after Stop button is pressed. To
resume mowing, please enter your preset PIN code on the control panel rst.
28EN
7.4 Resume
7.5 Return to the charging station
To resume the task when A1 Pro is paused, press Start button on A1 Pro and close the cover in 5 seconds.
A1 Pro will resume the previous mowing task. You can also tap "Continue" in the app to resume the mowing
task.
To stop the mowing task and send A1 Pro back to the charging station, conrm your PIN code on the control
panel and then press Home button. Conrm to end the task and close the cover in 5 seconds. A1 Pro will
automatically return to the charging station to charge. You can also tap "Return to Station" in the app to
send A1 Pro back to the charging station.
OR
OR
Where you can explore more
Dreamehome App is more than a remote control. There are many things you can do through the app:
completing various settings remotely, experiencing dierent mowing modes, editing the map freely and
adjusting mowing schedules. Moreover, you can view the 3D map of your lawn directly in the app.
8 Dreamehome App
29 EN
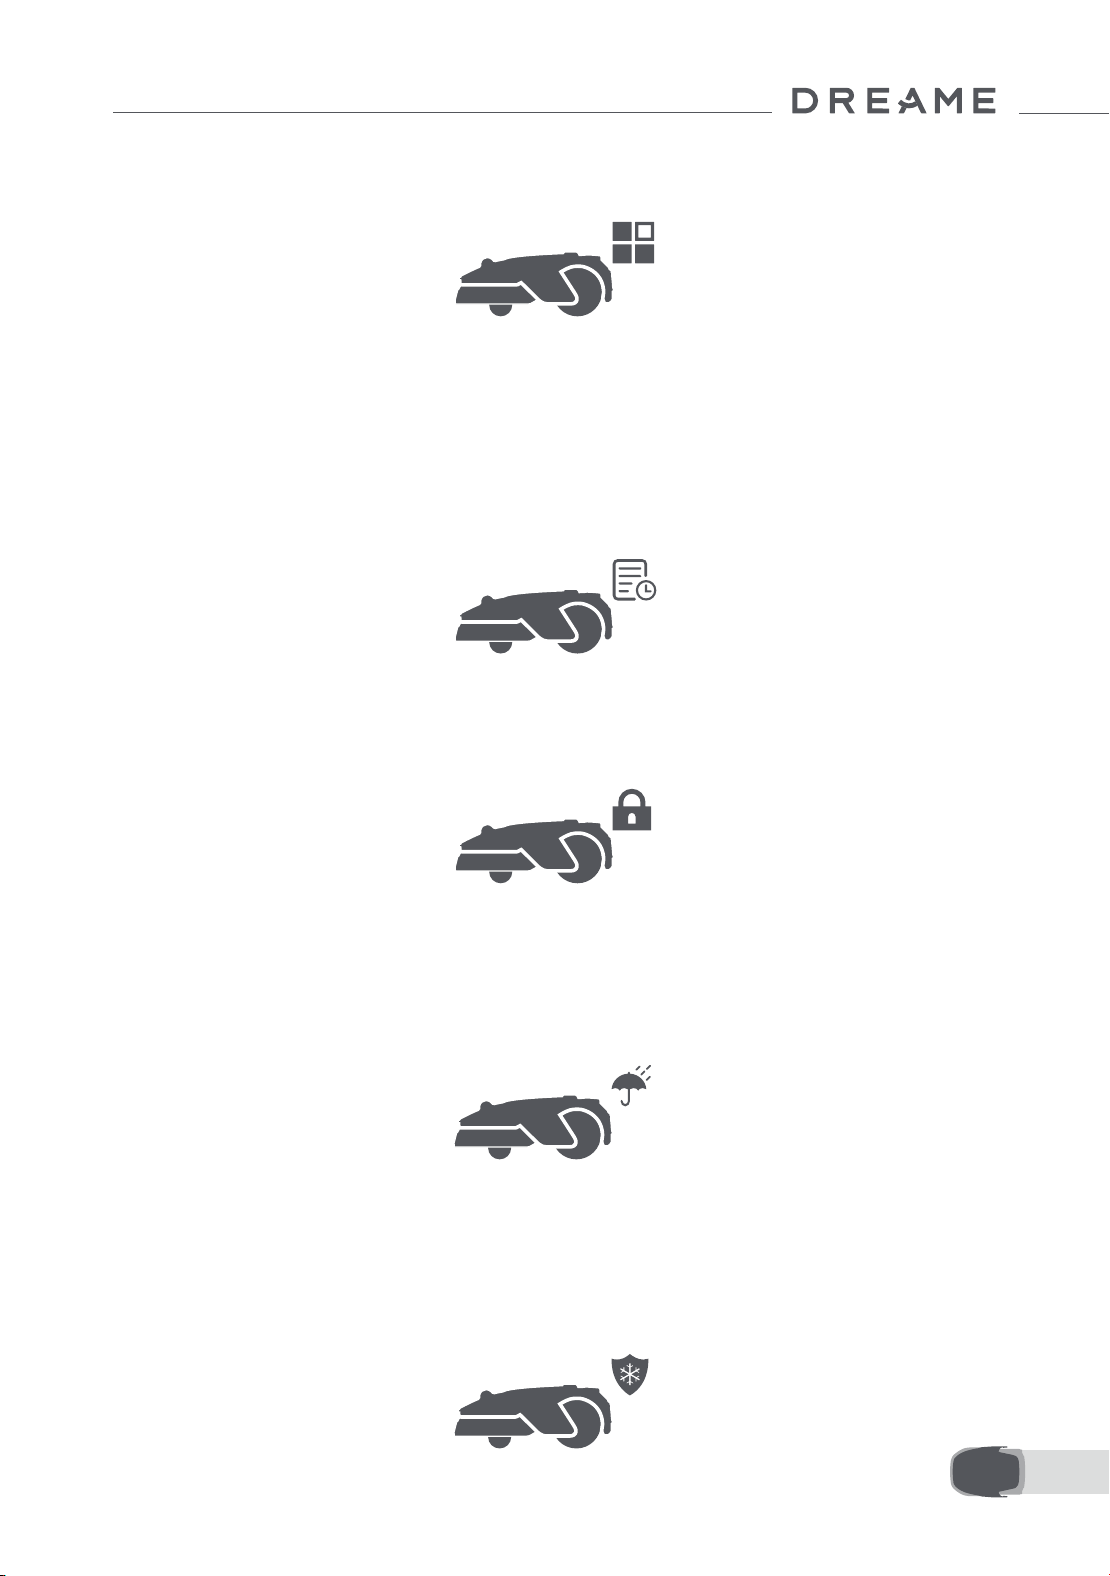
8.1 Mowing modes
8.2 Schedule
A1 Pro oers various mowing modes. You can switch between modes through the app.
After the rst map is completed, A1 Pro automatically creates two weekly mowing schedules according to
the lawn size, which are "Spr/Sum Schedule" and "Aut /Win Schedule". You can tap "Schedule" in the app
to do detailed schedule settings. With the schedule function, you can completely leave the daily mowing
work to A1 Pro. You only need to maintain A1 Pro regularly.
Note: If you worry that A1 Pro may disturb you or your neighbours when it works autonomously during
certain hours, you can go to Settings > Do Not Disturb and set Do Not Disturb time in the app.
8.3 Child lock
If you worry that children may operate A1 Pro, you can enable "Child Lock" function in the app. With this
function enabled, A1 Pro will be locked if no operations are performed for 5 minutes when the cover is open.
8.4 Rain protection
8.5 Frost protection
If you worry that adverse weather conditions may aect the mowing work, you can enable "Rain
Protection" function in "Settings" on the control panel or in the app. When this function is enabled, A1
Pro automatically pauses mowing and returns to the charging station when it rains. You can set the rain
protection time in the app.
When temperature is below 6 ℃ , mowing operations will cause permanent damages to the lawn. Battery
will not be able to charge due to self-protection. You can enable "Frost Protection" function in "Settings"
on the control panel or in the app. The function enables A1 Pro to automatically pause mowing and return
to the charging station when ambient temperature is ≤ 6 ℃ . It will automatically resume working when
temperature is above 11 ℃ .
30EN
8.6 Lift alarm
8.7 O-map alarm
With this function enabled, A1 Pro will be locked and alarm will go o immediately if it is lifted.
With this function enabled, A1 Pro will be locked and alarm will go o immediately if it is away from the map.
(This function requires installation of Link Module.)
8.8 Real-time location
With Link Module, you can view the current location of A1 Pro in Google Maps.
Note: Dreame development team will continuously conduct OTA (Over-the-Air) updates and maintenance
on the rmware and app. Please check for update notications or enable the Auto-update function to
keep the rmware and app up-to-date and enjoy more features.
9 Maintenance
For better performance and lifespan of A1 Pro, please clean it regularly and replace worn parts according to
the frequency below:
9.1 Cleaning
Warning: Before cleaning, please turn o A1 Pro and unplug the charging station.
Warning: Please make sure LiDAR protective cover is on the LiDAR before turning A1 Pro upside down to
avoid damages to the LiDAR.
Part Replacement Frequency
Blades Every 6–8 weeks or sooner
Cleaning brush Every 12 months or sooner
31 EN
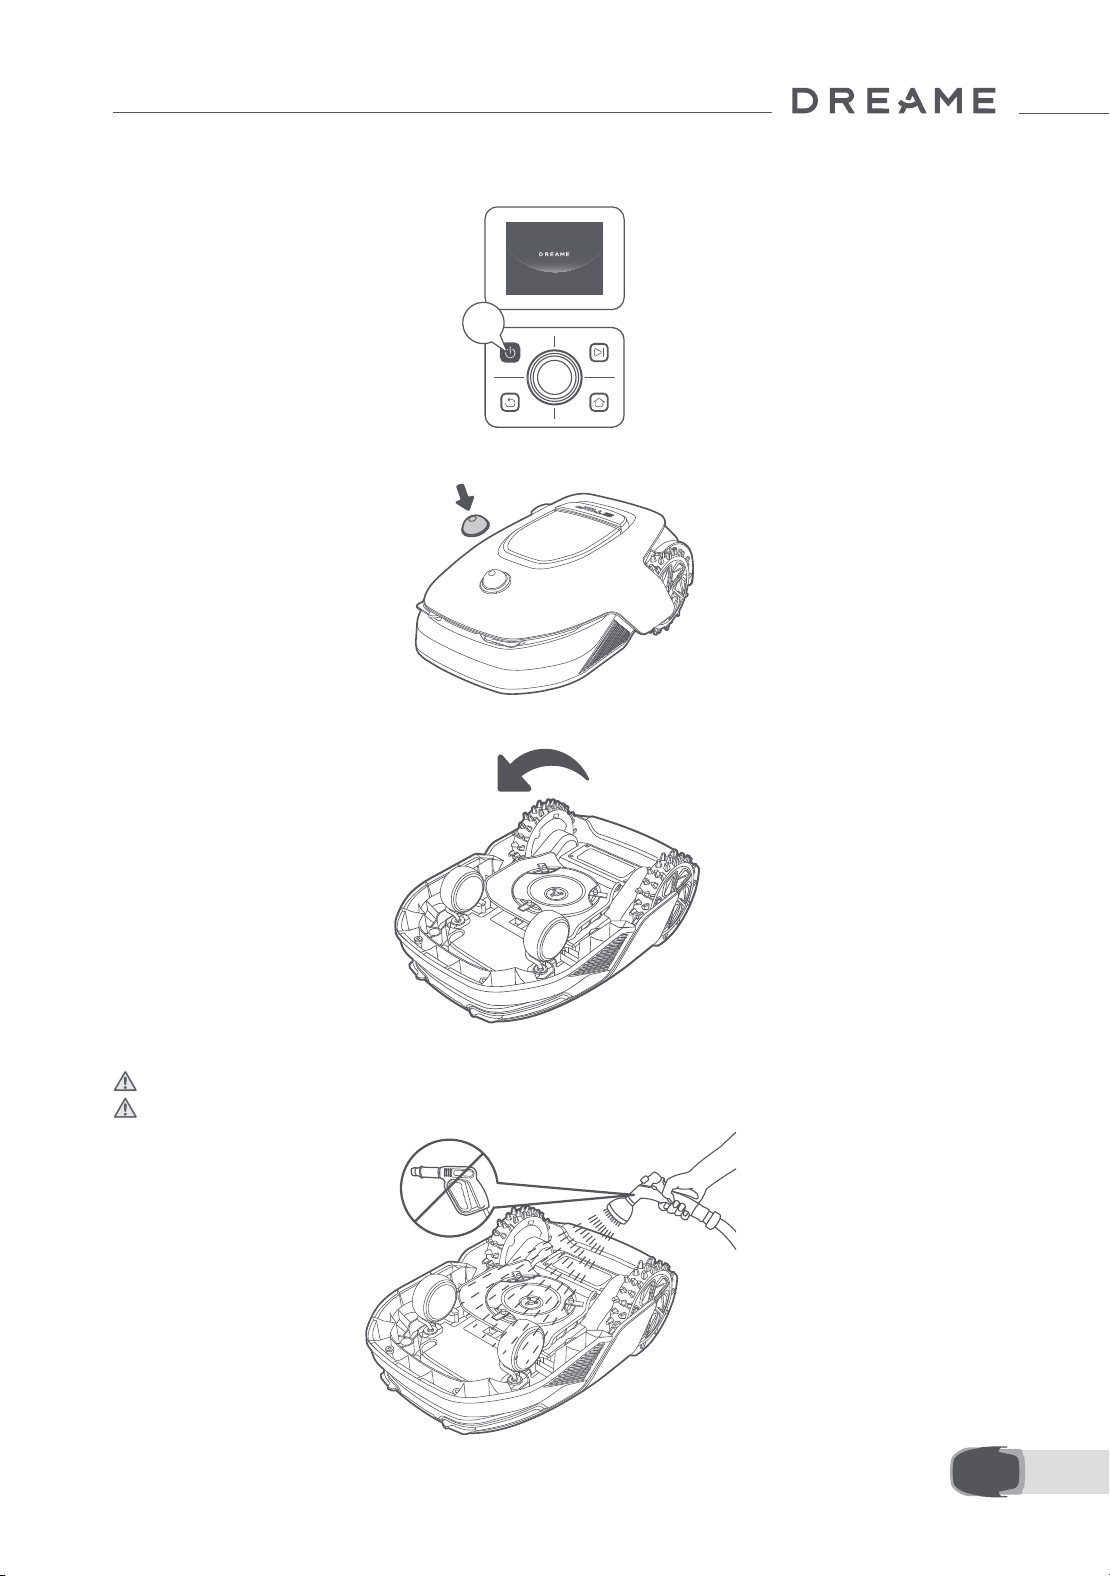
2s
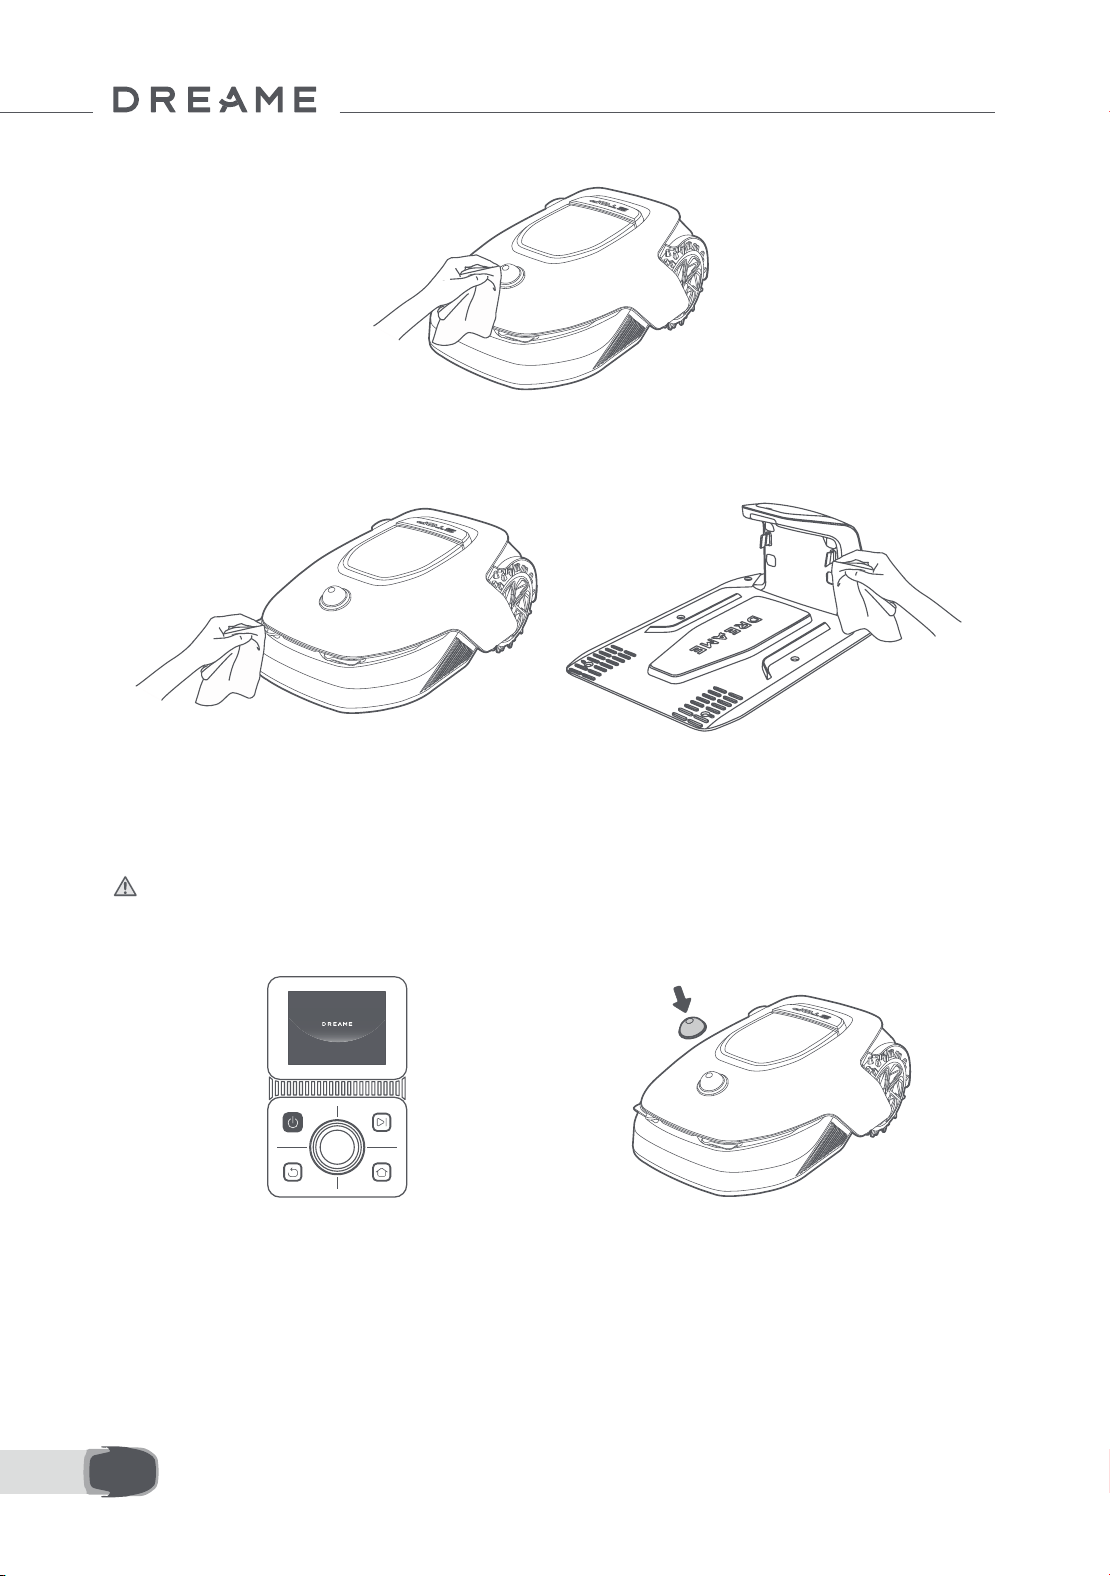
• The housing, chassis and blade disc:
1. Turn A1 Pro o.
2.Put the LiDAR protective cover on the LiDAR.
3. Turn A1 Pro upside down.
4. Clean the housing, blade disc and chassis with a hose.
Warning: Do not touch the blades when cleaning the chassis. Please wear gloves when cleaning.
Warning: Please do not use a high-pressure washer for cleaning. Do not use detergents for cleaning.
32EN
5. Use a lint-free cloth to carefully clean the LiDAR sensor.
• Charging contacts:
Use a clean cloth to clean the charging contacts on A1 Pro and the charging station. Keep the charging
contacts dry after cleaning.
9.2 Replacement of the components
• Replacement of the blades
To keep the blades sharp, please replace the blades regularly. It is recommended to replace the blades
every 6–8 weeks or sooner. Please only use Dreame original blades.
Warning:Please turn o A1 Pro and wear protective gloves before replacing the blades.
Note: Please replace all three blades at the same time to ensure a balanced cutting system.
1. Turn o A1 Pro. 2. Make sure the LiDAR protective cover is on.
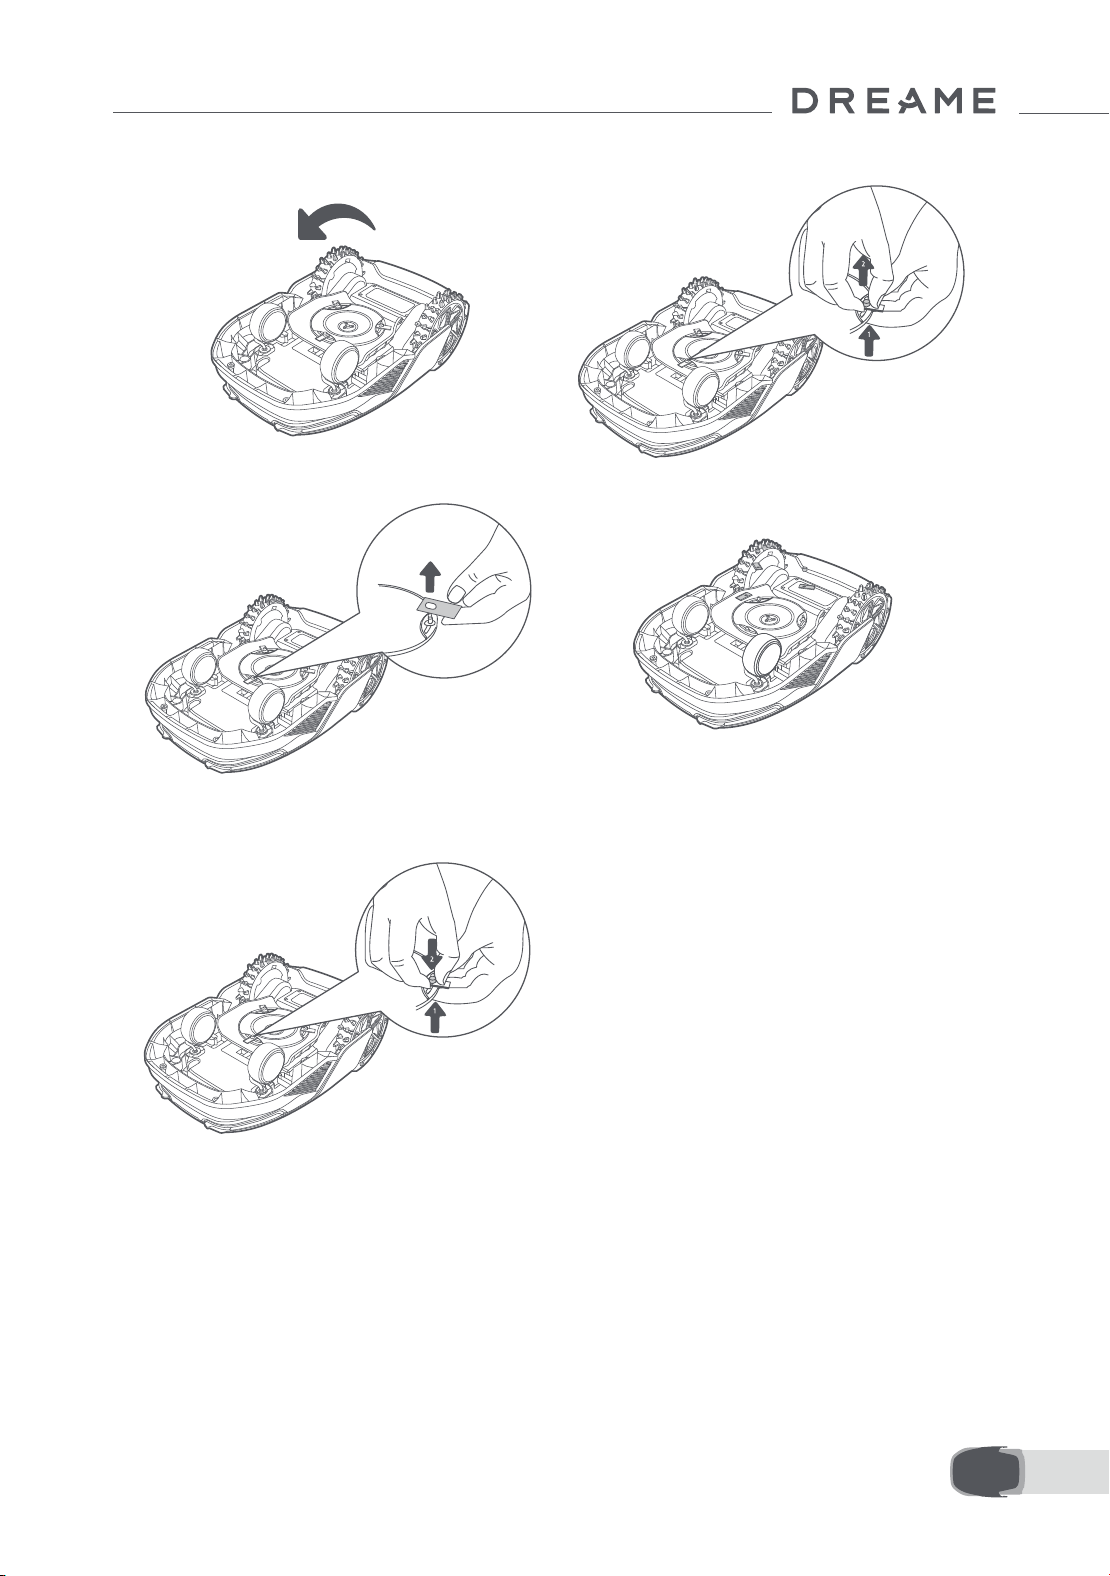
33 EN
5. Remove the blade by aligning the hole of the
blade with the shaft.
6. Remove 3 blades and holders.
• Replacement of the cleaning brush
When the cleaning brush for the LiDAR sensor wears out, its bristles may fray or deteriorate, aecting its
cleaning performance. Please replace the cleaning brush regularly to keep a good cleaning result. It is
recommended to replace the cleaning brush every 12 months or sooner.
Note: Before replacing the cleaning brush, please make sure to unplug the charging station.
7. Press the button under the blade disc and
align the hole of the holder with the shaft to
fasten the holders and the blades.
8. Make sure the blades can rotate freely.
3. Put A1 Pro on a soft surface and turn it upside
down.
4. Remove the holder by pressing the button
under the blade disc.
34EN
10 Battery
Low-power charging mode:
With low-power charging mode on, functions not related to charging will be disabled. (Display and network
will be turned o.)
• To enable low-power charging mode, press and hold Start button and Home button together, and press
Back button 5 times quickly at the same time. You will hear a voice prompt: Low-power charging mode is on.
• To disable low-power charging mode, restart A1 Pro or press Power button 5 times quickly to turn o low-
power charging mode.
For long-term storage, charge A1 Pro every 6 months to protect the battery. Battery damage caused by
over-discharge is not covered by the limited warranty. Do not charge the battery at an ambient temperature
above 45° C (113° F) or below 6° C (43° F). The long-term storage temperature for the battery should be
between -10 and 35° C (14 and 95° F). To minimize the damage, the recommended storage temperature
for the battery is between 0 and 25° C (32 and 77° F).
Note: The lifespan of A1 Pro's battery depends on frequency of usage and hours of operation. If the battery
is damaged or cannot be charged, do not dispose of the obsolete or faulty battery arbitrarily. Please obey
local recycling regulations.
11 Winter Storage
12 Transport
• A1 Pro
1. Charge the battery fully and turn A1 Pro o.
2. Clean A1 Pro thoroughly before putting it into storage in winter.
3. Put on the LiDAR protective cover.
4. Store A1 Pro inside in a dry place, at a temperature above 0° C.
• Charging station
Unplug the charging station and store it in a dry and cool place, away from direct sunlight.
Note: If you have not used A1 Pro for a long time, please remap your garden as signicant changes to the
garden environment may cause positioning errors.
For long distance transport, ensure that A1 Pro is turned o. It is recommended to use the original packaging.
Put on the LiDAR protective cover.
Warning: Please turn A1 Pro o before transporting it.
Warning: Lift the product by the rear with the blade disc away from your body.
35 EN
13 Troubleshooting
Issue Cause Solution
A1 Pro is not connected
to the app.
1. A1 Pro is not within Wi-Fi
signal coverage or Bluetooth
range.
2. A1 Pro is turned o or is
restarting.
1. Check if A1 Pro has completed the process of
turning on.
2. Check if the router is working properly.
3. Move closer to A1 Pro to establish a Bluetooth
connection.
A1 Pro lifted.
The wheel is not on the
ground.
1. Put A1 Pro back on at ground.
2. Enter the PIN code on A1 Pro and conrm.
3. A1 Pro can't cross objects higher than 4 cm.
Please keep the ground even where it is working.
A1 Pro tilted. A1 Pro tilts more than 37° .
1. Put A1 Pro back on at ground.
2. Enter the PIN code on A1 Pro to conrm.
3. A1 Pro cannot climb slopes greater than 45%
(24° ).
A1 Pro trapped.
A1 Pro is trapped and fails to
get out.
1. Remove the surrounding obstacles and then retry.
2. Manually move A1 Pro to a at and open place
inside the map and try starting the task again. If you
continue to encounter this problem, please retry
after A1 Pro is in the charging station.
3. Check if there are holes in the ground. Fill in the
holes before mowing to prevent A1 Pro from being
trapped.
4. Check if the surrounding grass is taller than 10
cm. You can adjust the obstacle avoidance height
or use a push mower to mow the lawn in advance
to prevent A1 Pro from being trapped.
5. If A1 Pro is often trapped in this location, you can
set it as a no-go zone.
Left/right rear wheel
error
The wheel cannot rotate or
the wheel motor has a
problem.
1. Clean the rear wheels and then retry.
2. If you continue to encounter this error, try
restarting A1 Pro.
3. If the problem persists, please contact the
after-sales service.
Blade disc can't rotate.
The blade disc cannot rotate
normally or the cutting
motor has a problem.
1. Clean the blade disc and then retry.
2. Check if the surrounding grass is taller than 10
cm. You can use a push mower to mow the lawn
in advance to prevent the blade disc from being
blocked by tall grass.
3. Check if there is water under the blade disc. If
there is any, move A1 Pro to a dry place and then
retry.
4. If you continue to encounter this error, try
restarting A1 Pro.
5. If the problem persists, please contact the
after-sales service.
Bumper error.
The front bumper sensor is
constantly triggered.
1. Check if A1 Pro is trapped somewhere.
2. Gently tap the bumper and make sure it
bounces back.
3. If you continue to encounter this error, try
restarting A1 Pro.
36EN
Issue Cause Solution
4. If the problem persists, please contact the
after-sales service.
Charging error.
A1 Pro docks in the charging
station, but the charging
current or voltage has a
problem.
1. Check if the charging station is correctly
connected to power.
2. Check if the charging contacts on A1 Pro and
the charging station are clean.
3. After checking is nished, try docking A1 Pro in
the charging station again.
4. If the problem persists, please contact the
after-sales service.
Battery temperature too
high.
Battery temperature is ≥
60℃ .
1. Use A1 Pro where ambient temperature is
below 40℃ . You can wait until the battery
temperature decreases automatically.
2. You can turn o A1 Pro and restart it after a
while.
3. If the problem persists, please contact the
after-sales service.
LiDAR is blocked.
LiDAR is blocked
(for examplethe LiDAR
protective cover is not
removed).
1. Remove the lidar protective cover and then
retry.
2. If lidar on the top of the robot is very dirty,
clean it with a lint-free cloth and then retry.
LiDAR malfunction.
LiDAR is very dirty or there is
a sensor error.
1. Check if the lidar is dirty. Clean it if necessary
and then try again.
2. If you continue to encounter this error, try
restarting the robot.
3. If the problem persists, please contact the
after-sales service.
A1 Pro is lost. Positioning is lost.
1. Check if the LiDAR on the top of A1 Pro is dirty.
Dirt will aect the positioning.
2. Manually move A1 Pro to an open place inside
the map and try starting the task again.
3. If the positioning is not recovered, remote
control A1 Pro back to the charging station via
the app, and then start the mowing task.
Sensor error. Sensor error.
1. Restart A1 Pro and retry.
2. If the problem persists, please contact the
after-sales service.
A1 Pro is in the no-go
zone.
A1 Pro is in the no-go zone.
1. Manually move the robot out of the no-go
zone and then retry.
2. Remotely control the robot through the app to
move it out of the no-go zone, and then retry.
A1 Pro is outside the
map.
A1 Pro is outside the map.
1. Manually move the robot inside the map, and
then retry.
2. Remote control the robot back inside the map
via the app, and then retry.
Emergency stop is
activated.
The Stop button on A1 Pro is
pressed.
Enter PIN code on A1 Pro to deactivate the
emergency stop.

37 EN
Issue Cause Solution
Low battery. A1 Pro will
shut down soon.
Battery level is ≤ 10%. Dock A1 Pro in the charging station to charge.
A1 Pro is away from
the map. Risk of being
stolen.
A1 Pro is away from the map.
1. Enter PIN code to verify.
2. You can disable the O-Map Alarm in settings
in the app.
Failed to return to the
charging station.
A1 Pro cannot nd the
charging station when
returning to the charging
station.
1. Check if there are obstacles blocking A1 Pro.
Remove the obstacles and retry.
2. Remote control A1 Pro back to the charging
station via the app.
Failed to dock in the
charging station.
A1 Pro nds the charging
station but fails to dock.
1. Check if the reective lms on the charging
station are dirty or blocked.
2. Check if there are obstacles in front of the
charging station.
3. Check if the charging station is moved.
4. Check if the baseplate is covered with thick
mud.
5. Check if the charging station has power.
6. Help the robot dock in the charging station by
using the remote control or manually.
Positioning failed.
Positioning fails when A1 Pro
tries to start a mowing task.
1. The lidar may be obstructed. Manually move
the robot to a at and open place inside the
map and try starting the task again.
2. If you continue to encounter this error, please
retry after the robot is docked in the charging
station.
Battery temperature is
high.
Battery temperature is ≥
45℃ .
1. Charging may fail when battery temperature is
above 45℃ .
2. Use A1 Pro where ambient temperature is
below 40℃ .
Battery temperature is
low.
Battery temperature is ≤ 6℃ .
1. Charging may fail when battery temperature is
below 6℃ .
2. Use A1 Pro where ambient temperature is
above 6℃ .
The blade disc fails to
move up or down.
The blade disc fails to move
up or down.
1. Clean the blade disc and then retry.
2. If you continue to encounter this error, try
restarting the robot.
3. If the problem persists, please contact the
after-sales service.
Insucient space for
turning in front of the
station.
Insucient space for turning
in front of the station.
1. If the station is placed at the edge of the map
or within it, ensure there is at least 1 m of free
space between the front area of the station's
baseplate and the boundary of the map;
otherwise, the robot may not be able to make
turns.
2. Relocate the station, or change the map in
Map Editing.
38EN
14 Specications
Basic information
Product name Dreame Roboticmower
Brand Dreame
Dimensions
643 × 436.5 × 261 mm
(25.3 × 17.2 × 10.2 in)
Weight (battery included) 12.6 kg (27.7 lbs)
Mowing
Recommended working capacity 2000 m² (0.5 acres)
Mowing eciency
Standard: 120 m² (0.03 acres)/h
Ecient: 200 m² (0.05 acres)/h
Mowing height 30~70 mm (1.2~2.8 in)
Mowing width 22 cm (8.7 in)
Charging time
[1]
65 min
Noise emissions
Sound power
level LWA
64 dB(A)
Sound power
uncertainties KWA
3 dB(A)
Sound pressure
level LpA
56 dB(A)
Sound pressure
uncertainties KpA
3 dB(A)
Working
condition
Operating temperature
0~50° C (32~122° F)
Recommended: 10~35° C
(50~95° F)
Long-term storage temperature
-10~35° C (14~95° F)
Recommended: 0~25° C
(32~77° F)
IP-classication
Mower: IPX6
Charging station: IPX4
Power supply: IP67
Maximum slope for mowing area 45% (24° )

39 EN
[1] Charging time applies when A1 Pro automatically returns to the charging station at low battery.
[2] Requires the installation of Link module.
[3] Requires the installation of Link module.
Note: The specications are subject to change as we continually improve our product. For the latest
information, please visit our website at global.dreametech.com.
Connectivity
Bluetooth frequency range 2400.0–2483.5 MHz
Wi-Fi Wi-Fi 2.4 GHz (2400–2483.5M)
Max. RF power
802.11b:16±2dBm(@11Mbps)
802.11g:14±2dBm(@54Mbps)
802.11n:13±2dBm(@HT20,HT40)
Bluetooth:7.49dBm
Link service (optional)
[2]
LTE-FDD: B1/3/7/8/20/28A
LTE-TDD: B38/40/41
GNSS (optional)
[3]
GPS/GLONASS/BDS/Galileo/QZSS
Cutting motor
Speed 2200/min
Driving motor
Driving speed under remote control 0.45 m/s
Driving speed when mowing
Standard: 0.35 m/s
Ecient: 0.6 m/s
Battery (mower)
Battery type Lithium-ion battery
Rated capacity 5000 mAh
Rated voltage 18 V
Power supply
Input voltage 100~240 V
Output voltage 20 V
Output current 3 A
Charging station
Input voltage 20 V
Output voltage 20 V
Input current 3 A
Output current 3 A

40DE
1 Sicherheitshinweise ................................................................................. P41
2 Lieferumfang ........................................................................................... P45
3 Produktübersicht ..................................................................................... P46
4 Installation .............................................................................................. P47
5 Vorbereitung vor der Inbetriebnahme ....................................................... P49
6 Karte Ihres Gartens erstellen .................................................................... P52
7 Bedienung ............................................................................................... P58
8 Dreamehome App .................................................................................... P63
9 Wartung .................................................................................................. P65
10 Akku ...................................................................................................... P69
11 Einlagerung in der Winterzeit .................................................................. P69
12 Transport ............................................................................................... P69
13 Fehlersuche und -behebung ................................................................... P70
14 Technische Daten ................................................................................... P74
Inhaltsverzeichnis
Übersetzung der Originalbetriebsanleitung

41 DE
1.1 Allgemeine Sicherheitshinweise
1 Sicherheitshinweise
• Lesen Sie die Originalbetriebsanleitung sorgfältig durch, bevor Sie das Produkt verwenden.
• Verwenden Sie mit dem Produkt nur die von Dreame empfohlene Zubehörteile. Andere Verwendungen sind
nicht zulässig.
• Lassen Sie niemals Kinder, Personen mit eingeschränkten körperlichen, sensorischen oder geistigen
Fähigkeiten oder mangelnder Erfahrung und Kenntnissen sowie Personen, die mit diesen Anweisungen nicht
vertraut sind, das Gerät benutzen.
• Kinder dürfen sich nicht in der Nähe des Geräts aufhalten oder mit diesem spielen, wenn es in Betrieb ist.
• Verwenden Sie das Gerät nicht in Bereichen, wo sich Personen der Anwesenheit des Geräts nicht bewusst sind.
• Laufen Sie nicht schnell, wenn Sie das Gerät manuell mit der Dreamehome App bedienen. Gehen Sie immer
zu Fuß, achten Sie auf Ihre Schritte an Steigungen, und achten Sie stets auf das Gleichgewicht.
• Verwenden Sie das Gerät nicht, wenn sich Personen, insbesondere Kinder oder Tiere, im Arbeitsbereich aufhalten.
• Wenn Sie das Gerät in öentlichen Bereichen einsetzen, stellen Sie Warnschilder mit folgendem Text
um den Arbeitsbereich auf: „Warnung! Automatischer Rasenmäher! Abstand zum Gerät halten! Kinder
beaufsichtigen!“
• Tragen Sie bei der Bedienung des Geräts festes Schuhwerk und lange Hosen.
• Legen Sie Arbeitsbereiche oder Fahrwege nicht über öentliche Verkehrs- oder Gehwege, um Schäden am
Gerät und Unfälle mit Fahrzeugen und Personen zu vermeiden.
• Berühren Sie bewegliche, gefährliche Teile, wie z. B. den Schneidkopf, nicht, bevor er zum Stillstand
gekommen ist.
• Bei Verletzungen oder Unfällen ärztliche Hilfe aufsuchen.
• Schalten Sie das Gerät AUS, bevor Sie Blockaden beseitigen, Wartungsarbeiten durchführen oder das Gerät
überprüfen. Wenn das Gerät ungewöhnlich vibriert, prüfen Sie es auf Schäden, bevor Sie es wieder in Betrieb
nehmen. Verwenden Sie das Gerät nicht, wenn Komponenten defekt sind.
• Schließen Sie ein beschädigtes Kabel nicht an und berühren Sie es nicht, bevor Sie es nicht aus der
Steckdose gezogen haben. Wenn das Kabel während des Betriebs beschädigt wird, ziehen Sie den
Netzstecker aus der Steckdose. Ein abgenutztes oder beschädigtes Kabel erhöht die Gefahr eines
Stromschlags und sollte von Fachpersonal ausgetauscht werden.
• Verlegen Sie das Hauptkabel nicht an Stellen, an denen sich das Gerät mähen könnte. Befolgen Sie die
Anweisungen für die Kabelinstallation.
• Laden Sie das Gerät nur mit der im Lieferumfang enthaltenen Ladestation auf. Bei unsachgemäßer Verwendung
besteht die Gefahr eines Stromschlags, einer Überhitzung oder des Austretens von ätzender Flüssigkeit aus dem
Akku. Im Falle des Austretens von Elektrolyt spülen Sie die betroene Stelle mit Wasser/Neutralisierungsmittel
aus und suchen Sie einen Arzt auf, wenn die ätzende Flüssigkeit in Ihre Augen gelangt ist.
• Beim Anschluss des Hauptkabels an die Steckdose ist ein Fehlerstromschutzschalter (RCD) mit einem
maximalen Auslösestrom von 30 mA zu verwenden.
• Benutzen Sie nur von Dreame empfohlene Original-Akkus. Die Gerätesicherheit kann mit nicht originalen
Akkus nicht gewährleistet werden. Verwenden Sie keine nicht wiederauadbaren Batterien.
• Halten Sie Verlängerungskabel von beweglichen, gefährlichen Teilen fern, um Beschädigungen an den
Kabeln zu vermeiden, die zum Kontakt mit stromführenden Elementen führen können.
l Die Abbildungen in dieser Anleitung dienen nur als Referenz. Bitte beziehen Sie sich auf die tatsächlichen
Produkte.
• Schieben Sie das Gerät nicht mit Gewalt oder zu schnell, da dies das Gerät beschädigen kann.
• Um die Einhaltung der Anforderungen an die RF-Exposition zu gewährleisten, sollte ein Abstand von 35 cm
zwischen dem Gerät und dem Menschen eingehalten werden.
• Benutzen Sie zum Auaden des Akkus nur das mit diesem Gerät mitgelieferte abnehmbare Netzteil.

42DE
• Installieren Sie die Ladestation nicht in Bereichen, in denen Personen darauf stoßen könnten.
• Installieren Sie die Ladestation nicht in Bereichen, in denen die Gefahr von stehendem Wasser besteht.
• Installieren Sie die Ladestation (einschließlich des Zubehörs) nicht in einem Umkreis von 60 cm von
brennbarem Material. Eine Fehlfunktion oder Überhitzung der Ladestation und des Netzteils kann eine
Brandgefahr darstellen.
• Für Benutzer in den USA/Kanada: Bei der Installation des Netzteils im Freien besteht die Gefahr
eines Stromschlags. Installieren Sie es nur in einer abgedeckten GFCI-Steckdose (RCD) der Klasse A
mit wetterfestem Gehäuse und achten Sie darauf, dass die Verschlusskappe des Befestigungssteckers
eingesteckt oder entfernt wird.
• Halten Sie Ihre Hände und Füße von den rotierenden Schneidmessern fern. Halten Sie Ihre Hände und Füße
nicht in die Nähe oder unter das Gerät, wenn es eingeschaltet ist.
• Heben oder bewegen Sie das Gerät nicht, wenn es eingeschaltet ist.
• Aktivieren Sie den Parkmodus oder schalten Sie das Gerät AUS, wenn sich Personen, insbesondere Kinder
oder Tiere, im Arbeitsbereich aufhalten.
• Achten Sie darauf, dass sich keine Gegenstände wie z. B. Steine, Äste, Gartenwerkzeuge oder Spielzeug
auf dem Rasen benden. Andernfalls können die Schneidmesser beschädigt werden, wenn sie mit einem
Gegenstand in Berührung kommen.
• Legen Sie keine Gegenstände auf das Gerät oder die Ladestation.
• Betreiben Sie das Gerät nicht, wenn die STOPP-Taste nicht funktioniert.
• Verhindern Sie Zusammenstöße zwischen dem Gerät und Menschen oder Tieren. Wenn eine Person oder
ein Tier in den Laufweg des Geräts gerät, halten Sie es sofort an.
• Schalten Sie das Gerät immer AUS, wenn es nicht in Betrieb ist.
• Verwenden Sie das Gerät nicht gleichzeitig mit einem Versenkregner. Verwenden Sie die Zeitplanfunktion,
um sicherzustellen, dass das Produkt und der Versenkregner nicht gleichzeitig in Betrieb sind.
• Platzieren Sie den Verbindungskanal nicht dort, wo Versenkregner installiert sind.
• Betreiben Sie das Gerät nicht bei stehendem Wasser im Arbeitsbereich, wie z. B. bei starkem Regen oder
Wasseransammlungen.
• Schalten Sie das Gerät bei Wartungsarbeiten AUS.
• Ziehen Sie den Stecker aus der Ladestation oder entfernen Sie die Sperrvorrichtung, bevor Sie die
Ladestation reinigen oder Wartungsarbeiten daran durchführen.
• Verwenden Sie zum Reinigen des Geräts weder einen Hochdruckreiniger noch Lösungsmittel.
• Stellen Sie sicher, dass das Gerät nach dem Waschen in seiner normalen Ausrichtung auf den Boden
gestellt wird und nicht verkehrt herum.
• Drehen Sie das Gerät nicht um, um das Gehäuse zu reinigen. Wenn Sie es zu Reinigungszwecken
umdrehen, achten Sie darauf, dass Sie es anschließend wieder in die richtige Ausrichtung bringen. Diese
Vorsichtsmaßnahme ist notwendig, um zu verhindern, dass Wasser in den Motor eindringt und den normalen
Betrieb beeinträchtigt.
Lithium-Ionen-Akkus können bei Zerlegung, Kurzschluss, Einwirkung von Wasser, Feuer oder hohen
Temperaturen explodieren oder einen Brand verursachen. Behandeln Sie sie mit Vorsicht, zerlegen oder
önen Sie den Akku nicht, und vermeiden Sie jede Form von elektrischer/mechanischer Fehlbedienung.
Bewahren Sie den Akku vor direktem Sonnenlicht geschützt auf.
1.2 Sicherheitshinweise für die Installation
1.3 Sicherheitshinweise für den Betrieb
1.4 Sicherheitshinweise für die Wartung
1.5 Sicherheit des Akkus
43 DE
1. Verwenden Sie nur das vom Hersteller mitgelieferte Akku-Ladegerät und -Netzteil. Die Verwendung eines
ungeeigneten Ladegeräts bzw. einer ungeeigneten Stromversorgung kann zu Stromschlag und / oder
Überhitzung führen.
2. VERSUCHEN SIE NICHT, AKKUS ZU REPARIEREN ODER ZU MODIFIZIEREN! Reparaturversuche können
zu schweren Verletzungen aufgrund von Explosionen oder Stromschlag führen. Die bei einem Leck
austretenden Elektrolyte sind ätzend und giftig.
3. Dieses Gerät enthält Akkus, die nur von Fachpersonal ausgetauscht werden können.
Tragen Sie beim Auswechseln der Schneidmesser stets Schutzhandschuhe, um Verletzungen zu vermeiden.
1.6 Restrisiken
1.7 Symbols and Decals
WARNUNG -
Lesen Sie die Bedienungsanleitung, bevor Sie das Gerät in
Betrieb nehmen.
WARNUNG -
Halten Sie während des Betriebs einen sicheren Abstand zum
Gerät ein.
WARNUNG -
Vor Arbeiten am Gerät oder dem Anheben des Geräts muss die
Sperrvorrichtung betätigt werden.
WARNUNG -
Nicht auf dem Gerät mitfahren.
WARNUNG -
Dieses Produkt darf nicht über den normalen Hausmüll entsorgt
werden Sorgen Sie dafür, dass das Produkt in Übereinstimmung
mit den örtlichen gesetzlichen Vorschriften recycelt wird.
44DE
Das Gartenprodukt ist für den Einsatz im häuslichen Bereich zur Rasenpege bestimmt. Es ist so konzipiert,
dass es häug mäht und einen gesünderen und schöneren Rasen als je zuvor erhält. Je nach Größe Ihres
Rasens kann Ihr Mäher so programmiert werden, dass er jederzeit oder in beliebiger Häugkeit arbeitet. Es
ist nicht für das Graben, Fegen oder Schneeräumen geeignet.
GEEIGNETE VERWENDUNG
Dieses Produkt entspricht den geltenden EU-Richtlinien.
Klasse III
Lesen Sie die Anleitung, bevor Sie das Gerät auaden.
Gleichstrom
Klasse II
Die Dreame Trading (Tianjin) Co., Ltd. erklärt hiermit, dass das Gerät Robotic Lawnmower MLLA7110 mit
den wesentlichen Anforderungen und den entsprechenden Bestimmungen der Richtlinien RED 2014/53/EU
übereinstimmt. Der vollständige Text der EU-Konformitätserklärung ist unter der folgenden Internetadresse
verfügbar: https://global.dreametech.com
Das ausführliche elektronische Handbuch nden Sie unter https://dreametech.zendesk.com/hc/en-us/
categories/7968864195993-User-Manual.
1. Entsorgung von Elektro- und Elektronikgeräten
Die durchgestrichene Mülltonne bedeutet, dass Sie gesetzlich verpichtet sind, diese Geräte einer vom
unsortierten Siedlungsabfall getrennten Erfassung zuzuführen. Die Entsorgung über die Restmülltonne
oder die gelbe Tonne ist untersagt. Enthalten die Produkte Batterien oder Akkus, die nicht fest verbaut sind,
müssen diese vor der Entsorgung entnommen und getrennt als Batterie entsorgt werden.
2. Möglichkeiten derRückgabe vonAltgeräten (EAR)
Besitzer von Altgeräten können diese im Rahmen der durch öentlich-rechtlichen Entsorgungsträger
eingerichteten und zur Verfügung stehenden Möglichkeiten der Rückgabe oder Sammlung von Altgeräten
abgeben, damit eine ordnungsgemäße Entsorgung der Altgeräte sichergestellt ist.
3. Datenschutz
Wir weisen alle Endnutzer von Elektro- und Elektronikaltgeräten darauf hin, dass Sie für das Löschen
personenbezogener Daten auf den zu entsorgenden Altgeräten selbst verantwortlich sind.
EU-Konformitätserklärung
45 DE
2 Lieferumfang
11 Schnellstartanleitung
1 Schutzabdeckung des Lidar
2
A1 Pro
3 Ladesäule
(mit einem 10m Verlängerungskabel)
4 Basisplatte
5 Netzteil 6 Reinigungsbürste
7 Schrauben × 8, Sechskantschlüssel 8 Ersatzklinge × 9
9 Originalbetriebsanleitung
10
Fusselfreies Tuch
1
2
3
4
5 6
8 97
10 11
Dreame Roboticmower A1 Pro
User Manual

46DE
3 Produktübersicht
Ladekontakte
Akkufach
Schneidkopf
Vorderrad
Oroad-Antriebsrad
LiDAR
Display
Knopf
Stopptaste
Sensor
Name Beschreibung
Lidar
Erfasst Umgebungsinformationen und erleichtert die Ortung des A1 Pro, die
Hindernisvermeidung und die Wasser- und Schmutzerkennung.
Erfassungsbereich: 70 m mit 360° horizontalem und 59° vertikalem Weitwinkel.
47 DE
4 Installation
4.1 Einen geeigneten Standort auswählen
• Stellen Sie die Ladestation auf eine ebene Fläche nahe der Rasenkante und einer Steckdose. Es wird
empfohlen, die Ladestation in einem Bereich mit guter WLAN-Signalstärke aufzustellen.
Hinweis: Prüfen Sie mit Ihrem Mobilgerät die WLAN-Signalstärke am Standort. Mit einer guten WLAN-
Signalstärke wird die Stabilität der Verbindung zwischen A1 Pro und der App verbessert.
Hinweis: Vergewissern Sie sich, dass der Boden weich genug ist, um die Verschraubung zu ermöglichen.
• Halten Sie links, rechts und im Vorderbereich der Ladestation einen Freiraum von mindestens 1 m ohne
Hindernisse ein. Sorgen Sie dafür, dass das Gras rund um den Standort kürzer als 6 cm ist. Wenn das Gras
höher ist, mähen Sie es bitte zuerst mit einem Schubmäher. Zu hohes Gras kann die Rückkehr von A1 Pro zur
Ladestation erschweren.
4.2 Installation der Ladestation
1 Befestigen Sie die Basisplatte mit den mitgelieferten Schrauben und dem Sechskantschlüssel auf dem
Boden.

48DE
2 Setzen Sie die Ladesäule in die Basisplatte ein, bis Sie ein Klickgeräusch hören.
3 Setzen Sie die Reinigungsbürste in die Ladesäule ein und richten Sie dabei die Zunge an der Nut aus.
4 Verbinden Sie das Netzteil mit dem Verlängerungskabel und schließen Sie es an eine Steckdose an. Bitte
halten Sie das Netzteil mindestens 30 cm über dem Boden.
Hinweis: Die LED-Anzeige an der Ladestation leuchtet konstant blau, wenn die Station mit Strom versorgt
wird.
5 Setzen Sie A1 Pro zum Auaden in die Ladestation. Stellen Sie sicher, dass die Ladekontakte an A1 Pro
und der Ladestation richtig miteinander verbunden sind.
Hinweis: Die Anzeigeleuchte wird grün blinken, wenn A1 Pro erfolgreich in der Ladestation geladen wird.
49 DE
LED-Anzeige an der Ladestation
Beim ersten Einschalten von A1 Pro müssen einige grundlegende Einstellungen vorgenommen werden,
bevor A1 Pro eingesetzt werden kann.
5 Vorbereitung vor der Inbetriebnahme
Farbe der LED-
Anzeigeleuchte
Bedeutung
Blinkend/Leuchtet rot
1. Die Ladestation weist ein Problem auf (wie z. B. ein Problem mit dem
Ladestrom oder der Spannung).
2. A1 Pro dockt an die Ladestation an, aber der Ladevorgang ist nicht
normal (z. B. ein Kurzschluss bei den Ladekontakten).
Leuchtet blau
Die Ladestation ist mit Strom versorgt. A1 Pro bendet sich nicht in der
Ladestation.
Blinkt grün A1 Pro wird in der Ladestation geladen.
Leuchtet grün A1 Pro bendet sich in der Ladestation und ist voll geladen.
1 Entfernen Sie die LiDAR-Schutzabdeckung.
50DE
2 Drücken Sie die Stopptaste, um die Abdeckung des Bedienfelds zu önen. Halten Sie die Einschalttaste
auf dem Bedienfeld 2 Sekunden lang gedrückt, um A1 Pro einzuschalten.
Hinweis: A1 Pro schaltet sich automatisch ein, wenn er in der Ladestation andockt.
3 Wählen Sie die bevorzugte Sprache
Drehen Sie den Drehknopf im Uhrzeigersinn nach unten und gegen den Uhrzeigersinn nach oben, um Ihre
Sprache auszuwählen. Drücken Sie den Drehknopf zur Bestätigung.
4 PIN-Code einstellen
1. Drehen Sie den Drehknopf, um eine Zahl zwischen 0 und 9 auszuwählen. Drehen Sie ihn im Uhrzeigersinn,
um die Zahl von 0 bis 9 zu erhöhen, und gegen den Uhrzeigersinn, um die Zahl zu verringern. Drücken
Sie den Drehknopf, um die nächste Zier einzustellen. Um die vorherige Zier zu ändern, drehen Sie den
Drehknopf gegen den Uhrzeigersinn, bis die Zahl 0 wird, und drehen Sie ihn noch einmal.
Hinweis: Bitte setzen Sie den PIN-Code nicht auf "0000".
2s
51 DE
2. Geben Sie den PIN-Code erneut ein, um die Einstellung des PIN-Codes abzuschließen.
Hinweis: Wenn zwei Passwörter nicht übereinstimmen, geben Sie bitte das neue Passwort erneut ein.
5 A1 Pro mit dem Internet verbinden
Bitte scannen Sie den QR-Code, um die Dreamehome App auf Ihr mobiles Gerät herunterzuladen. Nach der
Installation erstellen Sie bitte ein Konto und melden sich an.
Sie können die Dreamehome App auch im App Store oder bei Google Play herunterladen.
1) Bluetooth-Verbindung
1. Aktivieren Sie die Bluetooth-Funktion auf Ihrem mobilen Gerät.
2. Scannen Sie den QR-Code auf der Innenseite der Abdeckung oder wählen Sie A1 Pro manuell über die App
aus.
3. Halten Sie den Drehknopf auf dem Bedienfeld 3 Sekunden lang gedrückt, woraufhin A1 Pro in den
Bluetooth-Kopplungsmodus wechselt.

52DE
4. Koppeln Sie A1 Pro mit Ihrem mobilen Gerät über Bluetooth.
Hinweis: Stellen Sie sicher, dass sich Ihr mobiles Gerät im Umkreis von 10 m von A1 Pro bendet.
2) WLAN-Verbindung
Vergewissern Sie sich, dass A1 Pro und Ihr mobiles Gerät im selben WLAN-Netzwerk sind. Bitte folgen Sie
den Anweisungen in der App, um die Verbindung herzustellen
Hinweis: Bitte nutzen Sie ein Singleband-Netzwerk mit 2,4 GHz Frequenz oder ein Dualband-Netzwerk mit
2,4/5 GHz Frequenz.
Hinweis: Sie können auch das Link-Modul separat erwerben, um A1 Pro ohne WLAN-Verbindung fernzusteuern.
Wie kann man die Bindung von A1 Pro aufheben?
A1 Pro wird automatisch an das Dreamehome Konto gebunden, sobald die Kopplung erfolgreich ist. Jedes
Gerät kann nur an ein Konto gebunden werden. Es kann nicht gleichzeitig an ein anderes Konto gebunden
sein.
Um A1 Pro mit einem neuen Konto zu verknüpfen, müssen Sie die bestehende Bindung zunächst aufheben.
Gehen Sie zu „ D a s G e rä t“ und tippen Sie auf „Mehr“ > „Löschen“ in der oberen rechten Ecke, um die
Bindung des Geräts aufzuheben.
Wie kann man sich von seinem Dreamehome-Konto abmelden oder es löschen?
Um sich abzumelden, gehen Sie zu Mich > Einstellungen > Konto > Logout. Um das Konto zu löschen,
gehen Sie zu Mich > Einstellungen > Konto > Das Konto löschen.
Bevor Sie die Karte erstellen, überprüfen Sie bitte Folgendes:
• Der Akkustand von A1 Pro beträgt mehr als 50 %.
• Die Schutzabdeckung des LiDAR ist entfernt.
6 Karte Ihres Gartens erstellen
53 DE
• A1 Pro dockt korrekt in der Ladestation an.
6.1 Eine Grenze erstellen
1 Tippen Sie in der App auf "Erstellen beginnen", woraufhin A1 Pro seinen Status überprüft und sich
kalibriert. Er verlässt automatisch die Ladestation, um die Kalibrierung durchzuführen. Bitte seien Sie
vorsichtig.
2 Führen Sie A1 Pro per Fernbedienung die Rasenkante heran und tippen Sie auf "Startpunkt setzen", um
den Startpunkt der Grenze zu bestimmen.
3 Bewegen Sie A1 Pro per Fernbedienung entlang der Rasenkante, um den Arbeitsbereich zu erstellen.
Beachten Sie bitte beim Erstellen der Grenze durch die Fernsteuerung von A1 Pro die folgenden Punkte:
Warnung: Bewegen Sie A1 Pro beim Erstellen der Grenze nicht manuell, da sonst die Kartenerstellung
möglicherweise nicht erfolgreich ist.
Warnung: Wenn die Kartenerstellung über die Fernbedienung beginnt, darf A1 Pro nicht ferngesteuert
an die Ladestation angedockt werden, bevor die Kartenerstellung abgeschlossen ist. Andernfalls kann das
LiDAR blockiert werden, was zum Fehlschlagen der Kartenerstellung führen kann.
• Gehen Sie bei der Fernbedienung von A1 Pro in einer Entfernung von maximal 5 m hinter A1 Pro.

54DE
• Legen Sie die Grenze nicht an einer Steigung von mehr als 27 % an.
• Wenn zwischen der Rasenkante und dem angrenzenden Boden ein Höhenunterschied von mehr als 4 cm
besteht, halten Sie bitte einen Mindestabstand von 10 cm zwischen A1 Pro und der Rasenkante ein.
• Vermeiden Sie das Anlegen von Grenzen innerhalb von Gängen, die schmaler als 1.5 m sind.
55 DE
• Stellen Sie sicher, dass der Wendewinkel größer als 90° ist.
4 Wenn A1 Pro an die Stelle zurückkehrt, die 1 m vom Startpunkt entfernt ist, können Sie auf "Begrenzung
schließen" tippen und die Grenze wird automatisch fertiggestellt.
6.2 Sperrzone festlegen
A1 Pro kann zwar Hindernissen automatisch umgehen, dennoch ist es notwendig, Bereiche mit Sturzgefahr,
wie z. B. Schwimmbäder und Sandkästen, als Sperrzonen zu denieren. Bitte richten Sie für Objekte, die Sie
schützen möchten (wie z.B. ein Blumenbeet, ein Trampolin, ein Gemüsebeet oder eine oene Baumwurzel),
Sperrzonen ein. Sie können die Sperrzonen mit A1 Pro über die App per Fernbedienung erstellen oder
unter„Kartenbearbeitung“ direkt Sperrzonen auf der Karte einzeichnen bzw. löschen.
6.3 Mehrere Zonen festlegen
Wenn Ihr Rasen durch Wege getrennt ist oder Sie mehrere voneinander getrennte Rasenächen haben,
können Sie in der App auf "Arbeitszone" tippen, um die Arbeitszone per Fernbedienung zu erstellen. Sie
können die Zonen auch unter "Kartenbearbeitung" hinzufügen, löschen oder ändern, wenn die Karte fertig
ist.
56DE
6.4 Pfad festlegen
• So verbindet man zwei voneinander getrennte Arbeitszonen
Wenn sich die neue(n) Fläche(n) und die Ausgangsäche überlappen, werden sie automatisch miteinander
verbunden. Für isolierte Bereiche legen Sie bitte Pfade an, um sie zu verbinden, da sie sonst für A1 Pro
unzugänglich sind. Tippen Sie auf "Pfad" und steuern Sie A1 Pro mit der Fernbedienung, um einen Pfad zu
erstellen.
Hinweis: Achten Sie darauf, dass der Anfang und das Ende des Pfades im Arbeitsbereich liegen. Halten Sie
mindestens 1 m Abstand zwischen dem Anfang/Ende des Pfades und der Grenze ein.
Für einzelne Zonen müssen Sie einen Pfad erstellen, um sie zu verbinden. Isolierte Zonen ohne Pfad sind für
A1 Pro unzugänglich.
Hinweis: Standardmäßig befährt A1 Pro nur den Weg, ohne zu mähen.
Hinweis: Wenn Ihre Rasenäche durch Durchgänge mit einer Höhe von mehr als 4 cm unterteilt ist,
platzieren Sie ein Objekt mit einer Neigung, die der Höhe des Durchgangs entspricht (z. B. eine Rampe).

57 DE
6.5 Karte fertigstellen
Tippen Sie auf "Karte fertigstellen", wenn die Arbeitsbereiche, Wege und Sperrzonen festgelegt sind. A1 Pro
sollte sich im Bereich innerhalb der Karte benden, wenn die Karte fertiggestellt ist, andernfalls werden Sie
aufgefordert, ihn per Fernbedienung zurück in die Karte zu bewegen.
• So verbindet man die Arbeitszone und die Ladestation
Wenn sich Ihre Ladestation nicht im Arbeitsbereich bendet, sollte ein Pfad erstellt werden, um sie mit dem
Arbeitsbereich zu verbinden. Tippen Sie auf "Pfad", und steuern Sie den A1 Pro mit der Fernbedienung, um
einen Pfad für die Rückkehr des Roboters zur Ladestation zu erstellen.
Hinweis: Beim Erstellen eines Pfades stellen Sie sicher, dass ein Ende mindestens 1 Meter ( ≥ 1 m) mit dem
Arbeitsbereich überlappt und das andere Ende weniger als 0,2 Meter ( < 0,2 m) vor der Ladestation liegt.
Warnung: Beim Anlegen von Pfaden zwischen dem Arbeitsbereich und der Ladestation darf A1 Pro nicht
ferngesteuert an die Ladestation angedockt werden. Andernfalls kann das LiDAR blockiert werden, was zum
Fehlschlagen der Kartenerstellung führen kann.

58DE
7.1 Das Bedienfeld kennenlernen
7 Bedienung
Einschalten/
Ausschalten
Display
Zurück
Starten
Knopf
Startseite
Symbol Status
Akkustand (Zeigt den aktuellen Akkustand an.)
Auaden (A1 Pro dockt erfolgreich an die Ladestation an.)
Bluetooth (A1 Pro ist über Bluetooth mit der App verbunden.)
WLAN (A1 Pro ist über ein WLAN-Netzwerk mit der App verbunden.)
Link-Dienst (Der Link-Dienst ist aktiviert.)
Zeitplan (Eine Aufgabe ist für heute geplant und wurde noch nicht gestartet.)
59 DE
Taste Funktion
Einschalten
Stellen Sie sicher, dass sich A1 Pro außerhalb der Ladestation bendet. Drücken Sie die
Einschalttaste und halten Sie sie 2 Sekunden lang gedrückt, um das Gerät ein- oder
auszuschalten.
Starten
Drücken Sie die Startseite-Taste und schließen Sie die Abdeckung innerhalb von 5
Sekunden, um den A1 Pro zum Auaden an die Station zurückzuschicken. Die Aufgabe
wird abgebrochen, wenn die Abdeckung nicht innerhalb von 5 Sekunden geschlossen
wird.
Startseite
Drücken Sie die Startseite-Taste und schließen Sie die Abdeckung innerhalb von 5
Sekunden, um den A1 zum Auaden an die Station zurückzuschicken. Die Aufgabe wird
abgebrochen, wenn die Abdeckung nicht innerhalb von 5 Sekunden geschlossen wird.
Zurück
Drücken Sie die Zurück-Taste, um zur vorherigen Seite zurückzukehren.
Zurück
Drücken Sie den Drehknopf, um die Auswahl in den Menüs zu bestätigen.
Drücken Sie den Drehknopf und halten Sie ihn 3 Sekunden lang gedrückt, um den
Bluetooth-Kopplungsmodus auf A1 zu aktivieren.
Drehen Sie den Drehknopf im Uhrzeigersinn, um durch das Menü zu navigieren.
Starten +
Zurück
Drücken und halten Sie die Starten-Taste und die Zurück-Taste zusammen für 3
Sekunden, um den A1 Pro auf Werkseinstellungen zurückzusetzen. Der PIN-Code wird
dabei nicht gelöscht.
Startseite +
Zurück
Drücken Sie die Startseite-Taste und die Zurück-Taste gleichzeitig und halten Sie sie 3
Sekunden lang gedrückt, um die Info-Seite in den Einstellungen aufzurufen.
Die Info-Seite wird nach 5 Sekunden ausgeblendet.
Drehknopf +
Zurück
Drücken Sie den Drehknopf und die Zurück-Taste gleichzeitig und halten Sie sie 3
Sekunden lang gedrückt, um den PIN-Code zurückzusetzen.
Stopp
Drücken Sie die Stopp-Taste, um die Abdeckung des Bedienfelds zu önen und den A1
Pro zu stoppen. Zur Wiederaufnahme des Betriebs von A1 Pro muss der PIN-Code am
Bedienfeld eingegeben werden.
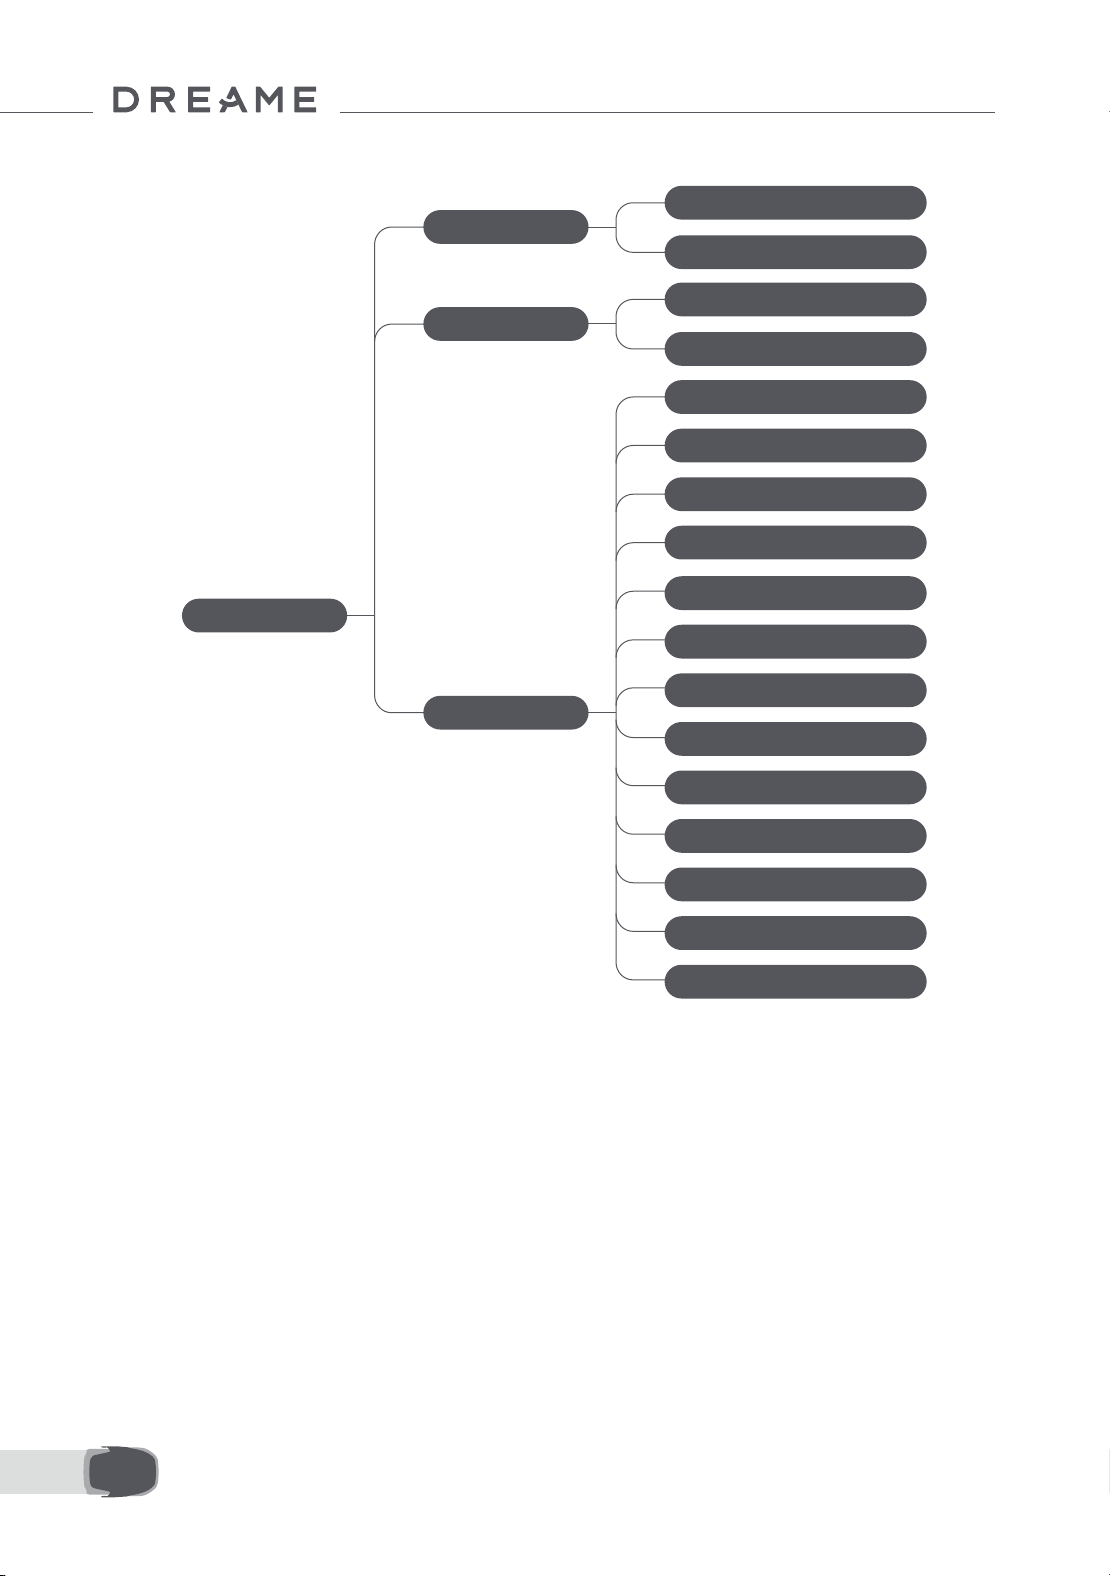
60DE
Übersicht der Menüstruktur
* Je nach Softwareversion werden möglicherweise Aktualisierungen vorgenommen.
7.2 Zum ersten Mal mit dem Mähen beginnen
Tipps vor dem Mähen:
• Mähen Sie das Gras mit einem Schubmäher auf eine Höhe von maximal 10 cm.
• Entfernen Sie alle Hindernisse wie Schutt, Laubhaufen, Spielzeug, Drähte und Steine vom Rasen. Achten
Sie darauf, dass sich keine Kinder oder Haustiere bei Mäharbeiten mit dem A1 Pro auf dem Rasen benden.
• Füllen Sie die Lücken im Rasen auf.
• Stellen Sie Ihre Mähpräferenzen in der App vorab ein (wie z. B. Mähezienz, Mähhöhe und Mährichtung).
Hauptseite
Zeitplan
Einstellungen
Mähmodus
Mähen der gesamten Fläche
Kantemähen
Zeitplan anzeigen
Zeitplan ein-/ausschalten
Mäh-Ezienz
Mähhöhe
Hindernisvermeidung Höhe
"Nicht Stören"-Modus
Regenschutz
Frostschutz
Anhebe-Alarm
Alarm bei Verlassen der Karte
PIN ändern
Lautstärke
Sprache
Zurücksetzen des Roboters
Info-Seite

61 DE
Drücken Sie die Starten-Taste auf dem Bedienfeld und schließen Sie die obere Abdeckung innerhalb von 5
Sekunden. Der A1 Pro verlässt die Ladestation und beginnt zu mähen. Sie können auch über die App starten,
indem Sie auf "Starten" tippen, um mit dem Mähen zu beginnen.
• Über das Bedienfeld starten
1. Drücken Sie die Stopp-Taste, önen Sie die Abdeckung und geben Sie den PIN-Code ein.
2. Wählen Sie "Mähmodus" auf dem Display und drücken Sie den Drehknopf.
3. Wählen Sie durch Drehen des Drehknopfes den gewünschten Mähmodus.
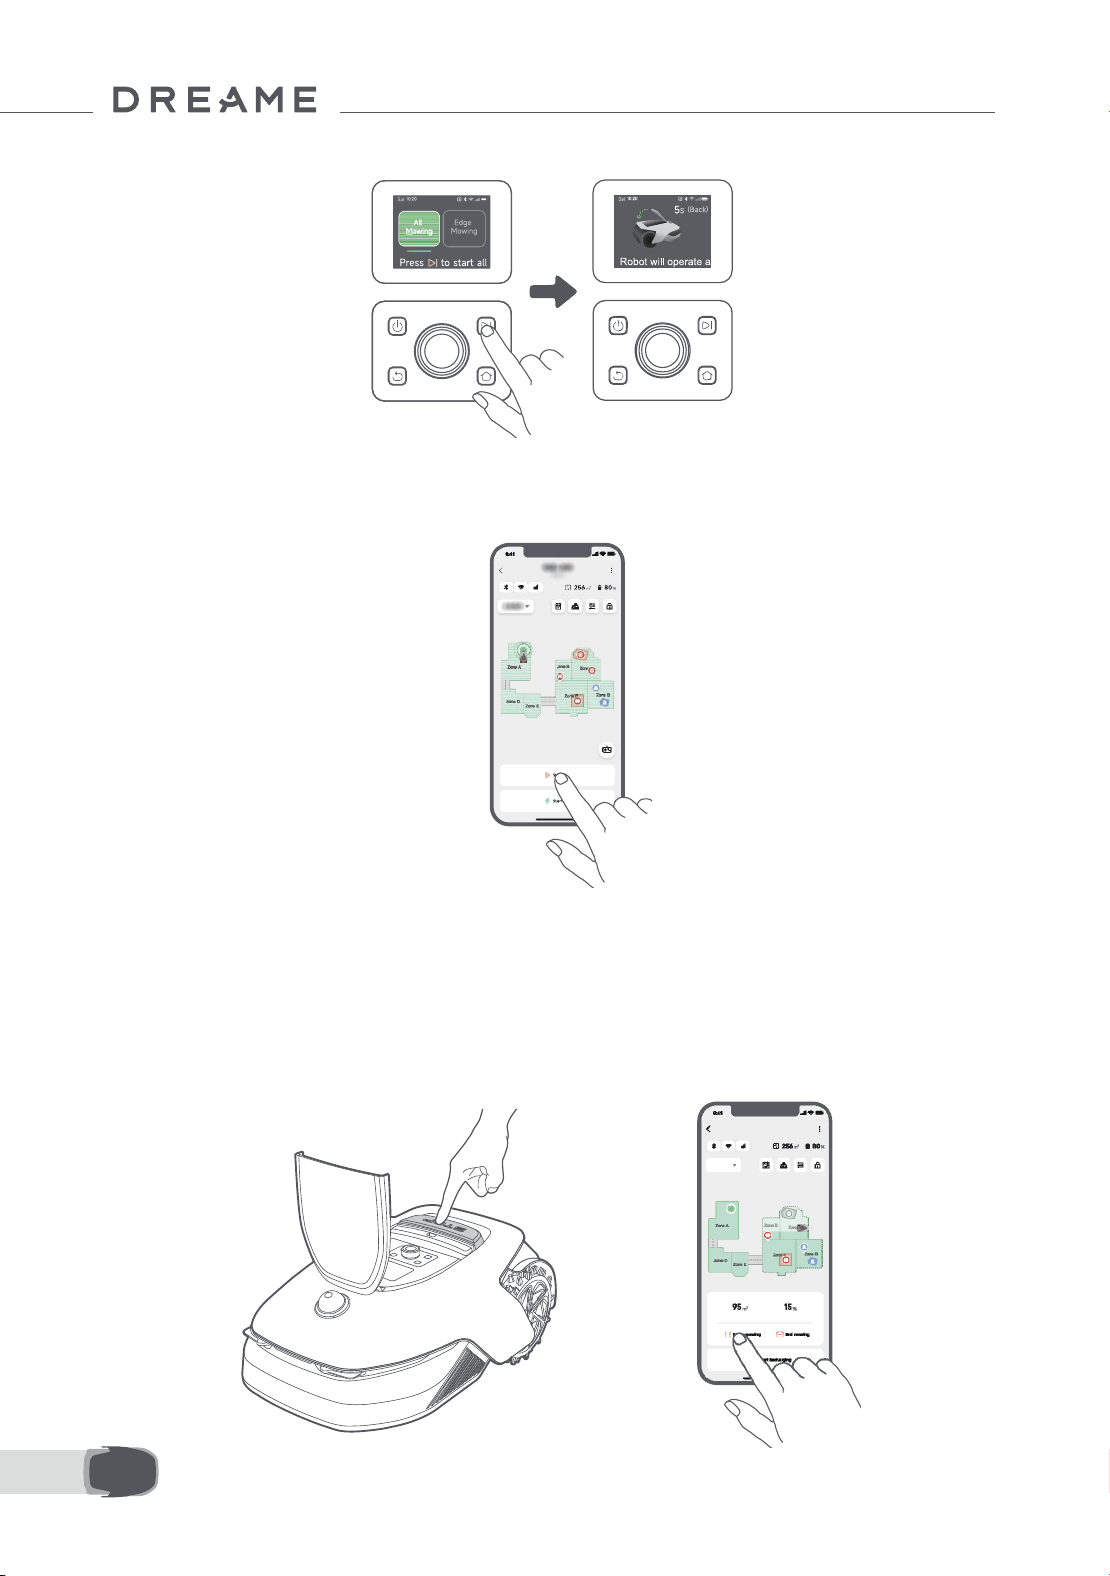
62DE
4. Drücken Sie die Starten-Taste und schließen Sie die obere Abdeckung innerhalb von 5 Sekunden. Der A1 Pro
beginnt zu mähen.
• Über die App starten
1. Önen Sie die App.
2. Wählen Sie einen Mähmodus und tippen Sie auf "Starten", um mit dem Mähen zu beginnen.
7.3 Pause/Unterbrechen
OR
Zum Unterbrechen der aktuellen Mähaufgabe können Sie die Stopp-Taste am A1 Pro drücken oder in der App
auf "Pause" tippen.
Hinweis: Nach dem Drücken der Stopp-Taste wird A1 Pro gesperrt und kann nicht direkt über die App
gestartet werden. Um das Mähen fortzusetzen, geben Sie bitte zuerst Ihren voreingestellten PIN-Code auf dem
Bedienfeld ein.
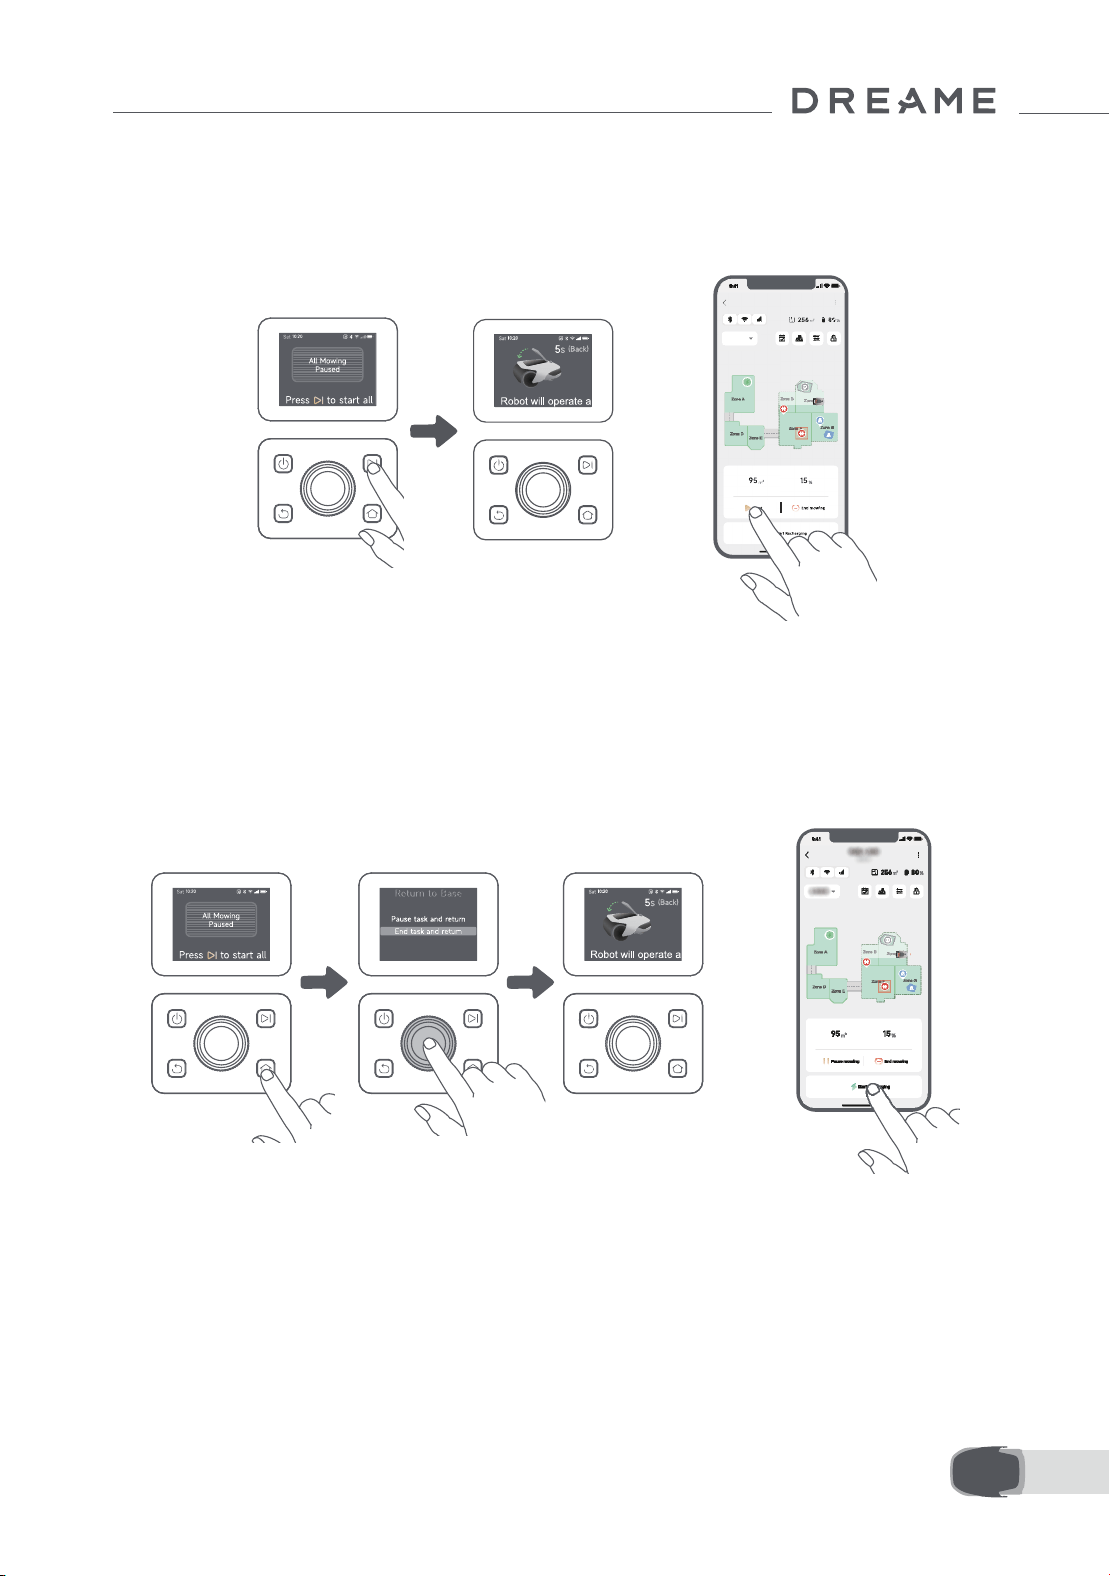
63 DE
7.4 Fortsetzen
7.5 Rückkehr zur Ladestation
Um den Mähvorgang nach einer Unterbrechung von A1 Pro fortzusetzen, drücken Sie die Starten-Taste an A1
Pro und schließen Sie die Abdeckung innerhalb von 5 Sekunden. A1 Pro wird die letzte Mähaufgabe fortsetzen.
Sie können auch in der App auf "Fortsetzen" tippen, um die Mähaufgabe fortzusetzen.
Geben Sie Ihren PIN-Code auf dem Bedienfeld ein und drücken Sie dann die Startseite-Taste, um die
Mähaufgabe zu beenden und A1 Pro zurück zur Ladestation zu schicken. Bestätigen Sie, um die Aufgabe
zu beenden und schließen Sie die Abdeckung innerhalb von 5 Sekunden. A1 Pro kehrt automatisch in die
Ladestation zum Wiederauaden zurück. Sie können auch in der App auf "Zurück zur Station" tippen, um A1 Pro
zurück zur Ladestation zu schicken.
OR
OR
Wo man noch mehr entdecken kann
Die Dreamehome App ist mehr als nur eine Fernbedienung. Sie können mit der App viele verschiedene
Funktionen nutzen: diverse Einstellungen per Fernbedienung vornehmen, verschiedene Mähmodi
ausprobieren, die Karte beliebig bearbeiten und den Mähplan anpassen. Darüber hinaus können Sie die
3D-Karte Ihrer Rasenäche direkt in der App anzeigen.
8 Dreamehome App

64DE
8.1 Mähmodi
8.2 Zeitplan
A1 Pro bietet verschiedene Mähmodi. Sie können über die App zwischen den Modi hin- und herschalten.
Nach Fertigstellung der ersten Karte erstellt A1 Pro automatisch zwei wöchentliche Mähpläne entsprechend
der Rasengröße: "Frühjahr&Sommer Plan" und "Herbst&Winter Plan". Sie können in der App auf "Zeitplan"
tippen, um detaillierte Zeitplaneinstellungen vorzunehmen. Mit der Zeitplanfunktion können Sie die tägliche
Mäharbeit komplett A1 Pro überlassen. Sie müssen A1 Pro nur noch regelmäßige Wartung durchführen.
Hinweis: Wenn Sie Sorge haben, dass A1 Pro Sie oder Ihre Nachbarn stören könnte, wenn er zu bestimmten
Zeiten selbstständig arbeitet, können Sie unter Einstellungen > Nicht stören die Ruhezeiten in der App
einstellen.
8.3 Kindersicherung
Wenn Sie Sorge haben, dass Kinder den A1 Pro benutzen könnten, können Sie die Funktion "Kindersicherung"
in der App aktivieren. Bei aktivierter Funktion wird A1 Pro gesperrt, wenn bei geöneter Abdeckung 5
Minuten lang keine Bedienung erfolgt.
8.4 Regenschutz
8.5 Frostschutz
Wenn Sie befürchten, dass schlechte Wetterbedingungen die Mäharbeiten beeinträchtigen könnten, können
Sie die Funktion "Regenschutz" in den "Einstellungen" auf dem Bedienfeld oder in der App aktivieren. Wenn
diese Funktion aktiviert ist, unterbricht A1 Pro das Mähen automatisch und kehrt zur Ladestation zurück,
wenn es regnet. Sie können die Regenschutzzeit in der App einstellen.
Wenn die Temperatur unter 6 ℃ liegt, kann das Mähen den Rasen dauerhaft beschädigen. Der Akku kann
infolge des aktivierten Selbstschutzes nicht geladen werden. Sie können die Funktion "Frostschutz" unter
"Einstellungen" auf dem Bedienfeld oder in der App aktivieren. Mit dieser Funktion kann der A1 Pro das
Mähen automatisch unterbrechen und zur Ladestation zurückkehren, wenn die Umgebungstemperatur ≤ 6
℃ liegt. Er setzt seine Arbeit automatisch fort, wenn die Temperatur über 11 ℃ liegt.
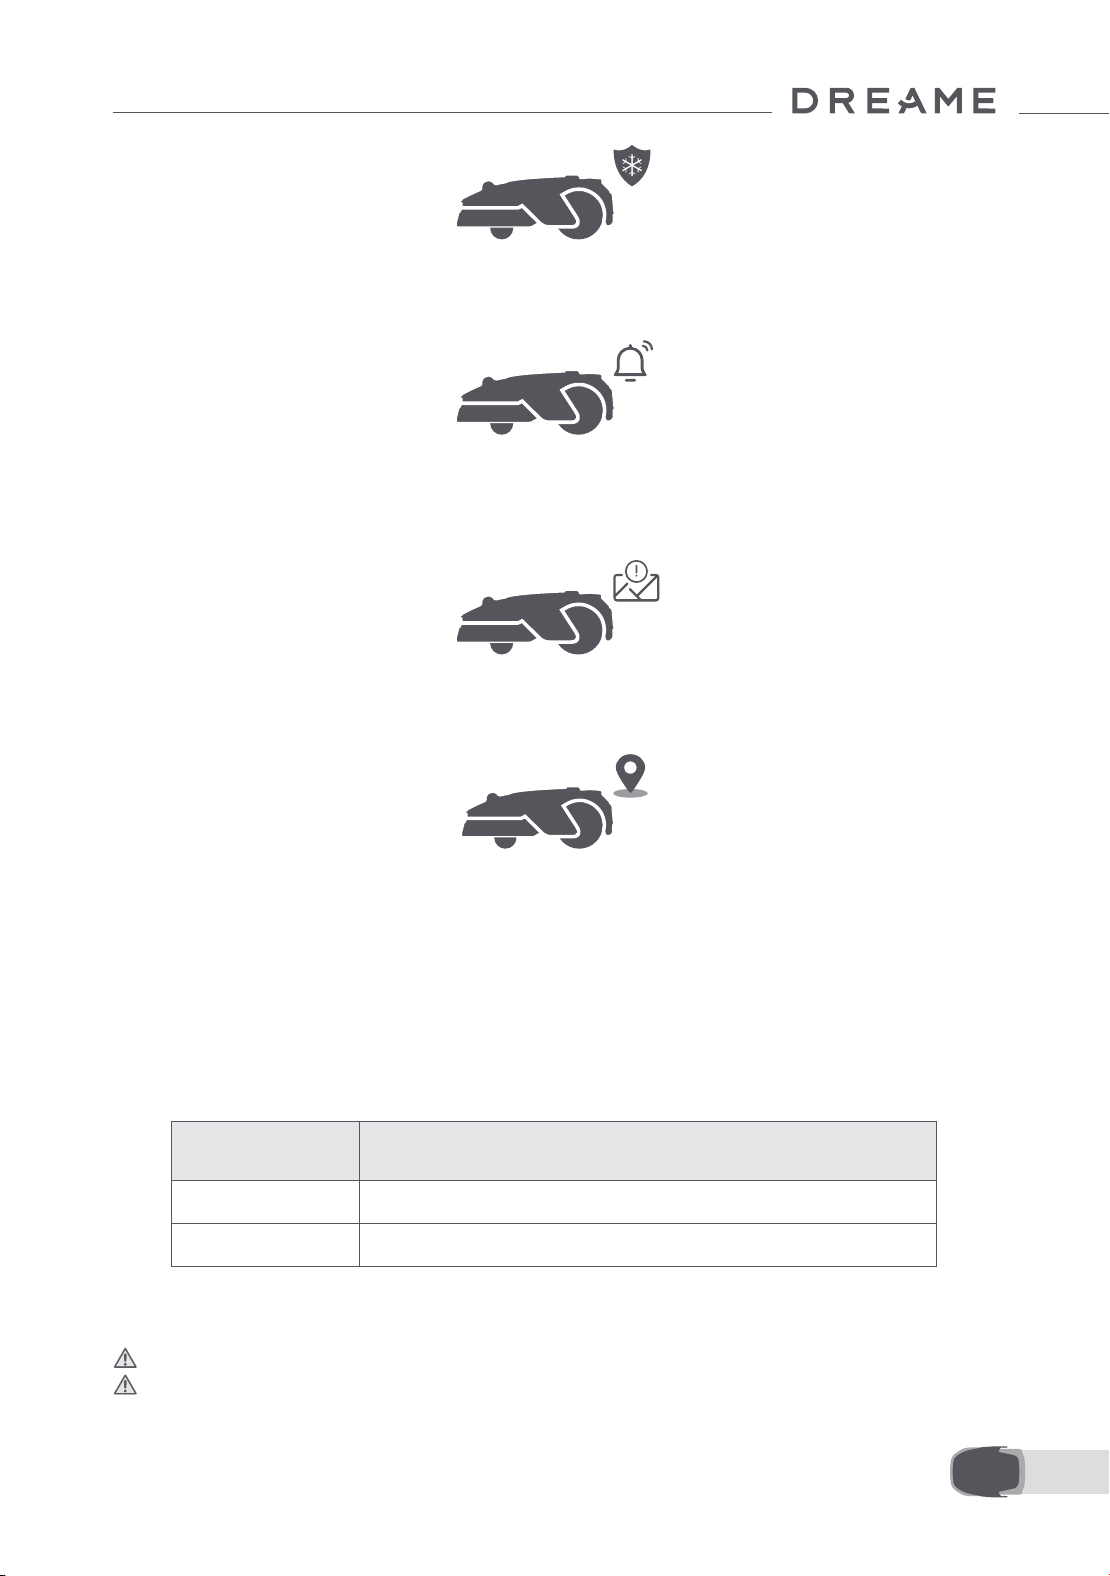
65 DE
8.6 Hebealarm
8.7 Alarm bei Verlassen der Karte
Bei aktivierter Funktion wird der A1 Pro gesperrt und der Alarm wird sofort ausgelöst, wenn er angehoben
wird.
Bei aktivierter Funktion wird der A1 Pro gesperrt und der Alarm wird sofort ausgelöst, wenn er sich außerhalb
der Karte bendet. (Für diese Funktion ist die Installation des Link-Moduls erforderlich.)
8.8 Standort in Echtzeit
Mit dem Link-Modul können Sie den aktuellen Standort von A1 Pro in Google Maps anzeigen lassen.
Hinweis: Das Dreame Entwicklungsteam führt laufend die Firmware- und App-Aktualisierungen per
Satelliten-Signal (OTA) durch. Bitte achten Sie auf Aktualisierungsbenachrichtigungen oder aktivieren Sie die
Funktion zur automatischen Aktualisierung, um die Firmware und die App auf dem neuesten Stand zu halten
und mehr Funktionen zu nutzen.
9 Wartung
Für eine bessere Leistung und Lebensdauer des A1 Pro reinigen Sie ihn bitte regelmäßig und tauschen Sie
abgenutzte Teile entsprechend der nachfolgend aufgeführten Häugkeit aus:
9.1 Reinigung
Warnung: Bitte schalten Sie A1 Pro vor der Reinigung aus und ziehen Sie den Stecker der Ladestation.
Warnung: Bitte achten Sie darauf, dass die LiDAR-Schutzabdeckung auf dem LiDAR angebracht ist, bevor
Sie A1 Pro auf den Kopf stellen, um Schäden am LiDAR zu vermeiden.
Teil Häugkeit des Austauschs
Schneidmesser Spätestens alle 6-8 Wochen
Reinigungsbürste Spätestens alle 12 Monate
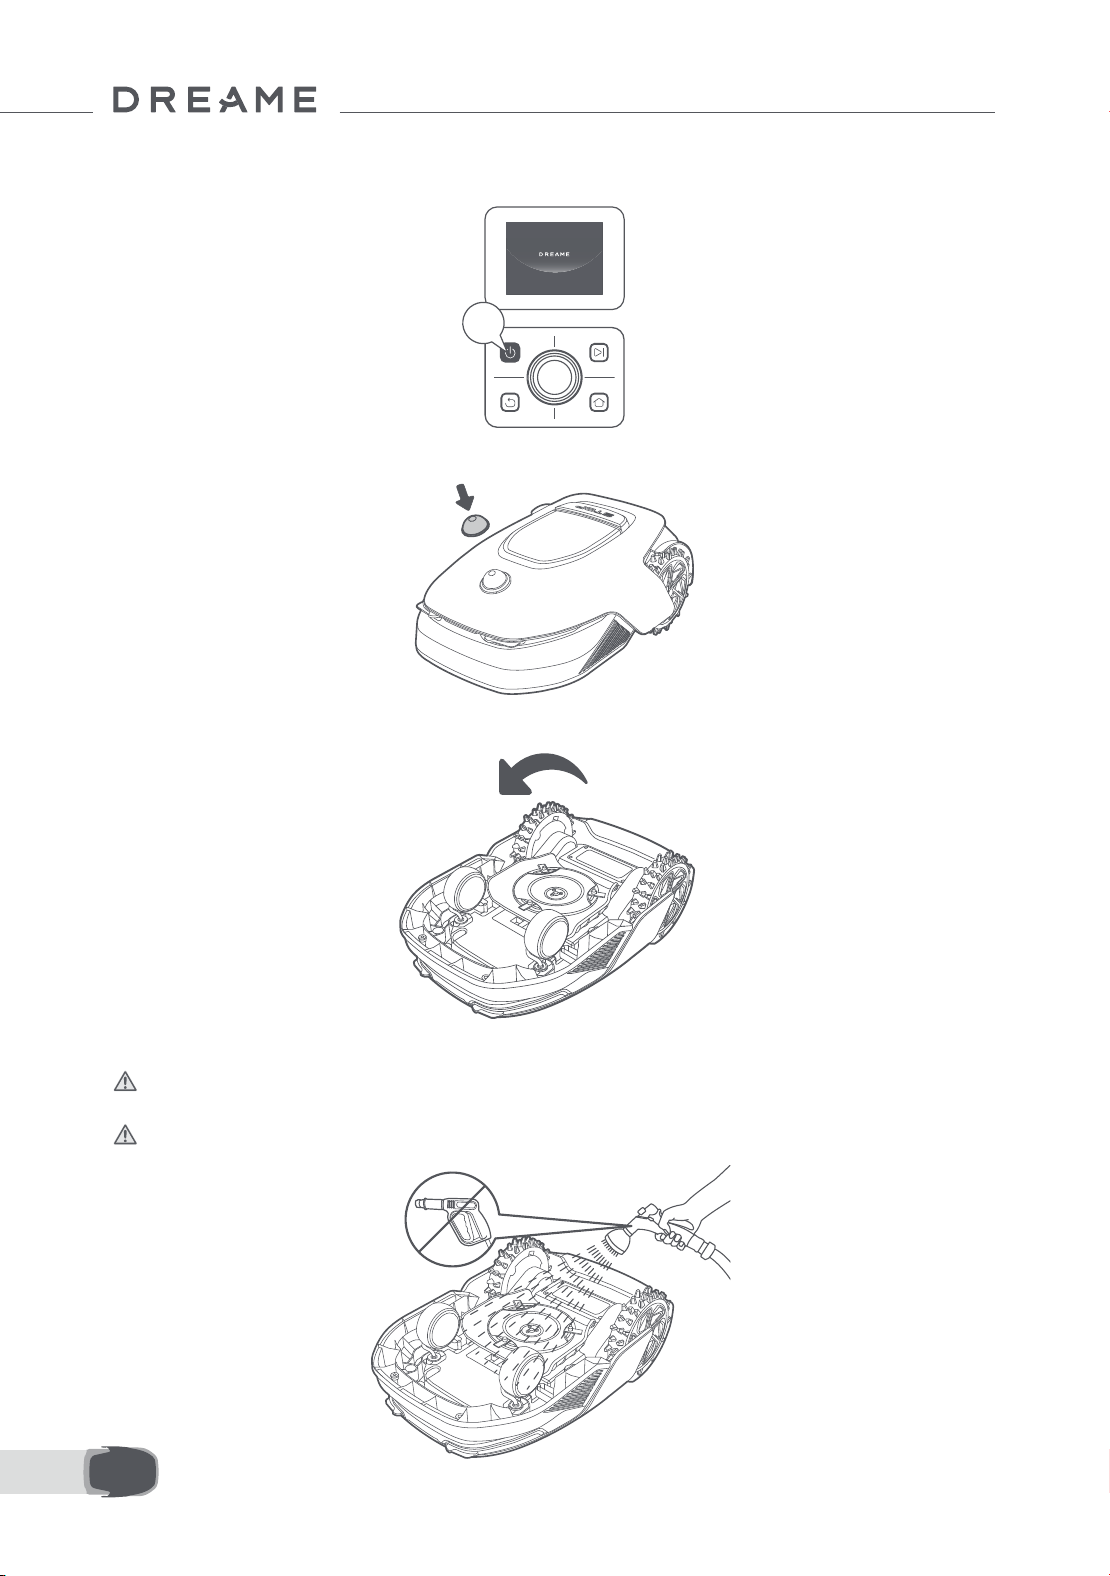
66DE
2s
• Das Gehäuse von A1 Pro, Fahrgestell und Schneidkopf:
1. Schalten Sie A1 Pro aus.
2. Setzen Sie die LiDAR-Schutzabdeckung auf das LiDAR.
3. Drehen Sie A1 Pro auf den Kopf.
4. Den Körper, den Schneidkopf und das Fahrgestell des A1 Pro mit einem Schlauch reinigen.
Warnung: Berühren Sie beim Reinigen des Gehäuses nicht die Schneidmesser. Bitte tragen Sie beim
Reinigen Handschuhe.
Warnung: Bitte reinigen Sie nicht mit einem Hochdruckreiniger. Verwenden Sie zur Reinigung keine
Reinigungsmittel.
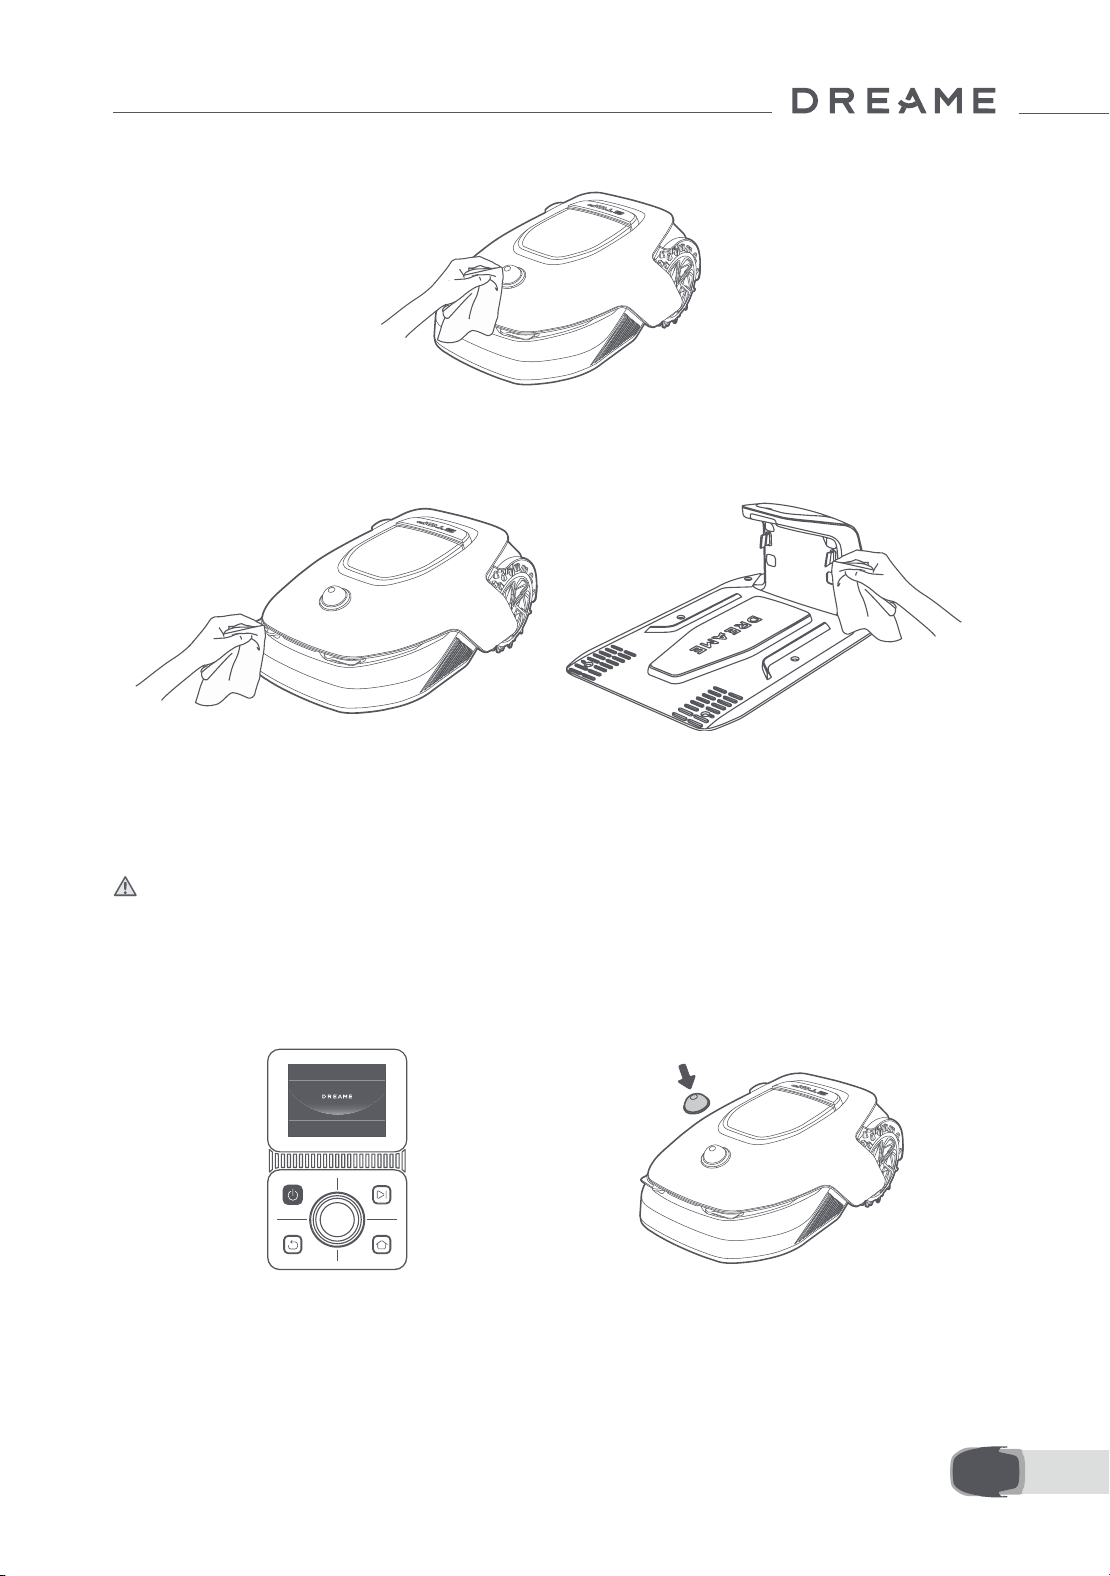
67 DE
3. Legen Sie A1 Pro auf eine weiche Unterlage
und stellen Sie ihn auf den Kopf.
4. Drücken Sie den Knopf unter dem
Schneidkopf, um die Aufnahme zu entfernen.
5. Reinigen Sie den LiDAR-Sensor vorsichtig mit einem fusselfreien Tuch.
• Ladekontakte:
Reinigen Sie die Ladekontakte von A1 und der Ladestation mit einem sauberen Tuch. Halten Sie die
Ladekontakte nach der Reinigung trocken.
9.2 Austausch der Komponenten
• Ersetzen der Schneidmesser
Ersetzen Sie die Schneidmesser regelmäßig, um sie scharf zu halten. Es wird empfohlen, die Klingen alle 6-8
Wochen oder früher zu ersetzen. Bitte verwenden Sie nur Original-Schneidmesser von Dreame.
Warnung: Bitte schalten Sie A1 Pro aus und tragen Sie Schutzhandschuhe, bevor Sie die Schneidmesser
austauschen.
Hinweis: Bitte tauschen Sie alle drei Schneidmesser gleichzeitig aus, um ein ausgewogenes Schneidsystem
zu gewährleisten.
1. Schalten Sie A1 Pro aus. 2. Stellen Sie sicher, dass die LiDAR-
Schutzabdeckung aufgesetzt ist.
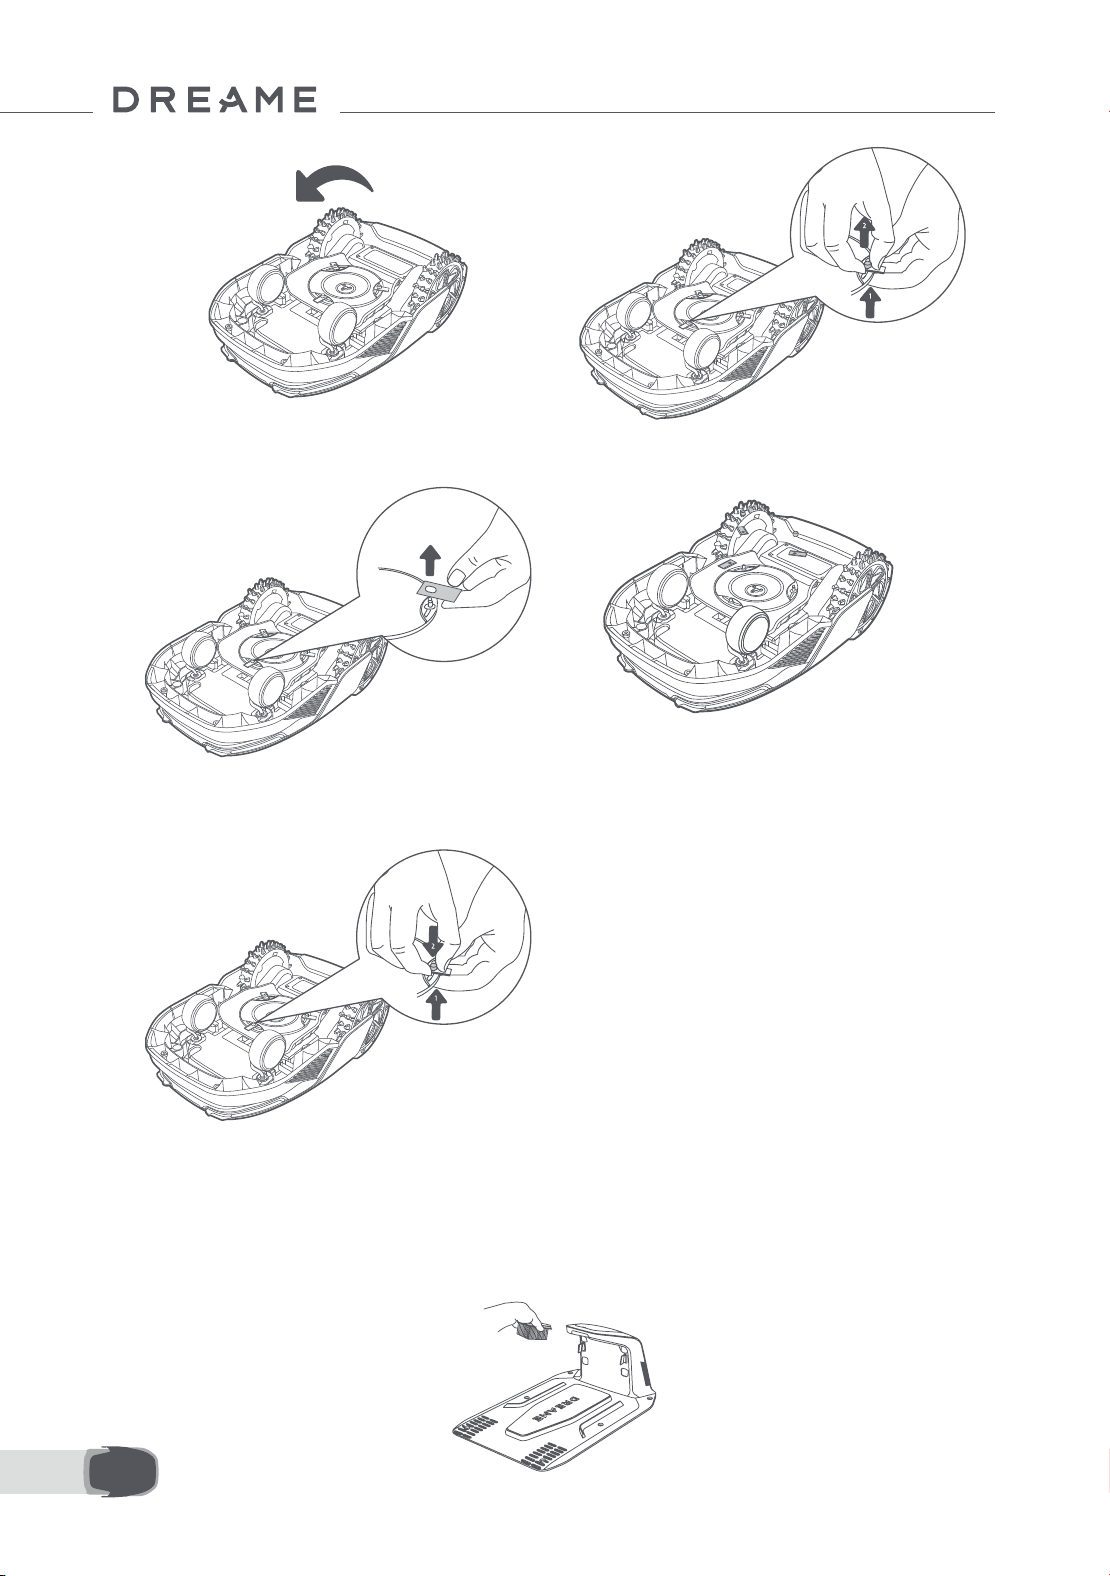
68DE
5. Richten Sie die Önung am Schneidmesser
auf den Schaft aus und nehmen Sie das
Schneidmesser heraus.
6. Entfernen Sie 3 Schneidmesser und
Aufnahmen.
• Austausch der Reinigungsbürste
Wenn die Reinigungsbürste für den LiDAR-Sensor abgenutzt ist, können ihre Borsten ausfransen oder
beschädigt werden, wodurch die Reinigungsleistung beeinträchtigt wird. Tauschen Sie die Reinigungsbürste
regelmäßig aus, um ein optimales Reinigungsergebnis zu erzielen. Es wird empfohlen, die Reinigungsbürste
mindestens alle 12 Monate auszutauschen.
Hinweis: Vor dem Austausch der Reinigungsbürste ziehen Sie bitte unbedingt den Stecker der Ladestation.
7. Drücken Sie den Knopf unter dem Schneidkopf
und richten Sie die Önung der Aufnahme mit
dem Schaft aus, um die Aufnahmen und die
Schneidmesser zu befestigen.
8. Stellen Sie sicher, dass sich die Schneidmesser
frei drehen können.

69 DE
10 Akku
Energiesparender Lademodus:
Bei aktiviertem Energiespar-Lademodus werden alle nicht mit dem Laden verbundenen Funktionen
deaktiviert. (Display und Netzwerk werden ausgeschaltet.)
• Zum Aktivieren des Energiespar-Lademodus drücken und halten Sie die Starten-Taste und die
Startseite-Taste zusammen und drücken Sie gleichzeitig fünfmal schnell die Zurück-Taste. Sie hören eine
Sprachansage: Der Energiespar-Lademodus ist aktiviert.
• Zum Deaktivieren des Energiespar-Lademodus starten Sie den A1 Pro neu oder drücken Sie fünfmal schnell
die Einschalttaste.
Laden Sie bei langfristiger Aufbewahrung A1 Pro alle 6 Monate auf, um den Akku zu schützen. Die
eingeschränkte Garantie deckt keine Akkuschäden ab, die durch Tiefentladung verursacht werden.
Laden Sie den Akku nicht bei einer Umgebungstemperatur über 45 ° C (113 ° F) bzw. unter 6 ° C (43 ° F). Die
Temperatur für die Langzeitlagerung des Akkus sollte zwischen -10 und 35 ° C (14 und 95 ° F) liegen. Zur
Schadensminimierung liegt die empfohlene Lagerungstemperatur für den Akku zwischen 0 und 25 ° C (32
bis 77 ° F).
Hinweis: Die Lebensdauer des Akkus von A1 Pro hängt von der Nutzungshäugkeit und der Anzahl
der Betriebsstunden ab. Ist der Akku beschädigt oder lässt er sich nicht mehr auaden, entsorgen
Sie den verbrauchten oder defekten Akku bitte nicht achtlos. Bitte halten Sie sich an die regionalen
Recyclingvorschriften.
11 Einlagerung in der Winterzeit
12 Transport
• A1 Pro
1. Laden Sie den Akku vollständig auf und schalten Sie A1 Pro aus.
2. Reinigen Sie A1 Pro gründlich, bevor Sie es für den Winter einlagern.
3. Bringen Sie die LiDAR-Schutzabdeckung an.
4. Lagern Sie A1 Pro an einem trockenen Ort bei einer Temperatur über 0 ° C.
• Ladestation
Ziehen Sie den Stecker der Ladestation und lagern Sie sie an einem trockenen, kühlen und vor direkter
Sonneneinstrahlung geschützten Ort.
Hinweis: Wenn Sie A1 Pro längere Zeit nicht benutzt haben, sollten Sie eine neue Karte Ihres Gartens
erstellen, da erhebliche Änderungen der Gartenumgebung zu Ortungsfehlern führen können.
Stellen Sie beim Transport über lange Strecken sicher, dass A1 Pro ausgeschaltet ist. Es wird empfohlen, die
Originalverpackung zu verwenden. Bringen Sie die LiDAR- Schutzabdeckung an.
Warnung: Bitte schalten Sie A1 Pro vor dem Transport aus.
Warnung: Heben Sie das Gerät am Rücken an, so dass der Schneidkopf von Ihrem Körper weg zeigt.
70DE
13 Fehlersuche und -behebung
Problem Ursache Lösung
A1 Pro ist nicht mit der
App verbunden.
1. A1 Pro bendet sich nicht
innerhalb der Reichweite
des WLAN- oder Bluetooth-
Signals.
2. A1 Pro ist ausgeschaltet
oder wird neu gestartet.
1. Prüfen Sie, ob A1 Pro den Einschaltvorgang
abgeschlossen hat.
2. Prüfen Sie, ob der Router ordnungsgemäß
funktioniert.
3. Gehen Sie näher an A1 Pro heran, um eine
Bluetooth-Verbindung herzustellen.
A1 Pro angehoben.
Das Rad ist nicht auf dem
Boden.
1. Stellen Sie den A1 Pro wieder auf den achen
Boden.
2. Geben Sie den PIN-Code am A1 Pro ein und
bestätigen Sie ihn.
3. A1 Pro kann nicht über Objekte mit einer
Höhe von mehr als 4 cm fahren. Bitte achten
Sie darauf, dass der Boden im Arbeitsbereich
des Roboters eben ist.
A1 Pro gekippt.
A1 Pro ist um mehr als 37°
gekippt.
1. Stellen Sie den A1 Pro wieder auf den achen
Boden.
2. Geben Sie den PIN-Code am A1 Pro zur
Bestätigung ein.
3. A1 Pro kann keine Steigungen von mehr als
45 % (24° ) befahren.
A1 Pro festgefahren.
A1 Pro ist festgefahren und
kann sich nicht befreien.
1. Entfernen Sie die umliegenden Hindernisse
und versuchen Sie es erneut.
2. Bewegen Sie den A1 Pro manuell an eine
ache und oene Stelle auf der Karte und
versuchen Sie erneut, die Aufgabe zu starten.
Wenn dieses Problem weiterhin auftritt,
versuchen Sie es erst dann erneut, wenn sich
der A1 Pro in der Ladestation bendet.
3. Prüfen Sie, ob es Gruben im Gelände gibt.
Füllen Sie die Gruben vor dem Mähen auf, um
ein Festfahren des A1 Pro zu verhindern.
4. Prüfen Sie, ob das umliegende Gras
höher als 10 cm ist. Sie können die Höhe der
Hindernisvermeidung einstellen oder den
Rasen im Voraus mit einem Schiebemäher
mähen, um das Festfahren des A1 Pro zu
verhindern.
5. Bleibt der A1 Pro häug an dieser Stelle
stecken, können Sie sie als Sperrzone
festlegen.
Störung am
linken/rechten
Hinterrad
Das Rad kann sich nicht
drehen oder es liegt ein
Problem mit dem Radmotor
vor.
1. Reinigen Sie die Hinterräder und versuchen
Sie es erneut.
2. Wenn dieser Fehler weiterhin auftritt,
versuchen Sie, den Roboter neu zu starten.
3. Wenn das Problem weiterhin besteht,
wenden Sie sich bitte an den Kundendienst.

71 DE
Problem Ursache Lösung
Schneidkopf kann sich
nicht drehen.
Der Schneidkopf kann sich
nicht normal drehen oder es
liegt ein Problem mit dem
Messermotor vor.
1. Reinigen Sie den Schneidkopf und versuchen
Sie es erneut.
2. Prüfen Sie, ob das umliegende Gras höher
als 10 cm ist. Sie können den Rasen vorher mit
einem Schiebemäher mähen, um eine
Blockierung des Schneidkopfes durch hohes
Gras zu vermeiden.
3. Prüfen Sie, ob sich Wasser unter dem
Schneidkopf bendet. Sollte dies der Fall sein,
bringen Sie den Roboter an einen trockenen
Ort und versuchen Sie es erneut.
4. Wenn dieser Fehler weiterhin auftritt,
versuchen Sie, den Roboter neu zu starten.
5. Wenn das Problem weiterhin besteht,
wenden Sie sich bitte an den Kundendienst.
Stoßfänger-Fehler.
Der vordere
Stoßfängersensor
wird ständig angeregt.
1. Prüfen Sie, ob der A1 Pro irgendwo
festgefahren ist.
2. Klopfen Sie leicht auf den Stoßfänger und
stellen Sie sicher, dass er zurückfedert.
3. Wenn dieser Fehler weiterhin auftritt,
versuchen Sie, den Roboter neu zu starten.
4. Wenn das Problem weiterhin besteht,
wenden Sie sich bitte an den Kundendienst.
Fehler beim Auaden.
A1 Pro dockt an die
Ladestation an, aber
der Ladestrom oder
die Ladespannung ist
fehlerhaft.
1. Prüfen Sie, ob die Ladestation richtig mit
dem Stromnetz verbunden ist.
2. Prüfen Sie, ob die Ladekontakte am A1 Pro
und an der Ladestation sauber sind.
3. Versuchen Sie nach der Überprüfung, den A1
Pro erneut an die Ladestation anzudocken.
4. Wenn das Problem weiterhin besteht,
wenden Sie sich bitte an den Kundendienst.
Akkutemperatur zu
hoch.
Die Akkutemperatur
beträgt ≥ 60℃ .
1. Verwenden Sie den A1 Pro bei einer
Umgebungstemperatur unter 40 ° C. Sie
können warten, bis die Akkutemperatur
automatisch sinkt.
2. Sie können den A1 Pro ausschalten und nach
einer Zeit neu starten.
3. Wenn das Problem weiterhin besteht,
wenden Sie sich bitte an den Kundendienst.
Lidar ist blockiert.
LiDAR ist blockiert (z.B. weil
die LiDAR-
Schutzabdeckung
nicht entfernt wurde).
1. Entfernen Sie die Schutzabdeckung des
Lidars und versuchen Sie es erneut.
2. Wenn das Lidar auf der Oberseite des
Roboters stark verschmutzt ist, reinigen Sie es
miteinem fusselfreien Tuch und versuchen Sie
es erneut.
72DE
Problem Ursache Lösung
LiDAR-Fehlfunktion.
LiDAR ist stark verschmutzt
oder es liegt ein
Sensorfehler vor.
1. Prüfen Sie, ob das Lidar verschmutzt ist.
Reinigen Sie es ggf. und versuchen Sie es dann
erneut.
2. Wenn dieser Fehler weiterhin auftritt,
versuchen Sie, den Roboter neu zu starten.
3. Wenn das Problem weiterhin besteht,
wenden Sie sich bitte an den Kundendienst.
A1 Pro ist verloren.
Ortung ist verloren
gegangen.
1. Prüfen Sie, ob das LiDAR auf der Oberseite
von A1 Pro verschmutzt ist. Verschmutzung
kann die Ortung beeinträchtigen.
2. Bewegen Sie den A1 Pro manuell an eine
freie Stelle auf der Karte und versuchen Sie, die
Aufgabe erneut zu starten.
3. Wenn die Ortung nicht wiederhergestellt
werden kann, steuern Sie den A1 Pro per
Fernbedienung über die App zurück zur
Ladestation, und starten Sie dann die
Mähaufgabe.
Sensorfehler. Sensorfehler.
1. Starten Sie den A1 Pro neu und versuchen Sie
es noch einmal.
2. Wenn das Problem weiterhin besteht,
wenden Sie sich bitte an den Kundendienst.
A1 Pro bendet sich in
der Sperrzone.
A1 Pro bendet sich in der
Sperrzone.
1. Bewegen Sie den Roboter manuell aus der
Sperrzone und versuchen Sie es erneut.
2. Bewegen Sie den Roboter über die App
ferngesteuert aus der Sperrzone, und
versuchen Sie es erneut.
A1 Pro bendet sich
außerhalb der Karte.
A1 Pro bendet sich
außerhalb der Karte.
1. Bewegen Sie den Roboter manuell innerhalb
der Karte und versuchen Sie es erneut.
2. Steuern Sie den Roboter über die App zurück
in die Karte, und versuchen Sie es erneut.
Notstopp ist aktiviert.
Die Stopptaste am A1 Pro ist
gedrückt.
Geben Sie den PIN-Code am A1 Pro ein, um den
Notstopp zu deaktivieren.
Akkuladestand niedrig.
A1 Pro wird bald
abgeschaltet.
Akkustand ≤ 10 %
Docken Sie A1 Pro zum Auaden in die
Ladestation an.
73 DE
Problem Ursache Lösung
A1 Pro bendet sich
außerhalb der Karte.
Diebstahlgefahr.
A1 Pro bendet sich
außerhalb der Karte.
1. Geben Sie zur Verizierung den PIN-Code
ein.
2. Sie können den Alarm bei Verlassen der Karte
in den Einstellungen der App deaktivieren.
Rückkehr zur
Ladestation
fehlgeschlagen.
A1 Pro kann beim
Zurückkehren zur
Ladestation die Ladestation
nicht nden.
1. Prüfen Sie, ob der A1 Pro durch Hindernisse
blockiert wird. Entfernen Sie die Hindernisse
und versuchen Sie es erneut.
2. Steuern Sie den A1 Pro per Fernbedienung
über die App zurück zur Ladestation.
Andocken an der
Ladestation
fehlgeschlagen.
A1 Pro ndet die
Ladestation, kann aber
nicht andocken.
1. Prüfen Sie, ob die Reexionsfolien an der
Ladestation verschmutzt oder blockiert sind.
2. Prüfen Sie, ob sich Hindernisse vor der
Ladestation benden.
3. Prüfen Sie, ob die Ladestation verschoben
wurde.
4. Überprüfen Sie, ob die Basisplatte mit
dickem Schlamm bedeckt ist.
5. Überprüfen Sie, ob die Station Strom hat.
6. Helfen Sie dem Roboter, manuell oder mit
der Fernbedienung in die Station zu docken.
Ortung
fehlgeschlagen.
Ortung schlägt fehl, wenn
A1 Pro versucht, eine
Mähaufgabe zu starten.
1. Das Lidar kann blockiert sein. Bewegen Sie
den Roboter manuell an eine ache und oene
Stelle auf der Karte und versuchen Sie erneut,
die Aufgabe zu starten.
2. Wenn Sie weiterhin auf diesen Fehler stoßen,
versuchen Sie es bitte erneut, nachdem der
Roboter in der Station angedockt ist.
Die Akkutemperatur ist
hoch.
Die Akkutemperatur
beträgt ≥ 45℃ .
1. Der Ladevorgang kann fehlschlagen, wenn
die Akkutemperatur über 45 ℃ liegt.
2. Verwenden Sie den A1 Pro bei einer
Umgebungstemperatur unter 40 ° C.
Die Akkutemperatur ist
niedrig.
Die Akkutemperatur
beträgt ≤ 6℃ .
1. Der Ladevorgang kann fehlschlagen, wenn
die Akkutemperatur unter 6℃ liegt.
2. Verwenden Sie den A1 Pro bei einer
Umgebungstemperatur über 6 ° C.
Der Schneidkopf kann
sich nicht nach oben
oder unten bewegen.
Der Schneidkopf kann sich
nicht nach oben oder unten
bewegen.
1. Reinigen Sie den Schneidkopf und versuchen
Sie es erneut.
2. Wenn der Fehler weiterhin auftritt, versuchen
Sie, den Roboter neu zu starten.
3. Wenn das Problem weiterhin besteht,
wenden Sie sich bitte an den Kundendienst.
Nicht ausreichend Platz
zum Drehen vor der
Station.
Nicht ausreichend Platz zum
Drehen vor der Station.
1. Wenn die Station am Rand der Karte oder
darauf platziert ist, stellen Sie sicher, dass
zwischen dem vorderen Bereich der Basisplatte
der Station und der Kartenbegrenzung
mindestens 1 m freier Raum ist; andernfalls
kann der Roboter möglicherweise nicht
wenden.
2. Verlegen Sie die Station oder ändern Sie die
Karte in der Kartenbearbeitung.
74DE
14 Technische Daten
Allgemeine
Informationen
Produktbezeichnung Dreame Mähroboter
Marke Dreame
Abmessungen
643 × 436,5 × 261 mm
(25,3 × 17,2 × 10,2 Zoll)
Gewicht ( inkl. Akku) 12.6 kg (27.7 lbs)
Mähbetrieb
Empfohlene Arbeitsäche 2000 ㎡ (0,5 Acker)
Mähleistung
Standard: 120 ㎡ (0,03 Acker)/Std.
Ezient: 200 ㎡ (0,05 Acker)/Std.
Mähhöhe 30~70 mm (1,2~2,8 Zoll)
Mähbreite 22 cm (8,7 Zoll)
Ladedauer
[1]
65 Minuten
Geräusch-
emissionen
Schallleistungspegel LWA 64 dB(A)
Messunsicherheiten der Schallleistung KWA 3 dB(A)
Schalldruckpegel LpA 56 dB(A)
Messunsicherheiten beim Schalldruck KpA 3 dB(A)
Betriebs-
bedingungen
Betriebstemperatur
0~50° C (32~122° F)
Empfohlen: 10~35° C
(50~95° F)
Temperatur bei Langzeitlagerung
-10~35° C (14~95° F)
Empfohlen: 0~25° C
(32~77° F)
IP-Einstufung
Mäher: IPX6
Ladestation: IPX4
Netzteil: IP67
Maximale Steigung der Mähäche 45% (24° )
Verbindungs-
möglichkeiten
Bluetooth-Frequenzbereich 2400,0-2483,5 MHz
WLAN 2,4 GHz WLAN (2400-2483,5M)
Maximale HF-Leistung
802.11b:16±2dBm(@11Mbps)
802.11g:14±2dBm(@54Mbps)
802.11n:13±2dBm(@HT20,HT40)
Bluetooth:7.49dBm
Link-Dienst (optional)
[2]
LTE-FDD: B1/3/7/8/20/28A
LTE-TDD: B38/40/41
GNSS (optional)
[3]
GPS/GLONASS/BDS/Galileo/QZSS
75 DE
[1] Die Ladedauer gilt, wenn A1 Pro bei niedrigem Akkuladestand automatisch zur Ladestation zurückkehrt.
[2] Erfordert die Installation des Link-Moduls.
[3] Erfordert die Installation des Link-Moduls.
Hinweis: Die technischen Daten können sich im Zuge der ständigen Verbesserung unserer Produkte ändern.
Die aktuellsten Daten nden Sie auf unserer Website unter global.dreametech.com.
Antriebsmotor
Fahrgeschwindigkeit bei Fernbedienung 0.45 m/s
Fahrgeschwindigkeit beim Mähen
Standard: 0,35 m/s
Ezient: 0,6 m/s
Messermotor
Geschwindigkeit 2200/min
Akku (Mäher)
Akku-Typ Lithium-Ionen-Akku
Nennkapazität 5000 mAh
Nennspannung 18 V
Netzteil
Eingangsspannung 100~240 V
Ausgangsspannung 20 V
Stromstärke am Ausgang 3 A
Ladestation
Eingangsspannung 20 V
Ausgangsspannung 20 V
Stromaufnahme 3 A
Stromstärke am Ausgang 3 A

76FR
1 Consignes de sécurité ............................................................................... P77
2 Qu'est-ce qui est dans la boîte .................................................................. P82
3 Présentation de produit ........................................................................... P83
4 Installation .............................................................................................. P84
5 Préparations avant utilisation ................................................................... P86
6 Mappage de votre jardin .......................................................................... P89
7 Opération ................................................................................................ P95
8 Application Dreamehome ....................................................................... P100
9 Entretien ................................................................................................ P102
10 Batterie ................................................................................................ P107
11 Stockage d'hiver ................................................................................... P107
12 Transport ............................................................................................. P107
13 Résolution des pannes .......................................................................... P108
14 Caractéristiques ................................................................................... P112
Sommaire
Traduction de l'instruction originale

77 FR
1.1 Consignes générales de sécurité
1 Consignes de sécurité
• Avant d'utiliser le produit, lisez attentivement et comprenez le manuel d'utilisation.
• Utiliser uniquement les outils recommandés par Dreame avec le produit. Toute autre utilisation n'est pas
appropriée.
• Les réglementations locales peuvent limiter l'âge de l'opérateur. Les enfants, les personnes ayant des
capacités physiques, sensorielles ou mentales réduites, les personnes manquant d'expérience et de
connaissances ou les personnes non familiarisées avec ces instructions ne doivent jamais utiliser la machine.
• Lorsque la machine fonctionne, ne laissez pas les enfants se trouver à proximité ou jouer avec elle.
• N'utilisez pas le produit dans des zones où les gens ignorent sa présence.
• Ne l'exécutez pas lorsque vous utilisez manuellement le produit avec l'application Dreamehome. À tout
moment, marchez, surveillez vos pas sur les pentes et maintenez votre équilibre.
• Évitez d'utiliser le produit lorsqu'il y a des personnes, en particulier des enfants ou des animaux, dans la
zone de travail.
• Si vous utilisez le produit dans des lieux publics, placez des panneaux d'avertissement autour de la zone
de travail avec le texte suivant : "Avertissement!" La tondeuse à gazon est un outil automatique! Évitez de
toucher la machine! Observez les enfants!
• Portez des chaussures robustes et un pantalon long lorsque vous utilisez le produit.
• Pour éviter tout dommage au produit et tout accident impliquant des véhicules ou des personnes, ne
placez pas de zones de travail ou de voies de transport sur les voies publiques.
• Ne touchez pas les pièces dangereuses en mouvement, telles que le disque de coupe, avant qu'il ne soit
complètement arrêté.
• Demandez de l’aide médicale en cas de blessure ou d’accident.
• Mettez le produit sur OFF avant d'éliminer les blocages, d'eectuer la maintenance ou d'examiner le
produit. Si le produit vibre anormalement, inspectez-le pour détecter tout dommage avant de redémarrer.
N'utilisez pas le produit si des pièces sont défectueuses.
• Tant qu'un câble n'est pas débranché de la prise de courant, ne le connectez pas et ne le touchez pas.
Débranchez la che de la prise de courant si le câble est endommagé pendant le fonctionnement. Le personnel
de service doit remplacer un câble usé ou endommagé car il augmente le risque de chocs électriques.
• N'installez pas le câble principal dans les zones où le produit risque de couper. Suivez les instructions
fournies pour l’installation du câble.
• Pour charger le produit, utilisez uniquement la station de recharge incluse dans l'emballage. Une utilisation
incorrecte peut provoquer un choc électrique, une surchaue ou une fuite de liquide corrosif de la batterie.
En cas de fuite d'électrolyte, nettoyez avec de l'eau ou un agent neutralisant, et si le liquide corrosif entre en
contact avec vos yeux, consultez un médecin.
• Lors du raccordement du câble principal à la prise de courant, utilisez un dispositif à courant résiduel (RCD)
avec un courant de déclenchement maximum de 30 mA.
• Utilisez uniquement des piles d'origine recommandées par Dreame . La sécurité du produit ne peut être
garantie avec des batteries non originales. N'utilisez pas de piles non rechargeables.
• Pour éviter d'endommager les rallonges qui pourraient entraîner un contact avec des pièces sous tension,
gardez les rallonges à l'écart des pièces dangereuses en mouvement.
• Les illustrations utilisées dans ce document sont uniquement à titre de référence. Veuillez vous référer aux
produits réels.
• Ne poussez pas le produit rapidement ou en forçant car vous risquez de l’endommager.
• Pour respecter les exigences d'exposition aux RF, une distance de séparation de 35 cm entre l'appareil et la
personne doit être maintenue.
• Pour recharger la batterie utilisez uniquement le bloc d'alimentation amovible fourni avec l'appareil.

78FR
• Évitez d'installer la borne de recharge dans des zones où des personnes pourraient trébucher dessus.
• N'installez pas la borne de recharge dans des zones où il existe un risque d'eau stagnante.
• La station de recharge et ses accessoires ne doivent pas être installés à moins de 60 cm/24 po de tout
matériau combustible. Un incendie peut survenir en cas de dysfonctionnement ou de surchaue de la
station de charge et de l'alimentation électrique.
• Pour les utilisateurs résidant aux États-Unis ou au Canada : Il existe un risque de choc électrique si vous
installez l'alimentation électrique à l'extérieur. Assurez-vous que le capuchon de la che de xation est
inséré ou retiré avant de l'installer dans une prise GFCI (RCD) couverte de classe A avec un boîtier résistant
aux intempéries.
1.2 Consignes de sécurité pour l'installation
• Gardez vos mains et vos pieds éloignés des lames rotatives. Ne placez pas vos mains ou vos pieds à
proximité ou en dessous du produit lorsqu'il est allumé.
• Ne soulevez pas et ne déplacez pas le produit lorsqu'il est allumé.
• Utilisez le mode stationnement ou réglez le produit sur OFF lorsqu'il y a des personnes, en particulier des
enfants ou des animaux, dans la zone de travail.
• Assurez-vous que la pelouse ne contient aucun objet comme des pierres, des branches, des outils ou des
jouets. Sinon, lorsqu'elles entrent en contact avec un objet, les lames peuvent être endommagées.
• Ne placez pas d'objets sur le produit ou la station de charge.
• N'utilisez pas le produit si le Bouton d'arrêt ne fonctionne pas.
• Évitez les collisions entre le produit et des personnes ou des animaux. Si une personne ou un animal se
trouve sur le chemin du produit, arrêtez-le immédiatement.
• Réglez toujours le produit sur OFF lorsqu'il n'est pas utilisé.
• N'utilisez pas le produit simultanément avec un arroseur escamotable. Utilisez la fonction Programmation
pour vous assurer que le produit et l'arroseur escamotable ne fonctionnent pas en même temps.
• Évitez de placer un canal de connexion là où des arroseurs escamotables sont installés.
• N'utilisez pas le produit si la zone de travail est couverte d'eau stagnante, par exemple en cas de forte
pluie ou d'accumulation d'eau.
1.3 Consignes de sécurité pour le fonctionnement
• Réglez le produit sur OFF lors de la maintenance.
• Débranchez la che de la borne de recharge ou retirez le dispositif de désactivation avant de nettoyer ou
d'eectuer l'entretien de la borne de recharge.
• N'utilisez pas de nettoyeur haute pression ni de solvants pour nettoyer le produit.
• Assurez-vous que le produit est posé sur le sol dans son orientation habituelle et non à l'envers après le
lavage.
• Le produit ne doit pas être inversé pour nettoyer le châssis. Si vous le tournez à l'envers à des ns de
nettoyage, assurez-vous qu'il retrouve sa bonne orientation. Cela est fait pour éviter que l'eau ne pénètre
dans le moteur et ne perturbe son fonctionnement normal.
1.4 Consignes de sécurité pour l'entretien
Si les batteries lithium-ion sont démontées, court-circuitées, exposées à l'eau, au feu ou à des températures
élevées, elles peuvent exploser ou provoquer un incendie. Évitez toute forme d'abus électrique ou
mécanique et manipulez-les avec précaution. Conservez-les à l'abri de la lumière ultraviolette.
1. Utilisez uniquement le chargeur de batterie et l'alimentation électrique fournis par le fabricant. L'utilisation
d'un chargeur et d'une alimentation inappropriés peut provoquer des chocs électriques et/ou une
surchaue.
1.5 Sécurité de la batterie

79 FR
Lors du remplacement des lames, portez des gants de protection pour éviter les blessures.
1.6 Risques résiduels
2. N'essayez pas de réparer ou de modier les batteries! Les blessures graves causées par une explosion ou
un choc électrique peuvent entraîner des tentatives de réparation. Les électrolytes libérés sont corrosifs et
toxiques en cas de fuite.
3. Ces appareils ont des piles qui ne peuvent être remplacées que par des personnes qualiées.
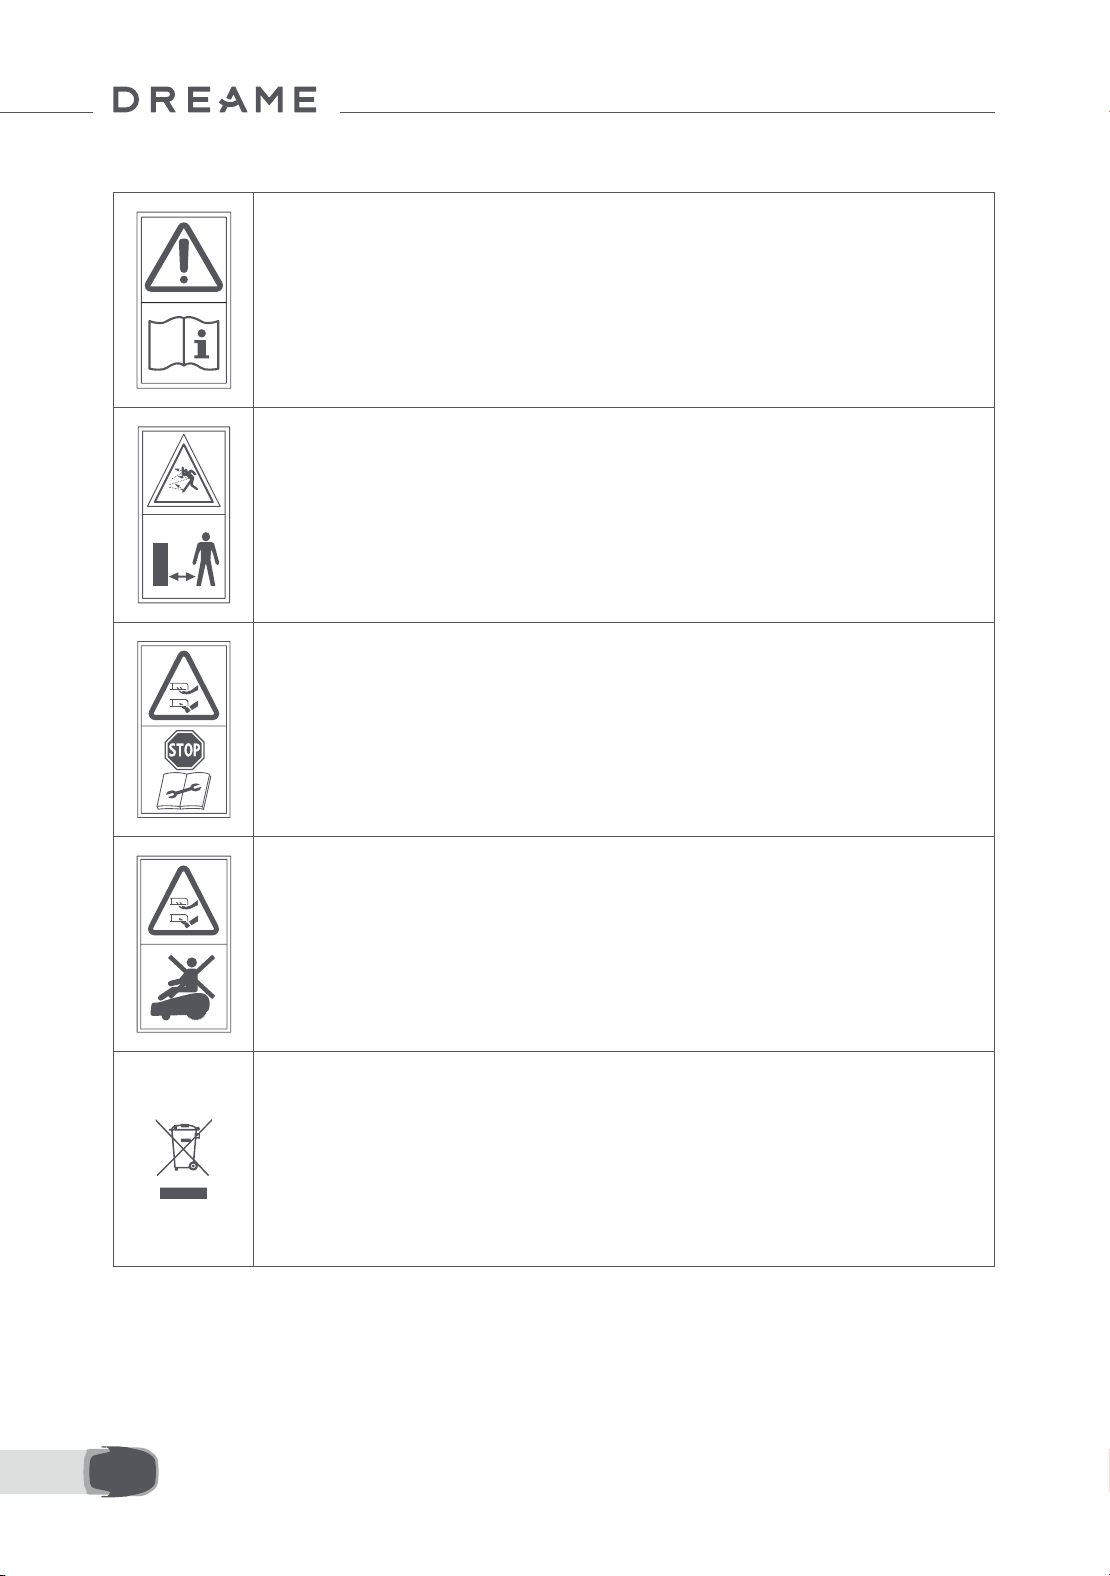
80FR
1.7 Symbols and Decals
AVERTISSEMENT -
Avant d'utiliser la machine, lisez attentivement les instructions
d'utilisation.
AVERTISSEMENT -
Lors de l'utilisation, maintenez une distance de sécurité avec la
machine.
AVERTISSEMENT -
Gardez une distance de sécurité par rapport à la machine lors de
l'utilisation.
AVERTISSEMENT -
Évitez de monter sur la machine.
AVERTISSEMENT -
Ce produit ne doit pas être jeté avec les ordures ménagères
ordinaires. Assurez-vous que le produit est recyclé en conformité
avec les lois locales.

81 FR
Ce produit est conforme aux directives CE applicables.
Classe III
Avant de charger, lisez les instructions.
Courant continu
Classe II
Le produit de jardin est destiné à la tonte des pelouses domestiques. Il est conçu pour tondre fréquemment,
maintenant une pelouse plus saine et plus belle que jamais. En fonction de la taille de votre pelouse, votre
tondeuse peut être programmée pour fonctionner à tout moment ou à n'importe quelle fréquence. Il est
impossible de l'utiliser pour creuser, balayer ou déneiger.
Par la présente, Dreame Trading (Tianjin) Co., Ltd. certie que le modèle d’équipement radio Dreame
Roboticmower MLLA7110 est conforme à la Directive 2014/53/UE. Le texte intégral de la déclaration de
conformité UE est disponible à l’adresse Internet suivante : https://global.dreametech.com
Pour le mode d'emploi électronique détaillé, connectez-vous à https://dreametech.zendesk.com/hc/en-us/
categories/7968864195993-User-Manual
UTILISATION PRÉVUE
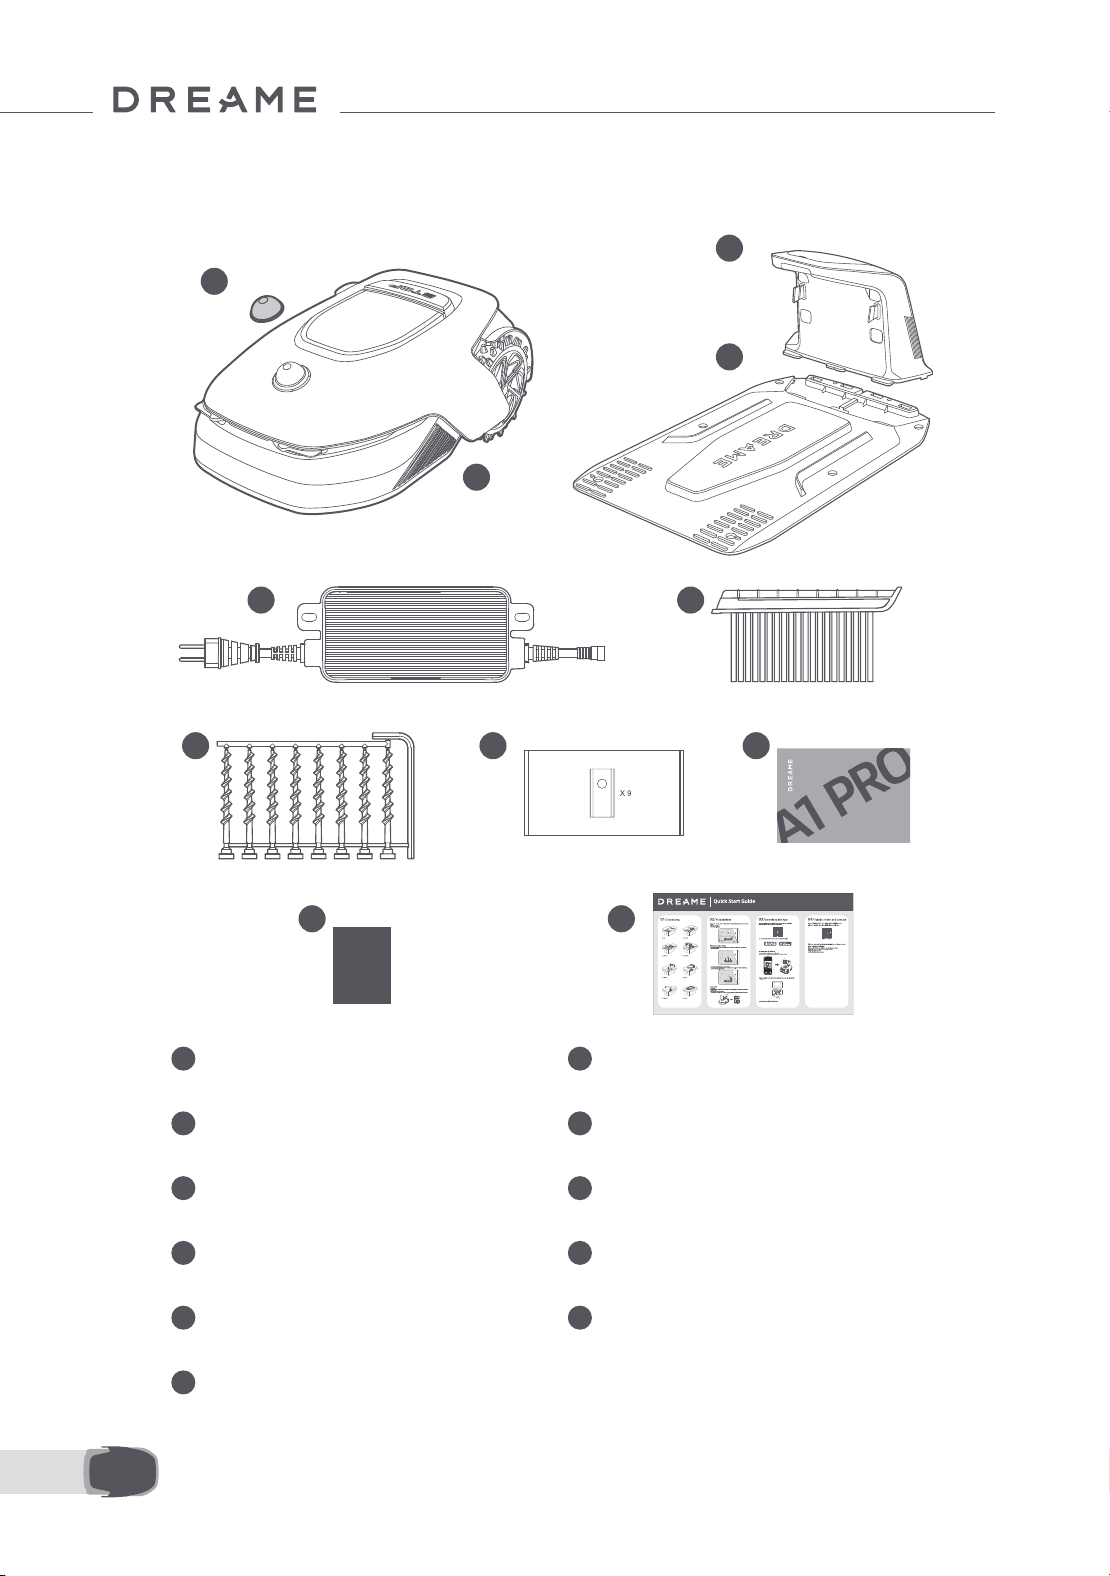
82FR
2 Qu'est-ce qui est dans la boîte
11 Guide de démarrage rapide
1 Couvercle de protection du lidar 2 A1 Pro
3 Tour de chargement
(avec 10m rallonge)
4 Plaque de base
5
Alimentation 6 Brosse de nettoyage
7 Vis × 8, Clé hexagonale 8 Lame de rechange × 9
9 Manuel d'utilisation 10 Chion non pelucheux
1
2
3
4
5 6
8 97
10 11
Dreame Roboticmower A1 Pro
User Manual

83 FR
3 Présentation de produit
Contacts de
charge
Compartiment de
batterie
Disque de coupe
Roue avant
Roue motrice tout-terrain
Lidar
Achage
Bouton
Bouton d'arrêt
Capteur
Nom Description
Lidar
Obtient des informations relatives à l'environnement et facilite le positionnement de l'A1
Pro, l'évitement des obstacles et la détection de l'eau et de la saleté.
Plage de détection : 70 cm avec angle de 360° à l'horizontale et 59° à la verticale.
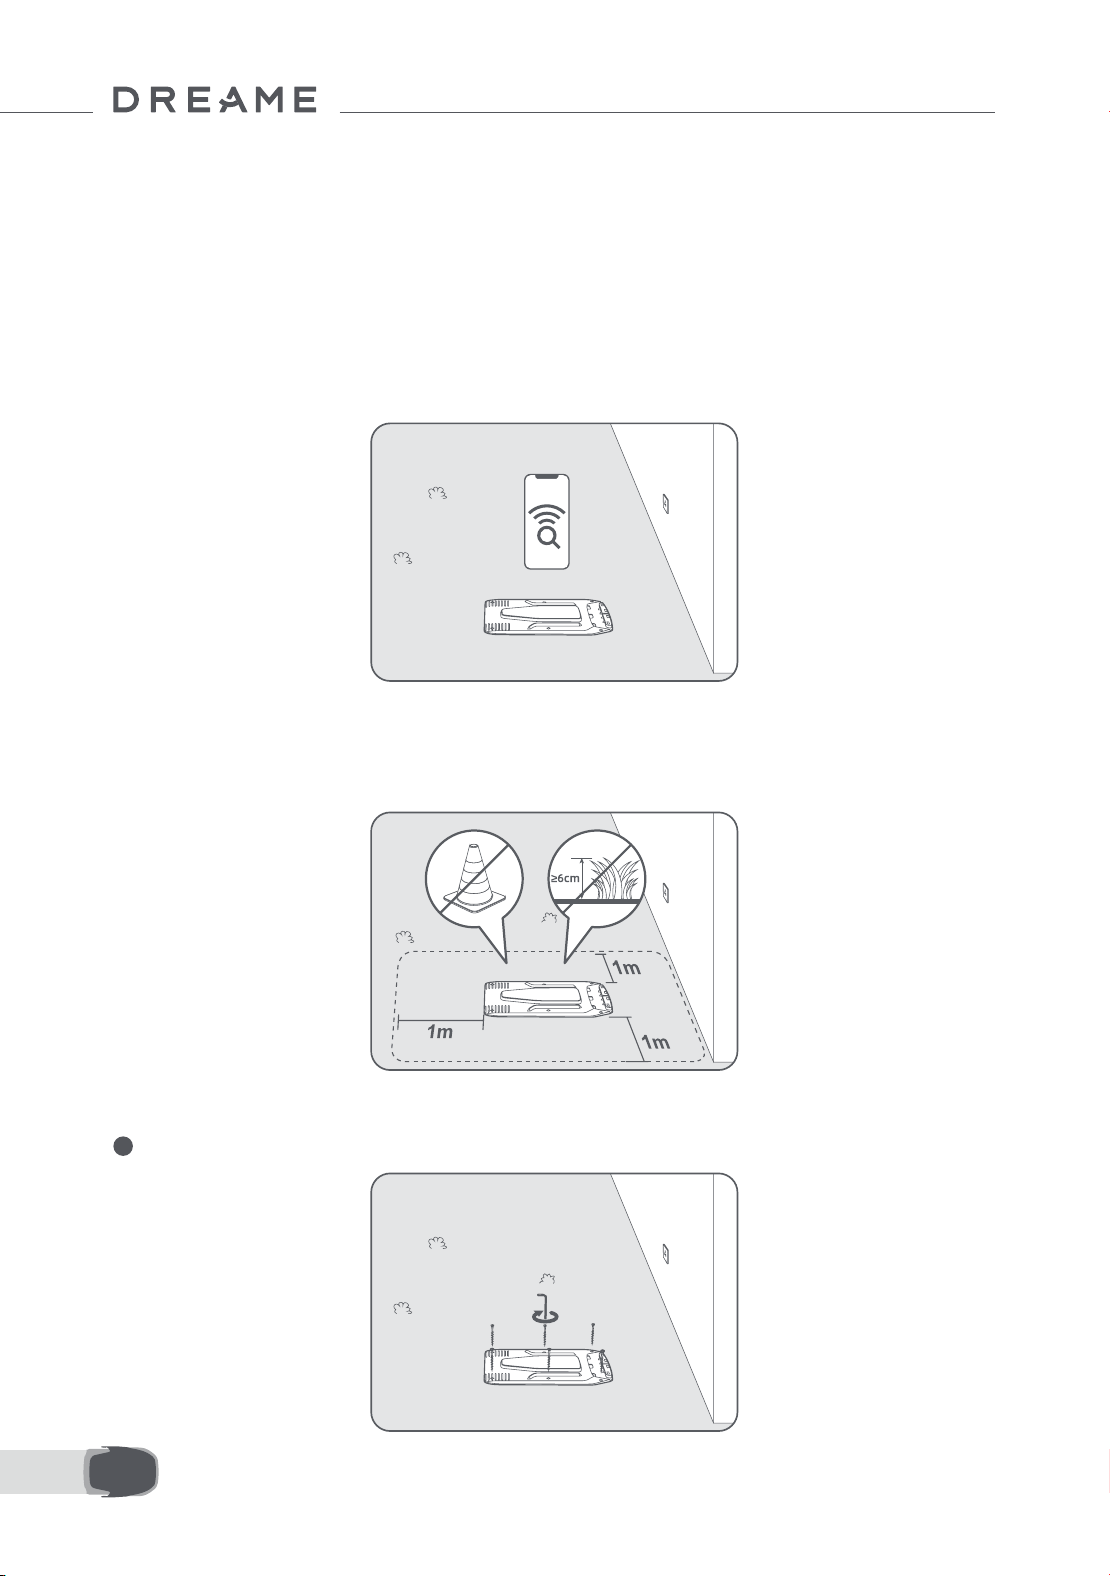
84FR
4 Installation
4.1 Sélectionner un emplacement approprié
• Placer la station de chargement sur une surface plane en bordure de pelouse et à proximité d'une prise
d'alimentation. Il est recommandé de placer la station de chargement dans une zone avec une bonne force du
signal Wi-Fi.
Remarque : Utiliser votre appareil portable pour aider à contrôler la force du signal Wi-Fi de l'emplacement.
Une bonne force du signal Wi-Fi améliore la stabilité de la connexion entre A1 Pro et l'application.
Remarque : Assurez-vous que le terrain est susamment souple pour permettre la pose des vis.
• Garder au moins 1 m d'espace libre sans obstacle à gauche, à droite et devant la station de chargement.
Assurez-vous que l'herbe autour de l'emplacement est inférieure à 6 cm. Si l'herbe est plus haute, veuillez
d'abord la tondre avec une tondeuse. Si l'herbe est haute, l'A1 Pro pourrait avoir des dicultés à retourner à la
station de chargement.
4.2 Installer la station de chargement
1 Fixer la plaque de base au sol avec les vis fournies en utilisant la clé hexagonale.

85 FR
2 Insérer la tour de chargement sur la plaque de base jusqu'à ce que vous entendiez le clic.
3 Insérer la brosse de nettoyage dans la tour de chargement en alignant la languette sur la rainure.
4 Raccorder l'alimentation à la rallonge et la brancher sur la prise d'alimentation. Garder l'alimentation à au
moins 30 cm au-dessus du sol.
Remarque : Le voyant LED sur l'appareil de chargement sera bleu xe si l'appareil est sous tension.
5 Mettre l'A1 Pro dans la station de chargement pour le charger. Assurez-vous que les contacts de chargement
sur l'A1 Pro et la station de chargement sont correctement raccordés.
Remarque : Le voyant lumineux clignotera en vert si l'A1 Pro se charge correctement dans la station de
chargement.
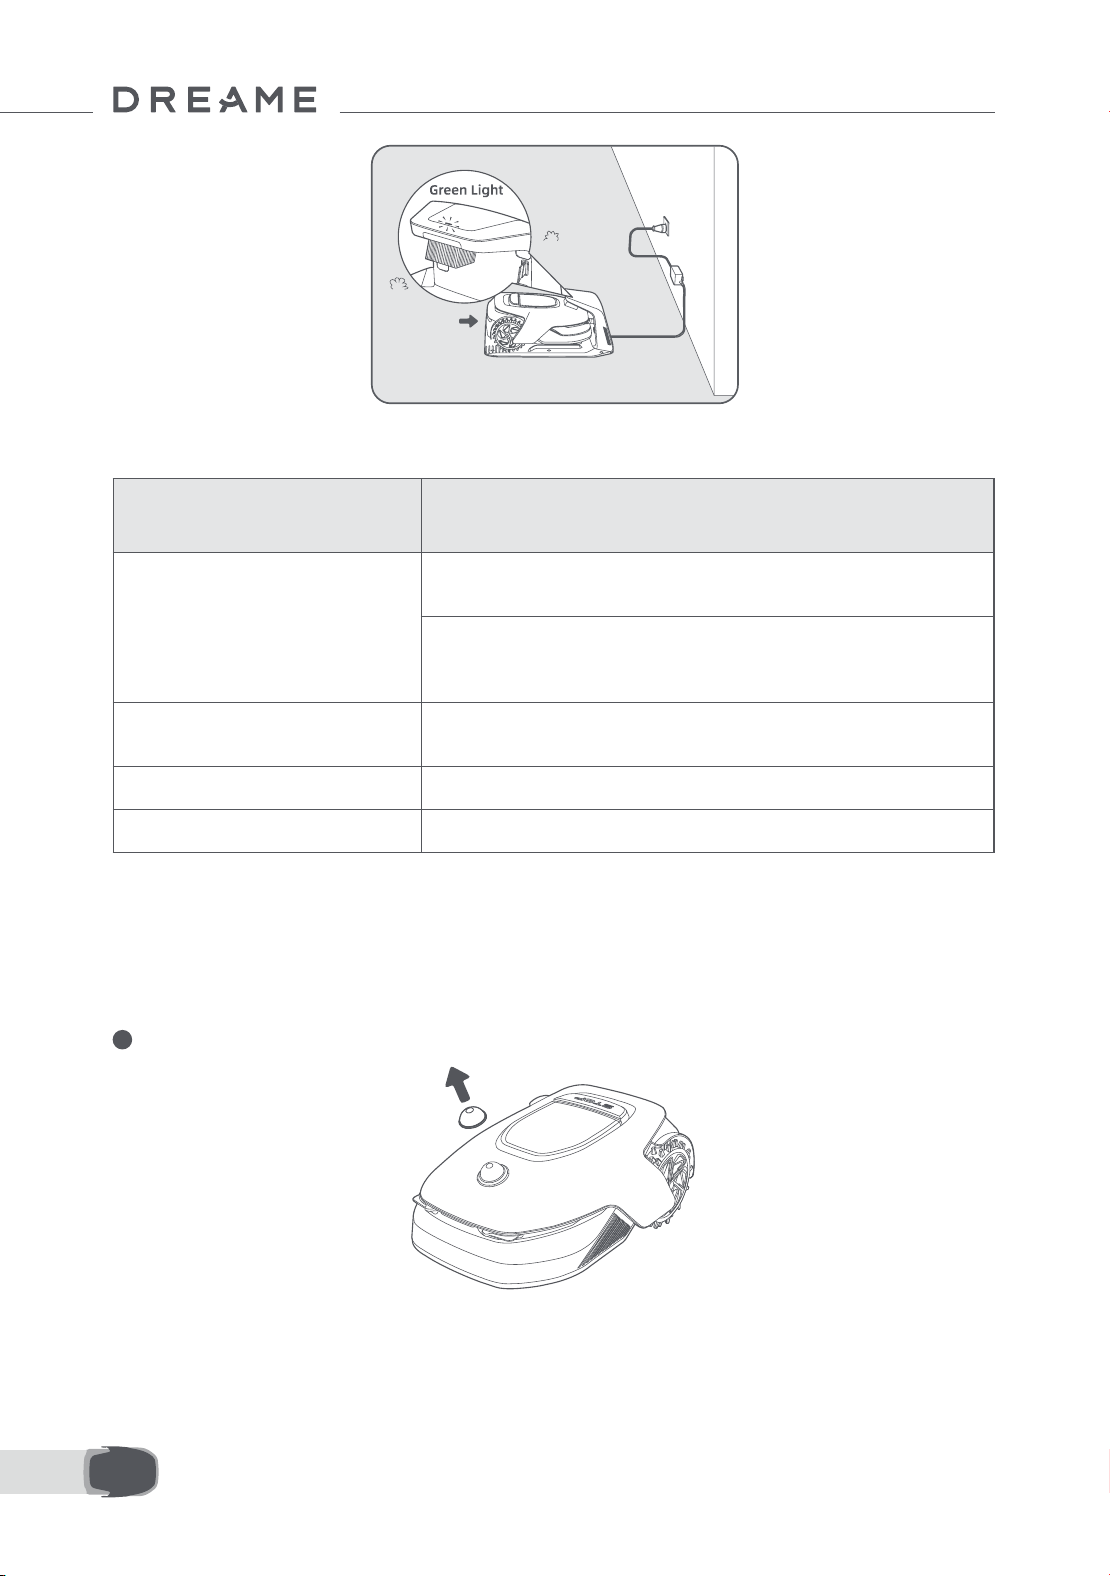
86FR
Voyant LED sur la station de chargement
Quand l'A1 Pro est allumé la première fois, certains Paramètres de base doivent être faits avant que l'A1 Pro ne
puisse commencer à travailler.
5 Préparations avant utilisation
Couleur de la lumière
du voyant LED
Signication
Rouge clignotant/xe
1. La station de chargement a un problème (par exemple, un problème
d'intensité ou de tension de chargement).
2. L'A1 Pro est ancré dans la station de chargement, mais le chargement
est anormal (par exemple, les contacts de chargement sont en court-
circuit).
Bleu xe
La station de chargement est sous alimentation. L'A1 Pro n'est pas
dans la station de chargement.
Clignotant vert L'A1 Pro est en cours de chargement dans la station de chargement.
Vert xe L'A1 Pro est dans la station de chargement et complètement chargé.
1 Retirer le couvercle de protection du lidar.
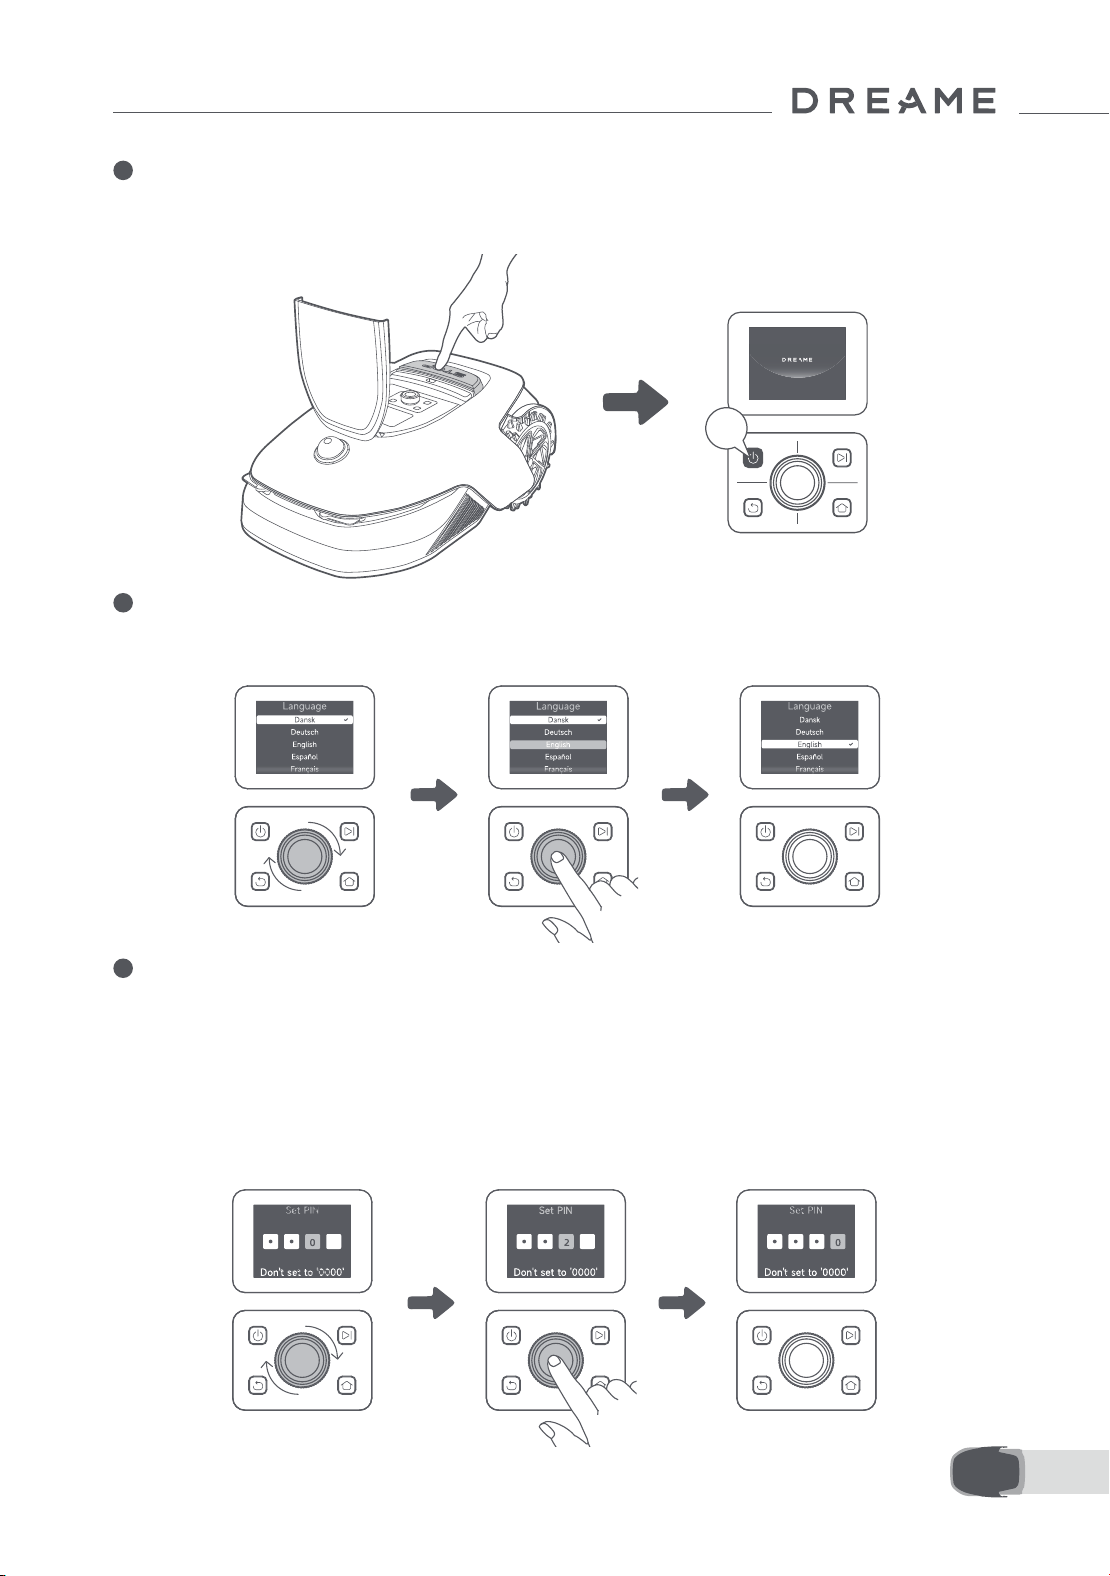
87 FR
2 Appuyer sur le bouton Arrêt pour ouvrir le couvercle du panneau de contrôle. Appuyer sans relâcher sur
le panneau de contrôle pendant 2 secondes pour allumer l'A1 Pro.
Remarque : L'A1 Pro s'allumera automatiquement lorsqu'il s'ancre dans la station de chargement.
3 Sélectionner la langue de préférence
Tourner le bouton dans le sens horaire pour descendre, dans le sens anti-horaire pour monter, et
sélectionner votre langue. Appuyer sur le bouton pour conrmer.
4 Spécier le code PIN
1. Tourner le bouton pour sélectionner un nombre entre 0 et 9. Le tourner dans le sens horaire pour
augmenter le nombre de 0 à 9, et dans le sens anti-horaire pour le diminuer. Appuyer sur le bouton pour
régler le chire suivant. Pour modier le chire précédent, tourner le bouton dans le sens anti-horaire
jusqu'à ce que le nombre arrive à 0 et tourner une fois de plus.
Remarque : Ne pas régler le code PIN sur «0000».
2s
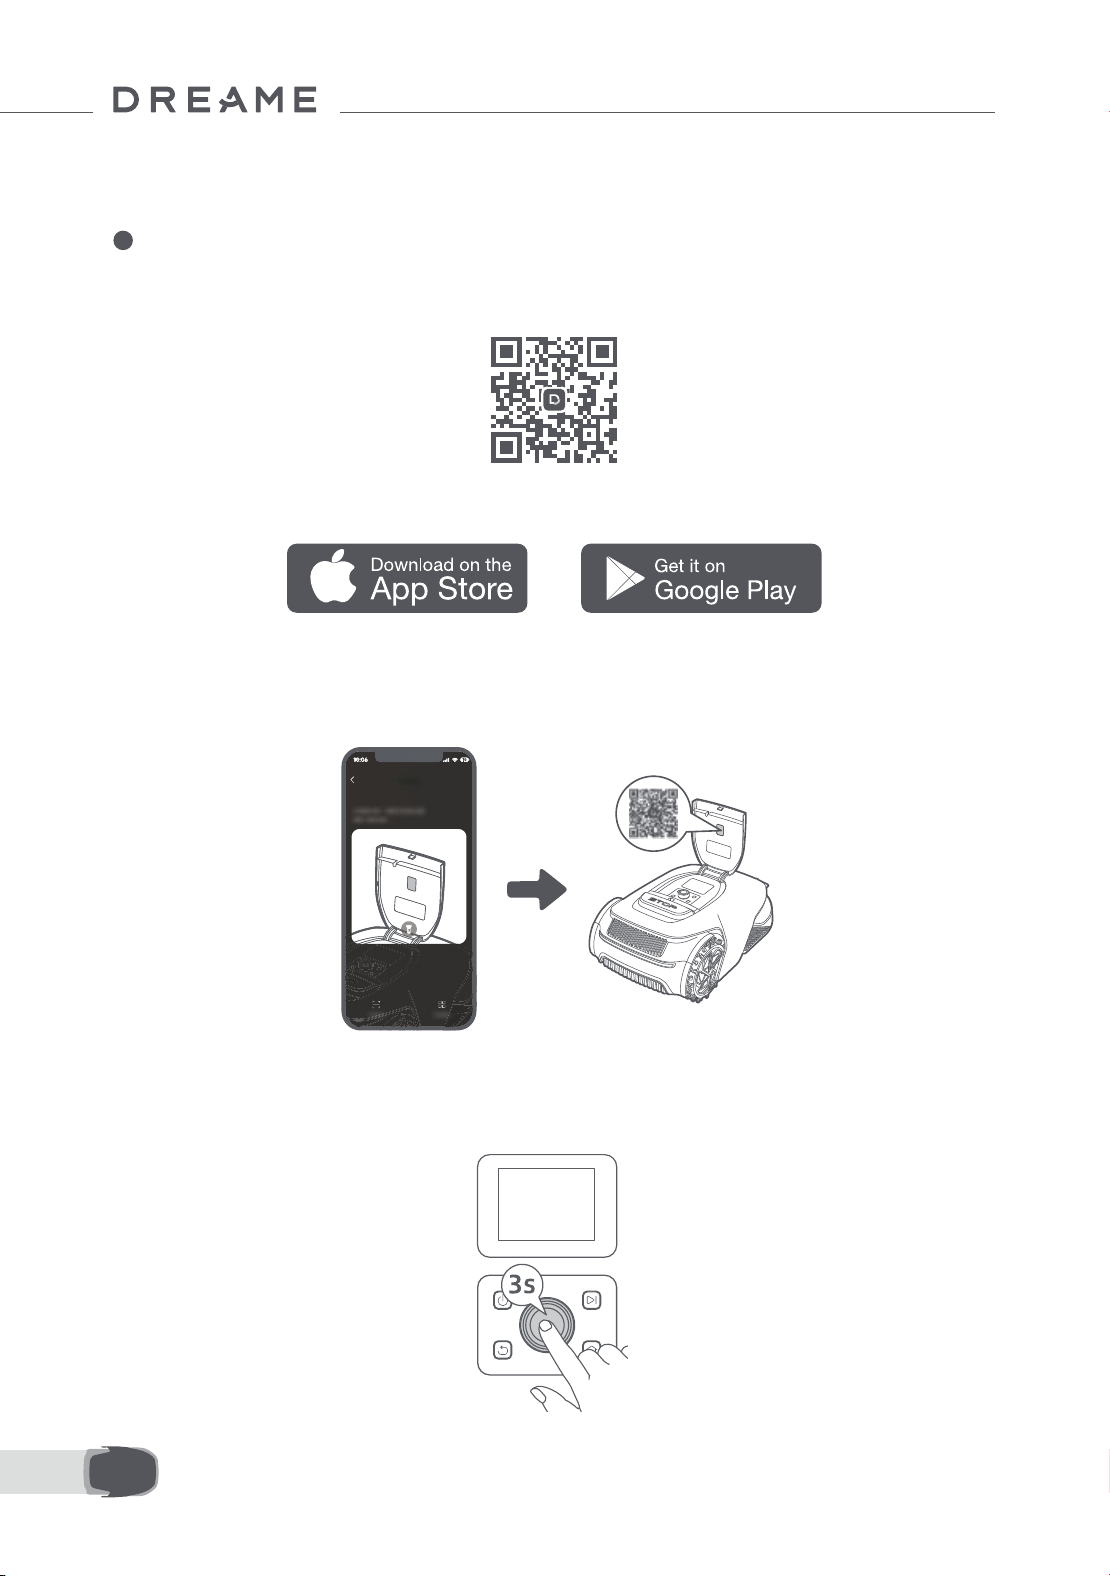
88FR
2. Entrer de nouveau le code PIN pour terminer le réglage du code PIN.
Remarque : Si les deux mots de passe ne correspondent pas, veuillez régler de nouveau le mot de passe.
5 Raccorder l'A1 à Internet
Scanner le QR code pour télécharger l'application Dreamehome sur votre téléphone portable. Après
l'installation, créez un compte et connectez-vous.
Vous pouvez également télécharger l'application Dreamehome de l'App Store ou Google Play.
1) Connexion Bluetooth
1. Activer la fonction Bluetooth sur votre appareil portable.
2. Scanner le QR code à l'intérieur du couvercle ou sélectionner manuellement l'A1 Pro via l'application.
3. Appuyer sans relâcher le bouton sur le panneau de contrôle pendant 3 secondes et l'A1 Pro entrera en
mode d'association Bluetooth.
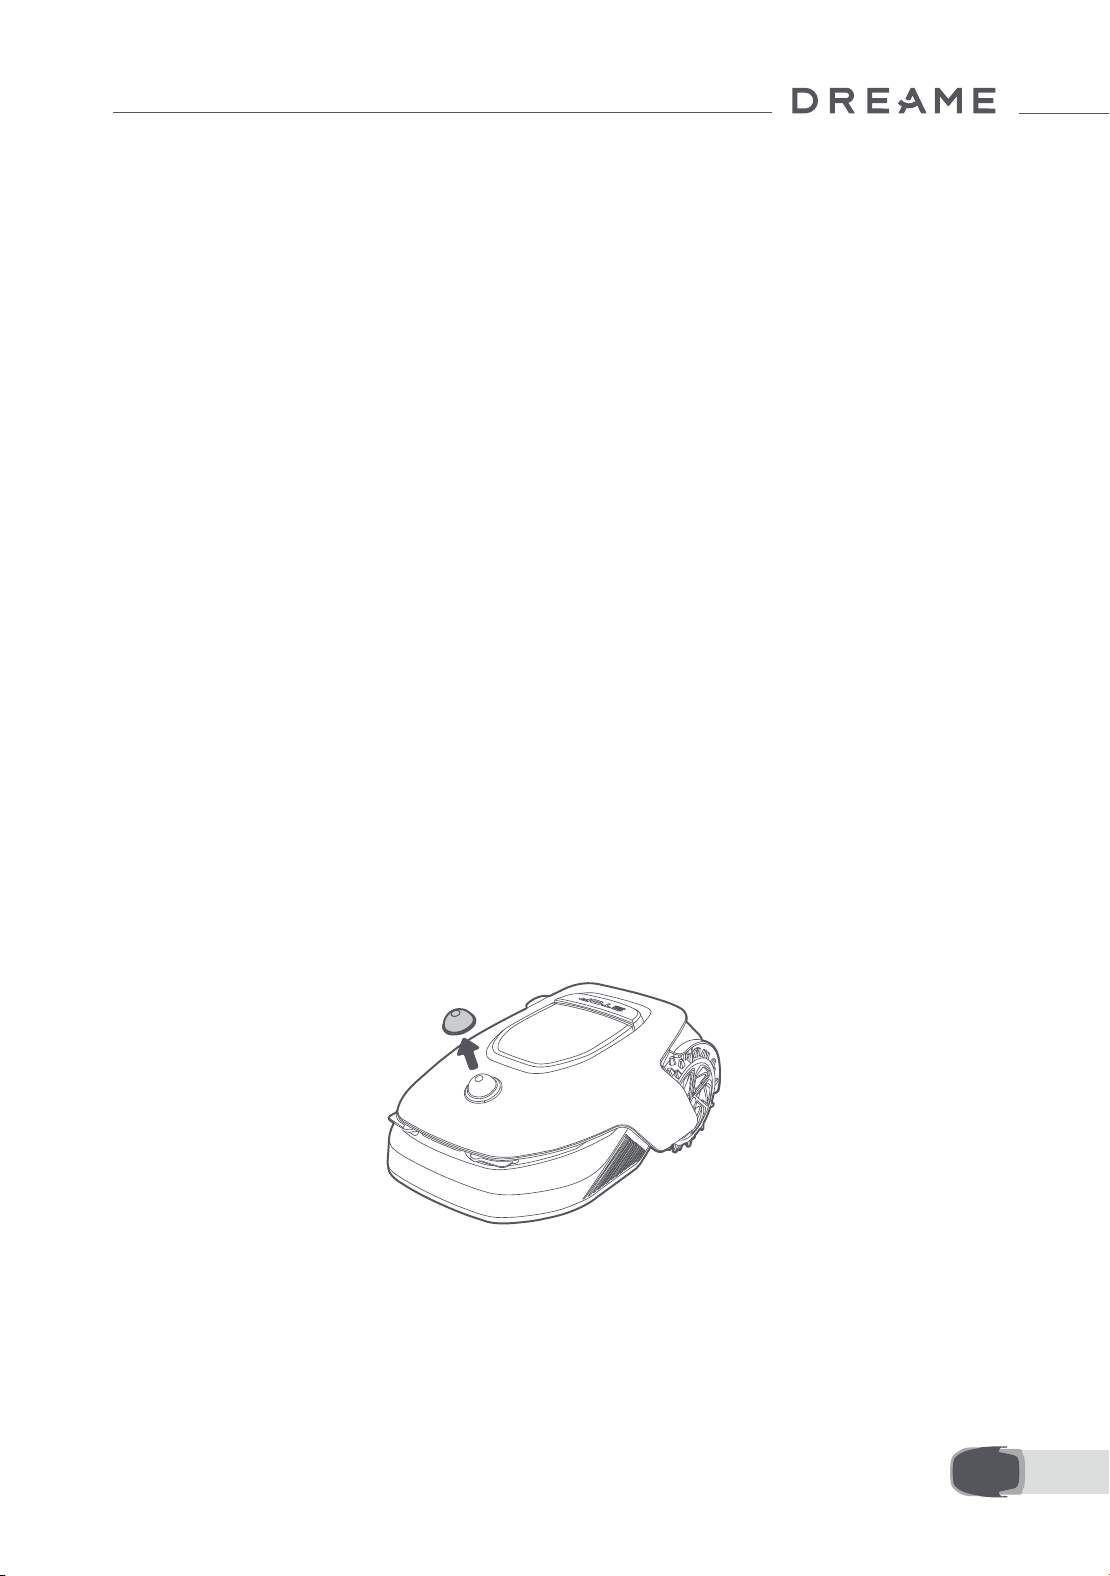
89 FR
4. Associer l'A1 Pro avec votre téléphone portable via Bluetooth.
Remarque : Assurez-vous que votre téléphone portable est dans un rayon de 10 m de l'A1 Pro.
2) Connexion Wi-Fi
Assurez-vous que l'A1 Pro et votre téléphone portable sont sur le même réseau Wi-Fi. Suivez les instructions
dans l'application pour compléter la connexion.
Remarque : Utiliser un réseau à bande unique avec une fréquence de 2,4 GHz ou un réseau à double bande
avec une fréquence de 2,4/5 GHz.
Remarque : Vous pouvez aussi acheter le module de liaison pour contrôler l'A1 Pro à distance sans
connexion Wi-Fi.
Comment dissocier l'A1 Pro ?
L'A1 Pro est automatiquement associé au compte Dreamehome une fois l'association terminée. Chaque
dispositif ne peut être associée qu'à un seul compte. Il ne peut pas être associé à un autre compte en même
temps.
Pour associer l'A1 Pro avec un nouveau compte, vous devez d'abord le dissocier. Vous pouvez aller dans «
Appareil » et appuyer sur Plus > Supprimer dans le coin supérieur droit pour dissocier l'appareil.
Comment exécuter la déconnexion de votre compte Dreamehome ou le supprimer ?
Pour vous déconnecter, aller sur Moi > Paramètres > Compte > Se déconnecter. Pour supprimer le compte,
aller sur Moi > Paramètres > Compte > Supprimer le compte.
Avant le mappage, contrôler ce qui suit :
• Le niveau de batterie de l'A1 Pro dépasse les 50 %.
• Le Couvercle de protection du lidar est retiré.
6 Mappage de votre jardin
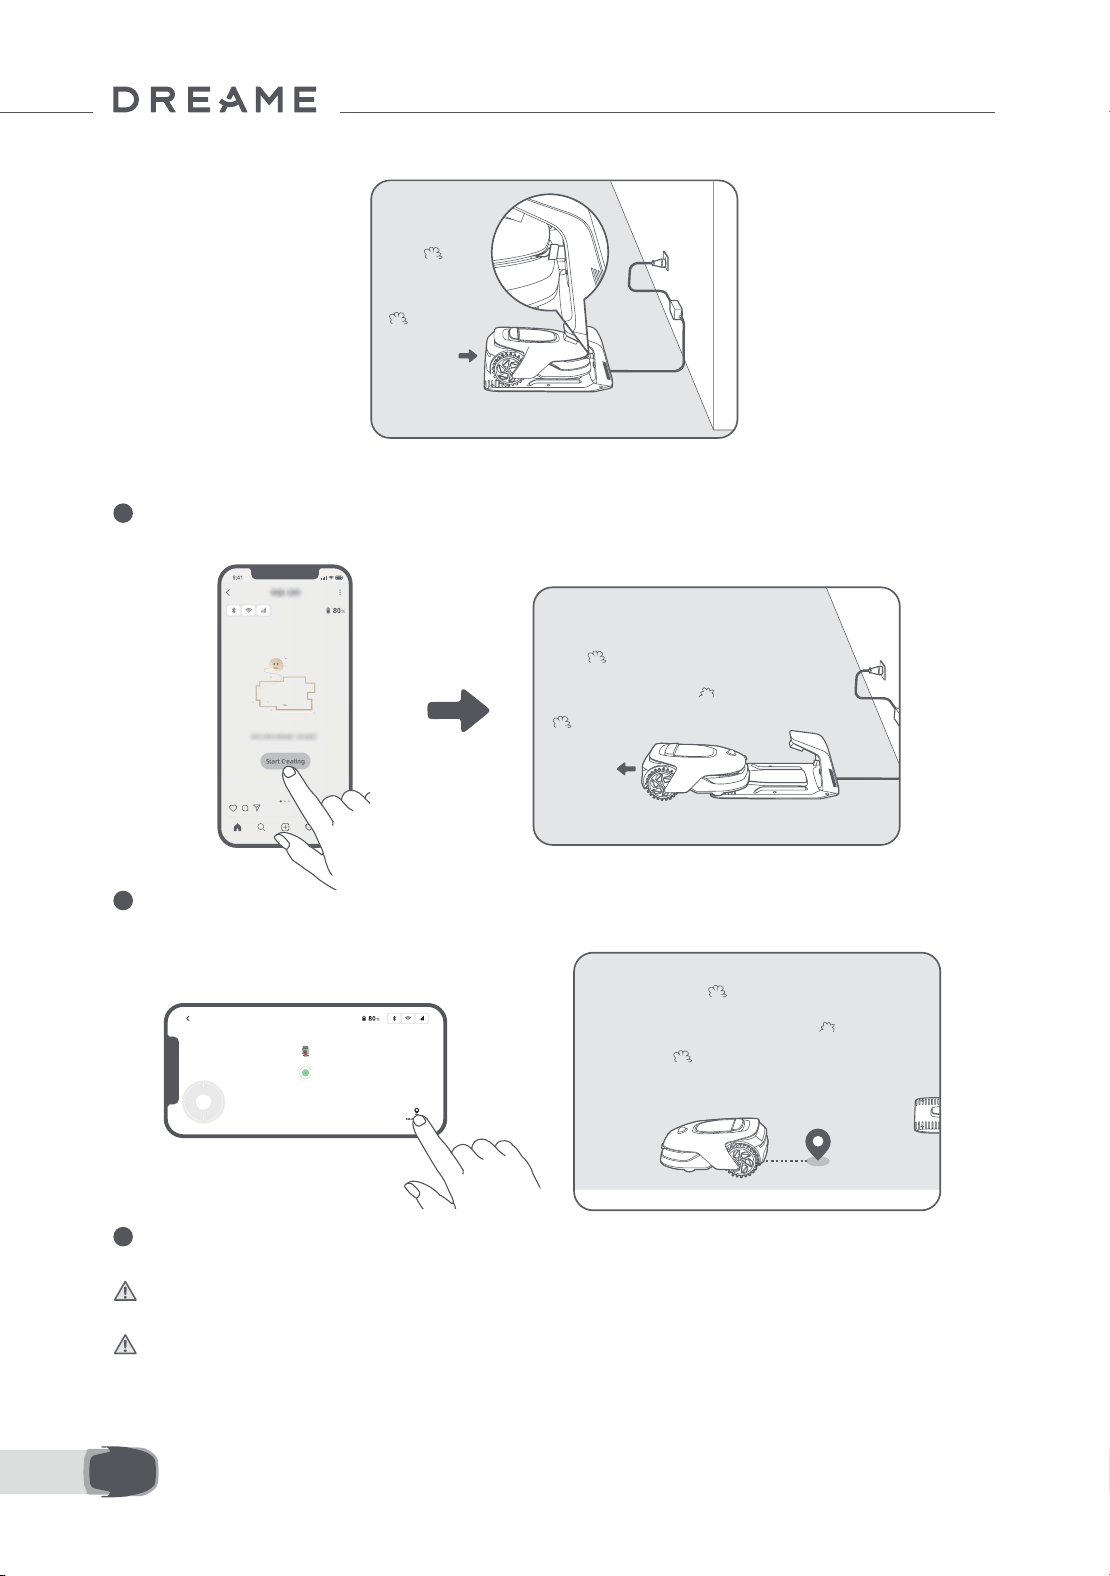
90FR
• A1 Pro se connecte correctement à la station de chargement.
6.1 Créer la limite
1 Appuyez sur « Commencer à créer » via l'application et l'A1 Pro contrôlera le statut et le calibrage. Il
quittera automatiquement la station de chargement pour exécuter le calibrage. Soyez prudent.
2 Télécommander l'A1 Pro vers la bordure de la pelouse et taper sur « Dénir le point de départ » pour
conrmer le point de démarrage de la limite.
3 Télécommander l'A1 Pro pour se déplacer le long de la bordure de la pelouse pour créer la zone de
travail. Lorsque l'A1 Pro est télécommandé pour créer la limite, ne pas oublier de :
Mise en garde : Ne pas déplacer manuellement l'A1 Pro pendant la création de la limite, sans quoi le
mappage pourrait échouer.
Mise en garde : Lorsque la cartographie commence via la télécommande, ne connectez pas l'A1 Pro à
distance à la station de charge tant que la cartographie n'est pas terminée. Si ce n'est pas le cas, le LiDAR
pourrait être bloqué, ce qui pourrait empêcher le mappage.
• Marcher dans les 5 m à l'arrière de l'A1 Pro lorsque la télécommande est utilisée ;
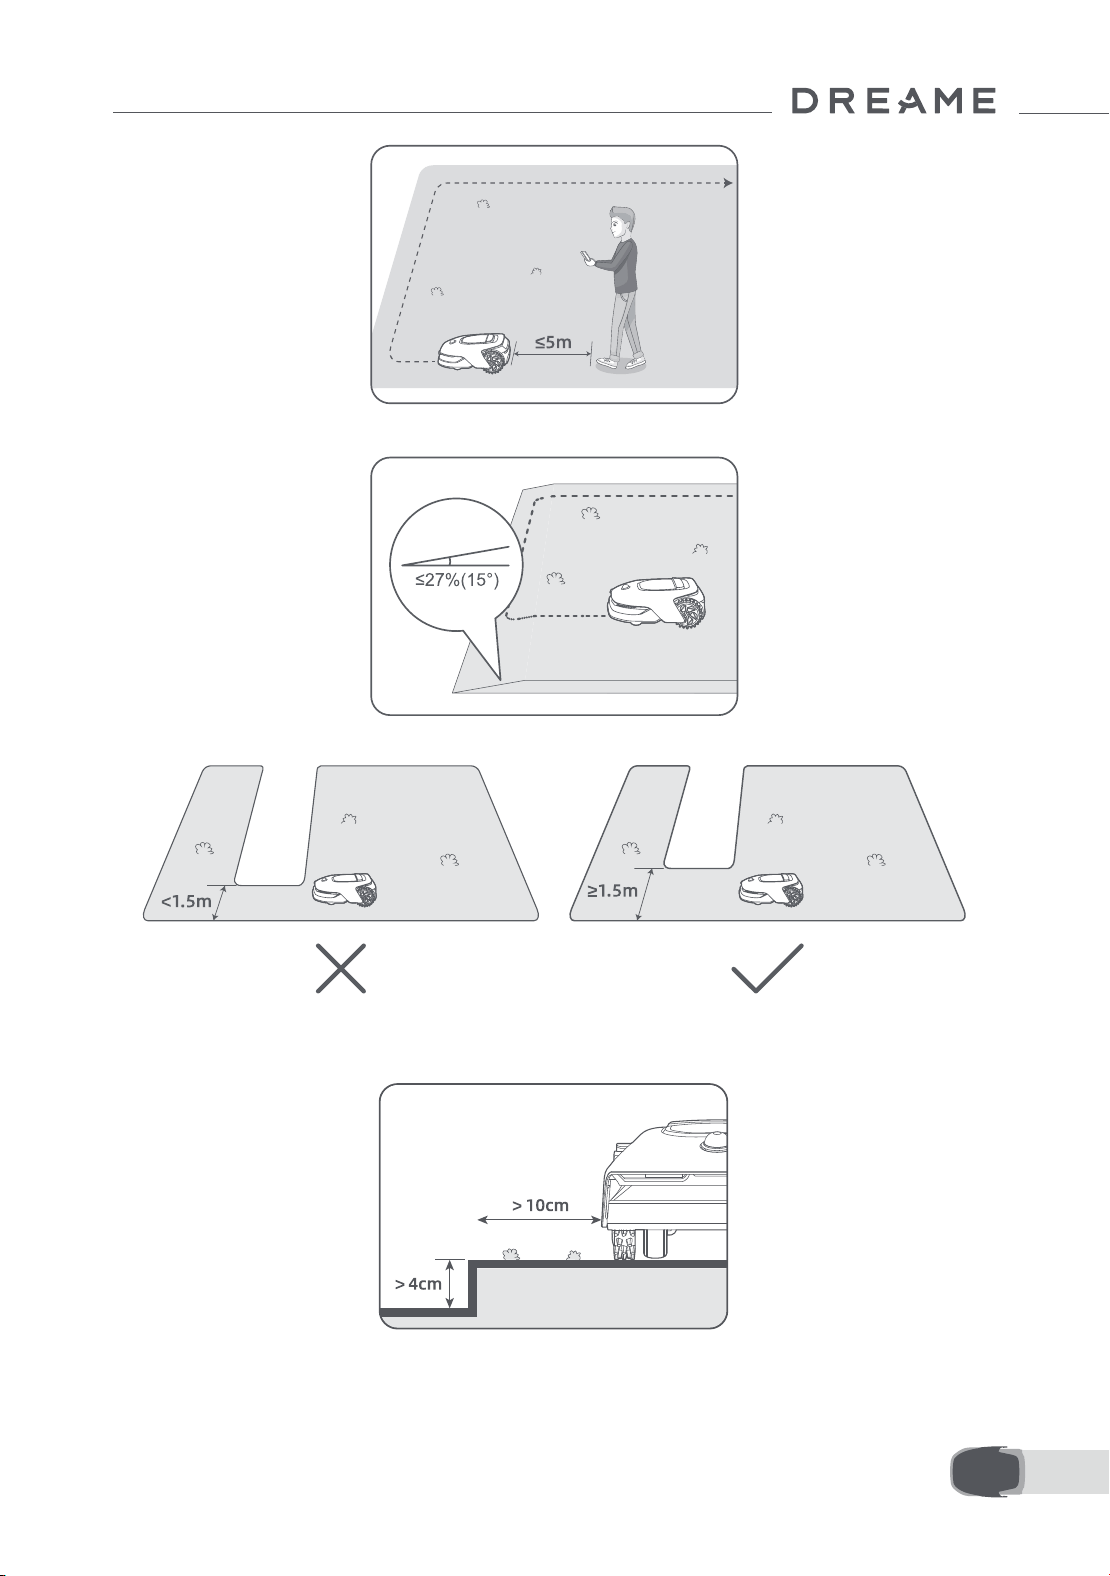
91 FR
• Ne pas créer de limite sur une pente qui dépasse les 27 %;
• En cas d'une diérence de hauteur de plus de 4 cm entre la bordure de la pelouse et le sol adjacent, garder l'A1
Pro à au moins 10 cm du bord de la pelouse ;
• Éviter de créer des limites à l'intérieur des corridors d'une largeur inférieure à 1.5 m ;
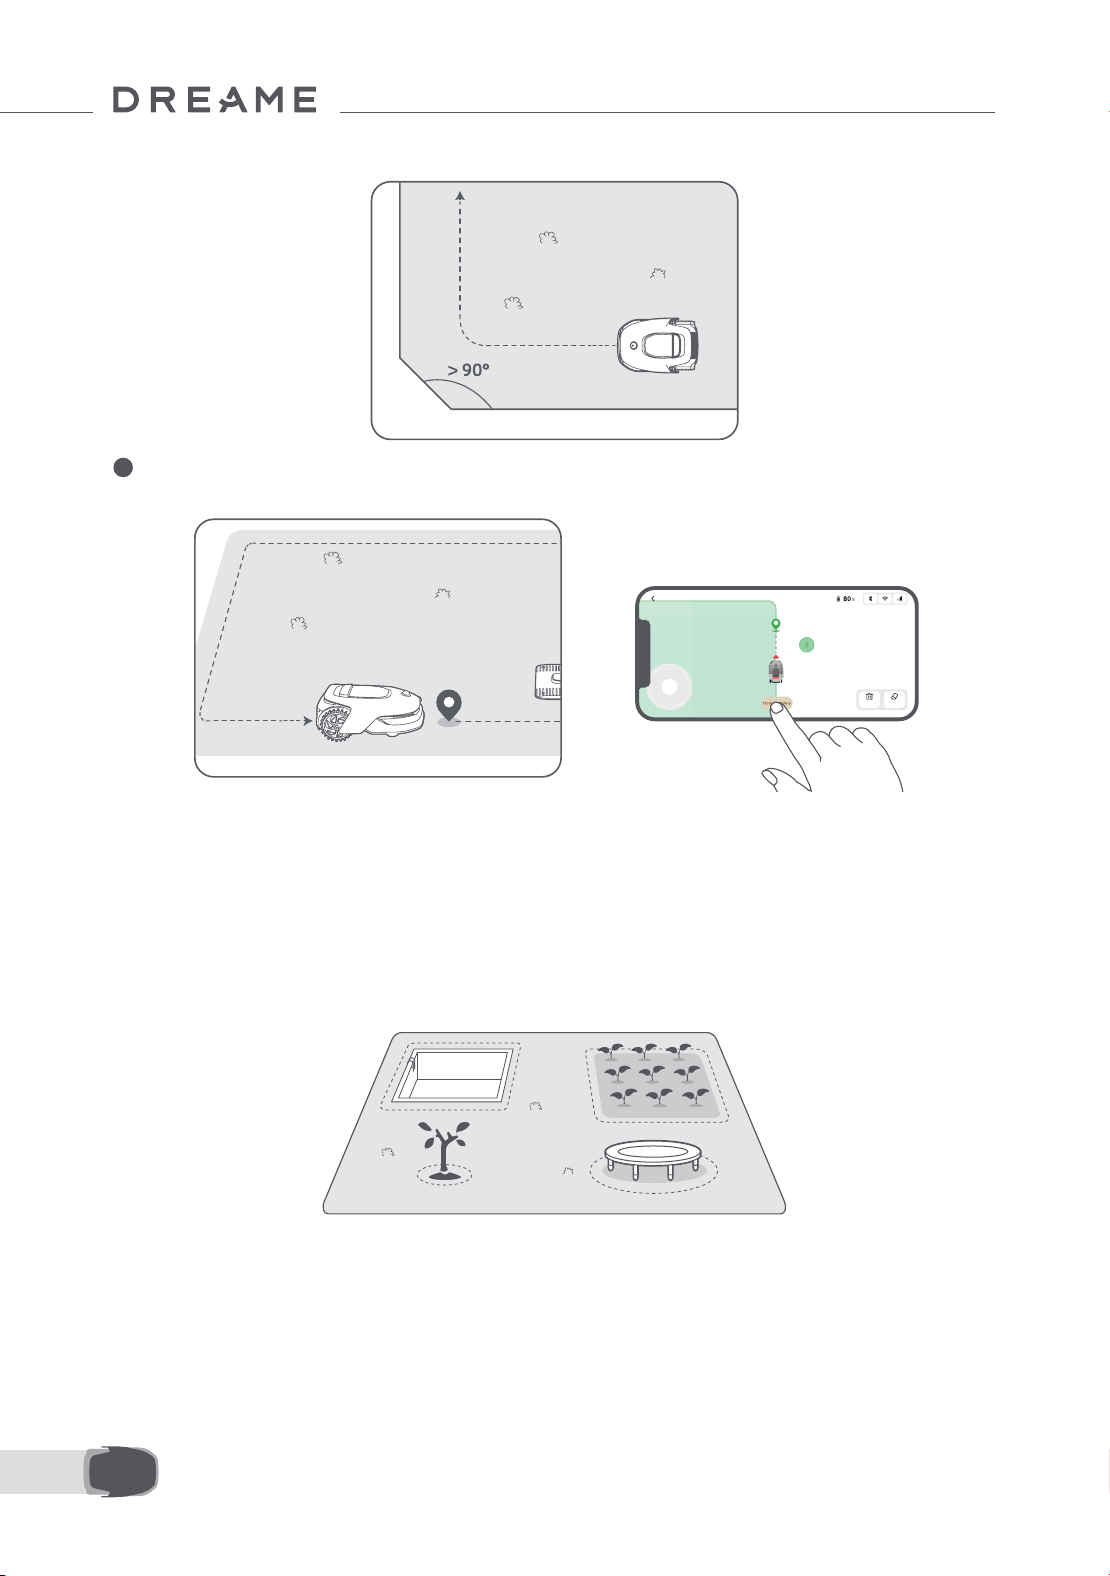
92FR
• Assurez-vous que les angles présentent une courbure de plus de 90° .
Lorsque l'A1 retourne à la place à 1 m à proximité du point de démarrage, vous pouvez taper sur « Fermer la
délimitation » et la limite sera automatiquement complétée.
4
6.2 Dénir la zone interdite
Bien que l'A1 Pro puisse automatiquement éviter les obstacles, il est toujours nécessaire de congurer les zones
à risque de chute, telles que les piscines et les bacs à sable, comme des zones interdites. Pour les objets que
vous voulez protéger (comme les parterres de eurs, les trampolines, un terrain cultivé ou une racine d'arbre
dénudée), veuillez les inclure dans la zone interdite. Vous pouvez télécommander l'A1 Pro pour créer des zones
interdites via l'application, ou aller sur « Édition de la carte » pour tracer ou supprimer directement les zones
interdites.
6.3 Dénir plusieurs zones
Si la pelouse est séparée par des routes ou vous avez plusieurs pelouses isolées, vous pouvez taper sur « Zone
de travail » dans l'application pour continuer à créer la zone de travail avec la télécommande. Vous pouvez
également ajouter, supprimer ou modier les zones dans « Édition de la carte » lorsque la carte est nie.
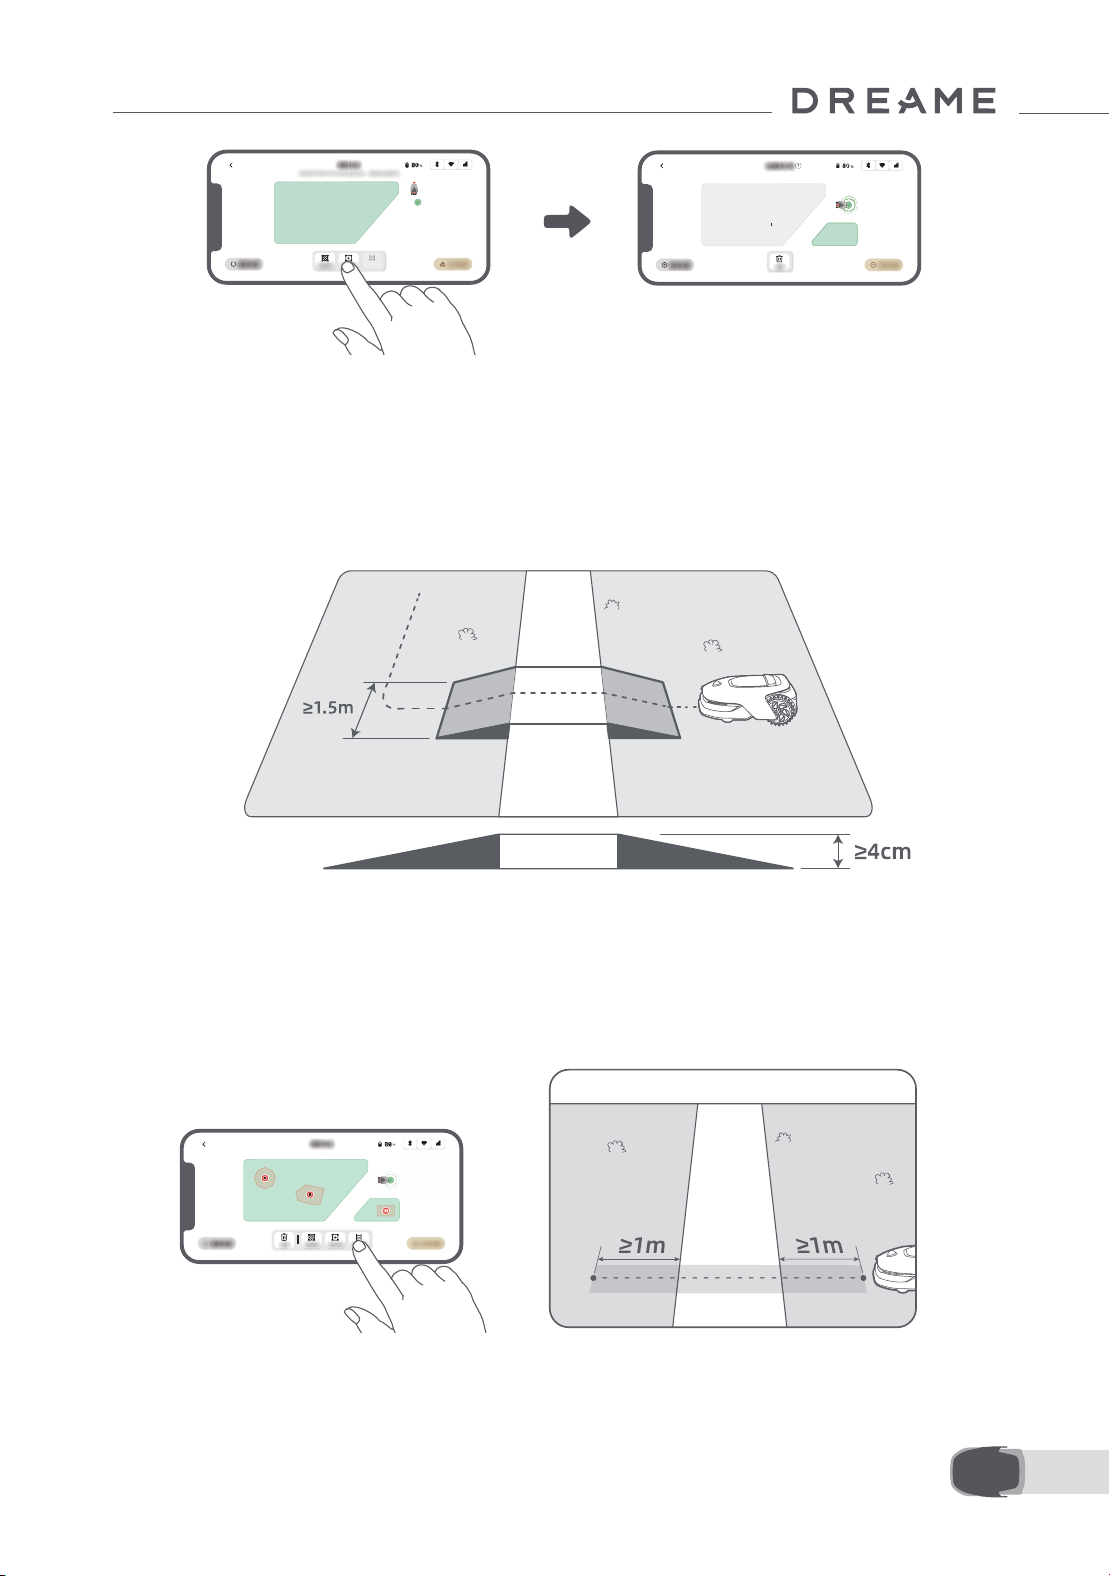
93 FR
6.4 Dénir la trajectoire
• Raccorder entre elles deux zones de travail isolées
En cas de chevauchement entre les nouvelles zones et la zone originale, elles seront automatiquement
combinées. Pour les zones isolées, veuillez créer des trajectoires pour les raccorder, sinon l'A1 Pro ne pourra
pas y accéder. Taper sur « Trajectoire » et, en mode télécommande, créer une trajectoire avec l'A1 Pro.
Remarque : Assurez-vous que le début et la n de la trajectoire sont compris dans la zone de travail. Prévoir
au moins 1 m de distance entre le début/la n de la trajectoire et la limite.
Pour les zones isolées, veuillez créer une trajectoire pour les raccorder entre elles. Les zones isolées sans une
trajectoire seront inaccessibles à l'A1 Pro.
Remarque : par défaut, l’A1 Pro ne fait que se déplacer le long du chemin sans tondre l'herbe.
Remarque : Si votre pelouse est divisée par des passages de plus de 4 cm, placer un objet avec une pente
d'une hauteur égale à celle du passage (une rampe par exemple).

94FR
6.5 Finir la carte
Taper sur « Terminer la carte » lorsque les zones de travail, les trajectoires et les zones interdites sont
terminées. L'A1 Pro doit être à l'intérieur de la carte lorsque celle-ci est terminée, sinon il vous sera demandé
de le renvoyer à l'intérieur de la carte avec la télécommande.
• Connecter la zone de travail et la station de chargement
Si votre station de chargement n'est pas dans la zone de travail, une trajectoire doit être créée pour la
raccorder à la zone de travail. Taper « Trajectoire » et télécommander l'A1 Pro pour créer une trajectoire qui
permet de retourner à la station.
Remarque: Pendant la création d'une trajectoire, assurez-vous qu'une extrémité chevauche la zone de
travail d'au moins 1 mètre ( ≥ 1 m) et que l'autre extrémité soit à moins de 0,2 mètre ( < 0,2 m) devant la
station.
Mise en garde : Lorsque vous créez des routes pour relier l'espace de travail à la station de charge,
n'ancrez pas A1 Pro à distance dans la station de charge. Si ce n'est pas le cas, le LiDAR pourrait être bloqué,
ce qui pourrait empêcher le mappage.

95 FR
7.1 Familiarisez-vous avec le panneau de contrôle
7 Opération
Marche/arrêt
Achage
Précédent
Démarrer
Bouton
Accueil
Icône Statut
Niveau de batterie (ache le niveau actuel de la batterie)
Chargement (l'A1 Pro est bien ancré dans la station de chargement)
Bluetooth (l'A1 Pro est connecté sur l'application via Bluetooth.)
Wi-Fi (l'A1 Pro est connecté à l'application via un réseau Wi-Fi)
Service de liaison (le service de liaison est activé)
Programme (une tâche est programmée pour aujourd'hui et elle n’a pas encore
été lancée.)
96FR
Bouton Fonction
Marche
Assurez-vous que l'A1 Pro est hors de la station de chargement Appuyez sans
relâcher sur le bouton Marche pendant 2 secondes pour allumer ou éteindre l'A1
Pro.
Démarrer
Appuyez sur le bouton Démarrer et fermer le couvercle dans les 5 secondes pour
commencer à tondre. La tâche sera annulée si le couvercle n'est pas fermé dans les
5 secondes.
Accueil
Appuyez sur les bouton Accueil et fermer le couvercle dans les 5 secondes pour
renvoyer l'A1 Pro à la station de chargement. La tâche sera annulée si le couvercle
n'est pas fermé dans les 5 secondes.
Précédent
Appuyez sur le bouton Précédent pour retourner à la page précédente.
Bouton
Appuyer sur le bouton pour conrmer la sélection dans les menus.
Appuyez sans relâcher pendant 3 secondes pour activer le mode d'association
Bluetooth sur l'A1 Pro.
Tourner le bouton dans le sens horaire/anti-horaire pour parcourir le menu.
Démarrer +
Précédent
Appuyez sur le bouton Démarrer, puis Précédent ensemble pendant 3 secondes
pour remettre l'A1 Pro sur la conguration d'usine. Le code PIN ne sera pas eacé.
Accueil +
Précédent
Appuyez sur le bouton Accueil, puis Précédent ensemble pendant 3 secondes pour
rejoindre la page À propos dans les Paramètres. La page À propos disparaîtra dans
les 5 secondes.
Bouton +
Précédent
Appuyez sur le bouton, puis sur Précédent ensemble pendant 3 secondes pour
remettre à zéro le code PIN.
Arrêt
Appuyer sur le bouton Arrêt pour ouvrir le couvercle du panneau de contrôle et
arrêter l'A1 Pro. Le code PIN doit être entré sur le panneau de contrôle pour reprendre
le fonctionnement de l'A1 Pro.
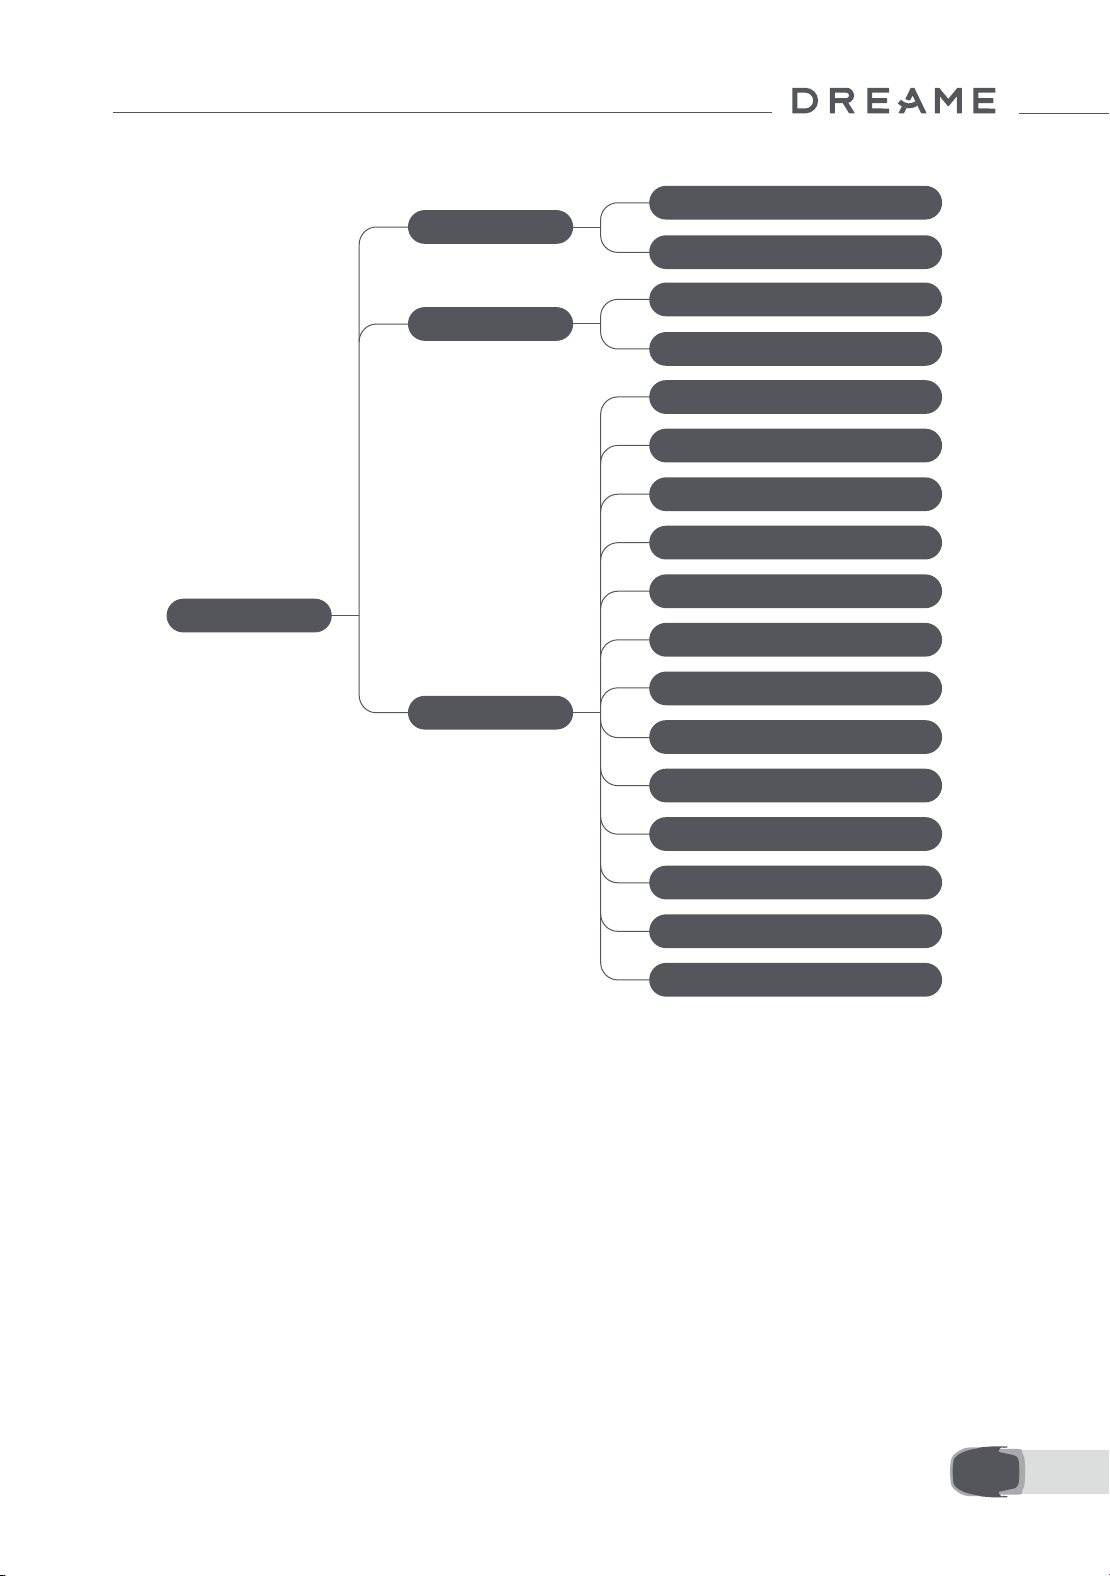
97 FR
Présentation de la structure du menu
* Elle pourrait être actualisée, selon la version du logiciel.
7.2 Commencer à tondre pour la première fois
Conseils avant la tonte :
• Utiliser une tondeuse à pousser pour tondre l'herbe à une hauteur non supérieure à 10 cm.
• Éliminer les obstacles en incluant les débris, les piles de feuilles, les jouets, les câbles et les pierres et en les
retirant de la pelouse. Assurez-vous qu'aucun enfant ou animal domestique ne soit sur la pelouse quand l'A1
Pro est en train de tondre.
• Remplir les trous dans la pelouse.
• Dénir les préférences de tonte dans l'application à l'avance (par exemple, ecacité, hauteur et direction de
tonte).
Page principale
Programme
Paramètres
Modes
Tondre toute la zone
Tondre les bords
Acher le programme
Activer/désactiver le programme
Ecacité de la tonte
Hauteur de la tonte
Hauteur d'évitement d'obstacles
Mode Ne pas déranger
Protection contre la pluie
Protection contre le gel
Alarme de levage
Alarme hors carte
Modier PIN
Volume
Langue
Réinitialiser le robot
À propos de
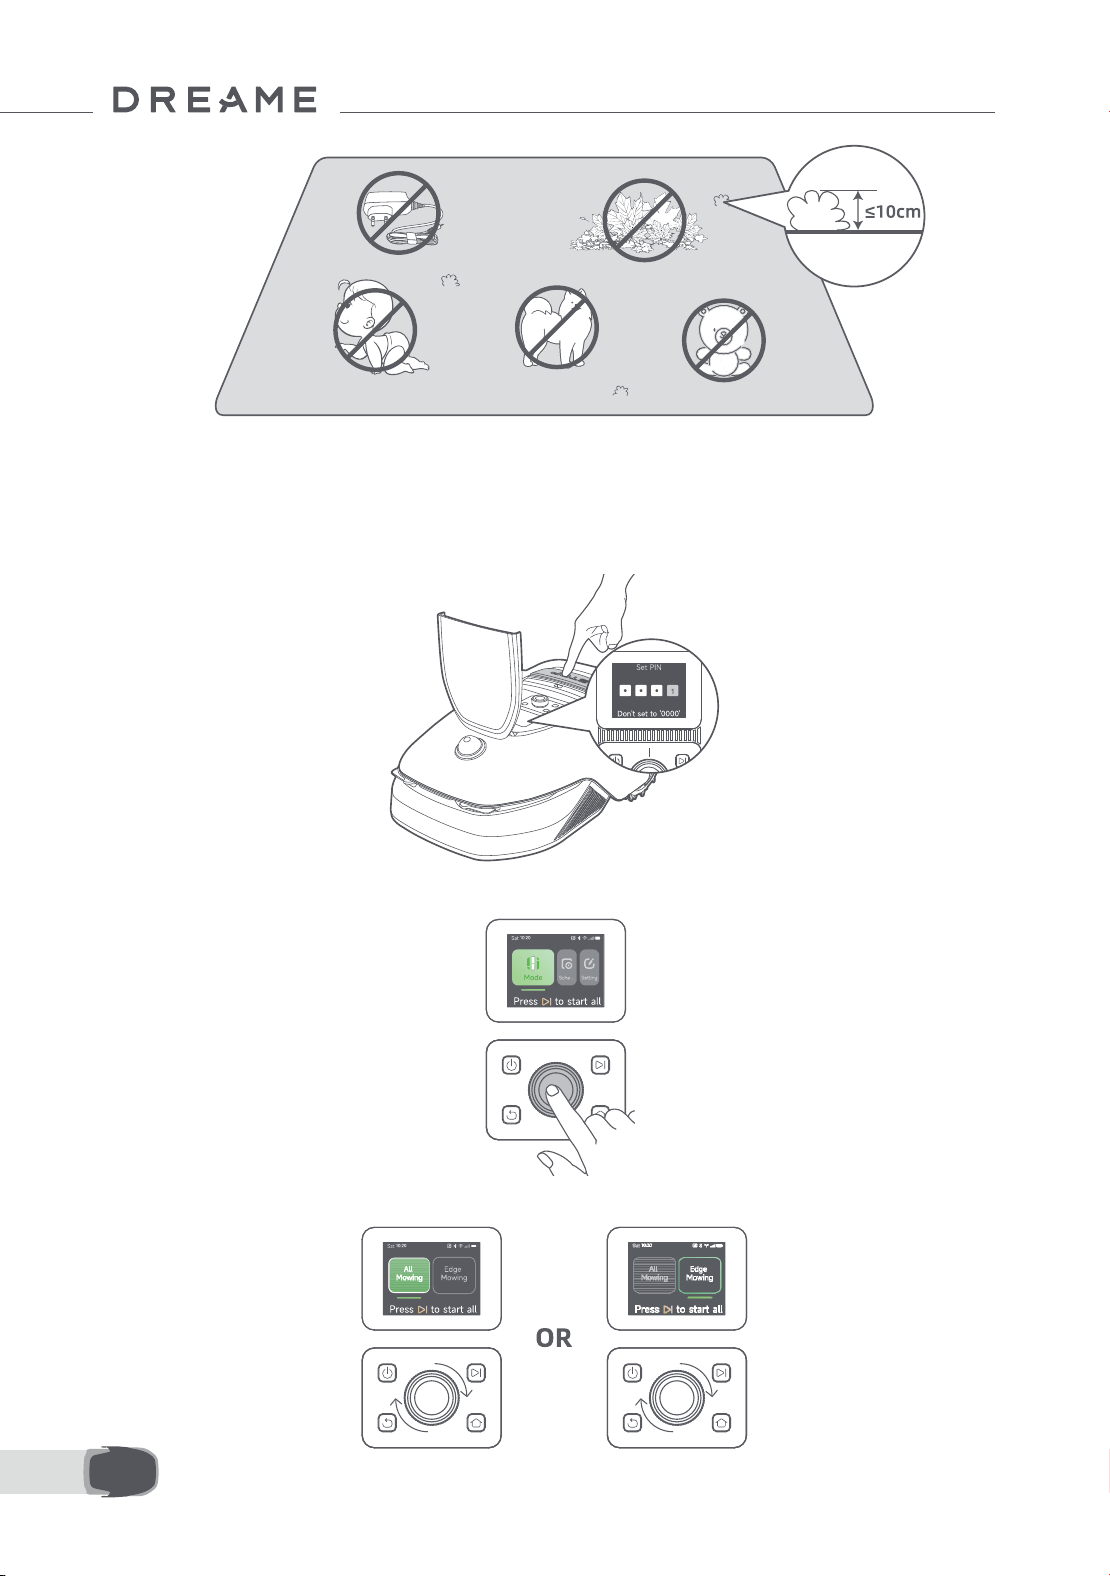
98FR
Appuyer sur le bouton Démarrer sur le panneau de contrôle et fermer le couvercle supérieur dans les 5
secondes. L'A1 Pro quittera la station de chargement et commencera à tondre. Vous pouvez aussi taper sur «
Démarrer » dans l'application pour commencer à tondre.
• Commencer via le panneau de commande
1. Appuyer sur le bouton Arrêter pour ouvrir le couvercle et entrer le code PIN.
2. Sélectionner les « Modes » sur l'achage et appuyer sur le bouton.
3. Tourner le bouton pour sélectionner le mode de tonte.
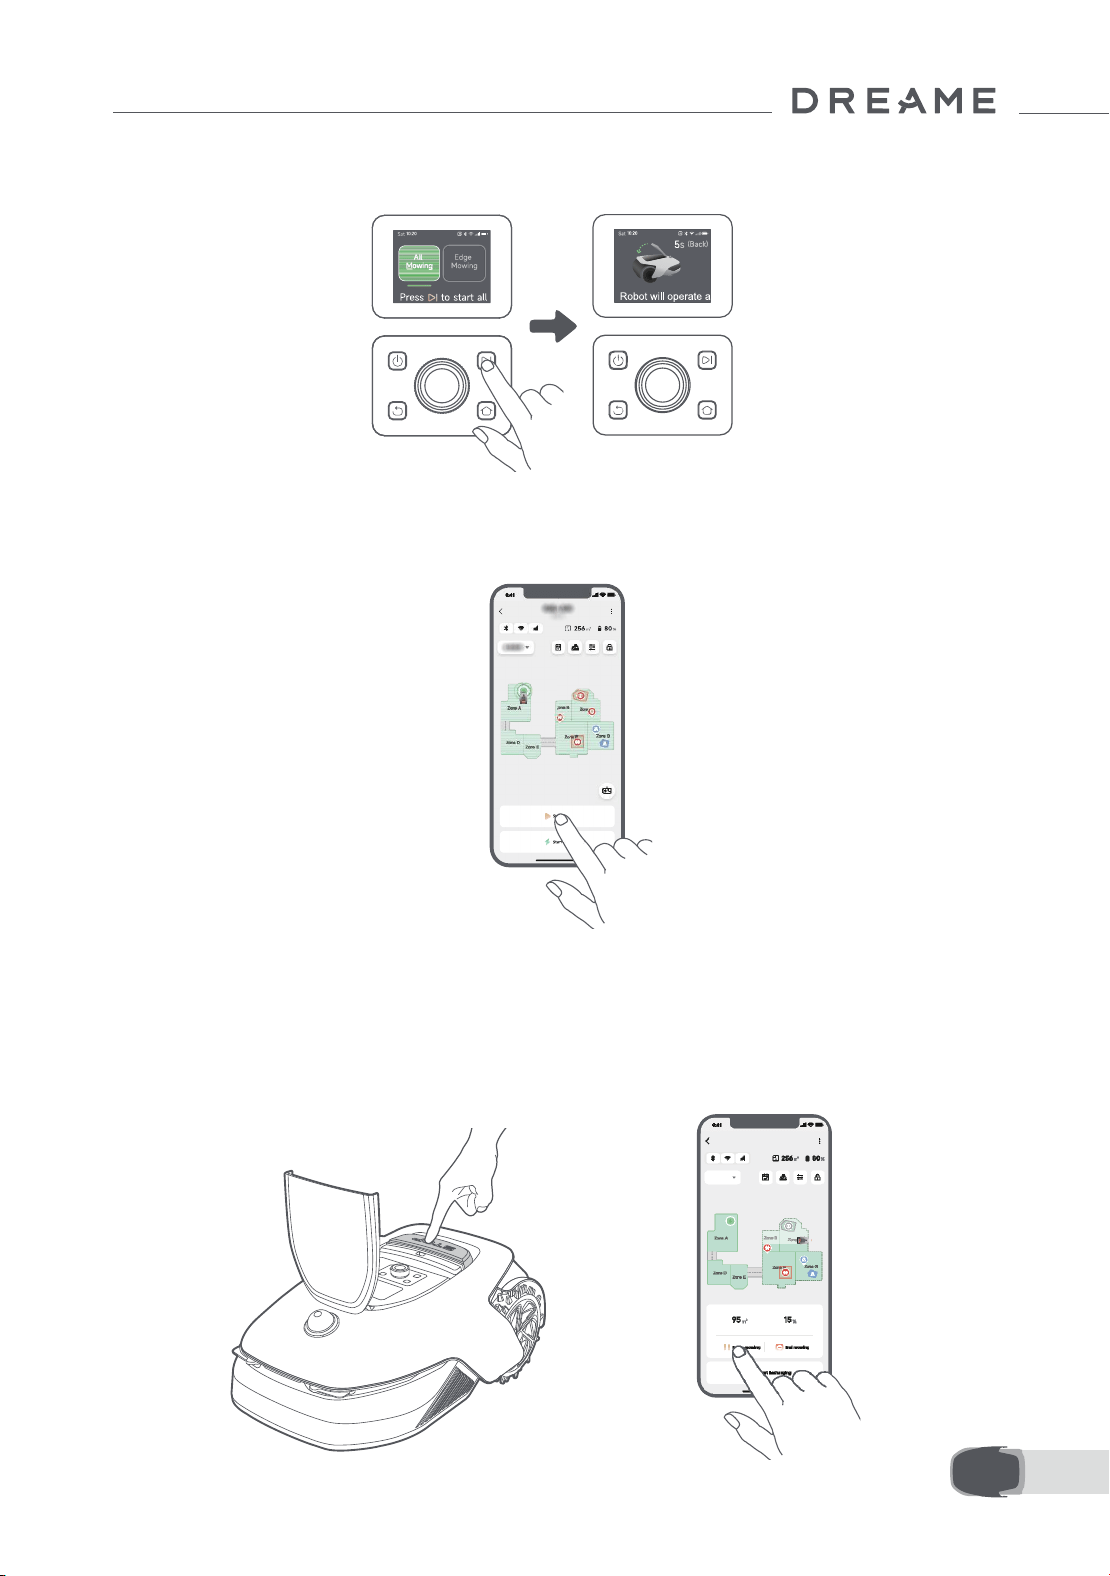
99 FR
4. Appuyez sur le bouton « Démarrer » et fermer le couvercle supérieur dans les 5 secondes. L'A1 Pro
commencera à tondre.
• Démarrer via l'application
1. Ouvrir l'application
2. Sélectionner un mode de tonte et taper sur « Démarrer » pour commencer à tondre.
7.3 Pause
OR
Pour mettre en pause la tâche actuelle de tonte, vous pouvez enfoncer la touche Arrêt sur l'A1 Pro ou taper «
Pause » dans l'application.
Remarque: l'A1 Pro sera verrouillé et ne peut pas commencer directement via l'application après avoir appuyé
sur le bouton Arrêt. Pour reprendre la tonte, entrez d'abord votre code PIN sur le panneau de contrôle.
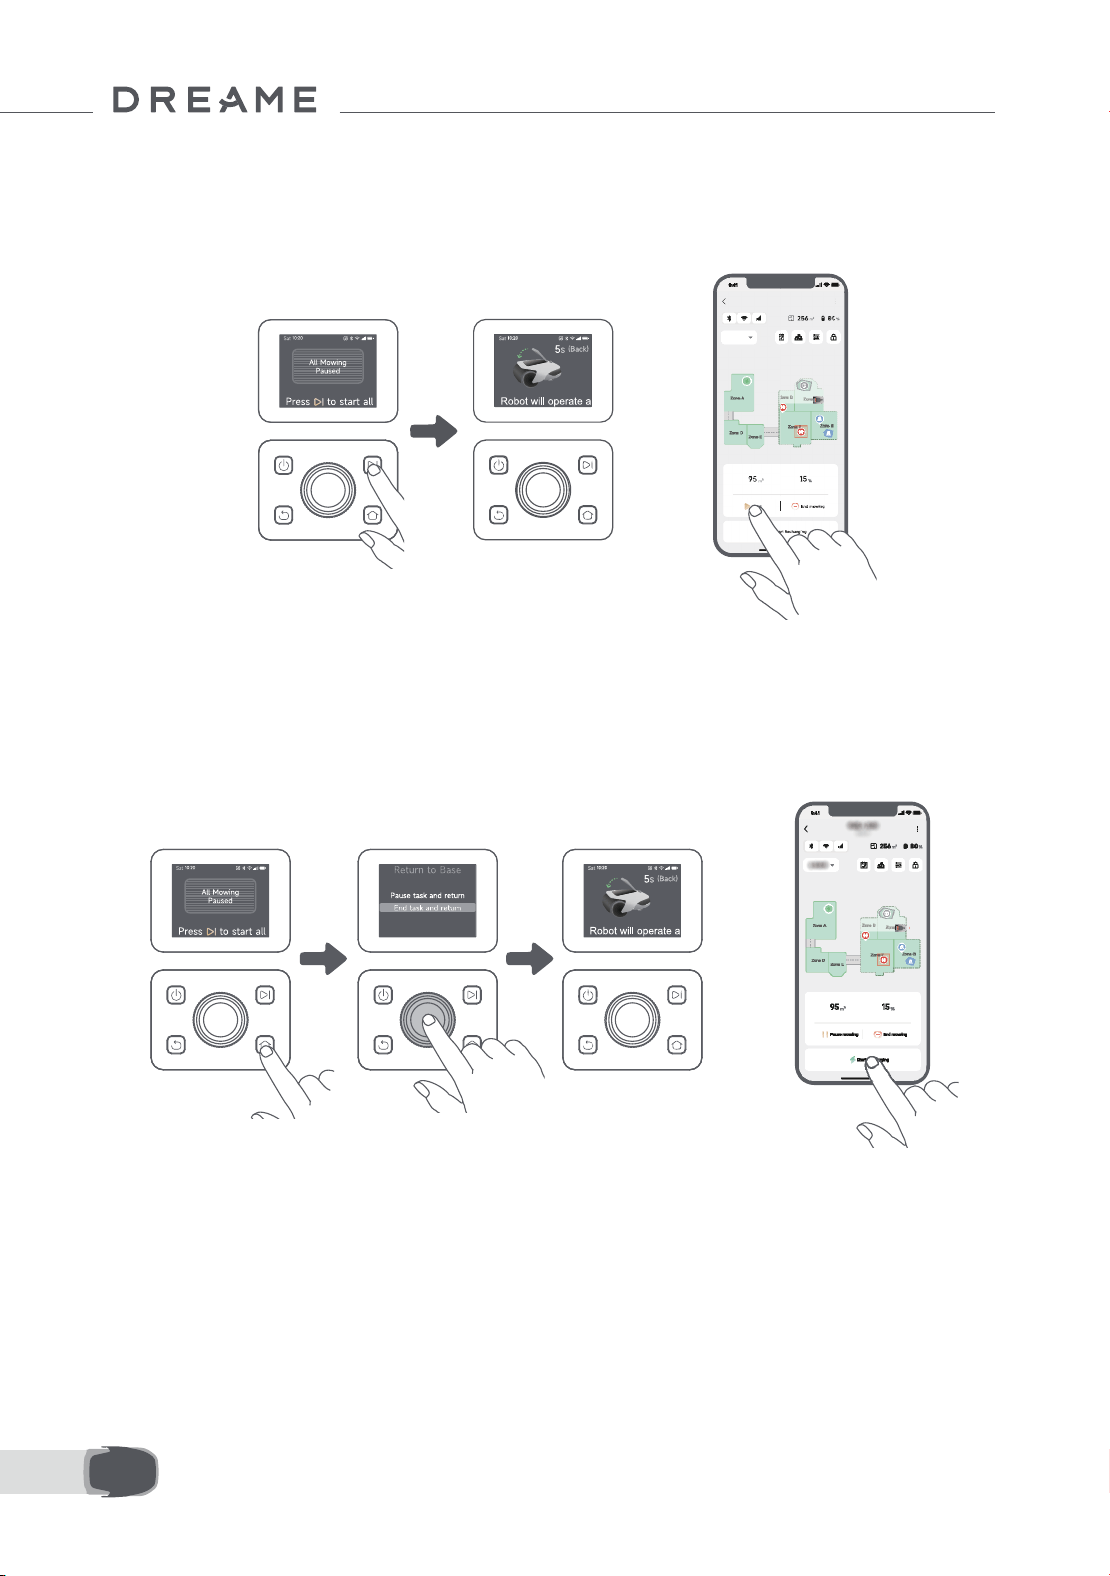
100FR
7.4 Reprendre
7.5 Retourner à la station de chargement.
Pour reprendre la tâche lorsque l'A1 Pro est en pause, appuyer sur le bouton Démarrer et fermer le couvercle
dans les 5 secondes. L'A1 Pro reprendre la tâche précédente de tonte. Vous pouvez aussi taper sur « Continuer »
dans l'application pour reprendre la tâche de tonte.
Pour arrêter la tâche de tonte et renvoyer l'A1 Proà la station de chargement, conrmer votre code PIN sur
le panneau de contrôle et appuyer sur le bouton Accueil. Conrmer la n de la tâche et fermer le couvercle
dans les 5 secondes. L'A1 Pro retournera automatiquement à la station de chargement pour le chargement.
Vous pouvez aussi taper sur « Retourner à la station » dans l'application et l'A1 Pro retournera à la station de
chargement.
OR
OR
Où vous pouvez explorer davantage
L'application Dreamehome est plus qu'une télécommande. Vous pouvez faire beaucoup de choses avec
l'application : compléter à distance les divers Paramètres, essayer diérents modes de tonte, modier
librement la carte et régler les programmes de tonte. De plus, vous pouvez acher la carte 3D de votre pelouse
directement dans l'application.
8 Application Dreamehome
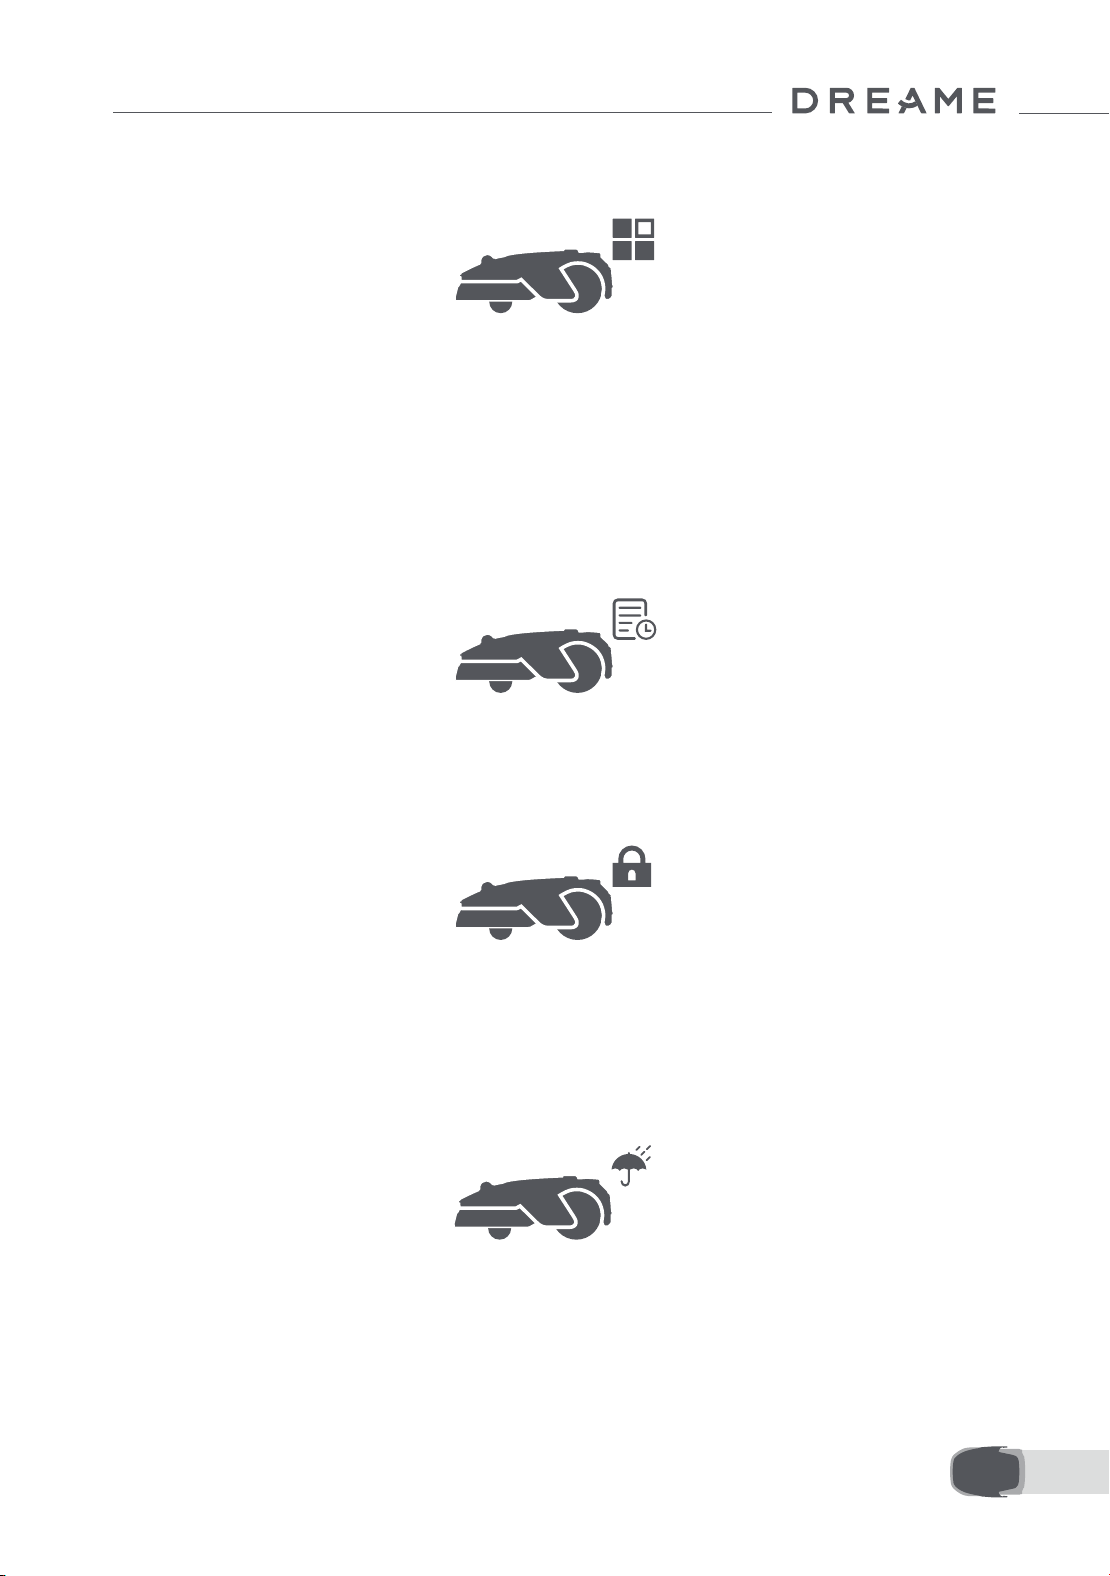
101 FR
8.1 Modes de tonte
8.2 Programme
A1 Pro ore diverses méthodes de tonte. Vous pouvez passer d'un mode à l'autre via l'application.
Après avoir terminé la première carte, l'A1 Pro crée automatiquement deux programmes hebdomadaires de
tonte selon la taille de la pelouse le programme « Programme Pr & Été » (printemps/été) et le programme «
Programme Aut & Hiv » (automne/hiver). Vous pouvez taper sur « Programme » dans l'application pour aller
sur les Paramètres de détails du programme. Avec la fonction de programme, vous pouvez laisser tout le travail
quotidien de tonte à l'A1 Pro. Il ne vous reste qu'à entretenir régulièrement l'A1 Pro.
Remarque : Si vous avez peur que l'A1 Pro ne vous dérange ou ne dérange les voisins lorsqu'il travaille de
façon autonome pendant certaines heures de la journée, vous pouvez aller sur Paramètres > Ne pas déranger
et régler les heures en mode Ne pas déranger dans l'application.
8.3 Verrou Enfant
Si vous avez peur que les enfants puissent mettre l'A1 Pro en marche, vous pouvez activer la fonction de «
Verrouillage parental » dans l'application. En activant cette fonction, l'A1 Pro sera verrouillé si aucune opération
n'est exécutée pendant 5 minutes lorsque le couvercle est ouvert.
8.4 Protection contre la pluie
Si vous avez peur que des conditions météorologiques graves ne puissent aecter le travail de tonte, vous
pouvez activer la fonction de « Protection contre la pluie » dans les « Paramètres » sur le panneau de contrôle
ou dans l'application. Lorsque cette fonction est activée, l'A1 Pro interrompt automatiquement la tonte et
retourne à la station de chargement lorsqu'il pleut. Vous pouvez régler l'heure de protection contre la pluie
dans l'application.
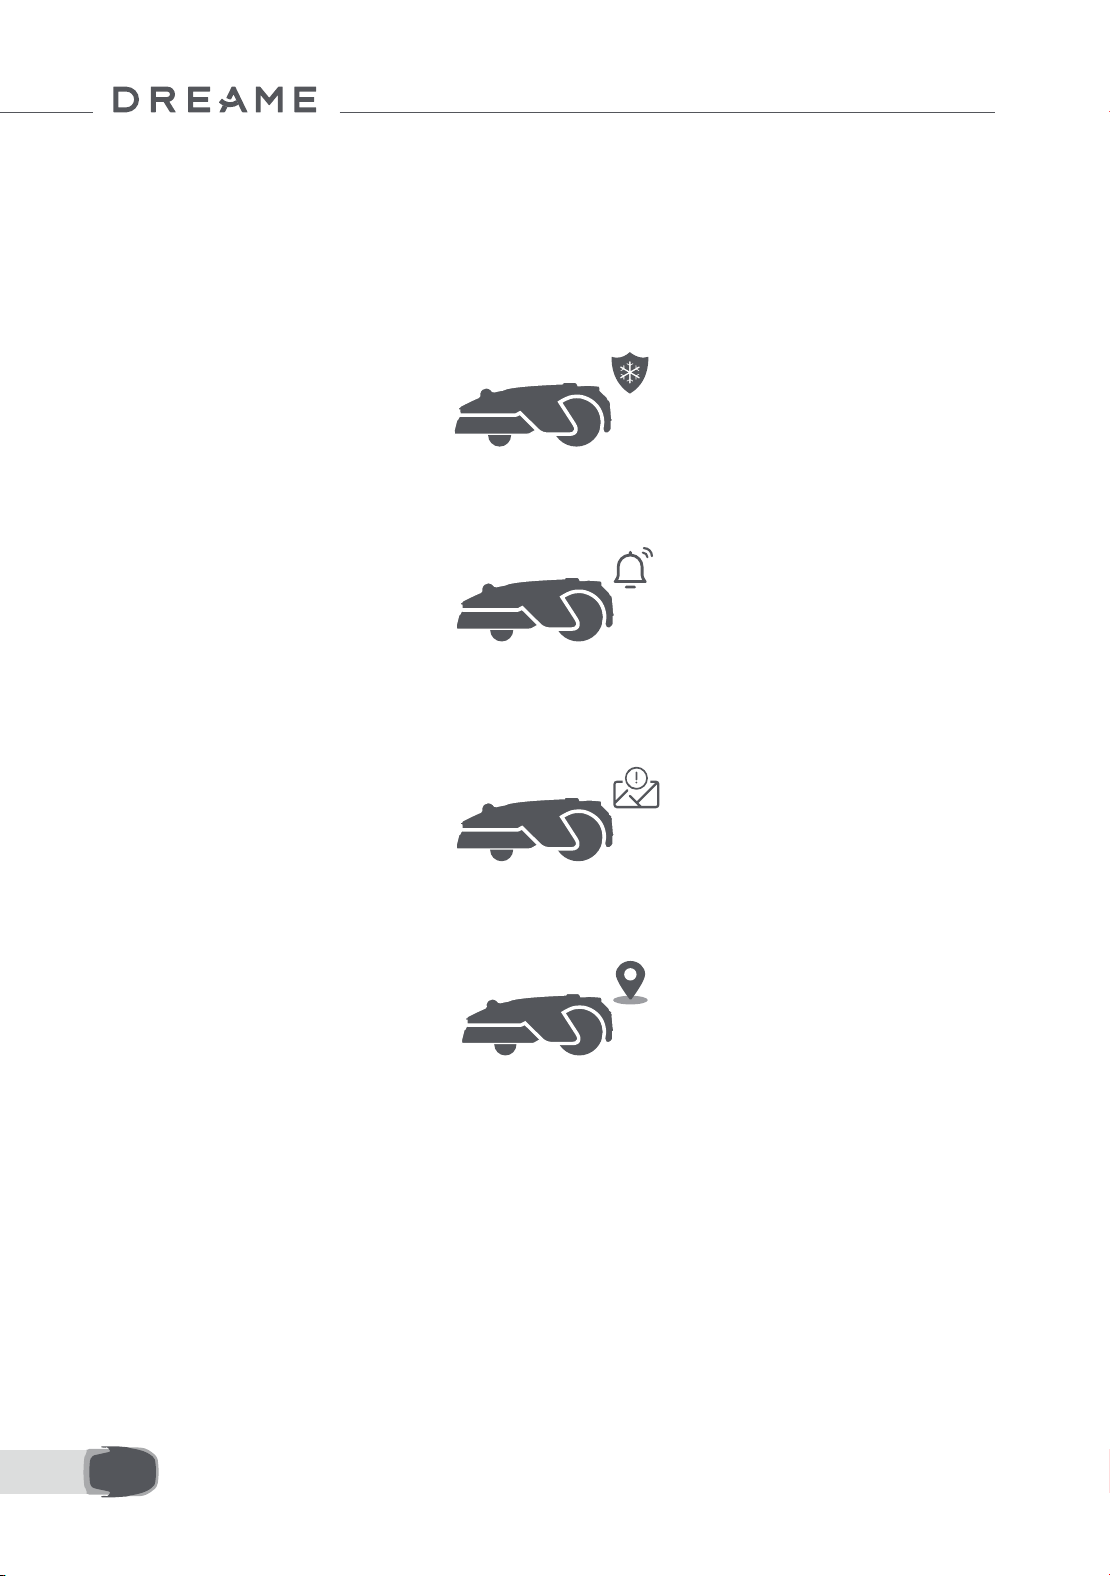
102FR
8.5 Protection contre le gel
Lorsque la température est inférieure à 6 ° C, les opérations de tonte provoqueront des dommages permanents à
la pelouse. La batterie ne pourra pas se charger en raison du dispositif d'auto-protection. Vous pouvez activer la
fonction de « Protection contre le gel » dans les « Paramètres » sur le panneau de contrôle ou dans l'application. La
fonction permet à l'A1 Pro de mettre automatiquement la tonte en pause et de retourner à la station de chargement
lorsque la température ambiante est inférieure à 6 ° C. Il reprendra automatiquement le travail quand la température
sera supérieure à 11 ° C.
8.6 Alarme de levage
8.7 Alarme hors carte
Lorsque cette fonction est activée, l'A1 Pro sera verrouillée et l'alarme se déclenchera immédiatement s'il est
soulevé.
En activant cette fonction, l'A1 Pro sera verrouillé et l'alarme sera immédiatement déclenchée s'il sort de la
carte. (Cette fonction requiert l'installation du module de liaison)
8.8 Localisation en temps réel
Avec module de liaison, vous pouvez acher l'emplacement actuel de l'A1 Pro sur Google Maps.
Remarque: L'équipe de développement Dreaeme exécutera continuellement des mises à jour OTA (Over-
the-Air) et un entretien sur le micrologiciel et l'application. Veuillez contrôler les notications de mise à jour ou
activez la fonction de mise à jour automatique pour garder le micrologiciel et l'application à jour et jouir ainsi
de plus de fonctionnalités.
9 Entretien
Pour de meilleures performances et une plus longue durée de vie de l'A1 Pro, nettoyez-le régulièrement et
remplacez les pièces usées selon la fréquence ci-dessous :
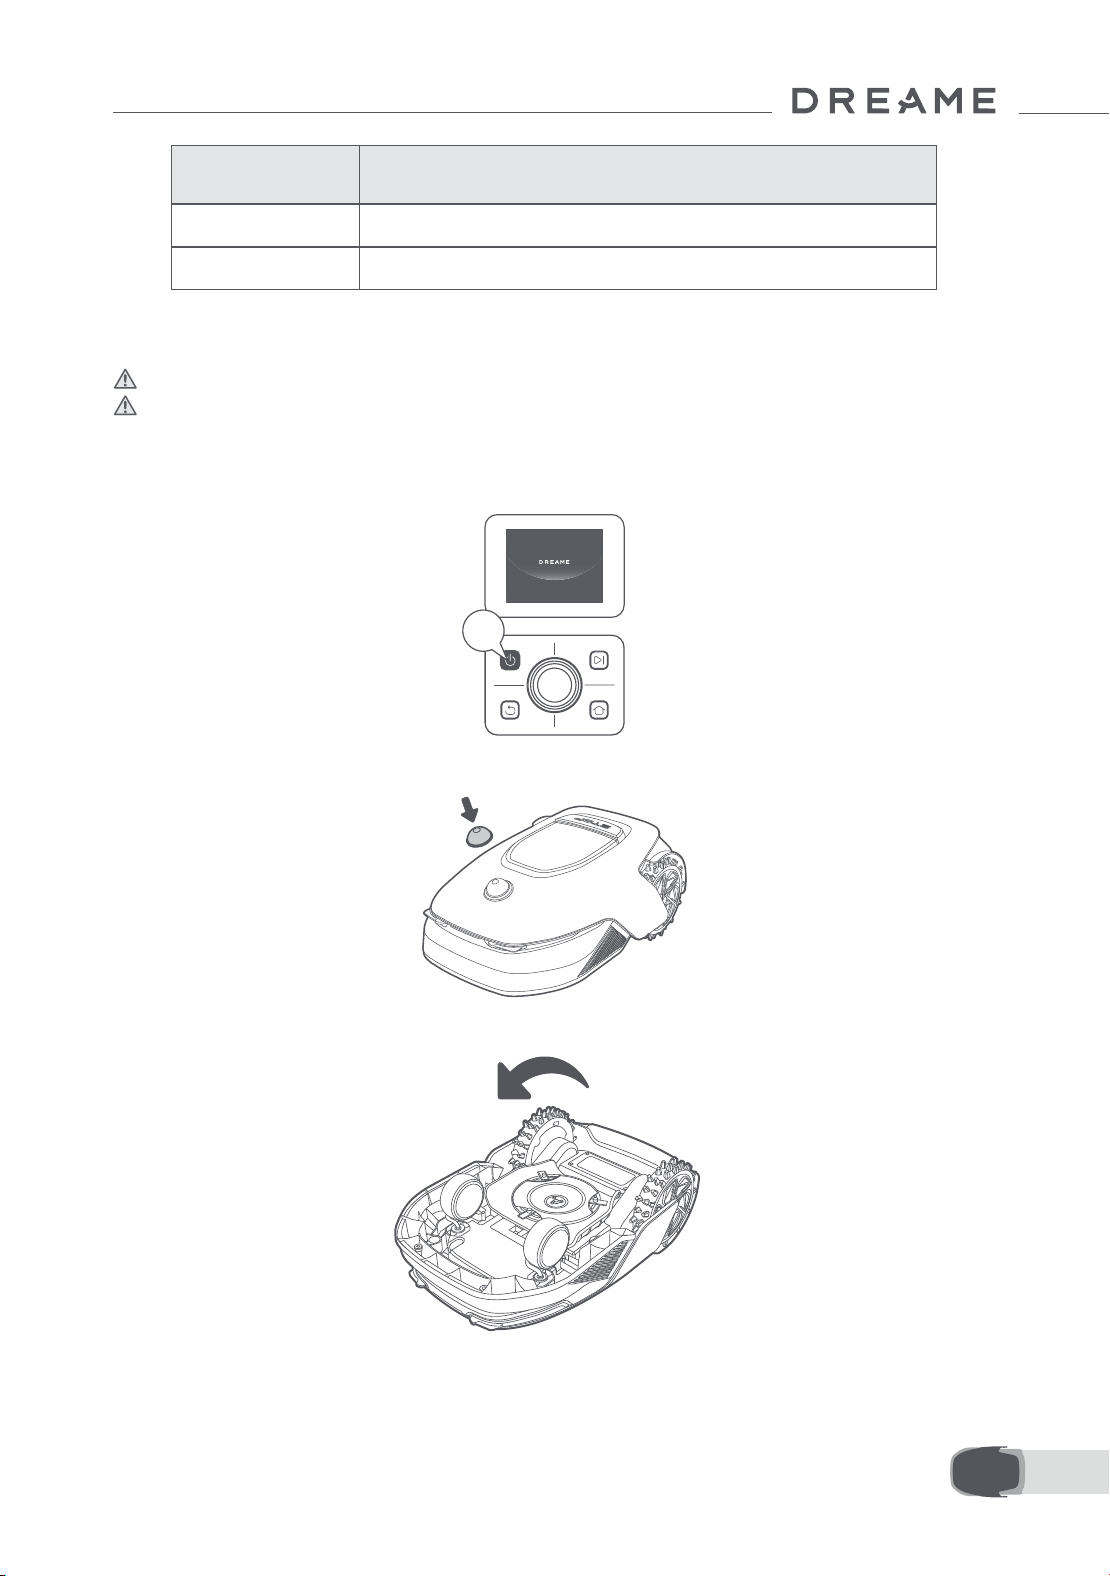
103 FR
2s
• Le corps de l'A1 Pro, châssis et disque de coupe :
1. Éteindre l'A1 Pro.
2. Mettre le Couvercle de protection du lidar sur le lidar.
3. Retourner l'A1 Pro.
9.1 Nettoyage
Mise en garde: Avant le nettoyage, éteindre l'A1 Pro et débrancher la station de chargement.
Mise en garde : Assurez-vous que le Couvercle de protection du lidar est sur le lidar avant de retourner l'A1
Pro pour éviter d'endommager le lidar.
Pièce Fréquence de remplacement
Lames Toutes les 6 à 8 semaines ou moins
Brosse de nettoyage Tous les 12 mois ou moins
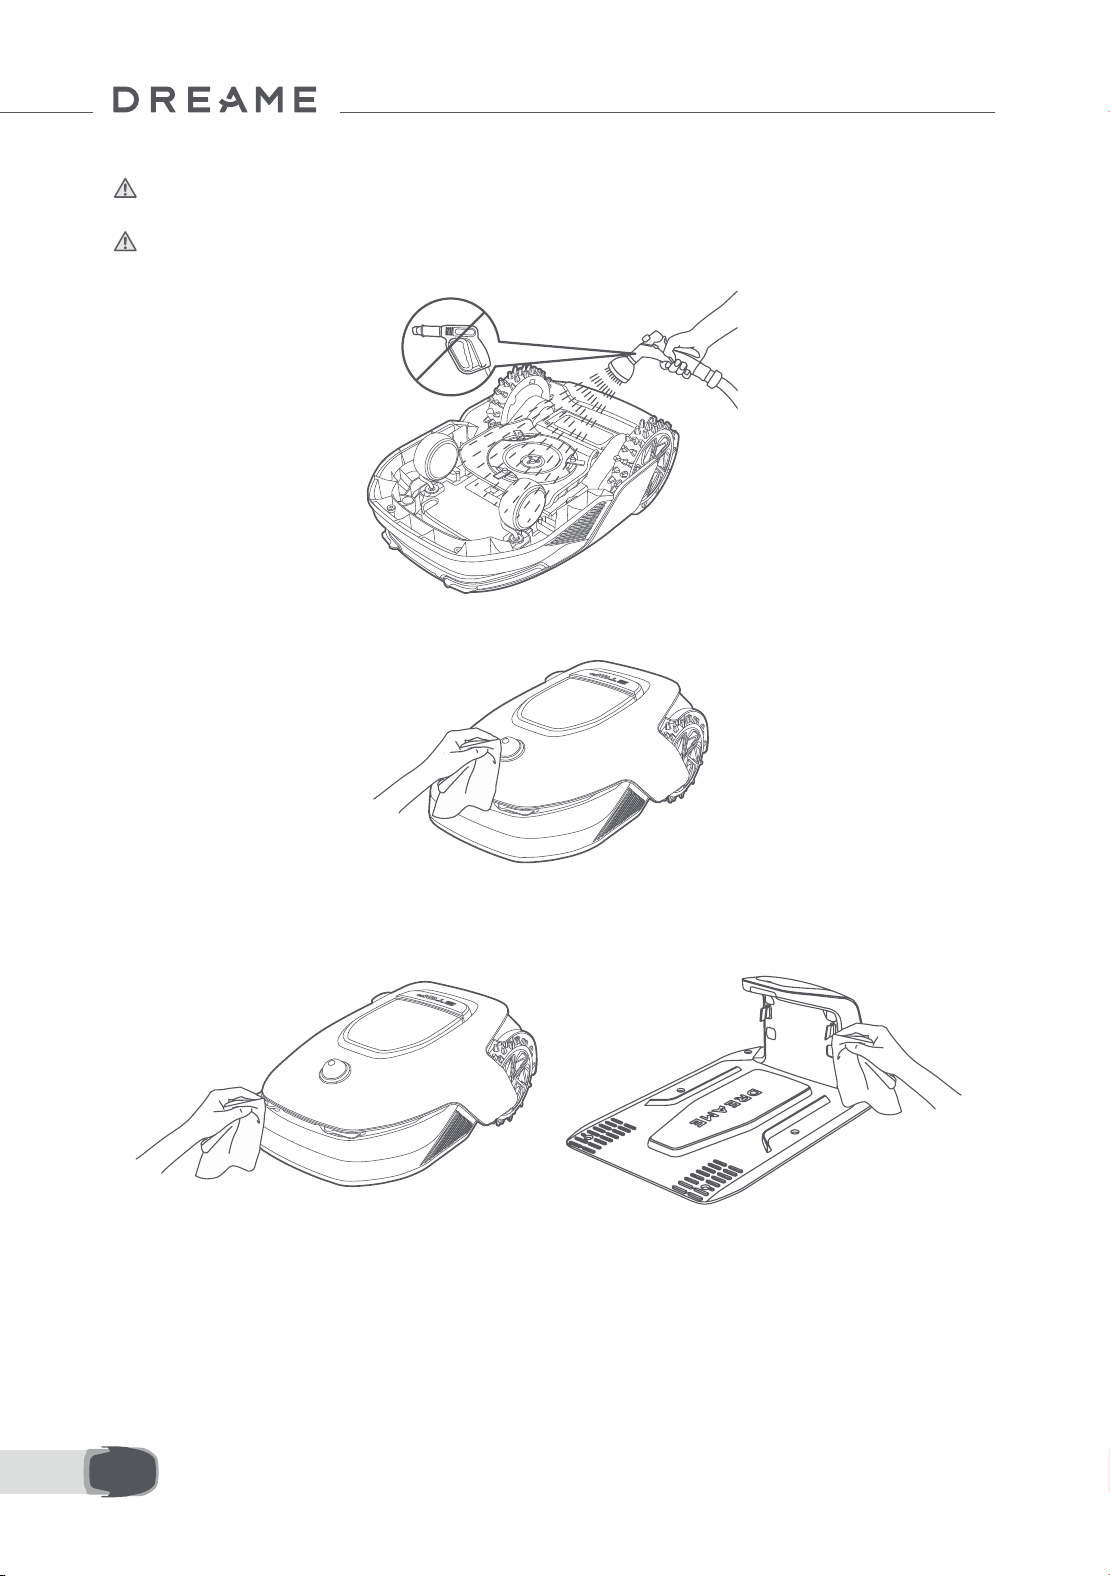
104FR
4. Nettoyez le corps, la lame et le châssis de l'A1 Pro avec un tuyau souple.
Mise en garde : Ne pas toucher les lames pendant le nettoyage du châssis. Toujours porter des gants
pendant le nettoyage.
Mise en garde : Ne pas utiliser de nettoyage à pression. Ne pas utiliser de solution détergente pendant le
nettoyage.
5. Nettoyez soigneusement le capteur LiDAR avec un chion non pelucheux.
• Contacts de chargement :
Utiliser un chion propre pour nettoyer les contacts de chargement sur l'A1 Pro et la station de chargement.
Sécher les contacts de chargement après le nettoyage.
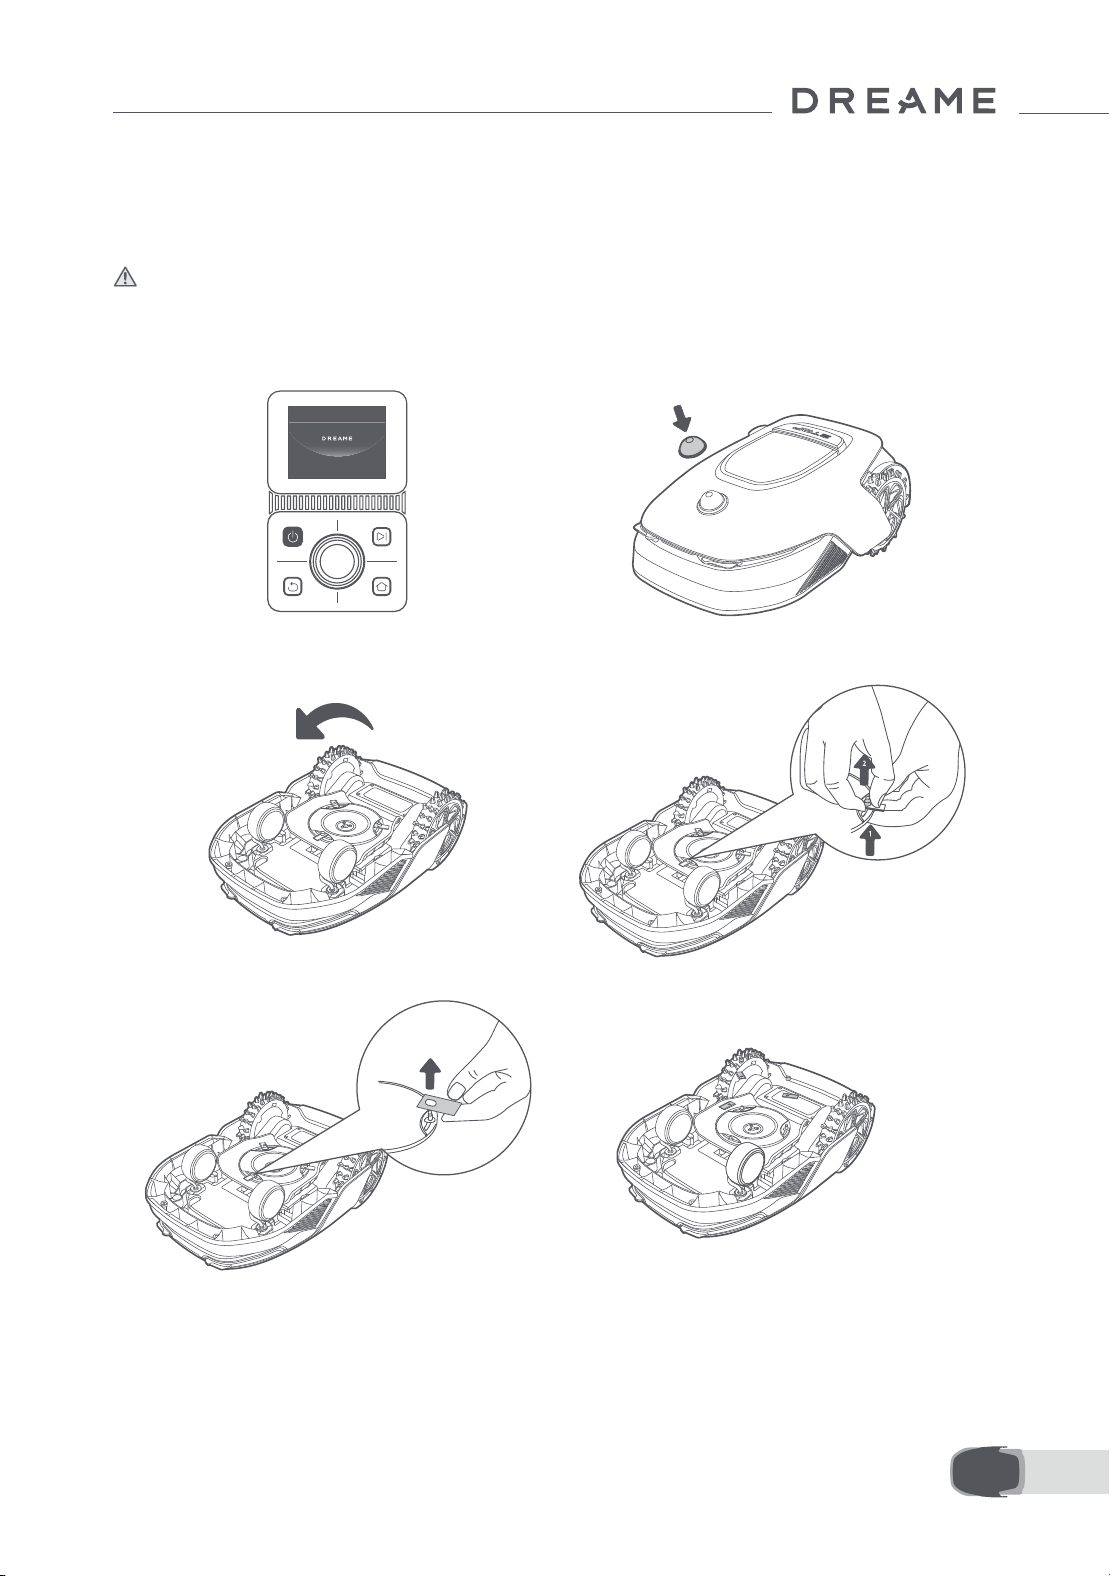
105 FR
9.2 Remplacement des composants
• Remplacement des lames
Pour garder les lames elées, les remplacer régulièrement. Il est recommandé de remplacer les lames toutes
les 6 à 8 semaines ou moins. N'utilisez que les lames originales Dreame.
Mise en garde: Éteindre l'A1 Pro et porter des gants de protection avant de remplacer les lames.
Remarque : Remplacer les trois lames en même temps pour assurer un système de coupe équilibré.
1. Éteindre l'A1 Pro. 2. Utiliser un chion souple pour nettoyer
soigneusement le capteur du lidar.
5. Enlever la lame en alignant le trou de la lame
sur l'arbre.
6. Enlever les 3 lames et les réceptacles.
3. Placer l'A1 Pro sur une surface souple et le
retourner.
4. Enlever le réceptacle en appuyant sur le
bouton sous le disque de coupe.

106FR
• Remplacement de la brosse de nettoyage
Lorsque la brosse de nettoyage du capteur du lidar est usé, ses soies peuvent tomber ou se détériorer et
aecter les performances du nettoyage. Remplacer régulièrement la brosse de nettoyage pour un bon résultat
de nettoyage. Il est recommandé de remplacer la brosse de nettoyage tous les 12 mois ou moins.
Remarque: Avant de remplacer la brosse de nettoyage, assurez-vous de débrancher la station de
chargement.
7. Appuyer sur le bouton sous le disque de coupe
et aligner le trou du réceptacle sur l'arbre pour
xer les réceptacles et les lames.
8. Assurez-vous que les lames peuvent tourner
librement.

107 FR
10 Batterie
Mode de chargement à faible puissance :
Avec le mode de chargement à faible puissance activé, les fonctions non associées au chargement seront
désactivées (l'achage et le réseau seront désactivés).
• Pour activer le mode de chargement à faible puissance, appuyer sans relâcher sur le bouton Démarrer et le
bouton Accueil ensemble, puis sur le bouton Précédent 5 fois rapidement en même temps. Vous entendrez
une invite vocale : mode de chargement à faible puissance activée.
• Pour désactiver le mode de chargement à faible puissance, redémarrer l'A1 Pro ou appuyer sur le bouton
Marche 5 fois rapidement pour désactiver le mode de chargement à faible puissance.
Pour un stockage à long terme, charger l'A1 Pro tous les 6 mois pour protéger la batterie. Les dommages à la
batterie résultant d'un déchargement excessif ne sont pas couverts par la garantie limitée. Ne pas charger la
batterie à une température ambiante de plus de 45 ° C ou de moins de 6 ° C. La température de stockage de la
batterie à long terme doit être comprise entre -10 et 35 ° C. Pour minimiser les dommages, la température de
stockage recommandée est entre 0 et 25 ° C.
Remarque: la durée de vie de la batterie dépend de la fréquence d'utilisation et des heures de
fonctionnement. Si la batterie est endommagée ou ne peut pas être chargée, ne jeter pas la batterie obsolète
ou défectueuse de façon arbitraire. Observer les réglementations locales en matière de recyclage.
11 Stockage d'hiver
12 Transport
• A1 Pro
1. Charger complètement la batterie et éteindre l'A1 Pro.
2. Nettoyer l'A1 Pro avant de le mettre en stockage d'hiver.
3. Placez le couvercle de protection du LiDAR.
4. Stocker l'A1 Pro dans un endroit sec, à une température supérieure à 0 ° C.
• Station de chargement
Débrancher la station de chargement et la stocker dans un endroit sec et frais, à l'abri de la lumière directe du
soleil.
Remarque: Si vous n'avez pas utilisé A1 Pro pendant longtemps, veuillez procéder au remappage de votre
jardin du fait que les changements signicatifs à l'environnement du jardin peut provoquer des erreurs de
positionnement.
Pour un transport longue distance, assurez-vous que l'A1 Pro est éteint. Il est recommandé d'utiliser l'emballage
original. Placez le couvercle de protection du LiDAR.
Mise en garde : Éteindre l'A1 Pro avant de le transporter.
Mise en garde : Soulevez le produit par l'arrière avec le disque de coupe à distance de votre corps.

108FR
13 Résolution des pannes
Problème Causes Solution
A1 Pro n'est
pas connecté à
l'application.
1. A1 Pro n'est pas en
couverture Wi-Fi ou
Bluetooth.
2. A1 Pro est éteint ou
redémarre.
1. Vériez si A1 Pro a terminé le processus de
mise sous tension.
2. Vériez si le routeur fonctionne correctement.
3. Rapprochez-vous de A1 Pro pour établir une
connexion Bluetooth.
A1 Pro soulevé. La roue n'est pas au sol.
1. Remettre l'A1 Pro sur un sol plat.
2. Entrer le code PIN sur l'A1 Pro et conrmer.
3. L'A1 Pro ne peut pas traverser des objets de
plus de 4 cm de haut. Garder le sol à niveau là
où il travaille.
A1 Pro incliné.
L'A1 Pro s'incline de plus de
37° .
1. Remettre l'A1 Pro sur un sol plat.
2. Entrer le code PIN sur l'A1 Pro pour conrmer.
3. L'A1 Pro ne peut pas monter des pentes avec
une inclinaison supérieure à 45 % (24° ).
A1 Pro piégé.
L'A1 Pro est piégé et ne peut
pas se libérer.
1. Réessayez après avoir éliminé les obstacles à
proximité.
2. Déplacer manuellement l'A1 Pro dans un
endroit plat et ouvert à l'intérieur de la carte
et essayer de recommencer la tâche. Si vous
continuez de rencontrer des problèmes,
réessayer après que l'A1 Pro est dans la station
de charge.
3. Vérier la présence de trous dans le sol.
Combler les trous avant de tondre pour éviter
que l'A1 Pro ne soit piégé.
4. Vérier que l'herbe environnante n'est pas
d'une hauteur supérieure à 10 cm. Vous pouvez
ajuster la hauteur d'évitement des obstacles ou
utiliser une tondeuse à pousser pour tondre la
pelouse à l'avance an d'éviter que l'A1 Pro ne
soit piégé.
5. Si l'A1 Pro est souvent pris dans cet endroit,
vous pouvez dénir cette emplacement comme
une zone interdite.
Erreur roue arrière
gauche/droite
La roue ne peut pas tourner
ou le moteur de la roue a un
problème.
1. Nettoyez les roues arrière, puis réessayez.
2. Essayez de redémarrer le robot si cette erreur
persiste.
3. Si le probème persiste, contacter le service
après-vente.
109 FR
Problème Causes Solution
Le disque de coupe ne
peut pas tourner.
l'application.
Le disque de coupe ne peut
pas tourner normalement
ou le moteur de coupe a un
problème.
1. Nettoyez le disque de coupe avant d'essayer
de nouveau.
2. Vérier que l'herbe environnante n'est pas
d'une hauteur supérieure à 10 cm. Vous pouvez
utiliser une tondeuse à pousser pour tondre la
pelouse an d'empêcher que le disque de
coupene se bloque à cause de l'herbe haute.
3. Vériez si de l'eau se trouve sous le disque de
coupe. Déplacez le robot dans un endroit sec et
réessayez s'il y en a.
4. Essayez de redémarrer le robot si cette erreur
persiste.
5. Si le probème persiste, contacter le service
après-vente.
Erreur de pare-chocs.
Le capteur de pare-chocs
avant est constamment
déclenché.
1. Vérier que l'A1 Pro pour voir s'il est piégé
quelque part.
2. Tapoter sur le pare-chocs pour vous assurer
qu'il rebondit.
3. Essayez de redémarrer le robot si cette erreur
persiste.
4. Si le probème persiste, contacter le service
après-vente.
Erreur de chargement.
L'A1 Pro est ancré dans la
station de chargement, mais
l'intensité ou la tension de
chargement a un problème.
1. Vérier que la station de chargement est
correctement raccordé à l'alimentation.
2. Vérier que les contacts de chargement et la
station de chargement sont propres.
3. Lorsque le contrôle est terminé, essayer
d'ancrer de nouveau l'A1 Pro dans la station de
chargement.
4. Si le probème persiste, contacter le service
après-vente.
La température de la
batterie est trop élevée.
La température de la batterie
est ≥ 60℃ .
1. Utiliser l'A1 Pro lorsque la température
ambiante est inférieure à 40 ° C. Vous pouvez
attendre que la température de la batterie
diminue automatiquement.
2. Vous pouvez éteindre l'A1 Pro et le redémarrer
après un certain temps.
3. Si le probème persiste, contacter le service
après-vente.
Le lidar est bloqué.
Le lidar est bloqué (par
exemple, le Couvercle de
protection du lidar n'est
pas retiré).
1. Réessayez après avoir retiré le capot de
protection du lidar.
2. Si le lidar du robot est sale, nettoyez-le avec
un chion non pelucheux et réessayez.

110FR
Problème Causes Solution
Dysfonctionnement du
LiDAR.
Le LiDAR est très sale ou il y
a une erreur de capteur.
1.Vériez que le lidar situé sur le dessus du robot
n'est pas sale. Si nécessaire, nettoyez-le et
réessayez.
2. Essayez de redémarrer le robot si cette erreur
persiste.
3. Veuillez contacter le service après-vente si le
problème persiste.
L'A1 Pro est perdu. Le positionnement est perdu.
1. Vérier que le lidar au sommet de l'A1 Pro est
sale. La saleté aectera le positionnement.
2. Déplacement manuellement l'A1 Pro pour le
placer dans un ouvert dans la carte et essayer
de reprendre la tâche.
3. Si le positionnement n'est pas retrouvé,
télécommander l'A1 Pro pour le ramener à la
station de chargement via l'application, puis
commencer la tâche de tonte.
Erreur de capteur. Erreur de capteur.
1. Redémarrer l'A1 Pro et réessayer.
2. Si le probème persiste, contacter le service
après-vente.
L'A1 Pro est dans la
zone interdite.
L'A1 Pro est dans la zone
interdite.
1. Déplacez le robot manuellement de la zone
interdite, puis réessayez.
2. Utilisez l'application pour contrôler le robot à
distance pour le déplacer hors de la zone
interdite, puis réessayez.
L'A1 Pro est sorti de la
carte.
L'A1 Pro est sorti de la carte.
1. Déplacez le robot à l'intérieur de la carte
manuellement, puis réessayez.
2. Utilisez l'application pour contrôler le robot à
l'intérieur de la carte à distance, puis réessayez.
L'arrêt d'urgence est
activé.
Le bouton d'arrêt sur l'A1 Pro
est enfoncé.
Entrer le code PIN sur l'A1 Pro pour désactiver
l'arrêt d'urgence.
Batterie faible. L'A1 Pro
s'éteindra bientôt.
Le niveau de la batterie
est ≤ 10 %.
Ancrer l'A1 Pro dans la station de chargement
pour le chargement.
111 FR
Problème Causes Solution
L'A1 Pro est hors de la
carte. Risque de vol.
L'A1 Pro est hors de la carte.
1. Entrer le code PIN pour vérier.
2. Vous pouvez désactiver l'Alarme hors carte
dans les Paramètres dans l'application.
Impossible de retourner
à la station de
chargement.
L'A1 Pro ne peut pas trouver
la station de chargement
lorsqu'il retourne à la station
de chargement.
1. Vérier la présence d'obstacles bloquant l'A1
Pro. Éliminer les obstacles et réessayer.
2. Télécommander l'A1 Pro pour le ramener à la
station de chargement via l'application.
Échec de l'ancrage
dans la station de
chargement.
L'A1 Pro trouve la station de
chargement, mais l'ancrage
échoue.
1. Regarder si les pellicules rééchissantes sur la
station de chargement sont sales ou bloqués.
2. Vérier la présence d'obstacles devant la
station de chargement.
3. Vérier que la station de chargement est
déplacée.
4. Vériez si la plaque de base est couverte de
boue épaisse.
5. Vériez si la station est alimentée.
6. Aidez le robot à s'accoupler à la station en
utilisant la télécommande ou manuellement.
Échec du
positionnement.
Le positionnement échoue
lorsque l'A1 Pro essaie de
commencer une tâche de
tonte.
1. Le Lidar pourrait être obstrué. Déplacez
manuellement le robot vers un endroit plat et
ouvert à l'intérieur de la carte et essayez de
recommencer la tâche.
2. Si vous continuez à rencontrer cette erreur,
veuillez réessayer après que le robot soit dans la
station.
La température de la
batterie est élevée.
La température de la batterie
est ≥ 45℃ .
1. Le chargement peut échouer lorsque la
température de la batterie dépasse 45 ° C.
2. Utiliser l'A1 Pro lorsque la température
ambiante est inférieure à 40 ° C.
La température de la
batterie est basse.
La température de la batterie
est ≤ 6℃ .
1. Le chargement peut échouer lorsque la
température de la batterie est inférieure à 6 ° C.
2. Utiliser l'A1 Pro lorsque la température
ambiante est supérieure à 6 ° C.
Le disque de coupe ne
parvient pas à monter
ou descendre.
Le disque de coupe ne
parvient pas à monter ou
descendre.
1. Nettoyez le disque de coupe et réessayez.
2. Essayez de redémarrer le robot si cette erreur
persiste.
3. Si le problème persiste, contactez le service
après-vente.
Espace insusant
pour tourner devant la
station.
Espace insusant pour
tourner devant la station.
1. Si la station est placée sur le bord ou à
l'intérieur de la carte, assurez-vous qu'il y a au
moins 1 m d'espace libre entre la zone avant de
la plaque de base de la station et la limite de la
carte ; sinon, le robot pourrait ne pas pouvoir
tourner.
2. Déplacez la station, ou modiez la carte dans
Édition de la carte.
112FR
14 Caractéristiques
Informations
de base
Nom du produit Tondeuse robotisée Dreame
Marque Dreame
Dimensions 643 × 436,5 × 261 mm
Poids (batterie incluse) 12.6 kg
Tonte
Capacité de travail recommandée 2000 ㎡ (0,5acre)
Ecacité de la tonte
Norme : 120 ㎡ /h (0,03 acre)
Ecacité : 200 ㎡ /h (0,05 acre)
Hauteur de tonte 30~70 mm
Largeur de tonte 22 cm
Temps de chargement
[1]
65 min
Émissions de
bruit
Niveau d'intensité sonore LWA 64 dB(A)
Incertitude de puissance
sonore KWA
3 dB(A)
Niveau de pression
sonore LpA
56 dB(A)
Incertitudes de
pression sonore KpA
3 dB(A)
Condition
de travail
Température de service
0~50° C
Recommandée : 10~35° C
Température de stockage sur une période
prolongée
-10~35° C
Recommandé : 0~25° C
Classement IP
Tondeuse : IPX6
Station de chargement : IPX4
Alimentation : IP67
Pente maximale pour zone de tonte 45% (24° )
Connectivité
Fréquence Bluetooth 2400,0–2483,5 MHz
Wi-Fi Wi-Fi 2.4 GHz (2400–2483.5M)
Puissance RF maximale
802.11b:16±2dBm(@11Mbps)
802.11g:14±2dBm(@54Mbps)
802.11n:13±2dBm(@HT20,HT40)
Bluetooth:7.49dBm
Service de liaison (optionnel)
[2]
LTE-FDD: B1/3/7/8/20/28A
LTE-TDD: B38/40/41
GNSS (optionnel)
[3]
GPS/GLONASS/BDS/Galileo/QZSS
113 FR
[1] Lorsque A1 Pro revient automatiquement à la station de charge avec une batterie faible, le temps de charge
s'applique.
[2] Nécessite l'installation du module de liaison.
[3] Nécessite l'installation du module de liaison.
Remarque : Les caractéristiques sont sujettes à modication du fait que nous améliorons continuellement nos
produits. Pour les informations les plus récentes, veuillez visiter notre site web sur global.dreametech.com.
Moteur
d'entraînementtor
Vitesse d'entraînement en télécommande 0.45 m/s
Vitesse d'entraînement en tonte
Norme : 0,35 m/s
Ecacité: 0,6 m/s
Moteur de coupe
Vitesse 2200 /min
Batterie
(tondeuse)
Type de batterie batterie ou lithium-ion
Capacité nominale 5000 mAh
Voltage nominale 18 V
Alimentation
Tension en entrée 100~240 V
Tension en sortie 20 V
Intensité en sortie 3 A
Station de
chargement
Tension en entrée 20 V
Tension en sortie 20 V
Intensité en entrée 3 A
Intensité en sortie 3 A

114IT
1 Istruzioni di sicurezza ............................................................................. P115
2 Cosa c'è nella scatola ............................................................................. P119
3 Panoramica del prodotto ........................................................................ P120
4 Installazione .......................................................................................... P121
5 Preparazioni prima dell'uso .................................................................... P123
6 Mappa il tuo giardino ............................................................................. P126
7 Operazione ............................................................................................ P132
8 Dreamehome App .................................................................................. P137
9 Manutenzione ........................................................................................ P139
10 Batteria ................................................................................................ P143
11 Conservazione invernale ....................................................................... P143
12 Trasporto ............................................................................................. P143
13 Risoluzione problemi ............................................................................ P144
14 Speciche ............................................................................................ P147
Tavola dei contenuti
Traduzione dell'istruzione originale

115 IT
1.1 Istruzioni di sicurezza generali
1 Istruzioni di sicurezza
• Leggere attentamente il manuale d'uso prima di utilizzare il prodotto.
• Utilizzare esclusivamente i dispositivi consigliati da Dreame con il prodotto. Ogni altro tipo di utilizzo è
improprio.
• È vietato far utilizzare il dispositivo ai bambini, alle persone con ridotte capacità siche, sensoriali e mentali
o a persone senza alcuna esperienza o conoscenza delle seguenti istruzioni. Le leggi locali possonostabilire
un'età minimaper l'operatore.
• Tenere i bambini lontani dal dispositivo quando è in funzione.
• Non utilizzare il prodotto in luoghi dove le persone non sono a conoscenza della presenza del dispositivo.
• Fare attenzione a non correre quando si manovra manualmente il dispositivo tramite l'app Dreamehome. È
preferibile camminare, prestare attenzione ad eventuali pendenze e mantenere sempre l'equilibrio.
• Evitare di usare il prodotto quando ci sono persone nell'area di lavoro, specie se bambini o animali.
• Se il prodotto viene utilizzato in aree pubbliche, posizionare cartelli intorno all'area di lavoro con la seguente
dicitura "Attenzione! Tosaerba automatico in movimento! Tenersi lontani dal dispositivo e tenere d'occhio i
bambini!"
• Indossare scarpe resistenti e pantaloni lunghi durante l'utilizzo del prodotto.
• Per evitare danni al prodotto e incidenti che coinvolgano veicoli e persone, non impostare aree di lavoro o
percorsi di trasporto su luoghi pubblici.
• Non toccare le parti pericolose in movimento, come le lame, no a che non si sono completamente fermate.
• Contattare il medico in caso di lesioni o incidenti.
• Impostare il prodotto su OFF prima di rimuovere blocchi, eseguire la manutenzione o esaminare il prodotto.
Se il prodotto vibra in modo anomalo, controllarlo per danni prima di riavviarlo. Non usare il prodotto se alcune
parti sono difettose.
• Non connettere o toccare alcun cavo danneggiato no a che non è stato rimosso dalla presa di corrente. Se
il cavo si danneggia durante l'utilizzo, togliere la spina dalla presa di corrente. Un cavo usurato o danneggiato
aumenta il rischio di scossa elettrica e deve essere sostituito dal personale di assistenza.
• Non posizionare il cavo principale nelle aree dove il dispositivo eseguirà il taglio. Seguire le istruzioni fornite
per l'installazione del cavo.
• Utilizzare esclusivamente la base di ricarica inclusa nel pacchetto per ricaricare il prodotto. Un uso non
corretto può provocare scosse elettriche, surriscaldamento o fuoriuscita di liquido corrosivo dalla batteria. In
caso di fuoriuscita di elettroliti, sciacquare con acqua/agente neutralizzante e contattare il medico se il liquido
corrosivo entra in contatto con gli occhi.
• Durante il collegamento del cavo principale alla presa di corrente, utilizzare il dispositivo di corrente residua
(RCD) con una corrente di intervento massima di 30 mA.
• Utilizzare esclusivamente le batterie originali consigliate da Dreame. La sicurezza del prodotto non può essere
garantita con l'utilizzo di batterie non originali. Non utilizzare batterie non ricaricabili.
• Tenere le prolunghe lontane dalle parti pericolose in movimento per evitare danni ai cavi, che potrebbero
portare al contatto con le parti sotto tensione.
• Le illustrazioni riportate in questo documento fungono solo da esempio. Si prega di fare riferimento ai prodotti
reali.
• Non spingere il prodotto con forza o rapidità, poiché ciò potrebbe danneggiarlo.
• Per mantenere la conformità con il requisito di esposizione alle RF, dovrebbe essere mantenuta una distanza
di separazione di 35 cm tra il dispositivo e la persona.
• Per ricaricare la batteria, utilizzare esclusivamente l'unità di alimentazione rimovibile fornita con questo
apparecchio.

116IT
• Tenere le mani e i piedi lontani dalle lame rotanti. Non posizionare le mani o i piedi vicino o sotto il prodotto
quando è acceso.
• Non sollevare o muovere il prodotto quando è acceso.
• Utilizzare la modalità Parcheggio o impostare il prodotto su OFF in presenza di persone nell'area di lavoro,
specie se si tratta di bambini o animali.
• Assicurarsi che sul prato non vi siano oggetti come pietre, rami, attrezzi o giocattoli, in quanto le lame
potrebbero subire danneggiamenti.
• Non posizionare oggetti sopra al prodotto o alla base di ricarica.
• Non usare il prodotto se il pulsante STOP non è attivo.
• Evitare la collisione del prodotto con persone o animali. Se una persona o animale si trova nel percorso del
dispositivo, fermarlo immediatamente.
• Impostare sempre il prodotto su OFF quando non è in funzione.
• Non utilizzare il prodotto contemporaneamente ad un irrigatore a scomparsa. Utilizzare la funzione
Programma per evitare che il prodotto e l'irrigatore a scomparsa operino contemporaneamente.
• Evitare di posizionare una rete di collegamento nel punto in cui si trovano gli irrigatori a scomparsa.
• Non utilizzare il prodotto in aree dove è presente acqua stagnante, come per esempio durante forti piogge.
1.3 Istruzioni di sicurezza durante l'utilizzo del dispositivo
• Imposta il prodotto su OFF durante la manutenzione.
• Scollegare la spina dalla base di ricarica o rimuovere il dispositivo di disattivazione prima di eseguire la pulizia
o la manutenzione della base di ricarica.
• Non utilizzare idropulitrici o solventi per pulire il prodotto.
• Dopo il lavaggio, assicurarsi che il prodotto sia posizionato a terra orientato normalmente e non capovolto.
• Non capovolgere il prodotto per pulire il telaio. Se il dispositivo viene capovolto per la pulizia, assicurarsi di
riposizionarlo a terra orientato correttamente. Questo tipo di precauzione serve per evitare che l'acqua penetri
nel motore, con il pericolo di comprometterne il normale funzionamento.
Le batterie agli ioni di litio possono esplodere o provocare un incendio se smontate, cortocircuitate, esposte
all'acqua, al fuoco o alle alte temperature, quindi è necessario maneggiarle con cura. Non smontare o aprire la
batteria ed evitare qualsiasi utilizzo improprio. Tenerle lontane dalla luce del sole.
1. Utilizzare esclusivamente il caricabatterie e l'alimentatore forniti dal produttore. L'utilizzo di un caricabatterie
o di un alimentatore non appropriato può provocare scosse elettriche e / o surriscaldamento.
2. NON RIPARARE O MODIFICARE IN ALCUN MODO LE BATTERIE! Provare a modicare o a riparare le batterie può
provocare lesioni personali, causate da esplosione o scossa elettrica. Se la batteria si danneggia e fuoriesce un
liquido, gli elettroliti rilasciati sono corrosivi e tossici.
3. Le batterie di questo dispositivo possono essere sostituite solo da persone esperte.
1.4 Istruzioni di sicurezza per la manutenzione
1.5 Sicurezza della batteria
• Evitare di installare la base di ricarica in aree in cui le persone possono inciamparvi.
• Non installare la base di ricarica in aree in cui è presente il rischio di ristagno d'acqua.
• Non installare la base di ricarica, incluso qualunque altro accessorio, a meno di 60 cm/24 pollici da qualsiasi
materiale combustibile. Il malfunzionamento o il riscaldamento della base di ricarica e dell'alimentatore
possono provocare il rischio di incendio.
• Per gli utenti in USA/Canada: l'installazione dell'alimentatore all'esterno può comportare il rischio di scossa
elettrica. Installare l'alimentatore esclusivamente in una presa GFCI (RCD) di classe A, coperta con un involucro
resistente alle intemperie, assicurandosi che il contenitore della spina sia inserito oppure rimosso.
1.2 Istruzioni di sicurezza per l'installazione
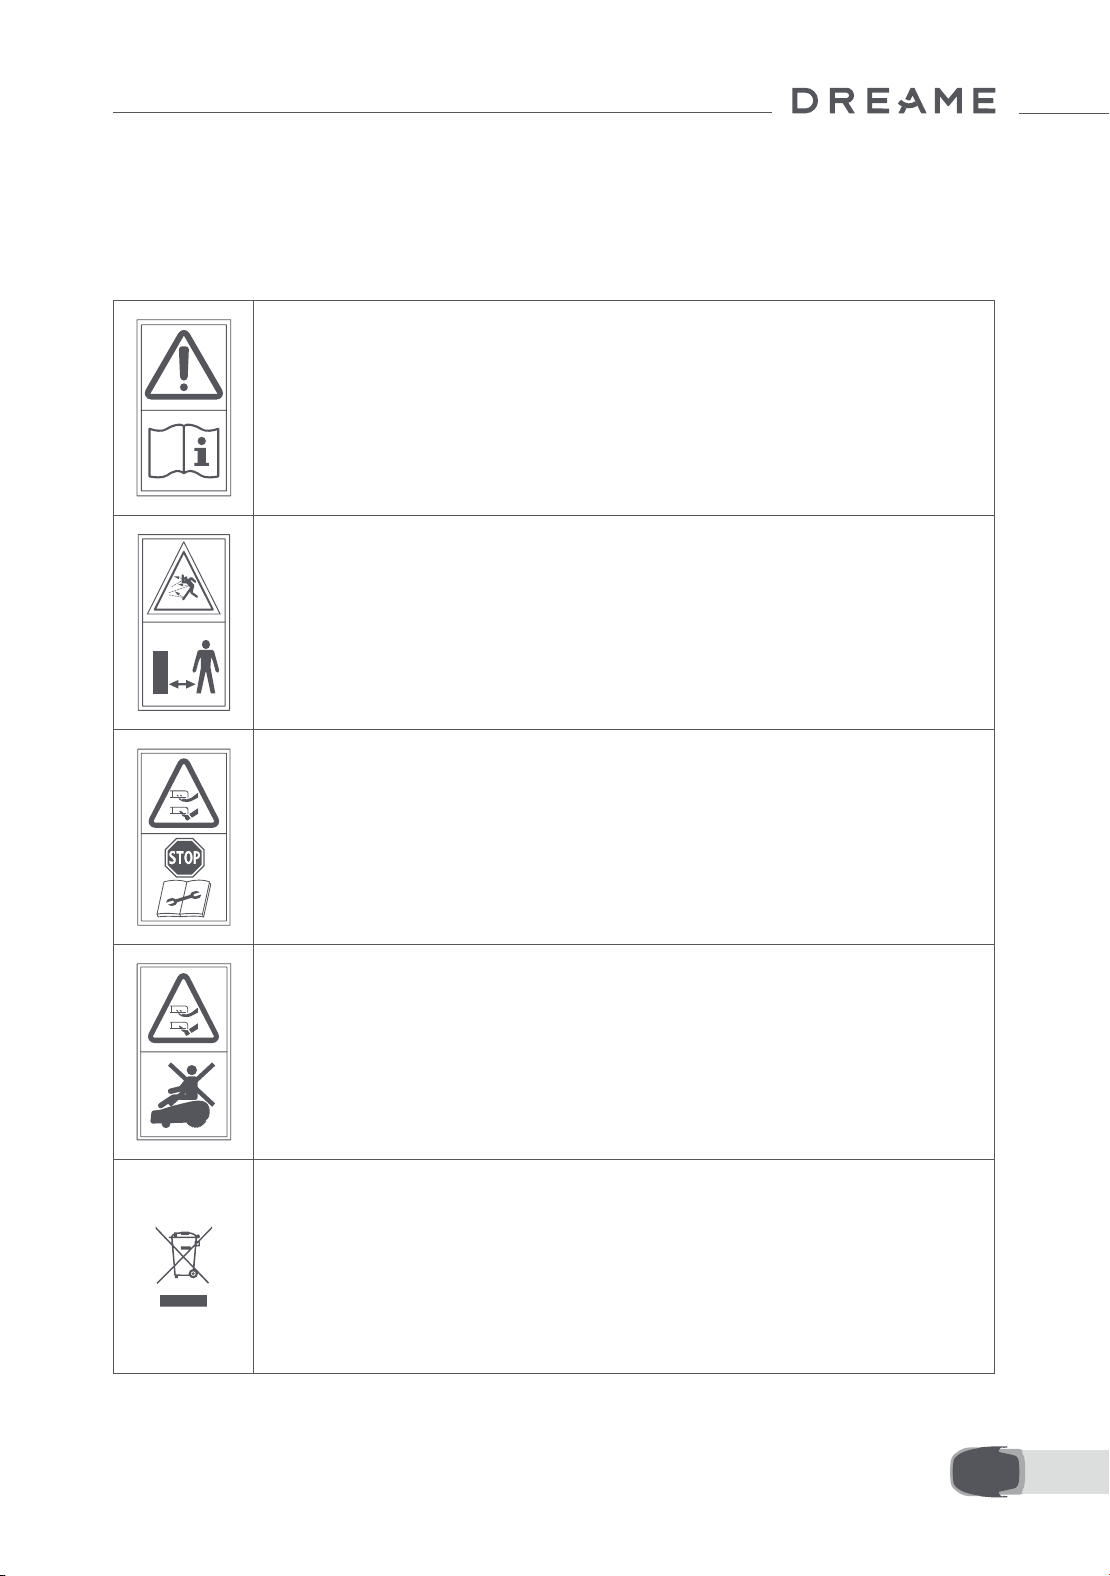
117 IT
1.7 Symbols and Decals
ATTENZIONE -
Leggere le istruzioni per l'uso prima di utilizzare la macchina.
ATTENZIONE -
Mantenere la distanza di sicurezza dalla macchina quando è in
funzione.
ATTENZIONE -
Azionare il dispositivo di disattivazione prima di maneggiare o
sollevare la macchina.
ATTENZIONE -
Non salire sulla macchina.
ATTENZIONE -
Non è consentito smaltire questo prodotto come normale riuto
domestico. Assicurarsi che il prodotto venga riciclato in
conformità delle leggi locali.
Quando si sostituiscono le lame, per evitare il rischio di lesioni personali si consiglia di indossare guanti
protettivi.
1.6 Rischi residui
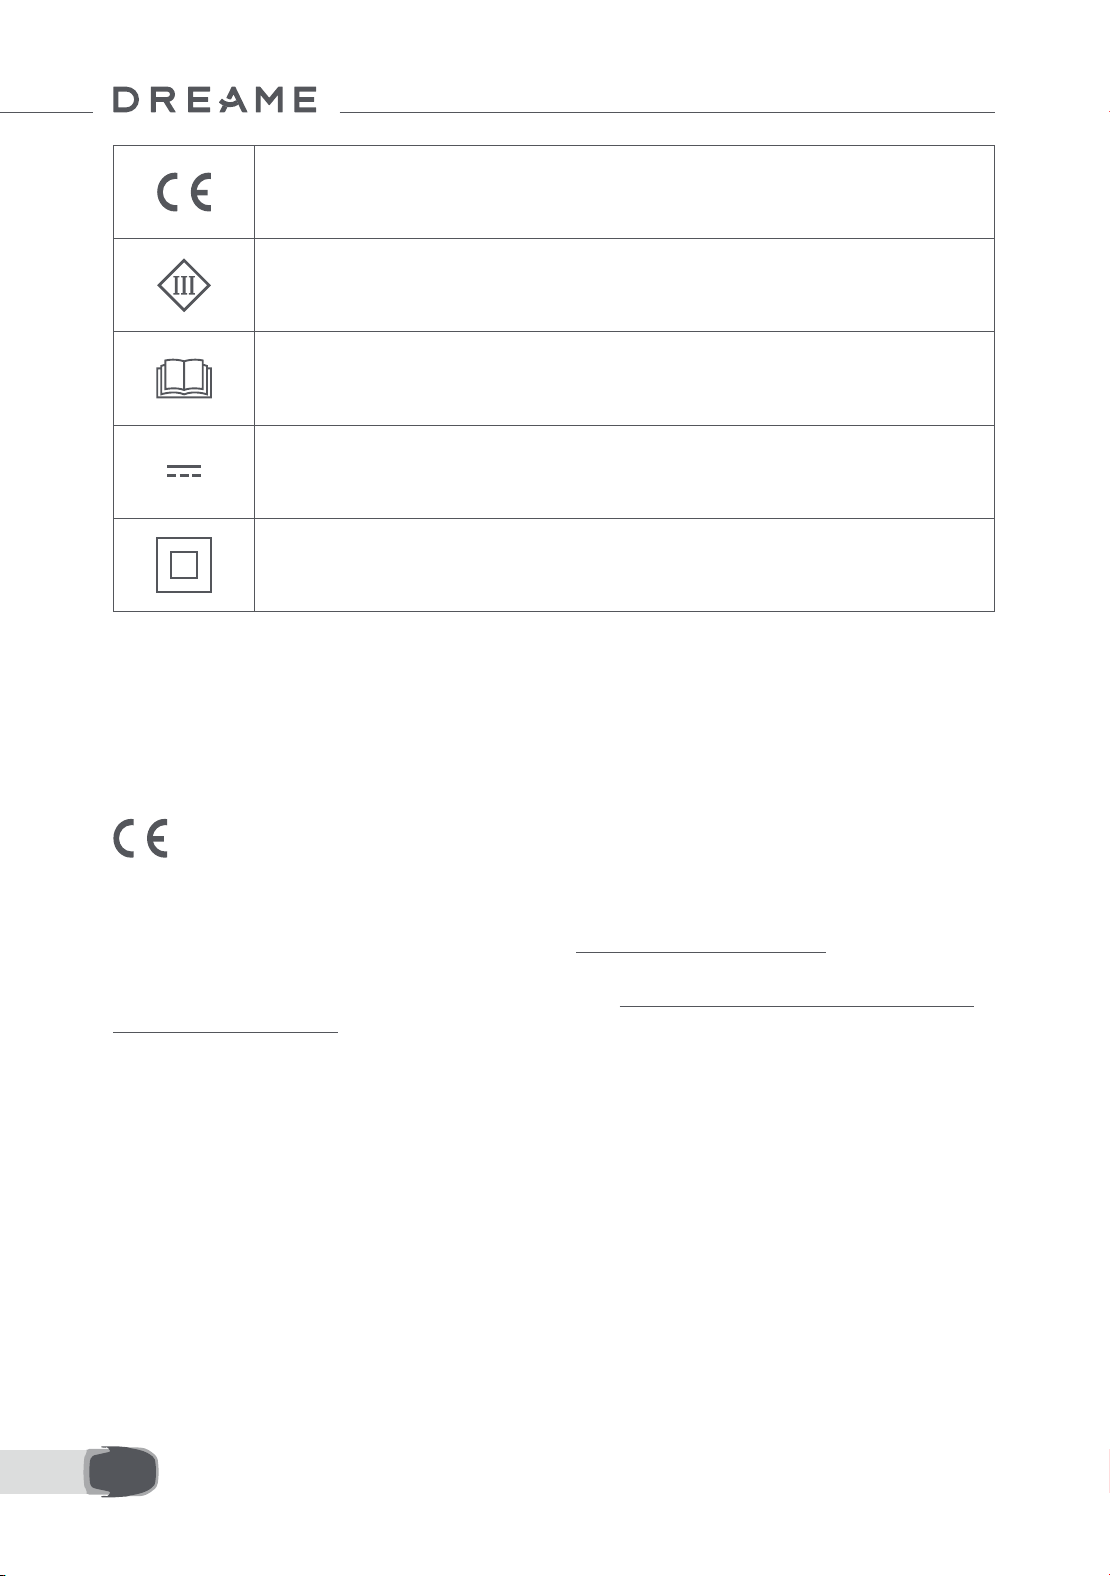
118IT
Questo prodotto è conforme alle direttive CE applicabili.
Classe III
Leggi le istruzioni prima di ricaricare.
Corrente continua
Classe II
Il prodotto da giardino è destinato alla falciatura del prato domestico. È progettato per falciare spesso,
mantenendo un prato più sano e dall'aspetto migliore che mai. A seconda delle dimensioni del tuo prato, il
tuo tosaerba può essere programmato per funzionare in qualsiasi momento o frequenza. Non è adatto per
scavare, spazzare o rimuovere la neve.
Con la presente, Dreame Trading (Tianjin) Co., Ltd. dichiara che il modello di apparecchiatura radio Dreame
Roboticmower MLLA7110 è conforme alla Direttiva 2014/53/UE. Il testo completo della dichiarazione di
conformità UE è disponibile al seguente indirizzo internet: https://global.dreametech.com
Per il manuale dettagliato in formato digitale, visitare la pagina https://dreametech.zendesk.com/hc/en-us/
categories/7968864195993-User-Manual
USO PREVISTO

119 IT
2 Cosa c'è nella scatola
11
Guida avvio rapido
1
Coperchio protettivo LiDAR
2
A1 Pro
3
Torre di ricarica
(con una prolunga da 10 m)
4
Piastra di base
5
Alimentazione elettrica
6
Spazzola di pulizia
7
Viti × 8, Chiave esagonale
8
Lama di riserva × 9
9
Manuale utente
10
Panno senza pelucchi
1
2
3
4
5 6
8 97
10 11
Dreame Roboticmower A1 Pro
User Manual

120IT
3 Panoramica del prodotto
Contatti di ricarica
Scomparto batteria
Disco a lama
Ruota anteriore
Ruota motrice fuoristrada
LiDAR
Schermo
Manopola
Pulsante di stop
Sensore
Nome Descrizione
Lidar
Ottiene informazioni ambientali e facilita il posizionamento di A1 Pro, l'evitamento degli
ostacoli e il rilevamento di acqua e sporco.
Campo di rilevamento: 70 m con un angolo di 360° orizzontali e 59° verticali.

121 IT
4 Installazione
4.1 Seleziona una posizione adatta
• Posiziona la stazione di ricarica su una supercie piana vicino al bordo del prato e a una presa di corrente. Si
raccomanda di posizionare la stazione di ricarica in una zona con una buona copertura del segnale Wi-Fi.
Nota: Usa il tuo dispositivo mobile per aiutare a controllare la forza del segnale Wi-Fi della zona. Una buona
forza del segnale di rete Wi-Fi aumenta la stabilità di connessione tra A1 Pro e l'app.
Nota: Assicurati che il terreno sia abbastanza morbido da permettere l'installazione a vite.
• Mantieni almeno 1 m di spazio libero senza ostacoli a sinistra, a destra e davanti alla stazione di ricarica.
Assicurati che l'erba intorno alla zona sia più corta di 6 cm. Se l'erba è più alta, falciala con un falciaerba a
spinta prima. L'erba alta può essere dicile per far tornare A1 Pro alla stazione di ricarica.
4.2 Installa la stazione di ricarica
1
Fissa la piastra di base al suolo con le viti in dotazione usando la chiave esagonale.

122IT
2
Inserisci la torre di ricarica alla piastra di base no a sentire un click.
3
Inserisci il pennello di pulizia nella torre di ricarica allineando la linguetta con la scanalatura.
4
Connetti l'alimentazione al cavo di prolunga e poi connetti a una presa di corrente. Mantieni l'alimentatore
almeno 30 cm sopra il terreno.
Nota: L'indicatore LED sulla stazione di ricarica sarà di colore blu sso se c'è corrente.
5
Metti A1 Pro nella stazione di ricarica a ricaricare. Assicurati che i contatti di ricarica su A1 Pro e la stazione di
ricarica siano connessi correttamente.
Nota: La spia luminosa lampeggerà verde se A1 Pro si sta caricando correttamente nella stazione di ricarica.
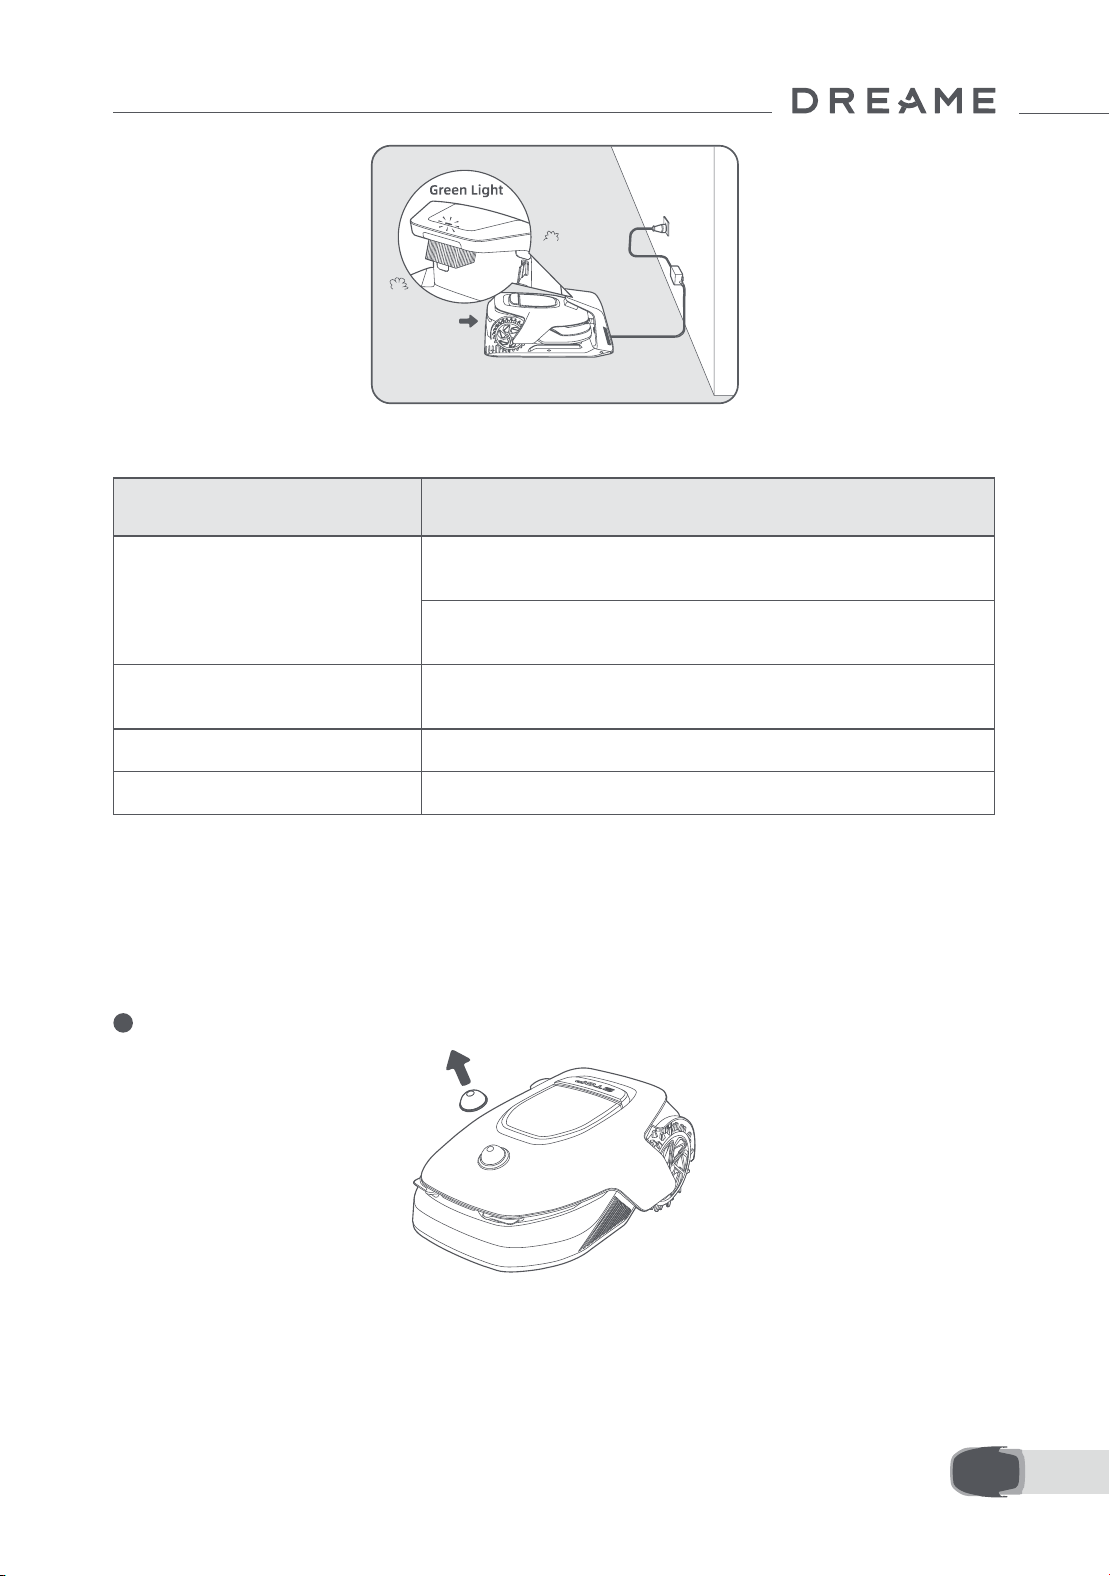
123 IT
L'indicatore LED sulla stazione di ricarica
Quando A1 Pro è acceso per la prima volta, ci sono delle impostazioni di base da fare prima che A1 Pro sia
pronto ad iniziare a lavorare.
5 Preparazioni prima dell'uso
Colore Luce Indicatore LED Signicato
Rosso lampeggiante/sso
1. La stazione di ricarica ha un problema (per esempio una corrente
di ricarica o un problema di voltaggio).
2. A1 Pro si aggancia alla stazione di ricarica ma la ricarica è
anormale (per esempio i contatti di ricarica hanno un corto circuito).
Blu sso
La stazione di ricarica ha corrente. A1 Pro non è nella stazione di
ricarica.
Verde lampeggiante A1 Pro si sta ricaricando nella stazione di ricarica.
Verde sso A1 Pro è nella stazione di ricarica e completamente carico.
1
Rimuovi il coperchio protettivo LIDAR.
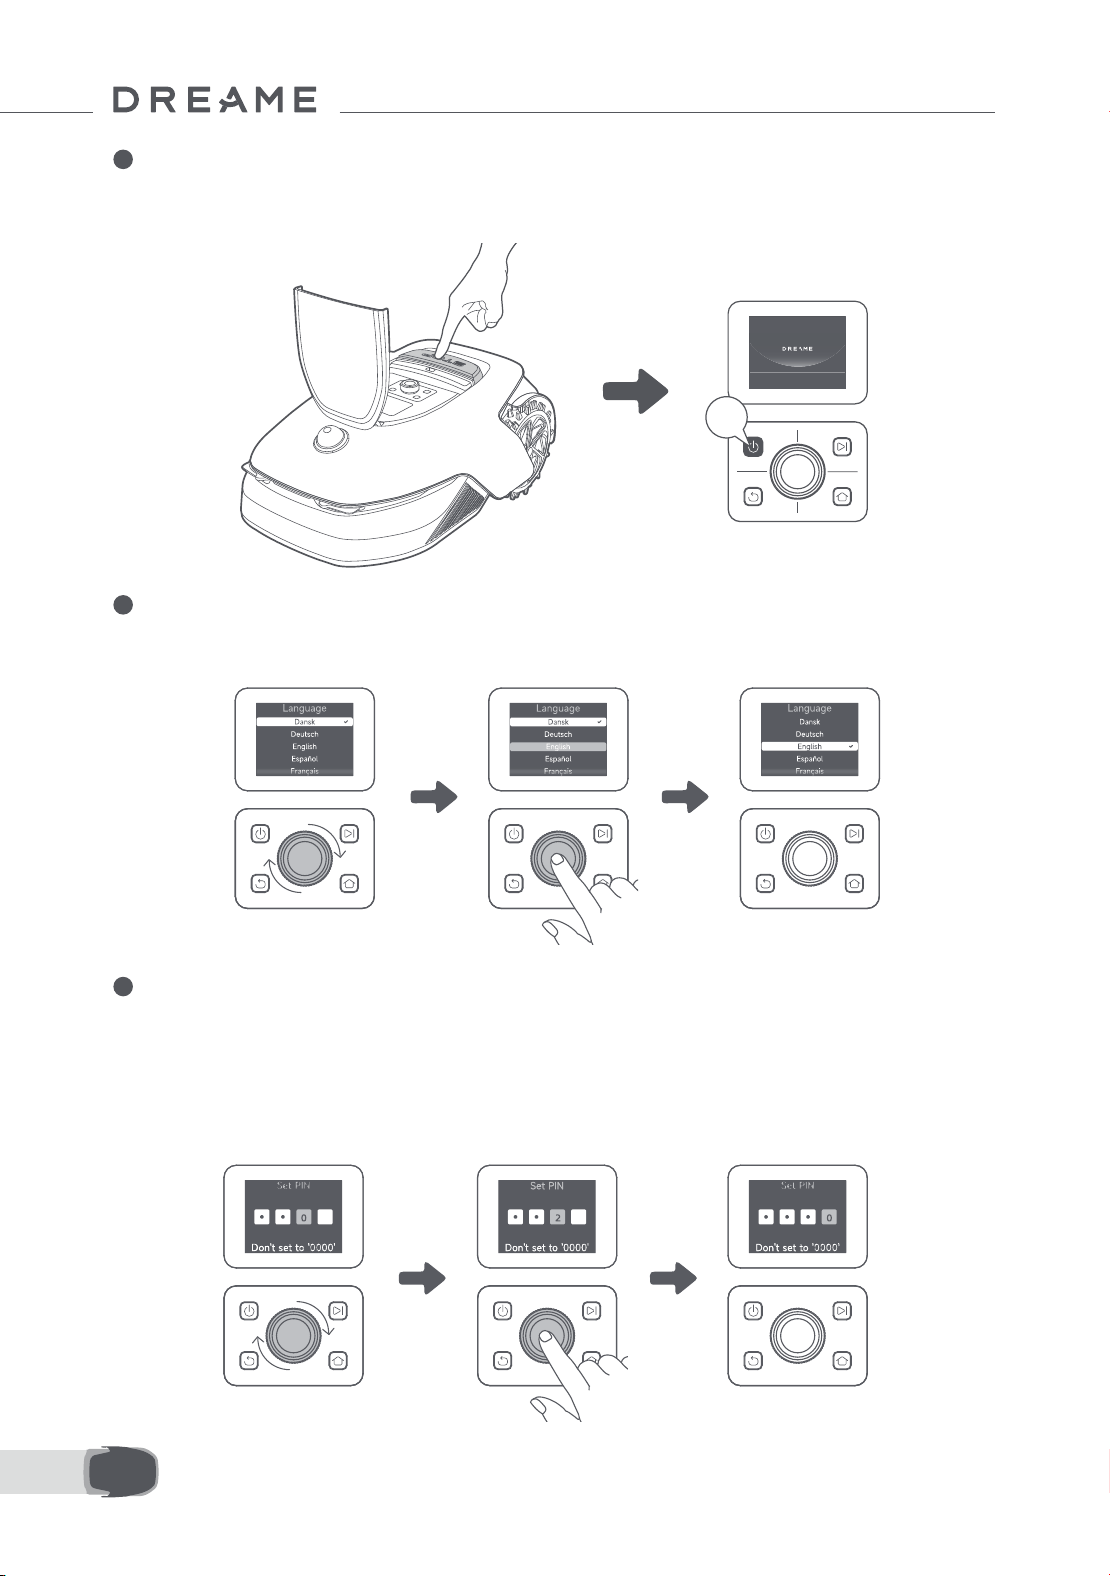
124IT
2
Premi il pulsante Stop per aprire il coperchio del pannello di controllo. Tieni premuto sul pannello di controllo
per 2 secondi per accendere A1 Pro.
Nota: A1 Pro si accende automaticamente quando si aggancia alla stazione di ricarica.
3
Seleziona la lingua che preferisci
Gira la manopola in senso orario per andare giù e in senso antiorario per andare su per selezionare la tua
lingua. Premi la manopola per confermare.
4
Imposta codice PIN
1. Gira la manopola per selezionare un numero da 0 a 9. Girala in senso orario per aumentare il numero da 0 a
9 e girala in senso antiorario per diminuire il numero. Premi la manopola per impostare il numero seguente. Per
modicare il numero precedente, gira la manopola in senso antiorario no a che il numero diventa 0 e continua
a girarla ancora una volta.
Nota: Non impostare il codice PIN su "0000".
2s
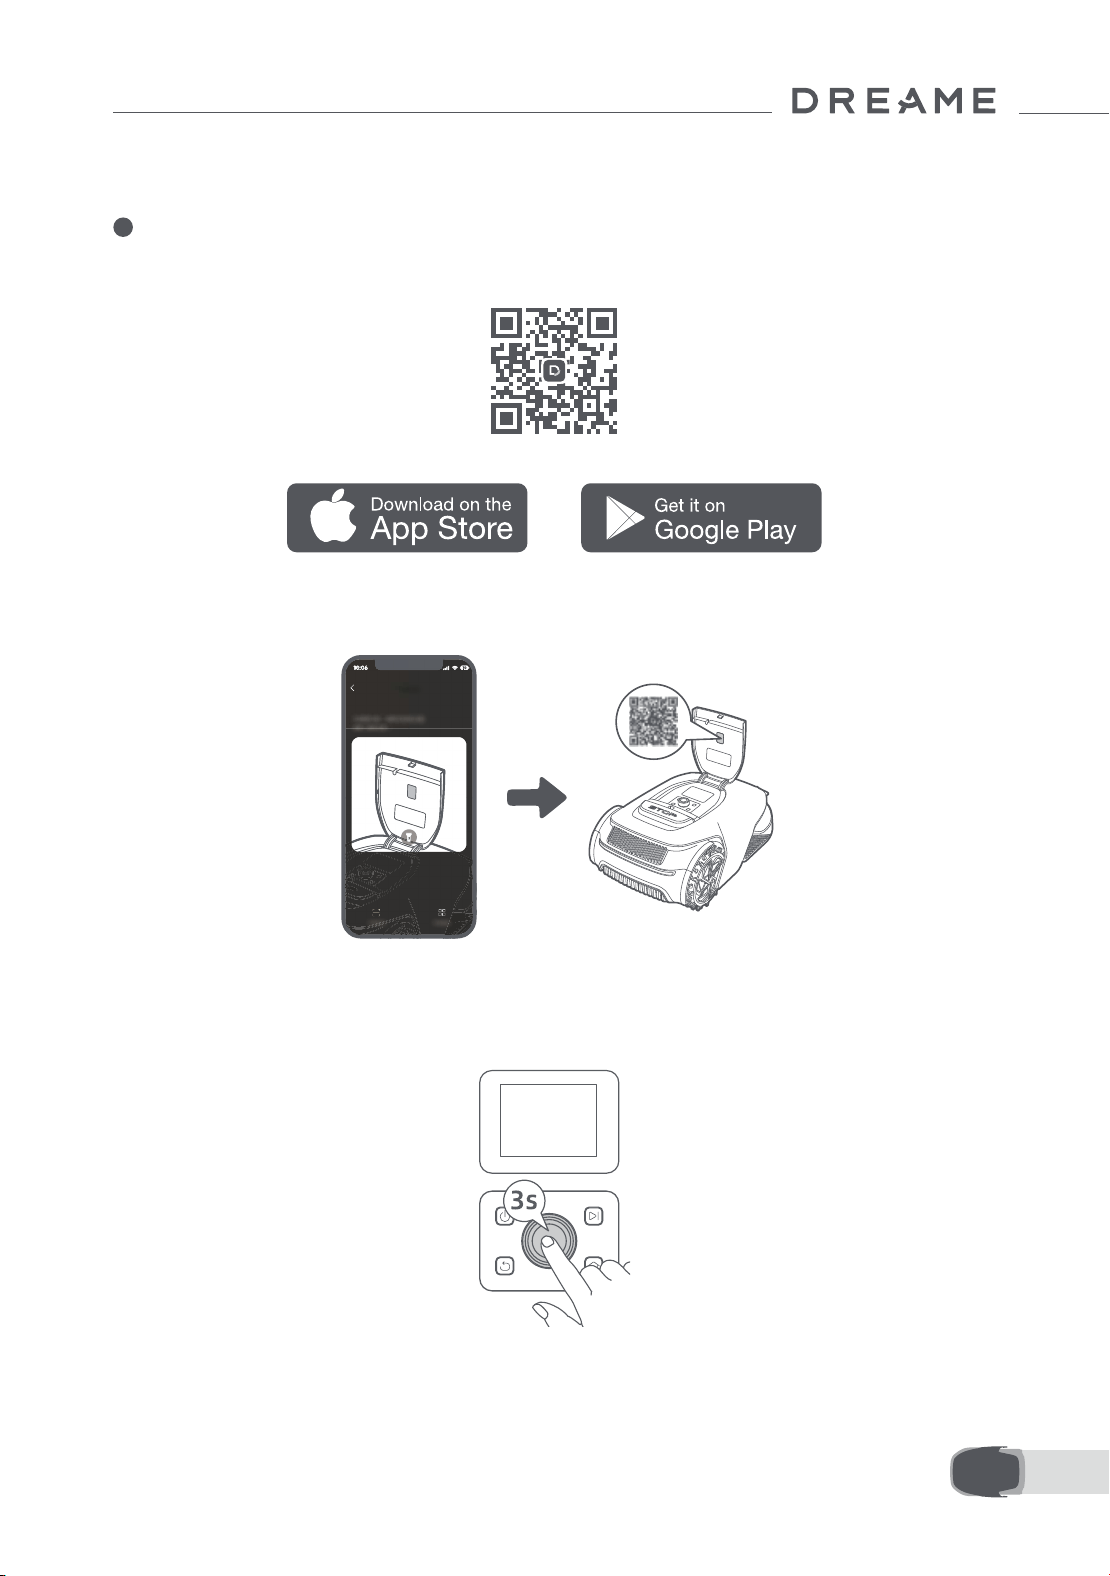
125 IT
2. Inserisci il codice PIN di nuovo per completare l'impostazione del codice PIN.
Nota: Se due password non combaciano, imposta di nuovo la nuova password.
5
Connetti A1 Pro a internet
Scansiona il codice QR per scaricare l'app Dreamehome sul tuo dispositivo mobile. Dopo l'installazione, crea
un account e accedi.
Puoi anche scaricare l'app Dreamehome da App Store o Google Play.
1) Connessione Bluetooth
1. Abilita la funzione Bluetooth sul tuo dispositivo mobile.
2. Scansiona il codice QR dentro la cover o seleziona A1 Pro manualmente tramite l'app.
3. Tieni premuta la manopola sul pannello di controllo per 3 secondi e A1 Pro accede alla modalità di
accoppiamento Bluetooth.
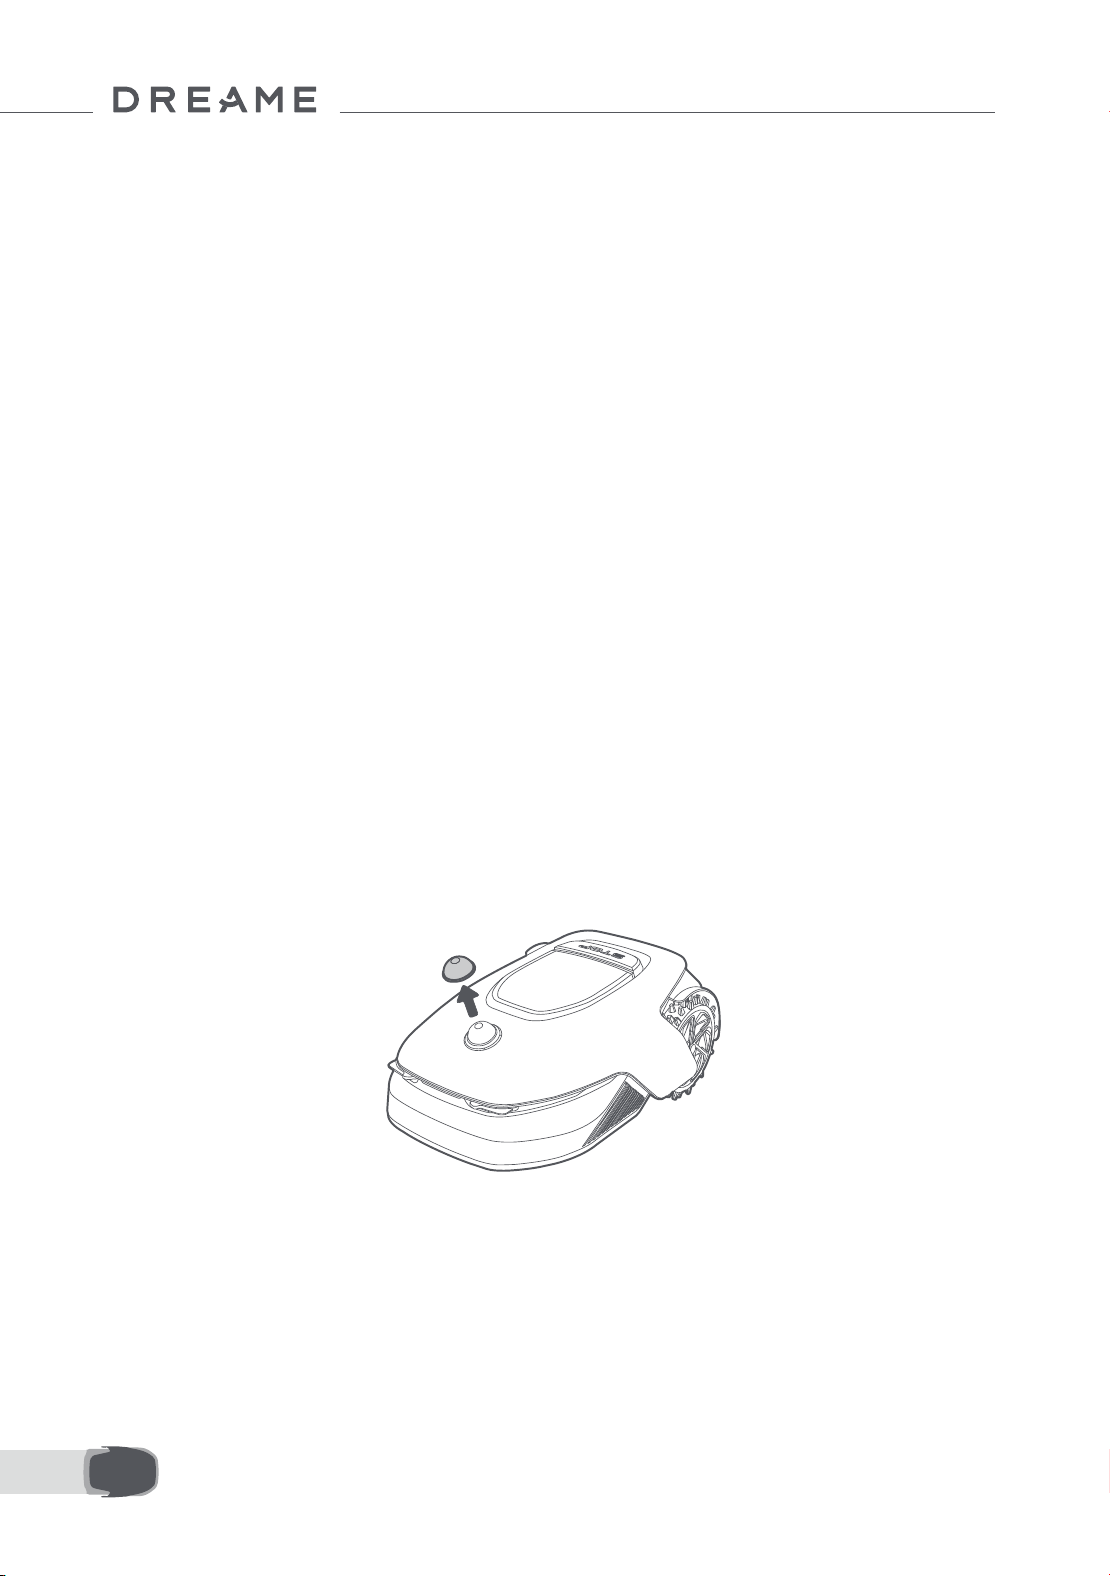
126IT
4. Accoppia A1 Pro con il tuo dispositivo mobile tramite Bluetooth.
Nota: Assicurati che il tuo dispositivo mobile sia entro 10 m da A1 Pro.
2) Connessione Wi-Fi
Assicurati che A1 Pro e il tuo dispositivo mobile siano sulla stessa rete Wi-Fi. Segui la guida in-app per
completare la connessione.
Nota: Usare una singola banda di rete di 2.4 GHz di frequenza o a banda doppia di frequenza 2.4/5 GHz.
Nota: Puoi acquistare il Modulo Link per controllare da remoto A1 Pro senza connessione Wi-Fi.
Come scollegare A1 Pro?
A1 Pro è automaticamente collegato all'account Dreamehome una volta che l'accoppiamento è riuscito. Ogni
dispositivo può essere solo collegato a un account. Non può essere collegato a un altro account allo stesso
tempo.
Per accoppiare A1 Pro con un nuovo account, prima è necessario scollegarlo. Per scollegare il dispositivo,
andare su "Dispositivo" e cliccare su More > Elimina nell'angolo destro in alto.
Come disconnetterti dal tuo account Dreamehome o eliminarlo?
Per disconnetterti, vai a Io > Impostazioni > Account >Disconnettiti. Per eliminare l'account, vai su Io >
Impostazioni > Account > Elimina Account.
Prima di mappare, controlla i seguenti:
• Il livello di batteria di A1 Pro è più del 50%.
• Il coperchio protettivo di LIDAR è rimosso.
6 Mappa il tuo giardino
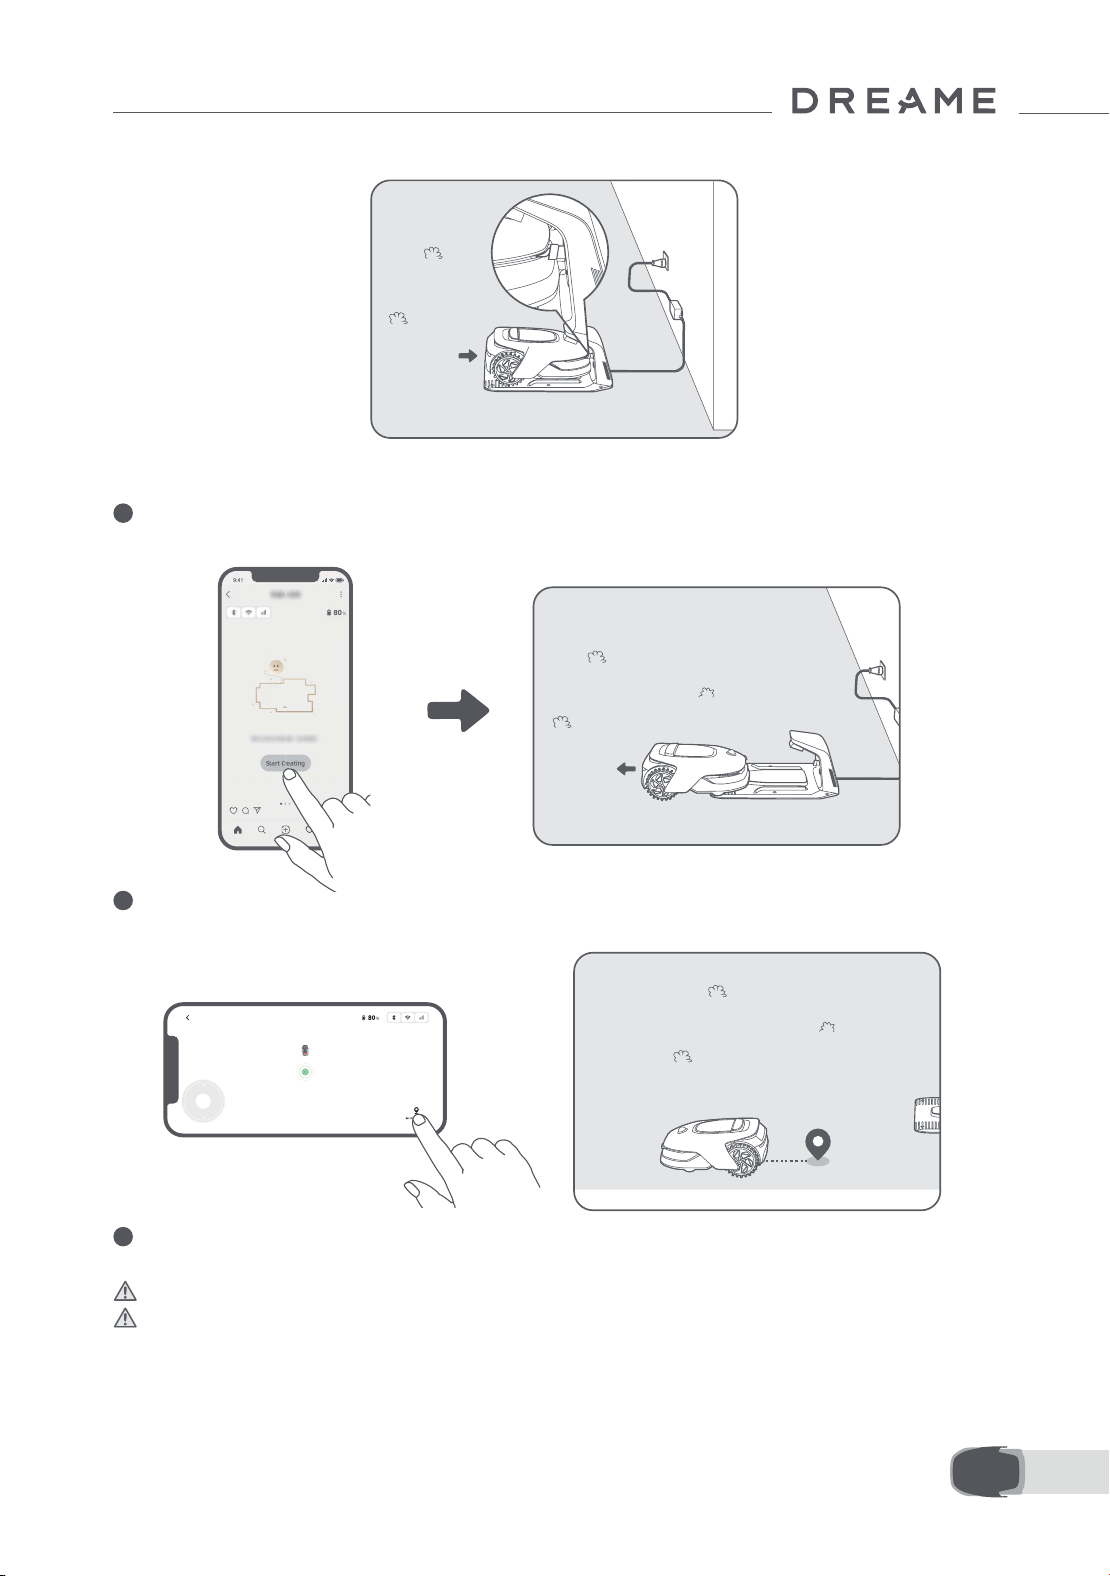
127 IT
• A1 Pro si aggancia correttamente alla stazione di ricarica.
6.1 Crea il conne
1
Tocca "Inizia a creare" tramite l'app, e A1 Pro controlla il suo stato e calibra. Lascia automaticamente la
stazione di ricarica per fare la calibrazione. Fare attenzione.
2
Controlla da remoto A1 Pro no al bordo del tuo prato e tocca "Imposta il punto di partenza" per confermare
il punto di inizio del conne.
3
Controlla da remoto A1 Pro per muoverlo lungo il bordo del tuo prato per creare la zona di lavoro. Quando
controlli da remoto A1 Pro per creare il conne, tieni a mente:
Attenzione: Non spostare manualmente A1 Pro quando crei il conne, altrimenti la mappatura fallisce.
Attenzione: Quando la mappatura viene avviata da remoto, non far attraccare A1 Pro nella base di ricarica
prima della ne della mappatura, altrimenti il LiDAR rischia di bloccarsi e la mappatura viene annullata.
• Cammina entro 5 m dietro A1 Pro quando lo controlli da remoto.

128IT
• Non creare il conne su una pendenza che supera il 27%.
• Se c'è una dierenza di altezza di più di 4 cm tra il bordo del tuo prato e il terreno adiacente, tieni A1 Pro
almeno a 10 cm dal bordo del tuo prato.
• Evita di creare conni dentro corridoi più stretti di 1.5 m.

129 IT
• Assicurati che gli angoli di svolta siano maggiori di 90° .
4
Quando A1 Pro ritorna a posto 1 m vicino al punto di inizio, puoi toccare "Chiudi il conne" e il conne
automaticamente è completato.
6.2 Imposta zona di delimitazione
Anche se A1 Pro può automaticamente evitare gli ostacoli, è ancora necessario impostare le zone in cui
potrebbe cadere, come piscine e sabbiere, come zone vietate. Per gli oggetti che vuoi proteggere (come
un'aiuola, un trampolino, un orto o la radice nuda di un albero), impostali come zone di delimitazione. Si
possono impostare zone vietate per A1 Pro tramite la app oppure andare su "Modica mappa" per disegnare o
cancellare le zone vietate direttamente sulla mappa.
6.3 Imposta zone multiple
Se il tuo prato è separato da strade o se hai molti prati isolati, puoi toccare "Zona di lavoro" nell'app per
continuare a creare la zona di lavoro da controllo remoto. Puoi anche aggiungere, eliminare o modicare le
zone in "Modica Mappa" quando la mappa è nita.
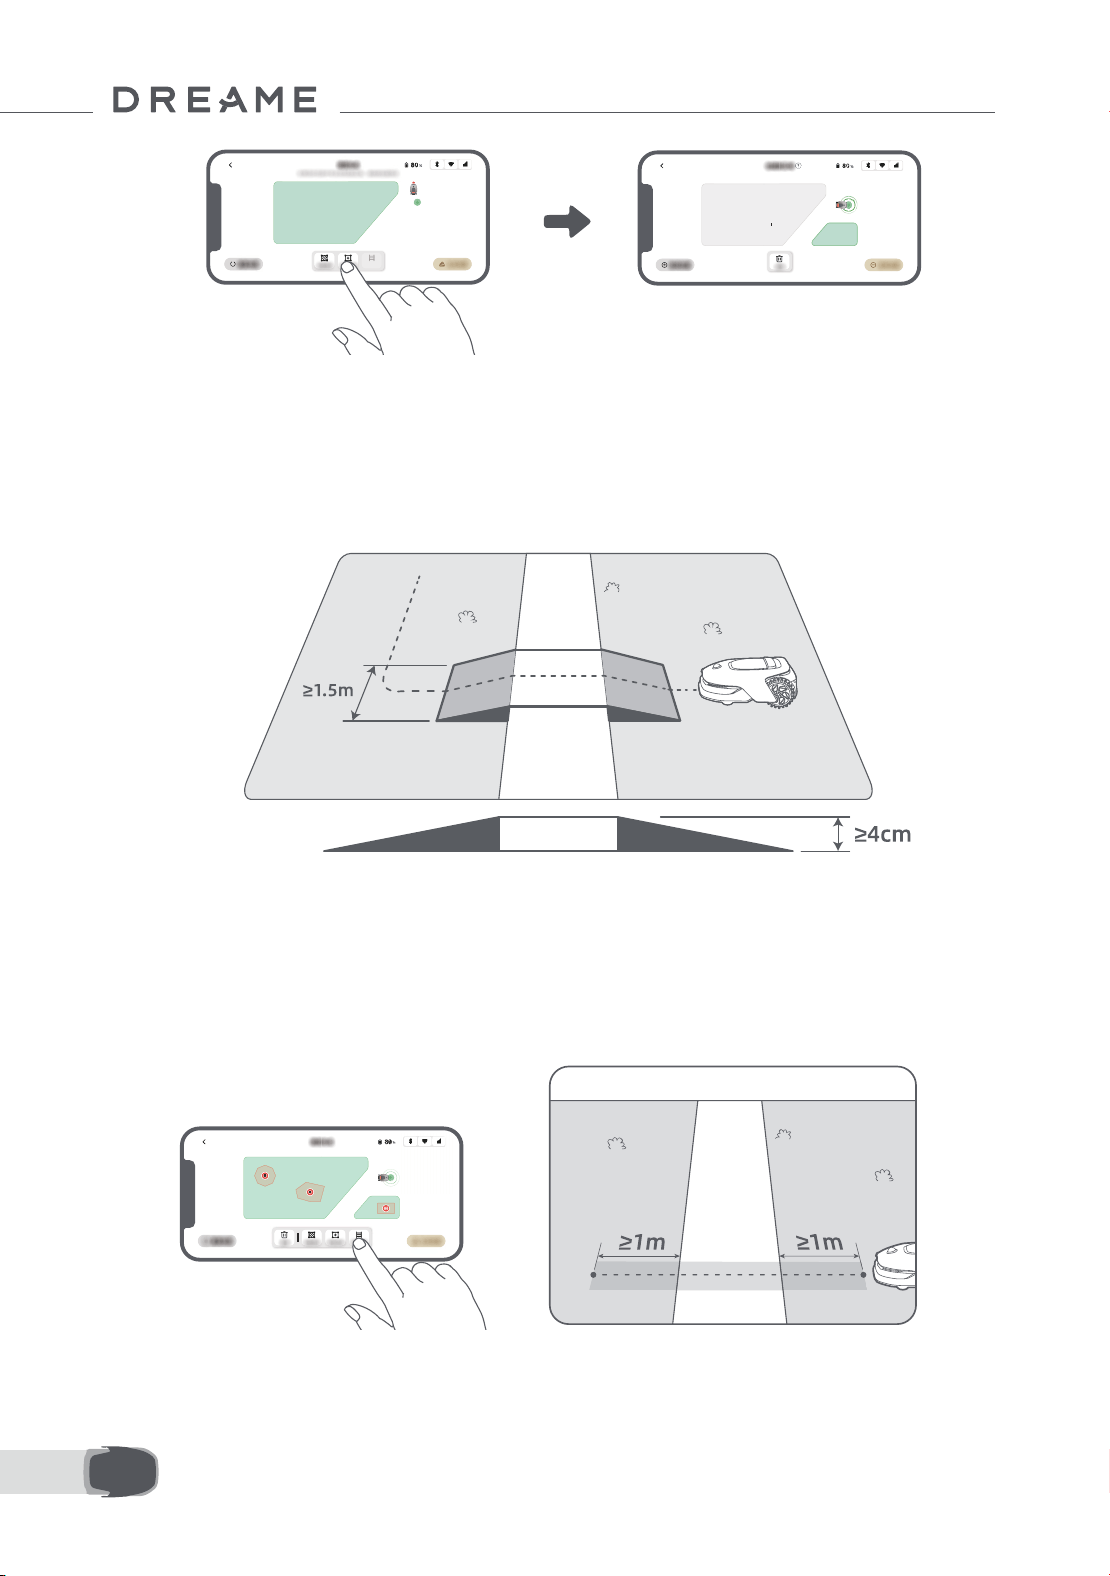
130IT
6.4 Imposta percorso
• Per connettere due zone di lavoro isolate
Se c'è uno spazio di sovrapposizione tra la nuova zona e la zona originale, esse saranno automaticamente
combinate. Per zone isolate, crea percorsi per connetterle, altrimenti saranno inaccessibili a A1 Pro. Tocca
"Percorso" e controlla da remoto A1 Pro per creare un percorso.
Note: Assicurati che l’inizio e la ne del percorso siano nella zona di lavoro. Mantieni almeno 1 m di distanza
tra inizio/ne del percorso e il conne.
Per zone isolate, crea un percorso per connetterle. Zone isolate senza un percorso saranno inaccessibili a A1
Pro.
Nota: Di default, A1 Pro si muove soltanto lungo il percorso ma non taglia l'erba.
Nota: Se il tuo prato è diviso da passaggi più alti di 4 cm, posiziona un oggetto con una pendenza uguale in
altezza al passaggio (come una rampa).
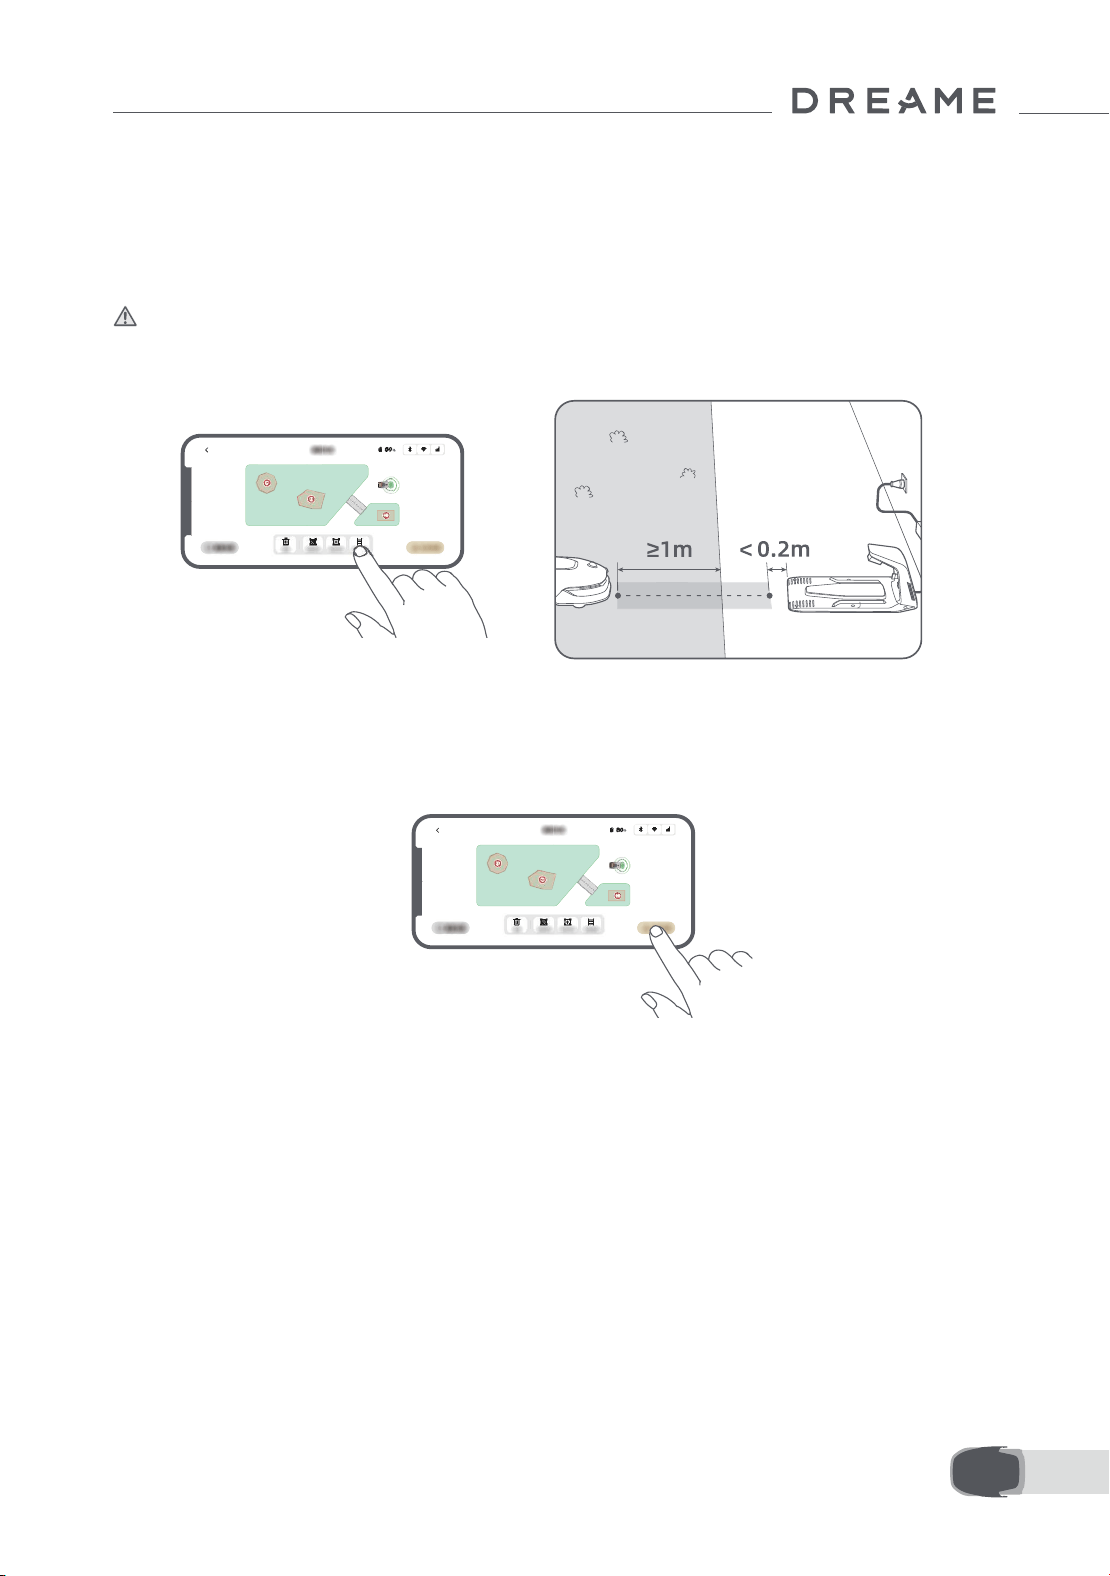
131 IT
6.5 Finire mappa
Tocca "Finire mappa" quando le zone di lavoro, i percorsi e le zone di delimitazione sono completate. A1 Pro
deve essere dentro la mappa quando la mappa è nita, altrimenti ti sarà chiesto di usare il controllo remoto
per riportarlo dentro la mappa.
• Per connettere la zona di lavoro e la stazione di ricarica
Se la tua stazione di ricarica non è nella zona di lavoro, deve essere creato un percorso per collegarla alla zona
di lavoro. Tocca "Percorso", e controlla da remoto A1 Pro per creare un percorso che gli permetta di tornare alla
stazione.
Nota: Quando crei un percorso, assicurati che una estremità si sovrapponga con la zona di lavoro di almeno 1
metro ( ≥ 1 m) e che l'altra estremità sia a meno di 0,2 metri ( < 0,2 m) davanti alla stazione.
Attenzione: Durante la creazione del percorso di collegamento tra l'area di lavoro e la base di ricarica,
non far attraccare A1 Pro da remoto nella base di ricarica, altrimenti il LiDAR rischia di bloccarsi e la mappatura
viene annullata.
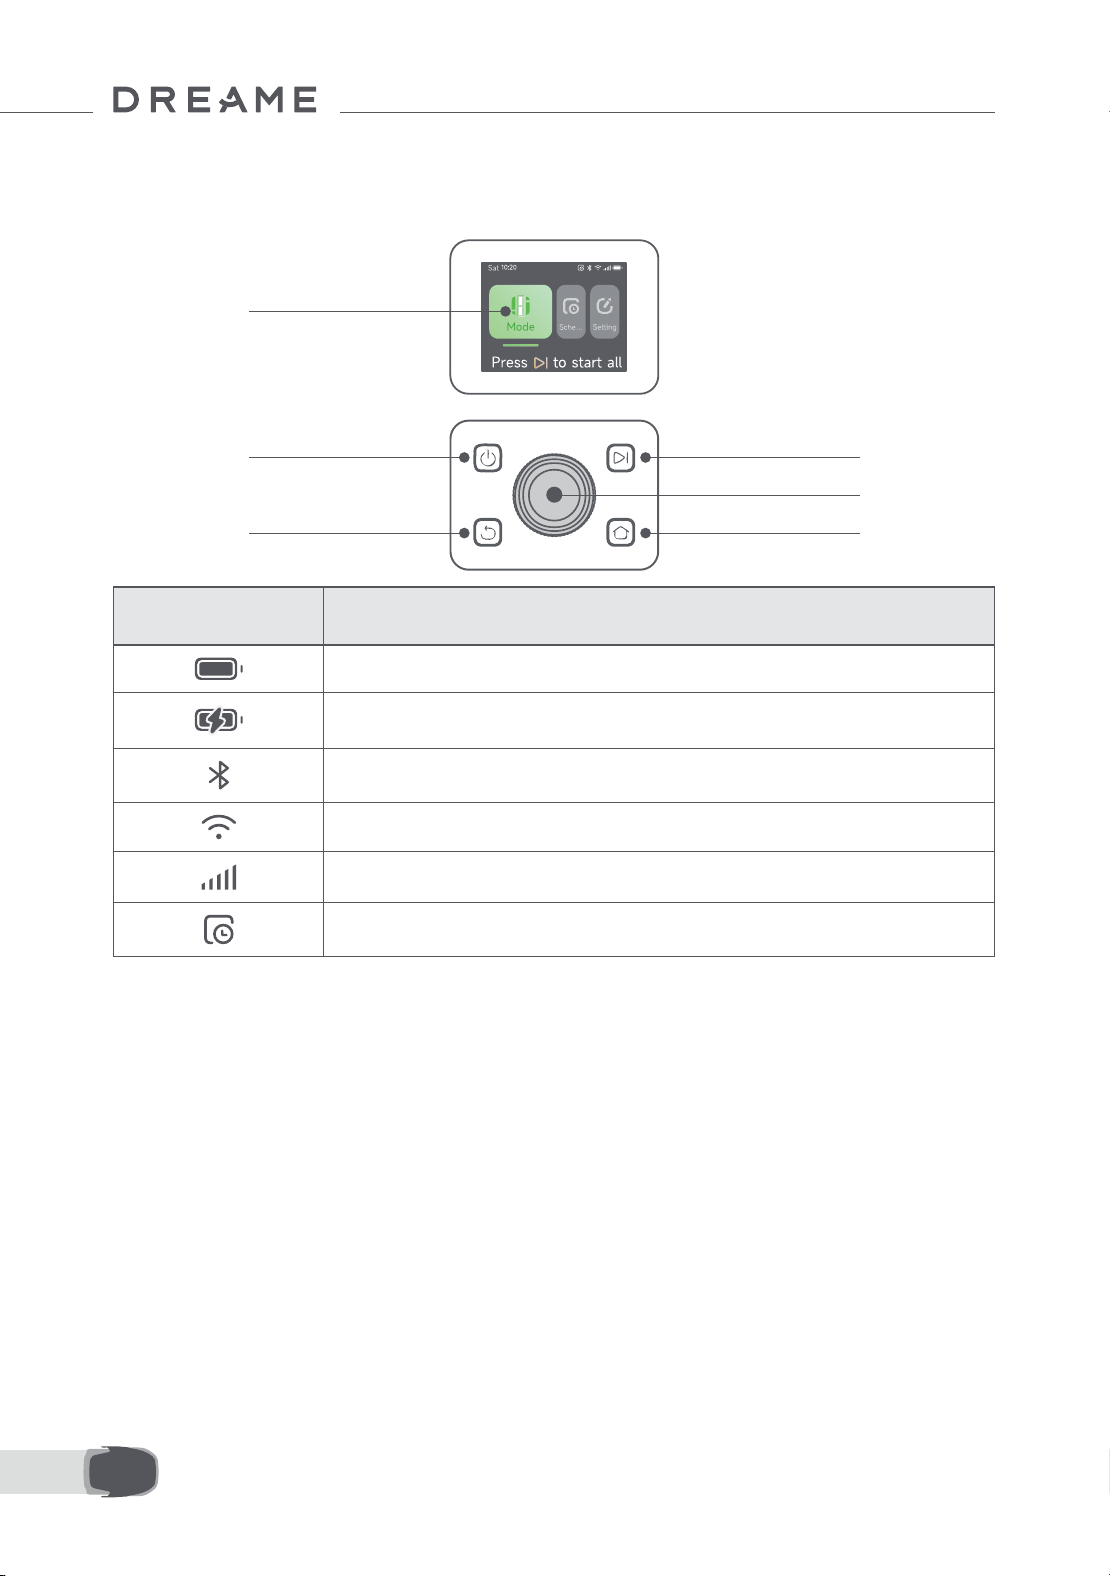
132IT
7.1 Familiarizza con il pannello di controllo
7 Operazione
Accensione
on/o
Schermo
Indietro
Avvio
Manopola
Home
Icona Stato
Livello batteria (Mostra il livello corrente di batteria).
In carica (A1 Pro si aggancia bene alla stazione di ricarica).
Bluetooth (A1 Pro è connesso all'app tramite Bluetooth.)
Wi-Fi (A1 Pro è connesso all'app tramite una rete Wi-Fi.)
Servizio Link (servizio Link attivato).
Programma (Un'attività è programmata per oggi ma non è ancora iniziata).
133 IT
Pulsante Funzione
Alimentazione
Assicurati che A1 Pro sia fuori dalla stazione di ricarica. Tieni premuto il pulsante di
Alimentazione per 2 secondi per accenderlo o spegnerlo.
Avvio
Premi il pulsante Avvio e chiudi il coperchio entro 5 secondi per iniziare a falciare.
L'attività è cancellata se il coperchio non è chiuso entro 5 secondi.
Home
Premi il pulsante Home e chiudi il coperchio entro 5 secondi per rimandare A1 Pro
alla stazione di ricarica. L'attività è cancellata se il coperchio non è chiuso entro 5
secondi.
Indietro
Premi il pulsante Indietro per tornare alla pagina precedente.
Manopola
Premi la manopola per confermare la selezione nel menu.
Tieni premuta la manopola per 3 secondi per permettere al Bluetooth di accoppiare
la modalità su A1 Pro.
Gira la manopola in senso orario/antiorario per navigare il menu.
Avvia +
Indietro
Tieni premuto il pulsante Avvio e il pulsante Indietro insieme per 3 secondi per
ripristinare le impostazioni di fabbrica di A1 Pro. Il codice PIN non viene eliminato.
Home +
Indietro
Tieni premuto il pulsante Home e Indietro insieme per 3 secondi per impostare la
pagina Informazioni nelle Impostazioni. La pagina Informazioni sparisce entro 5
secondi.
Manopola +
Indietro
Tieni premuta la manopola e il pulsante Indietro insieme per 3 secondi per
reimpostare il codice PIN.
Stop
Premi il pulsante Stop per aprire il coperchio del pannello di controllo e fermare
A1 Pro. Il codice PIN deve essere inserito sul pannello di controllo per riprendere
l'operazione di A1 Pro.
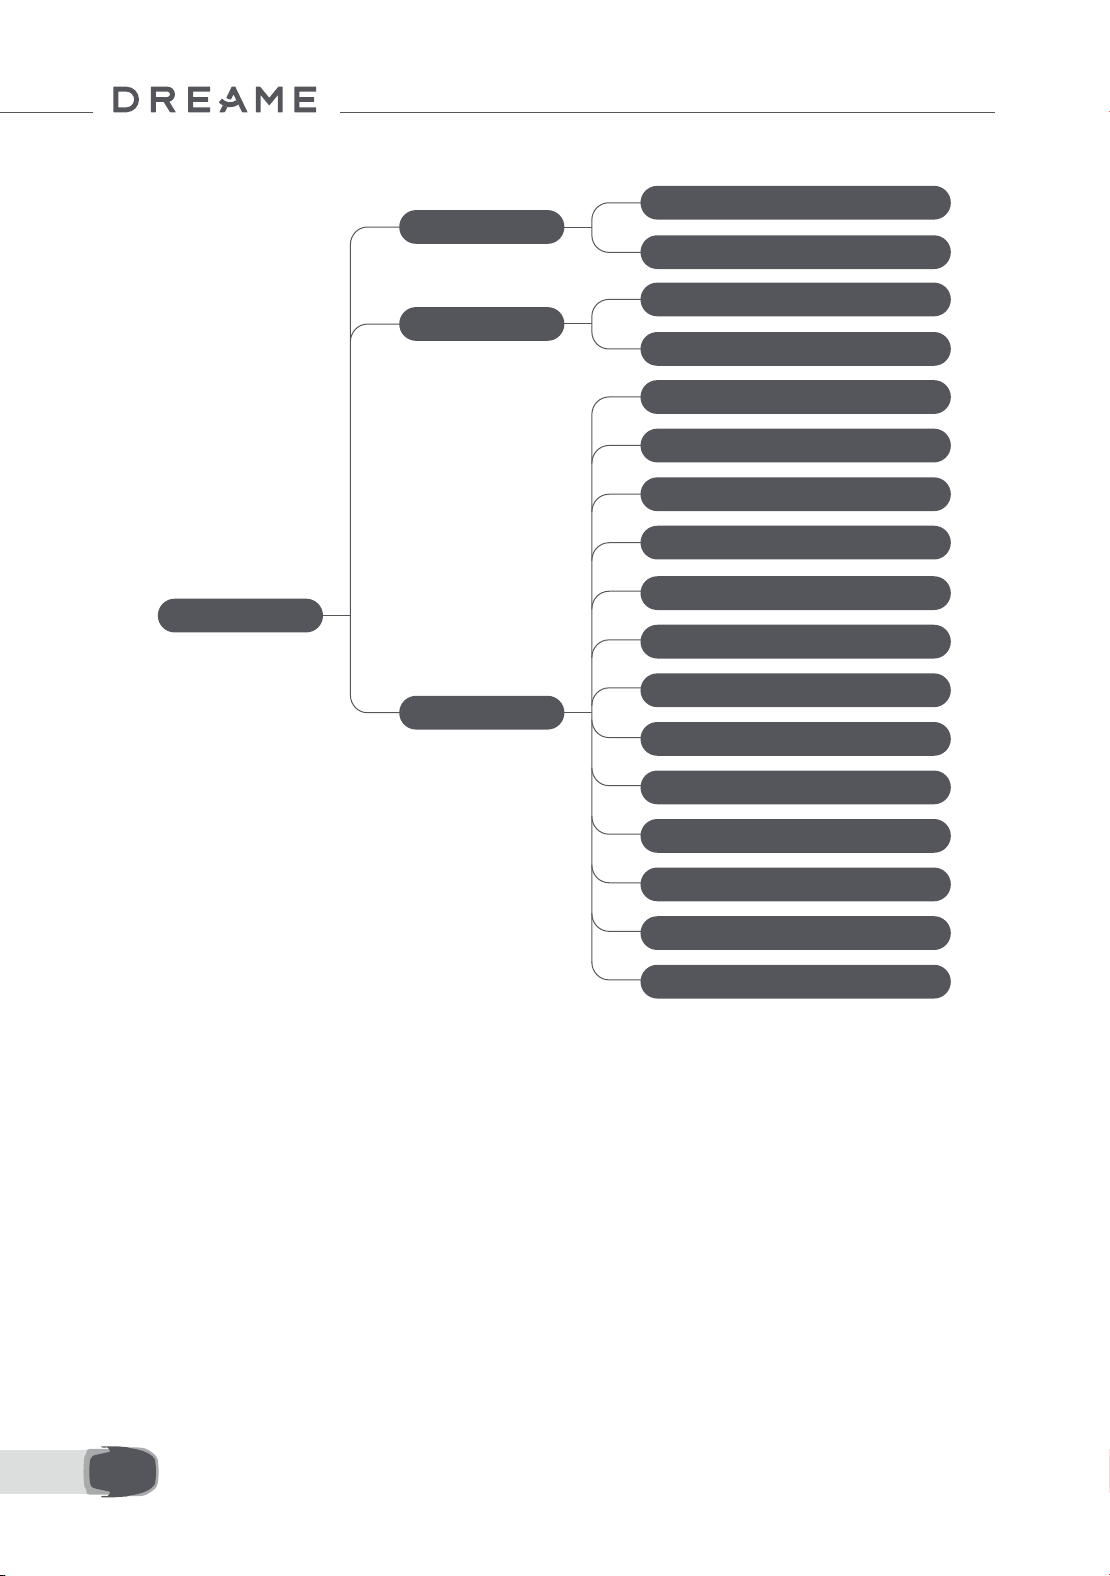
134IT
Panoramica della struttura del Menu
* Può essere aggiornato a seconda della versione del software.
7.2 Inizia la falciatura per la prima volta
Consigli prima della falciatura:
• Usa una falciatrice a spinta per falciare l'erba ad un'altezza non più di 10 cm.
• Elimina gli ostacoli inclusi detriti, mucchi di foglie, giochi, cavi e pietre dal prato. Assicurati che non ci siano
bambini o animali sul prato quando A1 Pro sta falciando.
• Riempi i buchi nel prato.
• Imposta le tue preferenze di falciatura nell'app in anticipo (come ecienza di falciatura, altezza falciatura e
direzione falciatura).
Pagina principale
Programma
Impostazioni
Modalità
Falciatura area intera
Falciatura dei bordi
Vedi programma
Attivare/Disattivare programma
Ecienza di falciatura
Altezza falciatura
Altezza di evitamento degli ostacoli
Modalità Non Disturbare
Protezione dalla pioggia
La protezione antigelo
Allarme di sollevamento
Allarme fuori mappa
Modica PIN
Volume
Lingua
Resettare il robot
Informazioni
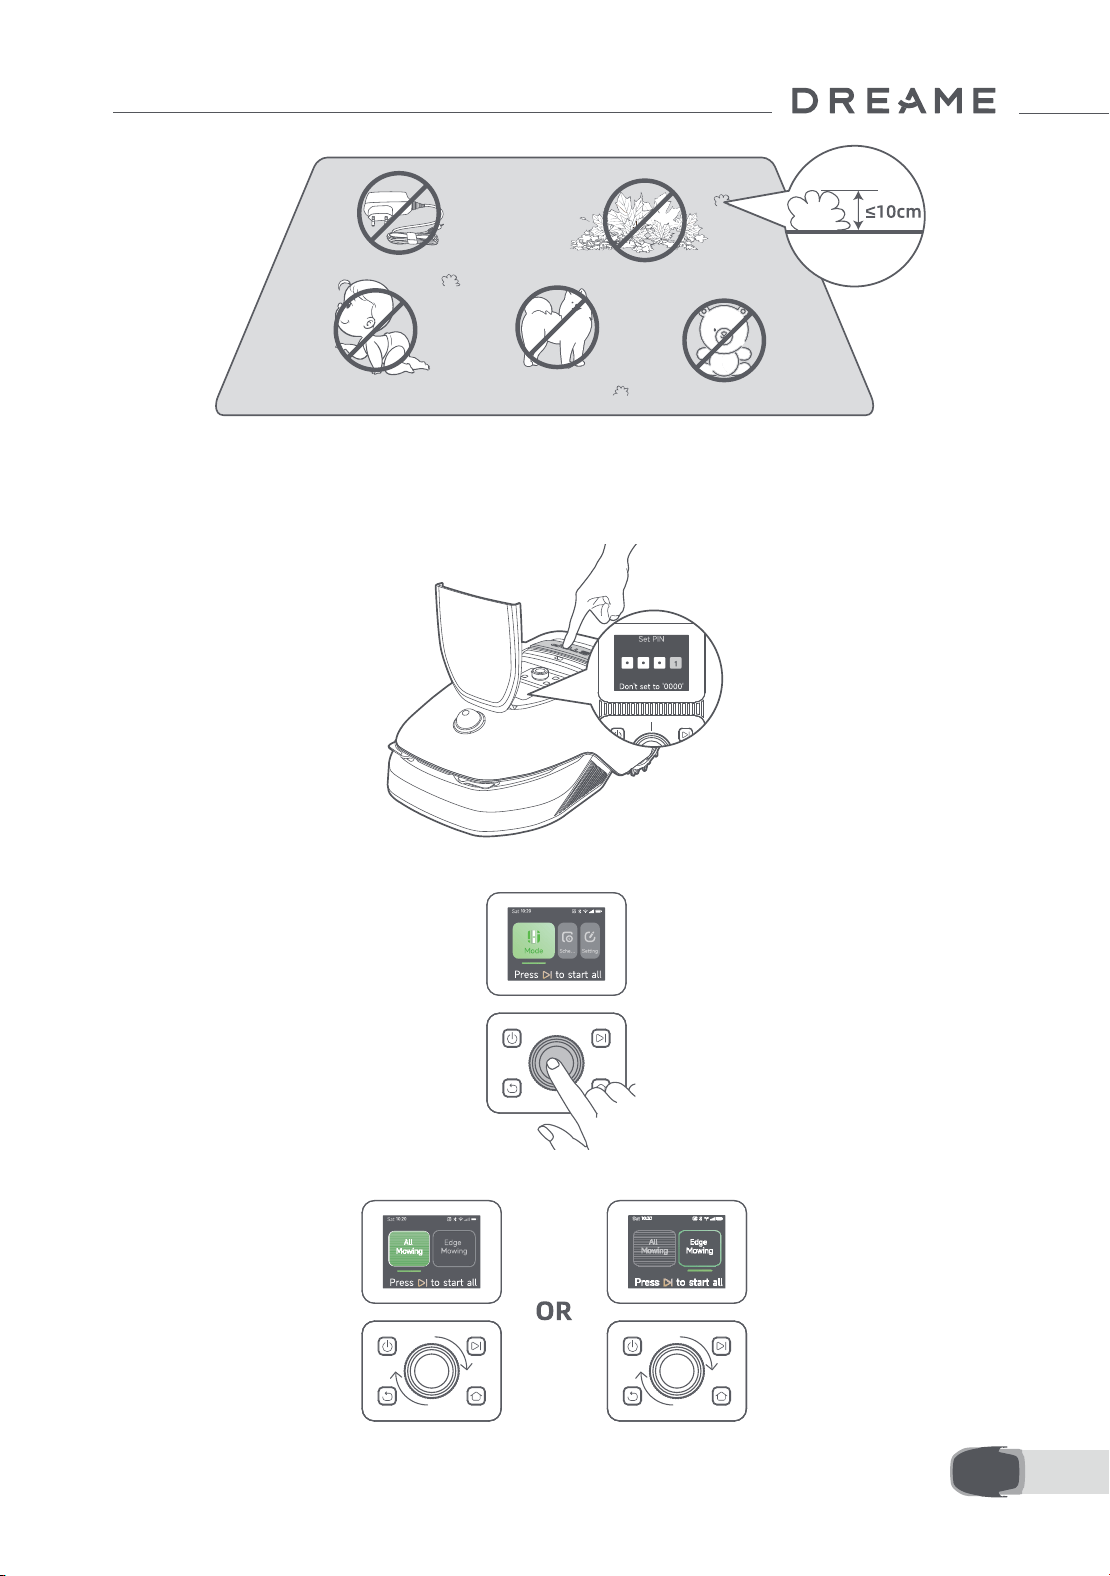
135 IT
Premi il pulsante Avvio sul pannello di controllo e chiudi il coperchio superiore entro 5 secondi. A1 Pro lascia la
stazione di ricarica e inizia la falciatura. Puoi anche toccare "Avvio" nell'app per iniziare la falciatura.
• Avvia tramite il pannello di controllo
1. Premi il pulsante Stop per aprire il coperchio e inserisci il codice PIN.
2. Seleziona "Modalità" sullo schermo e premi la manopola.
3. Gira la manopola per selezionare la modalità falciatura.
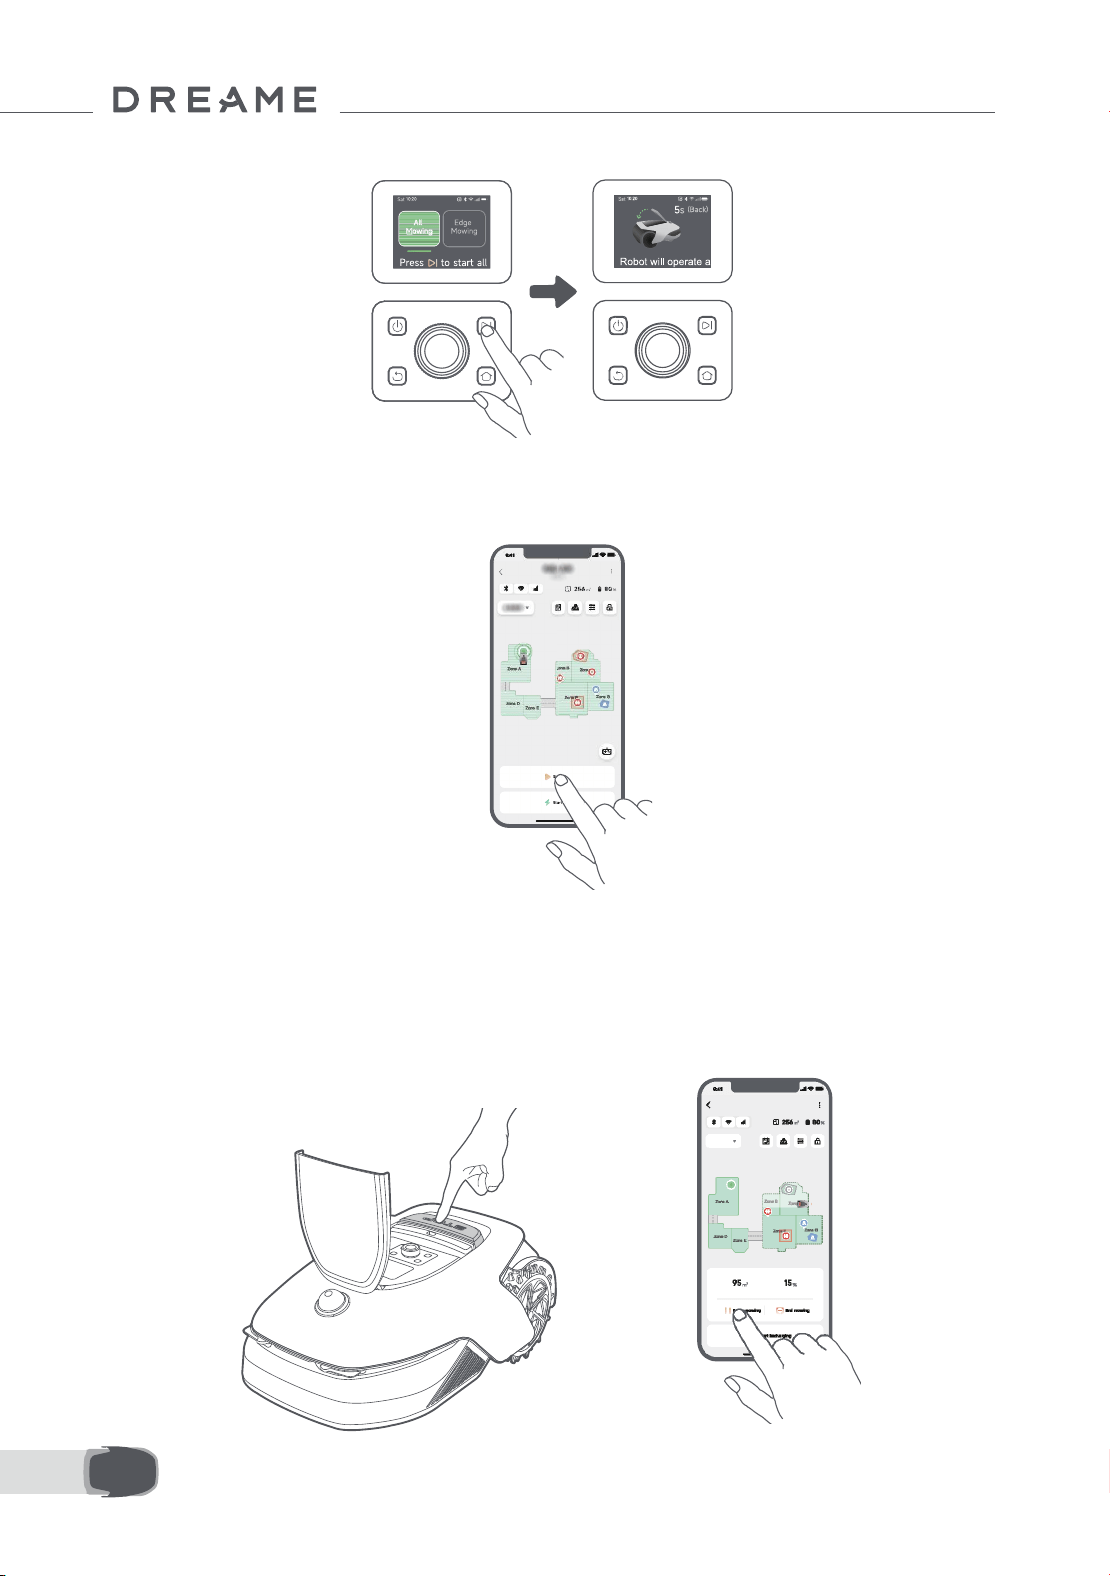
136IT
4. Premi il pulsante Avvio e chiudi il coperchio superiore entro 5 secondi. A1 Pro inizierà la falciatura.
• Avvia tramite app
1. Apri l'app.
2. Seleziona una modalità di falciatura e tocca "Avvio" per iniziare la falciatura.
7.3 Pausa
OR
Per mettere in pausa l'attuale attività di falciatura, puoi premere il pulsante Stop su A1 Pro o toccare "Metti in
pausa" nell'app.
Nota: A1 Pro è bloccato e non può essere avviato direttamente tramite app dopo che il pulsante Stop è
premuto. Per riprendere a falciare, inserisci il tuo codice PIN sul pannello di controllo prima.
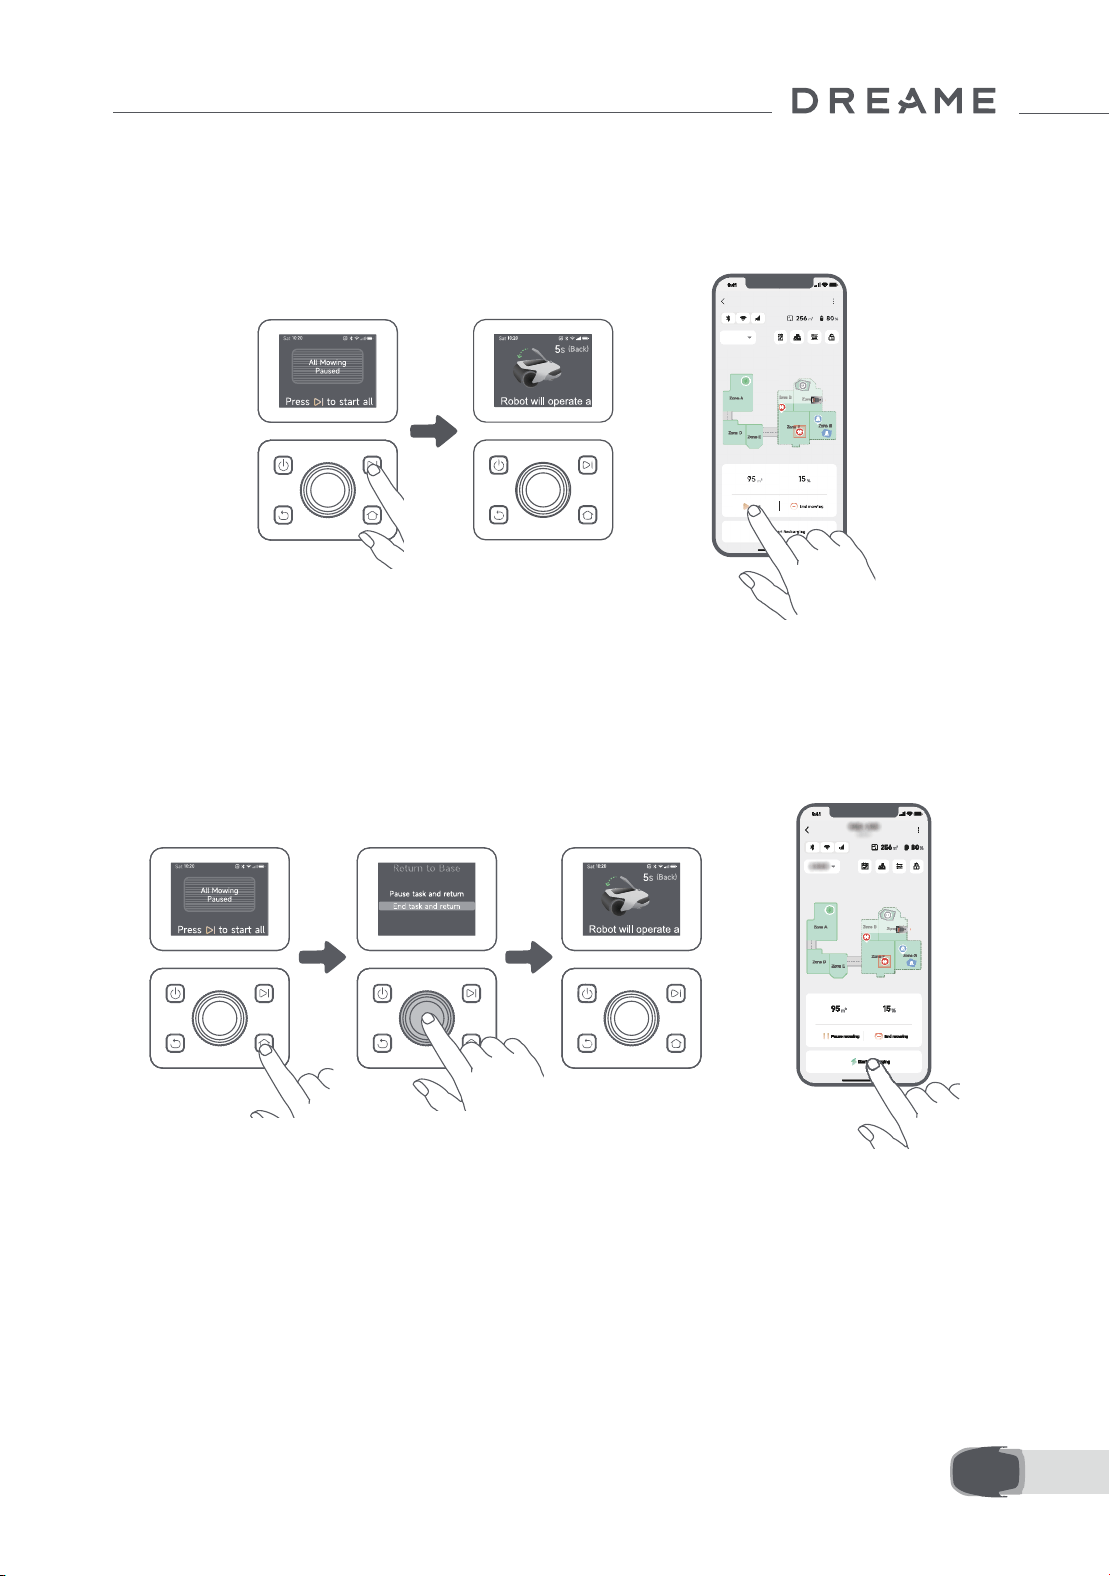
137 IT
7.4 Ripristina
7.5 Ritorna alla stazione di ricarica
Per ripristinare l'attività quando A1 Pro è in pausa, premi il pulsante Avvio su A1 Pro e chiudi il coperchio entro
5 secondi. A1 Pro ripristina la precedente attività di falciatura. Puoi anche toccare "Continua" nell'app per
ripristinare l'attività di falciatura.
Per fermare l'attività di falciatura e rimandare A1 Pro alla stazione di ricarica, conferma il tuo codice PIN sul
pannello di controllo e poi premi il pulsante Home. Conferma per nire l'attività e chiudi il coperchio entro 5
secondi. A1 Pro ritorna automanticamente alla stazione di ricarica per ricaricarsi. Puoi anche toccare "Ritorna
alla Stazione" nell'app per rimandare A1 Pro alla stazione di ricarica.
OR
OR
Dove puoi esplorare di più
Dreamehome App è più di un controllo remoto. Ci sono molte cose che puoi fare attraverso l'app: completare
varie impostazioni da remoto, sperimentare diverse modalità di falciatura, modicare la mappa liberamente e
aggiustare i programmi di falciatura. Inoltre, puoi vedere la mappa 3D del tuo prato direttamente sull'app.
8 Dreamehome App
138IT
8.1 Modalità falciatura
8.2 Programma
A1 Pro ore varie modalità di taglio. Puoi anche passare tra le modalità attraverso l'app.
Dopo che la prima mappa è completata, A1 Pro crea automaticamente due programmi di falciatura
settimanale secondo la misura del prato, che sono "Programma Spr & Sum" e "Programma Aut & Win". Puoi
toccare "Programma" nell'app per fare impostazione dettagliate del programma. Con la funzione programma,
puoi completare lasciare il lavoro quotidiano di falciatura a A1 Pro. Hai solo bisogno di dare manutenzione a A1
Pro regolarmente.
Nota: Se ti preoccupa che A1 Pro possa disturbare te e o i tuoi vicini quando lavora in autonomia durante certi
orari, puoi andare su Impostazioni > Non disturbare e impostare l'orario Non disturbare nell'app.
8.3 Blocco bambino
Se ti preoccupa che i bambini possano attivare A1 Pro, puoi attivare la funzione "Blocco bambino" nell'app. Con
questa funzione attivata, A1 Pro sarà bloccato se non viene eseguita nessuna operazione per 5 minuti quando
il coperchio è aperto.
8.4 Protezione dalla pioggia
8.5 Protezione dal gelo
Se ti preoccupa che le condizioni meteorologiche avverse possano inuenzare il lavoro di falciatura, puoi
attivare la funzione "Protezione dalla pioggia" in "Impostazioni" sul pannello di controllo o nell'app. Con questa
funzione abilitata, A1 Pro mette automaticamente in pausa la falciatura e ritorna alla stazione di ricarica
quando piove. Puoi impostare l'orario di protezione dalla pioggia nell'app.
Quando la temperatura è sotto i 6 ℃ , le operazioni di falciatura causano danni permanenti al prato. La
batteria non può ricaricarsi a causa dell'auto-protezione. Puoi attivare la funzione "La protezione antigelo" in
"Impostazioni" sul pannello di controllo o nell'app. La funzione permette a A1 Pro di mettere automaticamente
in pausa la falciatura e ritornare alla stazione di ricarica quando la temperatura ambiente è ≤ 6 ℃ . Riprende
automaticamente il lavoro quando la temperatura è sopra i 11 ℃ .
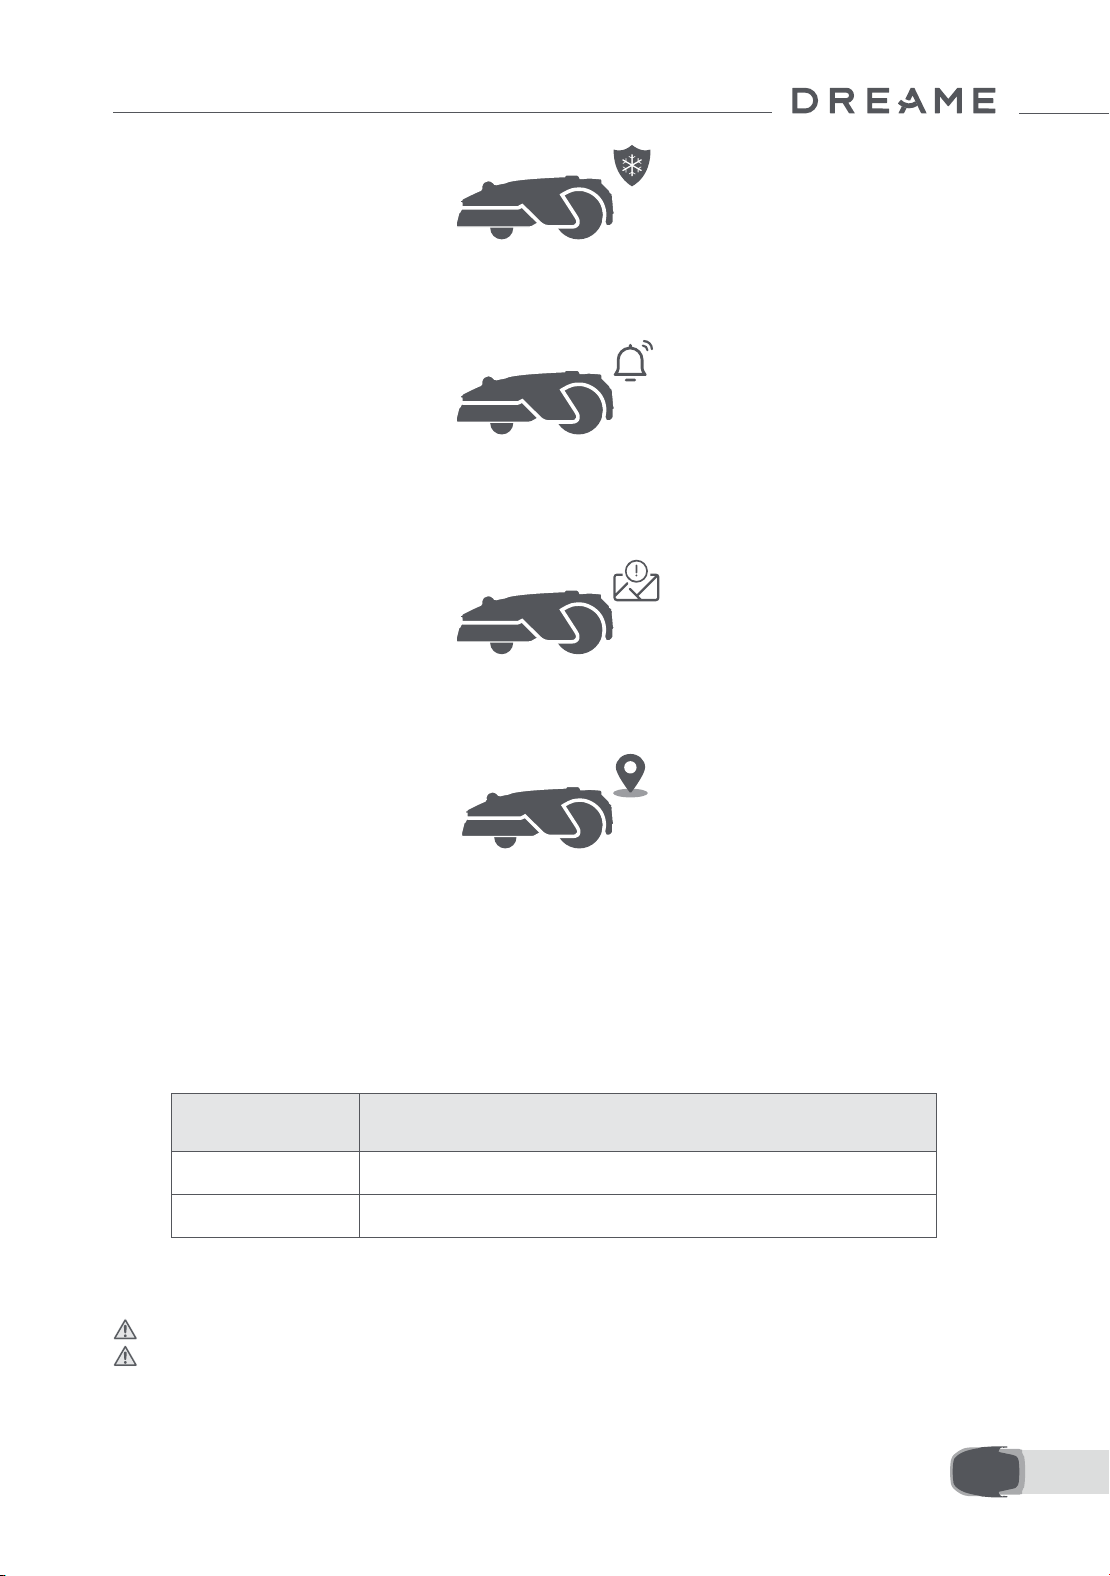
139 IT
8.6 Allarme di sollevamento
8.7 Allarme fuori mappa
Con questa funzione attivata, A1 Pro è bloccato e l'allarme scatta immediatamente se viene sollevato.
Con questa funzione attivata, A1 Pro è bloccato e l'allarme scatta immediatamente se è fuori dalla mappa.
(Questa funzione richiede l'installazione del Modulo Link).
8.8 Posizione in tempo reale
Con il Modulo Link, puoi vedere la posizione attuale di A1 Pro su Google Maps.
Nota: Il team di sviluppo Dreame eettua continuamente aggiornamenti via etere e manutenzione sul
rmware e sull'app. Controlla per notiche di aggiornamento o attiva la funzione aggiornamento automatico
per mantenere il rmware e l'app aggiornati e goditi più caratteristiche.
9 Manutenzione
Per una migliore prestazione e durata di A1 Pro, puliscilo regolarmente e sostituisci le parti usurate secondo la
frequenza indicata di seguito:
9.1 Pulizia
Attenzione: Prima della pulizia, disattivare A1 Pro e scollegare la stazione di ricarica.
Attenzione: Assicurati che il coperchio protettivo LiDAR sia sul LiDAR prima di girare A1 Pro al contrario per
evitare danni al LiDAR.
Parte Frequenza sostituzione
Lame Ogni 6-8 settimane o prima
Spazzola di pulizia Ogni 12 mesi o prima
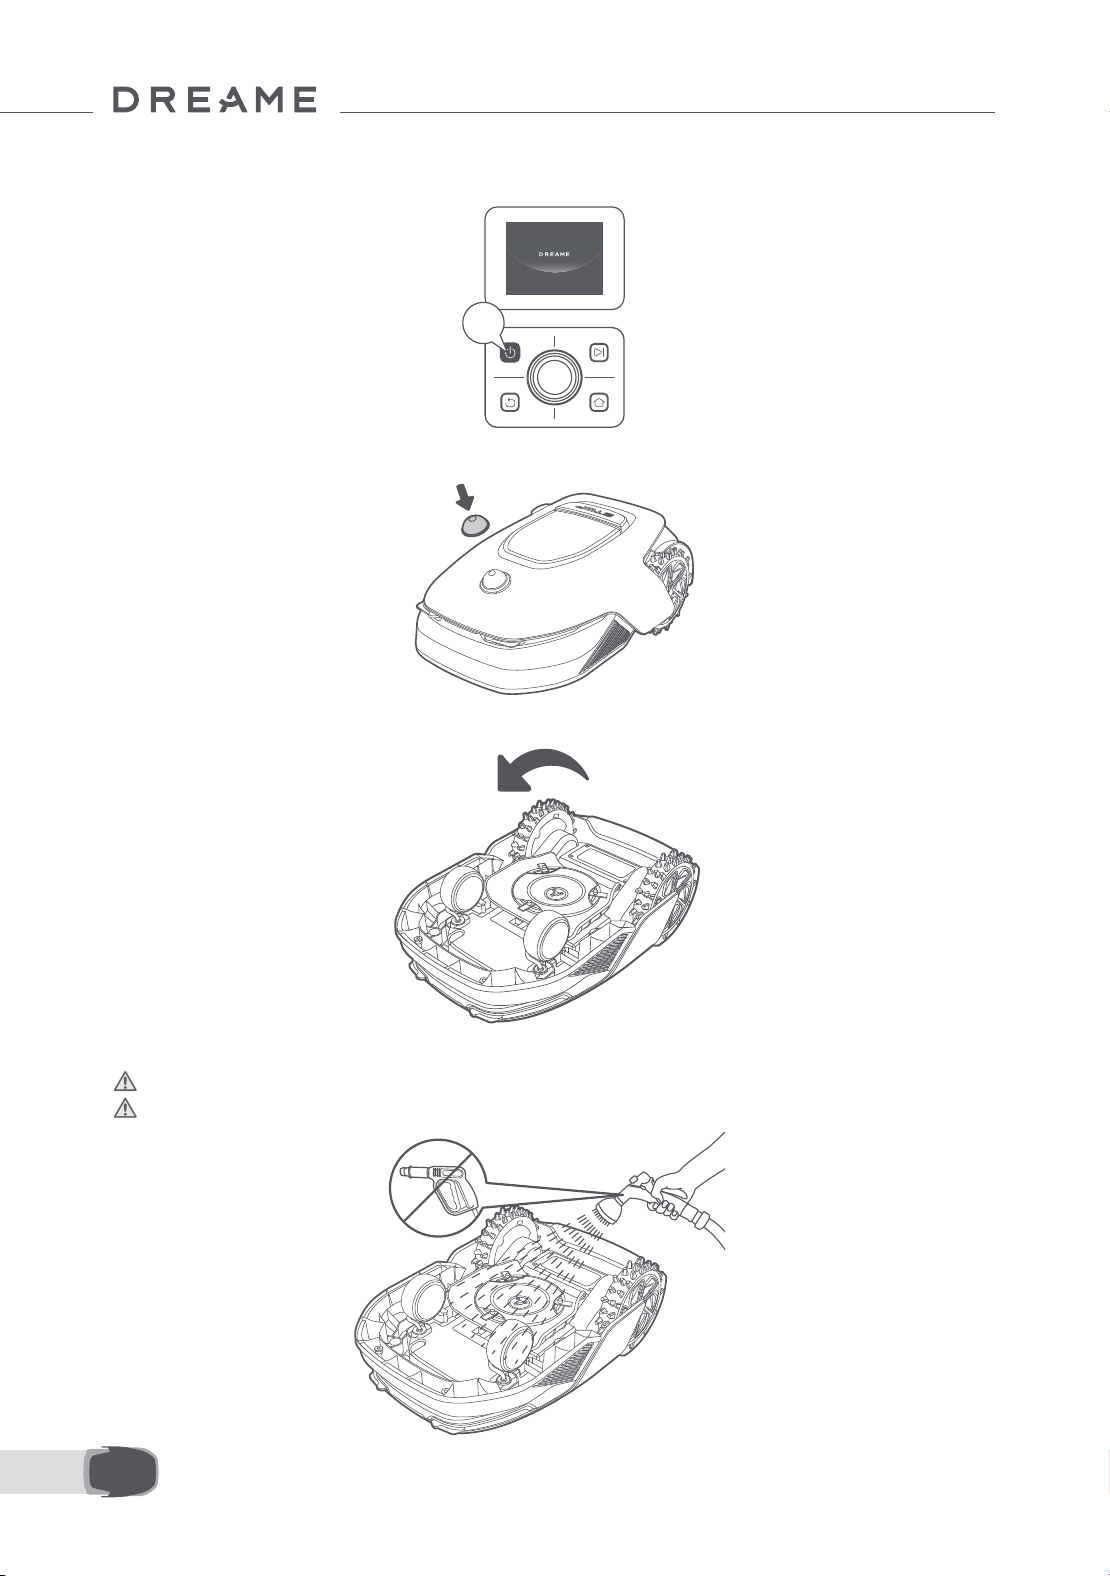
140IT
2s
• Il corpo di A1 Pro, Telaio e disco di taglio:
1. Disattiva A1 Pro.
2. Metti il coperchio protettivo LiDAR sul LiDAR.
3. Gira A1 Pro al contrario.
4. Utilizza un tubo essibile per pulire il corpo, il disco di taglio e il telaio dell'A1 Pro.
Attenzione: Non toccare le lame mentre pulisci il telaio. Indossa i guanti quando pulisci.
Attenzione: Non usare un'idropulitrice ad alta pressione per la pulizia. Non usare detergenti per la
pulizia.
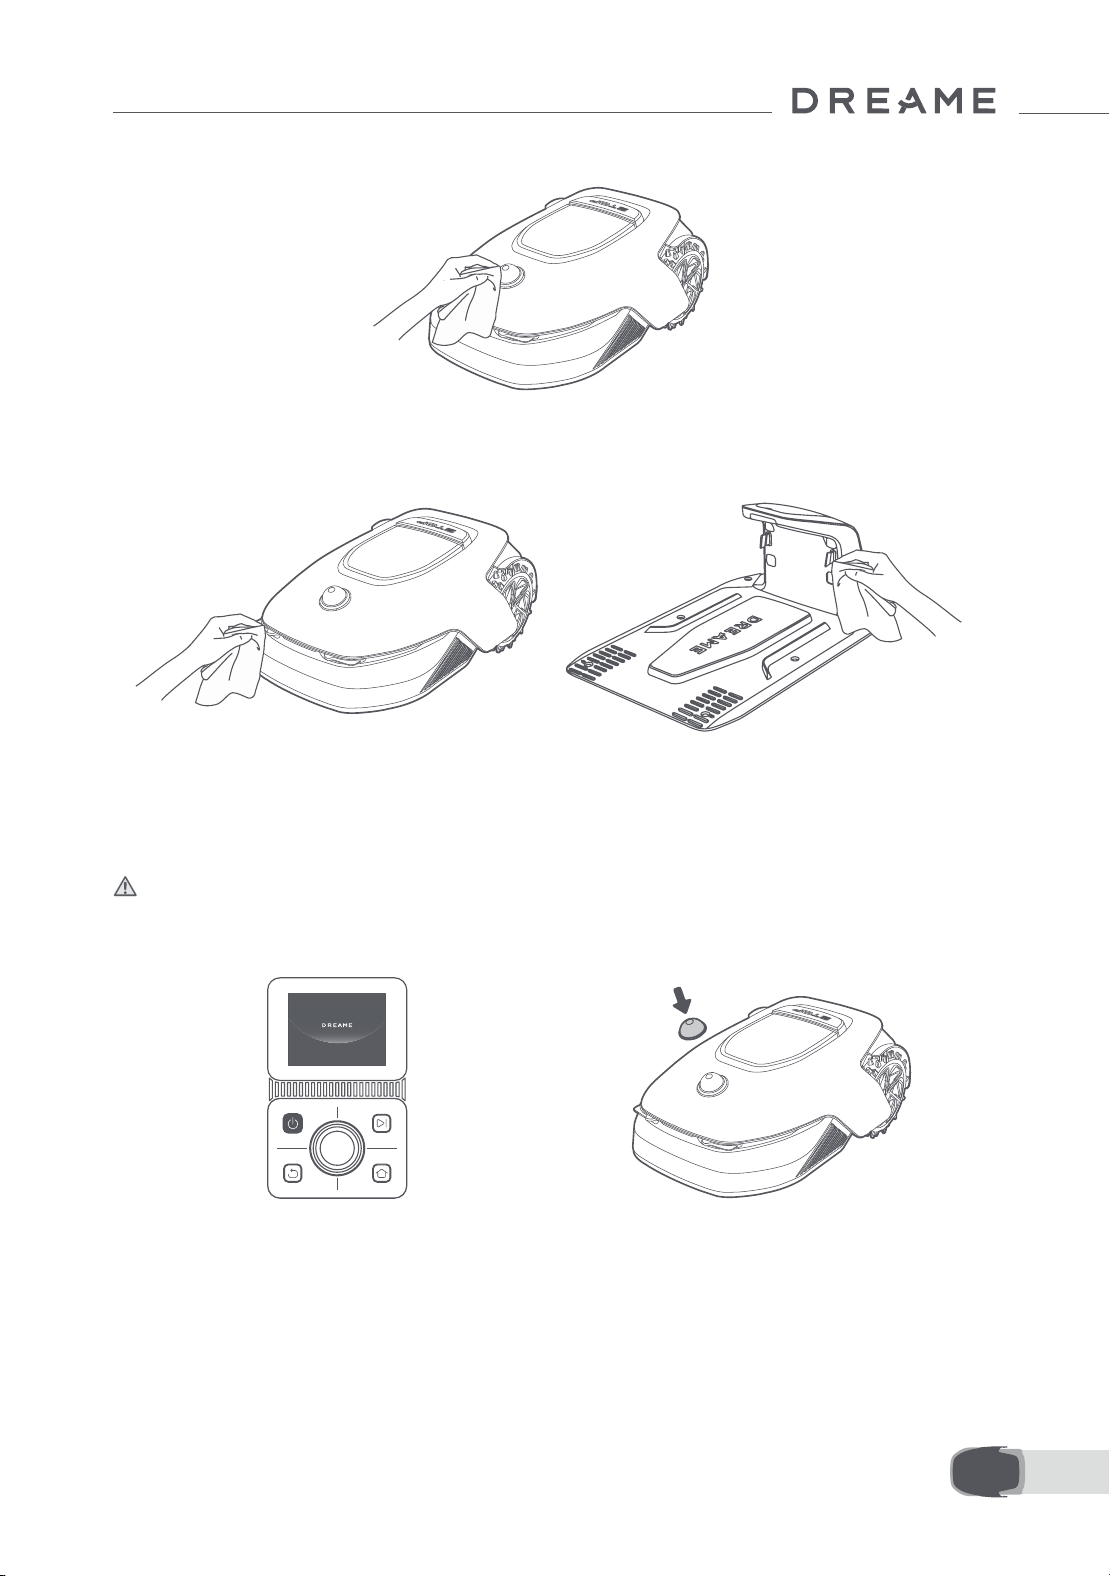
141 IT
3. Metti A1 Pro su una supercie morbida e giralo
al contrario.
4. Rimuovi le prese premendo il pulsante sotto il
disco di taglio.
5. Usa un panno senza pelucchi per pulire attentamente il sensore lidar.
• Contatti di ricarica:
Usa un panno pulito per pulire i contatti di ricarica su A1 Pro e la stazione di ricarica. Mantieni i contatti di
ricarica asciutti prima di pulire.
9.2 Sostituzione dei componenti
• Sostituzione delle lame
Per mantenere le lame alate, sostituisci le lame regolarmente. Si raccomanda di sostituire le lame ogni 6-8
settimane o prima. Usa solo lame originali Dreame.
Attenzione: Disattiva A1 Pro e indossa i guanti protettivi prima di sostituire le lame.
Nota: Sostituisci tutte e tre le lame allo stesso tempo per assicurarti un sistema di taglio bilanciato.
1. Disattiva A1 Pro. 2. Assicurati che il coperchio protettivo LiDAR sia
sopra.
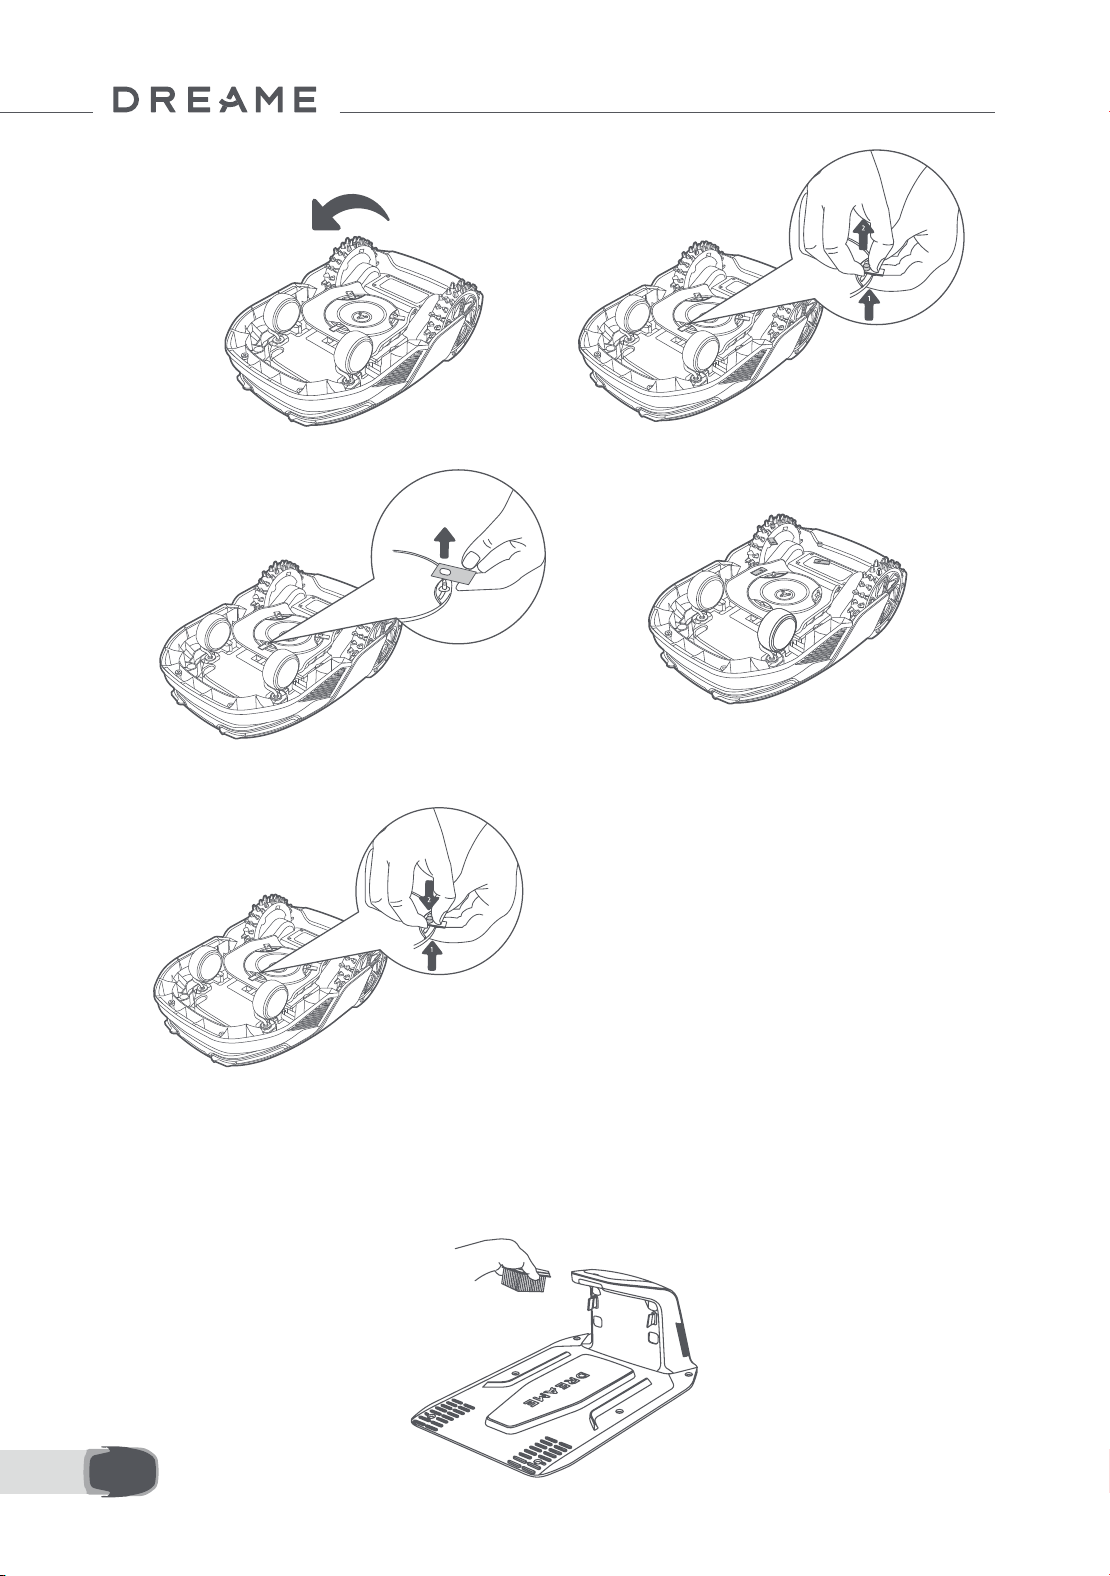
142IT
5. Rimuovi la lama allineando il buco della lama
con l'asta.
6. Rimuovi le 3 lame e le prese.
• Sostituzione della spazzola di pulizia
Quando la spazzola di pulizia per il sensore LiDAR si consuma, le sue setole potrebbero slacciarsi o
deteriorarsi, inuenzando le prestazioni di pulizia. Sostituisci la spazzola di pulizia regolarmente per mantenere
un buon risultato di pulizia. Si raccomanda di sostituire la spazzola di pulizia ogni 12 mesi o prima.
Nota: Prima di sostituire la spazzola di pulizia, assicurati di scollegare la stazione di ricarica.
7. Premi il pulsante sotto il disco di taglio e allinea
il buco della presa con l'asta per ssare le prese
e le lame.
8. Assicurati che le lame possano ruotare
liberamente.

143 IT
10 Batteria
Modalità di ricarica a basso consumo:
Con la modalità di ricarica a basso consumo attiva, le funzioni non relative a caricare saranno disabilitate.
(Schermo e rete saranno disattivati).
• Per attivare una modalità di ricarica a basso consumo, tieni premuto il pulsante Avvio e il pulsante Home
insieme, e premi il pulsante Indietro 5 volte velocemente allo stesso tempo. Sentirai un comando vocale: la
modalità a basso consumo è attiva.
• Per disabilitare la modalità ricarica a basso consumo, riavvia A1 Pro o premi il pulsante Avvio 5 volte
velocemente per disattivare la modalità carica a basso consumo.
Per una conservazione a lungo termine, carica A1 Pro ogni 6 mesi per proteggere la batteria. i danni alla
batteria causati da una scarica eccessiva non sono coperti dalla garanzia limitata. Non caricare la batteria
in un ambiente con una temperatura superiore a 45° C (113° F) o inferiore a 6° C (43° F). La temperatura dello
stoccaggio a lungo termine della batteria deve essere tra i -10 e i 35° C (14 e 95° F). Per minimizzare il danno, la
temperatura raccomandata di conservazione per la batteria è tra 0 e 25° C (32 a 77° F).
Nota: La durata della batteria di A1 Pro dipende dalla frequenza di utilizzo e dalle ore di operazione. Se la
batteria è danneggiata o non può essere caricata, non smaltire arbitrariamente la batteria obsoleta o difettosa.
Rispetta le regole di riciclaggio locale.
11 Conservazione invernale
12 Trasporto
• A1 Pro
1. Carica la batteria completamente e disattiva A1 Pro.
2. Pulisci A1 Pro completamente prima di conservarlo per l'inverno.
3. Mettere il coperchio protettivo LIDAR.
4. Conserva A1 Pro in un luogo asciutto ad una temperatura superiore a 0° C.
• Stazione di ricarica
Scollega la stazione di ricarica e conservalo in un luogo asciutto e fresco, lontano dalla luce diretta del sole.
Nota: Se non hai usato A1 Pro per tanto tempo, rimappa il tuo giardino perché cambiamenti signicativi
all'ambiente del giardino possono causare errori di posizionamento.
In caso di viaggi lunghi, assicurarsi che A1 Pro sia spento. Si consiglia di utilizzare l'imballo originale. Mettere il
coperchio protettivo LIDAR.
Attenzione: Disattiva A1 Pro prima di trasportarlo.
Attenzione: Solleva il prodotto dalla parte posteriore con il disco di taglio lontano dal tuo corpo.
144IT
13 Risoluzione problemi
Problema Causa Soluzione
A1 Pro non è connesso
all'app.
1. A1 Pro non rientra nella
copertura del segnale Wi-Fi
o nel campo del Bluetooth.
2. A1 Pro è spento o si sta
riavviando.
1. Controlla se A1 Pro ha completato il processo
di accensione.
2. Controlla se il router funziona correttamente.
3. Avvicinarsi ad A1 Pro per stabilire una
connessione Bluetooth.
A1 Pro sollevato. La ruota non è sul terreno.
1. Rimetti A1 Pro su una supercie piana.
2. Inserisci il codice PIN su A1 Pro e conferma.
3. A1 Pro non può attraversare oggetti più alti
di 4 cm. Mantieni il terreno uniforme dove sta
lavorando.
A1 Pro ribaltato. A1 Pro si ribalta più di 37° .
1. Rimetti A1 Pro su una supercie piana.
2. Inserisci il codice PIN su A1 Pro e conferma.
3. A1 Pro non può salire pendii più grandi di 45%
(24° ).
A1 Pro intrappolato.
A1 Pro è intrappolato e non
può uscire.
1. Rimuovi gli ostacoli intorno e riprova.
2. Sposta manualmente A1 Pro su una supercie
piana e aperta dentro la mappa e cerca di
nuovo l'attività. Se continui a incontrare questo
problema, riprova dopo che A1 Pro è nella
stazione di ricarica.
3. Controlla se ci sono buchi nel terreno. Riempi i
buchi prima della falciatura per prevenire che A1
Pro sia intrappolato.
4. Controlla se l'erba circostante è più alta di 10
cm. Puoi aggiustare l'altezza elusione ostacolo
o usare un tosaerba a spinta per falciare il prato
prima per evitare che A1 Pro sia intrappolato.
5. Se A1 Pro è spesso intrappolato in questa
posizione, puoi impostarla come zona di
delimitazione.
Errore ruota posteriore
sinistra/destra
La ruota non può ruotare o il
motore della ruota ha un
problema.
1. Pulisci le ruote posteriori e riprova.
2. Se continui a riscontrare l'errore, prova a
riavviare il robot.
3. Se il problema persiste, contatta il servizio
post-vendita.
Il disco di taglio non
può ruotare.
Il disco di taglio non può
ruotare normalmente o il
motore di taglio ha un
problema.
1. Pulisci il disco della lama e riprova.
2. Controlla se l'erba circostante è più alta di
10 cm. Puoi usare un tosaerba a spinta per
falciare il prato prima per evitare che il disco di
taglio sia bloccato dall'erba alta.
3. Controlla se c'è acqua sotto il disco della
lama. Se c'è acqua, sposta il robot in un luogo
asciutto e riprova.
4. Se continui a riscontrare l'errore, prova a
riavviare il robot.
5. Se il problema persiste, contatta il servizio
post-vendita.
145 IT
Problema Causa Soluzione
Errore paraurti.
Il sensore del paraurti
anteriore è costantemente
innescato.
1. Controlla se A1 Pro è intrappolato da qualche
parte.
2. Tocca gentilmente il paraurti e assicurati che
rimbalzi indietro.
3. Se continui a riscontrare l'errore, prova a
riavviare il robot.
4. Se il problema persiste, contatta il servizio post-
vendita.
Errore di carica.
A1 Pro si aggancia alla
stazione di ricarica, ma
la corrente ricarica o il
voltaggio ha un problema.
1. Controlla se la stazione di carica è
correttamente connessa alla corrente.
2. Controlla se i contatti di ricarica su A1 Pro e la
stazione di ricarica sono puliti.
3. Dopo che il controllo è terminato, prova ad
agganciare A1 Pro di nuovo nella stazione di
ricarica.
4. Se il problema persiste, contatta il servizio
post-vendita.
Temperatura della
batteria troppo alta.
La temperatura della
batteria è ≥ 60℃ .
1. Usa A1 Pro dove la temperatura ambiente è
inferiore a 40℃ . Puoi attendere no a quando
la temperatura della batteria diminuisce
automaticamente.
2. Puoi disattivare A1 Pro e riavviarlo dopo un
po'.
3. Se il problema persiste, contatta il servizio
post-vendita.
LiDAR è bloccato.
LiDAR è bloccato (per
esempio il coperchio
protettivo LiDAR non è stato
rimosso).
1. Rimuovi il coperchio di protezione del lidar e riprova.
2. Se il lidar sulla parte superiore del robot è
molto sporco, puliscilo con un panno senza
pelucchi e riprova.
Malfunzionamento
del lidar.
Il lidar è molto sporco o c'è
un errore del sensore.
1. Controlla se il lidar è sporco. Pulirlo se
necessario e riprova.
2. Se continui a riscontrare l'errore, prova a
riavviare il robot.
3. Se il problema persiste, contatta il servizio
post-vendita.
A1 Pro è perso. Il posizionamento è perso.
1. Controlla se il LiDAR sulla supercie di A1 Pro è
sporco. Lo sporco inuenza la localizzazione.
2. Sposta manualmente A1 Pro in un luogo
aperto dentro la mappa e prova a iniziare di
nuovo l'attività.
3. Se la localizzazione non è recuperata,
controlla da remoto A1 Pro no alla stazione
tramite l'app, e poi avvia l'attività di falciatura.
Errore sensore. Errore sensore.
1. Riavvia A1 Pro e riprova.
2. Se il problema persiste, contatta il servizio
post-vendita.
A1 Pro è nella zona di
delimitazione.
A1 Pro è nella zona di
delimitazione.
1. Sposta manualmente il robot fuori dall'area
vietata e riprova.
2. Controlla il robot da remoto tramite l'app per
spostarlo fuori dall'area vietata e riprova.
A1 Pro è fuori dalla
mappa.
A1 Pro è fuori dalla mappa.
1. Sposta manualmente il robot all'interno della
mappa e riprova.
2. Controlla il robot da remoto all'interno della
mappa tramite l'app e riprova.

146IT
Problema Causa Soluzione
L'arresto di emergenza
è attivato.
Il pulsante Stop su A1 Pro è
premuto.
Inserisci il codice PIN su A1 Pro per disattivare
l'arresto di emergenza.
Batteria scarica. A1 Pro
si spegnerà subito.
Il livello batteria è ≤ 10%.
Aggancia A1 Pro nella stazione di ricarica per
caricare.
A1 Pro è lontano dalla
mappa. Rischio di
essere rubato.
A1 Pro è lontano dalla
mappa.
1. Inserisci il codice PIN per vericare.
2. Puoi disabilitare l'allarme fuori mappa nelle
impostazioni sull'app.
Impossibile tornare alla
stazione di ricarica.
A1 Pro non può trovare la
stazione di ricarica quando
torna alla stazione di
ricarica.
1. Controlla se ci sono ostacoli che bloccano A1
Pro. Rimuovi gli ostacoli e riprova.
2. Controlla da remoto A1 Pro no alla stazione
di ricarica tramite l'app.
Impossibile agganciare
alla stazione di ricarica.
A1 Pro trova la stazione
di ricarica ma non può
agganciarsi.
1. Controlla se le pellicole riettenti sulla stazione
di ricarica sono sporche o bloccate.
2. Controlla se ci sono ostacoli davanti alla
stazione di ricarica.
3. Controlla se la stazione di ricarica è spostata.
4. Controlla se la piastra di base è coperta di
fango spesso.
5. Verica se la stazione ha energia.
6. Aiuta il robot ad attraccare alla stazione
utilizzando il telecomando o manualmente.
Posizionamento non
riuscito.
Posizionamento fallito
quando A1 Pro prova a
iniziare l'attività falciatura.
1. Il lidar potrebbe essere ostruito. Sposta
manualmente il robot in un luogo piatto e
aperto all'interno della mappa e prova a
ricominciare il compito.
2. Se continui a incontrare questo errore, riprova
dopo che il robot è ancorato nella stazione.
Temperatura della
batteria troppo alta.
Temperatura della batteria ≥
45℃ .
1. La carica potrebbe fallire quando la
temperatura della batteria è superiore a 45℃ .
2. Usa A1 Pro dove la temperatura ambiente è
inferiore a 40℃ .
Temperatura della
batteria troppo bassa.
Temperatura della batteria
≤6℃.
1. La carica potrebbe fallire quando la
temperatura della batteria è inferiore a 6℃ .
2. Usa A1 Pro dove la temperatura ambiente è
sopra i 6℃ .
Il disco a lama non si
muove verso l'alto o
verso il basso.
Il disco a lama non si muove
verso l'alto o verso il basso.
1. Pulire il disco a lama e riprovare.
2. Se si continua a riscontrare questo errore,
prova a riavviare il robot.
3. Se il problema persiste, contattare l’assistenza
post-vendita.
Spazio insuciente
per girare di fronte alla
stazione.
Spazio insuciente per
girare di fronte alla stazione.
1. Se la stazione è posizionata sul bordo della
mappa o all'interno di essa, assicurarsi che vi sia
almeno 1 m di spazio libero tra l'area anteriore
della piastra di base della stazione e il limite
della mappa; altrimenti, il robot potrebbe non
essere in grado di girare.
2. Spostare la stazione, o modicare la mappa
in Modica mappa.
147 IT
14 Speciche
Informazioni
di base
Nome del prodotto Dreame tosaerba robotico
Marchio Dreame
Dimensioni
643 × 436.5 × 261 mm
(25.3 × 17.2 × 10.2 in)
Peso (batteria inclusa) 12.6 kg (27.7 lbs)
Falciatura
Capacità lavorativa consigliata 2000 ㎡ (0.5 acre)
Ecienza di falciatura
Standard: 120 ㎡ (0.03 acre)/h
Eciente: 200 ㎡ (0.05 acre)/h
Altezza falciatura 30~70 mm (1.2~2.8 in)
Larghezza falciatura 22 cm (8.7 in)
Tempo di ricarica
[1]
65 min
Emissioni
di rumore
Livello di potenza sonora LWA 64 dB(A)
Potenza sonora
incertezze KWA
3 dB(A)
Pressione del suono
livello LpA
56 dB(A)
Pressione del suono
incertezze KpA
3 dB(A)
Condizioni
di lavoro
Temperatura di lavoro
0~50° C (32~122° F)
Raccomandata: 10~35° C (50~95° F)
Temperatura dello stoccaggio a lungo
termine
-10~35° C (14~95° F)
Raccomandata: 0~25° C (32~77° F)
Classicazione IP
Falciatrice: IPX6
Stazione di ricarica: IPX4
Alimentazione elettrica: IP67
Pendenza massima per l'area da falciare 45% (24° )
Connessione
Campo di frequenza Bluetooth 2400.0–2483.5 MHz
Wi-Fi Wi-Fi 2.4 GHz (2400–2483.5M)
Potenza RF massima
802.11b:16±2dBm(@11Mbps)
802.11g:14±2dBm(@54Mbps)
802.11n:13±2dBm(@HT20,HT40)
Bluetooth:7.49dBm
Servizio Link (facoltativo)
[2]
LTE-FDD: B1/3/7/8/20/28A
LTE-TDD: B38/40/41
GNSS (facoltativo)
[3]
GPS/GLONASS/BDS/Galileo/QZSS
148IT
[1] Il tempo di ricarica viene applicato quando A1 Pro ritorna automaticamente alla stazione di ricarica a
batteria scarica.
[2] Richiede l'installazione del modulo Link.
[3] Richiede l'installazione del modulo Link.
Nota: Le speciche sono soggette a cambiamento poiché miglioriamo continuamente il nostro prodotto. Per le
ultime informazioni, visita il nostro sito web su global.dreametech.com.
Motore di guida
Velocità di guida sotto controllo da
remoto
0.45 m/s
Velocità di guida quando falcia
Standard: 0.35 m/s
Ecient: 0.6 m/s
Motore falciante
Velocità 2200 /min
Batteria
(falciatrice)
Tipo batteria Batteria a ioni di litio
Capienza stimata 5000 mAh
Tensione nominale 18 V
Alimentazione
elettrica
Voltaggio di ingresso 100~240 V
Voltaggio di uscita 20 V
Uscita corrente 3 A
Stazione
di ricarica
Voltaggio di ingresso 20 V
Voltaggio di uscita 20 V
Ingresso corrente 3 A
Uscita corrente 3 A

149 ES
1 Instrucciones de seguridad ....................................................................... P150
2 Contenido de la caja ................................................................................. P154
3 Resumen del producto ............................................................................. P155
4 Instalación ............................................................................................... P156
5 Preparaciones antes del uso ..................................................................... P158
6 Cree un mapa de su jardín ........................................................................ P161
7 Funcionamiento ....................................................................................... P167
8 App Dreamehome .................................................................................... P172
9 Mantenimiento ........................................................................................ P174
10 Batería ................................................................................................... P178
11 Almacenamiento en invierno .................................................................. P178
12 Transporte ............................................................................................. P178
13 Solución de problemas ........................................................................... P179
14 Especicaciones ..................................................................................... P182
Índice
Traducción del manual original

150ES
1.1 Instrucciones generales de seguridad
1 Instrucciones de seguridad
• Lea atentamente el manual del usuario y compréndalo bien antes de utilizar el producto.
• Con este producto sólo debe utilizar el equipo recomendado por Dreame. Usarlo de otro modo es incorrecto.
• No permita nunca que los niños, las personas discapacitadas, con retraso mental o sensorial, sin experiencia
ni conocimientos o las personas no familiarizadas con estas instrucciones utilicen la máquina, las leyes locales
también pueden restringir la edad del operario.
• No permita que los niños estén cerca de la máquina ni tampoco que jueguen con ella cuando está en marcha.
• No utilizar el producto en zonas donde las personas no sepan que está.
• Cuando se utiliza el producto manualmente con la aplicación Dreamehome, no corra. Camine siempre,
vigilando sus pasos en las pendientes y procure mantener el equilibrio en todo momento.
• Evite usar el producto cuando haya personas en la zona de trabajo, sobre todo niños o animales.
• Si utiliza el producto en áreas públicas, ponga señales de advertencia alrededor del área de trabajo, avisando con
el texto: "¡Atención! ¡Cortadora de césped automática! ¡Mantener la distancia a la máquina! ¡Vigile a los niños!"
• Lleve puesto calzado resistente y pantalones largos al utilizar el producto.
• Para evitar provocar daños al producto y accidentes con otros vehículos y personas, no dena las zonas de
trabajo o rutas que atraviesen las vías públicas.
• No toque las piezas móviles peligrosas, por ejemplo el disco de corte, hasta que se haya detenido por
completo.
• Busque ayuda médica si sufre lesiones o accidentes.
• Ponga el producto en OFF antes quitar los bloqueos, realizar tareas de mantenimiento o revisar el producto.
Si el producto vibra de manera anormal, revise si ha sufrido daños antes de encenderlo de nuevo. No utilizar el
producto si tiene alguna pieza defectuosa.
• No conectar ni tocar un cable dañado hasta desconectarlo del enchufe. Si se daña el cable durante la
utilización, desconectar el cable del enchufe. Un cable gastado o dañado aumenta el riesgo de sufrir una
descarga eléctrica y debe cambiarlo el personal de servicio.
• No ponga el cable principal por las zonas que el producto pueda cortar. Siga las instrucciones dadas para
instalar los cables.
• Para cargar el producto, sólo debe utilizar la estación de carga que se incluye en el paquete. Hacer un uso
incorrecto puede causar descargas eléctricas, sobrecalentamiento o fugas de líquido corrosivo de la batería.
Si se produce una fuga de electrolito, debemos lavar con agua/producto neutralizante y buscar asistencia
médica en caso de que el líquido corrosivo contacte con los ojos.
• Cuando se conecta el cable principal al enchufe, se debe utilizar un dispositivo de corriente residual (RCD) con
una corriente de disparo máxima de 30 mA.
• Sólo debe utilizar las baterías originales recomendadas por Dreame. No es posible garantizar la seguridad
del producto si no se utilizan pilas originales. No utilice baterías no recargables.
• Mantenga los alargadores lejos de las piezas móviles peligrosas para evitar daños y que puedan entrar en
contacto con las piezas que tienen tensión.
• Las ilustraciones que acompañan este documento sirven sólo como referencia. Eche un vistazo al producto real.
• No empuje con fuerza o rápidamente el producto, ya que esto puede dañarlo.
• Para mantener el cumplimiento con el requisito de exposición a RF, se debe mantener una distancia de
separación de 35 cm entre el dispositivo y la persona.
• Para recargar la batería, utilice únicamente la unidad de suministro desmontable proporcionada con este
aparato.
• Evite instalar la estación de carga en sitios en los que las personas puedan tropezar.
1.2 Instrucciones de seguridad para la instalación

151 ES
• Mantenga manos y pies lejos de las cuchillas giratorias. No ponga las manos o los pies cerca o bajo el
producto cuando esté en marcha.
• No levante ni mueva el producto cuando esté en marcha.
• Utilice el modo aparcamiento o ponga en OFF el producto cuando haya personas, sobre todo niños o
animales, en la zona de trabajo.
• Asegúrese de que no haya piedras, ramas, herramientas o juguetes encima del césped. De lo contrario, las
cuchillas podrían resultar dañadas al contactar con un objeto.
• No debe dejar objetos encima del producto o de la estación de carga.
• No utilice el producto en caso de que el botón STOP no funcione.
• Evite las colisiones del producto con personas o animales. Si una persona o animal está en la ruta del
dispositivo, deténgalo de inmediato.
• Apague siempre el producto poniéndolo en OFF cuando no lo esté usando.
• No debe utilizar el producto al mismo tiempo que un aspersor emergente. Puede usar la función Programar
para asegurarse de que el producto y el aspersor emergente no se ponen en marcha al mismo tiempo.
• Evite poner un canal de conexión en el lugar donde están instalados los rociadores emergentes.
• No use el producto en zonas de trabajo con agua estancada, por ejemplo, si llueve mucho o hay charcos de
agua.
• Ponga el producto en OFF para labores de mantenimiento.
• Desconectar el enchufe de la estación de carga o quitar el dispositivo de desactivación antes de proceder a
limpiar o hacer el mantenimiento de la estación de carga.
• No utilizar limpiador a alta presión ni disolventes para la limpieza del producto.
• Al terminar la limpieza, asegúrese de colocar el producto sobre el suelo con una orientación normal, nunca
boca abajo.
• No de la vuelta al producto para limpiar el chasis. Si le da la vuelta para limpiarlo, asegúrese de ponerlo
correctamente después. Esta medida de precaución es necesaria para evitar que entre agua al motor y que
esto pueda afectar a su funcionamiento normal.
Las baterías de iones de litio pueden llegar a explotar o provocar incendios si se desmontan, sufren un
cortocircuito, están expuestas al agua, al fuego o a las altas temperaturas. Debe utilizarlas con cuidado, no
desmontar ni abrir la batería y evitar cualquier tipo de maltrato eléctrico o mecánico. Guárdelas lejos de la luz
solar directa.
1. Solo debe utilizar el cargador de baterías y la fuente de alimentación que suministra el fabricante.
Utilizar un cargador y una fuente de alimentación no adecuados puede provocar descargas eléctricas y/o
sobrecalentamiento.
2. ¡NO TRATE DE REPARAR O MODIFICAR LAS BATERÍAS! Los intentos de reparación pueden provocar lesiones
personales graves, por explosiones o por descargas eléctricas. En caso de fuga, sepa que los electrolitos
1.3 Instrucciones de seguridad para la utilización
1.4 Instrucciones de seguridad para el mantenimiento
1.5 Seguridad de la batería
• No instale la estación de carga en sitios con riesgo de que el agua se quede estancada.
• No instalar la estación de carga, incluyendo los accesorios, a menos de 60 cm/24 pulgadas de cualquier
material combustible. Un fallo de funcionamiento o el sobrecalentamiento de la estación de carga y de la
fuente de alimentación pueden suponer un riesgo de incendio.
• Para los usuarios de EE.UU./Canadá: si instala la fuente de alimentación en exteriores, esto supone un riesgo
de descarga eléctrica. Sólo debe instalarlo en un receptáculo tipo GFCI (RCD) de clase A cubierto por una
carcasa para uso en exteriores, asegurándose de que la tapa del conector está insertada o retirada.
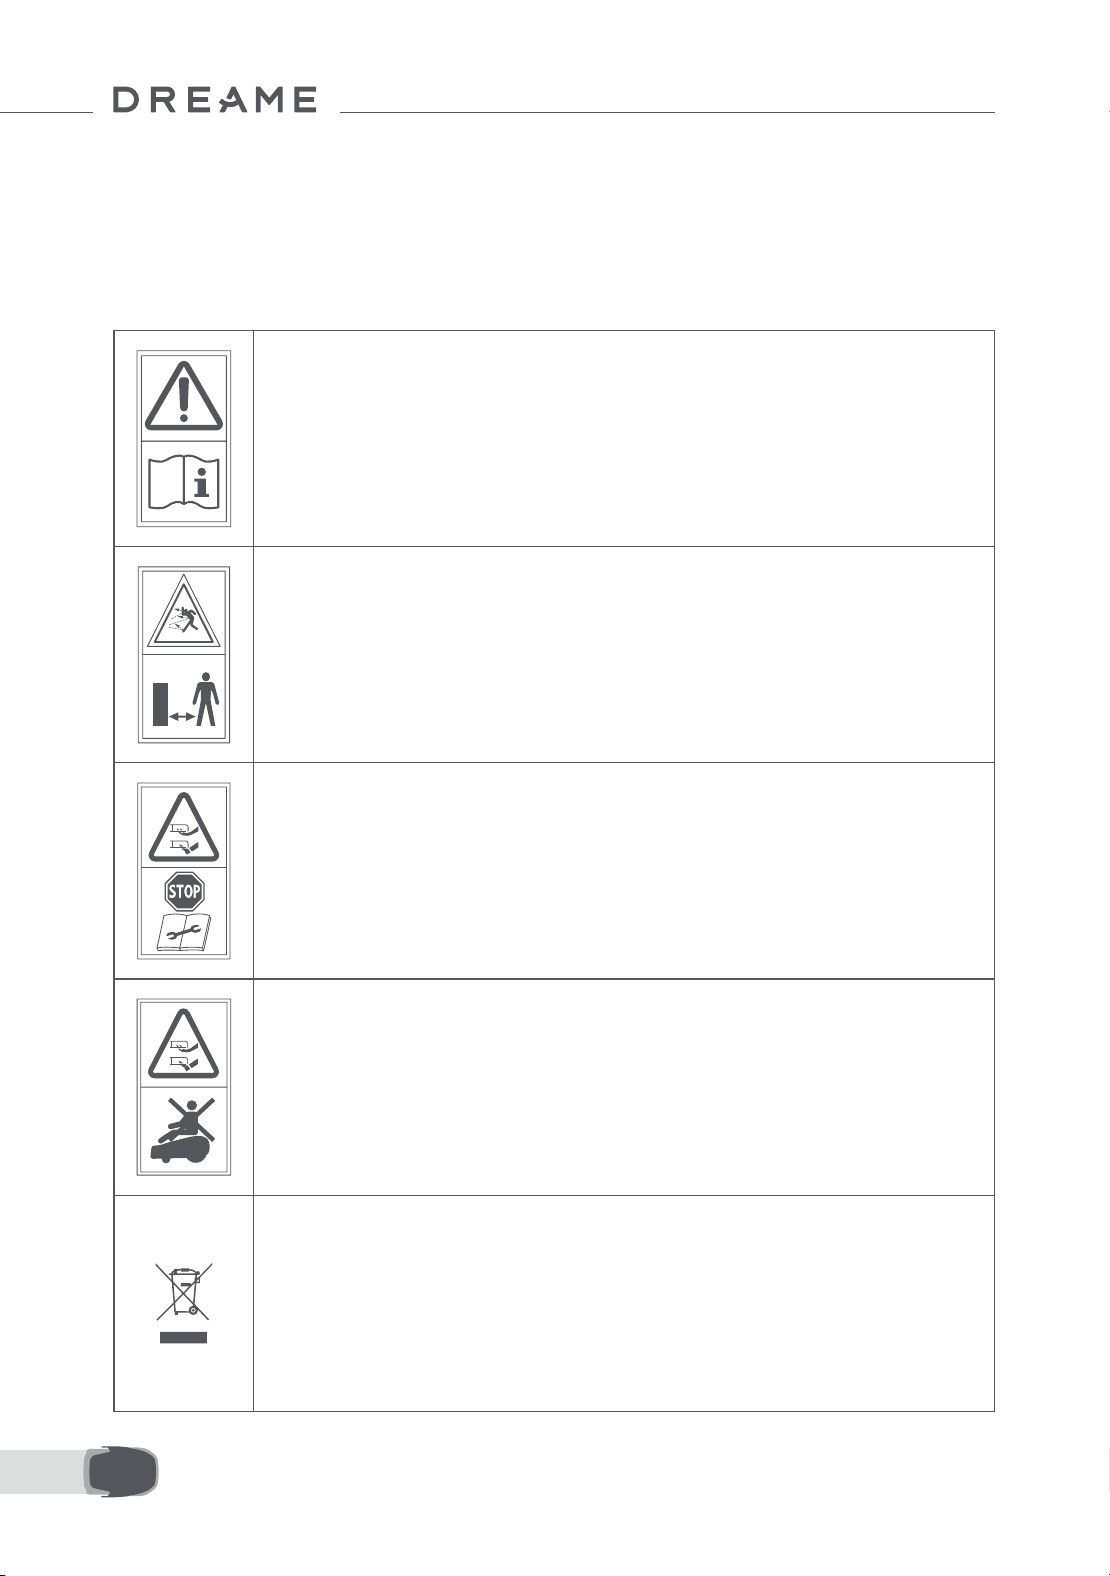
152ES
liberados son tóxicos y corrosivos.
3. Las baterías de este aparato sólo pueden ser cambiadas por personal cualicado.
Para evitar lesiones, utilizar guantes de protección para cambiar las cuchillas.
1.6 Riesgos residuales
1.7 Símbolos y calcomanías
ADVERTENCIA -
Lea las instrucciones de uso antes de usar la máquina.
ADVERTENCIA -
Mantenga una distancia segura a la máquina cuando la utilice.
ADVERTENCIA -
Utilice el dispositivo de desactivación antes de trabajar o levantar
la máquina.
ADVERTENCIA -
No se suba a la máquina.
ADVERTENCIA -
No se permite desechar este producto como si fuera basura
doméstica. Asegúrese de que se recicla siguiendo los requisitos
legales locales.
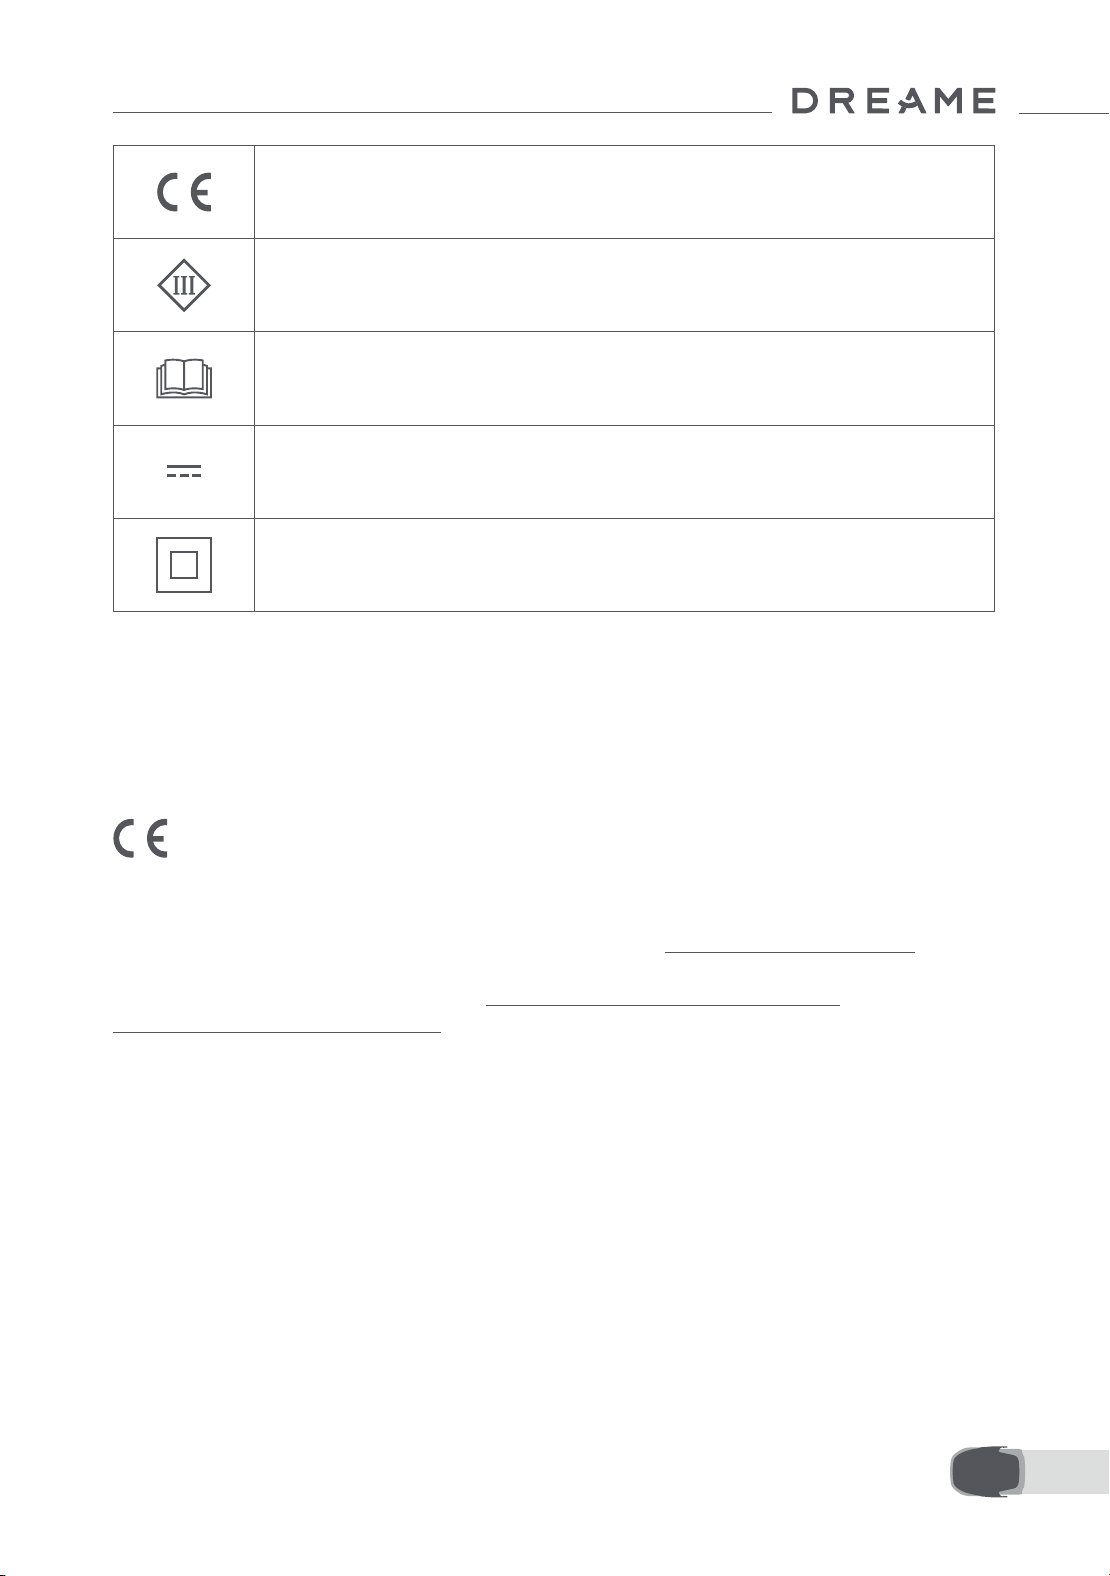
153 ES
Este producto cumple con las Normativas aplicables de la CE.
Clase III
Lea las instrucciones antes de cargar.
Corriente continua
Clase II
El producto de jardín está destinado a la siega de césped doméstico. Está diseñado para cortar a menudo,
manteniendo un césped más saludable y con mejor aspecto que nunca. Dependiendo del tamaño de su
césped, su cortacésped puede ser programado para operar en cualquier momento o frecuencia. No es
adecuado para cavar, barrer o limpiar nieve.
Por la presente, Dreame Trading (Tianjin) Co., Ltd. declara que el modelo del equipo radioeléctrico, robot
cortacésped MLLA7110 de Dreame, cumple con la Directiva 2014/53/UE. El texto completo de la declaración UE
de conformidad está disponible en la siguiente dirección de Internet: https://global.dreametech.com
、Para el manual electrónico detallado, vaya a https://dreametech.zendesk.com/hc/en-us/
categories/7968864195993-User-Manual
USO PREVISTO
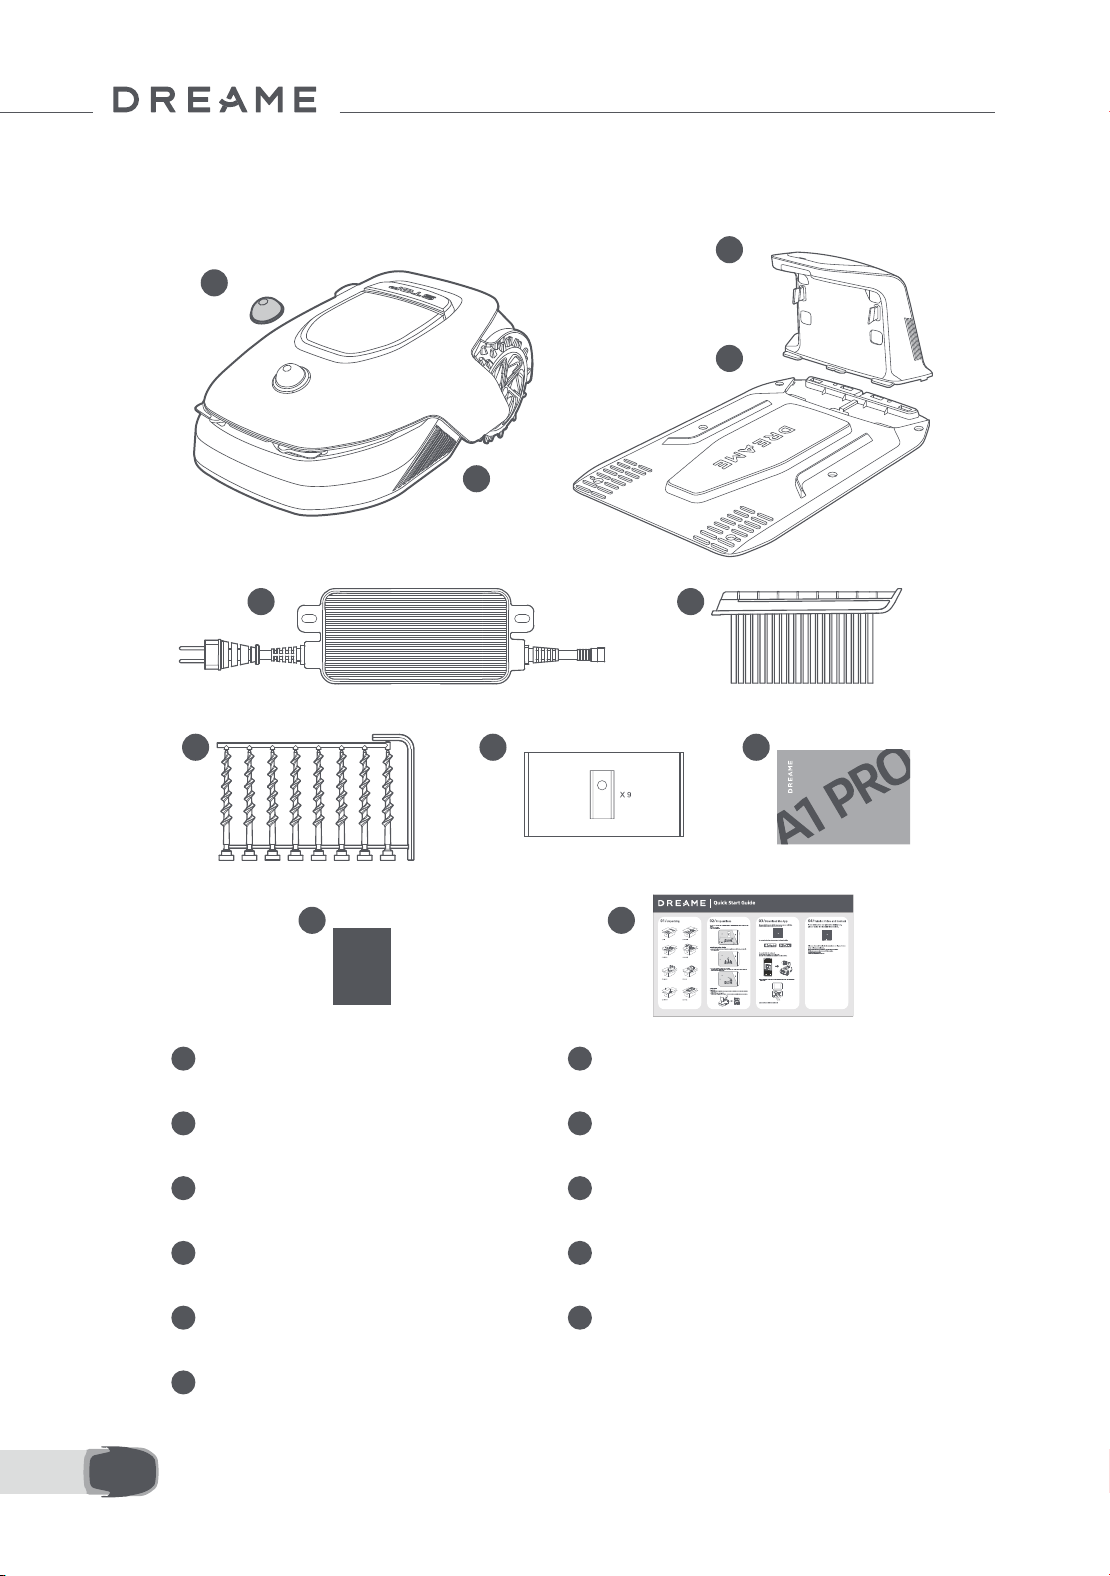
154ES
2 Contenido de la caja
11
Guía de inicio rápido
1
Cubierta protectora del lidar
2
A1 Pro
3
Torre de carga
(con un 10m cable de extensión)
4
Placa base
5
Fuente de alimentación
6
Cepillo de limpieza
7
8 tornillos, una llave hexagonal
8
Cuchilla de repuesto × 9
9
Manual de usuario
10
Paño sin pelusa
1
2
3
4
5 6
8 97
10 11
Dreame Roboticmower A1 Pro
User Manual
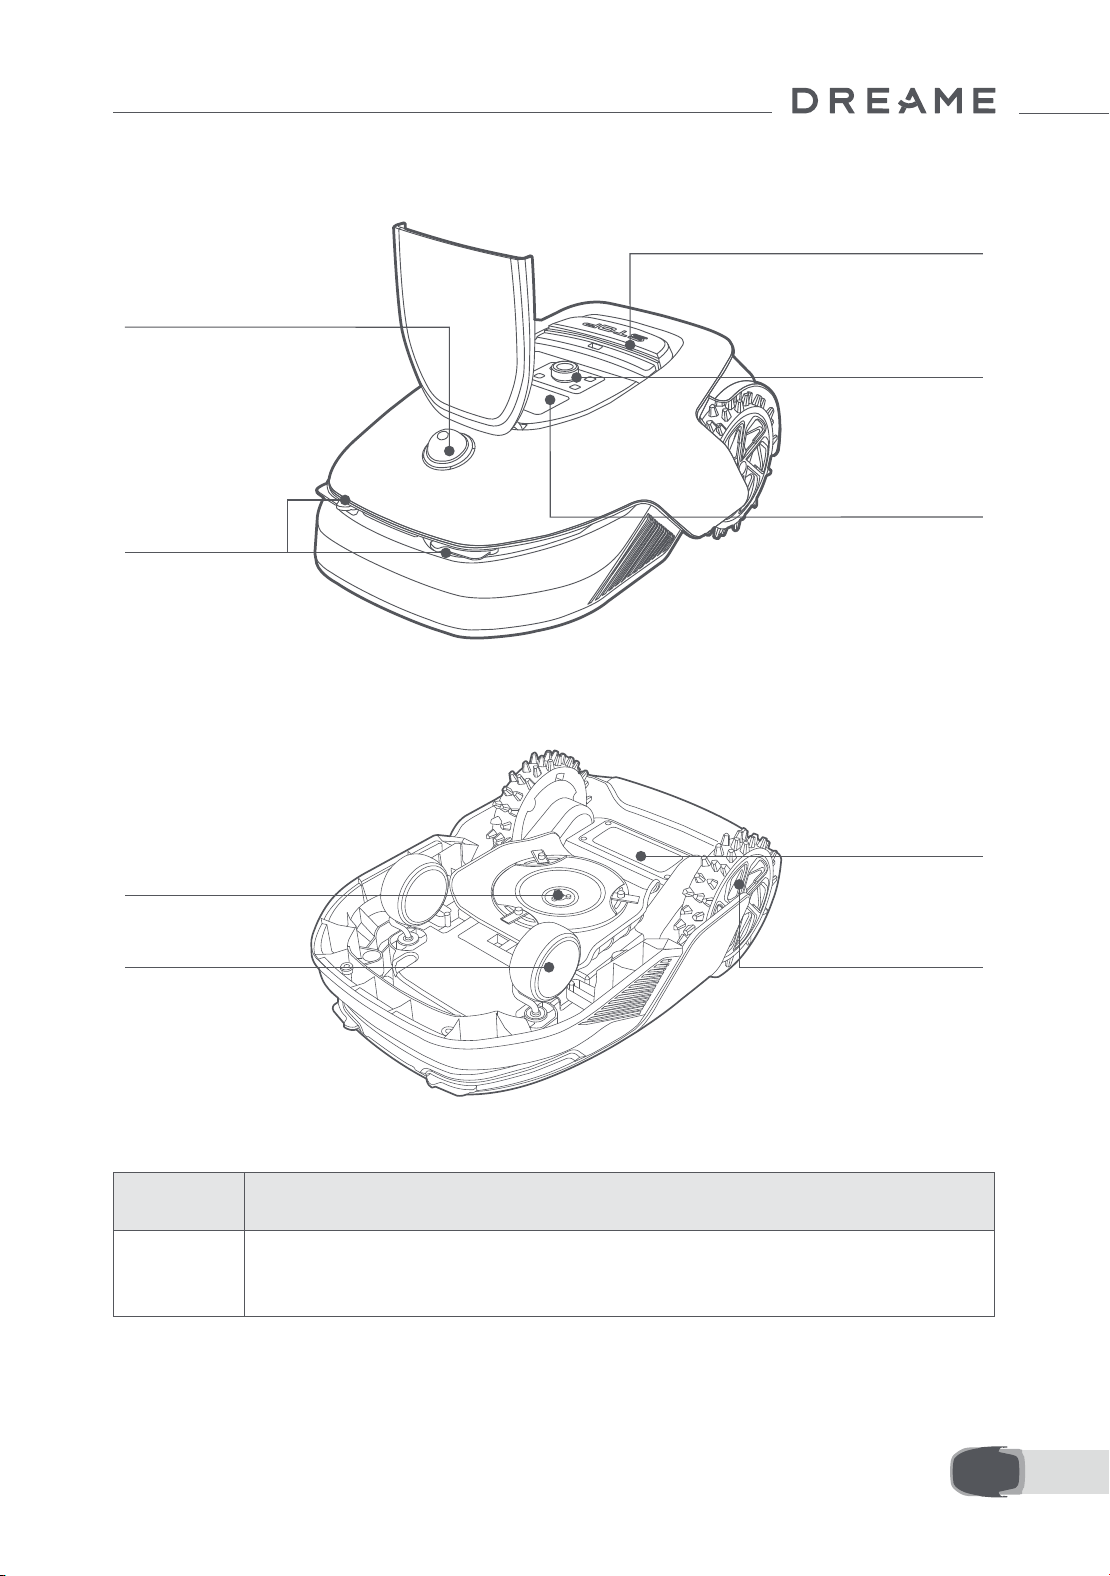
155 ES
3 Resumen del producto
Contactos
de carga
Compartimento
de la batería
Disco de cuchillas
Rueda frontal
Rueda motriz todoterreno
Lidar
Pantalla
Perilla
Botón de parada
Sensor
Nombre Descripción
Lidar
Obtiene información del entorno y facilita el posicionamiento, la evasión de obstáculos y el
sensor de agua y suciedad del A1 Pro.
Alcance de la detección: 70 m con gran angular horizontal de 360° y vertical de 59° .
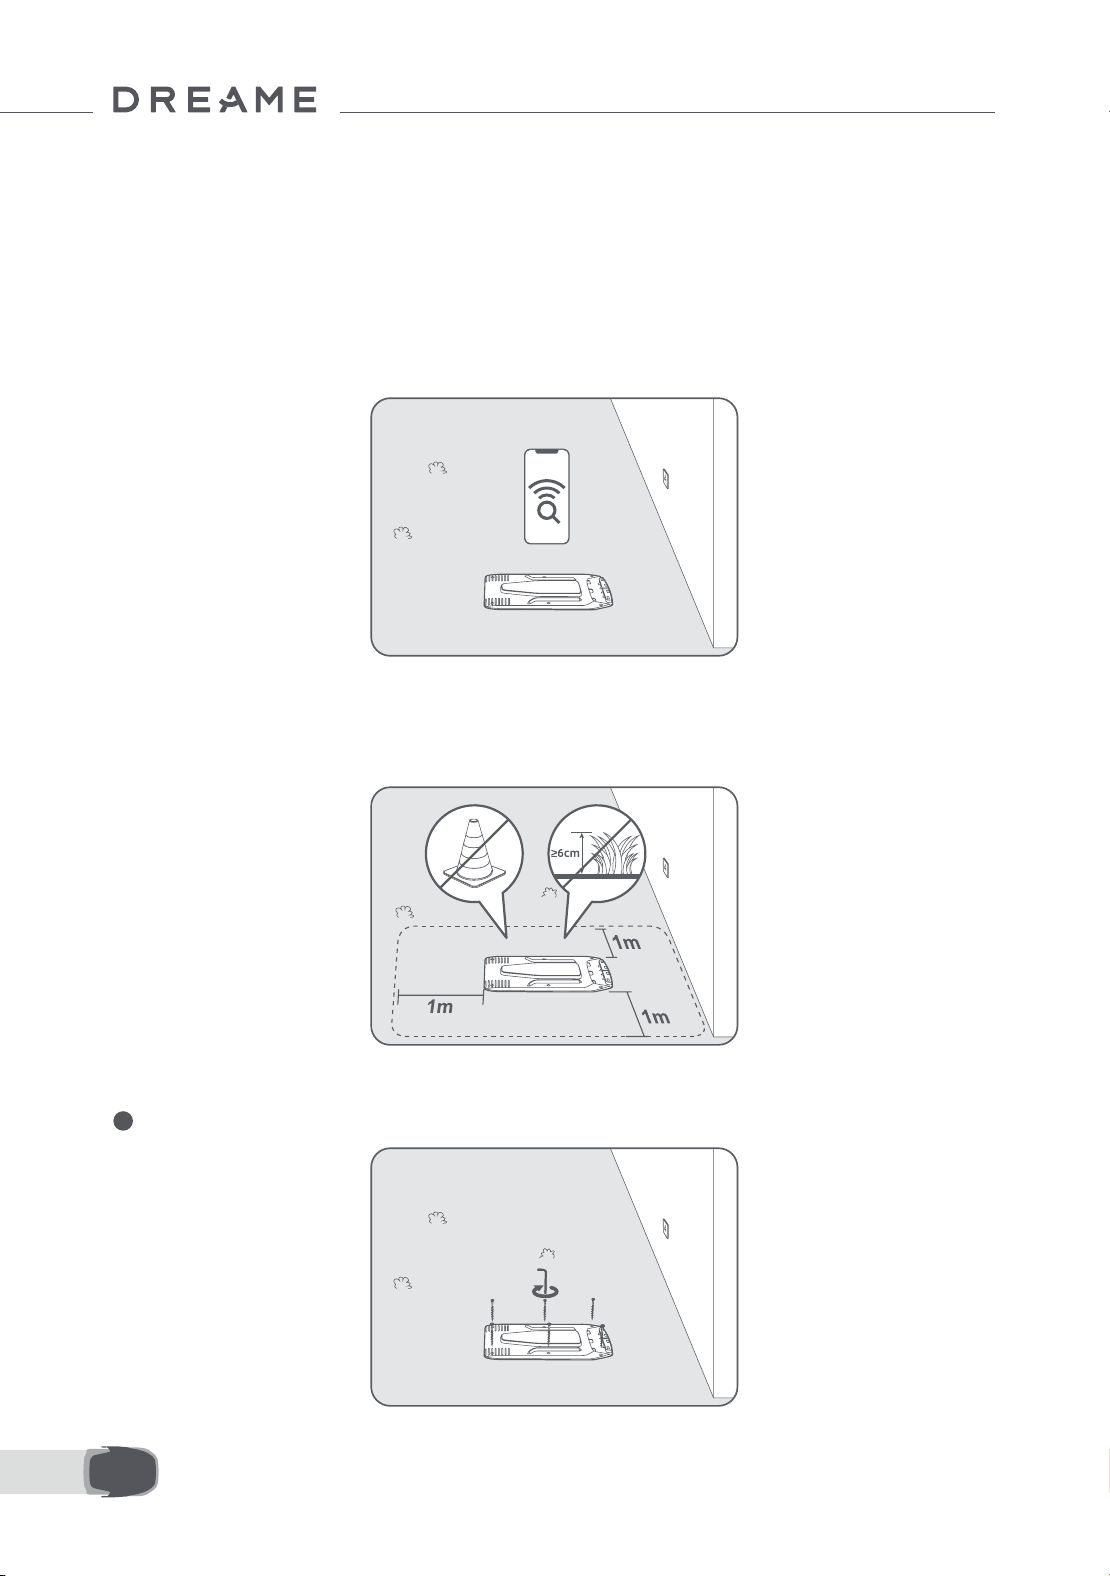
156ES
4 Instalación
4.1 Elija una ubicación adecuada
• Coloque la estación de carga en una supercie nivelada cerca del borde del césped y un enchufe. Se
recomienda colocar la estación de carga en una zona con una buena señal Wi-Fi.
Nota: utilice su dispositivo móvil para ayudar a comprobar la intensidad de la señal Wi-Fi de la ubicación Una
buena señal Wi-Fi mejora la estabilidad de la conexión entre el A1 Pro y la app.
Nota: Asegúrese de que la tierra es lo sucientemente blanda para permitir la instalación de tornillos.
• Mantenga al menos 1 m de espacio libre sin obstáculos a la izquierda, a la derecha y delante de la estación
de carga. Asegúrese de que la hierba que rodea la ubicación sea más baja de 6 cm. Si la hierba es más alta,
córtela primero con un cortacésped de empuje. La hierba alta puede dicultar al A1 Pro el regreso a la estación
de carga.
4.2 Instale la estación de carga
1
Fije la placa base al suelo con los tornillos suministrados utilizando la llave hexagonal.
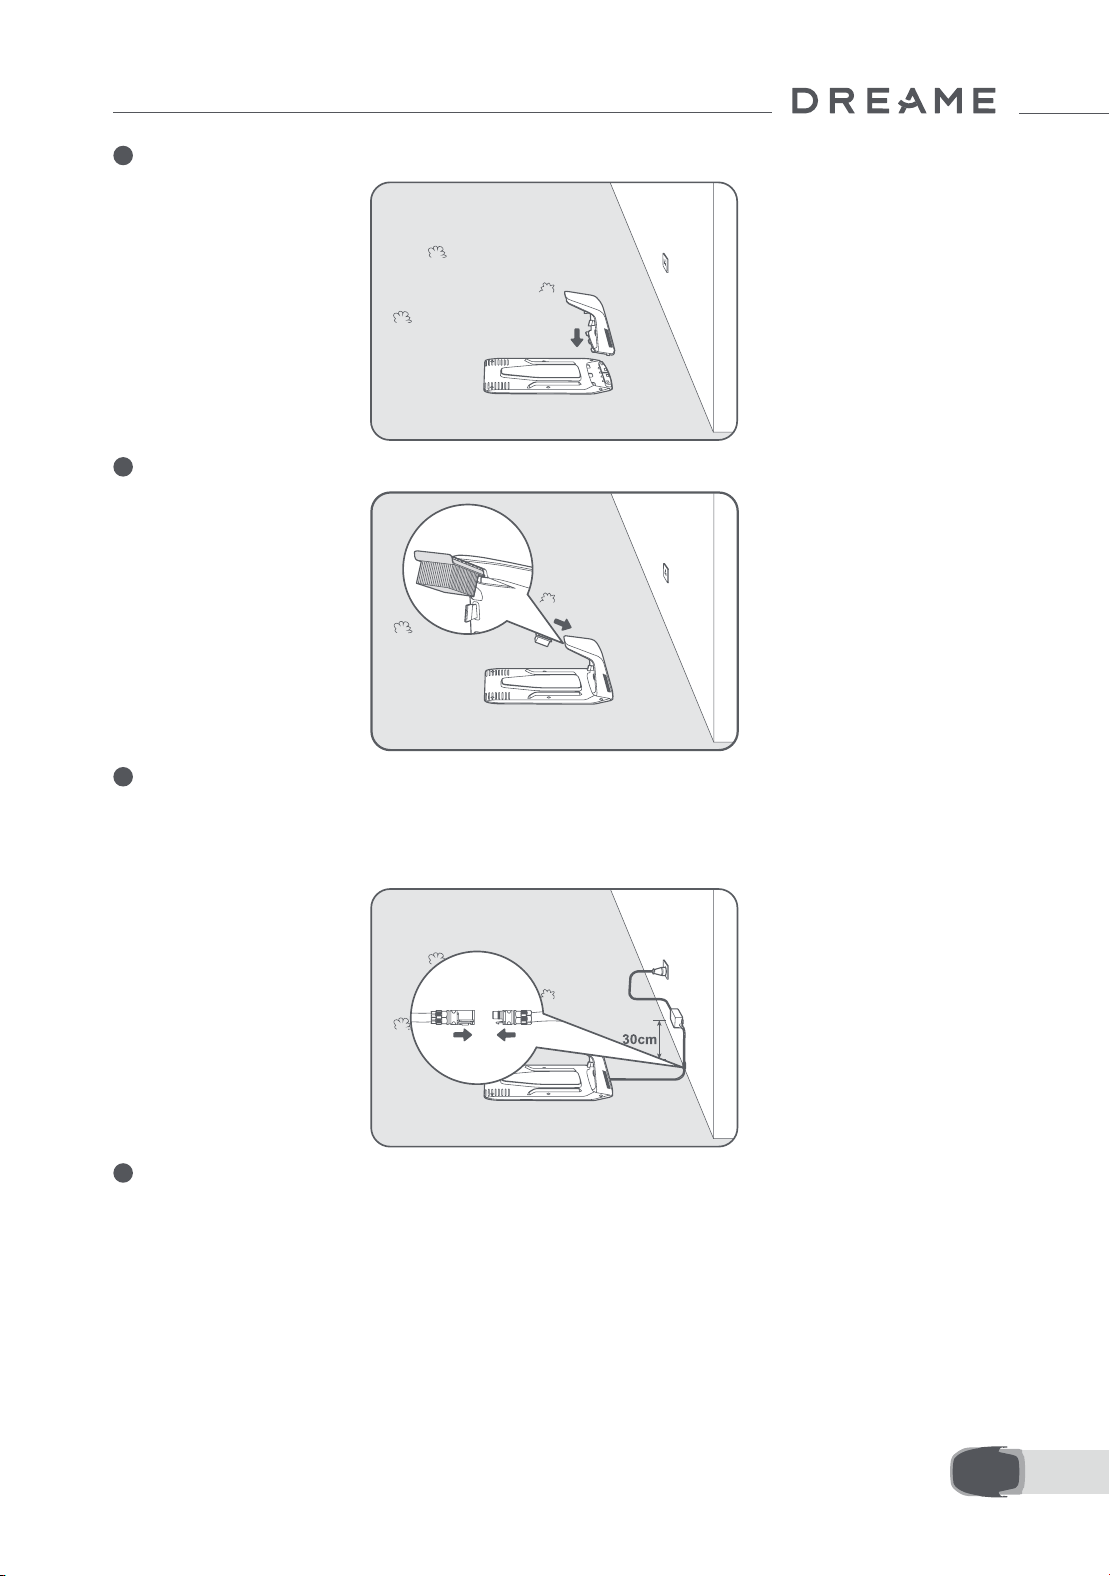
157 ES
2
Introduzca la torre de carga en la placa base hasta que escuche un clic.
3
Introduzca el cepillo de limpieza en la torre de carga alineando la lengüeta con la ranura.
4
Conecte la fuente de alimentación al cable de extensión y luego a un enchufe. Mantenga la fuente de
alimentación al menos 30 cm por encima de la tierra.
Nota: el indicador LED de la estación de carga estará constantemente en azul si todas las conexiones están
correctas si hay alimentación.
5
Ponga el A1 Pro a cargar en la estación. Asegúrese de que los contactos de carga del A1 Pro y de la estación
de carga están conectados correctamente.
Nota: La luz indicadora parpadeará en verde si A1 Pro se está cargando correctamente en la estación de
carga.

158ES
Indicador LED de la estación de carga
Cuando se enciende el A1 Pro por primera vez, se deben realizar algunas conguraciones básicas antes de que
el A1 Pro esté listo para empezar a trabajar.
5 Preparaciones antes del uso
Color de la luz del
indicador LED
Signicado
Rojo parpadeante/jo
1. La estación de carga tiene un problema (por ejemplo, un problema
de corriente o tensión de carga).
2. El A1 Pro se acopla a la estación de carga, pero la carga no es
normal (por ejemplo, los contactos de carga tienen un cortocircuito).
Azul jo
La estación de carga tiene corriente. El A1 Pro no está en la estación
de carga.
Verde parpadeante El A1 Pro se está cargando en la estación.
Verde jo El A1 Pro está en la estación de carga y completamente cargado.
1
Retire la cubierta protectora del lidar.
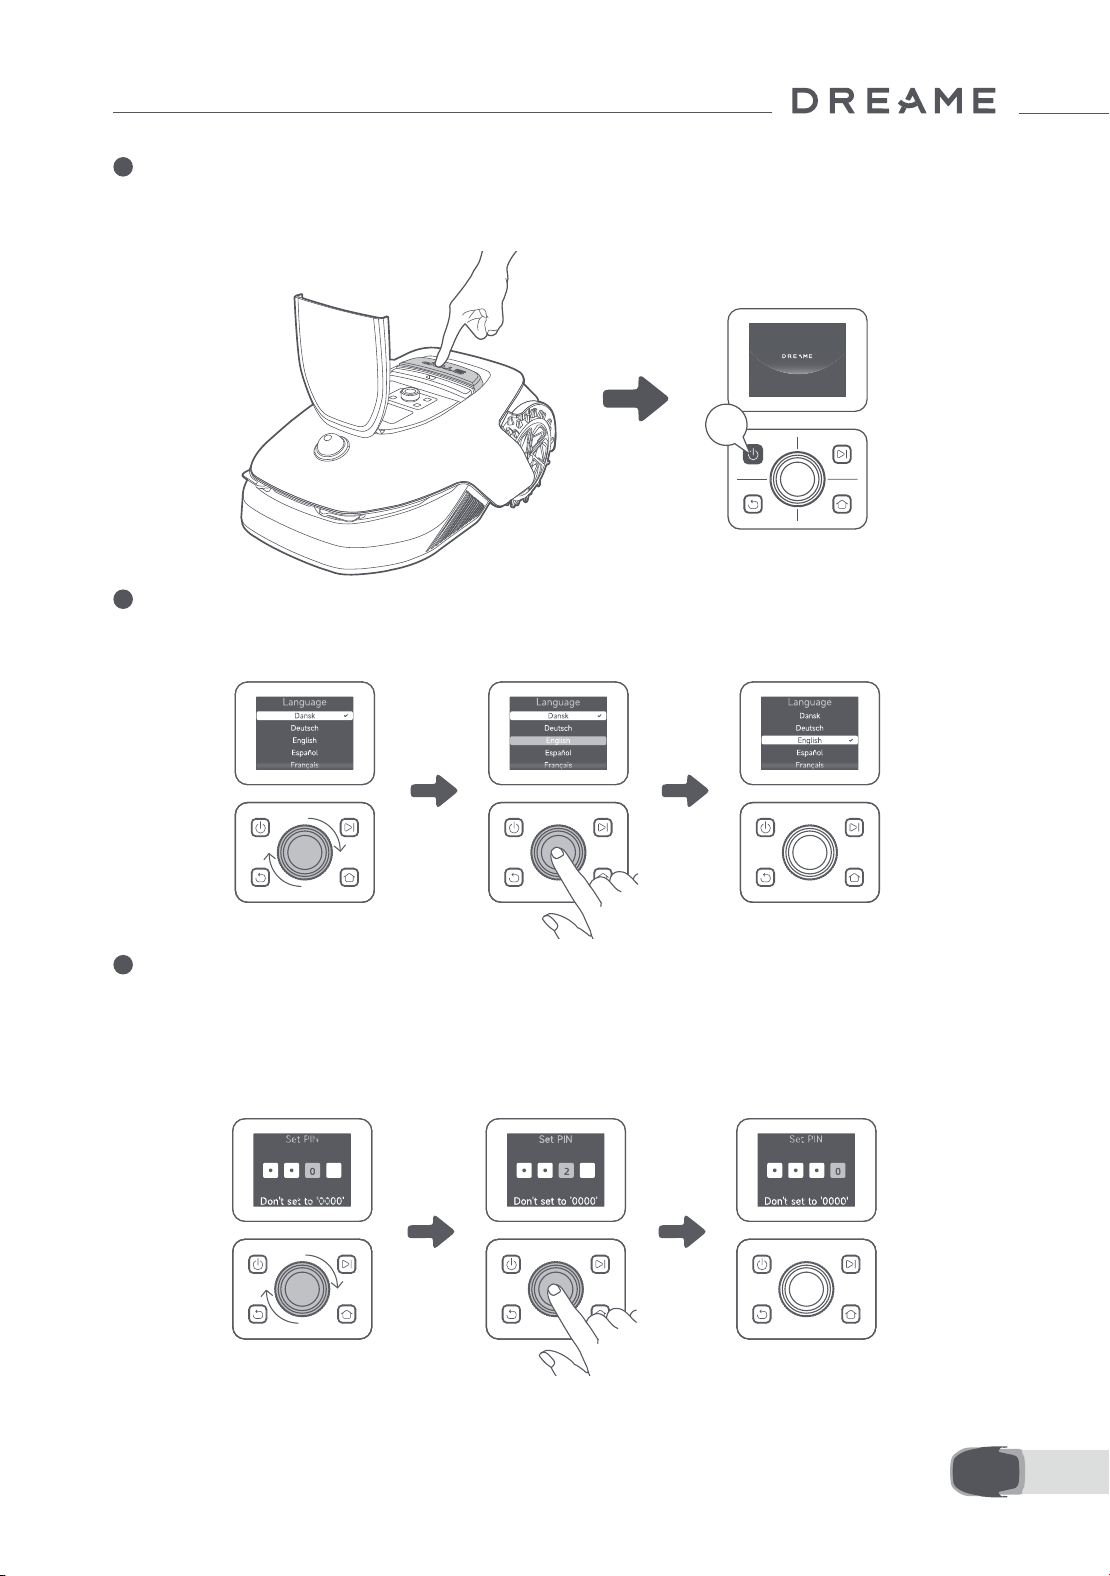
159 ES
2
Pulse el botón de parada para abrir la cubierta del panel de control. Mantenga pulsado el botón de
encendido del panel de control durante 2 segundos para encender el A1 Pro.
Nota: El A1 Pro se encenderá automáticamente cuando se acople a la estación de carga.
3
Seleccione el idioma que preera
Gire la perilla en sentido horario para bajar y en sentido antihorario para subir a la hora de elegir el idioma.
Pulse la perilla para conrmar.
4
Establezca un código PIN
1. Gire la perilla para elegir un número del 0 al 9. Gírela en sentido horario para aumentar el número de 0 a 9 y
en sentido antihorario para reducirlo. Pulse la perilla para establecer el siguiente dígito. Para modicar el dígito
anterior, gire la perilla en sentido antihorario hasta que el número llegue a 0 y vuelva a girarla una vez más.
Nota: no establezca «0000» como código PIN.
2s
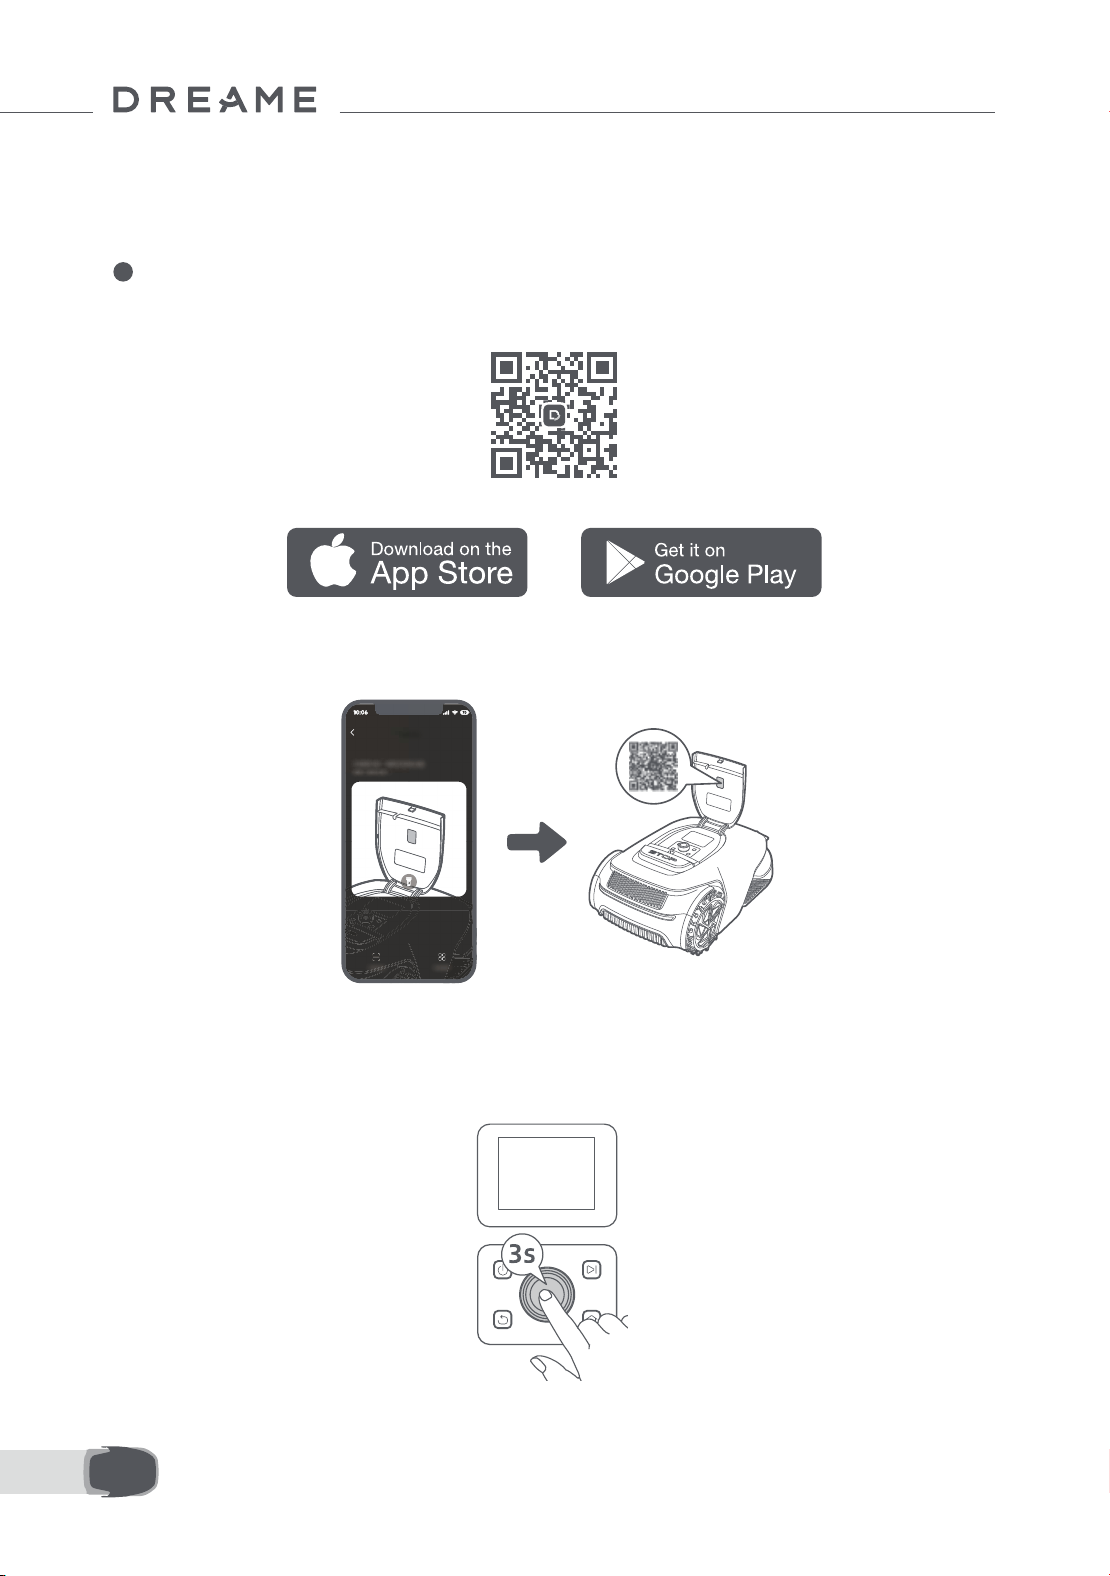
160ES
2. Vuelva a introducir el código PIN para completar la conguración.
Nota: si las dos contraseñas no coinciden, vuelva a introducir la nueva contraseña.
5
Conecte el A1 Pro a Internet
Escanee el código QR para descargar la app Dreamehome en su dispositivo móvil. Tras la instalación, cree una
cuenta e inicie sesión.
También puede descargar la app Dreamehome de la App Store o de Google Play.
1) Conexión Bluetooth
1. Active la función Bluetooth en su dispositivo móvil.
2. Escanee el código QR del interior de la cubierta o seleccione el A1 Pro manualmente en la app.
3. Mantenga pulsada la perilla del panel de control durante 3 segundos y el A1 Pro entrará en el modo de
emparejamiento Bluetooth.
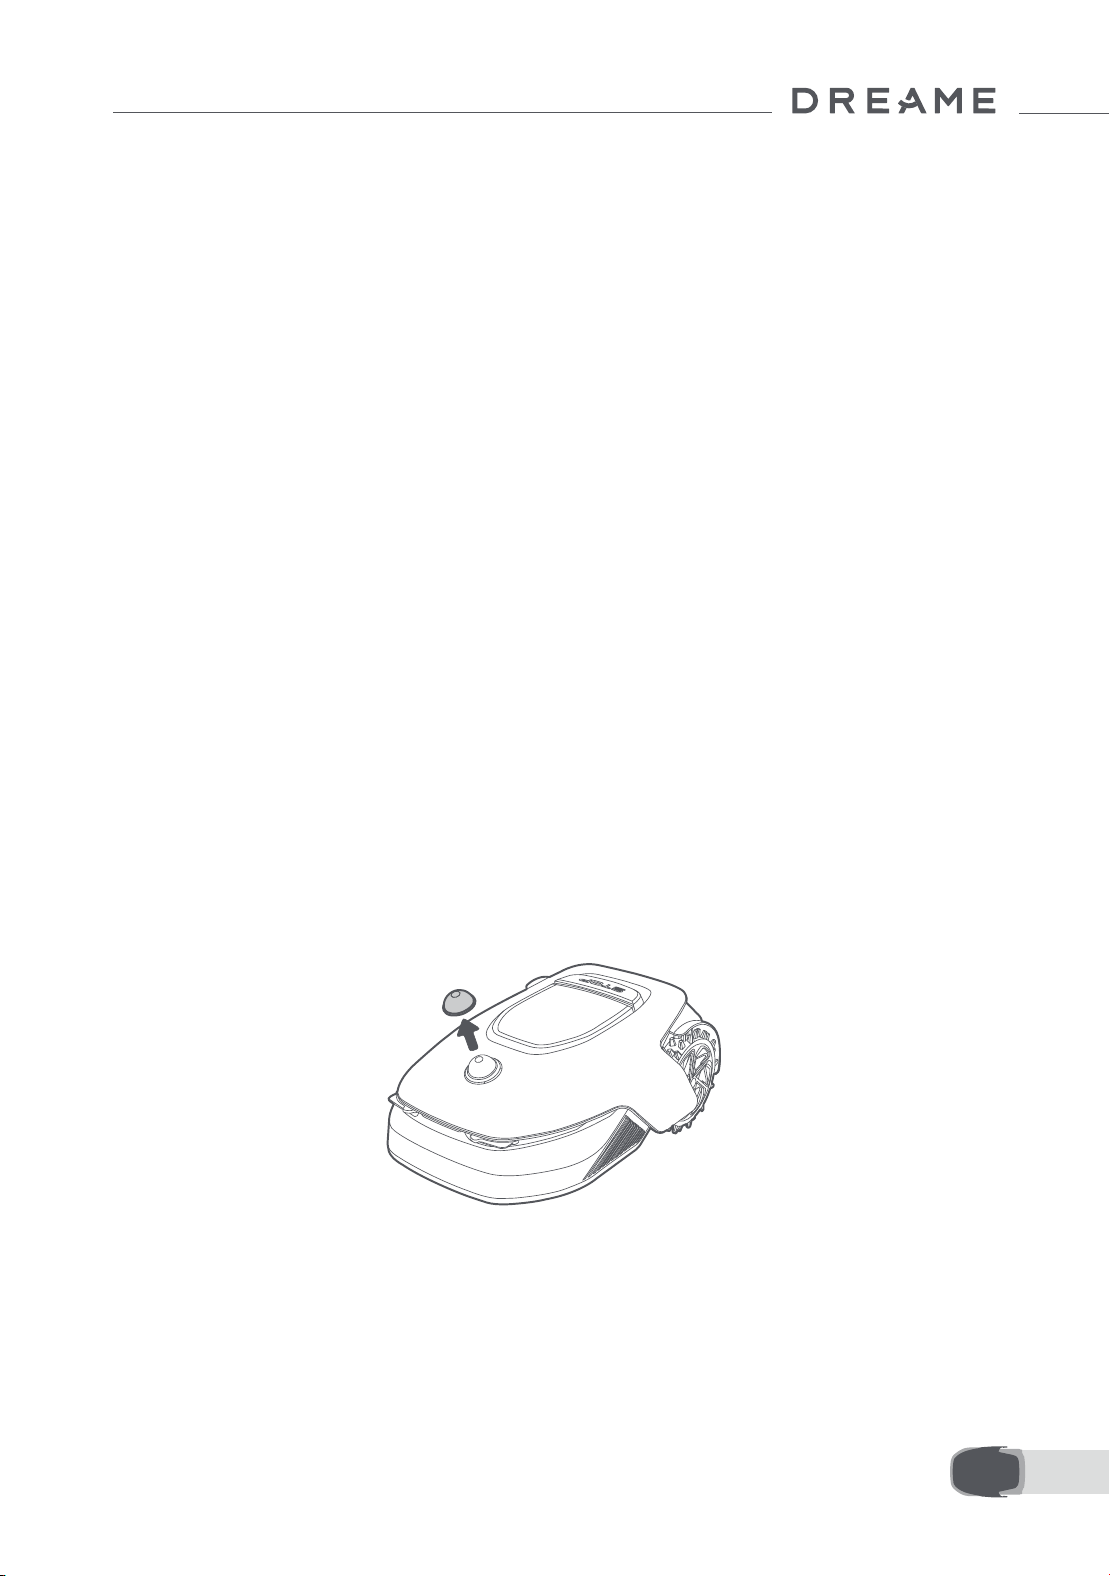
161 ES
4. Empareje el A1 Pro con su dispositivo móvil por Bluetooth.
Nota: Asegúrese de que su dispositivo móvil se encuentra a menos de 10 metros del A1 Pro.
2) Conexión Wi-Fi
Asegúrese de que el A1 Pro y su dispositivo móvil están en la misma red Wi-Fi. Siga las instrucciones de la app
para completar la conexión.
Nota: utilice una red de banda única de frecuencia 2,4 GHz o una red de banda dual de frecuencia 2,4/5 GHz.
Nota: también puede comprar el módulo de enlace para controlar el A1 Pro de forma remota sin una conexión
Wi-Fi.
¿Cómo desvincular el A1 Pro?
El A1 Pro se vincula automáticamente a la cuenta de Dreamehome tras completar el emparejamiento. Cada
dispositivo solo se puede vincular a una cuenta. No se puede vincular a otra cuenta al mismo tiempo.
Para emparejar el A1 Pro con una nueva cuenta, debe desvincularlo primero. Puede ir a "Dispositivo", y tocar
Más > Borrar en la esquina superior derecha para desvincular el dispositivo.
¿Cómo cerrar sesión en su cuenta de Dreamehome o borrarla?
Para cerrar sesión, vaya a Mi > Conguracion > Cuenta > Cerrar Sesión. Para borrar la cuenta, vaya a Mi >
Conguracion > Cuenta > Borrar Cuenta.
Antes de crear el mapa, compruebe lo siguiente:
• El nivel de batería del A1 Pro es superior al 50 %.
• Se ha retirado la cubierta protectora del lidar.
6 Cree un mapa de su jardín
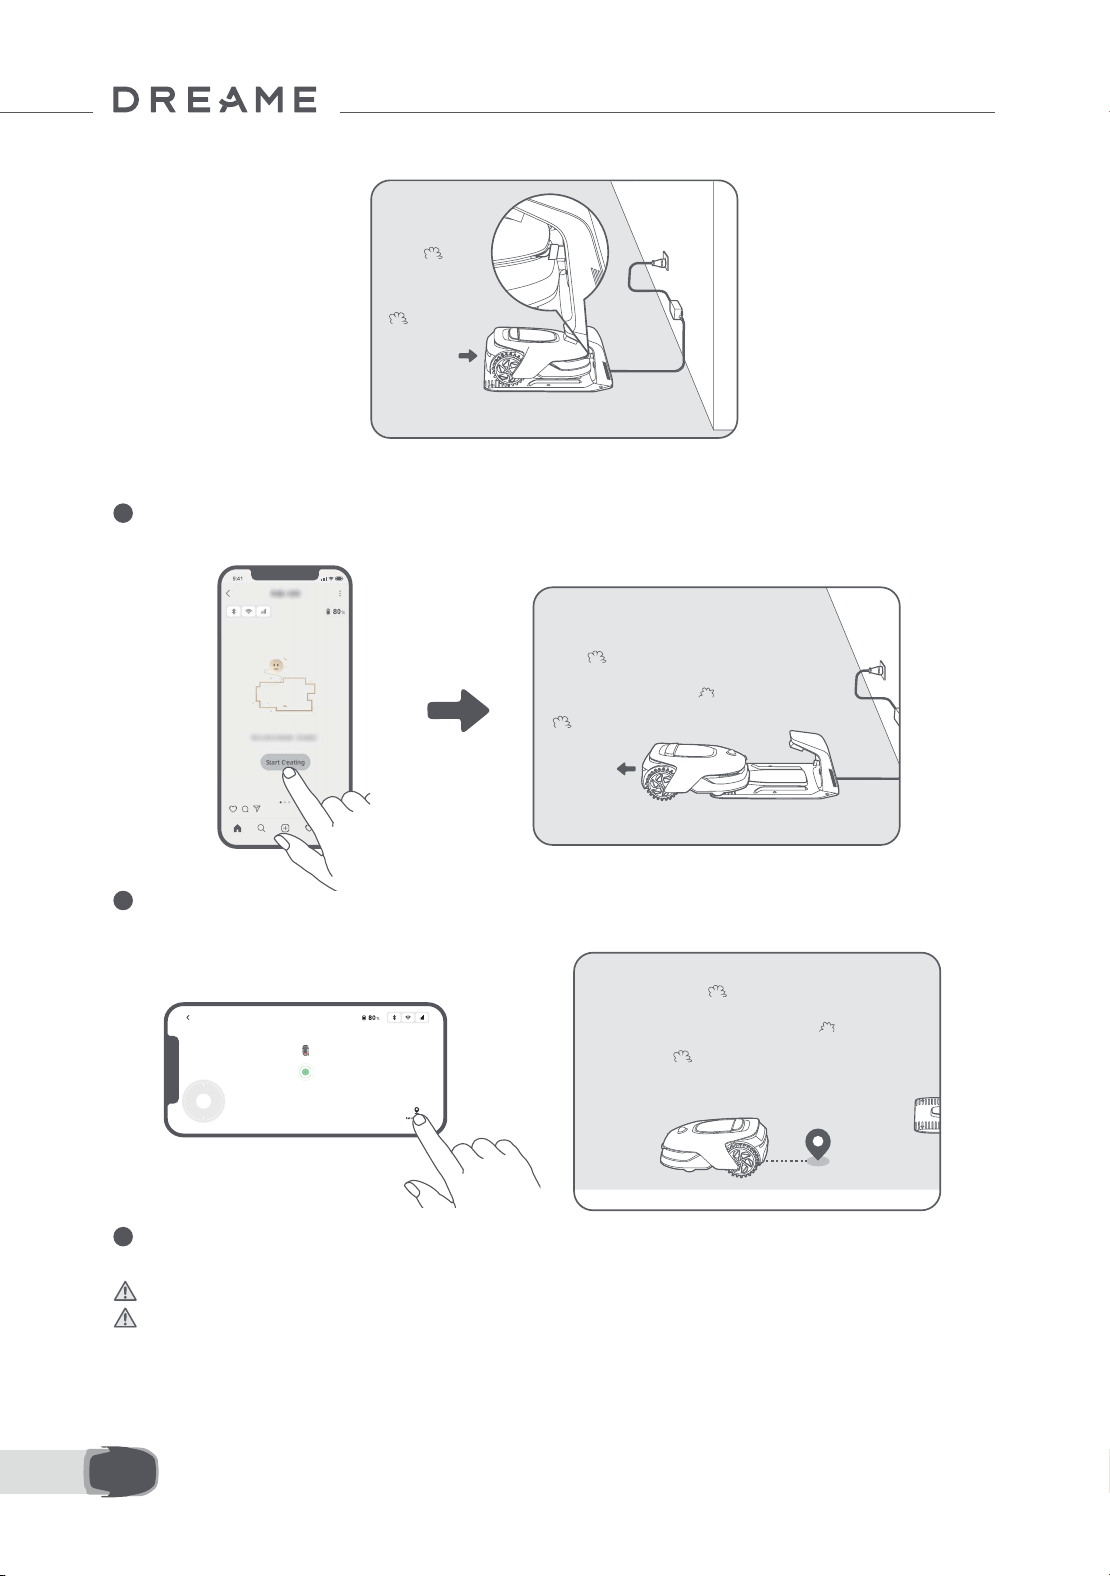
162ES
• A1 Pro se acopla correctamente en la estación de carga.
6.1 Cree el límite
1
Pulse «Empezar a crear» en la app, y el A1 Pro comprobará su estado y se calibrará. Abandonará
automáticamente la estación de carga para realizar la calibración. Tenga cuidado.
2
Controle el robot de forma remota hasta el borde de su césped y pulse «Establecer un punto de inicio» para
conrmar el punto de inicio del límite.
3
Controle el A1 Pro de forma remota para moverlo por el borde del césped para crear la zona de trabajo.
Cuando controle el A1 Pro de forma remota para crear el límite, tenga lo siguiente en cuenta:
Advertencia: No mueva el A1 Pro manualmente cuando cree el límite, de lo contrario, fallará el mapeo.
Advertencia: Cuando empiece el mapeo con el mando a distancia, no acople el A1 Pro a la estación
de carga a distancia hasta que nalice el mapeo. De lo contrario, el LiDAR puede bloquearse y hacer que el
mapeado falle.
• Camine a menos de 5 m por detrás del A1 Pro cuando lo controle de forma remota.

163 ES
• No cree el límite en una pendiente que exceda el 27 %.
• Si hay una diferencia de altura de más de 4 cm entre el borde de su césped y la tierra adyacente, mantenga el
A1 Pro al menos a 10 cm del borde de su césped.
• Evite crear límites dentro de pasillos más estrechos de 1.5 m.

164ES
• Asegúrese de que los ángulos de giro son superiores a 90° .
4
Cuando el A1 Pro vuelve a estar a 1 m del punto de inicio, puede pulsar «Cerrar límite» y el límite se
completará de forma automática.
6.2 Establecer zona prohibida
Aunque el A1 Pro puede evitar obstáculos automáticamente, sigue siendo necesario establecer zonas
prohibidas en zonas en las que hay riesgo de caída, como las piscinas o los fosos de arena. Si hay objetos
que quiere proteger (como un macizo de ores, una cama elástica, un huerto o una raíz de árbol desnuda),
establézcalos como zonas prohibidas. Puede controlar el A1 Pro de forma remota para crear zonas prohibidas
en la app, o ir a «Edición del mapa» para dibujar o eliminar directamente las zonas prohibidas en el mapa.
6.3 Establecer múltiples zonas
Si su césped está separado por caminos o si tiene varios céspedes aislados, puede pulsar «Zona de trabajo»
en la app para continuar creando la zona de trabajo con el control remoto. También puede añadir, eliminar o
modicar las zonas en «Edición del mapa» cuando el mapa se haya terminado.

165 ES
6.4 Establecer camino
• Para conectar dos zonas de trabajo aisladas
Si hay un espacio de superposición entre las zonas nuevas y la original, se combinarán automáticamente. Si
tiene zonas aisladas, cree un camino para conectarlas, de lo contrario, el A1 Pro no podrá acceder a ellas. Pulse
«Camino» y controle el A1 Pro de forma remota para crear un camino.
Nota: asegúrese de que el inicio y el nal del camino se encuentran en la zona de trabajo. Mantenga al menos
1 m de distancia entre el inicio/nal del camino y el límite.
Si tiene zonas aisladas, cree un camino para conectarlas. Si las zonas aisladas no tienen un camino, el A1 Pro
no podrá acceder a ellas.
Nota: De forma predeterminada, A1 Pro solo se mueve a lo largo del camino sin cortar el césped.
Nota: Si su césped está dividido por caminos más altos de 4 cm, coloque un objeto con una pendiente de la
misma altura hasta el camino (como una rampa).
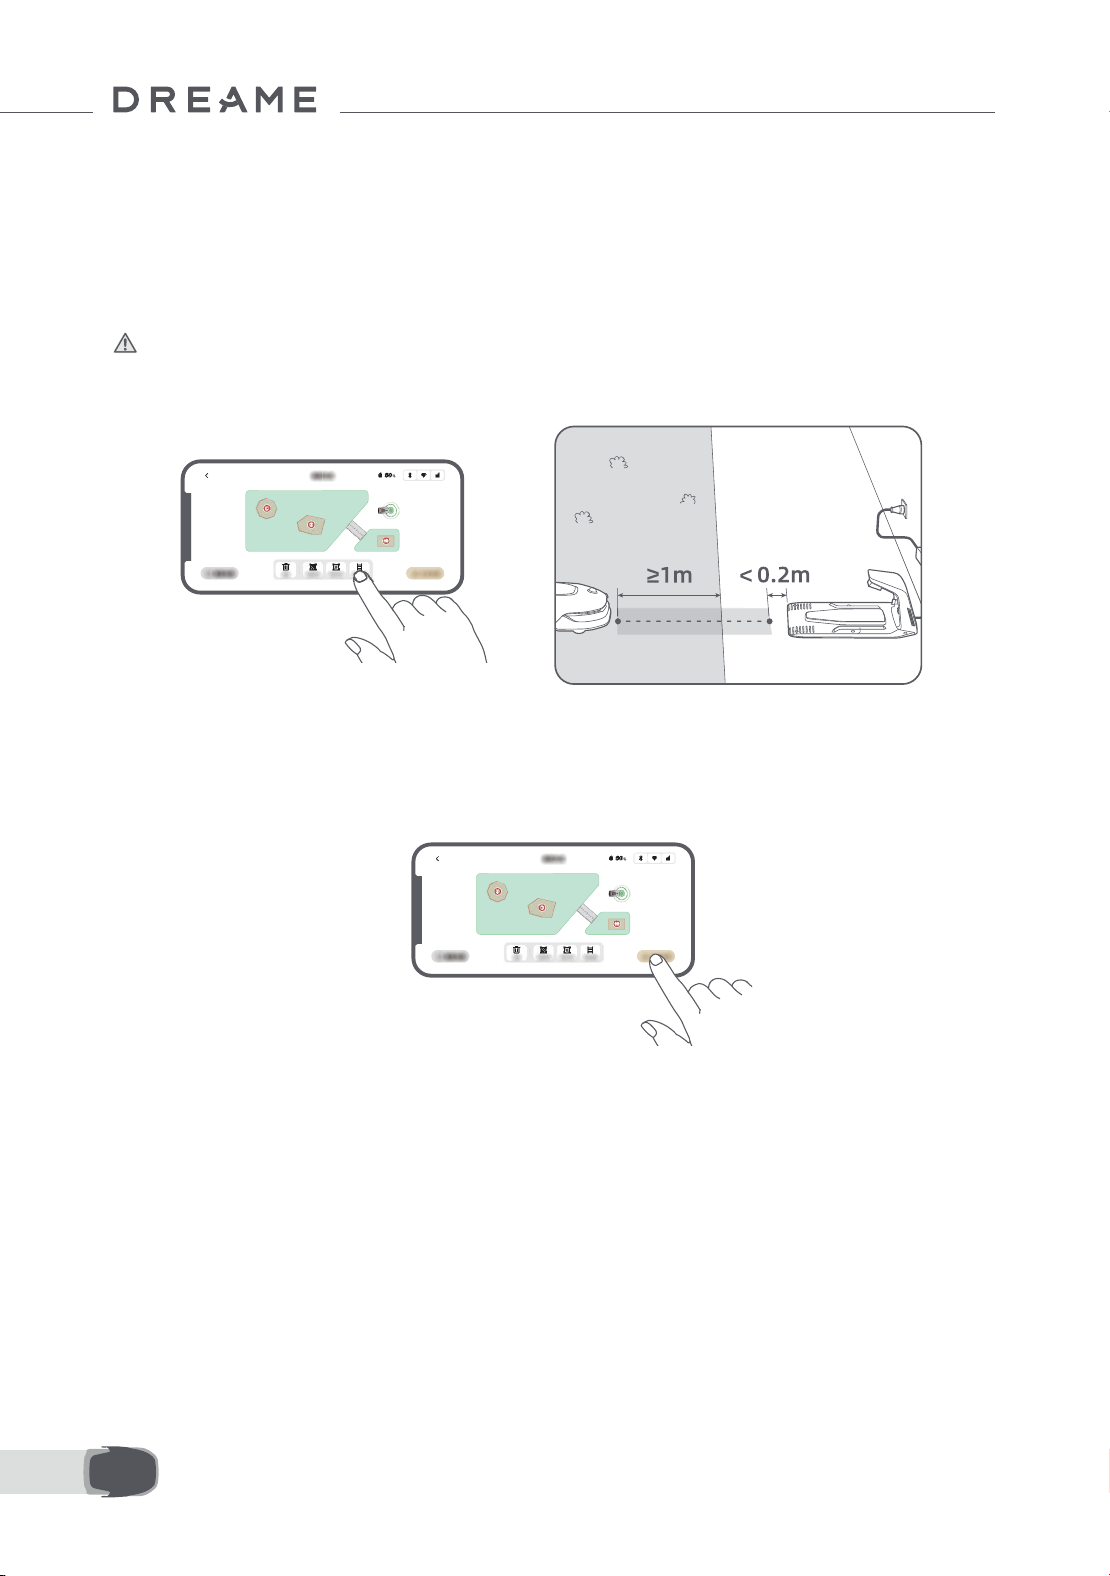
166ES
6.5 Finalizar el mapa
Pulse «Finalizar el mapa» cuando se completen las zonas de trabajo, los caminos y las zonas prohibidas. El
A1 Pro debe estar dentro del mapa cuando se haya terminado, de lo contrario, se le pedirá que lo controle de
forma remota para moverlo dentro del mapa.
• Para conectar la zona de trabajo y la estación de carga
Si la estación de carga no se encuentra en la zona de trabajo, se debe crear un camino para conectarla a tal
zona. Pulse «Camino» y controle el A1 Pro de forma remota para crear un camino que le permita regresar a la
estación.
Nota: Cuando cree un camino, asegúrese de que un extremo del camino se superponga con la zona de
trabajo por lo menos 1 metro ( ≥ 1 m), y que el otro extremo esté a menos de 0,2 metros ( < 0,2 m) delante de
la estación.
Advertencia: cuando cree rutas para conectar la zona de trabajo y la estación de carga, procure no
acoplar el A1 Pro de manera remota en la estación de carga. De lo contrario, el LiDAR puede bloquearse y
hacer que el mapeado falle.
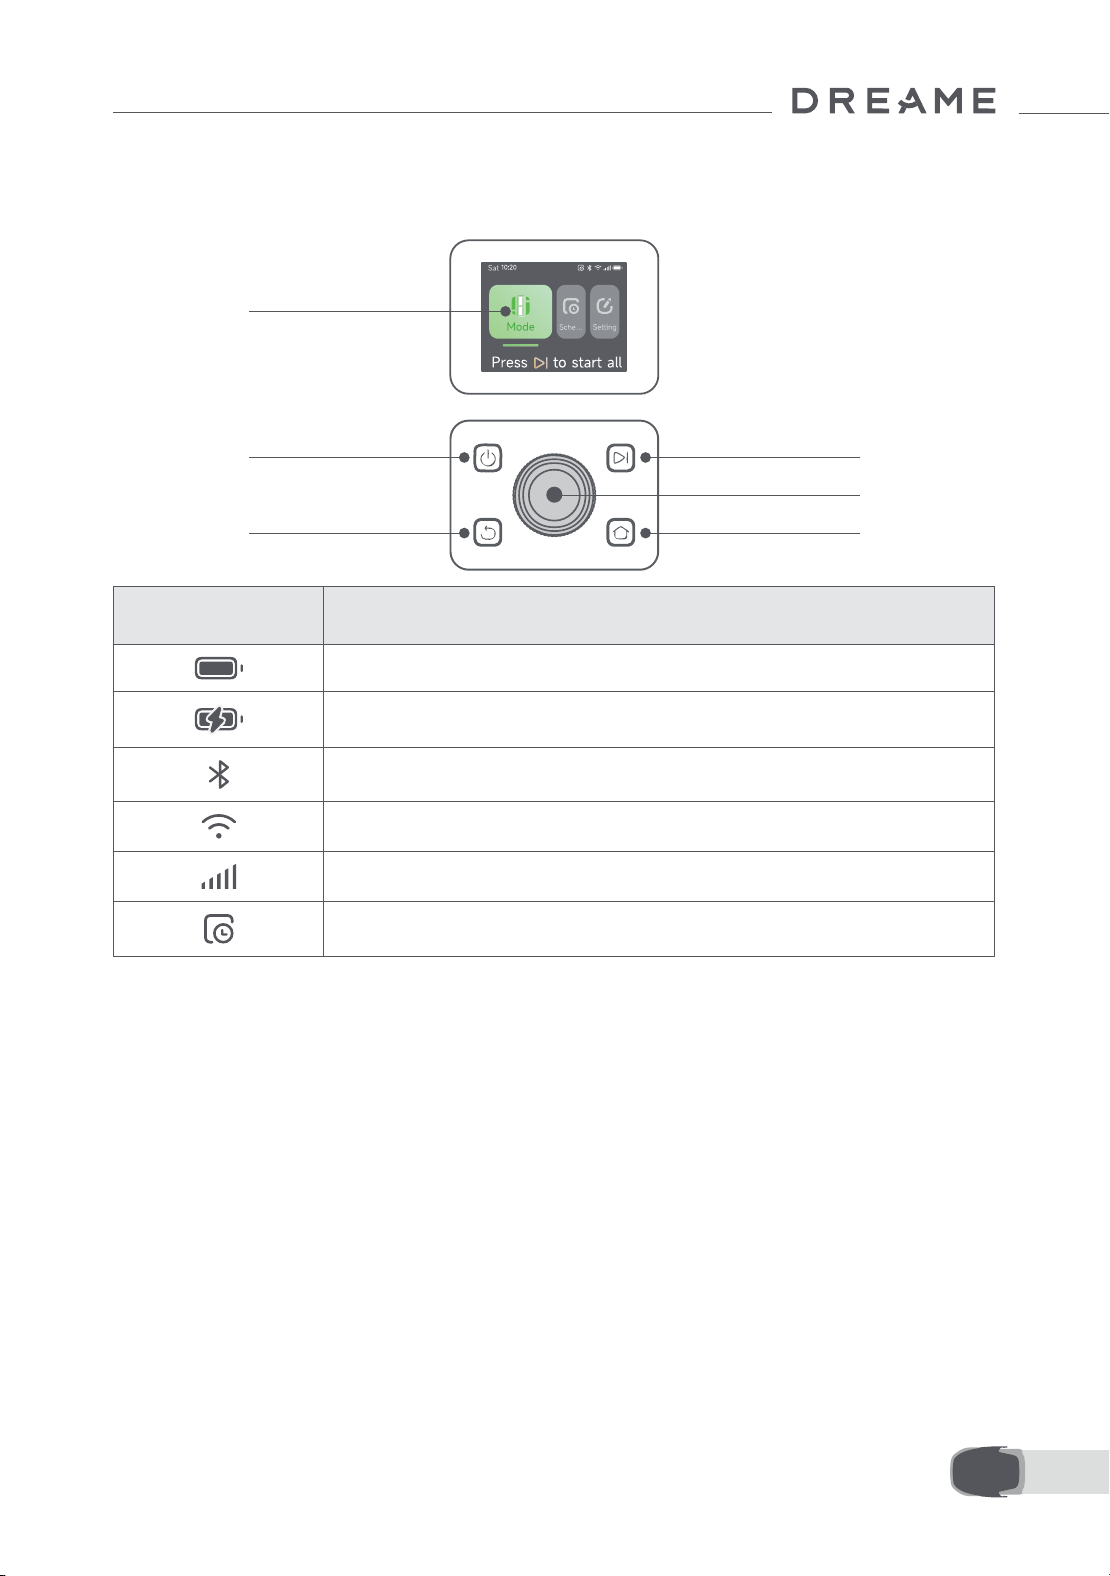
167 ES
7.1 Familiarícese con el panel de control
7 Funcionamiento
Encendido/
apagado
Pantalla
Atrás
Iniciar
Perilla
Inicio
Icono Estado
Nivel de batería (muestra el nivel de batería actual).
Carga (El A1 Pro se acopla correctamente en la estación de carga).
Bluetooth (El A1 Pro se conecta a la app por Bluetooth).
Wi-Fi (El A1 Pro se conecta a la app por la red Wi-Fi).
Servicio de enlace (El servicio de enlace está activado).
Programa (Se ha programado una tarea para hoy y todavía no ha empezado).
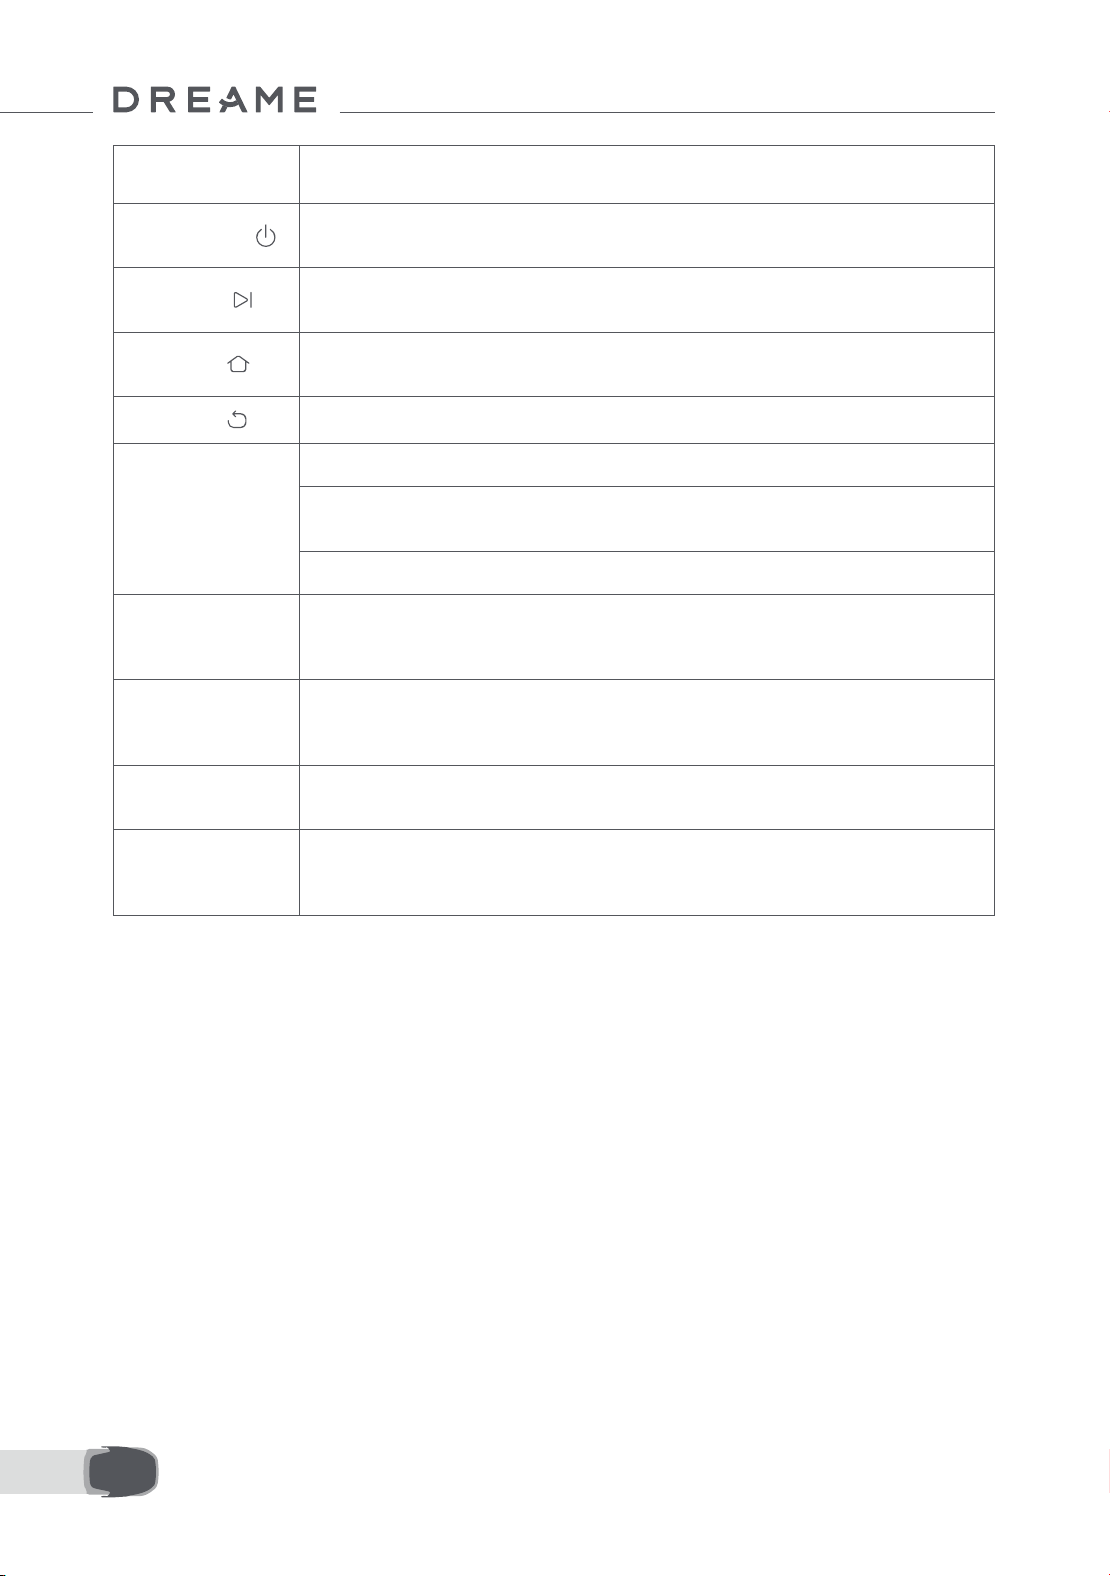
168ES
Botón Función
Encendido
Asegúrese de que el A1 Pro está fuera de la estación de carga. Mantenga pulsado el
botón de encendido durante 2 segundos para encenderlo o apagarlo.
Iniciar
Pulse el botón Iniciar y cierre la cubierta en 5 segundos para iniciar el corte. La tarea
se cancelará si la cubierta no se cierra en 5 segundos.
Inicio
Pulse el botón Inicio y cierre la cubierta en 5 segundos para devolver el A1 Pro a la
estación de carga. La tarea se cancelará si la cubierta no se cierra en 5 segundos.
Atrás
Pulse el botón Atrás para volver a la página anterior.
Perilla
Pulse la perilla para conrmar la selección en los menús.
Mantenga pulsada la perilla durante 3 segundos para activar el emparejamiento
por Bluetooth en el A1 Pro.
Gire la perilla en sentido horario/antihorario para navegar por el menú.
Iniciar + Atrás
Mantenga pulsados el botón Iniciar y el botón Atrás al mismo tiempo durante 3
segundos para restablecer el A1 Pro a los valores de fábrica. El código PIN no se
borrará.
Inicio + Atrás
Mantenga pulsados el botón Inicio y el botón Atrás al mismo tiempo durante 3
segundos para acceder a la página Acerca de en los ajustes. La página Acerca de
desaparecerá tras 5 segundos.
Perilla + Atrás
Mantenga pulsados la perilla y el botón Atrás al mismo tiempo durante 3 segundos
para reiniciar el código PIN.
Parada
Pulse el botón de parada para abrir la cubierta del panel de control y detener el
A1 Pro. Se debe introducir el código PIN en el panel de control para reanudar el
funcionamiento del A1 Pro.
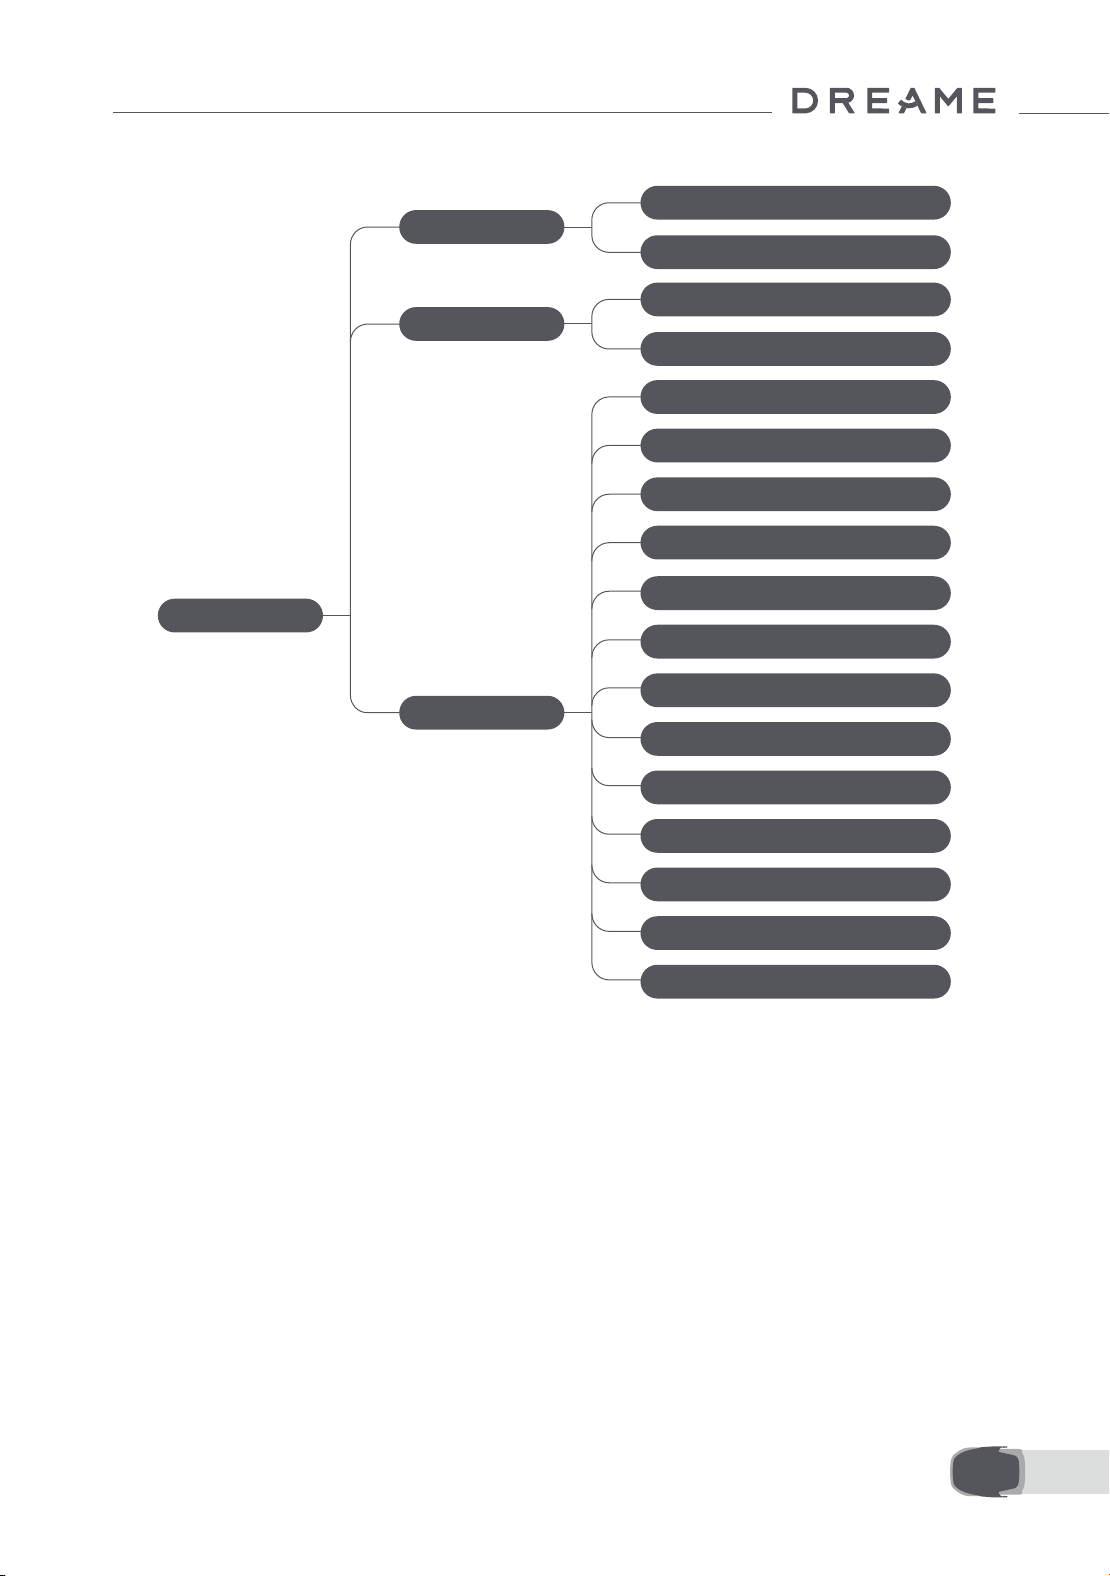
169 ES
Resumen de la estructura del menú
* Podría actualizarse dependiendo de la versión del software.
7.2 Iniciar el corte por primera vez
Consejos antes de cortar el césped:
• Utilice cortacésped de empuje para cortar la hierba a una altura no superior a 10 cm.
• Elimine los obstáculos como escombros, montones de hojas, juguetes, cables y piedras. Asegúrese de que no
hay niños ni mascotas en el césped cuando el A1 Pro lo esté cortando.
• Rellene los agujeros del césped.
• Ajuste sus preferencias de corte en la app de antemano (como la eciencia, la altura y la dirección de corte).
Página principal
Programa
Ajustes
Modos
Corte de toda la zona
Corte de bordes
Ver programa
Activar/desactivar el programa
Eciencia de corte
Altura de corte
Altura para evitación de obstáculos
Modo No molestar
Protección contra la lluvia
Protección contra escarcha
Alarma de elevación
Alarma de fuera del mapa
Cambiar PIN
Volume
Lingua
Resettare il robot
Informazioni

170ES
Pulse el botón Iniciar en el panel de control y cierre la cubierta superior en 5 segundos. El A1 Pro abandonará la
estación de carga e iniciará el corte. También puede pulsar «Iniciar» en la app para iniciar el corte.
• Inicio mediante el panel de control
1. Pulse el botón de parada para abrir la cubierta e introducir el código PIN.
2. Seleccione «Modos» en la pantalla y pulse la perilla.
3. Gire la perilla para seleccionar el modo de corte.
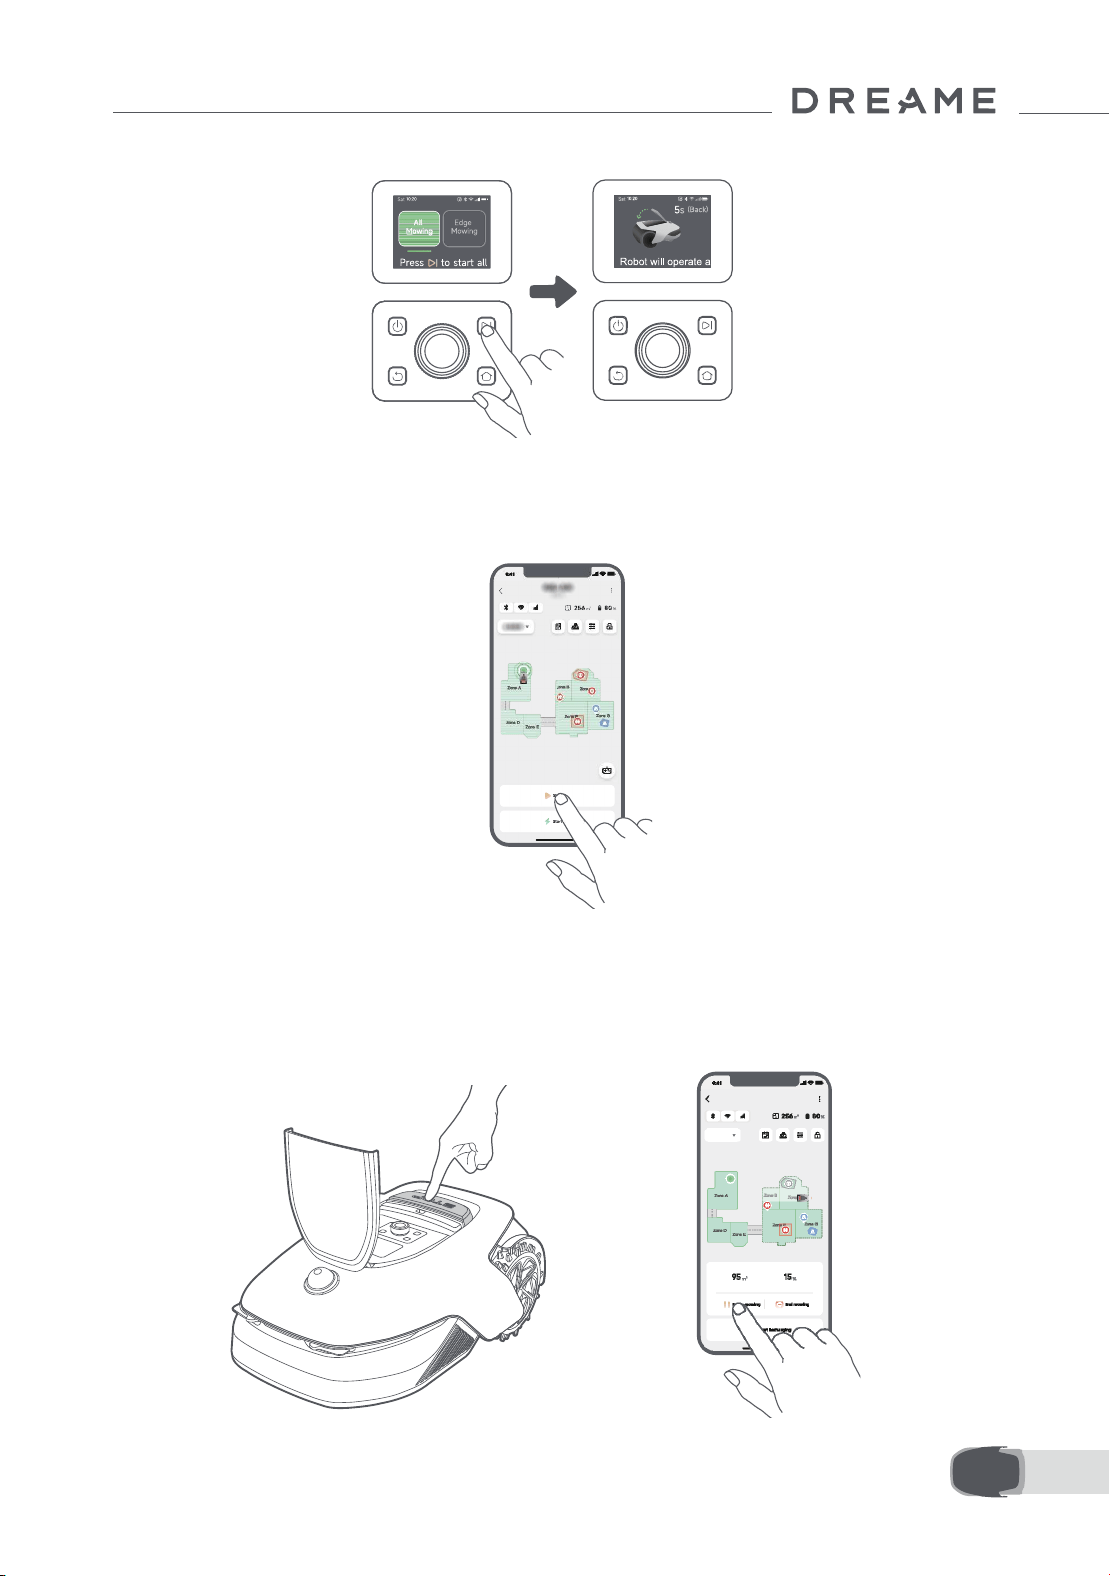
171 ES
4. Pulse el botón Iniciar y cierre la cubierta superior en 5 segundos. El A1 Pro iniciará el corte.
• Inicio mediante la app
1. Abra la app.
2. Seleccione el modo de corte y pulse «Iniciar» para iniciar el corte.
7.3 Pausar
OR
Para pausar la tarea de corte actual, puede pulsar el botón de parada del A1 Pro o «Pausar» en la app.
Nota: el A1 Pro se bloqueará y no se puede iniciar directamente por la app si se pulsa el botón de parada. Para
reanudar el corte, primero introduzca el código PIN preestablecido en el panel de control.
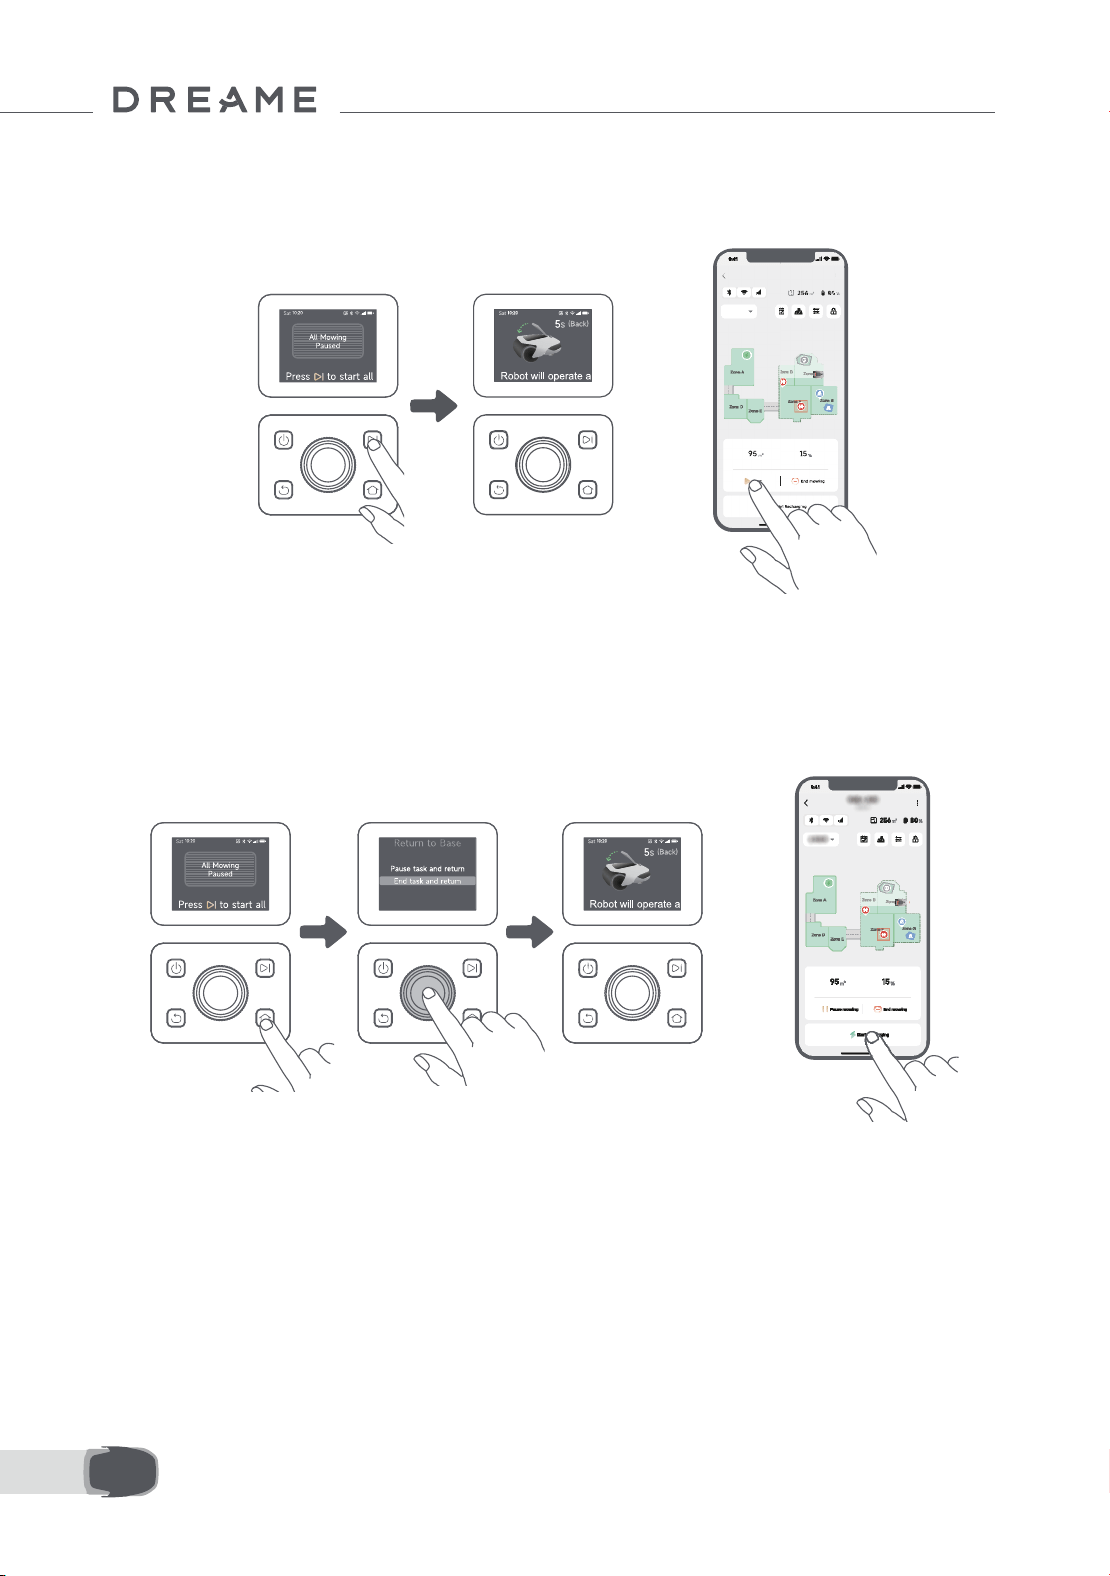
172ES
7.4 Reanudar
7.5 Regresar a la estación de carga
Para reanudar la tarea tras pausar el A1 Pro, pulse el botón Iniciar en el A1 Pro y cierre la cubierta en 5
segundos. El A1 Pro reanudará la tarea de corte anterior. También puede pulsar «Continuar» en la app para
reanudar la tarea de corte.
Para detener la tarea de corte y devolver el A1 Pro a la estación de carga, conrme el código PIN en el panel
de control y pulse el botón Inicio. Conrme para nalizar la tarea y cierre la cubierta en 5 segundos. El A1 Pro
regresará automáticamente a la estación para cargarse. También puede pulsar «Regresar a la estación» en la
app para devolver el A1 Pro a la estación de carga.
OR
OR
Dónde puede explorar más
La app Dreamehome es más que un control remoto. Hay muchas cosas que puede hacer con la aplicación:
completar varia conguración de forma remota, experimentar diferentes modos de corte, editar el mapa con
libertad y ajustar los programas de corte. Además, puede ver el mapa 3D de su césped directamente en la app.
8 App Dreamehome
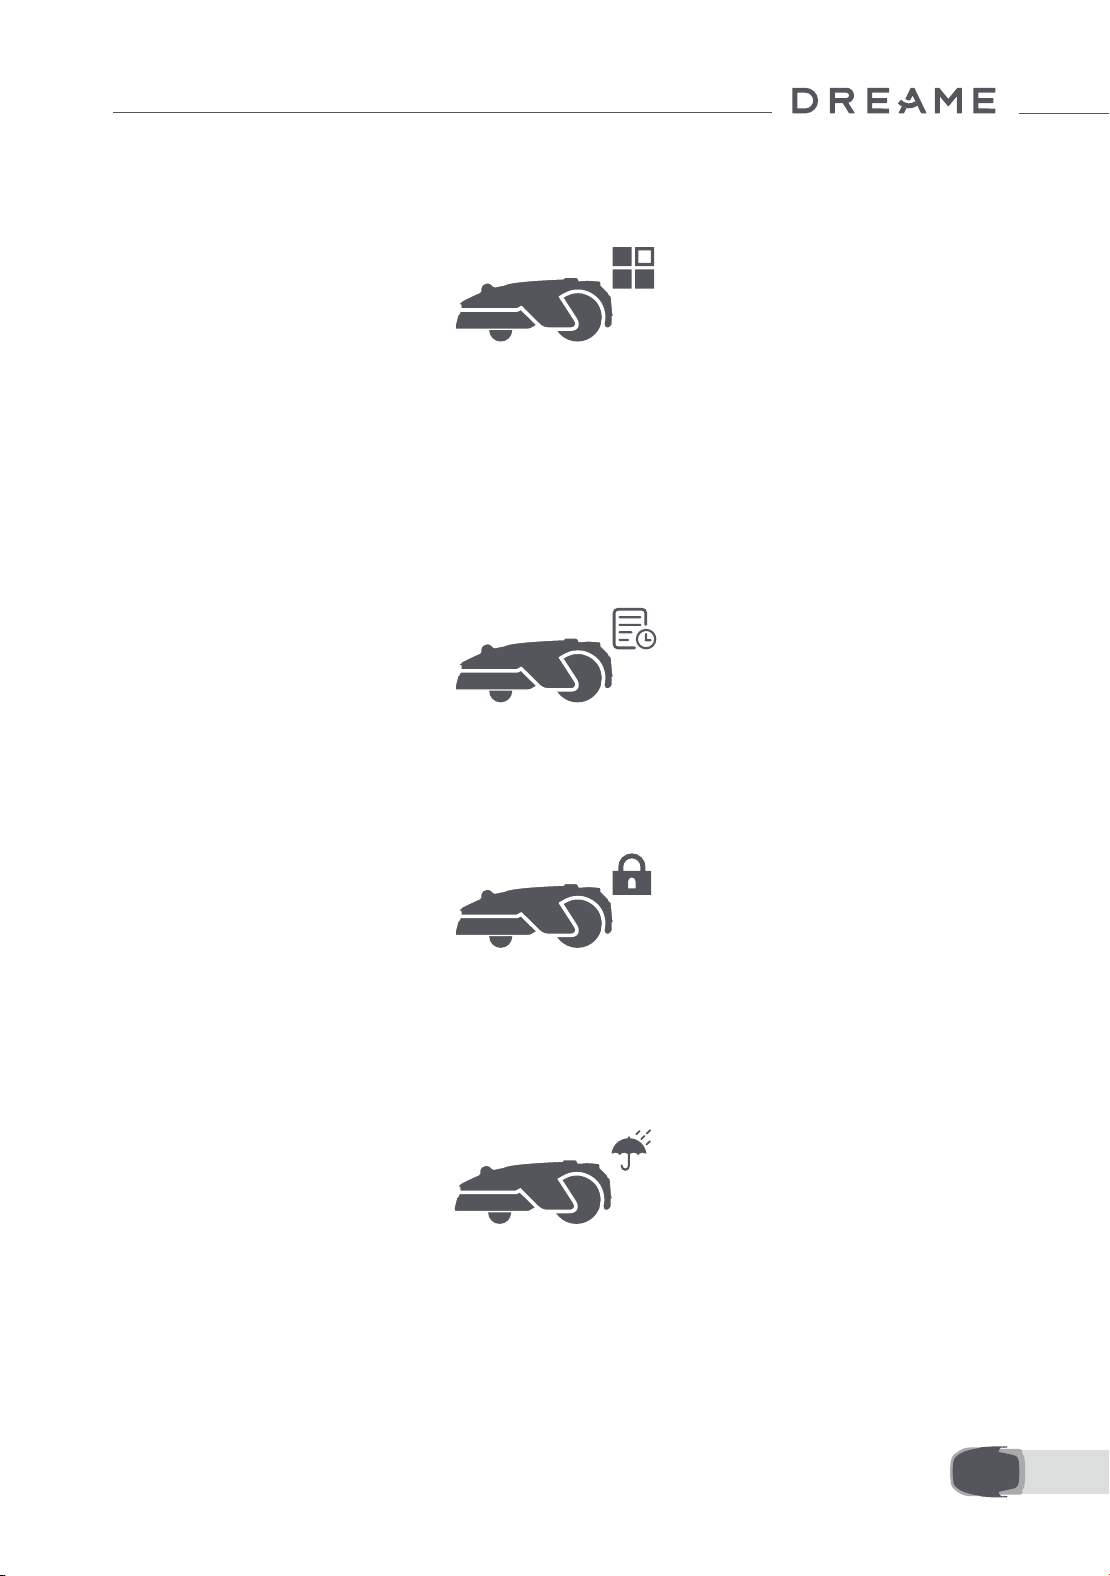
173 ES
8.1 Modos de corte
8.2 Programa
A1 Pro ofrece distintos modos de segado. Puede cambiar entre los modos en la app.
Tras completar el primer mapa, el A1 Pro crea automáticamente dos programas de corte semanales de
acuerdo con el tamaño del cesped, que son el «Programa de Prim y Ver» y el «Programa de Ot e Inv». Puedes
pulsar «programa» en la aplicación para realizar la conguración detallada de la programación. Con la función
de programa, puede dejar completamente el trabajo de corte diario al A1 Pro. Solo hay que mantener A1 Pro
con regularidad.
Nota: si le preocupa que el A1 Pro pueda molestarle a usted o a sus vecinos al trabajar de forma autónoma
durante ciertas horas, puede ir a Ajustes > No molestar y establecer un tiempo de No molestar en la app.
8.3 Bloqueo infantil
Si le preocupa que los niños puedan utilizar el A1 Pro, puede activar la función «Bloqueo infantil» en la app. Con
esta función activada, el A1 Pro se bloqueará si no se realiza ninguna operación durante 5 minutos mientras la
cubierta está abierta.
8.4 Protección contra la lluvia
8.5 Protección contra escarcha
Si le preocupa que las condiciones meteorológicas adversas puedan afectar al trabajo de corte, puede activar
la función «Protección contra la lluvia» en «Ajustes» del panel de control o en la app. Cuando esta función
está activada, A1 Pro pausa automáticamente el corte y regresa a la estación de carga cuando llueve. Puede
establecer el tiempo de protección contra la lluvia en la app.
Cuando la temperatura está por debajo de los 6 ℃ , el trabajo de corte provocará daños permanentes al
césped. La batería no podrá cargarse debido a la autoprotección. Puedes activar la función «Protección contra
escarcha» en «Ajustes» del panel de control o en la aplicación. Esta función permite que el A1 Pro pause el corte
automáticamente y regrese a la estación de carga cuando la temperatura ambiente sea ≤ 6 ℃ . Reanudará el
trabajo automáticamente cuando la temperatura supere los 11 ℃ .
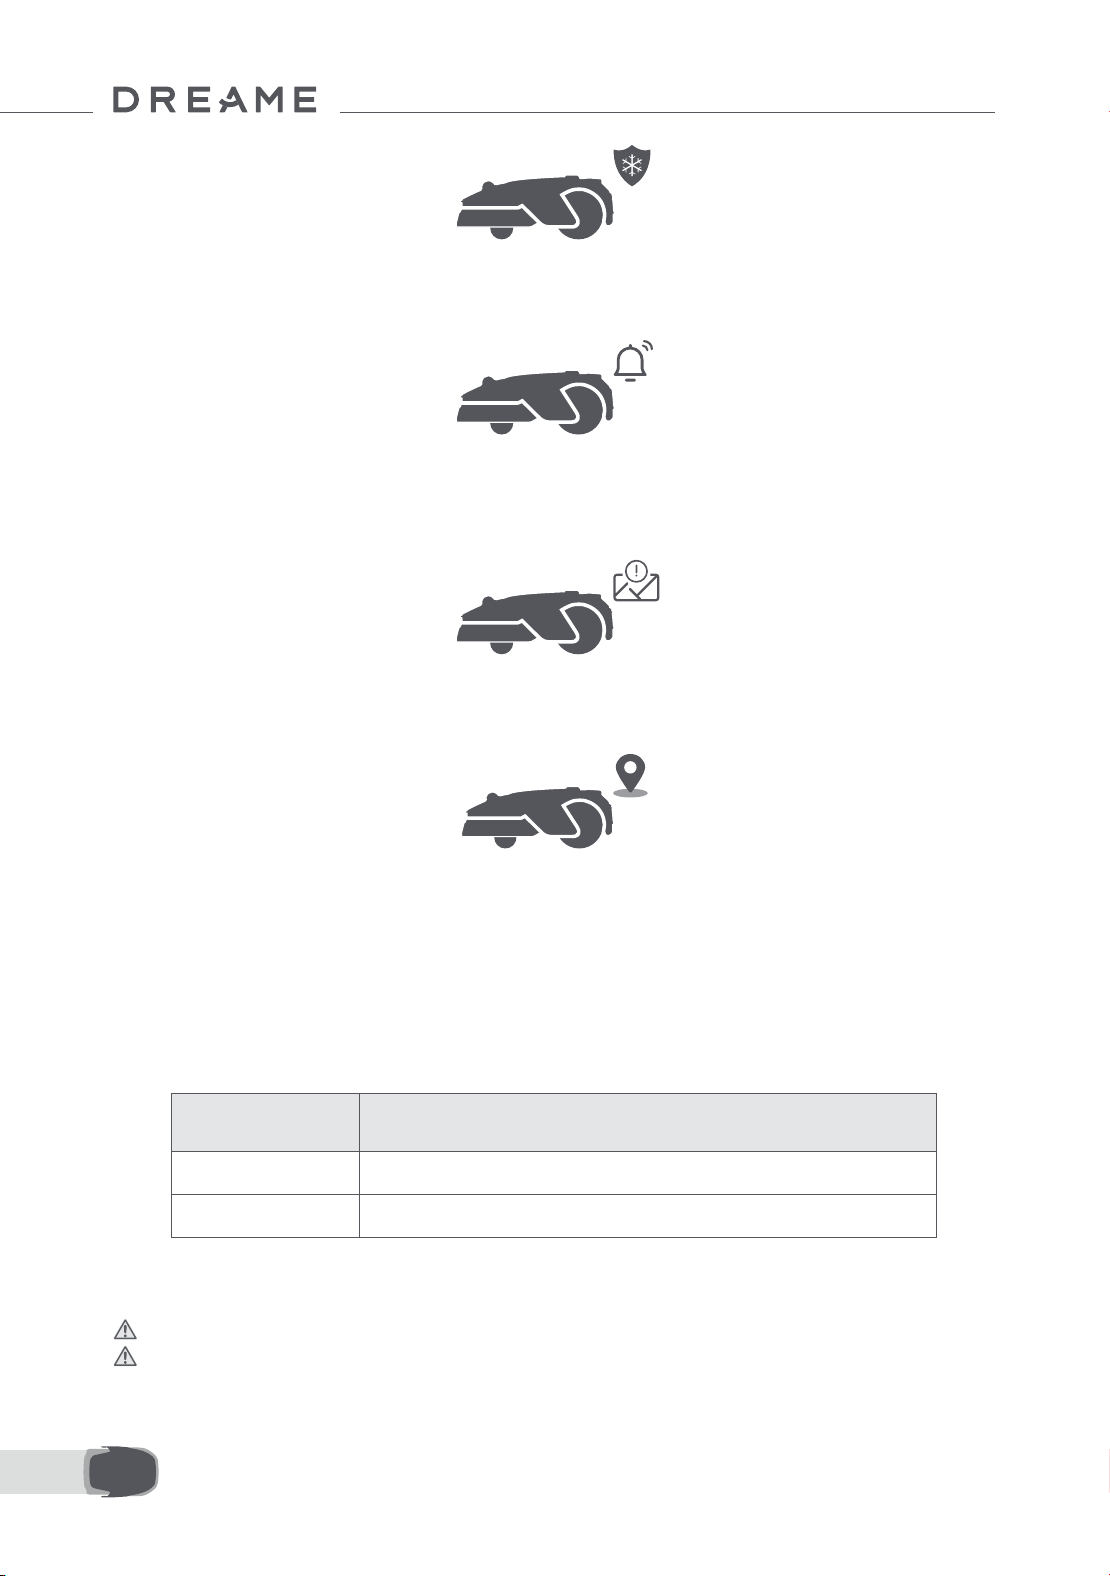
174ES
8.6 Alarma de elevación
8.7 Alarma de fuera del mapa
Con esta función activada, el A1 Pro se bloqueará y se activará la alarma en cuanto lo levanten.
Con esta función activada, el A1 Pro se bloqueará y se activará la alarma si está fuera del mapa. (Esta función
requiere la instalación del módulo de enlace).
8.8 Ubicación en tiempo real
Con el módulo de enlace, puede ver la ubicación actual del A1 Pro en Google Maps.
Nota: El equipo de desarrollo de Dreame realizará actualizaciones OTA (Over-the-Air) y mantenimiento del
rmware y la aplicación continuamente. Compruebe las noticaciones de actualizaciones o active la función
de actualización automática para mantener el rmware y la app actualizados y disfrutar de más funciones.
9 Mantenimiento
Para mejorar el rendimiento y la vida útil del A1 Pro, límpielo con regularidad y reemplace las piezas gastadas
según la siguiente frecuencia:
9.1 Limpieza
Advertencia: antes de la limpieza, apague el A1 Pro y desenchufe la estación de carga.
Advertencia: asegúrese de que el lidar tiene puesta la cubierta protectora antes de darle la vuelta al A1
Pro para evitar daños al lidar.
Pieza Frecuencia de reemplazo
Cuchillas Cada 6–8 semanas o antes
Cepillo de limpieza Cada 12 meses o antes

175 ES
2s
• El cuerpo del A1 Pro, Carcasa y disco de cuchillas:
1. Apague el A1 Pro.
2. Póngale al lidar la cubierta protectora.
3. Voltee el A1 Pro.
4. Limpie el cuerpo del A1 Pro, el disco de cuchillas y el chasis con una manguera.
Advertencia: no toque las cuchillas cuando limpie la carcasa. Lleve guantes cuando limpie.
Advertencia: no use un limpiador de alta presión para la limpieza. No use detergentes para la limpieza.
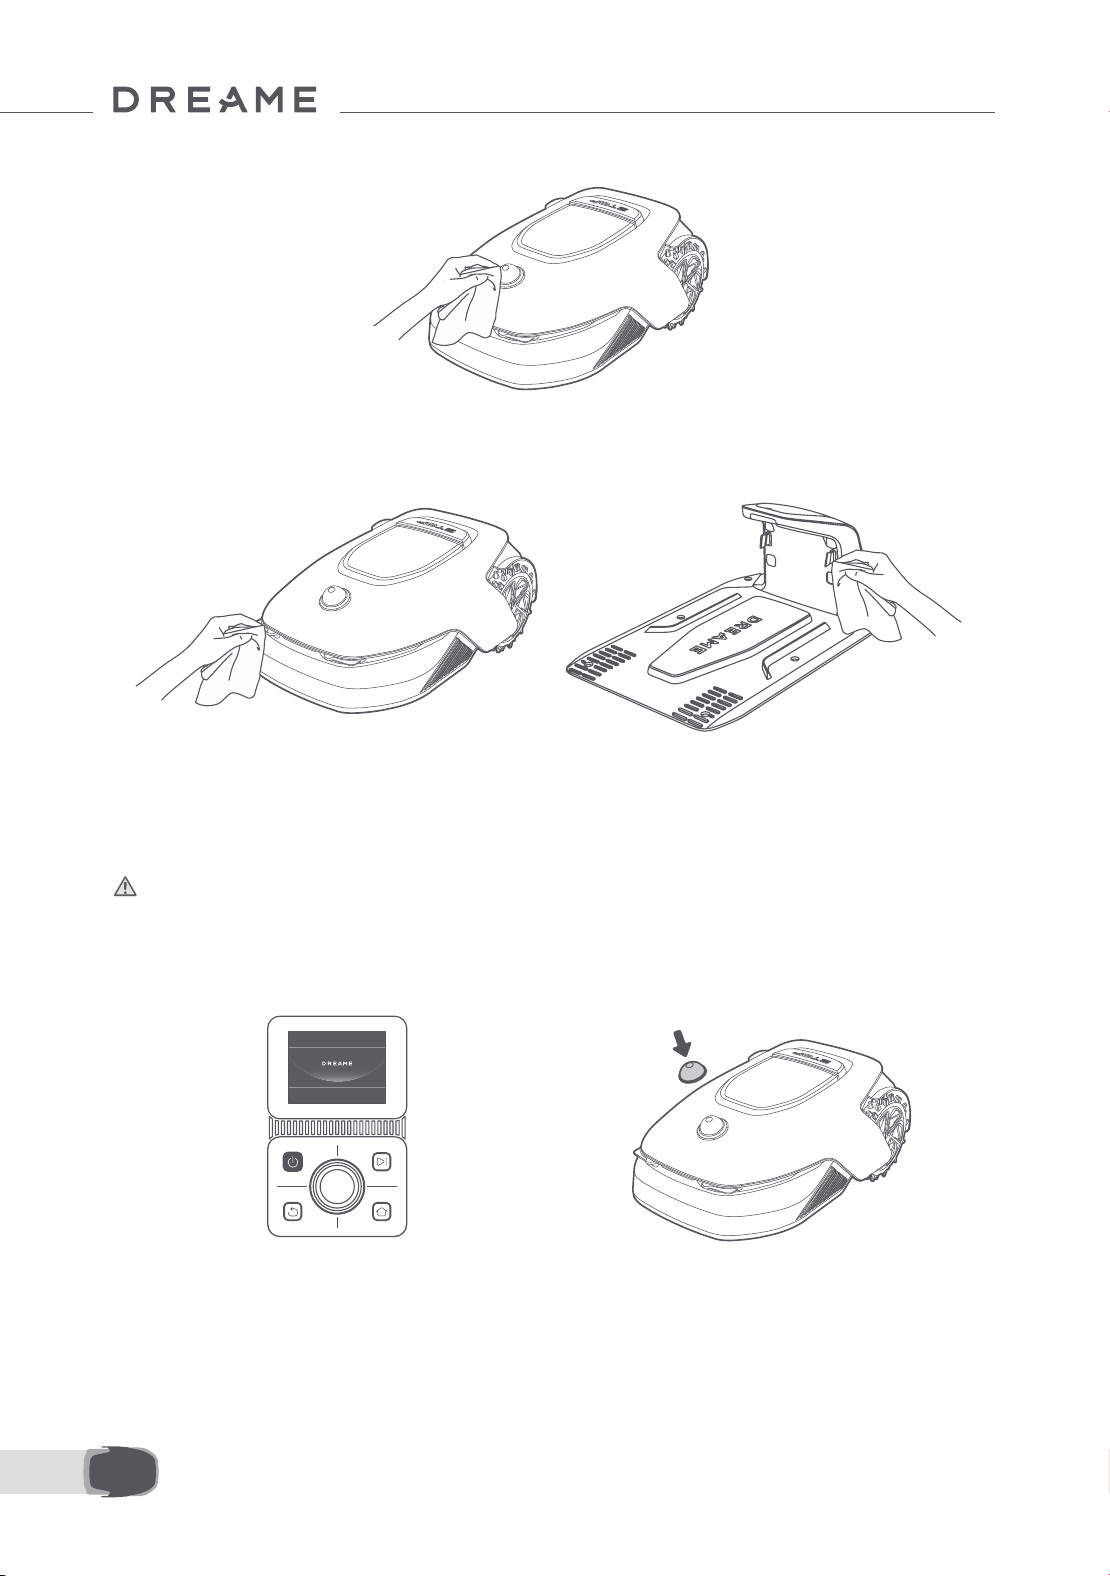
176ES
5. Utilice un paño que no deje pelusa para limpiar con cuidado el sensor LiDAR.
• Contactos de carga:
Utilice un paño limpio para limpiar los contactos de carga del A1 Pro y de la estación de carga. Mantenga los
contactos de carga limpios después de limpiarlos.
9.2 Reemplazo de los componentes
• Reemplazo de las cuchillas
Para mantener las cuchillas aladas, reemplácelas con regularidad. Se recomienda reemplazar las cuchillas
cada 6-8 semanas o antes. Utilice solo cuchillas originales de Dreame.
Advertencia: apague el A1 Pro y lleve guantes protectores antes de reemplazar las cuchillas.
Nota: reemplace las tres cuchillas al mismo tiempo para garantizar un sistema de corte equilibrado.
1. Apague el A1 Pro. 2. Asegúrese de que el lidar tiene la cubierta
protectora puesta.
3. Coloque el A1 Pro en una supercie suave y
póngalo boca abajo.
4. Retire el receptáculo pulsando el botón bajo el
disco de cuchillas.
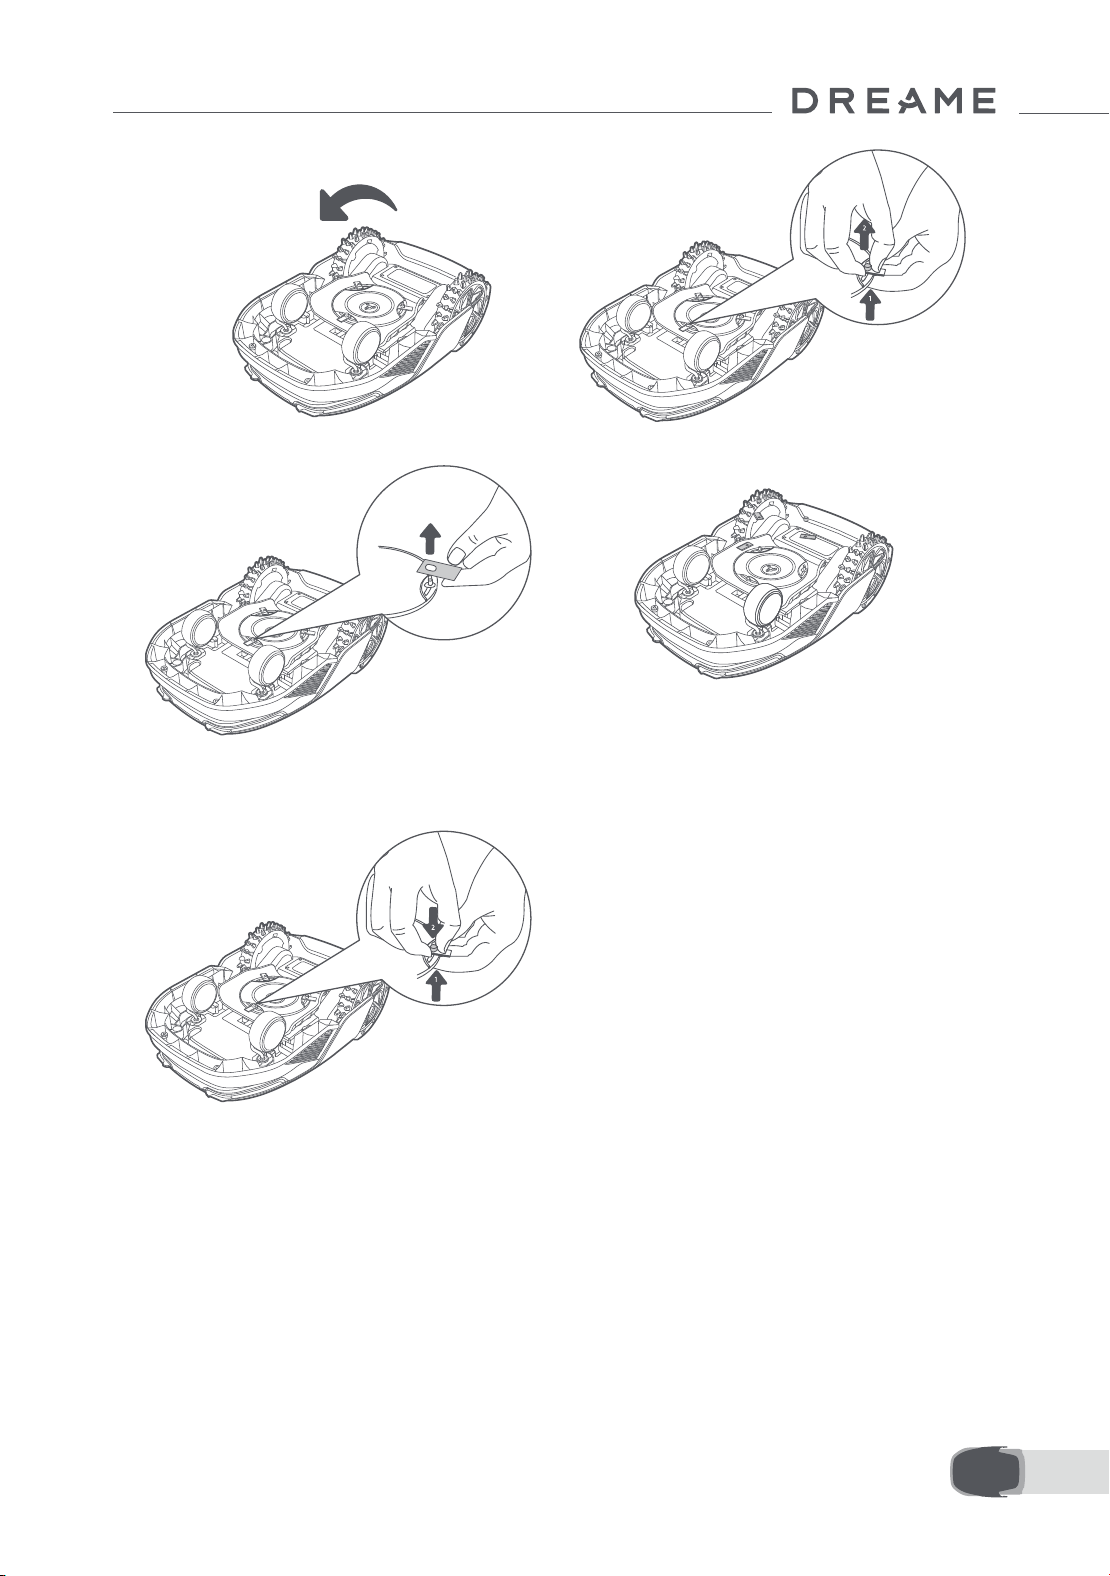
177 ES
5. Retire la cuchilla alineando el oricio de la
cuchilla con el eje.
6. Retire las 3 cuchillas y receptáculos.
• Reemplazo del cepillo de limpieza
Cuando el cepillo de limpieza del sensor lidar se desgasta, sus cerdas pueden deshilacharse o deteriorarse, lo
que afecta a su rendimiento de limpieza. Reemplace el cepillo de limpieza con regularidad para mantener un
buen resultado de limpieza. Se recomienda reemplazar el cepillo de limpieza cada 12 meses o antes.
Nota: antes de reemplazar el cepillo de limpieza, asegúrese de desenchufar la estación de carga.
7. Pulse el botón bajo el disco de cuchillas y
alinee el oricio del receptáculo con el eje para
apretar el receptáculo y las cuchillas.
8. Asegúrese de que las cuchillas pueden girar
con libertad.
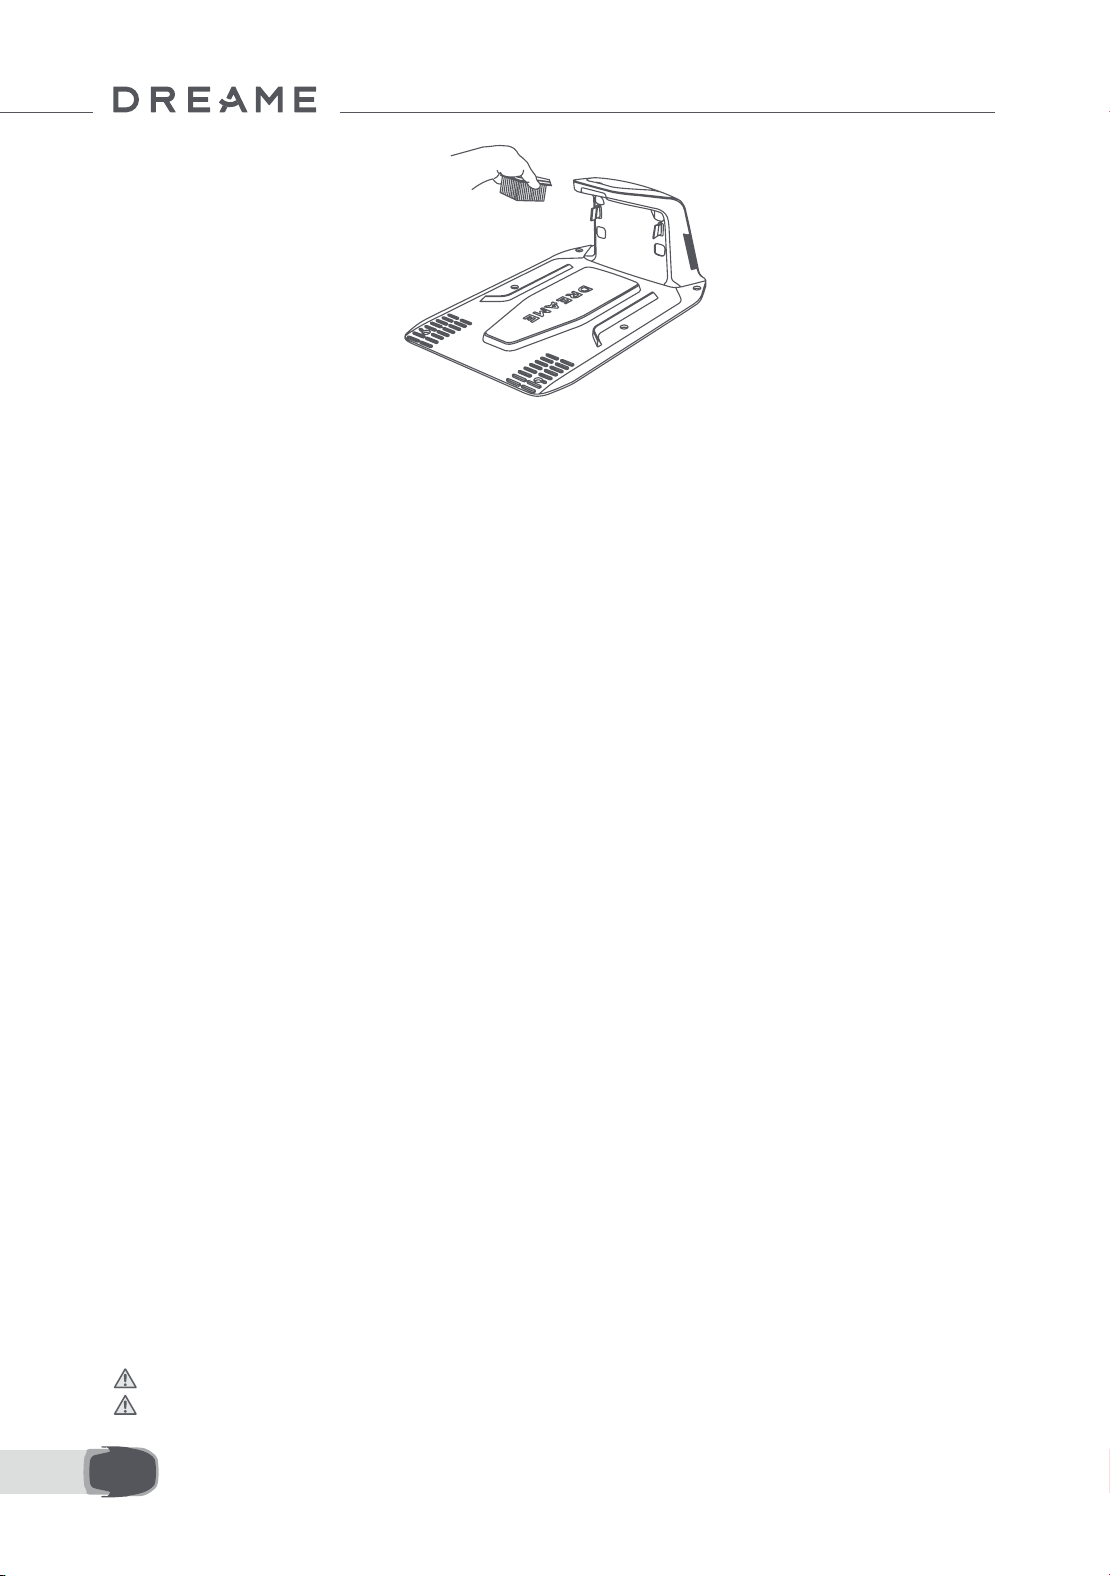
178ES
10 Batería
Modo de carga de bajo consumo:
Con el modo de carga de bajo consumo activado, se desactivarán las funciones que no estén relacionadas con
la carga. (La pantalla y la red se apagarán).
• Para activar el modo de carga de bajo consumo, mantenga pulsado el botón Iniciar y el botón Inicio a la vez,
y pulse el botón Atrás 5 veces rápidamente al mismo tiempo. Escuchará un mensaje de voz: El modo de carga
de bajo consumo está activado.
• Para desactivar el modo de carga de bajo consumo, reinicie el A1 Pro o pulse el botón de encendido 5 veces.
Si va a guardarlo durante mucho tiempo, cargue el A1 Pro cada 6 meses para proteger la batería. La garantía
limitada no cubre los daños causados a la batería por sobredescarga. No cargue la batería a una temperatura
ambiente superior a 45 ° C o inferior a 6° C. A largo plazo, la temperatura de almacenamiento de la batería
debe encontrarse entre -10 y 35° C. Para minimizar el daño, la temperatura de almacenamiento de la batería
recomendada es entre 0 y 25° C.
Nota: la vida útil de la batería del A1 Pro depende de la frecuencia de uso y las horas de funcionamiento. Si se
daña la batería o no se puede cargar, no la deseche arbitrariamente. Respete la normativa local sobre reciclaje.
11 Almacenamiento en invierno
12 Transporte
• A1 Pro
1. Cargue la batería por completo y apague el A1 Pro.
2. Limpie bien el A1 Pro antes de guardarlo en invierno.
3. Coloque la cubierta protectora del lidar.
4. Guarde el A1 Pro en un lugar seco, a una temperatura superior a 0 ° C.
• Estación de carga
Desenchufe la estación de carga y guárdela en un lugar seco y frío, alejado de la luz solar directa.
Nota: Si no ha usado el A1 Pro durante mucho tiempo, vuelva a crear el mapa de su jardín, ya que los cambios
signicativos en el entorno del jardín pueden provocar errores de posicionamiento.
Para el transporte de larga distancia, se recomienda utilizar el embalaje original para proteger el A1 Pro.
Coloque la cubierta protectora del lidar.
Advertencia: Apague el A1 Pro antes de transportarlo.
Advertencia: Levante el producto por la parte trasera, con el disco de cuchillas alejado de su cuerpo.
179 ES
13 Solución de problemas
Problema Causa Solución
A1 Pro no conectado a
la aplicación.
1. El A1 Pro no está en la
cobertura de una señal Wi-Fi
ni al alcance del Bluetooth.
2. El A1 Pro está apagado o
está reiniciándose.
1. Compruebe si el A1 Pro ha acabado de
encenderse.
2. Compruebe si el router funciona correctamente.
3. Acérquese al A1 Pro para conectar por
Bluetooth.
Se ha levantado el A1
Pro.
La rueda no está en el
suelo.
1. Vuelva a poner el A1 Pro en suelo llano.
2. Introduzca el código PIN en el A1 Pro y conrme.
3. El A1 Pro no puede cruzar objetos de más de
4 cm. Mantenga el suelo nivelado donde está
trabajando.
A1 Pro inclinado.
El A1 Pro se ha inclinado
más de 37° .
1. Vuelva a poner el A1 Pro en suelo llano.
2. Introduzca el código PIN en el A1 Pro para
conrmar.
3. El A1 Pro no puede escalar pendientes
superiores a 45 % (24° ).
A1 Pro atrapado.
El A1 Pro está atrapado y no
puede salir.
1. Quitar los obstáculos circundantes y volver a
intentar.
2. Mueva el A1 Pro de forma manual a un lugar
plano y abierto dentro del mapa y vuelva a
intentar iniciar la tarea. Si sigue encontrando este
problema, vuelva a intentarlo cuando el A1 Pro esté
en la estación de carga.
3. Compruebe si hay agujeros en el suelo. Rellene
los agujeros antes de cortar para evitar que el A1
Pro quede atrapado.
4. Compruebe si la hierba del entorno es más alta
de 10 cm. Puede ajustar la altura de la evasión de
obstáculos o usar un cortacésped manual para
cortar el césped con antelación y evitar que el A1
Pro quede atrapado.
5. Si el A1 Pro queda atrapado en esta ubicación a
menudo, puede establecerla como zona prohibida.
Error de la rueda
trasera izquierda/
derecha
La rueda no puede girar o
su motor tiene un problema.
1. Limpiar las ruedas traseras y volver a intentar.
2. Si este error sigue apareciendo, pruebe a
reiniciar el robot.
3. Si el problema persiste, póngase en contacto
con el servicio posventa.
El disco de cuchillas no
puede girar.
El disco de cuchillas no
puede girar con normalidad
o el motor de corte tiene un
problema.
1. Limpie el disco de corte e intente de nuevo.
2. Compruebe si la hierba del entorno es más
alta de 10 cm. Puede usar un cortacésped
manual para cortar el césped con antelación y
evitar que el disco de cuchillas quede
bloqueado por la hierba alta.
3. Compruebe si hay agua debajo del disco de
corte. Si hubiera agua, mover el robot a un
lugar seco e intentar de nuevo.
4. Si este error sigue apareciendo, pruebe a
reinic ar el robot.
5. Si el problema persiste, póngase en contacto
con el servicio posventa.

180ES
Problema Causa Solución
Error del paragolpes.
El sensor del paragolpes
delantero se activa
constantemente.
1. Compruebe si el A1 Pro está atrapado en
algún lado.
2. Golpee suavemente el paragolpes y
asegúrese de que rebota.
3. Si este error sigue apareciendo, pruebe a
reiniciar el robot.
4. Si el problema persiste, póngase en contacto
con el servicio posventa.
Error de carga.
El A1 Pro se acopla en la
estación de carga, pero
hay un problema con la
corriente o la tensión de
carga.
1. Compruebe si la estación de carga está
conectada correctamente a la corriente.
2. Compruebe si los contactos de carga del A1
Pro y de la estación de carga están limpios.
3. Cuando termine de comprobarlo, intente
volver a acoplar el A1 Pro a la estación de carga.
4. Si el problema persiste, póngase en contacto
con el servicio posventa.
La temperatura de la
batería es demasiado
alta.
La temperatura de la
batería es ≥ 60℃ .
1. Utilice el A1 Pro en un lugar donde la temperatura
ambiente sea inferior a 40 ℃ . Puede esperar a que
la temperatura de la batería baje automáticamente.
2. Puede apagar el A1 Pro y volver a encenderlo
después de un rato.
3. Si el problema persiste, póngase en contacto con
el servicio posventa.
El lidar está bloqueado
El lidar está bloqueado (por
ejemplo, no se ha retirado
la cubierta protectora del
lidar).
1. Quitar la cubierta protectora del lidar y
volver a intentar.
2. En caso de que el lidar en la parte superior
del robot esté muy sucio, hay que limpiar con un
paño que no deje pelusa e intentarlo de nuevo.
Fallo del LiDAR.
El LiDAR está muy sucio o el
sensor tiene un fallo.
1. Compruebe que el lidar no esté sucio.
Limpiar si procede e intentar de nuevo.
2. Si este error sigue apareciendo, pruebe a
reiniciar el robot.
3. Si el problema persiste, contacte con nuestro
servicio de posventa.
El A1 Pro está perdido.
Se ha perdido el
posicionamiento.
1. Compruebe si el lidar de la parte superior del A1 Pro
está sucio. La suciedad afecta al posicionamiento.
2. Mueva el A1 Pro de forma manual a un lugar
abierto dentro del mapa y vuelva a intentar iniciar la
tarea.
3. Si no se recupera el posicionamiento, controle el A1
Pro de forma remota para regresar a la estación de
carga usando la app y luego inicie la tarea de corte.
Error del sensor. Error del sensor.
1. Reinicie el A1 Pro y vuelva a intentarlo.
2. Si el problema persiste, póngase en contacto
con el servicio posventa.
El A1 Pro está en la
zona prohibida.
El A1 Pro está en la zona
prohibida.
1. Mueva el robot manualmente fuera de la
zona restringida y volver a intentar.
2. Controlar a distancia el robot con la
aplicación para moverlo fuera de la zona
restringiday volver a intentarlo después.
El A1 Pro está fuera del
mapa.
El A1 Pro está fuera del
mapa.
1. Mueva el robot manualmente dentro de los
límites del mapa y vuelva a intentarlo.
2. Trae de vuelta el robot mediante control
remoto al interior del mapa con la app e
inténtalo de nuevo.
181 ES
Problema Causa Solución
La parada de emergencia
está activada.
Se ha pulsado el botón de
parada del A1 Pro.
Ingrese el código PIN del A1 Pro para desactivar
la parada de emergencia.
Batería baja. El A1 Pro
se apagará pronto.
El nivel de batería es ≤ 10%. Acople el A1 Pro a la estación para cargarlo.
El A1 Pro está lejos del
mapa. Riesgo de robo.
El A1 Pro está lejos del
mapa.
1. Introduzca el código PIN para vericar.
2. Puede desactivar la alarma de fuera del
mapa en los ajustes de la aplicación.
Fallo al volver a la
estación de carga.
El A1 Pro no puede
encontrar la estación de
carga al intentar regresar.
1. Compruebe si hay obstáculos que bloqueen el
A1 Pro. Retire los obstáculos y vuelva a intentarlo.
2. Controle el A1 Pro de forma remota para
regresar a la estación de carga usando la app.
Fallo al acoplar en la
estación de carga.
El A1 Pro encuentra la
estación de carga pero no
logra acoplarse.
1. Compruebe si las películas reectantes de la
estación de carga están sucias o bloqueadas.
2. Compruebe si hay obstáculos frente a la
estación de carga.
3. Compruebe si se ha movido la estación de
carga.
4. Compruebe si la placa base está cubierta de
barro espeso.
5. Compruebe si la estación tiene energía.
6. Ayude al robot a acoplarse en la
estación utilizando el mando a distancia o
manualmente.
Fallo en el
posicionamiento.
Fallo en el posicionamiento
cuando el A1 Pro intenta
iniciar una tarea de corte.
1. El lidar podría estar obstruido. Mueva el robot de
forma manual a un lugar plano y abierto dentro del
mapa y vuelva a intentar iniciar la tarea.
2. Si continúa encontrando este error, inténtelo de
nuevo después de que el robot esté en la estación.
La temperatura de la
batería es alta.
La temperatura de la
batería es ≥ 45℃ .
1. La carga puede fallar si la temperatura de la
batería es superior a 45 ℃ .
2. Utilice el A1 Pro en un lugar donde la
temperatura ambiente sea inferior a 40 ℃ .
La temperatura de la
batería es baja.
La temperatura de la
batería es ≤ 6℃ .
1. La carga puede fallar si la temperatura de la
batería es inferior a 6 ℃ .
2. Utilice el A1 Pro en un lugar donde la
temperatura ambiente sea superior a 6 ℃ .
El disco de cuchilla no
logra moverse hacia
arriba o hacia abajo.
El disco de cuchilla no logra
moverse hacia arriba o
hacia abajo.
1. Limpie el disco de cuchilla e inténtelo de
nuevo.
2. Si este error sigue apareciendo, intente
reiniciar el robot.
3. Si el problema persiste, póngase en contacto
con el servicio posventa.
Espacio insuciente
para girar frente a la
estación.
Espacio insuciente para
girar frente a la estación.
1. Si la estación está colocada en el borde del
mapa o dentro de él, asegúrese de que haya
al menos 1 m de espacio libre entre la zona
frontal de la placa base de la estación y el
límite del mapa; de lo contrario, el robot podría
no ser capaz de girar.
2. Recoloque la estación, o cambie el mapa en
Edición del mapa.
182ES
14 Especicaciones
Información
básica
Nombre del producto Robot cortacésped de Dreame
Marca Dreame
Dimensiones
643 × 436.5 × 261 mm
(25.3 × 17.2 × 10.2 in)
Peso (batería incluida) 12.6 kg (27.7 lbs)
Corte
Capacidad de trabajo recomendada 2000 ㎡ (0.5 acre)
Eciencia de corte
Estándar: 120 ㎡ (0,03 acre)/h
Eciente: 200 ㎡ (0,05 acre)/h
Altura de corte 30~70 mm (1.2~2.8 in)
Anchura del corte 22 cm (8.7 in)
Tiempo de carga
[1]
65 min
Emisiones
de ruido
Nivel de sonido LWA 64 dB(A)
Incertidumbres sobre la potencia
acústica KWA
3 dB(A)
Nivel de presión
sonora LpA
56 dB(A)
Incertidumbres sobre la presión
acústica KpA
3 dB(A)
Condiciones
de trabajo
Temperatura de funcionamiento
0~50° C (32~122° F)
Recomendada: 10~35° C (50~95° F)
Temperatura de almacenamiento a largo
plazo
-10~35° C (14~95° F)
Recomendada: 0~25° C (32~77° F)
Clasicación IP
Cortacésped: IPX6
Estación de carga: IPX4
Fuente de alimentación: IP67
Pendiente máxima de la zona de corte 45% (24° )
Conectividad
Rango de frecuencias Bluetooth 2400.0–2483.5 MHz
Wi-Fi Wi-Fi 2.4 GHz (2400–2483.5M)
Potencia RF máxima
802.11b:16±2dBm(@11Mbps)
802.11g:14±2dBm(@54Mbps)
802.11n:13±2dBm(@HT20,HT40)
Bluetooth:7.49dBm
Servicio de enlace (opcional)
[2]
LTE-FDD: B1/3/7/8/20/28A
LTE-TDD: B38/40/41
GNSS (opcional)
[3]
GPS/GLONASS/BDS/Galileo/QZSS
183 ES
[1] El tiempo de carga es aplicable cuando el A1 Pro regresa con batería baja automáticamente a la estación
de carga.
[2] Requiere instalar un módulo de enlace.
[3] Requiere instalar un módulo de enlace.
Nota: las especicaciones están sujetas a cambios, ya que mejoramos continuamente nuestro producto. Para
obtener la información más reciente, visite nuestra página web en global.dreametech.com.
Motor propulsor
Velocidad de conducción por control
remoto
0.45 m/s
Velocidad de conducción durante el corte
Estándar: 0,35 m/s
Eciente: 0,6 m/s
Motor de corte
Velocidad 2200 /min
Batería
(cortacésped)
Tipo de batería Batería de ión-litio
Capacidad nominal 5000 mAh
Tensión nominal 18 V
Fuente de
alimentación
Tensión de entrada 100~240 V
Tensión de salida 20 V
Corriente de salida 3 A
Estación
de carga
Tensión de entrada 20 V
Tensión de salida 20 V
Corriente de entrada 3 A
Corriente de salida 3 A

184NL
1 Veiligheidsvoorschriften ........................................................................... P185
2 Inhoud van de doos .................................................................................. P189
3 Productoverzicht ...................................................................................... P190
4 Installatie ................................................................................................ P191
5 Voorbereidingen voor gebruik .................................................................. P193
6 Uw tuin in kaart brengen .......................................................................... P196
7 Bediening ................................................................................................ P202
8 Dreamehome-app .................................................................................... P207
9 Onderhoud .............................................................................................. P211
10 Accu ...................................................................................................... P213
11 Winteropslag ......................................................................................... P213
12 Transport ............................................................................................... P213
13 Probleemoplossing ................................................................................ P214
14 Specicaties ........................................................................................... P217
Inhoudsopgave
Vertaling van de oorspronkelijke gebruiksaanwijzing

185 NL
1.1 Algemene veiligheidsvoorschriften
1 Veiligheidsvoorschriften
• Lees de handleiding zorgvuldig door en zorg ervoor dat u alles begrijpt voordat u het product gaat gebruiken.
• Gebruik bij dit product alleen de apparatuur die door Dreame wordt aanbevolen. Elk ander gebruik wordt afgeraden.
• Laat het apparaat nooit bedienen door kinderen, personen met verminderde lichamelijke, zintuiglijke of
geestelijke bekwaamheid of een gebrek aan ervaring en kennis, of personen die niet bekend zijn met deze
instructies; plaatselijke voorschriften kunnen nadere eisen stellen aan de leeftijd van de gebruiker.
• Voorkom dat kinderen in de buurt zijn van of spelen met het apparaat als het operationeel is.
• Gebruik het product niet in gebieden waar personen zijn die niet weten dat het daar aan het werk is.
• Ren niet als u het product handmatig bedient met de Dreamehome-app. Zorg ervoor dat u altijd wandelt, let
op bij hellingen en verlies uw evenwicht niet.
• Gebruik het product niet als er zich personen, vooral kinderen of dieren, in het maaigebied bevinden.
• Als u het product in openbare gebieden gebruikt, plaats dan waarschuwingsborden rond het maaigebied met de
volgende tekst: "Waarschuwing! Automatische grasmaaier! Blijf uit de buurt van de maaier! Houd toezicht op kinderen!"
• Draag stevig schoeisel en een lange broek als u het product bedient.
• Stel geen maaigebieden of transportpaden in over openbare paden om schade aan het product en
ongelukken met voertuigen en personen te voorkomen.
• Raak geen bewegende, gevaarlijke onderdelen aan (zoals de maaikop) zolang deze niet volledig tot stilstand
zijn gekomen.
• Schakel medische hulp in bij letsel of ongevallen.
• Schakel het product UIT voordat u blokkades verwijdert, onderhoud uitvoert of het product controleert. Als het
product abnormaal trilt, controleer het dan op schade voordat u het opnieuw inschakelt. Gebruik het product
niet als er onderdelen defect zijn.
• Sluit geen beschadigde kabel aan en raak deze ook niet aan zolang de stekker nog in het stopcontact zit. Als
de kabel tijdens gebruik beschadigd raakt, haal dan de stekker uit het stopcontact. Een versleten of beschadigde
kabel verhoogt het risico op elektrische schokken en moet door een onderhoudsmonteur worden vervangen.
• Installeer de hoofdkabel niet in gebieden waar de robot gaat maaien. Volg de instructies voor de installatie
van de kabel.
• Gebruik alleen het meegeleverde oplaadstation om het product op te laden. Onjuist gebruik kan leiden tot
elektrische schokken, oververhitting of het lekken van bijtende vloeistoen uit de accu. Indien er elektrolyten
weglekken, spoel dan met water of een neutraliserend middel en schakel medische hulp in als de bijtende
vloeistof in uw ogen komt.
• Als u de hoofdkabel op het stopcontact aansluit, gebruik dan een aardlekschakelaar (RCD) met een maximale
uitschakelstroom van 30 mA.
• Gebruik alleen de originele, door Dreame aanbevolen accu. De veiligheid van het product kan niet worden
gegarandeerd met een accu van een ander merk. Gebruik uitsluitend een oplaadbare accu.
• Zorg ervoor dat er geen verlengsnoeren in de buurt van bewegende, gevaarlijke onderdelen liggen om te
voorkomen dat de snoeren beschadigd raken en in contact komen met onderdelen die onder spanning staan.
• De illustraties in dit document zijn alleen ter referentie. Zie de daadwerkelijke producten.
• Duw het product niet te hard of te snel, want dit kan het product beschadigen.
• Om te blijven voldoen aan de vereisten voor RF-blootstelling, moet een afstand van 35 cm tussen het
apparaat en het lichaam worden aangehouden.
• Gebruik voor het opladen van de accu alleen de afneembare voedingseenheid die bij dit apparaat wordt
geleverd.
• Installeer het oplaadstation niet in gebieden waar mensen erover kunnen struikelen.
1.2 Veiligheidsvoorschriften voor installatie

186NL
• Kom met uw handen en voeten niet in de buurt van de draaiende bladen. Plaats uw handen of voeten niet in
de buurt van of onder het product als het is ingeschakeld.
• Til het product niet op en beweeg het niet als het is ingeschakeld.
• Gebruik de parkeermodus of schakel het product UIT als er zich personen, vooral kinderen of dieren, in het
maaigebied bevinden.
• Zorg ervoor dat er geen voorwerpen zoals stenen, takken, gereedschap of speelgoed op het gazon liggen. De
bladen kunnen namelijk beschadigen als ze in contact komen met een voorwerp.
• Plaats geen voorwerpen op het product of het oplaadstation.
• Gebruik het product niet als de STOP-knop niet werkt.
• Voorkom botsingen tussen het product en mensen of dieren. Als een persoon of dier in de buurt van het
product komt, schakel het product dan onmiddellijk uit.
• Zet het product altijd UIT als het niet operationeel is.
• Gebruik het product niet op hetzelfde moment als een verzonken sproeier. Maak gebruik van de functie
Schema om ervoor te zorgen dat het product en de verzonken sproeier niet op hetzelfde moment aanstaan.
• Plaats geen verbindingskanaal op plekken waar verzonken sproeiers zijn geïnstalleerd.
• Gebruik het product niet als er in het maaigebied stilstaand water aanwezig is, bijvoorbeeld als het hard
regent of als er plassen water liggen.
• Schakel het product UIT als u onderhoud uitvoert.
• Haal de stekker uit het oplaadstation of verwijder de uitschakelvoorziening voordat u het oplaadstation reinigt
of er onderhoud aan uitvoert.
• Gebruik geen hogedrukspuit of oplosmiddelen om het product te reinigen.
• Plaats het product na reiniging op de grond in zijn normale positie, niet ondersteboven.
• Draai het product niet om als u het onderstel wilt reinigen. Als u het product toch omdraait om het te reinigen,
zorg er dan voor dat u het daarna weer in de juiste positie terugplaatst. Deze voorzorgsmaatregel is nodig om
te voorkomen dat er water in de motor komt, wat de normale werking kan beïnvloeden.
Een lithiumionaccu kan exploderen of brand veroorzaken bij demontage, kortsluiting, blootstelling aan water,
vuur of hoge temperaturen. Ga er voorzichtig mee om, demonteer of open de accu niet en vermijd elke vorm
van elektrisch/mechanisch misbruik. Bewaar de accu op een plek waar deze niet wordt blootgesteld aan direct
zonlicht.
1. Gebruik alleen de acculader en voeding die door de fabrikant zijn meegeleverd. Als u een ongeschikte lader
en voeding gebruikt, kan dit leiden tot elektrische schokken en/of oververhitting.
2. REPAREER OF PAS DE ACCU NOOIT ZELF AAN! Reparatiepogingen kunnen leiden tot ernstig persoonlijk letsel
als gevolg van explosie of elektrische schokken. Als er een lekkage ontstaat, zijn de vrijgekomen elektrolyten
bijtend en giftig.
3. Dit apparaat bevat een accu die alleen door gekwaliceerde personen mag worden vervangen.
1.3 Veiligheidsvoorschriften voor bediening
1.4 Veiligheidsvoorschriften voor onderhoud
1.5 Accuveiligheid
• Installeer het oplaadstation niet in gebieden waar sprake kan zijn van stilstaand water.
• Installeer het oplaadstation, inclusief accessoires, niet binnen 60 cm/24 inch van brandbare stoen. Storingen
of oververhitting van het oplaadstation en de voeding kunnen brand veroorzaken.
• Voor gebruikers in de VS/Canada: Als u de voeding buiten installeert, bestaat het risico op elektrische
schokken. Installeer de voeding alleen in een afgedekt GFCI-stopcontact van klasse A met een weerbestendige
behuizing en zorg ervoor dat het dopje van de bevestigingsstekker is geplaatst of verwijderd.
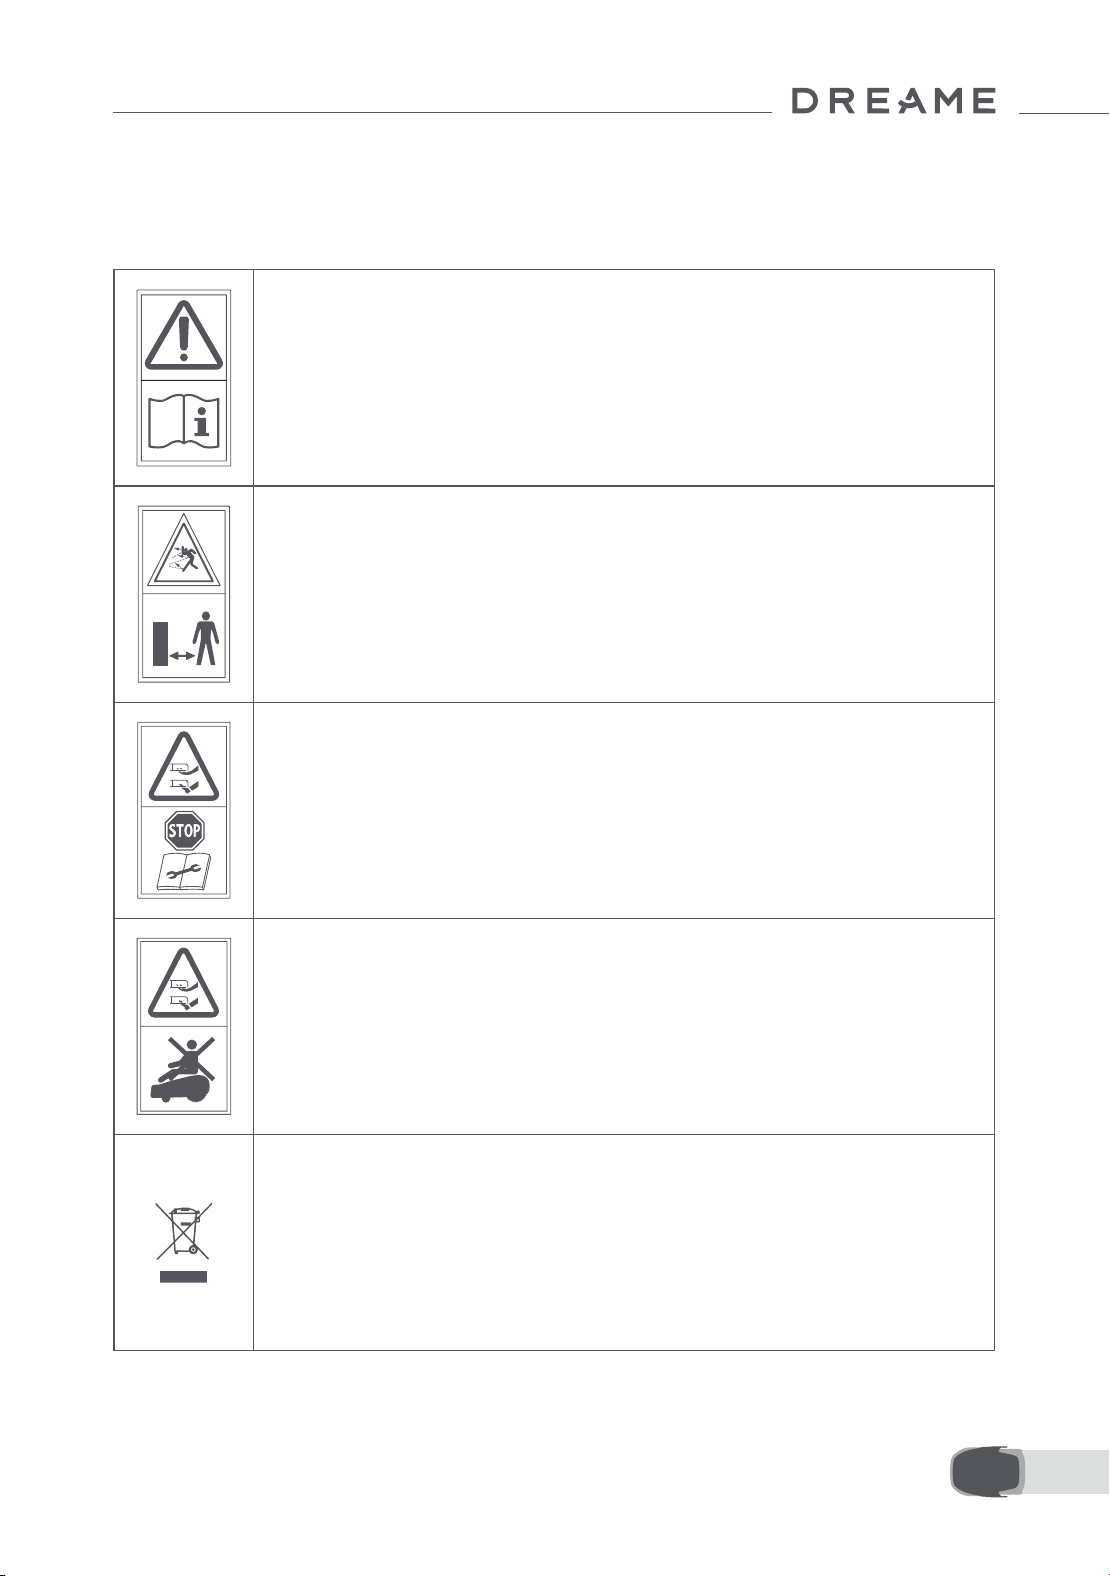
187 NL
Draag beschermende handschoenen bij het vervangen van de bladen om letsel te voorkomen.
1.6 Overige risico's
1.7 Symbolen en stickers
WAARSCHUWING –
Lees de gebruiksaanwijzing voordat u het apparaat gaat
gebruiken.
WAARSCHUWING –
Blijf op een veilige afstand van het apparaat als u het bedient.
WAARSCHUWING –
Schakel de uitschakelvoorziening in voordat u het apparaat
gebruikt of optilt.
WAARSCHUWING –
Ga niet op het apparaat rijden.
WAARSCHUWING –
Het is niet toegestaan om dit product weg te gooien bij uw
gewone huishoudelijke afval. Zorg ervoor dat het product
wordt gerecycled in overeenstemming met de lokale wettelijke
vereisten.
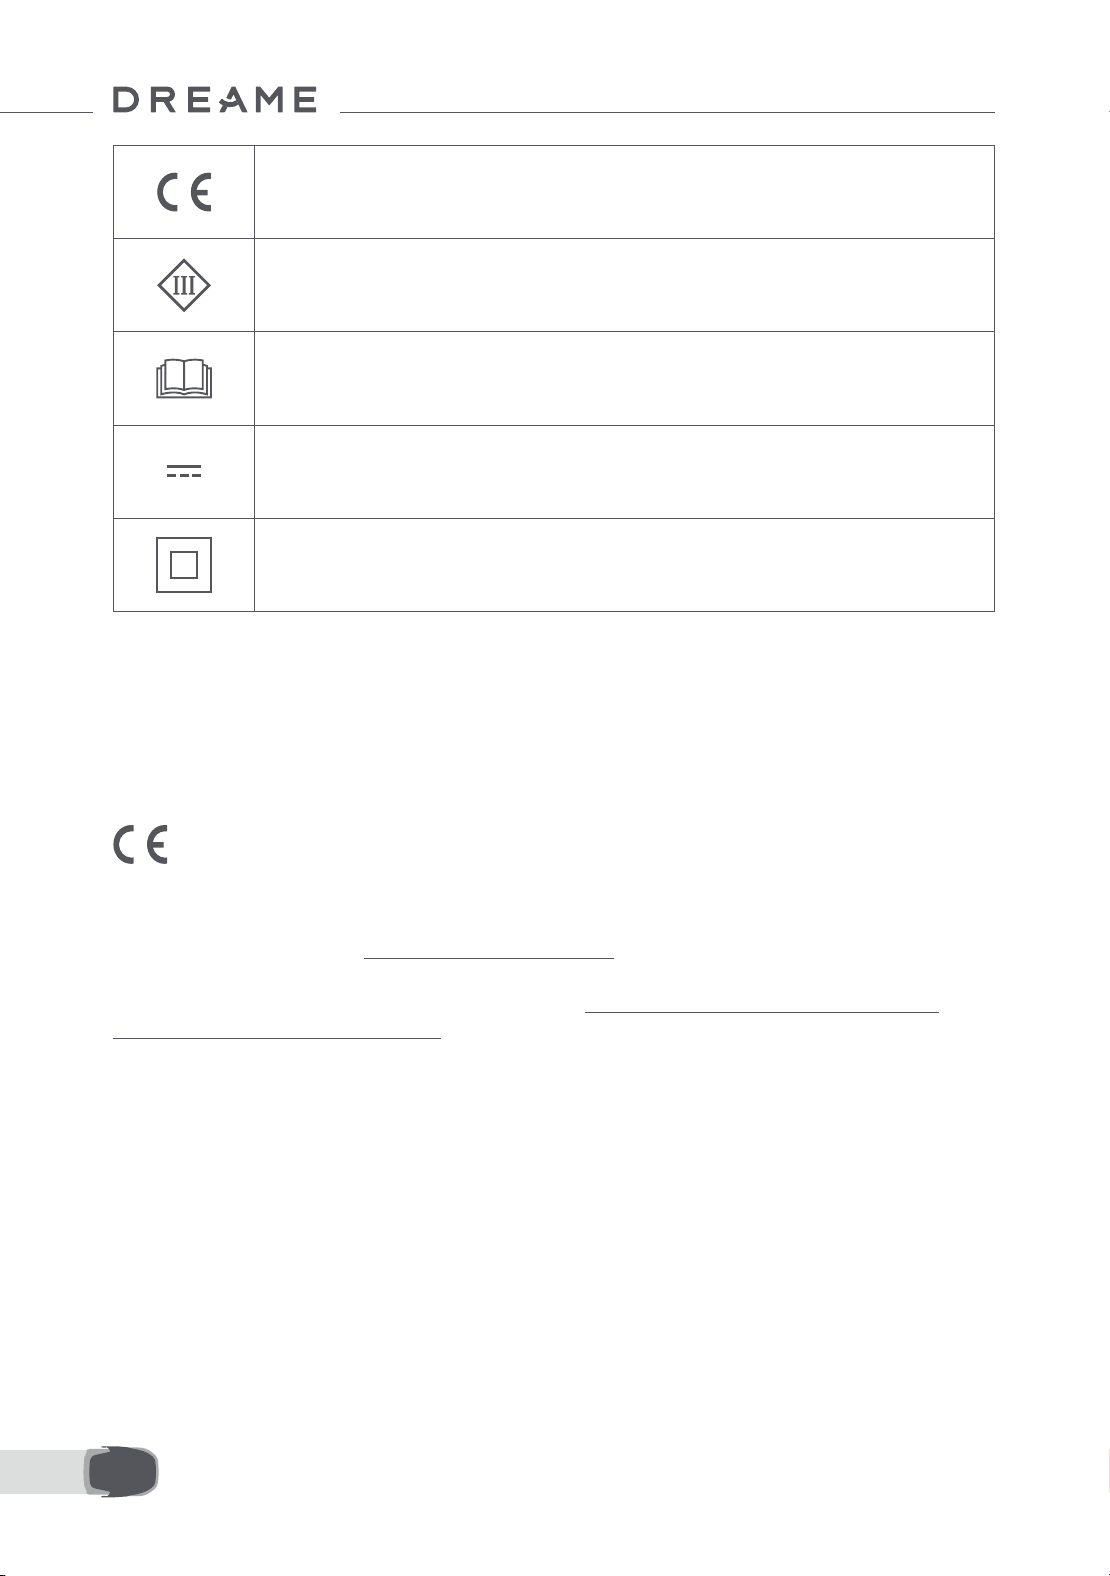
188NL
Dit product voldoet aan de toepasselijke EG-richtlijnen.
Klasse III
Lees de instructies voordat u het product oplaadt.
Gelijkstroom
Klasse II
Het tuinproduct is bedoeld voor het maaien van gazons bij u thuis. Het is ontworpen om vaak te maaien,
waardoor een gezonder en mooier gazon wordt onderhouden dan ooit tevoren. Afhankelijk van de grootte van
uw gazon kan uw maaier worden geprogrammeerd om op elk moment of met elke frequentie te werken. Het is
niet geschikt voor graven, vegen of sneeuwruimen.
Hierbij verklaart Dreame Trading (Tianjin) Co., Ltd. dat de radioapparatuur model Dreame Robotmaaier
MLLA7110 voldoet aan richtlijn 2014/53/EU. De volledige tekst van de EU-conformiteitsverklaring is beschikbaar
op het volgende internetadres: https://global.dreametech.com
Ga voor een gedetailleerde elektronische handleiding naar https://dreametech.zendesk.com/hc/en-us/
categories/7968864195993-User-Manual
BESTEMD GEBRUIK

189 NL
2 Inhoud van de doos
11
Snelstartgids
1
Beschermkap van de lidar
2
A1 Pro
3
Oplaadtoren
(met 10m verlengsnoer)
4
Grondplaat
5
Voeding
6
Reinigingsborstel
7
8 schroeven, inbussleutel
8
Reserveblad × 9
9
Handleiding
10
Pluisvrije doek
1
2
3
4
5 6
8 97
10 11
Dreame Roboticmower A1 Pro
User Manual
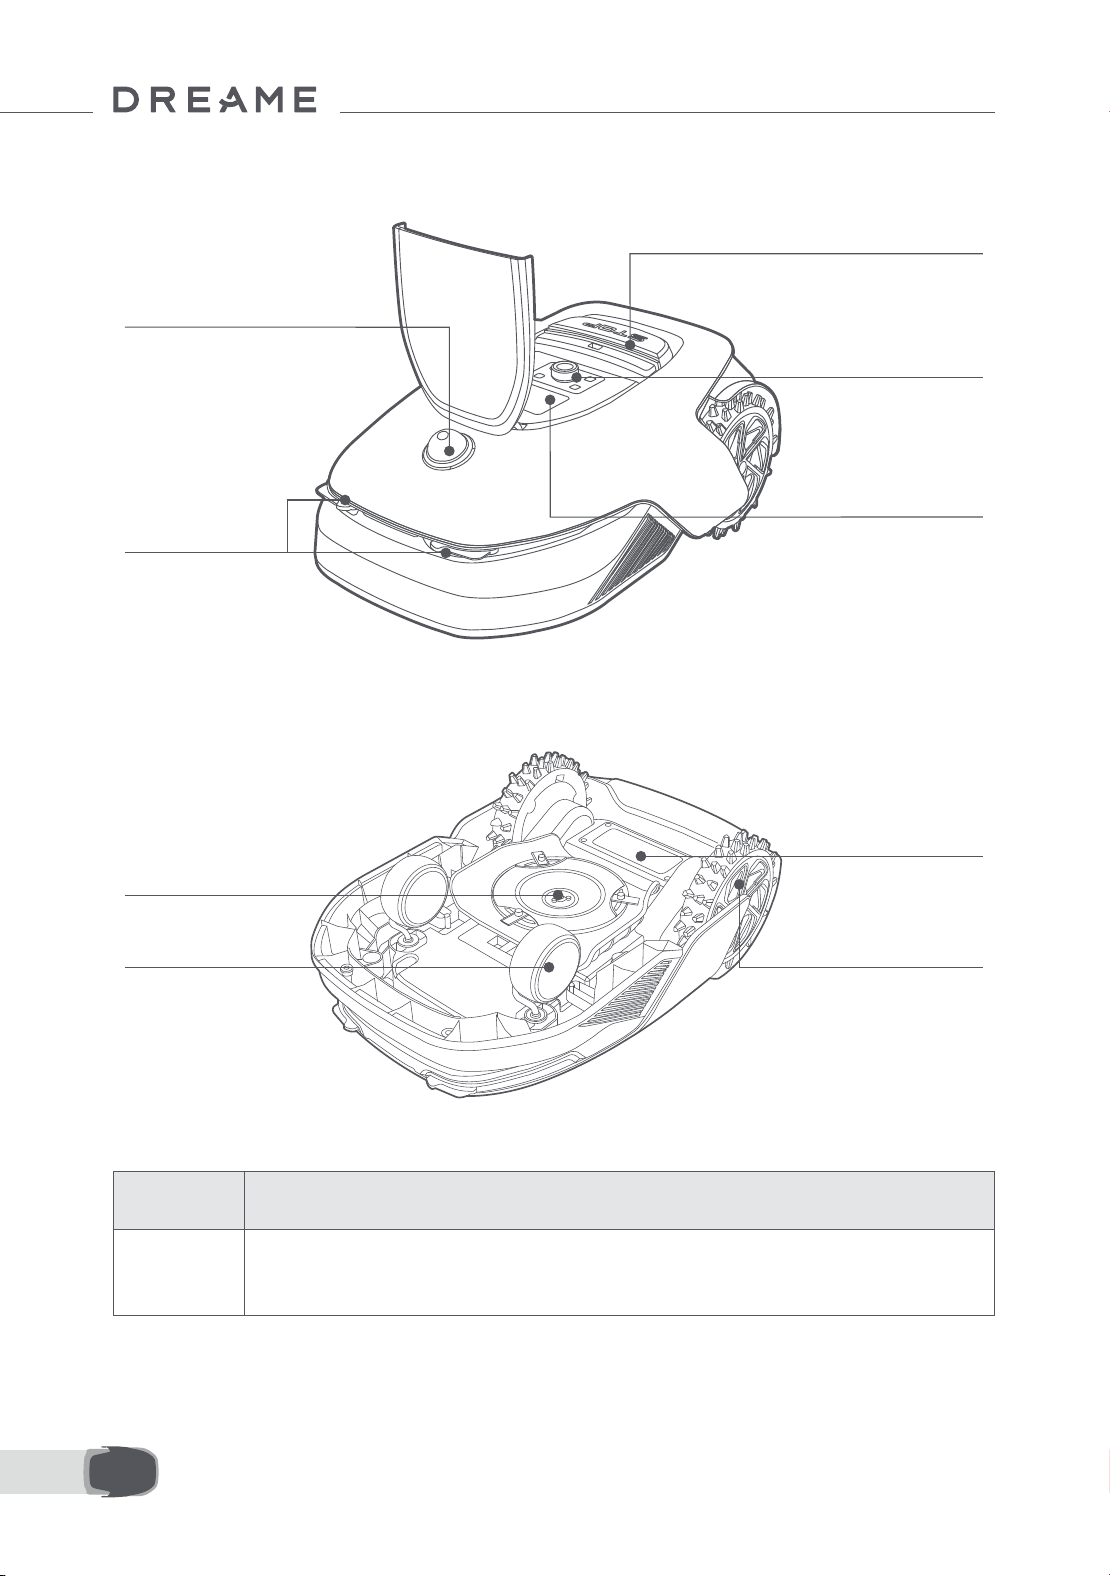
190NL
3 Productoverzicht
Laadcontacten
Accuhouder
Maaikop
Voorwiel
O-road aandrijfwiel
Lidar
Scherm
Knop
Stopknop
Sensor
Naam Beschrijving
Lidar
Verzamelt informatie over de omgeving en zorgt ervoor dat A1 Pro eenvoudiger kan
positioneren en obstakels kan vermijden. Daarnaast detecteert de lidar ook water en vuil.
Detectiebereik: 70 meter met een groothoek van 360° horizontaal en 59° verticaal.

191 NL
4 Installatie
4.1 Een geschikte locatie kiezen
• Plaats het oplaadstation op een vlakke ondergrond vlakbij de rand van het gazon en een stopcontact. We
raden aan om het oplaadstation te plaatsen op een plek waar het wisignaal sterk is.
Opmerking: Controleer op uw mobiele apparaat of het wisignaal van de locatie sterk genoeg is. Als het
wisignaal sterk is, is de verbinding tussen A1 Pro en de app stabieler.
Opmerking: Zorg ervoor dat de grond zacht genoeg is om de schroeven erin te draaien.
• Houd links, rechts en voor het oplaadstation minimaal 1 meter vrij, dus zonder obstakels. Zorg ervoor dat het
gras rondom de gekozen locatie korter is dan 6 cm. Als het gras hoger is, maai het gazon dan eerst met een
handmaaier. Als het gras te hoog is, wordt het voor A1 Pro lastig om terug te keren naar het oplaadstation.
4.2 Het oplaadstation installeren
1
Bevestig de grondplaat aan de grond met de meegeleverde schroeven en gebruik daarbij de inbussleutel.
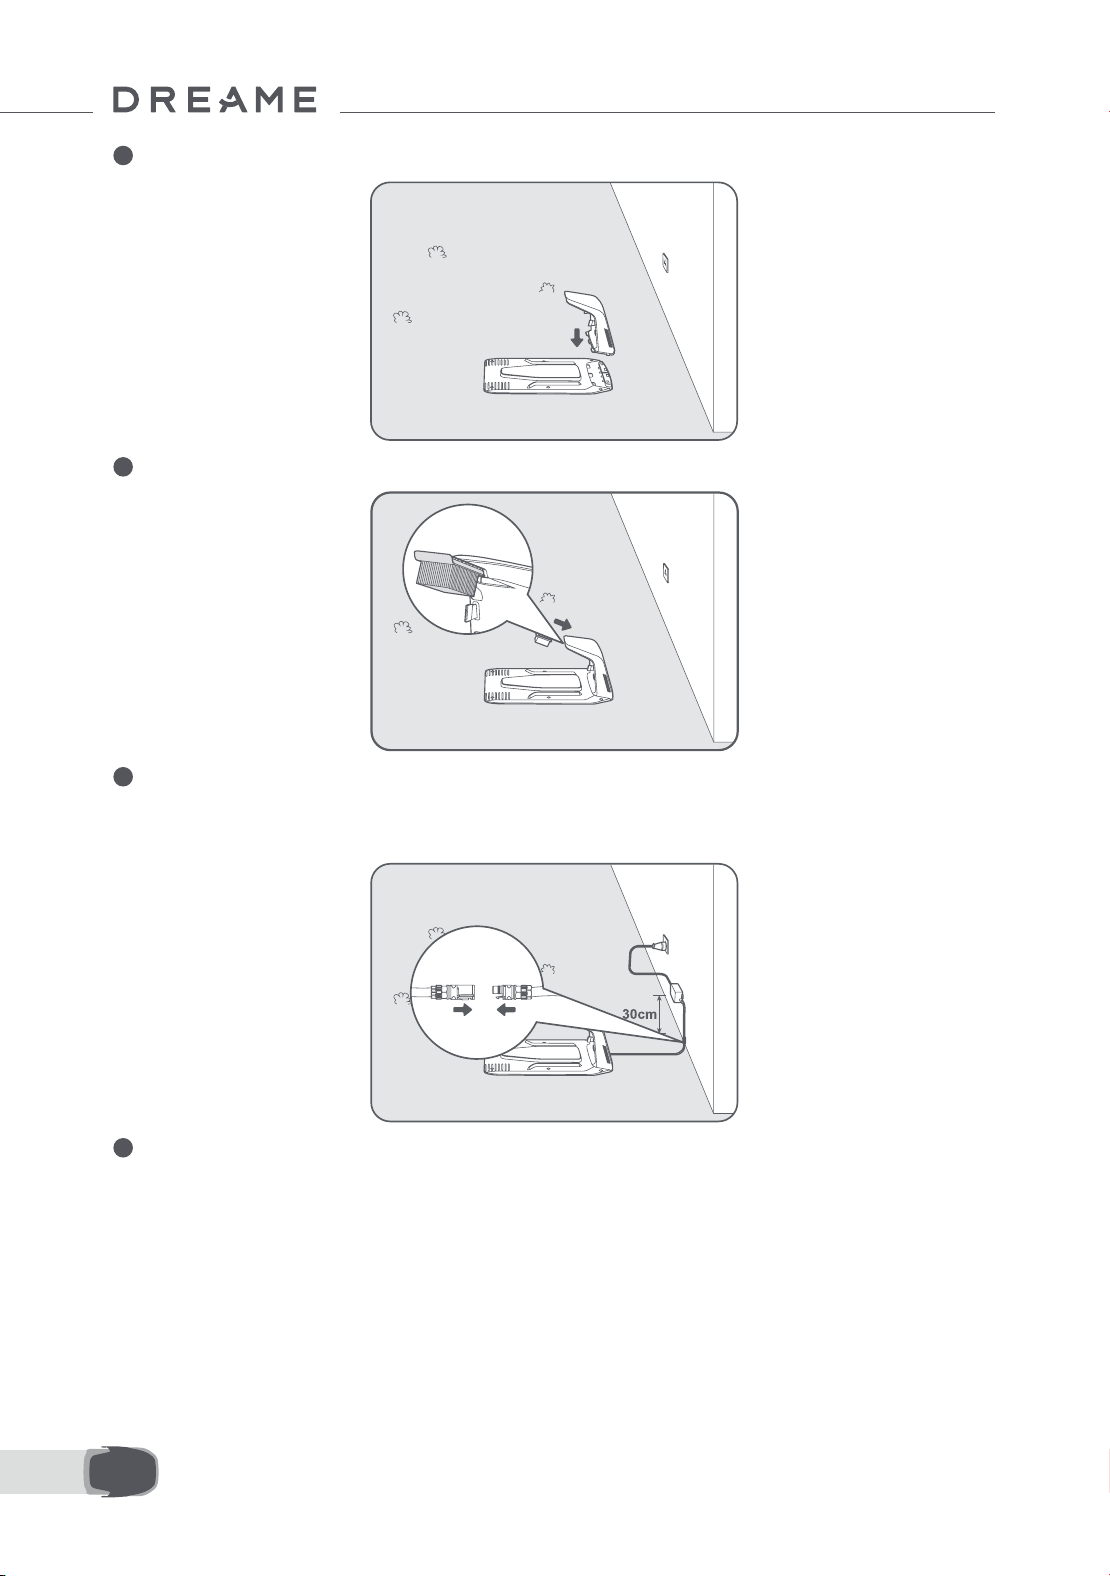
192NL
2
Schuif de oplaadtoren in de grondplaat totdat u een klik hoort.
3
Plaats de reinigingsborstel in de oplaadtoren door de lip in de gleuf te schuiven.
4
Sluit de voeding aan op het verlengsnoer en steek de stekker in het stopcontact. Zorg ervoor dat de voeding
zich minimaal 30 cm boven de grond bevindt.
Opmerking: Het ledlampje op het oplaadstation brandt continu blauw als er stroom is.
5
Plaats A1 Pro in het oplaadstation om op te laden. Zorg ervoor dat de laadcontacten op A1 Pro en het
oplaadstation correct zijn aangesloten.
Opmerking: Het indicatielampje zal groen knipperen als A1 Pro succesvol wordt opgeladen in het
oplaadstation.
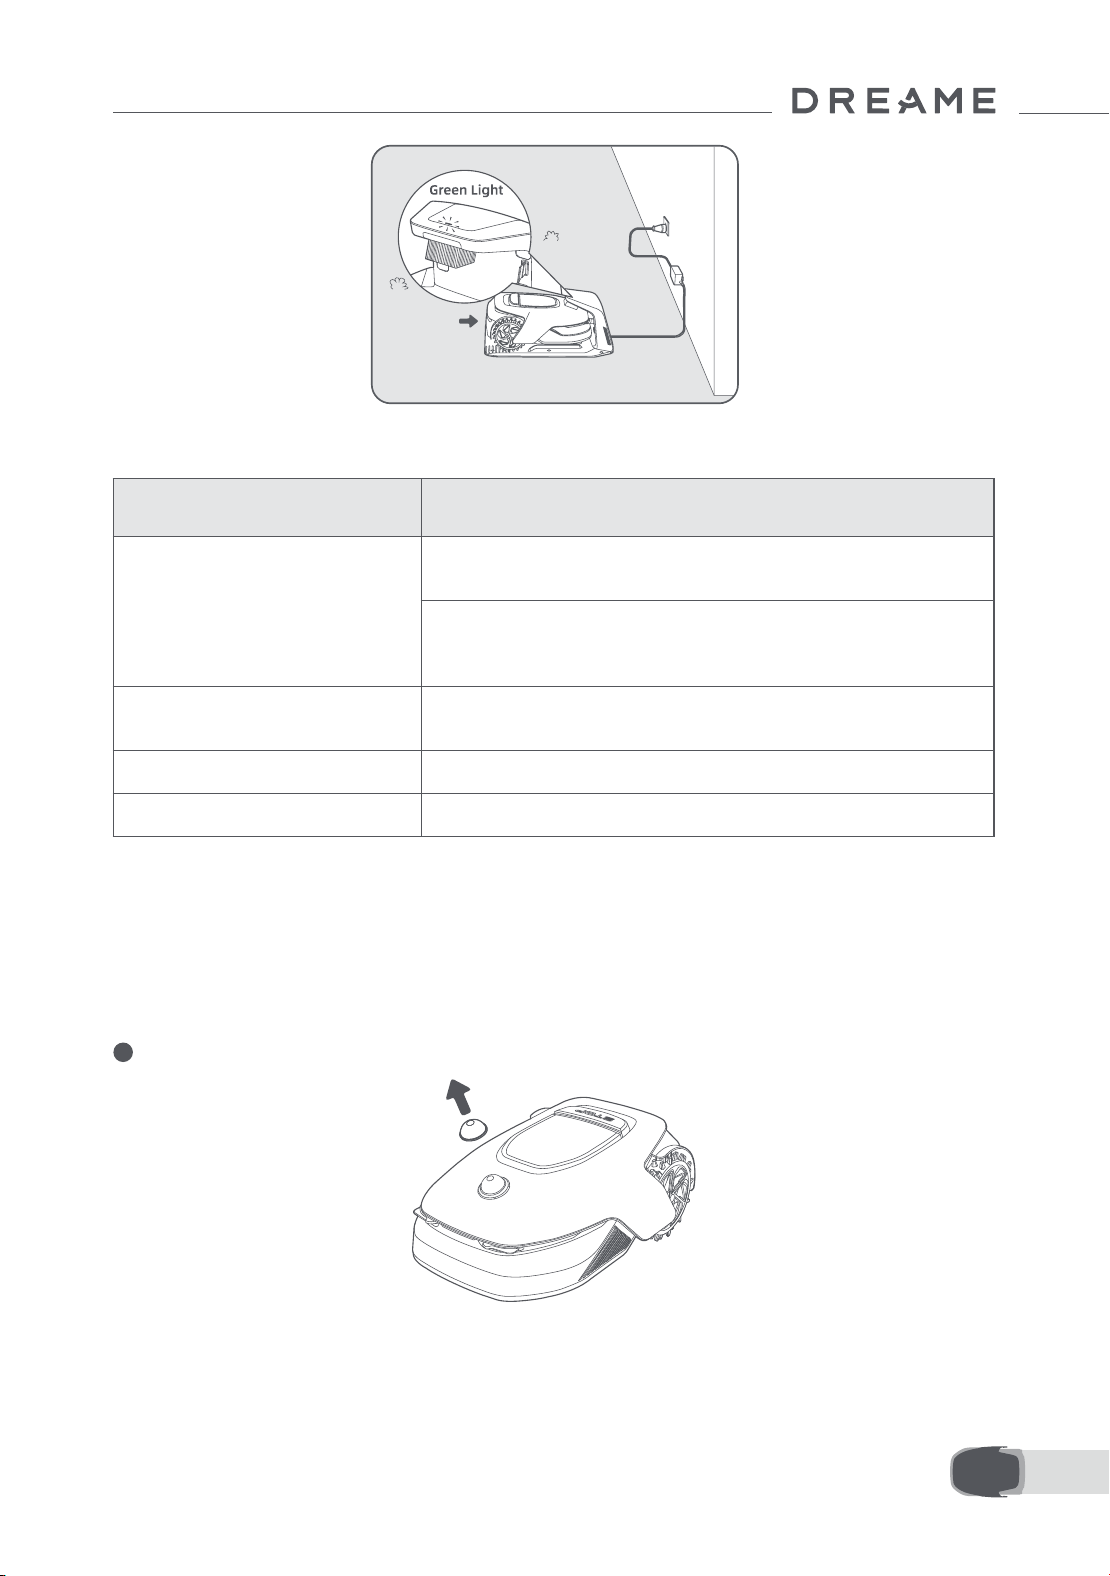
193 NL
Ledlampje op het oplaadstation
Voordat u A1 Pro kunt gebruiken, moet u een aantal basisinstellingen doorvoeren wanneer u A1 Pro voor het
eerst inschakelt.
5 Voorbereidingen voor gebruik
Kleur ledlampje Betekenis
Knipperend/continu rood
1. Er is een probleem met het oplaadstation (er is bijvoorbeeld een
probleem met de laadstroom of -spanning).
2. A1 Pro is gedockt in het oplaadstation, maar het opladen
verloopt niet naar behoren (er is bijvoorbeeld kortsluiting in de
laadcontacten).
Continu blauw
Het oplaadstation heeft stroom. A1 Pro bevindt zich niet in het
oplaadstation.
Knipperend groen A1 Pro is aan het opladen in het oplaadstation.
Continu groen A1 Pro bevindt zich in het oplaadstation en is volledig opgeladen.
1
Verwijder de beschermkap van de lidar.
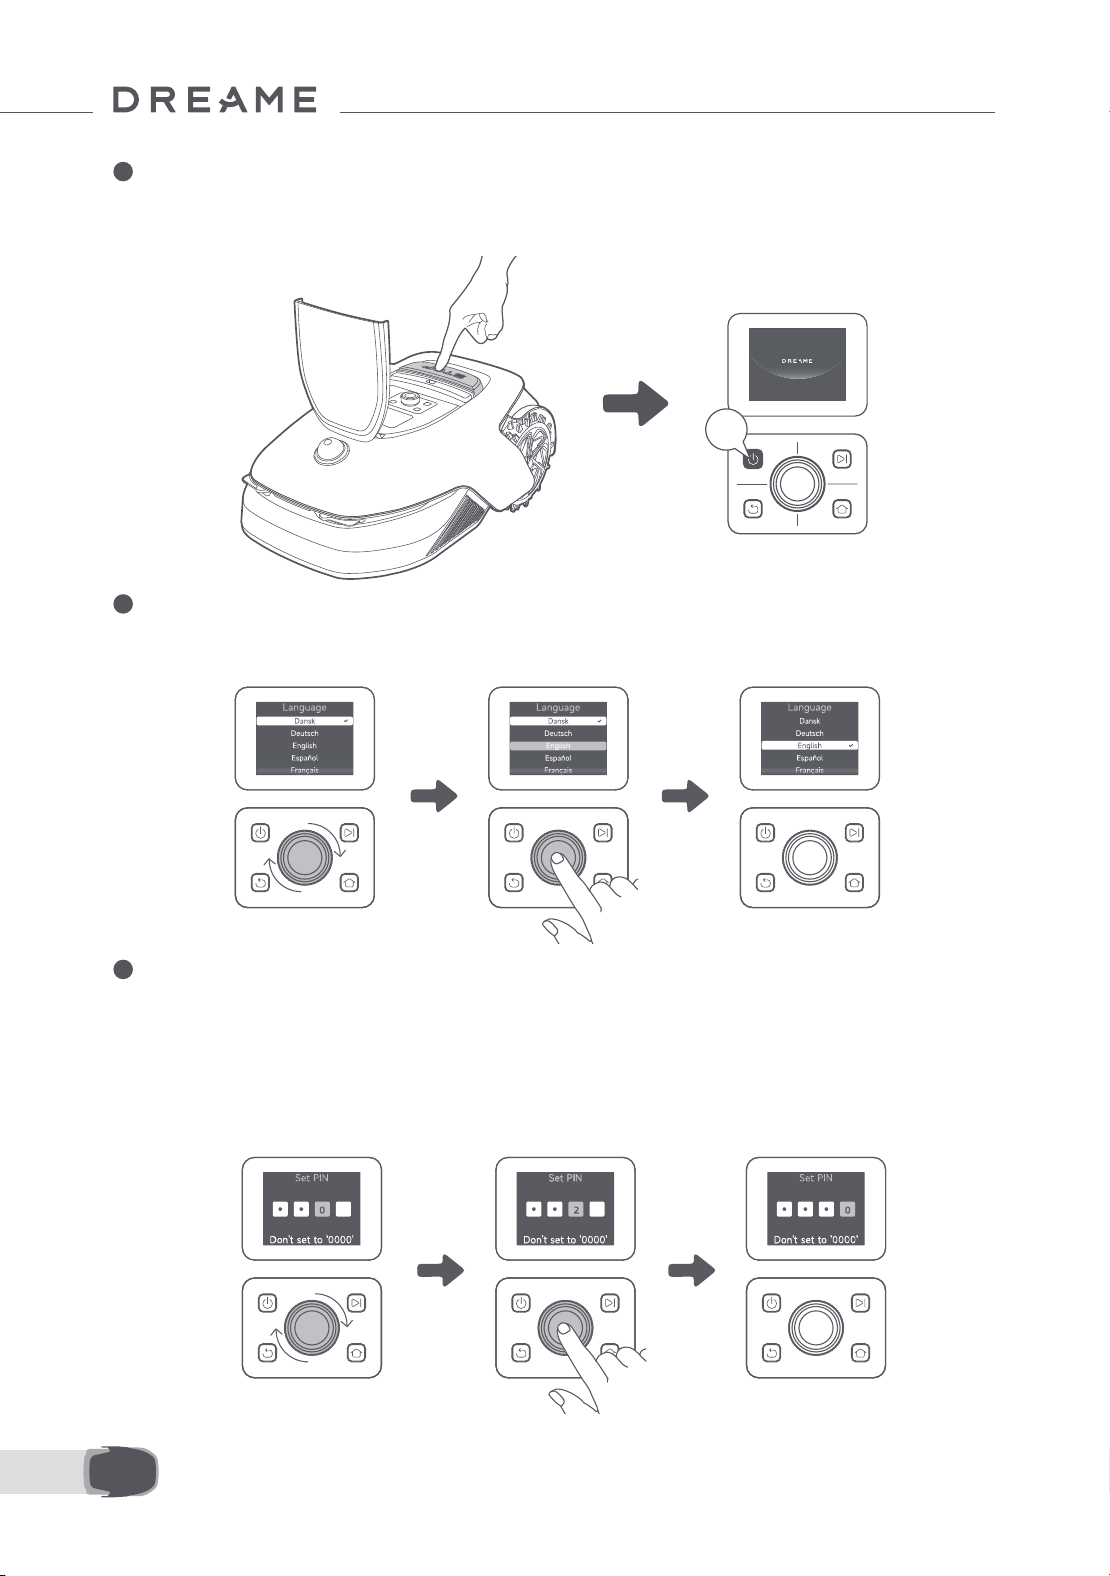
194NL
2
Druk op de Stopknop om de klep van het bedieningspaneel te openen. Houd de aan-uitknop op het
bedieningspaneel gedurende twee seconden ingedrukt om A1 Pro in te schakelen.
Opmerking: Als A1 Pro in het oplaadstation is gedockt, wordt hij automatisch ingeschakeld.
3
Selecteer de gewenste taal
Om uw taal te selecteren draait u de knop rechtsom om naar beneden te gaan en linksom om naar boven te
gaan. Druk op de knop om de selectie te bevestigen.
4
Pincode instellen
1. Draai aan de knop om een getal van 0 tot 9 te selecteren. Draai de knop rechtsom om van 0 naar 9 te gaan
en linksom om van 9 naar 0 te gaan. Druk op de knop om het volgende getal in te voeren. Om het vorige getal
te wijzigen, draait u de knop linksom totdat u bij het getal 0 bent. Vervolgens draait u de knop opnieuw naar
het juiste getal.
Opmerking: Stel de pincode niet in op '0000'.
2s
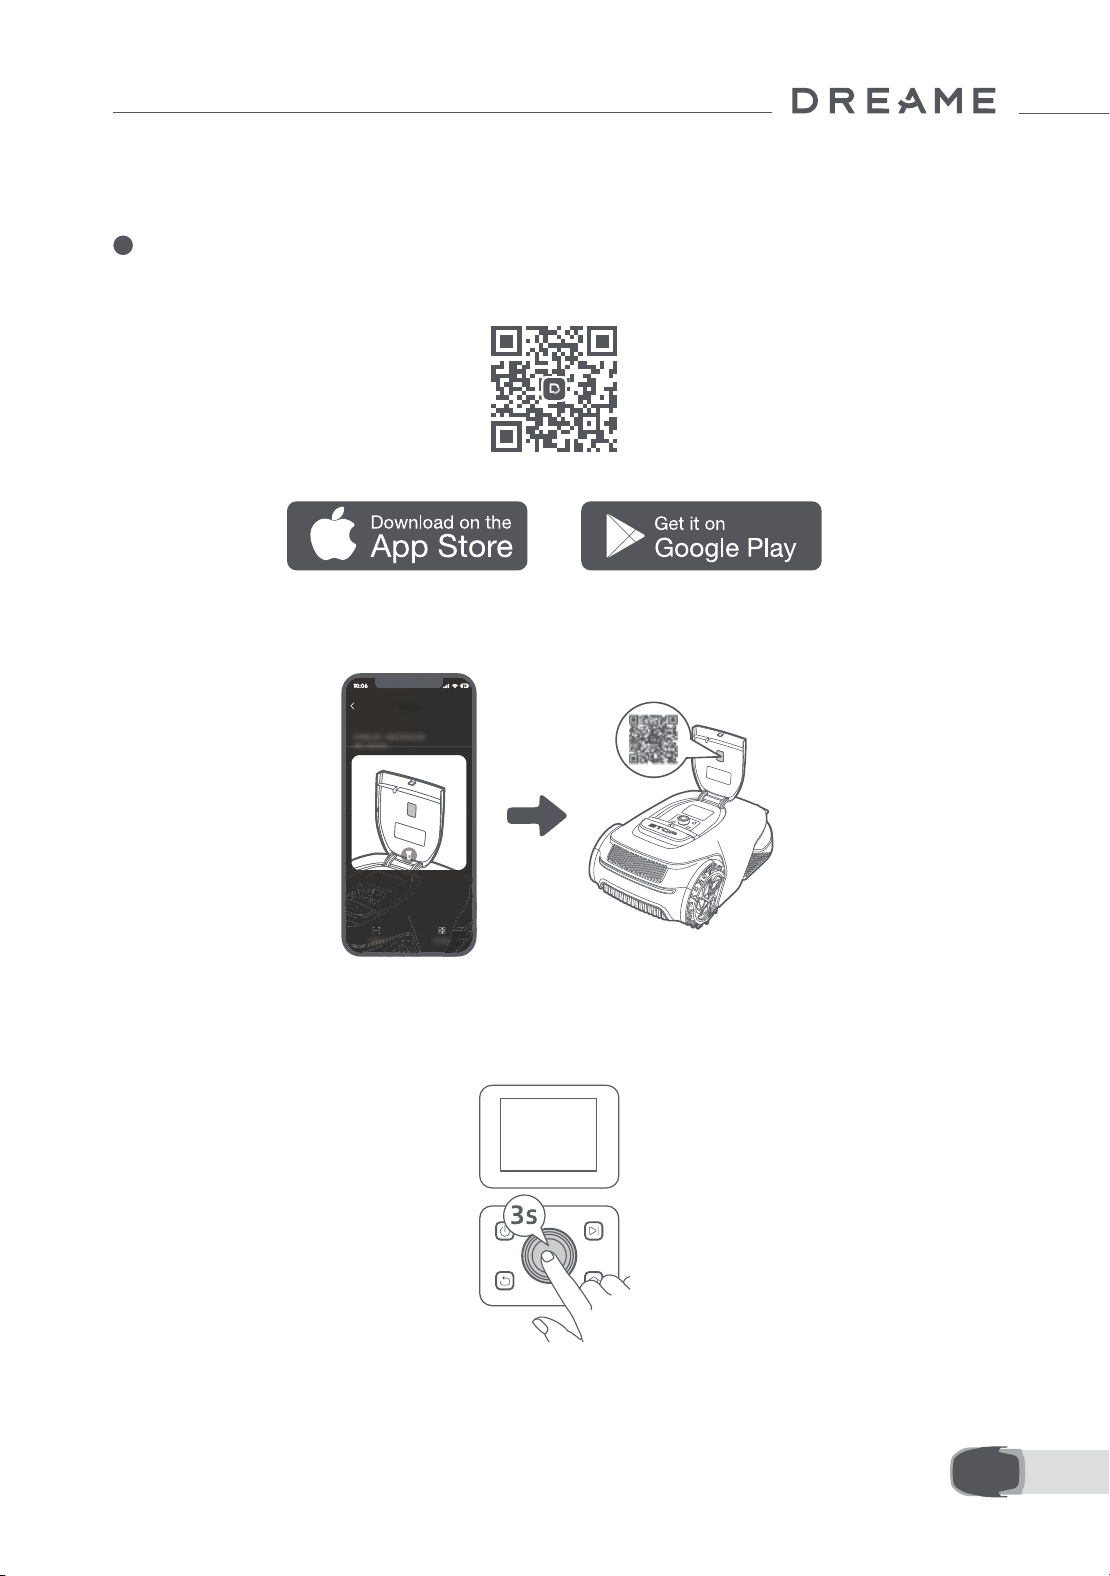
195 NL
Voer de pincode nogmaals in om het instellen van de pincode te voltooien.
Opmerking: Als twee wachtwoorden niet overeenkomen, stel dan het nieuwe wachtwoord opnieuw in.
5
A1 Pro met internet verbinden
Scan de QR-code om de Dreamehome-app te downloaden op uw mobiele apparaat. Maak na de installatie
een account aan en log in.
U kunt de Dreamehome-app ook downloaden via de App Store of Google Play.
1) Bluetooth-verbinding
1. Schakel Bluetooth in op uw mobiele apparaat.
2. Scan de QR-code aan de binnenkant van de klep of selecteer A1 Pro handmatig via de app.
3. Houd de knop op het bedieningspaneel gedurende drie seconden ingedrukt en A1 Pro opent de Bluetooth-
koppelingsmodus.
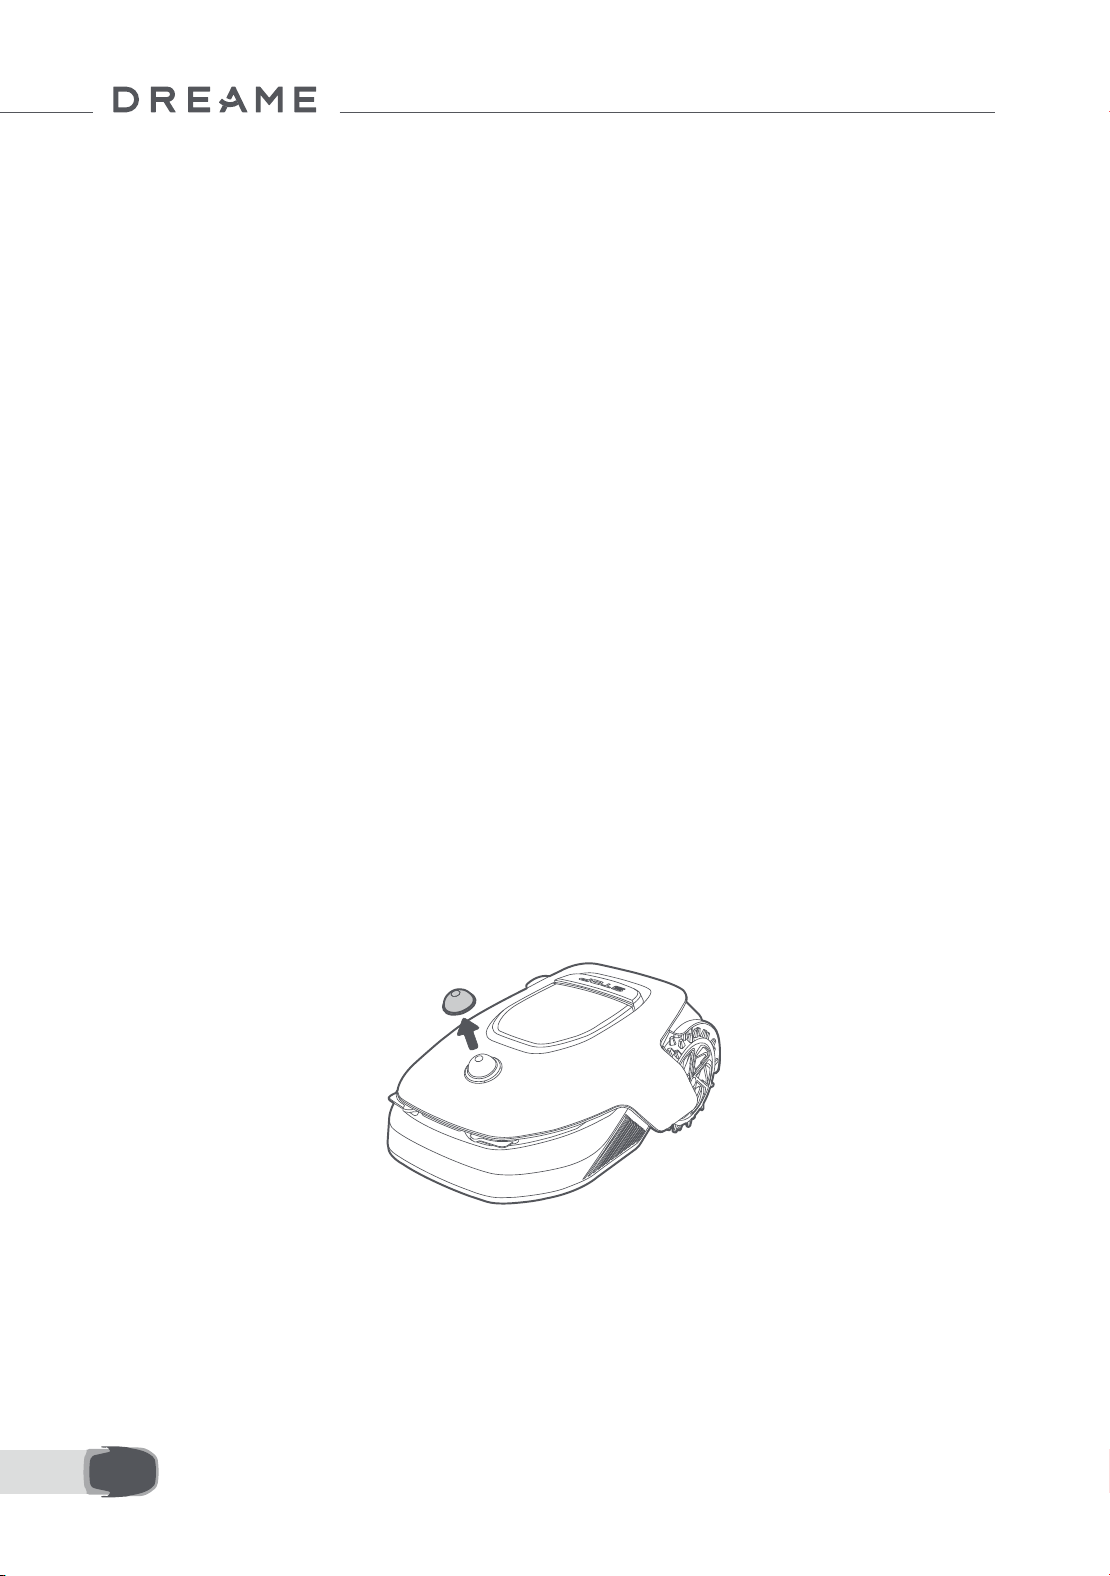
196NL
4. Koppel A1 Pro met uw mobiele apparaat via Bluetooth.
Opmerking: Zorg ervoor dat uw mobiele apparaat zich binnen 10 meter van A1 Pro bevindt.
2) Wiverbinding
Zorg ervoor dat A1 Pro en uw mobiele apparaat zijn verbonden met hetzelfde winetwerk. Volg de
aanwijzingen in de app om verbinding te maken.
Opmerking: Gebruik een single-bandnetwerk met een frequentie van 2,4 GHz of een dual-bandnetwerk met
een frequentie van 2,4/5 GHz.
Opmerking: U kunt ook de Link-module aanschaen om A1 Pro op afstand te besturen zonder wiverbinding.
A1 Pro loskoppelen
A1 Pro is automatisch verbonden met het Dreamehome-account zodra het koppelen is geslaagd. Elk apparaat
kan maar met één account worden verbonden. Het kan niet op hetzelfde moment met een ander account
worden verbonden.
Als u A1 Pro met een nieuw account wilt verbinden, moet u hem eerst van het andere account loskoppelen.
U kunt naar "Apparaat" gaan en tikken op Meer > Verwijderen in de rechterbovenhoek om het apparaat te
ontkoppelen.
Uitloggen bij uw Dreamehome-account of het account verwijderen
Ga naar Ik > Instellingen > Account > Uitloggen om uit te loggen. Ga naar Ik > Instellingen > Account >
Account verwijderen om het account te verwijderen.
Let op de volgende punten voordat u uw tuin in kaart brengt:
• Het accuniveau van A1 Pro is meer dan 50%.
• De beschermkap van de lidar is verwijderd.
6 Uw tuin in kaart brengen
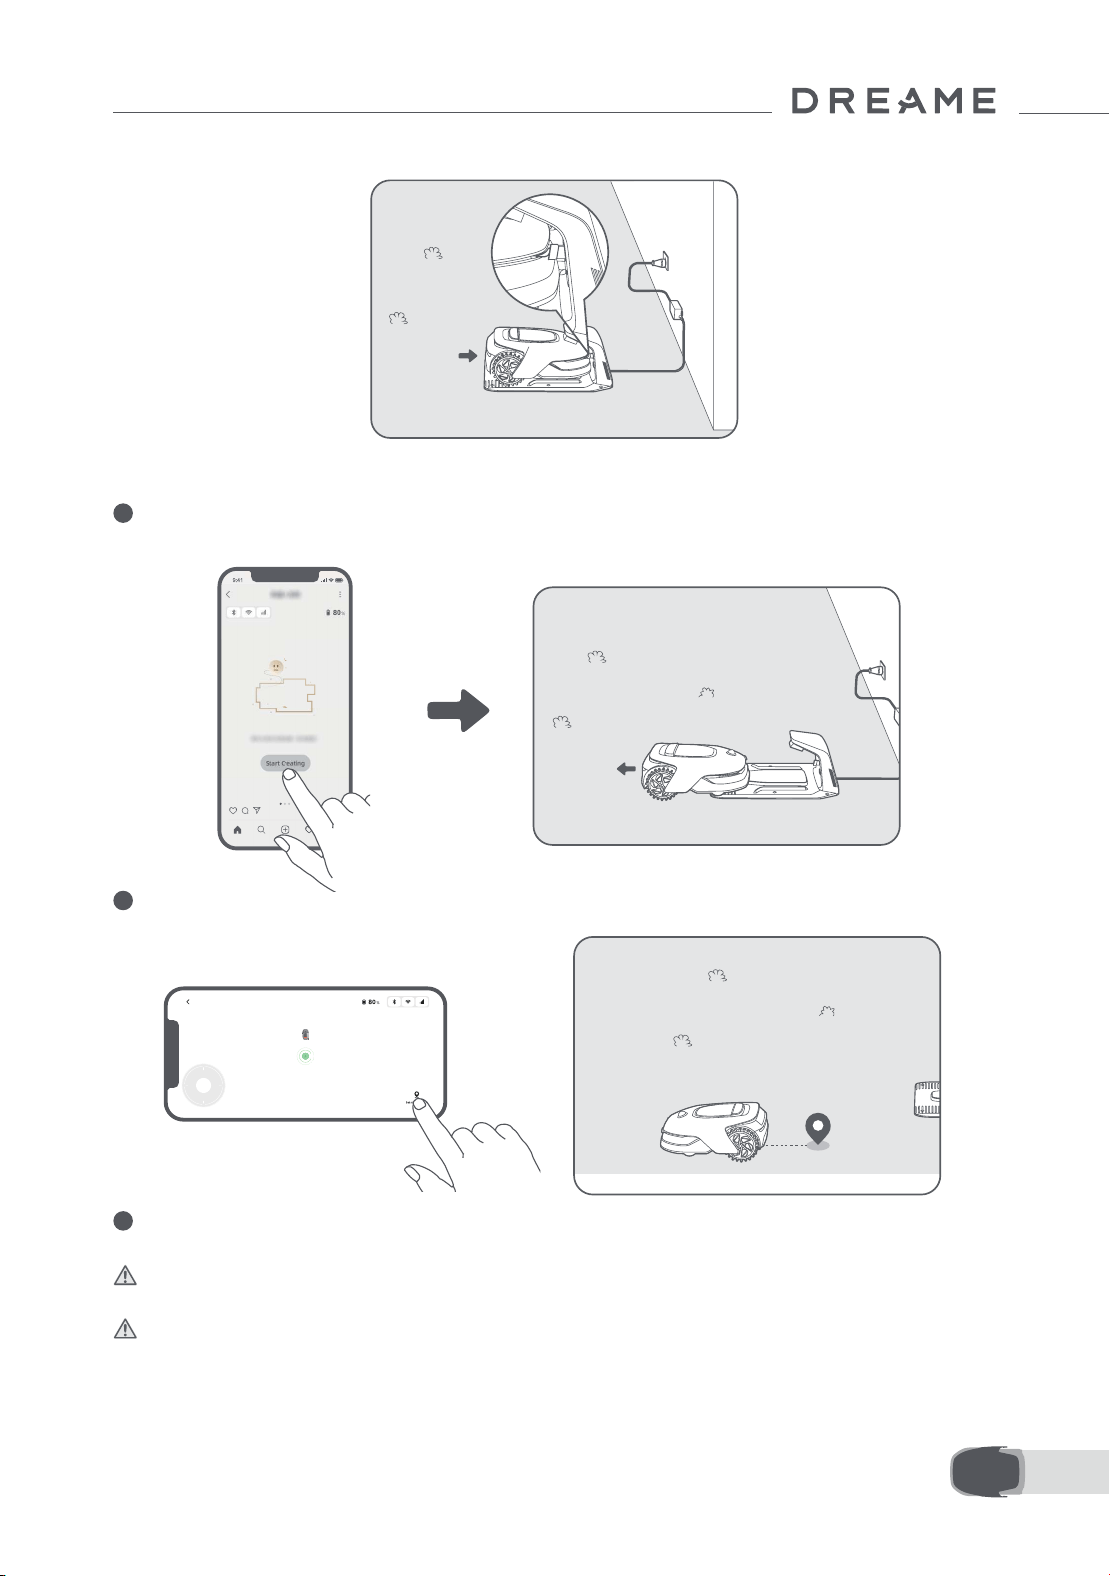
197 NL
• A1 Pro koppelt correct in het oplaadstation.
6.1 Grens aanmaken
1
Tik in de app op 'Maak plattegrond aan'. A1 Pro controleert dan de status en begint met kalibreren. Hij
verlaat automatisch het oplaadstation om de kalibratie uit te voeren. Let op.
2
Stuur A1 Pro op afstand naar de rand van het gazon en tik op 'Startpunt instellen' om het startpunt van de
grens te bevestigen.
3
Bestuur A1 Pro op afstand langs de rand van het gazon om het maaigebied aan te maken. Als u A1 Pro op
afstand bestuurt om de grens aan te maken, houd dan rekening met het volgende:
Waarschuwing: Verplaats A1 Pro niet handmatig tijdens het aanmaken van de grens. Het in kaart brengen
van de grens kan dan mislukken.
Waarschuwing: Als u begint met het in kaart brengen via de afstandsbediening, dock A1 Pro dan niet op
afstand in het oplaadstation, maar wacht totdat het in kaart brengen is voltooid. De lidar kan dan namelijk
blokkeren, waardoor het in kaart brengen mogelijk mislukt.
• Als u A1 Pro op afstand bestuurt, zorg er dan voor dat u binnen een straal van 5 meter achter A1 Pro aan
loopt.
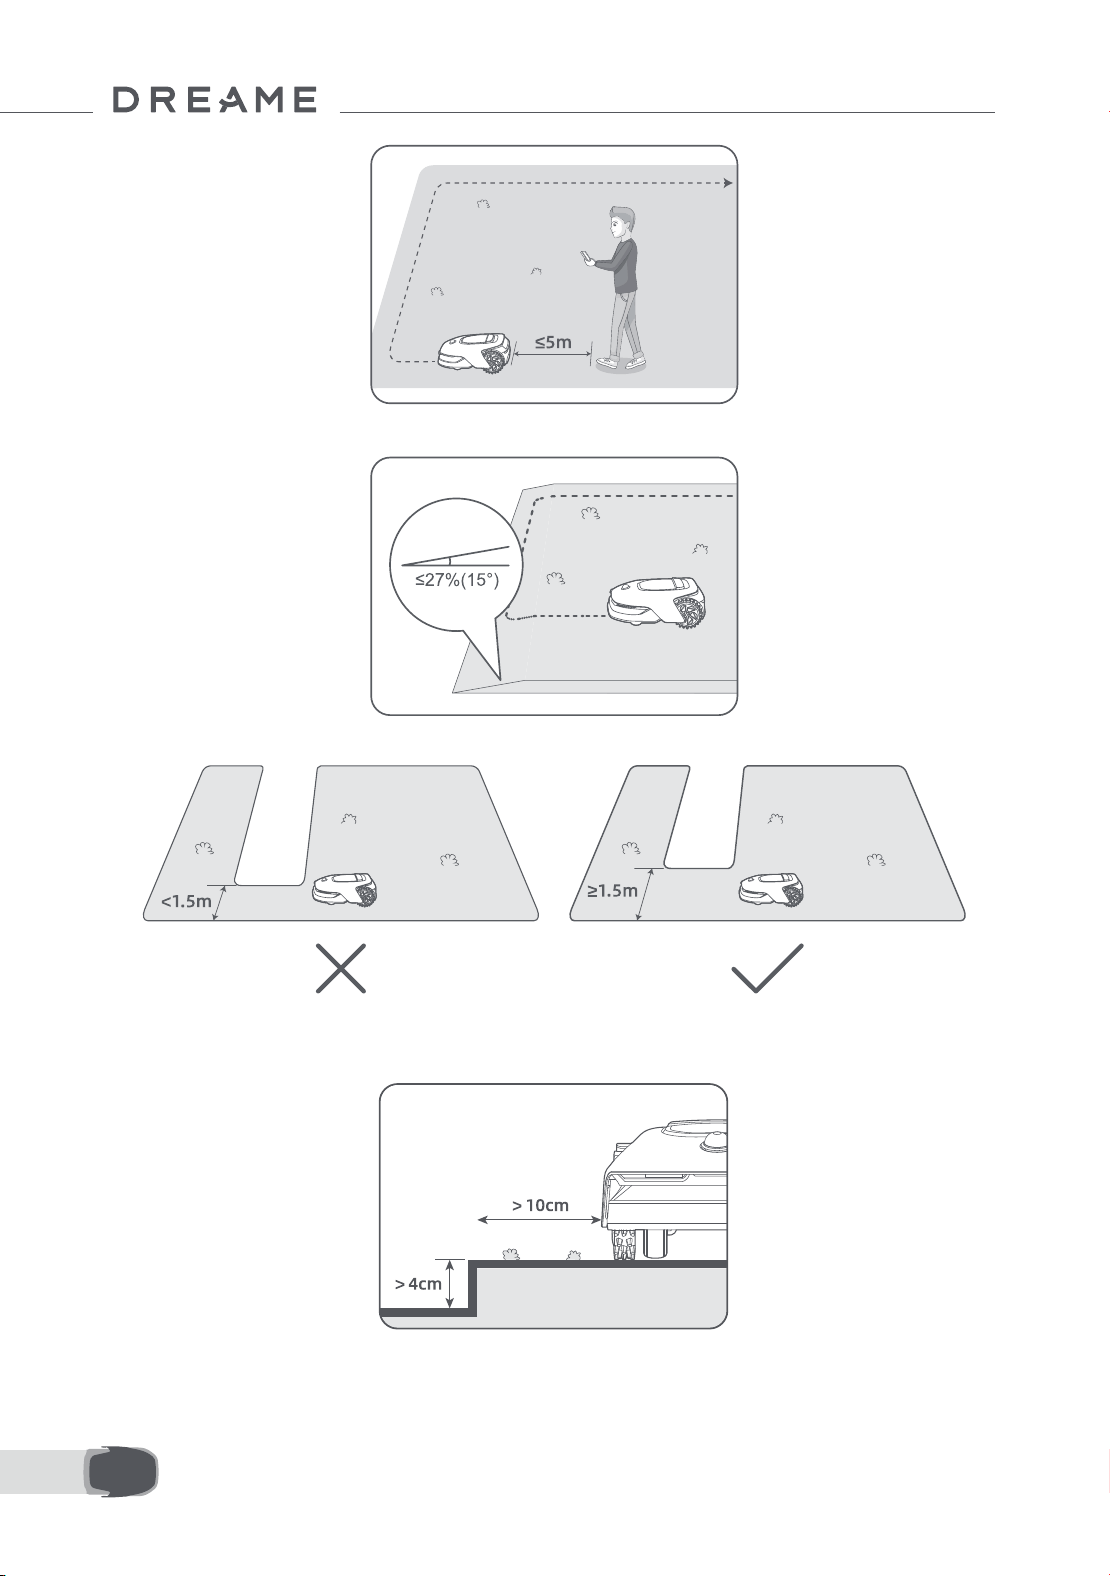
198NL
• Maak geen grens aan op een helling van meer dan 27%.
• Als er een hoogteverschil van meer dan 4 cm is tussen de rand van het gazon en de aangrenzende grond,
zorg er dan voor dat A1 Pro minstens 10 cm van de rand van het gazon blijft.
• Maak geen grenzen aan in doorgangen die smaller zijn dan 1.5 meter.
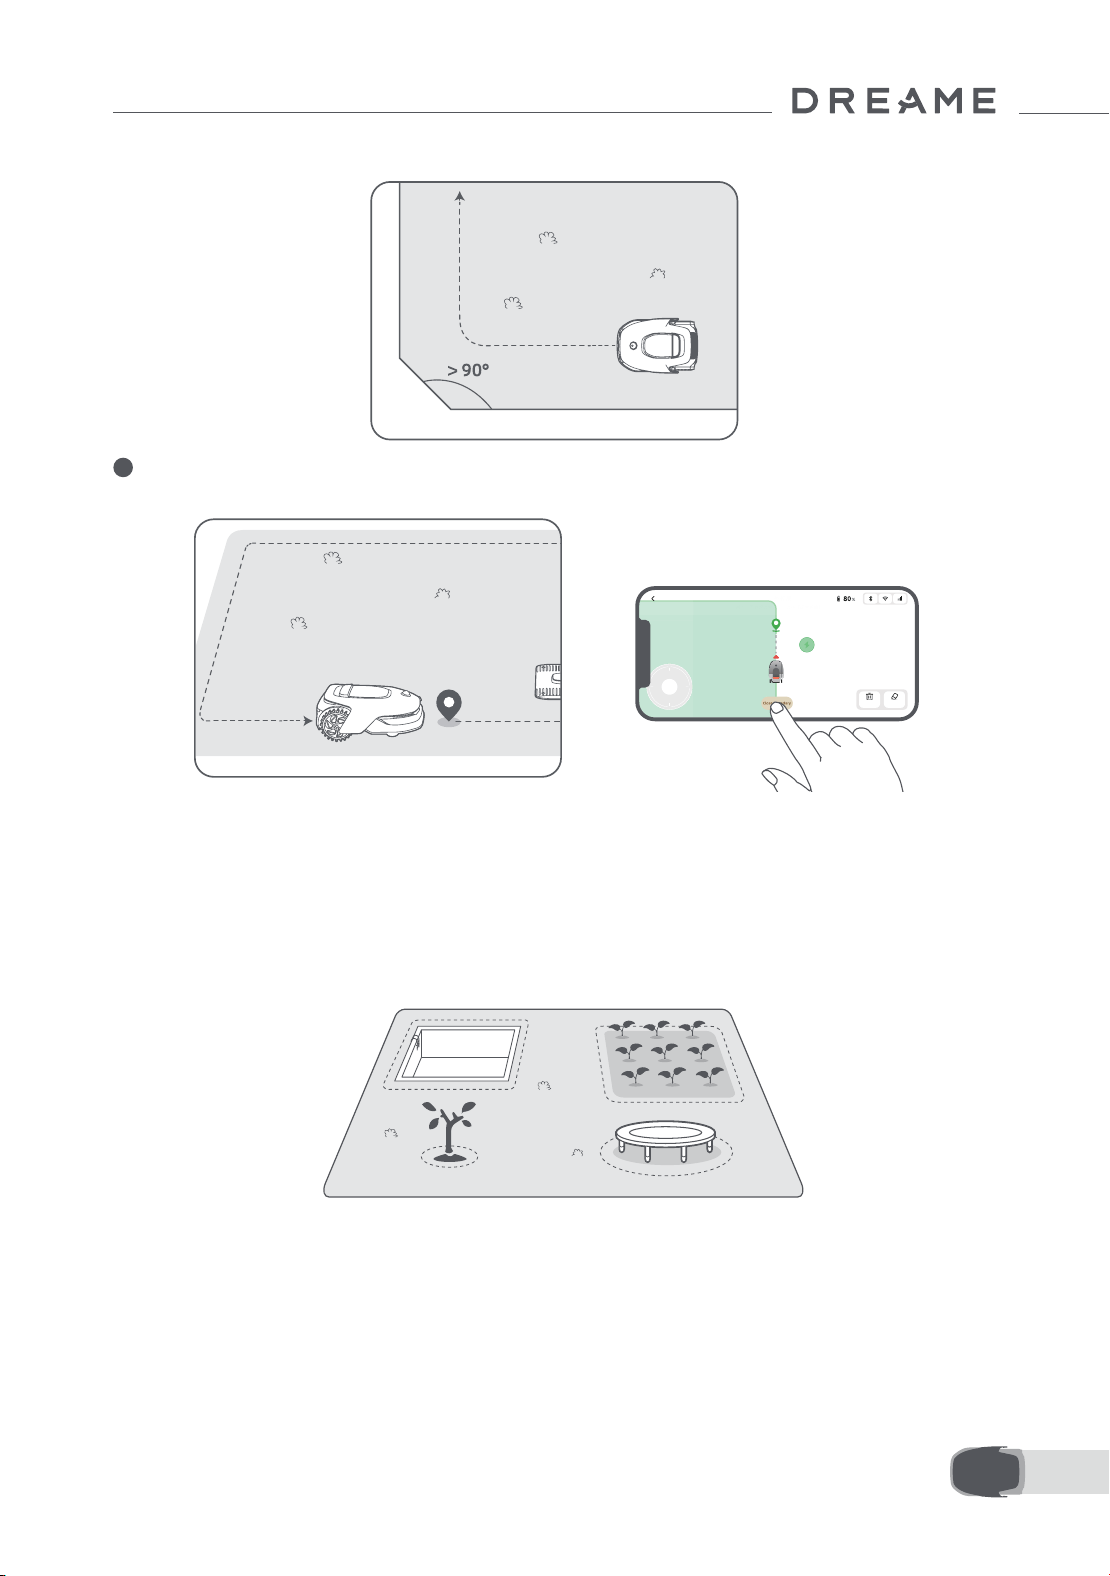
199 NL
• Zorg ervoor dat de draaihoeken groter zijn dan 90° .
4
Als A1 Pro terugkeert naar de plek die zich 1 meter van het startpunt bevindt, tikt u op 'Grens sluiten'. Het
aanmaken van de grens wordt dan automatisch voltooid.
6.2 Verboden zone instellen
Hoewel de A1 Pro automatisch obstakels kan ontwijken, is het nog steeds nodig om zones met een risico op
vallen, zoals zwembaden en zandbakken, als verboden zones in te stellen. Maak verboden zones aan voor
dingen die u veilig wilt stellen (zoals bloemperken, trampolines, moestuinen of blootliggende boomwortels). In
de app kunt u A1 Pro op afstand besturen om verboden zones aan te maken, of u kunt naar 'Kaart bewerken'
gaan om rechtstreeks op de plattegrond verboden zones te tekenen of te verwijderen.
6.3 Meerdere zones instellen
Als uw gazon wordt gescheiden door tuinpaden of als u verschillende afzonderlijke grasvelden hebt, tikt u
in de app op 'Werkzone toevoegen' om door te gaan met het aanmaken van maaizones op afstand. Als de
plattegrond is voltooid, kunt u ook zones toevoegen, verwijderen of wijzigen in 'Kaart bewerken'.
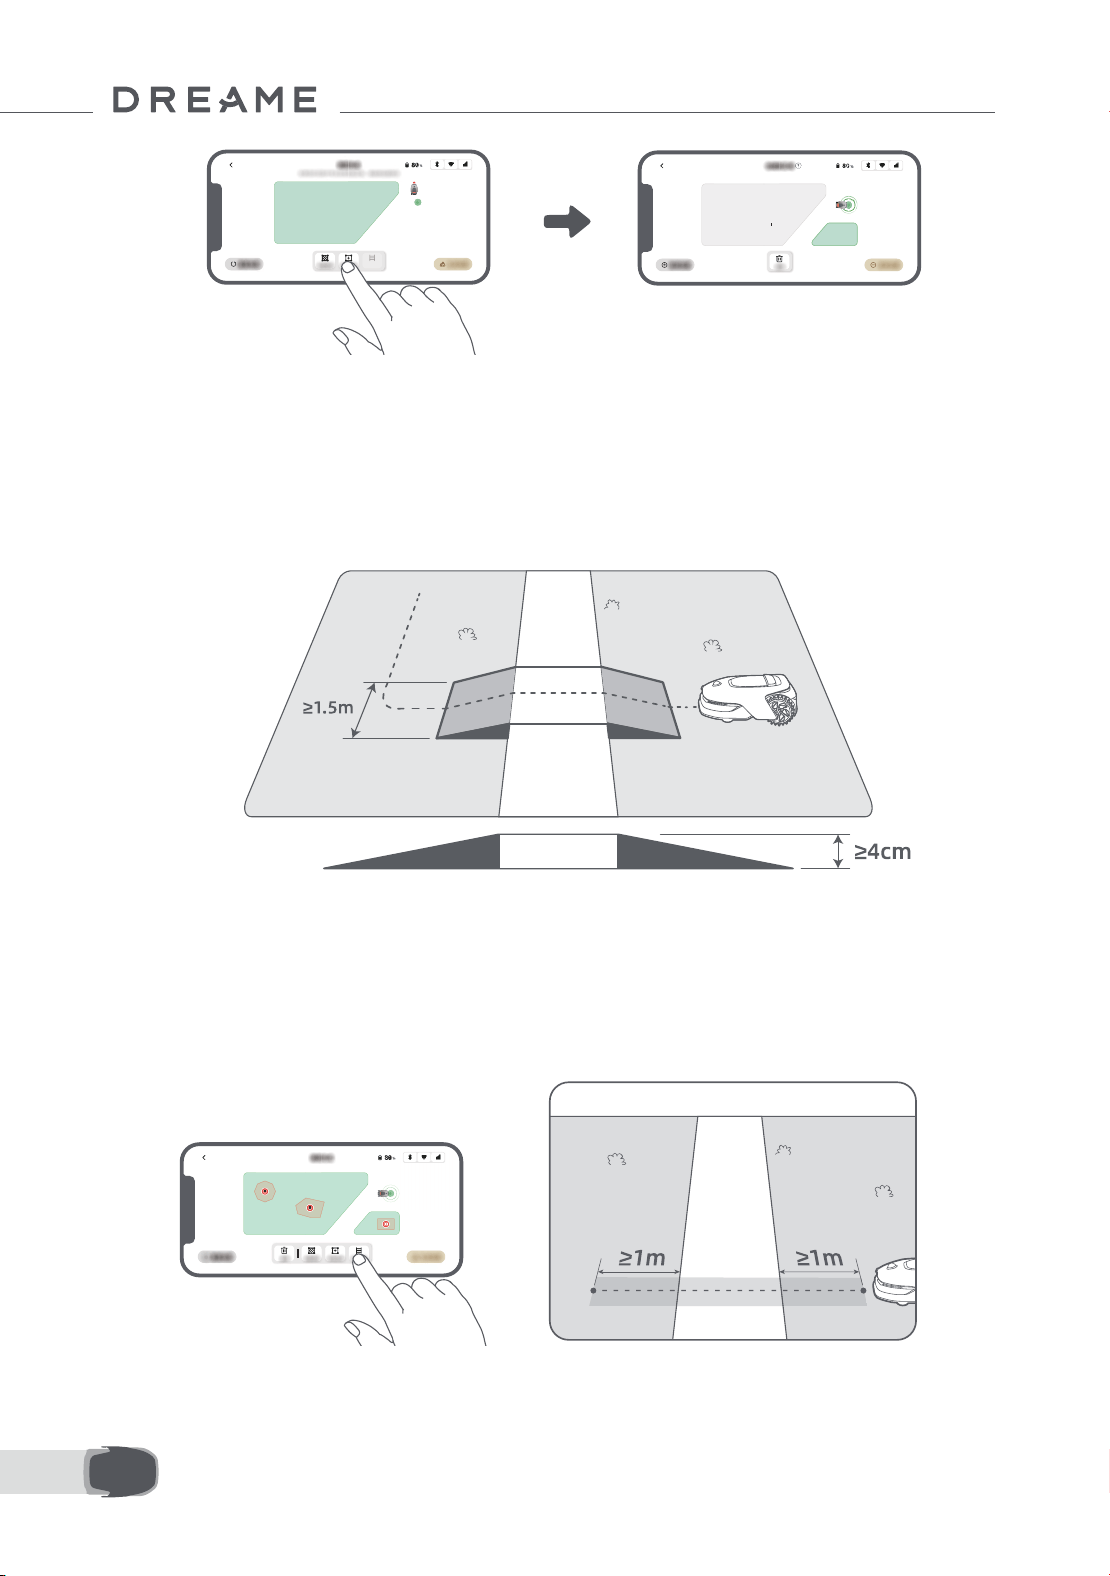
200NL
6.4 Pad instellen
• Twee afzonderlijke maaizones verbinden
Als er overlap is tussen de nieuwe zone(s) en de oorspronkelijke zone, worden ze automatisch samengevoegd.
Maak voor afzonderlijke zones paden aan om ze te verbinden, anders zijn ze niet bereikbaar voor A1 Pro. Tik op
'Pad toevoegen' en bestuur A1 Pro op afstand om een pad aan te maken.
Opmerking: Zorg ervoor dat het begin en het einde van het pad in het maaigebied liggen. De afstand tussen
het begin/einde van het pad en de grens moet minimaal 1 meter zijn.
Maak in het geval van afzonderlijke zones een pad aan om ze te verbinden. Afzonderlijke zones zonder pad zijn
niet bereikbaar voor A1 Pro.
Opmerking: Standaard beweegt de A1 Pro alleen langs het pad zonder het gras te maaien.
Opmerking: Als uw gazon wordt gescheiden door doorgangen die hoger zijn dan 4 cm, plaats dan een object
dat even hoog is als de doorgang (zoals een oprijplaat).

201 NL
6.5 Plattegrond voltooien
Tik op 'Kaart voltooien' als de maaigebieden, paden en verboden zones voltooid zijn. A1 Pro moet zich binnen
de plattegrond bevinden als de plattegrond voltooid wordt. Als dit niet het geval is, verschijnt het bericht dat u
A1 Pro op afstand moet besturen om hem terug binnen de plattegrond te brengen.
• Het maaigebied en het oplaadstation verbinden
Als het oplaadstation zich niet in het maaigebied bevindt, moet er een pad worden gemaakt om het
oplaadstation met het maaigebied te verbinden. Tik op 'Pad toevoegen' en bestuur A1 Pro op afstand om een
pad aan te maken waardoor hij terug kan keren naar het oplaadstation.
Opmerking: Zorg er bij het aanmaken van een pad voor dat het ene uiteinde van het pad zich overlapt met het
werkgebied over ten minste 1 meter (≥ 1 m), en dat het andere uiteinde zich bevindt op minder dan 0,2 meter (<
0,2 m) voor het oplaadstation.
Waarschuwing: Dock A1 Pro niet op afstand in het oplaadstation op het moment dat u paden aanmaakt
om het maaigebied en het oplaadstation met elkaar te verbinden. De lidar kan dan namelijk blokkeren,
waardoor het in kaart brengen mogelijk mislukt.
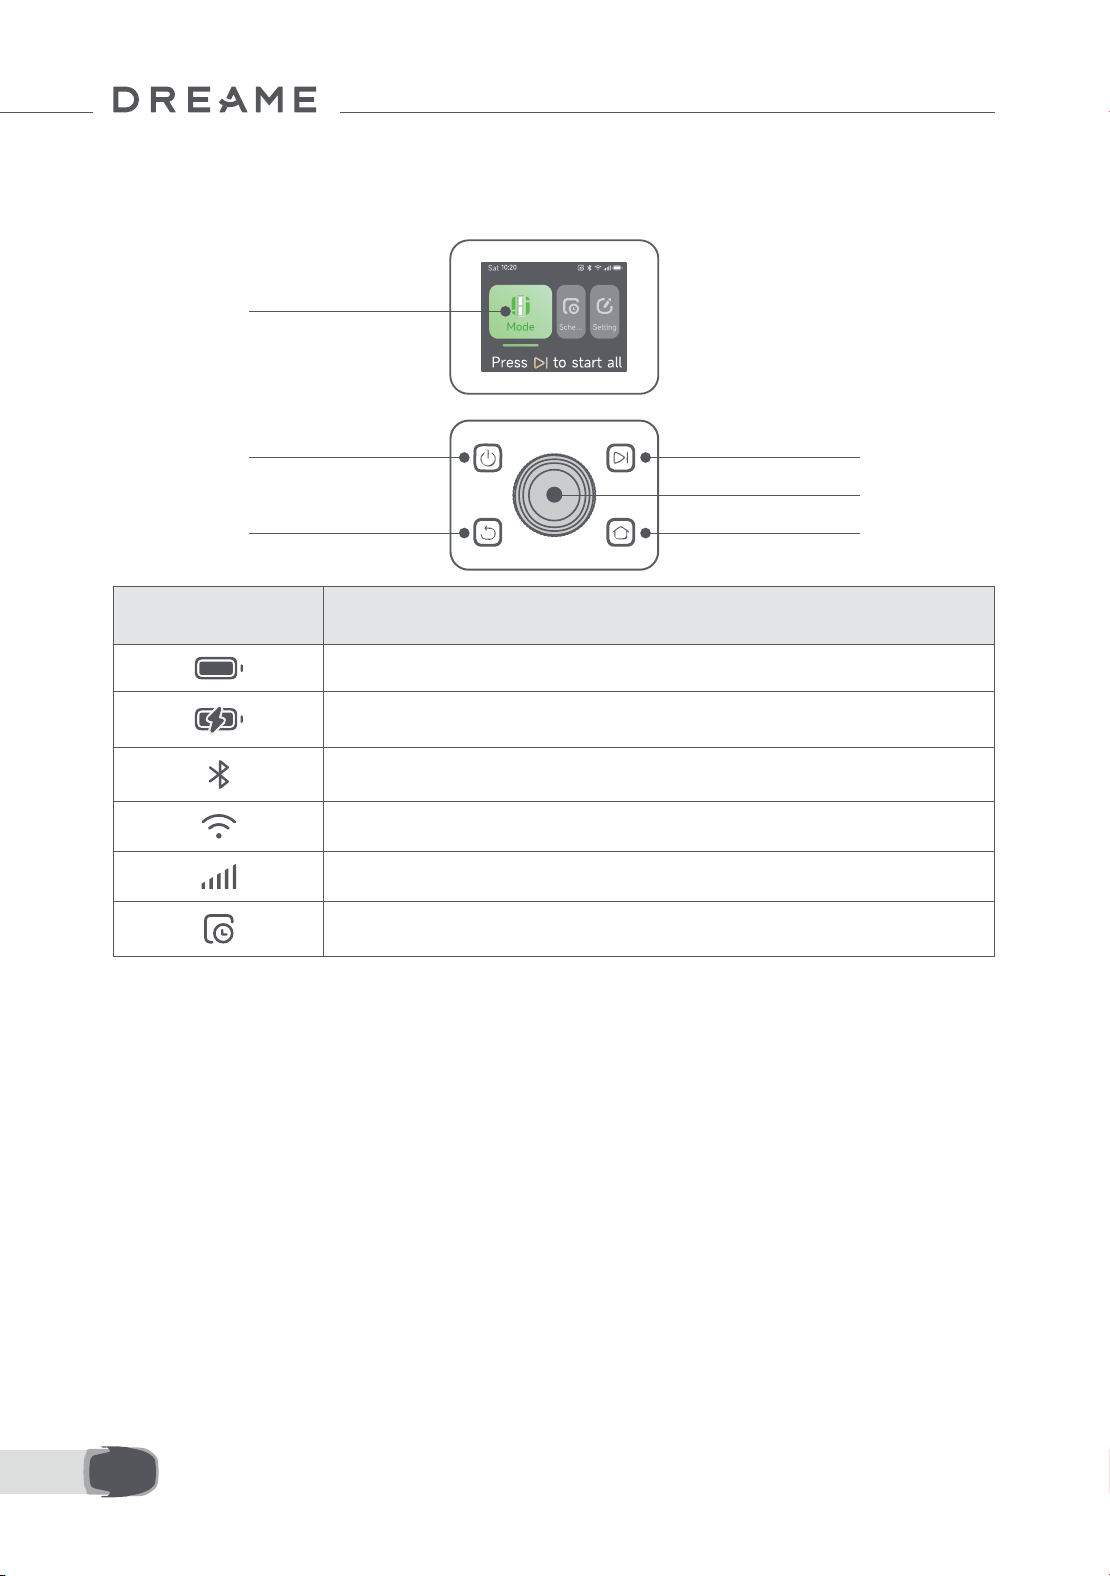
202NL
7.1 Het bedieningspaneel leren kennen
7 Bediening
Aan-uit
Scherm
Terug
Start
Knop
Home
Pictogram Status
Accuniveau (geeft het huidige niveau van de accu aan.)
Opladen (A1 Pro is correct in het oplaadstation gedockt.)
Bluetooth (A1 Pro is via Bluetooth met de app verbonden.)
Wi (A1 Pro is via een winetwerk met de app verbonden.)
Link-service (Link-service is geactiveerd.)
Schema (er is een taak gepland voor vandaag en is nog niet gestart.)
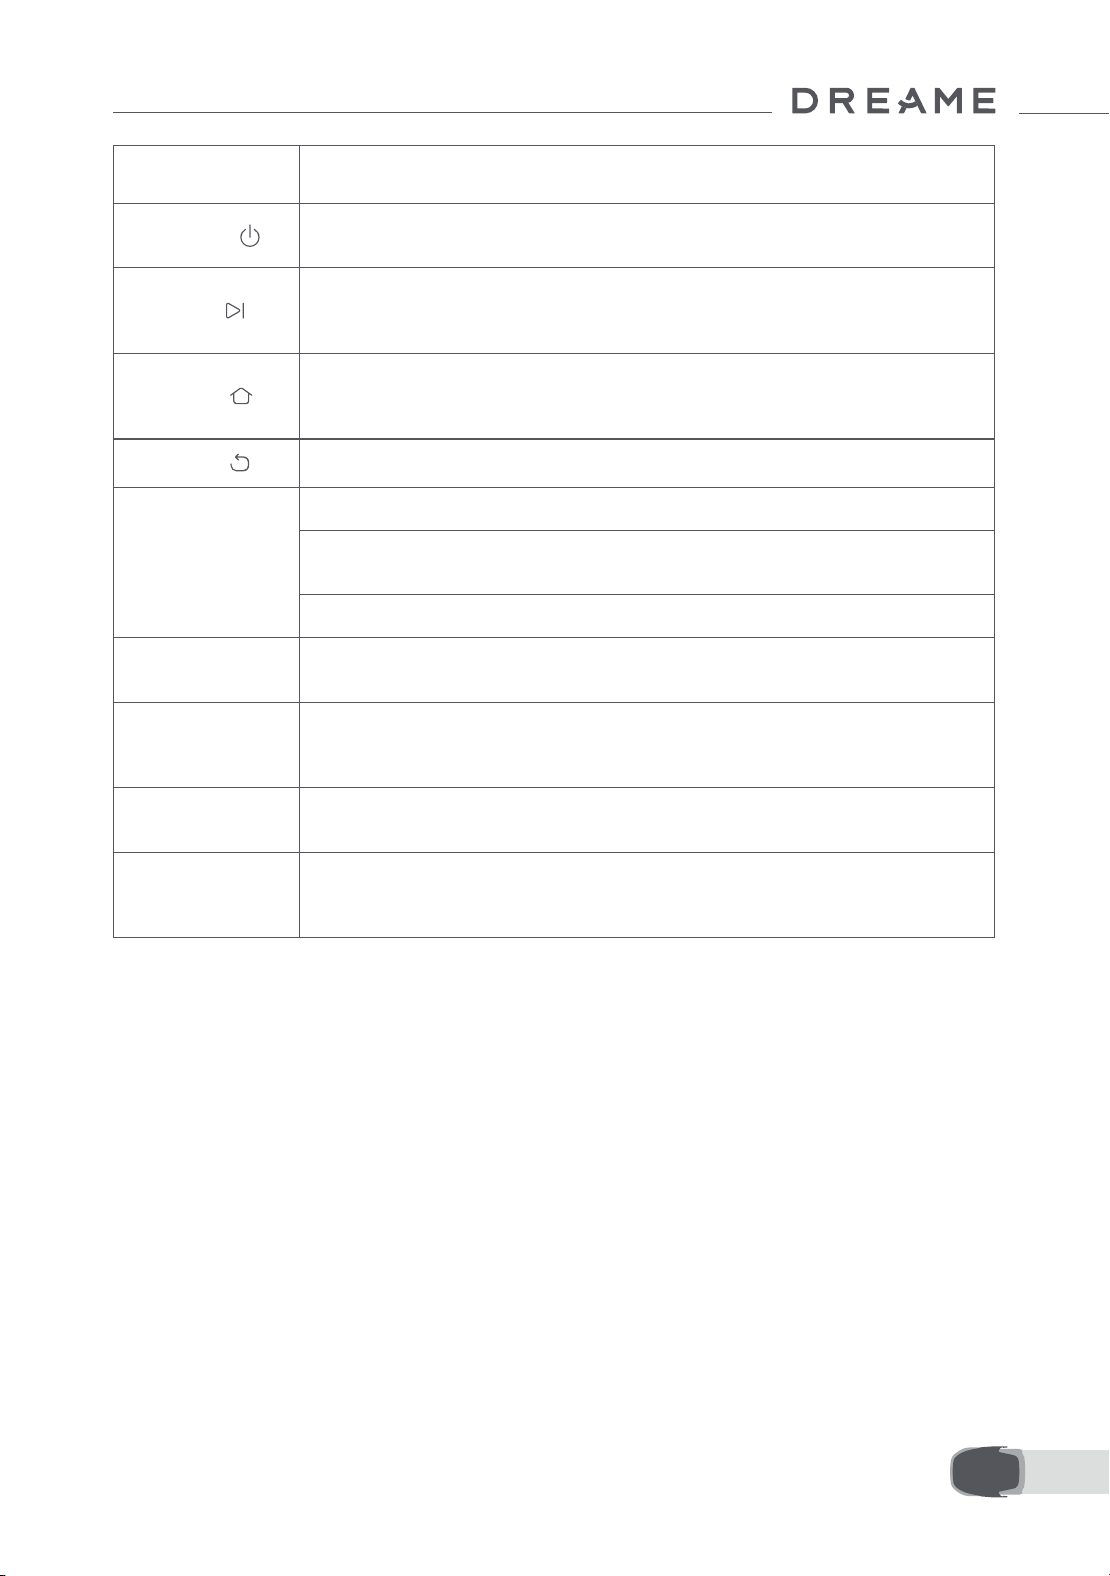
203 NL
Knop Functie
Aan-uit
Zorg ervoor dat A1 Pro zich buiten het oplaadstation bevindt. Houd de aan-uitknop
gedurende twee seconden ingedrukt om A1 Pro in of uit te schakelen.
Start
Druk op de Startknop en sluit de klep binnen vijf seconden om te beginnen met
maaien. De taak wordt geannuleerd als de klep niet binnen vijf seconden wordt
gesloten.
Home
Druk op de Home-knop en sluit de klep binnen vijf seconden om A1 Pro terug te
sturen naar het oplaadstation om op te laden. De taak wordt geannuleerd als de
klep niet binnen vijf seconden wordt gesloten.
Terug
Druk op de Terugknop om terug te gaan naar de vorige pagina.
Knop
Druk op de knop om de selectie in de menu's te bevestigen.
Houd de knop gedurende drie seconden ingedrukt om de Bluetooth-
koppelingsmodus in te schakelen op A1 Pro.
Draai de knop rechtsom/linksom om door het menu te navigeren.
Start + Terug
Houd de Start- en Terugknop tegelijkertijd gedurende drie seconden ingedrukt om
A1 Pro terug te zetten naar de fabrieksinstellingen. De pincode wordt niet gewist.
Home + Terug
Houd de Home- en Terugknop tegelijkertijd gedurende drie seconden ingedrukt
om naar de pagina Over in Instellingen te gaan. De pagina Over verdwijnt na vijf
seconden.
Knop + Terug
Houd de knop en de Terugknop tegelijkertijd gedurende drie seconden ingedrukt
om de pincode te resetten.
Stop
Druk op de Stopknop om de klep van het bedieningspaneel te openen en A1 Pro te
stoppen. U moet de pincode invoeren op het bedieningspaneel om A1 Pro weer te
kunnen gebruiken.

204NL
Overzicht menustructuur
* Afhankelijk van de softwareversie kunnen er updates worden uitgevoerd.
7.2 Voor het eerst beginnen met maaien
Tips voor het maaien:
• Gebruik een handmaaier om het gras te maaien tot een hoogte van maximaal 10 cm.
• Haal obstakels zoals afval, hopen bladeren, speelgoed, kabels en stenen van het gazon. Zorg ervoor dat er
geen kinderen of huisdieren op het gazon zijn als A1 Pro aan het maaien is.
• Vul de gaten in het gazon op.
• Stel vooraf uw maaivoorkeuren in via de app (zoals maai-eciëntie, maaihoogte en maairichting).
Hoofdpagina
Schema
Instellingen
Modi
Alles maaien
Rand maaien
Schema bekijken
Schema in-/uitschakelen
Maai-eciëntie
Maaihoogte
Hoogte om obstakels
Niet-storen-modus
Regenbescherming
Vorstbescherming
Optilalarm
Alarm buiten kaart
Wijzig PIN
Volume
Taal
Robot resetten
Over
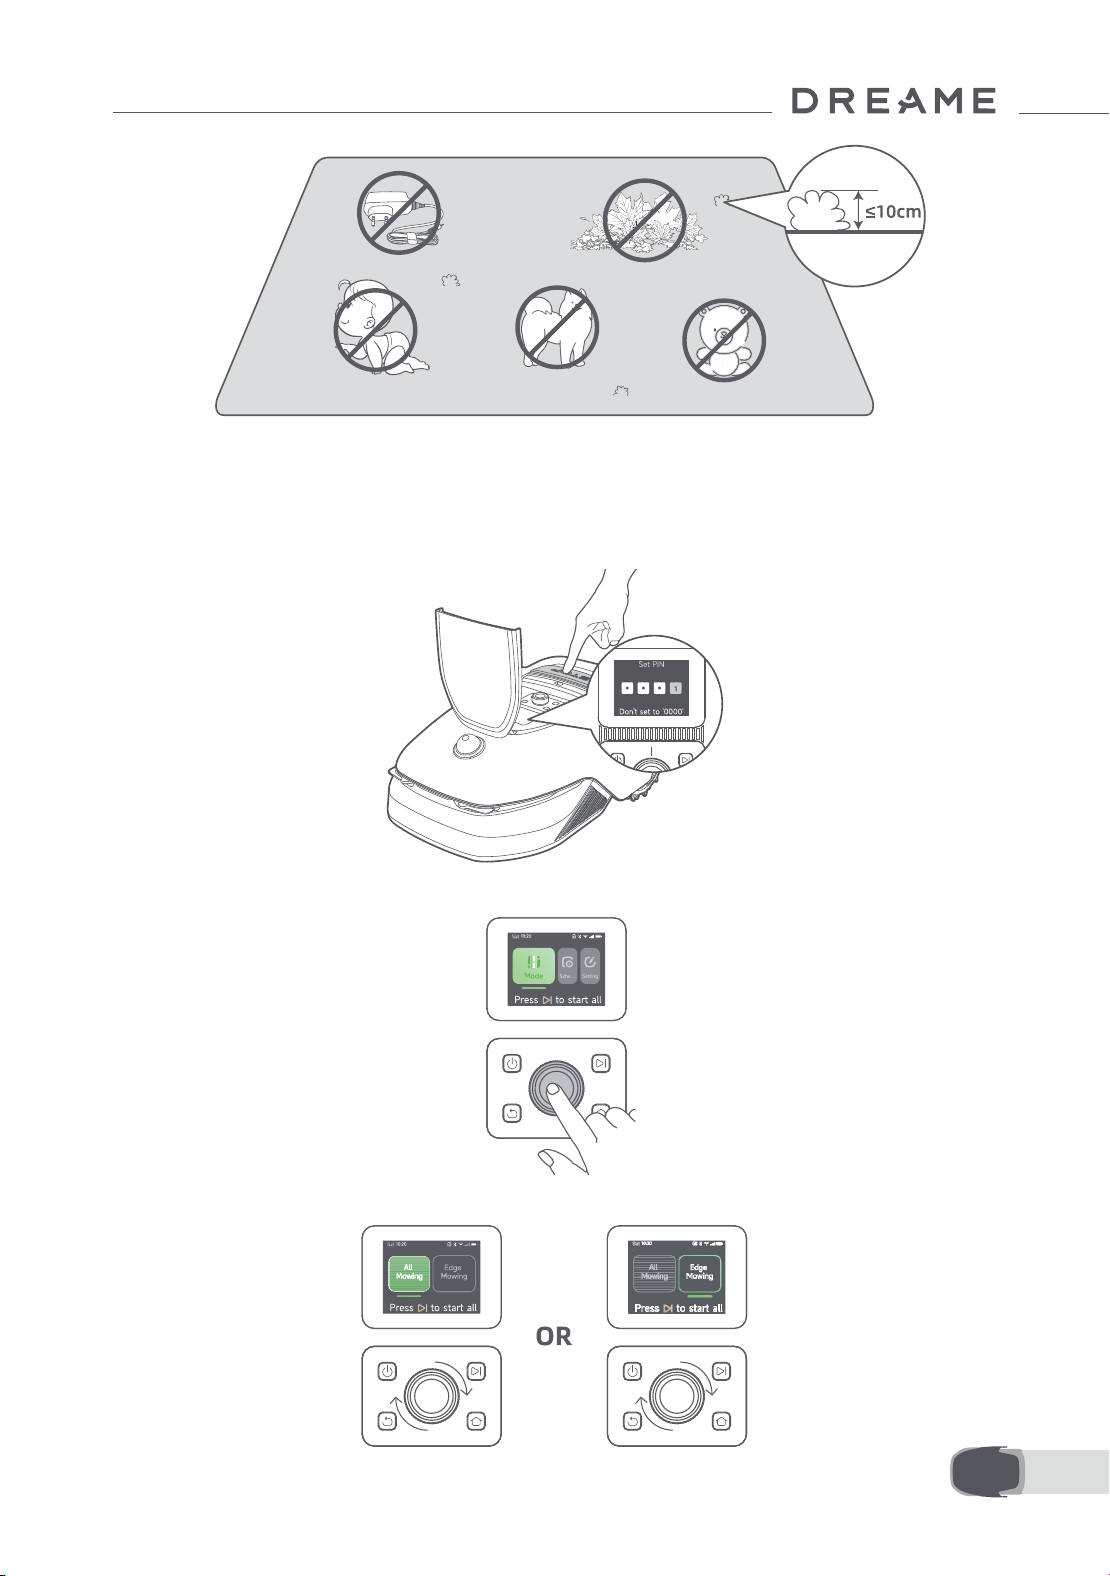
205 NL
Druk op de Startknop op het bedieningspaneel en sluit de klep aan de bovenkant binnen vijf seconden. A1
Pro verlaat het oplaadstation en begint met maaien. U kunt ook in de app op 'Start' tikken om te beginnen met
maaien.
• Start via het bedieningspaneel
1. Druk op de Stopknop om de klep te openen en voer de pincode in.
2. Selecteer 'Modi' op het scherm en druk op de knop.
3. Draai aan de knop om de maaimodus te selecteren.
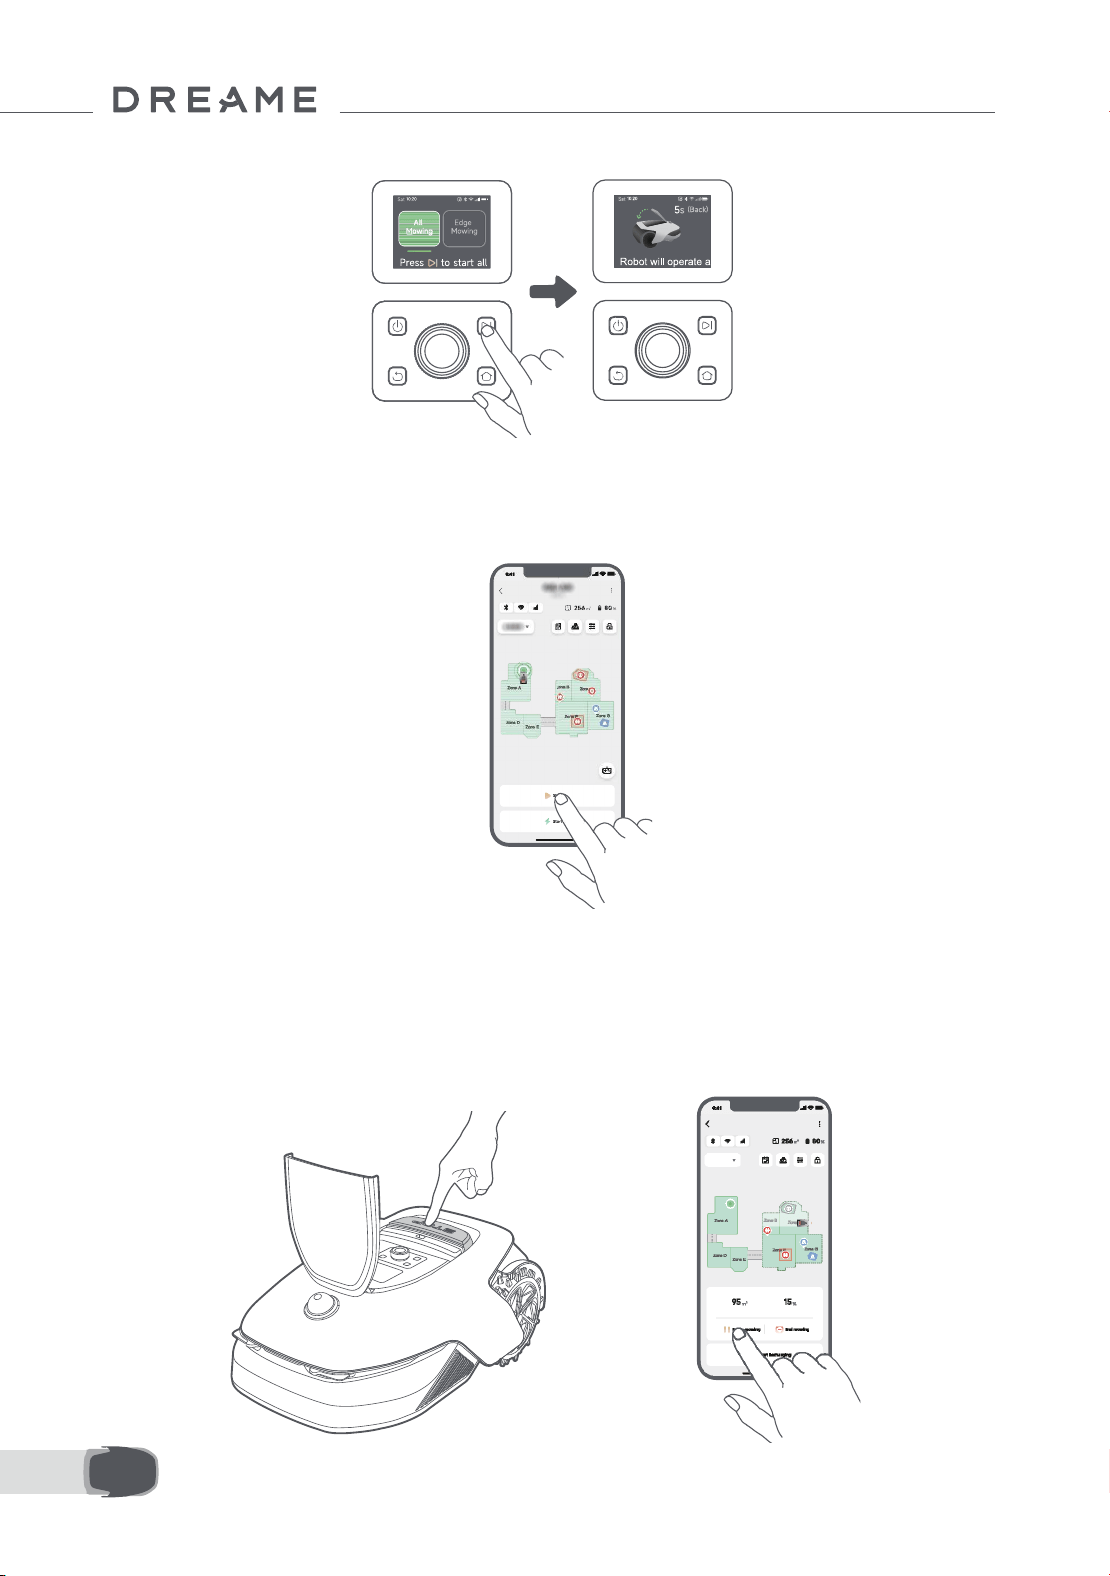
206NL
4. Druk op de Startknop en sluit de klep aan de bovenkant binnen vijf seconden. A1 Pro begint met maaien.
• Starten via de app
1. Open de app.
2. Selecteer een maaimodus en tik op 'Start' om te beginnen met maaien.
7.3 Pauze
OR
Druk op de Stopknop op A1 Pro of op 'Pauze' in de app om de huidige maaitaak te pauzeren.
Opmerking: A1 Pro wordt vergrendeld en kan niet rechtstreeks via de app worden gestart nadat er op
de Stopknop is gedrukt. Voer de vooraf ingestelde pincode in op het bedieningspaneel om het maaien te
hervatten.
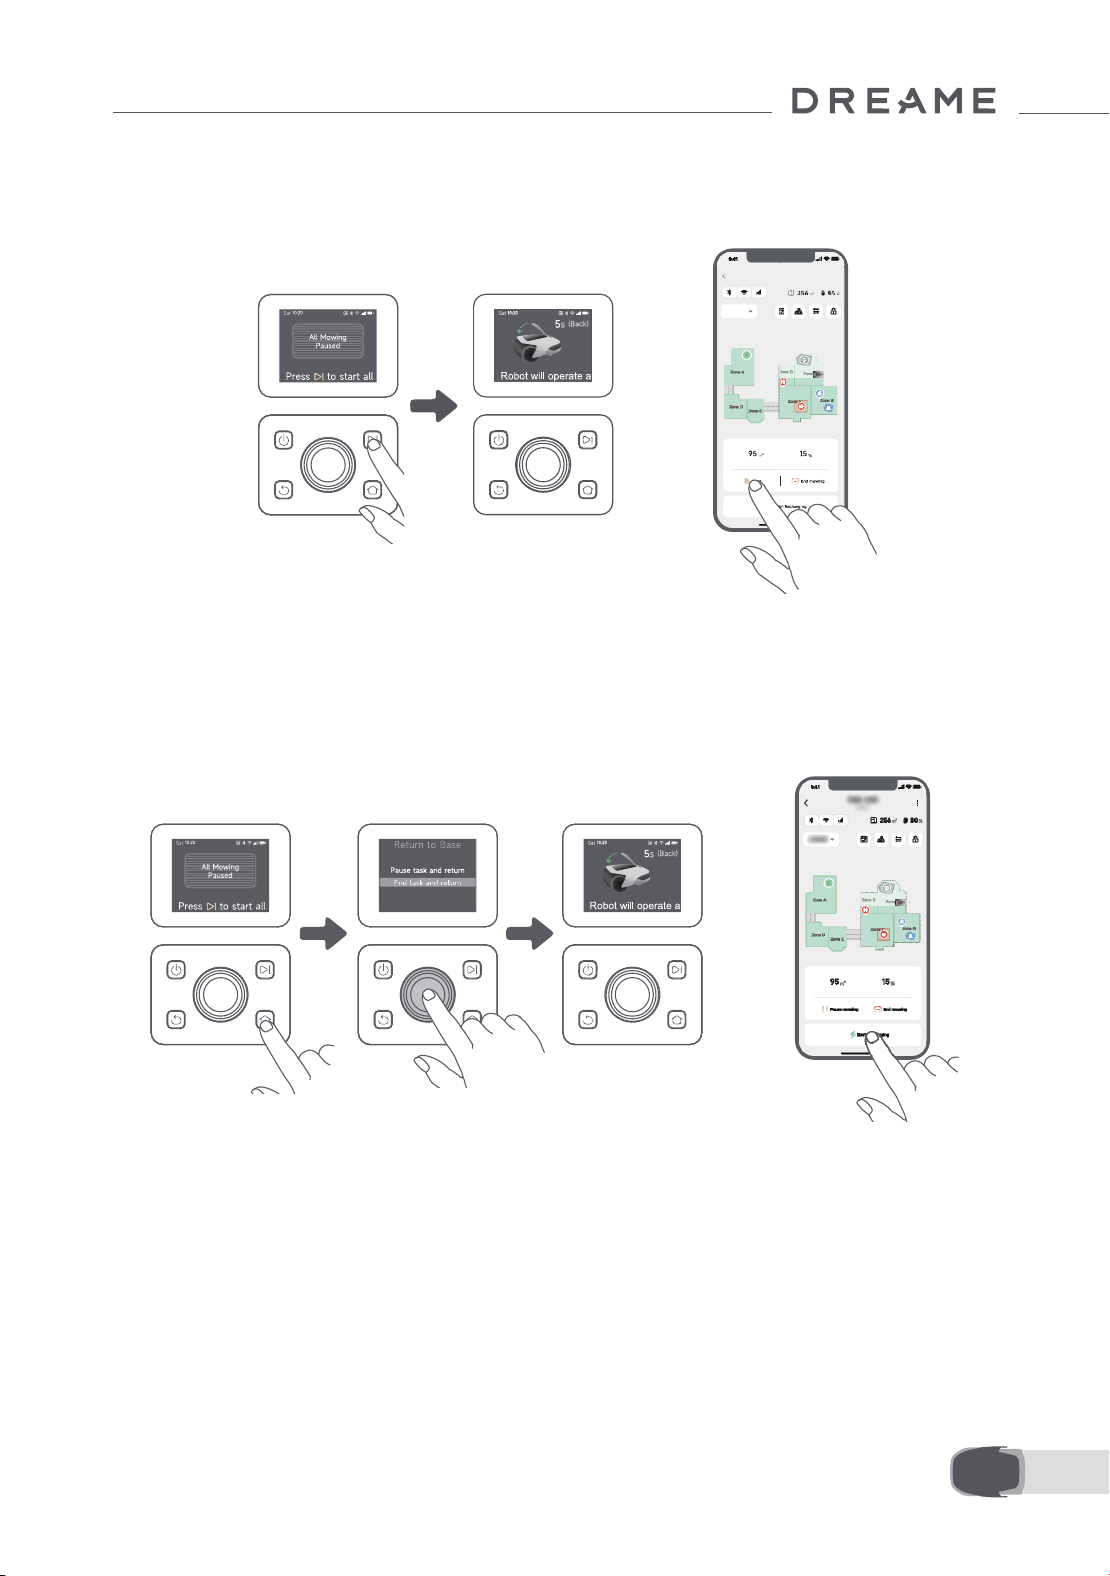
207 NL
7.4 Hervatten
7.5 Terugkeren naar het oplaadstation
Druk op de Startknop op A1 Pro en sluit de klep binnen vijf seconden om de taak te hervatten als A1 Pro
gepauzeerd is. A1 Pro hervat de vorige maaitaak. U kunt ook in de app op 'Ga verder' tikken om de maaitaak te
hervatten.
Om de maaitaak te stoppen en A1 Pro terug te sturen naar het oplaadstation, bevestigt u uw pincode op het
bedieningspaneel en drukt u op de Home-knop. Bevestig om de taak te beëindigen en sluit de klep binnen
vijf seconden. A1 Pro keert automatisch terug naar het oplaadstation om op te laden. U kunt ook in de app op
'Terugkeren naar oplaadstation' tikken om A1 Pro terug te sturen naar het oplaadstation.
OR
OR
Ontdek meer
De Dreamehome-app is meer dan een afstandsbediening. U kunt verschillende dingen doen via de app:
allerlei instellingen op afstand doorvoeren, verschillende maaimodi proberen, de plattegrond naar wens
aanpassen en maaischema's wijzigen. Bovendien kunt u de 3D-plattegrond van uw gazon direct in de app
bekijken.
8 Dreamehome-app
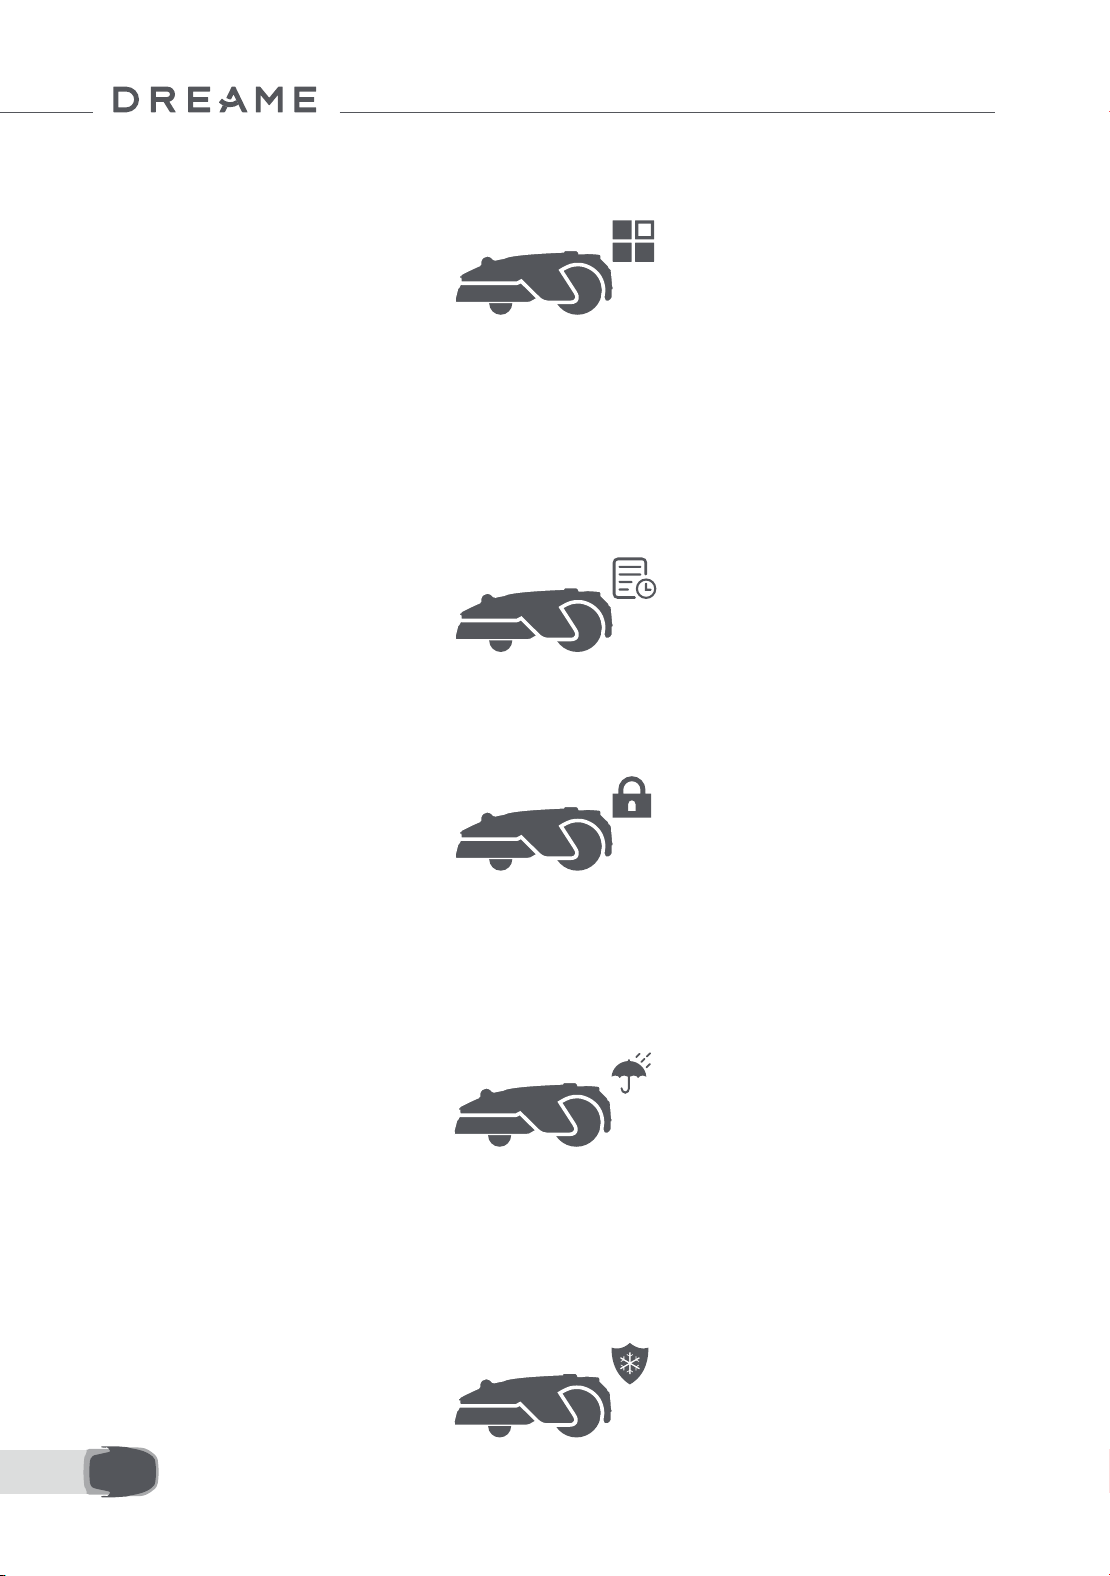
208NL
8.1 Maaimodi
8.2 Schema
A1 Pro beschikt over verschillende maaimodi. In de app kunt u tussen de verschillende maaimodi schakelen.
Zodra de eerste plattegrond voltooid is, maakt A1 Pro automatisch twee wekelijkse maaischema's aan die
zijn afgestemd op de grootte van het gazon: 'Spr & som schema' en 'Aut & Win schema'. U kunt in de app op
'Schema' tikken voor gedetailleerde schema-instellingen. Dankzij de planningsfunctie kunt u het dagelijkse
maaiwerk volledig aan A1 Pro overlaten. Het enige wat u hoeft te doen is A1 Pro regelmatig onderhouden.
Opmerking: Bent u bang dat A1 Pro u of uw buren zal storen tijdens bepaalde tijden als hij zelfstandig maait?
Ga dan in de app naar Instellingen > Niet-storen en stel de Niet-storen-tijd in.
8.3 Kinderslot
Bent u bang dat kinderen A1 Pro gaan besturen? Schakel dan de functie 'Kinderslot' in via de app. Als deze
functie is ingeschakeld, wordt A1 Pro vergrendeld als er gedurende vijf minuten niks wordt gedaan en als de
klep open is.
8.4 Regenbescherming
8.5 Vorstbeveiliging
Bent u bang dat slechte weersomstandigheden het maaiwerk zullen verstoren? Schakel dan de functie
'Regenbescherming' in onder 'Instellingen' op het bedieningspaneel of via de app. Als deze functie is
ingeschakeld, pauzeert A1 Pro automatisch het maaien en keert terug naar het oplaadstation als het regent. U
kunt de regenbeschermingstijd instellen in de app.
Bij temperaturen lager dan 6℃ zal het maaien blijvende schade aan het gazon veroorzaken. De accu wordt
niet opgeladen vanwege de automatische beveiliging. U kunt de functie 'Vorstbescherming' inschakelen
onder 'Instellingen' op het bedieningspaneel of via de app. Deze functie zorgt ervoor dat A1 Pro het maaien
automatisch pauzeert en terugkeert naar het oplaadstation als de omgevingstemperatuur lager dan 6℃ is. A1
Pro hervat het maaien automatisch als de temperatuur hoger dan 11℃ is.
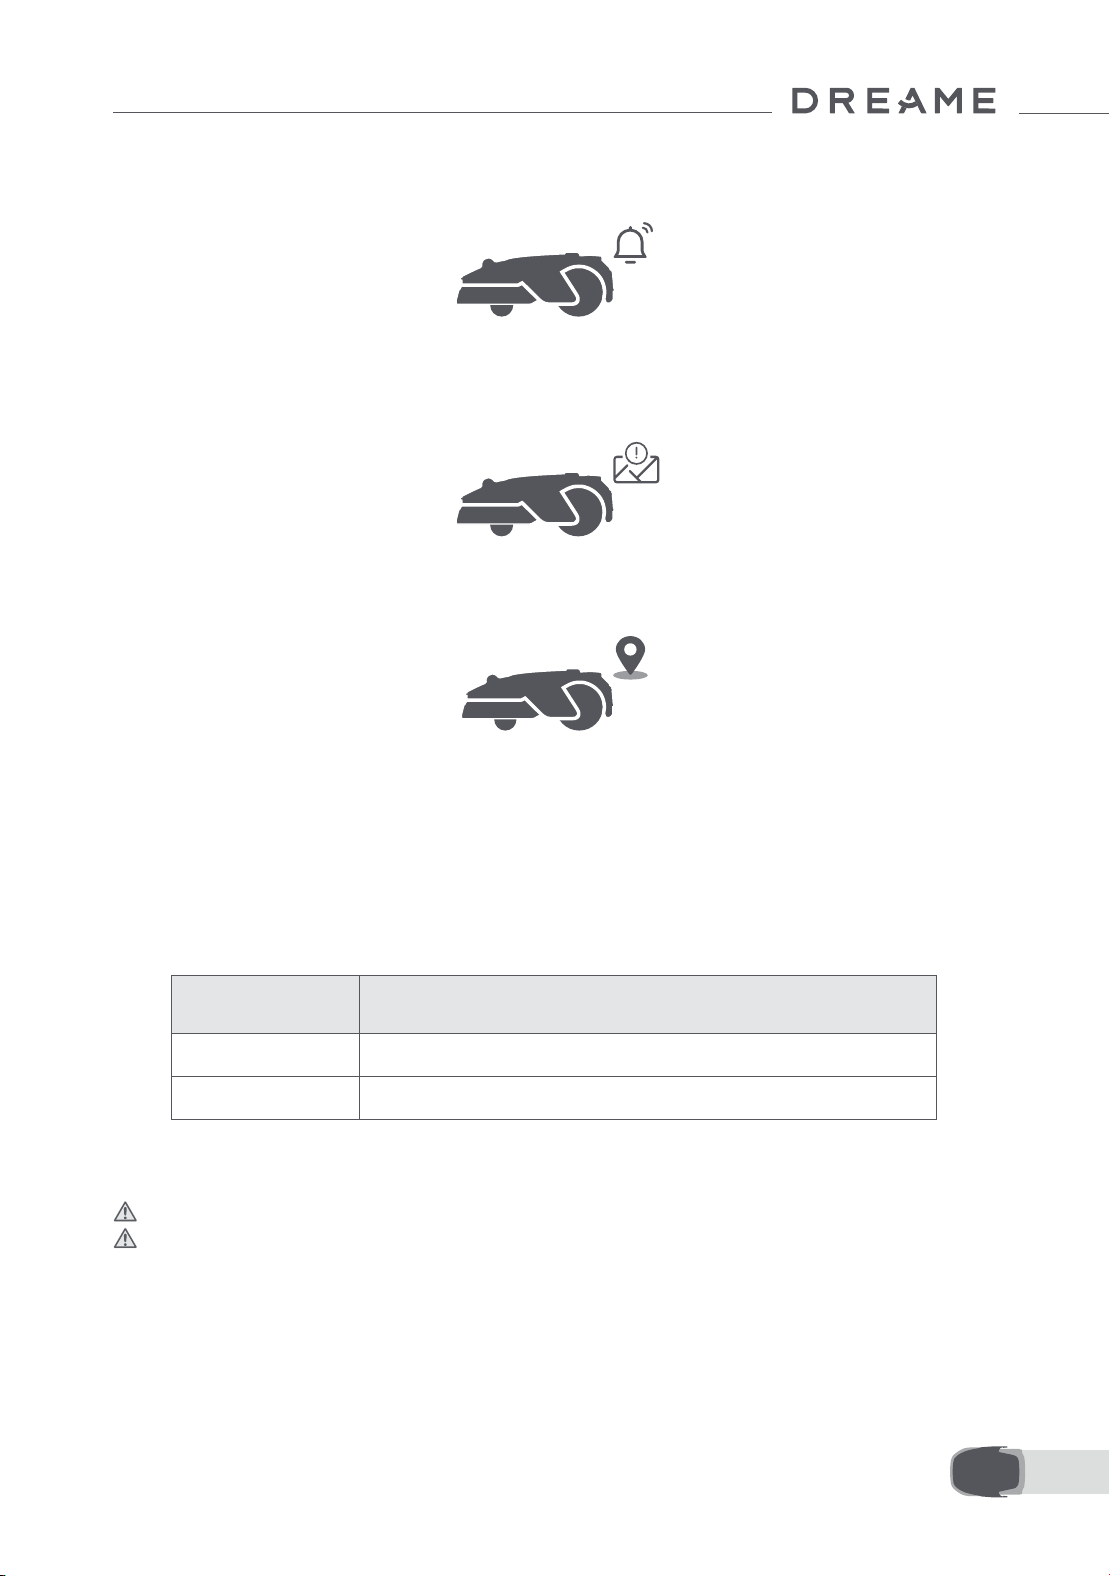
209 NL
8.6 Optilalarm
8.7 Alarm voor buiten de plattegrond
Als deze functie is ingeschakeld, wordt A1 Pro vergrendeld en gaat het alarm onmiddellijk af als hij wordt
opgetild.
Als deze functie is ingeschakeld, wordt A1 Pro vergrendeld en gaat het alarm onmiddellijk af als hij zich buiten
de plattegrond bevindt. (Voor deze functie moet de Link-module worden geïnstalleerd.)
8.8 Locatie in realtime
Met de Link-module kunt u de huidige locatie van A1 Pro in Google Maps bekijken.
Opmerking: Het ontwikkelingsteam van Dreame voert voortdurend draadloze updates en draadloos
onderhoud uit voor de rmware en app. Controleer of er updates beschikbaar zijn of schakel de automatische
updatefunctie in om de rmware en app up-to-date te houden en te proteren van nog meer functies.
9 Onderhoud
Om de prestaties en levensduur van A1 Pro te verbeteren, moet u het apparaat regelmatig reinigen en versleten
onderdelen vervangen zoals hieronder aangegeven:
9.1 Reiniging
Waarschuwing: Schakel A1 Pro uit en haal de stekker uit het oplaadstation voordat u hem reinigt.
Waarschuwing: Controleer of de beschermkap van de lidar op de lidar zit voordat u A1 Pro ondersteboven
keert en voorkom zo schade aan de lidar.
Onderdeel Vervangingsfrequentie
Bladen Elke 6-8 weken of vaker
Reinigingsborstel Elke 12 maanden of vaker

210NL
2s
• De behuizing van A1 Pro, Onderstel en maaikop:
1. Schakel A1 Pro uit.
2. Plaats de beschermkap van de lidar op de lidar.
3. Keer A1 Pro ondersteboven.
4. Reinig het lichaam, de messenschijf en het chassis van A1 Pro met een slang.
Waarschuwing: Raak de bladen niet aan tijdens het reinigen van het onderstel. Draag handschoenen
tijdens het reinigen.
Waarschuwing: Gebruik geen hogedrukspuit voor het reinigen. Gebruik geen schoonmaakmiddelen voor
het reinigen.
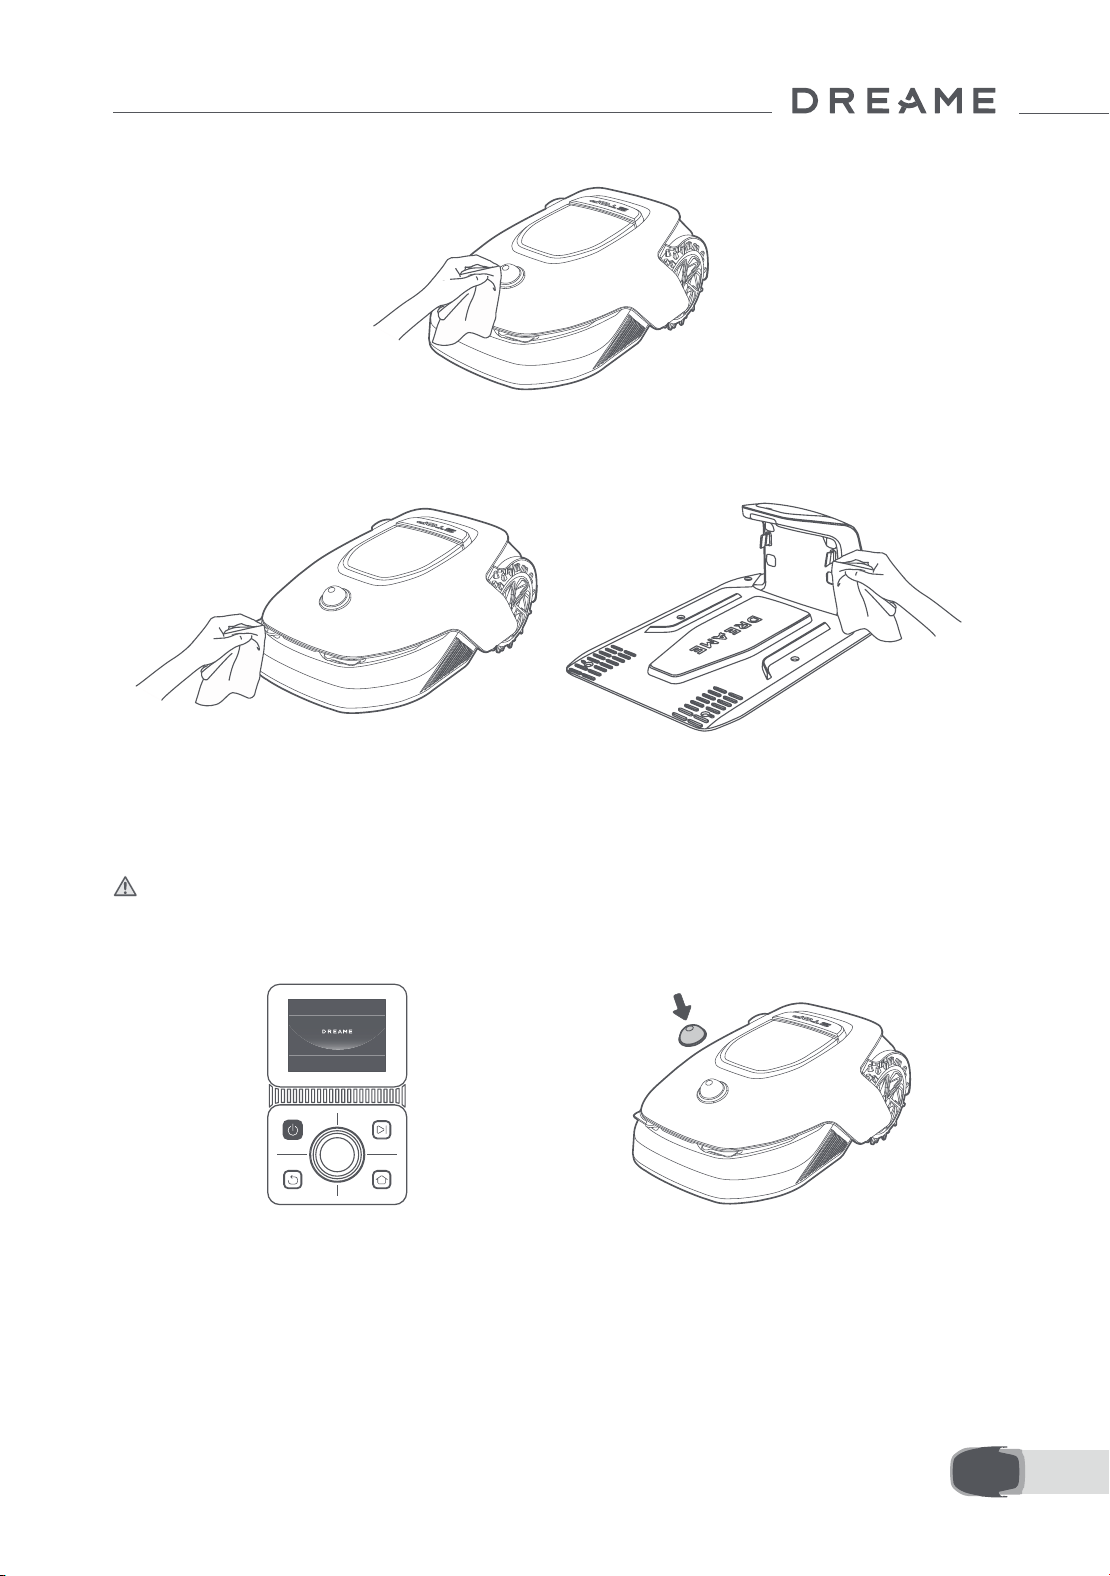
211 NL
5. Gebruik een pluisvrije doek om de lidarsensor voorzichtig te reinigen.
• Laadcontacten:
Gebruik een schone doek om de laadcontacten op A1 Pro en het oplaadstation te reinigen. Zorg ervoor dat de
laadcontacten droog blijven na het reinigen.
9.2 Onderdelen vervangen
• Bladen vervangen
Vervang de bladen regelmatig om ze scherp te houden. We raden aan om de bladen elke 6-8 weken of vaker
te vervangen. Gebruik alleen originele Dreame-bladen.
Waarschuwing: Schakel A1 Pro uit en draag beschermende handschoenen voordat u de bladen vervangt.
Opmerking: Vervang alle drie de bladen tegelijkertijd voor een gelijkmatig maairesultaat.
1. Schakel A1 Pro uit. 2. Controleer of de beschermkap van de lidar
erop zit.
3. Plaats A1 Pro op een zachte ondergrond en
keer hem ondersteboven.
4. Verwijder de houder door op de knop onder
de maaikop te drukken.
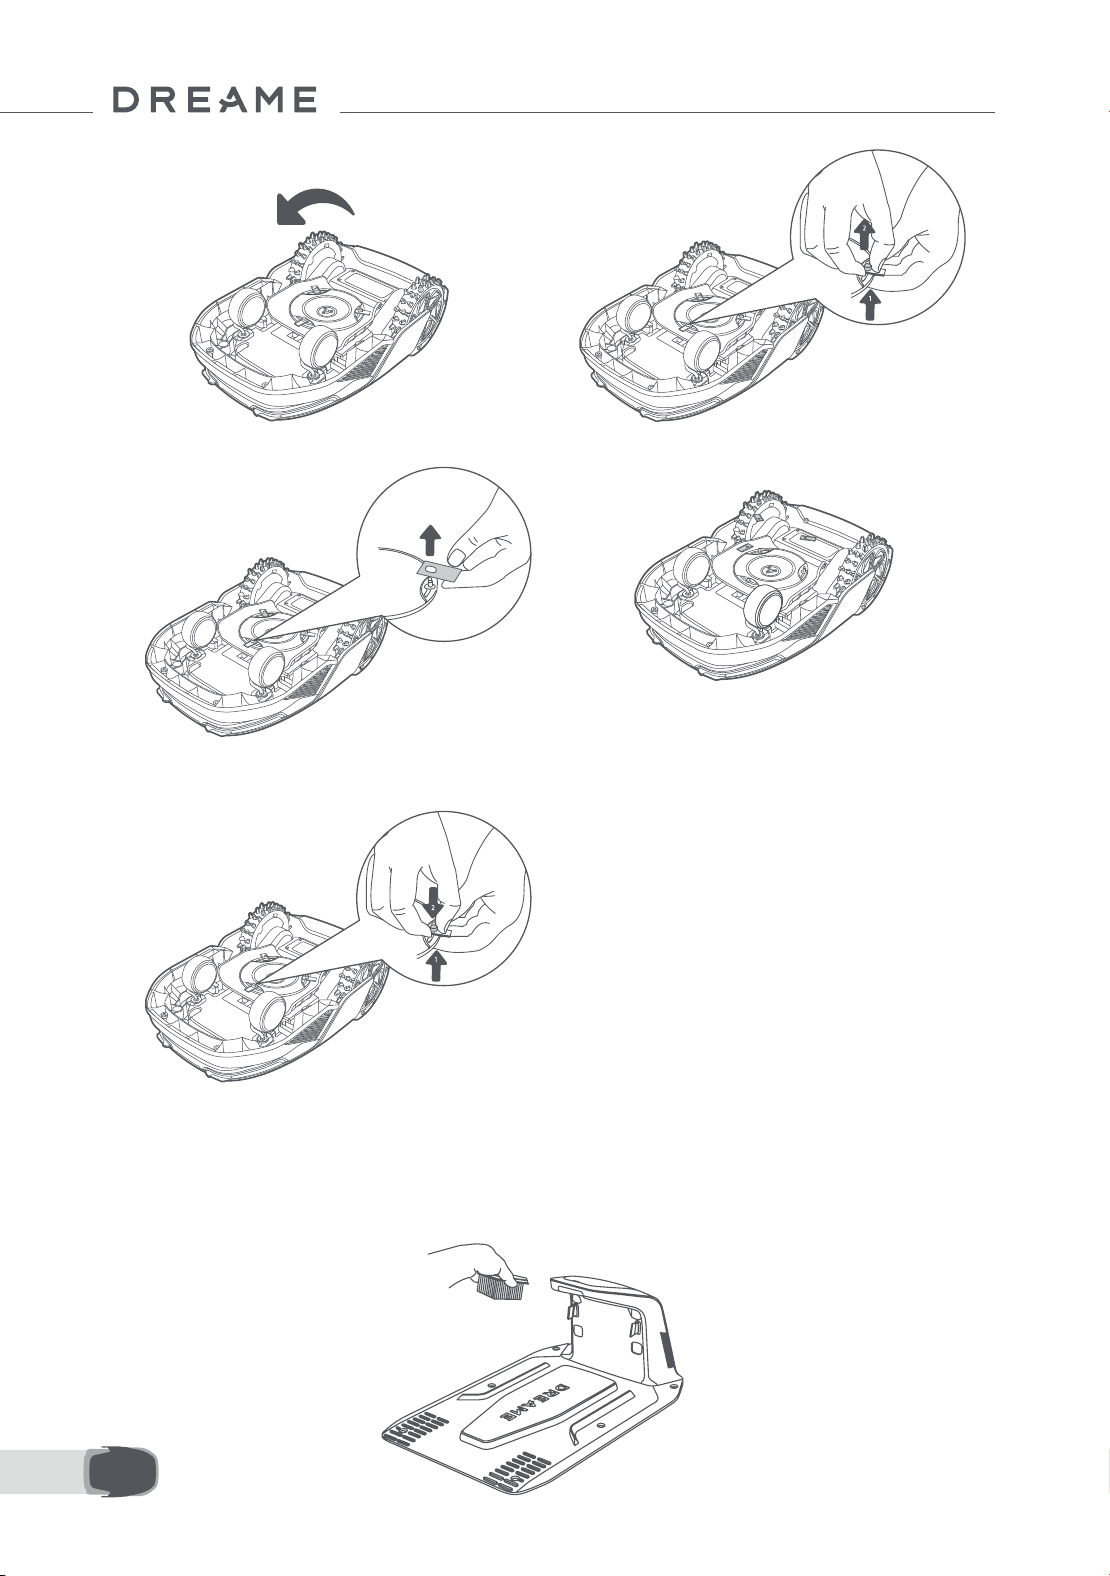
212NL
5. Verwijder het blad door het gat van het blad
uit te lijnen met de as.
6. Verwijder de drie bladen en houders.
• Reinigingsborstel vervangen
Als de reinigingsborstel voor de lidarsensor slijt, rafelen of verslechteren de borstelharen, waardoor de borstel
niet meer goed kan reinigen. Vervang de reinigingsborstel regelmatig om een goed reinigingsresultaat te
behouden. We raden aan om de reinigingsborstel elke 12 maanden of vaker te vervangen.
Opmerking: Haal de stekker van het oplaadstation uit het stopcontact voordat u de reinigingsborstel vervangt.
7. Druk op de knop onder de maaikop en lijn het
gat van de houder uit met de as om de houders
en bladen vast te zetten.
8. Zorg ervoor dat de bladen ongehinderd
kunnen draaien.

213 NL
10 Accu
Spaarstand:
Als de spaarstand is ingeschakeld, worden alle functies die niks met opladen te maken hebben uitgeschakeld.
(Het scherm en het netwerk worden uitgeschakeld.)
• Om de spaarstand in te schakelen, houdt u de Start- en Home-knop tegelijkertijd ingedrukt en op hetzelfde
moment drukt u vijf keer snel op de Terugknop. Er klinkt een spraakmelding: Spaarstand is ingeschakeld.
• Om de spaarstand uit te schakelen, start u A1 Pro opnieuw op of drukt u vijf keer snel op de aan-uitknop.
Als u A1 Pro lange tijd niet gebruikt, laad de accu dan om de 6 maanden op een goede staat van de accu te
waarborgen. Accuschade als gevolg van overmatige ontlading wordt niet gedekt door de beperkte garantie.
Laad de accu niet op bij een omgevingstemperatuur hoger dan 45° C of lager dan 6° C. Als u de accu langdurig
opslaat, zorg er dan voor dat de omgevingstemperatuur tussen de -10 en 35° C ligt. Om schade te beperken,
raden we aan om de accu op te slaan bij een omgevingstemperatuur tussen de 0 en 25° C.
Opmerking: De levensduur van de accu van A1 Pro hangt af van de mate van gebruik en het aantal maaiuren.
Als de accu is beschadigd of niet kan worden opgeladen, gooi de verouderde of defecte accu dan niet zomaar
weg. Houd u aan de lokale recyclingvoorschriften.
11 Winteropslag
12 Transport
• A1 Pro
1. Laad de accu volledig op en schakel A1 Pro uit.
2. Reinig A1 Pro grondig voordat u hem opslaat tijdens de winter.
3. Breng de beschermkap van de lidar aan.
4. Sla A1 Pro binnen en op een droge plek op, bij een temperatuur hoger dan 0° C.
• Oplaadstation
Haal de stekker van het oplaadstation uit het stopcontact en sla het station op een droge en koele plek op,
waar het niet wordt blootgesteld aan direct zonlicht.
Opmerking: Als u A1 Pro lange tijd niet hebt gebruikt, breng uw tuin dan opnieuw in kaart. Grote
veranderingen in de werkomgeving kunnen namelijk leiden tot positioneringsfouten.
Als u A1 Pro over een lange afstand vervoert, raden we aan de originele verpakking te gebruiken om het
product te beschermen. Breng de beschermkap van de lidar aan.
Waarschuwing: Schakel A1 Pro uit voordat u hem vervoert.
Waarschuwing: Til het product aan de achterkant op, met de maaikop van uw lichaam af.

214NL
13 Probleemoplossing
Probleem Oorzaak Oplossing
A1 Pro is niet
verbonden met de app.
1. A1 Pro bevindt zich niet
binnen het signaalbereik
van de wi of Bluetooth.
2. A1 Pro is uitgeschakeld of
start opnieuw op.
1. Controleer of A1 Pro het inschakelproces
heeft doorlopen.
2. Controleer of de router goed werkt.
3. Ga dichter bij A1 Pro staan om te verbinden
met Bluetooth.
A1 Pro opgetild.
Het wiel staat niet op de
grond.
1. Zet A1 Pro terug op een vlakke ondergrond.
2. Voer de pincode in op A1 Pro en bevestig.
3. A1 Pro kan niet over voorwerpen heen die
hoger zijn dan 4 cm. Zorg ervoor dat de grond
waar hij maait vlak is.
A1 Pro gekanteld.
A1 Pro is meer dan 37°
gekanteld.
1. Zet A1 Pro terug op een vlakke ondergrond.
2. Voer de pincode in op A1 Pro ter bevestiging.
3. A1 Pro kan niet tegen hellingen op die meer
dan 45% (24° ) zijn.
A1 Pro zit vast.
A1 Pro zit vast en kan niet
loskomen.
1. Haal de obstakels in de omgeving weg en
probeer het opnieuw.
2. Breng A1 Pro handmatig naar een vlakke
en open plek op de plattegrond en voer de
taak opnieuw uit. Als dit probleem zich blijft
voordoen, probeer het dan opnieuw nadat A1
Pro in het oplaadstation is geplaatst.
3. Kijk of er gaten in de grond zitten. Vul de
gaten op voordat A1 Pro gaat maaien om te
voorkomen dat hij vast komt te zitten.
4. Controleer of het omringende
gras hoger is dan 10 cm. U kunt de
obstakelvermijdingshoogte aanpassen of
een handmaaier gebruiken om het gazon van
tevoren te maaien om te voorkomen dat A1 Pro
vast komt te zitten.
5. Als A1 Pro vaak vast komt te zitten op deze plek,
kunt u dit gebied instellen als verboden zone.
Storing
linker-/
rechterachterwiel
Het wiel kan niet draaien of
er is een probleem met de
motor van het wiel.
1. Reinig de achterwielen en probeer het
opnieuw.
2. Als dit probleem zich blijft voordoen, probeer
de robot dan opnieuw op te starten.
3. Als het probleem aanhoudt, neem dan
contact op met de after-sales service.
Maaikop kan niet
draaien.
De maaikop kan niet
normaal draaien of er is een
probleem met de motor van
de maaikop.
1. Reinig de maaikop en probeer het opnieuw.
2. Controleer of het omringende gras hoger is
dan 10 cm. U kunt een handmaaier gebruiken
om het gazon van tevoren te maaien om te
voorkomen dat de maaikop wordt geblokkeerd
door hoog gras.
3. Kijk of er water onder de maaikop ligt. Als dit
het geval is, breng de robot dan naar een
droge plek en probeer het opnieuw.
4. Als dit probleem zich blijft voordoen, probeer
de robot dan opnieuw op te starten.
5. Als het probleem aanhoudt, neem dan
contact op met de after-sales service.
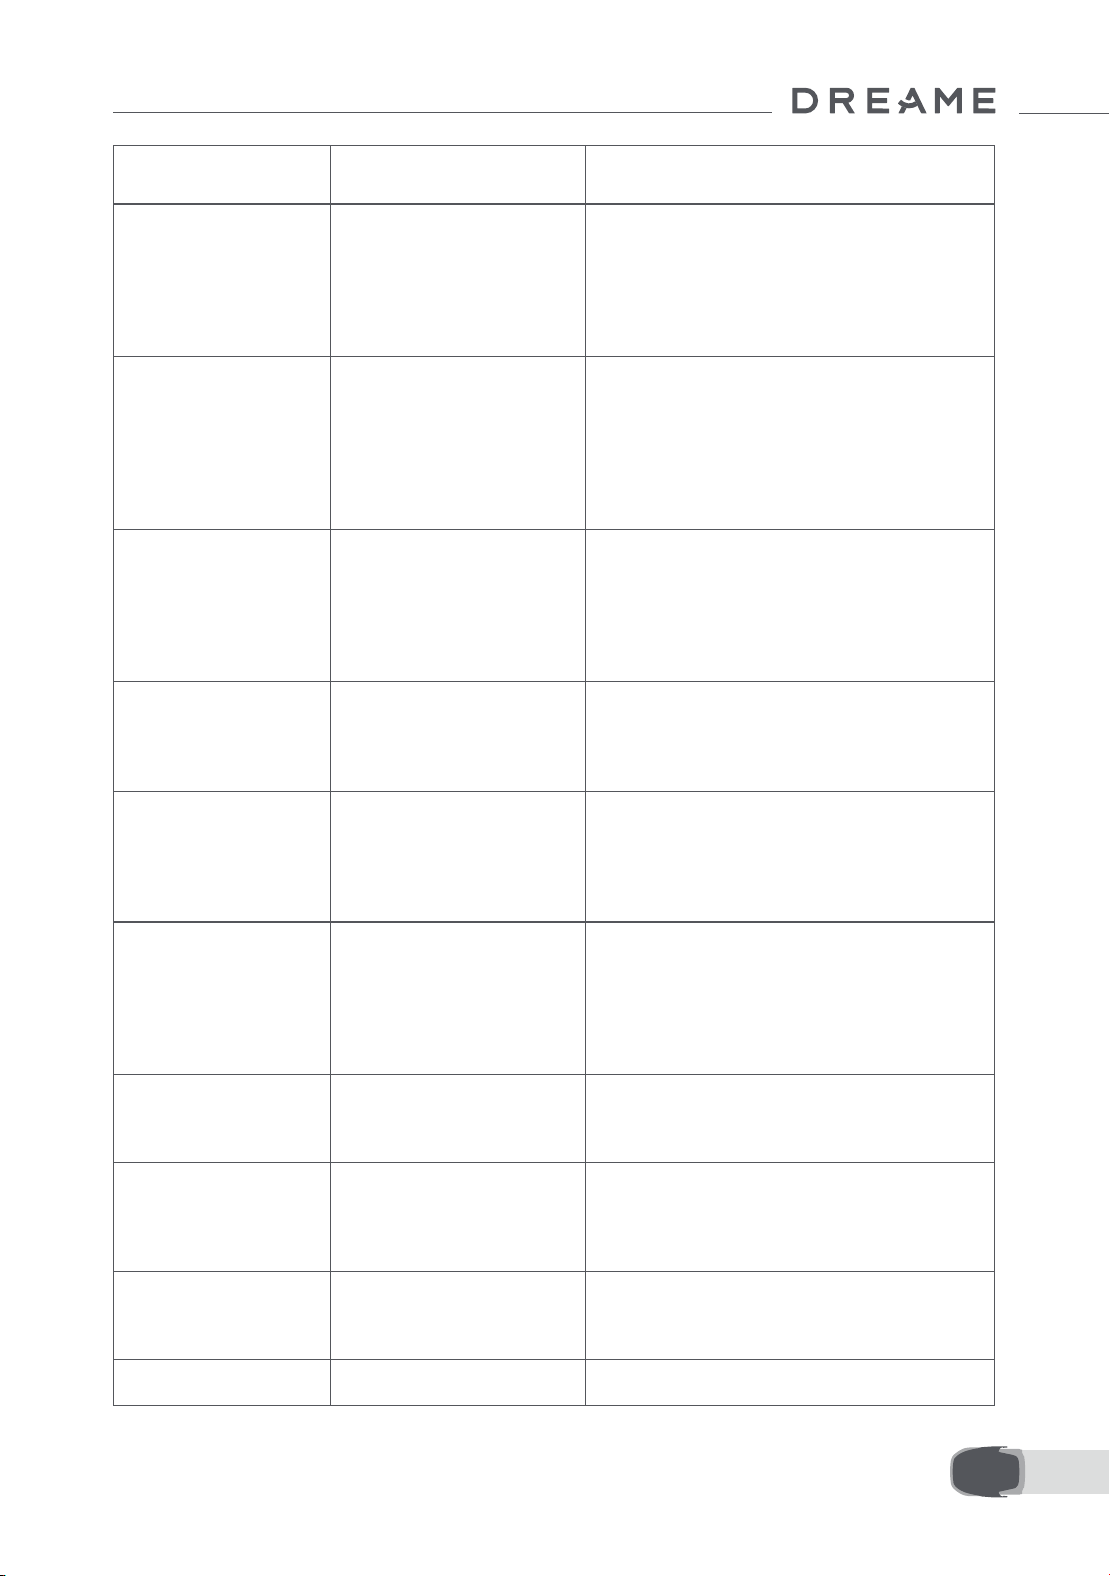
215 NL
Probleem Oorzaak Oplossing
Bumperstoring.
De sensor van de
voorbumper wordt constant
geactiveerd.
1. Kijk of A1 Pro ergens vastzit.
2. Tik zachtjes op de bumper en kijk of deze
terugveert.
3. Als dit probleem zich blijft voordoen, probeer
de robot dan opnieuw op te starten.
4. Als het probleem aanhoudt, neem dan
contact op met de after-sales service.
Opladen is abnormaal
A1 Pro is gedockt in het
oplaadstation, maar er
is een probleem met de
laadstroom of -spanning.
1. Controleer of het oplaadstation correct op
het stroomnetwerk is aangesloten.
2. Controleer of de laadcontacten op A1 Pro en
het oplaadstation schoon zijn.
3. Probeer A1 Pro opnieuw in het oplaadstation
te docken nadat u alles gecontroleerd hebt.
4. Als het probleem aanhoudt, neem dan
contact op met de after-sales service.
De accutemperatuur is
te hoog.
De accutemperatuur is
hoger dan 60℃ .
1. Gebruik A1 Pro bij een
omgevingstemperatuur lager dan 40℃ . Wacht
tot de accutemperatuur automatisch daalt.
2. Schakel A1 Pro uit en start na een tijdje
opnieuw op.
3. Als het probleem aanhoudt, neem dan
contact op met de after-sales service.
Lidar is geblokkeerd.
Lidar is geblokkeerd (de
beschermkap van de lidar is
bijvoorbeeld niet
verwijderd).
1. Verwijder de beschermkap van de lidar en
probeer het opnieuw.
2. Als de lidar aan de bovenkant van de robot
erg vuil is, reinig deze dan met een pluisvrije
doek en probeer het opnieuw.
Lidarstoring.
Lidar is erg vuil of
er is sprake van een
sensorstoring.
1. Controleer of de lidar vuil is. Reinig indien
nodig en probeer het opnieuw.
2. Als dit probleem zich blijft voordoen, probeer
de robot dan opnieuw op te starten.
3. Als het probleem aanhoudt, neem dan
contact op met de after-sales service.
A1 Pro is verdwaald. Positionering werkt niet.
1. Controleer of de lidar aan de bovenkant van A1
Pro vuil is. Vuil heeft invloed op de positionering.
2. Breng A1 Pro handmatig naar een open plek op
de plattegrond en voer de taak opnieuw uit.
3. Als de positionering nog steeds niet goed gaat,
stuur A1 Pro dan op afstand via de app terug naar
het oplaadstation en start de maaitaak dan.
Sensorstoring. Sensorstoring.
1. Start A1 Pro opnieuw op en probeer het
opnieuw.
2. Als het probleem aanhoudt, neem dan
contact op met de after-sales service.
A1 Pro bevindt zich in
de verboden zone.
A1 Pro bevindt zich in de
verboden zone.
1. Haal de robot handmatig uit de verboden
zone en probeer het opnieuw.
2. Bestuur de robot op afstand via de app om
hem uit de verboden zone te halen en probeer
het opnieuw.
A1 Pro bevindt zich
buiten de plattegrond.
A1 Pro bevindt zich buiten
de plattegrond.
1. Breng de robot handmatig binnen de
plattegrond en probeer het opnieuw.
2. Stuur de robot op afstand via de app terug
binnen de plattegrond en probeer het opnieuw.
De noodstop is
geactiveerd.
De Stopknop op A1 Pro is
ingedrukt.
Voer de pincode in op A1 Pro om de noodstop
uit te schakelen.

216NL
Probleem Oorzaak Oplossing
De accu is bijna leeg.
A1 Pro wordt zo
uitgeschakeld.
Accuniveau is minder dan
10%.
Dock A1 Pro in het oplaadstation om op te
laden.
A1 Pro bevindt zich
buiten de plattegrond.
De kans om gestolen te
worden is nu groter.
A1 Pro bevindt zich buiten
de plattegrond.
1. Voer de pincode in om te valideren.
2. U kunt het Alarm voor buiten de plattegrond
uitschakelen in de app bij Instellingen.
Terugkeren naar het
oplaadstation mislukt.
A1 Pro wil terugkeren naar
het oplaadstation, maar
kan het station niet vinden.
1. Controleer of er obstakels zijn die A1 Pro
blokkeren. Haal de obstakels weg en probeer
het opnieuw.
2. Stuur A1 Pro op afstand via de app terug
naar het oplaadstation.
Docken in het
oplaadstation mislukt.
A1 Pro heeft het
oplaadstation gevonden,
maar kan niet docken.
1. Ga na of de reecterende folies op het
oplaadstation vuil of geblokkeerd zijn.
2. Kijk of er obstakels voor het oplaadstation
liggen.
3. Controleer of het oplaadstation is verplaatst.
4. Controleer of de grondplaat bedekt is met
dikke modder.
5. Controleer of het station stroom heeft.
6. Help de robot handmatig of met de
afstandsbediening aan te meren in het station.
Positioneren mislukt.
Positioneren mislukt als A1
Pro een maaitaak probeert
te starten.
1. De lidar kan geblokkeerd zijn. Breng de robot
handmatig naar een vlakke en open plek op de
plattegrond en voer de taak opnieuw uit.
2. Als je blijft stuiten op deze fout, probeer het
dan opnieuw nadat de robot is aangemeerd in
het station.
De accutemperatuur is
hoog.
De accutemperatuur is
hoger dan 45℃ .
1. Als de accutemperatuur boven de 45℃ komt,
kan het opladen mislukken.
2. Gebruik A1 Pro bij een
omgevingstemperatuur lager dan 40℃ .
De accutemperatuur is
laag.
De accutemperatuur is lager
dan 6℃ .
1. Als de accutemperatuur onder de 6℃ komt,
kan het opladen mislukken.
2. Gebruik A1 Pro bij een
omgevingstemperatuur hoger dan 6℃ .
De maaikop kan niet
omhoog of omlaag
bewegen.
De maaikop kan niet
omhoog of omlaag
bewegen.
1. Reinig de maaikop en probeer het opnieuw.
2. Als u deze fout blijft tegenkomen, probeer
dan de robot opnieuw op te starten.
3. Als het probleem aanhoudt, neem dan
contact op met de klantenservice.
Onvoldoende ruimte
om voor het station te
keren.
Onvoldoende ruimte om
voor het station te keren.
1. Als het station aan de rand van de kaart of
daarbinnen is geplaatst, zorg er dan voor dat er
ten minste 1 m vrije ruimte is tussen het voorste
gebied van de grondplaat van het station en
de grens van de kaart; anders kan de robot
mogelijk niet keren.
2. Verplaats het station of wijzig de plattegrond
in Kaart bewerken.
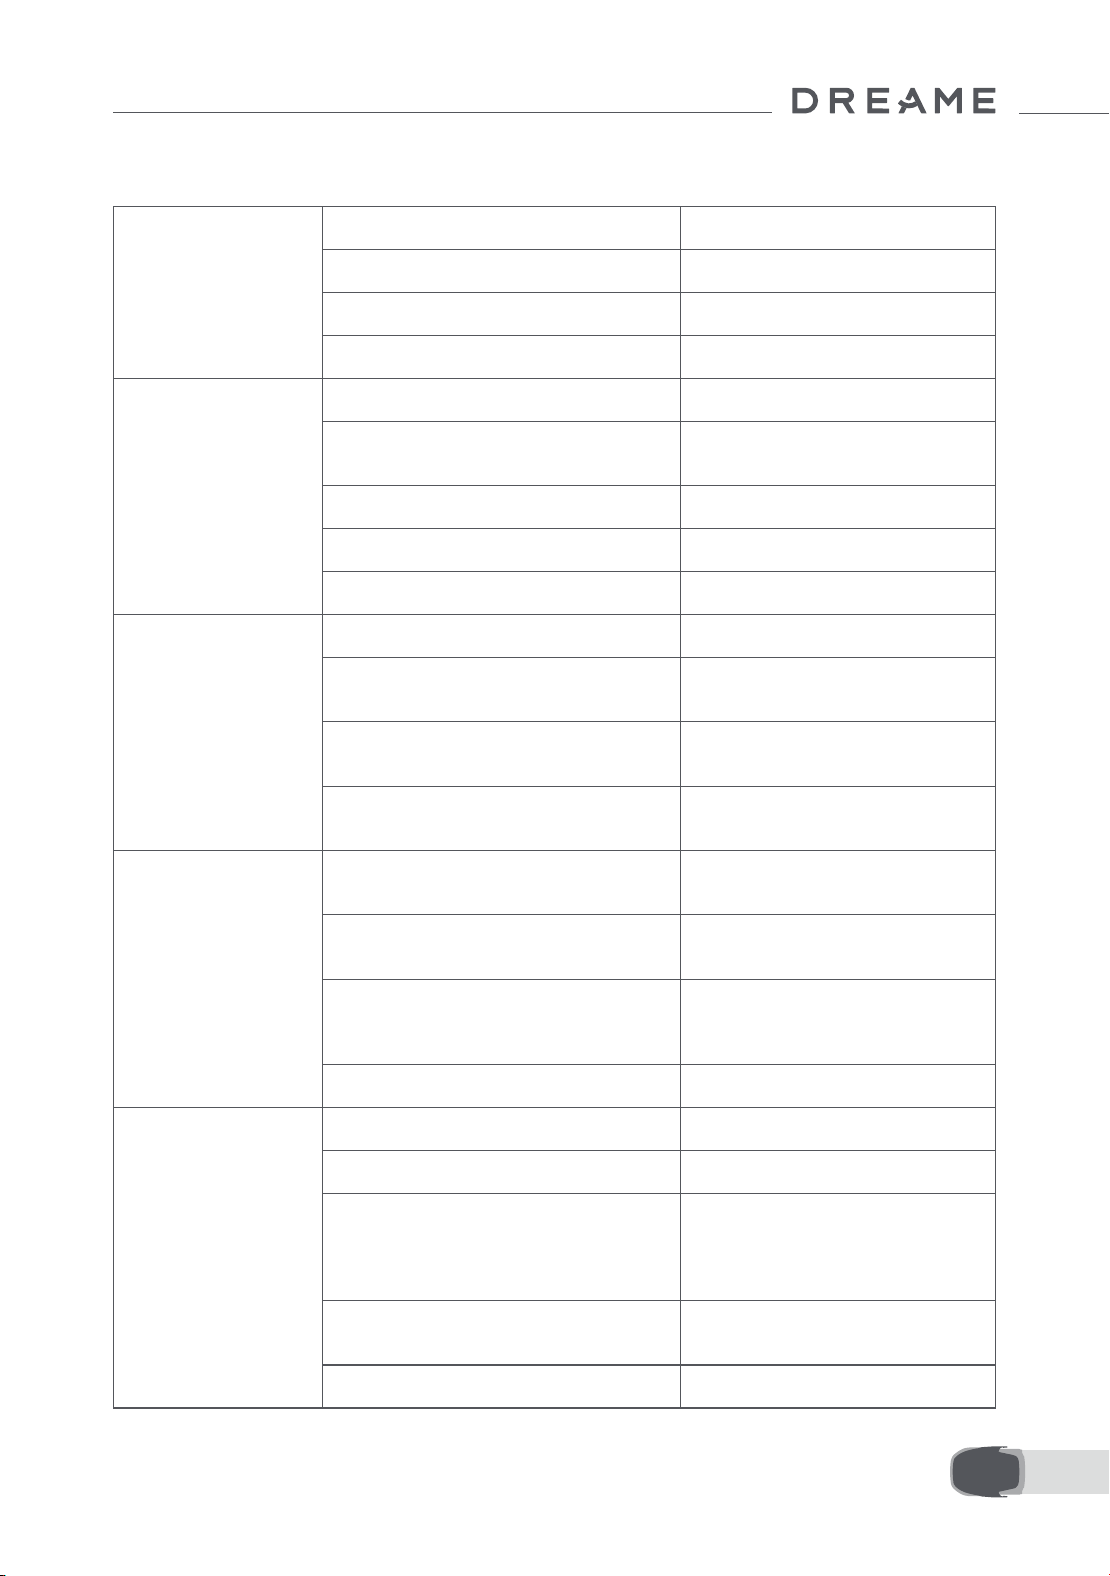
217 NL
14 Specicaties
Basisgegevens
Productnaam Dreame Robotmaaier
Merk Dreame
Afmetingen 643 × 436.5 × 261 mm
Gewicht (inclusief accu) 12.6 kg
Maaien
Aanbevolen werkvermogen 2000 ㎡
Maai-eciëntie
Standaard: 120 ㎡ /uur
Eciënt: 200 ㎡ /uur
Maaihoogte 30~70 mm
Maaibreedte 22 cm
Oplaadtijd
[1]
65 min
Geluidsniveaus
Geluidsvermogensniveau LWA 64 dB(A)
Geluidsvermogen
onzekerheden KWA
3 dB(A)
Geluidsdruk
niveau LpA
56 dB(A)
Geluidsdruk
onzekerheden KpA
3 dB(A)
Werkom-
standigheden
Werktemperatuur
0~50° C
Aanbevolen: 10~35° C
Temperatuur voor langdurige opslag
-10~35° C
Aanbevolen: 0~25° C
IP-classicatie
Maaier: IPX6
Oplaadstation: IPX4
Voeding: IP67
Maximale helling voor maaigebied 45% (24° )
Connectiviteit
Frequentiebereik Bluetooth 2400.0–2483.5 MHz
Wi Wi-Fi 2.4 GHz (2400–2483.5M)
Maximale RF-vermogen
802.11b:16±2dBm(@11Mbps)
802.11g:14±2dBm(@54Mbps)
802.11n:13±2dBm(@HT20,HT40)
Bluetooth:7.49dBm
Link-service (optioneel)
[2]
LTE-FDD: B1/3/7/8/20/28A
LTE-TDD: B38/40/41
GNSS (optioneel)
[3]
GPS/GLONASS/BDS/Galileo/QZSS
218NL
[1] Oplaadtijd wordt berekend wanneer A1 Pro automatisch terugkeert naar het oplaadstation als de accu bijna
leeg is.
[2] Hiervoor moet de Link-module worden geïnstalleerd.
[3] Hiervoor moet de Link-module worden geïnstalleerd.
Opmerking: De specicaties zijn onderhevig aan wijzigingen, omdat we ons product voortdurend verbeteren.
Ga voor de meest recente informatie naar onze website global.dreametech.com.
Aandrijfmotor
Rijsnelheid met afstandsbediening 0.45 m/s
Rijsnelheid tijdens maaien
Standard: 0.35 m/s
Ecient: 0.6 m/s
Maaimotor
Snelheid 2200 /min
Accu (maaier)
Type accu Lithiumionaccu
Nominaal vermogen 5000 mAh
Nominale spanning 18 V
Voeding
Ingangsspanning 100~240 V
Uitgangsspanning 20 V
Uitgangsstroom 3 A
Oplaadstation
Ingangsspanning 20 V
Uitgangsspanning 20 V
Ingangsstroom 3 A
Uitgangsstroom 3 A