
Technical Support and E-Warranty Certificate
www.vevor.com/support
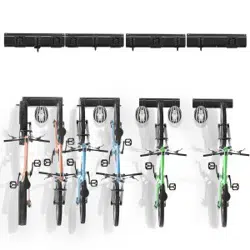
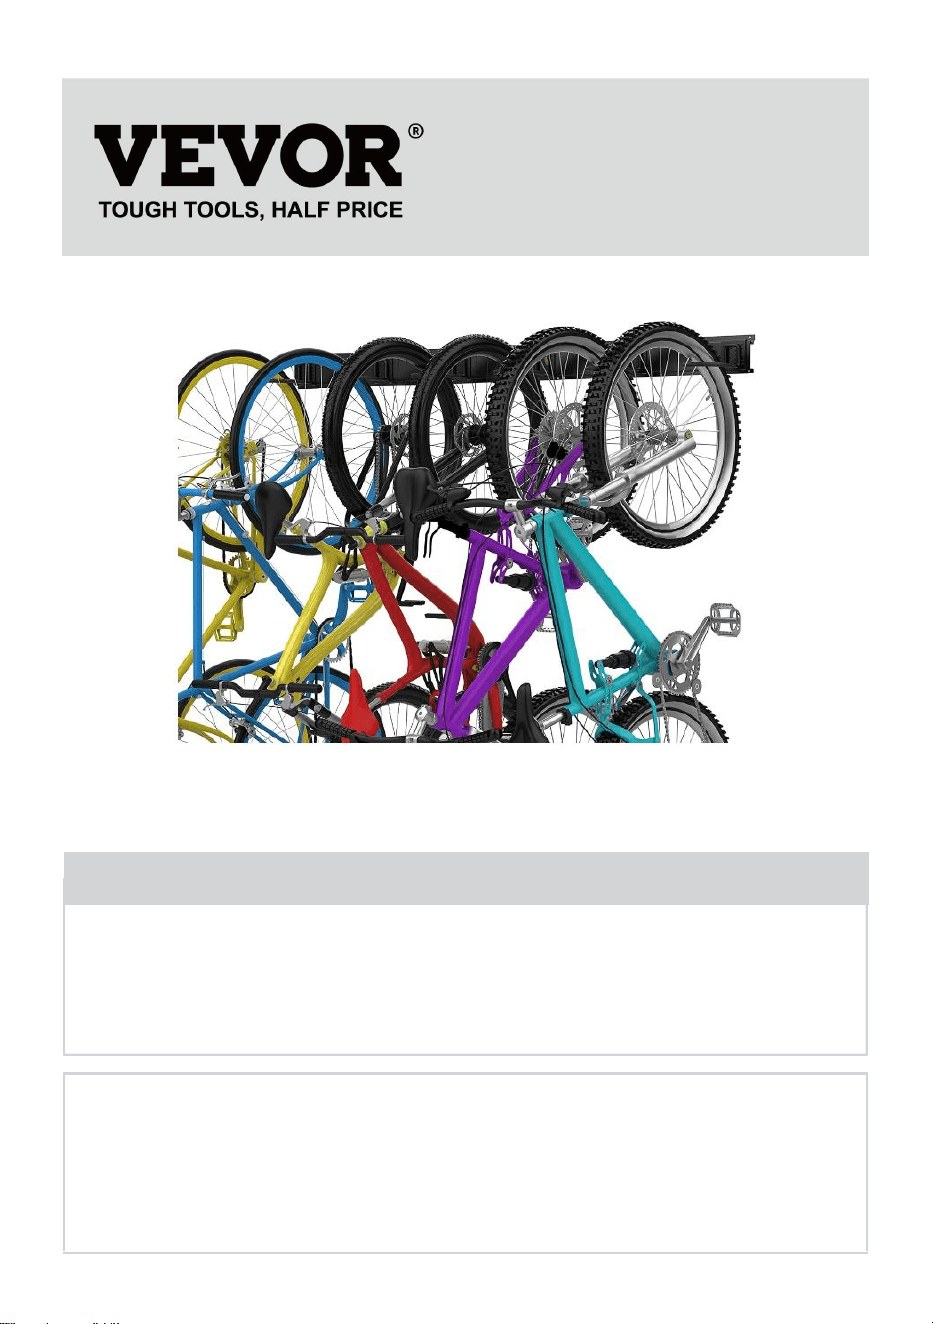
WALL-MOUNTED BIKE RACK
USER MANUAL
MODEL: JC24-ZXCZJ001/ JC24-ZXCZJ002 / JC24-ZXCZJ003
JC24-ZXCZJ004/ JC24-ZXCZJ005 / JC24-ZXCZJ006
JC24-ZXCZJ007/ JC24-ZXCZJ008 / JC24-ZXCZJ009
JC24-ZXCZJ010/ JC24-ZXCZJ011
We continue to be committed to provide you tools with competitive price.
"Save Half", "Half Price" or any other similar expressions used by us only represents an
estimate of savings you might benefit from buying certain tools with us compared to the major
top brands and does not necessarily mean to cover all categories of tools offered by us. You
are kindly reminded to verify carefully when you are placing an order with us if you are
actually saving half in comparison with the top major brands.

- 1 -
(The picture is for reference only; please refer to the actual object)
Have product questions? Need technical support? Please feel free to
contact us:
Technical Support and E-Warranty Certificate
www.vevor.com/support
NEED HELP? CONTACT US!
This is the original instruction, please read all manual instructions
carefully before operating. VEVOR reserves a clear interpretation of our
user manual. The appearance of the product shall be subject to the
product you received. Please forgive us that we won't inform you again if
there are any technology or software updates on our product.
Wall Mounted
Bike Rack

- 2 -
1. Warning-
1.1 Wall Installation Only: Please ensure the bike rack is correctly installed on a
solid wall to ensure safety. It should only be installed on brick walls or wooden
walls of sufficient thickness, choosing the appropriate hole spacing for the guide
rails.
1.2 Installation is not recommended on plasterboard, thin wood panels, and other
locations due to the weak structure being unable to bear the weight of hanging
bicycles.
1.3 Do Not Overload: Each bike rack has a limited maximum load capacity.
Please do not hang bicycles that exceed the weight limit or the number of bicycles
it can safely hold.
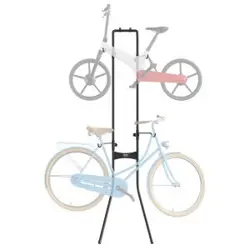
1.4 Placement Method: It is recommended to alternate the front and rear wheels
of adjacent bicycles to avoid handlebars obstructing each other.
1.5 Avoid Collision: Avoid collisions between the bicycle and other objects during
installation and use to prevent damage.
1.6 Regular Inspection: Periodically check the bike rack's screws and connectors
to ensure its stability.
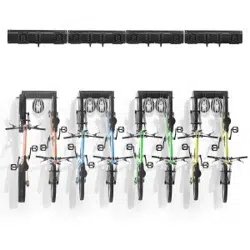
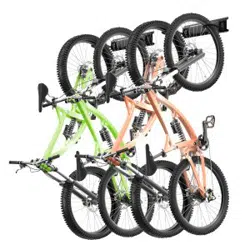
2. Product introduce
Wall mounted bike racks are storage and organization tools installed on the wall
to allow bicycles to be lifted off the floor and hung vertically on the wall. This
facilitates the organization and cleaning of your home and garage and effectively
saves space. They are widely used for organizing and storing bicycles in garages,
shops, basements, and other scenarios.
3. Main Feature
3.1 CUSTOMIZED BIKE STORAGE SOLUTIONS - Featuring an elegant rail interlock
design, these bike storage solutions seamlessly combine rails. Rails and hooks can be
separated or interlocked for wall mounting to display or hang your bike. The snap hook
design allows for easy attachment to the rails and adjustable hook spacing.
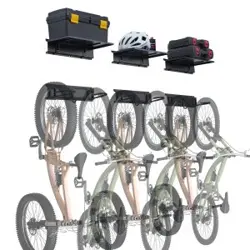
3.2 WALL-MOUNTED SPACE-SAVING - Our bike wall racks are perfect for garage
organizers, lifting bikes off the floor to facilitate organization and cleaning in your home
and garage. The wall-mounted bike rack efficiently saves space.

- 3 -
3.3 WIDE SIZE HOOKS for BIKE HANGER - Capable of hanging up to 4.4-inch fat
bike tires, making it suitable for mountain bikes, road bikes, folding bikes, hybrid bikes,
adult bikes, kids bikes, scooters, etc. Wide-size hooks simplify the task of hanging up
and taking down your bike.
3.4 DURABLE MATERIAL - Constructed with powder-coated rails and rubber-coated
sleeves for exceptional durability. It features anti-rust, anti-crack, anti-scratch, and
anti-slip functions, ensuring safety. EASY TO INSTALL - Installation requires only an
electric drill, and possibly a level to ensure proper alignment. Intended for mounting on
wall studs, suitable for drywall or other paneled wall sheeting, but must be affixed to
solid structures. Includes all necessary installation hardware.
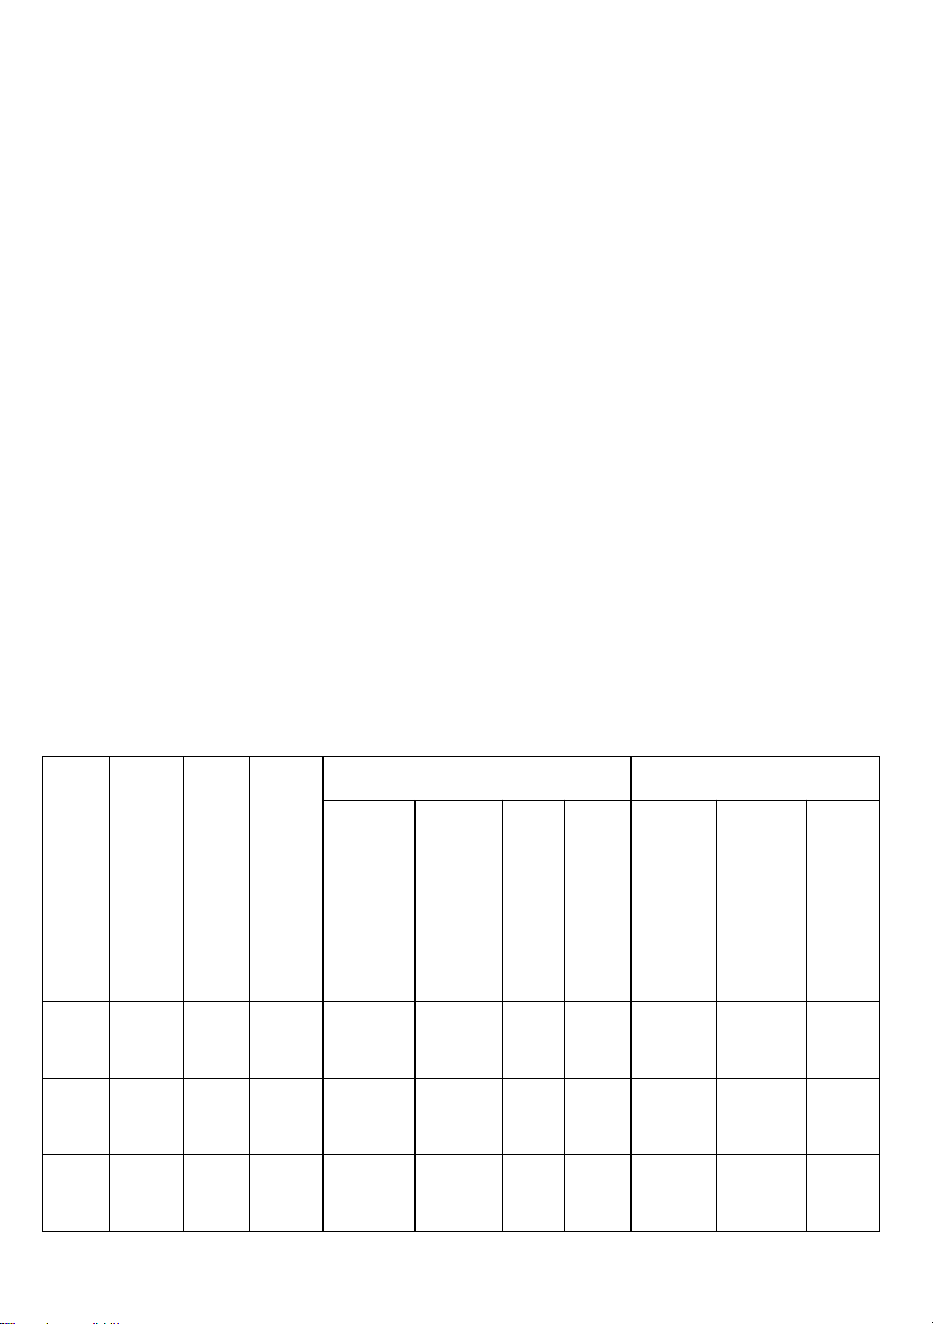
4. Product parameter
Item
Model
Total
Load
Limit
/
lbs
Store
Bike
Qty
/
pcs
Rail
Hook
Total
Length
/
inch
Length
of each
rail
/
inch
Hole
dista
nce
/
inch
Qty
/
pcs
For
4.4inch
Tire
/
pcs
For
2.5inch
Tire
/
pcs
Other
Hook
1
JC24-
ZXCZ
J001
100
2
17
17
16
1
1
1
✕
2
JC24-
ZXCZ
J002
200
4
32
16
15
2
1
3
2
3
JC24-
ZXCZ
J003
200
3+1
36
18
16
2
1
3
2
4
JC24-
ZXCZ
J004
300
3+3
48
16
15
3
1
5
3
5
JC24-
ZXCZ
J005
300
3+3
51
17
16
3
1
5
3
6
JC24-
ZXCZ
J006
300
5+1
64
16
15
4
1
5
5
7
JC24-
ZXCZ
J007
300
6
68
17
16
4
1
5
6

- 4 -
8
JC24-
ZXCZ
J008
400
5+3
72
18
16
4
1
7
7
9
JC24-
ZXCZ
J009
300
6
85
17
16
5
1
5
5
10
JC24-
ZXCZ
J010
300
3+3
48
16
15
6
1
5
3
Item
Model
Total
Load
Limit
/
lbs
Store
Bike
Qty
/
pcs
storage racks
Hook
Total
Length
/
inch
Length
of each
rail
/
inch
Hole
dista
nce
/
inch
Qty
/
pcs
For
4.4inch
Tire
/
pcs
For
2.5inch
Tire
/
pcs
Other
Hook
11
JC24-
ZXCZ
J011
500
4
63
31.5
/
2
1
3
20
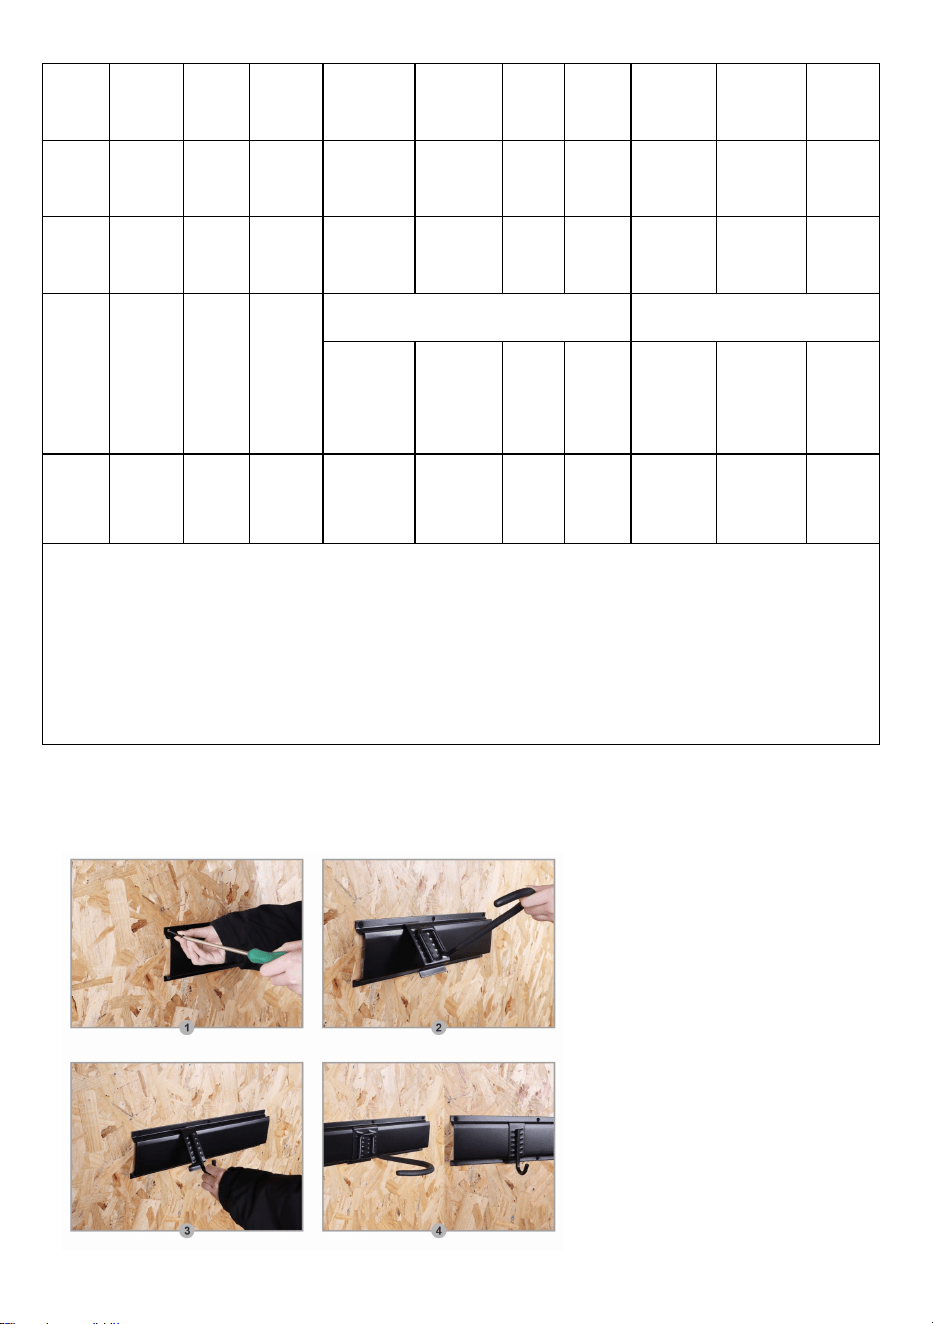
Note:
1. Item 10 additionally has 3pcs storage racks.
2. The max load capacity of Single hook is 50lbs.
3. If the “Store Bike Qty” shows “3+1”, that means 3 adult bikes + 1 child bike, a total of 4 bikes.
4. Easily use an 8mm drill bit to drill holes in the wall for installation on the rail.
5. Pre-drill holes in brick walls and install them with expansion tubes;
6. for wooden walls, use self-tapping screws.
7. Bicycle placement method: Alternate hanging of the front and rear wheels of adjacent bicycles is
recommended.
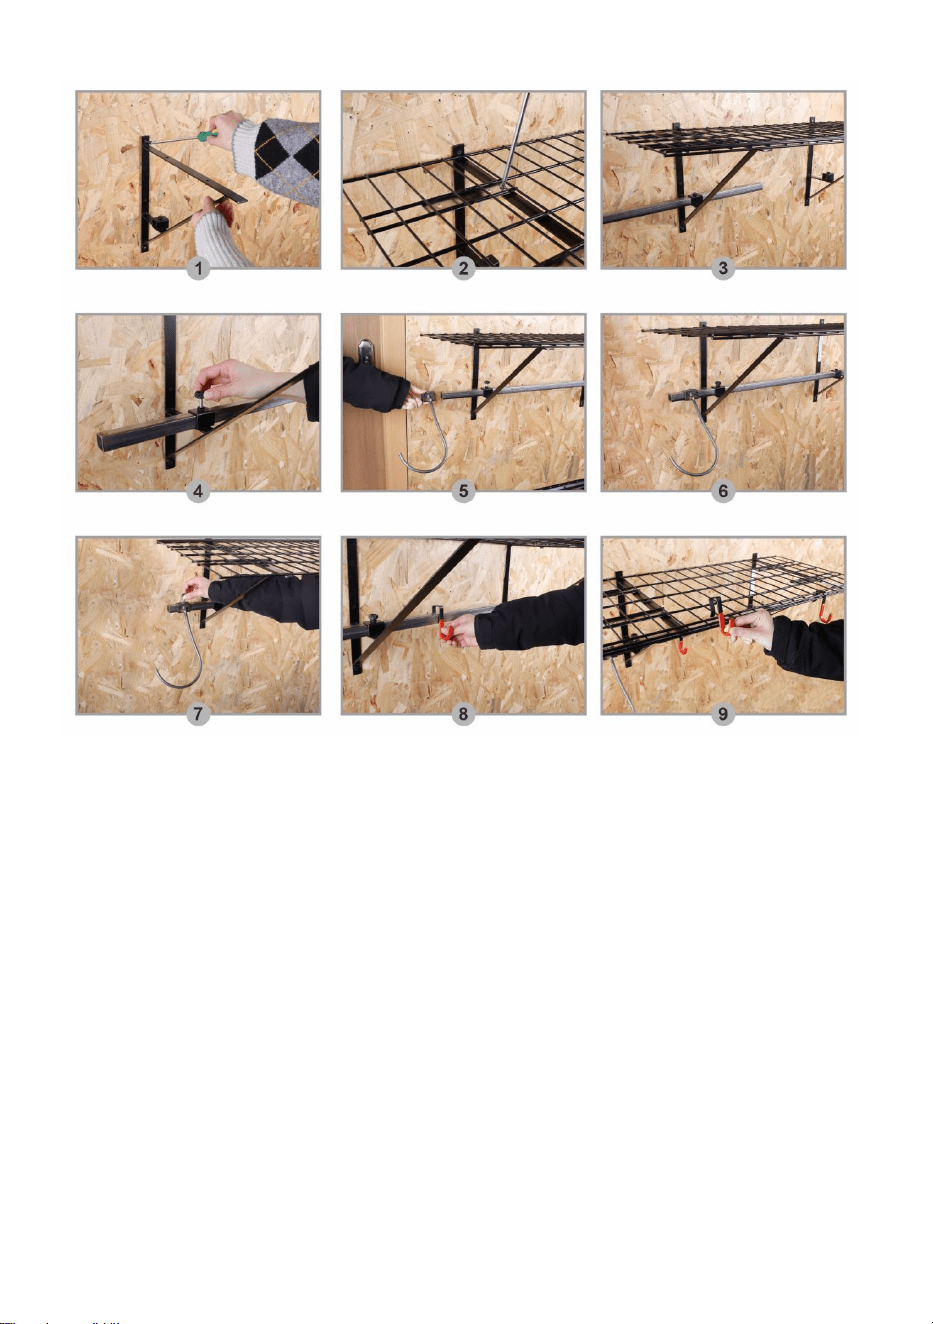
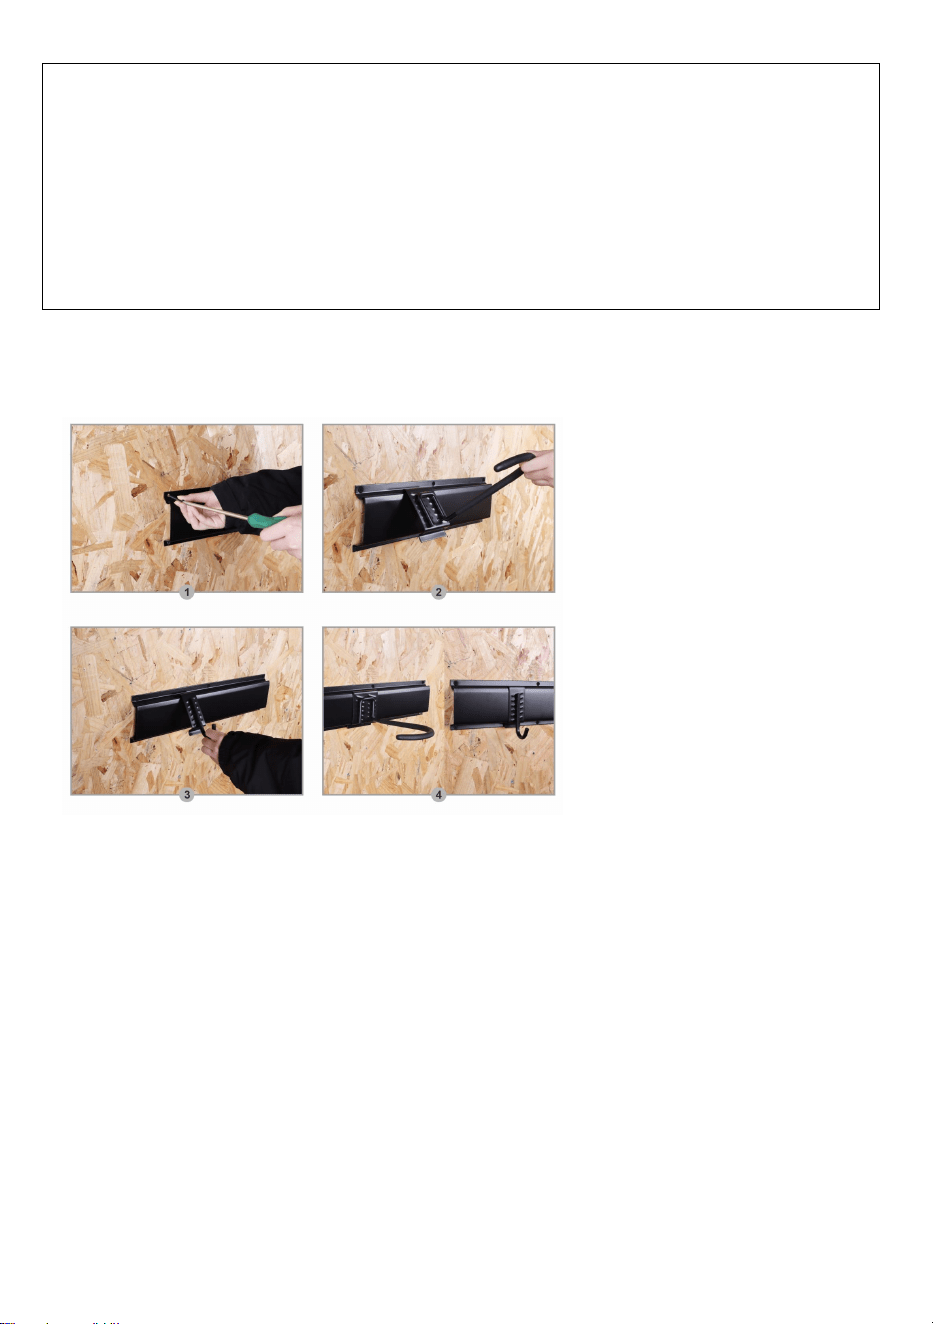
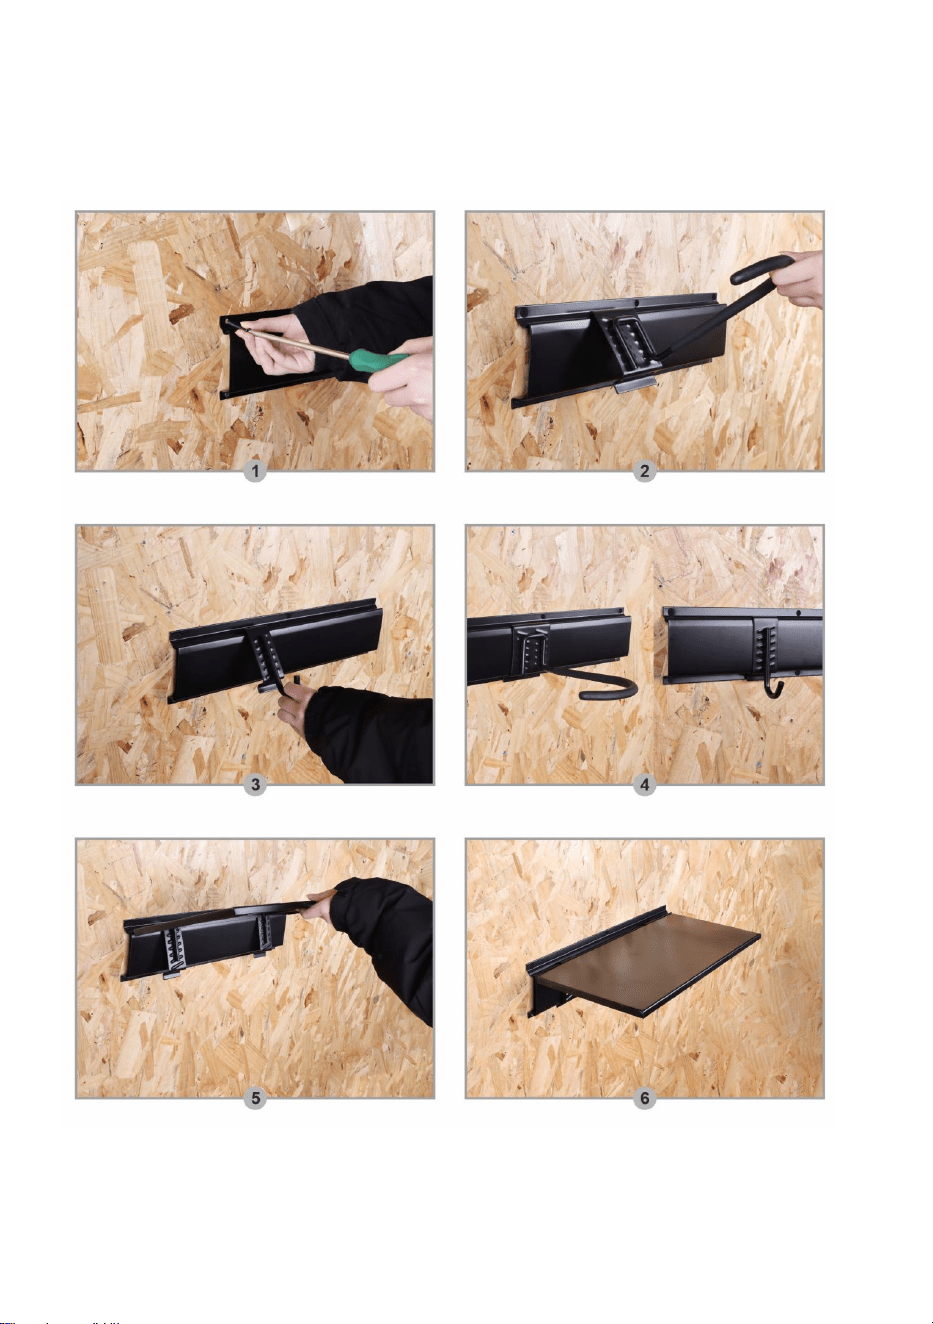
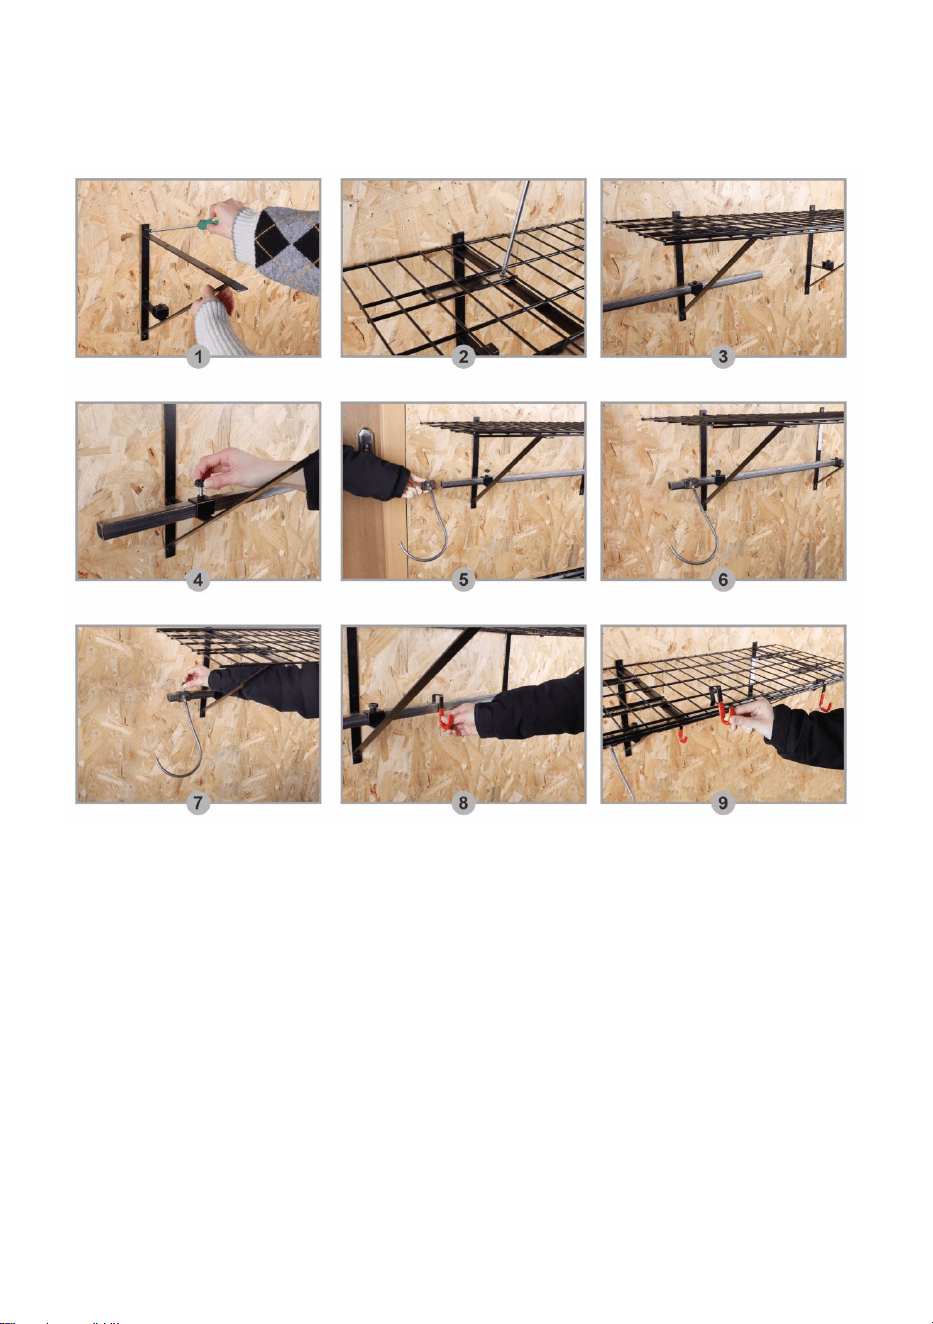
5. Installation Guide for itme1 - item9
You can use screws to fix the track on the wall, as shown here:
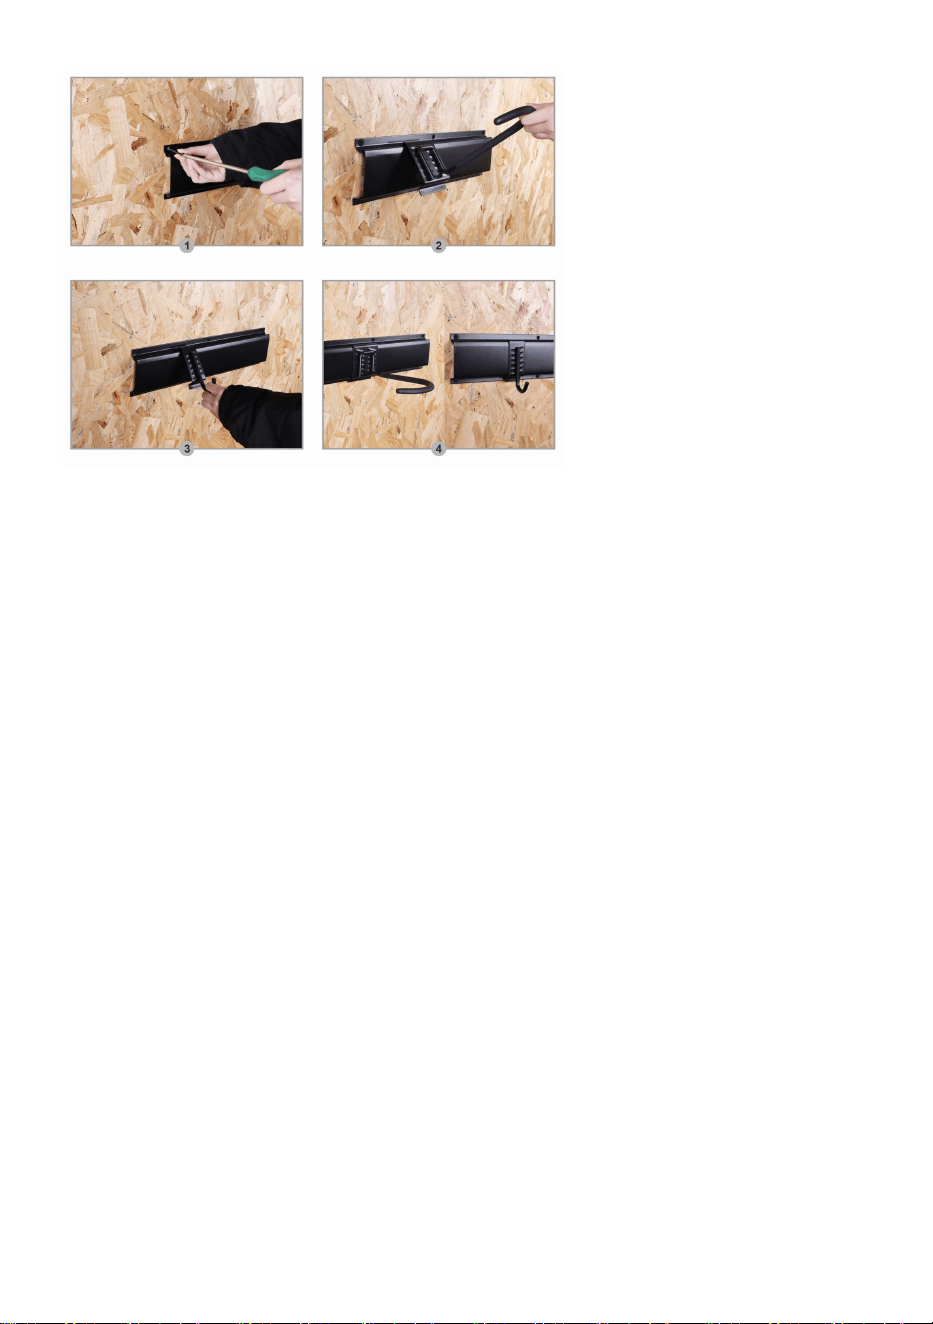
- 5 -
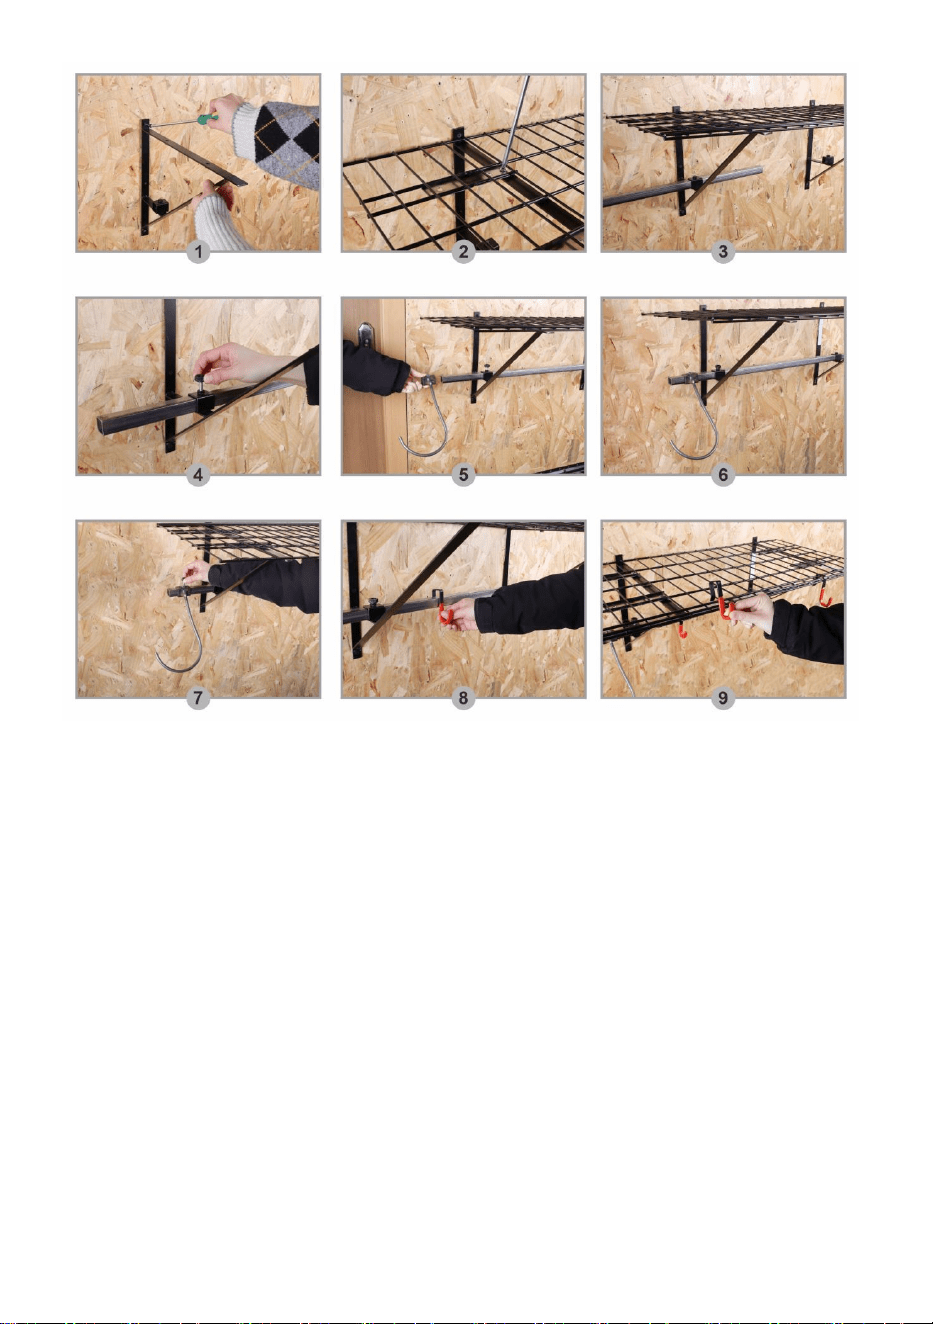
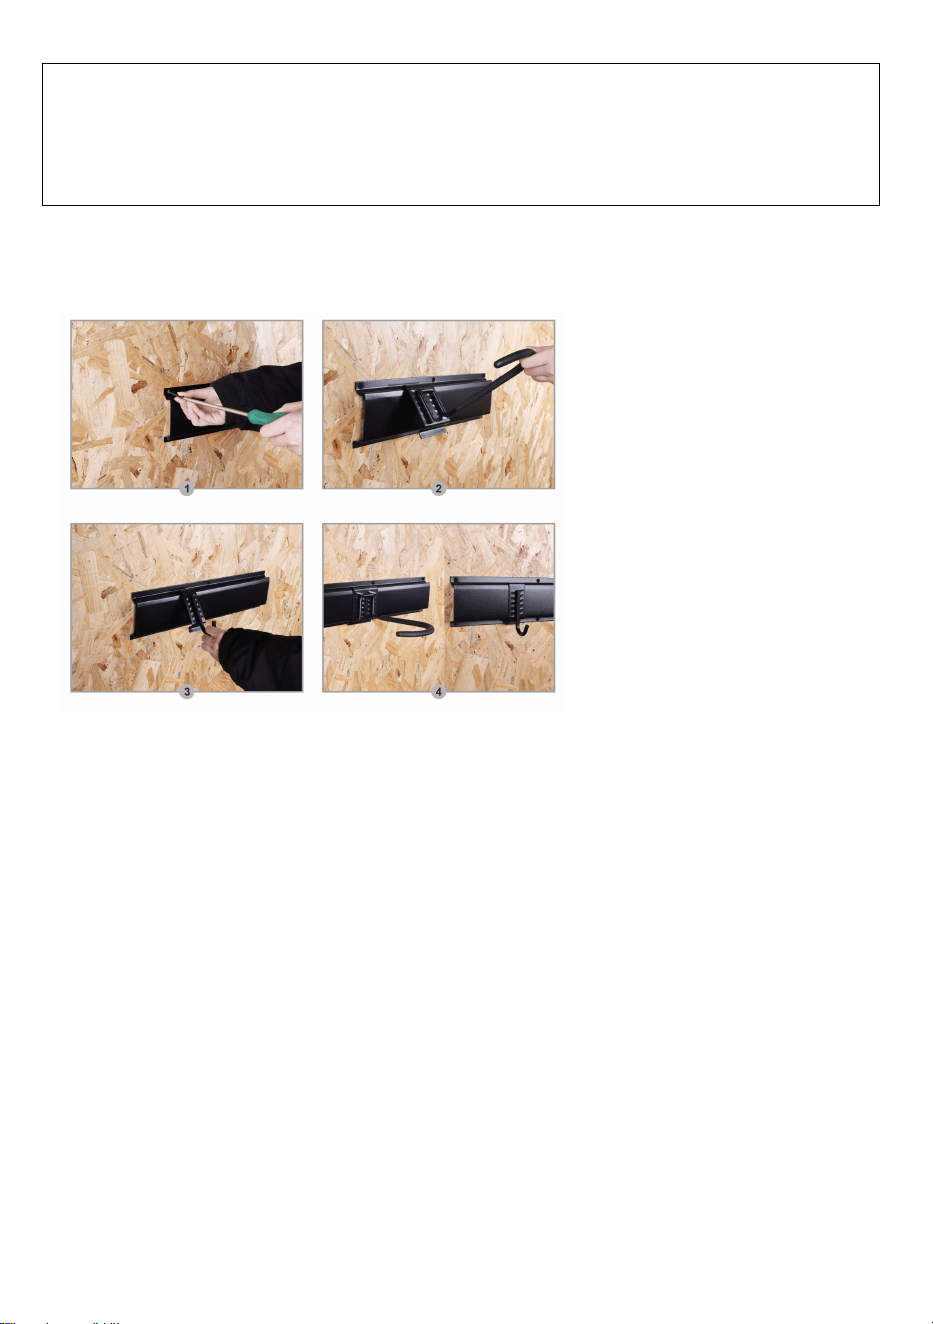
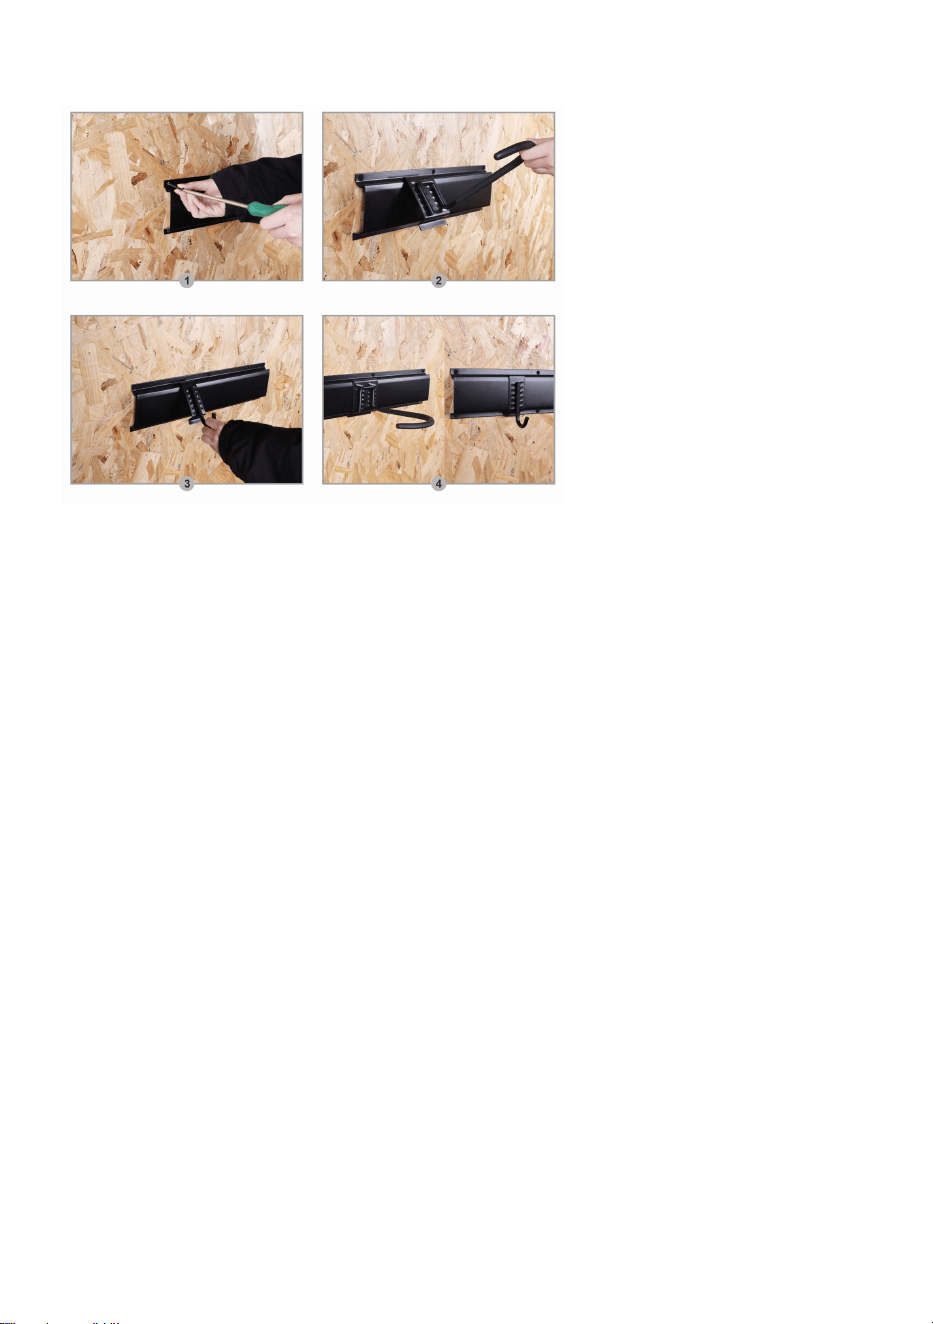
6. Installation Guide for item 10
You can use screws to fix the track on the wall, as shown here
:

- 6 -
7. Installation Guide for item11
You can use screws to fix the track on the wall, as shown here
:
- 7 -
8. Maintain
8.1 Cleaning: Use a damp cloth to wipe the surface of the bike rack to remove dust
and dirt.
8.2 Lubrication: Regularly apply lubricant to the screws and connectors of the bike
rack to ensure its smooth operation.
8.3 Inspection: Check the installation status of the bike rack every few months to
ensure its stability.

- 1 -
Address: Shuangchenglu 803nong11hao1602A-1609shi, baoshanqu,
shanghai 200000 CN.
Imported to AUS: SIHAO PTY LTD, 1 ROKEVA STREETEASTWOOD NSW
2122 Australia
Imported to USA: Sanven Technology Ltd., Suite 250, 9166 Anaheim Place,
Rancho Cucamonga, CA 91730
REP
EC
E-CrossStu GmbH
Mainzer Landstr.69, 60329 Frankfurt am Main.
REP
UK
YH CONSULTING LIMITED.
C/O YH Consulting Limited Office 147, Centurion House,
London Road, Staines-upon-Thames, Surrey, TW18 4AX
Technical Support and E-Warranty Certificate
www.vevor.com/support

- 2 -
Assistance technique et certificat de garantie électronique
www.vevor.com/support
SUPPORT À VÉLO MURAL
MANUEL D'UTILISATION
MODÈLE : JC24-ZXCZJ001/ JC24-ZXCZJ002 / JC24-ZXCZJ003
JC24-ZXCZJ004/ JC24-ZXCZJ005 / JC24-ZXCZJ006
JC24-ZXCZJ007/ JC24-ZXCZJ008 / JC24-ZXCZJ009
JC24-ZXCZJ010/ JC24-ZXCZJ011
We continue to be committed to provide you tools with competitive price.
"Save Half", "Half Price" or any other similar expressions used by us only represents an
estimate of savings you might benefit from buying certain tools with us compared to the major
top brands and does not necessarily mean to cover all categories of tools offered by us. You
are kindly reminded to verify carefully when you are placing an order with us if you are
actually saving half in comparison with the top major brands.

- 1 -
(L'image est à titre indicatif uniquement ; veuillez vous référer à l'objet réel)
Have product questions? Need technical support? Please feel free to
contact us:
Technical Support and E-Warranty Certificate
www.vevor.com/support
NEED HELP? CONTACT US!
This is the original instruction, please read all manual instructions
carefully before operating. VEVOR reserves a clear interpretation of our
user manual. The appearance of the product shall be subject to the
product you received. Please forgive us that we won't inform you again if
there are any technology or software updates on our product.
Wall Mounted
Bike Rack

- 2 -
9. Avertissement-
1.1 Installation murale uniquement : Veuillez vous assurer que le porte-vélos est
correctement installé sur un mur solide pour garantir la sécurité. Il ne doit être
installé que sur des murs en briques ou en bois d'une épaisseur suffisante, en
choisissant l'espacement des trous approprié pour les rails de guidage.
1.2 L'installation n'est pas recommandée sur des plaques de plâtre, des
panneaux de bois minces et d'autres emplacements en raison de la faiblesse de
la structure qui ne peut pas supporter le poids des vélos suspendus.
1.3 Ne pas surcharger : chaque porte-vélos a une capacité de charge maximale
limitée. Veuillez ne pas suspendre de vélos qui dépassent la limite de poids ou le
nombre de vélos qu'il peut supporter en toute sécurité.
1.4 Méthode de placement : Il est recommandé d'alterner les roues avant et
arrière des vélos adjacents pour éviter que les guidons ne se gênent
mutuellement.
1.5 Éviter les collisions : Évitez les collisions entre le vélo et d'autres objets lors
de l'installation et de l'utilisation pour éviter tout dommage.
1.6 Inspection régulière : Vérifiez périodiquement les vis et les connecteurs du
porte-vélos pour assurer sa stabilité.
10. Présentation du produit
Mur Les supports à vélos montés sont des outils de rangement et
d'organisation installés au mur pour permettre aux vélos d'être soulevés du sol et
suspendus verticalement au mur. Cela facilite l'organisation et le nettoyage de
votre maison et de votre garage et permet d'économiser efficacement de l'espace.
Ils sont largement utilisés pour organiser et ranger les vélos dans les garages, les
magasins, les sous-sols et d'autres scénarios.
11. Caractéristiques principales
11.1 SOLUTIONS DE RANGEMENT DE VÉLOS PERSONNALISÉES - Dotées d'une
conception élégante de verrouillage des rails, ces solutions de rangement de vélos
combinent parfaitement les rails. Les rails et les crochets peuvent être séparés ou
emboîtés pour un montage mural afin d'exposer ou de suspendre votre vélo. La
conception du mousqueton permet une fixation facile aux rails et un espacement
- 3 -
réglable des crochets.
11.2 SUPPORT MURAL POUR GAGNER DE L'ESPACE - Nos supports muraux pour
vélos sont parfaits pour les organisateurs de garage, soulevant les vélos du sol pour
faciliter l'organisation et le nettoyage dans votre maison et votre garage. Le support
mural pour vélos permet de gagner de la place de manière efficace.
11.3 GRANDE TAILLE pour CINTRE DE VÉLO - Capables de suspendre des pneus
de vélo gros jusqu'à 4,4 pouces, ce qui les rend adaptés aux VTT, vélos de route, vélos
pliants, vélos hybrides, vélos pour adultes, vélos pour enfants, scooters, etc. Les
crochets de grande taille simplifient la tâche de suspendre et de démonter votre vélo.
11.4 MATÉRIAU DURABLE - Construit avec des rails revêtus de poudre et des
manchons recouverts de caoutchouc pour une durabilité exceptionnelle. Il présente
des fonctions antirouille, anti-fissures, anti-rayures et antidérapantes, garantissant la
sécurité. FACILE À INSTALLER - L'installation ne nécessite qu'une perceuse
électrique et éventuellement un niveau pour assurer un alignement correct. Destiné au
montage sur des montants muraux, adapté aux cloisons sèches ou autres
revêtements muraux à panneaux, mais doit être fixé sur des structures solides.
Comprend tout le matériel d'installation nécessaire.
12. Paramètre du produit
Articl
e
Modèl
e
Limit
e de
char
ge
total
e
/
livres
Maga
sin
Vélo
Quant
ité
/
pièce
s
Rail
Crochet
Longue
ur totale
/
pouce
Longue
ur de
chaque
rail
/
pouce
Dist
anc
e
entr
e les
trou
s
/
pou
ce
Qua
ntité
/
pièc
es
Pour
4,4
pouces
Pneu
/
pièces
Pour
2,5
pouces
Pneu
/
pièces
Autre
Croch
et
1
JC24-
ZXCZ
J001
100
2
17
17
16
1
1
1
✕
2
JC24-
ZXCZ
J002
200
4
32
16
15
2
1
3
2
3
JC24-
ZXCZ
J003
200
3+1
36
18
16
2
1
3
2

- 4 -
4
JC24-
ZXCZ
J004
300
3+3
48
16
15
3
1
5
3
5
JC24-
ZXCZ
J005
300
3+3
51
17
16
3
1
5
3
6
JC24-
ZXCZ
J006
300
5+1
64
16
15
4
1
5
5
7
JC24-
ZXCZ
J007
300
6
68
17
16
4
1
5
6
8
JC24-
ZXCZ
J008
400
5+3
72
18
16
4
1
7
7
9
JC24-
ZXCZ
J009
300
6
85
17
16
5
1
5
5
10
JC24-
ZXCZ
J010
300
3+3
48
16
15
6
1
5
3
Articl
e
Modèl
e
Limit
e de
char
ge
total
e
/
livres
Maga
sin
Vélo
Quant
ité
/
pièce
s
étagères de rangement
Crochet
Longue
ur totale
/
pouce
Longue
ur de
chaque
rail
/
pouce
Dist
anc
e
entr
e les
trou
s
/
pou
ce
Qua
ntité
/
pièc
es
Pour
4,4
pouces
Pneu
/
pièces
Pour
2,5
pouces
Pneu
/
pièces
Autre
Croch
et
11
JC24-
ZXCZ
J011
500
4
63
31,5
/
2
1
3
20
Note:
8. L'article 10 dispose également de 3 supports de rangement.
9. La capacité de charge maximale d' un crochet simple est de 50 lb.
10. Si la « Quantité de vélos en magasin » indique « 3+1 », cela signifie 3 vélos adultes + 1 vélo
enfant , soit un total de 4 vélos.
11. Utilisez facilement un foret de 8 mm pour percer des trous dans le mur pour l'installation sur le rail.
12. Pré-percez des trous dans les murs en briques et installez- les avec des tubes d’expansion ;
13. pour les murs en bois, utilisez des vis autotaraudeuses.
14. Méthode de placement du vélo : Il est recommandé de suspendre en alternance les roues avant et
arrière des vélos adjacents .
13. Guide d'installation pour les éléments 1 à 9

- 5 -
Vous pouvez utiliser des vis pour fixer le rail au mur, comme indiqué ici :
14. Guide d'installation pour l'article 10
Vous pouvez utiliser des vis pour fixer le rail au mur, comme indiqué ici :

- 6 -
15. Guide d'installation pour l'article 11
Vous pouvez utiliser des vis pour fixer le rail au mur, comme indiqué ici :
- 7 -
16. Maintenir
16.1 Nettoyage : Utilisez un chiffon humide pour essuyer la surface du porte-vélos afin
d'éliminer la poussière et la saleté.
16.2 Lubrification : Appliquez régulièrement du lubrifiant sur les vis et les connecteurs
du porte-vélos pour assurer son bon fonctionnement.
16.3 Inspection : Vérifiez l'état d'installation du porte-vélos tous les quelques mois
pour assurer sa stabilité.
- 1 -
Adresse : Shuangchenglu 803nong11hao1602A-1609shi, baoshanqu,
Shanghai 200000 CN.
Importé en Australie : SIHAO PTY LTD, 1 ROKEVA STREET, ASTWOOD
NSW 2122 Australie
Importé aux États-Unis : Sanven Technology Ltd., Suite 250, 9166 Anaheim
Place, Rancho Cucamonga, CA 91730
REP
EC
E-CrossStu GmbH
Mainzer Landstr.69, 60329 Frankfurt am Main.
REP
UK
YH CONSULTING LIMITED.
C/O YH Consulting Limited Office 147, Centurion House,
London Road, Staines-upon-Thames, Surrey, TW18 4AX
Technique Certificat d'assistance et de garantie électronique
www.vevor.com/support

- 2 -
Technischer Support und E-Garantie-Zertifikat
www.vevor.com/support
FAHRRADSTÄNDER ZUR WANDMONTAGE
BENUTZERHANDBUCH
MODELL: JC24-ZXCZJ001/ JC24-ZXCZJ002 / JC24-ZXCZJ003
JC24-ZXCZJ004/ JC24-ZXCZJ005 / JC24-ZXCZJ006
JC24-ZXCZJ007/ JC24-ZXCZJ008 / JC24-ZXCZJ009
JC24-ZXCZJ010/ JC24-ZXCZJ011
We continue to be committed to provide you tools with competitive price.
"Save Half", "Half Price" or any other similar expressions used by us only represents an
estimate of savings you might benefit from buying certain tools with us compared to the major
top brands and does not necessarily mean to cover all categories of tools offered by us. You
are kindly reminded to verify carefully when you are placing an order with us if you are
actually saving half in comparison with the top major brands.

- 1 -
(Das Bild dient nur als Referenz . Bitte beziehen Sie sich auf das tatsächliche
Objekt.)
Have product questions? Need technical support? Please feel free to
contact us:
Technical Support and E-Warranty Certificate
www.vevor.com/support
NEED HELP? CONTACT US!
Wall Mounted
Bike Rack

- 2 -
This is the original instruction, please read all manual instructions
carefully before operating. VEVOR reserves a clear interpretation of our
user manual. The appearance of the product shall be subject to the
product you received. Please forgive us that we won't inform you again if
there are any technology or software updates on our product.
17. Warnung-
1.1 Nur Wandmontage: Bitte stellen Sie sicher, dass der Fahrradträger aus
Sicherheitsgründen korrekt an einer stabilen Wand montiert wird. Er sollte nur an
Ziegelwänden oder Holzwänden mit ausreichender Dicke montiert werden und
der richtige Lochabstand für die Führungsschienen muss gewählt werden.
1.2 Die Installation auf Gipskartonplatten, dünnen Holzplatten und anderen
Stellen wird nicht empfohlen, da die schwache Struktur das Gewicht hängender
Fahrräder nicht tragen kann.
1.3 Nicht überladen: Jeder Fahrradständer hat eine begrenzte maximale
Tragfähigkeit. Bitte hängen Sie keine Fahrräder auf, deren Gewicht das zulässige
Höchstgewicht oder die Anzahl der Fahrräder, die der Ständer sicher tragen kann,
überschreitet.
1.4 Platzierungsmethode: Es wird empfohlen, die Vorder- und Hinterräder
benachbarter Fahrräder abzuwechseln, um zu vermeiden, dass sich die Lenker
gegenseitig behindern.
1.5 Kollisionen vermeiden: Vermeiden Sie während der Installation und
Verwendung Kollisionen zwischen dem Fahrrad und anderen Objekten, um
Schäden vorzubeugen.
1.6 Regelmäßige Kontrolle: Überprüfen Sie regelmäßig die Schrauben und
Verbindungselemente des Fahrradträgers, um seine Stabilität sicherzustellen.
18. Produkteinführung
Wand Fahrradständer sind Aufbewahrungs- und Organisationswerkzeuge, die
an der Wand installiert werden, damit Fahrräder vom Boden abgehoben und
vertikal an die Wand gehängt werden können. Dies erleichtert die Organisation
und Reinigung Ihres Hauses und Ihrer Garage und spart effektiv Platz. Sie
werden häufig zum Ordnen und Aufbewahren von Fahrrädern in Garagen,

- 3 -
Geschäften, Kellern und anderen Szenarien verwendet.
19. Hauptmerkmal
19.1 MASSGESCHNEIDERTE FAHRRAD-AUFBEWAHRUNGSLÖSUNGEN - Diese
Fahrradaufbewahrungslösungen mit elegantem Schienenverriegelungsdesign
kombinieren Schienen nahtlos. Schienen und Haken können getrennt oder
miteinander verbunden werden, um Ihr Fahrrad an der Wand zu präsentieren oder
aufzuhängen. Das Karabinerhakendesign ermöglicht eine einfache Befestigung an
den Schienen und einen anpassbaren Hakenabstand.
19.2 WANDMONTAGE UND PLATZSPAREND – Unsere Fahrradwandhalterungen
sind perfekt für die Organisation in der Garage, da sie Fahrräder vom Boden heben
und so die Organisation und Reinigung in Ihrem Haus und Ihrer Garage erleichtern.
Die wandmontierte Fahrradhalterung spart effizient Platz.
19.3 BREIT GRÖßE HAKEN FÜR FAHRRADAUFHÄNGUNG - Kann bis zu 4,4 Zoll
große Fatbike-Reifen aufhängen und ist daher für Mountainbikes, Rennräder, Falträder,
Hybridräder, Erwachsenenfahrräder, Kinderfahrräder, Roller usw. geeignet. Breite
Haken vereinfachen das Aufhängen und Abnehmen Ihres Fahrrads.
19.4 LANGLEBIGES MATERIAL – Hergestellt aus pulverbeschichteten Schienen und
gummibeschichteten Hülsen für außergewöhnliche Haltbarkeit. Es verfügt über
Rostschutz-, Rissschutz-, Kratzschutz- und Rutschschutzfunktionen für mehr
Sicherheit. EINFACHE INSTALLATION – Für die Installation ist nur eine elektrische
Bohrmaschine und eventuell eine Wasserwaage erforderlich, um eine korrekte
Ausrichtung sicherzustellen. Vorgesehen für die Montage an Wandpfosten, geeignet
für Trockenbauwände oder andere Wandverkleidungen, muss jedoch an festen
Strukturen befestigt werden. Enthält alle erforderlichen Installationshardware.
20. Produktparameter
Artik
el
Model
l
Ges
amtl
astgr
enze
/
Pfun
d
Speic
hern
Fahrr
ad
Meng
e
/
pcs
Schiene
Haken
Gesamtl
änge
/
Zoll
Länge
jeder
Schien
e
/
Zoll
Loc
hab
stan
d
/
Zoll
Men
ge
/
pcs
Für
4,4 Zoll
Reifen
/
pcs
Für
2,5 Zoll
Reifen
/
pcs
Ander
e
Hake
n
1
JC24-
ZXCZ
J001
100
2
17
17
16
1
1
1
✕

- 4 -
2
JC24-
ZXCZ
J002
200
4
32
16
15
2
1
3
2
3
JC24-
ZXCZ
J003
200
3+1
36
18
16
2
1
3
2
4
JC24-
ZXCZ
J004
300
3+3
48
16
15
3
1
5
3
5
JC24-
ZXCZ
J005
300
3+3
51
17
16
3
1
5
3
6
JC24-
ZXCZ
J006
300
5+1
64
16
15
4
1
5
5
7
JC24-
ZXCZ
J007
300
6
68
17
16
4
1
5
6
8
JC24-
ZXCZ
J008
400
5+3
72
18
16
4
1
7
7
9
JC24-
ZXCZ
J009
300
6
85
17
16
5
1
5
5
10
JC24-
ZXCZ
J010
300
3+3
48
16
15
6
1
5
3
Artik
el
Model
l
Ges
amtl
astgr
enze
/
Pfun
d
Speic
hern
Fahrr
ad
Meng
e
/
pcs
Lagerregale
Haken
Gesamtl
änge
/
Zoll
Länge
jeder
Schien
e
/
Zoll
Loc
hab
stan
d
/
Zoll
Men
ge
/
pcs
Für
4,4 Zoll
Reifen
/
pcs
Für
2,5 Zoll
Reifen
/
pcs
Ander
e
Hake
n
11
JC24-
ZXCZ
J011
500
4
63
31,5
/
2
1
3
20
Notiz:
15. Bei Artikel 10 sind zusätzlich 3 Stück Lagerregale vorhanden.
16. Die maximale Tragfähigkeit eines Einzelhakens beträgt 50 Pfund .
17. Wenn bei „ Store Bike Qty“ „3+1“ angezeigt wird, bedeutet das 3 Erwachsenenfahrräder + 1
Kinderfahrrad , insgesamt 4 Fahrräder.
18. Zur Befestigung an der Schiene können Sie ganz einfach mit einem 8 mm Bohrer Löcher in die
Wand bohren.
19. Bohren Sie vorab Löcher in Ziegelwände und installieren Sie diese mit Expansionsrohren;
20. Verwenden Sie für Holzwände selbstschneidende Schrauben.
21. Methode zur Platzierung der Fahrräder: Es wird empfohlen, die Vorder- und Hinterräder
- 5 -
benachbarter Fahrräder abwechselnd aufzuhängen .
21. Installationshandbuch für item1 - item9
Sie können die Schiene mit Schrauben an der Wand befestigen, wie hier gezeigt:
22. Installationsanleitung für Artikel 10
Sie können die Schiene mit Schrauben an der Wand befestigen, wie hier gezeigt:

- 6 -
23. Installationsanleitung für item11
Sie können die Schiene mit Schrauben an der Wand befestigen, wie hier gezeigt:

- 7 -
24. Pflegen
24.1 Reinigung: Wischen Sie die Oberfläche des Fahrradträgers mit einem feuchten
Tuch ab, um Staub und Schmutz zu entfernen.
24.2 Schmierung: Tragen Sie regelmäßig Schmiermittel auf die Schrauben und
Verbindungselemente des Fahrradträgers auf, um eine reibungslose Funktion zu
gewährleisten.
24.3 Kontrolle: Kontrollieren Sie alle paar Monate den Montagezustand des
Fahrradträgers um dessen Stabilität sicherzustellen.

- 1 -
Adresse : Shuangchenglu 803nong11hao1602A-1609shi, Baoshanqu,
Shanghai 200000 CN.
Nach AUS importiert: SIHAO PTY LTD, 1 ROKEVA STREETEASTWOOD
NSW 2122 Australien
Importiert in die USA: Sanven Technology Ltd., Suite 250, 9166 Anaheim
Place, Rancho Cucamonga, CA 91730
REP
EC
E-CrossStu GmbH
Mainzer Landstr.69, 60329 Frankfurt am Main.
REP
UK
YH CONSULTING LIMITED.
C/O YH Consulting Limited Office 147, Centurion House,
London Road, Staines-upon-Thames, Surrey, TW18 4AX
Technisch Support und E-Garantie-Zertifikat
www.vevor.com/support

- 2 -
Supporto tecnico e certificato di garanzia elettronica
www.vevor.com/support
PORTABICI DA PARETE
MANUALE D'USO
MODELLO: JC24-ZXCZJ001/ JC24-ZXCZJ002 / JC24-ZXCZJ003
MODELLO JC24-ZXCZJ004/ MODELLO JC24-ZXCZJ005/
MODELLO JC24-ZXCZJ006
JC24-ZXCZJ007/ JC24-ZXCZJ008 / JC24-ZXCZJ009
MODELLO JC24-ZXCZJ010/ MODELLO JC24-ZXCZJ011
We continue to be committed to provide you tools with competitive price.
"Save Half", "Half Price" or any other similar expressions used by us only represents an
estimate of savings you might benefit from buying certain tools with us compared to the major
top brands and does not necessarily mean to cover all categories of tools offered by us. You
are kindly reminded to verify carefully when you are placing an order with us if you are
actually saving half in comparison with the top major brands.

- 1 -
(L'immagine è solo di riferimento ; fare riferimento all'oggetto reale)
Have product questions? Need technical support? Please feel free to
contact us:
Technical Support and E-Warranty Certificate
www.vevor.com/support
NEED HELP? CONTACT US!
This is the original instruction, please read all manual instructions
carefully before operating. VEVOR reserves a clear interpretation of our
user manual. The appearance of the product shall be subject to the
product you received. Please forgive us that we won't inform you again if
there are any technology or software updates on our product.
Wall Mounted
Bike Rack

- 2 -
25. Avvertimento-
1.1 Solo installazione a parete: assicurarsi che il portabici sia installato
correttamente su una parete solida per garantire la sicurezza. Deve essere
installato solo su pareti in mattoni o pareti in legno di spessore sufficiente,
scegliendo la spaziatura dei fori appropriata per le guide.
1.2 Si sconsiglia l'installazione su cartongesso, pannelli di legno sottili e altre
posizioni, poiché la struttura è debole e non è in grado di sostenere il peso delle
biciclette appese.
1.3 Non sovraccaricare: ogni portabici ha una capacità di carico massima limitata.
Si prega di non appendere biciclette che superino il limite di peso o il numero di
biciclette che può contenere in sicurezza.
1.4 Metodo di posizionamento: si consiglia di alternare le ruote anteriori e
posteriori delle biciclette adiacenti per evitare che i manubri si ostruiscano a
vicenda.
1.5 Evitare collisioni: evitare collisioni tra la bicicletta e altri oggetti durante
l'installazione e l'uso per prevenire danni.
1.6 Ispezione regolare: controllare periodicamente le viti e i connettori del
portabici per garantirne la stabilità.
26. Introduzione del prodotto
Parete i portabici montati sono strumenti di stoccaggio e organizzazione
installati sulla parete per consentire alle biciclette di essere sollevate da terra e
appese verticalmente alla parete. Ciò facilita l'organizzazione e la pulizia della
casa e del garage e consente di risparmiare spazio in modo efficace. Sono
ampiamente utilizzati per organizzare e riporre le biciclette in garage, negozi,
scantinati e altri scenari.
27. Caratteristica principale
27.1 SOLUZIONI PERSONALIZZATE PER IL PORTO DELLE BICICLETTE - Dotate
di un elegante design a incastro, queste soluzioni per il trasporto delle bici combinano
perfettamente le rotaie. Le rotaie e i ganci possono essere separati o interbloccati per il
montaggio a parete per esporre o appendere la bici. Il design del gancio a scatto
consente un facile fissaggio alle rotaie e una spaziatura regolabile dei ganci.
- 3 -
27.2 SALVASPAZIO MONTATO A PARETE - I nostri portabici da parete sono perfetti
per gli organizzatori di garage, sollevando le bici da terra per facilitare l'organizzazione
e la pulizia in casa e in garage. Il portabici da parete consente di risparmiare spazio in
modo efficiente.
27.3 DI LARGH DIMENSIONI PER GANCIO BICI - In grado di appendere pneumatici
per bici da strada fino a 4,4 pollici, rendendolo adatto a mountain bike, bici da strada,
bici pieghevoli, bici ibride, bici per adulti, bici per bambini, scooter, ecc. I ganci di grandi
dimensioni semplificano il compito di appendere e smontare la bici.
27.4 MATERIALE DUREVOLE - Realizzato con guide verniciate a polvere e manicotti
rivestiti in gomma per una durata eccezionale. È dotato di funzioni antiruggine,
anticrepa, antigraffio e antiscivolo, garantendo la sicurezza. FACILE DA INSTALLARE
- L'installazione richiede solo un trapano elettrico e, possibilmente, una livella per
garantire un corretto allineamento. Progettato per il montaggio su montanti a parete,
adatto per cartongesso o altri pannelli murali, ma deve essere fissato a strutture solide.
Include tutto l'hardware di installazione necessario.
28. Parametro del prodotto
Artic
olo
Model
lo
Limit
e di
caric
o
total
e
/
libbr
e
Nego
zio
Bici
Quant
ità
/
pz.
Sbarra
Gancio
Lunghe
zza
totale
/
pollice
Lunghe
zza di
ogni
rotaia
/
pollice
Dist
anz
a
del
foro
/
polli
ce
Qua
ntità
/
pz.
Per
4,4
pollici
Pneum
atico
/
pz.
Per
2,5
pollici
Pneum
atico
/
pz.
Altro
Ganci
o
1
Model
lo
JC24-
ZXCZ
J001
100
2
17
17
16
1
1
1
✕
2
Model
lo
JC24-
ZXCZ
J002
200
4
32
16
15
2
1
3
2
3
Model
lo
JC24-
ZXCZ
J003
200
3+1
36
18
16
2
1
3
2

- 4 -
4
Model
lo
JC24-
ZXCZ
J004
300
3+3
48
16
15
3
1
5
3
5
Model
lo
JC24-
ZXCZ
J005
300
3+3
51
17
16
3
1
5
3
6
Model
lo
JC24-
ZXCZ
J006
300
5+1
64
16
15
4
1
5
5
7
Codic
e
articol
o:
JC24-
ZXCZ
J007
300
6
68
17
16
4
1
5
6
8
Model
lo
JC24-
ZXCZ
J008
400
5+3
72
18
16
4
1
7
7
9
Model
lo
JC24-
ZXCZ
J009
300
6
85
17
16
5
1
5
5
10
Model
lo
JC24-
ZXCZ
J010
300
3+3
48
16
15
6
1
5
3
Artic
olo
Model
lo
Limit
e di
caric
o
total
e
/
libbr
e
Nego
zio
Bici
Quant
ità
/
pz.
scaffali di stoccaggio
Gancio
Lunghe
zza
totale
/
pollice
Lunghe
zza di
ogni
rotaia
/
pollice
Dist
anz
a
del
foro
/
polli
ce
Qua
ntità
/
pz.
Per
4,4
pollici
Pneum
atico
/
pz.
Per
2,5
pollici
Pneum
atico
/
pz.
Altro
Ganci
o
11
Model
lo
JC24-
ZXCZ
J011
500
4
63
31.5
/
2
1
3
20
- 5 -
Nota:
22. L'articolo 10 è dotato inoltre di 3 ripiani portaoggetti.
23. La capacità di carico massima del gancio singolo è di 50 libbre .
24. Se in " Negozio quantità bici" viene visualizzato "3+1", ciò significa 3 biciclette per adulti + 1
bicicletta per bambini , per un totale di 4 biciclette.
25. Per praticare facilmente dei fori nel muro per l'installazione sulla rotaia, utilizzare una punta da
trapano da 8 mm.
26. Preforare i fori nei muri in mattoni e installarli con i tubi di espansione;
27. per le pareti in legno utilizzare viti autofilettanti.
28. Metodo di posizionamento delle biciclette: si consiglia di appendere alternativamente le ruote
anteriori e posteriori delle biciclette adiacenti .
29. Guida all'installazione per itme1 - item9
È possibile utilizzare delle viti per fissare la guida al muro, come mostrato qui:
30. Guida all'installazione per l'articolo 10
È possibile utilizzare delle viti per fissare la guida al muro, come mostrato qui:

- 6 -
31. Guida all'installazione per l'articolo 11
È possibile utilizzare delle viti per fissare la guida al muro, come mostrato qui:

- 7 -
32. Mantenere
32.1 Pulizia: utilizzare un panno umido per pulire la superficie del portabiciclette, in
modo da rimuovere polvere e sporcizia.
32.2 Lubrificazione: applicare regolarmente del lubrificante alle viti e ai connettori del
portabici per garantirne il regolare funzionamento.
32.3 Ispezione: controllare lo stato di installazione del portabiciclette ogni pochi mesi
per garantirne la stabilità.

- 1 -
Indirizzo : Shuangchenglu 803nong11hao1602A-1609shi, baoshanqu,
shanghai 200000 CN.
Importato in AUS: SIHAO PTY LTD, 1 ROKEVA STREETEASTWOOD NSW
2122 Australia
Importato negli USA: Sanven Technology Ltd., Suite 250, 9166 Anaheim
Place, Rancho Cucamonga, CA 91730
REP
EC
E-CrossStu GmbH
Mainzer Landstr.69, 60329 Frankfurt am Main.
REP
UK
YH CONSULTING LIMITED.
C/O YH Consulting Limited Office 147, Centurion House,
London Road, Staines-upon-Thames, Surrey, TW18 4AX
Tecnico Supporto e certificato di garanzia elettronica
www.vevor.com/support

- 2 -
Soporte técnico y certificado de garantía electrónica
www.vevor.com/support
PORTABICICLETAS DE PARED
MANUAL DEL USUARIO
MODELO: JC24-ZXCZJ001/ JC24-ZXCZJ002 / JC24-ZXCZJ003
JC24-ZXCZJ004/ JC24-ZXCZJ005/ JC24-ZXCZJ006
JC24-ZXCZJ007/ JC24-ZXCZJ008 / JC24-ZXCZJ009
JC24-ZXCZJ010/ JC24-ZXCZJ011
We continue to be committed to provide you tools with competitive price.
"Save Half", "Half Price" or any other similar expressions used by us only represents an
estimate of savings you might benefit from buying certain tools with us compared to the major
top brands and does not necessarily mean to cover all categories of tools offered by us. You
are kindly reminded to verify carefully when you are placing an order with us if you are
actually saving half in comparison with the top major brands.

- 1 -
(La imagen es solo de referencia ; consulte el objeto real)
Have product questions? Need technical support? Please feel free to
contact us:
Technical Support and E-Warranty Certificate
www.vevor.com/support
NEED HELP? CONTACT US!
This is the original instruction, please read all manual instructions
carefully before operating. VEVOR reserves a clear interpretation of our
user manual. The appearance of the product shall be subject to the
product you received. Please forgive us that we won't inform you again if
there are any technology or software updates on our product.
Wall Mounted
Bike Rack

- 2 -
33. Advertencia-
1.1 Instalación únicamente en pared: Asegúrese de que el portabicicletas esté
instalado correctamente en una pared sólida para garantizar la seguridad. Solo
debe instalarse en paredes de ladrillo o de madera de espesor suficiente,
eligiendo el espaciado adecuado entre los orificios para los rieles guía.
1.2 No se recomienda la instalación sobre placas de yeso, paneles de madera
delgados y otros lugares debido a que la estructura débil no puede soportar el
peso de las bicicletas colgadas.
1.3 No sobrecargue: cada portabicicletas tiene una capacidad de carga máxima
limitada. No cuelgue bicicletas que superen el límite de peso o la cantidad de
bicicletas que puede soportar de forma segura.
1.4 Método de colocación: Se recomienda alternar las ruedas delanteras y
traseras de bicicletas adyacentes para evitar que los manillares se obstruyan
entre sí.
1.5 Evite colisiones: Evite colisiones entre la bicicleta y otros objetos durante la
instalación y el uso para evitar daños.
1.6 Inspección periódica: Revise periódicamente los tornillos y conectores del
portabicicletas para garantizar su estabilidad.
34. Presentación del producto
Muro Los portabicicletas montados son herramientas de almacenamiento y
organización que se instalan en la pared para permitir que las bicicletas se
levanten del piso y se cuelguen verticalmente en la pared. Esto facilita la
organización y la limpieza de su hogar y garaje y ahorra espacio de manera
efectiva. Se utilizan ampliamente para organizar y almacenar bicicletas en
garajes, tiendas, sótanos y otros escenarios.
35. Característica principal
35.1 SOLUCIONES PERSONALIZADAS PARA ALMACENAMIENTO DE
BICICLETAS: estas soluciones para almacenamiento de bicicletas cuentan con un
elegante diseño de enclavamiento de rieles y combinan a la perfección los rieles. Los
rieles y los ganchos se pueden separar o entrelazar para montarlos en la pared y
exhibir o colgar su bicicleta. El diseño de gancho a presión permite una fácil fijación a
- 3 -
los rieles y un espaciado ajustable de los ganchos.
35.2 AHORRO DE ESPACIO EN LA PARED: nuestros portabicicletas de pared son
perfectos para organizar el garaje, ya que levantan las bicicletas del piso para facilitar
la organización y la limpieza en su hogar y garaje. El portabicicletas montado en la
pared ahorra espacio de manera eficiente.
35.3 GANCHOS DE TAMAÑO ANCHO PARA PERCHA DE BICICLETAS: capaz de
colgar neumáticos de bicicleta de hasta 4,4 pulgadas, lo que lo hace adecuado para
bicicletas de montaña, bicicletas de carretera, bicicletas plegables, bicicletas híbridas,
bicicletas para adultos, bicicletas para niños, scooters, etc. Los ganchos de tamaño
ancho simplifican la tarea de colgar y desmontar su bicicleta.
35.4 MATERIAL DURADERO: Fabricado con rieles recubiertos con pintura en polvo y
manguitos recubiertos de goma para una durabilidad excepcional. Cuenta con
funciones antioxidantes, antigrietas, antirayaduras y antideslizantes, lo que garantiza
la seguridad. FÁCIL DE INSTALAR: La instalación solo requiere un taladro eléctrico y,
posiblemente, un nivel para garantizar una alineación adecuada. Diseñado para
montaje en montantes de pared, apto para paneles de yeso u otros revestimientos de
pared con paneles, pero debe fijarse a estructuras sólidas. Incluye todo el hardware de
instalación necesario.
36. Parámetros del producto
Artíc
ulo
Model
o
Límit
e de
carg
a
total
/
libra
s
Alma
cenar
Bicicl
eta
Canti
dad
/
pieza
s
Carril
Gancho
Longitu
d total
/
pulgada
Longitu
d de
cada
carril
/
pulgada
Dist
anci
a
del
aguj
ero
/
pulg
ada
Canti
dad
/
piez
as
Para
4,4
pulgad
as
Neumá
tico
/
piezas
Para
2,5
pulgada
s
Neumát
ico
/
piezas
Otro
Ganc
ho
1
JC24-
ZXCZ
J001
100
2
17
17
16
1
1
1
✕
2
JC24-
ZXCZ
J002
200
4
32
16
15
2
1
3
2
3
JC24-
ZXCZ
J003
200
3+1
36
18
16
2
1
3
2

- 4 -
4
JC24-
ZXCZ
J004
300
3+3
48
16
15
3
1
5
3
5
JC24-
ZXCZ
J005
300
3+3
51
17
16
3
1
5
3
6
JC24-
ZXCZ
J006
300
5+1
64
16
15
4
1
5
5
7
JC24-
ZXCZ
J007
300
6
68
17
16
4
1
5
6
8
JC24-
ZXCZ
J008
400
5+3
72
18
16
4
1
7
7
9
JC24-
ZXCZ
J009
300
6
85
17
16
5
1
5
5
10
JC24-
ZXCZ
J010
300
3+3
48
16
15
6
1
5
3
Artíc
ulo
Model
o
Límit
e de
carg
a
total
/
libra
s
Alma
cenar
Bicicl
eta
Canti
dad
/
pieza
s
Estantes de almacenamiento
Gancho
Longitu
d total
/
pulgada
Longitu
d de
cada
carril
/
pulgada
Dist
anci
a
del
aguj
ero
/
pulg
ada
Canti
dad
/
piez
as
Para
4,4
pulgad
as
Neumá
tico
/
piezas
Para
2,5
pulgada
s
Neumát
ico
/
piezas
Otro
Ganc
ho
11
JC24-
ZXCZ
J011
500
4
63
31.5
/
2
1
3
20
Nota:
29. El artículo 10 también tiene 3 estantes de almacenamiento.
30. La capacidad de carga máxima del gancho simple es de 50 libras .
31. Si la “ Cantidad de bicicletas de la tienda” muestra “3+1”, eso significa 3 bicicletas para adultos + 1
bicicleta para niños , un total de 4 bicicletas.
32. Utilice fácilmente una broca de 8 mm para perforar agujeros en la pared para la instalación en el
riel.
33. Perforar previamente agujeros en las paredes de ladrillo e instalarlos con tubos de expansión;
34. Para paredes de madera, utilice tornillos autorroscantes.
35. Método de colocación de la bicicleta: Se recomienda colgar alternativamente las ruedas delanteras
y traseras de las bicicletas adyacentes .
37. Guía de instalación de itme1 - item9
- 5 -
Puedes utilizar tornillos para fijar el riel a la pared, como se muestra aquí:
38. Guía de instalación del artículo 10
Puedes utilizar tornillos para fijar el riel a la pared, como se muestra aquí:

- 6 -
39. Guía de instalación del artículo 11
Puedes utilizar tornillos para fijar el riel a la pared, como se muestra aquí:

- 7 -
40. Mantener
40.1 Limpieza: Utilice un paño húmedo para limpiar la superficie del portabicicletas
para eliminar el polvo y la suciedad.
40.2 Lubricación: Aplique periódicamente lubricante a los tornillos y conectores del
portabicicletas para garantizar su buen funcionamiento.
40.3 Inspección: Verifique el estado de instalación del portabicicletas cada pocos
meses para garantizar su estabilidad.

- 1 -
Dirección : Shuangchenglu 803nong11hao1602A-1609shi, baoshanqu,
shanghai 200000 CN.
Importado a AUS: SIHAO PTY LTD, 1 ROKEVA STREETEASTWOOD NSW
2122 Australia
Importado a EE. UU.: Sanven Technology Ltd., Suite 250, 9166 Anaheim
Place, Rancho Cucamonga, CA 91730
REP
EC
E-CrossStu GmbH
Mainzer Landstr.69, 60329 Frankfurt am Main.
REP
UK
YH CONSULTING LIMITED.
C/O YH Consulting Limited Office 147, Centurion House,
London Road, Staines-upon-Thames, Surrey, TW18 4AX
Técnico Certificado de soporte y garantía electrónica
www.vevor.com/support

- 2 -
Wsparcie techniczne i certyfikat e-gwarancji
www.vevor.com/support
STOJAK NA ROWERY MONTOWANY NA
ŚCIANIE
INSTRUKCJA OBSŁUGI
MODELE: JC24-ZXCZJ001/ JC24-ZXCZJ002 / JC24-ZXCZJ003
JC24-ZXCZJ004/ JC24-ZXCZJ005 / JC24-ZXCZJ006
JC24-ZXCZJ007/ JC24-ZXCZJ008 / JC24-ZXCZJ009
JC24-ZXCZJ010/ JC24-ZXCZJ011
We continue to be committed to provide you tools with competitive price.
"Save Half", "Half Price" or any other similar expressions used by us only represents an
estimate of savings you might benefit from buying certain tools with us compared to the major
top brands and does not necessarily mean to cover all categories of tools offered by us. You
are kindly reminded to verify carefully when you are placing an order with us if you are
actually saving half in comparison with the top major brands.
- 1 -
(Zdjęcie ma charakter poglądowy , proszę odnieść się do rzeczywistego obiektu)
Have product questions? Need technical support? Please feel free to
contact us:
Technical Support and E-Warranty Certificate
www.vevor.com/support
NEED HELP? CONTACT US!
This is the original instruction, please read all manual instructions
carefully before operating. VEVOR reserves a clear interpretation of our
user manual. The appearance of the product shall be subject to the
product you received. Please forgive us that we won't inform you again if
there are any technology or software updates on our product.
Wall Mounted
Bike Rack

- 2 -
41. Ostrzeżenie-
1.1 Montaż tylko na ścianie: Upewnij się, że stojak na rowery jest prawidłowo
zainstalowany na solidnej ścianie, aby zapewnić bezpieczeństwo. Powinien być
instalowany tylko na ścianach z cegły lub ścianach drewnianych o odpowiedniej
grubości, wybierając odpowiedni odstęp otworów dla szyn prowadzących.
1.2 Nie zaleca się montażu na płytach gipsowo-kartonowych, cienkich panelach
drewnianych i innych miejscach ze względu na ich słabą konstrukcję, która nie
utrzyma ciężaru wiszących rowerów.
1.3 Nie przeciążaj: Każdy stojak na rowery ma ograniczoną maksymalną
ładowność. Nie wieszaj rowerów, których waga przekracza limit lub liczbę
rowerów, które można na nim bezpiecznie umieścić.
1.4 Metoda montażu: Zaleca się naprzemienne montowanie przednich i tylnych
kół sąsiadujących ze sobą rowerów, aby kierownice nie przeszkadzały sobie
nawzajem.
1.5 Unikaj kolizji: Aby zapobiec uszkodzeniom, podczas montażu i użytkowania
roweru należy unikać kolizji z innymi obiektami.
1.6 Regularna kontrola: Okresowo sprawdzaj śruby i łączniki bagażnika
rowerowego, aby zapewnić jego stabilność.
42. Wprowadzenie produktu
Ściana montowane stojaki na rowery to narzędzia do przechowywania i
organizacji, instalowane na ścianie, aby umożliwić podniesienie rowerów z
podłogi i zawieszenie ich pionowo na ścianie. Ułatwia to organizację i sprzątanie
domu i garażu oraz skutecznie oszczędza miejsce. Są szeroko stosowane do
organizowania i przechowywania rowerów w garażach, sklepach, piwnicach i
innych miejscach.
43. Główna cecha
43.1 INDYWIDUALNE ROZWIĄZANIA DO PRZECHOWYWANIA ROWERÓW -
Dzięki eleganckiej konstrukcji z blokadą szyn, te rozwiązania do przechowywania
rowerów bezproblemowo łączą szyny. Szyny i haki można rozdzielić lub zablokować w
celu montażu na ścianie, aby wyświetlić lub powiesić rower. Konstrukcja karabińczyka
umożliwia łatwe mocowanie do szyn i regulowaną odległość między hakami.
- 3 -
43.2 MONTOWANE NA ŚCIANIE OSZCZĘDZAJĄ MIEJSCE - Nasze ścienne stojaki
na rowery są idealne do organizerów garażowych, podnosząc rowery z podłogi, aby
ułatwić organizację i sprzątanie w domu i garażu. Montowany na ścianie stojak na
rowery skutecznie oszczędza miejsce.
43.3 SZEROKIE HAKI DO WIESZAKA NA ROWER - Umożliwiają zawieszenie opon
rowerów typu fat bike o średnicy do 4,4 cala, dzięki czemu nadają się do rowerów
górskich, szosowych, składanych, hybrydowych, rowerów dla dorosłych, rowerów
dziecięcych, hulajnóg itp. Szerokie haki ułatwiają wieszanie i zdejmowanie roweru.
43.4 TRWAŁY MATERIAŁ - Wykonany z malowanych proszkowo szyn i gumowanych
tulei dla wyjątkowej trwałości. Posiada funkcje antykorozyjne, antypęknięciowe,
antyzarysowaniowe i antypoślizgowe, zapewniając bezpieczeństwo. ŁATWY W
INSTALACJI - Montaż wymaga tylko wiertarki elektrycznej i ewentualnie poziomicy,
aby zapewnić prawidłowe wyrównanie. Przeznaczony do montażu na kołkach
ściennych, odpowiedni do płyt gipsowo-kartonowych lub innych paneli ściennych, ale
musi być przymocowany do solidnych konstrukcji. Zawiera wszystkie niezbędne
elementy montażowe.
44. Parametr produktu
Prze
dmio
t
Model
Całk
owity
limit
obci
ążen
ia
/
funty
Sklep
Rowe
r
Ilość
/
szt.
Kolej
Hak
Długość
całkowit
a
/
cal
Długoś
ć
każdej
szyny
/
cal
Odle
głoś
ć
mię
dzy
otwo
rami
/
cal
Ilość
/
szt.
Dla
4,4 cala
Opona
/
szt.
Dla
2,5 cala
Opona
/
szt.
Inny
Hak
1
JC24-
ZXCZ
J001
100
2
17
17
16
1
1
1
✕
2
JC24-
ZXCZ
J002
200
4
32
16
15
2
1
3
2
3
JC24-
ZXCZ
J003
200
3+1
36
18
16
2
1
3
2
4
JC24-
ZXCZ
J004
300
3+3
48
16
15
3
1
5
3

- 4 -
5
JC24-
ZXCZ
J005
300
3+3
51
17
16
3
1
5
3
6
JC24-
ZXCZ
J006
300
5+1
64
16
15
4
1
5
5
7
JC24-
ZXCZ
J007
300
6
68
17
16
4
1
5
6
8
JC24-
ZXCZ
J008
400
5+3
72
18
16
4
1
7
7
9
JC24-
ZXCZ
J009
300
6
85
17
16
5
1
5
5
10
JC24-
ZXCZ
J010
300
3+3
48
16
15
6
1
5
3
Prze
dmio
t
Model
Całk
owity
limit
obci
ążen
ia
/
funty
Sklep
Rowe
r
Ilość
/
szt.
regały magazynowe
Hak
Długość
całkowit
a
/
cal
Długoś
ć
każdej
szyny
/
cal
Odle
głoś
ć
mię
dzy
otwo
rami
/
cal
Ilość
/
szt.
Dla
4,4 cala
Opona
/
szt.
Dla
2,5 cala
Opona
/
szt.
Inny
Hak
11
JC24-
ZXCZ
J011
500
4
63
31,5
/
2
1
3
20
Notatka:
36. Pozycja 10 posiada dodatkowo 3 szt . regałów magazynowych.
37. Maksymalne obciążenie pojedynczego haka wynosi 50 funtów .
38. Jeżeli w polu „ Ilość rowerów w sklepie” wyświetla się „3+1”, oznacza to, że znajdują się tam 3
rowery dla dorosłych + 1 rower dla dziecka , czyli łącznie 4 rowery.
39. Za pomocą wiertła 8 mm można łatwo wywiercić otwory w ścianie, aby zamontować je na szynie.
40. Wywierć otwory w ścianach z cegieł i zamontuj je za pomocą rurek rozporowych;
41. w przypadku ścian drewnianych należy stosować wkręty samogwintujące.
42. Sposób mocowania roweru: Zaleca się naprzemienne wieszanie przednich i tylnych kół sąsiednich
rowerów .
45. Instrukcja instalacji dla itme1 - item9
Do przymocowania szyny do ściany można użyć śrub, jak pokazano tutaj:

- 5 -
46. Instrukcja instalacji dla pozycji 10
Do przymocowania szyny do ściany można użyć śrub, jak pokazano tutaj:

- 6 -
47. Instrukcja instalacji dla item11
Do przymocowania szyny do ściany można użyć śrub, jak pokazano tutaj:

- 7 -
48. Utrzymywać
48.1 Czyszczenie: Aby usunąć kurz i brud z powierzchni stojaka na rowery, należy
przetrzeć go wilgotną szmatką.
48.2 Smarowanie: Regularnie smaruj śruby i łączniki bagażnika rowerowego, aby
zapewnić jego płynne działanie.
48.3 Kontrola: Co kilka miesięcy należy sprawdzać stan montażu bagażnika
rowerowego, aby upewnić się, że jest stabilny.

- 1 -
Adres : Shuangchenglu 803nong11hao1602A-1609shi, baoshanqu, szanghaj
200000 CN.
Importowane do AUS: SIHAO PTY LTD, 1 ROKEVA STREETEASTWOOD
NSW 2122 Australia
Importowane do USA: Sanven Technology Ltd., Suite 250, 9166 Anaheim
Place, Rancho Cucamonga, CA 91730
REP
EC
E-CrossStu GmbH
Mainzer Landstr.69, 60329 Frankfurt am Main.
REP
UK
YH CONSULTING LIMITED.
C/O YH Consulting Limited Office 147, Centurion House,
London Road, Staines-upon-Thames, Surrey, TW18 4AX
Techniczny Wsparcie i certyfikat e-gwarancji
www.vevor.com/support

- 2 -
Technische ondersteuning en e-garantiecertificaat
www.vevor.com/support
MUURBEVESTIGDE FIETSENDRAGER
GEBRUIKERSHANDLEIDING
MODEL: JC24-ZXCZJ001/ JC24-ZXCZJ002 / JC24-ZXCZJ003
JC24-ZXCZJ004/ JC24-ZXCZJ005 / JC24-ZXCZJ006
JC24-ZXCZJ007/JC24-ZXCZJ008 / JC24-ZXCZJ009
JC24-ZXCZJ010/ JC24-ZXCZJ011
We continue to be committed to provide you tools with competitive price.
"Save Half", "Half Price" or any other similar expressions used by us only represents an
estimate of savings you might benefit from buying certain tools with us compared to the major
top brands and does not necessarily mean to cover all categories of tools offered by us. You
are kindly reminded to verify carefully when you are placing an order with us if you are
actually saving half in comparison with the top major brands.

- 1 -
(De afbeelding is alleen ter referentie ; raadpleeg het daadwerkelijke object)
Have product questions? Need technical support? Please feel free to
contact us:
Technical Support and E-Warranty Certificate
www.vevor.com/support
NEED HELP? CONTACT US!
This is the original instruction, please read all manual instructions
carefully before operating. VEVOR reserves a clear interpretation of our
user manual. The appearance of the product shall be subject to the
product you received. Please forgive us that we won't inform you again if
there are any technology or software updates on our product.
Wall Mounted
Bike Rack

- 2 -
49. Waarschuwing-
1.1 Alleen wandmontage: Zorg ervoor dat de fietsendrager correct op een stevige
muur is geïnstalleerd om de veiligheid te garanderen. Hij mag alleen op
bakstenen muren of houten muren van voldoende dikte worden geïnstalleerd,
waarbij de juiste gatafstand voor de geleiderails wordt gekozen.
1.2 Installatie op gipsplaat, dunne houten panelen en andere locaties wordt
afgeraden, omdat de zwakke structuur het gewicht van hangende fietsen niet kan
dragen.
1.3 Overbelast niet: Elke fietsendrager heeft een beperkte maximale
laadcapaciteit. Hang geen fietsen op die de gewichtslimiet of het aantal fietsen
dat hij veilig kan dragen, overschrijden.
1.4 Plaatsingsmethode: Het is raadzaam om de voor- en achterwielen van
aangrenzende fietsen om en om te plaatsen, zodat het stuur elkaar niet in de weg
zit.
1.5 Voorkom botsingen: Voorkom botsingen tussen de fiets en andere objecten
tijdens de installatie en het gebruik om schade te voorkomen.
1.6 Regelmatige inspectie: Controleer regelmatig de schroeven en connectoren
van de fietsendrager om de stabiliteit ervan te garanderen.
50. Product introductie
Muur gemonteerde fietsenrekken zijn opslag- en organisatietools die aan de
muur worden geïnstalleerd, zodat fietsen van de vloer kunnen worden getild en
verticaal aan de muur kunnen worden gehangen. Dit vergemakkelijkt de
organisatie en het schoonmaken van uw huis en garage en bespaart effectief
ruimte. Ze worden veel gebruikt voor het organiseren en opslaan van fietsen in
garages, winkels, kelders en andere scenario's.
51. Hoofdkenmerk
51.1 AANGEPASTE FIETSOPSLAGOPLOSSINGEN - Met een elegant
rail-interlockontwerp combineren deze fietsopslagoplossingen naadloos rails. Rails en
haken kunnen worden gescheiden of in elkaar worden geklikt voor wandmontage om
uw fiets te tonen of op te hangen. Het karabijnhaakontwerp zorgt voor eenvoudige
bevestiging aan de rails en verstelbare haakafstand.
- 3 -
51.2 AAN DE MUUR GEMONTEERD RUIMTEBESPAREND - Onze fietswandrekken
zijn perfect voor garage-organizers, ze tillen fietsen van de vloer om de organisatie en
schoonmaak in uw huis en garage te vergemakkelijken. Het aan de muur gemonteerde
fietsenrek bespaart efficiënt ruimte.
51.3 BREDE HAKEN VOOR FIETSENHANGER - Geschikt voor het ophangen van
banden van maximaal 4,4 inch voor fatbikes, waardoor deze geschikt is voor
mountainbikes, racefietsen, vouwfietsen, hybride fietsen, fietsen voor volwassenen,
kinderfietsen, scooters, enz. Brede haken vereenvoudigen het ophangen en afbreken
van uw fiets.
51.4 DUURZAAM MATERIAAL - Gemaakt met gepoedercoate rails en rubberen
mouwen voor uitzonderlijke duurzaamheid. Het beschikt over antiroest-, antischeur-,
antikras- en antislipfuncties, wat de veiligheid garandeert. GEMAKKELIJK TE
INSTALLEREN - Voor de installatie is alleen een elektrische boormachine nodig en
eventueel een waterpas om een goede uitlijning te garanderen. Bedoeld voor montage
op wandstuds, geschikt voor gipsplaat of andere paneelwandbekleding, maar moet
worden bevestigd aan stevige structuren. Inclusief alle benodigde installatiehardware.
52. Productparameter
Item
Model
Total
e
bela
stingl
imiet
/
pond
Wink
el
Fiets
Hoev
eelhei
d
/
stuks
Spoor
Haak
Totale
lengte
/
duim
Lengte
van
elke rail
/
duim
Gat
afst
and
/
dui
m
Hoev
eelh
eid
/
stuks
Voor
4,4 inch
Band
/
stuks
Voor
2,5 inch
Band
/
stuks
Ander
Haak
1
JC24-
ZXCZ
J001
100
2
17
17
16
1
1
1
✕
2
JC24-
ZXCZ
J002
200
4
32
16
15
2
1
3
2
3
JC24-
ZXCZ
J003
200
3+1
36
18
16
2
1
3
2
4
JC24-
ZXCZ
J004
300
3+3
48
16
15
3
1
5
3
5
JC24-
ZXCZ
J005
300
3+3
51
17
16
3
1
5
3

- 4 -
6
JC24-
ZXCZ
J006
300
5+1
64
16
15
4
1
5
5
7
JC24-
ZXCZ
J007
300
6
68
17
16
4
1
5
6
8
JC24-
ZXCZ
J008
400
5+3
72
18
16
4
1
7
7
9
JC24-
ZXCZ
J009
300
6
85
17
16
5
1
5
5
10
JC24-
ZXCZ
J010
300
3+3
48
16
15
6
1
5
3
Item
Model
Total
e
bela
stingl
imiet
/
pond
Wink
el
Fiets
Hoev
eelhei
d
/
stuks
opslagrekken
Haak
Totale
lengte
/
duim
Lengte
van
elke rail
/
duim
Gat
afst
and
/
dui
m
Hoev
eelh
eid
/
stuks
Voor
4,4 inch
Band
/
stuks
Voor
2,5 inch
Band
/
stuks
Ander
Haak
11
JC24-
ZXCZ
J011
500
4
63
31.5
/
2
1
3
20
Opmerking:
43. Item 10 heeft bovendien 3 opbergrekken .
44. Het maximale draagvermogen van de enkele haak is 50 lbs .
45. Als bij “ Fietsenaantal opslaan” “3+1” staat, betekent dit 3 volwassenfietsen + 1 kinderfiets , in totaal
4 fietsen.
46. Gebruik een boor van 8 mm om gaten in de muur te boren voor installatie op de rail.
47. Boor gaten voor in de bakstenen muren en installeer deze met expansiebuizen;
48. voor houten wanden gebruik je zelftappende schroeven.
49. Methode voor het plaatsen van de fiets: Het wordt aanbevolen om de voor- en achterwielen van
aangrenzende fietsen afwisselend op te hangen .
53. Installatiehandleiding voor item1 - item9
U kunt schroeven gebruiken om de rail aan de muur te bevestigen, zoals hier
getoond:

- 5 -
54. Installatiehandleiding voor item 10
U kunt schroeven gebruiken om de rail aan de muur te bevestigen, zoals hier
getoond:

- 6 -
55. Installatiehandleiding voor item11
U kunt schroeven gebruiken om de rail aan de muur te bevestigen, zoals hier
getoond:

- 7 -
56. Behouden
56.1 Reinigen: Gebruik een vochtige doek om het oppervlak van de fietsendrager af te
vegen en stof en vuil te verwijderen.
56.2 Smering: Breng regelmatig smeermiddel aan op de schroeven en connectoren
van de fietsendrager om een soepele werking te garanderen.
56.3 Inspectie: Controleer elke paar maanden de installatiestatus van de
fietsendrager om de stabiliteit ervan te garanderen.

- 1 -
Adres : Shuangchenglu 803nong11hao1602A-1609shi, baoshanqu, shanghai
200000 CN.
Geïmporteerd naar AUS: SIHAO PTY LTD, 1 ROKEVA
STREETEASTWOOD NSW 2122 Australië
Geïmporteerd naar de VS: Sanven Technology Ltd., Suite 250, 9166
Anaheim Place, Rancho Cucamonga, CA 91730
REP
EC
E-CrossStu GmbH
Mainzer Landstr.69, 60329 Frankfurt am Main.
REP
UK
YH CONSULTING LIMITED.
C/O YH Consulting Limited Office 147, Centurion House,
London Road, Staines-upon-Thames, Surrey, TW18 4AX
Technisch Ondersteuning en E-garantiecertificaat
www.vevor.com/support

- 2 -
Teknisk support och e-garanticertifikat
www.vevor.com/support
VÄGGMONTERAT CYKELSTÄLL
ANVÄNDARMANUAL
MODELL: JC24-ZXCZJ001/ JC24-ZXCZJ002 / JC24-ZXCZJ003
JC24-ZXCZJ004/ JC24-ZXCZJ005 / JC24-ZXCZJ006
JC24-ZXCZJ007/ JC24-ZXCZJ008 / JC24-ZXCZJ009
JC24-ZXCZJ010/ JC24-ZXCZJ011
We continue to be committed to provide you tools with competitive price.
"Save Half", "Half Price" or any other similar expressions used by us only represents an
estimate of savings you might benefit from buying certain tools with us compared to the major
top brands and does not necessarily mean to cover all categories of tools offered by us. You
are kindly reminded to verify carefully when you are placing an order with us if you are
actually saving half in comparison with the top major brands.

- 1 -
(Bilden är endast för referens ; vänligen hänvisa till det faktiska objektet)
Have product questions? Need technical support? Please feel free to
contact us:
Technical Support and E-Warranty Certificate
www.vevor.com/support
NEED HELP? CONTACT US!
This is the original instruction, please read all manual instructions
carefully before operating. VEVOR reserves a clear interpretation of our
user manual. The appearance of the product shall be subject to the
product you received. Please forgive us that we won't inform you again if
there are any technology or software updates on our product.
Wall Mounted
Bike Rack

- 2 -
57. Varning-
1.1 Endast vägginstallation: Se till att cykelstället är korrekt installerat på en solid
vägg för att garantera säkerheten. Den bör endast installeras på tegelväggar eller
träväggar med tillräcklig tjocklek, välj lämpligt hålavstånd för styrskenorna.
1.2 Installation rekommenderas inte på gipsskivor, tunna träpaneler och andra
platser på grund av att den svaga strukturen inte kan bära vikten av hängande
cyklar.
1.3 Överbelasta inte: Varje cykelställ har en begränsad maximal lastkapacitet.
Häng inte cyklar som överskrider viktgränsen eller antalet cyklar som den säkert
kan hålla.
1.4 Placeringsmetod: Det rekommenderas att växla fram- och bakhjulen på
intilliggande cyklar för att undvika att styret hindrar varandra.
1.5 Undvik kollision: Undvik kollisioner mellan cykeln och andra föremål under
installation och användning för att förhindra skador.
1.6 Regelbunden inspektion: Kontrollera regelbundet cykelställets skruvar och
kopplingar för att säkerställa dess stabilitet.
58. Produktintroduktion
W all monterade cykelställ är förvarings- och organisationsverktyg installerade på
väggen så att cyklar kan lyftas från golvet och hängas vertikalt på väggen. Detta
underlättar organisationen och städningen av ditt hem och garage och sparar
effektivt utrymme. De används ofta för att organisera och förvara cyklar i garage,
butiker, källare och andra scenarier.
59. Huvudfunktion
59.1 ANPASSAD CYKELFÖRVARINGSLÖSNINGAR - Med en elegant rälslåsdesign
kombinerar dessa cykelförvaringslösningar sömlöst skenor. Skenor och krokar kan
separeras eller låsas ihop för väggmontering för att visa eller hänga din cykel.
Karbinhakens design möjliggör enkel montering på skenorna och justerbart
krokavstånd.
59.2 VÄGGMONTAT PLASSBESPARANDE - Våra cykelväggställ är perfekta för
garagearrangörer, som lyfter cyklar från golvet för att underlätta organisation och
städning i ditt hem och garage. Det väggmonterade cykelstället sparar effektivt

- 3 -
utrymme.
59.3 BRED STORLEKAR för CYKELHÄNGARE - Kan hänga upp till 4,4-tums feta
cykeldäck, vilket gör den lämplig för mountainbikes, landsvägscyklar, hopfällbara
cyklar, hybridcyklar, vuxencyklar, barncyklar, skotrar, etc. Breda krokar förenklar
uppgiften att hänga på och ta ner din cykel.
59.4 HÅLLBAR MATERIAL - Konstruerad med pulverlackerade skenor och
gummibelagda ärmar för exceptionell hållbarhet. Den har rostskydds-, sprickskydds-,
repnings- och halkskyddsfunktioner, vilket garanterar säkerhet. LÄTT ATT
INSTALLERA - Installationen kräver endast en elektrisk borr, och eventuellt en nivå för
att säkerställa korrekt inriktning. Avsedd för montering på väggreglar, lämplig för
gipsskivor eller annan panelad väggplåt, men måste fästas på solida strukturer.
Inkluderar all nödvändig installationshårdvara.
60. Produktparameter
Punk
t
Model
l
Total
bela
stnin
gsgr
äns
/
lbs
Lagra
Cykel
Antal
/
st
Järnväg
Krok
Total
längd
/
tum
Längd
på varje
skena
/
tum
Håla
vstå
nd
/
tum
Antal
/
st
För
4,4 tum
Trötta
/
st
För
2,5 tum
Trötta
/
st
Andra
Krok
1
JC24-
ZXCZ
J001
100
2
17
17
16
1
1
1
✕
2
JC24-
ZXCZ
J002
200
4
32
16
15
2
1
3
2
3
JC24-
ZXCZ
J003
200
3+1
36
18
16
2
1
3
2
4
JC24-
ZXCZ
J004
300
3+3
48
16
15
3
1
5
3
5
JC24-
ZXCZ
J005
300
3+3
51
17
16
3
1
5
3
6
JC24-
ZXCZ
J006
300
5+1
64
16
15
4
1
5
5
7
JC24-
ZXCZ
J007
300
6
68
17
16
4
1
5
6
- 4 -
8
JC24-
ZXCZ
J008
400
5+3
72
18
16
4
1
7
7
9
JC24-
ZXCZ
J009
300
6
85
17
16
5
1
5
5
10
JC24-
ZXCZ
J010
300
3+3
48
16
15
6
1
5
3
Punk
t
Model
l
Total
bela
stnin
gsgr
äns
/
lbs
Lagra
Cykel
Antal
/
st
förvaringsställ
Krok
Total
längd
/
tum
Längd
på varje
skena
/
tum
Håla
vstå
nd
/
tum
Antal
/
st
För
4,4 tum
Trötta
/
st
För
2,5 tum
Trötta
/
st
Andra
Krok
11
JC24-
ZXCZ
J011
500
4
63
31,5
/
2
1
3
20
Notera:
50. Artikel 10 har dessutom 3 st förvaringsställ.
51. Den maximala lastkapaciteten för enkelkrok är 50lbs .
52. Om " Store Bike Qty" visar "3+1", betyder det 3 vuxencyklar + 1 barncykel , totalt 4 cyklar .
53. Använd enkelt en 8 mm borr för att borra hål i väggen för installation på skenan.
54. Förborra hål i tegelväggar och installera dem med expansionsrör;
55. för träväggar, använd självgängande skruvar.
56. Cykelplaceringsmetod: Alternativ upphängning av fram- och bakhjulen på intilliggande cyklar
rekommenderas .
61. Installationsguide för itme1 - item9
Du kan använda skruvar för att fixera spåret på väggen, som visas här:
- 5 -
62. Installationsguide för punkt 10
Du kan använda skruvar för att fixera spåret på väggen, som visas här:
- 6 -
63. Installationsguide för artikel 11
Du kan använda skruvar för att fixera spåret på väggen, som visas här:
64. Upprätthålla
64.1 Rengöring: Använd en fuktig trasa för att torka av ytan på cykelstället för att ta
bort damm och smuts.
64.2 Smörjning: Applicera regelbundet smörjmedel på skruvarna och kopplingarna på
cykelstället för att säkerställa att det fungerar smidigt.
64.3 Inspektion: Kontrollera cykelställets installationsstatus med några månaders
mellanrum för att säkerställa dess stabilitet.

- 7 -

Adress : Shuangchenglu 803nong11hao1602A-1609shi, baoshanqu,
shanghai 200000 CN.
Importerad till AUS: SIHAO PTY LTD, 1 ROKEVA STREETEASTWOOD
NSW 2122 Australien
Importerad till USA: Sanven Technology Ltd., Suite 250, 9166 Anaheim
Place, Rancho Cucamonga, CA 91730
REP
EC
E-CrossStu GmbH
Mainzer Landstr.69, 60329 Frankfurt am Main.
REP
UK
YH CONSULTING LIMITED.
C/O YH Consulting Limited Office 147, Centurion House,
London Road, Staines-upon-Thames, Surrey, TW18 4AX
Teknisk Support och e-garanticertifikat
www.vevor.com/support