Setup Instructions
Product No. 3500392
CORDLESS
ROTARY TOOL

2
Need further help?
suppor[email protected]
See our full range at
www.vonhaus.com
Besoin d’aide supplémentaire ?
suppor[email protected]
Découvrez notre gamme complète sur
www.vonhaus.com
Benötigen Sie weitere Hilfe?
suppor[email protected]
Entdecken Sie unser gesamtes
Sortiment auf
www.vonhaus.com
¿Necesita más ayuda?
suppor[email protected]
Descubra toda nuestra gama en
www.vonhaus.com
Hai bisogno di ulteriore assistenza?
suppor[email protected]
Scopri tutta la nostra gamma su
www.vonhaus.com
3
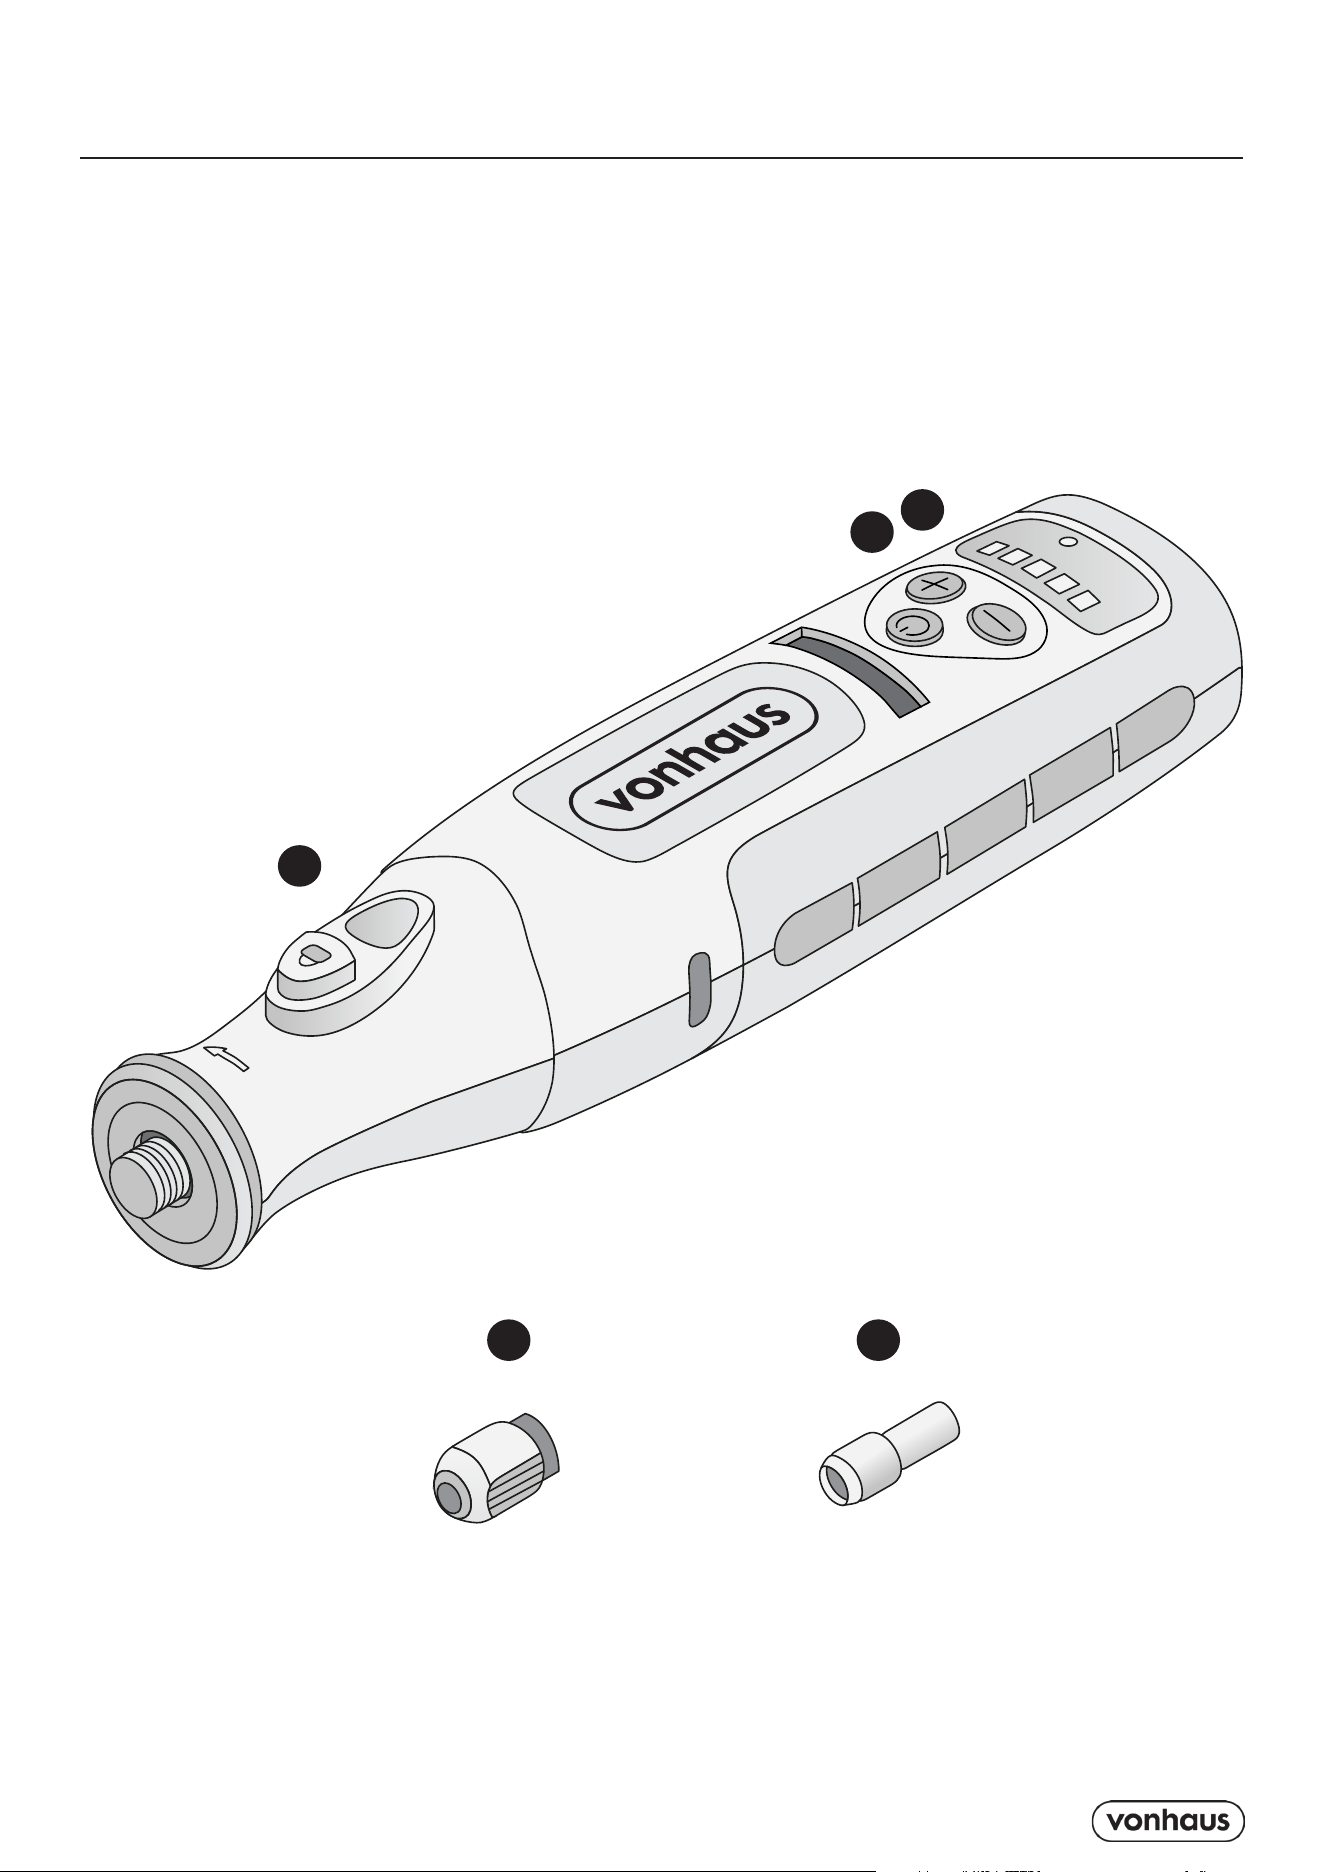
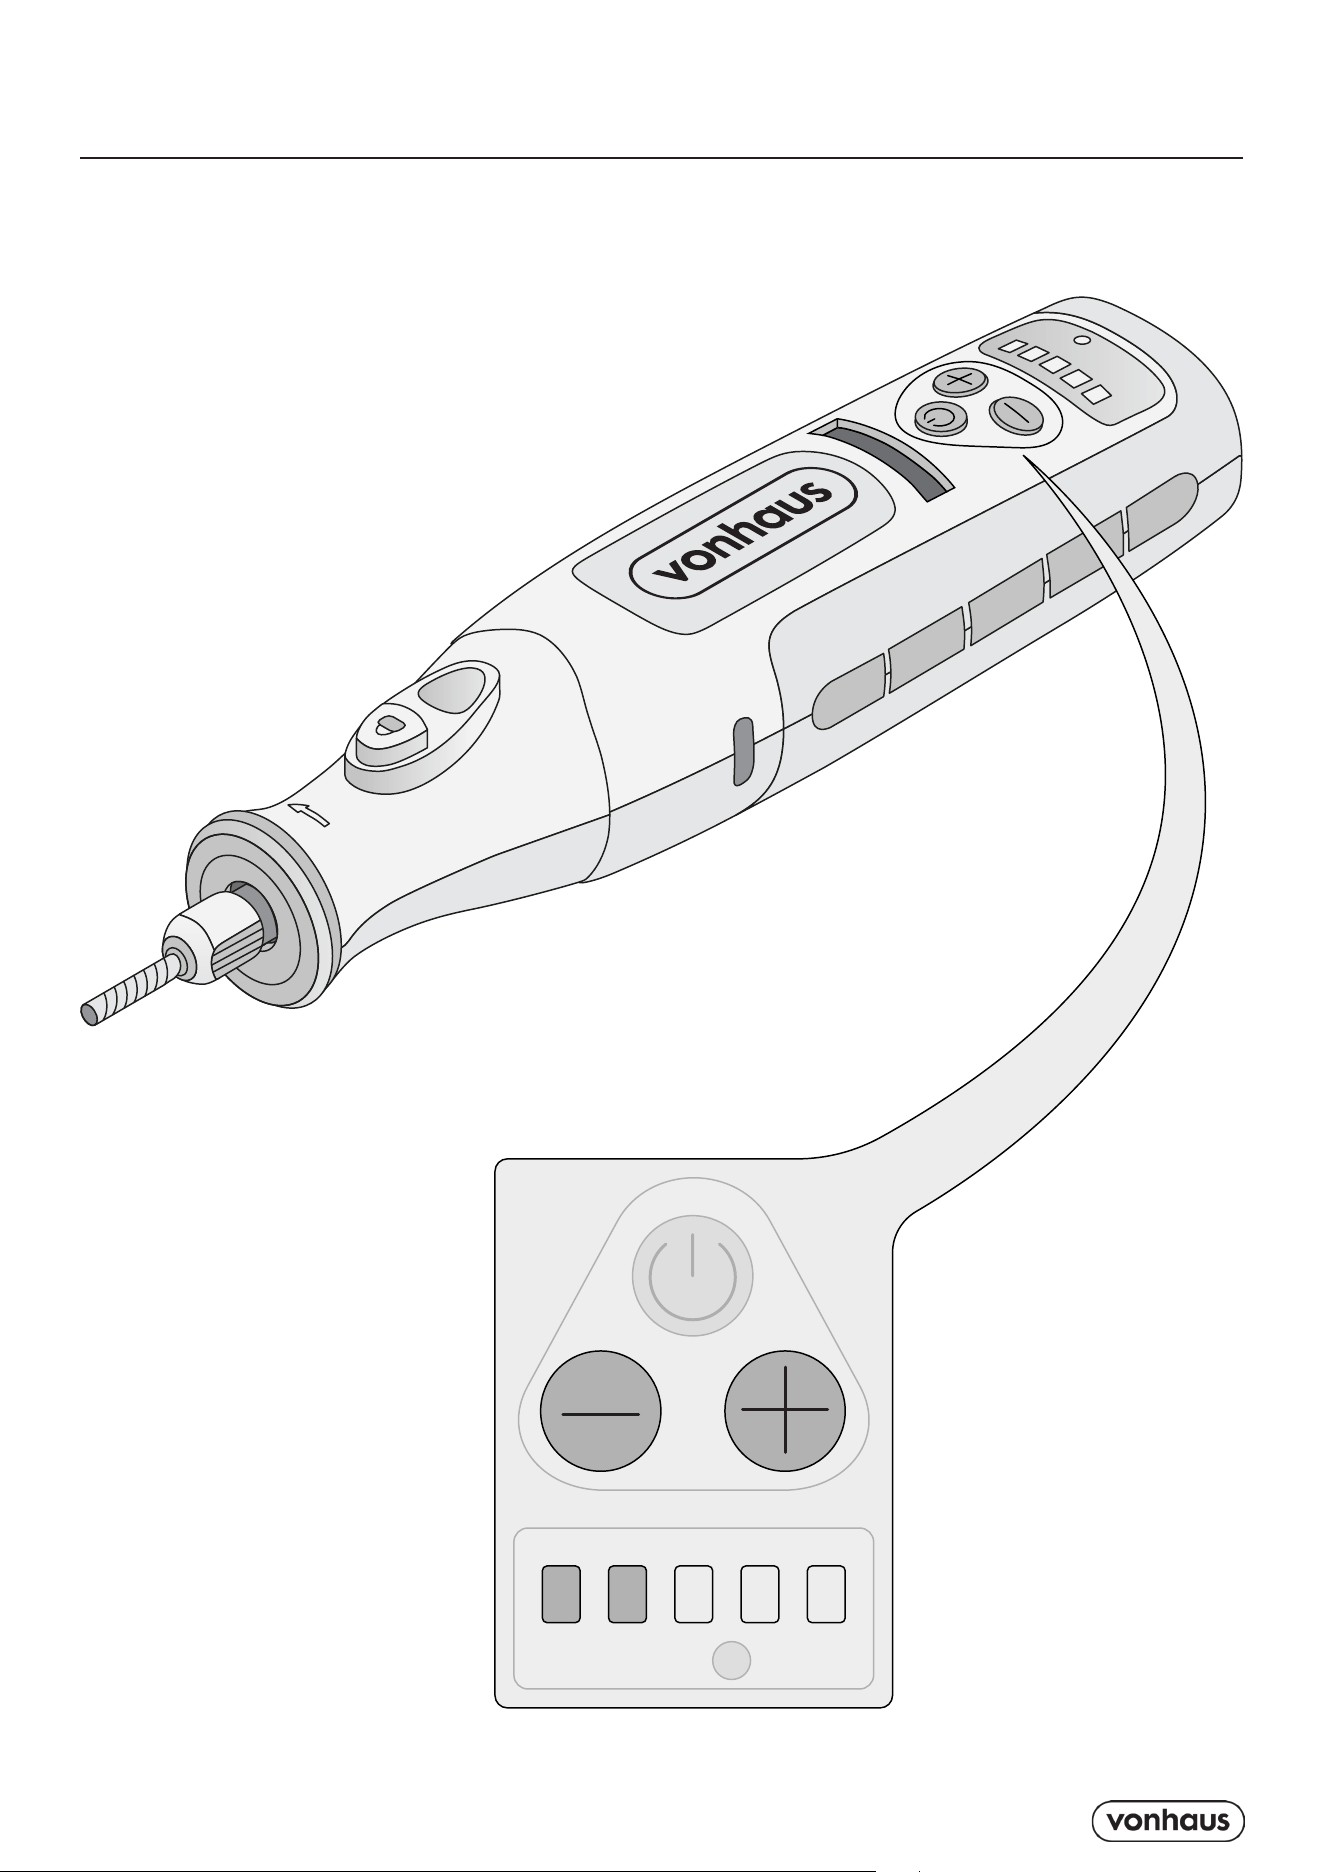
Controls & Parts
Fr: Contrôles et Pièces / De: Steuerungen und Teile
Es: Controles y Piezas / It: C Controlli e Parti
1
2
3
4 5
X2

4
Controls & Parts
1. Spindle Lock Button
2. On/Off Switch
3. Speed Adjustment Buttons
4. Collet Chuck
5. Collet (Two Different Sizes)
Contrôles et Pièces
1. Bouton de verrouillage de la broche
2. Interrupteur marche/arrêt
3. Boutons de réglage de la vitesse
4. Mandrin à pince
5. Pince (deux tailles différentes)
Steuerungen und Teile
1. Spindelarretierungsknopf
2. Ein/Aus-Schalter
3. Geschwindigkeitseinstellungstasten
4. Spannzangenfutter
5. Spannzange (zwei verschiedene Größen)
Controles y Pieza
1. Botón de bloqueo del husillo
2. Interruptor de encendido/apagado
3. Botones de ajuste de velocidad
4. Portabrocas de pinza
5. Pinza (dos tamaños diferentes)
Controlli e Parti
1. Pulsante di blocco del mandrino
2. Interruttore on/off
3. Pulsanti di regolazione della velocità
4. Mandrino a pinza
5. Pinza (due dimensioni diverse)
Controls & Parts
Fr: Contrôles et Pièces / De: Steuerungen und Teile
Es: Controles y Piezas / It: Controlli e Parti

5
Accessories
• 2pc HSS Cutter: ø3.2mm - High-speed
steel cutters for precise cutting.
• 80pcs Sanding Paper - Various grits for
smoothing surfaces.
• 36pcs Cut Off Wheels - For cutting metal,
plastic, and other materials.
• 5pcs Grinding Wheel with Shank:
ø3.2mm - For grinding and shaping.
• 2pc Sanding Shank: ø3.2mm - Holds
sanding bands.
• 10pcs Sanding Band - For sanding and
smoothing.
• 3pcs Small Fiberglass Cut Off Wheels -
Durable wheels for cutting.
• 2pc HSS Drill: 3.2mm & 2.3mm - High-
speed steel drills for precise drilling.
• 6pcs Diamond Bit: ø3.2mm - For engrav-
ing, carving, and etching.
• 3pcs Mandrel: ø3.2mm - Holds various
accessories.
• 4pcs Felt Wheel - For polishing and buffing.
• 1pc Spanner - For tightening and loosening
the collet nut.
• 2pcs Steel Brush: ø3.2mm - For cleaning
and removing rust.
• 2pc HSS Cutting Discs: ø3.2mm - For
cutting various materials.
• 2x Collet: ø3.2mm & ø2.3mm (1x pre-
assembled in tool) - Holds bits of different
sizes.
• 2pcs Diamond Wheel - For cutting and
grinding hard materials.
• Note: All accessories fit the 3.2mm collet
except for one 2.3mm drill bit, which fits the
2.3mm collet.
Accessories
• 2pc Fraise HSS : ø3,2mm - Fraises en acier
rapide pour une coupe précise.
• 80pcs Papier de verre - Différents grains
pour lisser les surfaces.
• 36pcs Disques à tronçonner - Pour couper
le métal, le plastique et d’autres matériaux.
• 5pcs Meule avec tige : ø3,2mm - Pour
meuler et façonner.
• 2pc Tige de ponçage : ø3,2mm - Supporte
les bandes de ponçage.
• 10pcs Bande de ponçage - Pour poncer
et lisser.
• 3pcs Petits disques à tronçonner en fibre
de verre - Disques durables pour la coupe.
• 2pc Foret HSS : 3,2mm & 2,3mm - Forets
en acier rapide pour un perçage précis.
• 6pcs Embout diamanté : ø3,2mm - Pour
graver, sculpter et ciseler.
• 3pcs Mandrin : ø3,2mm - Supporte divers
accessoires.
• 4pcs Roue en feutre - Pour polir et lustrer.
• 1pc Clé - Pour serrer et desserrer l’écrou de
la pince.
• 2pcs Brosse en acier : ø3,2mm - Pour
nettoyer et enlever la rouille.
• 2pc Disques de coupe HSS : ø3,2mm -
Pour couper divers matériaux.
• 2x Pinces de serrage : ø3,2 mm et ø2,3
mm (1x préassemblée dans l’outil) -
Maintient des embouts de différentes
tailles.
• 2pcs Meule diamantée - Pour couper et
meuler les matériaux durs.
• Remarque : Tous les accessoires s’adaptent
à la pince de 3,2 mm, sauf un foret de 2,3
mm qui s’adapte à la pince de 2,3 mm.
Accessories Fr: Accessoires / De: Zubehör / Es: Accesorios / It: Accessori

6
Zubehör
• 2 Stk. HSS-Fräser: ø3,2mm - Hoch-
geschwindigkeitsstahlschneider für präzises
Schneiden.
• 80 Stk. Schleifpapier - Verschiedene Kör-
nungen zum Glätten von Oberflächen.
• 36 Stk. Trennscheiben - Zum Schneiden
von Metall, Kunststoff und anderen Materi-
alien.
• 5 Stk. Schleifscheibe mit Schaft: ø3,2mm
- Zum Schleifen und Formen.
• 2 Stk. Schleifschaft: ø3,2mm - Hält
Schleifbänder.
• 10 Stk. Schleifband - Zum Schleifen und
Glätten.
• 3 Stk. Kleine Glasfaser-Trennscheiben -
Langlebige Scheiben zum Schneiden.
• 2 Stk. HSS-Bohrer: 3,2mm & 2,3mm
- Hochgeschwindigkeitsstahlbohrer für prä-
zises Bohren.
• 6 Stk. Diamantbit: ø3,2mm - Zum Gra-
vieren, Schnitzen und Ätzen.
• 3 Stk. Dorn: ø3,2mm - Hält verschiedene
Zubehörteile.
• 4 Stk. Filzscheibe - Zum Polieren und
Buffern.
• 1 Stk. Schraubenschlüssel - Zum Festzie-
hen und Lösen der Spannzangenmutter.
• 2 Stk. Stahlbürste: ø3,2mm - Zum Reini-
gen und Entfernen von Rost.
• 2 Stk. HSS-Schneidscheiben: ø3,2mm -
Zum Schneiden verschiedener Materialien.
• 2x Spannzange: ø3,2 mm & ø2,3 mm
(1x vormontiert im Werkzeug) - Hält Bits
verschiedener Größen.
• 2 Stk. Diamantscheibe - Zum Schneiden
und Schleifen harter Materialien.
• Hinweis: Alle Zubehörteile passen in
die 3,2-mm-Spannzange, außer einem
2,3-mm-Bohrer, der in die 2,3-mm-Spann-
zange passt.
Accesorios
• 2 uds. Fresa HSS: ø3,2mm - Fresas de
acero de alta velocidad para corte preciso.
• 80 uds. Papel de lija - Varios granos para
alisar superficies.
• 36 uds. Discos de corte - Para cortar metal,
plástico y otros materiales.
• 5 uds. Muela abrasiva con vástago:
ø3,2mm - Para moler y dar forma.
• 2 uds. Vástago de lijado: ø3,2mm - Sost-
iene bandas de lijado.
• 10 uds. Banda de lijado - Para lijar y alisar.
• 3 uds. Pequeños discos de corte de fibra de
vidrio - Discos duraderos para cortar.
• 2 uds. Broca HSS: 3,2mm y 2,3mm -
Brocas de acero de alta velocidad para
perforación precisa.
• 6 uds. Broca de diamante: ø3,2mm -
Para grabar, tallar y grabar al agua fuerte.
• 3 uds. Mandril: ø3,2mm - Sostiene varios
accesorios.
• 4 uds. Rueda de fieltro - Para pulir y abril-
lantar.
• 1 ud. Llave - Para apretar y aflojar la tuerca
del collarín.
• 2 uds. Cepillo de acero: ø3,2mm - Para
limpiar y eliminar óxido.
• 2 uds. Discos de corte HSS: ø3,2mm -
Para cortar diversos materiales.
• 2x Pinzas: ø3,2 mm y ø2,3 mm (1x
preinstalada en la herramienta) - Sujeta
brocas de diferentes tamaños.
• 2 uds. Disco de diamante - Para cortar y
moler materiales duros.meuler les matériaux
durs.
• Nota: Todos los accesorios se ajustan a la
pinza de 3,2 mm, excepto una broca de 2,3
mm que se ajusta a la pinza de 2,3 mm.
Accessories Fr: Accessoires / De: Zubehör / Es: Accesorios / It: Accessori

7
Accessori
• 2 pz. Fresa HSS: ø3,2mm - Frese in acciaio
rapido per tagli precisi.
• 80 pz. Carta abrasiva - Varie grane per
levigare le superfici.
• 36 pz. Dischi da taglio - Per tagliare
metallo, plastica e altri materiali.
• 5 pz. Mola con gambo: ø3,2mm - Per
smerigliare e modellare.
• 2 pz. Gambo per levigatura: ø3,2mm -
Supporta nastri abrasivi.
• 10 pz. Nastro abrasivo - Per levigare e
lisciare.
• 3 pz. Piccoli dischi da taglio in fibra di
vetro - Dischi resistenti per il taglio.
• 2 pz. Punta HSS: 3,2mm e 2,3mm - Punte
in acciaio rapido per forature precise.
• 6 pz. Punta diamantata: ø3,2mm - Per
incidere, intagliare e cesellare.
• 3 pz. Mandrino: ø3,2mm - Supporta vari
accessori.
• 4 pz. Ruota in feltro - Per lucidare e levi-
gare.
• 1 pz. Chiave - Per stringere e allentare il
dado della pinza.
• 2 pz. Spazzola in acciaio: ø3,2mm - Per
pulire e rimuovere la ruggine.
• 2 pz. Dischi da taglio HSS: ø3,2mm - Per
tagliare vari materiali.
• 2x Pinze: ø3,2 mm e ø2,3 mm (1x
preassemblata nello strumento) - Tiene
punte di diverse dimensioni.
• 2 pz. Disco diamantato - Per tagliare e
smerigliare materiali duri.
• Nota: Tutti gli accessori si adattano alla
pinza da 3,2 mm, tranne una punta da
trapano da 2,3 mm che si adatta alla pinza
da 2,3 mm.
Accessories Fr: Accessoires / De: Zubehör / Es: Accesorios / It: Accessori
8
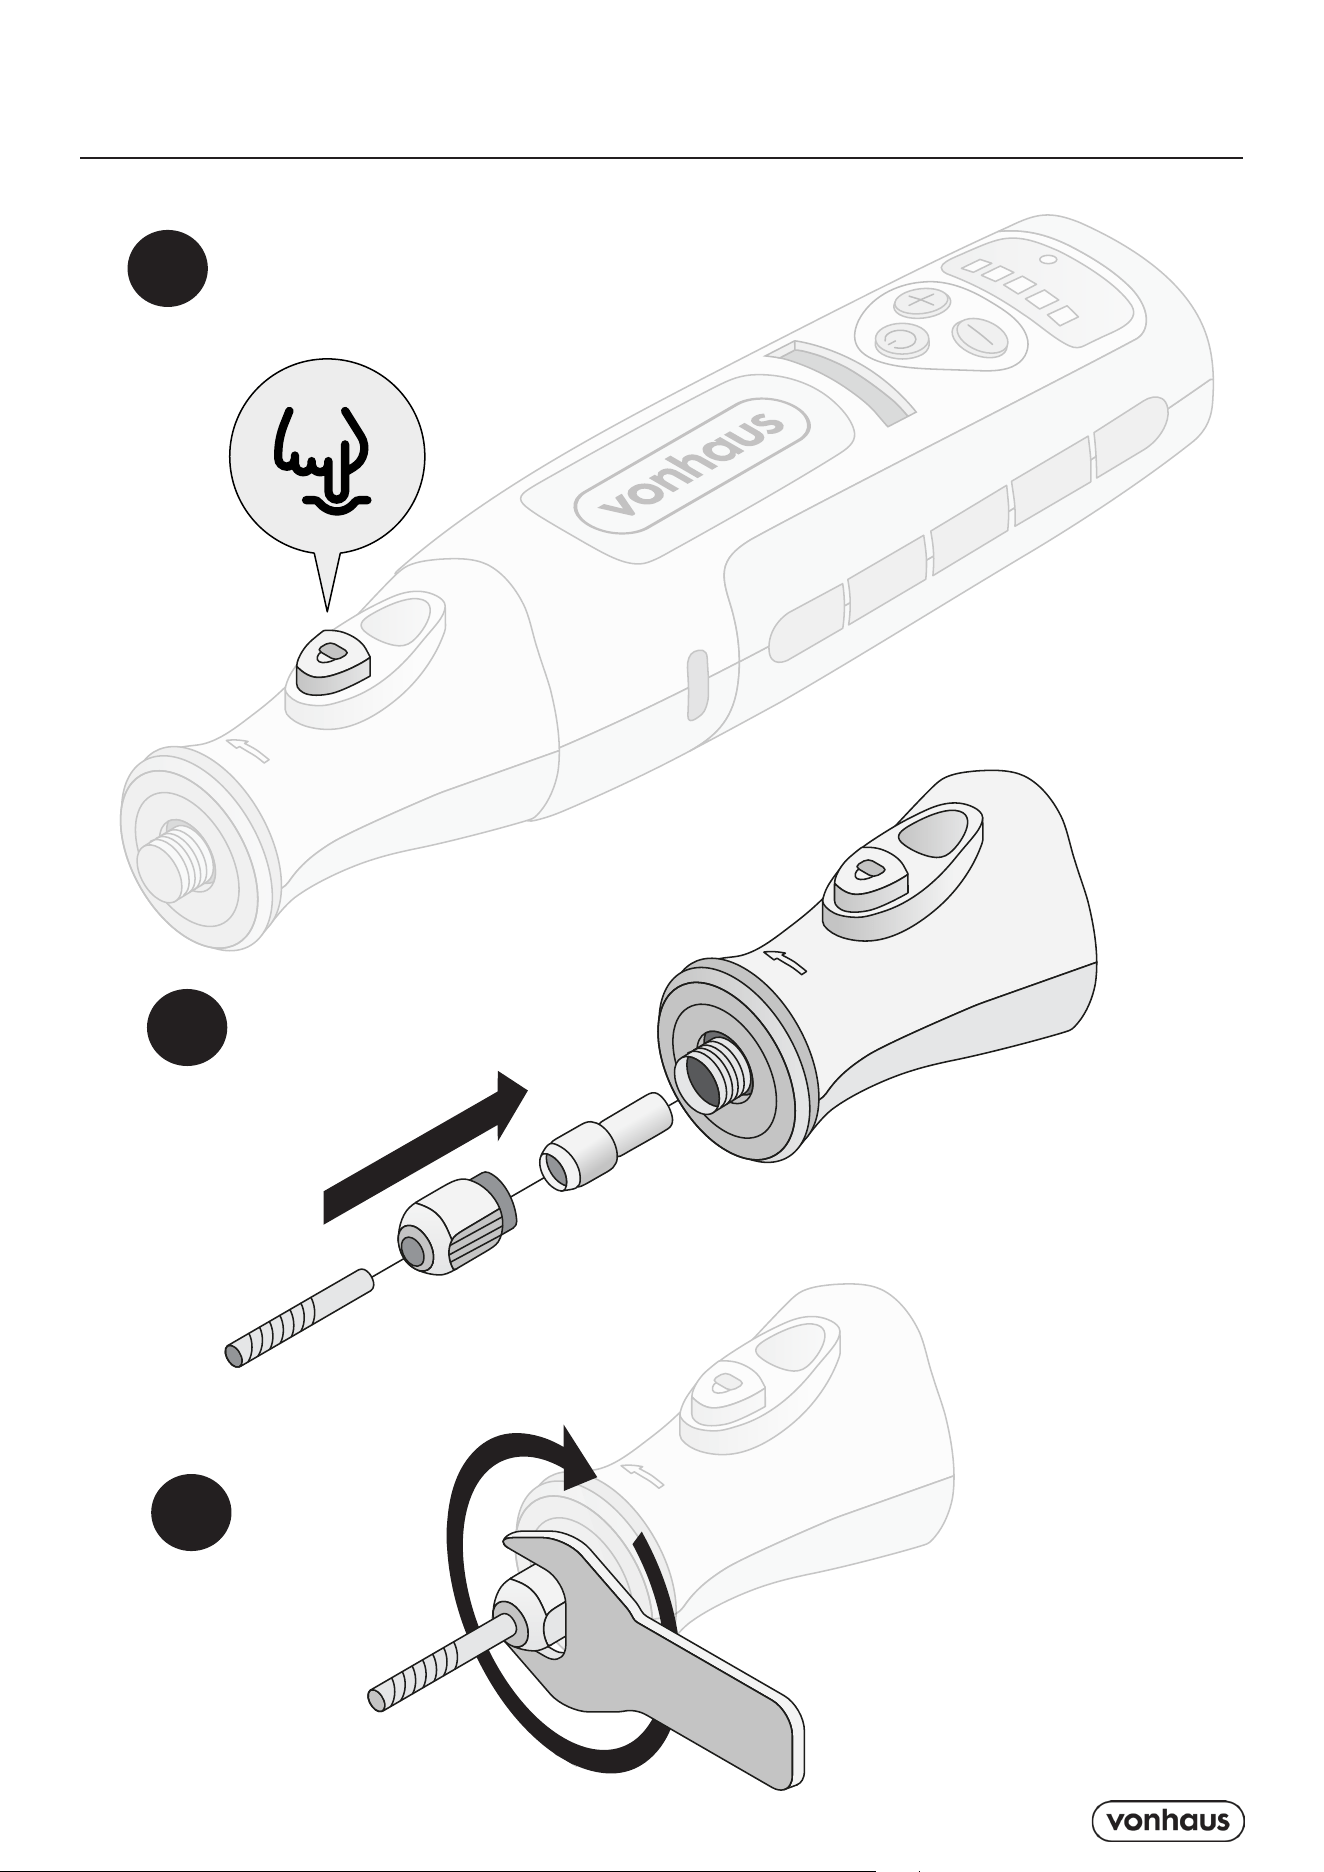
Insert Accessories Fr: Assemblée / De: Versammlung / Es: Asamblea / It: Assemblea
1
2
3
9
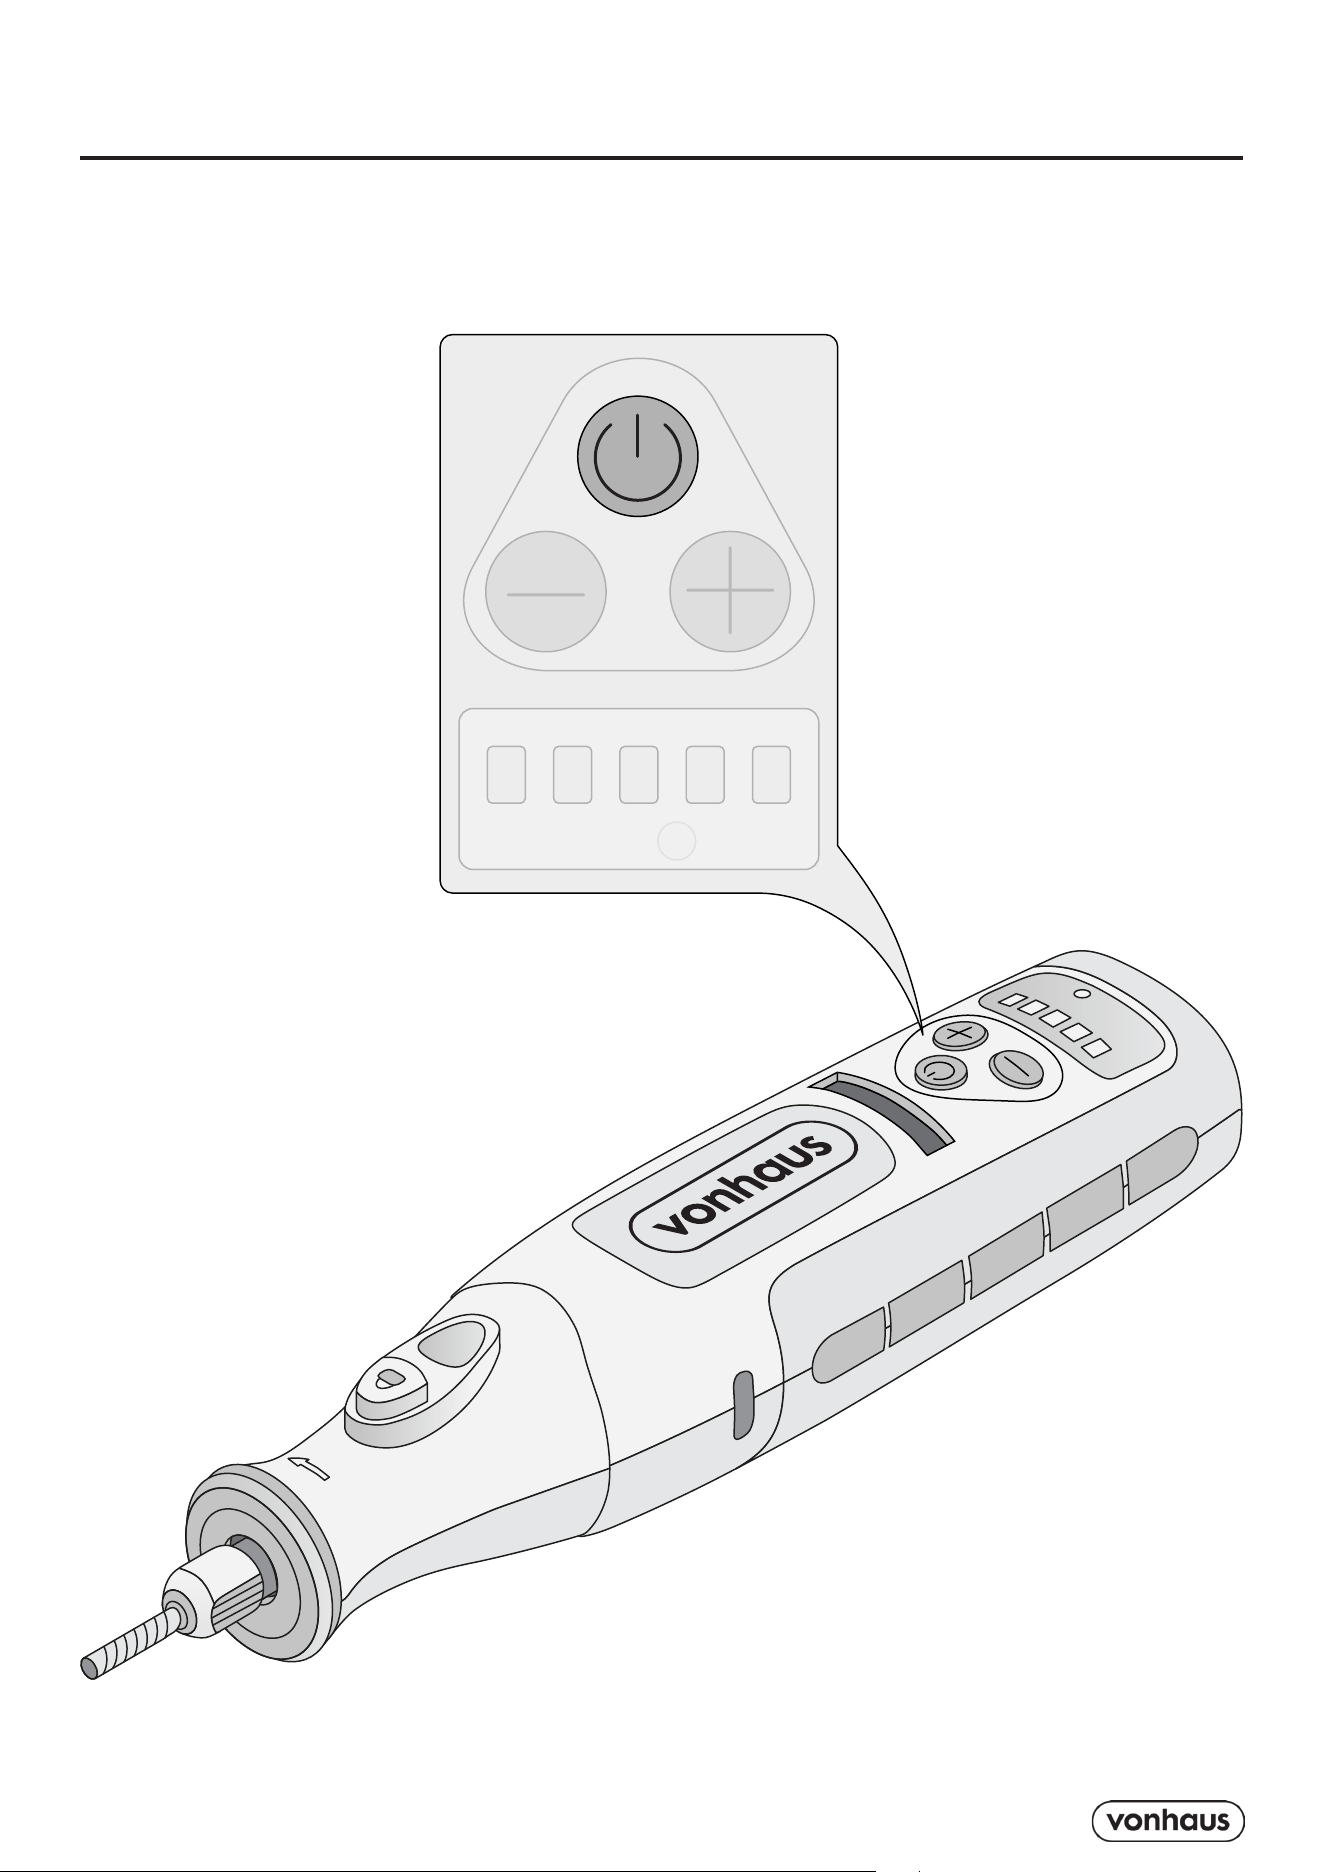
Turn On Fr: Allumer / De: Einschalten / Es: Encender / It: Accendere
10
Adjust Speed
Fr: Régler la vitesse / De: Geschwindigkeit anpassen
/ Es: Ajustar la velocidad / It: Regolare la velocità

11
Preparing to Use
1. Charge the Battery: Plug the charger into
an outlet and connect it to the tool. Allow it
to charge fully before first use.
2. Read the Manual: Carefully read through
the manual to understand the tool’s features,
specifications, and safety instructions.
Assembling the Tool
1. Install the Bit:
• Select the appropriate bit for your task.
• Insert the bit into the collet (the part that
holds the bit).
• Use the provided spanner to tighten the
collet nut securely, ensuring the bit is
firmly in place.
Changing the Bits
1. Turn Off the Tool: Ensure the tool is off and
the battery is removed if possible.
2. Engage the Spindle Lock:
• Press and hold the spindle lock button to
prevent the spindle from rotating.
3. Loosen the Collet Nut:
• Use the spanner to turn the collet nut
counterclockwise.
• Remove the current bit.
4. Insert the New Bit:
• Place the new bit into the collet.
• Tighten the collet nut by turning it clock-
wise with the spanner.
• Release the spindle lock.
Using the Tool
1. Select the Speed:
• Adjust the speed setting based on the
material and task. Lower speeds for
delicate tasks, higher speeds for tougher
materials.
2. Hold Steadily:
• Grip the tool firmly with both hands if
necessary.
• Allow the tool to get to full speed before
starting cut
• Guide it gently over the workpiece
without forcing it.
3. Apply Light Pressure:
• Let the tool do the work. Applying too
much pressure can damage the bit and
the workpiece.
How Not to Use
1. Avoid Overloading:
• Do not push the tool too hard. This can
cause overheating and damage.
• Do not start the tool in contact with the
material you are using the tool on. Always
start the tool under no load, then when at
full speed commence desired function
2. Do Not Use in Wet Conditions:
• Keep the tool dry to avoid electrical
hazards.
3. Avoid Loose Clothing:
• Ensure clothing and hair are secured to
prevent entanglement in the tool.
Information

12
Safety Concerns
1. Wear Protective Gear:
• Always wear safety glasses to protect
your eyes from debris.
• Use gloves to protect your hands.
• Wear a dust mask if working with materi-
als that produce fine dust.
2. Keep Away from Children:
• Store the tool and accessories out of
reach of children.
3. Inspect Before Use:
• Check the tool and accessories for any
signs of damage or wear before each
use.
Maintenance
1. Clean Regularly:
• After each use, wipe the tool with a dry
cloth to remove dust and debris.
2. Check Vents are Clear:
• Inspect the air vents on the tool regularly.
• Use a small brush or compressed air to
remove any dust or debris that may have
accumulated.
• Ensure the vents are not blocked to
prevent overheating and ensure optimal
performance. er the workpiece without
forcing it.
3. Store Properly:
• Keep the tool in a dry, cool place to
prevent rust and damage.
Troubleshooting
1. Tool Won’t Start:
• Check the battery charge and ensure it is
properly connected.
• Inspect the power switch and connections
for any issues.
2. Unusual Noise:
• Stop using the tool immediately.
• Inspect for any loose parts or damage.
3. Overheating:
• Allow the tool to cool down before con-
tinuing use.
• Check for any blockages or obstructions
that may be causing overheating.
Information

13
Information
Thank You
Thank you for purchasing your product/
appliance.
Should you require assistance with your
purchase, please contact us at support@domu.
co.uk
VonHaus is a registered trademark of DOMU
Brands Ltd. Made in China for DOMU Brands.
VonHaus is a registered trademark of DOMU
Brands Ltd.
Made in China for DOMU Brands.
Authorised Representative
Authorised Representative Service
77 Camden Street Lower
Dublin, D02 XE80, Ireland

14
Legal
DISPOSAL INFORMATION
Please recycle where facilities exist. Check with
your local authority for recycling advice.
CUSTOMER SERVICE
If you are having difficulty using this product
and require support, please contact support@
vonhaus.com
WARRANTY
To register your product and find out if you
qualify for a free extended warranty please go
to www.vonhaus.com/warranty.
Please retain a proof of purchase receipt or
statement as proof of the purchase date.
The warranty only applies if the product is used
solely in the manner indicated in the warnings
page of this manual, and all other instructions
have been followed accurately.
Any abuse of the product or the manner in which
it is used will invalidate the warranty.
RETURNS
Returned goods will not be accepted unless
re-packaged in its original packaging and ac-
companied by a relevant and completed returns
form. This does not affect your statutory rights.
No rights are given under this warranty to a
person acquiring the appliance second-hand
or for commercial or communal use.
COPYRIGHT
All material in this instruction manual are copy-
righted by DOMU Brands.
Any unauthorised use may violate worldwide
copyright, trademark, and other laws.

15
Préparation à l’utilisation
1. Charger la batterie : Branchez le char-
geur sur une prise et connectez-le à l’outil.
Laissez-le charger complètement avant la
première utilisation.
2. Lire le manuel : Lisez attentivement le
manuel pour comprendre les caractéris-
tiques, les spécifications et les consignes de
sécurité de l’outil.
Assemblage de l’outil
1. Installer l’embout :
• Sélectionnez l’embout approprié pour
votre tâche.
• Insérez l’embout dans la pince (la partie
qui maintient l’embout).
• Utilisez la clé fournie pour serrer ferme-
ment l’écrou de la pince, en vous assurant
que l’embout est bien en place.
Changement des embouts
1. Éteindre l’outil : Assurez-vous que l’outil est
éteint et que la batterie est retirée si possible.
2. Engager le blocage de l’arbre :
• Appuyez et maintenez le bouton de
blocage de l’arbre pour empêcher l’arbre
de tourner.
3. Desserrer l’écrou de la pince :
• Utilisez la clé pour tourner l’écrou de la
pince dans le sens antihoraire.
• Retirez l’embout actuel.
4. Insérer le nouvel embout :
• Placez le nouvel embout dans la pince.
• Serrez l’écrou de la pince en le tournant
dans le sens horaire avec la clé.
• Relâchez le blocage de l’arbre.
Utilisation de l’outil
1. Sélectionner la vitesse :
• Ajustez le réglage de la vitesse en fonc-
tion du matériau et de la tâche. Vitesses
plus basses pour les tâches délicates,
vitesses plus élevées pour les matériaux
plus durs.
2. Tenir fermement :
• Tenez l’outil fermement à deux mains si
nécessaire.
• Laissez l’outil atteindre sa pleine vitesse
avant de commencer la coupe.
• Guidez-le doucement sur la pièce à tra-
vailler sans forcer.
• Appliquer une légère pression :
• Laissez l’outil faire le travail. Appliquer
trop de pression peut endommager l’em-
bout et la pièce à travailler.
3. Comment ne pas utiliser
• Laissez l’outil faire le travail. Appliquer
trop de pression peut endommager l’em-
bout et la pièce à travailler.
Comment ne pas utiliser
1. Éviter la surcharge :
• Ne poussez pas trop fort sur l’outil. Cela
peut provoquer une surchauffe et des
dommages.
• Ne démarrez pas l’outil en contact avec
le matériau sur lequel vous travaillez.
Démarrez toujours l’outil à vide, puis
commencez la fonction désirée une fois
la pleine vitesse atteinte.
2. Ne pas utiliser dans des conditions
humides :
• Gardez l’outil au sec pour éviter les
risques électriques.
3. Éviter les vêtements amples :
• Assurez-vous que les vêtements et les
cheveux sont attachés pour éviter qu’ils
ne s’emmêlent dans l’outil.
Information

16
Préoccupations de sécurité
1. Porter un équipement de protection :
• Portez toujours des lunettes de sécurité
pour protéger vos yeux des débris.
• Utilisez des gants pour protéger vos
mains.
• Portez un masque anti-poussière si vous
travaillez avec des matériaux qui produ-
isent de la poussière fine.
2. Tenir hors de portée des enfants :
• Rangez l’outil et les accessoires hors de
portée des enfants.
3. Inspecter avant utilisation :
• Vérifiez l’outil et les accessoires pour tout
signe de dommage ou d’usure avant
chaque utilisation.
Entretien
1. Nettoyer régulièrement :
• Après chaque utilisation, essuyez l’outil
avec un chiffon sec pour éliminer la
poussière et les débris.
2. Vérifier que les évents sont dégagés :
• Inspectez régulièrement les évents
d’aération de l’outil.
• Utilisez une petite brosse ou de l’air com-
primé pour éliminer toute poussière ou
débris accumulés.
• Assurez-vous que les évents ne sont
pas obstrués pour éviter la surchauffe et
assurer des performances optimales.
3. Ranger correctement :
• Conservez l’outil dans un endroit sec et
frais pour éviter la rouille et les dommag-
es.
Dépannage
1. L’outil ne démarre pas :
• Vérifiez la charge de la batterie et
assurez-vous qu’elle est correctement
connectée.
• Inspectez l’interrupteur d’alimentation et
les connexions pour tout problème.
2. Bruit inhabituel :
• Arrêtez immédiatement d’utiliser l’outil.
• Vérifiez s’il y a des pièces desserrées ou
des dommages.
3. Surchauffe :
• Laissez l’outil refroidir avant de continuer
à l’utiliser.
• Vérifiez s’il y a des blocages ou des
obstructions qui pourraient causer une
surchauffe.
Information

17
Information
Merci
Nous vous remercions d’avoir acheté votre
produit/appareil.
Si vous avez besoin d’aide concernant votre
achat, veuillez nous contacter à support@
domu.co.uk
VonHaus est une marque déposée de DOMU
Brands Ltd. Fabriqué en Chine pour DOMU
Brands.
VonHaus est une marque déposée de DOMU
Brands Ltd.
Fabriqué en Chine pour DOMU Brands.
Représentant autorisé
Authorised Representative Service
77 Camden Street Lower
Dublin, D02 XE80, Ireland

18
Légal
INFORMATIONS SUR L’ÉLIMINATION
Veuillez recycler lorsque des installations exist-
ent. Consultez votre autorité locale pour obtenir
des conseils sur le recyclage.
CUSTOMER SERVICE
Si vous rencontrez des difficultés pour utiliser
ce produit et avez besoin d’assistance, veuillez
contacter suppor[email protected]
GARANTIE
Pour enregistrer votre produit et savoir si vous
êtes éligible à une extension de garantie gra-
tuite, veuillez vous rendre sur www.vonhaus.
com/warranty.
Veuillez conserver une preuve d’achat ou un
relevé comme preuve de la date d’achat.
La garantie ne s’applique que si le produit est
utilisé uniquement de la manière indiquée dans
la page des avertissements de ce manuel, et
que toutes les autres instructions ont été suivies
avec précision.
Tout abus du produit ou de la manière dont il est
utilisé invalidera la garantie.
RETOURS
Les marchandises retournées ne seront ac-
ceptées que si elles sont remballées dans leur
emballage d’origine et accompagnées d’un
formulaire de retour pertinent et dûment rempli.
Cela n’affecte pas vos droits statutaires.]
Aucun droit n’est accordé en vertu de cette
garantie à une personne acquérant l’appareil
d’occasion ou pour un usage commercial ou
communal.
DROITS D’AUTEUR
Tout le matériel contenu dans ce manuel d’in-
structions est protégé par les droits d’auteur de
DOMU Brands.
Toute utilisation non autorisée peut violer les lois
sur les droits d’auteur, les marques déposées et
autres lois dans le monde entier.

19
Vorbereitung zur Verwendung
1. Akku aufladen: Stecken Sie das Ladegerät
in eine Steckdose und verbinden Sie es mit
dem Werkzeug. Lassen Sie es vor dem ersten
Gebrauch vollständig aufladen.
2. Bedienungsanleitung lesen: Lesen Sie
die Anleitung sorgfältig durch, um die Funk-
tionen, Spezifikationen und Sicherheitshin-
weise des Werkzeugs zu verstehen.
Zusammenbau des Werkzeugs
1. Bit einsetzen:
• Wählen Sie den passenden Bit für Ihre
Aufgabe.
• Setzen Sie den Bit in die Spannzange
(den Teil, der den Bit hält) ein.
• Verwenden Sie den mitgelieferten
Schraubenschlüssel, um die Spannzan-
genmutter fest anzuziehen und sicherzus-
tellen, dass der Bit sicher sitzt.
Wechseln der Bits
1. Werkzeug ausschalten: Stellen Sie sicher,
dass das Werkzeug ausgeschaltet und der
Akku, wenn möglich, entfernt ist.
2. Spindelarretierung betätigen:
• Drücken und halten Sie den Spindelar-
retierungsknopf, um zu verhindern, dass
sich die Spindel dreht.
3. Spannzangenmutter lösen:
• Verwenden Sie den Schraubenschlüssel,
um die Spannzangenmutter gegen den
Uhrzeigersinn zu drehen.
• Entfernen Sie den aktuellen Bit.
4. Neuen Bit einsetzen:
• Setzen Sie den neuen Bit in die Spann-
zange ein.
• Ziehen Sie die Spannzangenmutter im
Uhrzeigersinn mit dem Schraubenschlüs-
sel fest.
• Lösen Sie die Spindelarretierung.
Verwendung des Werkzeugs
1. Geschwindigkeit wählen:
• Passen Sie die Geschwindigkeitseinstel-
lung an das Material und die Aufgabe an.
Niedrigere Geschwindigkeiten für emp-
findliche Aufgaben, höhere Geschwind-
igkeiten für härtere Materialien.
2. Sicher halten:
• Halten Sie das Werkzeug bei Bedarf mit
beiden Händen fest.
• Lassen Sie das Werkzeug die volle
Geschwindigkeit erreichen, bevor Sie mit
dem Schneiden beginnen.
• Führen Sie es sanft über das Werkstück,
ohne es zu forcieren.
3. Leichten Druck ausüben:
• Lassen Sie das Werkzeug die Arbeit
machen. Zu viel Druck kann den Bit und
das Werkstück beschädigen.
Wie man es nicht verwenden
sollte
1. Überlastung vermeiden:
• Drücken Sie das Werkzeug nicht zu stark.
Dies kann zu Überhitzung und Schäden
führen.
• Starten Sie das Werkzeug nicht in Kontakt
mit dem Material, an dem Sie arbeiten.
Starten Sie das Werkzeug immer ohne
Last und beginnen Sie dann bei voller
Geschwindigkeit mit der gewünschten
Funktion.
2. Nicht in nassen Umgebungen ver-
wenden:
• Halten Sie das Werkzeug trocken, um
elektrische Gefahren zu vermeiden.
3. Lose Kleidung vermeiden:
• Stellen Sie sicher, dass Kleidung und
Haare gesichert sind, um ein Verfangen
im Werkzeug zu verhindern.
Information

20
Sicherheitsbedenken
1. Schutzausrüstung tragen:
• Tragen Sie immer eine Schutzbrille, um
Ihre Augen vor Schmutz zu schützen.
• Verwenden Sie Handschuhe zum Schutz
Ihrer Hände.
• Tragen Sie eine Staubmaske, wenn Sie
mit Materialien arbeiten, die feinen Staub
erzeugen.
2. Von Kindern fernhalten:
• Bewahren Sie das Werkzeug und
Zubehör außerhalb der Reichweite von
Kindern auf.
3. Vor Gebrauch überprüfen:
• Überprüfen Sie das Werkzeug und
Zubehör vor jedem Gebrauch auf
Anzeichen von Beschädigung oder Ver-
schleiß.
Wartung
1. Regelmäßig reinigen:
• Wischen Sie das Werkzeug nach jedem
Gebrauch mit einem trockenen Tuch ab,
um Staub und Schmutz zu entfernen.
2. Lüftungsöffnungen prüfen:
• Überprüfen Sie regelmäßig die
Lüftungsöffnungen des Werkzeugs.
• Verwenden Sie eine kleine Bürste oder
Druckluft, um angesammelten Staub oder
Schmutz zu entfernen.
• Stellen Sie sicher, dass die Lüftungsöffnun-
gen nicht blockiert sind, um Überhitzung
zu vermeiden und optimale Leistung zu
gewährleisten.
3. Richtig lagern:
• Bewahren Sie das Werkzeug an einem
trockenen, kühlen Ort auf, um Rost und
Schäden zu vermeiden.
Fehlerbehebung
1. Werkzeug startet nicht:
• Überprüfen Sie den Batteriestand und
stellen Sie sicher, dass sie richtig ang-
eschlossen ist.
• Überprüfen Sie den Netzschalter und die
Verbindungen auf Probleme.
2. Ungewöhnliche Geräusche:
• Stellen Sie die Verwendung des
Werkzeugs sofort ein.
• Überprüfen Sie auf lose Teile oder Bes-
chädigungen.
3. Überhitzung:
• Lassen Sie das Werkzeug abkühlen,
bevor Sie es weiter verwenden.
• Überprüfen Sie auf Blockaden oder
Hindernisse, die eine Überhitzung verur-
sachen könnten.
Information

21
Information
Vielen Dank
Vielen Dank für den Kauf Ihres Produkts/
Geräts.
Sollten Sie Hilfe zu Ihrem Kauf benötigen,
kontaktieren Sie uns bitte unter support@domu.
co.uk
VonHaus ist eine eingetragene Marke von
DOMU Brands Ltd. Hergestellt in China für
DOMU Brands.
VonHaus ist eine eingetragene Marke von
DOMU Brands Ltd.
Hergestellt in China für DOMU Brands.
Autorisierter Vertreter
Authorised Representative Service
77 Camden Street Lower
Dublin, D02 XE80, Ireland

22
Rechtliches
ENTSORGUNGSINFORMATIONEN
Bitte recyceln Sie, wo Einrichtungen vorhanden
sind. Erkundigen Sie sich bei Ihrer örtlichen
Behörde nach Recycling-Empfehlungen.
KUNDENSERVICE
Wenn Sie Schwierigkeiten bei der Verwendung
dieses Produkts haben und Unterstützung benö-
tigen, kontaktieren Sie bitte
suppor[email protected]
GARANTIE
Um Ihr Produkt zu registrieren und herauszu-
finden, ob Sie für eine kostenlose erweiterte
Garantie qualifiziert sind, besuchen Sie bitte
www.vonhaus.com/warranty.
Bitte bewahren Sie einen Kaufbeleg oder eine
Kaufbestätigung als Nachweis des Kaufdatums
auf.
Die Garantie gilt nur, wenn das Produkt auss-
chließlich in der in den Warnhinweisen dieses
Handbuchs angegebenen Weise verwendet
wird und alle anderen Anweisungen genau
befolgt wurden.
Jeglicher Missbrauch des Produkts oder die Art
und Weise, wie es verwendet wird, führt zum
Erlöschen der Garantie.
RÜCKSENDUNGEN
Zurückgesendete Waren werden nur akzeptiert,
wenn sie in ihrer Originalverpackung neu ver-
packt und mit einem relevanten und ausgefüll-
ten Rücksendeformular versehen sind. Dies hat
keinen Einfluss auf Ihre gesetzlichen Rechte.
Im Rahmen dieser Garantie werden einer
Person, die das Gerät aus zweiter Hand oder für
gewerbliche oder gemeinschaftliche Nutzung
erwirbt, keine Rechte eingeräumt.
URHEBERRECHT
Alle Materialien in dieser Bedienungsanleitung
sind urheberrechtlich geschützt durch DOMU
Brands.
Jede unbefugte Nutzung kann weltweit gegen
Urheberrechts-, Marken- und andere Gesetze
verstoßen.

23
Preparación para el uso
1. Cargar la batería: Conecte el cargador
a una toma de corriente y conéctelo a la
herramienta. Déjela cargar completamente
antes del primer uso.
2. Leer el manual: Lea cuidadosamente el
manual para entender las características,
especificaciones e instrucciones de seguri-
dad de la herramienta.
Montaje de la herramienta
1. Instalar la broca:
• Seleccione la broca adecuada para su
tarea.
• Inserte la broca en la pinza (la parte que
sujeta la broca).
• Use la llave proporcionada para apretar
firmemente la tuerca de la pinza, ase-
gurándose de que la broca esté bien
sujeta.
Cambio de brocas
1. Apagar la herramienta: Asegúrese de
que la herramienta esté apagada y, si es
posible, retire la batería.
2. Activar el bloqueo del husillo:
• Presione y mantenga presionado el botón
de bloqueo del husillo para evitar que el
husillo gire.
3. Aflojar la tuerca de la pinza:
• Use la llave para girar la tuerca de la
pinza en sentido antihorario.
• Retire la broca actual.
4. Insertar la nueva broca:
• Coloque la nueva broca en la pinza.
• Apriete la tuerca de la pinza girándola
en sentido horario con la llave.
• Suelte el bloqueo del husillo.
Uso de la herramienta
1. Seleccionar la velocidad:
• Ajuste la configuración de velocidad
según el material y la tarea. Velocidades
más bajas para tareas delicadas, vel-
ocidades más altas para materiales más
duros.
2. Sujetar firmemente:
• Sujete la herramienta firmemente con
ambas manos si es necesario.
• Deje que la herramienta alcance la
velocidad máxima antes de comenzar a
cortar.
• Guíela suavemente sobre la pieza de
trabajo sin forzarla.
3. Aplicar presión ligera:
• Deje que la herramienta haga el trabajo.
Aplicar demasiada presión puede dañar
la broca y la pieza de trabajo.
Cómo no usar la herramienta
1. Evitar la sobrecarga:
• No presione la herramienta con dema-
siada fuerza. Esto puede causar sobre-
calentamiento y daños.
• No inicie la herramienta en contacto con
el material en el que está trabajando.
Siempre inicie la herramienta sin carga
y luego comience la función deseada a
velocidad máxima.
2. No usar en condiciones húmedas:
• Mantenga la herramienta seca para
evitar peligros eléctricos.
3. Evitar ropa suelta:
• Asegúrese de que la ropa y el cabello
estén asegurados para evitar que se
enreden en la herramienta.
Información

24
Consideraciones de seguridad
1. Usar equipo de protección:
• Siempre use gafas de seguridad para
proteger sus ojos de los escombros.
• Use guantes para proteger sus manos.
• Use una máscara antipolvo si trabaja
con materiales que producen polvo fino.
2. Mantener fuera del alcance de los niños:
• Guarde la herramienta y los accesorios
fuera del alcance de los niños.
3. Inspeccionar antes de usar:
• Revise la herramienta y los accesorios
en busca de signos de daño o desgaste
antes de cada uso.
Mantenimiento
1. Limpiar regularmente:
• Después de cada uso, limpie la herrami-
enta con un paño seco para eliminar el
polvo y los escombros.
2. Verificar que las rejillas de ventilación
estén despejadas:
• Inspeccione regularmente las rejillas de
ventilación de la herramienta.
• Use un cepillo pequeño o aire com-
primido para eliminar cualquier polvo o
escombro que se haya acumulado.
• Asegúrese de que las rejillas no estén blo-
queadas para evitar el sobrecalentami-
ento y garantizar un rendimiento óptimo..
3. Almacenar adecuadamente:
• Guarde la herramienta en un lugar seco y
fresco para evitar la oxidación y el daño.
Solución de problemas
1. La herramienta no arranca:
• Verifique la carga de la batería y
asegúrese de que esté correctamente
conectada.
• Inspeccione el interruptor de encendido
y las conexiones en busca de problemas.
2. Ruido inusual:
• Deje de usar la herramienta inmediata-
mente.
• Inspeccione si hay piezas sueltas o
daños.
3. Sobrecalentamiento:
• Permita que la herramienta se enfríe antes
de continuar usándola.
• Verifique si hay bloqueos u obstrucciones
que puedan estar causando sobre-
calentamiento.
Información

25
Información
Gracias
Gracias por comprar nuestro producto/
aparato.
Si necesita ayuda con su compra, contáctenos
en suppor[email protected]
VonHaus es una marca registrada de DOMU
Brands Ltd. Fabricado en China para DOMU
Brands.
VonHaus es una marca registrada de DOMU
Brands Ltd.
Fabricado en China para DOMU Brands.
Representante autorizado
Authorised Representative Service
77 Camden Street Lower
Dublin, D02 XE80, Ireland

26
Legal
INFORMACIÓN SOBRE ELIMINACIÓN
Por favor, recicle donde existan instalaciones.
Consulte con su autoridad local para obtener
consejos sobre reciclaje.
SERVIZIO CLIENTI
Si tiene dificultades para usar este producto y
necesita ayuda, por favor contacte a
suppor[email protected]
GARANTÍA
Para registrar su producto y averiguar si califica
para una garantía extendida gratuita, por favor
visite www.vonhaus.com/warranty
Por favor, conserve un comprobante de compra
o declaración como prueba de la fecha de
compra.
La garantía solo se aplica si el producto se
utiliza únicamente de la manera indicada en
la página de advertencias de este manual, y
todas las demás instrucciones se han seguido
con precisión.
Cualquier abuso del producto o la manera en
que se utiliza invalidará la garantía.
DEVOLUCIONES
Los productos devueltos no serán aceptados a
menos que sean reempaquetados en su emba-
laje original y acompañados de un formulario
de devolución relevante y completado. Esto no
afecta sus derechos legales.
No se otorgan derechos bajo esta garantía
a una persona que adquiera el aparato de
segunda mano o para uso comercial o comu-
nitario.
DERECHOS DE AUTOR
Todo el material en este manual de instruc-
ciones está protegido por derechos de autor de
DOMU Brands.
Cualquier uso no autorizado puede violar las
leyes de derechos de autor, marcas comercial-
es y otras leyes en todo el mundo.

27
Preparazione all’uso
1. Caricare la batteria: Collegare il caricab-
atterie a una presa di corrente e connetterlo
allo strumento. Lasciarlo caricare completa-
mente prima del primo utilizzo.
2. Leggere il manuale: Leggere attentamente
il manuale per comprendere le caratteris-
tiche, le specifiche e le istruzioni di sicurezza
dello strumento.
Assemblaggio dello strumento
1. Installare la punta:
• Selezionare la punta adatta al proprio
compito.
• Inserire la punta nel mandrino (la parte
che tiene la punta).
• Utilizzare la chiave fornita per stringere
saldamente il dado del mandrino, assicu-
randosi che la punta sia ben fissata.
Cambio delle punte
1. Spegnere lo strumento: Assicurarsi che lo
strumento sia spento e, se possibile, rimuo-
vere la batteria.
2. Attivare il blocco del mandrino:
• Presione y mantenga presionado el botón
de bloqueo del husillo para evitar que el
husillo gire.
3. Allentare il dado del mandrino:
• Utilizzare la chiave per ruotare il dado
del mandrino in senso antiorario.
• Rimuovere la punta attuale.
4. Inserire la nuova punta:
• Posizionare la nuova punta nel mandrino.
• Stringere il dado del mandrino ruotando-
lo in senso orario con la chiave.
• Rilasciare il blocco del mandrino.
Utilizzo dello strumento
1. Selezionare la velocità:
• Regolare l’impostazione della velocità in
base al materiale e al compito. Velocità
più basse per lavori delicati, velocità più
alte per materiali più duri.
2. Tenere saldamente:
• Tenere lo strumento saldamente con en-
trambe le mani se necessario.
• Lasciare che lo strumento raggiunga
la massima velocità prima di iniziare a
tagliare.
• Guidarlo delicatamente sul pezzo da
lavorare senza forzarlo.
3. Applicare una pressione leggera:
• Lasciare che lo strumento faccia il lavoro.
Applicare troppa pressione può danneg-
giare la punta e il pezzo da lavorare.
Come non utilizzare lo strumento
1. Evitare il sovraccarico:
• Non premere lo strumento con troppa
forza. Questo può causare surriscalda-
mento e danni.
• Non avviare lo strumento a contatto con il
materiale su cui si sta lavorando. Avviare
sempre lo strumento senza carico e poi
iniziare la funzione desiderata a piena
velocità.
2. Non utilizzare in condizioni di umidità:
• Mantenere lo strumento asciutto per
evitare pericoli elettrici.
3. Evitare abiti larghi:
• Assicurarsi che gli abiti e i capelli siano
ben fissati per evitare che si impiglino
nello strumento.
Informazioni

28
Considerazioni sulla sicurezza
1. Indossare dispositivi di protezione:
• Indossare sempre occhiali di sicurezza
per proteggere gli occhi dai detriti.
• Utilizzare guanti per proteggere le mani.
• Indossare una maschera antipolvere se
si lavora con materiali che producono
polvere fine.
2. Tenere lontano dalla portata dei
bambini:
• Conservare l’utensile e gli accessori fuori
dalla portata dei bambini.
3. Ispezionare prima dell’uso:
• Controllare l’utensile e gli accessori per
eventuali segni di danni o usura prima di
ogni utilizzo.
Manutenzione
1. Pulire regolarmente:
• Dopo ogni utilizzo, pulire l’utensile con
un panno asciutto per rimuovere polvere
e detriti.
2. Controllare che le prese d’aria siano
libere:
• Ispezionare regolarmente le prese d’aria
dell’utensile.
• Utilizzare una piccola spazzola o aria
compressa per rimuovere eventuali polveri
o detriti accumulati.
• Assicurarsi che le prese d’aria non siano
ostruite per prevenire il surriscaldamento e
garantire prestazioni ottimali.
3. Conservare correttamente:
• Conservare l’utensile in un luogo asciutto
e fresco per evitare ruggine e danni.
Risoluzione dei problemi
1. L’utensile non si avvia:
• Controllare la carica della batteria e as-
sicurarsi che sia collegata correttamente.
• Ispezionare l’interruttore di alimentazione
e le connessioni per eventuali problemi.
2. Rumore insolito:
• Interrompere immediatamente l’uso
dell’utensile.
• Ispezionare per eventuali parti allentate
o danni.
3. Surriscaldamento:
• Lasciare raffreddare l’utensile prima di
continuare l’uso.
• Controllare eventuali blocchi o ostruzioni
che potrebbero causare surriscaldamen-
to.
Informazioni

29
Informazioni
Grazie
Grazie per aver acquistato il nostro prodotto/
apparecchio.
Se hai bisogno di assistenza riguardo al tuo
acquisto, contattaci all’indirizzo support@
domu.co.uk
VonHaus è un marchio registrato di DOMU
Brands Ltd. Prodotto in Cina per DOMU
Brands.
VonHaus è un marchio registrato di DOMU
Brands Ltd.
Prodotto in Cina per DOMU Brands.
Rappresentante autorizzato
Authorised Representative Service
77 Camden Street Lower
Dublin, D02 XE80, Ireland

30
Legale
INFORMAZIONI SULLO SMALTIMENTO
Si prega di riciclare dove esistono le strutture.
Verificare con l’autorità locale per consigli sul
riciclaggio.
SERVIZIO CLIENTI
Se si hanno difficoltà nell’utilizzo di questo
prodotto e si necessita di supporto, si prega di
contattare suppor[email protected]
GARANZIA
Per registrare il prodotto e scoprire se si ha
diritto a un’estensione gratuita della garanzia,
visitare www.vonhaus.com/warranty
Si prega di conservare una prova d’acquisto
o una dichiarazione come prova della data
d’acquisto.
La garanzia si applica solo se il prodotto
viene utilizzato esclusivamente nel modo indi-
cato nella pagina delle avvertenze di questo
manuale e tutte le altre istruzioni sono state
seguite accuratamente.
Qualsiasi abuso del prodotto o del modo in
cui viene utilizzato invaliderà la garanzia.
RESI
I beni restituiti non saranno accettati a meno
che non siano reimballati nella confezione
originale e accompagnati da un modulo di
reso pertinente e compilato. Ciò non influisce
sui diritti legali.
Nessun diritto viene concesso in base a
questa garanzia a una persona che acquista
l’apparecchio di seconda mano o per uso
commerciale o comunitario.
DIRITTI D’AUTORE
Tutto il materiale in questo manuale di istruzi-
oni è protetto da copyright di DOMU Brands.
Qualsiasi uso non autorizzato può violare le
leggi sul copyright, sui marchi e altre leggi in
tutto il mondo.

Product No. 3500392