Technical Support and E-Warranty Certificate www.vevor.com/support
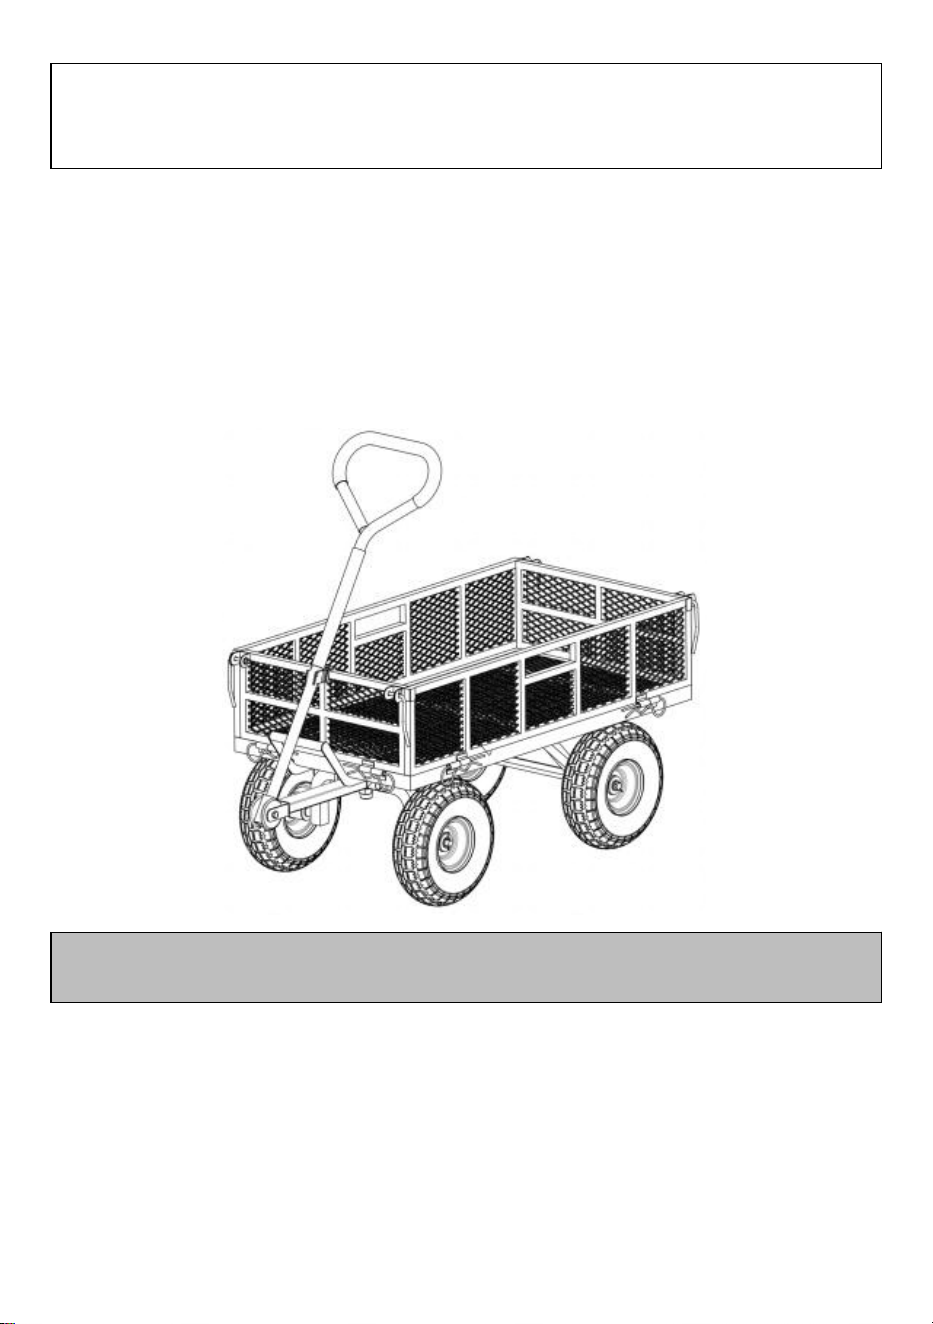
STEEL DUMP GARDEN CARTS
USER MANUAL
We continue to be committed to provide you tools with competitive price.
"Save Half","Half Price" or any other similar expressions used by us only represents an
estimate of savings you might benefit from buying certain tools with us compared to the major
top brands and does not necessarily mean to cover all categories of tools offered by us. You
are kindly reminded to verify carefully when you are placing an order with us if you are
actually saving half in comparison with the top major brands.

1
TC4206KB
Have product questions? Need technical support? Please feel free to
contact us:
Technical Support and E-Warranty Certificate
www.vevor.com/support
NEED HELP? CONTACT US!
This is the original instruction,please read all manual instructions carefully
before operating. VEVOR reserves a clear interpretation of our user
manual. The appearance of the product shall be subject to the product
you received. Please forgive us that we won't inform you again if there
are any technology or software updates on our product.
STEEL DUMP GARDEN
CARTS

2
Safety precautions
WARNING:
Read this instructions before using this product. Failure to do so can result in
serious injury. the basic precautions should always be followed,including the
following:
1. The plastic dump garden carts may not be used or stored in hazardous areas. It
is not allowed to use the appliance in hazardous locations.
2. The plastic dump garden carts must be checked to ensure that it is in proper
working order and is operating safely prior to use. Otherwise,the appliance must
not be used.
3. Use as intended only. The plastic dump garden carts are not suitable for
loading corrosive materials. Because they will plastic dump the material on garden
carts.
4. The operator must use the plastic dump garden carts properly. He must
consider the local conditions and must pay attention to third parties,in particular
children,when working with the plastic dump garden carts.
5. This plastic dump garden carts is not intended for use by persons (including
children) with reduced physical,sensory or mental abilities or lacking experience
and/or knowledge,unless they are super- vised by a person responsible for their
safety or are instructed by these persons on the use of the device. Children should
be supervised,to ensure that they do not play with the plastic dump garden carts.
6. Please use the Plastic Dump Garden Carts according to the weight indicated in
the manual. Do not load more than the marked weight, as this will damage the
Plastic Dump Garden Carts.
SAVE THESE INSTRUCTIONS
3
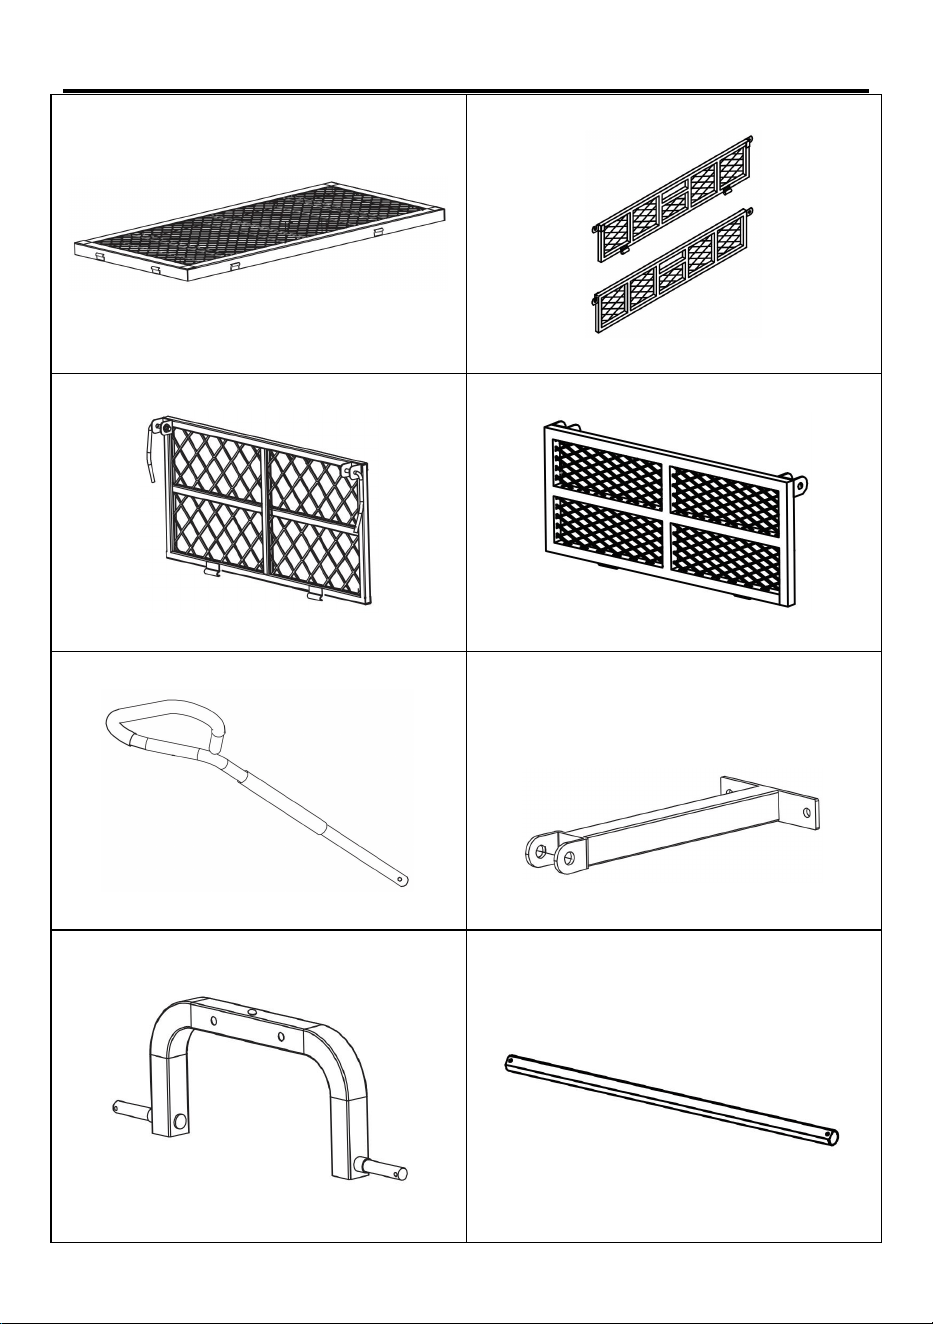
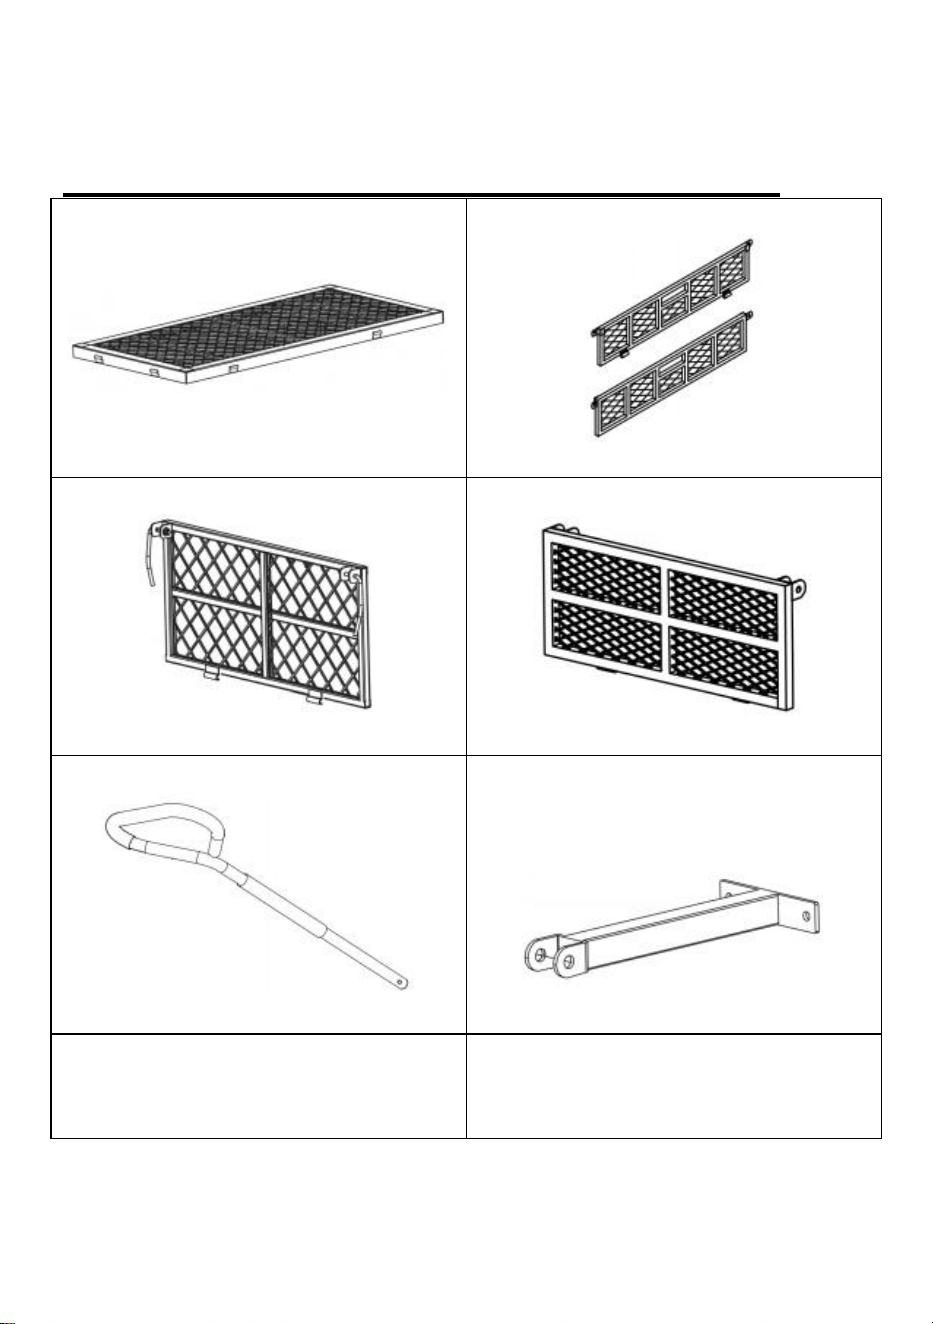
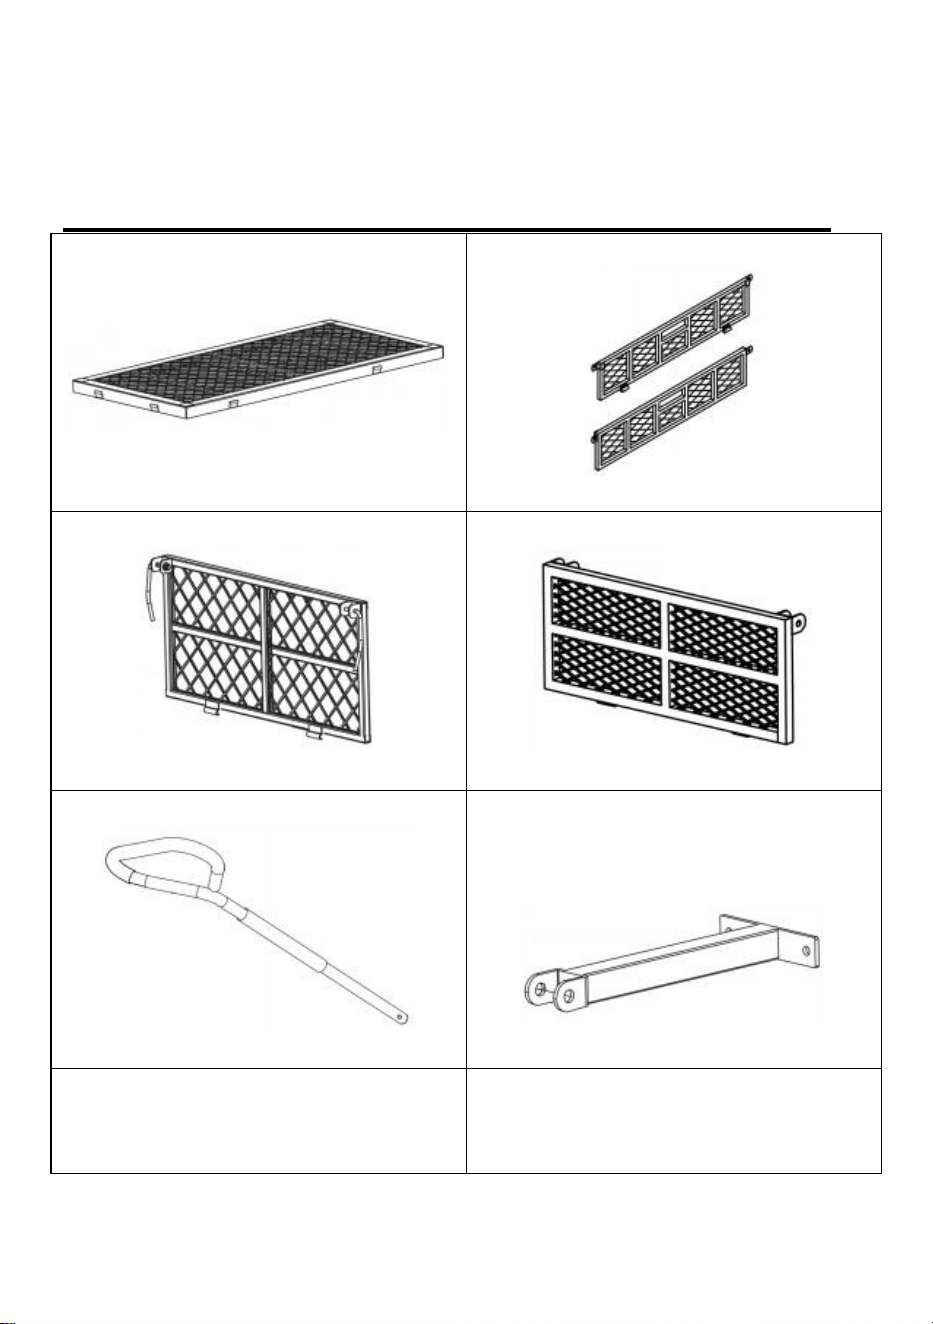
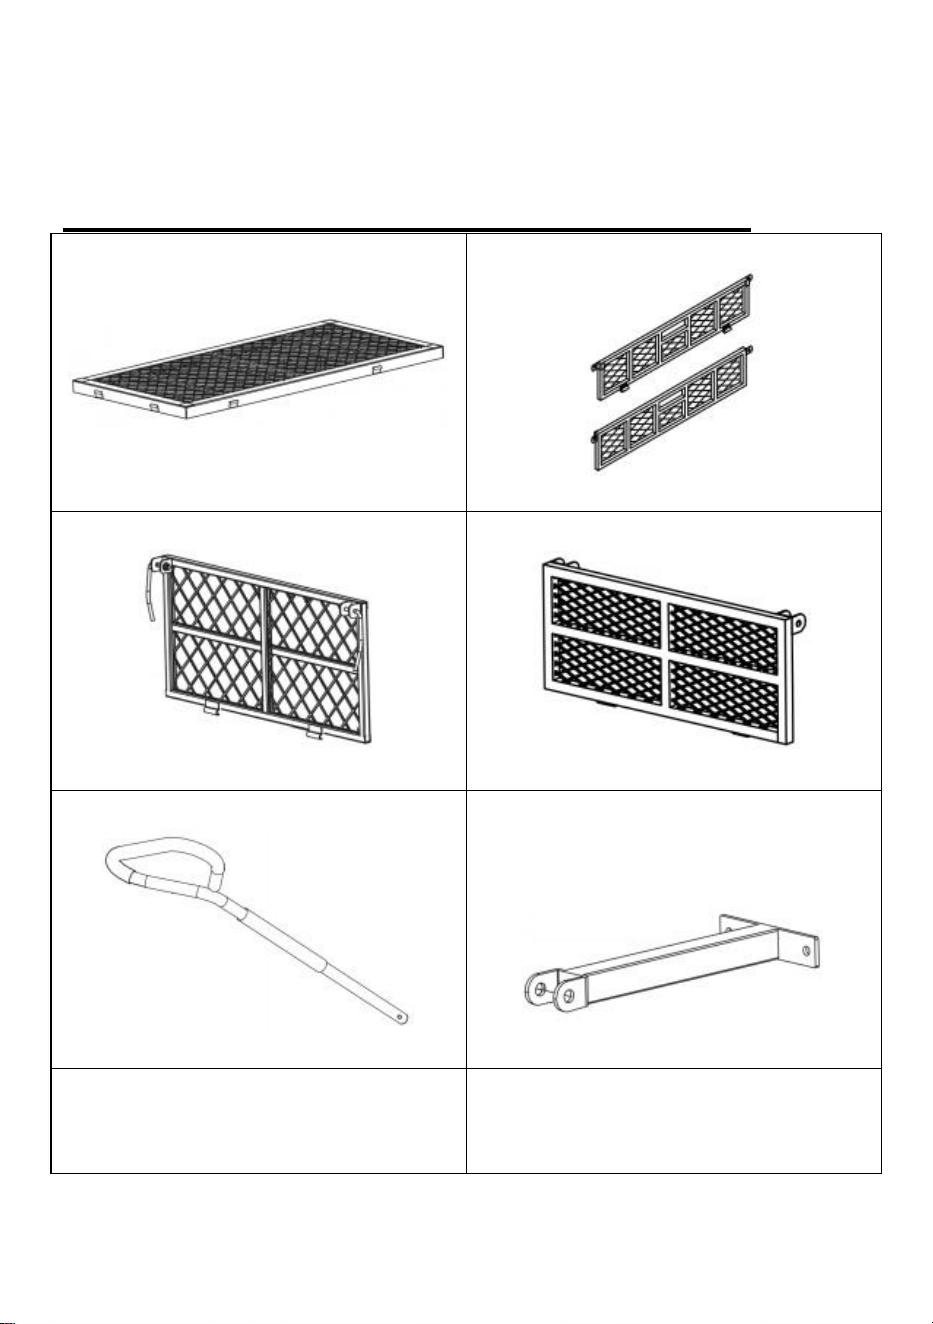
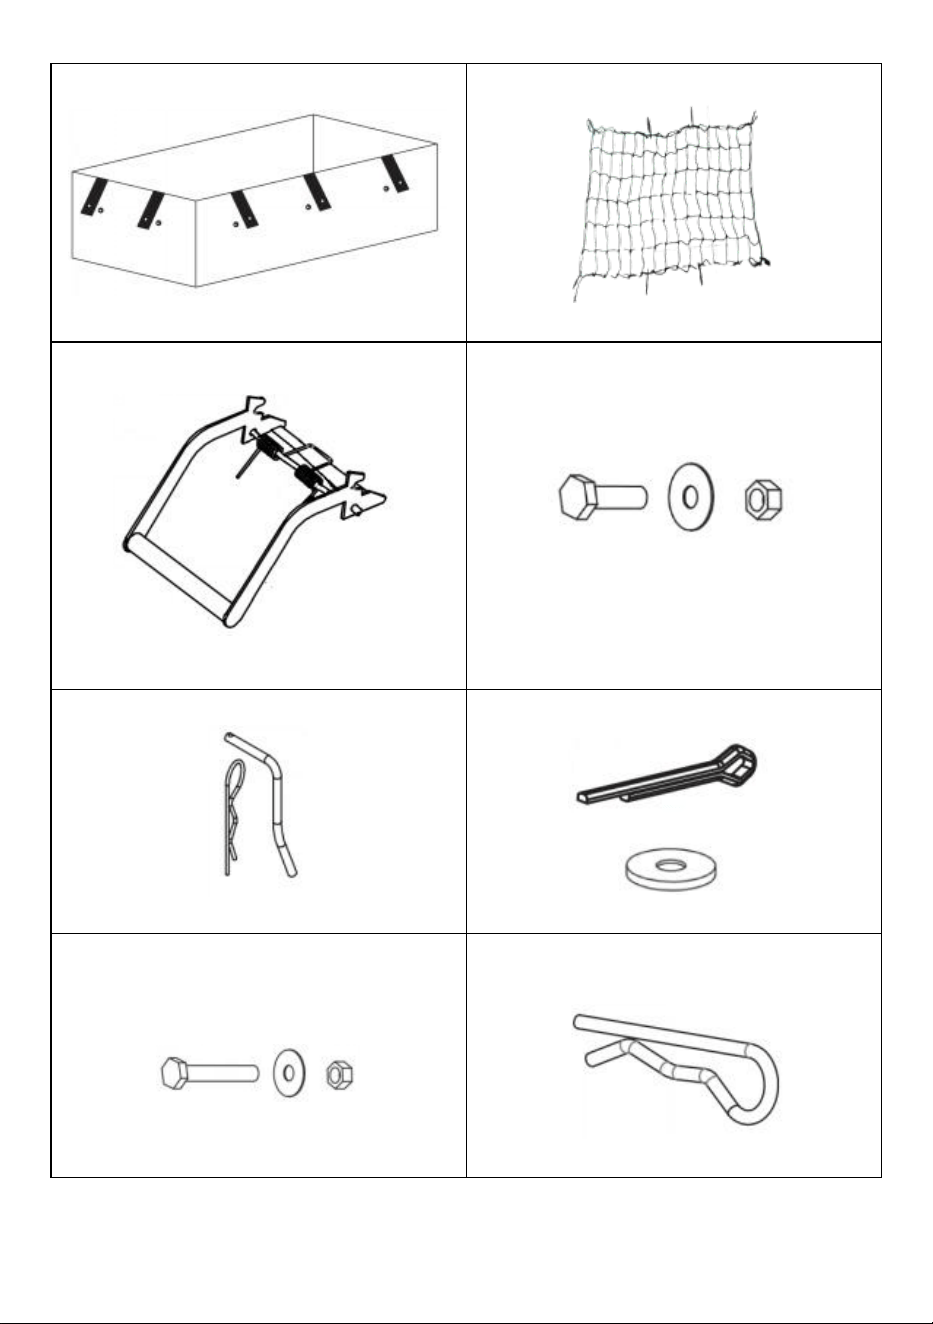
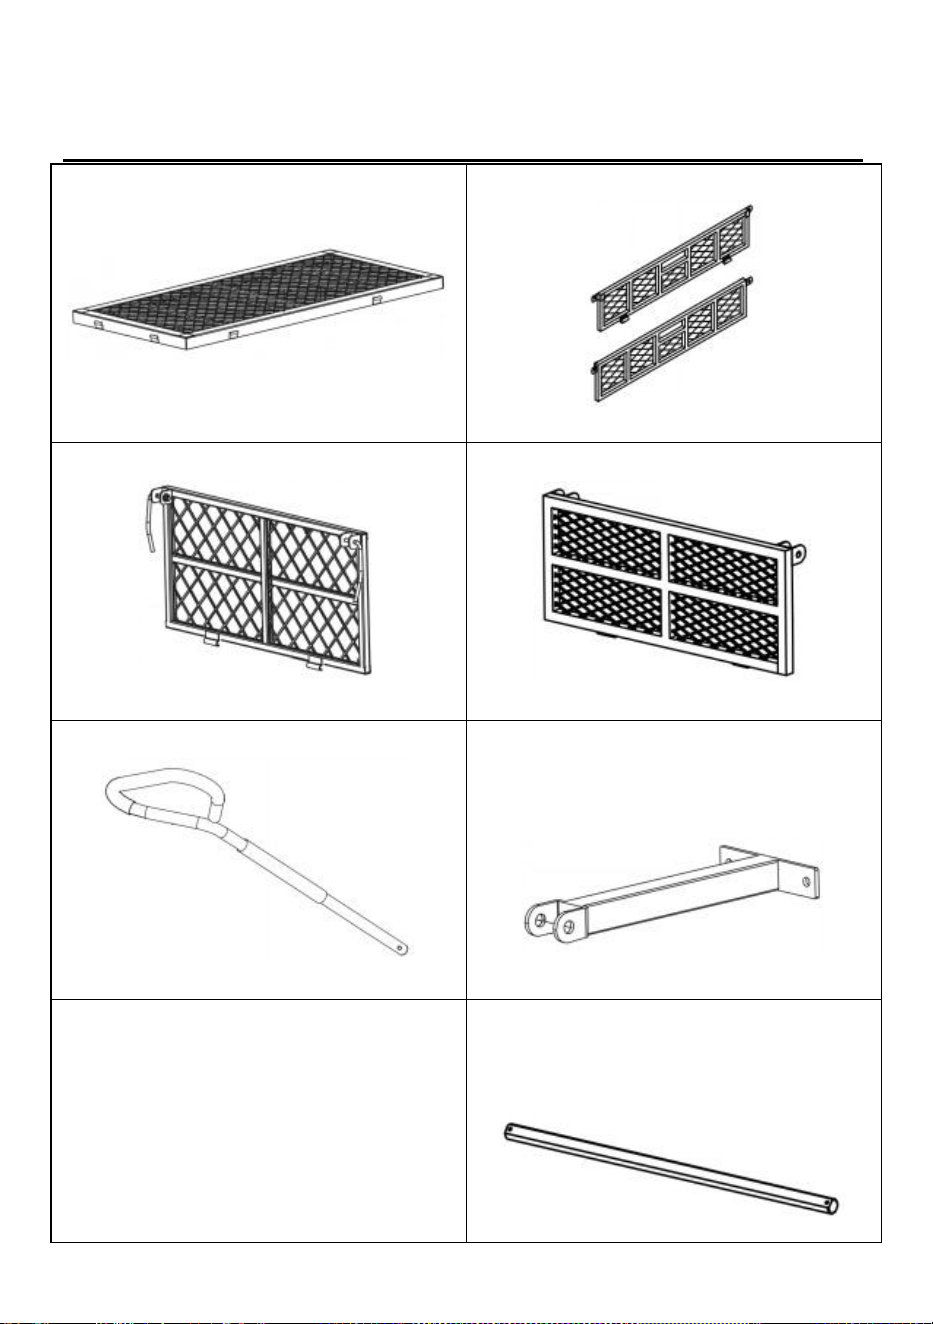
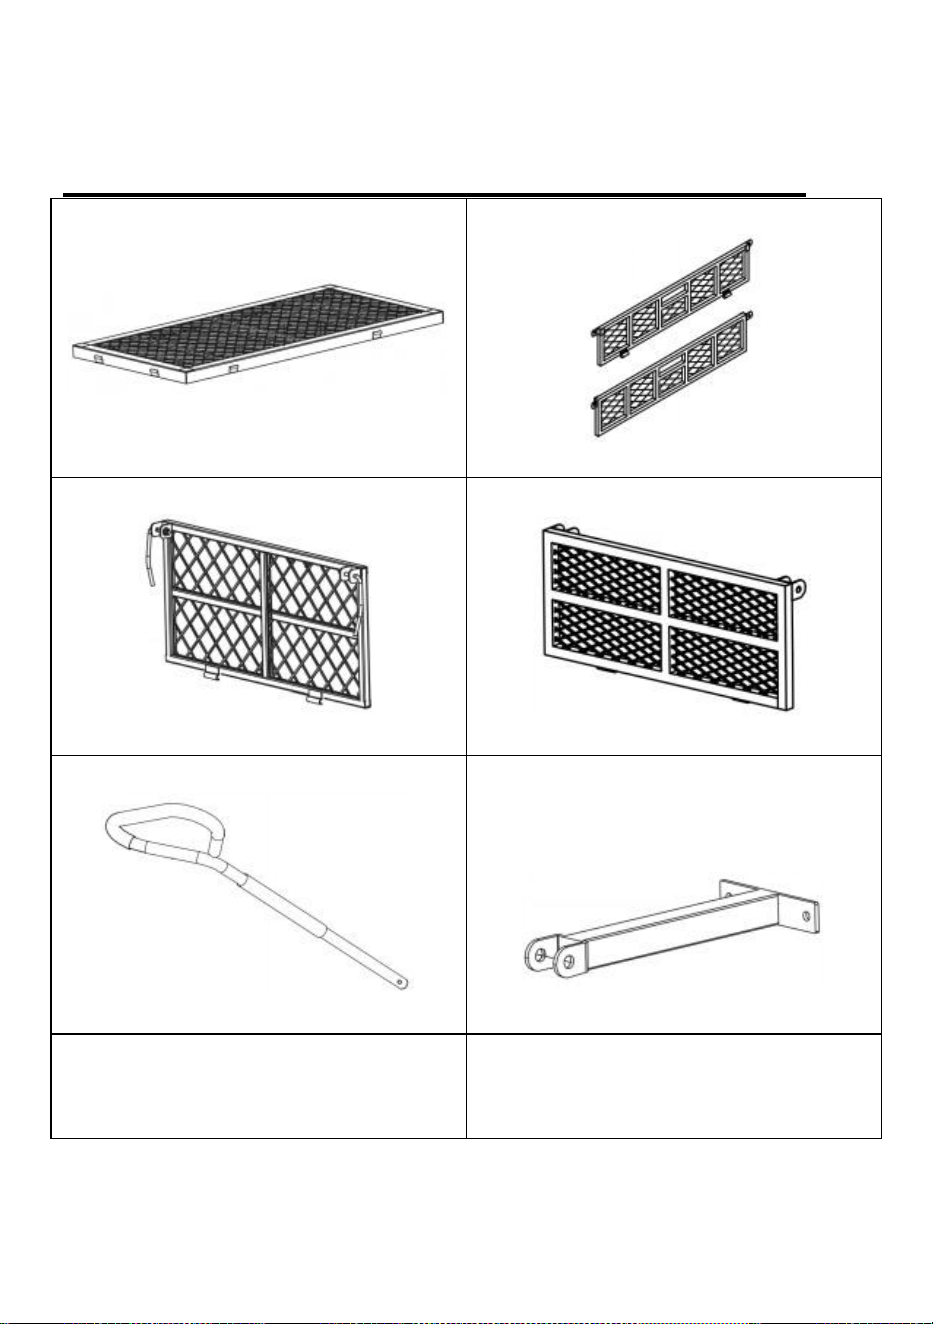
Product List
Ax1pc
Bottom Frame
Bx2pc
Left & Right Board
Cx1pc
Front Board
Dx1pc
Rear Board
Ex1pc
Handle
Fx1pc
Yoke
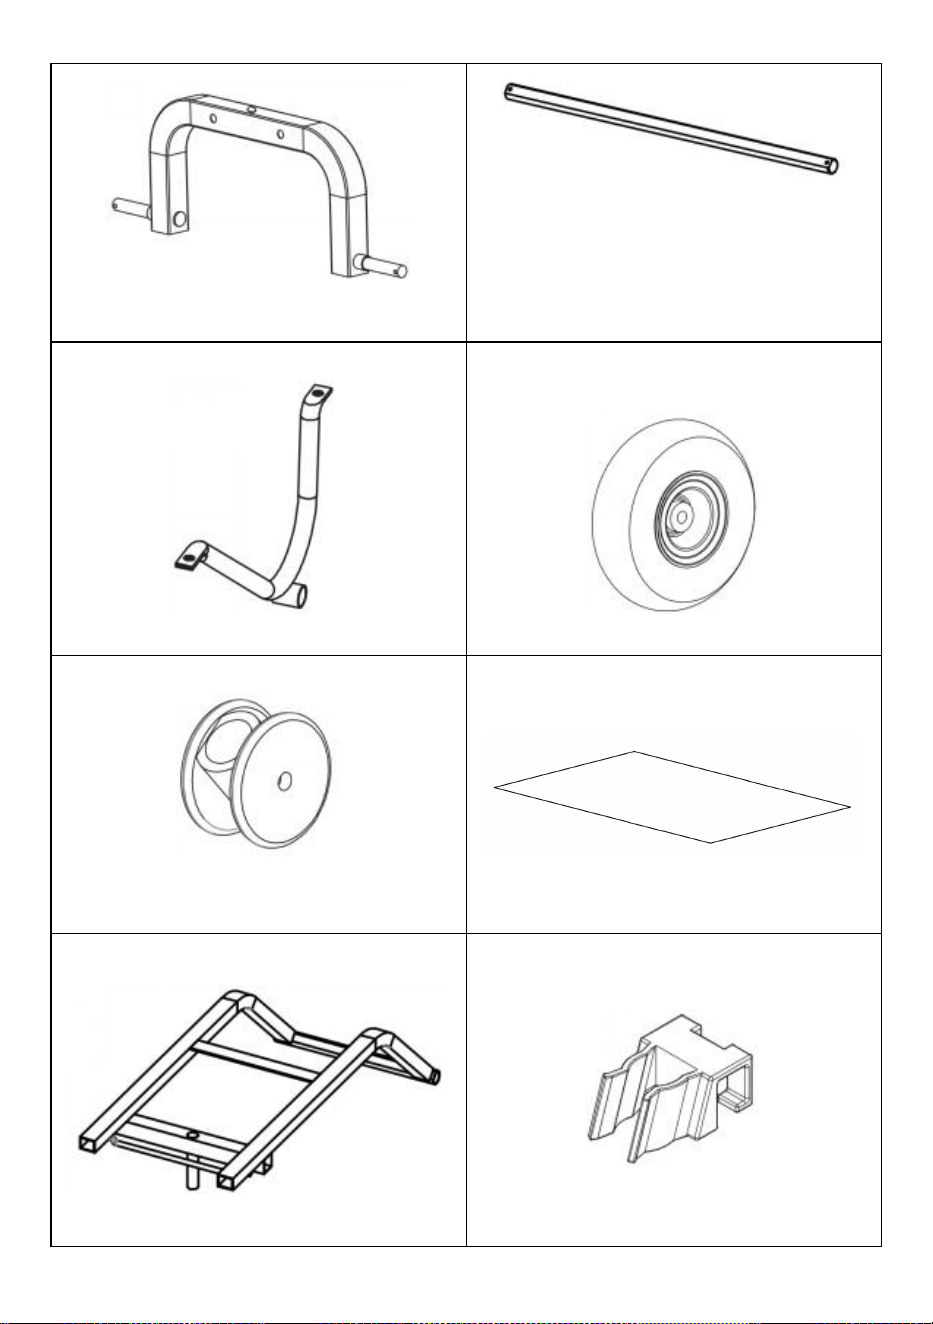
Gx1pc
Front Axle
Hx1pc
Rear Axle
4
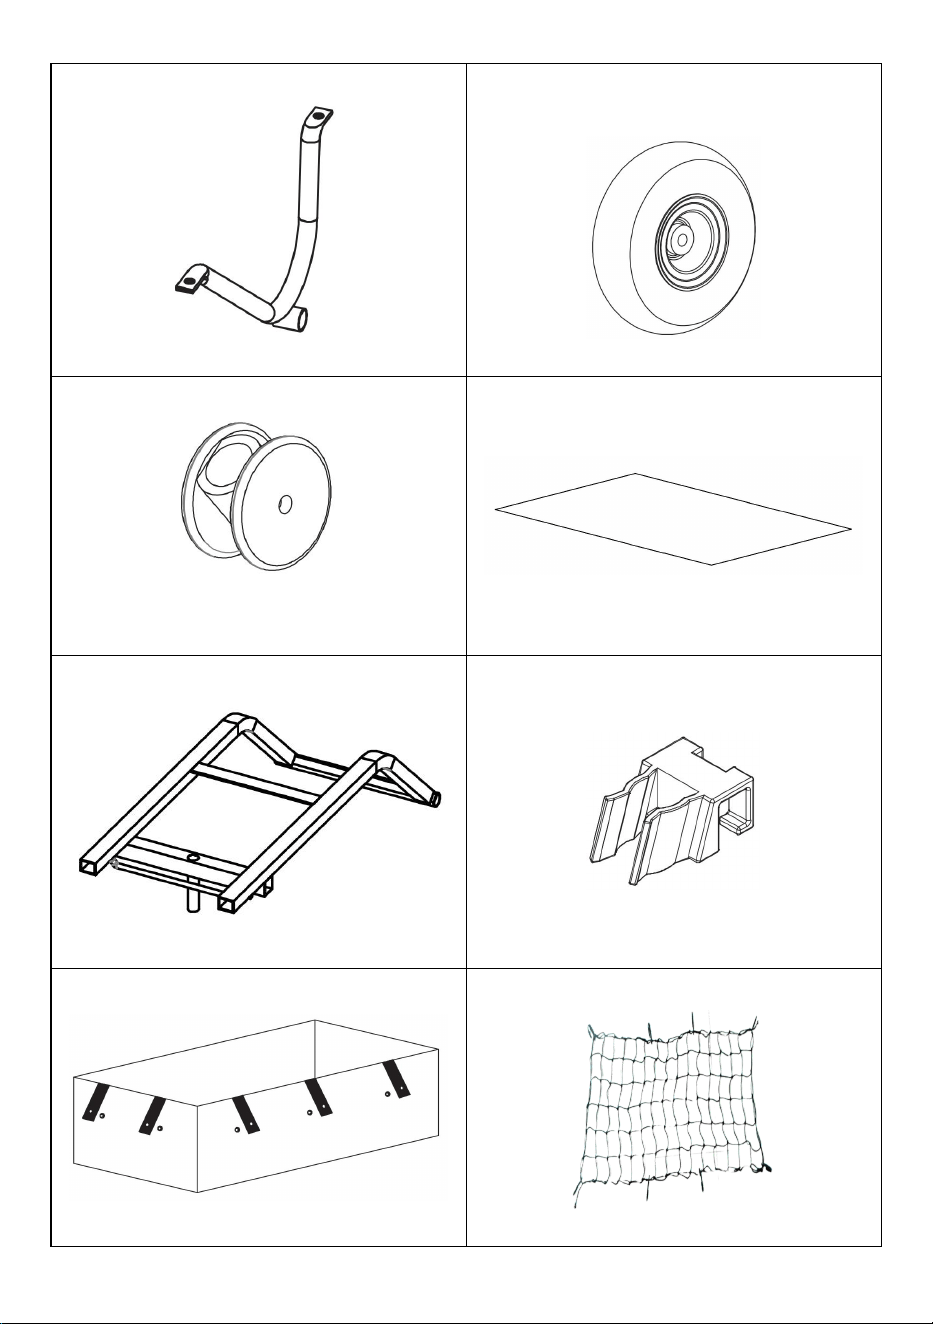
Ix2pc
Rear Axle Bracket
Jx4pc
Wheel
Kx1pc
Handle Coupler
Lx1pc
Mat
Mx1pc
Dump-bucket Bracket
Nx1pc
Handle Fastener
Ox1pc
Carry Bag
Px1pc
Stretch netting
5
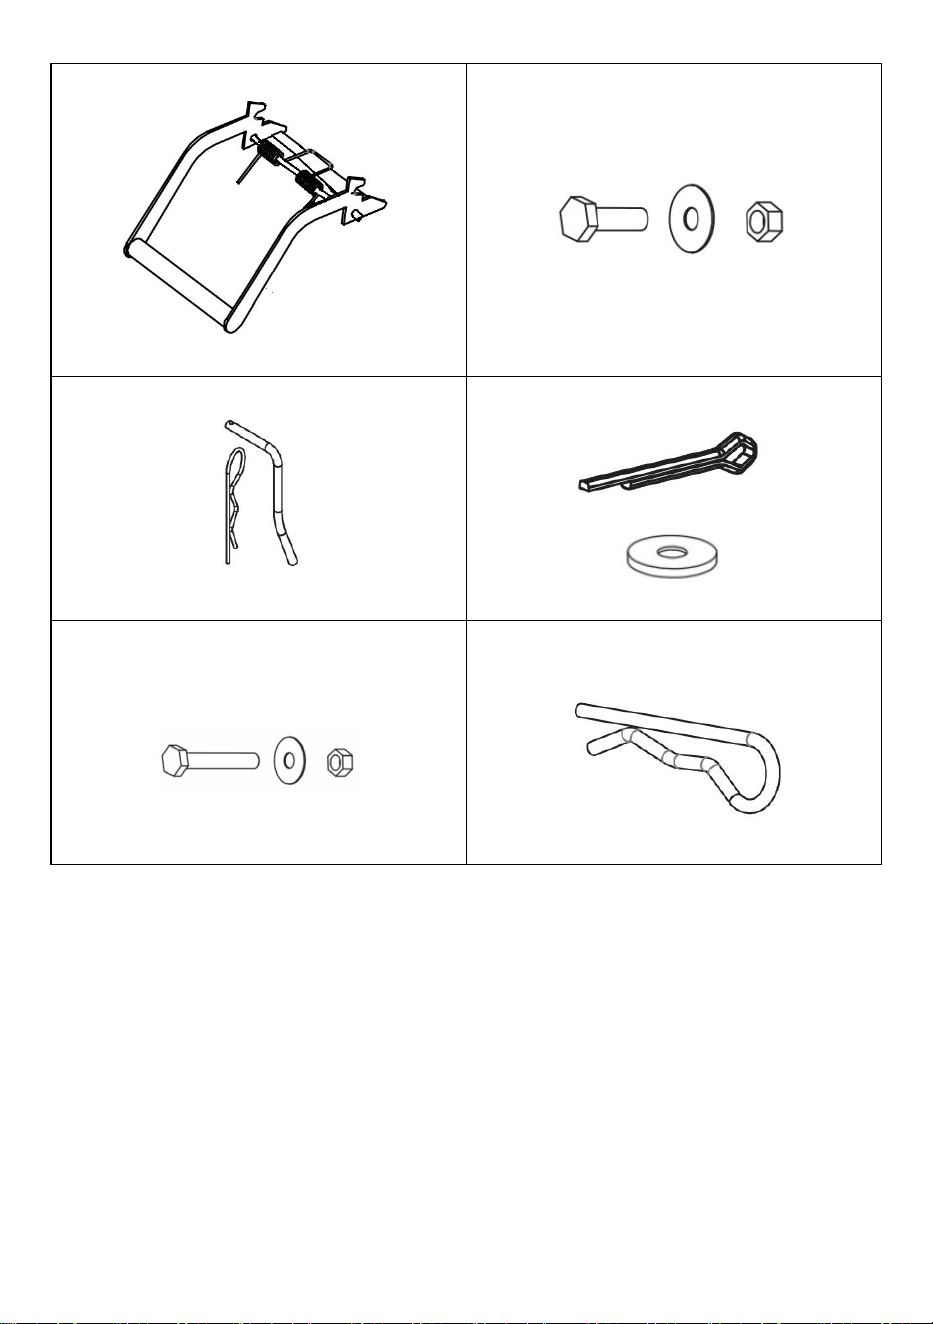
Qx1pc
Dumping Handle
(Ⅲ) x2pc
M8 Screw Set
(IV)x2pc
L Handle Set
(V)x4pc
Open Pin & Washer
(VI) x1pc
M8 Screw Set
(VII)x8pc
Large B Pin
6
Product Description
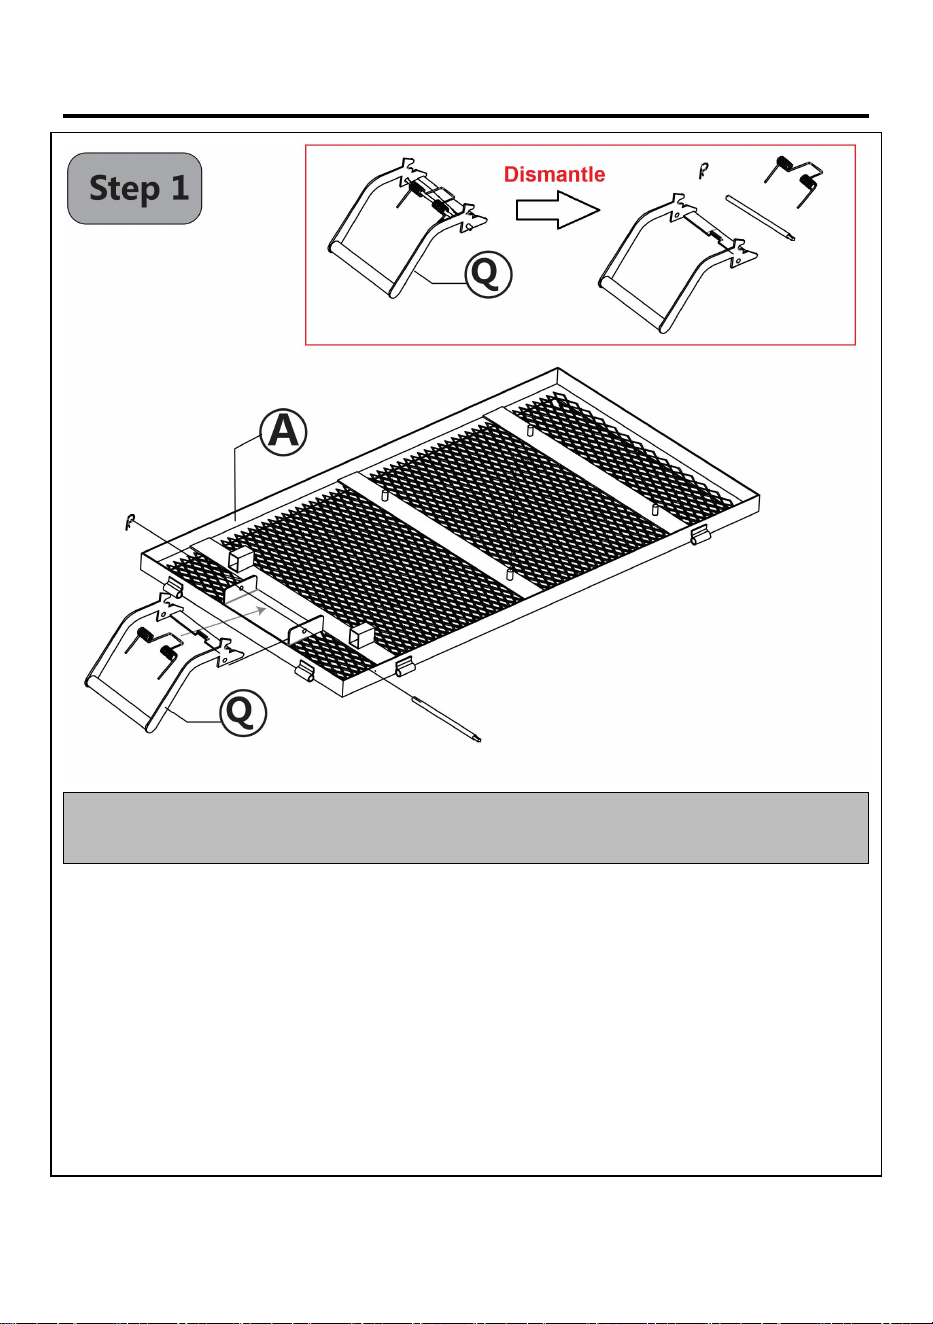
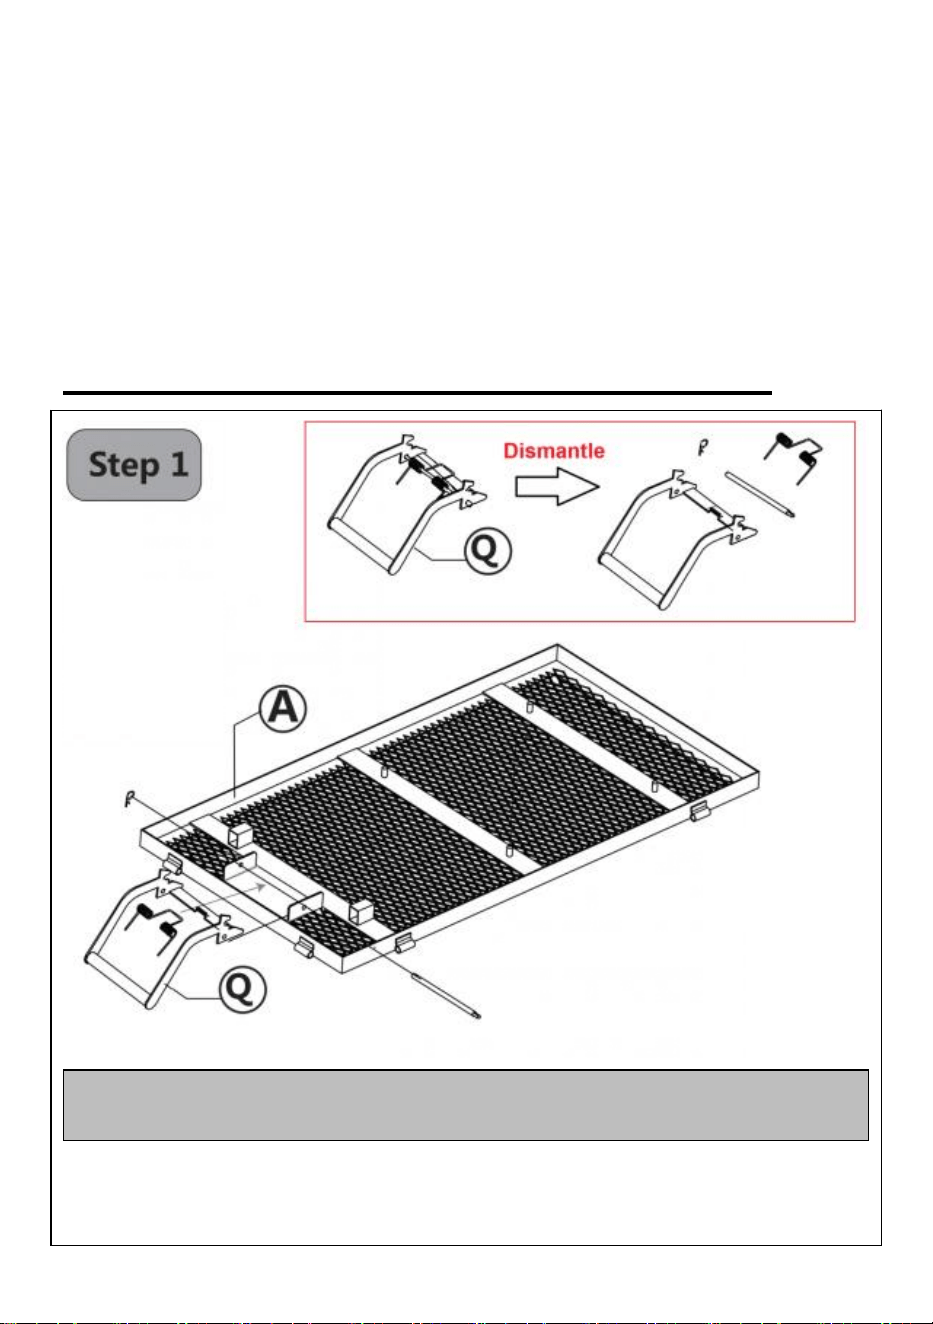
Note:It's recommended to assemble Dumping Handle and
Spring on a workbench.
Dumping Handle Assembly
● Disassemble the Dumping Handle (part Q) into handle, Spring, Stick, and
R pin.
● Align the holes of Bottom Frame(part A),Dumping Handle (part Q) and
Spring as shown,then make Stick go through the holes and secure it with R
Pin .
7
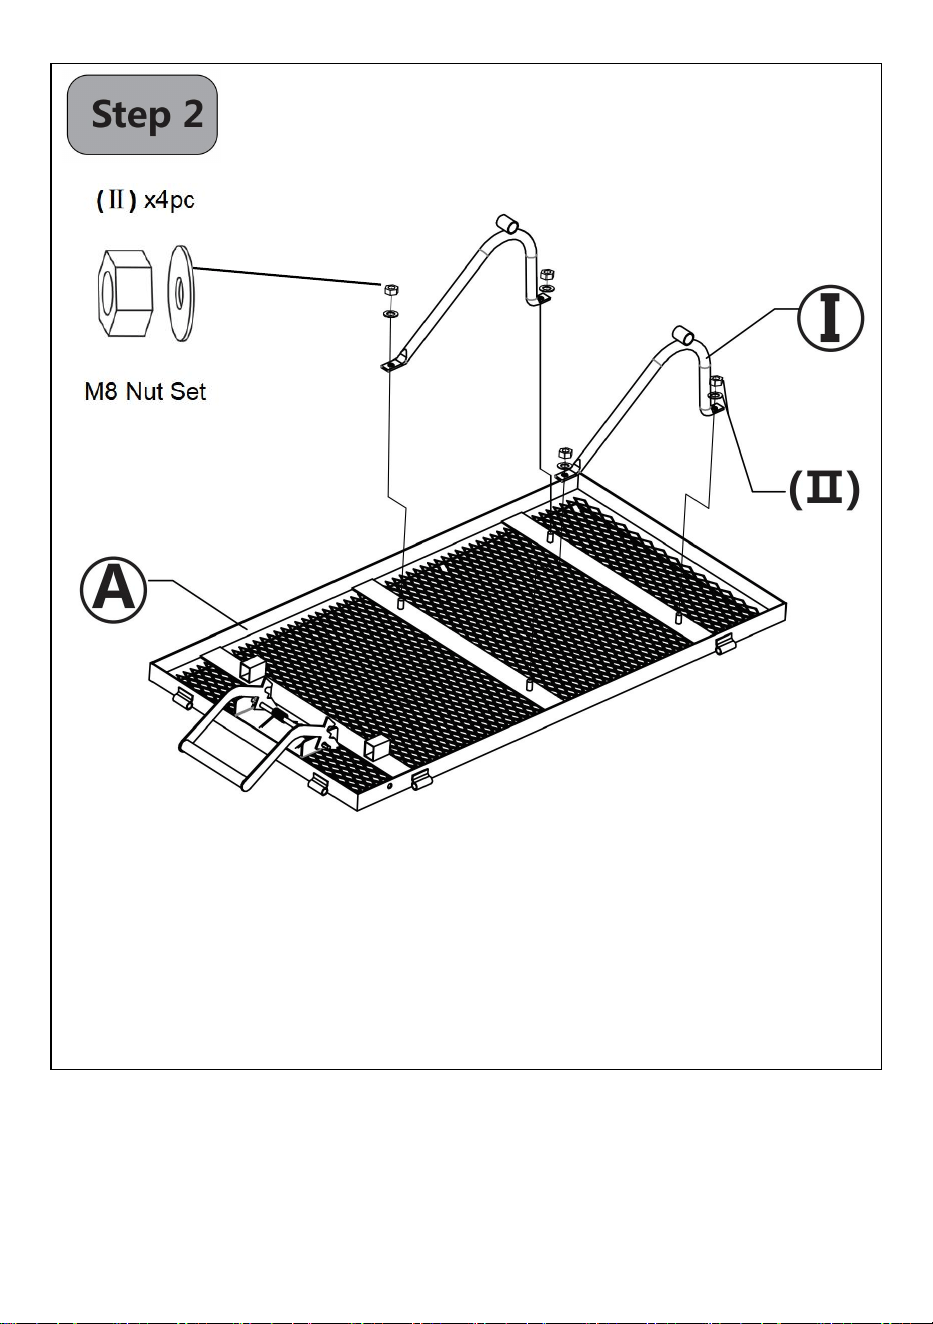
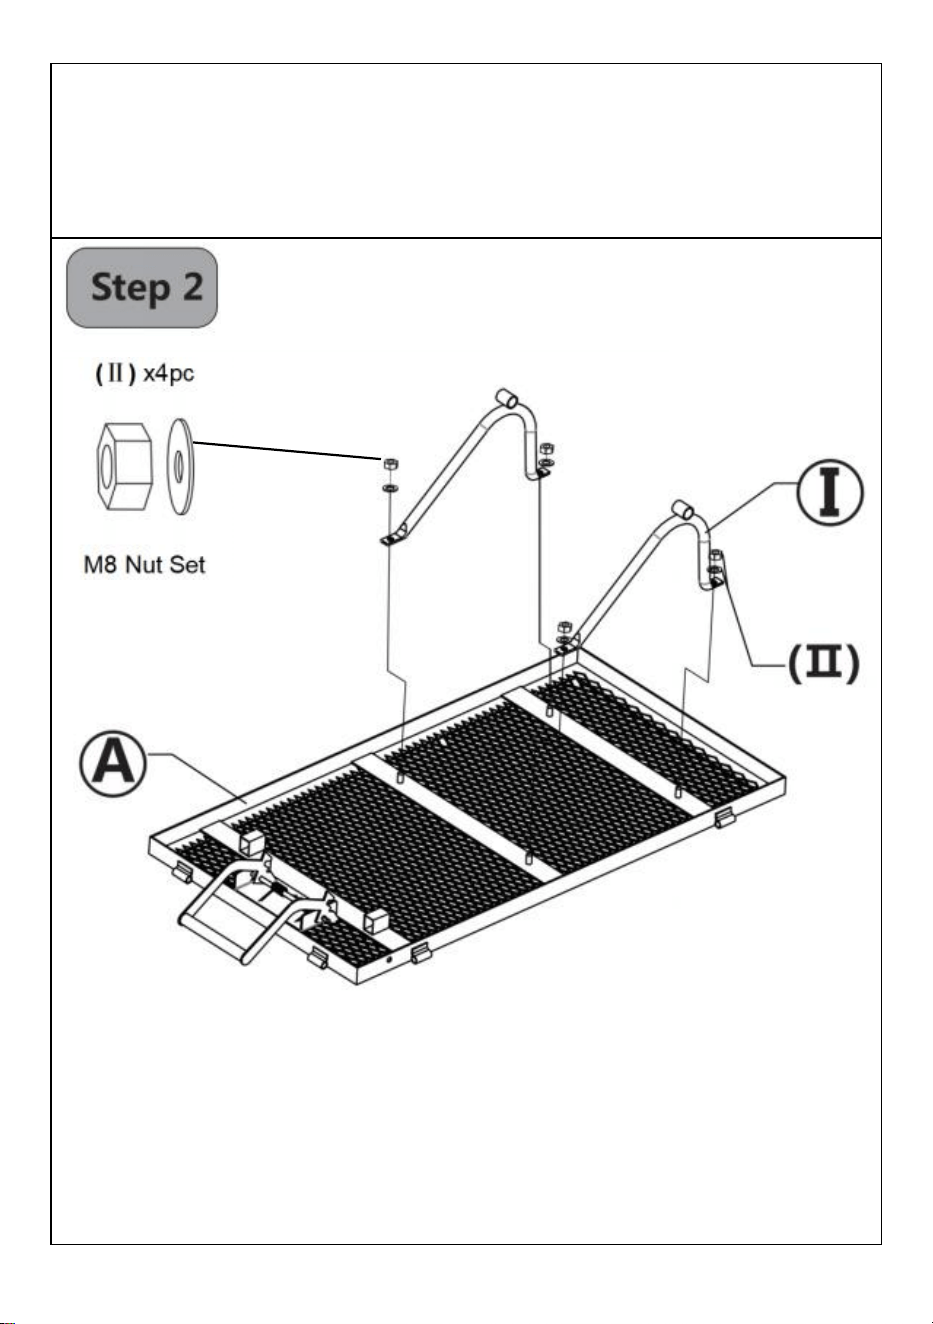
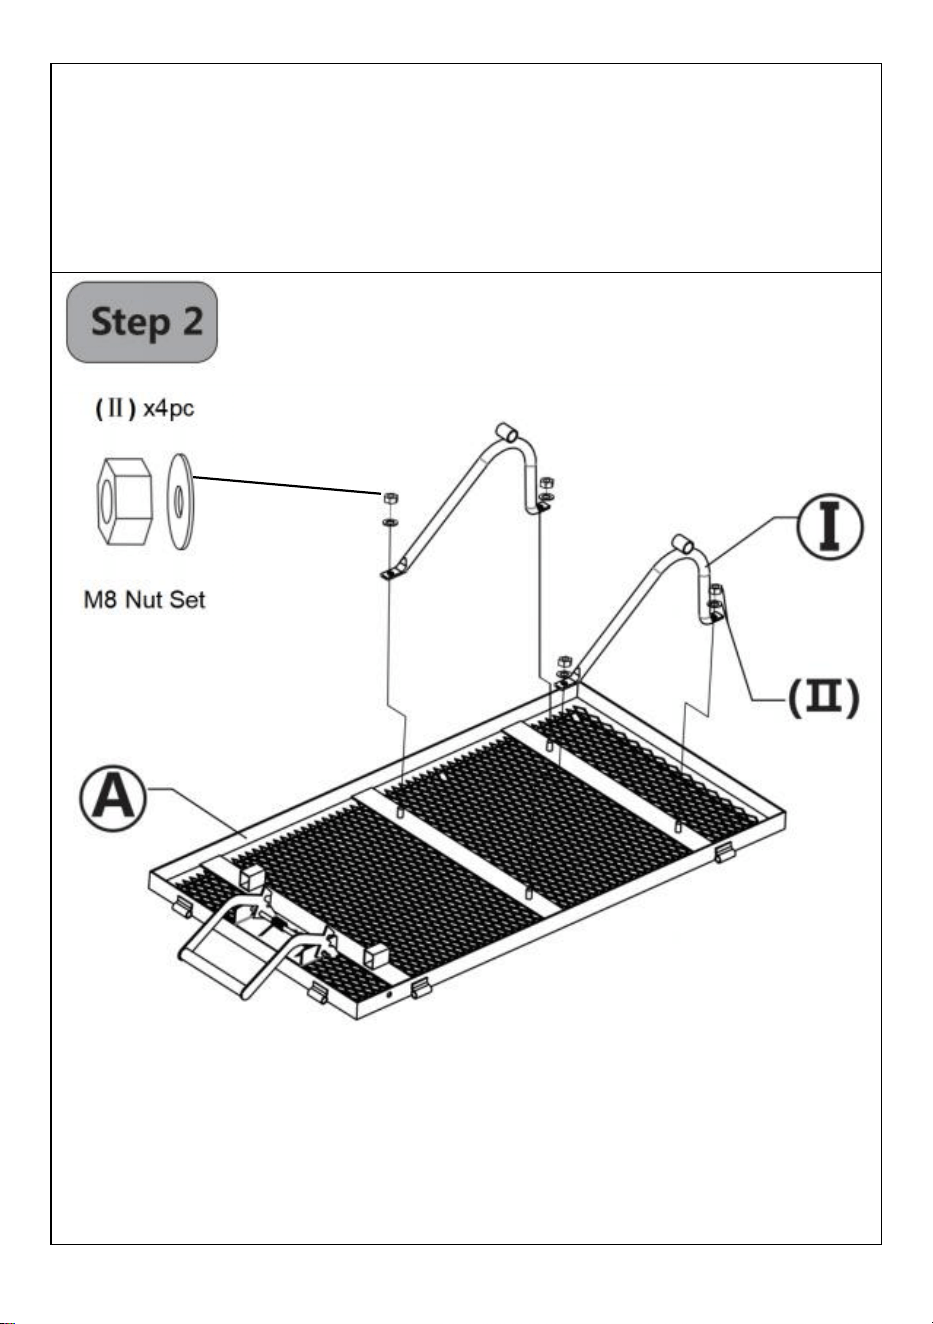
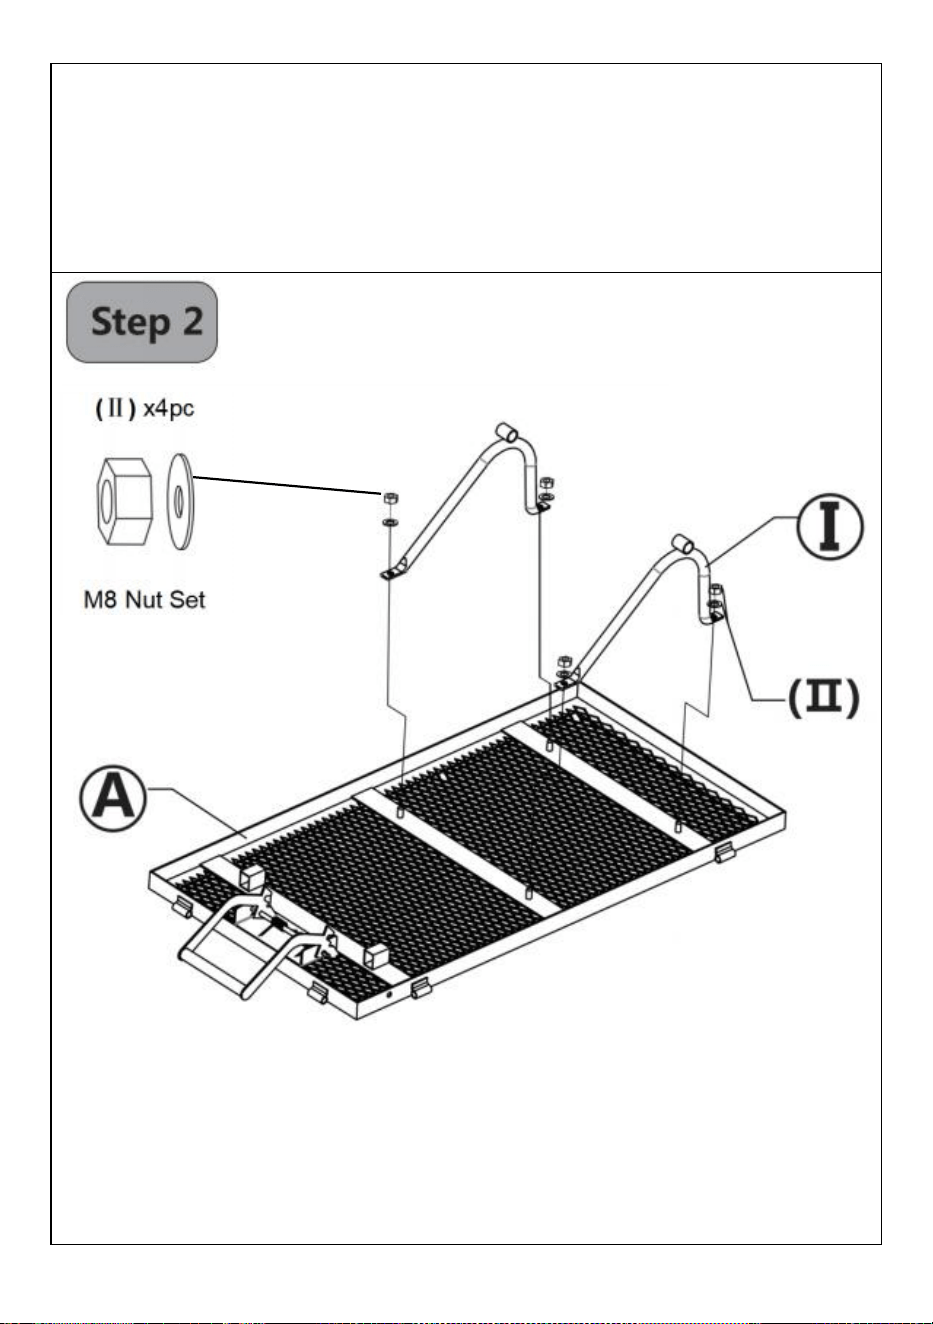
Rear Axle Bracket Assembly
● Detach the 4 M8 Nut Sets (Ⅱ) from the Bottom Frame.
● Attach 2 Rear Axle Brackets (part I) on Bottom Frame (part A) ) as
shown,then secure them with 4 M8 Nut Sets (partⅡ) .
8
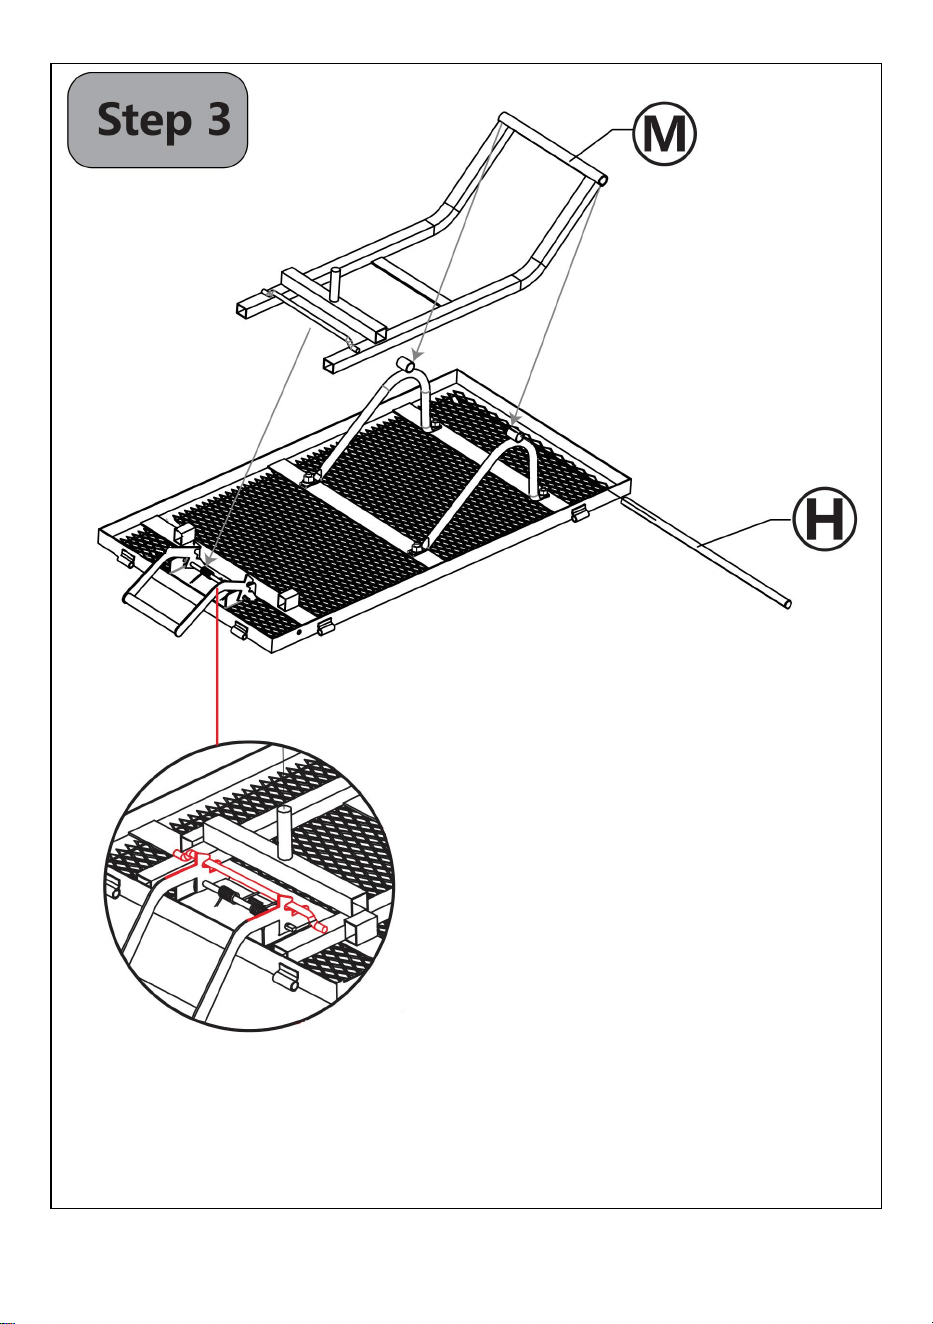
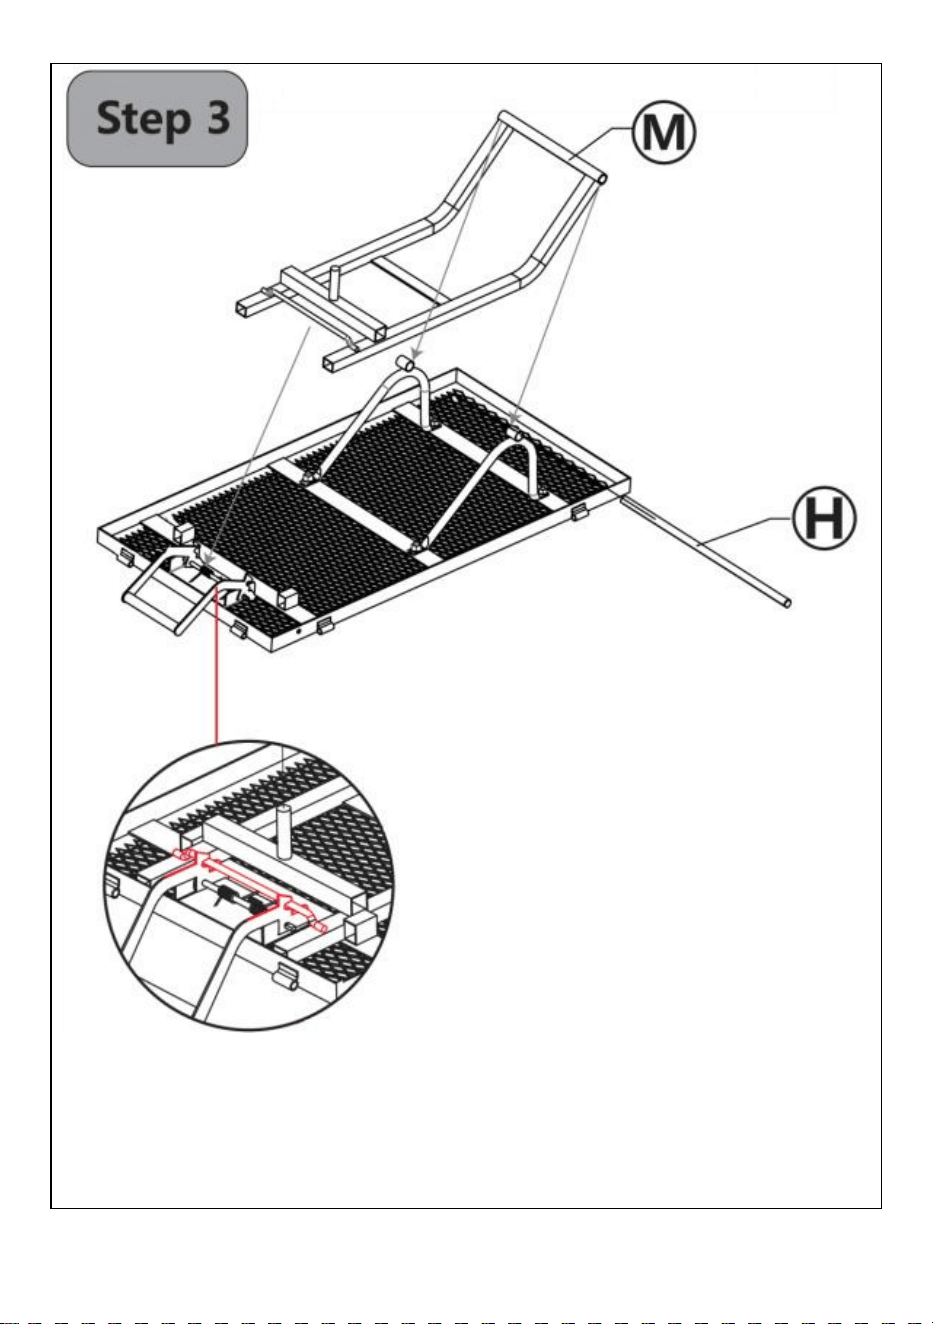
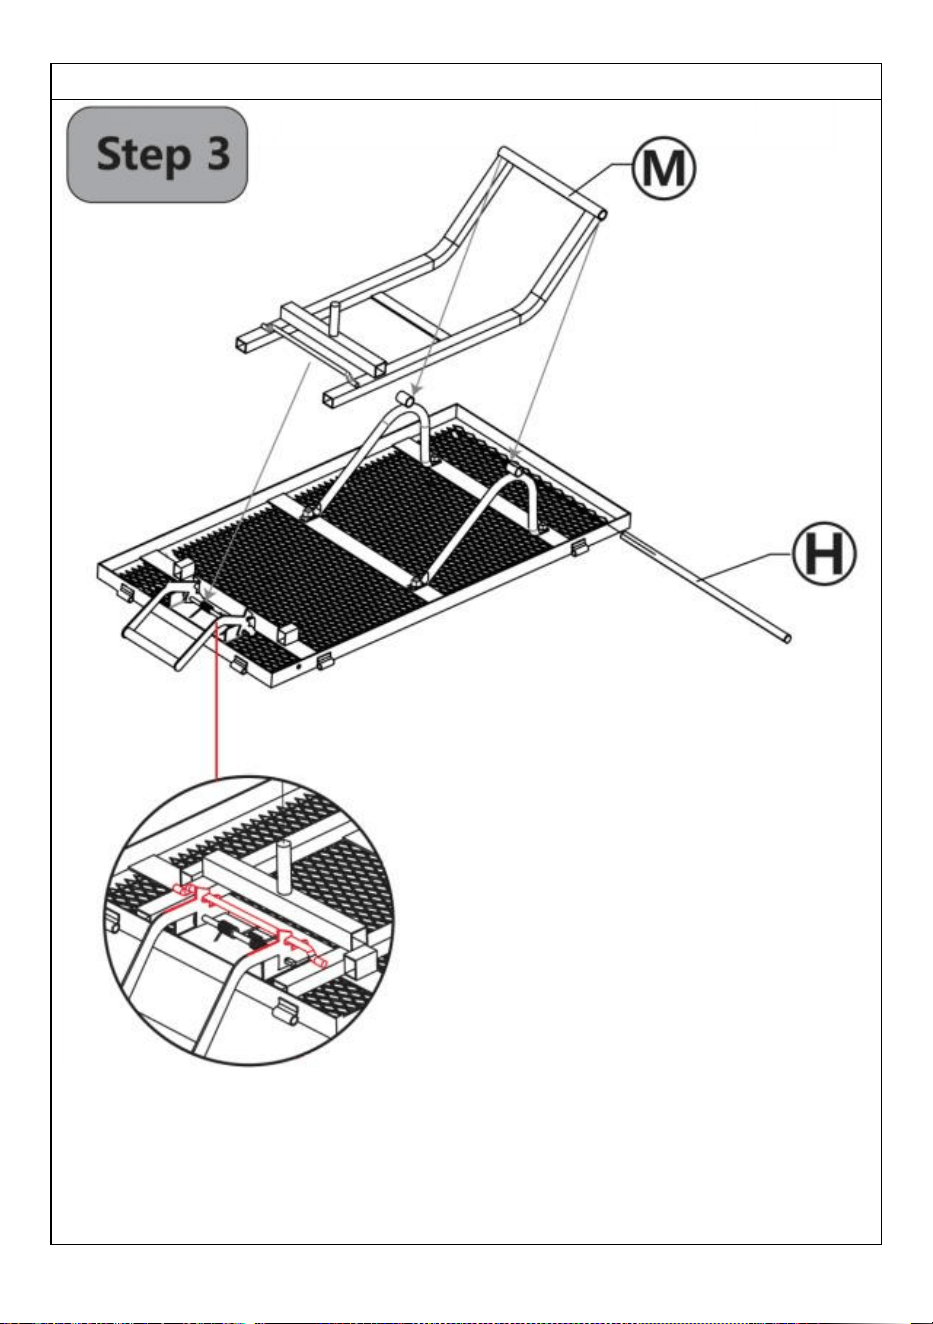
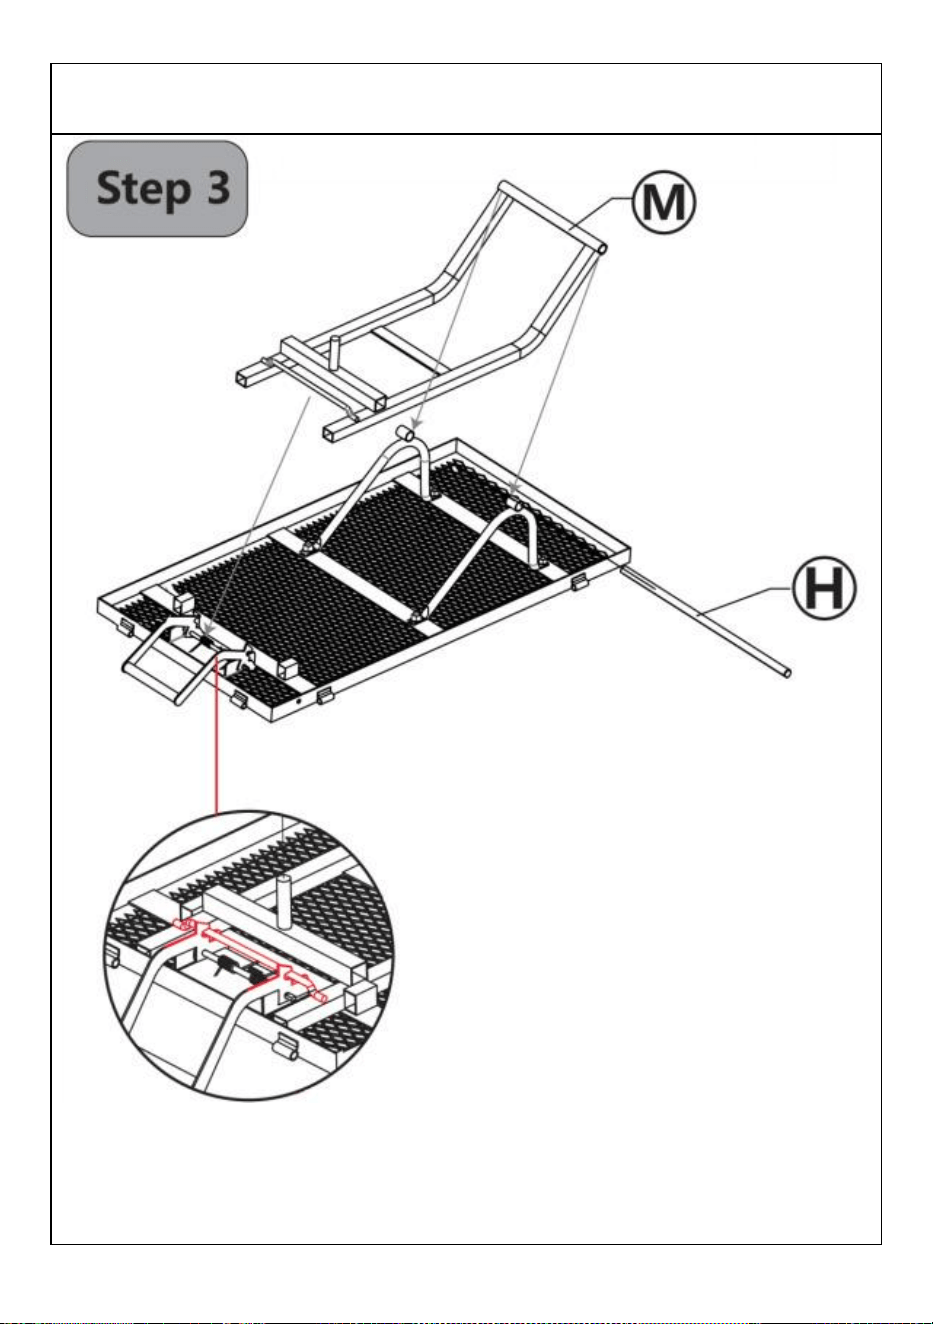
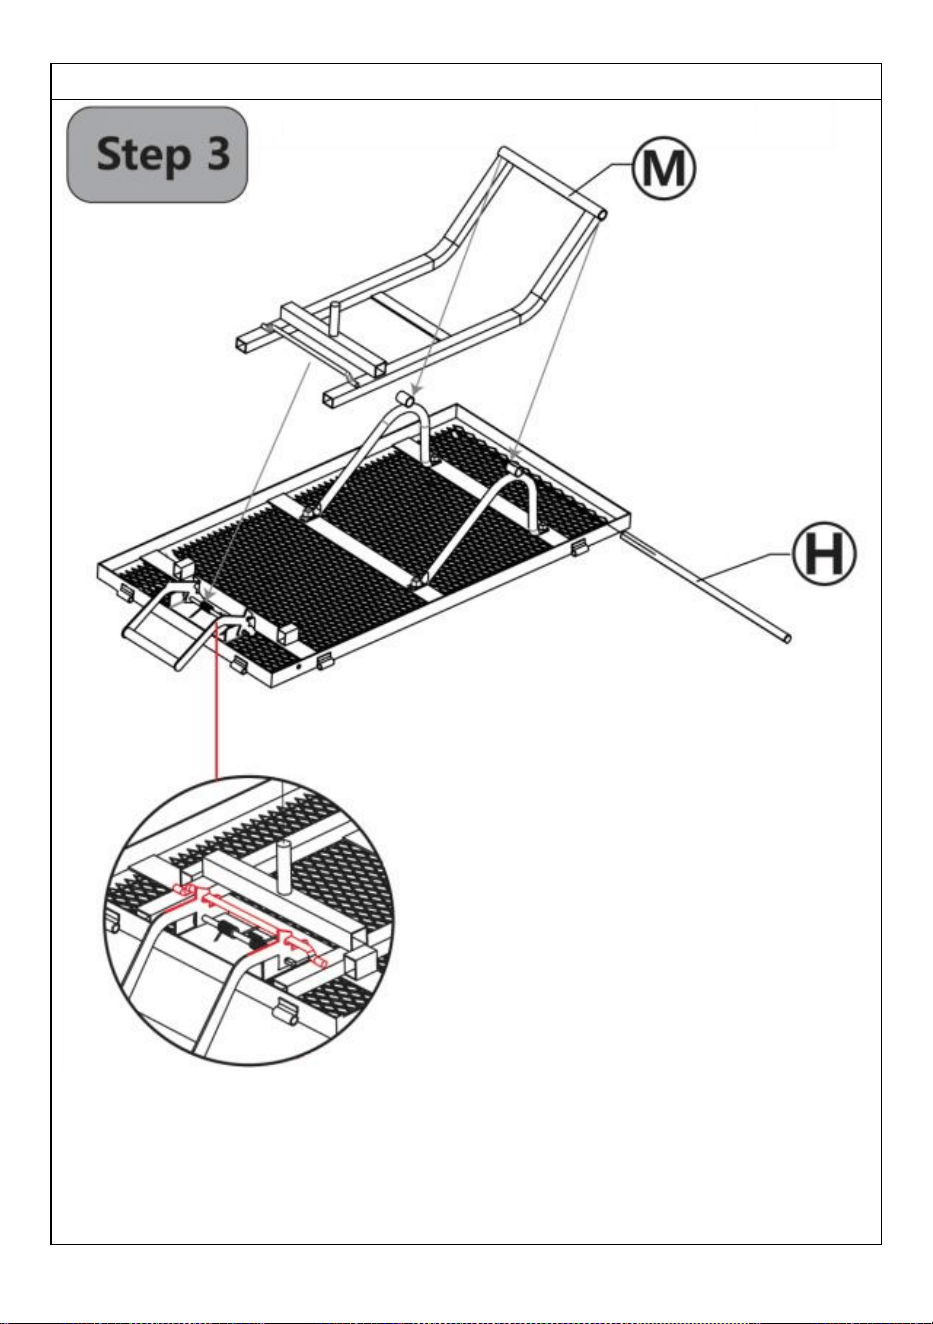
Dump-bucket Bracket & Rear Axle Assembly
● Lock Dump-bucket Bracket (part M) with the dumping handle on Bottom
Frame,align the holes of Dump-bucket Bracket and Rear Axle Brackets
(part I),then make the Rear Axle (part H) go through the holes

9
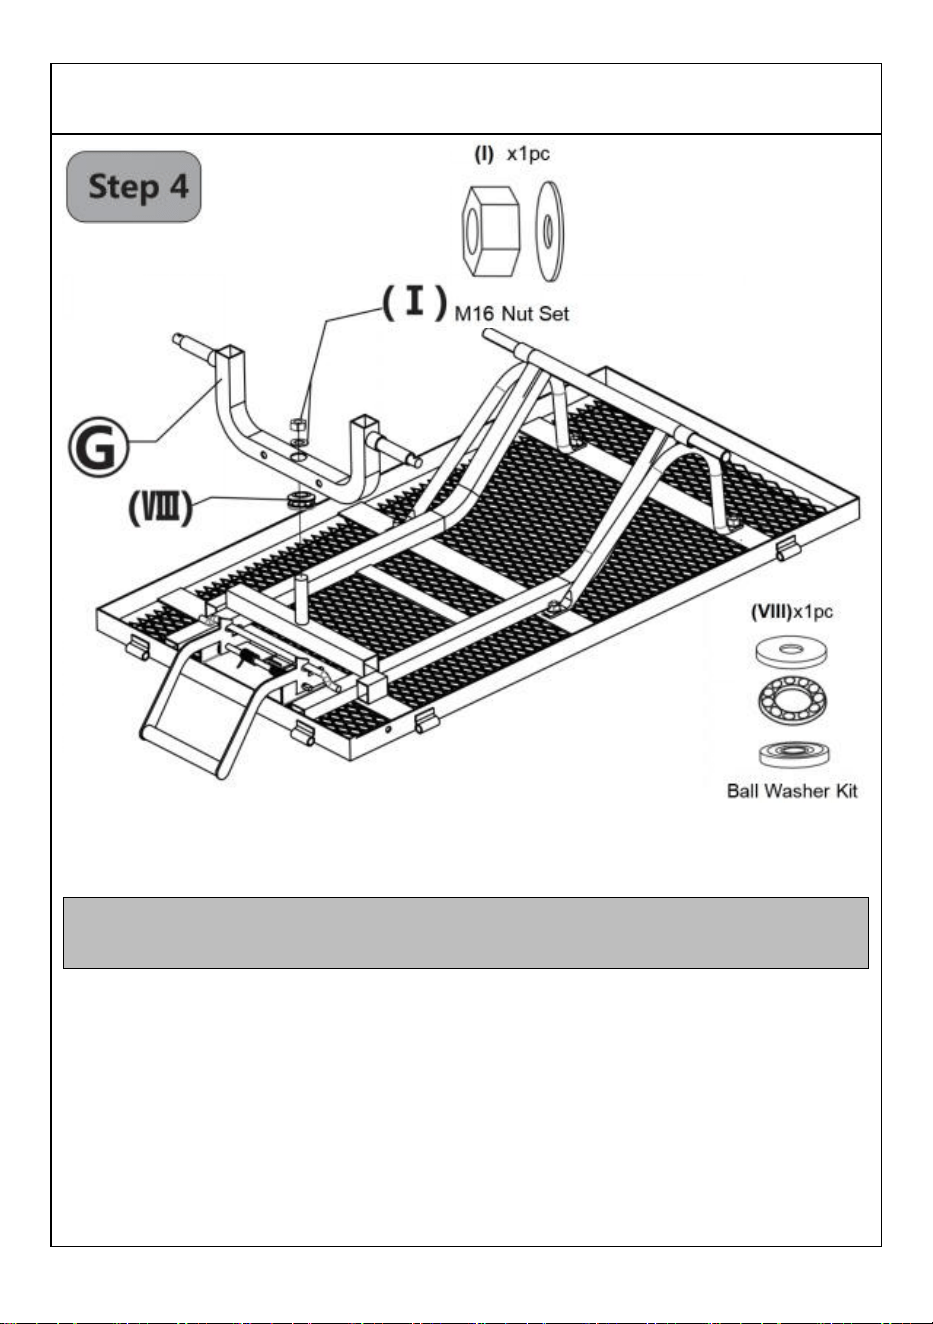
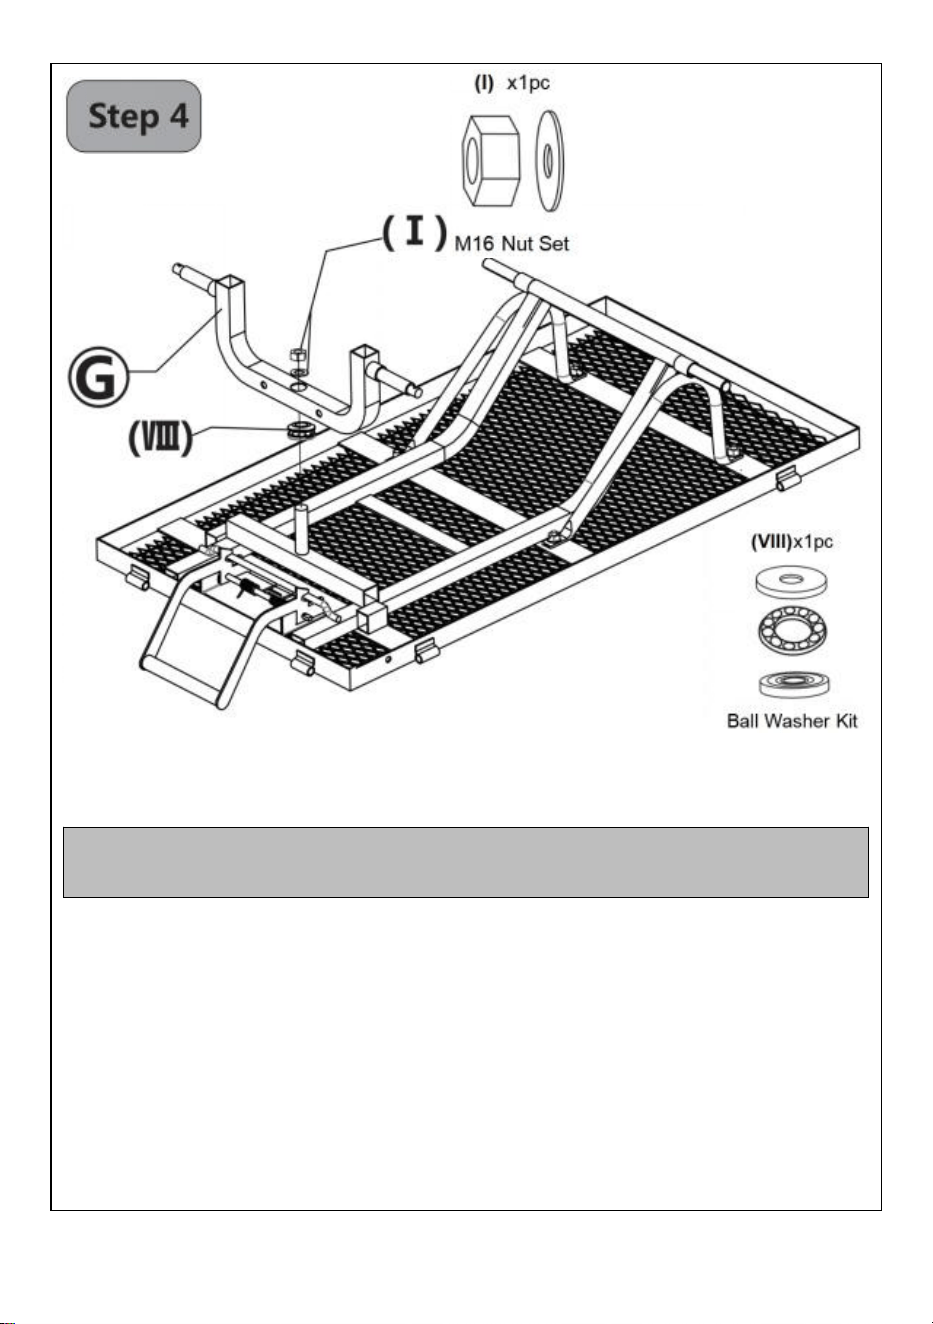
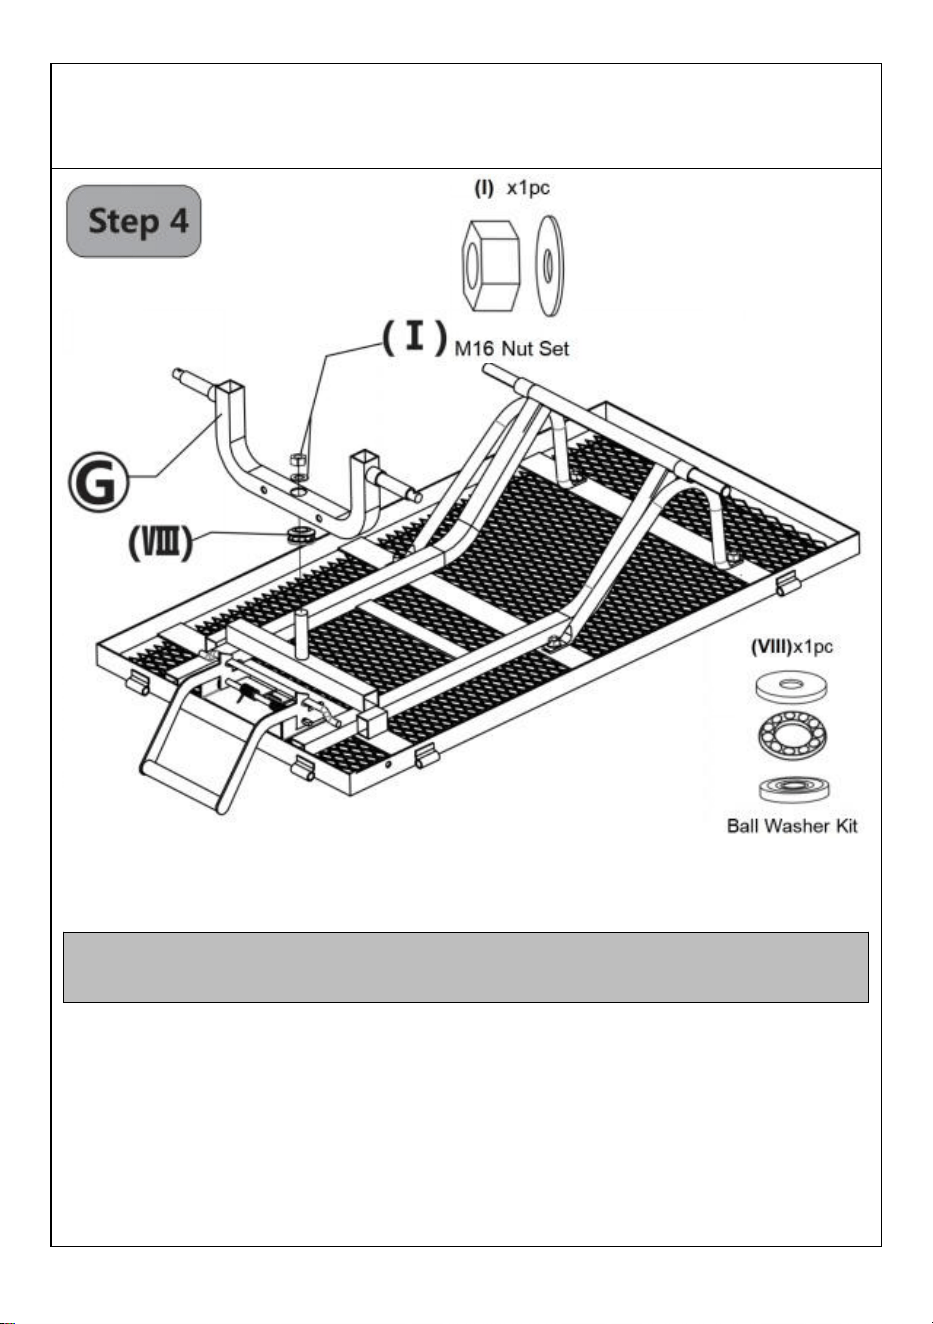
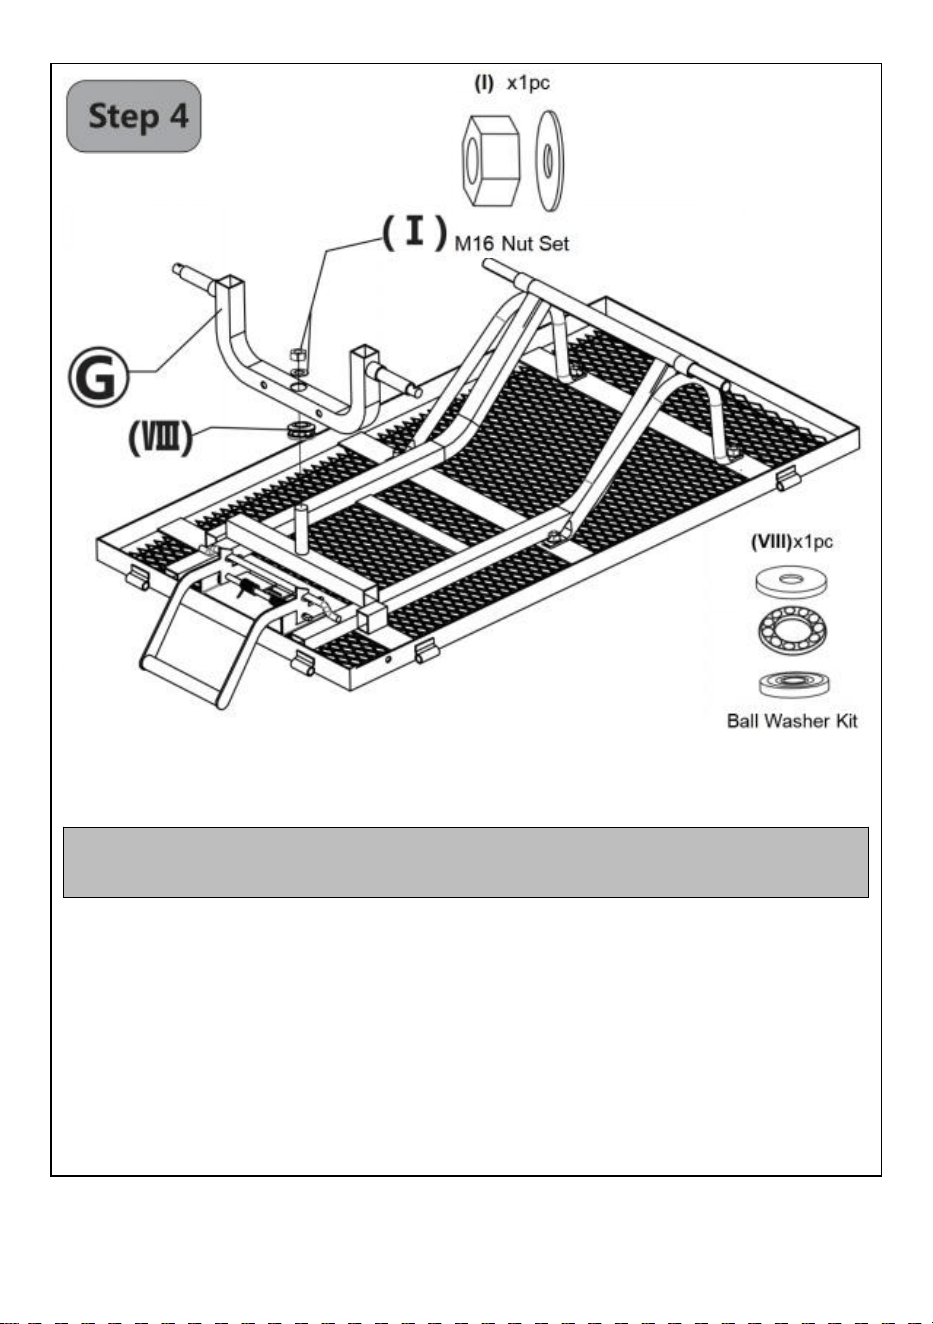
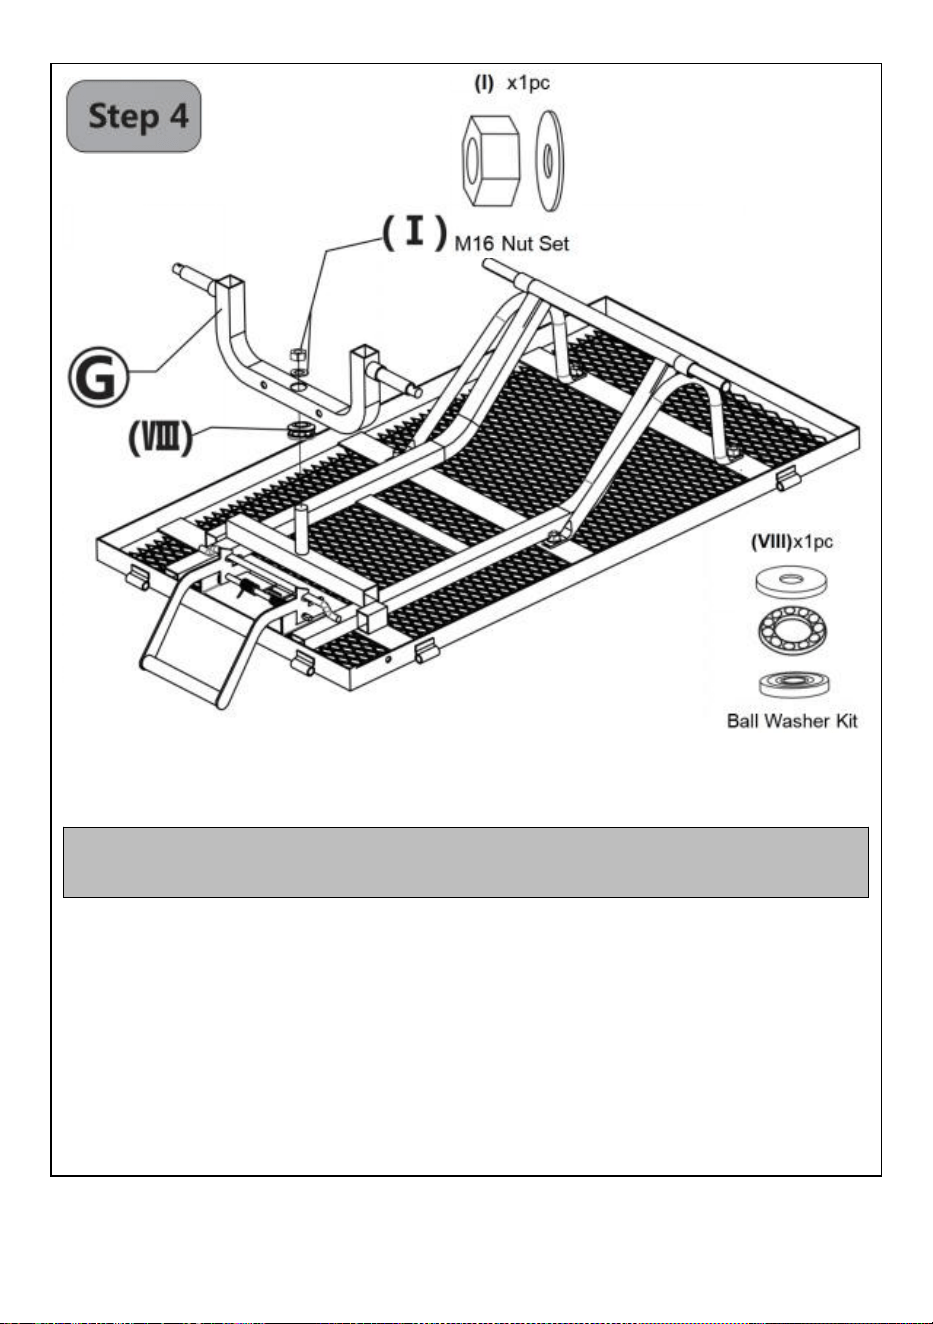
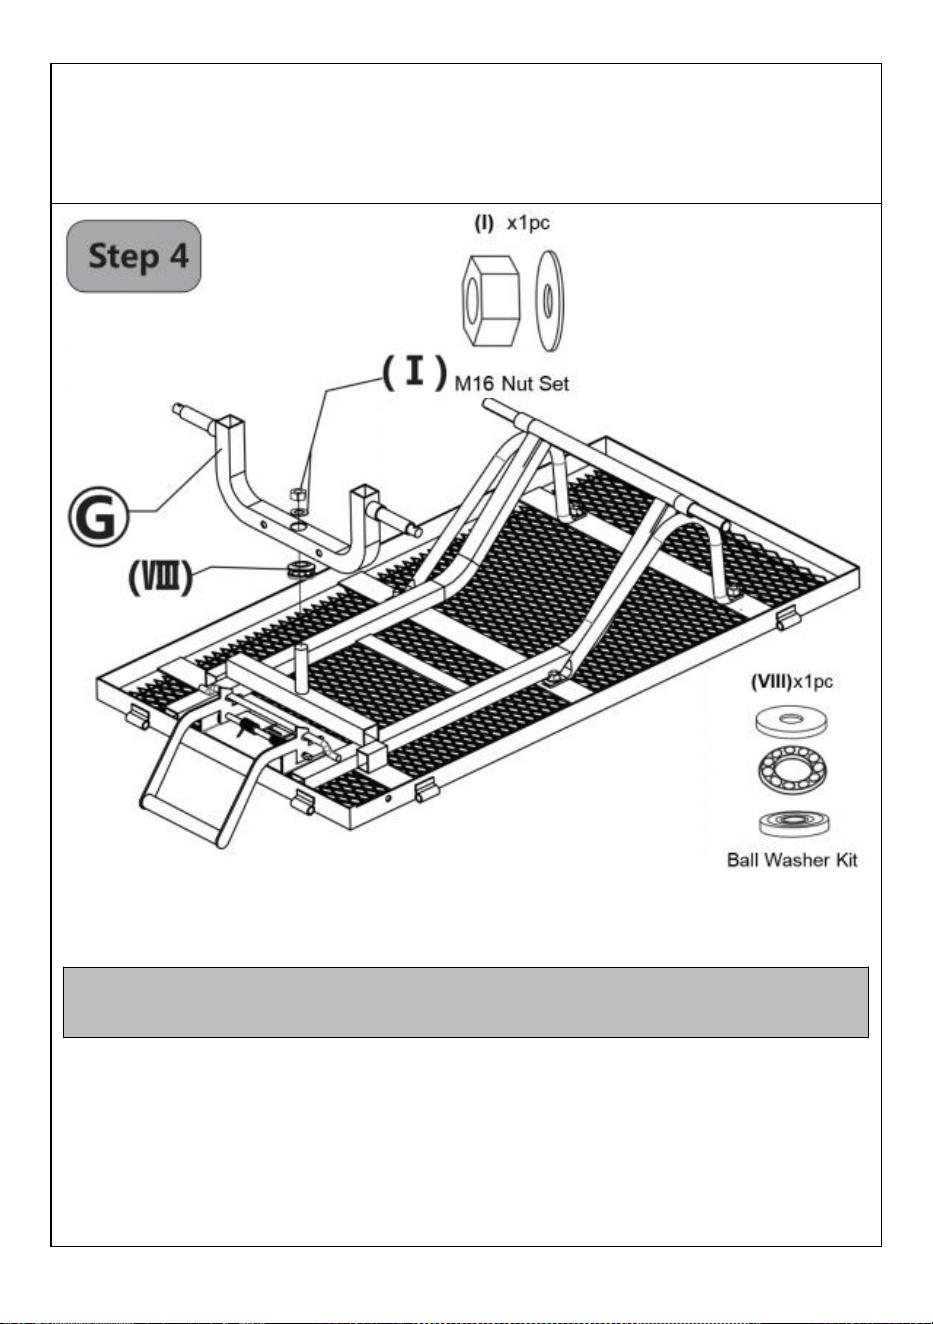
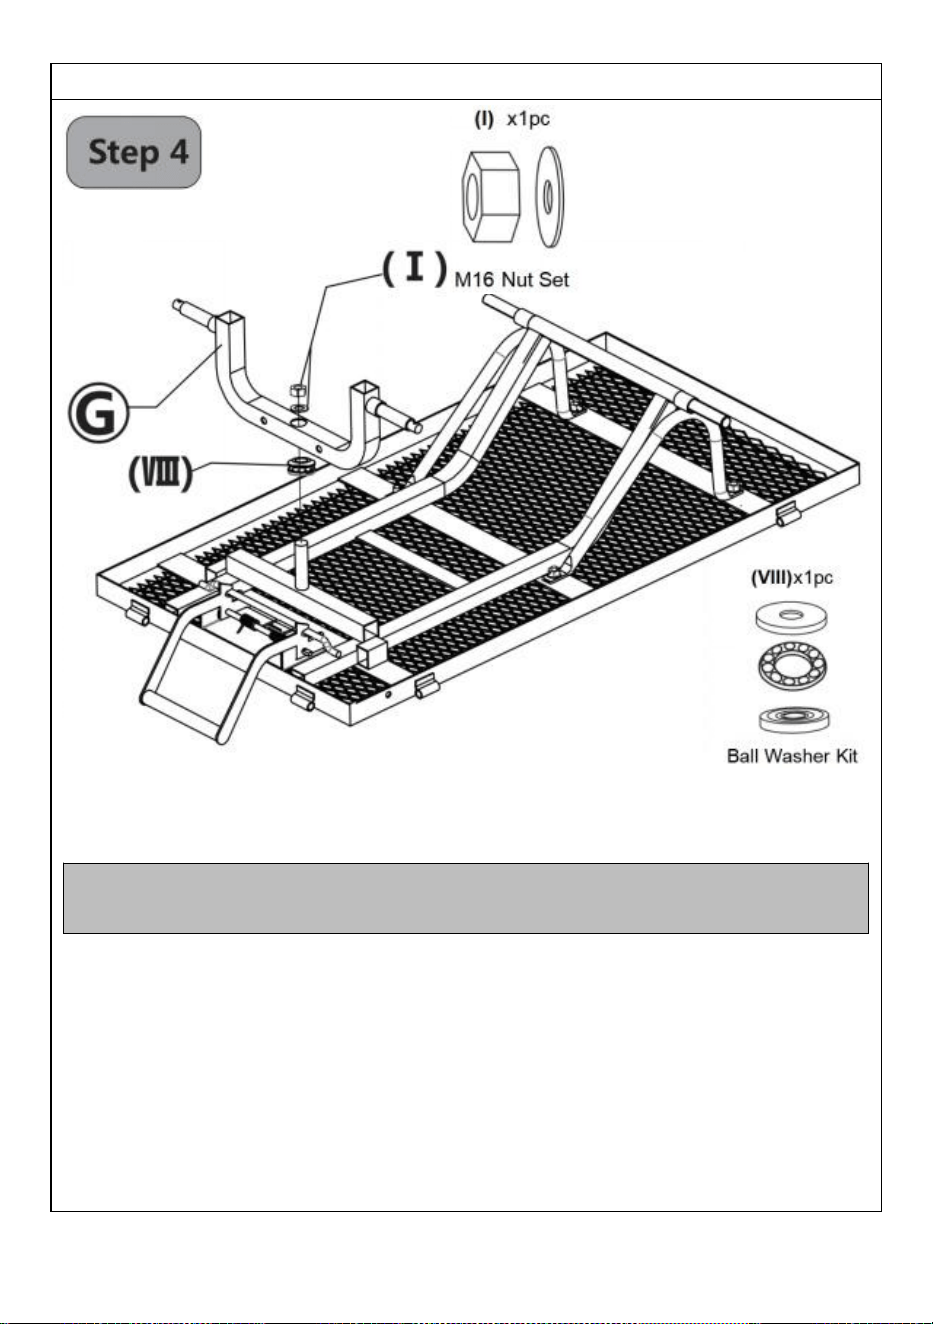
Note:To make sure Front Axle may pivot freely, please do not
over tighten M16Nut.
Front Axe Assembly
●Detach 1 x M16 Nut (
Ⅱ
) Set from the Dump-bucket Bracket.
● Attach Ball Washer Kit (part
Ⅷ
) on Dump-bucket Bracket (part M) as
shown,then attach Front Axe (part G) on it and secure Front Axle with
M16 Nut Set (part I).
10
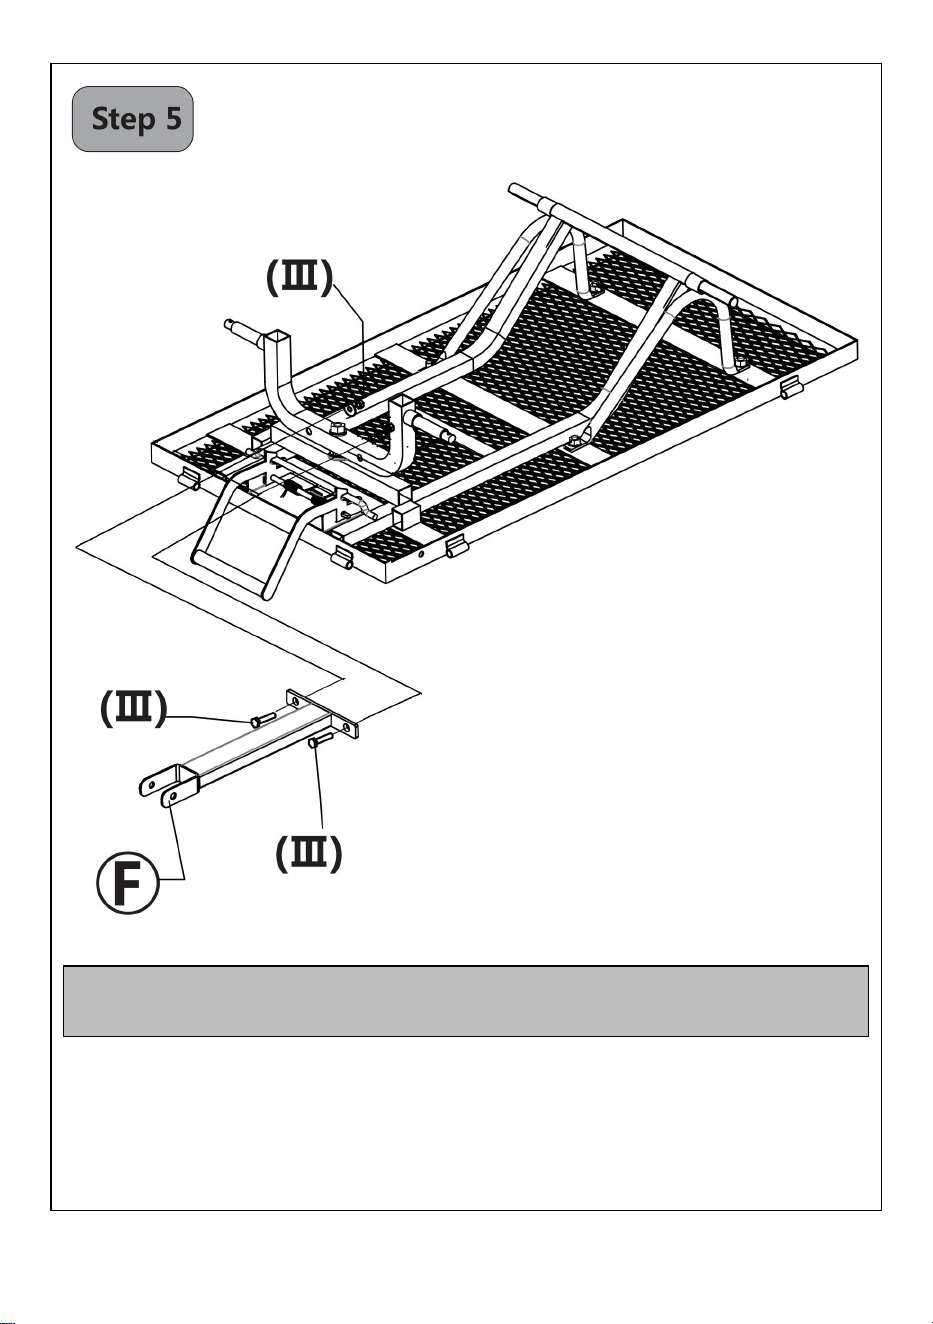
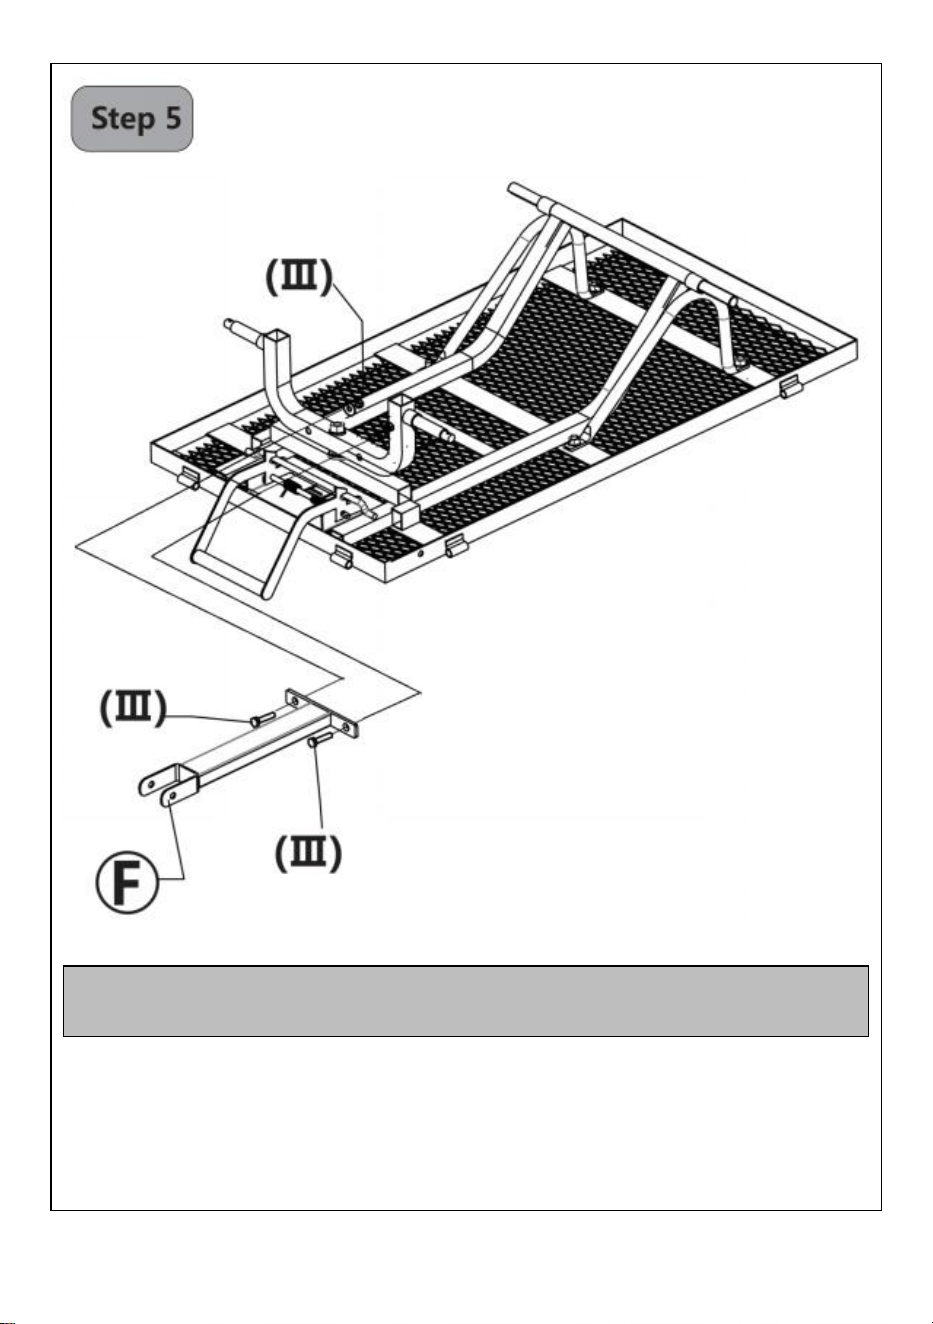
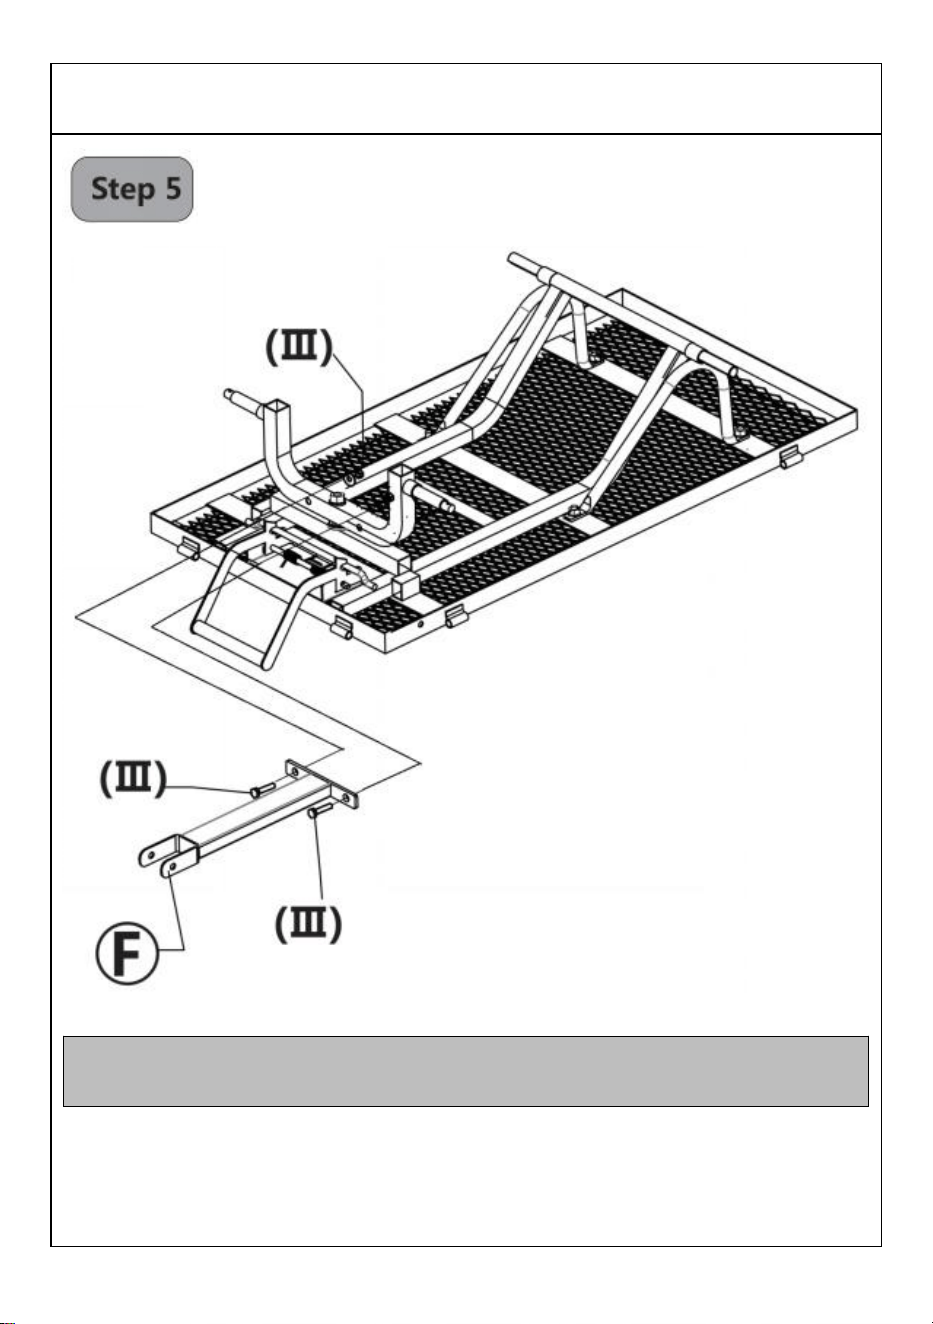
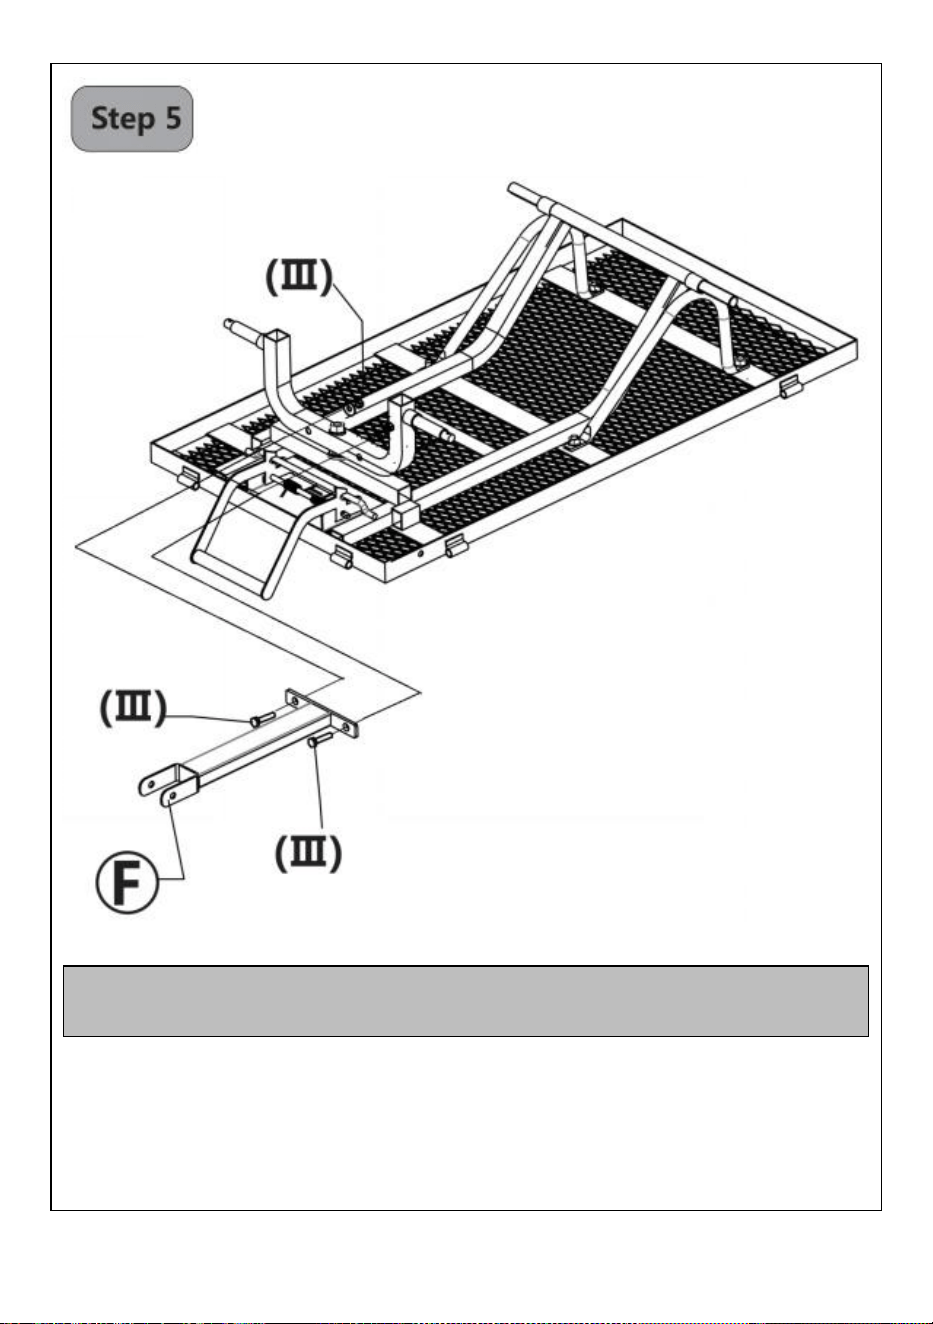
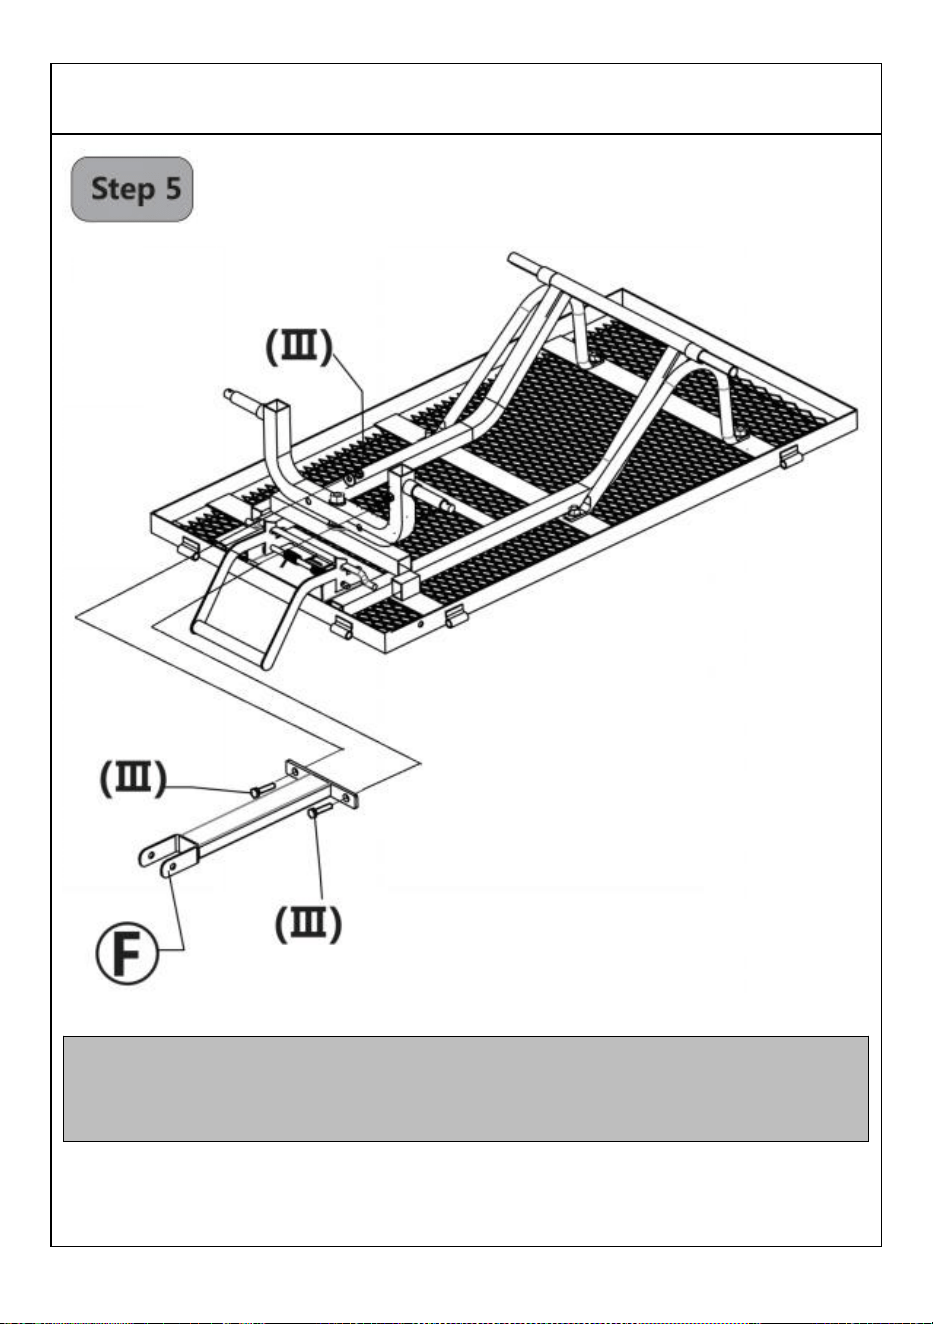
Note:Please use a wrench to hold the screw heads and
tighten the nuts with another wrench simultaneously.
Yoke Assembly
● Align the holes of Yoke (part F) and Front Axle ( art G),then secure
them with 2 M8 Screw Sets (part
Ⅲ
)

11
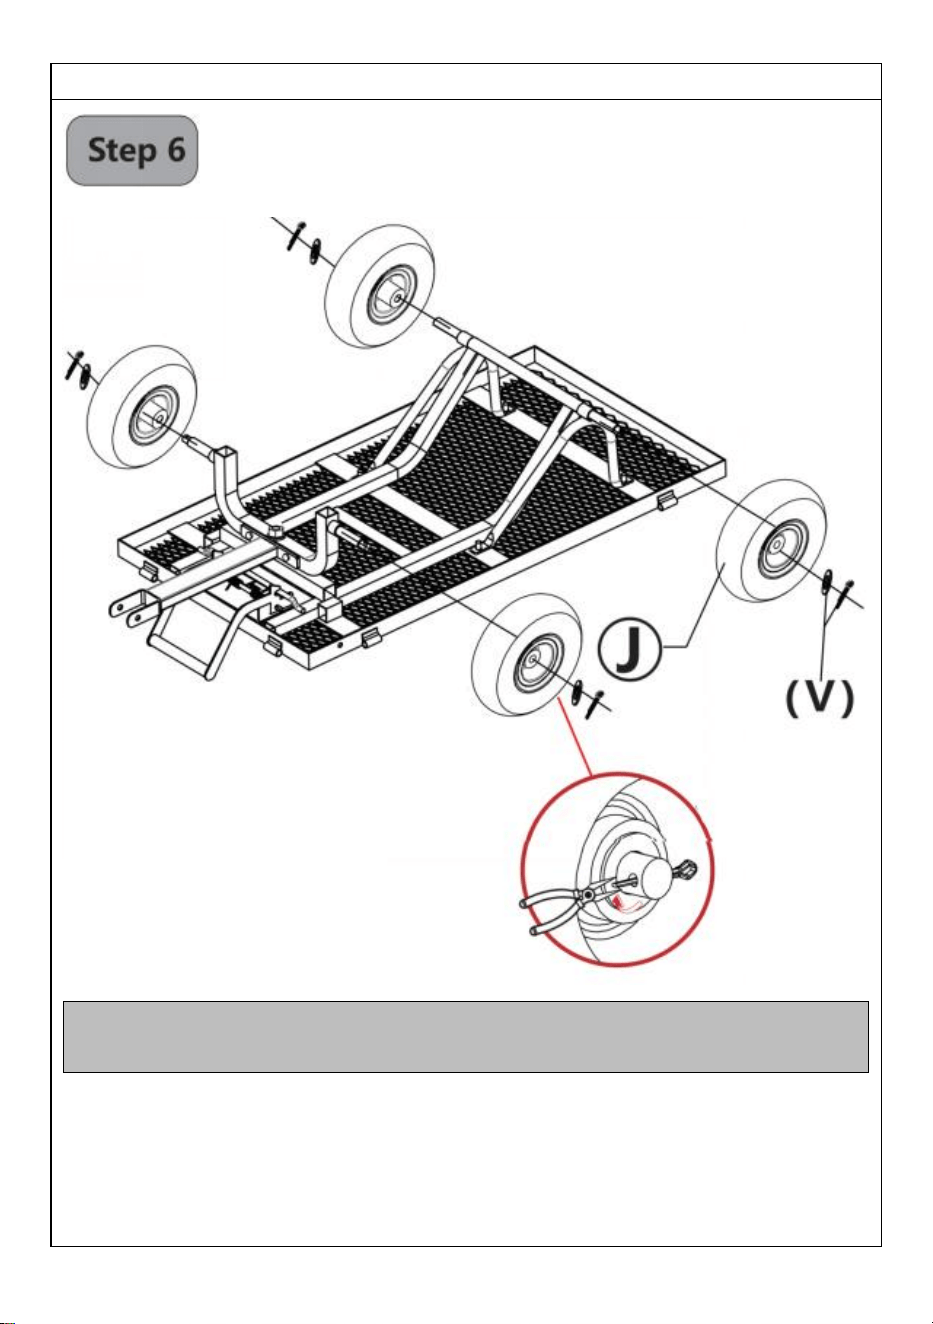
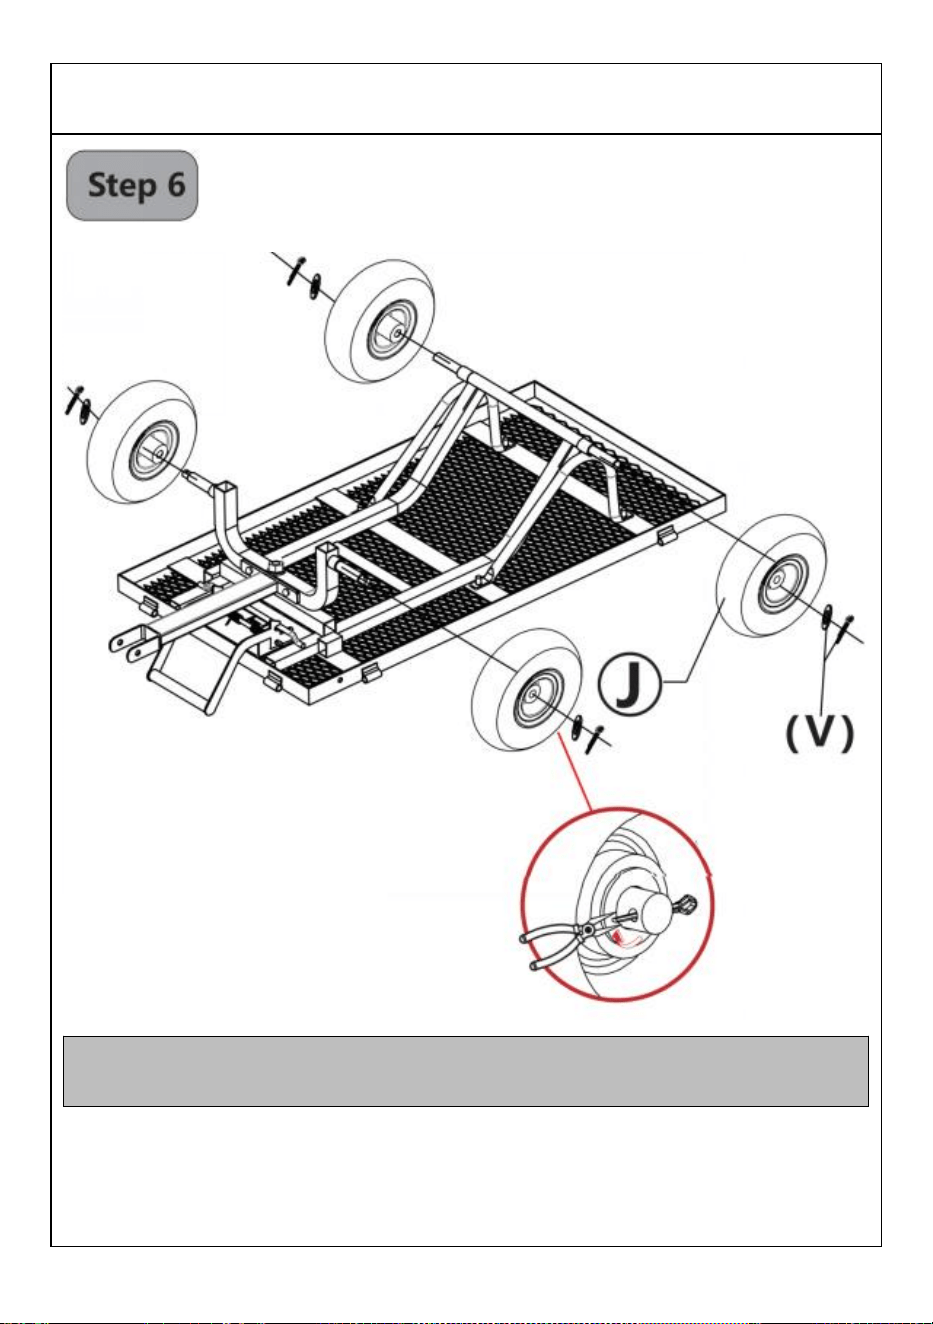
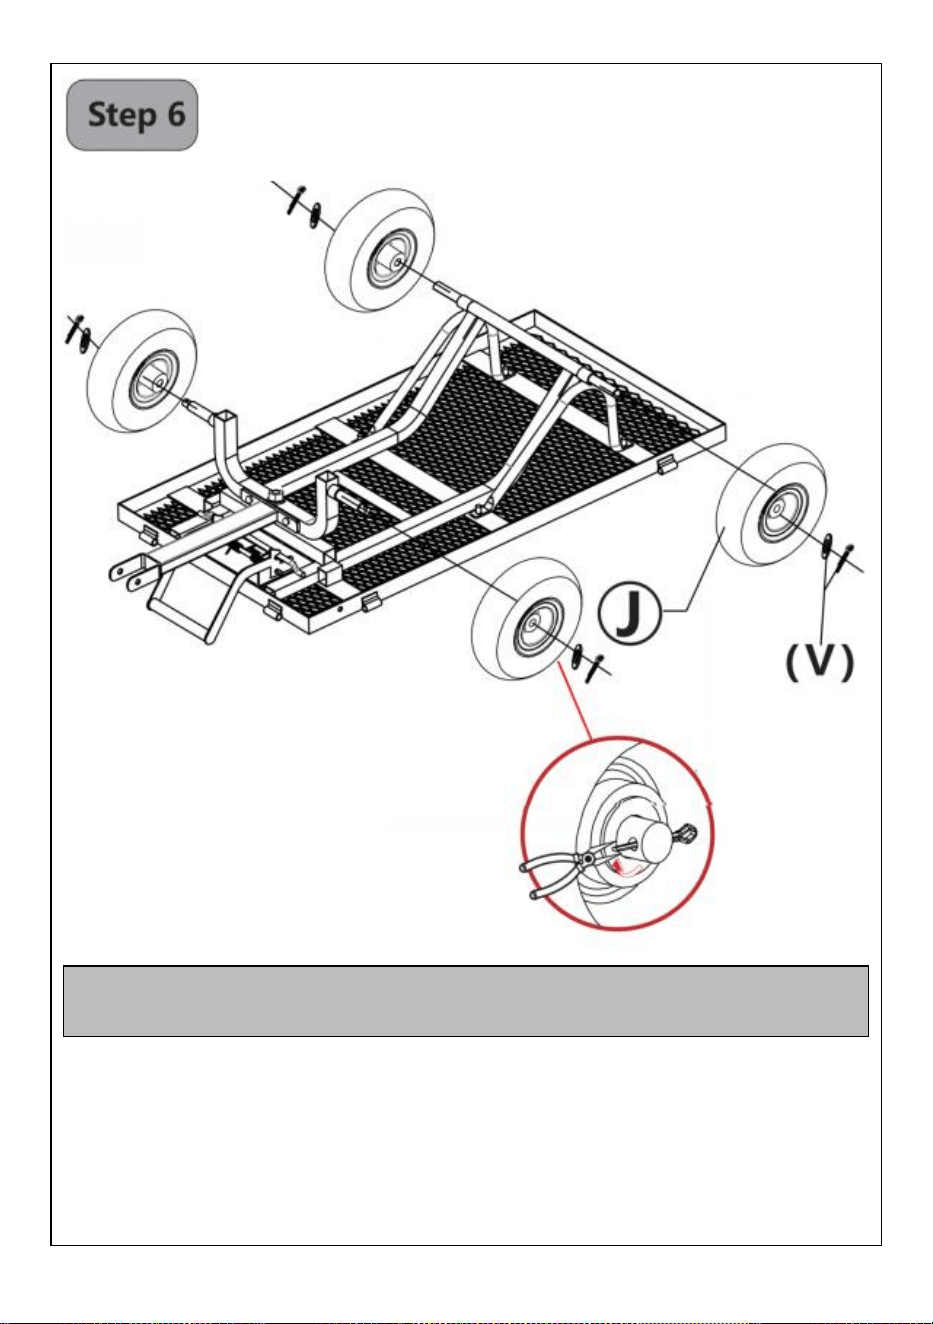
Note:Please make sure the tire valves won't be impeded by
Open Pins when running.
Wheel Assembly
● Attach 4 Wheels (part J) to the axles and secure Wheels with 4 Open Pin
& Washers (part V),then use a plier to bend the pins to lock Wheels.
12
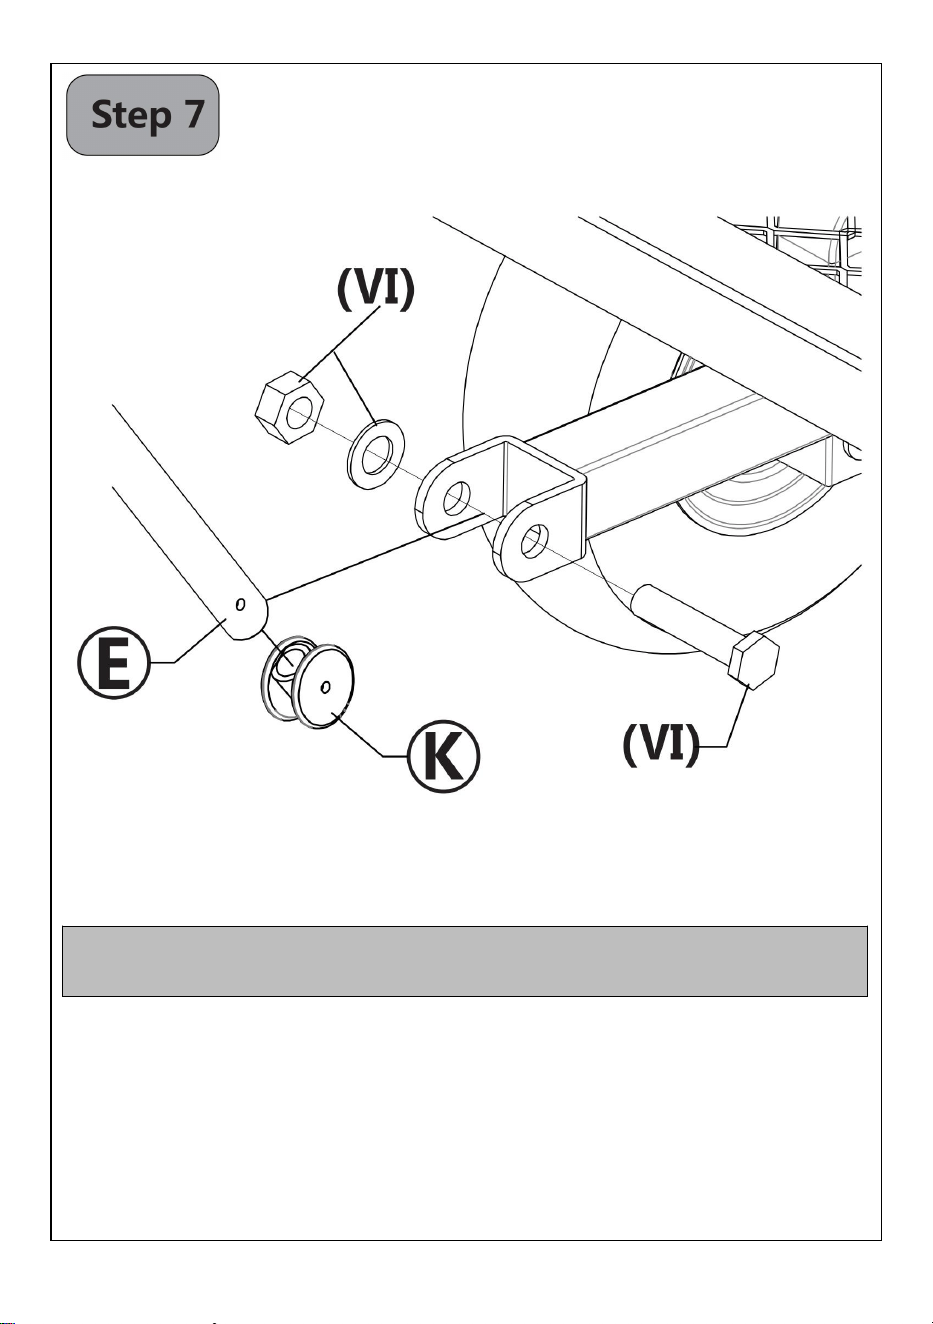
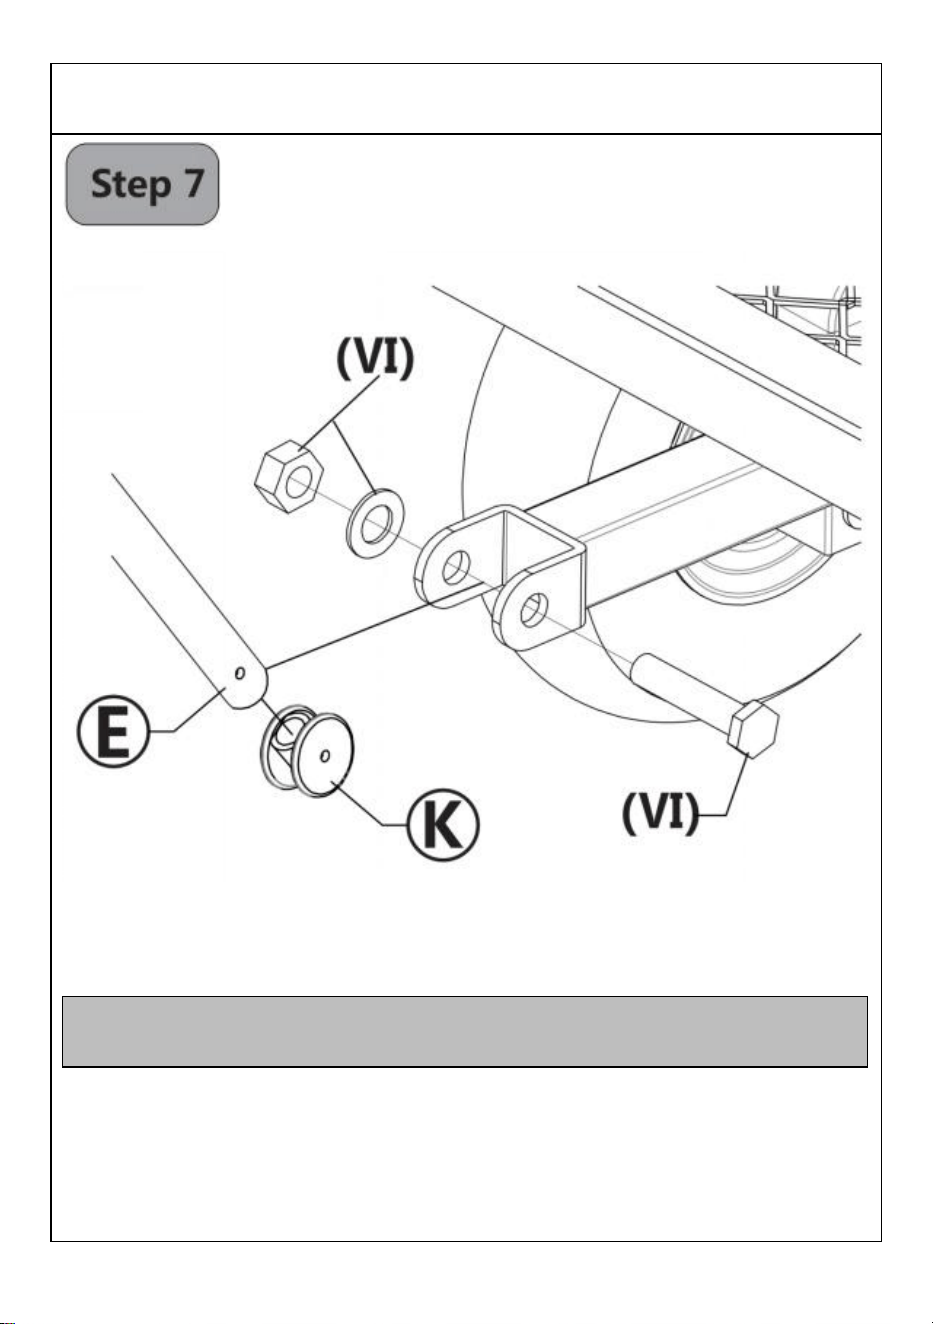
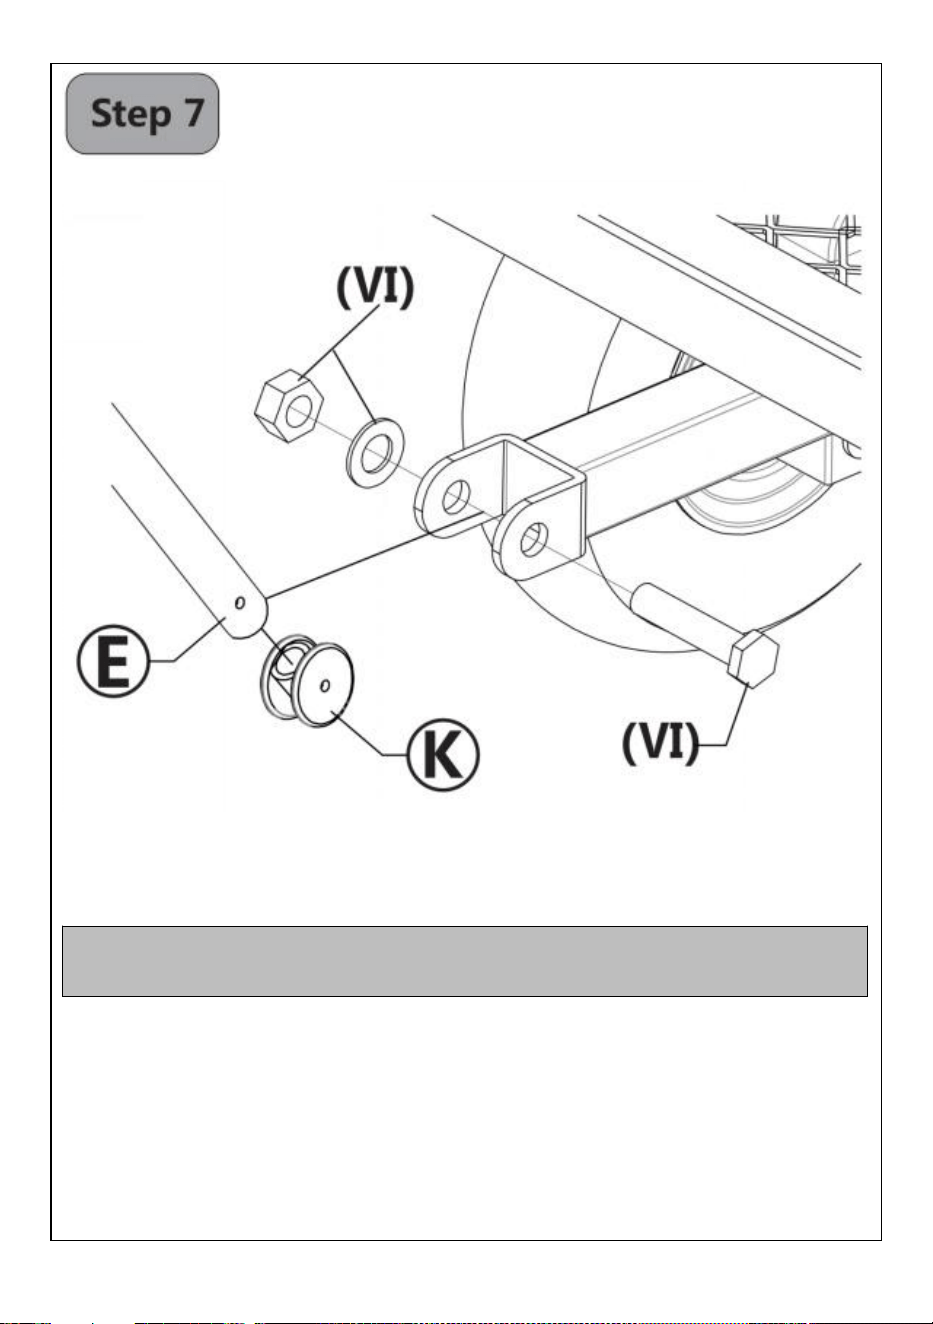
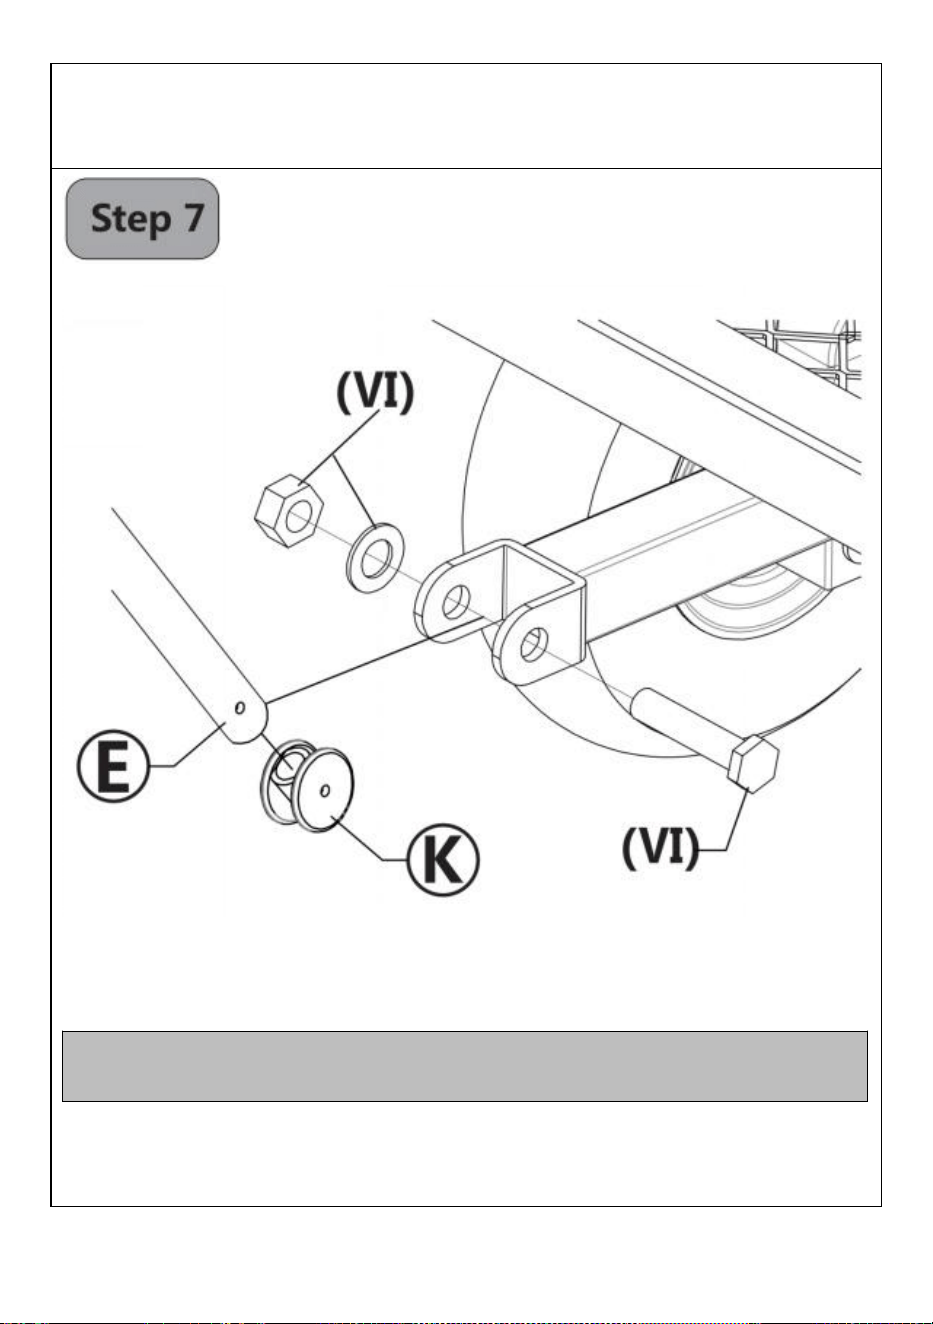
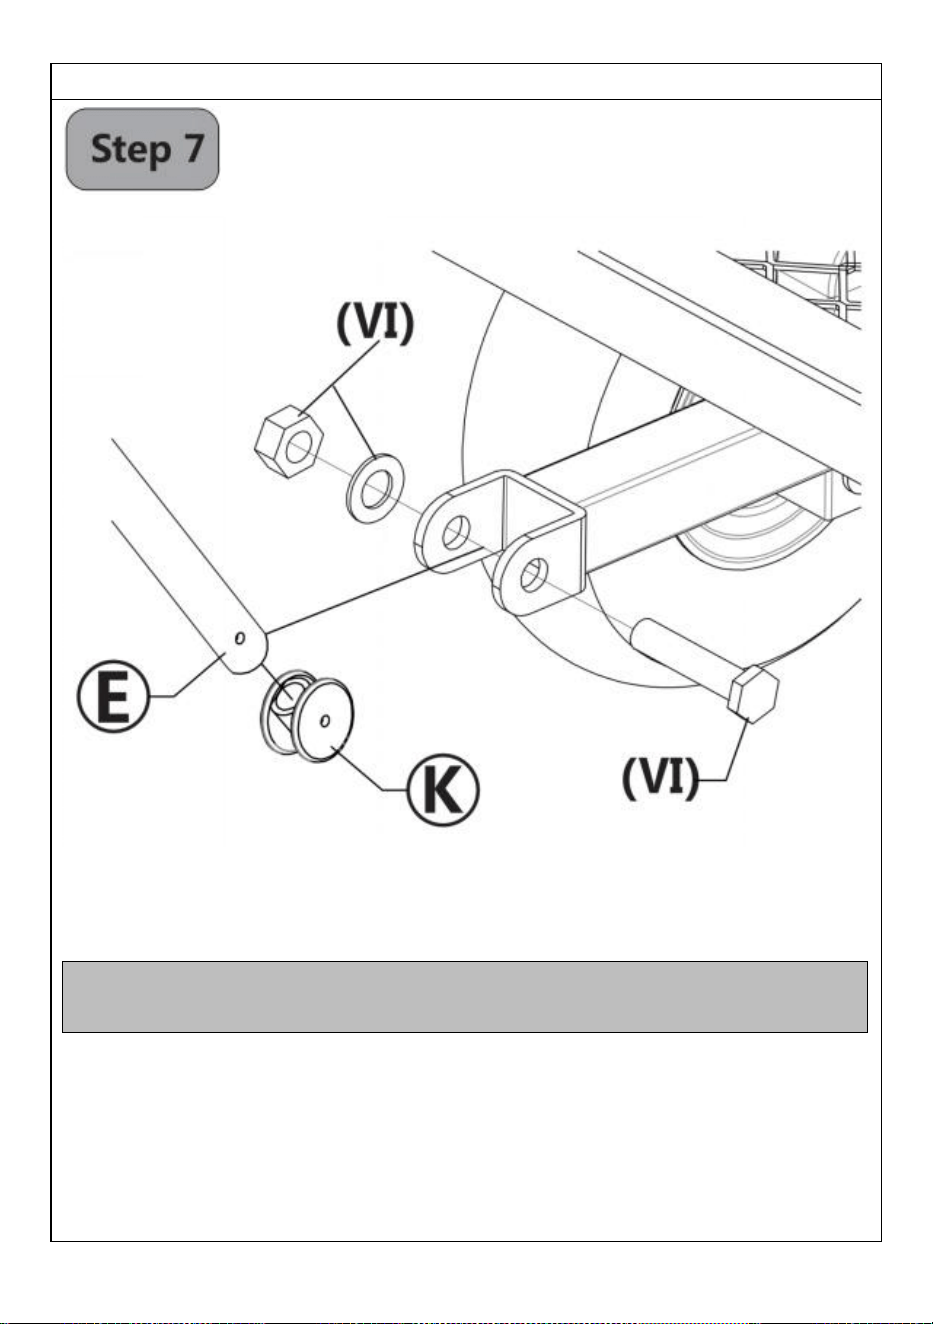
Handle Assembly
● Attach Handle Coupler (part K) and Handle (part E) to Yoke (part F)
successively,then secure them with M8 Screw Set (part VI) as shown.
Note
:
Please use a wrench to hold the screw head and tighten
the nut with another wrench simultaneously.

13
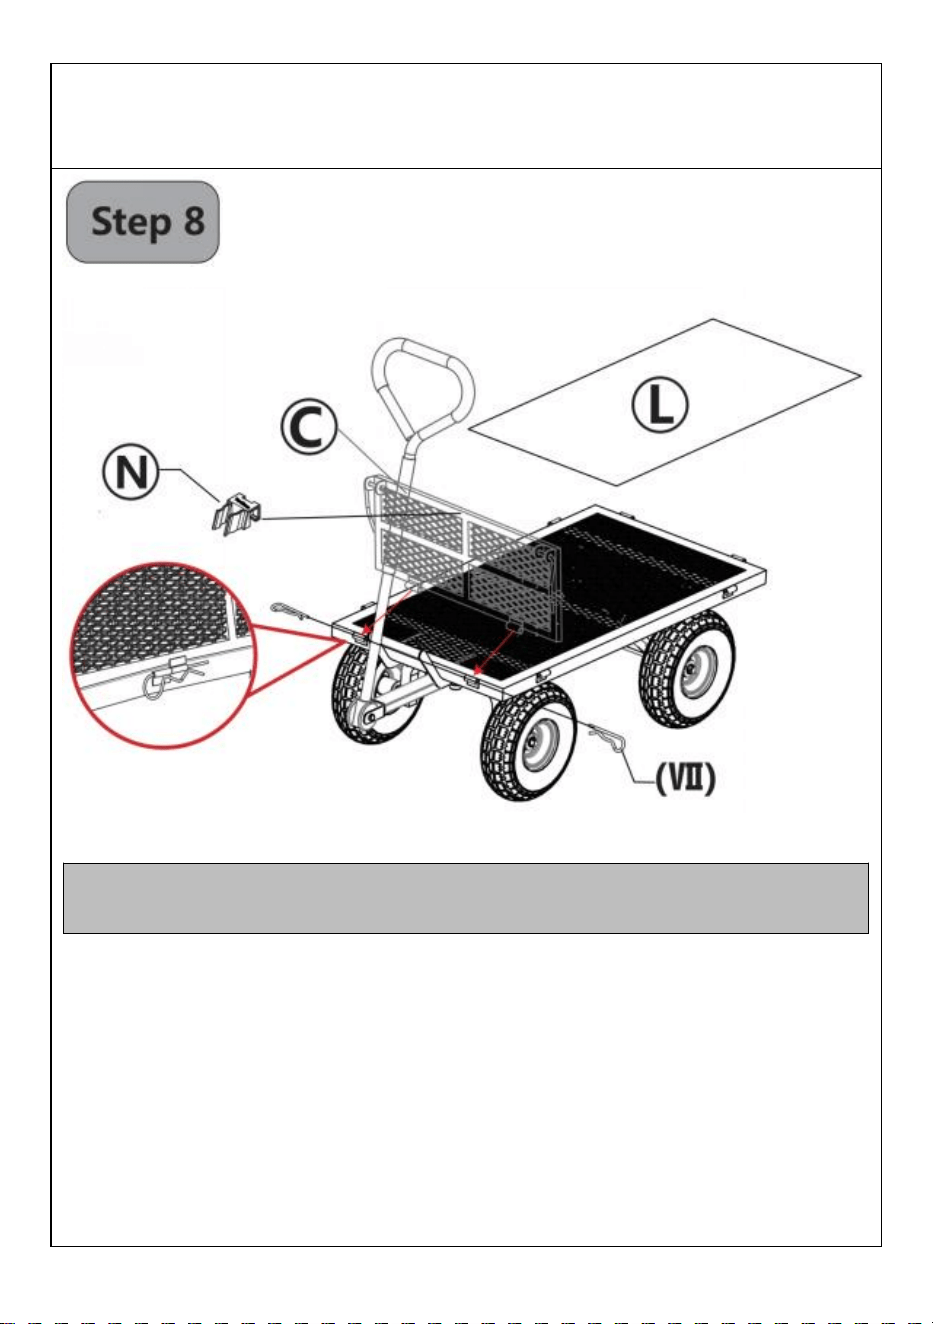
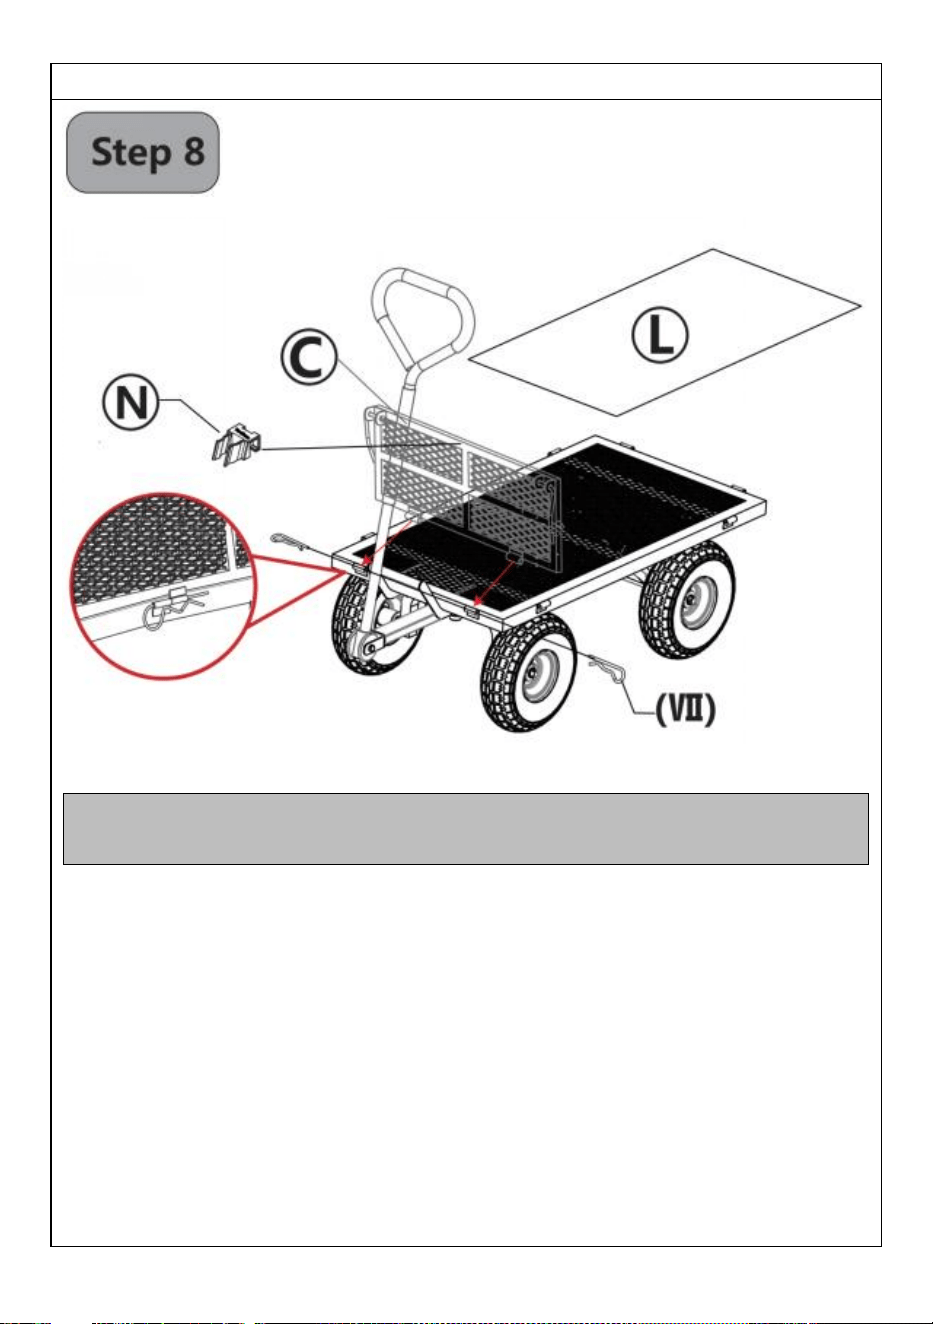
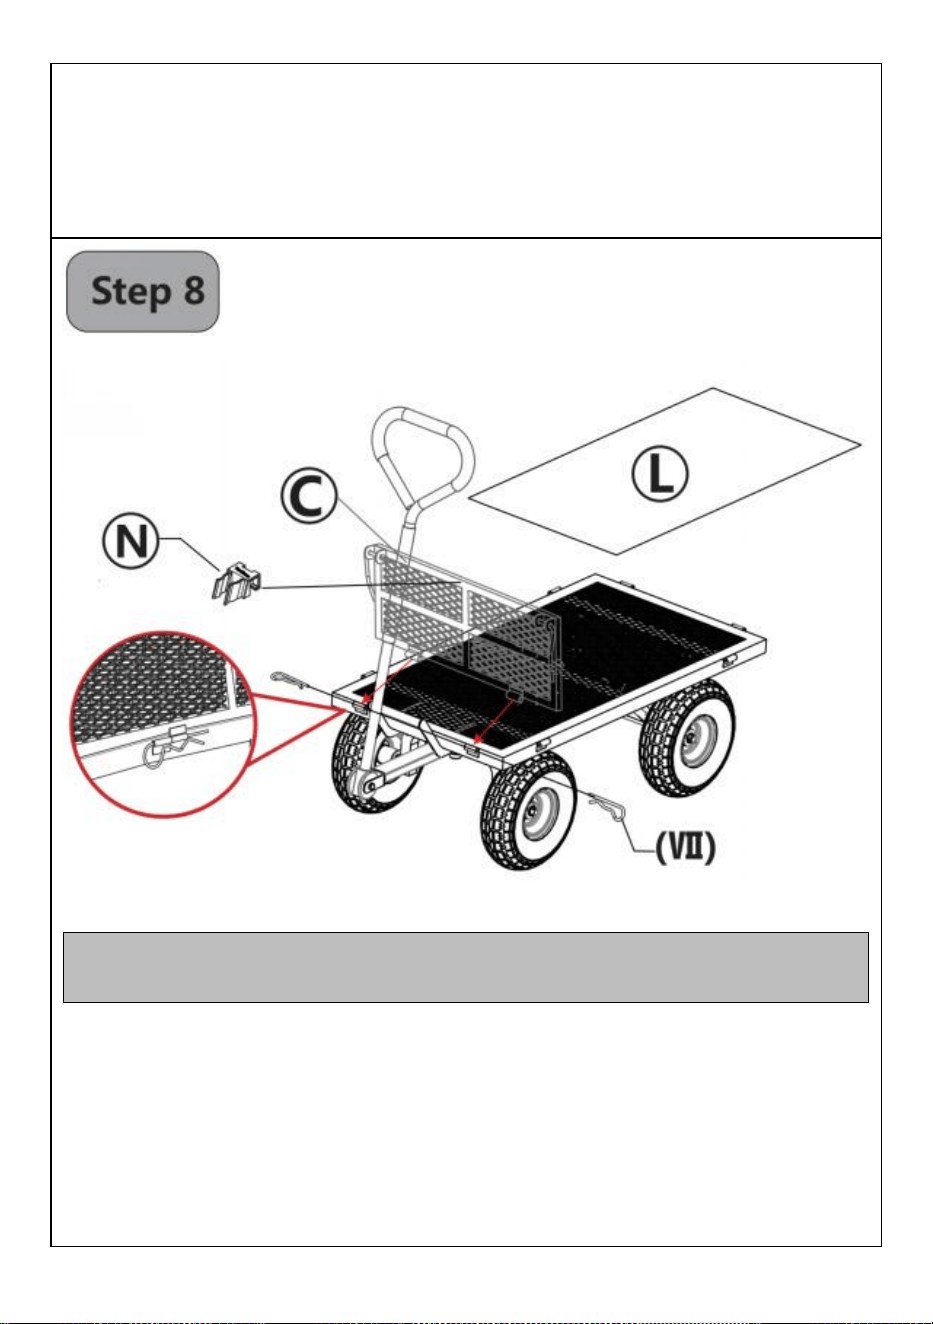
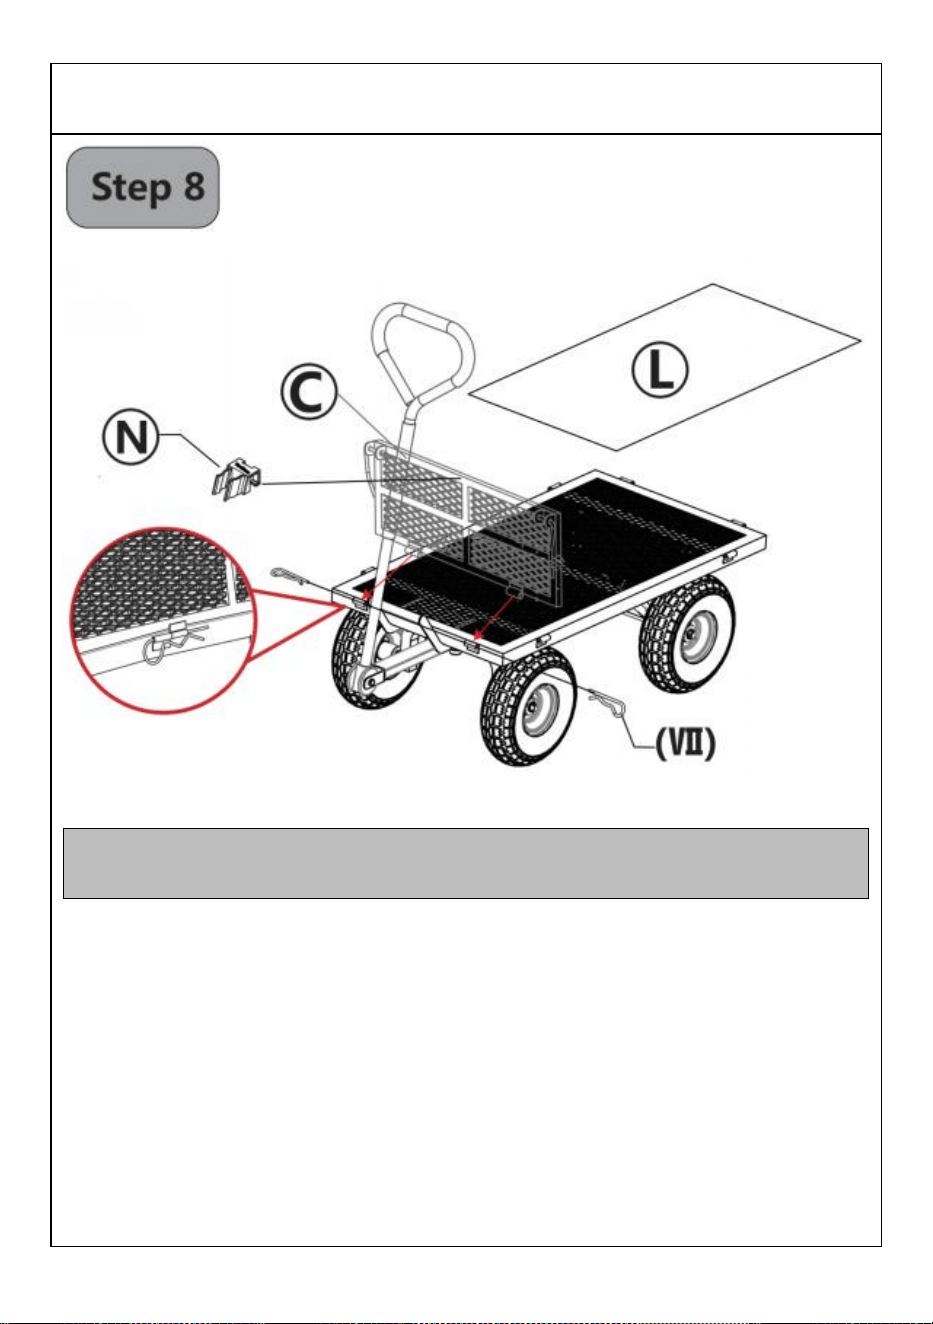
Note:Make Front Board press on Mat to op prevent sliding.
Front Board & Mat Assembly
● Align Mat (part L) with the fronted edge of Bottom Frame (part A) ) as
shown. Then Align the holes of Front Board (part C) and Bottom
Frame,and then secure them with 2 B Pins (part VI) as shown. Next,attach
Handle fastener (part N) on the middle of Front Board.
14
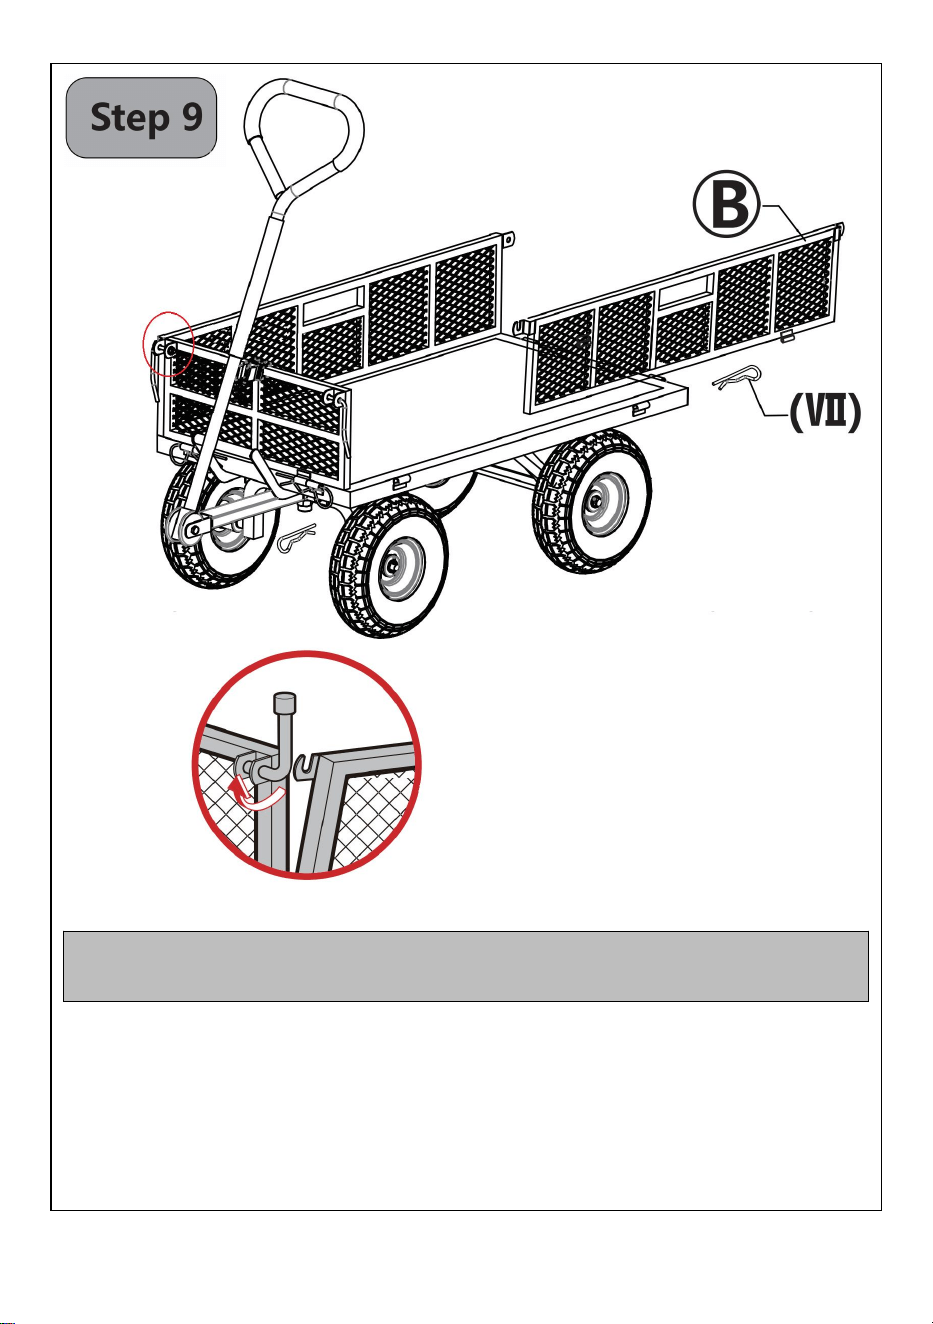
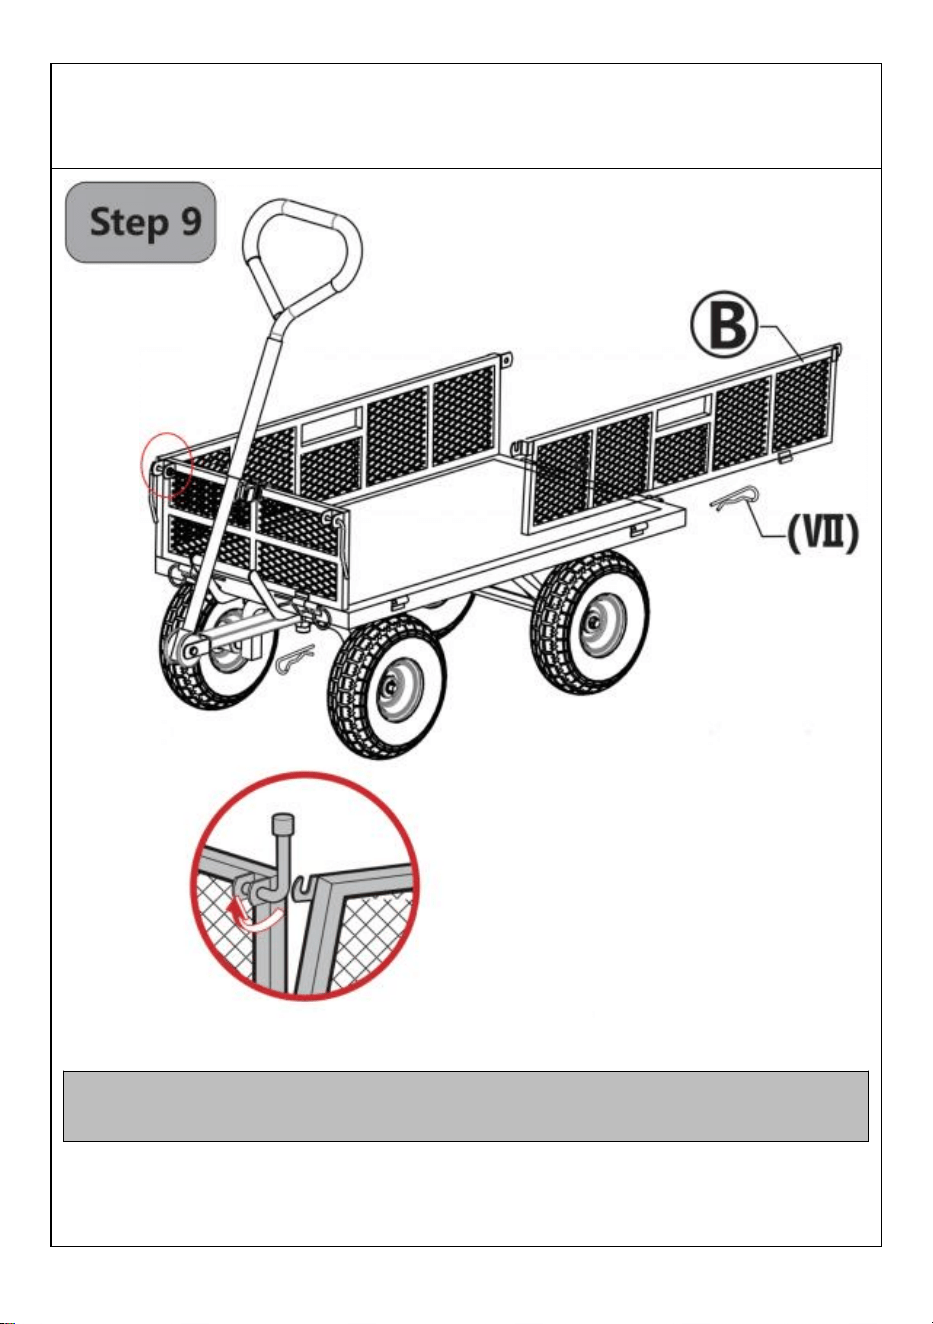
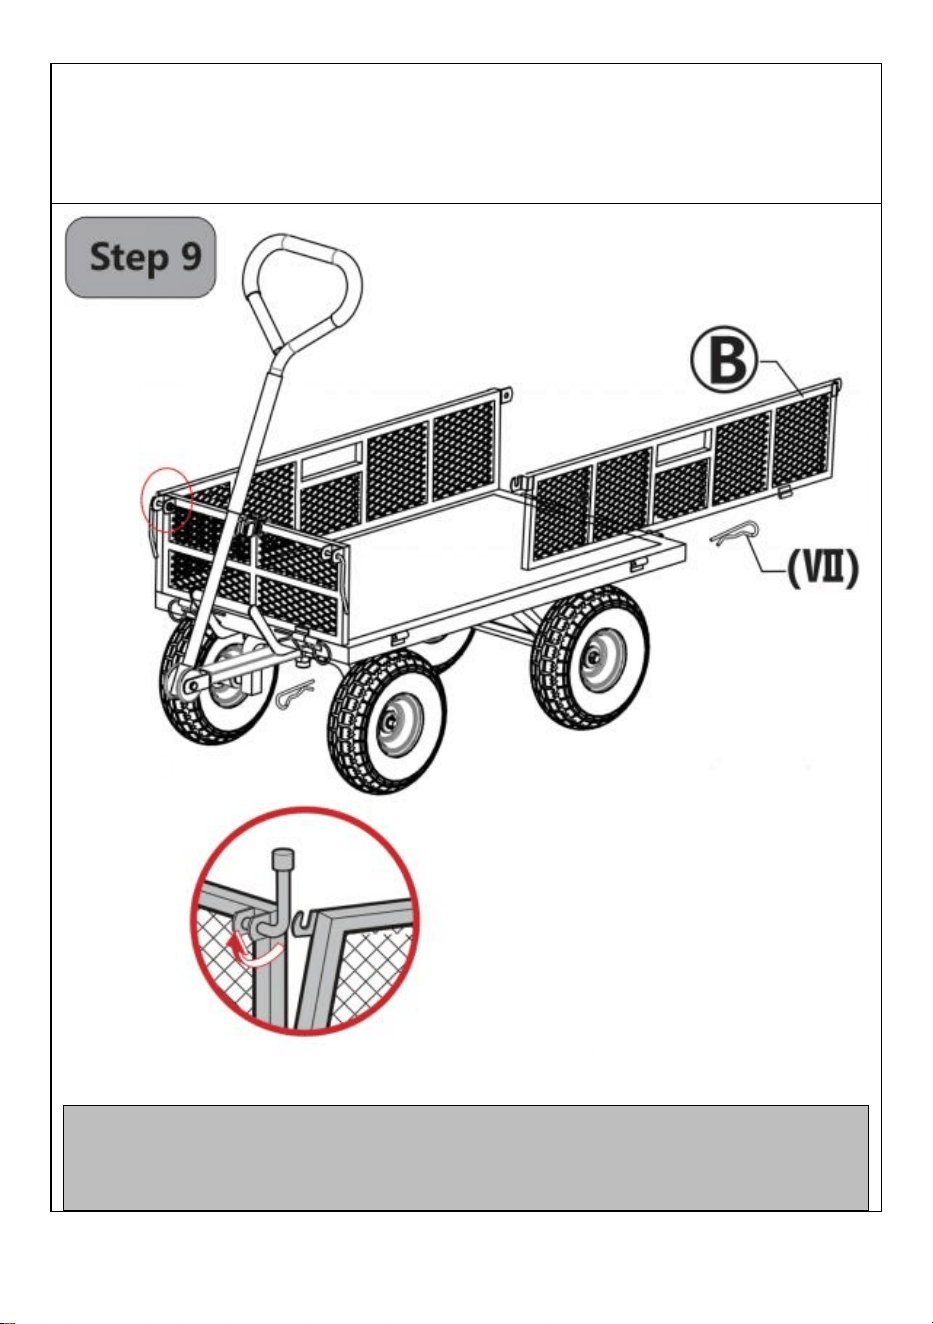
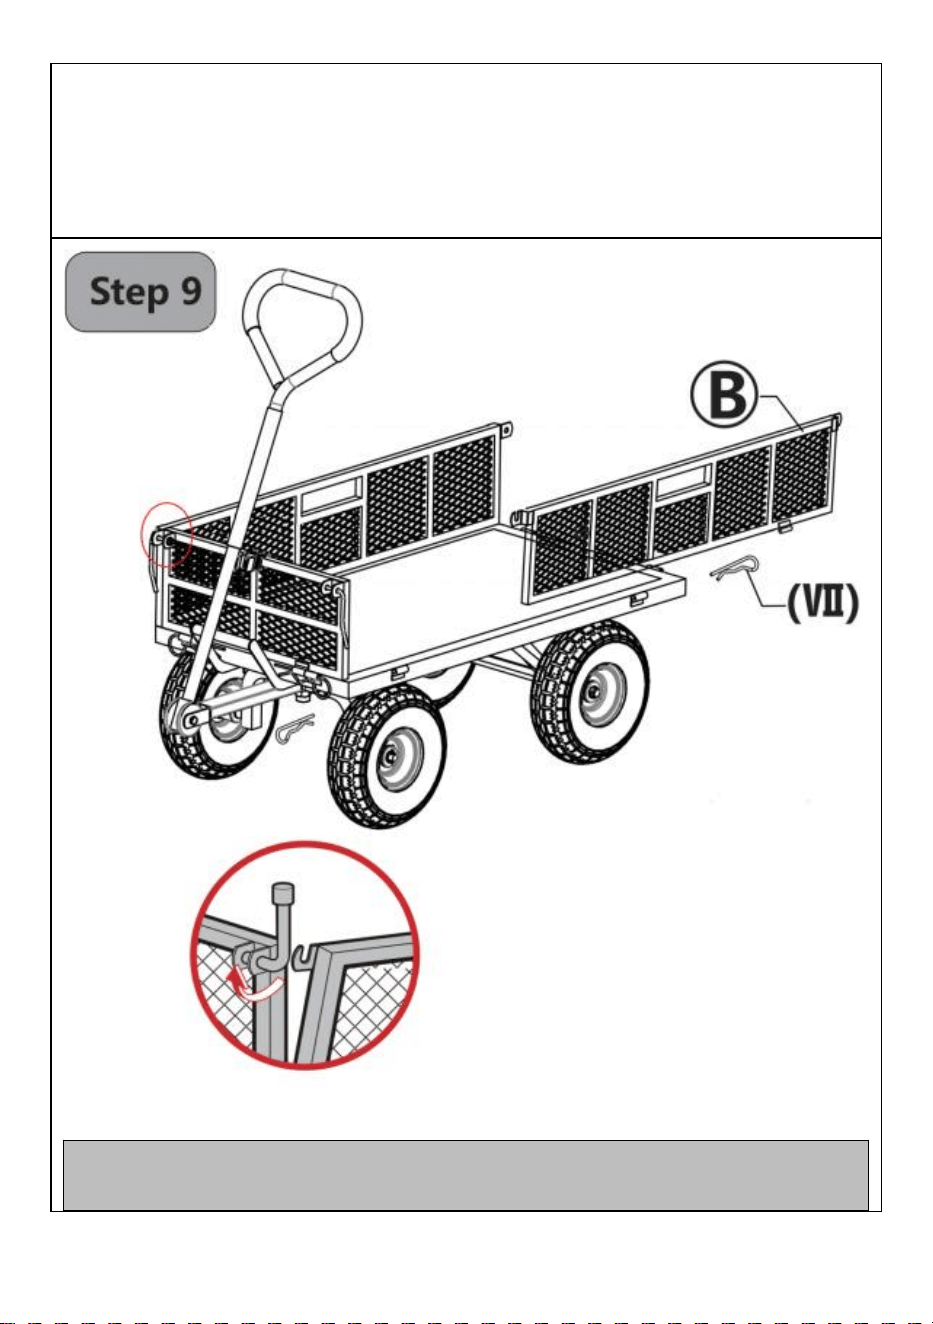
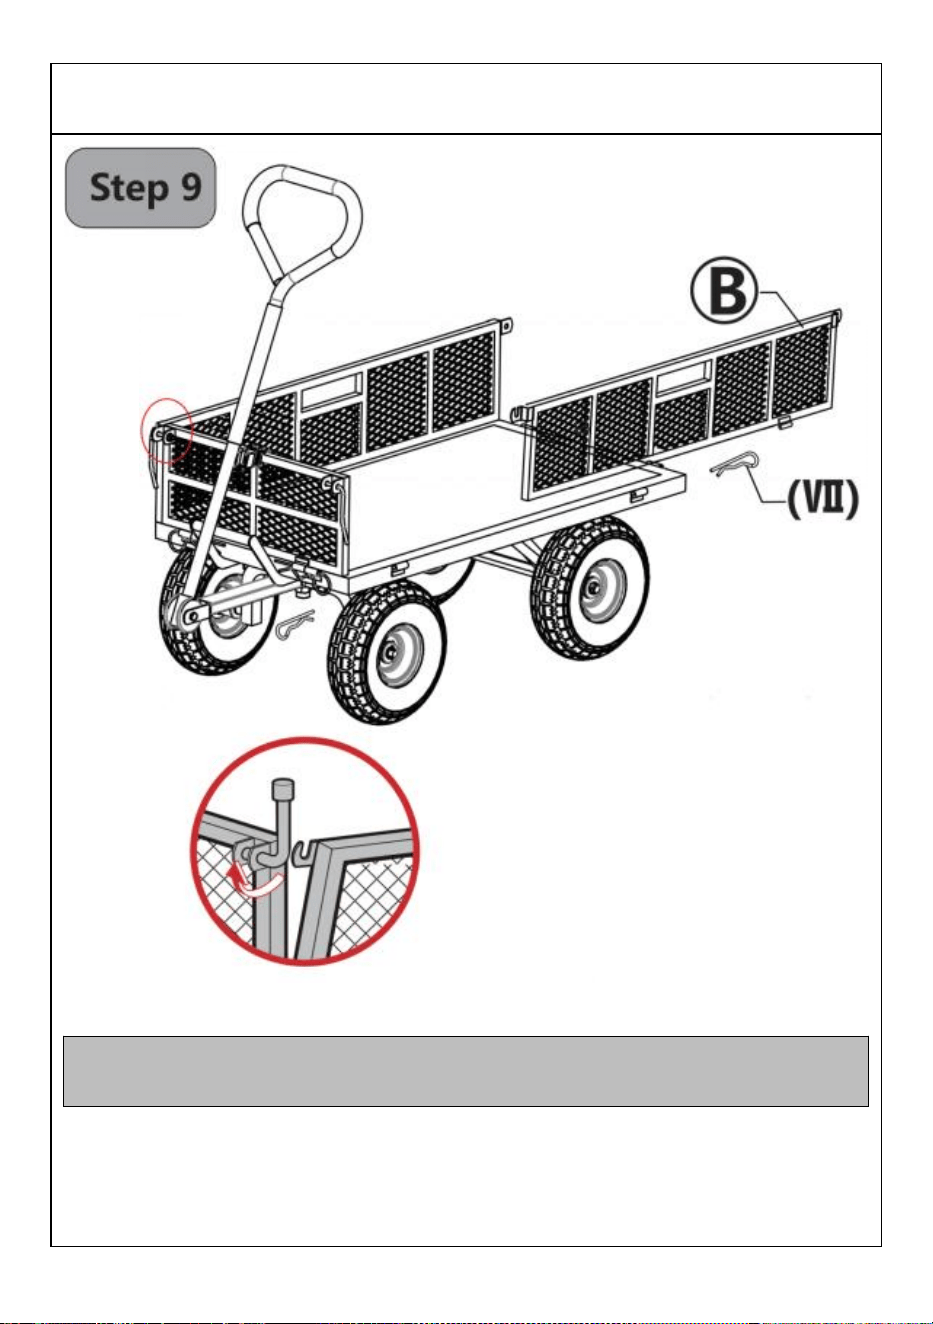
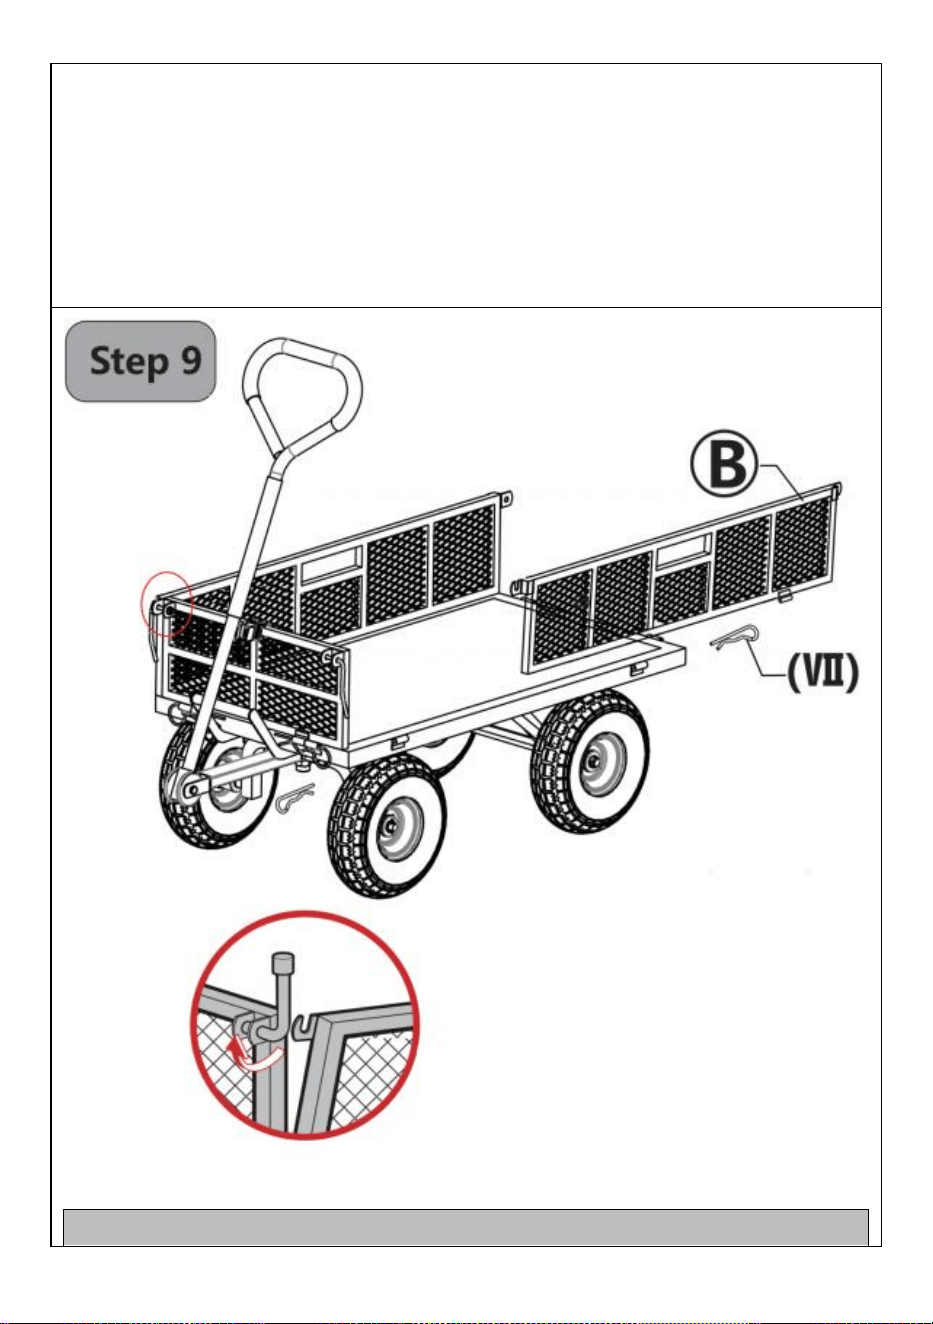
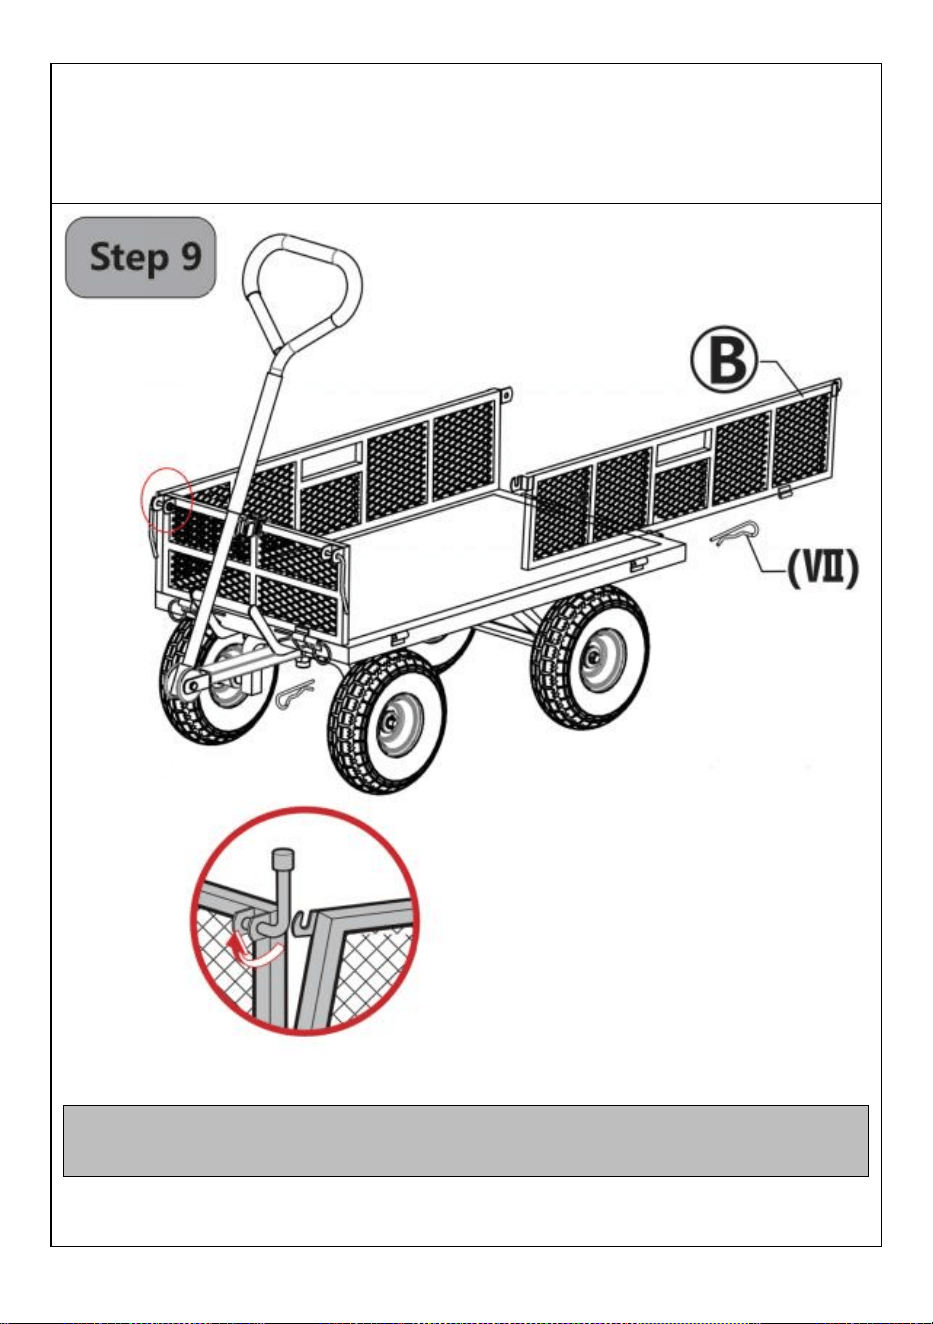
Note:Please make sure that the B Pinholes of the boards face
outward and the hooks face forward.
Left&Right Boards Assembly
● Attach Left & Right Boards (part B) to Bottom Frame (part A) as shown
,
then secure them with 4 B Pins (part VI). Next,pivot the little handles on
Front Board upward and press them inward,align the holes of the 3 boards,
then pull the little handles out and pivot them downward to lock the boards.
15
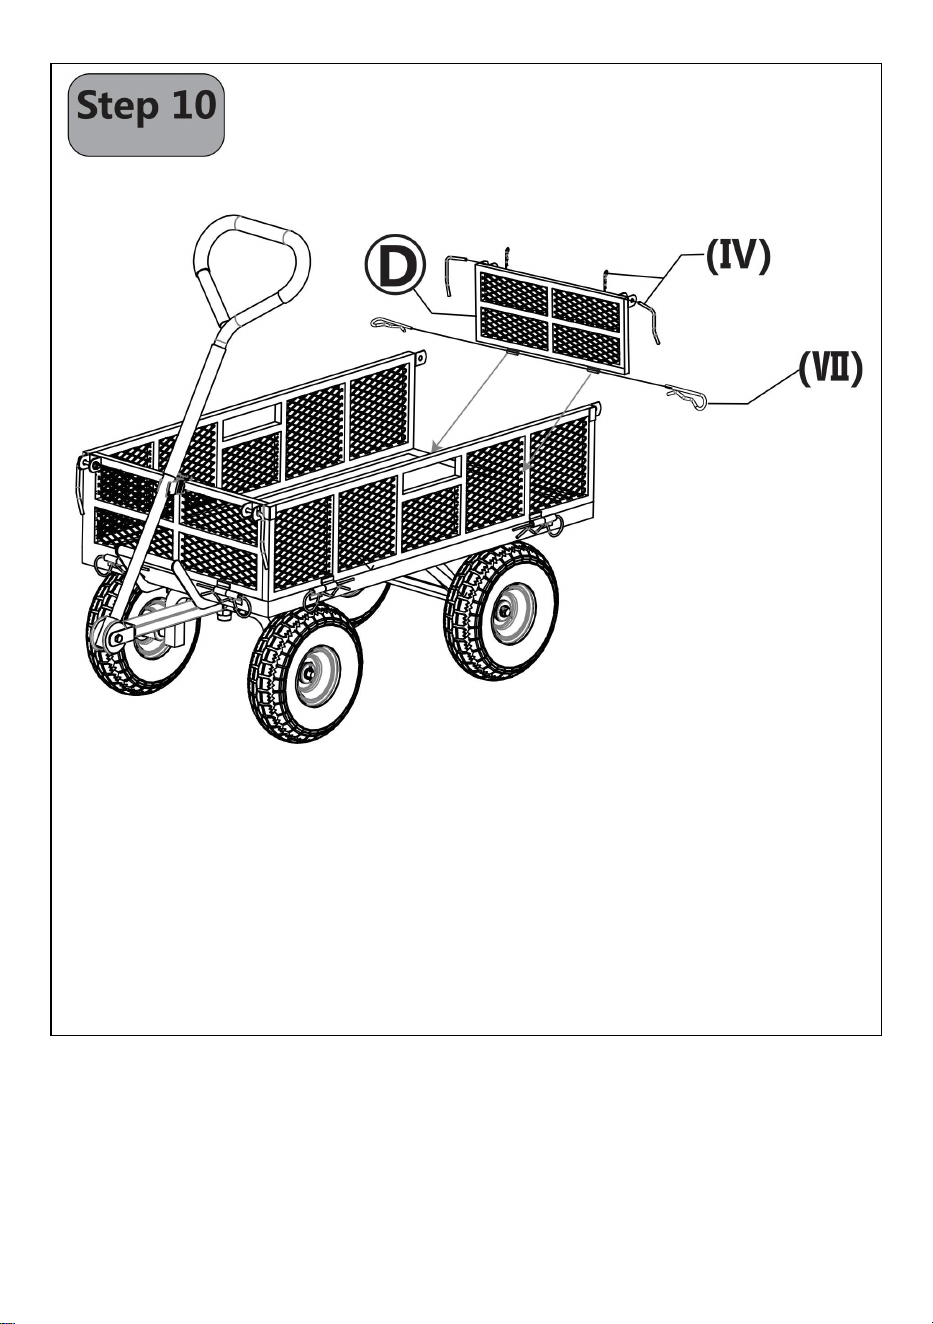
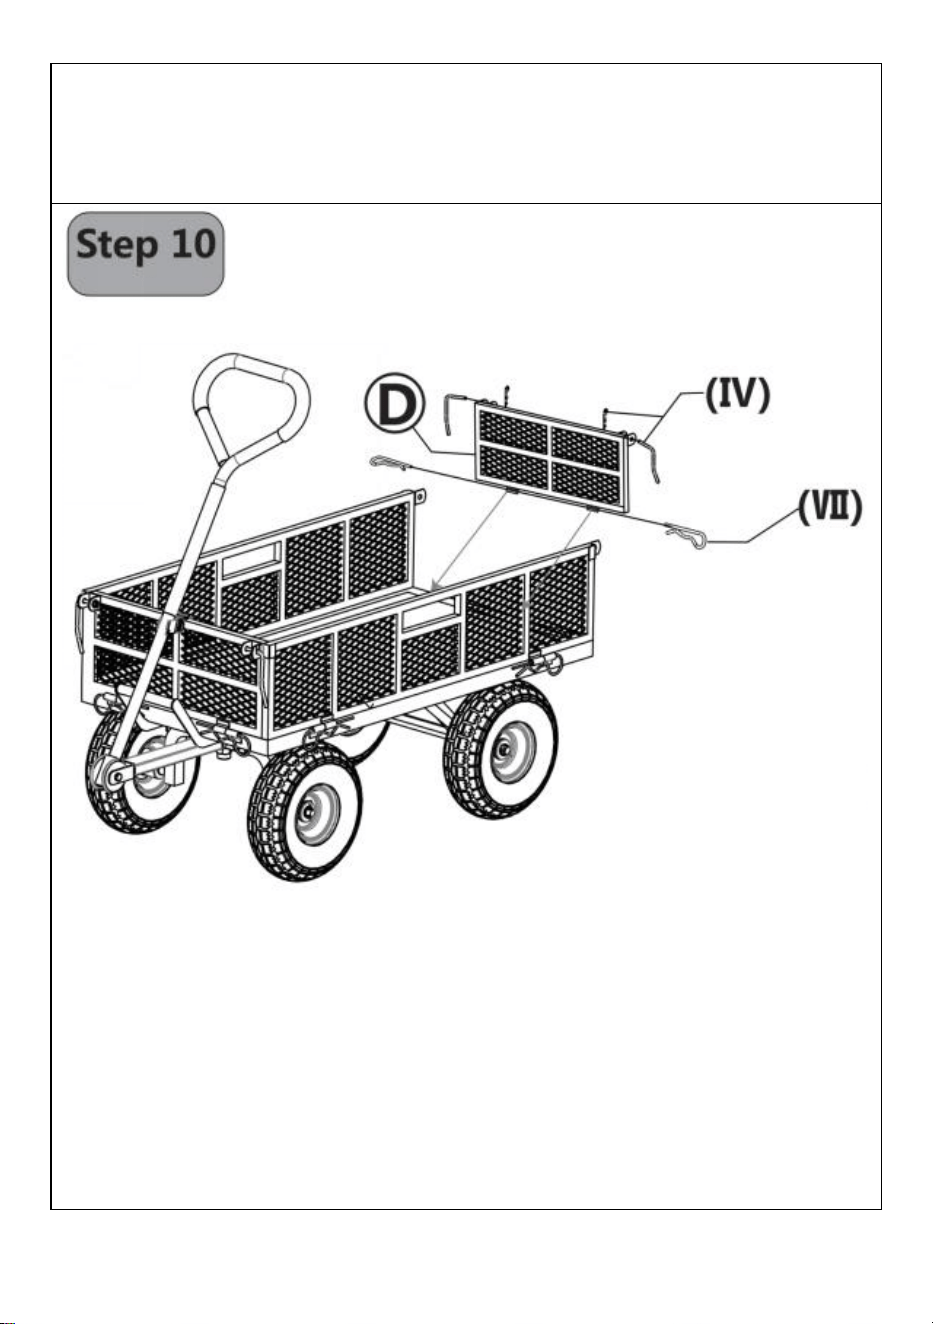
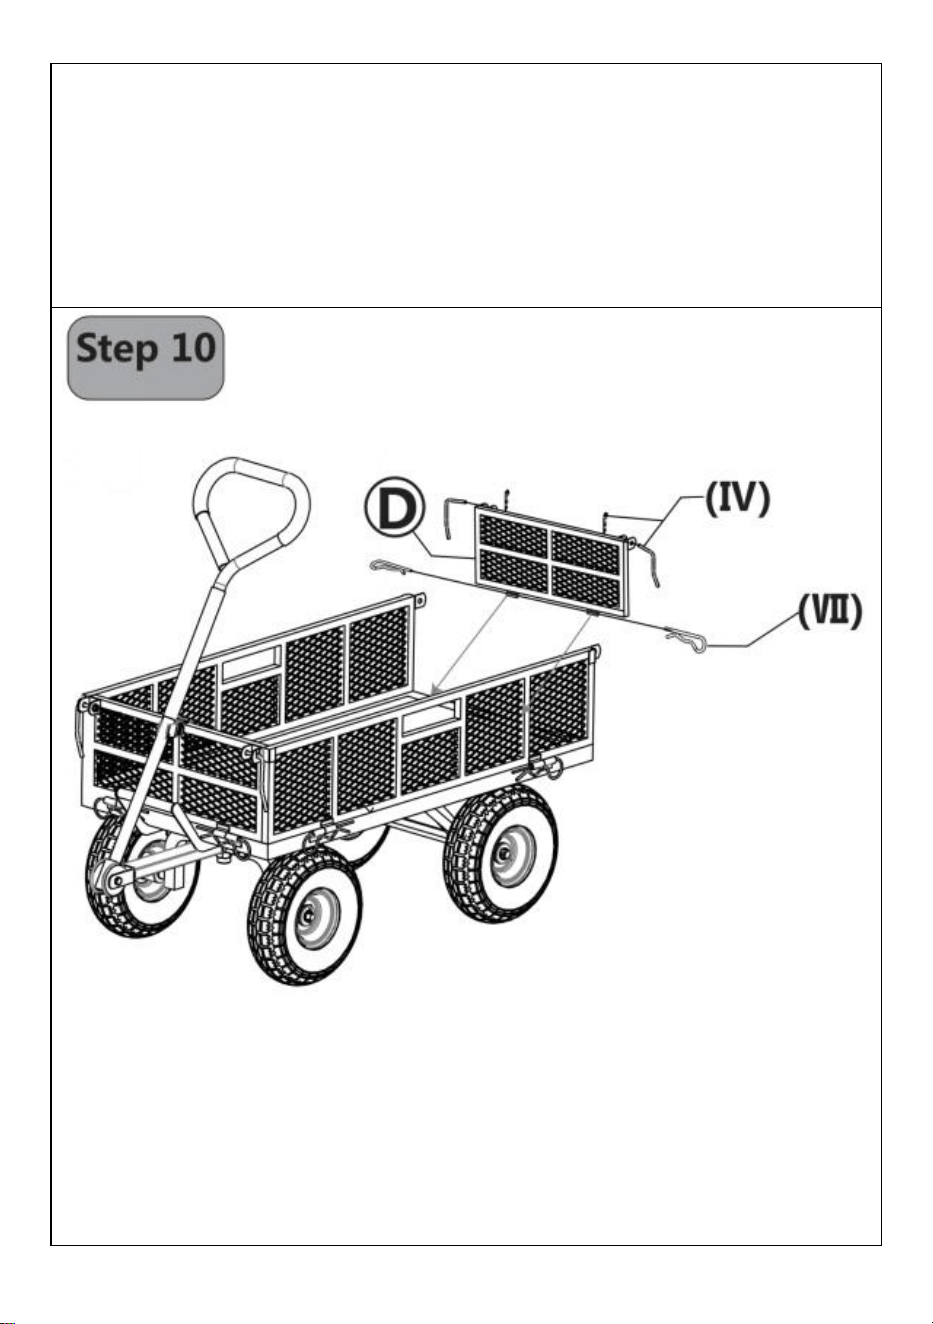
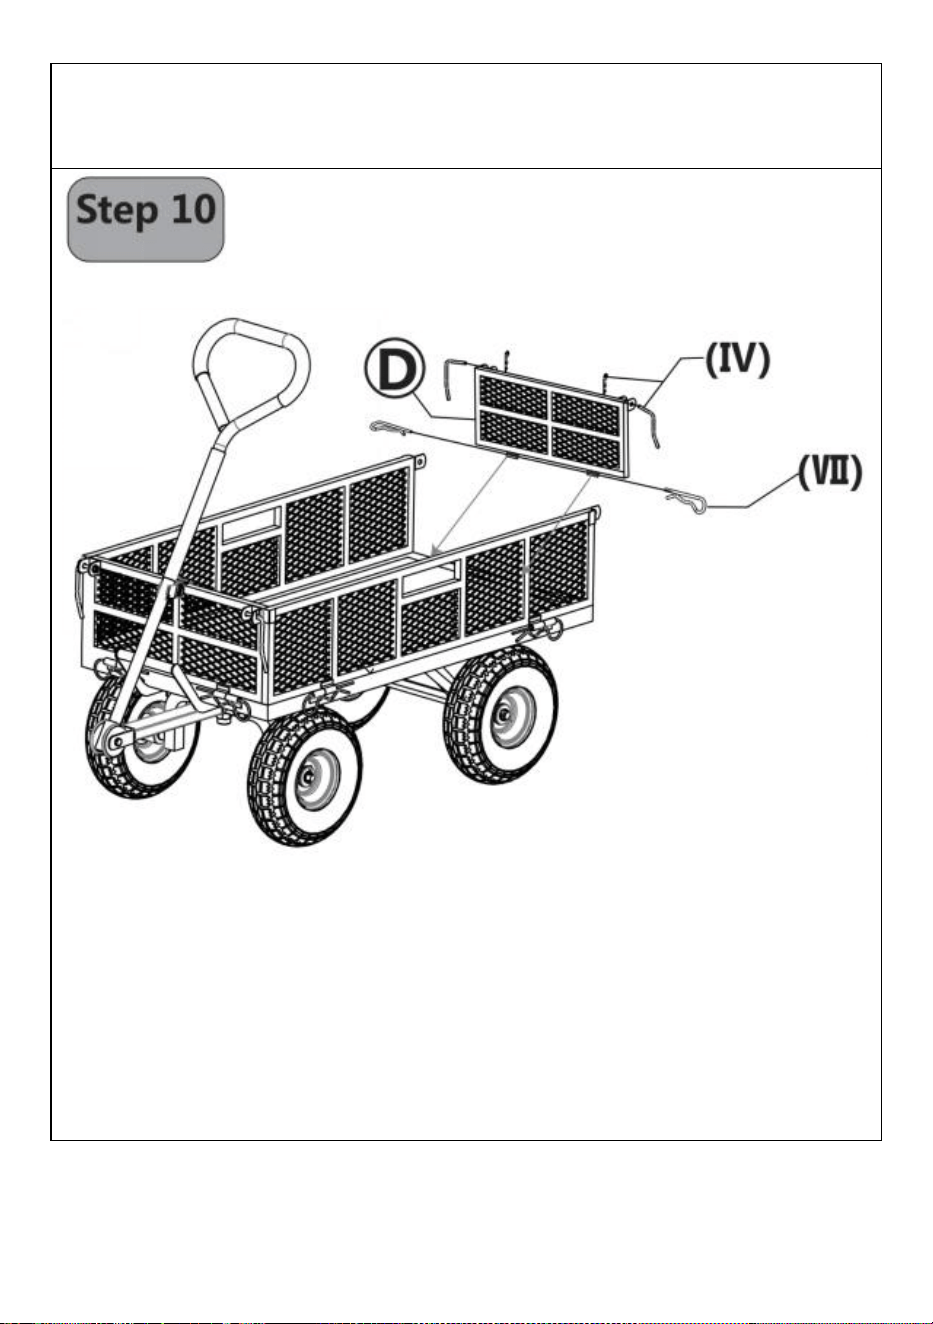
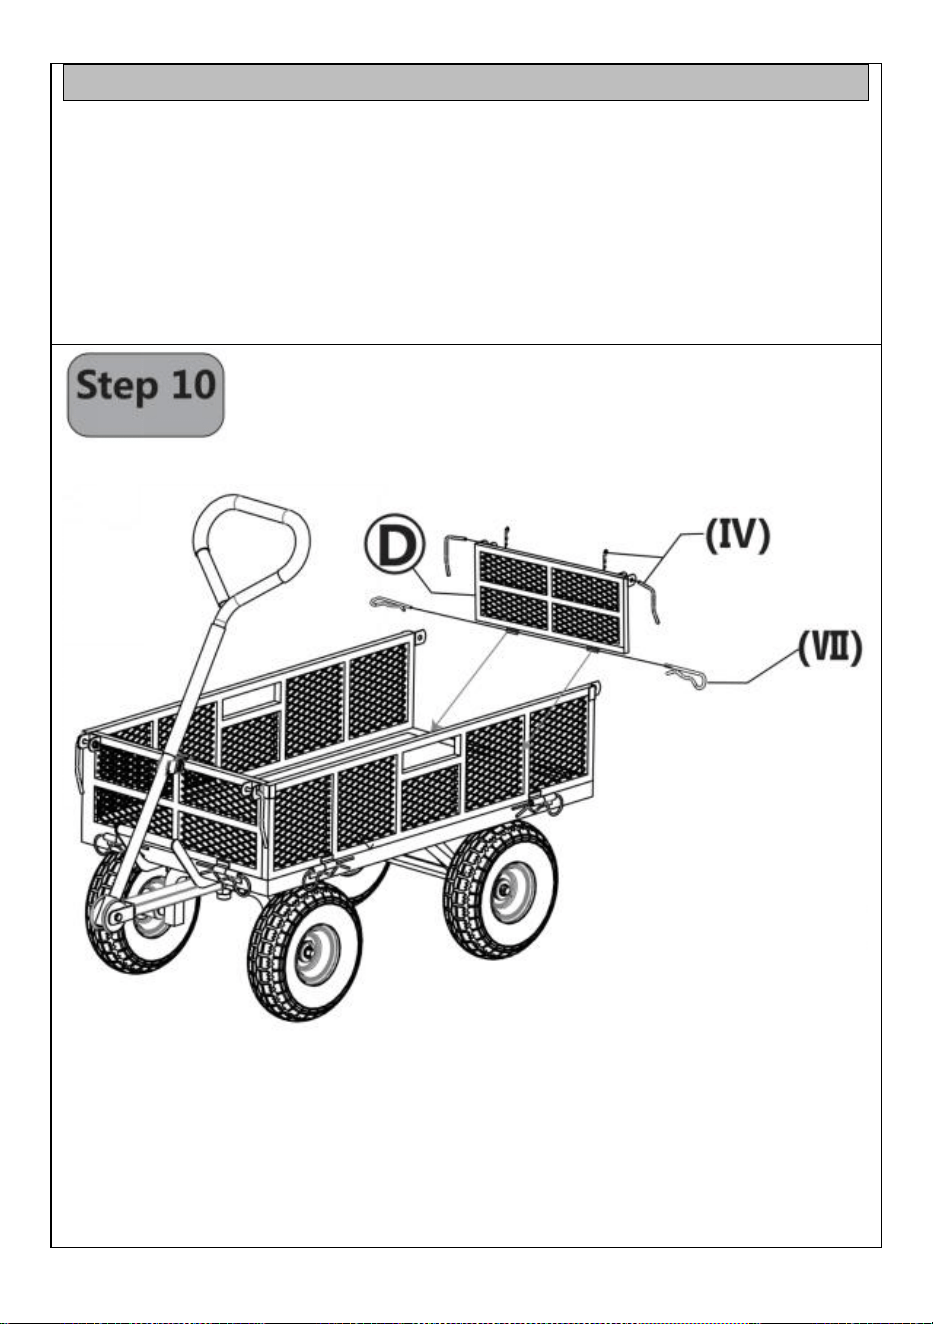
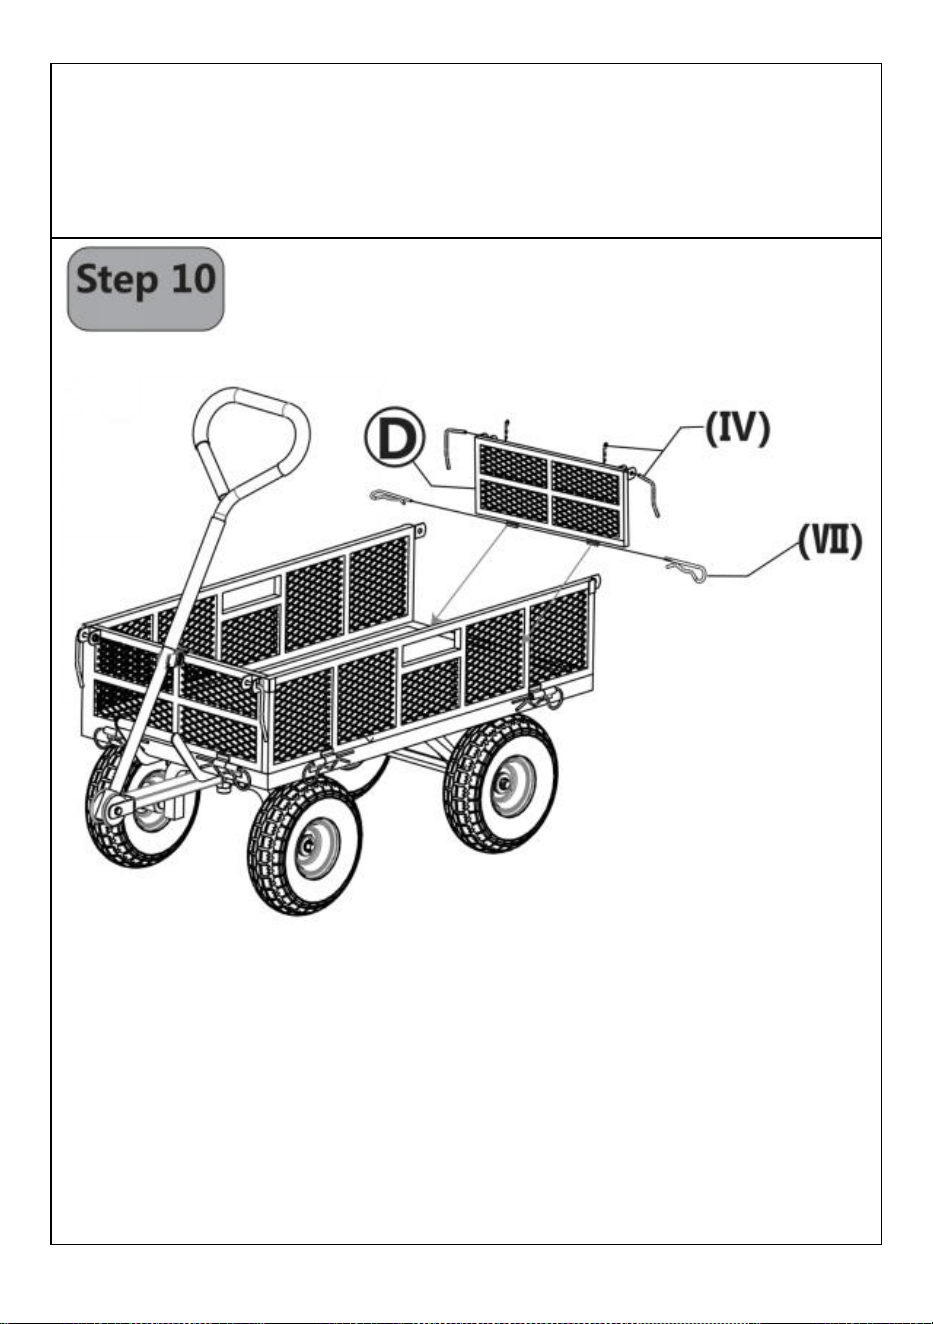
Rear Board Assembly
Align the B pin holes of Rear Board (part D) and Bottom Frame (part A),
then secure them with 2 B Pins (part VI). And then align the holes on the
upper side of the 3 boards,put 2 L Handles (part IV) into secure the boards
and then secure L Handles with 2 small B Pins of L Handle Set (part IV) .
16
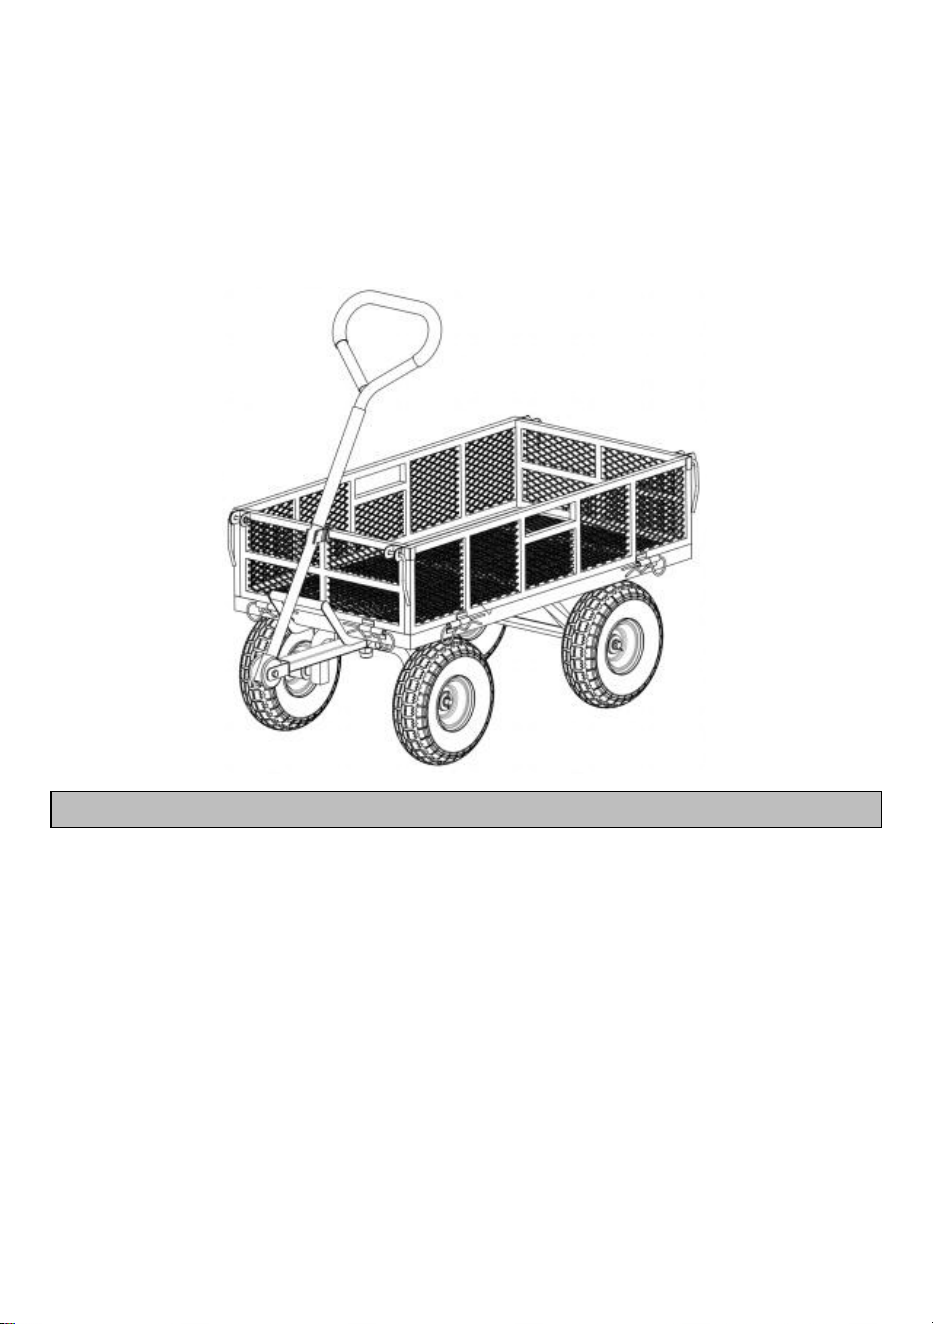
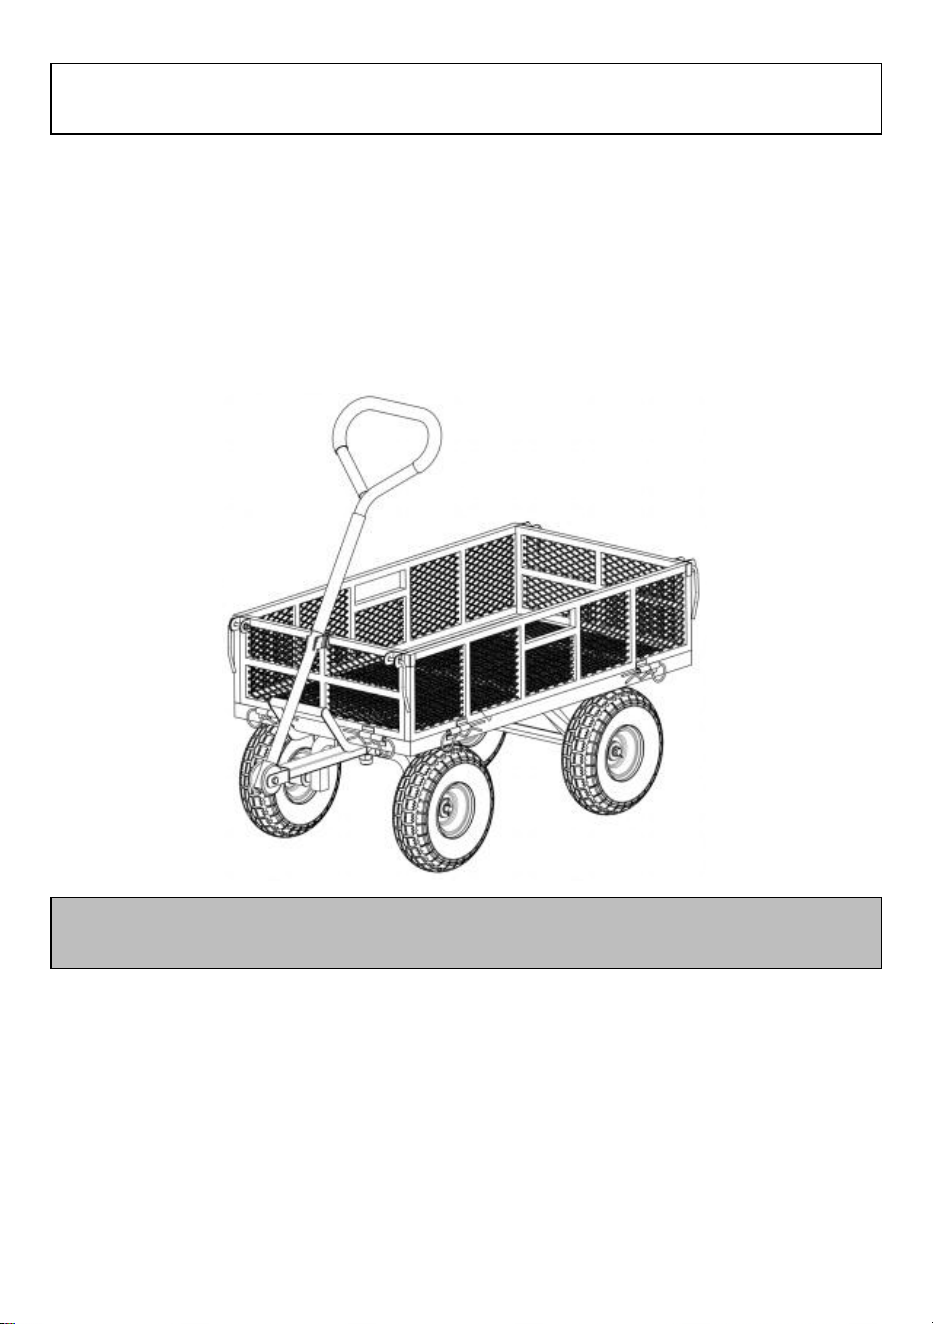
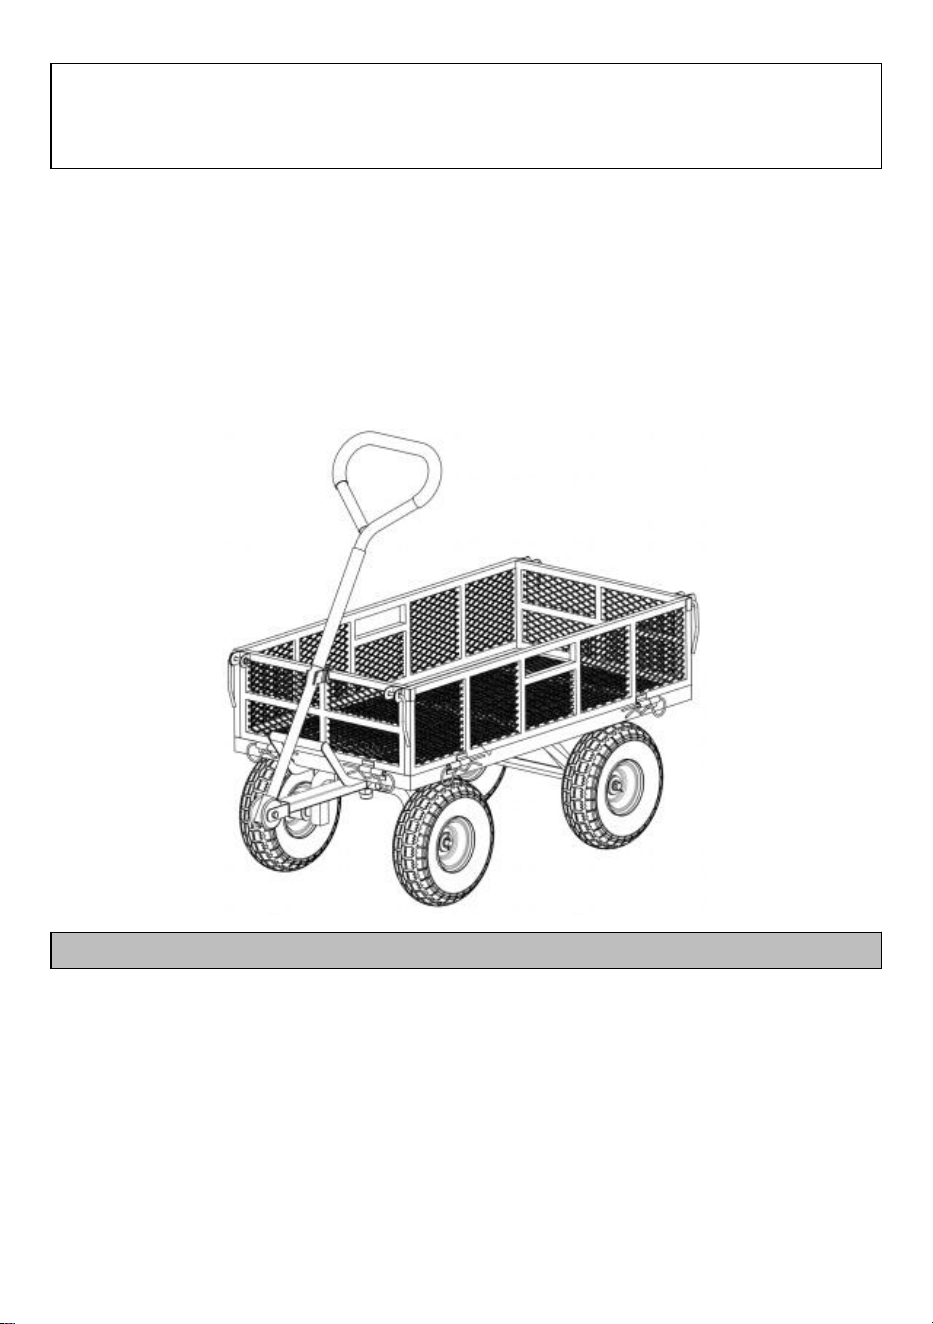
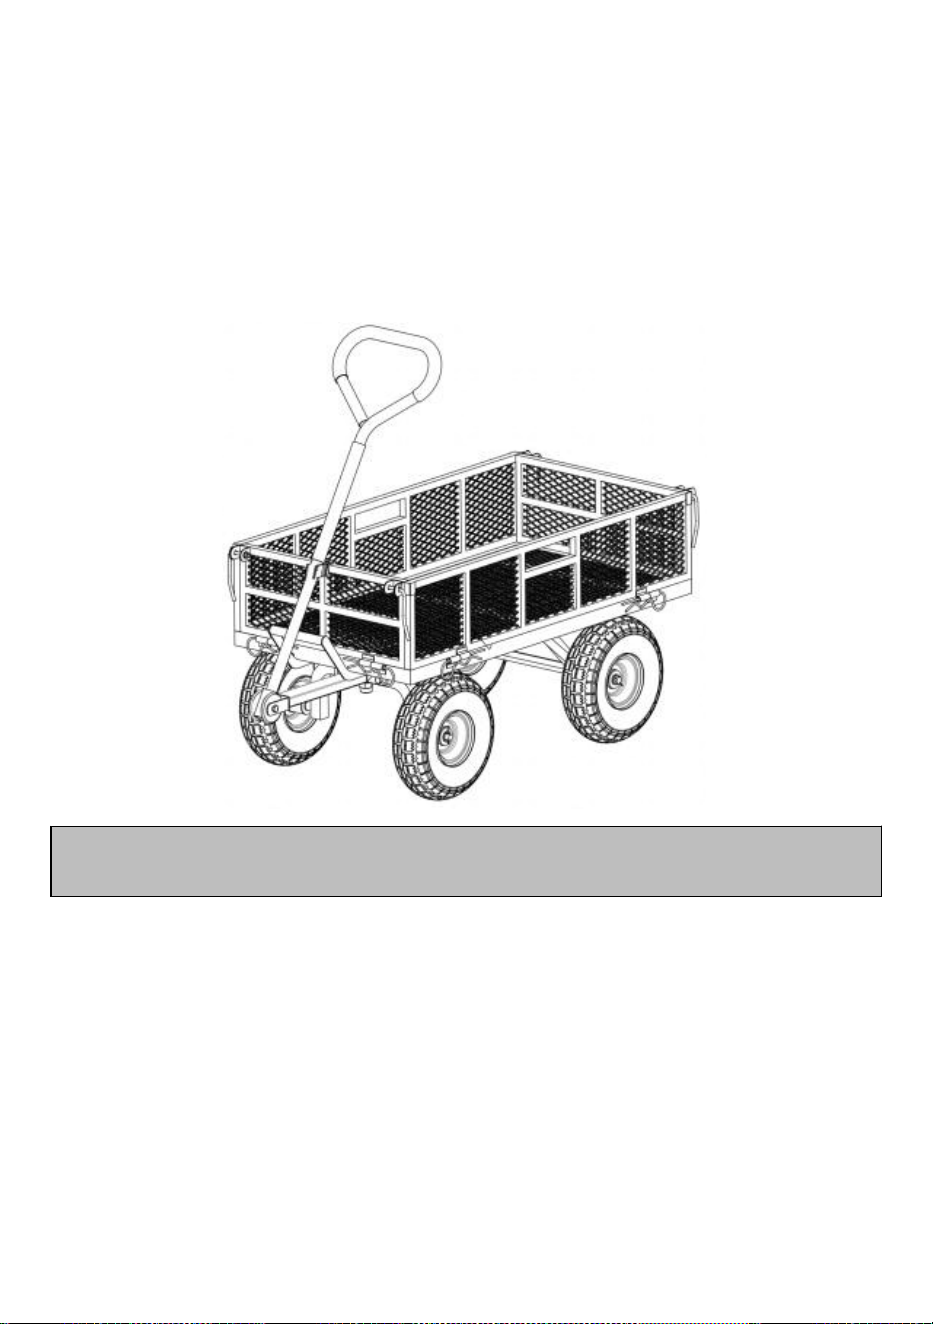
Complete
Note:Place Carry Bag on Bottom Frame if needed.
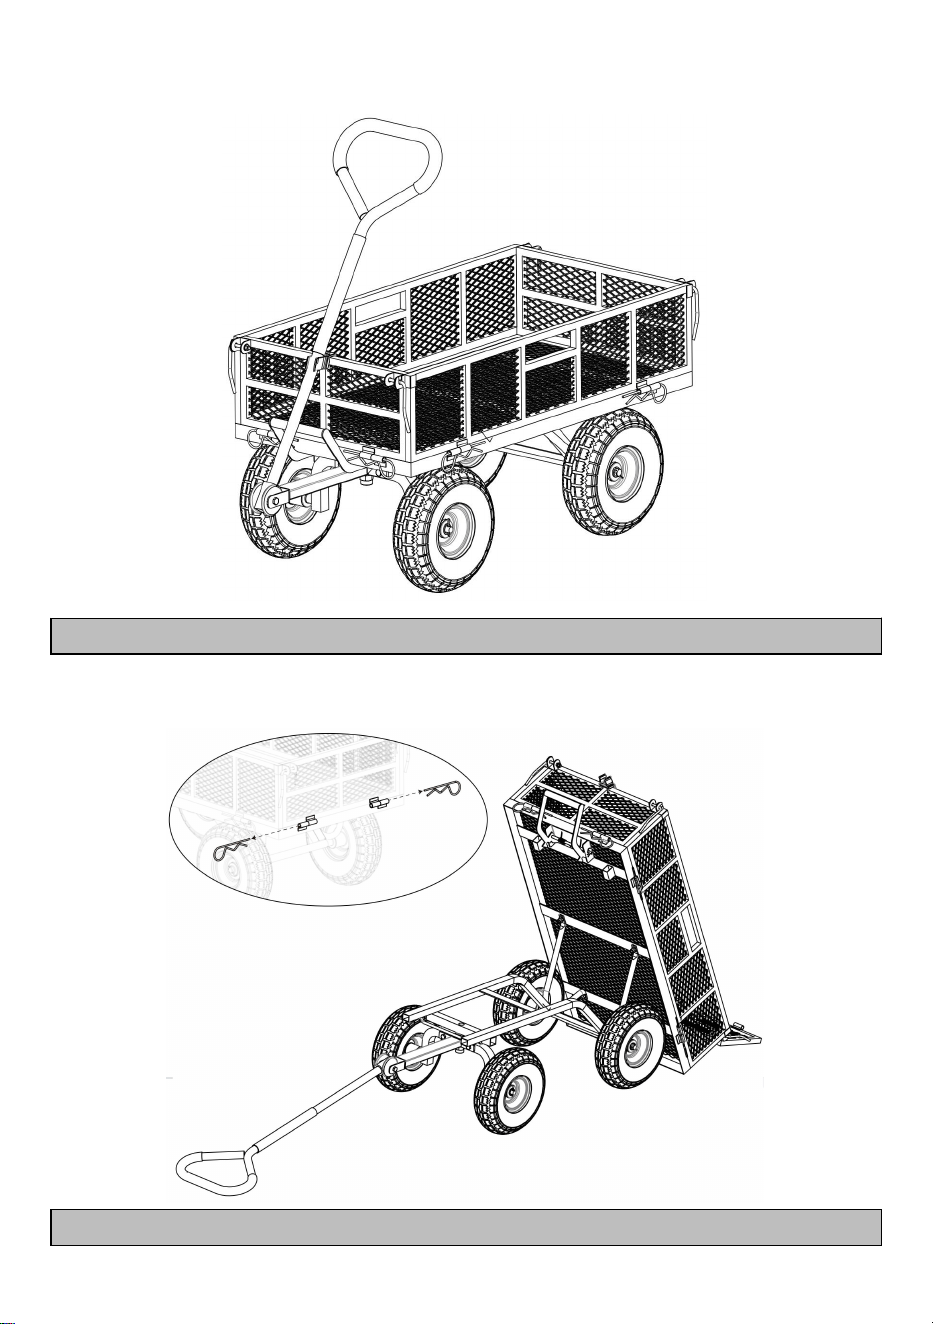
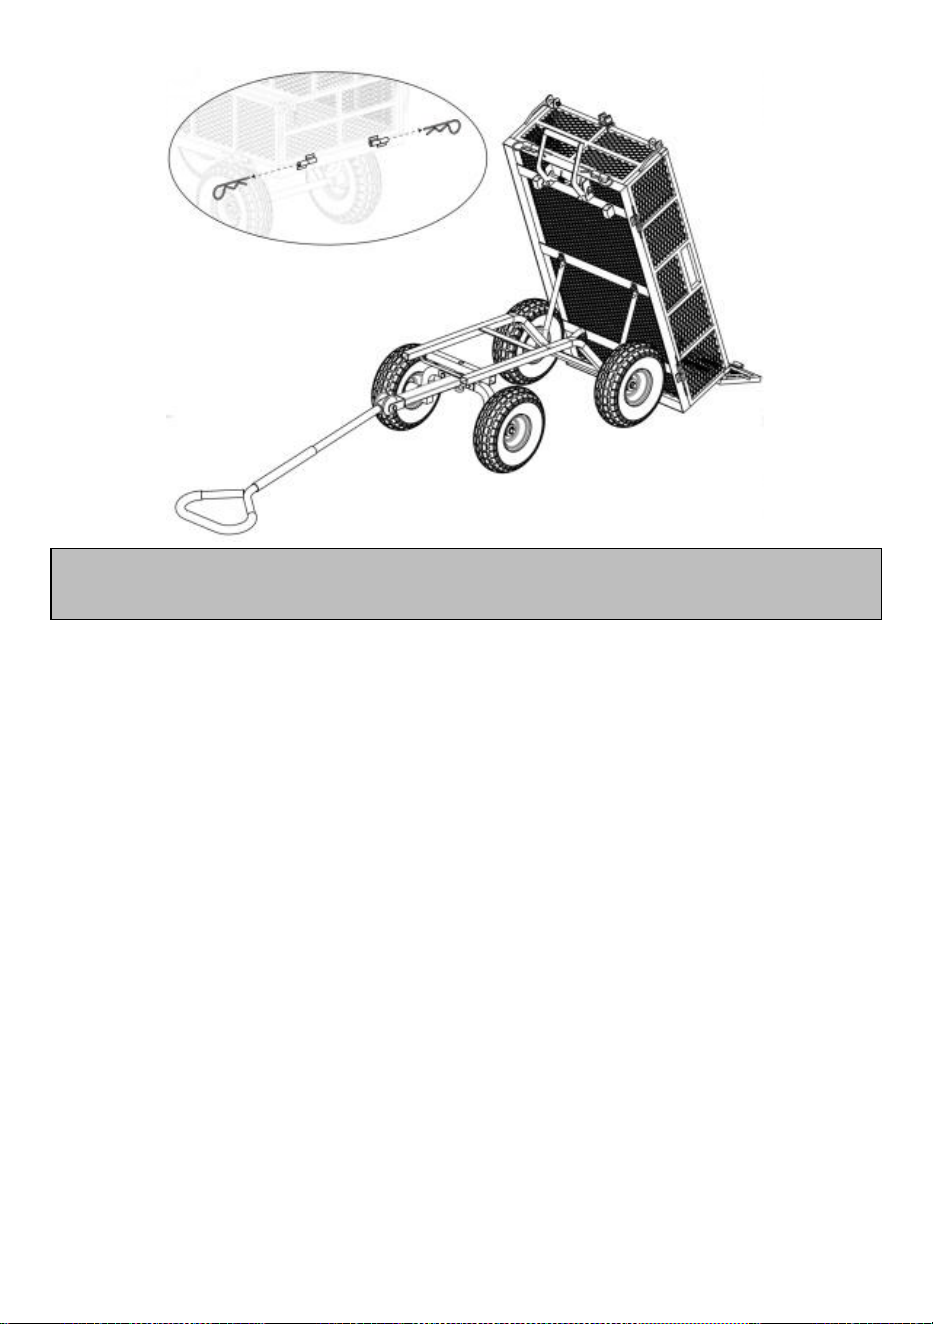
Usage
Note
:
Remove the pins as shown before dumping the load.
17
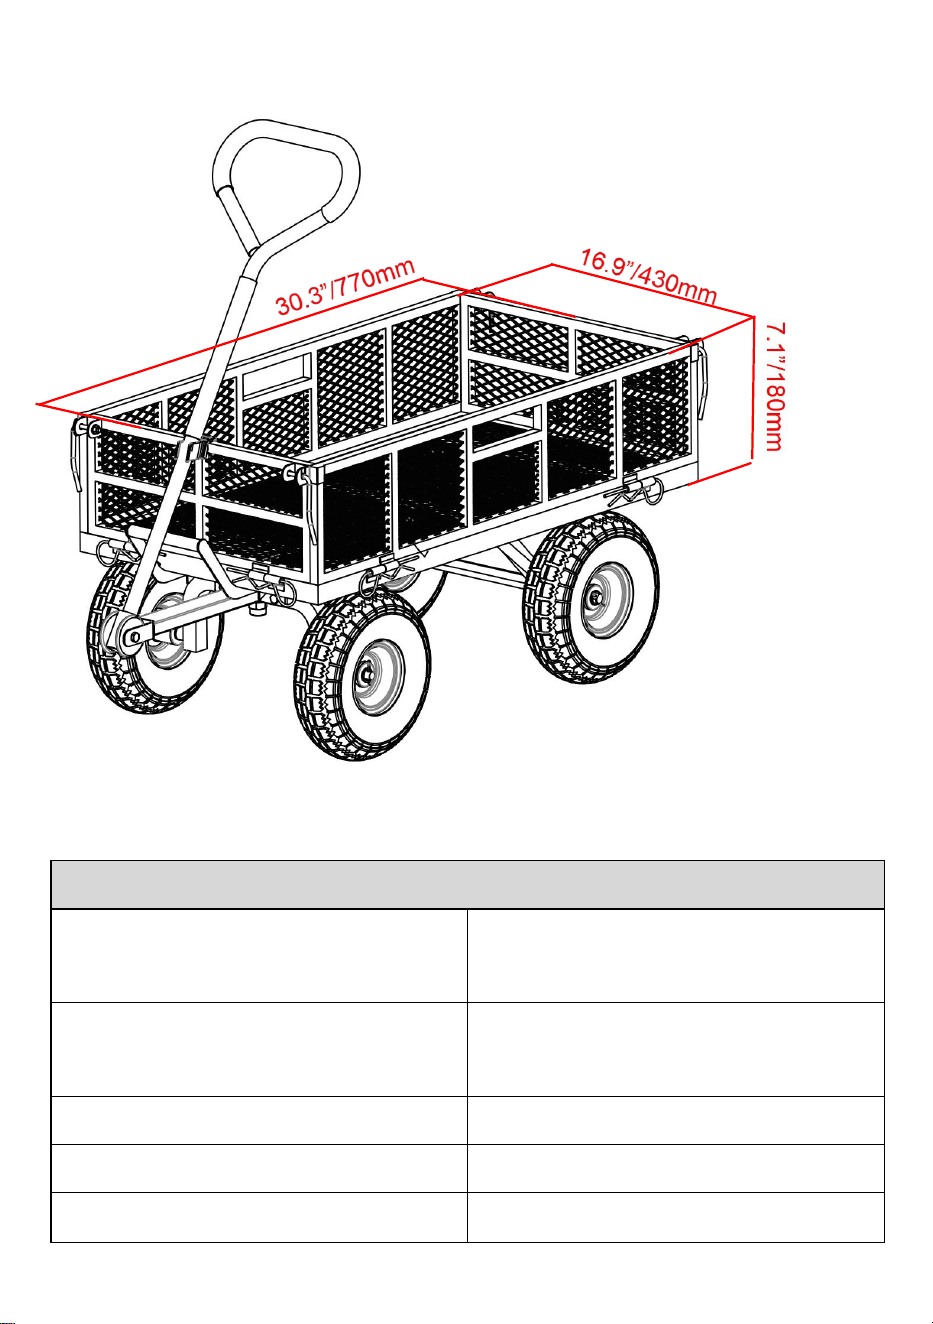
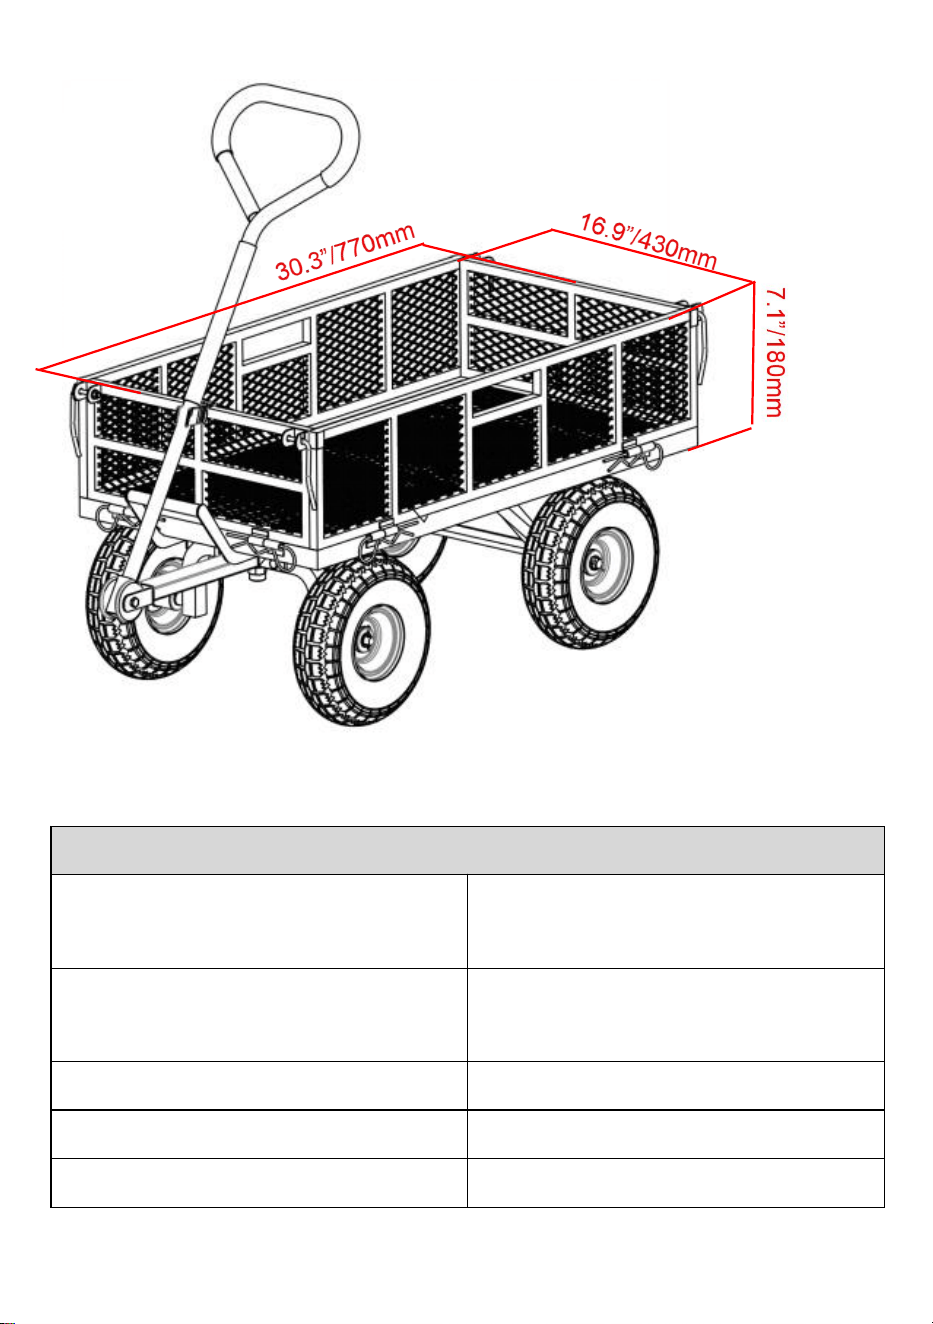
Body volume
Product parameters
Product dimensions
1770*495*500mm
69.7*19.5*19.7in
Body volume
770*430*180mm
30.3*16.9*7.1in
Maximum weight capacity
400 lbs
Net weight
19.4kg
Wheel
10*3.50-4

18
Address: Baoshanqu Shuangchenglu 803long 11hao 1602A-1609shi Shanghai
Imported to AUS: SIHAO PTY LTD,1 ROKEVA STREETEASTWOOD NSW 2122
Australia
Imported to USA: Sanven Technology Ltd., Suite 250,9166 Anaheim
Place,Rancho Cucamonga,CA 91730
REP
UK
Pooledas Group Ltd
Unit 5 Albert Edward House, The Pavilions
Preston, United Kingdom
REP
EC
SHUNSHUN GmbH
Römeräcker 9 Z2021, 76351
Linkenheim-Hochstetten, Germany
Made in China


3
We continue to be committed to provide you tools with competitive price.
"Save Half","Half Price" or any other similar expressions used by us only represents an
estimate of savings you might benefit from buying certain tools with us compared to the major
top brands and does not necessarily mean to cover all categories of tools offered by us. You
are kindly reminded to verify carefully when you are placing an order with us if you are
actually saving half in comparison with the top major brands.

1
TC4206KB
Have product questions? Need technical support? Please feel free to
contact us:
Technical Support and E-Warranty Certificate
www.vevor.com/support
NEED HELP? CONTACT US!
This is the original instruction,please read all manual instructions carefully
before operating. VEVOR reserves a clear interpretation of our user
manual. The appearance of the product shall be subject to the product
you received. Please forgive us that we won't inform you again if there
are any technology or software updates on our product.
STEEL DUMP GARDEN
CARTS

2
Środki ostrożności
OSTRZEŻENIE:
Przeczytaj tę instrukcję przed użyciem tego produktu. Niezastosowanie się do
tego może spowodować poważne obrażenia. należy zawsze przestrzegać
podstawowych środków ostrożności , w tym:
7. Plastikowe wózki ogrodowe na śmieci _ _ _ _ nie wolno używać ani
przechowywać w obszarach niebezpiecznych. Nie wolno używać urządzenia w
miejscach niebezpiecznych.
8. Plastikowe wózki ogrodowe na śmieci _ _ _ _ przed użyciem należy sprawdzić,
czy jest w dobrym stanie i czy działa bezpiecznie. W przeciwnym razie nie wolno
używać urządzenia.
9. Używaj wyłącznie zgodnie z przeznaczeniem. Wózki ogrodowe z tworzywa
sztucznego nie nadają się do ładowania materiałów żrących . Ponieważ będą
zrzucać plastik na wózki ogrodowe.
10. Operator musi używać plastikowych wózków ogrodowych _ _ _ odpowiednio.
Podczas pracy z plastikowymi wózkami ogrodowymi musi wziąć pod uwagę
warunki lokalne i zwracać uwagę na osoby trzecie , w szczególności na dzieci .
11. Te plastikowe wózki ogrodowe na śmieci _ _ _ nie jest przeznaczony do
użytku przez osoby (w tym dzieci) o ograniczonych zdolnościach fizycznych ,
sensorycznych lub umysłowych lub nieposiadające doświadczenia i/lub wiedzy ,
chyba że znajdują się pod nadzorem osoby odpowiedzialnej za ich
bezpieczeństwo lub zostaną przez te osoby poinstruowane w zakresie obsługi
urządzenie. Dzieci powinny być nadzorowane , aby mieć pewność , że nie bawią
się plastikowymi wózkami ogrodowymi .
12. Prosimy używać plastikowych wózków ogrodowych zgodnie z wagą podaną w
instrukcji. Nie ładuj więcej niż oznaczona waga, ponieważ spowoduje to

3
uszkodzenie plastikowych wózków ogrodowych.
ZACHOWAJ TE INSTRUKCJE
Lista produktów
x1 szt
Dolna rama
B x 2 szt
Lewa i prawa tablica
C x 1 szt
Płyta przednia
D x 1 szt
Płyta tylna
Np . x1 szt
Uchwyt
F x1 szt
Jarzmo
G x1 szt
wys . x1 szt

4
Oś przednia
Tylna oś
ja x2szt
Wspornik osi tylnej
J x 4 szt
Koło
K x 1 szt
Uchwyt Para r
dł. x 1 szt
Mata
M x 1 szt
Łyżka zrzutowa t Wspornik
N x 1 szt
Zapięcie uchwytu

5
O x1 szt
Torba do noszenia
P x 1 szt
Rozciągliwa siatka
P x 1 szt
Uchwyt do zrzutu
(Ⅲ) x2szt
M8 Śruba Ustawić
(IV) x 2 szt
Zestaw uchwytów L
(V) x4szt
Otwórz sworzeń i podkładkę
(VI) x 1 szt
M8 Śruba Ustawić
(VII) x8szt
Duże B Szpilka
6
Opis produktu
Uwaga: jest Zalecana do montażu uchwytu zrzutowego i
sprężyny na stole warsztatowym.
Zespół uchwytu zrzutowego

7
● Zdemontuj uchwyt do zrzutu (część Q) w uchwyt, sprężynę, drążek i R
szpilka.
● Dopasuj otwory w dolnej ramie (część A) i uchwycie do zrzutu (część Q) i
Wiosna jak pokazano , następnie przełóż kij przez otwory i zabezpiecz go
za pomocą R Szpilka .
Zespół wspornika osi tylnej
● Odłącz 4 zestawy nakrętek M8 (Ⅱ) od dolnej ramy.
● Załącz 2 Tył Wsporniki osi (część I) na dolnej ramie (część A) ), jak

8
pokazano , a następnie zabezpiecz je za pomocą 4 M8 Orzech Zestawy
(część Ⅱ) .
Wspornik łyżki zrzutowej & Zespół tylnej osi
● Zablokuj wspornik łyżki zrzutowej (część M) z uchwytem wyładowczym
na ramie dolnej , zrównaj otwory wspornika łyżki zrzutowej i wsporników
9
tylnej osi (część I) , następnie wykonaj Tylną Oś (część H) przejść przez
dziury
Uwaga: Aby mieć pewność, że oś przednia może się
swobodnie obracać , nie dokręcaj zbyt mocno nakrętki M16.
Przód Zespół siekiery
● Odłącz 1 x nakrętkę M16 (
Ⅱ
) Zestaw ze wspornika łyżki zrzutowej.
● Zamocuj zestaw podkładek kulowych (część
Ⅷ
) na łączniku czerpaka
zrzutowego ( część M), jak pokazano , a następnie przymocuj przednią oś
(część G) i zabezpiecz przód Oś z M16 Orzech Ustawić (część I).
10
Uwaga : Do przytrzymywania łbów śrub należy używać klucza
i jednocześnie dokręcać nakrętki innym kluczem .
Tak, ok Montaż
● Dopasuj otwory jarzma (część F) i oś przednia (art. G) , a następnie
zabezpiecz je za pomocą 2 Zestawy śrub M8 (część
Ⅲ
)

11
Uwaga: upewnij się, że zawory opon nie są zablokowane
przez Open Pins podczas biegu.
Zespół koła
● Przymocuj 4 koła (część J) do osi i zabezpiecz koła z 4 otwarty Szpilka &
Podkładki (część V) , a następnie za pomocą szczypiec zagnij kołki, aby

12
zablokować koła.
Zespół uchwytu
● Zamocuj łącznik uchwytu (część K) i Uchwyt (część E) do Yoke'a (część
Uwaga: Użyj klucza, aby przytrzymać łeb śruby i jednocześnie
dokręcić nakrętkę innym kluczem.

13
F) kolejno , a następnie zabezpiecz je za pomocą M8 Śruba Ustawić
(część VI), jak pokazano .
Uwaga : Dociśnij przednią płytę do maty, aby zapobiec
przesuwaniu się .
Płyta czołowa i Montaż maty
● Wyrównaj M w (część L) z przednią krawędzią dolnej ramy ( część A) )
jak pokazane. Następnie dopasuj otwory w płycie przedniej (część C) i
dolnej ramie , a następnie zabezpiecz je 2 B Kołki (część VI) jak pokazano.
14
Następnie przymocuj łącznik uchwytu ( część N) na środku płyty czołowej.
Uwaga: Upewnij się, że otwory B w deskach są skierowane na
zewnątrz, a haczyki skierowane są do przodu.
Montaż desek lewych i prawych
● Przymocuj lewą i prawą płytę (część B) do dolnej ramy (część A), jak
15
pokazano, a następnie zabezpiecz je 4 kołkami B (część VI). Następnie
obróć małe uchwyty na płycie czołowej w górę i wciśnij je do wewnątrz,
wyrównaj otwory w 3 deskach, następnie wyciągnij małe uchwyty i obróć je
w dół, aby zablokować deski.
Zespół tylnej płyty
Wyrównaj kołek B otwory w płycie tylnej (część D) i dolna rama (część A),
a następnie zabezpiecz je za pomocą 2 B Kołki (część VI). A następnie
wyrównaj otwory na górze bok 3 desek , połóż 2 L Uchwyty (część IV) w
zabezpiecz deski, a następnie zabezpiecz L Uchwyty za pomocą 2 mały B
Kołki uchwytu L Ustawić (część IV).
16
Kompletny
Uwaga: W razie potrzeby umieść torbę transportową na dolnej ramie.
Stosowanie

17
Uwaga: Przed zrzuceniem ładunku usuń sworznie zgodnie z
ilustracją.
Objętość ciała
18
Parametry produktu
Wymiary produktu
1770*495*500mm
69,7*19,5*19,7 cala
Objętość ciała
770*430*180mm
30,3*16,9*7,1 cala
Maksymalna nośność
4 00 funtów
Waga netto
19,4 kg
Koło
10*3,50-4

19
Adres: Baoshanqu Shuangchenglu 803long 11hao 1602A-1609shi Szanghaj
Import do AUS: SIHAO PTY LTD , 1 ROKEVA STREETEASTWOOD NSW 2122
Australia
Import do USA: Sanven Technology Ltd. , Suite 250 , 9166 Anaheim
Place , Rancho Cucamonga , CA 91730
REP
UK
Pooledas Group Ltd
Unit 5 Albert Edward House, The Pavilions
Preston, United Kingdom
REP
EC
SHUNSHUN GmbH
Römeräcker 9 Z2021, 76351
Linkenheim-Hochstetten, Germany
Wyprodukowano w Chinach


2
Technisch Support- und E-Garantie-Zertifikat www.vevor.com/support
GARTENKARREN AUS STAHL
BENUTZERHANDBUCH
We continue to be committed to provide you tools with competitive price.
"Save Half","Half Price" or any other similar expressions used by us only represents an
estimate of savings you might benefit from buying certain tools with us compared to the major
top brands and does not necessarily mean to cover all categories of tools offered by us. You
are kindly reminded to verify carefully when you are placing an order with us if you are
actually saving half in comparison with the top major brands.

1
TC4206KB
Have product questions? Need technical support? Please feel free to
contact us:
Technical Support and E-Warranty Certificate
www.vevor.com/support
NEED HELP? CONTACT US!
This is the original instruction,please read all manual instructions carefully
before operating. VEVOR reserves a clear interpretation of our user
manual. The appearance of the product shall be subject to the product
you received. Please forgive us that we won't inform you again if there
are any technology or software updates on our product.
STEEL DUMP GARDEN
CARTS

2
Sicherheitsvorkehrungen
WARNUNG:
Lesen Sie diese Anweisungen, bevor Sie dieses Produkt verwenden.
Andernfalls kann es zu schweren Verletzungen kommen. Die grundlegenden
Vorsichtsmaßnahmen sollten immer befolgt werden , einschließlich der folgenden:
13. Die Plastikmüll - Gartenwagen _ _ _ _ _ dürfen nicht in explosionsgefährdeten
Bereichen verwendet oder gelagert werden. Es ist nicht gestattet, das Gerät in
explosionsgefährdeten Bereichen zu verwenden.
14. Die Plastikmüll - Gartenwagen _ _ _ _ _ Vor der Verwendung muss überprüft
werden, ob es ordnungsgemäß funktioniert und sicher funktioniert. Andernfalls
darf das Gerät nicht verwendet werden.
15. Nur bestimmungsgemäß verwenden. Die Kunststoff - Muldenkipper -
Gartenwagen sind nicht zum Verladen von korrosiven Materialien geeignet . Weil
sie das Material auf Gartenkarren aus Plastik entsorgen.
16. Der Bediener muss die Kunststoff - Gartenwagen benutzen _ richtig. Er hat
die örtlichen Gegebenheiten zu berücksichtigen und beim Arbeiten mit den
Kunststoff - Gartenwagen Rücksicht auf Dritte , insbesondere Kinder , zu nehmen .
17. Dieser Plastikmüll - Gartenwagen ist ein echter Hingucker _ ist nicht für den
Gebrauch durch Personen (einschließlich Kinder) mit eingeschränkten
körperlichen , sensorischen oder geistigen Fähigkeiten oder mangels Erfahrung
und/oder mangels Wissen bestimmt , es sei denn, sie werden durch eine für ihre
Sicherheit zuständige Person beaufsichtigt oder erhielten von dieser Person
Anweisungen zum Gebrauch das Gerät. Kinder sollten beaufsichtigt werden , um
sicherzustellen , dass sie nicht mit den Plastik - Gartenwagen spielen .
18. Bitte verwenden Sie die Kunststoff-Gartenwagen entsprechend dem im
Handbuch angegebenen Gewicht. Beladen Sie nicht mehr als das angegebene
3
Gewicht, da dies zu Schäden am Kunststoff-Gartenwagen führt.
ANLEITUNG AUFBEWAHREN
Produktliste _
Ein x1Stk
Unterer Rahmen
B x2St
Linkes und rechtes Brett
C x1Stk
Vorderes Brett
D x1Stk
Hinteres Brett
E x1Stk
Handhaben
F x1Stk
Joch
G x1Stk
H x1Stk

4
Vorderachse
Hinterachse
Ich x2pc
Hinterachshalterung
J x4St
Rad
K x1Stk
Griffpaar r
L x1Stk
Matte
M x1Stk
Kippschaufelhalterung
N x1Stk
Griffverschluss

5
O x1Stk
Tragetasche
P x1Stk
Stretchnetz
Q x1Stk
Kippgriff
(Ⅲ) x2St
M8 Schrauben Satz
(IV) x 2 Stk
L-Griff-Set
(V) x4Stk
und Unterlegscheibe öffnen
(VI) x 1 Stk
M8 Schrauben Satz
(VII) x8Stk
Großes B Stift

6
Produktbeschreibung
Hinweis: Das ist es empfohlen zum Zusammenbau des
Kipphebels und der Feder auf einer Werkbank.
Zusammenbau des Kipphebels
7
● Demontieren Sie den Kippgriff (Teil Q) in Griff, Feder, Stock und R Stift.
● Richten Sie die Löcher des unteren Rahmens (Teil A) und des Kippgriffs
aufeinander aus (Teil Q) und Frühling Führen Sie den Stock wie abgebildet
durch die Löcher und befestigen Sie ihn mit R Pin .
Montage der Hinterachshalterung
● Lösen Sie die 4 M8-Mutternsätze (Ⅱ) vom unteren Rahmen.
● Anhang 2 Hinteren Achshalterungen (Teil I) am unteren Rahmen (Teil A) )
wie abgebildet und befestigen Sie sie dann mit 4 M8 Nuss Sets (TeilⅡ) .

8
Mülleimerhalterung & Hinterachsbaugruppe
● Verriegeln Sie die Halterung der Müllkippe (Teil M) Richten Sie den
Kippgriff am unteren Rahmen aus und richten Sie die Löcher der
Kippschaufelhalterung und der Hinterachshalterungen aus (Teil I) , dann
fertigen Sie die Hinterachse (Teil H) durch die Löcher gehen
9
Hinweis: Um sicherzustellen, dass sich die Vorderachse frei
drehen kann , ziehen Sie die M16-Mutter bitte nicht zu fest an.
Vorderseite Axtmontage
● Lösen Sie 1 x M16-Mutter (
Ⅱ
) Set aus der Dump-Eimer-Halterung.
● Befestigen Sie das Kugelscheiben-Kit (Teil
Ⅷ
) auf der
Kippschaufelhalterung (Teil M) , wie gezeigt , befestigen Sie dann die
Vorderachse (Teil G) daran und befestigen Sie die Vorderseite Achse mit
M16 Nuss Satz (Teil I).

10
Hinweis : Bitte halten Sie die Schraubenköpfe mit einem
Schraubenschlüssel fest und ziehen Sie die Muttern
gleichzeitig mit einem anderen Schraubenschlüssel fest .
Okay Montage
● Richten Sie die Löcher des Jochs aus (Teil F) und Vorderachse (Art. G)
und sichern Sie sie dann mit 2 M8 Schraubensätze (Teil
Ⅲ
)

11
Hinweis: Bitte stellen Sie sicher, dass die Reifenventile nicht
blockiert werden durch offene Pins beim Laufen.
Radmontage
● Befestigen Sie 4 Räder (Teil J) an den Achsen und sichern Sie die Räder
mit 4 Offen Stift & Unterlegscheiben (Teil V) und dann mit einer Zange die

12
Stifte biegen, um die Räder zu sichern.
Griffmontage
Hinweis: Bitte halten Sie den Schraubenkopf mit einem
Schraubenschlüssel fest und ziehen Sie die Mutter
gleichzeitig mit einem anderen Schraubenschlüssel fest.

13
● Bringen Sie die Griffkupplung an (Teil K) und Griff (Teil E) zum Joch (Teil
F) nacheinander festziehen und anschließend mit M8 sichern Schrauben
Satz (Teil VI) wie gezeigt .
Hinweis : Drücken Sie die Vorderplatte auf die Matte, um ein
Verrutschen zu verhindern .
Frontplatte & Mattenmontage
● Richten Sie die Matte (Teil L) an der Vorderkante des unteren Rahmens
(Teil A) aus gezeigt. Richten Sie dann die Löcher der Vorderplatte (Teil C)

14
und des unteren Rahmens aus und befestigen Sie sie dann mit 2 B Stifte
(Teil VI) wie abgebildet. Als nächstes befestigen Sie die Griffbefestigung
(Teil N) in der Mitte der Vorderplatte.
Hinweis: Bitte achten Sie darauf, dass die B-Stiftlöcher der
Bretter nach außen und die Haken nach vorne zeigen.

15
Zusammenbau der linken und rechten Platinen
● Befestigen Sie die linken und rechten Bretter (Teil B) wie gezeigt am
unteren Rahmen (Teil A) und befestigen Sie sie dann mit 4 B-Stiften (Teil
VI). Als nächstes schwenken Sie die kleinen Griffe an der Vorderplatte
nach oben und drücken Sie sie nach innen, richten Sie die Löcher der drei
Bretter aus, ziehen Sie dann die kleinen Griffe heraus und schwenken Sie
sie nach unten, um die Bretter zu verriegeln.
Montage der hinteren Platine
Richten Sie den B-Stift aus Löcher der Rückwand (Teil D) und unterer
Rahmen (Teil A), dann befestigen Sie sie mit 2 B Stifte (Teil VI). Und dann
16
richten Sie die Löcher am Obermaterial aus Seite der 3 Bretter , legen 2
L-Griffe (Teil IV) befestigen Sie die Bretter und befestigen Sie dann die
L-Griffe mit 2 klein B Stifte des L-Griffs Satz (Teil IV) .
Vollständig
Hinweis: Platzieren Sie bei Bedarf die Tragetasche am unteren
Rahmen.
Verwendung

17
Hinweis: Entfernen Sie die Stifte wie gezeigt, bevor Sie die Ladung
abladen.
Körpervolumen

18
Produktparameter
Produktabmessungen
1770*495*500mm
69,7 * 19,5 * 19,7 Zoll
Körpervolumen
770*430*180mm
30,3 * 16,9 * 7,1 Zoll
Maximale Gewichtskapazität
4 00 Pfund
Nettogewicht
19,4 kg
Rad
10*3,50-4

19
Adresse: Baoshanqu Shuangchenglu 803long 11hao 1602A-1609shi Shanghai
Importiert nach AUS: SIHAO PTY LTD , 1 ROKEVA STREETEASTWOOD NSW
2122 Australien
Importiert nach USA: Sanven Technology Ltd. , Suite 250 , 9166 Anaheim
Place , Rancho Cucamonga , CA 91730
REP
UK
Pooledas Group Ltd
Unit 5 Albert Edward House, The Pavilions
Preston, United Kingdom
REP
EC
SHUNSHUN GmbH
Römeräcker 9 Z2021, 76351
Linkenheim-Hochstetten, Germany
In China hergestellt


3
We continue to be committed to provide you tools with competitive price.
"Save Half","Half Price" or any other similar expressions used by us only represents an
estimate of savings you might benefit from buying certain tools with us compared to the major
top brands and does not necessarily mean to cover all categories of tools offered by us. You
are kindly reminded to verify carefully when you are placing an order with us if you are
actually saving half in comparison with the top major brands.

1
TC4206KB
Have product questions? Need technical support? Please feel free to
contact us:
Technical Support and E-Warranty Certificate
www.vevor.com/support
NEED HELP? CONTACT US!
This is the original instruction,please read all manual instructions carefully
before operating. VEVOR reserves a clear interpretation of our user
manual. The appearance of the product shall be subject to the product
you received. Please forgive us that we won't inform you again if there
are any technology or software updates on our product.
STEEL DUMP GARDEN
CARTS

2
Précautions de sécurité
AVERTISSEMENT:
Lisez ces instructions avant d'utiliser ce produit. Ne pas le faire peut entraîner
des blessures graves. les précautions de base doivent toujours être suivies ,
notamment les suivantes :
19. Les chariots de jardin à benne en plastique _ ne peut pas être utilisé ou stocké
dans des zones dangereuses. Il est interdit d'utiliser l'appareil dans des endroits
dangereux.
20. Les chariots de jardin à benne en plastique _ doit être vérifié pour s’assurer
qu’il est en bon état de fonctionnement et qu’il fonctionne en toute sécurité avant
utilisation. Dans le cas contraire , l'appareil ne doit pas être utilisé.
21. Utiliser uniquement comme prévu. Les chariots de jardin à benne en plastique
ne sont pas adaptés au chargement de matériaux corrosifs . Parce qu'ils jetteront
le matériel en plastique sur des chariots de jardin.
22. L'opérateur doit utiliser les chariots de jardin à benne basculante en
plastique . correctement. Il doit tenir compte des conditions locales et faire
attention aux tiers , en particulier aux enfants , lorsqu'il travaille avec la benne en
plastique .
23. Cette benne en plastique pour chariots de jardin _ n'est pas destiné à être
utilisé par des personnes (y compris des enfants) ayant des capacités physiques ,
sensorielles ou mentales réduites ou manquant d'expérience et/ou de
connaissances , à moins qu'elles ne soient supervisées par une personne
responsable de leur sécurité ou qu'elles ne soient instruites par ces personnes sur
l'utilisation de le dispositif. Les enfants doivent être surveillés pour s'assurer qu'ils
ne jouent pas avec les chariots de jardin à benne en plastique .
24. Veuillez utiliser les chariots de jardin à benne basculante en plastique selon le
3
poids indiqué dans le manuel. Ne chargez pas plus que le poids indiqué, car cela
endommagerait les chariots de jardin à benne basculante en plastique.
CONSERVEZ CES INSTRUCTIONS
Liste de produits
Un x1pc
Cadre inférieur
B x2pc
Tableau gauche et droit
C x1pc
Panneau avant
D x1pc
Panneau arrière
E x1pc
Poignée
F x1pc
Joug
G x1pc
H x1 pièce

4
Essieu avant
Essieu arrière
Je x2pc
Support d'essieu arrière
J x4pc
Roue
K x1 pièce
Poignée Couple r
L x1 pièce
Tapis
M x1 pièce
Support en T pour benne basculante
N x1pc
Attache de poignée

5
Ô x1pc
Sac de transport
Px1 pièce
Filet extensible
Q x1pc
Poignée de déversement
(Ⅲ) x2pc
M8 Vis Ensemble
(IV) x 2 pièces
Ensemble de poignées en L
(V) x4 pièces
Goupille ouverte et rondelle
(VI) x 1 pièce
M8 Vis Ensemble
(VII) x8 pièces
Grand B Épingle

6
Description du produit
Remarque : c'est recommandé pour assembler la poignée de
déchargement et le ressort sur un établi.
Ensemble de poignée de déversement
7
● Démonter la poignée de basculement (partie Q) dans la poignée, le
ressort, le bâton et R épingle.
● Alignez les trous du cadre inférieur (partie A) , de la poignée de
basculement. (partie Q) et Printemps comme indiqué , puis faites passer
Stick à travers les trous et fixez-le avec R Épingle .
Ensemble de support d'essieu arrière
● Détachez les 4 jeux d'écrous M8 (Ⅱ) à partir du cadre inférieur.
● Joindre 2 Arrière Supports d'essieu (partie I) sur le cadre inférieur (partie

8
A) ) comme illustré , puis fixez-les avec 4 M8 Noix Ensembles (partieⅡ) .
Support de benne basculante & Ensemble d'essieu
arrière
● Verrouiller le support de godet de décharge (pièce M) avec la poignée de
9
déversement sur le cadre inférieur , alignez les trous du support de godet
de décharge et des supports d'essieu arrière. (partie I) , puis réalisez
l'essieu arrière (partie H) passer par les trous
Remarque : Pour vous assurer que l'essieu avant peut pivoter
librement , veuillez ne pas trop serrer l'écrou M16.
Devant Assemblage de hache
● Détachez 1 x écrou M16 (
Ⅱ
) Situé à partir du support de godet de
décharge.
● Fixez le kit de rondelles de billes (pièce
Ⅷ
) sur le support du godet
10
(pièce M) comme indiqué , puis fixez l'essieu avant (pièce G) dessus et
fixez l'avant. Axe avec M16 Noix Ensemble (partie I).
Remarque : Veuillez utiliser une clé pour maintenir les têtes
de vis et serrer les écrous avec une autre clé simultanément .
ok Assemblée
● Alignez les trous du joug (partie F) et essieu avant ( art G) , puis fixez-les
11
avec 2 Jeux de vis M8 (pièce Ⅲ)
Remarque : veuillez vous assurer que les valves des pneus
ne seront pas gênées. par Open Pins lors de l’exécution.
Assemblage de roue
● Fixez les 4 roues (partie J) aux essieux et fixez les roues. avec 4 Ouvrir
12
Épingle & Rondelles (pièce V) , puis utilisez une pince pour plier les
goupilles afin de bloquer les roues.
Assemblage de la poignée
Remarque : veuillez utiliser une clé pour maintenir la tête de
vis et serrer l'écrou avec une autre clé simultanément.

13
● Fixer le coupleur de poignée (partie K) et poignée (partie E) au joug
(partie F) successivement , puis fixez-les avec M8 Vis Ensemble (partie VI)
comme indiqué .
Remarque : Assurez-vous que le panneau avant appuie sur le
tapis pour éviter tout glissement .
Tableau avant et Assemblage du tapis
● Alignez M à (partie L) avec le bord avant du cadre inférieur (partie A))
comme montré. Alignez ensuite les trous du panneau avant (partie C) et du
14
cadre inférieur , puis fixez-les avec 2 B Épingles (partie VI) comme indiqué.
Ensuite , fixez l'attache de poignée (pièce N) au milieu du panneau avant.
Remarque : veuillez vous assurer que les trous d'épingle B
des planches sont tournés vers l'extérieur et que les crochets
sont tournés vers l'avant.
15
Assemblage des cartes gauche et droite
● Fixez les planches gauche et droite (partie B) au cadre inférieur (partie A)
comme indiqué, puis fixez-les avec 4 broches B (partie VI). Ensuite, faites
pivoter les petites poignées du panneau avant vers le haut et appuyez-les
vers l'intérieur, alignez les trous des 3 planches, puis retirez les petites
poignées et faites-les pivoter vers le bas pour verrouiller les planches.
Assemblage du panneau arrière
Alignez la broche B trous du panneau arrière (partie D) et cadre inférieur
(partie A), puis fixez-les avec 2 B Épingles (partie VI). Et puis alignez les
trous sur le dessus côté des 3 planches , mettez 2 Poignées en L (partie
16
IV) pour fixer les planches, puis fixer les poignées en L avec 2 petit B
Goupilles de poignée en L Ensemble (partie IV) .
Complet
Remarque : placez le sac de transport sur le cadre inférieur si
nécessaire.
Usage

17
Remarque : retirez les broches comme indiqué avant de vider la
charge.
Volume corporel

18
Paramètres du produit
Dimensions du produit
1770*495*500mm
69,7*19,5*19,7 pouces
Volume corporel
770*430*180mm
30,3*16,9*7,1 pouces
Capacité de poids maximale
4 00 livres
Poids net
19,4 kg
Roue
10*3.50-4

19
Adresse : Baoshanqu Shuangchenglu 803long 11hao 1602A-1609shi Shanghai
Importé en Australie : SIHAO PTY LTD , 1 ROKEVA STREETESTWOOD NSW
2122 Australie
Importé aux États-Unis : Sanven Technology Ltd. , Suite 250 , 9166
Anaheim Place , Rancho Cucamonga , CA 91730
REP
UK
Pooledas Group Ltd
Unit 5 Albert Edward House, The Pavilions
Preston, United Kingdom
REP
EC
SHUNSHUN GmbH
Römeräcker 9 Z2021, 76351
Linkenheim-Hochstetten, Germany
Fabriqué en Chine


2
Technisch Ondersteuning en e-garantiecertificaat www.vevor.com/support
STALEN DUMPTUINKARREN
HANDLEIDING
We continue to be committed to provide you tools with competitive price.
"Save Half","Half Price" or any other similar expressions used by us only represents an
estimate of savings you might benefit from buying certain tools with us compared to the major
top brands and does not necessarily mean to cover all categories of tools offered by us. You
are kindly reminded to verify carefully when you are placing an order with us if you are
actually saving half in comparison with the top major brands.

1
TC4206KB
Have product questions? Need technical support? Please feel free to
contact us:
Technical Support and E-Warranty Certificate
www.vevor.com/support
NEED HELP? CONTACT US!
This is the original instruction,please read all manual instructions carefully
before operating. VEVOR reserves a clear interpretation of our user
manual. The appearance of the product shall be subject to the product
you received. Please forgive us that we won't inform you again if there
are any technology or software updates on our product.
STEEL DUMP GARDEN
CARTS

2
Veiligheidsmaatregelen
WAARSCHUWING:
Lees deze instructies voordat u dit product gebruikt. Als u dit niet doet, kan dit
leiden tot ernstig letsel. de basisvoorzorgsmaatregelen moeten altijd worden
gevolgd , waaronder de volgende:
25. De plastic dump tuinc kunsten _ _ _ _ mag niet worden gebruikt of opgeslagen
in gevaarlijke gebieden. Het is niet toegestaan het apparaat op gevaarlijke locaties
te gebruiken.
26. De plastic dump tuinc kunsten _ _ _ _ moet vóór gebruik worden
gecontroleerd om er zeker van te zijn dat deze in goede staat verkeert en veilig
werkt. Anders mag het apparaat niet worden gebruikt.
27. Alleen gebruiken zoals bedoeld. De kunststof dumptuinkarren zijn niet
geschikt voor het laden van corrosieve materialen . Omdat ze het materiaal op
tuinkarren dumpen.
28. De exploitant moet de plastic dump - tuinkarren gebruiken op de juiste manier.
Hij moet rekening houden met de plaatselijke omstandigheden en moet bij het
werken met de plastic dumptuinkaarten rekening houden met derden , in het
bijzonder kinderen .
29. Deze plastic dump - tuinkaarten _ _ _ _ is niet bedoeld voor gebruik door
personen (inclusief kinderen) met verminderde lichamelijke , zintuiglijke of
geestelijke vermogens of gebrek aan ervaring en/of kennis , tenzij zij onder
toezicht staan van een persoon die verantwoordelijk is voor hun veiligheid of door
deze personen zijn geïnstrueerd over het gebruik van het apparaat. Op kinderen
moet toezicht worden gehouden , om er zeker van te zijn dat ze niet met de plastic
dumptuinkarten spelen .
30. Gebruik de Plastic Dump Garden Carts volgens het gewicht aangegeven in de
3
handleiding. Laad niet meer dan het aangegeven gewicht, omdat dit de Plastic
Dump Garden Carts zal beschadigen.
BEWAAR DEZE INSTRUCTIES
Product lijst
EEN x1 st
Onderste frame
B x2st
Links en rechts bord
C x1 st
Voorbord
D x1 st
Achterbord
E x1 st
Hendel
F x1 st
Juk
G x1 st
H x1 st

4
Vooras
Achteras
ik x2st
Achterasbeugel
J x4st
Wiel
K x1 st
Handvat Paar r
L x 1 st
Mat
M x1 st
Dump-bucke t -beugel
N x 1 st
Handvatbevestiging

5
O x1 st
Draagtas
Px1 st
Reknet
Q x1 st
Dumphandvat
(Ⅲ) x2st
M8 Schroef Set
(IV) x 2 st
L-handgreepset
(V) x4st
Open pen en sluitring
(VI) x 1 st
M8 Schroef Set
(VII) x8st
Grote B Pin

6
Productomschrijving
Opmerking: het is aanbevolen om dumphandgreep en veer op
een werkbank te monteren.
Dumphandgreep

7
● Demonteer de dumphendel (deel Q) in handvat, veer, stok en R pin.
● Lijn de gaten van het onderste frame (deel A) , de dumphendel uit (deel
Q) en Lente zoals afgebeeld , laat Stick dan door de gaten gaan en zet
hem vast met R Vastzetten.
Achterasbeugelmontage
● Maak de 4 M8 moerensets los (Ⅱ) vanaf het onderste frame.
● Bijlage 2 Achterkant Asbeugels (deel I) op het onderste frame (deel A) )
zoals afgebeeld en zet ze vervolgens vast met 4 M8 Noot Stelt in (deelⅡ) .
8
Dump-emmer beugel & Achteras montage
● Vergrendel de dumpbakbeugel (onderdeel M) met de dumphendel op het
onderframe , lijn de gaten van de dumpbakbeugel en de achterasbeugels
uit (deel I) , maak vervolgens de achteras (deel H) ga door de gaten
9
Draai de M16-moer niet te vast om er zeker van te zijn dat de
vooras vrij kan draaien .
Voorkant Bijl montage
● Maak 1 x M16 moer (
Ⅱ
) los Ingesteld vanaf de dumpbakbeugel.
● Bevestig de kogelringset (onderdeelnr
Ⅷ
) op de dumpbakbeugel
(onderdeel M) zoals afgebeeld , bevestig vervolgens de vooras (onderdeel
G) erop en zet de voorkant vast As met M16 Noot Set (deel I).

10
Opmerking : Gebruik een sleutel om de schroefkoppen vast te
houden en draai de moeren tegelijkertijd vast met een andere
sleutel .
Oké Montage
● Lijn de gaten van het juk uit (deel F) en vooras (art G) , zet ze vervolgens
vast met 2 M8 Schroevensets (art.nr
Ⅲ
)

11
Opmerking: zorg ervoor dat de ventielen van de banden niet
worden belemmerd door Open Pins tijdens het hardlopen.
Wielmontage
● Bevestig 4 wielen (deel J) aan de assen en zet de wielen vast met 4
Open Pin & Sluitringen (onderdeel V) , gebruik vervolgens een tang om de

12
pinnen te buigen om de wielen te vergrendelen.
Handgreepmontage
Opmerking: gebruik een sleutel om de schroefkop vast te
houden en draai de moer tegelijkertijd met een andere sleutel
vast.
13
● Bevestig de handgreepkoppeling (deel K) en handvat (deel E) naar juk
(deel F) achtereenvolgens en zet ze vervolgens vast met M8 Schroef Set
(deel VI) zoals weergegeven .
Let op : Laat het voorbord op de mat drukken om schuiven te
voorkomen .
Voorbord & Matmontage
● Lijn M uit (deel L) met de voorkant van het onderste frame (deel A)) als
getoond. Lijn vervolgens de gaten van het voorpaneel (deel C) en het
14
onderframe uit en zet ze vervolgens vast met 2 B Pinnen (deel VI) zoals
afgebeeld. Bevestig vervolgens de handgreepbevestiging ( onderdeel N) in
het midden van het voorpaneel.
Opmerking: zorg ervoor dat de B-gaatjes van de planken naar
buiten wijzen en de haken naar voren wijzen.

15
Linker- en rechterraadsvergadering
● Bevestig de linker- en rechterplanken (deel B) aan het onderframe (deel
A) zoals afgebeeld en zet ze vervolgens vast met 4 B-pinnen (deel VI).
Draai vervolgens de kleine hendels op het voorpaneel naar boven en druk
ze naar binnen, lijn de gaten van de 3 planken uit, trek vervolgens de
kleine hendels naar buiten en draai ze naar beneden om de planken te
vergrendelen.
Achterste bordmontage
Lijn de B-pin uit gaten van de achterplaat (deel D) en onderframe (deel A),
zet ze vervolgens vast met 2 B Pinnen (deel VI). En lijn vervolgens de
16
gaten aan de bovenkant uit kant van de 3 planken , zet 2 L-handgrepen
(deel IV) om de planken vast te zetten en vervolgens de L-handgrepen
vast te zetten met 2 klein B Pinnen van L-handvat Set (deel IV).
Compleet
Opmerking: plaats de draagtas indien nodig op het onderframe.
Gebruik

17
Opmerking: verwijder de pinnen zoals afgebeeld voordat u de lading
dumpt.
Lichaamsvolume

18
Productparameters
Productafmetingen
1770*495*500mm
69,7*19,5*19,7in
Lichaamsvolume
770*430*180mm
30,3*16,9*7,1 inch
Maximale gewichtscapaciteit
4 00 pond
Netto gewicht
19,4 kg
Wiel
10*3,50-4

19
Adres: Baoshanqu Shuangchenglu 803long 11hao 1602A-1609shi Shanghai
Geïmporteerd naar AUS: SIHAO PTY LTD , 1 ROKEVA STREETEASTWOOD
NSW 2122 Australië
Geïmporteerd naar de VS: Sanven Technology Ltd. , Suite 250 , 9166
Anaheim Place , Rancho Cucamonga , CA 91730
REP
UK
Pooledas Group Ltd
Unit 5 Albert Edward House, The Pavilions
Preston, United Kingdom
REP
EC
SHUNSHUN GmbH
Römeräcker 9 Z2021, 76351
Linkenheim-Hochstetten, Germany
Gemaakt in China


2
Teknisk Support och e-garanticertifikat www.vevor.com/support
STÅLDUMP TRÄDGÅRDSVAGNAR
ANVÄNDARMANUAL
We continue to be committed to provide you tools with competitive price.
"Save Half","Half Price" or any other similar expressions used by us only represents an
estimate of savings you might benefit from buying certain tools with us compared to the major
top brands and does not necessarily mean to cover all categories of tools offered by us. You
are kindly reminded to verify carefully when you are placing an order with us if you are
actually saving half in comparison with the top major brands.

1
TC4206KB
Have product questions? Need technical support? Please feel free to
contact us:
Technical Support and E-Warranty Certificate
www.vevor.com/support
NEED HELP? CONTACT US!
This is the original instruction,please read all manual instructions carefully
before operating. VEVOR reserves a clear interpretation of our user
manual. The appearance of the product shall be subject to the product
you received. Please forgive us that we won't inform you again if there
are any technology or software updates on our product.
STEEL DUMP GARDEN
CARTS

2
Säkerhetsåtgärder
VARNING:
Läs dessa instruktioner innan du använder denna produkt. Underlåtenhet att
göra det kan resultera i allvarliga skador. de grundläggande
försiktighetsåtgärderna bör alltid följas, inklusive följande:
31. Den plastiska dump trädgårdskonsten _ _ _ _ _ får inte användas eller
förvaras i farliga områden. Det är inte tillåtet att använda apparaten på farliga
platser.
32. Den plastiska dump trädgårdskonsten _ _ _ _ _ måste kontrolleras för att
säkerställa att den är i korrekt fungerande skick och fungerar säkert före
användning. I annat fall får apparaten inte användas .
33. Använd endast som avsett. Plastdumpningen lämpar sig inte för lastning av
frätande material . För de kommer plastdumpa materialet på trädgårdsvagnar.
34. Operatören måste använda den plastiska dunsten _ _ _ ordentligt. Han måste
ta hänsyn till de lokala förhållandena och måste vara uppmärksam på tredje part ,
särskilt barn , när han arbetar med plastdeponi .
35. Denna plastiska dump trädgårdskonst _ _ _ _ _ är inte avsedd att användas
av personer (inklusive barn) med nedsatta fysiska, sensoriska eller mentala
förmågor eller som saknar erfarenhet och/eller kunskap , såvida de inte övervakas
av en person som ansvarar för deras säkerhet eller instrueras av dessa personer
om användningen av enheten. Barn bör övervakas för att säkerställa att de inte
leker med plastdumpen .
36. Använd trädgårdsvagnarna i plast enligt vikten som anges i manualen. Lasta
inte mer än den märkta vikten, eftersom detta kommer att skada
plastdumpningsträdgårdsvagnarna.

3
SPARA DESSA INSTRUKTIONER
Produktlista _
En x1st
Bottenram
B x 2 st
Vänster & Höger Board
C x 1 st
Frontbräda
D x 1 st
Bakre bräda
E x1st
Hantera
F x 1 st
Ok
G x 1 st
H x 1 st

4
Framaxel
Bakaxel
Jag x2st
Bakaxelfäste
J x 4 st
Hjul
K x 1 st
Handtag Par r
L x 1 st
Matta
M x 1 st
Dump-bucke t Fäste
N x 1 st
Handtagsfäste
5
O x 1 st
Väska
P x 1 st
Stretchnät
Q x1st
Dumpningshandtag
(Ⅲ) x2st
M8 Skruva Uppsättning
(IV) x 2 st
L Handtagsset
(V) x4st
Öppna Pin & Bricka
(VI) x 1 st
M8 Skruva Uppsättning
(VII) x8st
Stora B Stift

6
Produktbeskrivning
Obs: Det är rekommenderad för att montera
dumpningshandtag och fjäder på en arbetsbänk.
Dumpningshandtagsenhet

7
● Demontera dumpningshandtaget (del Q) i handtaget, fjädern, stickan och
R stift.
● Rikta in hålen på bottenramen (del A) , dumpningshandtaget (del Q) och
Spring som bilden visar och låt Stick gå igenom hålen och fäst den med R
Pin .
Bakaxelfäste Montering
● Lossa de 4 M8 muttersatserna (Ⅱ) från bottenramen.
● Fäst 2 Bak Axelfästen (del I) på bottenramen (del A) ) som visas , säkra
8
dem sedan med 4 M8 Nöt Uppsättningar (delⅡ) .
Dump-hink fäste & Bakaxelenhet
● Lås Dump-hink fäste (del M) med tömningshandtaget på bottenramen ,
passa in hålen på dumpskopfästet och bakaxelfästena (del I) , gör sedan
bakaxeln (del H) gå igenom hålen
9
Obs: För att säkerställa att framaxeln kan svänga fritt,
vänligen dra inte åt M16muttern för hårt.
Främre Yxa montering
● Lossa 1 x M16 mutter (
Ⅱ
) Set från Dump-Bucket Bracket.
● Fäst Ball Washer Kit (del
Ⅷ
) på Dump- Bet B acket (del M) enligt bilden ,
fäst sedan Front Axe (del G) på den och fäst fronten Axel med M16 Nöt
Uppsättning (del I).
10
Obs : Använd en skiftnyckel för att hålla skruvhuvudena och
dra åt muttrarna med en annan skiftnyckel samtidigt .
Okej hopsättning
● Rikta in hålen på oket (del F) och framaxel (art G) , säkra dem sedan
med 2 M8 skruvsatser (del
Ⅲ
)

11
Obs: Se till att däckventilerna inte hindras genom att öppna
pins när du kör.
Hjulmontering
● Fäst 4 hjul (del J) på axlarna och fäst hjulen med 4 Öppen Stift & Brickor
(del V) , använd sedan en tång för att böja stiften för att låsa hjulen.
12
Handtagsmontering
● Fäst handtagskoppling (del K) och handtag (del E) till Ok (del F)
successivt och säkra dem sedan med M8 Skruva Uppsättning (del VI) som
Obs: Använd en skiftnyckel för att hålla fast skruvhuvudet
och dra åt muttern med en annan skiftnyckel samtidigt.
13
visas .
Obs : Se till att frontbrädan trycker på mattan för att förhindra
att den glider .
Frontbräda & Matt montering
● Ali g n M at (del L) med den främre kanten på Bottenramen (del A) ) som
visad. Rikta sedan in hålen på frontbrädan (del C) och bottenramen och
fäst dem sedan med 2 B Stift (del VI) enligt bilden. Fäst sedan
handtagsfästet (del N) på mitten av frontbrädet .
14
Obs: Se till att B-hålen på brädorna är vända utåt och
krokarna vända framåt.
Vänster & höger styrelser församling
● Fäst vänster och höger brädor (del B) på bottenramen (del A) enligt
bilden, säkra dem sedan med 4 B-stift (del VI). Sväng sedan de små
15
handtagen på frontbrädan uppåt och tryck dem inåt, rikta in hålen på de tre
skivorna, dra sedan ut de små handtagen och sväng dem nedåt för att låsa
brädor.
Bakre styrelsemontering
Rikta in B-stiftet hål på bakre bräda (del D) och bottenram (del A), säkra
dem sedan med 2 B Pins (del VI). Och rikta sedan in hålen på den övre
sida av de 3 brädor , sätta 2 L Handtag (del IV) i säkra brädorna och säkra
sedan L-handtag med 2 små B Stift av L-handtag Uppsättning (del IV).
16
Komplett
Obs: Placera bärväskan på bottenramen vid behov.
Användande

17
Obs: Ta bort stiften som visas innan du tömmer lasten.
Kroppsvolym

18
Produktparametrar
Produktens mått
1770*495*500mm
69,7*19,5*19,7tum
Kroppsvolym
770*430*180mm
30,3*16,9*7,1tum
Maximal viktkapacitet
4 00 pund
Nettovikt
19,4 kg
Hjul
10*3,50-4

19
Shuangchenglu
803long 11hao 1602A-1609shi Shanghai
Importerad till AUS: SIHAO PTY LTD
,
1 ROKEVA STREETEASTWOOD NSW
2122 Australien
Importerad till USA : Sanven Technology Ltd.
REP
UK
Pooledas Group Ltd
Unit 5 Albert Edward House, The Pavilions
Preston, United Kingdom
REP
EC
SHUNSHUN GmbH
Römeräcker 9 Z2021, 76351
Linkenheim-Hochstetten, Germany
Tillverkad i Kina


3
We continue to be committed to provide you tools with competitive price.
"Save Half","Half Price" or any other similar expressions used by us only represents an
estimate of savings you might benefit from buying certain tools with us compared to the major
top brands and does not necessarily mean to cover all categories of tools offered by us. You
are kindly reminded to verify carefully when you are placing an order with us if you are
actually saving half in comparison with the top major brands.
1
TC4206KB
Have product questions? Need technical support? Please feel free to
contact us:
Technical Support and E-Warranty Certificate
www.vevor.com/support
NEED HELP? CONTACT US!
This is the original instruction,please read all manual instructions carefully
before operating. VEVOR reserves a clear interpretation of our user
manual. The appearance of the product shall be subject to the product
you received. Please forgive us that we won't inform you again if there
are any technology or software updates on our product.
STEEL DUMP GARDEN
CARTS

2
Precauciones de seguridad
ADVERTENCIA:
Lea estas instrucciones antes de usar este producto. De lo contrario, se pueden
producir lesiones graves. Siempre se deben seguir las precauciones básicas ,
incluidas las siguientes:
37. Los carros de jardín basureros de plástico _ _ No se puede utilizar ni
almacenar en zonas peligrosas. No está permitido utilizar el aparato en lugares
peligrosos.
38. Los carros de jardín basureros de plástico _ _ Se debe verificar para
garantizar que esté en buenas condiciones de funcionamiento y que funcione de
manera segura antes de su uso. De lo contrario , no se debe utilizar el aparato.
39. Úselo únicamente según lo previsto. Los carros basculantes de plástico para
jardín no son adecuados para cargar materiales corrosivos. Porque tirarán el
material en plástico en carritos de jardín.
40. El operador debe utilizar los carros de plástico para jardín . adecuadamente.
Al trabajar con los carros basculantes de plástico debe tener en cuenta las
condiciones locales y prestar atención a terceros , en particular a los niños .
41. Estos carros de jardín de plástico _ _ _ no está destinado a ser utilizado por
personas (incluidos niños) con capacidades físicas , sensoriales o mentales
reducidas o que carezcan de experiencia y/o conocimientos , a menos que estén
supervisados por una persona responsable de su seguridad o sean instruidos por
estas personas sobre el uso de el dispositivo. Los niños deben ser supervisados
para asegurarse de que no jueguen con los carritos de plástico del jardín .
42. Utilice los carros de jardín con volcador de plástico según el peso indicado en
el manual. No cargue más del peso marcado, ya que esto dañará los carros de
plástico para jardín.
3
GUARDA ESTAS INSTRUCCIONES
Lista de productos
Un x1pc
Marco inferior
B x2 piezas
Tablero izquierdo y derecho
Cx1 unidad
Tablero frontal
D x1 pieza
Tablero trasero
E x1 unidad
Manejar
F x1 pieza
Yugo
G x1 pieza
Alto x 1 pieza

4
Eje frontal
Eje posterior
Yo x2pc
Soporte del eje trasero
J x4ud
Rueda
Kx1 pieza
Mango Pareja r
Largo x 1 ud.
Estera
M x 1 pieza
Soporte t del cubo de descarga
N x 1 pieza
Sujetador de manija

5
O x1 pieza
Bolsa
P x 1 pieza
Red elástica
Q x 1 pieza
Mango de descarga
(Ⅲ) x2 piezas
M8 Tornillo Colocar
(IV) x 2 piezas
Juego de manijas en L
(V) x4 piezas
Pasador abierto y arandela
(VI) x 1 pieza
M8 Tornillo Colocar
(VII) x8ud
B grande Alfiler

6
Descripción del Producto
Nota: es recomendado para ensamblar la manija de descarga
y el resorte en un banco de trabajo.
Conjunto de manija de descarga
7
● Desmontar la manija de descarga (parte Q) en el mango, el resorte, la
palanca y R alfiler.
● Alinee los orificios del marco inferior (parte A) y la manija de descarga.
(parte Q) y primavera como se muestra , luego haga que Stick pase a
través de los orificios y asegúrelo con R Alfiler .
Conjunto de soporte del eje trasero
● Retire los 4 juegos de tuercas M8 (Ⅱ) del marco inferior.
● Adjuntar 2 Trasero Soportes de eje (parte I) en el marco inferior (parte
8
A)) como se muestra , luego asegúrelos con 4 M8 Tuerca Conjuntos (parte
Ⅱ).
Soporte del cucharón de descarga & Conjunto del eje
trasero
9
● Bloqueo del soporte del cucharón de descarga (parte M) con la manija
de descarga en el marco inferior , alinee los orificios del soporte del cubo
de descarga y los soportes del eje trasero (parte I) , luego haga que el eje
trasero (parte H) pasar por los agujeros
Nota: Para asegurarse de que el eje delantero pueda girar
libremente , no apriete demasiado la tuerca M16.
Frente Asamblea del hacha
● Retire 1 x tuerca M16 (
Ⅱ
) Instalar desde el soporte del cubo volcador.
● Conecte el kit de arandela de bolas (parte
Ⅷ
) en el soporte del cucharón
10
de volcado (parte M) como se muestra , luego coloque el eje delantero
(parte G) en él y asegure el frente. Eje con M16 Tuerca Colocar (parte I).
Nota : Utilice una llave para sujetar las cabezas de los
tornillos y apriete las tuercas con otra llave
simultáneamente .
Ok Asamblea
11
● Alinear los agujeros del yugo (parte F) y eje delantero (arte G) , luego
asegúrelos con 2 Juegos de tornillos M8 (parte Ⅲ)
Nota: asegúrese de que las válvulas de los neumáticos no se
vean obstaculizadas. por Open Pins cuando se ejecuta.
Conjunto de ruedas
12
● Conecte 4 ruedas (parte J) a los ejes y asegure las ruedas. con 4 Abierto
Alfiler & Arandelas (parte V) , luego use un alicate para doblar los
pasadores para bloquear las ruedas.
Nota: Utilice una llave para sujetar la cabeza del tornillo y
apriete la tuerca con otra llave simultáneamente.
13
Montaje del mango
● Conecte el acoplador de manija (parte K) y mango (parte E) al yugo
(parte F) sucesivamente , luego asegúrelos con M8 Tornillo Colocar (parte
VI) como se muestra .
Nota : Haga que la placa frontal presione la alfombrilla para
evitar que se deslice .
Tablero frontal y Montaje de tapete
14
● Alinee la alfombrilla (parte L) con el borde frontal del marco inferior
( parte A) como mostrado. Luego alinee los orificios de la placa frontal
(parte C) y el marco inferior y luego asegúrelos con 2 B Pasadores (parte
VI) como se muestra. Luego , fije el sujetador de la manija (parte N) en el
medio del tablero frontal.
Nota: Asegúrese de que los orificios B de las tablas miren
15
hacia afuera y los ganchos miren hacia adelante.
Montaje de tableros izquierdo y derecho
● Conecte las tablas izquierda y derecha (parte B) al marco inferior (parte
A) como se muestra y luego asegúrelas con 4 pasadores B (parte VI). A
continuación, gire las manijas pequeñas del tablero frontal hacia arriba y
presiónelas hacia adentro, alinee los orificios de las 3 tablas, luego saque
las manijas pequeñas y gírelas hacia abajo para bloquear las tablas.
Conjunto de placa trasera
Alinear el pin B agujeros del tablero trasero (parte D) y marco inferior
(parte A), luego asegúrelos con 2 B Patas (parte VI). Y luego alinee los

16
agujeros en la parte superior lado de las 3 tablas , poner 2 Manijas en L
(parte IV) para asegurar las tablas y luego asegure las manijas en L con 2
pequeño B Pasadores del mango en L Colocar (parte IV).
Completo
Nota: Coloque la bolsa de transporte en el marco inferior si es
necesario.
Uso
17
Nota: Retire los pasadores como se muestra antes de descargar la
carga.
Volumen corporal

18
parametros del producto
Dimensiones del producto
1770*495*500mm
69,7*19,5*19,7 pulgadas
Volumen corporal
770*430*180mm
30,3*16,9*7,1 pulgadas
Capacidad máxima de peso
4 00 libras
Peso neto
19,4 kilos
Rueda
10*3.50-4

19
Dirección: Baoshanqu Shuangchenglu 803long 11hao 1602A-1609shi Shanghai
Importado a AUS: SIHAO PTY LTD , 1 ROKEVA STREETEASTWOOD NSW 2122
Australia
Importado a EE. UU.: Sanven Technology Ltd. , Suite 250 , 9166 Anaheim
Place , Rancho Cucamonga , CA 91730
REP
UK
Pooledas Group Ltd
Unit 5 Albert Edward House, The Pavilions
Preston, United Kingdom
REP
EC
SHUNSHUN GmbH
Römeräcker 9 Z2021, 76351
Linkenheim-Hochstetten, Germany
Hecho en china


3
We continue to be committed to provide you tools with competitive price.
"Save Half","Half Price" or any other similar expressions used by us only represents an
estimate of savings you might benefit from buying certain tools with us compared to the major
top brands and does not necessarily mean to cover all categories of tools offered by us. You
are kindly reminded to verify carefully when you are placing an order with us if you are
actually saving half in comparison with the top major brands.
1
TC4206KB
Have product questions? Need technical support? Please feel free to
contact us:
Technical Support and E-Warranty Certificate
www.vevor.com/support
NEED HELP? CONTACT US!
This is the original instruction,please read all manual instructions carefully
before operating. VEVOR reserves a clear interpretation of our user
manual. The appearance of the product shall be subject to the product
you received. Please forgive us that we won't inform you again if there
are any technology or software updates on our product.
STEEL DUMP GARDEN
CARTS

2
Misure di sicurezza
AVVERTIMENTO:
Leggere queste istruzioni prima di utilizzare questo prodotto. In caso contrario si
potrebbero causare lesioni gravi. È necessario seguire sempre le precauzioni di
base , incluse le seguenti:
43. I carri da giardino con discarica di plastica _ non può essere utilizzato o
conservato in aree pericolose. Non è consentito utilizzare l'apparecchio in luoghi
pericolosi.
44. I carri da giardino con discarica di plastica _ deve essere controllato per
garantire che sia in buone condizioni di funzionamento e funzioni in sicurezza
prima dell'uso. In caso contrario l'apparecchio non deve essere utilizzato.
45. Utilizzare solo come previsto. I carrelli da giardino con cassone ribaltabile in
plastica non sono adatti al carico di materiali corrosivi . Perché scaricheranno il
materiale sui carrelli da giardino.
46. L'operatore deve utilizzare i carrelli da giardino con discarica in plastica
correttamente. Egli deve considerare le condizioni locali e prestare attenzione ai
terzi , in particolare ai bambini , quando lavora con il carrello da giardino con
discarica di plastica .
47. Questo carrello da giardino con discarica di plastica è artistico non è destinato
all'uso da parte di persone (compresi i bambini) con ridotte capacità fisiche ,
sensoriali o mentali o prive di esperienza e/o conoscenza , a meno che non siano
supervisionate da una persona responsabile della loro sicurezza o siano istruite da
queste persone sull'uso di il dispositivo. I bambini devono essere sorvegliati per
assicurarsi che non giochino con i carrelli da giardino con discarica di plastica .
48. Si prega di utilizzare i carrelli da giardino con scarico in plastica in base al
peso indicato nel manuale. Non caricare più del peso indicato, poiché ciò
3
danneggerebbe i carrelli da giardino con scarico in plastica.
CONSERVA QUESTE ISTRUZIONI
Elenco prodotti
Un x1pz
Telaio inferiore
Bx2pz
Scheda sinistra e destra
Cx1pz
Bordo anteriore
D x1pz
Pannello posteriore
E x1pz
Maniglia
Fx1pz
Giogo
Gx1pz
Hx1pz
4
Assale anteriore
Asse posteriore
Io x2pz
Staffa dell'asse posteriore
Jx4pz
Ruota
K x1pz
Maniglia Coppia dr
Lx1pz
Stuoia
Mx1pz
t per benna ribaltabile
N x 1 pz
Chiusura della maniglia

5
Ox1pz
Borsa per il trasporto
Px1pz
Rete elastica
Qx1pz
Maniglia di scarico
(Ⅲ) x2pz
M8 Vite Impostato
(IV) x 2 pz
Set maniglia L
(V) x4pz
Perno e rondella aperti
(VI) x 1 pz
M8 Vite Impostato
(VII) x8pz
Grande B Spillo

6
Descrizione del prodotto
Nota: lo è consigliato per montare la maniglia di scarico e la
molla su un banco di lavoro.
Gruppo maniglia di scarico

7
● Smontare la maniglia di scarico (parte Q) nella maniglia, nella molla, nel
bastone e nella R spillo.
● Allineare i fori del telaio inferiore (parte A) , maniglia di scarico (parte Q) e
Primavera come mostrato , quindi fai passare il bastoncino attraverso i fori
e fissalo con R Spillo .
Gruppo staffa asse posteriore
● Staccare i 4 set di dadi M8 (Ⅱ) dal telaio inferiore.
● Allega 2 Posteriore Staffe dell'asse (parte I) sul telaio inferiore (parte A))
8
come mostrato , quindi fissarli con 4 M8 Noce Imposta (parteⅡ) .
Staffa per benna di scarico & Gruppo asse posteriore
● Bloccare la staffa della benna di scarico (parte M) con la maniglia di
scarico sul telaio inferiore , allineare i fori della staffa della benna di scarico
e delle staffe dell'asse posteriore (parte I) , quindi realizzare l'asse
9
posteriore (part H) passare attraverso i fori
Nota: per assicurarsi che l'asse anteriore possa ruotare
liberamente , non serrare eccessivamente il dado M16.
Davanti Assemblea dell'ascia
● Staccare 1 dado M16 (
Ⅱ
) Impostato dalla staffa della benna di scarico.
● Collegare il kit rondella sferica (part
Ⅷ
) sulla staffa della benna di scarico
(parte M) come mostrato , quindi attaccare l'ascia anteriore (parte G) su di
essa e fissare la parte anteriore Asse con M16 Noce Impostato (parte I).

10
Nota : utilizzare una chiave per tenere le teste delle viti e
serrare i dadi contemporaneamente con un'altra chiave .
Sì, va bene Assemblea
● Allineare i fori della forcella (parte F) e Assale Anteriore (art G) , quindi
fissarli con 2 Set viti M8 (part
Ⅲ
)
11
Nota: assicurarsi che le valvole dei pneumatici non siano
ostacolate da Open Pins durante l'esecuzione.
Montaggio della ruota
● Collegare 4 ruote (parte J) agli assi e fissarle con 4 Aprire Spillo &
Rondelle (parte V) , quindi utilizzare una pinza per piegare i perni per
12
bloccare le ruote.
Maniglia di montaggio
● Collegare l'accoppiatore della maniglia (parte K) e Maniglia (parte E) a
Nota: utilizzare una chiave per tenere ferma la testa della vite
e serrare contemporaneamente il dado con un'altra chiave.
13
Giogo (parte F) successivamente , quindi fissarli con M8 Vite Impostato
(parte VI) come mostrato .
Nota : fare in modo che la scheda anteriore prema sul
tappetino per evitare che scivoli .
Pannello frontale e Assemblaggio tappetino
● Ali g n M at (parte L) con il bordo anteriore del telaio inferiore (parte A))
come mostrato. Quindi allineare i fori del pannello anteriore (parte C) e del
telaio inferiore , quindi fissarli con 2 B Perni (parte VI) come mostrato.
14
Successivamente , collegare il dispositivo di fissaggio della maniglia (parte
N) al centro del pannello anteriore.
Nota: assicurarsi che i fori B delle tavole siano rivolti verso
l'esterno e che i ganci siano rivolti in avanti.
Assemblaggio schede sinistra e destra
15
● Collega le schede sinistra e destra (parte B) al telaio inferiore (parte A)
come mostrato, quindi fissale con 4 perni B (parte VI). Successivamente,
ruotare le piccole maniglie sul pannello anteriore verso l'alto e premerle
verso l'interno, allineare i fori delle 3 assi, quindi estrarre le piccole
maniglie e ruotarle verso il basso per bloccare le assi.
Assemblaggio scheda posteriore
Allineare il perno B fori del pannello posteriore (parte D) e telaio inferiore
(parte A), quindi fissarli con 2 B Perni (parte VI). E poi allineare i fori sulla
parte superiore lato delle 3 assi , mettere 2 Maniglie a L (parte IV) per
fissare le tavole, quindi fissare le maniglie a L con 2 piccolo B Perni della
maniglia a L Impostato (parte IV).
16
Completare
Nota: posizionare la borsa per il trasporto sul telaio inferiore, se
necessario.
Utilizzo

17
Nota: rimuovere i perni come mostrato prima di scaricare il carico.
Volume corporeo

18
Parametri del prodotto
Dimensioni del prodotto
1770*495*500mm
69,7*19,5*19,7 pollici
Volume corporeo
770*430*180 mm
30,3*16,9*7,1 pollici
Capacità di peso massima
4 00 libbre
Peso netto
19,4 chilogrammi
Ruota
10*3,50-4

19
Indirizzo: Baoshanqu Shuangchenglu 803long 11hao 1602A-1609shi Shanghai
Importato negli Stati Uniti: SIHAO PTY LTD , 1 ROKEVA STREETEASTWOOD
NSW 2122 Australia
Importato negli Stati Uniti: Sanven Technology Ltd. , Suite 250 , 9166
Anaheim Place , Rancho Cucamonga , CA 91730
REP
UK
Pooledas Group Ltd
Unit 5 Albert Edward House, The Pavilions
Preston, United Kingdom
REP
EC
SHUNSHUN GmbH
Römeräcker 9 Z2021, 76351
Linkenheim-Hochstetten, Germany
Made in China