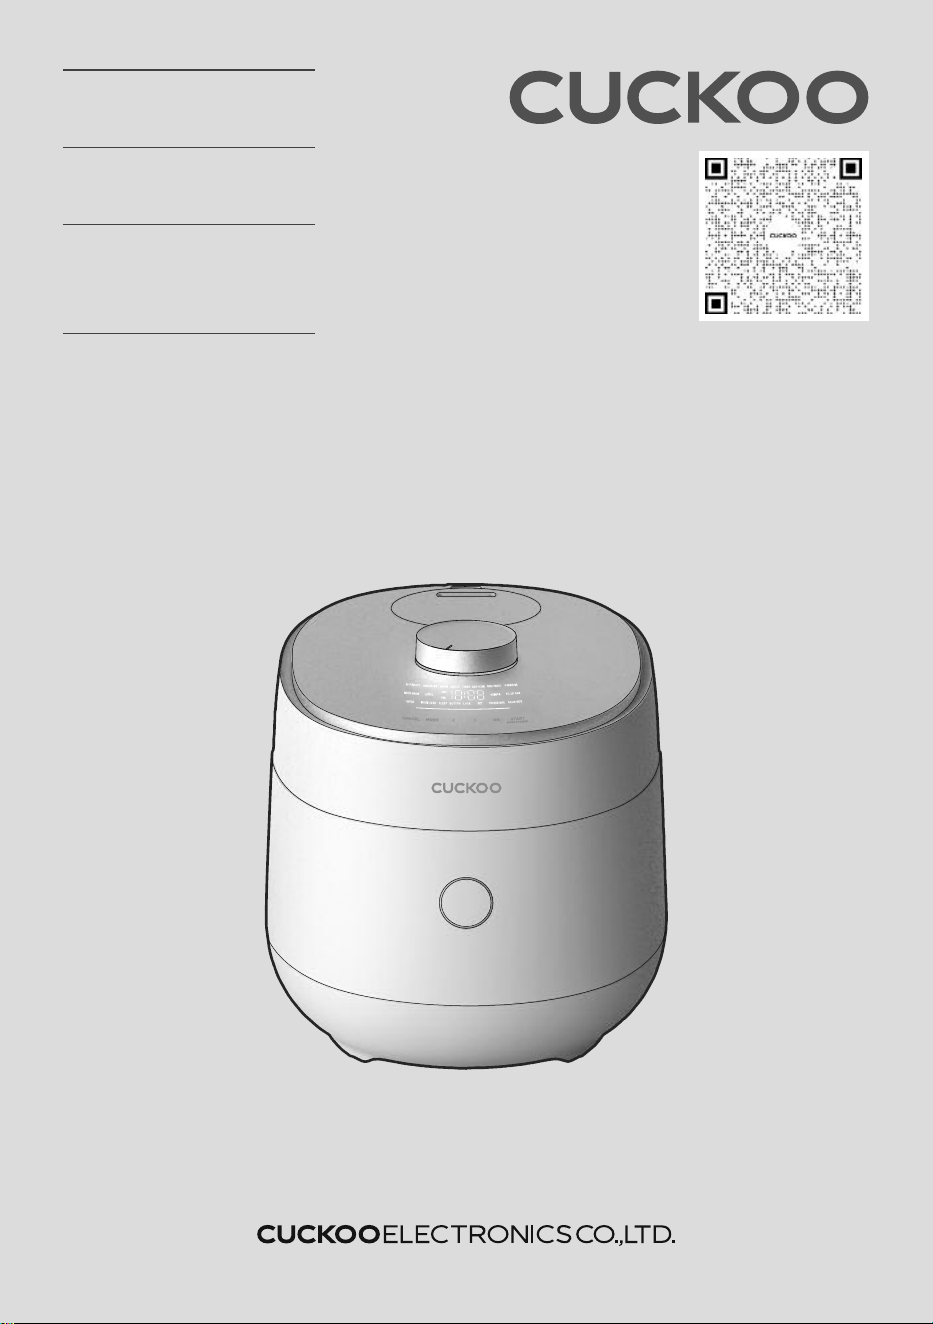
CUCKOO IH PRESSURE
RICE COOKER
OPERATING INSTRUCTIONS
사용설명서
CRP-OHT06
1.08L(1~6 PERSON)
1.08L(1~6인분)
Scan for Recipe

2
conTenTs
MAnUeL D’UTiLisATion frAnÇAis
MESURES DE PROTECTION IMPORTANTES ………………4
Spécifications du produit ……………………………………5
MESURES DE SÉCURITÉ …………………………………10~11
목차
한국어사용설명서
Important safeguards…………………………………………3
제품규격…………………………………………………………5
안정상의경고………………………………………………… 8~9
각부분의이름………………………………………………… 28
제품손질방법/ 고장시압력배출방법………………………… 29
제품손질방법/ 원터치버튼조립방법………………………… 30
제품 손질 방법 / 뚜껑 결합 손잡이의 사용법에 관하여………… 31
기능조작부의이름과역할/ 기능표시부의이상점검기능…… 32
고압모드또는무압모드선택방법 ……………………………… 33
현재시각의설정/ 음성안내기능의설정과해제……………… 34
야간음성볼륨설정기능/ 음성설정 기능……………………… 35
취사전준비사항……………………………………………… 36
맛있는밥을드시려면…………………………………………… 37
취사는이렇게하십시오………………………………………… 38
취사/ 자동세척기능은이렇게하십시오………………………39
쿠쿠맞춤취사기능은이렇게하십시오………………………… 40
찰현미는이렇게하십시오………………………………… 41~42
멀티쿡은이렇게하십시오……………………………………… 43
오픈쿠킹(OPEN COOKING)은이렇게하십시오……………… 44
수비드는 이렇게 하십시오 ……………………………………… 45
스틸컷오트밀은이렇게하십시오……………………………… 46
냉동보관밥은이렇게하십시오………………………………… 47
죽은 이렇게 하십시오 ………………………………………… 48
예약취사는이렇게하십시오……………………………… 49~51
예약재가열은이렇게하십시오…………………………… 52~53
취사 후 보온 설정 및 해제……………………………………… 53
밥을맛있게보온하려면…………………………………… 54~56
절전기능/화면조명절전기능은이렇게하십시오…………… 57
버튼잠금기능/ 취사잔여시간표시기능은이렇게하십시오…58
고장신고전에확인하십시오……………………………… 59~61
conTenTs
TABLe Des MATiÈres
Before Using
Important Safeguards…………………………………………3
Specifications …………………………………………………5
Safety Precautions…………………………………………6~7
Name of Each Part……………………………………………12
How to Clean ……………………………………………13~14
How to Care for the Product /
How to Use the Lock/Unlock Handle ………………………15
When Using
Function / Error Code and Possible Cause ………………16
How to Select High Pressure Mode or Non-Pressure Mode
…17
Voice Setting…………………………………………………18
How to Cook ………………………………………………19~20
How to Auto Clean……………………………………………20
How to Open Cook ……………………………………………21
How to Preset Timer for Cooking/Reheating Function22~23
Precautions for Preset Cooking/Reheating………………24
Before Asking for service
Check Before Reporting a Malfunction ………………25~27
cooking gUiDe
Cooking Guide ……………………………………………62~64

3
www.cuckooamerica.com
iMPorTAnT sAfegUArDs
ADDiTionAL iMPorTAnT sAfegUArDs
sAve These insTrUcTions
This APPLiAnce is for hoUsehoLD Use onLY
1. Read all instructions before using this appliance.
2. Do not touch hot surfaces. Use handles or knobs.
3. To prevent electric shock or injury, do not immerse the cord, plugs, or pressure components in water.
4. Close supervision is necessary when this appliance is used by or near children. This appliance is not
intended for use by young children without supervision.
5. Unplug cord from outlet when not in use and before cleaning.
Allow appliance to cool before putting on or taking off parts, and before cleaning the appliance.
6. Do not operate any appliance with a damaged cord or plug, after the appliance malfunctions, or has
been damaged in any manner. Return the appliance to the nearest authorized service facility for
examination, repair or adjustment.
7. The use of accessory attachments not recommended by the appliance manufacturer may result in fire,
electric shock, and / or injury to persons.
8. If the supply cord is damaged, it must be replaced by a special cord or assembly available from the
manufacturer or your service agent.
9. Do not use outdoors.
10. Do not let the cord hang over the edge of a table or counter, or touch hot surfaces.
11. Do not place on or near a hot gas, electric burner, or in a heated oven.
12. Always attach the plug to the appliance first, then plug the cord into the wall outlet. To disconnect, set all
controls to “OFF,” then remove the plug from the wall outlet.
13. Do not use this appliance for other than its intended use.
14. Extreme caution must be used when moving an appliance containing hot oil or any hot liquids.
15. Oversized foods, metal foil packages, or utensils must not be inserted into the appliance as they pose a risk
of fire or electric shock.
16. Fire may occur if the appliance is covered or touching flammable material, including curtains, draperies,
walls, etc while in operation.
17. To reduce the risk of electric shock, cook only in the provided removable container.
18. This appliance cooks under pressure. Improper use may result in scalding injury.
Before operating the unit, properly secure and close the unit. See “Operating Instructions.”
19. Do not cook foods such as applesauce, cranberries, cereals, macaroni, pasta, or other foaming foods.
These foods tend to foam, froth, and sputter, and may block the pressure releasing device.
20. Before use always check the pressure releasing device for clogging.
21. Do not open the pressure cooker until the unit has cooled and internal pressure has been reduced.
See “Operating Instructions.”
22. Do not use this pressure cooker to fry in oil.
23. Be sure that handles are assembled and fastened properly before each use. Cracked, broken or charred
handles should be replaced.
WArning : This appliance generates heat and releases steam during use. Use proper precaution to
prevent risk of burns, fires, other injuries, or damage to property.
1. Keep hands and face away from the Pressure Release Valve when releasing pressure.
2. Take extreme caution when opening the Lid after cooking. Severe burns can result from steam inside.
3. Never open the Lid while the unit is in operation.
4. Do not use without the inner pot in place.
5. Do not cover the Pressure Valve with anything as an explosion may occur.
6. Touch neither the inner pot nor any heating parts immediately after use.
Allow the unit to cool down completely first.
This appliance is intended to be used in household and similar applications such as :
- staff kitchen areas in shops, offices and other working environments;
- farm houses;
- by clients in hotels, motels and other residential type environments;
- bed and breakfast type environments.

4
MesUres De ProTecTion iMPorTAnTes
MesUres De ProTecTion sUPPLÉMenTAires
conserveZ ces insTrUcTions
CET APPAREIL EST DESTINÉ À UN USAGE DOMESTIQUE UNIQUEMENT
1. Lisez toutes les instructions avant d'utiliser cet appareil.
2. Ne touchez pas les surfaces chaudes. Utilisez les poignées ou les boutons.
3. Pour prévenir les risques d'incendie, les chocs électriques et/ou les blessures, ne plongez pas le cordon, les prises ou
le corps autocuiseur dans l'eau ou tout autre liquide.
4. Une surveillance étroite est nécessaire quand cet appareil est utilisé par des enfants ou qu'il se situe à leur portée.
Cet appareil n'est pas prévu pour être utilisé par de jeunes enfants sans surveillance.
5. Débranchez le cordon de la prise lorsque vous ne vous servez pas de l'appareil et avant de le nettoyer. Laissez
l'appareil refroidir avant de remettre en place ou de retirer des pièces, et avant de le nettoyer.
6. N'utilisez aucun appareil si le cordon ou la fiche est endommagé, s'il ne fonctionne pas correctement ou s'il est
endommagé de quelque façon que ce soit. Renvoyez l'appareil à un centre technique agréé le plus proche pour le
faire examiner, réparer ou régler.
7. L'utilisation d'accessoires non recommandés par le fabricant peut causer un incendie, un choc électrique et/ou des
blessures.
8. Si le cordon d'alimentation est endommagé, il doit être remplacé par un cordon ou ensemble prévu à cet effet,
disponible auprès du fabricant ou de réparateurs agréés.
9. N'utilisez pas l'appareil à l'extérieur.
10. Ne laissez pas le cordon pendre d'une table ou d'un comptoir. Ne le laissez pas non plus en contact avec une
surface chaude.
11. Ne placez pas l'appareil au-dessus ou près d'un brûleur à gaz, sur une plaque électrique ou dans un four chaud.
12. Branchez toujours la fiche sur l'appareil en premier, puis branchez le cordon dans la prise murale. Pour débrancher,
ou désactiver toutes les commandes, retirez la fiche de la prise murale.
13. N'utilisez pas cet appareil à des fins autres que celles pour lesquelles il a été conçu.
14. Une prudence extrême est requise lorsque vous déplacez l'appareil contenant de l'huile chaude ou tout autre liquide chaud.
15. Des denrées alimentaires de taille excessive, les emballages sous feuille métallique, ou les ustensiles ne doivent pas
être insérés dans l'appareil car ils constituent un risque d'incendie ou de choc électrique.
16. Un incendie peut se déclarer si l'appareil est couvert ou en contact avec des matériaux inflammables, y compris des
rideaux ou des draperies, des murs, etc., durant son fonctionnement.
17. Afin de réduire le risque de choc électrique, faites cuire uniquement dans le récipient amovible fourni.
18. Cet appareil cuit sous pression. Un mauvais usage peut entraîner des brûlures. Avant d'utiliser l'appareil, mettez
l'appareil bien en place et fermez-le. Reportez-vous à la section « Instructions d'utilisation ».
19. Ne cuisinez pas des aliments tels que compotes de pommes, canneberges, céréales, macaronis, spaghettis ou
autres. Ces aliments ont tendance à mousser, écumer et à crépiter et peuvent obstruer le dispositif de relâchement
de la pression.
20. Avant toute utilisation, vérifiez toujours si le dispositif de relâchement de la pression est obstrué.
21. N'ouvrez pas l'autocuiseur jusqu'à ce que l'appareil ait refroidi et que la pression interne ait diminué. Reportez-vous à
la section « Instructions d'utilisation ».
22. N'utilisez pas cet autocuiseur pour faire frire dans de l'huile.
AverTisseMenT :
Cet appareil génère de la chaleur et libère de la vapeur durant son fonctionnement. Utilisez les protections
appropriées pour prévenir le risque de brûlures, d'incendies, de blessures ou de dégâts matériels.
1. Gardez vos mains et votre visage à l'écart de la soupape de décharge lors du relâchement de la pression.
2. Faites extrêmement attention lors de l'ouverture du couvercle après la cuisson. La vapeur à l'intérieur peut
provoquer des brûlures graves.
3. N'ouvrez jamais le couvercle lorsque l'appareil est en fonctionnement.
4. N'utilisez pas l'appareil sans la cuve de cuisson à sa place.
5. Ne recouvrez pas la soupape de pression par un objet quelconque, une explosion pourrait survenir.
6. Ne touchez pas la cuve de cuisson ni les éléments chauffants immédiatement après utilisation. Laissez tout d'abord
l'appareil refroidir complètement. Cet appareil est prévu pour être utilisé à la maison à des fins telles que :
- la cuisine pour le personnel dans des magasins, des bureaux et d'autres environnements de travail;
- les fermes;
- par des clients dans des hôtels, des motels et autres environnements de type résidentiel;
- des environnements de type chambres d'hôtes.

5
www.cuckooamerica.com
hoW To Use eXTension corD / coMMenT UTiLiser Une rALLonge
sPecificATions / sPÉcificATions / 제품규격
hoW service is hAnDLeD / Mise en oeUvre DU service
note:
A. A short power-supply cord (or detachable power-supply cord) is provided to reduce the risk resulting from becoming
entangled in or tripping over a longer cord.
B. Longer detachable power-supply cords or extension cords are available and may be used if care is exercised in their use.
c. If a longer detachable power-supply cord or extension cord is used:
(1) The marked electrical rating of the cord set or extension cord should be at least as great as the electrical rating of the appliance;
(2) The cord should be arranged so that it will not drape over the countertop or tabletop where it can be pulled on by
children or tripped over unintentionally; and
(3) If the appliance is of the grounded type, the cord set or extension cord should be a grounding-type 3-wire cord
This appliance has a polarized plug : (one blade is wider than the other).
As a safety feature, this plug will fit in a polarized outlet only one way.
If the plug does not properly fit in the outlet, turn the plug over.
If it still does not fit, contact a qualified electrician. Do not attempt to modify the plug in any way
Please, keep this safety feature.
remarque:
A.
Un cordon d'alimentation court (ou détachable) vous est fourni pour réduire le risque de blessure personnelle en vous empêtrant ou en
trébuchant dans un cordon plus long.
B. Des rallonges ou cordons détachables sont disponibles et peuvent être utilisés si manipulé avec précaution.
c. En cas d’utilisation d’un cordon détachable ou d’une rallonge:
(1) La puissance électrique indiquée sur la rallonge doit être au moins aussi élevée que la puissance de l'appareil
(2) La rallonge doit être disposée de manière à ne pas reposer sur le comptoir ou sur la table lorsqu'elle peut être tirée par un enfant.
(3) Si l'appareil est un modèle avec prise de terre, la rallonge doit être à trois conducteurs avec neutre.
Cet appareil est muni d'une prise polarisée (une lame est plus large que l'autre).
Par mesure de sécurité, ce cordon ne se branche dans une prise polarisée que d'une seule manière.
Si l’embout de l’appareil n'entre pas correctement dans la prise, inversez sa position.
Si le branchement de l'appareil n'est toujours pas possible,veuillez contacter un électricien qualifié. Ne tentez en AUCUNE
façon de modifier l'embout électrique (la fiche) de l'appareil.
Veuillez respecter cette mesure de sécurité.
The East and the Central Districts
Tel. No. 718 888 9144
The West and the Central Districts
Tel. No. 323 780 8808
UsA
TORONTO
Tel. No. 905 707 8224
VANCOUVER
Tel. No. 604 540 1004
canada
Model Name / NOM DU MODÈLE / 모델명CRP-OHT06 Fuzzy Series
Power Supply / Alimentation électrique / 정격전압
120V~(AC Only), 60Hz
Power Consumption / CONSOMMATION D'ENERGIE / 정격소비전력
COOK : 1090W, WARM 78W
Cooking Capacity/
CAPACITÉ DE CUISSON /
용량
HIGH-PRESSURE WHITE RICE (고압백미)
1~6cups
HIGH-PRESSURE QUICK WHITE RICE (고압백미쾌속)
1~4cups
STICKY MULTI GRAIN RICE (잡곡)
QUICK STICKY MULTI GRAIN RICE (잡곡쾌속)
STICKY GABA/BROWN RICE (현미발아)
NON-PRESSURE WHITE RICE(무압백미)
LENTILS (렌틸콩)
QUINOA (퀴노아)
FROZEN STORED RICE (냉동보관밥)
PORRIDEG (죽)
THICK PORRIDGE(된죽)
1~1.5cups
THIN PORRIDGE(묽은죽)
0.5~1cups
STEEL CUT OATS (스틸 컷 오트밀)
1~2cups
Power Cord Length / LONGUEUR DU CORDON D'ALIMENTATION / 파워코드길이
1.2m
Pressure / PRESSION / 조정장치압력
98.0KPa(1.0kgf/cm²)
Weight / POIDS / 중량
6.9KG
Cooking Capacity/
CAPACITÉ DE CUISSON /
용량
Width / LARGEUR / 폭
26.9cm
Length / LONGUEUR / 길이
37.3cm
Height / HAUTEUR / 높이
26.8cm
sAfeTY PrecAUTions
6
WarningDo not
Do
n
o
t
u
se it
wit
h
o
u
t
t
h
e
in
n
e
r
p
o
t
.
•
It
c
an
c
aus
e
elect
ric
s
hoc
k
or
m
a
lfunc
tion.
•
D
o
not
p
our
r
i
c
e
or
w
ater
w
ithout the
i
nner
pot.
•
If
ric
e
or w
a
ter gets
in
t
he
n
do not turn the
pr
oduc
t ov
er
or
s
hak
e
it,
please
c
ontac
t the
dealer o
r
s
erv
i
c
e
c
enter.
Do n
o
t
co
ve
r t
h
e
a
u
t
o
ma
t
ic ste
a
m ou
t
le
t
o
r
p
r
e
ssu
r
e
w
e
igh
t
w
it
h
y
o
u
r h
a
n
d
o
r f
a
ce
.
• It can cause bur
n
s
.
• Es
p
ec
ially be carefu
l
to
keep it out of children’
s
r
e
ach.
Do
not
us
e
a
ri
c
e
c
ooker
a
t
a
place
w
here
d
ust
i
s
t
r
apped or
c
hem
i
c
al
m
at
e
ri
al
i
s l
oc
at
ed.
• Do
n
o
t
u
s
e an
y c
o
m
b
u
s
ti
b
l
e gas o
r f
l
amma
b
l
e
materi
al
s
n
earb
y a
p
r
o
d
u
c
t
.
• I
t c
a
n
cau
s
e exp
l
o
s
i
o
n
o
r
f
i
re.
Please
pay
car
e
f
ul
att
ent
i
on agai
ns
t
w
ater and
chem
i
c
a
l
s
•
I
t
c
a
n
ca
u
s
e a
n
e
l
ectri
c sh
o
ck o
r
f
i
re.
Do no
t
use
d
a
ma
g
e
d
p
o
w
e
r co
r
d
, plu
g
, or lo
o
se
s
o
ck
e
t
.
•
P
l
eas
e c
h
ec
k the power
c
ord
fr
equently for
dam
age.
• Seriou
s
dam
ag
e can cause electric shock or fire.
• If the plug is dam
aged
,
c
ontact the dealer
or
a s
er
vic
e c
enter.
Do no
t
b
e
n
d
, tie
, o
r p
u
ll t
h
e
p
o
w
e
r co
r
d
b
y
f
o
r
c
e
.
•
It can cause an electr
ic
s
hock or s
hor
t circuit res
ulting in fire.
Pleas
e
check the power c
ord and plug frequently.
Do
n
o
t
clea
n
t
h
e
p
r
o
d
u
c
t
wit
h
wa
t
e
r
o
r
p
o
u
r
wa
t
e
r
in
t
h
e
p
r
o
d
u
ct
.
•
It
c
a
n
c
aus
e
a
n
electr
i
c
s
hoc
k
or
fire.
•
If
i
t
c
ontac
ts
w
ater,
pl
eas
e
s
e
parate
pow
er
c
ord a
nd c
ontac
t deale
r
and
s
erv
i
c
e
c
enter.
Do
n
o
t
c
o
ve
r
t
h
e
a
u
t
o
mat
ic st
e
a
m ou
t
le
t
o
r
p
r
e
s
su
r
e
we
ig
h
t
wit
h
a
d
u
st
e
r, a
t
o
we
l, o
r
ap
r
o
n
, e
t
c.
•
It
c
an
c
aus
e
deformation
or a
br
e
ak
dow
n.
•
It
c
an
c
aus
e
an
e
x
plos
ion
by
pr
e
s
s
ure.
D
o not
u
s
e pot
s
t
hat
are no
t
des
ig
ned for
t
he c
o
oker
. D
o not
us
e ab
nor
m
al
p
ot
and do no
t
us
e
with
out
th
e
in
ner
pot
.
•
I
t
c
an
c
aus
e
an
e
lec
tric
s
hoc
k
or fi
r
e
.
•
D
e
pending
on
t
he
model,
t
he
c
ap
ac
ity
,
s
ha
pe,
materia
l
and
w
ater
s
c
ale of
the
inne
r
pot are
di
fferent.
When
purchas
ing
an
inner
pot,
ple
as
e
c
hec
k
the
model
name
of
the
product.
R
e
mov
e
a
f
o
r
e
ig
n
su
b
s
t
a
n
ce o
n
t
h
e
co
r
d
a
n
d
p
lu
g
wit
h
a
clea
n
clo
t
h
.
•
I
t
c
an
c
aus
e
fire.
Please
c
hec
k
the
pow
e
r
c
ord and
plug
frequently
.
B
e car
ef
u
l th
at
t
h
e
p
lu
g
an
d
power cor
d
a
r
e n
o
t
d
am
a
g
ed
by an
im
al bit
es
o
r
shar
p
m
e
t
al ob
ject
s
.
•
Dama
g
e
s
by
impac
t
c
a
n
c
a
us
e
a
n
e
le
c
tric
s
hoc
k
or
fire
.
Ple
a
s
e
c
he
c
k
the
powe
r
c
ord
a
nd
plug
fre
que
ntly.
D
on’
t
s
p
r
ay
or
put
any i
n
s
ec
t
ic
i
des
or
c
hemical
s
.
•
I
t
c
a
n
c
a
u
s
e
a
n
e
l
e
c
tri
c
s
h
o
c
k
o
r
fi
re
.
•
I
f
c
o
c
k
ro
a
c
h
e
s
o
r
a
n
y
i
n
s
e
c
ts
g
e
t
i
n
s
i
d
e
th
e
c
o
o
k
e
r,
p
l
e
a
s
e
c
a
l
l
a
d
e
a
l
e
r
o
r
a
s
e
rv
i
c
e
c
e
n
te
r.
D
on’
t
let foreign s
ubs
tanc
es
s
uc
h as needle, cleaning pin,
or metal get in or
bl
oc
k
t
he
in let/
out l
et pipe or
gap.
•
I
t
c
a
n
c
a
u
s
e
a
n
e
l
e
c
tri
c
s
h
o
c
k
o
r
fi
re
.
•
Do
n
o
t
p
u
t
a
c
l
e
a
n
i
n
g
p
i
n
i
n
a
g
a
p
o
r
a
h
o
l
e
o
f
th
e
p
r
o
d
u
c
t
e
xc
e
p
t
whe
n
c
l
e
a
ri
n
g
a
ste
a
m
o
u
tl
e
t.
This d
evice
is n
o
t
in
t
e
n
d
e
d
f
o
r
u
se b
y p
e
o
p
le
wh
o
la
ck
p
h
ysical, sen
so
r
y, an
d
men
t
a
l a
b
ilit
ie
s o
r
la
ck t
h
e
expe
r
ie
n
ce
a
n
d
kn
o
wle
d
g
e
t
o
s
a
f
e
ly u
se t
h
e
d
evice
with
o
u
t
s
u
p
e
r
visio
n
o
r
in
st
r
u
c
t
io
n
, in
clu
d
in
g
ch
ild
r
e
n
.
•
Keep
dev
ic
e
out of
r
e
ac
h
of
c
hil
d
re
n.
•
D
ev
ic
e
may
c
aus
e
electr
i
c
s
hoc
k,
burns
,
etc
Do
no
t
use
t
h
e
co
o
k
e
r
ne
a
r h
o
t
t
h
ing
s su
ch a
s
st
o
ve
,
g
a
s st
o
ve
o
r d
ire
ct
r
a
y of
li
g
h
t
.
•
It
can caus
e an electr
ic
s
h
o
ck, fire
,
d
efo
r
m
at
ion
,
m
alfu
n
ction
, or
d
is
co
lo
rat
io
n
. Please check th
e po
wer
cor
d
a
n
d
plu
g
fr
eq
u
e
n
t
ly.
D
o not tur
n the cov
er handle
to “N
on Pres
s
ur
e” w
h
i
le cooking.
•
T
h
e
h
o
t
ste
a
m
o
r
a
n
y
h
o
t
c
on
te
n
t
w
i
th
i
n
th
e
c
ooke
r
c
a
n
c
a
u
s
e
bu
rn
s
.
•
Afte
r
y
ou
finis
h
the
c
ook
ing
do
n
ot
try
to
ope
n
the
c
ook
e
r
by
force
unti
l
the
s
te
a
m
is
c
omplete
ly
e
x
ha
uste
d
.
Do
no
t
a
lt
e
r, re
a
sse
m
b
le
, disa
sse
mble
o
r r
e
p
a
ir.
• It can cause fire,
electr
i
cs
hock or injury
.
• For repair, c
o
ntact dealeror
the s
er
vic
e c
enter.
Do no
t
inse
rt
me
t
a
l ob
je
ct
s such a
s pins a
n
d
w
ire
s o
r
a
n
y
o
t
h
e
r ex
t
e
rn
a
l
su
b
st
a
n
ce
s in t
h
e
a
u
t
o
m
a
t
ic st
e
a
m
e
x
h
a
u
st
o
u
t
le
t
o
r a
n
y ot
h
e
r
slo
t
.
•
It
can cause an electr
ic shock or fire.
• Es
peciall
y be careful to keep
it
ou
t of reac
h
of
children
.
Use
a
s
in
g
le
so
ck
e
t
w
it
h
t
h
e
r
a
t
e
d
c
u
rr
e
n
t
a
b
o
ve
1
5
A.
• U
s
ing
s
everal plugs
in one s
ock
et
can caus
e
overh
e
at
i
n
g
or
fi
r
e.
•
U
s
e an ex
tensi
o
n
c
or
d w
ith
t
he
r
ated c
u
r
rent abo
v
e 15A.
• U
s
e AC 120V only
.
Do
n
o
t
o
p
e
n
t
h
e
LI
D w
h
ile
in
h
e
a
t
in
g
a
n
d
co
o
k
in
g
.
N
eve
r
o
p
e
n
t
h
e
lid
f
i
r
st
, eve
n
if
it
b
o
ils o
ve
r
o
r
t
h
e
s
t
e
a
m le
a
ks.
•
If
y
ou
need
to
op
e
n
the
li
d
w
hil
e
c
ook
ing, pr
e
s
s
and
hold
the
c
a
nc
el
button for 2
s
ec
onds
,
and
mak
e
s
ure
all internal
s
team
has
bee
n
rele
as
ed
by
turning
t
he
pres
s
ure
w
eight
ov
er.
D
o not
ov
er
unplug
an
d plug t
he power
c
or
d over
and over.
•
It
c
an
c
aus
e
an
e
lec
tric
s
hoc
k
or fire.
•
This
s
ign
is
i
n
tend
ed
t
o r
em
i
n
d
and
aler
t
t
hat
s
om
et
hing m
ay
cause
p
r
o
b
lem
s
und
er
t
he c
e
r
tain s
ituat
io
n.
•
P
leas
e
r
ead and
follo
w
t
h
e
ins
t
r
uc
t
ions
t
o
avo
i
d
injur
y
o
r
dam
age.
•
In
d
icat
e
s
a
p
r
o
h
ib
it
io
n
•
In
d
ica
t
e
s an
in
st
r
u
ct
io
n
T
h
is
mea
n
s th
at
t
h
e a
ct
io
n
it
d
escr
ib
es
m
a
y r
esu
lt
in
d
ea
t
h
o
r
seve
r
e in
ju
r
y.
T
h
is
m
ean
s th
at
th
e act
io
n
it
describ
es
m
ay
r
esult
in
in
ju
r
y
o
r
pr
o
p
er
t
y da
m
age
.
Read the f
ol
l
owi
ng p
roduc
t s
af
ety
gui
de c
are
f
ul
l
y
t
o
prev
ent any
ac
c
i
dents
and/or s
erio
us
danger
.
‘
W
arni
ng’
and
‘
C
auti
o
n’
are di
f
f
erent as f
ol
l
ows
.
W
arn
i
ng
c
au
ti
on
sAfeTY PrecAUTions
7
www.cuckooamerica.com
ENGLISH
D
o
no
t
use
i
t
o
n
a
rice
ch
e
st
o
r a
s
h
e
lf
.
•
D
o not
p
l
ac
e the power c
ord between furniture. It c
an
caus
e an
el
ectr
ic
s
hock
r
es
ult
i
n
g
in fire. Please check t
he power c
o
rd and plug
frequently
.
•
When usi
n
g
on
fu
r
niture be cautious of steam
r
ele
as
e As
it can cause
dam
age, fi
r
e
and
an
d/or
electric sh
oc
k.
Do
n
o
t
p
u
t
h
e
a
vy t
h
in
g
s o
n
t
h
e
p
o
we
r
co
r
d
.
•
It
c
an
c
aus
e
an
elec
tric
s
hoc
k
or fi
r
e
.
•
P
l
eas
e
c
he
c
k
the
pow
er
c
ord and
plug
frequently
A
f
t
e
r
yo
u
f
i
n
ish
co
o
king
, d
o
n
o
t
t
r
y t
o
o
p
e
n
t
h
e
co
o
k
e
r
b
y f
o
r
ce u
n
t
il t
h
e
s
t
e
a
m is co
m
p
le
t
e
ly exha
u
st
e
d
.
•
The
hot s
t
e
am
or any
hot c
ont
e
nt
w
ithin
the
c
ook
er
c
a
n
c
aus
e
burns
.
•
Cautious
ly
open
the
top c
ov
er
after
c
ook
ing
is
done
t
o
av
oid
dang
erous
s
team
and
burns
.
D
o
n
o
t
p
la
ce o
n
r
o
u
g
h
t
o
p
o
r
t
il
t
e
d
t
o
p
.
•
I
t
c
an
c
aus
e
burns
or
break
dow
ns
.
•
Be
c
areful
to install
the
pow
er
c
ord to pas
s
w
ithout dis
rupt
i
on.
Pleas
e c
all
c
ust
om
er
s
er
vic
e
if t
he inner
po
t
c
o
at
ing peels
o
ff.
•
I
nner
pot c
oa
ting
may
w
e
ar
aw
a
y
after
long
us
e.
•
W
hen
c
le
aning t
he
inner
pot,
do not us
e
tough
s
c
rubber,
metallic
s
c
rubber,
brus
h,
abras
iv
e
meta
llic
etc
.
A
lwa
ys t
u
r
n
t
h
e
cove
r
h
a
n
d
le
t
o
'Hig
h
P
r
e
ssu
r
e' whe
n
n
o
t
in
u
se.
•
Remaining
pres
s
ure
c
an
c
aus
e
de
form
a
t
i
on.
Do
n
o
t
h
o
ld
t
h
e
co
o
ke
r
b
y t
h
e
in
n
e
r
p
o
t
h
a
n
d
le
.
•
It
c
an
c
a
us
e
p
roble
ms
and
danger. There
are
port
a
ble
handle
s
on
the
bottom rig
ht
and
lef
t
s
ide
of
the
c
ook
er.
H
old
the
handle
s
w
ith
both hands
and
m
ov
e
it
c
arefully.
W
ip
e o
f
f
an
y exc
essive wat
er
on
t
h
e c
o
o
ker af
t
e
r
coo
k
i
n
g
.
•
I
t
c
an
c
aus
e
odor and
di
s
c
olouration.
Wipe
off
w
ater
that
is
left
behind
from
dew
.
D
o not
m
ove the pr
o
duct
by
p
ulling or
us
ing t
h
e power
c
or
d.
•
Elec
tric
s
hort migh
t
c
aus
e
fire.
I
n
case of
a
b
lacko
u
t
or
if
t
h
e
st
an
d
b
y power blocking
s
wit
ch
(TURN OFF) is activat
ed
du
r
in
g
coo
kin
g
, steam
f
r
o
m
t
h
e r
ice coo
ker
will b
e r
eleased
au
t
o
m
at
ically.
A
s a
r
esu
lt
, t
h
e q
u
alit
y o
f
t
h
e r
ice m
ay b
e lower t
h
a
n
n
o
r
m
al.
•
M
ak
e
s
ure
t
ha
t
the
s
tandby
pow
er
bloc
k
ing
s
w
itc
h
is
s
e
t
to
(O
N
)
before
c
ooki
ng.
•
Please
s
tart
c
ooki
ng
w
i
t
h
an
indic
ated
a
m
ount
of
ric
e
and
w
ater.
•
Water
c
an
ov
e
r
fl
ow
if
the
amount of
w
ater
in
a
pot
ex
c
eeds
the
indic
ated
lev
el
of
w
ater
us
age
.
•
Please
s
tart c
ook
ing
w
hen
the
s
team
c
ontrol c
a
p
is
c
omplete
ly
installed.
P
le
a
se
clea
n
t
h
e
b
o
d
y a
n
d
o
t
h
e
r
p
a
r
t
s af
t
e
r
co
o
kin
g
.
•
A
ft
e
r
c
ooki
ng
c
hi
c
k
en
s
oup,
multi
c
ook
dis
hes
,
and
etc
.,
the
s
mell
may
be
abs
orbed.
•
Clean
the
ov
en
pac
ki
ng,
top he
ater
plate,
and
inne
r
pot after
c
ooking
thes
e
dis
hes
.
•
F
ai
lure
to c
lean
may
c
aus
e
alteration
or
lingering s
mel
ls
.
•
U
s
e
dr
y
kitc
hen
c
l
eaner
or s
ponge
to
c
lea
n
the
inne
r
pot
,
s
i
nc
e
r
oug
h
s
c
rub or metal
lic
ones
are
abras
iv
e
to the
c
oating.
•
D
epending
on
the
us
ing
methods
or us
er'
s
c
i
r
c
ums
tanc
es
inner
pot
c
oating m
i
ght
ris
e
.
Plea
s
e
c
all the
c
us
tomer s
er
v
ic
e
for thos
e
c
as
es
.
•
Ple
as
e
,
do not pul
l
out the
c
lean s
tea
m
v
ent
by
forc
e
.
B
e
cau
t
io
u
s wh
e
n
s
t
e
a
m
is b
e
in
g
r
e
le
a
se
d
.
•
When
the
s
tea
m
is
released
don’t
be
s
ur
pris
ed.
•
Please
k
eep
the
c
ook
e
r
out
of
reac
h
of
c
hildren.
I
f
p
o
ss
ib
le
, o
n
ly u
se wa
r
min
g
f
u
n
ct
io
n
wh
e
n
co
o
king
whit
e
r
ice. Ot
h
e
r
f
o
o
d
s ar
e
ea
sily d
isco
lo
u
r
e
d
.
Wh
e
n
yo
u
p
u
ll o
u
t
t
h
e
p
o
we
r
p
lu
g
, d
o
n
’
t
p
u
ll t
h
e
p
o
we
r
co
r
d
. P
le
a
se, saf
e
ly p
u
ll o
u
t
t
h
e
p
o
w
e
r
p
lu
g
.
•
If
the
pow
er
c
ord is
s
ubje
c
ted
to
impac
t,
i
t
may
c
aus
e
an
e
lec
tric
s
hoc
k
or
fire.
Do
n
o
t
ch
a
n
g
e
, exte
n
d
o
r
co
n
n
e
c
t
t
h
e
p
o
we
r
co
r
d
with
o
u
t
t
h
e
a
d
vice
o
f
a
t
e
ch
n
ical expe
r
t
.
•
It
c
an
c
aus
e
a
n
electr
i
c
s
hoc
k
or
fire.
C
le
a
n
a
n
y d
u
st
o
r
e
xt
e
r
n
a
l su
b
st
a
n
ces o
f
f
t
h
e
t
e
mp
e
r
a
t
u
r
e
s
e
n
so
r
a
n
d
in
n
e
r
p
o
t
.
•
I
t
c
an
c
aus
e
a
s
y
s
tem
malfunc
tion
or fire.
Do
n
o
t
p
lu
g
o
r
p
u
ll o
u
t
t
h
e
p
o
w
e
r
co
r
d
wit
h
we
t
h
a
n
d
s.
•
It
c
an
c
aus
e
an
e
lec
tric
s
hoc
k.
P
le
a
se co
n
t
a
ct
a
d
e
a
le
r
o
r
se
r
vice
ce
n
t
e
r
wh
e
n
t
h
e
r
e
is
a
st
r
a
n
g
e
sm
e
ll o
r
smoke
.
•
F
i
r
s
t
pu
ll
ou
t
the
pow
e
r
c
ord.
And
c
onta
c
t
de
a
le
r
or
the
s
e
r
v
ic
e
c
e
nte
r.
Do
n
o
t
u
se
o
ve
r
t
h
e
maximu
m cap
a
cit
y.
•
It
c
a
n
c
aus
e
ov
erflow
or
br
e
ak
dow
n.
•
D
o
not c
ook
ov
er
s
tated
c
apac
ity
for c
ooking of
c
hi
c
k
en
s
oup a
nd
c
onge
e.
Do
n
o
t
t
o
u
ch
t
h
e
met
a
llic s
u
r
f
a
ce o
f
t
h
e
in
n
e
r
p
o
t
an
d
p
r
e
ssu
r
e
w
e
ig
h
t
a
f
t
e
r
co
o
king
o
r
w
a
r
m
in
g
.
•
It
c
an
c
aus
e
bur
ns
.
•
Remai
ning
hot s
team
c
an
c
aus
e
burns
w
hen
y
ou
tilt
the
p
re
s
s
ur
e
w
eight
w
hile and
right
afte
r
the
c
ook
ing.
Do
n
’
t
u
se t
h
e
co
o
ke
r
n
e
a
r
a
mag
n
e
t
ic f
ie
l
d
.
•
It
c
an
c
aus
e
burns
or break
dow
n.
Do
n
o
t
d
r
o
p
t
h
e
co
o
ke
r.
•
It
c
an
c
a
us
e
a
s
a
fety
proble
m
.
R
e
co
mmen
d
e
d
d
e
t
e
r
g
e
n
t
f
o
r
in
n
e
r
p
o
t
clea
n
in
g
(
in
sid
e
, o
u
t
sid
e
)
•
If
y
ou
do not us
e
a
s
uita
b
l
e
s
c
rubber for c
leaning,
the
inne
r
pot
c
oa
t
i
ng
may
be
damag
ed
and
pe
eled
off
.
Use
p
r
o
d
u
ct
o
n
a
f
la
t
su
r
f
a
ce
. Do
n
o
t
u
se o
n
a
cu
sh
io
n
.
Please
a
v
oid
us
ing
it
on
an
uns
table
loc
a
t
i
on
prone
to fa
lling dow
n.
•
It
c
an
c
aus
e
malf
unc
tion
or a
fire. P
l
ease
c
he
c
k
the
pow
er
c
ord and
plug
fre
q
ue
nt
l
y
.
D
on’
t us
e
t
he
inner pot for
pur
pos
es
other than its
intended use.
And
do
not heat
up
the
inner
p
o
t
on
the
g
as
s
tove.
•
It
c
a
n
c
aus
e
de
for
ma
t
i
on
of
the
inner
pot.
•
It
c
an
c
aus
e
to
s
pill
the
inne
r
c
oating
.
P
le
a
se u
n
p
lu
g
wh
e
n
n
o
t
in
u
se.
•
It
c
an
c
a
us
e
elec
tric
s
hoc
ks
or fire.
P
le
a
se o
n
ly u
se t
h
e
co
o
ke
r
f
o
r
it
s in
t
e
n
d
e
d
p
u
r
p
o
se.
•
It
c
an
c
aus
e
a
malfunc
tion
or s
mell.
Caution Do not
AvailableUnavailable
Cotton wool, Sponge wool,
Microfiber, Mesh wool
Blue, Green scrubber (Abrasive material),
Iron, Stain wool, Other metallic materials

안전상의 경고
8
변
형
된
내
솥
이
나
전
용
내
솥
이
아
닌
것
은
사
용
하
지
마
십
시
오
.
•
내솥이
가열
되어
이상작
동
및
화재의 원인이 됩니다.
•
내솥을
떨어뜨렸거
나
변형된 경우에는 서비스센터로 문의해 주십시오.
•
모델에 따라 내솥의
용
량,
형상,
재질,
물눈금이
다르므로
내솥 추가
구매 시에는 제품의 모델명을 확인하여 주십시오.
사
용
중
압
력
추
및
자
동
증
기
배
출
구
에
는
손
과
얼
굴
을
가
까
이
하
지
마
십
시
오
.
• 화
상
의
우
려
가
있
습
니
다
.
취
사
중
나
오
는
증
기
는
매
우
뜨
거
우
므
로
손
이
나
얼
굴
을
가
까
이
하
지
마
십
시
오
.
•
특
히
어
린
이
의
접
근
을
막
아
주
십
시
오
.
반드
시 정격 15
A이
상의 교류 12
0
V
전
용 콘센트에서만 사용해 주시고
한 콘센
트에 여러 제품의 전원플러그를 동시에 꽂아 사용하지 마십시오.
• 여
러
제
품
과
함
께
사
용
하
거
나
,
다
른
기
구
에
사
용
하
면
발
열
및
발
화
,
감
전
의
원
인
이
됩
니
다
.
수
시
로
콘
센
트
상
태
를
꼭
확
인
하
십
시
오
.
• 전
원
플
러
그
에
이
물
질
이
나
물
기
가
묻
어
있
는
경
우
에
는
잘
닦
은
다
음
사
용
하
십
시
오
.
• 연
장
코
드
도
15A
이
상
의
것
을
사
용
하
여
주
십
시
오
.
싱
크
대
,
목
욕
탕
등
제
품
에
물
이
들
어
갈
수
있
는
곳
이
나
,
눈
을
맞
을
수
있
는
실
외
에
서
사
용
하
지
마
십
시
오
.
•
전기 누전 및
감전의
위험이 있습니다.
•
제품에 물이
들
어
갔을 경우에는 서비스센터로 문의해 주십시오.
전
원
플
러
그
에
묻
은
이
물
질
은
물
기
가
없
는
천
으
로
깨
끗
이
제
거
하
여
주
십
시
오
.
•
화
재의
원인이
됩니다.
수시로 전원
플러
그
상태를 꼭
확인하십시오.
전
원
코
드
나
전
원
플
러
그
가
파
손
되
었
거
나
콘
센
트
가
흔
들
릴
때
는
사
용
을
중
지
하
고
,
서
비
스
센
터
로
문
의
바
랍
니
다
.
•
제품 사용 중
사용상
의
부주의로 전원 코드의 피복이 벗겨지거나
찍힐 경우
화재 및
감전의 원인이
될
수
있으니,
수
시로
전원코드
와
전원플러그,
콘센트
의
상태를 꼭
확인하십시오.
•
전원
코드나
전원플
러그가
파손
된
경우에는 위험이 생기지 않도록 하기
위하여 제조자나 그
판
매점
또는 유자격 기술자 (서비스 기사)에
의해
코드 교환을
하십
시오.
•
반드시
지
정된
서비스센
터에서
수리
하시기
바랍
니다.
제
품
을
싱
크
대
에
넣
고
닦
거
나
제
품
내
부
에
물
을
넣
지
마
십
시
오
.
•
전기
누전 및
감전,
화재의
원인이 됩니다.
•
제품에 물이 들어간 경우에는 사용을
중지
하고
전원플러
그를
뽑은 다음
서비스센터로문의
해
주십시오.
압
력
추
및
자
동
증
기
배
출
구
를
막
거
나
증
기
구
에
행
주
나
장
식
용
덮
개
,
기
타
물
건
을
올
린
채
사
용
하
지
마
십
시
오
.
•
압력에
의한 폭발의 위험이 있습니다.
•
본체의 변형,
변색
및
고장의 원인이 됩니다.
전
원
플
러
그
를
반
복
하
여
뺐
다
꽂
았
다
하
지
마
십
시
오
.
•
감전 및
화
재의
위험이 있습니다.
플
러
그
및
전
원
코
드
부
를
동
물
이
물
어
뜯
거
나
못
과
같
이
날
카
로
운
금
속
물
체
로
부
터
충
격
을
받
지
않
도
록
주
의
하
여
주
십
시
오
.
•
충격으
로
인한 파손은 합선,
감전
,
화재 등의
원
인이
됩니다
.
수시로전원코
드와
전원 플러그 상태를 꼭
확인
하십시오.
제품내에
살충제
나
화학물질
등을
뿌리거
나
투입하지
마십시오.
•
화
재
발
생
의
우
려
가
있
습
니
다
.
•
제
품
내
바
퀴
벌
레
나
벌
레
등
이
들
어
갔
을
경
우
는
서
비
스
센
터
로
문
의
해
주
십
시
오
.
취
사
나
요
리
가
진
행
중
일
때
절
대
로
뚜
껑
을
열
지
마
십
시
오
.
•
요리
중
끓어 넘치거나
증기가
누설
되더라도
절대로
먼저 뚜껑을
열지 마십시
오.
•
강
제
로
뚜
껑
을
열
면
내
용
물
비
산
으
로
화
상
의
우
려
가
있
습
니
다
.
•
취
사
또
는
요
리
가
진
행
중
일
때
부
득
이
하
게
뚜
껑
을
열
어
야
할
경
우
취
소
버
튼
을
약
0
.
3
초
간
(내솥
온
도
가
높
으
면
1
.
5
초
간
)
누
른
후
내
부
압
력
이
완
전
히
제
거
되
었
는
지
확
인
을
하
고
열
어
주
십
시
오
.
•
필
요
시
제
품
의
사
용
을
중
지
하
고
전
원
플
러
그
를
뽑
은
다
음
고
객
상
담
실
로
문
의
하
여
주
십
시
오
.
흡
•
배
기
구
또
는
틈
사
이
에
바
늘
,
청
소
용
핀
,
금
속
물
등
이
물
질
이
들
어
가
거
나
막
히
지
않
도
록
하
십
시
오
.
•
감
전
및
화
재
의
원
인
이
됩
니
다
.
•
청
소
용
핀
을
증
기
배
출
구
청
소
외
에
제
품
의
틈
새
나
구
멍
에
넣
지
마
십
시
오
.
이
기기는 신체,
감각
,
정신능력이 결여되어 있거나
경험과
지식이 부족하여
감독이나
지시
없이는 안전하게 기기를
사용할 수
없는
사
람(어린이
포함)
이
사용하도록
만들
어지지
않았습니다
.
•
어린이가
기
기를
가지고
놀지 않도록 주의하세요.
•
감전,
화상 등
부상의
원인이 됩니다.
제
품
을
직
사
광
선
이
쬐
는
곳
,
가
스
레
인
지
,
라
이
터
,
전
열
기
구
등
의
가
까
이
에
서
사
용
하
지
마
십
시
오
.
•
전기누전,
감전,
변형,
변색
및
화재의 원인이 됩니다.
•
전원코
드를
열기구
가까이 두지 마십시오.
코
드피복이
녹
아
화재,
감전의
원인이 됩니다.
수시로
전원
코드의
상태
를
꼭
확인하십시오.
내
솥
없
이
사
용
을
하
지
마
십
시
오
.
•
감전 및
고장의
원인
이
됩니다.
•
내솥이 없는
상
태에서
쌀이
나
물을 넣지 마십시오.
•
쌀이나
물
이
들어갔을
경우에는 제품을 뒤집거나 흔들지 마시고
서비
스센터로
꼭
문의 하십시오.
내
솥
없
이
분
리
형
커
버
,
찜
판
,
금
속
성
물
질
등
을
넣
거
나
,
넣
어
서
사
용
하
지
마
십
시
오
.
(특
히
,
어
린
이
주
의
).
•
감전 및
화재의
원
인이
됩니다
.
제
품
을
분
해
하
거
나
개
조
하
지
마
십
시
오
.
•
화재 및
감전의 원인이 됩니다.
•
서비스기사 이외의
사람
이
분해하거
나
수리하지
마십시오.
수리 및
고장 상담은
서비
스센터로
문
의하여
주십
시오.
전
원
코
드
를
무
리
하
게
구
부
리
거
나
,
묶
거
나
,
잡
아
당
기
지
마
십
시
오
.
•
감전이나 쇼트로 인해 화재의
원인
이
될
수
있습니다.
수시로 전원코드
상
태를
꼭
확인하십시오.
취
사
나
요
리
가
진
행
중
일
때
뚜
껑
열
림
버
튼
을
누
르
거
나
,
뚜
껑
결
합
손
잡
이
를
절
대
“
무
압
”으
로
돌
리
지
마
십
시
오
.
•
강제로 열
경우 압력으로
인
해
화상 및
폭발의 위험이
있습
니다.
•
취사나 요리 완료
후
증기가 완전히 배출된 상태에서 뚜껑
결합 손잡이를
작동시키십시오.
경고(금지)
• 이 기호는 특정조건하에서 위험을 끼칠 우려가 있는 사항에
대하여 주의를 환기시키는 표시입니다.
•
위험 발생을 피하기 위해 주의깊게 읽고 지시에 따라 사용하십시오.
• 이 기호는 어떤 행위를 ‘금지’하는 표시입니다.
• 이 기호는 어떤 행위를 ‘지시’하는 표시입니다.
피하지 않을 경우 사망이나 중상을
초래할 수 있는 잠재적인 위험상황
피하지 않을 경우 경상을 초래할 수
있는 잠재적인 위험상황
‘안전상의 경고’는 제품을 안전하고 올바르게 사용하여 사고나 위험을 미리 막기 위한 것이므로 반드시 지켜 주십시오.
‘안전상의 경고’는 ‘경고’와 ‘주의’의 두가지로 구분되어 있으며 ‘경고’와 ‘주의’의 의미는 다음과 같습니다.
경고
주의
안전상의 경고
9
www.cuckooamerica.com
KOREAN
쌀
통
및
다
용
도
선
반
등
에
제
품
을
놓
고
사
용
하
지
마
십
시
오
.
• 전원코드가 틈새에 눌러져 화재 및
감전의 원인이 됩니다.
수시로전원코드
상태를 꼭
확인하십시오.
• 취사 또는 요리중
증
기가
배출될
때
쌀통 및
다용도
선반에 의해
제품의 손상,
화재
,
감전의 원인이 됩니다.
전
원
코
드
위
에
무
거
운
물
건
을
올
려
놓
거
나
코
드
가
제
품
바
닥
에
눌
러
지
지
않
도
록
주
의
해
주
십
시
오
.
• 화재 및
감전의
원인이 됩니다.
수시로
전
원코드
상태
를
꼭
확인하십시오.
전원코드를
임
의로 연장하거나 연결하는
등
가
공하여
사용하지 마십시오.
• 감전
및
화재의 위험이 있습니다.
온
도
감
지
기
,
밥
솥
내
부
및
열
판
또
는
내
솥
바
깥
부
위
의
이
물
질
(밥
알
,기
타
음
식
물
등
)은
반
드
시
제
거
후
사
용
하
십
시
오
.
•
제품 사용
전
반드시 이물질 제거
상태
확인 후
사용하십시오.
• 온도감지를 정확히 못하게
되
므로
내솥이
가열되어 이상작동 및
화재의
원인이
됩
니다.
전
원
플
러
그
를
콘
센
트
에
서
꽂
거
나
뺄
때
는
손
의
물
기
를
반
드
시
제
거
한
후
전
원
플
러
그
를
잡
고
꽂
거
나
빼
어
주
십
시
오
.
• 젖은 손으로
전
원플러그를 뽑으면
감전
의
원인이 될
수
있
습니다.
• 무리하게 당겨 뽑으면
전원
코드에
이상
이
발생되어
누전 및
감전이될 수
있습니다.
제품
이동시
전원코드를 이용하여
들어
올리거나
잡아당
겨서
이동하지
마십시오.
• 쇼트로 인한 화재의 원인이
될
수
있습니다.
최
대
용
량
이
상
으
로
내
용
물
을
넣
고
사
용
하
지
마
십
시
오
.
•
밥물
넘침이
나
취사 불량 등
고장
의
원인이 됩니다.
• 죽
은
지정된 용량 이상은 사용하지 마십시오.
사
용
중
이
거
나
사
용
직
후
에
는
내
솥
,
내
부
,
열
판
및
압
력
추
등
은
뜨
거
우
므
로
만
지
지
마
십
시
오
.
• 고열에 의해 화상을 입을
수
있습니다.
• 압력추가
젖혀져 증기에 의해 화상을
입
을
수
있습니다.
뚜
껑
위
에
자
성
을
지
닌
물
체
를
올
려
놓
거
나
자
성
이
강
한
물
체
근
처
에
서
사
용
하
지
마
십
시
오
.
• 제
품
고장 및
기능이
정
상적으로
작
동되지
않을
수
있습니다.
제
품
에
심
한
충
격
을
주
거
나
떨
어
뜨
리
지
마
십
시
오
.
•
제품
고장 및
안전상의 문제가 발생할
수
있습니다.
내
솥
세
척
용
권
장
수
세
미
(내
측
,
외
측
)
• 사용
불가능
수세
미를
사용하
실
경우
내솥
코팅
이
손상되어
벗겨질 수
있습니
다.
제
품
밑
에
깔
판
,
방
석
,
전
기
장
판
등
을
놓
고
사
용
하
지
마
십
시
오
.
• 화재 및
변형의
원인이 됩니다.
수시로
제
품
상태를 꼭
확인하십시오.
취
사
,
보
온
,
지
정
된
메
뉴
이
외
의
식
혜
,
미
역
국
,
카
레
,
기
름
으
로
튀
기
는
요
리
등
다
른
용
도
로
사
용
하
지
마
십
시
오
.
• 고장 및
냄새의 원인이
됩
니다.
경
사
진
곳
이
나
울
퉁
불
퉁
한
곳
에
서
는
사
용
하
지
마
십
시
오
.
• 화상 및
제품
고장의
원인이 됩니다.
• 전원코드에 손이나 발,
기타
물체가 걸려 제품이 떨어지지
않
도록
주의 하십시오.
전
원
플
러
그
를
뽑
을
때
는
전
원
코
드
를
잡
지
마
시
고
꼭
전
원
플
러
그
를
잡
고
뽑
아
주
십
시
오
.
• 전원코
드에
충격이 가면 감전 및
화재의
원인이 될
수
있습
니다.
내
솥
을
다
른
용
도
로
사
용
하
거
나
불
위
에
올
리
지
마
십
시
오
.
• 내솥의 변형 및
코팅
이
벗겨져 제품에 이상이 발생할 수
있습니
다.
취
사
나
요
리
완
료
후
또
는
보
온
시
뚜
껑
결
합
손
잡
이
가
잘
돌
려
지
지
않
을
때
강
제
로
돌
리
지
마
십
시
오
.
• 화상 및
제품
손상의
원인
이
됩니다.
• 압력추를 젖혀 증기가
완
전히
배출되
었는지
확인
후
뚜껑 결합
손잡
이를
돌려주십시오.
• 취사나 요리 완료후
뚜껑
을
열때 증기에 의한 화상의
우
려가
있으므
로
주의하십시오.
내
솥
코
팅
이
벗
겨
질
경
우
서
비
스
센
터
로
문
의
해
주
십
시
오
.
•
제품을
장기
간
사용할 경우 내솥 코팅이
벗
겨질
수
있습니다.
•
거친
수세미
나
금속성 수세미로 내솥을 씻을 경우
코팅
이
벗겨질 수있으니
반
드시
주방용
중성세제와
스폰지로 씻어 주십시오.
•
날카로운
식
기류(포크,
숟가락
,
젓가락 등)를 내솥에
넣
은
채
씻을 경우
내
솥
코팅이 벗겨질 수
있습니다.
뚜
껑
결
합
손
잡
이
나
내
솥
손
잡
이
를
잡
고
제
품
을
들
어
올
리
지
마
십
시
오
.
• 뚜
껑
결합 손잡이나 내솥 손잡이를 잡고
들어
올릴 경우 뚜껑이
열
릴
우려가
있어
위험합니다
.
• 제
품
바닥 좌우측에 있는 홈을
양
손으로
들어
올려
안전하
게
사용하십
시오.
전
원
플
러
그
를
뽑
더
라
도
뚜
껑
결
합
손
잡
이
를
항
상
“고
압
”위
치
로
• 취사나 요리 완료
후
내솥이 뜨겁거나 뜨거운 밥이 남아
있을 경우
전원 플러그를 뽑더라도 뚜껑을
닫
고
뚜껑 결합 손잡이를 “
고압 ”
위치로
돌리지 않으면 내부압력에 의해
제
품의
변형이
나
손상의 원인이 됩니다.
• 취사, 요리
및
보온 중에도 반드시 뚜껑
결합
손잡이를 “
고압
”
위치
에
놓고
사용해 주십시오.
취
사
나
요
리
가
끝
난
뒤
에
는
반
드
시
본
체
에
고
인
물
을
닦
아
주
십
시
오
.
• 냄새 및
변색의
원인이 됩니다.
• 본체의 물받이에 고인
물을
닦아 주십시오.
사
용
중
에
이
상
한
소
리
나
냄
새
또
는
연
기
가
나
면
즉
시
전
원
플
러
그
를
뽑
고
내
부
압
력
을
완
전
히
제
거
후
서
비
스
센
터
로
문
의
해
주
십
시
오
.
취
사
또
는
요
리
진
행
중
정
전
또
는
요
리
진
행
중
대
기
전
력
차
단
스
위
치
가
(
O
FF)
가
되
면
자
동
증
기
배
출
장
치
가
작
동
하
여
내
용
물
비
산
의
우
려
가
있
습
니
다
.
취사
전
대
기전력
차단
스위치가
(O
N
)으로
되어
있는지 확인
후
취사해 주십시오.
• 정해진 쌀
및
물의
양으로 취사해 주십시오.
• 특히,
물의
양
이
규정보다 많으면 내용물 넘침의
원인이 됩니다.
• 증기조절캡
이
장착된 상태에서 취반을 하십시오.
요
리
후
에
는
반
드
시
청
소
해
주
십
시
오
.
• 닭찜
,
갈비찜 등의 요리
후
취사 및
보
온을
하게되면
밥에 냄새가 배어들
수도 있습니다.
• 내솥
뚜껑
세척시 거친 수세미나 금속성 수세미를
사
용할
경우 코팅이
벗겨질 수
있으니 반드시
스폰
지
또는 물기를 제거한 행주로
닦
아주십시오.
• 내솥, 내솥 뚜껑,
패킹 등을 깨끗이 닦아낸
후
사용하십시오.
• 제품의 사용환경이나
방법에 따라 내솥
뚜
껑의
코팅이 벗겨질 수
있습니다.
이런 경우 서비스센터로 문의해
주
십시오.
흰
밥
이
외
의
식
품
에
는
변
질
하
기
쉬
운
것
(
팥
밥
,혼
식
,크
로
켓
,그
라
탱
등
)
이
있
으
므
로
가
능
하
면
보
온
하
지
마
십
시
오
.
취
사
또
는
요
리
진
행
중
자
동
증
기
배
출
시
주
의
하
십
시
오
.
• 증기가 고속으로 배출되면서 ‘
취
익’
하는
소리가 나므로 놀라지 않도록
주의하십시오.
• 특히 어린이의 접근을
막아 주십시오.
화상의 원인이
됩
니다.
사
용
하
지
않
을
때
는
전
원
플
러
그
를
콘
센
트
에
서
뽑
아
주
십
시
오
.
• 절연 성능
저하
로
인해 감전,
누전,
화재의 원인이 될
수
있습니다.
주의(금지)
사용 가능사용 불가능
면 수세미, 스폰지 수세미,
극세사, 망사 수세미
청색, 녹색 수세미(연마제 재질),
철, 스텐 수세미, 기타 금속성 재질 수세미
MesUres De sÉcUriTÉ
10
Lisez attentivement le guide de sécurité du produit qui suit afin d'éviter les accidents et/ou les dangers graves.
« Avertissement » et « Attention » diffèrent comme suit :
Ne recouvrez pas la sortie de vapeur automatique
ou le poids de pression avec votre main ou votre visage.
• Cela peut entraîner des brûlures.
•
Faites particulièrement attention à le mettre hors de portée des enfants.
N'utilisez pas le cuiseur près de ce qui est chaud
comme une cuisinière, une cuisinière à gaz ou la
lumière directe du soleil.
• Cela peut causer un choc électrique, un incendie, une
déformation, un dysfonctionnement ou une décoloration.
Veuillez vérifier régulièrement le cordon d'alimentation et la prise.
Ne modifiez pas, ne remontez pas, ne démontez pas
ou ne réparez pas cet appareil.
•
Cela peut entraîner un incendie, un choc électrique ou des blessures.
•
Pour le faire réparer, contactez le revendeur ou le centre technique.
Utilisez une prise individuelle avec un courant
nominal supérieur à 15A.
• L'utilisation de plusieurs lignes sur une seule prise peut
provoquer une surchauffe ou un incendie.
• Veuillez vérifier fréquemment le cordon d'alimentation et la prise.
• Utilisez une rallonge avec un courant nominal supérieur à 15A.
Soyez particulièrement attentifs à l'eau ou aux
produits chimiques.
• Cela peut causer un choc électrique ou un incendie.
N'utilisez pas le cuiseur à riz dans un endroit qui retient
la poussière ou en présence de produits chimiques
•
N'utilisez aucun gaz inflammable ou produit inflammable près du produit.
• Cela peut entraîner une explosion ou un incendie.
N'utilisez pas un cordon d'alimentation
endommagé, une fiche ou une prise mal fixée.
•
Veuillez vérifier régulièrement si le cordon d'alimentation est endommagé.
•
Des dégâts importants peuvent entraîner un choc électrique ou un incendie.
•
Si la fiche est endommagée, contactez le revendeur ou un centre technique.
Ne nettoyez pas le produit avec de l'eau ni ne versez
de l'eau dans le produit.
• Cela peut entraîner un choc électrique ou un incendie.
•
Si le produit est en contact avec de l'eau, veuillez séparer le cordon
d'alimentation et contactez le revendeur et le centre technique
Ne recouvrez pas la sortie de vapeur automatique ou
le poids de pression avec un chiffon, une serviette ou
un tablier etc.
• Cela peut entraîner une déformation ou une panne.
• Cela peut entraîner une explosion due à la pression.
N'utilisez pas de cuves de cuisson qui ne sont pas
conçues pour le cuiseur.
N'utilisez pas une cuve de cuisson anormale et
n'utilisez pas l'appareil sans la cuve de cuisson.
• Cela peut entraîner un choc électrique ou un incendie.
N'utilisez pas l'appareil sans la cuve de cuisson
• Cela peut provoquer un choc électrique ou un dysfonctionnement.
• Ne mettez pas de riz ni d'eau sans la cuve de cuisson à l'intérieur.
•
Si du riz ou de l'eau s'infiltre, ne retournez pas le produit et ne le secouez
pas, veuillez contacter le revendeur ou le centre technique
Ne pas appuyer sur le bouton de serrage ou ne pas
tourner la poignée de verrouillage/déverrouillage en
mode « Aucune pression » pendant la cuisson.
•
Si l'appareil est ouvert de force, il peut provoquer des brûlures et une explosion.
•
Utiliser la poignée de verrouillage/déverrouillage une fois que la vapeur est
completement épuisée.
Tournez la poignée de verrouillage/déverrouillage en
position « haute pression » et ne fermez pas le couvercle
avec la casserole interne à l'intérieur de la machine.
•
La déformation ou l'endommagement de la serrure et de la casserole
interne peut provoquer des fuites de vapeur ou une explosion.
N'insérez pas d'objets en métal tels que des épingles et des
fils ou toute autre substance extérieure dans la sortie
d'évacuation de vapeur automatique ou toute autre ouverture.
• Cela peut entraîner un choc électrique ou un incendie.
•
Faites tout particulièrement attention de garder l'appareil hors de portée des enfants.
Gardez le cuiseur hors de portée des enfants.
•
Cela peut provoquer des brûlures, un choc électrique ou des blessures.
Ne vaporisez pas et n'utilisez pas d'insecticides ou de produits chimiques.
• Cela peut entraîner un choc électrique ou un incendie.
• Si des cafards ou d'autres insectes pénètrent dans le cuiseur,
veuillez contacter un revendeur ou un centre technique
Ne laissez pas des substances étrangères telles qu'une
aiguille, une épingle de nettoyage, ou du métal entrer et ne
bloquez pas le conduit d'arrivée/d'évacuation ou l'ouverture.
• Cela peut entraîner un choc électrique ou un incendie.
• Ne mettez pas une épingle de nettoyage dans l'ouverture ou le trou
du produit sauf pour nettoyer la sortie de vapeur.
N'ouvrez pas le couvercle supérieur lors de la phase de
chauffage et de la cuisson.
• Cela peut entraîner des brûlures.
•
Si vous avez besoin d'ouvrir le couvercle lors de la cuisson, maintenez appuyé le
bouton cancel (annuler) pendant deux secondes et vérifiez que la vapeur
interne s'est complètement évacuée en retournant le poids de pression.
Ne pliez pas, n'attachez pas et ne tirez pas le cordon
d'alimentation de force
•
Cela peut provoquer un choc électrique ou un courtcircuit entraînant un
incendie. Veuillez vérifier fréquemment le cordon d'alimentation et la prise.
Ne débranchez pas ni ne branchez sans arrêt le
cordon d'alimentation.
• Cela peut entraîner un choc électrique ou un incendie
Faites attention à ce que la fiche et le cordon d'alimentation
ne soient pas entrechoqués par des attaques d'animaux
ou par des matériaux métalliques tranchants.
•
Les dégâts dûs à des impacts peuvent provoquer un choc électrique ou un
incendie. Veuillez vérifier fréquemment le cordon d'alimentation et la prise.
Retirez une substance étrangère sur le cordon et la fiche
à l'aide d'un chiffon propre.
• Cela peut provoquer un incendie. Veuillez vérifier fréquemment le
cordon d'alimentation et la fiche.
Avertissement
ne pas
•
Ce symbole vise à rappeler et à alerter que quelque chose
peut entraîner des problèmes dans la situation donnée.
•
Veuillez lire et respecter l'instruction afin d'éviter toute
situation dangereuse
• Indique une interdiction
• Indique une instruction.
Cela signifie que l'action qui est décrite peut entraîner la
mort ou une blessure grave.
Avertissement
Cela signifie que l'action décrite peut entraîner des
blessures ou des dégâts matériels.
Attention
MesUres De sÉcUriTÉ
11
www.cuckooamerica.com
FRENCH
Avertissementse rappeler
N'utilisez pas l'appareil sur un coffre à riz ou une étagère
•
Ne placez pas le cordon d'alimentation entre des meubles. Cela peut
provoquer un choc électrique entraînant un incendie.
•
En cas d'utilisation sur du mobilier, faites attention à l'évacuation de la vapeur
car cela peut provoquer des dégâts, un incendie et/ou un choc électrique.
Ne placez pas de choses lourdes sur le cordon d'alimentation
•
Cela peut entraîner un choc électrique ou un incendie.
•
Veuillez vérifier fréquemment le cordon d'alimentation et la fiche.
Ne changez pas, ne rallongez pas ni ne branchez le cordon
d'alimentation sans l'avis d'un expert technique
•
Cela peut entraîner un choc électrique ou un incendie.
Nettoyez la poussière ou toute substance étrangère sur le
capteur de température et la cuve de cuisson.
•
Cela peut provoquer un dysfonctionnement du système ou un incendie
Ne branchez pas et ne retirez pas le cordon d'alimentation
avec les mains mouillées.
•
Cela peut provoquer un choc électrique
Ne déplacez pas le produit en tirant ou en utilisant le cordon
d'alimentation.
•
Un court-circuit électrique pourrait provoquer un incendie.
Ne pas utiliser la casserole interne à des fins diverses. Et ne pas
chauffer la casserole interne sur une cuisinière à gaz.
•
Cela peut entraîner une déformation de la casserole interne.
•
Cela peut entraîner le déversement du revêtement intérieur.
Veuillez contacter le service client si le revêtement de la cuve de cuisson s'enlève.
•
Il se peut que le revêtement s'use après une longue utilisation.
•
Lors du nettoyage de la cuve de cuisson, n'utilisez pas de tampon à
récurer dur ou métallique, de brosse, d'abrasifs métalliques etc.
Type de laveur recommandé pour nettoyer la casserole interne (intérieur, extérieur)
•
Si vous utilisez une éponge non mentionnée, le revêtement de la casserole interne peut s'user.
•
Si le revêtement de la casserole interne s'égratigne ou s'use à cause d'une erreur du client, vous
devrez payer la réparation même pendant la période de service de réparation gratuite.
Ne placez pas l'appareil sur une surface irrégulière ou inclinée.
•
Cela peut provoquer des brûlures ou des pannes.
•
Faites attention à installer le cordon d'alimentation de façon à ce
qu'il passe sans interruption.
Veuillez contacter un revendeur ou un centre technique
en cas d'odeur ou de fumée inhabituelle.
•
Débranchez tout d'abord le cordon d'alimentation.
Puis contactez le revendeur ou le centre technique.
N'utilisez pas l'appareil au-delà de la capacité maximum.
•
Cela peut provoquer un débordement ou une panne.
•
Ne faites pas cuire au-delà de la capacité mentionnée pour
la cuisson d'une soupe au poulet et d'un congee
N'utilisez pas le cuiseur près d'un champ magnétique.
•
Cela peut provoquer des brûlures ou une panne
Ne laissez pas tomber le cuiseur et ne le soumettez pas à des chocs.
•
Cela peut entraîner un problème de sécurité
Après avoir fini la cuisson, n'essayez pas d'ouvrir le cuiseur de
force avant que la vapeur ne soit complètement évacuée.
•
La vapeur chaude ou tout autre élément chaud à l'intérieur du
cuiseur peut provoquer des brûlures.
•
Ouvrez le couvercle supérieur avec prudence après la cuisson
afin d'éviter la vapeur et des brûlures présentant un danger.
Ne mettez pas le riz dans une assiette en utilisant une cuillère métallique
ou une cuillère à riz au lieu d'une cuillère à riz en plastique ou en bois.
•
Cela peut endommager la surface de la casserole interne et le revêtement peut s'user.
•
Si le revêtement de la casserole interne s'égratigne ou s'use à cause d'une erreur du client, vous
devrez payer la réparation même pendant la période de service de réparation gratuite.
Ne touchez pas la surface métallique de la cuve de cuisson et le
poids de pression après la cuisson et la phase de chauffage.
•
Cela peut entraîner des brûlures.
•
La vapeur chaude restante peut provoquer des brûlures quand vous
appuyez sur le poids de pression durant et juste après la cuisson.
Ne tenez pas le cuiseur par la poignée de la cuve de cuisson
•
Cela peut entraîner des problèmes ou être dangereux. Des poignées
amovibles sont disposées en bas à droite et sur le côté gauche du cuiseur.
Tenez les poignées à deux mains et déplacez-le avec précaution.
Utilisez seulement une tension alternative de 120 V.
•
Autrement, cela peut provoquer un choc électrique ou un incendie.
•
Cela peut provoquer des dysfonctionnements.
Utilisez le produit sur une surface plane. N'utilisez pas le produit sur un coussin. Veuillez
éviter d'utiliser le produit dans un endroit qui n'est pas stable où il risquerait de tomber
•
Cela peut entraîner un dysfonctionnement ou un incendie.
Veuillez vérifier fréquemment le cordon d'alimentation et la prise.
Ne pas dépasser la quantité indiquée pendant la cuisson.
•
Si vous dépassez la quantité d'aliment indiquée dans la recette, cela peut causer
un débordement en raison du poids de pression et du couvercle léger.
Veuillez utiliser le cuiseur dans le but dans lequel il a été conçu.
•
Cela peut provoquer un dysfonctionnement ou une odeur.
Veuillez débrancher la prise lorsque vous n'utilisez pas le produit
•
Cela peut provoquer des chocs électriques ou un incendie.
DisponibleNon disponible
Éponge en coton, éponge, récureur, récureur à filet, de type extra fin
Laveur bleu, vert (de type abrasif), éponge en acier inoxydable, autre récureur métallique
Attentionse rappeler
Attention
ne pas
Tournez la poignée de verrouillage/déverrouillage à la position
« Haute pression » lorsque l'appareil est débranché.
•
La pression interne dû à la cuisson du riz ou à la casserole interne peut
provoquer des déformations ou des dommages, si la poignée de
verrouillage/déverrouillage n'est pas en position « verrouillée ».
•
Assurez-vous de verrouiller la poignée de verrouillage/déverrouillage
pendant la cuisson et le réchauffement à haute pression.
Essuyez toute l'eau en excès sur le cuiseur après la cuisson.
•
Cela peut entraîner des odeurs ou une décoloration. Essuyez l'eau résultant
de la condensation.
Veuillez contacter un revendeur ou un centre technique lorsqu'un bouton du
produit ou le produit lui-même ne fonctionne pas correctement.
En cas de coupure de courant durant la cuisson, la vapeur du cuiseur à riz est évacuée
automatiquement. La qualité du riz est par conséquent inférieure à la normale.
•
Veuillez démarrer la cuisson avec la quantité d'eau et de riz indiquée.
•
L'eau peut déborder si la quantité d'eau dans la cuve de cuisson dépasse le niveau d'eau recommandé.
•
Veuillez démarrer la cuisson avec le capot de régulation de la vapeur.
complètement mis en place.
Lorsque vous cuisinez des aliments avec des os, comme des côtes levées
braisées, veuillez assaisonner la viande dans une autre assiette.
•
Le revêtement de la casserole interne peut s'user.
•
Si le revêtement de la casserole interne s'égratigne ou s'use à cause d'une erreur du client, vous devrez
payer la réparation même pendant la période de service de réparation gratuite.
Veuillez nettoyer le corps ainsi que les autres parties après la cuisson.
•
Après avoir fait cuire de la soupe au poulet, différents plats etc. il se peut que
l'odeur soit imprégnée.
•
N
ettoyez le compartiment du four, la plaque supérieure de chauffage et la cuve de
cuisson à chaque fois que vous faites cuire avec l'un d'entre eux.
•
Cela peut entraîner une altération ou des odeurs.
•
Utilisez un essuie-tout sec ou une éponge pour nettoyer la cuve de cuisson, car les surfaces
dures rugueuses ou celles en métal sont abrasives pour le revêtement.
•
En fonction des méthodes d'utilisation ou des circonstances propres à
l'utilisateur, le revêtement de la cuve de cuisson peut se détacher.
•
Veuillez contacter le service client dans ces cas de figure. Veuillez ne pas tirer
de force l'évent à vapeur propre.
Faites attention lorsque la vapeur est évacuée
•
Ne soyez pas surpris lorsque la vapeur est évacuée.
•
Veuillez conserver le cuiseur hors de portée des enfants.
N'utilisez si possible la fonction de chauffage que pour la cuisson de
riz blanc. Les autres aliments se décolorent facilement
Lorsque vous retirez la fiche d'alimentation, ne tirez pas sur le cordon
d'alimentation. Veuillez retirer en toute sécurité la fiche d'alimentation
•
Si vous faites prendre un impact au cordon d'alimentation, cela peut
entraîner un choc électrique ou un incendie.
Veuillez rincer le riz et le placer dans une autre assiette et ne frappez pas sur
la casserole interne pour retirer le reste de riz dans l'assiette.
•
Si le revêtement de la casserole interne s'égratigne ou s'use à cause d'une
erreur du client, vous devrez payer la réparation même pendant la période
de service de réparation gratuite.

Accessories
Cooking Guide
Rice Scoop
Rice Measuring Cup
Cleaning Pin
(Attached on the bottom of the unit)
Steam Plate
Manual
ALL STS Inner Pot
(All stainless steel inner pot
can be purchased separately.)
Manua
l
C
O
O
K
ING
GUIDE
nAMe of eAch PArT
12
NAME OF EACH PART
Drain Dish
Empty the drain dish after
cooking or keeping warm.
Leaving water in the drain dish
may cause odors.
DET. Cover Handle
Inner Pot(OVEN)
Place the inner pot into
The body property.
Pressure Packing
Control Plate
Packing
Detachable Lid
Separator
Power Plug
Power Cord
Temperature Sensor
Control Plate
Packing Cover
Pressure
Control Plate
Pot Handle
Detachable
Lid
Lid Assy
※
In case of a blackout during cooking, steam
from a rice cooker will be released automatically.
NAME OF EACH PART
Auto Steam Release Outlet
Silent Steam Valve
Soft Steam Cap
Clamp Knob
Turn handle to “NON PRESSURE’’, and
then press clamp knob to open (Do not press
the lid clamp while cooking).
Control Panel
M
a
in
P
o
w
e
r
S
w
itc
h
W
h
en
th
e p
o
w
er
is n
o
t su
p
p
lied after th
e
p
o
w
er cab
le
Is
co
n
n
ected
, ch
eck if th
e
sw
itc
h
is (O
N
).
-
E
n
a
b
led
:
(O
N
)
-D
is
ab
led
:
(O
FF)
(T
h
e stan
d
b
y p
o
w
er is b
lo
c
ked
, s
aving th
e
en
er
gy)
Lock/Unlock Handle
When the cover handle is rotated to“HIGH
PRESSURE”, “high pressure mode is
selected for cooking. When the cover handle is
rotated to “NON PRESSURE”, non pressure
mode is selected for cooking.
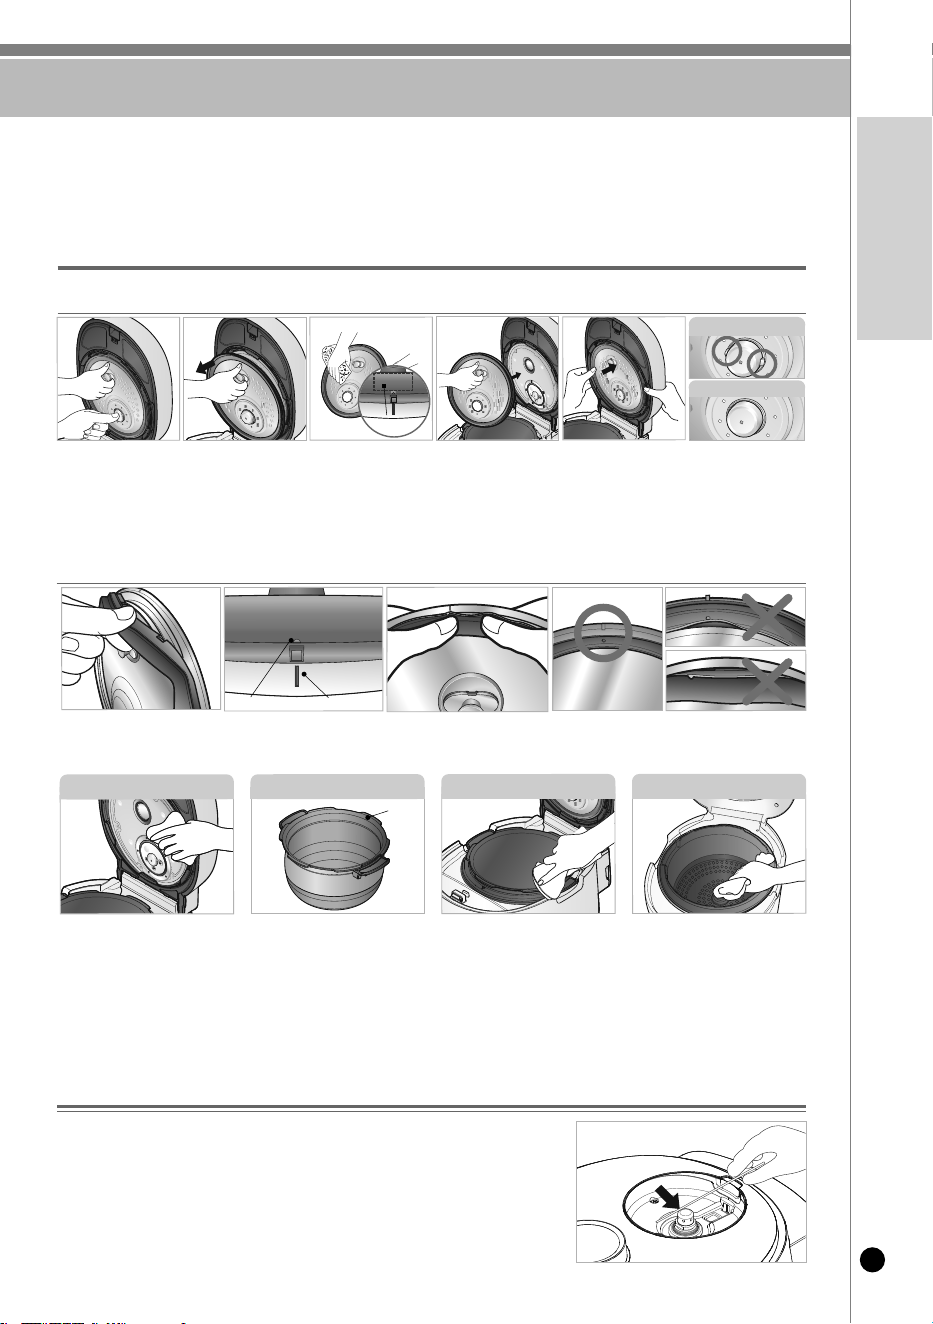
hoW To cLeAn
13
www.cuckooamerica.com
ENGLISH
-Always allow the cooker to completely cool before removing any parts or cleaning.
- Clean the body of rice cooker and the cover with a dry towel. Do not use benzene or thinner to clean the
rice cooker. The layer of starch, which is the residue from rice cooking, may appear on the detachable
cover or inside of rice cooker. This layer does not cause any health risk.
- Do not put materials like screws into holes of detachable cover. Check the back cover and front cover.
How to Release Pressure in Case of Malfunction
Make sure to clean the steam vent
before and after use. Do not try
to
pull out the clean steam went and
safety packing, clean it with care.
Make sure the clean steam went
and safety packing are installed
completely after/before use. If the
steam vent is detached, or not
attached completely, please
contact customer service.
Wipe the water on the outside and
bottom of the Inner Pot. A rough
sponge, a brush or an abrasive
can cause scratches on the
coating. Use a dishwashing liquid
and a soft cloth or a sponge.
Wipe the main unit with a wet
cloth that has been extracted out
of all water.
Make sure to clean the steam
control went before and after use.
Please fit a rubber packing into the cover plate completely after washing or replacing the rubber packing.
③
After fitting 6 projections to the holes,
please press the rubber packing
around the corner completely as
shown in the picture.
②
To put back the rubber packing,
please fit it to each of 6
projections and holes as shown
in the picture.
①To separate the rubber
packing, please pull it out
from the cover plate as
shown in the picture.
④
Please check that the rubber packing fits into the cover
plate completely. If not, steam may be released from
the crack between the packing and the plate.
※
Keeping the contact area of the Inner Pot
with the pressure packing always clean,
increases the product's durability.
- If the pressure is not released after cooking is complete and the Lock/Unlock Handle
cannot be turned, please disconnect the power and release the pressure as follows:
- Use a tool such as chopsticks to pull in the direction of the arrow to release the
pressure. (To avoid burns, please wear rubber gloves when releasing the pressure.)
- If the appliance does not operate after attempting to disconnect and reconnect the
power three times, please contact the Cuckoo Customer Service Center.
※
Caution
Do not clean the inner pot with any sharp cutlery inside (fork,
spoon, chopsticks, etc.).
- The coating of the inner pot may peel off.
Detachable cover & Pressure packing
After cleaning detachable cover, put it back on the lid
Unless detachable cover is mounted, preset cooking cannot be done. (Alarm may sound while keeping warm.)
③ When you mount the Detachable
Cover, hold the handle of the
Detachable Cover, attach it to the
Cover,
and push the bottom end unit
of the Detachable Cover until you
hear a clicking sound.
② Wash the
detachable cover
with a mild dish
detergent.
Afterwards,
remove all excess
moisture.
① Hold handle, press the center button,
and pull in the direction of the arrow.
Ove
n
c
ov
er
poi
n
t
Ru
bber
pa
c
king guide
In
n
e
r
p
o
t
c
o
n
ta
c
t
s
u
r
fa
c
e
.
DET.cover CLOSED
DET.cover OPEN
sa
f
e
t
y
Pac
king
inner
Pot
M
o
i
stu
re
D
i
sh
o
f
th
e
Mai
n
B
o
d
y
inside
of
the
M
a
in
bo
dy
Rubb
er
pack
i
ng
c
ont
act
s
ur
f
ac
e
.
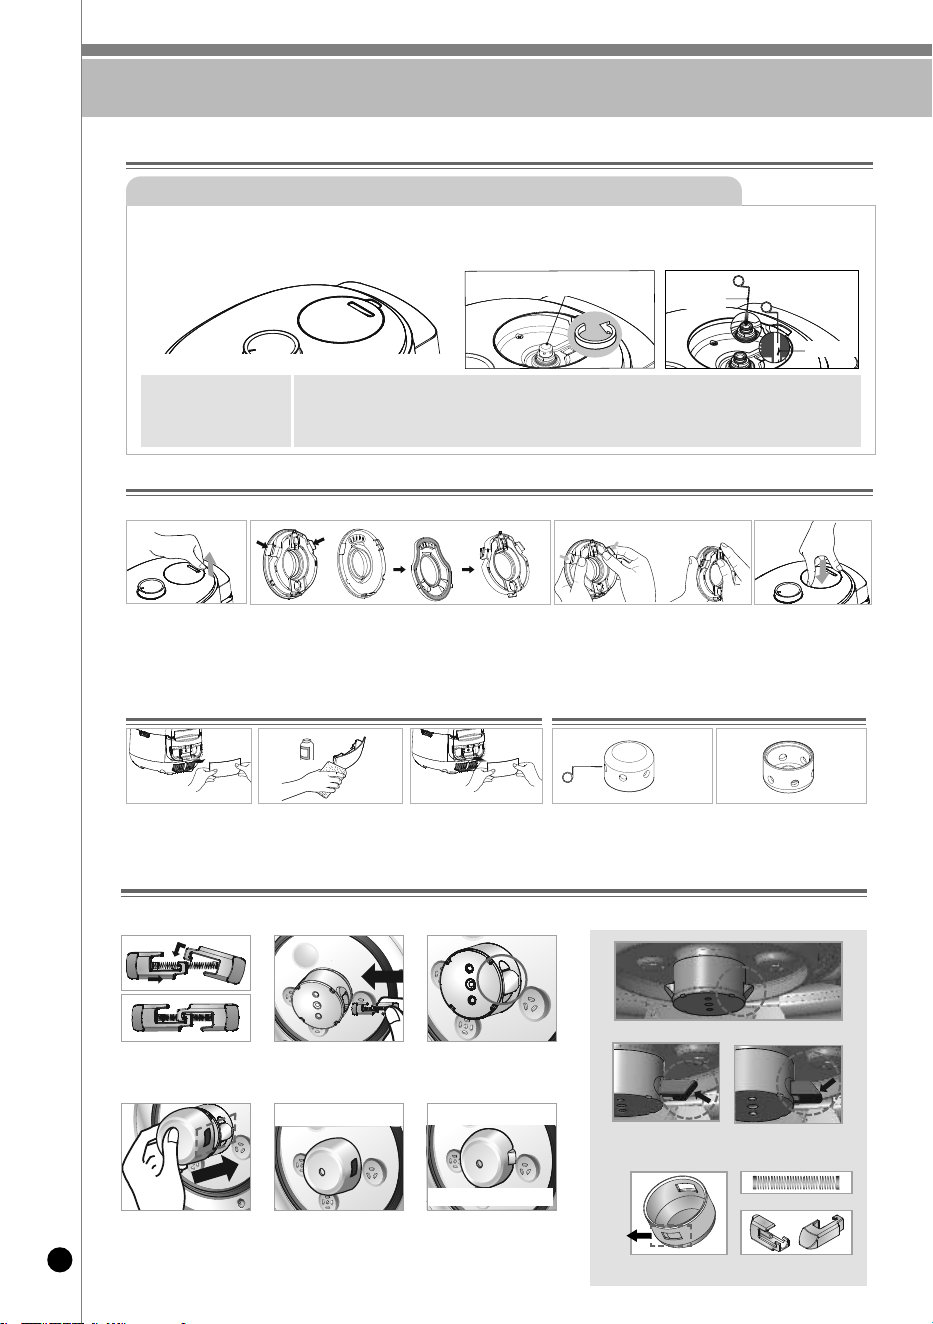
hoW To cLeAn
14
• The valve hole of the pressure weight allows steam to release. Check regularly to ensure that it is not blocked.
If the valve hole of the pressure weight is blocked, the hot steam and hot content within the cooker can cause serious
injury.
※Do not use the cleaning pin for any other use except to clean the valve hole of the pressure weight.
if the valve of the pressure part is clogged, puncture it with the cleaning pin
how to
disassemble the
pressure weight
▶ When the handle is in the ‘Lock’ position, turn the pressure weight counter-clockwise while pulling
it up, and pull it out.
▶ Puncture the clogged valve hole with the cleaning pin and reassemble it by turning it clockwise.
▶ When the pressure weight is properly assembled, it can freely be turned.
How to Clean the Pressure Weight Nozzle
2중 모션밸브 캡
❶Separate dew dish❷ Clean the dew dish with A
neutral detergent.
❸ Securely put in the dew dish
after cleaning.
How to clean dew dish
❶
If the hole in the silent steam valve cap
is blocked by foreign matter, use the
cleaning pin (attached to the bottom
of the main unit) to clear the hole, then
wash the surface with a neutral
kitchen detergent and a sponge.
❷
If the Silent Steam Valve Cap
becomes discolored, boil it in water
with added citric acid until the
discoloration disappears.
How to maintain the Silent Steam Valve Cap
How to clean the soft steam cap
Do not touch the surface of the soft steam cap right after cooking. You can get burned.
❶Detach the soft steam cap
like the picture.
❷ Press the hooks in the front in direction of arrow to detach the bottom
case. Clean the parts frequently with sponge or a neutral detergent.
※ Before reassembling the packing with the bottom case, please make sure
to put the packing into the packing groove.
※ In order to separate the steam cap into parts, please pull bottom part
downward by pressing the extrusion parts on both sides.
❸ Before reattaching the parts, fit the bottom case
into the groove of steam cap perfectly. Press the
hooks in direction of arrow to assemble the parts
together.
❹ After attaching the soft steam
cap on the lid as shown in
above picture, press the cap
firmly to assemble the cap
into the product.
Cover
Cover
groove
normal
※ Pay attention to the up and down direction of the stopper
Abnormal
Spring
Stopper (2EA)
❶ Assemble the parts of the
one-touch button as shown in the
picture above.
❷ Push the one-touch button assembled in picture 1 into the square
groove of the lid and secure it.
※ Be sure to pay attention to the direction of the stopper on the
one-touch button when assembling
❸ Align the groove and stopper of the
one-touch button cover in the correct
direction and push until you hear a
"click" sound.
❹ Please check if the one-touch button is properly assembled as shown
in the picture above.
❺ Press the one-touch button to verify that it operates correctly.
<One-touch components>
How to Assemble the One-Touch Button
- If the one-touch cover has been disassembled, please reassemble it as shown below.
- If any parts are lost or damaged, please reach out to the customer service center.
In Case of Improper Assembly of
the One-Touch Button
One-touch button assembled properly
The stopper should protrude.
SILENT STEAM VAVLE CAP
Cleaning Pin
Alien Substance
neutral detergent
hoW To cAre for The ProDUcT / hoW To Use The Lock/UnLock hAnDLe
15
www.cuckooamerica.com
ENGLISH
If residue is stuck to the inner pot, please refer to the cleaning instructions below and use them as described for easier cleaning.
If rice or food sticks to the all-stainless inner pot
After cooking is finished, use a rice paddle or similar utensil to scrape off any residue stuck to the inner pot.
Pour water into the inner pot up to the white rice water level 2, close the lid, and turn the lid locking handle to the
“No Pressure" position.
Use the arrow buttons to select the "Porridge" menu, then press the confirm button.
Use the arrow buttons to set the time to 25 minutes, then press the start button.
1
2
3
4
To remove impurities and stains and ensure long-lasting use, follow the instructions below for optimal cleanliness.
When using the product for the first time, fine particles (abrasives) may come off the inner pot surface.
Before use, thoroughly clean the inner pot using the method below until no abrasive residue or dust remains.
※ Notes on stainless steel care
- Slight discoloration or rainbow-like stains may appear on the stainless inner pot due to minerals in the food during cooking.
This is a normal occurrence and not a product defect. (Rainbow-colored stains that appear on the STAINLESS inner pot during cooking
are a natural phenomenon. They are completely harmless to the human body, so you can use the product with confidence.)
- Leaving salt water or acidic solutions in the stainless inner pot for extended periods may cause discoloration.
- Do not clean or wipe stainless steel parts with bleach or chlorine-based detergents.
- For water scale or rainbow-colored stains, using a sufficient amount of vinegar or lemon juice can help remove them.
ALL STAINLESS Inner Pot Cleaning and Care Instructions
(Be sure to clean before first use after purchase.)
While in standby mode, press the Mode button to select Auto-Clean, then press the Start button.
※ Press and hold the Mode button for at least 0.3 seconds to enter the mode.
※ Each time you press the Mode button, the selection moves one step forward.
※ For instructions on using the Auto-Clean function, refer to page 20.
After the automatic cleaning is finished, rinse with lukewarm water using a neutral detergent.
※ Be cautious of burns, as the inner pot may be hot after auto-cleaning.
Wipe away all moisture with a dry towel and let the inner pot dry completely.
※ If any polishing agent or residue remains, please repeat steps 1 to 4 until clean.
Add 10g of citric acid or baking soda (adjust the amount depending on the level of stains) and fill the inner pot with water
up to the auto-cleaning mark line. Close the lid and set the lid handle to “High Pressure” or “No Pressure.”
※ You may substitute vinegar (1/3 paper cup) for citric acid or baking soda.
1
2
3
4
※ If rice or food is stuck to the inner pot, soak it in warm water for more than 30 minutes before cleaning, or use the "Porridge" function to make cleaning easier.
※ Using the automatic cleaning menus to soak the inner pot may cause residual steam to block the steam outlets due to heating of the inner pot. Therefore, when soaking the
inner pot, be sure to use only the “Porridge” menu.
※ When the Scorched Rice/Porridge menu finishes, the inner pot will be hot, please be careful for your safety.
Usable
Cot
t
on s
c
r
ubber
,
s
ponge
s
cr
ubber
,
m
i
c
r
of
i
ber
,
m
es
h
s
cr
ubber
※
Us
i
n
g
no
n-r
e
c
o
mm
e
nded s
c
r
u
bb
e
r
s
may
da
mag
e
t
h
e
i
n
ne
r
po
t
o
r
er
a
s
e
wat
e
r
l
e
v
e
l
m
a
r
k
i
n
g
s
.
Not
usable
Blu
e
o
r
gr
e
e
n
ab
r
a
s
i
v
e
s
c
r
u
b
b
e
r
s
,
s
t
e
e
l
or
s
t
a
i
n
l
e
s
s
s
t
e
e
l
s
c
r
u
b
b
e
r
s
,
an
d
ot
h
e
r
me
t
a
l
-
b
a
s
e
d
s
c
r
u
b
b
e
r
s
R
ec
o
m
m
ended
s
cr
ubbers f
or
cl
eani
ng
t
he
i
nner
pot
(
i
nsi
de
and
outs
i
de)
How to use the handle
1. Make sure to close the lid and turn the Lock/Unlock handle to “NON PRESSURE” or “HIGH PRESSURE” while cooking.
• You can select cooking with high pressure when you turn the handle to “HIGH PRESSURE”. This is the function of safety device which
indicates that the cooker is properly locked, and cooking with high pressure is available.
• If you turn the handle to “NON PRESSURE” you can choose to cook without pressure or select cooking.
Then “NON PRESSURE” signal is displayed on the Display.
• If “HIGH PRESSURE” or “NON PRESSURE” does not appear on the Display,
Preset/Auto Clean button does not work.
2. When cooking with high pressure is done, turn the Lock/Unlock handle from
“HIGH PRESSURE” to “NON PRESSURE,” and then open up the lid with “Unlock” button.
• If steam is not completely exhausted after cooking, the handle might not be easily turned from
“HIGH PRESSURE” to “NON PRESSURE.”In such a case, allow remaining steam to escape by tilting the Pressure weight.
3. Make sure that the Lock/Unlock handle is completely turned to “NON PRESSURE” when opening and closing the lid.
high pressurenon pressure
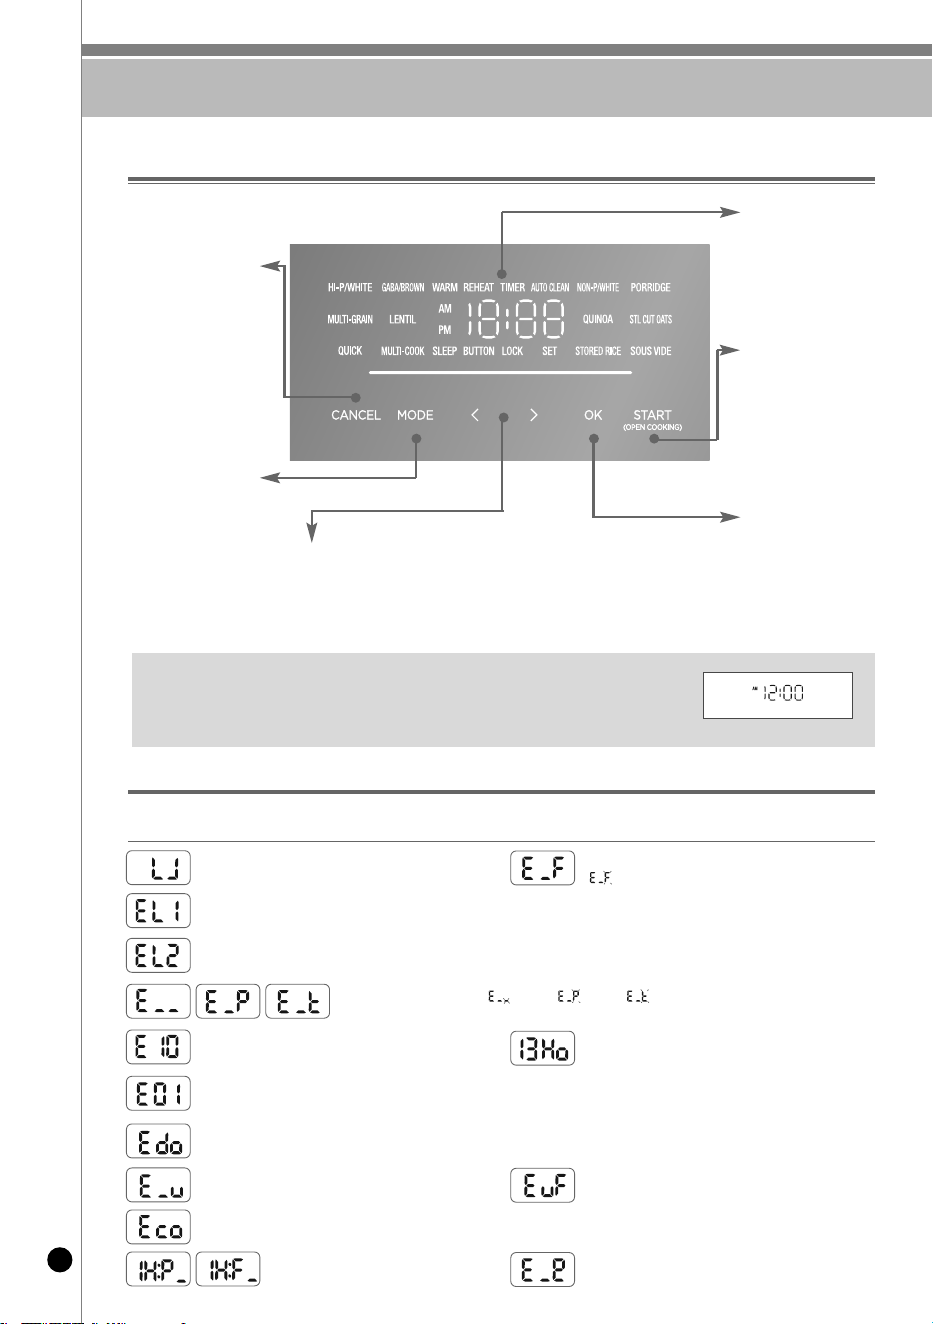
fUncTion / error coDe AnD PossiBLe cAUse
16
FUNCTION
<
sta
n
d-by
mode
>
CANCEL Button
This function is used to
cancel a selection or
release remaining steam in
the inner pot.
(Press the button for 0.3
seconds to cancel during
cooking, or press and hold
for 1.5 seconds if the inner
pot is hot.)
MODE Button
This function is used to
customize individual
cooking preference, time-
setting, voice volume
setting keep warm
temperature setting, and
power saving mode
ARROW Buttons
> : Right arrow button
< : Left arrow button
This function is used to select Menu or change the time.
Used when changing the function selected by the setting button.
Display
ST
A
R
T
(
O
P
EN
C
O
O
K
IN
G)
B
u
tto
n
-
Used
t
o
st
art
co
o
kin
g
.
-
Op
en
co
o
kin
g
fu
n
ct
i
o
n
.
OK Button
This function is used to
select a function.
(If the button is pressed for
more than 2 seconds, it
enters SETTING MODE.)
If the product malfunctions or is used incorrectly, refer to the following indicators.
If the error continues to appear under normal usage or after following the recommended steps, please contact customer service for assistance.
Error Code and Possible Cause
※ When you see an image like one in the right side on your display, it means the rice cooker is in ‘stand-by’ mode.
※ Press ‘Cancel’ button to enter the 'stand-by' mode.
※ Press the button until you hear the buzzer sound. The image of the plate may differ.
※ To start cooking, make sure to select a menu using the arrow buttons before pressing the START button.
(Cooking will not begin if you press the START button immediately while in standby mode.)
When the inner pot is not placed into the unit.
Displayed when ARROW buttons are pressed without the Lock/Unlock handle securely set to “High Pressure” or
“Non Pressure.” Firmly adjust the handle to the correct position.
This error code is shown when power is disconnected
for 10 minutes while cooking.
Press “Cancel” button to reset to Stand-by mode.
Displayed when preset time exceeds 13 hours. Set
the preset time within 13 hours.
Displayed if ‘START’ is pressed again or cooking is complete without ever turning the handle to “NON PRESSURE.” Turn
the handle to “NON PRESSURE,” then back to “HIGH PRESSURE” to resolve.
Micom power error.
Environment sensor error.
Micom memory error.
Error occurs if ‘PRESSURE COOK’ or ‘KEEP WARM/REHEAT’ is pressed without the detachable lid attached. Attach
the lid to resolve. Warming or reheating will not function until resolved.
This error indicates a power system check for
issues.
Fan monitor error.
(“ ” mark blink.)
This error code is displayed when the smart locking system has failed.
Displayed when the smart locking system fails. Do not open the lid until cooking is fully complete.
If the error occurs during the warming or standby mode, turn off the power before opening the lid.
For further assistance, please contact the service center.
Temperature sensor error. (“ ” mark, “ ” mark, “ ” mark blink.)
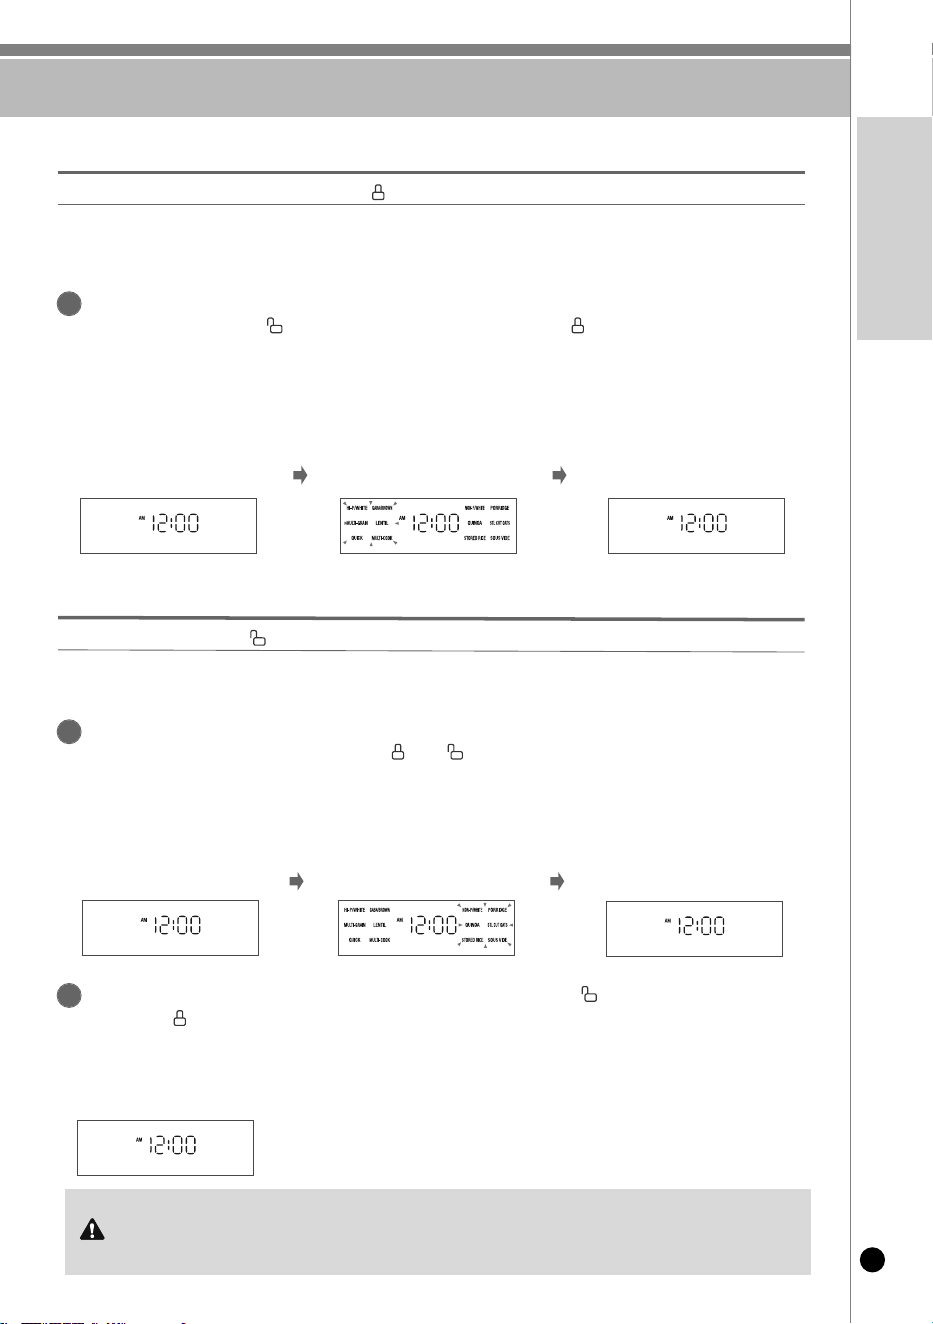
hoW To seLecT high PressUre MoDe or non PressUre MoDe
17
www.cuckooamerica.com
ENGLISH
If you want to change the pressure mode from non pressure mode to high pressure mode, turn
the cover handle from “NON PRESSURE” to “HIGH PRESSURE”.
▶ When the pressure mode is turned from non pressure mode to high pressure mode, only the high pressure
menu options will flash for three seconds.
▶ The LED on the cover handle lights up orange.
▶ To start cooking, you must first select a menu using the arrow buttons, then press the START button.
(Cooking will not begin if you press the START button immediately while in standby mode.)
▶ The LED on the cover handle lights up orange.
▶In high pressure mode, you can select only the high pressure menu options.
▶HIGH PRESSURE MENU: HIGH-PRESSURE WHITE RICE, HIGH-PRESSURE QUICK WHITE RICE, STICKY MULTI GRAIN RICE, QUICK STICKY
MULTI GRAIN RICE, STICKY GABA/BROWN RICE, LENTILS, MULTI COOK
1
Turn the cover handle to “HIGH PRESSURE”.
High Pressure Mode
<Screen on standby
(NON PRESSURE MODE)>
After high
pressure
menus flash
for 3 seconds
After non
pressure
menus flash
for 3 seconds
When
changing
into the non
pressure
mode
When
changing
into the high
pressure
mode
<Screen on standby
(HIGH PRESSURE MODE)>
If you want to change the pressure mode from high pressure mode to non pressure mode, turn
the cover handle from “HIGH PRESSURE” to “NON PRESSURE.”
▶
When the pressure mode is turned from high pressure mode to non pressure mode, only the non pressure menu options will flash for three seconds
▶
The LED on the cover handle lights up white.
▶ To start cooking, you must first select a menu using the arrow buttons, then press the START button.
(Cooking will not begin if you press the START button immediately while in standby mode.)
▶ The LED on the cover handle lights up white.
▶In high pressure mode, you can select only the non pressure menu options.
▶NON PRESSURE MENU: NON-PRESSURE WHITE RICE, QUINOA, FROZEN STORED RICE, PORRIDGE, STEEL CUT OATS, SOUS VIDE
1
Turn
t
h
e co
v
e
r h
an
d
l
e t
o
“NON P
RES
S
URE”.
NON P
r
e
ssure
M
od
e
<Screen on standby
(HIGH PRESSURE MODE)>
<Screen on standby
(NON PRESSURE MODE)>
If the Lock/Unlock Handle is left in the neutral position, not set to “NON PRESSURE” or “HIGH
PRESSURE
”
, you cannot select a menu or start cooking.
▶ A voice prompt will say, “Turn the Lock/Unlock Handle to the desired pressure position” when the arrow or start button is pressed.
▶ Turn the Lock/Unlock Handle fully to select either High Pressure or Non-Pressure mode.
2
<With the cover handle in the
neutral position>
When cooking in non pressure mode, please cook the designated capacity of food.
When cooking, please do not exceed the designated capacity of food.
-
If you exceed the capacity designated in the cooking guide, the Pressure Weight and Cleaning Soft Steam Cap lead to the overflow of food.
- Please follow the designated cooking guide.
Precautions
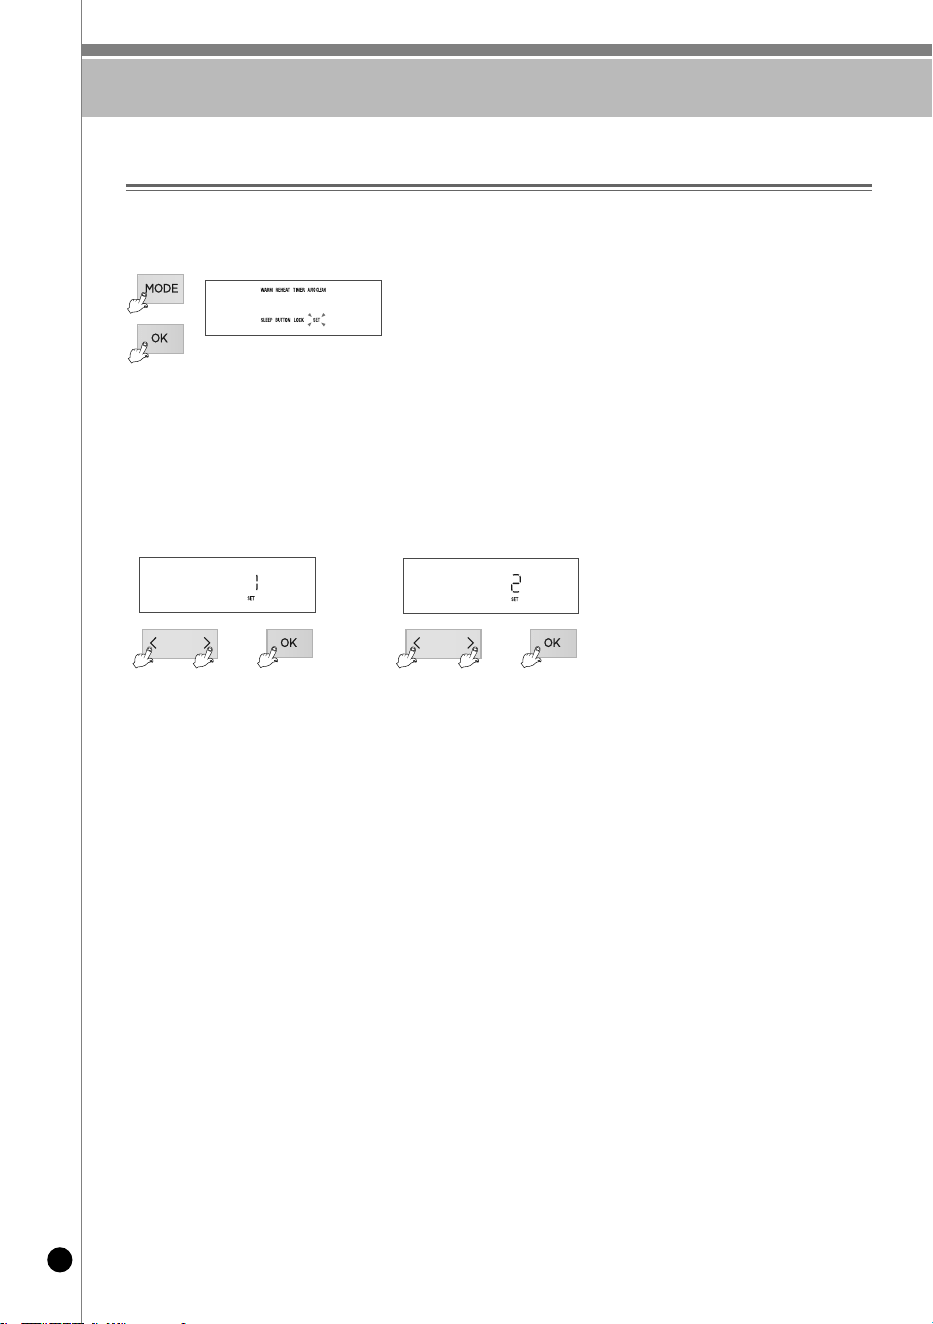
voice seTTing
18
2. Use the ‘Arrow’ buttons to select the voice language (English or Korean), then press the [OK] button to confirm.
3. Pressing [CANCEL] or leaving it idle for 7 seconds will cancel the setting and return to standby mode.
1. To enter voice settings mode in standby:
- Press the [MODE] button 8 times until “SET” appears, then press the [START] button.
- Alternatively, press and hold the [OK] button for more than 2 seconds in standby mode.
Notes:
▶ When pressing the [MODE] button for the first time, hold it for at least 0.3 seconds.
▶ Each press of the [MODE] button advances the selection by one step.
Voice setting function
You may select your preferred voice among,‘Korean and English’. The default is English.
▶How to set up voice
▶How to enter settings mode
<When set to Korean Voice><When set to English Voice>
➡➡
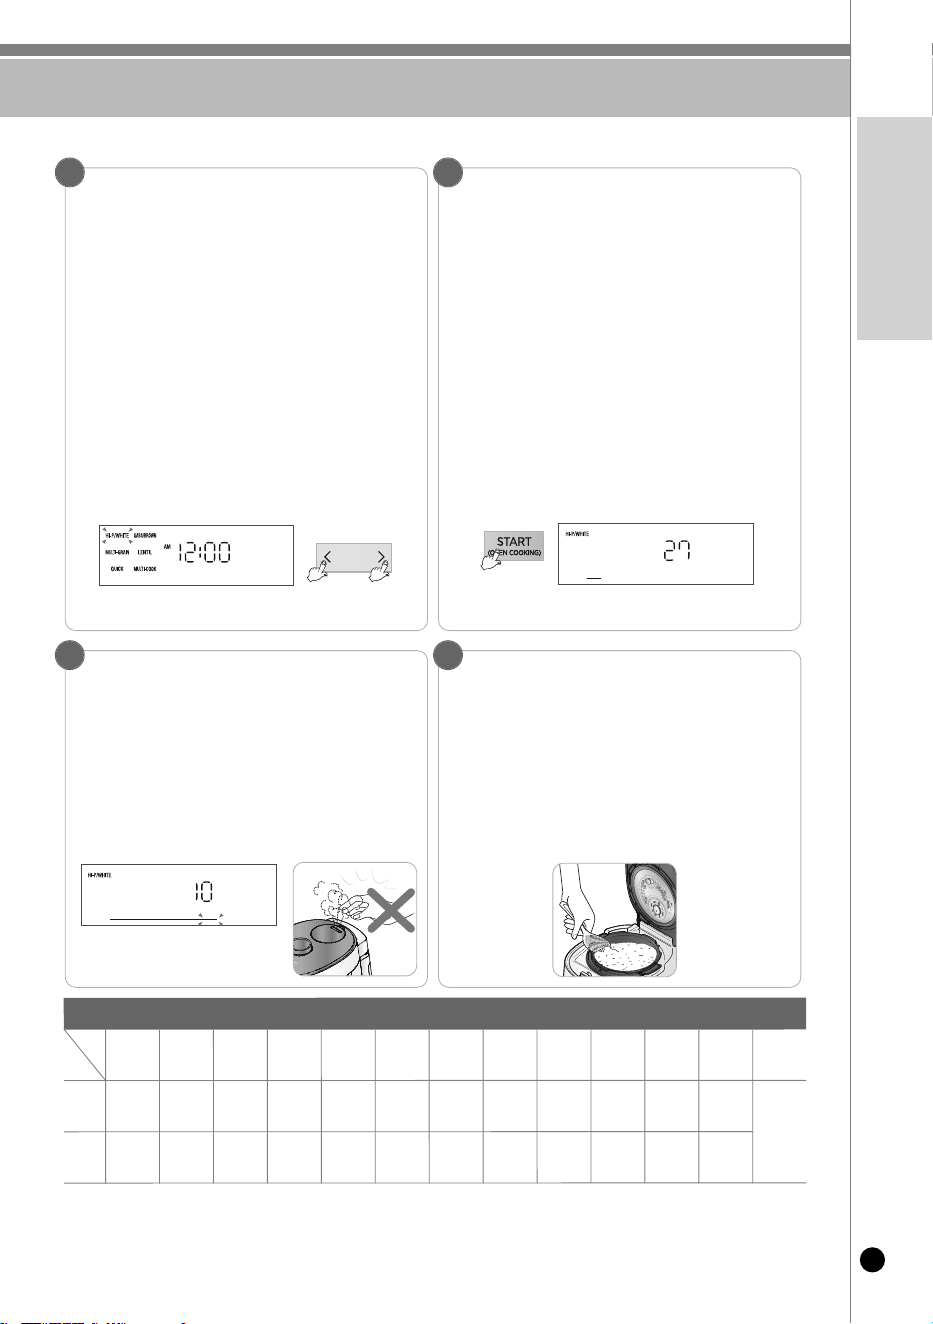
hoW To cook
19
www.cuckooamerica.com
ENGLISH
Select the desired pressure mode with the lid engagement knob.
Press the [START] button to start cooking.
Selecting Pressure Mode
Use the lid engagement knob to select the desired pressure mode.
• Ensure the removable cover is properly installed.
• If the correct pressure mode is not selected, you cannot select a menu.
• In High Pressure Mode, only high pressure menus can be selected.
• In Non-Pressure Mode, only non-pressure menus can be selected.
< high PressUre MoDe >
Each press of the right arrow button cycles through the following menus:
• High-Pressure White Rice → High-Pressure Quick White Rice → Sticky Multi-Grain
Rice → Quick Sticky Multi-Grain Rice → Sticky Brown Rice → Lentils→ Multi Cook
< non-PressUre MoDe >
Each press of the right arrow button cycles through the following menus:
• Non-Pressure White Rice → Quinoa → Frozen Stored Rice → Porridge →
Steel-Cut Oats → SOUS VIDE
Menu Memory:
For High-Pressure White Rice, Sticky Multi-Grain Rice, Sticky Brown Rice, and Non-
Pressure White Rice, the menu will be memorized after cooking. No need to select the
menu again for continuous use.
Before cooking:
• For high-pressure menus, turn the lid Lock/Unlock Handle to
“HIGH PRESSURE” and press the [START] button.
For non-pressure menus, turn the lid Lock/Unlock Handle to
“NON PRESSURE” and press the [START] button.
• The estimated cook time will be displayed for the first minute
after starting.
• Actual cooking time may vary depending on factors such as
cooking capacity, water temperature, and cooking conditions.
• Starting one minute after cooking begins, the remaining cook
time will be displayed for 10-second intervals.
(Except for GABA process, MULTI-COOK, STEEL CUT OATS, and
PORRIDGE, SOUS VIDE.)
12
End of Cooking:
•
When cooking is complete, the warming mode will start,
accompanied by the voice message: "Cuckoo has finished
cooking your delicious high-pressure white rice."
•
To stop warming, press the [CANCEL] button for more than 0.3
seconds.
Stir the rice immediately after cooking. If left unstirred, rice
may spoil and develop a bad smell.
•
Do not press the [CANCEL] button during cooking.
4
Steaming
•
T
he
re
m
a
in
ing
cook
tim
e
is
dis
pla
y
e
d
once
coo
k
ing
is
in
pro
g
re
s
s
.
•
Cook
tim
e
va
rie
s
de
pe
nding
on
the
s
e
le
ct
e
d
m
e
nu.
•
B
e
ca
utio
us
of
the
Aut
o
S
t
e
a
m
Re
le
a
s
e
Out
l
e
t
t
o
a
void
burns
.
3
※After cooking, odors may linger in the unit. Clean the rubber packing and lid as instructed on pages 13-14 before using the
unit again.
※Cooking times may vary depending on the product's environment and usage conditions.
ex) In case of 10 minutes left.
Cook
i
ng t
i
m
e
by
Me
nu
M
e
n
u
D
iv
is
io
n
H
I
G
H
-P
R
E
S
S
U
R
E
W
H
IT
E
R
IC
E
H
IG
H
-P
R
E
S
S
U
R
E
Q
u
i
ck
W
H
I
T
E
R
I
C
E
S
T
IC
K
Y
M
U
LT
I-G
R
A
I
N
R
IC
E
Q
u
ic
k
S
T
IC
K
Y
M
U
LT
I-G
R
A
IN
R
IC
E
S
T
IC
K
Y
B
R
O
W
N
R
IC
E
L
E
N
T
IL
S
N
O
N
-
P
R
E
S
S
U
R
E
W
H
IT
E
R
IC
E
Q
u
in
o
a
F
R
O
Z
E
N
S
T
O
R
E
D
R
I
C
E
T
H
IC
K
P
O
R
R
I
D
G
E
T
H
IN
P
O
R
R
ID
G
E
S
T
E
E
L
C
U
T
O
A
T
S
M
U
LT
I
C
O
O
K
S
O
U
S
V
ID
E
C
A
P
A
C
IT
Y
1
-
6
P
E
R
S
O
N
S
1
-4
P
E
R
S
O
N
S
1
-4
P
E
R
S
O
N
S
1
-4
P
E
R
S
O
N
S
1
-4
P
E
R
S
O
N
S
1
-
4
P
E
R
S
O
N
S
1
-4
P
E
R
S
O
N
S
1
-4
P
E
R
S
O
N
S
1
-4
P
E
R
S
O
N
S
1
-
1
.5
C
U
P
S
0
.5
-1
C
U
P
S
1
-2
C
U
P
S
R
e
fe
r
to
t
h
e
d
e
ta
ile
d
g
u
id
e
fo
r
c
o
o
k
in
g
in
s
tr
u
c
t
io
n
s
fo
r e
a
c
h
m
e
n
u
.
C
O
O
K
IN
G
T
IM
E
A
p
p
ro
x
.
2
2
~
3
1
min
A
p
p
r
o
x
.
1
2
~
1
8
min
A
p
p
ro
x
.
3
9
~
4
6
m
in
A
p
p
ro
x
.
2
7
~
3
3
min
A
p
p
ro
x
.
4
7
~
5
2
min
A
p
p
r
o
x
.
4
2
~
5
3
m
i
n
A
p
p
ro
x
.
3
4
~
3
9
m
in
A
p
p
ro
x
.
3
2
~
4
2
min
A
p
p
ro
x
.
2
7
~
3
1
min
A
p
p
r
o
x
.
3
5
~
4
5
m
i
n
A
p
p
ro
x
.
4
0
~
5
0
m
in
A
p
p
r
o
x
.
4
5
~
6
5
m
in
ex) When selecting High-Pressure White Rice
ex) When cooking High-Pressure white rice in high pressure mode
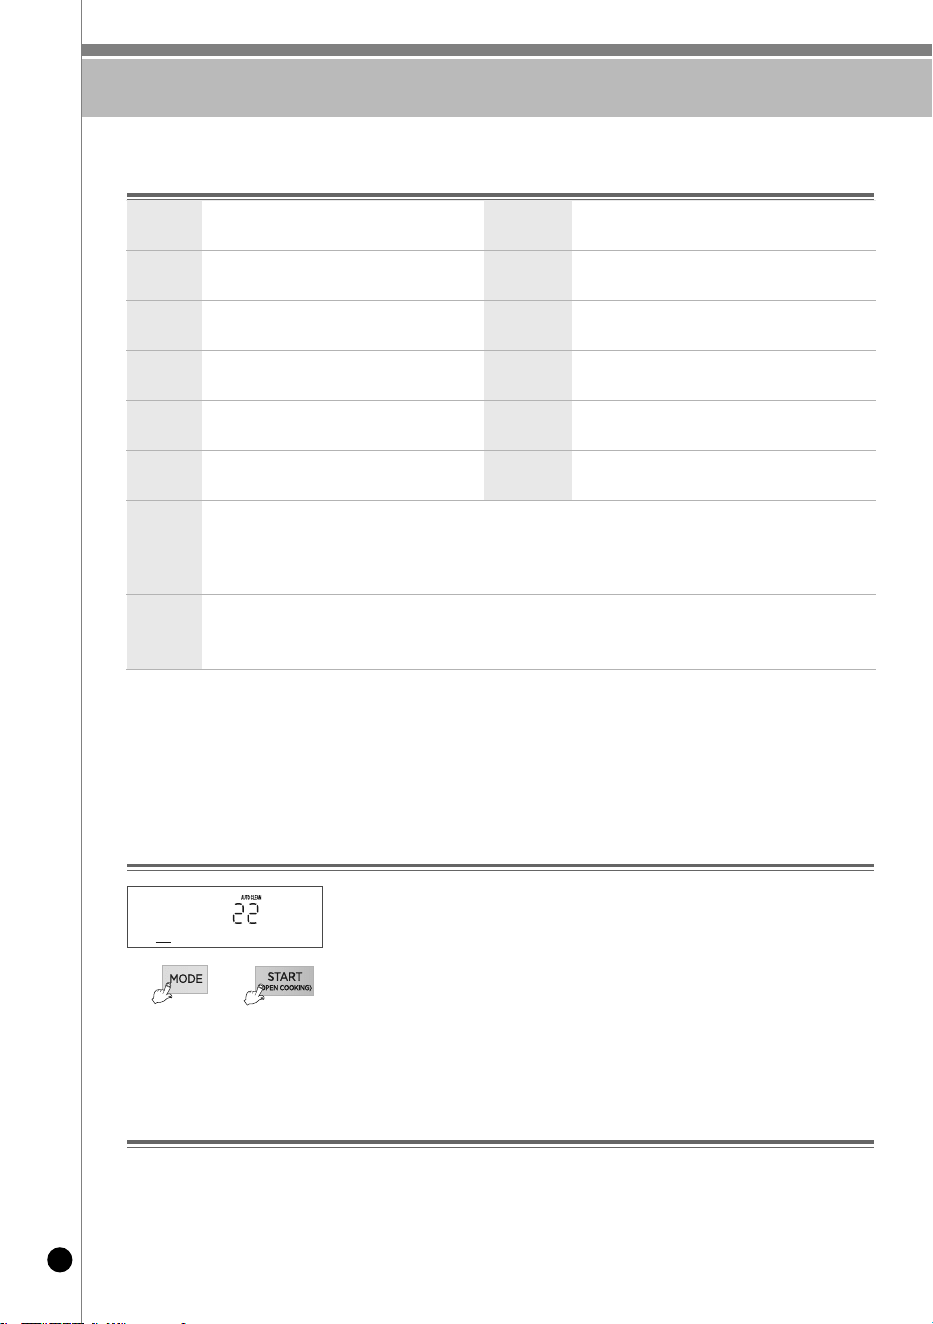
hoW To cook / hoW To AUTo cLeAn
20
How to use the cooking menu
HI-PRESSURE
WHITE RICE
Use this function to cook high pressure white rice.
STICKY MULTI
GRAIN RICE
Used to cook a variation of mixed or brown rice.
STICKY
BROWN
RICE(0H)
Used to cook variation of brown rice.
STICKY BROWN
RICE(3H)
Used to cook germinated brown rice.
NON PRESS
WHITE RICE
Used for soft non-pressure white rice with a fluffy
texture.
QUINOA
Select this menu to cook quinoa and other grains.
FROZEN
STORED RICE
This menu is used to prepare rice for freezing.
STEEL-CUT
OATS
Select this menu to cook steel-cut oats.
PORRIDGE
For cooking porridge.
MULTI COOK
Allows you to set the temperature the heating power
and cooking time manually for your dish.
LENTIL
Used to cook LENTILS.
SOUS VIDE
For cooking SOUS VIDE.
HI-PRESSURE
QUICK
WHITE RICE
- Selecting "HI-P/WHITE QUICK" reduces the total cooking time. (For 1 serving of white rice, it takes about 13 minutes.)
- Use the "HI-P/WHITE QUICK" function only for cooking rice for up to 4 servings.
- "HI-P/WHITE QUICK" may affect the quality of the rice, so it’s best used for less than 4 cups.
- For better taste, soak the rice in water for about 20 minutes before using the quick cooking option.
QUICK
STICKY MULTI
GRAIN RICE
- Selecting "MULTI-GRAIN QUICK" reduces the total cooking time. (It takes about 25 minutes to cook multi-grain rice for 1
serving.)
- "MULTI-GRAIN QUICK" may affect the quality of the rice, so it’s best used for cooking less than 4 cups.
- After cooking in High Pressure QUICK White Rice, QUICK Sticky Multi-Grain Rice, or when cooking small portions, discard any
remaining water.
- For best results, follow the detailed cooking instructions for each menu.
- Do not cook thick or sticky foods, such as jujube porridge, using the “PORRIDGE” menu. It may block the steam outlet and
cause safety issues.
- Only use ingredients recommended in the user manual’s cooking guide.
• Fill the inner pot with water up to the “AUTO CLEAN” water scale line.
• Close the lid and turn the handle to either HIGH PRESSURE or NON PRESSURE mode.
steps :
1. While in standby mode, press the MODE button until "AUTO CLEAN" is displayed.
2. Press the START button to begin the cleaning process.
※ Press and hold the MODE button for at least 0.3 seconds the first time.
※ Each press of the MODE button moves through the menu one step at a time.
※ Regular use of the Auto Clean function helps keep the steam valve clean.
※ After cleaning, be sure to wipe away any remaining moisture from the Silent Steam
Shield.
You may notice a light brown or golden color at the bottom of the cooked rice. This is normal and results from the cooker enhancing
the rice's flavor and aroma. This natural browning, known as melanoizing, is more noticeable during preset cooking than during
immediate cooking.
※ Mixing other types of rice with white rice may intensify the browning effect.
※ This is not a malfunction.
Searing Effect
How to Use the Auto Clean Function (Steam Cleaning)
➡
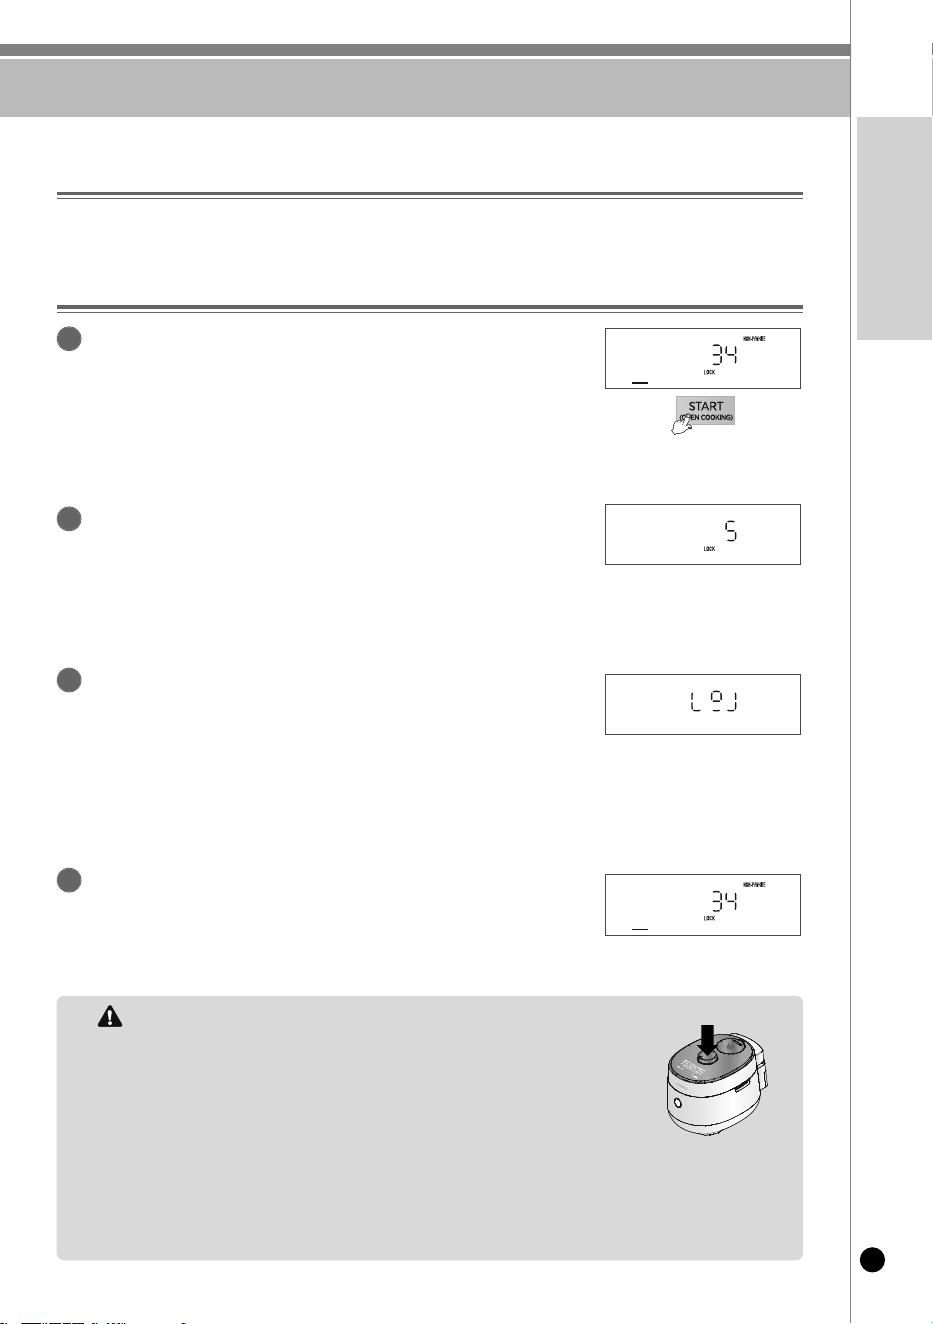
hoW To oPen cook
21
www.cuckooamerica.com
ENGLISH
Open Cooking is a function that allows the user to temporarily release the smart locking device during a
non-pressure cooking process. This enables the user to safely open the lid to add ingredients or stir the
contents inside the pot.
What is Open Cooking?
How to Use the Open Cooking Function
During a non-pressure menu cooking process, press the
START/OPEN COOKING button.
1
Wait for the smart locking device to release.
▶ This may take between 5 to 60 seconds.
2
Once the display indicates that it is safe to open the lid,
proceed to do so.
▶ You will hear an audible instruction: “Please open the lid.”
▶ Do not press the Open Lid button while the smart locking device’s remaining
time is still displayed or if cooking is in progress.
▶ Only press the Open Lid button when the Add Ingredients indicator is
illuminated.
3
After opening the lid, be sure to close it within 3 minutes.
▶ If the lid remains open for more than 3 minutes, the cooking process will be
automatically canceled.
4
cAUTion
Cautions for Open Cooking
- Do not exceed the designated capacity.
- If the designated capacity is exceeded, the appliance may overflow due to boiling.
- The inner pot will not be heated while the lid is open.
Burn Hazard: Do not remove the detachable cover while the appliance is in use.
- Only close the lid when the inner pot and detachable cover are properly assembled.
- Pressing the lid clamp knob while the smart locking device is activated may cause damage to the
appliance. Only press the Open Lid button when the Add Ingredients Indicator is active.
- Contact Cuckoo Customer Service if the appliance does not operate properly.
- If the lid does not open after open cooking or non-pressure cooking is completed:
Unlock the smart locking device using the cover as shown on the right, then push the clamp knob to open.
- If error code “EL1” appears, please contact Customer Service for assistance.
- If error code “EL2” appears, do not open the lid until cooking is fully completed.
If the error occurs during warming or standby mode, turn off the power and then open the lid.
Please contact the service center for further support.
< Cooking process indication >
< Add ingredient indication >
< Remaining time under
released locking device >
< Button Indication >
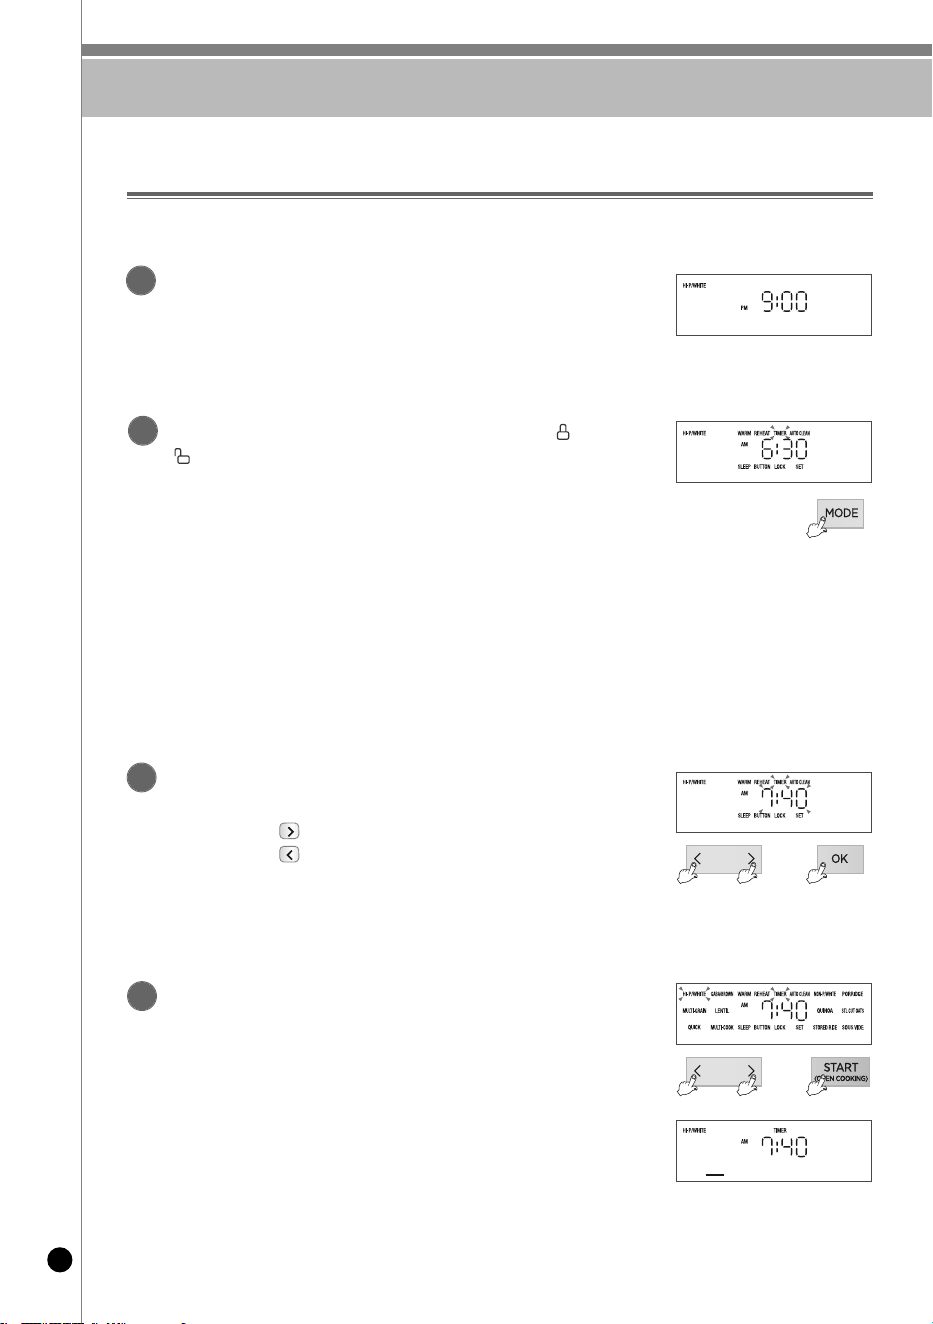
hoW To PreseT TiMer for cooking / reheATing fUcTion
22
1
3
How to Use the Timer for Cooking
For example, if it’s nine o’clock in the evening and you want to have warm breakfast at 7:40 the
next morning:
2
4
Ensure the current time is correct.
▶ If the current time is not set correctly, the preset cooking time will also be
inaccurate.
▶ Be sure to set the correct AM or PM time.
Turn the Lock/Unlock Handle toward “HIGH PRESSURE” or
“NON PRESSURE”, then press the MODE button to select
“TIMER.”
▶ Press and hold the MODE button for at least 0.3 seconds the first time.
▶ Each press of the MODE button will move the menu one step forward.
▶In High Pressure mode, the preset timer function cannot be used with the
following menus:
- GABA RICE (3H)
- HI-PRESSURE QUICK WHITE RICE
- QUICK STICKY MULTI GRAIN RICE
- SOUS VIDE
※ To preset a timer while in Warm mode, press the Cancel button to exit Keep
Warm mode, then configure the preset timer.
Set the Preset Time Using the Arrow Buttons and Press the
OK Button.
▶ Each press of the button increases the preset time by 10 minutes.
▶ Each press of the button also increases the preset time by 10 minutes.
▶ If you hold down the button, the time will continue to increase (repeated
adjustment is allowed).
※ Be careful not to accidentally switch between AM and PM.
Select a Menu Using the Arrow Buttons and Press the START
Button.
▶ Cooking will begin and complete as scheduled.
(Note: Completion time may vary depending on appliance conditions or rice
quantity.)
▶ Once the preset cook is completed, the time setting is saved in memory.
There’s no need to reconfigure the timer for the same setting.
▶ If a small quantity of rice is cooked, it may finish earlier than the preset time.
➡
➡
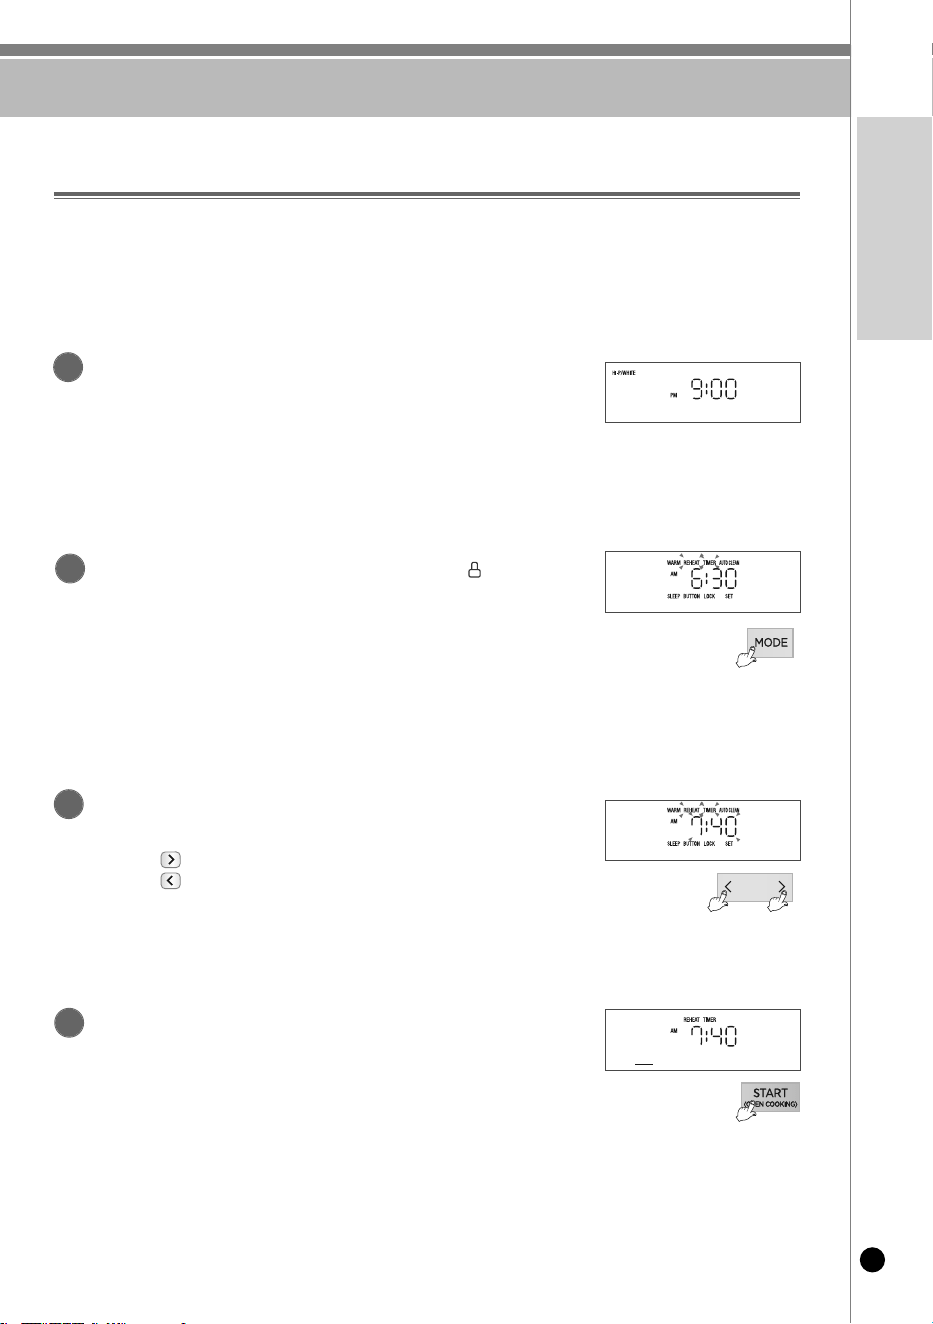
hoW To PreseT TiMer for cooking / reheATing fUcTion
23
www.cuckooamerica.com
ENGLISH
For example, if it’s 9:00 PM and you want warm rice by 7:40 AM the next morning:
1
3
How to Use the Preset Reheating Function
▶
Use this function when cooked rice is not being kept warm in the rice cooker but you still want to enjoy a hot
meal later at your convenience
▶
It takes approximately 100 minutes to fully reheat the rice. Please set the timer at least 100 minutes in
advance of your intended mealtime.
2
4
Ensure the current time is correct
▶ Confirm that the current time is accurately set, so the reheating process ends at
your desired time.
▶ Avoid confusion between AM and PM settings.
Turn the Lock/Unlock Handle to “HIGH PRESSURE” and
press the MODE button to select “REHEAT TIMER”
▶ Hold the MODE button for at least 0.3 seconds the first time.
▶ Each press of the MODE button advances the menu by one step.
▶ Ensure the Lock/Unlock Handle is securely turned to High Pressure mode
before using the “REHEAT TIMER” function.
Use the Arrow Buttons to Set the Desired Completion Time for
Reheating
▶ Press the button to increase the time by 10 minutes with each press.
▶ Press the button to also increase the time by 10 minutes with each press.
▶ Holding down the button will continuously adjust the time.
(Repetitive input is allowed.)
※ Be cautious not to switch between AM and PM unintentionally.
Press the START Button
▶ Reheating will begin and complete as scheduled.
▶ Once reheating is completed with a preset time, that time is saved in the memory.
You do not need to reconfigure it again for future use.

PrecAUTions for PreseT cooking / reheATing
24
Precautions for Preset Cooking / Reheating
In Case of Preset Reheating
▶ Leaving cooked rice at room temperature for extended periods can cause moisture to evaporate.
In such cases, reheating may dry out the rice or cause slight browning (melanoidin).
▶ If the pot contains a large amount of rice, it may not reheat evenly.
It is recommended to reheat portions no larger than for three people (about half of the inner pot).
▶ Reheating cold or frozen rice may result in uneven heating, dryness, or partial burning.
▶ Before reheating cold-stored rice, place it in the pot, loosen it with a scoop, and then start reheating.
▶ Frozen rice should be fully thawed before using the reheating function.
2
Changing the Preset Time
▶ To change the preset time, press and hold the CANCEL button for more than 0.3 seconds, then
restart the process.
3
If the Preset Time Is Outside the Available Range
▶ If the preset time is shorter than the cooking duration, cooking will start immediately.
▶ If the reheating preset time is shorter than the minimum required (100 minutes), reheating will
start immediately.
4
5
In Case of Preset Cooking
▶ If the rice is old and dry, the results may be poor.
▶ If the rice is undercooked, add water up to half the scale to improve the result.
▶ A longer preset time may increase the chance of rice melanoidin (browning).
▶ Rinsed rice contains residual starch, which may cause burning during preset timer cooking.
- To reduce scorching, rinse the rice thoroughly in running water or decrease the cooking quantity.
1
Possibl
e
Pr
es
et
Ti
m
e
Se
t
t
i
ngs by M
enu
M
e
n
u
C
la
ss
H
IG
H
-
P
R
E
S
S
U
R
E
W
H
IT
E
R
IC
E
S
T
IC
K
Y
M
U
LT
I
G
R
A
IN
R
I
C
E
S
T
IC
K
Y
B
R
O
W
N
R
IC
E
L
E
N
T
IL
S
N
O
N
-
P
R
E
S
S
U
R
E
W
H
IT
E
R
I
C
E
Q
U
IN
O
A
F
R
O
Z
E
N
S
T
O
R
E
D
R
IC
E
H
IG
H
R
E
S
S
U
R
E
Q
U
I
C
K
W
H
IC
E
R
IC
E
Q
U
I
C
K
M
U
LT
I
G
R
A
IN
R
IC
E
S
O
U
S
V
ID
E
T
H
IC
K
P
O
R
R
ID
G
E
T
H
IN
P
O
R
R
ID
G
E
M
U
LT
I C
O
O
K
S
T
E
E
L
C
U
T
O
A
T
S
P
o
s
s
ib
le
time
S
e
tti
n
g
fr
o
m
3
6
m
i
n
u
te
s
to
1
3
h
o
u
rs
fro
m
5
3
m
in
u
te
s
to
1
3
h
o
u
rs
fro
m
6
1
m
in
u
te
s
t
o
1
3
h
o
u
rs
fro
m
5
2
m
in
u
te
s
t
o
1
3
h
o
u
rs
fro
m
4
7
m
in
u
te
s
to
1
3
h
o
u
r
s
fr
o
m
4
7
m
i
n
u
te
s
to
1
3
h
o
u
rs
f
ro
m
3
8
m
in
u
t
e
s
t
o
1
3
h
o
u
rs
P
r
e
s
e
t
t
ime
r
n
o
t
s
u
p
p
o
r
t
e
d
F
ro
m
(
S
e
t
time
+
1
m
in
u
te
)
to
1
3
h
o
u
r
s
If the Preset Time Exceeds 13 Hours
▶ “13H” will be displayed, and the preset time will automatically be limited to 13 hours.
Example: If you set the finish time to 7:00 AM the next day, but it’s 5:00 PM on the current day
(preset time = 14 hours), the system will display “13H” and reset the time to 6:00 AM.
(Maximum allowable preset time is 13 hours.)
Additional Notes:
- If the preset time exceeds 13 hours, it may result in spoilage or a bad odor.
- The 13-hour limit helps prevent rice from spoiling, especially during hot weather.
Use the Preset Cooking function for finish times between 1 and 13 hours.
- Use the Preset Reheating function when your finish time falls between 100 minutes and 13 hours.
- Press the START button during preset cooking to check the current time; it will be displayed for 2 seconds.
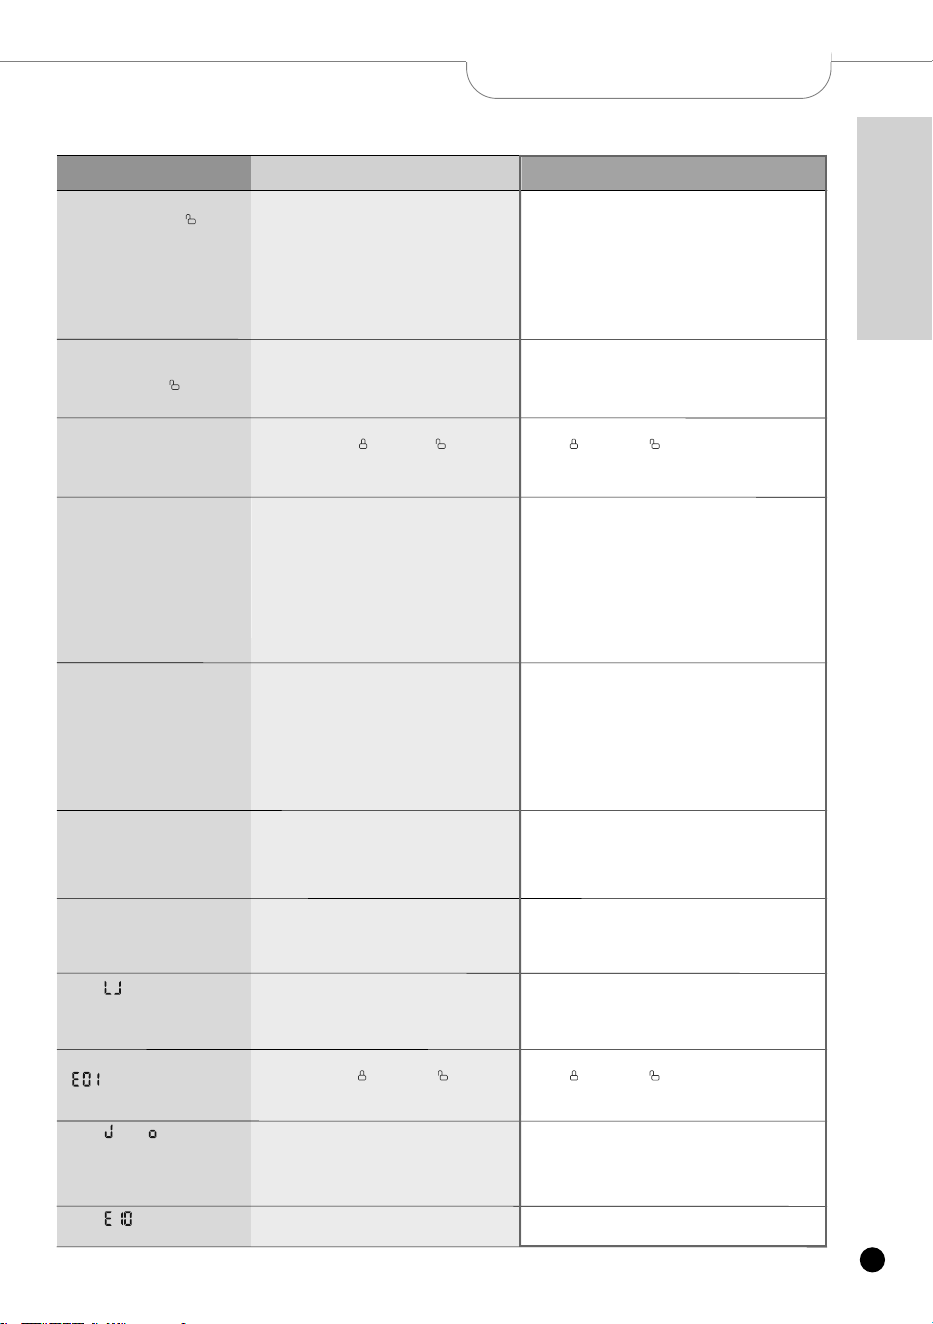
25
www.cuckooamerica.com
ENGLISH
check Before reporting
a Malfunction
W
h
e
n
th
e
L
o
c
k
/U
n
lo
c
k
h
a
n
d
le
d
o
e
s
n
o
t
m
o
v
e
in
th
e
“U
n
lo
c
k
”
d
ire
c
tio
n
• D
i
d
yo
u
tu
r
n
th
e
L
o
c
k
/U
n
lo
ck
h
a
n
d
le
d
u
ri
n
g
o
p
e
ra
tio
n
?
•
D
id
yo
u
tu
rn
th
e
L
o
ck
/U
n
l
o
ck
H
a
n
d
le
w
ith
o
u
t the
m
a
in
b
o
d
y
co
m
p
le
te
ly r
e
le
a
sin
g
th
e
ste
a
m
?
• T
h
e
l
id
w
ill n
o
t o
p
e
n
d
u
rin
g
co
o
k
in
g
.
D
o
n
o
t
fo
rc
e
o
p
e
n
th
e
lid
.
If you
m
u
st op
e
n
th
e
l
id
, p
re
ss
th
e
C
a
n
c
e
l b
u
tto
n
fo
r
0
.3
se
co
n
d
s (1.5
se
co
n
d
s if
th
e
i
n
n
e
r
p
o
t
te
m
p
e
ra
tu
re
is h
i
g
h
)
to
c
a
n
ce
l coo
k
in
g
. T
h
e
n
, t
ilt the
p
r
e
ssure
w
e
ig
h
t to
c
o
m
p
le
te
ly rele
a
se
th
e
ste
a
m
a
n
d
o
p
e
n
th
e
l
id
.
• A
lw
a
ys
tilt th
e
p
re
ss
u
re
w
e
ig
h
t to co
m
p
le
t
e
ly r
e
le
a
se
th
e
ste
a
m
b
e
fo
re
o
p
e
n
in
g
th
e
lid
.
If the
lid
d
o
e
s n
o
t o
p
e
n
e
v
e
n
th
o
u
g
h
th
e
L
o
c
k
/U
n
lo
c
k
h
a
n
d
le
i
s
fu
lly
tu
r
n
e
d
in
th
e
“U
n
lo
c
k
”
d
ire
c
tio
n
•
T
h
is
is be
ca
u
se
o
f th
e
p
re
ssu
re
in
t
h
e
in
n
e
r
p
o
t.
• T
ilt the
p
r
e
ssure
w
e
ig
h
t to
c
o
m
p
le
te
ly rele
a
se
th
e
ste
a
m
a
n
d
o
p
e
n
th
e
lid
.
W
h
e
n
t
h
e
“
H
ig
h
P
re
ssu
r
e
”, “
N
o
n
P
re
ssure
”
m
a
rk
fla
s
h
e
s
w
ith
a
b
e
e
p
so
u
n
d
d
u
r
in
g
r
e
se
r
v
a
ti
o
n
co
o
k
in
g
•
D
id
y
o
u
t
u
rn
t
h
e
L
o
ck
/
U
n
lo
ck
h
a
n
d
l
e
fu
l
ly in th
e
d
i
re
cti
o
n
o
f "L
o
ck" or "Un
lo
ck
"?
•
T
u
r
n
th
e
L
o
c
k
/U
n
lo
ck
h
a
n
d
le
fu
lly
in
th
e
d
i
re
cti
o
n
o
f
"
L
o
ck
" o
r
"U
n
l
o
ck".
W
h
e
n
s
te
a
m
le
a
k
s t
h
ro
u
g
h
th
e
lid
o
r t
h
e
re
is a
“
w
h
o
o
sh
”
w
h
istl
e
• A
re
th
e
re
a
n
y
fo
re
ig
n
s
u
b
st
a
n
ce
s (rice
g
r
a
in
s,
e
tc.
)
o
n
th
e
p
a
ck
in
g
?
• Is th
e
p
a
ck
in
g
w
o
rn
o
u
t?
• C
le
a
n
t
h
e
p
a
ck
in
g
w
ith
a
so
ft
clo
th
b
e
f
o
re
u
se
.
•
A
lw
a
ys ke
e
p
t
h
e
a
re
a
a
ro
u
n
d
th
e
p
a
ck
in
g
clea
n
.
• If ste
a
m
le
a
k
s, i
m
m
e
d
ia
te
ly pre
ss
th
e
C
a
n
ce
l b
u
tto
n
fo
r
0
.3
se
co
n
d
s
(1
.5
se
co
n
d
s
if th
e
in
n
e
r p
o
t te
m
p
e
ra
tu
r
e
is
h
ig
h
)
to
re
le
a
s
e
th
e
stea
m
, d
iscon
n
e
ct the
p
o
w
e
r
p
lu
g
,
a
n
d
co
n
ta
ct
th
e
cu
st
o
m
e
r se
r
vice
ce
n
t
e
r.
•
R
e
p
l
a
ce
t
h
e
p
a
ck
i
n
g
a
fte
r 1
- 3
ye
a
r
s o
f u
se
d
e
p
e
n
d
in
g
o
n
th
e
m
e
th
o
d
a
n
d
fre
q
u
e
n
cy o
f u
se
. If yo
u
c
o
n
tin
u
e
t
o
u
s
e
th
e
o
ld
p
a
ck
in
g
, s
te
a
m
m
a
y lea
k
a
n
d
p
r
e
ssure
c
o
o
k
i
n
g
m
a
y n
o
t b
e
p
o
ssible
.
W
h
e
n
t
h
e
C
a
n
ce
l b
u
tto
n
d
o
e
s n
o
t
w
o
r
k
d
u
rin
g
co
o
k
in
g
• Is
th
e
in
sid
e
o
f
th
e
in
n
e
r p
o
t
h
o
t
?
• I
s th
e
b
u
t
to
n
l
o
ck
w
o
rk
in
g?
•
If you
in
e
vitab
ly ne
e
d
to
ca
n
ce
l co
o
k
in
g
, yo
u
m
u
st p
r
e
ss
th
e
ca
n
ce
l
b
u
t
to
n
f
o
r 0
.
3
se
c
o
n
d
s (1
.5
se
c
o
n
d
s if the
in
n
e
r
p
o
t
te
m
p
e
ra
tu
re
is hig
h
)
fo
r safe
ty
to
c
a
n
ce
l co
o
k
in
g
.
• I
f co
o
k
in
g
is can
ce
le
d
,
th
e
c
o
n
te
n
ts
m
a
y
sca
t
te
r a
s th
e
ste
a
m
is re
l
e
a
se
d
to
th
e
a
u
to
m
a
t
ic stea
m
d
ischa
rg
e
d
e
v
ice
, s
o
b
e
ca
re
fu
l a
s it ma
y
ca
u
s
e
b
u
rn
s o
n
y
o
u
r fa
ce
a
n
d
h
a
n
d
s
.
• P
re
ss the
A
u
to
W
a
sh
/
L
o
ck
b
u
t
to
n
fo
r 2
se
co
n
d
s
o
r lo
n
g
e
r
to
d
i
sa
b
l
e
th
e
b
u
t
to
n
l
o
ck
fu
n
c
tio
n
.
W
h
e
n
th
e
re
is
a
str
a
n
g
e
n
o
ise
d
u
rin
g
co
o
k
in
g
o
r k
e
e
p
in
g
w
a
rm
•
D
o
e
s it ma
k
e
a
w
in
d
y
so
u
n
d
(“
B
u
n
g
”) wh
e
n
co
o
k
in
g?
•
D
o
y
o
u
h
e
a
r a
“b
z
z” sou
n
d
d
u
r
in
g
c
o
o
k
i
n
g
o
r
w
a
rm
i
n
g?
•
T
h
is
is the
so
u
n
d
o
f th
e
b
lo
w
e
r
m
o
t
o
r run
n
in
g
to
co
o
l th
e
in
t
e
rn
a
l p
a
rts. Th
e
re
is no
p
ro
b
le
m
w
i
th
th
e
p
ro
d
u
c
t.
•
“B
z
z” sou
n
d
d
u
r
in
g
c
o
o
k
i
n
g
o
r w
a
rm
in
g
is
th
e
s
o
u
n
d
o
f
th
e
IH
p
re
ssu
re
co
o
k
e
r
o
p
e
r
a
tin
g
. T
h
e
re
i
s n
o
p
ro
b
le
m
w
i
th
th
e
p
r
o
d
u
c
t.
W
h
e
n
b
r
o
w
n
rice d
o
e
s n
o
t
g
e
rm
in
a
te
p
r
o
p
e
rly
• D
i
d
y
o
u
g
e
r
m
in
a
te
m
o
re
th
a
n
th
e
ra
te
d
a
m
o
u
n
t o
f
b
ro
w
n
ric
e
?
• D
id
y
o
u
u
s
e
o
l
d
b
ro
w
n
rice
?
•
P
le
a
se
p
u
t the
b
ro
w
n
rice
o
f th
e
ra
te
d
a
m
o
u
n
t.
•
T
h
e
g
e
rm
in
a
tio
n
ra
te
m
a
y
d
e
c
re
a
s
e
w
h
e
n
o
ld
b
r
o
w
n
rice
o
r co
n
ta
m
in
a
te
d
b
r
o
w
n
rice is u
s
e
d
.
W
h
e
n
“
”
is disp
la
y
e
d
w
h
e
n
y
o
u
p
re
ss
th
e
b
u
tt
o
n
• Is th
e
in
n
e
r
p
o
t
in
se
r
te
d
?
• D
id
y
o
u
u
s
e
th
e
p
ro
d
u
ct
fo
r 1
2
0
V
(p
o
w
e
r)?
• T
h
e
b
u
tto
n
s d
o
n
o
t w
o
rk
w
h
e
n
th
e
i
n
n
e
r
p
o
t
is n
o
t
in
s
e
rte
d
. P
le
a
se
in
se
rt th
e
in
n
e
r p
o
t.
• T
h
is pro
d
u
ct is fo
r
1
2
0
V
o
n
ly
.
U
s
e
th
e
p
o
w
e
r p
ro
p
e
rly.
W
h
e
n
b
u
t
to
n
s
d
o
e
s n
o
t w
o
rk
,
a
n
d
“” i
s d
is
p
la
y
e
d
•
D
id
yo
u
tu
rn
th
e
L
o
ck
/U
n
lo
ck
h
a
n
d
le
fu
lly
i
n
th
e
d
ire
c
tio
n
o
f "
L
o
ck"
o
r "
U
n
lo
ck"?
• Is th
e
“
H
ig
h
P
re
ssu
re
” o
r
“N
o
n
P
re
ssure
” ma
rk
d
isp
la
ye
d
?
• T
u
rn
t
h
e
L
o
ck
/
U
n
lo
ck
h
a
n
d
le
fu
l
ly
in
th
e
d
ire
c
tio
n
o
f
"L
o
ck"
o
r " Un
lo
ck". If yo
u
d
o
n
o
t fu
lly
tu
rn
t
h
e
L
o
c
k
/U
n
lo
ck
h
a
n
d
le
,
th
e
C
o
o
k
a
n
d
R
e
s
e
rva
tio
n
b
u
tt
o
n
s
w
ill n
o
t w
o
rk
.
W
h
e
n
“”
↔
“”
fla
sh
a
lt
e
rn
a
te
ly
• Is th
e
li
d
o
p
e
n
?• W
h
e
n
m
a
k
in
g
h
ig
h
-p
re
s
su
re
/N
o
n
-p
r
e
ssure
co
o
k
in
g
,
w
a
rm
i
n
g
/re
h
e
a
tin
g
,
o
r ma
k
in
g
re
se
rv
a
tio
n
s, ple
a
se
clo
s
e
th
e
lid
b
e
fo
r
e
p
ro
ce
e
d
in
g
.
• If
th
e
lid
is
n
o
t
clo
se
d
d
u
rin
g
co
o
k
in
g
, th
e
re
is
a
ris
k
o
f
b
u
rn
s d
u
e
t
o
h
o
t stea
m
.
W
h
e
n
“” s
ig
n
s
h
o
w
s u
p
• Wa
s t
h
e
p
o
w
e
r o
f t
h
e
p
ro
d
u
ct cut o
f
f fo
r
m
o
re
th
a
n
1
0
m
i
n
u
te
s d
u
rin
g
co
o
k
in
g
?
• P
re
ss the
C
a
n
ce
l b
u
t
to
n
t
o
re
l
e
a
se
th
e
“E
1
0
” m
a
rk
a
n
d
co
o
k
a
g
a
in
.
▼
If the
re is a
proble
m with
your co
oker, p
lease c
heck t
he follo
wing b
efore c
ontact
ing the
custom
er ser
vice off
ice.
casecheck pointscheck points
26
check Before reporting
a Malfunction
▼ If there is a problem with your cooker, please check the following before contacting the customer service office.
W
h
e
n
th
e
r
ice
i
s to
o
stick
y
•
A
re
t
h
e
re
a
n
y
fo
re
ig
n
s
u
b
st
a
n
ce
s o
r
rice
g
ra
in
s o
n
th
e
o
u
tside
o
f t
h
e
te
m
p
e
ra
tu
re
se
n
so
r
o
r in
n
e
r
p
o
t?
• D
id
y
o
u
s
e
t the
“C
u
sto
m
ize
d
C
o
o
k
in
g
” fun
cti
o
n
?
• R
e
m
o
v
e
fo
re
ig
n
su
b
sta
n
ce
s
fro
m
th
e
te
m
p
e
ra
tu
re
se
n
s
o
r
a
n
d
th
e
o
u
te
r su
r
fa
ce
o
f th
e
in
n
e
r p
o
t.
(R
e
fe
r
to
p
a
g
e
s
1
3
)
• C
o
o
k
a
f
te
r s
e
tting
th
e
cu
s
to
m
ize
d
co
o
k
in
g
fu
n
c
tio
n
a
s
n
e
ce
ssa
r
y.
W
h
e
n
c
o
o
k
in
g
i
s n
o
t co
m
p
le
te
d
fo
r
a
lo
n
g
t
im
e
a
n
d
“” is
d
is
p
la
y
e
d
•
A
re
y
o
u
u
sin
g
th
e
p
ro
d
u
ct
w
ith
1
2
0
V
p
o
w
e
r?
• T
h
i
s is th
e
m
a
rk
th
a
t
a
p
p
e
a
rs
w
h
e
n
co
o
k
in
g
is no
t
c
o
m
p
le
te
d
fo
r a
lo
n
g
t
im
e
d
u
e
t
o
p
r
o
d
u
c
t m
a
lfu
n
ction
(h
e
a
te
r
d
isc
o
n
n
e
ction
, h
e
a
tin
g
fa
ilu
re
, e
tc.
). T
u
rn
o
f
f th
e
p
o
w
e
r a
n
d
co
n
ta
ct the
cu
sto
m
e
r service
ce
n
te
r.
• T
h
is pro
d
u
ct is fo
r
1
2
0
V
o
n
ly
. U
s
e
th
e
p
o
w
e
r p
ro
p
e
rly.
W
h
e
n
th
e
re
se
rv
e
d
c
o
o
k
i
n
g
t
im
e
is
n
o
t
co
rre
c
t
• Is
th
e
cu
rre
n
t t
im
e
se
t c
o
rre
ctly?
•
D
id
yo
u
se
t A
M
o
r P
M
co
rr
e
ctly?
• D
id
y
o
u
se
t a
r
e
se
r
va
tio
n
time
lo
n
g
e
r th
a
n
1
3
h
o
u
rs?
• I
f th
e
cu
rr
e
n
t
tim
e
is n
o
t set, co
o
k
in
g
w
il
l n
o
t
b
e
co
m
p
le
te
d
a
t the
re
se
rve
d
time
. S
e
t t
h
e
cu
rre
n
t time
.
•
P
le
a
se
ch
e
ck
th
e
A
M
/P
M
s
ta
tu
s
.
• T
h
e
m
a
ximu
m
re
se
rva
t
io
n
t
im
e
is 1
3
h
o
u
rs.
(R
e
fe
r to p
a
g
e
2
4
)
W
h
e
n
th
e
ric
e
sme
lls
b
a
d
rig
h
t
a
fte
r coo
k
in
g
o
r
d
u
ri
n
g
w
a
rm
in
g
• D
id
yo
u
clea
n
u
p
th
e
p
ro
d
u
c
t a
ft
e
r coo
k
in
g
b
ra
ise
d
ch
ic
k
e
n
o
r b
r
a
ise
d
rib
s?
•
R
e
fe
r to
p
a
g
e
1
3
a
n
d
w
ip
e
th
e
p
a
ck
in
g
o
n
th
e
lid
cle
a
n
b
e
fo
re
u
si
n
g
.
W
h
e
n
th
e
lid
d
o
e
s
n
o
t
c
lo
s
e
• I
s th
e
L
o
c
k
/U
n
lo
ck
h
a
n
d
le
fu
lly
tu
rn
e
d
(
)
" U
n
lo
ck
e
d"
d
ire
ction
?
•
Is the
re
r
ice
o
r h
o
t fo
o
d
in
th
e
i
n
n
e
r
p
o
t
?
• D
id
yo
u
p
u
t th
e
in
n
e
r p
o
t in
th
e
m
a
in
b
o
d
y?
• T
u
rn
t
h
e
L
o
ck
/U
n
lo
ck
h
a
n
d
l
e
fu
l
ly in
th
e
d
ire
c
tio
n
o
f
"U
n
l
o
ck
"
a
n
d
clo
s
e
th
e
lid
.
• T
ilt the
p
r
e
ssure
w
e
ig
h
t a
n
d
close
th
e
lid
.
• T
u
rn
th
e
in
n
e
r p
o
t h
a
n
d
l
e
a
tt
a
ch
e
d
to
th
e
in
n
e
r p
o
t
to
th
e
le
ft o
r righ
t to co
m
p
le
t
e
ly s
e
a
t
it o
n
th
e
m
a
in
b
o
d
y.
“”
a
re
sh
o
w
n
o
n
th
e
L
C
D
b
y
tu
rn
s
• T
h
e
re
is
a
p
ro
b
le
m
w
ith
t
h
e
p
o
w
e
r o
f t
h
e
m
ico
m
.
• T
u
rn
o
ff t
h
e
p
o
w
e
r a
n
d
co
n
ta
ct
th
e
cu
sto
m
e
r se
r
vice
ce
n
te
r.
“”
a
r
e
sh
o
w
n
o
n
t
h
e
L
C
D
b
y
tu
rn
s
• T
h
e
re
is
a
p
r
o
b
le
m
w
ith
t
h
e
e
n
viron
m
e
n
ta
l
se
n
so
r.• T
u
rn
o
ff the
p
o
w
e
r
a
n
d
co
n
ta
ct
th
e
c
u
sto
m
e
r
se
rv
ice
ce
n
te
r.
W
h
e
n
“” sign
sh
o
w
s
u
p
• T
h
e
re
is
a
n
e
rro
r
in
th
e
in
te
rn
a
l m
e
m
o
ry
o
f
th
e
m
icroco
m
p
u
te
r.
• T
u
rn
o
ff the
p
o
w
e
r
a
n
d
co
n
t
a
ct t
h
e
cu
sto
m
e
r s
e
rv
i
ce
ce
n
te
r.
W
h
e
n
“” ma
rk
is disp
la
y
e
d
d
u
ri
n
g
th
e
w
a
rm
in
g
o
r
w
h
e
n
yo
u
p
re
ss
C
o
o
k
b
u
t
to
n
o
r W
a
rm
i
n
g
/R
e
h
e
a
tin
g
;
o
r W
h
e
n
“”
m
a
r
k
is disp
la
y
e
d
d
u
rin
g
th
e
co
o
k
in
g
• T
h
is is a
fu
n
ction
to
ch
e
c
k
p
o
w
e
r
o
r p
r
o
d
u
ct a
b
n
o
rm
a
lit
y.
If this a
p
p
e
a
r
s co
n
tin
u
o
u
s
ly, con
ta
c
t th
e
cu
s
to
m
e
r serv
ice
o
ffice
.
W
h
e
n
th
e
ric
e
is no
t c
o
o
k
e
d
• D
id
y
o
u
p
re
s
s the
C
o
o
k
b
u
tto
n
?
•
W
a
s
th
e
r
e
a
p
o
w
e
r o
u
ta
g
e
d
u
ri
n
g
c
o
o
k
i
n
g?
• P
r
e
ss t
h
e
C
o
o
k
b
u
tt
o
n
o
n
ce
a
n
d
ch
e
c
k
“” si
g
n
o
n
th
e
d
isp
la
y.
• R
e
fe
r
to
p
a
g
e
3
4
fo
r th
e
p
o
w
e
r o
u
ta
g
e
co
m
p
e
n
sa
t
io
n
fu
n
ction
.
W
h
e
n
t
h
e
r
ice
is
u
n
d
e
rc
o
o
k
e
d
o
r
d
ry
; o
r Wh
e
n
o
n
ly
th
e
b
o
tto
m
ric
e
is coo
k
e
d
•
D
id
y
o
u
u
se
t
h
e
m
e
a
su
rin
g
cu
p
fo
r t
h
e
r
ice
?
• D
i
d
y
o
u
p
u
t p
ro
p
e
r a
m
o
u
n
t o
f w
a
te
r?
• D
id
y
o
u
r
in
se
th
e
r
ice
b
e
fo
r
e
co
o
k
in
g
?
• D
id
yo
u
p
u
t rice
in
w
a
te
r fo
r
a
lo
n
g
time
?
• W
a
s the
rice o
ld
o
r d
ry
?
• D
id
y
o
u
ru
n
th
e
a
u
to
m
a
tic cle
a
n
in
g
fu
n
c
tio
n
re
g
u
la
rl
y
?
•
R
e
fe
r to
p
a
g
e
s 3
6
-
3
7
fo
r p
ro
p
e
r
u
se
.
• A
d
d
w
a
te
r a
b
o
u
t h
a
l
f a
sc
a
le
a
n
d
co
o
k
.
•
R
e
fe
r to
p
a
g
e
2
0
fo
r p
r
o
p
e
r
u
se
.
W
h
e
n
“” sign
sh
o
w
s
u
p
•
T
h
e
re
is
a
p
r
o
b
le
m
w
ith
th
e
sma
rt
lo
ck
.
• T
u
rn
o
ff the
p
o
w
e
r
a
n
d
co
n
t
a
ct t
h
e
c
u
sto
m
e
r
se
rv
ice
ce
n
te
r.
W
h
e
n
“”
sig
n
sh
o
w
s u
p
•
T
h
e
r
e
is a p
ro
b
le
m
w
it
h
th
e
sma
rt lock
.
• D
o
n
o
t
o
p
e
n
th
e
lid
u
n
til
th
e
co
o
k
in
g
i
s co
m
p
le
te
.
•
If you
w
a
n
t to o
p
e
n
th
e
lid
w
h
i
le
th
e
w
a
rm
in
g
fu
n
ction
is
o
n
o
r
in
stan
d
b
y, turn
o
f
f th
e
p
o
w
e
r a
n
d
o
p
e
n
th
e
l
id
.
•
P
le
a
se
c
o
n
ta
ct the
cu
sto
m
e
r s
e
rv
ic
e
o
f
fice
.
casecheck pointscheck points

27
www.cuckooamerica.com
ENGLISH
check Before reporting
a Malfunction
▼ If there is a problem with your cooker, please check the following before contacting the customer service office.
W
h
e
n
t
h
e
b
e
a
n
s (mixe
d
g
ra
in
/
b
ro
w
n
rice
)
a
re
h
a
lf
-co
o
k
e
d
•
A
re
th
e
b
e
a
n
s (mixe
d
g
ra
in
/ b
ro
w
n
rice) to
o
d
ry
?
• S
o
a
k
o
r b
o
il b
e
a
n
s (
m
ixe
d
g
r
a
in
/
b
ro
w
n
ri
ce
) a
n
d
c
o
o
k
th
e
m
in
th
e
M
ixe
d
R
ic
e
m
e
n
u
.
D
e
p
e
n
d
in
g
o
n
th
e
typ
e
o
f
m
ixe
d
g
ra
in
s, t
h
e
ri
ce
m
a
y b
e
h
a
lf-coo
k
e
d
.
W
h
e
n
th
e
r
ice
i
s to
o
w
a
te
ry
o
r s
tiff
•
D
id
yo
u
ch
o
o
se
th
e
m
e
n
u
co
rr
e
ctly?
• D
id
yo
u
p
u
t p
ro
p
e
r
a
m
o
u
n
t
o
f w
a
te
r?
•
D
id
yo
u
o
p
e
n
th
e
lid
b
e
fo
re
co
o
k
in
g
w
a
s finish
e
d
?
• S
e
le
ct
th
e
d
e
sir
e
d
m
e
n
u
co
rr
e
ctly.
•
A
d
ju
st the
w
a
te
r a
ccu
r
a
te
l
y. (R
e
fe
r t
o
p
a
g
e
s
3
6
)
• A
f
te
r t
h
e
co
o
k
in
g
co
m
p
l
e
tio
n
so
u
n
d
i
s h
e
a
rd
a
n
d
t
h
e
p
re
ssu
r
e
is co
m
p
le
te
ly rele
a
se
d
, o
p
e
n
th
e
l
id
a
n
d
m
ix the
r
ice
.
W
h
e
n
th
e
w
a
te
r
o
v
e
r
flo
w
s d
u
rin
g
co
o
k
in
g
• D
id
yo
u
u
s
e
th
e
m
e
a
su
r
in
g
c
u
p
f
o
r the
ric
e
?
•
D
id
yo
u
p
u
t
p
ro
p
e
r a
m
o
u
n
t o
f w
a
t
e
r?
• D
id
y
o
u
c
h
o
o
s
e
th
e
m
e
n
u
c
o
rre
ctly?
•
R
e
fe
r to
p
a
g
e
s 3
6
fo
r p
ro
p
e
r u
s
e
.
W
h
e
n
y
o
u
sme
ll o
d
o
r
s w
h
ile
w
a
r
m
in
g
• D
i
d
yo
u
close
th
e
lid
?
•
D
id
th
e
p
o
w
e
r p
l
u
g
co
m
e
o
u
t o
f th
e
o
u
tle
t w
h
ile
th
e
w
a
rm
in
g
fu
n
ct
io
n
w
a
s o
p
e
ra
tin
g
?
• D
id
yo
u
k
e
e
p
th
e
rice w
a
rm
fo
r m
o
re
t
h
a
n
1
2
h
o
u
rs
o
r k
e
e
p
t
o
o
lit
tle
r
ice
w
a
rm
?
• D
i
d
yo
u
le
a
ve
a
rice
p
a
d
d
le
, c
o
ld
rice
,
o
r o
th
e
r
typ
e
s o
f
rice
in
th
e
in
n
e
r p
o
t w
h
ile
k
e
e
p
in
g
w
a
rm
?
•
P
le
a
se
cl
o
se
t
h
e
l
id
co
m
p
l
e
te
ly
.
• A
l
w
a
y
s p
lu
g
in
th
e
p
o
w
e
r p
lu
g
d
u
rin
g
w
a
r
m
in
g
.
• K
e
e
p
w
a
r
m
in
g
time
w
i
th
in
1
2
h
o
u
rs
.
•
D
o
n
o
t h
e
a
t a
m
e
n
u
o
t
h
e
r
th
a
n
w
h
i
te
ric
e
a
n
d
co
ld
ric
e
.
“”,
“”, “”
s
ig
n
s
h
o
w
s u
p
• D
i
sp
la
ye
d
w
h
e
n
th
e
re
is
a
p
r
o
b
le
m
w
ith
t
h
e
te
m
p
e
ra
tu
re
se
n
s
o
r.
•
T
u
rn
o
ff t
h
e
p
o
w
e
r a
n
d
co
n
ta
ct
th
e
cu
st
o
m
e
r se
r
vice
ce
n
te
r
.
W
h
e
n
“
”
sig
n
b
li
n
k
s
•
D
isp
la
ye
d
w
h
e
n
t
h
e
re
is a
p
ro
b
le
m
w
ith
th
e
c
o
o
lin
g
fa
n
.
• T
u
rn
o
ff th
e
p
o
w
e
r a
n
d
c
o
n
ta
ct the
cu
sto
m
e
r s
e
rv
ic
e
ce
n
te
r.
W
h
e
n
t
h
e
w
a
rm
in
g
-e
n
d
m
a
rk
b
lin
k
s d
u
rin
g
w
a
rm
in
g
• H
a
s 2
4
h
o
u
rs
p
a
ss
e
d
si
n
ce
yo
u
s
ta
rt
e
d
k
e
e
p
in
g
th
e
rice w
a
rm
?
• A
ft
e
r 2
4
h
o
u
rs of w
a
r
m
in
g
, th
e
w
a
rm
in
g
time
e
n
d
m
a
rk
is
d
isp
l
a
ye
d
b
lin
k
in
g
to
in
d
ica
te
th
a
t the
w
a
rm
i
n
g
h
a
s
e
la
p
se
d
fo
r
a
lo
n
g
time
.
W
h
e
n
th
e
rice
is cold
o
r
a
lo
t o
f
w
a
te
r i
s g
e
n
e
ra
te
d
d
u
ri
n
g
w
a
rm
in
g
•
D
id
yo
u
se
t the
w
a
rm
i
n
g
fu
n
ct
io
n
t
o
sle
e
p
w
a
rm
i
n
g
m
o
d
e
?
•
If ne
ce
s
sa
ry
, tu
rn
o
ff
o
r o
n
th
e
sle
e
p
w
a
rm
in
g
m
o
d
e
a
n
d
k
e
e
p
rice
w
a
rm
.
W
h
e
n
“
”
sign
sh
o
w
s
u
p
• D
id
y
o
u
e
ve
r p
re
ss the
C
o
o
k
b
u
tto
n
in
th
e
s
ta
te
w
h
e
re
w
a
rm
in
g
w
a
s can
ce
le
d
(s
ta
n
d
b
y
st
a
te
)
w
i
th
o
u
t tu
r
n
in
g
th
e
L
o
ck
/U
n
lo
ck
h
a
n
d
le
in
th
e
"
U
n
lo
ck
" d
ire
c
tio
n
w
h
e
n
th
e
p
o
w
e
r w
a
s
a
p
p
lie
d
a
ft
e
r coo
k
in
g
w
a
s com
p
l
e
te
d
?
• T
u
rn
th
e
L
o
ck
/U
n
lo
ck
h
a
n
d
le
in
th
e
d
ire
c
tio
n
o
f
“U
n
lo
ck
”
a
n
d
th
e
n
tu
r
n
it i
n
th
e
d
ire
ction
o
f
“L
o
c
k”.
W
h
e
n
th
e
p
o
w
e
r d
o
e
s
n
o
t t
u
rn
o
n
a
ft
e
r c
o
n
n
e
c
tin
g
th
e
p
o
w
e
r
c
a
b
le
•
Is the
stan
d
b
y
p
o
w
e
r
cu
t-o
ff switch se
t t
o
(O
N
)?
• C
h
a
n
g
e
th
e
sta
n
d
b
y
p
o
w
e
r c
u
t-o
ff switch
fro
m
(
O
F
F
) to
(O
N
).
casecheck pointscheck points

각 부분의 이름
28
각 부 명칭(외부)
부속품 안내
(부속품은 모델별로 상이할 수 있습니다.)
보온이나 취사, 요리 후에는
항상 물받이에 있는 물을 버려
주세요 . 물받이에 밥물이 고여
있을 경우 냄새의 원인이 됩니다.
물받이 (제품후면)
분리형커버 손잡이
내솥을 본체에 똑바로 넣습니다.
※ 내솥형상은 모델별로 다를 수 있습니다.
내솥
패킹은 사용방법 및
횟수에 따라 1년~3년
정도 사용 후 교환
하여 주십시오.
패킹
안전패킹
원터치 버튼
전원플러그
전원코드
온도감지기
안전패킹 커버
압력조절판
내솥 손잡이
분리형커버
뚜껑
각 부 명칭(내부)
자동 증기 배출구
취사나 요리가 끝나거나 보온시 자동으로 증기를
배출시켜 줍니다. 필요할 경우 취소 버튼을 눌러
증기를 배출 시킬 수도 있습니다.
사일런트 스팀 밸브
(SILENT STEAM VALVE)
취사나 요리 진행 중 “취익~“ 하는 소리는 압력 조절을
위해 증기가 배출될 때 나는 소리입니다.
(압력추의 증기 배출 소리와 다릅니다.)
※ 사일런트 스팀 밸브는 소프트 스팀 캡 아래에 위치
하고 있습니다.
소프트 스팀 캡
뚜껑 열림 버튼을 누르면 뚜껑이 열립니다.
(취사나 요리 중에는 뚜껑 열림 버튼을 누르지 마십시오.)
뚜껑 열림 버튼
기능조작부 및 표시부
뚜껑 결합 손잡이
뚜껑 결합 손잡이를 회전시켜 “고압 ”에 위치하면
고압모드 조리 선택이 가능하고, “무압 ”에 위치
하면 무압모드 조리 선택이 가능합니다.
요리레시피
주 걱
계량컵
청소용 핀
(실물은 본체 바닥면에 부착되어 있습니다.)
찜판
사용설명서
ALL STAINLESS내솥(별매품)
사
용
설
명
서
요
리
레
시
피
전원코드 연결 후 전원이 들어오지 않을 경우 대기전력
차단 스위치가 (ON)으로 되었는지 확인 바랍니다.
• 사용시 : (ON)
• 미사용시 : (OFF)
(대기전력이 차단되어 에너지 절전효과가 있습니다.)
※
취사 또는 요리 진행 중 대기전력 차단 스위치가
(OFF)가 되면 자동증기 배출장치가 작동하여
내용물 비산의 우려가 있습니다.
대
기
전
력
차
단
스위
치
(일부
모
델
제
외
)
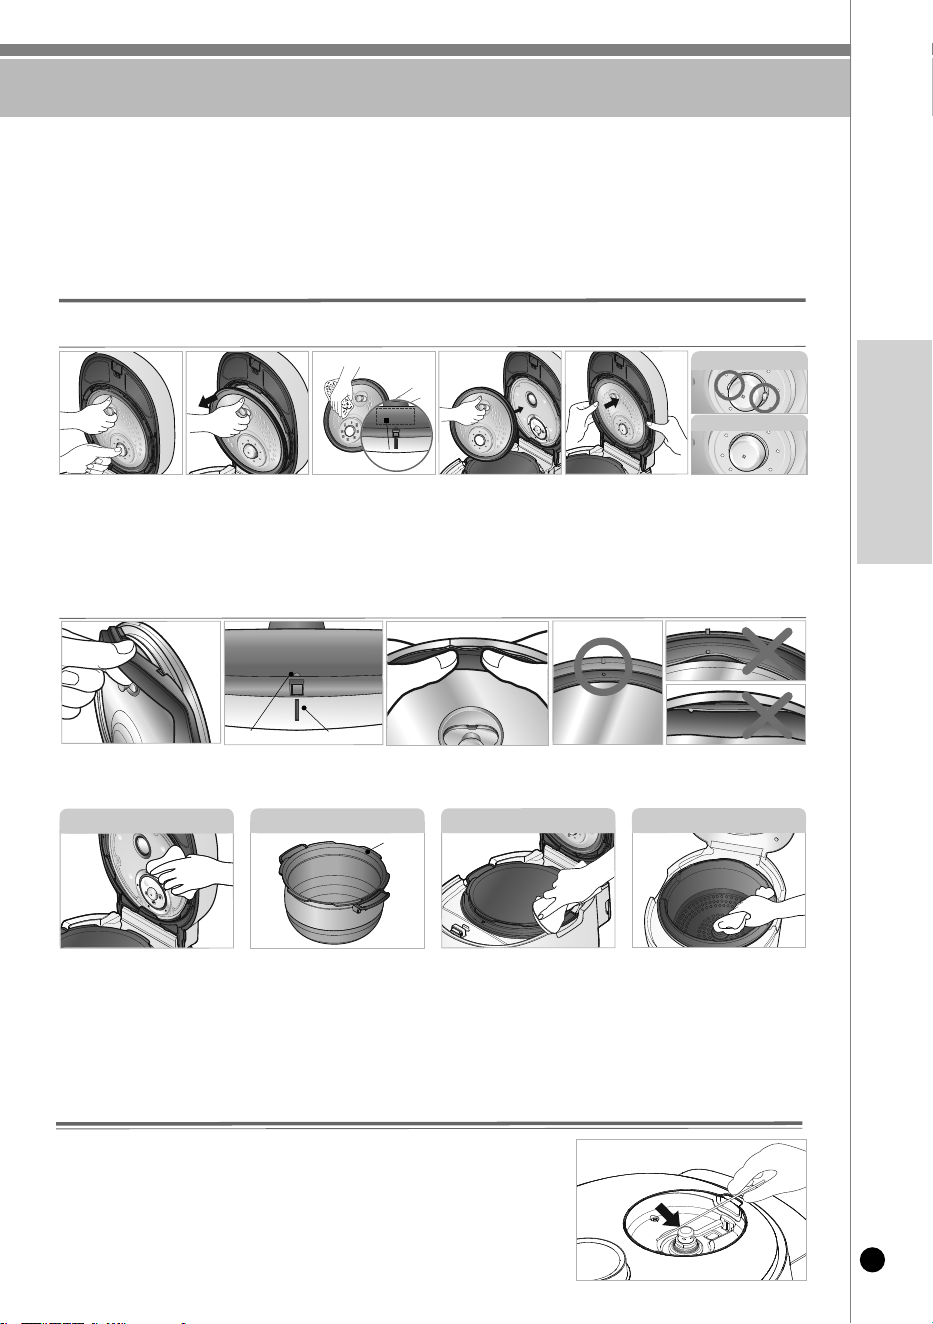
제품 손질 방법 / 고장 시 압력배출 방법
29
www.cuckooamerica.com
KOREAN
-
청
소
를
잘
하
지
않
으
면
보
온
중
냄
새
가
나
는
원
인
이
됩
니
다
.
특
히
뚜
껑
부
는
자
주
청
소
해
주
십
시
오
.
(
전
원
플
러
그
를
빼
고
본
체
의
열
이
식
고
난
후
손
질
하
십
시
오
.
)
-
본
체
·
뚜
껑
은
물
기
를
제
거
한
행
주
로
닦
아
주
십
시
오
.
벤
젠
,
신
나
등
은
사
용
하
지
마
십
시
오
.
-
분
리
형
커
버
및
기
타
스
테
인
리
스
재
질
부
분
은
락
스
또
는
염
소
성
분
이
첨
가
된
세
제
로
세
척
하
거
나
닦
지
마
십
시
오
.
-
사
용
중
분
리
형
커
버
나
내
솥
내
부
에
밥
물
이
묻
어
전
분
막
이
생
기
는
수
가
있
으
나
,
위
생
상
아
무
런
영
향
이
없
습
니
다
.
고
장
시
압
력
배
출
방
법
분
리
형
커
버
및
압
력
패
킹
분
리
형
커
버
세
척
후
에
는
반
드
시
뚜
껑
에
장
착
해
주
십
시
오
.
분
리
형
커
버
가
장
착
되
지
않
으
면
취
사
,
예
약
취
사
가
되
지
않
습
니
다
.
(보
온
시
경
고
음
발
생
)
압
력
패
킹
의
세
척
이
나
교
환
으
로
분
리
후
재
조
립
시
에
는
빠
진
곳
이
없
도
록
완
전
히
끼
워
넣
고
사
용
해
주
십
시
오
.
③
6군데
를
끼운
후
그
림과
같
이
압력
패킹을
돌려가며
눌러
완
전히
끼
워주십시오.
②
조립 시에는
6군데
의
압력
패킹
맞춤돌
기와
커
버눈금을
먼
저
맞춰
끼워주십시오.
①
압력패킹
분리
시에는 그림과
같이
잡고
당겨
주십시오.
③
장착
시에는
분리형
커버
손잡이를
잡고
뚜
껑에
부착
한
후
분리형
커버의
하단부를
‘
딸깍
’
소리가
나도록
밀어
완전히
결합시켜
주십시오.
②
주방용
중성
세제 및
스
폰지로
자주
세척
해
주
시고 물기를
제거한 행주로 닦아 주십시오
.
※
압
력
패
킹
의
내
솥
접
촉
면
에
는
밥
알
등
이
붙
지
않
게
닦
아
주
시
고
청
결
히
관
리
하
면
제
품
을
더
오
래
사
용
할
수
있
습
니
다
.
①
분리형
커버
손잡이를
잡고
버튼의
중앙을
누른
후
손잡이를
화살표
방향과
같이
잡아
당기면
밥솥과
쉽게
분리되어
세척이
가능합니다.
※
분리형커버를 분리 또는
장착
시
떨어질
우려가 있으니
분리형커버 손잡이를 잡아주십시오
※
버튼의 중앙을 누르지 않을 경우 동작이
되
지
않을 수
있으니
버
튼의
중앙
을
눌러 사용 해주십시오.
내
솥
접
촉
면
-
취사
완료
후
압력이 배출되지 않아
뚜
껑
결합
손잡이가
돌아가지
않을
때,
전원을
차
단하고
아
래와
같
이
압력을
배출해 주십시오.
-
젓가락 등의
도
구를
이
용해서
화
살표
방향
으로
당
기면
압력
이
배출됩
니다.
(
※
화상
의
우려가
있으므
로
고무
장갑을 착용하고 압력을 배출해 주십시오.)
-
전원
차단
,
전원
연결을 3번
반
복하여 시도해도 동작하지 않을
경
우,
쿠쿠
고
객상담실로 문의
바랍니다.
사용 전·후 증기배
출구가
막히지않도록
깨
끗이 부드럽
게 닦아 주십시오.
안전패
킹은
부드럽게
닦
아
주
시고 강제로
빼거나
제품
에서
떼어
내지 마시고
사
용 전·후
결합상태를
확인해
주십 시오.
결합이
불완전한
경
우
반드시
서비
스 센터에
문의 하십시
오.
내솥의
바깥
면이나
밑면의
이물
질
및
물
기를
깨끗
이 닦아 주십시오.
거친 수세미,
솔,
연마제
등은 코팅이
벗겨질
수 있으므
로
주
방
용
세제
와
부드
러
운
천,
스폰
지
로 닦아
주십
시오.
※
내솥의 압력
패
킹
접촉
부위를 청결히
관리하면 제품을 더 오래 사용할 수
있습니
다.
취사 시 발생하는
밥물은
증기
배출구로
통해
이
곳에 고일수
있도록
설계
되어 있으므로
취사
완료
후
물
기를 제거한
행주로
깨
끗이
닦아 주십시
오.
온도감지
기에
이
물질이 눌러 붙어
있
는
경우
금
속
판
이
손
상
되
지
않
게
제
거
하
십
시
오
.
안
전
패
킹
내
솥
본
체
물
고
임
부
본
체
내
부
압
력
패
킹
접
촉
면
※
내솥 세척 시 유의 사항
날카로
운
식
기류(
포
크,
숟가락
,
젓가락
등)
를 내솥에
넣은 채 세척 하지 마십시
오.
-
내솥 코팅이
손상 될 수 있습니다.
-
고객 과실에
의한
내솥
코
팅의 스크래치
및 벗겨짐
이
발
생할
경
우에는
무상
서
비스 기간 내라도
유상 처리됩
니다.
분리형 커버 잠김 시
분리형 커버 열림 시
④
전
둘레에
그림과
같이
완전히
끼워지지
않은
구간이
있는지
확인
하여
주십시오.
압력패킹이
완전히
끼워지지
않으면
증기가
누설될
수
있습니다.
커
버
눈
금
패
킹
맞
춤
돌
기
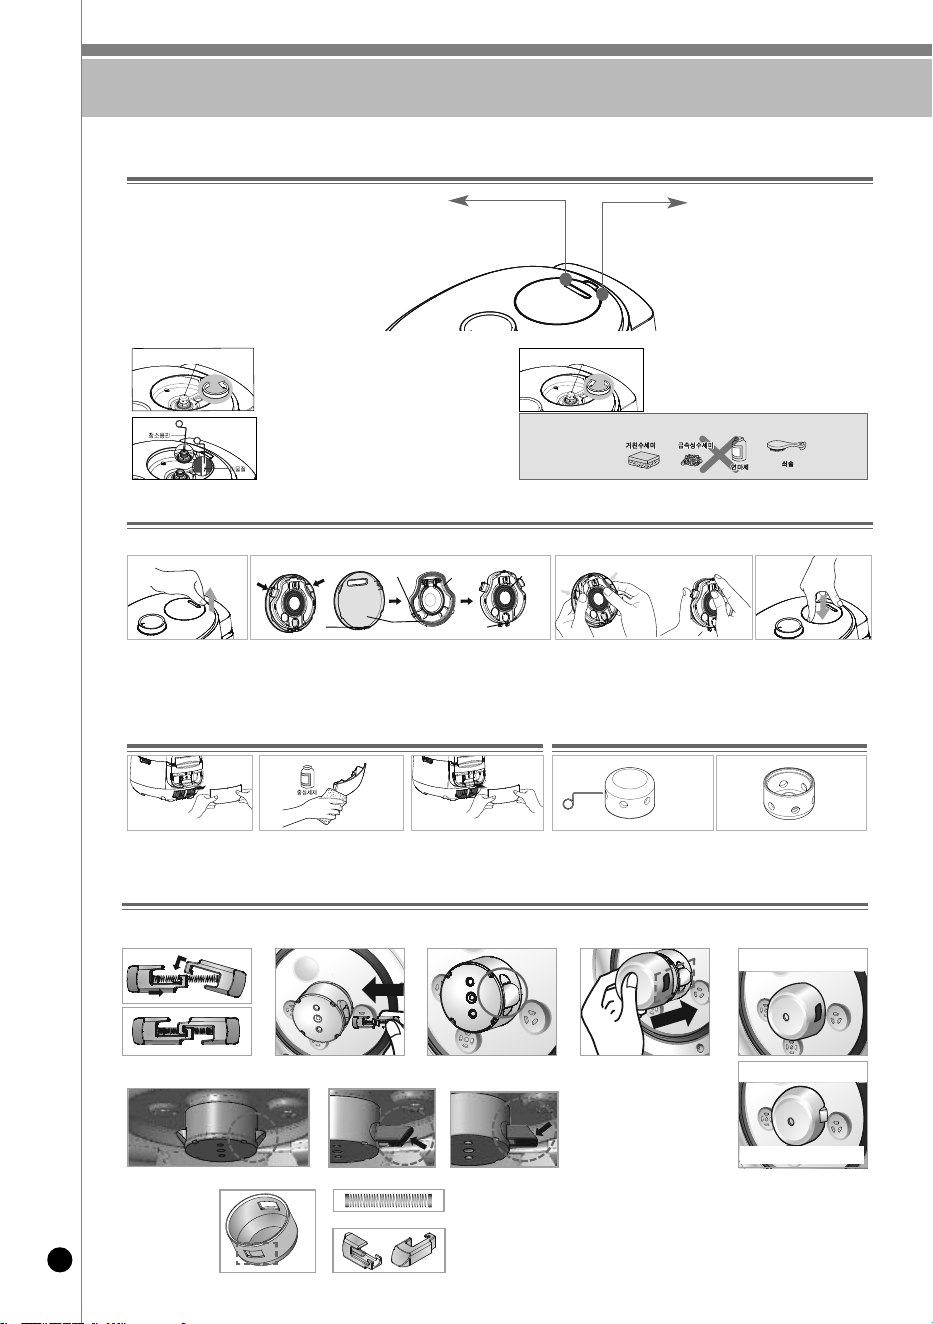
제품 손질 방법 / 원터치버튼 조립방법
30
압력 노즐막힘 손질 방법
<사일런트 스팀 밸브 캡 / 증기배출구 청소방법>
❶ 소프트 스팀 캡을 분리한 후 사일런트 스팀 밸브 캡을 잡고
화살표 방향 (반시계방향) 으로 돌려서 분리합니다.
※고무장갑을 착용하고 분리하십시오.
❷ 청소용 핀(실물은 본체 바닥면에 부착되어 있음)으로 구멍을
뚫습니다.
※ 청소용 핀으로 증기 배출구만 청소하시고, 다른 구멍은 안전
장치이므로 절대로 찌르지 마십시오.
❸ 청소후 사일런트 스팀 밸브 캡을 조립할때는 분리할 때와
반대 방향(시계방향) 으로 돌려서 끼워 넣습니다.
❹ 고무장갑을 착용하고 한번 더 꽉 잠가 주세요.
2중 모션밸브 캡
내솥·부속품 • 주방용 중성세제와 스폰지로 씻어 주십시오.
2
중
모
션
밸
브
캡
이
물질 등으로 증기 배출구와 사일런트 스팀 밸브가 막혀 있으면 제 기능을 발휘하지 못하므로 사용 전·
후에는
아래
의 사일런트 스팀 밸브 캡 / 증기배출구 /
사일런트 스팀 밸브 청소방법을 참조하여 사일런트 스팀 밸브 캡을
분리
한 다음 청소용 핀으로 구멍을 뚫은 후 사용해 주십시오.
사일
런트 스팀 밸브의
이물
질 제거를 위해 정기적으로 자동세척을 실시해 주십시오.
증기
배출구의 구멍이 막히지 않았는지 정기적으로 점검해 주십시오.
※ 디자인은 그림과 다를 수 있습니다.
사일런트 스팀 밸브/ 사일런트 스팀 밸브 캡
취사나 요리 완료 후 떼어낸 다음 주방용
중성세제 및 스폰지로 자주 세척해 주시고
제품 뚜껑에 고인물은 물을 꼭 짠 행주로
닦아 주십시오.
소프트 스팀 캡
❶ 물받이를 분해합니다.❷
물받이를 물기를 제거한 행주로 닦거나
주방용 중성세제 및 스펀지로 세척해 주십시
오.
❸
물받이를 화살표 방향으로 눌러
확실히 끼워 주십시오.
물받이 손질 방법
❶ 사일런트 스팀 밸브 캡 구멍이 이물질로
막혔을 경우 청소용 핀(실물은 본체 바닥면에
부착되어 있음)으로 구멍을 뚫은 후 표면은
주방용 중성세제와 스폰지로 씻어 주십시오.
❷ 사일런트 스팀 밸브 캡이 변색되었을 경우
구연산을 첨가한 물에 변색이 사라질 때까지
끓입니다.
사일런트 스팀 밸브 캡 손질 방법
소프트 스팀 캡 손질 방법
취사나 요리 완료 직후에는 소프트 스팀 캡이 뜨거우므로 만지지 마십시오. 화상을 입을 수 있으므로 주의하십시오.
❶
소프트 스팀 캡을 그림과 같이 손잡
이를 위로 살짝 들어 올리면서 떼어
냅니다.
❷
앞쪽에 있는 후크를 화살표 방향으로 눌러서 분해하고, 주방용 세제 및 스폰지로 자주 세척해
주십시오. 세척 후 순서대로 조립해 주십시오.
※ 상부 패킹을 끼울 때는 방향에 주의해서 패킹 홀을 잘 맞춘 후 끼워 주십시오.
※ 하부 패킹을 끼울 때는 전 둘레의 홈에 잘 맞춘 후 끼워 주십시오.
❸ 소프트 스팀 캡을 조립하여 끼울 때에는 스팀 실드 홀
부분을 맞춰 끼우고, 아래쪽의 홈과 돌기 부분을 맞춘 후,
화살표 방향으로 눌러앞쪽의 후크를 확실히 끼워 주십시오.
❹
제품에 소프트 스팀 캡을 장착할 때는
그림과 같이 소프트 스팀 캡을안착한 후
소프트 스팀 캡을 눌러 단단히고정시켜
주십시오.
상부 패킹
패킹홈
하부 패킹
스팀 실드 홀
돌기
홈
덮개
덮개 홈
정상※스토퍼의 형상 상하방향 주의비정상
스프링
스토퍼(2EA)
❶ 원터치버튼의 부품을 위 그림처럼 조립
해 주십시오.
❷❶그림 에서 조립된 원터치 버튼을 뚜껑부의 사각 홈에 밀어 넣어 조립해 주십시오.
※ 원터치버튼의 스토퍼의 방향에 주의하여 결합해 주십시오.
❸ 원터치버튼 덮개의 홈과 스토퍼를 방향에 맞게
맞추어 ‘딸깍’ 소리가 나도록 밀어주세요.
❹ 위 그림과 같이 원터치 버튼이 정상
적으로 결합됐는지 확인해주세요.
❺ 원터치 버튼을 눌러 정상적으로
동작되는지 확인하여 주세요.
<원터치 구성품>
원터치버튼 조립방법
- 원터치 덮개가 분해되었을 때 아래와 같이 결합해 주십시오.
- 부품 분실이나 파손시 고객상담실로 문의해 주십시오.
원터치 버튼 비정상 결합시
원터치 버튼 정상 결합시
스토퍼 돌출될것
�
사일런트 스팀 밸브 캡사일런트 스팀 밸브 캡
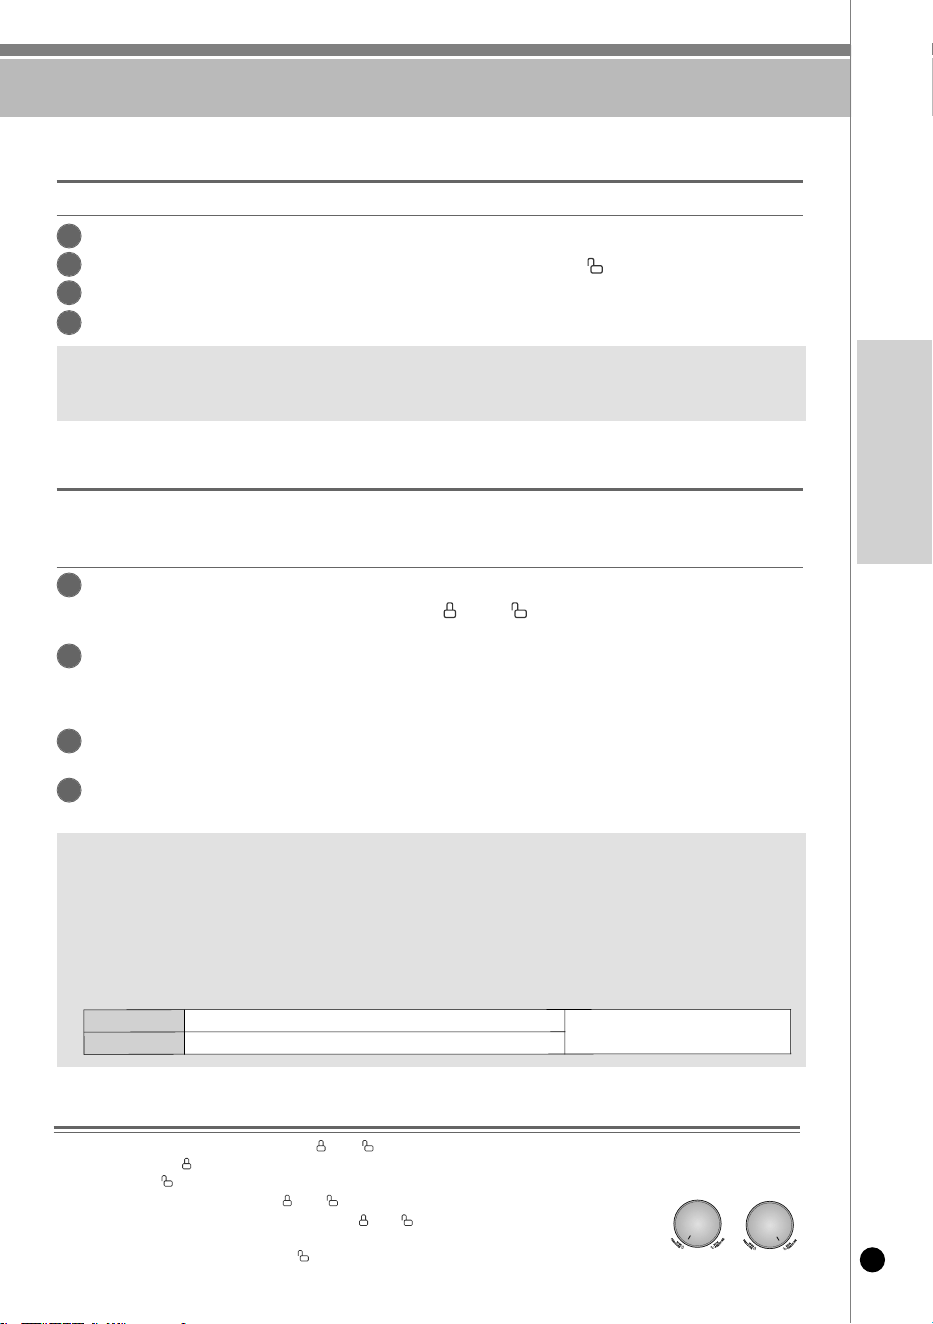
제품 손질 방법 / 뚜껑 결합 손잡이의 사용법에 관하여
31
www.cuckooamerica.com
KOREAN
내솥에 달라붙은 잔여물을 세척시 아래와 같이 사용 해주시면 보다 쉽게 세척을 하실수 있습니다.
ALL STAINLESS 내솥에 밥이나 음식이 눌어 붙은 경우
취사나 요리가 끝난 후 주걱 등을 사용하여 내솥에 붙은 잔여물을 밀어서 때어내 주십시오.
내솥에 물을 백미 물눈금 2 까지 붓고, 뚜껑을 덮어 뚜껑 결합 손잡이 방향을 “무압”으로 돌려 주십시오.
좌/우 버튼으로 죽을 선택한 후 확인 버튼을 눌러 주십시오.
좌/우 버튼으로 시간을 25분으로 선택하고 시작 버튼을 눌러 주십시오.
1
2
3
4
불순물 및 얼룩 제거와 오랜 시간 사용을 위해 아래와 같이 관리 해주시면 보다 깨끗하게 사용하실 수 있습니다.
초기 제품 사용 전 내솥에 미세한 먼지(연마제)가 묻어 나올 수 있습니다.
아래 세척방법으로 먼지(연마제)가 나오지 않을 때 까지 깨끗이 세척 후 사용해 주세요.
※스테인리스 참고 사항
- 사용 중 스테인리스 오븐 색깔이 약간 거무스름해지거나 무지개 빛깔처럼 얼룩이 생기는 것은 조리시 음식물이 가지고 있는
미네랄 성분이 내솥에 남아 생기는 현상이며, 제품의 하자가 아닙니다.
(STAINLESS 내솥에 생기는 무지개 빛 얼룩은 음식 조리 시 발생될 수 있는 자연현상입니다. 인체에 전혀 무해한 부분이므로 안심하고 사용하셔도 됩니다.)
- 스테인리스 오븐에 소금물이나 산성용액 등 을 장시간 담가둘시 변색의 원인이 됩니다.
- 스테인리스 재질 부분은 락스 또는 염소 성분이 첨가된 세제로 세척하거나 닦지 마십시오.
- 물때 또는 무지개 빛 얼룩은 충분한 양의 식초 또는 레몬즙을 사용하시면 얼룩 제거에 도움이 될 수 있습니다.
ALL STAINLESS 내솥 세척 및 관리 방법 (제품 구매시 반드시 세척 후 사용바랍니다.)
대기상태에서 모드 버튼을 눌러 자동세척을 선택한 후 시작 버튼을 눌러 주십시오.
※ 모드 버튼을 초기에 누를 시 0.3초 이상 눌러야 진입 가능합니다.
※ 모드 버튼을 누를 때 마다 한단계 씩 이동 합니다.
※ 자동세척 사용 방법은 39쪽을 참조하십시오.
자동세척 완료 후 중성세제를 이용하여 미온수로 씻어주세요.
※ 자동세척 완료 후 내솥 이 뜨거우니 화상에 주의 바랍니다.
마른 수건으로 물기를 닦아내고, 충분히 건조해 줍니다.
※연마제 및 이물이 묻어나올 경우, 나오지 않을 때 까지 1~4를 반복해주세요.
내솥에 구연산 또는 베이킹소다 10g (얼룩의 정도에 따라 양 조절 가능)과 자동세척 눈금에
맞춰 물을 넣고, 뚜껑을 덮어 뚜껑 결합 손잡이를 “고압” 또는 “무압” 으로 돌려주십시오.
※ 구연산 또는 베이킹소다 대신 식초 (종이컵1/3)로 대체 가능합니다.
1
2
3
4
※ 내솥에 밥이나 음식물이 눌어 붙은 내솥의 경우 따뜻한 물에 30분 이상 불린 후 세척하여 주시거나, 『죽』기능을 사용하시면 세척이 편리합니다.
※ 내솥 불릴 목적으로 자동세척 메뉴를 사용하시면 내솥의 잔여물이 증기배출구를 막는 문제가 발생할 수 있으니 내솥 불릴 목적으로 사용시
반드시 죽 메뉴를 사용해 주십시오.
※ 죽 메뉴 완료시 내솥이 뜨거우니 안전에 유의해 주십시오.
사
용
가
능
면
수
세
미
,
스
폰
지
수
세
미
,
극
세
사
,
망
사
수
세
미
※사
용
불
가
능
수
세
미
를
사
용
하
실
경
우
내
솥
및
물
눈
금
이
손
상
될
수
있
습
니
다
.
사
용
불
가
능
청
색
,
녹
색
수
세
미
(
연
마
제
재
질
)
,
철
,
스
텐
수
세
미
,
기
타
금
속
성
재
질
수
세
미
내
솥
세
척
용
권
장
수
세
미
(
내
측
,
외
측
)
뚜껑 결합 손잡이의 사용법에 관하여
1. 취사나 요리 시에는 뚜껑을 닫고 뚜껑 결합 손잡이를 “고압” 또는 “무압” 방향으로 확실하게 돌려주십시오.
• 뚜껑 결합 손잡이를 “고압”으로 돌리면, 고압메뉴가 표시되며 고압메뉴 취사나 요리 선택이 가능 합니다.
• 뚜껑 결합 손잡이를 “무압”으로 돌리면, 무압메뉴가 표시되며 무압메뉴 취사나 요리 선택이 가능 합니다.
2. 고압취사나 고압요리 후 뚜껑 결합 손잡이를 “고압”에서 “무압” 방향으로 돌린 후, 뚜껑 열림 버튼을 눌러 뚜껑을 열어주십시오.
제품내부에 증기가 완전히 배출되지 않으면 뚜껑 결합 손잡이가 “고압”에서 “무압” 쪽으로 쉽게 돌아가지 않습니다.
이때 뚜껑 결합 손잡이를 강제로 돌리지 마시고 사일런트 스팀 밸브 캡을 도구로 젖혀 내부 증기가 완전히 배출된 후 다시 조작해 주십시오.
3. 뚜껑을 열고 닫을 때는 항상 뚜껑 결합 손잡이 위치를 “무압” 방향으로 확실하게 돌려 주십시오.
고압무압
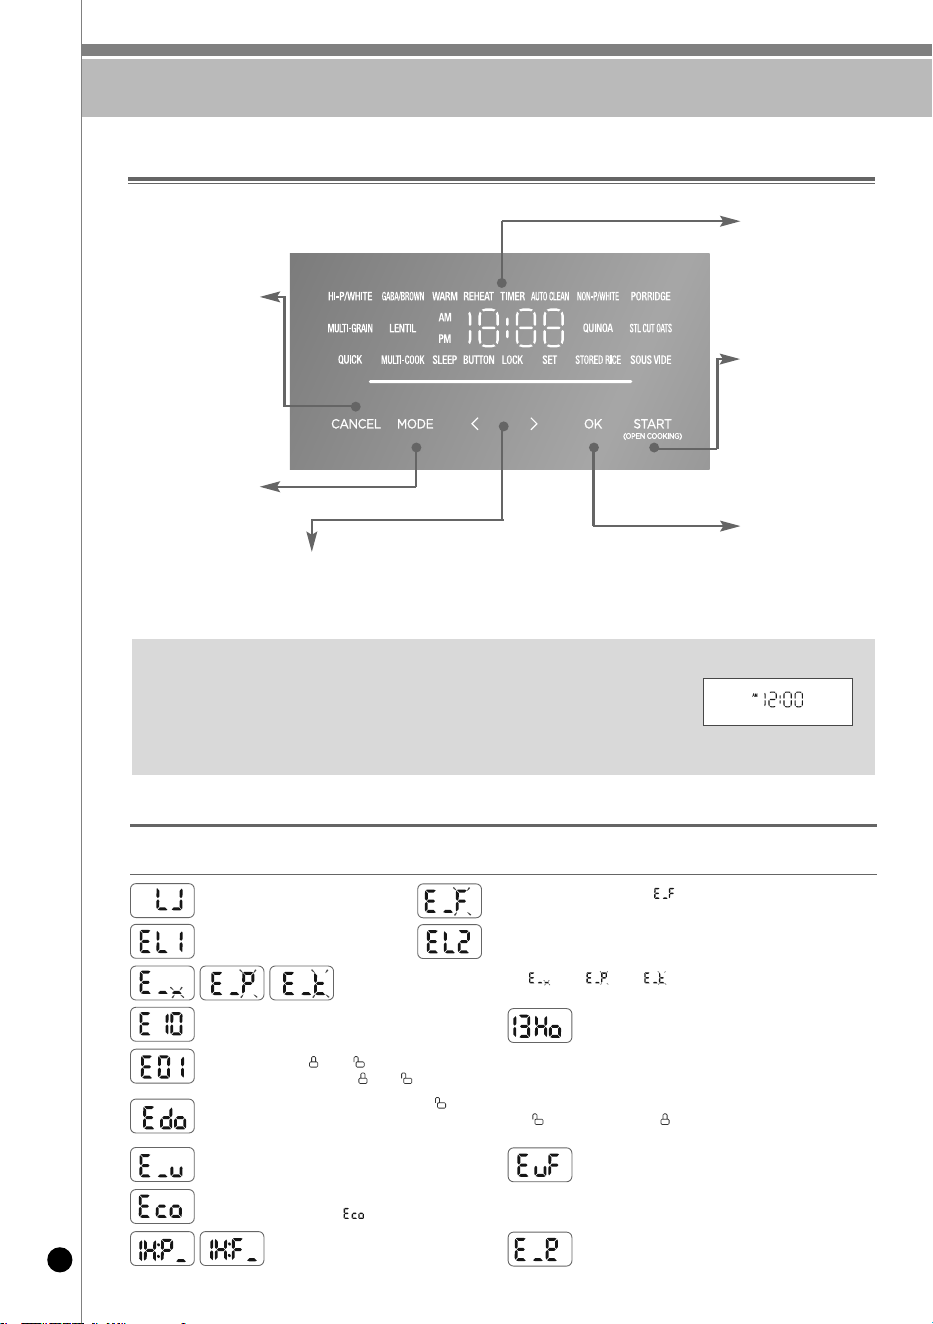
기능 조작부의 이름과 역할 / 기능 표시부의 이상점검 기능
32
기능 조작부의 이름과 역할
<대기 상태 화면>
취소 버튼
선택한 기능을 취소할 경우 사용
하거나 자동으로 증기를 배출시킬 때
(취사 또는 요리 중에 취소시킬 경우 0.3초간,
내솥 온도가 높으면 1.5초간 눌러 주십시오)
▶ 59쪽 참조
모드 버튼
보온, 보온재가열, 예약,
예약재가열, 자동세척, 절전,
버튼잠금, 설정을 선택할 경우 사용
설정모드 변경시 사용
좌/우 버튼
메뉴를 선택할 경우 사용, 시간을 변경할 경우 사용,
모드 버튼으로 선택한 기능을 변경할 경우 사용
기능표시부
시
작
/오픈
쿠
킹
버
튼
취
사
및
요
리
를
시
작
할
경
우
사
용
▶
38쪽
참
조
오
픈
쿠
킹
을
할
경
우
사
용
▶
44쪽
참
조
확인 버튼
선택한 기능을 설정 할 경우 사용
※ 전원플러그를 꽂고 아무 동작을 하지 않은 경우, 그림과 같이 화면상태가 나타날 때가 대기 상태입니다.
(대기 상태 화면은 메뉴, 시간 등 사용자의 설정에 따라 다를 수 있습니다.)
※ 기능 조작 시 취소 버튼을 누르면 대기 상태로 전환됩니다.
※ 버튼은 부저음이 날 때까지 확실히 눌러 주시고 본 명판의 디자인은 실물과 다를 수 있습니다.
※ 취사를 시작하시려면 반드시 좌/우 버튼으로 메뉴를 선택한 후 시작 버튼을 눌러주세요.
(대기 상태에서 바로 시작 버튼을 누를 시 취사가 시작 되지 않습니다.)
사용방법이 올바르지 않거나 제품에 이상이 생겼을 때 아래와 같은 표시가 나타나 경보를 하여 줍니다.
정상적인 사용 조건에서나 혹은 조치 이후에도 지속적으로 표시가 나타날 경우에는 고객상담실로 문의하십시오.
기능 표시부의 이상점검 기능
내솥이 없을 때 나타납니다.
뚜껑 결합 손잡이를 “고압” 또는 “ 무압” 방향으로 확실하게 돌리지 않은 상태에서 좌/우 버튼을 누르거나 취사, 예약, 예약재가열, 자동세척을 시작할 때
나타납니다. 뚜껑결합손잡이를 “고압” 또는 “무압” 방향으로 확실하게 돌려 주십시오.
취사 중 제품의 전원이 10분간 차단되었을 때 나타납니다.
취소버튼을 누르면 표시가 해제되며 대기상태로 돌아갑니다.
예약 시간이 13시간을 초과한 경우에 나타납니다.
13시간 이내로 예약을 하십시오.(51,53쪽 참조)
취사 완료 후 보온 상태에서 한번도 뚜껑 결합 손잡이를“ 무압”쪽으로 하지 않고, 대기 상태가 된 후 재차 취사 또는 예약을 시작할 때
나타납니다. 뚜껑 체결 감지 장치의 동작 확인 기능입니다. 뚜껑 결합 손잡이를 “ 무압”으로 한 후 다시“고압 ”쪽으로 돌려 주시면 됩니다.
그래도 문제가 계속 해결되지 않으면 고객상담실로 문의하여 주십시오.
마이컴 전원에 이상이 있을때 나타납니다.
고객상담실로 문의하십시오.
환경센서에 이상이 있을때 나타납니다.
고객상담실로 문의하십시오.
마이컴 내부 메모리에 이상이 있을때 나타납니다.
고객상담실로 문의하십시오.
분리형 커버가 장착하지 않았을 때 나타납니다. 분리형 커버를 장착해 주십시오.
분리형 커버가 장착된 상태에 서“”표시가 점멸하는 경우는 분리형 커버 감지부에 이상이 발생되었을 경우입니다.
전원 또는 제품의 이상 발생 점검 기능입니다.
고객상담실로 문의하십시오.
냉각팬에 이상이 있을 때 나타납니다. (“” 표시가 깜박거립니다.)
고객상담실로 문의하십시오.
스마트 잠금 장치에 이상이 있을 때 나타납니다.
고객상담실로 문의하십시오.
스마트 잠금 장치에 이상이 있을 때 나타납니다. 취사가 완료될 때 까지 뚜껑을 열지 마세요. 보온 및 대기 상태에서
뚜껑을 열고자 할 경우 전원을 차단하고 뚜껑을 열어주세요. 고객상담실로 문의 하십시오.
온도 감지기에 이상이 있을 때 나타납니다. (“”표시,“”표시, “”표시가 깜박거립니다.)
고객상담실로 문의하십시오.
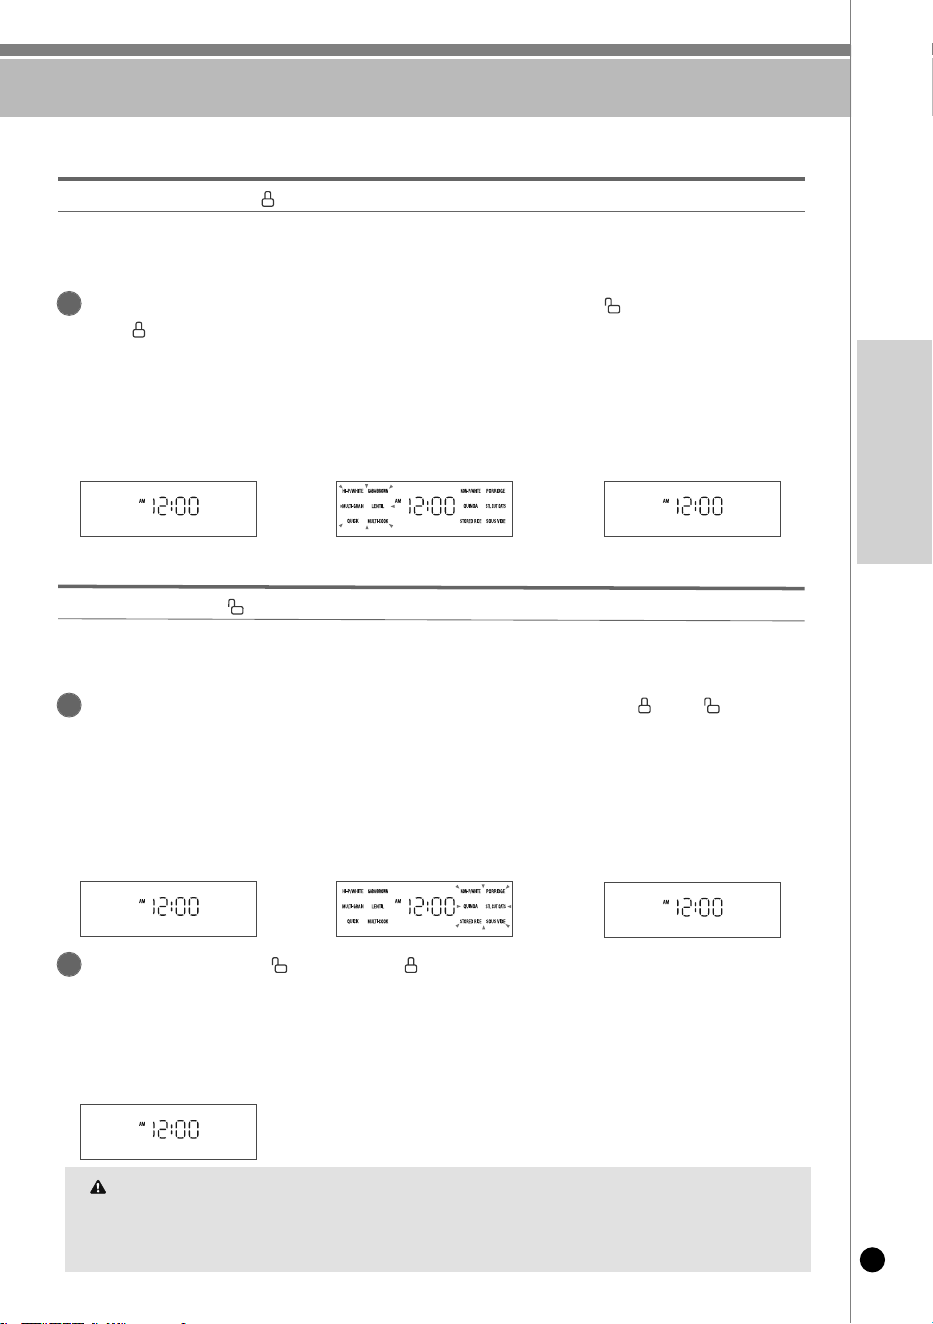
고압모드 또는 무압모드 선택 방법
33
www.cuckooamerica.com
KOREAN
압력모드를 무압모드에서 고압모드로 변경을 원하실 경우 뚜껑결합손잡이를 “무압 ”에서
“ 고압”으로 돌려주세요.
▶ 압력모드가 무압모드에서 고압모드로 변경이 되면 전체 고압메뉴만 3초간 점멸 후 저장된 고압메뉴가 점등합니다.
▶ “고압모드입니다. 고압메뉴를 선택해주세요”하는 음성이 나옵니다.
▶ 뚜껑결합손잡이의 램프의 불빛이 주황색으로 변경됩니다.
▶ 취사를 시작하시려면 반드시 좌/우 버튼으로 메뉴를 선택한 후 시작 버튼을 눌러주세요.
(대기 상태에서 바로 시작 버튼을 누를 시 취사가 시작 되지 않습니다.)
▶뚜껑 결합 손잡이의 LED가 주황색으로 점등됩니다.
▶고압모드에서는 고압메뉴만 선택이 가능합니다.
▶고압메뉴 : 고압백미, 고압백미쾌속, 찰잡곡, 찰잡곡쾌속, 찰현미, 렌틸콩, 멀티쿡
1
뚜껑결합손잡이 방향을 “ 고압”으로 해주세요.
고압모드 선택
➡
<대기상태(무압모드)>
고압메뉴
3초간 점멸 후
➡
무압메뉴
3초간 점멸 후
➡
무압모드
변경 시
➡
고압모드
변경 시
<대기상태(고압모드)>
압력모드를 고압모드에서 무압모드로 변경을 원하실 경우 뚜껑결합손잡이를 “ 고압”에서 “무압 ”으로
돌려주세요.
▶ 압력모드가 고압모드에서 무압모드로 변경이 되면 전체 무압메뉴만 3초간 점멸 후 저장된 무압메뉴가 점등합니다.
▶ “무압모드입니다. 무압메뉴를 선택해주세요” 하는 음성이 나옵니다.
▶ 뚜껑결합손잡이의 램프의 불빛이 흰색으로 변경됩니다.
▶ 취사를 시작하시려면 반드시 좌/우 버튼으로 메뉴를 선택한 후 시작 버튼을 눌러주세요.
(대기 상태에서 바로 시작 버튼을 누를 시 취사가 시작 되지 않습니다.)
▶뚜껑 결합 손잡이의 LED가 흰색으로 점등됩니다.
▶무압모드에서는 무압메뉴만 선택이 가능합니다.
▶무압메뉴 : 무압백미, 죽, 냉동보관밥, 퀴노아, 스틸컷 오트밀, 수비드
1
뚜껑결합손잡이 방향을 “무압 ”으로 해주세요.
무
압
모
드
선
택
<대기상태(고압모드)>
<대기상태(무압모드)>
뚜껑결합손잡이의 방향을 “무압” 또는 “고압”으로 정확하게 하지 않을 경우(중립위치) 메뉴선택 및
취사를 할 수 없습니다.
▶ 좌/우 버튼 또는 시작 버튼 입력 시 “뚜껑결합손잡이를 원하는 압력위치로 돌려주세요” 하는 음성이 나옵니다.
(확인 버튼 2초 이상 누를시 음성 설정 모드로 진입합니다.)
▶ 뚜껑결합손잡이를 정확하게 돌려 고압모드 또는 무압모드를 선택해주세요.
2
<뚜껑결합 손잡이 중립위치 상태>
주의사항
무압 메뉴 취사/요리시 지정된 용량으로 조리하십시오.
취사나 요리시에는 지정된 용량을 초과하여 요리하지 마십시오.
- 요리레시피에 지정된 용량을 초과할 경우 사일런트 스팀 밸브와 소프트 스팀 캡으로 내용물 넘침의 원인이 됩니다.
- 반드시 지정된 요리레시피를 준수 바랍니다.
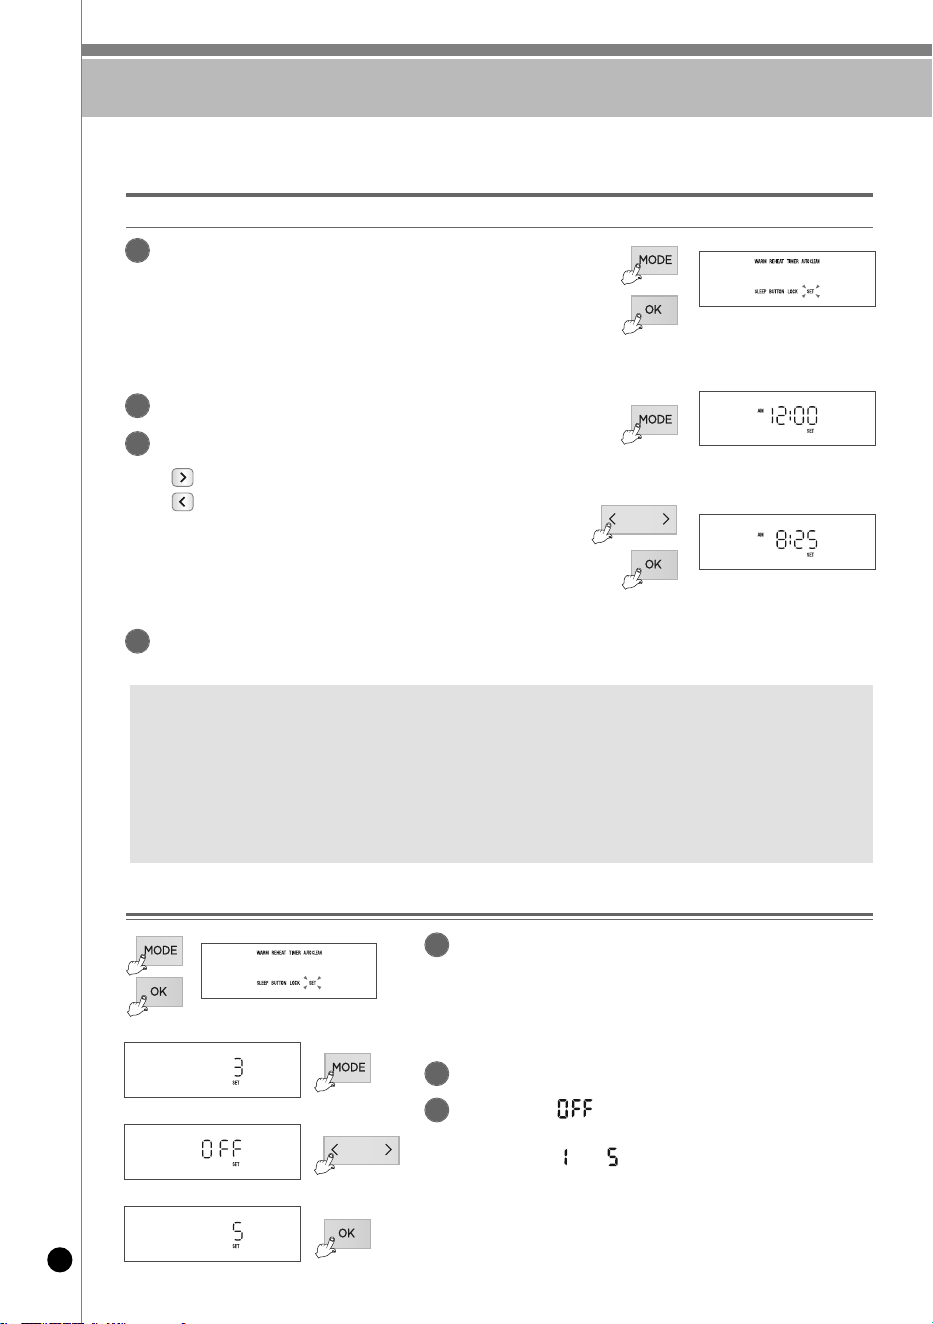
현재시각의 설정 / 음성안내 기능의 설정과 해제
34
음성볼륨 조절기능(음성기능을 해제하거나 음성볼륨을 조절하는 기능임)
대기상태에서 모드 버튼을 눌러 “설정” 에서
확인 버튼을 누르면 음성 설정 모드에 진입합니다.
(대기상태에서 확인 버튼을 2초 이상 눌러도
음성 설정 모드로 진입합니다.)
▶ 모드 버튼을 초기에 누를 시 0.3초 이상 눌러야 진입 가능합니다.
▶ 모드 버튼을 누를 때마다 한 단계씩 이동합니다.
1
■ 리튬 건전지에 대하여
• 본 제품에는 정전보상 기능 및 시계 기능을 위하여 리튬 건전지가 내장되어 있으며 건전지의 수명은 약 3년 정도이나 성능에 따라서 차이가 날 수 있습니다.
• 전원플러그를 뺐다가 다시 꽂았을 때 현재시각이 “12:00”로 리셋되는 현상이 발생하면 건전지에 문제
(방전 등)가 있으므로 고객상담실로 문의하여 지정된 서비스센터에서 건전지를 교환한 후 사용하십시오.
■ 정전 보상기능이란?
• 본 제품은 정전이 되어도 정전 이전의 상태를 기억하게 되어 있어 정전 후, 다시 전기가 들어오면 정상적으로 작동하게 됩니다.
• 취사나 요리 중에 정전이 되면, 정전된 시간만큼 취사나 요리 시간이 늦어지며 정전시간에 따라 취사나 요리 상태가 다소 차이가 날 수도 있습니다.
•
10분 이상 정전 시 취사가 취소됩니다.
• 보온 중 정전이 되어 밥이 식었을 때는 보온이 취소됩니다.
현재시각을 맞추려면 다음 사항을 꼭 알아두십시오. 예) 현재 시각이 오전 8시 25분일 경우
현재시각은 이렇게 맞추십시오.
3
2
대기상태에서 모드 버튼을 눌러 “설정” 에서 확인 버튼을 누르면
음성 설정 모드에 진입합니다.
(대기상태에서 확인 버튼을 2초 이상 눌러도 음성 설정 모드로 진입합니다.)
▶ 모드 버튼을 초기에 누를 시 0.3초 이상 눌러야 진입 가능합니다.
▶ 모드 버튼을 누를 때마다 한 단계씩 이동합니다.
좌/우 버튼으로 시를 8 에 맞추고 분을 25 에 맞춥니다.
▶ 버튼을 누를 때마다 1분 단위로 증가합니다.
▶ 좌측 선택 버튼을 누를 때마다 1분 단위로 감소합니다.
▶ 버튼을 계속 누르고 있으면 10분 단위로 연속으로 변합니다.(반복기능)
반복기능을 이용하여 원하는 시를 먼저 맞춘 후,
1분 단위로 분을 맞추면 원하는 시각을 더 편리하게 설정 할 수 있습니다.
▶ 오전, 오후가 바뀌지 않도록 주의하여 맞춥니다.
▶ 낮 12:00의 경우는 오후 12:00로 표시됩니다.
4
원하는 시각으로 설정이 완료되면 확인 버튼을 눌러주십시오.
▶ 확인 버튼을 누르지 않고 7초가 경과되면 시각 설정이 취소됩니다.
모드 버튼을 1회 누르면 현재 시각 설정 모드에 진입합니다.
➡
1
모드 버튼을 2회 누르면 음성 볼륨 설정 모드에 진입 합니다.
2
좌/우 버튼으로 가 선택되면 “음성 기능이 해제되었습니다.”
하는 음성이 나옵니다.
좌/우 버튼으로 부터 까지의 음성볼륨 크기를 설정할 수
있습니다.
▶ 계속 누르고 있으면 연속으로 변합니다.
▶ 원하시는 음성볼륨을 선택하신 후 확인 버튼을 눌러 주십시오.
▶ 버튼을 누르지 않고 7초가 경과되면 기능이 설정되지 않고 취소되며
대기상태로 돌아갑니다.
3
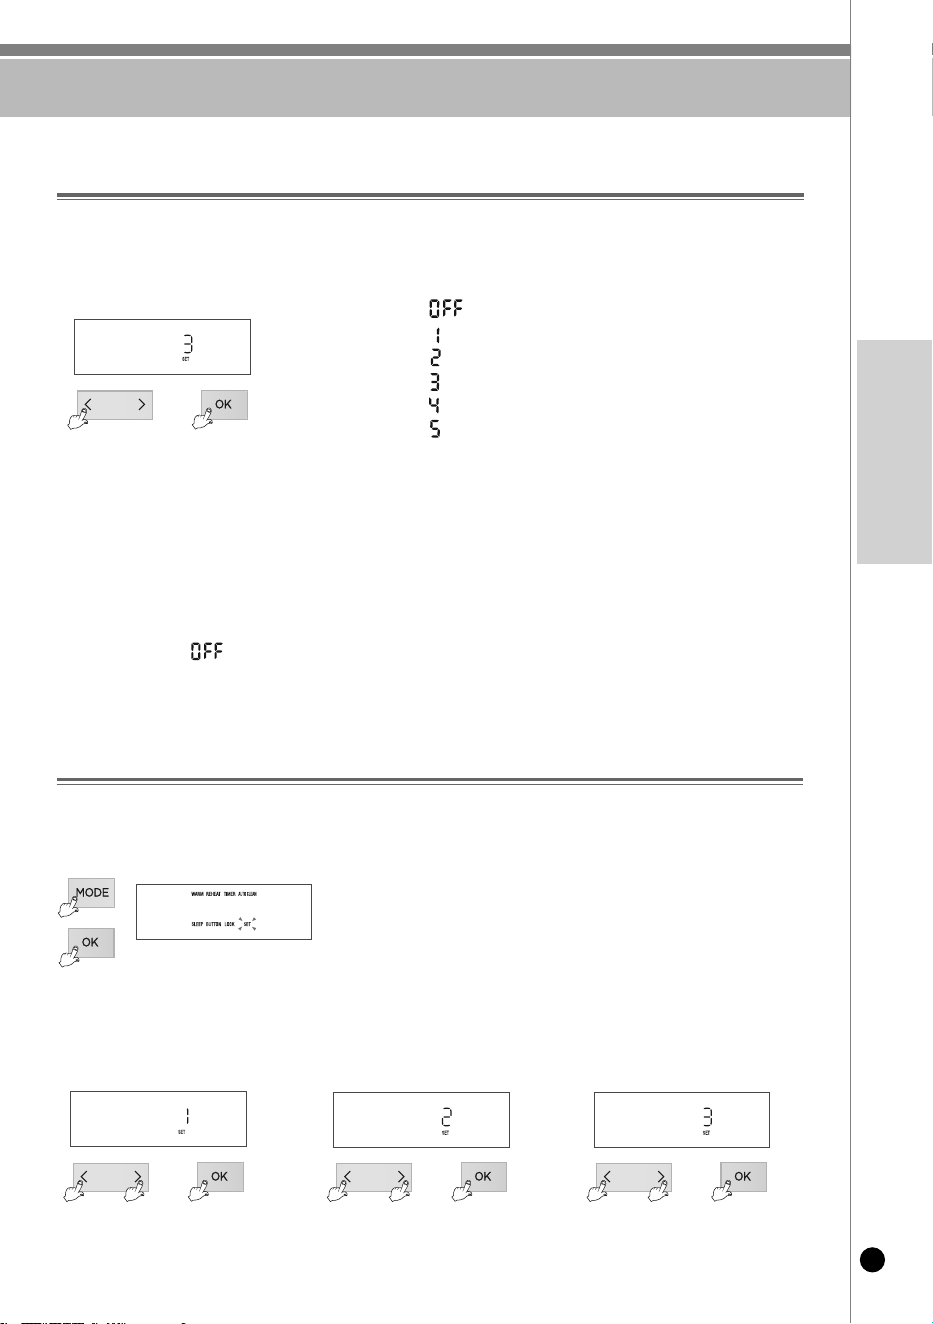
야간 음성볼륨 설정 기능 / 음성 설정 기능
35
www.cuckooamerica.com
KOREAN
야간 음성볼륨 설정 기능
1. 대기상태에서 모드 버튼을 눌러 “설정” 에서 확인 버튼을 누르면 음성 설정 모드에 진입합니다.
(대기상태에서 확인 버튼을 2초 이상 눌러도 음성 설정 모드로 진입합니다.)
▶ 모드 버튼을 초기에 누를 시 0.3초 이상 눌러야 진입 가능합니다.
▶ 모드 버튼을 누를 때마다 한 단계씩 이동합니다.
2. 모드 버튼을 11회 누르면 야간 음성 볼륨 설정 모드에 진입 합니다.
3. 좌/우 버튼을 누르면 단계가 선택되면서 음성의 크기가 바뀝니다.
좌/우 버튼을 조절하여 표시가 되면 “야간 음성 기능이 해제되었습니다.”하는 음성이 나옵니다.
4. 원하시는 음성의 크기를 선택 후 확인 버튼을 눌러 주세요.
5. 야간 음성볼륨 줄임 설정 모드 진입 후 취소 버튼을 누르거나 아무런 버튼 입력없이 7초가 지나면 기능이 설정되지 않고
취소되며 대기상태로 돌아갑니다.
2. 좌/우 버튼으로 한국어음성, 영어음성, 중국어음성 선택 후 확인 버튼을 눌러주세요.
3. 음성 설정 모드 진입 후 취소 버튼을 누르거나 아무런 버튼 입력없이 7초가 지나면 기능이 설정되지 않고 취소되며 대기상태로 돌아갑니다.
1. 대기상태에서 모드 버튼을 눌러 “설정” 에서 확인 버튼을 누르면 음성 설정 모드에 진입합니다.
(대기상태에서 확인 버튼을 2초 이상 눌러도 음성 설정 모드로 진입합니다.)
▶ 모드 버튼을 초기에 누를 시 0.3초 이상 눌러야 진입 가능합니다.
▶ 모드 버튼을 누를 때마다 한 단계씩 이동합니다.
예) 3단계, 음성 크기의 60%
예) 한국어음성 설정 시예) 중국어음성 설정 시
설정 단계에 따른 야간음성 크기
야간 음성볼륨 줄임 기능은 야간시간(10:00 PM~05:59 AM)의 음성볼륨을 줄이는 기능으로 필요에 따라 설정하여 주십시오.
이 기능은 야간 시간 중에만 동작합니다.
▶ 야간 음성볼륨 설정방법
음성 설정 기능
한국어, 영어, 중국어 음성을 선택하는 기능으로 원하시는 음성을 설정 가능합니다.
제품의 초기 상태는 영어음성 상태입니다.
▶ 음성 기능 설정방법
▶ 설정 진입 방법
: 음성 없음.
: 음성 크기의 20%
: 음성 크기의 40%
: 음성 크기의 60%
: 음성 크기의 80%
: 음성 크기의 100%
예) 영어음성 설정 시
➡
➡➡➡
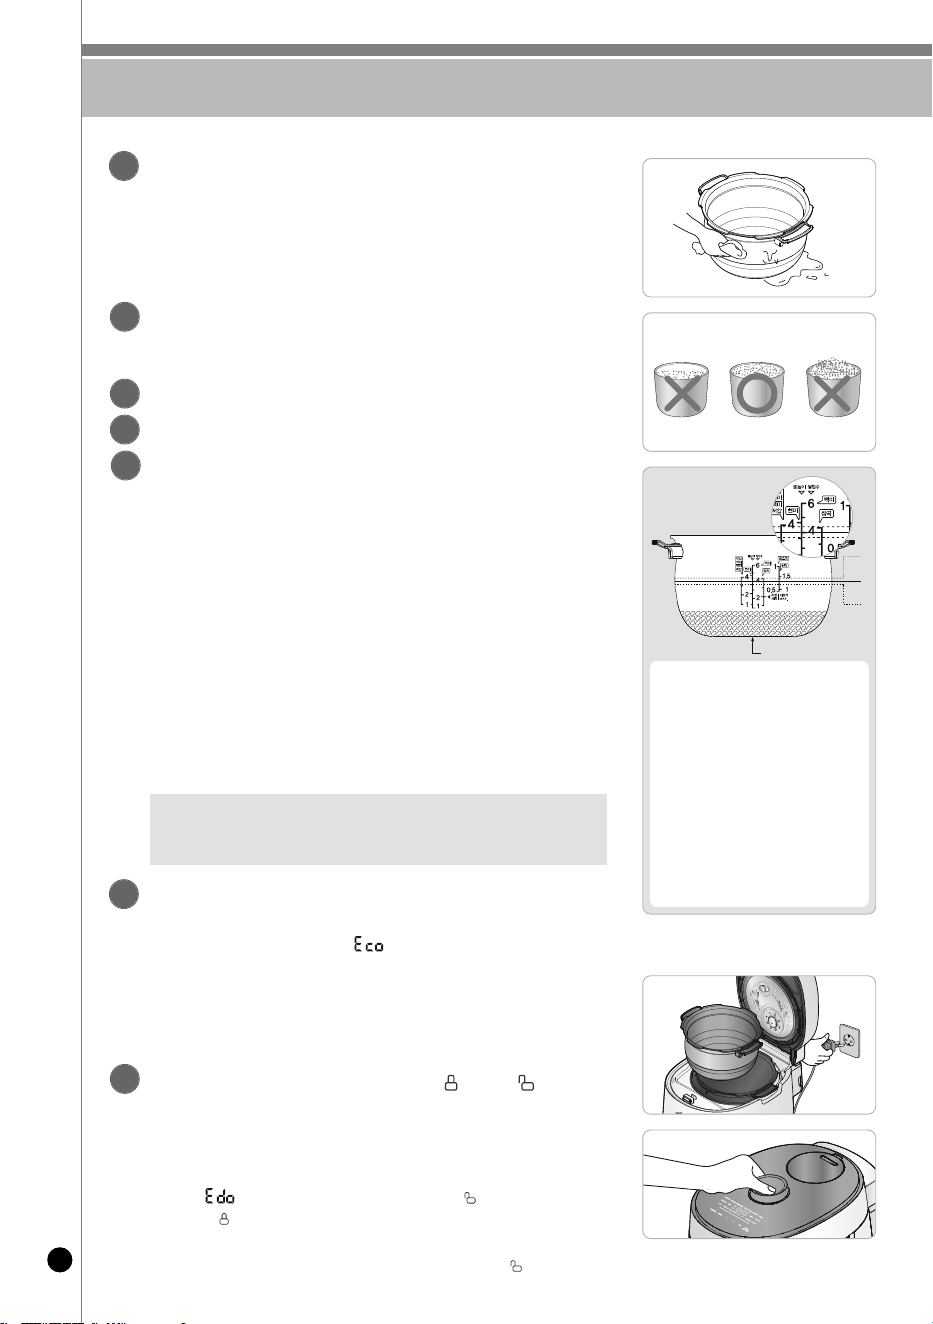
취사 전 준비사항
36
2
맑은 물이 나올 때까지 깨끗이 씻습니다.
3
깨끗이 씻은 쌀을 내솥에 옮겨 담습니다.
4
6
7
메뉴에 따라 물의 양을 조절합니다.
• 바닥이 평평한 곳에 내솥을 올려 놓고 내솥에 표시된 눈금에 맞춰 물의 양을 조절합니다.
• 내솥에 표시된 눈금은 쌀과 물을 함께 부었을 때의 물눈금을 표시합니다.
• 물 높이 조절에 대하여
- 고압백미, 고압백미쾌속 : ‘백미’물눈금 기준으로 물을 맞춥니다.
고압백미는 최대 6인분, 고압백미쾌속은 최대 4인분까지 취사 가능합니다.
- 찰잡곡, 찰잡곡쾌속, 렌틸콩 : ‘잡곡’물눈금 기준으로 물을 맞춥니다.
찰잡곡, 찰잡곡쾌속, 렌틸콩은 최대 4인분까지 취사 가능합니다.
- 찰현미 : ‘현미’ 물눈금 기준으로 맞춥니다.
찰현미, 찰현미발아는 최대 4인분까지 취사 가능합니다.
- 무압백미, 냉동보관밥, 퀴노아 :
‘무압백미’물눈금 기준으로 물을 맞춥니다.
무압백미, 냉동보관밥, 퀴노아는 최대 4인분까지 취사 가능합니다.
- 스틸컷오트밀 : 스틸컷 오트밀은 46페이지 참조하여 주십시오.
스틸컷 오트밀은 최대 2컵까지 취사가 가능합니다.
- 된죽 : ‘된죽’ 물눈금 기준으로 맞춥니다. 된죽은 최대 1.5컵까지 취사 가능합니다.
- 묽은죽 : ‘묽은죽’ 물눈금 기준으로 맞춥니다. 묽은죽은 최대 1컵까지 취사가 가능합니다.
5
※ 콩, 팥과 같은 딱딱한 곡류는 불리거나 삶아서 찰잡곡, 찰잡곡쾌속 메뉴에서 취사를 하십시오.
잡곡의 종류에 따라 설익을 수도 있습니다.
※ 메뉴별 취사량은 ‘메뉴별 취사시간’을 참조하십시오.(38쪽 참조)
※ 본 모델은 백미저압 메뉴를 지원하지 않습니다.
❶ 진밥을 원할때 : 물을 규정량보다 많이 부어
주십시오.
❷ 쌀 4인분의 경우 (계량컵 4컵)
내솥의 ‘백미’ 눈금 4에 물을 맞춥니다.
❸ 쌀을 충분히 불렸을 때 또는 된밥을 원할 때 :
물을 규정량보다 적게 부어주십시오.
❹ 밥이 설익거나 꼬들한 경우 :
쌀의 품종 차이 또는 함수율(묵은쌀)
차이로 발생합니다. 이 경우 기존 취사 물량
대비 1~10% 물량을 늘려서 취사해 주십시오.
쌀4인분 (계량컵4컵)
내솥을 깨끗이 씻은 후 물기를 닦습니다.
• 내솥을 씻을 때는 부드러운 행주를 사용하여 주십시오.
• 강한 수세미를 사용하면 내솥 안쪽 표면이 벗겨지는 경우가 있습니다.
• 날카로운 식기류(포크, 숟가락, 젓가락 등)를 내솥에 넣은채 세척하지 마십시오.
-내솥 코팅이 손상될 수 있습니다.
-고객 과실에 의한 내솥 코팅의 스크래치 및 벗겨짐이 발생할 경우에는 무상 서비스
기간 내라도 유상 처리됩니다.
계량컵을 사용하여 쌀을 인분수 만큼 별도의 용기에 담습니다.
• 쌀을 계량컵의 윗면 기준하여 평평하게 맞추면 1인분에 해당됩니다.
(예 : 3인분일 경우 → 3컵, 6인분일 경우 → 6컵)
뚜껑을 닫은 후 뚜껑 결합 손잡이를 “고압” 또는 “무압”
위치로 돌려주십시오.
▶뚜껑 결합 손잡이의 LED가 주황색으로 점등되면 고압모드이고,
뚜껑 결합 손잡이의 LED가 흰색으로 점등되면 무압모드입니다.
※ 보온 중일 때는 취소 버튼을 눌러 보온을 취소한 후 원하시는 기능을 선택하여 주십시오.
▶ 이외에 “”표시가 나올 경우에는 뚜껑 결합 손잡이를 “무압” 방향으로 돌린 후
다시 “ 고압”으로 돌려 주시면 정상적으로 동작 됩니다.
(뚜껑 체결 감지 장치의 동작 확인 기능)
전원플러그를 꽂은 후 내솥을 본체에 넣어 주십시오.
분리형 커버가 장착되어 있는지 확인하여 주십시오.
▶ 분리형 커버가 장착되어 있지 않으면 “”표시가 나타나며 버튼입력이 되지 않습니다.
내솥을 넣을 때 본체에 완전히 들어가도록 주의하여 넣습니다.
▶ 내솥의 바닥면에 쌀 등의 이물질이 붙어 있으면 취사가 잘 되지 않거나
고장의 우려가 있습니다.
▶내솥이 본체에 정확하게 들어가지 않으면 뚜껑이 닫히지 않습니다.
(내솥의 손잡이가 본체의 홈에 들어가도록 하십시오.)
1
❶
❷
❸
※ 고압모드 상태로 이전 취사에서 취사 완료 후 한번 이상 뚜껑 결합 손잡이를“ 무압”방향으로 돌렸을 경우에는 해당되지 않습니다.
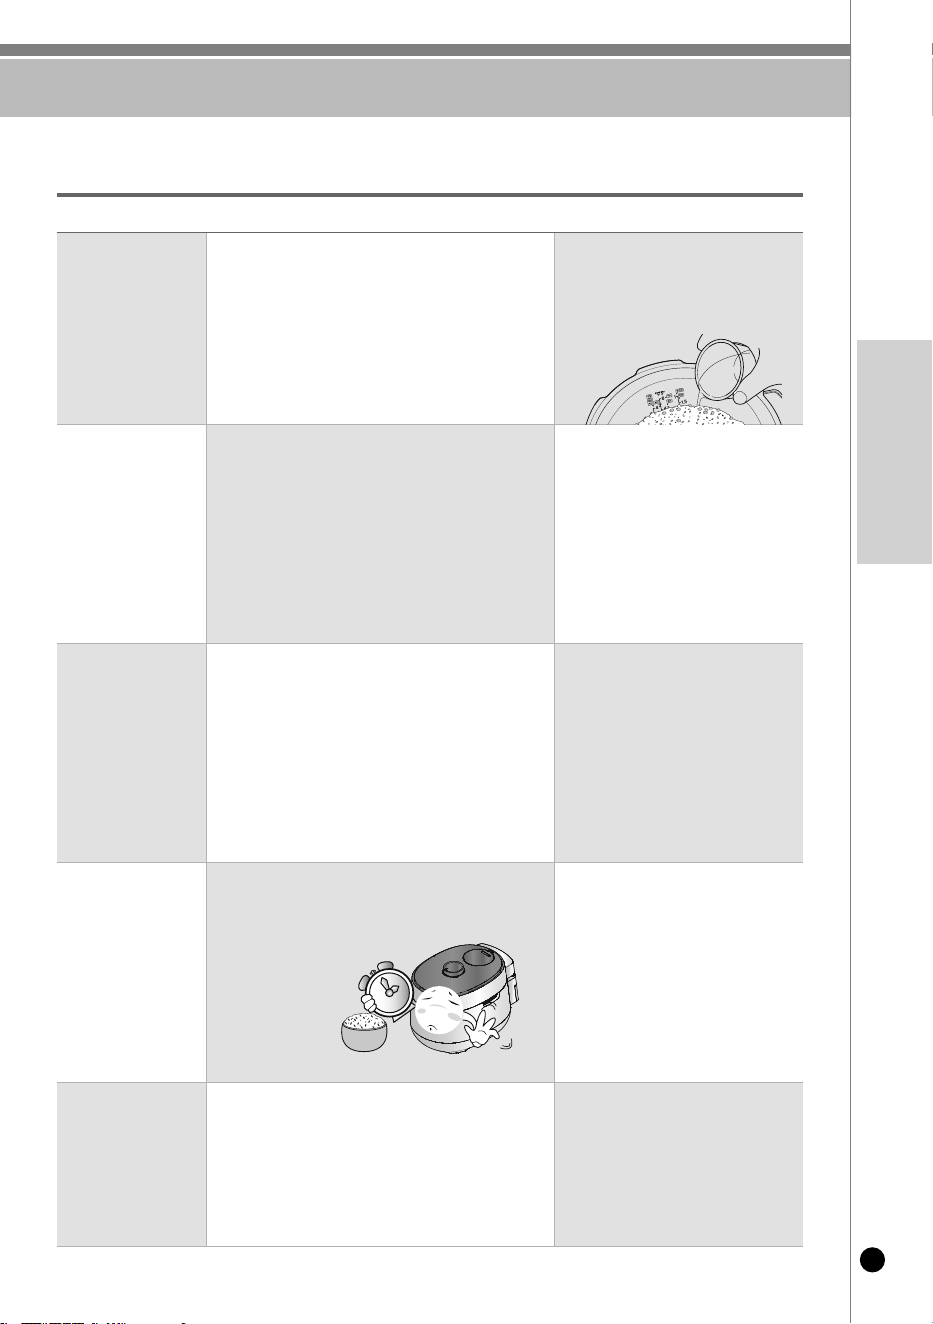
맛있는 밥을 드시려면
37
www.cuckooamerica.com
KOREAN
쌀은 계량컵으로!
물은 내솥눈금
으로 정확히!
쌀은 보관
방법이 중요!
예약 취사 시간은
짧을수록 좋습니다!
보온시간은 짧을
수록 좋습니다!
제품은 깨끗하게!
• 쌀은 반드시 계량컵을 사용하여 정확히 계량합니다.
(시중에 유통되고 있는 쌀통은 제품에 따라 쌀의
양이 다소 차이가 날 수도 있습니다.)
• 물의 양은 내솥을 평평한 곳에 놓고 내솥의 물(水) 눈금에
맞춥니다.
• 쌀은 가급적이면 소량으로 구입하여 통풍이 잘되고
직사광선이 없는 서늘한 곳에 쌀의 수분이 잘 증발되지
않도록 보관합니다.
• 쌀을 개봉한 지 오래되어 말라 있는 경우는 물을
반눈금 정도 더 넣고 취사를 하면 좋습니다.
• 쌀이 많이 말라 있는 경우는 가급적 예약취사를
피하시고 물을 반눈금 정도 더 넣고 취사합니다.
• 보온은 12시간 이내로 하는 것이 좋습니다.
• 청소를 자주 하십시오.
특히, 뚜껑부에 이물질이 묻어 있지 않도록 자주 닦아
주십시오.
쌀의 양과 물의 양이 맞지 않으면
밥이 퍼석하거나 설익거나 질게
될 수가 있습니다.
쌀이 많이 말라 있는 경우는 계량을 정확
히 하더라도 밥이 퍼석할 수가 있습니다.
10시간 이상 예약취사하거나 말라있는 쌀을
예약취사할 경우는 밥이 퍼석하거나 설익을
수가 있으며 심한 경우는 층밥이 될 수도
있습니다.
예약 설정 시간이 길어질수록
멜라노이징(미세 밥 눌음)현상이 증가할 수
있습니다.
장시간 보온을 하게되면 밥색깔이
변하거나 밥에서 냄새가 날 수도
있습니다.
청소를 자주 하지 않으면 세균이
번식하여 보온시 밥에서 냄새가
날 수 있습니다.
맛있는 압력밥솥 밥을 드시려면 다음 사항을 꼭 알아두십시오.
압력밥솥으로 맛있는 밥짓기
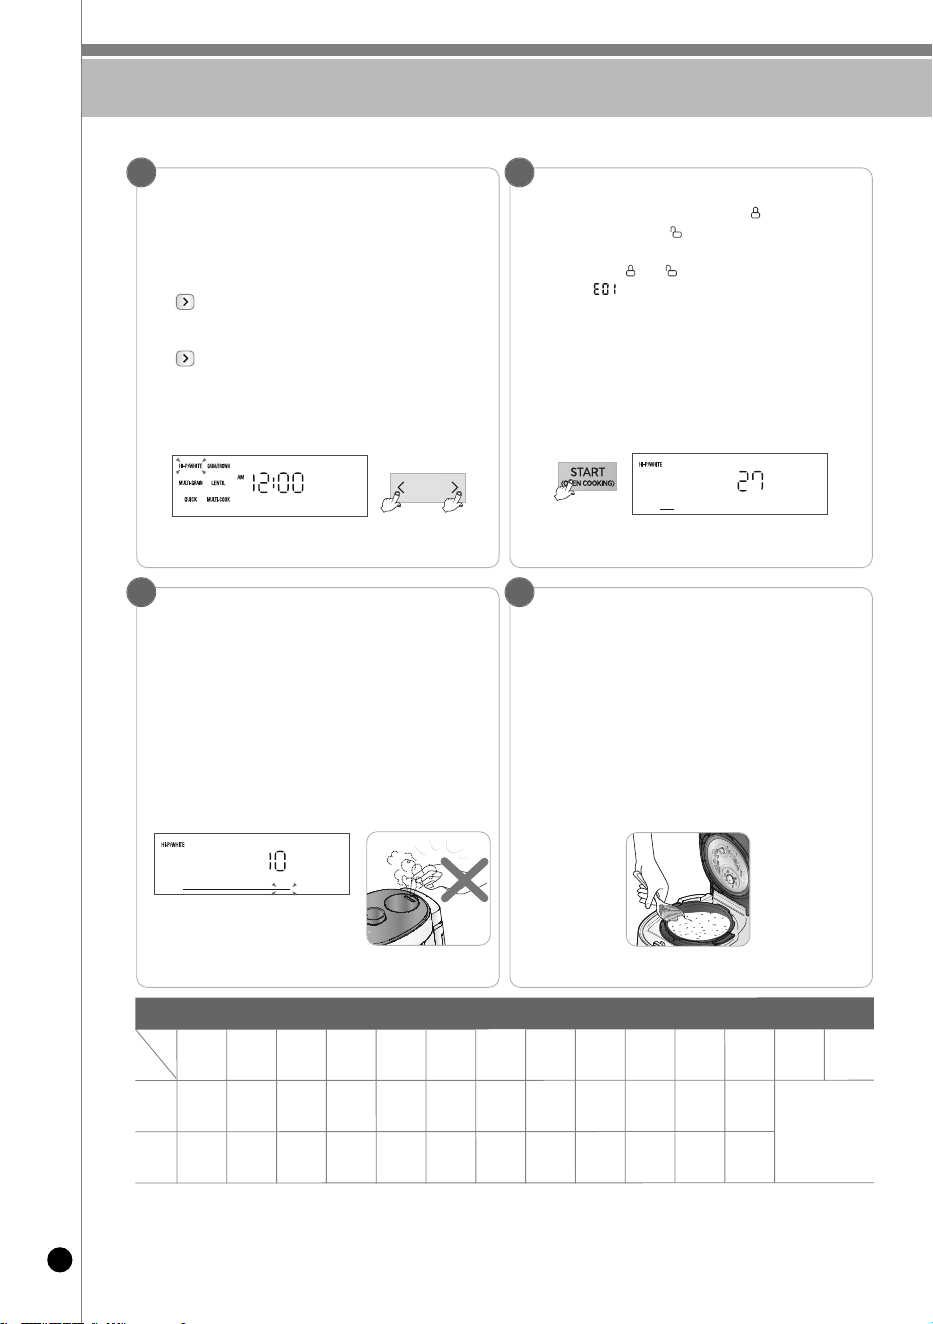
취사는 이렇게 하십시오
38
뚜껑결합손잡이로 원하는 압력모드를 선택합니다.
시작 버튼을 눌러 취사를 시작합니다.
•
분리형 커버가 장착되어 있는지 확인하여 주십시오.
•
정확한 압력모드가 선택되지 않으면 메뉴를 선택할 수 없습니다.
•
뚜껑결합손잡이가 고압모드일 경우 고압메뉴만 선택되고 무압모드일 경우
무압메뉴만 선택이 됩니다.
<고압모드>
•
우측 버튼을 누를 때마다 고압백미→고압백미쾌속→찰잡곡→찰잡곡쾌속→
찰현미→렌틸콩밥 →멀티쿡 순으로 반복 선택됩니다.
<무압모드>
•
우측 버튼을 누를 때마다 무압백미→퀴노아→냉동보관밥→죽→스틸컷 오트밀
→수비드 순으로 반복 선택됩니다.
•
고압백미, 찰잡곡, 찰현미, 무압백미 메뉴의 경우 취사가 완료되면 메뉴가
기억되므로 동일 메뉴를 연속 사용할 경우는 메뉴를 선택하지 않아도 됩니다.
•
취사를 하기전에 고압메뉴의 경우 뚜껑결합손잡이를 “고압”으로 돌리고 시작 버튼을,
무압메뉴의 경우 뚜껑결합손잡이를 “무압”으로 돌리고 시작 버튼을 눌러주세요.
•
시작 버튼을 누르면 취사가 시작합니다.
•
뚜껑결합손잡이를 “고압” 또는 “무압” 방향으로 하지 않고 시작 버튼을 누른 경우
경고음과 함께 “”이 나타난 후 취사가 진행되지 않습니다.
•
취사 시작 직후 1분간 취사 완료 예상 시간을 표시합니다.
•
취사 용량이나 수온, 전압 등 사용 환경에 따라 실제 취사 시간은 차이가 있을 수 있습니다.
•
취사 시작 1분 후에는 일정 주기로 남은 취사시간을 산정하여 10초간 표시됩니다.
•
취사 진행 정도에 따라 표시되는 시간이 자동으로 갱신되어 표시되므로 실제 시간과
다를 수 있습니다.
•
LED Bar에 취사 공정 진행률이 표시됩니다.
(단, 현미 발아 공정, 멀티쿡, 죽, 스틸컷 오트밀, 수비드 제외)
12
취사완료
•
취사가 완료되면 보온 기능을 시작합니다.
•
보온을 원하지 않을 경우 취소 버튼을 0.3초간 눌러 보온을
취소하여 주십시오.
•
취사가 끝나면 즉시 밥을 골고루 잘 섞어 주십시오.
섞지 않고 그냥 두면 밥이 굳고 변색되어 냄새가 발생합니다.
•
취사 중에는 취소 버튼을 누르지 마십시오. 취사가 취소됩니다.
4
예) 고압백미를 선택 할 경우
예) 고압모드에서 고압백미를 취사 할 경우
뜸들이기 (예:고압백미)
•
뜸
완
료
1
~
4
분
전
에
증
기
배
출
효
과
음
(
기
차
소
리
)
이
나
오
고
“
증
기
배
출
이
시
작
됩
니
다
.”
하
는
음
성
과
함
께
증
기
가
자
동
배
출
되
므
로
놀
라
거
나
화
상
을
입
지
않
도
록
주
의
하
십
시
오
.
•
단
,
음
성
볼
륨
OF
F
및
야
간
음
성
볼
륨
기
능
O
F
F
설
정
시
(
야
간
시
간
)
부
저
음
울
림
이
후
증
기
가
자
동
배
출
되
므
로
놀
라
거
나
화
상
을
입
지
않
도
록
주
의
하
십
시
오
.
3
※ 멀티쿡, 수비드 등의 요리 후 취사하게 되면 냄새가 배어들 수도 있습니다.
(29~30쪽을 참조하여 패킹과 뚜껑 부위를 깨끗하게 닦아 낸 후 사용하여 주십시오.)
※ 메뉴별 취사시간은 전압, 물량, 수온 등 사용환경에 따라 다소 차이가 날 수 있습니다.
(예: 10분 남은 경우)
메
뉴
별
취
사
시
간
메뉴
구분
고압
백미
(
기본메
뉴)
고압백미
쾌속
찰잡곡
찰잡곡
쾌속
찰
현미
렌틸
콩밥
무압백미퀴노아냉동보
관밥
죽(된죽)죽(묽은죽)
스틀컷
오
트밀
멀티쿡수
비드
취사량
1
인분~
6
인분
1
인분~
4
인분
1
인
분~
4
인
분
1
인분~
4
인분
1
인분~
4
인분
1
인분~
4
인분
1
인분~
4
인분
1
인
분~
4
인
분
1
인분~
4
인분
1
컵~
1
.5
컵
0
.
5
컵~
1
컵
1
컵~
2
컵
메뉴별 요리레시피를
참조하여 주십시오.
취사
시간
약2
2
분
~
약3
1
분
약1
2
분~
약1
8
분
약3
9
분~
약4
6
분
약2
7
분~
약3
3
분
약4
7
분~
약5
2
분
약
4
2
분~
약
5
3
분
약3
4
분~
약3
9
분
약3
2
분~
약4
2
분
약2
7
분~
약3
1
분
약3
5
분~
약4
5
분
약
4
0
분~
약
5
0
분
약45
분
~
약65
분
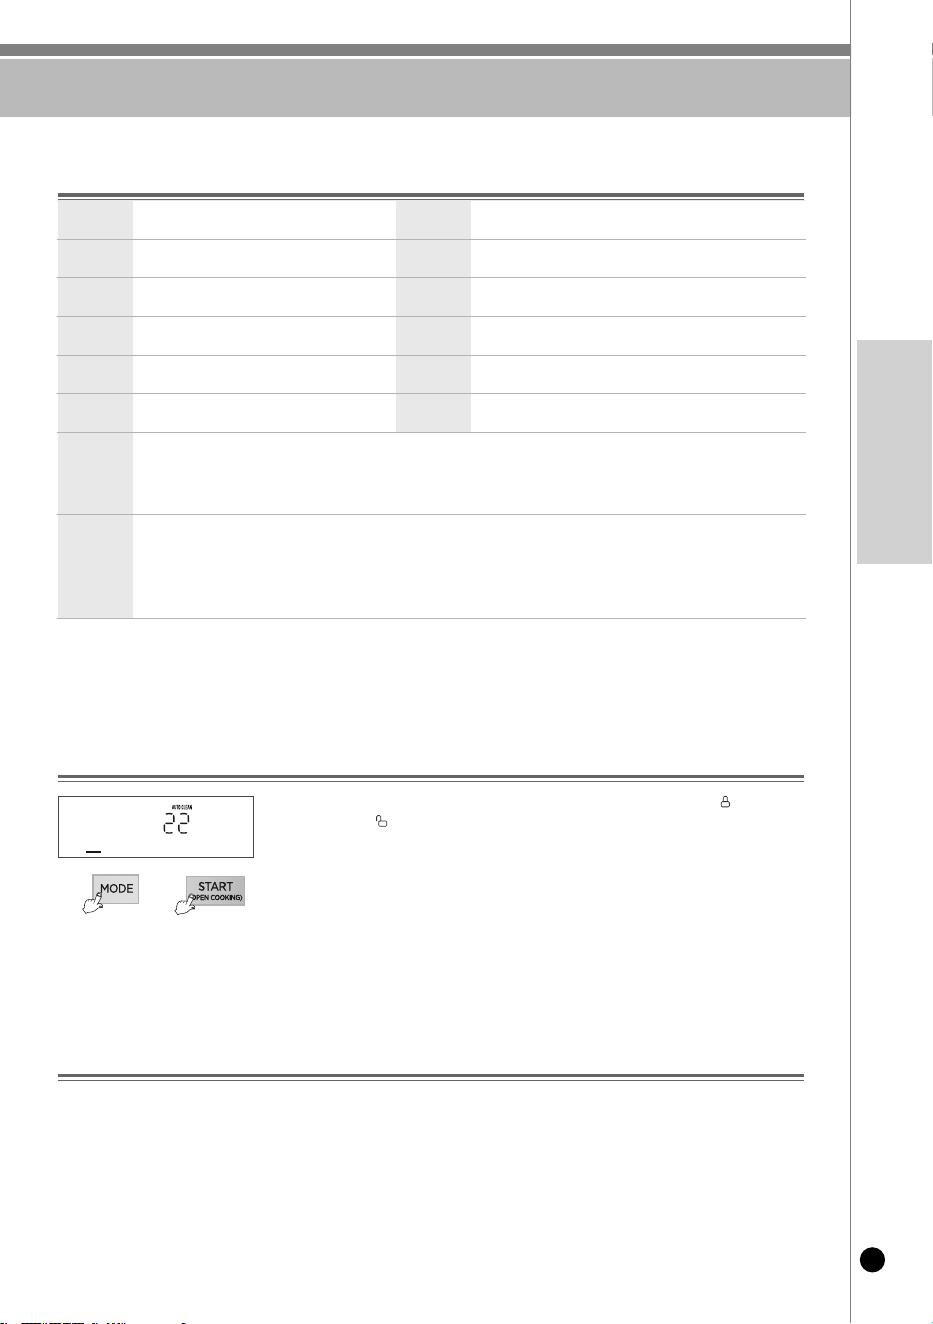
취사 / 자동세척 기능은 이렇게 하십시오
39
www.cuckooamerica.com
KOREAN
취사메뉴 사용법
고압백미백미를 취사할 때 사용합니다.찰잡곡백미를 곡류에 섞어서 취사할 경우 사용합니다.
찰현미(0H)
현미를 발아시키지 않고, 현미밥을 드시고자 할 때 사용합니다.
찰현미발아
(2H~6H)
현미를 발아시켜 발아현미밥을 드시고자 할 때 사용합니다.
렌틸콩밥
렌틸콩밥을 취사할 때 사용합니다.
퀴노아퀴노아 및 기타 곡물을 드시고자 할 때 사용합니다.
죽죽을 만들 때 사용합니다.냉동보관밥밥을 냉동으로 보관하여 드시고자 할 때 사용합니다.
수비드수비드를 할 때 사용합니다.이유식이유식을 자동으로 요리해 줍니다.
스틸컷 오트밀
스틸컷 오트밀을 드시고자 할 때 사용합니다.
멀티쿡수동으로 히터레벨, 온도 시간을 설정하여 요리합니다.
고압백미쾌속
• 좌/우 버튼을 이용하여 고압백미쾌속 메뉴를 선택한 후 시작버튼을 누르면 밥짓는 시간이 단축됩니다.
(백미 1인분 기준 약 12분 정도 걸림)
• 고압백미쾌속 취사는 정상취사보다 밥상태가 좋지 않으므로 4인분 이하에서만 사용하여 주십시오.
찰잡곡쾌속
• 좌/우 버튼을 이용하여 찰잡곡쾌속 메뉴를 선택한 후 시작버튼을 누르면 밥짓는 시간이 단축됩니다.
(잡곡 1인분 기준 약 27분 정도 걸림)
• 찰잡곡쾌속 취사는 정상 취사보다 밥 상태가 좋지 않으므로 4인분 이하에서만 사용하여 주십시오.
• 취사전 잡곡을 미리 불리거나 딱딱한 콩, 팥등의 경우 미리 삶아서 취사하시면 밥맛이 더욱 좋아집니다.
※ 고압백미쾌속, 찰잡곡쾌속 및 저인분을 취사할 경우 물받이에 있는 물이 많을 수 있으므로 취사 후 물을 버려 주십시오.
※ 메뉴별 상세한 요리 방법은 요리레시피를 참조하십시오.
※ 죽 메뉴 사용시 점성이 높은 좁쌀 등 식재료 취사를 하지 마세요. 증기 배출구의 막힘 발생으로 인해 위험할 수가 있습니다.
※ 사용설명서 요리가이드 메뉴를 제외한 기타 식재료로 요리를 하지 마세요.
내솥의 자동세척 눈금에 맞춰 물을 넣고 뚜껑을 덮어 뚜껑 결합 손잡이를“고압”또는
“무압 ”으로 돌려주십시오.
방법
1. 대기상태에서 모드 버튼을 눌러 “자동세척” 에서 시작 버튼을 눌러 주십시오.
※ 모드 버튼을 초기에 누를 시 0.3초 이상 눌러야 진입 가능합니다.
※ 모드 버튼을 누를 때마다 한 단계씩 이동합니다.
※ 자동세척을 정기적으로 하시면 사일런트 스팀 밸브를 청결히 유지할 수 있습니다.
※ 자동세척 후에는 반드시 소프트 스팀 캡 내부의 물기를 제거해 주십시오.
(29~30쪽 참조)
이 압력밥솥은 밥의 밑면에 엷은 누런 빛깔이 나타나는데, 이는 밥이 잔여수분을 밥 내부로 흡수시켜 밥 특유의 구수한 향기와 맛을 내는 멜라노이징 현상을
일으켜 맛있는 밥이 되도록 설계되어 있기 때문입니다. 특히 예약취사와 같이 쌀알이 오랜 시간 침전되면 내솥 바닥에 미세 전분이 가라앉아 일반취사 보다
멜라노이징(미세 밥 눌음)현상이 증가할 수 있습니다.
※ 백미에 곡류를 섞어서 잡곡을 취사할 경우 백미만으로 취사할 때 보다 멜라노이징(미세 밥 눌음)현상이 증가할 수 있습니다.
멜라노이징(미세 밥 눌음) 현상
➡
자동세척은 이렇게 하십시오.
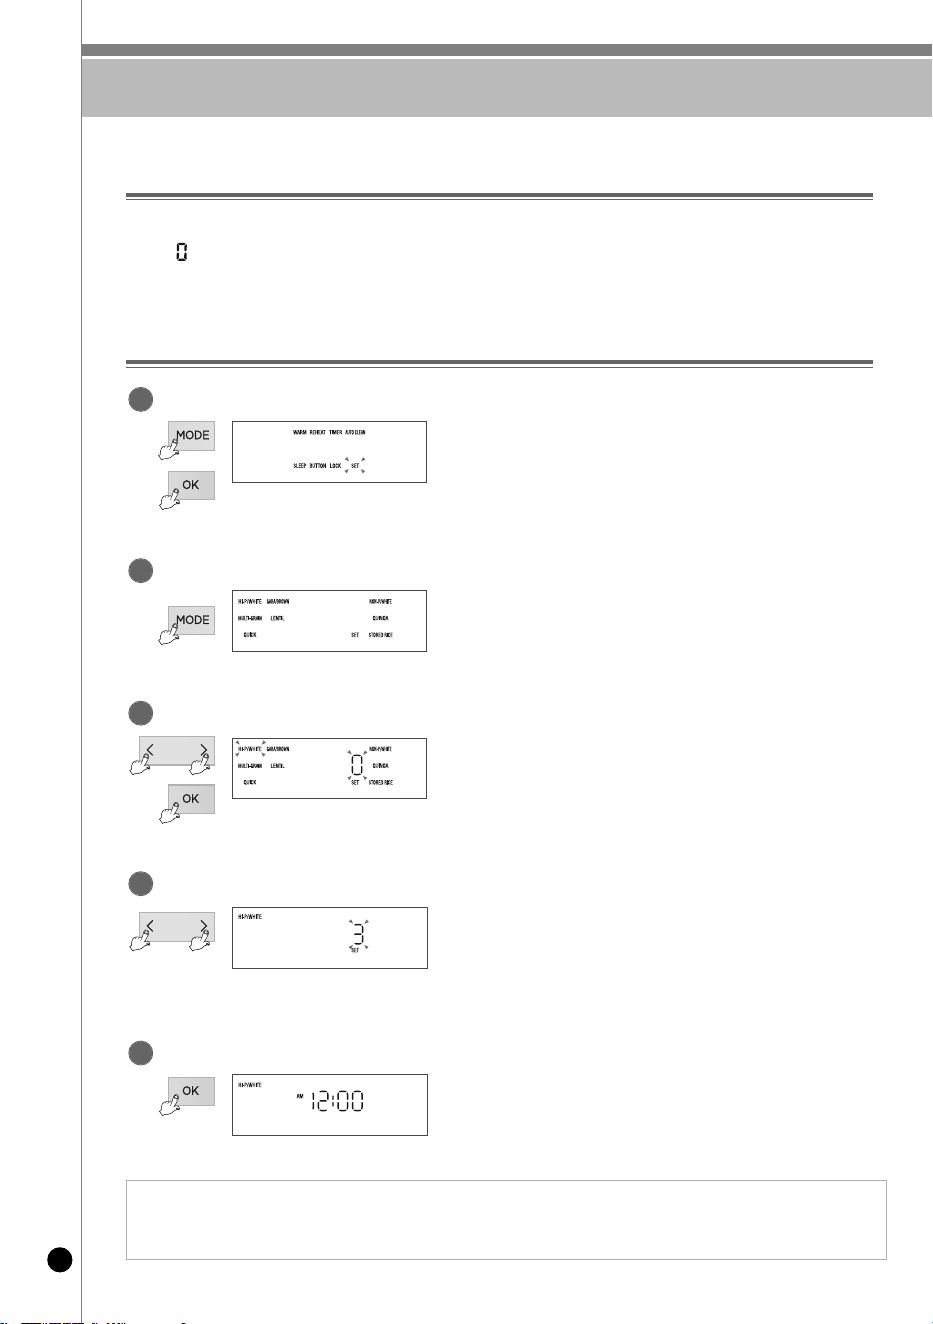
쿠쿠 맞춤취사 기능은 이렇게 하십시오
40
쿠쿠 맞춤취사 사용방법
1. 쿠쿠 맞춤취사 기능은 고압백미, 고압백미쾌속, 찰잡곡, 찰잡곡쾌속, 찰현미, 렌틸콩밥, 무압백미, 퀴노아, 냉동보관밥에 개별 적용됩니다.
2. 초기 표시 화면을 기준으로 하여 기호에 따라 맞춤취사 단계를 설정하여 주십시오. 취사단계가 높은 경우 눌음현상이 발생할 수 있습니다.
3. 단계별 설정 후 취사시 쌀의 상태 및 함수율에 따라서 취반상태에서 차이가 있을 수 있습니다.
초기값은 으로 설정되어 있으며 경우에 따라 단계별 조절을 해주십시오.
- 높은단계 : 잡곡류로 취사하실 경우나 차진밥을 좋아하실 경우에 설정해 주십시오.
- 낮은단계 : 햅쌀로 취사하실 경우나 차진밥을 싫어하실 경우에 설정해 주십시오.
취사시 가열 온도단계를 조절(온도의 높고, 낮음)하여 취사할 수 있는 기능으로 기존 취사시 고정되어 있던 온도단계를
소비자가 직접 조절할 수 있으므로 소비자가 원하는 기호에 맞게 취사할 수 있습니다.
쿠쿠 맞춤취사 기능(취사온도 조절기능)
설정 화면
대기상태에서 모드 버튼을 눌러 “설정” 에서 확인 버튼을
누르면 음성 설정 모드에 진입합니다.
(대기상태에서 확인 버튼을 2초 이상 눌러도
음성 설정 모드로 진입합니다.)
▶ 모드 버튼을 초기에 누를 시 0.3초 이상 눌러야 진입 가능합니다.
▶ 모드 버튼을 누를 때마다 한 단계씩 이동합니다.
1
맞춤취사 설정화면
음성 설정 모드에 진입한 후 모드 버튼을 5회 누르면
맞춤취사 설정모드로 들어 갑니다.
▶ 모드 버튼을 누를 때마다 한 단계씩 이동합니다.
2
메뉴 선택 화면
좌/우 버튼으로 맞춤취사가 지원되는 메뉴를 선택한 후
확인 버튼을 눌러주십시오.
3
단계 조정 화면
좌/우 버튼으로 원하시는 단계를 선택합니다.
▶ 버튼을 계속 누르고 있으면 연속으로 변합니다.
4
설정 완료 화면
확인 버튼을 누르면 설정된 값이 자동으로 저장됩니다.
(취소 버튼을 누르거나 버튼 입력없이 7초가 경과하면
기능이 취소되고 대기상태로 돌아갑니다.)
5
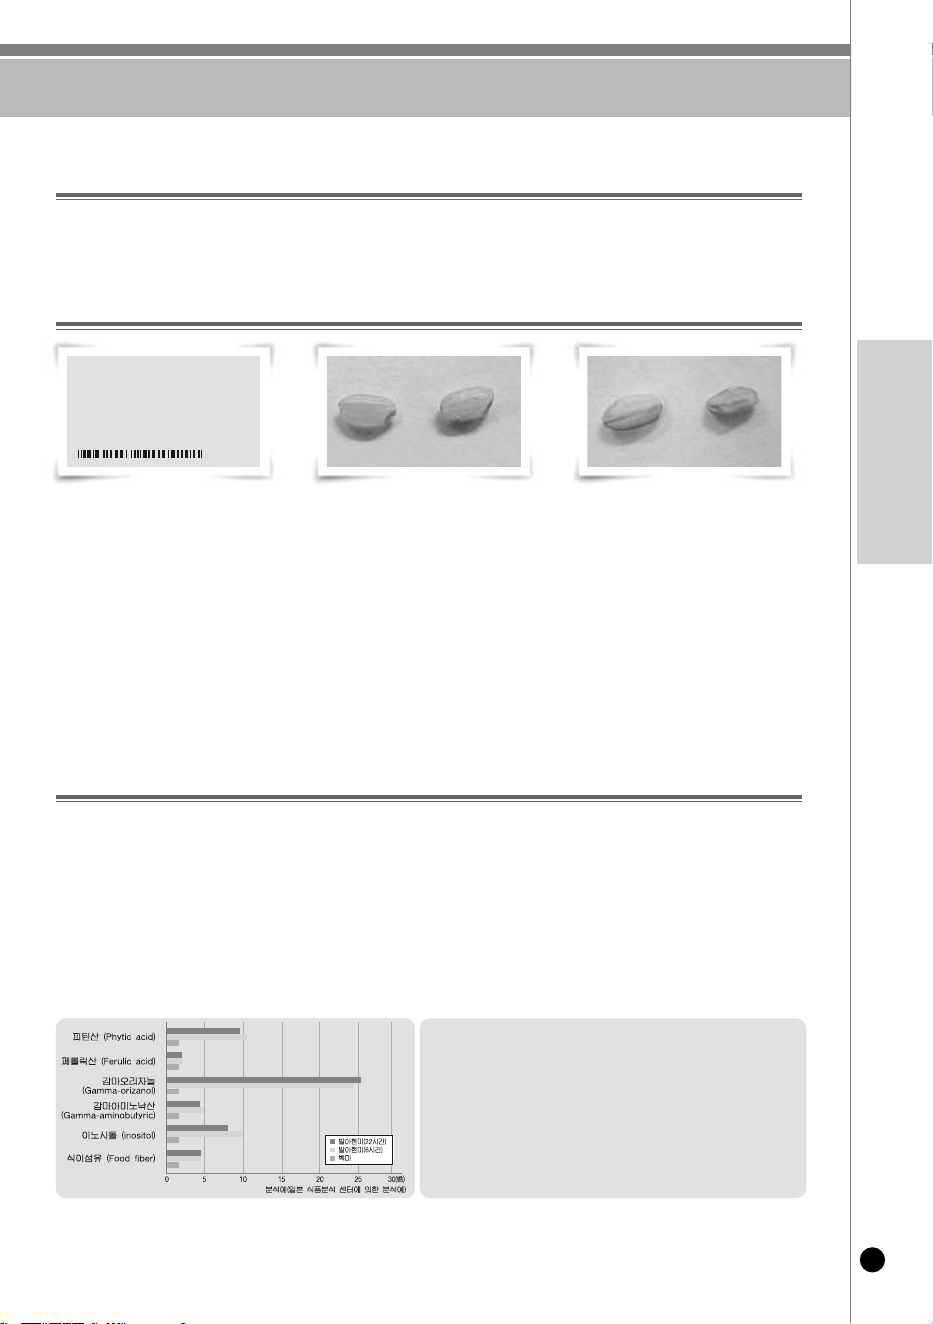
찰현미는 이렇게 하십시오
41
www.cuckooamerica.com
KOREAN
원산지 : 경기 용인
품 목 : 추청
단 위 : 1.5kg
생산년도 : ××××년산
도정일자 : ××××년 ××월 ××일
❶먼저 생산일자와 도정일자를 확인 하십시오.
▶ 수확한지 1년 이내 그리고 도정일자로부터 3개월 이내의 현미를 사용하십시오.
(현미의 경우 수확년도와 도정날짜가 표시되어 있습니다.)
❷눈으로 현미를 직접 확인하십시오.
▶ 시중에서 판매하는 현미의 대부분은 내부를 볼 수 있도록 되어 있습니다.
• 씨눈이 살아 있는지 먼저 확인하십시오.
• 쌀 표면이 밝은 황색을 띄고 표면에 윤기가 흐르면 좋은 현미이고 표면이 하얗게 일어나거나 색이 검은 기운을 띄면
발아에 적합하지 않은 현미입니다.
• 조각나거나 덜 여문 현미는 피하시고 쭉정이가 없는 현미를 고르세요.
쭉정이는 발아 중 썩어 냄새를 유발하고 푸르스름한 색을 띄는 덜 여문 현미는 발아가 되지 않습니다.
(정상현미) (불량 현미 - 씨눈 소실)
발아현미(6시간)와 백미의 영양 비교
발아현미는 백미에 비해 높은 영양소를 가집니다.
피틴산 10.3배
페롤릭산 1.4배
감마오리자놀 23.9배
감마아미노낙산 5배
이노시톨 10배
식이섬유 4.3배
현미는 백미에 비해 영양가가 높은 식품이지만 먹었을 때 거칠고 딱딱하며, 소화하기 힘들다는 단점이 있으나 아주 조금만 발아시켜도 잠자고
있던 효소가 활성화되어 영양성분이 보다 풍부하게 되고 소화 흡수가 훨씬 수월한 형태로 변화됩니다.
발아현미란
발아현미는 영양가 높은 현미를 발아 시켜 영양소를 더욱 증가시키고 현미의 단점인 거친 밥맛이 개선된
소화가 잘되는 훌륭한 영양원입니다.
▶ 현미보다 부드러운 밥맛을 즐기실 수 있습니다.
▶ 소화가 잘되고 영양소가 풍부합니다 - 발아과정에서 당화호르몬이 분비되어 소화흡수가 잘됩니다.
▶ 어린이나 수험생의 영양 건강식으로 좋습니다 - 식이섬유가 풍부합니다.
▶ 발아현미에는 GABA(감마아미노낙산)가 다량 함유되어 있습니다. GABA는 간장과 신장의 신진대사를 촉진하며 중성지방
증가 억제 작용, 혈압상승 방지효과, 뇌세포 대사 촉진 등 우리몸에 좋은 효과가 있음이 의학적으로 확인되었습니다.
발아현미의 특징
현미구입방법
(불량 현미 - 쭉정이와 덜 여문 현미)
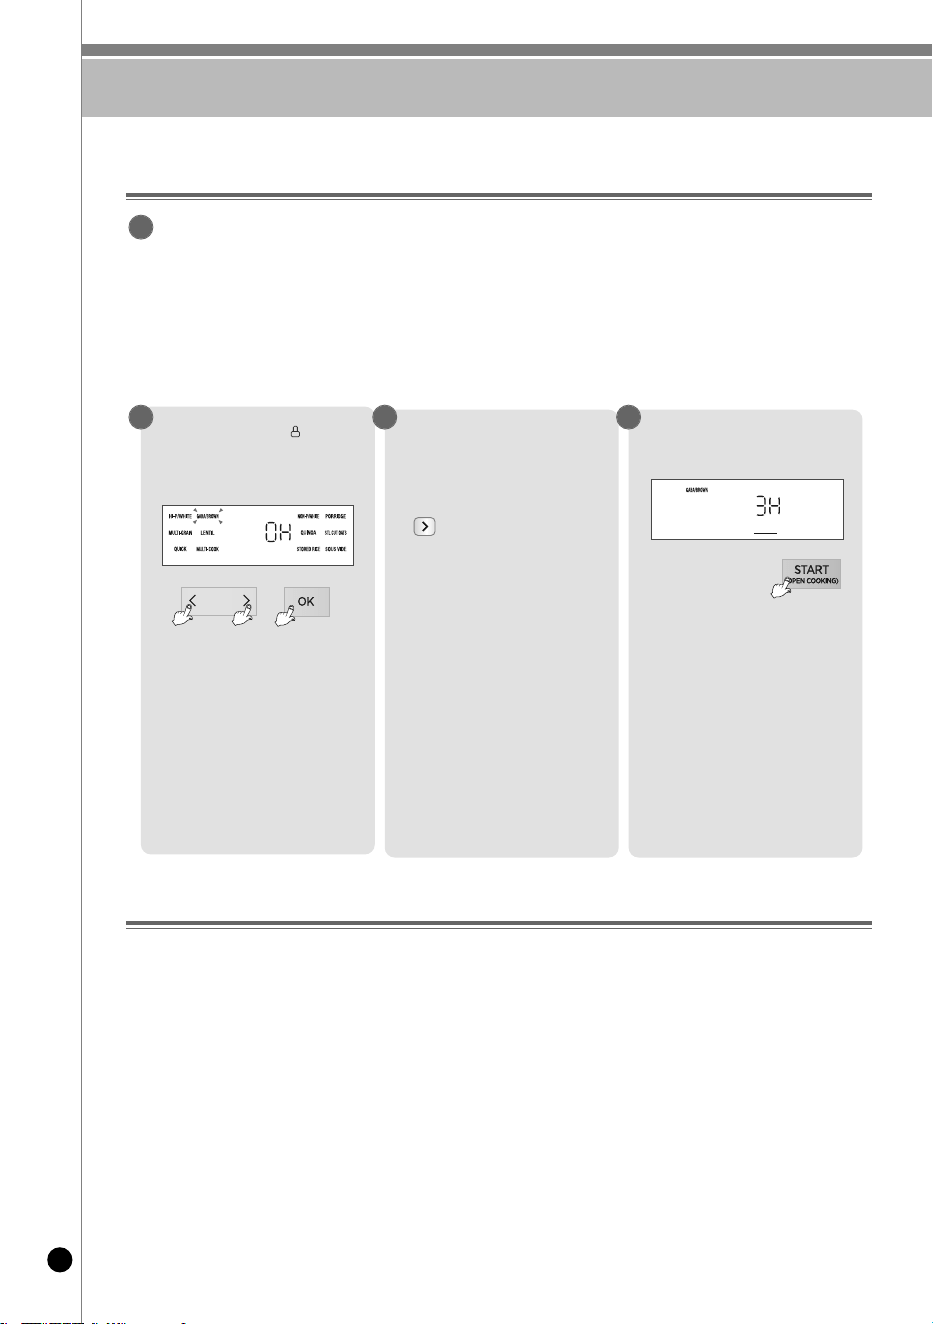
찰현미는 이렇게 하십시오
42
찰현미 메뉴의 조작방법
찰현미 취사 시 유의사항
❶ 발아된 싹의 크기를 키우지 않고 좀 더 빨리 드시고 싶으면 예비발아를 하지않고 찰현미를 선택하여 원하는 발아시간을 설정하신 후 시작 버튼을 눌러
취사하십시오. (싹의 크기에 따른 영양분의 차이는 크지 않습니다.)
❷ 기온이 높을때 오랜시간 발아시키면 냄새가 날 경우가 있습니다. 그 경우에는 발아 설정시간을 짧게 설정하여 주십시오.
❸ 찰현미 메뉴로 취사하실 경우에는 최대 4인분 이하로 하여 주십시오.
❹ 물은 수돗물을 사용하셔도 무방하나 생수를 이용하시면 더욱 좋습니다. 단, 뜨거운 물, 끓인 물은 식힌 경우라 하더라도 발아가 되지 않을수 있으니
사용을 피해주십시오.
❺ 현미의 발아율이나 싹의 길이 등의 발아상태는 현미의 종자와 보관상태, 보관기간에 따라 차이가 있을 수 있습니다.
- 발아현미는 현미를 싹틔운 것으로, 현미의 종자에 따라 발아율 및 발아된 후의 싹의 길이에 차이가 있을 수 있습니다.
발아시킬 현미는 반드시 수확후 1년 미만의 것을 사용해 주시고, 도정 후 보관기간이 가급적 짧은 것을 이용해 주십시오.
❻ 찰현미 메뉴의 경우 3H 설정시에는 예약이 되지 않습니다.
예약을 원하실 경우에는 0H로 설정하신 후, 예약해 주십시오.
❼ 현미의 종류에 따라 멜라노이징 또는 밥상태의 차이가 나타날 수 있습니다.
기호에 맞게 물량을 가감하거나 맞춤취사 기능을 이용해 주십시오. (40쪽 참조)
❽ 사용환경이나 쌀 상태에 따라서 싹이 보이지 않을 수 있습니다.
발아를 더욱 촉진 시키기 위해 현미를 미리 16시간 이내로 침수하여 예비발아를 해주십시오.
예비발아방법
▶
일반적으로 가정에서 사용하시는 용기에 씻은 현미를 넣은 뒤, 물을 충분히 넣고 침수시킨 후 예비발아하여 주십시오.
▶
예비발아는 16시간 이내로 하여 주시고 찰현미발아 메뉴 사용 전에는 반드시 흐르는 물에 세척하신 후 사용하여 주십시오.
지나치게 세게 문질러 세척하면 쌀눈(배아)이 떨어져 발아되지 않을 수 있습니다.
▶
예비발아하실 때 침수시간에 따라 특유의 냄새가 날 수 있습니다.
▶
예비발아가 완료된 현미는 씻은 후에 내솥에 넣고 취사량에 따라 물높이를 맞추신 후 찰현미 메뉴를 사용하여 주십시오.
▶
기온이 높은 여름이나 보관온도 등에 따라 예비발아시에는 냄새가 날 수 있으니 가급적 예비발아시간을 줄여 주시고
더 주의해서 깨끗이 잘 씻어 주십시오.
1
뚜껑 결합 손잡이를“ 고압”방향으로
돌리고, 좌/우 버튼을 눌러 찰현미를
선택한 후 확인 버튼을 누릅니다.
찰현미 메뉴가 선택되었을 때는 표시부에
0H가 표시됩니다.
2
좌/우 버튼으로 시간을 설정합니다.
1.우측 선택 버튼을 누르면
찰현미발아 시간이3시간으로 증가합니다.
2. 찰현미발아 시간은 0,3 시간으로
설정 가능합니다.
▶ 발아하지 않고, 찰현미밥을 드실 경우,
찰현미 0H를 선택하여 취사하십시오.
3
※ 발아잔여시간이 3시간 남아있을 때
시작 버튼을 누릅니다.
▶ 시작 버튼을 누르거나 확인 버튼을
누른 후 시작 버튼을 누르면 설정된
시간만큼 발아를 시작하고 발아 완료 후
즉시 취사가 시작 됩니다.
▶ 발아중에는남은 시간이 표시됩니다.
4
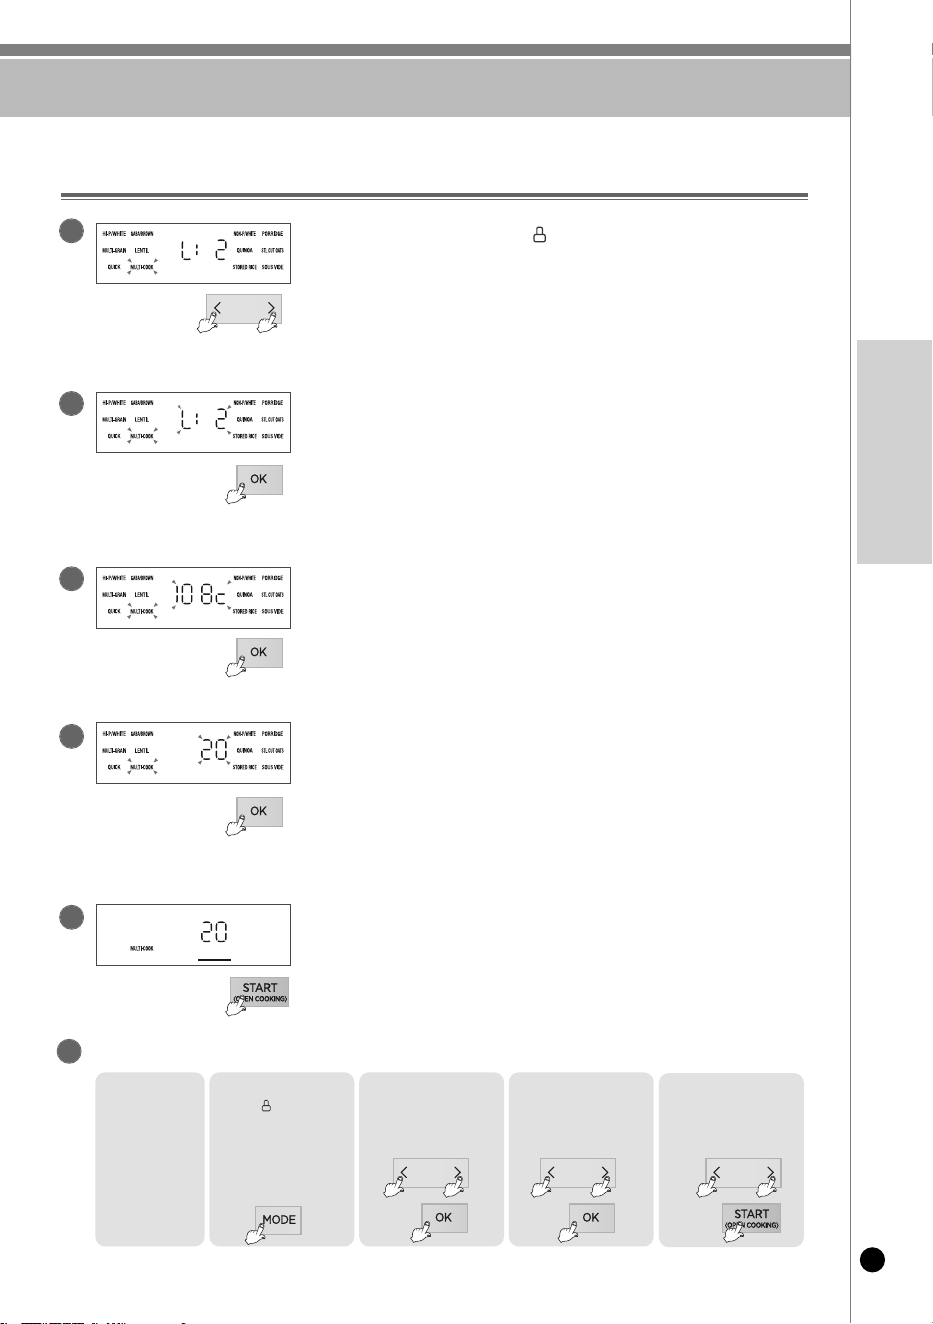
멀티쿡은 이렇게 하십시오
43
www.cuckooamerica.com
KOREAN
멀티쿡 예약은 이렇게 하십시오.
확인버튼을 누르고 좌/우 버튼으로 원하시는 화력을 설정합니다.
▶ 화력은 1~3단계까지 설정 가능합니다.
(높을수록 화력이 강해집니다.)
뚜껑 결합 손잡이를 “고압” 방향으로 돌리고 좌/우 버튼을 눌러
멀티쿡을 선택합니다.
▶ 멀티쿡 메뉴가 선택 되었을때는 표시부에 화력이 표시됩니다.
멀티쿡 사용 및 예약방법
확인버튼을 누르고 좌/우 버튼으로 원하시는 요리 온도를
설정합니다.
▶ 요리 온도는 70℃~120℃까지 설정 가능합니다.
2
1
3
6
1
.
현재 시각이
맞는지
확인합니다.
2
.
뚜껑 결합 손잡이를
“ 고압”방향으로 돌리고
모드 버튼을 눌러
예약을 선택합니다.
※모드 버튼을 초기에 누를 시
0.3초 이상 눌러야 진입 가능합니다.
※모드 버튼을 누를때 마다
한단계 씩 이동 합니다.
3
.
좌/우 버튼을 눌러
취사 완료 시각을 맞춘 후
확인 버튼을 누릅니다.
4
.
좌/우 버튼을 눌러
멀티쿡을 선택하고
확인 버튼을 누릅니다.
5
.
좌/우 버튼을 눌러 원하시는
화력, 온도, 요리시간을 설정
하고 시작 버튼을 누릅니다.
확인버튼을 누르고 좌/우 버튼으로 원하시는 요리 시간을
설정합니다.
▶ 요리 시간은 10분~90분까지 설정 가능합니다.
4
시작 버튼을 누릅니다.
▶ 시작 버튼을 누르면 멀티쿡이 시작됩니다.
멀티쿡이 시작되면 남은 시간이 표시됩니다.
5
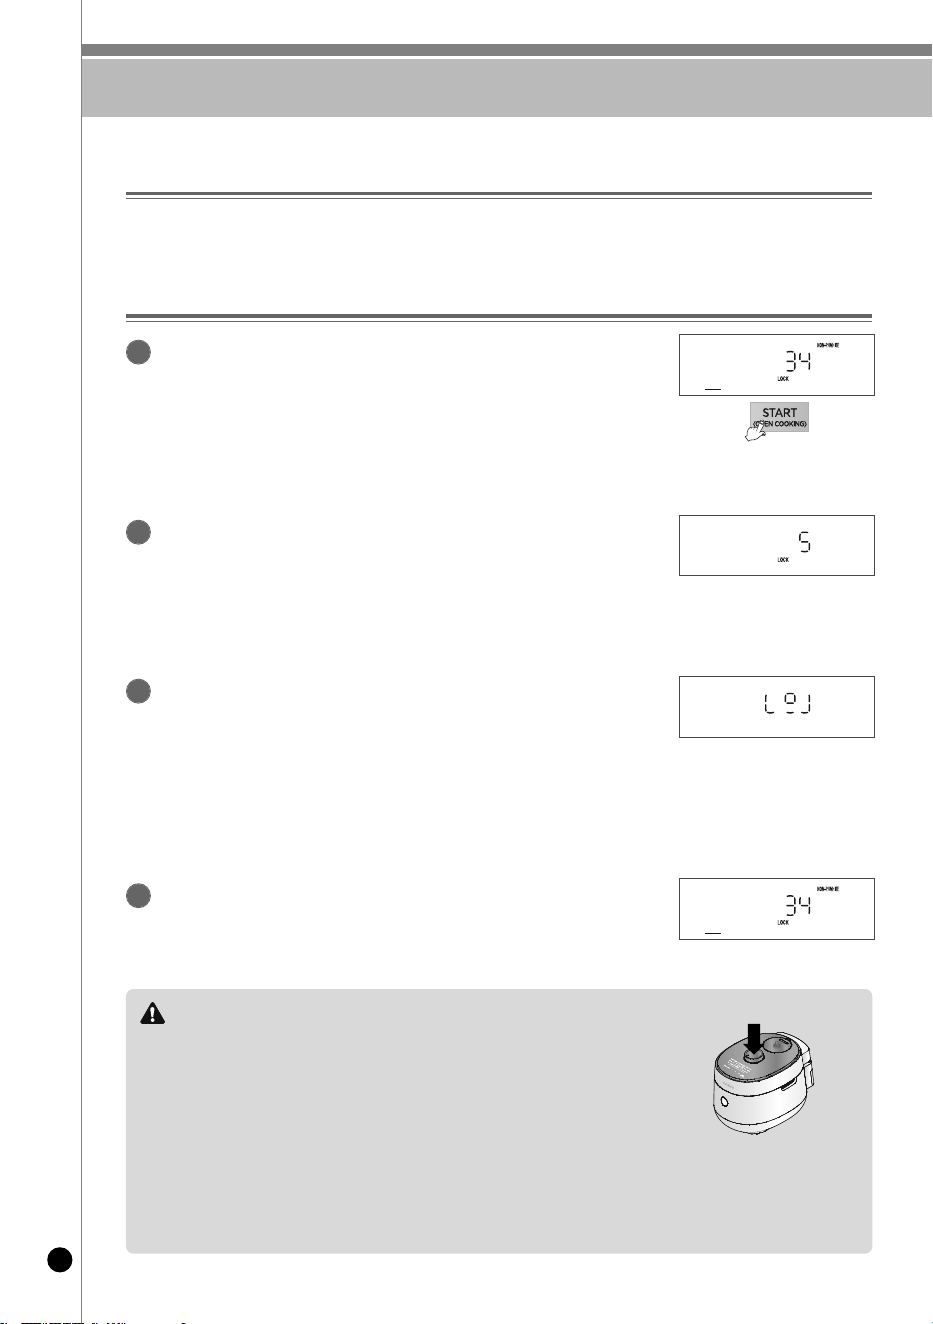
오픈 쿠킹(OPEN COOKING)은 이렇게 하십시오
44
<취사 진행 표시>
<재료 투입 표시>
<해제 잔여시간 표시>
< 버튼 표시 >
무압 메뉴 취사 중 스마트 잠금장치를 해제시켜 뚜껑을 열고 재료를 투입하거나 내용물을 뒤집을 수 있는 기능입니다.
오픈 쿠킹(OPEN COOKING) 이란?
오픈 쿠킹(OPEN COOKING) 사용 방법
먼저, 무압 메뉴 취사 중 시작/오픈쿠킹 버튼을 눌러주세요.
1
그리고 스마트 잠금장치가 해제될 때까지 기다려주세요.
▶ 스마트 잠금장치는 5초 ~ 1분 후 해제됩니다.
2
우측 그림이 표시되면, 뚜껑을 열고 재료를 투입하거나
내용물을 뒤집어주세요.
▶ "뚜껑을 열어주세요"하는 음성이 나옵니다.
▶ 요리 안내는 요리레시피를 참고해주세요.
▶ 스마트 잠금장치 해제 잔여시간이 표시 중이거나 취사 중에는
뚜껑 열림 버튼을 누르지 마십시오.
반드시 재료 투입 표시가 나타나면 뚜껑 열림 버튼을 눌러주세요.
3
뚜껑을 열고난 후 3분 이내에 뚜껑을 닫아주세요.
▶
3분 이상 뚜껑이 열려 있을 경우 취사가 취소됩니다.
4
주의사항
오픈 쿠킹 시 주의 사항
- 지정된 용량을 초과하여 조리하지 마십시오.
- 지정된 용량을 초과할 경우 끓어 넘침이 발생할 수 있습니다.
- 뚜껑이 열려 있을 경우, 내솥이 가열되지 않습니다.
- 화상의 우려가 있으므로 분리형 커버를 분리하지 마십시오.
- 내솥과 분리형 커버가 제대로 장착된 상태에서 뚜껑을 닫아주십시오.
- 스마트 잠금 장치가 동작 중일 때 뚜껑 열림 버튼을 누르면 파손이나 고장의 원인이 됩니다.
반드시 재료 투입 표시가 나타나면 뚜껑 열림 버튼을 눌러주세요.
만약, 제품이 정상적으로 동작되지 않을 시 쿠쿠 고객상담실로 문의 바랍니다.
- 오픈쿠킹 사용 및 무압모드 취사 완료 후 뚜껑이 열리지 않을 경우
우측 그림처럼 뚜껑을 눌러 스마트 잠금장치가 해제 되도록 한 후 뚜껑 열림 버튼을 눌러 주십시오.
- “EL1” 표시가 나타날 경우 고객상담실로 문의 하십시오.
- “EL2” 표시가 나타날 경우 취사가 완료될 때 까지 뚜껑을 열지 마세요.
보온 및 대기 상태에서 뚜껑을 열고자 할 경우 전원을 차단하고 뚜껑을 열어주세요.
고객상담실로 문의 하십시오.
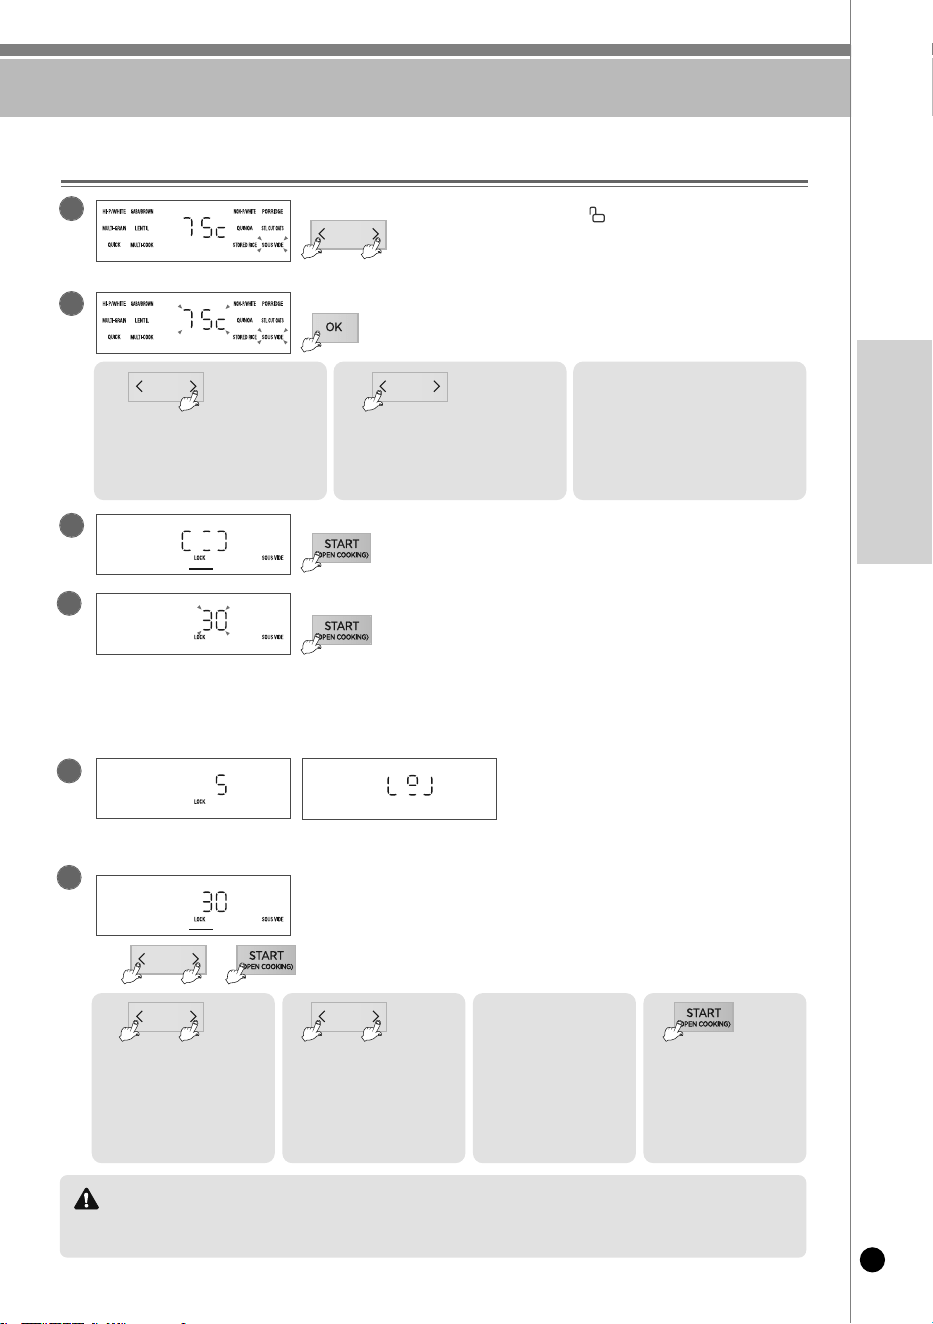
수비드는 이렇게 하십시오
45
www.cuckooamerica.com
KOREAN
예열이 완료되면 스마트 잠금장치 해제를 위해
시작/오픈쿠킹 버튼을 눌러주세요.
▶ 예열이 완료되면 표시부에 이전에 했던 수비드 시간이 표시됩니다.
(선택한 온도에따라 표시 시간이 다를 수 있습니다.)
▶ 시간 카운터가 끝나면 수비드가 종료 됩니다.
카운터가 끝나기 전에 시작/오픈쿠킹 버튼을 누른 후 재료를 넣고
뚜껑을 닫아 주세요.
확인 버튼을 누르고 좌/우 버튼으로 요리 온도를
설정합니다.
뚜껑 결합 손잡이를 “무압” 방향으로 돌리고,
좌/우 버튼을 눌러 수비드를 선택합니다.
▶ 표시부에 온도가 표시됩니다.
수비드 사용방법
시작/오픈쿠킹 버튼을 눌러 예열을 시작합니다.
2
1
3
4
스마트
잠금장
치가
해제될
때까지
기다려주세요.
재
료
투입
표시가
표시
되면,
뚜껑을
열
고
재료
를
넣고
뚜껑을
닫아
주세요.
5
좌/우 버튼으로 요리 시간을 설정하고 시작 버튼을 누릅니다.
(메뉴별 시간 설정은 요리레시피를 참조하세요.)
▶ 시작/오픈쿠킹 버튼을 누르면 수비드 요리가 시작됩니다.
6
버튼을 누르면 수비드 요리 시간이
증가 또는 감소합니다.
2.
3
.
수비드 시간은 아래와 같이
증가 또는 감소 합니다.
▶ 10분 ~ 1시간 까지는 1분씩
▶ 1시간 ~ 7시간 까지는 10분씩
▶ 7시간 ~ 20시간 까지는 30분씩
▶
20시간 ~ 24시간 까지는 1시간씩
수비드 시간은
10분~24시간까지
설정 가능하며,
요리 온도가 80℃를 초과하면
7시간 까지 설정 가능합니다.
요리 시간을 설정 후
시작/오픈쿠킹 버튼을 누르면
수비드 요리가 시작됩니다.
4.
1.
<해제 잔여시간 표시>
<재료 투입 표시>
버튼을 누르면 수비드 온도가
1도씩 증가합니다.
▶계속 누르고 있으면 연속으로
변합니다.
2.
3
.
버튼을 누르면 수비드 온도가
1도씩 감소합니다.
▶계속 누르고 있으면 연속으로
변합니다.
수비드 온도는 35℃~90℃까지
설정 가능합니다.
(메뉴별 온도 설정은 요리레시피를
참조하세요.)
(내용물의 온도는 사용조건, 환경에 따라
설정온도와 다소 차이가 날 수 있습니다.)
1.
수비드 메뉴 사용시 주의 사항
- 지정된 용량을 초과하여 조리하지 마십시오.
- 지정된 용량을 초과할 경우 끓어 넘침이 발생합니다.
주의사항
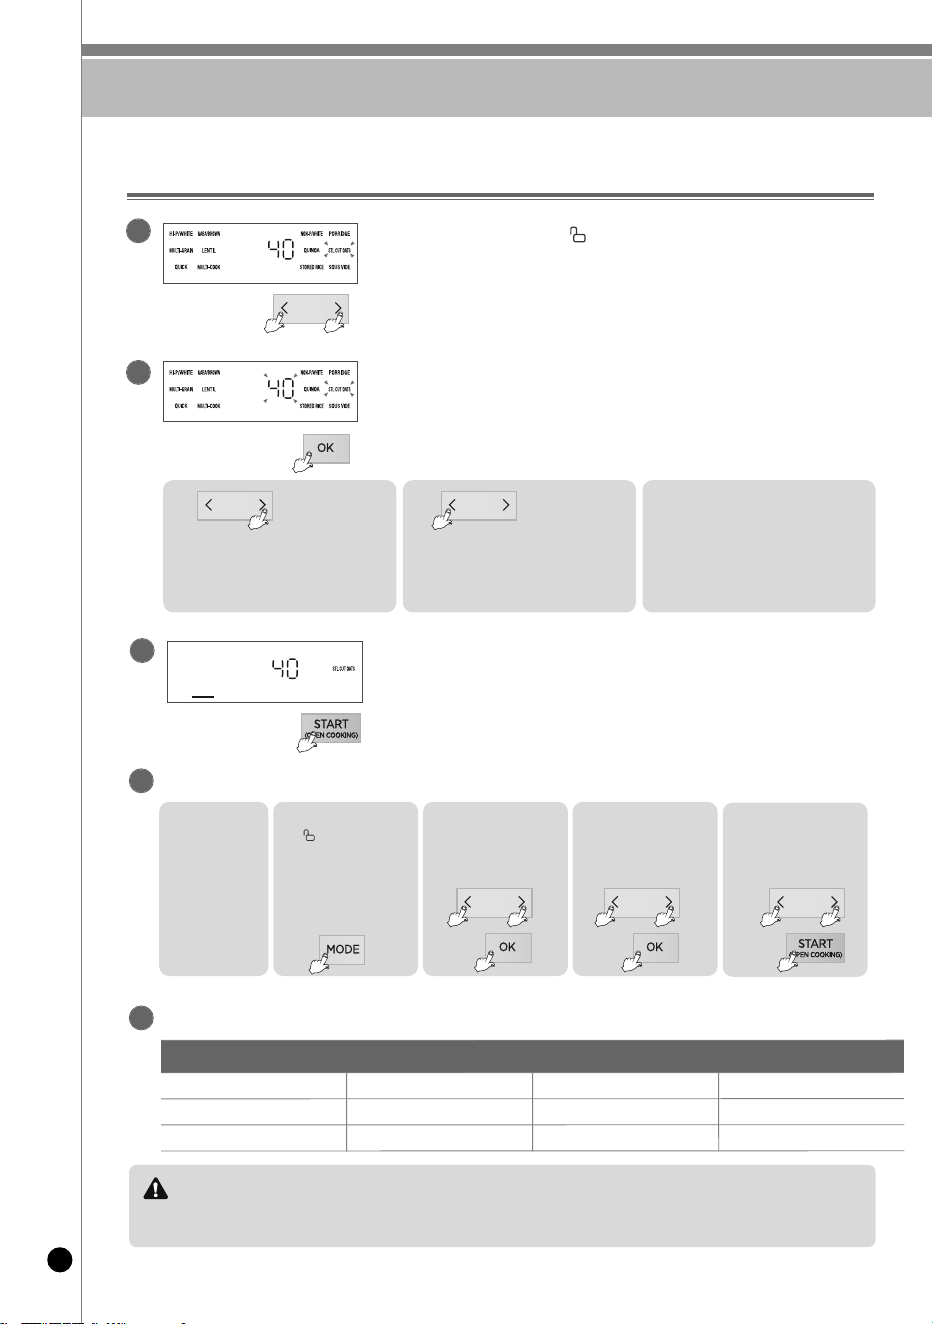
스틸컷 오트밀은 이렇게 하십시오
46
스
틸
컷
오
트
밀
용
량
에
따
른
물
량
및
설
정
시
간
스
틸
컷
오트
밀
(
1
0
0
%
)
1
컵(1
2
0
g
)
1
.5
컵(1
8
0
g
)
2
컵(2
4
0
g
)
물
2
컵
(
3
6
0
g
)
3
컵
(
5
4
0
g
)
4
컵(7
2
0
g
)
설
정
시
간
4
5
분5
5
분6
5
분
시작 버튼을 누릅니다.
▶시작 버튼을 누르면 스틸컷 오트밀 취사가 시작됩니다.
스틸컷 오트밀 취사가 시작되면 남은 시간이 표시됩니다.
스틸컷 오트밀 사용 및 예약방법
3
4
스틸컷 오트밀 예약은 이렇게 하십시오.
스틸컷 오트밀 메뉴 사용시 주의 사항
- 지정된 용량을 초과하여 조리하지 마십시오.
- 지정된 용량을 초과할 경우 끓어 넘침이 발생합니다.
주의사항
1
.
현재 시각이
맞는지
확인합니다.
2
.
뚜껑 결합 손잡이를
“무압”방향으로
돌리고 모드 버튼을 눌러
예약을 선택합니다.
▶모드 버튼을 초기에 누를 시 0.3초
이상 눌러야 진입 가능합니다.
▶ 모드 버튼을 누를때 마다
한단계 씩 이동 합니다.
3
.
좌/우 버튼을 눌러
취사 완료 시각을 맞춘 후
확인 버튼을 누릅니다.
4
.
좌/우 버튼을 눌러
스틸컷 오트밀 선택하고
확인 버튼을 누릅니다.
5
.
좌/우 버튼을 눌러
요리시간을 선택하고
시작 버튼을 누릅니다.
5
아래 표를 따라 스틸컷 오트밀 물량과 시간 설정을 확인하세요. (포함된 계량컵 사용)
확인 버튼을 누르고 좌/우 버튼으로 요리 시간을 설정합니다.
▶ 메뉴별 시간 설정은 요리레시피를 참조하세요
뚜껑 결합 손잡이를 “무압” 방향으로 돌리고,
좌/우 버튼을 눌러 스틸컷 오트밀을 선택합니다.
▶ 스틸컷 오트밀 메뉴가 선택되었을때는 표시부에 시간이 표시됩니다.
2
1
우측 선택 버튼을 누르면 스틸컷 오트밀 시간이
5분씩 증가합니다.
▶계속 누르고 있으면 연속으로 변합니다.
2.
3
.
좌측 선택 버튼을 누르면 스틸컷 오트밀 시간이
5분씩 감소합니다.
▶계속 누르고 있으면 연속으로 변합니다.
스틸컷 오트밀 시간은 10분~90분까지 설정
가능합니다.
1.
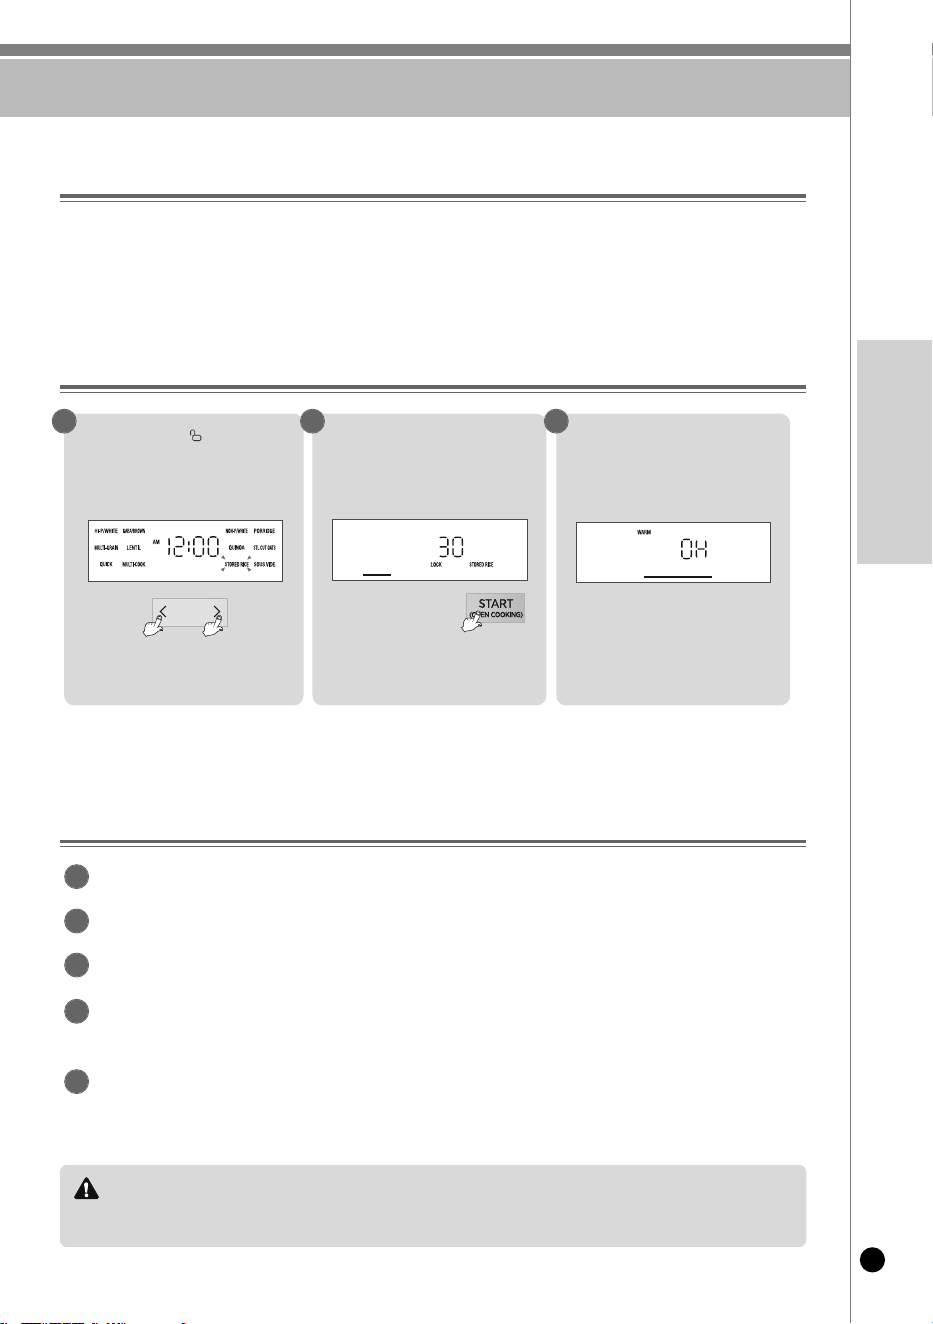
냉동보관밥은 이렇게 하십시오
47
www.cuckooamerica.com
KOREAN
냉동보관밥 메뉴 사용시 주의 사항
- 지정된 용량을 초과하여 조리하지 마십시오.
- 지정된 용량을 초과할 경우 끓어 넘침이 발생합니다.
- 화상의 우려가 있으므로 분리형 커버를 분리하지 마십시오.
주의사항
냉동보관밥 메뉴 취사 시 무압백미 물눈금을 이용하여 주십시오. 최대 4인분까지 가능합니다.
1
취사가 완료되어 보온으로 되면 밥을 잘 저어 주십시오.
2
전자레인지 전용 용기에 약 1인분씩(210g) 소분해서 냉동하여 주십시오.
3
냉동 후 전자레인지 사용 시, 용기의 뚜껑을 조금 연 상태에서 3분 30초(1인분 기준) 가열하여 주십시오 .
(밥 용량 및 용기 크기, 전자레인지 전력에 따라 가열 시간을 조절하여 주십시오.)
4
냉동보관밥은 보관 기간이 길어질수록 밥맛이 떨어질 수 있으니 주의하여 주십시오.
5
밥을 냉동으로 보관하여 드시고자 할 때 사용하며 해동 후에도 갓 지은 밥맛과 고슬고슬한 식감을 구현할 수
있는 메뉴입니다.
냉동보관밥이란?
냉동보관밥 사용 방법
냉동보관밥 취사 시 유의사항
뚜껑 결합 손잡이를 “ 무압” 방향으로
돌리고, 좌/우 버튼을 눌러 냉동보관밥을
선택합니다.
1
시작 버튼을 눌러 취사를 시작합니다.
2
취사가 완료되어 보온으로 되면 뚜껑을
열어 저어준 뒤 전자레인지 전용 용기에
나누어 담아 주십시오.
3
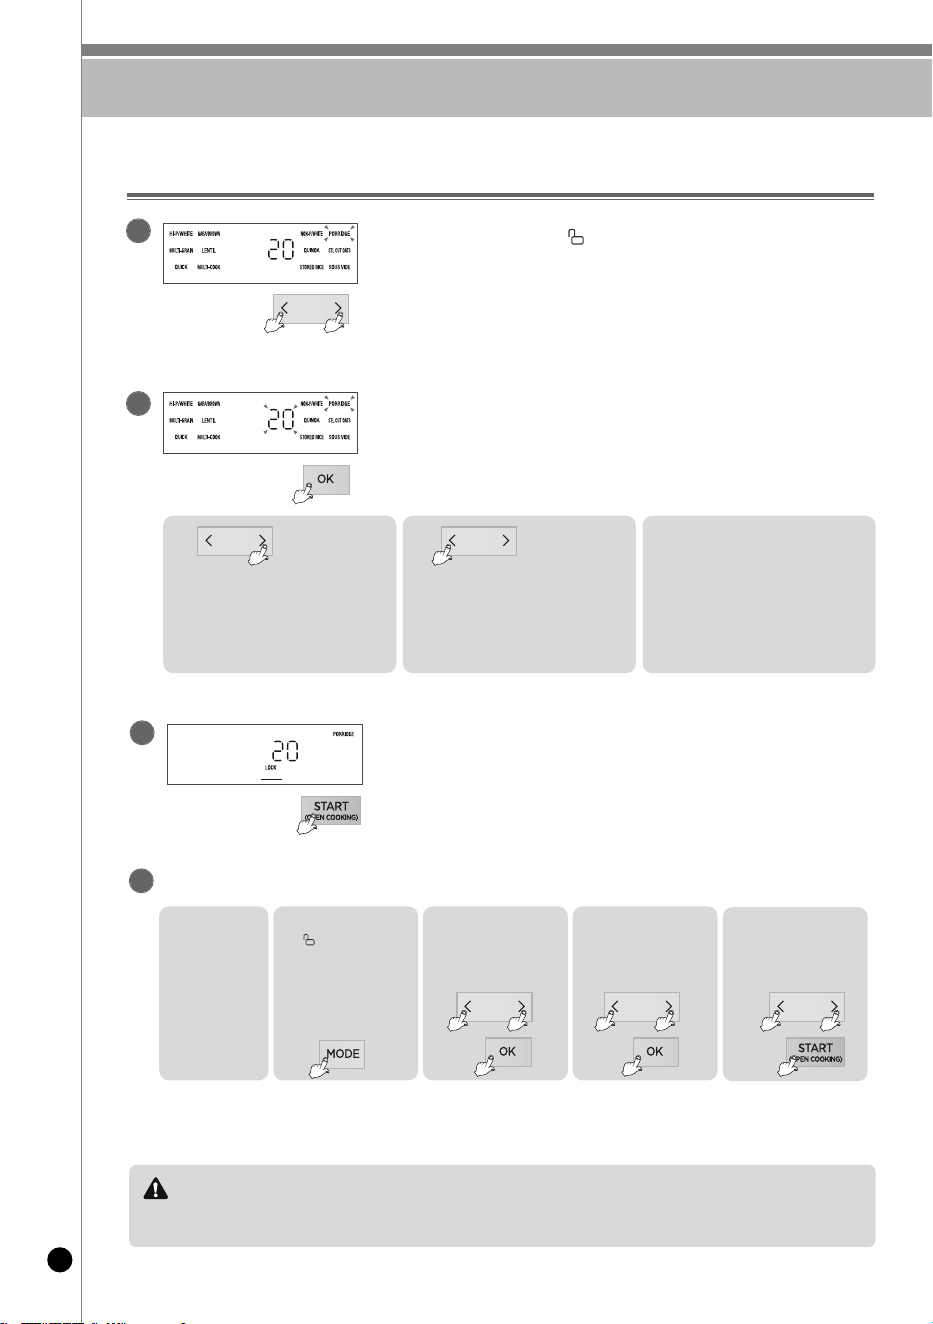
죽은 이렇게 하십시오.
48
시작 버튼을 누릅니다.
▶ 시작 버튼을 누르면 죽이 시작됩니다.
죽이 시작되면 남은 시간이 표시됩니다.
죽 사용 및 예약방법
3
4
죽 예약은 이렇게 하십시오.
죽 메뉴 사용시 주의 사항
- 지정된 용량을 초과하여 조리하지 마십시오.
- 지정된 용량을 초과할 경우 끓어 넘침이 발생합니다.
주의사항
1
.
현재 시각이
맞는지
확인합니다.
2
.
뚜껑 결합 손잡이를
“무압”방향으로 돌리고
모드 버튼을 눌러
예약을 선택합니다.
▶모드 버튼을 초기에 누를 시
0.3초 이상 눌러야 진입 가능합니다.
▶ 모드 버튼을 누를때 마다
한단계 씩 이동 합니다.
3
.
좌/우 버튼을 눌러
취사완료 시각을 맞춘 후
확인 버튼을 누릅니다.
4
.
좌/우 버튼을 눌러
죽을 선택하고
확인 버튼을 누릅니다.
5
.
좌/우 버튼을 눌러
요리시간을 선택하고
시작 버튼을 누릅니다.
확인 버튼을 누르고 좌/우 버튼으로 요리 시간을 설정합니다.
▶ 죽 물량은 36페이지를 참조하세요.
▶ 된죽은 1컵~1.5컵 가능하며 설정 시간은 35~45분으로 설정하십시오.
묽은죽은 0.5~1컵 가능하며 설정시간은 40~50분으로 설정하십시오.
뚜껑 결합 손잡이를 “무압” 방향으로 돌리고,
좌/우 버튼을 눌러 죽을 선택합니다.
▶ 죽 메뉴가 선택되었을때는 표시부에 시간이 표시됩니다.
2
1
우측 선택 버튼을 누르면 죽 시간이
5분씩 증가합니다.
(90분 이후 에는 10분씩 증가합니다.)
▶계속 누르고 있으면 연속으로 변합니다.
2.
3
.
좌측 선택 버튼을 누르면 죽 시간이
5분씩 감소합니다.
(90분 이후 에는 10분씩 감소합니다.)
▶계속 누르고 있으면 연속으로 변합니다.
죽 시간은 20~12분까지
설정 가능합니다.
1.
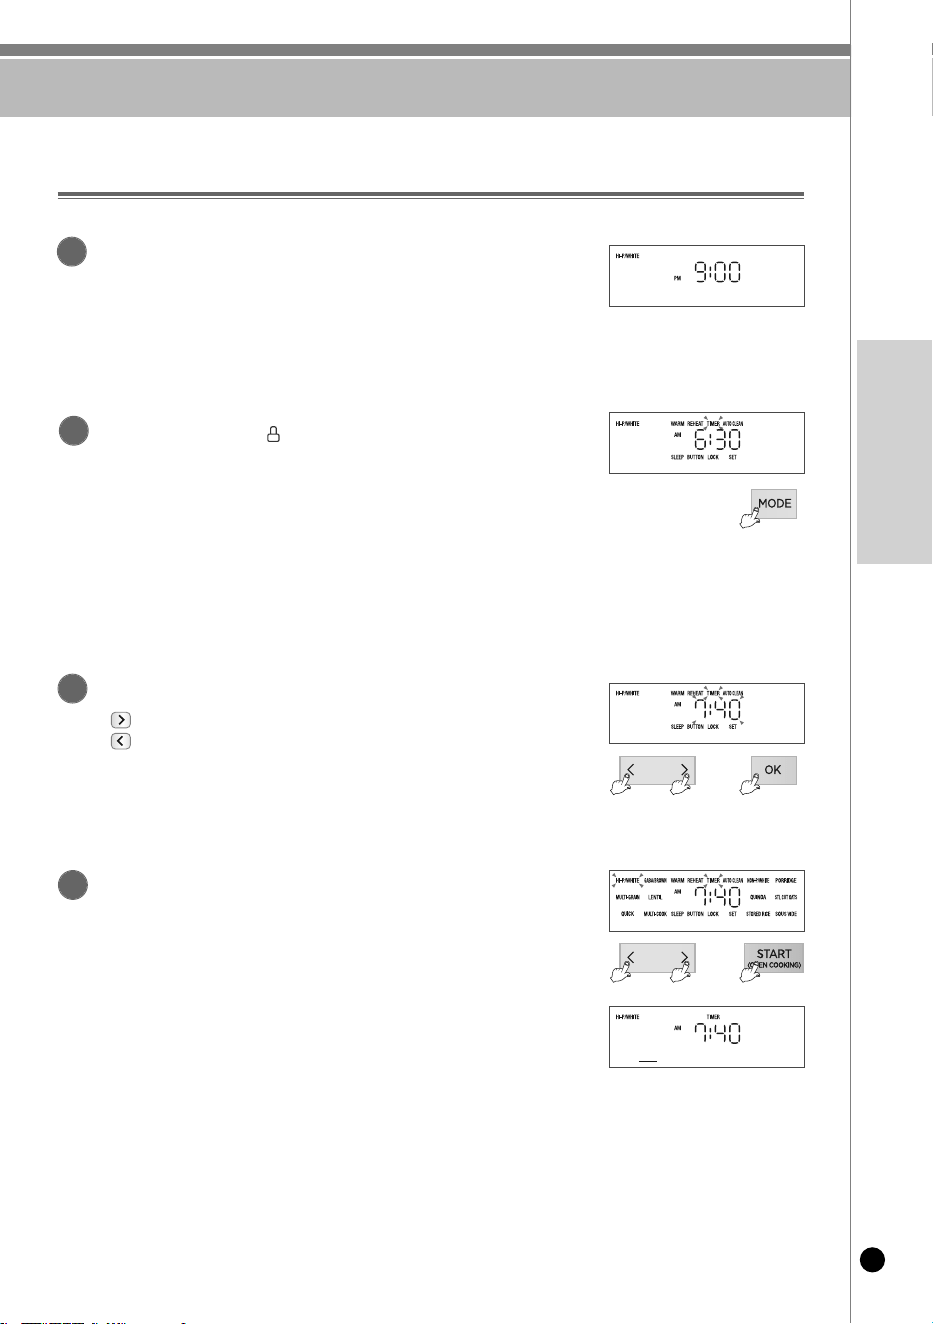
예약 취사는 이렇게 하십시오
49
www.cuckooamerica.com
KOREAN
1
3
예약 취사하는 방법(고압메뉴를 하고 싶을 때 이렇게 하세요)
현재 시각이 오후 9시이고 다음날 오전 7시 40분에 식사를 하고 싶을 경우
2
4
현재 시각이 맞는지 확인합니다.
▶ 현재 시각을 맞추는 방법은 34쪽을 참조하십시오.
▶현재 시각을 맞지 않을 경우 예약취사 시각이 맞지 않으므로
현재 시각으로 정확히 맞춥니다.
▶오전, 오후가 바뀌지 않도록 주의합니다.
뚜껑 결합 손잡이를 “고압” 방향으로 돌리고 모드 버튼을 눌러
예약을 선택합니다.
▶모드 버튼을 초기에 누를 시 0.3초 이상 눌러야 진입 가능합니다.
▶ 모드 버튼을 누를때 마다 한단계 씩 이동 합니다.
▶ 고압모드일 경우 고압백미쾌속, 찰잡곡쾌속, 찰현미발아(3H)
메뉴는 예약취사가 설정 되지 않습니다.
※ 보온 중일 때 예약 취사를 설정하실 경우 취소 버튼을 눌러 보온을 취소한 후
예약 시간을 설정해 주십시오.
좌우 버튼을 눌러 예약시각을 설정한 후 확인 버튼을 누릅니다.
▶ 우측 선택 버튼을 누를 때마다 10분 단위로 증가합니다.
▶ 좌측 선택 버튼을 누를 때마다 10분 단위로 감소합니다.
버튼을 계속 누르고 있으면 연속으로 변합니다. (반복기능)
※ 오전/오후가 바뀌지 않도록 주의하십시오.
좌우 버튼을 눌러 원하는 메뉴를 선택한 후 시작 버튼을 누릅니다.
▶ 예약 설정된 시각에 예약 취사가 완료됩니다.
(취사량 및 사용조건에 따라 완료시각이 다소 차이가 날 수도 있습니다.)
▶ 한 번 설정되어 취사가 완료된 예약 시각은 기억되므로 예약 시각을 맞출 필요없습니다.
※ 예약 취사 시간은 메뉴별 최대인분 기준으로 설정되어 있으므로 소량 취사시
일찍 취사가 완료될 수 있습니다.
➡
➡
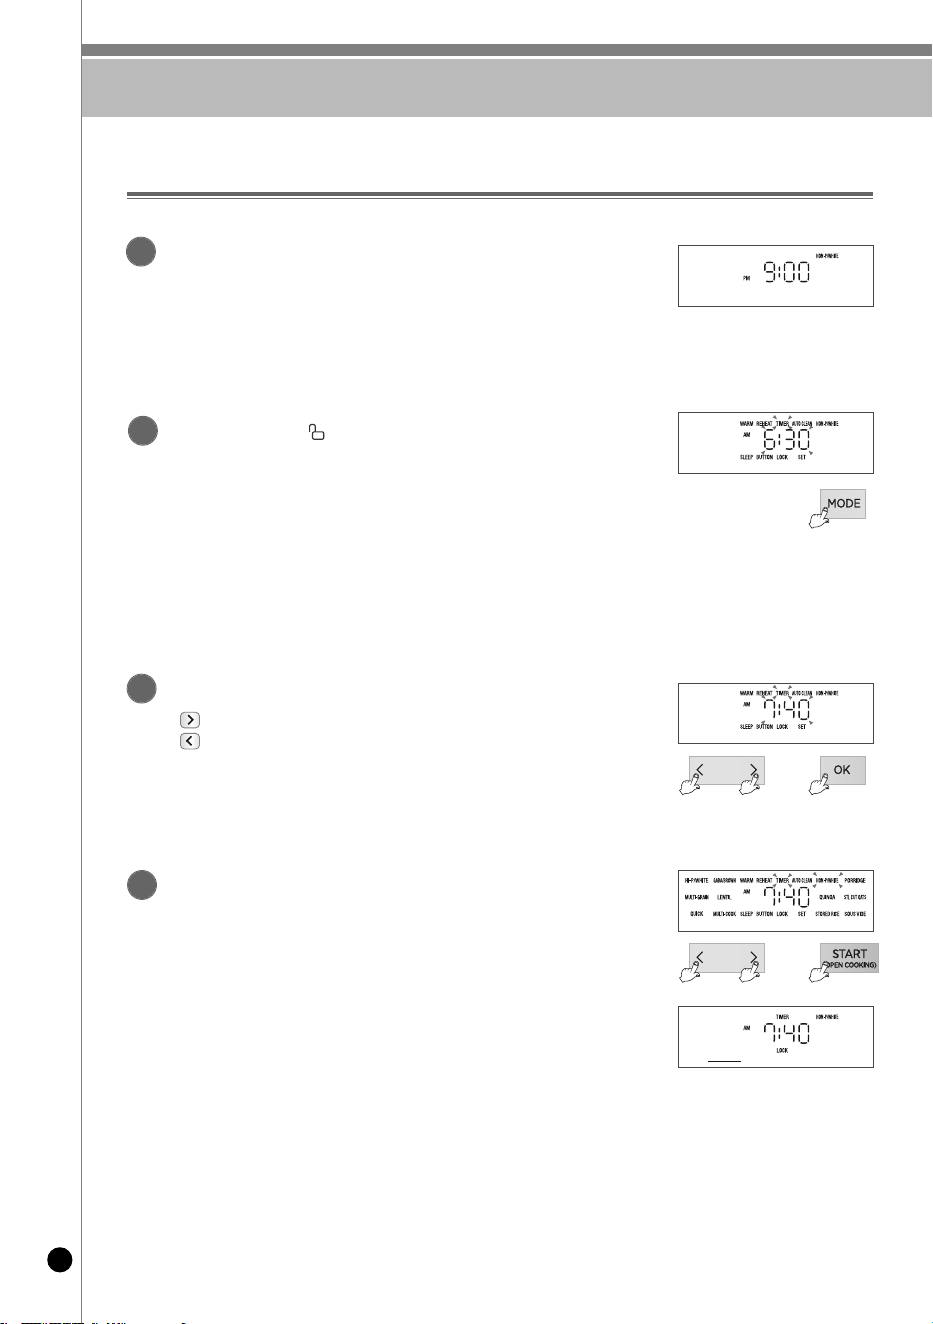
예약 취사는 이렇게 하십시오
50
1
3
예약 취사하는 방법(무압메뉴를 하고 싶을 때 이렇게 하세요)
현재 시각이 오후 9시이고 다음날 오전 7시 40분에 식사를 하고 싶을 경우
2
4
현재 시각이 맞는지 확인합니다.
▶ 현재 시각을 맞추는 방법은 34쪽을 참조하십시오.
▶현재 시각을 맞지 않을 경우 예약취사 시각이 맞지 않으므로
현재 시각으로 정확히 맞춥니다.
▶오전, 오후가 바뀌지 않도록 주의합니다.
뚜껑 결합 손잡이를 “ 무압” 방향으로 돌리고
모드 버튼을 눌러 예약을 선택합니다.
▶모드 버튼을 초기에 누를 시 0.3초 이상 눌러야 진입 가능합니다.
▶ 모드 버튼을 누를때 마다 한단계 씩 이동 합니다.
▶ 무압모드일 경우 수비드 메뉴는 예약취사가 설정 되지 않습니다.
※ 보온 중일 때 예약 취사를 설정하실 경우 취소 버튼을 눌러 보온을 취소한 후
예약 시간을 설정해 주십시오.
좌우 버튼을 눌러 예약시각을 설정한 후 확인 버튼을 누릅니다.
▶ 우측 선택 버튼을 누를 때마다 10분 단위로 증가합니다.
▶ 좌측 선택 버튼을 누를 때마다 10분 단위로 감소합니다.
버튼을 계속 누르고 있으면 연속으로 변합니다. (반복기능)
※ 오전/오후가 바뀌지 않도록 주의하십시오.
좌우 버튼을 눌러 원하는 메뉴를 선택한 후 시작 버튼을 누릅니다.
▶ 예약 설정된 시각에 예약 취사가 완료됩니다.
(취사량 및 사용조건에 따라 완료시각이 다소 차이가 날 수도 있습니다.)
▶ 한 번 설정되어 취사가 완료된 예약 시각은 기억되므로 예약 시각을 맞출 필요없습니다.
※ 예약 취사 시간은 메뉴별 최대인분 기준으로 설정되어 있으므로 소량 취사시
일찍 취사가 완료될 수 있습니다.
➡
➡
예약 취사는 이렇게 하십시오
51
www.cuckooamerica.com
KOREAN
설정시간이 13시간을 초과할 경우
▶“”가 표시되고 예약 시간은 자동적으로 13시간으로 변경됩니다.
예) 오후 5시에 내일 오전 7시 취사 완료를 예약하면 (설정시간 14시간이 됨) “”가 표시되고 예약 각이 오전 6시로 자동 변경됩니다.
(설정시간 13시간)
※ 예약시간이 13시간을 초과할 경우 냄새 및 변색의 원인이 되고, 여름철에는 쌀이 쉬기 때문에 13시간 이하로
예약설정 가능시간을 설정하였습니다.
※ 낮 12시에 예약취사 완료를 원하실 경우 오후 12:00로 설정해 주십시오.
※ 예약취사 기능은 현재시각 기준 1시간 후에서 13시간 이내로 취사완료를 원하실때 사용해 주십시오.
※ 예약취사 진행중에 현재 시각을 확인하려면 확인 버튼을 누르면 현재 시각이 약 2초간 나타납니다.
※ 고압백미쾌속, 찰잡곡쾌속, 찰현미발아(3H), 수비드 메뉴는 예약취사가 설정 되지 않습니다.
예약 취사시 유의사항
1
2
3
4
메뉴
별 예약 취사시간
메
뉴
구
분
고
압
백
미
찰
잡
곡
찰
현
미
렌
틸
콩
무
압
백
미
냉
동
보
관
밥
퀴
노
아
멀
티
쿡
죽
스
틸
컷
오
트
밀
취
사
시
간
3
6
분
~
1
3
시
간
5
3
분
~
1
3
시
간
6
1
분
~
1
3
시
간
5
2
분
~
1
3
시
간
4
7
분
~
1
3
시
간
3
8
분
~
1
3
시
간
4
7
분
~
1
3
시
간
(설정
시
간
+
1
분
)
예약 취사를 할 경우
▶ 쌀이 개봉된 지 오래되어 매우 말라버린 경우에는 층밥이 되는 수도 있습니다.
▶예약취사 설정시간 또는 주변 환경조건에 따라서 밥이 되거나 질어질 수 있으므로 내솥표시의 물(水)눈금 기준에서
가감하여 물량을 조절해 주십시오.
▶예약 취사 용량이 많거나 장시간 예약취사를 설정하실 경우 멜라노이징(미세 밥 눌음)현상이 증가할 수 있습니다.
▶세척미는 침전된 전분이 많으므로 예약 취사 시 눌음이 발생할 수 있습니다. 세척미를 흐르는 물에 행궈 취사하시거나,
취사 용량을 적게 해주시면 눌음 정도가 감소합니다.
예약 시각 변경
▶ 예약시각을 변경할 경우는 취소 버튼을 0.3초 이상 눌러 취소시킨 후 다시 시작하십시오.
예약 설정 가능 시간을 벗어난 경우
▶ 설정 시간이 예약 설정 가능 시간보다 짧았을 경우 즉시 취사를 시작합니다.
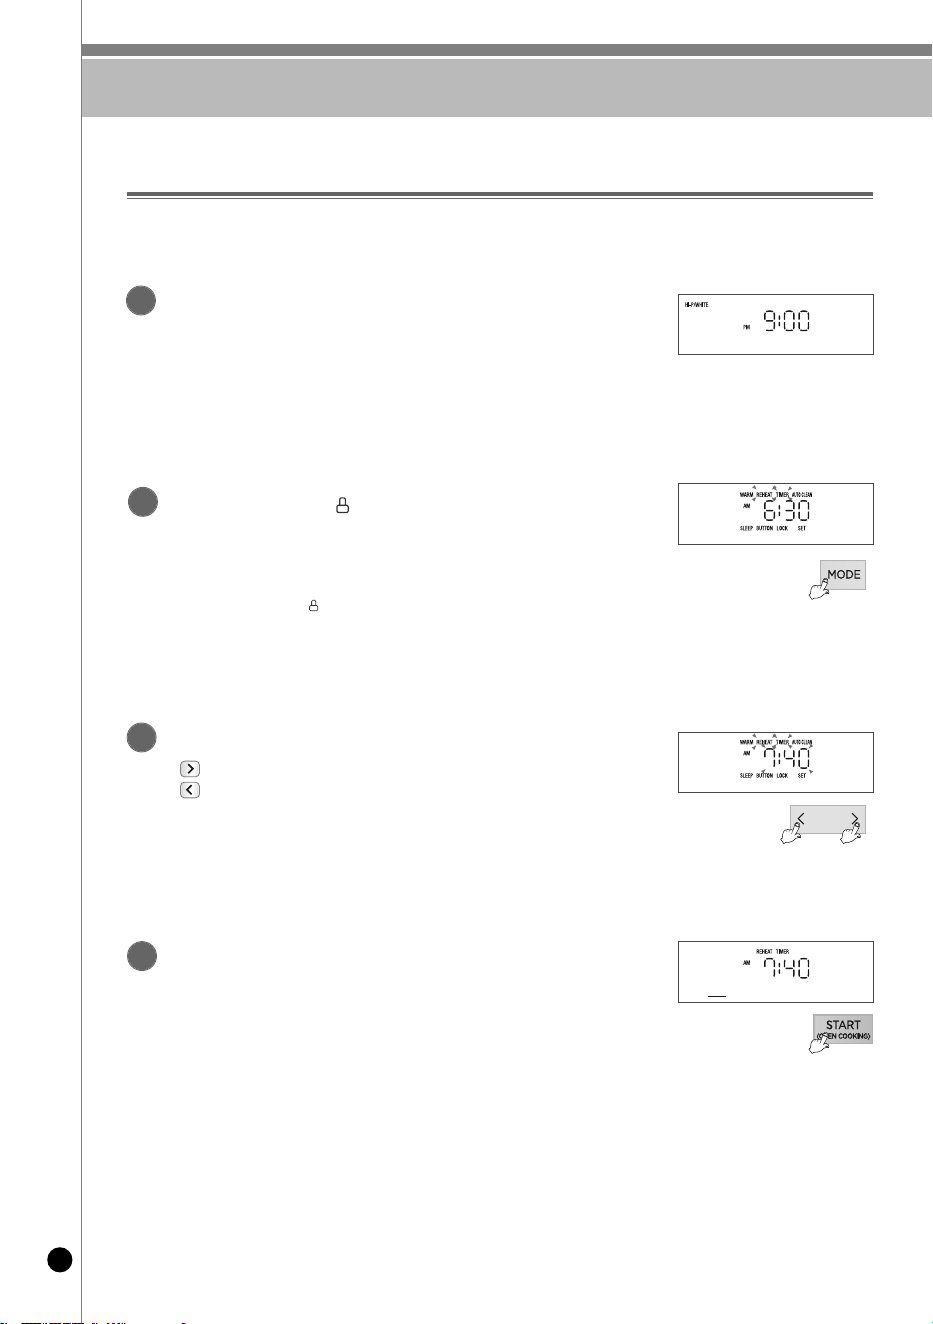
예약 재가열은 이렇게 하십시오
52
현재 시각이 오후 9시이고 다음날 오전 7시 40분에 따뜻한 식사를 하고 싶을 경우
1
3
예약 재가열 사용 방법
▶보온을 하지 않고 밥솥에 보관중인 밥을 원하시는 시각에 따뜻하게 드시고 싶을 때, 설정하십시오.
▶예약 재가열은 100분 동안 진행되므로 밥을 드시고자 하는 시각에서 최소 100분 전 예약 재가열을 하십시오.
2
4
현재 시각이 맞는지 확인합니다.
▶ 현재 시각을 맞추는 방법은 34쪽을 참조하십시오.
▶현재 시각을 맞지 않을 경우 예약 재가열 완료 시각이 맞지 않으므로
현재 시각으로 정확히 맞춥니다.
▶오전, 오후가 바뀌지 않도록 주의합니다.
뚜껑 결합 손잡이를 “고압” 방향으로 돌리고
모드 버튼을 눌러 예약재가열을 선택합니다.
▶모드 버튼을 초기에 누를 시 0.3초 이상 눌러야 진입 가능합니다.
▶ 모드 버튼을 누를때 마다 한단계 씩 이동 합니다.
▶ 뚜껑 결합 손잡이를“고압”방향으로 돌리지 않으면 예약 재가열을 할 수 없습니다.
좌우 버튼을 눌러 예약 재가열 완료 시각을 설정합니다.
▶ 우측 선택 버튼을 누를 때마다 10분 단위로 증가합니다.
▶ 좌측 선택 버튼을 누를 때마다 10분 단위로 감소합니다.
버튼을 계속 누르고 있으면 연속으로 변합니다. (반복기능)
※ 오전/오후가 바뀌지 않도록 주의하십시오.
시작 버튼을 누릅니다.
▶ 설정 시각에 예약 재가열이 완료됩니다.
▶ 한번 설정되어 재가열이 완료된 예약 시각은 항상 기억되므로
예약 시각을 맞춤 필요없습니다.
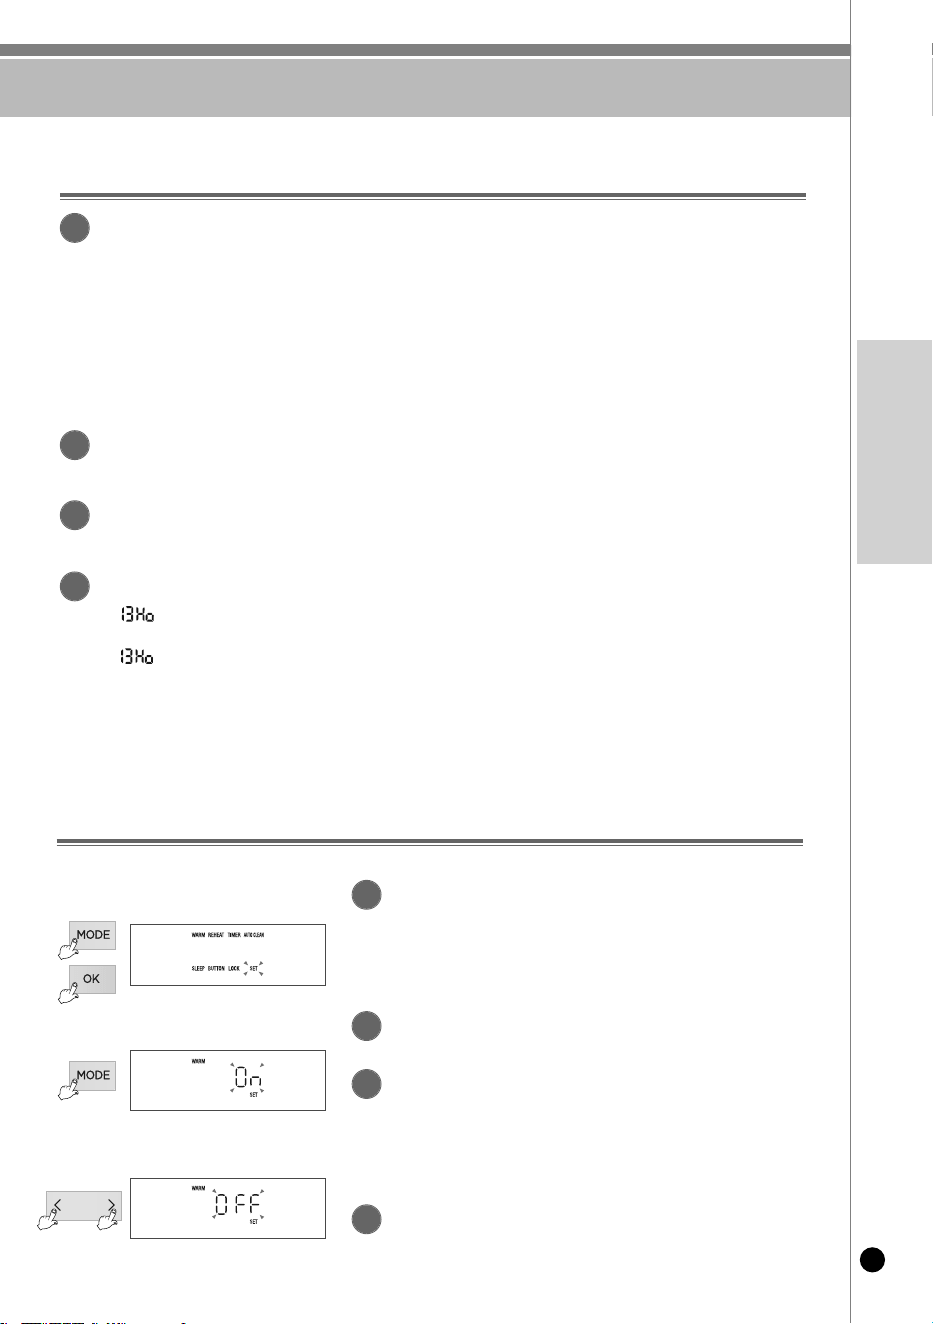
예약 재가열은 이렇게 하십시오 / 취사 후 보온 설정 및 해제
53
www.cuckooamerica.com
KOREAN
예약 재가열시 유의 사항
예약 재가열을 할 경우
▶ 취사가 완료된 후 상온에서 장시간 보관된 밥은 수분이 증발되어 예약 재가열을 하실 경우 밥이 마르거나 멜라노이징
(미세 밥 눌음) 현상이 발생할 수 있습니다.
▶ 밥양이 많은 경우 밥이 먹기 좋은 따끈따끈한 온도까지 충분히 데워지지 않을 수 있으니 예약 재가열 설정시 밥양은 3인분(내솥의 절반
가량) 이내를 권장합니다.
▶ 냉장 또는 냉동 보관된 밥의 경우 보관 상태에 따라 예약 재가열 완료 후 밥이 덜 데워지거나 밥 마름 및 멜라노이징
(미세 밥 눌음) 현상이 증가할 수 있습니다.
▶ 냉장 보관된 밥 사용시에는 내솥에 옮겨 담은 후 주걱을 사용하여 골고루 저어 뭉쳐진 밥을 잘 펼친 후 예약 재가열 하시기 바랍니다.
▶ 냉동 보관된 밥은 반드시 해동 후 예약 재가열 하시기 바랍니다.
예약 시각 변경
▶ 예약 시각을 변경할 경우는 취소 버튼을 0.3초 이상 눌러 취소시킨 후 다시 시작하십시오.
예약 설정 가능 시간을 벗어난 경우
▶ 설정 시간이 예약 설정 가능 시간(100분)보다 짧았을 경우 즉시 예약 재가열을 시작합니다.
설정시간이 13시간을 초과할 경우
▶“ ”가 표시되고 예약 시간을 자동적으로 13시간으로 변경됩니다.
예) 오늘 오후 5시에 내일 오전 7시 예약 재가열 완료를 예약하면(설정시간14시간이 됨)
“”가 표시되고 예약 시각이 내일 오전 6시로 자동 변경됩니다.(설정시간 13시간)
※ 예약 재가열 시간이 13시간을 초과할 경우 냄새 및 변색의 원인이 되고, 여름철에는 쌀이 쉬기 때문에 13시간 이하로
예약설정 가능시간을 설정합니다.
※ 낮 12시에 예약 재가열 완료를 원하시는 경우 오후 12:00로 설정해 주십시오.
※ 예약 재가열 기능은 현재시각 기준 100분 후에서 13시간 이내로 재가열 완료를 원하실 때 사용해 주십시오.
※ 예약 재가열 진행중에 현재 시각을 확인하려면 확인 버튼을 누르면 현재 시각이 약2초간 나타납니다.
1
2
3
4
취사 후 자동보온 기능 설정 및 해제방법
1
대기상태에서 모드 버튼을 눌러 “설정”에서 확인 버튼을
누르면 음성 설정 모드에 진입합니다.
(대기상태에서 확인 버튼을 2초이상 눌러도 음성 설정 모드로 진입합니다.)
▶ 모드 버튼을 초기에 누를 시 0.3초 이상 눌러야 진입 가능합니다.
▶ 모드 버튼을 누를 때 마다 한 단계 씩 이동합니다.
2
모드 버튼을 7회 누르고 확인 버튼을 누르면 취사 후
자동보온 기능 설정 모드에 진입 합니다.
3
좌/우 버튼을 눌러 OFF를 선택한 후 확인 버튼을 누르면
취사 후에 보온이 진입되지 않고 대기 모드로 돌아갑니다.
좌/우 버튼을 눌러 On을 선택한 후 확인 버튼을 누르면
취사 후에 보온으로 진입합니다.
▶제품의 초기 상태는 On 상태입니다.
4
취사 후 자동보온 기능 설정모드 진입 후 취소 버튼을 누르거나
아무런 버튼 입력없이 7초가 지나면 기능이 설정되지 않고
취소되며 대기모드로 돌아갑니다.
취사 후 자동으로 진입하는 보온을 설정하거나 해제 할 수 있도록하는 기능으로 필요에 따라 설정해 주십시오.
▶ 설정 및 해제 방법
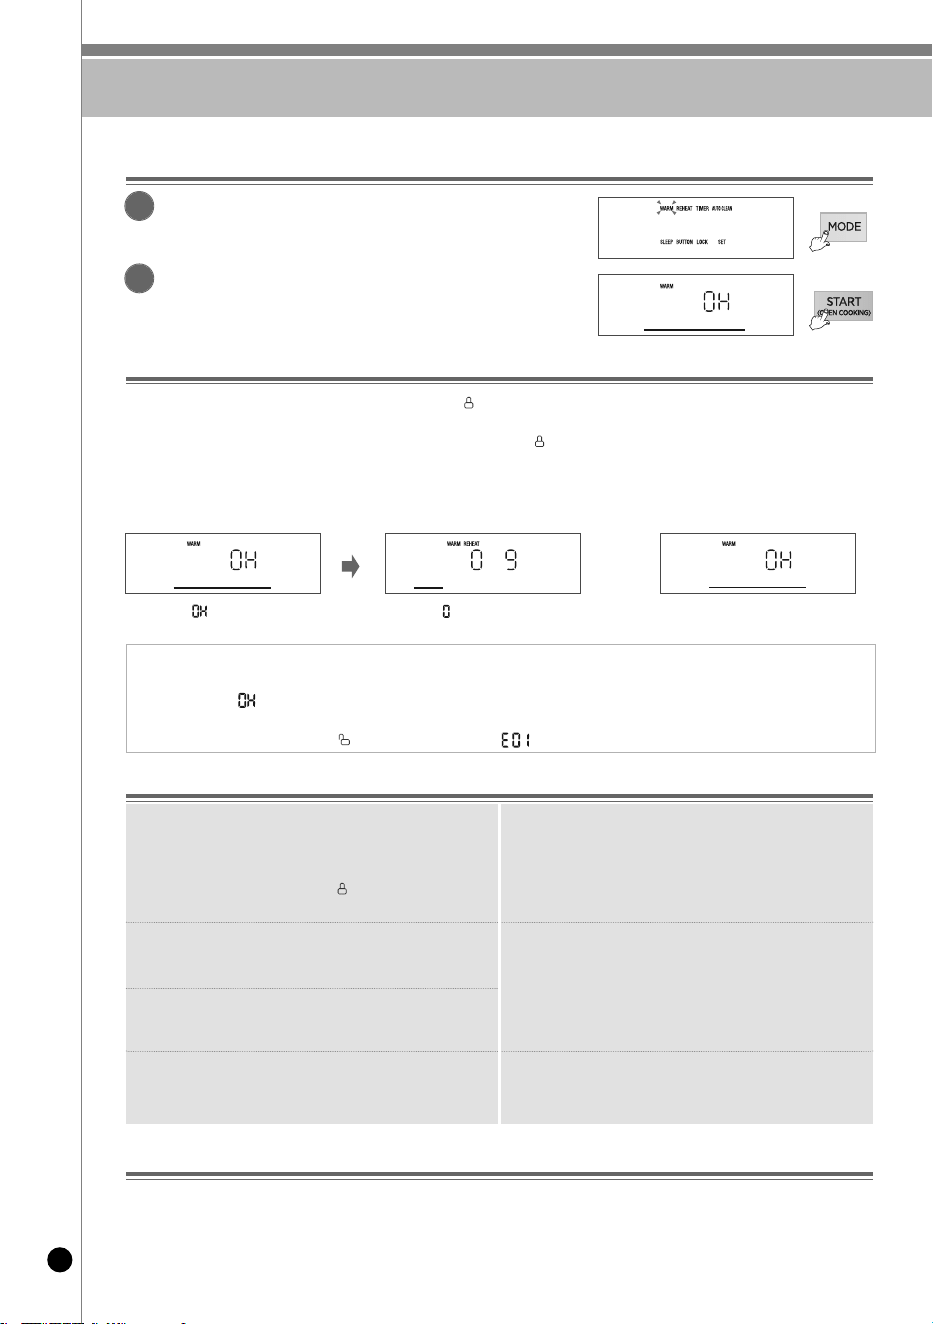
밥을 맛있게 보온하려면
54
보온 방법
1
2
재가열 방법
• 보온 중 따끈따끈한 밥을 원하시면, 뚜껑 결합 손잡이를 “고압”위치로 돌린후, 모드 버튼을 눌러 보온재가열을 선택하고,
시작 버튼을 누르면 재가열이 시작되고 9분 후 밥을 드시면 금방 지은 밥처럼 따끈따끈한 밥을 드실 수 있습니다.
• 대기 상태에서 보온재가열을 사용하실 경우에는 뚜껑 결합 손잡이를 “고압”위치로 돌린후, 모드 버튼을 눌러 보온재가열을 선택하고,
시작 버튼을 눌러 주십시오.
▶ 모드 버튼을 초기에 누를 시 0.3초 이상 눌러야 진입 가능합니다.
▶ 모드 버튼을 누를때 마다 한단계 씩 이동 합니다.
표시부의 “”는 보온경과 시간이
0시간임을 의미합니다.
<보온중>
➡
표시부의 “” 표시가 빙글빙글 돌아가고
남은시간을 표시하며 보온재가열을 합니다.
<보온재가열 중>
재가열이 끝나면 다시 보온을
진행하며 보온경과 시간을 표시합니다.
<보온재가열 완료>
취사 직후나 보온 중 뚜껑을 열 때 압력에 의해 뚜껑이 잘 안열리는 경우가
있습니다. 뚜껑을 열 때는 사일런트 스팀 밸브 캡을 도구로 젖혀 압력이
완전히 제거된 다음 열어 주십시오.
재가열시 반드시 뚜껑 결합 손잡이를“고압”방향으로돌려주십시오.
(뚜껑 열림 버튼 파손 및 보온성능에 영향을 줍니다.)
취사 완료 후 밥을 밑면까지 골고루 섞어 보온하면 밥상태가 좋습니다.
(적은 밥은 내솥의 중앙에 불룩하게 모아서 보온하십시오.)
보온 중 내솥에 밥이 없거나 사용하지 않을 경우에는 취소 버튼을 눌러
보온을 취소하거나, 전원플러그를 콘센트에서 뽑아 주십시오.
주걱을 내솥에 넣어 둔 채로 보온하지 마십시오.
특히, 나무주걱 등은 세균을 발생시켜 냄새의 원인이 됩니다.
장시간 보온하면 밥이 변색되고 냄새가 날 수 있으므로 보온은 12시간
이내로 하는 것이 좋습니다.
특히, 압력밥은 특성상 일반 밥솥의 밥보다 변색이 빨리 됩니다.
보온 24시간 경과 이후부터 보온 경과 시간을 깜빡이게 표시하여 보온이
장시간 경과 되었음을 알립니다.
잡곡, 현미는 백미보다 보온 상태가 좋지 않으므로 가급적 보온은
피하십시오.
보온 중 내솥의 가장자리나 증기 배출구 하단부는 부분적으로
밥이 하얗게 변하고 부풀어 오를 수도 있습니다.
이럴 경우는 밥을 저어서 섞어 주십시오.
너무 적은 밥을 보온하거나 먹다 남은 밥이나 찬밥을
보온 중인 밥과 섞어서 보온하지 마십시오.
밥에서 냄새가 날 수 있습니다. (찬밥은 전자레인지를 이용하십시오.)
보온할 때 주의사항
▶보온재가열 기능을 너무 자주 사용하시면 밥이 변색되거나 마르는 경우가 있습니다. 1일 1~2회만 사용하세요.
▶별도의 전열기구나 가스불로 밥을 지은 경우는 밥을 밥솥에 담은 후 보온을 진행해 주세요.
이때, 표시부에는“”가 표시됩니다. (이와 같이 차가운 밥솥에 뜨거운 밥을 옮겨 담아 보온할 경우 냄새나 변색이 있을 수 있습니다.)
▶보온중 무압모드에서는 보온재가열이 진행되지 않습니다. 고압모드로 변경 후 보온재가열을 진행해 주세요.
▶보온재가열 진행중 뚜껑 결합 손잡이를“ 무압”으로 돌릴경우, 표시부에“ ”가표시됩니다. 이때 보온 재가열이 취소되고 보온이 진행됩니다.
보온 시 냄새가 날 때
▶ 청소를 자주 해 주십시오. 특히, 뚜껑부의 청소상태가 나쁘면 세균이 번식하여 보온시 냄새가 날 수 있습니다.
▶ 외관상 깨끗하더라도 곳곳에 세균이 서식하여 보온시 냄새를 발생시킬 수 있으므로 냄새가 많이 날 경우는 물을 내솥의 자동세척 눈금에
맞추고 식초를 1큰술 넣은 후 뚜껑을 닫고 모드 버튼을 눌러 “자동세척” 을 선택하고, 시작 버튼을 눌러 주십시오. 자동세척을 완료 후,
내솥을 반드시 깨끗이 씻어 냅니다. (39쪽 참조)
▶ 탕이나 찜, 간편식 등의 요리를 한 후 깨끗이 씻어내지 않고 보온하면 밥에 냄새가 배어들 수 있습니다.
대기상태에서 모드 버튼을 눌러 보온을 선택합니다.
• 모드 버튼을 초기에 누를 시 0.3초 이상 눌러야 합니다.
• 모드 버튼을 누를때 마다 한단계 씩 이동 합니다.
시작 버튼을 누르면 보온이 시작 됩니다.
• 취소 버튼을 누르거나 아무런 버튼 입력없이 7초가 지나면
취소 후 대기상태로 돌아갑니다.
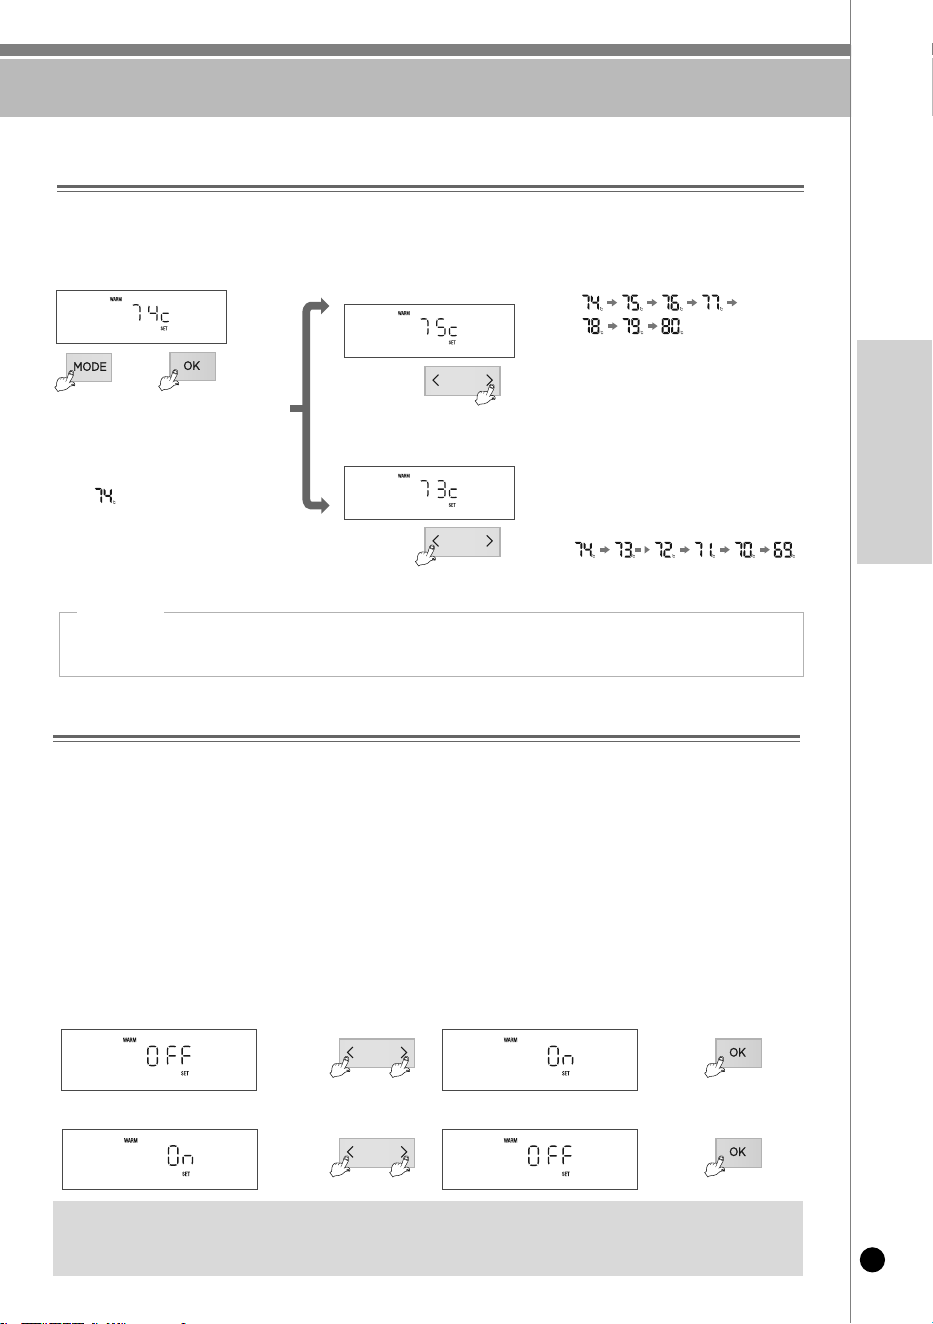
밥을 맛있게 보온하려면
55
www.cuckooamerica.com
KOREAN
대기상태에서 모드 버튼을 눌러 “설정”에서
확인 버튼을 누르면 음성 설정 모드에 진입합니다.
모드 버튼을 3회 누르고 확인 버튼을 누르면
보온온도 설정 모드에 진입 합니다.
이때, 는 현재 보온온도를 나타냅니다.
▶ 모드 버튼을 초기에 누를 시 0.3초 이상 눌러야
진입 가능합니다.
▶ 모드 버튼을 누를때 마다 한단계 씩 이동 합니다.
❶
❸
우측 버튼을 눌러 표시부가
와 같이
변하도록 합니다.
▶ 계속 누르고 있으면 연속으로 변합니다.
❷-2
❷-1
좌측 버튼을 눌러 표시부가
와 같이 변하도록 합니다.
▶ 계속 누르고 있으면 연속으로 변합니다.
➡
보온온도 조정방법
청소를 자주하고 물을 끓여 소독을 하였는데도 냄새가 나고 물이 맺히거나 색깔이 변하는 경우는 보온 온도가 맞지않은 경우이므로
보온 온도를 조정합니다.
보온 온도를 조정하고자 하실 때는 고객상담실로 문의 하시면 상세히 안내해 드리겠습니다.
장시간 보온을 유지할 시 밥품질(변색, 마름, 냄새등)의 저하예방을 위해 취침시간(PM 10 : 00 ~ AM 04 : 00)동안
보온온도를 저온상태로 유지하는 기능으로 필요에 따라 설정해 주십시오.
원하는 온도를 설정한 후 확인 버튼을 누르면
설정된 온도가 자동으로 입력됩니다.
(취소 버튼을 누르거나 입력없이 7초가 경과
하면 기능이 취소되고 대기상태로 돌아갑니다.)
※ 제품 출고 시 설정된 기준온도는 설명서와 다를 수 있습니다.
1. 쉰 냄새가 많이 나고 물이 많이 맺히는(밥이 삭는)경우 : 보온 온도가 낮은 경우 입니다. 보온 온도를 2~3℃정도 높여 줍니다.
2. 밥 색깔이 심하게 누렇고 밥이 마르면서 냄새가 날 경우 : 보온 온도가 높은 경우 입니다. 보온 온도를 2~3℃정도 낮춰 줍니다.
온도조정치
온도를 올릴 때
온도를 내릴 때
➡
➡
취침보온 모드 설정방법
1. 대기상태에서 모드 버튼을 눌러 “설정” 에서 확인 버튼을 누르면 음성 설정 모드에 진입합니다.
▶ 모드 버튼을 초기에 누를 시 0.3초 이상 눌러야 진입 가능합니다.
▶ 모드 버튼을 누를때 마다 한단계 씩 이동 합니다.
2. 모드 버튼을 6회 누르고 확인 버튼을 누르면 취침보온 설정 모드에 진입 합니다.
3. 좌/우 버튼을 눌러 On을 선택한 후 확인 버튼을 누르면 취침 보온이 선택 됩니다.
좌/우 버튼을 눌러 OFF를 선택한 후 확인 버튼을 누르면 취침 보온이 해제 됩니다.
4. 취침보온 설정모드 진입 후 취소 버튼을 누르거나 아무런 버튼 입력없이 7초가 지나면
기능이 설정되지 않고 취소되며 대기모드로 돌아갑니다.
▶ 설정방법
▶ 해제방법
▶ 본 기능을 설정시 취침시간 동안 보온온도가 저온상태로 유지되오니 취침시간에 보온이 필요하신 분은 설정하지 마십시오.
기온이 높은 여름철에는 밥이 상해서 변색되거나 냄새가 날 수 있습니다. 여름철에는 취침보온 모드 설정을 가급적 하지 마십시오.
▶ 본 기능은 제품 출하 시 해제 상태로 되어 있으니 필요에 따라 설정해 주십시오.
➡➡
➡➡
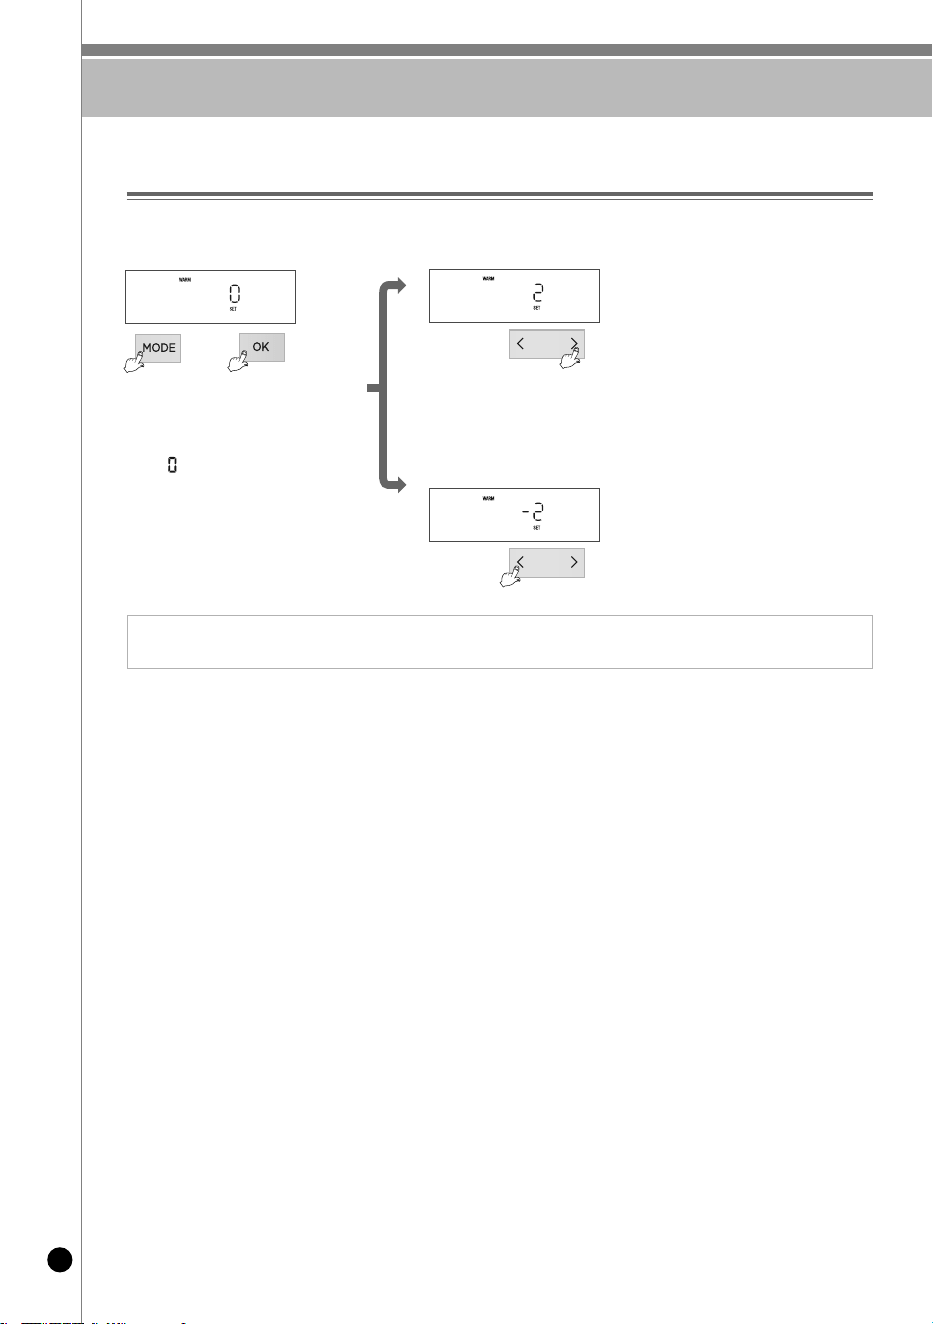
밥을 맛있게 보온하려면
56
대기상태에서 모드 버튼을 눌러 “설정” 에서
확인 버튼을 누르면 음성 설정 모드에 진입합니다.
모드 버튼을 4회 누르고 확인 버튼을 누르면
맞춤보온 설정 모드에 진입 합니다.
이때, 는 현재 설정 값을 나타냅니다.
▶ 모드 버튼을 초기에 누를 시 0.3초 이상 눌러야
진입 가능합니다.
▶ 모드 버튼을 누를때 마다 한단계 씩 이동 합니다.
❶
우측 버튼을 눌러 표시부가
그림과 같이 변하도록 합니다.(높임)
▶ 계속 누르고 있으면 연속으로 변합니다.
❷-1
좌측 버튼을 눌러 표시부가
그림과 같이 변하도록 합니다.(낮춤)
▶ 계속 누르고 있으면 연속으로 변합니다.
❷-2
1. 뚜껑을 열때 물이 많이 흐를 경우 : 좌/우 버튼을 눌러 설정값을 높여 줍니다.
2. 밥 가장자리에 밥퍼짐 현상이 생기는 경우 :좌/우 버튼을 눌러 설정값을 낮춰 줍니다.
맞춤보온 기능 조정방법
보온 시 뚜껑을 열 때 물이 많이 흐를 경우나 밥 가장자리에 밥 퍼짐 현상이 생길 경우에 사용합니다.
➡
설정값을 낮출 경우
설정값을 높일 경우
➡
원하는 값을 설정한 후 확인 버튼을 누르면
설정된 값이 자동으로 입력됩니다.
(취소 버튼을 누르거나 입력없이 7초가 경과
하면 기능이 취소되고 대기상태로 돌아갑니다.)
❸
➡
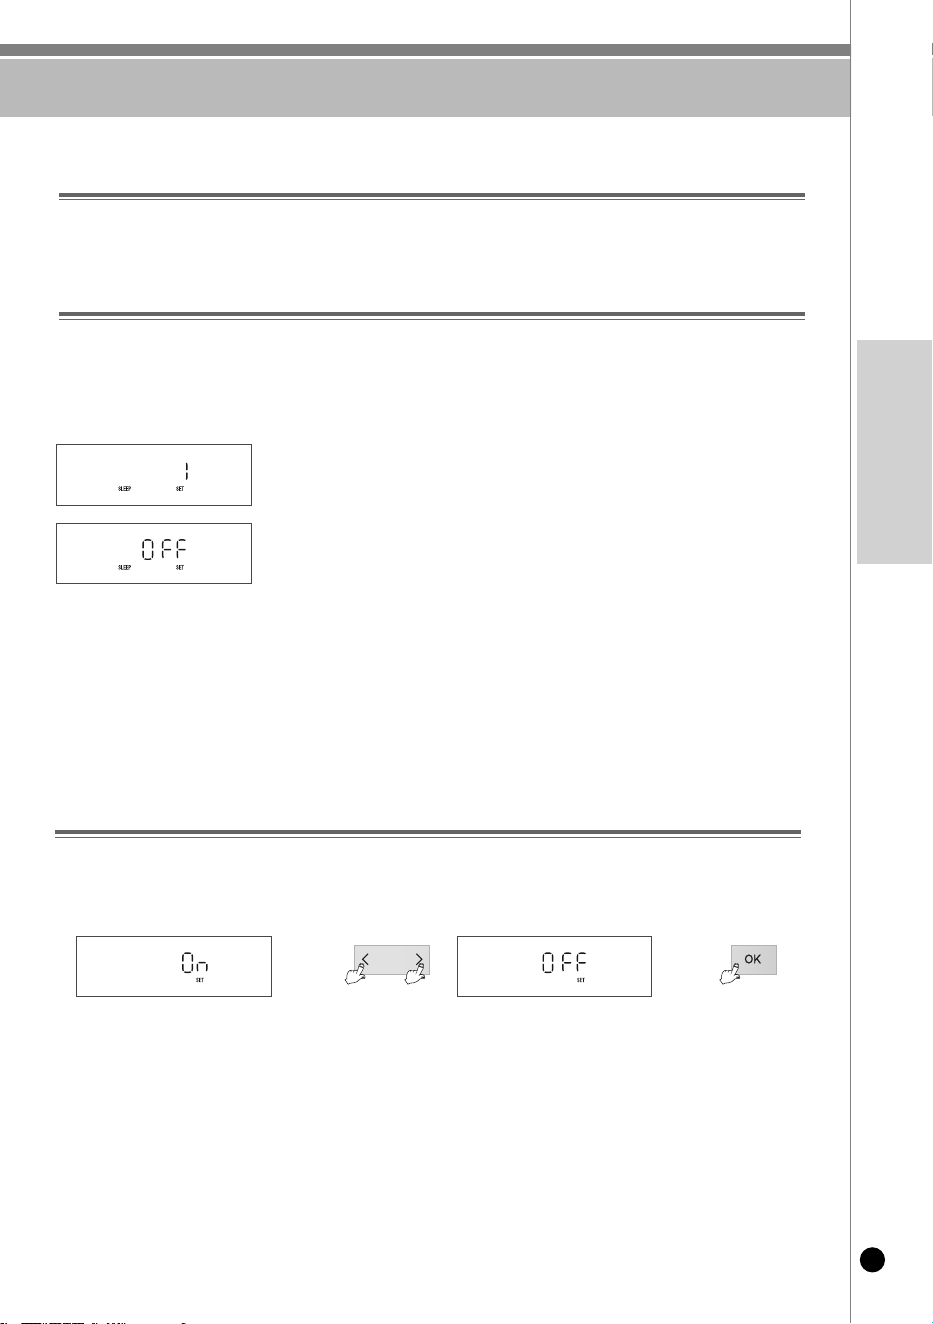
절전 기능/화면 조명 절전 기능은 이렇게 하십시오
57
www.cuckooamerica.com
KOREAN
대기모드 절전기능이란
전원코드를 뽑지 않으면 동작하지 않는 대기상태라 할지라도 약간의 전력이 소모됩니다. 이를 대기전력이라고 하는데
이를 절감하기 위해 밥솥내부의 전기회로를 외부 전원으로부터 차단시켜 전력 소모를 최소화 하는 기술입니다.
자동 절전기능 사용방법
「자동 절전기능 설정모드」에서 대기시간을 ‘OFF’가 아닌 값으로 선택하면 대기상태에서 선택된 시간이 경과한 후 자동으로
절전 기능이 시작됩니다. (※ 제품출고시 설정된 값은 1분입니다.)
만약 대기시간이 경과되기 전 뚜껑 결합 손잡이를 돌리거나 버튼을 누르면 대기시간이 선택된 설정값부터 다시 감소합니다.
(아무 버튼이나 누르거나, 뚜껑 결합 손잡이를 열거나 닫으면 절전모드가 해제되고, 대기 상태로 돌아갑니다.)
▶ 설정방법
1. 대기상태에서 모드 버튼을 눌러 “설정” 에서 확인 버튼을 누르면
음성 설정 모드에 진입합니다.
▶ 모드 버튼을 초기에 누를 시 0.3초 이상 눌러야 진입 가능합니다.
▶ 모드 버튼을 누를때 마다 한단계 씩 이동 합니다.
2. 모드 버튼을 8회 누르고 확인 버튼을 누르면 자동 절전기능 설정 모드에
진입 합니다.
3. 좌/우 버튼으로 원하시는 시간을 선택 후 확인 버튼을 눌러 주십시오.
▶ 시간은 OFF, 1분, 10분, 20분, 30분, 40분, 50분, 60분까지 선택 가능합니다.
▶ OFF를 선택하면 자동 절전 기능을 지원하지 않는 상태가 됩니다.
4. 자동 절전기능 설정모드 진입 후 취소 버튼을 누르거나 아무런 버튼 입력없이
7초가 지나면 기능이 설정되지 않고 취소되며 대기모드로 돌아갑니다.
화면조명 절전기능
대기, 취사, 보온, 예약 취사 중 화면의 밝기를 적절히 조절하는 기능입니다.
(화면조명 절전기능 On상태에서 아무런 버튼 입력없이 10초가 지나면 화면이 어두워집니다.)
▶ 기능 설정 및 해제 방법
(
※제품출고시 설정된 값은 On입니다.
)
1. 대기상태에서 모드 버튼을 눌러 “설정” 에서 확인 버튼을 누르면 음성 설정 모드에 진입합니다.
▶ 모드 버튼을 초기에 누를 시 0.3초 이상 눌러야 진입 가능합니다.
▶ 모드 버튼을 누를때 마다 한단계 씩 이동 합니다.
2. 모드 버튼을 9회 누르고 확인 버튼을 누르면 화면조명 절전기능 설정 모드에 진입 합니다.
3. 좌/우 버튼을 눌러 On을 선택한 후 확인 버튼을 누르면 화면조명 절전기능이 선택됩니다.
좌/우 버튼을 눌러 OFF를 선택한 후 확인 버튼을 누르면 화면조명 절전기능이 해제됩니다.
4. 화면조명 절전기능 설정모드 진입 후 취소 버튼을 누르거나 아무런 버튼 입력없이 7초가 지나면 기능이
설정되지 않고 취소되며 대기모드로 돌아갑니다.
➡➡
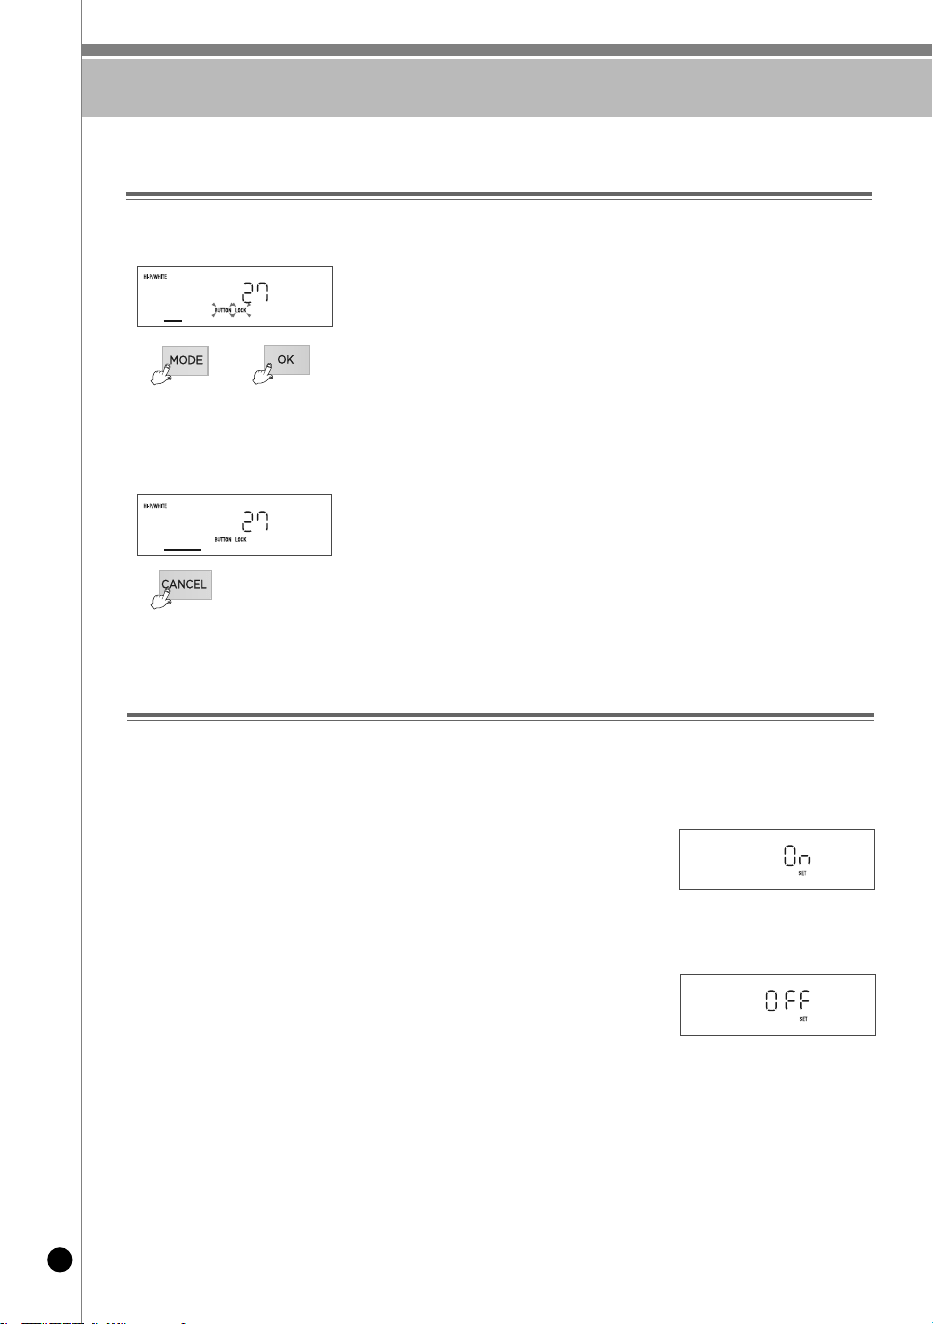
버튼 잠금기능 / 취사 잔여시간 표시기능은 이렇게 하십시오
58
버튼 잠금기능
1. 모드 버튼을 눌러 “버튼잠금” 에서 확인 버튼을 누르면
버튼 잠금이 설정됩니다.
▶ 모드 버튼을 초기에 누를 시 0.3초 이상 눌러야 진입 가능합니다.
▶ 모드 버튼을 누를때 마다 한단계 씩 이동 합니다.
2. 버튼 잠금이 설정 되었을때, 화면에 버튼 잠금 표시가
깜빡거립니다.
청소 시나 어린이 접촉에 의한 오동작을 방지하기 위해 버튼잠금(LOCK)을 설정할 수 있는 기능 입니다.
1. 버튼 잠금이 설정된 상태에서 취소버튼을 2초 이상 누르면
버튼잠금이 해제 됩니다.
2. 버튼 잠금이 설정된 상태에서 전원 OFF후 재인가시
버튼 잠금기능이 해제 됩니다.
취사 잔여시간 표시 기능
취사 진행 중 주기적으로 나타나는 취사 잔여시간 표시를 선택 또는 해제 할 수 있습니다.
• 취사 용량이나 수온, 전압 등 사용 환경에 따라 실제 취사 시간은 차이가 있을 수 있습니다.
• 취사 시작 1분 후에는 일정 주기로 남은 취사시간을 산정하여 10초간 표시됩니다.
• 취사 진행 정도에 따라 표시되는 시간이 자동으로 갱신되어 표시되므로 실제 시간과 다를 수 있습니다.
1. 대기상태에서 모드 버튼을 눌러 “설정” 에서 확인 버튼을 누르면
음성 설정 모드에 진입합니다.
▶ 모드 버튼을 초기에 누를 시 0.3초 이상 눌러야 진입 가능합니다.
▶ 모드 버튼을 누를때 마다 한단계 씩 이동 합니다.
2. 모드 버튼을 10회 누르고 확인 버튼을 누르면
취사 잔여시간 표시 기능 설정 모드에 진입 합니다.
3. 좌/우 버튼을 눌러 On을 선택한 후 확인 버튼을 누르면
취사 잔여시간 표시 기능이 선택됩니다.
좌/우 버튼을 눌러 OFF를 선택한 후 확인 버튼을 누르면
취사 잔여시간 표시 기능이 해제됩니다.
4. 취사 잔여시간 표시 설정 모드 진입 후, 취소 버튼을 누르거나
아무런 버튼 입력없이 7초가 지나면 기능이 설정되지 않고 취소되며
대기모드로 돌아갑니다.
※ 취사 잔여시간 표시 기능 해제시
※ 취사 잔여시간 표시 기능 선택시
(초기값 설정 상태로 되어 있습니다.)
▶ 설정방법
▶ 해제방법
➡
59
www.cuckooamerica.com
KOREAN
고장신고 전에 확인하십시오
▼ 제품에 이상이 생겼을 경우에는 고객상담실로 문의하시기 전에 아래 사항을 확인해 주십시오.
뚜
껑
결
합
손
잡
이
가
“무
압
”
방
향
으
로
움
직
이
지
않
을
때
• 고
압
취
사
또
는
요
리
중
에
뚜
껑
결
합
손
잡
이
를
돌
리
지
않
았
습
니
까
?
• 증
기
가
완
전
히
배
출
되
지
않
은
상
태
에
서
뚜
껑
결
합
손
잡
이
를
돌
리
지
않
았
습
니
까
?
• 고
압
취
사
또
는
요
리
중
에
는
뚜
껑
이
열
리
지
않
습
니
다
.뚜
껑
을
강
제
로
열
지
마
십
시
오
.
부
득
이
한
경
우
는
취
소
버
튼
을
0
.3
초
간
(내
솥
온
도
가
높
으
면
1
.5
초
간
)
눌
러
취
소
시
킨
다
음
사
일
런
트
스
팀
밸
브
캡
을
도
구
로
젖
혀
증
기
를
완
전
히
빼
낸
후
열
어
주
십
시
오
.
• 사
일
런
트
스
팀
밸
브
캡
을
도
구
로
젖
혀
증
기
를
완
전
히
빼
낸
후
뚜
껑
을
열
어
주
십
시
오
.
뚜
껑
결
합
손
잡
이
가
“
무
압
”
방
향
으
로
완
전
히
돌
아
갔
는
데
도
뚜
껑
이
열
리
지
않
을
경
우
• 압
력
때
문
입
니
다
.
• 사
일
런
트
스
팀
밸
브
캡
을
도
구
로
젖
혀
증
기
를
완
전
히
빼
낸
후
뚜
껑
을
열
어
주
십
시
오
.
예
약
취
반
중
알
림
음
과
함
께
뚜
껑
결
합
손
잡
이
의
L
E
D
가
주
황
색
↔
흰
색
으
로
교
차
점
멸
할
때
• 뚜
껑
결
합
손
잡
이
를
“
고
압”또는
“무
압
”
방
향
으
로
완
전
히
돌
리
셨
습
니
까
?
•
고
압
메
뉴
를
예
약
취
사
중
뚜
껑
결
합
손
잡
이
를
“무
압
” 방
향
으
로
돌
리
셨
습
니
까
?
• 무압
메
뉴
를
예
약
취
사
중
뚜
껑
결
합
손
잡
이
를
“
고
압”
방
향
으
로
돌
리
셨
습
니
까
?
• 뚜
껑
결
합
손
잡
이
를
완
전
히
“
고
압”
또
는
“무
압
” 방
향
으
로
돌
립
니
다
.
•
고
압
메
뉴
를
예
약
취
사
중
에
는
뚜
껑
결
합
손
잡
이
를
“고
압”
방
향
으
로
완
전
히
돌
립
니
다
.
• 무압
메
뉴
를
예
약
취
사
중
에
는
뚜
껑
결
합
손
잡
이
를
“무
압
”
방
향
으
로
완
전
히
돌
립
니
다
.
뚜
껑
사
이
로
증
기
가
누
설
되
거
나
“삐
”
하
는
휘
파
람
소
리
가
날
때
• 패
킹
에
이
물
질
(밥
알
등
)이
묻
어
있
지
않
습
니
까
?
• 패
킹
이
낡
지
않
았
습
니
까
?
• 패
킹
을
행
주
나
부
드
러
운
헝
겊
으
로
깨
끗
이
닦
은
후
사
용
하
십
시
오
.
• 패
킹
주
변
은
항
상
깨
끗
이
유
지
시
켜
주
십
시
오
.
• 증
기
가
누
설
되
면
곧
바
로
취
소
버
튼
을
0
.3
초
간
(내
솥
온
도
가
높
으
면
1
.
5
초
간
) 눌
러
증
기
를
빼
낸
후
전
원
플
러
그
를
뽑
아
사
용
을
중
지
하
고
고
객
상
담
실
로
문
의
하
십
시
오
.
• 패
킹
은
사
용
방
법
및
횟
수
에
따
라
1
년
~
3
년
정
도
사
용
후
교
환
하
여
주
십
시
오
. 낡
은
패
킹
을
계
속
하
여
사
용
시
증
기
가
누
설
되
어
압
력
취
사
가
되
지
않
을
수
있
습
니
다
.
취
사
또
는
요
리
중
취
소
버
튼
이
눌
러
지
지
않
을
때
• 내
솥
의
내
부
가
뜨
겁
지
않
습
니
까
?
• 버
튼
잠
금
이
설
정
되
어
있
지
않
습
니
까
?
• 취
사
또
는
요
리
중
부
득
이
하
게
취
소
할
경
우
, 내
솥
내
부
온
도
가
높
으
면
안
전
을
위
해
취
소
버
튼
을
0
.3
초
간
(내
솥
온
도
가
높
으
면
1
.5
초
간
)
눌
러
야
취
사
또
는
요
리
가
취
소
됩
니
다
.
• 고
압
취
사
또
는
요
리
가
취
소
되
면
자
동
증
기
배
출
장
치
로
증
기
가
배
출
되
면
서
내
용
물
이
비
산
할
수
있
으
므
로
얼
굴
과
손
등
에
화
상
을
입
을
수
있
으
니
주
의
하
십
시
오
.
•
취
소
버
튼
을
2
초
이
상
눌
러
버
튼
잠
금
기
능
을
해
제
하
여
주
십
시
오
.
취
사
나
보
온
시
이
상
한
소
음
이
날
때
• 취
사
시
바
람
부
는
소
리
(“붕
”
)가
나
지
않
습
니
까
?
• 취
사
및
보
온
중
“
찌
”하
는
소
리
가
납
니
까
?
• 내
부
부
품
의
열
을
식
혀
주
기
위
해
송
풍
모
터
가
돌
아
가
는
소
리
입
니
다
. 정
상
입
니
다
.
• 취
사
및
보
온
중
“
찌
”하
는
소
리
는
IH
압
력
밥
솥
이
동
작
될
때
나
는
소
리
입
니
다
. 정
상
입
니
다
.
현
미
가
제
대
로
발
아
되
지
않
을
때
• 정
격
용
량
이
상
의
현
미
를
넣
고
발
아
시
키
지
않
았
습
니
까
?
•
묵
은
현
미
를
사
용
하
지
않
았
습
니
까
?
• 정
격
용
량
의
현
미
를
넣
어
주
십
시
오
.
• 묵
은
현
미
나
오
염
된
현
미
를
사
용
했
을
때
발
아
율
이
떨
어
질
수
있
습
니
다
. (4
1
쪽
현
미
구
입
방
법
참
조
)
버
튼
입
력
시
“
”표
시
가
나
타
날
때
• 내
솥
이
제
품
에
들
어
있
습
니
까
?
•
1
2
0
V
용
(전
원
)에
사
용
하
지
않
았
습
니
까
?
•
내
솥
이
들
어
있
지
않
은
상
태
에
서
는
취
사
, 예
약
, 보
온
/재
가
열
,
자
동
세
척
이
되
지
않
습
니
다
.
• 본
제
품
은
1
2
0
V
전
용
제
품
입
니
다
.
전
원
을
바
르
게
사
용
하
십
시
오
.
버
튼
이
동
작
하
지
않
거
나
“”표
시
가
나
타
날
때
• 뚜
껑
결
합
손
잡
이
를
“고압” 또는
“무
압
” 방향
으
로
확
실
하
게
돌
리
셨
습
니
까
?
• 메
뉴
가
표
시
되
었
습
니
까
?
•
뚜
껑
결
합
손
잡
이
를
완
전
히
“고압” 또는
“
무
압
”방
향
으
로
확
실
하
게
돌
립
니
다
.
뚜
껑
결
합
손
잡
이
가
완
전
히
체
결
되
지
않
으
면
시
작
,
모
드
, 좌
/우
버
튼
이
작
동
되
지
않
습
니
다
.
“”
↔
“”
표
시
가
교
차
로
점
멸
할
때
• 뚜
껑
이
열
려
있
습
니
까
?• 고
압
/무
압
취
사
, 보
온
/재
가
열
, 예
약
을
하
실
때
는
뚜
껑
을
닫
고
진
행
해
주
십
시
오
.
•
취
사
중
뚜
껑
을
닫
지
않
으
면
뜨
거
운
증
기
로
인
해
화
상
의
위
험
이
있
습
니
다
.
“”표
시
가
나
타
날
때
• 취
사
중
제
품
의
전
원
이
1
0
분
이
상
차
단
되
었
습
니
까
?
• 취
소
버
튼
을
눌
러
“”표
시
를
해
제
한
후
다
시
취
사
해
주
십
시
오
.
증 상확인사항조치사항
60
고장신고 전에 확인하십시오
▼ 제품에 이상이 생겼을 경우에는 고객상담실로 문의하시기 전에 아래 사항을 확인해 주십시오.
밥
이
심
하
게
눌
을
때
•
온
도
감
지
기
, 내
솥
외
면
에
밥
알
이
심
하
게
눌
어
붙
어
있
거
나
이
물
질
이
있
지
는
않
습
니
까
?
•
“
맞
춤
취
사
”기
능
을
설
정
하
지
않
으
셨
습
니
까
?
• 온
도
감
지
기
,
내
솥
외
면
의
이
물
질
을
제
거
해
주
십
시
오
.
(2
9
쪽
참
조
)
• 필
요
에
따
라
맞
춤
취
사
기
능
을
설
정
한
후
취
사
하
여
주
십
시
오
.
(4
0
쪽
참
조
)
장
시
간
동
안
취
사
가
완
료
되
지
않
고
“
”
표
시
가
나
타
날
때
• 1
2
0
V
용
(전
원
)에
사
용
하
지
않
으
셨
습
니
까
?•
제
품
에
이
상
이
생
겨
(히
터
단
선
, 열
량
부
족
등
)
장
시
간
밥
이
완
료
되
지
않
을
때
나
타
나
는
표
시
입
니
다
.
전
원
을
차
단
후
고
객
상
담
실
로
문
의
하
십
시
오
.
• 본
제
품
은
1
2
0
V
전
용
제
품
입
니
다
. 전
원
을
바
르
게
사
용
하
십
시
오
.
예
약
취
사
시
각
이
맞
지
않
을
때
• 현
재
시
각
이
맞
습
니
까
?
• 오
전
, 오
후
를
잘
못
선
택
하
지
않
았
습
니
까
?
• 예
약
시
간
을
1
3
시
간
이
상
으
로
선
택
하
지
않
았
습
니
까
?
• 현
재
시
각
을
맞
추
지
않
으
면
예
약
시
각
에
취
사
가
완
료
되
지
않
습
니
다
.
현
재
시
각
을
맞
추
십
시
오
.
(3
4
쪽
참
조
)
• 오
전
, 오
후
를
확
인
하
십
시
오
.
• 최
대
예
약
시
간
은
1
3
시
간
입
니
다
. (
5
1
쪽
참
조
)
취
사
직
후
나
보
온
중
밥
에
서
이
상
한
냄
새
가
날
때
•
닭
찜
, 갈
비
찜
등
의
요
리
를
하
신
후
청
소
를
깨
끗
이
하
셨
습
니
까
?
• 2
9
쪽
을
참
조
하
여
뚜
껑
부
의
패
킹
을
깨
끗
이
닦
아
낸
후
사
용
하
여
주
십
시
오
.
뚜
껑
이
닫
혀
지
지
않
을
때
• 뚜
껑
결
합
손
잡
이
가
(
)
“ 무
압
” 방향
으
로
완
전
히
돌
려
졌
습
니
까
?
•
내
솥
에
밥
이
나
뜨
거
운
음
식
물
이
들
어
있
지
않
습
니
까
?
• 내
솥
을
본
체
에
완
전
히
넣
었
습
니
까
?
• 뚜
껑
결
합
손
잡
이
를
“무
압
”
방
향
으
로
완
전
히
돌
리
고
닫
아
주
십
시
오
.
• 사
일
런
트
스
팀
밸
브
캡
을
도
구
로
젖
힌
다
음
뚜
껑
을
닫
습
니
다
.
•
내
솥
에
부
착
되
어
있
는
내
솥
손
잡
이
를
좌
우
로
돌
려
본
체
에
완
전
히
안
착
시
킵
니
다
.
“, ”
번
갈
아
가
면
서
표
시
가
나
타
날
때
• 마
이
컴
전
원
에
이
상
이
있
을
때
나
타
납
니
다
.
• 전
원
을
차
단
후
고
객
상
담
실
로
문
의
하
십
시
오
.
“,
”
번
갈
아
가
면
서
표
시
가
나
타
날
때
• 환
경
센
서
에
이
상
이
있
을
때
나
타
납
니
다
.
• 전
원
을
차
단
후
고
객
상
담
실
로
문
의
하
십
시
오
.
“”표
시
가
나
타
날
때
• 마
이
컴
내
부
메
모
리
에
이
상
이
있
을
때
나
타
납
니
다
.
• 전
원
을
차
단
후
고
객
상
담
실
로
문
의
하
십
시
오
.
시
작
버
튼
입
력
시
,
보
온
동
작
중
“”, 취사
동
작
중
“”표
시
가
나
타
날
때
• 전
원
또
는
제
품
의
이
상
점
검
기
능
입
니
다
.
지
속
적
으
로
표
시
가
나
타
날
경
우
에
는
고
객
상
담
실
로
문
의
하
십
시
오
.
밥
이
되
지
않
을
때
• 시
작
버
튼
을
눌
렀
습
니
까
?
•
취
사
중
정
전
이
되
지
않
았
습
니
까
?
• 원
하
는
메
뉴
선
택
후
반
드
시
시
작
버
튼
을
1
회
눌
러
표
시
부
에
“”
표
시
가
나
타
나
는
지
확
인
하
십
시
오
.
• 정
전
보
상
기
능
에
대
해
서
는
3
4
쪽
을
참
조
하
십
시
오
.
밥
이
설
익
거
나
퍼
석
할
때
또
는
층
밥
이
될
때
• 계
량
컵
을
사
용
하
셨
습
니
까
?
•
물
조
절
은
정
확
히
하
셨
습
니
까
?
• 쌀
을
깨
끗
이
씻
었
습
니
까
?
• 쌀
을
장
시
간
불
린
후
취
사
하
셨
습
니
까
?
•
쌀
을
개
봉
한
지
오
래
되
어
너
무
말
라
있
지
않
습
니
까
?
• 자
동
세
척
을
정
기
적
으
로
하
셨
습
니
까
?
• 3
6
~
3
7
쪽
을
참
조
하
여
올
바
르
게
사
용
하
십
시
오
.
•
물
을
반
눈
금
정
도
더
넣
고
취
사
하
십
시
오
.
• 3
9
쪽
을
참
조
하
여
올
바
르
게
사
용
하
십
시
오
.
“”
표
시
가
나
타
날
때
• 스
마
트
잠
금
장
치
에
이
상
이
있
을
때
나
타
납
니
다
.
• 전
원
을
차
단
후
고
객
상
담
실
로
문
의
하
십
시
오
.
“”
표
시
가
나
타
날
때
• 스
마
트
잠
금
장
치
에
이
상
이
있
을
때
나
타
납
니
다
.• 취
사
가
완
료
될
때
까
지
뚜
껑
을
열
지
마
세
요
.
• 보온
및
대
기
상
태
에
서
뚜
껑
을
열
고
자
할
경
우
전
원
을
차
단
하
고
뚜
껑
을
열
어
주
세
요
.
• 고
객
상
담
실
로
문
의
하
십
시
오
.
증 상확인사항조치사항
61
www.cuckooamerica.com
KOREAN
고장신고 전에 확인하십시오
▼ 제품에 이상이 생겼을 경우에는 고객상담실로 문의하시기 전에 아래 사항을 확인해 주십시오.
콩
(잡
곡
/현
미
)이
설
익
을
때
• 콩
(잡
곡
/
현
미
)이
너
무
마
르
지
않
았
습
니
까
?• 콩
(잡
곡
/현
미
)을
불
리
거
나
삶
아
서
찰
잡
곡
메
뉴
에
서
취
사
를
하
십
시
오
. 잡
곡
의
종
류
에
따
라
설
익
을
수
도
있
습
니
다
.
밥
이
너
무
질
거
나
된
밥
일
때
• 메
뉴
선
택
은
맞
게
하
셨
습
니
까
?
•
물
조
절
은
정
확
히
하
셨
습
니
까
?
• 뜸
을
들
이
는
상
태
에
서
뚜
껑
을
열
지
는
않
았
습
니
까
?
• 원
하
는
메
뉴
를
바
르
게
선
택
하
십
시
오
.
• 물
조
절
을
정
확
히
하
십
시
오
. (3
6
~
3
7
쪽
참
조
)
• 취
사
완
료
음
이
울
린
후
압
력
이
완
전
히
제
거
된
다
음
뚜
껑
을
열
고
밥
을
섞
어
주
십
시
오
.
취
사
도
중
밥
물
이
넘
칠
때
•
계
량
컵
을
사
용
하
셨
습
니
까
?
• 물
조
절
은
정
확
히
하
셨
습
니
까
?
• 메
뉴
선
택
을
정
확
히
하
셨
습
니
까
?
• 3
6
~
3
7
쪽
을
참
조
하
여
올
바
르
게
사
용
하
십
시
오
.
보
온
중
냄
새
가
날
때
• 뚜
껑
을
꼭
닫
았
습
니
까
?
• 보
온
중
전
원
플
러
그
가
콘
센
트
에
서
빠
지
지
않
았
습
니
까
?
•
1
2
시
간
이
상
보
온
하
였
거
나
너
무
적
은
밥
을
보
온
하
지
않
았
습
니
까
?
• 주
걱
이
나
식
은
밥
혹
은
다
른
종
류
의
밥
을
넣
어
서
보
온
하
지
않
았
습
니
까
?
•
뚜
껑
을
완
전
히
닫
아
주
십
시
오
.
• 보
온
중
전
원
플
러
그
를
항
상
꽂
아
주
십
시
오
.
• 보
온
시
간
은
가
능
한
1
2
시
간
이
내
로
하
십
시
오
.
•
고
압
백
미
이
외
의
메
뉴
와
식
은
밥
은
보
온
하
지
마
십
시
오
.
“”
, “, “”
표
시
가
나
타
날
때
• 온
도
감
지
기
에
이
상
이
있
을
때
나
타
납
니
다
.
• 전
원
을
차
단
후
고
객
상
담
실
로
문
의
하
십
시
오
.
“
”
표
시
가
깜
빡
일
때
• 냉
각
팬
에
이
상
이
있
을
때
나
타
납
니
다
.
•
전
원
을
차
단
후
고
객
상
담
실
로
문
의
하
십
시
오
.
보
온
중
보
온
경
과
시
간
표
시
가
깜
빡
일
때
•
보
온
후
2
4
시
간
이
경
과
하
지
않
으
셨
습
니
까
?
• 보
온
2
4
시
간
경
과
이
후
부
터
보
온
경
과
시
간
을
깜
빡
이
게
표
시
하
여
보
온
이
장
시
간
경
과
되
었
음
을
알
립
니
다
.
보
온
중
밥
이
많
이
식
었
거
나
물
이
많
이
흐
를
때
• 보
온
을
취
침
보
온
모
드
로
설
정
하
지
않
으
셨
습
니
까
?
• 필
요
에
따
라
취
침
보
온
모
드
를
해
제
또
는
설
정
한
후
보
온
하
여
주
십
시
오
.
“
”
표
시
가
나
타
날
때
•
취
사
완
료
후
전
원
이
인
가
된
상
태
에
서
한
번
도
뚜
껑
결
합
손
잡
이
를
“
무
압
”
방
향
으
로
돌
리
지
않
고
보
온
이
취
소
된
상
태
(
대
기
상
태
)
에
서
시
작
버
튼
을
누
르
지
않
으
셨
습
니
까
?
• 뚜
껑
결
합
손
잡
이
를
“무
압
”방
향
으
로
돌
린
뒤
다
시
“고
압”방향
으
로
돌
려
주
십
시
오
.
“”표
시
가
나
타
날
때
• 분
리
형
커
버
가
장
착
되
어
있
습
니
까
?
•
분
리
형
커
버
를
장
착
해
주
십
시
오
. (2
9
쪽
참
조
)
• 분
리
형
커
버
가
장
착
된
상
태
에
서
“”표
시
가
계
속
점
멸
할
경
우
고
객
상
담
실
로
문
의
하
십
시
오
.
보
온
중
경
고
음
이
울
리
거
나
보
온
중
재
가
열
이
되
지
않
을
때
• 분
리
형
커
버
가
장
착
되
어
있
습
니
까
?
•
분
리
형
커
버
를
장
착
해
주
십
시
오
. (2
9
쪽
참
조
)
전
원
코
드
연
결
후
전
원
이
들
어
오
지
않
을
때
(일
부
모
델
제
외
)
• 대
기
전
력
차
단
스
위
치
가
(O
N
)으
로
되
어
있
습
니
까
?
• 대
기
전
력
차
단
스
위
치
를
(O
F
F
)에
서
(O
N
)
으
로
변
경
해
주
십
시
오
. (2
8
쪽
참
조
)
증 상확인사항조치사항
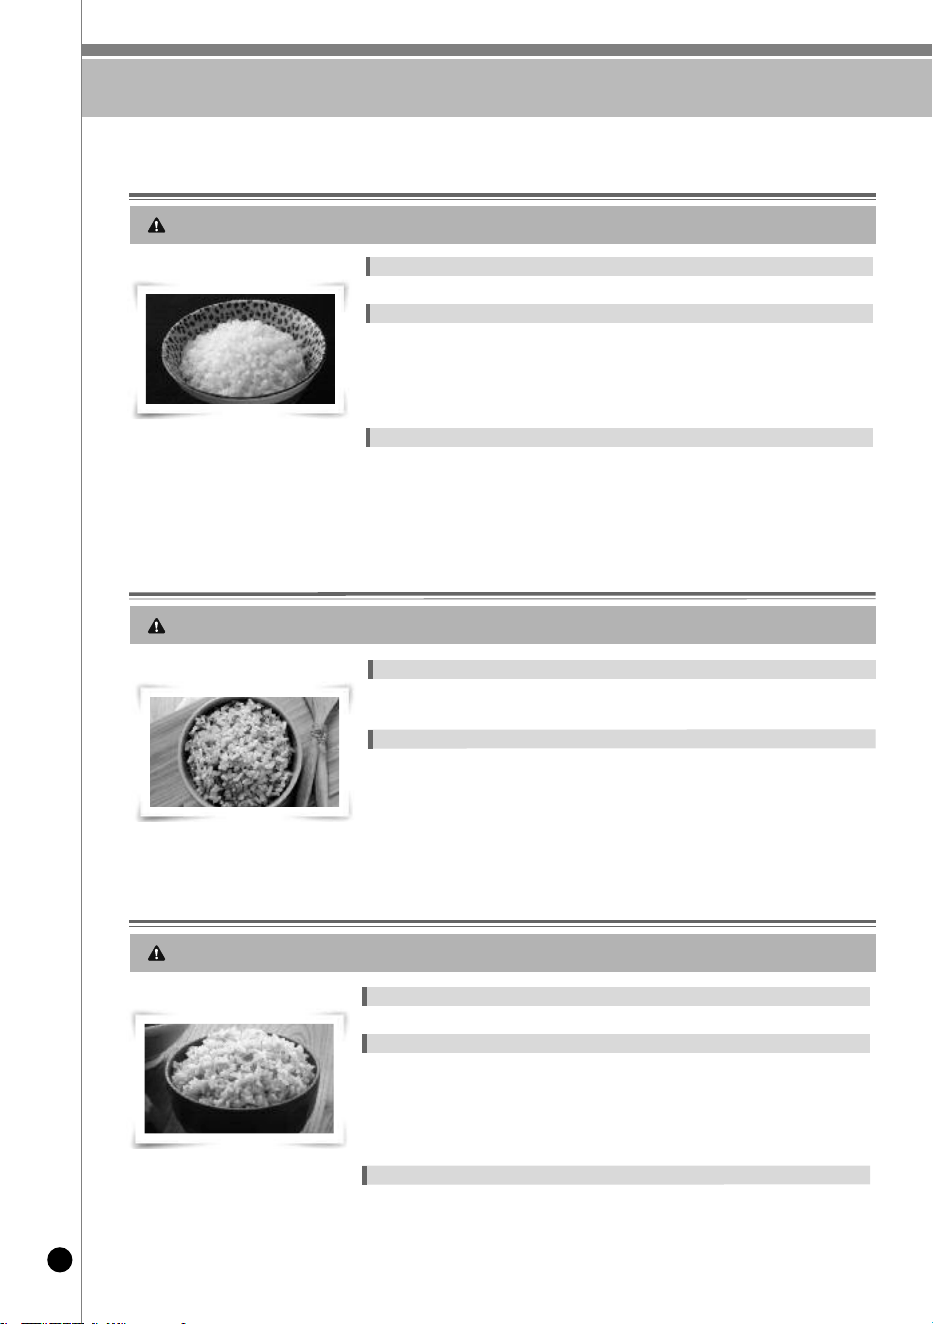
cooking gUiDe
62
White Rice: 4 cups (600 g)
Ingredients
Instructions
❶ Place clean, washed rice into the inner pot and add water up to the WHITE RICE 4 line.
❷ Close the lid and set the handle to High Pressure mode.
❸ Select [High Pressure White Rice] using the Arrow buttons , then press Start to begin cooking.
❹ When the cooker switches to Keep Warm mode, open the lid and stir the rice gently.
∷White Rice
Reference Tips
• For freshly harvested or glutinous rice, add slightly less water than indicated.
• For older rice, add slightly more water than indicated.
(Adjust the water amount based on your preference.)
WHITE RICE (High Pressure Menu)
BROWN RICE (High Pressure Menu)
-
Br
o
wn
Ri
c
e
:
4 c
u
p
s
(
6
0
0
g)
I
n
g
r
e
d
i
e
n
t
s
I
n
s
t
r
u
c
t
i
o
n
s
❶ Pl
a
c
e
c
l
e
a
n
, wa
s
h
e
d
r
ic
e
int
o
t
h
e
i
n
n
e
r
po
t
, t
h
e
n
ad
d
wa
t
e
r
up
t
o
t
h
e
B
R
OW
N
RI
C
E
4
l
ine
.
❷
C
l
o
s
e
t
h
e
l
id an
d
t
u
r
n
t
h
e
ha
n
d
l
e
t
o
H
i
g
h
Pr
e
s
s
u
r
e
mod
e
.
❸
S
e
l
e
c
t
[
S
t
ick
y
Br
o
w
n
Ric
e
]
u
s
ing
t
h
e
Ar
r
o
w b
u
t
t
o
n
s
. Se
t
t
h
e
g
e
r
mina
t
ion
t
ime
t
o
0
h
o
u
r
s
,
t
h
e
n
p
r
e
s
s
t
h
e
St
a
r
t
b
u
t
t
o
n
t
o
be
g
in c
o
o
k
ing
.
❹ Wh
e
n
t
h
e
c
o
o
k
e
r
s
wit
c
h
e
s
t
o
Ke
e
p
Wa
r
m mo
d
e
, op
e
n
t
h
e
l
id
a
n
d
mix
t
h
e
r
ic
e
t
h
o
r
o
u
g
h
l
y
.
R
e
f
e
r
e
n
c
e
Ti
p
s
•
Wh
e
n
c
o
o
k
i
n
g
g
l
u
t
ino
u
s
br
o
wn
r
ic
e
,
a
d
d
s
l
ig
h
t
l
y
l
e
s
s
wa
t
e
r
t
h
a
n
i
n
d
ic
a
t
e
d
.
(
A
d
jus
t
w
a
t
e
r
l
e
v
e
l
s
t
o
s
u
i
t
y
o
u
r
t
a
s
t
e
.)
•
Y
o
u
c
a
n
ad
j
u
s
t
t
h
e
g
e
r
mi
n
a
t
ion
t
ime ac
c
o
r
d
ing
t
o
y
o
u
r
pr
e
f
e
r
e
n
c
e
be
f
o
r
e
c
o
o
k
ing
.
∷
Br
ow
n
Ri
c
e
- All cup measurements use the provided rice measuring cup. (Water: 180 ml / Rice: 150 g)
White Rice Cautions
- All cup measurements use the provided rice measuring cup. (Water: 180 ml / Rice: 150 g)
Multi-Grain Rice Cautions
- All cup measurements use the provided rice measuring cup. (Water: 180 ml / Rice: 150 g)
Brown Rice Cautions
-
Whi
t
e
Ri
c
e
:
2
c
u
p
s
(
3
0
0
g)
-
Br
o
wn
R
i
c
e
:
2 c
u
p
s
(
3
0
0
g)
I
n
g
r
e
d
i
e
n
t
s
I
n
s
t
r
u
c
t
i
o
n
s
❶ Pla
c
e
c
lea
n
,
w
a
s
h
e
d
r
ic
e
int
o
t
h
e
inn
e
r
po
t
an
d
ad
d
wa
t
e
r
up
t
o
t
h
e
MUL
T
I
GR
A
I
N
4
li
n
e
.
❷ Clo
s
e
t
h
e
l
id
a
n
d
s
e
t
t
h
e
h
a
n
d
le t
o
Hig
h
P
r
e
s
s
u
r
e
mo
d
e
.
❸ Se
lec
t
[
Mu
lt
i
G
r
a
i
n
Ric
e
]
u
s
ing
t
h
e
Ar
r
o
w b
u
t
t
o
n
s
, t
h
e
n
pr
e
s
s
St
a
r
t
t
o
b
e
g
in c
o
o
k
in
g
.
❹ Whe
n
t
h
e
c
o
o
k
e
r
s
wi
t
c
h
e
s
t
o
Ke
e
p
Wa
r
m mo
d
e
, op
e
n
t
h
e
l
id
a
n
d
mix
t
h
e
r
i
c
e
we
l
l.
∷
M
ul
t
i
-
Gr
ai
n
Ri
ce
M
U
LTI
-
G
R
A
I
N
R
I
C
E
(
H
i
gh
P
ressure
M
en
u)
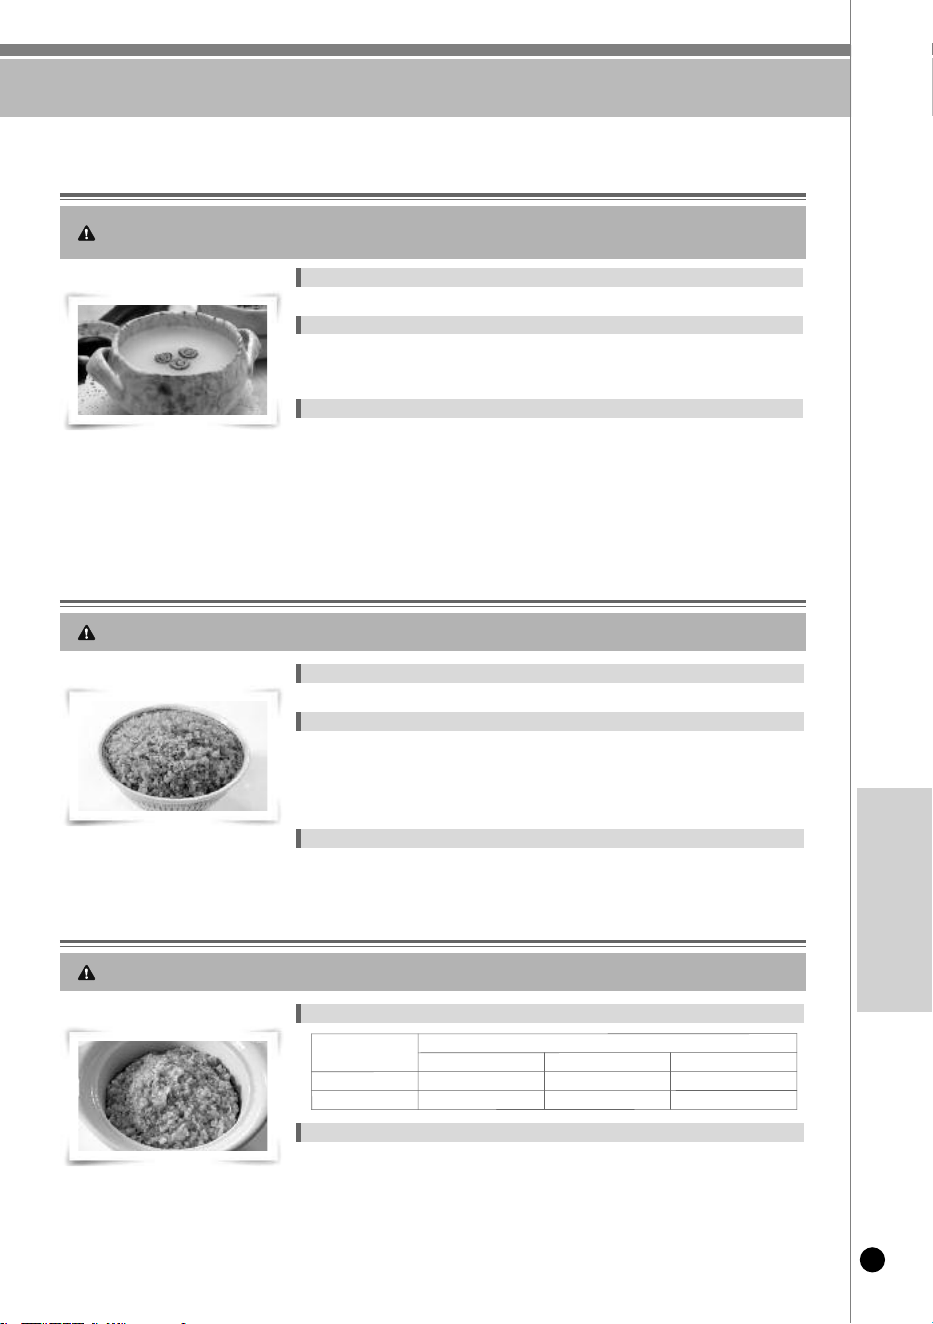
cooking gUiDe
63
www.cuckooamerica.com
RECIPE
Quinoa: 4 cups (540 g) (1 cup quinoa ≈ 135 g)
Ingredients
Instructions
❶ Rinse quinoa using a sieve. Place it in the inner pot and add water up to the 4 line on the
Non Pressure White Rice scale.
❷ Close the lid and set the handle to Non Pressure mode.
❸ Select [Quinoa] using the Arrow buttons, then press Start.
❹ Once it switches to Keep Warm, open the lid and mix well.
∷Quinoa
PORRIDGE (Non Pressure Menu)
QUINOA (Non Pressure Menu)
Reference Tips
• Some grains may brown slightly due to melanoidin development.
• Do not exceed the recommended capacity to prevent overflow.
- All measurements use the provided rice measuring cup. (Water: 180 ml / Rice: 150 g)
- Do not exceed the cooker’s capacity. Overfilling can cause overflow and potential damage.
Porridge Cautions
- All measurements use the provided rice measuring cup. (Water: 180 ml / Rice: 150 g)
- Note: Grain weights differ from rice. Please follow quinoa-specific measurements.
Quinoa Cautions
Ingredients
Instructions
❶ Place the steel cut oats and water into the inner pot.
❷ Close the lid and press the Arrow buttons for [STEEL CUT OATS].
❸ Set the cooking time based on quantity:
- 1 cup: 45 minutes
- 1.5 cups: 55 minutes
- 2 cups: 65 minutes
❹ Press the Start button to begin cooking.
∷Steel Cut Oats
STEEL CUT OATS (Non Pressure Menu)
- All measurements use the provided rice measuring cup.
- For 100% grains, adjust weight as grain mass differs from rice (150 g per cup).
Steel Cut Oats Cautions
White Rice: 1 cup (150 g)
Ingredients
Instructions
❶ Wash rice clean and put it into the inner pot. And pour water by THIN PORRIDGE water “scale 1”.
❷ Close the lid and turn the handle to Non Pressure mode.
❸ Select [Porridge] using the Arrow buttons. Set the timer to 50 minutes, then press Start.
∷Porridge
Reference Tips
• Do not exceed the recommended ingredient amount.
• Overfilling may result in boiling over.
• Keep the lid closed during cooking to avoid bubbling, splattering, or burns.
• Only use ingredients specified in the Cooking Guide.
• Do not cook glutinous ingredients (e.g., millet) using the porridge setting — they can block the
steam outlet.
I
n
g
r
e
d
i
e
n
t
s
S
t
e
e
l
-
C
u
t
Oa
t
s
(
1
0
0
%)
1
c
u
p
1
.
5
c
u
p
2
c
u
p
S
t
e
e
l
c
u
t
oa
t
s12
0
g
(
1
c
u
p
)
1
8
0
g
(
2
c
u
p
)
2
4
0
g
(
2
c
u
p
)
Wa
t
e
r3
6
0
g
(
2
c
u
p
)
5
4
0
g
(
3
c
u
p
)
7
2
0
g
(
4
c
u
p
)
cooking gUiDe
64
Beef sirloin (250 to 300g, 3 cm thick), 5g butter, A pinch of olive oil, A pinch of salt, A pinch of
pepper, Home-use vacuum sealer, Plastic vacuum sealing bag
* Doneness: 6 tablespoon olive oil
100g potato, 100g carrot, 100g shiitake mushroom, 100g zucchini, 5g butter for each, A pinch
of salt, A pinch of pepper, A pinch of olive oil
Ingredients
Instructions
❶
Remove moisture from the meat using a paper towel and sprinkle olive oil, salt, and pepper on top.
❷ Place it in a plastic vacuum sealing bag with butter, then use the vacuum sealer to compress it.
❸ Pour water into the inner pot until it reaches the 1.5 mark on the scale for thick porridge.
❹ Close the lid and turn the handle to Non Pressure mode.
❺ S
elect [Sous-Vide] using the Arrow buttons, set the temperature to [Rare (40℃)/Medium (50℃)/Well-
Done (70℃)] according to your preference, and press the Start button to begin cooking.
❻ Once the voice says, “Preheat is complete. Please add the ingredients,” open the lid, add the
vacuum-sealed meat, and close the lid. Set the time to [1 hour] and press the Start button.
❼
Once cooking is complete, take the meat out of the plastic bag and remove moisture using a paper towel.
❽ Slick a pan with olive oil and grill over high heat, flipping every minute or every one and a half
minutes. Transfer onto a plate and slice.
∷Sous-Vide Sirloin Steak
LENTILS (Non Pressure Menu)
SOUS-VIDE (Non Pressure Menu)
Reference Tips
• Adjust the temperature and time to your preference.
The quality of the dish may vary based on the environment, water temperature, and in-gredient amounts.
The contents' temperature may differ from the set temperature, depending on conditions.
Keep the ingredients below the recommended capacity to avoid boil-over.
ReferenceTips
Adjust the temperature and time to your preference.
The quality of the dish may vary based on the environment, water temperature, and in-gredient amounts.
The contents' temperature may differ from the set temperature, depending on conditions.
Keep the ingredients below the recommended capacity to avoid boil-over.
- All measurements use the provided rice measuring cup. (Water: 180 ml / Rice: 150 g)
- Do not exceed the cooker’s capacity. Overfilling can cause overflow and potential damage.
Porridge Cautions
- All measurements use the provided rice measuring cup. (Water: 180 ml / Rice: 150 g)
-Do not exceed the cooker's capacity. Overfilling may cause overflow or product damage.
Quinoa Cautions
Ingredients
Instructions
❶ Cut the vegetables into bite-sized pieces and sprinkle salt and pepper on top.
❷
Place each portion in a plastic vacuum sealing bag with butter, then compress using the vacuum sealer.
❸ Pour water into the inner pot until it reaches 1.5 on the scale for thick porridge.
❹ Close the lid and turn the handle to Non Pressure mode.
❺ Select [Sous-Vide] using the Arrow buttons, set the temperature to [85℃] according to your
preference, and press the Start button to begin cooking.
❻ Once the voice says, “Preheat is complete. Please add the ingredients,” open the lid, add the
vacuum-sealed vegetables, and close the lid. Set the time to [Soft Vegetables (1 hour)/Hard
Vegetables (2 hours)] according to your preference and press the Start button.
❼ Once cooking is complete, remove the vegetables from the plastic bags and grill them in a pan.
∷Sous-Vide Vegetables
Lentils 4 cups(580g) (Lentils 1 cup: 145g)
Ingredients
Instructions
❶ Put the thoroughly rinsed grains into the inner pot, and pour water until it reaches level 4 on the
scale for mixed rice.
❷ Close the lid turn the handle to High Pressure mode.
❸ Select [Lentils] andusing the Arrow buttons, and press Start to begin cooking.
❹ When the cooker switches to “Keep Warm” mode, mix the rice well.
∷Lentils
Reference Tips
• Some types of grains may develop a higher degree of melanoizing.
• Keep the ingredients below the recommended capacity. If above capacity, the contents may boil over.

MeMo
65
www.cuckooamerica.com

MeMo
66

MeMo
67
www.cuckooamerica.com
100% Recycled paper 383-904U rev.0
383-056D rev.0
CRP-OHT06 1YEAR 1YEAR Cuckoo Electronics America
Call: 213 228 5330
Address: 16610 Marquardt Ave. Cerritos, CA 90703, USA
Canada (Vancouver)
Call: 604 540 1004
Address: 945 Lougheed Hwy Coquitlam BC Canada V3K 3T4