For Cooking & Demo Videos Go To: www.yedihousewareappliances.com/breadmaker
Follow us on Instagram @yedihouseware
THE YEDI HOUSEWARE
BREAD MAKER

CONTENTS
Important Safeguards ....................................................................3
Parts and A
ccessories..................................................................4
Control Panel Buttons Explained ..................................................5
How to Make Bread .......................................................................9
Delay Timer .....................................................................................13
Recommended Recipes.................................................................14
Soft Bread ...............................................................................14
Sweet Bread ...........................................................................14
Natural Sourdough Bread.....................................................15
French Bread ..........................................................................15
Whole Wheat Bread ..............................................................16
Quick Bread............................................................................16
Sugar Free Bread ...................................................................17
Multigrain Bread .................................................................... 17
Milky Loaf Bread ....................................................................18
Cake.........................................................................................18
Raw Dough ............................................................................. 19
Leaven Dough ........................................................................19
Bake .........................................................................................19
Jam ..........................................................................................20
Yogurt......................................................................................20
Gluten Free Bread .................................................................20
Sticky Rice ...............................................................................21
Stir Fry......................................................................................21
Ferment...................................................................................21
Tips ................................................................................................... 21

CONTENTS
Cleaning & Care Maintenance...................................................... 23
Measurement & Conversion Chart...............................................24
Technical Specifications ................................................................25
FAQ ..................................................................................................26
Warranty ..........................................................................................27

IMPORTANT SAFEGUARDS
When using the electrical appliance, basic precautions should
always be followed. See below:
1. Read all instructions, product labels and warnings carefully
before using the bread maker.
2. Do not touch hot surfaces. Use handles.
3. Always wear cooking mitts.
4. To avoid electrical shock, do not immerse cord, plug, or
appliance in water or other liquid.
5. Supervision is necessary when any appliance is used by or
near children.
6. Unplug from outlet when not in use and before cleaning.
Allow to cool before attaching or removing parts.
7. The use of accessory attachments not recommended by
the appliance manufacturer may cause fire, electric shock
or injury.
8. Do not use outdoors.
9. Avoid contact with moving parts.
10. Do not use the appliance for other than intended
or specified uses.
11. Do not place the appliance on unstable surfaces or near a
hot gas or electric burner, or in an oven.
12. Do not let the cord hang over the edge of the table or
counter or touch hot surfaces including the stove.
13. Extreme caution is needed when moving an appliance
containing hot oil or other hot liquids.
14. To disconnect, press and hold the START/STOP button for
a full second; remove plug from the wall outlet.
15. Do not scratch, damage, modify, forcefully bend, pull, twist
or fold the power cord.
16. Use only 120-VOLT AC electrical current.
3

SAVE THESE INSTRUCTIONS
HOUSEHOLD USE ONLY
1. A short power-supply cord should be used to reduce the
risk resulting from becoming entangled in or tripping over
a longer cord.
2
. Longer extension cords are available and may be used if
care is exercised in their use.
3. If a longer extension cord is used:
a. The marked electrical rating of the extension cord
should be at least as great as the electrical rating of the
appliance
b. Don't drape the cord over the countertop or tabletop
where it can be pulled on by children or tripped over
unintentionally. If the appliance is of the grounded type,
the extension cord should be a grounding-type
3-wire cord.
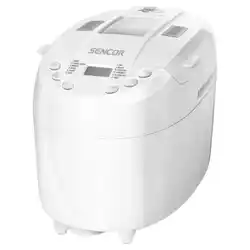
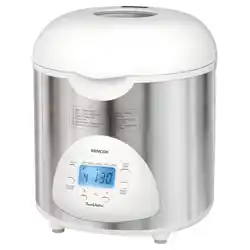
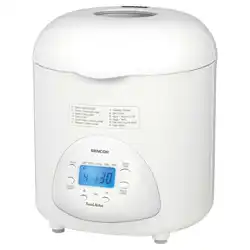
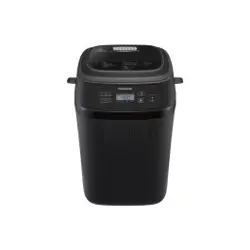
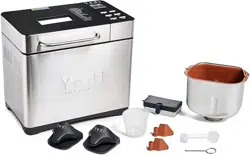
PARTS AND ACCESSORIES
1. Steel Housing
2. Display Screen
3. Steel Lid
4. Handle
5. Viewing Window
6. Fruit/Nut Dispenser
7. Air Vent
8
. Baking chamber
9. Bread Pan
10. Stirring paddle (Includes 2)
11. Hook
12. Measuring Spoon
13. Measuring Cup
14. Cooking Mitts
4
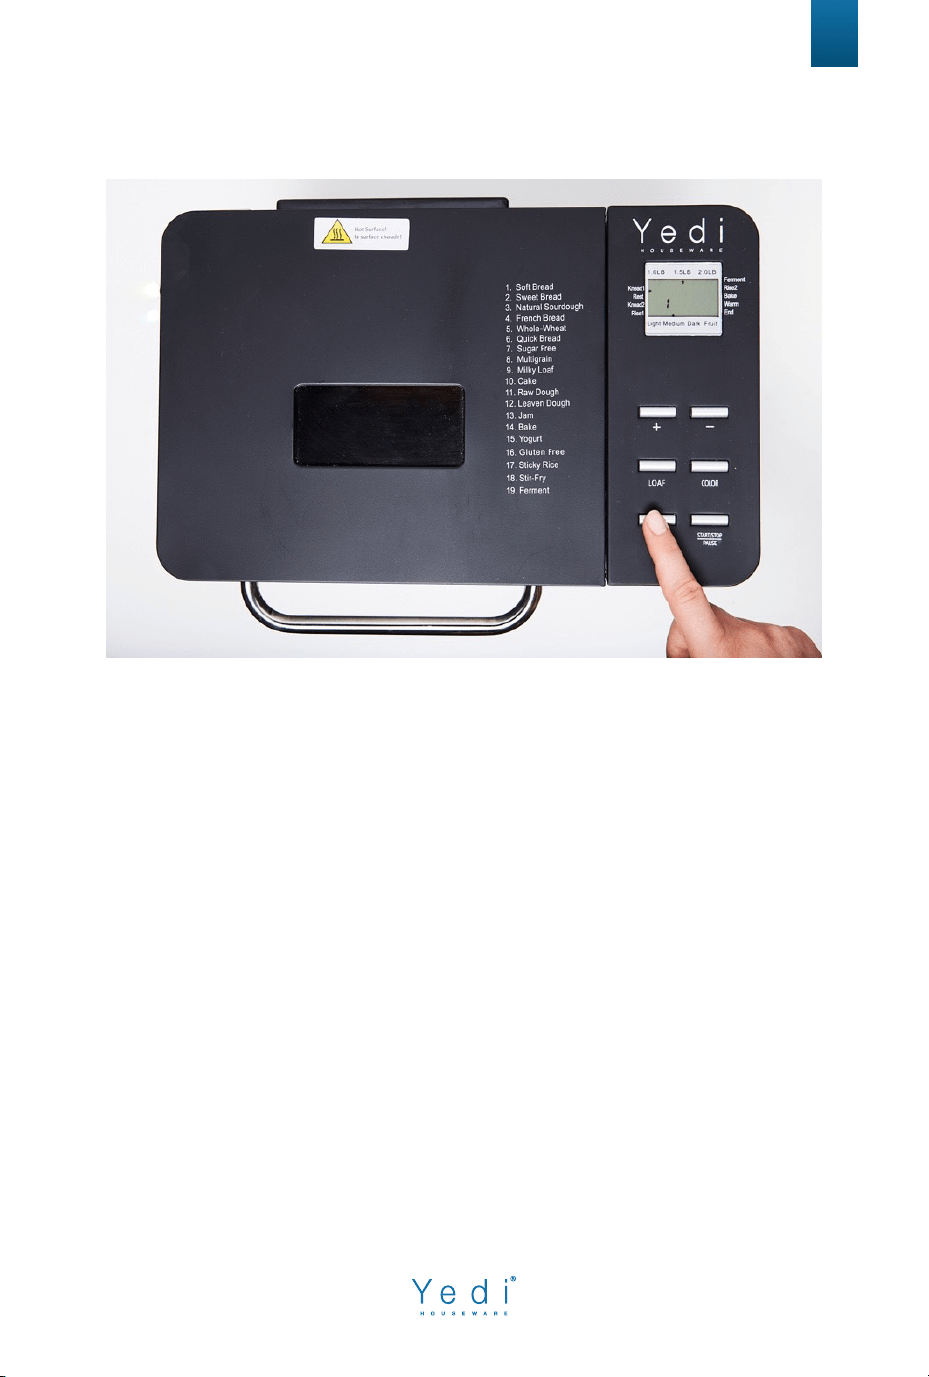
CONTROL PANEL BUTTONS EXPLAINED
5
“MENU” Button - The MENU button is used to select your desired cooking
program. Press the MENU button repeatedly to scroll through the cooking
programs until you see the number on the display screen corresponding to
the cooking program you desire to use. The PROGRAM LIST is as follows:
1. Soft Bread
2. Sweet Bread
3. Natural Sourdough Bread
4. French Bread
5. Whole Wheat
6. Quick Bread
7. Sugar Free
8. Multigrain Bread
9. Milky Loaf Bread
10. Cake
11. Raw Dough
12. Leaven Dough
13. Jam
14. Bake
15. Yogurt
16. Gluten Free
17. Sticky Rice
18. Stir-fry
19. Ferment

6
“LOAF” Button: Press the LOAF button repeatedly to select the desired bread
size (this function is just available for programs 1 to 9 and 16). The arrow
location will indicate your loaf size/weight. You can choose between 3
options:
• 1.0 LB
• 1.5 LB
• 2.0 LB
“COLOR” Button: Press the COLOR button repeatedly to select the desired
crust color (this function is just available for programs 1 to 10, 14 & 16). The
arrow location will indicate your colored crust choice. You can choose
between 3 options:
“START/STOP/PAUSE” Button:
1. Once you’ve selected your desired settings and are ready to begin
cooking, press the START/STOP/PAUSE button once. A short beep will
be heard. The colon “:” in the time display will begin to flash, and the
cooking cycle will start. When the bread maker cycle begins, all the
buttons/functions will be locked. If you need to access the unit's buttons/
functions, please hold the START/PAUSE button for 2 seconds.
2. When you press and hold the START/STOP button for at least 2 seconds
you will hear a prompt sound “Buzz”, the unit will stop working
immediately. However, please note this does not shut off the appliance.
To shut it off you will need to disconnect the power cable.
3. To pause a program, you should quickly tap the PAUSE button and then
the program will stop its countdown. While the machine is paused you
can add some ingredients or check your mix. Tap the PAUSE button
again and the cooking program will resume.
• Light
• Medium
• Dark

INDICATORS
AUTOMATIC FRUIT/NUT DISPENSER
(Optional Use)
7
When cooking bread an arrow will point to what part of the bread making
process the machine is in. See below the 9 different stages of the bread cook-
ing process:
For Demo Video Go Here: www.yedihousewareappliances.com/breadmaker
Note: Assemble to the bread maker before cooking. See instructions below:
Fruit Indicator: Whenever making bread with dry fruits or nuts, the bread
maker will sound a buzzer for 10 seconds and the arrow will point to the “Fruit”
label. If using the fruit/nut dispenser, its contents will be automatically
released at this time.
Note: This can also be done manually by carefully opening the beadmaker lid
and dropping your desired fruits & nuts into the mix.
1. Knead1
2.
Rest
3. Knead2
4. Rise1
5. Ferment
6. Rise2
7. Bake
8. Warm
9. End
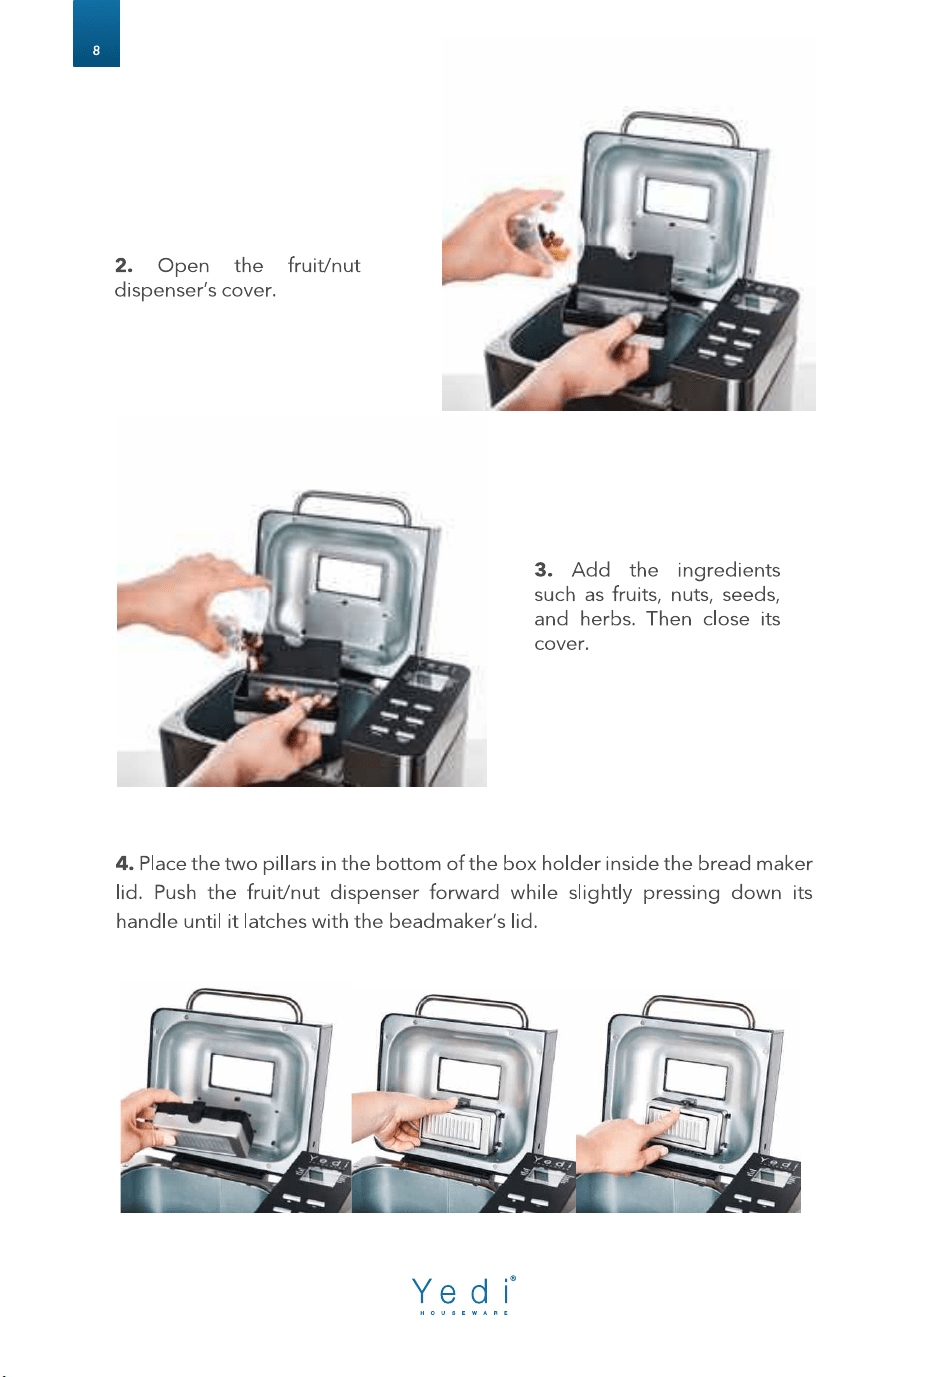
1. Open the cover of the
bread maker. Press the
fruit/nut dispenser’s small
black handle down to
unlock and remove the
fruit/nut dispenser form the
beadmaker.

BEFORE FIRST USE
HOW TO MAKE BREAD
The appliance may emit a slight smell and/or smoke when you
turn it on for the first time. Do not worry, this is normal and will
soon stop. Make sure the appliance has sufficient ventilation.
Please check whether all parts and accessories are complete and
free of damage.
Clean all the parts according to the section “CLEANING AND
CARE MAINTENANCE”.
Assemble the bread pan and then set the bread maker on BAKE
mode and bake empty for 10-minutes. Then let it cool down
and clean all the parts again.
Dry all parts thoroughly and assemble them if necessary.
YOU’RE NOW READY TO USE YOUR YEDI!
9
1. Open the lid and take out the bread pan by holding it from the handle
and turning it slightly counterclockwise until it's released. Then pull it up and
out of the baking chamber.
For Demo Video Go Here: www.yedihousewareappliances.com/breadmaker
10
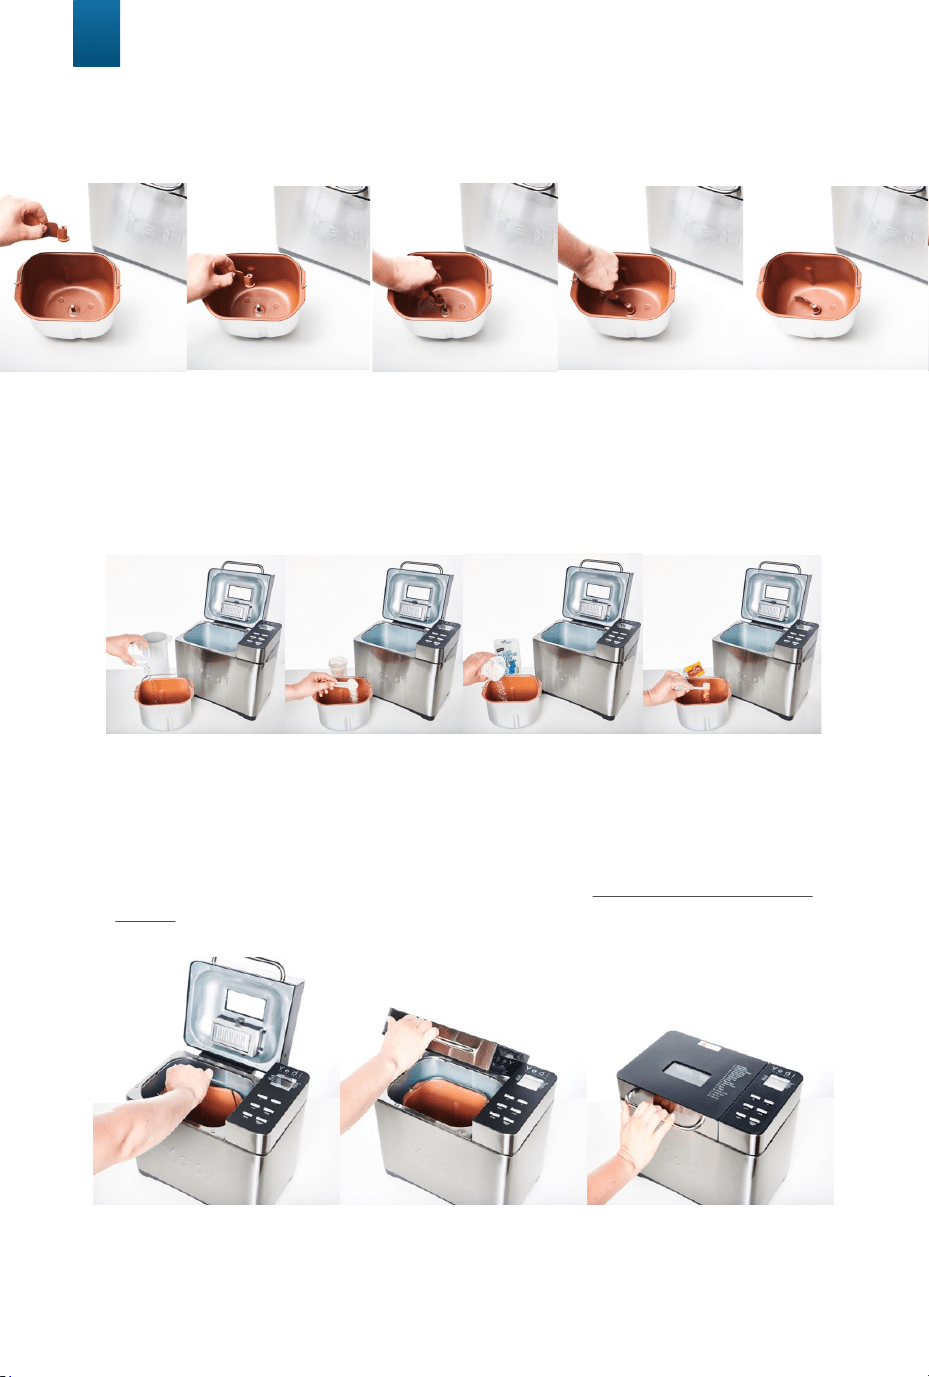
2. Attach the stirring paddle to the rotating shaft inside the bread pan and
push down firmly.
3. Put the appropriate measured ingredients into the bread pan (See
our RECOMMENDED RECIPES section in this Instruction Manual – it
provides the ingredients and measurements you will need to use for
each cooking program).
4. Put the bread pan into the baking chamber and turn slightly clockwise to
secure. Close the lid.
Note: We recommend adding the flour and then the yeast last (put yeast on
top of the flour) to avoid the yeast contacting any of the wet ingredients which
may reduce its activation capacity.
Note: If you found an obstruction with the bread pan while pressing down,
you could lift the bread pan again and turn its axel (located underneath the
bread pan) try securing it to the baking chamber using another angle.

11
HOW TO MAKE BREAD
5. Plug the bread maker into an outlet. You will hear a buzzer sound and the
digital control panel will illuminate: The default value after starting the
unit is 1.5 LB /Medium Color/ Soft Bread.
6. Select your Bread Recipe by pressing the “MENU” button until you reach
your desired bread program.
7. Press “COLOR” to select your crust color (Light, Medium or Dark)
8. Press “LOAF” to select your bread size. (1 LB, 1.5 LB or 2 LB).
8. Press “START/STOP/PAUSE” to begin cooking.
9. Finishing the Bread-making process: When countdown reaches 0:00, the
buzzer sound will occur to notify you that bread making is done. The
appliance will keep the bread warm for up to one hour in case you don’t
remove it immediately. After one hour the indicator arrow will move to
"End".
10. Using a pair of gloves/mitts, take out the Bread pan. Then turn the bread
pan upside down and shake slightly to release the bread. Note: If the
bread cooks over the edges of the bread pan, remove excess bread
before turning over.
BUZZER SOUNDS & KEEP WARM FUNCTION
12
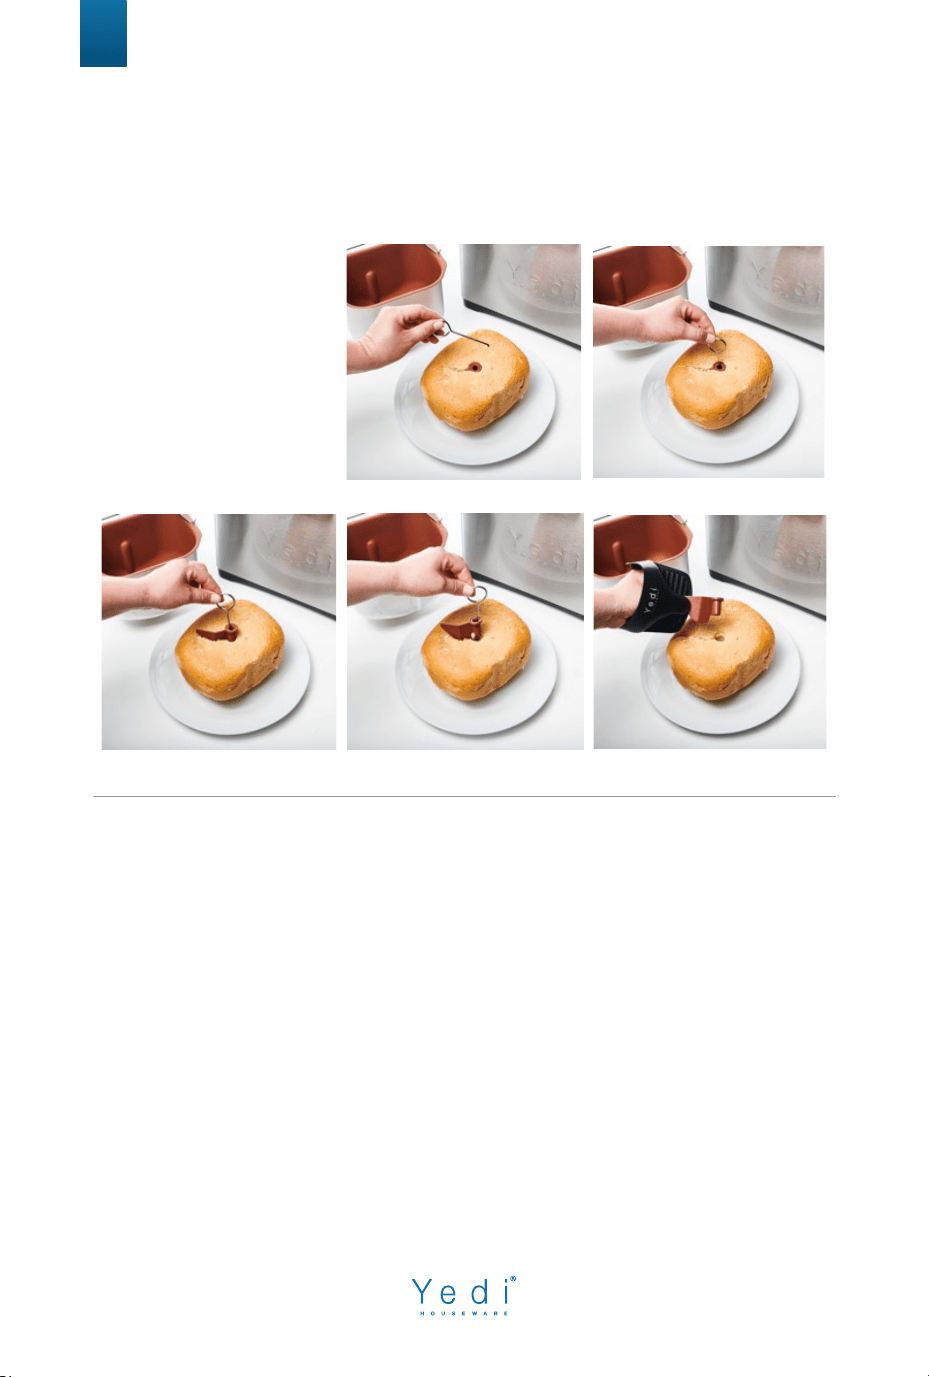
Note: The stirring paddle may remain stuck in the bread when it comes out. In
this case, use the hook accessory as follows:
1. Insert the hook
in the axis of the
stirring paddle.
2. Pull gently to
release the
stirring paddle
from the bread.
A buzzer sound will be given as:
1. Machine is connected to an outlet.
2. Loaf, Color, Menu or Time Setup is pressed.
3. Switch “Start/Stop/Pause”.
4. During the kneading process, a buzzer will sound for 10 seconds to
remind you it’s time to add the fruits and nuts if you desire.
Note: This may be done automatically when using the fruit/nut dispenser.
5. The operation has finished, and the appliance is entering
a “Keep Warm” mode.
6. The intermittent buzzer sound is given as “Keep Warm” is done.
The machine will no longer keep the bread warm after this.

13
“Keep Warm”
1. After the baking process is complete, the bread machine will shift to the
Keep Warm setting for 1 hour.
2. To cancel the Keep Warm process, press the START/STOP button for 3
seconds until a buzzer sound is given.
TIP: Removing bread immediately after the baking cycle is complete will
prevent the crust from b
ecoming darker.
Delay Timer (Only for Programs 1-9, 11-12 & 16-17)
• Set the Delay Timer after selecting Menu, Loaf Size, and Crust Color when
applicable.
• To set the Delay Timer press the “-” button to access the delay timer
feature.
• Please note, the delay time shown on the display indicates how long it will
take for the bread making process to conclude and not how long until the
process starts. (The cooking process is included in the time shown).
• Now use the “+” and “-” buttons to choose your desired time.
• Do not use the Delay Timer function with recipes that include dairy or
other ingredients, such as eggs, milk, cream, or cheese.
If using the delay function
, make sure to add the ingredients in the following
order (always keeping the yeast for the end and distant from the water).
14
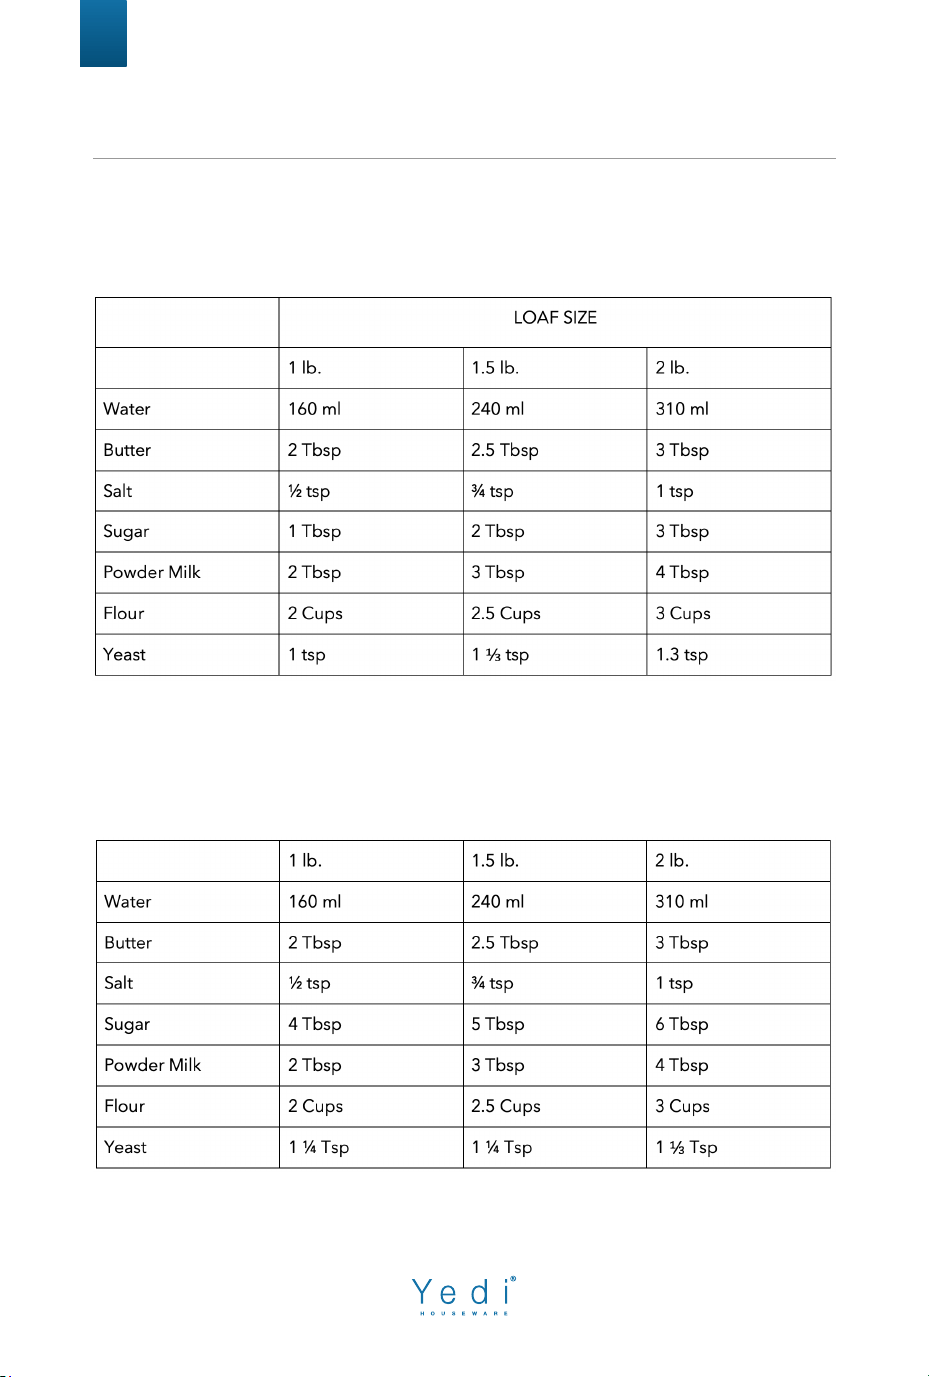
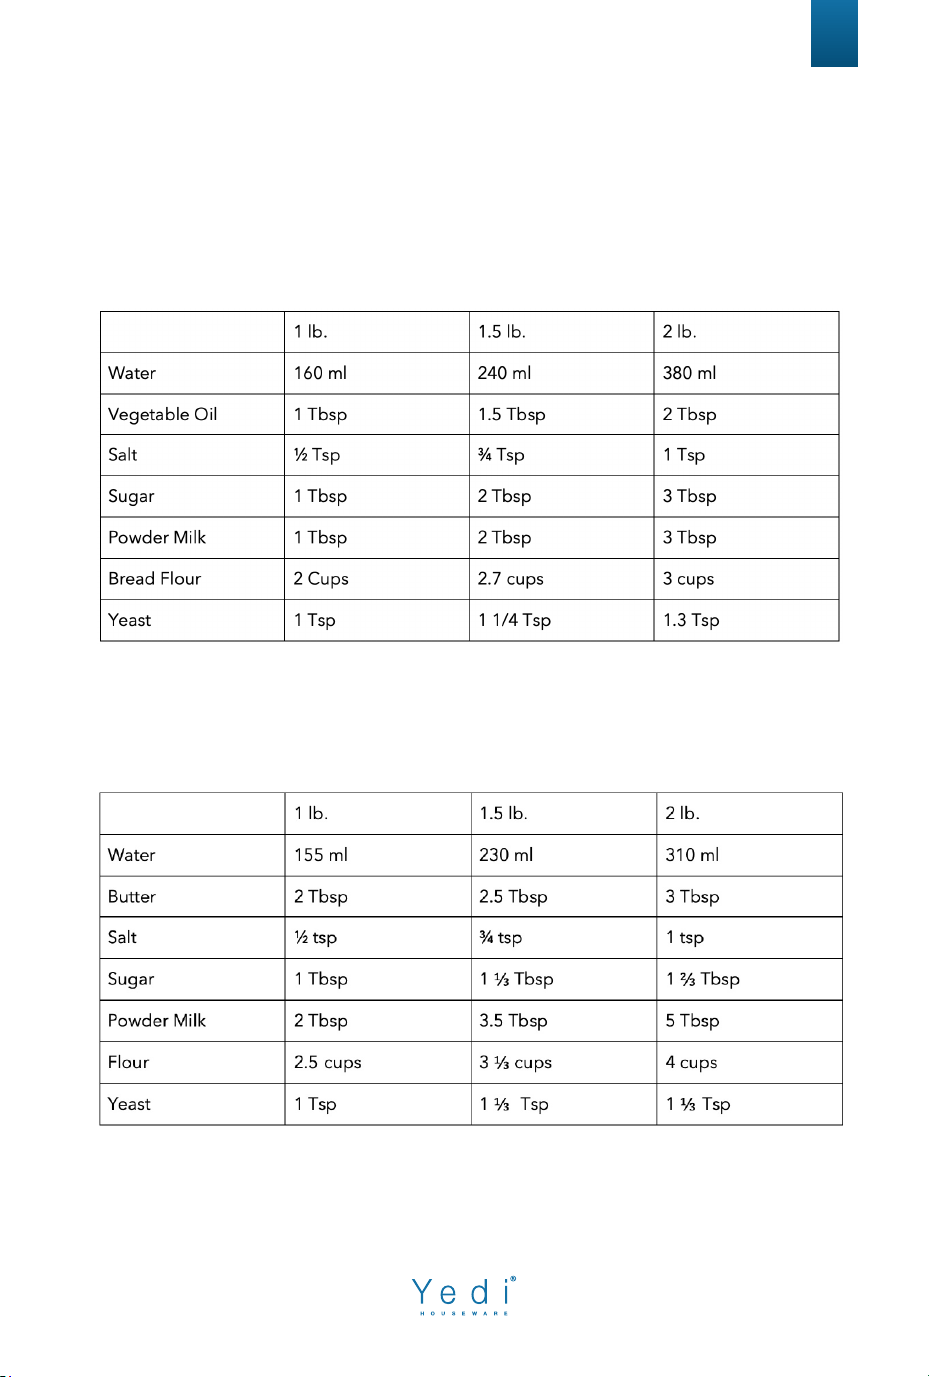
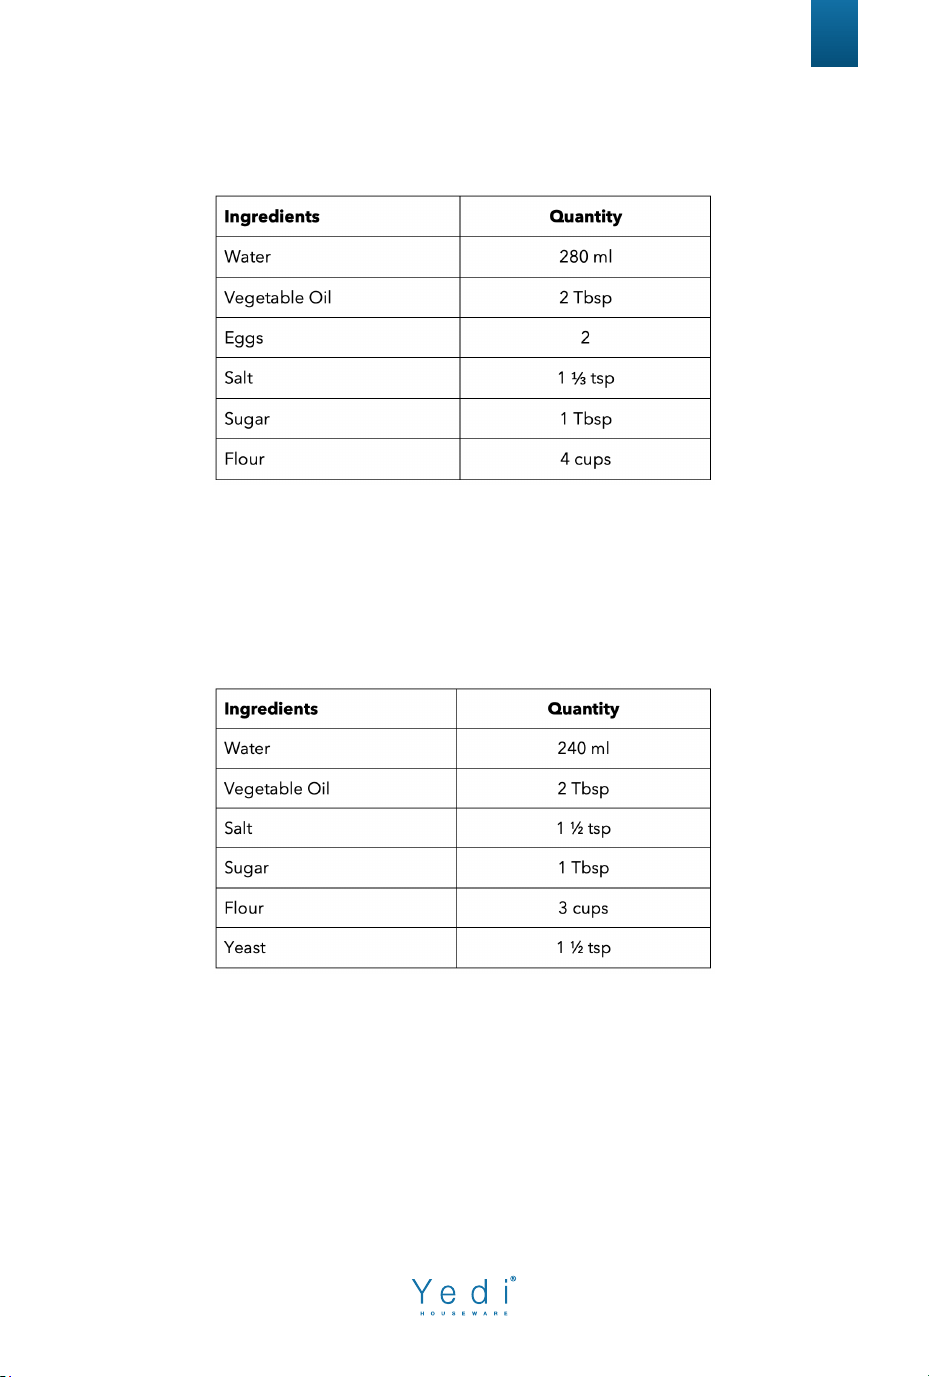
Soft Bread
Estimate time - 3:06 to 3:16 hours
Sweet Bread
Estimated time - 2:54 to 3:04 hours
RECOMMENDED RECIPES
15
Natural Sourdough Bread
Estimated time - 6:34 to 6:49 hours
French Bread
Estimated time - 3:09 to 3:24 hours
16
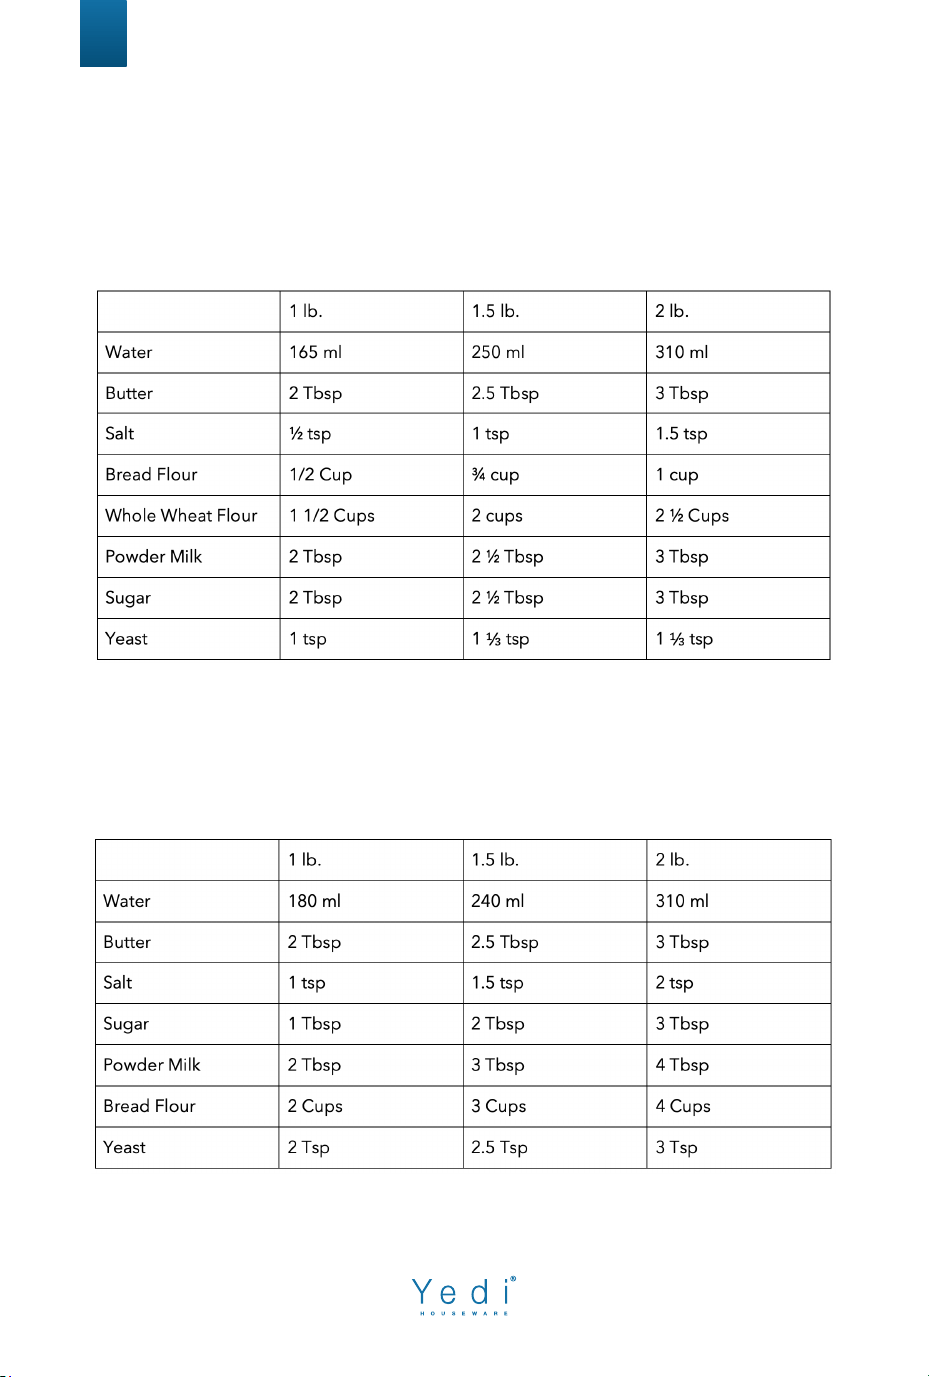
Whole Wheat Bread
Estimated time - 3:08 to 3:23 hours
Quick Bread
Estimated time 1:33 to 1:43 hours
17
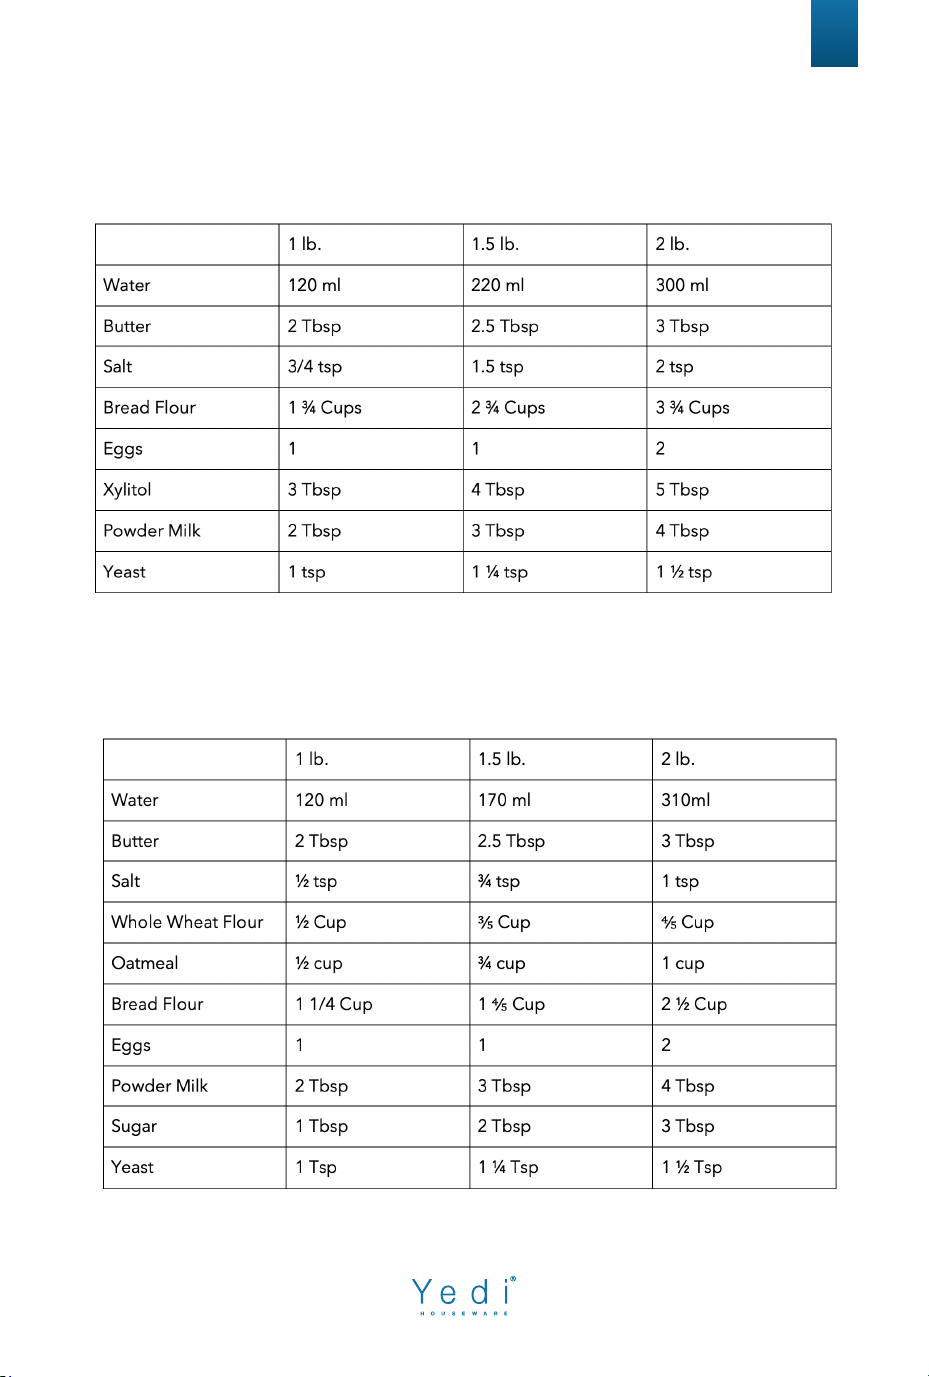
Sugar Free Bread
Estimated time - 3:04 to 3:18 hours
Multigrain Bread
Estimated time 3:00 to 3:14 hours
18
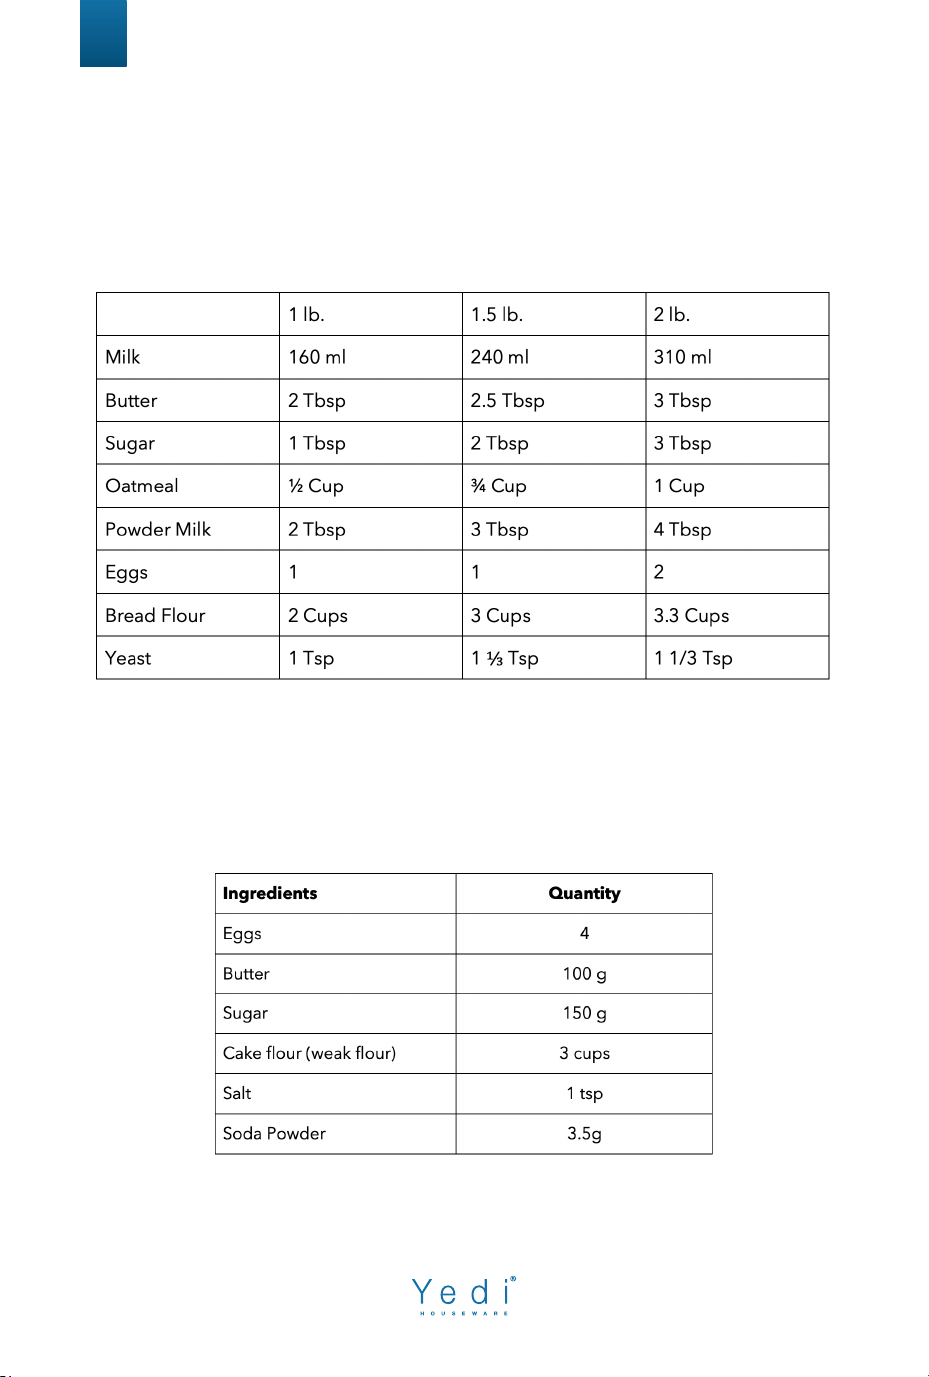
Milky Loaf Bread
Estimated time - 2:59 to 3:13 hours
Cake
Estimated time - 1
:33 hours
Place all ingredients in the bread pan and select the cake program.
19
Raw Dough
Estimated time - 0
:23 hours
Place all ingredients in the bread pan and select Raw Dough program.
Leaven Dough
E
stimated time - 1:24 hours
Place all ingredients in the bread pan and select Leaven Dough program.
(Note, place the flour and then the yeast last).
Bake
Manually input your desired baking time as well as
your Loaf Color in order to customize your bread.
Temperatures: Light = 220°F, Middle = 240°F, Dark = 255°F

20
Jam
Estimated time - 1:05 hours
Smash the fruit of your choice into 3 cups.
Then place all ingredients in the bread pan and select the Jam program.
Yogurt
Estimated time - 8:00 hours
P
lace all ingredients in the bread pan and select Yogurt program.
Gluten Free Bread
Estimated time - 2:50 to 3:00 hours

21
Ferment
This function will allow you to create your o
wn bread recipes, tailor made
to your needs. Place your pre-made dough in the bread pan and select
the Ferment program. This will allow your dough to rise
for 30 minutes, giving more depth and flavor.
Pre-set temperature: 86° F
Sticky Rice
Estimated time - 1:15 hours Place
all ingredients in the b
read pan and
select Sticky Rice program.
Stir Fry
Estimated time - 0:30 hours
• Cut raw chicken and red
pepper into little pieces
• Then put all ingredients into
bread pan and select Stir Fry
program.
• When done cooking add salt
and pepper to taste and any
sauce you desire.
TIPS
Basic Bread Ingredients Definition and Tips
1. All-Purpose Flour: Fl
our that contains no baking powder, suitable for
“quick” breads or bread made with the Quick setting.
2. Bread Flour: Bread flour is the most important ingredient for making
bread and is recommended in most yeast-bread recipes. It has a high
gluten content and can keep the bread from collapsing after rising. Flour
varies by region. For example, American flour is milled from hard spring
wheat; Canadian flour is milled from hard winter wheat.
3. Self-Rising Flour: Flour that contains baking powder, used especially for
making cakes. Do not use self-rising flour in combination with yeast.
4. Whole-Wheat Flour: Whole-wheat flour is ground from the entire wheat
kernel. Bread made with all or part whole-wheat flour will have higher
fiber and nutritional content. Whole-wheat flour is heavier and, as a
result, loaves may be smaller in size and have a heavier texture.

22
Basic Bread Ingredients Definition and Tips
Yeast: Y
east is a living organism and should be kept in the refrigerator to remain
fresh. It needs carbohydrates found in sugar and flour as nourishment. Yeast
used in bread maker recipes will be sold under several different names: Bread
machine yeast (preferred), active-dry yeast, and instant yeast. Before using,
check the expiration date of the yeast. Return to the refrigerator immediately
after each use.
Sugar: Sugar is “food” for the yeast and increases the sweet taste and color of
bread. White sugar is normally used; however, brown sugar, powdered sugar,
or cotton sugar may also be called for in some recipes. Do not substitute with
powdered sugar, brown sugar or other artificial sweeteners unless instructed to.
Salts: Salt in bread is NOT just a matter of taste! Salt restrains the growth of the
yeast and improves elasticity and structure. If you reduce or eliminate salt from
the bread, it will rise excessively - if you use too much salt, the loaf will not rise
enough. Use common table salt.
Butter: Butter makes bread soft and glossy. Measure and cut into small pieces.
Water: When the bread machine is baking, all liquids, particularly water, should
be 80°F (27°C) unless stated otherwise. Temperatures too cool or too warm can
prevent the yeast from activating.
Milk: Whole, semi-skimmed or skimmed milk can be used in bread making but
it should always be added lukewarm. Refrigerated milk must be heated to
around 80°F (27°C). Never heat milk above 98°F (37°C) as this can cause prob-
lems with the yeast.
Egg: Eggs can improve bread texture and make the bread larger in size. The
egg must be whisked in with the other liquid ingredients.
Tips for successful baking
1. Ingredients: Always use fresh ingredients.
2. Measurements: Measure ingredients accurately. Bread and yeast are very
delicate and will not rise and bake properly if the ingredients are measured
inaccurately.
3. Room Temperature: If the room temperature is over 77°F (25°C), we
recommend using refrigerated liquids. Flour should be fresh and at room
temperature.
4. Humidity: Humidity tends to make dough moisture. Try adding an extra
tablespoon of flour to improve the dough consistency. Repeat if necessary
until the dough forms a nice ball.
5. High Altitude: For baking in high altitudes, decrease the amount of yeast
by approximately 1/2 teaspoon, and decrease the sugar slightly.

2. If over-spills such as flour, nuts, raisins etc. occur in the interior
baking chamber, carefully remove them using a soft, damp cloth. Use
extreme caution when cleaning the heating elements. Ensure the bread
maker is completely cool then gently rub a soft, damp sponge or cloth
along the length of the heating element. Do not use any type of cleanser
or cleaning agent.
3. Let all surfaces dry thoroughly prior to inserting the power plug
into a power outlet.
23
C
LEANING & CARE MAINTENANCE
Regular maintenance of your appliance will keep it safe and in proper
operational order. Before cleaning, always disconnect the appliance.
Wash removable parts in warm, soapy water then rinse and dry all parts.
Allow the bread maker and all accessories to cool completely before
disassembling and cleaning.
Cleaning the Stainless-Steel Housing and Lid
1. Wipe the exterior of the stainless-steel housing and the
display screen with a soft, damp cloth. A non-abrasive liquid cleanser
or mild spray solution may be used to avoid build-up of stains. Apply the
cleanser to the soft cloth, not the outer surface or display screen, before
cleaning. Do not use a dry paper towel or rough cloth to clean the display
screen, or use an abrasive cleanser or metal scouring pad to clean any
part of the bread maker as these will scratch the surface.
Note: Never immerse the stainless-steel housing in water or place in the
dishwasher. Take care not to allow water or cleaning fluids to seep under
the buttons or display screen on the control panel.
24
CL
EANING & CARE MAINTENANCE
Bread Pan, Kneading Paddle, Measuring Spoon
and Measuring Cup
Wash with warm soapy water and rinse thoroughly, or clean in the upper
rack of the dishwasher. Dry all parts after use. If you have trouble remov-
ing the kneading paddle from the bread pan, soak in warm water for 10
to 15 minutes – this will loosen the kneading paddle.
Note: Do not use metal utensils with the bread pan as they will damage
the copper nonstick surface.
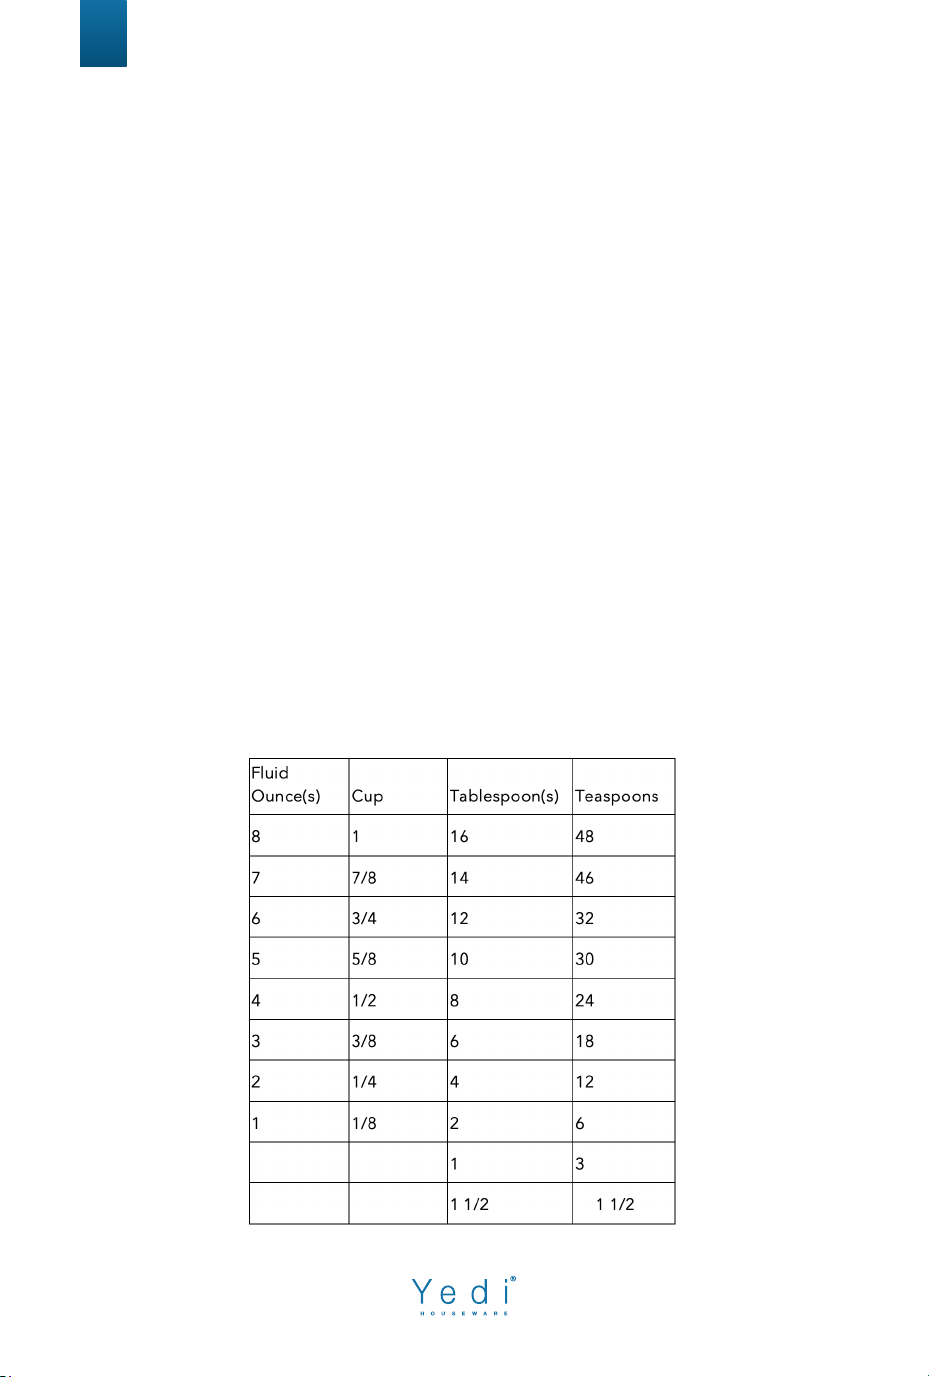
Measurement and Conversion Chart
1. Liquid: Use only liquid measuring cups with the cups/ounces
marked clearly on the side. After filling the measuring cup, place it on a
flat surface and view it at eye level to make sure the amount of liquid is
exact. Liquids must be at room temperature.
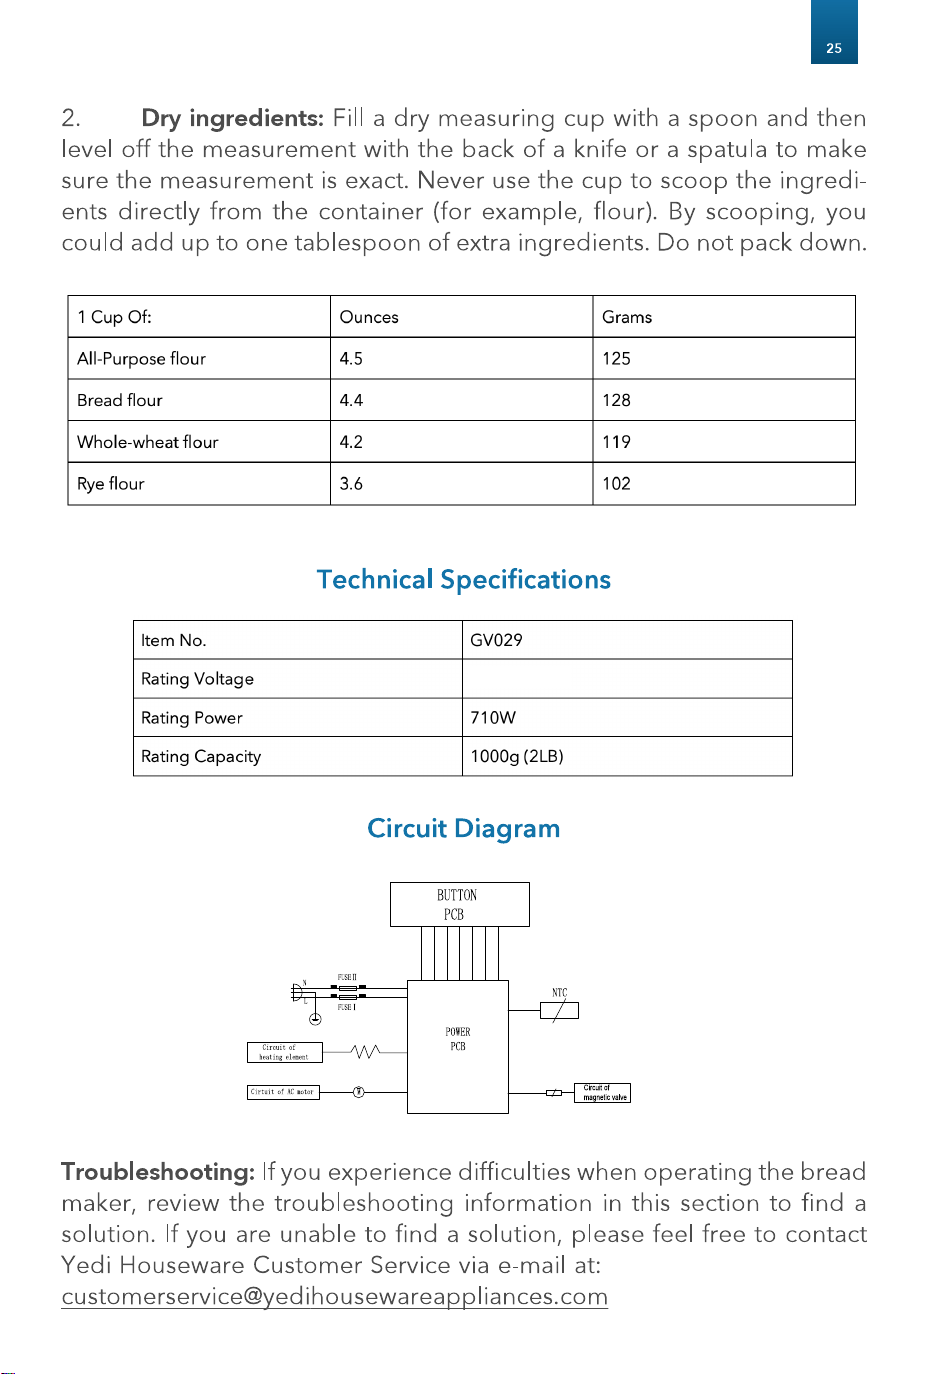
AC120V 60Hz
AC120V 600W
AC120V-60Hz

26
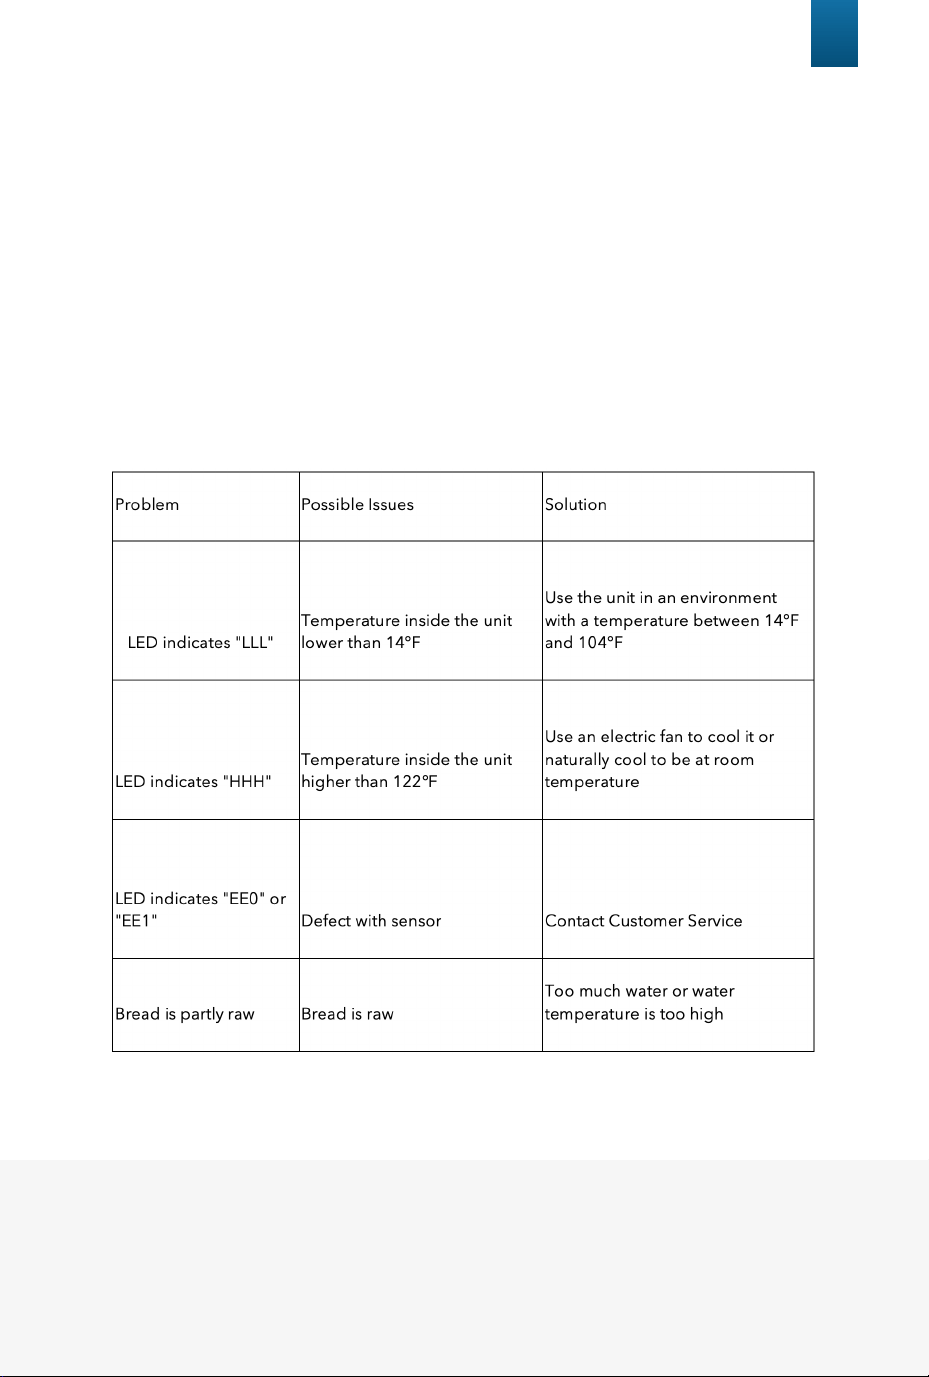
FAQ
Can other bread recipes be made in this machine?
Results may vary when using other recipes as the recipes in this booklet are sized so that
the dough is kneaded properly and the finished bread does not exceed the bread pan
capacity.
Use only recipes with similar quantities of ingredients. As a general guide, a
minimum 2 cups and maximum 4.5 cups of total dry ingredients are recommended on the
bread settings. On the jam setting, as a general guide, a maximum 3 cups of fruit should
be used.
Can powdered products be used in place of fresh products and visa-versa?
Yes, egg powders, dried buttermilk or dry milk can be used. These products allow you to
use the Delay Start feature, however, always ensure to add the water to the bread pan
first, then add the dry substitution after the flour to keep them separate.
Can other sweetening agents be used in place of sugar?
Yes, honey, golden syrup or brown sugar can be used. When substituting honey or similar
sweet liquids for sugar, ensure to decrease the same measurement of liquid to equal the
liquid sugar substitute. We do not recommend powdered or liquid artificial sweeteners.
Can butter or margarine be used in place of oil?
Yes, but the bread texture may appear a more creamy, yellow color.
Can salt be omitted?
Salt plays a very important part in bread making. Omitting it will decrease water retention
in the dough, as well as affect mixing, the strength of the gluten development and the
fermentation of the yeast. In the finished bread, salt improves the loaf shape, crumb
structure and crust color, as well as extending shelf life and enhancing flavor.
Why do the ingredients need to be placed in the bread pan in the specified order?
To ensure all dry ingredients are mixed with the water and to avoid the yeast activating
prematurely with the water, salt or sugar when using the Delay Start feature.
Why did the bread not rise?
There may be several reasons. Check the protein level of the flour, we recommend flours
with at least 11-12% protein. The yeast may have failed to activate so check the ‘Best
Before Date’ of the yeast, the yeast measurements and the temperature of the liquids
(80°F/27°C) and dry ingredients (68°F-77°F/20°C-25°C).
What do I do if the bread rose too much?
Try using less yeast (1/4 teaspoon less at a time). This could also be the result of forgetting
to add salt.
Why do large holes appear inside the bread?
Occasionally air bubbles will concentrate at a certain location during the last ‘rise’ phase
and will bake in this state. This could be caused by too much water and/or yeast or insuffi-
cient flour. Check the recipe ingredients and method of weighing/measuring.
27
Why does the top of the bread collapse?
Usually this is because the ingredients are not in balance or low protein flour is used.
Check the method of weighing/measuring the ingredients. Too much yeast, water or
other liquid ingredients, or insufficient flour, may cause the bread to be pale on top and
collapse while baking.
Why is there smoke coming out of the bread maker?
• It is normal that the bread maker emits a fine smoke during first use as it burns off the
protective substances on the heating element.
• However, smoke can also be caused by spilt ingredients on the outside of the bread
pan and inside the baking chamber. Unplug the appliance and clean cautiously.
FAQ
Warranty
If you have any issues with your Yedi Bread Maker, please fill out our
customer warranty form at: www.yedihousewareappliances.com/warranty-policy
or email us at [email protected]