Robot Vacuum
RV2620WAUK
OWNER’S GUIDE

WARNING
To reduce the risk of fire, electric shock, injury, or property damage:
IMPORTANT SAFETY INSTRUCTIONS
PLEASE READ CAREFULLY BEFORE USE • FOR HOUSEHOLD USE ONLY
If the charging cable plug does not fit fully into the outlet, reverse the plug. If it still does not fit,
contact a qualified electrician. DO NOT force into outlet or try to modify to fit.
GENERAL WARNINGS
When using an electrical appliance, basic
precautions should always be followed,
including the following:
1. This appliance consists of a Robot Floor
Cleaner and charging base with power
supply. These components contain
electrical connections, electrical wiring,
and moving parts that potentially present
risk to the user.
2. Place the cords from other appliances out
of the area to be cleaned.
3. Before each use, carefully inspect all parts
for any damage. If a part is damaged,
discontinue use.
4. Use only identical replacement parts
found on sharkclean.com
5. This Robot Floor Cleaner contains no
serviceable parts.
6. Use only as described in the Owner's
Guide provided on sharkclean.com.
DO NOT use Robot Floor Cleaner for any
purpose other than those described in the
Owner's Guide.
7. With exception of the filters, dust bin,
and pads, DO NOT expose any parts of
the Robot Floor Cleaner to water or other
liquids.
8. DO NOT put hands into any opening in the
base or robot.
USE WARNINGS
9. This appliance can be used by children
aged from 8 years and above and persons
with reduced physical, sensory, or mental
capabilities or lack of experience and
knowledge if they have been given
supervision or instruction concerning
use of the appliance in a safe way and
understand the hazards involved.
a) Children shall not play with
the appliance.
b) Cleaning and user maintenance shall
not be made by children without
supervision.
10. To minimize the risk of the robot traveling
beyond an unsafe boundary (stair/
cli edges, fireplaces, water hazards),
establish these areas as no-go zones using
the mapping feature in the SharkClean®
mobile app. Upon setting the boundary,
run the vacuum and visually confirm that
the settings eectively prevent the robot
from passing beyond the set boundary.
Adjust settings as necessary.
11. Always turn o the Robot Floor Cleaner
before inserting or removing the filter,
dust bin, or side brushes.
12. DO NOT handle plug, charging dock,
charging cable, or Robot Floor Cleaner
with wet hands. Cleaning and user
maintenance shall not be made by
children without supervision.
13. DO NOT use the Robot Floor Cleaner
without the dust bin, filter, brushroll, and
side brush in place.
14. DO NOT damage the charging cord:
a) DO NOT pull or carry charging dock by
the cord or use the cord as a handle.
b) DO NOT unplug by pulling on cord.
Grasp the plug, not the cord.
c) DO NOT close a door on the cord, pull
the cord around sharp corners, or leave
the cord near heated surfaces.
15. DO NOT put any objects into nozzle or
accessory openings. DO NOT use with any
opening blocked; keep free of dust, lint,
hair, and anything that may reduce airflow.
16. DO NOT use Robot Floor Cleaner if
airflow is restricted. If the air paths
become blocked, turn the vacuum cleaner
o and remove all obstructions before
turning on the unit again.
17.
Keep all vacuum openings away from hair,
face, fingers, uncovered feet, or loose clothing.
18. DO NOT use if Robot Floor Cleaner is not
working as it should, or has been dropped,
damaged, left outdoors, or dropped into water.
19. DO NOT place Robot Floor Cleaner on
unstable surfaces,
20. If the Robot Floor Cleaner is not starting
from the dock, it must be placed at least
45 cm away from any stairs or ledges.
21. DO NOT use to pick up:
a) Liquid spills.
b) Large objects.
c) Hard or sharp objects (glass, nails,
screws, or coins).
d) Large quantities of dust (drywall dust,
fireplace ash, or embers).
e) Smoking or burning objects (hot coals,
cigarette butts, or matches).
f) Flammable or combustible materials
(lighter fluid, gasoline, or kerosene).
g) Toxic materials (high concentrations
of chlorine bleach liquid, high
concentrations of ammonia, or drain
cleaning solution).
SAVE THESE INSTRUCTIONS
For the latest warnings and cautions, go to support.sharkclean.co.uk
22. DO NOT use in the following areas:
a) Outdoor areas near fireplaces with
unobstructed entrances.
b) Spaces that are enclosed and may
contain explosive or toxic fumes or
vapors (lighter fluid, gasoline, kerosene,
paint, paint thinners, mothproofing
substances, or flammable dust).
c) In an area with a space heater.
d) Near fireplaces with unobstructed
entrances.
23. Turn o the Robot Floor Cleaner before
any adjustment, cleaning, maintenance, or
troubleshooting.
24. Allow all filters to air-dry completely
before reinstalling them in the Robot
Floor Cleaner to prevent liquid from being
drawn into electric parts.
25. DO NOT modify or attempt to repair
the Robot Floor Cleaner or the battery
yourself, except as indicated in the
Owner's Guide. DO NOT use the vacuum if
it has been modified or damaged.
26. Remove all spilled or leaked liquid from
the dock landing mat, base, or floor, as it
could lead to risk of electrical shock.
27.
When refilling the reservoir, check for leaks,
as pooled liquids are a slipping hazard and
may cause electrical shock. If the reservoir
is damaged, it must be replaced.
28. Use caution walking on mopped floors, as
they may be slippery while damp.
29. For your Robot Floor Cleaner's cli sensors
to work properly, all runners, rugs, carpets,
or small thresholds (like child gates) must
be 8 inches from any stairs (or must be
continuous and extend over the edge of
the stairs). If a runner, rug, carpet, or small
threshold that is less than 8 inches from
the stairs cannot be moved, you must use
a no-go zone to block o the stairs.
30. DO NOT use as an attachment to power
tools for dust collection.
31. DO NOT use the vacuum on a wet surface.
(unless it is a WD vacuum)
32. DO NOT operate the vacuum in a room
where an infant or child is sleeping.
33. DO NOT operate the vacuum in an area
where there are lit candles or fragile
objects on the floor to be cleaned.
34. DO NOT operate the vacuum in a room
that has lit candles on furniture that the
vacuum may accidentally hit or bump into.
35. DO NOT allow children to sit on the
vacuum.
BATTERY USE
36. The battery is the power source for
the vacuum. Carefully read and follow
all charging instructions.
37. To prevent unintentional starting, ensure
the vacuum is powered o before picking
it up or carrying it.
38. Use ONLY the Shark® charging dock
XDRV2600WA, XDKRV2600WA &
XDKRV2402WS and use only battery
RVBAT850 (EUK) 26V. Use of batteries
or battery chargers other than those
indicated may create a risk of fire.
39. Keep the battery away from all metal
objects such as paper clips, coins, keys,
nails, or screws. Shorting the battery
terminals together increases the risk of
fire or burns.
40. Under abusive conditions, liquid may be
ejected from the battery. Avoid contact
with this liquid, as it may cause irritation or
burns. If contact occurs, flush with water.
If liquid contacts eyes, seek medical help.
41. Robot Floor Cleaner should not be stored,
charged, or used at temperatures below
10°C (50°F) or above 40°C (104°F).
Ensure the battery and vacuum have
reached room temperature before
charging or use. Exposing the robot or
battery to temperatures outside of this
range may damage the battery and
increase the risk of fire.
42. DO NOT expose the Robot Floor Cleaner
or battery to fire or temperatures above
130°C (265°F) as it may cause explosion.
43. Non-rechargeable batteries cannot
be recharged.
NO-GO ZONES
44. Always use no-go zones around reflective
flooring and surfaces.
45. No-go zones should always be used near
carpeted stairs.
46. DO NOT use no-go zones within 10 feet of
the dock.
LASER WARNING
47. This product has a Class 1 laser. It is safe
under reasonably foreseeable conditions
(as defined in the Owner's Guide). Always
turn o the power before lifting the
Robot Floor Cleaner or performing any
maintenance on it.
48. DO NOT look directly into laser.
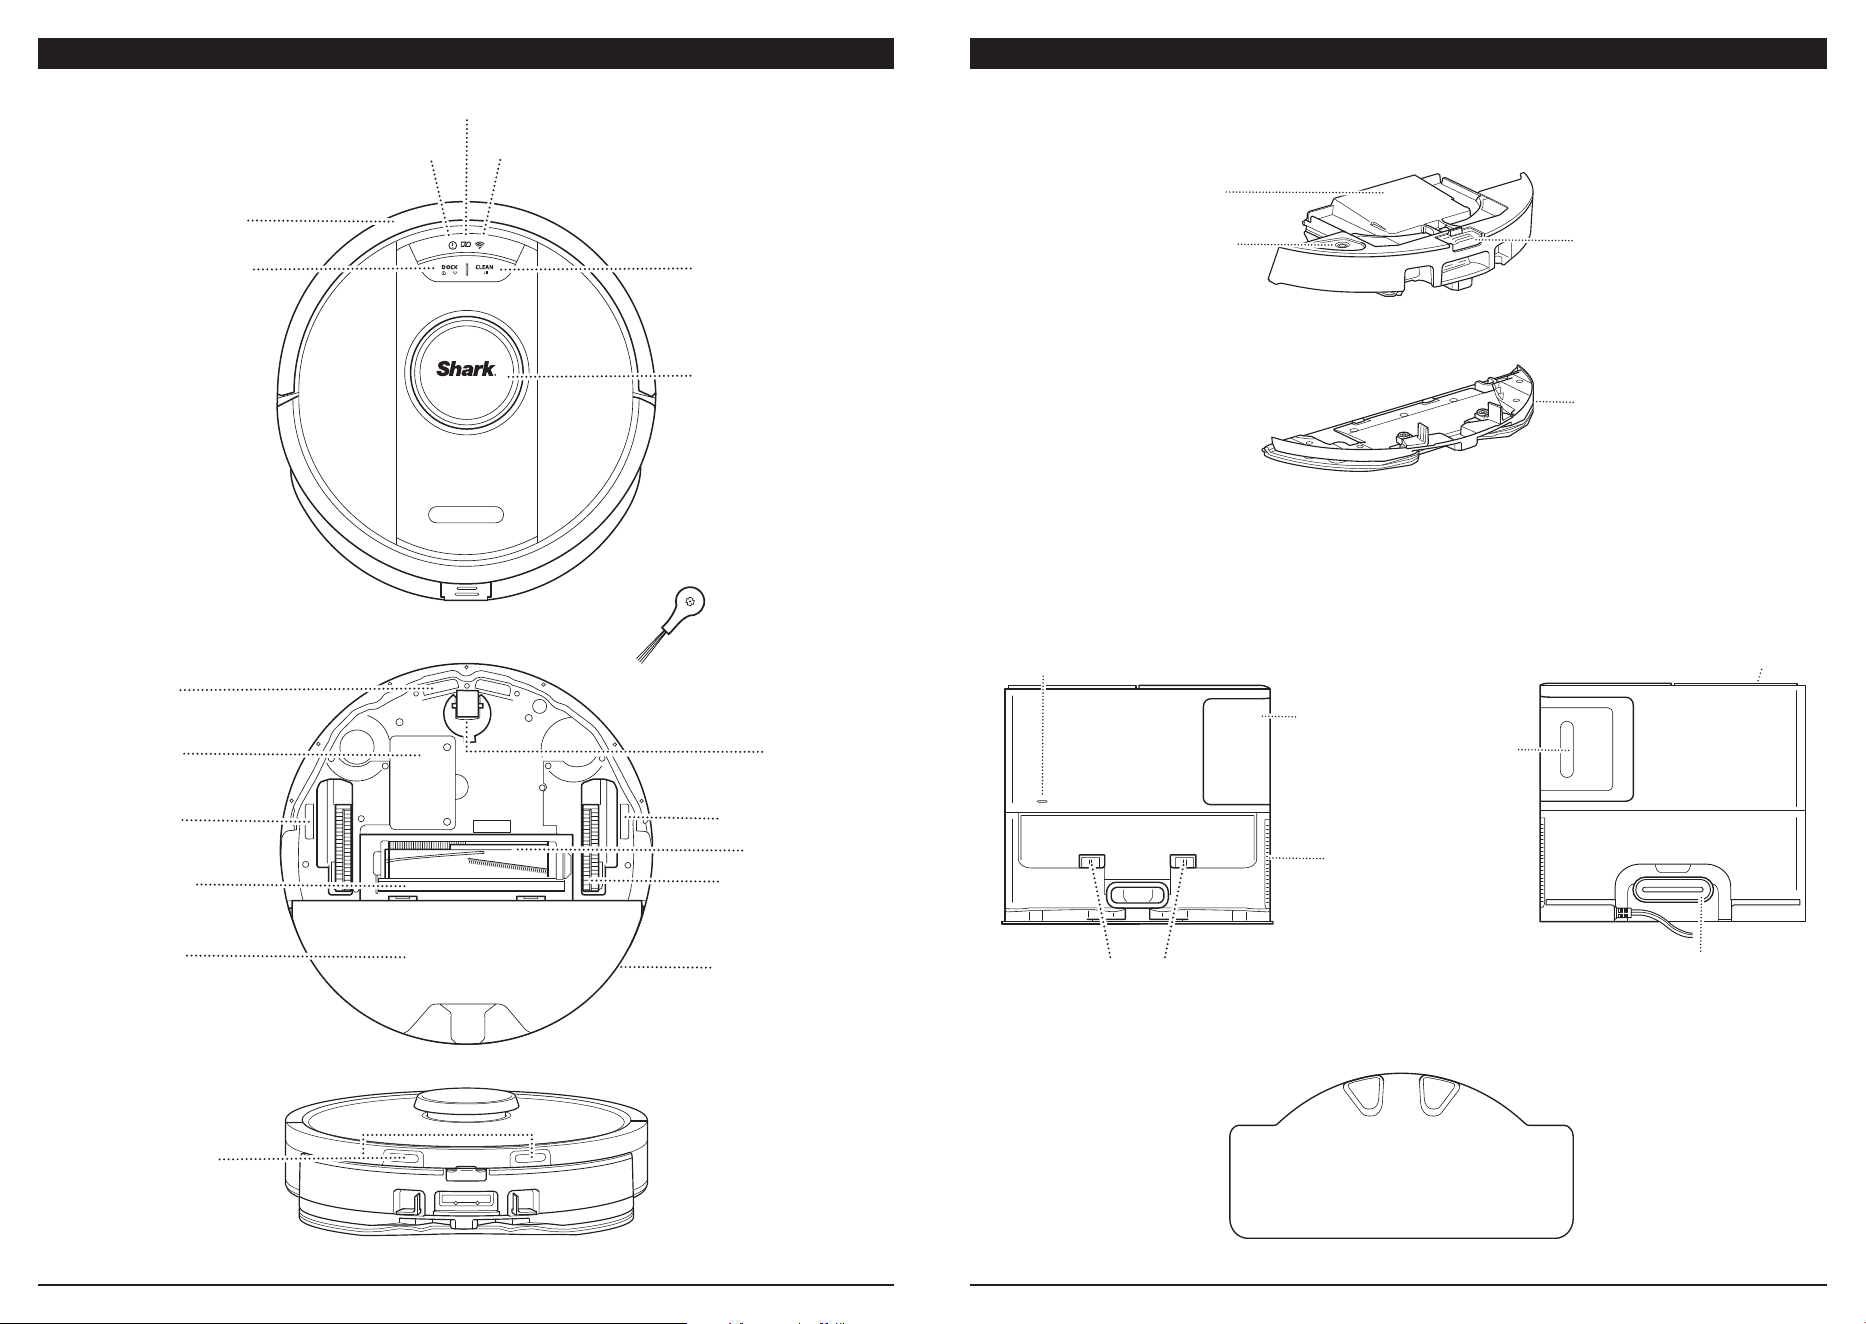
GETTING TO KNOW YOUR SHARK MATRIX
™
PLUS 2-IN-1 ROBOT
CLEAN Button
LIDAR Navigation
Module
Front Bumper
Error Indicator Light
Charge Indicator Lights
Wi-Fi Indicator Light
Charging Contact
Battery Door
Cli Sensors
Brushroll Door
Drive Wheel
Self-Empty Dust
Bin and Filter
Front Caster
Wheel
Brushroll
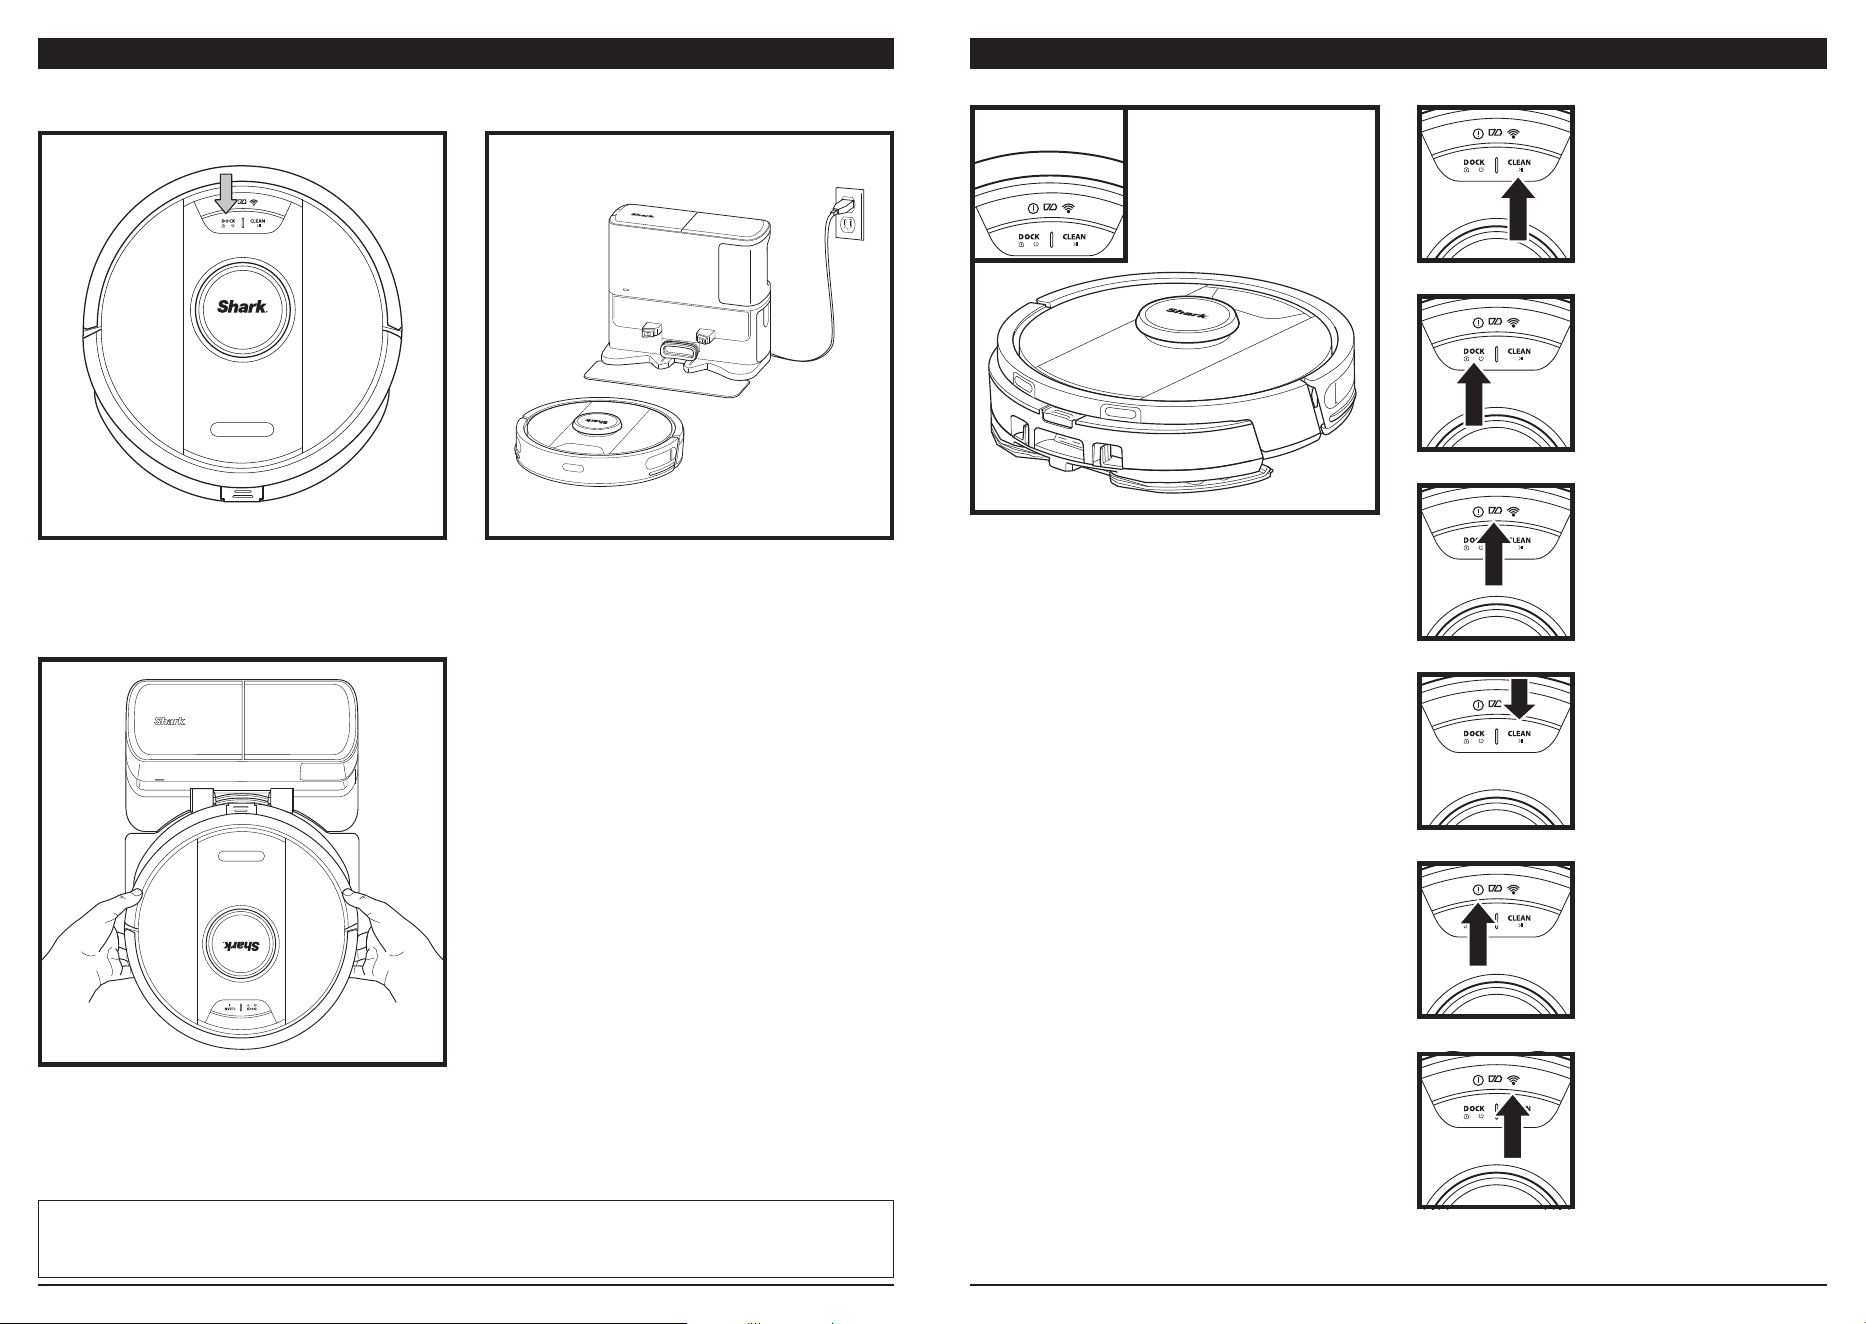
GETTING TO KNOW YOUR SHARK MATRIX
™
PLUS 2-IN-1 ROBOT
SELF-EMPTY BASE
FRONT
ROBOT DUST BIN
LANDING MAT
(This side up)
Charging Contacts
Charger Cord
Post-Motor
Filter Door
Pre-Motor
Filter Housing
Release Button
VAC & MOP 2-in-1 Dust Bin
Holds dry debris for vacuuming and water for mopping
Fill Port
Pad Plate
DOCK Button
Filter
Release
Button
SELF-EMPTY BASE
BACK
Base Dust Bin
Cli Sensors
Mopping Pad
Side Brush
Note: Side brush design
may vary
Indicator Light
Holds mopping pad and enables
mopping mode when attached to
the robot dust bin
Cli Sensors

ROBOT BATTERY INDICATOR LIGHTS
NOTE: If the low charge light is blinking red, there is not enough battery power for the robot to return to the base.
Manually place the robot on the base.
TIP: To preserve battery life, if the robot will not be used for a long time, turn o the power on the robot by pressing the
DOCK button and holding it for 5-7 seconds. The robot should be recharged at least once every three months.
If the base is relocated after setup, the robot may not be able to find its way back, and the robot will
have to completely re-map your home.
The white charge indicator lights show how much
battery power is remaining.
While the robot is charging, both white LED lights
will flash. When charging is complete, both will
illuminate steadily. It may take up to 6 hours to fully
charge your robot.
If the robot is idle and away from the charging
base for 10 minutes, it will enter Sleep Mode. The
indicator lights will turn o, but the battery and
Wi-Fi lights will remain on in sleep mode. Wake up
the robot by pressing any button.
In Use
Full
Charge
(White)
Partial
Charge
(White)
Low
Charge
(Red)
While
Charging
(White)
No Charge
or O
SELF-EMPTY BASE
INSTALLING THE SIDE BRUSH
Snap the included side brush onto the square peg
on the bottom of the robot. The brush will spin
clockwise when correctly assembled.
Note: Side brush design may vary.
0.6m
0.3m
0.3m
• Select a permanent location for the Self-Empty Base. Remove protective film from robot and base.
• Place the base with its back against a wall on bare wall. Select a level surface on a bare floor in a central
area with a strong Wi-Fi signal. Do not place base against baseboard heaters or other heating elements.
• Remove any objects that are closer than 1 foot from either side of the base or closer than 2 feet from the
front of the base.
• Plug in the base. The Base Power Indicator icon (
) on the top right side of the base will
illuminate when the base has power.
Place the Landing Mat on the floor and align the
self-empty base on top so that it sets into place
BUTTONS AND INDICATOR LIGHTS
NOTE: If the robot has no charge or it cannot return to the base, manually place it on the base. When manually placing the
robot on the base, make sure the Charging Contacts on the back of the robot are touching the ones on the base. When
picking up the robot, be careful not to place fingers between the bumper and the base of the robot.
The robot will dock with its BACK to the base
so that it can automatically empty itself.
When the cleaning cycle is complete, or if the battery
is running low, the robot will search for the base. If
the robot doesn't return to the base, its charge may
have run out, or if it is in mopping mode, the base
may be blocked by carpet.
CHARGING
IMPORTANT: The Shark Matrix™ Plus 2-In-1 Robot has a pre-installed rechargeable battery. Charge the
battery completely before first use. It may take up to 6 hours to fully charge.
To turn ON the robot, press and hold the DOCK
button for 5-7 seconds. To charge, place the robot on
the base. The robot will beep when charging begins
and the charging indicator on the base will illuminate.
DOCK BUTTON
Press to send the robot back
to the base. To turn the robot
power o, take it o the Self-
Empty Base and press the
DOCK button on the robot
for 5-7 seconds.
CHARGE INDICATOR LIGHTS
Display the amount of charge
remaining in the battery.
WET MOPPING
INDICATOR
The area above the CLEAN
button will illuminate blue
when the fluid reservoir
is properly installed. The
CLEAN button will illuminate
yellow if the tank is empty
and needs refilling.
“!” ERROR INDICATOR
See Troubleshooting section
for full list of error codes.
WI-FI INDICATOR
White light: Connected to
Wi-Fi.
Red light: Disconnected.
Flashing White Light:
Setup mode.
No light: Not set up yet.
CLEAN BUTTON
Press to begin a cleaning
session and press again to
pause the cleaning session. To
activate Matrix Clean to focus
on a 1.5m by 1.5m area, press
and hold the CLEAN button
for 5 seconds.
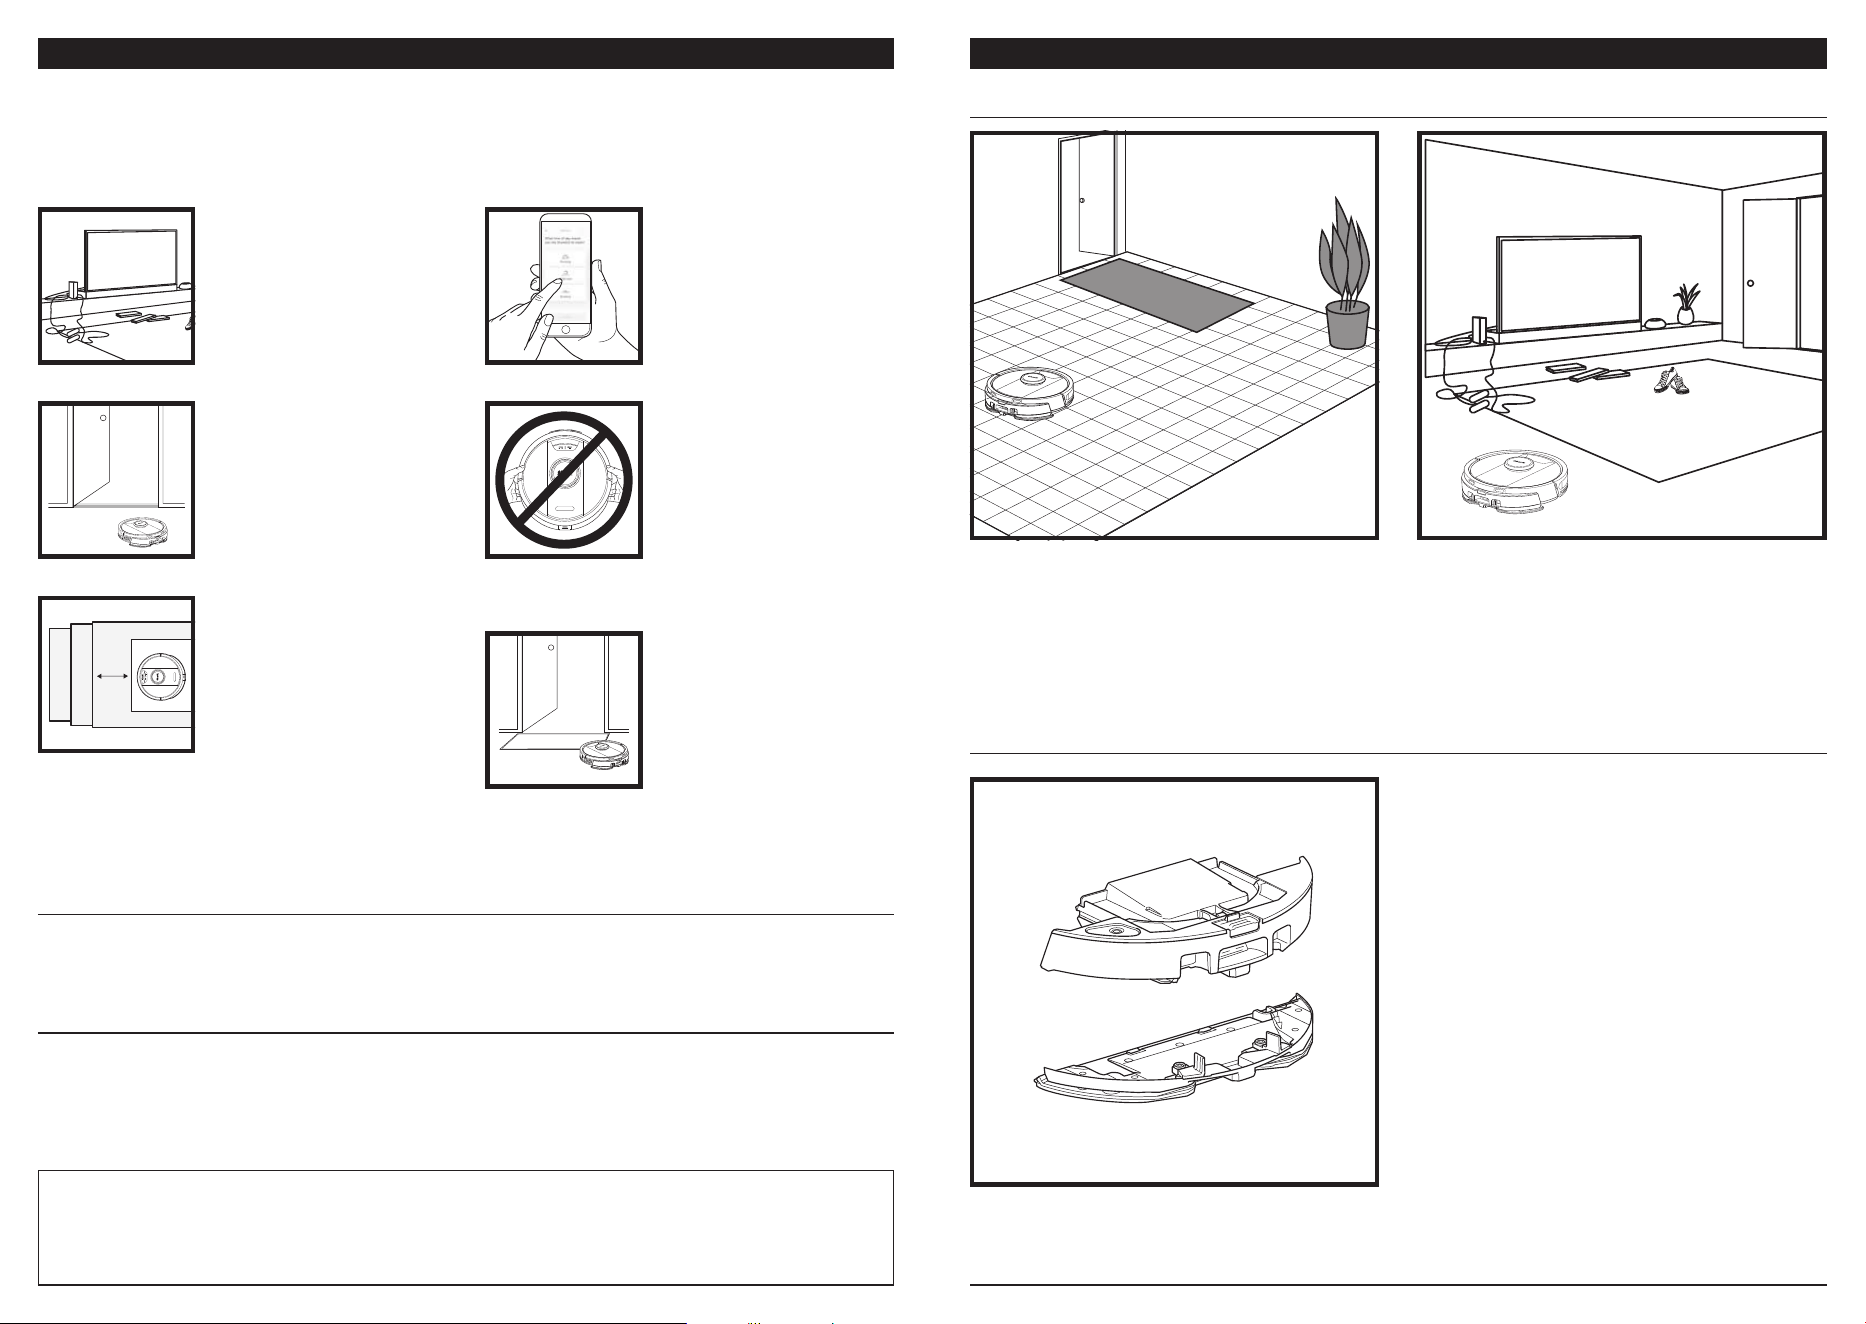
PREP YOUR HOME
USING THE SHARK MATRIX
™
PLUS 2-IN-1 ROBOT
AI LASER NAVIGATION™
After setup is complete, follow instructions in the
app to help your robot conduct an Explore Run to
create an initial map of your home. Ensure the
Self-Empty Dust Bin is inserted for the Explore
Run.
The robot will travel from room to room to identify
walls, furniture, and other obstacles as it cleans.
This run will take less time than a full cleaning, as it
doesn’t cover the entire floor.
MANUAL CLEANING MODE
To manually start a cleaning cycle, press the CLEAN button on the robot.
To immediately send the robot back to the Self-Empty Base, press the DOCK button.
The robot will dock with its BACK to the base so that it can automatically empty itself.
NOTE: Be sure to charge the robot completely before its first cleaning so that it can explore, map, and clean as much of
your home as possible. It may take up to 6 hours to fully charge your robot.
NOTE: Avoid moving the dock. If it is relocated, the robot may not be able to find its way back to the dock, and you will
need to remap your home. If relocated while in use, the robot it may not be able to follow its intelligent cleaning path,
or find its way back to the dock.
Your robot uses an array of sensors to navigate around walls, furniture legs, and other obstacles while it
cleans. To prevent the robot from entering areas you don't want it to, set up no-go zones in the app. For
best results, prepare your home as indicated below, and schedule a daily cleaning to ensure all floor areas
are regularly maintained.
OBSTRUCTIONS
Clear cords and small objects
less than 11.5cm in height,
and open interior doors to
ensure a complete map of
your home.
SCHEDULING
While your robot is cleaning
do not pick it up and move
it, this will impact the robot's
navigation. If you move
the charging base to a new
location, you will need to
remap your home. This will
impact the robot's ability
to return to the dock when
cleaning is complete.
THRESHOLDS
Your robot can climb over
most thresholds to get from
room to room, but if one is
too high, set up a no-go zone
in the app to block it o.
AVOID MOVING THE
ROBOT OR BASE
While your robot is cleaning,
do not pick it up and move it,
as this will impact the robot's
navigation. If you move the
charging base to a new loca-
tion, you will need to re-map
your home. This will impact
the robot's ability to return
to the dock when cleaning is
complete.
REMOVE RUGS FROM
DOORWAYS WHEN
MOPPING
Before mopping, we
recommend setting up
Carpet Zones in the app, and
moving any carpets or rugs
that block access to floors
that you want your robot to
mop.
STAIRS
For your robot's cli sensors
to work properly, all runners,
rugs, carpets, or small
thresholds (like child gates)
must be 20cm from any
stairs (or must be continuous
and extend over the edge of
the stairs). If a runner, rug,
carpet, or small threshold is
near the stairs and cannot
be moved, you must use a
no-go zone to block o the
stairs.
The robot's object detection technology helps it
navigate around obstacles taller than 11.5cm in
height. Clear away small objects that may interfere
with the cleaning path of your robot.
Create no-go zones in the app to block o areas you
do not want the robot to enter.
VACUUM-ONLY SETUP
To start vacuum-only cleans, remove the pad plate
from the robot dust bin.
Matrix Clean is targeted deep cleaning of a specific room or spot. A Matrix Clean can be activated with the
SharkClean® app, or manually without the app.
Matrix Clean with the SharkClean app: To set up a Matrix Clean with the app, select a specific room or spot to
be cleaned on the map. Your robot will clean this targeted area on demand in a 1.5m by 1.5m area. You can also
initiate MatrixClean manually by placing the robot in the spot to be cleaned, then press and hold the CLEAN
button for 5 to 7 seconds.
MATRIX CLEAN
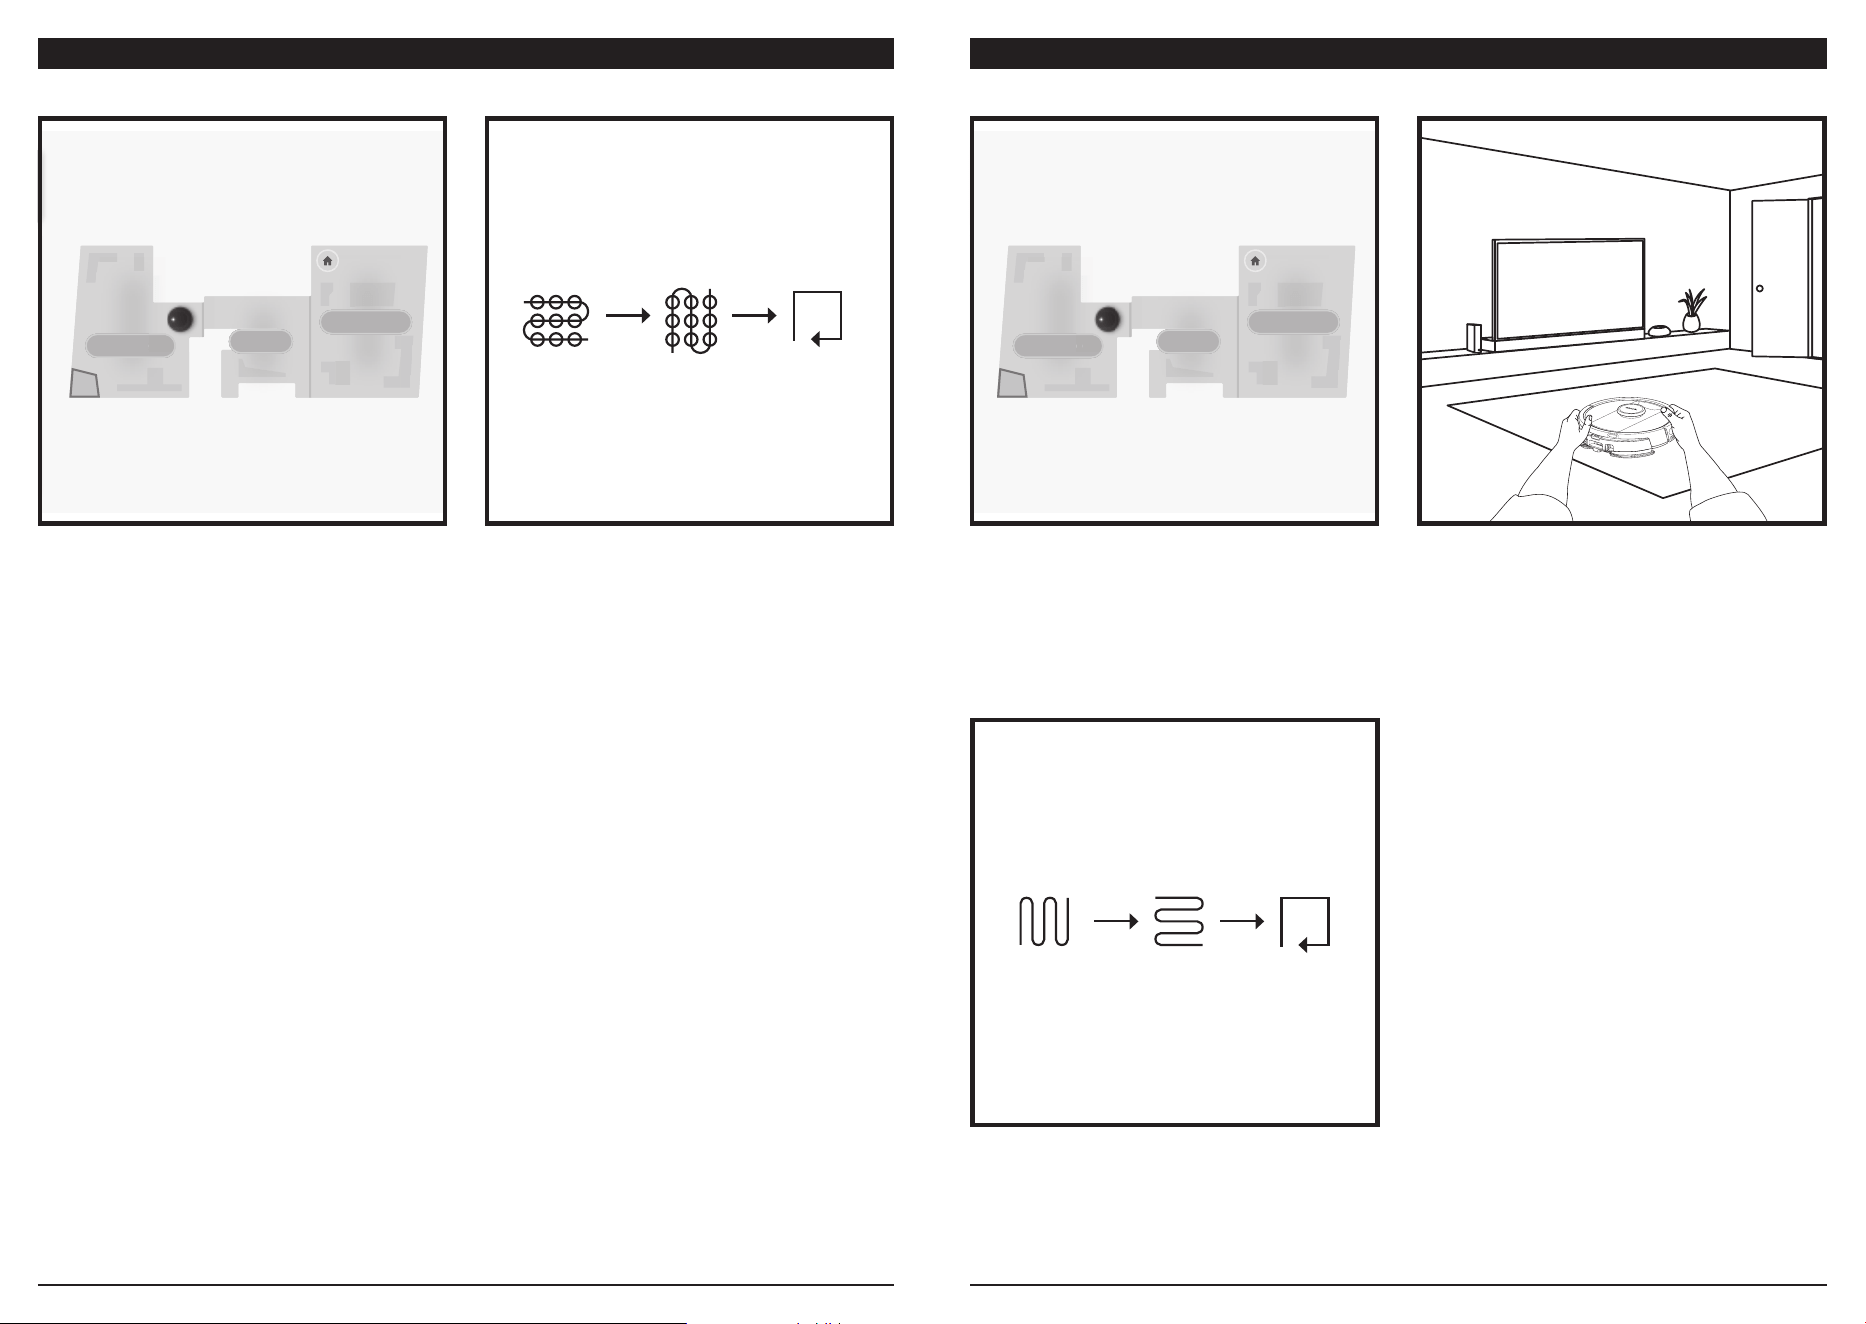
VAC & MOP 2-IN-1 CLEANING MODE VACUUM-ONLY CLEANING MODES
Spot Clean Matrix Mop
To clean a specific 1.5m by 1.5m spot, place the robot in
the area to be cleaned, then press and hold the CLEAN
button for 5 to 7 seconds. The robot will rotate while
vacuuming and mopping the area in a matrix pattern.
Spot Clean is also available through the app.
Whole-Home Cleaning
To start a whole-home Vac & Mop run, press the
CLEAN button on the robot or in the app. The robot
will clean perimeter areas first, then change to a row-
by-row pattern. If the fluid reservoir empties before
the whole-home run is complete, the robot will pause
for up to 10 minutes to allow you to refill the reservoir
before it returns to the base. When the whole-home
run is complete, the robot will return to its base.
RUMPELSTILTSKIN
Schedule History
EDIT OPTIONS
MapsControl
Shark
Kitchen
Living Room
Dining Room
o
m
Whole-Home Cleaning
To activate a whole-home clean when in vacuum-only
mode, press the CLEAN button on the robot or in the
app. The robot will clean perimeter areas first, then
change to a row-by-row pattern.
Single-Room Matrix Clean
Once the robot has a created map, you can select a
specific room for it to vacuum in Matrix Clean mode.
Place the robot in the room to be cleaned, then press
the CLEAN button. This function is also available
through the app.
Spot Clean Matrix Clean
To clean a specific 1.5m by 1.5m spot, place the robot
in the area to be cleaned, then press and hold the
CLEAN button for 5 to 7 seconds. The robot will
clean the area in a matrix pattern. Spot Clean is also
available through the app.
RUMPELSTILTSKIN
Schedule History
EDIT OPTIONS
MapsControl
Shark
Kitchen
Living Room
Dining Room
o
m
USING THE SHARK MATRIX
™
PLUS 2-IN-1 ROBOTUSING THE SHARK MATRIX
™
PLUS 2-IN-1 ROBOT
VAC & MOP 2-IN-1 SETUPVAC & MOP 2-IN-1 SETUP
Secure the pad to the Vac & Mop 2-in 1 Dust Bin.
Lift open the fill cap on the top of the reservoir. Add water
to the max fill line.. Close the cap and make sure it is
properly sealed.
Attach the mopping pad by inserting the flat edge of
the pad through the slot in the Vac & Mop 2-in-1 Dust
Bin. Pull the mop pad all the way through the slot until
it is securely inserted.
NOTE: Before it can mop, the robot MUST complete an Explore Run with the pad plate removed.
After the Explore Run, you will have an option to set up Carpet Zones and verify those carpets in the app
with a Carpet Verification Run. This ensures your robot will avoid carpets in mopping mode.
Firmly push the Vac & Mop 2-in-1 Dust Bin into the
back of the robot, and ensure both latches click into
place. The CLEAN button on the robot will illuminate
blue when the Vac & Mop 2-in-1 Dust Bin is inserted
properly.
When the reservoir in the Vac & Mop 2-in-1 Dust Bin
has fluid and is properly installed, with the mopping
pad attached, the robot is ready to vacuum and mop
simultaneously. Press the CLEAN button on the robot
or in the app to start a vacuuming and mopping run.
The robot will pre-saturate the mopping pad before
starting its run.
When mopping is complete, remove the Vac & Mop
2-in-1 Dust Bin by pressing the fill port button and
sliding it out. Empty the reservoir after each use.
The dust bin will auto-evacuate into the self-empty
base when the robot docks.
CAUTION: Floors may be slippery after mopping.
To remove the mopping pad from the Vac & Mop
2-in-1 Dust Bin, detach the pad from the pad plate
and slide the pad out of the slot.
NOTE: Before the first mopping run, remove any rugs or mats from the robot's path. You can also prevent
your robot from traveling over rugs and carpets by setting up Carpet Zones in the app.
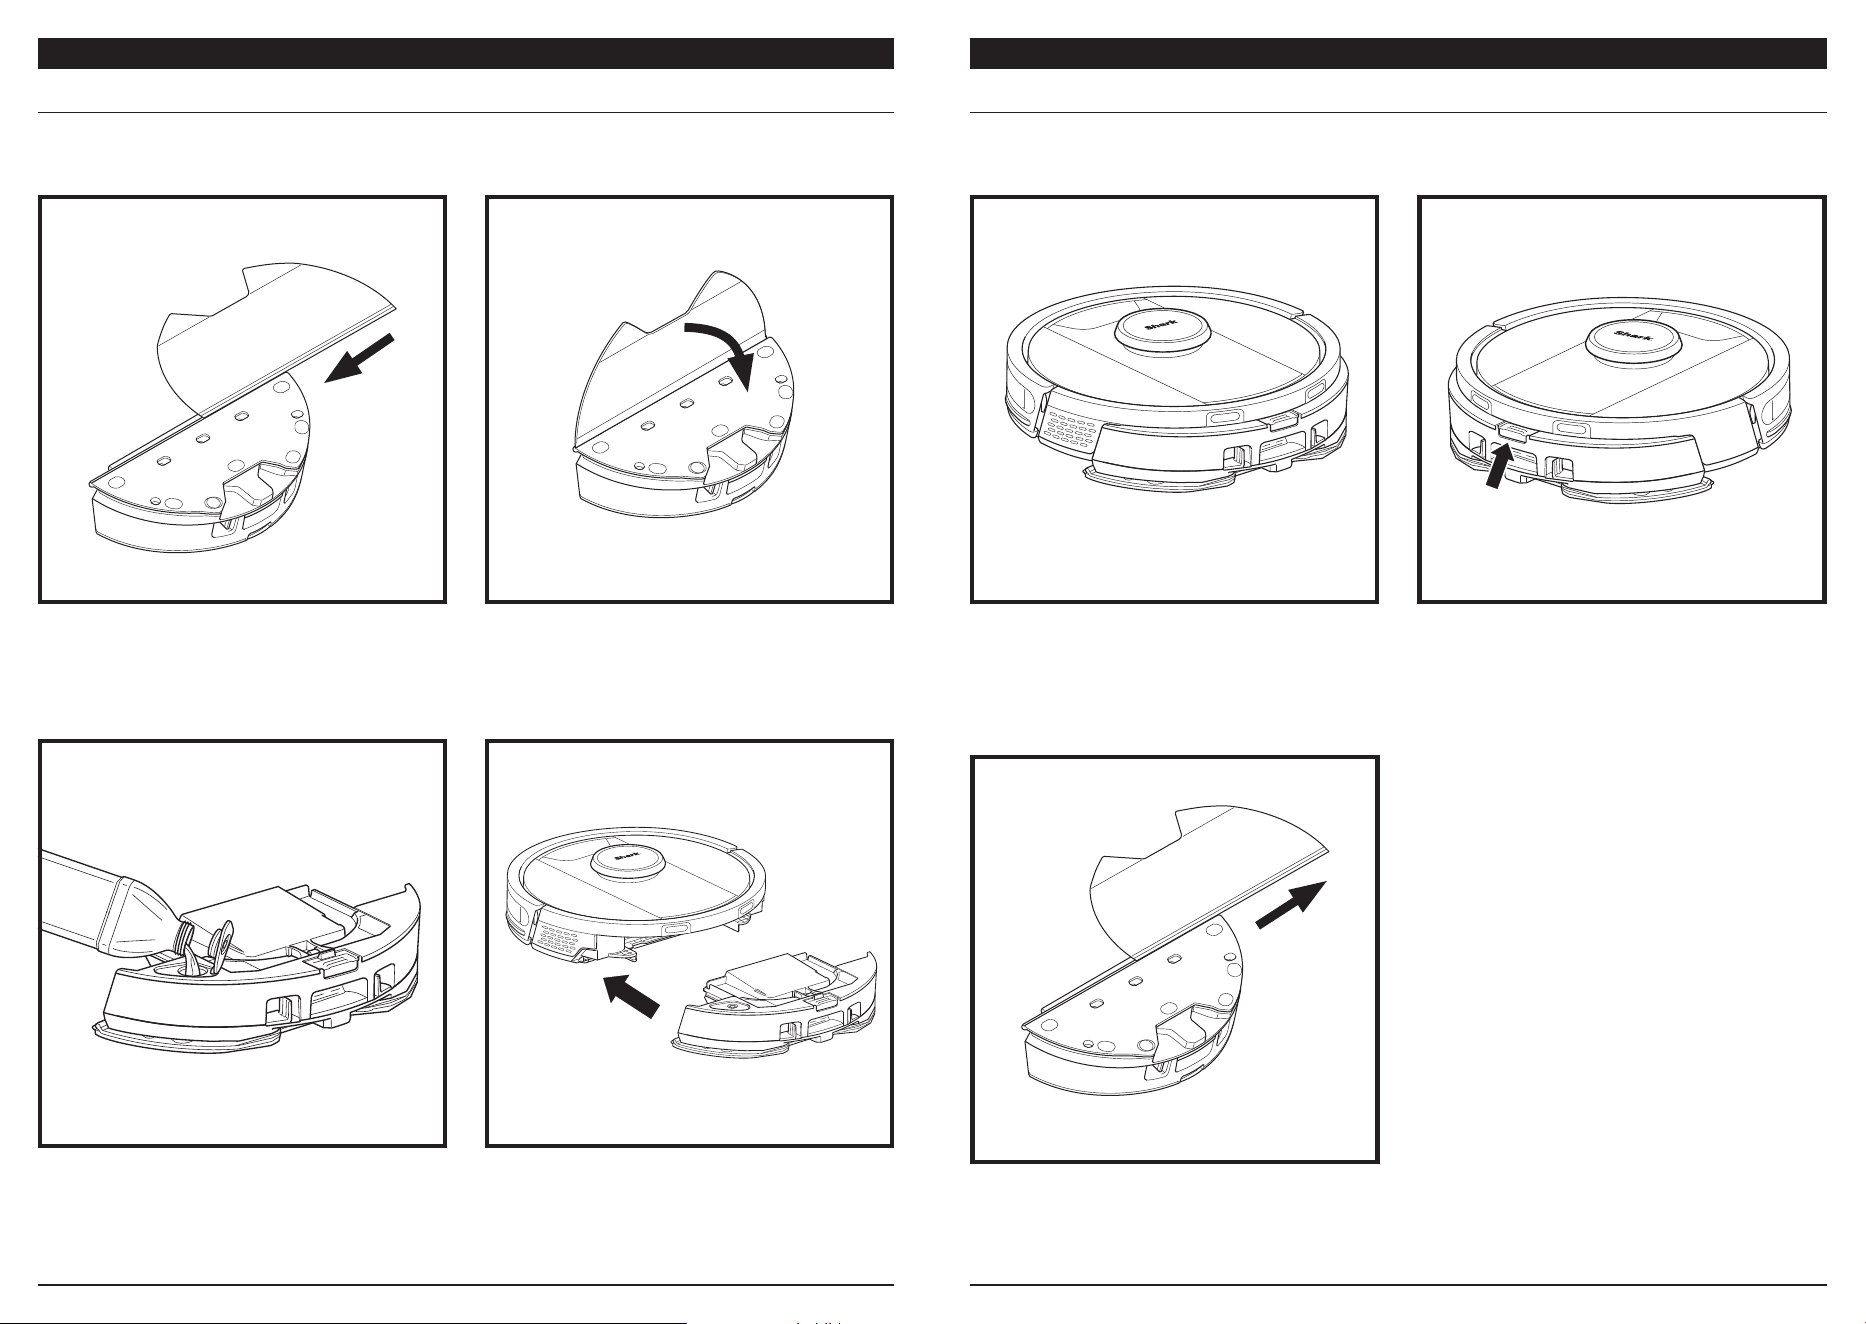
MAINTENANCE
EMPTYING THE SELF-EMPTY BASE DUST BIN
MAINTENANCE
MAINTAINING THE VAC & MOP 2-IN-1 DUST BIN
To remove the Vac & Mop 2-in-1 Dust Bin, press the
release button at the top of the dust bin and slide it
out.
To turn the robot power o, take it o the Self-Empty Base and press the DOCK button on the robot for 5-7
seconds.
CAUTION: Turn o power before performing any maintenance. Remove the vac & mop 2-in-1 dust bin
before any maintenance.
To open the dust bin lid, pinch the side latches in the
finger slots and hold them while lifting the lid.
Remove the filter and use a damp cloth to wipe the
dust bin clean. Allow the bin to air-dry for 24 hours
before reinstalling it.
NOTE: Make sure to insert the dust bin completely, until
it clicks into place.
Look between the filter and the plastic shield and
make sure there is no debris buildup.
Depending on the size of the base, empty the base
dust bin every 30 to 60 days or as needed.
To detach the bin, press the Dust Bin Release
button on the back right side of the base, then
slide out the bin.
To empty the bin, hold it over the trash, then press
the release button with the trash can icon on the
side of the bin. The bin lid will open, releasing
dust and debris. Lightly tap the dust bin against
the inside of the trash receptacle to knock o any
remaining debris. Reinstall the bin by sliding it into
the slot in the base until it clicks into place.
MAINTENANCE
CLEAN POST-MOTOR FILTER EVERY YEAR
Press the button at the top of the Filter Door and
slide the latch down to lift Filter Door o. Remove
the Post-Motor Filter from the base. Tap the filter
clean over the trash. You may wash with water only
and be sure to fully dry before re-inserting it into the
base. To reinstall the post-motor filter, insert it into
the base and replace the filter door.
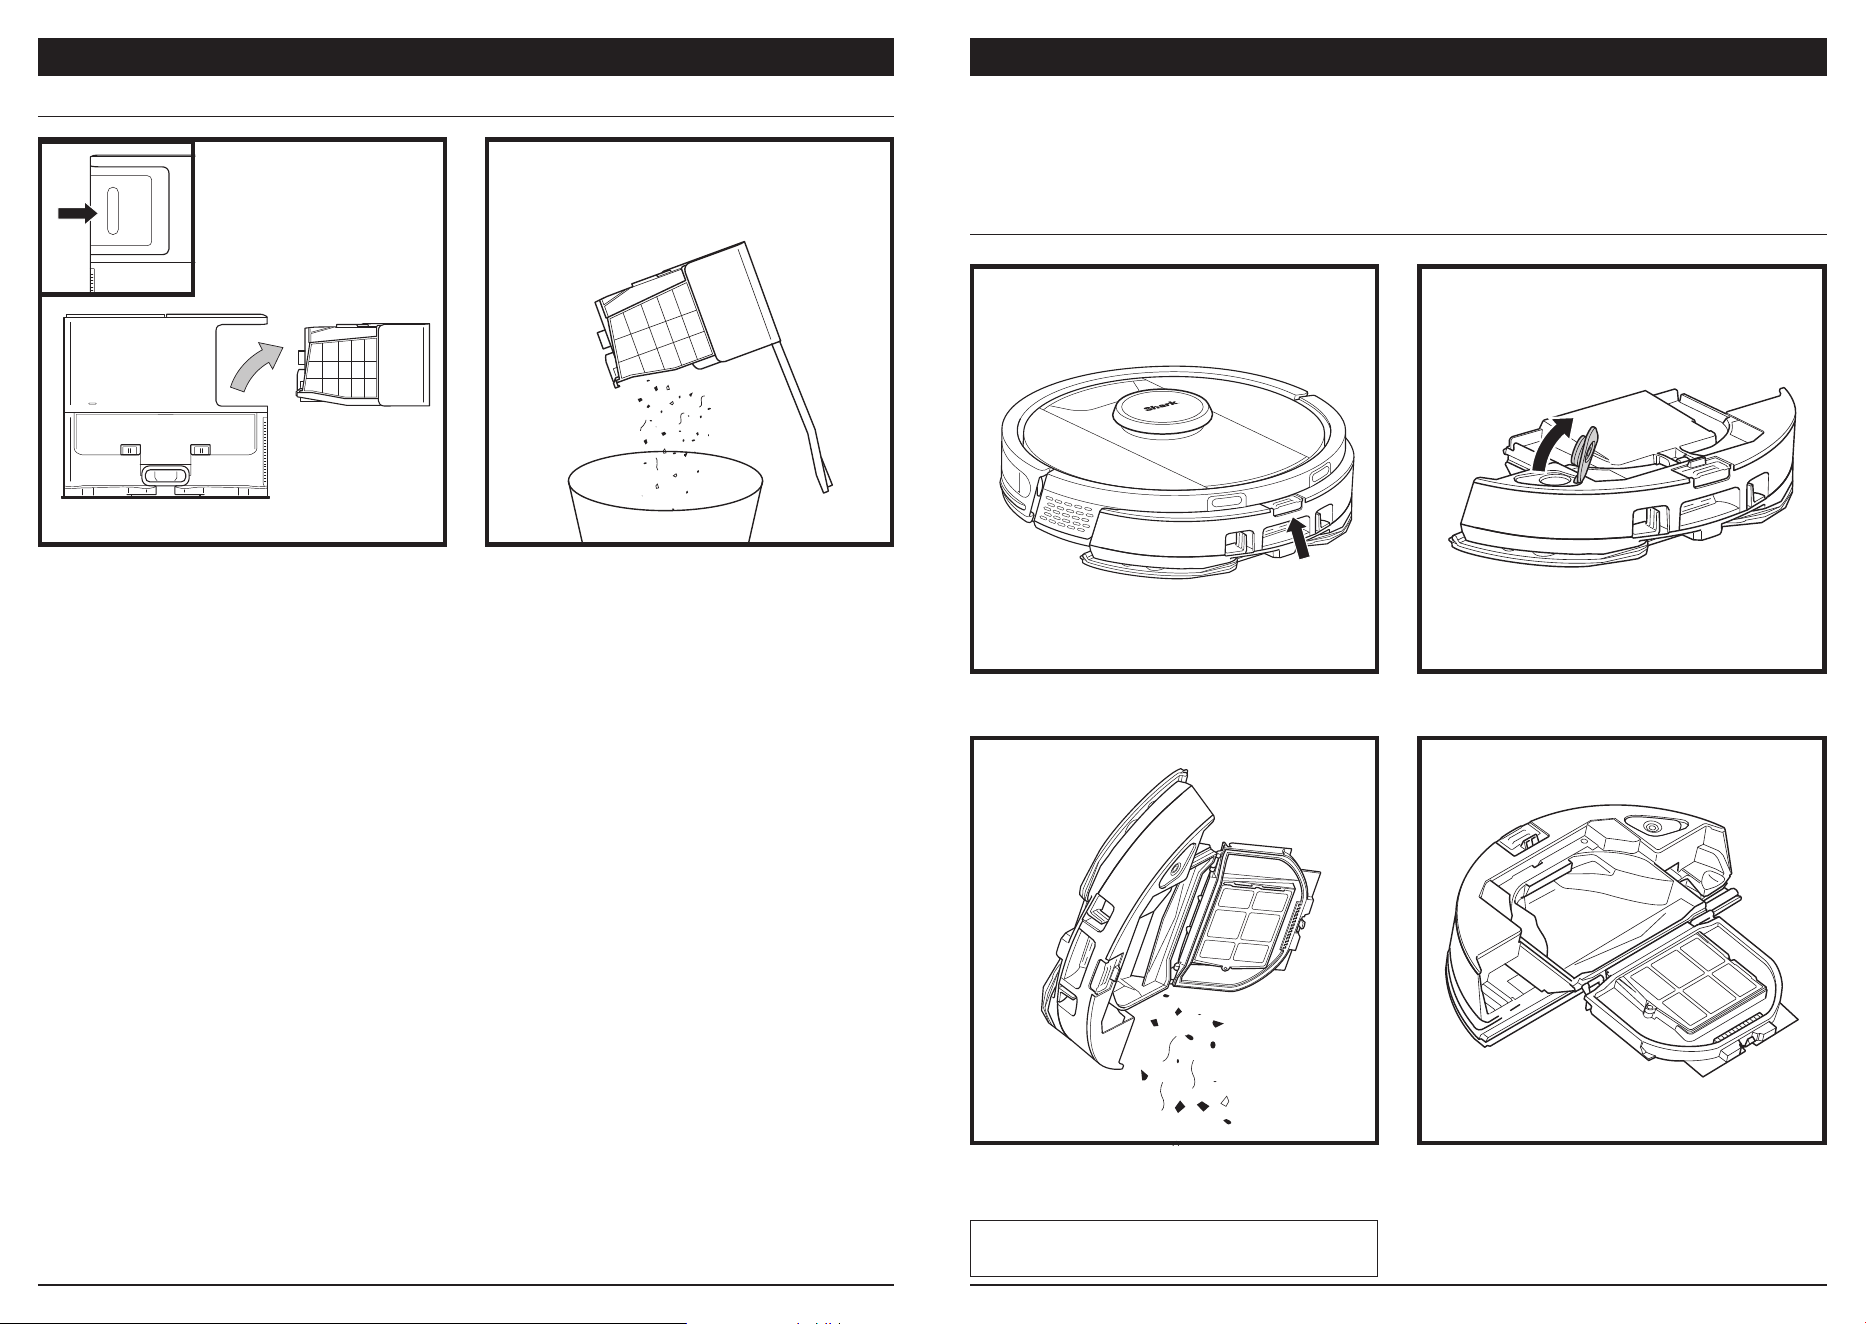
CLEAN PRE-MOTOR FILTERS ONCE A MONTH
To open the filter housing lid, hold the top left edge
of the base and pull up on the lid. With the lid open,
remove the foam filter by the top handle, then lift out
the felt filter underneath. Tap the filters clean over the
trash, then rinse with cold water ONLY, as soap may
damage them. Allow filters to air-dry completely before
reinstalling them. The filters must be installed correctly
for the base to work properly. Reinsert the felt filter
first, then the foam filter.
Regularly clean the filters to keep your vacuum's suction power optimal. Replace filters every 6-12
months or as needed.
CLEANING AND REPLACING THE SELF-EMPTY BASE FILTERS
Filter
Door
MAINTENANCE
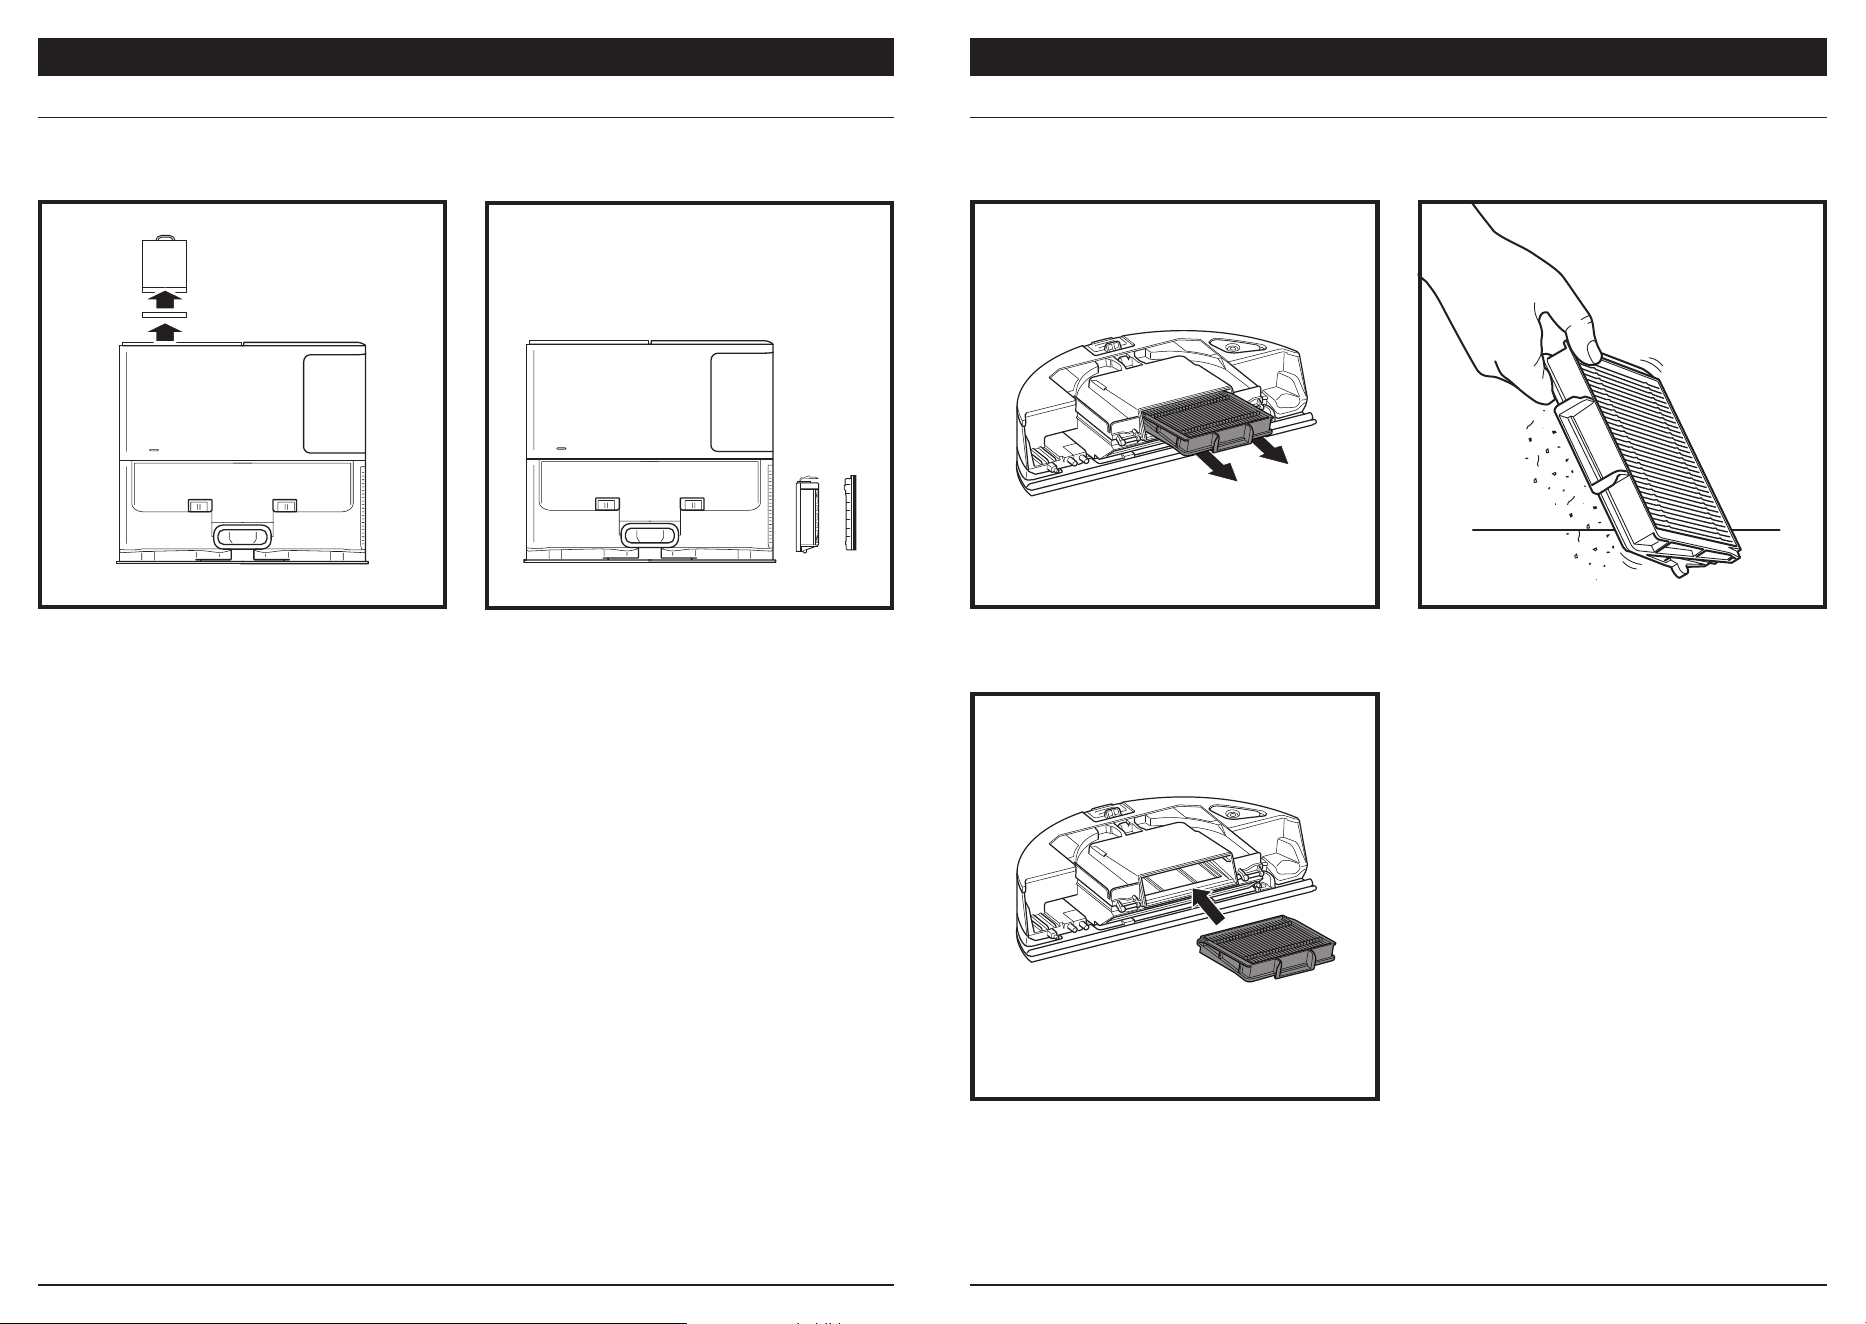
CLEANING AND REPLACING THE ROBOT'S FILTERS
Remove and empty the Self-Empty Dust Bin. Pull
filter out of the dust bin by the tabs.
Lightly tap the filter to remove debris every time
you empty the dust bin. Replace the filter every
6-12 months or as needed.
Reinsert the filter into the dust bin, then slide the
dust bin back into the robot until it clicks into
place.
For optimal suction power, please clean and reinsert the Self-Empty Dust Bin filter after each use.
See sharkclean.co.uk for replacement parts and accessories.

MAINTENANCE
CLEANING THE VAC & MOP 2-IN-1 DUST BIN AND MOPPING PAD
To clean pads, machine wash warm with light
colors. Use mild detergents and do not use bleach
or fabric softeners. Air-dry, or tumble-dry on low
with no dryer sheets.
Empty the remaining liquid and the debris from the
fluid reservoir after each use. Using a damp cloth,
wipe the inside of the dust bin. Let the dust bin air
dry for 24 hours before use. DO NOT put Vac & Mop
2-in-1 Dust Bin in the dishwasher.
NOTE: Before storing, make sure the Vac & Mop 2-in-1 Dust Bin and pad are completely dry. Store them in a dry place to
prevent damage.
CLEANING THE SELF-CLEANING BRUSHROLL
MAINTENANCE
The Self-Cleaning Brushroll actively removes hair wrap while your robot cleans. If some debris remains
wrapped around the brushroll, continue to run the robot to give the brushroll time to clean itself. If some hair
wrap or debris remains after continued cleaning, carefully remove it from the brushroll.
To access the brushroll, push up on the tabs on the
brushroll door, then lift o the door.
Lift out the brushroll and remove any debris.
Remove the end cap to clean out any trapped hair
or debris. Replace the end cap once clean.
Reinstall the brushroll, inserting the flat end first.
Close the brushroll door and press down until both
sides click into place.
NOTE: Replace brushroll every 6 to 12 months, or when visibly worn. See sharkaccessories.co.uk for replacement parts.
CLEANING THE LIDAR NAVIGATION MODULE
Periodically check the LIDAR navigation module
on top of the robot for hair and debris. Gently wipe
away any hair or debris from the module.
For a more thorough cleaning, place the robot on
a level surface and turn o the power. Use a cotton
swab to gently rotate the module clockwise five
times.
Do not insert cotton swab inside the openings in the
module.

CLEANING SENSORS AND CHARGING CONTACTS
CLEANING SIDE BRUSH
MAINTENANCE
Carefully unwind and remove any string or hair
wrapped around the side brush.
Gently wipe brush with a dry cloth. To reinstall, snap
the brush over the pegs. Spin the brush manually to
make sure it is installed correctly.
CLEAN SENSORS AND CHARGING CONTACTS AS NEEDED. With a dry cloth, gently dust o the sensors
and contacts located on the bottom of the robot and on the base.
NOTE: Remove and replace the side brush if it is bent or damaged. To remove the brush, lift it o its peg. Replace side
brushes every 12 months or when visibly worn.
IMPORTANT: The robot uses cli sensors to avoid stairs and other steep drops. Sensors may work less eectively when
they are dirty. For best results, clean sensors regularly.
CLEAN SIDE BRUSH AS NEEDED.
USING THE SHARK MATRIX
™
PLUS 2-IN-1 ROBOT
USING THE SHARKCLEAN® APP AND VOICE CONTROLS
HERE ARE SOME THINGS YOU CAN SAY TO GOOGLE ASSISTANT OR AMAZON ALEXA.
Google Assistant:
Hey Google, start vacuuming.
Hey Google, tell (robot name) to vacuum.
Hey Google, pause vacuuming.
Hey Google, tell (robot name) to go home.
Hey Google, ask Shark® to Matrix Clean my
(room name).
Amazon Alexa:
Alexa, ask Shark® to start vacuuming/cleaning the
(room name).
Alexa, start/stop the vacuum.
Alexa, send the vacuum to base.
Alexa, ask Shark® to Matrix Clean my (room name).
Get the most out of your robot with these app features:
• Recharge and Resume
Enable this feature to handle multi-room cleaning
in larger homes. The robot will return to the base,
recharge, and can pick up where it left o.
• Matrix Clean: Targeted deep cleaning for a specific
room or single spot.
• No-Go Zones
Use the no-go zones in the app to keep your robot
out of the areas you would like it to avoid.
• Scheduling
Set up whole-home cleanings for any time,
any day.
• Control From Anywhere
Wherever you are, you’re in control of your robot.
• Cleaning Reports
Each time your robot cleans, your app will generate
a cleaning report. Search for SharkClean in the app
store and download the app to your iPhone
TM
or
Android
TM
.
• Carpet Zone
Once your robot has mapped your home, set up
Carpet Zones in the app to identify areas of your
carpeted floors you do not want your robot to
mop.
To get the best cleaning performance from your robot, we recommend downloading the latest version of the SharkClean® app.
How do I use my robot with Amazon Alexa?
Open the Amazon Alexa app, go to the menu and select Skills. Or go to the Alexa Skills store on the Amazon
website. Search for "Shark Skill". Select the Shark® Skill to open the detail page, then select the Enable Skill
option. Once enabled, you can ask Alexa to control your robot (i.e., "Alexa, tell Shark® to start cleaning").
How do I set up my robot with the Google Assistant on an Apple device?
1. Download, open, and sign in to the Google Assistant app. 2. Select the “Explore” icon. Search for “Shark”
and select “Try it.” 3. To allow Google to link to your SharkClean® account, sign in to your SharkClean account.
This is the same account you used when setting up your Shark® robot in the SharkClean app. Select “Autho-
rize” to link your SharkClean account to the Google Assistant. To send your robot in to action, use the voice
command, “Google, tell Shark® to start cleaning.”
How do I set up my robot with the Google Assistant on Android?
1. Download open, and sign in to the Google Assistant app. 2. Select the “Explore” icon. Search for “Shark”
and select “Link.” 3. Sign in to your SharkClean account. This is the same account you used when setting up
your Shark® robot in the SharkClean app. To send your robot in to action, use the voice command, “Google, tell
Shark® to start cleaning.”
WI-FI TROUBLESHOOTING
ERROR CODE PROBLEM
! (RED) + Wi-Fi indicator (RED Flashing) Wrong password for Wi-Fi
! (Flashing red) + Wi-Fi (RED) SSID cannot be found, try connecting again
! + Wi-Fi (Flashing RED at the same time) Cannot connect to Wi-Fi
WI-FI TROUBLESHOOTING
• To use the app, your phone must be connected to
a 2.4GHz network. The app will only work on a
2.4GHz network.
• Do not use a VPN or a proxy server.
CAN'T CONNECT?
Reboot your robot
• If your base has a power switch, make sure it is in
the ON position.
• Take robot o base and press and hold the
DOCK button on the robot for 5-7 seconds to
turn o power. Place the robot back on the base
to power back on.
Restart your phone
Turn o phone, wait a few minutes, then turn it back
on and connect to Wi-Fi.
Reboot your router
• Unplug the router power cable for 30 seconds,
then plug it back in. Allow several minutes for your
router to reboot completely.
What should I do if my Wi-Fi randomly disconnects?
It is normal for your robot to temporarily lose connectivity when it goes under furniture or moves far from your
router. Your Shark® robot will automatically reconnect to Wi-Fi. If the robot does not reconnect, power it o,
wait 10 seconds, power the robot back on, and place it back on the base. Take the robot o the base and press
and hold the DOCK button on the robot for 5-7 seconds to turn o power. Place the robot back on the base to
turn power back on. Turn o your phone. Wait 30 seconds, then turn your phone back on. Open Wi-Fi settings
on your phone, find the Shark® network, and select Forget Network. Reopen SharkClean app and retry the
connection process.
What should I do if I verified a wireless network password that is incorrect?
Close the app, then reopen it. Make sure that you entered the correct Wi-Fi network password this time. In
your phone's network settings, choose your home 2.4 GHz network, and select Forget. Reconnect to your
home network. Make sure to use the correct password. If you were able to connect to your home network,
proceed to the app setup process. We recommend that you use the eye icon when entering your password to
make sure it is correct. If you cannot locate your Wi-Fi password, please contact your Internet service provider.
What should I do it my SharkNinja user name and password is invalid?
We recommend you select the eye icon next to the password entry to verify you are entering your password
correctly. Select the ‘Forgot Password’ option on the sign-in page. The automated system will email you a link
to reset your password. If you do not see an email, search your inbox and spam folder for emails from
mysharkninja@sharkninja.com. You can use the “Resend code” option to send the email again.
What should I do if there is an issue resetting password (did not receive the email or token
was invalid)?
If you do not see an email, search your inbox and spam folder for emails from mysharkninja@sharkninja.com.
You can use the “Resend code” option to send the email again.
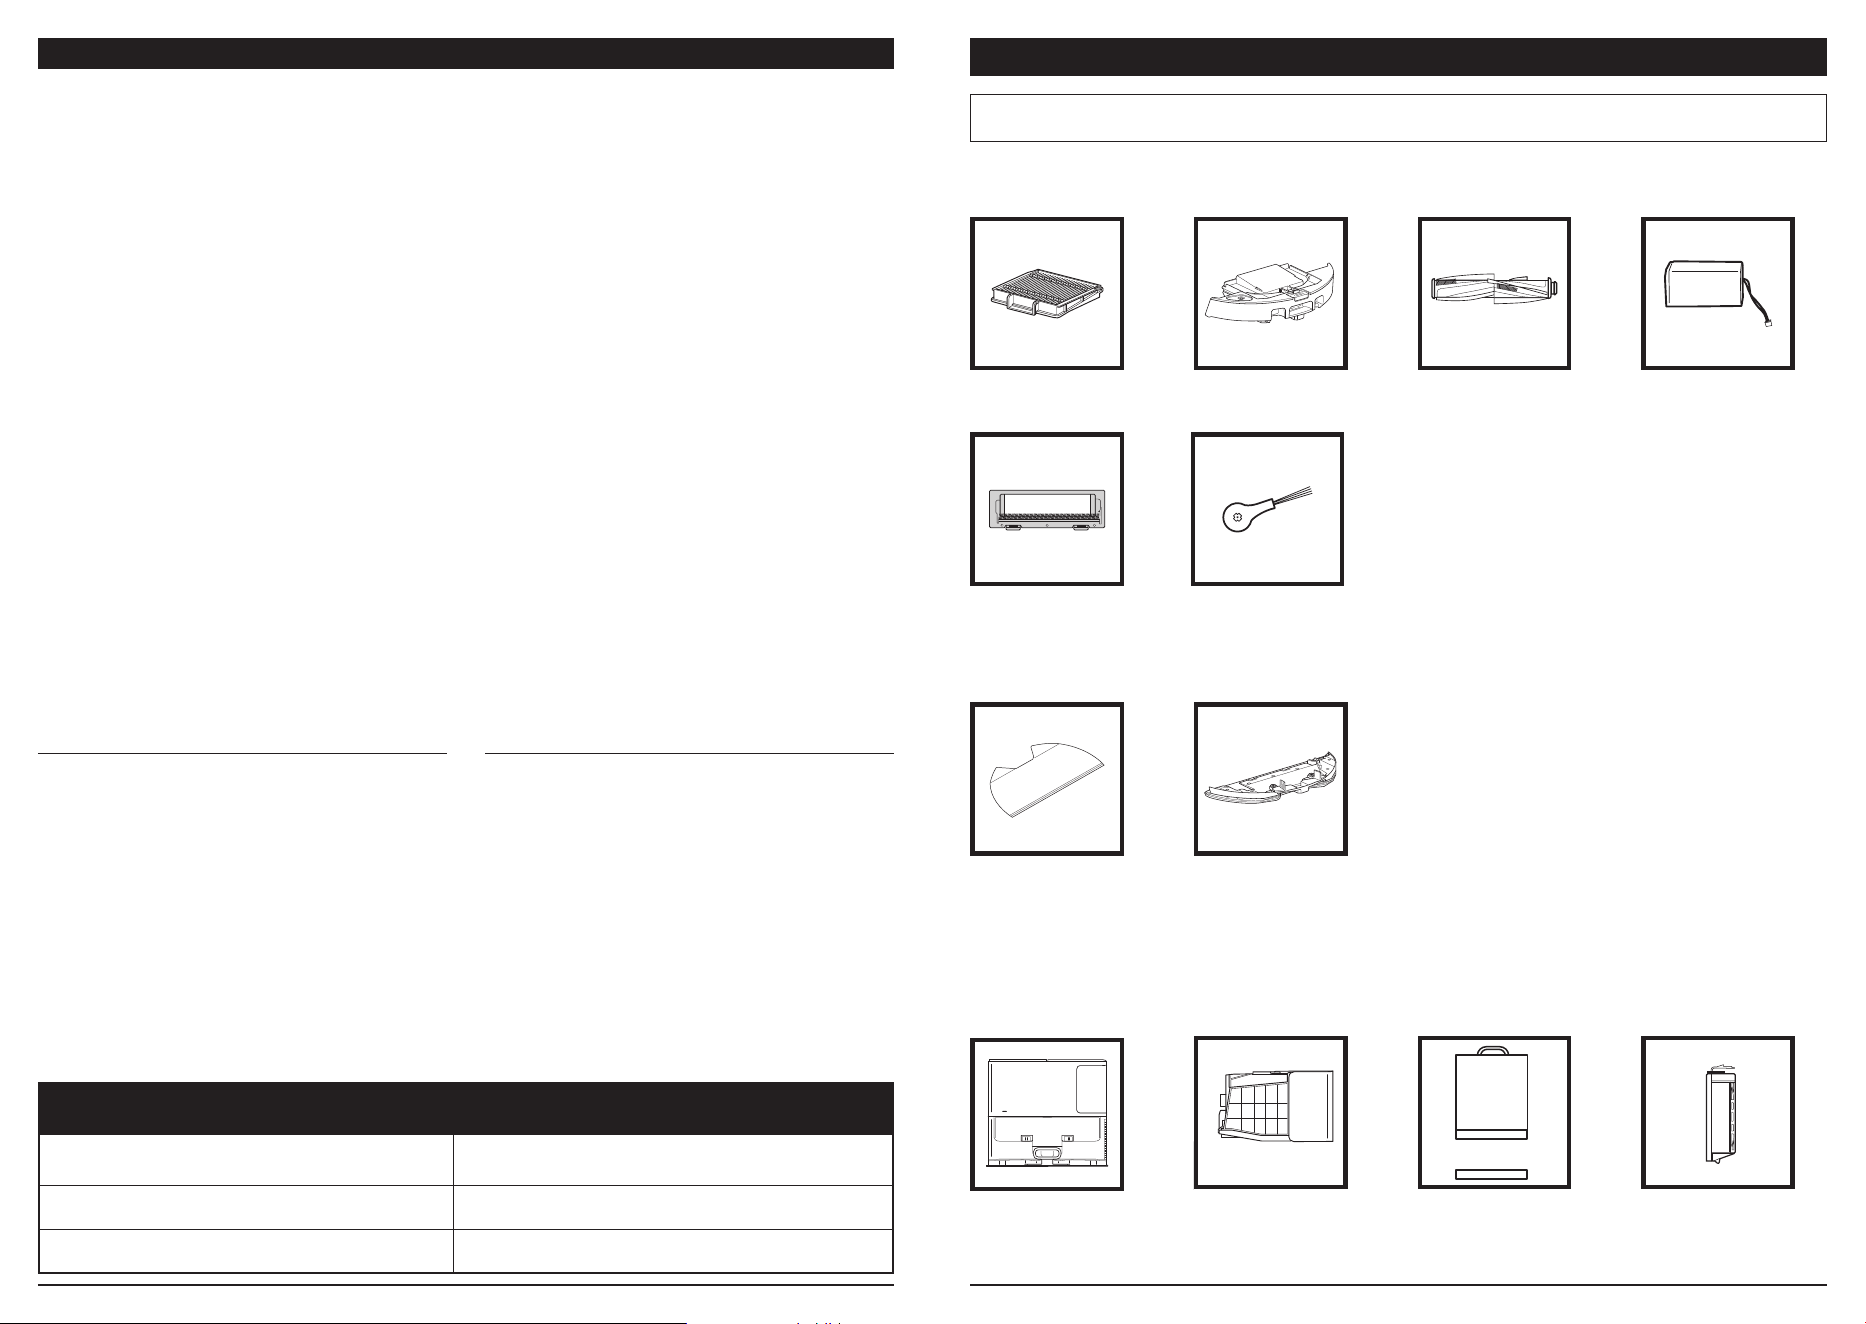
REPLACEMENT PARTS
NOTE: To order replacement parts and filters, visit sharkaccessories.co.uk
Robot Filter
Brushroll
Side Brush
Charging Base
Self-Empty
Dust Bin
Base Dust Bin
Brushroll Door
Base Pre-Motor
Foam & Felt Filter
Kit
Base Post-Motor
Filter
Battery
REPLACEMENT PARTS: ROBOT
REPLACEMENT PARTS: MOPPING
REPLACEMENT PARTS: BASE
Mopping Pad
Pad Plate
ERROR CODES
ERROR CODE SOLUTION
CLEAN (RED) flashing + ! (RED) flashing
Suction motor failure. Remove and empty the dust bin,
clean the filters, and remove blockages to ensure nothing is
reducing suction.
CLEAN (RED) flashing
Robot may be stuck on an obstacle. Move robot to a new
location on a level surface.
DOCK (RED) flashing
Front bumper may be jammed. Clean the bumper and make
sure it moves in and out freely.
CLEAN (RED) + DOCK (RED) flashing
Robot dust bin has been removed and needs to be
reinserted.
DOCK (RED) + ! (RED) flashing
Side brush is stuck. Remove any debris from around the side
brush.
CLEAN (RED) + DOCK (RED) + ! (RED) flashing
A drive wheel is stuck. Clean the wheels and remove any
debris wrapped around the axles.
CLEAN (WHITE) + DOCK (RED) + ! (RED) flashing
Wheel motor encoder failure. Please turn the power o and
back on.
CLEAN (WHITE) + ! (RED) flashing
Blockage in brushroll. Remove any debris from around the
brushroll.
CLEAN (RED) + DOCK (WHITE) + ! (RED) flashing
Robot has encountered an error while booting. Please turn
the power o and back on.
CLEAN (WHITE) + DOCK (RED) flashing
Robot cannot locate base. Please pick up your robot and place
it on the base.
BATTERY ICON (RED) flashing
Battery is critically low and needs recharging. If your robot
is unable to base, place the robot manually on the base.
CLEAN (RED) flashing + DOCK (WHITE) flashing
alternating
Robot is stuck. Please move to a level surface.
CLEAN (YELLOW)
Fluid reservoir of the Vac & Mop 2-in-1 Dust Bin is empty.
Refill before cleaning.
If any error lights are illuminated or flashing on your Shark Matrix™ Plus 2-In-1 Robot, see the
error code chart below:
END-USER LICENSE AGREEMENT FOR SHARKNINJA SOFTWARE
IMPORTANT: PLEASE READ THE TERMS AND CONDITIONS OF THIS LICENCE AGREEMENT CAREFULLY
BEFORE COMMENCING USE OF THIS PRODUCT
This End-User License Agreement (“EULA”) is a legal agreement between you and SharkNinja Operating
LLC’s (“SharkNinja”, “us” or “we”) for [the]/[SharkNinja’s] computer software which is preinstalled on
your SharkNinja device, which you download in order to control the SharkNinja device from your phone or
computer, or, in either case, is made available by way of updates (the “Software”), as well as any printed,
online or electronic documents related to the Software (the “Documentation”).
We grant you the right to use of the Software and Documentation on the terms of this License. We do not sell
the Software or Documentation to you. We remain the owners of the Software and Documentation at all times.
If you do not agree to the terms of this EULA, do not install or use the Software, the Documentation or
the SharkNinja device. In that case, you may return the unused SharkNinja device to us for a full refund.
This does not aect your legal rights to return goods to your retailer if you change your mind or if they are
faulty, or the terms of our separate manufacturer’s guarantee, if any.
1. GRANT OF LICENSE.
Installation and Use. In return for you agreeing to comply with the terms of this EULA, SharkNinja grants
you the right to use the Software and Documentation, and to receive and use any free supplementary
software code or update of the Software incorporating "patches" and corrections of errors as may be
provided by the Licensor from time to time, solely for the purpose of domestic operation and use of the
SharkNinja device in relation to which the Software was supplied.
2. DESCRIPTION OF OTHER RIGHTS AND LIMITATIONS.
2.1. Maintenance of Copyright Notices. You must not remove or alter any copyright notices on any and all
copies of the Software and Documentation.
2.2. Copying and Distribution. You must not make or distribute to third parties copies of the Software or the
Documentation.
2.3. Prohibition on Reverse Engineering, Decompilation, and Disassembly. You must not reverse engineer,
decompile, or disassemble the Software, except and only to the extent that such activity is expressly
permitted by applicable law notwithstanding this limitation.
2.4. Rental. You must not rent, lease, or lend the Software or the Documentation without written permission
from SharkNinja.
2.5. “Not for resale” software. Software identified as “Not for Resale” or “NFR”, must not be resold,
transferred, or used for any purpose other than demonstration, test, or evaluation.
2.6. Support Services. SharkNinja may provide you with support services related to the Software or your
SharkNinja device (the “Support Services”). Any supplemental software code provided to you as part
of the Support Services shall be considered part of the Software and be subject to the terms and
conditions of this EULA.
2.7. Ownership of Software. SharkNinja retains ownership of all intellectual property rights in the Software
and the Documentation.
2.8. Compliance with Applicable Laws. You must comply with all applicable laws regarding use of the
Software and Documentation.
3. UPDASTES.
SharkNinja may upgrade or update, or require you to upgrade or update, the Software, provided that
the Software shall always match the description of it that we provided to you before you bought your
SharkNinja device. This EULA will govern any upgrades or updates provided by SharkNinja that replace
and/or supplement the Software supplied pre-loaded to your SharkNinja device, unless such upgrade is
accompanied by a separate End User Licence Agreement, in which case the terms of that End User Licence
Agreement will govern.
4. DATA AND PRIVACY.
SharkNinja is committed to ensuring your privacy by adhering to high standards of fairness and integrity,
and complying with applicable data protection laws. We are committed to keeping our customers informed
about how we use the information we gather from you through the use of the Software. Our privacy
practices are described in SharkNinja’s Privacy Policy, as well as in separate notices given when an app,
product, or service is purchased or downloaded. At all times your information will be treated in accordance
with the SharkNinja Privacy Policy, which is incorporated by reference into this EULA and can be viewed at
the following URL: https://ninjakitchen.co.uk/systempage.privacypolicy.pagelet2-page-cms-systempage.
privacyPolicy.pagelet2-Page. Please read and review our Privacy Policy and any other relevant privacy
notices carefully to understand how your personal data is collected, processed and shared by SharkNinja,
and your data subject rights in relation to such data.
Sensor
Name
Functional Description
Cli
Sensor
Cli sensors monitor the cli to avoid falling by way of infrared ranging. If there is a downward stair
in front (e.g. the height of the white ground is greater than 50mm, or the black ground is greater than
30mm), the reading value of the sensor exceeds the preset value, then robot stop moving forward.
Lidar
Sensor
Lidar sensor help robot map through laser ranging. Detective distance is 8m.
Wall Follow
sensor
Wall follow sensor detects the distance between the objects and the left side of the robot by the TOF
ranging. Detective distance is 30mm.
MANUFACTURER'S GUARANTEE
The Shark Guarantee
When a consumer buys a product in the UK, they get the benefit of legal rights relating to the quality of the
product (your “legal rights”). You can enforce your legal rights against your retailer, including Shark if you
bought your appliance from sharkclean.co.uk . However, at Shark we are so confident about the quality of our
products that we give the owner an additional, free parts and labour manufacturer’s guarantee of up to 2 years.
The guarantee it comes with is an important consideration - and reflects how much confidence the manufacturer
has in its product and manufacturing quality. The manufacturer’s guarantee does not aect your legal rights.
How long are new Shark machines guaranteed for?
Our manufacturer’s guarantee lasts for one year from the date of purchase as standard, or for two years if
you register your purchase with us within 28 days.
How do I register my Shark guarantee?
If you have purchased your Shark appliance directly from sharkclean.co.uk your guarantee is registered automatically.
If you bought it from anywhere else in the UK, you can register your guarantee online within 28 days of purchase.
• To register online, please visit sharkclean.co.uk/register-guarantee or scan the QR code in your instruction booklet.
• Keep a note of the date you purchased the machine.
IMPORTANT:
• Keep your receipt if you bought your Shark appliance from anywhere except sharkclean.co.uk . You will
need it to claim under your guarantee.
• The free Shark guarantee only applies in the UK.
What are the benefits of registering my free Shark guarantee?
When you register your guarantee, you will get an extra one year of cover. We’ll also have your details to
hand if we ever need to get in touch. If you further agree to receive communications from us, you can also
receive tips and advice on how to get the best out of your Shark appliance and hear the latest news about
new Shark technology and launches.
What is covered by the free Shark guarantee?
Repair or replacement (at Shark’s discretion) of your Shark machine, including all parts and labour.
What is not covered by the free Shark guarantee?
• Normal wear and tear.
•
Accidental damage or faults caused by negligent use or care, misuse, neglect, careless operation or handling of
the Shark appliance which is not in accordance with the Shark Operating Manual supplied with your machine.
• Damage caused by use of the Shark appliance for anything other than normal domestic household purposes.
• Damage caused by use of parts not assembled or installed in accordance with the operating instructions.
• Damage caused by use of parts and accessories which are not Shark Genuine Components
• Faulty installation (except where installed by Shark).
• Repairs or alterations carried out by parties other than Shark or its agents.
How can I claim under the free Shark guarantee?
Contact our customer service helpline on 0800 862 0453. For service hours please visit our website under
‘Contact Us’. It’s free to call, and you’ll be put straight through to a Shark representative. You’ll also find
online support at support.sharkclean.co.uk . The Shark representative will go through some troubleshooting
with you, and if we conclude that the item has failed, we will send you a replacement part or a returns label
to send the defective item back to us free of charge. When you have delivered the defective product to us,
we will send you a replacement. Please remember that the item will need to be boxed when you return it to
us. It can be any suitable box, it does not have to be the original packaging.
Where can I buy genuine Shark spares and accessories?
Shark spares and accessories are developed by the same engineers who developed your Shark appliance.
You’ll find a full range of Shark spares, replacement parts and accessories for all Shark machines at
sharkclean.co.uk. Please remember that damage caused by the use of non-Shark spares may not be
covered under your guarantee. These instructions are designed to help you keep your Shark Robot running
at peak performance.
5. THIRD-PARTY APPLICATION LIBRARIES AND EMBEDDED SOFTWARE
5.1 You acknowledge that Ayla Networks, Inc. (“Ayla”) has provided certain application libraries that have
been embedded into the Software (“Ayla Application Libraries”) and enables SharkNinja devices to
connect to the Ayla Cloud Service (“Ayla Embedded Software”).
5.2 You must not use the Ayla Application Libraries except as an incorporated portion of the Software,
unmodified from the form provided to you.
5.3 You must not use the Ayla Embedded Software except as an incorporated portion of your SharkNinja
device, unmodified from the form provided to you.
5.4 You must not reverse engineer, decompile, or disassemble the Ayla Application Libraries or the
Ayla Embedded Software, except and only to the extent that such activity is expressly permitted by
applicable law notwithstanding this limitation.
5.5 SharkNinja retains ownership of all intellectual property rights in the Ayla Application Libraries and the
Ayla Embedded Software incorporated into the Software.
5.6 You must not use the Ayla Application Libraries or Ayla Embedded Software to attempt to gain
unauthorised access to or use of the systems/services of SharkNinja’s other licensors; nor will you
transmit viruses, worms, Trojan horses, time bombs, spyware, malware, cancelbots, passive collection
mechanisms, robots, data mining software, or any other malicious or invasive code or program into the
systems/services of SharkNinja’s other licensors.
5.7 You will not use the Ayla Application Libraries or Ayla Embedded Software to interfere with, breach, or
circumvent any security feature, authentication feature, or any other feature that restricts or enforces
limitations on the use of, or access to, the systems/services of SharkNinja’s other licensors.
5.8
You will not probe, attack, scan, or test the vulnerability of the systems/services of SharkNinja’s other licensors.
5.9 SharkNinja’s other licensors of the Software, Ayla Application Libraries, and the Ayla Embedded
Software, are the express third-party beneficiaries of this EULA, and the provisions of this Section of
this EULA are made expressly for the benefit of such licensors, and are enforceable by such licensors.
6. TERMINATION.
Without prejudice to any other rights, SharkNinja may terminate this EULA if you commit a
material or persistent breach of this EULA which you fail to remedy (if remediable) within 14 days after the
service of written notice requiring you to do so. Upon termination for any reason, all rights granted to you
under this EULA shall cease, you must cease all activities authorised by this EULA, and you must immediately
delete or remove the Software from all computer equipment in your possession and immediately destroy or
return to us (at our option) all copies of the Software then in your possession, custody or control.
7.1. The Software is for domestic and private use. If you use the Software for any commercial, business
or resale purpose we will have no liability to you for any loss of profit, loss of business, business
interruption, or loss of business opportunity.
7.2
You acknowledge that the Software has not been developed to meet Your individual requirements, and that it is
therefore Your responsibility to ensure that the Software as described in the Documents meets your requirements.
7.3 We are responsible for loss or damage you suer that is a foreseeable result of our breaking this EULA or
our failing to use reasonable care and skill, but we are not responsible for any loss or damage that is not
foreseeable, except as set out at 7.3 to 7.4 below. Loss or damage is foreseeable if either it is obvious that
it will happen or if, at the time this EULA came into force, both we and you knew it might happen.
7.4 If defective digital content that we have supplied damages a device or digital content belonging to you,
then, in accordance with section 46 of the Consumer Rights Act 2015, we will either repair the damage
or pay you compensation. However, we will not be liable for damage that you could have avoided by
following our advice to apply an update or upgrade oered to you free of charge or for damage that
was caused by you failing to correctly follow installation instructions or to have in place the minimum
system requirements advised by us.
7.5 If you bought the SharkNinja device directly from SharkNinja or one of its group companies, we or our
group company, as the seller, may be responsible to you under the contract of sale for loss or damage
caused by your use of the Software. You can find our terms and conditions of sale here: https://
ninjakitchen.co.uk/terms-and-conditions . If you bought the SharkNinja device from another company,
they may have a similar responsibility to you.
7.6
Many SharkNinja products come with a free manufacturer’s guarantee. If you suer loss or damage as a result
of using the Software, you may be able to claim under the guarantee. You can find the terms of our guarantee
here: https://support.ninjakitchen.co.uk/hc/en-gb/articles/360013838359-Ninja-Guarantee-Terms-Conditions.
7.7 We do not exclude or limit in any way our liability to you where it would be unlawful to do so. This
includes liability for death or personal injury caused by our negligence or the negligence of our
employees, agents or subcontractors or for fraud or fraudulent misrepresentation.
8. APPLICABLE LAW AND JURISDICTION. This EULA is governed by English law and you can bring legal
proceedings in respect of the products in the English courts. If you live in Scotland you can bring legal
proceedings in respect of the products in either the Scottish or the English courts. If you live in Northern Ireland
you can bring legal proceedings in respect of the products in either the Northern Irish or the English courts.
9. ASSIGNMENT. We may transfer our rights and obligations under this EULA to another organisation. We
will always tell you in writing if this happens and we will ensure that the transfer will not aect your
rights under the EULA.
7. OUR RESPONSIBILITY FOR LOSS AND DAMAGE CONSUMERS SUFFER.

NOTES
MANUFACTURER'S GUARANTEE
SharkNinja Europe Ltd, 1st/2nd Floor Building 3150, Thorpe Park, Century Way, Leeds, England, LS15 8ZB
SharkNinja Germany GmbH, Rotfeder-Ring 9, 60327 Frankfurt am Main, Germany sharkclean.co.uk
Illustrations may dier from actual product. We are constantly striving to improve our products; therefore
the specifications contained herein are subject to change without notice.
PLEASE READ CAREFULLY AND KEEP FOR FUTURE REFERENCE.
This Owner's Guide is designed to help you keep your Shark Matrix Plus 2-in-1 robot running
at peak performance.
SharkNinja Europe Ltd,
1st/2nd Floor Building 3150,
Thorpe Park,
Century Way, Leeds, England,
LS15 8ZB
www.sharkclean.co.uk
Illustrations may dier from actual product We are constantly striving to improve our products;
therefore the specifications contained here in are subject to change without notice.
© 2024 SharkNinja Operating LLC. SHARK is a registered trademark in the United Kingdom
of SharkNinja Operating LLC.
Apple App Store is a trademark of Apple Inc. Google,
Android and Google Play are trademarks of Google LLC.
EXPECTED PERFORMANCE
Expected runtime: 60 minutes
Expected charging time: 6 hours
TIP: You can find the model and serial
numbers on the QR code labels on the
bottom of the robot and base.
RECORD THIS INFORMATION
Model Number: ������������������������
Date of Purchase: ����������������������
(Keep receipt)
Store of Purchase: ����������������������
REGISTER YOUR PURCHASE
registeryourshark.co.uk
RV2620WAUK�IB�MP�SDC�MATRIX�Mv1�240712
sharkclean.uk