- 1 -
Technical Support and E-Warranty Certificate www.vevor.com/support
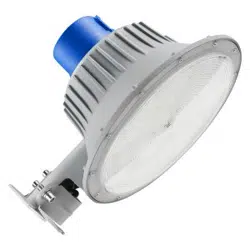
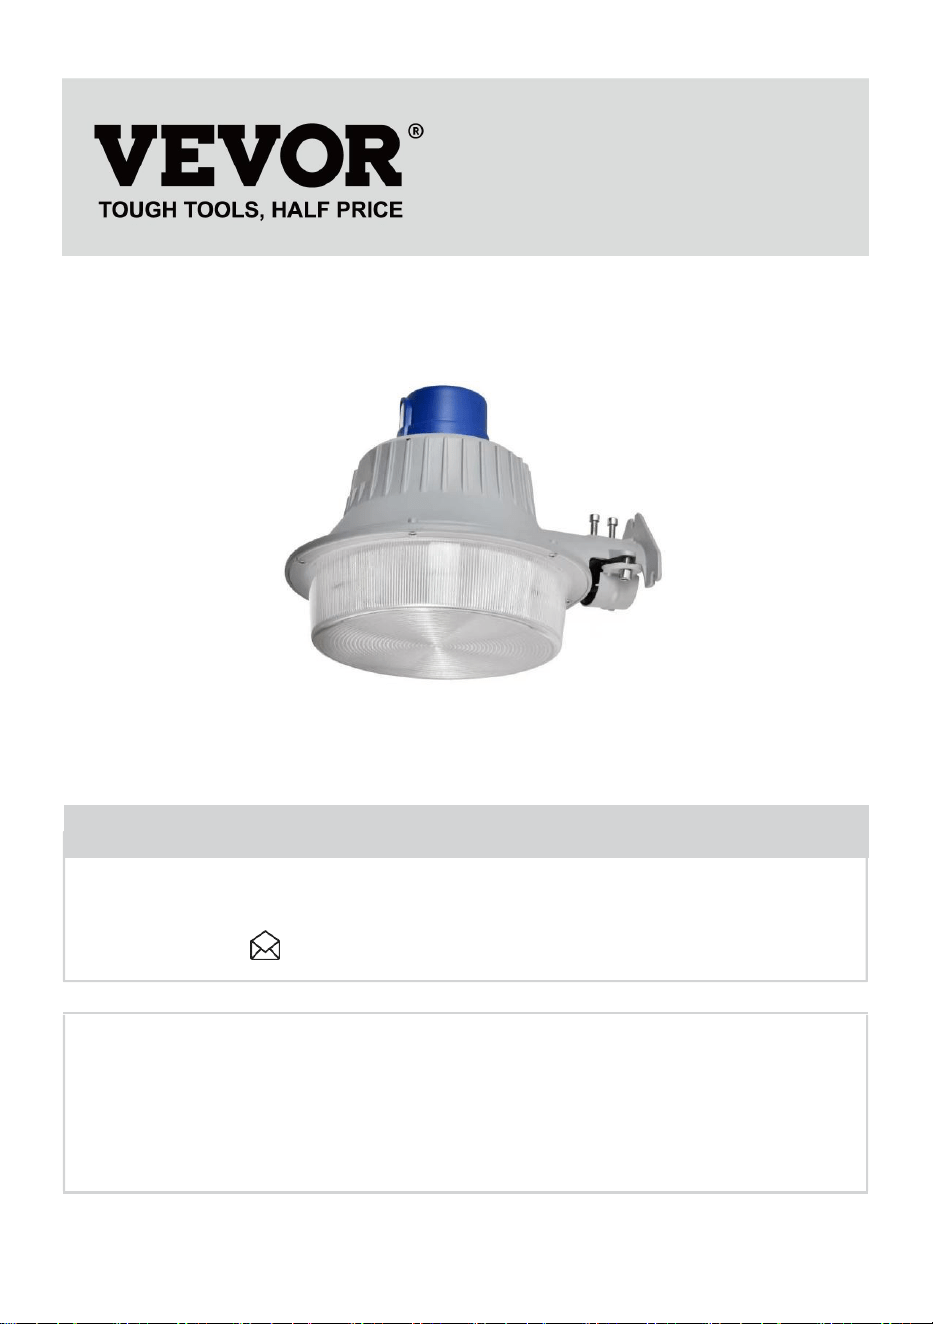
LED WALL LIGHT INSTRUCTION
USER'S MANUAL
MODEL:BD-HB-50W/BD-HB-100W
We continue to be committed to provide you tools with competitive price.
"Save Half", "Half Price" or any other similar expressions used by us only represents an
estimate of savings you might benefit from buying certain tools with us compared to the major
top brands and doses not necessarily mean to cover all categories of tools offered by us. You
are kindly reminded to verify carefully when you are placing an order with us if you are
actually saving half in comparison with the top major brands.

- 2 -
MODEL: BD-HB-50W/BD-HB-100W
Have product questions? Need technical support? Please feel free to
contact us:
CustomerService@vevor.com
NEED HELP? CONTACT US!
This is the original instruction, please read all manual instructions
carefully before operating. VEVOR reserves a clear interpretation of our
user manual. The appearance of the product shall be subject to the
product you received. Please forgive us that we won't inform you again if
there are any technology or software updates on our product.
LED WALL LIGHT
INSTRUCTION
- 3 -
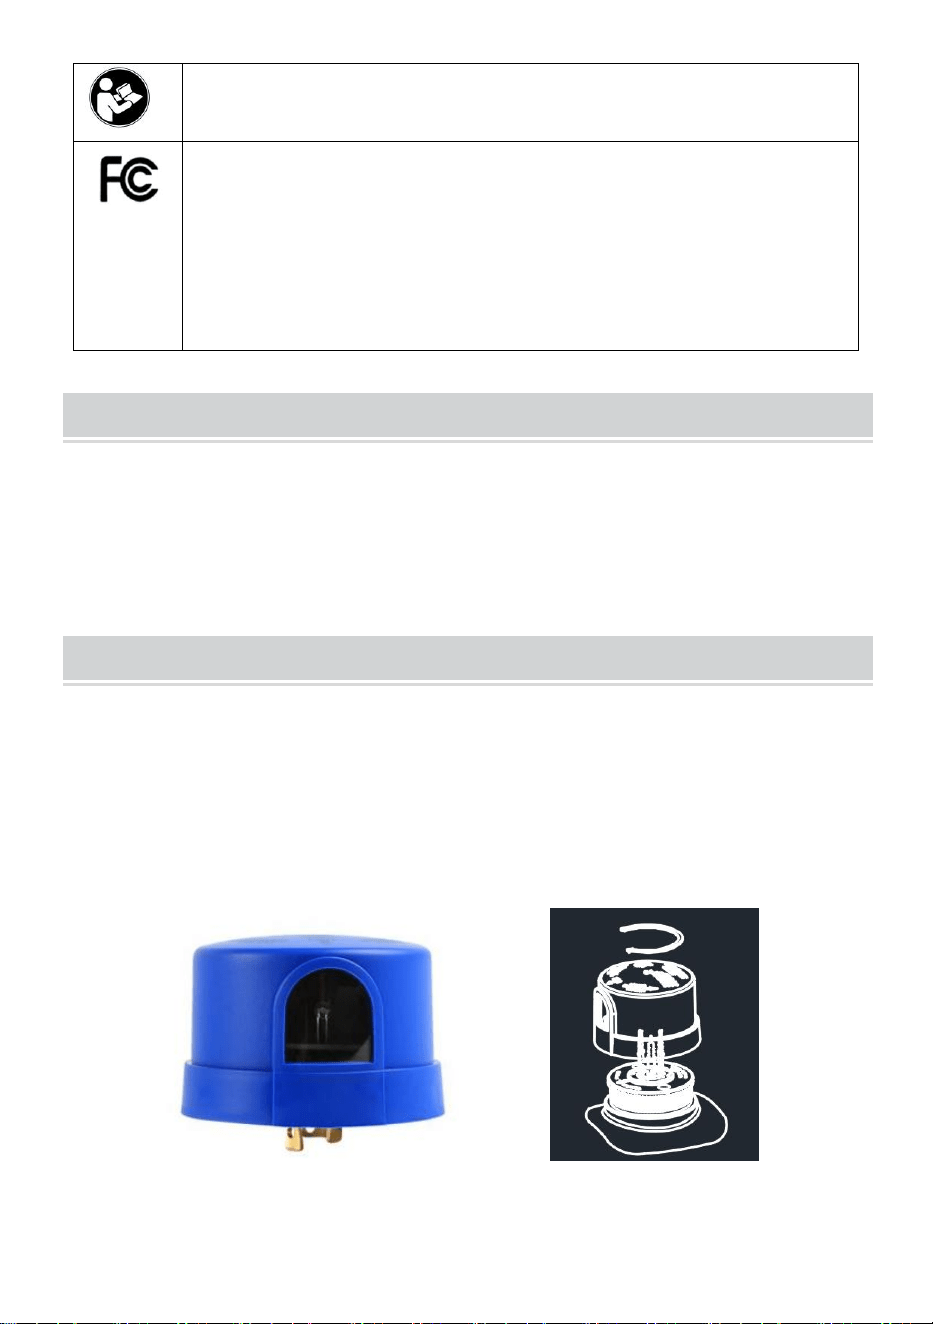
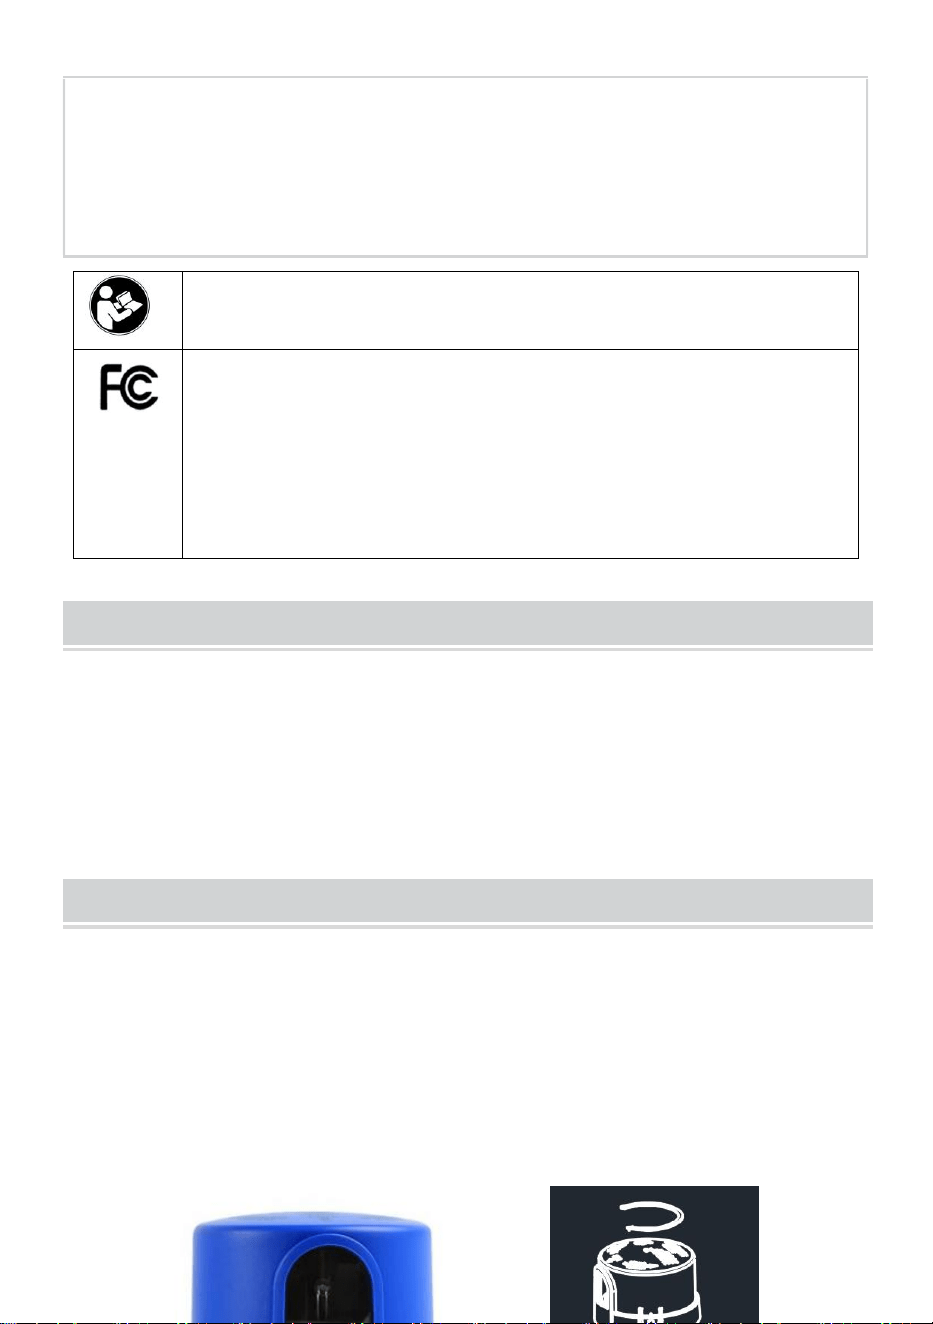
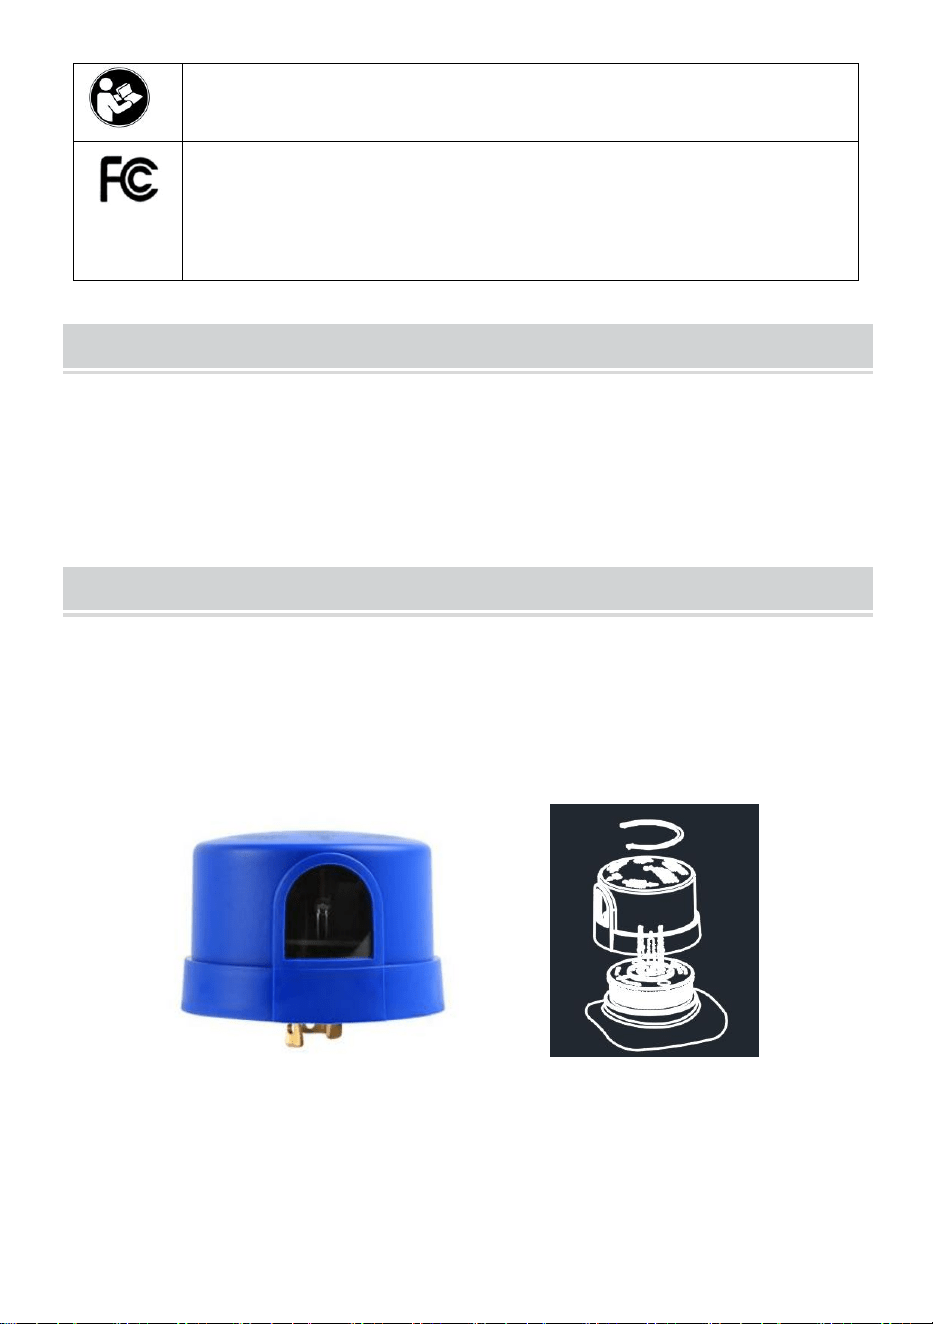
Warning-To reduce the risk of injury, user must read
instructions manual carefully.
This device complies with Part 15 of the FCC Rules. Operation is
subject to the following two conditions:(1)This device may not
cause harmful interference, and (2)this device must accept any
interference received, including interference that may cause
undesired operation.
TECHNIQUE PARAMETER
Input Voltage: AC100-265V 50/60HZ
Rated power: 50W(BD-HB-50W), 100W(BD-HB-100W)
Certificate: IP65, CE, FCC , ROHS.
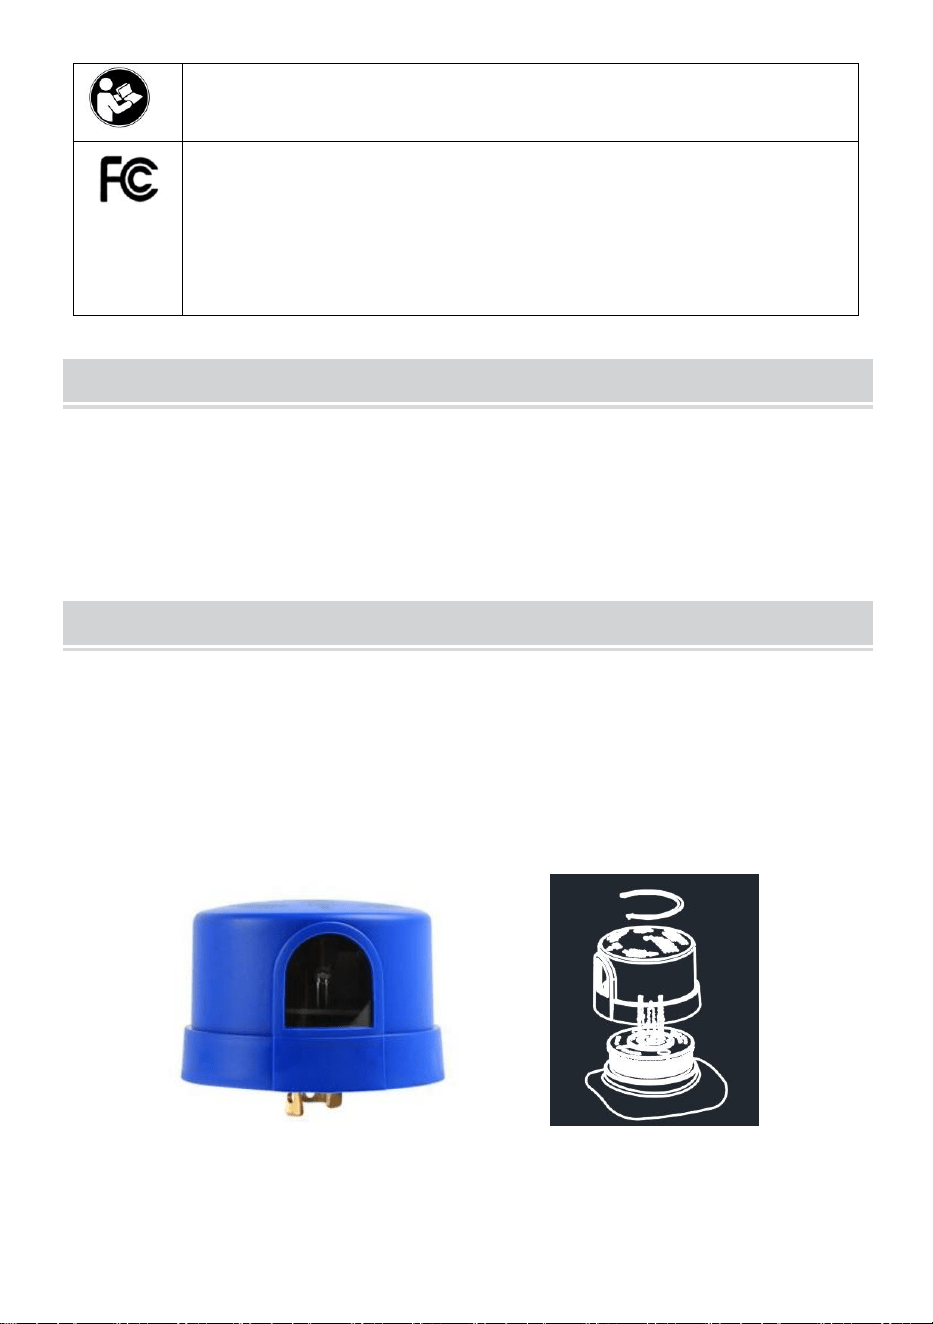
INSTALLATION INSTRUCTIONS FOR LIGHT CONTROL COMPONENTS
1. Take out the light control unit, and the plug of the light control unit is
aimed at the socket hole of the lamp body (it cannot be inserted if it is not
fully aligned).
2. After alignment, turn clockwise until it cannot rotate, at which point the
installation is complete.
3. Specifications of the photosensitive component
Turn-On Light Levels:10-16 Lux
- 4 -
Time Delay :3-10 Seconds
Operating: -40℃ to +70℃
Switch: > 5000 ON/OFF Operations at Rated Load
Ingress Protection:IP65
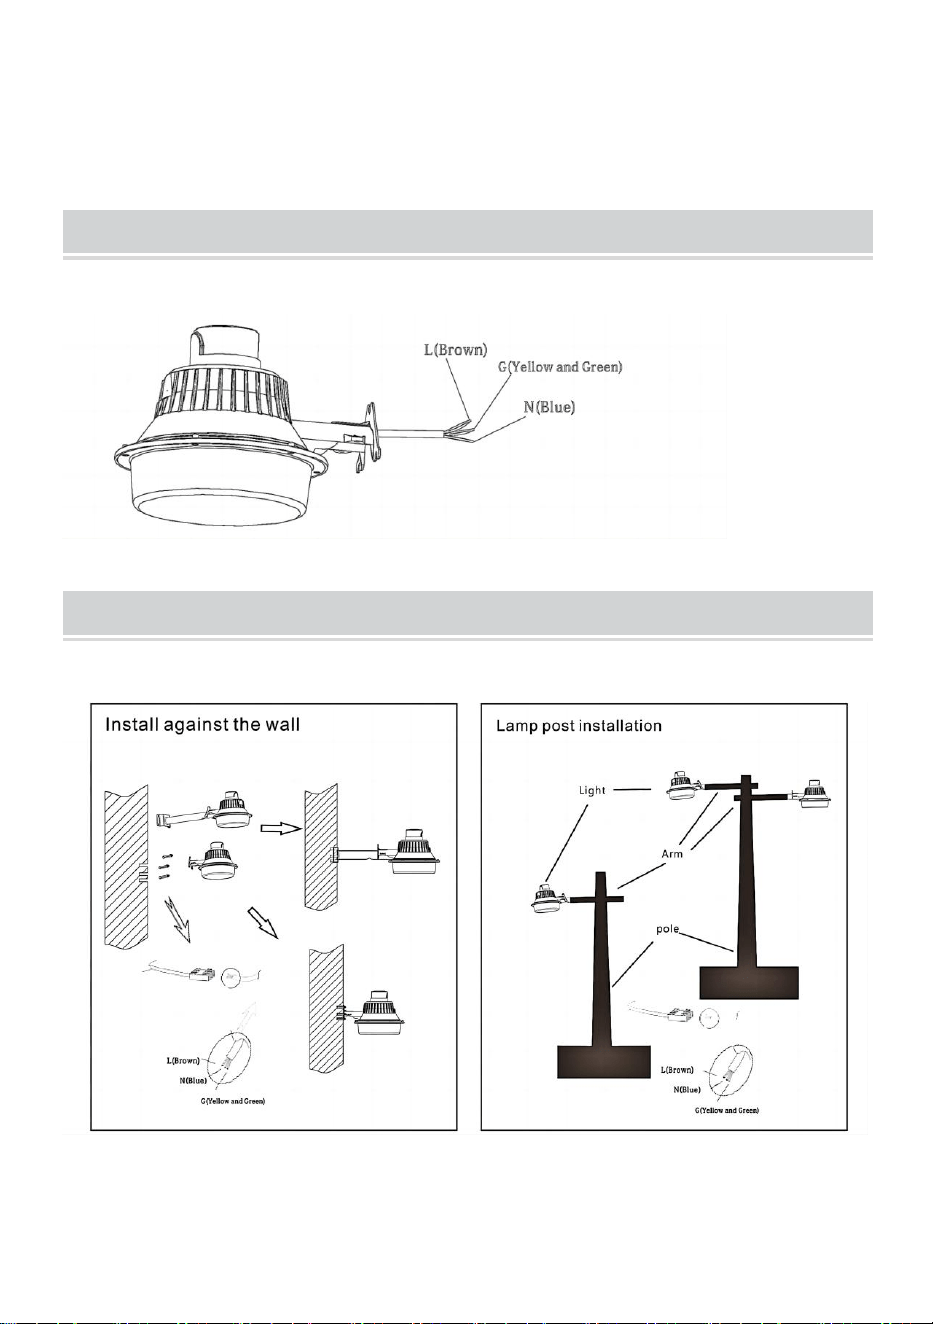
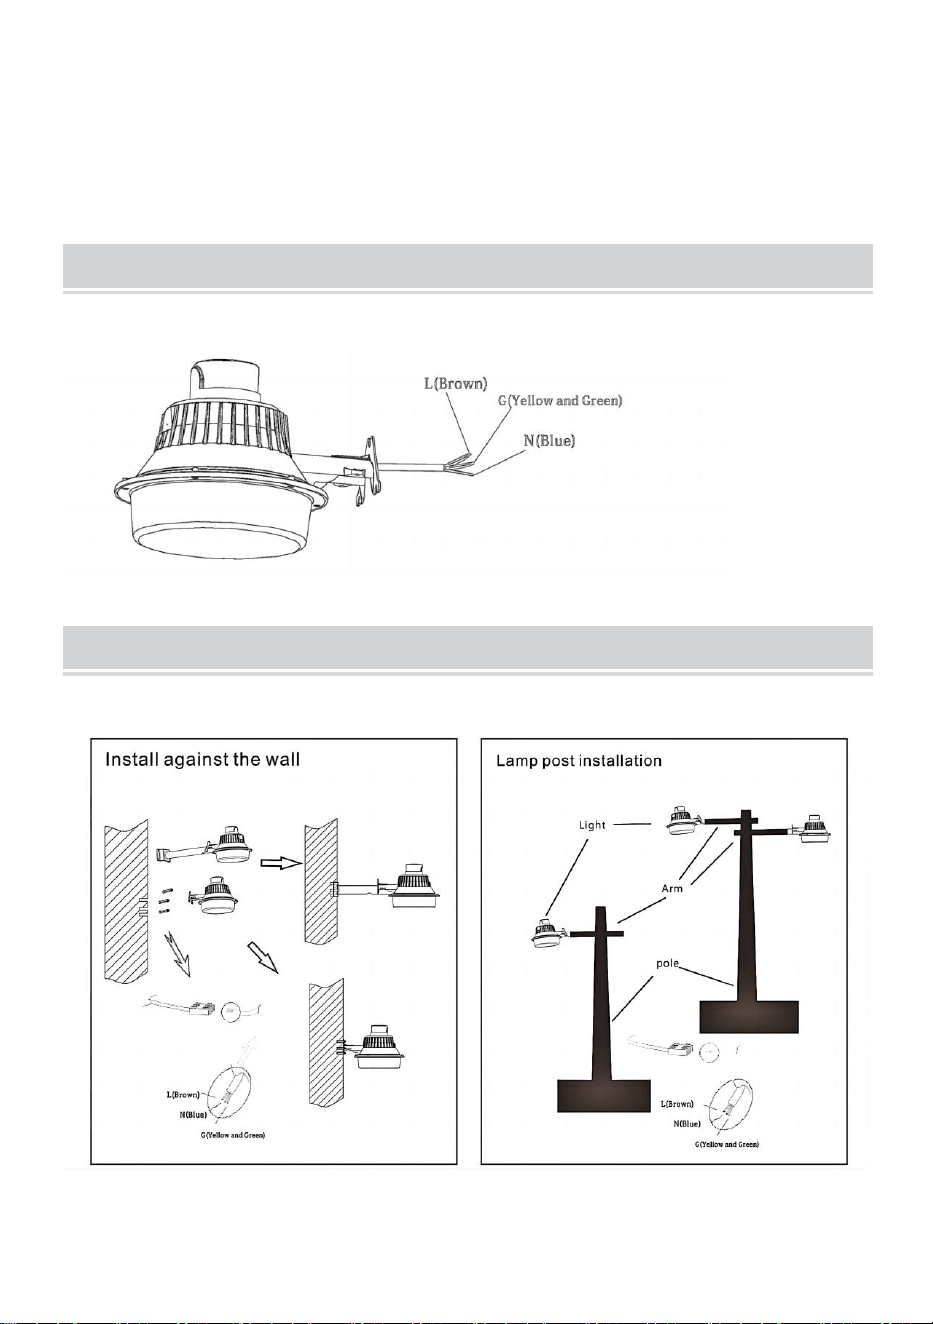
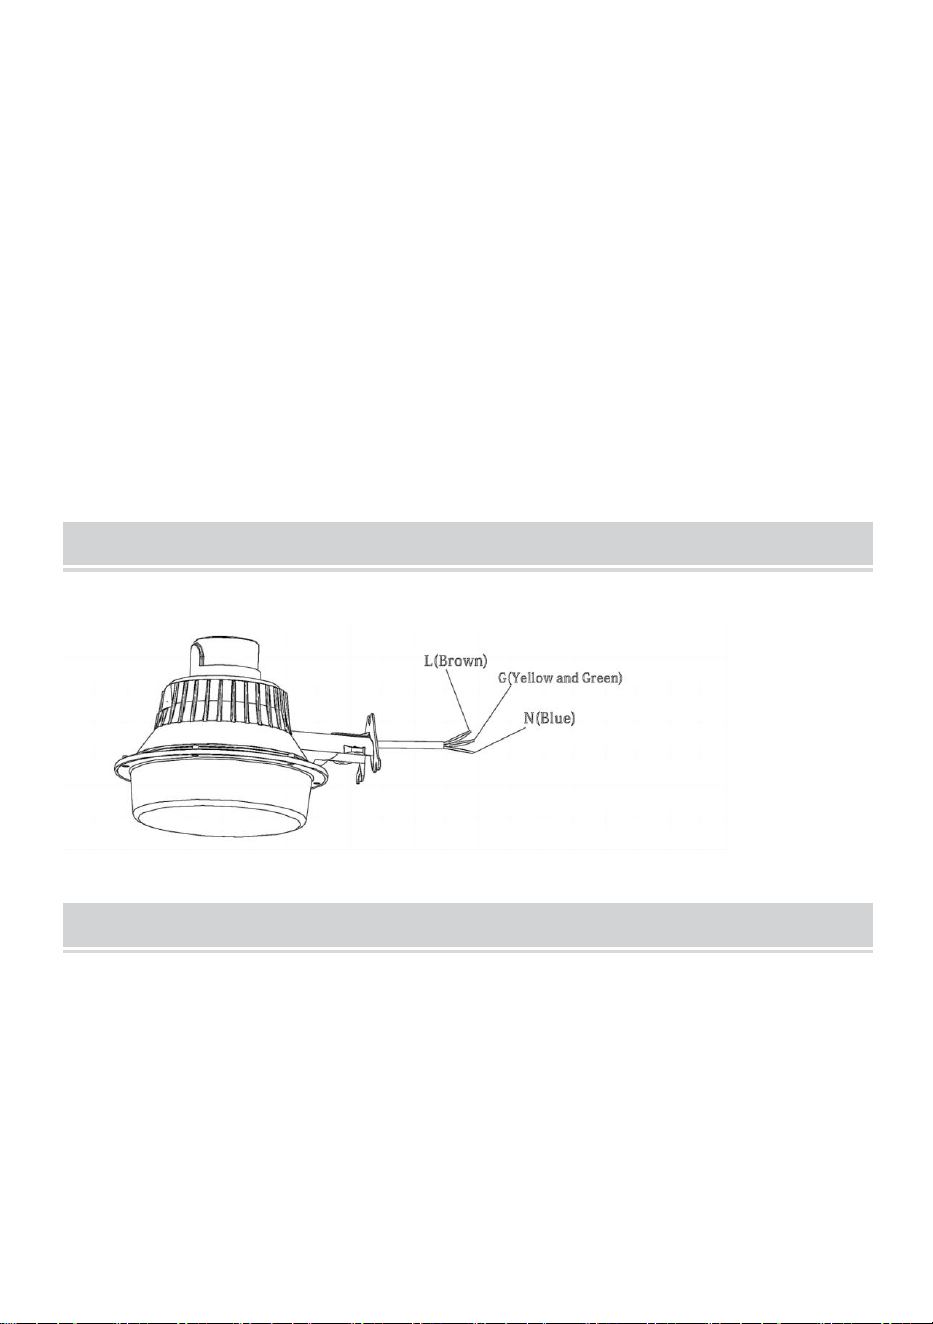
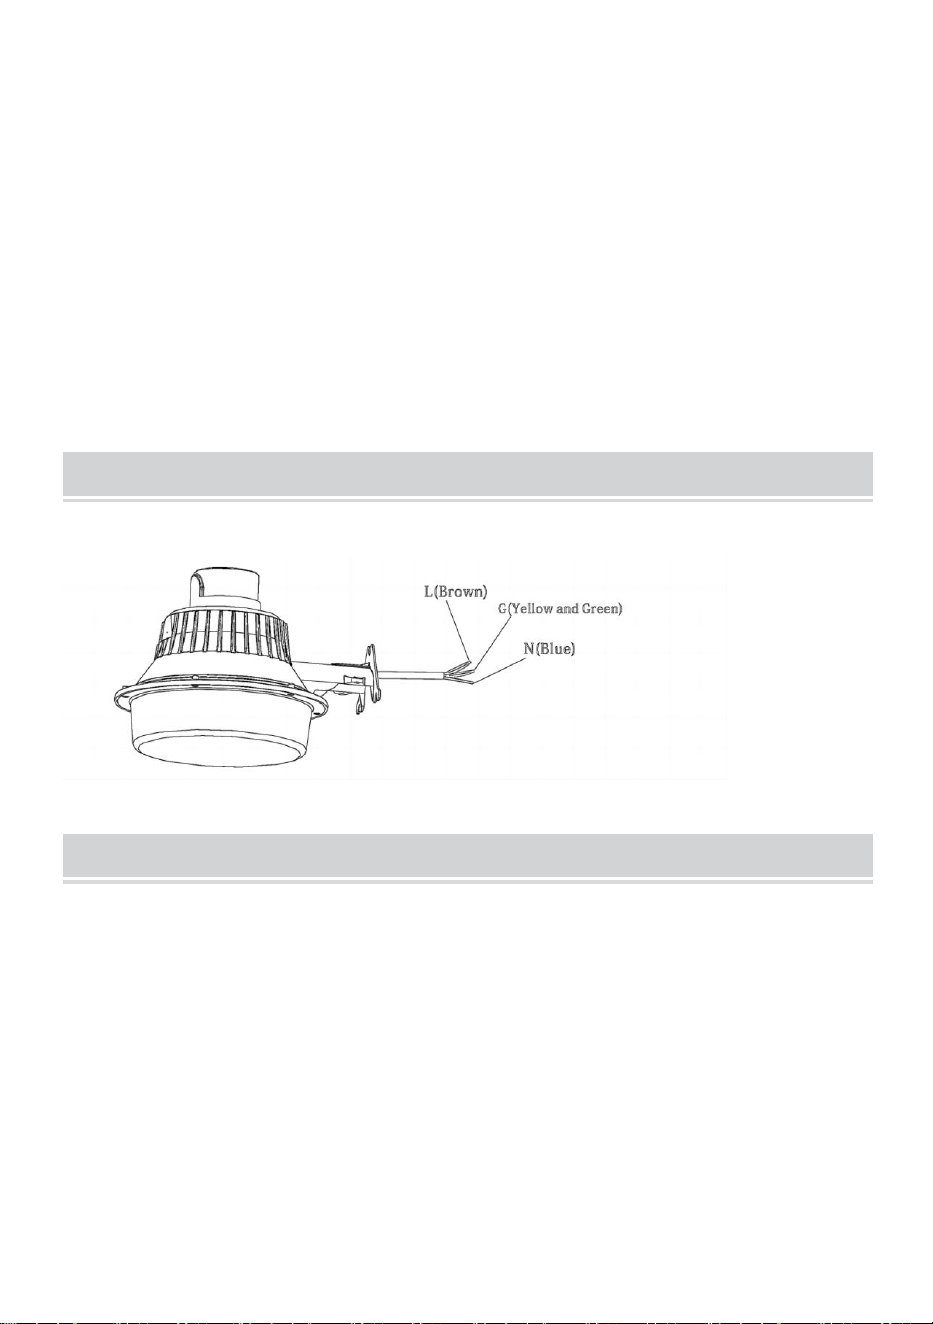
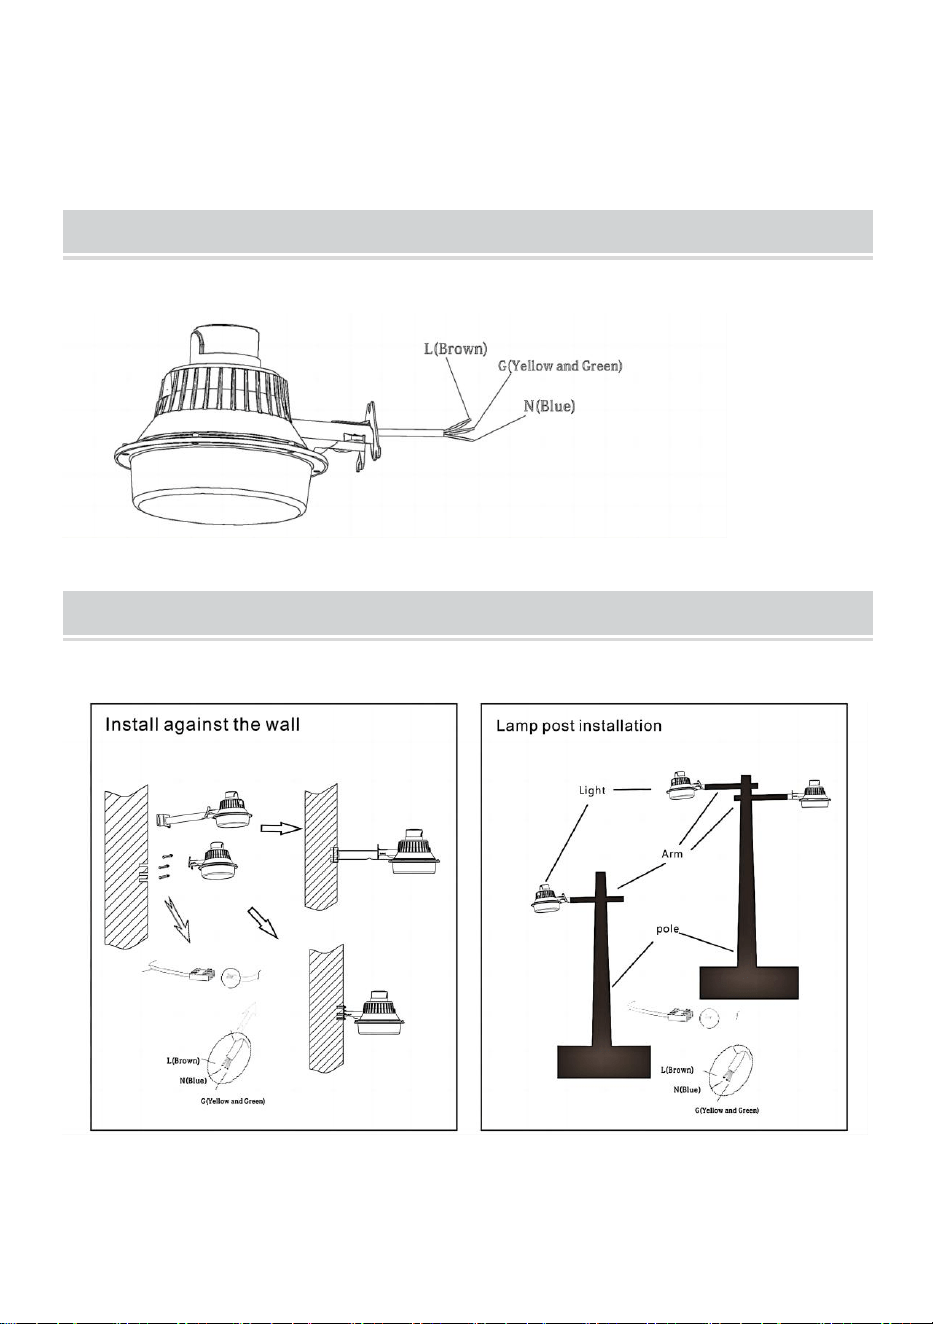
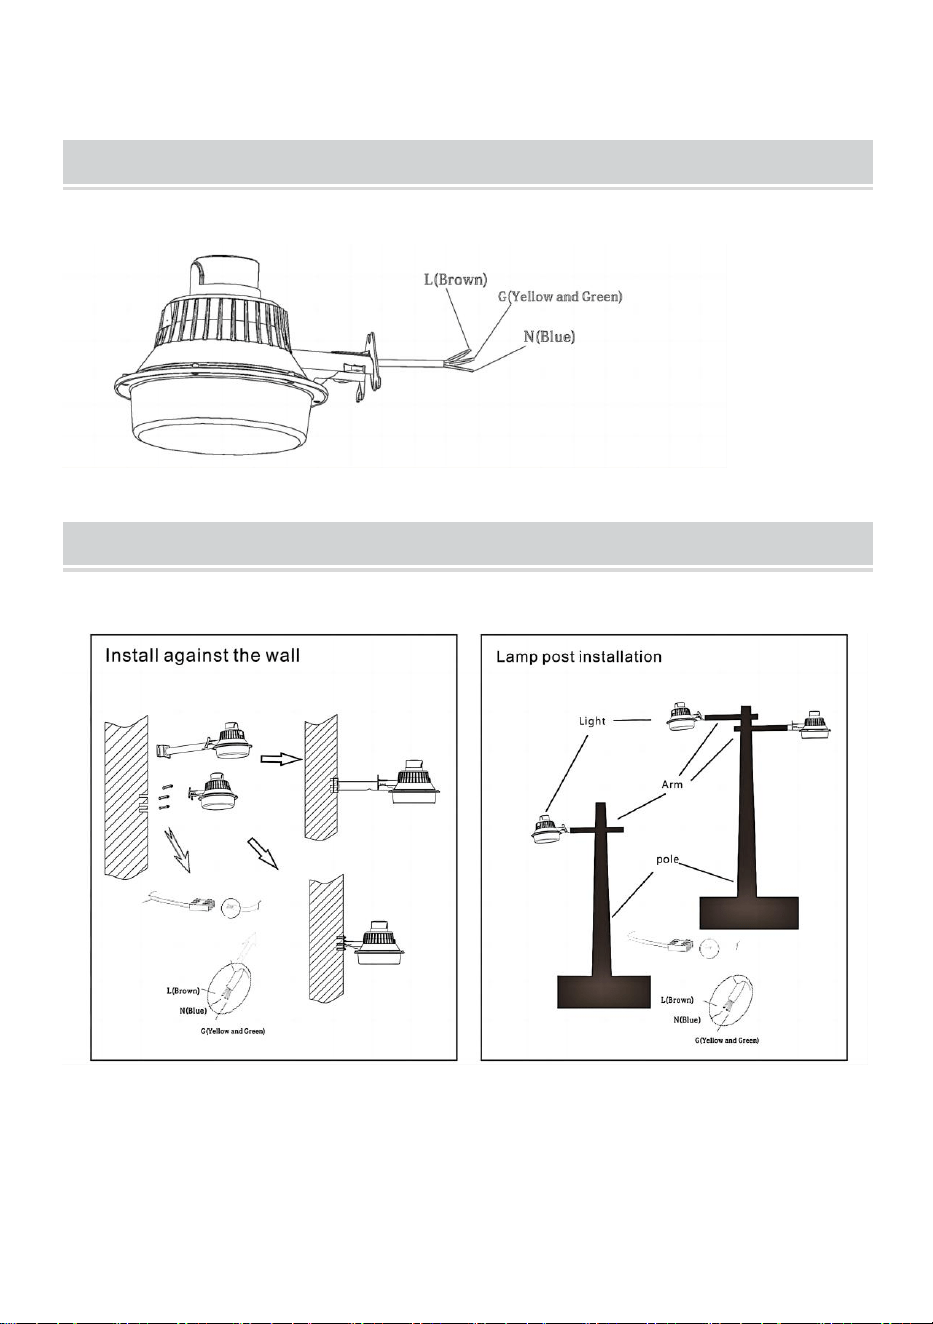
WIRING DIAGRAM
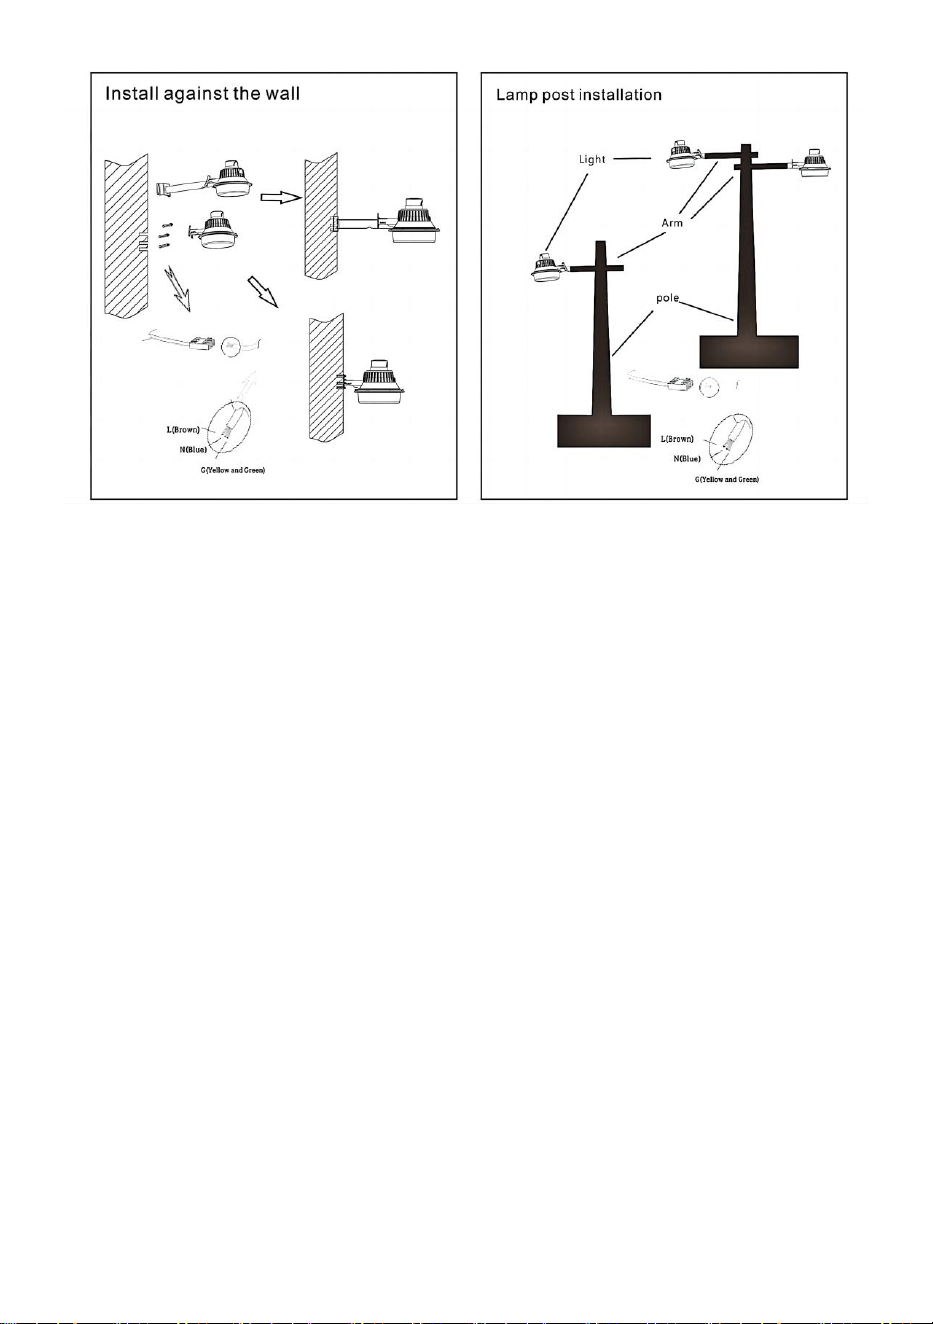
INSTALLATION DIAGRAM
Blackout before installation.Don't install it with electricty on.
Adjust the suitable angle.

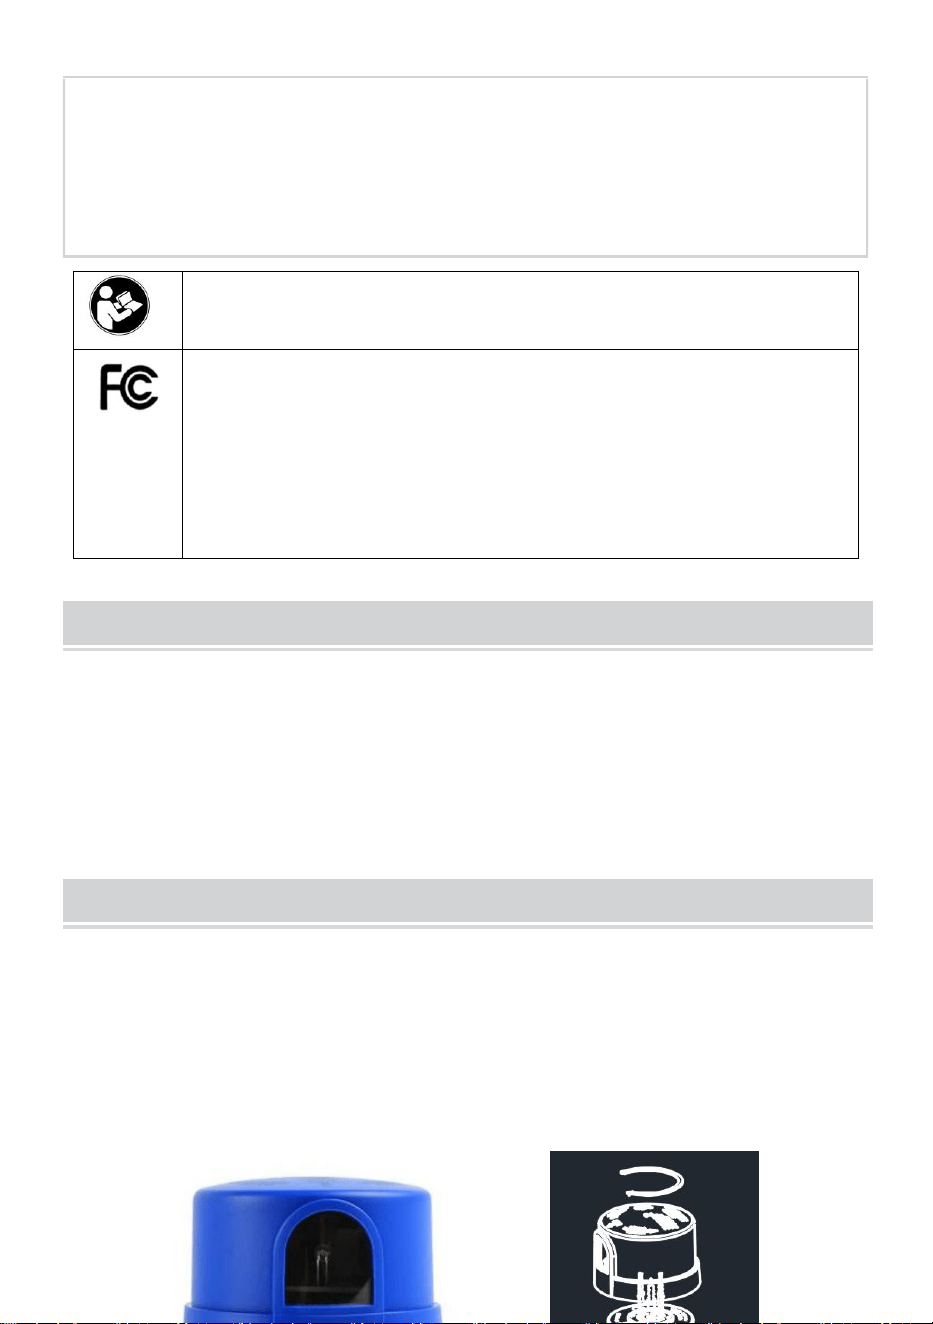
- 5 -
The lamp body is directly installed on the wall:please close the
opening and fix it on the wall with 10mm expansion screws.
Installation with lamp post: use 8mm socket wrench to loosen the
screw until the lamp post can be inserted into the lamp cap and pass
through the joint, then tighten the screw, and then fix the lamp arm on
the wall or lamp post.
Connect the wire. It’s 0.75MM² triple-core, brown is Line of fire, blue is
zero line, yellow green is ground line.
After the wiring is completed, turn on the power (this product does not
have a power switch, and the user needs to install the control switch
by himself); The light control unit starts to work, the light does not light
up during the day, and it automatically lights up at night.
Don’t try to install the damaged product.
Don’t install the lamp in the enclosed place in order to have a good
heat dissipation effect.
Make sure the wire connection is good and safe to avoid electric
leakage after installing the lamp.
Waterproof measures must be taken when connecting the driver.
Don’t violate the law of fire control when using the lamp.
The lamp can be automatically turned on and off according to the
intensity of the ambient, and the lamp is automatically turned off during
the day and turned on at night.

- 6 -
MAINTENANCE INSTUCTION
Turn off the driver when maintaining the lamp.
Regularly Clean the dust on the heat sink in order to have a good heat
dissipation effect.
Don’t use chemical or corrosive liquid to clean the lamp. Please use
dry cloth to clean it.
Please contact the dealer and manufacturer if the LED chip or driver
has to be replaced. Because the waterproof and dust-proof
performance will be effected after dismounting again.

- 7 -
Products * 1
Light Control Components*1
Expansion Screws(6mm*60mm)*3
Dense Bags*1
Made In China
LIST OF ACCESSORIES


- 3 -
We continue to be committed to provide you tools with competitive price.
"Save Half", "Half Price" or any other similar expressions used by us only represents an
estimate of savings you might benefit from buying certain tools with us compared to the major
top brands and doses not necessarily mean to cover all categories of tools offered by us. You
are kindly reminded to verify carefully when you are placing an order with us if you are
actually saving half in comparison with the top major brands.
MODÈLE: BD-HB-50W / BD-HB-100W
Have product questions? Need technical support? Please feel free to
contact us:
CustomerService@vevor.com
NEED HELP? CONTACT US!
LED WALL LIGHT
INSTRUCTION

- 4 -
This is the original instruction, please read all manual instructions
carefully before operating. VEVOR reserves a clear interpretation of our
user manual. The appearance of the product shall be subject to the
product you received. Please forgive us that we won't inform you again if
there are any technology or software updates on our product.
Avertissement - Pour réduire le risque de blessure,
l'utilisateur doit lire attentivement le manuel d'instructions.
Cet appareil est conforme à la partie 15 des règles de la FCC. Son
fonctionnement est soumis aux deux conditions suivantes : (1) Cet
appareil ne doit pas provoquer d'interférences nuisibles et (2) Cet
appareil doit accepter toute interférence reçue, y compris les
interférences pouvant entraîner un fonctionnement indésirable.
TECHNIQUE PARAMETER
Tension d'entrée : 100-265 V CA 50/60 Hz
Puissance nominale : 50 W (BD-HB-50W), 100 W
(BD-HB-100W)
Certificat : IP65, CE, FCC , Directive ROHS.
INSTALLATION INSTRUCTIONS FOR LIGHT CONTROL COMPONENTS
4. Retirez l'unité de commande d'éclairage et la fiche de l'unité de
commande d'éclairage est dirigée vers le trou de douille du corps de la
lampe (elle ne peut pas être insérée si elle n'est pas complètement
alignée).
5. Après l'alignement, tournez dans le sens des aiguilles d'une montre
jusqu'à ce qu'il ne puisse plus tourner, moment auquel l'installation est
terminée.

- 5 -
6. Spécifications du composant photosensible
Niveaux d'éclairage d'allumage : 10-16 lux
Délai d'attente : 3 à 10 secondes
Fonctionnement : -40 ℃ à +70 ℃
Interrupteur : > 5 000 opérations marche/arrêt à charge nominale
Indice de protection : IP65
WIRING DIAGRAM
INSTALLATION DIAGRAM

- 6 -
Panne d'électricité avant l'installation. Ne l'installez pas avec
l'électricité allumée.
Ajustez l'angle approprié.
Le corps de la lampe est directement installé sur le mur : veuillez
fermer l'ouverture et le fixer au mur avec des vis d'expansion de
10 mm.
Installation avec lampadaire : utilisez une clé à douille de 8 mm pour
desserrer la vis jusqu'à ce que le lampadaire puisse être inséré dans
le culot de la lampe et passer à travers le joint, puis serrez la vis, puis
fixez le bras de la lampe sur le mur ou le lampadaire.
Connectez le fil. Il s'agit d'un fil triple conducteur de 0,75 MM², le
marron est la ligne de tir, le bleu est la ligne zéro, le vert jaune est la
ligne de terre.
Une fois le câblage terminé, mettez l'appareil sous tension (ce produit
n'a pas d'interrupteur d'alimentation et l'utilisateur doit installer
lui-même l'interrupteur de commande) ; l'unité de commande
d'éclairage commence à fonctionner, la lumière ne s'allume pas
pendant la journée et s'allume automatiquement la nuit .
N'essayez pas d'installer le produit endommagé.
N'installez pas la lampe dans un endroit clos afin d' avoir un bon effet
de dissipation de la chaleur.

- 7 -
Assurez-vous que la connexion des fils est bonne et sûre pour éviter
les fuites électriques après l'installation de la lampe.
Des mesures d'étanchéité doivent être prises lors de la connexion du
pilote.
Ne violez pas la loi sur le contrôle des incendies lorsque vous utilisez
la lampe.
La lampe peut être automatiquement allumée et éteinte en fonction de
l'intensité de l'environnement, et la lampe s'éteint automatiquement
pendant la journée et s'allume la nuit.
MAINTENANCE INSTUCTION
Éteignez le pilote lors de l'entretien de la lampe.
Nettoyez régulièrement la poussière sur le dissipateur thermique afin
d'avoir un bon effet de dissipation thermique.
Ne pas utiliser Ne pas utiliser de liquide chimique ou corrosif pour
nettoyer la lampe. Veuillez utiliser un chiffon sec pour le nettoyer.
Veuillez contacter le revendeur et le fabricant si la puce LED ou le
pilote doit être remplacé. En effet, les performances d'étanchéité à
l'eau et à la poussière seront affectées après le démontage.

- 8 -
Produits * 1
Composants de contrôle de la lumière*1
Vis d'expansion ( 6 mm x 60 mm ) x 3
Sacs denses*1
Fabriqué en Chine
LIST OF ACCESSORIES

- 9 -


- 2 -
Technisch Support und E-Garantie-Zertifikat www.vevor.com/support
LED WANDLEUCHTE ANLEITUNG
BENUTZERHANDBUCH
MODELL: BD-HB-50W /BD-HB-100W
We continue to be committed to provide you tools with competitive price.
"Save Half", "Half Price" or any other similar expressions used by us only represents an
estimate of savings you might benefit from buying certain tools with us compared to the major
top brands and doses not necessarily mean to cover all categories of tools offered by us. You
are kindly reminded to verify carefully when you are placing an order with us if you are
actually saving half in comparison with the top major brands.

- 3 -
MODELL: BD-HB-50W /BD-HB-100W
Have product questions? Need technical support? Please feel free to
contact us:
CustomerService@vevor.com
NEED HELP? CONTACT US!
This is the original instruction, please read all manual instructions
carefully before operating. VEVOR reserves a clear interpretation of our
user manual. The appearance of the product shall be subject to the
product you received. Please forgive us that we won't inform you again if
there are any technology or software updates on our product.
LED WALL LIGHT
INSTRUCTION
- 4 -
Warnung: Um das Verletzungsrisiko zu verringern, muss der
Benutzer die Bedienungsanleitung sorgfältig lesen.
Dieses Gerät entspricht Teil 15 der FCC-Bestimmungen. Der
Betrieb unterliegt den folgenden beiden Bedingungen: (1) Dieses
Gerät darf keine schädlichen Störungen verursachen und (2)
dieses Gerät muss alle empfangenen Störungen akzeptieren,
einschließlich Störungen, die einen unerwünschten Betrieb
verursachen können.
TECHNIQUE PARAMETER
Eingangsspannung: AC100-265V 50/60HZ
Nennleistung: 50 W (BD-HB-50 W), 100 W (BD-HB-100W)
Zertifikat: IP65, CE, FCC , ROHS-zertifiziert.
INSTALLATION INSTRUCTIONS FOR LIGHT CONTROL COMPONENTS
7. Nehmen Sie die Lichtsteuereinheit heraus und richten Sie den Stecker
der Lichtsteuereinheit auf die Fassungsöffnung des Lampenkörpers (er
lässt sich nicht einstecken, wenn er nicht vollständig ausgerichtet ist).
8. Nach der Ausrichtung im Uhrzeigersinn drehen, bis es sich nicht mehr
drehen lässt. Dann ist die Installation abgeschlossen.
9. Spezifikationen der lichtempfindlichen Komponente
- 5 -
Einschalthelligkeit: 10-16 Lux
Zeitverzögerung: 3-10 Sekunden
Betrieb: -40 ℃ bis +70 ℃
Schalter: > 5000 EIN/AUS-Vorgänge bei Nennlast
Schutzart: IP65
WIRING DIAGRAM
INSTALLATION DIAGRAM
Vor der Installation eine Verdunkelung durchführen. Nicht bei
eingeschaltetem Strom installieren.

- 6 -
Stellen Sie den passenden Winkel ein.
Der Lampenkörper wird direkt an der Wand montiert: Bitte
schließen Sie die Öffnung und befestigen Sie ihn mit 10 mm
Dehnschrauben an der Wand.
Montage mit Laternenpfahl: Mit einem 8-mm-Steckschlüssel die
Schraube soweit lösen, dass der Laternenpfahl in den Lampensockel
eingesetzt und durch die Verbindung geführt werden kann, dann die
Schraube festziehen und den Lampenarm an der Wand oder am
Laternenpfahl befestigen.
Schließen Sie das Kabel an. Es ist ein 0,75 mm² Dreiadrigkabel, Braun
ist die Feuerleitung, Blau ist die Nullleitung, Gelbgrün ist die
Erdungsleitung.
Nachdem die Verkabelung abgeschlossen ist, schalten Sie den Strom
ein (dieses Produkt hat keinen Netzschalter und der Benutzer muss
den Steuerschalter selbst installieren); die Lichtsteuereinheit beginnt
zu arbeiten, das Licht leuchtet tagsüber nicht und schaltet sich nachts
automatisch ein .
Versuchen Sie nicht, das beschädigte Produkt zu installieren.
Installieren Sie die Lampe nicht in einem geschlossenen Raum, um
eine gute Wärmeableitung zu gewährleisten.
Stellen Sie sicher, dass die Kabelverbindung gut und sicher ist, um
Stromlecks nach der Installation der Lampe zu vermeiden.
Beim Anschließen des Treibers müssen wasserdichte Maßnahmen
getroffen werden.
Verstoßen Sie bei der Verwendung der Lampe nicht gegen
Brandschutzbestimmungen.
Die Lampe kann je nach Umgebungsintensität automatisch ein- und
ausgeschaltet werden, außerdem wird die Lampe tagsüber
automatisch ausgeschaltet und nachts eingeschaltet.

- 7 -
MAINTENANCE INSTUCTION
Schalten Sie den Treiber aus, wenn Sie die Lampe warten.
Entfernen Sie regelmäßig Staub vom Kühlkörper, um eine gute
Wärmeableitung zu gewährleisten.
Nicht verwenden Verwenden Sie keine Chemikalien oder ätzende
Flüssigkeiten, um die Lampe zu reinigen. Reinigen Sie sie mit einem
trockenen Tuch.
Bitte kontaktieren Sie den Händler und Hersteller, wenn der LED-Chip
oder der Treiber ausgetauscht werden muss. Denn die Wasser- und
Staubdichtigkeit wird durch eine erneute Demontage beeinträchtigt.

- 8 -
Produkte * 1
Lichtsteuerungskomponenten*1
Dehnschrauben ( 6mm x 60mm ) *3
Dichte Taschen * 1
In China hergestellt
LIST OF ACCESSORIES


- 3 -
We continue to be committed to provide you tools with competitive price.
"Save Half", "Half Price" or any other similar expressions used by us only represents an
estimate of savings you might benefit from buying certain tools with us compared to the major
top brands and doses not necessarily mean to cover all categories of tools offered by us. You
are kindly reminded to verify carefully when you are placing an order with us if you are
actually saving half in comparison with the top major brands.
MODELLO: MODELLO BD-HB-50W / BD-HB-100W
Have product questions? Need technical support? Please feel free to
contact us:
CustomerService@vevor.com
NEED HELP? CONTACT US!
LED WALL LIGHT
INSTRUCTION
- 4 -
This is the original instruction, please read all manual instructions
carefully before operating. VEVOR reserves a clear interpretation of our
user manual. The appearance of the product shall be subject to the
product you received. Please forgive us that we won't inform you again if
there are any technology or software updates on our product.
Attenzione: per ridurre il rischio di lesioni, l'utente deve
leggere attentamente il manuale di istruzioni.
Questo dispositivo è conforme alla Parte 15 delle Norme FCC. Il
funzionamento è soggetto alle due condizioni seguenti: (1) Questo
dispositivo non può causare interferenze dannose e (2) Questo
dispositivo deve accettare qualsiasi interferenza ricevuta,
comprese le interferenze che possono causare un funzionamento
indesiderato.
TECHNIQUE PARAMETER
Tensione di ingresso: AC100-265V 50/60HZ
Potenza nominale: 50W (BD-HB-50W), 100W (BD-HB-100W)
Certificato: IP65, CE, Commissione federale delle comunicazioni
(FCC), Direttiva RoHS.
INSTALLATION INSTRUCTIONS FOR LIGHT CONTROL COMPONENTS
10.Estrarre l'unità di controllo della luce; la spina dell'unità di controllo della
luce è rivolta verso il foro della presa del corpo della lampada (non può
essere inserita se non è completamente allineata).
11.Dopo l'allineamento, ruotare in senso orario finché non è più possibile
ruotare; a quel punto l'installazione è completa.

- 5 -
12.Specifiche del componente fotosensibile
Livelli di accensione della luce: 10-16 Lux
Ritardo: 3-10 secondi
Funzionamento: da -40 ℃ a +70 ℃
Interruttore: > 5000 operazioni ON/OFF a carico nominale
Protezione ingresso: IP65
WIRING DIAGRAM
INSTALLATION DIAGRAM

- 6 -
Interrompere l'installazione prima dell'installazione. Non
installare con la corrente elettrica accesa.
Regolare l'angolazione adatta.
Il corpo della lampada viene installato direttamente sulla parete:
chiudere l'apertura e fissarla alla parete con viti ad espansione
da 10 mm.
Installazione con lampione: utilizzare una chiave a bussola da 8 mm
per allentare la vite finché il lampione non può essere inserito nel
tappo della lampada e passare attraverso il giunto, quindi stringere la
vite e fissare il braccio della lampada alla parete o al lampione.
Collega il filo. È un triplo nucleo da 0,75 MM², il marrone è la linea di
fuoco, il blu è la linea zero, il giallo verde è la linea di terra.
Dopo aver completato il cablaggio, accendere l'alimentazione (questo
prodotto non ha un interruttore di alimentazione e l'utente deve
installare autonomamente l'interruttore di controllo); l'unità di controllo
della luce inizia a funzionare, la luce non si accende durante il giorno e
si accende automaticamente di notte .
Non tentare di installare il prodotto danneggiato.
Per ottenere una buona dissipazione del calore, non installare la
lampada in un luogo chiuso .

- 7 -
Assicurarsi che il collegamento dei cavi sia buono e sicuro per evitare
perdite elettriche dopo l'installazione della lampada.
Quando si collega il driver è necessario adottare misure di
impermeabilità .
Non violare le leggi sul controllo del fuoco quando si utilizza la
lampada.
La lampada può essere accesa e spenta automaticamente in base
all'intensità della luce ambientale, spegnendosi automaticamente
durante il giorno e accendendosi di notte.
MAINTENANCE INSTUCTION
Durante la manutenzione della lampada, spegnere il driver.
Per ottenere un buon effetto di dissipazione del calore, pulire
regolarmente la polvere dal dissipatore di calore.
Non usare liquido chimico o corrosivo per pulire la lampada. Si prega
di utilizzare un panno asciutto per pulirla.
Contattare il rivenditore e il produttore se il chip LED o il driver devono
essere sostituiti. Poiché le prestazioni impermeabili e antipolvere
saranno compromesse dopo un nuovo smontaggio.

- 8 -
Prodotti * 1
Componenti di controllo della luce*1
Viti di espansione ( 6mm*60mm ) *3
Borse dense*1
Made in China
LIST OF ACCESSORIES

- 9 -


- 3 -
We continue to be committed to provide you tools with competitive price.
"Save Half", "Half Price" or any other similar expressions used by us only represents an
estimate of savings you might benefit from buying certain tools with us compared to the major
top brands and doses not necessarily mean to cover all categories of tools offered by us. You
are kindly reminded to verify carefully when you are placing an order with us if you are
actually saving half in comparison with the top major brands.
MODELO: BD-HB-50W /BD-HB-100W
Have product questions? Need technical support? Please feel free to
contact us:
CustomerService@vevor.com
NEED HELP? CONTACT US!
LED WALL LIGHT
INSTRUCTION
- 4 -
This is the original instruction, please read all manual instructions
carefully before operating. VEVOR reserves a clear interpretation of our
user manual. The appearance of the product shall be subject to the
product you received. Please forgive us that we won't inform you again if
there are any technology or software updates on our product.
Advertencia: Para reducir el riesgo de lesiones, el usuario
debe leer atentamente el manual de instrucciones.
Este dispositivo cumple con la Parte 15 de las Normas de la FCC.
Su funcionamiento está sujeto a las dos condiciones siguientes:
(1) Este dispositivo no puede causar interferencias perjudiciales y
(2) Este dispositivo debe aceptar cualquier interferencia que
reciba, incluidas las interferencias que puedan causar un
funcionamiento no deseado.
TECHNIQUE PARAMETER
Voltaje de entrada: CA 100-265 V 50/60 Hz
Potencia nominal: 50 W (BD-HB-50 W), 100 W (BD-HB-100 W)
Certificado: IP65, Estaré, Comisión Federal de Comunicaciones
(FCC), 1.
INSTALLATION INSTRUCTIONS FOR LIGHT CONTROL COMPONENTS
13.Retire la unidad de control de luz y apunte el enchufe de la unidad de
control de luz al orificio del zócalo del cuerpo de la lámpara (no se puede
insertar si no está completamente alineado).
14.Después de la alineación, gire en el sentido de las agujas del reloj
hasta que no pueda girar, momento en el cual la instalación estará
completa.
- 5 -
15.Especificaciones del componente fotosensible
Niveles de luz de encendido: 10-16 Lux
Retardo de tiempo: 3-10 segundos
Funcionamiento: -40 ℃ a +70 ℃
Interruptor: > 5000 operaciones de encendido/apagado con carga nominal
Protección de entrada: IP65
WIRING DIAGRAM
INSTALLATION DIAGRAM
- 6 -
Apague el dispositivo antes de la instalación. No lo instale con la
electricidad encendida.
Ajuste el ángulo adecuado.
El cuerpo de la lámpara se instala directamente en la pared:
cierre la abertura y fíjela en la pared con tornillos de expansión
de 10 mm.
Instalación con poste de luz: use una llave de tubo de 8 mm para
aflojar el tornillo hasta que el poste de luz pueda insertarse en la tapa
de la lámpara y pasar a través de la junta, luego apriete el tornillo y
luego fije el brazo de la lámpara en la pared o el poste de luz.
Conecte el cable. Es de triple núcleo de 0,75 mm². El marrón es la
línea de fuego, el azul es la línea cero y el verde amarillento es la línea
de tierra.
Una vez completado el cableado, encienda la alimentación (este
producto no tiene un interruptor de alimentación y el usuario debe
instalar el interruptor de control por sí mismo); La unidad de control de
luz comienza a funcionar, la luz no se enciende durante el día y se
enciende automáticamente por la noche .
No intente instalar el producto dañado.
No instale la lámpara en un lugar cerrado para tener un buen efecto
de disipación del calor.

- 7 -
Asegúrese de que la conexión del cable sea buena y segura para
evitar fugas eléctricas después de instalar la lámpara.
Se deben tomar medidas de impermeabilidad al conectar el
controlador .
No viole la ley de control de incendios al utilizar la lámpara.
La lámpara se puede encender y apagar automáticamente según la
intensidad del ambiente, y se apaga automáticamente durante el día y
se enciende durante la noche.
MAINTENANCE INSTUCTION
Apague el controlador cuando realice el mantenimiento de la lámpara.
Limpie periódicamente el polvo del disipador de calor para tener un
buen efecto de disipación de calor.
No utilizar No utilice productos químicos ni líquidos corrosivos para
limpiar la lámpara. Utilice un paño seco para limpiarla.
Comuníquese con el distribuidor y el fabricante si es necesario
reemplazar el chip o el controlador LED, ya que la resistencia al agua
y al polvo se verá afectada después de desmontarlo nuevamente.

- 8 -
Productos * 1
Componentes de control de iluminación*1
Tornillos de expansión ( 6 mm x 60 mm ) x 3
Bolsas densas*1
Hecho en china
LIST OF ACCESSORIES

- 9 -


- 3 -
We continue to be committed to provide you tools with competitive price.
"Save Half", "Half Price" or any other similar expressions used by us only represents an
estimate of savings you might benefit from buying certain tools with us compared to the major
top brands and doses not necessarily mean to cover all categories of tools offered by us. You
are kindly reminded to verify carefully when you are placing an order with us if you are
actually saving half in comparison with the top major brands.
MODEL: BD-HB-50W /BD-HB-100W
Have product questions? Need technical support? Please feel free to
contact us:
CustomerService@vevor.com
NEED HELP? CONTACT US!
LED WALL LIGHT
INSTRUCTION
- 4 -
This is the original instruction, please read all manual instructions
carefully before operating. VEVOR reserves a clear interpretation of our
user manual. The appearance of the product shall be subject to the
product you received. Please forgive us that we won't inform you again if
there are any technology or software updates on our product.
Ostrzeżenie: Aby zminimalizować ryzyko obrażeń,
użytkownik powinien uważnie przeczytać instrukcję obsługi.
To urządzenie jest zgodne z częścią 15 przepisów FCC. Jego
działanie podlega następującym dwóm warunkom: (1) To
urządzenie nie może powodować szkodliwych zakłóceń i (2) to
urządzenie musi akceptować wszelkie odbierane zakłócenia, w
tym zakłócenia, które mogą powodować niepożądane działanie.
TECHNIQUE PARAMETER
Napięcie wejściowe: AC100-265V 50/60HZ
Moc znamionowa: 50W(BD-HB-50W), 100 W (BD-HB-100 W)
Certyfikat: IP65, CE, FCC, RoHS (dyrektywa RoHS)
INSTALLATION INSTRUCTIONS FOR LIGHT CONTROL COMPONENTS
16.Wyjmij jednostkę sterującą oświetleniem. Jej wtyczkę skieruj do otworu
w obudowie lampy (nie można jej włożyć, jeśli nie jest całkowicie
wyrównana).
17.Po ustawieniu należy obrócić element zgodnie z ruchem wskazówek
zegara do momentu, aż będzie się on nie obracał. W tym momencie
instalacja jest zakończona.
- 5 -
18.Specyfikacje elementu światłoczułego
Poziomy światła włączającego: 10-16 luksów
Opóźnienie czasowe: 3-10 sekund
Temperatura pracy: -40 ℃ do +70 ℃
Przełącznik: > 5000 operacji WŁ./WYŁ. przy obciążeniu znamionowym
Ochrona przed wnikaniem: IP65
WIRING DIAGRAM
INSTALLATION DIAGRAM

- 6 -
Przed montażem należy wyłączyć zasilanie. Nie należy
instalować urządzenia przy włączonym zasilaniu elektrycznym.
Ustaw odpowiedni kąt.
Korpus lampy montuje się bezpośrednio na ścianie: należy
zamknąć otwór i przymocować lampę do ściany za pomocą
wkrętów rozporowych 10 mm.
Montaż na latarni: za pomocą klucza nasadowego 8 mm poluzuj śrubę,
aż będzie można wsunąć latarnię do klosza i przejść przez złącze,
następnie dokręć śrubę i zamocuj ramię lampy na ścianie lub latarni.
Podłącz przewód. Jest to przewód 0,75MM² triple-core, brązowy to
linia ognia, niebieski to linia zerowa, żółto-zielony to linia uziemienia.
Po zakończeniu podłączania przewodów należy włączyć zasilanie
(produkt nie posiada wyłącznika zasilania, dlatego użytkownik musi
samodzielnie zainstalować przełącznik sterujący). Jednostka sterująca
oświetleniem zaczyna działać, światło nie włącza się w ciągu dnia, a
włącza się automatycznie w nocy .
Nie próbuj instalować uszkodzonego produktu.
Aby zapewnić dobre odprowadzanie ciepła, nie należy instalować
lampy w zamkniętych pomieszczeniach.
Aby uniknąć upływu prądu po zainstalowaniu lampy, należy upewnić
się, że połączenie przewodów jest dobre i bezpieczne.

- 7 -
Podłączając sterownik należy podjąć środki ostrożności zapewniające
wodoodporność .
Używając lampy, nie należy naruszać przepisów przeciwpożarowych.
Lampa może włączać się i wyłączać automatycznie w zależności od
natężenia światła otoczenia. Wyłącza się automatycznie w ciągu dnia i
włącza w nocy.
MAINTENANCE INSTUCTION
Podczas konserwacji lampy należy wyłączyć sterownik.
Regularnie czyść radiator z kurzu, aby zapewnić dobre odprowadzanie
ciepła.
Nie używaj chemikaliów lub żrących płynów do czyszczenia lampy.
Proszę używać suchej ściereczki do czyszczenia.
Skontaktuj się ze sprzedawcą i producentem, jeśli chip LED lub
sterownik muszą zostać wymienione. Ponieważ wodoodporność i
pyłoszczelność zostaną naruszone po ponownym demontażu.

- 8 -
Produkty * 1
Komponenty sterowania oświetleniem*1
Śruby rozprężne ( 6mm*60mm ) *3
Gęste worki*1
Wyprodukowano w Chinach
LIST OF ACCESSORIES

- 9 -


- 2 -
Technisch Ondersteuning en E-garantiecertificaat www.vevor.com/support
LED WANDLAMP INSTRUCTIES
GEBRUIKERSHANDLEIDING
MODEL:BD-HB-50W /BD-HB-100W
We continue to be committed to provide you tools with competitive price.
"Save Half", "Half Price" or any other similar expressions used by us only represents an
estimate of savings you might benefit from buying certain tools with us compared to the major
top brands and doses not necessarily mean to cover all categories of tools offered by us. You
are kindly reminded to verify carefully when you are placing an order with us if you are
actually saving half in comparison with the top major brands.
- 3 -
MODEL: BD-HB-50W /BD-HB-100W
Have product questions? Need technical support? Please feel free to
contact us:
CustomerService@vevor.com
NEED HELP? CONTACT US!
This is the original instruction, please read all manual instructions
carefully before operating. VEVOR reserves a clear interpretation of our
user manual. The appearance of the product shall be subject to the
product you received. Please forgive us that we won't inform you again if
there are any technology or software updates on our product.
LED WALL LIGHT
INSTRUCTION

- 4 -
Waarschuwing: om het risico op letsel te verkleinen, moet de
gebruiker de gebruiksaanwijzing zorgvuldig lezen.
Dit apparaat voldoet aan Deel 15 van de FCC-regels. De werking
is onderworpen aan de volgende twee voorwaarden: (1) Dit
apparaat mag geen schadelijke interferentie veroorzaken, en (2)
dit apparaat moet alle ontvangen interferentie accepteren, inclusief
interferentie die ongewenste werking kan veroorzaken.
TECHNIQUE PARAMETER
Ingangsspanning: AC100-265V 50/60HZ
Nominaal vermogen: 50W (BD-HB-50W), 100W (BD-HB-100W)
Certificaat: IP65, CE, FCC-nummer , ROHS-richtlijn.
INSTALLATION INSTRUCTIONS FOR LIGHT CONTROL COMPONENTS
19.Haal de lichtregeleenheid eruit en zorg dat de stekker van de
lichtregeleenheid in het fittinggat van de lampbehuizing past (als deze niet
volledig is uitgelijnd, kan deze niet worden geplaatst).
20.Nadat u het hebt uitgelijnd, draait u het met de klok mee totdat het niet
meer kan draaien. De installatie is dan voltooid.
21.Specificaties van het lichtgevoelige onderdeel
Inschakellichtniveaus: 10-16 Lux
- 5 -
Tijdvertraging: 3-10 seconden
Bedrijfstemperatuur: -40 ℃ tot +70 ℃
Schakelaar: > 5000 AAN/UIT-bewerkingen bij nominale belasting
Beschermingsgraad: IP65
WIRING DIAGRAM
INSTALLATION DIAGRAM
Stroomuitval vóór de installatie. Installeer het apparaat niet
terwijl de elektriciteit nog aan staat.
Pas de gewenste hoek aan.

- 6 -
De lampbehuizing wordt rechtstreeks op de muur gemonteerd.
Sluit de opening en bevestig de lamp aan de muur met 10 mm
expansieschroeven.
Installatie bij lantaarnpaal: gebruik een 8 mm dopsleutel om de schroef
los te draaien totdat de lantaarnpaal in de lampenkap en door de
verbinding past. Draai vervolgens de schroef vast en bevestig de
lamparm aan de muur of lantaarnpaal.
Sluit de draad aan. Het is een 0,75MM² drievoudige kern, bruin is de
vuurlijn, blauw is de nullijn, geelgroen is de aardlijn.
Zodra de bedrading is voltooid, schakelt u de stroom in (dit product
heeft geen aan/uit-schakelaar en de gebruiker moet de
bedieningsschakelaar zelf installeren). De lichtregeleenheid begint te
werken, het licht brandt overdag niet en gaat 's nachts automatisch
aan .
Probeer het beschadigde product niet te installeren.
Installeer de lamp niet in een afgesloten ruimte, zodat de warmte goed
afgevoerd wordt.
Zorg ervoor dat de draadverbinding goed en veilig is om lekkage te
voorkomen nadat de lamp is geïnstalleerd.
waterdichte maatregelen worden genomen.
Overtreed de wet op brandbestrijding niet wanneer u de lamp gebruikt.
De lamp kan automatisch worden in- en uitgeschakeld op basis van de
intensiteit van de omgeving. Overdag wordt de lamp automatisch
uitgeschakeld en 's nachts ingeschakeld.

- 7 -
MAINTENANCE INSTUCTION
Schakel de driver uit wanneer u onderhoud aan de lamp uitvoert.
Maak het koellichaam regelmatig stofvrij, zodat de warmte goed
afgevoerd wordt.
Niet gebruiken chemische of bijtende vloeistof om de lamp schoon te
maken. Gebruik een droge doek om het schoon te maken.
Neem contact op met de dealer en fabrikant als de LED-chip of driver
vervangen moet worden. Omdat de waterdichte en stofdichte
prestaties beïnvloed worden na het opnieuw demonteren.

- 8 -
Producten * 1
Lichtregelcomponenten*1
Expansieschroeven ( 6 mm * 60 mm ) * 3
Dichte zakken*1
Gemaakt in China
LIST OF ACCESSORIES


- 2 -
Teknisk Support och e-garanticertifikat www.vevor.com/support
LED VÄGGLAMPA INSTRUKTION
ANVÄNDARMANUAL
MODELL: BD-HB-50W /BD-HB-100W
We continue to be committed to provide you tools with competitive price.
"Save Half", "Half Price" or any other similar expressions used by us only represents an
estimate of savings you might benefit from buying certain tools with us compared to the major
top brands and doses not necessarily mean to cover all categories of tools offered by us. You
are kindly reminded to verify carefully when you are placing an order with us if you are
actually saving half in comparison with the top major brands.

- 3 -
MODELL: BD-HB-50W /BD-HB-100W
Have product questions? Need technical support? Please feel free to
contact us:
CustomerService@vevor.com
NEED HELP? CONTACT US!
This is the original instruction, please read all manual instructions
carefully before operating. VEVOR reserves a clear interpretation of our
user manual. The appearance of the product shall be subject to the
product you received. Please forgive us that we won't inform you again if
there are any technology or software updates on our product.
LED WALL LIGHT
INSTRUCTION
- 4 -
Varning - För att minska risken för skada måste användaren
läsa instruktionerna noggrant.
Denna enhet uppfyller del 15 av FCC-reglerna. Driften är föremål
för följande två villkor: (1) Den här enheten får inte orsaka skadliga
störningar och (2) den här enheten måste acceptera alla mottagna
störningar, inklusive störningar som kan orsaka oönskad funktion.
TECHNIQUE PARAMETER
Ingångsspänning: AC100-265V 50/60HZ
Märkeffekt: 50W(BD-HB-50W), 100W(BD-HB-100W)
Certifikat: IP65, CE, FCC, ROHS.
INSTALLATION INSTRUCTIONS FOR LIGHT CONTROL COMPONENTS
22.Ta ut ljusstyrenheten och kontakten på ljusstyrenheten är riktad mot
lamphusets uttagshål (den kan inte sättas in om den inte är helt inriktad).
23.Efter justering, vrid medurs tills den inte kan rotera, varvid installationen
är klar.
24.Specifikationer för den ljuskänsliga komponenten
Tändljusnivåer: 10-16 lux
Tidsfördröjning: 3-10 sekunder
Drift: -40 ℃ till +70 ℃
- 5 -
Switch: > 5000 PÅ/AV-funktioner vid nominell belastning
Inträngningsskydd: IP65
WIRING DIAGRAM
INSTALLATION DIAGRAM
Blackout före installation. Installera inte den med ström på.
Justera lämplig vinkel.
Lampkroppen monteras direkt på väggen: stäng öppningen och
fäst den på väggen med 10 mm expansionsskruvar.

- 6 -
Installation med lyktstolpe: använd en 8 mm hylsnyckel för att lossa
skruven tills lyktstolpen kan sättas in i lampkåpan och passera genom
skarven, dra sedan åt skruven och fäst sedan lamparmen på väggen
eller lyktstolpen.
Anslut ledningen. Den är 0,75 mm² trippelkärnig, brun är eldlinje, blå är
nolllinje, gulgrön är marklinje.
Slå på strömmen efter att kabeldragningen är klar (den här produkten
har ingen strömbrytare och användaren måste installera
kontrollbrytaren själv); Ljusstyrenheten börjar fungera, ljuset tänds inte
under dagen och den tänds automatiskt på natten .
Försök inte installera den skadade produkten.
Installera inte lampan på det instängda stället för att få en bra
värmeavledningseffekt.
Se till att kabelanslutningen är bra och säker för att undvika elektriskt
läckage efter installation av lampan.
Vattentäta åtgärder måste vidtas vid anslutning av föraren.
Bryt inte mot lagen om brandkontroll när du använder lampan.
Lampan kan tändas och släckas automatiskt beroende på
omgivningens intensitet, och lampan stängs automatiskt av under
dagen och tänds på natten.
MAINTENANCE INSTUCTION

- 7 -
Stäng av föraren när du underhåller lampan.
Rengör regelbundet dammet på kylflänsen för att få en bra
värmeavledningseffekt.
Använd inte kemisk eller frätande vätska för att rengöra lampan.
Använd en torr trasa för att rengöra den.
Kontakta återförsäljaren och tillverkaren om LED-chippet eller
drivrutinen måste bytas ut. Eftersom den vattentäta och dammsäkra
prestandan kommer att påverkas efter demontering igen.
LIST OF ACCESSORIES

- 8 -
Produkter * 1
Ljuskontrollkomponenter*1
Expansionsskruvar ( 6mm*60mm ) *3
Täta påsar*1
Tillverkad i Kina