USER MANUAL
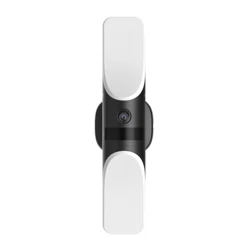
S100 Wall Light Cam
Anker Innovations Limited. All rights reserved. eufy Security and eufy Security Logo are
trademarks of Anker Innovations Limited, registered in the United States and other
countries. All other trademarks are the property of their respective owners.
BENUTZERHANDBUCH
MANUAL DE USUARIO
MANUEL D’UTILISATION
MANUALE UTENTE
GEBRUIKERSHANDLEIDING
MANUAL DO UTILIZADOR
مدختسملا ليلد
V02
Model: T84A1
EN
1
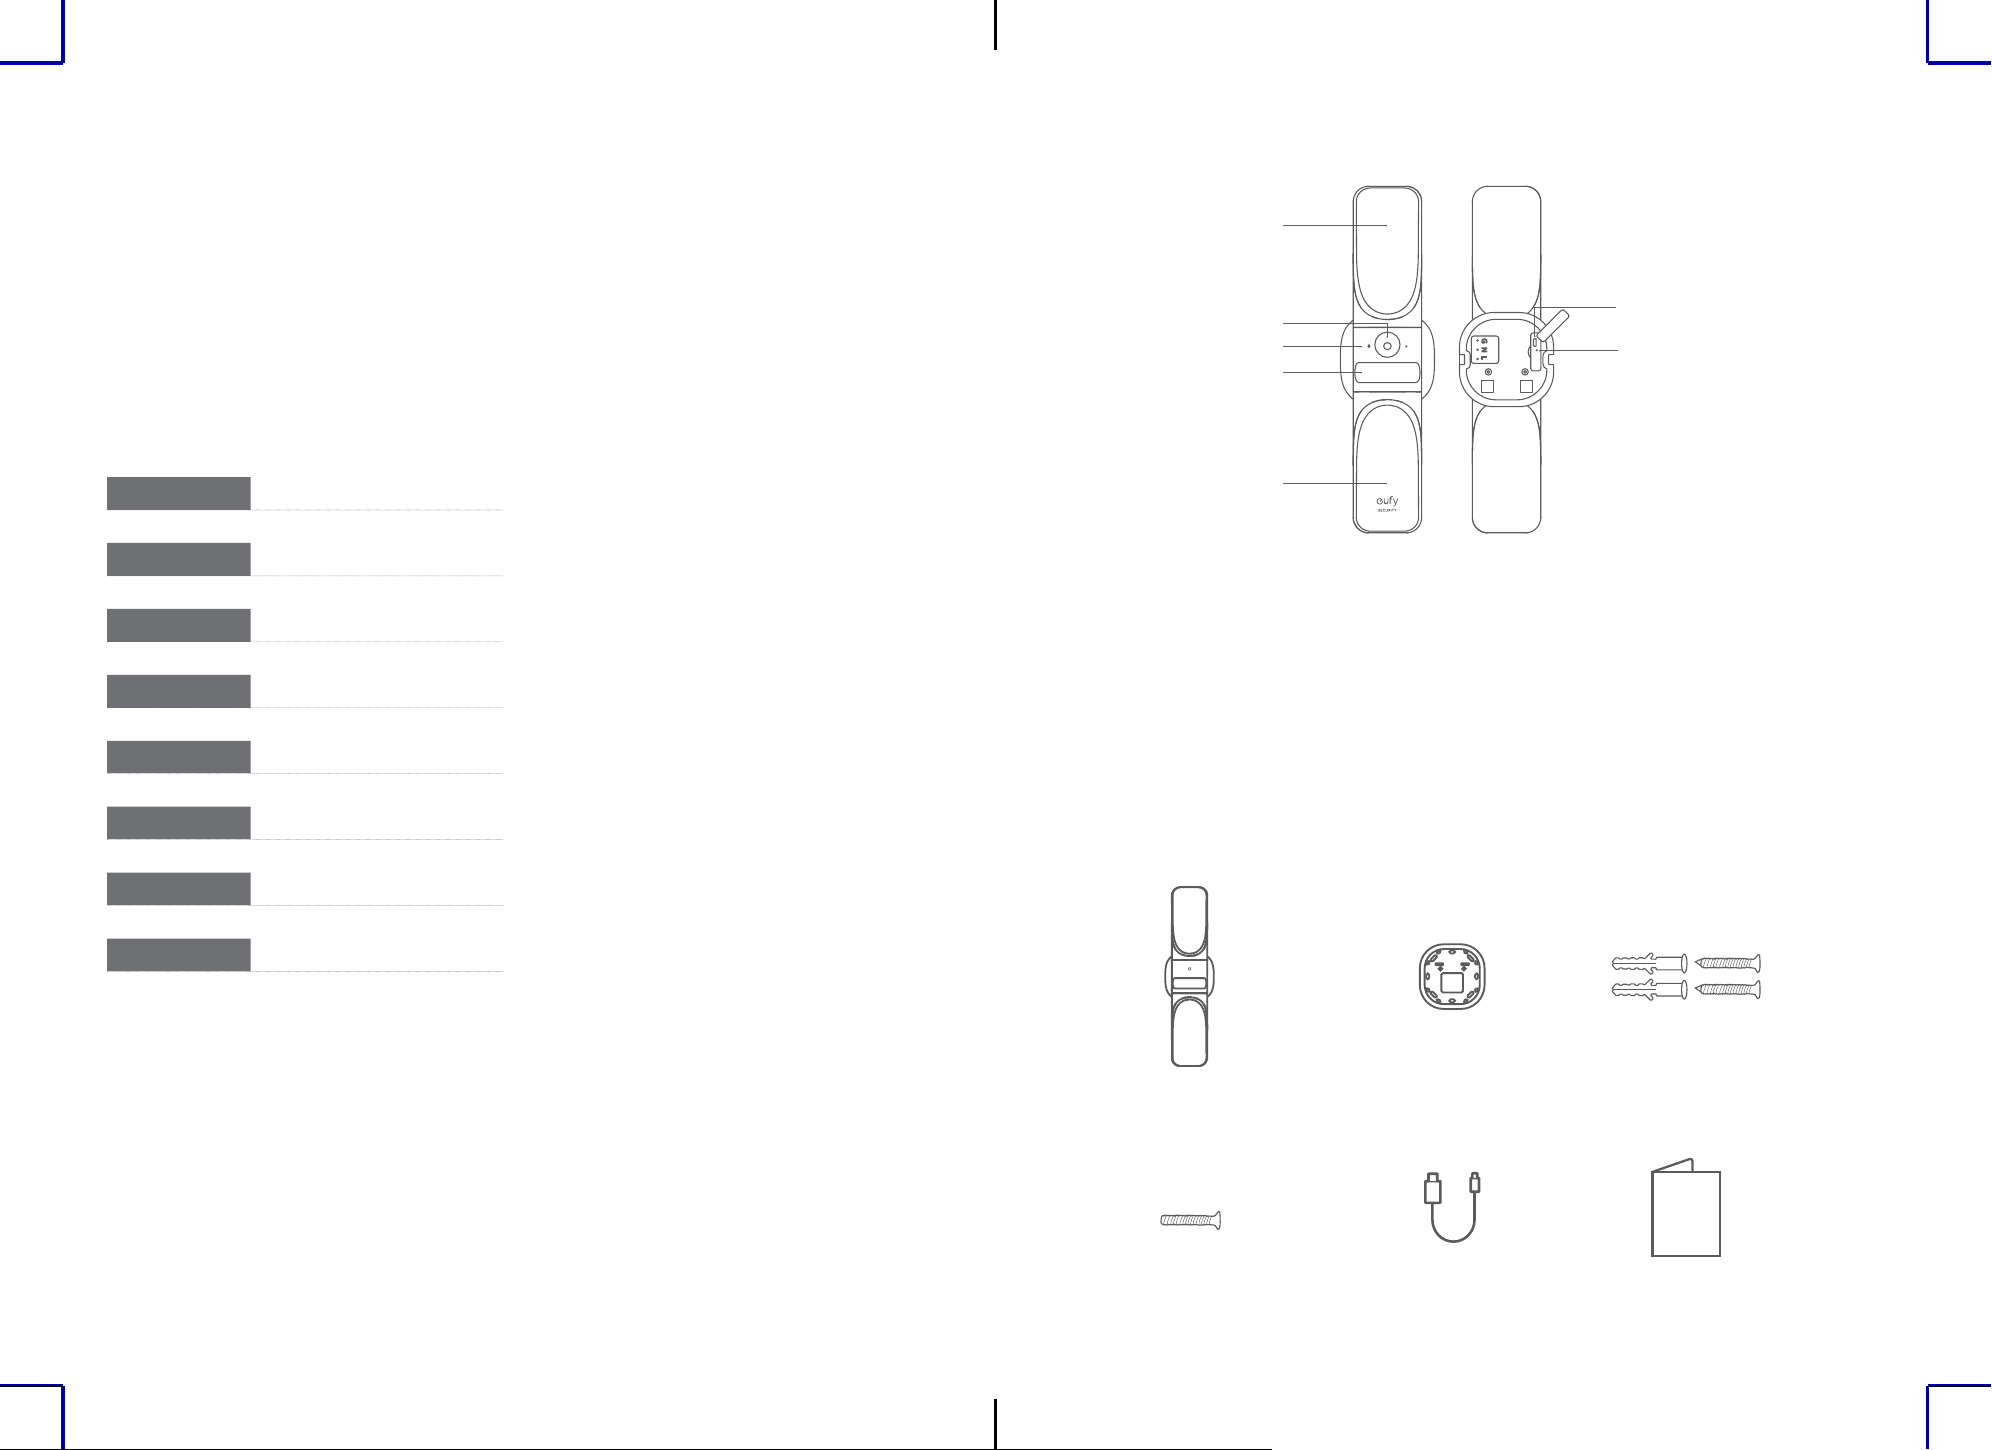
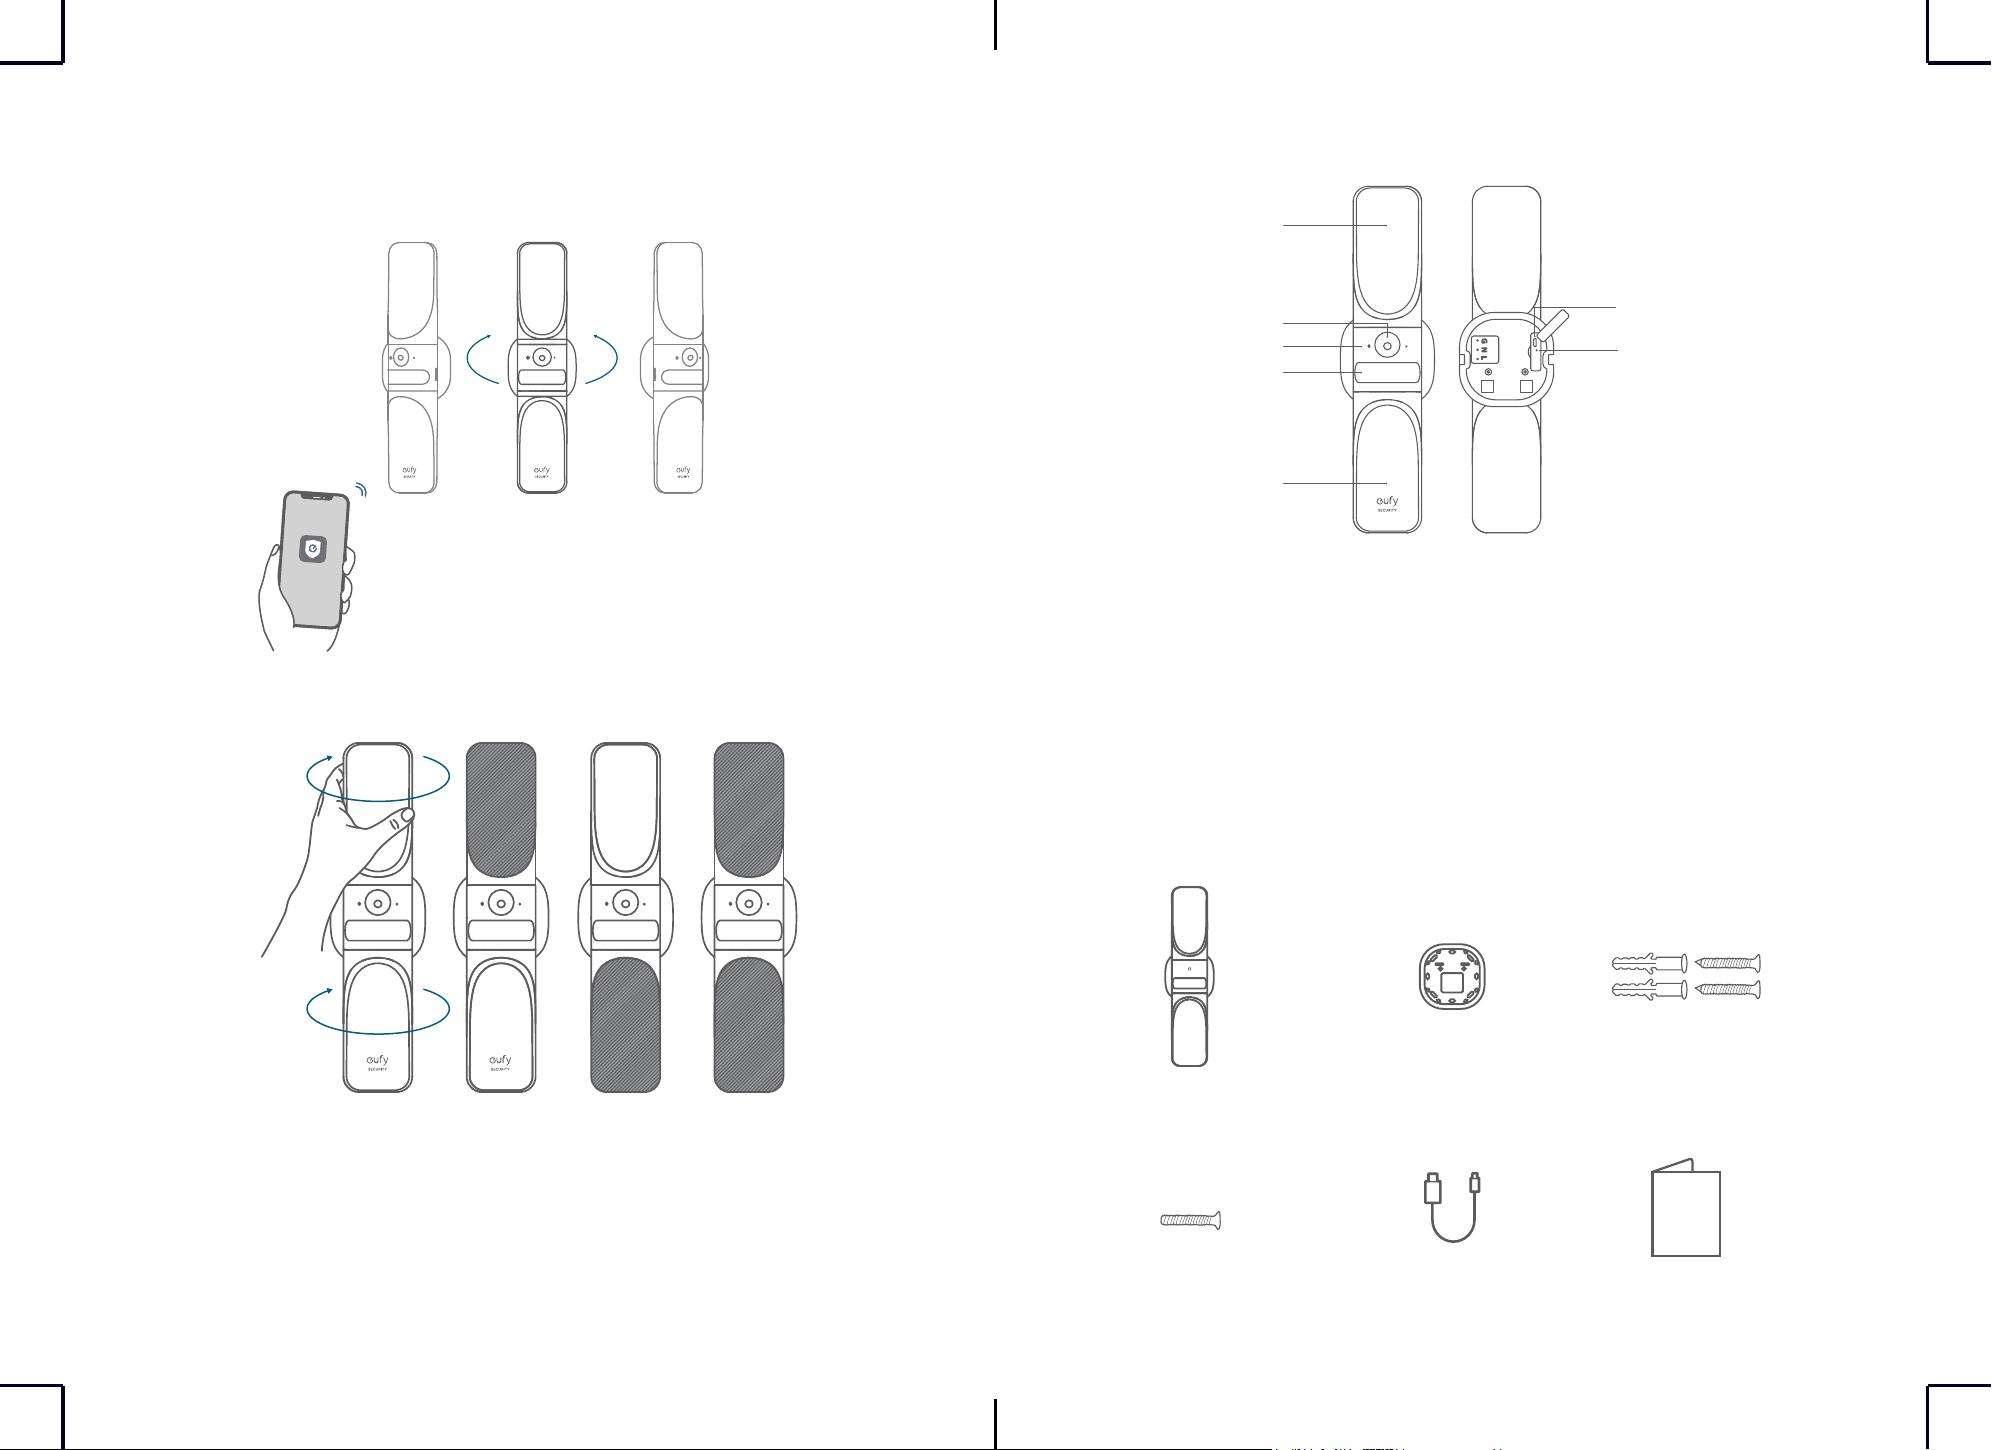
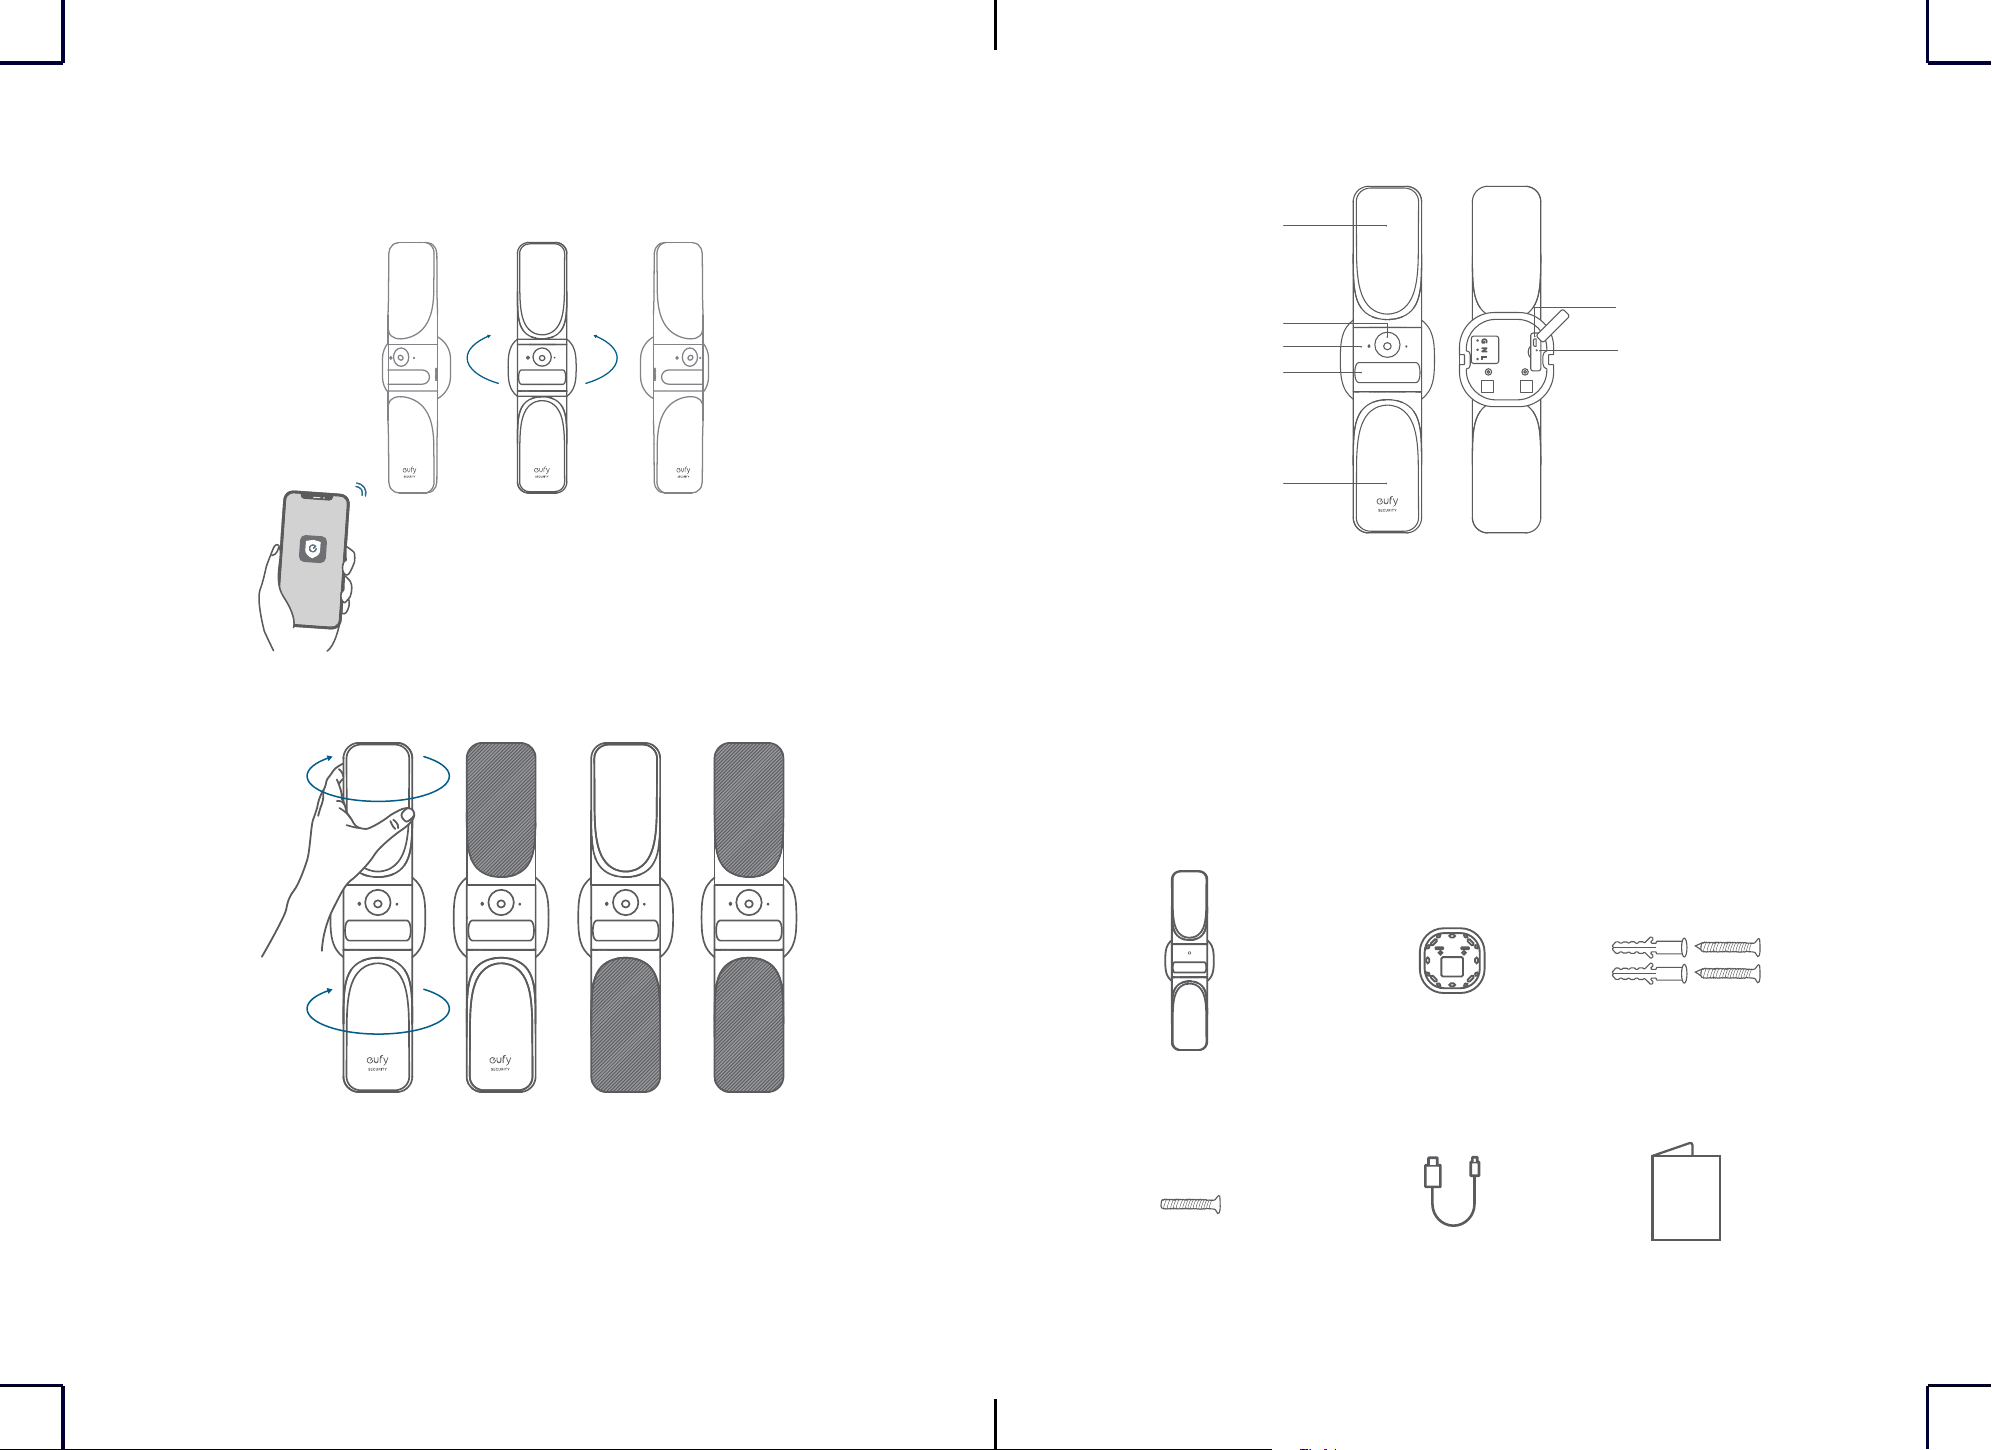
AT A GLANCE
①
①
⑥
②
③
④
⑤
①
Light
②
Camera Lens
③
Status LED
④
Motion Sensor
⑤
Micro-USB Port
⑥
Reset Hole
WHAT'S INCLUDED
S100 Wall Light Cam
Camera Fixing Screw
Mounting Base
USB Cable
Base Screw
Quick Start Guide
English 01
Deutsch 09
Español 17
Français 25
Italiano 33
Nederlands 41
Português 49
ةي
ِ
ب
َ
ر
َ
عل
57
2
EN EN
3
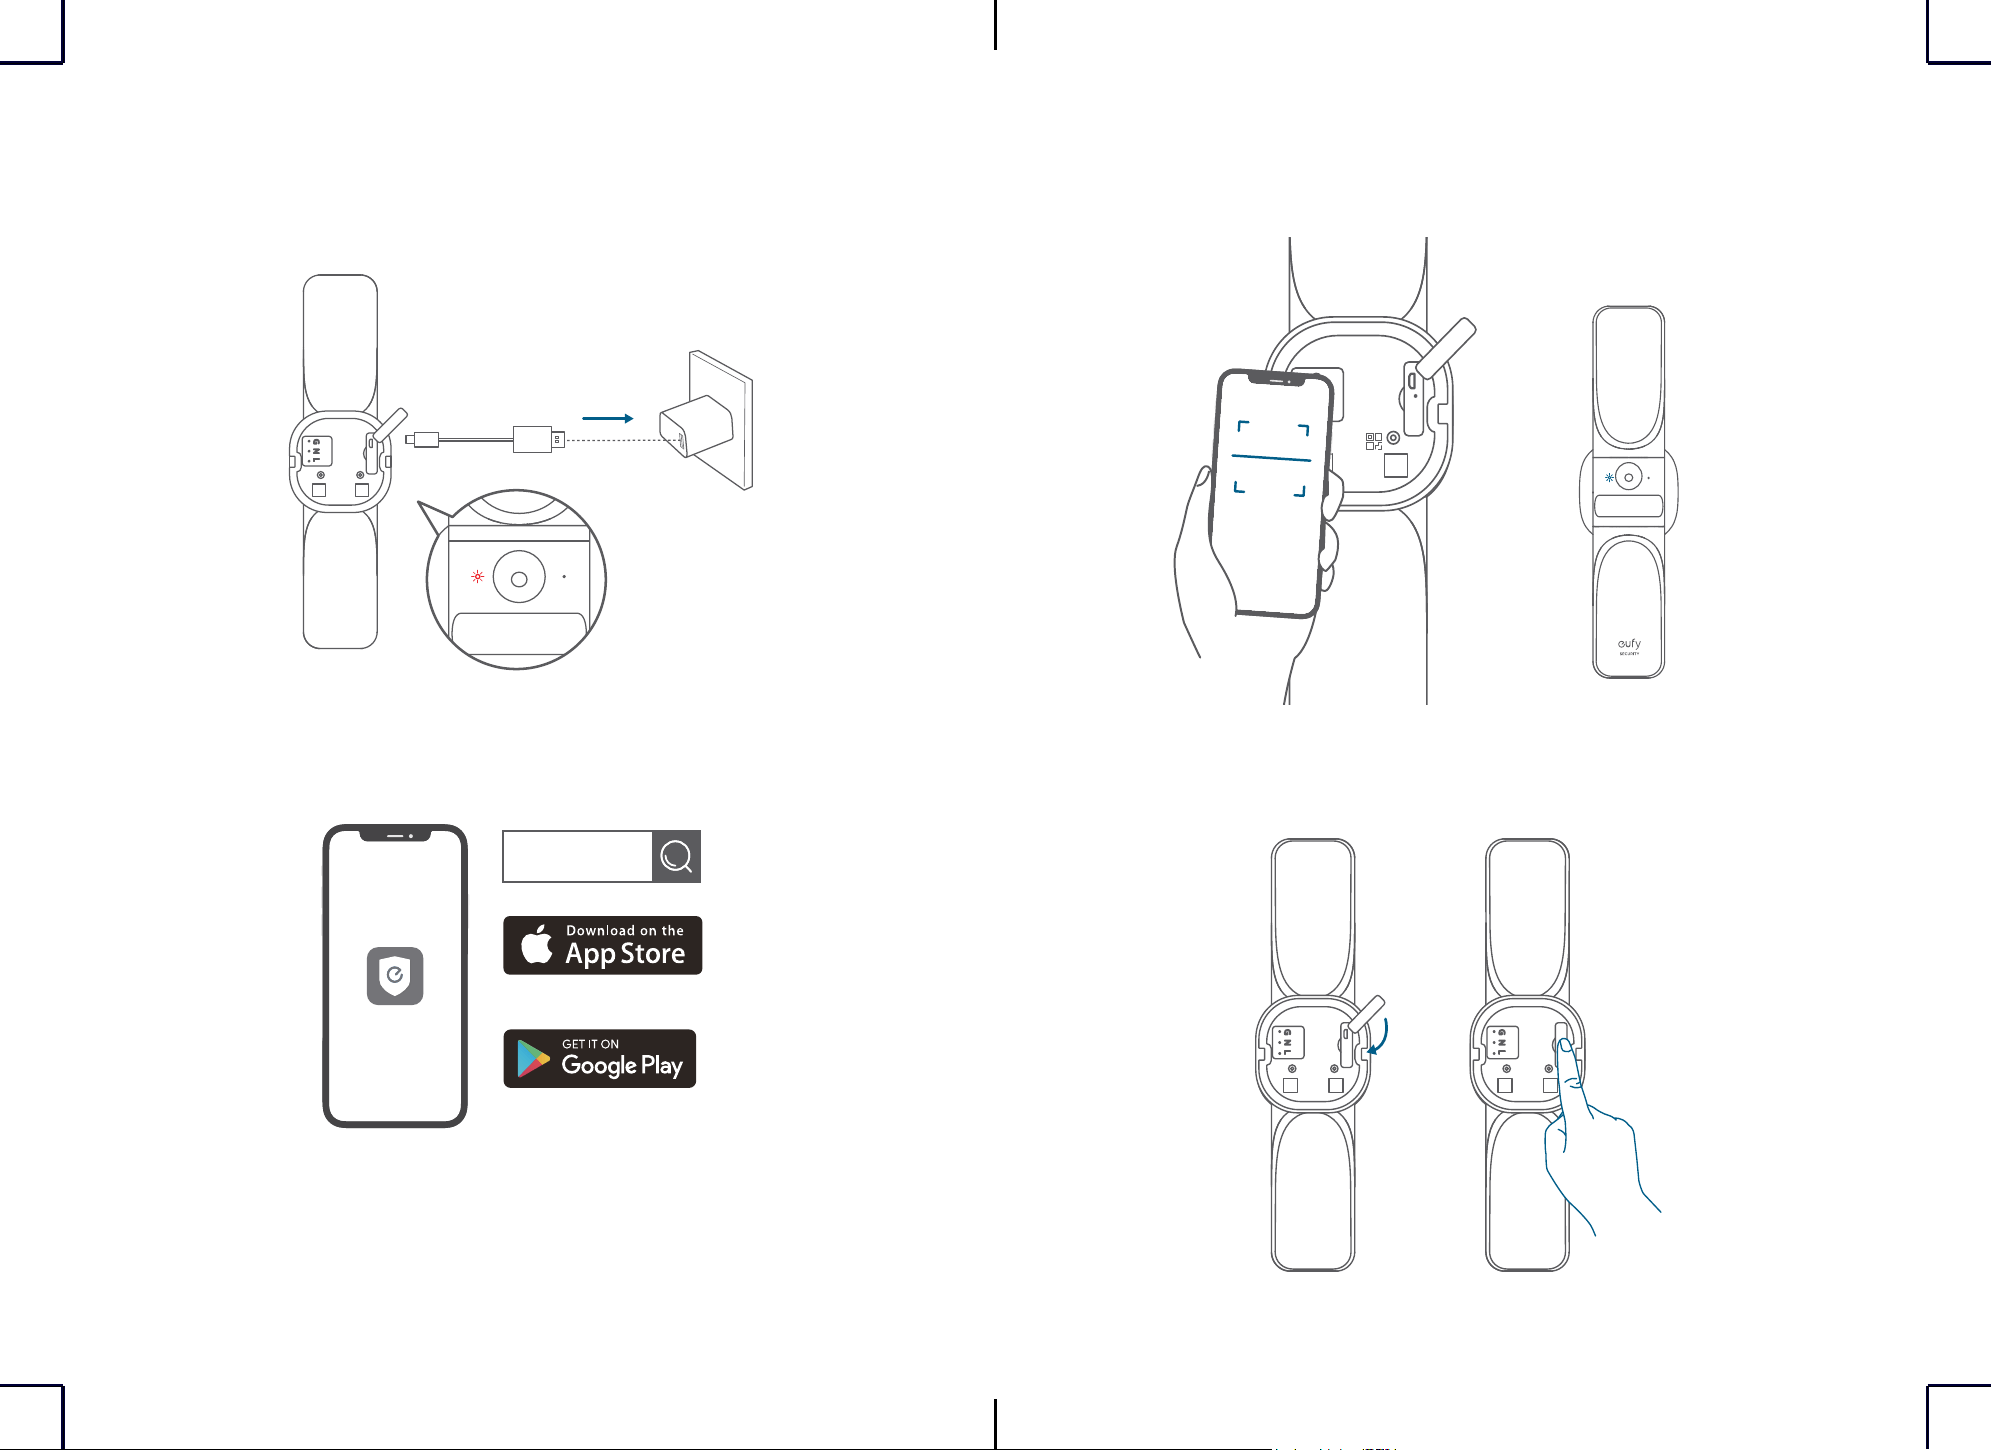
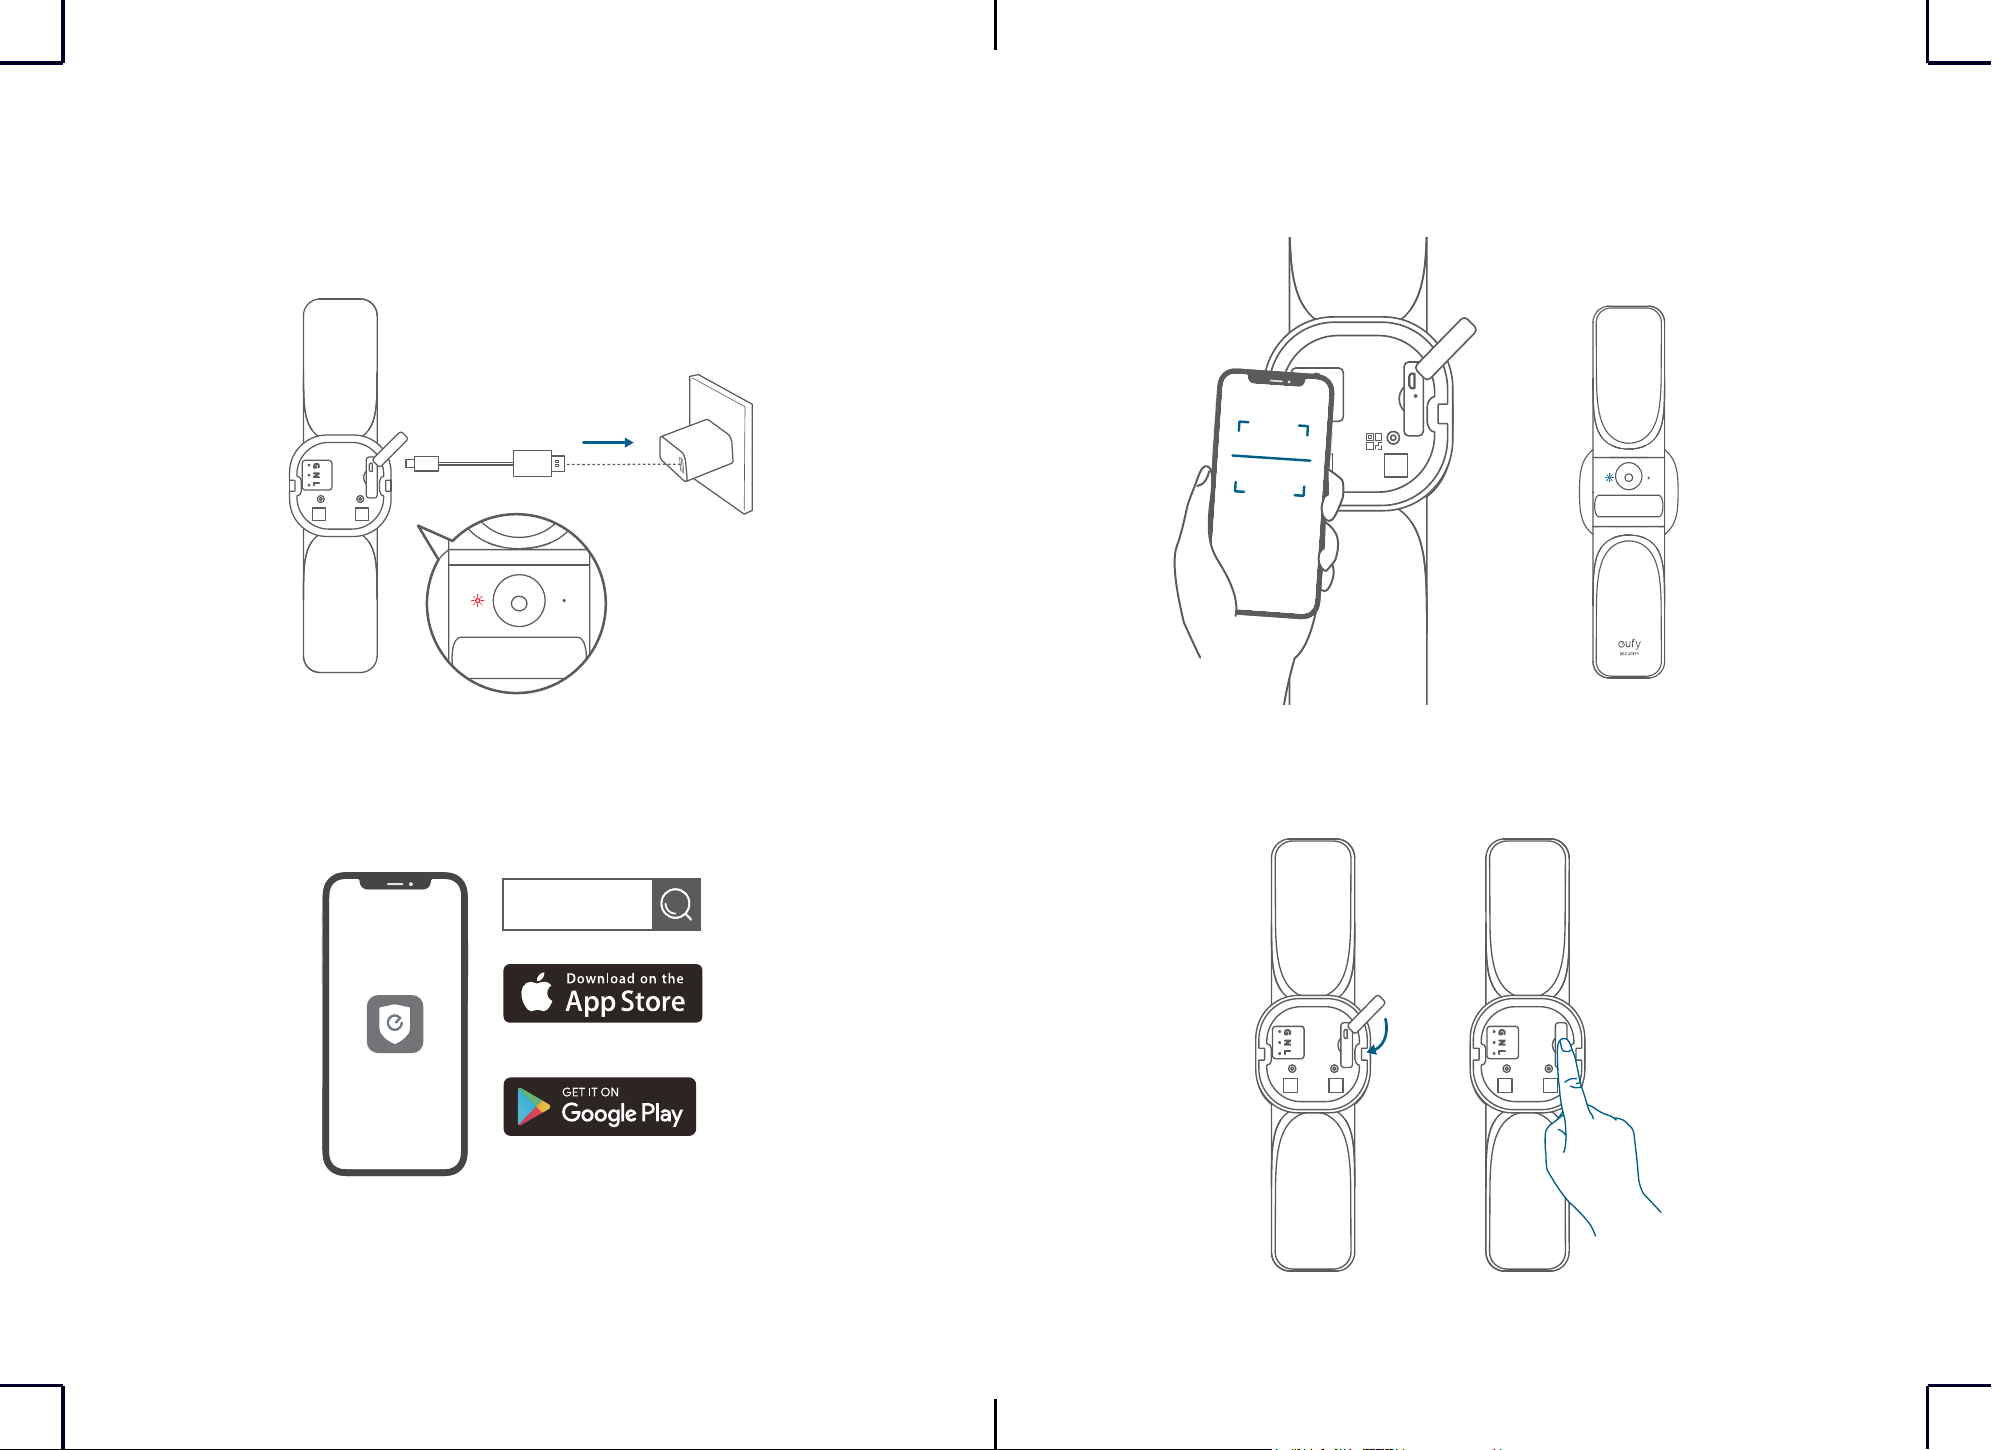
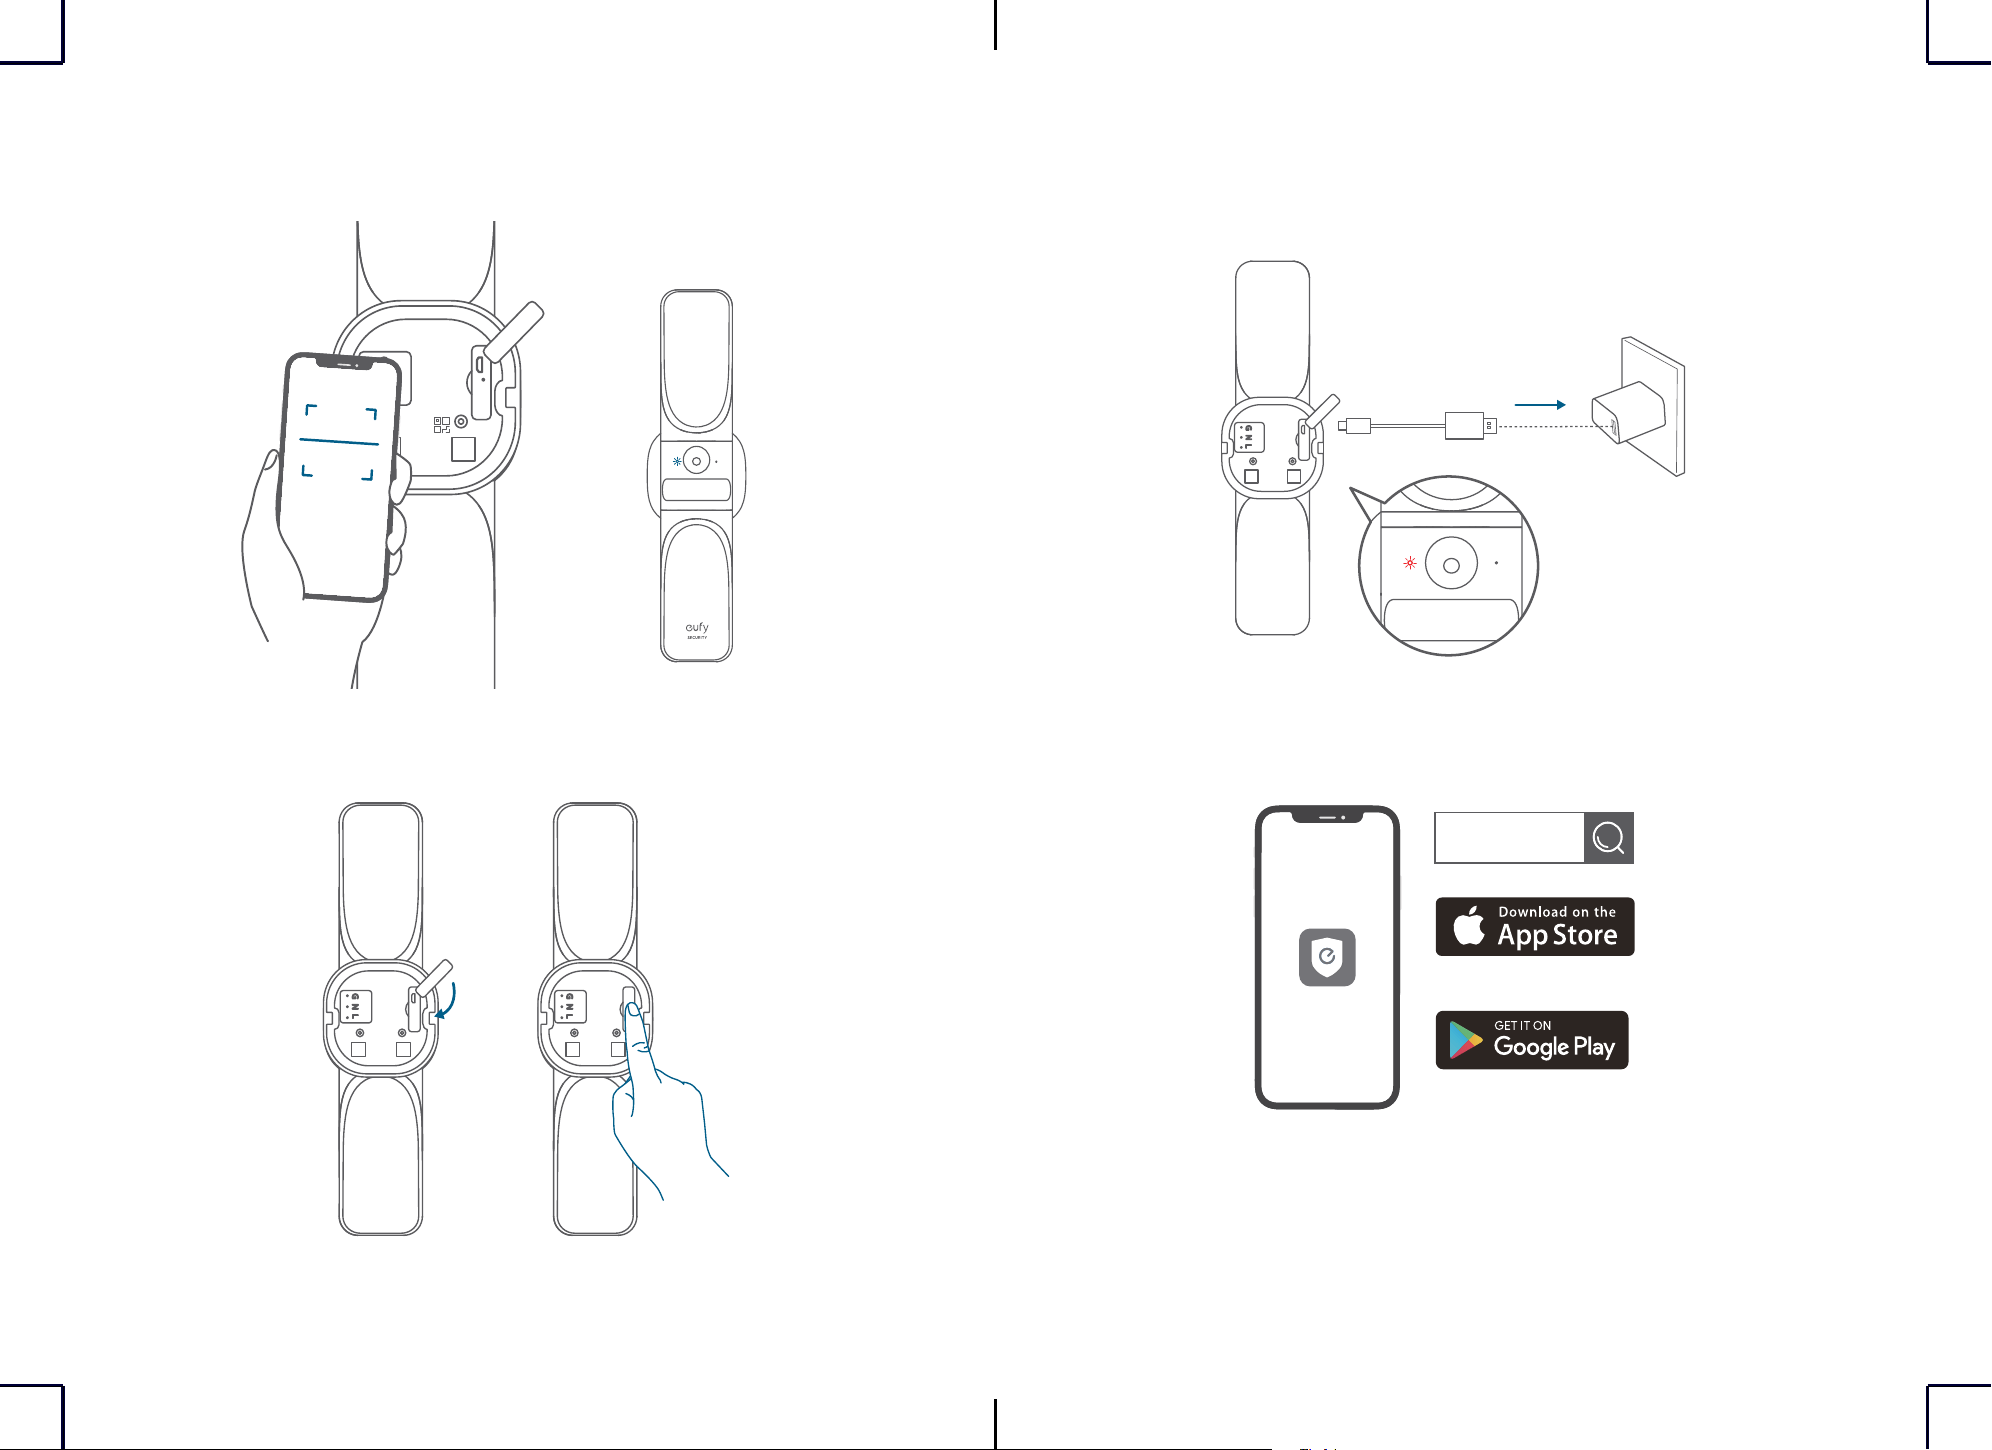
SETTING UP THE SYSTEM
1. Open the USB port cover on the back of the device, then connect it to power with the
provided cable. The status LED will display red when the device is ready for setup.
Not Included
⚠
The main lights will not function while the device is powered via the USB port.
2. Download and install the eufy Security app, then set up an account.
eufy security
Google Play and the Google Play
logo are trademarks of Google Inc.
Apple and the Apple logo are
trademarks of Apple Inc.
3. Scan the QR code on the back of the device or Quick Start Guide, then follow the on-screen
instructions to complete the setup.
4. Disconnect the device from power and close the USB port cover, then secure the rubber
plugs.
4
EN EN
5
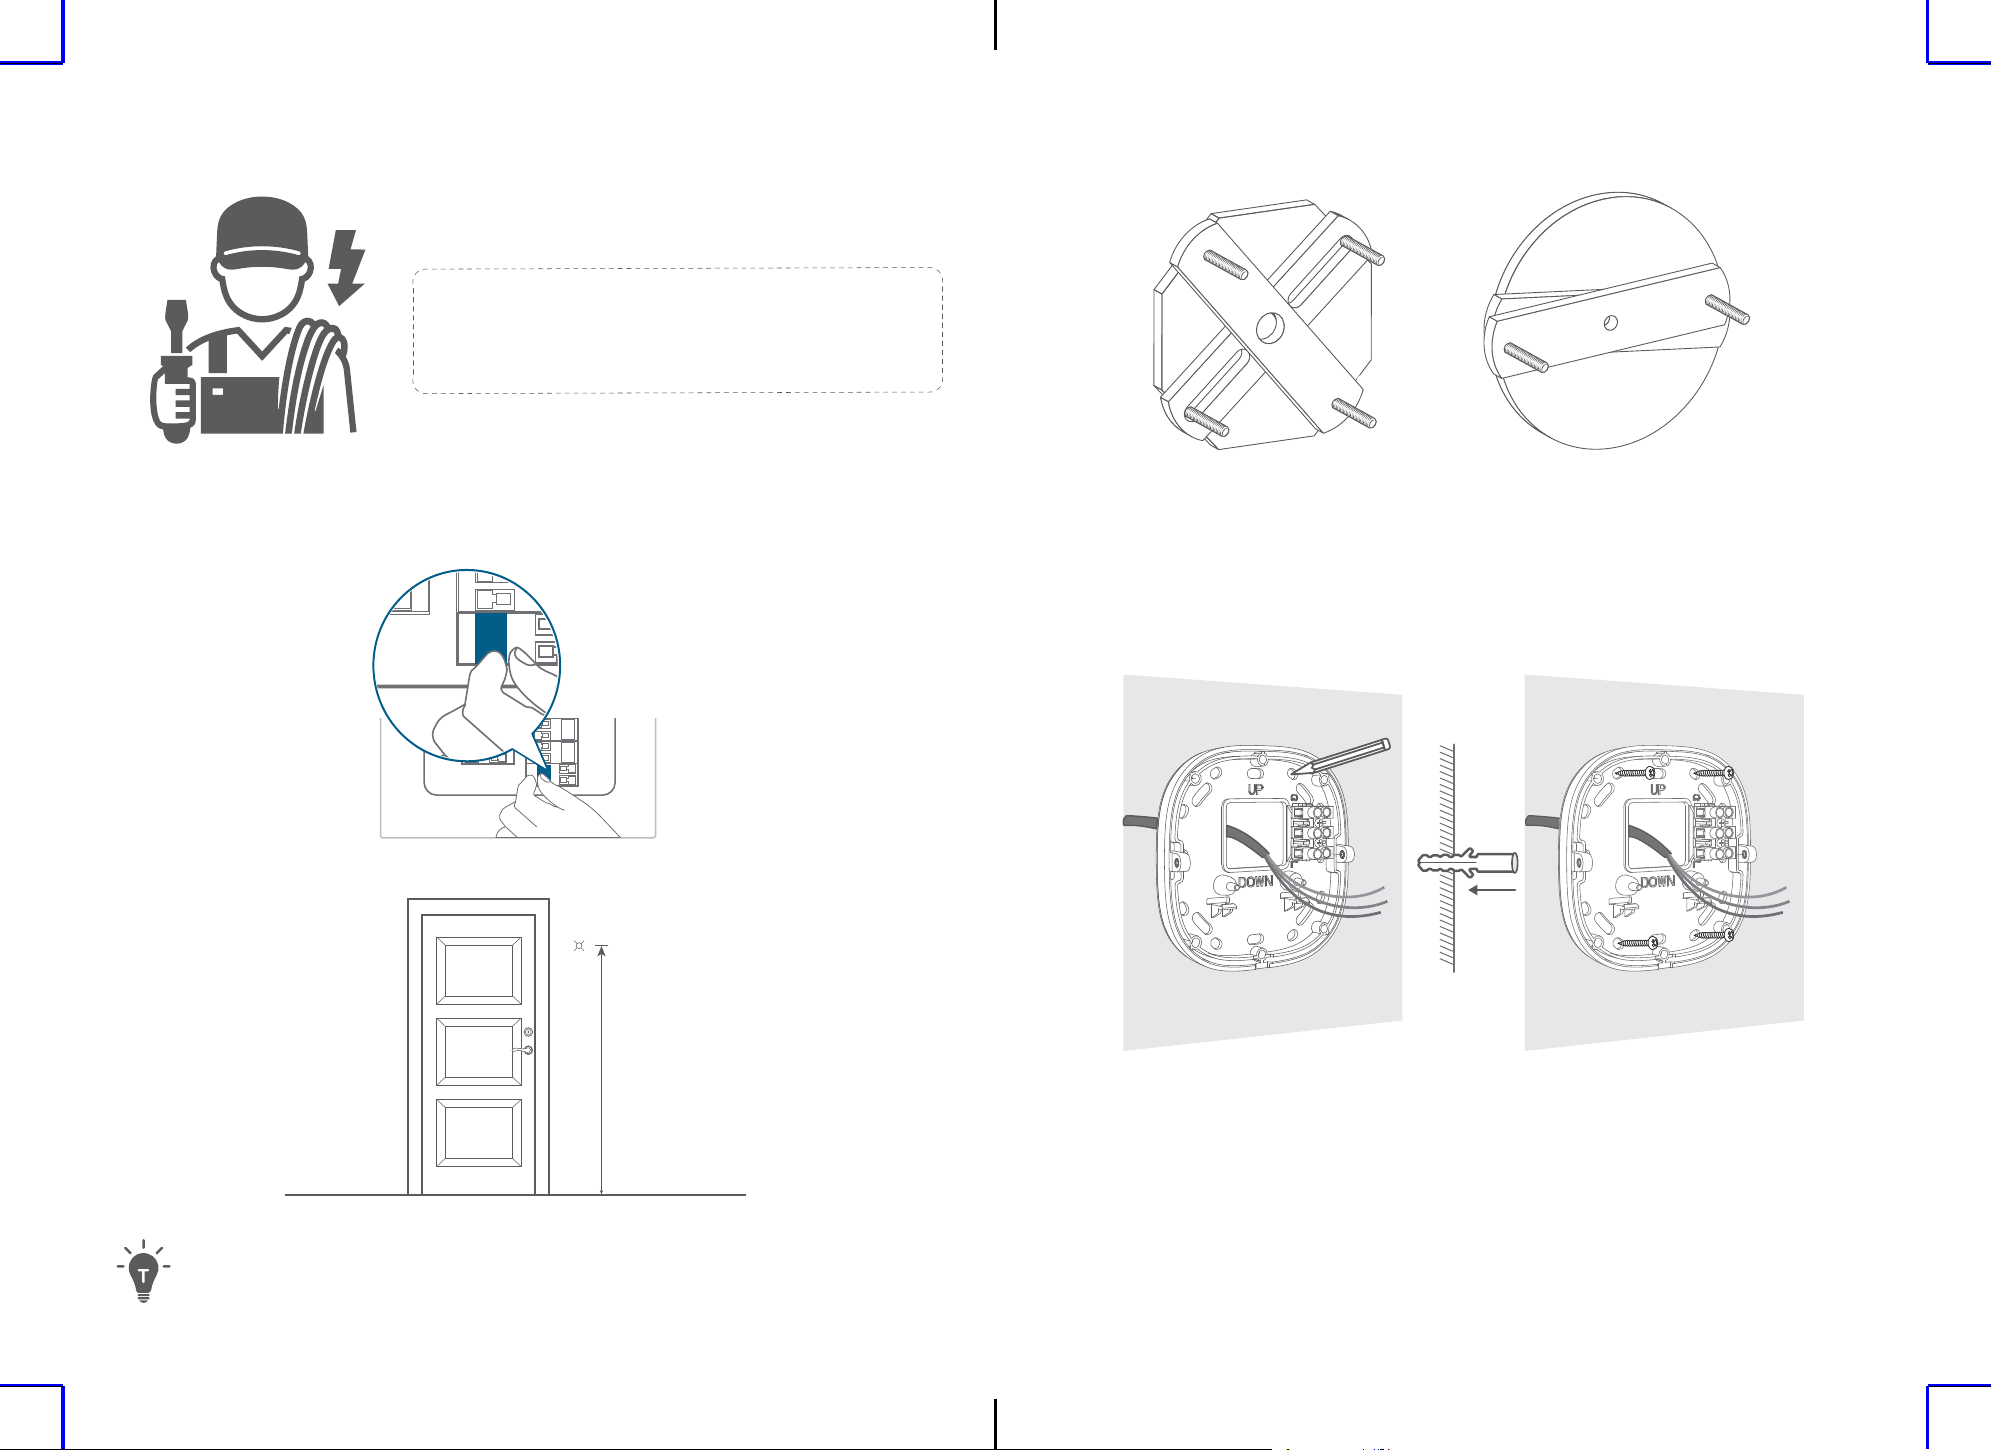
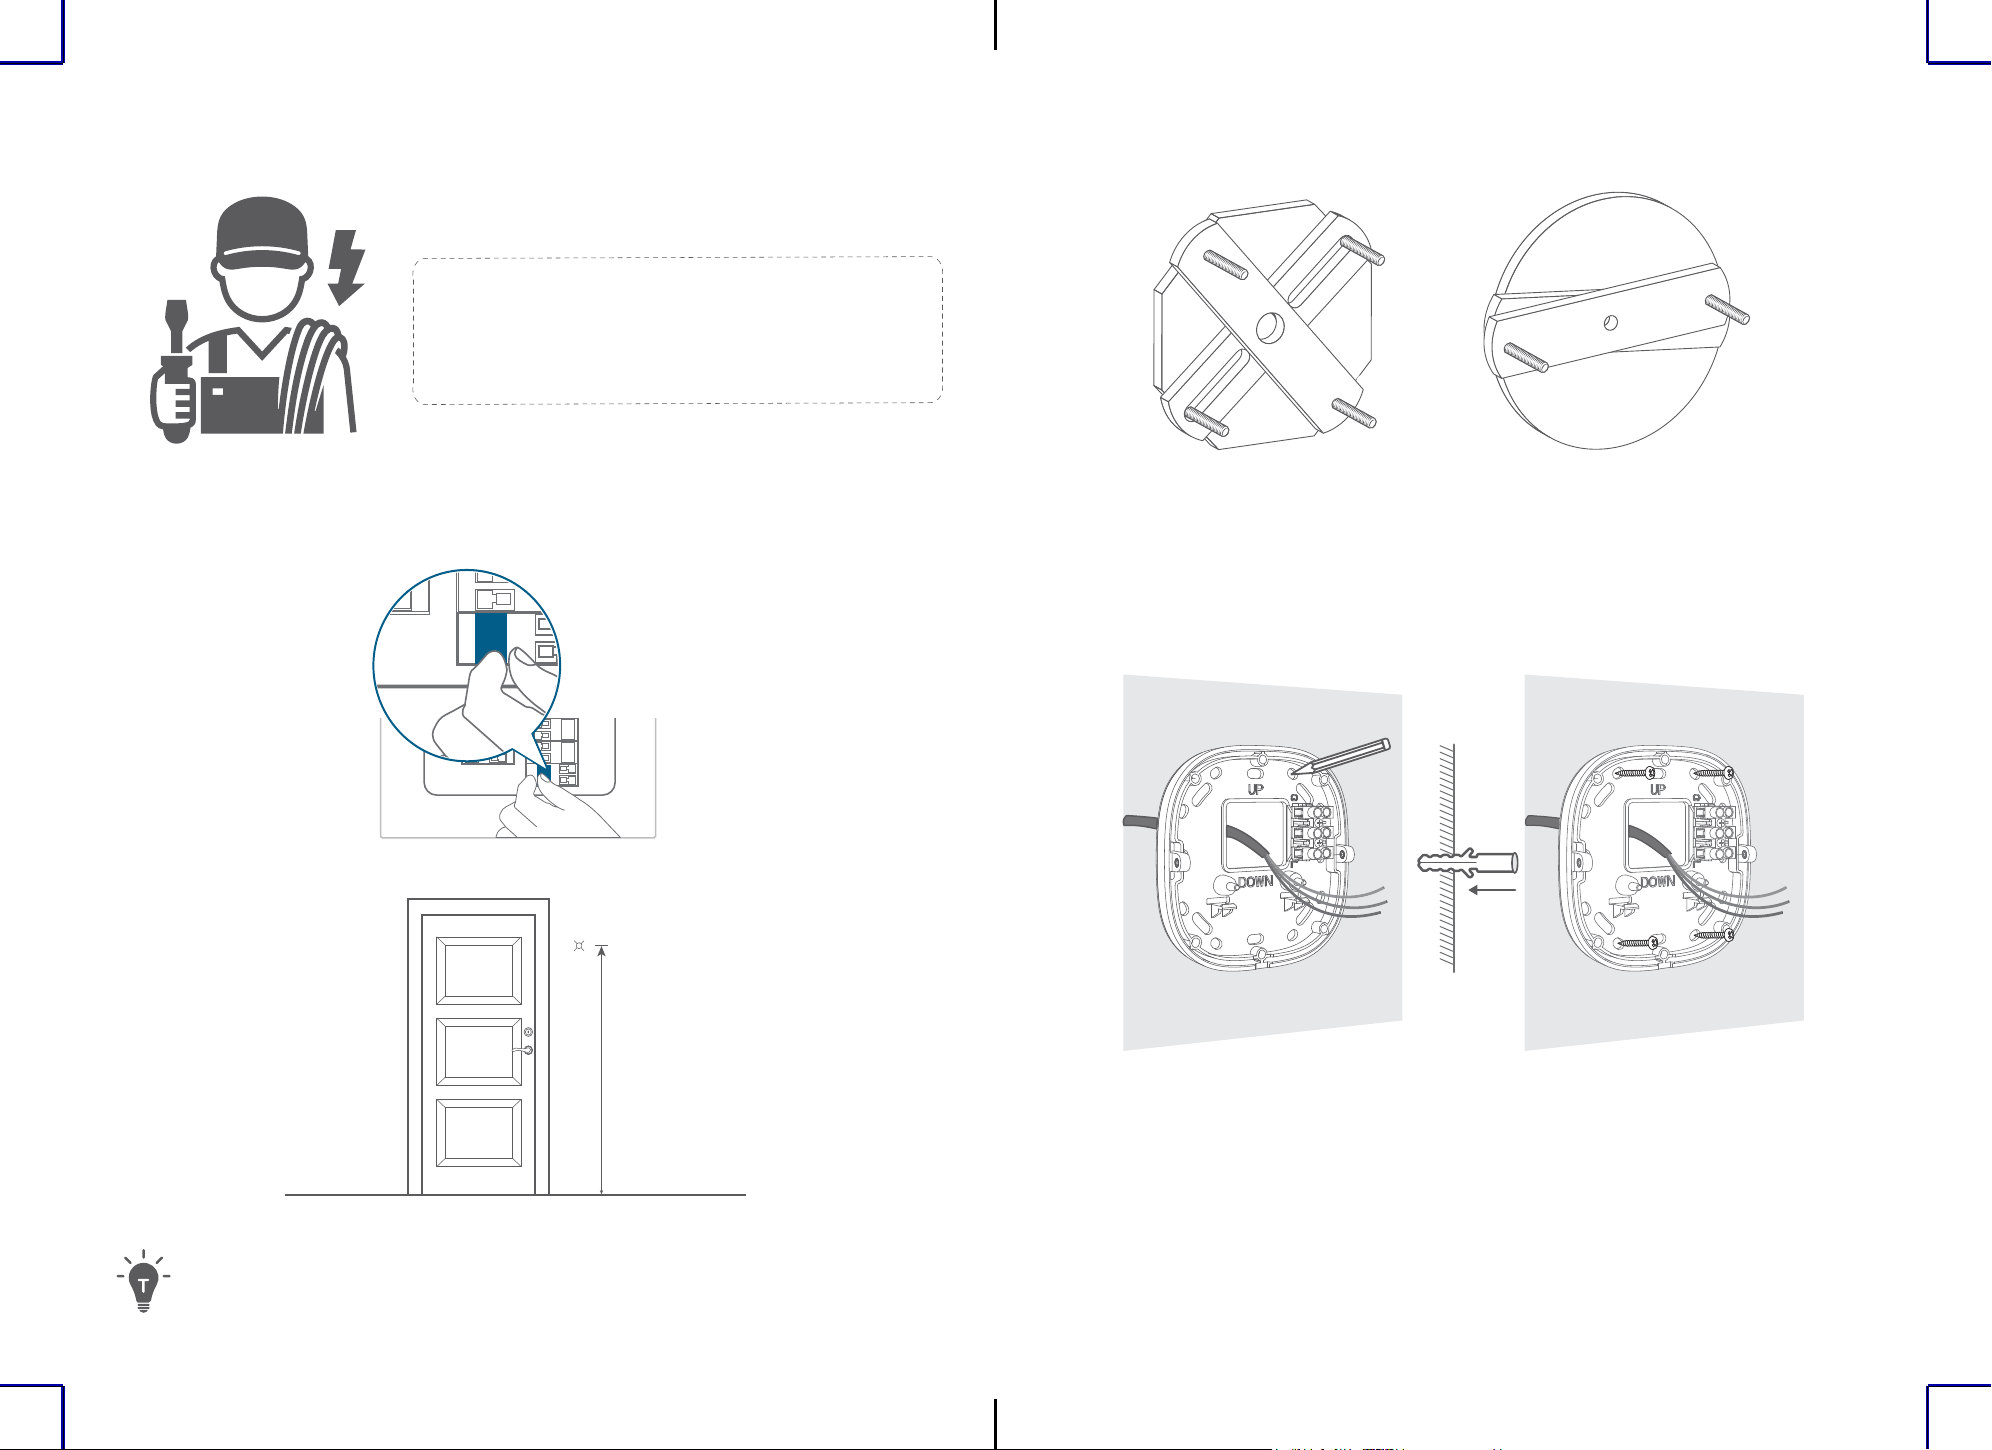
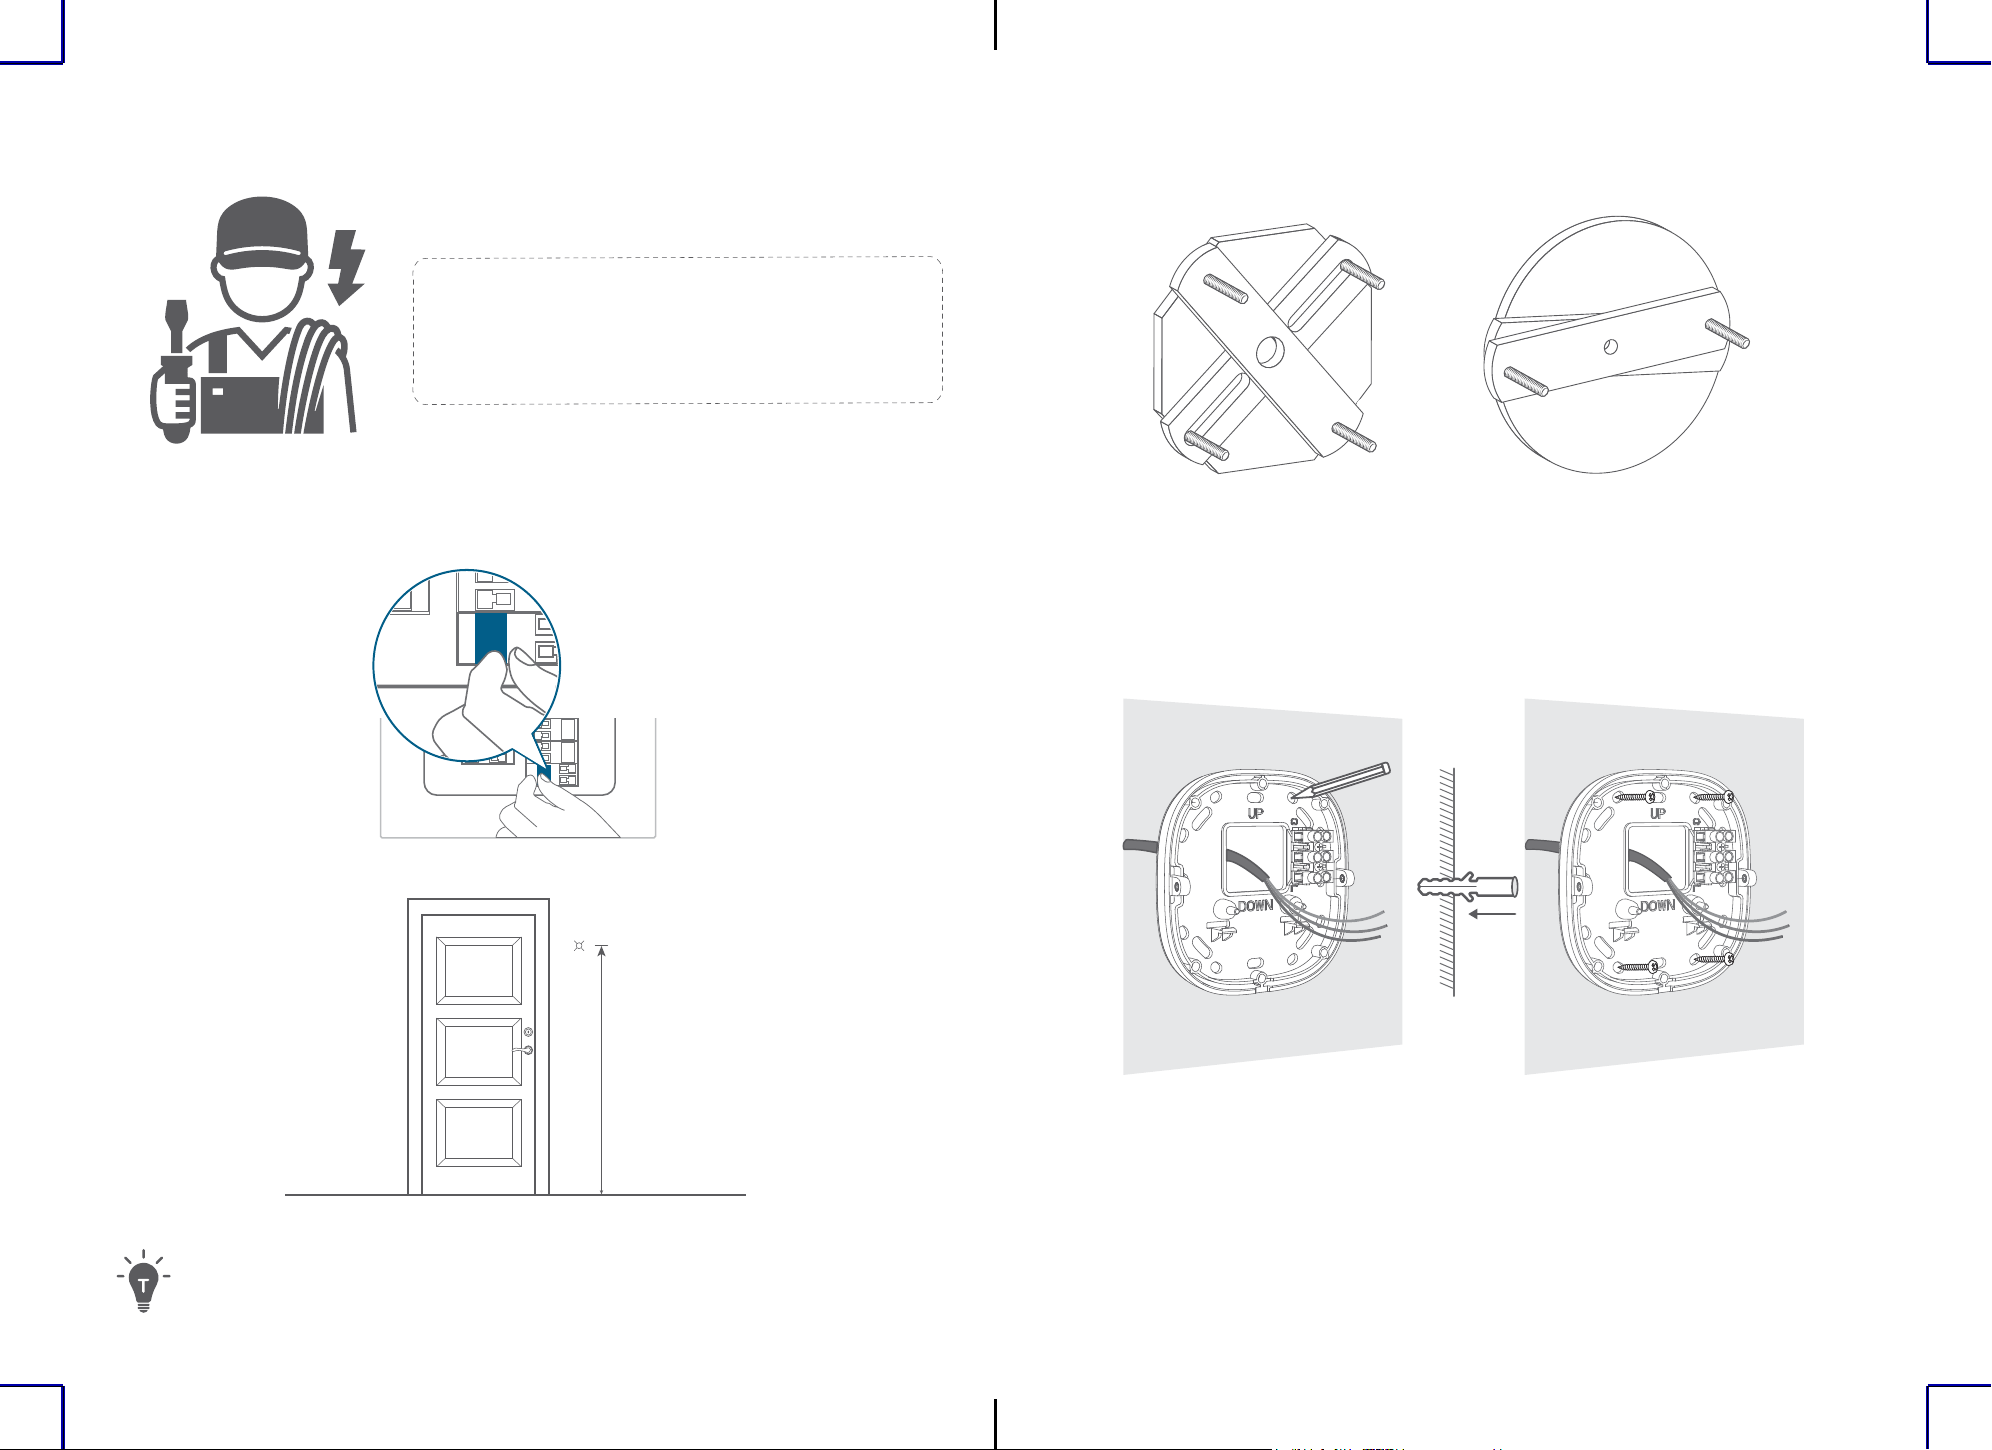
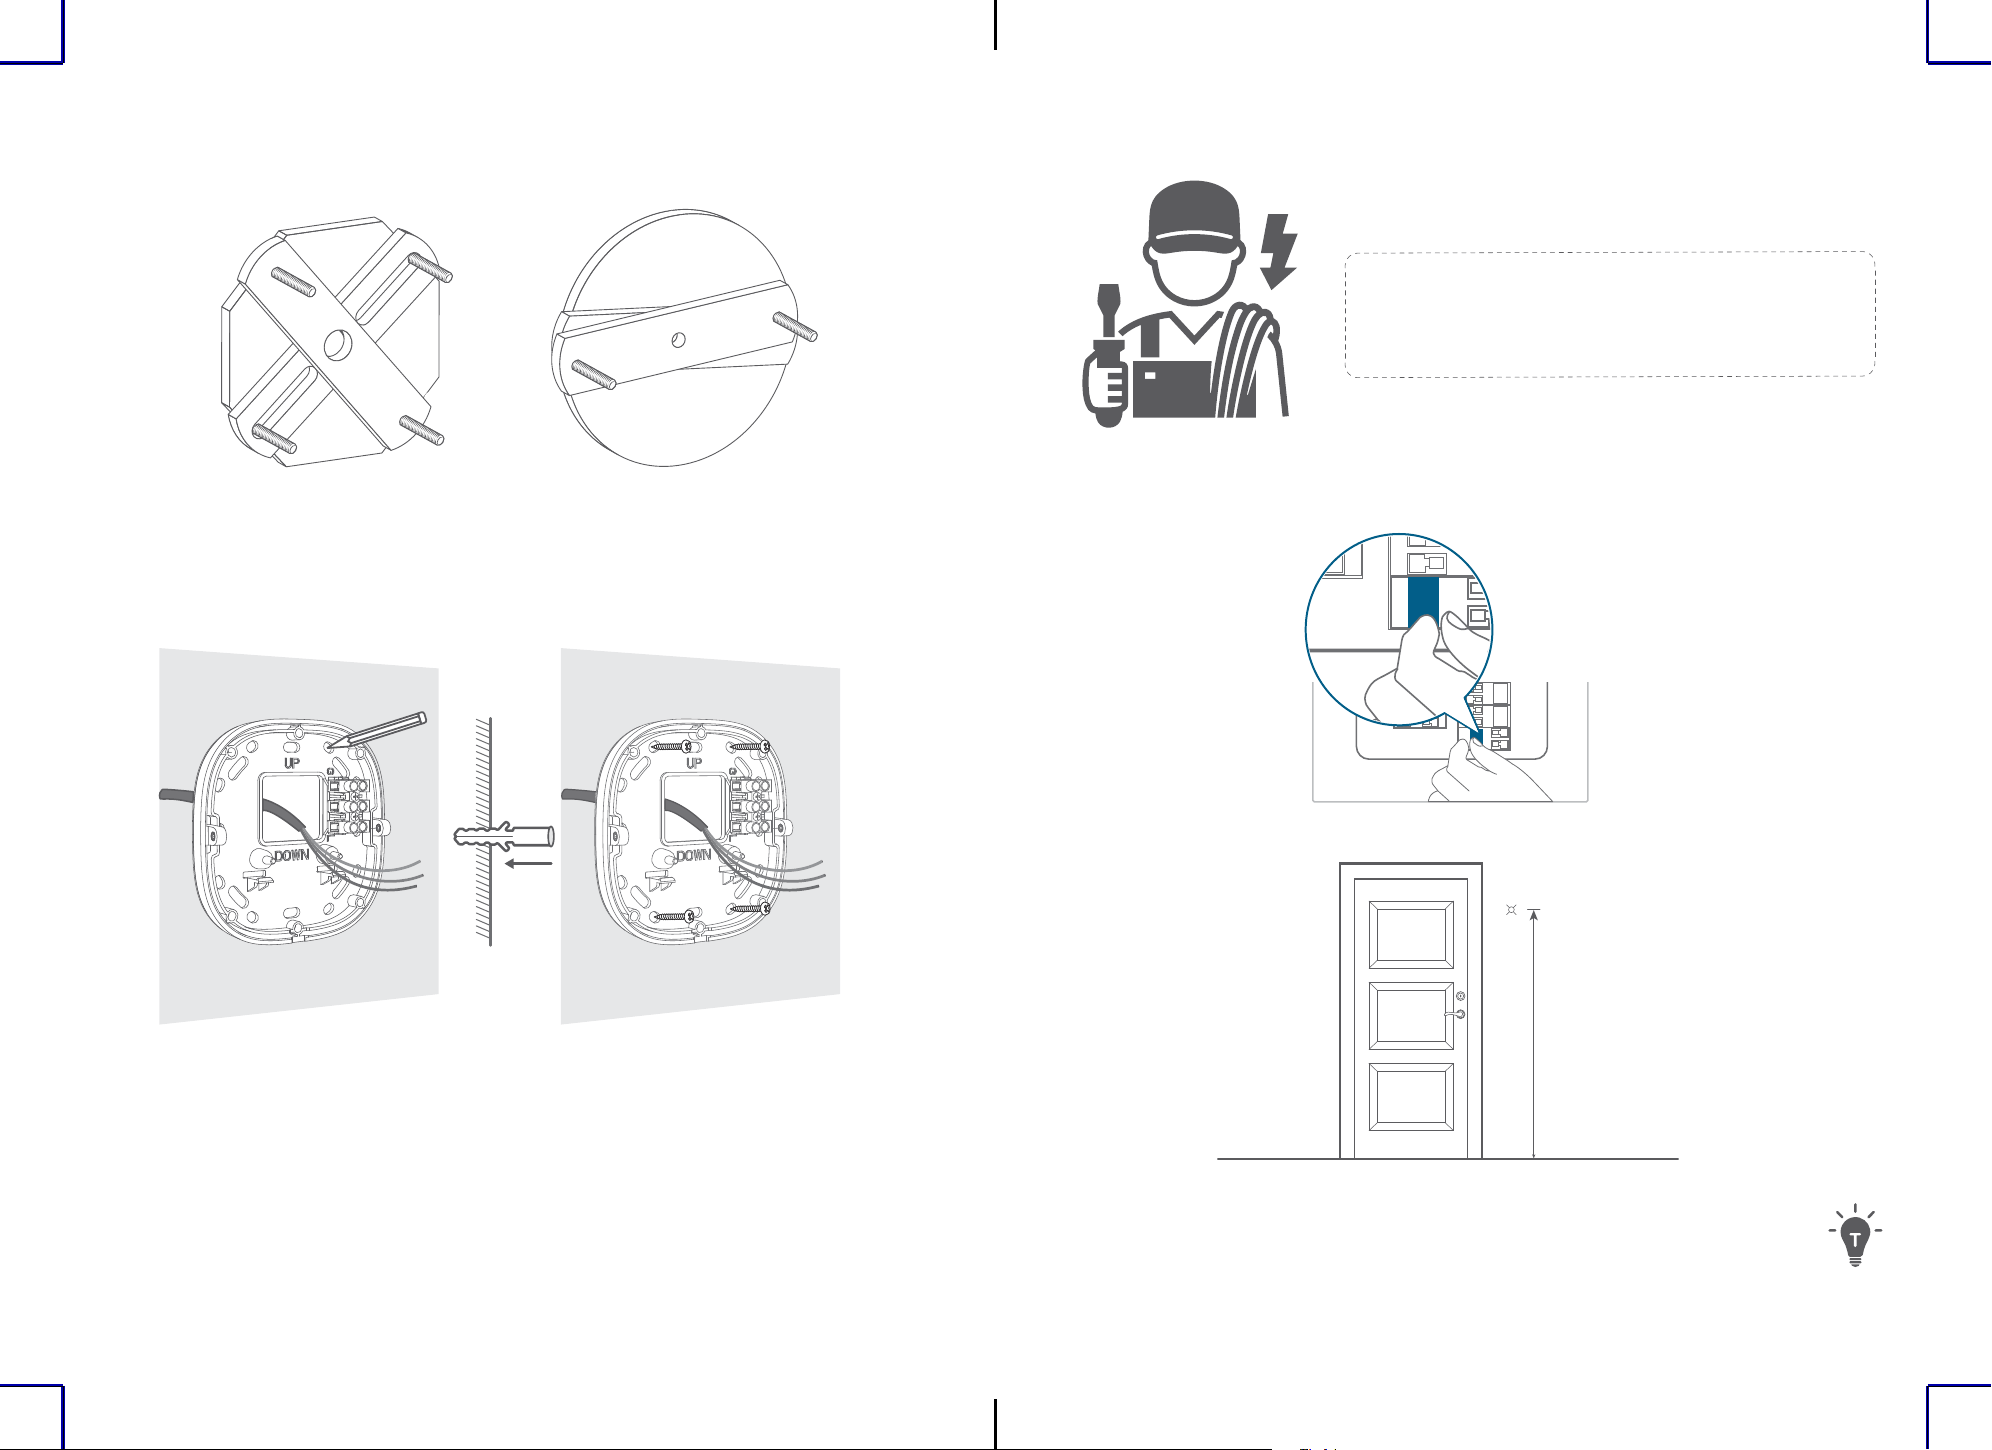
INSTALLATION
1. Turn off the circuit breaker of your home. Turn the lights on and off to check the electricity
in your home is properly turned off.
OFF
OFF
2. Select and mark the installation location on a flat section of wall.
1.8m~2m
71in~79in
For the best motion detection experience:
• Make sure the device is located on a at surface and the device is installed parallel to the wall. Do
not install the device with an upward or downward tilt.
• Install the device between 1.8m/71in and 2m/79in above ground level of the motion detection area.
Do not install the device more than 2.2m/87in above the ground.
To avoid the risk of shock, injury, or death, always
be cautious when working with electricity. Hire a
professional electrician if you're uncomfortable
working with electrical wiring.
3. If there is a mount from a previous light, remove it before continuing.
4. Screw the mounting bracket onto the wall.
• On wooden walls, do not pre-drill holes. Use the screws provided to fix the mounting
bracket onto the wall.
• For walls made of hard materials, such as stucco, brick, or concrete, pre-drill holes in the
required locations, insert the provided anchors, and then use the provided screws to fix the
mounting bracket to the wall.
(optional)

6
EN EN
7
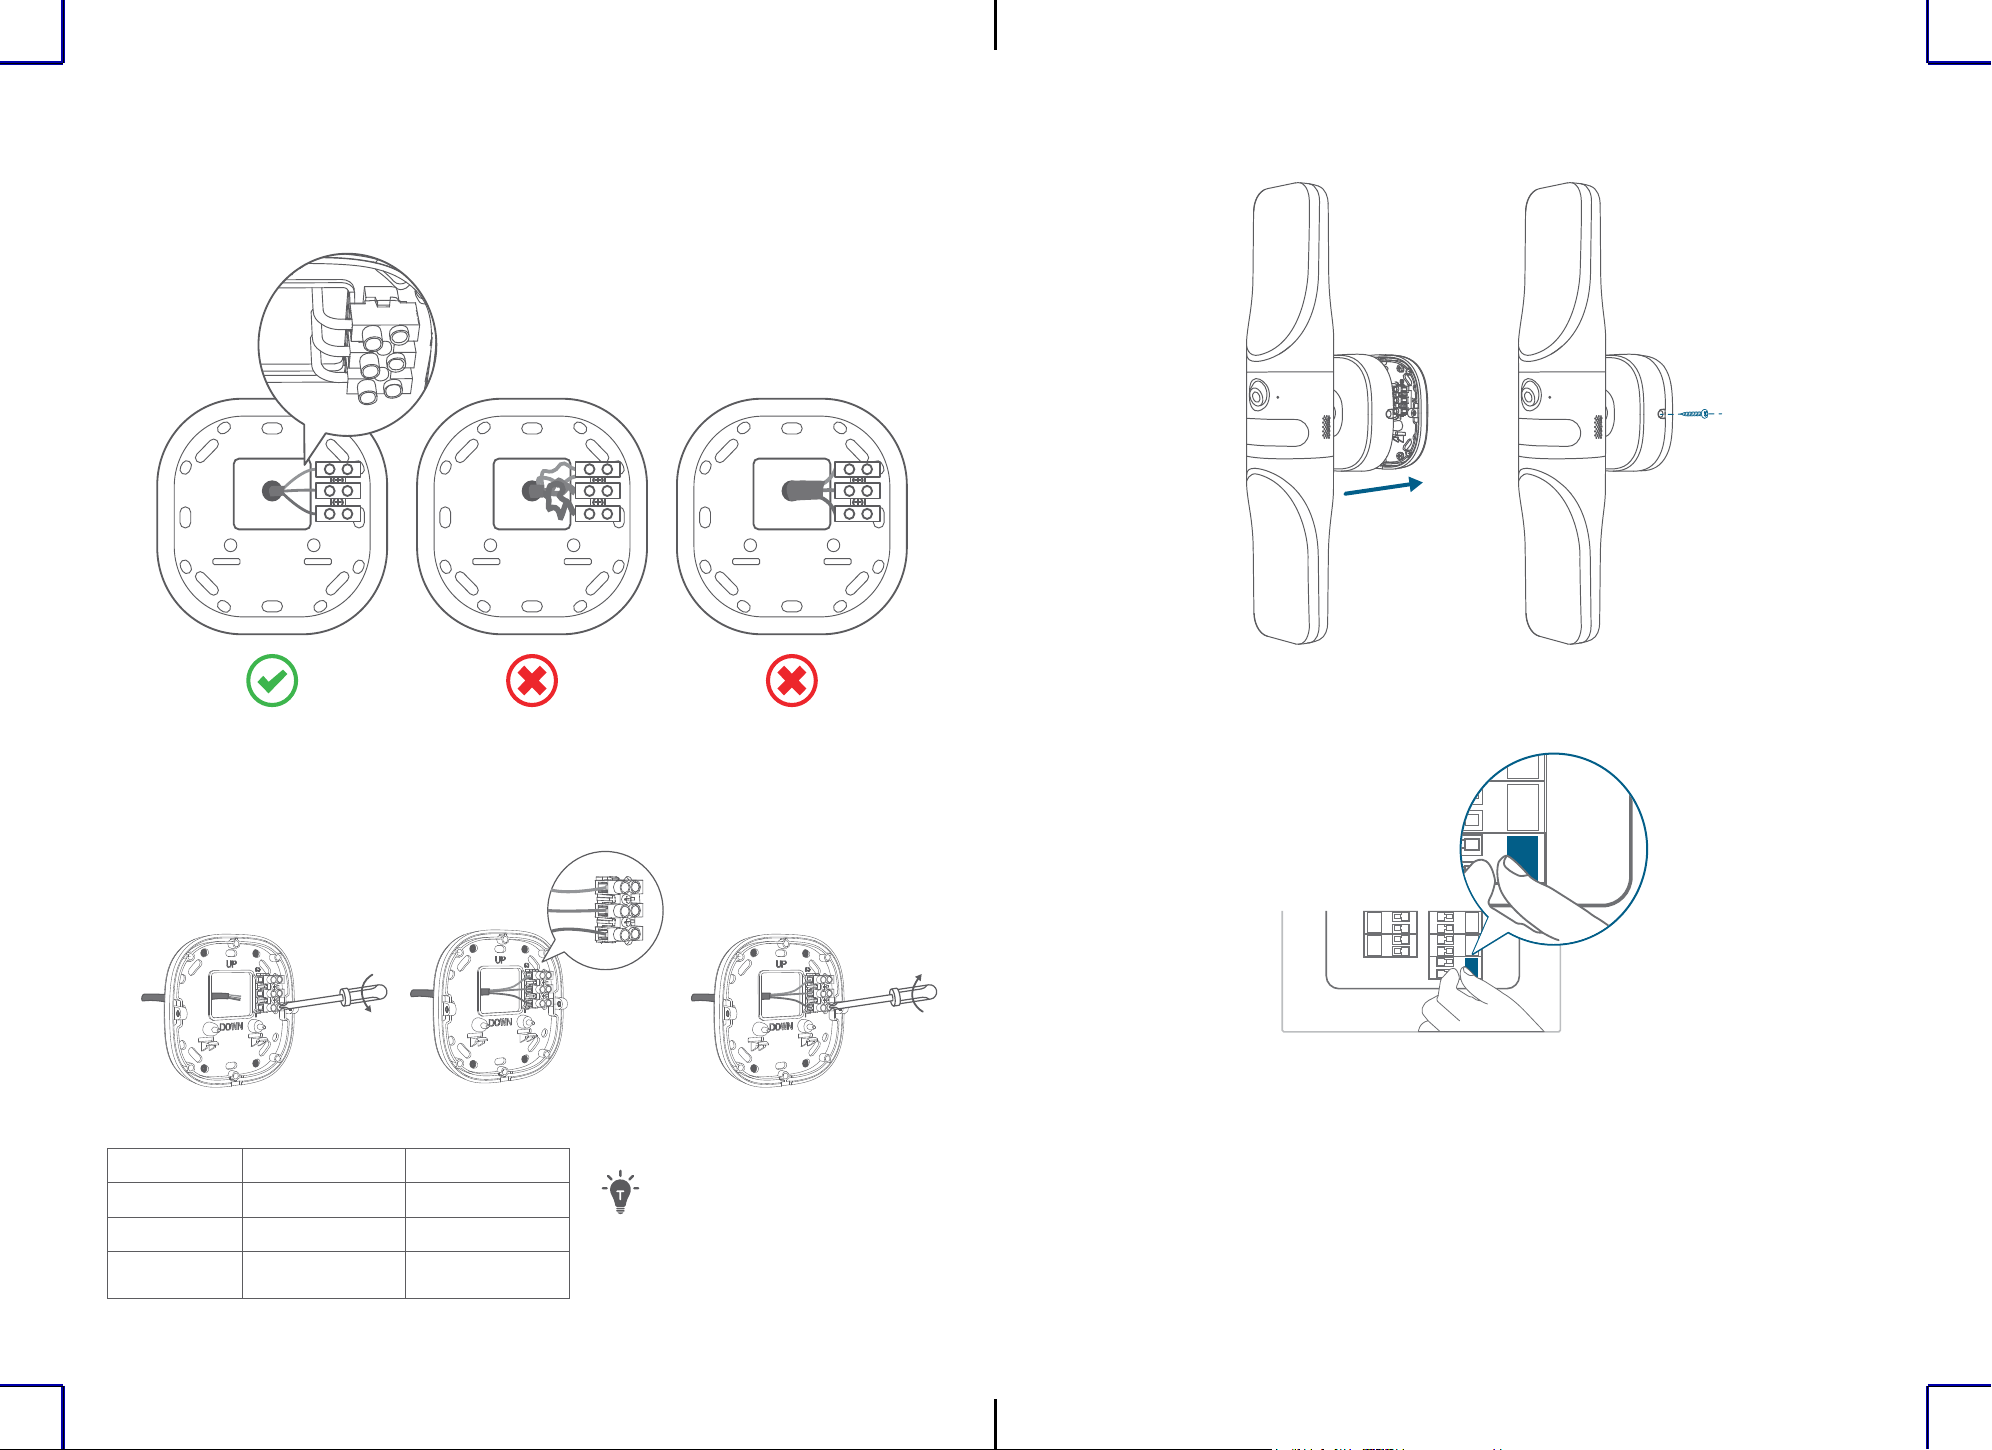
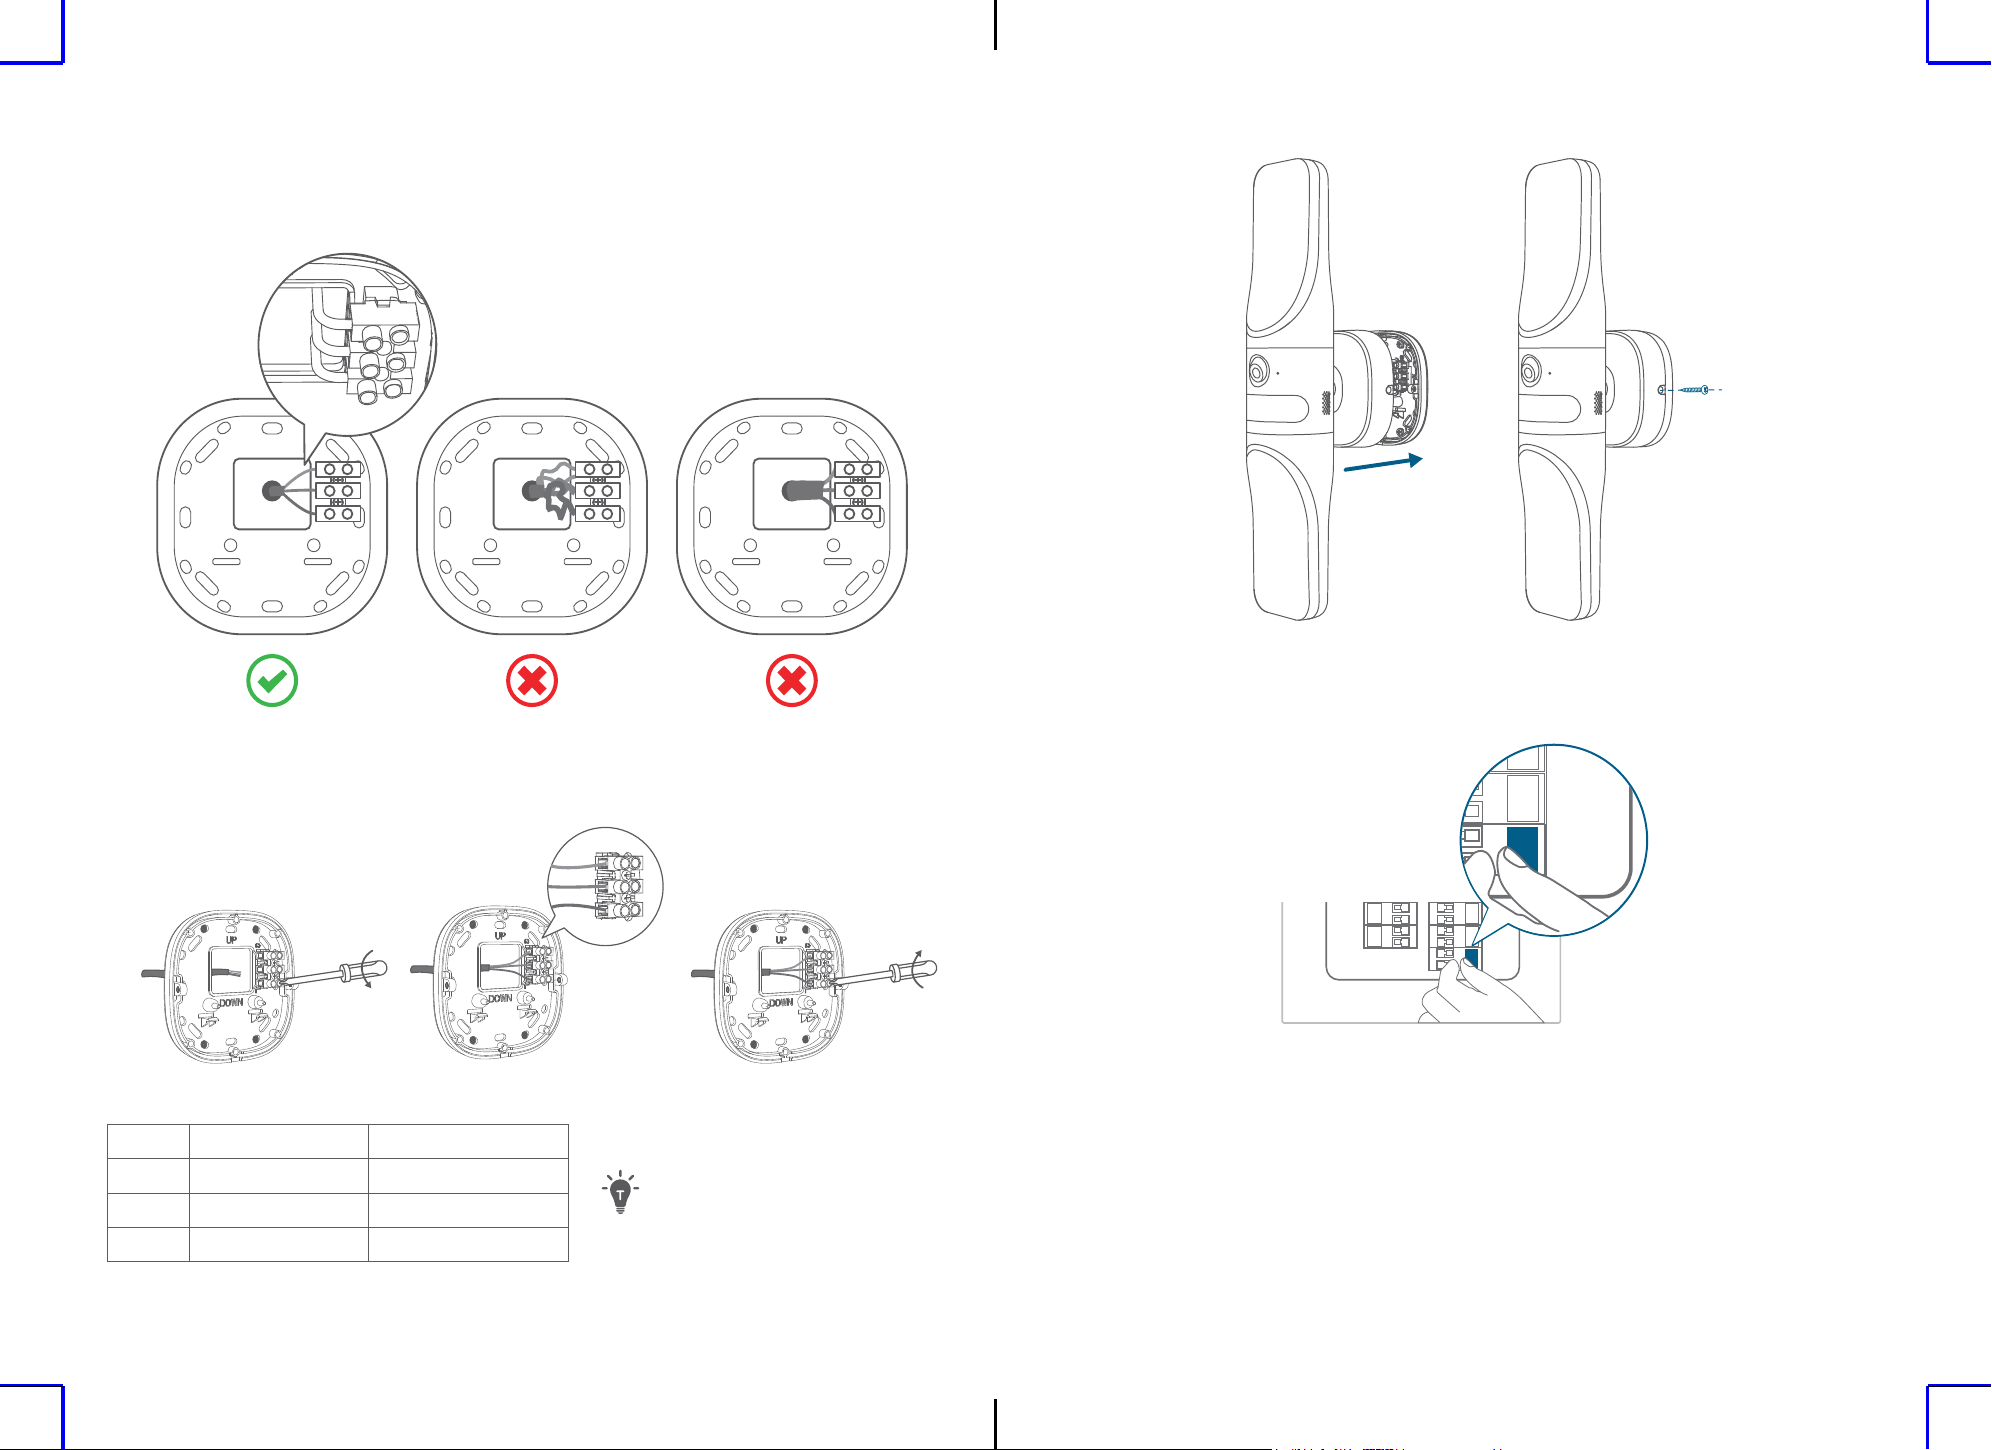
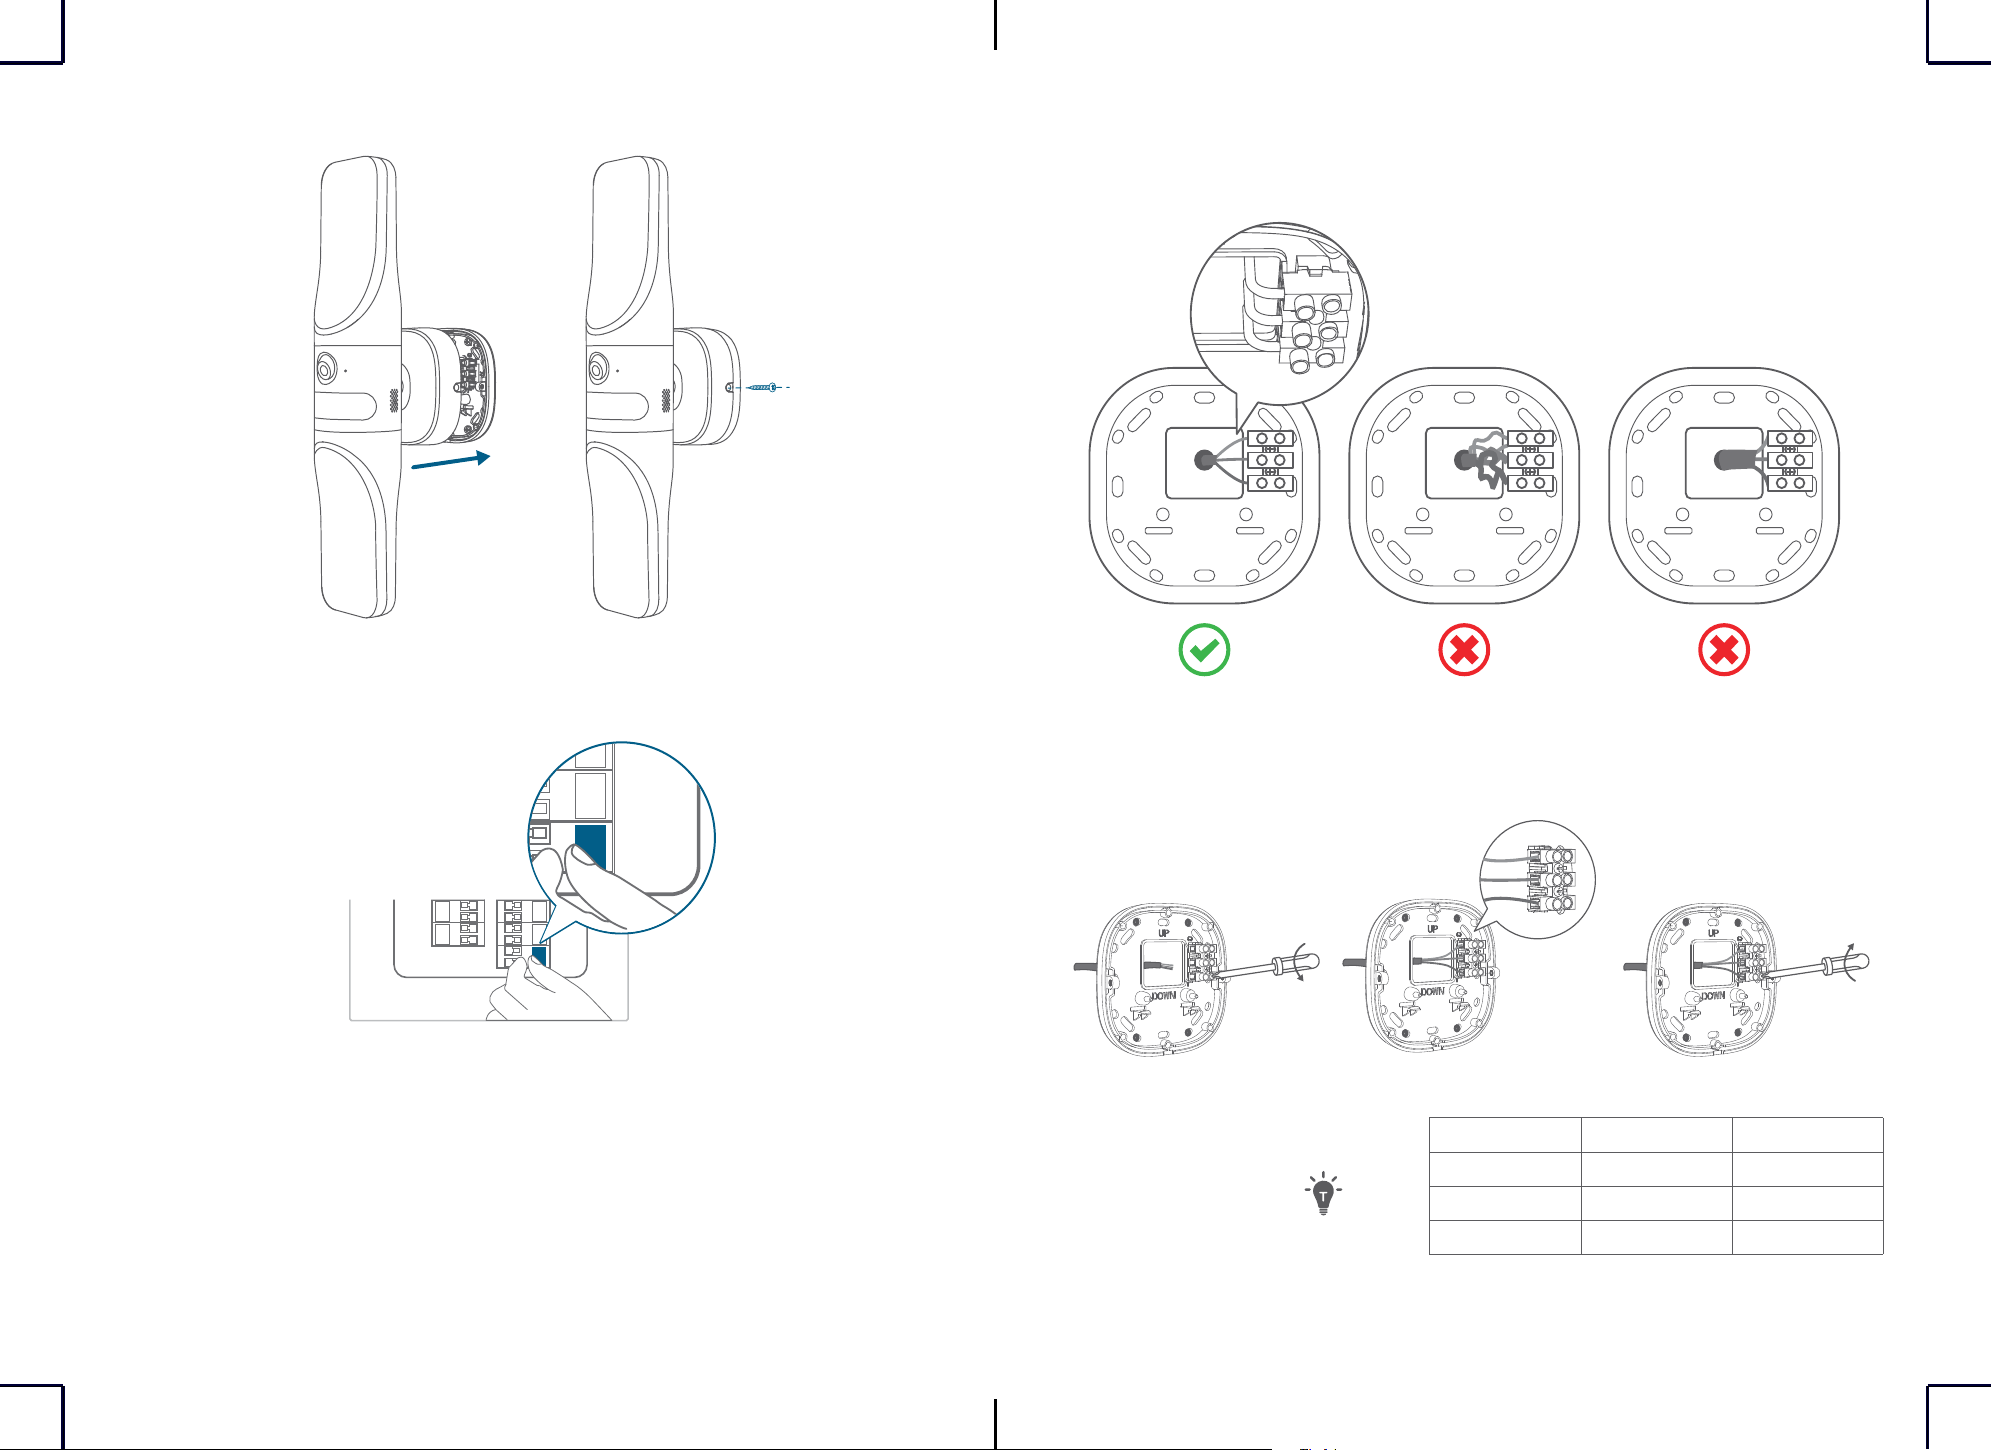
7. Mount the device onto the mounting bracket, and then secure it with a screw on each side.
8. Turn on the circuit breaker of your home.
ON
ON
5. To avoid difficulty when mounting the device onto the mounting bracket:
• Make sure the wires are not too thick.
• Try to bend the wires at a 90° angle.
90°
6. Loosen the wire screws, insert the neutral, ground, and live wires into the connectors, and
then tighten the wire screws to thoroughly secure the wires.
Neutral
Ground
Live
①②③
North America Europe
Ground Green / Yellow Green / Yellow
Neutral White Blue
Live Black Brown
The wire colors vary depending
on region.

DE
98
EN
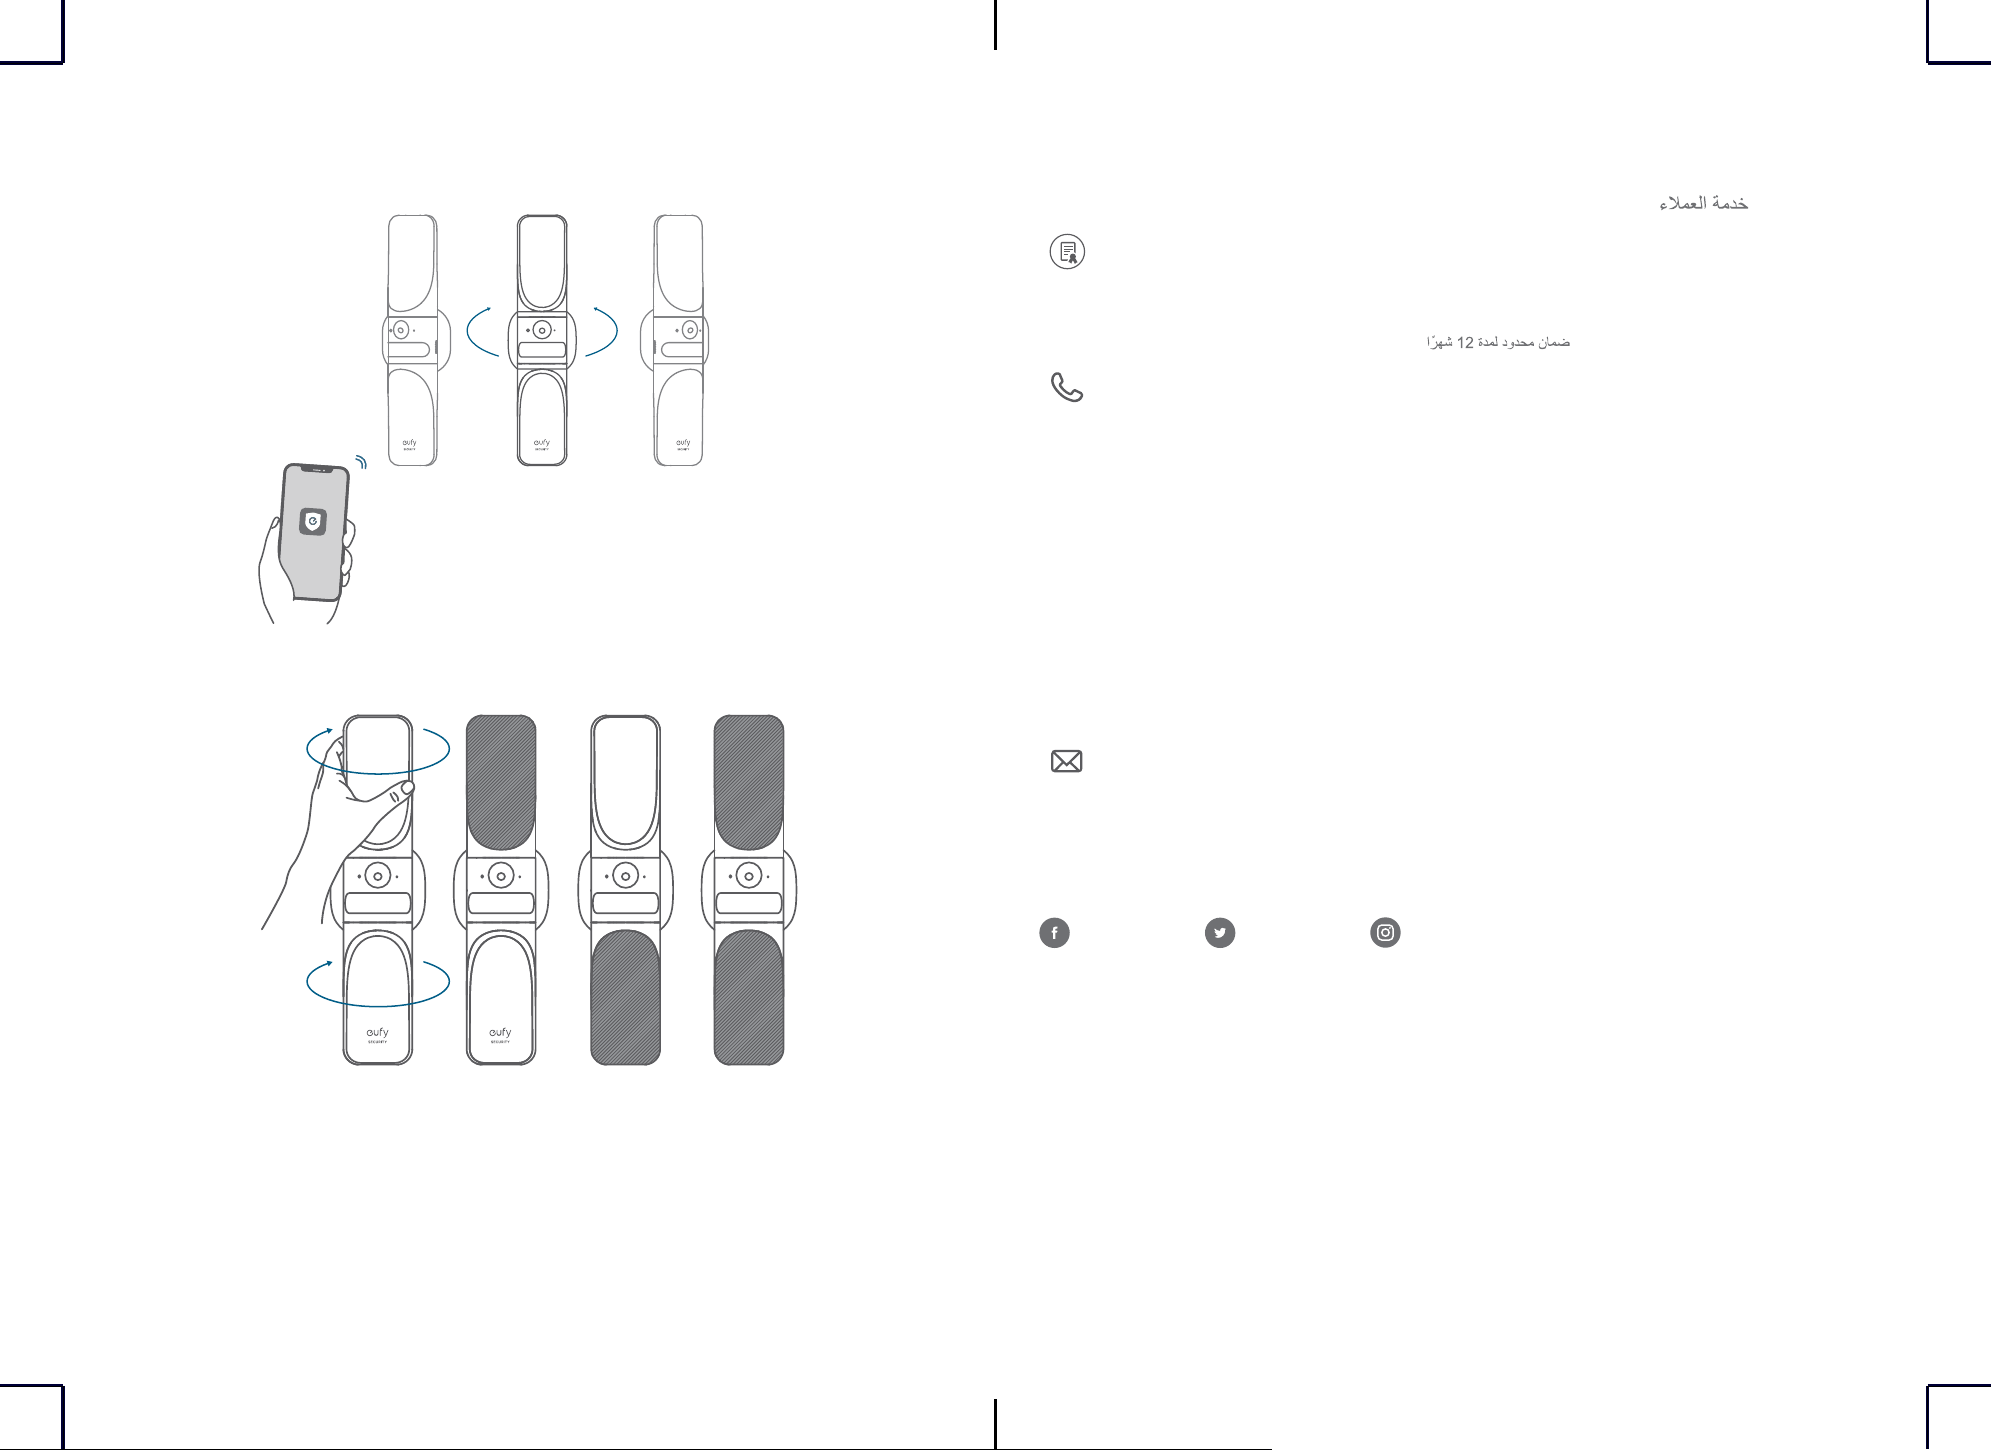
ADJUSTING ANGLES
1. Turn the device while checking the live stream from the eufy Security app until you get the
desired view.
30°
30°
2. Turn the light to find the best angle to light your space.
AUF EINEN BLICK
①
①
⑥
②
③
④
⑤
①
Lampe
②
Kameraobjektiv
③
Status-LED
④
Bewegungssensor
⑤
Micro-USB-Anschluss
⑥
Zurücksetz-Öffnung
IM LIEFERUMFANG
Wandlicht-Kamera
S100
Schraube zum
Befestigen der Kamera
Halterung
USB-Kabel
Basisschraube
KURZANLEITUNG

10
DE DE
11
Einrichten des Systems
1. Öffnen Sie die Abdeckung des USB-Anschlusses auf der Rückseite des Geräts, und
schließen Sie es mit dem mitgelieferten Kabel an die Stromversorgung an. Die Status-LED
leuchtet rot, wenn das Gerät für die Einrichtung bereit ist.
Not Included
⚠
Das Hauptlicht funktioniert nicht, wenn das Gerät über den USB-Anschluss mit Strom
versorgt wird.
2. Laden Sie die eufy Security-App herunter und richten Sie anschließend ein Konto ein.
eufy security
Google Play and the Google Play
logo are trademarks of Google Inc.
Apple and the Apple logo are
trademarks of Apple Inc.
3. Scannen Sie den QR-Code auf der Rückseite des Geräts oder in der Kurzanleitung und
folgen Sie dann den Anweisungen auf dem Bildschirm, um die Einrichtung abzuschließen.
4. Trennen Sie das Gerät von der Stromversorgung, schließen Sie die Abdeckung des USB-
Anschlusses und befestigen Sie die Gummistopfen.

12
DE DE
13
INSTALLATION
1. Schalten Sie die Sicherung in Ihrem Haus aus. Schalten Sie das Licht ein und aus, um zu
prüfen, ob der Strom in Ihrer Wohnung ordnungsgemäß abgeschaltet ist.
OFF
OFF
2. Wählen und markieren Sie den Installationsort auf einem ebenen Wandabschnitt.
1.8m~2m
71in~79in
Für eine optimale Bewegungserkennung:
• Stellen Sie sicher, dass das Gerät auf einer ebenen Fläche steht und parallel zur Wand installiert ist.
Installieren Sie das Gerät nicht mit einer Neigung nach oben oder nach unten.
• Installieren Sie das Gerät zwischen 1,8 m und 2 m über dem Boden des
Bewegungserkennungsbereichs.Installieren Sie das Gerät nicht höher als 2,2 m über dem Boden.
Um das Risiko eines Stromschlags, einer Verletzung
oder des Todes zu vermeiden, gehen Sie bei
Arbeiten mit Elektrizität immer vorsichtig vor.
Beauftragen Sie einen professionellen Elektriker,
wenn Sie sich bei Arbeiten an der elektrischen
Verkabelung nicht sicher fühlen.
3. Falls eine Halterung von einer früheren Leuchte vorhanden ist, entfernen Sie diese, bevor
Sie fortfahren.
4. Schrauben Sie dann die Halterung an die Wand.
• Bohren Sie bei Holzwänden keine Löcher vor. Befestigen Sie die Montagehalterung mit den
mitgelieferten Schrauben an der Wand.
• Bei Wänden aus hartem Material, wie z.B. Stuck, Backstein oder Backstein, bohren
Sie Löcher an den gewünschten Stellen vor, setzen Sie die mitgelieferten Dübel ein
und befestigen Sie die Halterung mit den mitgelieferten Schrauben an der Wand.
(optional)
14
DE DE
15
7. Montieren Sie das Gerät auf die Halterung und sichern Sie es mit einer Schraube auf jeder
Seite.
8. Schalten Sie die Sicherung in Ihrem Haus an.
ON
ON
5. So vermeiden Sie Schwierigkeiten bei der Montage des Geräts auf der Montagehalterung:
• Stellen Sie sicher, dass die Kabel nicht zu dick sind.
• Versuchen Sie, die Kabel in einem Winkel von 90° zu biegen.
90°
6. Lösen Sie die Kabelschrauben, stecken Sie den Neutralleiter, den Schutzleiter und den
stromführenden Leiter in die Verbinder und ziehen Sie dann die Kabelschrauben fest, um die
Kabel zu sichern.
Neutral
Ground
Live
①②③
Nordamerika Europa
Schutzleiter Grün/Gelb Grün/Gelb
Neutralleiter Weiß Blau
Stromführender
Leiter
Schwarz Braun
Der Farben der Kabel können je
nach Region variieren.

ES
1716
DE
EINSTELLEN DES WINKELS
1. Drehen Sie das Gerät, während Sie den über die eufy Security-App zugänglichen Live-
Stream überprüfen, bis Sie die gewünschte Ansicht erhalten.
30°
30°
2. Drehen Sie das Licht, um den besten Winkel für die Beleuchtung Ihres Raums zu finden.
VISTA GENERAL
①
①
⑥
②
③
④
⑤
①
Luz
②
Objetivo de la cámara
③
LED de estado
④
Sensor de movimiento
⑤
Puerto micro-USB
⑥
Orificio de reinicio
Contenido
Cámara con luz de
pared S100
Tornillo de sujeción
de la cámara
Base de montaje
Cable USB
Tornillo para la base
Guía de inicio rápido

18
ES ES
19
Configuración del sistema
1. Abra la tapa del puerto USB de la parte posterior del dispositivo y conecte el cable de
corriente incluido. El LED de estado se iluminará en rojo cuando el dispositivo esté listo para
configurarse.
Not Included
⚠
Las luces principales no responderán mientras el dispositivo esté funcionando a través
del puerto USB.
2. Descargue e instale la aplicación eufy Security y cree una cuenta.
eufy security
Google Play and the Google Play
logo are trademarks of Google Inc.
Apple and the Apple logo are
trademarks of Apple Inc.
3. Escanee el código QR que está en la parte posterior del dispositivo o la guía de inicio
rápido y siga las instrucciones en pantalla para completar la configuración.
4. Desenchufe el dispositivo de la corriente, cierre la tapa del puerto USB y luego fije bien los
tapones de goma.
20
ES ES
21
INSTALACIÓN
1. Desconecte el diferencial de su casa. Encienda y apague las luces para comprobar que no
hay suministro de electricidad en su hogar.
OFF
OFF
2. Localice y marque la zona de instalación en un área lisa y plana de la pared.
1.8m~2m
71in~79in
Para que la detección de movimiento funcione de la mejor manera:
• Asegúrese de que el dispositivo esté colocado en una supercie plana y que se monte paralelo a
la pared.No instale el dispositivo inclinado hacia arriba o hacia abajo.
• Coloque el dispositivo a una altura de entre 1,8 m (71 pulg.) y 2 m (79 pulg.) sobre el nivel del suelo
que haya sobre la zona de detección de movimiento.No monte el dispositivo a más de 2,2 m (87
pulg.) de altura del suelo.
Para evitar el riesgo de descargas eléctricas,
lesiones o incluso muerte, tenga siempre cuidado
al trabajar con electricidad. Llame a un electricista
profesional si no quiere manipular el cableado
eléctrico.
3. Si hay un soporte de una luz ya instalada, retírela antes de continuar.
4. Atornille el soporte de montaje a la pared.
• En paredes de madera, no taladre agujeros. Utilice los tornillos incluidos para fijar el
soporte de montaje a la pared.
• En paredes hechas de materiales duros, como estuco, ladrillo u hormigón, taladre
los agujeros en los puntos correspondientes, introduzca los anclajes incluidos
y luego use los tornillos designados para fijar el soporte de montaje a la pared.
(optional)

22
ES ES
23
7. Coloque el dispositivo en el soporte de montaje y fíjelo con un tornillo en cada lado.
8. Conecte el diferencial de su casa.
ON
ON
5. Cómo facilitar la instalación del dispositivo en el soporte de montaje:
• Compruebe que los cables no sean demasiado gruesos.
• Intente doblar los cables en un ángulo de 90°.
90°
6. Afloje los tornillos para cables, introduzca los cables neutros, de toma de tierra y de
corriente en los conectores y luego apriete los tornillos para cables para sujetar bien los
cables.
Neutral
Ground
Live
①②③
Norteamérica Europa
Toma de tierra Verde / Amarillo Verde / Amarillo
Neutro Blanco Azul
De corriente Negro Marrón
Los colores de los cables varían
según la región.
FR
2524
ES
ÁNGULOS DE AJUSTE
1. Gire el dispositivo a la vez que comprueba que sale la imagen en directo en la aplicación
eufy Security hasta conseguir el ángulo deseado.
30°
30°
2. Gire la luz para dar con el mejor ángulo para iluminar el espacio.
RÉCAPITULATIF
①
①
⑥
②
③
④
⑤
①
Lumière
②
Objectif de caméra
③
Voyant d’état
④
Détecteur de mouvement
⑤
Port micro USB
⑥
Orifice de réinitialisation
Contenu
S100Wall Light Cam
Vis de fixation de la
caméra
Base de montage
Câble USB
Vis de base
GUIDE DE
DÉMARRAGE RAPIDE
26
FR FR
27
Configuration du système
1. Ouvrez le couvercle du port USB à l’arrière de l’appareil, puis connectez-le à l’alimentation
avec le câble fourni. Le voyant d’état s’allume en rouge lorsque l’appareil est prêt à être
configuré.
Not Included
⚠
Les lumières principales ne fonctionnent pas lorsque l’appareil est alimenté par le port
USB.
2. Téléchargez et installez l’application eufy Security, puis créez un compte.
eufy security
Google Play and the Google Play
logo are trademarks of Google Inc.
Apple and the Apple logo are
trademarks of Apple Inc.
3. Scannez le code QR au dos de l’appareil ou sur le Guide de démarrage rapide, puis suivez
les instructions à l’écran pour terminer la configuration.
4. Débranchez l’appareil de l’alimentation et fermez le couvercle du port USB, puis fixez les
bouchons en caoutchouc.

28
FR FR
29
INSTALLATION
1. Coupez le disjoncteur de votre maison. Allumez et éteignez les lumières pour vérifier que
l’électricité de votre maison est bien coupée.
OFF
OFF
2. Sélectionnez et marquez l’emplacement de l’installation sur une section plate du mur.
1.8m~2m
71in~79in
Pour une expérience optimale de la détection de mouvement:
• Assurez-vous que l’appareil est situé sur une surface plane et que l’appareil est installé
parallèlement au mur.N’installez pas l’appareil avec une inclinaison vers le haut ou vers le bas.
• Installez l’appareil entre 1,8m et 2m au-dessus du niveau du sol de la zone de détection de
mouvement.N’installez pas l’appareil à plus de 2,2m au-dessus du sol.
Pour éviter tout risque d’électrocution, de blessure
ou de mort, soyez toujours prudent lorsque
vous travaillez avec l’électricité. Faites appel à un
électricien professionnel si vous ne vous sentez pas
à l’aise avec le câblage électrique.
3. S’il y a une fixation d’une lampe précédente, enlevez-la avant de continuer.
4. Vissez le support de montage sur le mur.
• Sur les murs en bois, ne pré-percez pas de trous. Utilisez les vis fournies pour fixer le
support de montage au mur.
• Pour les murs en matériaux durs, tels que le stuc, la brique ou le béton,
percez des trous aux endroits requis, insérez les ancrages fournis,
puis utilisez les vis fournies pour fixer le support de montage au mur.
(optional)
30
FR FR
31
7. Montez l’appareil sur le support de montage, puis fixez-le avec une vis de chaque côté.
8. Allumez le disjoncteur de votre maison.
ON
ON
5. Pour éviter toute difficulté lors du montage de l’appareil sur le support de montage:
• Assurez-vous que les fils ne sont pas trop épais.
• Essayez de plier les fils à un angle de 90°.
90°
6. Desserrez les vis, insérez les fils neutre, de terre et sous tension dans les connecteurs, puis
serrez les vis pour bien fixer les fils.
Neutral
Ground
Live
①②③
Amérique du Nord Europe
Terre Vert jaune Vert jaune
Neutre Blanc Bleue
Phase Noir Marron
Les couleurs des ls varient selon
la région.

IT
3332
FR
RÉGLAGE DES ANGLES
1. Tournez l’appareil tout en vérifiant le flux en direct depuis l’application eufy Security jusqu’à
ce que vous obteniez la vue souhaitée.
30°
30°
2. Tournez la lumière pour trouver le meilleur angle pour éclairer votre espace.
DESCRIZIONE DEL PRODOTTO
①
①
⑥
②
③
④
⑤
①
Luce
②
Obiettivo della telecamera
③
LED di stato
④
Sensore di movimento
⑤
Porta micro USB
⑥
Foro di ripristino
CONTENUTO DELLA CONFEZIONE
S100 Telecamera e
luce da parete
Vite di fissaggio della
telecamera
Base di montaggio
Cavo USB
Vite di base
Guida rapida

34
IT IT
35
Configurazione del sistema
1. Aprire il coperchio della porta USB sul retro del dispositivo, quindi collegarlo
all'alimentazione con il cavo in dotazione. Quando il dispositivo è pronto per la
configurazione, il LED di stato è rosso.
Not Included
⚠
Le luci principali non funzioneranno quando il dispositivo è alimentato tramite la porta
USB.
2. Scaricare e installare l'app eufy Security e configurare un account.
eufy security
Google Play and the Google Play
logo are trademarks of Google Inc.
Apple and the Apple logo are
trademarks of Apple Inc.
3. Scansionare il codice QR sul retro del dispositivo o della Guida introduttiva, quindi seguire
le istruzioni sullo schermo per completare la configurazione.
4. Scollegare il dispositivo dall'alimentazione e chiudere il coperchio della porta USB, quindi
fissare i tappi in gomma.

36
IT IT
37
INSTALLAZIONE
1. Spegnere l'interruttore automatico dell'abitazione. Accendere e spegnere le luci per
controllare che l'elettricità nell'abitazione sia effettivamente spenta.
OFF
OFF
2. Selezionare e contrassegnare la posizione di installazione su una sezione piana del muro.
1.8m~2m
71in~79in
Per la migliore esperienza di rilevamento del movimento:
• Assicurarsi che il dispositivo sia posizionato su una supercie piana e che sia installato
parallelamente alla parete.Non installare il dispositivo con un'inclinazione verso l'alto o verso il
basso.
• Installare il dispositivo a una distanza compresa tra 1,8 m e 2 m dal suolo dell'area di rilevamento
del movimento. Non installare il dispositivo a più di 2,2 m dal suolo.
Per evitare il rischio di scosse elettriche, lesioni
o morte, prestare sempre attenzione quando si
lavora con l'elettricità. Assumere un elettricista
professionista se si è a disagio nel lavorare con i
cavi elettrici.
3. Se è presente la montatura di una luce precedente, rimuoverla prima di continuare.
4. Avvitare la staffa di montaggio alla parete.
• Su pareti in legno non praticare fori. Utilizzare le viti in dotazione per fissare la staffa di
montaggio alla parete.
• Per pareti in materiali duri, come stucco, mattoni o cemento, eseguire
i fori nei punti richiesti, inserire i tasselli in dotazione, quindi utilizzare
le viti in dotazione per fissare la staffa di montaggio alla parete.
(optional)

38
IT IT
39
7. Montare il dispositivo sulla staffa di montaggio, quindi fissarlo con una vite su ciascun lato.
8. Accendere l'interruttore automatico dell'abitazione.
ON
ON
5. Per evitare difficoltà durante il montaggio del dispositivo sulla staffa di montaggio:
• Accertarsi che i cavi non siano troppo spessi.
• Provare a piegare i cavi a un angolo di 90°.
90°
6. Allentare le viti dei cavi, inserire i cavi neutro, di messa a terra e sotto tensione nei
connettori, quindi stringere le viti dei cavi per fissarli completamente.
Neutral
Ground
Live
①②③
Nord America Europa
Messa a terra Verde/giallo Verde/giallo
Neutro Bianco Blu
Sotto tensione Nero Marrone
I colori dei cavi variano a
seconda dell'area geograca.

NL
4140
IT
REGOLAZIONE DEGLI ANGOLI
1. Ruotare il dispositivo mentre si controlla la riproduzione in diretta streaming dall'app eufy
Security finché non si ottiene la visualizzazione desiderata.
30°
30°
2. Ruotare la luce per trovare l'angolazione migliore per illuminare lo spazio.
IN EEN OOGOPSLAG
①
①
⑥
②
③
④
⑤
①
Lamp
②
Cameralens
③
Statusled
④
Bewegingssensor
⑤
Micro-USB-poort
⑥
Resetgaatje
WAT ZIT ER IN DE DOOS?
S100 Wall Light Cam
Bevestigingsschroef
camera
Montagevoet
USB-kabel
Bevestigingsschroef
montagevoet
Snelstartgids

42
NL NL
43
Het systeem instellen
1. Open het klepje van de USB-poort achterop het apparaat en sluit de meegeleverde kabel
aan op de USB-poort en de voeding. Als het apparaat kan worden ingesteld, brandt de
indicatieled rood.
Not Included
⚠
De hoofdlampen werken niet als het apparaat via de USB-poort van stroom wordt
voorzien.
2. Download en installeer de eufy Security-app en stel een account in.
eufy security
Google Play and the Google Play
logo are trademarks of Google Inc.
Apple and the Apple logo are
trademarks of Apple Inc.
3. Scan de QR-code achterop het apparaat of de beknopte handleiding en volg de instructies
op het scherm om het instellen te voltooien.
4. Koppel het apparaat los van de voeding en sluit het klepje van de USB-poort en de
rubberen dopjes.

44
NL NL
45
MONTAGE
1. Onderbreek de stroomvoorziening van uw huis. Doe het licht aan en uit om te controleren
of de elektriciteit echt is uitgeschakeld.
OFF
OFF
2. Kies een vlakke plek op de muur om de lamp te monteren en markeer de plek.
1.8m~2m
71in~79in
Om de bewegingsdetectie zo goed mogelijk te laten werken:
• Zorgt u dat het apparaat op een vlakke ondergrond en parallel aan de muur wordt gemonteerd.
Plaats het apparaat niet omhoog of omlaag gekanteld.
• Monteert u het apparaat tussen 1,8 en 2 meter boven de grond waarop u bewegingen wilt
detecteren.Monteer het apparaat niet hoger dan 2,2meter boven de grond.
Wees altijd voorzichtig met elektra om schokken,
letsel of overlijden te voorkomen. Schakel een
professionele elektricien in als u niet bekend bent
met het werken met elektrische bedrading.
3. Als er nog een beugel van een eerdere lamp aanwezig is, verwijdert u die eerst.
4. Schroef de montagevoet op de muur.
• In een houten ondergrond hoeft u niet voor te boren. Gebruik de meegeleverde schroeven
om de montagevoet aan de muur te bevestigen.
• In harde ondergronden, zoals stucwerk, baksteen of beton, boort u op
de vereiste locaties gaten voor, plaatst u de meegeleverde pluggen en
bevestigt u vervolgens de montagevoet met de meegeleverde schroeven.
(optional)

46
NL NL
47
7. Plaats het apparaat op de montagevoet en zet het vast met een schroef aan elke kant.
8. Herstel de stroomvoorziening van uw huis.
ON
ON
5. Om problemen bij het monteren van het apparaat op de montagebeugel te voorkomen:
• Moet u zorgen dat de draden niet te dik zijn.
• Kunt u proberen om de draden in een hoek van 90° te buigen.
90°
6. Draai de schroeven van de draadklemmen los, steek de fase-, nul- en aardedraad in de
klemmen en draai de schroeven weer aan, zodat de draden stevig vastzitten.
Neutral
Ground
Live
①②③
Noord-Amerika Europa
Aarde Groen-geel Groen-geel
Nul Wit Blauw
Fase Zwart Bruin
De kleuren van de draden
verschillen per regio.

PT
4948
NL
DE HOEK AANPASSEN
1. Draai het apparaat terwijl u de livestream van de eufy Security-app bekijkt, tot u het
gewenste beeld hebt.
30°
30°
2. Draai het licht om de juiste hoek voor het verlichten van uw ruimte te vinden.
VISTA GERAL
①
①
⑥
②
③
④
⑤
①
Luz
②
Lente da câmara
③
LED de estado
④
Sensor de movimento
⑤
Porta micro-USB
⑥
Orifício de reposição
INCLUÍDO
Câmara com luz de
parede S100
Parafuso de fixação
da câmara
Base de montagem
Cabo USB
Parafuso da base
GUIA DE INÍCIO
RÁPIDO

50
PT PT
51
Configurar o sistema
1. Abra a tampa da porta USB na parte posterior do dispositivo e depois ligue à corrente
com o cabo fornecido. O LED de estado fica vermelho quando o dispositivo estiver pronto
para ser configurado.
Not Included
⚠
As luzes principais não funcionam enquanto o dispositivo receber energia através da
porta USB.
2. Transfira e instale a aplicação eufy Security e depois configure uma conta.
eufy security
Google Play and the Google Play
logo are trademarks of Google Inc.
Apple and the Apple logo are
trademarks of Apple Inc.
3. Leia o código QR existente na parte posterior do dispositivo ou Guia de início rápido e siga
as instruções apresentadas no ecrã para concluir a configuração.
4. Desligue o dispositivo da corrente, feche a tampa da porta USB e depois fixe as tampas de
borracha.
52
PT PT
53
INSTALAÇÃO
1. Desligue o disjuntor de sua casa. Ligue e desligue as luzes para verificar se cortou o
fornecimento de eletricidade em sua casa.
OFF
OFF
2. Selecione e marque o local de instalação numa secção lisa da parede.
1.8m~2m
71in~79in
Para usufruir da melhor experiência de deteção de movimento:
• Certique-se de que o dispositivo está posicionado numa superfície lisa e é instalado
paralelamente à parede.Não instale o dispositivo com uma inclinação ascendente ou
descendente.
• Instale o dispositivo entre 1,8 m e 2 m acima do nível do solo da área de deteção de movimento.
Não instale o dispositivo a mais de 2,2 m acima do solo.
Para evitar o risco de choque, ferimentos ou morte,
tenha sempre cuidado quando trabalhar com
eletricidade. Contrate um eletricista profissional
se não se sentir confortável em trabalhar com fios
elétricos.
3. Se existir uma instalação anterior de um equipamento de luz, remova-a antes de
continuar.
4. A seguir, aparafuse o suporte de montagem à parede.
• Em paredes de madeira, não pré-perfure os orifícios. Utilize os parafusos fornecidos para
fixar o suporte de instalação à parede.
• Para paredes feitas de materiais duros, como estuque, tijolo ou cimento, pré-
perfure os orifícios nas posições necessárias, insira as buchas fornecidas e depois
utilize os parafusos fornecidos para fixar o suporte de montagem à parede.
(optional)

54
PT PT
55
7. Monte o dispositivo no suporte de montagem e fixe-o com um parafuso em cada lado.
8. Ligue o disjuntor de sua casa.
ON
ON
5. Para poder instalar facilmente o dispositivo no suporte de instalação:
• Certifique-se de que os fios não são demasiado grossos.
• Tente dobrar os fios num ângulo de 90°.
90°
6. Desaperte os parafusos dos fios, insira os fios neutro, de terra e de corrente nos
conectores e depois aperte os parafusos dos fios para fixar bem os fios.
Neutral
Ground
Live
①②③
América do Norte Europa
Terra Verde/amarelo Verde/amarelo
Neutro Branco Azul
Corrente Preto Castanho
As cores dos os variam
consoante a região.
AR
5756
PT
ÂNGULOS DE AJUSTE
1. Rode o dispositivo enquanto verifica a transmissão em direto a partir da aplicação eufy
Security até obter a vista desejada.
30°
30°
2. Vire a luz para encontrar o melhor ângulo para iluminar o espaço.
ةعيرس ةرظن
①
①
⑥
②
③
④
⑤
حابصم①
اريماكلا ةسدع②
ةلاحلا LED رشؤم③
ةكرحلا رعشتسم④
Micro USB ذفنم ⑤
نييعتلا ةداعإ ةحتف⑥
ةن
ّ
مضملا مزاوللا
S100 طئاحلا حابصم اريماك
اريماكلا تيبثت
ّ
يغرب
بيكرتلا ةدعاق
USB لباك
ةدعاقلا يغرب
عيرسلا ءدبلا ليلد
ماظنلا دادعإ
ةلاحلا LED رشؤم رهظيس .رفوتملا لباكلا مادختساب ةقاطلاب ه
ّ
لصو مث ،زاهجلا نم يفلخلا ءزجلا يف دوجوملا USB ذفنم ءاطغ حتفا .1
.دادعل ا
ً
زهاج زاهجلا نوكي امدنع رمحا نوللاب
Not Included
.USB ذفنم ربع زاهجلا ليغشت ءانثأ ةيسيئرلا حيباصملا لمعت نل *
.باسح دادعإب مق مث ،هتبثو eufy Security قيبطت ل
زن .2
eufy security
Google Play and the Google Play
logo are trademarks of Google Inc.
Apple and the Apple logo are
trademarks of Apple Inc.
ةشاشلا ىلع رهظت يتلا تاميلعتلا عبتا مث ، عيرسلا ءدبلا ليلد وأ زاهجلا نم يفلخلا ءزجلا ىلع دوجوملا ةعيرسلا ةباجتسا زمر حسما .3
.دادعا لامك
.ةيطاطملا سباقملا ن
ّ
مأ مث ،USB ذفنم ءاطغ قلغأو ةقاطلا نع زاهجلا لصفا .4
59
AR AR
58
.ةعباتملا لبق هتلازإب مق ،قباس حابصمل لماح كانه ناك اذإ .3
.طئاحلا ىلع تيبثتلا ةفيتك عضول يغاربلا مدختسا .4
.طئاحلا ىلع بيكرتلا ةفيتك تيبثتل ةرفوتملا يغاربلا مدختسا .ةقبس
ُ
م بوقث لمعب مقت ،ةيبشخلا ناردجلا ىلع
يف ةقبس
ُ
م بوقث لمعب مق ،ةناسرخلا وأ بوطلا وأ صجلا لثم ،ةبلص داوم نم ةعونصملا ناردجلل ةبسنلاب
.طئاحلا ىلع بيكرتلا ةفيتك تيبثتل ةقفرملا يغاربلا مدختسا مث ،ةقفرملا تاتبثملا ل
ِ
خدأ مق ،ةبولطملا عقاوملا
(optional)
تيبثتلا
.راونا ءافطإو ليغشت قيرط نع كلزنم يف يبرهكلا رايتلا عاطقنا نم ققحت .كلزنم يف ةيئابرهكلا ةرئادلا عطاق ليغشت فقوأ . 1
OFF
OFF
.رادجلا نم حطسم ءزج ىلع بيكرتلا عقوم ز
ّ
يمو ددح .2
1.8m~2m
71in~79in
:ةكرحلا فاشتك ةبرجت لضفأ ىلع لوصحلل
.لفس وأ ىلع ةلامإب زاهجلا بيكرتب مقت .طئاحلل
ٍ
زاوم لكشب زاهجلا بيكرت نمو
ٍ
وتسم حطس ىلع زاهجلا عضو نم دكأت
بيكرتب مق .ةكرحلا فاشتكا ةقطنم يف ضرا حطس قوف ةصوب 79/نيرتمو ةصوب 71/رتم 1.8 نيب عافترا ىلع زاهجلا بيكرتب مق
.ضرا حطس قوف ةصوب 87/رتم 2.2 نع ديزي عافترا ىلع زاهجلا
دنع ا
ً
مئاد رذحلا
ّ
خوت ،ةافولا وأ ةباصا وأ ةمدصل ضرعتلا رطخ بنجتل
كتردق يف كشت تنك اذإ فرتحم ءابرهك ينفب نعتسا .ءابرهكلا عم لماعتلا
.ةيئابرهكلا كسا عم لماعتلا ىلع
61
AR AR
60
.بناج لك نم رامسمب اهتبث مث ،تيبثتلا ةفيتك ىلع زاهجلا ب
ّ
كر .7
.كلزنم يف ةيئابرهكلا ةرئادلا عطاق ليغشت د
ِ
عأ .8
ON
ON
:تيبثتلا لماح ىلع زاهجلا بيكرت دنع ةبوعصلا بنجتل .5
.ةياغلل ةكيمس تسيل كسا نأ نم دكأت
.ةجرد 90 ةيوازب كسا ينث لواح
90°
كسا نيمأتل كلسلا يغارب طبر مكحأ مث ،تصوملا يف رايتلل ةلماحلاو ةيضراو ةدياحملا كسا لخدأو ،كسا يغارب كفب مق .6
.ا
ً
مامت
Neutral
Ground
Live
①②③
ابوروأ ةيلامشلا اكيرمأ
رفصأ / رضخأ رفصأ / رضخأ يضرأ
قرزأ ضيبأ دياحم
ينب دوسأ رايتلا لماح
63
AR AR
62
.ةقطنملا بسح كسا ناولأ فلتخت
6564
AR
اياوزلا طبض
.بولطملا ضرعلا ىلع لصحت ىتح eufy Security قيبطت نم رشابملا ثبلا نم ققحتلا ءانثأ زاهجلا بلقا .1
30°
30°
.كتحاسم ةءاض ةيواز لضفأ ىلع روثعلل ءوضلا ردأ .2
Customer Service
Kundenservice | Servicio de atención al cliente | Service client | Servizio
clienti | Klantenservice | Serviço de Apoio ao Cliente |
12-month limited warranty | 12 Monate eingeschränkte Garantie |
Garantía limitadade 12 meses | Garantie limitée de 12 mois |
Garanzia limitata di 12 mesi | 12 maanden beperkte garantie | 12
meses de garantia limitada |
(US) +1 (800) 988-7973
(UK) +44 (0) 1604 936200
(DE) +49 (0) 69 9579 7960
(
中国
) +86 400 0550 036
(
日本
) 03 4455 7823
(AU) +61 3 8331 4800
(Egypt) +20 8000000826
(UAE) +971 8000320817
(Kuwait) +965 22069086
(Saudi Arabia) +966 8008500030
(Middle East & Africa) +971 42428633
Anker Innovations Limited
Room 1318-19, Hollywood Plaza, 610 Nathan Road, Mongkok, Kowloon,
Hong Kong
@EufyOfficial @EufyOfficial @EufyOfficial