English/Deutsch/Français/Polski/Italiano Element 1 Pro
122mmX130mm
70g
User Manual
Sma Cube
Voice-controlled Dashcam


- 1 -
IT
CONTENTS
VERZEICHNIS
CONTENU
SPIS TREŚCI
CONTENUTI
37
76
113
150
187
Warranty & Suppo
Garantie und Suppo
Garantie & Suppo
Gwarancja & wsparcie
Garanzia e Assistenza
6.
7
43
Installation
Installation
Installation
Instalacja
Installazione
3.
82
119
157
36
75
112
149
186
Specications
Spezikation
Spécication
Dane techniczne
Specifche tecniche
5.
Camera Oveiew
Die Übersicht über Kamera
Vue d'ensemble de la caméra
Budowa wideorejestratora
Panoramica della Dashcam
4
40
79
116
154
2.
17
53
92
129
166
Basic Operation
Grundlegende Bedienung
Opération de base
Podstawowe funkcje
Operazioni di base
4.
3
39
78
115
153
What’s in the box?
Was liegt im Kaon?
Qu'y a-t-il dans la boîte?
Co znajdziemy w pudełku?
Contenuto della confezione
1.

- 2 -
Warm Tips:
Please read the User Manual carefully before use.
The dash cam must be plugged in to operate.
Please do not debug the product or use your mobile phone to watch driving
videos during driving to ensure driving safely.
This product requires inseing an SD card before use. Please ensure that the
SD card is functioning properly and compatible with the device.
Please do not disassemble or repair the dash cam without authorization. In case
of any malfunction, please contact VANTRUE ocial customer seice in a
timely manner.
Do not install the dash cam in a location that may obstruct the driving view.
Please stay away from high temperature and humid environments to ensure the
normal operation of the equipment.
To enhance the user experience, the product rmware will be updated
irregularly. You can download the latest version as needed to enjoy the latest
features.
Do not install the dash cam directly in front of passengers to prevent accidental
detachment and potential safety hazards.
Please note that it may not be possible to connect to the app when using
CarPlay or Android Auto;
Please use this product within the scope permitted by law.
·
·
·
·
·
·
·
·
·
·
·
EN
- 3 -
F.
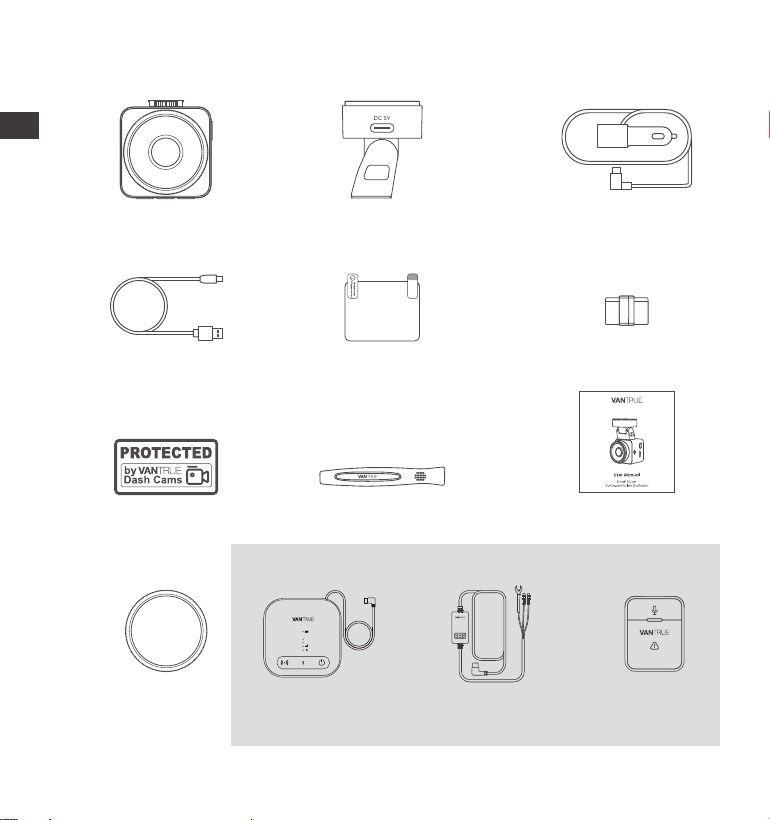
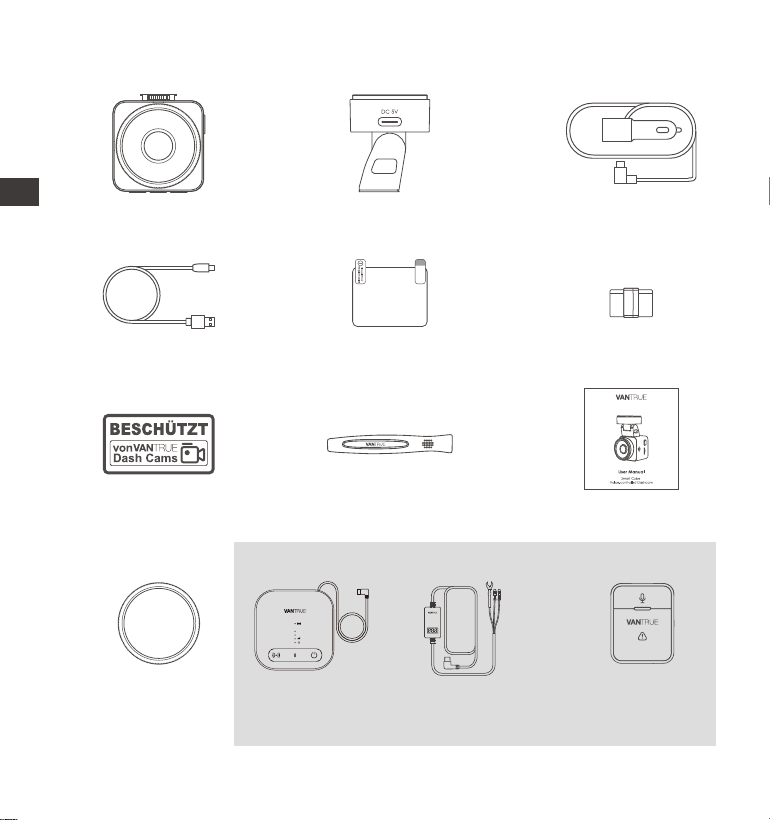
Cable Clip
1. What's in the box?
L. Hardwire Kit
(9.8ft)
M. Wireless
Controller
J. CPL Filter
Optional Accessories
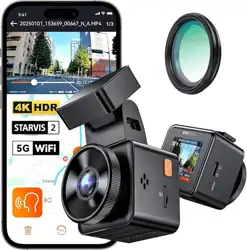
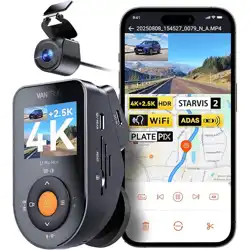
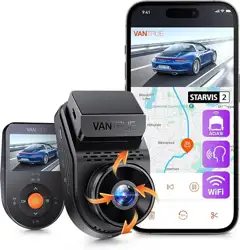
A. VANTRUE E1 Pro
Dash Cam
D. Type C Data Cable
(3.3ft, for transferring
les only)
G. Warning Stickers
(2pcs)
C. Car Charger with
Built-in Type C
Cable (11.5ft)
E. Electrostatic
Stickers (2pcs)
I. User Manual
B. GPS Adhesive
Mount
H. Crowbar
K. Vantrue LTE
Module (LT01)
EN
Element 1 Pro
EN
- 4 -
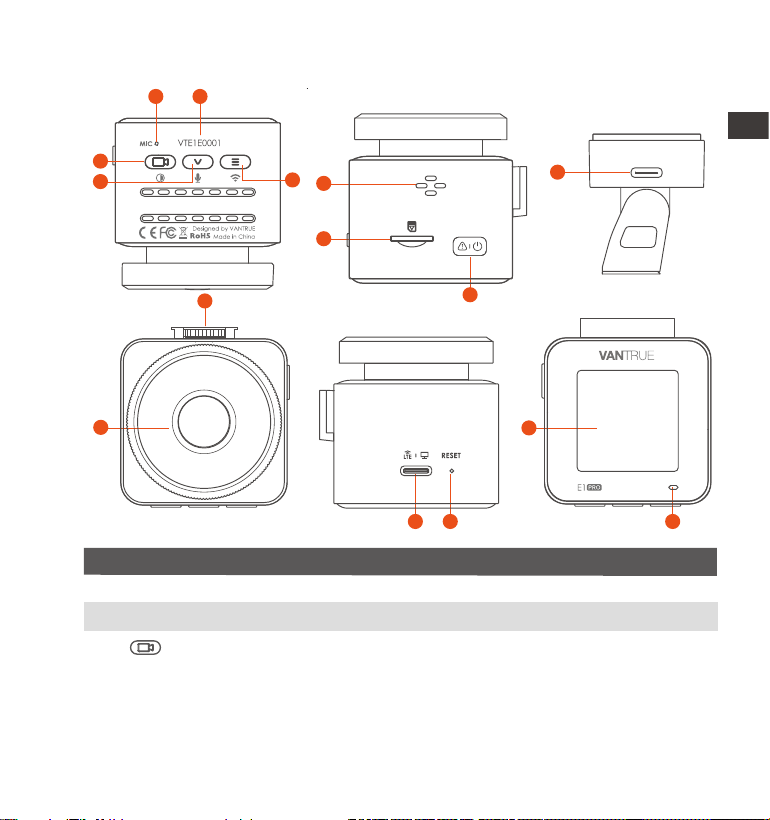
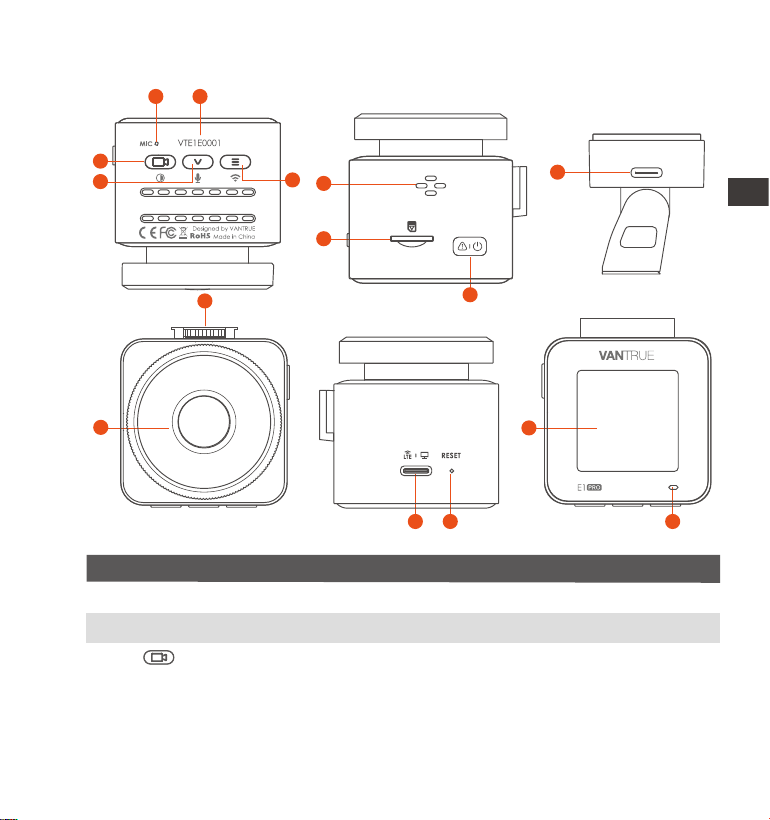
2. Camera Oveiew
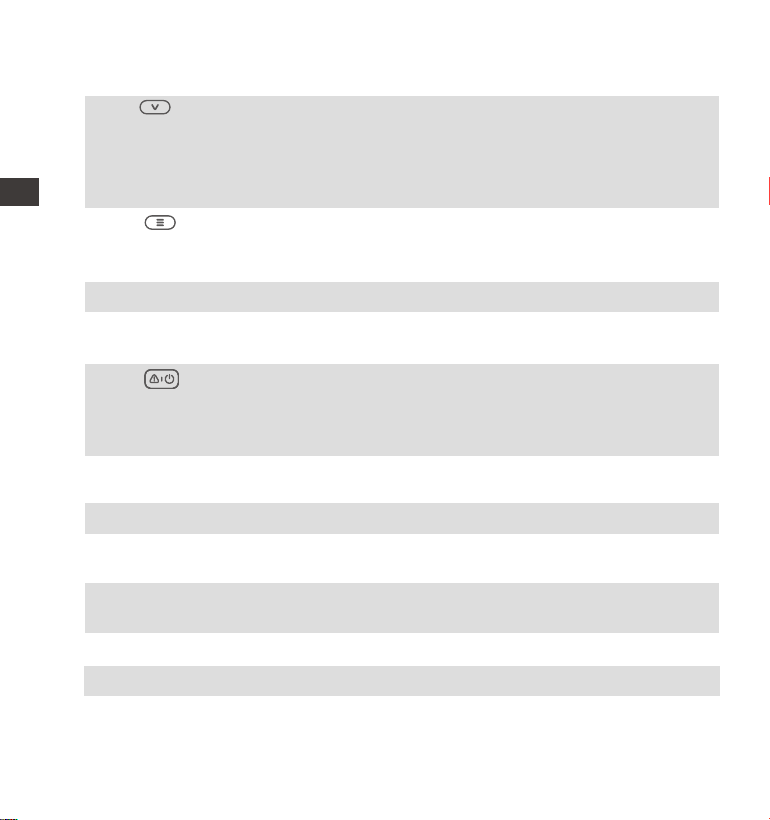
NO. DescriptionName
During video recording, long press to turn o the
screen, sho press to stop video recording and enter
standby mode; you can conrm the selected option
in the menu; when playing back les, you can play/
pause les
1 Microphone
2
3
Button
Serial Number Serial number for warranty registration.
Records clear audio with the video footage.
EN
6
9
7
3
4
5
1 2
8
12
14
10
11
13 15
GM01 DC 5V
EN

- 5 -
4 During video recording and standby, long press to
quickly enter parking mode, and sho press to turn
on/o the microphone; in menu settings, long press
to scroll through menu options, and sho press to
display the next menu option; during le browsing,
long press to scroll to display le, sho press to
display the next le; in playback mode, sho press to
pop up the delete le menu.
Button
6
7
8
9
10
11
12
5 Button
SD Card Slot
Speaker
During video recording and standby mode, long
press to turn on/o WiFi
Mount Po Connects to Type C cable or car charger for external
power supply
Suppos Micro SD Card up to 1TB in FAT32, Class 10
Button Power ON/OFF; long press to turn on/o the dash
cam; sho press during recording to enter event
recording mode; sho press to capture pictures
during event recording
Delivers sound during video playback.
Front Camera Front facing camera for video recording road Events
For connecting mountsMount Inteace
13
14
Power Po
Connects to Type C cable or car charger for
external power supply;Connects the data cable
for data transfer;Connect to LTE Module for power
supply
Sho press to resta the camera.Reset Button
Screen 1.54" LCD Screen
ENEN
- 6 -
MP/H
00:00:37
11-12-2024 14:09:07
56
3840x2160P 30FPS
HDR
15
DescriptionLED Status
15 Camera is recordingBlinking green light
Steady green light Instandbystatus
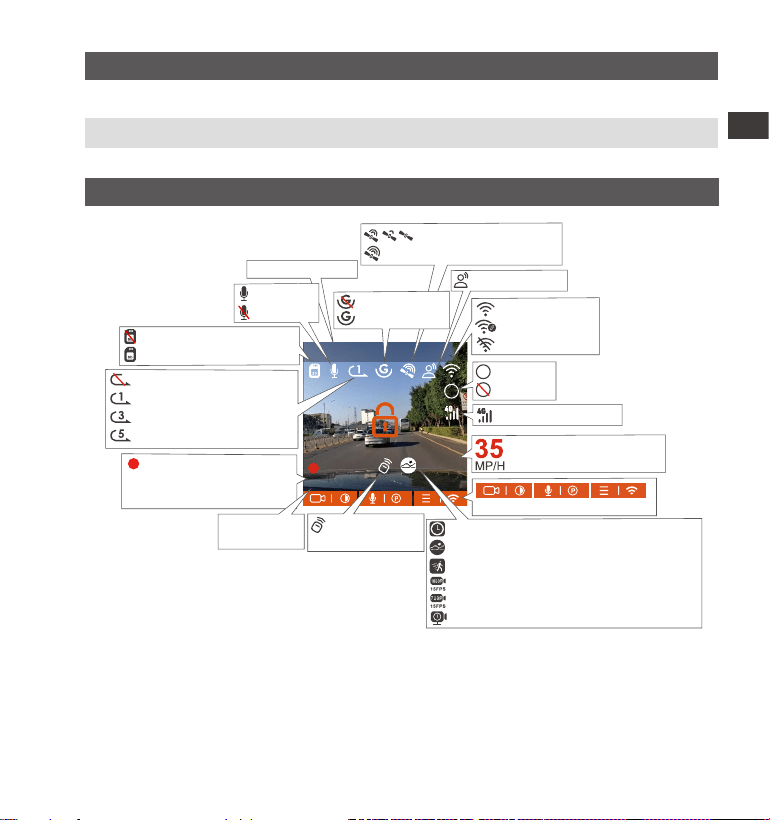
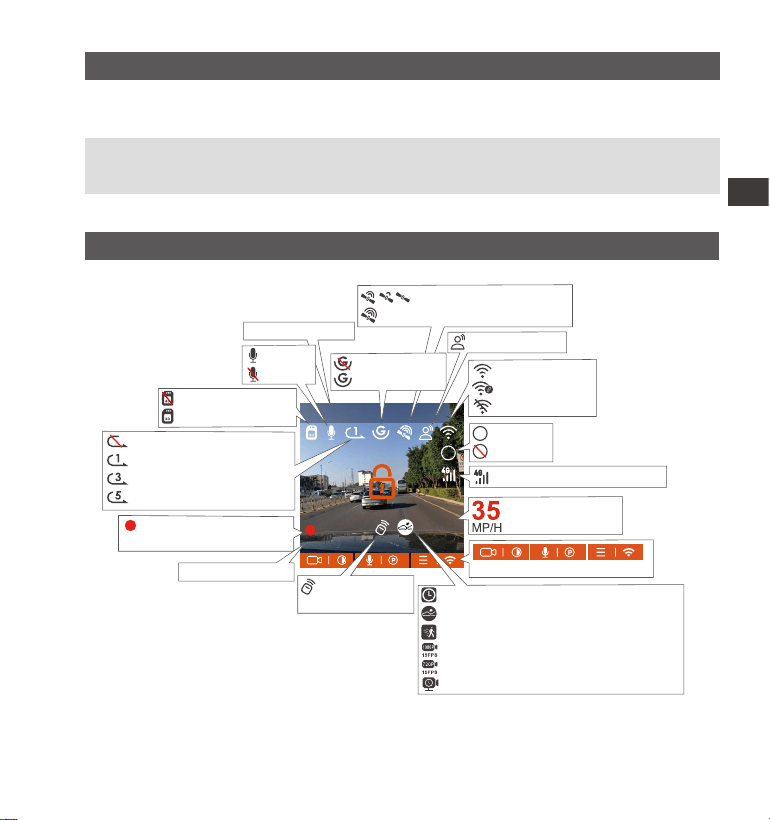
Screen Oveiew
Loop recording o
Loop recording for 1 min
Loop recording for 3 mins
Loop recording for 5 mins
GPS Signal Connecting
GPS Signal Locked
Recorded Driving Speed
(KMH or MPH)
No memo card inseed
Memo card inseed
Time Lapse On
Collision Detection ON
Motion Detection ON
1080P Low Bitrate Recording ON 15FPS
720P Low Bitrate Recording ON 15FPS
Low Framerate Parking Mode
Video Resolution
Icons for Indicating Buttons
WiFi ON
WiFi Connected
WiFi OFF
Parking Mode
Recording Time
(Current Clip)
00�00�37
HDR ON
HDR OFF
HDR
HDR
G-Sensor OFF
G-Sensor ON
Remote control
is connected
Current Date
and Time
Voice Assistant
Mic is ON
Mic is OFF
Network Signal Icon
EN
- 7 -
Before using this card, please follow the steps below to format it properly:
If the camera is recording, please press the icon to pause the recording,
then press the icon to enter the menu, then enter “System”, select the"
Format SD Card " , and conrm to format the memo card until it prompts
"Formatted successfully."
3. Installation
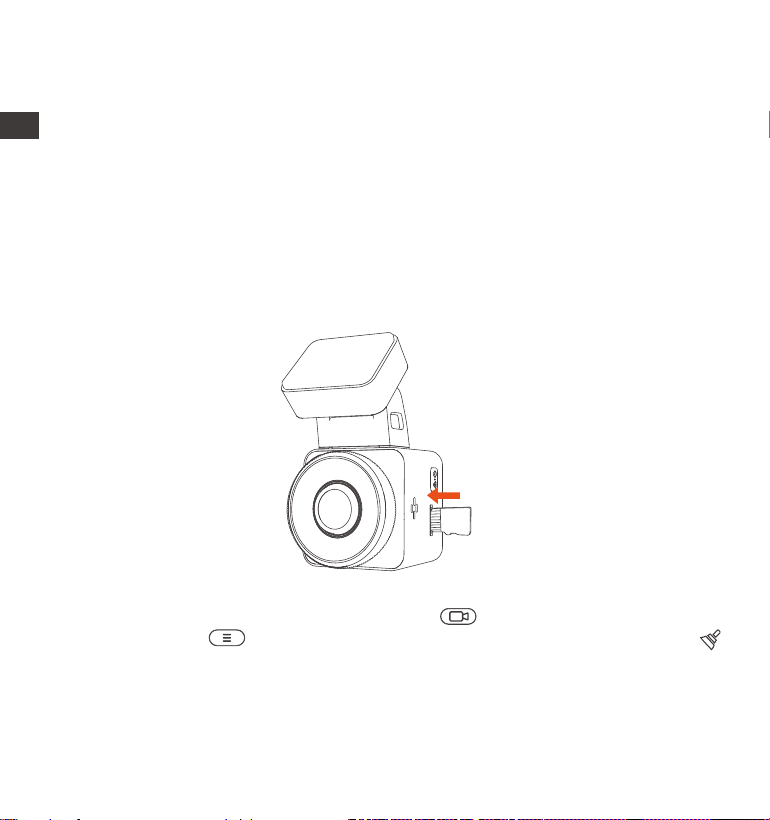
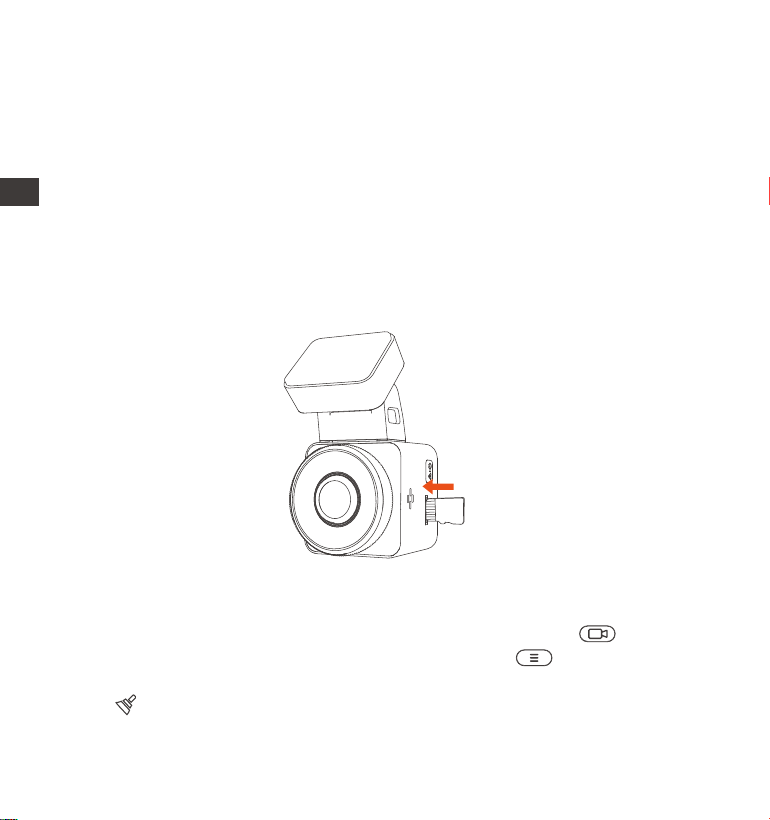
3.1 Installing a Memo Card (Recommended: Vantrue U3 high-speed micro
SD card).
Please inse a memo card (memo card capacity: 32GB-1TB, card speed:
U3/ Class10/A2). The dashcam has ceain requirements on the card speed of
the memo card. For reliable operation, we recommend using a VANTRUE SD
card(sold separately).
Memo Card Installation: There is an icon indicating the inseion direction of
the memo card. Please push the memo card into the card slot according
to the direction indicated by this icon, until a "click" sound is heard in the card
slot, indicating that the memo card is inseed properly.
ENEN
- 8 -
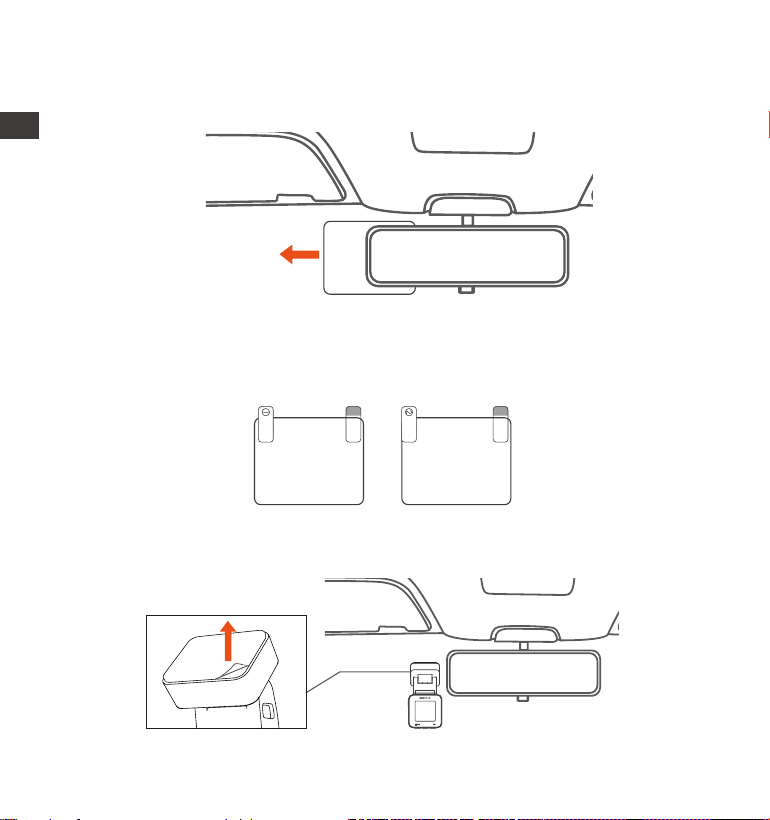
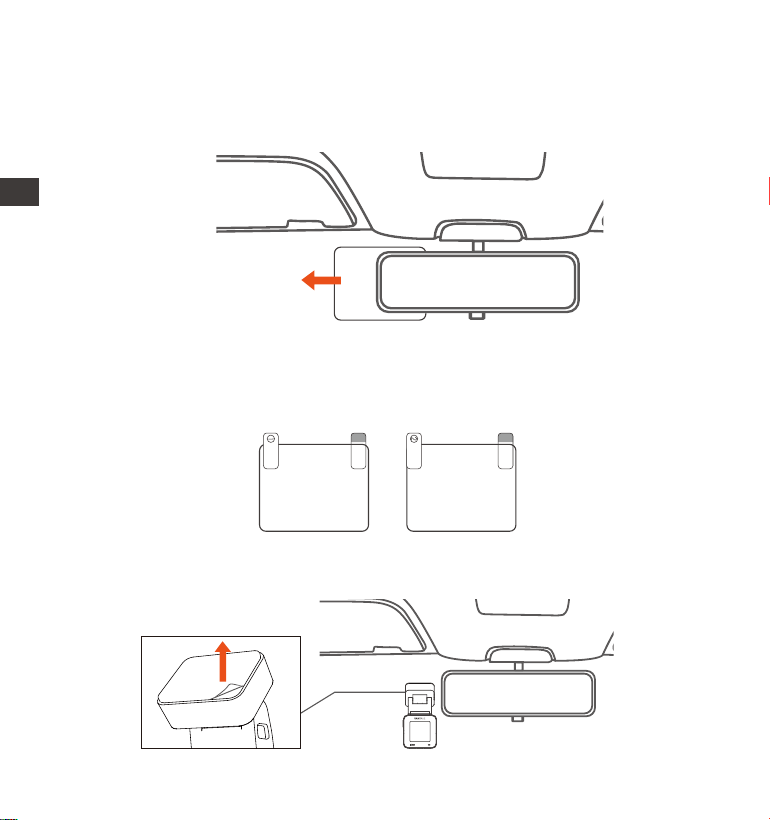
3.2 Installing the camera onto your windshield
We recommend formatting the card once a month to ensure normal
operation of the dash cam.
Do not remove or inse the memo card during recording to avoid losing
impoant videos.
Please do not use bad cards or low-speed cards on the dash cam, as it is
easy to stop or lose the recording due to a failure of the memo card.
Before formatting the memo card, please check the emergency video
folder in the SD card to see if there are any videos that need to be saved
separately, so as not to delete impoant videos by mistake.
REMINDER:
1.
1.
2.
3.
4.
After inseing the memo card, if the screen prompts "Card error, please
format" (please note that the recorder does not record at this time), please
directly press the button to enter the menu and sta the formatting
process.
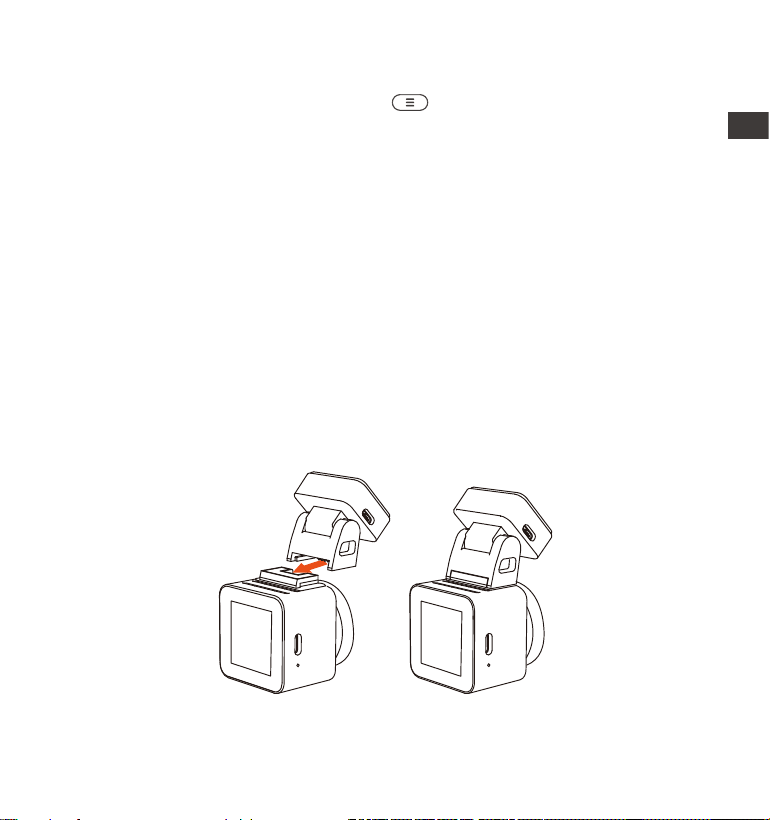
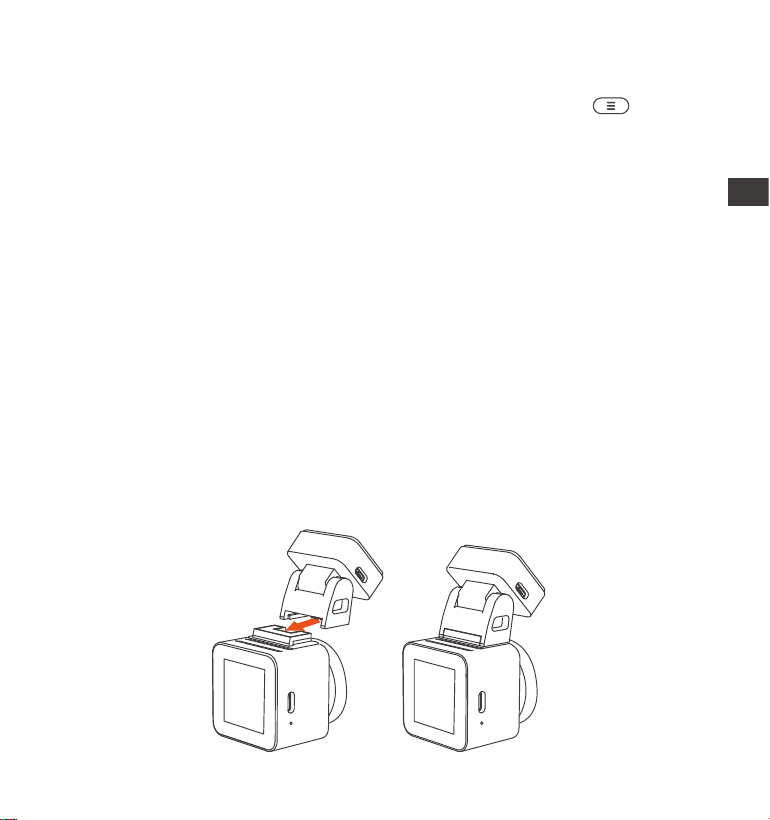
Align the mount with the dash cam mount inteace then push in until the
mount is installed
EN
- 9 -
Thoroughly clean the windshield with water or alcohol, then wipe it with a
d cloth. Stick the electrostatic sticker behind the rear-view mirror, which
is the recommended position to prevent blocking your view while driving.
2.
Remove the 3M tape from the mount, then x the mount and camera on the
electrostatics stickers.
3.
Electrostatic sticker
Note: There are two protective lms numbered 1 and 2. Please remove the
protective lm from No. 1, paste the electrostatic sticker on the windshield,
and then remove the protective lm from No.2.
Please peel o this mask
AFTER application completed
Please peel o this
mask BEFORE application
EN
- 10 -
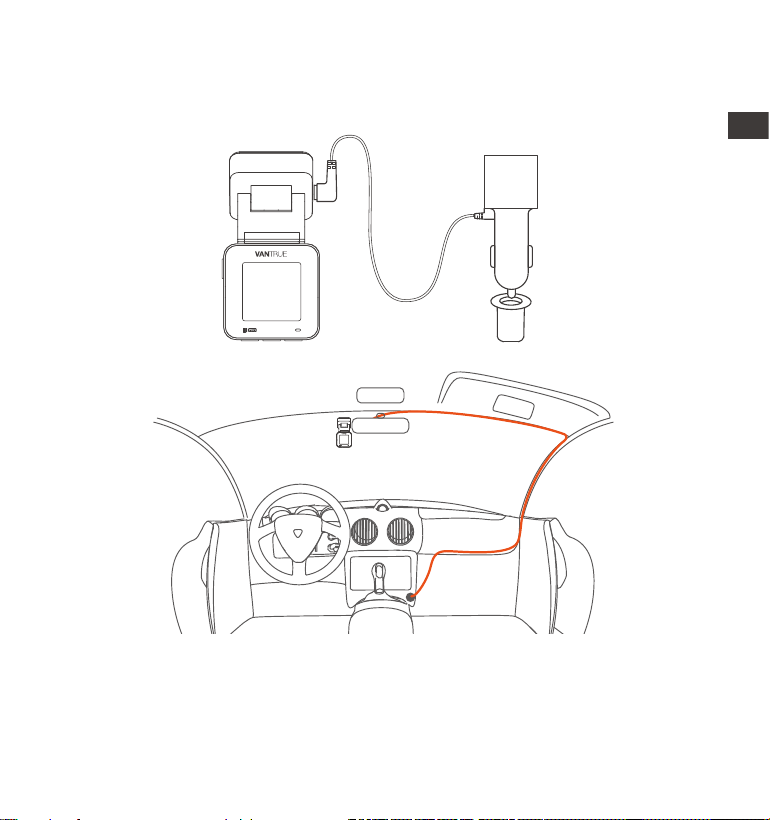
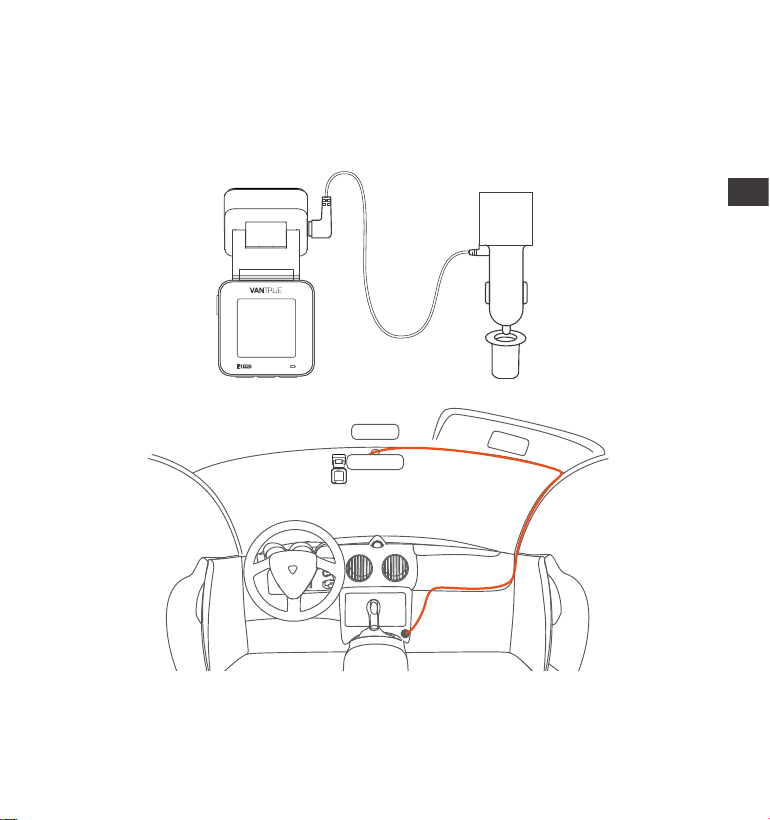
Connect the car charger to the car cigarette lighter, then inse the USB end
of the charger into the Type C USB power po of the camera. After the car
is staed, the camera can be powered on immediately.
4.
When organizing or storing car charger cables cable clips can be used for
securing them in place. After attaching the cable clip to a suitable spot,
simply fasten the cables within the clip.
EN EN

- 11 -
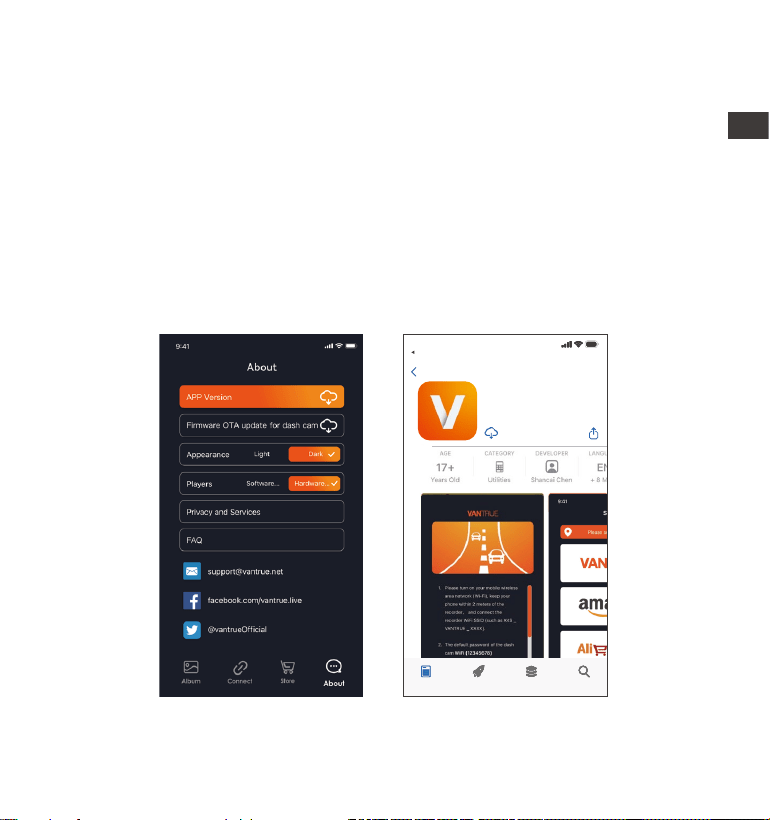
3.3 APP Download
Please scan the QR code of the relevant version below to download the APP
and install it.
Search for the "Vantrue" app in App Store or Google Play Store to nd the
app and then download and install it on your phone.
Note: After this camera is successfully connected to the mobile phone through
WiFi, it can realize real-time video preview, change camera settings, download
les without Internet connection, and play back videos on the mobile phone.
However, the GPS track playback and video sharing functions will depend on
the Internet or telecom value-added seices (requires you to turn o/
disconnect the camera WiFi).
ENEN
- 12 -
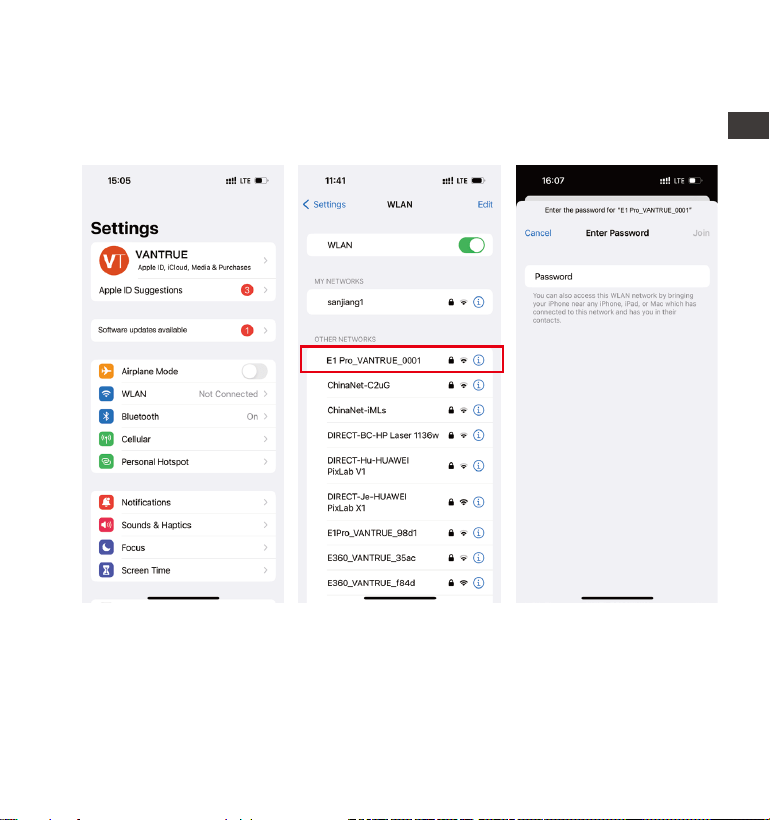
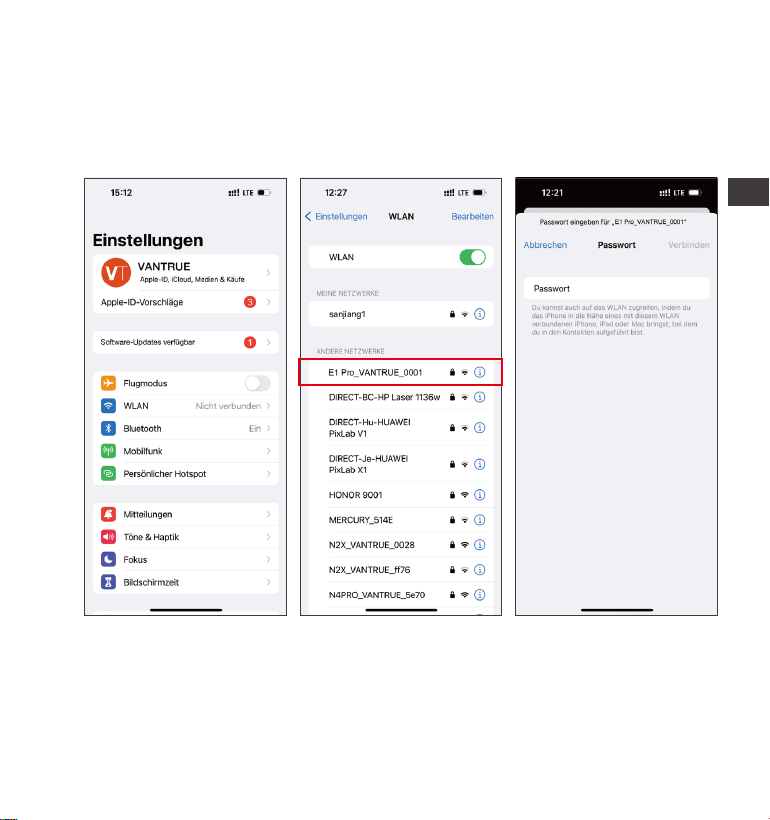
Turn on the WiFi function of the camera, enter the WiFi settings of the mobile
phone, then nd the WiFi name, such as: E1 Pro_VANTRUE_XXXX, and enter
the WiFi default password: 12345678 to connect to WiFi.
3.4 WiFi Connection
EN
- 13 -
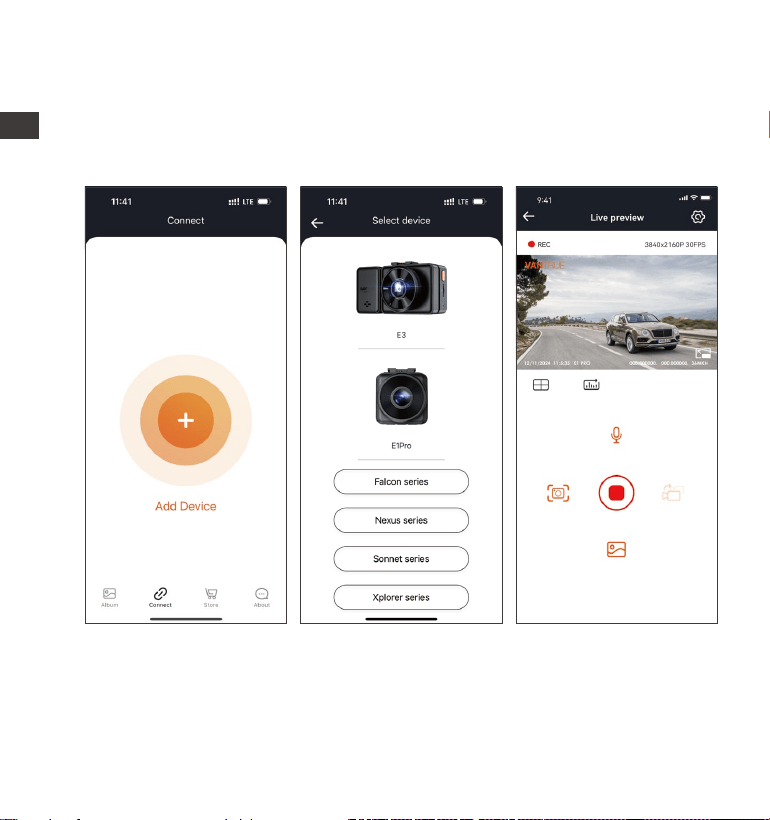
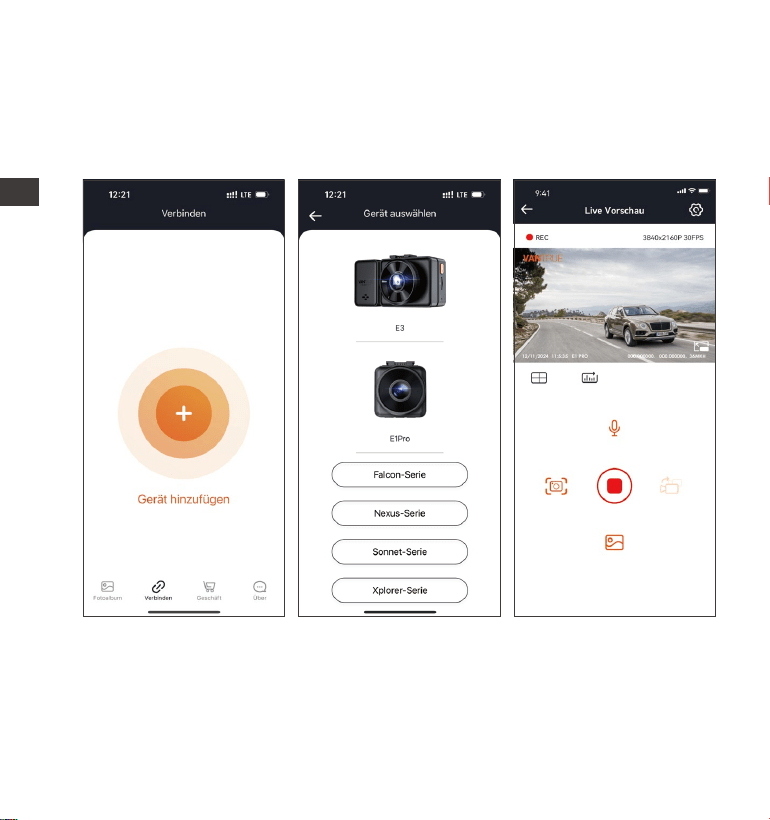
After the WiFi connection is successful, click "+" when opening the app for the
rst time, add the camera model, then the app will automatically connect to
the camera and display the current real-time recording situation of the
camera.
3.5 App Connection
Note:
If you do not connect to WiFi before opening the app, the app will prompt
you by saying "Please connect to WiFi rst", and will automatically jump to
the WiFi settings. Please complete the steps to connect to WiFi rst.
1.
EN

- 14 -
4.
5.
6.
2.
3.
If the WiFi is already connected, but the app jumps to the application
permissions after selecting the model, please check whether the wireless
network permissions for the app are turned on.
The initial password for this device is only used for initial login. In order to
prevent potential security risks, please be sure to change the initial
password after the initial login to prevent others from logging into your
device without authorization or other adverse consequences.
If you forget the WiFi password, you can restore the default setting of the
device, and the Wi-Fi password of the device will also be restored to the
default password(12345678).
If the connected WiFi name does not match your dash cam model, the app
will prompt you: "Please select the correct model" and automatically jump
back to the model selection inteace.
If there is no connection with the mobile phone after the WiFi is turned on,
the camera will automatically turn o the WiFi and return to the recording
inteace after 10 minutes.
EN
- 15 -
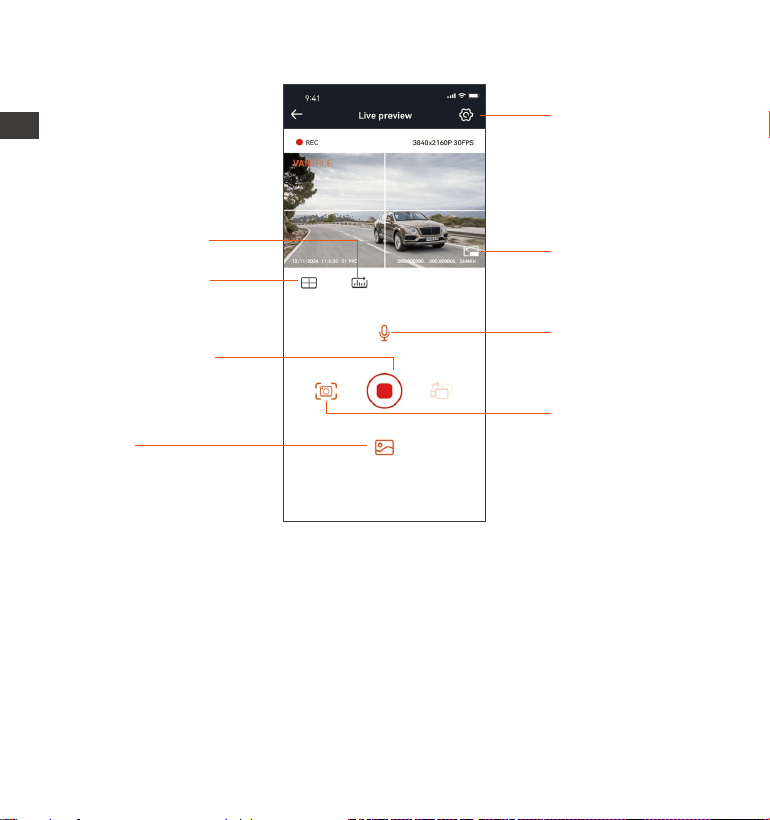
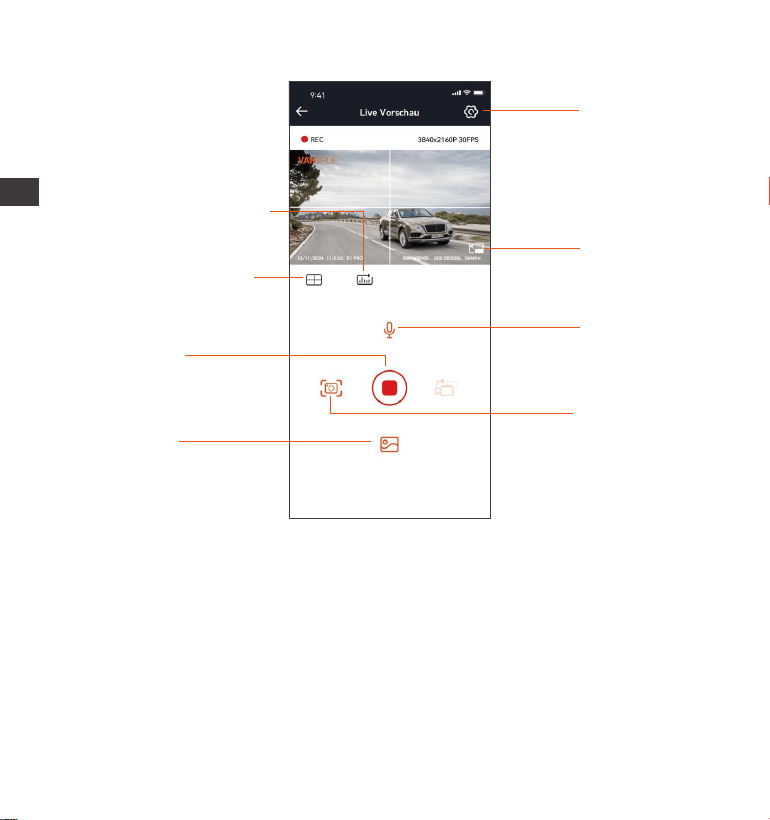
3.6 App Operation
Camera Setting
Full-Screen icon
Snapshot
Album
Stop Recording
icon
Lens correction
line
Mileage Statistics
Microphone switch
After entering the app's real-time preview, you can peorm the following
operations:
Video preview: After the app is successfully connected to the camera, enter
the real-time preview page, click the full-screen button or place the phone
horizontally, and the real-time screen will automatically switch to the
full-screen preview mode.
Video playback: The video and photo les recorded on the SD card can be
viewed in the app, and the video can be played back after clicking the le.
EN
- 16 -
Vantrue Ltd.
Vantrue
Vantrue
9:41
Today Games Apps Search
Back
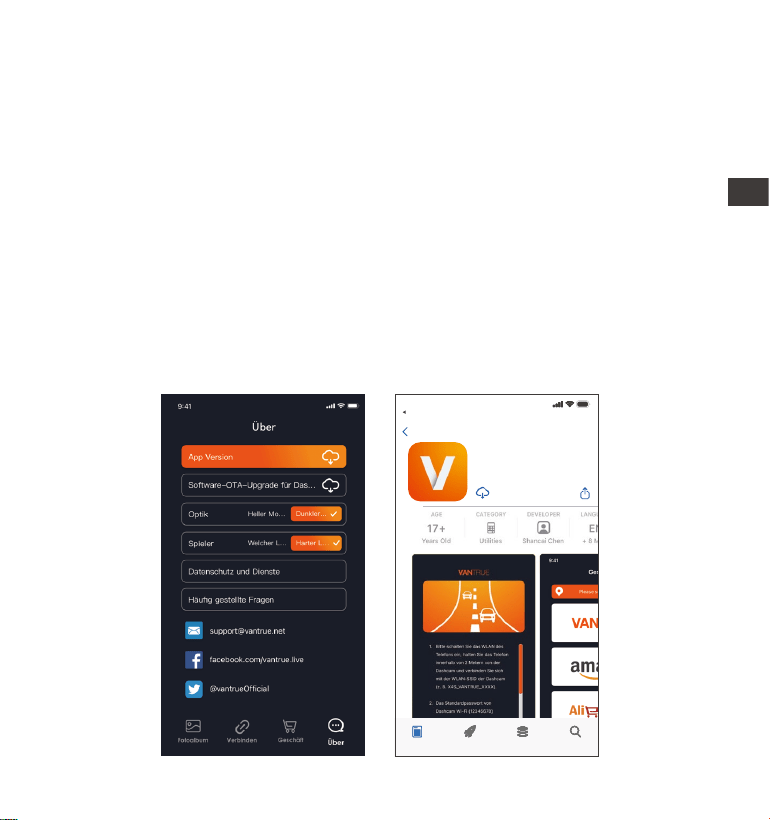
3.7 App Upgrade
Open the "Vantrue" App, connect to Wi-Fi, and enter Settings > About >
Detect New Version. The app will automatically detect whether the its version
is the latest version. If there is a new version of the app, follow the prompts
and upgrade the version.
Video download: You can select the video or picture you want to download
in the SD card browsing inteace or in the video playback area.
After downloading the video, if you play it in the local app inteace, you can
view the GPS track of the video.
Video snapshot: You can capture the current screen in the real-time preview
inteace of the app.
EN
- 17 -
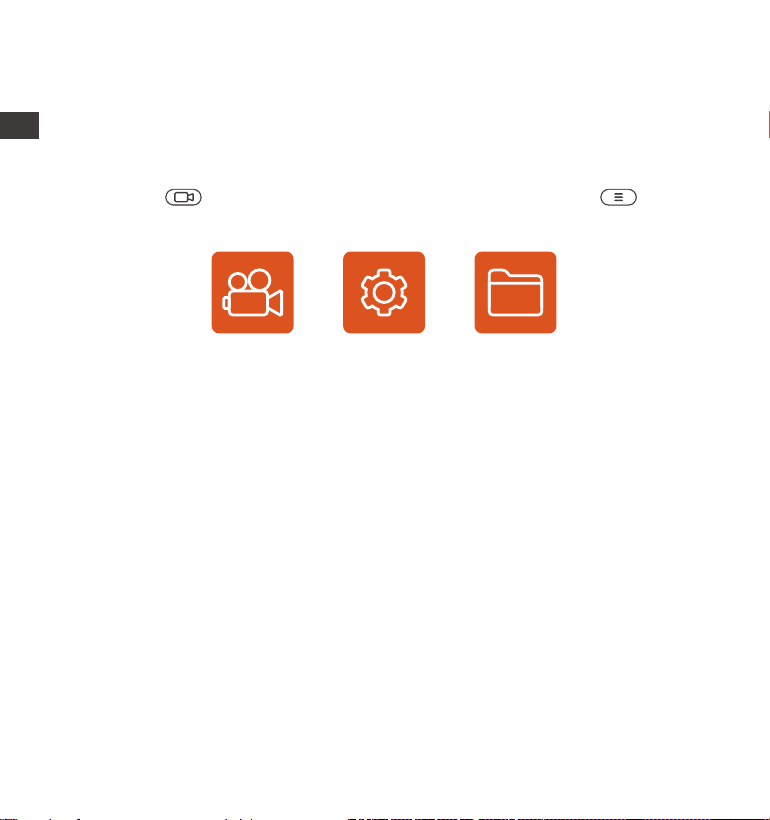
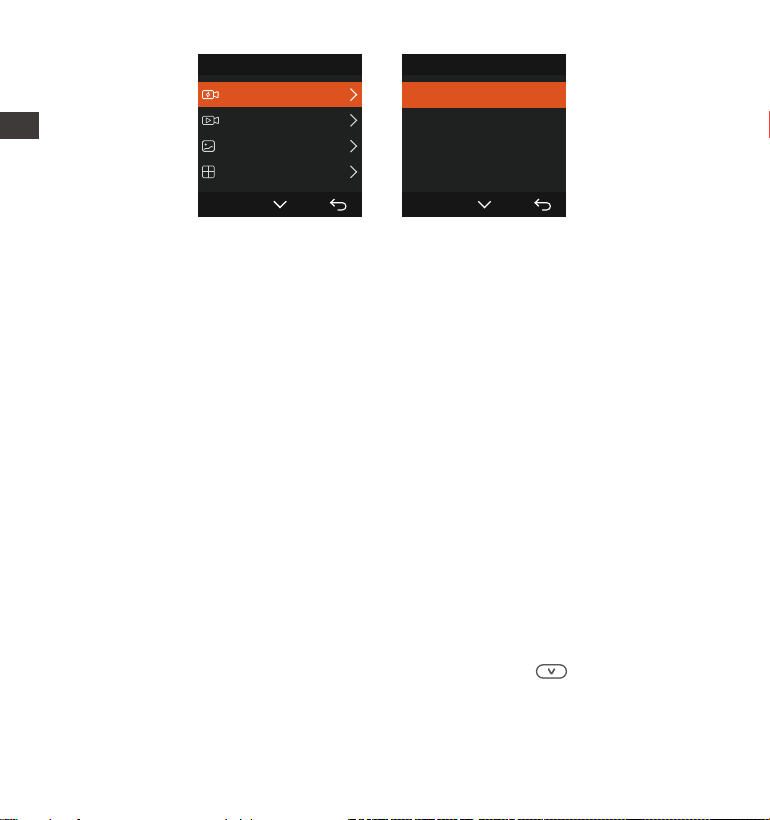
The E1 Pro dash cam has 3 function menus, which are: record settings, system
settings, and le browsing. You can set your dash cam according to your
requirements with these function setting.
Press the button, pause the video rst, and then press the button to
enter the menu settings.
4. Basic Operation
4.1 Menu Settings
Record System Files
A. Record Setup
-Resolution: The E1 Pro Dash Cam includes four resolutions: 3840x2160P
30FPS, 2560x1440P 30FPS, 1920x1080P 30FPS, 1280x720P 30FPS Resolution:
-Image quality: Default standard, can choose PlatePix ™
-Loop Recording: Default setting is 1 min. You can choose among 1/2/3 mins
and OFF.
-HDR: default enabled, optional to disable.
-HDR Timer: It is turned o by default and can be selected to be turned on or
o at a set time.
-G-Sensor: Select the level of G-sensor you need, then you can set 3
directions (Front + Back/Left + Right/Up + Down). The G-sensor value in each
direction can be selected as 1/2/3/4/5/O. The higher the sensitivity
level, the easier it is to trigger emergency recording. G-sensor is most
sensitive when set to 5.
-Audio Recording: The default is ON. Set recording to on or o.
-Exposure: The default value is +0.0. Adjust the exposure of the lens.
ENEN

- 18 -
-REC Status Light: Default setting is ON. You can choose to turn on/o the
recording status light.
-Rotate Display: Default is o. You can choose to ip the video screen up and
down(180 Degree).
-Number Plate: Press the button to select the number or letter to be set.
After setting, your license plate number can be displayed in the recorded
video.
-Stamp: Enable or disable the watermark stamp on video and photos. The
watermark stamp includes date and time label, VANTRUE label, license plate
number, GPS location information, and speed label. All enabled by default.
-Time Lapse: The default value is disabled. You can choose to enable
1FPS/5FPS/10FPS/15FPS.
-Parking monitoring mode: Here you can set the parking mode you need,
collision detection/motion detection/low bit rate recording/low frame rate
mode/o, default o.
-Parking monitoring settings: Used in conjunction with parking monitoring
mode, when you turn on parking monitoring, the parking low light night vision
is enabled by default. When using collision detection, the parking collision
detection quick sta mode is enabled by default.
-LTE settings: This feature needs to be used in conjunction with Vantrue LTE
Module, and can choose message push mode and the le size of uploading
collision video. When using Vantrue LTE Module, the default message is
pushed in real-time and uploading collision videos with trac saving mode by
default. Users can change other options.
-Mileage statistics: It is enabled by default. After enabling it, the E1 Pro dash
cam will record the driving GPS information, and you can expo data and view
it in the App.
-GPS Setting: GPS is enabled by default. GPS ON/OFF settings, speed unit
settings, and GPS information are all set here.
EN

- 19 -
B. System Setup
-Language: Available languages are Engish/Français/Español/Deutsch/
Italiano/简体中文/русский/日本語/Polski.
-Wi-Fi: The default is to turn on Wi-Fi automatically. Under this function, you
can set Wi-Fi to automatically turn on or o and view Wi-Fi information.
-Display Setting: The default setting is Full Screen mode. You can switch it to
panorama mode.
-USB mode: Vantrue LTE Module and the supplied USB cable share the same
USB inteace for data transfer, so the LTE data transfer mode is turned on by
default. When users need to use USB cable to transfer data, they need to
switch to USB mode.
-Voice Assistant: The default sensitivity is Standard. Voice commands can be
recognized after the option is turned on. You can choose options such as low
sensitivity/high sensitivity/standard/o.
-Voice Content: Voice recognition commands. You can use dierent
commands to remote control the camera.
-Format Memo Card: Format all data on the memo card.
-Format Reminder Setup: Select the reminder options: 15 Days, 1 Month,
and O. Default is o.
To prevent you from forgetting to format the memo card regularly, we have
added a format reminder time setting. You can choose to be reminded after
15 days or 1 month, When the time is up, you can choose "OK" to format, or
choose "Next."
Note: If changing the format reminder option, the timing will resta as soon
as the option is changed.
-Date & Time: There are two ways to set the time and date:
Automatic GPS update: GPS automatic update is enabled by default.
The date and time will be automatically updated based on your time zone,
please select the correct time zone.
Manual date/time setting. You can choose to turn o automatic GPS update,
turn on manual date/time setting, and manually correct date and time.
•
Summer/Winter time automatic switching. The default is OFF.
After this function is enabled, the system automatically switches
between summer time and winter time.* This feature is available in Noh
America only. Time error may occur in other regions.
Time Format: The default settings in recording inteace is 24-hour time
display, you can switch to 12-hour time display as needed. This settings only
reect in recording inteace and watermark stamp of time label.
The date format and time zone settings can also be set under this menu.
ENEN

- 20 -
Automatic GPS update: GPS automatic update is enabled by default.
The date and time will be automatically updated based on your time zone,
please select the correct time zone.
Manual date/time setting. You can choose to turn o automatic GPS update,
turn on manual date/time setting, and manually correct date and time.
•
•
Summer/Winter time automatic switching. The default is OFF.
After this function is enabled, the system automatically switches
between summer time and winter time.* This feature is available in Noh
America only. Time error may occur in other regions.
Time Format: The default settings in recording inteace is 24-hour time
display, you can switch to 12-hour time display as needed. This settings only
reect in recording inteace and watermark stamp of time label.
The date format and time zone settings can also be set under this menu.
-Auto LCD O: Set the time to automatically turn o the LCD display after
no operation.
If you set the Auto LCD O to 3 min, the camera’s LCD screen will auto light
o after 3 min but recording will continue. If the setup is O, the screen will
not turn o. Press the Button to choose the option you want: 30s, 1Min,
3Min and OFF.
-Device Sound: Set the volume of the device. The default volume level is 3,
the lowest is 0, and the highest is 5.
-Prompt Tone: According to dierent situations, the dash cam is set with 5
kinds of prompt tones, which are power-on/o sound, Keys sound, File
locked sound, Format sound, abnormal stop recording reminder. All prompt
tones are turned on by default.
-Frequency: Dierent countries have dierent frequencies. In order to avoid
aecting the video, you can choose 50Hz or 60Hz frequency according to
dierent regions.
-System Info: Check the current model, rmware version, and the Vantrue
ocial website.
-Ceications: You can view the ceication information of E1 Pro camera.
-Default Setting: Reset the device back to facto settings.
C. File browsing includes
Under this feature, you can view video les and photo les recorded by the
dash cam.
-Event Video: This folder contains emergency video les, with a le name
format of
20300128_140633_00008_E_A.MP4
-Parking video: This folder contains separate parking monitoring video les,
with the le name being
20300128_140633_00007 P A.MP4
-Normal videos: This folder stores loop recording videos and time-lapse
recording videos. The le name for the loop recording is
20300128_140633_00008_N_A.MP4; The time-lapse recording le name is
20300128_140633_00006_T_A.MP4.
-Photo: The photo les are stored in this folder.
-All: All les can be viewed in this folder.
EN

- 21 -
-Auto LCD O: Set the time to automatically turn o the LCD display after
no operation.
If you set the Auto LCD O to 3 min, the camera’s LCD screen will auto light
o after 3 min but recording will continue. If the setup is O, the screen will
not turn o. Press the Button to choose the option you want: 30s, 1Min,
3Min and OFF.
-Device Sound: Set the volume of the device. The default volume level is 3,
the lowest is 0, and the highest is 5.
-Prompt Tone: According to dierent situations, the dash cam is set with 5
kinds of prompt tones, which are power-on/o sound, Keys sound, File
locked sound, Format sound, abnormal stop recording reminder. All prompt
tones are turned on by default.
-Frequency: Dierent countries have dierent frequencies. In order to avoid
aecting the video, you can choose 50Hz or 60Hz frequency according to
dierent regions.
-System Info: Check the current model, rmware version, and the Vantrue
ocial website.
-Ceications: You can view the ceication information of E1 Pro camera.
-Default Setting: Reset the device back to facto settings.
C. File browsing includes
Under this feature, you can view video les and photo les recorded by the
dash cam.
4.2 Main Functions
4.2.1 Loop Recording
After inseing the memo card and connecting the power, the E1 Pro dash
cam will auto turn on and enter loop recording. The duration of each recorded
video will be saved in the normal video folder according to the loop recording
time you set.
When the capacity of the normal video folder reaches 70% of the total, new
loop recording les will automatically overwrite original loop recording les.
After this function is enabled, the video le will automatically overwrite the
loop, so as not to stop recording during the driving process.
Notice:
2.
1. The normal operation of the loop recording function is ve dependent on
the speed of the memo card, so please format the memo card regularly
to avoid problems such as excessive memo card les and card aging that
aect normal loop recording.
Please check the loop recording video regularly to avoid necessa videos
being overwritten.
-Event Video: This folder contains emergency video les, with a le name
format of
20300128_140633_00008_E_A.MP4
-Parking video: This folder contains separate parking monitoring video les,
with the le name being
20300128_140633_00007 P A.MP4
-Normal videos: This folder stores loop recording videos and time-lapse
recording videos. The le name for the loop recording is
20300128_140633_00008_N_A.MP4; The time-lapse recording le name is
20300128_140633_00006_T_A.MP4.
-Photo: The photo les are stored in this folder.
-All: All les can be viewed in this folder.
EN
- 22 -
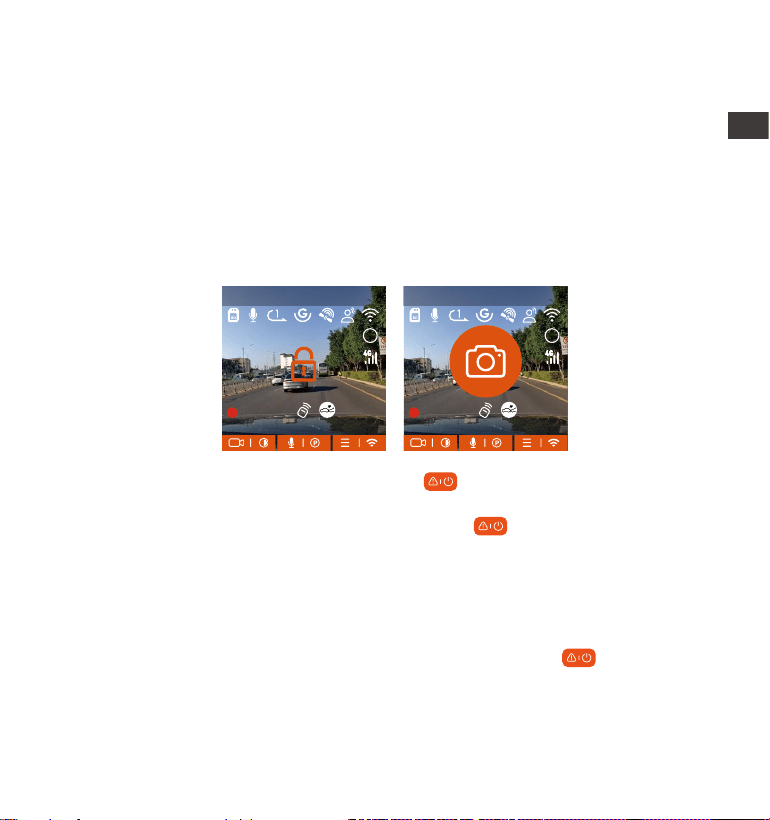
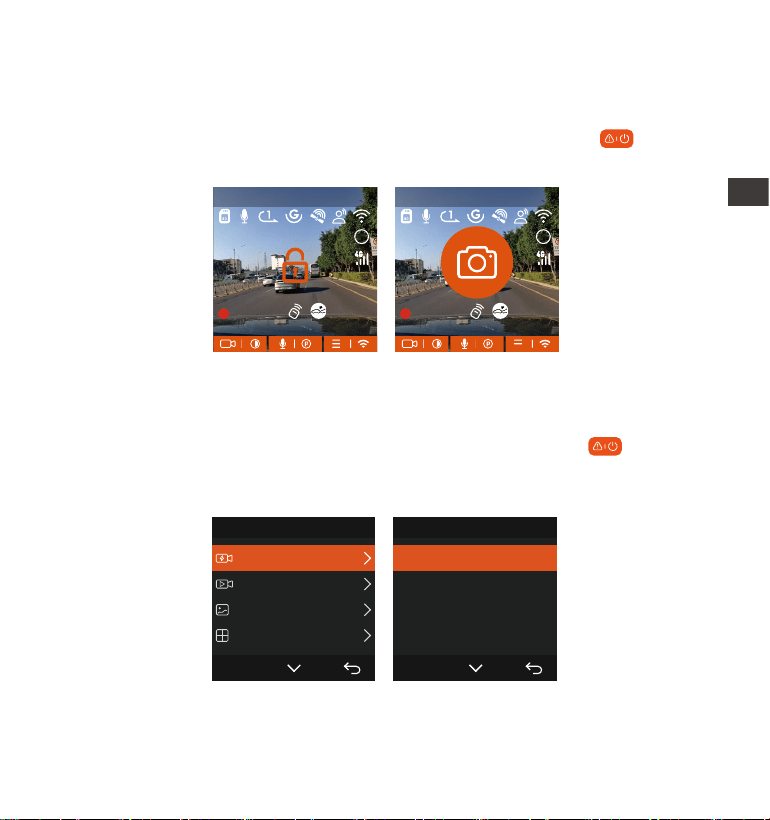
4.2.2 Event Recording
Event video is triggered by the G-sensor(Gravity Sensor), which can be
automatically triggered or manually locked.
During driving, in case of special circumstances, the camera will automatically
lock for event recording or you can manually lock it for event recording.
To manually lock the video, just press the button to lock the current
video and capture it.
During the lock video period, you can press the button to capture
multiple times. After recording, the video will be automatically saved in the
event video folder , and the photo will be saved in the photo folder.
Automatic locking event video is triggered when the car is hit/shaken. The
dash cam detects the vibration and automatically locks the current video,
which is saved in the event video folder.
During the locked recording period, you can also press the button to take
a picture. After the event video recording ends, the video will be saved in the
emergency video folder, and the photo will be saved in the photo folder.
3.
4.
After loop recording is turned o, the lock video function will no longer
work.
After the loop recording is turned o, the duration of each video will be 20
mins, and the recording will stop when the memo card capacity is full.
MP/H
00:00:37
11-12-2024 14:09:07
56
3840x2160P 30FPS
HDR
MP/H
00:00:37
11-12-2024 14:09:07
56
3840x2160P 30FPS
HDR
EN
- 23 -
Parking Mode operates as a sent function under dierent situations. You
can switch to dierent parking monitoring modes according to dierent
parking situations.
After parking mode is turned on, there are two ways to record. You can wait
for 5 minutes to resta automatically, or long press the button to begin
manually.
The sensitivity of the automatic locking video trigger is determined by the
sensitivity of the collision. The higher the sensitivity setting, the greater the
probability of being triggered.
The total capacity of the event video le accounts for 30% of the total
capacity of the current memo card. When the event video le reaches the
upper limit, new event video le will automatically overwrite old event video
le. It is recommended to periodically check and save your event video les
to avoid loss.
Lock recording will not trigger in either of the following situations: Loop
recording is o or time-lapse recording is on.
1.
2.
3.
Note:
4.2.3 Parking Mode (When the parking mode is turned on, the time-lapse
video function will not work. These two functions cannot run at the same
time)
Files 1/4
Event Video
Normal Video
Photo
All Files
OK
Event Video 2/5
20241118_140633_0001_E...
20241118_140633_0003_E...
20241118_140633_0004_E...
20241118_140633_0002_E...
OK
EN
- 24 -
Please use a hardwiring kit or other stable and continuous power supply to
power the camera to ensure that the camera works properly in parking
mode.
The E1 Pro operating environment temperature is 14°F to 158°F (-10°C to
70°C). We recommend selecting Collision Detection within this temperature
range, as it will automatically turn o once the temperature exceeds the
normal operating temperature range. If the temperature outside is high,
turn o the camera when parking.
Time-lapse video recording and parking mode (including collision detec-
tion, motion detection, low bit rate recording, and low framerate mode) can
only be enabled one at a time. When one is enabled, the other will be
automatically disabled.
All videos in parking mode(Collison Detection, Motion Detection, Low
Bitrate Recording, Low Framerate mode) will be saved in the normal folder.
In order to prevent the video in parking mode from being overwritten in a
loop, please check and save the required les in time to prevent loss.
1.
2.
4.
3.
Note:
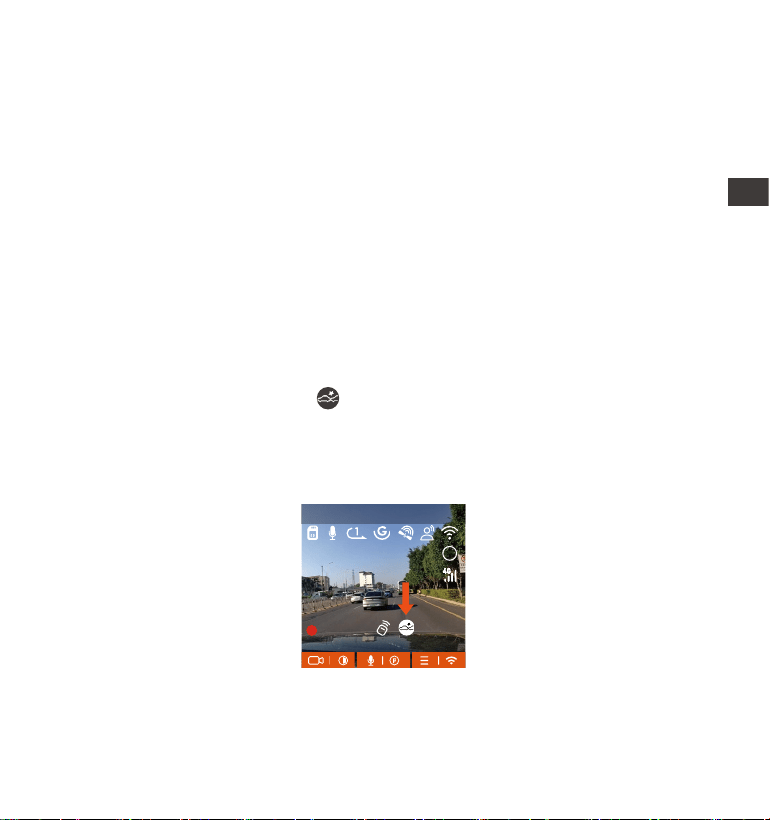
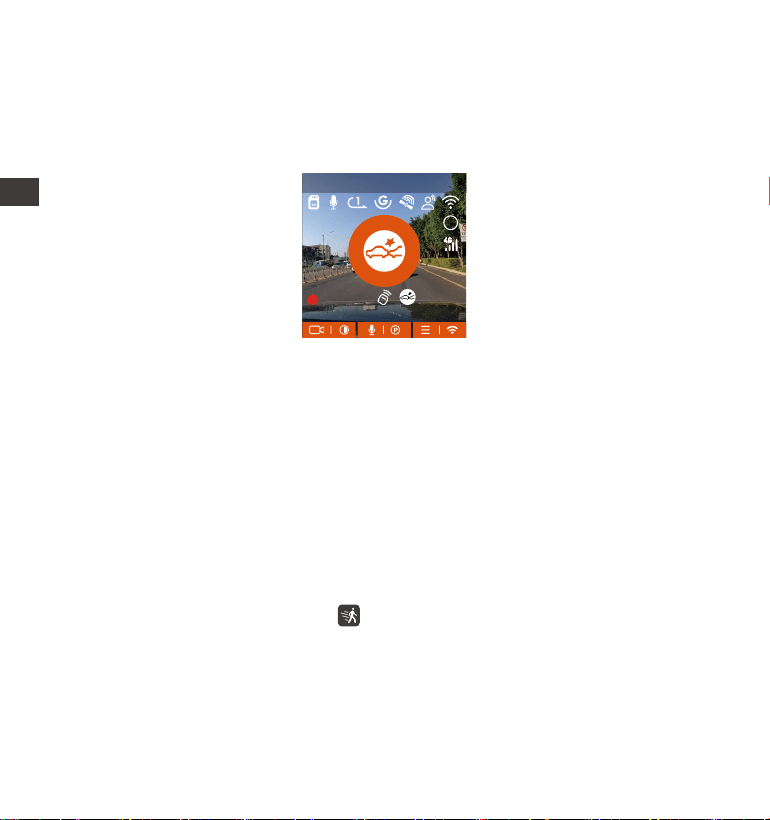
Collision Detection
When collision detection is enabled, the icon will be displayed on the
recording inteace, indicating that the camera is currently using collision
detection mode. Collision detection sensitivity can be adjusted from 1 to 5
levels. You can adjust according to your habits as well as the surroundings of
the car.
MP/H
00:00:37
11-12-2024 14:09:07
56
3840x2160P 30FPS
HDR
EN
- 25 -
Note: If the dash cam continues to be hit during collision detection recording,
it will exit the collision detection mode and enter normal recording, restaing
the 5-minute ent mechanism.
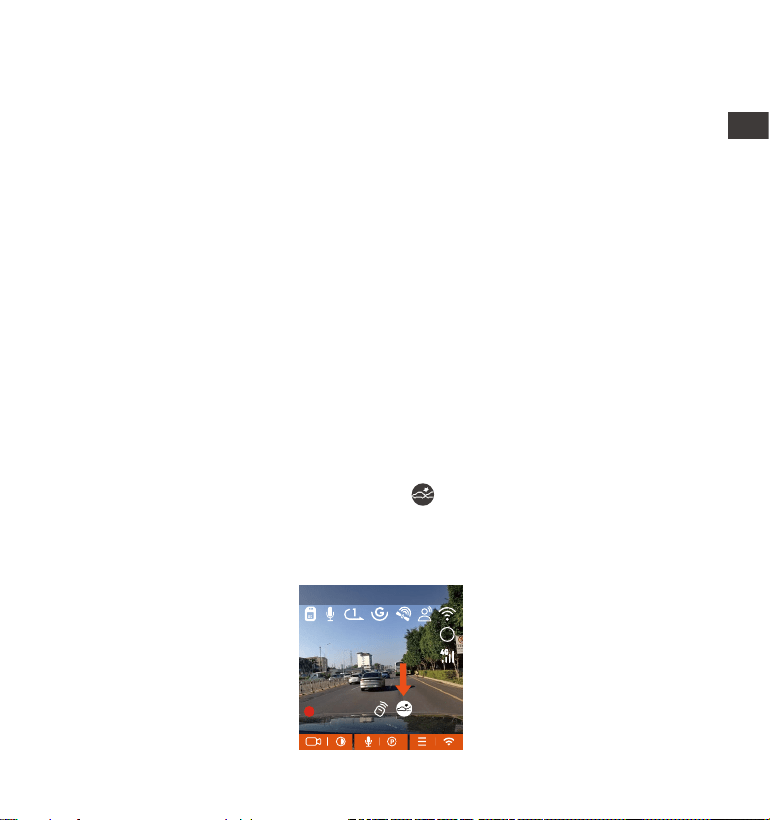
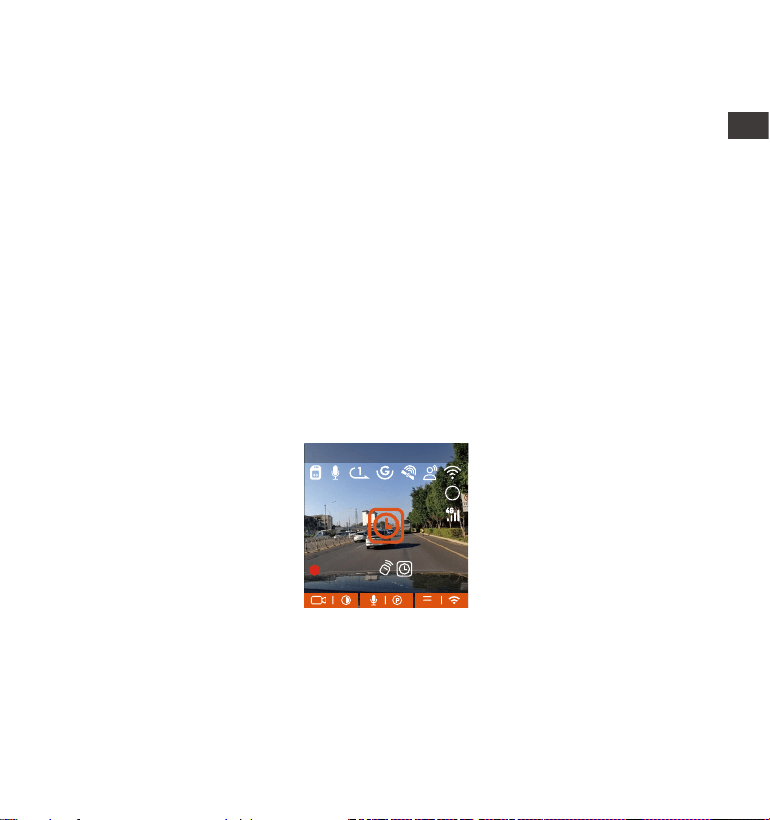
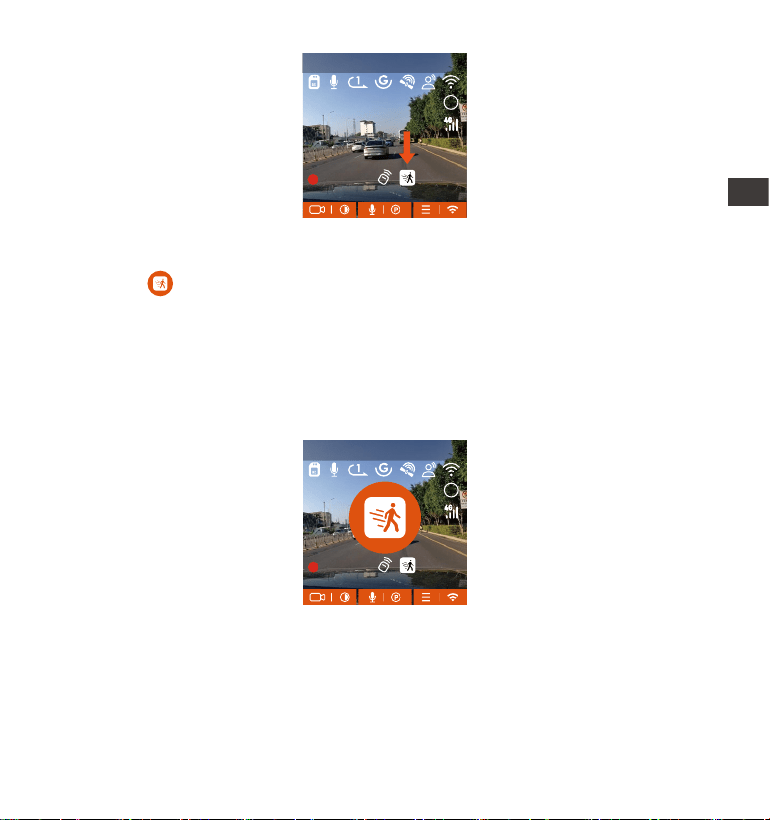
Motion Detection
When the motion detection is turned on, the icon will be displayed on the
recording inteace, indicating that the dash cam is currently in motion
detection mode. Motion detection has three levels of low/medium /high that
can be adjusted, and the corresponding detection ranges for motion detection
is 6.6ft/13ft/19.7ft.
When the Collision Detection is turned on, and no movement is detected after
5 minutes of recording (5-minute ent mechanism for sho), then Collision
Detection is activated. Collision Detection icon will appear in the middle of the
screen and the camera will automatically turn o. When the dash cam is
turned o, it will sta to record for 1 minute after being shaken, then turn o
the dash cam again.
MP/H
00:00:37
11-12-2024 14:09:07
56
3840x2160P 30FPS
HDR
MP/H
00:00:37
11-12-2024 14:09:07
56
3840x2160P 30FPS
HDR
EN
- 26 -
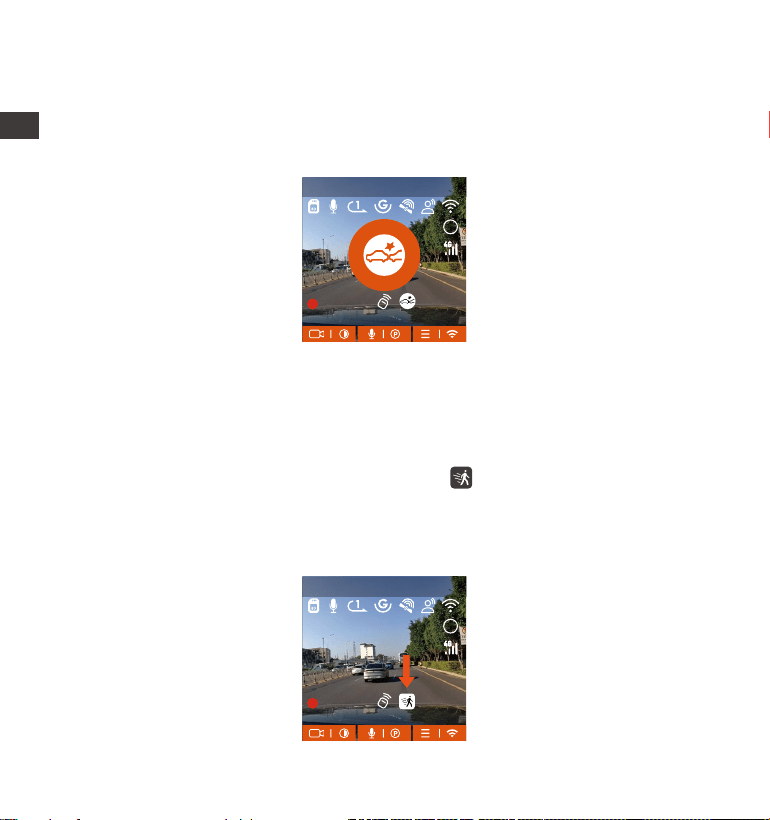
When the motion Detection is turned on, and no movement is detected after
5 minutes of recording, then an orange icon will appear in the center of the
screen, and the screen will turn o after 3 minutes.
Video recording process: When the camera detects object movement, it will
automatically trigger video recording for 30 seconds. After the motion
detection recording ends, the camera will load a 15s pre-recorded video into
the 30s motion detection video and save the 45s video to the normal folder.
MP/H
00:00:37
11-12-2024 14:09:07
56
3840x2160P 30FPS
HDR
Note:
Motion detection mode can only be engaged when the camera is turned on.
Once the camera is turned o, the motion detection mode will not work.
The resolution of the motion detection pre-recording function is based on
the dashcam default resolution, and pre-recording suppos 4K.
1.
2.
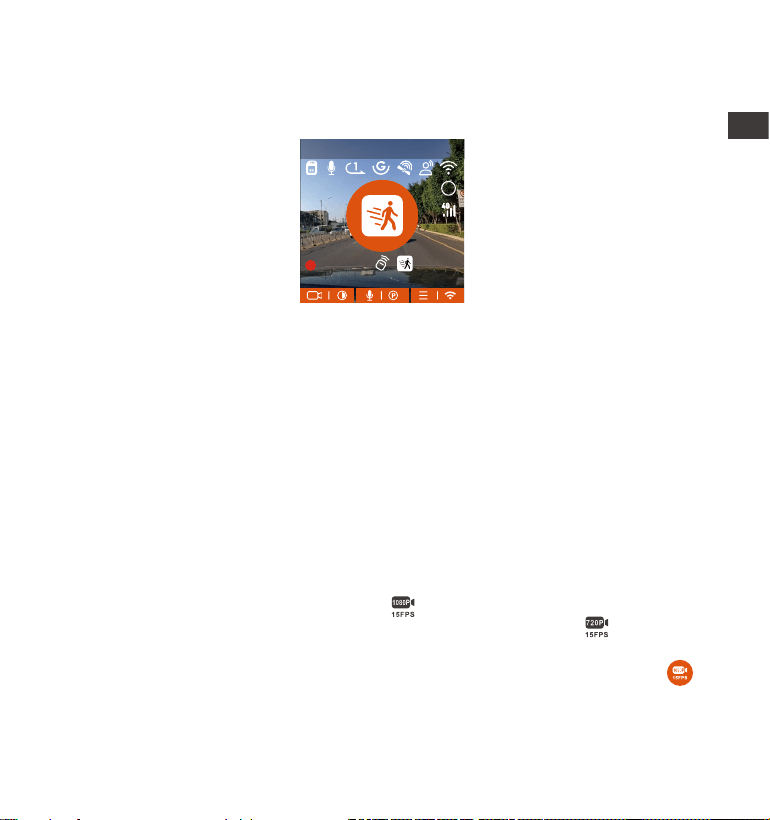
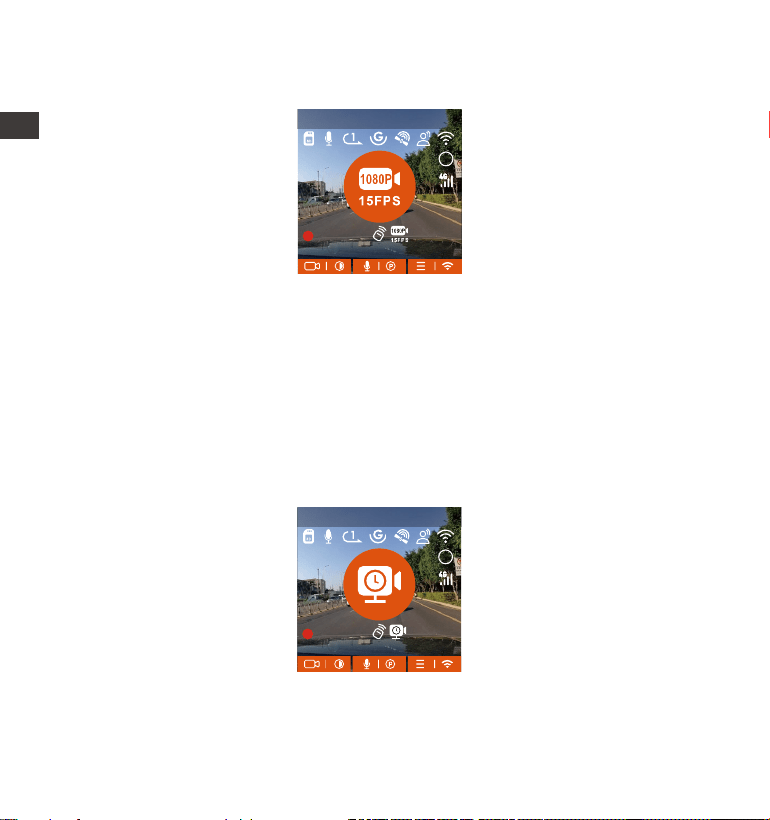
Low Bitrate Recording
When the low bitrate mode is on, the icon will be displayed in the lower
right corner of the screen if 1080P 15FPS is selected, and the icon will be
displayed in the lower right corner of the screen if 720P 15FPS is selected.
If no movement is detected after 5 minutes of recording, there will be a
icon that appears in the center of the screen. The resolution of all current
video will be automatically switched to 1080P 15FPS or 720P 15FPS for
recording, and the recording duration is determined according to the
EN
- 27 -
MP/H
00:00:37
11-12-2024 14:09:07
56
3840x2160P 30FPS
HDR
Note: Low Bitrate recording can only be engaged when the camera is turned
on. Once the camera is turned o, Low Bitrate recording will not work.
Low Framerate mode
When the low framerate mode is selected, the camera will record according to
your selection among 1FPS/5FPS/10FPS/15FPS.
For example, if you select 1FPS and the current video resolution framerate is
30FPS, the recorder will generate a 30FPS video per second. Low framerate
mode can greatly presee the integrity of the video and save space on the
memo card.
currently set loop recording duration. When the camera vibrates or is moved,
it will automatically exit, wait 5 minutes, and enter again.
[Real Recording Time(Sec)=Low Framerate Video Time Length(Sec) x Video
Frame Tate(FPS)/Low Framerate Option (FPS)]
(Time should be conveed into seconds)
MP/H
00:00:37
11-12-2024 14:09:07
56
3840x2160P 30FPS
HDR
EN
- 28 -
4.2.4 Time Lapse
When time lapse is selected, the camera will record according to your
selection among 1FPS/5FPS/10FPS/15FPS.
For example, if you select 1FPS and the current video resolution framerate is
30FPS, the recorder will generate a 30FPS video per second. Low framerate
mode can greatly presee the integrity of the video and save space on the
memo card.
The formula for calculating video duration is:
[Real Recording Time(Sec)=Time Lapse Video Time Length(Sec) x Video Frame
Tate(FPS)/Time Lapse Option (FPS)]
(Time should be conveed into seconds)
MP/H
00:00:37
11-12-2024 14:09:07
56
3840x2160P 30FPS
HDR
Note:
The time unit of the calculation formula is seconds, so the nal normal
recording time calculated is also in seconds. If you need to conve it into
other time units, please check the units and conve.
The low framerate mode is similar to the time-lapse recording function, but
the dierence is that there is no 5-minute ent mechanism for time-lapse
recording, which will be directly turned on after setting.
In low framerate mode, the camera also needs a stable power supply. Once
the power is o or exhausted, the camera will shut down.
1.
2.
3.
EN

- 29 -
4.2.6 Automatic Time via GPS
The GPS automatic correction time setting for the E1 Pro dash cam is turned
on by default. You can select GMT-08:00 by selecting your time zone, such as
Los Angeles. If you do not know the time zone of your location, you can use
WiFi to connect to the Vantrue app, and conrm that the automatic time
adjustment function in the app is turned on.
Note:
The GPS connection will be completed within 1 minute after you turn on
the device. If the GPS connection is not successful within 1 minute, please
check whether the DEVICE has turned on the GPS function, whether the
GPS bracket is properly connected, and whether your environment
(underground parking lot, densely populated residential area, subway,
tunnel, etc.) is aecting the reception of GPS signal.
GPS information is recorded along with video. To view it, please download
and install the VANTRUE App and VANTRUE GPS Player (available for
download at www.vantrue.net).
1.
2.
4.2.5 GPS Function
The GPS function is one of the most impoant functions of the dash cam.
GPS is enabled by default, and the camera receives GPS signals through the
GPS mount. It can automatically correct the time and date in your area,
recording the location where the video was taken and the speed of the car at
the time.
GPS Information
40
46
39
43
48
ENEN
- 30 -
4.2.7 Voice Assistant
In addition to controlling the camera with the remote control, you can also
control the camera with voice command. Currently suppoed languages are
English, Japanese, Russian and Chinese. For more detailed voice commands,
please check System Settings > Voice Content.
The default setting is standard sensitivity. Voice recognition has options such
as low sensitivity/standard/high sensitivity/o. You can control the camera
with voice commands.
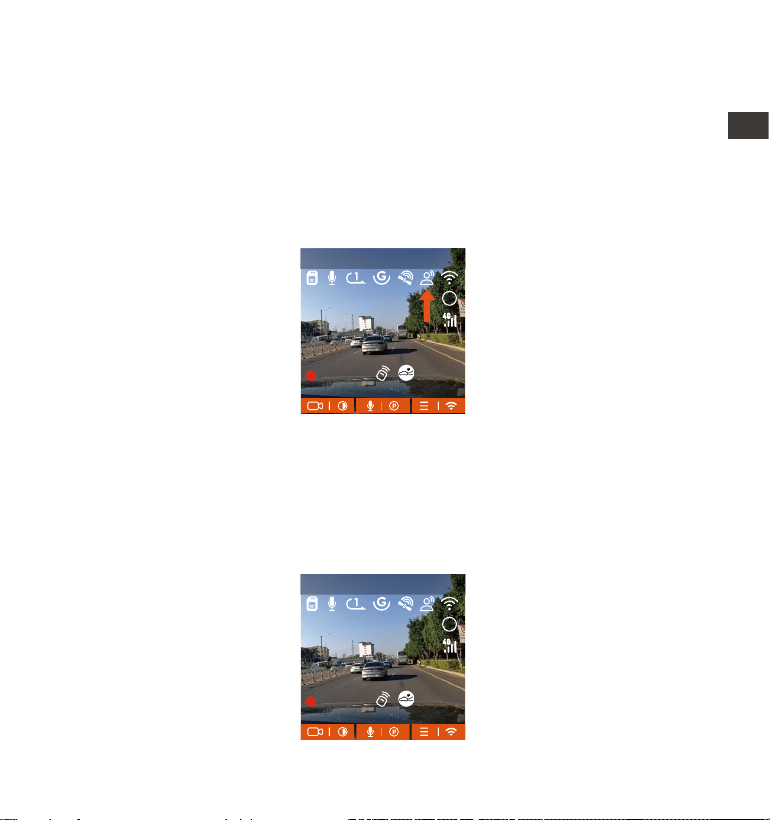
4.2.8 Display Settings
E1 Pro is a small screen camera, so we specially set two screen display modes
for you.
The rst is full-screen mode. Full-screen mode is full-screen display, with a
larger screen ratio, but it will lose some of the left and right viewing angles.
MP/H
00:00:37
11-12-2024 14:09:07
56
3840x2160P 30FPS
HDR
MP/H
00:00:37
11-12-2024 14:09:07
56
3840x2160P 30FPS
HDR
EN

- 31 -
The other is the panorama mode. In this mode, all the content seen by the
video camera will be displayed, and the ratio of the video screen display is 4:3.
4.2.9 Viewing Video/Photos
a. Viewing les on the Camera
After clicking "Files," enter any folder, and after opening the video folder, you
can press the button to select the next le, or press the button to
delete the le during playback.
00�30 01�07
1280x720
2024/11/11
7�15
20241211_140633_0002_N
MP/H
00:00:37
11-12-2024 14:09:07
56
3840x2160P 30FPS
EN
- 32 -
--Delete Videos
Delete the video on the camera. Press the button in the le browsing
inteace to pop up the delete menu.
Normal Video
Delete This File?
Delete All Files?
OK
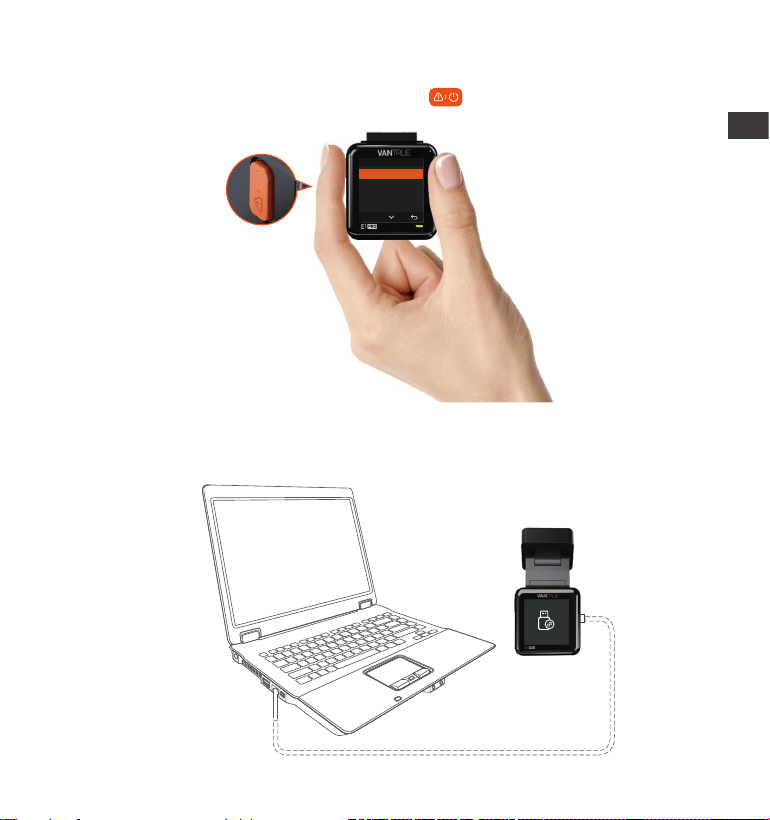
Connect the included TYPE-C USB data cable to the camera and the
computer.
b. Viewing les on a Computer
1.
EN
- 33 -
After the connection is successful, the icon will appear on the display of
the camera to transfer data, and then you can view the video les in the
computer folder.
2.
Depending on the computer systems of dierent users, after the camera is
connected to the computer, it will be displayed as a removable drive or a
removable folder.
To view les on the computer, you can directly access, right-click to open
the menu and delete them.
You can also use a USB card reader to read the memo card information.
3.
4.
5.
EN
- 34 -
For video playback in the app, or for downloads to SD card, there will be no
network trac consumption.
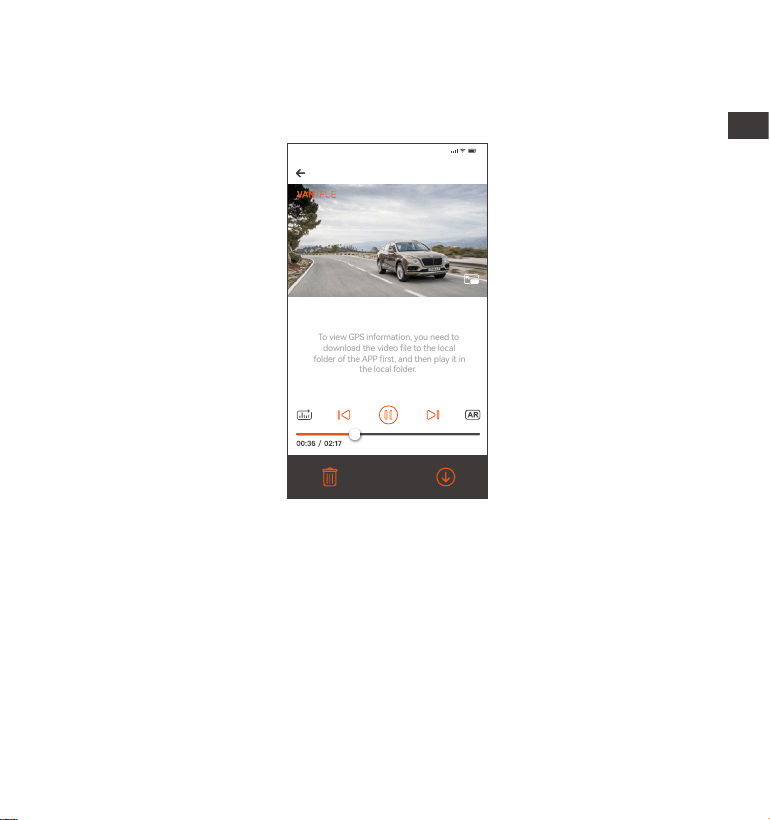
You can view GPS track information only after the video le is downloaded
and played back locally. At the same time, you need to disconnect the WiFi
of the dash cam, otherwise the map information will be blank.
1.
2.
Note:
c. View on the "Vantrue"App
After the camera is successfully connected to the mobile phone through WiFi,
it can play back, download and delete les in the mobile app.
20241211 _115036_0079_N_A.MP4
11/12/2024 11:5:35 E1 Pro 000.000000. 000.000000. 36MK/H
To view GPS information, you need to
download the video le to the local
folder of the APP rst, and then play it in
the local folder.
Note:
9:41
EN

- 35 -
4.2.10 Upgrading the Firmware
The system will automatically update with the Micro-SD card rmware
upgrade le. The camera will resta once the upgrade has been completed.
The latest rmware version is always available at the ocial VANTRUE
website (www.vantrue.net). We strongly recommend registering your product
(www.vantrue.net/register) to receive a notication email when a new
rmware update is available.
4.2.11 Working Temperature
The camera is designed to operate in temperatures from -4 to 158°F (-20 to
70°C). Temperatures outside this range risk degrading the camera’s
peormance and causing damage.
To avoid damage
In hot weather, do not expose the camera directly to the sun when the car is
parked.
In extreme winter conditions, i.e. -4°F (-20°C) or lower, detach the camera
from the windshield when not in use, and store in the glove box.
EN

- 36 -
5. Specications
E1 ProModel
Engish/ Français/ Español/ Deutsch/ Italiano/简体
中文/русский/ 日本語/ Polski
3840x2160P 30FPS(HDR); 2560x1440P 30FPS(HDR);
1920x1080P 30FPS(HDR); 1280x720P 30FPS(HDR)
External: 32GB-1TB Micro SD Card, U3, Class 10
(not included in the package)
Novatek high-peormance processor
Sony CMOS Sensor
1.54” IPS Screen
Built-in 2.4GHz & 5GHz
The specications of this product may change without prior notice due to
product improvements.
Chips
Image Sensor
Screen
WiFi
Front: 158° wide viewing angle; F/1. 8 wide apeure
Languages
Built-in microphone and speaker
Audio
Memo Storage
Video Resolution
Built-in super capacitor
MP4
DC 5V 2.4A
3.5W
-4°F to 158°F(-20°C to 70°C)
-22°F to 185°F(-30°C to 85°C)
Type C
Power Source
Video File Format
Supply voltage current
Power
Working Temperature
Storage Temperature
USB Po
Lens
EN

- 37 -
Warranty
The VANTRUE® Element 1 Pro Dash Cam comes with a full 12 months
warranty. If you register your product on our ocial site (www.van-
true.net/register), you can extend the warranty to 18 months.
Suppo new
If you have any questions regarding your product, please do not hesitate to
contact us at suppo@vantrue.net, or drop us a message through the live
chat box at www.vantrue.net.
Queries are typically answered within 12-24hours.
Your opinion matters
VANTRUE® is rmly committed to always improving our products, seices,
and user experience. If you have any thoughts on how we can do even better,
we welcome your constructive feedback and suggestions. Connect with us
today at suppo@vantrue.net.
6. Warranty & Suppo
ENEN

- 38 -
Bedienungshinweise:
Bitte lesen Sie vor dem Gebrauch der Dashcam das Benutzerhandbuch
sorgfältig durch.
Die Dashcam sollte stets an eine stabile Stromquelle angeschlossen werden, um
reibungslos zu funktionieren.
Um Fahrsicherheit willen bitte vermeiden Sie während der Fah, die Dashcam
zu bedienen oder Dateien auf Vantrue App zu überprüfen.
Bitte legen Sie eine microSD-Kae mit ausreichenden Schreib- und
Lesegeschwindigkeiten ein, um die Dashcam ordnungsmäßig zu bedienen.
Bitte wenden Sie sich an den VANTRUE Kundendienst, wenn das Produkt nicht
ordnungsgemäß funktionie. Es ist NICHT empfohlen, das Gehäuse der
Dashcam zu zerlegen oder das Gerät selbst reparieren zu versuchen.
Bitte bringen Sie die Dashcam an eine geeignete Stelle an, damit sie die Sicht
der Fahrer:innen nicht stö.
Bitte verwenden Sie das Produkt NICHT bei übermäßig hohen Temperaturen
oder in feuchter Umgebung.
Um Benutzereahrungen kontinuierlich zu verbessern, wird die Firmware der
Dashcam unregelmäißg aktualisie. Nach Veröentlichung der Firmware-Datei
neuerer Version können Sie bei Beda die Software aktualisieren.
Bitte montieren Sie die Dashcam NICHT an der Windschutzscheibesstelle direkt
vor Fahrer:innen, um mögliche Beschädigungen im Fall des Lösens der
Dashcam von der Windschutzscheibe zu vermeiden.
Bitte beachten Sie, dass bei der Verwendung von drahtlosem CarPlay oder
Android Auto die Verbindung mit Vantrue App beeinträchtigt sein könnte.
Bitte halten Sie beim Gebrauch der Dashcam Gesetze und Vorschriften Ihres
Staates (oder Landes oder Provinz) ein.
·
·
·
·
·
·
·
·
·
·
·
DE
- 39 -
A. VANTRUE E1 Pro
Dashcam
1. Was liegt im Kaon?
F. Kabelhalter
(3 Stücke)
L. Hardwire Kit
(3,5 Meter)
M. FernbedienungJ. CPL Filter
Optionale Zubehöeile:
D. USB C Datenkabel
(3,5 Meter)
G.
Warnauleber
(2 Stücke)
C. Autoladegerät
mit USB C Kabel
(3,5 Meter)
E. Elektrostatische
Folie (2 Blätter)
I.
Benutzerhandbuch
B. GPS Klebehalterung
H.
Kabelverlegehebel
K.
LTE-Modul
(LT01)
Element 1 Pro
DE
- 40 -
2. Die Übersicht über Kamera
Num. Beschreibung
1
2
Name
Taste Während der Aufnahme lange drücken, um den
Bildschirm auszuschalten; kurz drücken, um die
Aufnahme zu stoppen und in den Standby-Modus
zu wechseln; Bestätigen die ausgewählte Option im
3
Mikrofon Zeichnet den Ton mit dem Videomaterial auf.
Serien Nummer
Seriennummer für die Garantieregistrierung.
6
9
7
3
4
5
1 2
8
12
14
10
11
13 15
GM01 DC 5V
DE
- 41 -
Taste Lange drücken, um den Parkmodus aufzurufen,
während die Kamera aufzeichnet und im Standby;
Kurz drücken, Mikrofon AN/AUS; Abwäsauswahl;
Im Wiedergabemodus kurz drücken, um die Dateien
zu löschen
4
5
6
7
Taste
Taste
lange drücken während des Videos oder Standby
Status, um WLAN ein-/auszuschalten; kurz
drücken, um das Menü aufzurufen
Frontkamera
Verbindet sich mit der Halterung
Frontkamera für Überwachung der Fahrspuren.
8
USB C Anschluss USB C Anschluss zum Laden oder Überagen
von Daten; Anschluss zum VANTRUE LT01 Modul;
9 Anschluss auf
der Halterung
USB C Anschluss zum Laden
10
Reset Taste Kurz drücken, um die Kamera neu zu staen.
12
Lautsprecher Liefe Ton bei der Wiedergabe von Videos.
13
14
11
Screen 1.54” LCD Screen
Bietet erweiterbaren Speicher (bis zu 1TB in FAT32,
Klasse 10 oder höher)
mcroSD-
Kaensteckplatz
Halterungs-
anschluss
Power An/ Aus wenn lange drücken; während des
Videos kurz drücken, um in den Notfallmodus zu
wechseln; weiter kurz drücken, um Bilder aufzu-
nehmen.
6
Menü(OK); Bei der Wiedergabe von Dateien
können die Dateien abspielen/anhalten
DE
- 42 -
Die Übersicht über die Kamera
15
BeschreibungLED Status
15 Im Aufnahme
Im standbystatus.Grünes Lichtes ist auf der
Anzeigelampe sichtbar
Grünes Licht blinkt auf der
Anzeigelampe
MP/H
00:00:37
11-12-2024 14:09:07
56
3840x2160P 30FPS
HDR
Daueraufnahme AUS
Daueraufnahme 1 Minute
Daueraufnahme 3 Minute
Daueraufnahme 5 Minute
GPS-Signal durchsuchen
GPS Signal wird gesper
Geschwindigkeit
(KM/H oder MPH)
Keine SD Kae
SD Kae eingelegt
Zeitraer AN
Kollisionserkennung AN
Bewegungserkennung AN
1080P Niedrige Bitraten Modus/15FPS
720P Niedrige Bitraten Modus/15FP
Parkmodus mit niedriger Framerate
Video Auösung
Tastenführung
WiFi An
WiFi Verbunden
WiFi Aus
Parkmodus-Zeit
(Aktuelles Clip)
00�00�37
HDR AN
HDR AUS
HDR
HDR
G-Sensor AUS
G-Sensor AN
Fernbedienung
angeschlossen
Urzeit Und Datum
Sprachassistent
Mik AN
Mik AUS
Signalstärke des Netzwerks
DE
- 43 -
Bevor Sie diese Kae verwenden, führen Sie bitte die folgenden Schritteaus,
um sie richtig zu formatieren:
Wenn die Kamera aufzeichnet, drücken Sie bitte das Symbol , um die
Aufnahme anzuhalten, drücken Sie dann das Symbol , um das Menü
aufzurufen, rufen Sie dann das „System“ auf, wählen Sie die Kae formatieren
aus und bestätigen Sie das Formatieren der Speicherkae, bis die Meldung
„Formatieren eolgreich“ angezeigt wird.
3. Installation
3.1 Speicherkae installieren(VANTRUE U3 MicroSD-Kae empfohlen)
Bitte legen Sie eine Speicherkae ein (Speicherkaenkapazität: 32GB-1TB,
Kaengeschwindigkeit: U3/Class10/A2), da die Dashcam bestimmte
Anforderungen an die Kaengeschwindigkeit der Speicherkae stellt. Für
einen zuverlässigen Betrieb empfehlen wir die Verwendung einer VANTRUE
SD-Kae (separat erhältlich).
Wie zu installieren: Ein Symbol zeigt die Einschubrichtung der Speicherkae
an. Bitte schieben Sie die Speicherkae in der durch das Symbol angezeigten
Richtung in den Kaensteckplatz, bis ein „Klick“-Geräusch im Kaensteck-
platz zu hören ist, was darauf hinweist, dass die Speicherkae richtig
eingesetzt ist
DE
- 44 -
Wenn nach dem Einlegen der Speicherkae der Bildschirm „Kaenfehler,
bitte formatieren“ anzeigt (bitte beachten Sie, dass der Rekorder zu diesem
Zeitpunkt nicht aufzeichnet), drücken Sie bitte direkt die Taste um das
Menü aufzurufen und den Formatierungsprozess zu staen.
3.2 Installieren Sie die Kamera auf Ihrer Windschutzscheibe
Wir empfehlen, die Kae einmal im Monat zu formatieren, um die normale
Verwendung der Dashcam sicherzustellen.
Entfernen oder stecken Sie die Speicherkae nicht während der Aufnahme,
um den Verlust wichtiger Videos zu vermeiden.
Bitte verwenden Sie keine schlechten Kaen oder Kaen mit niedriger
Geschwindigkeit auf der Dashcam, da die Aufnahme aufgrund des Ausfalls
der Speicherkae leicht angehalten oder verloren werden kann.
Bevor Sie die Speicherkae formatieren, überprüfen Sie bitte den
Notfallvideoordner auf der SD-Kae, ob Videos vorhanden sind, die
separat gespeiche werden müssen, um nicht versehentlich wichtige
Videos zu löschen.
ERINNERUNG:
1.
Verbinden Sie die Halterung mit der Montagesockel der Kamera und
drücken Sie sie hinein, bis sie einrastet.
1.
2.
3.
4.
DE
- 45 -
Reinigen Sie die Windschutzscheibe gründlich mit Wasser oder Alkohol und
wischen Sie sie dann mit einem trockenen Tuch ab. Kleben Sie den
elektrostatischen Auleber hinter den Rückspiegel. Dies ist die empfohlene
Position, um unsere Sicht während der Fah nicht zu beeinträchtigen.
2.
Elektrostatischer
Auleber
Hinweis: Es gibt zwei elektrostatische Auleber mit den Nummern 1 und 2.
Bitte entfernen Sie die Schutzfolie von Nr. 1, kleben Sie den elektro-
statischen Auleber auf die Windschutzscheibe und entfernen dann die
Schutzfolie von Nr. 2.
Entfernen Sie das 3M-Klebeband von der Halterung und befestigen Sie
dann die Halterung und die Kamera auf dem Elektrostatik-Auleber
3.
Please peel o this mask
AFTER application completed
Please peel o this
mask BEFORE application
DE
- 46 -
Schließen Sie das Autoladegerät an den Zigarettenanzünder des Autos an
und stecken Sie dann das USB-Ende des Ladegeräts in den USB-C-Stro-
manschluss der Kamera. Nachdem das Auto gestaet wurde, kann die
Kamera sofo eingeschaltet werden.
Um das Autoladekabel oder das Verbindungskabel für die Heckkamera
ordentlich zu verlegen und zu befestigen, kann man die mitgeliefeen
4.
DE

- 47 -
Bitte scannen Sie den QR-Code der entsprechenden Version unten, um die
APP herunterzuladen und zu installieren.
Suchen Sie im App Store oder Google Play Store nach der App „Vantrue “, um
die App zu nden, und laden Sie sie dann herunter und installieren Sie sie auf
Ihrem Telefon.
3.3 APP-Download
Kabelhalter benutzen. Platzieren und kleben Sie die Kabelhalter zuerst an
gewünschten Stellen im Fahrzeug, dann führen Sie das Kabel durch die
dafür vorgesehene Önung in jedem Kabelhalter.
Hinweis: Nachdem diese Kamera eolgreich über WLAN mit dem Mobiltele-
fon verbunden wurde, kann sie eine Echtzeit-Videovorschau realisieren,
Kameraeinstellungen ändern, Dateien ohne Internetverbindung herunterlad-
en und Videos auf dem Mobiltelefon wiedergeben. Die Wiedergabe von
GPS-Tracks und die Video-Sharing-Funktionen hängen jedoch vom Internet
oder den Mehrwediensten der Telekom ab (eorde das Ausschalten/Tren-
nen des WLAN der Kamera).
DE
- 48 -
3.4 WLAN-Verbindung
Schalten Sie die WLAN-Funktion der Kamera ein, geben Sie die WLAN-
Einstellungen des Mobiltelefons ein und suchen Sie dann den WLAN-Namen,
z. B.: E1 Pro_VANTRUE_XXXX, und geben Sie das WLAN-Standardpasswo
ein: 12345678, um eine WLAN-Verbindung herzustellen.
DE
- 49 -
Nachdem die WLAN-Verbindung eolgreich ist, klicken Sie beim ersten
Önen der APP auf „+“, fügen Sie das Kameramodell hinzu, und die APP
verbindet sich automatisch mit der Kamera und zeigt die aktuelle
Echtzeit-Aufnahmesituation der Kamera an.
Notiz:
Wenn Sie sich vor dem Önen der APP nicht mit dem WLAN verbinden,
forde die APP Sie auf: „Bitte zuerst mit WLAN verbinden“ und springt
automatisch zu den WLAN-Einstellungen. Bitte führen Sie zuerst die Schritte
aus, um sich mit dem WLAN zu verbinden.
1.
3.5 APP-Verbindung
DE

- 50 -
3.
2.
4.
5.
6.
Wenn das WLAN bereits verbunden ist, aber die APP nach der Auswahl des
Modells zur Anwendungsberechtigung der APP springt, überprüfen Sie bitte,
ob die drahtlose Netzwerkberechtigung der APP aktivie ist.
Das Initialpasswo dieses Geräts wird nur für die Erstanmeldung verwendet.
Um potenziellen Sicherheitsrisiken vorzubeugen, ändern Sie das Initialpass-
wo bitte rechtzeitig nach der ersten Anmeldung, um zu verhindern, dass
sich andere unbefugt in Ihr Gerät einloggen oder andere nachteilige Folgen
haben.
Wenn Sie das WLAN-Passwo vergessen, können Sie die Standardeinstel-
lung des Geräts wiederherstellen, und das WLAN-Passwo des Geräts wird
ebenfalls auf das Standardpasswo (12345678) zurückgesetzt.
Wenn der verbundene WLAN-Name nicht mit Ihrem Dashcam-Modell
übereinstimmt, forde die APP auf „Bitte wählen Sie das richtige Modell aus
“ und springt automatisch zurück zur Modellauswahlobeläche.
Nachdem das WLAN eingeschaltet wurde und keine Verbindung zum
Mobiltelefon besteht, schaltet die Dashcam das WLAN nach 10 Minuten aus
und keh zur Aufnahmeseite zurück.
DE
- 51 -
Einstellungen
Vollbild-Schalter
Schnappschuss
Mikrofonschalter
3.6 WLAN-Verbindung
Nach dem Aufrufen der APP-Echtzeitvorschau können Sie die folgenden
Vorgänge ausführen:
Videovorschau: Nachdem die APP eolgreich mit der Kamera verbunden
wurde, rufen Sie die Echtzeit-Vorschauseite auf, klicken Sie auf die Vollbild-
Schaltäche oder platzieren Sie das Telefon horizontal, und der Echtzeit-Bild-
schirm wechselt automatisch in den Vollbild-Vorschaumodus. Klicken Sie auf
die Fensterwechsel-Schaltäche, um das vordere und hintere Videofenster
umzuschalten.
Videowiedergabe: Die auf der SD-Kae aufgezeichneten Video-und
Fotodateien können in der APP angezeigt werden, und das Video kann nach
Fotoalbum
Aufnahme
staen/ pausieren
Linsenkorrekturlinie
Kilometerstandstatistik
DE
- 52 -
Vantrue Ltd.
Zurück
Vantrue
Vantrue
9:41
Heute Spiele Apps Suche
3.7 APP-Upgrade
Önen Sie die „Vantrue“ App, stellen Sie eine Verbindung zum WLAN her und
geben Sie „Einstellungen > Info > Neue Version erkennen“ ein. Die App
erkennt automatisch, ob die App-Version die neueste Version ist. Wenn es
eine neue Version der App gibt, befolgen Sie die Anweisungen der App und
aktualisieren Sie die Version.
dem Klicken auf die Datei wiedergegeben werden.
Video-Download: Sie können das Video oder Bild, das Sie herunterladen
möchten, in der Benutzerobeläche zum Durchsuchen der SD-Kae oder in
der Videowiedergabe auswählen. Wenn Sie das Video nach dem Herunterlad-
en in der lokalen Datei der App abspielen, können Sie den GPS-Track des
Videos sehen.
Video-Schnappschuss: Sie können das aktuelle Bild in der Echtzeit-
Vorschauobeläche der App eassen.
DE

- 53 -
Die E1 Pro Dash Cam veügt über 3 Funktionsmenüs, nämlich Video Einstel-
lungen, System Einstellungen und Datei. In dieser Funktionseinstellung können
Sie Ihre Dashcam nach Ihren Wünschen einstellen.
Drücken Sie die Taste, halten Sie zuerst das Video an und drücken Sie
dann die Taste , um die Menüeinstellungen aufzurufen.
4. Grundlegende Bedienung
4.1 Menüeinstellungen
Video System Datei
A. Video Einstellung
Videoauösung: Bei der E1 Pro Dashcam sind vier Videoauösungsoptionen
zur Auswahl: 3840x2160P 30FPS, 2560x1440P 30FPS, 1920x1080P 30FPS und
1280x720P 30FPS.
Bildqualität: Die Standardeinstellung gilt für die Bildqualität der gesamten
Szene. Wenn die Dashcam auf den Modus „PlatePix™“ geschaltet wird, wird
vor allem die Erkennung der Kennzeichen berücksichtigt.
Daueraufnahme: Die Dauer jeder Sequenz ist standardgemäß 1 Minute.
Optionen zur Auswahl: Aus, 1 Minute, 2 Minuten und 3 Minuten.
HDR: Das HDR Feature lässt sich für eine ausgewogene Bildqualität ein und
ausschalten. „An“ standardgemäß eingestellt.
HDR Timer: Wenn der HDR Timer aktivie ist, lässt sich einstellen, wann HDR
automatisch ein- und ausgeschaltet wird. „Aus“ standardgemäß eingestellt.
G-Sensor: Wählen Sie nach Beda Empndlichkeitsstufen des G-Sensors für
verschiedene Richtungen (Vorne + Hinten, Links + Rechts, Oben + Unten) aus.
Die Empndlichkeitsstufe des G-Sensors für jede Richtung kann als 1, 2, 3, 4,
DE

- 54 -
5 oder Aus eingestellt werden. Je höher die Empndlichkeitsstufe, desto
weniger ist die Kraft benötigt, um den G-Sensor zu erwecken und die
automatische Sperrung der Ereignisaufnahme auszulösen. Die Stufe „3“
standardgemäß eingestellt
Audio Rekord: Die Standardeinstellung ist AN. Die Tonaufnahme lässt sich
nach Beda ein- und ausschalten.
Audio-Rauschunterdrückung: Die Audioqualität der Aufnahme wird durch
dynamische Rauschunterdrückung angepasst. Optionen zur Auswahl: Aus, An.
„An“ standardgemäß eingestellt.
Belichtung: Die Belichtungswee für die Kamera nach vorne lassen sich
einstellen. „+0.0“ standardgemäß eingestellt.
Aufnahme-Licht: Die Statusanzeige der Aufnahme lässt sich ein- und
ausschalten. Optionen zur Auswahl: Aus, An. „An“ standardgemäß eingestellt.
Bildschirm Drehen: Man kann den Bildschirm der Dashcam umdrehen und die
Ansicht auf den Kopf stellen. „Aus“ standardgemäß eingestellt.
Nummernschild: Geben Sie bis zu neun Ziern und/oder Buchstaben ein, um
das Nummernschild Ihrers Fahrzeugs auf dem Bildschirm und im aufgezeich-
neten Videos anzuzeigen.
Stempel: Zeigen Sie nach Beda Stempel bzw. Wasserzeichen auf Aufnahmen
und Fotos. Einzustellende Optionen: Datum/Uhrzeit, Hersteller / Modell,
Nummernschild, Geschwindigkeit, GPS Stando. Alle Optionen standard-
mäßig aktivie.
Zeitraer: Der Zeitraer-Modus ermöglicht, mit 1, 5, 10 oder 15 FPS
aufzunehmen. „Aus“ standardgemäß eingestellt.
Parkmodus: Unterschiedliche Parkmodi lassen sich je nach Beda einstellen:
Kollisionserkennung, Bewegungserkennung, Modus mit niedriger Auösung,
Low-Frame-Rate-Modus, Aus. „Aus“ standardgemäß eingestellt.
Parküberwachungseinstellungen: Abhängig von dem Parkmodus. Der
„Nachtsicht Parkmodus“ wird für eine bessere Bildqualität standardgemäß
aktivie, nachdem irgendein Parkmodus aktivie ist. Für den Parkmodus
„Kollisionserkennung“ sind beide Modi „Stromsparmodus“ und „Schnellsta-
DE

- 55 -
modus“ zur Auswahl – der „Schnellstamodus“ ist standardgemäß
ausgewählt.
LTE-Einstellungen: Abhängig von dem damit verbundenen LTE-Modul. Es
lässt sich hier einstellen, ob und wann nach der Ereigniserkennung eine
Push-Nachricht geschickt wird, ob und wie ein Kollisionsvideo auf den
Cloud-Speicher hochgeladen wird. Nach der Verbindung mit dem LTE-Modul
wird standardgemäß eingestellt, dass die Push-Nachricht in Echtzeit geschickt
und, um mobile Daten zu sparen, das Ereignisvideo mit einer mittelmäßigen
Videoqualität hochgeladen wird. Die Einstellungen lassen sich nach Beda
anpassen.
Kilometerstatistik: Wenn diese Funktion aktivie wird, zeichnet die Dashcam
Kilometerstandsdaten auf. Nach eolgreicher WLAN-Verbindung mit Vantrue
App lassen sich die Daten analysieren und expoieren. „An“ standardgemäß
eingestellt.
GPS Einstellung: Die GPS Funktion ist standardgemäß aktivie. Einzustellen-
de Optionen: GPS (Aus / An), Geschwindigkeitseinheit (KM/H / MPH), GPS
Signalstärke.
B. System Einstellung
Sprache: Folgende Sprachen sind momentan unterstützt: English/Français/
Español/Deutsch/Italiano/简体中文/русский/日本語/Polski/한국어.
WLAN: „WLAN AUS/AN“ und „WLAN-Frequenzband“ lassen sich einstellen
und die „WLAN Information“ lässt sich überprüfen.
WLAN AUS/AN: WLAN ist standardgemäß automatisch aktivie und in 10
Minuten deaktivie. Wenn Sie „Aus“ betätigen, muss das WLAN manuell
aktivie werden. Wenn Sie „An“ betätigen, bleibt es ständig aktivie.
WLAN Band: Als „5G“ standardgemäß eingestellt. Nach der Aktivierung lässt
sich die Dashcam mit Ihrem Smaphone verbinden und über die Vantrue App
steuern.
WLAN Information: Der Titel und das Passwo des WLAN sind hier sichtbar.
Bildschirmeinstellung: Man kann nach Beda den Vollbildmodus oder den
DE

- 56 -
Vollansichtsmodus einstellen. Beim Vollansichtsmodus erhält man anhand des
Weitwinkels ein größeres Sichtfeld. Der Vollbildmodus ist standardgemäß
eingestellt.
USB Modus: Für die Datenüberagung über das LTE-Modul und über das
USB Kabel benutzt man denselben USB C Anschluss an der Seite der
Dashcam. Der LTE-Datenüberagungsmodus ist standardgemäß aktivie. Vor
der Datenüberagung über das das USB Kabel sollte die Dashcam zuerst auf
den USB-Datenüberagungsmodus geschaltet werden.
Spracherkennung: Nach der Aktivierung dieser Funktion können bestimmte
Sprachbefehle erkannt werden. Einzustellende Empndlichkeitsstufe: AUS,
Niedrige Empndlichkeit, Standard, Hohe Empndlichkeit. Standardgemäß als
„Standard“ eingestellt.
Sprachbefehle: Sie können bestimmte Sprachebefehle geben, um mit Ihrer
Stimme die Dashcam zu bedienen.
SD Kae Formatieren: Formatieren Sie alle Daten auf der Speicherkae. Es
ist empfohlen, vor der Formatierung benötige Dateien in der Speicherkae am
Computer zu speichern.
Formatierungserinnerung: Sie können alle 15 Tagen oder jeden Monat zur
Formatierung erinne werden. Erinnerungsoptionen: 15 Tage, 1 Monat, Aus.
„Aus“ standardgemäß eingestellt. Nach der Betätigung beginnt der Count-
down. Dann erscheint auf der Benutzerobeläche der Dashcam rechtzeitig
eine Formatierungsmeldung. Tippen Sie da auf die Option „Ja, jetzt formatie-
ren“, um die Speicherkae zu formatieren. Tippen Sie auf die Option „Nein,
nächstes Mal“, um mit dem Countdown erneut zu beginnen.
Datum & Uhrzeit: Uhrzeit und Datum lässt sich auf zwei Weisen anpassen.
① Automatisches GPS-Update: Die automatische Aktualisierung über GPS
wird standardgemäß aktivie, sodass Datum und Uhrzeit rechtzeitig automa-
tisch aktualisie wird. Die Aktualisierung basie auf die der eingestellten
Zeitzone. Es ist empfohlen, eine dem Stando entsprechende Zeitzone
einzustellen.
DE

- 57 -
② Datum / Uhrzeit manuell einstellen: Deaktivieren Sie die automatische
Aktualisierung über GPS und stellen dann Datum und Uhrzeit manuell ein.
③ Automatische ST/WT-Umschaltung: Wenn diese Funktion aktivie wird,
lässt sich Datum und Uhrzeit entsprechend der Sommer- oder Winterzeit
automatisch aktualisieren. „Aus“ standardgemäß eingestellt.
*Diese Funktion lässt sich momentan nur für Nordamerika verwirklichen. Bei
Verwendung in anderen Regionen könnte es zu Fehlern bezüglich Datum und
Uhrzeit kommen.
④Uhrzeitformat: Man kann nach Beda das 24- oder das 12-Stunden-
Format einstellen. Standardeinstellung: 24-Stunden-Format. Diese Einstellung
betrit nur die Uhrzeit-Anzeige bei der Aufzeichnung und in Aufnahmen.
Datumsformat und Zeitzone lassen sich ebenfalls hier einstellen.
Bildschirmschoner: Stellen Sie ein, wie lange daue es, bis der Bildschirm der
Dashcam automatisch ausgeschaltet wird, wenn keine Bedienung an der
Dashcam betätigt wird. Der Bildschirm wird zwar ausgeschaltet, aber die
Dashcam läuft weiter. Optionen zur Auswahl: Aus, 30 Sekunden, 1 Minute, 3
Minuten. Standardeinstellung: Aus.
Lautstärke: Die Lautstärke der Warntöne lässt sich anpassen. Optionen zur
Auswahl: AUS, 1, 2, 3, 4, 5. Je höher die Stufe, desto lauter eönen Warntöne.
Die Stufe „3“ standardgemäß eingestellt.
Warntöne: Je nach Situation eönt ein entsprechender Ton von der Dashcam.
Fünf Tonaen lassen sich ein und ausschalten: Stasound, Tastenton,
Datei-Sperren-Ton, Formatierungston, und Warnton beim ungewöhnlichen
Beenden einer Aufnahme. Alle Warntöne sind standardmäßig eingeschaltet.
Frequenz: Die anwendbare Frequenz hängt von Land und Region ab, in der
Sie sich benden. Für eine bessere Videoqualität sollte man eine passende
Frequenz von 50 Hz oder 60 Hz wählen.
System Info: Hier sind das Dashcam-Modell, die Firmware-Version und die
ozielle Website von VANTRUE sichtbar.
DE

- 58 -
Zeizierungsinfo: Sie können die Zeizierungsinformationen der E1 Pro
Dashcam überprüfen.
Standardeinstellungen: Setzen Sie das Gerät auf die Werkeinstellungen
zurück.
C. Datei
Hier können Sie die von der Dashcam aufgezeichneten Aufnahmen abspielen,
Schnappschüsse sehen und Dateien löschen.
-Notfallvideo: In diesem Ordner werden Ereignisvideos, die durch G-Sensor
automatisch erkannt oder manuell gesper wurden, gespeiche. Das
Dateinamenformat für Notfallvideos lautet:
20300128_140633_00008_E_A.MP4
-Parkvideo: In diesem Ordner werden Aufnahmen, die im Parkmodus
aufgezeichnet wurden, gespeiche. Das Dateinamenformat für Videos im
Parkmodus lautet:
20300128_140633_00007 P A.MP4
-Normal Video: In diesem Ordner werden Aufnahmen, die bei der Loop-
Aufnahme und im Zeitraer-Modus aufgezeichnet wurden, gespeiche.
Das Dateinamenformat für gewöhnliche Videos bei der Loop-Aufnahme
lautet:
20300128_140633_00008_N_A.MP4
Das Dateinamenformat für gewöhnliche Videos im Zeitraer-Modus lautet:
20300128_140633_00006_T_A.MP4
-Fotos: In diesem Ordner werden alle Schnappschüsse gespeiche.
-Alle Dateien: Alle Videos und Fotos sind hier sichtbar.
DE

- 59 -
DE
4.2 Spezikation
4.2.1 Daueraufnahme
Nach dem Einlegen der Speicherkae und dem Anschließen der Stromver-
sorgung schaltet sich die E1 Pro-Dashcam automatisch ein und beginnt mit
der Loop-Aufnahme. Die Dauer jedes aufgezeichneten Videos wird basierend
auf der von Ihnen eingestellten Loop-Aufnahmezeit im normalen Videoord-
ner gespeiche.
Wenn die Kapazität des normalen Videoordners 70% der Gesamtkapazität
erreicht, überschreibt die neue Loop-Aufnahmedatei automatisch die
ursprüngliche Loop-Aufnahmedatei. Nachdem diese Funktion aktivie ist,
überschreibt die Videodatei automatisch die Schleife, um die Aufzeichnung
während des Fahorgangs nicht zu stoppen.
Notiz:
1. Der normale Betrieb der Loop-Aufnahmefunktion hängt stark von der
Geschwindigkeit der Speicherkae ab. Formatieren Sie die Speicherkae
daher regelmäßig, um Probleme wie übermäßige Speicherkaendateien und
Kaenalterung zu vermeiden, die sich auf die normale Loop-Aufnahme
auswirken.
Bitte überprüfen Sie regelmäßig das Loop-Aufzeichnungsvideo, um zu
vermeiden, dass das eorderliche Video durch die Schleife überschrieben
wird.
Wenn Sie die Loop-Aufnahme deaktivieren, funktionie die Videosperr-
funktion nicht mehr
Nachdem die Loop-Aufnahme ausgeschaltet wurde, beträgt die Dauer jedes
Videos 20 Minuten, und die Aufnahme wird beendet, wenn die Kapazität
der Speicherkae voll ist.
2.
4.
3.
DE
- 60 -
Das automatische Sperrereignisvideo wird ausgelöst, wenn das Auto
getroen/gerüttelt wird, die Dashcam erkennt die Vibration und sper
automatisch das aktuelle Video, das im Ereignisvideoordner gespeiche ist.
Während der Sperideoperiode können Sie die Notfall-Taste drücken,
um mehrmals zu fotograeren. Nach der Aufnahme wird das Video automa-
tisch im Ereignisvideoordner und das Foto im Fotoordner gespeiche.
Datei 1/4
Notfallvideo
Normal Video
Fotos
Alle Dateien
OK
2/5Notfallvideo 2/5
20241118_140633_0001_E...
20241118_140633_0003_E...
20241118_140633_0004_E...
20241118_140633_0002_E...
OK
4.2.2 Notfallaufzeichnung
Während des Fahrens können Sie den Rekorder unter besonderen Umständen
manuell oder automatisch für Notfallaufzeichnungen sperren.
Zum manuellen Sperren müssen Sie nur die Notfall-Videotaste drücken,
um das aktuelle Video zu sperren und aufzunehmen.
MP/H
00:00:37
11-12-2024 14:09:07
56
3840x2160P 30FPS
HDR
MP/H
00:00:37
11-12-2024 14:09:07
56
3840x2160P 30FPS
HDR
DE

- 61 -
DE
4.2.3 Parkmodus (Wenn der Parkmodus eingeschaltet ist, funktionie die
Zeitraer-funktion nicht. Diese beiden Funktionen können nicht gleich-
zeitig ausgefüh werden.)
Der Parkmodus fungie in verschiedenen Situationen als Wächteunktion. Sie
können je nach Parksituation in verschiedene Parküberwachungsmodi
wechseln.
Um den Parkmodus einzuschalten, gibt es zwei Möglichkeiten, ihn einzuge
ben. Sie können 5 Minuten waen, um automatisch einzutreten, oder lange
auf die Abwästaste drücken, um manuell einzutreten.
Um sicherzustellen, dass die Kamera im Parkmodus ordnungsgemäß
funktionie, verwenden Sie bitte die Hardwire Kits oder eine andere stabile
und kontinuierliche Stromversorgung, um die Dashcam mit Strom zu
versorgen.
Die Betriebsumgebungstemperatur des E1 Pro beträgt -10°C bis 70°C (14°F
bis 158°F). Wir empfehlen, die Kollisionserkennung innerhalb dieses
1.
2.
HINWEIS:
Die Empndlichkeit des Auslösens des automatischen Sperrens wird durch
die Empndlichkeit der Kollision bestimmt. Je höher die Empndlichkeit-
seinstellung, desto größer ist die Wahrscheinlichkeit, ausgelöst zu werden.
Die Gesamtkapazität der Notfallsvideodatei macht 30% der Gesamt-
kapazität der aktuellen Speicherkae aus. Wenn die Notfallsvideodatei die
Obergrenze erreicht, überschreibt die neue Notfallsvideodatei automatisch
die ursprüngliche Ereignisvideodatei. Es wird empfohlen, Ihre Notfall-
Videodateien regelmäßig zu überprüfen und zu speichern, um Verluste zu
vermeiden.
Die Sperraufnahme wird in keiner der folgenden Situationen ausgelöst:
Schalten Sie die Daueraufnahme aus oder schalten Sie die Zeitraer-
Aufnahme ein.
1.
2.
3.
Notiz:
DE
- 62 -
4.
3.
4.2.3.2 Kollisionserkennung
Wenn die Kollisionserkennung aktivie ist, wird das
Kollisionserkennungssymbol auf der Aufzeichnungsobeläche angezeigt,
was darauf hinweist, dass der Rekorder derzeit den
Kollisionserkennungsmodus verwendet. Die Empndlichkeit der
Kollisionserkennung kann von 1 bis 5 Stufen eingestellt werden, Sie können
sie entsprechend der Gewohnheit sowie der Umgebung des Autos anpassen.
Wenn die Kollisionserkennung eingeschaltet wurde und nach 5 Minuten
Aufzeichnung keine Bewegung erkannt wird (kurz 5-Minuten-
MP/H
00:00:37
11-12-2024 14:09:07
56
3840x2160P 30FPS
HDR
Temperaturbereichs auszuwählen, da sie sich automatisch ausschaltet,
sobald die Temperatur die normale Betriebstemperatur überschreitet. Wenn
die Temperatur hoch ist, schalten Sie die Kamera beim Parken aus.
Zeitraer-Videoaufzeichnung und Parkmodus (einschließlich Kollision-
serkennung, Bewegungserkennung, Aufzeichnung mit niedriger Bitrate und
Modus mit niedriger Framerate) können nur für einen von ihnen aktivie
werden. Wenn einer aktivie ist, wird der andere automatisch deaktivie.
Alle im Parkmodus aufgezeichneten Dateien (einschließlich Kollisionserken-
nung, Bewegungserkennung, Modus mit niedriger Bitrate und Modus mit
niedriger Framerate) werden im Normalen Ordner gespeiche.
Um zu vermeiden, dass die Parkmodusdatei durch Dauer überschrieben
wird, überprüfen Sie sie daher bitte regelmäßig, um Verluste zu vermeiden.
DE
- 63 -
DE
1.
2.
Notiz:
Wenn die Dashcam während der Kollisionserkennungsaufzeichnung
weiterhin getroen wird, verlässt sie den Kollisionserkennungsmodus und
wechselt in die normale Aufzeichnung, wodurch der 5-Minuten-
Eingabemechanismus neu gestaet wird.
Das Kollisionserkennungsvideo wird im Ordner „Normal“ gespeiche. Um
zu verhindern, dass das Video überschrieben wird, überprüfen Sie es bitte
rechtzeitig und speichern Sie die eorderliche Kollisionserkennungsdatei,
um Verluste zu vermeiden.
4.2.3.3 Bewegungserkennung
Wenn die Bewegungserkennung eingeschaltet ist, wird das
Bewegungserkennungssymbol auf der Aufnahmeobeläche angezeigt und
zeigt an, dass sich die Dashcam derzeit im Bewegungserkennungsmodus
bendet. Die Bewegungserkennung hat drei einstellbare Stufen: niedrig/
mittel/hoch, und der entsprechende Eassungsbereich der
Bewegungserkennung beträgt 2 Meter/ 4Meter /6 Meter.
MP/H
00:00:37
11-12-2024 14:09:07
56
3840x2160P 30FPS
HDR
Eingabemechanismus), wird die Kollisionserkennung mit einem
Kollisionserkennungssymbol in der unteren rechten Ecke des Bildschirms und
der Kamera aktivie automatisch ausschalten. Wenn die Dashcam
ausgeschaltet wird, beginnt sie nach dem Schütteln 1 Minute lang mit der
Aufnahme und schaltet die Dashcam dann wieder aus.
DE
- 64 -
DE
Notiz: Der Bewegungserkennungsmodus muss ausgefüh werden, wenn die
Kamera eingeschaltet wird. Sobald die Kamera ausgeschaltet ist,
funktionie der Bewegungserkennungsmodus nicht.
Wenn die Bewegungserkennung eingeschaltet wurde und nach 5 Minuten
Aufnahme keine Bewegung erkannt wird, erscheint ein orangefarbenes
Symbol in der Mitte des Bildschirms und der Bildschirm schaltet sich nach
3 Minuten aus.
Wenn die Kamera eine Bewegung erkennt, wird automatisch eine 30 Sekund-
en lange Videoaufzeichnung ausgelöst. Nachdem die Bewegungserkennung-
saufzeichnung beendet ist, lädt die Kamera ein 15 Sekunden langes voraufge-
zeichnetes Video in das 30-Sekunden-Bewegungserkennungsvideo und
speiche das 45-Sekunden-Video im normalen Ordner.
MP/H
00:00:37
11-12-2024 14:09:07
56
3840x2160P 30FPS
HDR
MP/H
00:00:37
11-12-2024 14:09:07
56
3840x2160P 30FPS
HDR
DE

- 65 -
DE
Notiz: Der Bewegungserkennungsmodus muss ausgefüh werden, wenn die
Kamera eingeschaltet wird. Sobald die Kamera ausgeschaltet ist,
funktionie der Bewegungserkennungsmodus nicht.
4.2.3.4 Modus mit Niedriger Bitrate
Wenn die Aufzeichnung mit niedriger Bitrate aktivie ist, wird das Symbol ++
oder in der unteren rechten Ecke des Bildschirms angezeigt, je nachdem,
ob Sie 1080P 15FPS oder 720P 15FPS wählen.
Wenn nach 5 Minuten Aufnahme keine Bewegung erkannt wird, erscheint ein
Symbol in der Mitte des Bildschirms. Die Auösung aller aktuellen Videos
wird für die Aufnahme automatisch auf 1080P 15FPS oder 720P 15FPS
umgeschaltet, und die Aufnahmedauer wird entsprechend der aktuell
eingestellten Loop-Aufnahmedauer bestimmt. Wenn die Kamera vibrie oder
bewegt wird, wird sie automatisch den Modus verlassen, 5 Minuten waen
und wieder eintreten.
Notiz: Die Aufzeichnung mit niedriger Bitrate muss durchgefüh werden,
wenn die Kamera eingeschaltet ist. Sobald die Kamera ausgeschaltet ist,
funktionie die Aufzeichnung mit niedriger Bitrate nicht.
4.2.3.5 Modus mit niedriger Framerate
Wenn der niedrige Frameratenmodus ausgewählt ist, nimmt die Kamera
entsprechend der Auswahl von 1FPS/5FPS/10FPS/15FPS auf.
Wenn Sie beispielsweise 1 FPS auswählen und die Framerate der aktuellen
Videoauösung 30 FPS beträgt, generie der Rekorder ein Video mit 30 FPS
pro Sekunde. Der Modus mit niedriger Bildrate kann die Integrität des Videos
erheblich bewahren und Speicherplatz auf der Speicherkae sparen.
MP/H
00:00:37
11-12-2024 14:09:07
56
3840x2160P 30FPS
HDR
DE
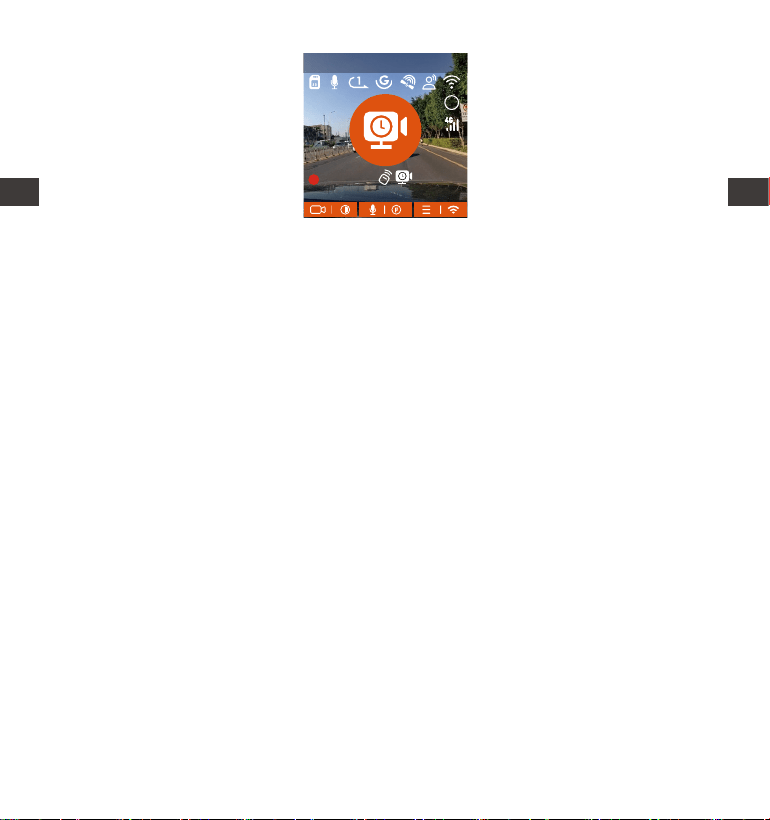
- 66 -
DE
Notiz:
Die Zeiteinheit der Berechnungsformel ist Sekunden, daher beträgt die
berechnete endgültige normale Aufnahmezeit ebenfalls Sekunden. Wenn
Sie es in andere Zeiteinheiten umrechnen müssen, überprüfen und
konveieren Sie es bitte selbst.
Der niedrige Frameratenmodus ähnelt der Zeitraeraufnahmefunktion,
aber der Unterschied besteht darin, dass es keinen 5-Minuten-Eingabe-
mechanismus für die Zeitraeraufnahme gibt, der nach der Einstellung
direkt aktivie wird.
Im Modus mit niedriger Bildrate benötigt die Kamera außerdem eine stabile
Stromversorgung. Sobald die Stromversorgung ausgeschaltet oder
erschöpft ist, wird die Kamera heruntergefahren.
1.
2.
3.
4.2.4 Zeitraer
Wenn Zeitraer ausgewählt ist, nimmt die Kamera entsprechend der Auswahl
von 1FPS/5FPS/10FPS/15FPS auf.
Wenn Sie beispielsweise 1 FPS auswählen und die Bildrate der aktuellen
Videoauösung 30 FPS beträgt, generie der Rekorder ein Video mit 30 FPS
pro Sekunde. Der Modus mit niedriger Bildrate kann die Integrität des Videos
[Normale Aufnahmezeit = Zeitraeraufnahmezeit (Sek.) x Aufnahmebildrate
FPS/Zeitraeroption]
(Die Zeit sollte in Sekunden umgerechnet werden)
MP/H
00:00:37
11-12-2024 14:09:07
56
3840x2160P 30FPS
HDR
DE
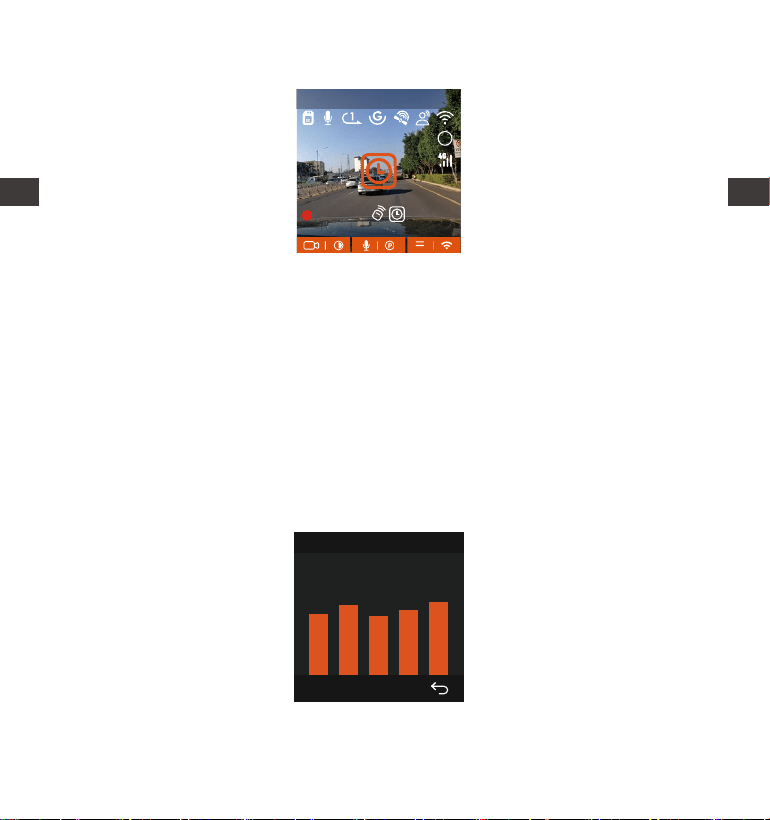
- 67 -
DE
[Normale Aufnahmezeit = Zeitraeraufnahmezeit (Sek.) x Aufnahmebildrate
FPS/Zeitraeroption]
(Die Zeit sollte in Sekunden umgerechnet werden)
Note: Gleich wie der Modus mit niedriger Framerate
4.2.5 GPS-Funktion
Auch die GPS-Funktion gehö zu den wichtigen Funktionen der Dashcam.
GPS ist standardmäßig aktivie und die Kamera empfängt GPS-Signale über
die GPS-Halterung. Es kann die Uhrzeit und das Datum in Ihrer Nähe
automatisch korrigieren und den O aufzeichnen, an dem das Video
aufgenommen wurde, sowie die Geschwindigkeit des Autos zu diesem
Zeitpunkt.
GPS-Informationen
40
46
39
43
48
MP/H
00:00:37
11-12-2024 14:09:07
56
3840x2160P 30FPS
HDR
erheblich bewahren und Speicherplatz auf der Speicherkae sparen.
DE

- 68 -
DE
Notiz:
Die GPS-Verbindung wird innerhalb von 1 Minute nach dem Einschalten
des Geräts hergestellt. Wenn die GPS-Verbindung nicht innerhalb von 1
Minute eolgreich ist, überprüfen Sie bitte, ob die GPS-Funktion des
Gerätes eingeschaltet hat, ob die GPS-Halterung richtig angeschlossen ist
und Ihre Umgebung (Tiefgarage, dicht besiedeltes Wohngebiet, U-Bahn,
Tunnel usw. ) wirkt sich auch auf den Empfang des GPS-Signals aus.
GPS-Informationen werden in dem von Ihnen aufgenommenen Video
aufgezeichnet. Um es anzuzeigen, laden Sie bitte die VANTRUE APP und
den VANTRUE GPS Player herunter und installieren Sie sie (zum Download
veügbar auf www.vantrue.net).
1.
2.
4.2.6 Automatische GPS-Zeitkorrektur
Die automatische GPS-Korrekturzeiteinstellung der E1 Pro -Dashcam ist
standardmäßig aktivie. Sie können GMT-08:00 auswählen, indem Sie Ihre
Zeitzone auswählen, z. B. Los Angeles. Wenn Sie die Zeitzone Ihres Standos
nicht kennen, können Sie sich über WLAN mit der Vantrue APP verbinden und
bestätigen, dass die automatische Zeitanpassungsfunktion in der APP
aktivie ist.
4.2.7 Spracherkennung
Neben der Steuerung der Kamera mit der Fernbedienung können Sie dem
Rekorder über den Sprachassistenten auch Sprachbefehle eeilen, Derzeit
unterstützte Sprachen sind Englisch , Japanisch, Russisch, Chinesisch.
Detaillieere Sprachbefehle nden Sie unter System Einstellungen >
Sprachinhalt.
Die Standardeinstellung ist Standardempndlichkeit. Die Spracherkennung
hat Optionen wie niedrige Empndlichkeit/Standard/hohe Empndlichkeit
/aus. Sie können die Kamera mit Sprachbefehlen steuern.
DE
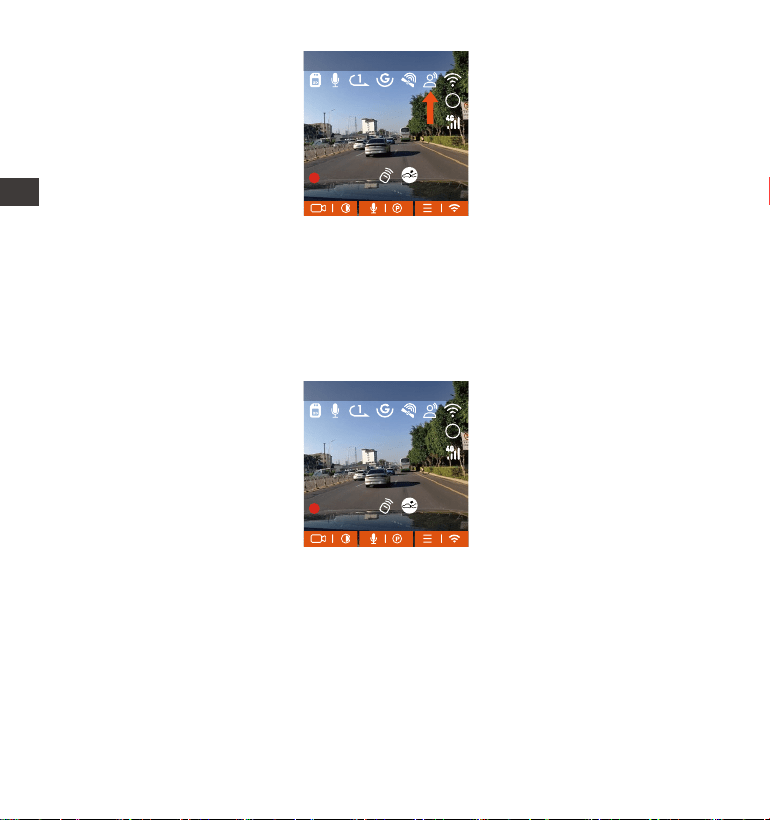
- 69 -
4.2.8 Bildschirm Einstellungen
E1 Pro ist eine Mini Kamera, daher haben wir speziell zwei Bildschirmanzeige-
modi für Sie eingestellt.
Der erste ist der Vollbildmodus, aber es werden einige der linken und rechten
Betrachtungswinkel verloren gehen.
Der andere ist der Vollansichtsmodus. In diesem Modus wird der gesamte von
der Videokamera gesehene Inhalt angezeigt, und das Verhältnis der Video-
bildschirmanzeige beträgt 4:3.
MP/H
00:00:37
11-12-2024 14:09:07
56
3840x2160P 30FPS
HDR
MP/H
00:00:37
11-12-2024 14:09:07
56
3840x2160P 30FPS
HDR
DE
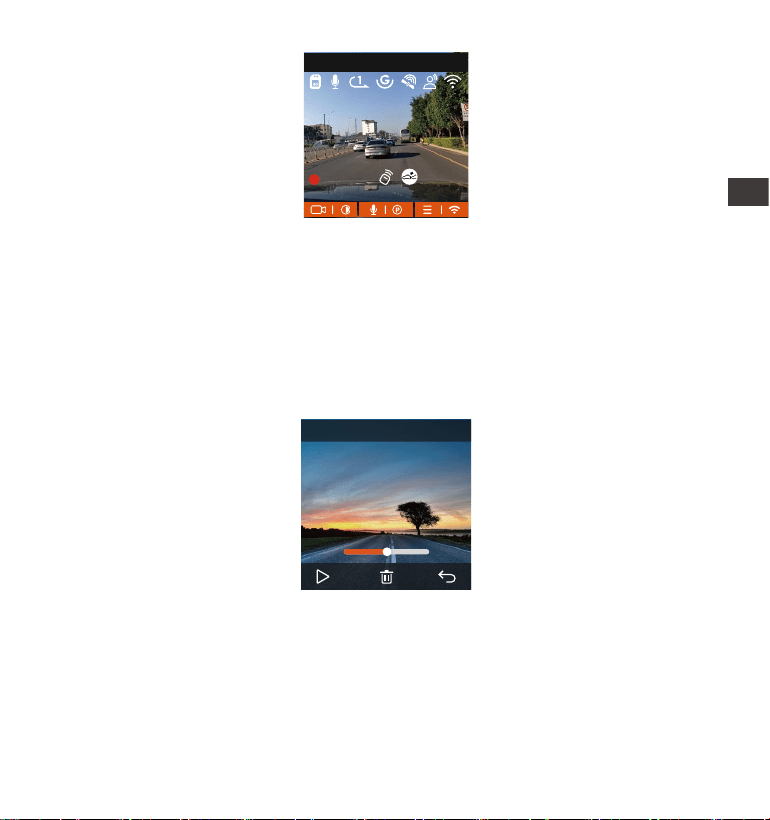
- 70 -
4.2.10 Anzeigen von Videos/Fotos
a. Anzeigen von Dateien auf der Kamera
Nachdem Sie auf „Dateien“ geklickt haben, geben Sie einen beliebigen Ordner
ein, nachdem Sie den Videoordner geönet haben, können Sie die
Abwästaste drücken, um die nächste Datei auszuwählen, und die
Abwästaste drücken, um die Datei während der Wiedergabe zu löschen.
- Videos löschen
Löschen Sie das Video auf der Kamera. Drücken Sie die Notfallstaste in der
Benutzerobeläche zum Durchsuchen von Dateien, um das Menü „Löschen“
aufzurufen.
MP/H
00:00:37
11-12-2024 14:09:07
56
3840x2160P 30FPS
00�30 01�07
1280x720
08/22/2024
7�15
20241118_140633_0002_N
DE
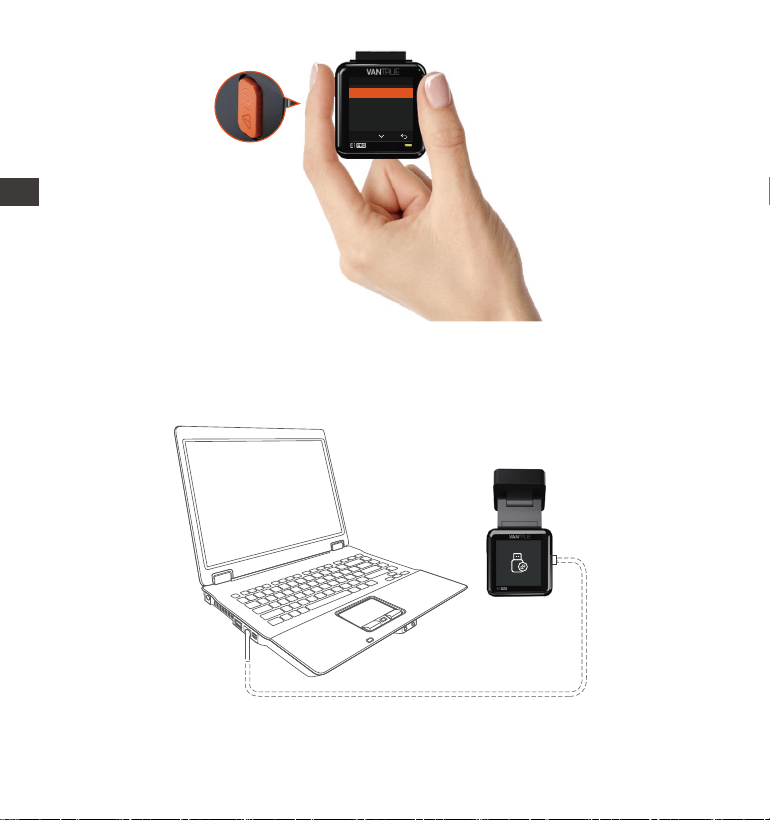
- 71 -
Normal Video
Diese Datei Löschen?
Alle Dateien löschen?
OK
Verbinden Sie über das mitgeliefee USB-C Datenkabel die Kamera und
dem Computer.
b. Anzeigen von Dateien auf einem Computer
1.
DE
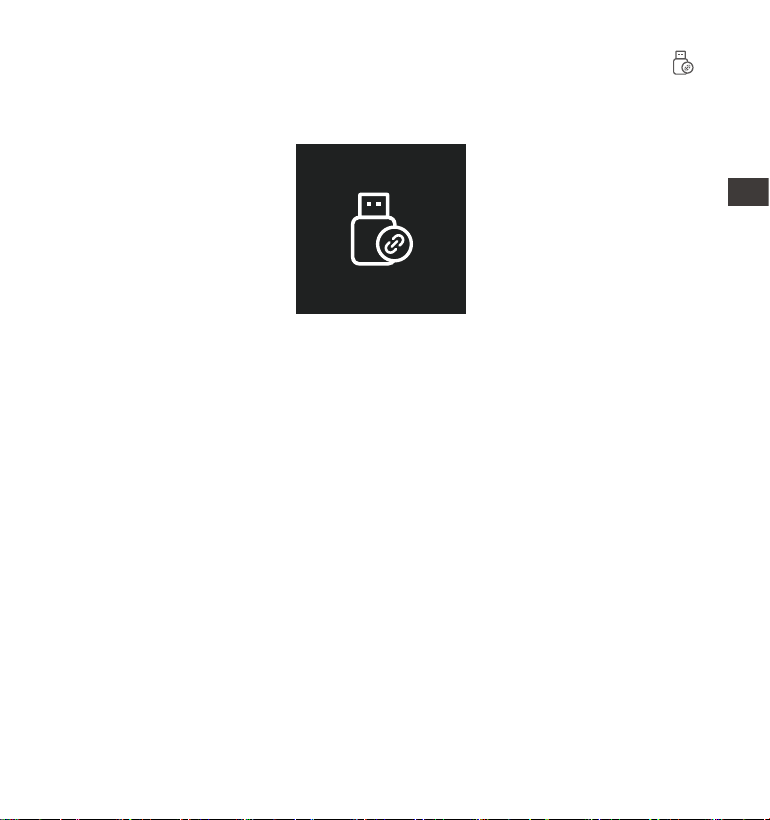
- 72 -
Nachdem die Verbindung eolgreich hergestellt wurde, erscheint das
Symbol auf dem Display der Kamera, um Daten zu überagen, und dann
können Sie die Videodateien im Computerordner durchsuchen.
2.
Je nach Computersystem verschiedener Benutzer wird die Kamera nach
dem Anschließen an den Computer als Wechseldatenträger oder
Wechselordner auf dem Computer angezeigt.
Um die Datei auf dem Computer anzuzeigen, können Sie direkt mit der
rechten Maustaste klicken, um das Menü zu önen und sie zu löschen.
Sie können auch einen USB-Kaenleser verwenden, um die
Speicherkaeninformationen zu lesen.
3.
4.
5.
DE
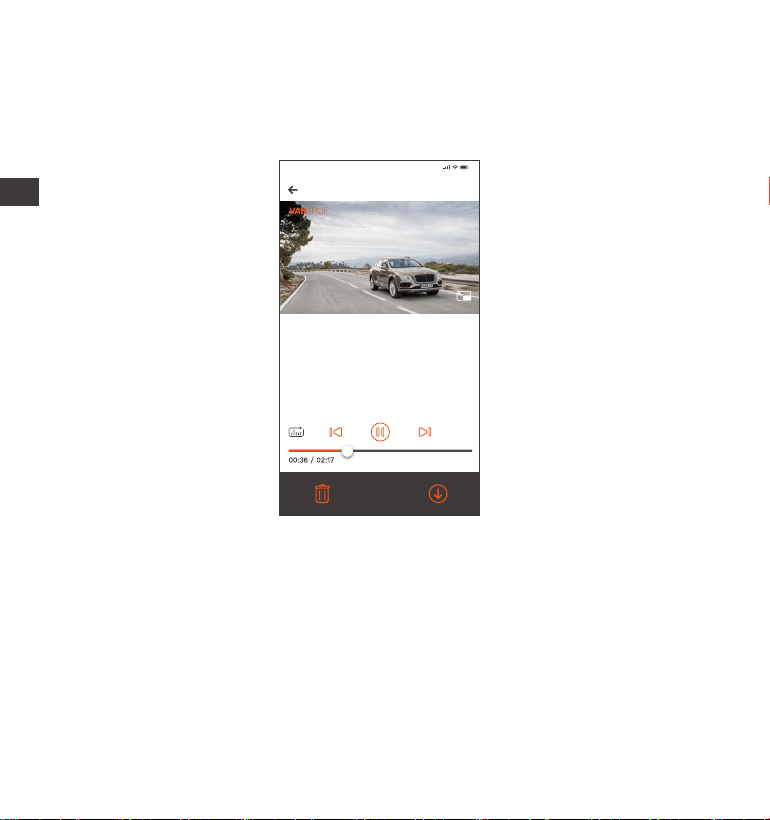
- 73 -
c. View auf „Vantrue“ APP
Nachdem die Kamera eolgreich über WLAN mit dem Mobiltelefon verbund-
en wurde, kann sie Dateien in der mobilen APP wiedergeben, herunterladen
und löschen.
20241118_115036_0079_N_A.MP4
18/11/2024 11:5:35 E1 Pro 000.000000. 000.000000. 36MK/H
Hinweis:
9:41
Um GPS-Informationen anzuzeigen,
müssen Sie zuerst die Videodatei in den
lokalen Ordner der APP herunterladen
und dann im lokalen Ordner abspielen.
Videowiedergabe in APP oder Download auf SD-Kae, es wird kein
Netzwerkverkehr verbraucht.
Videodateien müssen in einen lokalen Ordner heruntergeladen und
abgespielt werden, bevor GPS-Trackinformationen angezeigt werden
können. Gleichzeitig müssen Sie das WLAN des Fahenschreibers trennen,
da sonst die GPS-Informationen leer sind.
1.
2.
Notiz:
DE

- 74 -
5.8 Aktualisieren der Firmware
Das System aktualisie automatisch, wenn die Micro-SD-Kae die
Firmware-Upgrade-Datei enthält. Die Kamera wird neu gestaet, sobald das
Upgrade abgeschlossen ist.
Die neueste Firmware-Version ist immer auf der oziellen VANTRUE-
Website (www.vantrue.net) veügbar. Wir empfehlen dringend, Ihr Produkt
zu registrieren (www.vantrue.net/register), um eine Benachrichtigungs-
E-Mail zu erhalten, wenn ein neues Firmware-Update veügbar ist.
5.9 Arbeitstemperatur
Die Kamera ist für den Betrieb bei Temperaturen von -20 bis 70°C (-4 bis
158°F) ausgelegt, Temperaturen außerhalb dieses Bereichs können die
Leistung der Kamera beeinträchtigen und Schäden verursachen.
Um Schäden zu vermeiden
Setzen Sie die Kamera bei heißem Wetter nicht direkt der Sonne aus, wenn
das Auto geparkt ist.
Bei extremen Winterbedingungen, d. h. -20°C (-4°F) oder niedriger, nehmen
Sie die Kamera von der Windschutzscheibe ab, wenn sie nicht verwendet
wird, und bewahren Sie sie im Handschuhfach auf.
DE

- 75 -
5. Spezikation
E1 ProModel
Engish/ Français/ Español/ Deutsch/ Italiano/
简体中文/русский/ 日本語/ Polski
3840x2160P 30FPS (HDR);2560x1440P 30FPS
(HDR);1920x1080P 30FPS (HDR);1280x720P
30FPS (HDR)
Extern: 32GB-1TB Micro-SD-Kae, U3, Klasse
10 (nicht im Lieferumfang enthalten)
Novatek Hochleistungsprozessor
Sony CMOS Sensor
1.54” IPS
2.4GHz & 5GHz
Eingebaut Mikrofon und Lautsprecher
Die Spezikationen dieses Produkts können sich aufgrund von Produktver-
besserungen ohne vorherige Ankündigung ändern.
Chips
Bild Sensor
Screen
Wlan
3.5W
-20°C bis 70°C (-4°F bis 158°F)
-30°C bis 85°C(-22°F bis 185°F)
USB C
Betriebsstrom
Arbeitstemperatur
Lageemperatur
USB Anschluss
Vorderseite: 158° breiter Betrachtungswinkel;
F/1. 8 Weitwinkel
Sprache
Audio
Speicher
Videoauösung
Eingebauter Superkondensator
MP4
Energiequelle
Video Format
Linse
Versorgungsspannung Strom DC 5V 2.4A
DE

- 76 -
Garantie
Auf die VANTRUE® E1 Pro On Dash Dashcam erhalten Sie volle 12 Monate
Garantie. Wenn Sie Ihr Produkt auf unserer oziellen Website (www.vantrue.
net/register) registrieren, können Sie die Garantie auf 18 Monate genießen.
Unterstützung
Wenn Sie Fragen zu Ihrem Produkt haben, zögern Sie bitte nicht, uns unter
suppo@vantrue.net zu kontaktieren oder uns eine Nachricht über die
Live-Chat-Box auf www.vantrue.net zu senden.
Anfragen werden in der Regel innerhalb von 12-24 Stunden beantwoet.
Ihre Meinung zählt
VANTRUE® ist fest entschlossen, unsere Produkte, Dienstleistungen und
Benutzereahrung ständig zu verbessern. Wenn Sie Ideen haben, wie wir
noch besser werden können, freuen wir uns über Ihr konstruktives Feedback
und Ihre Vorschläge. Kontaktieren Sie uns noch unter suppo@vantrue.net.
6. Garantie und Suppo
DE

- 77 -
Conseils:
Veuillez lire attentivement le manuel d'utilisation avant la première utilisation
pour assurer une utilisation correcte.
Le dashcam doit être alimenté pour fonctionner correctement.
Pour garantir la sécurité routière, ne pas régler l'appareil ou visionner des vidéos
sur votre téléphone pendant la conduite.
Ce produit nécessite une cae SD pour fonctionner, veuillez vous assurer que la
cae SD est fonctionnelle et compatible avec l'appareil.
Ne démontez ni ne réparez le dashcam vous-même. En cas de problème, veuillez
contacter le seice client ociel de VANTRUE.
Évitez d'installer le dashcam à un endroit qui obstrue la vue du conducteur.
Utilisez l'appareil loin de la chaleur et de l'humidité pour garantir son bon
fonctionnement.
Pour améliorer l'expérience utilisateur, le rmware du produit sera mis à jour
régulièrement. Vous pouvez télécharger la dernière version selon vos besoins
pour proter des nouvelles fonctionnalités.
Ne pas installer le dashcam directement devant les passagers pour éviter tout
risque de chute de l'appareil.
Veuillez noter qu'utiliser CarPlay sans l ou Android Auto peut aecter la
connexion à l'application.
Veuillez utiliser ce produit de manière raisonnable tout en respectant les lois et
règlements en vigueur.
·
·
·
·
·
·
·
·
·
·
·
FR
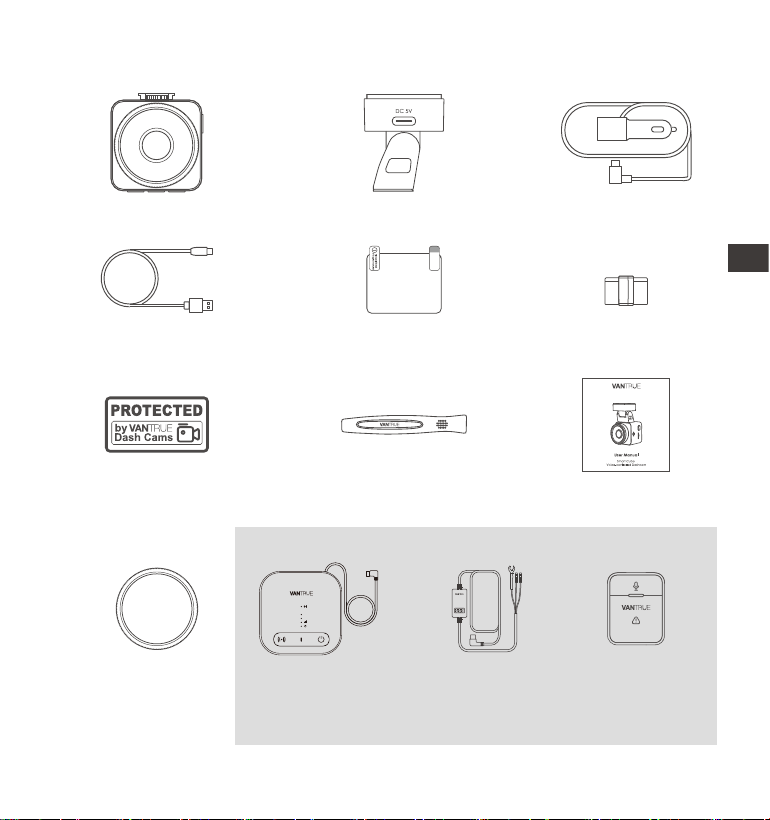
- 78 -
1. Qu'y a-t-il dans la boîte?
F.
Clip de câble
(3 pièces)
L. Câble de
réductionde
tension
(3,5 mètres)
M. TélécommandeJ. Filtre polarisant
CPL
Accessoires Optionnel
A. VANTRUE E1Pro
Dashcam
D. Câble de données
USB C ( 1m )
G.
Autocollants
d'aveissement
C. Chargeur de
voiture avec câble
USB C (3.5 m)
E. Autocollants
électrostatiques
I. Manuel de
l’utilisateur
B. Suppo adhésif
GPS
H. Pied-de-biche
K.
Boîtier LTE
(LT01)
Element 1 Pro
FR
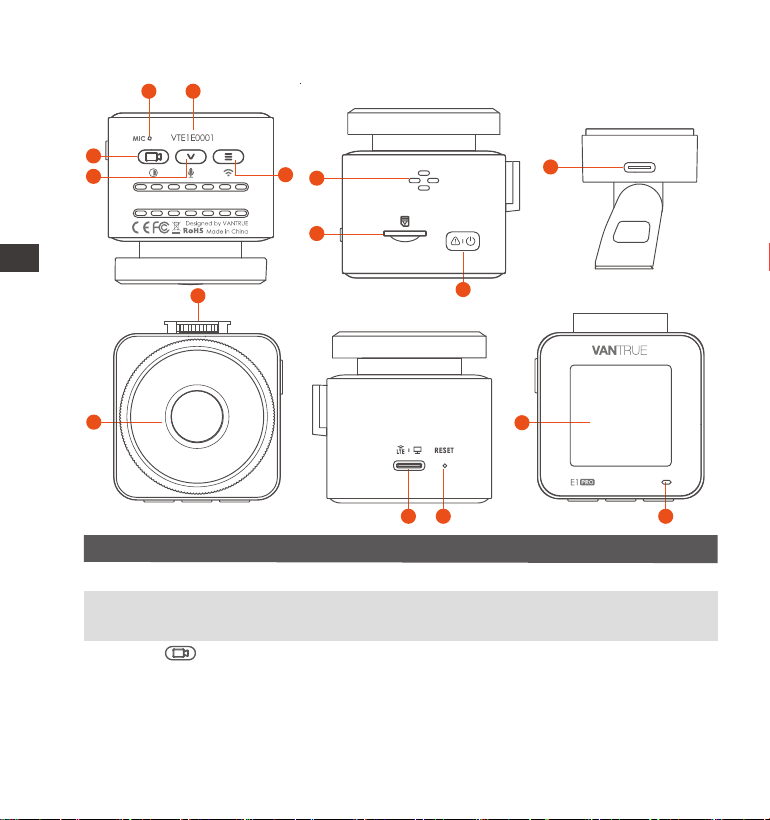
- 79 -
2. Vue d'ensemble de la caméra
Numéro DescriptionNom
1
Bouton
Pendant l'enregistrement , Appui long pour éteindre
l'écran, appui cou pour arrêter l'enregistrement
vidéo et passer en mode veille;Vous pouvez
conrmer l'option sélectionnée dans le menuet
lire/mettre en pause des chiers.
Enregistre un son clair avec les séquences vidéo.
Microphone
2
3
Numéro de série pour l'enregistrement de la
garantie.
Numéro de
Série
6
9
7
3
4
5
1 2
8
12
14
10
11
13 15
GM01 DC 5V
FR

- 80 -
Bouton
Appui long pour allumer et éteindre, appui cou
pour verrouiller la vidéo et prendre des photos.
4
5
Pendant l'enregistrement vidéo et la veille, Appui
long pour entrer rapidement en mode parking et
aappui cou pour allumer/éteindre le microphone;
Dans le menu et la navigation des chiers, Appui
long pour faire déler les options, Appui cou pour
acher l'option suivante; Appui cou pour le
supprimer lors de la lecture de chiers.
Pendant l'enregistrement vidéo et le mode veille,
appuyez longuement pour activer/désactiver le WiFi.
7
Inteace de
Suppo
6
Caméra
Frontale
Enregistrer une vidéo de la route devant la voiture.
Pour connecter le suppo.
9
Po
d'alimentation
8
11
Bouton de
réinitialisation
10
Po de
Suppo
Se connecte au câble USB C ou au chargeur de
voiture pour une alimentation externe.
Appuyez brièvement pour redémarrer la caméra.
Écran LCD de 1,54 pouces
12
Écrans
13
Haut-parleur Délivre le son pendant la lecture vidéo.
14
Se connecte à un câble de USB C ou à un chargeur
de voiture pour une alimentation externe.Connectez
le câble de données pour le transfe de données.
Slot pour cae
MicroSD
Prise en charge de la cae Micro SD jusqu'à 1 To en
FAT32, classe 10
Bouton
Bouton
FR
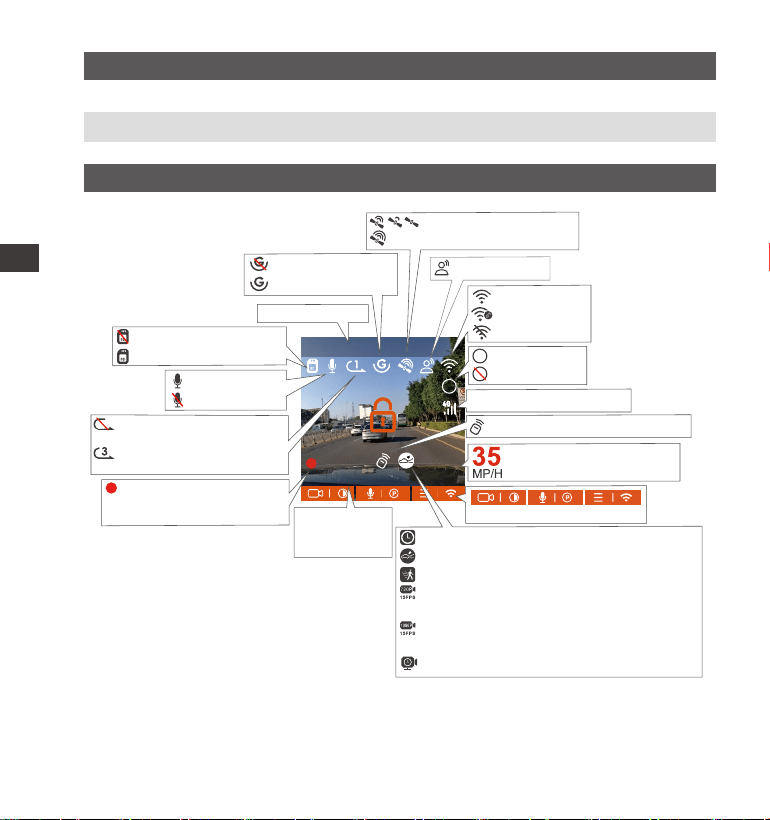
- 81 -
MP/H
00:00:37
11-12-2024 14:09:07
56
3840x2160P 30FPS
HDR
Aperçu de l'écran
15
DescriptionÉtat des voyants
15 La caméra est en train d'enregistrer.Le voyant ve clignote
Le voyant ve reste allumé Enétat de veille.
Enregistrement en accéléré activé
Détection de collision activé
Détection de mouvement activée
Enregistrement à bas débit (720P 15FPS)
activé
Enregistrement à bas débit (1080P 15FPS)
activé
Mode Parking à faible fréquence d'images
Enregistrement en boucle
désactivé
Temps d'enregistrement
en boucle (3 minutes)
Capteur G désactivé
Capteur G activé
La télécommande est connectée
Connexion du signal GPS
Signal GPS verrouillé
Assistant vocal
Durée
d'enregistrement
(clip actuel)
Vitesse de conduite
enregistrée (KMH ou MPH)
MIC activé
MIC désactivé
Sans cae mémoire
Cae mémoire insérée
Résolution vidéo
00�00�37
Date actuelle
(MM / JJ / AA)
et heure (24H)
Touches de navigation
WiFi Activé
WiFi Connecté
WiFi Désactivé
HDR activé
HDR désactivé
HDR
HDR
Télécommande connecté
FR
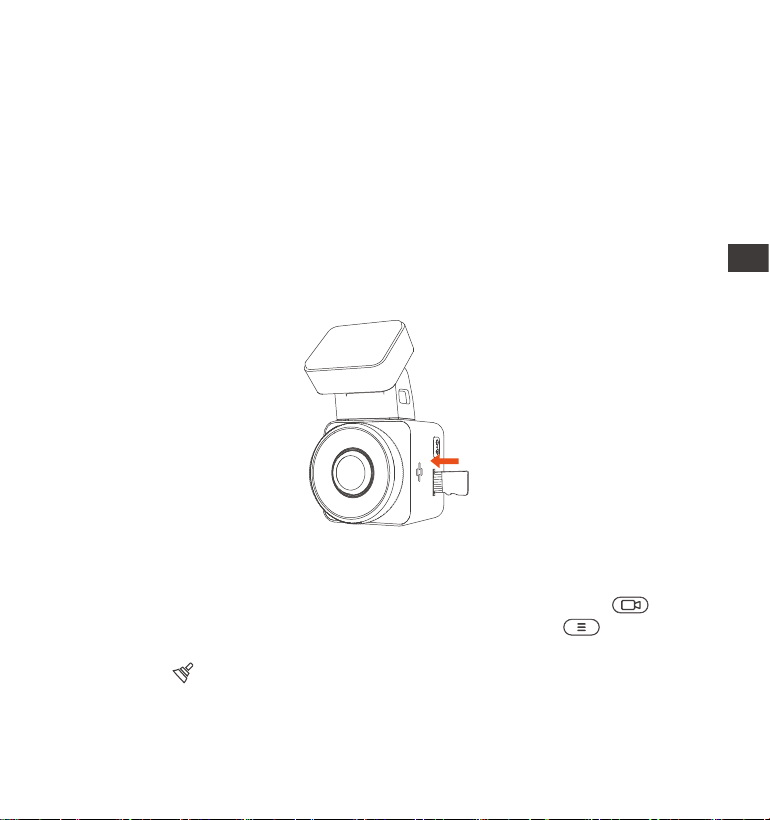
- 82 -
Avant d'utiliser cette cae, veuillez suivre les étapes ci-dessous pour la
formater correctement:
Si l'appareil est en train d'enregistrer, veuillez appuyer sur l'icône pour
mettre en pause l'enregistrement, puis appuyez sur l'icône pour entrer
dans le menu, puis entrez dans le "Système", sélectionnez la cae de
formatage et conrmez pour formater la cae mémoire jusqu'à ce qu'il
vous demande "Formaté avec succès" .
Après avoir inséré la cae mémoire, si l'écran ache "Erreur de cae, veuillez
formater" (veuillez noter que l'enregistreur n'enregistre pas à ce moment),
3. Installation
3.1 Installation d'une cae mémoire (Cae microSD VANTRUE recommandée)
Veuillez insérer une cae mémoire (capacité de la cae mémoire : 32 Go-1 To,
vitesse de la cae : U3/Class10/A2), car la dashcam a ceaines exigences sur
la vitesse de la cae mémoire. Pour un fonctionnement able, nous vous
recommandons d'utiliser la cae SD VANTRUE (vendue séparément).
Installation de la cae mémoire : Une icône indique le sens d'inseion de la
cae mémoire. Veuillez pousser la cae mémoire dans la fente pour cae
selon la direction indiquée par l'icône, jusqu'à ce qu'un "clic" se fasse entendre
dans la fente pour cae, indiquant que la cae mémoire est correctement
insérée.
FR
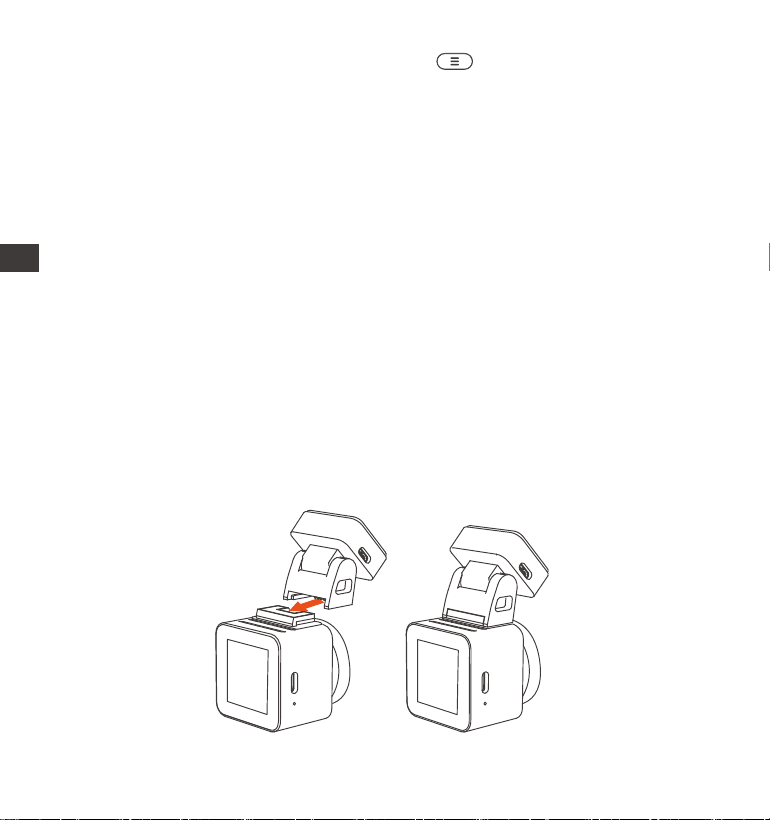
- 83 -
veuillez appuyer directement sur le bouton pour accéder au menu et
démarrer le processus de formatage.
3.2 Installation de la caméra sur votre pare-brise
Nous vous recommandons de formater la cae une fois par mois pour
garantir l'utilisation normale de la caméra de tableau de bord;
Ne retirez pas ou n'insérez pas la cae mémoire pendant l'enregistrement
pour éviter de perdre des vidéos impoantes.
Veuillez ne pas utiliser de mauvaises caes ou de caes à faible vitesse sur
la caméra de tableau de bord, car il est facile d'arrêter ou de perdre
l'enregistrement en raison d'une défaillance de la cae mémoire.
Avant de formater la cae mémoire, veuillez vérier le dossier vidéo
d'urgence sur la cae SD pour voir s'il y a des vidéos qui doivent être
enregistrées séparément, an de ne pas supprimer des vidéos impoantes
par erreur.
RAPPEL:
1.
Alignez le suppo avec l'inteace de montage de la caméra, puis poussez
jusqu'à ce que le suppo soit installé
1.
2.
3.
4.
FR
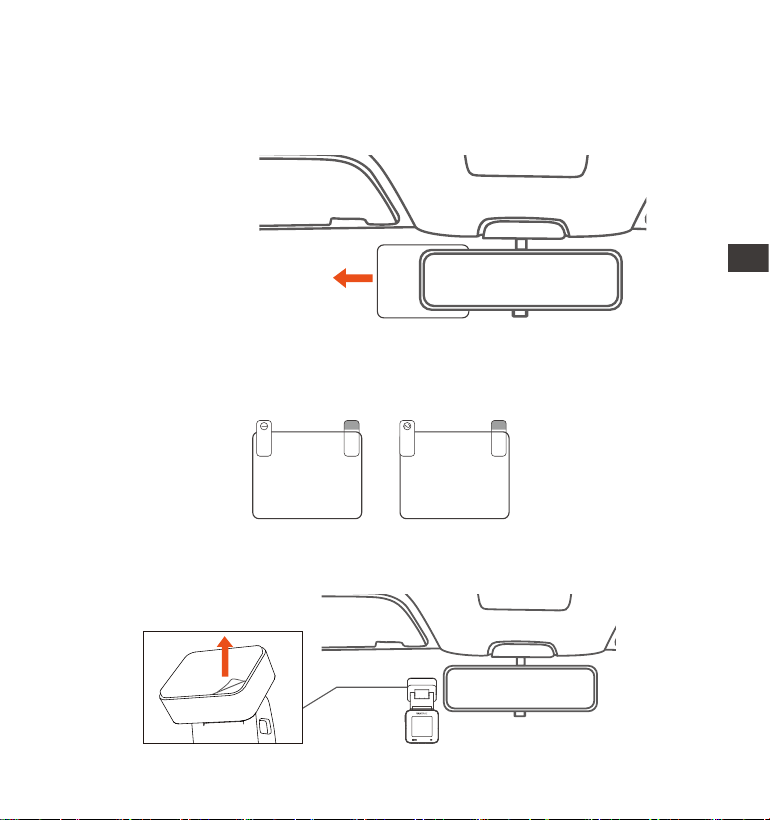
- 84 -
Nettoyez soigneusement le pare-brise avec de l'eau ou de l'alcool, puis
essuyez-le avec un chion sec. Collez l'autocollant électrostatique derrière
le rétroviseur, qui est la position recommandée pour éviter de bloquer
notre vue pendant la conduite.
2.
Électrostatique autocollant
Remarque : il y a deux autocollants électrostatiques numérotés 1 et 2.
Veuillez retirer le lm protecteur du n° 1, coller l'autocollant électrostatique
sur le pare-brise, puis retirer le lm protecteur du n° 2.
Retirez le ruban adhésif 3M du suppo, puis xez le suppo et la caméra
sur l'autocollant électrostatique.
3.
Please peel o this mask
AFTER application completed
Please peel o this
mask BEFORE application
FR
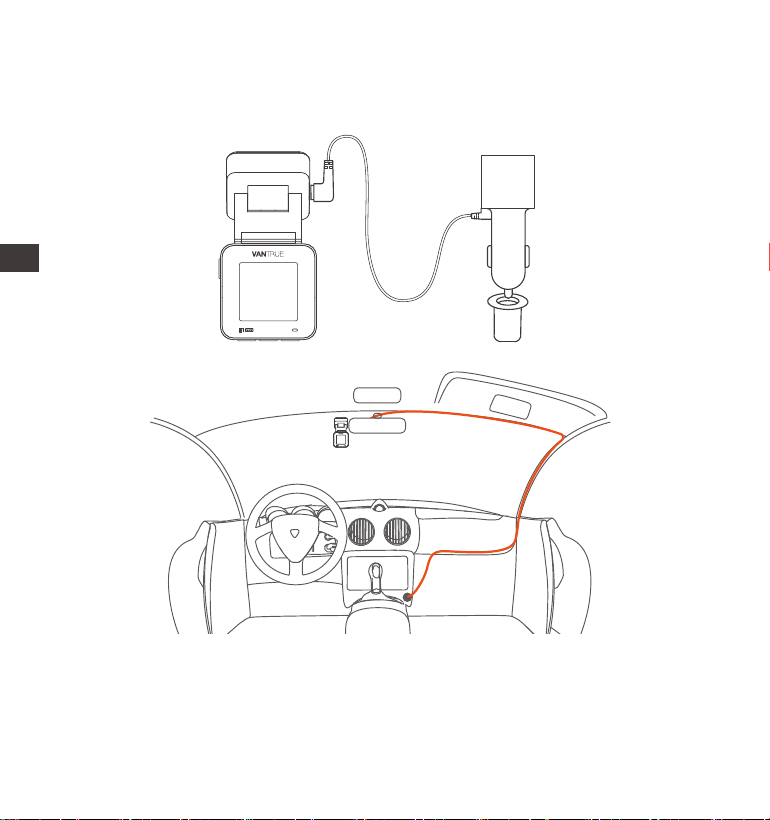
- 85 -
Connectez le chargeur de voiture à l'allume-cigare de la voiture, puis insérez
l'extrémité USB du chargeur dans le po d'alimentation USB de USB C de
l'appareil.
Le clip de câble peut être utilisé pour xer et ranger le câble du chargeur
de voiture ou le câble de l'objectif arrière après l'avoir xé dans une
position appropriée.
4.
FR
- 86 -
Veuillez scanner le code QR de la version appropriée ci-dessous pour
télécharger l'APP et l'installer.Recherchez l'application "Vantrue" dans l'App
Store ou Google Play Store pour trouver l'application, puis téléchargez-la et
installez-la sur votre téléphone.
3.3 Téléchargement de l'APP
Remarque : Une fois la caméra connectée au téléphone mobile via WiFi, vous
pouvez prévisualiser la vidéo en temps réel, modier les paramètres de
l'enregistreur, télécharger le chier avec 0 trac et lire la vidéo sur le
téléphone mobile. Cependant, les fonctions de lecture de piste GPS et de
paage vidéo dépendront des seices à valeur ajoutée Internet ou télécom
(nécessite d'éteindre/déconnecter l'enregistreur WiFi).
FR
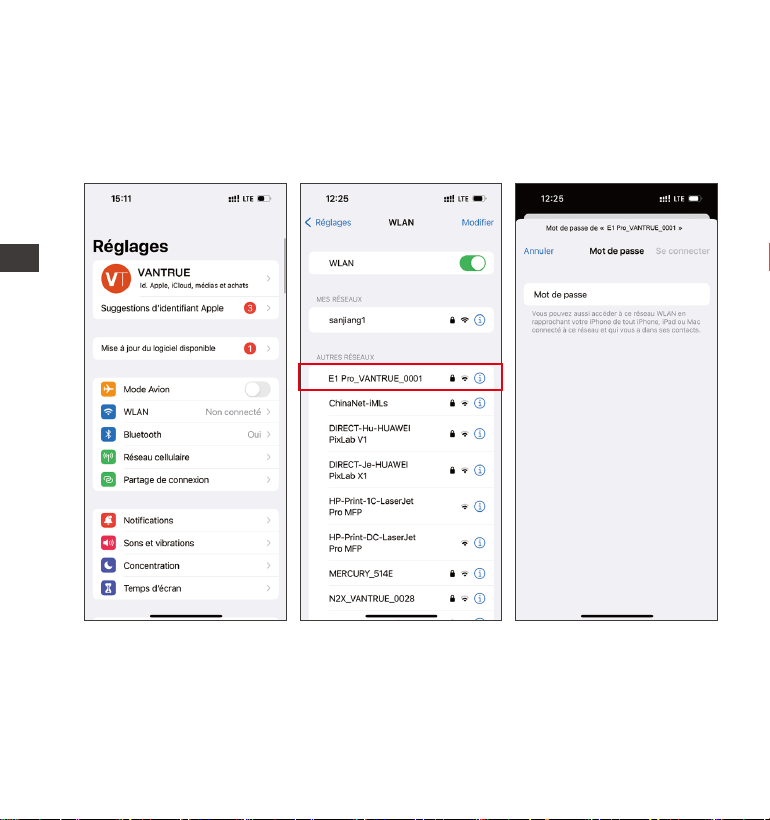
- 87 -
- 88 -
3.4 Connexion Wi-Fi
Activez la fonction WiFi de la dashcam, puis ouvrez les paramètres WiFi du
téléphone mobile, recherchez le nom WiFi tel que:E1 Pro_VANTRUE_XXXX,
entrez le mot de passe par défaut du WiFi: 12345678, et le téléphone mobile
peut se connecter avec succès au WiFi.
FR
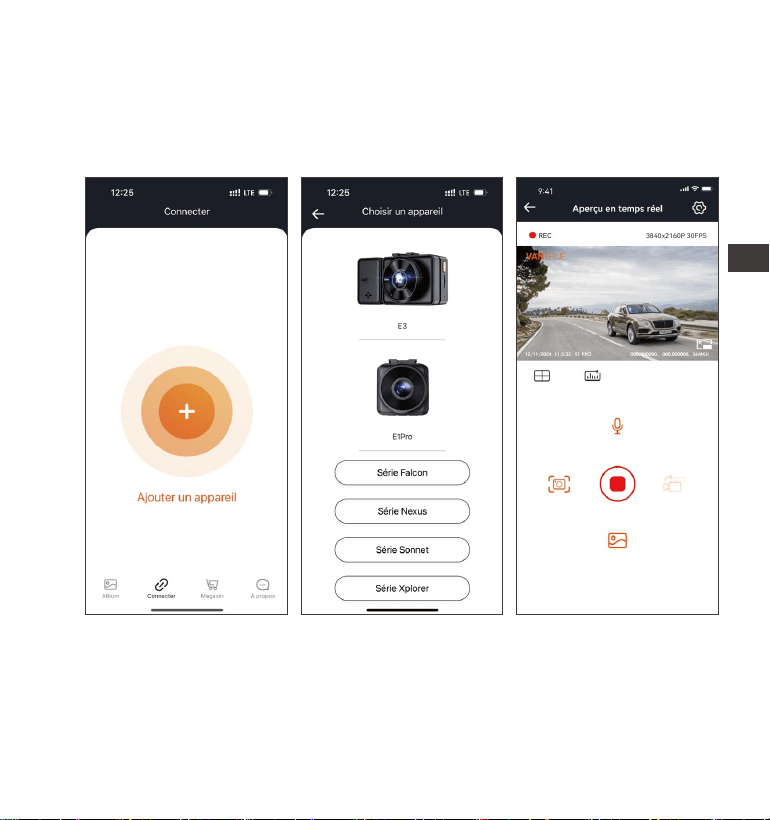
Une fois la connexion WiFi établie, cliquez sur "+" lors de la première ouver-
ture de l'APP, ajoutez le modèle de caméra, puis l'APP se connectera automa-
tiquement à la caméra et achera la situation d'enregistrement en temps réel
actuelle de la caméra.
Noter:
Si vous ne vous êtes pas connecté au WiFi avant d'ouvrir l'APP, l'APP vous
demandera "Veuillez d'abord vous connecter au WiFi", et passera automa-
tiquement aux paramètres WiFi, veuillez d'abord suivre les étapes pour
vous connecter au WiFi.
1.
3.5 Connexion APP
FR
- 88 -

- 89 -
2.
3.
4.
5.
6.
Si vous vous êtes connecté au Wi-Fi, mais passez à l'autorisation d'applica-
tion de l'APP après avoir sélectionné le modèle dans l'APP, veuillez vérier si
l'autorisation de réseau sans l de l'APP est activée.
Le mot de passe initial de cet appareil est uniquement pour la connexion
initiale. An d'éviter les risques de sécurité potentiels, assurez-vous de le
changer initial à temps après la connexion initiale pour empêcher d'autres
personnes de se connecter à votre appareil sans autorisation ou d'autres
conséquences néfastes.
Si vous oubliez le mot de passe Wi-Fi, vous pouvez restaurer les paramètres
d'usine et le mot de passe sera également restauré par défaut.
Si le nom Wi-Fi connecté ne correspond pas au modèle, l'application
demandera "Veuillez sélectionner le bon modèle" et reviendra automatique-
ment à l'inteace de sélection du modèle.
Si vous ne le connectez pas à votre téléphone après avoir activé le wi, la
caméra éteindra le wi après 10 minutes et reviendra à l'inteace d'enregis-
trement
FR
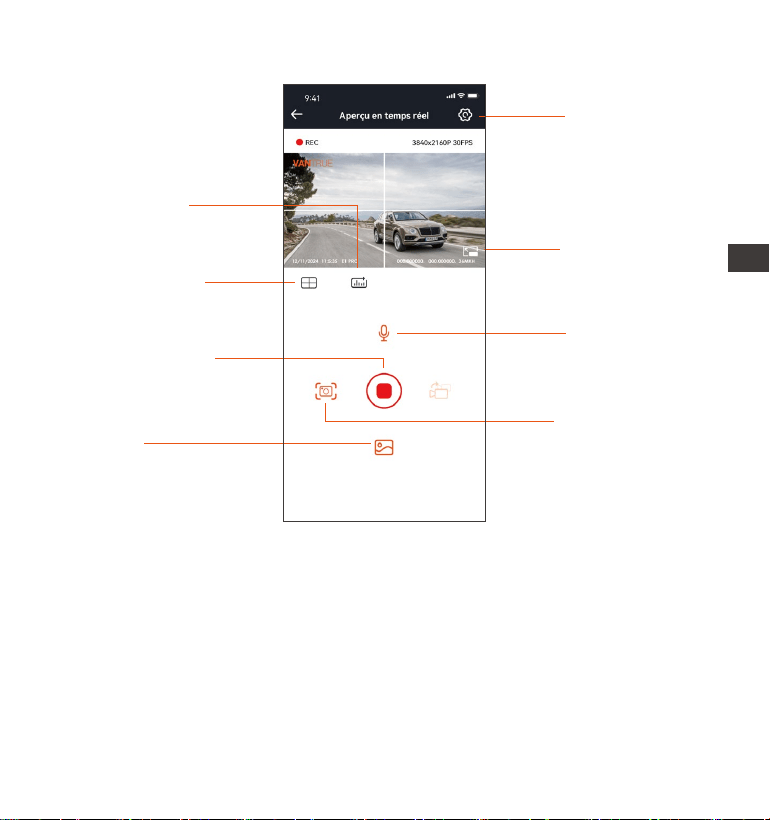
- 90 -
Après être entré dans l'aperçu en temps réel de l'APP, vous pouvez eectuer
les opérations suivantes:
Aperçu vidéo : une fois l'appareil connecté avec succès à l'APP, l'enregistreur
accède à la page d'aperçu en temps réel, cliquez sur le bouton plein écran ou
placez le téléphone horizontalement, l'image en temps réel passera automa-
tiquement mode aperçu plein écran.
Cliquez sur le bouton commutation pour basculer les fenêtres vidéo avant et
arrière.
Lecture vidéo : vous pouvez visualiser le chier vidéo ou photo enregistré sur
Réglage
Bouton plein écran
Instantané
Album
Bouton arrêter
l'enregistrement
Ligne de correction
de l'objectif
Statistiques
kilométriques
Microphone
3.6 Fonctionnement de l'application
FR
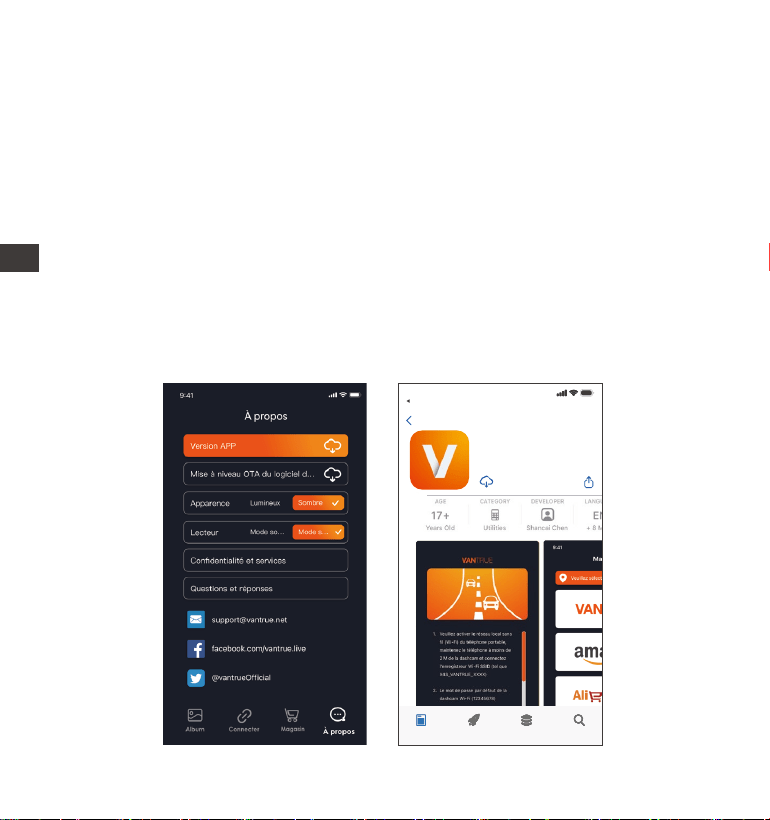
- 91 -
Vantrue Ltd.
Vantrue
Vantrue
9:41
Derrière
Connard Le jeu Apps Recherche
3.7 Mise à niveau de l'application
Ouvrez l'application "Vantrue", entrez "Paramètres> À propos> Détecter
nouveau Version", l'App détectera automatiquement si la version de l'App est
la dernière version. S'il existe une nouvelle version de l'application, suivez les
invites de l'application et mettez-la à niveau.
la cae SD dans l'APP, et cliquer sur le chier pour lire la vidéo.
Téléchargement vidéo : vous pouvez choisir de télécharger des vidéos ou des
images dans l'inteace de navigation des chiers de la cae SD ou dans la
lecture vidéo. Après avoir téléchargé la vidéo, elle peut être lue dans le chier
local de l'application et la trace GPS de la vidéo peut être visualisée.
Capture vidéo : vous pouvez capturer l'image actuelle dans l'inteace de
prévisualisation en temps réel de l'application. Veuillez cliquer sur le bouton
d'instantané pour le prendre.
FR
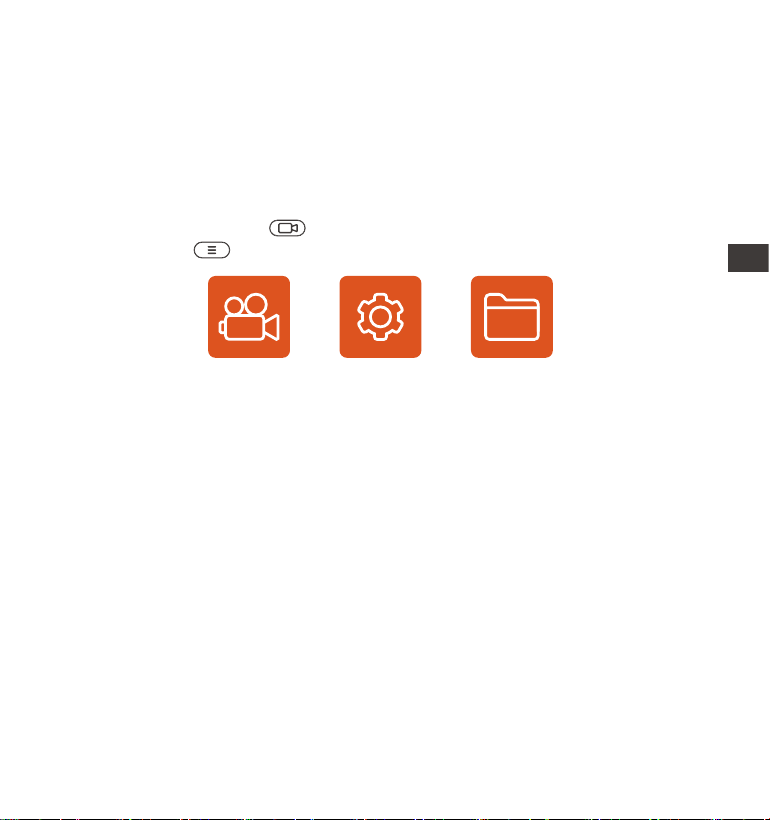
- 92 -
Dashcam E1 Pro dispose de 3 menus de fonctions, qui sont les paramètres
d'enregistrement, les paramètres système et la navigation dans les chiers.
Vous pouvez régler votre caméra de tableau de bord selon vos besoins dans
ce paramètre de fonction.
Appuyez sur le bouton , mettez d'abord la vidéo en pause, puis appuyez
sur le bouton pour accéder aux paramètres du menu.
4. Opération de base
4.1 Paramètres de Menu
Vidéo Système Fichier
A.Paramètres d’enregistrement
Résolution: 3840x2160P 30FPS、2560x1440P 30FPS、1920x1080P 30FPS、
1280x720P 30FPS
Enregistrement en Boucle: Par défaut 1 minutes. Sélectionner les options de
la durée: 1,2,3, Désactive.
Minuterie HDR: Désactivé par défaut, vous pouvez choisir de l’activer à une
heure xe
Capteur G: La sensibilité aux collisions a 3 dimensions d'une voiture:
En avant & En arrière ; Vers la gauche & la droite ; Vers le haut & Vers le bas
Le niveau par défaut est 3, sélectionner les options de sensibilité: 1,2,3,4,5,
Désactive. Une sensibilité élevée signie qu'une légère collision déclenchera la
détection.
Enregistrement Audio: Activé par défaut. Vous pouvez choisir de le désacti-
ver si vous ne voulez pas enregistrer le son environnant.
Exposition: Par défaut est +0,0 valeur d'exposition. Réglez l'exposition de
l'objectif.
FR

- 93 -
Indicateur d'enregistrement : Le réglage par défaut est Actif, vous pouvez
choisir de activer/ désactiver le voyant d'état de l'enregistrement.
Rotation de l'écran: Désactive par défaut. Si vous choisissez d'activer, l'écran
vidéo sera inversé de 180°
Plaque d'immatriculation: Après le réglage, votre numéro de plaque
d'immatriculation peut être aché dans la vidéo enregistrée
Filigrane: Tout sont activés par défaut. Vous pouvez choisir de activer : Date
et heure, modèle et logo, numéro de plaque d'immatriculation, étiquette de
vitesse, localisation GPS.
Enregistrement en accéléré: Désactivé par défaut. Il existe actuellement 4
options: 1FPS/5FPS/10FPS/15FPS. Selon votre choix, la vidéo est enregistrée
à 1 image/5 images/10 images/ 15 images par seconde.
Mode Parking: Désactive par défaut. Vous pouvez modier les options:
Détection de collision, Détection de mouvement, Enregistrement à faible
débit,Mode à faible fréquence d'images.
Parking - Détection de collision : Mode d'économie d'énergie par défaut.
Après activation de ce mode, la dashcam s'éteint, attend la collision, puis
rallume la caméra et continue d'enregistrer la vidéo. Mode de démarrage
rapide (mode veille):une fois la détection de collision activée, la E3 éteint
l'objectif et l'écran et attend une collision pour commencer à enregistrer
immédiatement.
GPS: Activé par défaut. Les paramètres de commutation GPS, les paramètres
d'unité de vitesse, les informations GPS sont tous dénis ici.
Qualité d'image : Standard par défaut, vous pouvez choisir PlatePix™
HDR: activé par défaut, peut être désactivé.
Minuterie HDR: La minuterie HDR est désactivée par défaut et vous pouvez
choisir de l'activer ou de la désactiver à une heure programmée.
Paramètres de sueillance du stationnement: la vision nocturne du
stationnement en cas de faible luminosité est activée par défaut et le mode
de démarrage rapide est par défaut lors de l'utilisation de la détection de
collision.
FR

- 94 -
Paramètres LTE: il doit être utilisé avec un boîtier LTE. Le message par
défaut est poussé en temps réel et la vidéo de collision est enregistrée par
défaut.
Statistiques de kilométrage: activé par défaut, l'enregistreur E1Pro
enregistrera les informations GPS de conduite, que vous pourrez consulter
dans l'APP.
B.Paramètres Système
Langue: English / Français / Italiano / Deutsch / Español / Русский язык /
Polskie / 日本語 / 简体中文
Wi-Fi: Automatique activé par défaut, vous pouvez choisir de démarrer ou de
désactiver automatiquement et d’acher les informations Wi-Fi.
Assistant Vocal: Le contrôle en français n'est pas pris en charge actuelle-
ment.
Uniquement en anglais.La sensibilité par défaut est Standard. Les
commandes vocales peuvent être reconnues une fois l'option activée. Vous
pouvez choisir des options telles que faible sensibilité/haute sensibilité/stan-
dard/désactivé.
Contenu vocal: Commandes de reconnaissance vocale. Vous pouvez utiliser
diérentes commandes pour contrôler à distance la caméra pour qu'elle
fonctionne.
Formater la cae mémoire: Choisir de formater la cae micro SD.
Rappel de format: Désactivé par défaut. Sélectionner les options de rappel:
15 jours, 1 mois et désactivé.
Heure & Date: Il existe deux méthodes de réglage①Mise à jour automatique
du GPS, ② Réglage manuel de la
date/heure. Mise à jour automatique par défaut. La première méthode est
basée sur votre fuseau horaire, vous devez donc choisir le bon ; vous pouvez
également choisir de le désactiver et de corriger manuellement l'heure de la
date vous-même.
-Format de l'heure : dans l'inteace d'enregistrement, l'heure par défaut est
FR

- 95 -
24 heures, vous pouvez la remplacer par 12 heures. Cette fonction n'aecte
que l'heure de l'inteace d'enregistrement et l'heure du ligrane vidéo.
La fonction de commutation automatique été/hiver n'est disponible qu'en
Amérique du Nord, sinon elle peut entraîner des erreurs d'heure.
LCD s'éteint Auto: 30 seconds/1minute/3minute/désactivé sont
disponibles. Par défaut est désactivé. En mode auto, l'écran réduira automa-
tiquement la luminosité, mais ne s'éteindra pas. Sinon, l'écran s'éteindra après
le temps déni. Mais l'enregistrement ne s'arrêtera pas.
Volume de Son: Réglez le volume de l'appareil. Le niveau de volume par
défaut est 3, le plus bas est 0 et le plus élevé est 5.
Rappel Sonore: Selon diérentes situations, la caméra est réglée avec 5
types de rappel sonore, qui sont: Son de mise en marche, Son des touches,
Son du chier verrouillé, Son du Format, Rappel d'arrêt d'enregistrement
anormal. Tous sont activées par défaut.
Fréquence de la source lumineuse: 50Hz / 60Hz sont disponibles. Choisissez
la bonne fréquence selon les diérentes régions.
Informations système: Vériez le modèle de la machine, la version du
logiciel, l'URL du site ociel
Paramètres Défaut: Vous pouvez restaurer les paramètres d'usine.
Mode USB : le mode de transmission de données LTE est activé par défaut.
Lorsque vous devez utiliser USB pour transférer des données, vous devez
passer en mode disque U.
C.Parcourir les Documents
Passez en revue et supprimez les vidéos stockées dans des dossiers de
chiers.
Vidéo d’urgence:Les chiers vidéo d'urgence sont enregistrés dans ce
dossier. Le nom du chier est 20300128_140633_0008_E_A.MP4
Vidéo Normal: Ce dossier enregistre la vidéo en boucle courants, la vidéo en
mode parking, la vidéo en accéléré. Les noms de chiers sont respectivement:
20300128_140633_0008_N_A.MP4 Vidéo d'enregistrement en boucle
FR

- 96 -
20300128_140633_0007_P_A.MP4 Vidéo du mode parking
20300128_140633_0006_T_A.MP4 Vidéo enregistrée en accéléré
Photo: Le chier capturé est enregistré ici.
TOUS: Vous pouvez acher tous les chiers sur la dashcam.
4.2 Présentation des fonctions
4.2.1 Enregistrement en Boucle
Avec une cae mémoire insérée, la caméra démarre (par défaut) immédiate-
ment l'enregistrement vidéo en boucle lorsqu'elle est connectée à une source
d'alimentation.
Selon la taille de la cae mémoire actuelle, une fois que l'enregistrement
atteint le réglage (70% de la capacité totale), le nouvel enregistrement
écrasera automatiquement le plus ancien. L'activation de cette fonction peut
éviter d'arrêter l'enregistrement lorsque le chier est plein pendant la
conduite.
2.
1.
3.
4.
Le fonctionnement normal de cette fonction dépend en grande paie de la
vitesse de la cae mémoire. Veuillez donc formater la cae mémoire
régulièrement pour éviter des problèmes tels qu'un trop grand nombre de
chiers sur la cae mémoire et le vieillissement de la cae qui aectent le
cycle d'enregistrement normal.
Veuillez vérier régulièrement la vidéo d'enregistrement en boucle pour
éviter de boucler sur la vidéo nécessaire.
Lorsque l'enregistrement en boucle est désactivé, la caméra enregistrera la
vidéo en 20 minutes chaque clip, mais n'écrasera pas les anciennes vidéos
lorsque la cae de stockage est pleine.
Si l'enregistrement en boucle est désactivé, la fonction d'enregistrement de
verrouillage automatique ne fonctionnera plus.
Remarquer:
FR
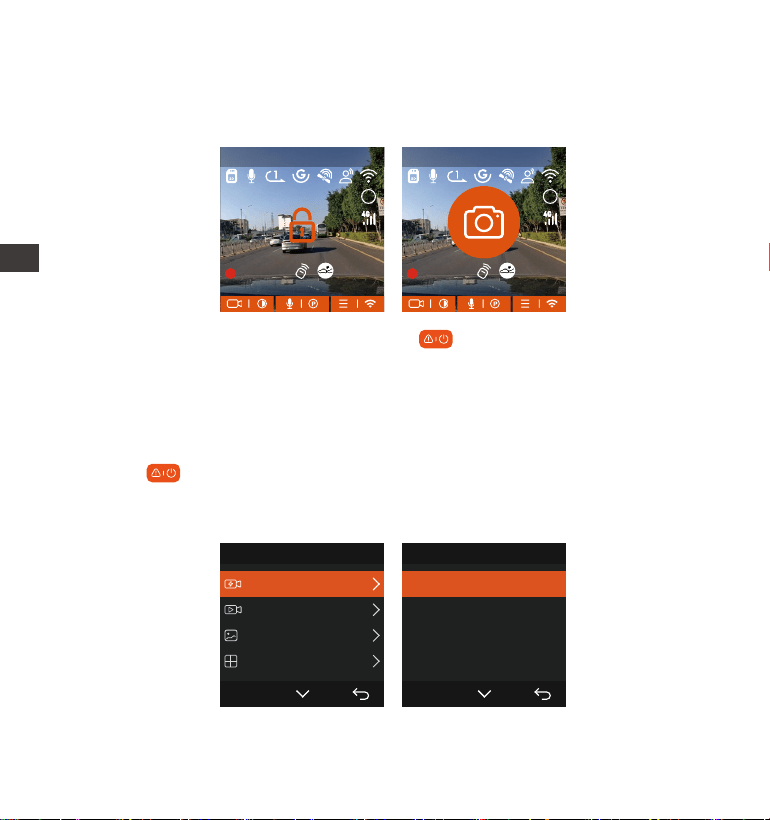
- 97 -
4.2.2 Vidéo d'urgence
L'enregistrement d'urgence est déclenché par G-Sensor, qui peut être divisé
en déclenchement automatique et verrouillage manuel.
Verrouillage manuel : Cliquez sur l'icône pour commencer à verrouiller
l'enregistrement et la vidéo est enregistrée dans le dossier vidéo d'urgence.
Verrouillage automatiquement: Lorsque la voiture est heuée par une
collision, le capteur G détecte la vibration et verrouille automatiquement la
vidéo actuelle et l'enregistre dans le dossier vidéo d'urgence.
Pendant la période de verrouillage de la vidéo, vous pouvez appuyer sur le
bouton pour capturer plusieurs fois. Après l'enregistrement, la vidéo sera
automatiquement enregistrée dans le dossier vidéo de l'événement et la
photo sera enregistrée dans le dossier photo.
Fichier 1/4
Vidéo Événement
Vidéo Normale
Photo
Tous les chiers
OK
Vidéo Événement 2/5
20221118_140633_0001_E...
20221118_140633_0003_E...
20221118_140633_0004_E...
20221118_140633_0002_E...
OK
MP/H
00:00:37
11-12-2024 14:09:07
56
3840x2160P 30FPS
HDR
MP/H
00:00:37
11-12-2024 14:09:07
56
3840x2160P 30FPS
HDR
FR

- 98 -
4.2.3 Mode Parking (Ne peut pas être utilisé avec la fonction "Enregis-
trement en Accéléré" en même temps)
Le mode parking fonctionne comme une sentinelle dans diérentes situations.
Veuillez choisir le mode de stationnement en fonction de vos besoins.
Une fois le mode de stationnement activé, il existe deux façons d'entrer. Vous
pouvez attendre 5 minutes pour entrer automatiquement, ou appuyer
longuement sur le bouton pour entrer manuellement.
La sensibilité du déclencheur vidéo à verrouillage automatique est
déterminée par la sensibilité de la collision. Plus le réglage de sensibilité est
élevé, plus la probabilité d'être déclenché est grande.
La capacité totale du chier vidéo d'événement représente 30% de la
capacité totale de la cae mémoire actuelle. Lorsque le chier vidéo
d'événement atteint la limite supérieure, le nouveau chier vidéo d'événe-
ment écrasera automatiquement le chier vidéo d'événement d'origine. Il
est recommandé de vérier et d'enregistrer périodiquement vos chiers
vidéo d'événement pour éviter toute pee.
La situation qui ne déclenchera pas l'enregistrement verrouillé : désactivez
le mode d'enregistrement en boucle ou activez le mode d'enregistrement en
accéléré. Dans les deux cas, vous ne pouvez prendre que des photos
1.
2.
3.
Noter:
Pour vous assurer que la caméra fonctionne correctement en mode parc,
veuillez utiliser les kits de câblage ou une autre alimentation stable et
continue pour alimenter la caméra de tableau de bord.
La température de l'environnement de fonctionnement E1 Pro est de 14°F à
158°F (-10°C à 70°C). Nous vous recommandons de sélectionner la
détection de collision dans cette plage de température, car elle s'éteindra
automatiquement une fois la température trop élevée. veuillez éteindre la
caméra lorsque vous vous garez s'il fait trop chaud. Si la température est
1.
2.
Noter:
FR
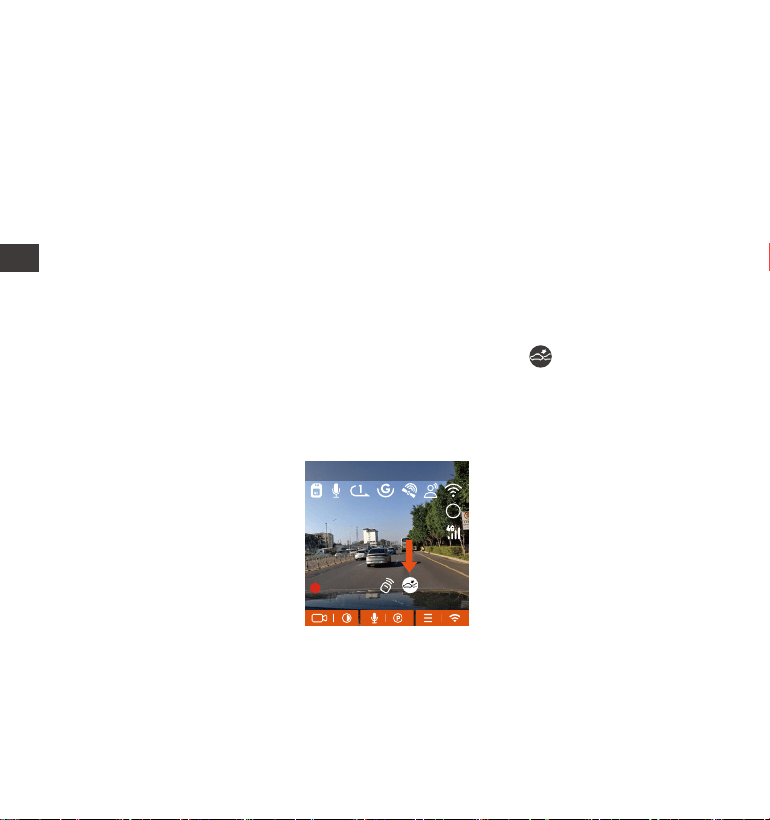
- 99 -
Si l'enregistreur de conduite ne détecte pas le mouvement ou la vibration de
l'objet dans les 5 minutes, le mode de détection de collision se déclenche
automatiquement. L'icône apparaît au centre de l'écran, puis la dashcam
s'éteint automatiquement. Pendant cette période, si des vibrations ou un
mouvement de la voiture sont détectés, la caméra sera allumé et enregistré
3.
4.
élevée, Veuillez éteignez la caméra lorsque vous vous garez.
L'enregistrement en accéléré et le mode de stationnement (y compris la
détection de collision, la détection de mouvement, l'enregistrement à faible
débit binaire et le mode à faible fréquence d'images) ne peuvent être
activés que pour l'un d'entre eux. Lorsque l'un est activé, l'autre sera
automatiquement désactivé.
Les chiers enregistrés en mode parking (y compris la détection de collision,
la détection de mouvement, l'enregistrement à faible débit binaire et le
mode à faible fréquence d'images) seront enregistrés dans le dossier
normal, an d'éviter que les chiers ne soient écrasés, veuillez les vérier
régulièrement pour éviter toute pee.
A. Détection de Collision
Lorsque la détection de collision est activée, son icône s'ache à l'écran,
indiquant que la caméra utilise actuellement le mode de détection de
collision. La sensibilité de détection de collision peut être ajustée de 1 à 5
niveaux, Une sensibilité élevée signie qu'une légère collision peut facilement
déclencher l'enregistrement.
MP/H
00:00:37
11-12-2024 14:09:07
56
3840x2160P 30FPS
HDR
FR
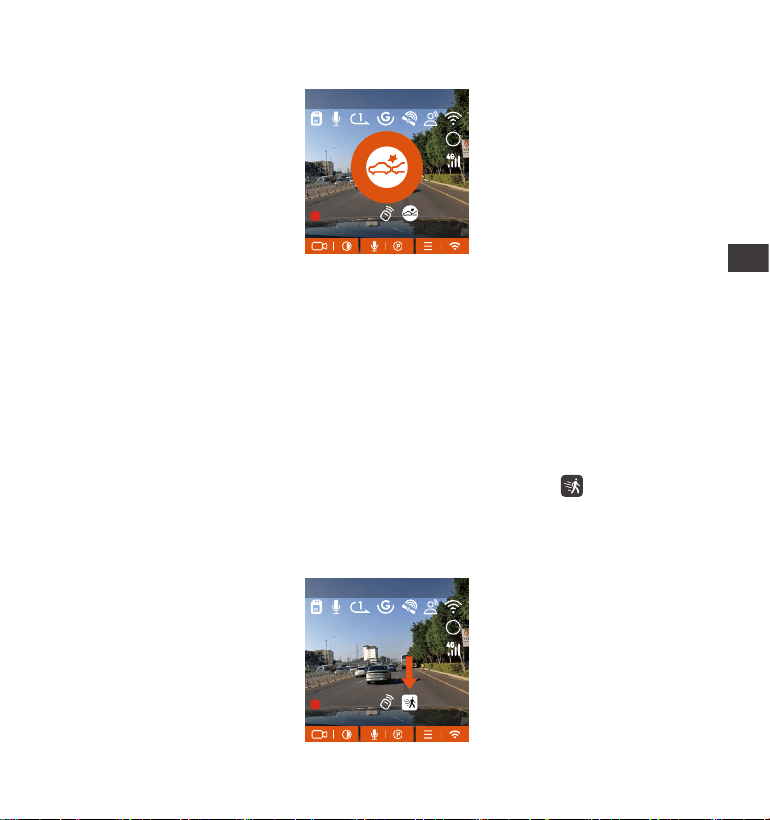
- 100 -
1.
2.
Remarque:
Si l'enregistreur est continuellement en collision pendant le processus
d'enregistrement de détection de collision, il quittera le mode de détection
de collision, entrera dans l'enregistrement normal et redémarrera le
mécanisme d'entrée de 5 minutes.
La vidéo de détection de collision sera enregistrée dans le dossier Normal.
An d'éviter que la vidéo ne soit couvee, veuillez la vérier à temps et
enregistrer le chier de détection de collision requis pour éviter toute pee.
B. Détection de Mouvement
Lorsque la détection de mouvement est activée, son icône s'ache à
l'écran, indiquant que la caméra utilise actuellement le mode de détection de
mouvement. La détection de mouvement est réglable avec 3 réglages: faible,
Moyen et élevé et la plage de détection de mouvement correspondante est
de 2 m/4 m/6 m.
pendant 1 minute, puis éteint à nouveau.
MP/H
00:00:37
11-12-2024 14:09:07
56
3840x2160P 30FPS
HDR
MP/H
00:00:37
11-12-2024 14:09:07
56
3840x2160P 30FPS
HDR
FR
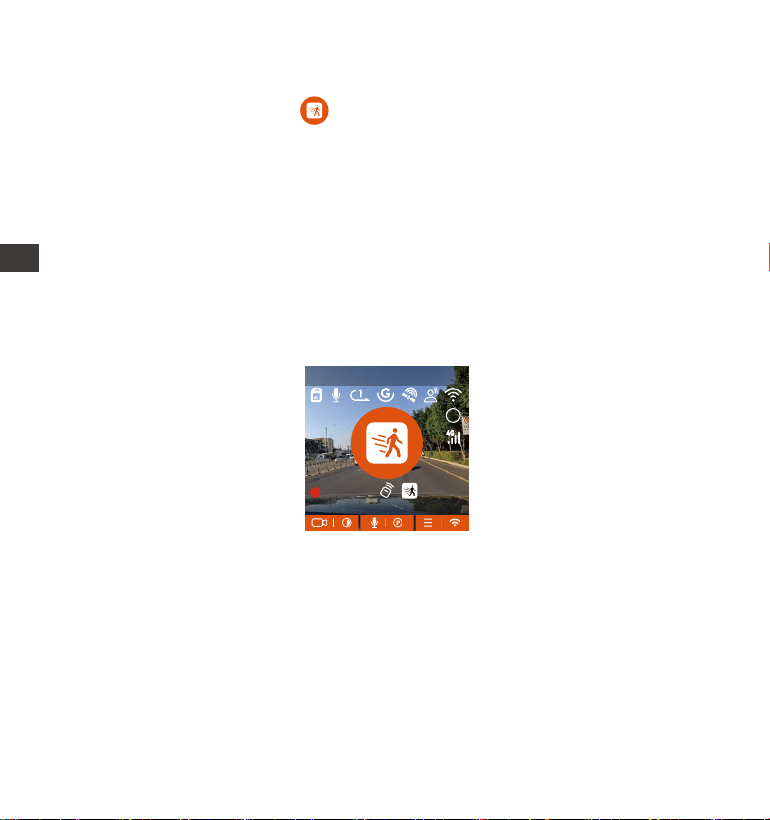
- 101 -
1.
2.
15 secondes de contenu vidéo avant le déclenchement de la détec tion de
mouvement
30 secondes de contenu lors du déclenchement de la détection de
mouvement
Remarque: Le mode de détection de mouvement doit être exécuté lorsque la
caméra est allumée. Une fois la caméra éteinte, le mode de détection de
mouvement ne fonctionnera pas.
Si l'enregistreur de conduite ne détecte pas le mouvement ou la vibration de
l'objet dans les 5 minutes, le mode de détection de mouvement se déclenche
automatiquement. L'icône apparaît au centre de l'écran, et l'écran
s'éteindra après 3 minutes.
Processus d'enregistrement vidéo : lorsque l'enregistreur détecte le
mouvement de l'objet ou ressent la vibration de la voiture, il déclenche
automatiquement l'enregistrement vidéo. VANTRUE E1 Pro a une fonction de
pré-enregistrer 15 secondes, de soe que la vidéo de détection de
mouvement de stationnement sera de 45 secondes qui se compose de deux
paies :
MP/H
00:00:37
11-12-2024 14:09:07
56
3840x2160P 30FPS
HDR
FR
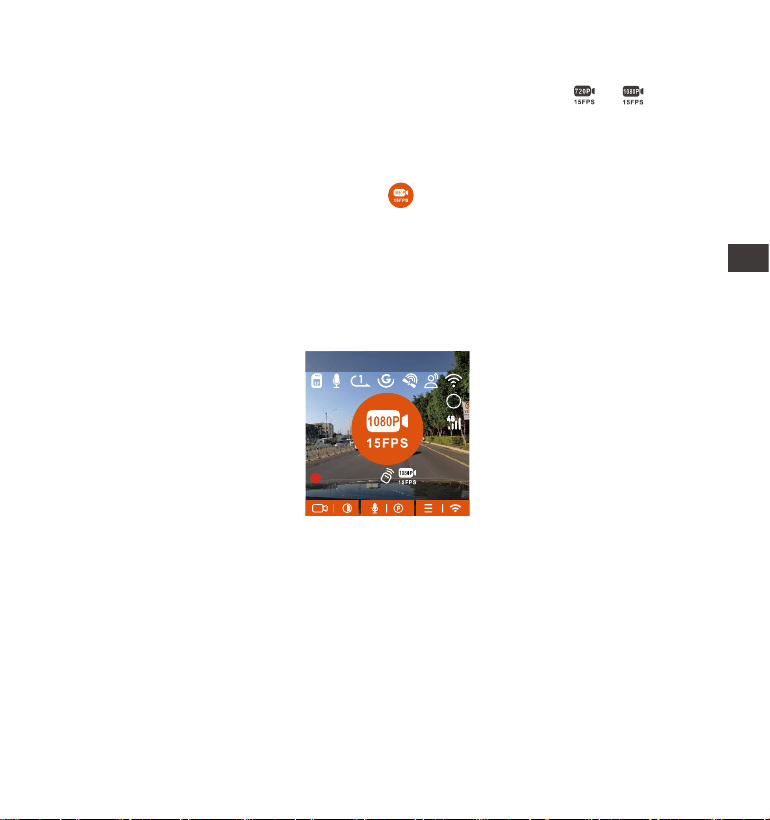
- 102 -
Remarque: Le mode de détection de mouvement doit être exécuté lorsque la
caméra est allumée. Une fois la caméra éteinte, le mode de détection de
mouvement ne fonctionnera pas.
C. Enregistrement à faible débit
Lorsque Enregistrement à faible débit est activée, son icône ou s'ache
à l'écran, selon l'option que vous choisissez d'être 1080P 15FPS ou 720P 15FPS.
Si l'enregistreur de conduite ne détecte pas le mouvement ou la vibration de
l'objet dans les 5 minutes, le mode de enregistrement à faible débit se
déclenche automatiquement. L'icône apparaît au centre de l'écran. La
résolution de tous les objectifs actuels sera automatiquement commutée sur
1080P 15FPS ou 720P 15FPS, et la durée d'enregistrement est déterminée en
fonction de la durée d'enregistrement en boucle dénie. Lorsque la dashcam
détecte des vibrations ou des mouvements, il quitte ce mode et passe à
l'enregistrement normal. Après 5 minutes d'absence de mouvement ou de
vibration, il passe à nouveau en mode faible débit.
Remarque:Le mode de enregistrement à faible débit doit être exécuté
lorsque l'appareil est allumé. Une fois la dashcam éteint, ce mode ne fonction-
nera pas.
D. Mode à faible fréquence d'images
Lorsque Mode à faible fréquence d'images est avtivé, la dashcam enregistrera
selon la sélection de 1FPS/5FPS/10FPS/15FPS. Par exemple, si vous sélection-
nez 1FPS et que la résolution vidéo actuelle est de 30FPS, l'enregistreur
générera une vidéo de 30FPS toutes les secondes.
MP/H
00:00:37
11-12-2024 14:09:07
56
3840x2160P 30FPS
HDR
FR
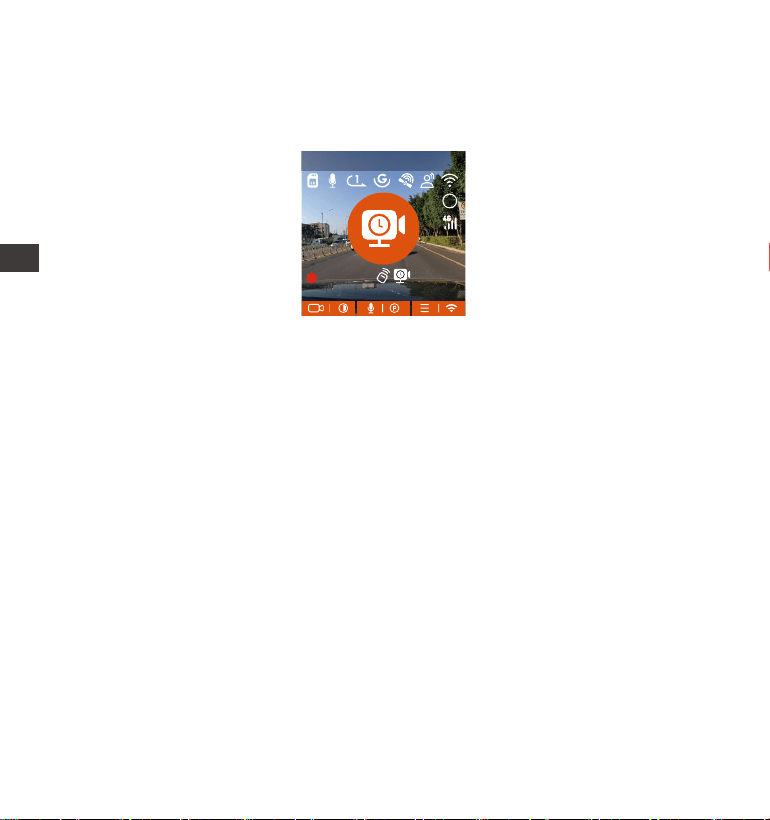
- 103 -
Remarque:
L'unité de temps de la formule de calcul est la seconde, donc la durée
d'enregistrement normale nale calculée est également la seconde. Si vous
avez besoin de le conveir dans d'autres unités de temps, veuillez vérier
et conveir par vous-même.
Le mode de fréquence d'images faible est similaire à la fonction vidéo
accélérée. La diérence entre les deux est le mécanisme d'entrée de 5
minutes. Le mode de fréquence d'images faible attendra cinq minutes
après le réglage, puis entrera dans ce mode. Le mode vidéo accélérée sera
activé directement après le réglage.
Le mode à faible fréquence d'images doit être exécuté lorsque l'appareil
est allumé. Une fois la dashcam éteint , ce mode ne fonctionnera pas.
1.
2.
3.
La formule d'enregistrement:
Durée du chier à faible fréquence d'images * fréquence d'images / Frame de
résolution = Durée réelle du chier d'enregistrement (Le temps doit être
convei en secondes)
Après le stationnement, l'enregistreur activera le mécanisme d'entrée pendant
5 minutes, puis entrera automatiquement en mode de fréquence d'images
faible. La vidéo accélérée peut grandement préseer l'intégrité de la vidéo et
économiser de l'espace sur la cae mémoire.
MP/H
00:00:37
11-12-2024 14:09:07
56
3840x2160P 30FPS
HDR
FR
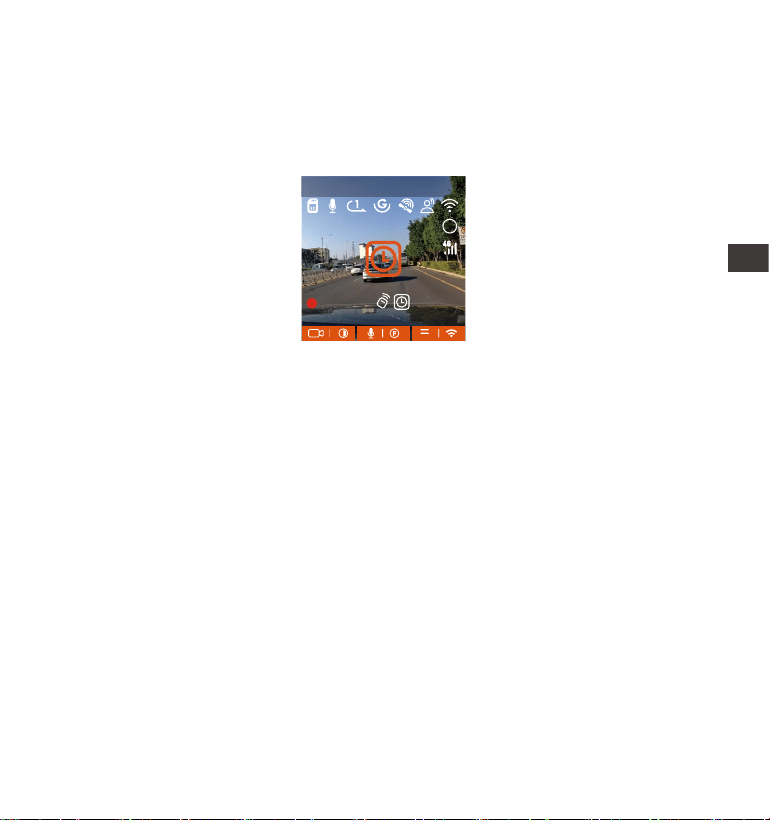
- 104 -
4.2.4. Enregistrement en Accélérée
Lorsque Mode à faible fréquence d'images est avtivé, la dashcam enregistrera
selon la sélection de 1FPS/5FPS/10FPS/15FPS. Par exemple, si vous sélection-
nez 1FPS et que la résolution vidéo actuelle est de 30FPS, l'enregistreur
générera une vidéo de 30FPS toutes les secondes.
La formule d'enregistrement:
Durée du chier d'enregistrement en accéléré * Frame d'enregistrement en
Accéléré/ Frame de résolution = Durée réelle du chier d'enregistrement (Le
temps doit être convei en secondes)
4.2.5 Fonction GPS
La fonction GPS est également l'une des fonctions impoantes de la caméra
de tableau de bord. Le GPS est activé par défaut et la caméra reçoit des
signaux GPS via le suppo GPS. Il peut corriger automatiquement l'heure et
la date de votre région, en enregistrant l'endroit où la vidéo a été enregistrée
et la vitesse de la voiture à ce moment-là.
MP/H
00:00:37
11-12-2024 14:09:07
56
3840x2160P 30FPS
HDR
FR

- 105 -
Informations GPS
40
46
39
43
48
Remarque:
La connexion GPS sera établie dans la minute qui suit la mise sous tension
de l'appareil. Si la connexion GPS échoue dans la minute qui suit, veuillez
vérier si l'appareil a activé la fonction GPS, si le suppo GPS est
correctement connecté et votre environnement (parking souterrain, zone
résidentielle densément peuplée, métro, tunnel, etc. ) aectera également
la réception du signal GPS.
Les informations GPS sont enregistrées dans la vidéo que vous avez
enregistrée. Pour le voir, veuillez télécharger et installer VANTRUE APP et
VANTRUE GPS Player (disponibles en téléchargement sur www.vantrue.net.
1.
2.
4.2.6 Correction Automatique de l'heure par GPS
Par défaut, l'enregistreur E1 Pro active la correction automatique de l'heure
GPS, veuillez sélectionner votre fuseau horaire, comme Paris, vous pouvez
choisir GMT+2. Si vous ne connaissez pas le fuseau horaire de votre emplace-
ment, vous pouvez utiliser le Wi-Fi pour vous connecter à l'application Vantrue
et conrmer que la fonction de réglage automatique de l'heure dans l'applica-
tion est activée. Une fois la connexion établie, le fuseau horaire du l'enreg-
istreur sera corrigé de force en fonction du fuseau horaire de votre téléphone
mobile.
4.2.7 Assistant Vocal (En Anglais)
En plus de contrôler la caméra avec la télécommande, vous pouvez également
FR
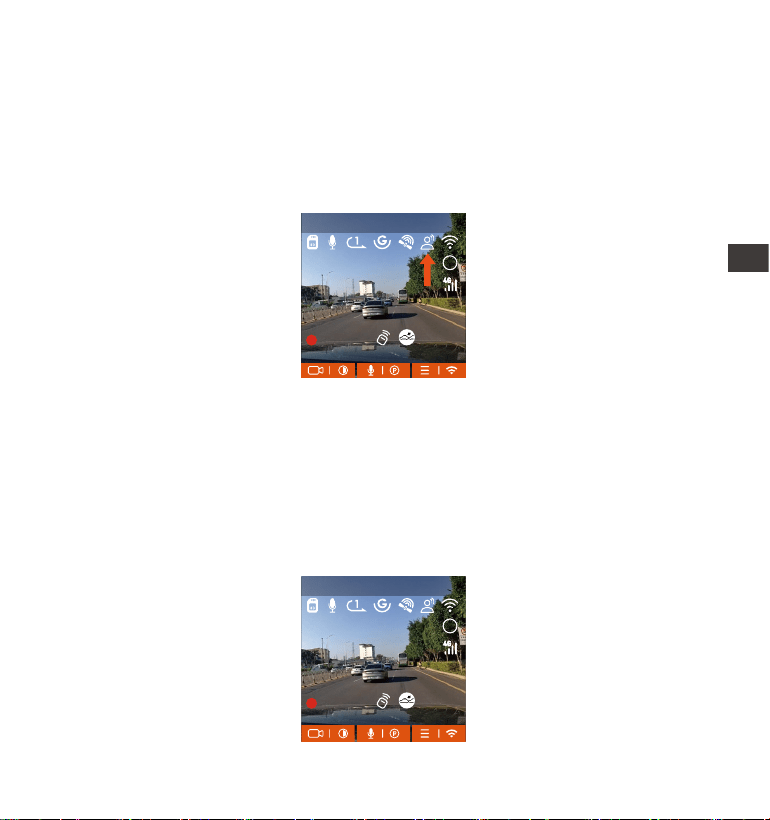
- 106 -
Le mode plein écran. Le mode plein écran est un achage plein écran,
avec un rappo d'écran plus grand, mais il perdra ceains des angles de
vision gauche et droit.
1.
4.2.8 Paramètres d'achage
E1 Pro est une caméra à petit écran, nous avons donc spécialement déni
deux modes d'achage pour vous.
donner des commandes vocales à l'enregistreur via l'assistant vocal, Le
contrôle en français n'est pas pris en charge actuellement.
Pour des commandes vocales plus détaillées, veuillez vérier Paramètres
système > Contenu vocal. Le réglage par défaut est la sensibilité standard. La
reconnaissance vocale propose des options telles que faible sensibilité/
standard/haute sensibilité/désactivé. Vous pouvez contrôler la caméra avec
des commandes vocales.
MP/H
00:00:37
11-12-2024 14:09:07
56
3840x2160P 30FPS
HDR
MP/H
00:00:37
11-12-2024 14:09:07
56
3840x2160P 30FPS
HDR
FR
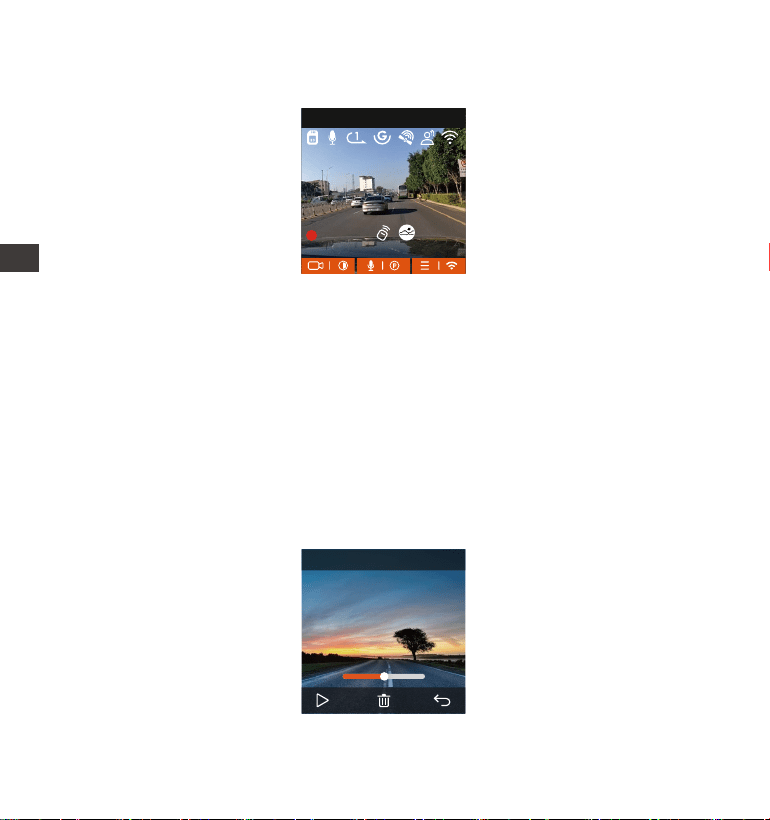
- 107 -
Le mode panorama. Dans ce mode, tout le contenu vu par la caméra vidéo
sera aché et le rappo d'achage de l'écran vidéo est de 4:3.
2.
Remarque: Ce qui précède n'est que le mode d'achage et n'aectera pas
l'angle d'enregistrement de la vidéo.
4.2.9 Lecture et Suppression de Fichiers
a. Regarder sur la caméra
Lire les vidéos
Après avoir cliqué sur "Fichiers", entrez dans n'impoe quel dossier, après
avoir ouve le dossier vidéo, vous pouvez appuyer sur le bouton Bas pour
sélectionner le chier suivant, et appuyez sur le bouton Bas pour supprimer
le chier pendant la lecture.
00�30 01�07
1280x720
2024/11/11
7�15
20241211_140633_0002_N
MP/H
00:00:37
11-12-2024 14:09:07
56
3840x2160P 30FPS
FR
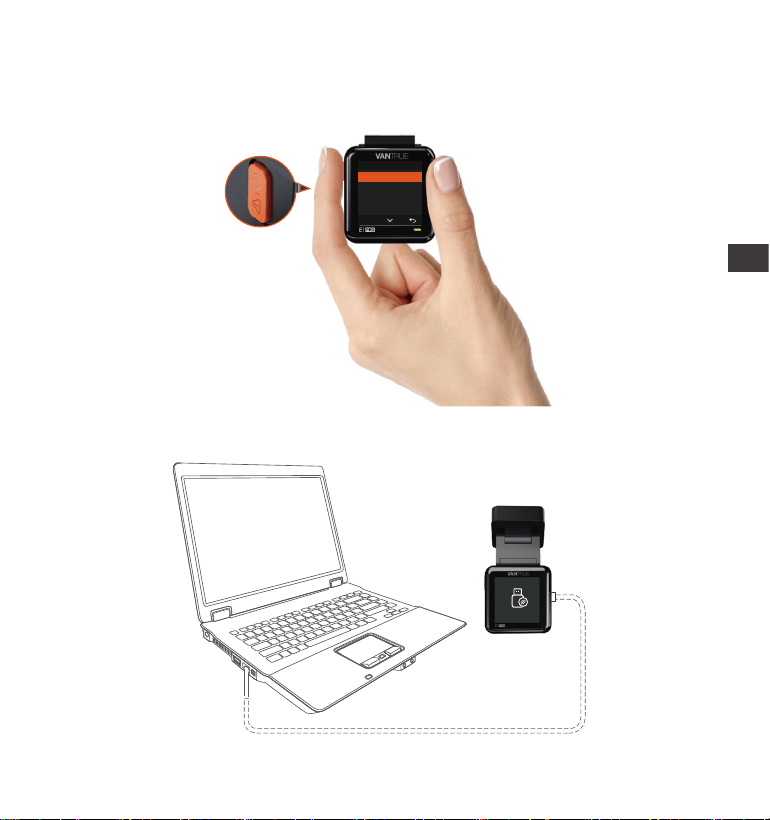
- 108 -
Supprimer les vidéos
Supprimez la vidéo sur la caméra. Appuyez sur le bouton d'enregistrement
d'urgence dans l'inteace de navigation des chiers pour faire apparaître le
menu de suppression
Connectez le câble de données USB C fourni à l'appareil et à l'ordinateur.
b. Regarder sur l'ordinateu
1.
Supprimer ce chier?
Supprimer tous les chiers?
OK
Vidéo Normale
FR
- 109 -
FR
Une fois la connexion réussie, l'icône apparaîtra sur l'écran de l'appareil
pour transférer les données, puis vous pourrez visualiser les chiers vidéo
dans le dossier de l'ordinateur.
2.
Selon le système informatique des diérents utilisateurs, une fois l'appareil
connecté à l'ordinateur, il s'achera en tant que lecteur amovible ou dossier
amovible sur l'ordinateur.
Pour acher le chier sur l'ordinateur, vous pouvez directement cliquer avec
le bouton droit pour ouvrir le menu et le supprimer.
Vous pouvez également utiliser un lecteur de cae USB pour lire les
informations de la cae mémoire.
3.
4.
5.
FR
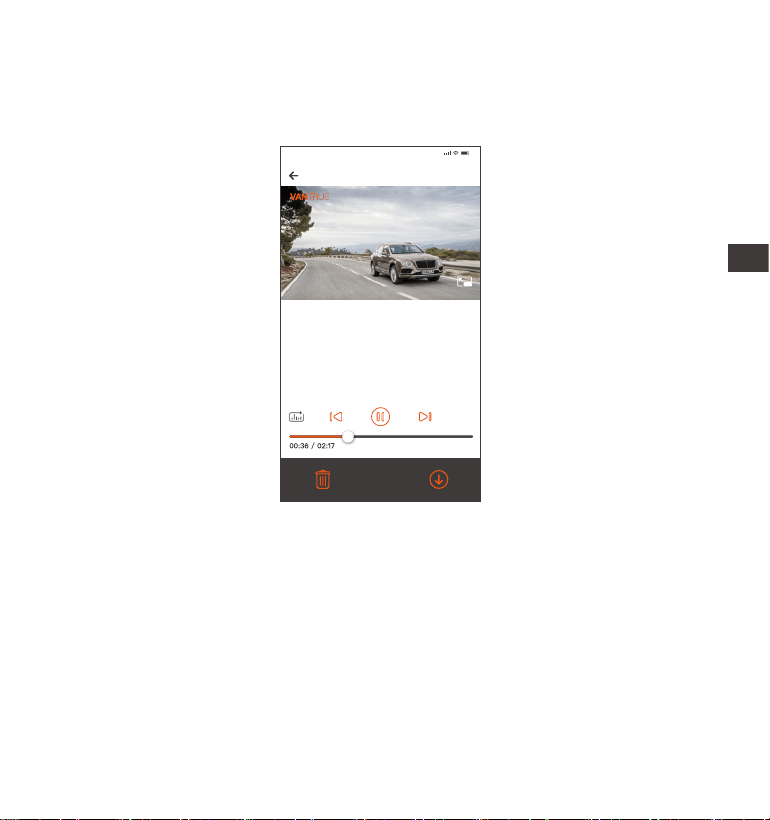
- 110 -
c. Regarder/ suprrimer dans l'application
Une fois que l'appareil est connecté avec succès au téléphone mobile via WiFi,
il peut lire, télécharger et supprimer des chiers dans l'application mobile.
La lecture de vidéos dans l'APP ou le téléchargement de chiers sur la cae
SD ne consommera pas de données.
Une fois le chier vidéo téléchargé et lu localement, vous pouvez acher les
informations de suivi GPS.Vous devez déconnecter le WIFI de l'enregistreur
de conduite, sinon les informations caographiques seront vides.
1.
2.
Remarque:
20241118_115036_0079_N_A.MP4
18/11/2024 11:5:35 E1 Pro 000.000000. 000.000000. 36MK/H
Remarque :
9:41
pour acher les informations GPS, vous
devez d'abord télécharger le chier vidéo
dans le dossier local de l'APP, puis le lire
dans le dossier local.
FR

- 111 -
4.2.10 Mise à niveau du logiciel
La version du logiciel de la dashcam sera annoncée sur le site ociel de
VANTRUE. Vous pouvez contacter le seice client ou télécharger la dernière
version du logiciel à pair du site ociel, et mettre à niveau selon les invites
du site ociel. (www.vantrue.net)
Remarque: Pendant le processus de mise à niveau, ne mettez pas hors
tension, sinon la mise à niveau échouera ou la dashcam sera endommagé.
Si vous rencontrez une panne de courant soudaine qui entraîne l'échec de la
mise à niveau, n'hésitez pas à contacter le seice clientèle pour résoudre le
problème pour vous.
4.2.11 Température de fonctionnement
La caméra est conçue pour fonctionner à des températures comprises entre
-4 et 158°F (-20-70°C), les températures en dehors de cette plage risquent de
dégrader les peormances de la caméra et de causer des dommages.
Pour éviter les dommages
Par temps chaud, n'exposez pas l'appareil directement au soleil lorsque la
voiture est garée.
Dans des conditions hivernales extrêmes, c'est-à-dire -4°F (-20°C) ou moins,
détachez la caméra du pare-brise lorsqu'elle n'est pas utilisée et rangez-la
dans la boîte à gants.
FR

- 112 -
5. Spécication
E1 ProModèle
English、简体中文、日本語、Deutsch、Italiano、
Español、Français、Русский язык、Polski
3840x2160P 30FPS、2560x1440P 30FPS、
1920x1080P 30FPS、1280x720P 30FPS
Processeur Novatek haute peormance
Capteur CMOS Sony
Capteur à trois axes intégré
Écran IPS 1,54 pouces
2.4GHz & 5GHz
Avant: Objectif grand angle F1.8, 160 degrés
Microphone et haut-parleur intégrés
Cae micro SD (U3 ou supérieur, jusqu'à 1 To)
Super condensateur
MP4
DC 5V 2.4A
3.5W
Processeur de puce
Capteur d'image
Capteur G
Écran
WiFi
Lentille
Langues
Audio
Mode de stockage
Type de batterie
Format de vidéo
Résolution vidéo
Tension et courant de
l'alimentation
Puissance
Température de travail
-4°F à 158°F(-20°C à 70°C)
Température de stockage
Inteace USB USB-C (Type-C)
-22°F à 185°F(-30℃ à 85℃)
FR

- 113 -
FR
Garantie
VANTRUE ore une période de seice de garantie de 12 mois, pendant
laquelle vous pouvez proter de seices tels que des réparations rapides, le
retour et l'échange de marchandises endommagées, etc.
Si vous vous inscrivez en tant que membre sur le site ociel de VANTRUE,
votre période de seice de garantie peut être étendue à 18 mois.
Suppo
Si vous avez des questions sur le produit, vous pouvez envoyer un e-mail à
notre e-mail ociel suppo@vantrue.net pour nous contacter. Le personnel
spécialisé répondra aux questions dans les 12 à 24 heures.
Votre opinion compte
VANTRUE® s'engage fermement à toujours améliorer notre produits, seices
et expérience utilisateur. Si tu as quelque réexions sur la façon dont nous
pouvons faire encore mieux, nous apprécions vos commentaires et
suggestions constructifs. Connectez-vous avec nous aujourd'hui à
suppo@vantrue.net.
6. Garantie & Suppo
FR

- 114 -
Ważne wskazówki:
Przed użyciem należy uważnie przeczytać instrukcję obsługi.
Kamera samochodowa musi być podłączona do zasilania, aby działać.
Nie debuguj produktu ani nie oglądaj lmów z jazdy telefonem komórkowym
podczas jazdy, aby zapewnić bezpieczną jazdę.
Przed użyciem tego produktu należy włożyć kaę SD. Upewnij się, że kaa SD
działa prawidłowo i jest zgodna z urządzeniem.
Nie rozmontowuj ani nie naprawiaj kame samochodowej bez upoważnienia.
W przypadku jakichkolwiek usterek skontaktuj się z ocjalnym działem obsługi
klienta VANTRUE.
Nie instaluj kame samochodowej w miejscu, które może utrudniać widoczność
podczas jazdy.
Unikaj środowisk o wysokiej temperaturze i wilgotności, aby zapewnić normalne
działanie sprzętu.
Aby poprawić komfo użytkowania, oprogramowanie układowe produktu
będzie aktualizowane nieregularnie. Możesz pobrać najnowszą wersję w razie
potrzeby, aby korzystać z najnowszych funkcji.
Nie instaluj kame samochodowej bezpośrednio przed pasażerami, aby
zapobiec przypadkowemu odłączeniu i potencjalnym zagrożeniom bezpiec-
zeństwa.
Należy pamiętać, że połączenie z aplikacją może być niemożliwe podczas
korzystania z CarPlay lub Android Auto; · Prosimy używać tego produktu
zgodnie z przepisami prawa.
·
·
·
·
·
·
·
·
·
·
PL
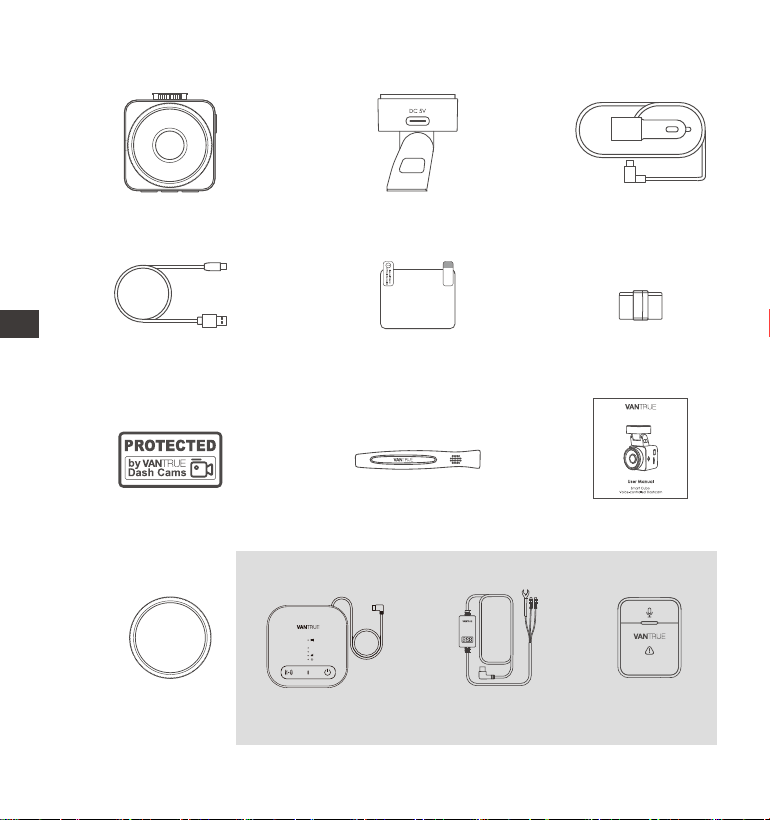
- 115 -
1. Co znajdziemy w pudełku?
A. VANTRUE E1 Pro
wideorejestrator
F.
Klips do kabli
L. Adapter zasialania M. Pilot BTJ. CPL Filtr
Opcjonalne akcesoria
D. Kabel USB C
Tylko do
przesyłania
danych
G. Naklejki
ostrzegawcze
C. Ładowarka
samochodowa
12V (350 cm)
E. Naklejki
elektrostatyczne
(2 sztuki)
I.
Instrukcja obsługi
B. uchwyt GPS
H. Szpatułka
K.
Vantrue LTE
Moduł (LT01)
Element 1 Pro
PL
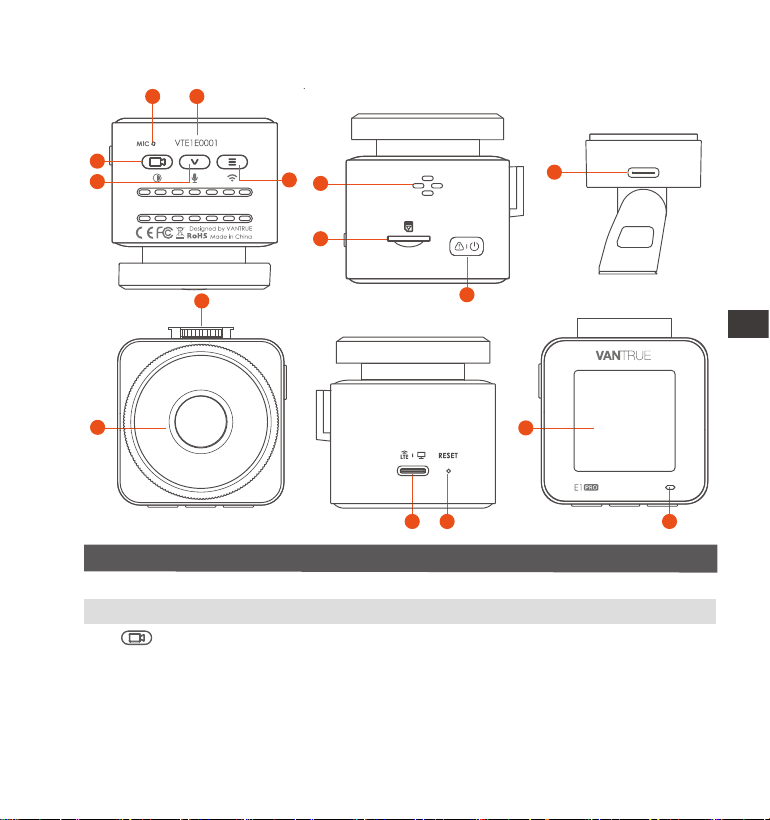
- 116 -
2. Budowa wideorejestratora
Nr. OpisNazwa
Podczas nagwania wideo naciśnij długo, aby
wyłączyć ekran lub naciśnij krótko, aby zatrzymać
nagwanie wideo i przejść w tb czuwania; możesz
potwierdzić wybraną opcję w menu; podczas
odtwarzania plików możesz odtwarzać /
wstrzymywać pliki
1 Mikrofon
2
3 Przycisk
Numer sejny Numer sejny urządzenia
Nagwa wyraźny dźwięk z obrazem wideo.
6
9
7
3
4
5
1 2
8
12
14
10
11
13 15
GM01 DC 5V
PL

- 117 -
13
14
Krótkie wciśnięcie resetuje urządzenieReset
Ekran 1.54" LCD ekran
12
Gniazdo zasilania
Łączy się z kablem typu C lub ładowarką
samochodową w celu zasilania zewnętrznego;
łączy kabel danych w celu przesyłania danych
4 Podczas nagwania wideo i czuwania naciśnij długo,
aby szybko przejść do tbu parkowania,
naciśnij krótko, aby włączyć/wyłączyć mikrofon; w
ustawieniach menu naciśnij długo, aby przewijać
opcje menu i naciśnij krótko, aby wyświetlić następną
opcję menu;
podczas przeglądania plików naciśnij długo, aby
przewijać, aby wyświetlić plik, naciśnij krótko, aby
wyświetlić następny plik; w tbie odtwarzania
naciśnij krótko, aby wyświetlić menu usuwania pliku.
Zasilanie WŁ/WYŁ; długie naciśnięcie włącza/
wyłącza kamerę samochodową; krótkie naciśnięcie
podczas nagwania, aby wejść w tb nagwania
zdarzeń; krótkie naciśnięcie, aby robić zdjęcia
podczas nagwania zdarzeń
Służy do podłączenia zasilania zewnętrznego np. PC
Główne zasilanie powinno być wpięte w uchwyt.
Przycisk
6
7
8
9
10
11
5
Przycisk
Slot ka micro SD
Głośnik
Podczas nagwania wideo i w tbie czuwania
naciśnij i przytrzymaj, aby włączyć/wyłączyć Wi-Fi
Po do uchwytu
Obsługuje kay pamięci do 1 TB w FAT32, Class 10
Przycisk
Dostarcza dźwięk podczas oglądania nagrań
Przednia kamera Nagwa wszystko co dzieje się przed pojazdem
Do podłączenia uchwytuGniazdo uchwytu
PL
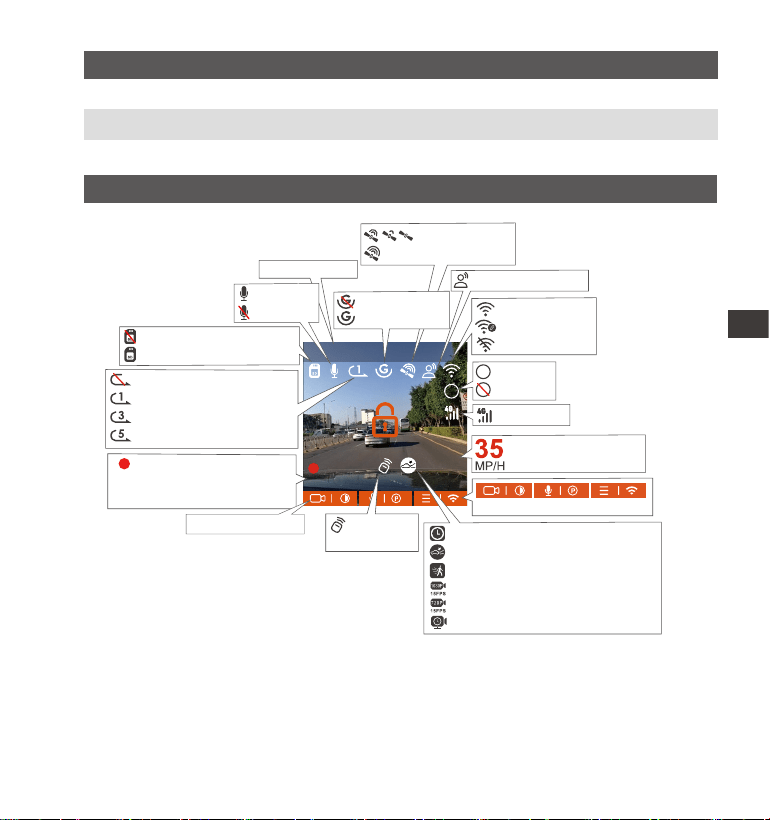
- 118 -
Przegląd ekranu
15
OpisLED Status
15 Kamera nagwaMigające zielone światło
Stałe zielone światło Status czuwania
MP/H
00:00:37
11-12-2024 14:09:07
56
3840x2160P 30FPS
HDR
Nagwanie w pętli WYŁ
Nagwanie w pętli 1 min
Nagwanie w pętli 3 min
Nagwanie w pętli 5 min
GPS Łączenie
GPS Połączony
Nagwana prędkość
(KMH lub MPH)
Brak kay pamięci
Kaa pamięci włożona
Tb poklatkowy WŁ
Detekcja kolizji WŁ
Detekcja ruchu WŁ
1080P Low Bitrate WŁ 15FPS
720P Low Bitrate WŁ 15FPS
Tb poklatkowy tb parkingowy
Rozdzielczość
Icons for Indicating Buttons
WiFi WŁ
WiFi Połączone
WiFi WYŁ
Tb parkingowy
Czas nagwania
(Bieżący klip)
00�00�37
HDR WŁ
HDR WYŁ
HDR
HDR
G-Sensor WYŁ
G-Sensor WŁ
PILOT BT
Połączony
Bieżąca data i cas
Komendy głosowe
Mikr. WŁ
Mikr. WYŁ
Ikona sieci
PL
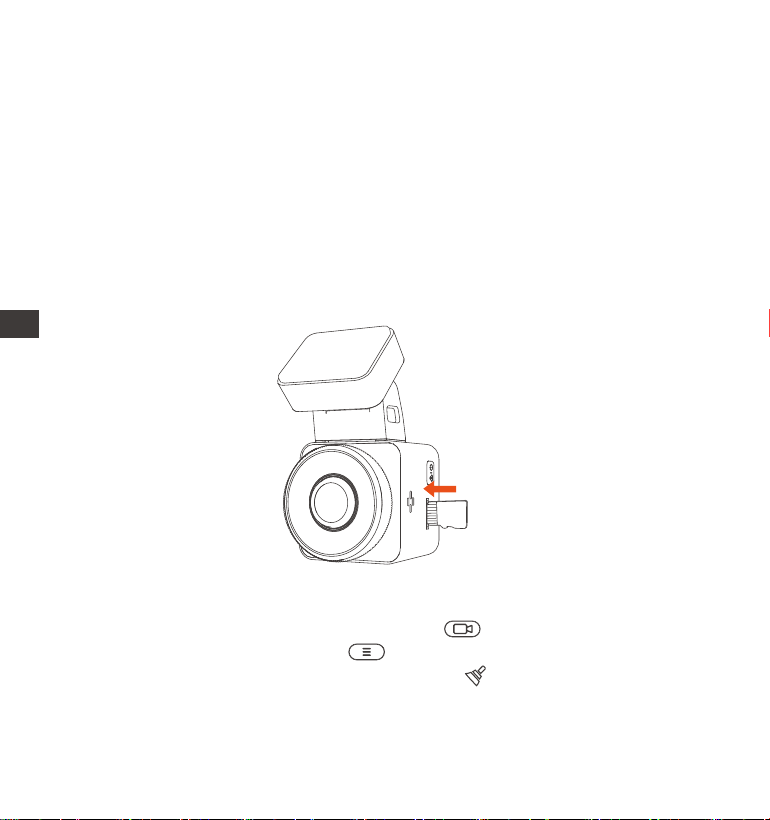
Przed użyciem tej kay, wykonaj poniższe czynności, aby ją prawidłowo
sformatować: Jeśli kamera nagwa, naciśnij ikonę, aby wstrzymać
nagwanie, a następnie naciśnij ikonę, aby wejść do menu, następnie
wejdź w „System”, wybierz „Formatuj kaę SD” i potwierdź formatowanie
kay pamięci, aż pojawi się komunikat „Sformatowano pomyślnie”.
- 119 -
3. Instalacja
3.1 Instalowanie kay pamięci (zalecana: szybka kaa micro SD Vantrue U3).
Proszę włożyć kaę pamięci (pojemność kay pamięci: 32GB–1TB, prędkość
kay: U3/Class10/A2). Kamera samochodowa ma określone wymagania
dotyczące prędkości kay pamięci. Aby zapewnić niezawodną pracę,
zalecamy użycie kay SD VANTRUE (sprzedawanej oddzielnie).
Instalacja kay pamięci: Jest ikona wskazująca kierunek wkładania kay
pamięci. Proszę wsunąć kaę pamięci do gniazda kay zgodnie z kierunkiem
wskazanym przez tę ikonę, aż usłyszysz dźwięk „kliknięcia” w gnieździe kay,
co oznacza, że kaa pamięci została prawidłowo włożona.
PL
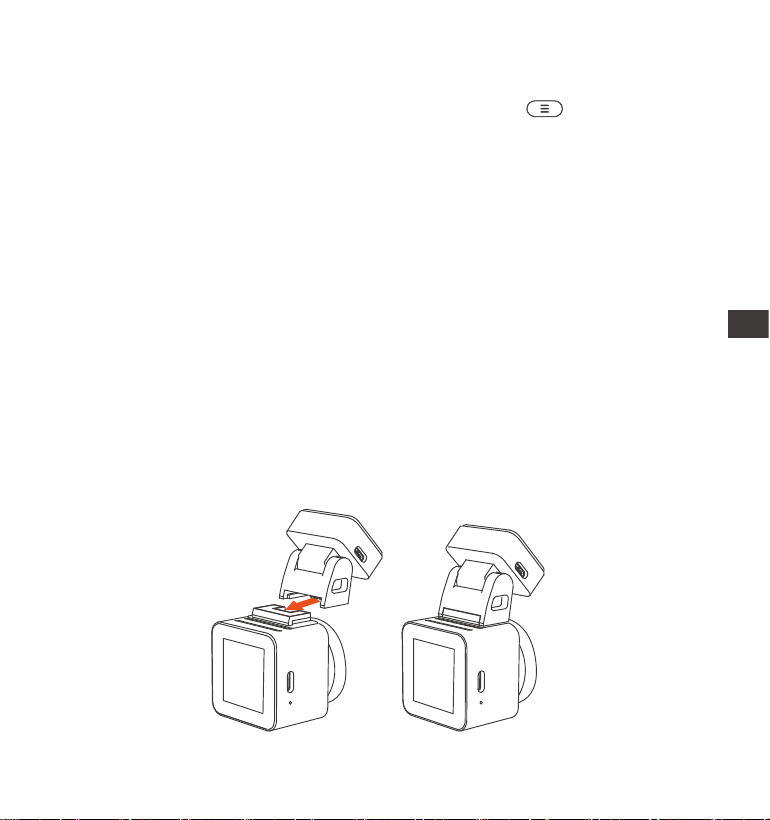
- 120 -
Po włożeniu kay pamięci, jeśli na ekranie pojawi się komunikat „Błąd kay,
sformatuj” (należy pamiętać, że rejestrator w tym momencie nie nagwa),
należy bezpośrednio nacisnąć przycisk, aby przejść do menu i rozpocznij
proces formatowania.
3.2 Montaż kame na przedniej szybie samochodu
Wyrównaj uchwyt z inteejsem mocowania kame samochodowej, a
następnie dociśnij, aż uchwyt zostanie zainstalowany.
1.
Zalecamy formatowanie kay raz w miesiącu, aby zapewnić normalne
działanie kame samochodowej.
Nie wyjmuj ani nie wkładaj kay pamięci podczas nagwania, aby uniknąć
utraty ważnych lmów.
Nie używaj złych ka lub ka o niskiej prędkości w kamerze samochodowej,
ponieważ łatwo jest przerwać lub utracić nagwanie z powodu awarii kay
pamięci.
Przed sformatowaniem kay pamięci sprawdź folder z lmami awajnymi
na karcie SD, aby zobaczyć, czy są jakieś lmy, które należy zapisać osobno,
aby nie usunąć przez pomyłkę ważnych lmów.
UWAGA:
1.
2.
3.
4.
PL
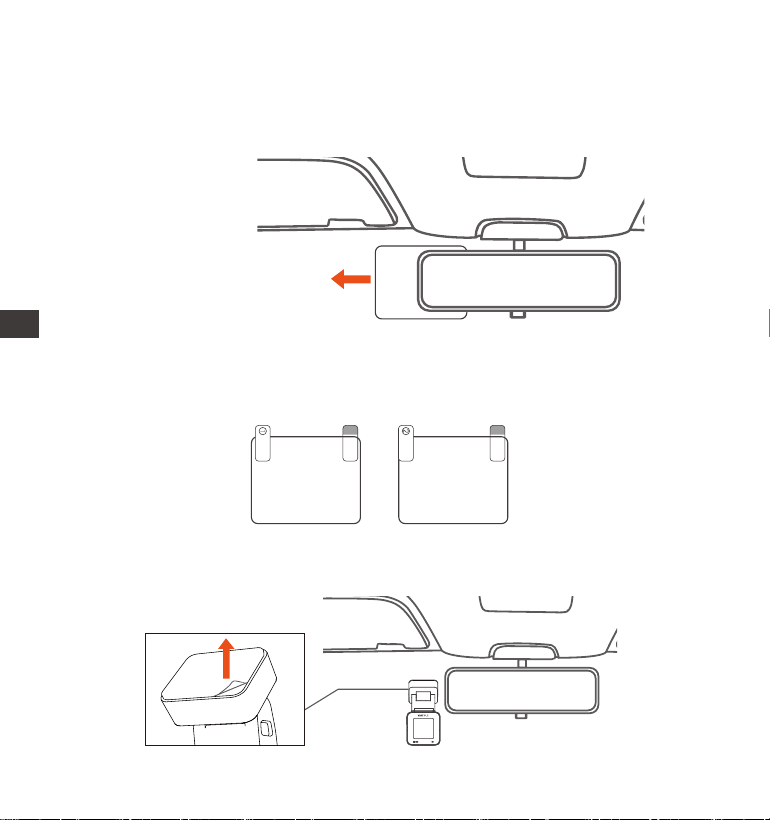
- 121 -
Dokładnie wyczyść przednią szybę wodą lub alkoholem, a następnie
przetrzyj ją suchą szmatką. Przyklej naklejkę elektrostatyczną (nie jest to
wymagane) za lusterkiem wstecznym, co jest zalecaną pozycją, aby nie
zasłaniała widoku podczas jazdy.
2.
Usuń taśmę 3M z uchwytu, a następnie przymocuj uchwyt i kamerę do
naklejek elektrostatycznych.
3.
Naklejka elektrostatyczna
Please peel o this mask
AFTER application completed
Please peel o this
mask BEFORE application
UWAGA: Znajdują się tam dwie folie ochronne ponumerowane 1 i 2. Proszę
usunąć folię ochronną z nr 1, nakleić naklejkę elektrostatyczną na przednią
szybę, a następnie usunąć folię ochronną z nr 2.
PL
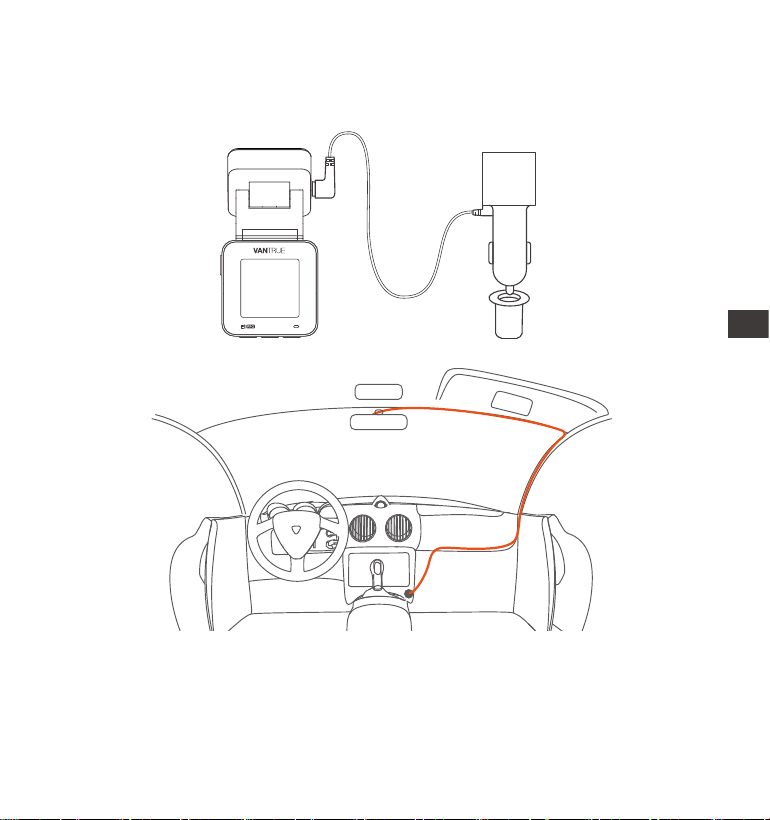
- 122 -
Podłącz ładowarkę samochodową do gniazda zapalniczki samochodowej, a
następnie włóż końcówkę USB ładowarki do pou zasilania USB typu C
kame. Po uruchomieniu samochodu kamerę można natychmiast włączyć.
Podczas organizowania lub przechowywania kabli do ładowania
samochodów można użyć zacisków kablowych, aby je zabezpieczyć. Po
przymocowaniu zacisku kablowego w odpowiednim miejscu, po prostu
zamocuj kable w zacisku.
4.
PL

- 123 -
Zeskanuj kod QR odpowiedniej wersji poniżej, aby pobrać aplikację i
zainstalować ją.
Wyszukaj aplikację „Vantrue” w App Store lub Google Play Store, aby ją
znaleźć, a następnie pobierz ją i zainstaluj na swoim telefonie.
3.3 APP pobieranie
UWAGA: Po pomyślnym połączeniu kame z telefonem komórkowym przez
WiFi, może ona realizować podgląd wideo w czasie rzeczywistym, zmieniać
ustawienia kame, pobierać pliki bez połączenia z Internetem i odtwarzać
lmy na telefonie komórkowym.
Jednak odtwarzanie śladu GPS i funkcje udostępniania wideo będą zależeć
od Internetu lub usług telekomunikacyjnych o waości dodanej (wymaga
wyłączenia/rozłączenia WiFi kame).
PL
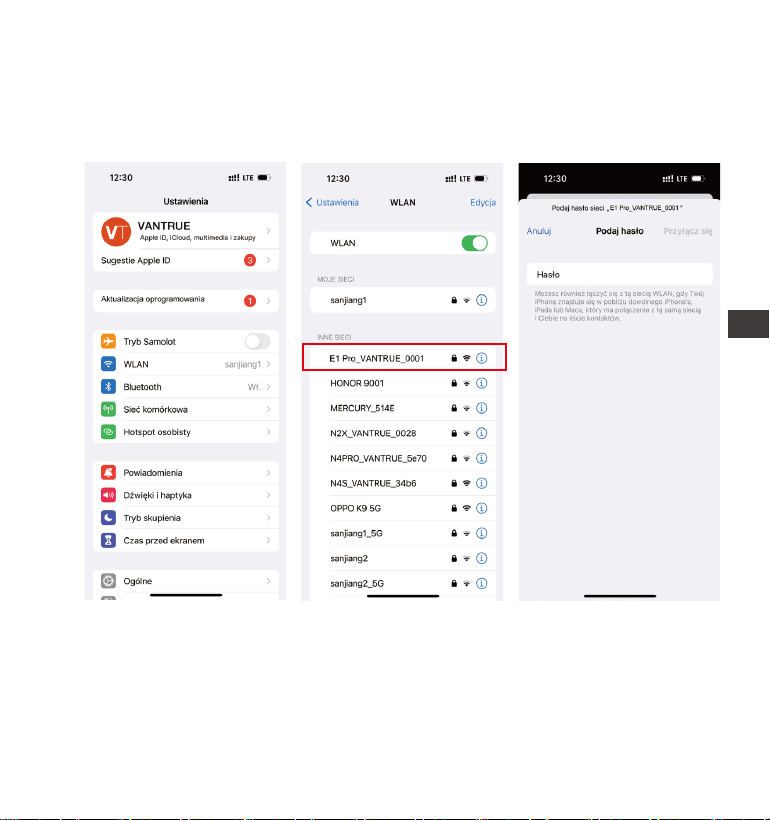
- 124 -
3.4 WiFi połączenie
Włącz funkcję WiFi w kamerze, wejdź do ustawień WiFi w telefonie
komórkowym, znajdź nazwę WiFi, np.: E1_VANTRUE_XXXX, i wprowadź
domyślne hasło WiFi: 12345678, aby połączyć się z siecią WiFi.
PL
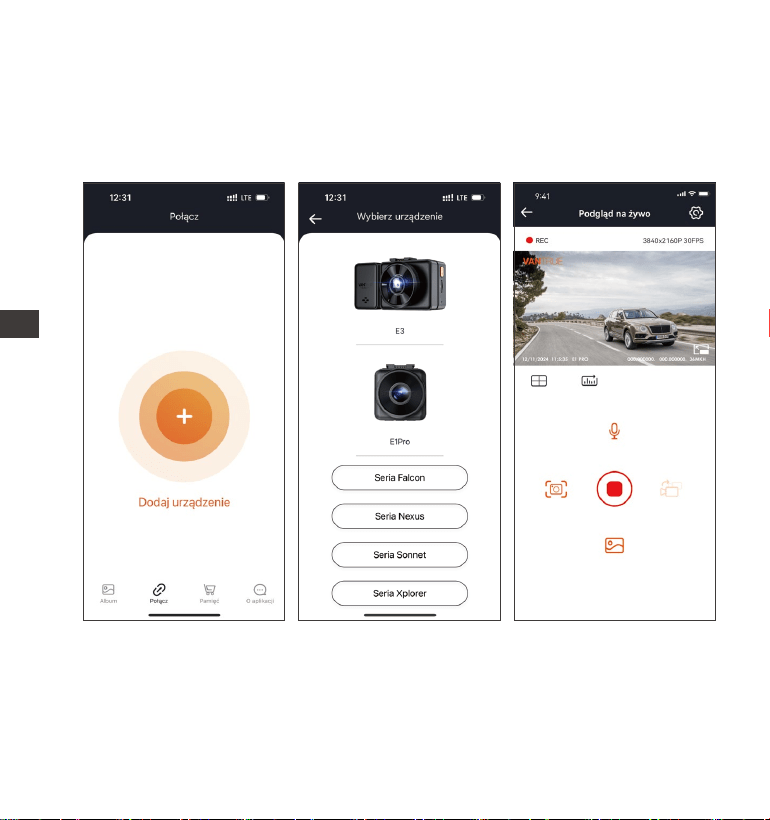
- 125 -
Po pomyślnym nawiązaniu połączenia Wi-Fi kliknij „+” przy pierwszym
otwarciu aplikacji, dodaj model kame, a następnie aplikacja automatycznie
połączy się z kamerą i wyświetli bieżącą sytuację nagwania w czasie
rzeczywistym przez kamerę.
UWAGA:
Jeśli nie połączysz się z siecią Wi-Fi przed otwarciem aplikacji, aplikacja
wyświetli monit „Najpierw połącz się z siecią Wi-Fi” i automatycznie przejdzie
do ustawień sieci Wi-Fi. Wykonaj poniższe kroki, aby najpierw połączyć się z
siecią Wi-Fi.
1.
3.5 App połączenie
PL

- 126 -
2.
3.
4.
5.
6.
Jeśli sieć Wi-Fi jest już połączona, ale aplikacja przechodzi do uprawnień
aplikacji po wybraniu modelu, sprawdź, czy uprawnienia sieci bezprze-
wodowej dla aplikacji są włączone.
Początkowe hasło dla tego urządzenia jest używane tylko do pierwszego
logowania. Aby zapobiec potencjalnym zagrożeniom bezpieczeństwa,
pamiętaj o zmianie początkowego hasła po pierwszym zalogowaniu, aby
uniemożliwić innym osobom zalogowanie się do urządzenia bez autozacji
lub innych negatywnych konsekwencji.
Jeśli zapomnisz hasła do sieci Wi-Fi, możesz przywrócić domyślne
ustawienia urządzenia, a hasło do sieci Wi-Fi urządzenia zostanie również
przywrócone do domyślnego hasła (12345678).
Jeśli nazwa podłączonej sieci Wi-Fi nie pasuje do modelu kame
samochodowej, aplikacja wyświetli monit: „Wybierz prawidłowy model” i
automatycznie powróci do inteejsu wyboru modelu.
Jeśli po włączeniu WiFi nie ma połączenia z telefonem komórkowym,
kamera automatycznie wyłączy WiFi i powróci do inteejsu nagwania po
10 minutach
PL
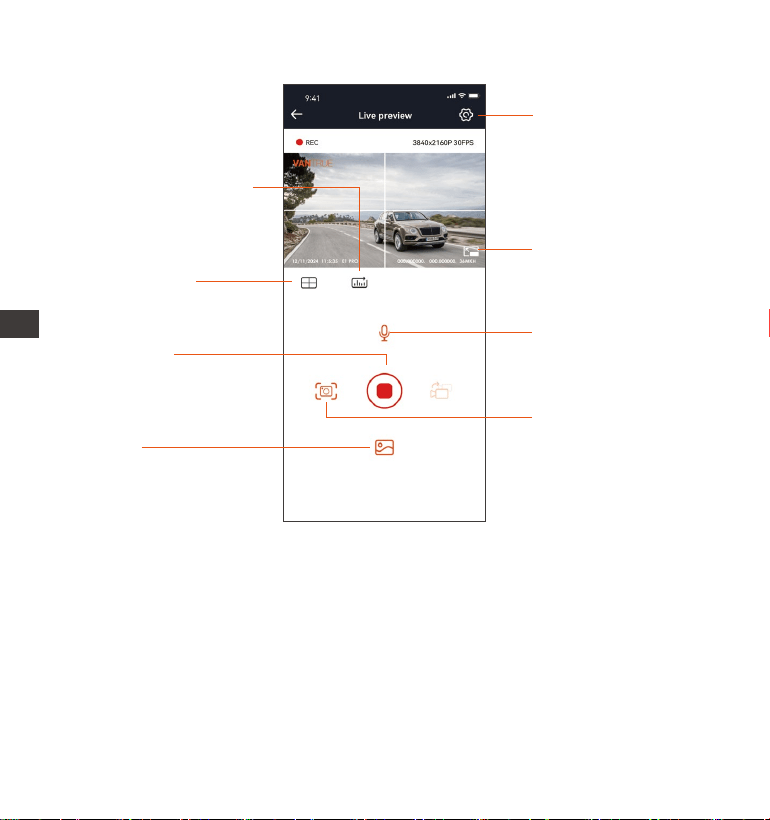
- 127 -
Po wejściu do podglądu w czasie rzeczywistym aplikacji możesz wykonać
następujące operacje:
Podgląd wideo: Po pomyślnym połączeniu aplikacji z kamerą, przejdź do
strony podglądu w czasie rzeczywistym, kliknij przycisk pełnego ekranu lub
umieść telefon poziomo, a ekran w czasie rzeczywistym automatycznie
przełączy się na tb podglądu pełnoekranowego.
Odtwarzanie wideo: Pliki wideo i zdjęć nagrane na karcie SD można obejrzeć
w aplikacji, a wideo można odtworzyć po kliknięciu pliku. Pobieranie wideo:
Możesz wybrać wideo lub zdjęcie, które chcesz pobrać, w inteejsie
3.6 App funkcje
Ustawienia kame
Pełny ekran
Zdjęcie
Album
Zatrzymaj
nagwanie
Linie korekcji
obrazu
Statystyki przebiegu
Mikrofon wł/wył
PL
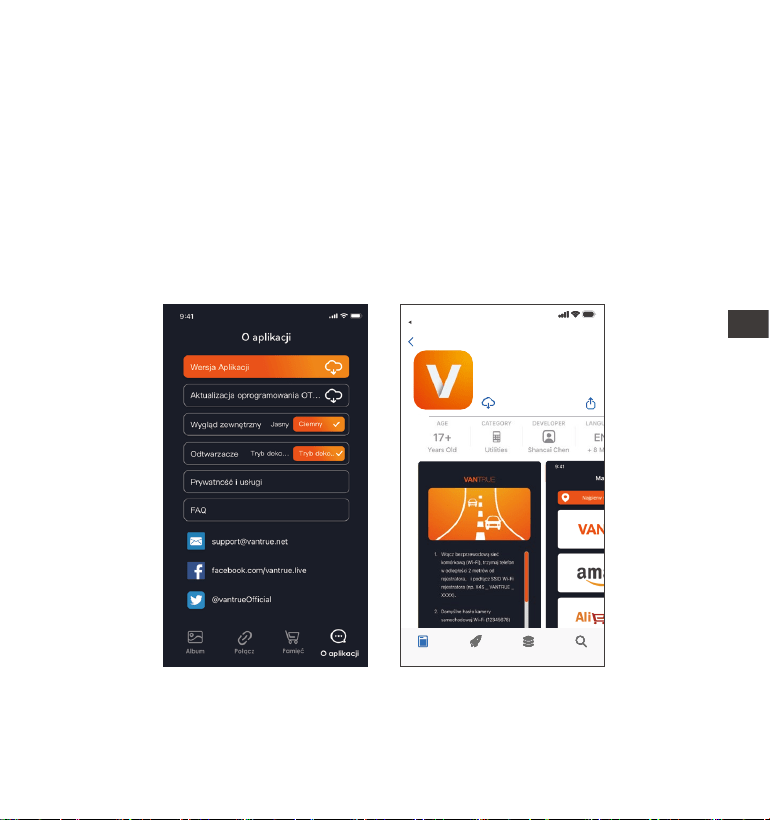
- 128 -
Otwórz aplikację „Vantrue”, połącz się z Wi-Fi i wejdź w Ustawienia >
Informacje > Wykj nową wersję. Aplikacja automatycznie wykje, czy jej
wersja jest najnowszą wersją. Jeśli jest nowa wersja aplikacji, postępuj zgodnie
z instrukcjami i uaktualnij wersję.
3.7 App aktualizacja
Vantrue Ltd.
Vantrue
Vantrue
9:41
Powrót
Dzisiaj G Apps Wyszukiwanie
przeglądania kay SD lub w obszarze odtwarzania wideo.
Po pobraniu wideo, jeśli odtwarzasz je w lokalnym inteejsie aplikacji, możesz
wyświetlić ślad GPS wideo.
Migawka wideo: Możesz uchwycić bieżący ekran w inteejsie podglądu w
czasie rzeczywistym aplikacji.
PL
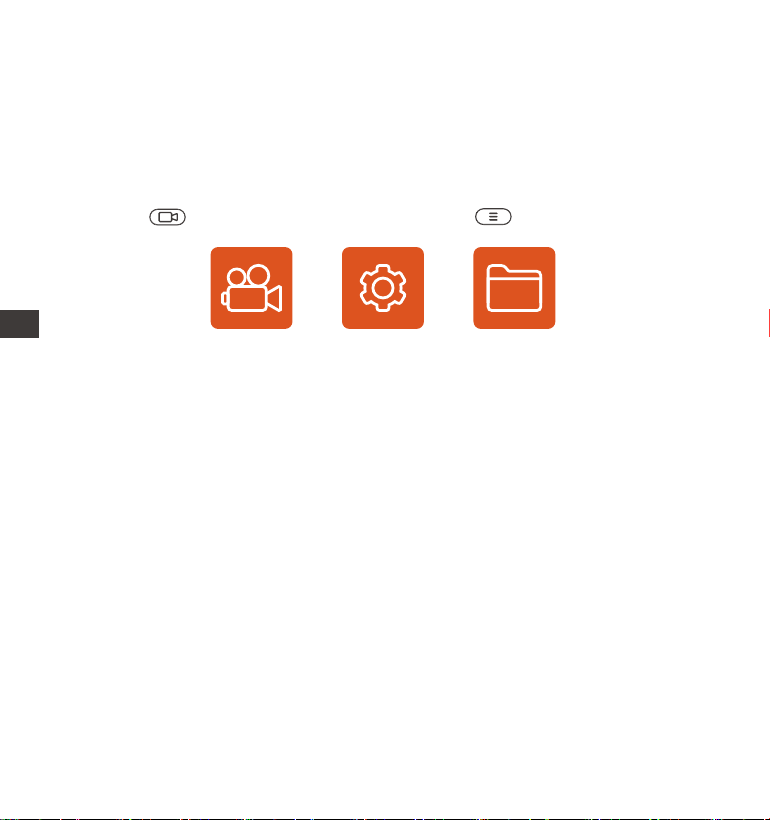
- 129 -
Kamera samochodowa E1 ma 3 menu funkcji, któmi są: ustawienia
nagwania, ustawienia systemowe i przeglądanie plików. Możesz ustawić
kamerę samochodową zgodnie ze swoimi wymaganiami za pomocą tych
ustawień funkcji.
Naciśnij aby zatrzymać nagwanie i potem aby wejść do menu
ustawień.
4. Podstawowe funkcje
4.1 Menu - ustawienia
Nagwanie Ustawienia Pliki
Rozdzielczość: Kamera samochodowa E1 Pro obejmuje czte rozdzielczości:
3840x2160P 30FPS, 2560x1440P 30FPS, 1920x1080P 30FPS, 1280x720P
30FPS, itd.
-Jakość obrazu: Domyślny standard, można wybrać PlatePix ™
-Nagwanie w pętli: Domyślne ustawienie to 1 min. Możesz wybrać 1/2/3
min i WYŁ.
-HDR: domyślnie włączony, opcjonalnie można go wyłączyć.
-HDR Timer: domyślnie wyłączony i można go włączyć lub wyłączyć o
określonej godzinie.
-G-Sensor: wybierz poziom G-sensora, którego potrzebujesz, a następnie
możesz ustawić 3 kierunki (przód + tył/lewo + prawo/góra + dół). Waość
G-sensora w każdym kierunku można wybrać jako 1/2/3/4/5/wył. Im wyższy
poziom czułości, tym łatwiej jest uruchomić nagwanie awajne. G-sensor
jest najbardziej czuły, gdy jest ustawiony na 5.
- Nagwanie dźwięku: Domyślnie włączone. Ustaw nagwanie na włączone
lub wyłączone.
PL

- 130 -
- Ekspozycja: Domyślnie waość to +0,0. Dostosuj ekspozycję obiektywu.
- Lampka stanu nagwania: Domyślnie ustawiona jest na WŁ. Możesz
włączyć/wyłączyć lampkę stanu nagwania.
- Obróć wyświetlacz: Domyślnie wyłączone. Możesz wybrać, aby obrócić
ekran wideo w górę i w dół (180 stopni).
- Tablica rejestracyjna: Naciśnij przycisk, aby wybrać numer lub literę do
ustawienia. Po ustawieniu numer tablicy rejestracyjnej może być wyświetlany
na nagranym wideo.
- Znaczek: Włącz lub wyłącz znak wodny na wideo i zdjęciach. Znak wodny
obejmuje etykietę daty i godziny, etykietę VANTRUE, numer tablicy
rejestracyjnej, informacje o lokalizacji GPS i etykietę prędkości. Wszystkie są
domyślnie włączone.
- Upływ czasu: Domyślnie wyłączone. Możesz włączyć 1FPS/5FPS/10F-
PS/15FPS.
- Tb monitorowania parkowania: Tutaj możesz ustawić potrzebny tb
parkowania, wykwanie kolizji/wykwanie ruchu/nagwanie z niską
szybkością transmisji/tb niskiej szybkości klatek/wyłączony, domyślnie
wyłączony.
- Ustawienia monitorowania parkowania: Używane w połączeniu z tbem
monitorowania parkowania, po włączeniu monitorowania parkowania, nocna
wizja parkingowa przy słabym oświetleniu jest domyślnie włączona. Podczas
korzystania z wykwania kolizji, tb szybkiego stau wykwania kolizji
parkingowych jest domyślnie włączony.
- Ustawienia LTE: Ta funkcja musi być używana w połączeniu z modułem
Vantrue LTE i może wybrać tb wysyłania wiadomości i rozmiar pliku
przesyłanego wideo kolizji. Podczas korzystania z modułu Vantrue LTE,
domyślna wiadomość jest wysyłana w czasie rzeczywistym i przesyłane są
lmy kolizji z tbem oszczędzania ruchu domyślnie. Użytkownicy mogą
zmieniać inne opcje.
- Statystyki przebiegu: Są domyślnie włączone. Po włączeniu kamera
samochodowa E1 Pro będzie rejestrować informacje GPS jazdy, a Ty możesz
PL

- 131 -
ekspoować dane i przeglądać je w aplikacji.
- Ustawienia GPS: GPS jest domyślnie włączony. Ustawienia GPS WŁ./WYŁ.,
ustawienia jednostki prędkości i informacje GPS są tutaj ustawiane.
B. Ustawienia systemu
- Język: Dostępne języki to angielski/francuski/hiszpański/niemieck-
i/włoski/hiszpański/rosyjski/japoński/polski.
- Wi-Fi: Domyślnie Wi-Fi jest włączane automatycznie. W ramach tej funkcji
możesz ustawić Wi-Fi tak, aby automatycznie włączało się lub wyłączało i
wyświetlało informacje o Wi-Fi.
- Ustawienia wyświetlania: Domyślnym ustawieniem jest tb pełnego
ekranu. Możesz przełączyć go na tb panoramiczny.
- Tb USB: Moduł Vantrue LTE i dostarczony kabel USB współdzielą ten sam
inteejs USB do przesyłania danych, więc tb przesyłania danych LTE jest
domyślnie włączony. Gdy użytkownicy muszą użyć kabla USB do przesyłania
danych, muszą przełączyć się na tb USB.
- Asystent głosowy: Domyślna czułość to Standard. Polecenia głosowe mogą
być rozpoznawane po włączeniu tej opcji. Możesz wybrać takie opcje, jak
niska czułość/wysoka czułość/standardowa/wyłączona.
- Treść głosowa: Polecenia rozpoznawania głosu. Możesz użyć różnych
poleceń, aby zdalnie sterować kamerą.
- Formatuj kaę pamięci: sformatuj wszystkie dane na karcie pamięci.
- Ustawienia przypomnienia o formacie: wybierz opcje przypomnienia: 15
dni, 1 miesiąc i wyłączone. Domyślnie jest wyłączone.
Aby zapobiec zapominaniu o regularnym formatowaniu kay pamięci,
dodaliśmy ustawienie czasu przypomnienia o formatowaniu. Możesz wybrać
przypomnienie po 15 dniach lub 1 miesiącu. Po upływie czasu możesz wybrać
„OK”, aby sformatować, lub wybrać „Dalej”.
Uwaga: Jeśli zmienisz opcję przypomnienia o formacie, odliczanie zostanie
ponownie uruchomione natychmiast po zmianie opcji.
- Data i godzina: Istnieją dwa sposoby ustawiania godziny i daty:
PL

- 132 -
Automatyczna aktualizacja GPS: Automatyczna aktualizacja GPS jest
domyślnie włączona. Data i godzina zostaną automatycznie zaktualizowane
na podstawie Twojej strefy czasowej, wybierz prawidłową strefę czasową.
Ręczne ustawianie daty/godziny. Możesz wyłączyć automatyczną
aktualizację GPS, włączyć ręczne ustawianie daty/godziny i ręcznie poprawić
datę i godzinę.
Automatyczne przełączanie czasu letniego/zimowego. Domyślnie wyłączone.
Po włączeniu tej funkcji system automatycznie przełącza się między czasem
letnim i zimowym.* Ta funkcja jest dostępna tylko w Amece Północnej. W
innych regionach może wystąpić błąd czasu.
Format czasu: Domyślne ustawienia w inteejsie nagwania to
wyświetlanie czasu 24-godzinnego, w razie potrzeby można przełączyć się
na wyświetlanie czasu 12-godzinnego. Te ustawienia są widoczne tylko w
inteejsie nagwania i znaczku wodnym etykiety czasu.
W tym menu można również ustawić format daty i ustawienia strefy
czasowej.
·
·
·
-Automatyczne wyłączanie LCD: Ustaw czas automatycznego wyłączania
wyświetlacza LCD po braku aktywności.
Jeśli ustawisz automatyczne wyłączanie LCD na 3 minuty, ekran LCD kame
wyłączy się automatycznie po 3 minutach, ale nagwanie będzie kontyn-
uowane. Jeśli ustawienie jest wyłączone, ekran nie wyłączy się. Naciśnij
przycisk, aby wybrać żądaną opcję: 30 s, 1 min, 3 min i WYŁ.
-Dźwięk urządzenia: Ustaw głośność urządzenia. Domyślny poziom głośności
to 3, najniższy to 0, a najwyższy to 5.
-Dźwięk monitu: W zależności od sytuacji kamera samochodowa jest
ustawiona na 5 rodzajów dźwięków monitu, które są dźwiękiem włącza-
nia/wyłączania, dźwiękiem klawiszy, dźwiękiem zablokowanego pliku,
dźwiękiem formatowania, przypomnieniem o nieprawidłowym zatrzymaniu
nagwania. Wszystkie dźwięki monitu są domyślnie włączone.
-Częstotliwość: Różne kraje mają różne częstotliwości. Aby uniknąć wpływu
na wideo, możesz wybrać częstotliwość 50 Hz lub 60 Hz w zależności od
regionu.
PL

- 133 -
4.2 Główne funkcje
4.2.1 Nagwanie w pętli
Po włożeniu kay pamięci i podłączeniu zasilania kamera samochodowa
E1 Pro włączy się automatycznie i przejdzie w tb nagwania w pętli. Czas
trwania każdego nagranego lmu zostanie zapisany w normalnym folderze
wideo zgodnie z ustawionym czasem nagwania w pętli.
Gdy pojemność normalnego folderu wideo osiągnie 70% całkowitej
pojemności, nowe pliki nagwania w pętli automatycznie nadpiszą oginalne
pliki nagwania w pętli. Po włączeniu tej funkcji plik wideo automatycznie
nadpisze pętlę, aby nie przewać nagwania podczas procesu nagwania.
-Informacje o systemie: Sprawdź aktualny model, wersję oprogramowania
układowego i ocjalną stronę internetową Vantrue.
-Ceykaty: Możesz wyświetlić informacje o ceykacji kame E1 Pro.
-Ustawienie domyślne: Zresetuj urządzenie do ustawień fabcznych.
C. Przeglądanie plików obejmuje
W ramach tej funkcji możesz przeglądać pliki wideo i pliki zdjęć nagrane przez
kamerę samochodową.
-Wideo zdarzenia: Ten folder zawiera pliki wideo alarmowe o nazwie pliku
20300128_140633_00008_E_A.MP4
- Wideo z parkowania: Ten folder zawiera oddzielne pliki wideo z monitorin-
gu parkingowego, a nazwa pliku to
20300128_140633_00007 P A.MP4
- Normalne lmy: Ten folder przechowuje lmy z nagraniami w pętli i lmy z
nagraniami poklatkowymi. Nazwa pliku dla nagrania w pętli to
20300128_140633_00008_2N_A.MP4; Nazwa pliku z nagraniem poklatkowym
to 20300128_140633_00006_TA_A.MP4.
- Zdjęcie: Pliki zdjęć są przechowywane w tym folderze.
- Wszystkie: Wszystkie pliki można przeglądać w tym folderze.
PL
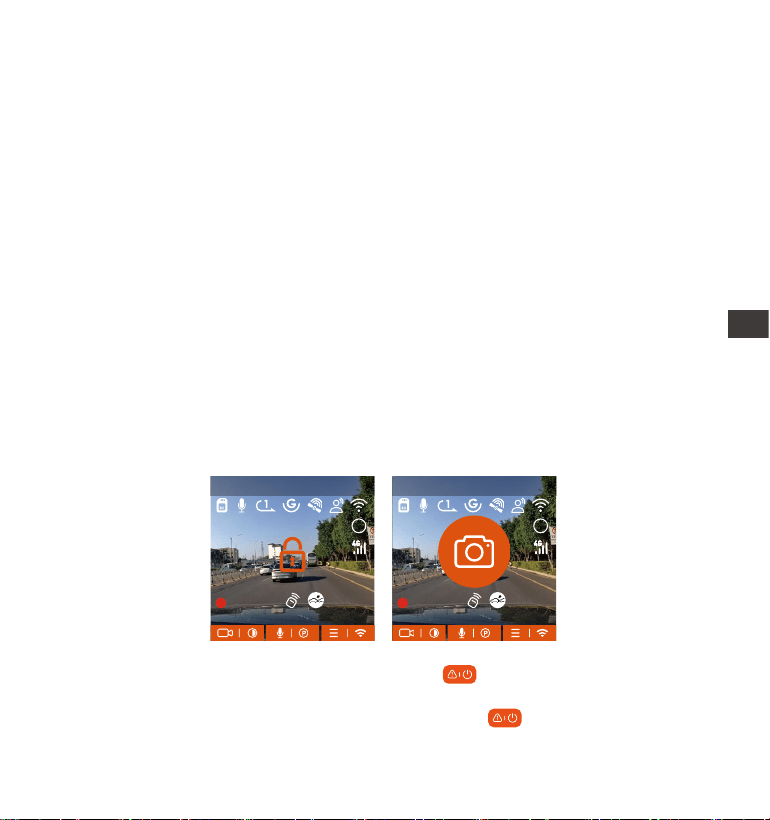
- 134 -
4.2.2 Nagwanie awajne
Wideo z wydarzenia jest wyzwalane przez czujnik G (czujnik grawitacji), któ
może być wyzwalany automatycznie lub blokowany ręcznie.
Podczas jazdy, w przypadku szczególnych okoliczności, kamera automatycznie
zablokuje się w celu nagwania zdarzeń lub możesz ją ręcznie zablokować w
celu nagwania zdarzeń.
Aby manualnie zablokować nagranie wciśnij a kamera zablokuje bieżący
klip.
Podczas blokady wideo możesz nacisnąć przycisk przycisk do
wielokrotnego nagwania. Po nagraniu wideo zostanie automatycznie
2.
3.
4.
1. Normalne działanie funkcji nagwania w pętli jest w dużym stopniu zależne
od szybkości kay pamięci, dlatego należy regularnie formatować kaę
pamięci, aby uniknąć problemów, takich jak nadmierne pliki kay pamięci i
starzenie się kay, które wpływają na normalne nagwanie w pętli.
Należy regularnie sprawdzać nagwanie w pętli, aby uniknąć nadpisywania
niezbędnych lmów.
Po wyłączeniu nagwania w pętli funkcja blokowania wideo nie będzie już
działać.
Po wyłączeniu nagwania w pętli każdy lm będzie trwał 20 minut, a
nagwanie zakończy się, gdy kaa pamięci się zapełni.
MP/H
00:00:37
11-12-2024 14:09:07
56
3840x2160P 30FPS
HDR
MP/H
00:00:37
11-12-2024 14:09:07
56
3840x2160P 30FPS
HDR
Uwaga:
PL
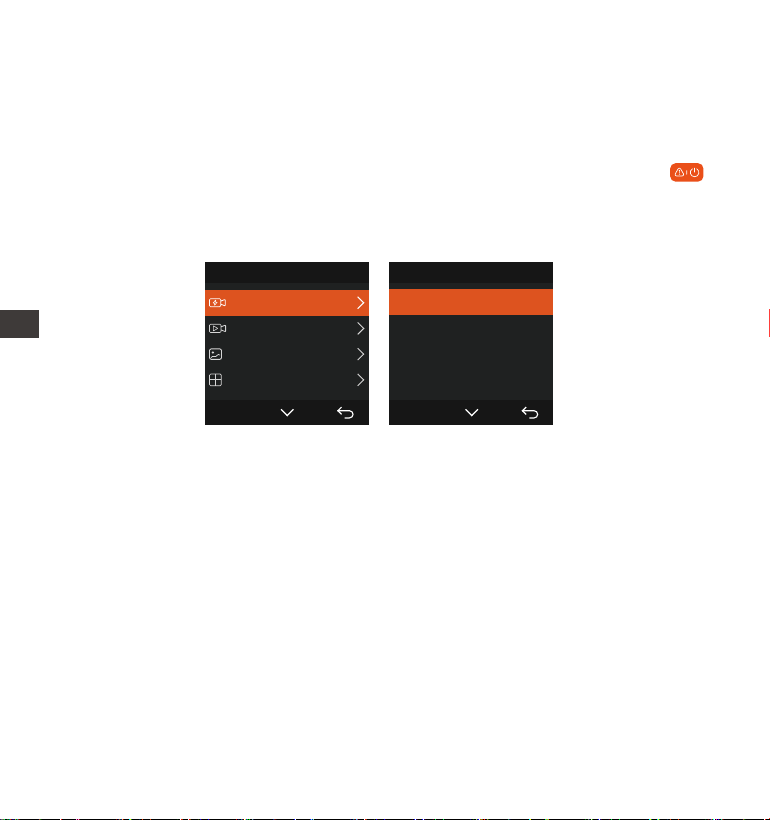
- 135 -
zapisane w folderze wideo zdarzeń, a zdjęcie zostanie zapisane w folderze
zdjęć. Automatyczne blokowanie wideo zdarzeń jest wyzwalane, gdy
samochód zostanie uderzony/potrząśnięty. Kamera samochodowa wykwa
wibracje i automatycznie blokuje bieżące wideo, które jest zapisywane w
folderze wideo zdarzeń.
W czasie zablokowanego nagwania możesz również nacisnąć przycisk
przycisk, aby zrobić zdjęcie. Po zakończeniu nagwania wideo zdarzenia,
wideo zostanie zapisane w folderze wideo awajnego, a zdjęcie zostanie
zapisane w folderze zdjęć.
Czułość automatycznego wyzwalacza wideo blokującego jest określana
przez czułość kolizji. Im wyższe ustawienie czułości, tym większe
prawdopodobieństwo wyzwolenia.
Całkowita pojemność pliku wideo zdarzenia stanowi 30% całkowitej
pojemności bieżącej kay pamięci. Gdy plik wideo zdarzenia osiągnie górny
limit, nowy plik wideo zdarzenia automatycznie nadpisze sta plik wideo
zdarzenia. Zaleca się okresowe sprawdzanie i zapisywanie plików wideo
zdarzenia, aby uniknąć ich utraty.
Nagwanie blokady nie zostanie wyzwolone w żadnej z następujących
sytuacji: Nagwanie w pętli jest wyłączone lub nagwanie poklatkowe jest
włączone.
1.
2.
3.
UWAGA:
Pliki 1/4
Zdarzenia
Normalne
Zdjęcia
Wszystkie pliki
OK
Zdarzenia 2/5
20241118_140633_0001_E...
20241118_140633_0003_E...
20241118_140633_0004_E...
20241118_140633_0002_E...
OK
PL

- 136 -
4.2.3 Tb parkowania (Gdy włączony jest tb parkowania, funkcja
nagwania poklatkowego nie będzie działać. Te dwie funkcje nie mogą
działać jednocześnie)
Tb parkowania działa jako funkcja waownika w różnych sytuacjach. Możesz
przełączać się na różne tby monitorowania parkowania w zależności od
różnych sytuacji parkingowych.
Po włączeniu tbu parkowania istnieją dwa sposoby nagwania. Możesz
odczekać 5 minut, aby automatycznie ponownie uruchomić, lub nacisnąć i
przytrzymać przycisk, aby rozpocząć ręcznie
Użyj zestawu okablowania lub innego stabilnego i ciągłego źródła zasilania,
aby zasilić kamerę, aby zapewnić jej prawidłowe działanie w tbie
parkowania.
Temperatura otoczenia roboczego E1 Pro wynosi od 14°F do 158°F (od
-10°C do 70°C). Zalecamy wybranie funkcji Collision Detection w tym
zakresie temperatur, ponieważ wyłączy się ona automatycznie, gdy
temperatura przekroczy normalny zakres temperatur roboczych. Jeśli
temperatura na zewnątrz jest wysoka, wyłącz kamerę podczas parkowania.
Nagwanie wideo poklatkowe i tb parkowania (w tym wykwanie kolizji,
wykwanie ruchu, nagwanie z niską szybkością transmisji bitów i tb
niskiej liczby klatek na sekundę) można włączyć tylko pojedynczo. Gdy
jeden jest włączony, drugi zostanie automatycznie wyłączony.
Wszystkie lmy w tbie parkowania (Detekcja kolizji ruchu, lowbitrate tb
poklatkowy) zostaną zapisane w normalnym folderze. Aby zapobiec
nadpisywaniu lmu w tbie parkowania w pętli, sprawdź i zapisz wyma-
gane pliki na czas, aby zapobiec ich utracie.
1.
2.
3.
4.
UWAGA:
PL
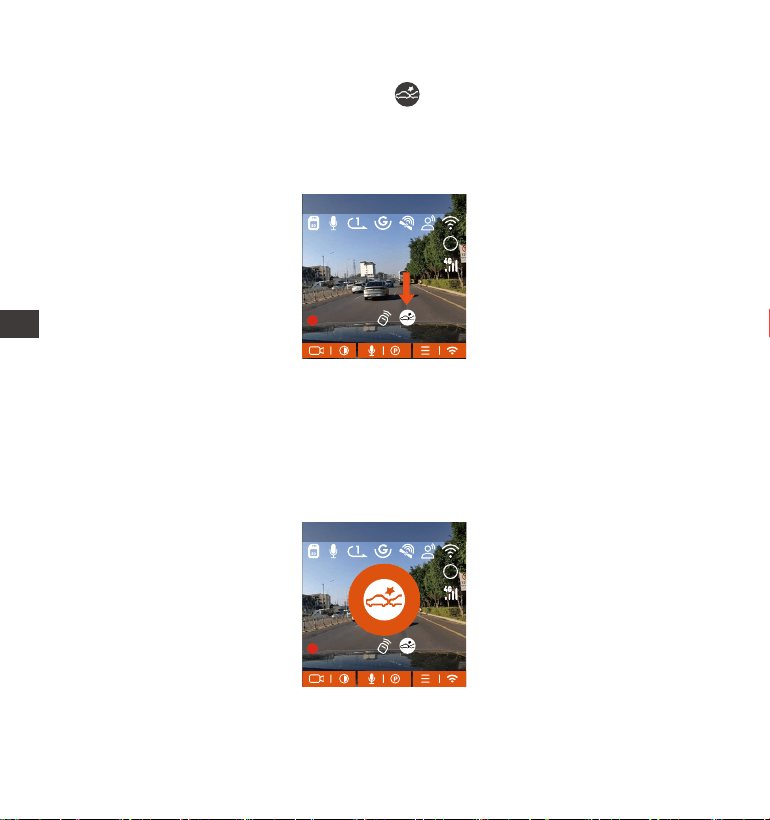
- 137 -
Detekcja kolizji
Kiedy detekcja kolizji jest włączona to ikona zostanie wyświetlona na
inteejsie nagwania, wskazując, że kamera aktualnie używa tbu
wykwania kolizji. Czułość wykwania kolizji można regulować od 1 do 5
poziomów. Możesz dostosować ją do swoich przyzwyczajeń, a także
otoczenia samochodu.
Gdy włączona jest funkcja Collision Detection i po 5 minutach nagwania nie
zostanie wykty żaden ruch (w skrócie 5-minutowy mechanizm
wprowadzania), wówczas aktywowana jest funkcja Collision Detection. Ikona
Collision Detection pojawi się na środku ekranu, a kamera automatycznie się
wyłączy. Gdy kamera samochodowa zostanie wyłączona, rozpocznie nag-
wanie przez 1 minutę po potrząśnięciu, a następnie wyłączy się ponownie.
UWAGA: Jeśli kamera samochodowa będzie nadal uderzana podczas
nagwania wykwania kolizji, wyjdzie z tbu wykwania kolizji i przejdzie
MP/H
00:00:37
11-12-2024 14:09:07
56
3840x2160P 30FPS
HDR
MP/H
00:00:37
11-12-2024 14:09:07
56
3840x2160P 30FPS
HDR
PL
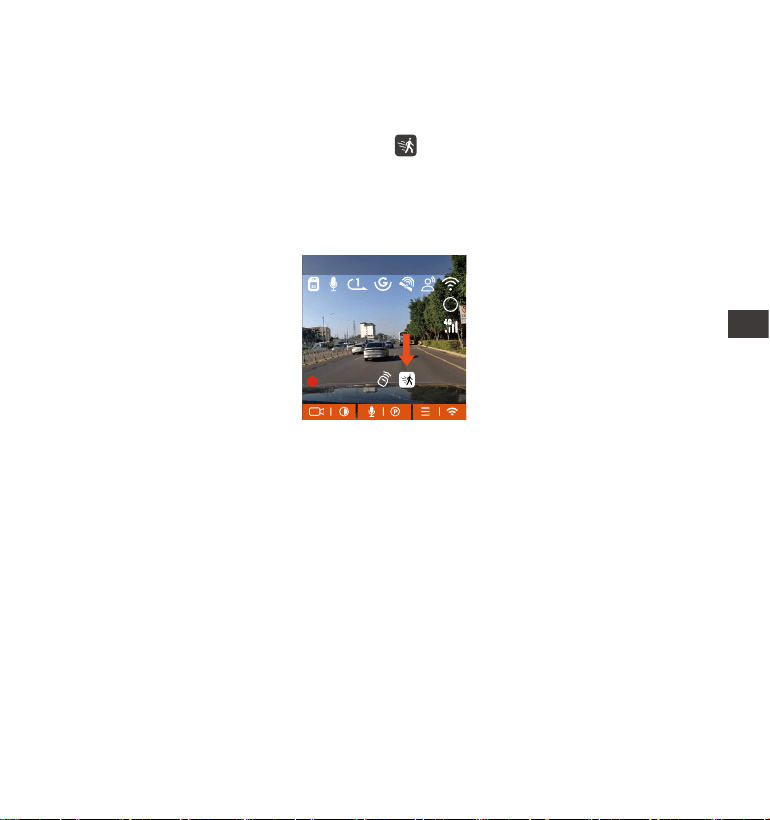
- 138 -
do normalnego nagwania, ponownie uruchamiając mechanizm
wprowadzania danych co 5 minut
Detekcja ruchu
Kiedy detekcja ruchu jest włączona to ikona zostanie wyświetlona na
inteejsie nagwania, wskazując, że kamera samochodowa jest obecnie w
tbie wykwania ruchu. Wykwanie ruchu ma trzy poziomy: niski/średni/
wysoki, które można regulować, a odpowiadające im zakresy wykwania
ruchu to 6,6 stopy/13 stóp/19,7 stopy.
Gdy włączona jest funkcja wykwania ruchu i po 5 minutach nagwania nie
zostanie wykty żaden ruch, na środku ekranu pojawi się pomarańczowa
ikona, a ekran wyłączy się po 3 minutach.
Proces nagwania wideo: Gdy kamera wykje ruch obiektu lub drgania
samochodu, automatycznie uruchomi nagwanie wideo. E1 Pro ma funkcję
wstępnego nagwania. Po zakończeniu nagwania z wykwaniem ruchu
kamera załaduje wstępnie nagrane wideo do wideo z wykwaniem ruchu i
zapisze je w normalnym folderze.
MP/H
00:00:37
11-12-2024 14:09:07
56
3840x2160P 30FPS
HDR
PL
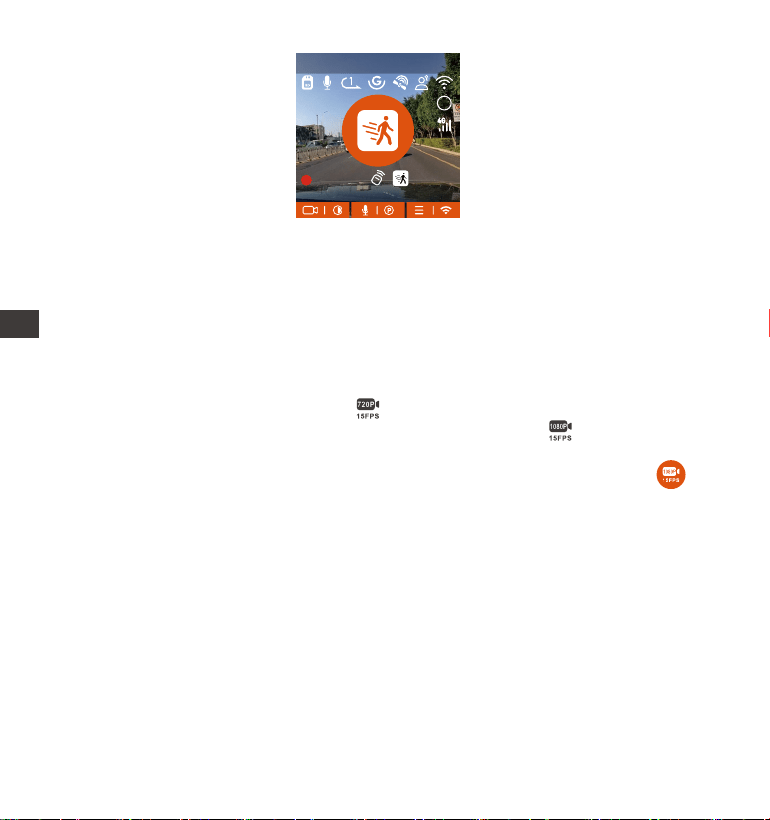
Nagwanie lowbitrate
Kiedy lowbitrate jest włączony to ikona będzie wyświetlana w prawym
dolnym rogu ekranu, jeśli wybrano opcję 1080P 15FPS, a ikona będzie
wyświetlana w prawym dolnym rogu ekranu, jeśli wybrano 720P 15FPS. Jeśli
po 5 minutach nagwania nie zostanie wykty żaden ruch, pojawi się
ikona, która pojawia się na środku ekranu. Rozdzielczość wszystkich bieżących
lmów zostanie automatycznie przełączona na 1080P 15FPS lub 720P 15FPS
do nagwania, a czas trwania nagwania jest określany zgodnie z aktualnie
ustawionym czasem trwania nagwania w pętli. Gdy kamera wibruje lub jest
poruszana, automatycznie wyjdzie, odczeka 5 minut i ponownie wejdzie.
- 139 -
1.
2.
MP/H
00:00:37
11-12-2024 14:09:07
56
3840x2160P 30FPS
HDR
UWAGA:
Tb wykwania ruchu można włączyć tylko wtedy, gdy kamera jest
włączona. Po wyłączeniu kame tb wykwania ruchu nie będzie działał.
Rozdzielczość 1944P i 1440P HDR nie obsługuje funkcji wstępnego
nagwania, więc po włączeniu wykwania ruchu rozdzielczość zostanie
automatycznie zmieniona na 1440P do nagwania..
PL
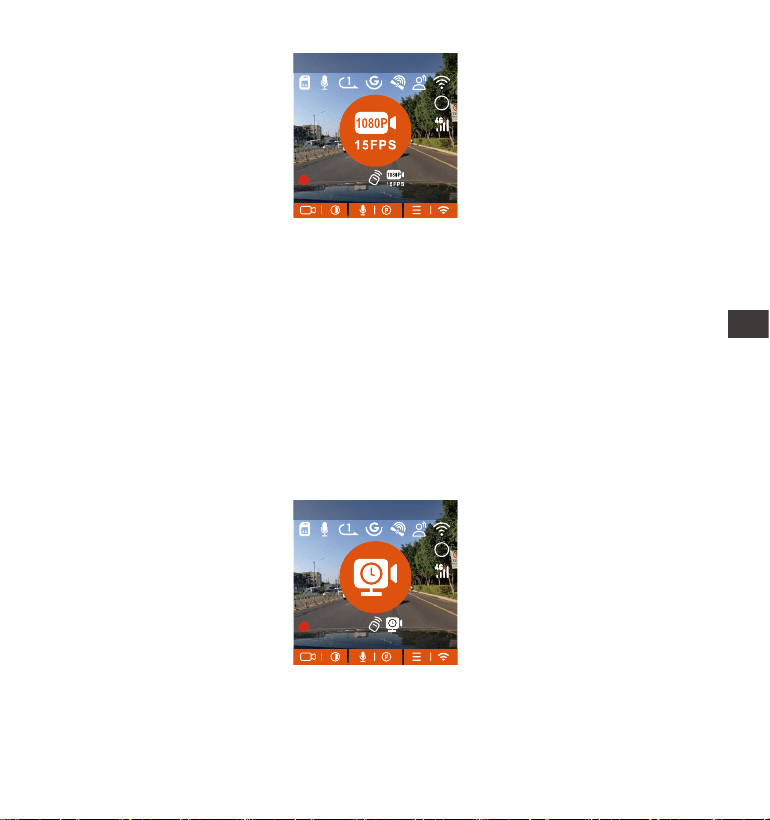
- 140 -
UWAGA: Nagwanie Low Bitrate można włączyć tylko wtedy, gdy kamera
jest włączona. Po wyłączeniu kame nagwanie Low Bitrate nie będzie
działać.
Tb poklatkowy
Gdy wybrany jest tb niskiej liczby klatek na sekundę, kamera będzie
nagwać zgodnie z wybranym przez Ciebie ustawieniem 1FPS/5FPS/10FPS/
15FPS.
Na przykład, jeśli wybierzesz 1FPS, a bieżąca rozdzielczość wideo wynosi
30FPS, rejestrator wygeneruje wideo 30FPS na sekundę. Tb niskiej liczby
klatek na sekundę może znacznie zachować integralność wideo i zaoszczędzić
miejsce na karcie pamięci.
[Rzeczywisty czas nagwania (sek.) = Czas trwania wideo o niskiej liczbie
klatek na sekundę (sek.) x Liczba klatek na sekundę wideo (kl./s) / Opcja niskiej
liczby klatek na sekundę (kl./s)] (Czas należy przeliczyć na sekundy)
MP/H
00:00:37
11-12-2024 14:09:07
56
3840x2160P 30FPS
HDR
MP/H
00:00:37
11-12-2024 14:09:07
56
3840x2160P 30FPS
HDR
PL
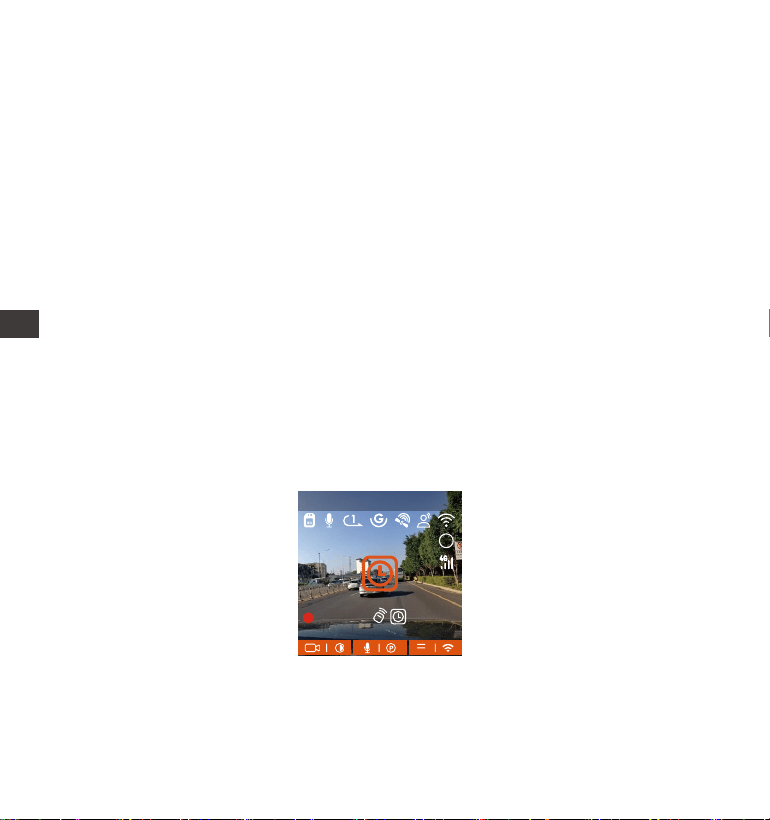
- 141 -
UWAGA:
Jednostką czasu wzoru obliczeniowego są sekundy, więc końcowy normalny
czas nagwania jest również obliczony w sekundach. Jeśli musisz przeliczyć
go na inne jednostki czasu, sprawdź jednostki i przelicz.
Tb niskiej liczby klatek na sekundę jest podobny do funkcji nagwania
poklatkowego, ale różnica polega na tym, że nie ma mechanizmu
wprowadzania 5 minut dla nagwania poklatkowego, któ zostanie
włączony bezpośrednio po ustawieniu.
W tbie niskiej liczby klatek na sekundę kamera potrzebuje również
stabilnego zasilania. Po wyłączeniu lub wyczerpaniu zasilania kamera
wyłączy się.
1.
2.
3.
4.2.4 Tb poklatkowy
Po wybraniu opcji time lapse kamera będzie nagwać zgodnie z wybranym
przez Ciebie ustawieniem 1FPS/5FPS/10FPS/15FPS.
Na przykład, jeśli wybierzesz 1FPS, a bieżąca rozdzielczość wideo wynosi
30FPS, rejestrator wygeneruje wideo 30FPS na sekundę. Tb niskiej liczby
klatek na sekundę może znacznie zachować integralność wideo i zaoszczędzić
miejsce na karcie pamięci.
Wzór na obliczenie czasu trwania wideo jest następujący:
[Rzeczywisty czas nagwania (sek.) = Długość czasu wideo poklatkowego
(sek.) x Klatka wideo Tate (FPS) / Opcja poklatkowa (FPS)]
(Czas należy przeliczyć na sekundy)
MP/H
00:00:37
11-12-2024 14:09:07
56
3840x2160P 30FPS
HDR
PL
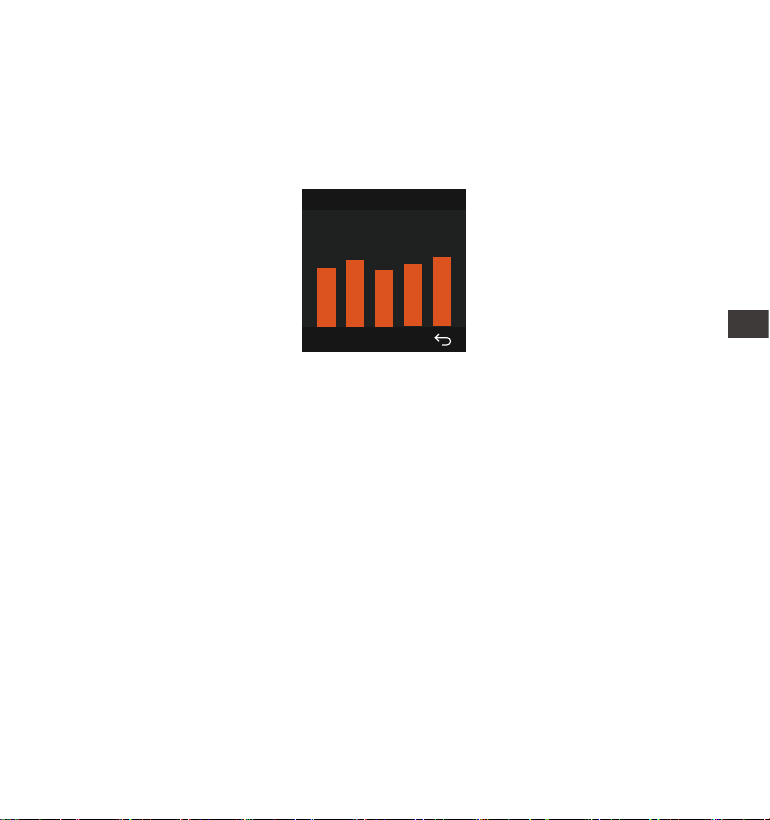
- 142 -
UWAGA:
Połączenie GPS zostanie nawiązane w ciągu 1 minuty od włączenia
urządzenia. Jeśli połączenie GPS nie powiedzie się w ciągu 1 minuty,
sprawdź, czy URZĄDZENIE włączyło funkcję GPS, czy uchwyt GPS jest
prawidłowo podłączony i czy Twoje otoczenie (parking podziemny, gęsto
zaludniony obszar mieszkalny, metro, tunel itp.) wpływa na odbiór sygnału
GPS.
Informacje GPS są rejestrowane wraz z wideo. Aby je obejrzeć, pobierz i
zainstaluj aplikację VANTRUE App i odtwarzacz VANTRUE GPS Player
(dostępne do pobrania na stronie www.vantrue.net).
1.
2.
Informacje GPS
40
46
39
43
48
4.2.5 GPS
Funkcja GPS jest jedną z najważniejszych funkcji kame samochodowej. GPS
jest domyślnie włączony, a kamera odbiera sygnały GPS przez mocowanie
GPS. Może automatycznie kogować czas i datę w Twojej okolicy, rejestrując
lokalizację, w której nagrano wideo, oraz prędkość samochodu w tym czasie.
4.2.6 Automatyczny czas z GPS
Ustawienie automatycznej korekty czasu GPS dla kame samochodowej
E1 Pro jest domyślnie włączone. Możesz wybrać GMT-08:00, wybierając swoją
strefę czasową, np. Los Angeles. Jeśli nie znasz strefy czasowej swojej
lokalizacji, możesz użyć WiFi, aby połączyć się z aplikacją Vantrue i potwi-
erdzić, że funkcja automatycznej korekty czasu w aplikacji jest włączona.
PL
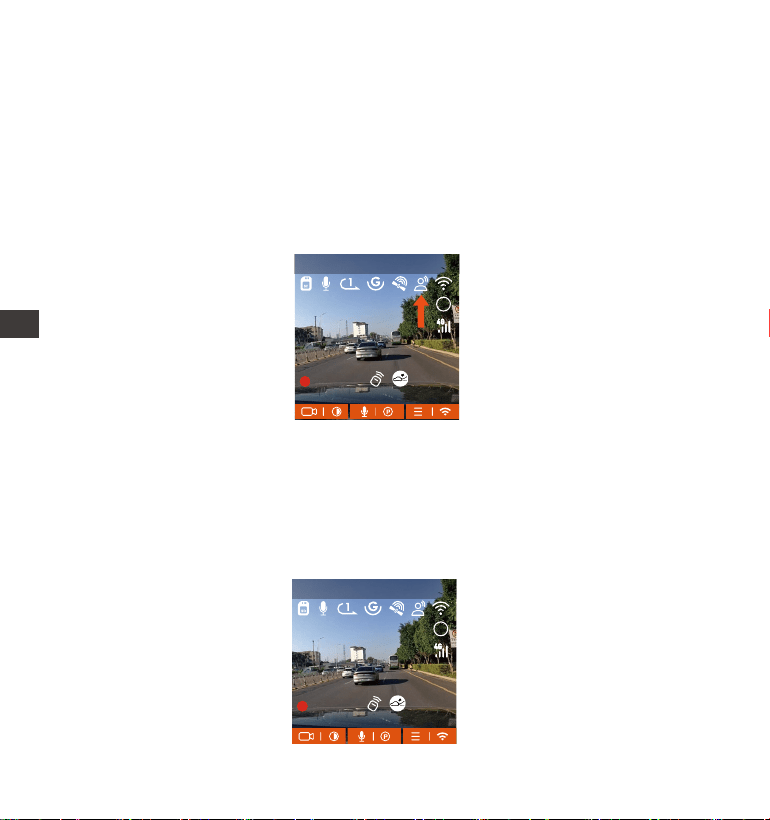
- 143 -
4.2.8 Ustawienia ekranu
E1 Pro to kamera z małym ekranem, więc specjalnie ustawiliśmy dla Ciebie
dwa tby wyświetlania ekranu. Pierwszy to tb pełnoekranowy. Tb
pełnoekranowy to wyświetlanie pełnoekranowe z większym współczynnikiem
ekranu, ale straci część kątów widzenia z lewej i prawej strony.
MP/H
00:00:37
11-12-2024 14:09:07
56
3840x2160P 30FPS
HDR
MP/H
00:00:37
11-12-2024 14:09:07
56
3840x2160P 30FPS
HDR
4.2.7 Komendy głosowe
Oprócz sterowania kamerą za pomocą pilota, możesz również sterować
kamerą za pomocą poleceń głosowych. Obecnie obsługiwane języki to
angielski, japoński, rosyjski i chiński. Aby uzyskać bardziej szczegółowe
polecenia głosowe, sprawdź Ustawienia systemowe > Treść głosowa.
Domyślnym ustawieniem jest standardowa czułość. Rozpoznawanie głosu ma
opcje takie jak niska czułość/standardowa/wysoka czułość/wyłączone.
Możesz sterować kamerą za pomocą poleceń głosowych.
PL
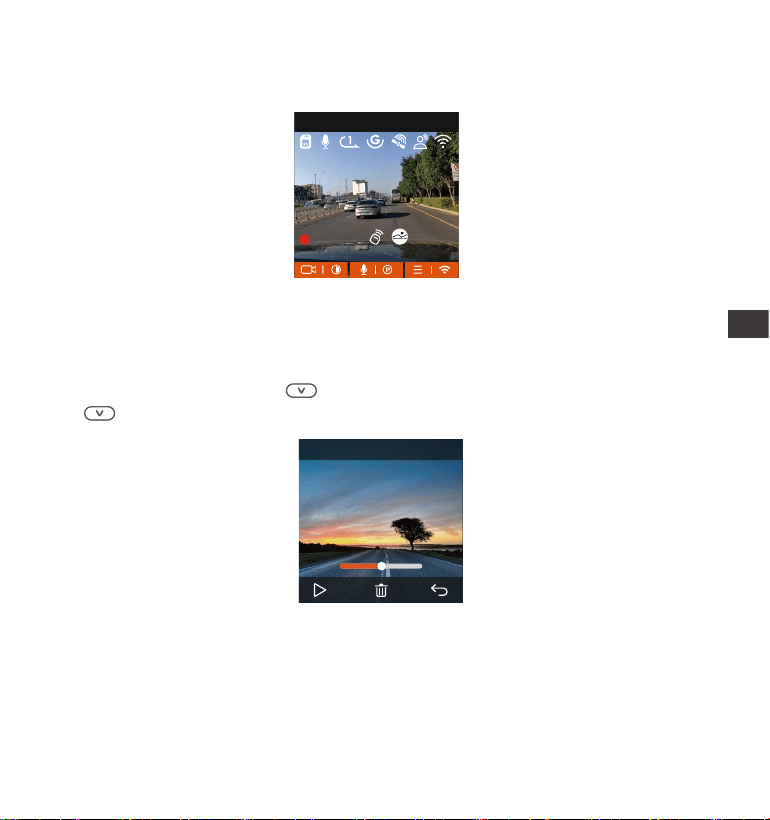
- 144 -
4.2.9 Przeglądanie video/zdjęć
a. Przeglądanie na kamerze
Po kliknięciu „Pliki” przejdź do dowolnego folderu i po otwarciu folderu z
lmami możesz nacisnąć przycisk, aby wybrać następny plik lub naciśnij
przycisk służący do usuwania pliku podczas odtwarzania.
Drugim jest tb panoramiczny. W tym tbie wyświetlana jest cała zawaość
widziana przez kamerę wideo, a proporcje ekranu wideo wynoszą 4:3.
00�30 01�07
1280x720
18/11/2024
7�15
20241118_140633_0002_N
MP/H
00:00:37
11-12-2024 14:09:07
56
3840x2160P 30FPS
PL
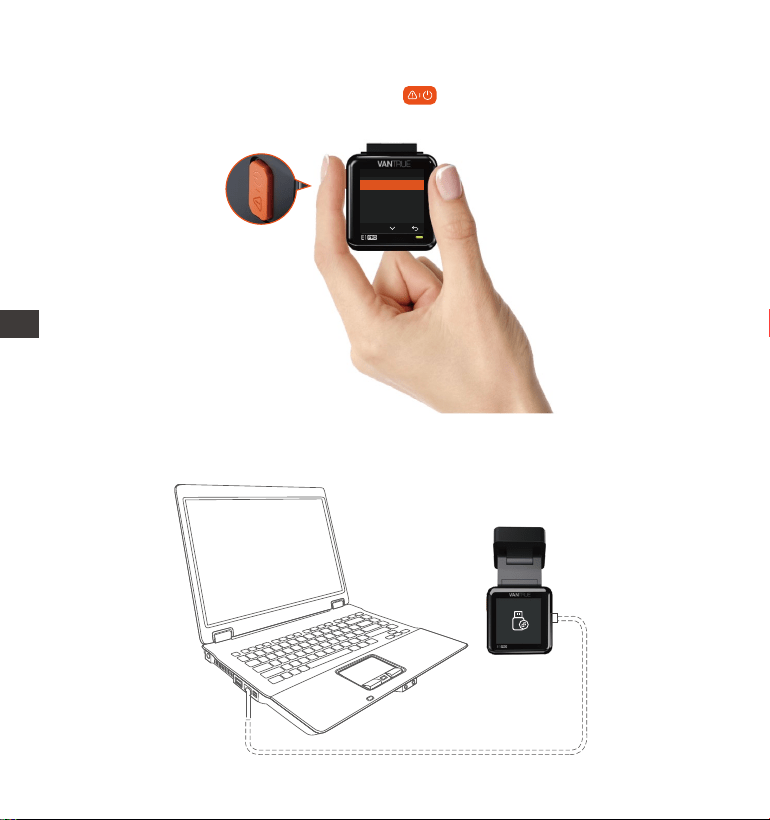
- 145 -
--Kasowanie video
Usuń wideo z kame. Naciśnij przycisk w inteejsie przeglądania plików,
aby wyświetlić menu usuwania.
Normalne
Skasować ten plik?
Skasować wszystkie pliki?
OK
b. Przeglądanie plików na komputerze
1. Podłącz dołączony kabel danych USB TYPE-C do kame i komputera.
PL
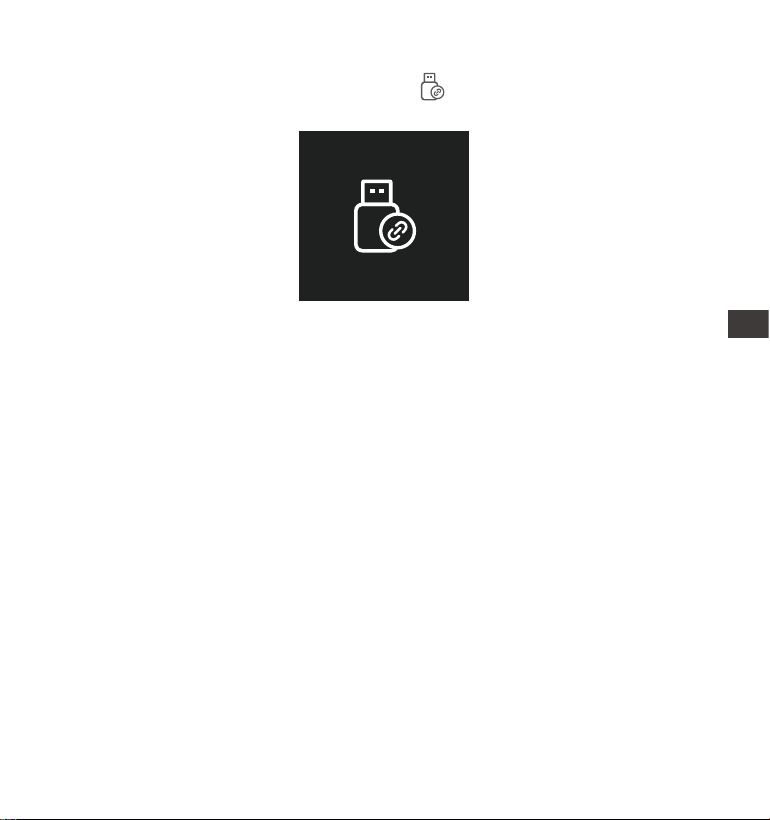
- 146 -
Po pomyślnym nawiązaniu połączenia na wyświetlaczu kame pojawi się
ikona umożliwiająca przesłanie danych , po czym będzie można
przeglądać pliki wideo w folderze komputera.
2.
W zależności od systemów komputerowych różnych użytkowników, po
podłączeniu kame do komputera, będzie on wyświetlany jako dysk
wymienny lub folder wymienny.
Aby wyświetlić pliki na komputerze, możesz uzyskać do nich bezpośredni
dostęp, kliknąć prawym przyciskiem myszy, aby otworzyć menu i je usunąć.
Możesz również użyć czytnika ka USB, aby odczytać informacje z kay
pamięci.
3.
4.
5.
PL
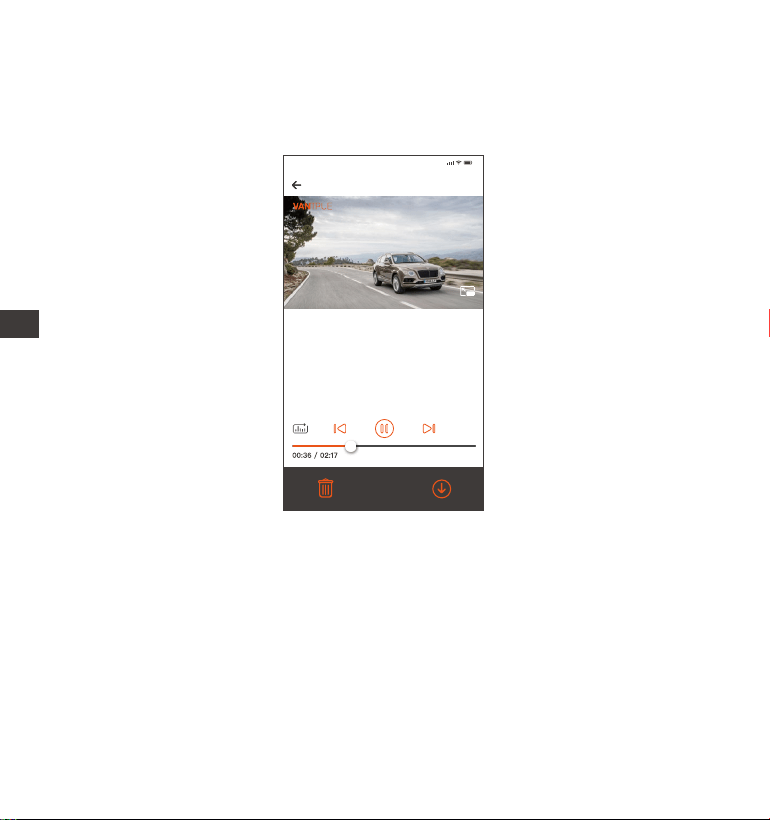
- 147 -
c. Zobacz w aplikacji „Vantrue”
Po pomyślnym połączeniu kame z telefonem komórkowym przez Wi-Fi
można odtwarzać, pobierać i usuwać pliki za pomocą aplikacji mobilnej.
W przypadku odtwarzania wideo w aplikacji lub pobierania na kaę SD nie
będzie żadnego zużycia ruchu sieciowego.
Informacje o ścieżce GPS można wyświetlić dopiero po pobraniu pliku wideo
i odtworzeniu go lokalnie. Jednocześnie należy rozłączyć sieć Wi-Fi kame
samochodowej, w przeciwnym razie informacje na mapie będą puste.
1.
2.
UWAGA:
20241118_115036_0079_N_A.MP4
18/11/2024 11:5:35 E1 Pro 000.000000. 000.000000. 36MK/H
Uwaga:
9:41
Aby wyświetlić informacje GPS, musisz
najpierw pobrać plik wideo do lokalnego
folderu aplikacji, a następnie odtworzyć
go w folderze lokalnym.
PL

- 148 -
4.2.10 Aktualizacja oprogramowania
System automatycznie zaktualizuje się za pomocą pliku aktualizacji
oprogramowania układowego kay Micro-SD. Kamera uruchomi się ponownie
po zakończeniu aktualizacji. Najnowsza wersja oprogramowania układowego
jest zawsze dostępna na ocjalnej stronie internetowej VANTRUE
(www.vantrue.net lub vantrue.pl/wsparcie ).
4.2.11 Temperatura pracy
Kamera jest przeznaczona do pracy w temperaturach od -4 do 158°F (-20 do
70°C). Temperatu poza tym zakresem mogą pogorszyć działanie kame i
spowodować jej uszkodzenie.
Aby uniknąć uszkodzeń
W upalne dni nie wystawiaj kame bezpośrednio na słońce, gdy samochód
jest zaparkowany.
W ekstremalnych warunkach zimowych, tj. -4°F (-20°C) lub niższych, odłącz
kamerę od przedniej szyby, gdy nie jest używana, i przechowuj ją w schowku
na rękawiczki.
PL

- 149 -
5. Dane techniczne
E1 ProModel
Engish/ Français/ Español/ Deutsch/ Italiano/
简体中文/русский/ 日本語/ Polski
2592x1944P 30FPS; 2560x1440P 60FPS;
2560x1440P(HDR)30FPS; 2560x1440P 30FPS;
1920x1080P 60FPS; 1920x1080P(HDR)30FPS;
1920x1080P 30FPS; 1280x720P(HDR)30FPS;
1280x720P 30FPS
Novatek high-peormance processor
Sony CMOS Sensor
1.54” IPS
Wbudowane 2.4G
Przód: 160°; F/1. 8
Wbudowany mikrofon oraz głośnik
Ze względu na udoskonalanie produktu, specykacje tego produktu mogą ulec
zmianie bez wcześniejszego powiadomienia.
Procesor
Sensor obrazu
Ekran
WiFi
Obiektyw
Języki
Audio
Pamięć
Rozdzielczość
Zewnętrzna: 32GB-1TB Micro SD Card, U3, C
lass 10 (brak w podstawowym zestawie)
Kondensator
MP4
DC 5V 2.4A
3.5W
-4°F do 158°F(-20°C do 70°C)
-22°F do 185°F(-30°C do 85°C)
Typ C
Zasilanie
Video Format
Prąd napięcia zasilania
Zasilanie
Temp. pracy
Temp. kay pamięci
USB Po
PL

- 150 -
Gwarancja
Kamera samochodowa VANTRUE® Element 1 Dash Cam jest objęta pełną
12-miesięczną gwarancją.
Wsparcie
Jeśli masz jakiekolwiek pytania dotyczące produktu, nie wahaj się
skontaktować z nami pod adresem [email protected]
Na zapytania zazwyczaj odpowiadamy w ciągu 12–24 godzin.
Twoja opinia ma znaczenie
VANTRUE® jest mocno zaangażowane w ciągłe ulepszanie naszych produktów,
usług i doświadczeń użytkowników. Jeśli masz jakieś pomysły, jak możemy
działać jeszcze lepiej, chętnie przyjmiemy Twoje konstruktywne opinie i
sugestie. Skontaktuj się z nami już dziś pod adresem [email protected]
6. Gwarancja & wsparcie
PL
- 151 -
www.vantrue.pl
facebook.com/vantruePolska
Skontaktuj się z nami:
PL

- 152 -
IT
Suggerimenti utili:
Leggere attentamente il manuale del prodotto prima del primo utilizzo per
garantire un funzionamento corretto.
La dashcam funziona solo quando è collegata all'alimentazione.
Per garantire la sicurezza durante la guida, non regolare il dispositivo o
guardare i video sul telefono mentre si è alla guida.
Questo prodotto richiede l'inserimento di una scheda SD; assicurarsi che la
scheda sia compatibile e funzionante.
Non smontare o riparare autonomamente la dashcam; in caso di problemi,
contattare il seizio clienti uciale di VANTRUE.
Evitare di installare la dashcam in punti che possano ostruire la visuale del
conducente.
Utilizzare il dispositivo lontano da ambienti con temperature elevate o umidità
per garantire un funzionamento corretto.
Per migliorare l'esperienza d'uso, il rmware del prodotto sarà aggiornato
periodicamente; scaricare l'ultima versione se necessario per usufruire delle
nuove funzionalità.
Non installare la dashcam direttamente di fronte ai passeggeri per evitare rischi
in caso di distacco del dispositivo.
Durante l'uso di CarPlay o Android Auto wireless, l'applicazione potrebbe non
connettersi correttamente.
Utilizzare questo prodotto nel rispetto delle leggi e dei regolamenti vigenti.
IT
·
·
·
·
·
·
·
·
·
·
·
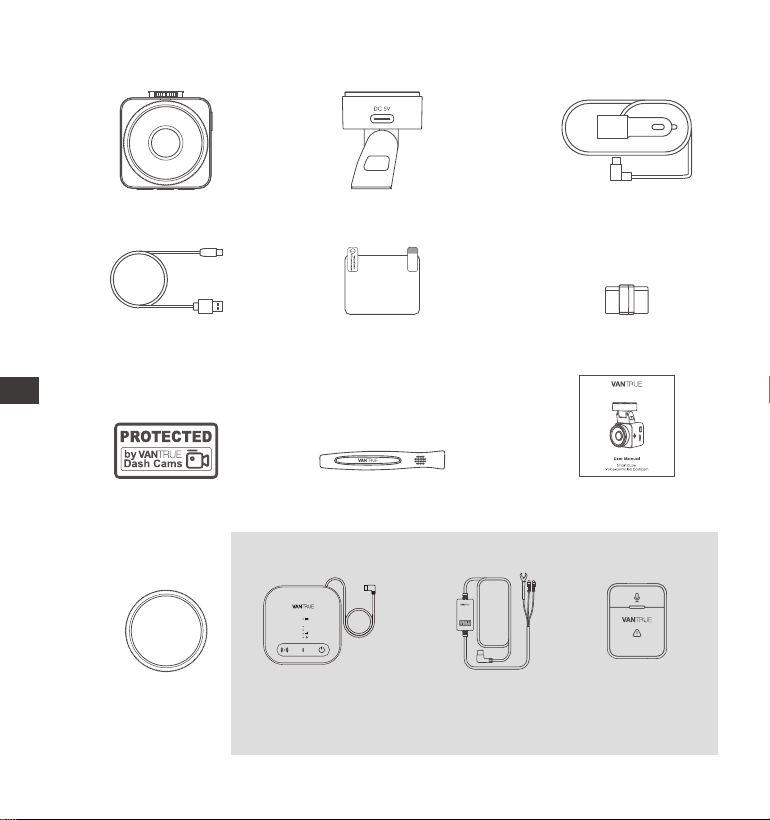
- 153 -
F.
Clip per cavi
(3 pezzi)
1. Contenuto della confezione
L. Cavo di riduzione
della tensione
(3,5 metri)
M. Telecomando
J. Filtro CPL
(polarizzatore
circolare)
Accessori opzionali
A. Vantrue E1 Pro
Dashcam
D. Cavo dati Type-C
(1 metro, solo per
trasferimento dati)
G. Adesivi di
avveimento
(2 pezzi)
C. Caricatore per
auto Type-C
(3,5 metri)
E. Adesivi
elettrostatici
(2 pezzi)
I. Manuale utente
B. Suppoo GPS
H. Leva di plastica
K. Box LTE (LT01)
Element 1 Pro
IT
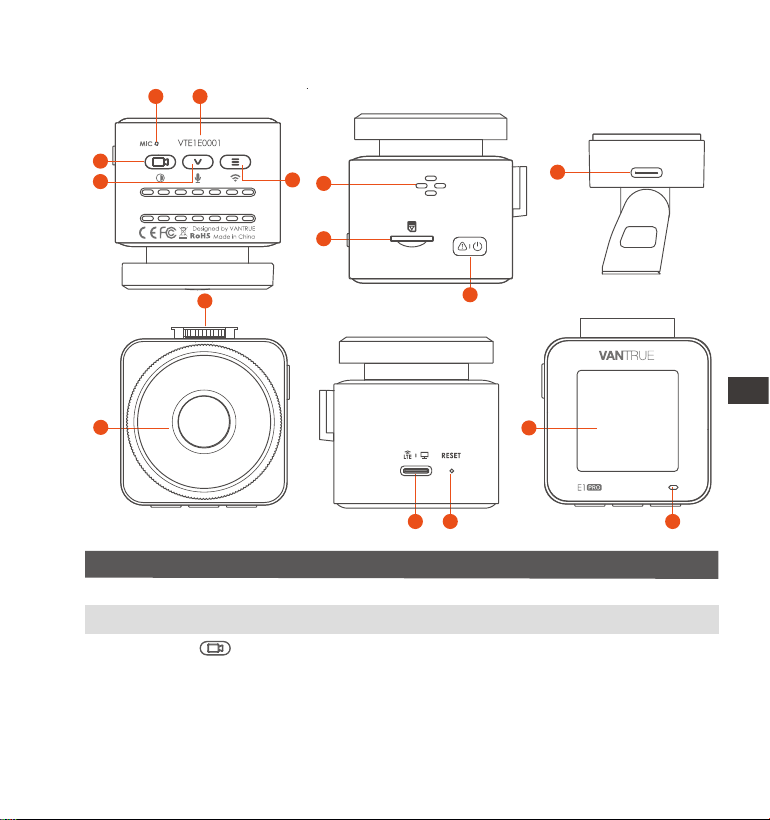
- 154 -
NO. DescrizioneNome
Durante la registrazione, pressione lunga per
spegnere lo schermo; pressione breve per
interrompere la registrazione e attivare la modalità
standby. Conferma l'opzione selezionata nel menu
o avvia/pausa durante la riproduzione dei le.
1 Microfono
2
3
Pulsante
Numero di serie Utilizzato per la registrazione della garanzia.
Registra audio chiaro insieme ai video.
2. Panoramica della Dashcam
6
9
7
3
4
5
1 2
8
12
14
10
11
13 15
GM01 DC 5V
IT
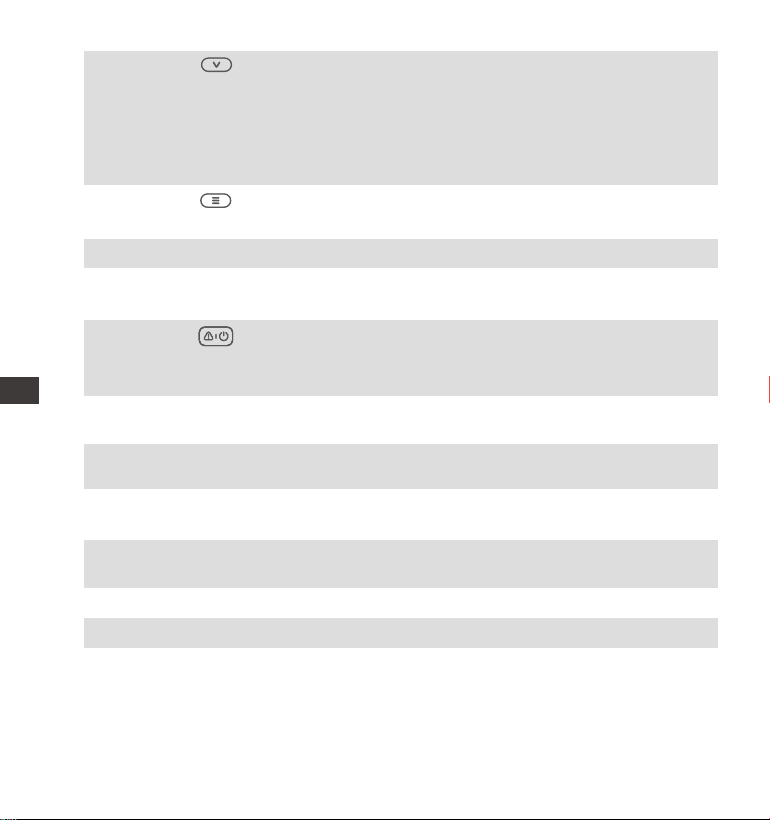
- 155 -
4 Durante la registrazione e in standby, pressione
lunga per entrare rapidamente in modalità
parcheggio; pressione breve per attivare/
disattivare il microfono. Nel menu, scorre le opzioni;
durante la navigazione dei le, seleziona il le
successivo.
Pulsante
6
7
8
9
10
11
12
5 Pulsante
Slot scheda SD
Altoparlante
Accensione/spegnimento WiFi con pressione lunga
durante registrazione o standby.
Poa di
montaggio
Collega il cavo Type-C o il caricatore per
l’alimentazione esterna.
Suppoa schede Micro SD no a 1TB in formato
FAT32, Classe 10.
Pulsante Accende/spegne la dashcam (pressione lunga);
durante la registrazione, avvia la modalità evento
(pressione breve) o cattura foto durante eventi.
Riproduce l'audio durante la visualizzazione dei video.
Telecamera
frontale
Registra gli eventi sulla strada.
Per collegare i suppoi.Inteaccia di
montaggio
13
14
Poa di
alimentazione
Collega il cavo Type-C o il caricatore; trasferisce
dati attraverso il cavo dati Type-C.
Riavvia la dashcam con una pressione breve.Pulsante Reset
Schermo Display LCD da 1,54".
IT
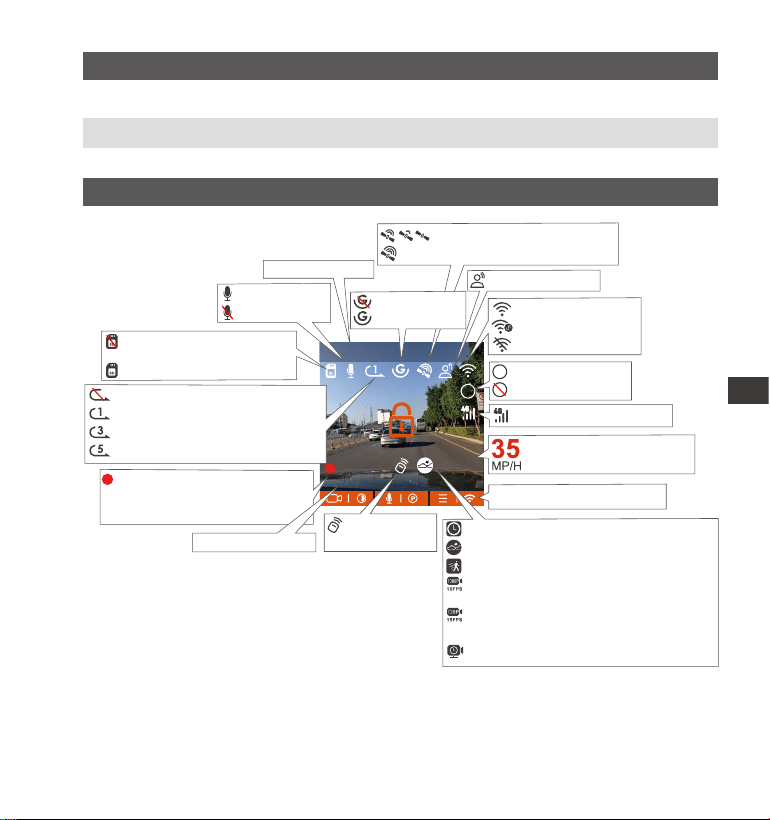
- 156 -
MP/H
00:00:37
11-12-2024 14:09:07
56
3840x2160P 30FPS
HDR
15
DescrizioneStato dei LED
15 Dashcam in registrazione.Luce verde lampeggiante
Luce verde ssa Dashcam in modalità standby.
Panoramica dello schermo
Registrazione in loop disattivata
Registrazione in loop per 1 minuto
Registrazione in loop per 3 minuti
Registrazione in loop per 3 minuti
Connessione del segnale GPS
Segnale GPS bloccato
Velocità di guida registrata
(KMH or MPH)
Nessuna scheda di memoria
inserita
Scheda di memoria inserita
Time Lapse On
Rilevamento collisione ON
Rilevamento movimento ON
Registrazione 1080P a basso bitrate ON
15FPS
Registrazione 720P a basso bitrate ON
15FPS
Modalità parcheggio a basso frame rate
Risoluzione video
Icone per indicare i pulsanti
WiFi ACESSO
WiFi Concesso
Wi-Fi DISATTIVATO
Modalità parcheggio
Tempo di registrazione
Data e ora corre
00�00�37
HDR ACESSO
HDR DISATTIVATO
HDR
HDR
G-Sensor OFF
G-Sensor ON
Il telecomando
è collegato
Data e ora correnti
Assistente vocale
MIC è ACCESO
MIC è CHUISO
Icona Del Segnale Di Rete
IT
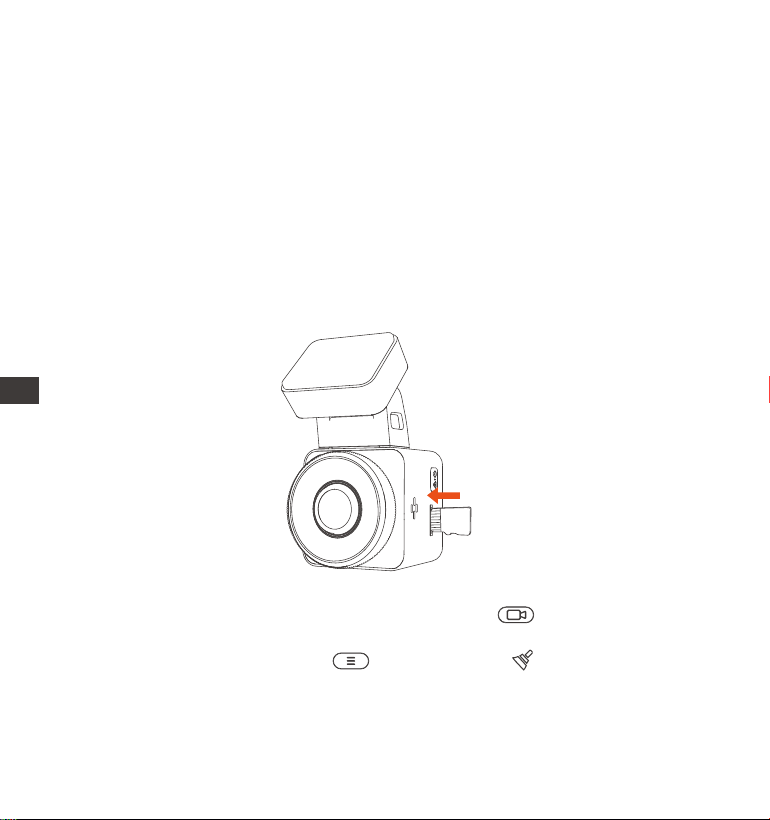
- 157 -
Prima di utilizzare la scheda:
Se la dashcam sta registrando, premere il pulsante "Stop" per
interrompere la registrazione.
Accedere al menu, selezionare "Sistema", quindi "Formatta scheda SD"
e confermare per completare la formattazione. Quando appare il messaggio
"Formattazione completata", la scheda è pronta all'uso.
3. Installazione
3.1 Installazione della scheda di memoria
(Consigliato: scheda microSD Vantrue U3 ad alta velocità)
Inserire una scheda di memoria (capacità: 32GB-1TB, velocità: U3/Classe
10/A2). La dashcam richiede una scheda ad alta velocità per un
funzionamento adabile; si consiglia di utilizzare schede SD VANTRUE
(vendute separatamente).
Installazione della scheda di memoria:
Inserire la scheda di memoria nello slot seguendo la direzione indicata
dall'icona accanto allo slot, nché non si sente un "click", segnale che la
scheda è correttamente inserita.
IT
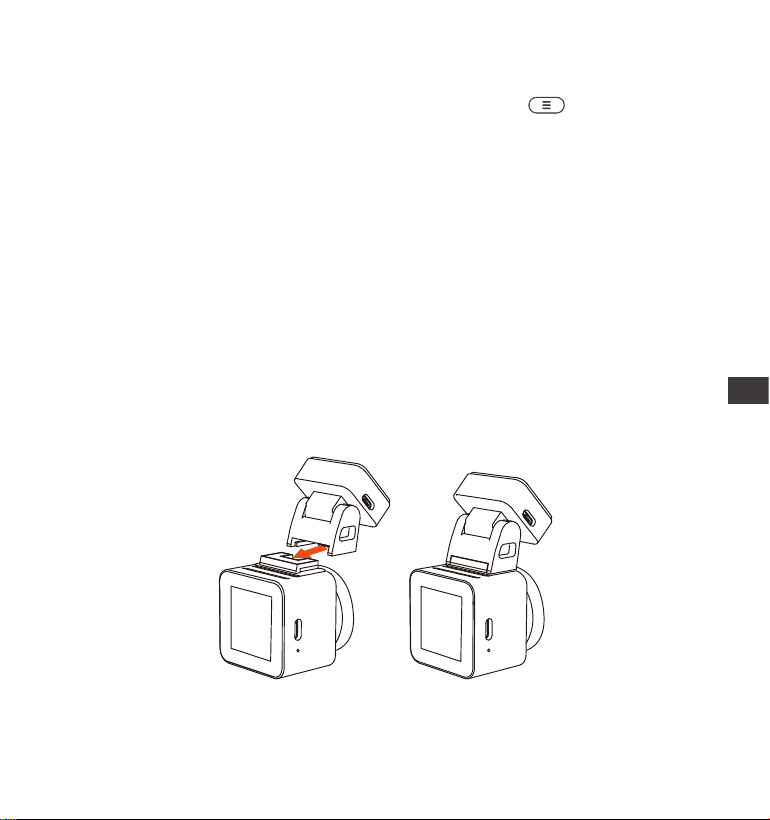
- 158 -
Si consiglia di formattare la scheda ogni mese per garantire un funziona-
mento stabile.
Non rimuovere o inserire la scheda durante la registrazione per evitare di
perdere dati impoanti.
Non utilizzare schede di bassa qualità o velocità; possono causare
interruzioni o perdita di registrazioni.
Prima di formattare, vericare che non ci siano video impoanti da salvare
nella caella di emergenza.
Nota:
1.
2.
3.
4.
Dopo aver inserito la scheda di memoria, se sullo schermo viene visualizzato il
messaggio "Errore scheda, formattare" (si noti che il registratore non registra
in questo momento), premere direttamente il pulsante per accedere al
menu e avviare il processo di formattazione.
3.2 Installazione della dashcam sul parabrezza
1.
Allineare il suppoo con l'inteaccia di montaggio della dashcam e
spingere no a installazione completata.
IT
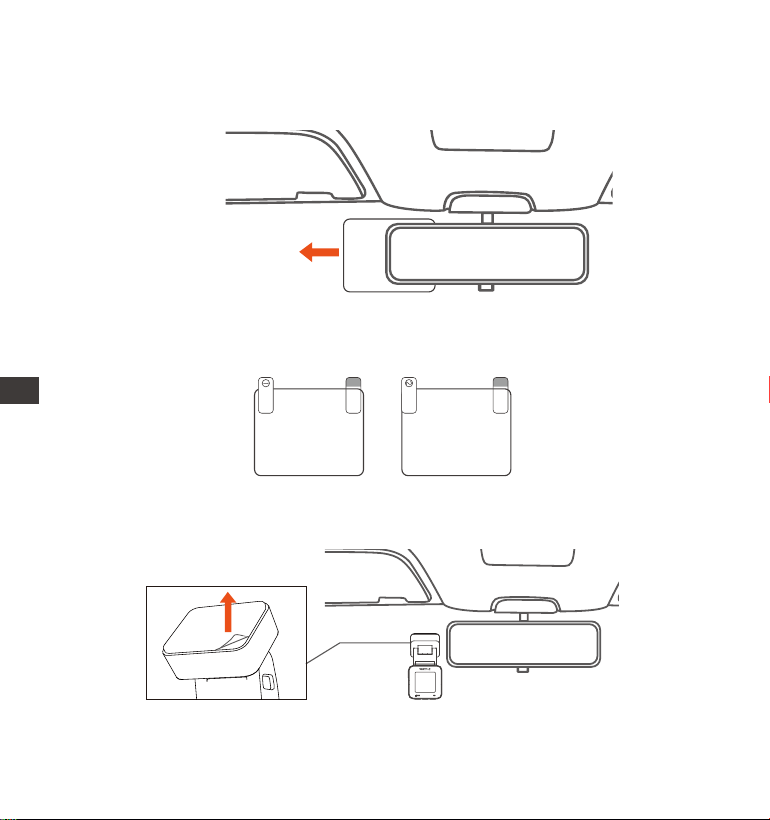
- 159 -
2.
Rimuovere il nastro adesivo 3M dal suppoo, quindi ssare il suppoo e la
dashcam sull'adesivo elettrostatico.
3.
Adesivo elettrostatico
Nota: L'adesivo ha due pellicole protettive numerate (1 e 2). Rimuovere
prima la pellicola n. 1, incollare l'adesivo al parabrezza, quindi rimuovere la
pellicola n. 2.
Please peel o this mask
AFTER application completed
Please peel o this
mask BEFORE application
Pulire il parabrezza con acqua o alcol e asciugarlo con un panno. Incollare
l'adesivo elettrostatico dietro lo specchietto retrovisore, evitando di ostruire
la visuale durante la guida.
IT
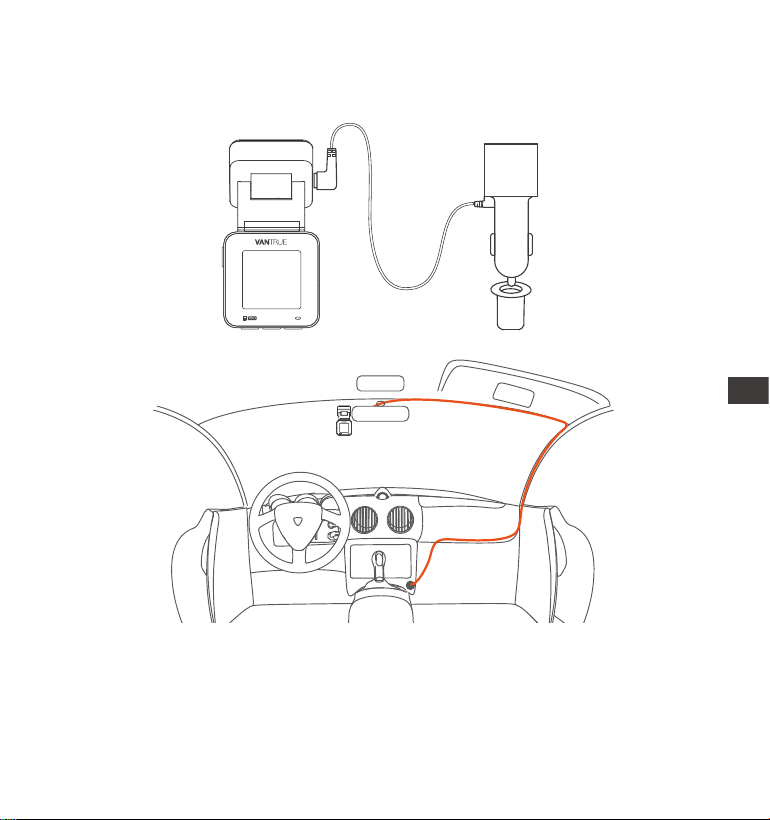
- 160 -
Collegare il caricatore per auto alla presa accendisigari e connettere il cavo
Type-C alla dashcam. L'accensione dell'auto alimenterà automaticamente la
dashcam.
4.
Quando si organizzano o si conseano i cavi del caricabatterie per auto,
è possibile utilizzare delle clip per cavi per ssarli in posizione. Dopo aver
ssato la clip per cavi in un punto adatto, è suciente ssare i cavi
all'interno della clip.
IT

- 161 -
3.3 Download dell'App
Scansionare il codice QR fornito per scaricare l'app Vantrue dall'App Store o
Google Play.
Dopo aver connesso la dashcam al telefono tramite Wi-Fi, l'app permette di:
Visualizzare i video in tempo reale.
Modicare le impostazioni della dashcam.
Scaricare le senza connessione Internet.
Riprodurre video e tracciare percorsi GPS (richiede connessione Internet).
Nota: Dopo che questa fotocamera è stata collegata correttamente al
telefono cellulare tramite WiFi, può realizzare un'anteprima video in tempo
reale, modicare le impostazioni della fotocamera, scaricare le senza
connessione Internet e riprodurre video sul telefono cellulare. Tuttavia, le
funzioni di riproduzione della traccia GPS e di condivisione video
dipenderanno da Internet o dai seizi a valore aggiunto delle
telecomunicazioni (richiede di disattivare/disconnettere il WiFi della
fotocamera).
IT
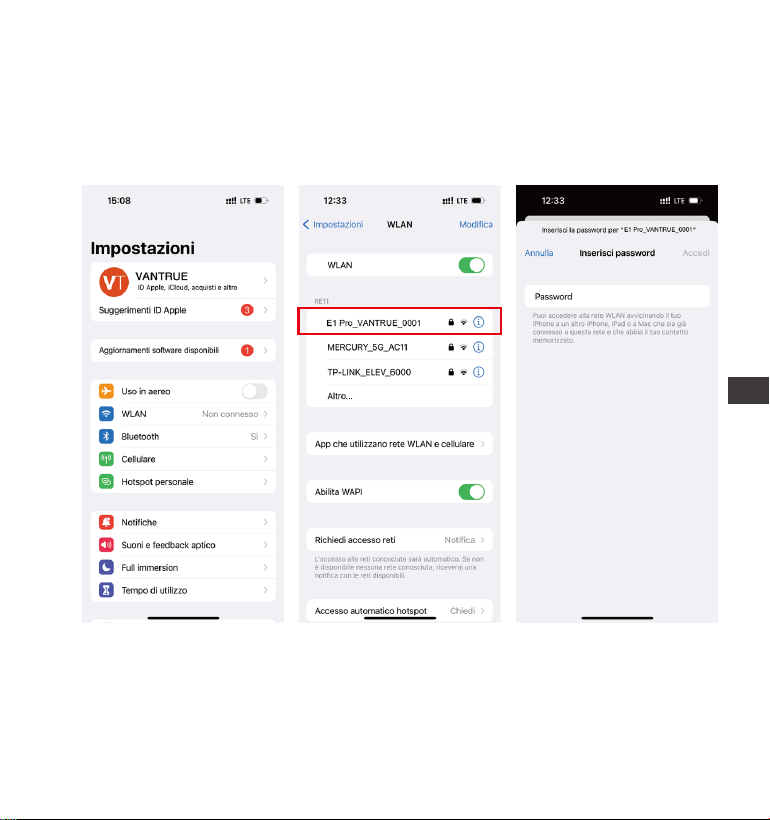
- 162 -
Attivare la funzione Wi-Fi della dashcam.
Accedere alle impostazioni Wi-Fi del telefono e cercare il nome Wi-Fi della
dashcam, ad esempio: E1_VANTRUE_XXXX.
Inserire la password Wi-Fi predenita: 12345678 per connettersi.
3.4 Connessione Wi-Fi
IT
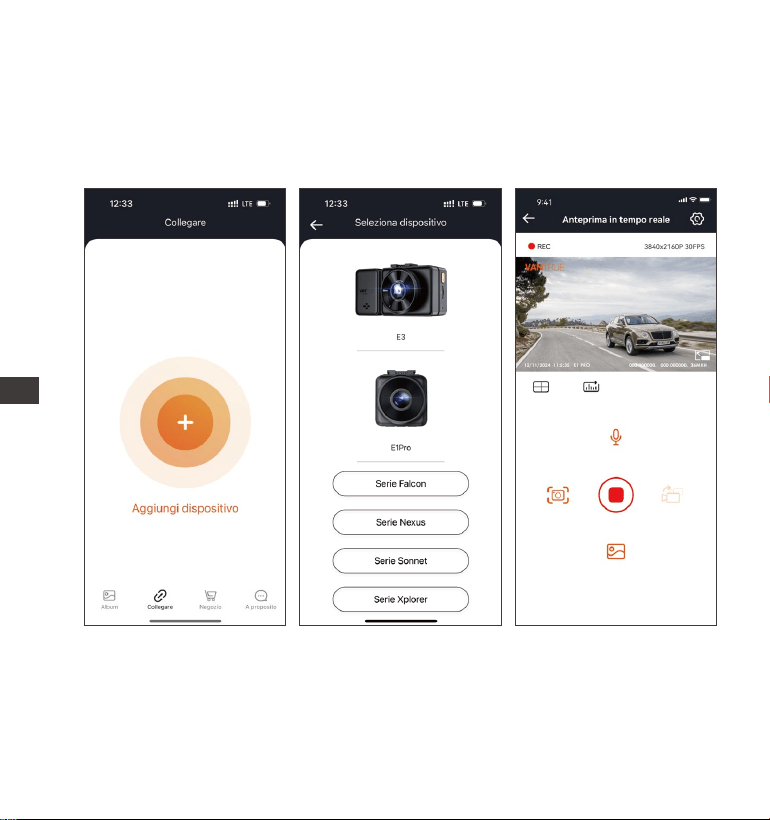
- 163 -
Dopo il successo della connessione Wi-Fi, aprire l'app Vantrue e fare clic su "+"
per aggiungere il modello di dashcam.
L'app si connetterà automaticamente alla dashcam e mostrerà la registrazione
in tempo reale.
3.5 Connessione tramite App
Nota:
Se l'app richiede di connettersi al Wi-Fi, completare prima la congurazione
Wi-Fi del dispositivo.
Se la password Wi-Fi viene dimenticata, è possibile ripristinare le impostazi-
oni predenite della dashcam, che ripoerà la password a 12345678.
1.
2.
IT
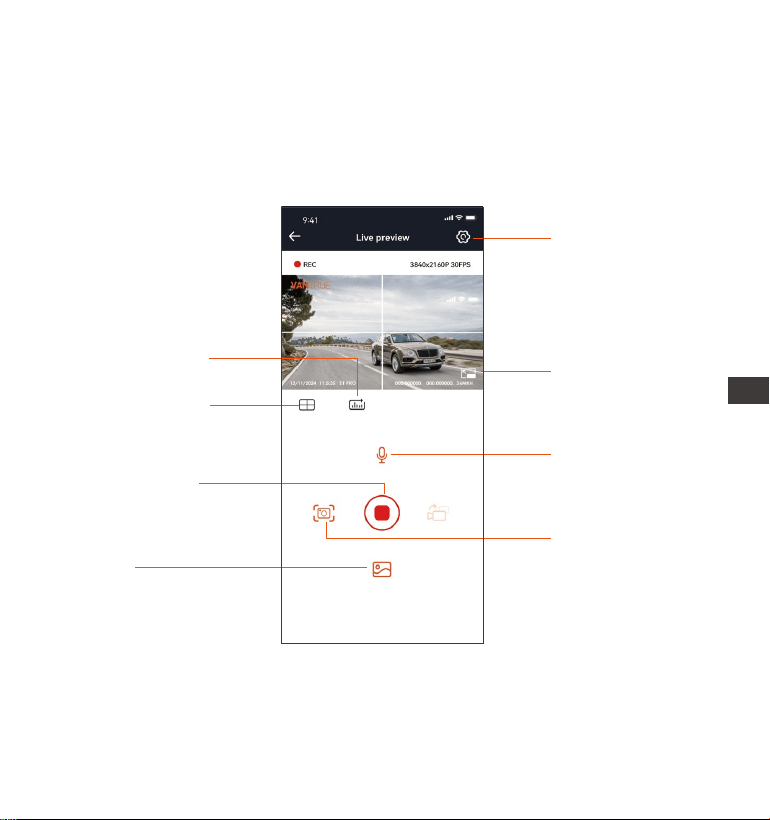
- 164 -
3.6 Operazioni con l’App
Impostazioni
Icona a schermo
intero
Album
Microfono ON/OFF
3.
4.
Dopo aver collegato l’app alla dashcam, è possibile:
Anteprima video in tempo reale: Visualizzare lo schermo in modalità a
schermo intero o orizzontale.
Statistiche sul
chilometraggio
Linea di correzione
dell'obiettivo
Icona di arresto
registrazione
Istantanea
Dopo 10 minuti senza connessione, la dashcam disattiverà automatica-
mente il Wi-Fi e tornerà alla modalità di registrazione.
Se il nome della rete WiFi connessa non corrisponde al modello della tua
dash cam, l'app ti chiederà: "Seleziona il modello corretto" e tornerà
automaticamente all'inteaccia di selezione del modello.
IT
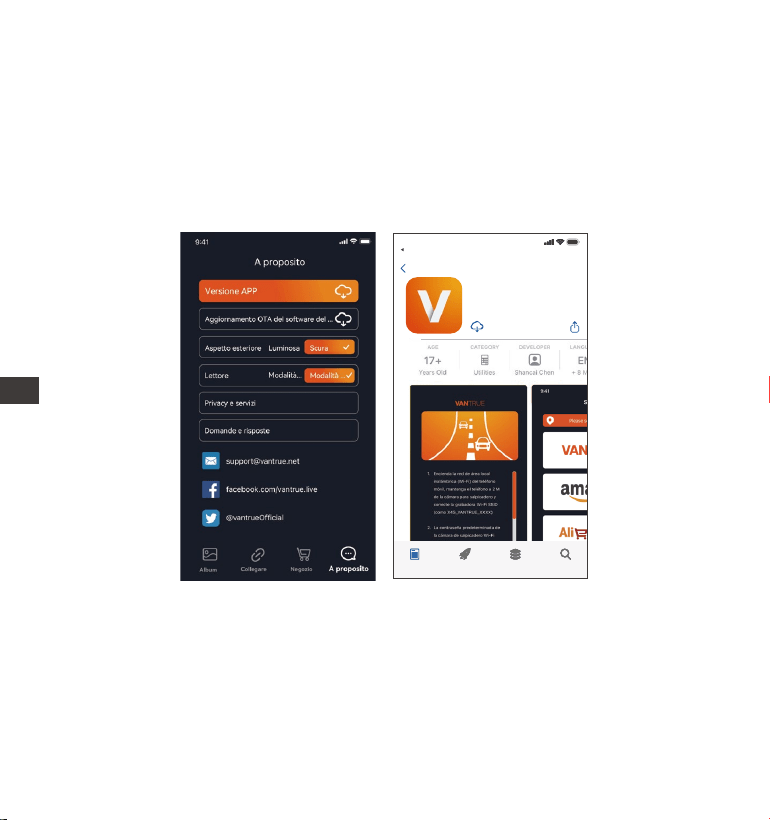
- 165 -
3.7 Aggiornamento dell’App
Aprire l’app Vantrue, accedere a Impostazioni > Info > Rileva nuova versione.
Seguire le istruzioni per aggiornare l’app all’ultima versione disponibile.
Vantrue Ltd.
Vantrue
Vantrue
9:41
Atrás
Riproduzione video: Guardare i le salvati nella scheda SD e riprodurli.
Download video: Scaricare video o foto dall’inteaccia di navigazione.
Snapshot: Scattare istantanee durante l’anteprima in tempo reale.
IT
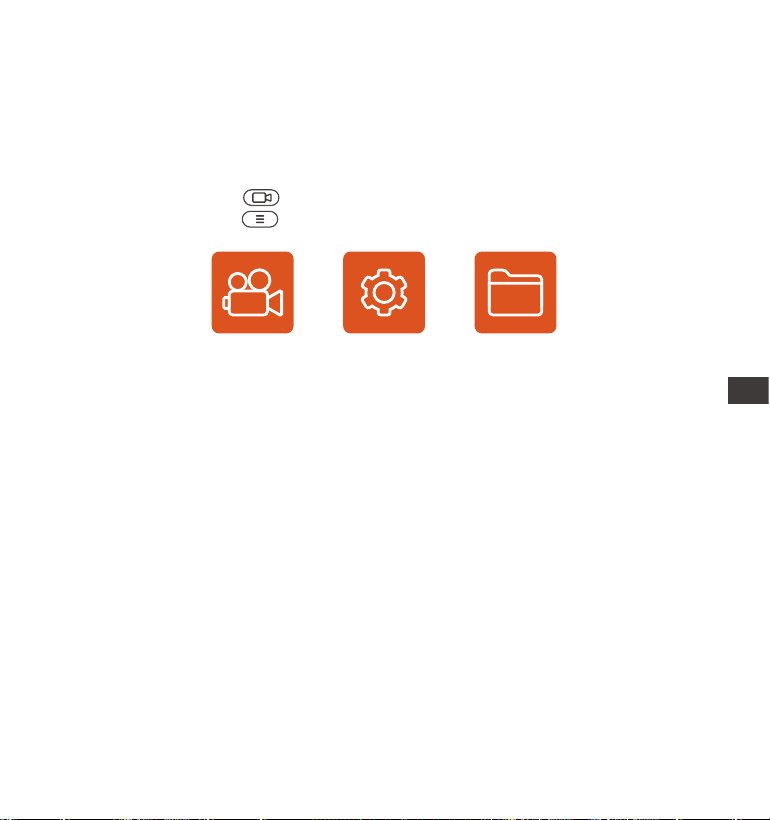
- 166 -
La dashcam E1 dispone di 3 menu funzionali: impostazioni di registrazione,
impostazioni di sistema e navigazione le. È possibile congurare la dashcam
in base alle proprie esigenze attraverso questi menu.
Premere il pulsante "Stop" per mettere in pausa la registrazione.
Premere il pulsante Menu per accedere alle impostazioni
4. Operazioni di base
4.1 Funzioni principali di E1 Pro
Video Impostazioni Archivios
A. Impostazione registrazione
a. Risoluzione: La dashcam E1 Pro suppoa le seguenti risoluzioni:
3840x2160P 30FPS, 2560x1440P 30FPS, 1920x1080P 30FPS, 1280x720P
30FPS.
b. Qualità dell'immagine: Impostazione predenita standard, ma è possibile
scegliere l'opzione PlatePix™.
c. Registrazione in loop: Impostazione predenita 1 minuto. Sono disponibili
4 opzioni: OFF, 1 minuto, 2 minuti, 3 minuti.
d. HDR: Attivato di default, ma può essere disattivato.
e. Timer HDR: Disattivato di default, ma può essere impostato per attivarsi o
disattivarsi automaticamente.
f. Sensibilità collisioni: Scegli il livello di sensibilità per la rilevazione delle
collisioni, con 3 direzioni (fronte/rear, sinistra/destra, su/giù) e 6 livelli: 1, 2, 3,
4, 5, OFF. Il livello predenito è 3.
g. Registrazione audio: Attivata di default, ma è possibile attivare o disattiva
re la registrazione audio.
IT

- 167 -
h. Riduzione rumore audio: Attivata di default per ridurre il rumore di fondo,
ma può essere disattivata.
i. Compensazione esposizione: Impostato su +0.0 di default, consente di
regolare l'esposizione della fotocamera.
j. Indicatore di registrazione: Attivato di default, ma può essere disattivato.
k. Rotazione display: Disattivato di default, consente di ruotare il video di 180
gradi.
l. Impostazione numero di targa: Dopo aver impostato, il numero di targa
verrà visualizzato nei video registrati.
m. Filigrana: Impostata per visualizzare data e ora, marchio VANTRUE, numero
di targa, informazioni GPS e velocità nel video. Di default, tutte le opzioni sono
attivate.
n. Time-lapse: Disattivato di default. Puoi scegliere di attivare le opzioni 1FPS,
5FPS, 10FPS, 15FPS.
o. Modalità parcheggio: Imposta la modalità parcheggio che desideri:
rilevamento collisioni, rilevamento movimento, registrazione a basso bitrate,
modalità a basso framerate o OFF. Di default è disattivato.
p. Impostazioni modalità parcheggio: Quando si attiva la modalità parcheg-
gio, è possibile attivare la visione notturna con illuminazione a bassa intensità
e la modalità di avvio rapido per il rilevamento collisioni.
q. Impostazioni LTE: Questa funzione richiede l'uso del box LTE. Puoi scegliere
la modalità di notica e la dimensione massima per il caricamento video di
collisione. Quando si utilizza il box LTE, le notiche sono inviate in tempo reale
e i video di collisione vengono caricati in modalità a basso consumo di dati.
Altri parametri sono congurabili dall'utente.
r. Statistiche chilometriche: Attivato di default, registra le informazioni GPS di
viaggio. Puoi espoare i dati tramite l'app e visualizzarli.
Impostazioni GPS: GPS attivato di default. In questa sezione si congurano
l'accensione del GPS, l'unità di misura della velocità e altre informazioni GPS.
IT

- 168 -
B. Congurazione del sistema
a. Lingua: Le lingue disponibili includono Inglese, Francese, Spagnolo,
Tedesco, Italiano, Cinese semplicato, Russo, Giapponese e Polacco.
b. Wi-Fi: Il Wi-Fi è attivato di default, con la possibilità di abilitare o disabili-
tare l'attivazione automatica del Wi-Fi e visualizzare le informazioni Wi-Fi.
c. Impostazioni display: Il display è impostato su modalità schermo intero di
default, ma può essere cambiato in modalità panoramica.
d. Modalità USB: Poiché il box LTE e la trasmissione dati USB condividono la
stessa poa USB, la modalità di trasmissione dati LTE è attiva di default. Se è
necessario utilizzare la poa USB per il trasferimento di dati, è necessario
cambiare la modalità in modalità U-disk.
e. Riconoscimento vocale: Impostato su sensibilità standard di default.
Quando attivato, riconosce i comandi vocali, con opzioni di sensibilità bassa,
standard, alta o disattivata.
f. Contenuti vocali: Comandi di riconoscimento vocale che permettono di
controllare la dashcam con diversi comandi vocali.
g. Formattazione: Formatta tutti i dati sulla scheda di memoria.
h. Impostazioni promemoria di formattazione: Disattivato di default. Per
evitare che dimentichi di formattare la scheda di memoria, puoi impostare un
promemoria di formattazione a 15 giorni o 1 mese. Quando il periodo
impostato è scaduto, è possibile scegliere "OK" per formattare o "Successivo"
per rinviare, con il calcolo del tempo che ripae dalla nuova data.
i. Data/Ora: Ci sono 2 modi per impostare la data e l'ora:
Aggiornamento automatico GPS: Abilitato di default. La data e l'ora vengono
aggiornate automaticamente in base al fuso orario dell'utente, quindi è
necessario selezionare il fuso orario corretto.
Impostazione manuale della data/ora: Se disabiliti l'aggiornamento automati-
co, puoi impostare manualmente data e ora.
Cambio automatico tra ora legale e ora solare: Disattivato di default. Quando
attivato, la dashcam cambierà automaticamente l'orario in base all'ora legale e
solare, ma questa funzione è disponibile solo in Nord America. In altre regioni,
IT

- 169 -
potrebbe causare errori nell'ora.
Formato orario: Di default, l'orario viene visualizzato nel formato 24 ore. Puoi
cambiarlo in formato 12 ore. Questa modica inuirà solo sull'orario mostrato
nell'inteaccia di registrazione e sull'ora nel timbro video. Inoltre, è possibile
modicare il formato della data e impostare il fuso orario in questo menu.
j. Impostazioni di risparmio energetico (screensaver): Disattivato di default.
È possibile impostare il tempo per il risparmio energetico a 30 secondi, 1
minuto o 3 minuti.
k. Volume: Il volume di default è impostato su 3. Può essere regolato da 0
(minimo) a 5 (massimo).
l. Toni di avviso: Sono disponibili 5 toni di avviso, per l'accensione/spegni-
mento, il tasto, il blocco, la formattazione e l'avviso di registrazione anomala.
Tutti i toni sono attivati di default.
m. Frequenza della luce sorgente: Poiché i paesi utilizzano diverse frequenze
di luce, è possibile scegliere tra 50Hz e 60Hz per evitare inteerenze nella
registrazione video.
n. Informazioni di sistema: Visualizza il modello della dashcam, la versione del
rmware e il sito uciale di VANTRUE.
o. Ceicazioni: Visualizza le ceicazioni della dashcam.
p. Impostazioni predenite: Ripristina le impostazioni di fabbrica della
dashcam.
C. Navigazione le
In questa sezione, puoi visualizzare i video e le foto registrati dalla dashcam.
a. Video di emergenza: Questa caella contiene i video registrati durante
eventi di emergenza. Il formato del nome del le è:
20300128_140633_00008_E_A.MP4
b. Video di parcheggio: Questa caella contiene i video registrati durante la
modalità di monitoraggio parcheggio. Il formato del nome del le per i video
di parcheggio è: 20300128_140633_00007_P_A.MP4
c. Video normali: Questa caella contiene i video registrati in modalità di loop
o time-lapse.
IT

- 170 -
I video di loop hanno il nome del le: 20300128_140633_00008_N_A.MP4
I video di time-lapse hanno il nome del le:
20300128_140633_00006_T_A.MP4
d. Foto: Le foto catturate sono salvate in questa caella.
e. Tutti: Puoi visualizzare tutti i le salvati (video e foto) in questa caella.
4.2 Funzioni principali
4.2.1 Registrazione in loop
Dopo aver inserito la scheda di memoria e aver collegato l'alimentazione, la
dash cam E1 Pro si accenderà automaticamente ed entrerà in registrazione in
loop. La durata di ogni video registrato verrà salvata nella caella video
normale in base al tempo di registrazione in loop impostato.
Quando la capacità della caella video normale raggiunge il 70% del totale, i
nuovi le di registrazione in loop sovrascriveranno automaticamente i le di
registrazione in loop originali. Dopo aver abilitato questa funzione, il le video
sovrascriverà automaticamente il loop, in modo da non interrompere la
registrazione durante il processo di guida.
Avviso:
1.
2.
3.
Il normale funzionamento della funzione di registrazione in loop dipende
molto dalla velocità della scheda di memoria, quindi formatta regolarmente
la scheda di memoria per evitare problemi come le eccessivi sulla scheda
di memoria e invecchiamento della scheda che inuenzano la normale
registrazione in loop.
Controlla regolarmente il video di registrazione in loop per evitare che i
video necessari vengano sovrascritti.
Dopo aver disattivato la registrazione in loop, la funzione di blocco video
non funzionerà più. 4. Dopo aver disattivato la registrazione in loop, la
durata di ogni video sarà di 20 minuti e la registrazione si interromperà
quando la capacità della scheda di memoria sarà piena.
IT
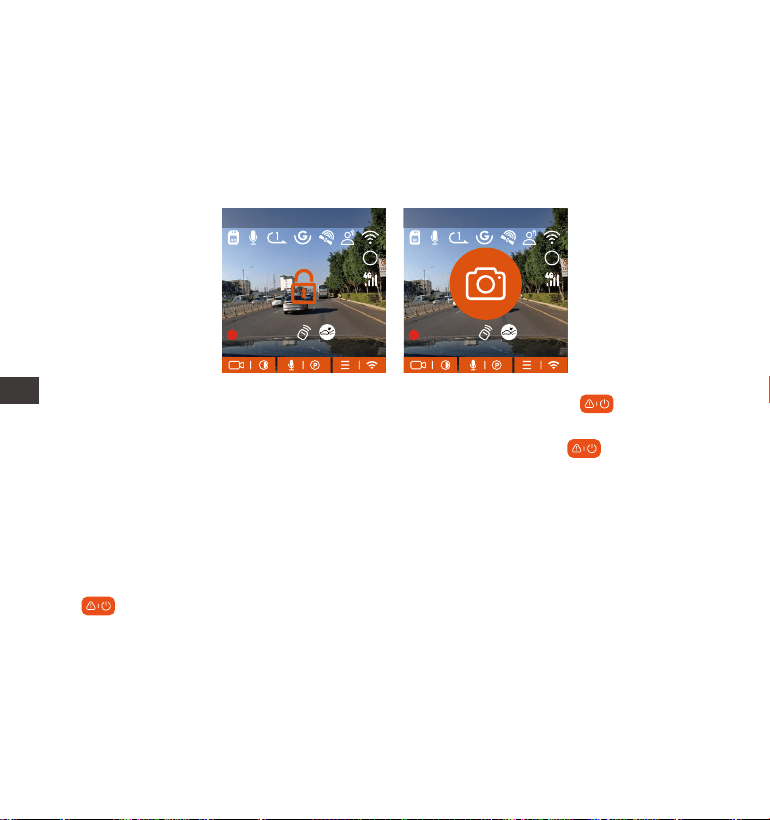
- 171 -
4.2.2 Registrazione eventi
Il video degli eventi viene attivato dal sensore G (sensore di gravità), che può
essere attivato automaticamente o bloccato manualmente.
Durante la guida, in caso di circostanze paicolari, la telecamera si bloccherà
automaticamente per la registrazione degli eventi oppure è possibile
bloccarla manualmente per la registrazione degli eventi.
Per bloccare manualmente il video, basta premere il pulsante per bloccare
il video corrente e catturarlo.
Durante il periodo di blocco video, puoi premere il pulsante per catturare
più volte. Dopo la registrazione, il video verrà automaticamente salvato nella
caella video dell'evento e la foto verrà salvata nella caella foto.
Il blocco automatico del video dell'evento viene attivato quando l'auto viene
colpita/scossa. La dash cam rileva la vibrazione e blocca automaticamente il
video corrente, che viene salvato nella caella video dell'evento.
Durante il periodo di registrazione bloccato, puoi anche premere il pulsante
+ per scattare una foto. Dopo che la registrazione del video dell'evento
termina, il video verrà salvato nella caella video di emergenza e la foto verrà
salvata nella caella foto.
MP/H
00:00:37
11-12-2024 14:09:07
56
3840x2160P 30FPS
HDR
MP/H
00:00:37
11-12-2024 14:09:07
56
3840x2160P 30FPS
HDR
IT
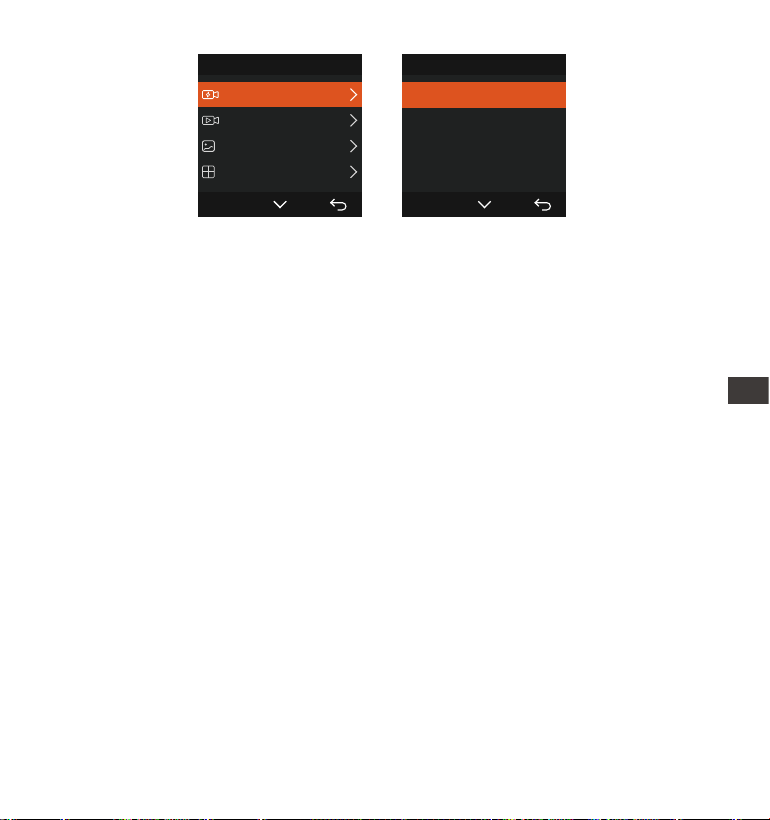
- 172 -
La sensibilità del trigger video di blocco automatico è determinata dalla
sensibilità della collisione. Maggiore è l'impostazione della sensibilità,
maggiore è la probabilità di essere attivato.
La capacità totale del le video dell'evento rappresenta il 30% della
capacità totale della scheda di memoria corrente. Quando il le video
dell'evento raggiunge il limite massimo, il nuovo le video dell'evento
sovrascriverà automaticamente il vecchio le video dell'evento. Si consiglia
di controllare e salvare periodicamente i le video dell'evento per evitare
perdite.
La registrazione del blocco non verrà attivata in nessuna delle seguenti
situazioni: la registrazione in loop è disattivata o la registrazione time-lapse
è attivata.
1.
2.
3.
Nota:
Archivios 1/4
Video dell'Evento
Video Normale
Foto
Tutti i les
OK
Video dell'Evento 2/5
20241118_140633_0001_E...
20241118_140633_0003_E...
20241118_140633_0004_E...
20241118_140633_0002_E...
OK
4.2.3 Modalità parcheggio (quando la modalità parcheggio è attivata, la
funzione video time-lapse non funzionerà. Queste due funzioni non
possono essere eseguite contemporaneamente)
La modalità parcheggio funziona come una funzione di sentinella in diverse
situazioni. È possibile passare a diverse modalità di monitoraggio del
parcheggio in base alle diverse situazioni di parcheggio.
Dopo aver attivato la modalità parcheggio, ci sono due modi per registrare.
È possibile attendere 5 minuti per il riavvio automatico oppure premere a
lungo il pulsante per iniziare manualmente.
IT

- 173 -
Utilizzare un kit di cablaggio o un altro alimentatore stabile e continuo per
alimentare la telecamera per garantire che funzioni correttamente in
modalità parcheggio.
La temperatura ambiente operativa E1 Pro è compresa tra 14 °F e 158 °F
(-10 °C e 70 °C). Si consiglia di selezionare Rilevamento collisione entro
questo inteallo di temperatura, poiché si spegnerà automaticamente una
volta che la temperatura supera l'inteallo di temperatura di funzionamento
normale. Se la temperatura esterna è elevata, spegnere la telecamera
durante il parcheggio.
La registrazione video time-lapse e la modalità parcheggio (incluso rileva-
mento collisione, rilevamento movimento, registrazione a basso bit rate e
modalità a basso frame rate) possono essere abilitate solo una alla volta.
Quando una è abilitata, l'altra verrà
automaticamente disabilitata.
Tutti i video in modalità parcheggio (rilevamento collisione, rilevamento
movimento, registrazione a basso bit rate, modalità a basso frame rate)
verranno salvati nella caella normale. Per evitare che il video in modalità
parcheggio venga sovrascritto in un loop, controllare e salvare i le richiesti
in tempo per evitare perdite.
1.
2.
3.
4.
Nota:
Rilevamento collisione
Quando il rilevamento collisione è abilitato, l'icona verrà visualizzata
sull'inteaccia di registrazione, indicando che la telecamera sta attualmente
utilizzando la modalità di rilevamento collisione. La sensibilità del rilevamen-
to collisione può essere regolata da 1 a 5 livelli. Puoi regolarla in base alle
tue abitudini e all'ambiente circostante l'auto
IT
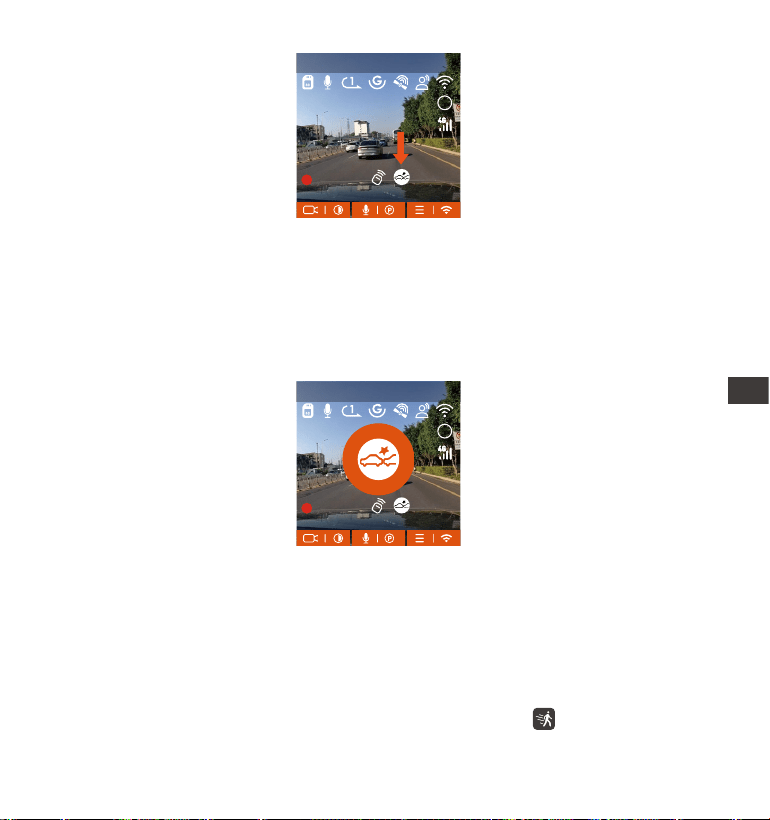
- 174 -
Quando la Collision Detection è attivata e non viene rilevato alcun movimento
dopo 5 minuti di registrazione (meccanismo di immissione di 5 minuti in
breve), allora la Collision Detection è attivata. L'icona Collision Detection
apparirà al centro dello schermo e la telecamera si spegnerà automatica-
mente. Quando la dash cam è spenta, inizierà a registrare per 1 minuto dopo
essere stata scossa, quindi spegnerà nuovamente la dashcam
MP/H
00:00:37
11-12-2024 14:09:07
56
3840x2160P 30FPS
HDR
MP/H
00:00:37
11-12-2024 14:09:07
56
3840x2160P 30FPS
HDR
Nota: Se la dash cam continua a essere colpita durante la registrazione del
rilevamento delle collisioni, uscirà dalla modalità di rilevamento delle collisioni
ed entrerà nella registrazione normale, riavviando il meccanismo di immissi-
one di 5 minuti.
Rilevamento del movimento
Quando il rilevamento del movimento è attivato, l'icona verrà visualizzata
IT
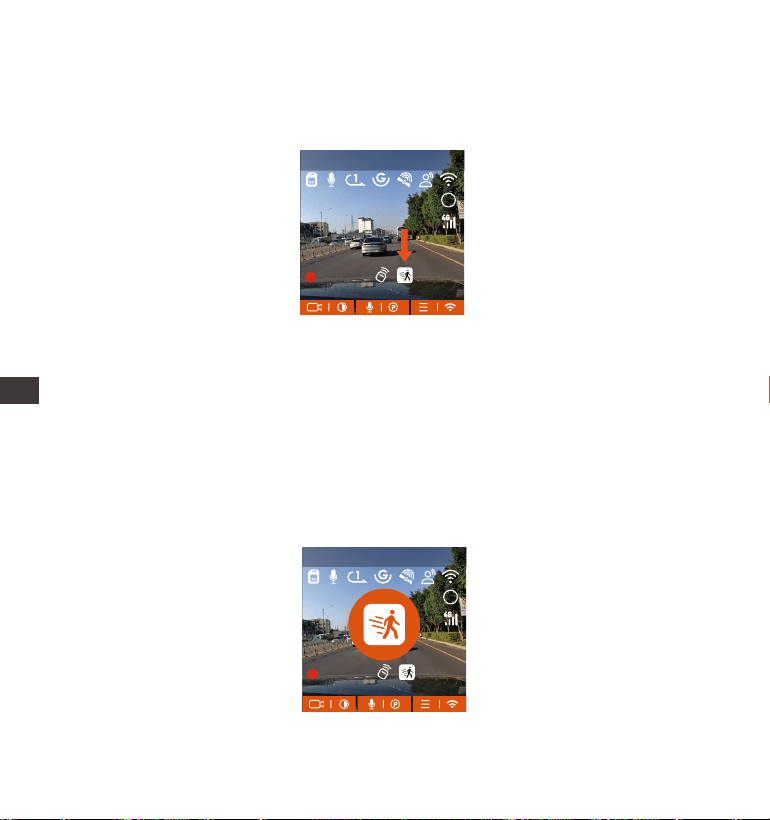
- 175 -
Quando il rilevamento del movimento è attivato e non viene rilevato alcun
movimento dopo 5 minuti di registrazione, al centro dello schermo apparirà
un'icona arancione e lo schermo si spegnerà dopo 3 minuti.
Processo di registrazione video: quando la telecamera rileva il movimento di
un oggetto o la vibrazione di un'auto, avvierà automaticamente la registrazi-
one video. E1 Pro è dotato di una funzione di pre-registrazione. Una volta
terminata la registrazione del rilevamento del movimento, la telecamera
caricherà il video preregistrato nel video di rilevamento del movimento e lo
salverà nel normale raccoglitore
MP/H
00:00:37
11-12-2024 14:09:07
56
3840x2160P 30FPS
HDR
MP/H
00:00:37
11-12-2024 14:09:07
56
3840x2160P 30FPS
HDR
sull'inteaccia di registrazione, indicando che la dash cam è attualmente in
modalità di rilevamento del movimento. Il rilevamento del movimento ha tre
livelli di basso/medio/alto che possono essere regolati e i corrispondenti
intealli di rilevamento per il rilevamento del movimento sono 6,6 piedi/13
piedi/19,7 piedi
IT
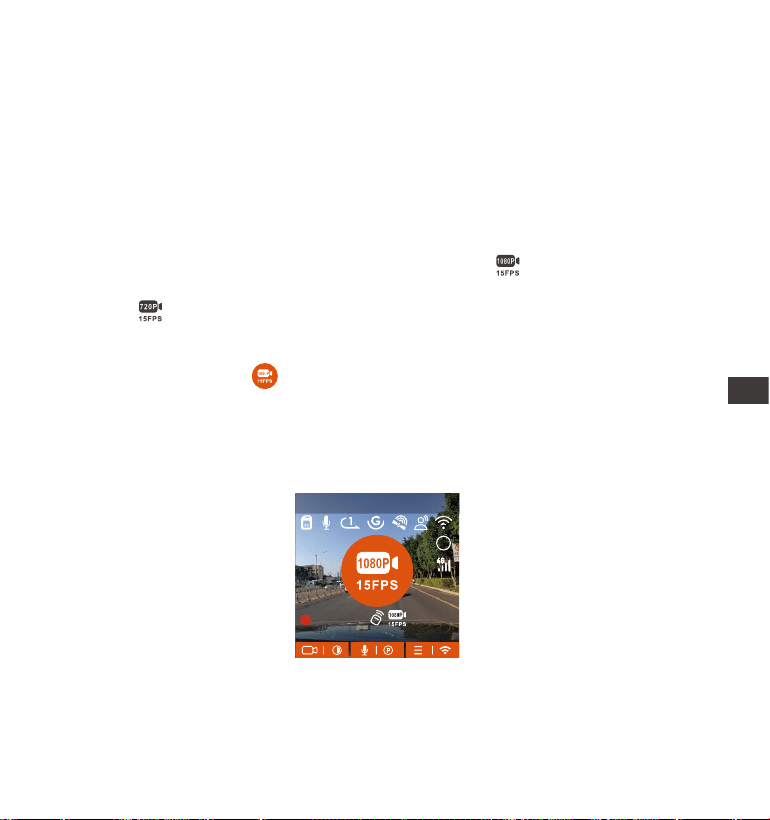
- 176 -
Nota:
La modalità di rilevamento del movimento può essere attivata solo quando
la telecamera è accesa. Una volta spenta la telecamera, la modalità di
rilevamento del movimento non funzionerà.
La risoluzione di 1944P e 1440P HDR non suppoa la funzione di
preregistrazione, quindi dopo aver abilitato il rilevamento del movimento, la
risoluzione verrà automaticamente modicata in 1440P per la registrazione.
1.
2.
Registrazione a basso bitrate
Quando è attiva la modalità a basso bitrate, l'icona verrà visualizzata
nell'angolo in basso a destra dello schermo se è selezionato 1080P 15FPS, e
l'icona verrà visualizzata nell'angolo in basso a destra dello schermo se è
selezionato 720P 15FPS.
Se non viene rilevato alcun movimento dopo 5 minuti di registrazione, verrà
visualizzata un'icona al centro dello schermo. La risoluzione di tutti i video
correnti verrà automaticamente commutata a 1080P 15FPS o 720P 15FPS per
la registrazione e la durata della registrazione verrà determinata in base alla
durata della registrazione in loop attualmente impostata. Quando la
telecamera vibra o viene spostata, uscirà automaticamente, attenderà 5
minuti e rientrerà.
MP/H
00:00:37
11-12-2024 14:09:07
56
3840x2160P 30FPS
HDR
Nota: La registrazione Low Bitrate può essere attivata solo quando la
fotocamera è accesa. Una volta spenta la fotocamera, la registrazione Low
Bitrate non funzionerà.
IT
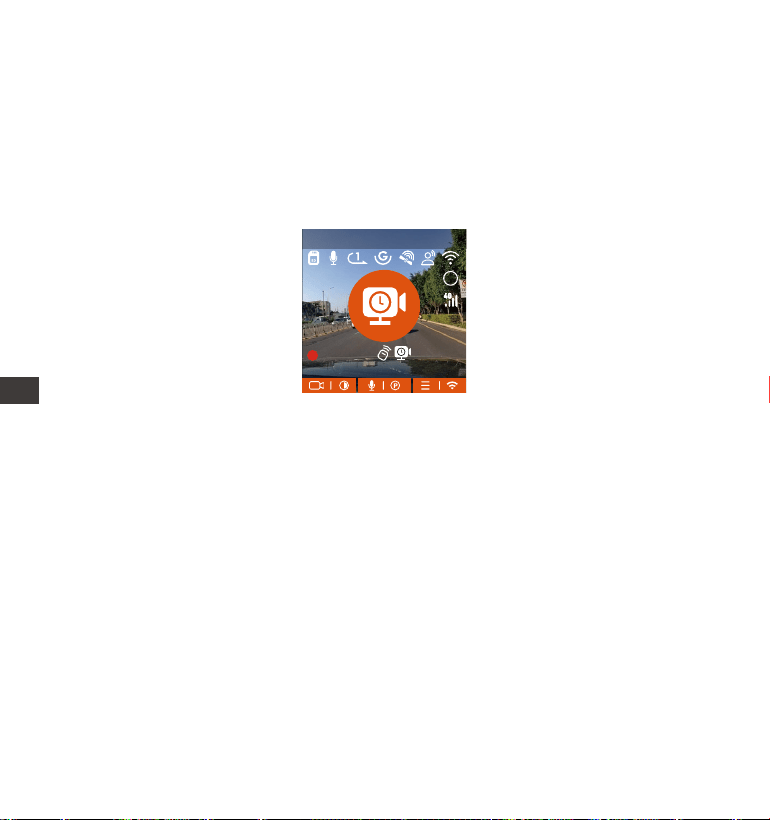
- 177 -
IT
[Tempo di registrazione reale (sec) = Durata video a bassa frequenza
fotogrammi (sec) x Frequenza fotogrammi video (FPS)/Opzione bassa
frequenza fotogrammi (FPS)] (Il tempo deve essere conveito in secondi)
MP/H
00:00:37
11-12-2024 14:09:07
56
3840x2160P 30FPS
HDR
Modalità Low Framerate
Quando è selezionata la modalità Low Framerate, la telecamera registrerà in
base alla selezione eettuata tra 1FPS/5FPS/10FPS/15FPS.
Ad esempio, se si seleziona 1FPS e la risoluzione video corrente è 30FPS, il
registratore genererà un video a 30FPS al secondo. La modalità Low
Framerate può preseare notevolmente l'integrità del video e risparmiare
spazio sulla scheda di memoria.
Nota:
L'unità di tempo della formula di calcolo è in secondi, quindi il tempo di
registrazione normale nale calcolato è anch'esso in secondi. Se devi
conveirlo in altre unità di tempo, controlla le unità e convei.
La modalità a basso frame rate è simile alla funzione di registrazione
time-lapse, ma la dierenza è che non esiste un meccanismo di immissione
di 5 minuti per la registrazione time-lapse, che verrà attivato direttamente
dopo l'impostazione.
In modalità a basso frame rate, la telecamera necessita anche di
un'alimentazione stabile. Una volta spenta o esaurita l'alimentazione, la
telecamera si spegnerà.
1.
2.
3.
IT

- 178 -
4.2.4 Time Lapse
Quando si seleziona time lapse, la telecamera registrerà in base alla selezione
eettuata tra 1FPS/5FPS/10FPS/15FPS.
Ad esempio, se si seleziona 1FPS e il frame rate della risoluzione video
corrente è 30FPS, il registratore genererà un video a 30FPS al secondo. La
modalità frame rate basso può preseare notevolmente l'integrità del video
e risparmiare spazio sulla scheda di memoria.
La formula per calcolare la durata del video è:
[Tempo di registrazione reale (sec)=Durata video time-lapse (sec) x Frame
video Tate (FPS)/Opzione time-lapse (FPS)]
(Il tempo deve essere conveito in secondi)
MP/H
00:00:37
11-12-2024 14:09:07
56
3840x2160P 30FPS
HDR
IT
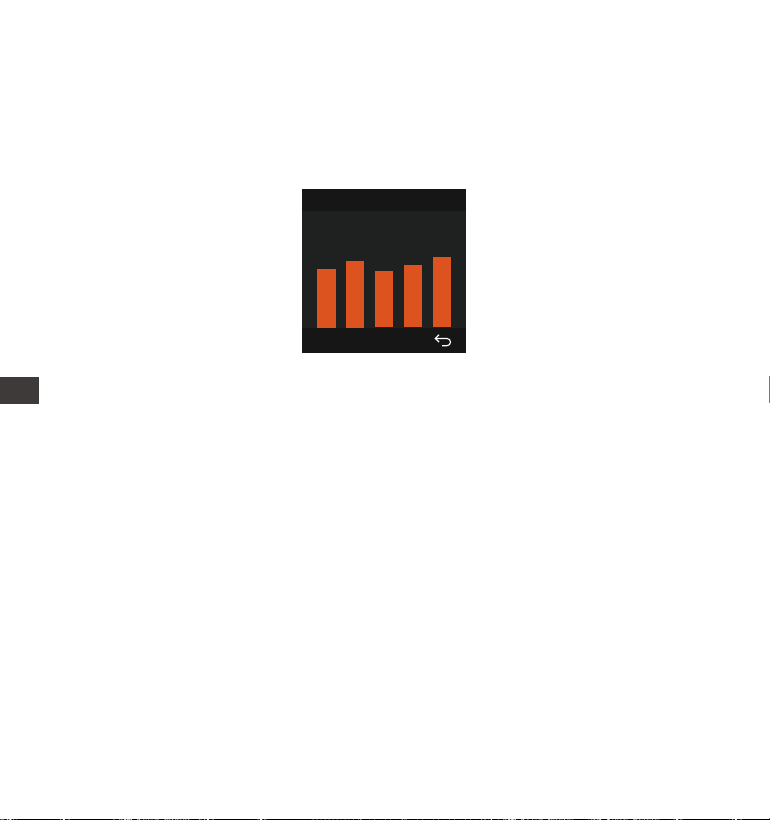
- 179 -
4.2.6 Ora automatica tramite GPS
L'impostazione dell'ora di correzione automatica del GPS per la dash cam
E1 Pro è attivata per impostazione predenita. Puoi selezionare GMT-08:00
selezionando il tuo fuso orario, ad esempio Los Angeles. Se non conosci il fuso
orario della tua posizione, puoi usare il WiFi per connettei all'app Vantrue e
confermare che la funzione di regolazione automatica dell'ora nell'app sia
attivata.
Nota:
La connessione GPS verrà completata entro 1 minuto dall'accensione del
dispositivo. Se la connessione GPS non riesce entro 1 minuto, controlla se il
DISPOSITIVO ha attivato la funzione GPS, se la staa GPS è collegata
correttamente e se l'ambiente (parcheggio sotterraneo, area residenziale
densamente popolata, metropolitana, tunnel, ecc.) inuisce sulla ricezione
del segnale GPS.
Le informazioni GPS vengono registrate insieme al video. Per visualizzarle,
scarica e installa l'app VANTRUE e VANTRUE GPS Player (disponibili per il
download su www.vantrue.net).
1.
2.
4.2.5 Funzione GPS
La funzione GPS è una delle funzioni più impoanti della dash cam.
Il GPS è abilitato di default e la telecamera riceve i segnali GPS tramite il
suppoo GPS. Può correggere automaticamente l'ora e la data nella tua zona,
registrando la posizione in cui è stato girato il video e la velocità dell'auto in
quel momento.
Informazioni GPS
40
46
39
43
48
IT
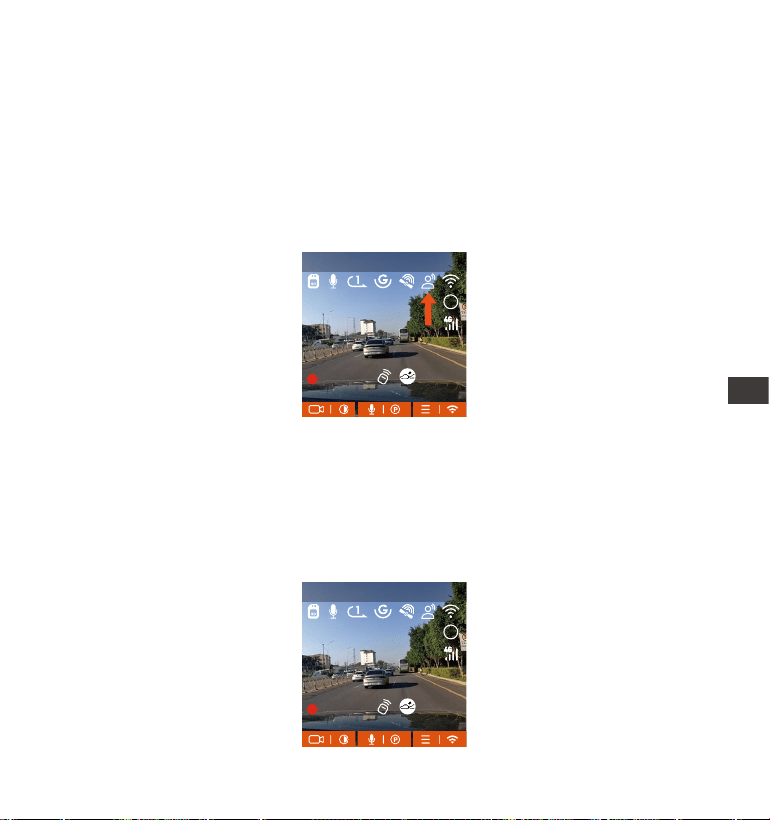
- 180 -
4.2.7 Assistente vocale
Oltre a controllare la telecamera con il telecomando, puoi anche controllare la
telecamera con un comando vocale. Le lingue attualmente suppoate sono
inglese, giapponese, russo e cinese. Per comandi vocali più dettagliati,
controlla Impostazioni di sistema > Contenuto vocale.
L'impostazione predenita è sensibilità standard. Il riconoscimento vocale ha
opzioni come bassa sensibilità/standard/alta sensibilità/spento. Puoi
controllare la telecamera con comandi vocali.
4.2.8 Impostazioni di visualizzazione
E1 Pro è una telecamera con schermo piccolo, quindi abbiamo impostato
appositamente due modalità di visualizzazione dello schermo per te.
La prima è la modalità a schermo intero. La modalità a schermo intero è una
visualizzazione a schermo intero, con un rappoo di visualizzazione più
grande, ma perderà alcuni degli angoli di visualizzazione sinistro e destro.
MP/H
00:00:37
11-12-2024 14:09:07
56
3840x2160P 30FPS
HDR
MP/H
00:00:37
11-12-2024 14:09:07
56
3840x2160P 30FPS
HDR
IT
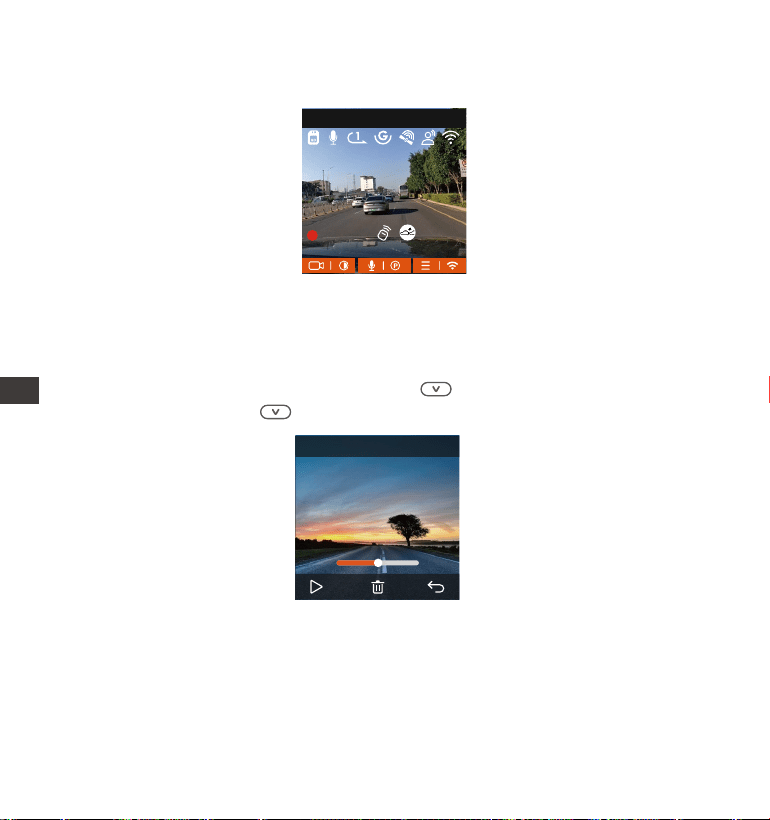
- 181 -
4.2.9 Viewing Video/Photos
a. Visualizzazione di le sulla fotocamera
Dopo aver cliccato su "File", accedi a una caella qualsiasi e, dopo aver apeo
la caella video, puoi premere il pulsante per selezionare il le successivo
o premere il pulsante per eliminare il le durante la riproduzione.7
L'altra è la modalità panorama. In questa modalità, tutto il contenuto visto
dalla videocamera verrà visualizzato e il rappoo di visualizzazione dello
schermo video è 4:3.
MP/H
00:00:37
11-12-2024 14:09:07
56
3840x2160P 30FPS
00�30 01�07
1280x720
2024/11/11
7�15
20241211_140633_0002_N
IT
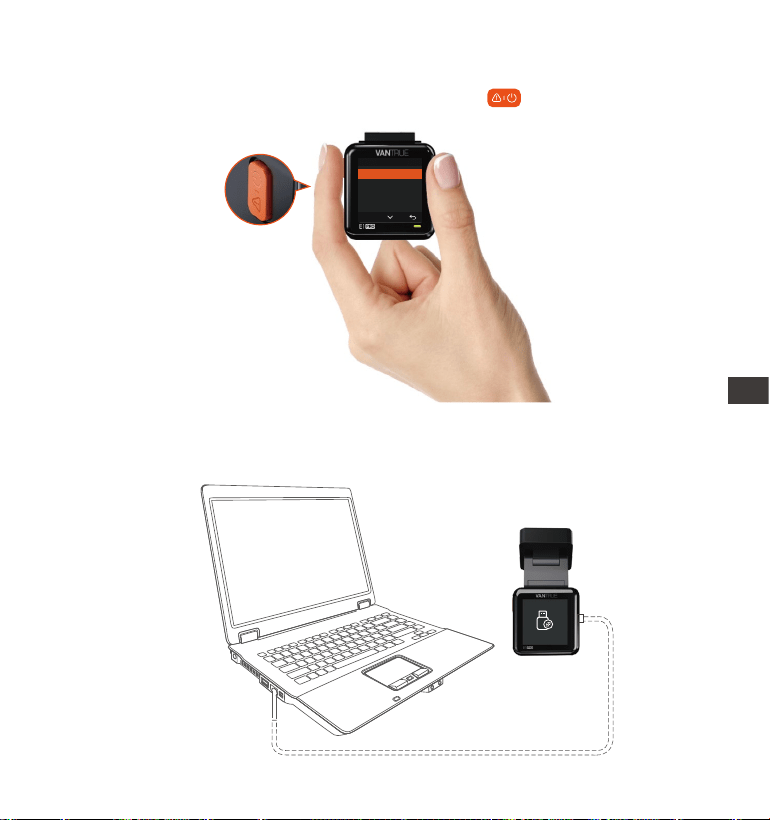
- 182 -
--Elimina video
Elimina il video sulla telecamera. Premi il pulsante nell'inteaccia di
navigazione dei le per far apparire il menu di eliminazione.
Video dell'Evento
Vuoi eliminare questo le?
Eliminare tutto File?
OK
Collegare il cavo dati USB TYPE-C incluso alla fotocamera e al computer.
b. Visualizzazione dei le su un computer
1.
IT
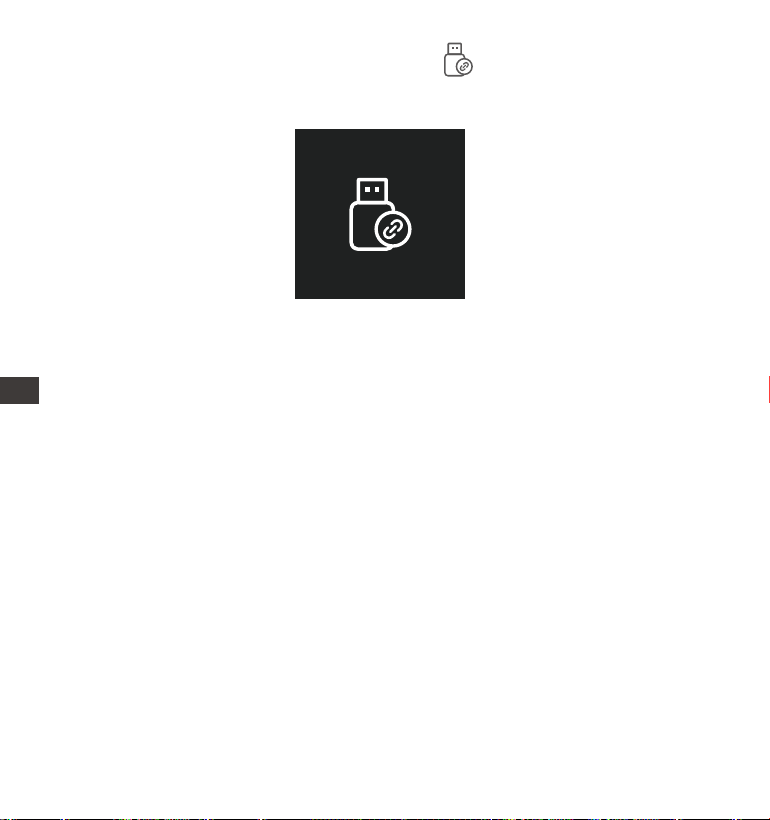
- 183 -
Dopo che la connessione è riuscita, l'icona apparirà sul display della
fotocamera per trasferire i dati, e quindi potrai visualizzare i le video nella
caella del computer.
2.
A seconda dei sistemi informatici dei diversi utenti, dopo aver collegato la
fotocamera al computer, verrà visualizzata come unità rimovibile o caella
rimovibile.
Per visualizzare i le sul computer, è possibile accedei direttamente, fare
clic con il pulsante destro del mouse per aprire il menu ed eliminarli.
È inoltre possibile utilizzare un lettore di schede USB per leggere le
informazioni della scheda di memoria.
3.
4.
5.
IT
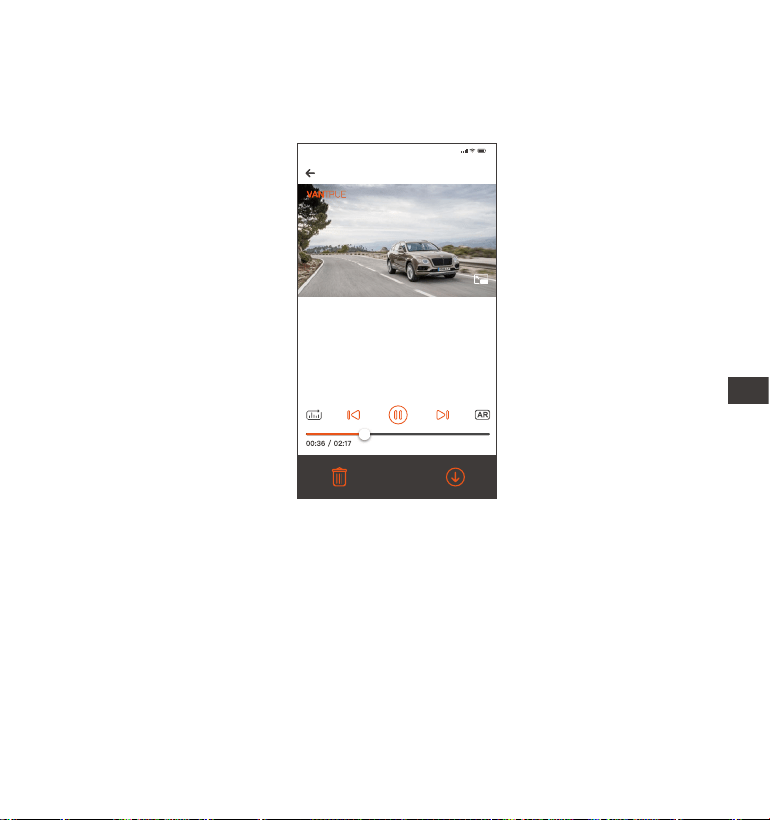
- 184 -
Per la riproduzione video nell'app o per i download sulla scheda SD, non ci
sarà alcun consumo di traco di rete.
Puoi visualizzare le informazioni della traccia GPS solo dopo aver scaricato e
riprodotto localmente il le video. Allo stesso tempo, devi scollegare il WiFi
della dash cam, altrimenti le informazioni sulla mappa saranno vuote.
1.
2.
Nota:
c. Visualizzazione sull'app "Vantrue"
Dopo che la fotocamera è stata collegata correttamente al telefono cellulare
tramite WiFi, può riprodurre, scaricare ed eliminare le nell'app mobile.
20241211 _115036_0079_N_A.MP4
11/12/2024 11:5:35 E1 Pro 000.000000. 000.000000. 36MK/H
Nota:
9:41
Nota: per visualizzare le informazioni GPS, è
necessario prima scaricare il le video nella
caella locale dell'APP, quindi riprodurlo nella
caella locale.
IT

- 185 -
IT
4.2.10 Aggiornamento del rmware
Il sistema si aggiornerà automaticamente con il le di aggiornamento del
rmware della scheda Micro-SD. La telecamera si riavvierà una volta comple-
tato l'aggiornamento. L'ultima versione del rmware è sempre disponibile sul
sito Web uciale VANTRUE (www.vantrue.net). Consigliamo vivamente di
registrare il prodotto (www.vantrue.net/register) per ricevere un'e-mail di
notica quando è disponibile un nuovo aggiornamento del rmware.
4.2.11 Temperatura di funzionamento
La telecamera è progettata per funzionare a temperature comprese tra -4 e
158 °F (-20 e 70 °C). Temperature al di fuori di questo inteallo rischiano di
degradare le prestazioni della telecamera e di causarne danni.
Per evitare danni
In caso di caldo intenso, non esporre direttamente la telecamera al sole
quando l'auto è parcheggiata.
In condizioni invernali estreme, ovvero a -20°C (-4°F) o temperature inferiori,
rimuovere la telecamera dal parabrezza quando non in uso e riporla nel vano
poaoggetti.
IT

- 186 -
5. Speciche tecniche
E1 ProModello
Engish/ Français/ Español/ Deutsch/ Italiano/简体中文
/русский/ 日本語/ Polski
Processore ad alte prestazioni Novatek
Sensore CMOS Sony
Display IPS da 1,54"
Integrato 2.4G
Anteriore: Angolo di visione ampio di 160°;
Ampia apeura F/1.8
Microfono e altoparlante integrati
Super condensatore integrato
MP4
Le speciche di questo prodotto possono essere soggette a modiche senza
preavviso a causa di miglioramenti del prodotto.
Chipset
Sensore d'immagine
Schermo
WiFi
Obiettivo
Lingue Suppoate:
Audio
Memoria di
Archiviazione
Risoluzione Video
Fonte di
Alimentazione
Formato File Video
DC 5V 2.4A
Alimentazione e
Corrente
3.5W
Potenza
-4°F to 158°F(-20°C to 70°C)
Temperatura di
Funzionamento
2592x1944P 30FPS; 2560x1440P 60FPS;
2560x1440P(HDR)30FPS; 2560x1440P 30FPS;
1920x1080P 60FPS; 1920x1080P(HDR)30FPS;
1920x1080P 30FPS; 1280x720P(HDR)30FPS;
1280x720P 30FPS
Suppoo per Micro SD Card esterna da 32GB a
512GB, U3, Classe 10 (non inclusa nella confezione)
IT

- 187 -
Type C
Poa USB
-22°F to 185°F(-30°C to 85°C)
Temperatura di
Conseazione
Garanzia
La dash cam VANTRUE® Element 1 è copea da una garanzia completa di 12
mesi. Registrando il prodotto sul nostro sito uciale
(www.vantrue.net/register), è possibile estendere la garanzia a 18 mesi.
Assistenza
Per qualsiasi domanda sul prodotto, non esitate a contattarci all'indirizzo
suppo@vantrue.net oppure inviateci un messaggio tramite la chat dal vivo
disponibile su www.vantrue.net.
Di solito, le richieste vengono evase entro 12-24 ore.
La tua opinione è impoante
VANTRUE® si impegna costantemente a migliorare i propri prodotti, seizi e
l'esperienza degli utenti. Se avete suggerimenti o idee su come possiamo fare
ancora meglio, apprezziamo molto il vostro feedback costruttivo.
Connettiti con noi oggi stesso scrivendo a suppo@vantrue.net.
6. Garanzia e Assistenza
IT