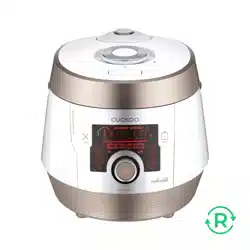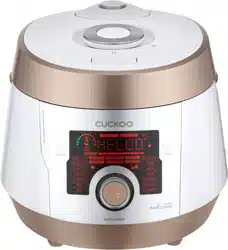
CMC-A5 Series (cETL approved)
ICOOK A5 PREMIUM & SUPERIOR
Operating Instruction
KOREA NO.1
CUCKOO
Electric Multi Pressure Cooker
Thank you very much for purchasing
“
CUCKOO
”
Electric Multi Pressure Cooker
Read the following instruction manual carefully before use or when facing problems.
在使用产品之前或是使用过程中出现任何问题, 请仔细阅读该产品的说明书.
Lea atentamente a las siguientes instrucciones antes de su uso o en caso de cualquier mal funcion.
※ Pictures may look different from the actual product.
※ 图片可能与实际产品不同。
※
Los dibujos pueden verse diferentes al producto actual.
※ 사진은 실제 현물과 다를 수 있습니다.

CONTENTS
2
CONTENTS
BEFORE USING
IMPORTANT SAFEGUARDS
…………………………………
3
HOW TO USE EXTENSION CORD
…………………………
5
SP
ECIFICATIONS
……………………………………………
5
SAFETY PRECAUTIONS
…………………………………
6~7
NAME OF EACH PART
……………………………………
10
HOW TO CLEAN
…………………………………………
11~16
FUNCTION OPERATING PART
……………………………
17
WHEN USING
HOW TO SET FUNCTION
……………………………………
18
HOW TO PRESET COOKING
………………………………
19
COOKER SETTINGS OVERVIEW
…………………………
20
PREPARATION BEFORE COOKING
………………………
21
HOW TO COOK
…………………………………………
22~24
KEEP WARM / REHEAT FUNCTION AND VOLTAGE SAG
PROTECTION FUNCTION
…………………………………
25
PROBLEM CHECKLIST
PLEASE CHECK BEFORE CALLING FOR SUPPORT
…
26~28
TABLA DE CONTENIDOS
ANTES DE USAR
IMPORTANT SAFEGUARDS
…………………………………
3
ESPECIFICACIONES
…………………………………………
5
NOMBRE DE LAS PIEZAS
…………………………………
50
CÓMO LIMPIAR
………………………………………
51~56
PANEL DE CONTROL Y PANTALLA
………………………
57
CUANDO USAS
CÓMO CONFIGURAR
………………………………………
58
CÓMO PRECONFIGURAR LA COCCIÓN
…………………
59
TABLA DE RESUMEN
………………………………………
60
PREPARACIÓN ANTES DE COCINAR
……………………
61
CÓMO COCINAR
………………………………………
62~64
MANTENER CALIENTE, RECALENTAR, PROTECCIÓN
DE CAÍDA DE VOLTAJE
……………………………………
65
LISTA DE COMPROBACIÓN DE PROBLEMAS
POR FAVOR VERIFIQUE ANTES DE PEDIR SOPORTE
…
66~68
TABLE DES MATIÈRES
AVANT L'UTILISATION
MESURES DE PROTECTION IMPORTANTES
……………
4
COMMENT UTILISER UNE RALLONGE
……………………
5
SPÉCIFICATIONS
………………………………………………
5
MESURES DE SÉCURITÉ
…………………………………
8~9
…………………………………
3
………………………………………………………………
5
…………………………………………………
30
………………………………………………
31~36
…………………………………………………
37
………………………………………………………
38
…………………………………………………
39
…………………………………………………
40
…………………………………………………
41
……………………………………………………
42~44
…………………………………
45
………………………………………
46~48
݆۳
ӈ
ҍࡸଇӲ
౩ࢸГဨ١ٌ
控制&显示板
使用时
设定功能
预约煮饭方法
压力锅设置概览
煮饭前准备事项
煮饭方法
保温/再加热功能及保温温度设定
问题检查表
常见故障及处理方法
IMPORTANT SAFEGUARDS

3
1
. Read all instructions before using this appliance.
2. Do not touch hot surfaces. Use handles or knobs.
3. To protect against fire, electric shock and / or injury to persons do not immerse cord, plugs, or Pressure
Cooker Body in water or any other liquid.
4. Close supervision is necessary when this appliance is used by or near children. This appliance is not
intended for use by young children without supervision.
5. Unplug cord from outlet when not in use and before cleaning. Allow appliance to cool before putting on
or taking off parts, and before cleaning the appliance.
6. Do not operate any appliance with a damaged cord or plug, after the appliance malfunctions, or has
been damaged in any manner. Return the appliance to the nearest authorized service facility for
examination, repair or adjustment.
7. The use of accessory attachments not recommended by the appliance manufacturer may result in fire,
electric shock, and / or injury to persons.
8. If the supply cord is damaged, it must be replaced by a special cord or assembly available from the
manufacturer or your service agent.
9. Do not use outdoors.
10. Do not let the cord hang over the edge of a table or counter, or touch hot surfaces.
11. Do not place on or near a hot gas, electric burner, or in a heated oven.
12. Always attach the plug to the appliance first, then plug the cord into the wall outlet. To disconnect, or
set all control to “off”, then remove the plug from the wall outlet.
13. Do not use this appliance for other than its intended use.
14. Extreme caution must be used when moving an appliance containing hot oil or any hot liquids.
15. Oversized foods, metal foil packages, or utensils must not be inserted into the appliance as they are a
risk of fire or electric shock.
16. Fire may occur if the appliance is covered or touching flammable material, including curtains, draperies,
walls, etc while in operation.
17. To reduce the risk of electric shock, cook only in the provided removable container.
18. This appliance cooks under pressure. Improper use may result in scalding injury. Before operating the
unit, properly secure and close the unit. See “Operating Instructions.”
19. Before use always check the pressure releasing device for clogging.
20. Do not use this pressure cooker to fry in oil.
21. This appliance is not intended for use by persons (including children) with reduced physical, sensory or
mental capabilities, or lack of experience and knowledge, unless they have been given supervision or
instruction concerning use of the appliance by a person responsible for their safety.
22. Never immerse the appliance in water while cleaning.
SAVE THESE INSTRUCTIONS
THIS APPLIANCE IS FOR HOUSEHOLD USE ONLY
WARNING : This appliance generates heat and releases steam during use. Use proper precaution to
prevent risk of burns, fires, other injuries, or damage to property.
1. Keep hands and face away from the Pressure Release Valve when releasing pressure.
2. Take extreme caution when opening the Lid after cooking. Severe burns can result from steam inside.
3. Never open the Lid while the unit is in operation.
4. Do not use without the inner Pot in place.
5. Do not cover the Pressure Valve with anything as an explosion may occur.
6. Do not touch the inner pot nor any heating parts, immediately after use.
Allow the unit to cool down completely first.
This appliance is intended to be used in household and similar applications such as :
- staff kitchen areas in shops, offices and other working environments;
- farm houses;
- by clients in hotels, motels and other residential type environments;
- bed and breakfast type environments.
ADDITIONAL IMPORTANT SAFEGUARDS
IMPORTANT SAFEGUARDS

1. Lisez toutes les instructions avant d'utiliser cet appareil.
2
. Ne touchez pas les surfaces chaudes. Utilisez les poignées ou les boutons.
3. Pour prévenir les risques d'incendie, les chocs électriques et/ou les blessures, ne plongez pas le cordon, les prises ou
le corps autocuiseur dans l'eau ou tout autre liquide.
4. Une surveillance étroite est nécessaire quand cet appareil est utilisé par des enfants ou qu'il se situe à leur portée.
Cet appareil n'est pas prévu pour être utilisé par de jeunes enfants sans surveillance.
5. Débranchez le cordon de la prise lorsque vous ne vous servez pas de l'appareil et avant de le nettoyer. Laissez
l'appareil refroidir avant de remettre en place ou de retirer des pièces, et avant de le nettoyer.
6. N'utilisez aucun appareil si le cordon ou la fiche est endommagé, s'il ne fonctionne pas correctement ou s'il est
endommagé de quelque façon que ce soit. Renvoyez l'appareil à un centre technique agréé le plus proche pour le
faire examiner, réparer ou régler.
7. L'utilisation d'accessoires non recommandés par le fabricant peut causer un incendie, un choc électrique et/ou des
blessures.
8. Si le cordon d'alimentation est endommagé, il doit être remplacé par un cordon ou ensemble prévu à cet effet,
disponible auprès du fabricant ou de réparateurs agréés.
9. N'utilisez pas l'appareil à l'extérieur.
10. Ne laissez pas le cordon pendre d'une table ou d'un comptoir. Ne le laissez pas non plus en contact avec une
surface chaude.
11. Ne placez pas l'appareil au-dessus ou près d'un brûleur à gaz, sur une plaque électrique ou dans un four chaud.
12. Branchez toujours la fiche sur l'appareil en premier, puis branchez le cordon dans la prise murale. Pour débrancher,
ou désactiver toutes les commandes, retirez la fiche de la prise murale.
13. N'utilisez pas cet appareil à des fins autres que celles pour lesquelles il a été conçu.
14. Une prudence extrême est requise lorsque vous déplacez l'appareil contenant de l'huile chaude ou tout autre liquide chaud.
15. Des denrées alimentaires de taille excessive, les emballages sous feuille métallique, ou les ustensiles ne doivent pas
être insérés dans l'appareil car ils constituent un risque d'incendie ou de choc électrique.
16. Un incendie peut se déclarer si l'appareil est couvert ou en contact avec des matériaux inflammables, y compris des
rideaux ou des draperies, des murs, etc durant son fonctionnement.
17. Afin de réduire le risque de choc électrique, faites cuire uniquement dans le récipient amovible fourni.
18. Cet appareil cuit sous pression. Un mauvais usage peut entraîner des brûlures. Avant d'utiliser l'appareil, mettez
l'appareil bien en place et fermez-le. Reportez-vous à la section « Instructions d'utilisation ».
19. Avant toute utilisation, vérifiez toujours si le dispositif de relâchement de la pression est obstrué.
20. N'utilisez pas cet autocuiseur pour faire frire dans de l'huile.
21. Cet appareil n'est pas conçu pour être manipulé par des personnes (y compris des enfants) dont les capacités
physiques sensorielles ou mentales sont réduites ou qui manquent d'expérience et de connaissance, à moins
qu'elles n'aient reçu une une formation ou des instructions sur l'utilisation de l'appareil par une personne responsable
de leur sécurité
22. Ne jamais immerger l'appareil dans l'eau pendant le nettoyage.
CONSERVEZ CES INSTRUCTIONS
CET APPAREIL EST DESTINÉ À UN USAGE DOMESTIQUE UNIQUEMENT
AVERTISSEMENT : Cet appareil génère de la chaleur et libère de la vapeur durant son fonctionnement. Utilisez les
protections appropriées pour prévenir le risque de brûlures, d'incendies, de blessures ou de
dégâts matériels.
1. Gardez vos mains et votre visage à l'écart de la soupape de décharge lors du relâchement de la pression.
2. Faites extrêmement attention lors de l'ouverture du couvercle après la cuisson. La vapeur à l'intérieur peut provoquer
des brûlures graves.
3. N'ouvrez jamais le couvercle lorsque l'appareil est en fonctionnement.
4. N'utilisez pas l'appareil sans la cuve de cuisson à sa place.
5. Ne recouvrez pas la soupape de pression par un objet quelconque, une explosion pourrait survenir.
6. Ne touchez pas la cuve de cuisson ni les éléments chauffants immédiatement après utilisation. Laissez tout d'abord
l'appareil refroidir complètement. Cet appareil est prévu pour être utilisé à la maison à des fins telles que :
- la cuisine pour le personnel dans des magasins, des bureaux et d'autres environnements de travail;
- les fermes;
- par des clients dans des hôtels, des motels et autres environnements de type résidentiel;
- des environnements de type chambres d'hôtes.
MESURES DE PROTECTION SUPPLÉMENTAIRES
MESURES DE PROTECTION IMPORTANTES
4
Note:
A. A short power-supply cord (or cord set) is provided to reduce the hazards from entanglement by a longer cord.
B. Extension cord should be used properly.
C. Extension cord usage for the multi cooker:
(1) The correct rated voltage should be used for the multi cooker.
(2) If the appliance is set on the ground, the extension cord should also be set on the ground.
(3) The cord wires and extension cord should always be arranged to prevent hazards to children.
"This appliance has a polarized plug (one blade is wider than the other).
To reduce the risk of electric shock, this plug is intended to fit into a polarized outlet
only one way. If the plug does not fit fully into the outlet, reverse the plug. If it still does not fit,
contact a qualified electrician. do not attempt to modify the plug in any way."
Remarque :
A.
Un cordon d'alimentation court (ou câble) est fourni pour réduire les dangers d'emmêlement causés par un cordon plus long.
B. La rallonge doit être utilisée correctement.
C. L'utilisation de la rallonge pour le cuiseur à riz :
(1) La tension nominale correcte doit être utilisée pour le cuiseur à riz.
(2) Si l'appareil est installé sur le sol, la rallonge doit aussi être installée sur le sol.
(3) Les câbles et la rallonge doivent toujours être disposés dans le but d'éviter les dangers pour les enfants.
"Cet appareil possède une fiche polarisée (une lame plus large que l'autre).
Afin de réduire le risque d'électrocution, cette fiche est conçue pour s'adapter à une prise polarisée dans un seul
sens. Si la fiche ne s'emboîte pas complètement dans la prise, inversez la fiche. S'il ne convient toujours pas,
veuillez communiquer avec un électricien qualifié. N'essayez pas de modifier la fiche de quelque façon que ce
soit."
SPECIFICATIONS / 规格 / ESPECIFICACIONES / SPÉCIFICATIONS / 제품규격
5
HOW TO USE EXTENSION CORD / COMMENT UTILISER UNE RALLONGE
Model name/型号名称/Modelo/
모델명
CMC-A5 Series
Power supply/电源/Alimentación eléctrica/
전원
AC120V~, 60Hz
Power consumption/
功耗/Consumo de energía/
소비전력
1150W
MENU
MULTI COOK --
STEAM COOK --
SLOW COOK --
RICE COOK
WHITE RICE
STICKY RICE
SUSHI RICE
GENERAL RICE
BROWN RICE -
GABA RICE -
MULTI GRAIN -
SUPER GRAIN -
VEGETABLES
VEGETABLES -
BEAN & CHILI -
MEAT --
SOUP
SOUP -
PORRIDGE -
STEW -
BROWN FRY/SAUTÉ --
YOGURT --
CANNING --
OVEN --
PASTA/NOODLE --
STERILIZATION --
MY RECIPES --
Power cord length/电源线长度/Longitud del cable eléctrico/
전원코드길이
1.3m
Pressure/
压力/Presión/
사용압력
78.4KPa(0.8kgf/cm2)
Weight/重量/Peso/
중량
Dimension/尺寸/Dimensiones/
치수
Width/宽度/Anchura/
폭
29.4cm
Length/长度/Longitud/
길이
39.5cm
Height/
高度/Altura/
높이
29cm
PREMIUM
SUPERIOR
7.5kg
7.2kg

•
This sign is intended to remind and alert that something may cause
problems under the certain situation.
•
P
lease read and follow the instruction to avoid any harmful situation.
•
Indicates a prohibition
This means that the action it describes
may result in death or severe injury.
This means that the action it describes
may result in injury or property damage.
•
Indicates an instruction
Read the following product safety guide carefully to prevent any accidents and/or serious danger.
‘Warning’ and ‘Caution’ are different as follows.
Warning
Caution
Use a single socket with the rated current above 15A.
•Using several lines in one socket can cause overheating
or fire. Please check the power cord and plug frequently.
•Use an extension cord with the rated current above 15A.
Do not cover the automatic steam outlet or pressure
weight with your hand or face.
Please pay careful attention against water and
chemicals
•It can cause an electric shock or fire.
Do not use the cooker near hot things such as stove,
gas stove or direct ray of light.
•It can cause an electric shock, fire, deformation, malfunction, or
discoloration. Please check the power cord and plug frequectly.
Do not alter, reassemble, disassemble or repair.
•It can cause fire, electricshock or injury.
•For repair, contact dealeror the service center.
•It can cause burns.
•Especially be careful to keep it out of children’s reach.
Warning Do not
Do not use a multi cooker at a place where dust is
trapped or chemical material is located.
•Do not use any combustible gas or flammable materials nearby a
product.
•It can cause explosion or fire.
Do not use damaged power cord, plug, or loose socket.
•Please check the power cord frequently for damage.
•Serious damage can cause electric shock or fire.
•If the plug is damaged, contact the dealer or a service center.
Do not clean the product with water or pour water in the
product.
Do not over unplug and plug the power cord over and
over.
•It can cause an electric shock or fire.
Do not turn the Lock/Unlock Handle to
“Unlock” while cooking.
•The hot steam or any hot content within the cooker can cause
burns.
•After you finish the cooking do not try to open the cooker by
force until the steam is completely exhausted.
Do not insert metal objects such as pins and wires or
any other external substances in the automatic steam
exhaust outlet or any other slot.
Keep the cooker out of reach of children.
•It can cause burns, electric shock or injury.
Do not use it without the inner pot.
•It can cause electric shock or malfunction.
•Do not pour rice or water without the inner pot.
•If rice or water gets in then do not turn the product over or
shake it, please contact the dealer or service center.
Be careful that both the plug and power cord are not to be
shocked by animal attack or sharp metal materials.
•Damages by impact can cause an electric shock or fire.
Please check the power cord and plug frequently.
Remove a foreign substance on the cord and plug with a
clean cloth.
•It can cause fire. Please check the power cord and plug
frequently.
Don’t spray or put any insecticides or chemicals.
•It can cause an electric shock or fire.
•If cockroaches or any insects get inside the cooker, please call a
dealer or a service center.
Don’t let foreign substances such as needle, cleaning pin, or
metal get in or block the in let/out let pipe or gape.
•It can cause an electric shock or fire.
•Do not put a cleaning pin in a gap or a hole of the product
except when dearing a steam outlet.
Do not open the top cover while in heating and cooking.
•It can cause burns.
•If you need to open the lid while cooking, keep pressing the
cancel button for 2 seconds and confirm internal steam
released completely turning the pressure weight over.
Do not use pots that are not designed for the cooker. Do
not use abnormal pot and do not use without the inner
pot.
•It can cause an electric shock or fire.
Do not bend, tie, or pull the power cord by force.
•It can cause an electric shock or short circuit resulting in fire. Please
check the power cord and plug frequently.
Do not cover the automatic steam outlet or pressure
weight with a duster, a towel, or apron, etc.
•It can cause deformation or a breakdown.
•It can cause an explosion by pressure.
•It can cause an electric shock or fire.
•If it contacts water, please separate power cord and contact dealer
and service center.
•It can cause an electric shock or fire.
•Especially be careful to keep it out of reach of children.
SAFETY PRECAUTIONS
6

Clean any dust or external substances off the
temperature sensor and inner pot.
•It can cause a system malfunction or fire.
Do not use it on a rice chest or a shelf.
Do not plug or pull out the power cord with wet hands.
•It can cause an electric shock.
Do not press heavy things on the power cord.
•It can cause an electric shock or fire.
•Please check the power cord and plug frequently
Do not change, extend or connect the power cord
without the advice of a technical expert.
•It can cause an electric shock or fire.
•Do not place the power cord between furniture. It can cause
an electric shock resulting in fire.
Please check the power cord and plug frequently.
•When using on furniture be cautious of steam release
As it can cause damage, fire and and/or electric shock.
Caution Do not
Do not move the product by pulling or using the power
cord.
•Electric short might cause fire.
Please contact a dealer or service center when there is a
strange smell or smoke.
•First pull out the power cord. And contact dealer or the service
center.
Do not fill the Inner Pot for more than its maximum capacity.
Please call customer service if the inner pot coating peels off.
•
Inner pot coating may wear awayafter long use.
•
When cleaning the inner pot, do not use tough scrubber,
metallic scrubber, brush, abrasive metallic etc.
Do not place on rough top or tilted top.
•It can cause burns or breakdowns.
•Be careful to install the power cord to pass without disruption.
Do not hold the cooker by the inner pot handle.
Always turn the Lock/Unlock Handle to "Lock" when
not in use.
•
It can cause deformation by remaining pressure.
After you finish cooking, do not try to open the cooker by
force until the steam is completely exhausted.
•
The hot steam or any hot content within the cooker can cause
burns.
•
Cautiously open the top cover after cooking is done to avoid
dangerous steam and burns.
Be cautious when steam is being released.
As the food could go bad, please avoid using
the Keep Warm mode for a long time.
When you pull out the power plug, don’t pull the
power cord. Please, safely pull out the power plug.
•When the steam is released don’t be surprised.
•Please keep the cooker out of reach of children.
•If you inflict impact on power cord, it can cause an electric
shock or fire.
Please clean the body and other parts after cooking.
•If you cook rice or use the Keep Warm function after cooking
other food, the rice or the food may smell or stink.
•Clean the oven packing, top heater plate,
and inner pot every time you cook any of those.
•It can cause alteration or smell.
•Use dry kitchen cleaner or sponge to clean the inner pot, since
rough scrub or metallic ones are abrasive to the coating.
•Depending on the using methods or user's circumstances inner
pot coating might rise.
Please call the customer service for those cases.
•Please, do not pull out the clean steam vent by force.
Wipe off any excessive water on the cooker after
cooking.
•
It can cause odor and discoloration.
Wipe off water that is left behind from dew.
Please contact dealer or service center when either a
button of a product or a product itself is not working
properly.
•It c
In case of a blackout during cooking, steam from
a multi cooker will be released automatically.
Thus, the quality of rice is lower than normal.
•
Please start cooking with an indicated amount of rice and water.
•Water can overflow if the amount of water in a pot exceeds the
indicated level of water usage.
•Please start cooking in a status that steam control cap is installed
completely.
Don’t use the cooker near a magnetic field.
•It can cause burns or breakdown.
Do not drop or impact the cooker.
•It can cause a safety problem.
Please surely pull out the plug when not in use.
•It can cause electric shocks or fire.
•Use AC 120V only.
Use product on a flat surface. Do not use on a cushion.
Please avoid using it on an unstable location prone to
falling down.
•It can cause malfunction or a fire. Please check the power
cord and plug frequently.
Don’t use for various purpose for inner pot.
And do not heat up the inner pot on the gas stove.
•It can cause deformation of the inner pot.
•It can cause to spill the inner coating.
Please pull out the plug when not in use.
Please use the cooker for it’s intended purpose.
•It can cause electric shocks or fire.
•It can cause malfunction or smell.
Do not touch the metallic surface of the inner pot and
pressure weight after cooking or warming.
•It can cause burns.
•Remaining hot steam can cause burns when you tilt the
pressure weight while and right after the cooking.
•It may cause a malfunction leading to issues such as
overflow of contents or poor cooking.
•It can cause problems and danger. There are portable handles
on the bottom right and left side of the cooker. Hold the
handles with both hands and move it carefully.
7
SAFETY PRECAUTIONS
SAFETY PRECAUTIONS

Lisez attentivement le guide de sécurité du produit qui suit afin d'éviter les accidents et/ou les dangers graves.
« Avertissement » et « Attention » diffèrent comme suit :
Ne recouvrez pas la sortie de vapeur automatique ou le
poids de pression avec votre main ou votre visage.
N'utilisez pas le cuiseur près de ce qui est chaud comme une
cuisinière, une cuisinière à gaz ou la lumière directe du soleil.
•Cela peut causer un choc électrique, un incendie, une déformation, un
dysfonctionnement ou une décoloration. Veuillez vérifier régulièrement
le cordon d'alimentation et la prise.
Ne modifiez pas, ne remontez pas, ne démontez pas ou ne
réparez pas cet appareil.
•Cela peut entraîner un incendie, un choc électrique ou des
blessures.
•Pour le faire réparer, contactez le revendeur ou le centre
technique.
•Cela peut entraîner des brûlures.
•Faites particulièrement attention à le mettre hors de portée des
enfants.
Utilisez une prise individuelle avec un courant nominal
supérieur à 15A.
Soyez particulièrement attentifs à l'eau ou aux produits
chimiques.
•L'utilisation de plusieurs lignes sur une seule prise peut provoquer
une surchauffe ou un incendie.
•Veuillez vérifier fréquemment le cordon d'alimentation et la prise.
•Utilisez une rallonge avec un courant nominal supérieur à 15A.
N'utilisez pas le cuiseur à riz dans un endroit qui retient la
poussière ou en présence de produits chimiques.
Ne mettez pas la poignée Lock/Unlock (verrouiller/
déverrouiller) sur « Unlock » durant la cuisson.
•La vapeur chaude ou tout autre élément chaud à l'intérieur
de l'autocuiseur peut entraîner des brûlures.
•Après avoir fini la cuisson n'essayez pas d'ouvrir le cuiseur
de force avant que la vapeur se soit complètement évacuée.
N'utilisez pas l'appareil sans la cuve de cuisson.
•Cela peut provoquer un choc électrique ou un
dysfonctionnement.
•Ne mettez pas de riz ni d'eau sans la cuve de cuisson à
l'intérieur.
•Si du riz ou de l'eau s'infiltre, ne retournez pas le produit
et ne le secouez pas, veuillez contacter le revendeur ou le
centre centre technique.
Ne débranchez pas ni ne branchez sans arrêt le cordon
d'alimentation.
•Cela peut entraîner un choc électrique ou un incendie.
N'utilisez pas de cuves de cuisson qui ne sont pas
conçues pour le cuiseur.
N'utilisez pas une cuve de cuisson anormale et
n'utilisez pas l'appareil sans la cuve de cuisson.
•Cela peut entraîner un choc électrique ou un incendie.
Faites attention à ce que la fiche et le cordon d'alimentation
ne soient pas entrechoqués par des attaques d'animaux ou par des
matériaux métalliques tranchants.
•Les dégâts dûs à des impacts peuvent provoquer un choc
électrique ou un incendie. Veuillez vérifier fréquemment le
cordon d'alimentation et la prise.
Ne laissez pas des substances étrangères telles qu'une aiguille,
une épingle de nettoyage, ou du métal entrer et ne bloquez pas
le conduit d'arrivée/d'évacuation ou l'ouverture.
•Cela peut entraîner un choc électrique ou un incendie.
•Ne mettez pas une épingle de nettoyage dans l'ouverture ou le
trou du produit sauf pour nettoyer la sortie de vapeur.
N'ouvrez pas le couvercle supérieur lors de la phase de
chauffage et de la cuisson.
•Cela peut entraîner des brûlures.
•Si vous avez besoin d'ouvrir le couvercle lors de la cuisson,
maintenez appuyé le bouton cancel (annuler) pendant deux
secondes et vérifiez que la vapeur interne s'est complètement
évacuée en retournant le poids de pression.
N'insérez pas d'objets en métal tels que des épingles et des fils ou
toute autre substance extérieure dans la sortie d'évacuation de
vapeur automatique ou toute autre ouverture.
Gardez le cuiseur hors de portée des enfants.
•Cela peut provoquer des brûlures, un choc électrique ou
des blessures.
Ne vaporisez pas et n'utilisez pas d'insecticides ou de
produits chimiques.
•Cela peut entraîner un choc électrique ou un incendie.
•Si des cafards ou d'autres insectes pénètrent dans le cuiseur,
veuillez contacter un revendeur ou un centre technique.
•Cela peut entraîner un choc électrique ou un incendie.
•Faites tout particulièrement attention de garder l'appareil hors
de portée des enfants.
Ne nettoyez pas le produit avec de l'eau ni ne versez de l'eau
dans le produit.
•Cela peut entraîner un choc électrique ou un incendie.
•Si le produit est en contact avec de l'eau, veuillez séparer le
cordon d'alimentation et contactez le revendeur et le centre
technique.
Ne recouvrez pas la sortie de vapeur automatique ou le poids
de pression de pression avec un chiffon, une serviette ou un
tablier etc.
Ne pliez pas, n'attachez pas et ne tirez pas le cordon
d'alimentation de force.
•Cela peut entraîner une déformation ou une panne.
•Cela peut entraîner une explosion due à la pression.
•Cela peut provoquer un choc électrique ou un courtcircuit entraînant
un incendie. Veuillez vérifier fréquemment le cordon d'alimentation et
la prise.
N'utilisez pas un cordon d'alimentation endommagé,
une fiche ou une prise mal fixée.
•Veuillez vérifier régulièrement si le cordon d'alimentation est
endommagé.
•Des dégâts importants peuvent entraîner un choc électrique ou un
incendie.
•Si la fiche est endommagée, contactez le revendeur ou un centre
technique.
•N'utilisez aucun gaz inflammable ou produit inflammable près du
produit.
•Cela peut entraîner une explosion ou un incendie.
•Cela peut causer un choc électrique ou un incendie.
•
Ce symbole vise à rappeler et à alerter que quelque chose peut
entraîner des problèmes dans la situation donnée.
•
Veuillez lire et respecter l'instruction afin d'éviter toute situation
dangereuse.
•
Indique une interdiction.
Cela signifie que l'action qui est décrite peut
entraîner la mort ou une blessure grave.
Cela signifie que l'action décrite peut entraîner
des blessures ou des dégâts matériels.
•
Indique une instruction.
Avertissement
Attention
Avertissement Ne pas
MESURES DE SÉCURITÉ
8

Ne placez pas de choses lourdes sur le cordon d'alimentation.
•Cela peut entraîner un choc électrique ou un incendie.
•
Veuillez vérifier fréquemment le cordon d'alimentation et la fiche.
R
etirez une substance étrangère sur le cordon et la fiche
à
l'aide d'un chiffon propre.
Ne changez pas, ne rallongez pas ni ne branchez le cordon
d'alimentation sans l'avis d'un expert technique.
•Cela peut entraîner un choc électrique ou un incendie.
•Cela peut provoquer un incendie. Veuillez vérifier fréquemment le
cordon d'alimentation et la fiche.
N'utilisez pas l'appareil sur un coffre à riz ou une étagère.
•Ne placez pas le cordon d'alimentation entre des meubles. Cela peut
provoquer un choc électrique entraînant un incendie.
•Veuillez vérifier fréquemment le cordon d'alimentation et la prise.
•En cas d'utilisation sur du mobilier, faites attention à l'évacuation de la
vapeur car cela peut provoquer des dégâts, un incendie et/ou un choc
électrique.
Nettoyez la poussière ou toute substance étrangère sur
le capteur de température et la cuve de cuisson.
•Cela peut provoquer un dysfonctionnement du système ou un incendie.
Ne branchez pas et ne retirez pas le cordon d'alimentation
avec les mains mouillées.
•Cela peut provoquer un choc électrique.
Veuillez contacter un revendeur ou un centre technique en cas
d'odeur ou de fumée inhabituelle.
Ne déplacez pas le produit en tirant ou en utilisant le cordon
d'alimentation.
Veuillez contacter le service client si le revêtement de la cuve de
cuisson s'enlève.
•
Il se peut que le revêtement s'use après une longue utilisation.
•
Lors du nettoyage de la cuve de cuisson, n'utilisez pas de tampon
à récurer dur ou métallique, de brosse, d'abrasifs métalliques etc.
Ne placez pas l'appareil sur une surface irrégulière ou inclinée.
•Cela peut provoquer des brûlures ou des pannes.
•Faites attention à installer le cordon d'alimentation de façon à
ce qu'il passe sans interruption.
Ne tenez pas le cuiseur par la poignée de la cuve de cuisson
•Cela peut entraîner des problèmes ou être dangereux. Des
poignées amovibles sont disposées en bas à droite et sur le
côté gauche du cuiseur. Tenez les poignées à deux mains et
déplacez-le avec précaution.
Après avoir fini la cuisson, n'essayez pas d'ouvrir le cuiseur
de force avant que la vapeur ne soit complètement évacuée.
•La vapeur chaude ou tout autre élément chaud à l'intérieur du
cuiseur peut provoquer des brûlures.
•Ouvrez le couvercle supérieur avec prudence après la cuisson afin
d'éviter la vapeur et des brûlures présentant un danger.
Faites attention lorsque la vapeur est évacuée.
Lorsque vous retirez la fiche d'alimentation, ne tirez pas sur le
cordon d'alimentation. Veuillez retirer en toute sécurité la fiche
d'alimentation.
•Ne soyez pas surpris lorsque la vapeur est évacuée.
•Veuillez conserver le cuiseur hors de portée des enfants.
•Si vous faites prendre un impact au cordon d'alimentation, cela
peut entraîner un choc électrique ou un incendie.
Ne pas réchauffer le contenu pendant trop longtemps sous
peine de détérioration ou alteration.
Veuillez nettoyer le corps ainsi que les autres parties après la
cuisson.
•Une odeur pourrait imprégner le nouveau contenu lorsque vous faites
cuire ou réchauffer après une première utilisation.
•Nettoyez le compartiment du four, la plaque supérieure de chauffage et
la cuve de cuisson à chaque fois que vous faites cuire avec l'un d'entre
eux.
•Cela peut entraîner une altération ou des odeurs.
•Utilisez un essuie-tout sec ou une éponge pour nettoyer la cuve de
cuisson, car les surfaces dures rugueuses ou celles en métal sont
abrasives pour le revêtement.
•En fonction des méthodes d'utilisation ou des circonstances propres à
l'utilisateur, le revêtement de la cuve de cuisson peut se détacher.
•Veuillez contacter le service client dans ces cas de figure. Veuillez ne pas
tirer de force l'évent à vapeur propre.
Mettez toujours la poignée Lock/Unlock (verrouillage/
déverrouillage) sur « Lock » lorsque vous n'utilisez
pasl'appareil n'est pas utilisé.
•Cela peut entraîner une déformation du à la pression restante.
Essuyez toute l'eau en excès sur le cuiseur après la cuisson.
•It c
Veuillez contacter un revendeur ou un centre technique
lorsqu'un bouton du produit ou le produit lui-même ne
fonctionne pas correctement.
En cas de coupure de courant durant la cuisson, la vapeur du
cuiseur à riz est évacuée automatiquement. La qualité du riz est
par conséquent inférieure à la normale.
•
Veuillez démarrer la cuisson avec la quantité d'eau et de riz indiquée.
•
L'eau peut déborder si la quantité d'eau dans la cuve de cuisson dépasse
le niveau d'eau recommandé.
•
Veuillez démarrer la cuisson avec le capot de régulation de la vapeur.
complètement mis en place.
Ne touchez pas la surface métallique de la cuve de cuisson et
le poids de pression après la cuisson et la phase de
chauffage.
•Cela peut entraîner des brûlures.
•La vapeur chaude restante peut provoquer des brûlures
quand vous appuyez sur le poids de pression durant et juste
après la cuisson.
N'utilisez pas le cuiseur près d'un champ magnétique.
•Cela peut provoquer des brûlures ou une panne.
Ne laissez pas tomber le cuiseur et ne le soumettez pas à des
chocs.
•Cela peut entraîner un problème de sécurité.
Veuillez vous assurer de débrancher la prise lorsque l'appareil
n'est pas utilisé.
•Cela peut provoquer des chocs électriques ou un incendie.
•
Utilisez du courant 120V uniquement.
Utilisez le produit sur une surface plane. N'utilisez pas le produit
sur un coussin. Veuillez éviter d'utiliser le produit dans un endroit
qui n'est pas stable où il risquerait de tomber.
Veuillez débrancher la prise lorsque vous n'utilisez pas le
produit.
Veuillez utiliser le cuiseur dans le but dans lequel il a été conçu.
•Cela peut entraîner un dysfonctionnement ou un incendie. Veuillez
vérifier fréquemment le cordon d'alimentation et la prise.
•Cela peut provoquer des chocs électriques ou un incendie.
•Cela peut provoquer un dysfonctionnement ou une odeur.
N'utilisez pas l'appareil au-delà de la capacité maximum.
•Cela pourrait provoquer un dysfonctionnement tel que le
débordement de contenu ou une tout autre panne.
•Débranchez tout d'abord le cordon d'alimentation.
Puis contactez le revendeur ou le centre technique.
Avertissement Se rappeler
•Un court-circuit électrique pourrait provoquer un incendie.
•
Cela peut entraîner des odeurs ou une décoloration. Essuyez
l'eau résultant de la condensation.
9
MESURES DE SÉCURITÉ
MESURES DE SÉCURITÉ
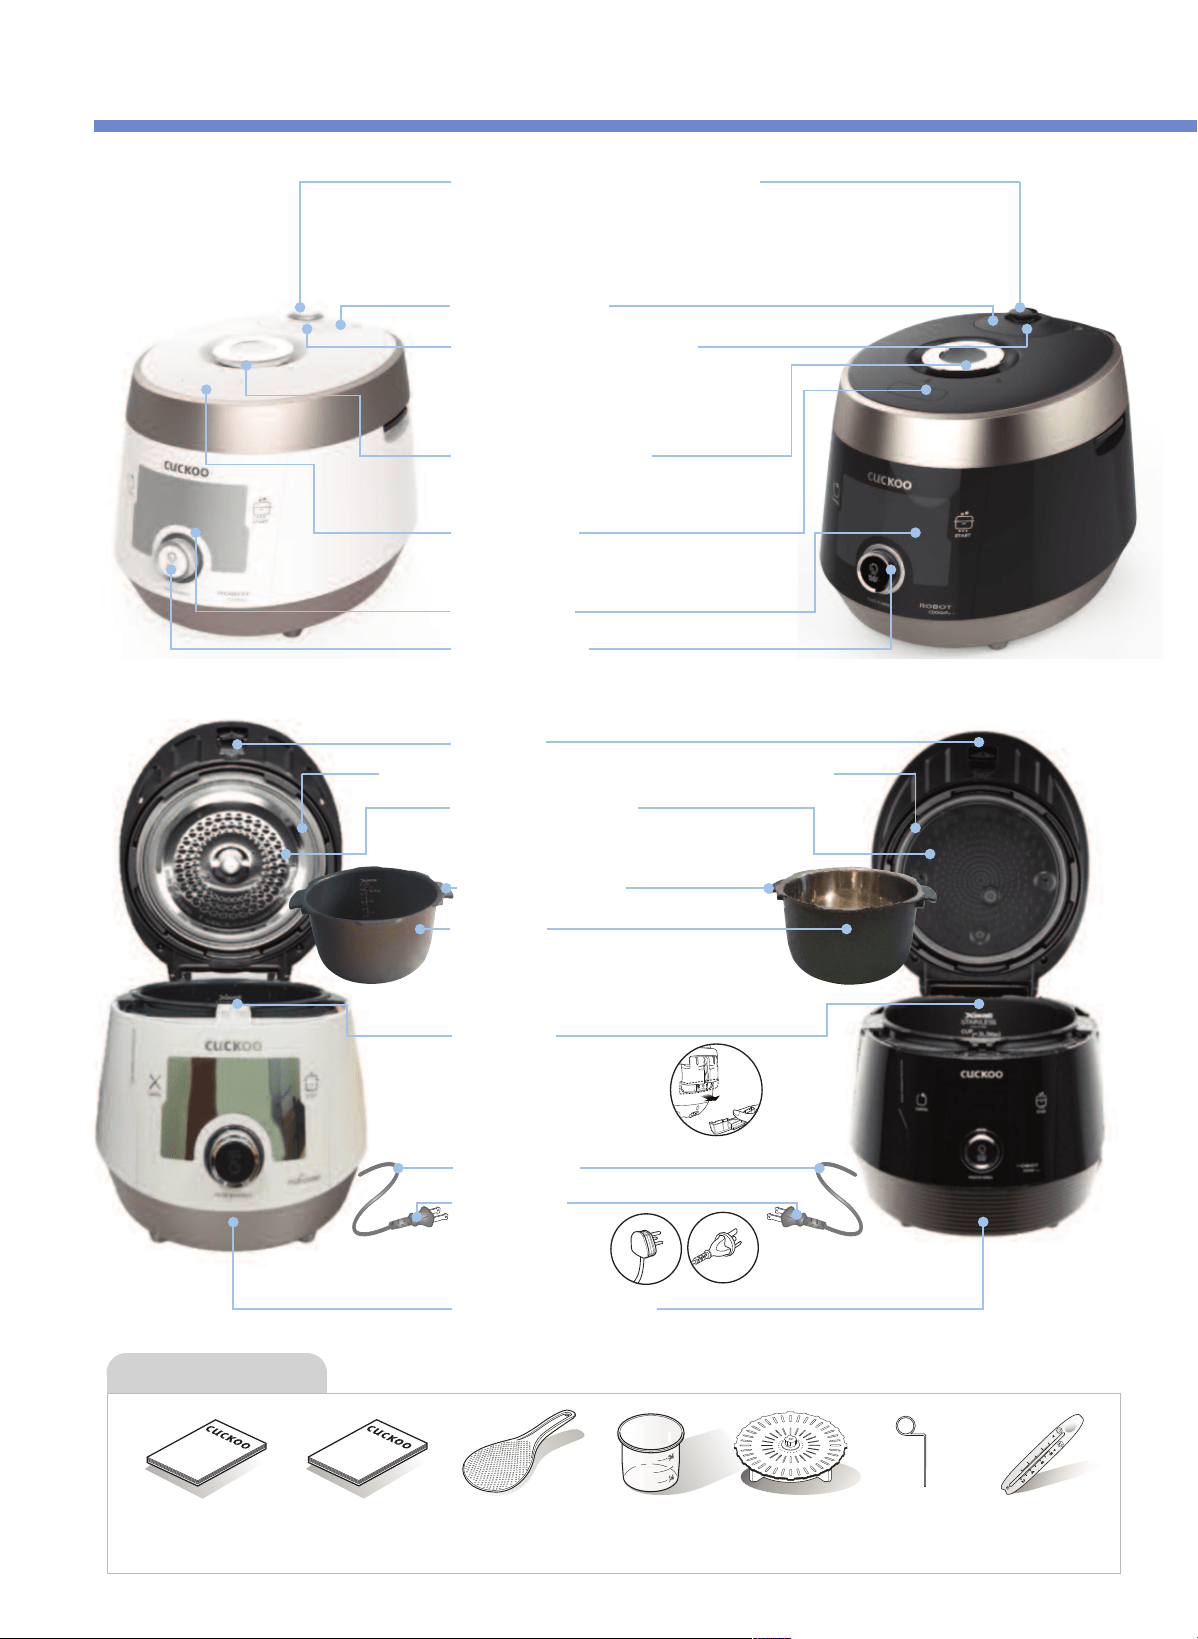
Automatic Steam Exhaust
Outlet
When cooking is finished or in
w
arming mode, steam releases
automatically.
Digital Programmed Steam Releaser
(Solenoid Valve)
Keep the pressure weight horizontally. It
stabilizes steam inside. When the pressure
weight spins, it releases steam.
Lock/Unlock Handle
The handle has to be in ‘Lock’ position to
operate.
Clamp Knob
Turn handle to ‘Unlock’, and then press
Clamp knob to open.
※
Pictures may look different from the actual product
FND Display
JOG DIAL
Drain Dish
Pour out water from drain dish
after cooking or during ‘Warming’
mode. Otherwise, an odor(s) may
occurs
Power Cord
Power Plug
Temperature Sensor
Detachable Cover
ICOOK A5 PREMIUM: STS + STS Detachable Cover
ICOOK A5 SUPERIOR: Diecasting(No Detachable Cover)
ICOOK A5 PREMIUM: STS+NON STICK COATING
ICOOK A5 SUPERIOR: STS+NO COATING
Lid Assy
Accessories
Operating Instruction Cooking Guide Rice Scoop Measuring Cup
C
U
P
L
I
T
E
R
1
L
2
L
3
L
(
M
A
X
)
Volume Gage
(Only applies to
ICOOK A5 SUPERIOR )
Steam Plate
Dual Motion Packing
Insert the inner pot into multi cooker.
Inner Pot
Inner Pot Handle
The plug type may
differ from the actual.
(this is only to explain
about how it works.)
Cleaning Pin
(Attached on the
bottom of the unit)
NAME OF EACH PART
10
Manual
Cook
ing Guid
Soft Steam Cap
ICOOK A5 PREMIUM ICOOK A5 SUPERIOR
Packing
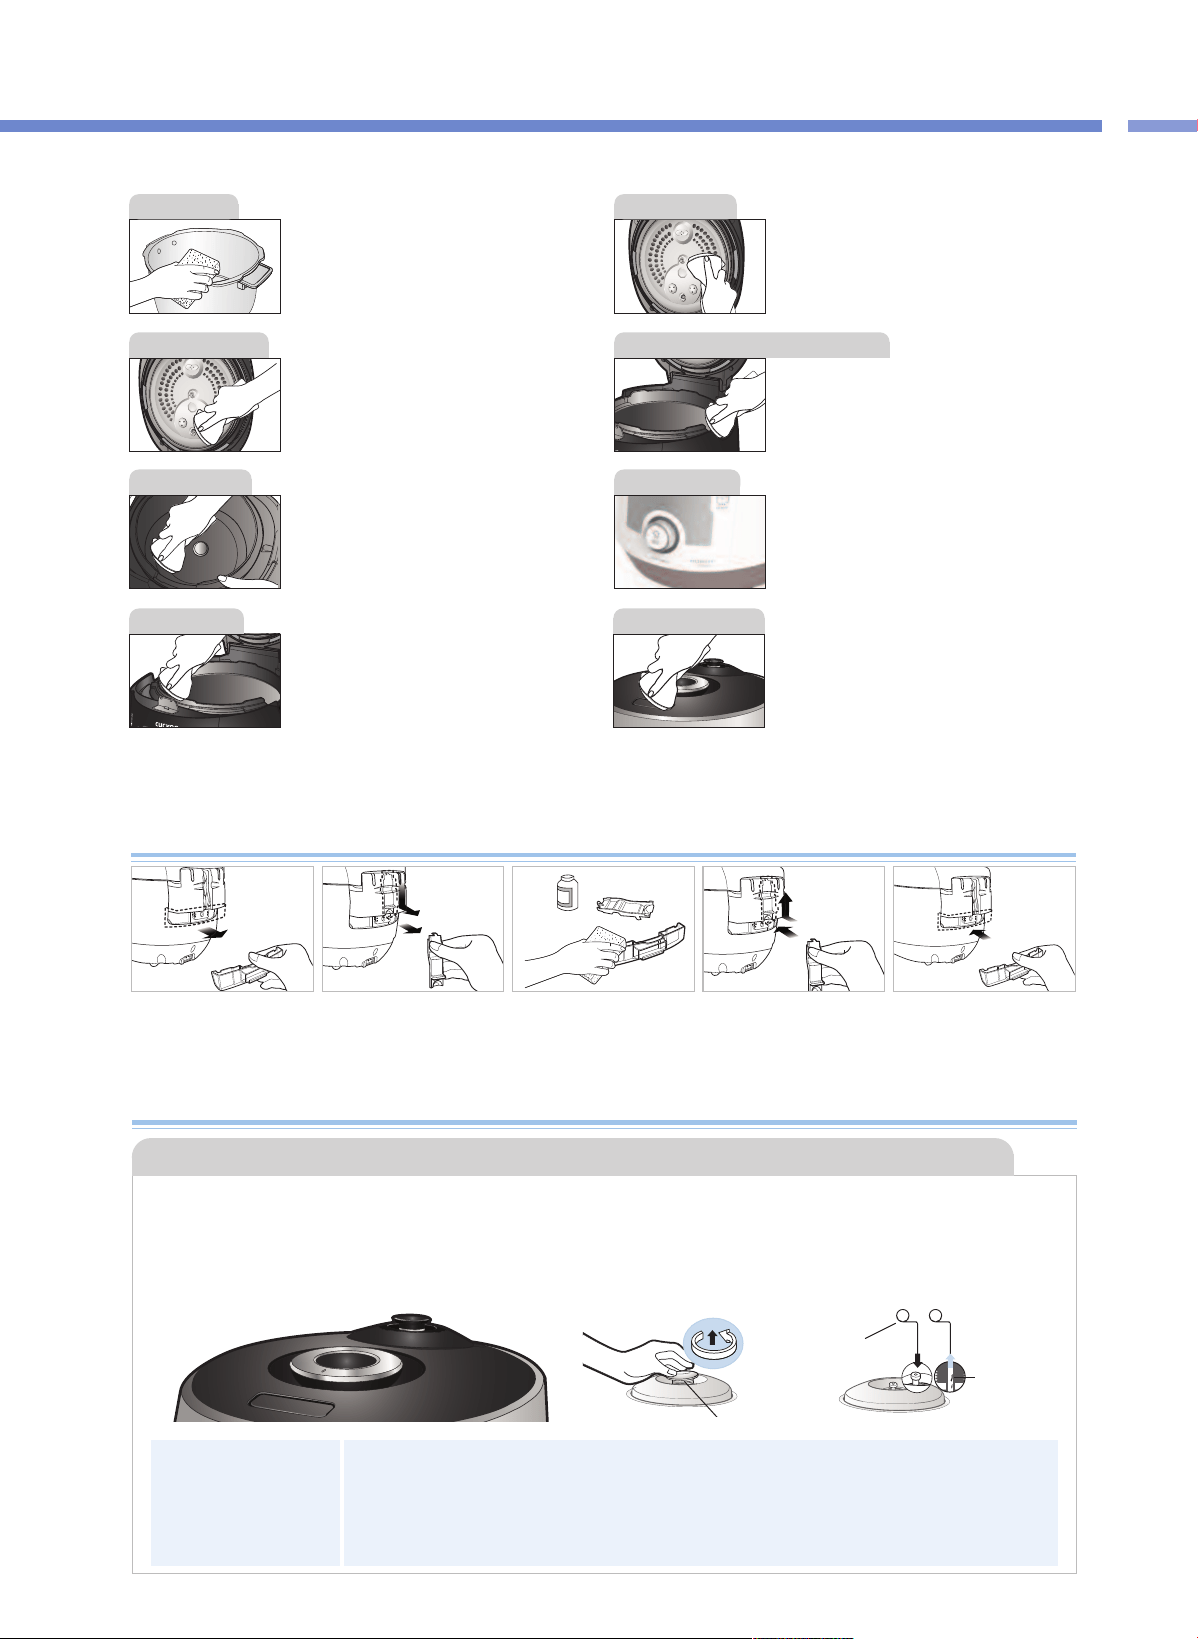
Wipe the inner, upper, and outer parts of the
inner pot of any foreign substance.
If there is rice water left on the lid, please wipe
clean with a wet towel. The center of the lid is
made out of metal so beware when cleaning.
※P
ictures may look different from the actual product
TOP COVEr
Wipe the top cover with a damp cloth.
Be careful when cleaning the top heater
※P
ictures may look different from the actual product
OVEn PACKInG
This part is designed to gather the moisture
coming through the steam vent during
cooking. Once cooking finished, wipe it clean
with a well wrung dish cloth.
Moisture dish of the main body
In case the cauldron is stained with cooked rice
water or foreign matter, wipe the cauldron with a
damp dishcloth. Using a rough scouring pad,
brush, or etc. may damage the cauldron surface.
If the buttons are not functioning correctly,
please contact our customer care service.
COnTrOL
If there are foreign substances stuck on the
temperature sensor, remove them without
damaging the metal plate. Cleanly wipe the
foreign substances or any moisture on the
heat plate.
InnEr BODY
Wipe the main unit with a damp cloth.
※
Caution
Do not clean the inside of the inner pot with any sharp cutlery (fork, spoon, chopsticks, etc.).
- The coating of the inner pot may peel off.
MAIn UnIT
Before or after use, please wipe around the Lid
Open button and remove rice water or any
other foreign substances using a wet towel.
Before or after use, if the Lid Open button does
not work, please contact customer service.
LID OPEn BUTTOn
InnEr POT
❶ Separate the drain
dish.
❷
Separate the drain
dish cap by pushing
it down.
❸
Clean the drain dish
cap and drain dish
with a neutral
detergent.
❹
Securely put in the
drain dish cap after
cleaning
❺
Insert the drain dish
firmly by pressing it in
direction of the arrow
(as shown in the
picture above).
How to Clean Drain Dish
How to Clean The Pressure Weight Nozzle
•The valve hole of the pressure weight allows steam to release. Check regularly to ensure that it is not
blocked. If the valve hole of the pressure weight is blocked, the hot steam and hot content within the
cooker can cause serious injury.
※Do not use the cleaning pin for any other use except to clean the valve hole of the pressure weight.
If the valve hole underneath the pressure weight is clogged, puncture it with the cleaning pin
How to
Disassemble the
Pressure Weight
▶Under the Lock/Unlock handle is the steam cap that guards the pressure weight. To remove the
pressure weight, remove the steam cap, turn the pressure weight counter-clockwise while pulling
it up, and keep turning until it comes out.
▶Puncture the clogged valve hole with the cleaning pin and reassemble it by turning it clockwise.
▶When the pressure weight is properly assembled, it can freely be turned.
Soft steam cap
Cleaning Pin
※Attached on the
bottom of the
unit
Alien
substance
Pressure Weight
a neutral
detergent
11
HOW TO CLEAN
HOW TO CLEAN
※Pictures may look different from the actual product
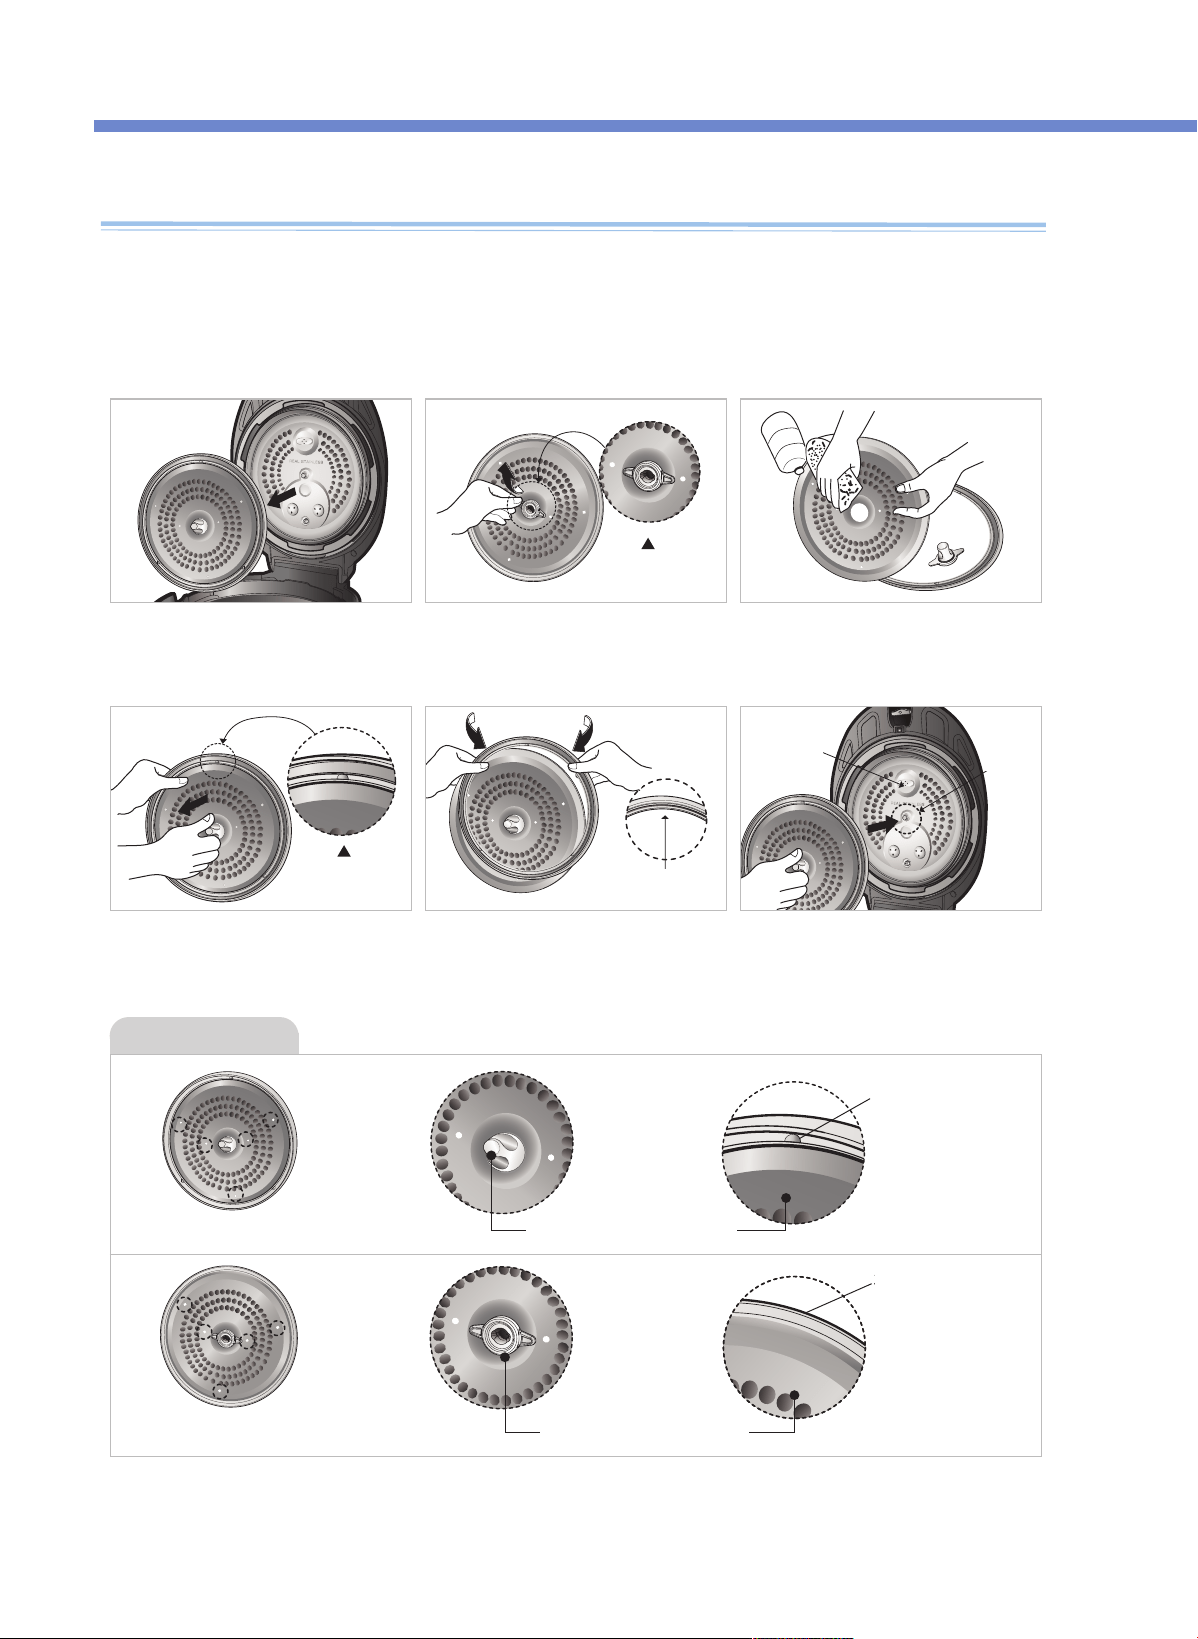
① If you pull out the detachable
cover, indicated by the arrow, it can
be easily separated.
③
Frequently, clean the cover with a
sponge and a neutral detergent.
② When cleaning the detachable cover,
hold and pull out the both side wing
of the cover, and then separate the
handle and the rubber packing.
⑤When you fix the rubber packing along
the detachable cover edge, hold it
between and put insert the edge of
the detachable cover by turning it.
④
Please put the detachable cover.
⑥
When putting the cover into the lid,
press the cover handle after fitting the
handle into the groove indicated by
the arrow.
Lid of the
inner pot
the back side
the front side
the back side of
cover packing
A groove
Correct Example
-Cle
a
n
t
h
e
d
e
t
a
c
h
a
b
le
c
o
ve
r
t
o
p
r
e
ve
n
t
o
d
o
r
s
.
-Cle
a
n
t
h
e
b
o
d
y a
n
d
c
o
ve
r
w
it
h
a
d
r
y d
is
h
t
o
w
e
l. Do
n
o
t
u
s
e
m
e
t
a
llic
s
c
r
u
b
b
e
r
s
-Do
n
o
t
p
u
t
m
a
t
e
r
ia
ls
lik
e
s
c
r
e
w
s
in
t
o
t
h
e
h
o
le
s
o
f
t
h
e
d
e
t
a
c
h
a
b
le
c
o
ve
r
. Ch
e
c
k
t
h
e
b
a
c
k
c
o
ve
r
a
n
d
f
r
o
n
t
c
o
ve
r
.
D
e
t
a
c
ha
b
l
e
C
ov
e
r
&
P
re
s
s
ure
P
a
c
ki
ng
(
On
l
y
a
p
p
l
i
e
s
t
o
I
COOK
A5
PR
EMI
UM)
A
ft
er
cl
ean
i
n
g
t
h
e
det
ach
abl
e
cov
er
,
pu
t
i
t
back
on
t
h
e
l
i
d.
U
nles
s
t
he
d
et
achab
le
co
v
er
is
m
o
unt
ed
,
p
res
et
co
o
k
ing
canno
t
b
e
d
o
ne.
T
he
d
et
achab
le
co
v
er
m
us
t
b
e
m
o
unt
ed
o
r
t
he
p
res
et
co
o
k
ing
o
p
t
io
ns
canno
t
co
m
m
ens
e.
(
Alarm
m
ay
s
o
und
w
hile
k
eep
ing
w
arm
.
)
※Do not put substances like a screw into hole of detachable cover.
(Do not alter the Detachable Cover holes with substances like screws, nails, ect...)
※Look in the back cover and the front cover.
Front of packing Front of handle
Projection
presenting the
front
No projection
Back of packing
Back of handle
HOW TO CLEAN (ICOOK A5 PREMIUM)
12
•
proper maintenance of the pressure packing helps keep the unit airtight. Also, adds durability to packing and ensures the taste of the food.
•
Read the directions below carefully to install your packing properly.
How to remove and clean the pressure packing
How to install the Dual Motion Packing / Packing (ICOOK A5 PREMIUM , SUPERIOR)
The all-stainless cover is not only delamination-free and easy to clean, but it also lasts long,
In addition, CUCKOO’s special stainless CSV-a CUCKOO’s patented technology, improves the
product’s durability and makes it easier to clean.
①
Unplug the power cord and wait until the
pot cools down before opening the Top
Cover.
※ICOOK A5 SUPERIOR : Pictures may look different from the actual product
③
After hand washing the pressure packing
with a neutral cleaning liquid and a
sponge, wipe it clean with a well wrung
dish cloth.
②
To remove the pressure packing, hold it as
shown in the picture above and pull it out.
▶Figure.1
Standard points
on the pressure packing.
Standard notches
on the Inner Pot lid.
2
4
5
1
3
6
• First match the standard notches on the Inner Pot lid with the standard points on the pressure packing following the numerical order (1, 2, 3, 4, 5, 6).
Then, press the outer rim of the packing to insert it into the groove. To reassemble the pressure packing follow the order described below:
1
How to reassemble the pressure packing
2
② After matching the standard points 1 to 6, press the rest of the packing into the
groove by pushing on its outer rim.
①As the Figure 1 shows, put the point #1 on the pressure packing with the standard
notch #1 on the Inner Pot lid together before pressing the outer rim of the packing
to insert it into the groove. Repeat with points #2 to # 6.
13
HOW TO CLEAN
HOW TO CLEAN
①
Visual inspection
•
check the entire circumference carefully for any crack or damage between
the Inner Pot lid and the pressure packing.
Since a badly assembled packing can cause the rice/food to be half-cooked or burned by steam leakage, double
check the packing thoroughly as described below.
(look for parts sticking out of the inner) (look for parts sticking out of outer rim) (look for parts sticking out of damaged parts)
③ Water boiling test
• Pour water into the Inner Pot up to water level 2 (for “Rice”) and press the Menu/Selection button to select the self-cleaning mode.
Then push the Pressure Cook button.
• Within 10 minutes, the pressure regulator weight will start rattling and hissing while emitting stream. If there is no steam coming out from the
pot other than through the pressure regulator weight the packing has been properly installed.
• If steam comes out from other parts, stop the test and pull out the power cord. Wait until the pot unit cools down before removing the
pressure packing from the lid. Once reinstalled repeat the boiling test.
• For a more precise water boiling test, you can wrap plastic around the circumference of the closed Top Cover. By doing so, you can easily
check where the steam leakage is.
• If you still have a problem with reassembling the packing, please contact our Customer Service.
②
Physical inspection
• Check if the pressure packing is thoroughly
put into the groove by rubbing the inside rime
of the packing with a finger around the entire
circumference as shown in the picture above.
• Check if the pressure packing is properly put
into the groove of the Inner Pot lid by pushing
the outer rim with a finger around the entire
circumference as shown in the picture.
• Check if the pressure packing is thoroughly
put into the groove by pushing the inside of
the rim packing with a finger around the entire
circumference as shown in the picture.
How to double check whether the packing is well assembled
3
Normal
assembly
Abnormal
assembly
Normal
assembly
Abnormal
assembly
HOW TO CLEAN
14
※ICOOK A5 SUPERIOR : Pictures may look different from the actual product.
The method of installation for Dual Motion Packing / Packing is same.
(ICOOK A5 PREMIUM / SUPERIOR)
1. Simple Ways to Clean Stainless Steel Inner Pot
15
HOW TO CLEAN
HOW TO CLEAN
Recommended detergent for inner pot cleaning (inside, outside)
Recommended Not recommended
Cloth, Sponge, Microfiber
sponge, Net sponge
Sting sponge, Scrubbing Sponge,
sting or stainless steel material scrubber
•
Not recommended: May scratch the coating and cause peeling of the inner pot.
OPTION 1
1. Put 10g of Citric Acid or Baking Soda(You may put more if you needed) with 3 L of water into the inner pot.
Close the Lid and lock “ ” the handle.
※ Please use Food Citric Acid / Baking Soda.
2. Select the AUTO CLEAN function using MENU button, and press COOK.
3. Wash with warm water once it’s done.
※ Caution Hot surface: BURN HAZARD. PLEASE BE CAREFUL OF HOT SURFACE.
4. Use dry cloth to dry off and desiccated.
※ information
- Transitory change such as rainbow stain or darkness in stainless steel can occur while cooking.
(Mineral phenomenon is a natural phenomenon, that occurs while your cooking which is harmless to the human body)
- Stainless steel discoloring is caused when salt water or acidic fluid settles for a long period of time.
- Please do not use chlorine or any chlorine base detergent to wash stainless steel.
2. Cleaning SUPER stubborn burnt residue
1. Put water (3L) into the inner pot. Close the Lid and lock “ ” the handle.
※ You may add baking soda if necessary.
2. Select the AUTO CLEAN function using MENU button, and press COOK.
3. Once it’s done, use the wooden spatula to strip off the burns and wash with warm water.
※ You may add baking soda if necessary. Use the wooden spatula to clean burned-on food.
4. Use dry cloth to dry off and desiccated.
OPTION 2
1. Put 3 L of water with 1/3 cup of Vinegar into the inner pot. Close the Lid and lock “ ” the handle.
2. Select the AUTO CLEAN function using MENU button, and press COOK.
3. Wash with warm water once it’s done.
※ Caution Hot surface: BURN HAZARD. PLEASE BE CAREFUL OF HOT SURFACE
4. Use dry cloth to dry off and desiccated.
Here is a guide on how to clean burnt food and remove stains from your stainless steel inner pot.
Please follow the direction below to preserve your inner pot.
(It is recommended to wash the inner pot in clean water before use.)
Citric Acid /
Baking Soda
Vinegar
①
Water
②③④
①②③④
①②③④
HOW TO CLEAN
16
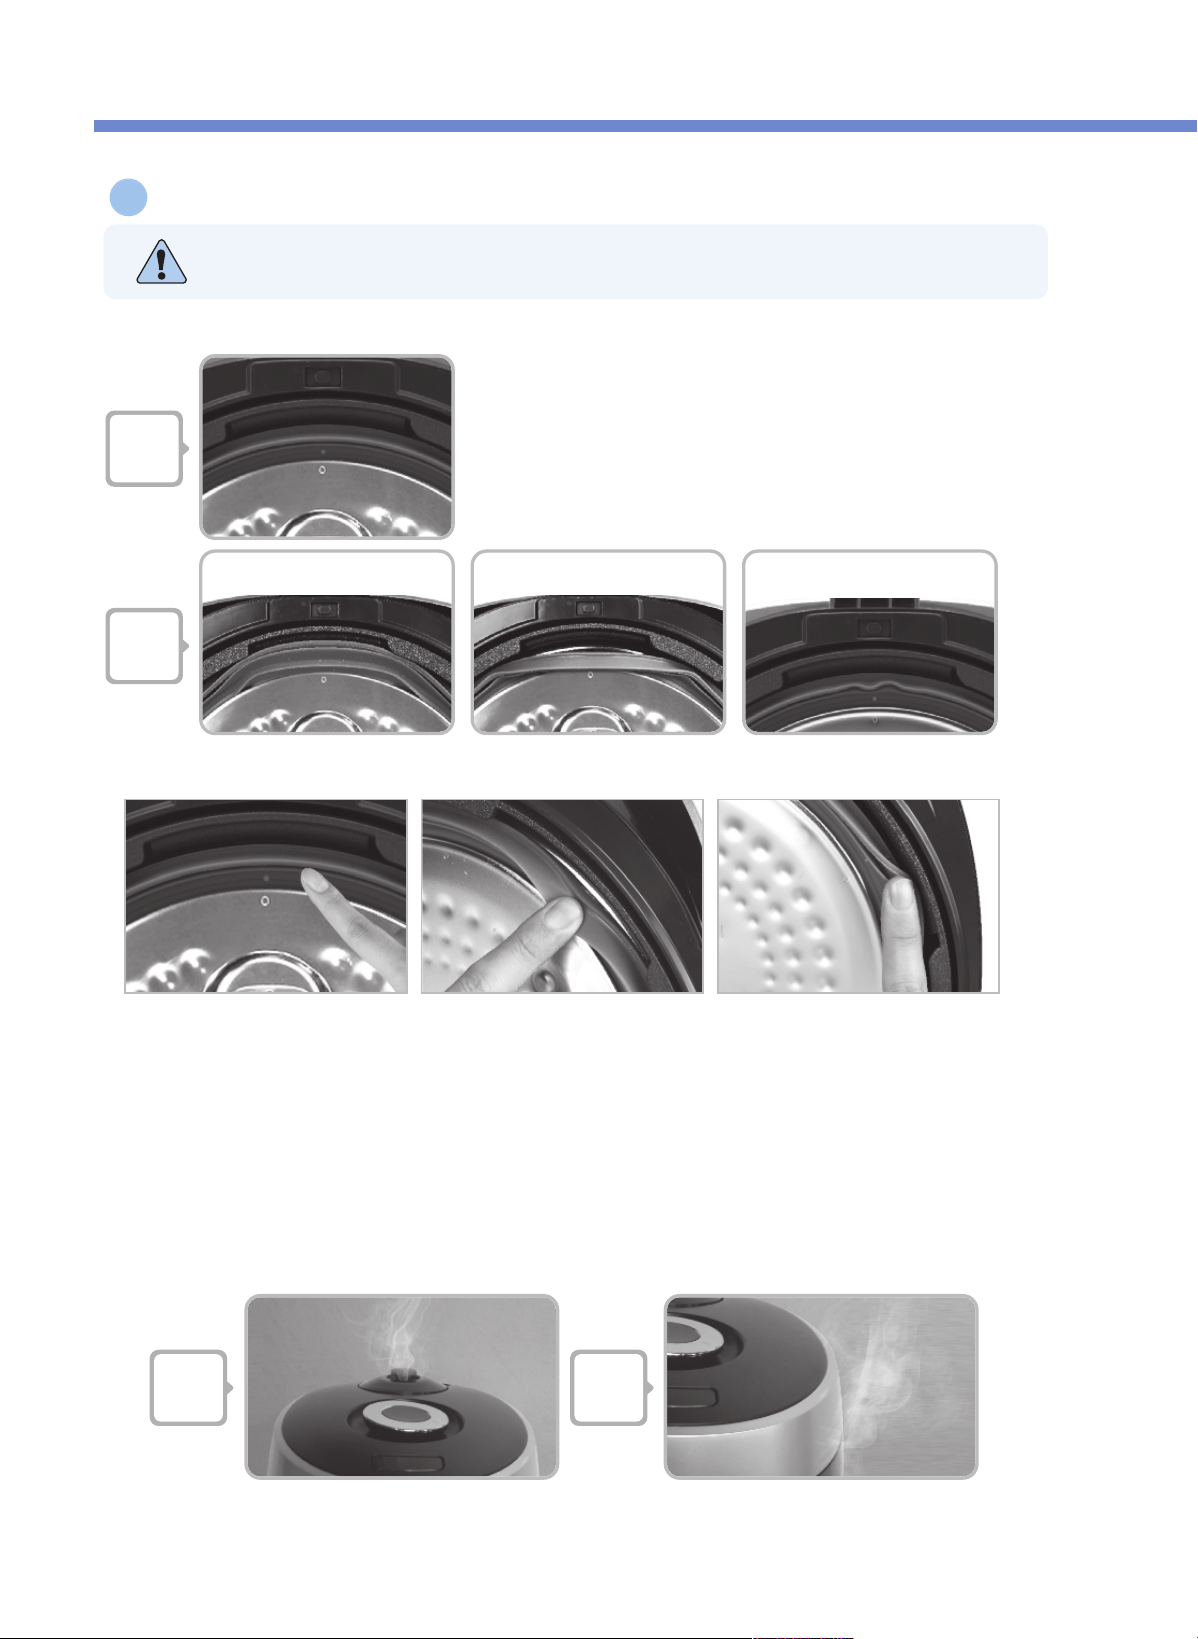
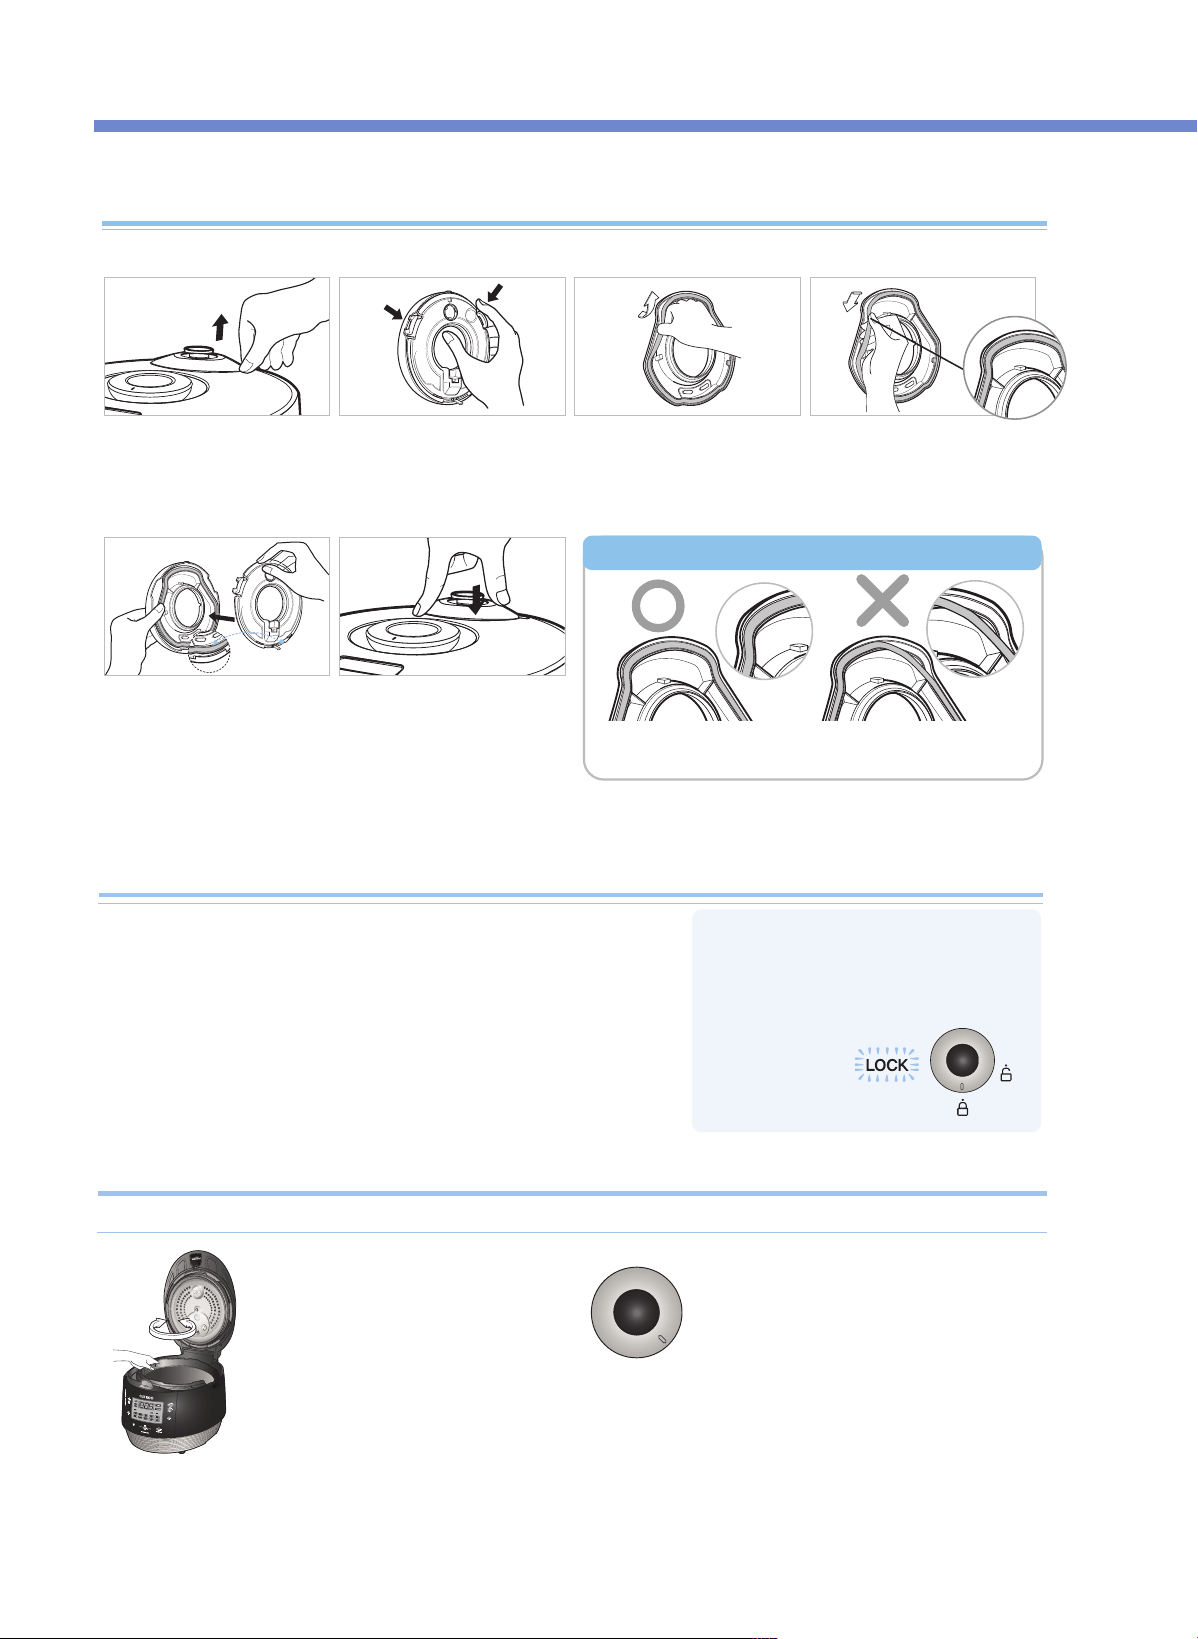
How to use the handle
•If the lamp does not turn on, it would
not operate the “Cook” and “Preset”
buttons. Make sure the handle is
located in “Lock”.
2. To close the top cover turn the
handle to unlock shown in the
picture on the right. (Make sure
to turn the handle to "unlock".)
1. Make sure the inner pot is
place correctly inside the main
body.
3. If there is excess steam inside the
inner pot, it may be difficult to lock the
handle. Cautiously pull up the pressure
weight and allow the excess steam to
release. Then try to turn the handle
again.
When top cover does not close perfectly
Do not try to close the top cover by force. It may damage your cooker and cause problems.
1. After cooking, turn the handle from “Lock” to “Unlock” to open
2. If there is unreleased steam in the Inner pot it maybe difficult to
turn the handle. In this case, twist (cautiously pull up) the
pressure weight and let the excess steam out. (See more detail
of the pressure weight on page 11.) Do not open by force.
3. Handle must be turned to “Unlock” to open and close the lid.
※
Pictures may look different from the actual product
How to clean the soft steam cap
※ Do not touch the surface of the soft steam cap right after cooking. You can get burned.
❶ Peel off the soft steam cap as
shown in the image above by
grasping the dented part with
your fingers and pulling to the
side while lifting gently.
❺ When you are putting the
soft steam cap together, match
the bump on the bottom, press
it towards the arrow and
make sure the hook in the
front is locked.
❻ When installing the soft
steam cap, insert the cap
firmly by pressing it in the
direction as shown above.
Correct
올바른 패킹사용 예
Wrong
※ Carefully insert the packing the correct way.
❷ Disassemble soft steam cap
in the rear by pressing in the
direction of arrow and ash it
frequently with an neutral
detergent of sponge.
❸ Disassemble the rubber
packing in the direction of
the arrow.
❹ When fitting the rubber
packing into the plate, please
make sure the packing is
facing the correct direction.
How to check if your packing has installed properly
17
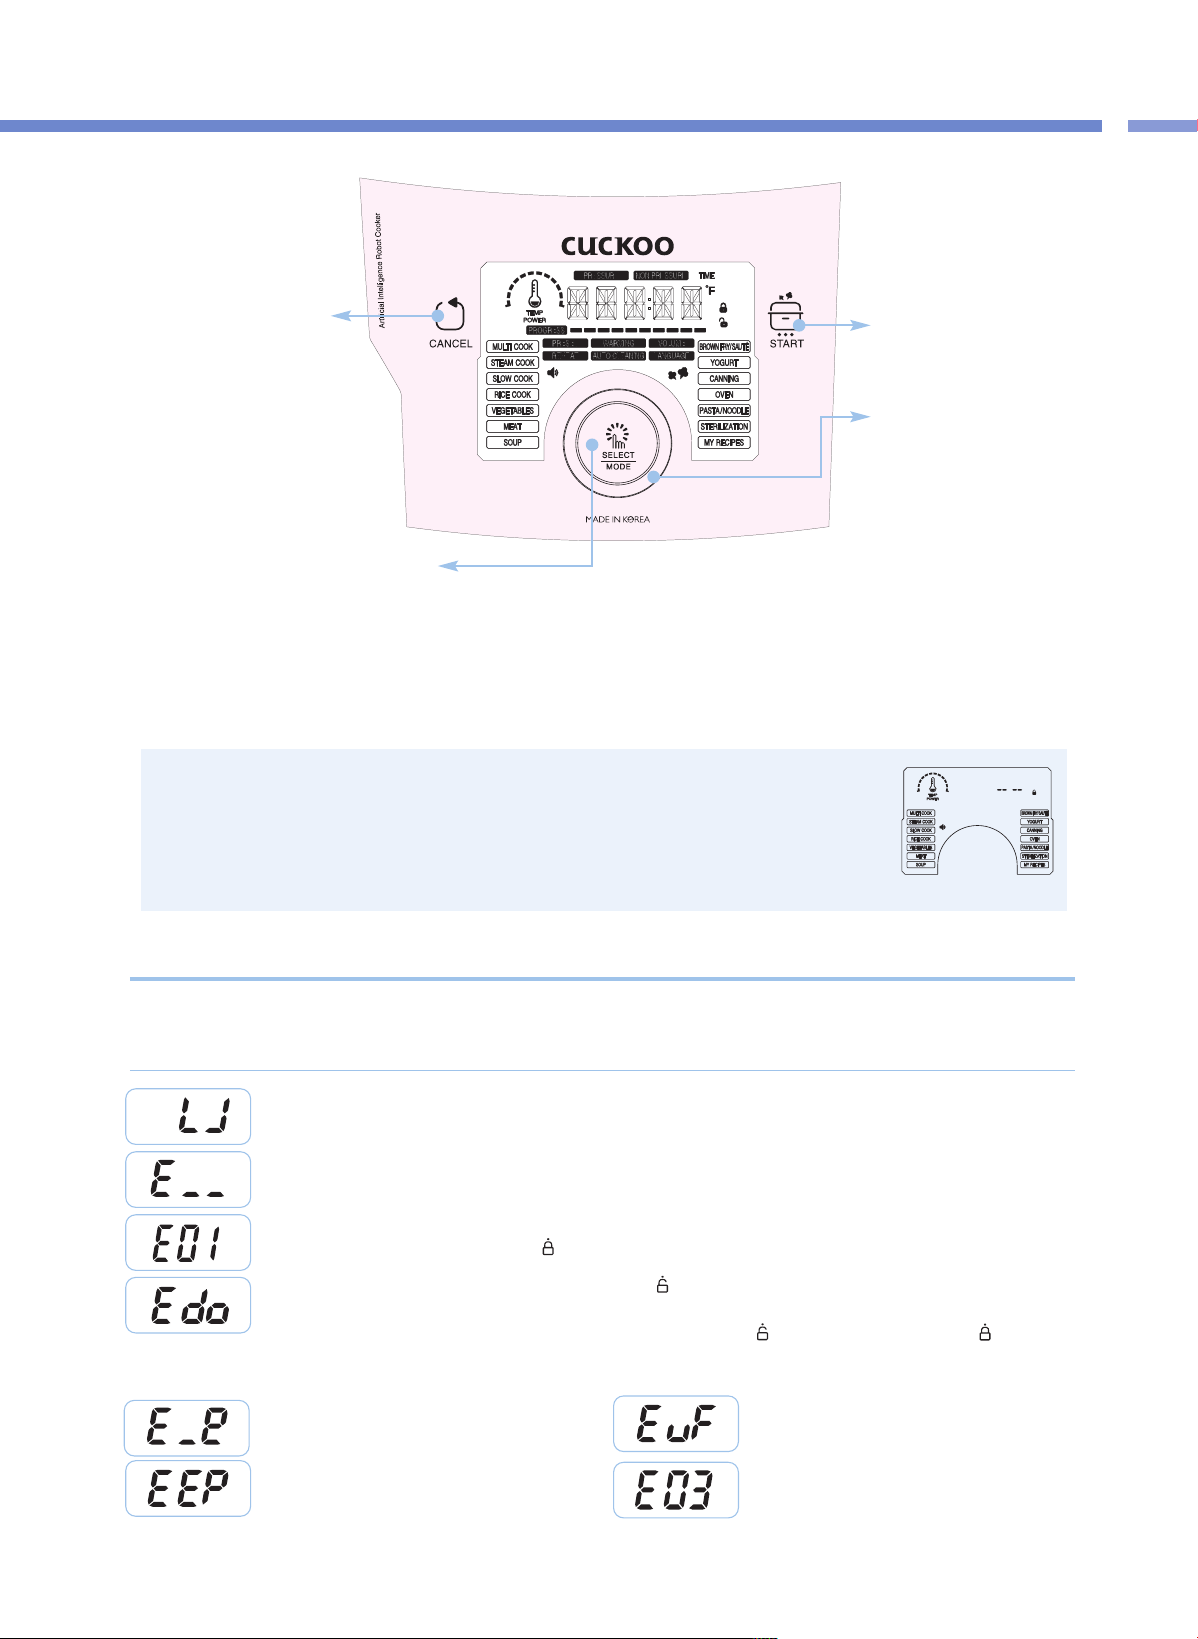
NAMES AND FUNCTIONS ON CONTROL PANEL / MALFUNCTION INSPECTION OF DISPLAY PANEL
HOW TO CLEAN / CONTROL&DISPLAY PANEL
※
When the product is plugged in and no operation is being conducted. the product is in
Standby Mode. The in screen image showing on the right indicates Standby mode.
(The options of the Standby mode display and presence of the voice are different according
to user setting.)
※
When operating functions, press the CANCEL button to enter the Standby mode.
※
Press the button until you hear the buzzer sound. The design of the plate may differ in reality.
START button
Used to start cooking
JOG DIAL
· 메뉴를 변경할 경우
· 사용자 모드 메뉴를 변경할 경우
· 예약시간, 요리시간, 요리온도 등을
변경할 경우
CANCEL button
Used to cancel a selected
function or to automatically
discharge steam(Press and hold
the button for two seconds to
cancel during cooking.)
SELECT / MODE button
· 선택한 기능을 설정 할 경우.
·
Used to enter user mode.(Press and hold the button for two seconds)
<Standby Mode>
This appears when the Inner Pot is not mounted.
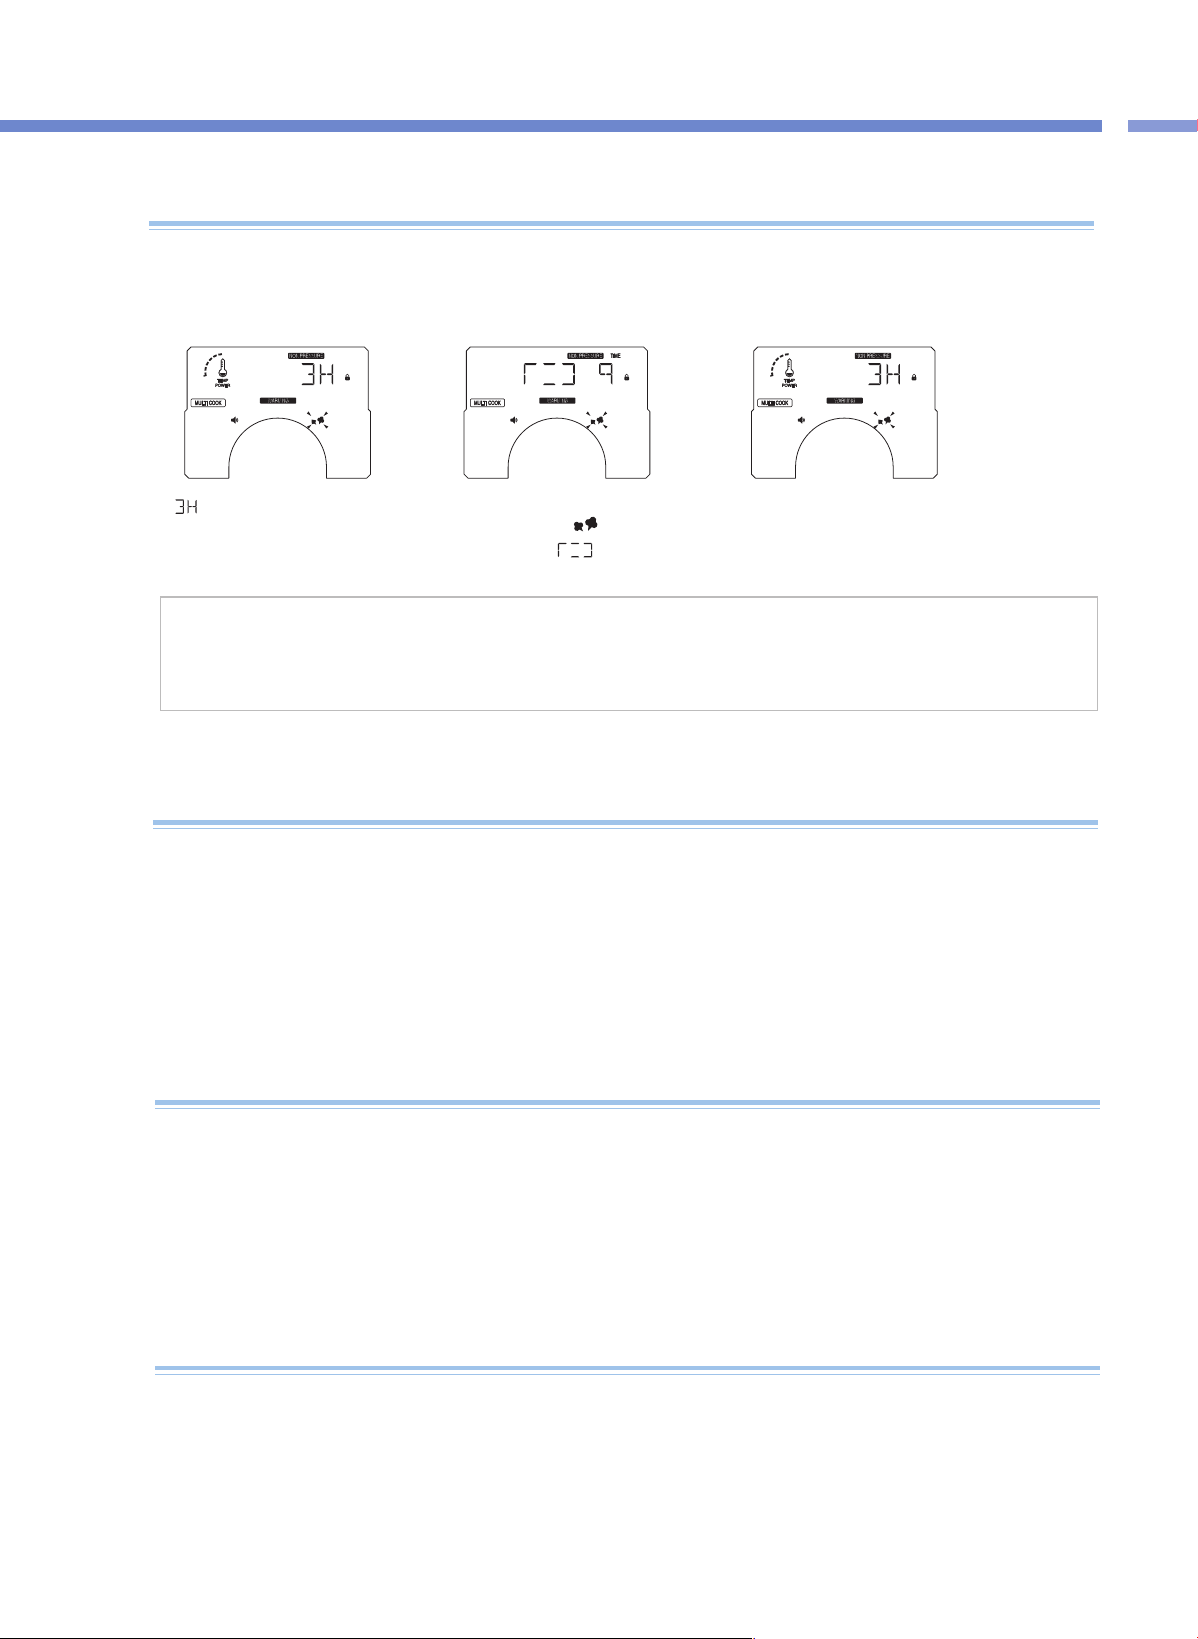
This indicates that the Temperature Sensor is malfunctioning.
Contact our customer service center.
This appears when you press the COOK or PRESET button without completely turning the Cover Handle.
Completely turn the Cover Handle to “ ” (Lock).
For any incorrect use or when the product is not properly working, the Display Panel will display the below
signs to alert you. If a sign keeps showing even in normal conditions or after proper action has been taken,
please contact our customer service center.
Error Inspection Function of Display Panel
This appears when the Cover Handle is not turned to “ ” (Open) in the Keep Warm mode after cooking is done
and you press the COOK or the PRESET button again after entering into Standby mode. This function is to check the
operation of the Cover Fastening Sensor. Turn the Cover Handle to “ ” (Open) and then turn it to “ ” (Lock). If
the problem persists, contact our customer service center.
This indicates that there is an error with the external
memory of MICOM. Contact our customer service center.
This appears when you boil only water continuously or
there is a malfunction with the product.
Contact our customer service center.
This indicates that the Environmental Sensor fails
to work. Contact our customer service center.
This indicates that there is an error with the internal
memory of MICOM. Contact our customer service center.
※ Pictures may look different from the actual product
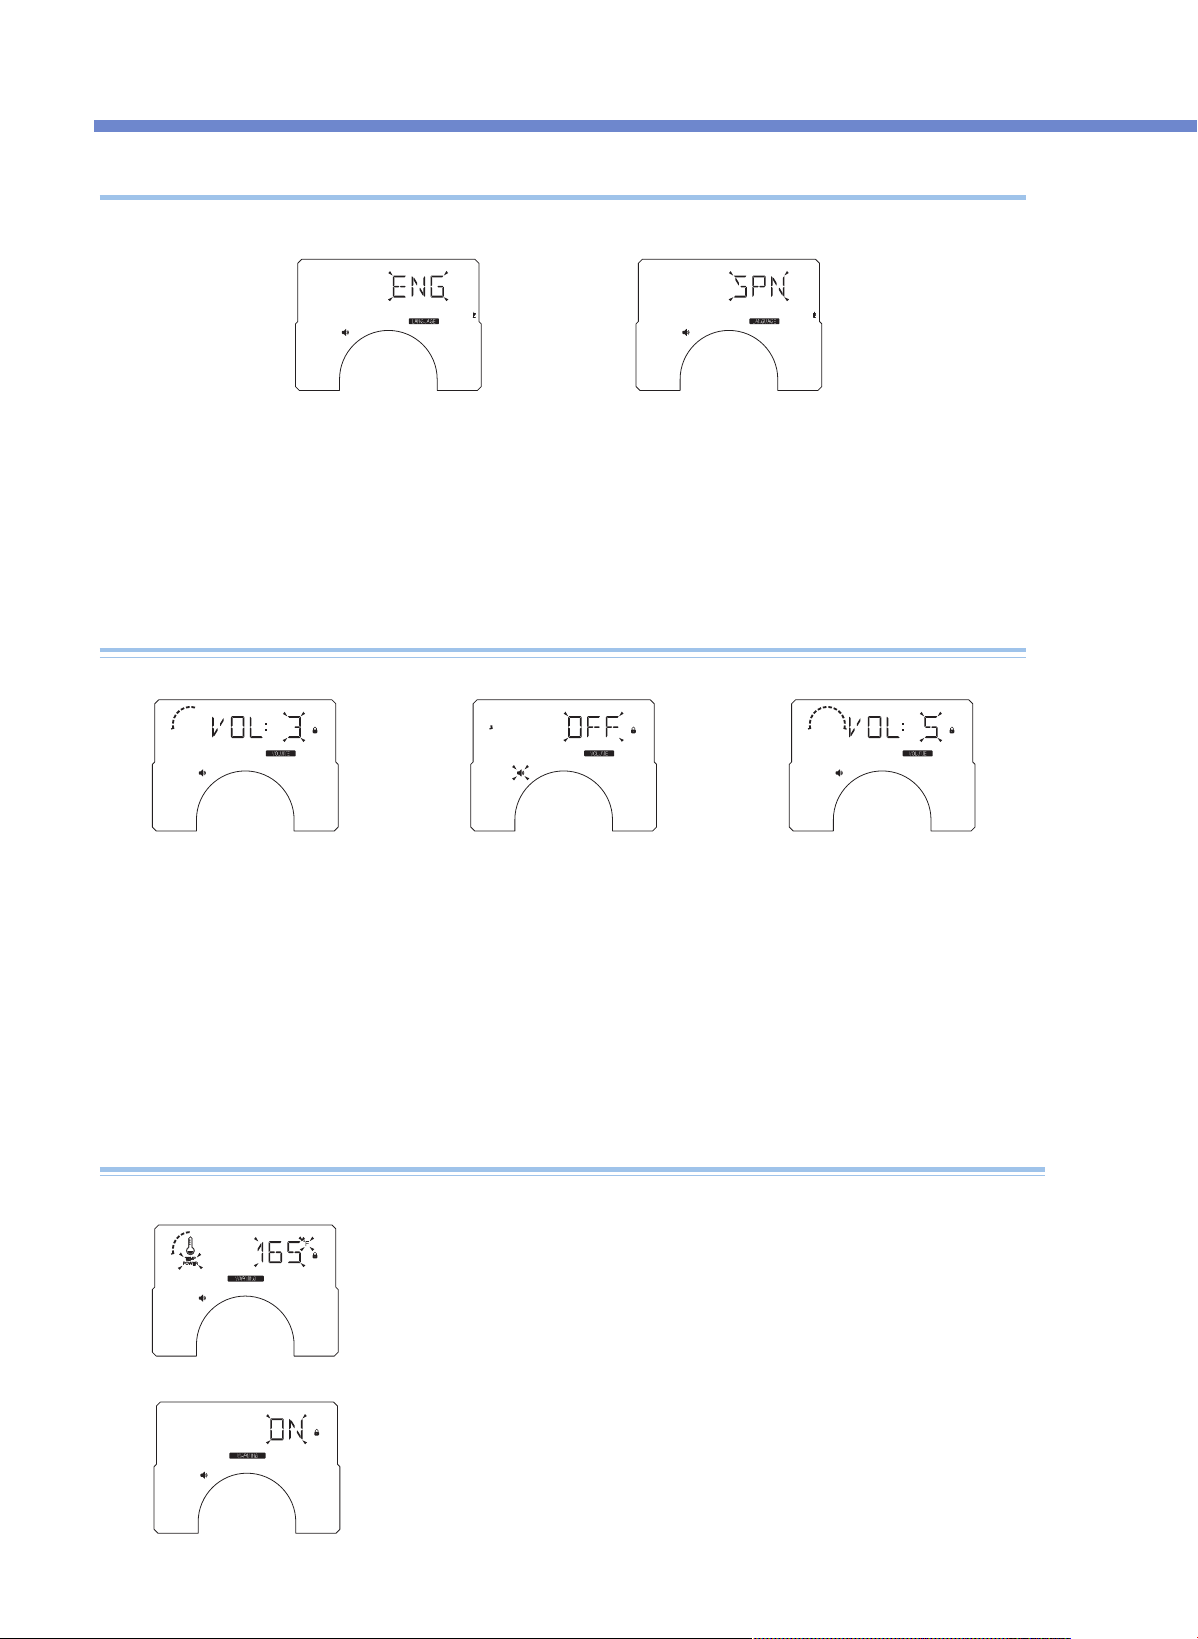
How to Adjust Voice Volume
(To reset the Voice function or adjust the voice volume)
You can select your preferred language(Engilsh and Chinese). The initial default voice setting is in English.
How to Set Language
1. When you press and hold the SETTING button for 2 seconds or longer in Standby Mode, you will enter the
language setting mode as shown in the Display Panel in the image above.
▶ If you press the CANCEL button or 7 seconds have elapsed without any button input, the function will be canceled without being set, and it
will return to Standby Mode.
2. Press the COOK button or the KEEP WARM /REHEAT button after selecting the preferred language, and the
function is set and the product returns to Standby mode.
HOW TO SET FUNCTION(LANGUAGE, VOLUME, KEEP WARM TEMPERATURE)
18
How to Adjust Keep Warm Temperature and Automatic Keep Warm
Food may go bad or smell if the Keep Warm temperature is not proper, so adjust the Keep Warm temperature.
e.g.) English voice guied e.g) Spanish voice guied
e.g.) volume : 3 Step
e.g.) 보온온도 설정 165℉
e.g.) 자동보온 설정 ON 상태
e.g.) volume off e.g.) volume : 5 Step
영어, 중국어, 스페인어 음성을 선택하는 기능으로 원하시는 음성설정이 가능합니다. 제품의 초기 상태는 영어음성 상태입니다.
1. 대기상태에서 SELECT / MODE 버튼을 2초 이상 누르면 사용자 설정모드에 진입합니다.
▶ CANCEL 버튼을 누르거나 아무런 버튼 입력없이 7초가 경과되면 기능이 설정되지 않고 취소되며, 대기모드로 돌아갑니다.
2. 사용자 설정모드에서 다이얼을 이용하여 “LANGUAGE”를 선택하고, SELECT / MODE 버튼을 누르면 음성안내 언어 설정 모드로 진입합니다.
3. 음성안내 언어 설정 모드에서 다이얼을 이용하여 영어, 중국어, 스페인어중 원하시는 언어를 선택한 후 SELECT / MODE 버튼을 누르면 언어가 변경됩니다.
▶ 음성안내 언어가 설정되면, 사용자 설정모드로 돌아갑니다.
1. 대기상태에서 SELECT / MODE 버튼을 2초 이상 누르면 사용자 설정모드에 진입합니다.
▶ CANCEL 버튼을 누르거나 아무런 버튼 입력없이 7초가 경과되면 기능이 설정되지 않고 취소되며, 대기모드로 돌아갑니다.
2. 사용자 설정모드에서 다이얼을 이용하여 “VOLUME”를 선택하고, SELECT / MODE 버튼을 누르면 음성안내 언어 설정 모드로 진입합니다.
3. 음성 볼륨 설정 모드에서 다이얼을 이용하여 1 ~ 5 및 OFF 단계의 음성 볼륨을 설정할 수 있습니다.
4. 원하시는 음성안내 볼륨 단계를 선택한 후 SELECT / MODE 버튼을 누르면 음성안내 볼륨이 설정되고, 사용자 설정모드로 돌아갑니다.
① 대기상태에서 SELECT / MODE 버튼을 2초 이상 누르면 사용자 설정모드에 진입합니다.
▶ CANCEL 버튼을 누르거나 아무런 버튼 입력없이 7초가 경과되면 기능이 설정되지 않고 취소되며, 대기모드로 돌아갑니다.
② 사용자 설정모드에서 다이얼 이용하여 “WARMING” 를 선택하고, SELECT / MODE 버튼을 누르면 보온온도 설정
모드로 진입니다.
③ 보온온도 설정 모드에서 다이얼을 이용하여 원하시는 보온온도를 선택한 후 SELECT / MODE 버튼을 누르면
보온온도 설정이 저장이 되고 자동보온 설정 모드로 진입합니다.
· 보온 설정 가능 온도 : 153℉ ~ 176℉
· Default 보온온도 : 165℉
④ 자동보온 설정 모드에서 다이얼을 이용하여 ON 이나 OFF를 선택하고 SELECT / MODE 버튼을 누르면 설정 저장되고,
사용자 설정모드로 돌아갑니다.
(* 자동보온이란, 요리 완료 후 자동으로 보온이 진행되는것을 말합니다.)
19
HOW TO PRESET COOKING
HOW TO SET FUNCTION / PRESET COOKING
뚜껑 결합 손잡이를“
”
(잠김)으로 맞춘 후 화면에“
”
램프 표시가 뜨면 대기모드에서 SELECT/MODE 버튼을 2초간
눌러 사용자 설정모드로 진입합니다.
사용자 설정모드에서 다이얼을 이용하여 “PRESET”을 선택하고 SELECT/MODE 버튼을 누르면 예약 설정모드로
진입합니다.
다이얼을 이용하여 원하시는 메뉴를 선택하고 SELECT/MODE 버튼을 누르면 해당 메뉴의 설정모드로 진입합니다.
▶ BROWN FRY/SAUTÉ, GABA RICE, SUPER GRAIN메뉴는 예약메뉴에서 제외됩니다.
예약 메뉴의 설정(요리시간, 요리온도, 압력/비압력 등)을 완료하고 SELECT/MODE을 누르면, 예약 시간 설정 모드로
진입합니다.
예약 시간 설정 모드에서 다이얼을 이용하여 원하시는 시간을 설정한 후 START 버튼을 누르면 예약요리가 시작됩니다.
▶ 뚜껑 결합 손잡이를“
”
(잠김)으로 맞추지 않고 START 버튼을 누를면 E01에러 표시가 뜨고 예약요리 시작이
되지 않습니다.
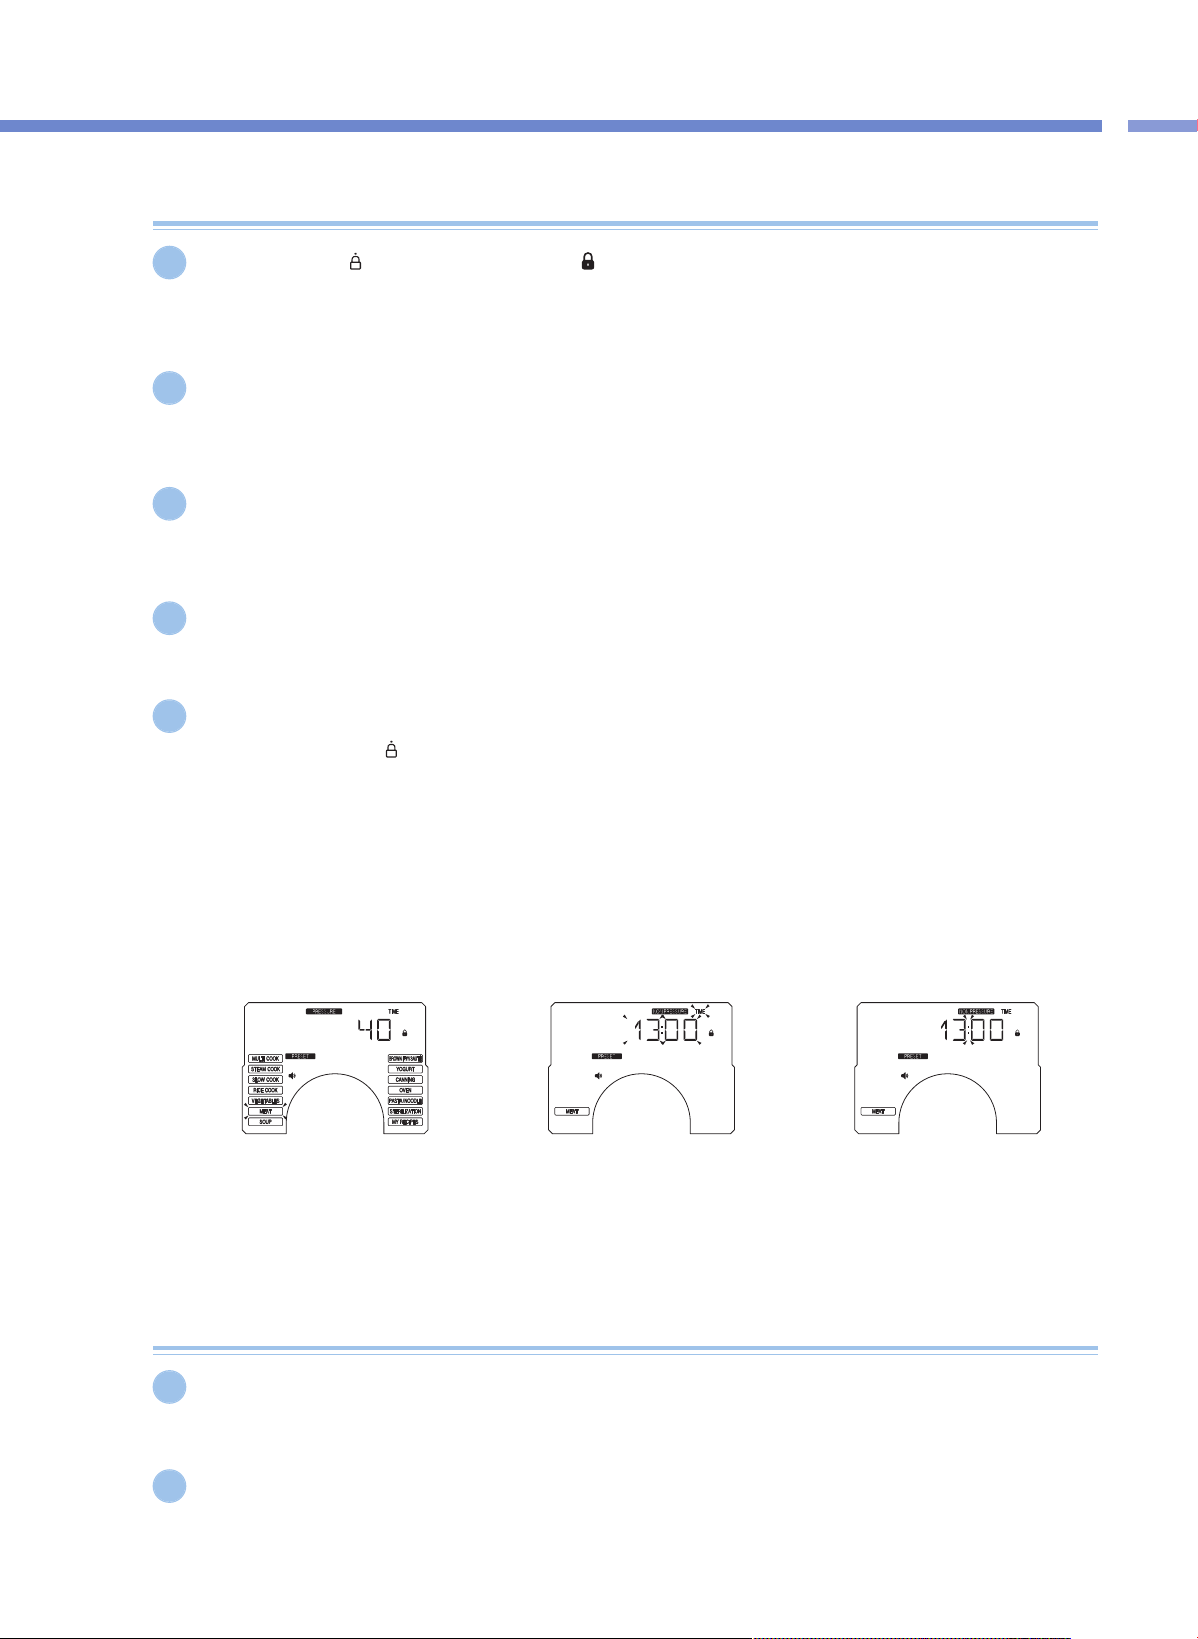
▶ 예약 시간 설정 후 SELECT/MODE를 누르면 설정 된 값들이 저장되고, 사용자 설정모드로 돌아갑니다.
▶ 보온 중에 예약 요리를 설정 하실 경우 CANCEL 버튼을 눌러 보온을 취소한 후 예약요리를 설정 해주세요.
▶ 예약 시간은 10분 부터 13시간까지 설정이 가능합니다. (10분씩 조절 가능)
▶ 예약 설정 된 시간은 예약 취사 완료까지 남은 시간입니다.
(요리 용량 및 사용조건에 따라 완료 시간이 다소 차이가 날수 있습니다.)
▶ 예약 설정 시간을 요리시간보다 짧게 설정하여 START 버튼을 누르면 요리가 바로 시작됩니다.
▶ 예약 요리 진행 시 “ : ” 표시가 깜박거립니다.
1
5
4
2
3
How to Preset Cooking
예약 요리를 할 경우
▶ 쌀이 개봉된 지 오래되어 매우 말라버린 경우에는 층밥이 되는 수도 있습니다.
▶ 예약 요리 용량이 많거나 장시간 예약 취사를 설정하실 경우 멜라노이징(미세 밥 눌음) 현상이 증가 할 수 있습니다.
예약 설정 변경
▶ 예약 설정 (예약 메뉴, 예약 시간, 예약 메뉴온도등) 을 변경할 경우 CANCLE 버튼을 1초간 눌러 취소시킨 후 다시
설정하십시오.
1
2
예약 요리 시 유의사항
e.g) 예약 메뉴(MEAT) 선택 시 e.g) 예약 시간 선택 시 e.g) 예약 요리 진행 중

COOKER SETTINGS OVERVIEW
20
COOKING
MODE
ADJUSTABLE
요리시간
설정 범위
요리온도
설정 범위
Pressure RECIPES
MULTI COOK
Cooking Time
& Temperature
& Pressure
15 ~ 90 minute
160℉ ~ 250℉
Pressure or
Non Pressure
상세 요리 레시피는
간편 요리북을 참고해 주십시오
.
MY RECIPES
STEAM
COOK
Cooking Time
& Temperature
210℉ ~ 260℉
Pressure
VEGEATABLES Cooking Time - Pressure
BEAN / CHILI Cooking Time - Pressure
STERILIZATION Time - Pressure
MEAT Cooking Time
25 ~ 90 minute
- Pressure
STEW Cooking Time - Pressure
OVEN
Cooking Time
& Temperature
10 ~ 90 minute
230℉ ~ 250℉
Non Pressure
SOUP Cooking Time
30 ~ 90 minute
- Pressure
CANNING Cooking Time
40 minute ~ 2 hour
- Pressure
PASTA /
NOODLE
Cooking Time
15 minute ~ 1 hour
- Pressure
BROWN FRY /
SAUTÉ
Cooking Time
& Temperature
1 minute ~
30 minute
230℉ ~ 290℉
Non Pressure
SLOW COOK
Cooking Time
& Temperature
15 minute ~ 12 hour
140℉ ~ 210℉
Non Pressure
YOGURT Cooking Time
1 ~ 12 hour
- Pressure
SUPER GRAIN
불림시간
0 or 3 hour
- Pressure
* All the pressure cook mode pressure range goes up to 80kPa.
* PRESET (Delay cooking timer offers up to 13:00 hour. You can preset the time when you want the multi cooker to start cooking.)
FIND MORE DEICIOUS RECIPES ON CUCKOOMULTICOOKER.COM
* Control Temperature may have difference from actual food temperature
21
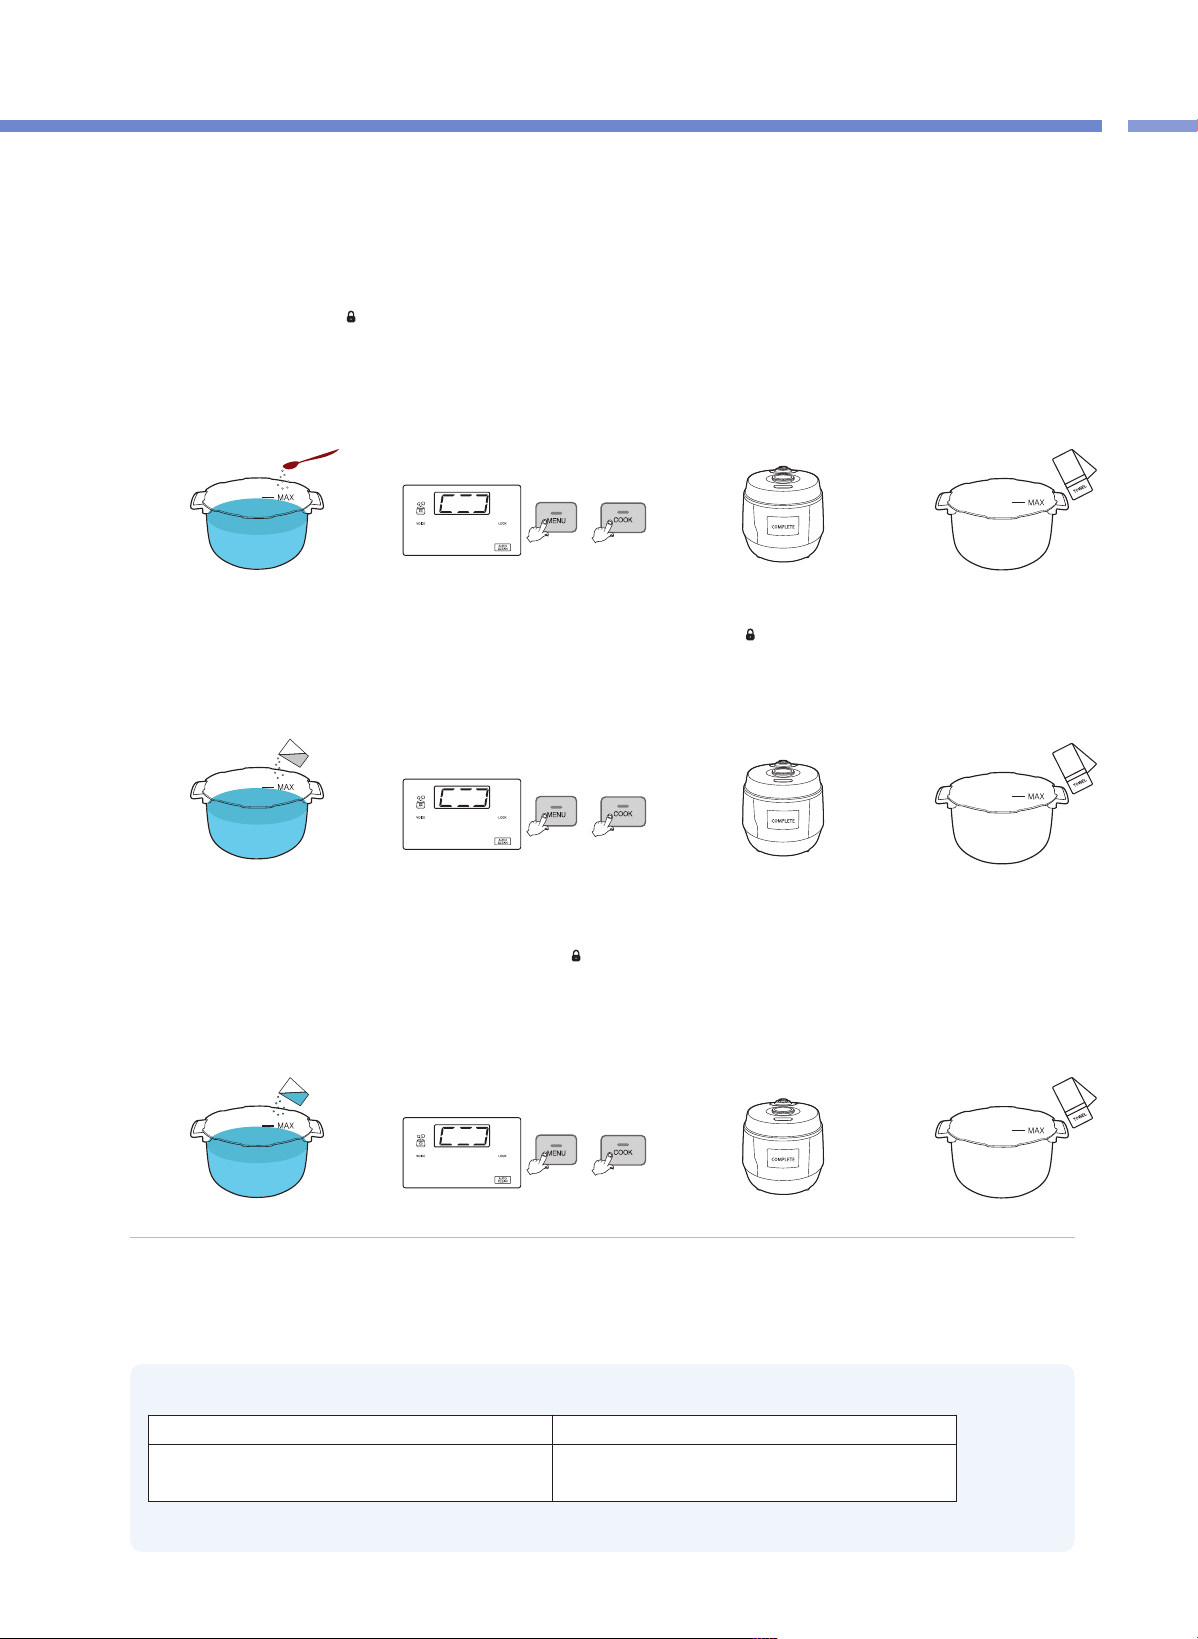
PREPARATION BEFORE COOKING
OVERVIEW TABLE / BEFORE COOKING
1
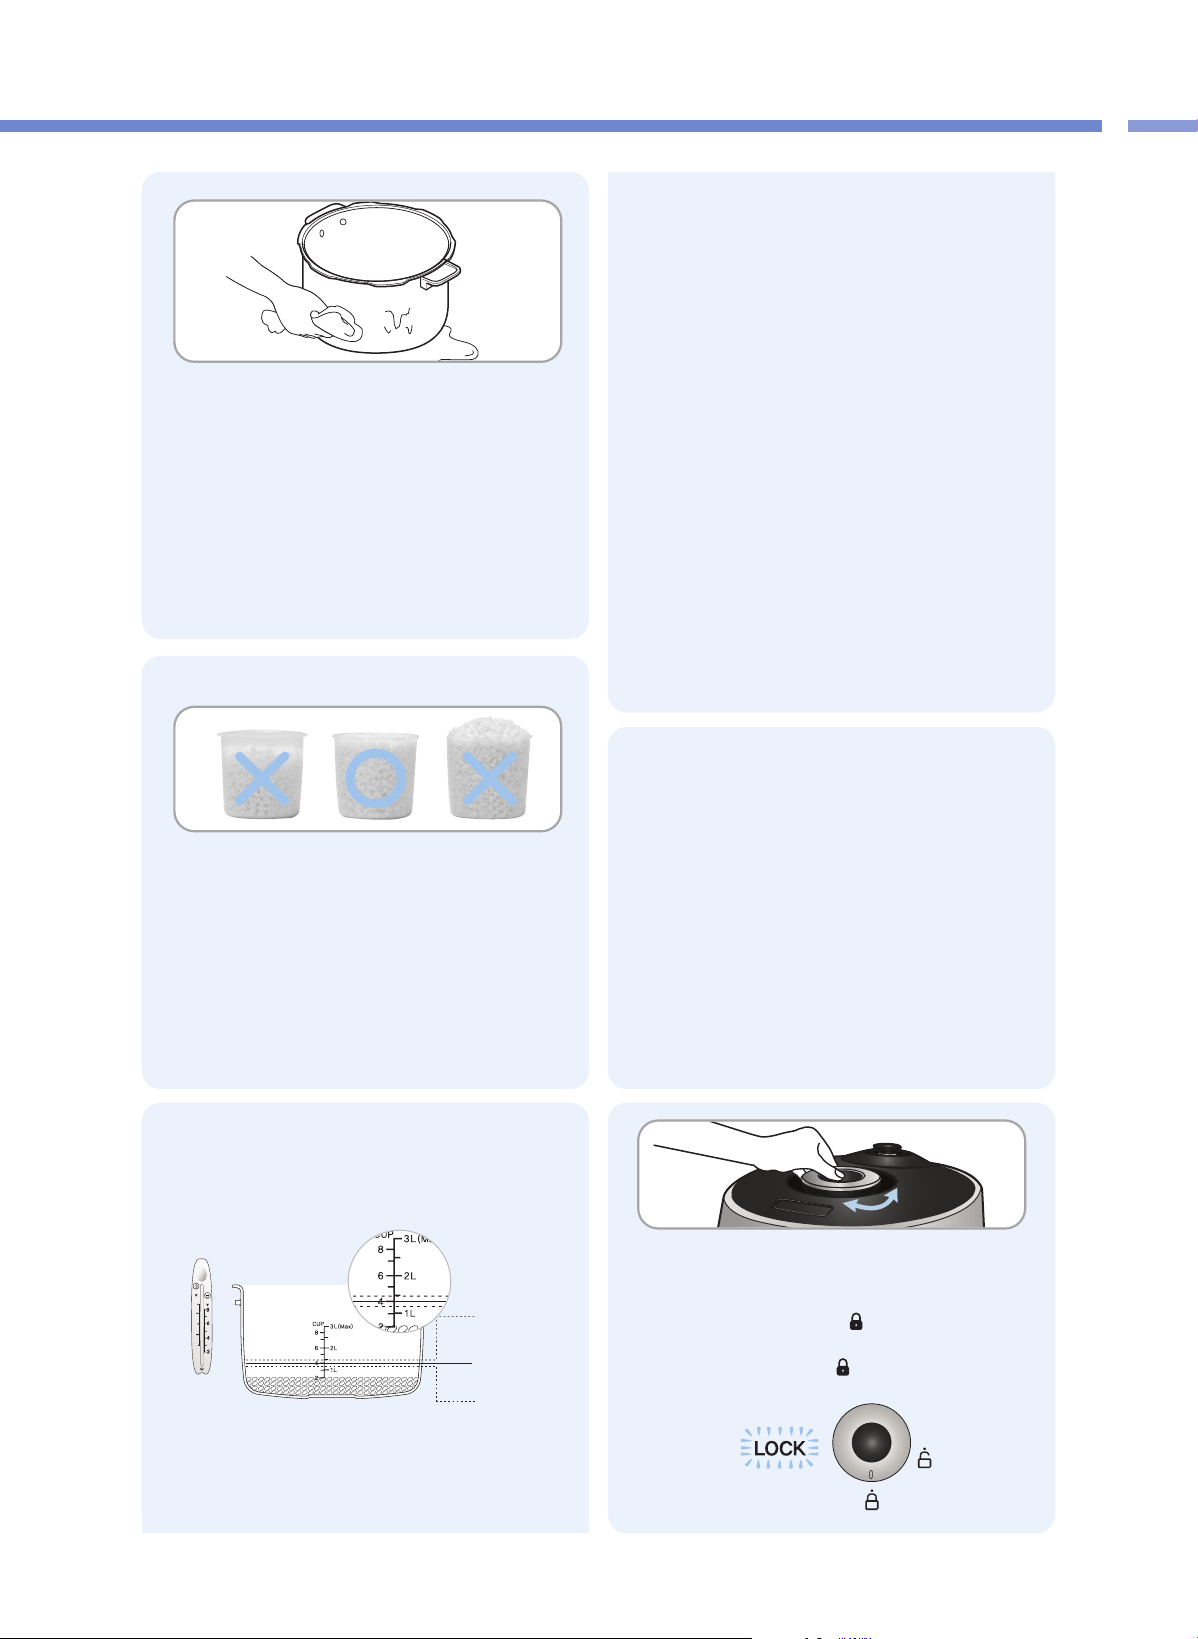
Wash the inner pot and wipe out excess
moisture.
▶
Use a soft dishcloth when washing the inner pot.
▶
If you use a strong scrubber, the inner surface of the inner
pot may peel off.
▶
Do not wash the inner pot with sharp utensils (fork, spoon,
or chopsticks, etc).
- The coating of the inner pot may peel off.
4
Please make sure to plug in the product before
placing the inner pot in the main body.
Put the inner pot completely in the main body.
▶
If there are foreign substances on the bottom of the inner
pot, this may lead to a problem in cooking or a malfunction.
▶ If the inner pot is not precisely put in the main body, the
cover won't be able to be closed. (Put the handle of the
inner pot into the groove of the main body.)
After closing the cover, “ ”(lock) the cover
handle.
▶ If the display panel shows “ ", it means that the cover is
properly locked.
2
Put food in the container by using the
measuring cup.
▶
One cup of food means the measuring cup filled with food
up to its top.
(There are gradations of ¼, ½, and ¾ on an external
surface of the measuring cup.)
5
▶
The liter gradations on the inner pot (ICOOK A5 PREMIUM)
show the gradations for water when water is poured in.
▶
The liter gradations on the Volume Gage(ICOOK A5
SUPERIOR) show the gradations for water when water is
poured in.
▶
The cup gradations on the inner pot(ICOOK A5 PREMIUM)
show the gradations for water when jasmine rice and
water are added together.
▶
The cup gradations on the Volume Gage(ICOOK A5
SUPERIOR) show the gradations for water when jasmine
rice and water are added together.
❶When you cook old rice or want the rice watery: Add
more water than the standard.
❷In case of four portions of rice (four measuring cups of
rice), pour water up to the 4-cup gradation on the inner
pot. (We recommend cooking four servings or less of
rice at one time)
❸When you have soaked rice enough in water or want
the rice hard-boiled: Put less water than the standard.
▶
The quality of cooking may vary according to the type of
rice, so adjust the water volume or the steaming time.
3
Adjust the water volume in accordance with
the dish you want to prepare.
▶
Put the inner pot on a flat surface, and adjust the water
volume by using the gradations on the inner pot.
❶
❷
❸
C
U
P
L
I
T
E
R
1
L
2
L
3
L
(M
A
X
)
Volume Gage
※VOLUME GAGE Only applies to ICOOK A5 SUPERIOR
HOW TO COOK (MANUAL COOK MODE)
22
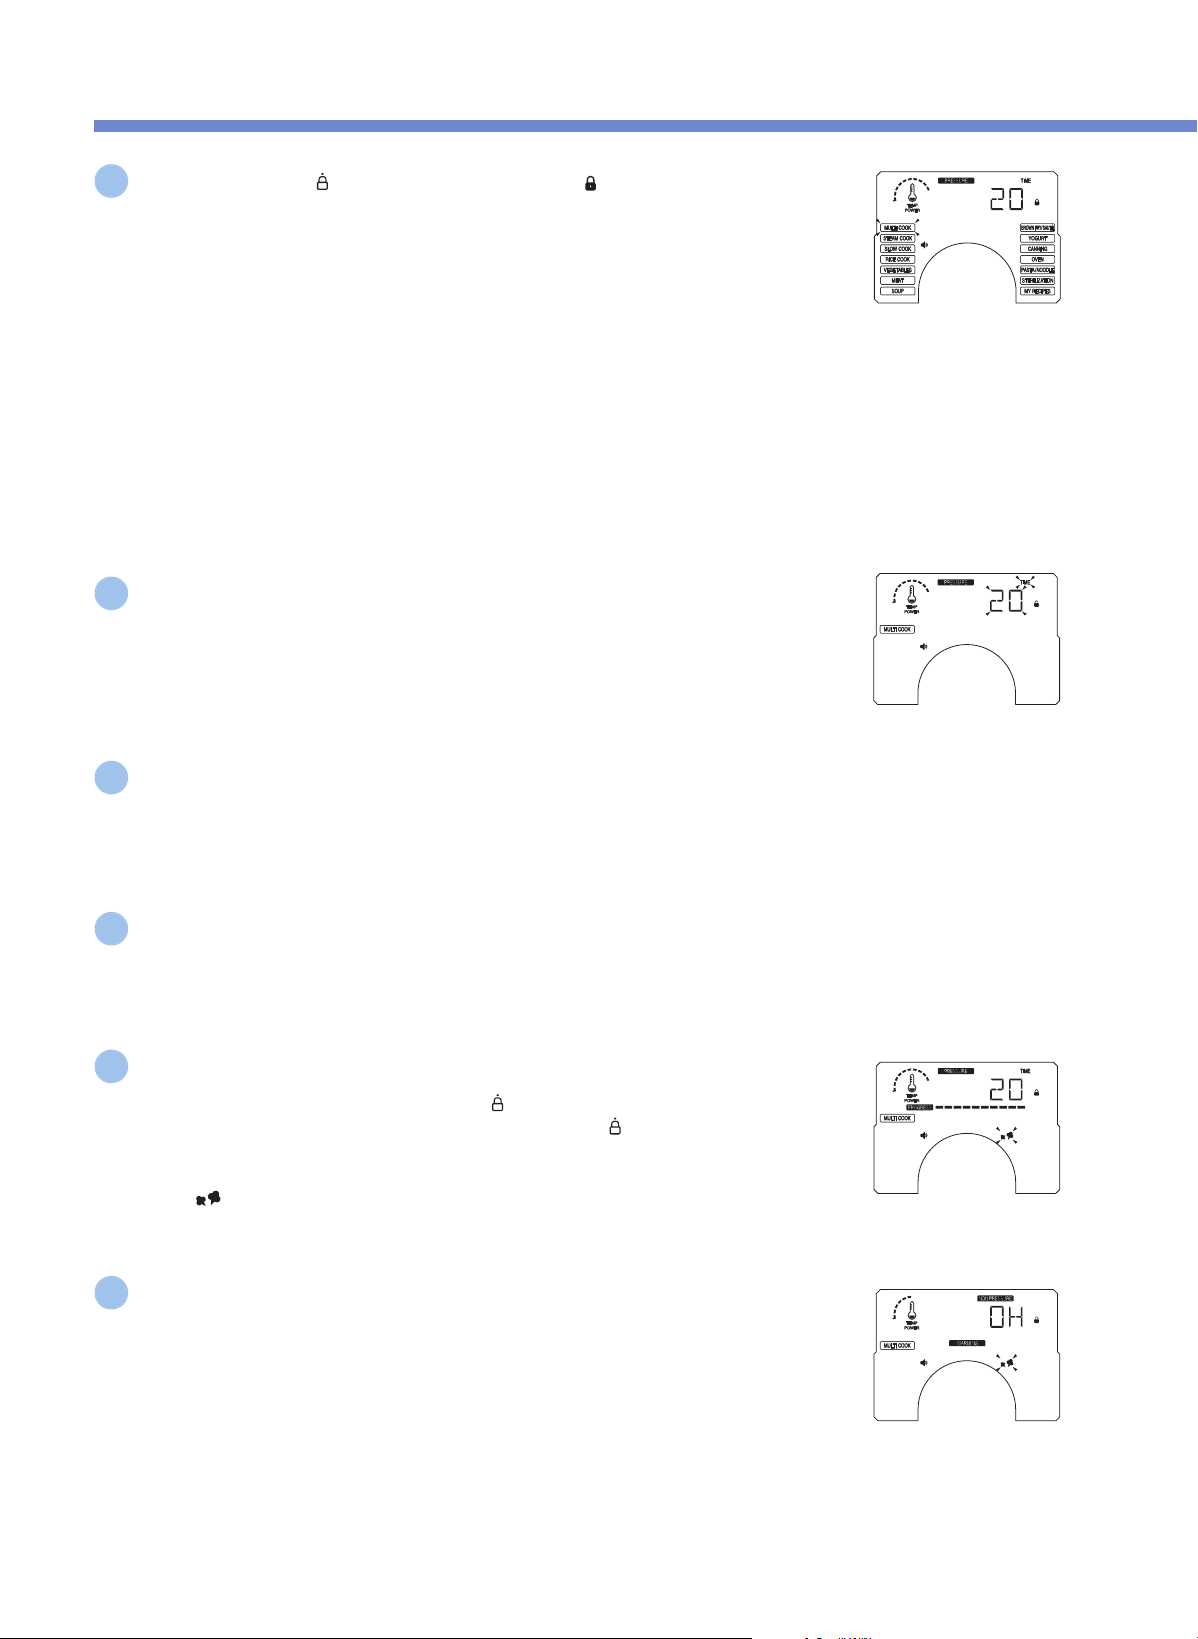
뚜껑 결합 손잡이를 “ ”(잠김)으로 맞춘 후 화면에 “ ”램프 표시가 뜨면 다이얼
을
돌려 원하시는 메뉴를 선택하십시오.
▶분리형 커버가 장착되어 있는지 확인하여 주십시오
▶ Before cooking, ensure that the Pressure Weight is properly aligned horizontally.
▶
다이얼을 왼쪽으로 돌릴때마다 MULTI COOK → STEAM COOK → SLOW COOK →
RICE COOK → VEGETABLES → MEAT → SOUP → MY RECIPES → STERILIZATION
→ PASTA/NOODLE → OVEN → CANNING → YOUGURT → BROWN FRY/SAUTÉ
순서대로 연속으로 변합니다.
▶ If cooking is completed once, the menu is remembered. So if you use the same menu
repeatedly, you don't need to select the menu.
▶ Do not fill 2/3 or more of the Inner Pot with cooked food or liquid food such as meat broth and soup.
▶ Do not fill two-thirds or more of the Inner Pot with dry food such as rice and beans
▶ Do not fill 2/3 or more of the Inner Pot with food.
※ Do not put excess food in the Inner Pot that goes over its maximum capacity.
압력/비압력 설정모드 진입 후 다이얼을 돌려 압력 이나 비압력을 선택하십시오.
▶ 원하시는 요리온도 선택 후 [SELECT/MODE] 버튼을 누르면 압력/비압력 설정모드로 진입합니다.
▶ 압력/비압력 조절 가능 메뉴 : MULTI COOK, MY RECIPES
e.g.) When MULTI COOK is selected
▶ The voice says “MULTI COOK,
Press [Select] button”.
Press the START button to start cooking
▶ Before cooking, always turn the Cover Handle to “ ” (Lock). Then, Press the COOK
▶ If you press the COOK button without turning the Cover Handle to “ ” (Lock), “E01 ”
appears with a warning sound and the voice saying“Turn the handle to the lock position”,
and cooking will not commence.
▶ The “ ” lamp is blinked on during cooking.
요리시간 설정모드 진입 후 다이얼을 돌려 원하시는 요리시간을 선택하십시오.
▶ 원하시는 메뉴 선택 후 [SELECT/MODE] 버튼을 누르면 요리시간 설정모드로 진입합니다.
▶ RICE COOK 메뉴는 자동요리라서 요리시간 설정모드가 없습니다.
▶ 단, SUPER GRAIN 메뉴의 경우 불림 시간 설정모드가 있습니다.
요리온도 설정모드 진입 후 다이얼을 돌려 원하시는 요리온도를 선택하십시오.
▶ 원하시는 요리시간 선택 후 [SELECT/MODE] 버튼을 누르면 요리온도 설정모드로 진입합니다.
▶ 요리온도 조절 가능 메뉴 : MULTI COOK, STEAM COOK, SLOW COOK, BROWN FRY/SAUTÉ, OVEN, MY RECIPES
e.g) MULTI COOK 요리시간 설정시
e.g) MULTI COOK 요리중
Cooking Complated
▶ When the cooking ends, an ending alarm rings, and the Keep Warm function begins with the voice
saying “Cooking has been completed”.
▶ If you don't want the Keep Warm function, press the CANCEL button to cancel the Keep Warm function.
▶ If the Cover Handle won't turn smoothly, cautiously bend the Pressure Weight to completely discharge
the inside steam. Then, turn the Cover Handle again.
▶ Do not press the CANCEL button during cooking. Cooking will be canceled.
▶요리 시간, 요리 온도 설정이 가능한 메뉴는 요리 중 SELECT/MODE 버튼을 2초간 누르면
요리시간 설정모드, 요리온도 설정모드로 진입하여 요리중에도 변경 가능합니다.
(요리시간, 요리온도 설정가능 메뉴 : 20쪽 참고)
e.g) MULTI COOK 완료 후
자동보온 상태
1
2
3
4
5
6

HOW TO COOK
23
HOW TO COOK (AUTO COOK MODE, RICE COOK)
뚜껑 결합 손잡이를 “ ”(잠김)으로 맞춘 후 화면에 “ ”램프 표시가 뜨면 다이얼을 돌려 RICE COOK을 선택하고
SELECT/MODE 버튼을 누르시면 하위메뉴 선택이 가능합니다.
▶ 하위 메뉴 : WHITE RICE, GABA RICE, BROWN RICE, MULTI GRAIN, SUPER GRAIN
(WHITE RICE 하위 메뉴 : STICKY RICE, SUSHI RICE, GENERAL RICE)
▶ 하위메뉴 이름은 화면 오른쪽에서 왼쪽으로 이동하면서 표시됩니다.
Cooking Complated (22page 6항 참조)
원하시는 RICE COOK 메뉴를 선택한 후 START 버튼을 눌러 취사를 시작합니다.
※ Example) 쌀 300g 기준 STICKY RICE 취사시, 물량은 쌀량 대비 1.3~1.4 비율이므로, 기호에 따라 195g~210g
로 넣어 취사하시면 됩니다.
※ Cooking time by menus may vary to some degree depending on the using environment of the product.
※ 취사 관련 주의사항은 P.21 참고하여 주십시오.
뜸들이기
▶
뜸 진행부터는 “Steaming is starting” 하는 음성과 함께 표시부에 남은 취사시간을 표시합니다.
메뉴에 따라 남은 시간은 차이가 있습니다.
▶ 뜸 완료 3분 전에 증기배출 효과음(기차소리)이 나오고 “steam Release will begin” 하는
음성과 함께 증기가 자동배출되므로 놀라거나 화상을 입지 않도록 주의하십시오.
RICE COOK 메뉴별 물량 및 취사시간
Menu
Type
STICKY
RICE
SUSHI
RICE
GENERAL
RICE
GABA
RICE
BROWN
RICE
MULTI
GRAIN
SUPER
GRAIN
AUTO
CLEANING
Cooking Capacity
2 servings~
10 servings
2 servings~
8 servings
2 servings~
6 servings
2 servings~
6 servings
2 servings~
6 servings
2 servings~
8 servings
2 servings~
8 servings
-
Water Quantity
(Grain:Water ratios)
1: 1.3~1.4
(단립미)
1: 1.4~1.5
(장립미)
1: 1.3~1.5
(단립미)
1: 1.4~1.6
(장립미)
1: 1.4~1.5
(단립미)
1: 1.5~1.6
(장립미)
1: 1.5~1.6 1: 1.5~1.6 1: 1.3~1.5 1: 1.3~1.5 3+1/2 CUP
Cooking Time
About 28min
~ 45min
About 29min
~ 51min
About 40min
~ 61min
About 44min
~ 63min
(+GABA 3H)
About 50min
~ 70min
About 45min
~ 62min
About 34min
~ 53min
About 24min
1
2
3
4
HOW TO COOK
24
MY RECIPES
※ MY RECIPES란, MULTI COOK에서 사용자가 원하는 설정을 저장하고 사용 할 수 있는 메뉴입니다.
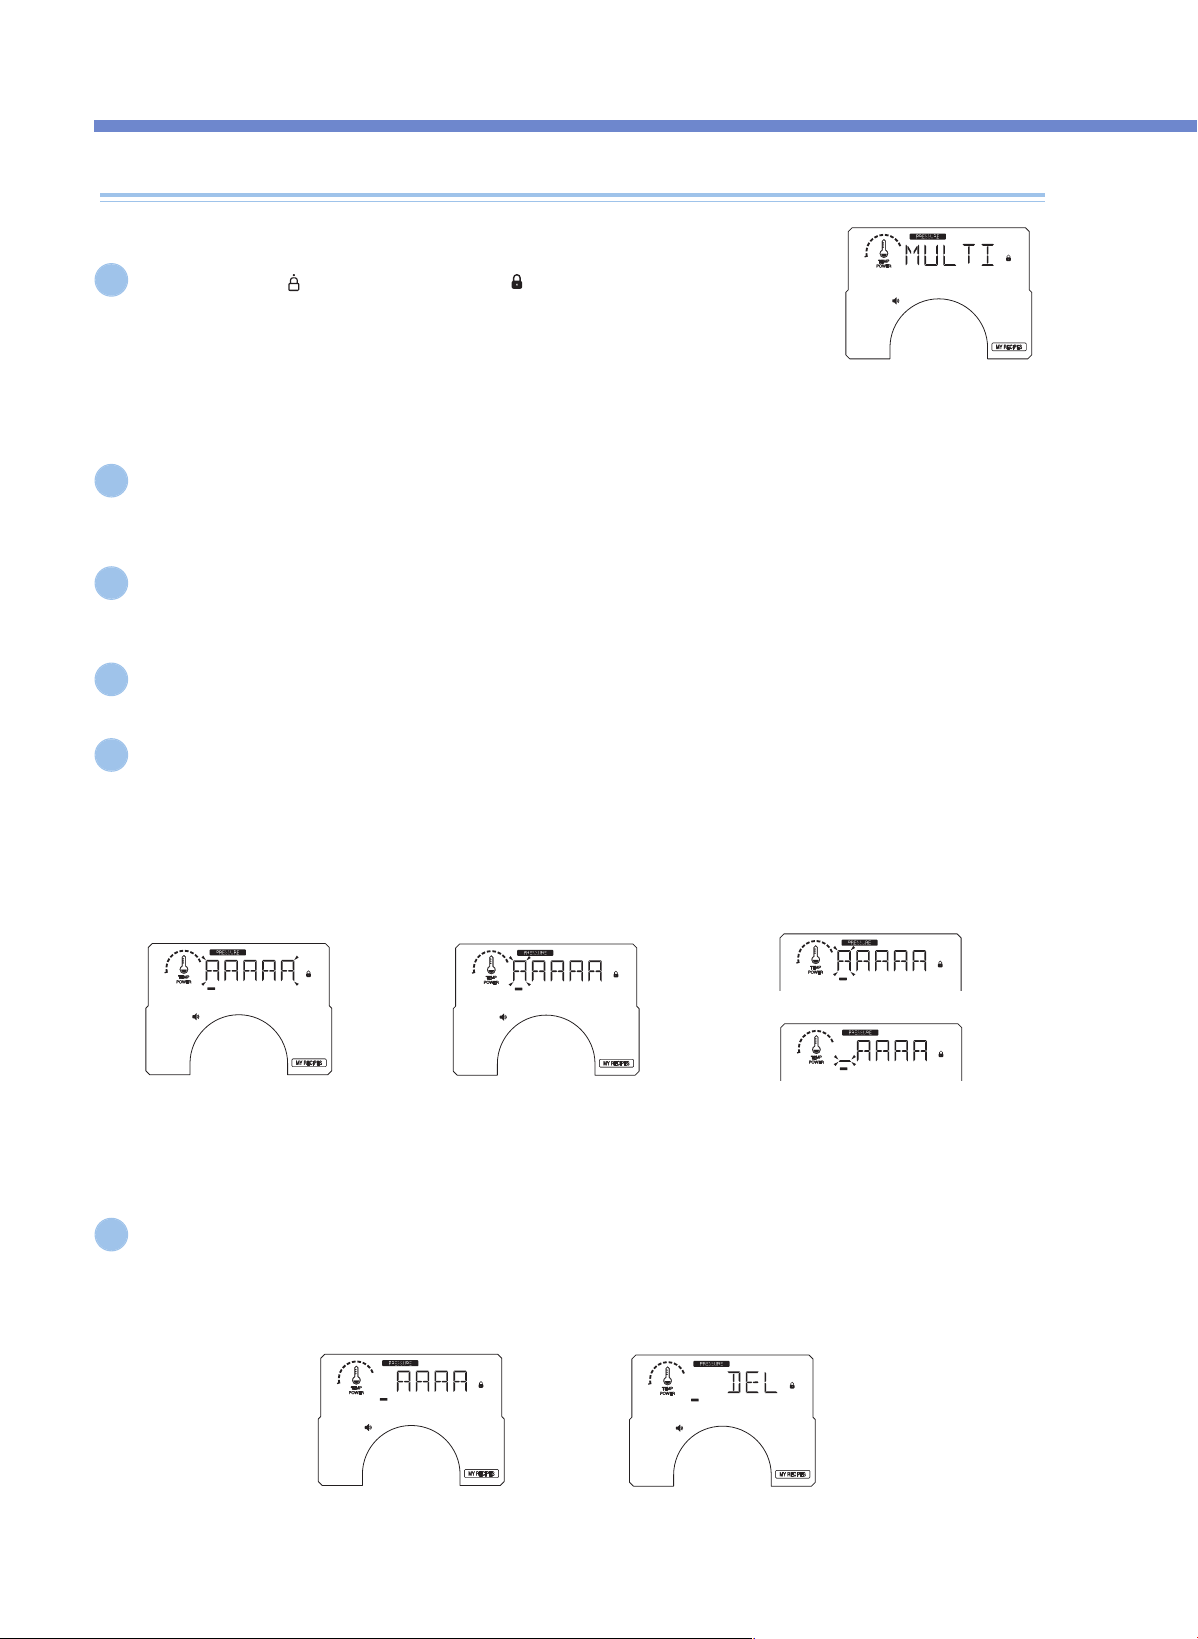
뚜껑 결합 손잡이를
“”
(잠김)으로 맞춘 후 화면에
“”
램프 표시가 뜨면 다이얼을 돌려
MY RECIPES를 선택하고 SELECT/MODE 버튼을 누르면 레시피 선택모드로 진입합니다.
▶ 레시피 선택 모드에서 다이얼(오른쪽) 동작 시 MULTI AAAAA BBBBB
... SSSSS MULTI 순으로 선택됩니다.
▶ MULTI 레시피는 전에 MULTI COOK에서 설정하고 요리한 값이 저장됩니다.
다이얼을 이용하여 원하시는 레시피 선택 한 후 SELECT/MODE 버튼을 누르면 해당 레시피의 요리시간 설정모드로 진입합니다.
▶ 설정 가능 시간 : 15분 ~ 1시간30분
다이얼을 이용하여 원하시는 요리시간을 선택 한 후 SELECT/MODE 버튼을 누르면 요리온도 설정모드로 진입합니다.
▶ 설정 가능 온도 : 160℉ ~ 250℃
다이얼을 이용하여 원하시는 요리온도을 선택 한 후 SELECT/MODE 버튼을 누르면 압력, 비압력 설정모드로 진입합니다.
다이얼을 이용하여 압력/비압력을 선택한 후 SELECT/MODE 버튼을 누르면 레시피 이름 설정모드로 진입합니다.
▶ 레시피 이름 설정모드에서 다이얼을 돌리면 한 문자씩 선택가능하며, 원하시는 문자를 선택하고 SELECT/MODE 버튼을 누르면
알파벳 및 숫자, “_” 선택모드로 진입합니다.
▶ 다이얼을 돌려 알파벳 및 숫자, “_"표시를 선택한 후 SELECT/MODE 버튼을 누르면 설정이 저장되고 문자 선택모드로 돌아갑니다.
▶ 원하시는 레시피 이름을 설정한 후 다이얼을 돌려 전체 레시피가 점멸 할 때 SELECT/MODE 버튼을 누르면 레시피 이름이 저장되고
레시피 선택모드로 돌아갑니다.
▶ MULTI 레시피에 레시피 이름을 바꿔서 저장 시 다음 번지 저장공간에 저장됩니다. (MULTI 레시피는 이름 변경 안됨)
레시피를 삭제 할 때에는 문자 선택 모드(한 문자가 점멸)에서 SELECT/MODE 버튼을 3초 이상 누르면 DEL과 레시피 이름이
번갈아 표시 됩니다.
▶ DEL과 레시피 이름이 번갈아 표시되는 상태에서 SELECT/MODE 버튼을 누르면 레시피가 삭제됩니다.
▶ DEL과 레시피 이름이 번갈아 표시되는 상태에서 CANCEL 버튼을 누르면 삭제 없이 대기 상태로 돌아갑니다.
e.g.) 레시피 선택모드 진입 시
1
2
3
4
5
6
e.g.) AAAA레시피에서 레시피이름
설정모드 진입 시
e.g.) 레시피 이름 설정모드에서
다이얼을 돌리면 한 문자가
점멸함
e.g) 레시피 삭제 모드 진입 시
e.g.) 알파벳 및 숫자, “_” 선택모드
진입시
⬌
⬌
HOW TO COOK / KEEP WARM, REHEAT, VOLTAGE SAG PROTECTION
25
KEEP WARM / REHEAT FUNCTION AND VOLTAGE SAG PROTECTION FUNCTION
Cautions for Keeping Warm
▶ When you open the cover right after cooking or during the Keep Warm function, the cover may not open properly due to pressure. Always use
caution when you bend back the pressure weight to completely remove the pressure before opening the cover.
▶ Always lock the cover handle when keeping warm or reheating food. (If not, there may be damage caused to the Cover Open button and the
Keep Warm function.)
▶ If there is no food in the inner pot during the Keep Warm function or if you are not using the product, press the Cancel button to cancel the
Keep Warm function or remove the power cord from the power outlet.
▶ Do not use the Keep Warm function with a rice spatula left in the inner pot. In particular, a wooden spatula may generate germs and odors.
<Keep Warm>
<Reheat>
When you serve your meal
▶If you want to serve your meal during the Keep Warm mode and want the food hot, press the KEEP WARM /
REHEAT button, and then the Keep Warm / Reheat function begins with the voice saying “REHEATing is
s
tarting”. Reheating will conclude in 10 minutes.
▶ If you use the Reheat function too often, the food may burn or become dry.
▶ 보온중에 SELECT/MODE 버튼을 누르면 보온온도 설정모드로 진입하여 보온온도 설정이 가능합니다.
<Reheat Complete>
“ ”
of the Display Panel means
that the time elapsed for the Keep
Warm function is 3 hours.
The remaining reheat time will show in
minutes while the “ ” lamp is
blinking with the “ ” sign on the Display
going round and round.
When the Reheat function ends, the voice says
"REHEAT has been completed" and the product starts
the Keep Warm function again, displaying the time
elapsed.
▶ Clean the product often. In particular, if the Cover is not cleaned completely, germs may grow, which can cause smell during the Keep Warm
mode.
▶ Even if the product looks clean outside, germs may grow anywhere, which can cause smell during the Keep Warm mode. Thus, if the product
smells, clean the product by using the AUTO CLEANING function.
After the AUTO CLEANING function is completed, the Inner Pot must be washed completely.
▶ If you don't wash the Inner Pot after cooking and then use the Keep Warm function, the food may smell or stink.
When it smells during The Keep Warm mode
▶ This product remembers its status even when a blackout occurs, so if electricity gets back again within around 2 minutes, this product will
normally work again. (There may be differences according to the product.)
▶ If cooking is canceled because of a blackout, you need to press the COOK button again to resume cooking.
▶ If a blackout occurs during cooking, the cooking time is delayed for the duration of the blackout, and the status of cooking may differ to some
extent according to the time of the blackout.
▶ If a blackout occurs The Keep Warm function and when the food becomes cold, the Keep Warm function is canceled.
Voltage Sag Protection Function?
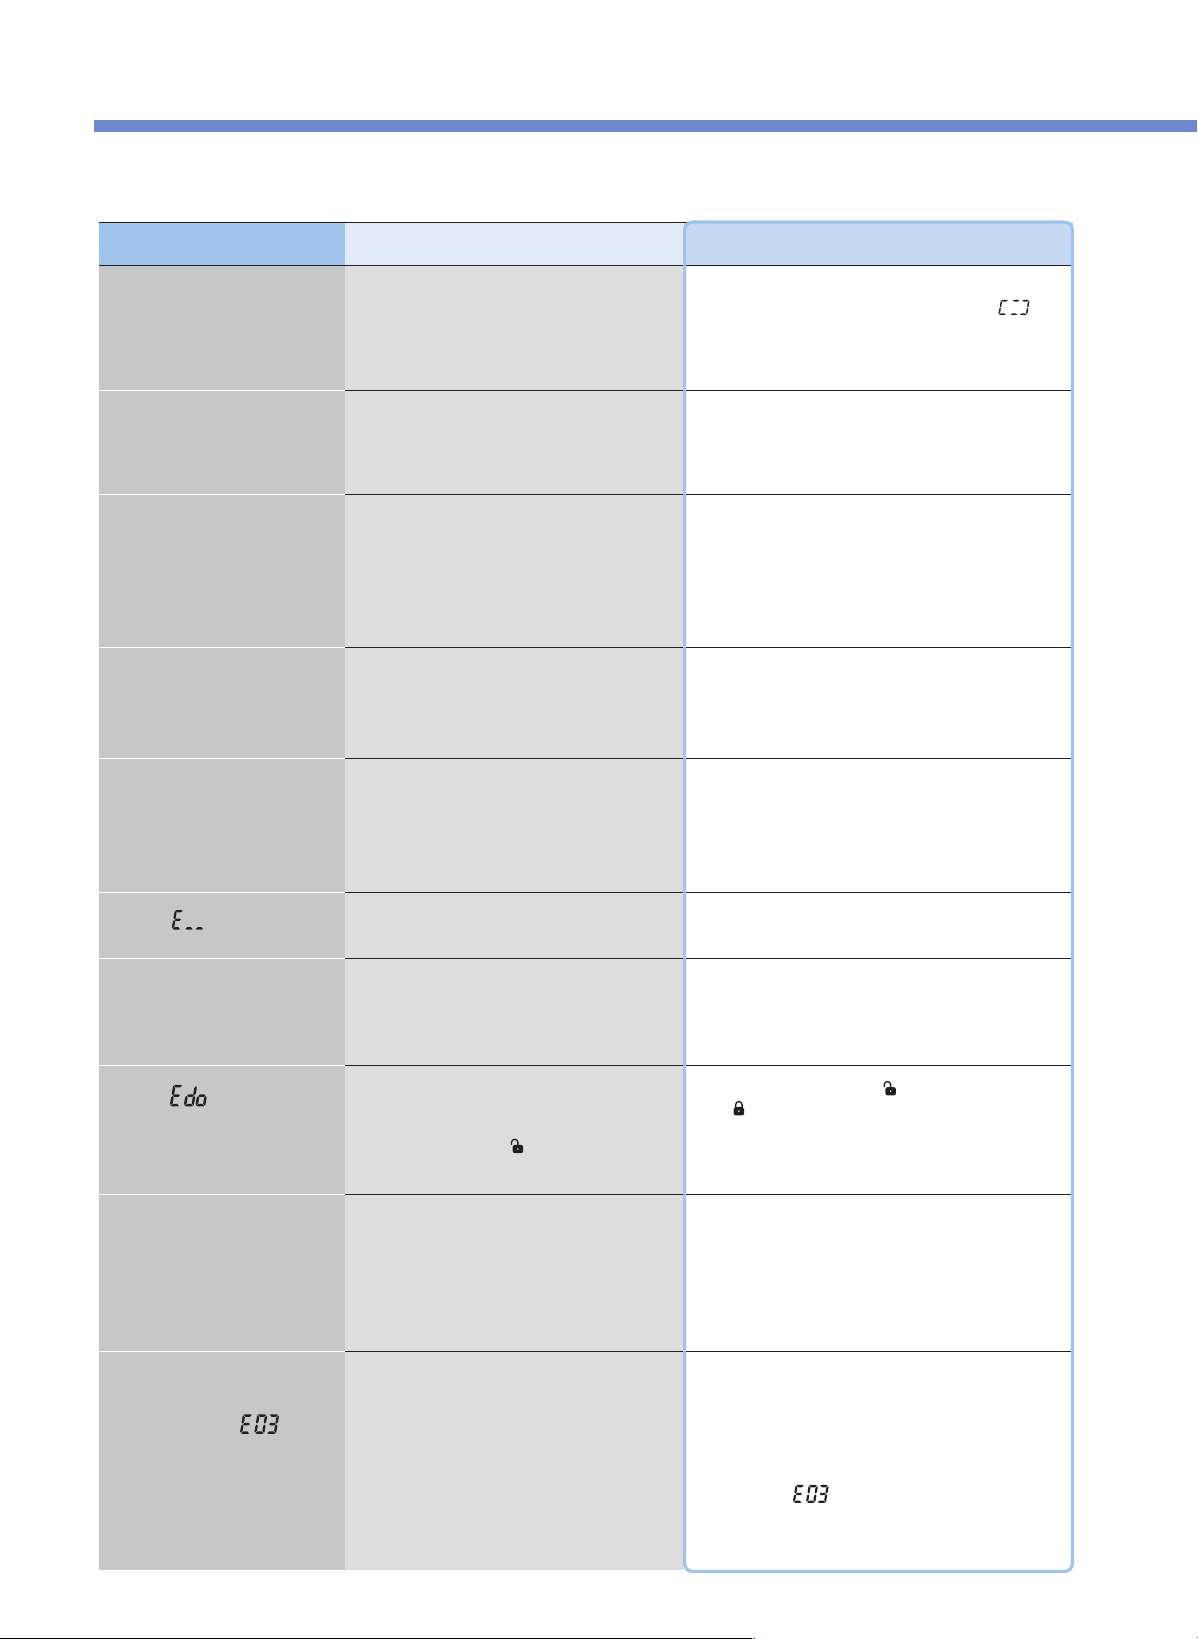
PLEASE CHECK BEFORE CALLING FOR SUPPORT
26
▼ When there is a malfunction with the product, check the following matters before contacting our customer service center.
Problem
When food is not cooked
Checklist
•Did you press the PRESSURE COOK button?
•Did a blackout occur during cooking?
Recommended Actions
•After selecting the desired menu, always press the
PRESSURE COOK button once to check if “
”
appears in the Display Panel.
•Refer to page 24 for the Voltage Sap Protection
function.
When beans (mixed
rice/brown rice) are half-
cooked
•Are the beans (mixed rice/brown rice) too dry?
•Soak the beans (mixed rice/brown rice) in water or boil
them before cooking.
The mixed rice may be half-cooked according to their
type.
When the food is half-cooked
or scorched
•Did you properly select the menu?
•Did you precisely adjust the quantity of
ingredients?
•Did you open the Cover during steaming?
•Properly select the desired menu.
•Adjust the time and the heating level for cooking.
(See pages 22 and 23.)
•After the complete cooking alarm rings and the
pressure is completely removed, open the Cover and
blend the food.
When the food overflows
during cooking
•Did you use a measuring cup?
•Did you precisely adjust the quantity of
ingredients?
•Did you precisely select the menu?
When it smells during the
Keep Warm mode
•Is the Cover closed completely?
•Is the power cord pulled out from the socket
during the Keep Warm mode?
•Did you use the Keep Warm mode for 12 hours
straight or longer?
•Close the Cover completely.
•Always keep the product plugged in during the Keep
Warm mode.
•Use the Keep Warm mode only for 12 hours or less.
When “ ”
appears
•This indicates that the Temperature Sensor fails
to work properly.
•Shut off the power supply, and contact our customer
service center.
When cooking is not
completed even in a long
time and when “ ”
appears
•Did you use the power properly?
•Did you use the proper power voltage?
•This appears when there is a malfunction with the
product (heater disconnection, insufficient quantity of
heat, etc.) and cooking is not completed in a long time.
Shut off the power supply, and contact our customer
service center.
•If you just put in water and heat it for a long time, it is
normal that “
”
appears.
•This product is exclusively for 120V. Use the power
properly.
When “ ”
appears
•Did you press the PRESSURE COOK button
with the Keep Warm mode canceled and the
product in the Standby mode without turning
the Cover Handle to “
”
(Open) after cooking
is completed with the power supplied?
•Turn the Cover Handle to “
”
(Open) and then turn it
to “
”
(Lock).
When the Keep Warm Time
sign blinks during the Keep
Warm mode
•Have 24 hours elapsed since the Keep Warm
mode began?
•After 24 hours have elapsed since the Keep Warm
mode began, the Keep Warm Time sign blinks to let
you know that the Keep Warm mode has been used
for too long.
When the warning alarm rings
during the Keep Warm mode or
the Reheat function won't work
during the Keep Warm mode
•Is the Removable Cover mounted?
•Mount the Removable Cover.
(See page 12.)
※This only applies to
ICOOK A5 PREMIUM
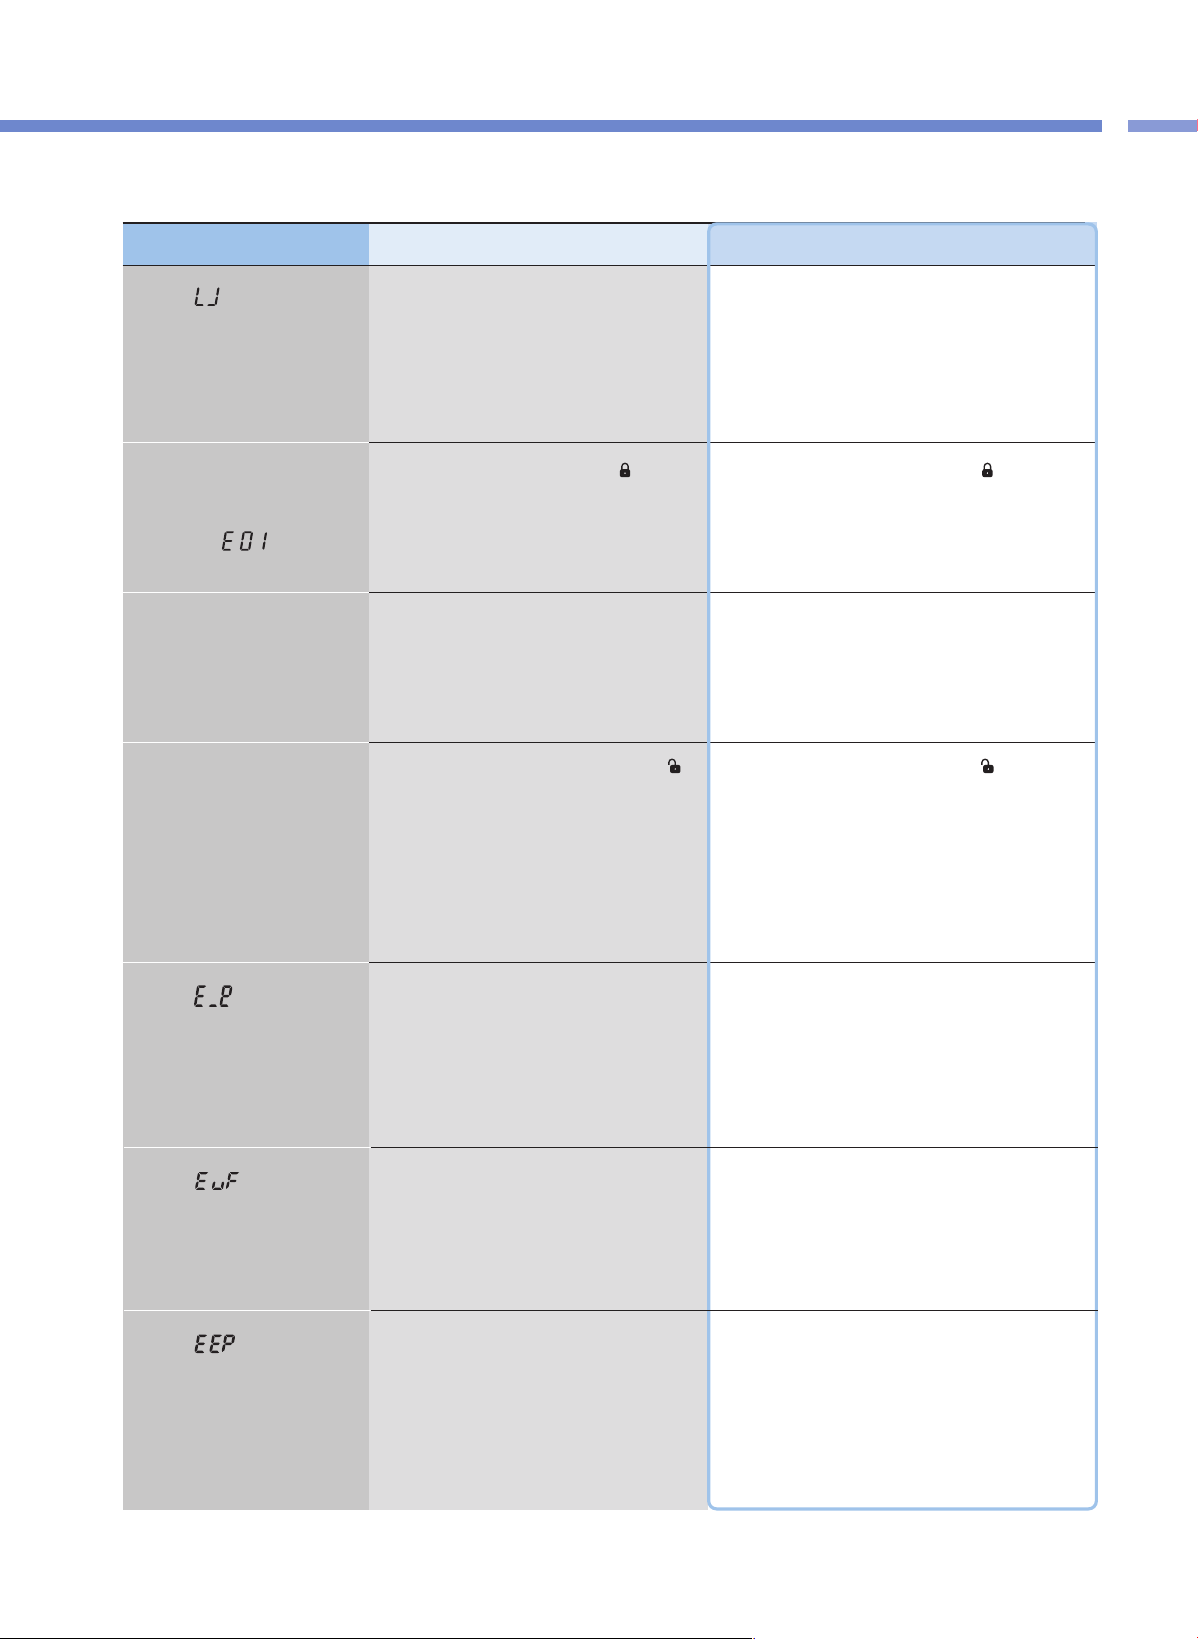
27
PLEASE CHECK BEFORE CALLING FOR SUPPORT
PROBLEM CHECKLIST
▼ When there is a malfunction with the product, check the following matters before contacting our customer service center.
Problem Checklist Recommended Actions
When “ ” appears when
you press a button
•Is the Inner Pot put in the product?
•Did you use the power properly?
Did you use the proper power supply?
•The buttons will not work without the Inner Pot inside
in the product. Put the Inner Pot inside the product.
•This product is exclusively for 120V.
Use the power property. use the proper power voltage.
When a button such as the
PRESSURE COOK button or
the PRESET button won't
work and “ ” appears
•Did you turn the Cover Handle to “
”
(Lock)?
•Is the Lock lamp turned on?
•Completely turn the Cover Handle to “
”
(Lock).
If the Cover Handle is not completely fastened, the
PRESSURE COOK button and the PRESET button will
not work.
When the product smells odd
right after cooking or during
the Keep Warm mode
•Did you completely clean the product after
cooking?
•Refer to page 12, 13 and completely clean the
Removable Cover and the pressure packing before use.
When “ ”
appears
•This indicates that the Environmental Sensor
fails to work.
•Shut off the power supply, and contact our customer
service center.
When “ ”
appears
•This indicates that there is an error with the
internal memory of MICOM.
•Shut off the power supply, and contact our customer
service center.
When “ ”
appears
•This indicates that there is an error with the
internal memory of MICOM.
•Shut off the power supply, and contact our customer
service center.
When the Cover won't be
closed
•Is the Cover handle completely turned to “
”
(Open)?
•Is there hot food in the Inner Pot?
•Is the Inner Pot completely in the Main Frame?
•Completely turn the Cover Handle to “
”
(Open) and
then close the Cover again.
•Bend the Pressure Weight, and then close the Cover.
•Turn the Inner Pot Handle attached to the Inner Pot to
both left and right sides, and secure it on the Main
Frame completely.
※This only applies to
ICOOK A5 PREMIUM

PLEASE CHECK BEFORE CALLING FOR SUPPORT
28
▼ When there is a malfunction with the product, check the following matters before contacting our customer service center.
Problem Checklist Recommended Actions
When the Cover Handle
won't “ ” (Open)
•Did you turn the Cover Handle during cooking?
•Did you turn the Cover Handle without
completely discharging the steam?
•The Cover will not open during cooking.
Do not forcibly open the Cover.
If you have to open the Cover, press and hold the
CANCEL button for 2 seconds to cancel, cautiously
bend the Pressure Weight to completely discharge the
steam, and then open the Cover.
•Cautiously Bend the Pressure Weight to completely
discharge the steam, and then open the Cover.
When the Cover Handle is
completely turned to “ ”
(Open) but the Cover won't
open
•It is because of the pressure.
•Cautiously Bend the Pressure Weight to completely
discharge the steam, and then open the Cover.
When the steam is leaked
through the Cover and a the
product makes a whistle-like
sound
•Are there any foreign substances (rice, etc.) on
the packing?
•Is the packing worn out?
•Wipe out the packing with a dishcloth or a soft cloth
before use.
•Always keep the parts around the packing clean.
•If steam is leaked, immediately press and hold the
CANCEL button for 2 seconds to discharge the steam,
and pull out the power cord. Then discontinue using the
product, and contact our customer service center.
•Use packing for 1 to 3 years according to the method
or frequency of use and then replace it with a new one.
If you continue to use worn-out packing, steam may be
leaked out during use, and the pressure cooking won't
be operational.
When the CANCEL button
won't work during cooking
•Is the Inner Pot hot inside?
•If you have to cancel during cooking and the
temperature in the Inner Pot is high, you need to
press and hold the CANCEL button for 2 seconds to
cancel cooking for safety purposes.
•If cooking is canceled, the steam is discharged
through the Auto Steam Discharger, and the content
may spill or splatter. Thus, please be cautious since
you might get burned in your face or on your hands.