
Thanks for your purchase.
We provide a one-year warranty.
If any quality issues,
replacement or refund is available.
Please feel free to contact us via E-mail:
Cool and Warm
Mist Humidifier
LCD-MH-J18
User Manual

Precautions
Thank you for purchasing our humidifier LCD-MH-J18.
Please read this manual carefully before using
and keep it for future reference.
All pictures shown are for illustration purposes only.
Actual products may vary due to product enhancement.

Safety Guide
Attention
Components
Placement
Installation
Water filling
Control Panel& Remote Control
Maintenance
FAQ
Product Specifications
Warranty
1-2
3-4
5
6
7
8
9-11
12-14
15-16
17
18
Contents

0101
Safety Guide
010101010101
Do not disassemble or modify the machine.
Do not subject the machine to strong impacts.
Do not allow liquids such as water or (flammable) detergent to enter the air inlet and
outlet to avoid electric shock or fire.
Do not connect the machine to a socket that exceeds the rated voltage or use an
extension cable, as this may cause fire or electric shock.
Do not unplug the power plug with wet hands, as this may cause electric shock or injury.
Do not block the outlet or add water to the mist outlet, as this may cause water leakage,
deformation, or failure.
Do not use acidic detergents in the main body, as they may produce toxic gas.
Please use at normal room temperature (41°F~104°F). This machine is for indoor use only.
Do not place metal objects, chemicals, or detergents in the sink, as it may result in
poor atomization.
If the product needs to be moved, cleaned, refilled with water, or will not be used for an
extended period, be sure to turn off the power and unplug the power cord. Do not move
the machine randomly while it is working.
Do not touch the atomizer with your hands when turning on the machine, as it may
cause discomfort.
Do not pour water at 104°F into the water tank and tank to avoid damaging the machine.
Never let water flow into the body through the air outlet. If the body gets wet, use a dry
cloth to wipe it dry to avoid damaging the machine.
When the room temperature is below 32°F (0°C), pour out the water in the water tank and
tank to prevent freezing and damage to the machine.

Safety Guide
Do not turn or move the product if it's filled with water and under working condition.
Do not remove the main motor when the product is in working condition.
Do not hit the product with a hard object.
Do not insert your fingers, water or other objects into the air inlet and outlet.
Do not use this product near gas appliances, heating devices or stoves.
Do place the humidifier 2 meters away from furniture and electronic devices.
Do not use this product in a humid or hot environment such as a bathroom, toilet or
kitchen.
The water temperature inside the tank will heat up during the heater operation of the
warm mist function. Please don't touch it directly as there is a risk of burns.
02
03
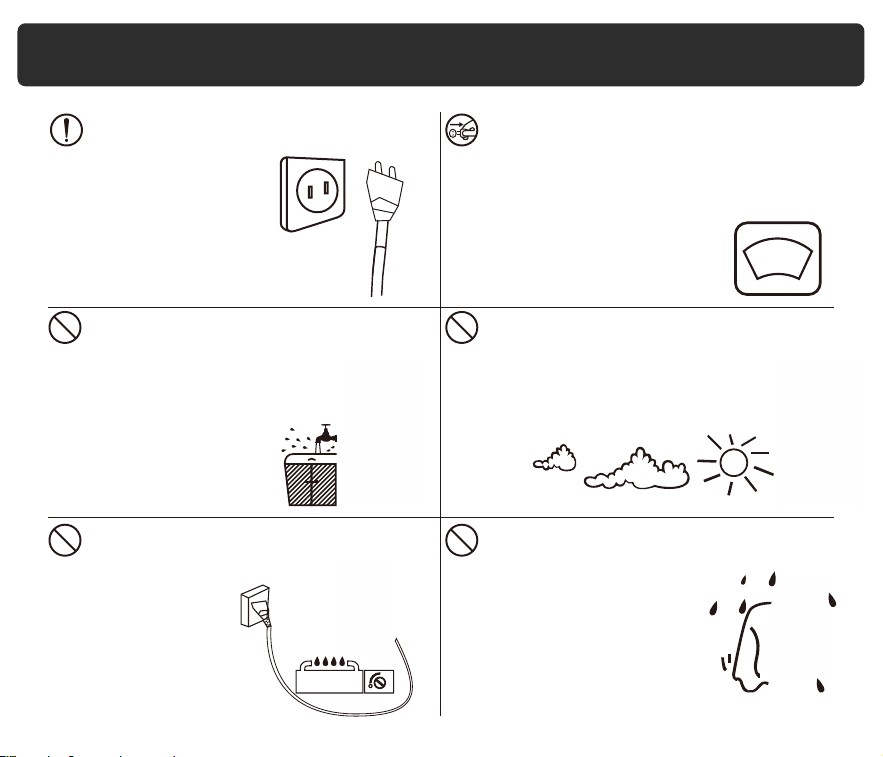
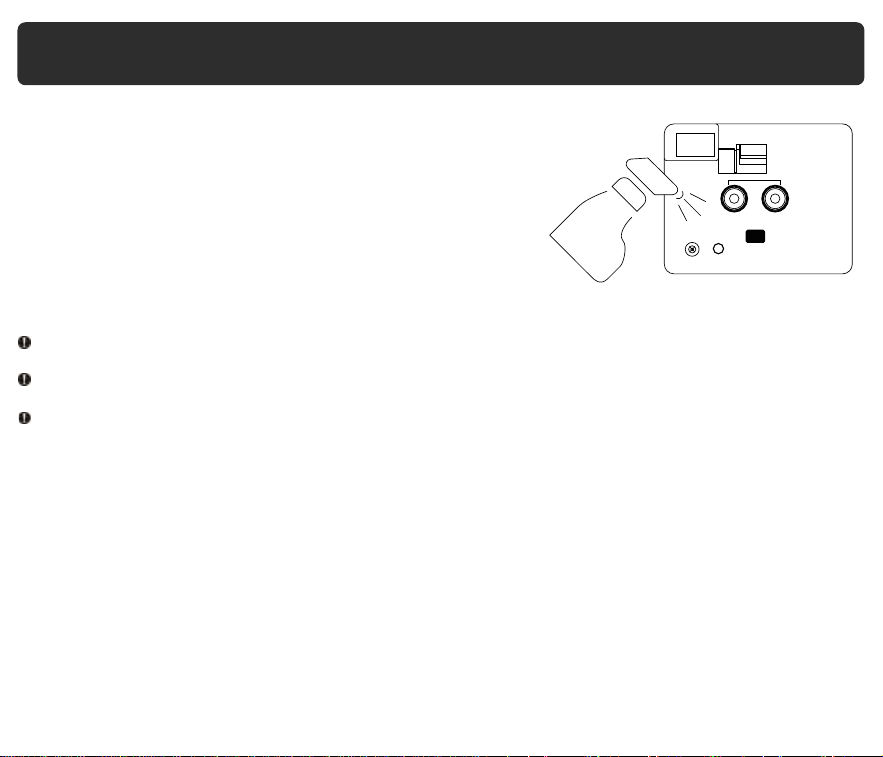
Attention
Please check that the
plug and power cord
are intact to avoid the
risk of electric shock.
Keep the power cord away from
heat sources.
This product is for household use
only; do not use it
outdoors.
Do not immerse the product in
water or any other liquids, and
do not touch the machine with
wet hands to prevent
electrical leakage
accidents.
Ensure that the power source
is properly grounded and the
local voltage matches the
voltage indicated on the
product.
Avoid placing the product
on a hot surface.
120V~
04
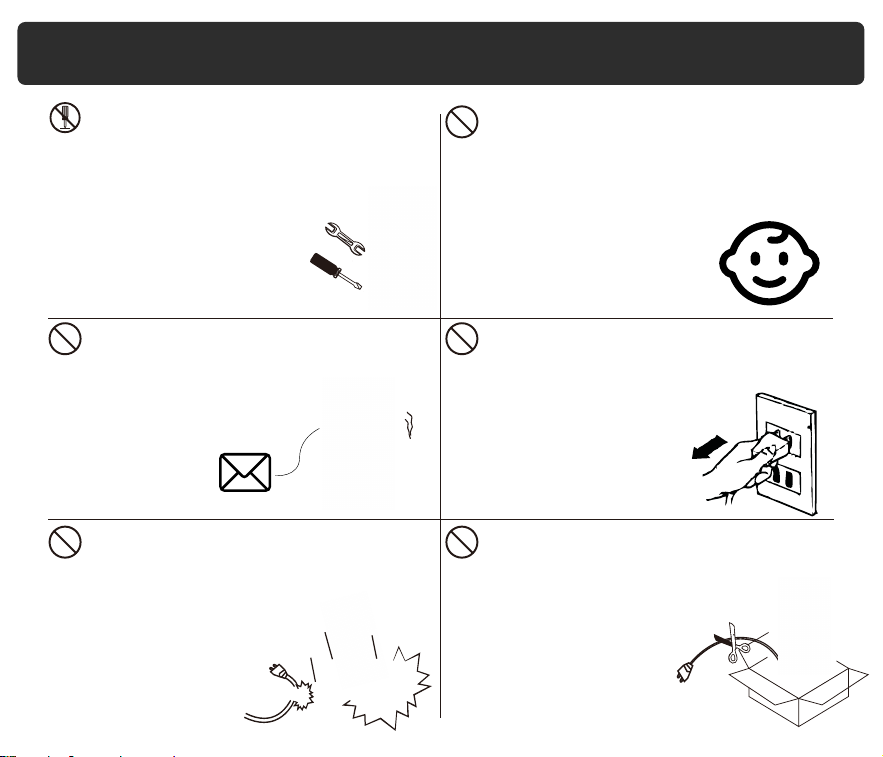
Attention
professional repair personnel are
prohibited from disassembling
or repairing it, as it may
result in fire, electric
shock, or injury accidents.
Do not modify the product, and non-
If the power cord or plug of the product
is damaged or if the product has been
dropped on the ground, do not
continue using it. If the power
cord is damaged, please
contact the after-sales
team for assistance.
Always disconnect the power before
cleaning the product.
If the product malfunctions, please stop
using it immediately and disconnect the
power. Contact the after-sales
team by email.
and individuals with impaired abilities.
Children and individuals with impaired
abilities should use this product under
adult supervision.
Keep this product out of reach of children
When discarding the product, it is
recommended to cut off the power
cord. Also, take similar precautions
for any parts that may pose a
danger, especially those that
could be hazardous to children.
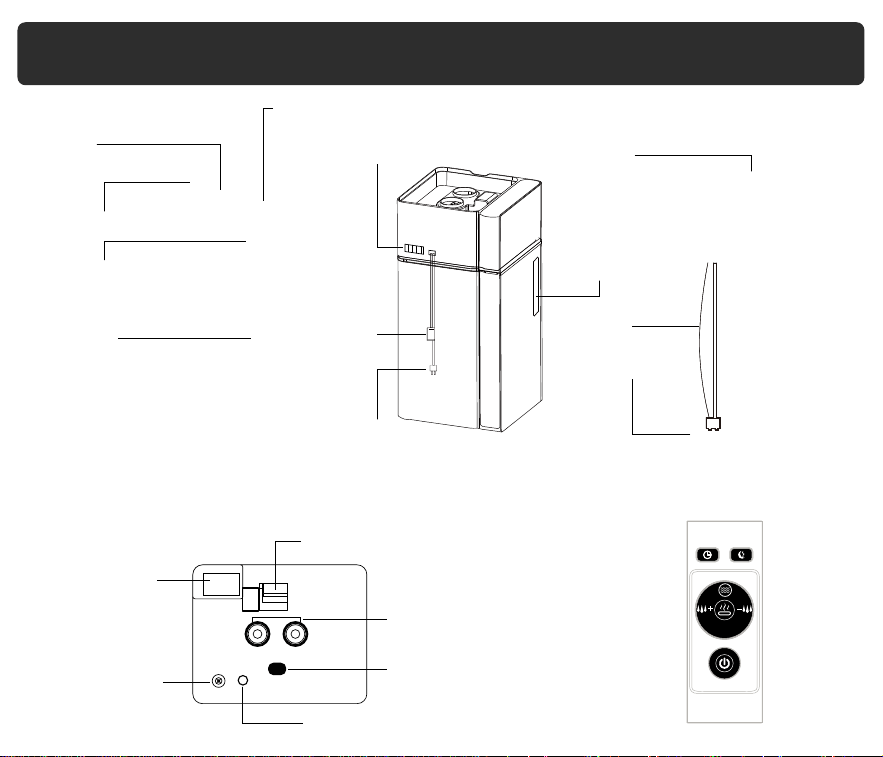
Components
05
Remote ControlMain Body Inside
Float
Water Outlet
Water Overflow Port
Heating Element
Nozzles
Safety Drain Hole Main Body
Water Pipe
Water Pump
Power Cord
Sensor
Top Cover
LED Display
Control Panel
Water Tank
Water Viewport
Fan Outlet
Stainless Steel Atomizer
+
-
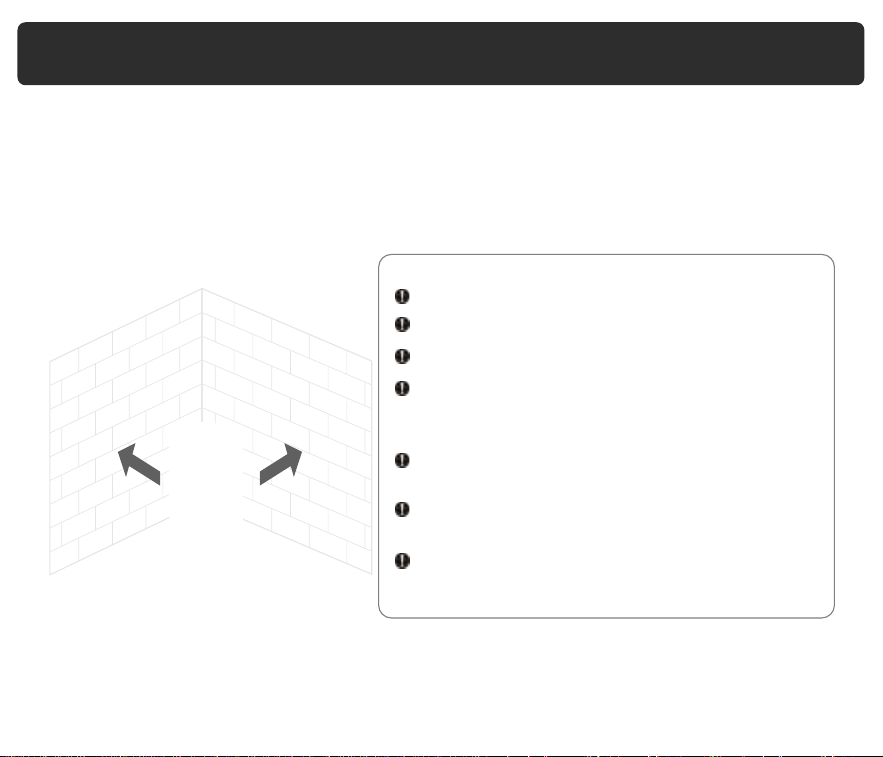
Place the humidifier on a level, dry surface that is free from any inclinations. Ensure
that it is horizontally positioned at a distance of more than 50 cm from any furniture,
walls, appliances, or other items.
Avoid using the humidifier in the following situations to prevent water leakage,
signal jamming, damage, or injury:
Please follow these guidelines carefully to ensure the safe and proper operation of
your humidifier. If you have any questions or concerns, please refer to the user
manual or contact customer support.
In direct sunlight.
On an unstable platform.
In high temperatures, humidity, or dust.
Near heat sources like air conditioners,
heaters, stoves, or any other objects that emit
heat.
Under tables, curtains, carpets, bedding, or
any other similar objects to avoid dampness.
Near objects that emit radio waves such as
radios.
Near precision instruments like mobile phones,
computers, and other electronic devices.
Placement
06
50cm 50cm
PLEASE SCAN IN! https://lacidoll.com/pages/user-manual
07
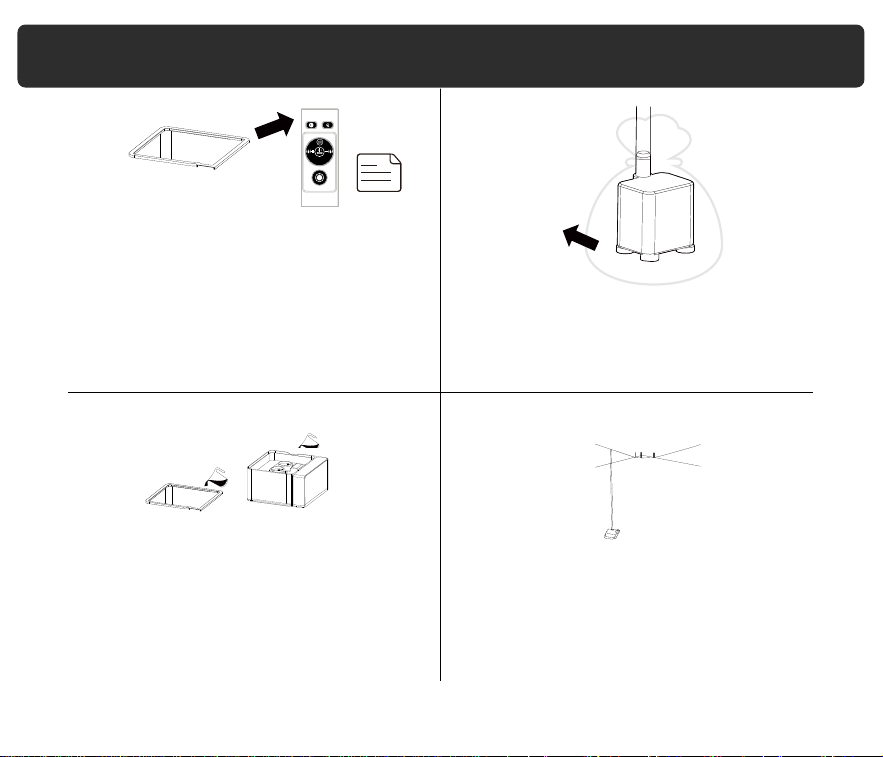
1. Take the main body out of the packaging and
remove the remote control and other
accessories from the water tank.
2. Before use, please remove the packaging bag of
the water pump and check if the water pipe is
connected to both ends of the water pump and
the main body's interface.
3. Open the top cover of the main unit to add
water or add directly to the water tank,
making sure not to exceed the maximum
water level (20L/5.3Gal).
4. Place the main body on the water tank properly.
+
-
Installation
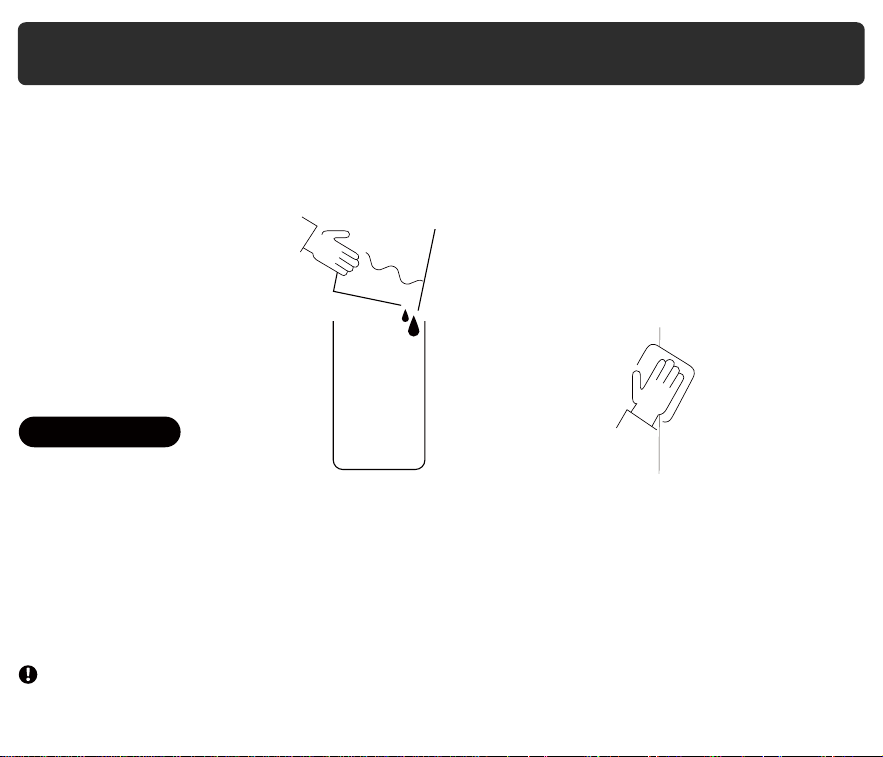
Water Filling
08
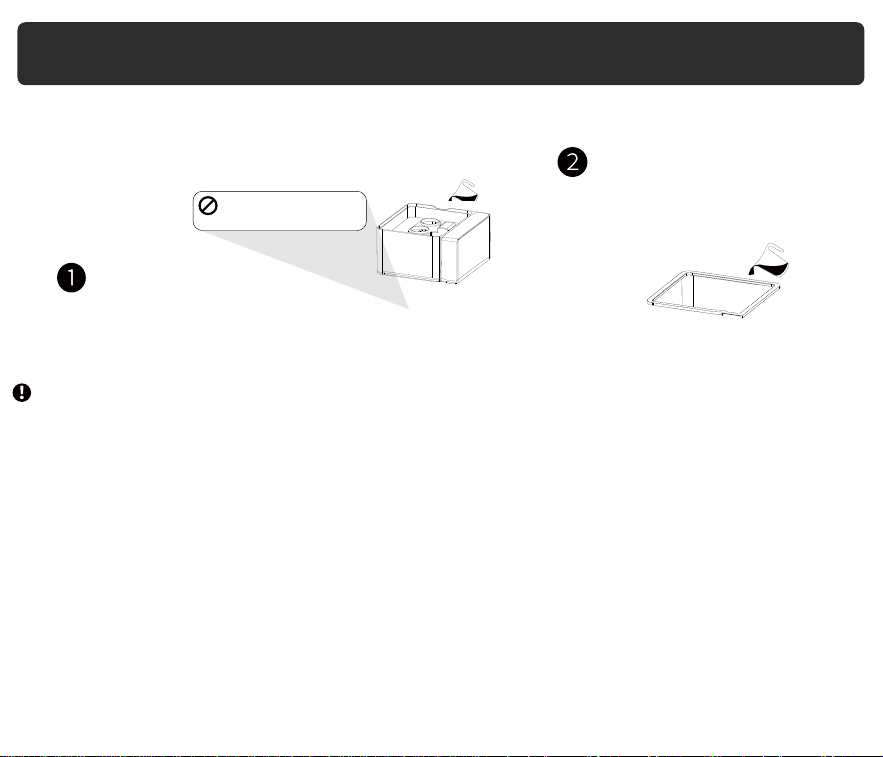
There are two ways to add water.
● Please add water below 40°C.
● Distilled water or RO water is recommended.
● Please do not exceed the maximum water mark.
● Please do not allow water to enter the mist outlet, or water may enter the inside and cause
the machine to malfunction.
● Please do not add mineral water, plasma water or tap water that has not been used for
a long time. If mold or impurities grow, it may cause health problems.
● When the water is insufficient, the machine will prompt water shortage and automatically
shut down. Please refill with water and turn it on.
● Regarding water accumulation in the base: The humidifier uses ultrasonic vibration of the misting
plate to disperse liquid water into a mist. The water tank is merely a transitional water storage
tool, and all humidifiers' base reservoirs will accumulate water. Please use it with confidence.
Note
Open the top cover of the main unit
to add water.
Do not exceed the
full water line(MAX).
Remove the main body and add
water to the water tank directly.
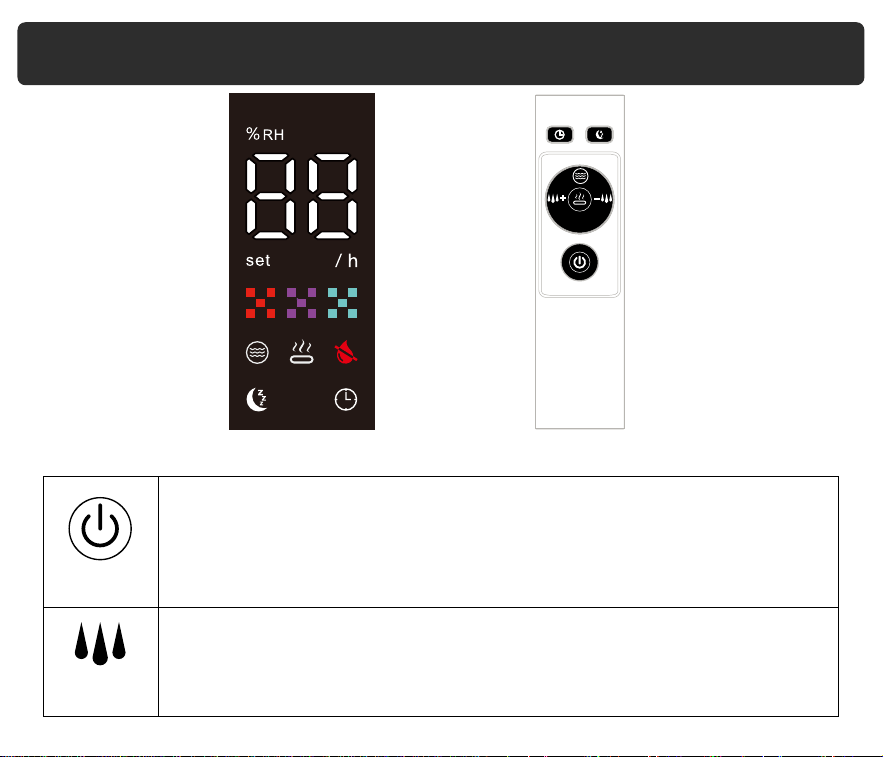
Control Panel & Remote Control
09
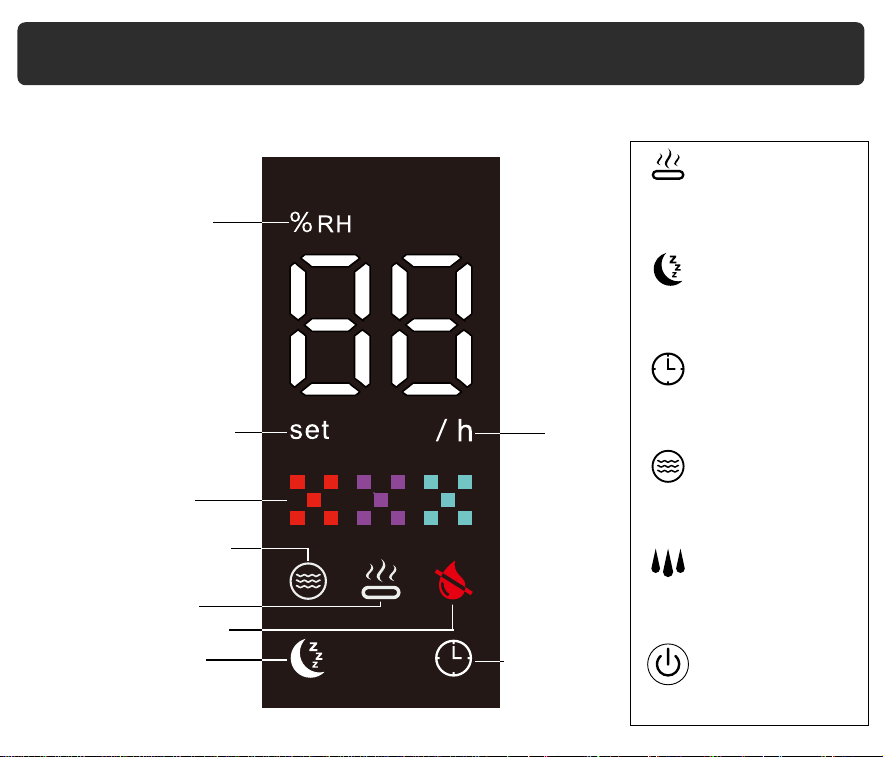
The control panel and remote control allow you to operate the humidifier with ease.
Relative Humidity(RH)
Percentage Indicator
Humidity Setting Indicator
Mist Level Indicator
Humidity Setting Indicator
Warm Mist Indicator
Water Shortage Indicator
Sleep Mode Indicator Timer Indicator
Hour
Sleep Button
Sleep
Timer Button
Timer
Humidity Button
Humidity
Max-Min Button
Max-Min
Power Button
Power
Warm Mist Button
Warm
Long Press
Control Panel & Remote Control
10
Power: After plugging in the power, press the power button to turn on the
machine. After powering on, there will be a sound of the water pump
drawing water, and mist production will begin 40-60 seconds later. Lightly
touch the power button to turn off the machine, and the fan will shut down
with a 15-second delay.
Display & Buttons Remote Control
+
-
Power
Max-Min
Max-Min: The product has three mist levels that can be adjusted. Press
the mist level button to cycle through the levels. The machine defaults to
the lowest mist level at startup and does not retain the setting. Display:
red is the 1st level, blue is the 2nd level, and green is the 3rd level.
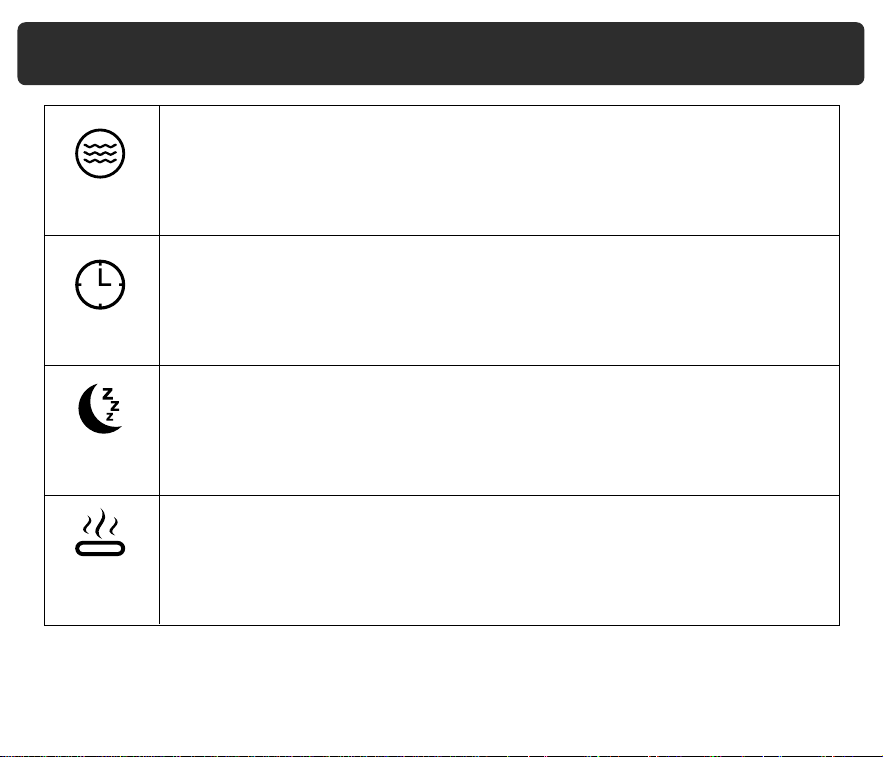
Control Panel& Remote Control
11
Sleep
Timer
Humidity
Warm
Long Press
Humidity: Adjustable range: 45-90%. Lightly touch the humidity control button to
activate the humidity control function, and the Humidity Indicator on the display lights
up. The default humidity is 45%, and each subsequent press increases it by 5% until
reaching 90%. Press again to exit the humidity control function. When the ambient
humidity reaches the preset value, the machine stops working. If the ambient
humidity is more than 5% below the preset value, the machine resumes operation.
Timer: Adjustable range: 1-24 hours. After setting the time, it takes effect after a
flashing period, and the display shows the current humidity with the Timer Indicator.
Sleep: After activating sleep mode, the display screen turns off, leaving only the
Sleep Indicator.
Warm: Press and hold for 3-5 seconds to enter. Press the remote control or panel
again to exit.
●Point the infrared emitter of the remote control towards the humidifier's control panel.
●If there is water around the machine during use, it indicates that the room humidity is too
high. Please adjust the mist level accordingly.
Maintenance
12
Daily Cleaning
●Change the water daily to avoid bacteria growth.
1. Unplug the humidifier.
2. Remove and rinse the water tank cover/aroma box/aroma pad.
3. Remove the main body. Pour out any water from the tank and sink.
4. Wipe the outside of the humidifier with a damp soft cloth or sponge below 40°C.
5. Clean the inside surfaces of sinks and tanks with a soft cloth or brush. Never immerse the main
body in water or liquid.
6. Dry all parts with a cloth. (We have included a towel for your complimentary use.)
Make sure all parts are completely dry before reassembling or storing.
If you've been using the warm mist setting, allow the humidifier to cool before cleaning.
●Clean the humidifier water tank and sink every week.
●If not using the humidifier for 1 week or longer, do not leave water inside.
Clean and dry the humidifier instead.
Note
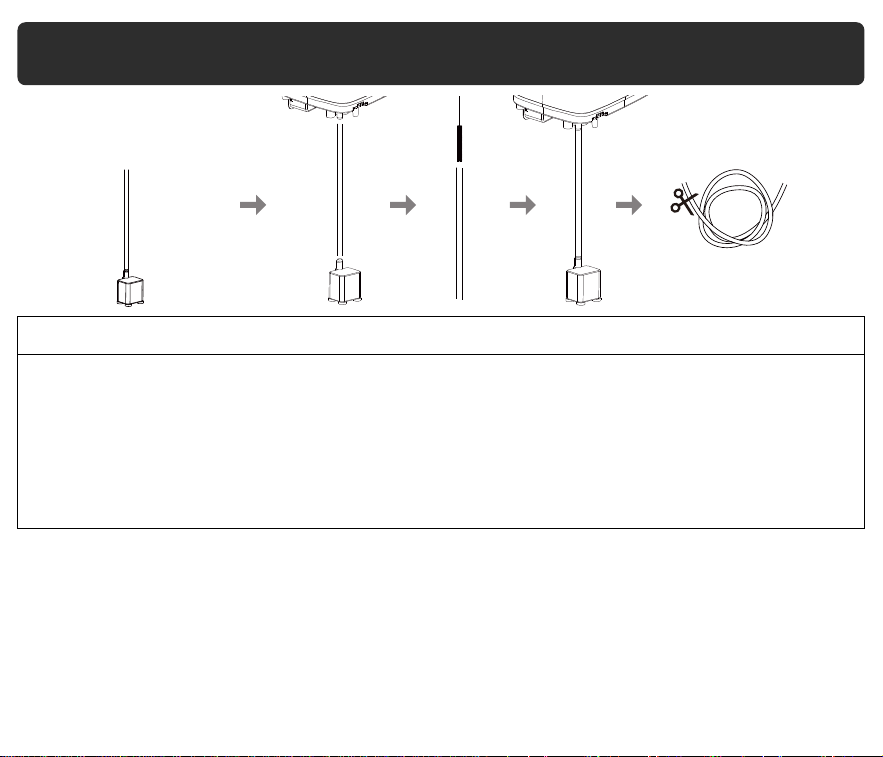
Maintenance
13
If you notice sediment in the water pump, you can clean it using a slim brush or contact our customer
service to request a replacement. Follow these steps to clean or replace the water pump:
1. Unplug the water pump from the humidifier.
2. Clean the water pump using a slim brush, or replace it if necessary.
3. Reinstall the water pump by plugging it back into the humidifier.
4. If the water pipe is too long, you can cut it to a suitable length before reinstalling it.
●Always disconnect the power plug before performing any maintenance on the humidifier.
●Do not directly flush the whole machine with water as this can cause short circuit and failure.
●Use mild detergent and make sure to remove any residue to avoid harm to health.
●If the humidifier will not be used for more than 24 hours, pour out the water from the tank and sink to
●avoid mold or impurities that may be harmful to health.
●The sponge that comes with the humidifier is only for cleaning; it is not a filter.
Water Pump
Note:
Maintenance
14
1. Fill the tank or sink with distilled white vinegar and soak for
15-20 minutes. Vinegar will loosen scale (mineral buildup)
2. Use a soft cloth and the included cleaning brush to remove
scale from all parts.
3. Rinse all parts until any vinegar smell is completely gone.
To descale the humidifier (remove mineral buildup):
Note:
Always disconnect the power plug before performing any maintenance on the humidifier.
Do not directly flush the whole machine with water as this can cause short circuit and failure.
Use mild detergent and make sure to remove any residue to avoid harm to health.
How to Change the Pump

Q:Why does the humidifier emit mist even when the display is dark?
A:There may be a power issue or the electricity is not connected properly. Reconnect
the power supply as a solution. If you are still having problems, please get in touch
with our customer care team.
Q: Why is there no mist despite the display lighting up?
A1:The water level in the water sink may be excessively high. Drain some water
from the water tank or upper sink area before replacing the cover.
A2:The water level in the water sink may be excessively high. Drain some water
from the water tank or upper sink area before replacing the cover.
FAQ
Q:Why is there so little mist?
A:There could be several reasons, such as unclean water, a dirty atomizer plate,
or a clogged air intake. Clean the atomizer plate, replace the water with clean
water, and then check if the air inlet is blocked.
Q: Why is there unusual noise?
A:There could be too little water or the humidifier may be placed on an unstable
surface. Place the humidifier on a solid and sturdy surface and fill the water tank
with water.
Q:Why is there white powder around the humidifier?
A:Tap water contains minerals that can adhere to objects. Clean the water tank
regularly and keep precision instruments away from the humidifier to avoid damage.
15
*If your problem is not listed, please contact Customer Suppoort.

Q:Why is there scale in the water sink or tank?
A:Tap water contains minerals that can adhere to objects. Clean the water sink and
tank regularly.
Q:Why is there interference with the TV remote control signal?
A:Keep the humidifier at least 1 meter away from the TV or other objects that emit
radio waves.
Q:Why is the floor wet or there is water around the humidifier?
A:The humidity may be too high or the humidifier may be placed in a non-ventilated
area, causing the mist to not fully evaporate.
FAQ
16
17
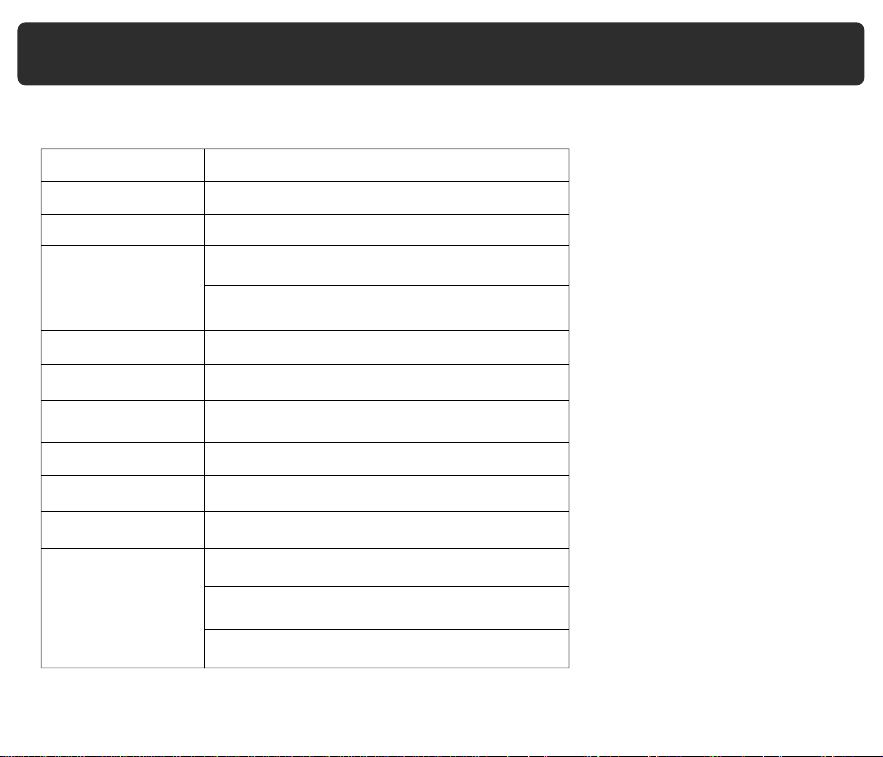
Product Specifications
Product Name
Cool and Warm Mist Humidifier
Model Number
LCD-MH-J18
Operation Mode
Low Medium High
50W (Cool Mist))
20L/5.3Gal
Rated Power
130W (Warm Mist)
1-24 hours timer
Waterless auto shut-off
Automatic shutdown when falling
Tank Capacity:
Size:
9.84x 9.45 x 19.97 inches
Net weight:
3.8kg
Gross weight:
4.2 kg
Safety Functions
Rated Voltage
120V~
Rated Frequency
60Hz

Warranty Period
Our company provides a one-year warranty starting from the date of purchase.
Warranty Requirements
In order to receive warranty service, please follow these steps:
Provide the warranty card and the order number.
Please note that we cannot provide warranty service if you are unable to provide the
above information.
Thank you for choosing our product, and we hope you enjoy using it. If you have any
questions or concerns, please don't hesitate to contact us.
Describe the problems you are experiencing in detail and provide pictures or videos
if possible.
Non-Warranty Policy
The following conditions are not covered by the warranty:
Damage that occurs after the warranty period has expired.
Damage caused by natural disasters or other force majeure events.
Any damage caused by use that does not follow the requirements outlined in the
User Manual.
Failure or damage caused by the forced use of the product.
The user disassembles or repairs the product without authorization.
Warranty
If you need to return the product, please make sure that it is intact and that
the packaging boxes and accessories are complete.
18