
Technical Support and E-Warranty Certificate
www.vevor.com/support
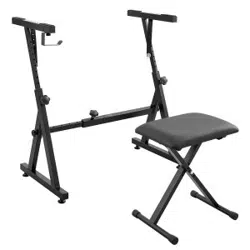
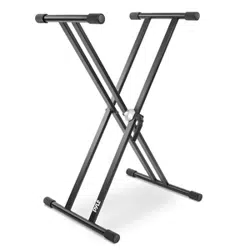
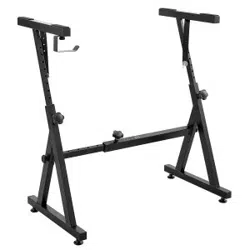
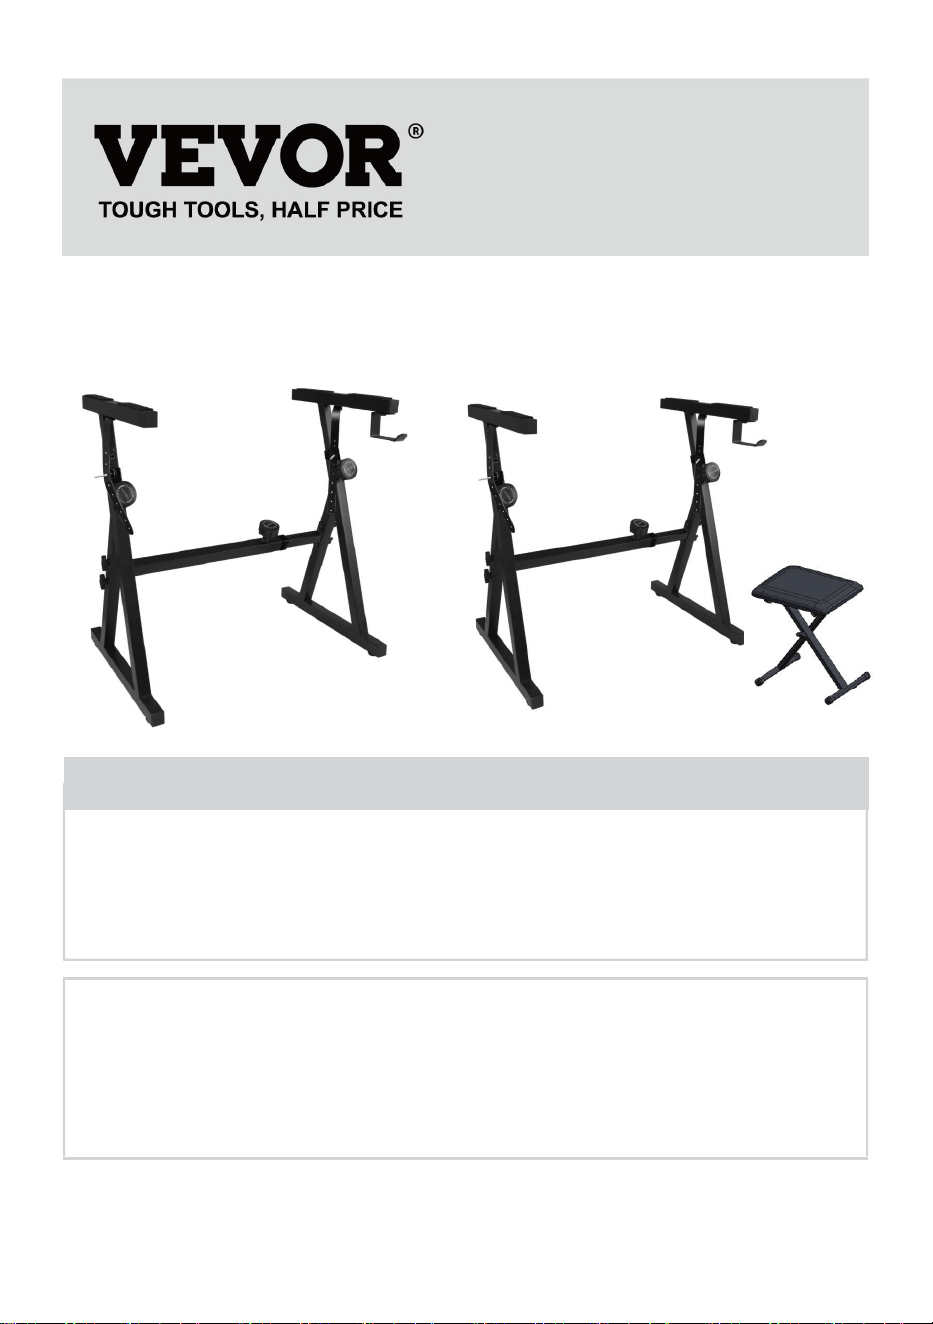
PIANO KEYBOARD STAND
MODEL: AKS-Z1
AKS-Z1-AKT-1200E
We continue to be committed to provide you tools with competitive price.
"Save Half", "Half Price" or any other similar expressions used by us only represents an
estimate of savings you might benefit from buying certain tools with us compared to the major
top brands and does not necessarily mean to cover all categories of tools offered by us. You
are kindly reminded to verify carefully when you are placing an order with us if you are
actually saving half in comparison with the top major brands.
- 1 -
MODEL: AKS-Z1 AKS-Z1-AKT-1200E
Have product questions? Need technical support? Please feel free to
contact us:
Technical Support and E-Warranty Certificate
www.vevor.com/support
NEED HELP? CONTACT US!
This is the original instruction, please read all manual instructions
carefully before operating. VEVOR reserves a clear interpretation of our
user manual. The appearance of the product shall be subject to the
product you received. Please forgive us that we won't inform you again if
there are any technology or software updates on our product.
PIANO KEYBOARD STAND

- 2 -
Warning-To reduce the risk of injury, user must read
instructions manual carefully.
WARNING:
Read this material before using this product. Failure to do so can result in
serious injury.
Assembly precautions
1. Assemble only according to these instructions. Improper assembly can
create hazards.
2. Wear duty work gloves during assembly.
3. Keep the assembly area clean and well-lit.
4. Keep bystanders out of the area during assembly.
5. Do not assemble when tired or when under the influence of alcohol,
drugs or medication.
6. The product capabilities apply to properly and completely assembled
products only.
7. For additional information regarding the parts listed in the following
pages, please refer to the Assembly Diagram of this manual. Unwrap
and separate all parts in a clean work area.
Use precautions
1. Weight Restrictions: Do not exceed the maximum weight capacity of
this product.
2. Do not use this product for any purpose not explicitly specified by
manufacture. Manufacture is not responsible for damage or injury caused
by incorrect assembly or use.
3. Inspect before every use; do not use if parts are loose or damaged.
4. This product is not a toy, cannot be used as toys for children to play with
it.
5. When adjusting the bracket, prevent hand pinching.
6. Before adjusting the bracket, ensure that there are no other items on the
bracket.
SAVE THESE INSTRUCTIONS
- 3 -
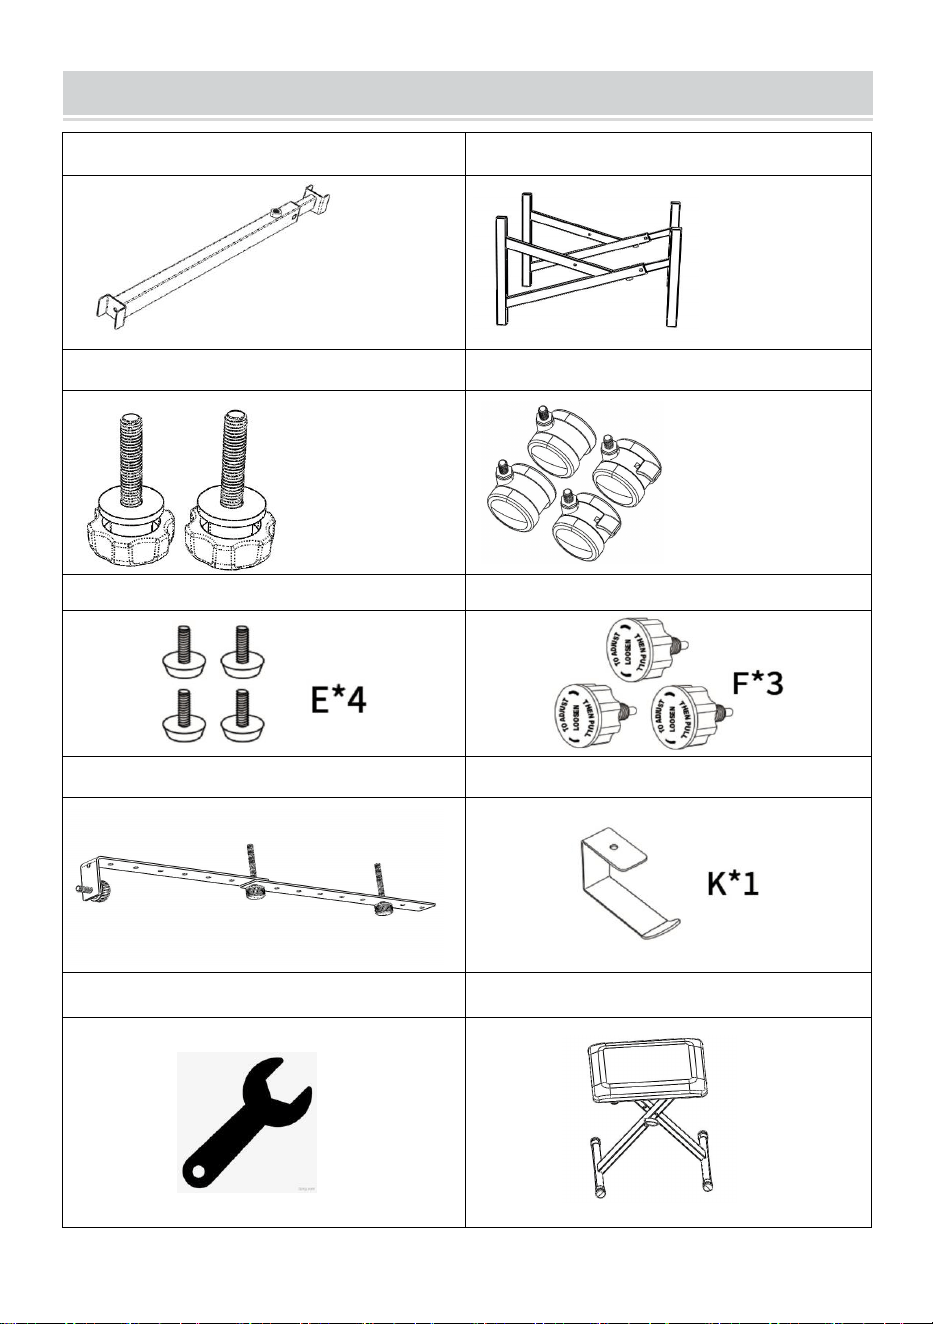
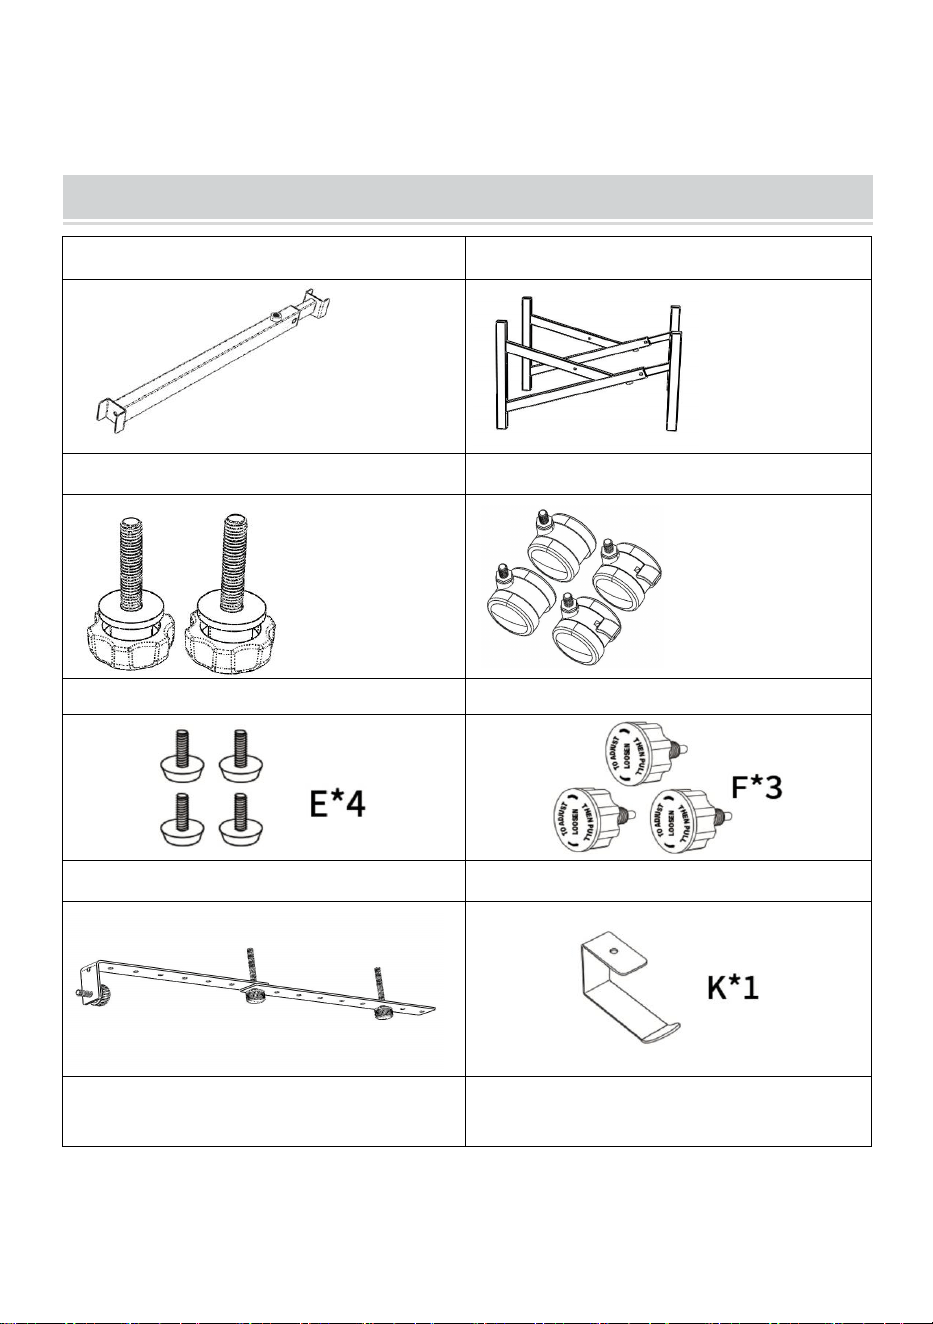
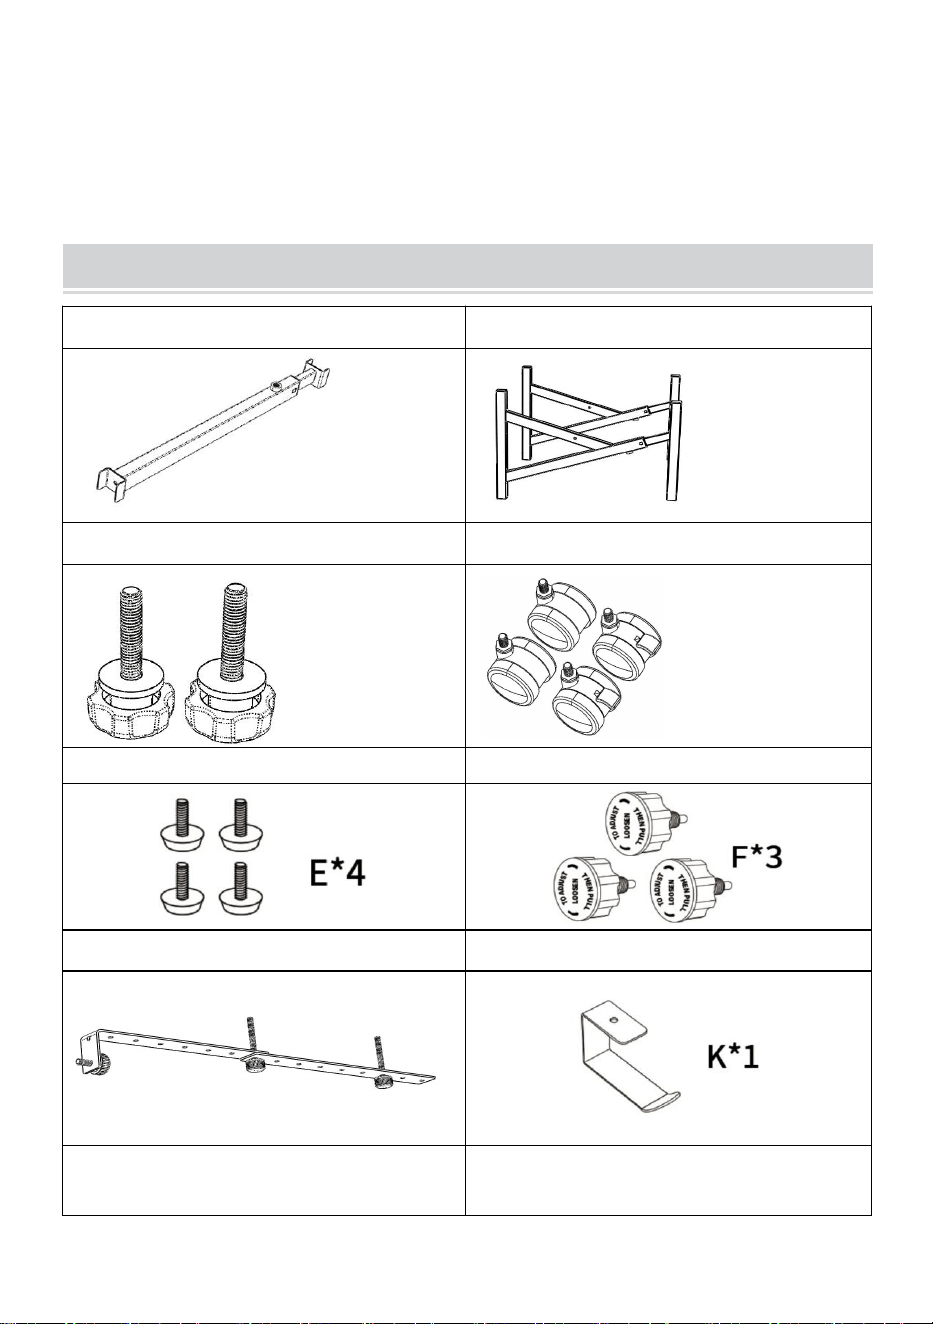
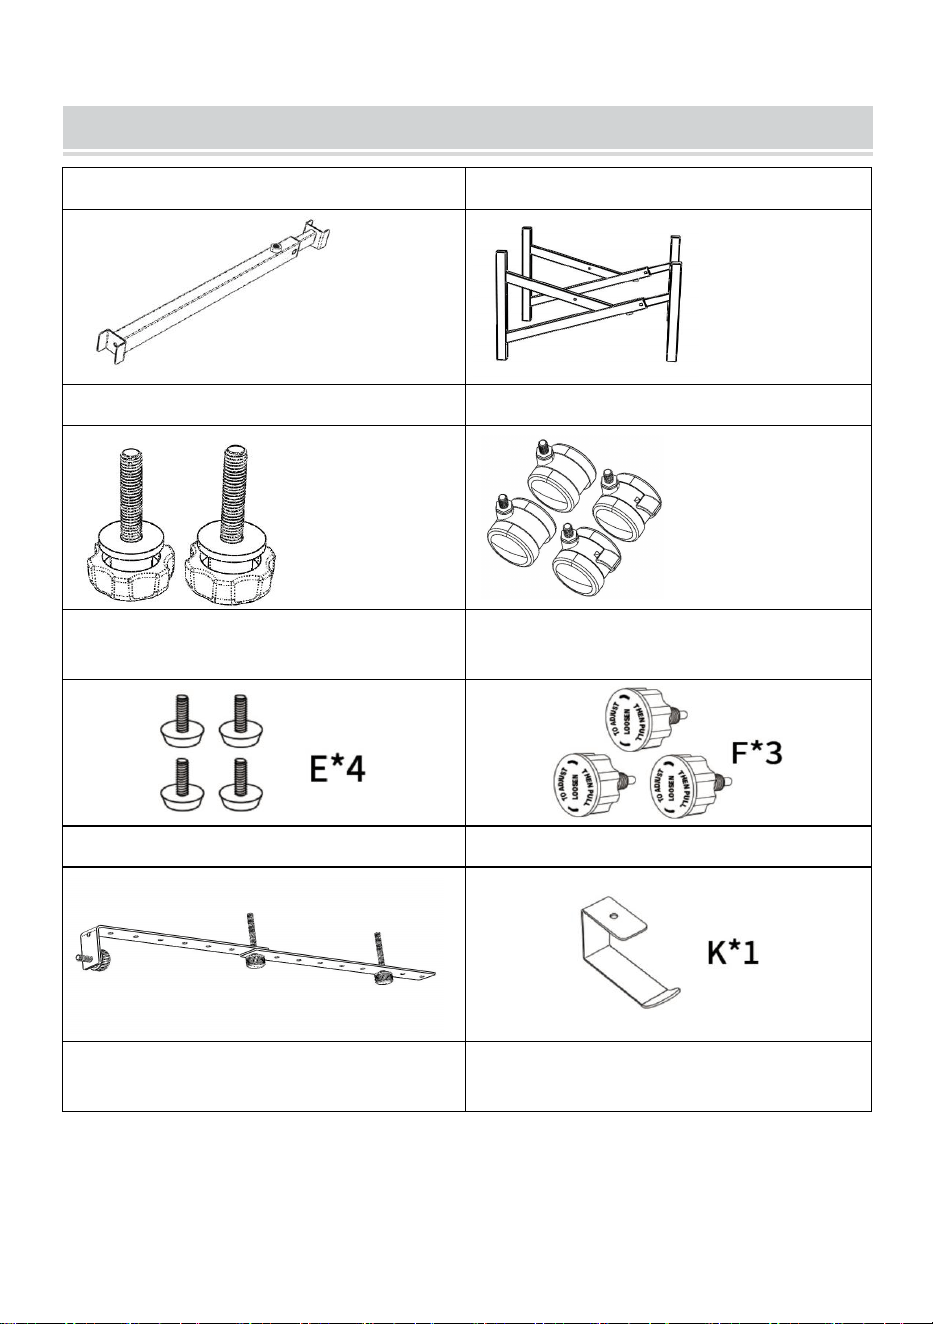
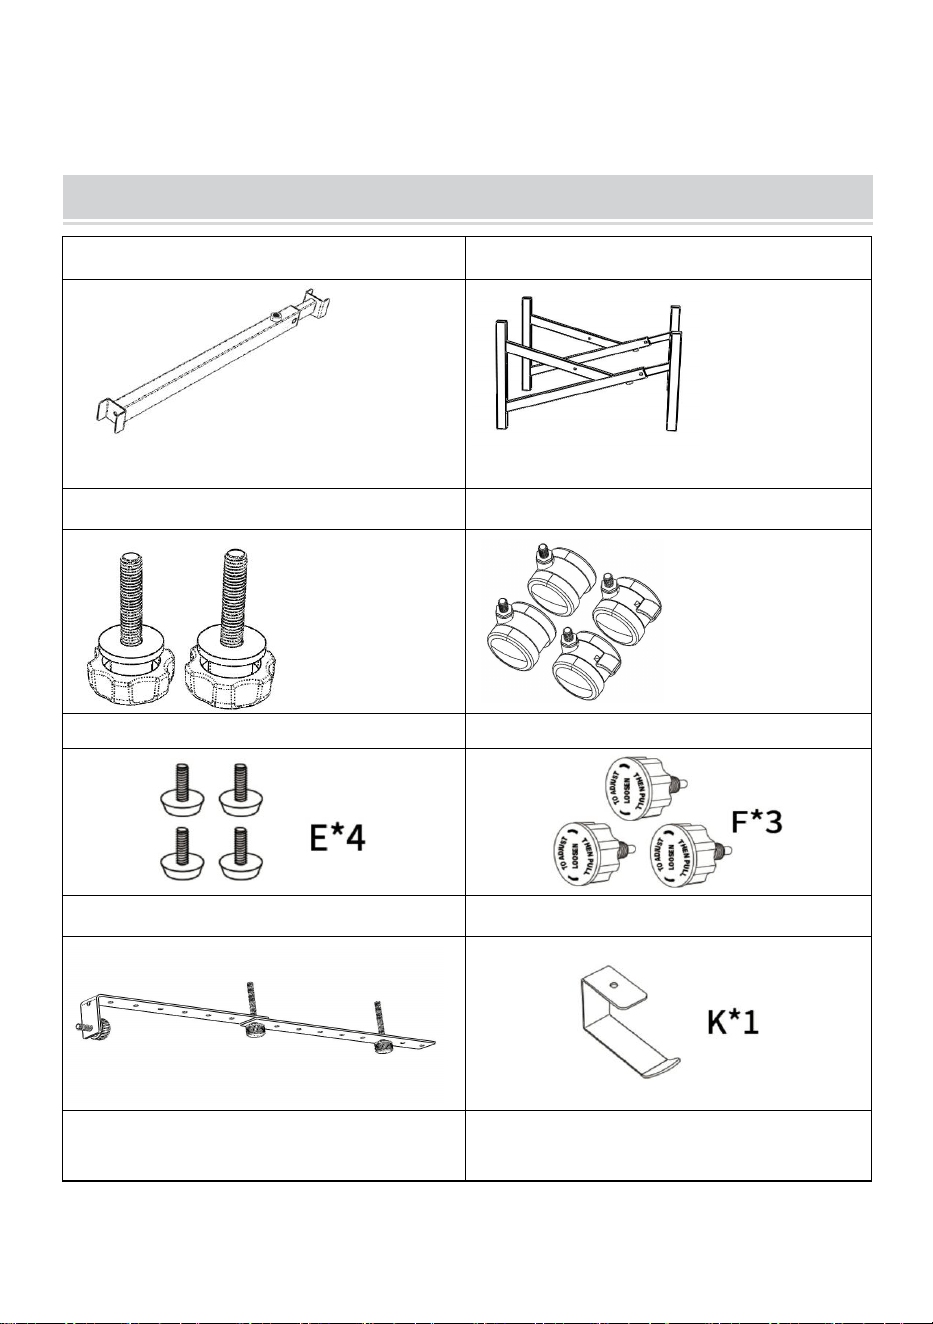
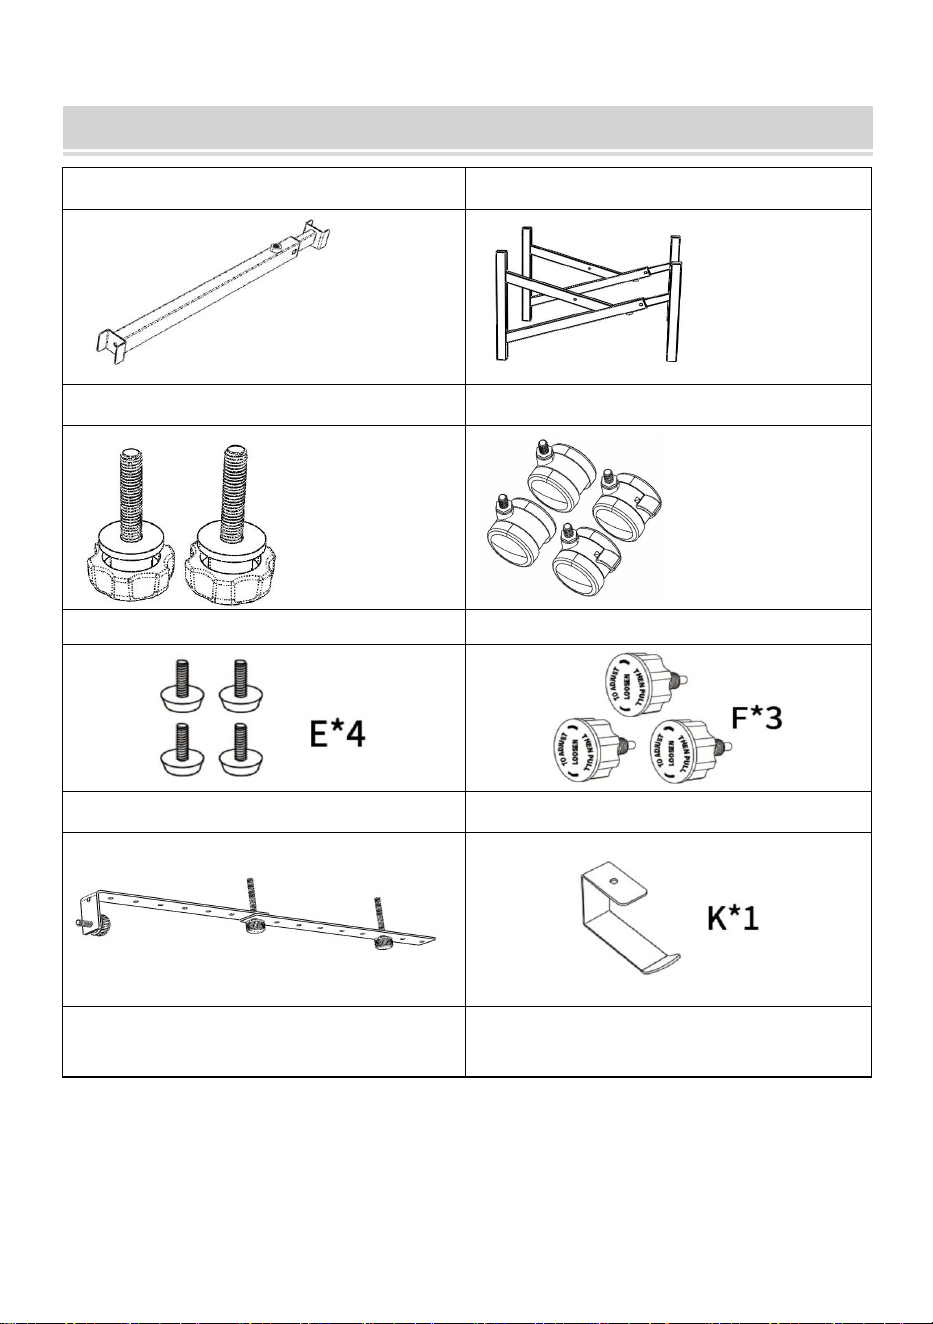
PACKAGE INCLUSIONS
① Crossbeam
② Base
A*1
B*2
③ T Knobs
④ Casters
Include washer
C*2
2 casters
without lock
D*4
⑤Rubber Feet
⑥Support adjustment knobs
⑦ Secure Straps
⑧Headphone Hook
G*2
⑨Wrench
⑩Chair(Only AKS-Z1-AKT-1200E)
H*1
J*1
- 4 -
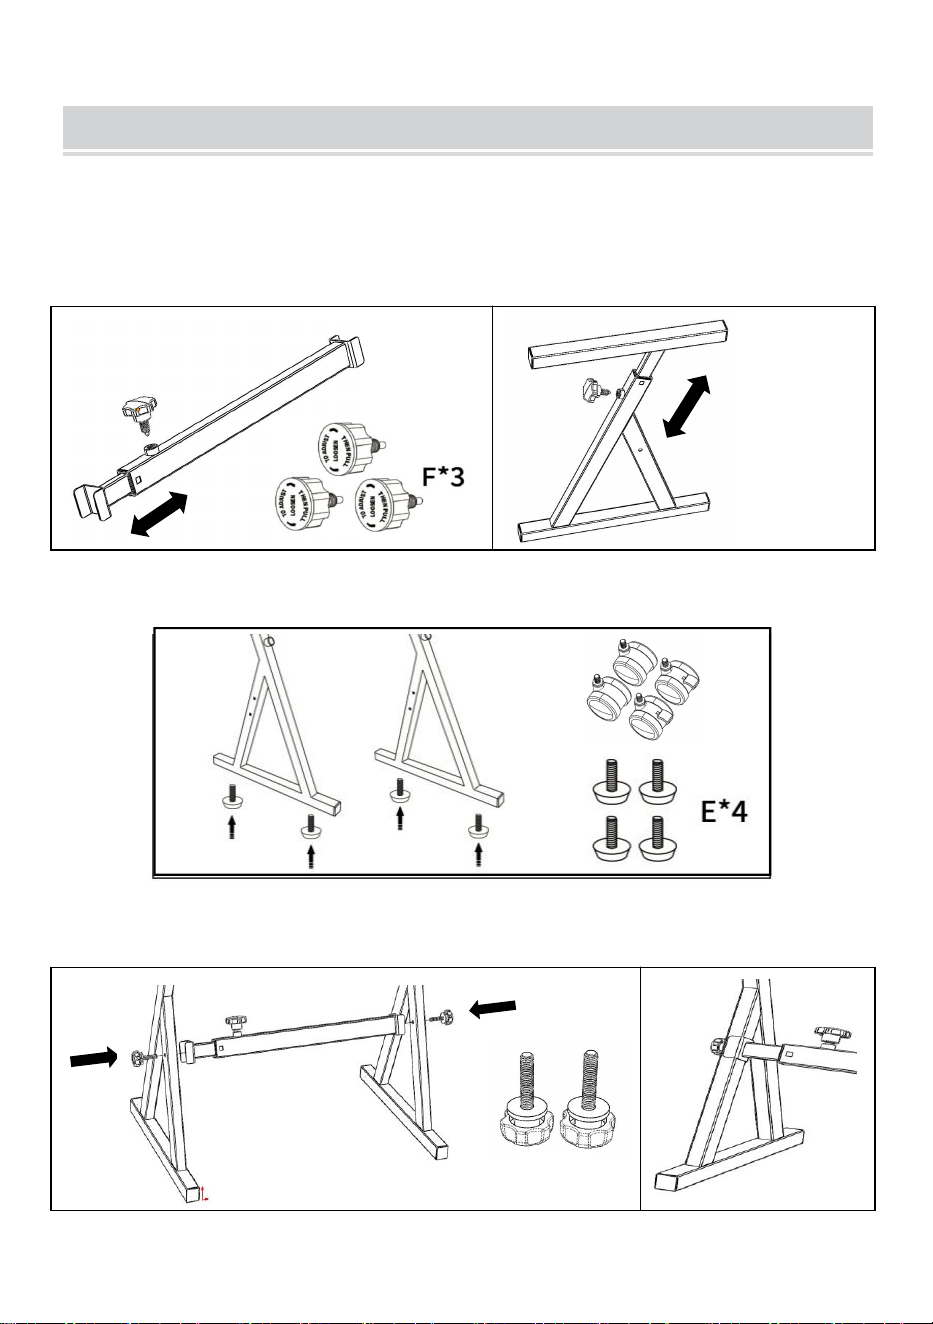
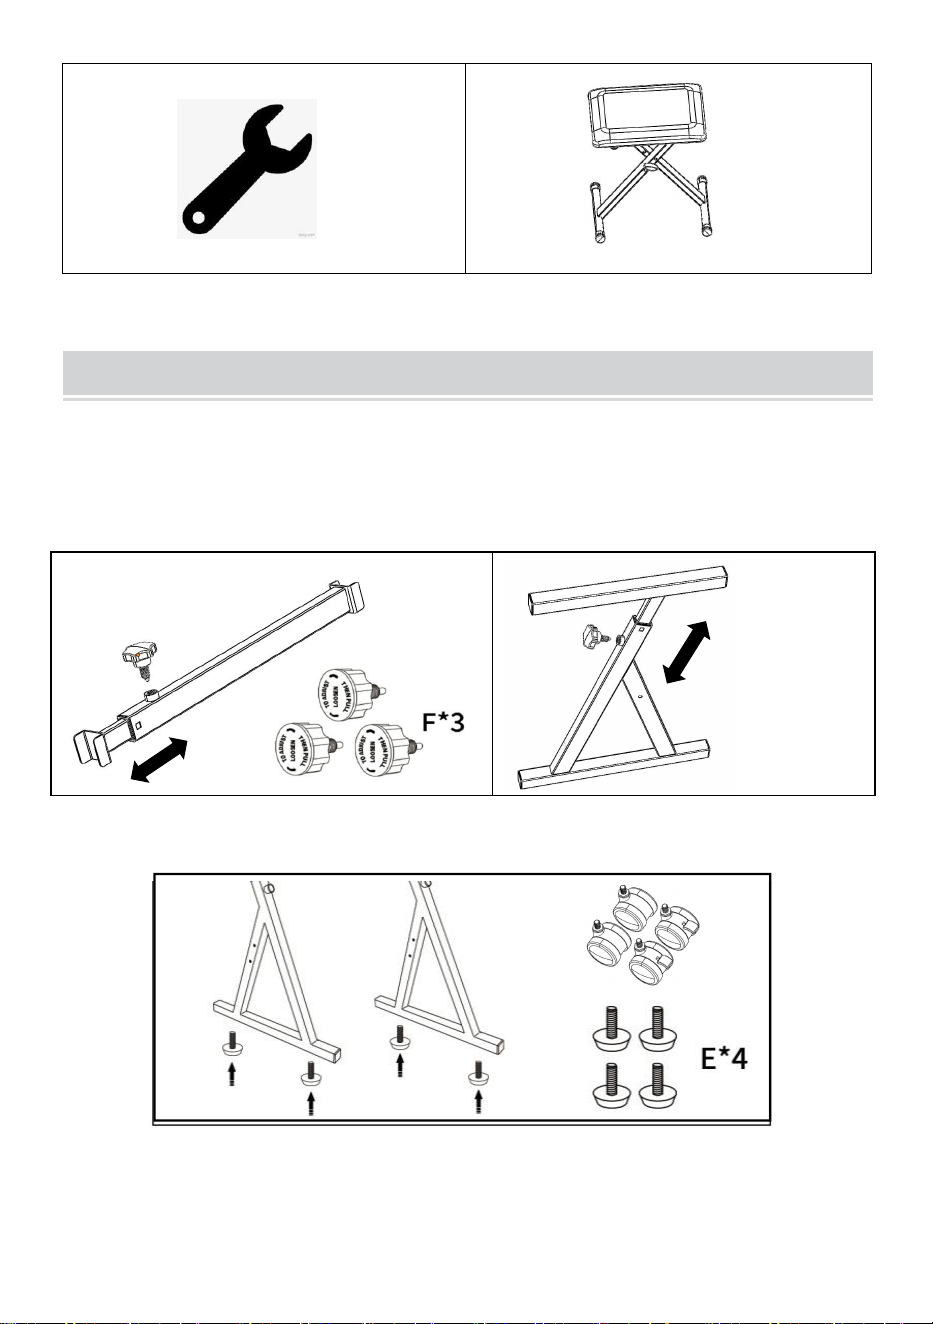
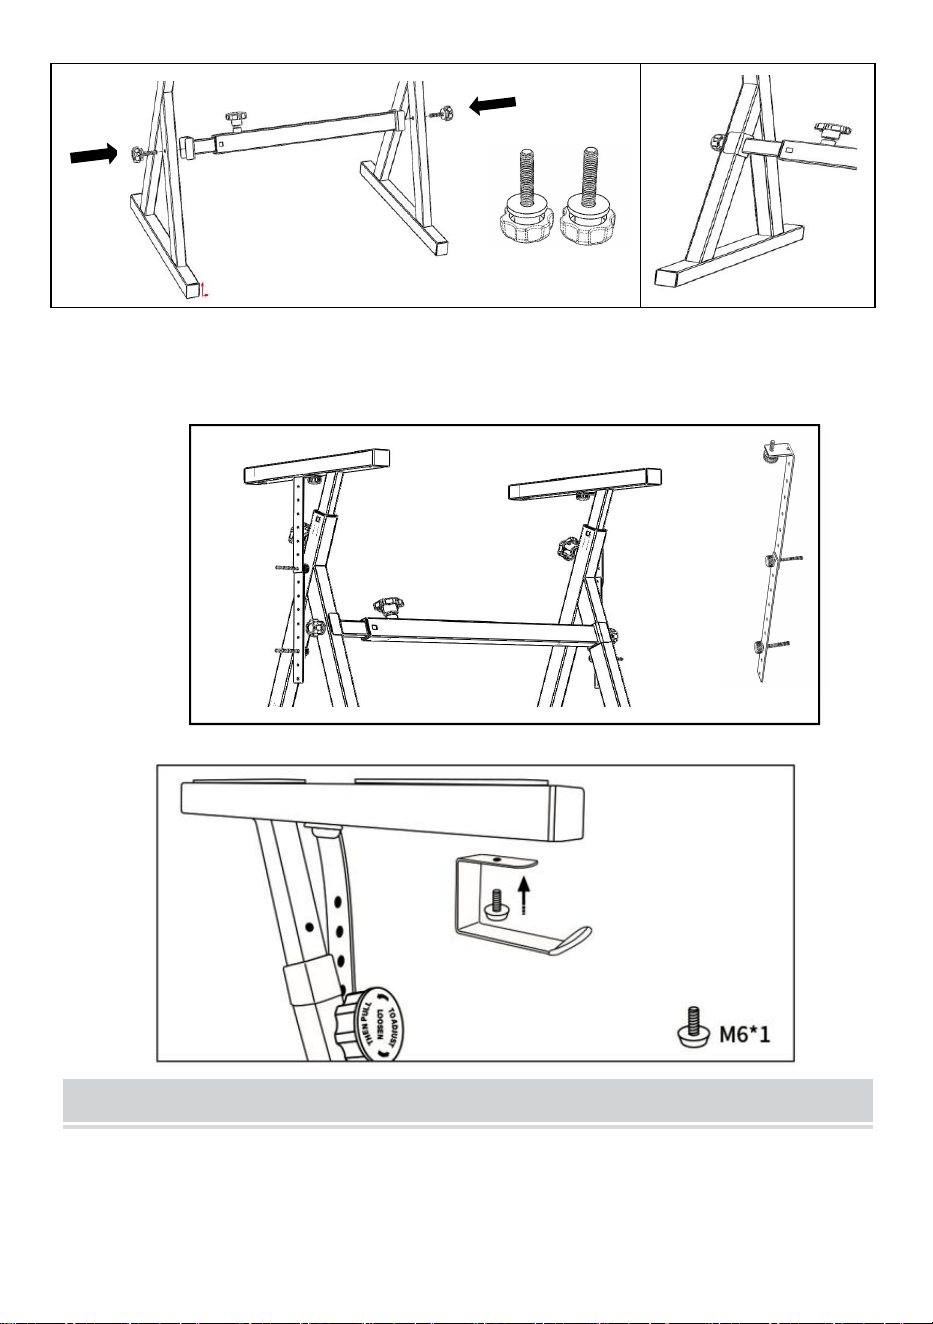
INSTALLATION GUIDELINES
Step 1:Adjust the crossbeam to the required length and then use the
adjustment knobs to lock it tightly.
Adjust the Base to the required height and then use the
adjustment knobw to lock it tightly
Step 2:Screw 2 Rubber Feet(or Casters) into each Base.
Step 3:Attach the assembled Crossbeam to each Base. Pay attention to
the position of the screw hole when installing.
C*2
- 5 -
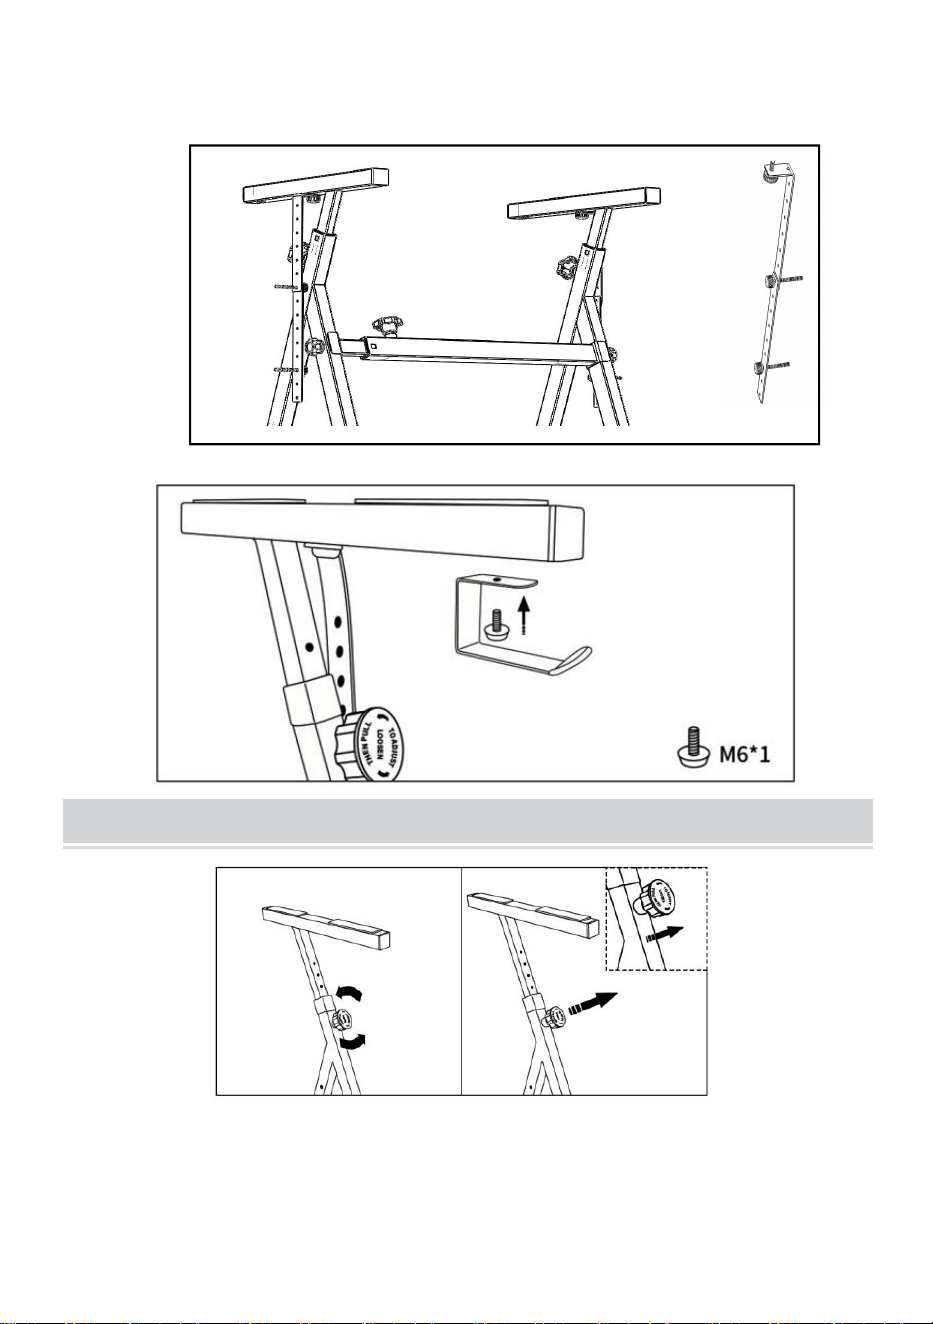
Step 4:Screw the Secure Straps into each Supports and then attach the
keyboards.
G*2
Step 5:Screw the Headphone Hook.
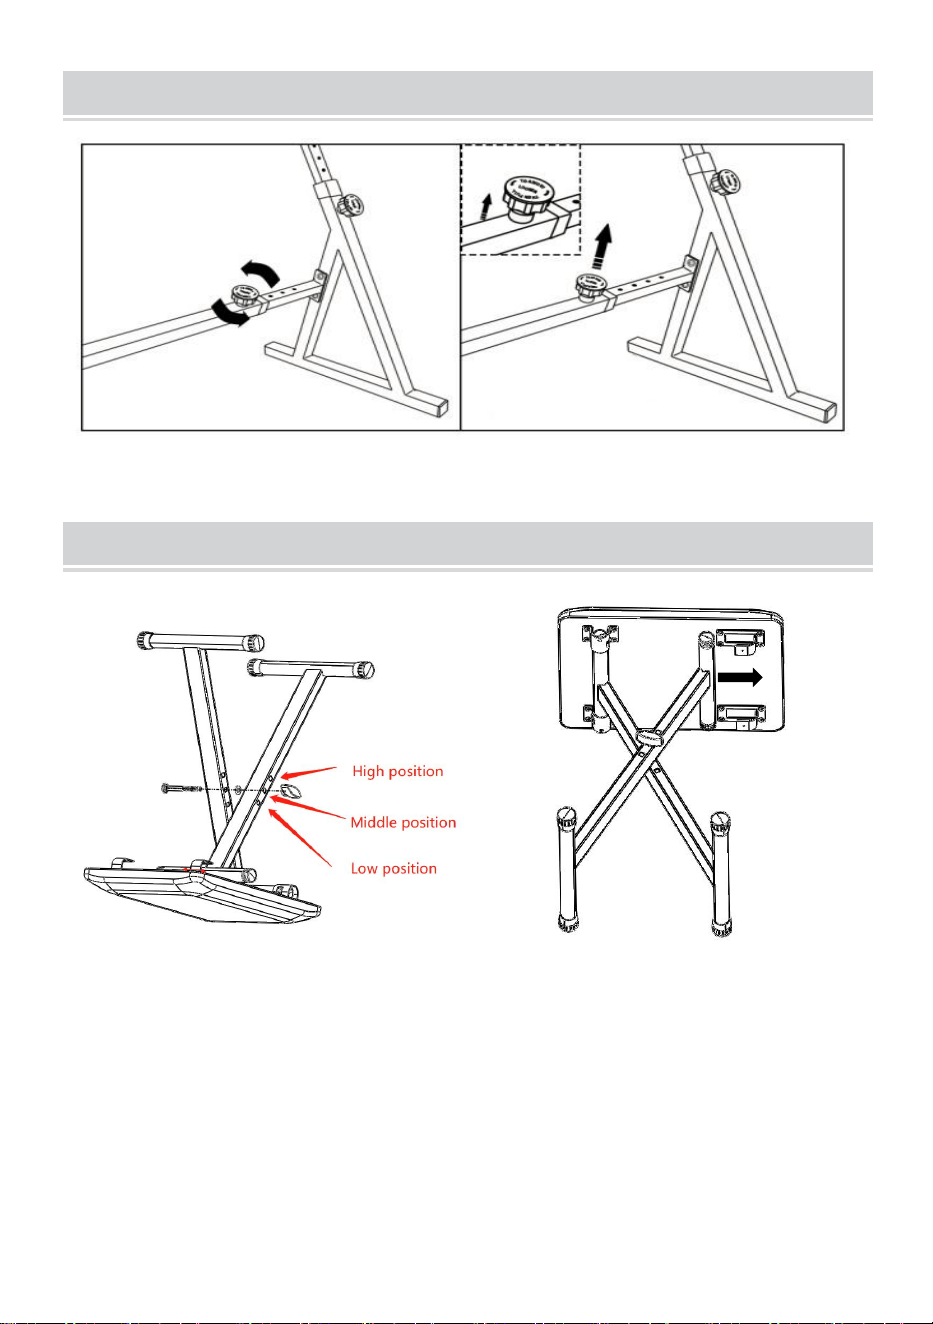
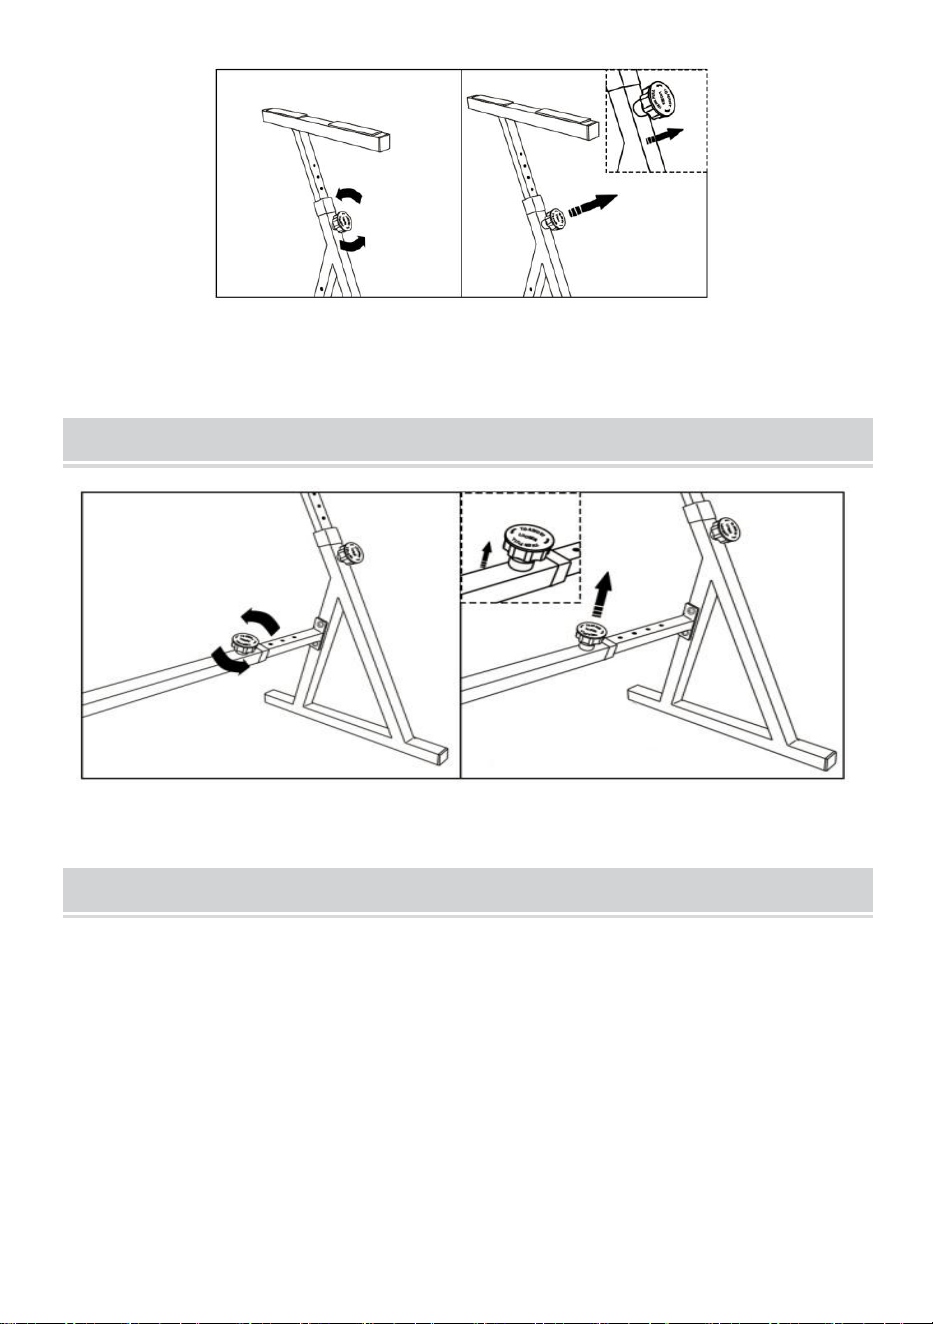
HOW TO ADJUST THE HEIGHT?
Loosen the Support adjustment knobs, then pull them out to adjust the
proper height and width.
- 6 -
HOW TO ADJUST THE WIDTH?
Loosen the Support adjustment knobs, then pull them out to adjust the
proper height and width.
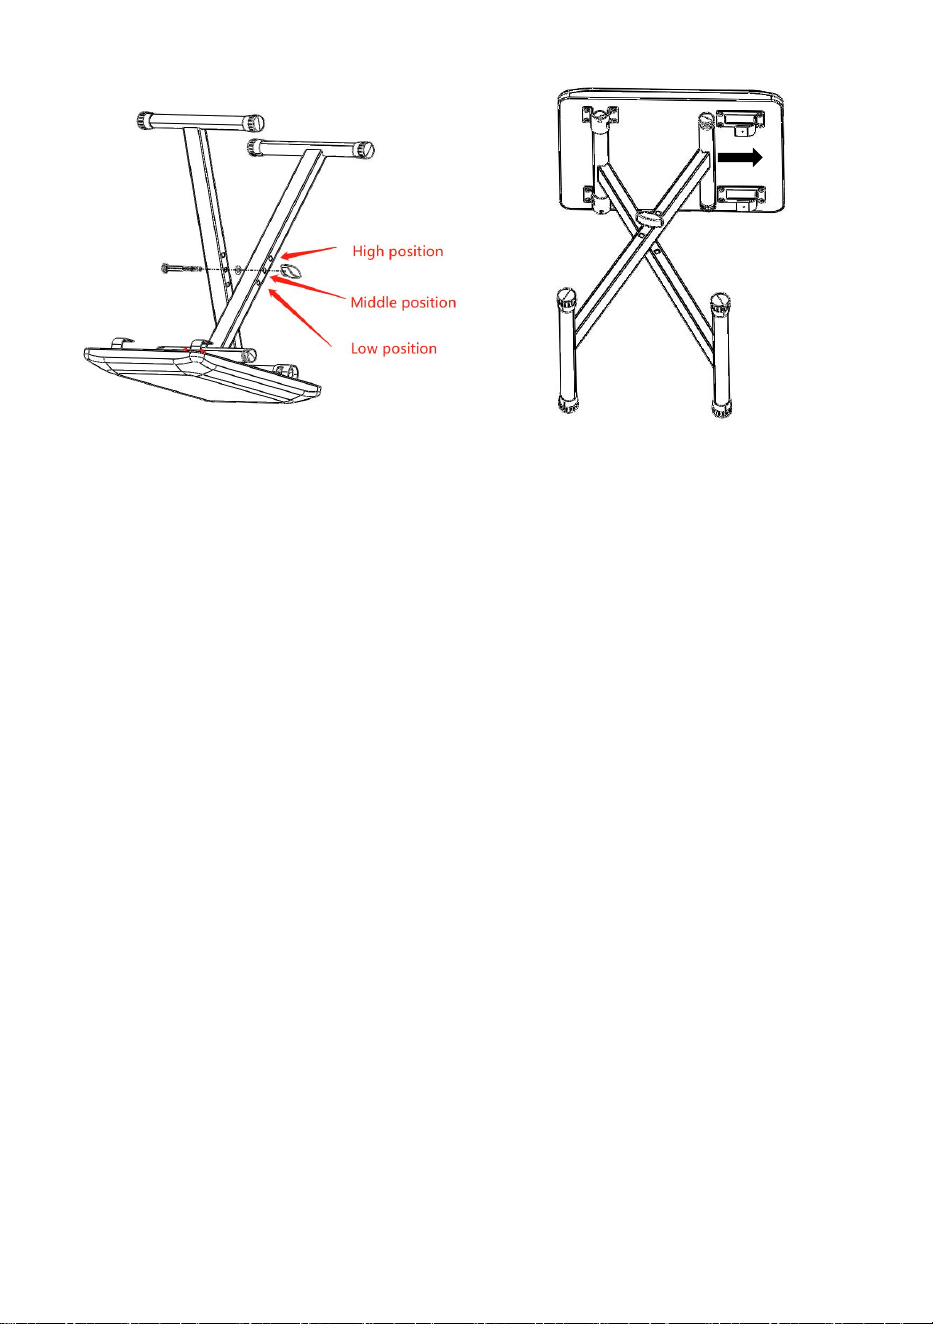
HOW TO ADJUST THE CHAIR?
Only AKS-Z1-AKT-1200E
By installing bolts in different holes, different heights can be adjusted.
Before use, please ensure that the bolts are locked tightly and the X feet
are clamped in place.
Made In China
Pull it out a little bit
to adjust the width
Pull it out a little bit
to adjust the height


- 2 -
Technique Assistance et certificat de garantie électronique
www.vevor.com/support
SUPPORT DE CLAVIER DE PIANO
MODÈLE: AKS-Z1
AKS-Z1-AKT-1200E
We continue to be committed to provide you tools with competitive price.
"Save Half", "Half Price" or any other similar expressions used by us only represents an
estimate of savings you might benefit from buying certain tools with us compared to the major
top brands and does not necessarily mean to cover all categories of tools offered by us. You
are kindly reminded to verify carefully when you are placing an order with us if you are
actually saving half in comparison with the top major brands.

- 1 -
MODÈLE: AKS-Z1 AKS-Z1-AKT-1200E
Have product questions? Need technical support? Please feel free to
contact us:
Technical Support and E-Warranty Certificate
www.vevor.com/support
NEED HELP? CONTACT US!
This is the original instruction, please read all manual instructions
carefully before operating. VEVOR reserves a clear interpretation of our
user manual. The appearance of the product shall be subject to the
product you received. Please forgive us that we won't inform you again if
there are any technology or software updates on our product.
PIANO KEYBOARD STAND

- 2 -
Avertissement : Pour réduire le risque de blessure, l'utilisateur
doit lire attentivement le manuel d'instructions.
AVERTISSEMENT:
Lisez ce document avant d'utiliser ce produit. Ne pas le faire peut
entraîner des blessures graves.
Précautions de montage
1. Assemblez uniquement selon ces instructions. Un assemblage
incorrect peut créer des dangers.
2. Portez des gants de travail pendant l'assemblage.
3. Gardez la zone de montage propre et bien éclairée.
4. Gardez les spectateurs hors de la zone pendant l'assemblage.
5. Ne vous rassemblez pas lorsque vous êtes fatigué ou sous l'influence
de l'alcool, de drogues ou de médicaments.
6. Les capacités du produit s'appliquent uniquement aux produits
correctement et complètement assemblés.
7. Pour plus d'informations concernant les pièces répertoriées dans les
pages suivantes, veuillez vous référer au schéma d'assemblage de ce
manuel. Déballez et séparez toutes les pièces dans une zone de travail
propre.
Utiliser des précautions
1. Restrictions de poids : Ne dépassez pas la capacité de poids maximale
de ce produit.
2. N'utilisez pas ce produit à des fins non explicitement spécifiées par le
fabricant. Le fabricant n'est pas responsable des dommages ou des
blessures causés par un assemblage ou une utilisation incorrecte.
3. Inspectez avant chaque utilisation ; ne pas utiliser si les pièces sont
desserrées ou endommagées.
4 . Ce produit n'est pas un jouet et ne peut pas être utilisé comme jouet
pour que les enfants puissent jouer avec.
5 . Lors du réglage du support, évitez de vous pincer les mains .
- 3 -
6 . Avant de régler le support, assurez-vous qu'il n'y a aucun autre
élément sur le support .
CONSERVEZ CES INSTRUCTIONS
PACKAGE INCLUSIONS
① Traverse
② Base
Un*1
B*2
③ Boutons en T
④ Roulettes _ _
Inclure la laveuse
C*2
2 roulettes
sans serrure
D*4
⑤ Pieds en caoutchouc
⑥ Bouton de réglage du support s
⑦ Sangles sécurisées
⑧ Crochet pour casque
G*2
⑨ Clé _
⑩ Cheveux (uniquement AKS- Z1
-AKT-1200E)

- 4 -
H*1
J*1
INSTALLATION GUIDELINES
Étape 1 : Ajustez la traverse à la longueur requise, puis utilisez les
boutons de réglage pour la verrouiller fermement .
Ajustez la base à la hauteur requise , puis utilisez le bouton de réglage
pour la verrouiller fermement.
Étape 2 : vissez 2 pieds en caoutchouc ( ou roulettes ) dans chaque base .
Étape 3 : Fixez la traverse assemblée à chaque base. Faites attention à la
position du trou de vis lors de l'installation.

- 5 -
Étape 4 : vissez les sangles sécurisées dans chaque support, puis fixez
les claviers.
G*2
Étape 5 : Vissez le crochet du casque.
HOW TO ADJUST THE HEIGHT?
C*2

- 6 -
Desserrez les boutons de réglage du support , puis retirez-les pour régler
la hauteur et la largeur appropriées.
HOW TO ADJUST THE WIDTH?
Desserrez les boutons de réglage du support , puis retirez-les pour régler
le hauteur et largeur appropriées.
HOW TO ADJUST THE CHAIR?
Pull it out a little bit
to adjust the width
Pull it out a little bit
to adjust the height

- 7 -
Uniquement AKS-Z1-AKT-1200E
En installant des boulons dans différents trous, différentes hauteurs
peuvent être ajustées .
Avant utilisation, assurez-vous que les boulons sont bien verrouillés et que
les pieds en X sont bien serrés .
Fabriqué en Chine


- 2 -
Technisch Support- und E-Garantiezertifikat
www.vevor.com/support
KLAVIERTASTATURSTÄNDER
MODELL: AKS-Z1
AKS-Z1-AKT-1200E
We continue to be committed to provide you tools with competitive price.
"Save Half", "Half Price" or any other similar expressions used by us only represents an
estimate of savings you might benefit from buying certain tools with us compared to the major
top brands and does not necessarily mean to cover all categories of tools offered by us. You
are kindly reminded to verify carefully when you are placing an order with us if you are
actually saving half in comparison with the top major brands.

- 1 -
MODELL: AKS-Z1 AKS-Z1-AKT-1200E
Have product questions? Need technical support? Please feel free to
contact us:
Technical Support and E-Warranty Certificate
www.vevor.com/support
NEED HELP? CONTACT US!
This is the original instruction, please read all manual instructions
carefully before operating. VEVOR reserves a clear interpretation of our
user manual. The appearance of the product shall be subject to the
product you received. Please forgive us that we won't inform you again if
there are any technology or software updates on our product.
PIANO KEYBOARD STAND

- 2 -
Warnung: Um das Verletzungsrisiko zu verringern, muss der
Benutzer die Bedienungsanleitung sorgfältig lesen.
WARNUNG:
Lesen Sie dieses Material, bevor Sie dieses Produkt verwenden.
Andernfalls kann es zu schweren Verletzungen kommen.
Vorsichtsmaßnahmen bei der Montage
1. Montieren Sie das Gerät nur gemäß dieser Anleitung. Durch
unsachgemäße Montage können Gefahren entstehen.
2. Tragen Sie bei der Montage Arbeitshandschuhe.
3. Halten Sie den Montagebereich sauber und gut beleuchtet.
4. Halten Sie während der Montage unbeteiligte Personen aus dem
Bereich fern.
5. Montieren Sie das Gerät nicht, wenn Sie müde sind oder unter dem
Einfluss von Alkohol, Drogen oder Medikamenten stehen.
6. Die Produkteigenschaften gelten nur für ordnungsgemäß und
vollständig montierte Produkte.
7. Weitere Informationen zu den auf den folgenden Seiten aufgeführten
Teilen finden Sie im Montagediagramm dieser Anleitung. Packen Sie alle
Teile aus und trennen Sie sie an einem sauberen Arbeitsplatz.
Treffen Sie Vorsichtsmaßnahmen
1. Gewichtsbeschränkungen: Überschreiten Sie nicht die maximale
Gewichtskapazität dieses Produkts.
2. Verwenden Sie dieses Produkt nicht für Zwecke, die nicht ausdrücklich
vom Hersteller angegeben sind. Der Hersteller übernimmt keine Haftung
für Schäden oder Verletzungen, die durch unsachgemäße Montage oder
Verwendung verursacht werden.
3. Vor jedem Gebrauch prüfen; Nicht verwenden, wenn Teile lose oder
beschädigt sind.
4 . Dieses Produkt ist kein Spielzeug und kann nicht als Spielzeug für
Kinder zum Spielen verwendet werden.
- 3 -
5 . Beim Verstellen der Halterung darauf achten, dass die Hände nicht
eingeklemmt werden .
6 . Stellen Sie vor dem Einstellen der Halterung sicher, dass sich keine
anderen Gegenstände auf der Halterung befinden .
ANLEITUNG AUFBEWAHREN
PACKAGE INCLUSIONS
① Querbalken
② Base
A*1
B*2
③ T- Knöpfe
④ C aster s
Inklusive Unterlegscheibe
C*2
2 Rollen
ohne Schloss
D*4
⑤ Gummifüße
⑥ Stützeinstellknopf s
⑦ Sichere Gurte
⑧ Kopfhörerhaken
G*2
⑨ Schraubenschlüssel _
⑩ C- Haar (nur
AKS-Z1-AKT-1200E)
- 4 -
H*1
J*1
INSTALLATION GUIDELINES
Schritt 1: Stellen Sie den Querträger auf die erforderliche Länge ein und
verriegeln Sie ihn dann mit den Einstellknöpfen fest .
Stellen Sie die Basis auf die gewünschte Höhe ein und verriegeln Sie sie
dann mit dem Einstellknopf fest
Schritt 2 : Schrauben Sie zwei Gummifüße (oder Rollen ) in jede Basis .
Schritt 3 : Befestigen Sie den zusammengebauten Querträger an jeder
Basis. Achten Sie bei der Installation auf die Position des Schraubenlochs.

- 5 -
Schritt 4 : Schrauben Sie die Sicherheitsgurte in jede Stütze und
befestigen Sie dann die Tastaturen.
G*2
Schritt 5 : Schrauben Sie den Kopfhörerhaken fest.
HOW TO ADJUST THE HEIGHT?
C*2

- 6 -
Lösen Sie die Einstellknöpfe der Stütze und ziehen Sie sie dann heraus,
um die richtige Höhe und Breite einzustellen .
HOW TO ADJUST THE WIDTH?
Lösen Sie die Einstellknöpfe der Stütze und ziehen Sie sie dann heraus,
um sie einzustellen richtige Höhe und Breite.
HOW TO ADJUST THE CHAIR?
Pull it out a little bit
to adjust the width
Pull it out a little bit
to adjust the height

- 7 -
Nur AKS-Z1-AKT-1200E
Durch den Einbau von Bolzen in verschiedene Löcher können
unterschiedliche Höhen eingestellt werden .
Bitte stellen Sie vor der Verwendung sicher, dass die Bolzen fest verriegelt
sind und die X-Füße festgeklemmt sind .
In China hergestellt


- 2 -
Tecnico Supporto e certificato di garanzia elettronica
www.vevor.com/support
SUPPORTO PER TASTIERA DI
PIANOFORTE
MODELLO: AKS-Z1
AKS-Z1-AKT-1200E
We continue to be committed to provide you tools with competitive price.
"Save Half", "Half Price" or any other similar expressions used by us only represents an
estimate of savings you might benefit from buying certain tools with us compared to the major
top brands and does not necessarily mean to cover all categories of tools offered by us. You
are kindly reminded to verify carefully when you are placing an order with us if you are
actually saving half in comparison with the top major brands.

- 3 -

- 1 -
MODELLO: AKS-Z1 AKS-Z1-AKT-1200E
Have product questions? Need technical support? Please feel free to
contact us:
Technical Support and E-Warranty Certificate
www.vevor.com/support
NEED HELP? CONTACT US!
This is the original instruction, please read all manual instructions
carefully before operating. VEVOR reserves a clear interpretation of our
user manual. The appearance of the product shall be subject to the
product you received. Please forgive us that we won't inform you again if
there are any technology or software updates on our product.
PIANO KEYBOARD STAND

- 2 -
Avvertenza: per ridurre il rischio di lesioni, l'utente deve
leggere attentamente il manuale di istruzioni.
AVVERTIMENTO:
Leggere questo materiale prima di utilizzare questo prodotto. In caso
contrario si potrebbero causare lesioni gravi.
Precauzioni per il montaggio
1. Assemblare solo secondo queste istruzioni. Un montaggio improprio
può creare pericoli.
2. Indossare guanti da lavoro durante il montaggio.
3. Mantenere l'area di assemblaggio pulita e ben illuminata.
4. Tenere gli astanti lontani dall'area durante l'assemblaggio.
5. Non montare in caso di stanchezza o sotto l'effetto di alcol, droghe o
farmaci.
6. Le caratteristiche del prodotto si applicano solo ai prodotti
correttamente e completamente assemblati.
7. Per ulteriori informazioni riguardanti le parti elencate nelle pagine
seguenti, fare riferimento allo Schema di Montaggio di questo manuale.
Scartare e separare tutte le parti in un'area di lavoro pulita.
Usare precauzioni
1. Limitazioni di peso: non superare la capacità di peso massima di questo
prodotto.
2. Non utilizzare questo prodotto per scopi non esplicitamente specificati
dal produttore. Il produttore non è responsabile per danni o lesioni causati
da assemblaggio o utilizzo errati.
3. Ispezionare prima di ogni utilizzo; non utilizzare se le parti sono
allentate o danneggiate.
4 . Questo prodotto non è un giocattolo, non può essere utilizzato come
giocattolo per far giocare i bambini.
5 . Quando si regola la staffa, evitare di pizzicarsi le mani .
6 . Prima di regolare la staffa, assicurarsi che non vi siano altri elementi
sulla staffa .
- 3 -
CONSERVA QUESTE ISTRUZIONI
PACKAGE INCLUSIONS
① Traversa
② Base
A*1
B*2
③ Manopole a T
④ Caster s _
Include lavatrice
C*2
2 rotelle
senza serratura
D*4
⑤ Piedini in gomma
⑥ Manopola di regolazione del
supporto s
⑦ Cinghie di sicurezza
⑧ Gancio per le cuffie
G*2
⑨ Chiave inglese
⑩ Capelli C (Solo
AKS-Z1-AKT-1200E)

- 4 -
H*1
J*1
INSTALLATION GUIDELINES
Passaggio 1: regolare la traversa alla lunghezza richiesta, quindi utilizzare
la manopola di regolazione per bloccarla saldamente .
Regolare la base all'altezza richiesta , quindi utilizzare la manopola di
regolazione per bloccarla saldamente
Passaggio 2 : avvitare 2 piedini in gomma ( o rotelle ) in ciascuna base .
Passaggio 3 : collegare la traversa assemblata a ciascuna base. Prestare
attenzione alla posizione del foro della vite durante l'installazione.

- 5 -
Passaggio 4 : Avvitare le cinghie di sicurezza in ciascun supporto e quindi
collegare le tastiere.
G*2
Passaggio 5 : avvitare il gancio delle cuffie.
HOW TO ADJUST THE HEIGHT?
C*2

- 6 -
Allentare le manopole di regolazione del supporto , quindi estrarle per
regolare l' altezza e la larghezza corrette.
HOW TO ADJUST THE WIDTH?
Allentare le manopole di regolazione del supporto , quindi estrarle per
regolare il altezza e larghezza adeguate.
HOW TO ADJUST THE CHAIR?
Pull it out a little bit
to adjust the width
Pull it out a little bit
to adjust the height

- 7 -
Solo AKS-Z1-AKT-1200E
Installando i bulloni in fori diversi, è possibile regolare altezze diverse .
Prima dell'uso, assicurarsi che i bulloni siano bloccati saldamente e che i
piedini a X siano fissati in posizione .
Made in China


- 2 -
Técnico Certificado de soporte y garantía electrónica
www.vevor.com/support
SOPORTE PARA TECLADO DE PIANO
MODELO: AKS-Z1
AKS-Z1-AKT-1200E
We continue to be committed to provide you tools with competitive price.
"Save Half", "Half Price" or any other similar expressions used by us only represents an
estimate of savings you might benefit from buying certain tools with us compared to the major
top brands and does not necessarily mean to cover all categories of tools offered by us. You
are kindly reminded to verify carefully when you are placing an order with us if you are
actually saving half in comparison with the top major brands.

- 1 -
MODELO: AKS-Z1 AKS-Z1-AKT-1200E
Have product questions? Need technical support? Please feel free to
contact us:
Technical Support and E-Warranty Certificate
www.vevor.com/support
NEED HELP? CONTACT US!
This is the original instruction, please read all manual instructions
carefully before operating. VEVOR reserves a clear interpretation of our
user manual. The appearance of the product shall be subject to the
product you received. Please forgive us that we won't inform you again if
there are any technology or software updates on our product.
PIANO KEYBOARD STAND

- 2 -
Advertencia: para reducir el riesgo de lesiones, el usuario
debe leer atentamente el manual de instrucciones.
ADVERTENCIA:
Lea este material antes de usar este producto. De lo contrario, se pueden
producir lesiones graves.
Precauciones de montaje
1. Ensamble únicamente de acuerdo con estas instrucciones. Un montaje
inadecuado puede crear peligros.
2. Utilice guantes de trabajo durante el montaje.
3. Mantenga el área de reunión limpia y bien iluminada.
4. Mantenga a las personas transeúntes fuera del área durante el
montaje.
5. No reunirse cuando esté cansado o bajo la influencia de alcohol,
drogas o medicamentos.
6. Las capacidades del producto se aplican únicamente a productos
ensamblados de manera adecuada y completa.
7. Para obtener información adicional sobre las piezas enumeradas en las
siguientes páginas, consulte el diagrama de montaje de este manual.
Desenvuelva y separe todas las piezas en un área de trabajo limpia.
Use precauciones
1. Restricciones de peso: No exceda la capacidad máxima de peso de
este producto.
2. No utilice este producto para ningún propósito que no esté
explícitamente especificado por el fabricante. El fabricante no es
responsable de daños o lesiones causados por un montaje o uso
incorrecto.
3. Inspeccionar antes de cada uso; no lo utilice si las piezas están sueltas
o dañadas.
4 . Este producto no es un juguete, no se puede utilizar como juguete para
que los niños jueguen con él.
5 . Al ajustar el soporte, evite pellizcar la mano .

- 3 -
6 . Antes de ajustar el soporte, asegúrese de que no haya otros elementos
en el soporte .
GUARDA ESTAS INSTRUCCIONES
PACKAGE INCLUSIONS
① Travesaño
② Base
Un*1
B*2
③ Perillas en T
④ Ruedas _ _
Incluye lavadora
C*2
2 ruedas
sin cerradura
D*4
⑤ Pies de goma
⑥ Perilla de ajuste del soporte s
⑦ Correas seguras
⑧ Gancho para auriculares
G*2
⑨ Llave inglesa
⑩ Cabello C (solo
AKS-Z1-AKT-1200E)

- 4 -
Alto*
1
J*1
INSTALLATION GUIDELINES
Paso 1: Ajuste el travesaño a la longitud requerida y luego use la perilla
de ajuste s para bloquearlo firmemente .
Ajuste la base a la altura requerida y luego use la perilla de ajuste para
bloquearla firmemente.
Paso 2 : Atornille 2 patas de goma ( o ruedas ) en cada base.
Paso 3 : Fije el travesaño ensamblado a cada base. Preste atención a la
posición del orificio del tornillo durante la instalación.
- 5 -
Paso 4 : Atornille las correas seguras en cada soporte y luego conecte los
teclados.
G*2
Paso 5 : Atornille el gancho para auriculares.
HOW TO ADJUST THE HEIGHT?
C*2
- 6 -
Afloje las perillas de ajuste del soporte y luego extráigalas para ajustar la
altura y el ancho adecuados.
HOW TO ADJUST THE WIDTH?
Afloje las perillas de ajuste del soporte y luego extráigalas para ajustar el
altura y ancho adecuados.
HOW TO ADJUST THE CHAIR?
Pull it out a little bit
to adjust the width
Pull it out a little bit
to adjust the height
- 7 -
Sólo AKS-Z1-AKT-1200E
Al instalar pernos en diferentes orificios, se pueden ajustar diferentes
alturas .
Antes de usar, asegúrese de que los pernos estén bien cerrados y que las
patas en X estén sujetas en su lugar .
Hecho en china


- 2 -
Techniczny Certyfikat wsparcia i e-gwarancji
www.vevor.com/support
STOJAK NA KLAWIATURĘ
FORTEPIANOWĄ
MODEL: AKS-Z1
AKS-Z1-AKT-1200E
We continue to be committed to provide you tools with competitive price.
"Save Half", "Half Price" or any other similar expressions used by us only represents an
estimate of savings you might benefit from buying certain tools with us compared to the major
top brands and does not necessarily mean to cover all categories of tools offered by us. You
are kindly reminded to verify carefully when you are placing an order with us if you are
actually saving half in comparison with the top major brands.

- 3 -

- 1 -
MODEL: AKS-Z1 AKS-Z1-AKT-1200E
Have product questions? Need technical support? Please feel free to
contact us:
Technical Support and E-Warranty Certificate
www.vevor.com/support
NEED HELP? CONTACT US!
This is the original instruction, please read all manual instructions
carefully before operating. VEVOR reserves a clear interpretation of our
user manual. The appearance of the product shall be subject to the
product you received. Please forgive us that we won't inform you again if
there are any technology or software updates on our product.
PIANO KEYBOARD STAND

- 2 -
Ostrzeżenie — aby zmniejszyć ryzyko obrażeń, użytkownik
musi uważnie przeczytać instrukcję obsługi.
OSTRZEŻENIE:
Przeczytaj ten materiał przed użyciem tego produktu. Niezastosowanie się
do tego może spowodować poważne obrażenia.
Środki ostrożności przy montażu
1. Montaż wyłącznie zgodnie z niniejszą instrukcją. Nieprawidłowy montaż
może stworzyć zagrożenie.
2. Podczas montażu należy nosić rękawice robocze.
3. Utrzymuj miejsce zbiórki w czystości i dobrze oświetlone.
4. Podczas montażu trzymaj osoby postronne z dala od obszaru.
5. Nie montuj się będąc zmęczonym, pod wpływem alkoholu, narkotyków
lub leków.
6. Możliwości produktu dotyczą wyłącznie produktów prawidłowo i
całkowicie zmontowanych.
7. Dodatkowe informacje dotyczące części wymienionych na kolejnych
stronach można znaleźć na schemacie montażu w niniejszej instrukcji.
Rozpakuj i oddziel wszystkie części w czystym miejscu pracy.
Stosuj środki ostrożności
1. Ograniczenia wagi: Nie przekraczaj maksymalnego udźwigu tego
produktu.
2. Nie używaj tego produktu do celów, które nie są wyraźnie określone
przez producenta. Producent nie ponosi odpowiedzialności za
uszkodzenia lub obrażenia spowodowane nieprawidłowym montażem lub
użytkowaniem.
3. Sprawdź przed każdym użyciem; nie używać, jeśli części są luźne lub
uszkodzone.
4 . Ten produkt nie jest zabawką i nie może być używany jako zabawka
dla dzieci do zabawy.
5 . Podczas regulacji wspornika należy zapobiegać przyszczypnięciu
dłoni .

- 3 -
6 . Przed regulacją wspornika należy upewnić się, że na wsporniku nie
znajdują się żadne inne przedmioty .
ZACHOWAJ TE INSTRUKCJE
PACKAGE INCLUSIONS
① Trawers
② Baza
A*1
B*2
③ Pokrętła T
④ C aster s
Dołącz podkładkę
C*2
2 kółka
bez zamka
D*4
⑤ Gumowe nóżki
⑥ Pokrętło regulacji podparcia s
⑦ Bezpieczne paski
⑧ Zaczep na słuchawki
G*2
⑨ Wrench _
⑩ Włosy C (tylko
AKS-Z1-AKT-1200E)

- 4 -
H*1
J*1
INSTALLATION GUIDELINES
Krok 1: Wyreguluj belkę poprzeczną do wymaganej długości, a następnie
użyj pokrętła regulacyjnego s , aby ją mocno zablokować .
Dostosuj podstawę do wymaganej wysokości, a następnie za pomocą
pokrętła regulacyjnego mocno ją zablokuj
Krok 2 : Wkręć 2 gumowe nóżki (lub kółka ) do każdej podstawy .
Krok 3 : Przymocuj zmontowaną belkę poprzeczną do każdej podstawy.
Podczas montażu należy zwrócić uwagę na położenie otworu na śrubę.

- 5 -
Krok 4 : Przykręć bezpieczne paski do każdego wspornika, a następnie
przymocuj klawiatury.
G*2
Krok 5 : Przykręć zaczep słuchawek.
HOW TO ADJUST THE HEIGHT?
C*2

- 6 -
Poluzuj pokrętła regulacji wspornika , a następnie wyciągnij je, aby
wyregulować odpowiednią wysokość i szerokość.
HOW TO ADJUST THE WIDTH?
Poluzuj pokrętła regulacji wspornika , a następnie wyciągnij je, aby
wyregulować odpowiednią wysokość i szerokość.
HOW TO ADJUST THE CHAIR?
Pull it out a little bit
to adjust the width
Pull it out a little bit
to adjust the height

- 7 -
Tylko AKS-Z1-AKT-1200E
Instalując śruby w różnych otworach, można regulować różne wysokości .
Przed użyciem upewnij się, że śruby są dobrze dokręcone, a nóżki X są
zaciśnięte .
Wyprodukowano w Chinach


- 2 -
Technisch Ondersteuning en e-garantiecertificaat
www.vevor.com/support
PIANOTOETSENBORDSTANDAARD
MODEL: AKS-Z1
AKS-Z1-AKT-1200E
We continue to be committed to provide you tools with competitive price.
"Save Half", "Half Price" or any other similar expressions used by us only represents an
estimate of savings you might benefit from buying certain tools with us compared to the major
top brands and does not necessarily mean to cover all categories of tools offered by us. You
are kindly reminded to verify carefully when you are placing an order with us if you are
actually saving half in comparison with the top major brands.

- 1 -
MODEL: AKS-Z1 AKS-Z1-AKT-1200E
Have product questions? Need technical support? Please feel free to
contact us:
Technical Support and E-Warranty Certificate
www.vevor.com/support
NEED HELP? CONTACT US!
This is the original instruction, please read all manual instructions
carefully before operating. VEVOR reserves a clear interpretation of our
user manual. The appearance of the product shall be subject to the
product you received. Please forgive us that we won't inform you again if
there are any technology or software updates on our product.
PIANO KEYBOARD STAND

- 2 -
Waarschuwing-Om het risico op letsel te verminderen, moet
de gebruiker de handleiding zorgvuldig lezen.
WAARSCHUWING:
Lees dit materiaal voordat u dit product gebruikt. Als u dit niet doet, kan dit
leiden tot ernstig letsel.
Voorzorgsmaatregelen voor montage
1. Monteer uitsluitend volgens deze instructies. Onjuiste montage kan
gevaren veroorzaken.
2. Draag tijdens de montage werkhandschoenen.
3. Houd de verzamelplaats schoon en goed verlicht.
4. Houd omstanders tijdens de montage uit de buurt.
5. Niet monteren als u moe bent of onder invloed bent van alcohol, drugs
of medicijnen.
6. De productmogelijkheden gelden alleen voor correct en compleet
gemonteerde producten.
7. Voor aanvullende informatie over de onderdelen die op de volgende
pagina's worden vermeld, verwijzen wij u naar het montageschema van
deze handleiding. Pak alle onderdelen uit en scheid ze van elkaar op een
schone werkplek.
Gebruik voorzorgsmaatregelen
1. Gewichtsbeperkingen: Overschrijd de maximale gewichtscapaciteit van
dit product niet.
2. Gebruik dit product niet voor enig doel dat niet uitdrukkelijk door de
fabrikant is gespecificeerd. De fabrikant is niet verantwoordelijk voor
schade of letsel veroorzaakt door onjuiste montage of gebruik.
3. Inspecteer vóór elk gebruik; niet gebruiken als onderdelen los of
beschadigd zijn.
4 . Dit product is geen speelgoed en kan niet worden gebruikt als
speelgoed waarmee kinderen ermee kunnen spelen.
5 . Voorkom dat uw handen bekneld raken bij het afstellen van de beugel .
- 3 -
6 . Voordat u de beugel afstelt, moet u ervoor zorgen dat er geen andere
voorwerpen op de beugel zitten .
BEWAAR DEZE INSTRUCTIES
PACKAGE INCLUSIONS
① Dwarsbalk
② Baseren
EEN*
1
B*2
③ T- knoppen
④ Casters _ _
Inclusief wasmachine
C*2
2 zwenkwielen
zonder slot
D*4
⑤ Rubberen voetjes
⑥ Steun instelknop s
⑦ Veilige riemen
⑧ Koptelefoonhaak
G*2
⑨ W rench
⑩ STOEL (Alleen AKS- Z1
-AKT-1200E)

- 4 -
H*1
J*1
INSTALLATION GUIDELINES
Stap 1: Stel de dwarsbalk af op de gewenste lengte en gebruik vervolgens
de instelknop s om hem stevig vast te zetten .
Stel de basis af op de gewenste hoogte en gebruik vervolgens de
afstelknop om hem stevig vast te zetten
Stap 2 : Schroef 2 rubberen voetjes (of zwenkwielen ) in elke basis .
Stap 3 : Bevestig de gemonteerde dwarsbalk aan elke basis. Let bij
montage op de positie van het schroefgat.

- 5 -
Stap 4 : Schroef de veiligheidsriemen in elke steun en bevestig vervolgens
de toetsenborden.
G*2
Stap 5 : Schroef de hoofdtelefoonhaak vast.
HOW TO ADJUST THE HEIGHT?
C*2

- 6 -
Draai de afstelknoppen van de steun los en trek ze vervolgens naar buiten
om de juiste hoogte en breedte aan te passen.
HOW TO ADJUST THE WIDTH?
Draai de afstelknoppen voor de ondersteuning los en trek ze vervolgens
naar buiten om de afstelling af te stellen juiste hoogte en breedte.
HOW TO ADJUST THE CHAIR?
Pull it out a little bit
to adjust the width
Pull it out a little bit
to adjust the height

- 7 -
Alleen AKS-Z1-AKT-1200E
Door bouten in verschillende gaten te plaatsen, kunnen verschillende
hoogtes worden aangepast .
Zorg er vóór gebruik voor dat de bouten stevig vastzitten en dat de
X-pootjes op hun plaats zijn vastgeklemd .
Gemaakt in China


- 2 -
Teknisk Support och e-garanticertifikat
www.vevor.com/support
STATIV FÖR PIANOKLAVIATUR
MODELL: AKS-Z1
AKS-Z1-AKT-1200E
We continue to be committed to provide you tools with competitive price.
"Save Half", "Half Price" or any other similar expressions used by us only represents an
estimate of savings you might benefit from buying certain tools with us compared to the major
top brands and does not necessarily mean to cover all categories of tools offered by us. You
are kindly reminded to verify carefully when you are placing an order with us if you are
actually saving half in comparison with the top major brands.
- 1 -
MODELL: AKS-Z1 AKS-Z1-AKT-1200E
Have product questions? Need technical support? Please feel free to
contact us:
Technical Support and E-Warranty Certificate
www.vevor.com/support
NEED HELP? CONTACT US!
This is the original instruction, please read all manual instructions
carefully before operating. VEVOR reserves a clear interpretation of our
user manual. The appearance of the product shall be subject to the
product you received. Please forgive us that we won't inform you again if
there are any technology or software updates on our product.
PIANO KEYBOARD STAND

- 2 -
Varning - För att minska risken för skada måste användaren
läsa instruktionerna noggrant.
VARNING:
Läs detta material innan du använder denna produkt. Underlåtenhet att
göra det kan resultera i allvarliga skador.
Försiktighetsåtgärder vid montering
1. Montera endast enligt dessa instruktioner. Felaktig montering kan
skapa faror.
2. Använd arbetshandskar vid montering.
3. Håll monteringsområdet rent och väl upplyst.
4. Håll åskådare borta från området under monteringen.
5. Sätt dig inte ihop när du är trött eller påverkad av alkohol, droger eller
mediciner.
6. Produktens funktioner gäller endast för korrekt och färdigmonterade
produkter.
7. För ytterligare information om delarna som listas på följande sidor, se
monteringsdiagrammet i denna manual. Packa upp och separera alla
delar på ett rent arbetsområde.
Använd försiktighetsåtgärder
1. Viktbegränsningar: Överskrid inte den maximala viktkapaciteten för
denna produkt.
2. Använd inte denna produkt för något ändamål som inte uttryckligen
anges av tillverkningen. Tillverkningen ansvarar inte för skada eller
personskada orsakad av felaktig montering eller användning.
3. Inspektera före varje användning; Använd inte om delar är lösa eller
skadade.
4 . Denna produkt är inte en leksak, kan inte användas som leksaker för
barn att leka med den.
5 . Vid justering av fästet, förhindra att handen kläms .
6 . Innan du justerar fästet, se till att det inte finns några andra föremål på
fästet .
- 3 -
SPARA DESSA INSTRUKTIONER
PACKAGE INCLUSIONS
① Tvärbalk
② Bas
A*1
B*2
③ T knoppar
④ C aster s
Inkludera bricka
C*2
2 hjul
utan lås
D*4
⑤ Gummifötter
⑥ Stödjusteringsratt s
⑦ Säkra remmar
⑧ Hörlurskrok
G*2
⑨ W rench
⑩ C hår (Endast
AKS-Z1-AKT-1200E)

- 4 -
H*1
J*1
INSTALLATION GUIDELINES
Steg 1: Justera tvärbalken till önskad längd och använd sedan
justeringsratten s för att låsa den ordentligt .
Justera basen till önskad höjd och använd sedan justeringsratten för att
låsa den ordentligt
Steg 2 : Skruva fast 2 gummifötter (eller kaster ) i varje bas .
Steg 3 : Fäst den sammansatta tvärbalken på varje bas. Var uppmärksam
på skruvhålets placering vid montering.

- 5 -
Steg 4 : Skruva fast de säkra remmarna i varje stöd och fäst sedan
tangentborden.
G*2
Steg 5 : Skruva fast hörlurskroken.
HOW TO ADJUST THE HEIGHT?
C*2

- 6 -
Lossa stödets justeringsknappar och dra sedan ut dem för att justera rätt
höjd och bredd.
HOW TO ADJUST THE WIDTH?
Lossa stödjusteringsrattarna och dra sedan ut dem för att justera rätt höjd
och bredd.
HOW TO ADJUST THE CHAIR?
Pull it out a little bit
to adjust the width
Pull it out a little bit
to adjust the height

- 7 -
Endast AKS-Z1-AKT-1200E
Genom att montera bultar i olika hål kan olika höjder justeras .
Före användning, se till att bultarna är ordentligt låsta och att X-fötterna är
fastklämda .
Tillverkad i Kina