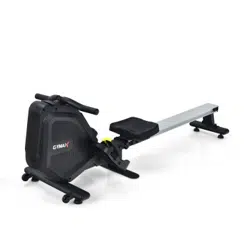
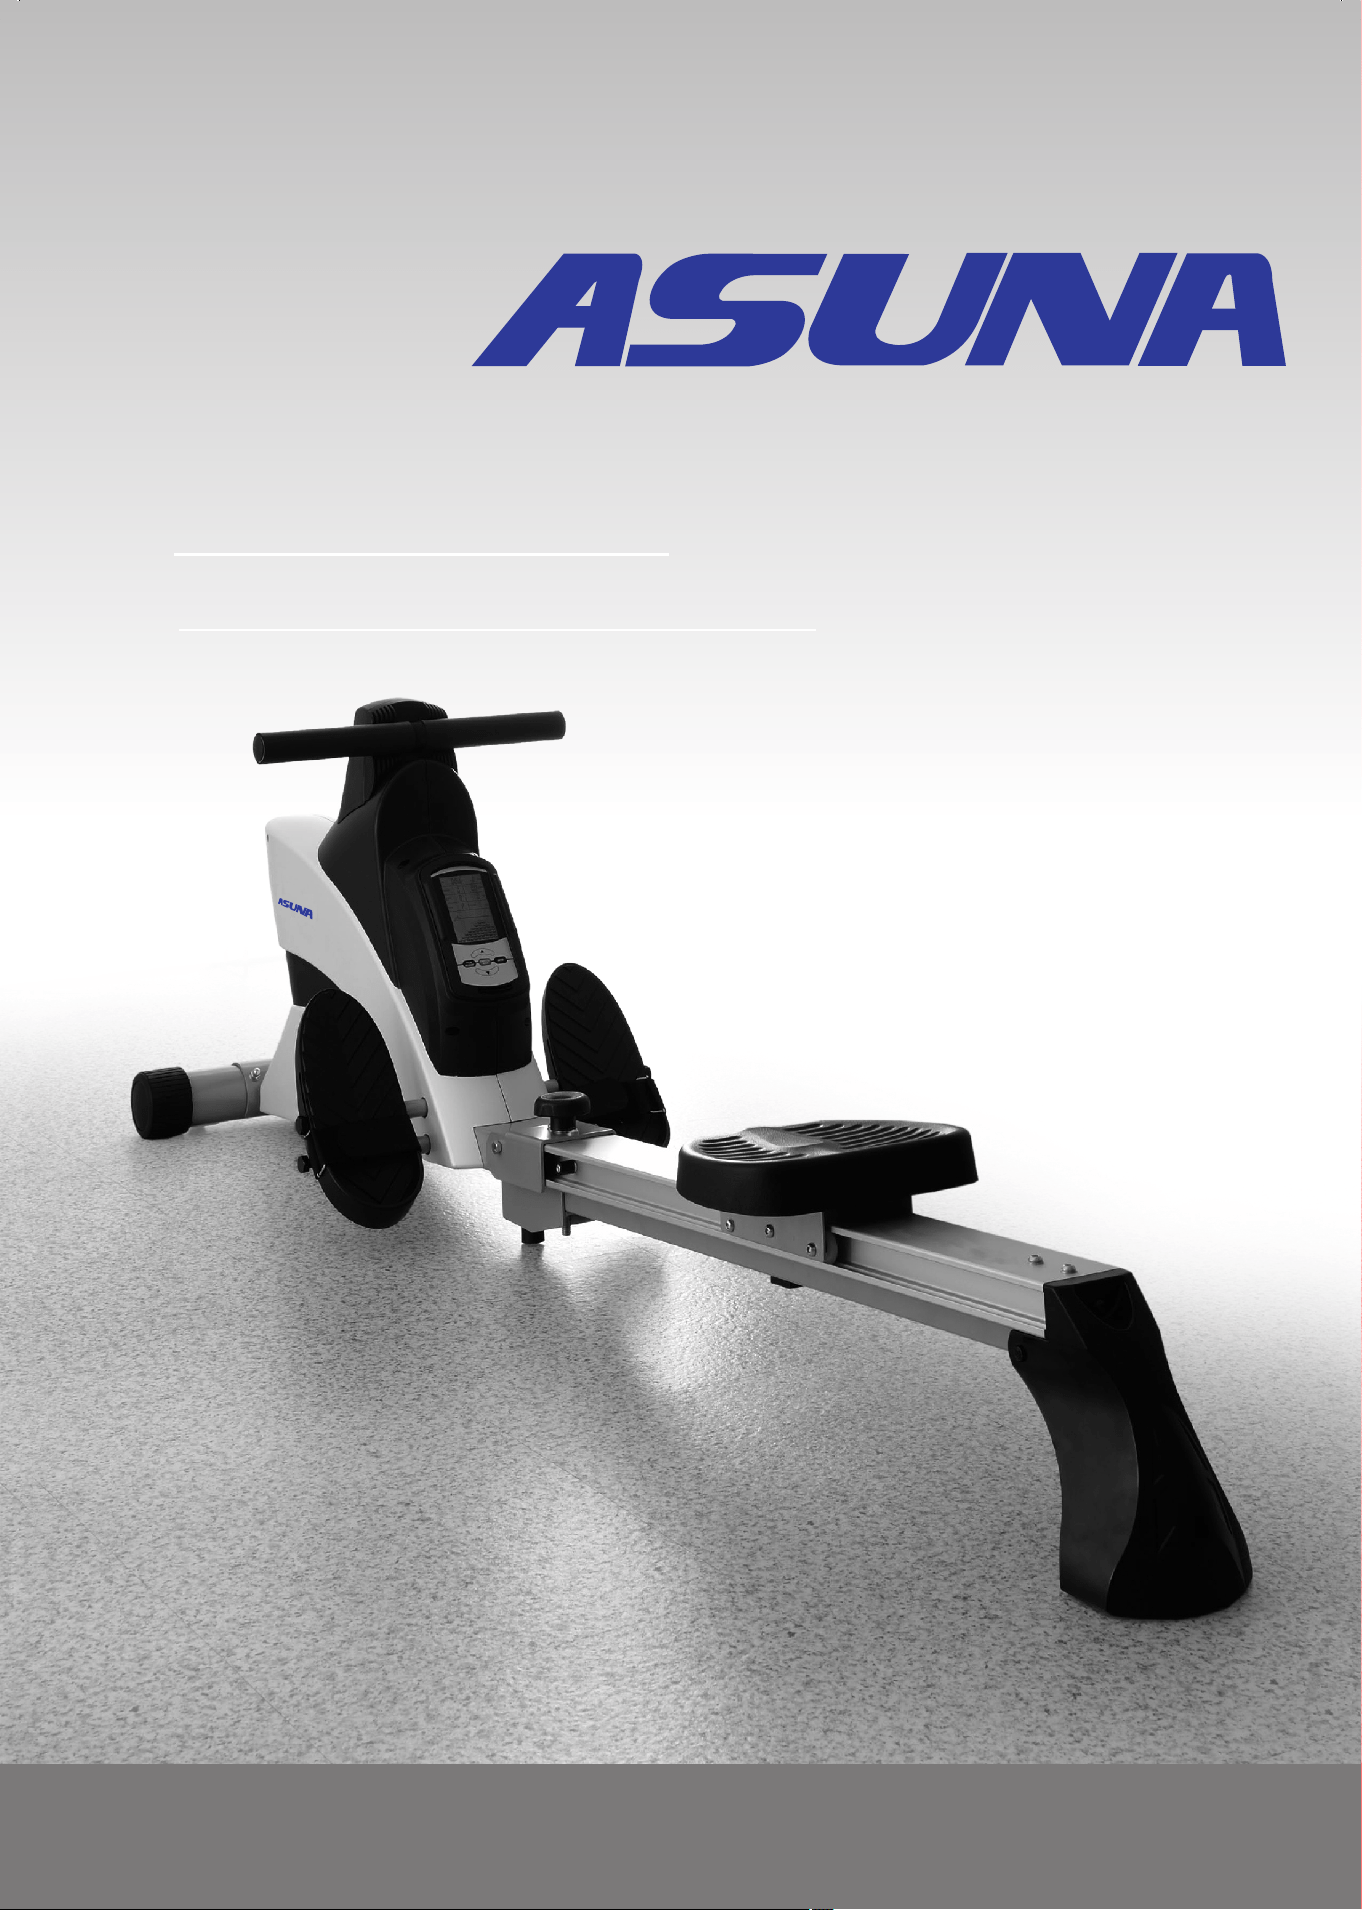
ASUNA 4500
ROWING MACHINE
Owner's Manual
Made in Taiwan

INDEX
IMPORTANT SAFETY INFORMATION P . 1
ASSEMBLY PARTS LIST
P . 2
ASSEMBLY INSTRUCTION
P . 3
EXERCISE INSTRUCTION
P . 4
COMPUTER INSTRUCTION
. . . . . . . . . . . . . . . . . . . . . .. . . .
P . 5-7
MAINTENANCE
P . 8-10
EXPLODED DRAWING
PARTS LIST
. . . . . . . . . . . . . . . . . . . . .. . . . .
. . . . . . . . . . . . . . . . . . . . . . . . . . . .
. . . . . . . . . . . . . . . . . . . . . .. . . . . .
. . . . . . . . . . . . .. . . . . . . . . . . . .. .
. . . . . . . . . . . . . . . . . . . .. . . . . . . .
P . 11-16
. . . . . . . . . . . . . . . . . . .. . . . . . . . .
P . 17
. . . . . . . . . . . . . . . . . . . . . . . . . .. .
ATTENTION: Please verify that all parts associated with this product are
in good condition and accounted for. During the assembly process
please be sure to follow each step accordingly as it has been explained
within the manual.
WARNING: During assembly it is recommended that all bolts be
tightened by hand, upon completing assembly, bolts should then be
properly secured using the wrench provided. To avoid injury, check bolts
carefully before use.
IMPORTANT: Read all instructions carefully before using this product.
Retain owner's manual for future reference. For customer service, please
contact: [email protected]
WARNING: Do not plug into power supply until equipment has been fully
assembled. Ensure that the power supply matches the specifications of
the equipment : 120V.

1
IMPORTANT SAFETY INFORMATION
1. Before starting any exercise program, you should consult your physician to
determine if you have any medical or physical conditions that could put your health
and safety at risk, or prevent you from using the equipment properly. Your
physician’s advice is essential if you are taking medication that affects your heart
rate, blood pressure or cholesterol level.
2. Be aware of your body’s signals. Incorrect or excessive exercise can damage your
health. Stop exercising if you experience any of the following symptoms: pain,
tightness in your chest, irregular heartbeat, shortness of breath, lightheadedness,
dizziness or feelings of nausea. If you do experience any of these conditions, you
should consult your physician before continuing with your exercise program.
3. Keep children and pets away from the equipment. The equipment is designed for
adult use only.
4. Use the equipment on a solid, flat level surface with a protective cover for your floor
or carpet. To ensure safety, the equipment should have at least 2 feet (0.6 M) of free
space all around it.
5. Ensure that all nuts and bolts are securely tightened before using the equipment.
The safety of the equipment can only be maintained if it is regularly examined for
damage and/or wear and tear.
6. Always use the equipment as indicated. If you find any defective components while
assembling or checking the equipment, or if you hear any unusual noises coming
from the equipment during exercise, discontinue use of the equipment immediately
and do not use until the problem has been rectified.
7. Wear suitable clothing while using the equipment. Avoid wearing loose clothing that
may become entangled in the equipment.
8. Do not place fingers or objects into the moving parts of the equipment.
9. The maximum weight capacity of this unit is 300 pounds (135 KG).
10. The equipment is not suitable for therapeutic use.
11. To avoid bodily injury and/or damage to the product or property, proper lifting and
moving is required.
12. Your product is intended for use in cool, dry conditions. You should avoid storage in
extreme cold, hot or damp areas as this may lead to corrosion and other related
problems.
13. This equipment is designed for indoor and home use only, it is not intended for
commercial use!
We thank you for choosing our product. To ensure your safety and health, please use
this equipment correctly. It is important to read this entire manual before assembling
and using the equipment. Safe and effective use can only be achieved if the equipment
is assembled, maintained and used properly. It is your responsibility to ensure that all
users of the equipment are informed of all warnings and precautions.

Exploded Drawing
23
22
24
A1
A2
A5
A7
9
A9
A10
B1L
B1R
B2
B5
28
29
27
A3
A4
A6
A8
B7
B8
18
20
B9
C3
25
19
17
D3
16
C2
С1
30
C6
C9
14
13
3
5
10
11
12
C4
18
C8
31
C7
15
D2
26
2
D7
6
D1
5
D5
21
8
D6
D4
3
4
7
1
B4
2
B3
B3
25
16
17
D3
10
5
3
D1
C8
C9
3
B2
2
27
29
7
7
7
7
7
7
7
28
1
15

Parts List
3
A1
Main Frame
1
A2 Front Stabilizer 1
A3 Slide Rail (Steel Tube) 1
A4 Slide Rail (Aluminum Tube) 1
A5 Folding Bracket 1
A6 Seat Carrier 1
A7 Pulley 1
A8 L-shaped Bracket 1
A9 Motor 1
A10 Cable 1
B1-R Chain Cover (right) 1
B1-L Chain Cover (left) 1
B2 Foot Cap Ø76 2
B3 Pedal 2
B4 Computer 1
B5 PVC Cover 1
B7 Rear Fulcrum 1
B8 Rubber Pad 1
B9 Seat 1
C1 Knob 1
C2 Pop Pin 1
C3 PU Wheel Ø37 6
C4 Rubber Cushion 1
C6
Tension Strap
1
C7
Elastic Belt Ø10
1
C8
Sponge Ø35
2
C9
End Cap
2
D1
Plastic Pulley
3
D2
Handlebar
D3
Rubber Cushion
2
D4
Tension Pulley
1
D5
Magnetic Flywheel
1
D6
Spring
1
D7
Sensor Wire
1
T1
Allen Wrench x 6mm
1
T2
Spanner x #13 - #14
1
No. Description Q’ty No. Description Q’ty
T3 Spanner x #14 1
T4 Spanner x #21 1
1 Carriage Bolt M8 x 90L 2
2 Dome Nut M8 2
3 Nut 3/8” x 26 4
4 Nut 3/8” x 3T 1
5 Screw M8 x 35L 3
6 Screw M8 x 30L 1
7 Tapping Screw M4 x 16 8
8 Nut M8 1
9 Nut 3/8” x 4T 1
10 Shaft 1/2” 4
11 Bolt 3/8” x 120L 1
12 Nylon Nut 3/8” 1
13 Bolt 3/8” x 105L 1
14 Nut x 7T 3/8” 1
15
Bolt M5 x 0.8 x 15L
2
16
Nut M6
2
17 Screw M6 x 25L 2
18 Screw M8 x 25L 4
19 Bolt M8 x 25L 6
20 Spacer Ø12.5 x Ø8.2 x 10L 6
21 Nut M8 6
22 Bolt 3/8” x 90L 1
23 Nut 3/8” 1
24 Screw M8 x 40L 1
25 Screw M8 x 12L 4
26 Adapter 1
27 Flat Washer M8 x Ø16 2
28 Plastic Wheel 2
29 Screw M4 x 16 4
30 Flat Washer Ø13 x Ø25 1
31 Belt 1
1
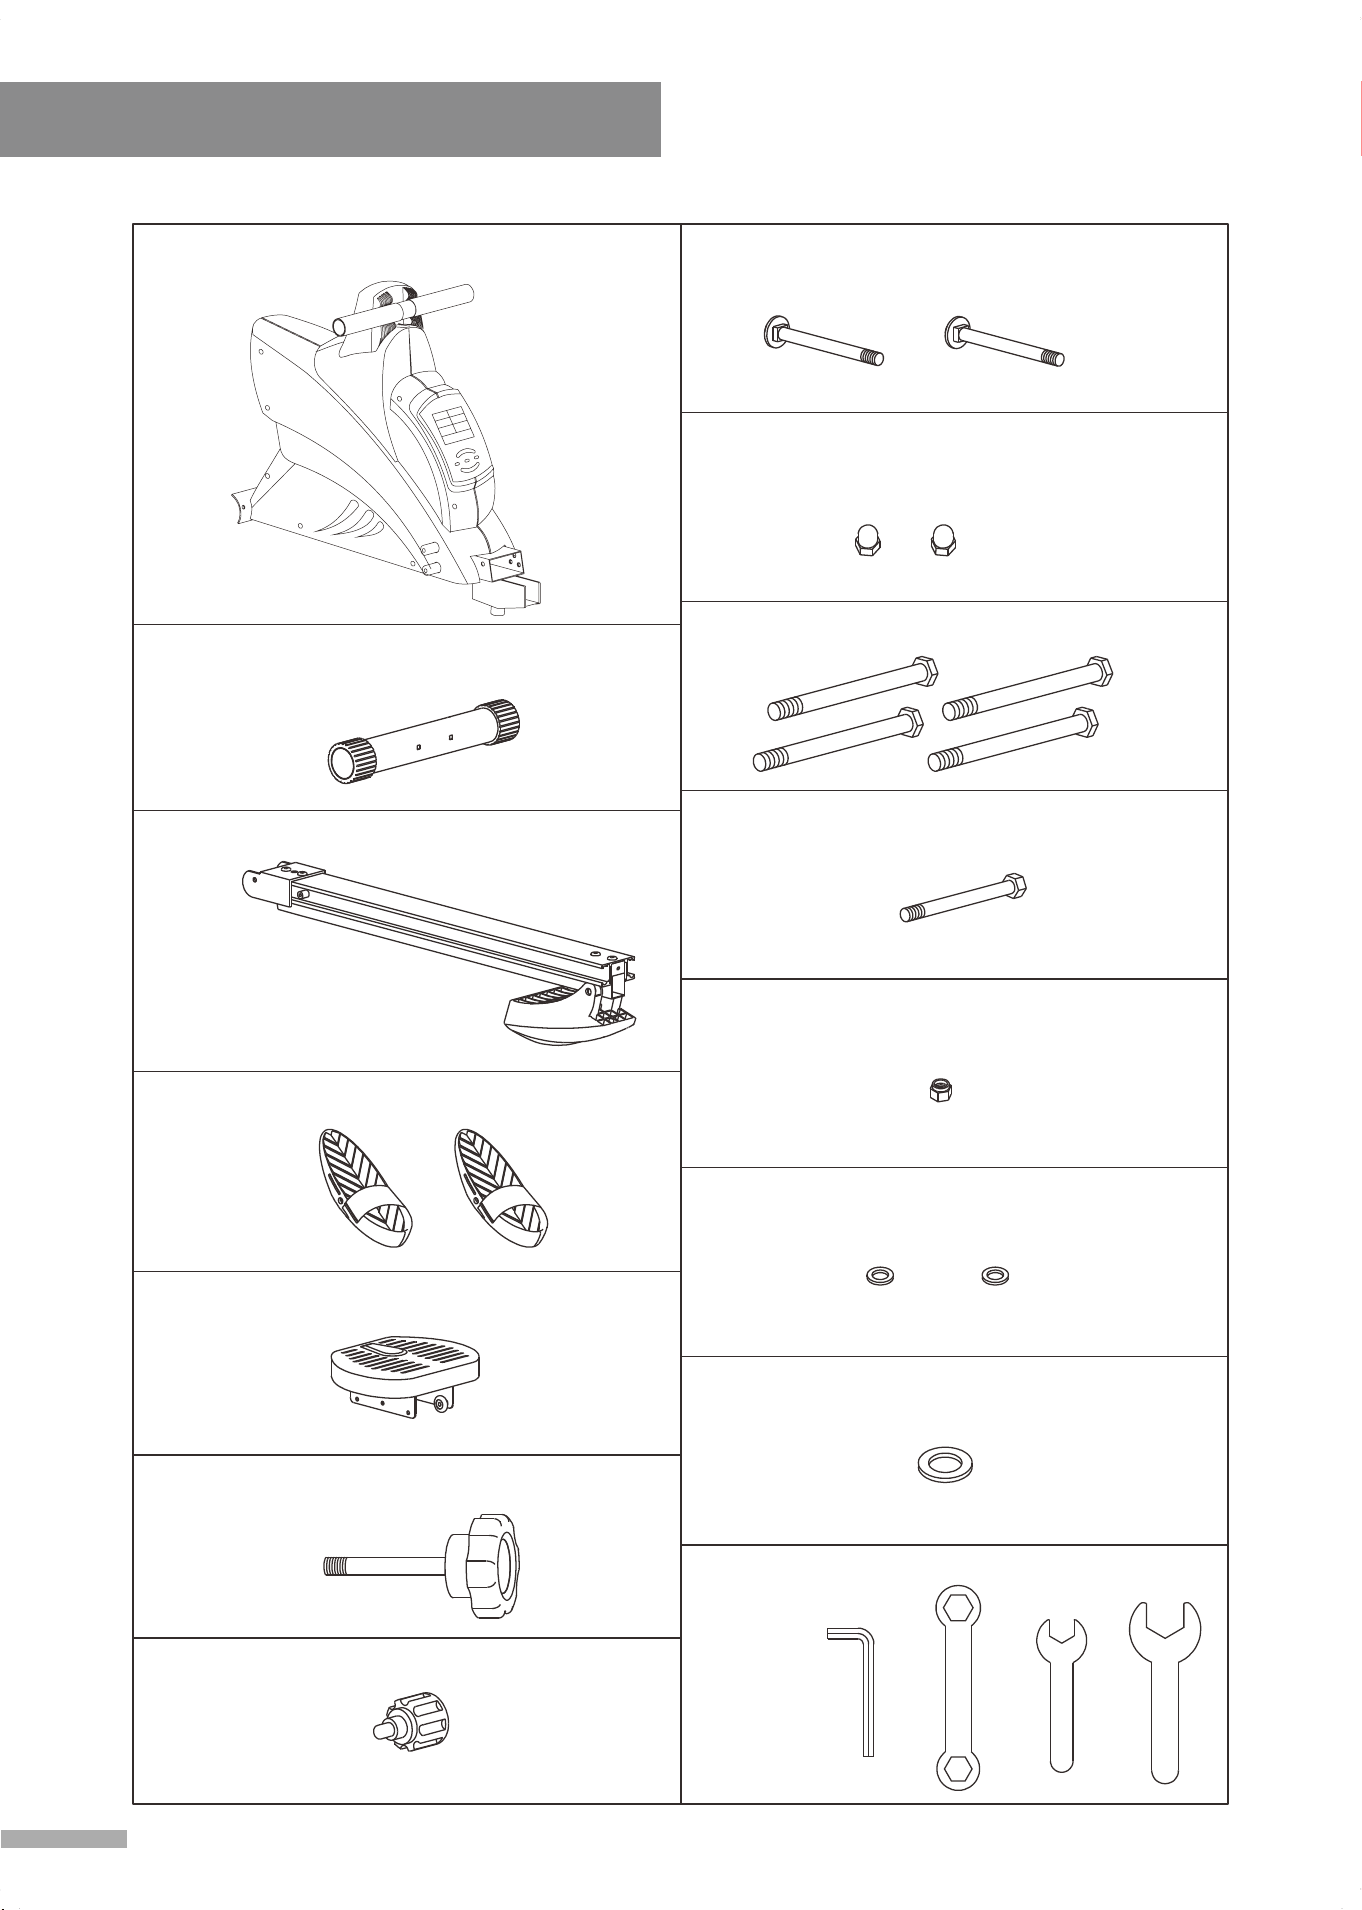
Assembly Parts List
4
#B3 Pedal - 2 pcs
#B9 Seat - 1 set
#1 Carriage Bolt M8 x 90L - 2 pcs
#2 Dome Nut M8 - 2 pcs
#10 Shaft 1/2" - 4 pcs
#27 Flat Washer 8 x 16 - 2 pcsØ Ø
#12 Nylon Nut 3/8" - 1 pc
#11 Bolt 3/8" x 120L - 1 pc
#30 Flat Washer 13 x 25 - 1 pcØ Ø
#A2 Front Stabilizer - 1 set
Tools
#C2 Pop Pin - 1 pc
#C1 Knob - 1 pc
21
T4
14
T3
M6
T1
14
13
T2
#A1 Main Frame
- 1 set
#A4 Slide Rail - 1 set
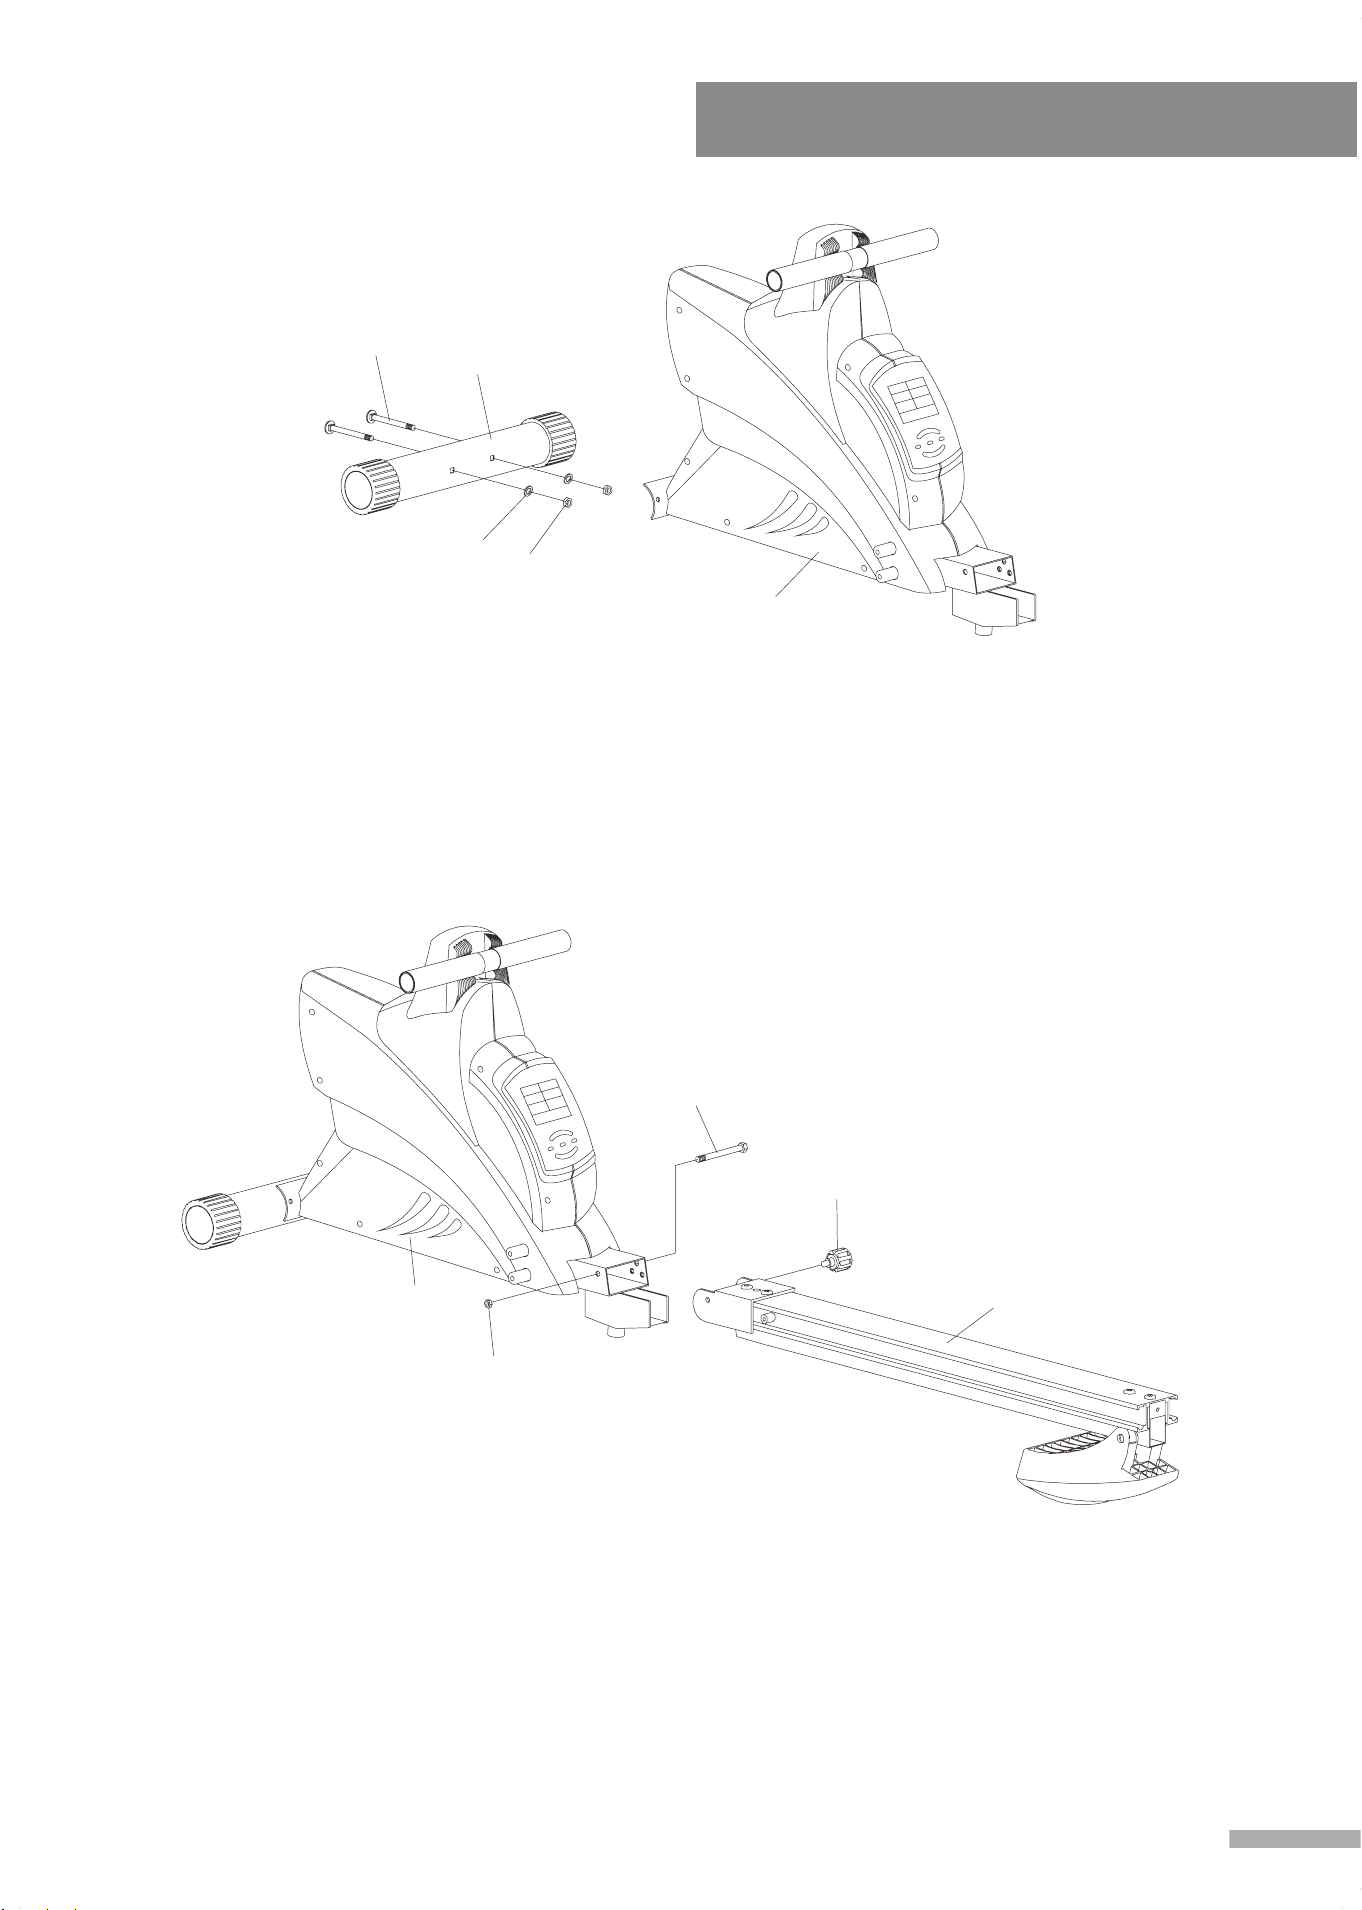
組 裝 說 明
Assembly Instruction
Step 1.
Attach Front Stabilizer (A2) to the Main Frame (A1), and fasten with 2 Carriage
Bolts (1), 2 Nuts (2) and 2 Flat Washers (27), use Spanner Wrench #14 (T3) to
tighten and secure.
27
2
A2
1
A1
C2
A4
A1
11
12
Step 2.
1. Assemble Main Frame (A1) with Slide Rail (A4), fasten with Bolts (11), Nuts
(12) and Pop Pin (C2), Use Spanner Wrench #14 (T3) to tighten and secure.
5
A4
Assembly Instruction
6
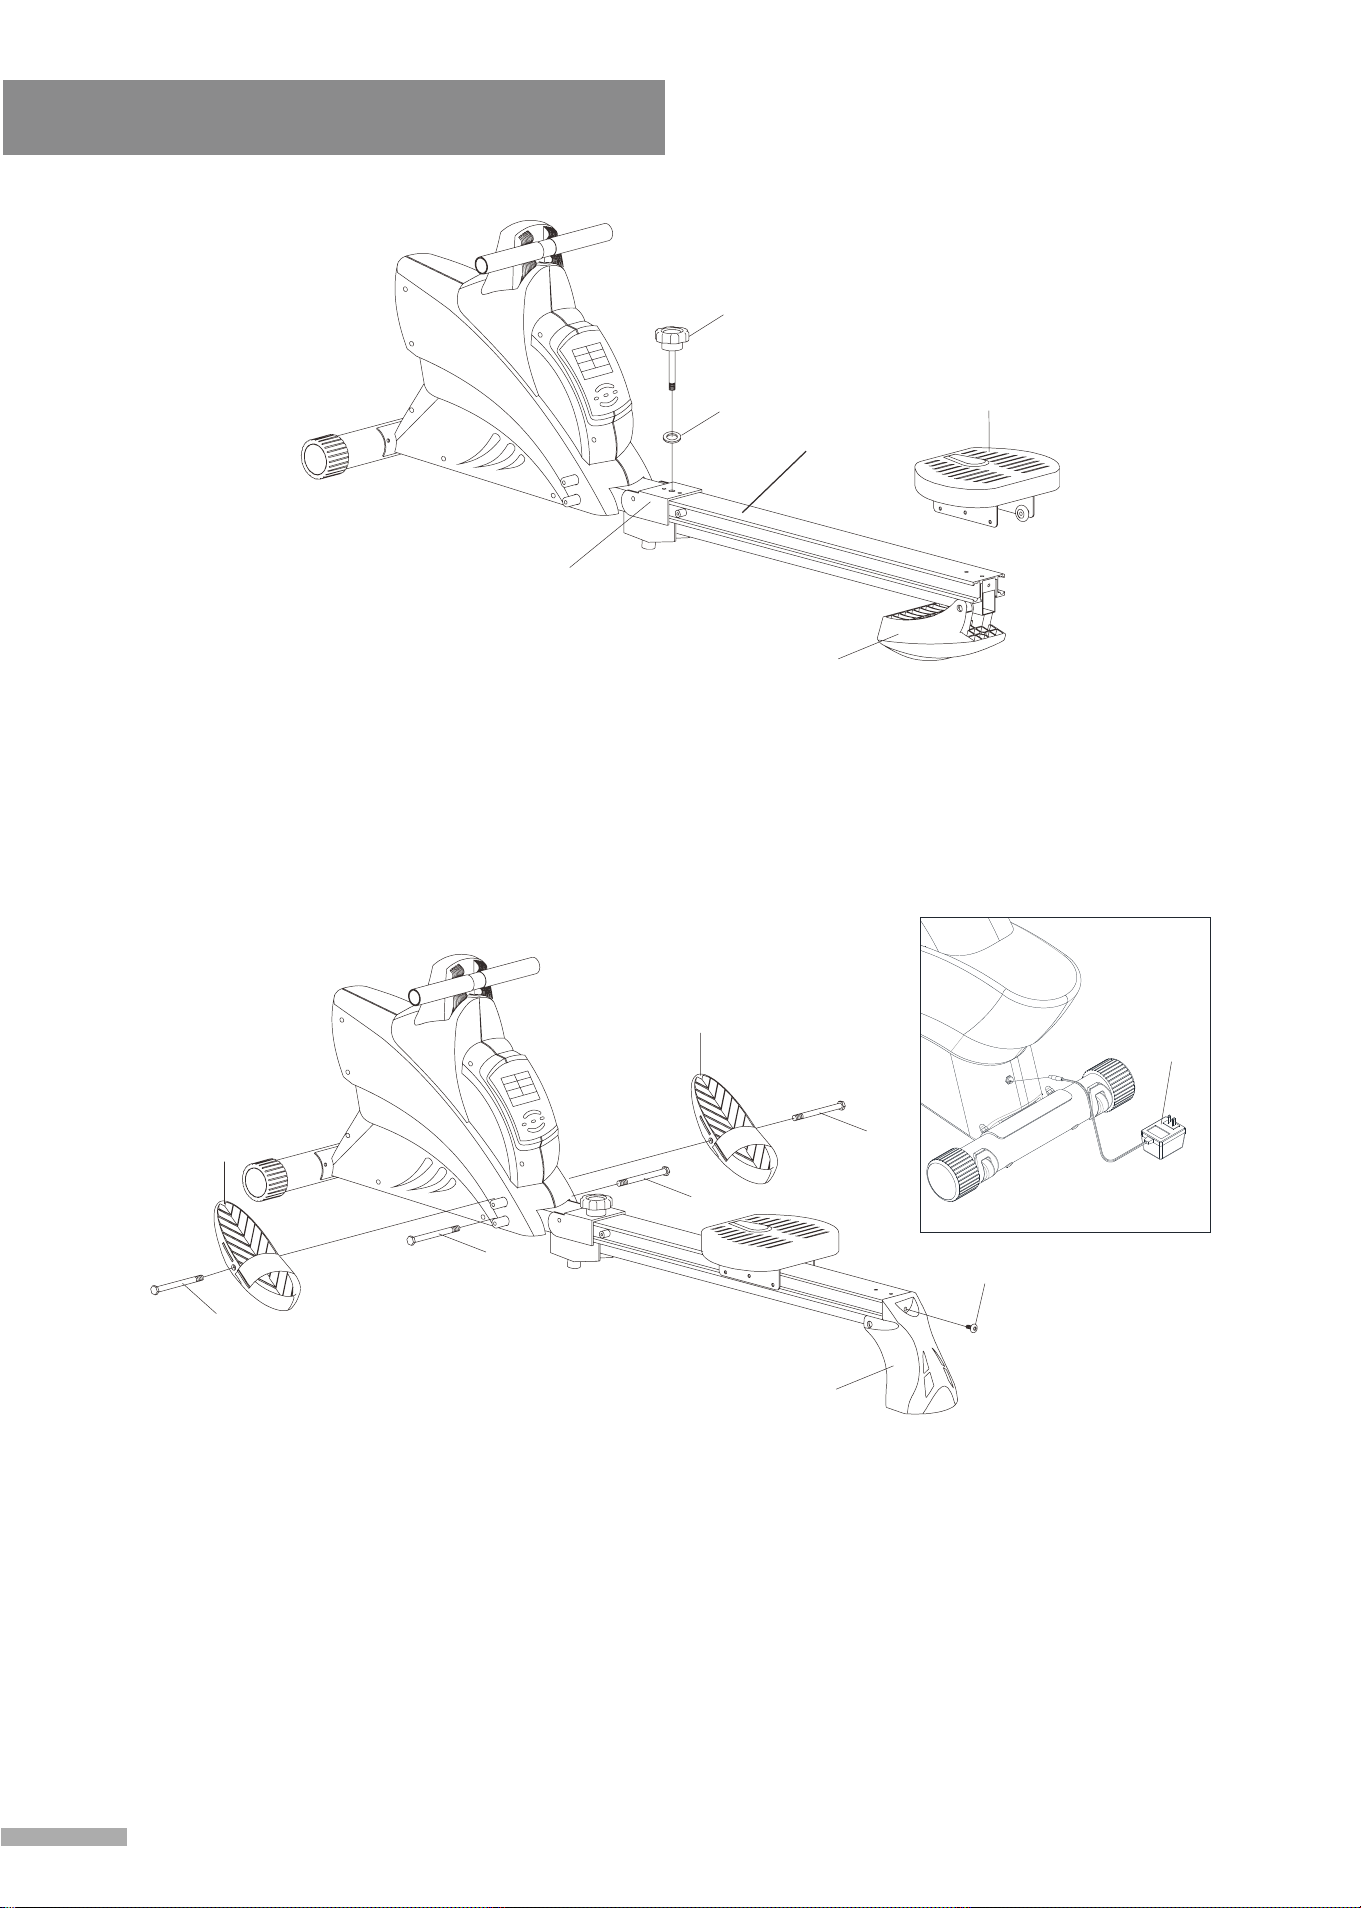
Step 3.
1. Fasten Knob (C1) and Flat Washer (30) onto Folding Bracket (A5).
2. Flip down Rear Fulcrum (B7) on the end of Slide Rail (A4), mount Seat (B9) to
Slide Rail (A4).
Step 4.
1. Flip Rear Fulcrum (B7) back to upright position and fasten with Screw (24), use
Allen Wrench (T1) to tighten and secure.
2. Fasten 2 Shafts (10) onto lower holes of the Main Frame (A1), use Spanner
Wrench # 21 (T4) to tighten and secure.
3. Insert Shafts (10) through Pedals (B3) and the upper holes on the Main Frame
(A1), use Spanner Wrench #21 (T4) to tighten and secure.
4. Refer to Figure 1. Plug the Adapter (26) into the socket located on the front of the
rower. Plug the Adapter (26) into an electrical outlet.
B9
B7
30
C1
A5
10
10
B3
24
B7
10
10
B3
26
Figure 1
30
C2
A4
C1
Assembly Instruction
7
CC22
3300
CC11
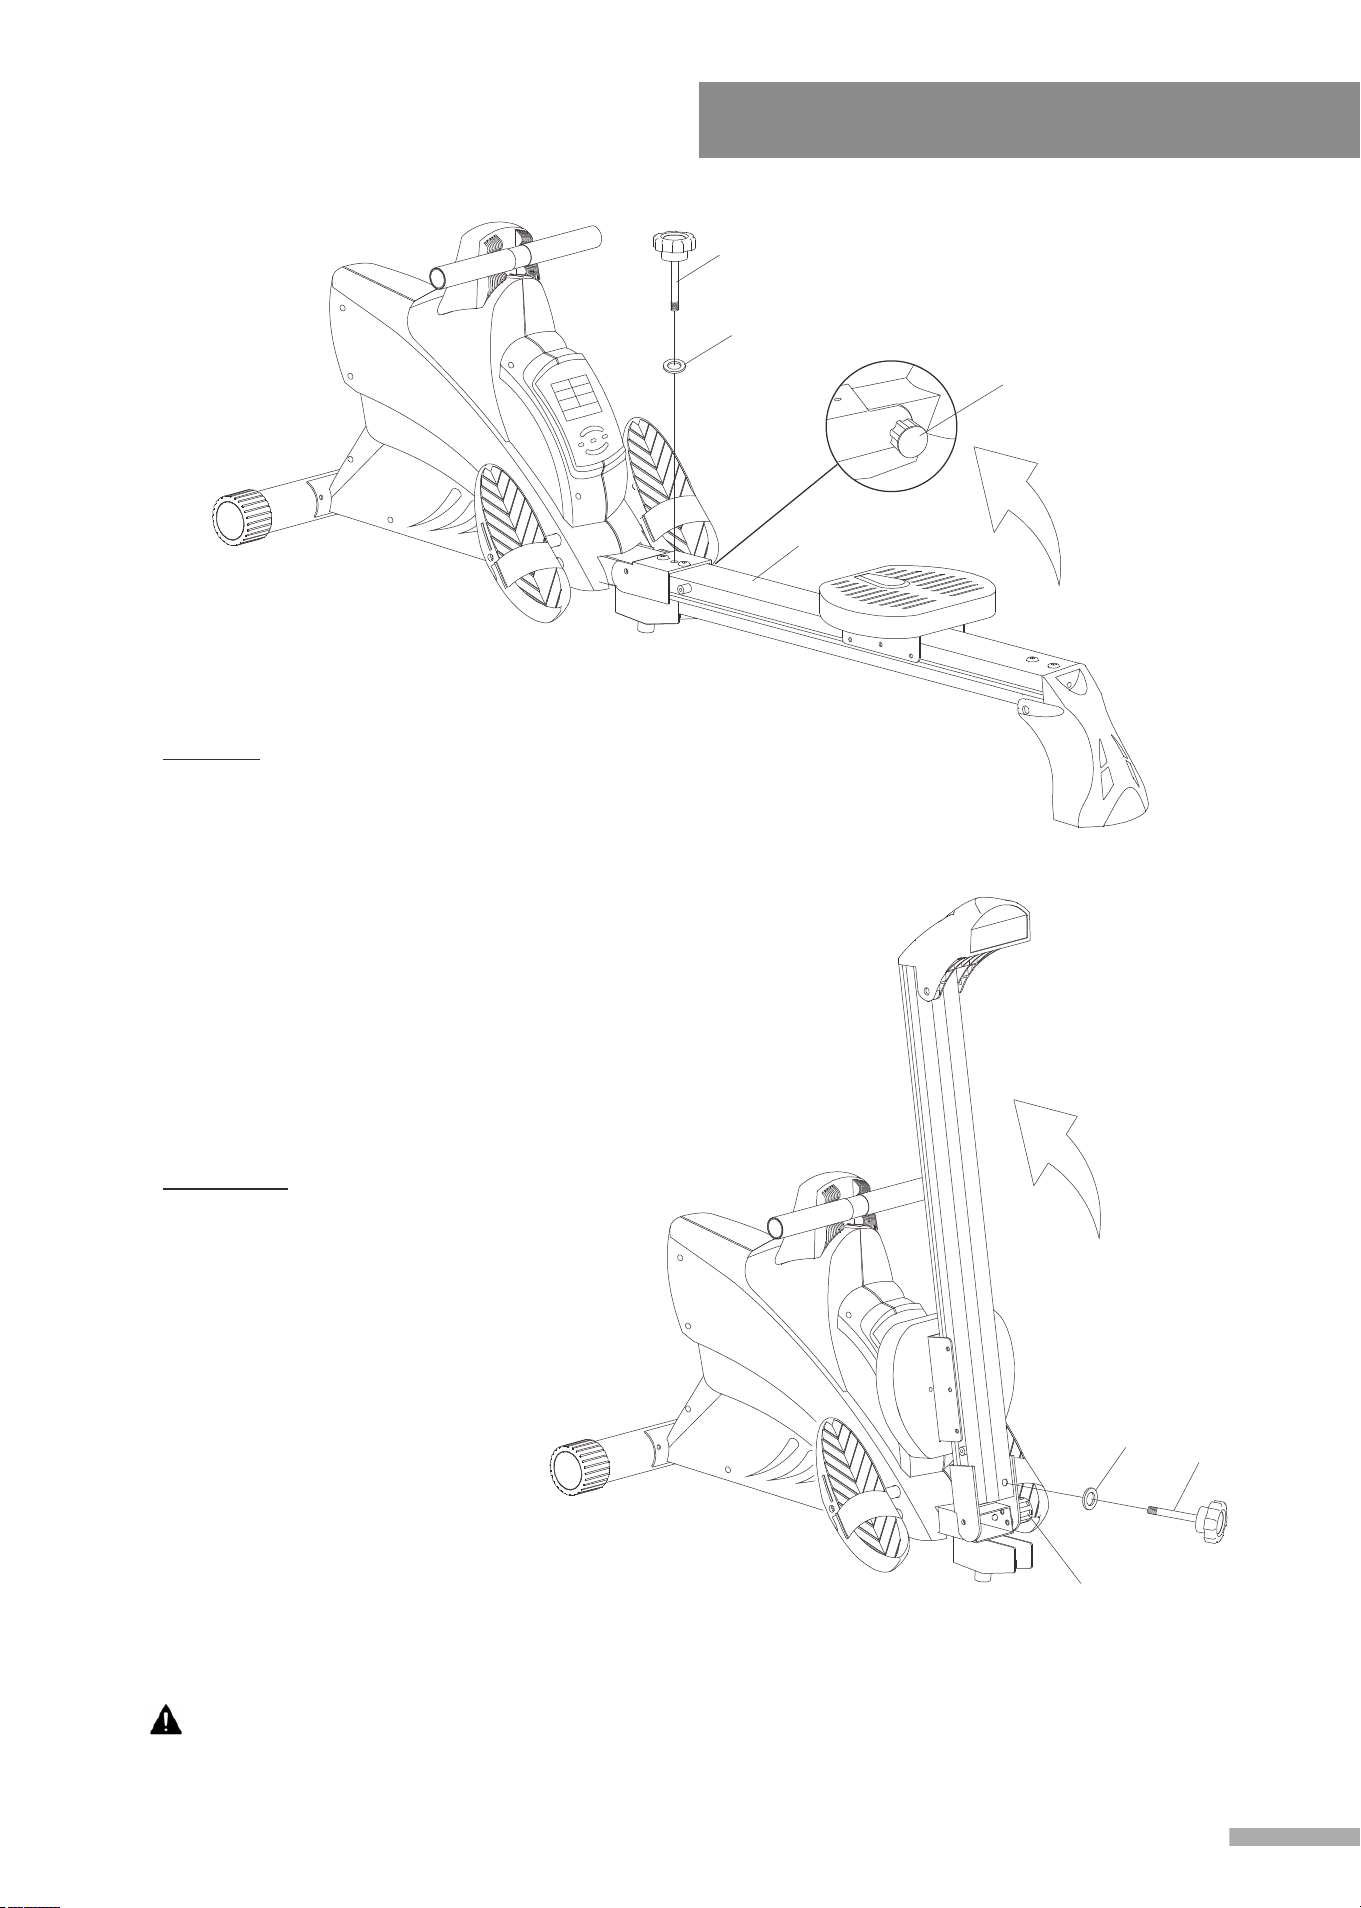
Folding Instructions:
1. Folding:
Remove Knob (C1) and Flat
Washer (30), place them
aside. Pull Pop Pin (C2)
out
and lift the slide rail, then
release Pop Pin (C2) until you
hear a "click”. That means the
rail is locked in the vertical
position. Insert Knob (C1) and
Flat Washer (30) into the hole
at the bottom of slide rail.
2.
Unfolding:
Remove Knob (C1) and Flat
Washer (30), place them
aside. Pull Pop Pin (C2) out
and pull down the slide rail,
then release Pop Pin (C2)
until you hear a "click”. That
means the rail is locked in
position. Insert Knob (C1) and
Flat Washer (30) into the
original place on slide rail.
CAUTION: Keep hands clear of the hinge when folding and unfolding the unit.

Exercise Instruction
8
A good exercise program consists of a warm-up, aerobic exercise, and a cool down.
Do the entire program at least two to three times a week, resting for a day between
workouts. After several months you can increase your workouts to four or five times
per week.
AEROBIC EXERCISE is any sustained activity that sends oxygen to your muscles via
your heart and lungs. Aerobic exercise improves the fitness of your lungs and heart.
Aerobic fitness is promoted by any activity that uses your large muscles e.g. legs,
arms and buttocks. Your heart beats quickly and you breathe deeply. An aerobic
exercise should be part of your entire exercise routine.
The WARM-UP is an important part of any workout. It should begin every session to
prepare your body for more strenuous exercise by heating up and stretching your
muscles, increasing your circulation and pulse rate, and delivering more oxygen to
your muscles.
COOL DOWN at the end of your workout, repeat these exercises to reduce soreness
in tired muscles.
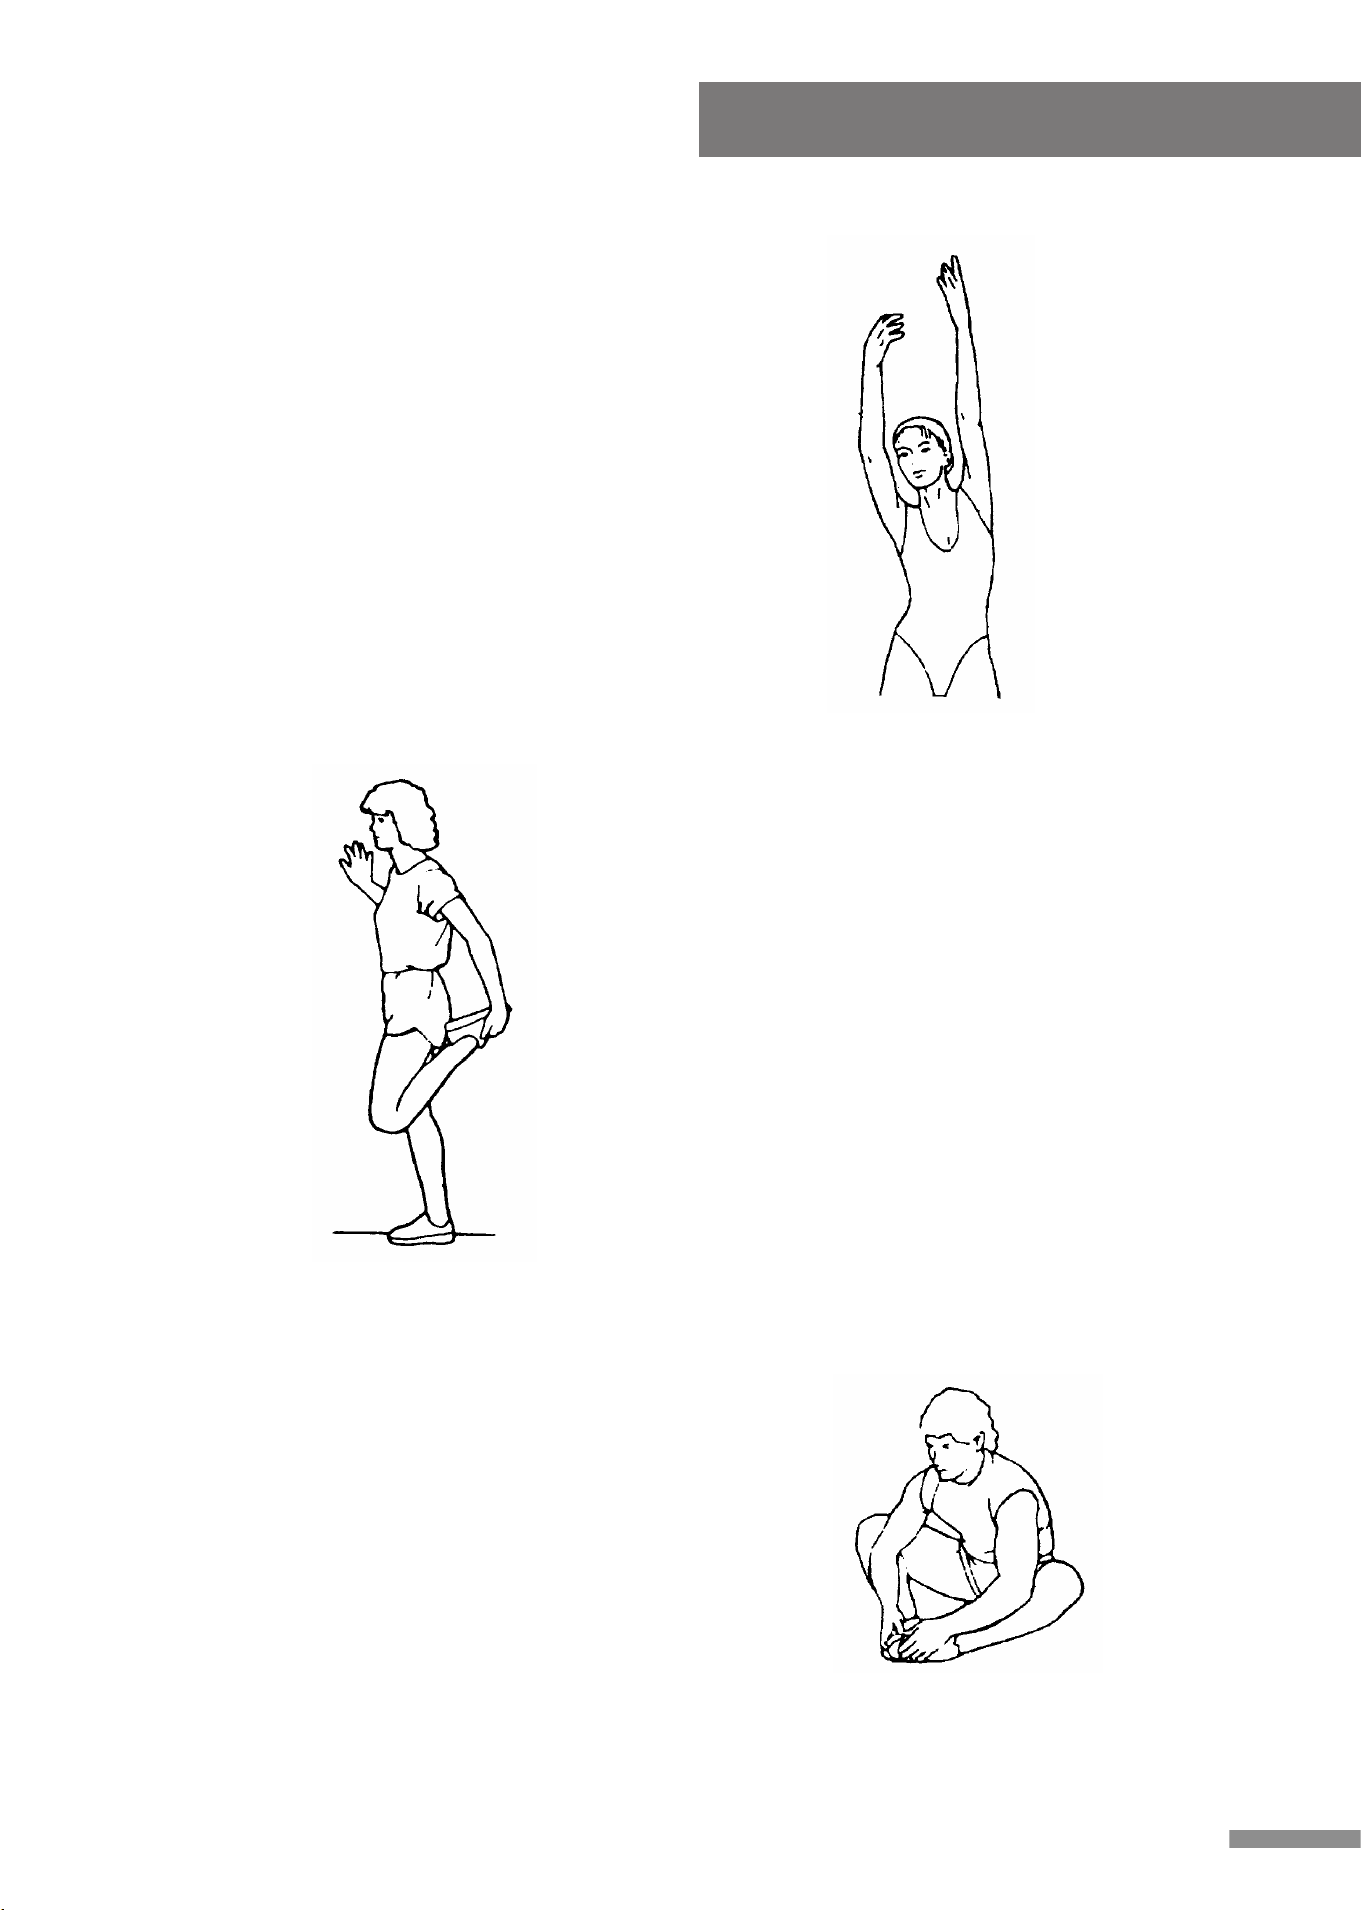
HEAD ROLLS
Rotate your head to the right for one count,feeling
the stretch up the left side of your neck, then
rotate your head back for one count, stretching
your chin to the ceiling and letting your mouth
open. Rotate your head to the left for one count
and then drop your head to your chest for one
count.
SHOULDER LIFTS
Lift your right shoulder toward your ear for one
count. Then lift your left shoulder up for one
count as you lower your right shoulder.
9
Exercise Instruction
SIDE STRETCHES
Open your arms to the side and lift them until
they're over your head. Reach your right arm
as far toward the ceiling as you can for one
count. Repeat this action with your left arm.
QUADRICEPS STRETCH
With one hand against a wall for balance, reach
behind you and pull your right foot up. Bring
your heel as close to your buttocks as possible.
Hold for 15 counts and repeat with left foot.
INNER THIGH STRETCH
Sit with the soles of your feet together and your
knees pointing outward. Pull your feet as close
to your groin as possible. Gently push your
knees toward the floor. Hold for 15 counts.
10
Exercise Instruction
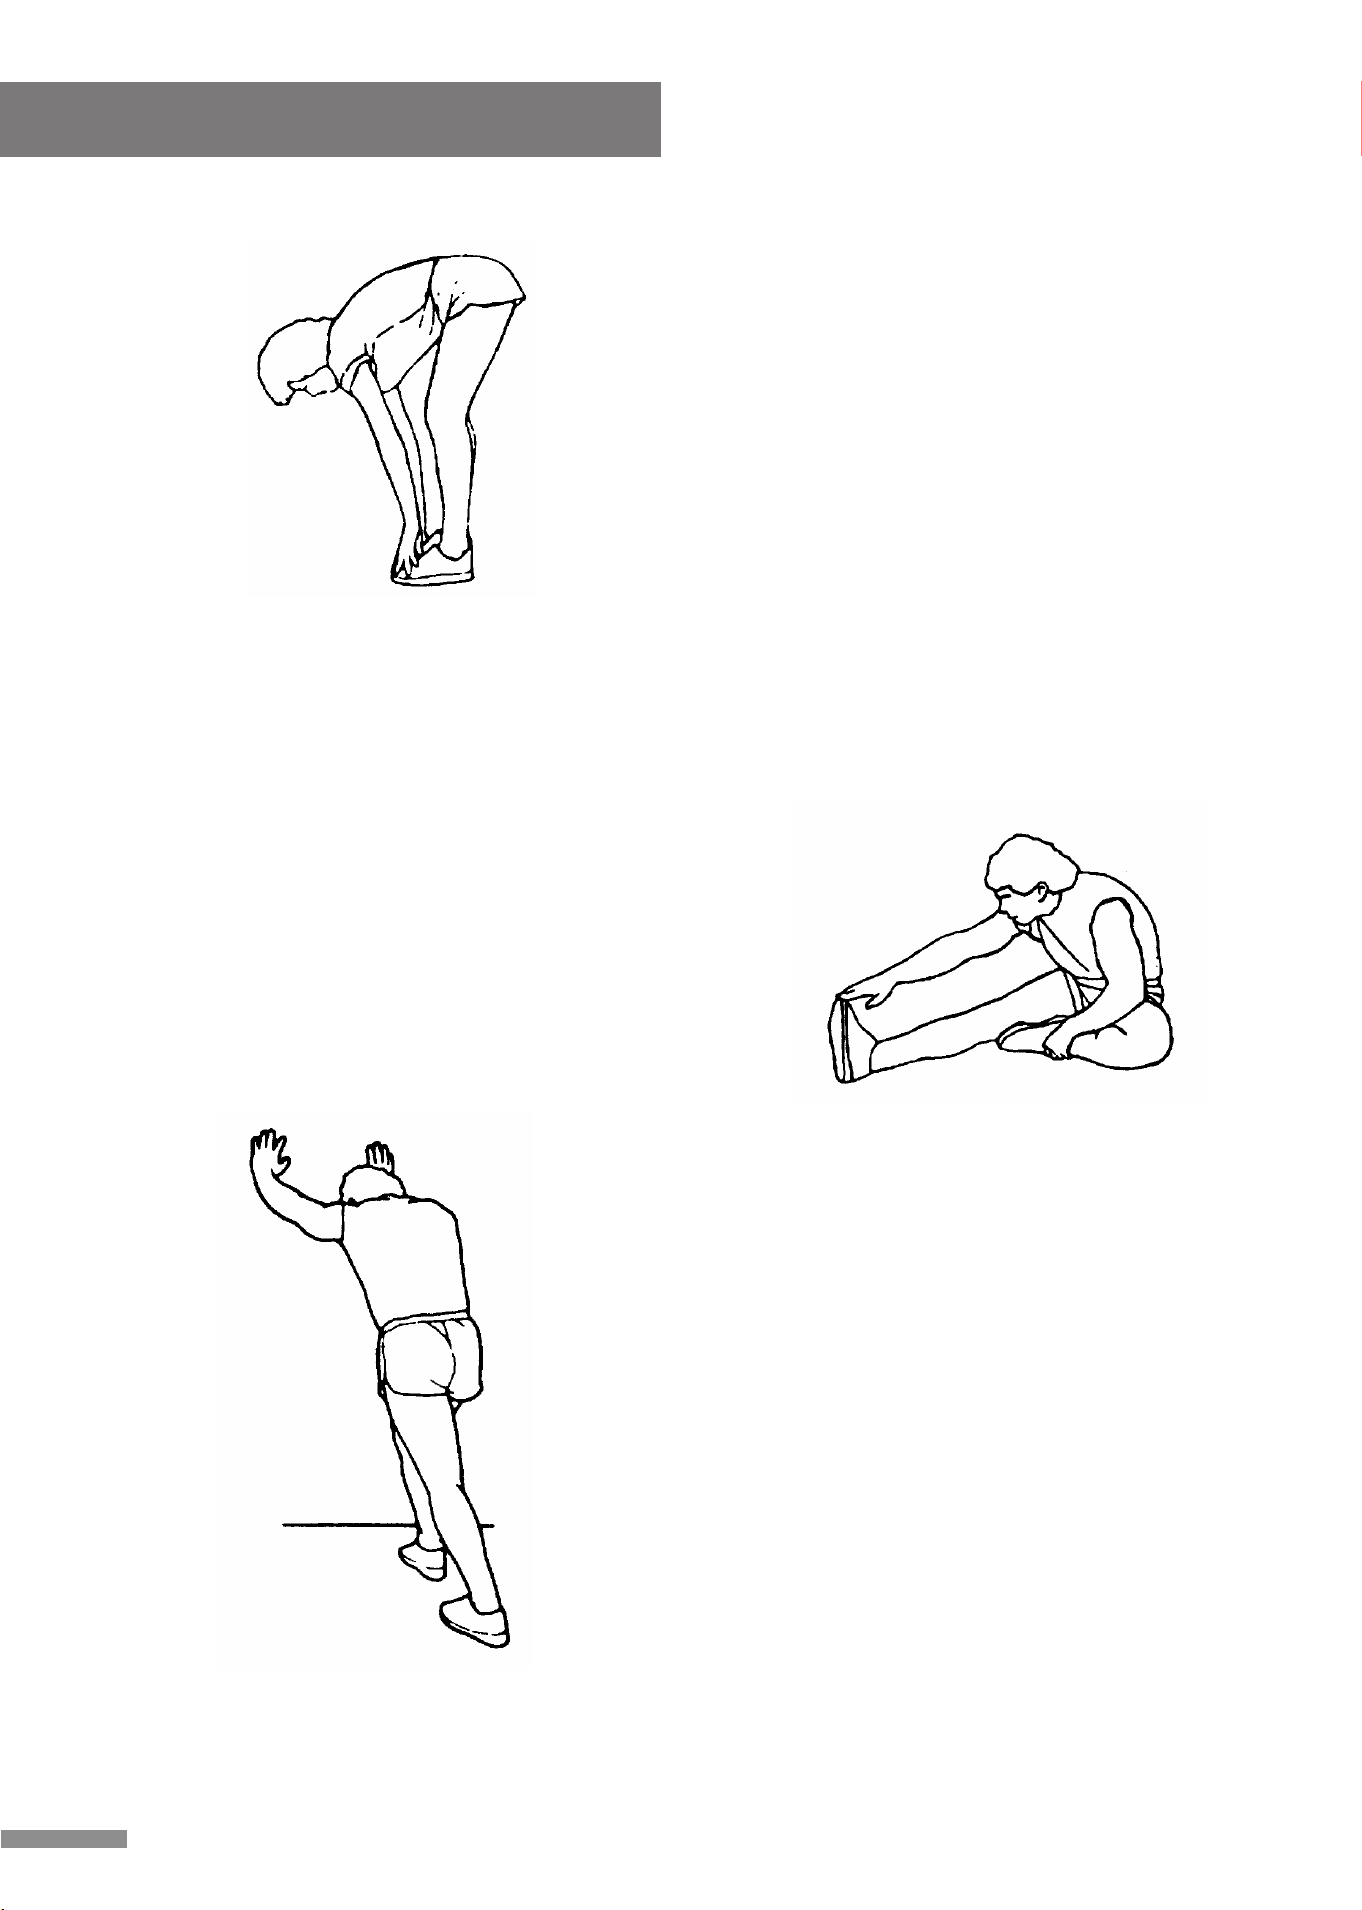
TOE TOUCHES
Slowly bend forward from your waist, letting
your back and shoulders relax as you stretch
toward your toes. Reach as far as you can and
hold for 15 counts.
HAMSTRING STRETCHES
Extend your right leg. Rest the sole of your left
foot against your right inner thigh. Stretch
toward your toe as far as possible. Hold for 15
counts. Relax and then repeat with left leg.
CALF/ACHILLES STRETCH
Lean against a wall with your left leg in front of
the right and your arms forward. Keep your right
leg straight and the left foot on the floor; then
bend the left leg and lean forward by moving
your hips toward the wall. Hold, then repeat on
the other side for 15 counts.
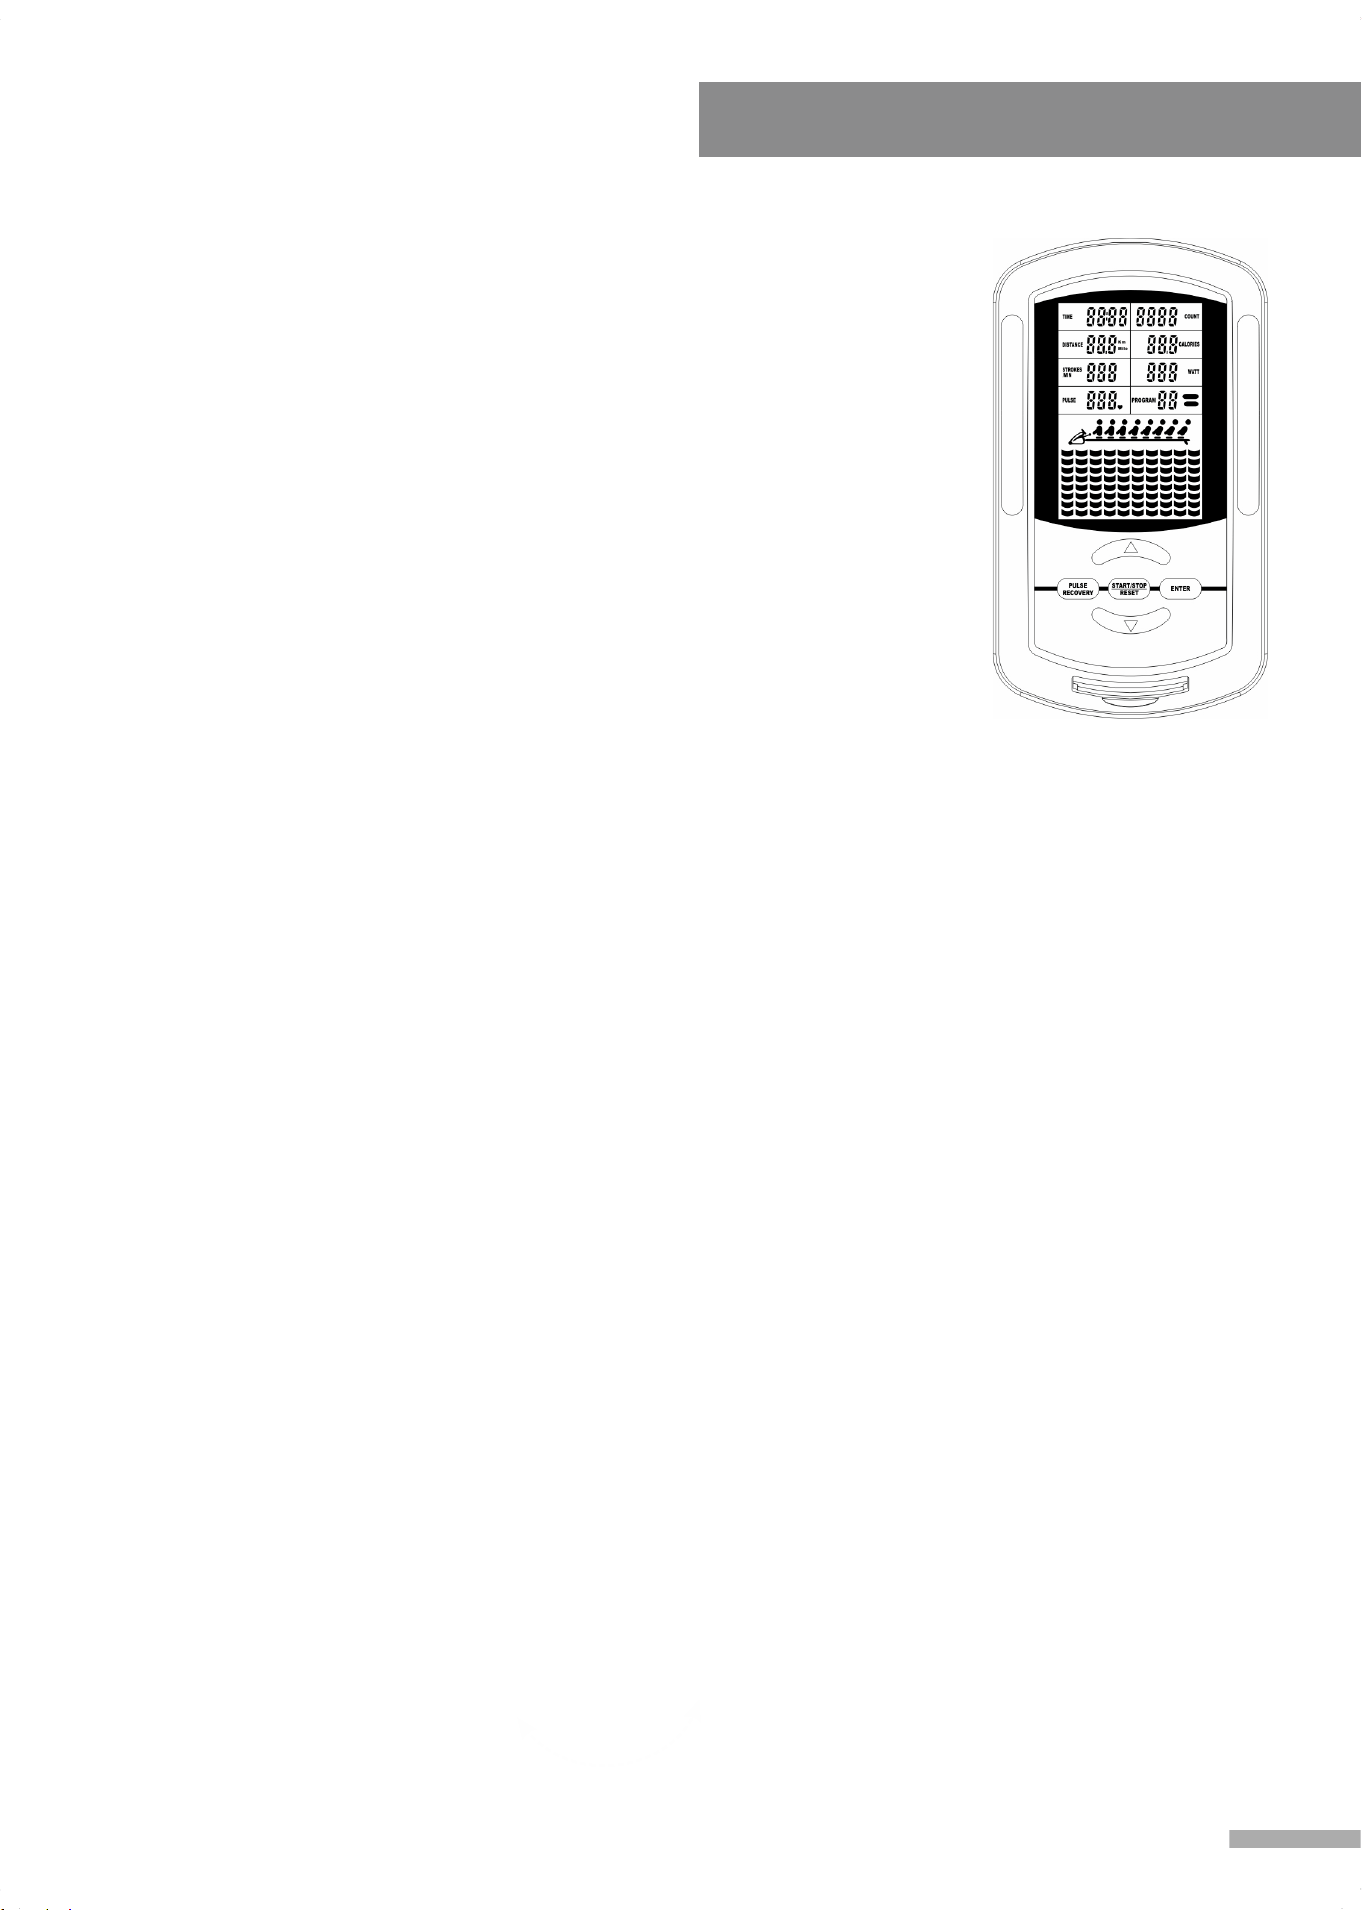
A. POWER UP:
a. Connect all of the cables to the monitor.
b. After power up all LCD segments will light up for 2 seconds, the
Monitor will reset to the initial resistance mode.
c. If the Monitor shows E1 & E2 message please contact service.
B. KEY BOARD:
a. ENTER:
1. During the pause mode, press ENTER to select and confirm
programs.
2. Confirm the setting values of TIME, COUNT, DISTANCE,
CALORIES and PULSE in the heart rate control; PROGRAM 8 &
PROGRAM PROFILE in the user setting program.
b. START/STOP/RESET:
1. To START or STOP exercising.
2. Holding this button for 2 seconds will enter the initial mode and reset
all value to zero.
c. UP & DOWN BUTTONS:
1. During the pause mode, cycle through programs or increase the
setting values of TIME, COUNT, DISTANCE, CALORIES and
PULSE in the heart rate control; PROGRAM 8 & PROGRAM
PROFILE in the user setting program.
2. During the exercise mode, press the UP button to increase the load
level, press the DOWN button to decrease the load level.
d. PULSE RECOVERY:
After completing an exercise, press to activate the pulse recovery
function. You must wear the HEART RATE TRANSMITTER.
Computer Instruction
11

C. FUNCTIONS:
TIME: Exercise time will be shown on the display when exercising. If there is no signal
detected within 4 seconds, it will reset to zero. (When presetting the program time during
setup, Programs 2-12 have a set point from 5:00 to 99:00).
Count Up: Without setting the time value, the monitor will count up from 0:00 to 99:59.
Count Down: Setting the exercise time, the monitor will count down from your setting values.
Once the setting value is reached, the monitor will produce a beep sound, and then the time
will begin counting up from 0:00.
COUNT: Count will be shown on the display when exercising. If there is no signal detected
within 4 seconds, it will reset to zero.
Count Up: Without setting the count value, the monitor will count up from 0 to 9999.
Count Down: Setting the exercise count, the monitor will count down from your setting
values. Once the setting value is reached, the monitor will produce a beep sound, and then
the count will begin counting up from 0.
CALORIE: The calories burned will be displayed on the window. The range is 0.0-99.9 kcal.
Count Up: Without setting the calorie value, the monitor will count up from 0.0 to 99.9 kcal.
Count Down: Setting the calorie consumption, the monitor will count down from your setting
values. Once the setting value is reached, the monitor will produce a beep sound, and then
the count value will begin counting up from 0.0 kcal.
DISTANCE: The distance will be displayed on the window. The monitor will calculate from 1
mile to 99.9 miles.
Count Up: Without setting the distance value, the monitor will count up from 0.1-99.9 miles.
Count Down: Setting the exercise distance, the monitor will count down from your setting
values. Once the setting value is reached, the monitor will produce a beep sound, and then
the count value will begin counting up from 1 mile.
STROKES/MIN: Displays the current amount of strokes per minute during exercise.
WATT: Displays the amount of power being exerted during exercise, range: 0-999 watt.
PULSE: Displays the heart rate, range 40 to 240 beats per minute (BPM).
NOTE:
To use this function a Heart Rate Transmitter must be worn in order to register your heart
rate for displaying. In this function the Heart Rate Transmitter sends your heart rate
information to a built in receiver, the receiver then displays your heart rate information on the
monitor. Each heart rate signal is accompanied by a “ ” symbol flash. If the Heart Rate
Transmitter is incorrectly worn around your chest, a “P” mark will be displayed.
Computer Instruction
12
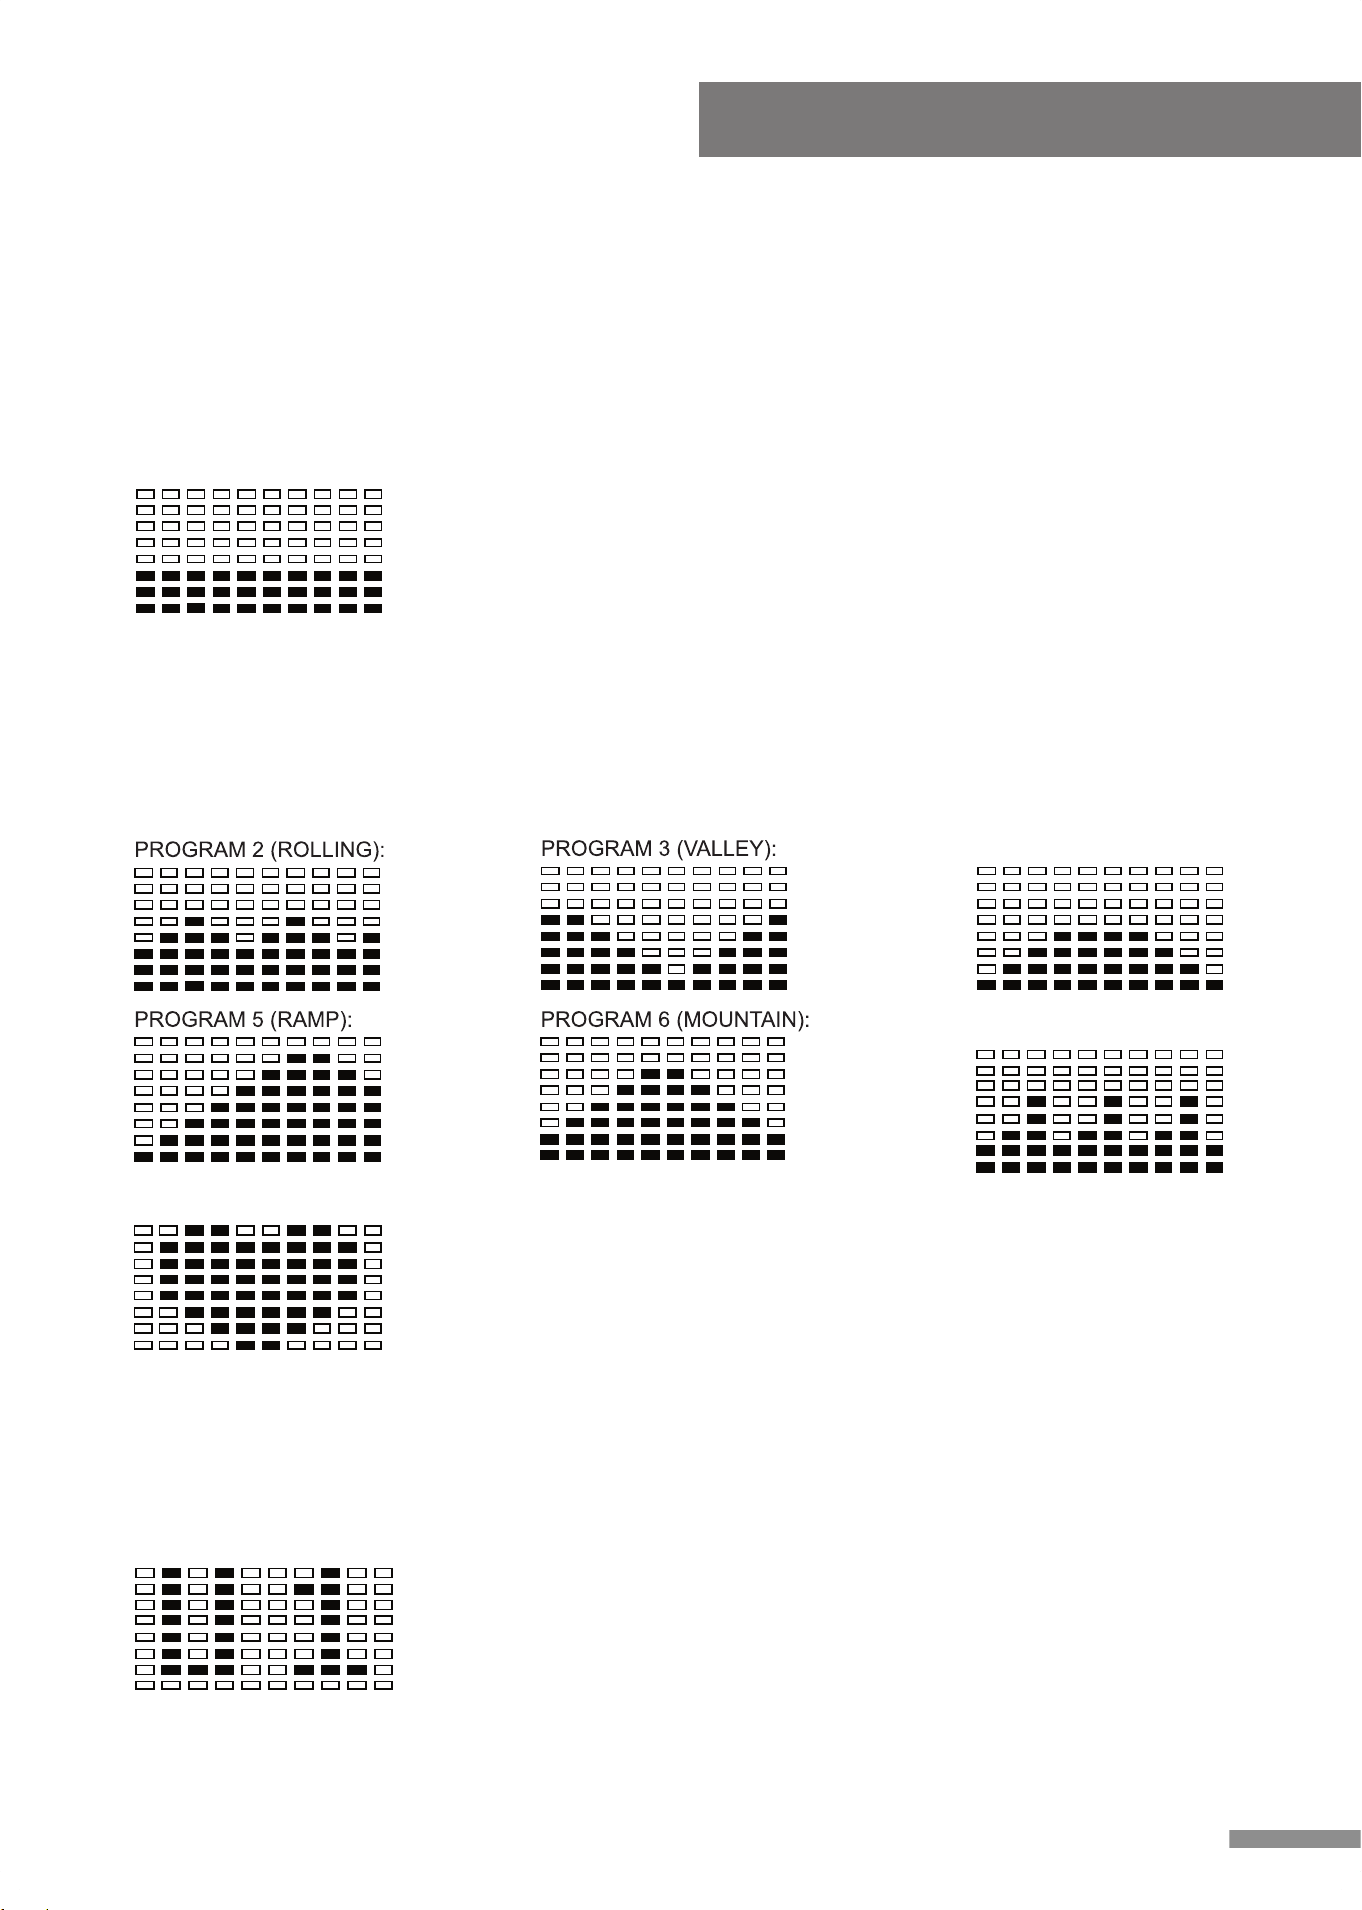
PROGRAM 8 (TRAGET H .R .):
PROGRAM 7 (INTERVALS):
PROGRAM 4 (FAT BURN):
PROGRAM 1 (MANUAL):
Computer Instruction
Preset Programs 2-7: Programs 2 through 7 are automatic programs, however the user
may still increase or decrease the tension level of these programs using the “▲/▼” buttons.
Preset program profiles are displayed on the face of the computer. Under these Preset
Programs users may still set a value for TIME, COUNT, CALORIE and DISTANCE. To set a
value, refer to the FUNCTIONS section of the computer instructions.
Computer Instruction
13
D. PROGRAM PROFILE:
The computer contains 12 different programs. You can preset the program time so that the
computer will divide the time into 10 intervals. If the program time is not preset, the
computer will count up 1 minute for each interval of Program 1 (Manual Program), for
Programs 2-12 the computer will use a preset value of 30 minutes, programs will run in
cycle.
Manual Program 1: Program 1 is a manual program; in this
program the user has full manual control of the workload.
Increase the load using “▲” button, decrease the load using
“▼” button.
Target Heart Rate Program 8: This program requires the
user to wear a Heart Rate Transmitter around their chest.
This program is controlled by heart rate. When the user
selects Program 8 the PULSE window located on the
monitor will display a flashing 90 (the initial setting value), at
this time the user may input their desired Target H.R. from
90-220BPM. In this program the computer will automatically adjust the tension level during
exercise according to the users' heart rate, detected by the heart rate transmitter, in order to
keep the users heart rate within the zone of plus & minus 5 BPM of their set Target H.R.
PROGRAM 9 (user setting):
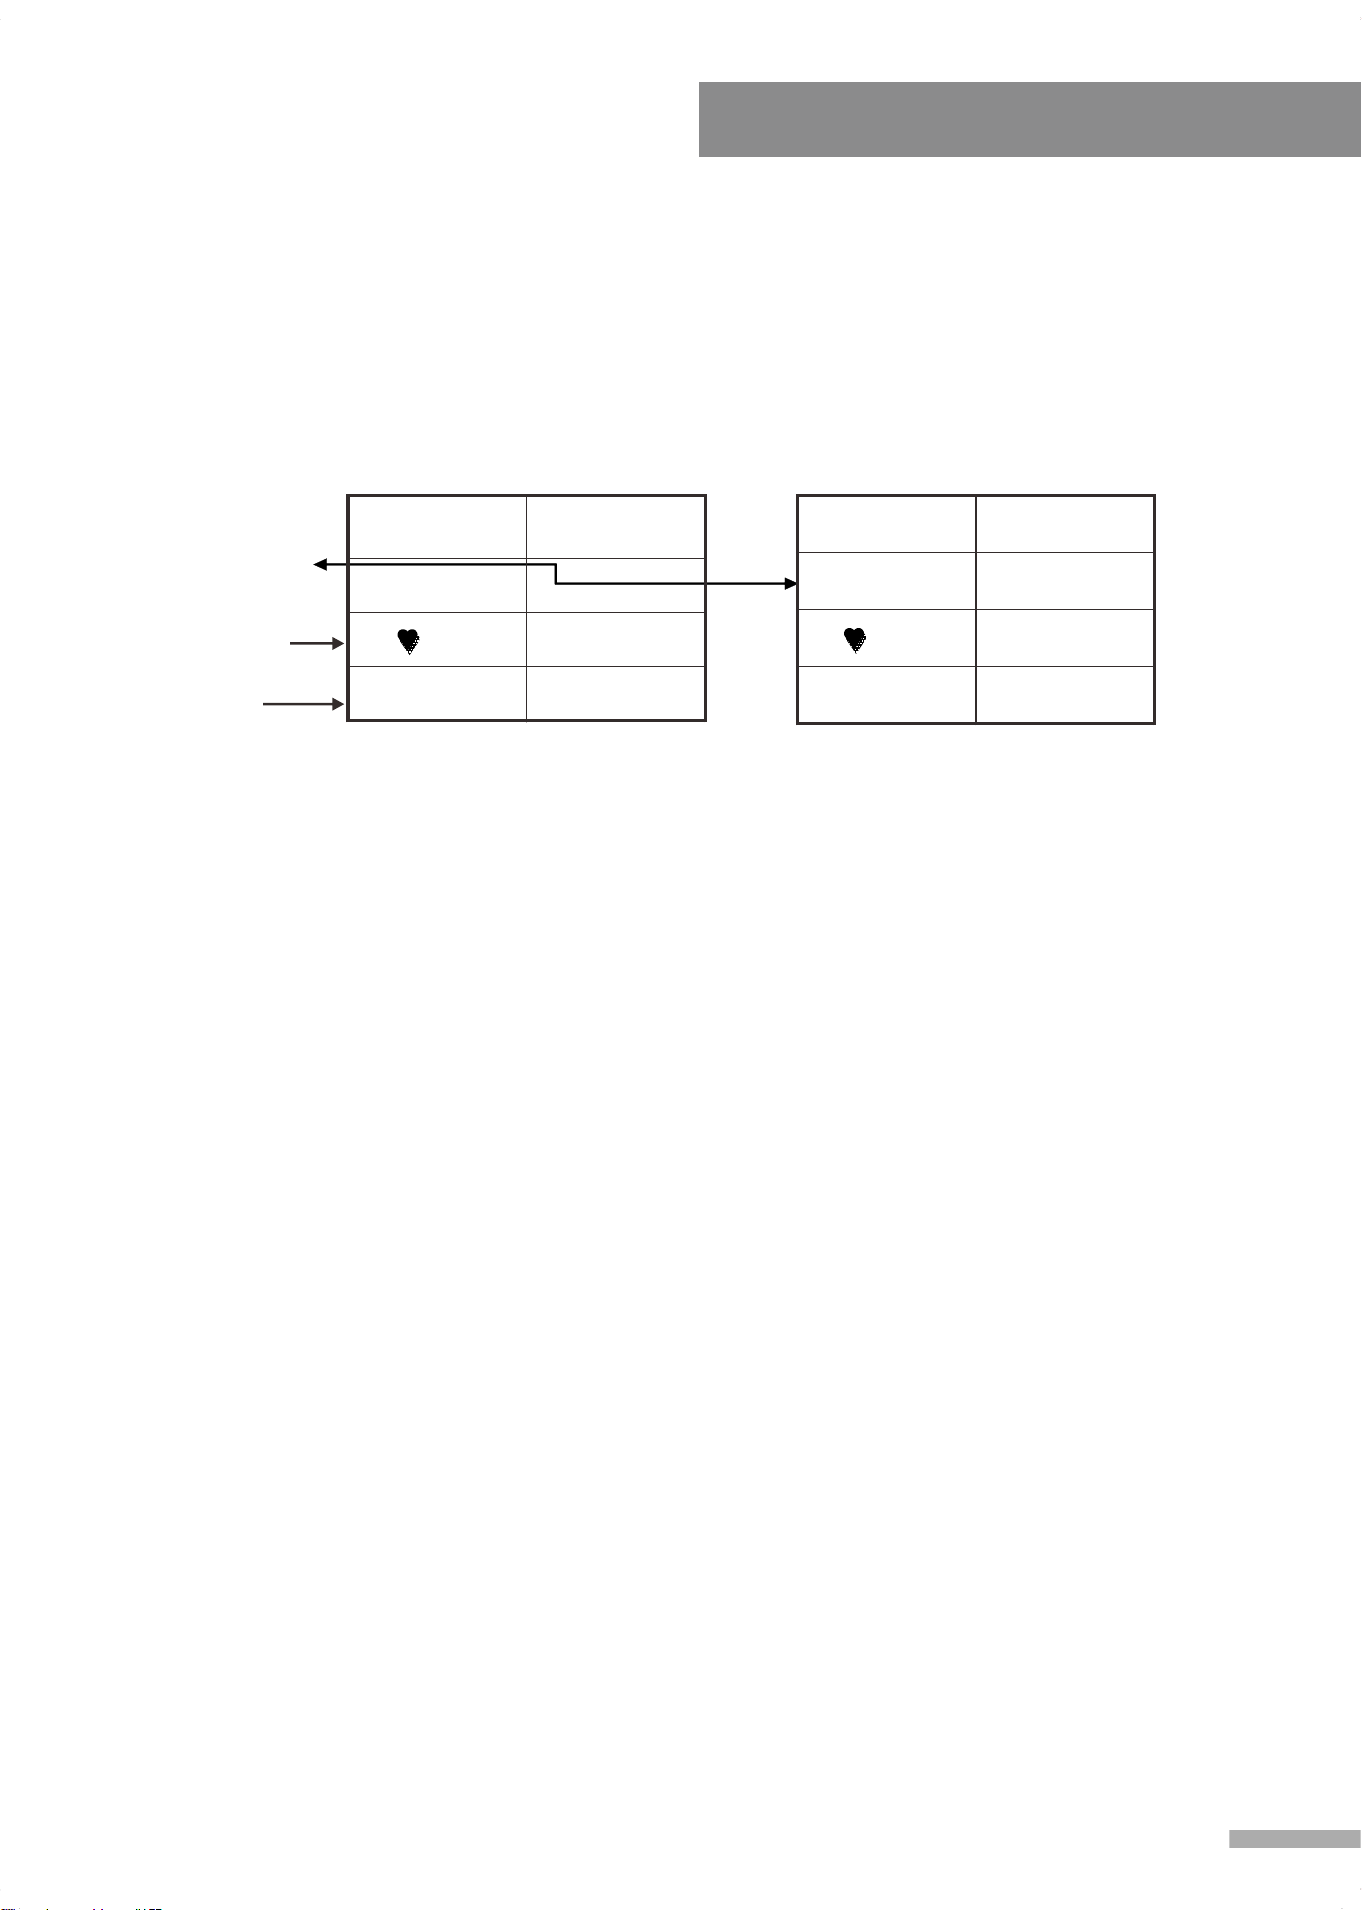
User Setting Programs 9-12: (U1-U4) Programs 9 through
12 are programs that allow the user(s) to manually preset
each of the 10 intervals in order to create personal exercise
profile(s). To create a profile scroll through the User
Settings Program until “Column” flashes on the Monitor,
press the “ ▲ / ▼ ” buttons to create your exercise program,
press the ENTER button to confirm the first Column of your exercise profile. Repeat this
process to create additional Columns.

Under the User Settings Programs 9-12 (U1-U4), users may still set a value for TIME,
COUNT, DISTANCE and CALORIE, (in that order), to set press the ENTER button to select
the program, use the “ ▲ / ▼ ” buttons to set the function values, press the ENTER button
to input the values. Or pass some of the inputs, by pressing the ENTER button. The values
will be stored in the memory after setup. Users may also manually increase or decrease the
functions value in each interval by pressing the “ ▲ / ▼ ” buttons, the value stored in the
memory will not be changed or affected by doing this.
NOTE:
1. Your personal exercise profile will be stored in the memory of the monitor.
2. When you reach one of the targets such as TIME, COUNT, DISTANCE or CALORIES,
the monitor will produce a beep sound and then stop.
3. If you set more than one target and would like to continue, press START to begin the
exercise again.
4. The maximum number of users able to create a personal exercise profile is 4.
Computer Instruction
14
TRAVEL DISTANCE INDICATOR
Indicates the distance traveled on the rower during
during exercise.
E. PULSE RECOVERY FUNCTION:
NOTE: To use this program, you must wear the Heart Rate Transmitter.
The Pulse Recovery function is used upon completion of an exercise, the function
measures the amount of time it takes for the users' heart rate to return to a resting heart
rate, the quicker the users heart rate returns to a resting heart rate the better. The computer
monitors your heart rate for 60 seconds and then calculates a Pulse Recovery value from
F1- F6.
F1.0 = Excellent F2.0 = Good F3.0 = Fair
F4.0 = Below Average F5.0 = Not Good F6.0 = Poor
The readings mentioned are to be used as points of reference, this information is NOT to be
used for any medical reference or purposes.
When starting the Pulse Recovery function, a “ ” symbol will be displayed, after 5 seconds
your heart rate will then be displayed. Once your heart displays on the monitor, press the
Pulse Recovery button, during the Pulse Recovery function, only the PULSE and TIME are
active. The TIME will begin count down from 0:60 seconds, during this time the “ ” symbol
will blink, when the TIME reaches 0:00 the computer will sound an audible alarm for ten
seconds and then display your Pulse Recovery reading from F1.0 to F6.0. (During Pulse
Recovery, press any button to stop audible alarm. Press any button to exit Pulse Recovery
function).
“E” displayed in
Pulse Recovery
Value window if a
proper heart rate
signal is unavailable.
Highest detected
Heart Rate within
the first 20 sec.
Current Heart
Rate
TIME 0:55
90
PULSE 84
TIME 0:00
E 3.2
90
PULSE 78
F. HEART RATE MONITORING:
To achieve the maximum results from your workout on this 817 Rowing Machine it is
imperative that you exercise within your target heart rate zone for a minimum of 20 minutes.
Studies have shown that exercising below your target heart rate zone will not allow you to
burn fat or improve cardiovascular fitness, working above your target heart rate zone is
counter-productive as well.
Everyone has their own specific target heart rate zone, when exercising your main goals
should be reaching that zone and staying within that zone. Determining your personal target
heart rate zone is calculated by the following:
STEP 1: Find your maximum heart rate using this formula:
220 - Your Age = predicted max heart rate.
Example: A person 40 years of age would have a predicted max heart rate of 180
BPM (Beats Per Minute), 220 - 40 = 180.
STEP 2: Your target heart rate zone is a range of 55% to 90% of your max heart rate.
Predicted Max Heart Rate x .55 = Low End of your target heart rate zone.
Predicted Max Heart Rate x .90 = High End of your target heart rate zone.
Example: A person 40 years of age would have a Target Heart Rate Zone of 99 to
162 BPM (Beats Per Minute); 180 x .55 = 99. 180 x .99 = 162.
For additional conditioning
guidelines and to set up
the target heart rate for
programs, the chart to the
right provides a reference
to Target Heart Rate
zones estimated by age.
NOTE:
1. Press the Pulse Recovery button at any time to run the pulse recovery function, the pulse
recovery function can be ran during an exercise and while running another program.
2. Once the pulse recovery function is initiated the TIME will begin count down from 0:60
seconds down to 0:00, during these (60) seconds you will not be able to quit the pulse
recovery function. An “E” message will display in the pulse recovery value window of the
monitor when there is no heart rate signal detected or available.
15
Computer Instruction

LCD W/PROGRAM MONITOR TROUBLE SHOOTING GUIDE
E1
No signal from
motor gear .
1. Review the Assembly Instructions and check that
all the computer plugs and sockets are firmly and
correctly connected.
2. Review the machine's Magnetic Resistance
System to ensure that it is set correctly at it can
freely be adjusted. A symptom of the previous
problem is the Motor will struggle to adjust the
resistance and begin making an abnormal sound.
If this happens the Motor may already be
damaged by some kind of interference. After
freeing the interference the Motor will have to be
checked that it still correctly.
3. Motor Problems:
a. Symptoms include an unusually loud noise
coming from the Motor, which means the Gears
are NOT meshing correctly. Try reversing the
resistance and try again. If this fails then
Replace the Motor.
b. If the Motor fails to move at all then please
recheck as per Solution above.
c. If this fails then Replace the Motor.
E2
The Computer
cannot interface
with the IC Chip .
Disconnect the Adaptor and/or remove the Batteries.
Reconnect the Adaptor and /or the Batteries. This will
REBOOT the IC Chip and may help the Computer
interface with the IC Chip. Remove and reinsert the
IC Chip If reinsertion fails then replace the IC Chip
with a NEW IC Chip.
SYMPTOM SOLUTIONPOSSIBLE CAUSE
16
Computer Instruction

Maintenance
IMPORTANT:
Safe and effective use can only be achieved if the equipment is assembled, maintained and
used properly. It is your responsibility to ensure that the equipment is maintained regularly.
Any components found to be worn and/or damaged should be replaced before continuing use
of the equipment. Equipment should only be used and stored indoors, prolonged exposure to
weathering and changes in temperature and humidity may have a severe impact on electrical
components and moving parts of the machine.
Daily Maintenance:
- Clean and remove sweat and moisture after each use.
- Perform inspection of all nuts and bolts associated with moving parts of the equipment,
tighten as required.
- Check the mobility of moving parts and components on the equipment, lubricate if
required.
- Clean plastic parts of the equipment using a damp cloth, clean metal parts of the
equipment using a dry cloth. Do not use cleaning products to clean the equipment.
Weekly Maintenance:
- Thoroughly inspect the parts of the equipment; nuts, bolts, screws and moving parts
such as foot pedals, seat, pulley's, etc. Tighten or replace parts as required.
Monthly Maintenance:
- Inspect the frame and inner working components for wear and tear as well as damage,
maintenance or replace as required.
17

2018.03.20