
UNITED STATES
CANADA
UNITED KINGDOM
ITALY
SPAIN
JAPAN
RUSSIA
AUSTRALIA
With your inspiring rating, COSTWAY will be more consistent to offer you EASY
SHOPPING EXPERIENCE, GOOD PRODUCTS and EFFICIENT SERVICE!
Mit Ihrer inspirierenden Bewertung wird COSTWAY konsistenter sein, um Ihnen
EIN SCHÖNES EINKAUFSERLEBNIS, GUTE PRODUKTE und EFFIZIENTEN
SERVICE zu bieten!
Avec votre évaluation inspirante, COSTWAY continuera à fournir une
EXPÉRIENCE D’ACHAT PRATIQUE, des PRODUITS DE QUALITÉ et un
SERVICE EFFICACE !
Con su calificación inspiradora, COSTWAY será más consistente para ofrecerle
EXPERIENCIA DE COMPRA FÁCIL, BUENOS PRODUCTOS y SERVICIO
EFICIENTE.
Con la tua valutazione incoraggiante, COSTWAY sarà più coerente per offrirti
ESPERIENZA DI ACQUISTO FACILE, BUONI PRODOTTI e SERVIZIO
EFFICIENTE!
Dzięki twojej opinii COSTWAY będzie mógł oferować jeszcze WYGODNIEJSZE
ZAKUPY, LEPSZE PRODUKTY i SPRAWNIEJSZĄ OBSŁUGĘ KLIENTA.
US office: Fontana
UK office: Ipswich
DE office: FDS GmbH, Neuer Höltigbaum 36, 22143 Hamburg, Deutschland
FR office : 26 RUE DU VERTUQUET, 59960 NEUVILLE EN FERRAIN, FRANCE
GERMANY
FRANCE
USER'S MANUAL/HANDBUCH/MANUEL DE L'UTILISATEUR
/MANUAL DEL USUARIO/MANUALE UTENTE/INSTRUKCJA OBSŁUGI
Rowing Machine / Rudergerät / Rameur
/ Máquina de Remo / Vogatore / Wioślarz
SP37675
EN DE FR ES IT PL

IMPORTANT: Read all instructions carefully before using this
product.Retain this owner's manual for future reference. The
specifications of this product may vary from this photo, subject to change
without notice.
Thank you for choosing our products. For your safety and health, please
use this equipment correctly. Please read the entire manual before
assembling and using the equipment. Only when the equipment is
assembled, maintained and used properly, can it be used safely and
effectively. Please read all the warnings and precautions carefully.
1.Before starting any exercise program, you should consult your doctor
to determine whether you have any medical or physical condition that
may endanger your health and safety or prevent you from using the
equipment correctly. If you are taking drugs that affect your heart rate,
blood pressure or cholesterol level, doctor's advice is essential.
2.Pay attention to the signals from the body. Incorrect or excessive
exercise will harm your health. If the following symptoms occur, please
stop exercising: pain, chest tightness, irregular heartbeat, shortness of
breath, dizziness or nausea. If you have experienced these situations, you
should consult your doctor before continuing your exercise program.
3.Keep children and pets away from equipment. This device is for adult
use only.
4.Use the equipment on solid and flat ground, and cover the floor or
carpet with protective cover. To ensure safety, there should be at least
61CM of free space around the equipment.
5.Before using the equipment, make sure that all nuts and bolts are
tightened. Only by regularly checking the damage and/or wear of the
equipment, can the safety of the equipment be maintained.
IMPORTANT SAFETY GUIDELINES
EN
02

6. Be sure to use the equipment as instructed. If defective parts are found
during assembly or inspection of equipment, or abnormal noise is heard
during operation, the equipment shall be stopped immediately and reused
after the problem is solved.
7. Wear appropriate clothes when using the equipment. Avoid wearing
loose clothes to avoid getting entangled with the equipment.
8. Do not put fingers or other objects into the moving parts of the
equipment.
9. The maximum load capacity of this machine is 120kg.
10. This equipment is not suitable for treatment.
11. In order to avoid personal injury and/or damage to products or
property, it is necessary to lift and move properly.
12. Your product is suitable for use in cool and dry conditions. You
should avoid storing in extremely cold, hot or humid places.
13. This equipment is for indoor and domestic use only.
A successful exercise program includes warm-up and aerobic exercise.
Do it at least twice a week, preferably three times, and take a day off
between exercises. After a few months, you can increase your exercise to
four/five times a week. Please do some warm-up before exercise. It
prepares your body for more intense exercise, by heating and stretch your
muscles, increasing your circulation and pulse rate, and delivering more
oxygen to your muscles. At the end of your workout, repeat these
exercises to reduce sore muscle problems.
EXERCISE GUIDANCE
03
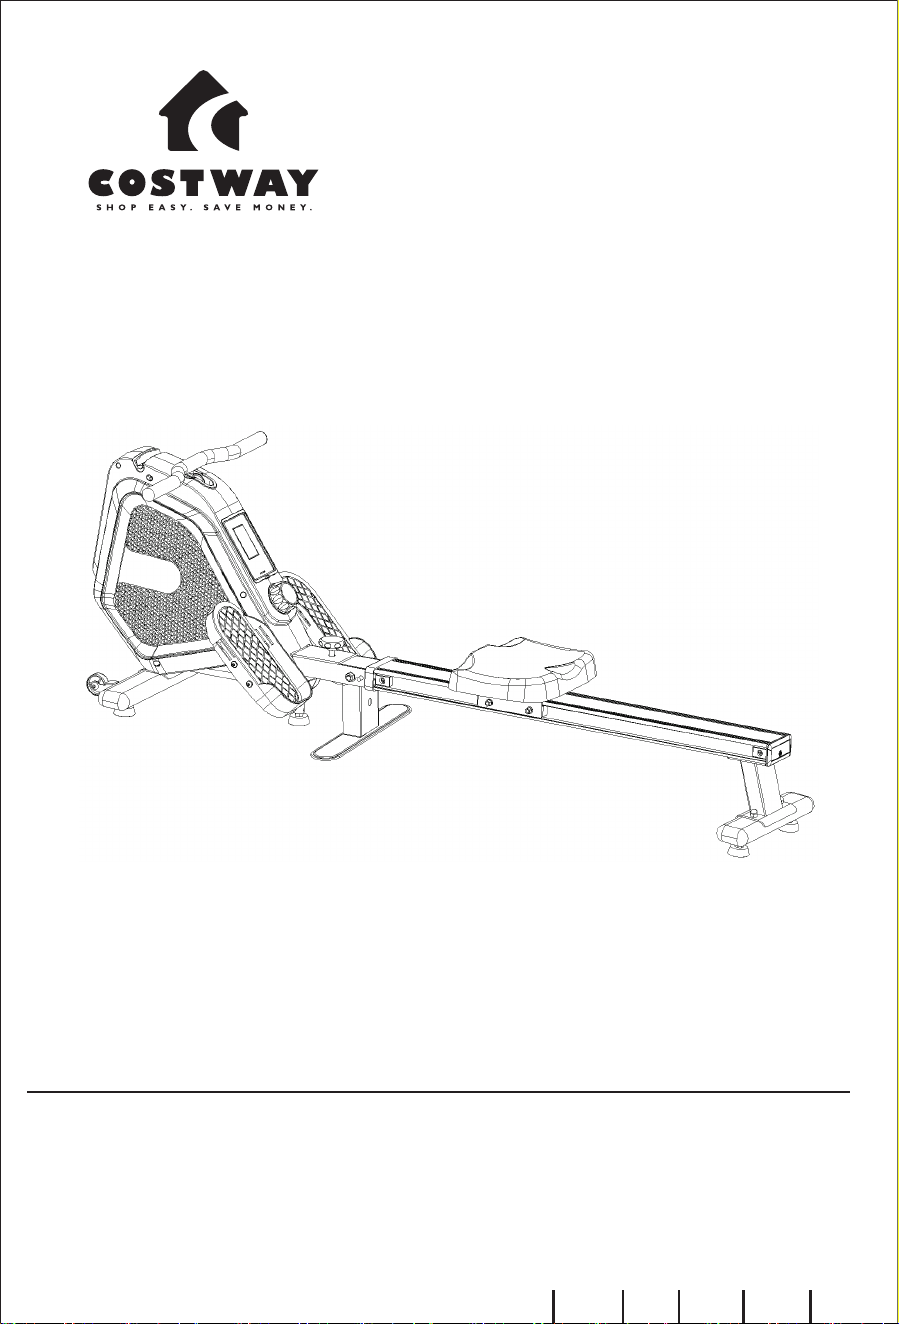
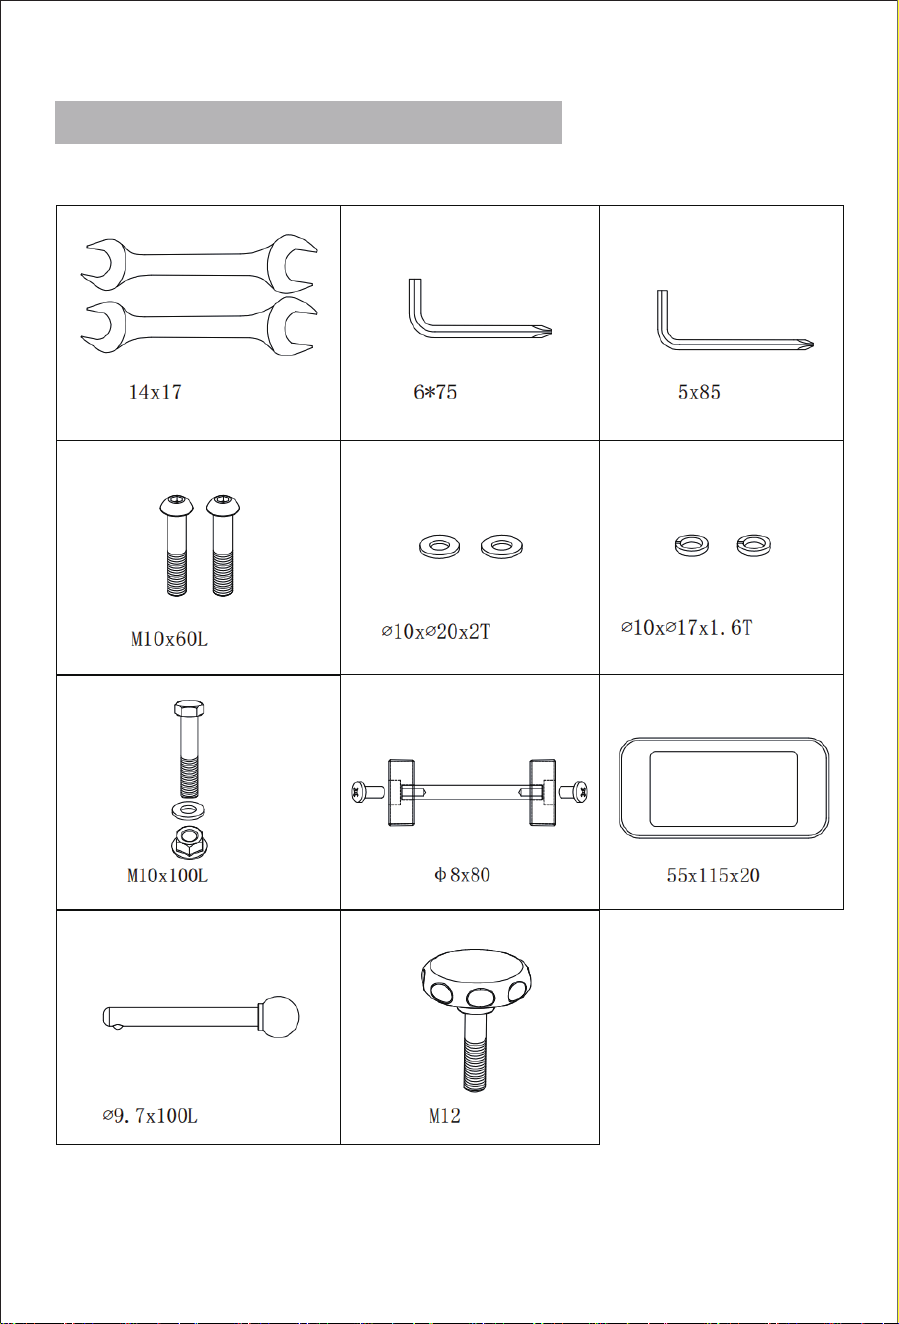
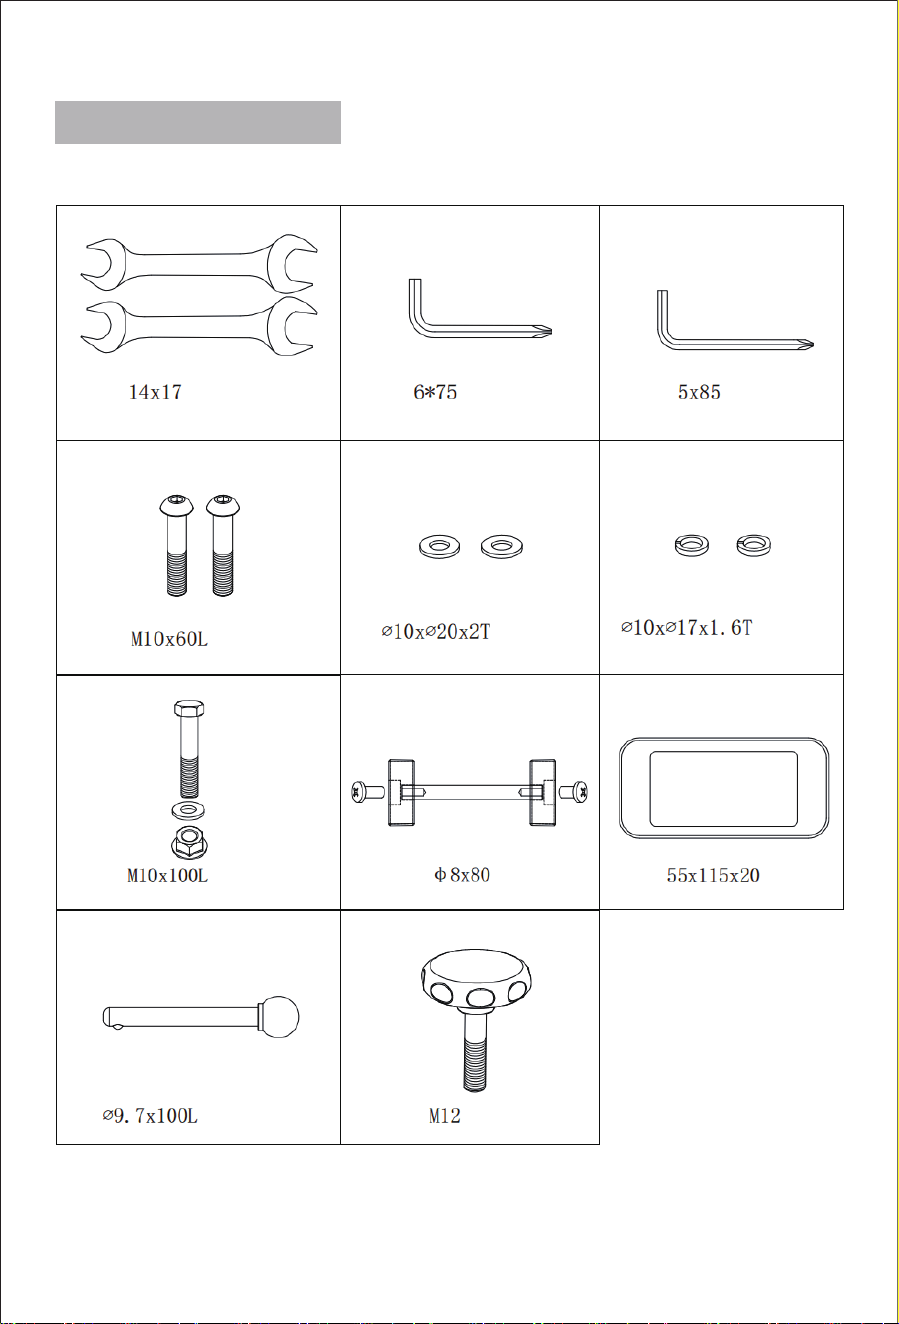
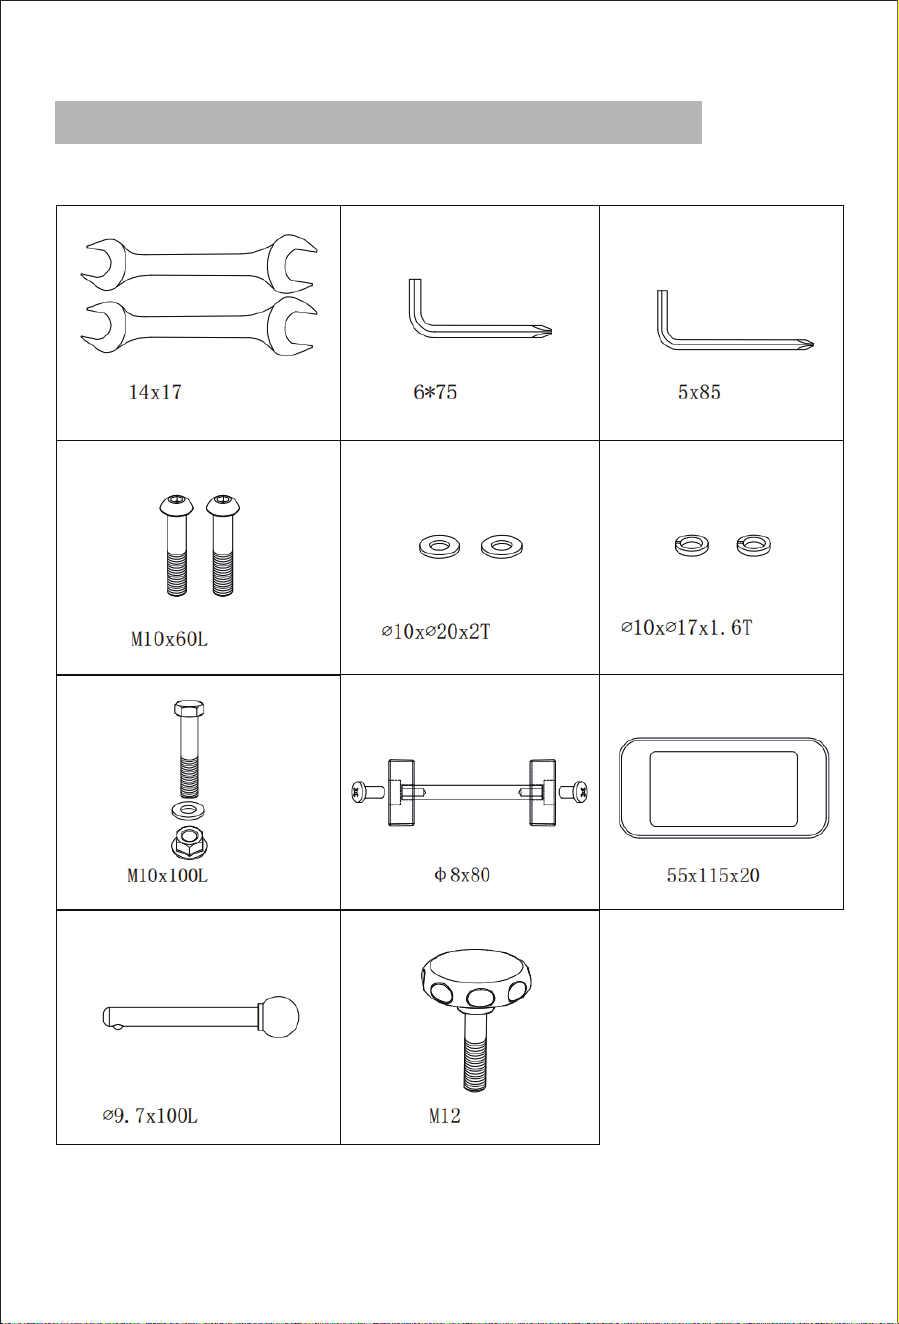
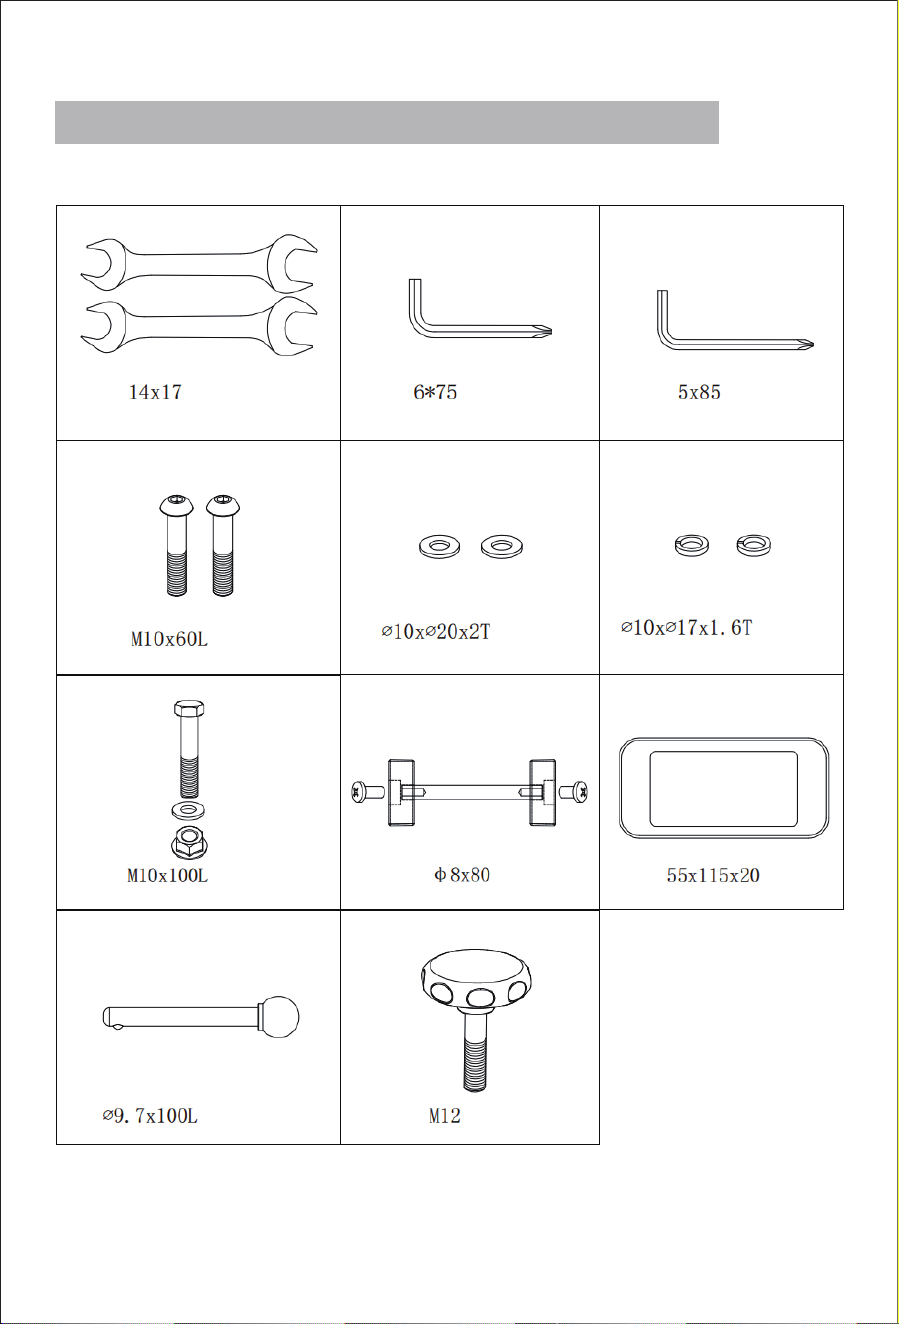
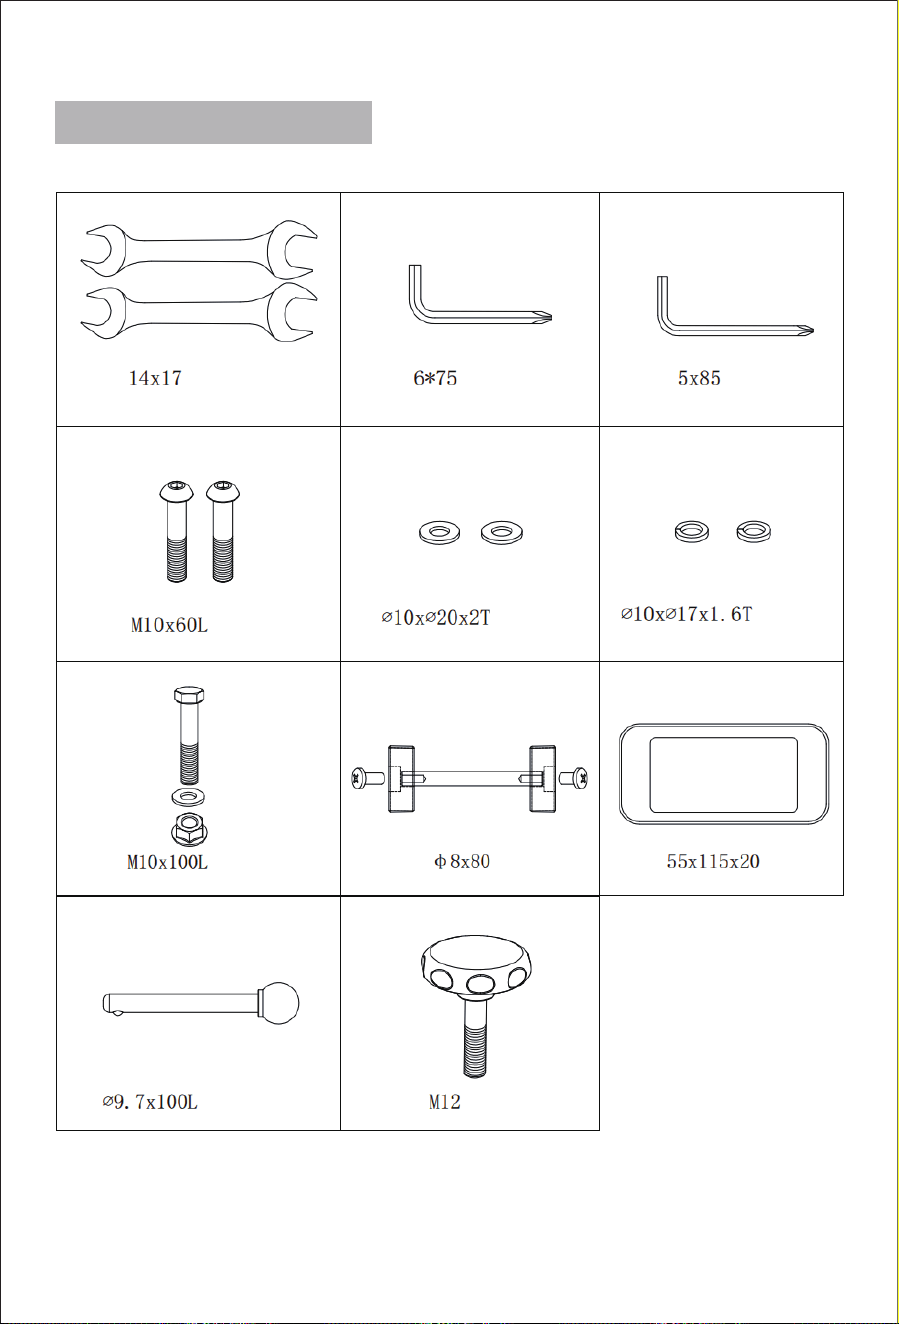
HARDWARE & TOOLS PACK
X2
X2
X1
X1 X1
X2
X2
X1 X1
04
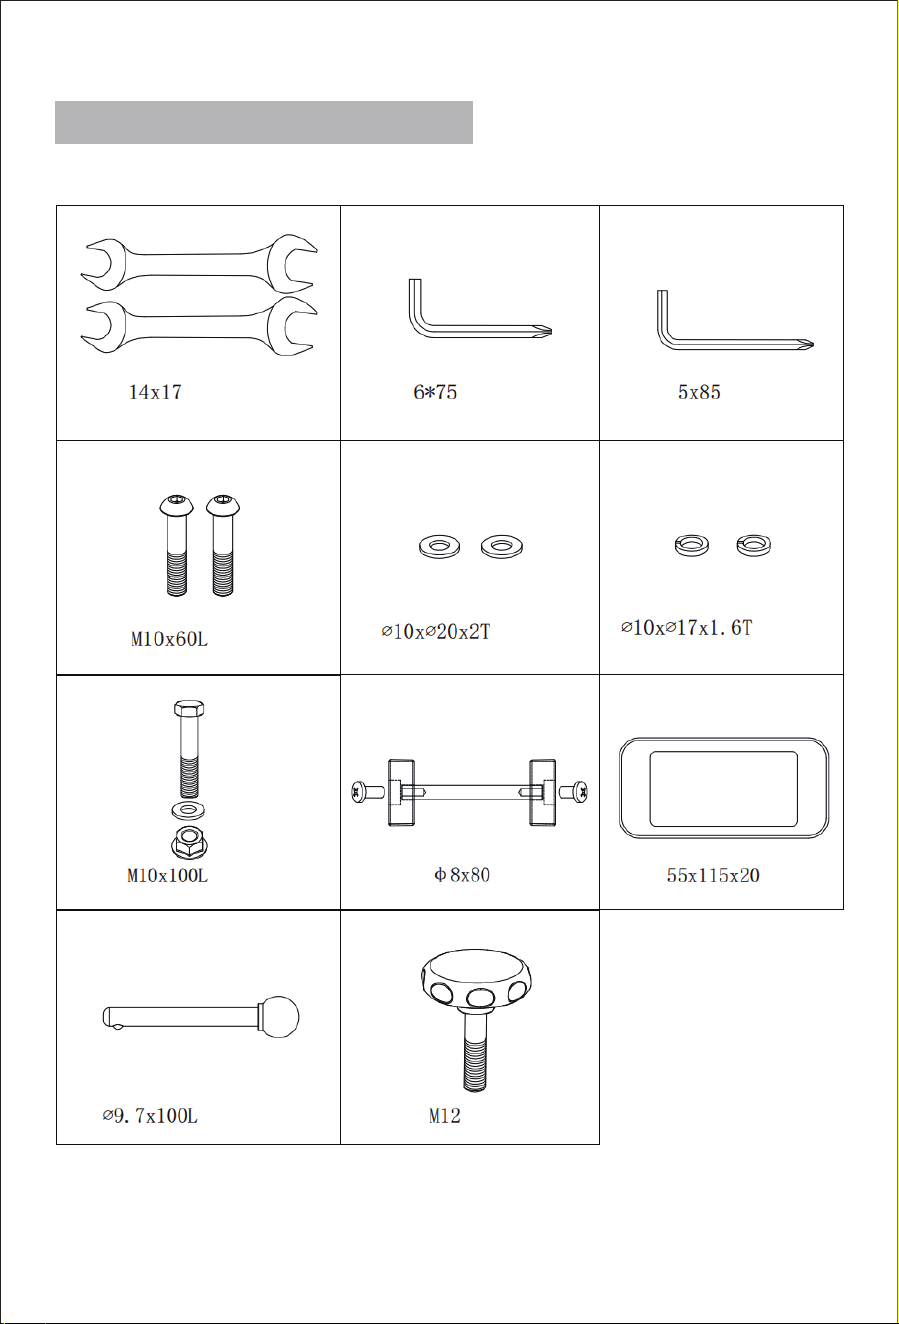
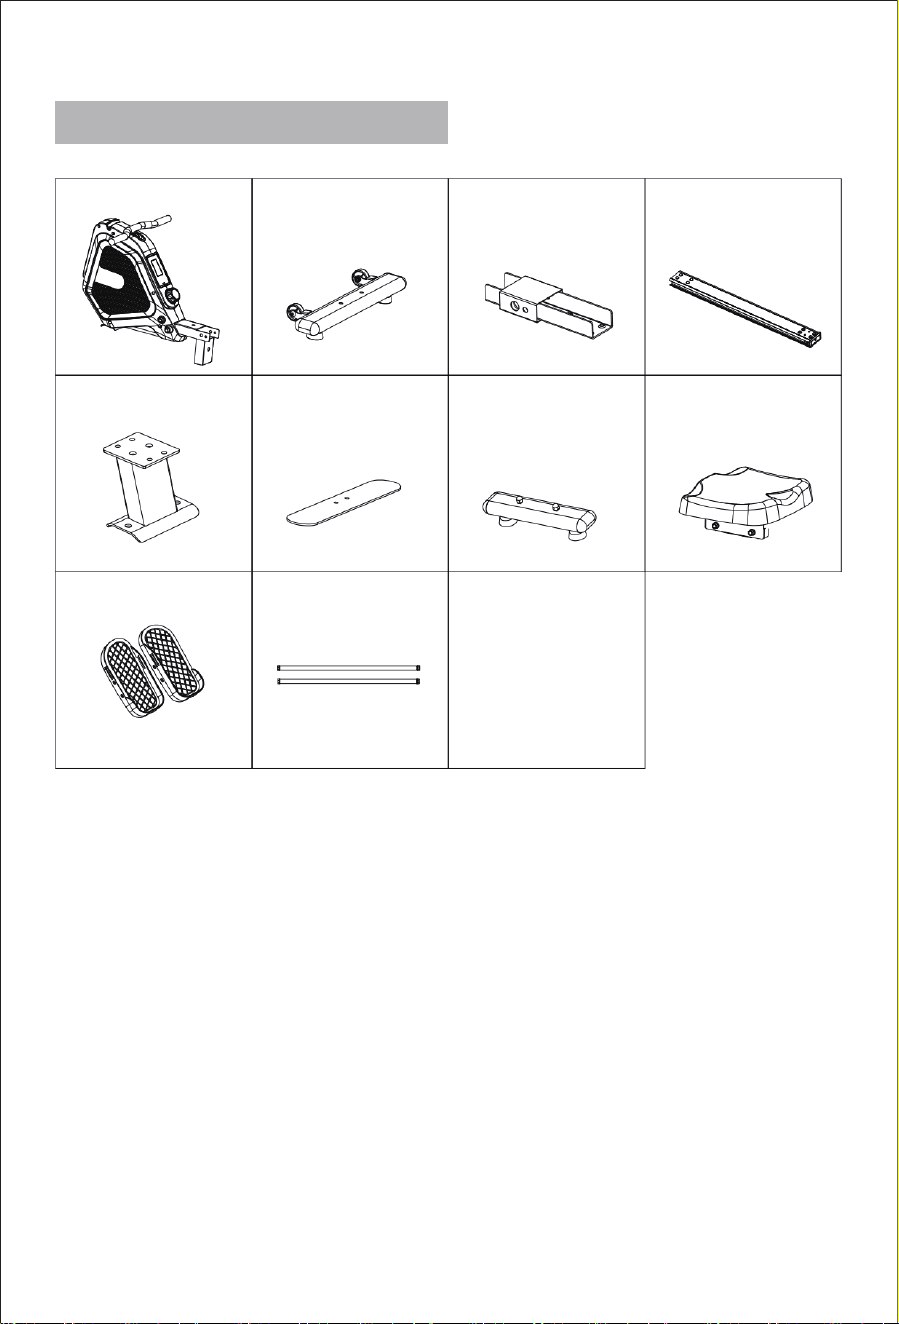
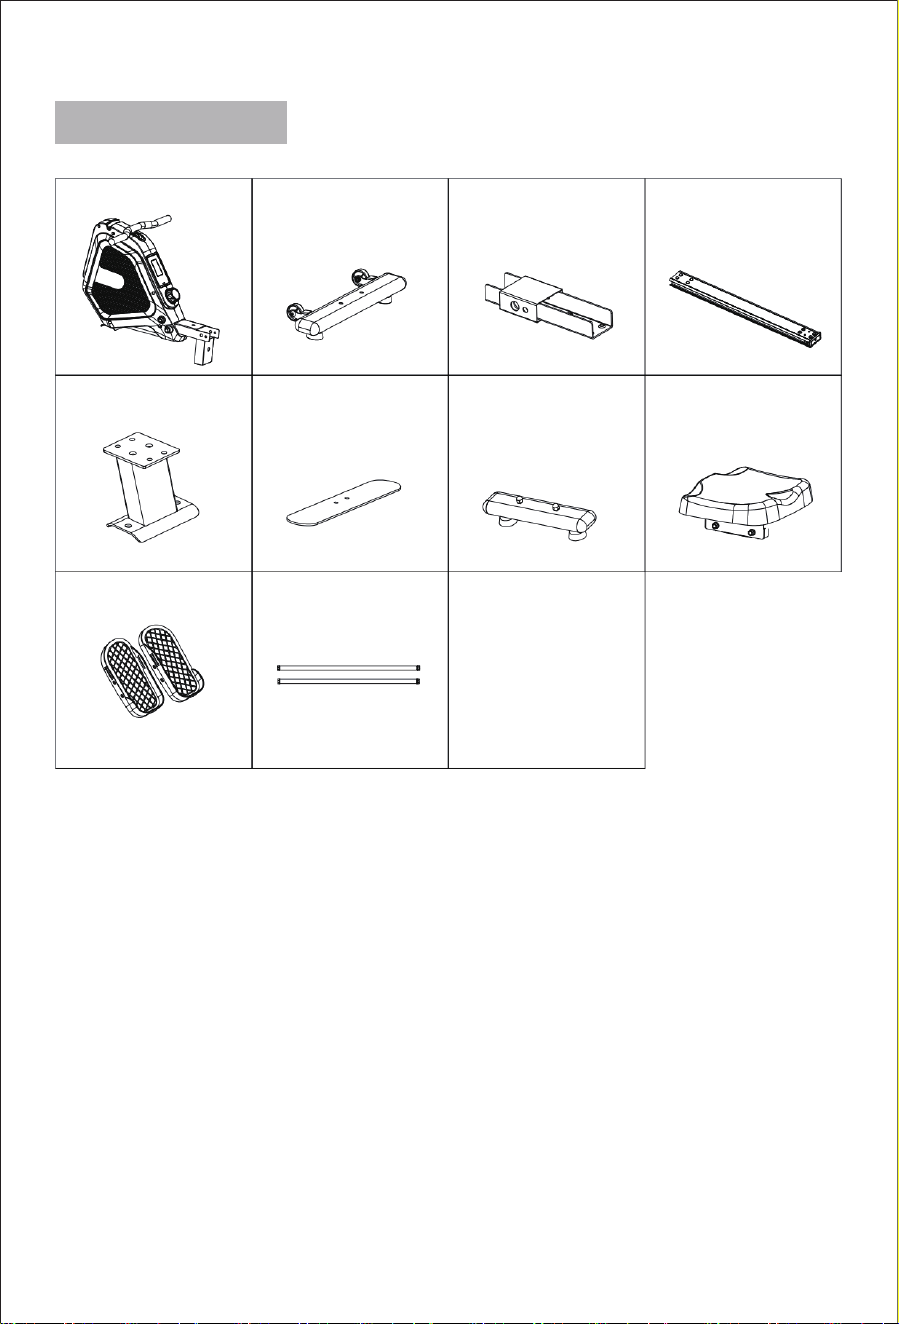
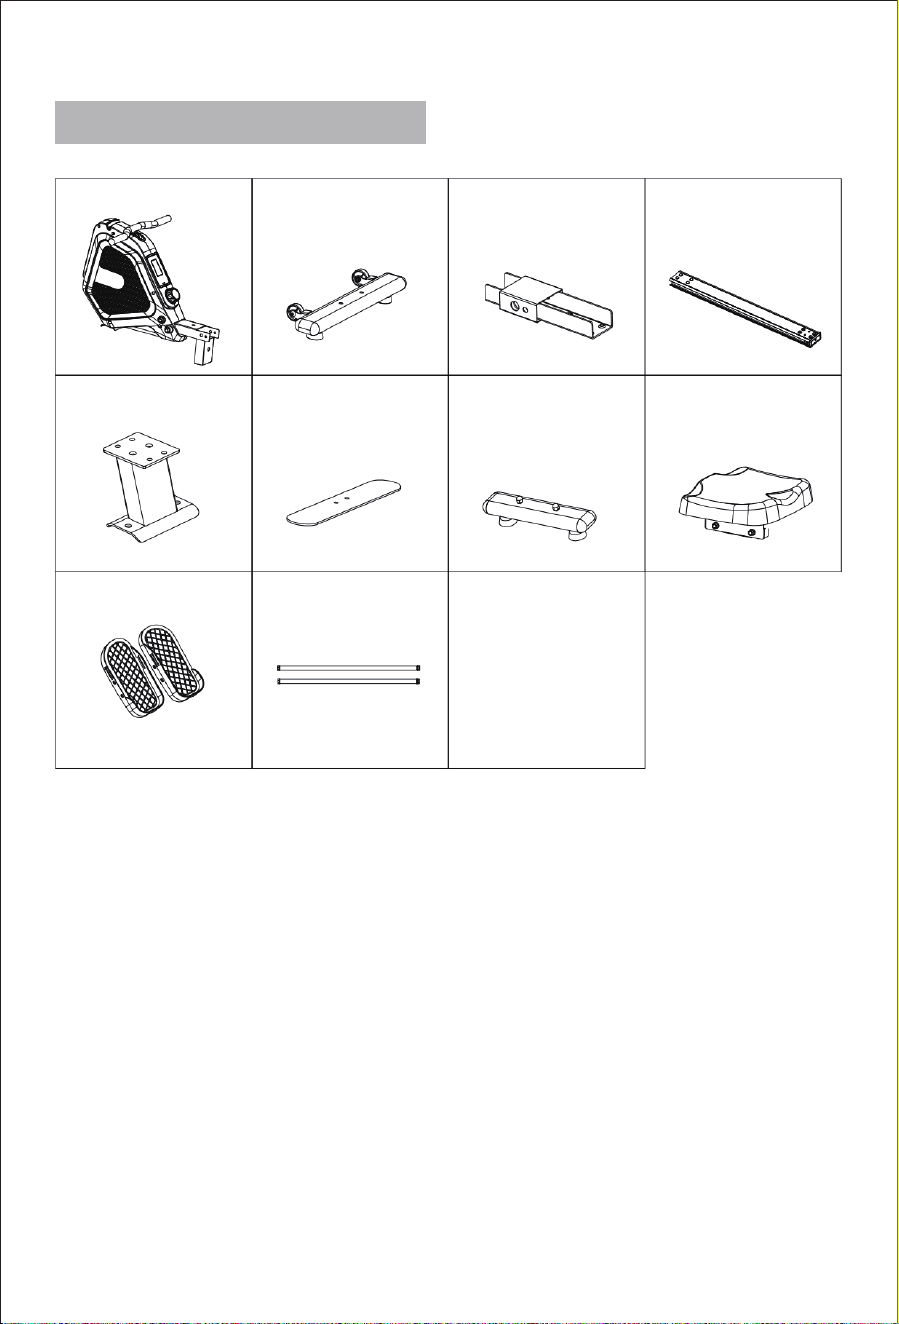
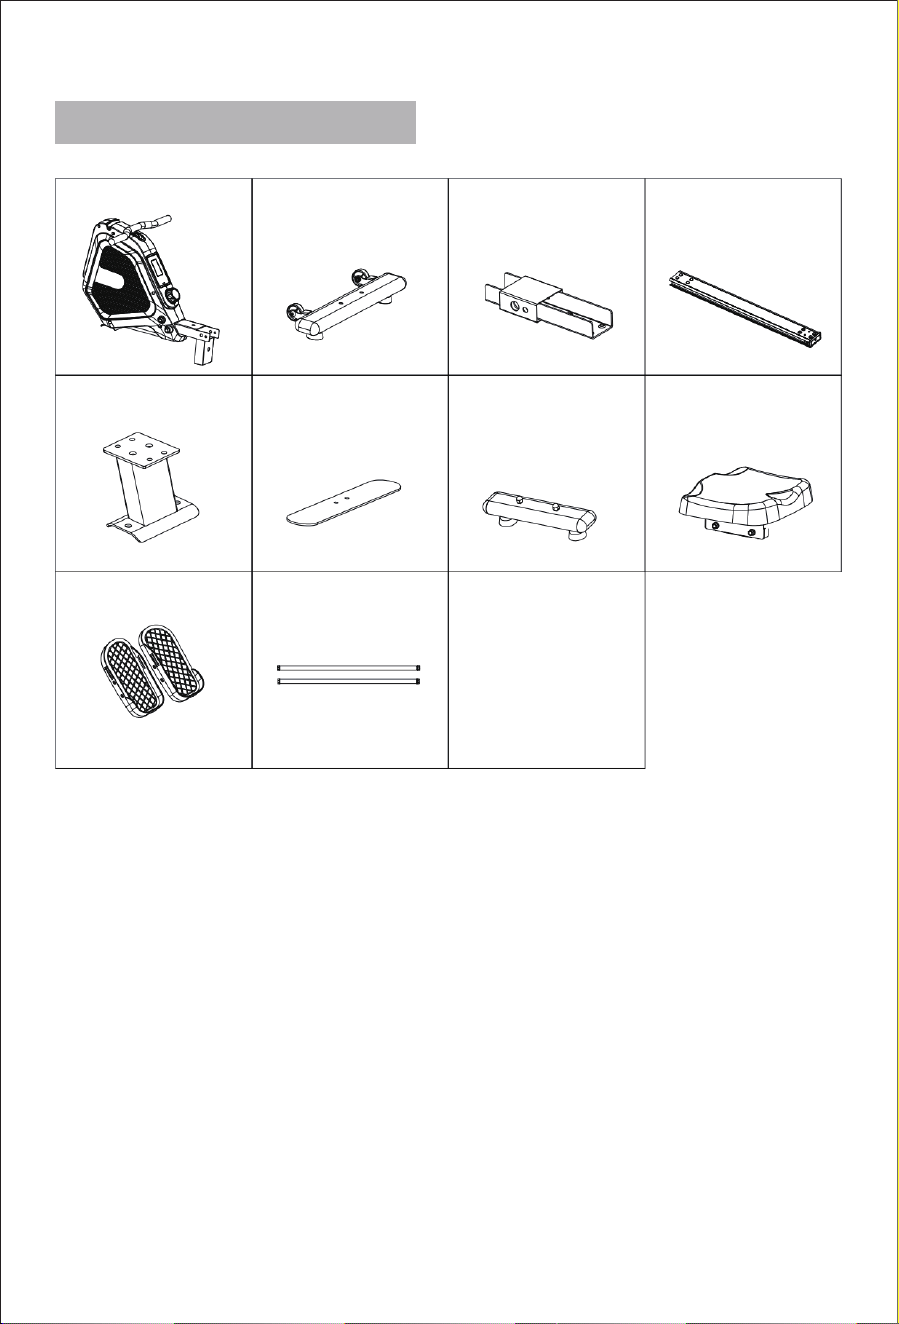
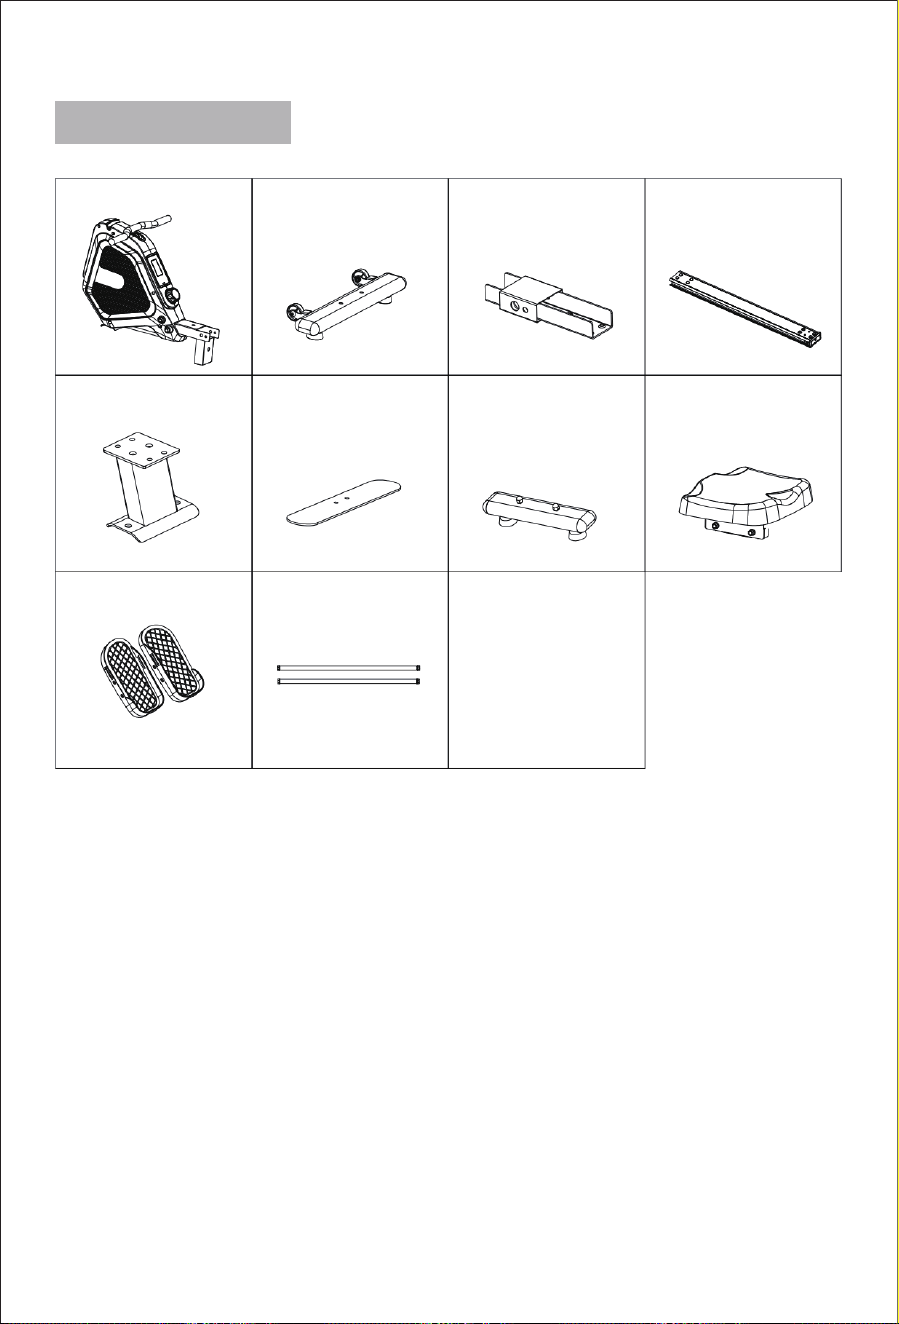
PRE-INSTALLED PARTS
05

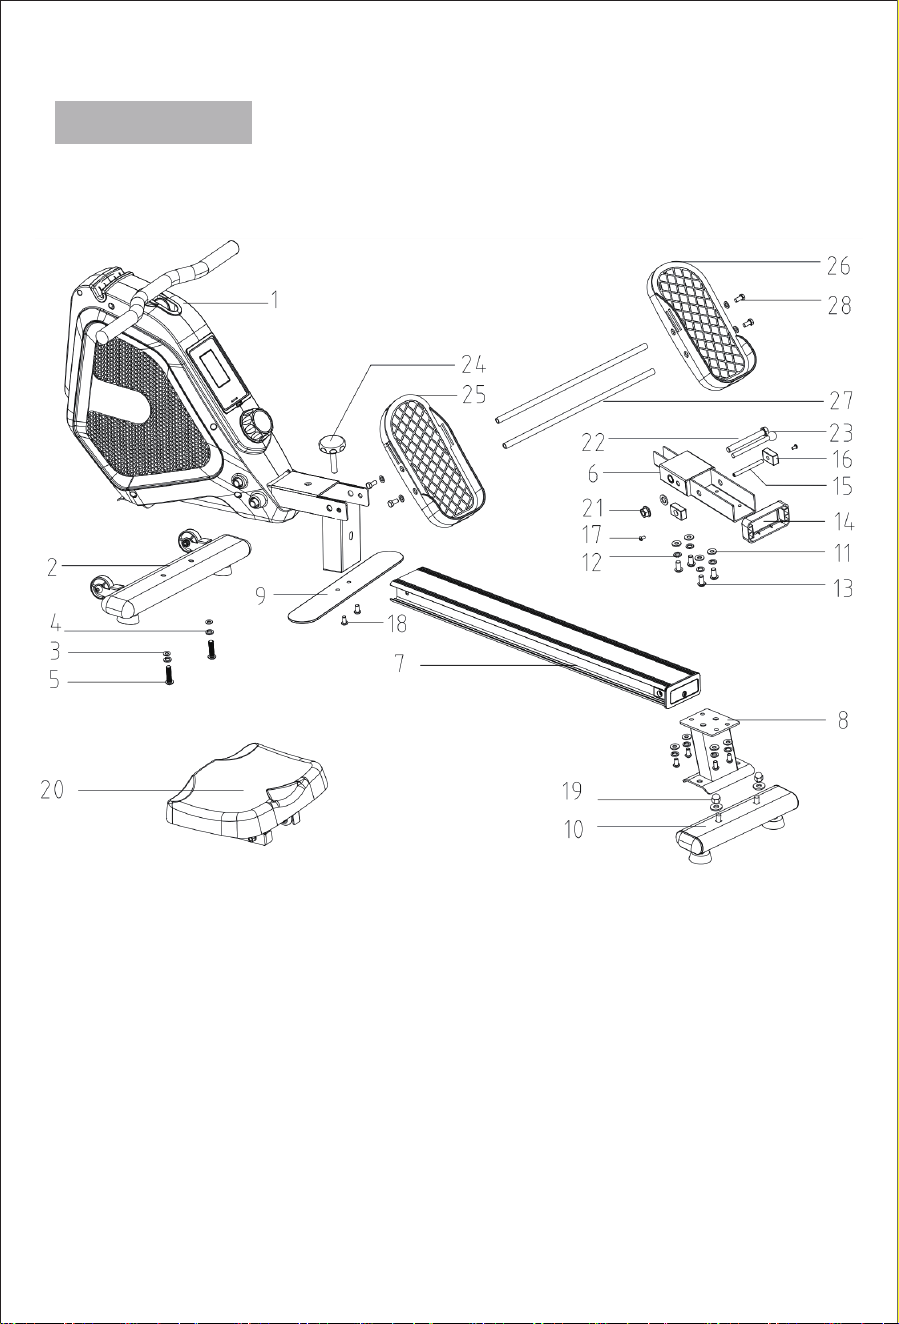
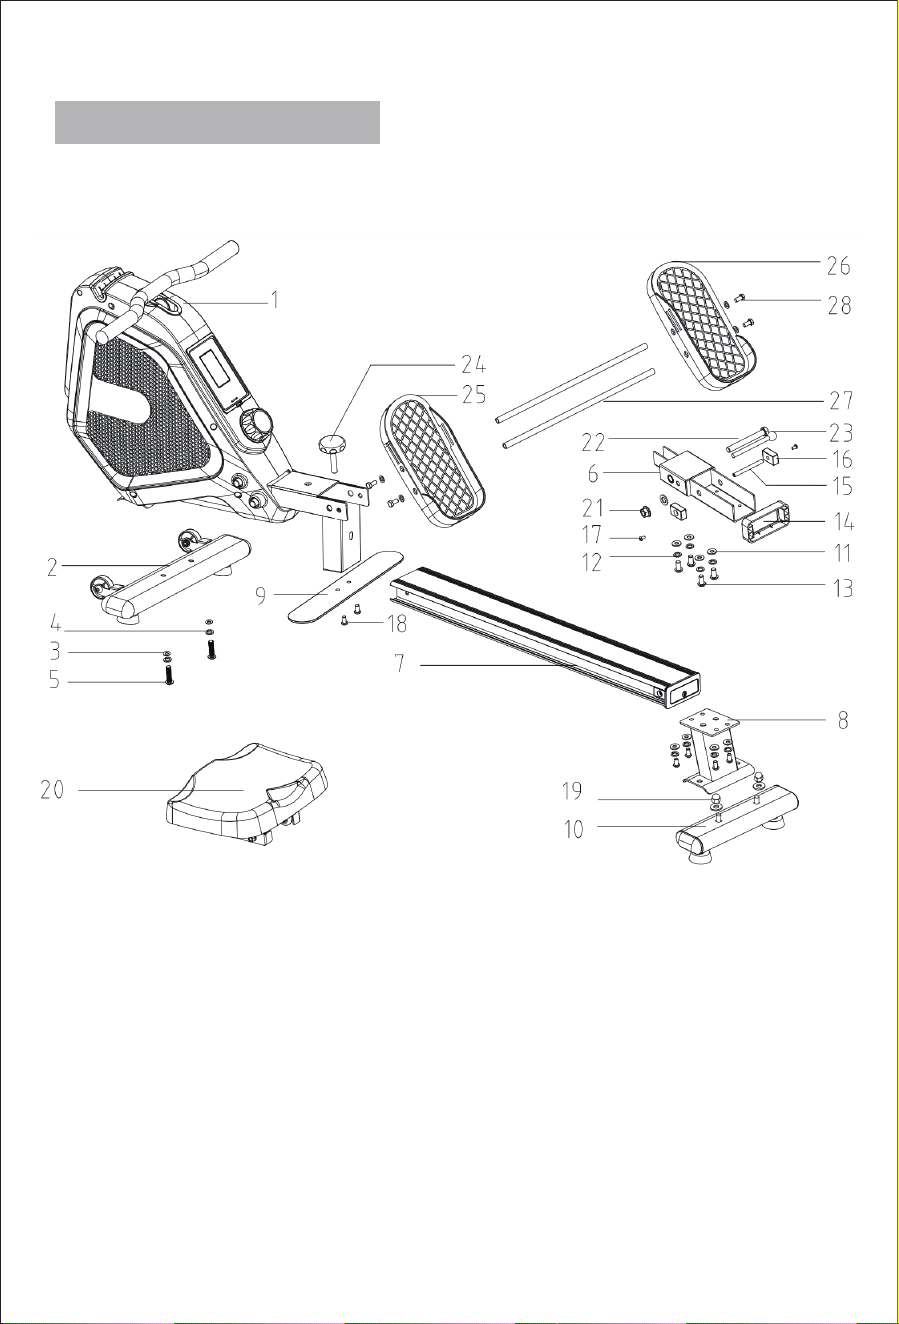
OVERVIEW DRAWING
06

NO Description Specification Qty
1
2
3
4
5
6
7
8
9
10
11
12
13
14
15
16
17
18
19
20
Frame assembly JTR101
Front leg assembly Spraying plastic /black
Flat gasket Φ10*Φ20*1.6
Spring washer Φ10
Socket head cap screw M10*60
Frame connecting seat Spraying plastic /black
Aluminium rail Anodic oxidation
Rear foot base Spraying plastic /black
Pedal plate Spraying plastic /black
Rear leg assembly Spraying plastic /black
Flat gasket Φ8*Φ16*1.6
Spring washer Φ8/Steel
Hexagon socket flat
head screws
M8*20/black
Aluminum rail front
end cover
Rubber
Fixing shaft Φ8*80
Blocking plug Rubber/black
Cap nut M10
Seat cushion assembly Black
Cross-recessed
countersunk head screw
M5*10
Hexagon socket
countersunk head screw
M8*20
1
1
4
2
2
1
1
1
1
1
12
8
8
1
1
2
2
2
2
1
07

NO Description Specification Qty
21
22
23
24
25
26
27
28
1
1
1
1
1
1
2
4
Outer hexagonal lock nut
M10
Outer hexagon screw M10*100
Lock pin Φ10*100
Locking knob M12*55
Pedal(L) PP
Pedal(R) PP
Pedal fixed shaft Φ12.5*418
Outer hexagonal screw M8*20
08

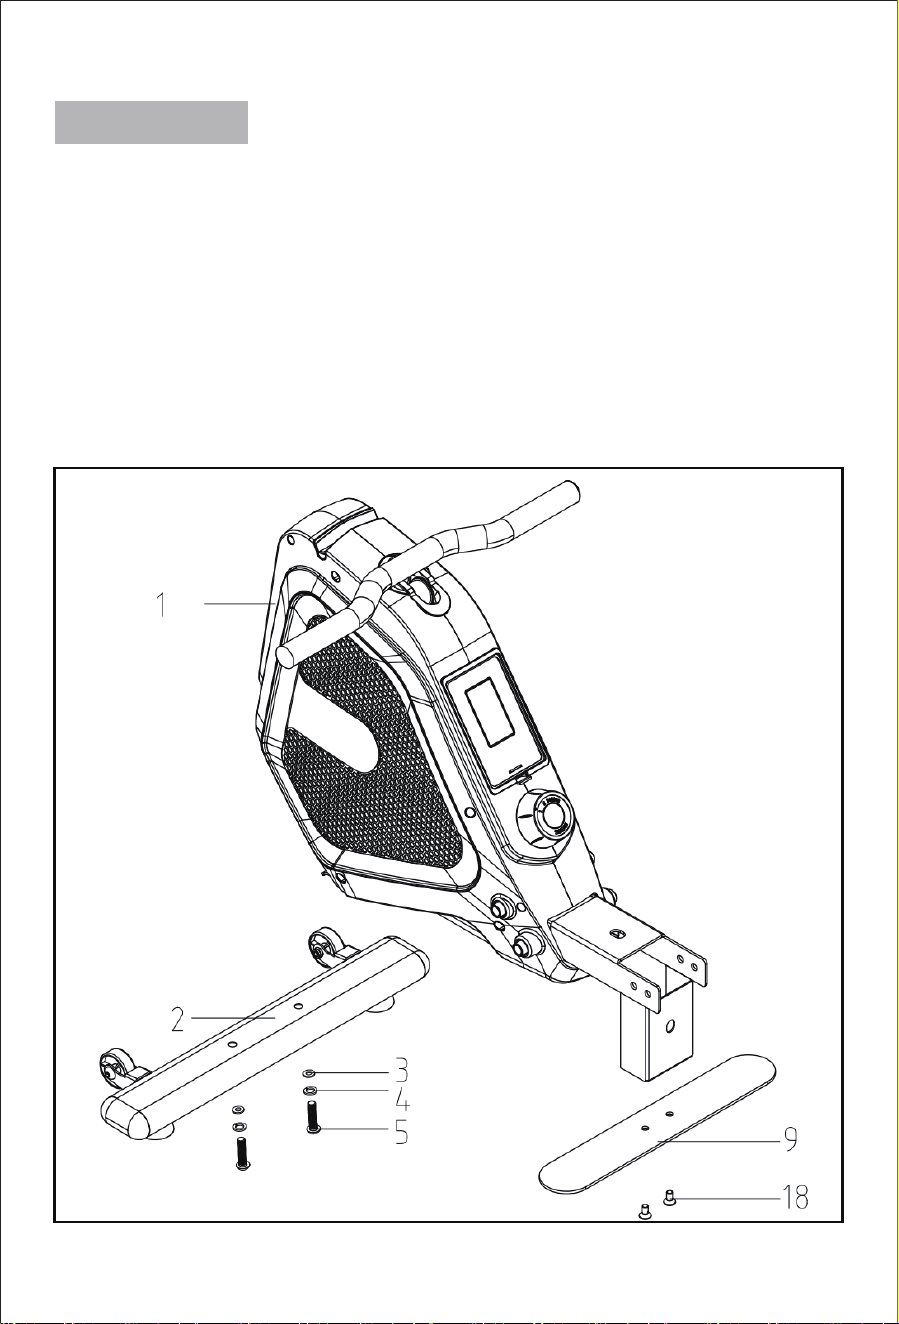
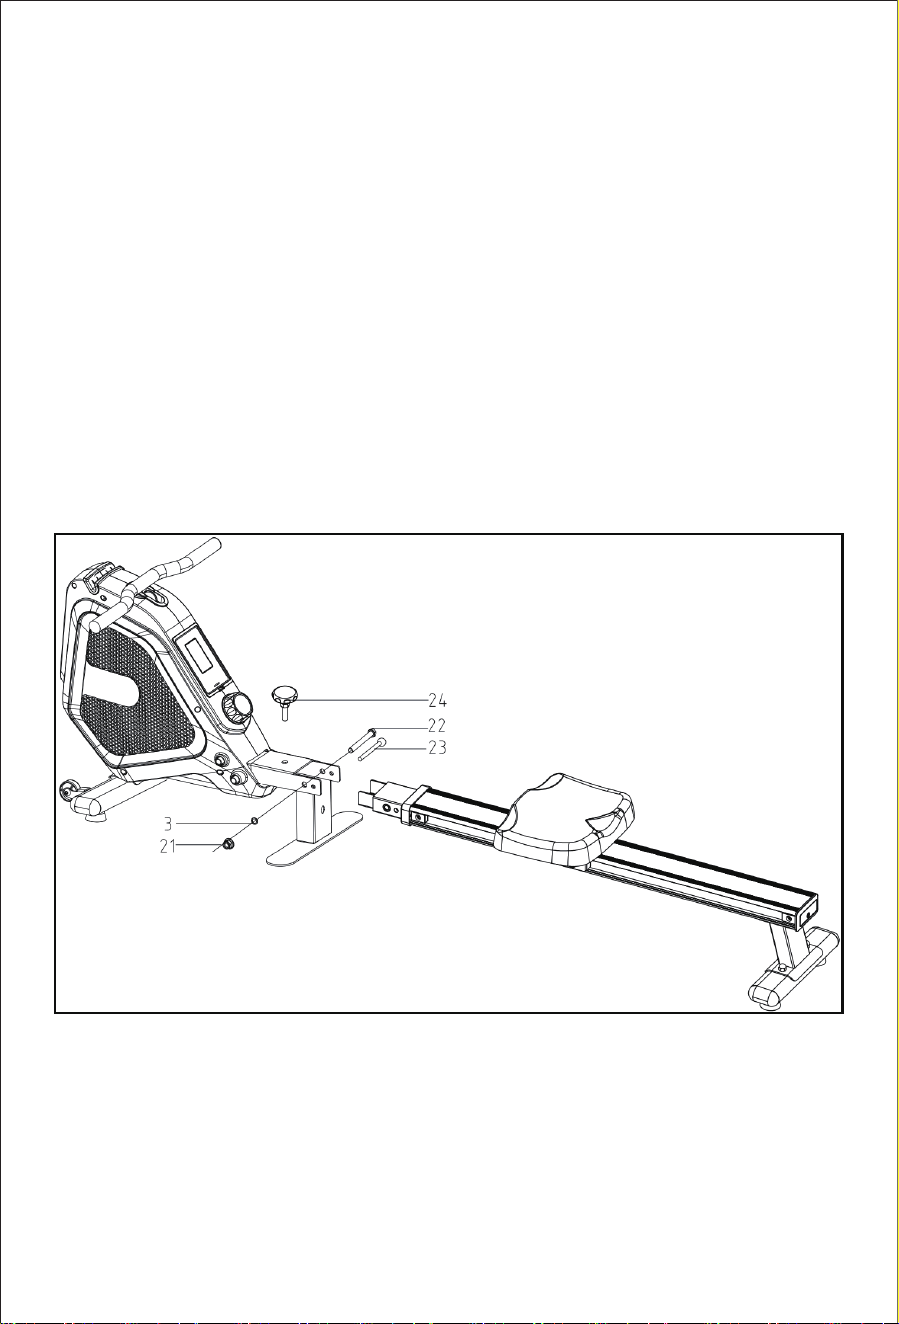
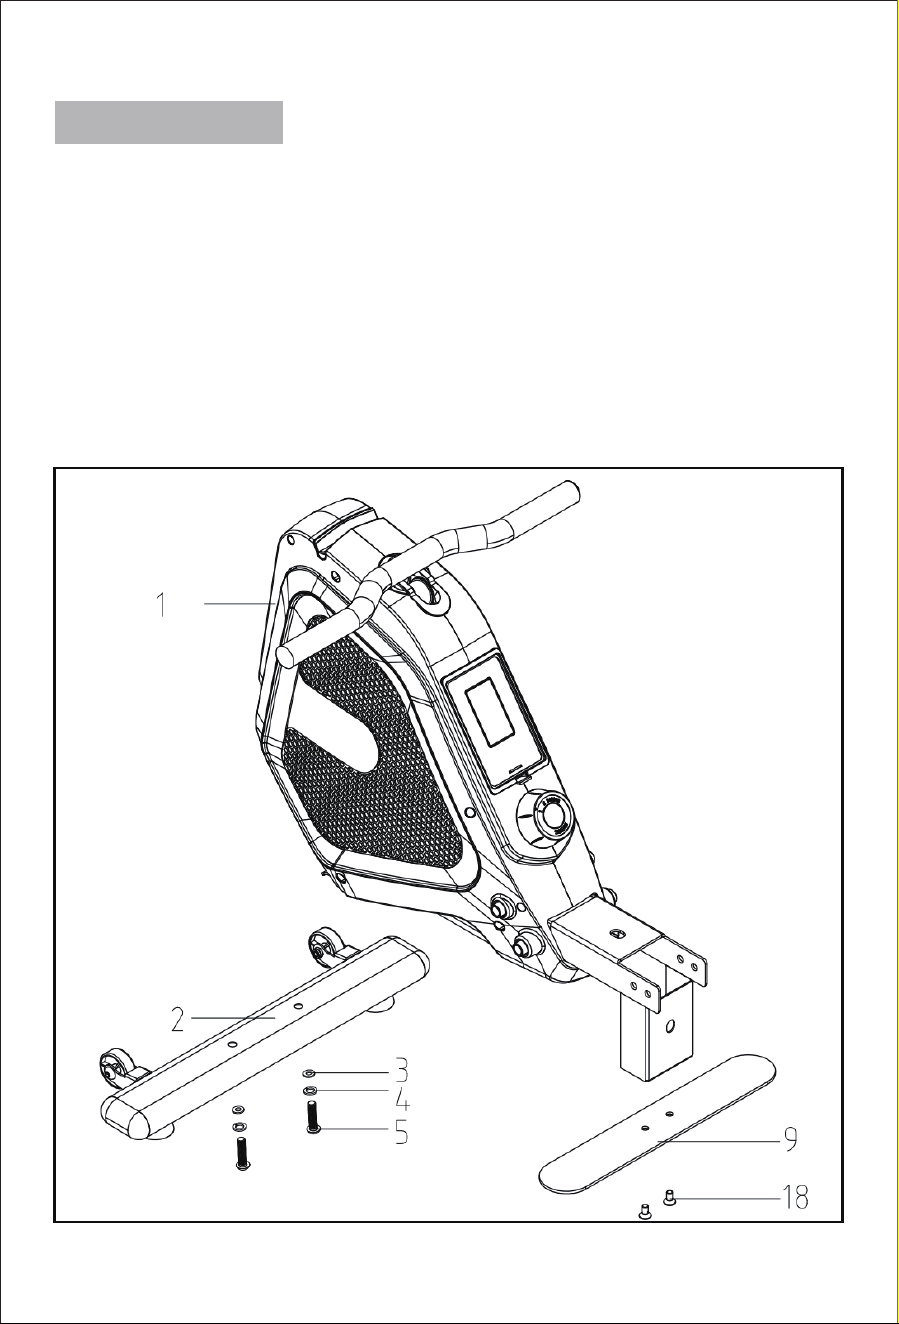
ASSEMBLY
Connect the main frame assembly (1) with the front leg assembly (2), and
fix them together with the socket head cap screw (5) and the flat gasket
(3) and the spring washer (4).
Fix the pedal plate (9) and the frame assembly (1) together with the
hexagon socket countersunk head screw (18).
STEP 1
09

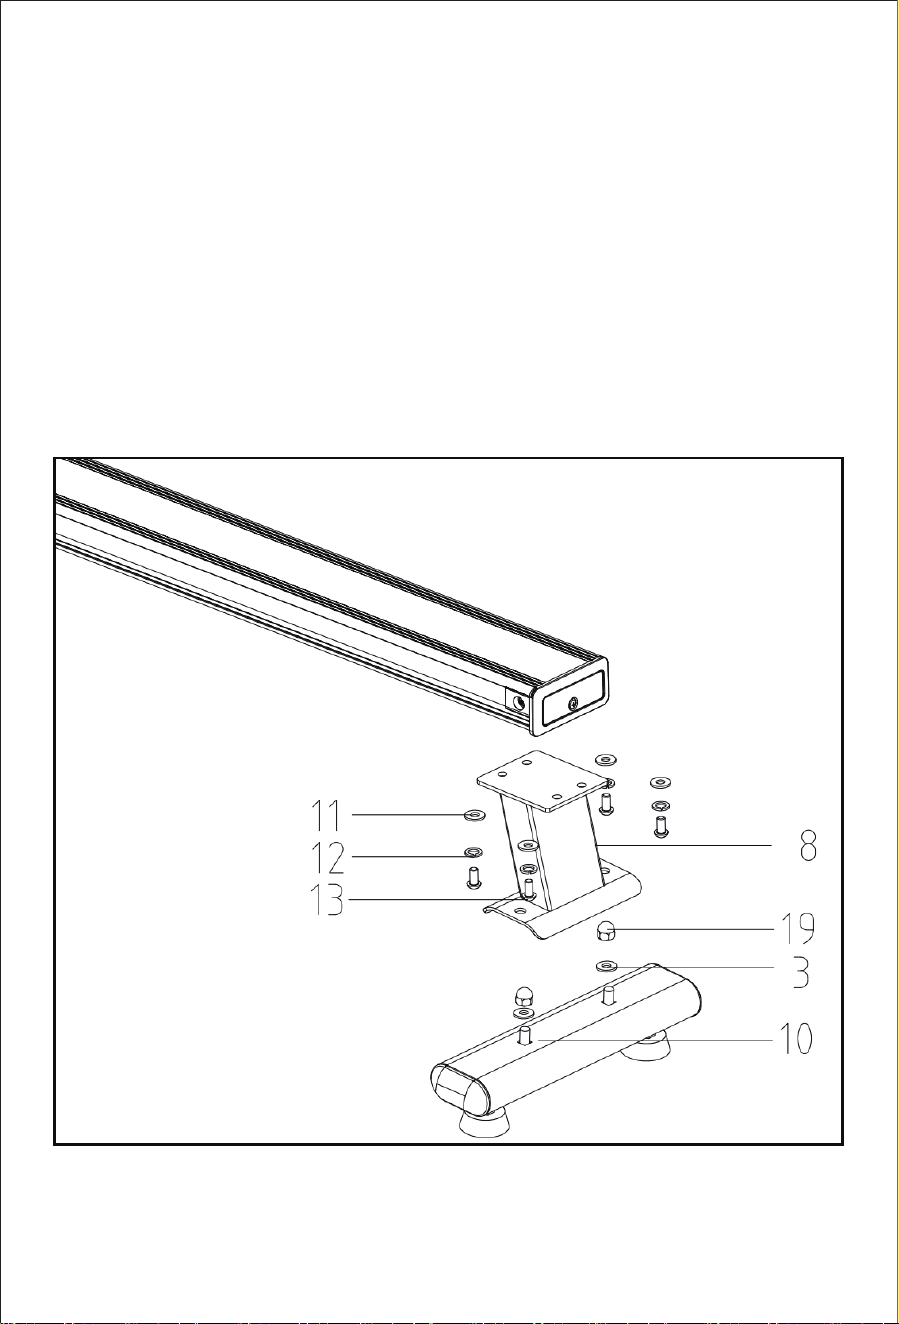
Place the rear leg assembly (10) under the semicircular piece of the rear
foot base(8), and then fix it with the cap nut (19) and flat gasket (3).
Place the rear foot base 8# under the aluminum rail, and then fix it with
the hexagon socket flat head screws(13), the flat gasket(11) and the
spring washer(12).
STEP 2
10

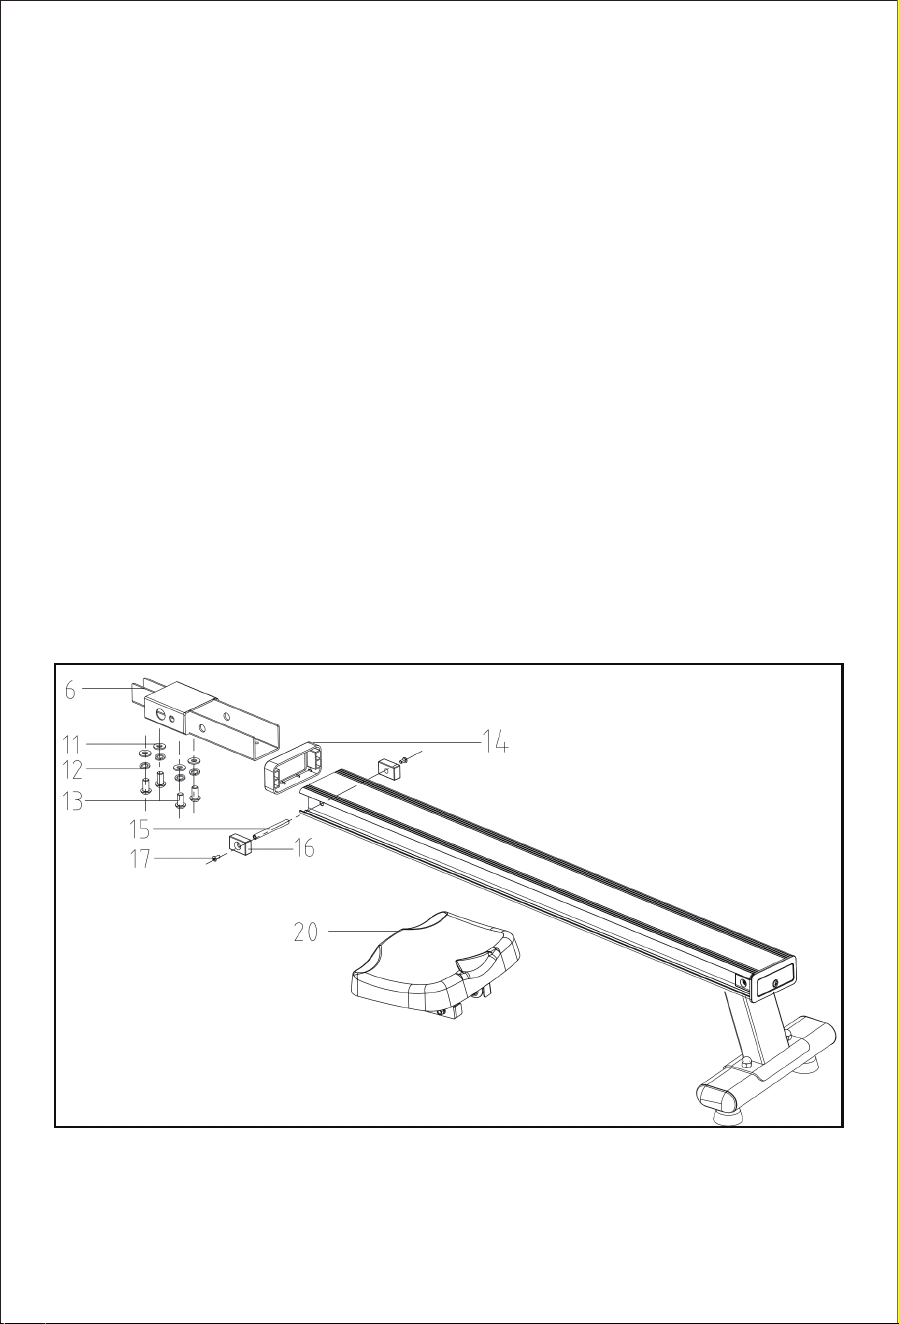
Put the seat cushion assembly (20) on the end of the slide rail and put it
in the aluminum rail (7).
Insert the frame connecting seat(6) into the slide rail, and fix it with
hexagon socket flat head screws(13), spring washer(12) and flat
gasket(11).
Insert the fixing shaft(15) into the aluminum rail, put the blocking
plug(16) on both sides, and lock it with cross-recessed countersunk head
screw(17) on both sides.
Place the aluminum rail front end cover(14) between the connecting base
and the aluminum rail.
STEP 3
11
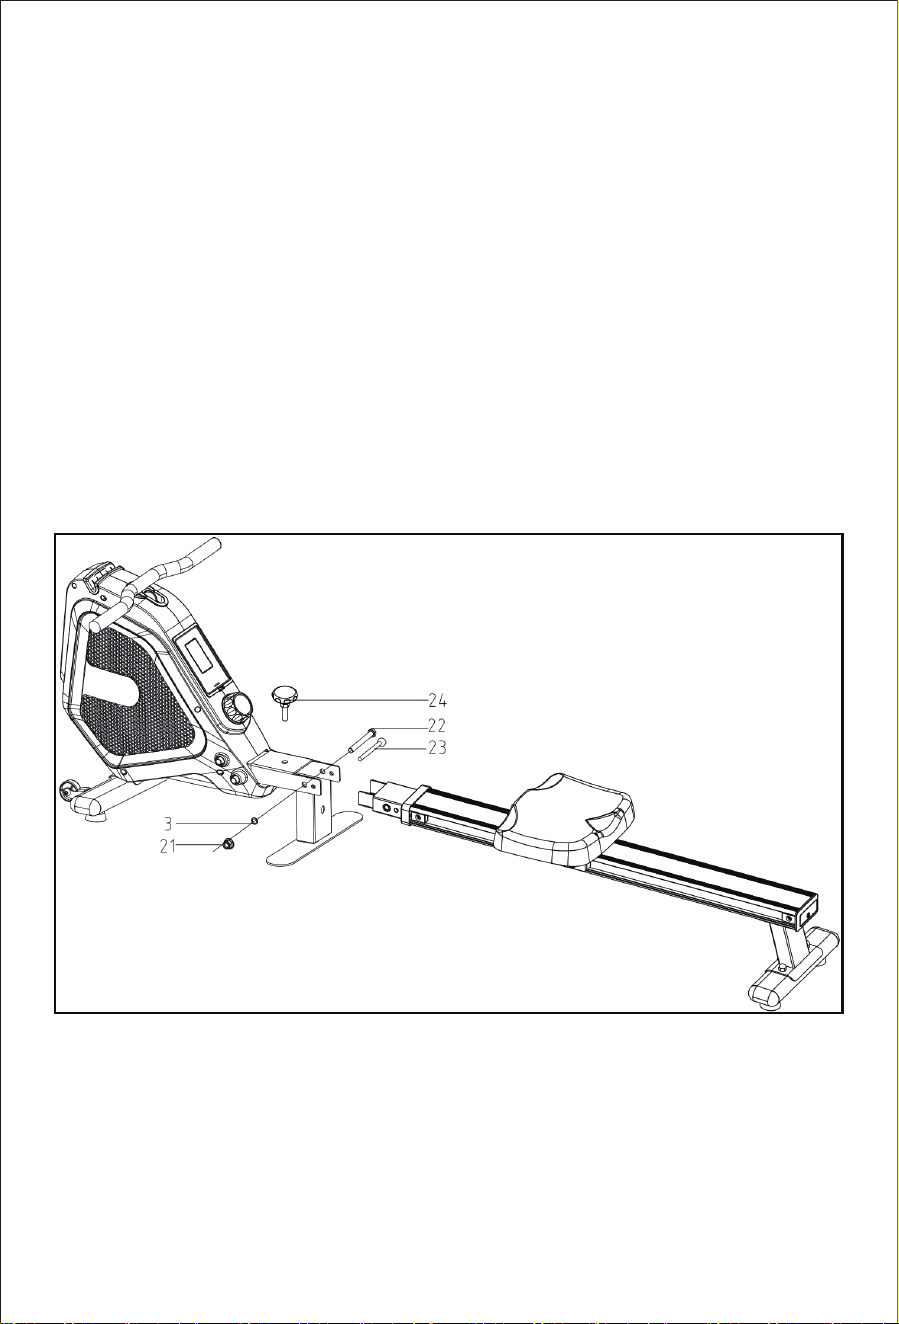
Connect the main frame assembly (1) with the aluminum rail (7), and fix
them with the outer hexagonal lock nut (21), flat gasket (3) and outer
hexagon screw (22).
Insert the lock pin (23)
Screw the locking knob (24) into the nut from above, making sure that it
is tightened in place.
STEP 4
12
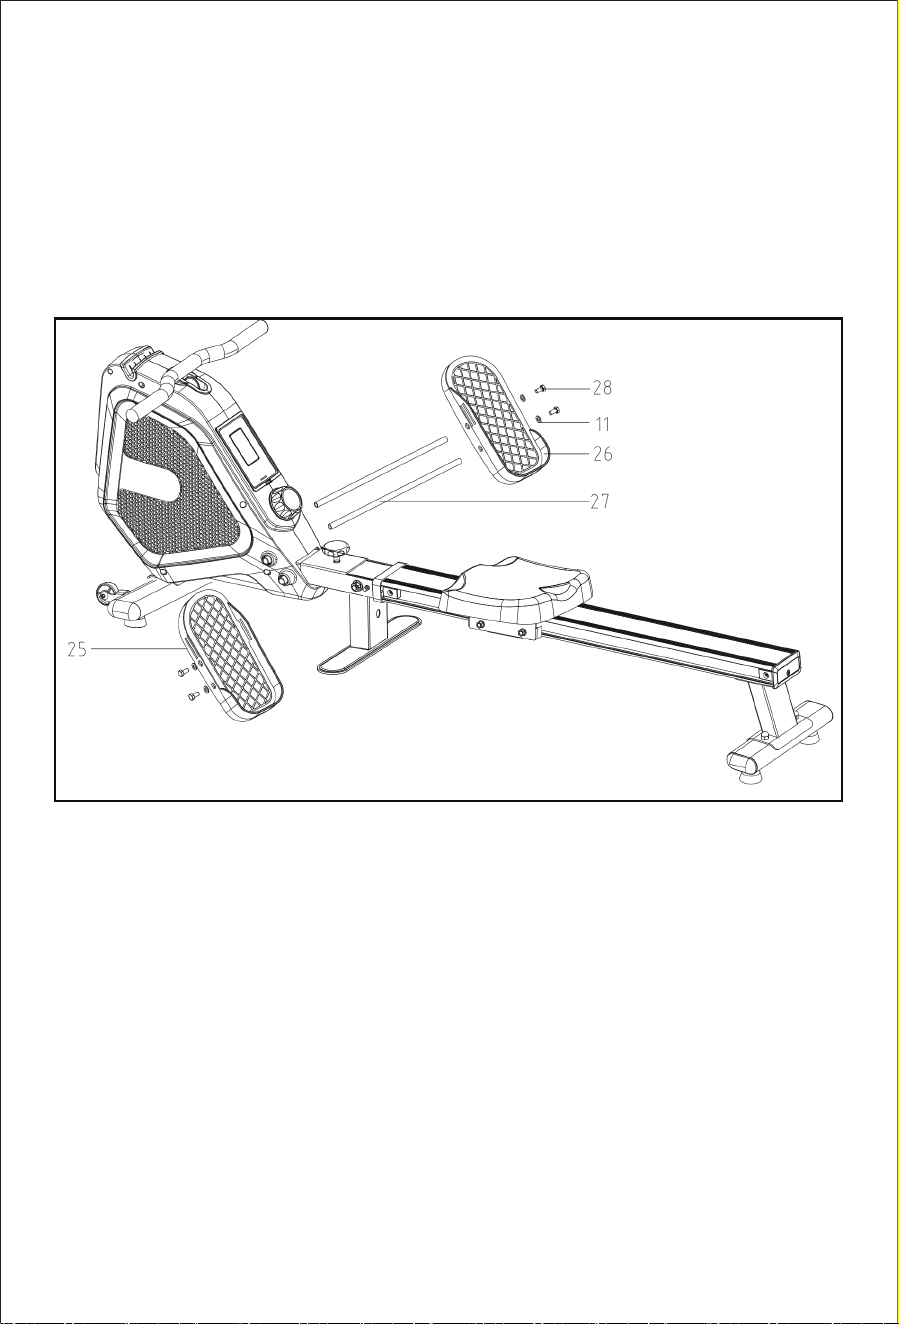
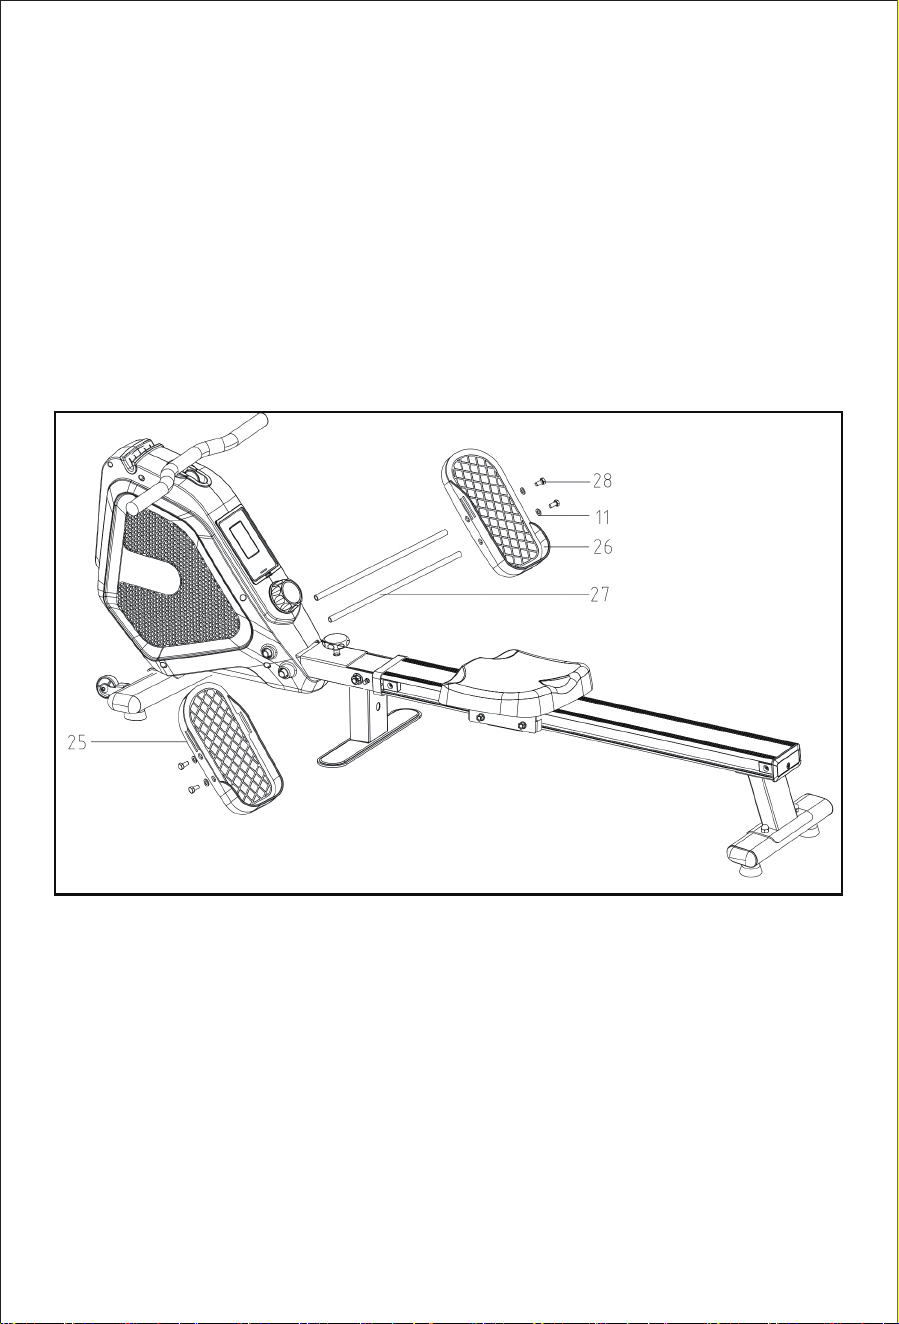
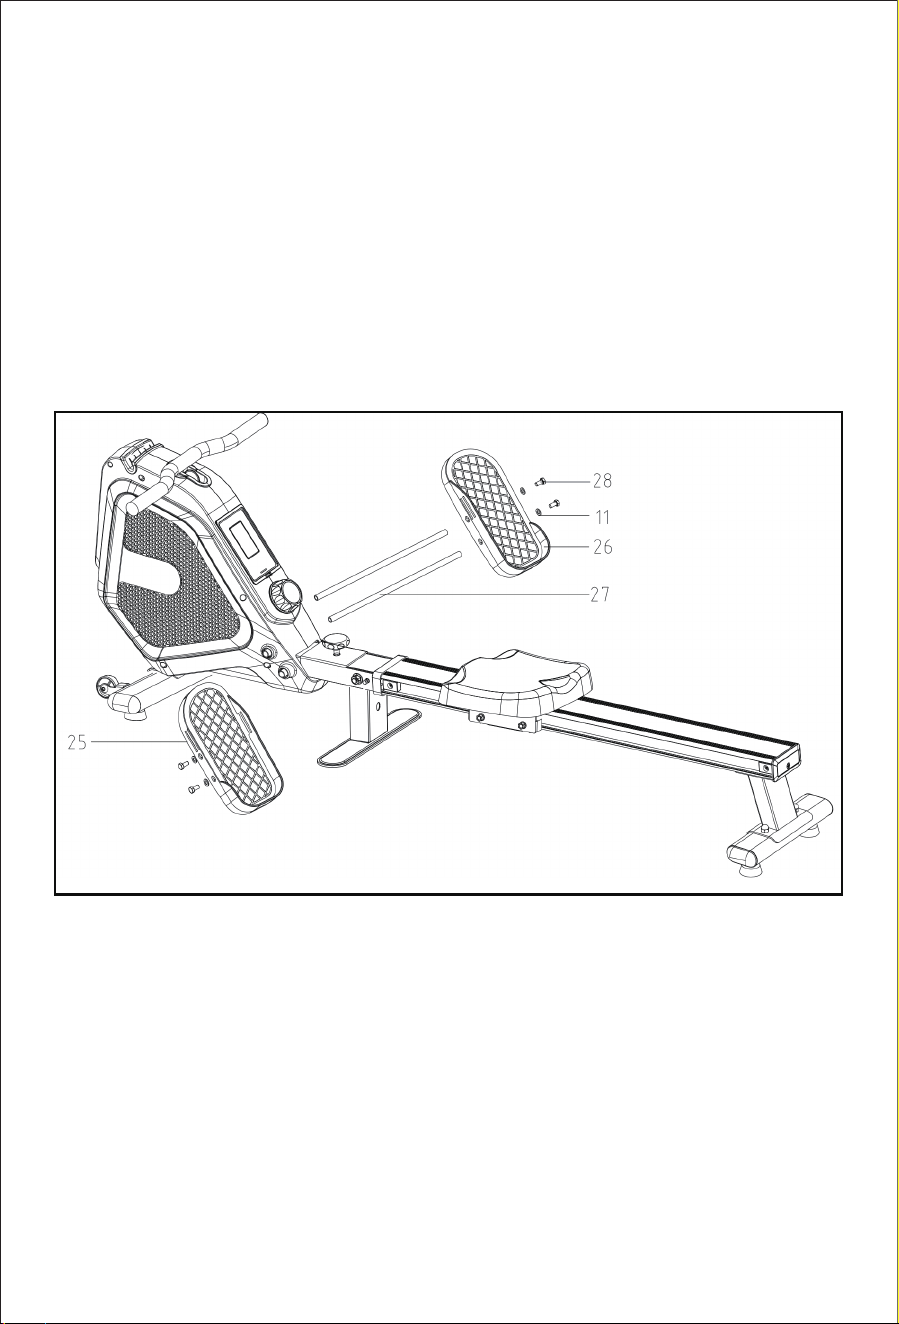
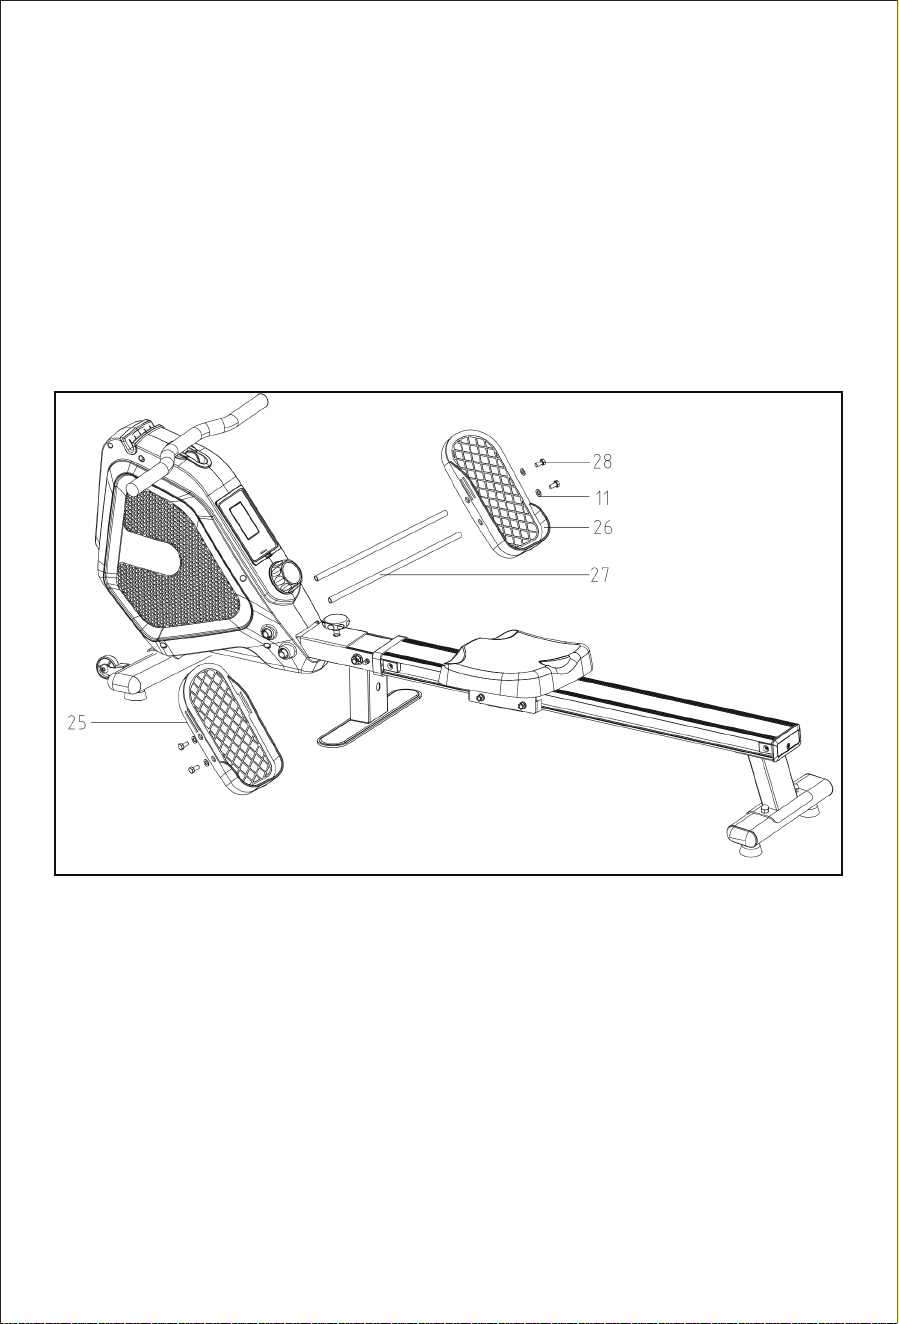
Pass the pedal fixed shaft (27) through the hole. Insert the pedals (25 &
26) into the shaft, and then fix it with the outer hexagonal screw (28) and
the flat gasket (11).
STEP 5
13

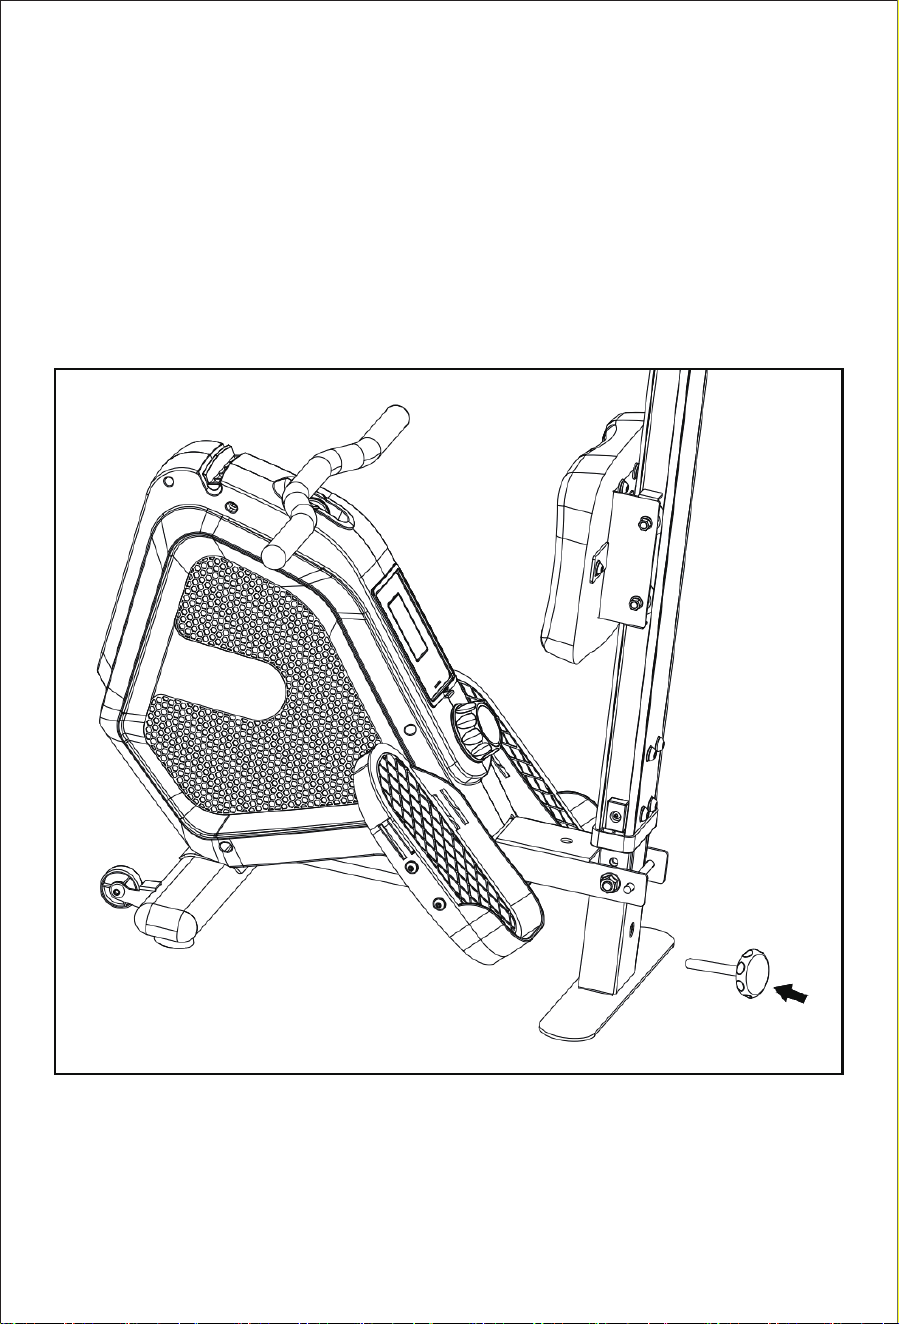
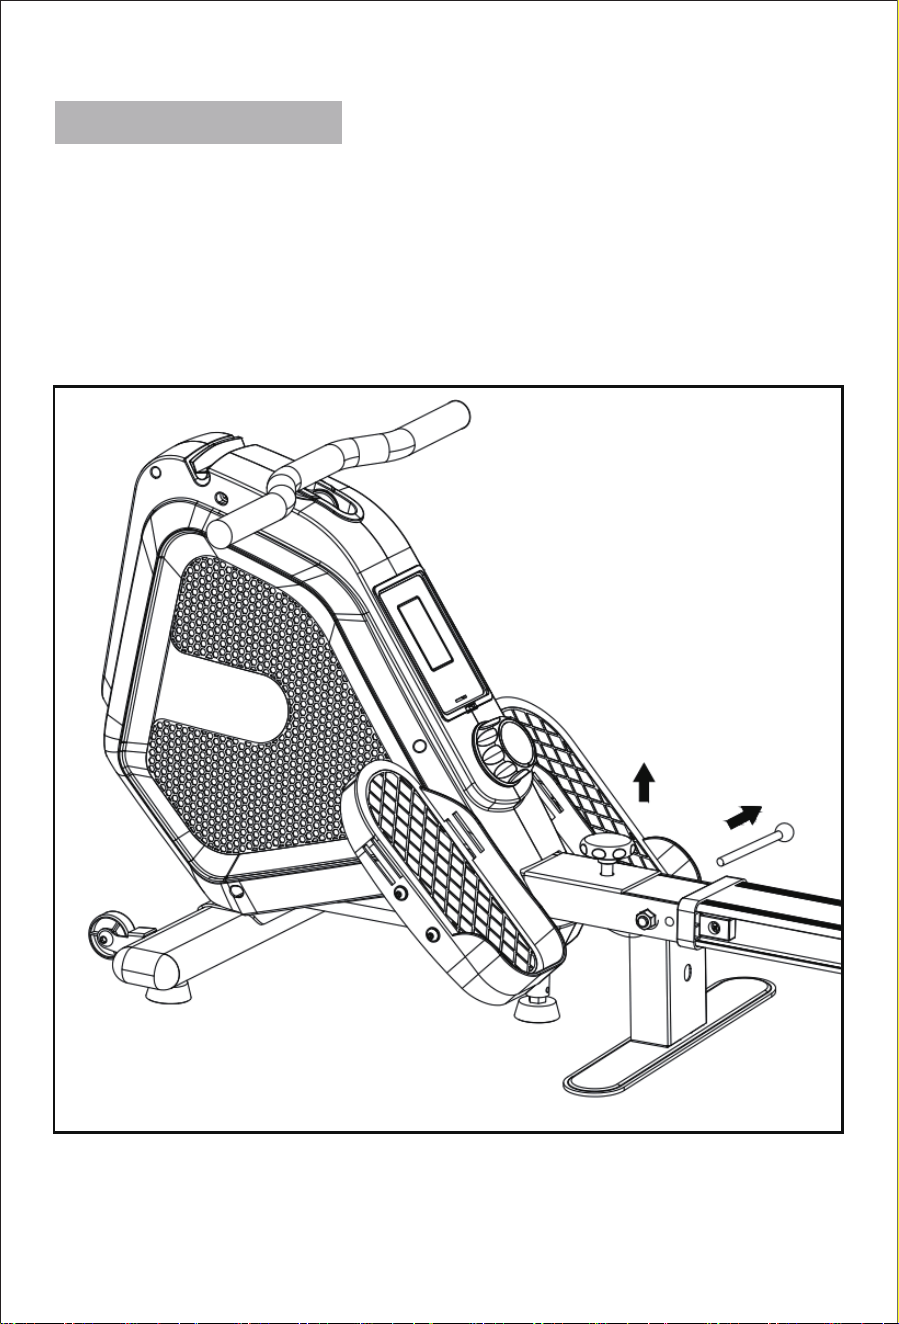
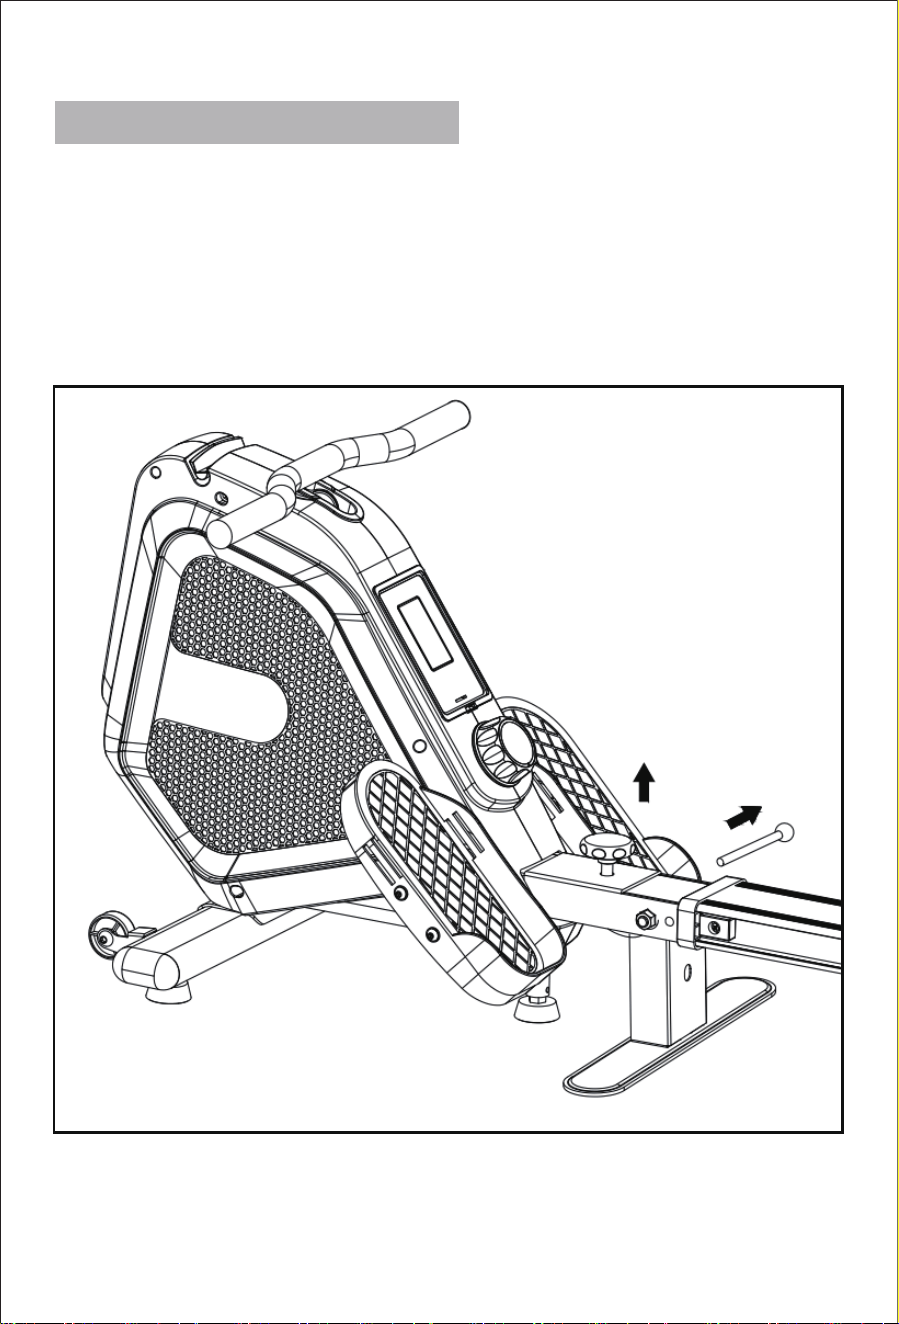
FOLDING INSTRUCTIONS
Unscrew the locking knob (24) first, and then pull out the lock pin (23)
from its position.
Step 1
14
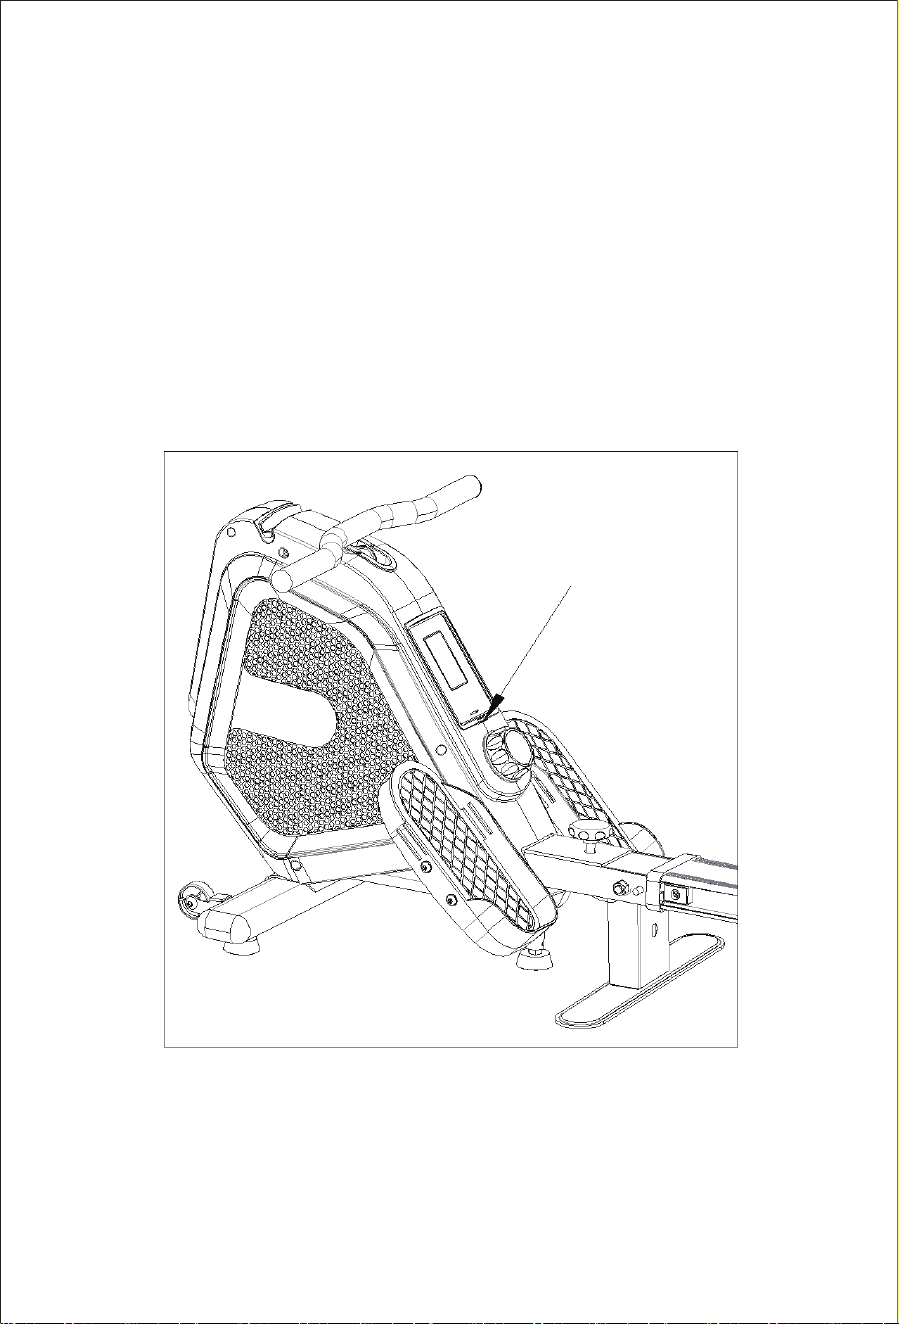
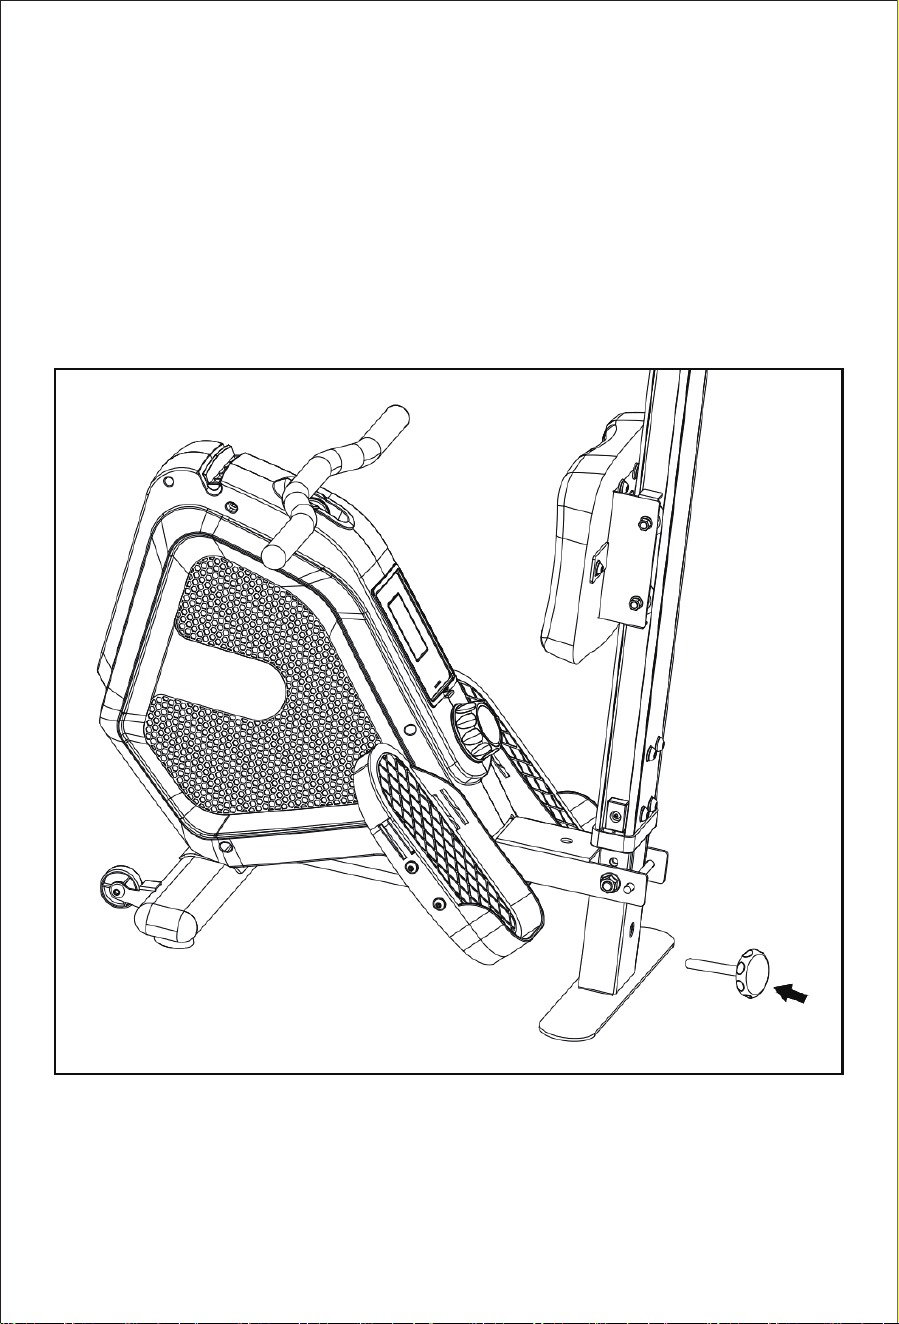
Lift the aluminum rail slowly to make it stand upright, and then insert the
lock pin (23) into the hole. Adjust the length position of the nut on the
locking knob (24), and then turn it back to the corresponding position. At
this time, the equipment is folded successfully.
Step 2
15

1. Function
★ Functions: timer, 500 meters/min, count, distance, calories,
strokes/min.
2. Key
3. Operation Function
1) Power on
When power on, the LCD will display for 1 second, and the buzzer will
sound "BI" for a long time, then display the "COUNT" icon and the
corresponding window will display "0", and enter the normal mode after
1 second.
2) Key functions
MODE Key:
Each time you short press the mode button to switch a setting mode, the
corresponding mode number flashes, and the setting mode is exited
without setting for 15 seconds.
Switching sequence is:
TIME→COUNT→DIST→CALORIES→STROKES/MIN→Exit the
setting mode and return to the normal mode.
ELECTRONIC METER
Rowing Machine Operating Instructions
Key Name
MODE
SET
RESET
Function
Modes switching
Increase in setting value
Set value cleared to 0
16

SET Key:
When switching to the corresponding setting mode, press the UP key to
increase the setting value. Press and hold for 2 seconds, it will increase
quickly (change 5 times per second).
It is invalid to press the UP key when not in the setting mode.
RESET Key
When switching to the corresponding setting mode, press the RESET key
to clear the current value.
Short pressing the RESET key is invalid when not in the setting mode.
Press and hold the RESET key for 2 seconds to clear all the data, the
display will return to zero, the LCD will display for 1 second, and the
buzzer will beep once for a long time, then the "COUNT" icon will be
displayed and the corresponding window will display "0", and it will
enter Normal mode after one second.
3) TIMER
Measure the time taken from the start to the stop of the exercise, and
return to zero after a single item overflows. When a signal comes in, start
timing.
When there is no speed signal input within 4 seconds, the time is paused
and "STOP" is displayed. Set the exercise time, and there will be a sound
prompt when the scheduled time is reached. Setting range: 0:00~99:00.
4) 500m/MIN
Default system setting: rowing 500 meters, the time required.
Setting range: 0:00~99:00.
5) Count (CNT)
Measuring range: 0 ~ 9999, return to zero after single item overflow.
Setting range: 10 ~ 9990. The setting value is +10 each time.
17

6) Distance (DIST)
Measure the distance from the beginning of the exercise to the stop of the
exercise.
Measuring range: 0.0~99.9KM (ML), return to zero after single item
overflow.
7) Calories (CAL)
Measure the calories (CAL) consumed from the start of the exercise to
the stop of the exercise.
Measuring range: 0.0 ~ 9999 calories, return to zero after a single item
overflows.
8) STROKES/MIN
Measure the strokes per minute during exercise.
9) Sleep
If there is no motion signal and heart rate signal input within 4 minutes,
and no key is pressed, the IC enters the SLEEP mode. The LCD display
turns off after entering sleep mode.
10) Wake up
When the distance signal, mode switching signal, setting signal and reset
signal are input, the system starts to work, while the current distance
signal and keystroke signal are only used for awakening, not for speed or
mode switching.
11) Voice Prompt
Long "BI" sound (1s) when powered on;
There will be a "BI" sound every time you press a key; Long press does
not sound. When the set time, distance and calorie are reset to zero, there
will be 4 beeps of "BI-BI-BI-BI", which will stop when the prompt
sounds are not pressed, and only the prompt sounds will stop when the
next key is pressed, and the key function will not be executed.
18
4.Battery
This monitor uses 2 batteries
If the display screen is displayed incorrectly, reinstall the battery, and the
effect will be better. When replacing the battery, all records will be
deleted.
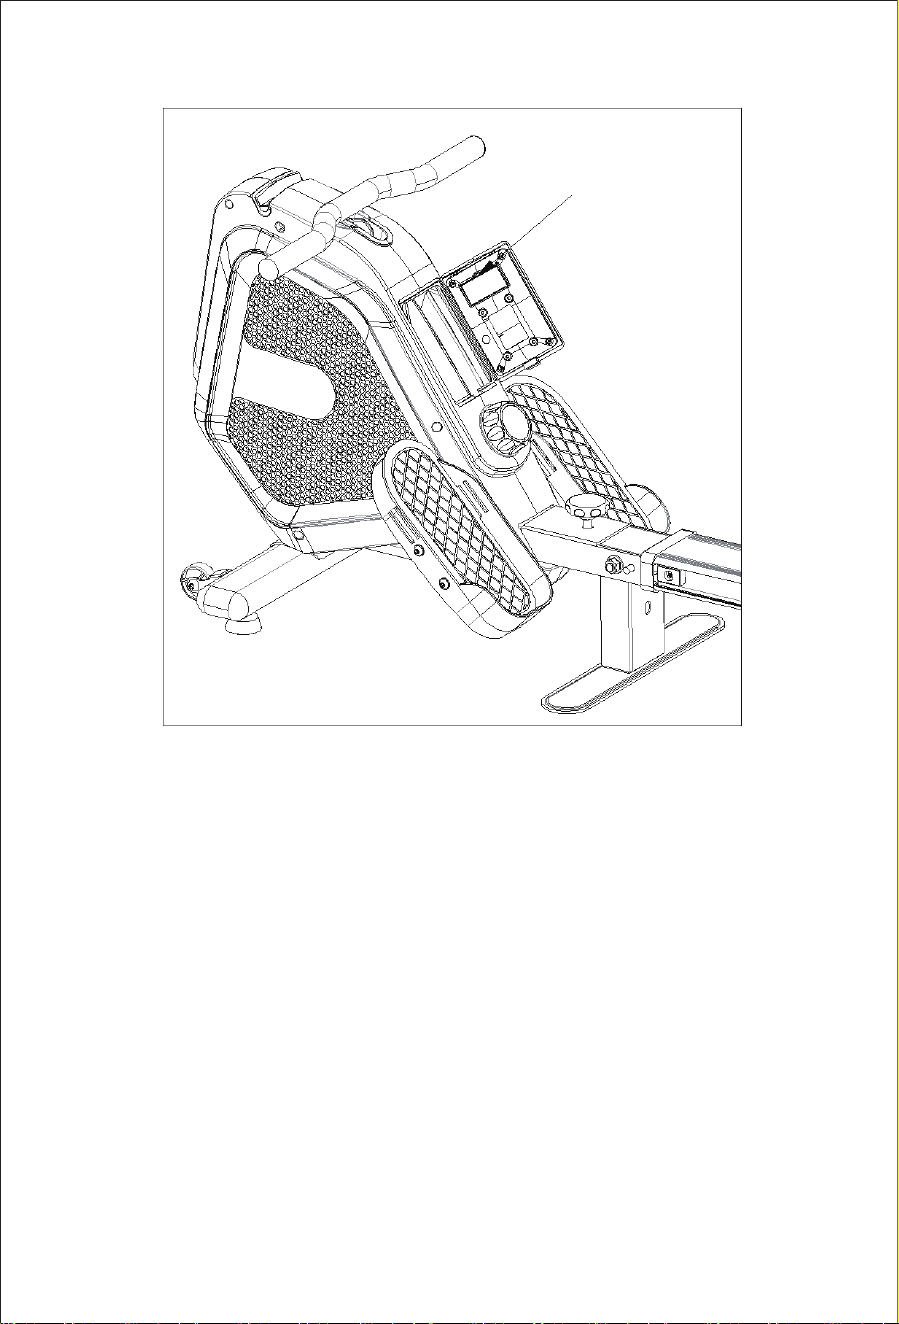
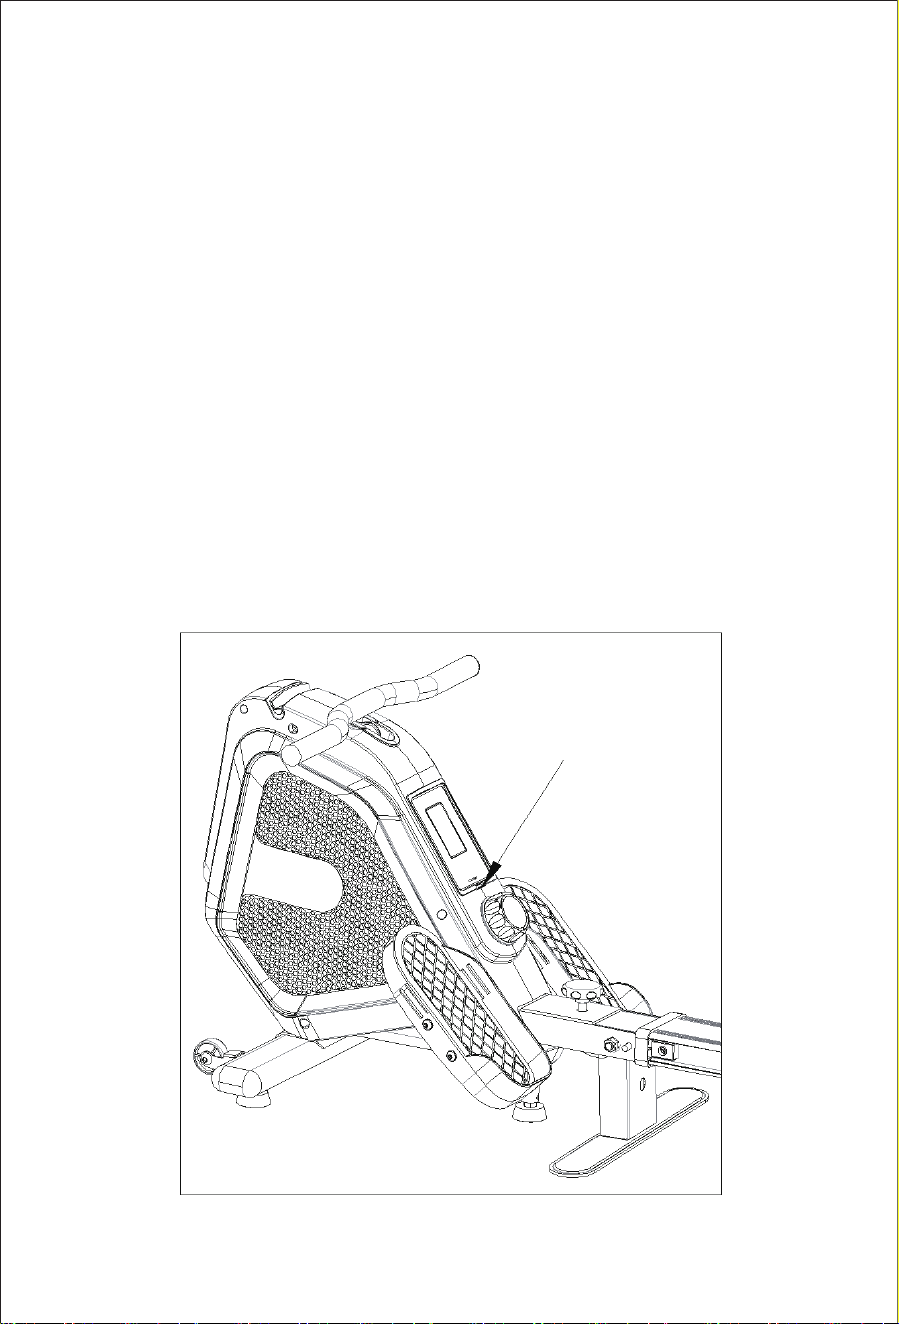
To replace the battery, press the button at the bottom of the LED box to
open the cover(See Figure 1), then press the button in the back to open
the battery case (see Figure 2), and you can change the battery now.
Figure 1
Pull the button
19
* Important Safety Information *
Please observe the following safety rules to avoid injury and/or accidents.
1. Keep the rowing machine away from children, and do not let children around when using the
rowing machine.
2. Do not stand on the rowing machine.
3. Do not use the rowing machine while wearing loose robes, pants or skirts.
4. Be sure to use sports shoes or tennis shoes.
5. Place the rowing machine on a smooth and hard surface.
6. The maximum user weight is 120 kg.
7. This equipment is for indoor and domestic use only.
8. Before each use, make sure that all fasteners on the machine have been tightened. If there is a
defect, do not use it until repaired.
9. Only by carefully inspecting the damage and wear of the equipment, can the safety level of the
equipment be maintained.
10. This rowing machine is not suitable for therapeutic use.
Figure 2
Pull the button
20

WICHTIG: Lesen Sie alle Anweisungen sorgfältig durch, bevor Sie
dieses Produkt verwenden. Bewahren Sie dieses Benutzerhandbuch zum
späteren Nachschlagen auf. Die technischen Daten dieses Produkts
können von diesem Foto abweichen, Änderungen sind vorbehalten.
Vielen Dank, dass Sie sich für unsere Produkte entschieden haben. Bitte
verwenden Sie dieses Gerät zu Ihrer Sicherheit und Gesundheit korrekt.
Bitte lesen Sie die gesamte Anleitung, bevor Sie das Gerät montieren und
benutzen. Nur wenn das Gerät ordnungsgemäß montiert, gewartet und
benutzt wird, kann es sicher und effektiv eingesetzt werden. Bitte lesen
Sie alle Warnhinweise und Vorsichtsmaßnahmen sorgfältig durch.
1.Bevor Sie mit einem Trainingsprogramm beginnen, sollten Sie Ihren
Arzt konsultieren, um festzustellen, ob Sie an einer medizinischen oder
körperlichen Erkrankung leiden, die Ihre Gesundheit und Sicherheit
gefährdet oder Sie daran hindert, die Geräte richtig zu benutzen. Wenn
Sie Medikamente einnehmen, die sich auf Ihre Herzfrequenz, Ihren
Blutdruck oder Ihren Cholesterinspiegel auswirken, ist der Rat Ihres
Arztes unerlässlich.
2.Achten Sie auf die Signale des Körpers. Falsches oder übermäßiges
Training schadet Ihrer Gesundheit. Wenn die folgenden Symptome
auftreten, hören Sie bitte mit dem Training auf: Schmerzen, Engegefühl
in der Brust, unregelmäßiger Herzschlag, Kurzatmigkeit, Schwindel oder
Übelkeit. Wenn Sie diese Situationen erlebt haben, sollten Sie Ihren Arzt
konsultieren, bevor Sie Ihr Trainingsprogramm fortsetzen.
3.Halten Sie Kinder und Haustiere von dem Gerät fern. Dieses Gerät ist
nur für Erwachsene geeignet.
4.Verwenden Sie das Gerät auf einem festen und ebenen Untergrund und
decken Sie den Boden oder Teppich mit einer Schutzabdeckung ab. Um
die Sicherheit zu gewährleisten, sollte um das Gerät herum ein Freiraum
von mindestens 61CM vorhanden sein.
WICHTIGE SICHERHEITSRICHTLINIEN
DE
21

5.Vergewissern Sie sich vor der Verwendung des Geräts, dass alle
Muttern und Schrauben fest angezogen sind. Nur durch regelmäßige
Kontrolle der Beschädigung und/oder des Verschleißes der Geräte kann
die Sicherheit der Geräte aufrechterhalten werden.
6. Achten Sie darauf, dass Sie das Gerät gemäß den Anweisungen
verwenden. Wenn bei der Montage oder Inspektion des Geräts defekte
Teile gefunden werden oder während des Betriebs abnormale Geräusche
zu hören sind, muss das Gerät sofort gestoppt und nach Behebung des
Problems wieder verwendet werden.
7. Tragen Sie bei der Verwendung des Geräts geeignete Kleidung.
Vermeiden Sie das Tragen loser Kleidung, um ein Verheddern mit dem
Gerät zu vermeiden.
8. Stecken Sie keine Finger oder andere Gegenstände in die beweglichen
Teile des Geräts.
9. Die maximale Tragfähigkeit dieser Maschine beträgt 120 kg.
10. Dieses Gerät ist nicht zur Behandlung geeignet.
11. Um Personen- und/oder Produkt- oder Sachschäden zu vermeiden, ist
es notwendig, richtig zu heben und zu bewegen.
12. Ihr Produkt ist für den Einsatz unter kühlen und trockenen
Bedingungen geeignet. Eine Lagerung an extrem kalten, heißen oder
feuchten Orten sollten Sie vermeiden.
13. Dieses Gerät ist nur für den Innen- und Hausgebrauch bestimmt.
Ein erfolgreiches Trainingsprogramm umfasst Aufwärm- und
Aerobic-Übungen. Machen Sie es mindestens zweimal pro Woche,
vorzugsweise dreimal, und legen Sie zwischen den Übungen einen Tag
Pause ein. Nach ein paar Monaten können Sie Ihr Training auf vier/fünf
Mal pro Woche steigern. Bitte machen Sie vor dem Training ein
Aufwärmtraining. Es bereitet Ihren Körper auf ein intensiveres Training
vor, indem es Ihre Muskeln erwärmt und dehnt, den Kreislauf und die
Pulsfrequenz erhöht und Ihre Muskeln mit mehr Sauerstoff versorgt.
Wiederholen Sie diese Übungen am Ende des Trainings, um Muskelkater
zu vermeiden.
ÜBUNGSANLEITUNG
22
HARDWARE- & WERKZEUGPAKET
X2
X2
X1
X1 X1
X2
X2
X1 X1
23
VORINSTALLIERTE TEILE
24

ÜBERSICHTSZEICHNUNG
25

NR Beschreibung Spezifikation Menge
1
2
3
4
5
6
7
8
9
10
11
12
13
14
15
16
17
18
19
20
Rahmenmontage JTR101
Vordere Beinbaugruppe Sprühplastik/ schwarz
Flachdichtung Φ10*Φ20*1,6
Federscheibe Φ10
Zylinderschraube mit
Innensechskant
M10*60
Rahmenverbindungssitz Sprühplastik/ schwarz
Aluminiumschiene Anodische Oxidierung
Hinterer Fußsockel Sprühplastik/ schwarz
Pedalplatte Sprühplastik/ schwarz
Hintere Beinbaugruppe Sprühplastik/ schwarz
Flachdichtung Φ8*Φ16*1,6
Federscheibe Φ8/ Stahl
Flachkopfschrauben
mit Innensechskant
M8*20/ schwarz
Frontabdeckung für
Aluminiumschienen
Gummi
Befestigungswelle Φ8*80
Blockierstecker Gummi / schwarz
Hutmutter M10
Sitzkissen-Montage schwarz
Senkkopfschraube mit
Kreuzschlitz
M5*10
Senkkopfschraube mit
Innensechskant
M8*20
1
1
4
2
2
1
1
1
1
1
12
8
8
1
1
2
2
2
2
1
26

NR Beschreibung Spezifikation Menge
21
22
23
24
25
26
27
28
1
1
1
1
1
1
2
4
Äußere
Sechskant-Sicherungsmutter
M10
Äußere
Sechskantschraube
M10*100
Sicherungsstift Φ10*100
Verriegelungsknopf M12*55
Pedal(L) PP
Pedal(R) PP
Sicherungsstift für
Pedal
Φ12,5*418
Äußere
Sechskantschraube
M8*20
27
MONTAGE
Verbinden Sie die Hauptrahmenbaugruppe (1) mit der vorderen
Beinbaugruppe (2) und befestigen Sie sie mit der Innensechskantschraube
(5) und der Flachdichtung (3) und der Federscheibe (4).
Befestigen Sie die Pedalplatte (9) und die Rahmenbaugruppe (1)
zusammen mit der Innensechskant- Senkkopfschraube (18).
SCHRITT 1
28

Legen Sie die hintere Beinbaugruppe (10) unter das halbrunde Stück der
hinteren Fußbasis (8) und befestigen Sie sie dann mit der Hutmutter (19)
und der Flachdichtung (3).
Legen Sie den hinteren Fußsockel 8# unter die Aluminiumschiene und
befestigen Sie ihn dann mit den Innensechskant-Flachkopfschrauben
(13), der Flachdichtung (11) und der Federscheibe (12).
SCHRITT 2
29

Stecken Sie die Sitzkissen-Baugruppe (20) auf das Ende der Gleitschiene
und legen Sie sie in die Aluminiumschiene (7).
Setzen Sie den Rahmenverbindungssitz(6) in die Gleitschiene ein und
befestigen Sie ihn mit Innensechskant-Flachkopfschrauben(13),
Federscheibe(12) und Flachdichtung(11).
Führen Sie die Befestigungswelle(15) in die Aluminiumschiene ein,
setzen Sie beidseitig den Sperrstopfen(16) ein und sichern Sie ihn mit der
Kreuzschlitz-Senkkopfschraube(17) auf beiden Seiten.
Platzieren Sie die vordere Abdeckung der Aluminiumschiene (14)
zwischen der Verbindungsbasis und der Aluminiumschiene.
SCHRITT 3
30

Verbinden Sie die Hauptrahmenbaugruppe (1) mit der Aluminiumschiene
(7) und befestigen Sie sie mit der äußeren Sechskant-Sicherungsmutter
(21), der Flachdichtung (3) und der äußeren Sechskantschraube (22).
Setzen Sie den Sicherungsstift (23) ein.
Schrauben Sie den Arretierknopf (24) von oben in die Mutter und achten
Sie darauf, dass er fest angezogen ist.
SCHRITT 4
31
Führen Sie die feste Pedalwelle (27) durch das Loch. Setzen Sie die
Pedale (25 & 26) in die Welle ein und befestigen Sie sie dann mit der
äußeren Sechskantschraube (28) und der Flachdichtung (11).
SCHRITT 5
32
FALTANLEITUNG
Schrauben Sie zuerst den Verriegelungsknopf (24) ab und ziehen Sie
dann den Sicherungsstift (23) aus seiner Position heraus.
Schritt 1
33
Heben Sie die Aluminiumschiene langsam an, damit sie aufrecht steht,
und setzen Sie dann den Sicherungsstift (23) in das Loch ein. Stellen Sie
die Längenposition der Mutter am Verriegelungsknopf (24) ein, und
drehen Sie ihn dann in die entsprechende Position zurück. Zu diesem
Zeitpunkt ist das Gerät erfolgreich zusammengeklappt.
Schritt 2
34

1. Funktion
★ Funktionen: Timer, 500 Meter/Min., Zählen, Distanz, Kalorien,
Schläge/Min.
2. Sicherheitsschloss
3. Bedienung Funktion
1) Einschalten
Nach dem Einschalten wird die LCD-Anzeige 1 Sekunde lang angezeigt,
und der Summer ertönt für eine lange Zeit „BI“, dann wird das Symbol
„COUNT“ angezeigt und das entsprechende Fenster zeigt „0“ an, und
nach 1 Sekunde wird der normale Modus aufgerufen.
2) Tastenfunktionen
MODE-Taste:
Jedes Mal, wenn Sie die Modustaste kurz drücken, um einen
Einstellungsmodus zu wechseln, blinkt die entsprechende
Modusnummer, und der Einstellungsmodus wird 15 Sekunden lang ohne
Einstellung verlassen.
Die Schaltfolge ist:
TIME COUNTDISTCALORIESSTROKES/MIN Verlassen Sie den
Einstellmodus und kehren Sie in den Normalmodus zurück.
ELEKTRONISCHES MESSGERÄT
Betriebsanleitung des Rudergeräts
Taste Name
MODUS
AUFSTELLEN
ZURÜCKSETZEN
Funktion
Modus-Umschaltung
Erhöhung des Einstellwertes
Sollwert wird auf 0 gelöscht
35

SET-Taste:
Wenn Sie in den entsprechenden Einstellmodus wechseln, drücken Sie
die UP-Taste, um den Einstellwert zu erhöhen. Halten Sie die Taste 2
Sekunden lang gedrückt, erhöht sich der Wert schnell (Änderung 5 Mal
pro Sekunde).
Es ist nicht zulässig, die UP-Taste zu drücken, wenn Sie sich nicht im
Einstellmodus befinden.
RESET-Taste
Wenn Sie in den entsprechenden Einstellmodus wechseln, drücken Sie
die RESET-Taste, um den aktuellen Wert zu löschen.
Ein kurzes Drücken der RESET-Taste ist ungültig, wenn Sie sich nicht im
Einstellmodus befinden.
Halten Sie die RESET-Taste 2 Sekunden lang gedrückt, um alle Daten zu
löschen. Die Anzeige kehrt auf Null zurück, die LCD-Anzeige wird 1
Sekunde lang angezeigt, und der Summer piept einmal lang, dann wird
das Symbol „COUNT“ angezeigt und das entsprechende Fenster zeigt
„0“ an, und nach einer Sekunde wird der Normalmodus aufgerufen.
3) TIMER
Messen Sie die Zeit, die vom Start bis zum Stopp der Übung benötigt
wird, und kehren Sie auf Null zurück, wenn ein einzelnes Element
überläuft. Wenn ein Signal eingeht, starten Sie die Zeitmessung.
Wenn innerhalb von 4 Sekunden kein Geschwindigkeitssignal
eingegeben wird, wird die Zeit angehalten und „STOP“ wird angezeigt.
Stellen Sie die Trainingszeit ein, und es ertönt ein akustisches Signal,
wenn die geplante Zeit erreicht ist. Einstellbereich: 0:00~99:00.
4) 500m/MIN
Standardeinstellung des Systems: 500 Meter rudern, die erforderliche
Zeit.
Einstellbereich: 0:00~99:00.
36

5) Zählen (CNT)
Messbereich: 0 ~ 9999, Rückkehr auf Null nach Überlauf eines einzelnen
Elements.
Einstellbereich: 10 ~ 9990. Der Einstellwert ist jeweils +10.
6) Entfernung (DIST)
Messen Sie die Strecke vom Beginn der Übung bis zum Ende der Übung.
Messbereich: 0,0~99,9KM (ML), Rückkehr auf Null nach
Einzelpostenüberlauf.
7) Kalorien (CAL)
Messen Sie die verbrauchten Kalorien (CAL) vom Beginn der Übung bis
zum Ende der Übung.
Messbereich: 0,0 ~ 9999 Kalorien, Rückkehr auf Null nach Überlauf
eines einzelnen Elements.
8) Hub /Min.
Messen Sie die Hübe pro Minute während des Trainings.
9) Ruhe
Wenn innerhalb von 4 Minuten kein Bewegungssignal und kein
Herzfrequenzsignal eingegeben wird und keine Taste gedrückt wird,
wechselt der IC in den Ruhemodus. Das LCD-Display schaltet sich nach
dem Eintritt in den Ruhemodus aus.
10) Aufwachen
Wenn das Abstandssignal, das Betriebsartumschaltsignal, das
Einstellsignal und das Rücksetzsignal eingegeben werden, beginnt das
System zu arbeiten, während das aktuelle Abstandssignal und das
Tastendrucksignal nur zum Aufwecken, nicht aber zur Geschwindigkeits-
oder Betriebsartumschaltung verwendet werden.
11) Sounddarstellung
Langer „BI“-Ton (1S) beim Einschalten;
37
4.Batterie
Dieser Monitor verwendet 2 Batterien
Wenn der Anzeigebildschirm nicht korrekt angezeigt wird, setzen Sie die
Batterie neu ein, und der Effekt wird besser sein.Wenn Sie die Batterie
austauschen, werden alle Aufzeichnungen gelöscht.
Um die Batterie auszutauschen, drücken Sie die Taste an der Unterseite
der LED-Box, um die Abdeckung zu öffnen (sehen Sie Abbildung 1),
dann drücken Sie die Taste auf der Rückseite, um das Batteriegehäuse zu
öffnen (sehen Sie Abbildung 2), und Sie können die Batterie jetzt
austauschen.
Jedes Mal, wenn Sie eine Taste drücken, ertönt ein „BI“-Ton; langes
Drücken ist nicht hörbar. Wenn die eingestellte Zeit, Distanz und
Kalorien auf Null zurückgesetzt werden, ertönen 4 Pieptöne
„BI-BI-BI-BI“, die aufhören, wenn die Aufforderungstöne nicht gedrückt
werden, und nur die Aufforderungstöne hören auf, wenn die nächste
Taste gedrückt wird, und die Tastenfunktion wird nicht ausgeführt.
Abbildung 1
Ziehen Sie die Taste
38

* Wichtige Sicherheitsinformationen *
Bitte beachten Sie die folgenden Sicherheitsregeln, um Verletzungen und/oder
Unfälle zu vermeiden.
1. Halten Sie das Rudergerät von Kindern fern, und lassen Sie Kinder nicht in
der Nähe, wenn Sie das Rudergerät benutzen.
2. Stellen Sie sich nicht auf das Rudergerät.
3. Benutzen Sie das Rudergerät nicht, wenn Sie weite Gewänder, Hosen oder
Röcke tragen.
4. Achten Sie darauf, Sport- oder Tennisschuhe zu verwenden.
5. Stellen Sie das Rudergerät auf eine glatte und harte Unterlage.
6. Das maximale Benutzergewicht beträgt 120 kg.
7. Dieses Gerät ist nur für den Innen- und Hausgebrauch bestimmt.
8. Vergewissern Sie sich vor jedem Einsatz, dass alle Befestigungselemente am
Gerät fest angezogen sind. Wenn ein Defekt vorliegt, verwenden Sie es bis zur
Reparatur nicht.
9. Nur durch eine sorgfältige Inspektion der Schäden und des Verschleißes der
Geräte kann das Sicherheitsniveau der Geräte aufrechterhalten werden.
10. Dieses Rudergerät ist nicht für den therapeutischen Einsatz geeignet.
Abbildung 2
Ziehen Sie die Taste
39

IMPORTANT : Lisez attentivement toutes les instructions avant
d'utiliser ce produit. Conservez ce manuel d’utilisation pour toute
référence ultérieure.
Nous vous remercions d’avoir choisi nos produits. Pour votre sécurité et
votre santé, veuillez utiliser cet équipement correctement. Veuillez lire le
manuel avant d’assembler et d’utiliser l’équipement. Veuillez lire
attentivement tous les avertissements et toutes les précautions.
1. Avant de commencer tout programme d’exercice, vous devez consulter
votre médecin afin de déterminer si vous souffrez d'un état médical ou
physique susceptible de mettre en danger votre santé et votre sécurité ou
de vous empêcher d’utiliser correctement l'équipement. Si vous prenez
des médicaments qui affectent votre rythme cardiaque, votre tension
artérielle ou votre taux de cholestérol, l'avis du médecin est
indispensable.
2. Faites attention aux signaux du corps. Un exercice incorrect ou
excessif nuit à votre santé. Si les symptômes suivants se manifestent,
veuillez arrêter l'exercice : douleur, oppression thoracique, rythme
cardiaque irrégulier, essoufflement, vertiges ou nausées. Si vous avez
connu ces situations, vous devez consulter votre médecin avant de
poursuivre votre programme d’exercice.
3. Tenez les enfants et les animaux domestiques à l’écart de l'équipement.
Cet appareil est réservé à un usage adulte.
4. Utilisez l’équipement sur un sol solide et plat, et recouvrez le sol ou le
tapis d'une housse de protection. Pour garantir la sécurité, il doit y avoir
au moins 61CM d'espace libre autour de l’équipement.
5. Avant d’utiliser l’équipement, assurez-vous que tous les écrous et
boulons sont bien serrés. Seul un contrôle régulier des dommages et/ou
de l'usure de l'équipement permet de maintenir la sécurité de
l’équipement.
CONSIGNES IMPORTANTES DE SÉCURITÉ
FR
40

6. Veillez à utiliser l’équipement conformément aux instructions. Si des
pièces défectueuses sont trouvées pendant le montage ou l'inspection de
l’équipement, ou si un bruit anormal est entendu pendant le
fonctionnement, veuillez ne pas l’utiliser.
7. Portez des vêtements appropriés lorsque vous utilisez l’équipement.
Évitez de porter des vêtements amples pour ne pas vous emmêler avec
l’équipement.
8. Ne mettez pas vos doigts ou d'autres objets dans les pièces mobiles de
l’équipement.
9. La capacité de charge maximale de cette machine est de 120 kg.
10. Cet équipement n’est pas adapté au traitement.
11. Afin d'éviter les blessures corporelles et/ou les dommages aux
produits, il est nécessaire de soulever et de déplacer ce produit
correctement.
12. Votre produit est adapté à une utilisation dans des conditions fraîches
et sèches. Vous devez éviter de le stocker dans des endroits extrêmement
froids, chauds ou humides.
13. Cet équipement est destiné à un usage intérieur et domestique
uniquement.
Un programme d’exercice réussi comprend un échauffement et des
exercices d’aérobic. Faites-les au moins deux fois par semaine, de
préférence trois fois, avec un jour de repos entre les entraînements. Après
quelques mois, vous pouvez augmenter vos exercices à quatre/cinq fois
par semaine. Faites un échauffement avant de faire de l'exercice. Il
prépare votre corps à un exercice plus intense, en chauffant et en étirant
vos muscles, augmente votre circulation et votre pouls et en apporte plus
d’oxygène à vos muscles. À la fin de votre séance d’entraînement,
répétez ces exercices pour réduire les problèmes de muscles douloureux.
CONSEILS POUR L’EXERCICE
41
Liste des accessoires
X2
X2
X1
X1 X1
X2
X2
X1 X1
42
Liste des pièces
43
Dessin éclaté
44

N° Description Spécification Qté
1
2
3
4
5
6
7
8
9
10
11
12
13
14
15
16
17
18
19
20
Cadre JTR101
Pied avant
Pulvérisation de
plastique/noir
Rondelle plate Φ10*Φ20*1,6
Rondelle élastique Φ10
Vis à six pans creux à
tête cylindrique
M10*60
Connecteur de cadre
Pulvérisation de
plastique/noir
Glissière en aluminium Oxydation
Base de pied arrière
Pulvérisation de
plastique/noir
Plaque de pédale Trempage de plastique
Pied arrière
Pulvérisation de
plastique/noir
Rondelle plate Φ8*Φ16*1,6
Rondelle élastique Φ8/ acier
Vis à six pans creux
vis à tête plate
M8*20/noir
Couvercle de glissière Caoutchouc
Arbre fixe Φ8*80
Butée Caoutchouc/noir
Écrou borgne M10
Coussin Noir
Vis cruciforme à tête
fraisée
M5*10
Vis à six pans creux
à tête fraisée
M8*20
1
1
4
2
2
1
1
1
1
1
12
8
8
1
1
2
2
2
2
1
45

N° Description Spécification Qté
21
22
23
24
25
26
27
28
1
1
1
1
1
1
2
4
Contre-écrou à tête
hexagonale
M10
Vis à tête hexagonale
M10*100
Goupille rapide Φ10*100
Bouton de fixation M12*55
Pédale gauche PP
Pédale droite PP
Arbre fixe de pédale
Φ12,5*418
Vis à tête hexagonale
M8*20
46

Assemblage
Reliez le cadre principal (1) au pied avant (2), et fixez-les ensemble avec
la vis à tête cylindrique à six pans creux (5), la rondelle plate (3) et la
rondelle élastique (4).
Fixez la plaque de pédale (9) et le cadre (1) à l’aide de la vis à tête fraisée
à six pans creux (18).
ÉTAPE 1
47
Placez le pied arrière (10) sous la pièce semi-circulaire de la base du pied
arrière (8), puis fixez-la avec l’écrou borgne (19) et la rondelle plate (3).
Placez la base de pied arrière (8) sous la glissière en aluminium, puis
fixez-la avec les vis à tête plate à six pans creux (13), la rondelle plate
(11) et la rondelle élastique (12).
ÉTAPE 2
48

Placez le coussin (20) sur l’extrémité de la glissière et mettez-le dans la
glissière en aluminium (7).
Insérez le connecteur du cadre (6) dans la glissière, et fixez-le avec des
vis à tête plate à six pans creux (13), une rondelle élastique (12) et une
rondelle plate (11).
Insérez l’arbre de fixation (15) dans la glissière en aluminium, mettez les
butées (16) sur les deux côtés, et fixez-les avec la vis cruciforme à tête
fraisée (17) sur deux côtés.
Placez le couvercle avant de glissière (14) entre le connecteur du cadre et
la glissière en aluminium.
ÉTAPE 3
49
Reliez le cadre principal (1) à la glissière en aluminium (7) et fixez-les
avec le contre-écrou à tête hexagonale (21), la rondelle plate (3) et la vis
à tête hexagonale (22).
Insérez la goupille de verrouillage (23).
Vissez le bouton de verrouillage (24) dans l’écrou par le haut, en vous
assurant qu’il est bien serré en place.
ÉTAPE 4
50

Insérez l’arbre fixe de la pédale (27) dans le trou. Insérez les pédales (25
& 26) dans l’arbre, puis fixez-les avec la vis à tête hexagonale (28) et la
rondelle plate (11).
ÉTAPE 5
51
INSTRUCTIONS DE PLIAGE
Dévissez d’abord le bouton de verrouillage (24), puis retirez la goupille
de verrouillage (23) de sa position.
Étape 1
52

Soulevez lentement la glissière en aluminium pour le faire tenir debout,
puis insérez la goupille de verrouillage (23) dans le trou. Réglez la
position en longueur de l’écrou sur le bouton de verrouillage (24), puis
remettez-le dans la position correspondante. À ce moment, l’équipement
est plié avec succès.
Étape 2
53

1. Fonction
★ Fonctions : minuterie, 500 mètres, compteur, distance, calories,
fréquence.
2. Bouton
3. Utilisation de fonction
1) Mise sous tension
Lors de la mise sous tension, l’écran LCD s’affiche pendant 1 seconde, et
le bipeur émet un son « BI », puis l’icône « COUNT » s’affiche et la
fenêtre correspondante affiche « 0 », et le produit entre en mode normal
après 1 seconde.
2) Bouton de fonction
MODE :
Chaque fois que vous appuyez brièvement sur le bouton de mode pour
passer à un mode de réglage, le numéro du mode correspondant clignote,
et le mode de réglage est quitté sans réglage dans 15 secondes.
L’ordre de commutation :
TIME→COUNT→DIST→CALORIES→STROKES/MIN→Quitter le
mode de réglage et rentrer dans le mode normal
Panneau d’affichage
Mode d’emploi du rameur
Nom de bouton
MODE
SET (RÉGLAGE)
Fonction
Pour choisir le mode
Pour augmenter la valeur
Pour remettre la valeur à 0
RESET
(RÉINITIALISATION)
54

SET (RÉGLAGE) :
Lorsque vous passez au mode de réglage correspondant, appuyez sur le
bouton « UP » pour augmenter la valeur de réglage. Si vous maintenez ce
bouton enfoncé pendant 2 secondes, la valeur augmente rapidement (elle
change 5 fois par seconde).
Appuyer sur le bouton UP n’est pas valable quand on n’est pas en mode
de réglage.
RESET (RÉINITIALISATION) :
Lorsque vous passez au mode de réglage correspondant, appuyez sur le
bouton RESET pour effacer la valeur actuelle.
Une pression brève sur le bouton RESET n’est pas valable lorsque vous
n’êtes pas en mode de réglage.
Appuyez sur le bouton RESET pendant 2 secondes pour effacer toutes les
données, l’affichage revient à zéro, l’écran LCD s’affiche pendant 1
seconde, et le bipeur émet un long bip, puis l’icône « COUNT » s’affiche
et la fenêtre correspondante affiche « 0 », et l’appareil passe en mode
normal après une seconde.
3) TIMER (MINUTERIE)
La minuterie mesure le temps mis entre le début et la fin de l’exercice, et
revient à zéro après le débordement d’un seul élément. Lorsqu’un signal
entre, le chronométrage commence.
Lorsqu’il n’y a pas d’entrée de signal de vitesse dans les 4 secondes, la
MINUTERIE est mise en pause et « STOP » s’affiche sur l’écran. Réglez
la durée de l’exercice, un signal sonore retentit lorsque l’heure prévue est
atteinte. Plage de réglage : 0:00~99:00.
4) MINUTERIE de 500m
Réglage du système par défaut : minuterie de 500m
Plage de réglage : 0:00~99:00.
55

5) Count (Compteur)
Plage de mesure : 0 ~ 9999, le compteur revient à zéro après le
débordement d’un seul élément.
Plage de réglage : 10 ~ 9990. La valeur de réglage est de +10 à chaque
fois.
6) Distance (DIST)
La fonction mesure la distance entre le début de l’exercice et la fin de
l'exercice.
Plage de mesure : 0.0~99.9 KM (ML), revient à zéro après le
débordement d’un seul élément.
7) Calories (CAL)
La fonction mesure les calories (CAL) consommées depuis le début de
l’exercice jusqu'à la fin de l'exercice.
Plage de mesure : 0,0 ~ 9999 calories, revient à zéro après le
débordement d’un seul élément.
8) Fréquence (COUPS/MIN)
Mesure le nombre de coups par minute pendant l’exercice.
9) Mode veille
S'il n’y a pas de signal d’exercice ni de signal de fréquence cardiaque
dans les 4 minutes, et si aucun bouton n’est pressé, le système passe en
mode veille. L’écran LCD s’éteint après le passage en mode veille.
10) Réveil
Lorsque le signal de distance, le signal de changement de mode, le signal
de réglage et le signal de réinitialisation sont entrés, le système
commence à fonctionner.
11) Bip sonore
Il y a un bip sonore (1s) à la mise sous tension ;
56

4.Batterie
Ce moniteur utilise 2 piles
Si l’écran s’affiche incorrectement, réinstallez la pile, et l’effet sera
meilleur. Lors du remplacement de la pile, tous les enregistrements seront
supprimés.
Pour remplacer la pile, appuyez sur le bouton situé en bas du boîtier LED
pour ouvrir le couvercle (voir Figure 1), puis appuyez sur le bouton situé
à l'arrière pour ouvrir le boîtier de la pile (voir Figure 2), et vous pouvez
maintenant changer la pile.
Un bip sonore est émis à chaque fois que vous appuyez sur un bouton ;
les pressions longues ne sont pas audibles. Lorsque la minuterie, la
distance et les calories sont remis à zéro, il y a 4 bips « BI-BI-BI-BI », à
ce moment-là, vous pouvez appuyer sur un bouton pour seulement arrêter
les bips sonores.
Figure 1
Appuyez sur le bouton
57

* Informations importantes sur la sécurité *
Veuillez respecter les règles de sécurité suivantes pour éviter les blessures et/ou
les accidents.
1. Gardez le rameur hors de portée des enfants et ne laissez pas les enfants à
proximité lorsque vous utilisez le rameur.
2. Ne vous tenez pas debout sur le rameur.
3. N’utilisez pas le rameur en portant des robes, pantalons ou jupes amples.
4. Veillez à utiliser des chaussures de sport.
5. Placez le rameur sur une surface lisse et dure.
6. Le poids maximal de l’utilisateur est de 120 kg.
7. Cet équipement est destiné à un usage intérieur et domestique uniquement.
8. Avant chaque utilisation, assurez-vous que toutes les fixations de la machine
ont été serrées. S'il y a un défaut, ne l'utilisez pas jusqu'à ce qu’il soit réparé.
9. Seule une inspection attentive des dommages et de l'usure de l'équipement
permet de maintenir le niveau de sécurité de l'équipement.
10. Ce rameur n’est pas adapté à un usage thérapeutique.
Figure 2
Appuyez sur le bouton
58

IMPORTANTE: Lea detenidamente todas las instrucciones antes de
utilizar este producto. Conserve este manual de instrucciones para futuras
consultas. Las especificaciones de este producto pueden variar con
respecto a esta foto, sujetas a cambios sin previo aviso.
Gracias por elegir nuestros productos. Por su seguridad y salud, por
favor, utilice este equipo correctamente. Lea todo el manual antes de
montar y utilizar el equipo. Sólo cuando el equipo se monta, se mantiene
y se utiliza correctamente, se puede utilizar de forma segura y eficaz. Lea
atentamente todas las advertencias y precauciones.
1. Antes de comenzar cualquier programa de ejercicios, debe consultar a
su médico para determinar si tiene alguna condición médica o física que
pueda poner en peligro su salud y seguridad o que le impida utilizar el
equipo correctamente. Si está tomando medicamentos que afecten a su
ritmo cardíaco, a su presión arterial o a su nivel de colesterol, es
imprescindible el consejo del médico.
2. Preste atención a las señales del cuerpo. Un ejercicio incorrecto o
excesivo perjudicará su salud. Si se producen los siguientes síntomas,
deje de hacer ejercicio: dolor, opresión en el pecho, latidos irregulares,
falta de aire, mareos o náuseas. Si ha experimentado estas situaciones,
debe consultar a su médico antes de continuar con su programa de
ejercicios.
3. Mantenga a los niños y a las mascotas alejados del equipo. Este
aparato es de uso exclusivo para adultos.
4. Utilice el equipo sobre un suelo sólido y plano, y cubra el suelo o la
alfombra con una funda protectora. Para garantizar la seguridad, debe
haber al menos 61CM de espacio libre alrededor del equipo.
PRECAUCIONES DE SEGURIDAD IMPORTANTES
ES
59

5. Antes de utilizar el equipo, asegúrese de que todas las tuercas y
tornillos estén apretados. Sólo mediante la comprobación periódica de los
daños y/o el desgaste del equipo, se puede mantener la seguridad del
equipo.
6. Asegúrese de utilizar el equipo según las instrucciones. Si se
encuentran piezas defectuosas durante el montaje o la inspección del
equipo, o se escuchan ruidos anormales durante el funcionamiento, el
equipo deberá detenerse inmediatamente y volver a utilizarse después de
que se resuelva el problema.
7. Lleve ropa adecuada cuando utilice el equipo. Evite llevar ropa suelta
para no enredarse con el equipo.
8. No introduzca los dedos u otros objetos en las partes móviles del
equipo.
9. La capacidad de carga máxima de esta máquina es de 120 kg.
10. Este equipo no es adecuado para el tratamiento.
11. Para evitar lesiones personales y/o daños al producto o a la propiedad,
es necesario levantar y mover adecuadamente.
12. El producto es adecuado para su uso en condiciones frescas y secas.
Debe evitar almacenarlo en lugares extremadamente fríos, calientes o
húmedos.
13. Este equipo es sólo para uso doméstico y en interiores.
Un programa de ejercicios exitoso incluye el calentamiento y el ejercicio
aeróbico. Hágalo al menos dos veces por semana, preferiblemente tres, y
tómese un día de descanso entre los ejercicios. Después de unos meses,
puede aumentar el ejercicio a cuatro/cinco veces por semana. Haga un
calentamiento antes del ejercicio. Esto le ayuda a preparar su cuerpo para
un ejercicio más intenso, a través de calentar y estirar los músculos,
aumentar la circulación y el pulso, y hacer llegar más oxígeno a los
músculos. Al final de su entrenamiento, repita estos ejercicios para
reducir los problemas de dolores musculares.
GUÍA PARA EL EJERCICIO
60
PAQUETE DE ACCESORIOS Y HERRAMIENTAS
X2
X2
X1
X1 X1
X2
X2
X1 X1
61
PIEZAS PREINSTALADAS
62

VISTA GENERAL
63

Núm. Descripción Especificación Cantidad
1
2
3
4
5
6
7
8
9
10
11
12
13
14
15
16
17
18
19
20
Conjunto del marco JTR101
Conjunto de la pata
delantera
Pulverización de
plástico / negro
Junta plana Φ10*Φ20*1,6
Arandela elástica Φ10
Tornillo de cabeza
hueca
M10*60
Bloque de conexión
de marco
Pulverización de
plástico / negro
Riel de aluminio Oxidación anódica
Base de pata trasera
Pulverización de
plástico / negra
Placa de pedal
Inmersión de
plástico / negra
Conjunto de la pata
trasera
Pulverización de
plástico / negro
Junta plana Φ8*Φ16*1,6
Arandela elástica Φ8 / Acero
Tornillo de cabeza plana
M8*20/negro
Tapa frontal del riel de
aluminio
Goma
Eje de fijación Φ8*80
Tapón de bloqueo Goma/negro
Tuerca abovedada M10
Conjunto de asiento Negro
Tornillo de cabeza
avellanada en cruz
M5*10
Tornillo de cabeza
avellanada hexagonal
M8*20
1
1
4
2
2
1
1
1
1
1
12
8
8
1
1
2
2
2
2
1
64

Núm. Descripción Especificación Cantidad
21
22
23
24
25
26
27
28
1
1
1
1
1
1
2
4
Tuerca de bloqueo
hexagonal exterior
M10
Tornillo hexagonal
exterior
M10*100
Pasador de bloqueo Φ10*100
Perilla de bloqueo M12*55
Pedal izquierdo PP
Pedal derecho PP
Eje de fijación de pedal
Φ12,5*418
Tornillo hexagonal exterior
M8*20
65

MONTAJE
Conecte el conjunto del marco principal (1) con el conjunto de la pata
delantera (2), y fíjelos juntos con los tornillos de cabeza hueca (5), las
juntas planas (3) y las arandelas elásticas (4).
Fije la placa de pedal (9) en el conjunto del marco principal (1) con los
tornillos de cabeza avellanada hexagonales (18).
PASO 1
66

Coloque el conjunto de la pata trasera (10) debajo de la pieza
semicircular de la base de pata trasera (8), y fíjelo con las tuercas
abovedadas (19) y las juntas planas (3).
Coloque la base de pata trasera (8) debajo del riel de aluminio, y luego
fíjela con los tornillos de cabeza plana (13), las juntas planas (11) y las
arandelas elásticas (12).
PASO 2
67
Coloque el conjunto de asiento (20) en el extremo del riel de
deslizamiento y póngalo en el riel de aluminio (7).
Inserte el bloque de conexión de marco (6) en el riel de deslizamiento y
fíjelo con los tornillos de cabeza plana (13), las arandelas elásticas (12) y
las juntas planas (11).
Inserte el eje de fijación (15) en el riel de aluminio, coloque el tapón de
bloqueo (16) en ambos lados y fíjelo con los tornillos de cabeza
avellanada en cruz (17) en ambos lados.
Coloque la tapa del extremo frontal del riel de aluminio (14) entre el
bloque de conexión y el riel de aluminio.
PASO 3
68

Conecte el conjunto del marco principal (1) con el riel de aluminio (7), y
fíjelos con la tuerca de bloqueo hexagonal exterior (21), la junta plana (3)
y el tornillo hexagonal exterior (22).
Inserte el pasador de bloqueo (23).
Atornille la perilla de bloqueo (24) en la tuerca desde arriba,
asegurándose de que esté bien apretada en su lugar.
PASO 4
69
Pase el eje de fijación de pedal (27) por el orificio. Inserte los pedales (25
y 26) en el eje y fíjelos con los tornillos hexagonales exteriores (28) y las
juntas planas (11).
PASO 5
70

INSTRUCCIONES DE PLEGADO
Desenrosque primero la perilla de bloqueo (24) y luego saque el pasador
de bloqueo (23) de su posición.
Paso 1
71

Levante el riel de aluminio lentamente para ponerlo en posición vertical,
y luego inserte el pasador de bloqueo (23) en el orificio. Ajuste la
posición de la longitud de la tuerca de la perilla de bloqueo (24) y, a
continuación, vuelva a girarla hasta la posición correspondiente. En este
momento, el equipo está plegado con éxito.
Paso 2
72

1. Función
★ Funciones: temporizador, 500 metros/min, contar (contador),
distancia, calorías, frecuencia (brazadas/min).
2. Botón
3. Función de Operación
1) Encendido
Cuando se enciende, la pantalla LCD se mostrará durante 1 segundo, y el
zumbador sonará "BI" durante un tiempo prolongado, luego se mostrará
el icono "COUNT" ("CONTAR") y la ventana correspondiente mostrará
"0", y entrará en el modo normal después de 1 segundo.
2) Funciones de botones
Botón MODE (MODO):
Cada vez que presiona brevemente el botón de modo para cambiar un
modo de ajuste, el número de modo correspondiente parpadea, y se sale
del modo de ajuste sin ajustar durante 15 segundos.
La secuencia de cambio es:
TIME (TEMPORIZADOR)→COUNT (CONTAR)→DIST
(DISTANCIA)→CALORIES (CALORÍAS)→STROKES/MIN
(BRAZADAS/MIN.)→Se sale del modo de ajuste y se vuelve al modo
normal.
MEDIDOR ELECTRÓNICO
Instrucciones de Uso de la Máquina de Remo
Nombre de Botón
MODE (MODO)
SET (ESTABLECER)
Función
Para cambiar los modos.
Para aumentar el valor de ajuste
Valor de ajuste borrado a 0
RESET
(RESTABLECER)
73

Botón SET (ESTABLECER):
Al cambiar al modo de ajuste correspondiente, presione el botón "UP"
("ARRIBA") para aumentar el valor de ajuste. Si se mantiene presionado
durante 2 segundos, aumentará rápidamente (cambia 5 veces por
segundo).
No es válido presionar el botón "UP" ("ARRIBA") cuando no se está en
el modo de ajuste.
Botón RESET (RESTABLECER):
Al cambiar al modo de ajuste correspondiente, presione el botón
"RESET" para borrar el valor actual.
La pulsación corta del botón "RESET" no es válida cuando no se está en
el modo de ajuste.
Mantenga presionado el botón "RESET" durante 2 segundos para borrar
todos los datos, la visualización volverá a cero, la pantalla LCD mostrará
durante 1 segundo, y el zumbador emitirá un pitido prolongado, después
se mostrará el icono "COUNT" ("CONTAR") y la ventana
correspondiente mostrará "0", y entrará en el modo normal después de un
segundo.
3) TEMPORIZADOR
Calcula el tiempo transcurrido desde el inicio hasta el final del ejercicio,
y vuelve a cero después de que se desborde un solo elemento. Cuando
entra una señal, comienza el cronometraje.
Cuando no entra ninguna señal de velocidad en 4 segundos, el tiempo se
detiene y se muestra "STOP" ("PARADA"). Ajuste el tiempo de
ejercicio, habrá un aviso sonoro cuando se alcance el tiempo
programado. Rango de ajuste: 0:00~99:00.
4) 500m/MIN
Ajuste del sistema por defecto: remar 500 metros, el tiempo requerido.
Rango de ajuste: 0:00~99:00.
74

5) Contar (CNT)
Rango de medición: 0 ~ 9999, vuelve a cero después de un
desbordamiento de un solo elemento.
Rango de ajuste: 10 ~ 9990. El valor de ajuste es de +10 cada vez.
6) Distancia (DIST)
Mide la distancia desde el inicio hasta el final del ejercicio.
Rango de medición: 0,0~99,9KM (ML), vuelve a cero después de un
desbordamiento de un solo elemento.
7) Calorías (CAL)
Mide las calorías (CAL) consumidas desde el inicio hasta el final del
ejercicio Rango de medición: 0,0 ~ 9999 calorías, vuelve a cero después
de un desbordamiento de un solo elemento.
8) STROKES/MIN (BRAZADAS/MIN)
Mide las brazadas por minuto durante el ejercicio.
9) Sueño
Si no hay ninguna señal de movimiento ni de frecuencia cardíaca en 4
minutos, y no se pulsa ningún botón, el CI (circuito integrado) entra en el
modo de reposo. La pantalla LCD se apaga después de entrar en el modo
de reposo.
10) Despertar
Cuando se introducen la señal de distancia, la señal de cambio de modo,
la señal de ajuste y la señal de reinicio, el sistema comienza a funcionar,
mientras que la señal de distancia y la señal de pulsación actuales sólo se
utilizan para despertar, no para la velocidad o el cambio de modo.
11) Indicación de voz
Hay un sonido prolongado de "BI" (1s) cuando se enciende;
Habrá un sonido "BI" cada vez que pulse un botón; la pulsación larga no
75

4. Batería
Este monitor utiliza 2 pilas.
Si la pantalla de visualización se visualiza incorrectamente, vuelva a
instalar la batería, y el efecto será mejor. Al sustituir la batería, se
borrarán todos los registros.
Para reemplazar la batería, presione el botón en la parte inferior de la caja
de LED para abrir la tapa (vea la Figura 1), luego presione el botón en la
parte posterior para abrir la caja de la batería (vea la Figura 2), y ya
puede cambiar la batería.
suena. Cuando el tiempo, la distancia y las calorías ajustados se ponen a
cero, habrá 4 pitidos de "BI-BI-BI-BI", y el pitido se detendrá cuando se
pulse un botón antes de que termine el pitido. La pulsación actual del
botón sólo detendrá el sonido de aviso y no ejecutará la función del
botón.
Figura 1
Presione el botón
76

* Información Importante de Seguridad *
Observe las siguientes reglas de seguridad para evitar lesiones y/o accidentes.
1. Mantenga la máquina de remo lejos de los niños, y no permita que los niños
estén cerca cuando se utilice la máquina de remo.
2 . No se ponga de pie sobre la máquina de remo.
3. No utilice la máquina de remo mientras lleve batas, pantalones o faldas
sueltos.
4. Asegúrese de utilizar calzado deportivo o zapatillas de tenis.
5. Coloque la máquina de remo sobre una superficie lisa y dura.
6. El peso máximo del usuario es de 120 kg.
7. Este equipo es sólo para uso interior y doméstico.
8. Antes de cada uso, asegúrese de que todas las piezas de fijación en la
máquina han sido apretadas bien. Si hay algún defecto, no utilice el producto
hasta que sea reparado.
9. Sólo inspeccionando cuidadosamente los daños y el desgaste del equipo, se
puede mantener el nivel de seguridad del equipo.
10. Esta máquina de remo no es adecuada para uso terapéutico.
Figura 2
Presione el botón
77

IMPORTANTE: Leggere attentamente tutte le istruzioni prima di usare
questo prodotto. Conservare questo manuale del proprietario per
riferimento futuro. Le specifiche di questo prodotto possono variare da
questa foto, soggette a modifiche senza preavviso.
Grazie per aver scelto i nostri prodotti. Per la vostra sicurezza e salute, vi
preghiamo di usare questo prodotto correttamente. Si prega di leggere
l'intero manuale prima di assemblare e utilizzare il prodotto. Solo quando
il prodotto è assemblato, mantenuto e usato correttamente, può essere
utilizzato in modo sicuro ed efficace. Si prega di leggere attentamente
tutte le avvertenze e le precauzioni.
1. Prima di iniziare qualsiasi programma di esercizio, si dovrebbe
consultare il proprio medico per determinare se si dispone di qualsiasi
condizione medica o fisica che può mettere in pericolo la salute e la
sicurezza o impedire di utilizzare il prodotto correttamente. Se state
prendendo farmaci che influenzano il vostro ritmo cardiaco, la pressione
sanguigna o il livello di colesterolo, il consiglio del medico è essenziale.
2. Prestare attenzione ai segnali del corpo. Un esercizio scorretto o
eccessivo danneggia la vostra salute. Se si verificano i seguenti sintomi,
si prega di interrompere l'esercizio: dolore, oppressione al petto, battito
cardiaco irregolare, mancanza di respiro, vertigini o nausea. Se avete
sperimentato queste situazioni, dovreste consultare il vostro medico
prima di continuare il vostro programma di esercizi.
3. Tenere i bambini e gli animali domestici lontani dal prodotto. Questo
dispositivo è solo per uso da parte di adulti.
4. Usare il prodotto su un terreno solido e piatto, e coprire il pavimento o
il tappeto con una copertura protettiva. Per garantire la sicurezza, ci
dovrebbero essere almeno 61 cm di spazio libero intorno all'attrezzatura.
5. Prima di utilizzare l'attrezzatura, assicurarsi che tutti i dadi e i bulloni
siano serrati. Solo controllando regolarmente i danni e/o l'usura
dell'attrezzatura, è possibile mantenere la sicurezza dell'attrezzatura.
IMPORTANTE GUIDA SULLA SICUREZZA
IT
78

6. Assicurarsi di usare l'attrezzatura come da istruzioni. Se si trovano
parti difettose durante il montaggio o l'ispezione dell'attrezzatura, o si
sente un rumore anormale durante il funzionamento, l'attrezzatura deve
essere fermata immediatamente e riutilizzata dopo che il problema è stato
risolto.
7. Indossare abiti appropriati quando si usa l'attrezzatura. Evitare di
indossare abiti larghi per evitare di impigliarsi con l'attrezzatura.
8. Non mettere le dita o altri oggetti nelle parti in movimento
dell'attrezzatura.
9. La capacità di carico massima di questa macchina è di 120 kg.
10. Questa attrezzatura non è adatta al trattamento.
11. Per evitare lesioni personali e/o danni a prodotti o proprietà, è
necessario sollevare e spostare correttamente.
12. Il prodotto è adatto all'uso in condizioni fresche e asciutte. Si
dovrebbe evitare di conservare in luoghi estremamente freddi, caldi o
umidi.
13. Questa attrezzatura è solo per uso interno e domestico.
Un programma di esercizi di successo include il riscaldamento e
l'esercizio aerobico. Fallo almeno due volte a settimana, preferibilmente
tre, e prenditi un giorno di riposo tra un esercizio e l'altro. Dopo qualche
mese, puoi aumentare il tuo esercizio a quattro/cinque volte alla
settimana. Si prega di fare un po' di riscaldamento prima dell'esercizio.
Prepara il tuo corpo per un esercizio più intenso, riscaldando e
allungando i muscoli, aumentando la circolazione e la frequenza del
polso, e fornendo più ossigeno ai tuoi muscoli. Alla fine del tuo
allenamento, ripeti questi esercizi per ridurre i problemi muscolari
doloranti.
GUIDA PER L'ESERCIZIO
79
PACCHETTO DEGLI ACCESSORI E STRUMENTI
X2
X2
X1
X1 X1
X2
X2
X1 X1
80
PARTI PREINSTALLATE
81
DISEGNO GENERALE
82

N. Descrizione Specifiche Quantità
1
2
3
4
5
6
7
8
9
10
11
12
13
14
15
16
17
18
19
20
Telaio principale JTR101
Gamba anteriore
Spruzzatura di
plastica/Nera
Guarnizione piatta Φ10*Φ20*1,6
Rondella a molla Φ10
Vite a testa cilindrica
M10*60
Telaio di collegamento
del sedile
Spruzzatura di
plastica/Nero
Guida in alluminio Ossidazione anodica
Base del piede posteriore
Spruzzatura di
plastica/Nera
Piastra del pedale
Spruzzatura di
plastica/Nera
Gamba posteriore
Spruzzatura di
plastica/Nera
Guarnizione piatta Φ8*Φ16*1,6
Rondella elastica Φ8/Acciaio
Vite a testa piatta con
esagono incassato
M8*20/Nera
Coperchio anteriore
della guida in alluminio
Gomma
Albero di fissaggio Φ8*80
Tappo di blocco Gomma/Nera
Dado M10
Cuscino del sedile Nero
Vite a testa svasata a
croce
M5*10
Vite a testa svasata
con esagono interno
M8*20
1
1
4
2
2
1
1
1
1
1
12
8
8
1
1
2
2
2
2
1
83

N. Descrizione Specifiche Quantità
21
22
23
24
25
26
27
28
1
1
1
1
1
1
2
4
Dado esagonale esterno
M10
Vite esagonale esterna
M10*100
Perno di bloccaggio Φ10*100
Manopola di bloccaggio
M12*55
Pedale(L) PP
Pedale(R) PP
Albero fisso del pedale
Φ12,5*418
Vite esagonale esterna
M8*20
84
MONTAGGIO
Collegare il telaio principale (1) con la gamba anteriore (2), e fissarli
insieme con la vite a testa cilindrica (5) e la guarnizione piatta (3) e la
rondella elastica (4).
Fissare la piastra del pedale (9) e il telaio principale (1) insieme con la
vite a testa svasata con esagono interno (18).
PASSO 1
85

Mettere la gamba posteriore (10) sotto il pezzo semicircolare della base
del piede posteriore (8), quindi fissarla con il dado (19) e la guarnizione
piatta (3).
Posizionare la base del piede posteriore (8) sotto la guida di alluminio,
quindi fissarla con le viti a testa piatta con esagono incassato (13), la
guarnizione piatta(11) e la rondella elastica(12).
PASSO 2
86

Mettere il cuscino del sedile (20) all'estremità della guida di scorrimento
e inserirlo nella guida di alluminio (7).
Inserire il telaio di collegamento del sedile (6) nella guida di scorrimento,
e fissarlo con le viti a testa piatta con esagono incassato(13), la rondella
elastica(12) e la guarnizione piatta(11).
Inserire l'albero di fissaggio(15) nella guida di alluminio, mettere il tappo
di blocco(16) su entrambi i lati, e bloccarlo con la vite a testa svasata a
croce (17) su entrambi i lati.
Posizionare il coperchio anteriore della guida in alluminio (14) tra la base
di collegamento e la guida in alluminio.
PASSO 3
87

Collegare il telaio principale (1) con la guida in alluminio (7), e fissarli
con il dado esagonale esterno (21), la guarnizione piatta (3) e la vite
esagonale esterna (22).
Inserire il perno di bloccaggio (23).
Avvitare la manopola di bloccaggio (24) nel dado dall'alto, assicurandosi
che sia stretto in posizione.
PASSO 4
88
Far passare l'albero fisso del pedale (27) attraverso il foro. Inserire i
pedali (25 & 26) nell'albero, e poi fissarlo con la vite esagonale esterna
(28) e la guarnizione piatta (11).
PASSO 5
89

ISTRUZIONI PER PIEGARE
Svitare prima la manopola di bloccaggio (24) e poi estrarre il perno di
bloccaggio (23) dalla sua posizione.
Passo 1
90

Sollevare lentamente la guida di alluminio per farla stare in piedi, e poi
inserire il perno di bloccaggio (23) nel foro. Regolare la posizione della
lunghezza del dado sulla manopola di bloccaggio (24), e poi riportarla
nella posizione corrispondente. In questo momento, l'attrezzatura è
piegata con successo.
Passo 2
91

1. Funzione
★ Funzioni: Temporizzatore, 500 metri/minuto, conteggio, distanza,
calorie, colpi/minuto.
2. Chiave
3. Funzione di operazione
1) Accendere l'alimentazione
Quando si accende, il display LCD visualizzerà per 1 secondo, e il
cicalino suonerà "BI" per un lungo periodo, quindi visualizzerà l'icona
"COUNT" e la finestra corrispondente visualizzerà "0", ed entrerà nella
modalità normale dopo 1 secondo.
2) Funzioni della chiave
MODE (MODALITÀ)
Ogni volta che si preme brevemente il pulsante di modalità per cambiare
una modalità di impostazione, il numero di modalità corrispondente
lampeggia, e la modalità di impostazione viene abbandonata senza
impostazione per 15 secondi.
La sequenza di commutazione è:
TIME→COUNT→DIST→CALORIES→STROKES/MIN→Uscire dal
modo di impostazione e tornare al modo normale.
CONTATORE ELETTRONICO
Istruzioni per l'uso del vogatore
Nome della chiave
MODE (MODALITÀ)
SET (IMPOSTAZIONE)
Funzione
Commutazione di modalità
Aumento del valore di regolazione
Valore impostato cancellato a 0
RESET
(RIPRISTINARE)
92

SET (IMPOSTAZIONE)
Quando si passa alla modalità di impostazione corrispondente, premere il
tasto “UP” per aumentare il valore di impostazione. Tenere premuto per 2
secondi, aumenterà rapidamente (cambiare 5 volte al secondo). Non è
valido premere il tasto “UP” quando non si è in modalità di
impostazione.
RESET (RIPRISTINARE)
Quando si passa alla modalità di impostazione corrispondente, premere il
tasto "RESET" per cancellare il valore corrente.
La pressione breve del tasto "RESET" non è valida quando non si è in
modalità di impostazione.
Premere e tenere premuto il tasto "RESET" per 2 secondi per cancellare
tutti i dati, il display tornerà a zero, il display LCD visualizzerà per 1
secondo, e il cicalino emetterà un lungo segnale acustico, poi l'icona
"COUNT" verrà visualizzata e la finestra corrispondente visualizzerà "0",
ed entrerà in modalità normale dopo un secondo.
3) TIME(TEMPORIZZATORE)
Misurare il tempo impiegato dall'inizio alla fine dell'esercizio, e tornare a
zero dopo lo sforamento di un singolo elemento. Quando arrivare un
segnale, iniziare il cronometraggio. Quando non viene immesso alcun
segnale di velocità entro 4 secondi, il tempo viene messo in pausa e viene
visualizzato "STOP". Impostare il tempo di esercizio, ci sarà un avviso
sonoro quando il tempo previsto viene raggiunto. Intervallo di
impostazione: 0:00~99:00.
4) 500m/MIN
Impostazione predefinita del sistema: canottaggio 500 metri, il tempo
richiesto. Intervallo di regolazione: 0:00~99:00.
93

5) Count (Conteggio)
Campo di misura: 0 ~ 9999, ritorno a zero quando finito.
Campo di regolazione: 10 ~ 9990. Il valore di impostazione è +10 ogni
volta.
6) Distance (Distanza)
Misurare la distanza dall'inizio dell'esercizio alla fine dell'esercizio.
Campo di misura: 0.0~99.9KM (ML), ritorno a zero quando finito.
7) Calories (Calorie)
Misurare le calorie consumate dall'inizio dell'esercizio alla fine dello
stesso. Campo di misura: 0.0 ~ 9999 calorie, ritorno a zero quando finito.
8) Frequenza (colpi/minuto)
Misurare i colpi al minuto durante l'esercizio.
9) Sonno
Se non c'è nessun segnale di movimento e di frequenza cardiaca in
ingresso entro 4 minuti, e nessun tasto viene premuto, l'IC entra in
modalità "SLEEP". Il display LCD si spegne dopo essere entrato in
modalità di riposo.
10) Sveglia
Quando il segnale di distanza, il segnale di commutazione di modalità, il
segnale di impostazione e il segnale di reset vengono immessi, il sistema
inizia a funzionare, mentre il segnale di distanza secondario e il segnale
di pressione dei tasti vengono utilizzati solo per il risveglio, non per la
velocità o la commutazione di modalità.
11) Richiesta della voce
Lungo suono "BI" (1s) quando si accende; Ci sarà un suono "BI" ogni
volta che si preme un tasto; la pressione lunga non suona. Quando il
94

4.Batteria
Questo monitor utilizza 2 batterie.
Se lo schermo del display viene visualizzato correttamente, reinstallare la
batteria, e l'effetto sarà migliore. Quando si sostituisce la batteria, tutte le
registrazioni saranno cancellate.
Per sostituire la batteria, premi il pulsante in fondo alla scatola del LED
per aprire il coperchio (vedi Figura 1), poi premi il pulsante nella parte
posteriore per aprire la custodia della batteria (vedi Figura 2), e puoi
cambiare la batteria ora.
tempo impostato, la distanza e la caloria vengono azzerati, ci saranno 4
bip di "BI-BI-BI-BI", che si fermeranno quando i suoni di richiesta non
vengono premuti, e solo i suoni di richiesta si fermeranno quando viene
premuto il tasto successivo, e la funzione del tasto non verrà eseguita.
Figura 1
Premere il pulsante
95
* Informazioni importanti sulla sicurezza *
Si prega di osservare le seguenti regole di sicurezza per evitare lesioni e/o
incidenti.
1. Tenere il vogatore lontano dai bambini e non lasciare che i bambini siano in
giro quando si usa il vogatore.
2. Non stare in piedi sul vogatore.
3. Non utilizzare il vogatore mentre si indossano abiti, pantaloni o gonne larghi.
4. Assicurati di usare scarpe sportive o da tennis.
5. Posizionare il vogatore su una superficie liscia e dura.
6. Il peso massimo dell'utente è di 120 kg.
7. Questa attrezzatura è solo per uso interno e domestico.
8. Prima di ogni utilizzo, assicurarsi che tutti i dispositivi di fissaggio della
macchina siano stati serrati. Se c'è un difetto, non usarlo fino a quando non è
stato riparato.
9. Solo controllando attentamente i danni e l'usura dell'attrezzatura, è possibile
mantenere il livello di sicurezza dell'attrezzatura.
10. Questo vogatore non è adatto all'uso terapeutico.
Figura 2
Premere il pulsante
96

WAŻNE: Przeczytaj uważnie wszystkie instrukcje przed użyciem
produktu. Zachowaj niniejszą instrukcję obsługi do wykorzystania w
przyszłości. Specyfikacja produktu może różnić się od stanu
przedstawionego na rysunku i może ulec zmianie bez zawiadomienia.
Dziękujemy za wybranie naszego produktu. Dla własnego
bezpieczeństwa i zdrowia prosimy o prawidłowe używanie sprzętu.
Prosimy o zapoznanie się z całą instrukcją przed montażem i
użytkowaniem urządzenia. Sprzęt może być używany bezpiecznie i
skutecznie, tylko wtedy, gdy jest prawidłowo zmontowany i
konserwowany. Prosimy o uważne przeczytanie wszystkich ostrzeżeń i
wskazówek dotyczących bezpieczeństwa.
1. Przed rozpoczęciem jakiegokolwiek programu ćwiczeń skonsultuj się
z lekarzem, aby ustalić, czy masz jakiekolwiek dolegliwości, które mogą
zagrażać twojemu zdrowiu i bezpieczeństwu lub uniemożliwiać
prawidłowe korzystanie ze sprzętu. Konieczna jest konsultacja lekarska
także, jeśli zażywasz leki, które wpływają na tętno, ciśnienie krwi lub
poziom cholesterolu.
2. Zwróć uwagę na sygnały twojego ciała. Nieprawidłowe lub nadmierne
ćwiczenia mogą zaszkodzić twojemu zdrowiu. Zaprzestań ćwiczeń w
przypadku następujących objawów: ból, ucisk w klatce piersiowej,
nieregularne bicie serca, duszność, zawroty głowy lub nudności. Jeśli
doświadczyłeś takich sytuacji, powinieneś skonsultować się z lekarzem
przed kontynuowaniem programu ćwiczeń.
3. Trzymaj dzieci i zwierzęta z dala od sprzętu. Urządzenie jest
przeznaczone wyłącznie do użytku przez osoby dorosłe.
4. Używaj urządzenia na twardym i płaskim podłożu, a podłogę lub
dywan zabezpiecz osłoną ochronną. Aby zapewnić bezpieczeństwo,
wokół urządzenia powinno być co najmniej 61cm wolnej przestrzeni.
WAŻNE WSKAZÓWKI BEZPIECZEŃSTWA
PL
97

5. Przed użyciem urządzenia upewnij się, że wszystkie nakrętki i śruby są
dokręcone. Tylko poprzez regularne sprawdzanie uszkodzeń i zużycia
sprzętu można utrzymać bezpieczeństwo jego użytkowania.
6. Upewnij się, że korzystasz ze sprzętu zgodnie z instrukcją. Jeśli
podczas montażu lub kontroli sprzętu odkryjesz wadliwe części lub
podczas pracy słychać podejrzany hałas, natychmiast zatrzymaj sprzęt i
wróć do jego używania dopiero po usunięciu nieprawidłowości.
7. Podczas korzystania z urządzenia noś odpowiednią odzież. Unikaj
noszenia luźnych ubrań, aby nie zaplątały się one w części sprzętu.
8. Nie wkładaj palców ani innych przedmiotów do ruchomych części
urządzenia.
9. Maksymalna ładowność urządzenia to 120kg.
10. Sprzęt nie nadaje się do celów terapeutycznych.
11. Aby uniknąć obrażeń ciała lub uszkodzenia produktów lub mienia,
podnoszenie i przenoszenie urządzenia musi być wykonane w
odpowiedni sposób.
12. Produkt przeznaczony jest do użytku w chłodnych i suchych
warunkach. Unikaj przechowywania w bardzo zimnych, gorących lub
wilgotnych miejscach.
13. Sprzęt jest przeznaczony wyłącznie do użytku w pomieszczeniach i w
domu.
Udany program ćwiczeń obejmuje rozgrzewkę i ćwiczenia aerobowe.
Wykonuj ćwiczenia co najmniej dwa, a najlepiej trzy razy w tygodniu.
Pamiętaj o dniu wolnym między ćwiczeniami. Po kilku miesiącach
możesz zwiększyć ćwiczenia do czterech/pięciu razy w tygodniu.
Pamiętaj o rozgrzewce przed przystąpieniem do ćwiczeń. Przygotowuje
ona organizm do bardziej intensywnych ćwiczeń, rozgrzewając i
rozciągając mięśnie, zwiększając krążenie i tętno oraz dostarczając
więcej tlenu do mięśni. Pod koniec treningu powtórz te ćwiczenia, aby
zmniejszyć późniejsze problemy z bólem mięśni.
WSKAZÓWKI DOTYCZĄCE ĆWICZEŃ
98
LISTA AKCESORIÓW
X2
X2
X1
X1 X1
X2
X2
X1 X1
99
LISTA CZĘŚCI
100

RYSUNEK POGLĄDOWY
101

Nr Nazwa części Specyfikacja Ilość
1
2
3
4
5
6
7
8
9
10
11
12
13
14
15
16
17
18
19
20
Rama JTR101
Przednia noga
Plastik/czarny
Płaska uszczelka Φ10xΦ20x1.6
Podkładka Φ10
Śruba z łbem
gniazdowym
M10x60
Rama łącząca siedzisko
Plastik/czarny
Szyna aluminiowa Utlenianie anodowe
Podstawa tylnej nogi
Plastik/czarny
Płytka pedału
Plastik/czarny
Tylna noga
Plastik/czarny
Płaska uszczelka Φ8xΦ16x1.6
Podkładka Φ8/Stal
Śruby z łbem płaskim z
gniazdem sześciokątnym
M8x20/czarny
Osłona szyny
Guma
Wałek mocujący Φ8x80
Kołek blokujący Guma/czarny
Nakrętka kołpakowa M10
Poduszka siedziska Czarny
Śruba z łbem stożkowym
z wgłębieniem krzyżowym
M5x10
Śruba z łbem stożkowym
z gniazdem sześciokątnym
M8x20
1
1
4
2
2
1
1
1
1
1
12
8
8
1
1
2
2
2
2
1
102

Nr Nazwa części Specyfikacja Ilość
21
22
23
24
25
26
27
28
1
1
1
1
1
1
2
4
Zewnętrzna sześciokątna
nakrętka zabezpieczająca
M10
Zewnętrzna śruba
sześciokątna
M10x100
Trzpień blokujący Φ10x100
Pokrętło blokujące
M12x55
Pedał(L) Materiał pp
Pedał(P) Materiał pp
Trzon pedałów
Φ12.5x418
Zewnętrzna śruba
sześciokątna
M8x20
103

MONTAŻ:
Połącz ramę (1) z przednią nogą (2) i skręć je razem za pomocą śruby z
łbem gniazdowym (5), płaskiej uszczelki (3) i podkładki (4).
Zamocuj płytkę pedału (9) i ramę (1) za pomocą śruby z łbem
stożkowym z gniazdem sześciokątnym (18).
KROK 1
104
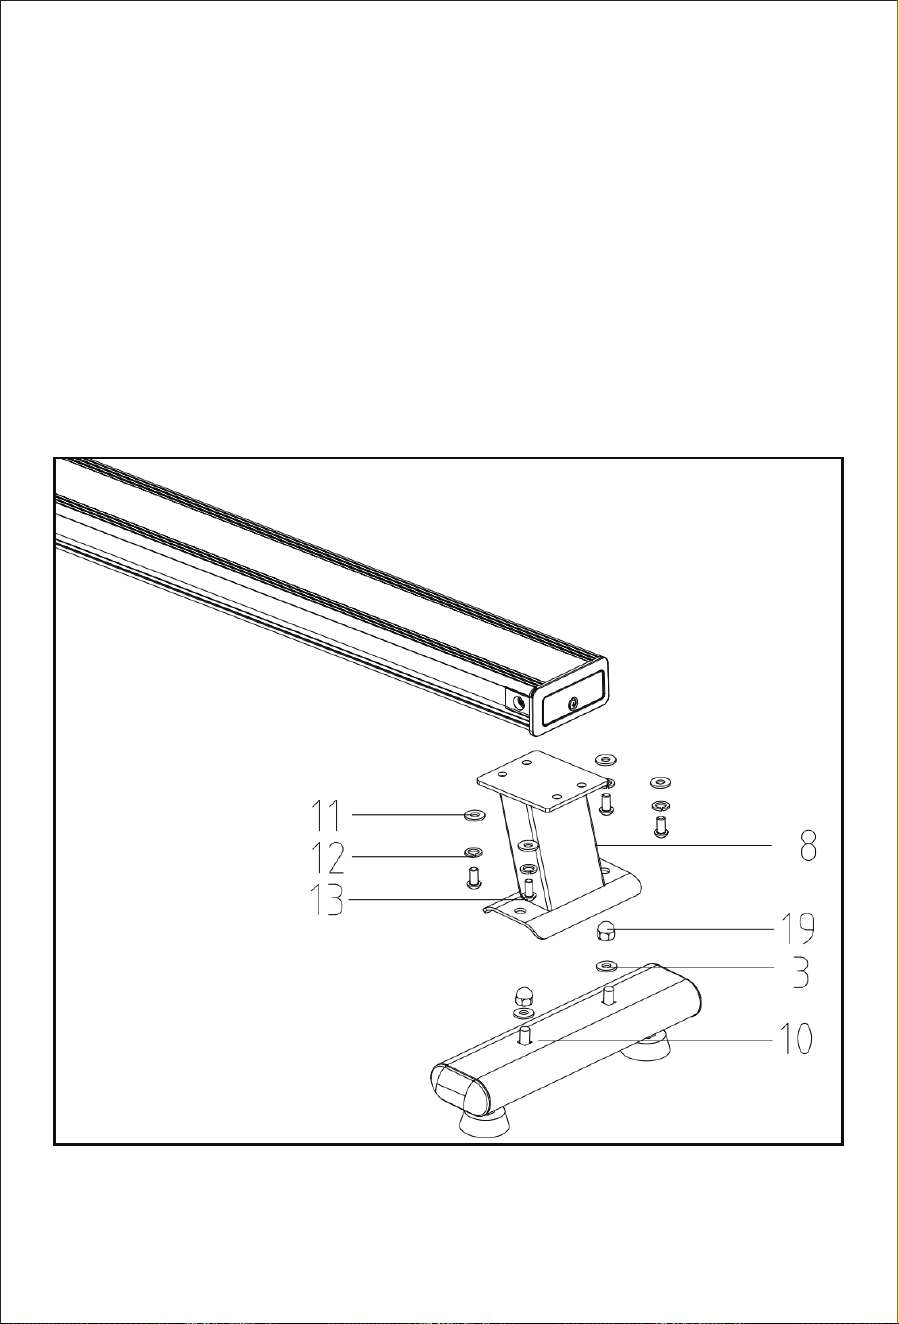
Umieść tylną nogę (10) pod podstawą tylnej nogi (8), a następnie
przymocuj ją nakrętką kołpakową (19) i płaską uszczelką (3).
Umieść podstawę tylnej nogi (8) pod aluminiową szyną, a następnie
przykręć ją za pomocą śrub z łbem sześciokątnym (13), płaskiej
uszczelki (11) i podkładki (12).
KROK 2
105

Umieść poduszkę siedziska (20) na końcu szyny ślizgowej, a następnie w
szynie aluminiowej (7).
Włóż ramę łączącą siedzisko (6) do szyny ślizgowej i przymocuj je
śrubami z łbem sześciokątnym (13), podkładką (12) i płaską uszczelką
(11).
Włóż wałek mocujący (15) w szynę aluminiową, a następnie włóż kołek
blokujący (16) po obu stronach i zablokuj go śrubami z łbem stożkowym
z wgłębieniem krzyżowym (17) po obu stronach.
Umieść osłonę szyny (14) między podstawą łączącą a aluminiową szyną.
KROK 3
106

Połącz ramę (1) z szyną aluminiową (7) i zamocuj je za pomocą
zewnętrznej sześciokątnej nakrętki zabezpieczającej (21), płaskiej
uszczelki (3) i zewnętrznej śruby sześciokątnej (22).
Włóż trzpień blokujący (23).
Wkręć pokrętło blokujące (24) w nakrętkę od góry, upewniając się, że
jest dokręcone.
KROK 4
107
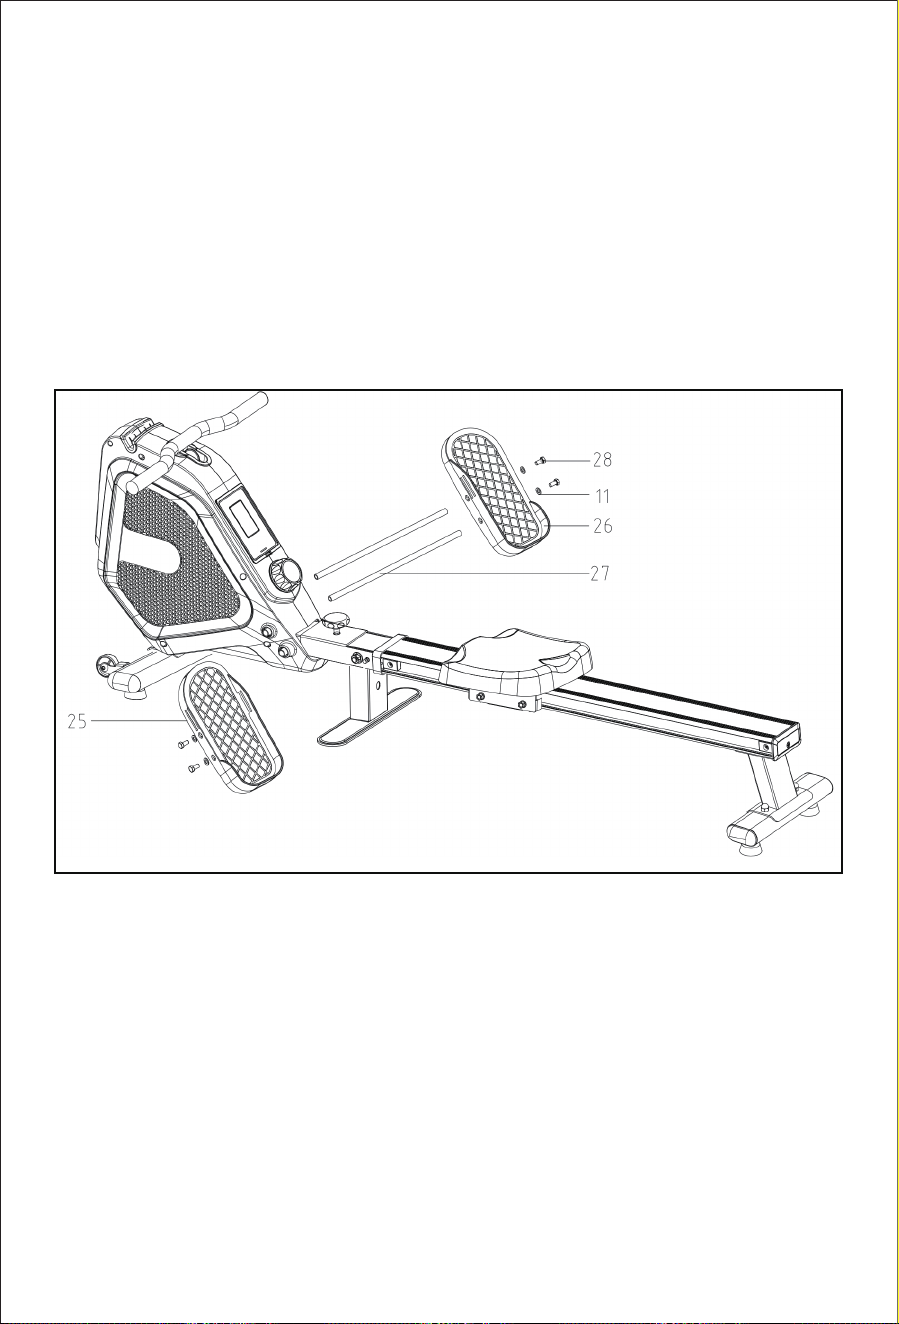
Przełóż trzon pedałów (27) przez otwór. Włóż pedały (25 i 26) do trzonu,
a następnie przymocuj je zewnętrzną śrubą sześciokątną (28) i płaską
uszczelką (11).
KROK 5
108

INSTRUKCJE SKŁADANIA
Najpierw odkręć pokrętło blokujące (24), a następnie wyciągnij trzpień
blokujący (23) z jego pozycji.
Krok 1
109

Powoli podnieś aluminiową szynę, aby stała pionowo, a następnie włóż
trzpień blokujący (23) do otworu. Wyreguluj położenie długości nakrętki
na pokrętle blokującym (24), a następnie obróć je z powrotem do
odpowiedniej pozycji. W tej chwili sprzęt składa się pomyślnie.
Krok 2
110

1. Funkcje.
★ Funkcje: czas, 500 metrów/czas, dystans, kalorie, uderzenia/min.
2. Ustawienia funkcji.
3. Działanie.
1) Włącz zasilanie
Po włączeniu, wyświetlacz LCD będzie zadziała przez 1 sekundę, a
dźwięk zabrzmi przez długi czas, następnie wyświetli "COUNT", a
odpowiednie okno wyświetli "0" i przejdzie do trybu normalnego po 1
sekundzie .
2) Funkcje przycisków
MODE (TRYB):
Każde krótkie naciśnięcie przycisku trybu w celu przełączenia trybu
ustawień powoduje miganie odpowiedniego numeru trybu. Urządzenie
automatycznie opuści ten tryb po 15 sekundach bezczynności.
Sekwencja przełączania to:
CZAS POMIAR DYSTANS KALORIE RUCHY/MIN Wyjdź z trybu
ustawień i wróć do normalnego trybu.
WYŚWIETLACZ
Instrukcja obsługi wioślarza
Nazwa funkcji
MODE (tryb)
SET (konfiguracja)
RESET (reset)
Funkcja
Przełączanie trybów
Zwiększenie wartości ustawienia
Czyszczenie wartości do 0
111

SET (USTAWIENIA):
Po przejściu do odpowiedniego trybu ustawień, naciśnij „UP”, aby
zwiększyć wartość. Naciśnij i przytrzymaj przez 2 sekundy, a wzrośnie
szybko (5 razy na sekundę).
Niedozwolone jest naciśnięcie przycisku „UP”, gdy urządzenie nie jest w
trybie ustawień.
RESET:
Po przełączeniu do odpowiedniego trybu ustawień, naciśnij „RESET, aby
wyczyścić bieżącą wartość.
Krótkie naciśnięcie przycisku „RESET” nie ma efektu, gdy urządzenie
nie jest w trybie ustawień.
Naciśnij i przytrzymaj przycisk „RESET” przez 2 sekundy, aby
wyczyścić wszystkie dane. Wyświetlacz powróci do zera, urządzenie
wyda jeden sygnał dźwiękowy przez długi czas, a następnie zostanie
wyświetlona ikona „COUNT” a odpowiednie okno wyświetli "0" i
urządzenie przejdzie w tryb normalny po jednej sekundzie.
3) TIMER
Zmierz czas od rozpoczęcia do zakończenia ćwiczenia i powróć do zera
po zakończeniu. Czas jest odmierzany po sygnale dźwiękowym.
Gdy w ciągu 4 sekund nie ma sygnału wejściowego prędkości, czas
zostaje wstrzymany i wyświetlany jest komunikat „STOP”. Ustaw czas
ćwiczeń, po osiągnięciu zaplanowanego czasu pojawi się sygnał
dźwiękowy. Zakres ustawień: 0:00~99:00.
4) 500m/min
Domyślne ustawienie systemu: wiosłowanie 500 metrów, wymagany
czas.
Zakres ustawień: 0:00~99:00.
112

5) Pomiar (COUNT)
Zakres pomiarowy: 0 ~ 9999, powrót do zera po zakończeniu.
Zakres ustawień: 10 ~ 9990. Wartość ustawienia wynosi każdorazowo
+10.
6) Dystans (DIST)
Zmierz dystans od początku ćwiczenia do jego zakończenia.
Zakres pomiarowy: 0.0~99,9KM (ML), powrót do zera po zakończeniu.
7) Kalorie (CAL)
Zmierz spalone kalorie (CAL) od początku ćwiczenia do jego
zakończenia.
Zakres pomiarowy: 0,0 ~ 9999 kalorii, powrót do zera po zakończeniu.
8) RUCHY/MIN
Mierz ruchy na minutę podczas ćwiczeń.
9) Stan uśpienia
Jeśli w ciągu 4 minut nie będzie sygnału ruchu ani sygnału tętna, a żaden
klawisz nie zostanie naciśnięty, urządzenie przejdzie w tryb uśpienia
„SLEEP”. Wyświetlacz LCD wyłącza się po przejściu w stan uśpienia.
10) Wybudzenie
Po wprowadzeniu sygnału odległości, sygnału przełączania trybu,
sygnału ustawień i sygnału resetowania system zaczyna działać, podczas
gdy obecny sygnał odległości i sygnał naciśnięcia klawisza są używane
tylko do przebudzenia, a nie do przełączania prędkości lub trybu.
11) Komunikat głosowy
Długi dźwięk „bi” (1s) po włączeniu;
Za każdym naciśnięciem klawisza rozlegnie się dźwięk. Długie
naciśnięcie to brak dźwięku. Gdy ustawiony czas, dystans i kalorie
zostaną zresetowane do zera, rozlegną się 4 sygnały dźwiękowe
113

4.Bateria
Ten monitor używa 2 baterii
Jeśli ekran wyświetlacza działa niepoprawnie, zainstaluj ponownie
baterie. Podczas wymiany baterii wszystkie zapisy zostaną usunięte.
Aby wymienić baterię, naciśnij przycisk na dole wyświetlacza, aby
otworzyć pokrywę (patrz rysunek 1), a następnie naciśnij przycisk z tyłu,
aby otworzyć pojemnik na baterie (patrz rysunek 2) i wymienić je.
„bi-bi-bi-bi”, które ustaną, gdy dźwięk monitu nie zostanie naciśnięty, a
dźwięki monitu ustaną, gdy zostanie naciśnięty następny klawisz. Wtedy
funkcja klawisza nie zostanie wykonana.
Rysunek 1
Pociągnij
114

* Ważne informacje dotyczące bezpieczeństwa *
Należy przestrzegać poniższych zasad bezpieczeństwa, aby uniknąć obrażeń lub
wypadków.
1. Trzymaj wioślarza z dala od dzieci i nie pozwalaj dzieciom przebywać w
pobliżu, podczas korzystania z niego.
2. Nie stawaj na wioślarzu.
3. Nie używaj wioślarza w luźnych ubraniach.
4. Pamiętaj, aby nosić obuwie sportowe.
5. Umieść wioślarza na gładkiej i twardej powierzchni.
6. Maksymalna waga użytkownika to 120 kg.
7. Sprzęt jest przeznaczony wyłącznie do użytku wewnątrz pomieszczeń.
8. Przed każdym użyciem upewnij się, że wszystkie mocowania na maszynie
zostały dokręcone. W przypadku zauważenia wady, nie używaj do czasu
naprawy.
9. Tylko poprzez staranne sprawdzenie uszkodzeń i zużycia sprzętu można
utrzymać bezpieczeństwo użytkowania urządzenia.
10. Wioślarz nie nadaje się do użytku terapeutycznego.
Rysunek 2
Pociągnij
115