
Technical Support and E-Warranty Certificate www.vevor.com/support
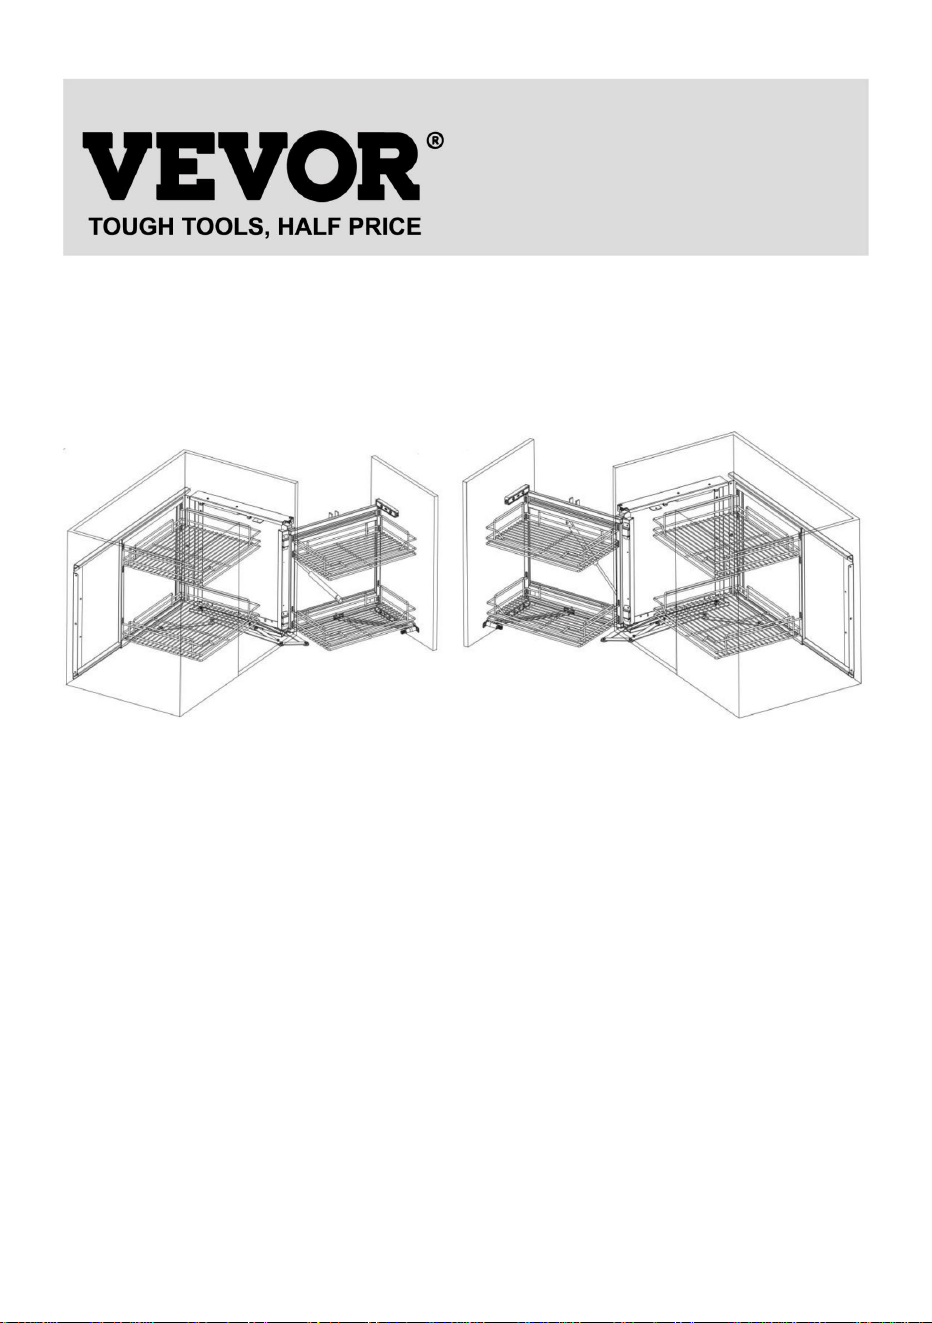
BLIND CORNER PULL OUT BASKET
ORGANIZER
We continue to be committed to provide you tools with competitive price.
"Save Half", "Half Price" or any other similar expressions used by us only represents an
estimate of savings you might benefit from buying certain tools with us compared to the major top
brands and does not necessarily mean to cover all categories of tools offered by us. You are
kindly reminded to verify carefully when you are placing an order with us if you are actually saving
half in comparison with the top major brands.


1
Thanks for purchasing one of our products, please read carefully the assembly
instructions before the installation.
Model: DG-900
NEED HELP? CONTACT US!
Have product questions? Need technical support? Please feel free to contact us:
Technical Support and E-Warranty Certificate www.vevor.com/support
This is the original instruction, please read all manual instructions carefully before
operating. VEVOR reserves a clear interpretation of our user manual. The
appearance of the product shall be subject to the product you received. Please
forgive us that we won't inform you again if there are any technology or software
updates on our product.
Blind Corner Pull Out
Basket Organizer
2
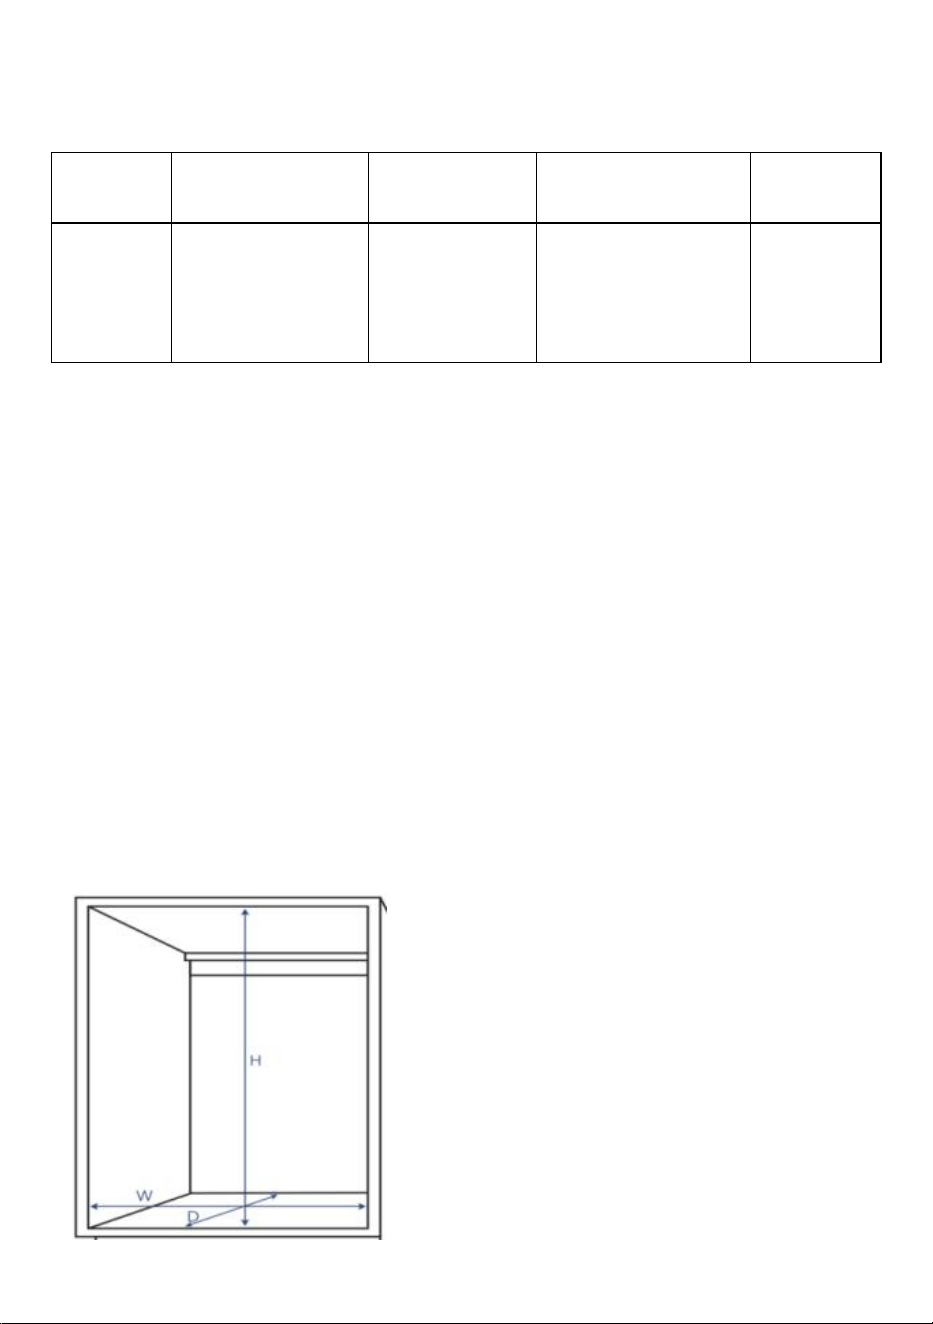
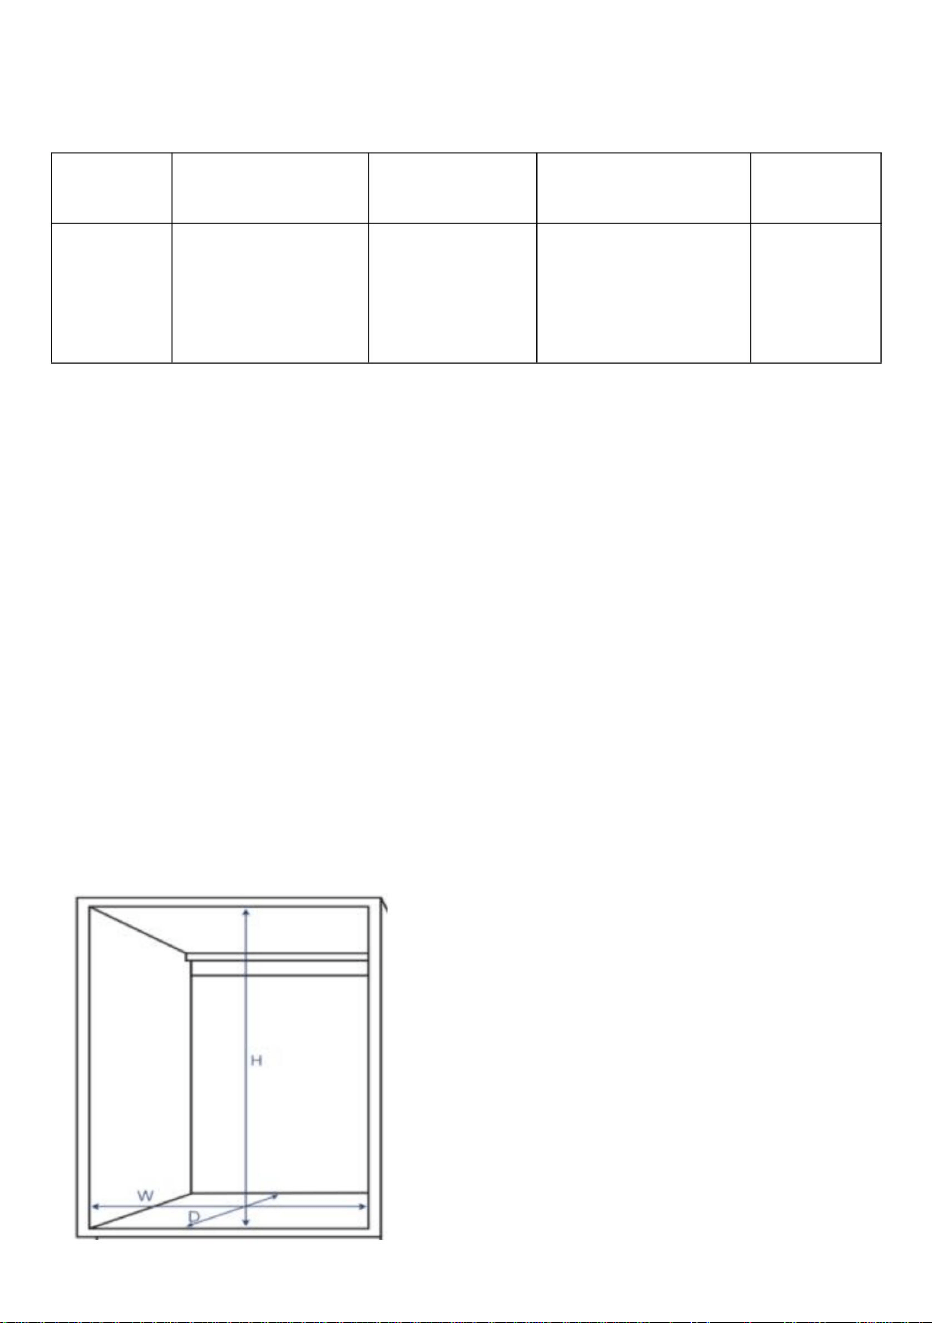
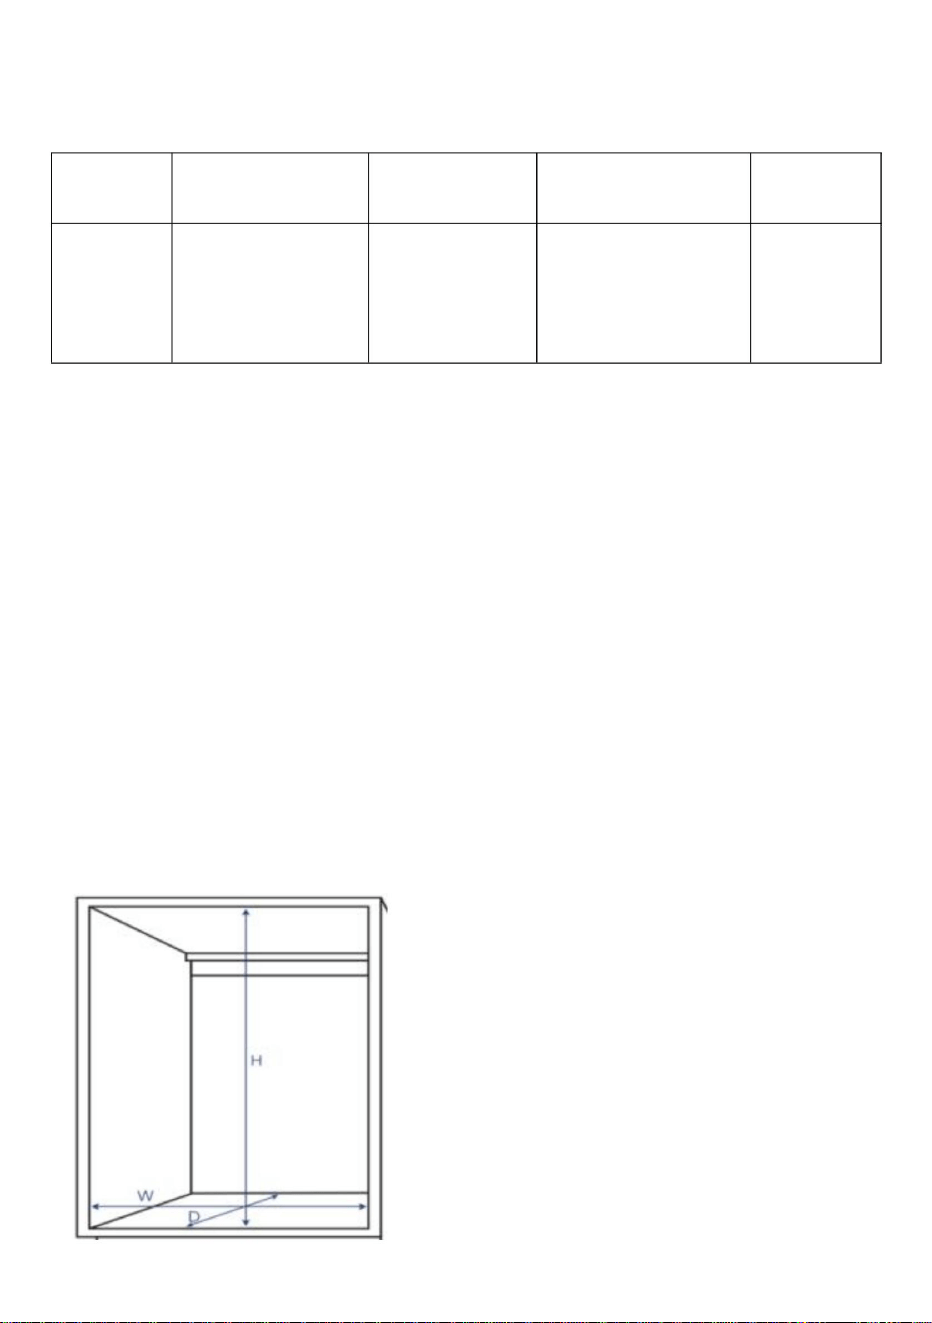
PRODUCT PARAMETERS
ASSEMBLY PRECAUTIONS
1. Assemble needs to follow these instructions. Incorrect assembly can be
a hazard.
2. Wear safety goggles and heavy-duty work gloves during assembly.
3. Do not assemble when tired or when under the influence of alcohol,
drugs or medication.
4. Weight capacity and other product capabilities apply to a properly and
completely assembled product only.
5. Keep the assembly area clean and well-lit.
6. Keep bystanders out of the area during assembly.
7. Check the installation size of the corresponding model of the pull
basket, and select the cabinet consistent with or close to the
installation size for installation.
Model
Product Size
Loading
Capacity
Installation
size(mm)W*D*H
Installation
mode
DG-900
33.8"x21"x22"
(860x 535x560
mm)
50 lbs(Max)
(single layer
25 lbs)
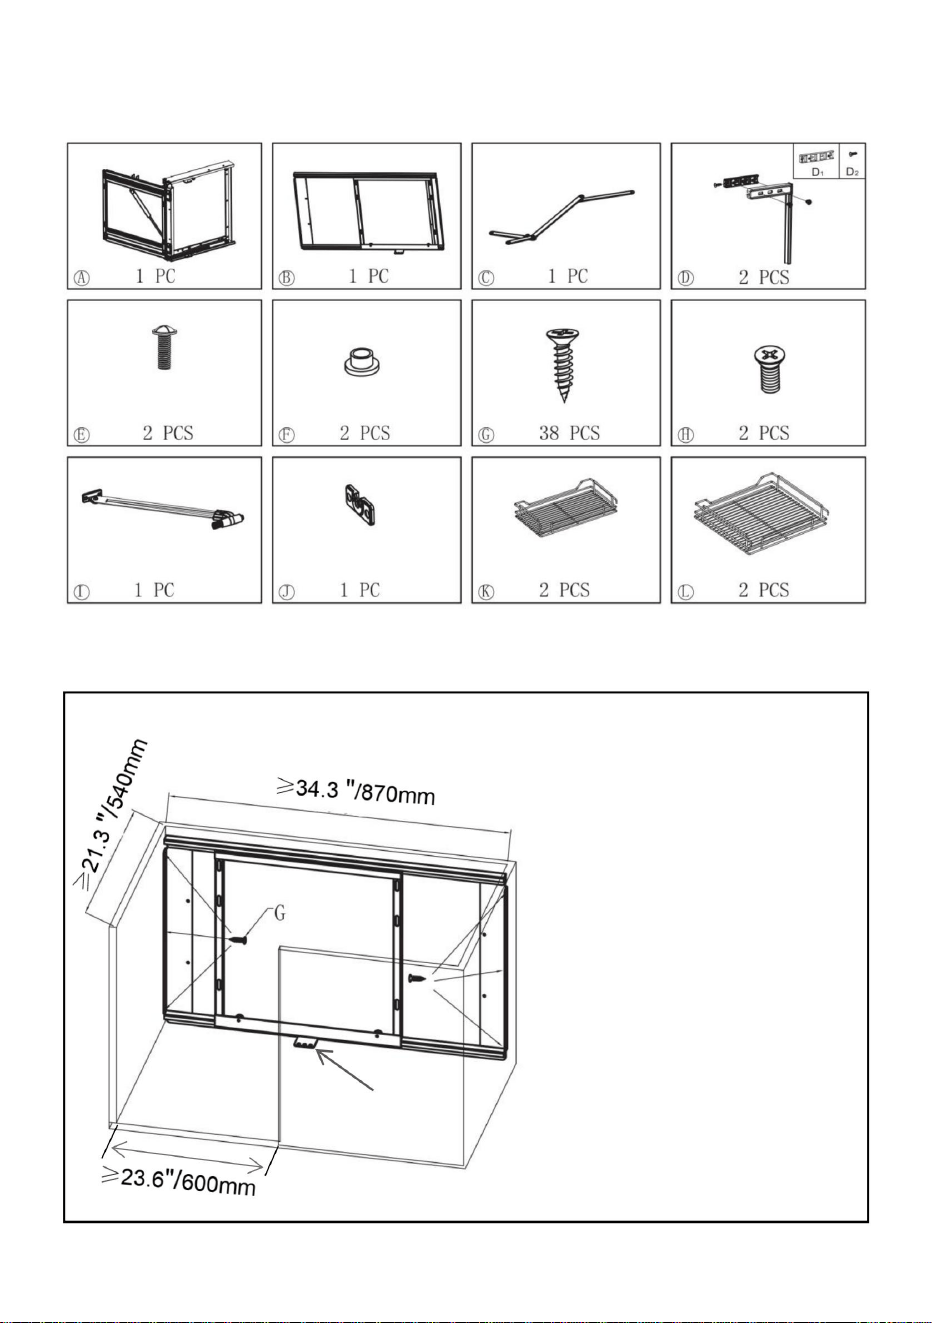
≥ 870x540x600
Left
mounting
or right
mounting

3
USE PRECAUTIONS
WARNING: TO PREVENT SERIOUS INJURY AND DEATH FROM
TIPPING:
1. This product is not a toy. Do not allow children to play with or approach
this item.
2. Use as intended only. Do not sit or stand on the product.
3. Inspect before every use. Do not use it if parts are loose or damaged.
4. Use on Kitchen cabinet only and Do not use it alone on the ground or on
the desktop.
5. Do not exceed the listed weight capacity. Tighten all knobs securely
before applying load. Be aware of dynamic loading! The sudden load
movement may briefly create an excess load, causing product failure.

4
PARTS LIST
ASSEMBLY STEPS
Step 1:
As shown in the
figure, first choose the
appropriate size of the
cabinet, and install the
frame B in the cabinet.
B
5
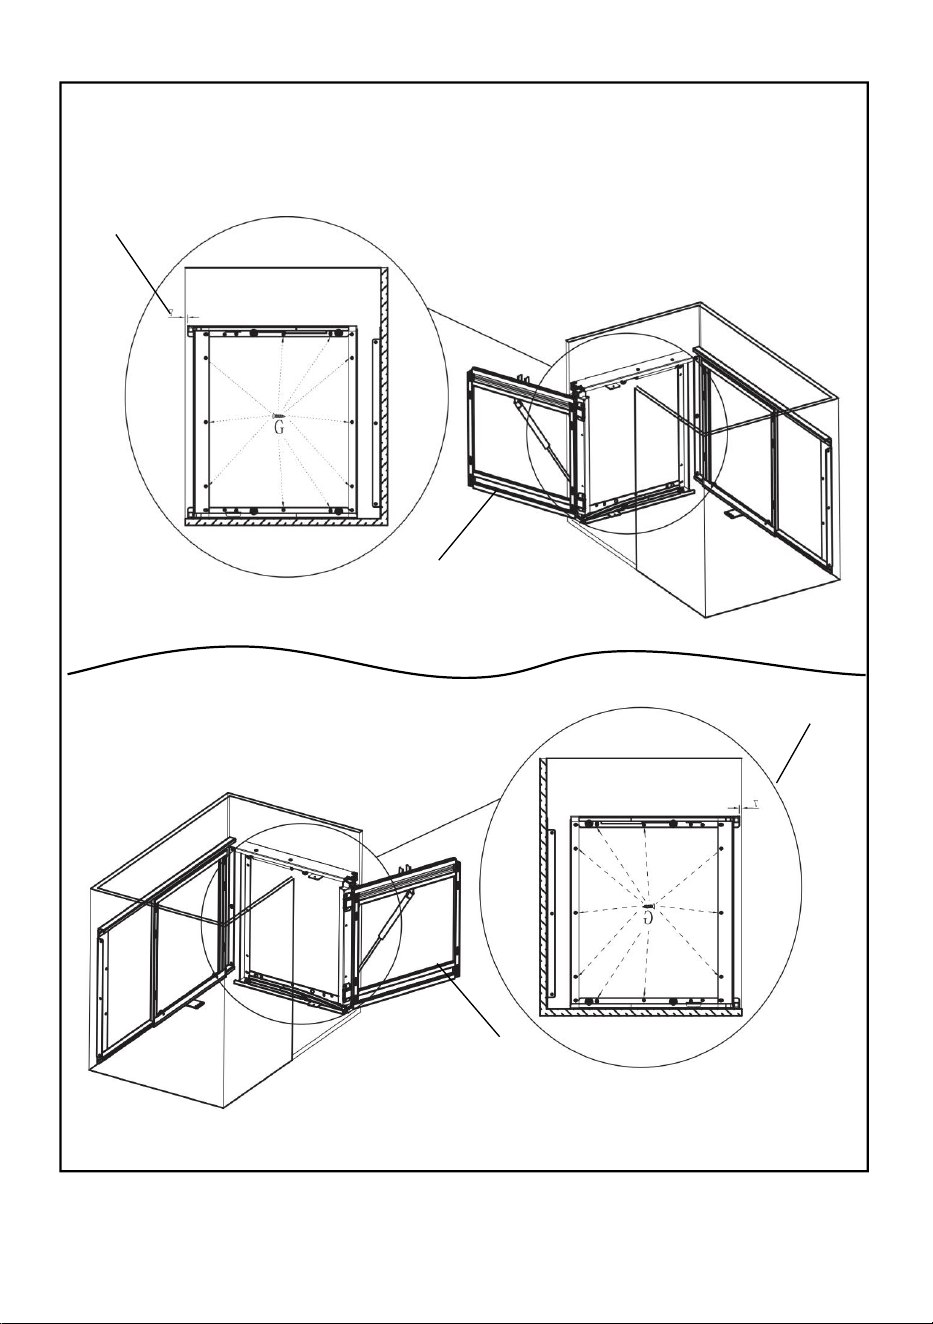
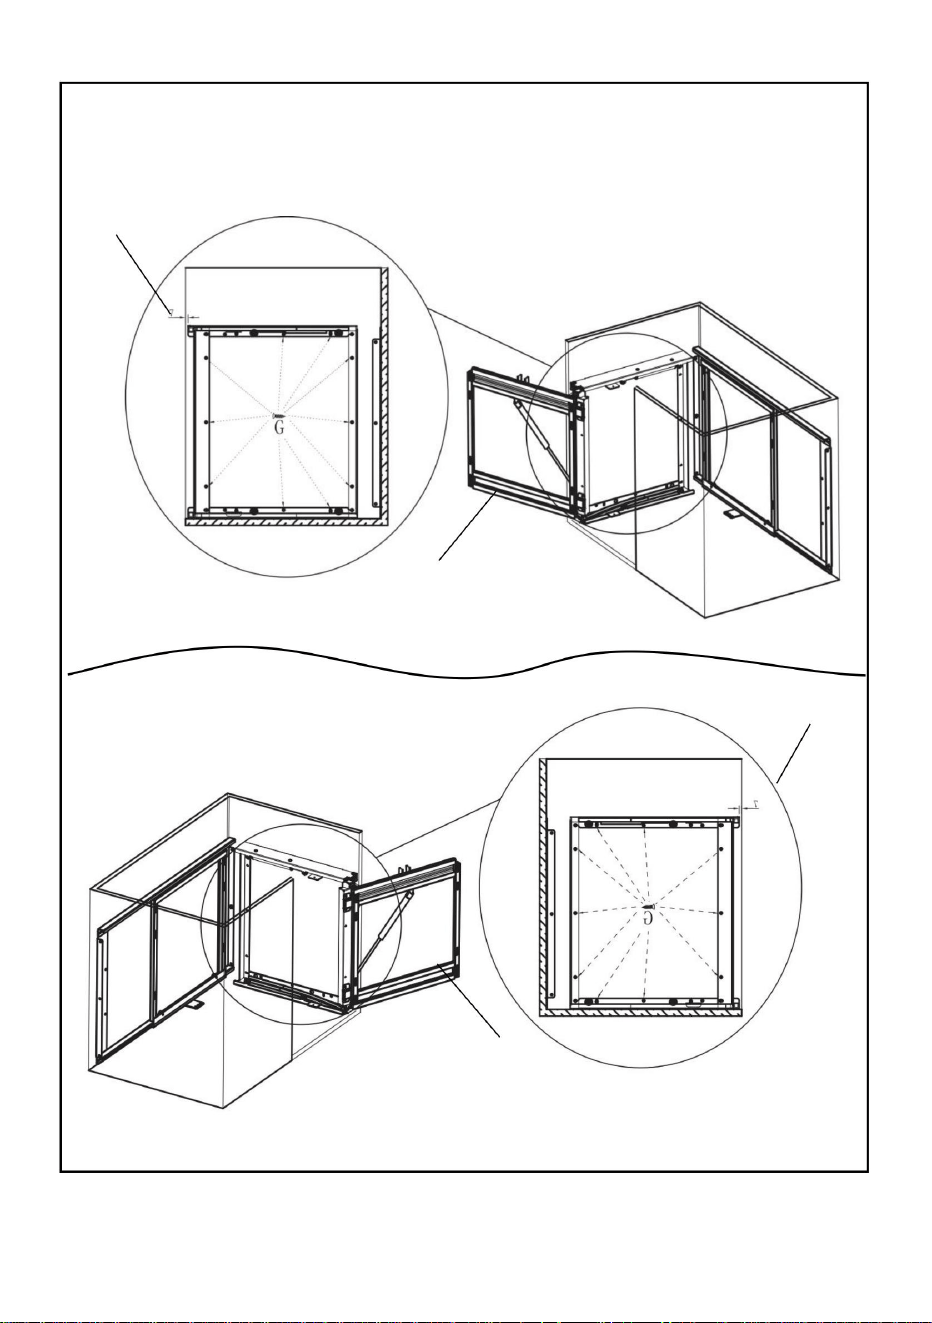
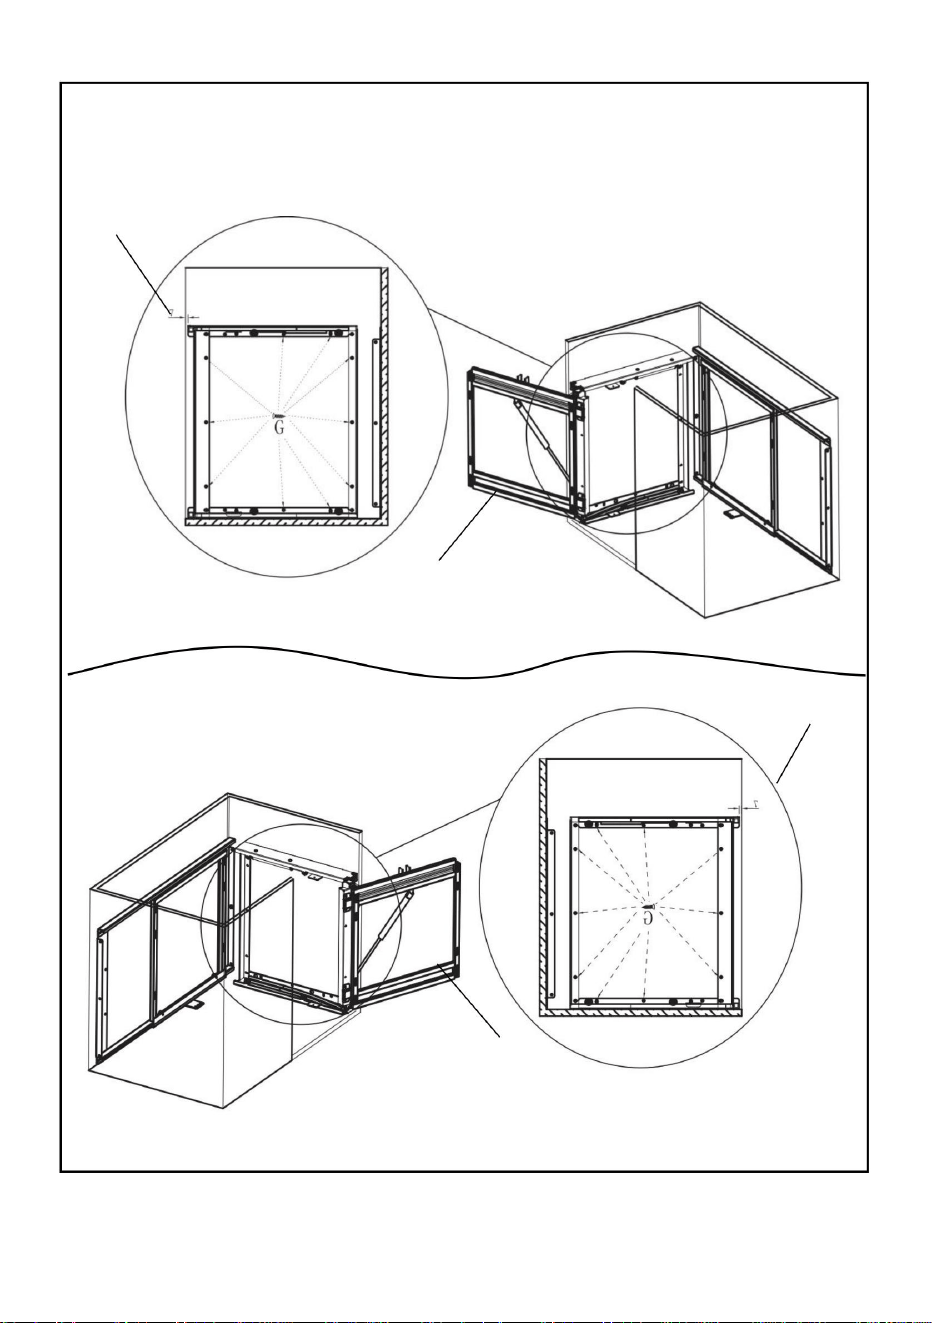
Step 2:
Install side frame A with screw G, noting the
distance between side frame and cabinet edge.
A
0.27 "/ 7mm
Install on the left
Install on the right
A
0.27 "/ 7mm

6
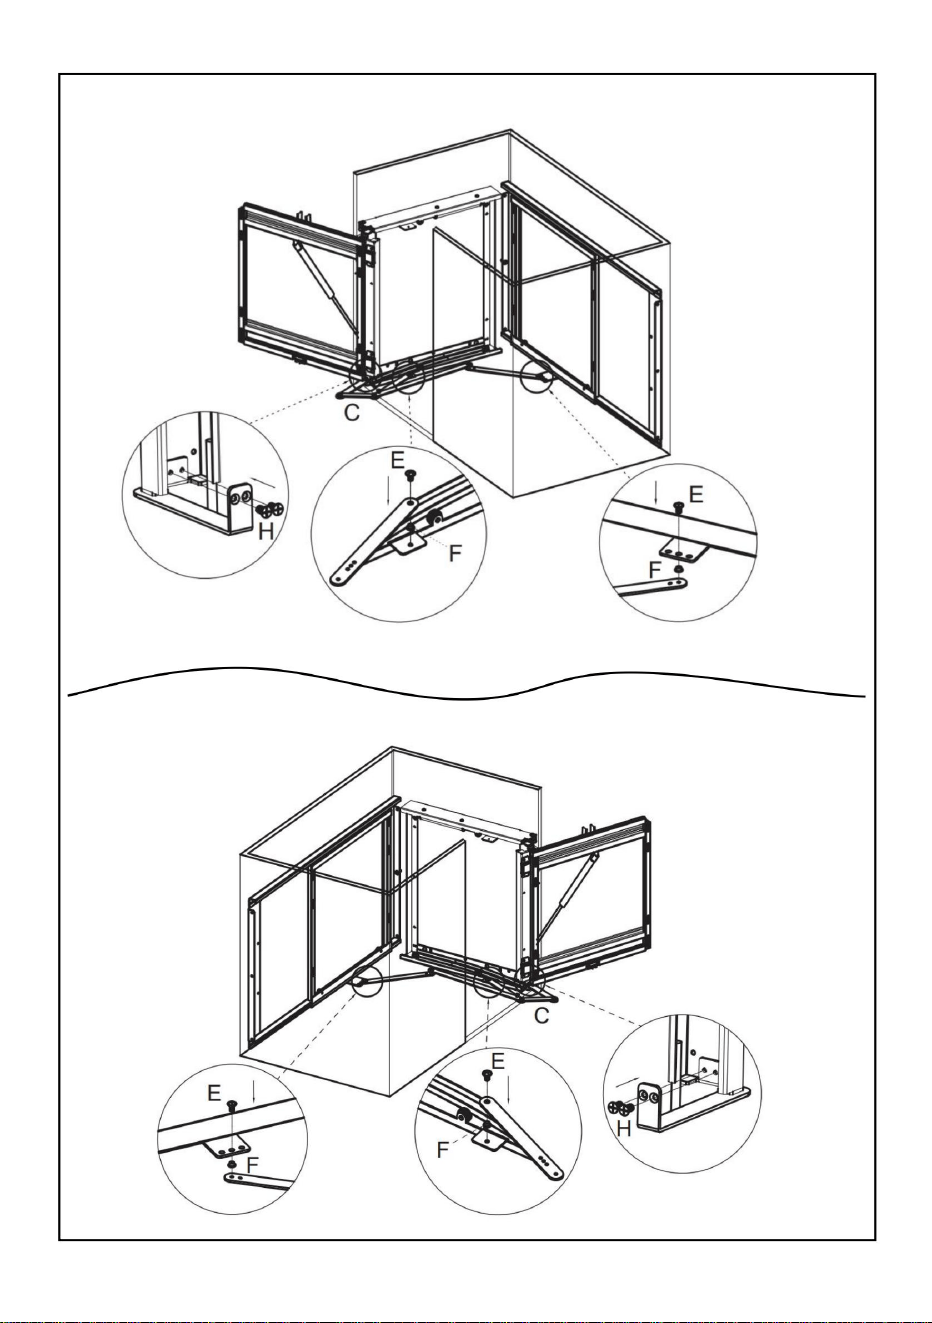
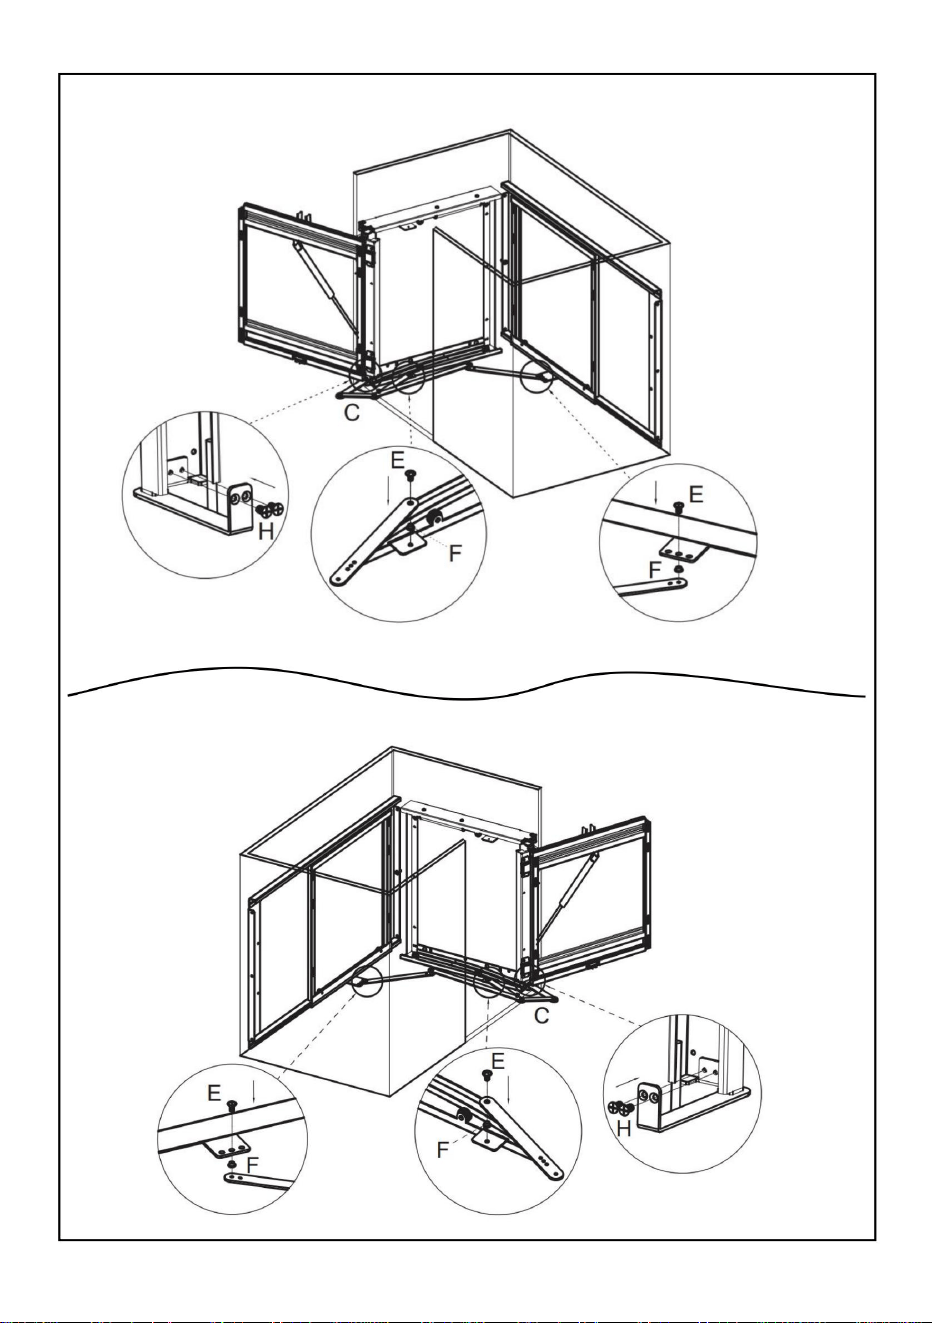
Step 3:Attach link C to the frame
Install on the left
Install on the right
7
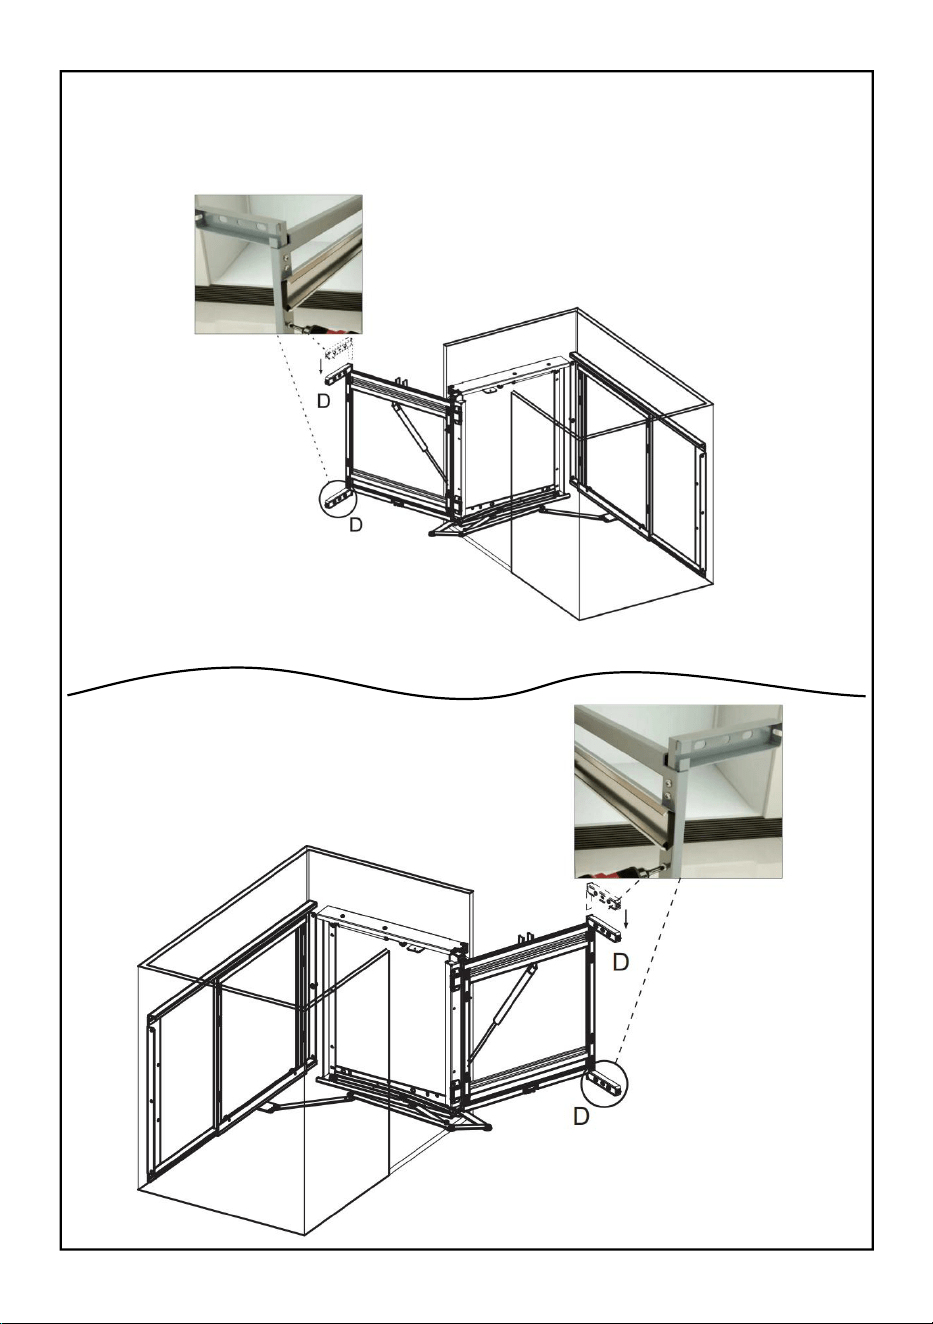
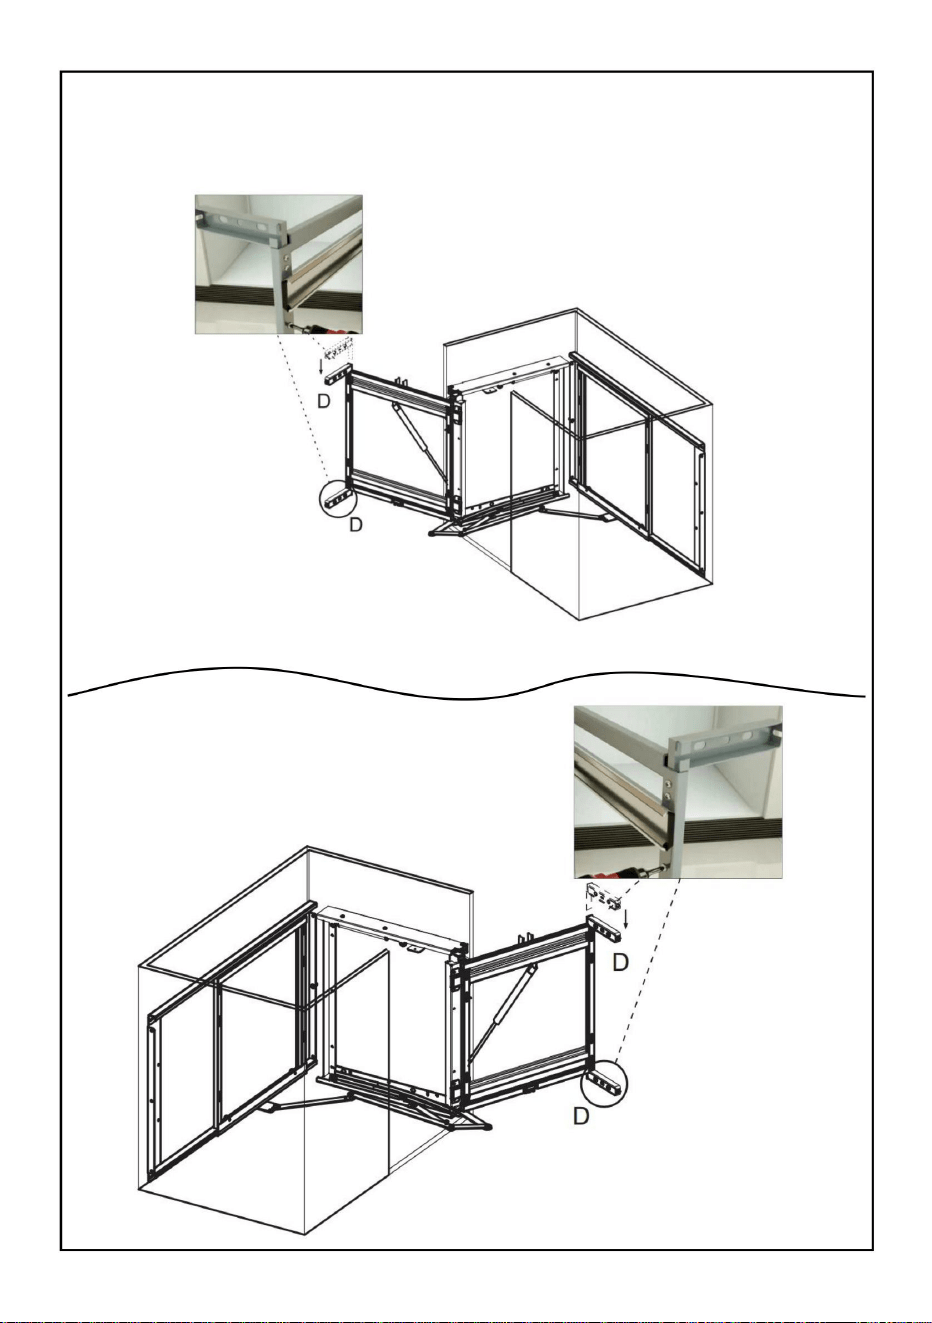
Step 4:Install the connecting blocks for the upper and lower door
panels D, as shown in the figure.
Install on the left
Install on the right
8
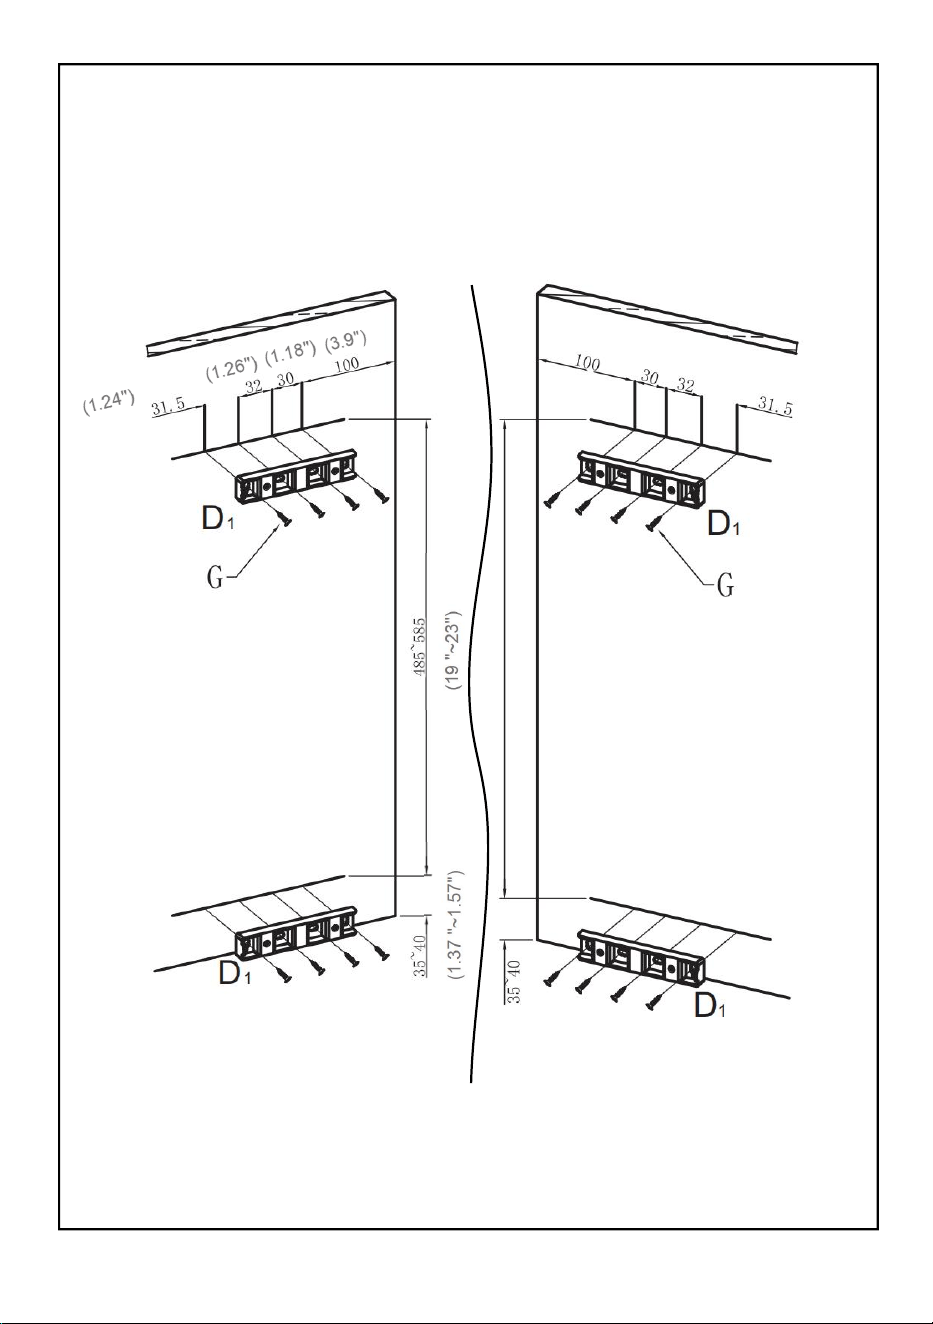
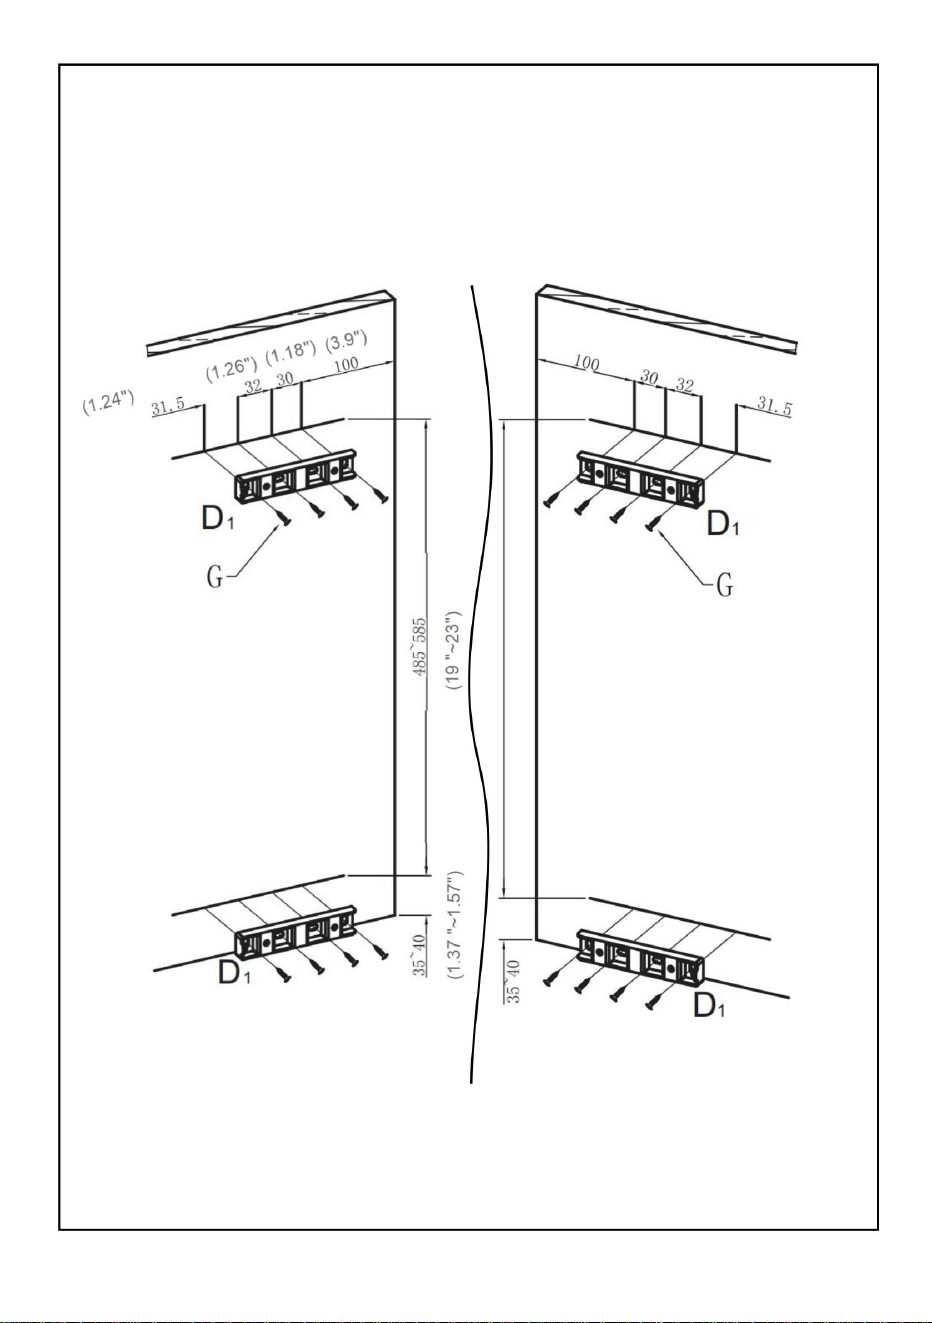
Step 5:Mark the door panels according to the following figure, and
install the door panel connector D1
Install on the left
Install on the right

9
I
A
Step 5:
1
)
Install the door panel on the side frame using screws D2.
2) Install the door panel adjusting rod I and positioning block on the side
frame and door panel using screws H and G, respectively.
Install on the left
Install on the right
A
I
10
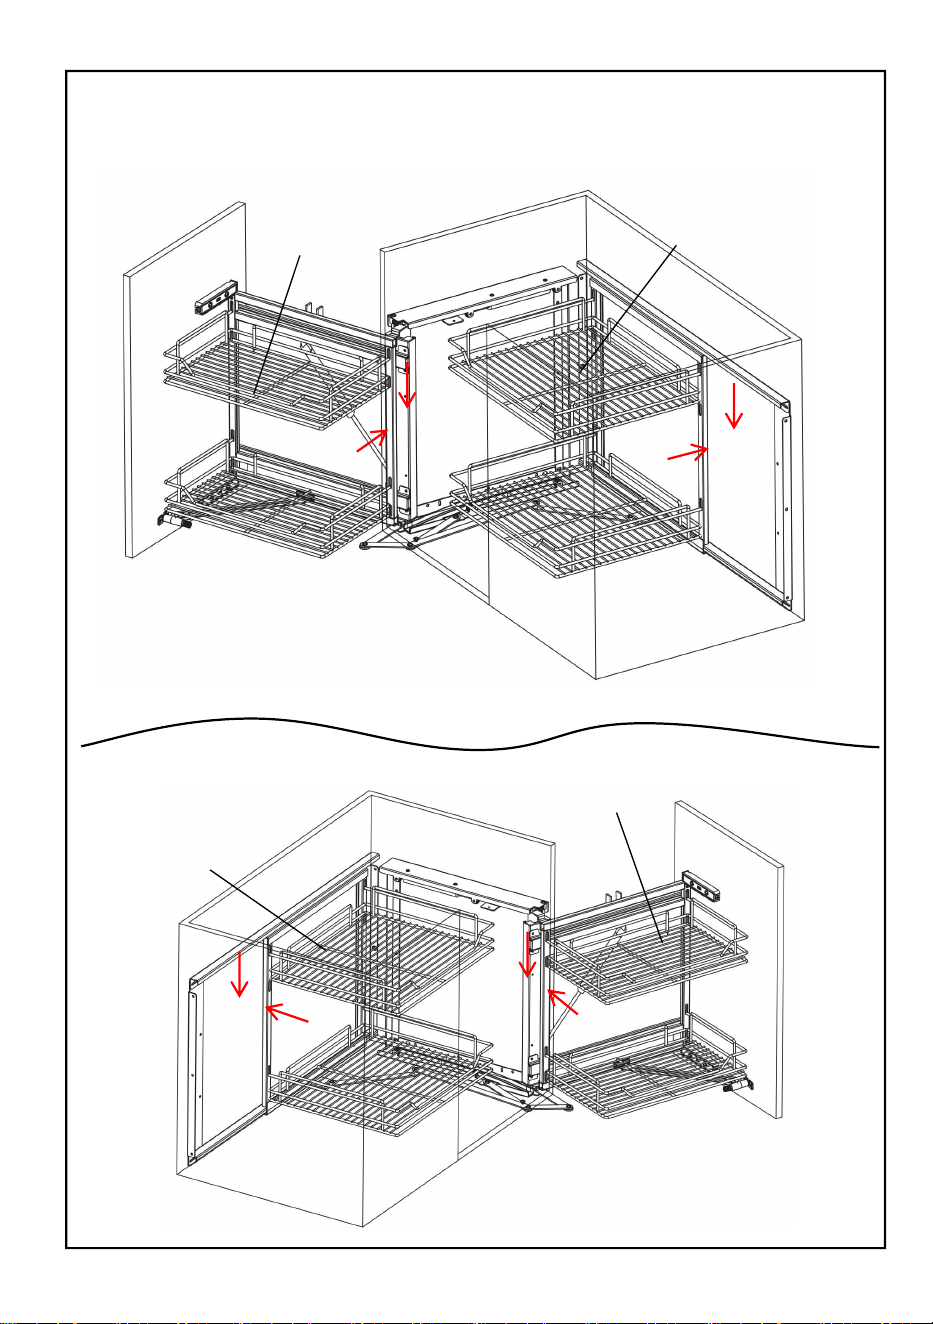
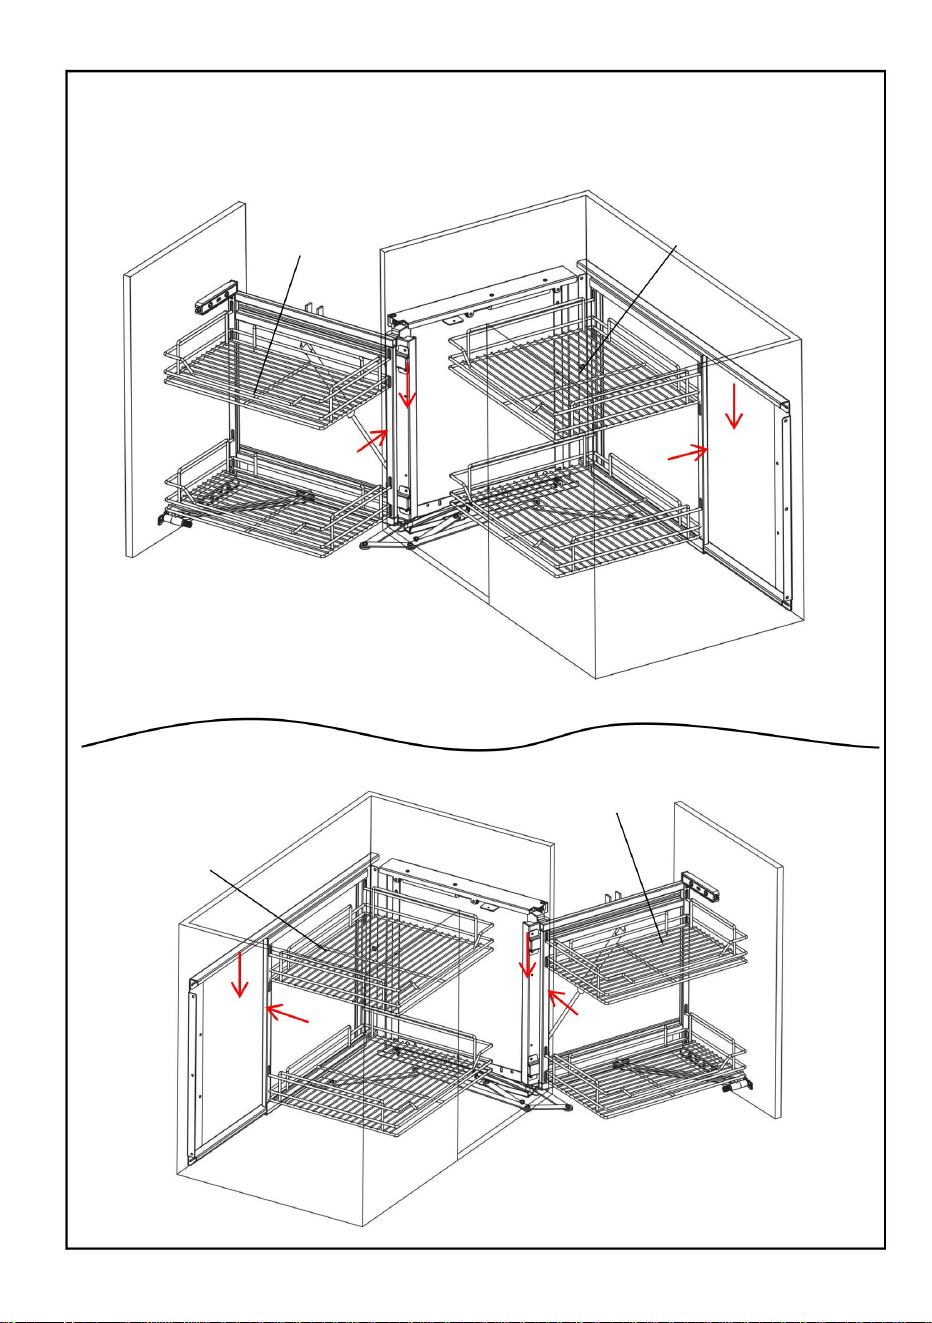
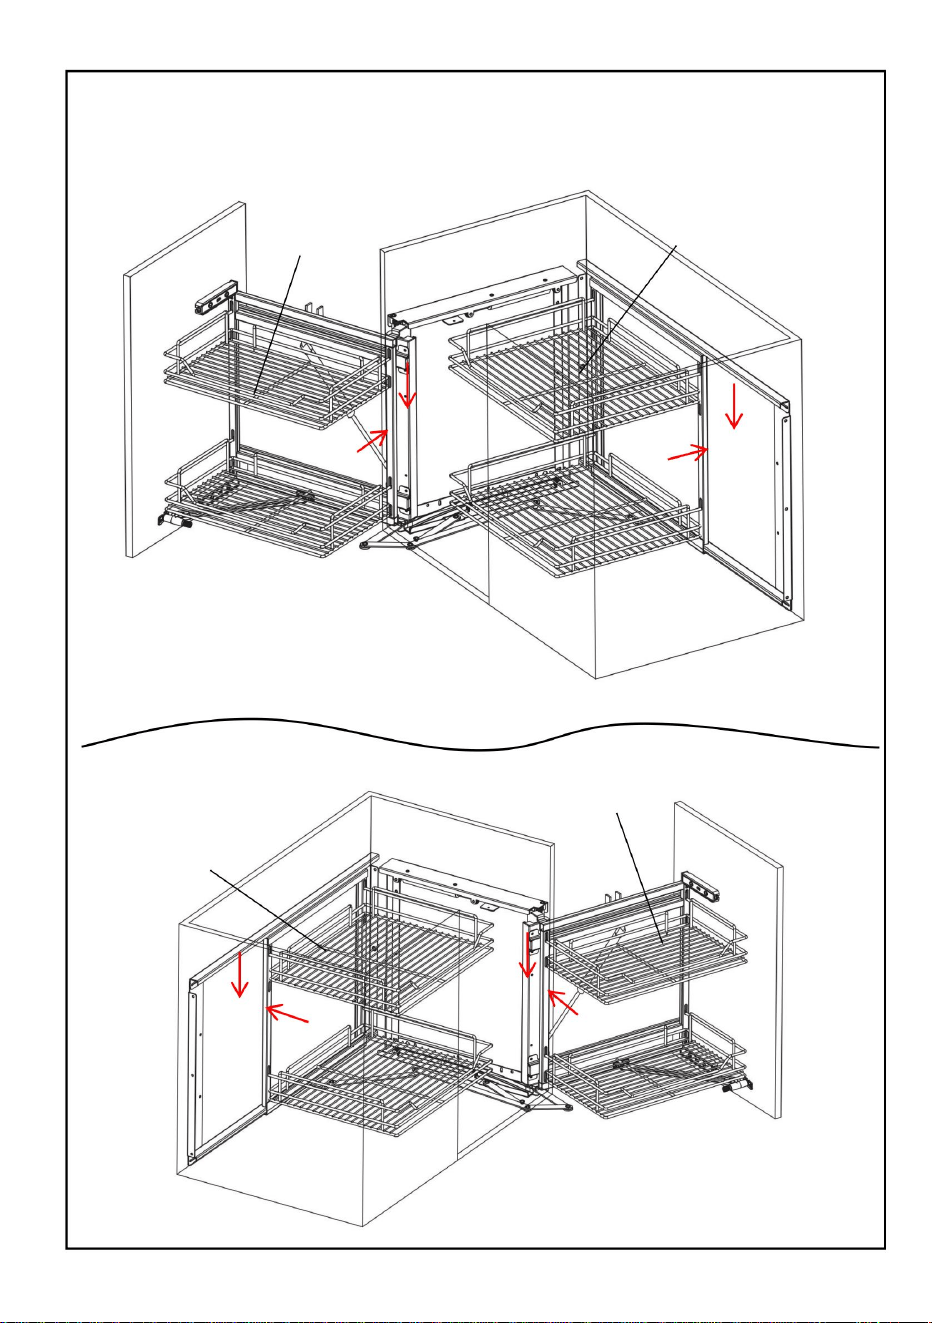
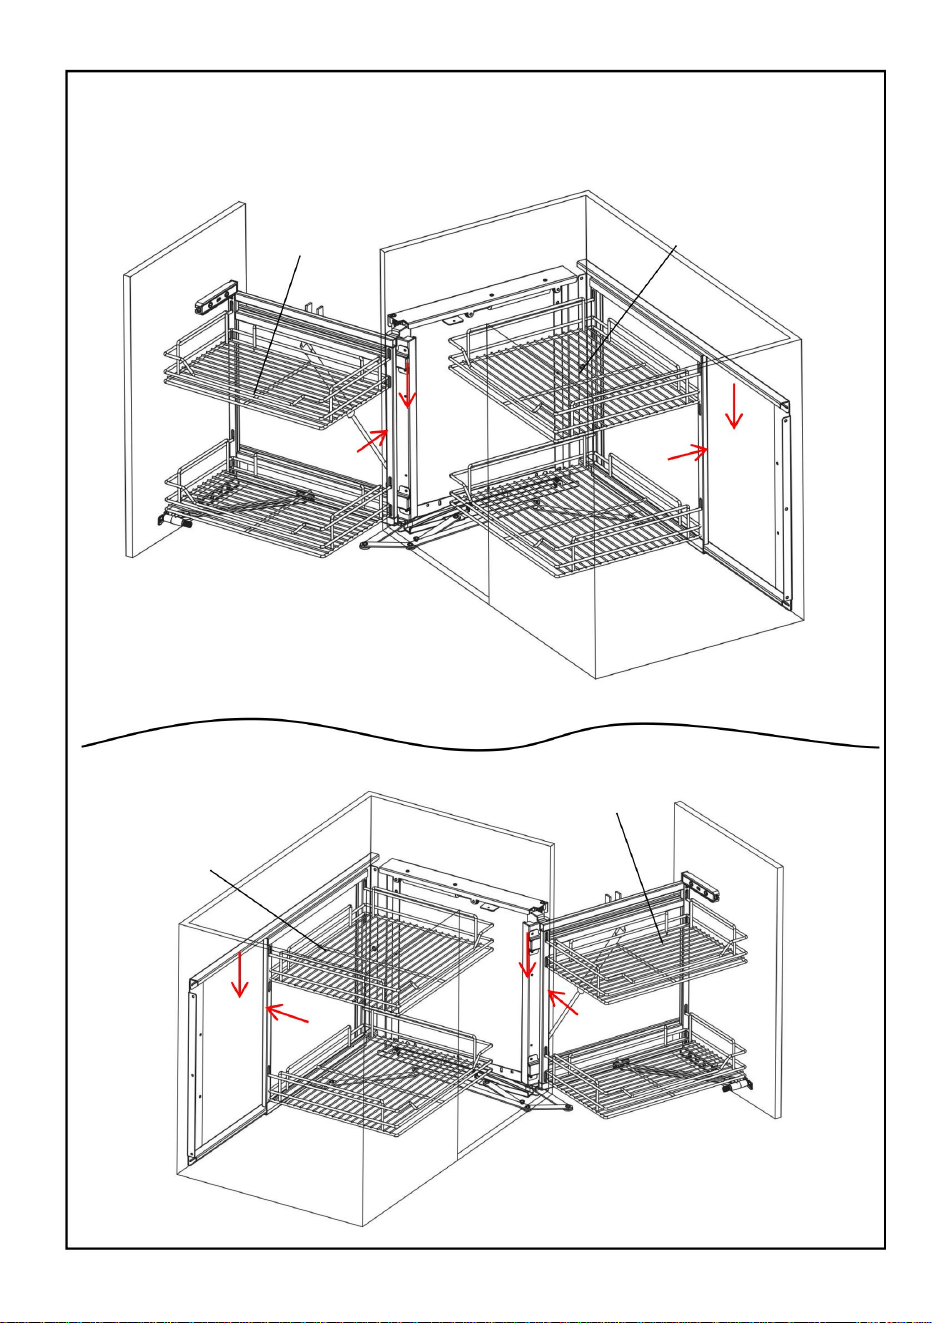
K
L
As shown in the figure, the hanging basket K and hanging basket L are
installed on the side frame and the bottom frame respectively
Install on the left
Install on the right
K
L

11
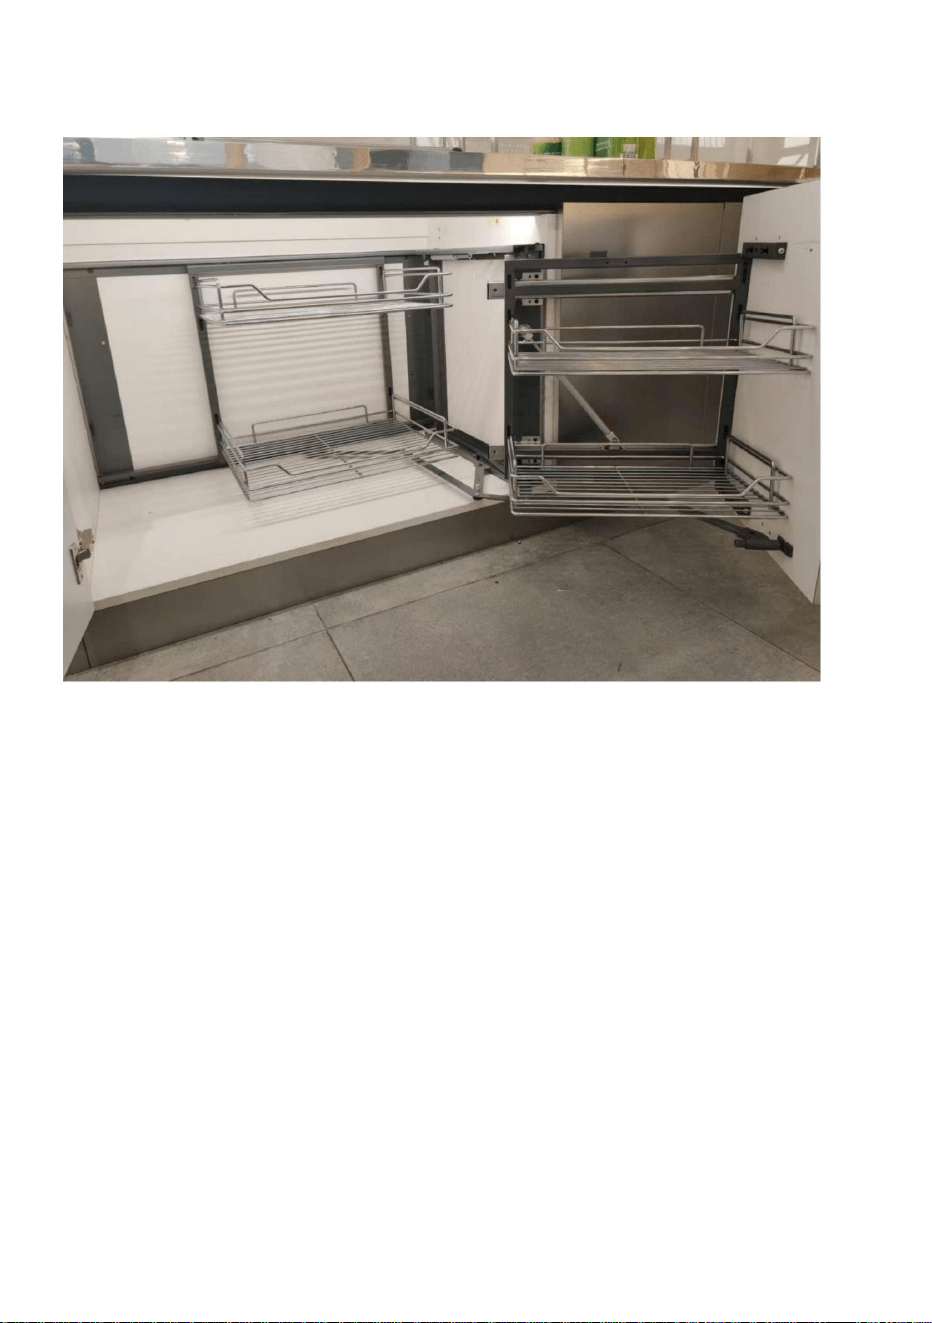
Actual assembly effect drawing(Install on the right)
Cleaning
-For cleaning, wipe the surface with a damp (not wet) cloth or wipe dry with
a clean lint free cotton cloth.
-Window cleaning liquid or a similar cleaning liquid can be used to clean
the surface.

12
Manufacturer: Shanghaimuxinmuyeyouxiangongsi
Address: Shuangchenglu 803nong11hao1602A-1609shi, baoshanqu,
shanghai 200000 CN.
EC REP: E-CrossStu GmbH.
Mainzer Landstr.69, 60329 Frankfurt am Main.
UK REP: YH CONSULTING LIMITED.
C/O YH Consulting Limited Office 147, Centurion House, London Road,
Staines-upon-Thames, Surrey, TW18 4AX
Imported to AUS: SIHAO PTY LTD.
1 ROKEVA STREETEASTWOOD NSW 2122 Australia
Imported to USA: Sanven Technology Ltd.
Suite 250, 9166 Anaheim Place, Rancho Cucamonga, CA 91730


„Sparen Sie die Hälfte“, „Halber Preis“ oder andere ähnliche Ausdrücke, die wir verwenden, stellen nur eine
Schätzung der Ersparnis dar, die Sie beim Kauf bestimmter Werkzeuge bei uns im Vergleich zu den großen Topmarken
erzielen können, und decken nicht unbedingt alle von uns angebotenen Werkzeugkategorien ab. Wir möchten Sie
freundlich daran erinnern, bei Ihrer Bestellung bei uns sorgfältig zu prüfen, ob Sie im Vergleich zu den großen
Topmarken tatsächlich die Hälfte sparen.
Wir sind weiterhin bestrebt, Ihnen Werkzeuge zu wettbewerbsfähigen Preisen anzubieten.
Technischer Support und E-Garantie-Zertifikat www.vevor.com/support
VERANSTALTER
AUSZIEHKORB FÜR BLINDE ECKEN
Machine Translated by Google

Machine Translated by Google

1
Modell: DG-900
Brauchen Sie Hilfe? Kontaktieren Sie uns!
Korb-Organizer
Ausziehbare Ecke
Haben Sie Fragen zum Produkt? Benötigen Sie technischen Support? Bitte kontaktieren
Sie uns: Technischer Support und E-Garantie-Zertifikat www.vevor.com/support
Dies ist die Originalanleitung. Bitte lesen Sie alle Anweisungen sorgfältig durch, bevor Sie das Gerät in
Betrieb nehmen. VEVOR behält sich eine klare Auslegung unserer Bedienungsanleitung vor. Das
Erscheinungsbild des Produkts richtet sich nach dem Produkt, das Sie erhalten haben. Bitte verzeihen
Sie uns, dass wir Sie nicht erneut informieren, wenn es Technologie- oder Software-Updates für unser
Produkt gibt.
Vielen Dank für den Kauf eines unserer Produkte, bitte lesen Sie sorgfältig die Montage
Anweisungen vor der Installation.
Machine Translated by Google

Montage
Modus
oder rechts
Montage
Links
ProduktgrößeModell
Laden
33,8"x21"x22"
DG-900
(860 x 535 x 560
50 Pfund (max.)
Kapazität
mm)
ÿ 870 x 540 x 600
Installation
(einlagig
25 Pfund)
Größe (mm) B * T * H
Installation
4. Gewichtskapazität und andere Produkteigenschaften gelten für eine ordnungsgemäße
Nur komplett montiertes Produkt.
5. Halten Sie den Versammlungsbereich sauber und gut beleuchtet.
6. Halten Sie während der Montage unbeteiligte Zuschauer vom Bereich fern.
eine Gefahr.
3. Nicht montieren, wenn Sie müde sind oder unter dem Einfluss von Alkohol, Drogen oder
Medikamenten stehen.
2. Tragen Sie während der Montage eine Schutzbrille und strapazierfähige Arbeitshandschuhe.
1. Die Montage muss diesen Anweisungen folgen. Eine falsche Montage kann
7. Überprüfen Sie die Einbaumaße des entsprechenden Modells des Zuges
Einbaugröße für den Einbau.
Korb, und wählen Sie den Schrank, der mit dem übereinstimmt oder in der Nähe ist
VORSICHTSMASSNAHMEN BEI DER MONTAGE
PRODUKTPARAMETER
2
Machine Translated by Google

4. Verwenden Sie es nur auf Küchenschränken und nicht allein auf dem Boden oder auf
dieser Artikel.
3. Vor jedem Gebrauch überprüfen. Nicht verwenden, wenn Teile lose oder beschädigt sind.
der Desktop.
1. Dieses Produkt ist kein Spielzeug. Erlauben Sie Kindern nicht, damit zu spielen oder sich ihm zu nähern.
2. Nur bestimmungsgemäß verwenden. Nicht auf dem Produkt sitzen oder stehen.
KIPPEN:
WARNUNG: UM SCHWERE VERLETZUNGEN UND TOD DURCH
5. Überschreiten Sie nicht die angegebene Gewichtskapazität. Ziehen Sie alle Knöpfe fest an
vor dem Aufbringen der Last. Achten Sie auf dynamische Belastung! Die plötzliche Belastung
Durch Bewegung kann es kurzzeitig zu einer Überlastung und damit zu einem Produktausfall kommen.
VORSICHTSMASSNAHMEN BEIM GEBRAUCH
3
Machine Translated by Google

Abbildung: Wählen Sie
zuerst die entsprechende
Schrankgröße aus und
installieren Sie den Rahmen B im Schrank.
Schritt 1: Wie in der
MONTAGEANLEITUNG
TEILELISTE
4
B
Machine Translated by Google
0,27 "/ 7 mm
0,27 "/ 7 mm
5
Abstand zwischen Seitenzarge und Korpuskante.
Schritt 2: Seitenrahmen A mit Schraube G montieren, dabei die
Einbau links
A
Einbau rechts
A
Machine Translated by Google
6
Schritt 3: Befestigen Sie Link C am Rahmen
Einbau links
Einbau rechts
Machine Translated by Google

Einbau rechts
Einbau links
Platten D, wie in der Abbildung gezeigt.
Schritt 4:Montieren Sie die Verbindungsblöcke für die obere und untere Tür
7
Machine Translated by Google
Einbau rechts
Einbau links
Installieren Sie den Türverkleidungsverbinder D1
Schritt 5: Markieren Sie die Türblätter gemäß der folgenden Abbildung und
8
Machine Translated by Google

Einbau rechts
A
ICH
A
ICH
Einbau links
1ÿMontieren Sie die Türverkleidung mit den Schrauben D2 am Seitenrahmen.
2) Montieren Sie die Türblatt-Einstellstange I und den Positionierungsblock mit den
Schrauben H bzw. G am Seitenrahmen und am Türblatt.
Schritt 5:
9
Machine Translated by Google
10
Wie in der Abbildung gezeigt, sind der Hängekorb K und der Hängekorb
L jeweils am Seitenrahmen und am Bodenrahmen angebracht
Einbau links
M
M
K
Einbau rechts
K
Machine Translated by Google

Reinigung
-Zur Reinigung der Oberfläche kann Fensterputzmittel oder ein ähnliches Reinigungsmittel verwendet werden.
- Wischen Sie die Oberfläche zum Reinigen mit einem feuchten (nicht nassen) Tuch ab oder reiben Sie sie mit einem
sauberen, fusselfreien Baumwolltuch trocken.
Tatsächliche Montageeffektzeichnung (Installation rechts)
11
Machine Translated by Google

12
C/O YH Consulting Limited Office 147, Centurion House, London Road, Staines-upon-
Thames, Surrey, TW18 4AX
UK-VERTRETER: YH CONSULTING LIMITED.
Nach AUS importiert: SIHAO PTY LTD.
Adresse: Shuangchenglu 803nong11hao1602A-1609shi, baoshanqu, Shanghai
200000 CN.
Mainzer Landstr.69, 60329 Frankfurt am Main.
EG-Vertreter: E-CrossStu GmbH.
Hersteller: Shanghaimuxinmuyeyouxiangongsi
1 ROKEVA STREETEASTWOOD NSW 2122 Australien
In die USA importiert: Sanven Technology Ltd.
Suite 250, 9166 Anaheim Place, Rancho Cucamonga, CA 91730
Machine Translated by Google

Machine Translated by Google


«Économisezlamoitié»,«Moitiéprix»outouteautreexpressionsimilaireutiliséeparnousnereprésente
qu'uneestimationdeséconomiesquevouspourriezréaliserenachetantcertainsoutilscheznousparrapportaux
grandesmarquesetnecouvrepasnécessairementtouteslescatégoriesd'outilsquenousproposons.Nous
vousrappelonsdebienvouloirvérifiersoigneusementlorsquevouspassezunecommandecheznoussivous
économisezréellementlamoitiéparrapportauxgrandesmarques.
Nouscontinuonsànousengageràvousfournirdesoutilsàdesprixcompétitifs.
Assistancetechniqueetcertificatdegarantieélectroniquewww.vevor.com/support
ORGANISATEUR
PANIEREXTRACTIBLEPOURCOINAVEUGLE
Machine Translated by Google

Machine Translated by Google
1
Organisateurdepanier
BESOIND'AIDE?CONTACTEZNOUS!
Modèle:DG900
Coinmortrétractable
Vousavezdesquestionssurnosproduits?Vousavezbesoind'assistancetechnique?N'hésitezpasànous
contacter:Assistancetechniqueetcertificatdegarantieélectroniquewww.vevor.com/support
instructionsavantl'installation.
Mercid'avoirachetél'undenosproduits,veuillezlireattentivementlemontage
Ils'agitdelanoticed'utilisationd'origine.Veuillezlireattentivementtouteslesinstructions
dumanuelavantdel'utiliser.VEVORseréserveledroitd'interpréterclairementnotre
manueld'utilisation.L'apparenceduproduitdépendduproduitquevousavezreçu.
Veuilleznousexcuser,nousnevousinformeronsplusencasdemiseàjourtechnologique
oulogicielledenotreproduit.
Machine Translated by Google

montage
mode
ouàdroite
montage
Gauche
TailleduproduitModèle
Chargement
33,8"x21"x22"
DG900
(860x535x560
50livres(max.)
Capacité
mm)
≥870x540x600
Installation
(coucheunique
25livres)
taille(mm)L*P*H
Installation
4.Lacapacitédepoidsetlesautrescapacitésduproduits'appliquentàunproduitcorrectementet
produitentièrementassembléuniquement.
5.Gardezlazonedemontagepropreetbienéclairée.
panieretsélectionnezl'armoirecompatibleouprochedela
2.Portezdeslunettesdesécuritéetdesgantsdetravailrésistantspendantl’assemblage.
3.Nemontezpaslorsquevousêtesfatiguéousousl'influencedel'alcool,dedroguesoude
médicaments.
undanger.
1.L'assemblagedoitsuivrecesinstructions.Unassemblageincorrectpeutentraîner
6.Gardezlesspectateurshorsdelazonependantlemontage.
tailled'installationpourl'installation.
7.Vérifiezlatailled'installationdumodèlecorrespondantdelatraction
PRÉCAUTIONSD'ASSEMBLAGE
PARAMÈTRESDUPRODUIT
2
Machine Translated by Google

cetarticle.
3.Inspectezl'appareilavantchaqueutilisation.Nel'utilisezpassidespiècessontdesserréesouendommagées.
4.Utiliseruniquementsurlesarmoiresdecuisineetnepasl'utiliserseulsurlesolousur
lemouvementpeutbrièvementcréerunechargeexcessive,provoquantunedéfaillanceduproduit.
1.Ceproduitn'estpasunjouet.Nelaissezpaslesenfantsjoueravecous'enapprocher.
2.Utiliseruniquementcommeprévu.Nepass'asseoirnisetenirdeboutsurleproduit.
POURBOIRE:
AVERTISSEMENT:POURÉVITERDESBLESSURESGRAVESETLAMORT
5.Nedépassezpaslacapacitédepoidsindiquée.Serrezfermementtouslesboutons
lebureau.
avantd'appliquerlacharge.Soyezconscientdelachargedynamique!Lachargesoudaine
PRÉCAUTIONSD'EMPLOI
3
Machine Translated by Google

figure,choisissezd'abordla
tailleappropriéedel'armoire
etinstallezlecadreBdans
l'armoire.
Étape1:Commeindiquédansla
LISTEDESPIÈCES
ÉTAPESD'ASSEMBLAGE
4
B
Machine Translated by Google

0,27"/7mm
0,27"/7mm
5
distanceentrelecadrelatéraletleborddel'armoire.
Étape2:InstallezlecadrelatéralAaveclavisG,ennotantle
Installeràdroite
UN
Installeràgauche
UN
Machine Translated by Google
Installeràdroite
Installeràgauche
Étape3:FixezlelienCaucadre
6
Machine Translated by Google

Installeràdroite
Installeràgauche
panneauxD,commeindiquésurlafigure.
Étape4:Installezlesblocsdeconnexionpourlaportesupérieureetinférieure
7
Machine Translated by Google

Installeràdroite
Installeràgauche
installerleconnecteurdupanneaudeporteD1
Étape5:Marquezlespanneauxdeporteconformémentàlafiguresuivanteet
8
Machine Translated by Google

je
UN
Installeràdroite
UN
je
Installeràgauche
2)InstallezlatigederéglagedupanneaudeporteIetleblocdepositionnementsurle
cadrelatéraletlepanneaudeporteàl'aidedesvisHetG,respectivement.
1)Installezlepanneaudeportesurlecadrelatéralàl'aidedesvisD2.
Étape5:
9
Machine Translated by Google
Installeràgauche
L
L
K
Installeràdroite
K
Commelemontrelafigure,lepaniersuspenduKetlepaniersuspenduL
sontinstallésrespectivementsurlecadrelatéraletlecadreinférieur
10
Machine Translated by Google

Pourlenettoyage,essuyezlasurfaceavecunchiffonhumide(pasmouillé)ouessuyezavecun
chiffonencotonproprenonpelucheux.
Unliquidenettoyantpourvitresouunliquidedenettoyagesimilairepeutêtreutilisépour
nettoyerlasurface.
Nettoyage
Dessindel'effetd'assemblageréel(installationàdroite)
11
Machine Translated by Google

12
A/SYHConsultingLimitedBureau147,CenturionHouse,LondonRoad,Staines
uponThames,Surrey,TW184AX
REPRÉSENTANTAUROYAUMEUNI:YHCONSULTINGLIMITED.
ImportéenAUS:SIHAOPTYLTD.
1ROKEVASTREETEASTWOODNSW2122Australie
CEREP:ECrossStuGmbH.
MainzerLandstr.69,60329FrancfortsurleMain.
Adresse:Shuangchenglu803nong11hao1602A1609shi,baoshanqu,shanghai
200000CN.
Fabricant:Shanghaimuxinmuyeyouxiangongsi
Suite250,9166AnaheimPlace,RanchoCucamonga,CA91730
ImportéauxÉtatsUnis:SanvenTechnologyLtd.
Machine Translated by Google

Machine Translated by Google


"Save Half", "Half Price" of andere soortgelijke uitdrukkingen die wij gebruiken, geven alleen een schatting van de
besparingen die u kunt behalen door bepaalde gereedschappen bij ons te kopen in vergelijking met de grote topmerken en
betekent niet noodzakelijkerwijs dat alle categorieën gereedschappen die wij aanbieden, worden gedekt. Wij herinneren
u eraan om zorgvuldig te controleren of u daadwerkelijk de helft bespaart in vergelijking met de grote topmerken wanneer u
een bestelling bij ons plaatst.
Wij streven er voortdurend naar om u gereedschappen tegen concurrerende prijzen te leveren.
Technische ondersteuning en e-garantiecertificaat www.vevor.com/support
ORGANISATOR
Blinde hoek uittrekbare mand
Machine Translated by Google

Machine Translated by Google

1
Model: DG-900
HULP NODIG? NEEM CONTACT MET ONS OP!
Mandorganizer
Blinde hoek uittrekbaar
Heeft u vragen over het product? Heeft u technische ondersteuning nodig? Neem dan gerust contact
met ons op: Technische ondersteuning en E-garantiecertificaat www.vevor.com/support
Dit is de originele instructie, lees alle handleidingen zorgvuldig door voordat u het product gebruikt.
VEVOR behoudt zich een duidelijke interpretatie van onze gebruikershandleiding voor. Het uiterlijk van
het product is afhankelijk van het product dat u hebt ontvangen. Vergeef ons dat we u niet opnieuw zullen
informeren als er technologie- of software-updates voor ons product zijn.
Bedankt voor de aankoop van een van onze producten. Lees de montagehandleiding zorgvuldig door.
instructies vóór de installatie.
Machine Translated by Google
montage
modus
of juist
montage
Links
ProductgrootteModel
Laden
33,8"x21"x22"
DG-900
(860x 535x560
50 lbs (maximaal)
Capaciteit
mm)
ÿ 870x540x600
Installatie
(enkele laag
25 pond)
afmetingen (mm)B*D*H
Installatie
Enkel volledig gemonteerd product.
4. Het draagvermogen en andere producteigenschappen zijn van toepassing op een correct en
5. Zorg ervoor dat de verzamelplaats schoon en goed verlicht is.
6. Houd omstanders uit de buurt tijdens de montage.
2. Draag tijdens de montage een veiligheidsbril en stevige werkhandschoenen.
3. Kom niet bijeen als u moe bent of onder invloed van alcohol, drugs of medicijnen.
een gevaar.
1. De montage moet volgens deze instructies worden uitgevoerd. Onjuiste montage kan
7. Controleer de installatiemaat van het overeenkomstige model van de trekhaak
installatiegrootte voor installatie.
mandje en selecteer de kast die overeenkomt met of dicht bij de
MONTAGEVOORZORGSMAATREGELEN
PRODUCTPARAMETERS
2
Machine Translated by Google

4. Gebruik het alleen op keukenkastjes en gebruik het niet alleen op de grond of op
dit item.
3. Inspecteer voor elk gebruik. Gebruik het niet als onderdelen los of beschadigd zijn.
het bureaublad.
1. Dit product is geen speelgoed. Laat kinderen niet met het product spelen of het benaderen.
2. Gebruik alleen zoals bedoeld. Ga niet op het product zitten of staan.
FOOIEN:
WAARSCHUWING: OM ERNSTIG LETSEL EN DE DOOD TE VOORKOMEN
5. Overschrijd het vermelde draagvermogen niet. Draai alle knoppen stevig vast
voordat u belasting toepast. Wees u bewust van dynamische belasting! De plotselinge belasting
Beweging kan kortstondig een overbelasting veroorzaken, waardoor het product defect raakt.
GEBRUIK VOORZORGSMAATREGELEN
3
Machine Translated by Google

afbeelding, kies eerst de
juiste maat van de kast en
monteer frame B in de kast.
Stap 1: Zoals weergegeven in de
ONDERDELENLIJST
MONTAGESTAPPEN
B
4
Machine Translated by Google

0,27 "/ 7 mm
0,27 "/ 7 mm
5
afstand tussen zijframe en kastrand.
Stap 2: Monteer zijframe A met schroef G, waarbij u rekening houdt met de
Links installeren
A
Rechts installeren
A
Machine Translated by Google

Links installeren
Rechts installeren
Stap 3: Bevestig schakel C aan het frame
6
Machine Translated by Google

Rechts installeren
Links installeren
panelen D, zoals weergegeven in de afbeelding.
Stap 4: Monteer de verbindingsblokken voor de boven- en onderdeur
7
Machine Translated by Google

Links installeren
Rechts installeren
installeer de deurpaneelconnector D1
Stap 5: Markeer de deurpanelen volgens de volgende afbeelding en
8
Machine Translated by Google

Rechts installeren
A
I
A
I
Links installeren
2) Monteer de deurpaneelverstelstang I en het positioneringsblok op het zijframe en
het deurpaneel met behulp van de schroeven H en G.
1) Monteer het deurpaneel op het zijframe met behulp van schroeven D2.
Stap 5:
9
Machine Translated by Google

Links installeren
Ik
Ik
Ik
Rechts installeren
Ik
Zoals weergegeven in de afbeelding zijn de hangmand K en de hangmand L
respectievelijk op het zijframe en het onderste frame geïnstalleerd
10
Machine Translated by Google

- Voor het reinigen veegt u het oppervlak af met een vochtige (geen natte) doek of droogt u het af met
een schone, pluisvrije katoenen doek.
- Om het oppervlak schoon te maken, kunt u een glasreiniger of een vergelijkbare reinigingsvloeistof
gebruiken.
Schoonmaak
Werkelijke montage-effecttekening ( rechts installeren)
11
Machine Translated by Google

12
C/O YH Consulting Limited Kantoor 147, Centurion House, London Road, Staines-upon-
Thames, Surrey, TW18 4AX
VK VERTEGENWOORDIGING: YH CONSULTING LIMITED.
Geïmporteerd naar AUS: SIHAO PTY LTD.
1 ROKEVA STRAAT EASTWOOD NSW 2122 Australië
EG-REP: E-CrossStu GmbH.
Mainzer Landstr.69, 60329 Frankfurt am Main.
Adres: Shuangchenglu 803nong11hao1602A-1609shi, baoshanqu, shanghai 200000
CN.
Fabrikant: Shanghaimuxinmuyeyouxiangongsi
Geïmporteerd naar de VS: Sanven Technology Ltd.
Suite 250, 9166 Anaheim Place, Rancho Cucamonga, CA 91730
Machine Translated by Google

Machine Translated by Google


ARRANGÖR
BLIND HÖRN UTDRAGSKORG
Teknisk support och e-garanticertifikat www.vevor.com/support
Vi fortsätter att vara engagerade i att ge dig verktyg till konkurrenskraftiga priser.
"Spara hälften", "halva priset" eller andra liknande uttryck som används av oss representerar
bara en uppskattning av besparingar du kan dra nytta av att köpa vissa verktyg hos oss jämfört med de
stora toppmärkena och betyder inte nödvändigtvis att täcka alla kategorier av verktyg som erbjuds av
oss. Du påminns vänligen om att noggrant kontrollera när du gör en beställning hos oss om du faktiskt
sparar hälften i jämförelse med de främsta stora varumärkena.
Machine Translated by Google

Machine Translated by Google

instruktioner innan installationen.
Tack för att du köpte en av våra produkter, läs noggrant igenom monteringen
Detta är den ursprungliga instruktionen, läs alla instruktioner noggrant innan du
använder den. VEVOR reserverar sig för en tydlig tolkning av vår användarmanual.
Utseendet på produkten är beroende av den produkt du fått. Ursäkta oss att vi inte
kommer att informera dig igen om det finns någon teknik eller mjukvaruuppdateringar
på vår produkt.
Modell: DG-900
BEHÖVER HJÄLP? KONTAKTA OSS!
Korgorganisatör
Utdragbar blindhörna
Har du produktfrågor? Behöver du teknisk support? Kontakta oss gärna: Teknisk
support och e-garanticertifikat www.vevor.com/support
1
Machine Translated by Google
4. Viktkapacitet och andra produktegenskaper gäller för en korrekt och
endast färdigmonterad produkt.
5. Håll monteringsområdet rent och väl upplyst.
6. Håll åskådare borta från området under monteringen.
2. Använd skyddsglasögon och kraftiga arbetshandskar vid montering.
3. Sätt dig inte ihop när du är trött eller påverkad av alkohol, droger eller mediciner.
en fara.
1. Montering måste följa dessa instruktioner. Felaktig montering kan vara
7. Kontrollera monteringsstorleken för motsvarande modell av draget
installationsstorlek för installation.
korg och välj det skåp som överensstämmer med eller nära
2
storlek (mm) B*D*H
25 lbs)
Installation
montering
50 lbs (max)
Kapacitet
ÿ 870x540x600
(enkelt lager
Installation
Modell Produktstorlek
DG-900
(860 x 535 x 560
Belastning
33,8"x21"x22"
läge
eller höger
mm)
montering
Vänster
FÖRSIKTIGHETSÅTGÄRDER FÖR MONTERING
PRODUKTPARAMETRAR
Machine Translated by Google

2. Använd endast på avsett sätt. Sitt eller stå inte på produkten.
4. Använd endast på köksskåp och använd den inte ensam på marken eller på
denna artikel.
skrivbordet.
1. Denna produkt är inte en leksak. Låt inte barn leka med eller närma sig
3. Inspektera före varje användning. Använd den inte om delar är lösa eller skadade.
TIPPNING:
VARNING: FÖR ATT FÖREBYGGA ALLVARLIGA SKADA OCH DÖDSFALL AV
5. Överskrid inte den angivna viktkapaciteten. Dra åt alla knoppar ordentligt
innan du applicerar belastning. Var uppmärksam på dynamisk laddning! Den plötsliga belastningen
rörelse kan kortvarigt skapa en överbelastning, vilket orsakar produktfel.
ANVÄND FÖRSIKTIGHETSÅTGÄRDER
3
Machine Translated by Google
figur, välj först lämplig storlek
på skåpet och installera
ramen B i skåpet.
B
Steg 1:Som visas i
DELLISTA
MONTERINGSSEG
4
Machine Translated by Google

avstånd mellan sidokarm och skåpskant.
Installera till höger
A
Installera till vänster
A
0,27"/7mm
0,27 "/ 7 mm
5
Steg 2: Installera sidoram A med skruv G, notera
Machine Translated by Google

Installera till höger
Installera till vänster
Steg 3: Fäst länk C till ramen
6
Machine Translated by Google

paneler D, som visas i figuren.
7
Installera till vänster
Installera till höger
Steg 4: Installera anslutningsblocken för den övre och nedre dörren
Machine Translated by Google

installera dörrpanelskontakten D1
8
Installera till vänster
Installera till höger
Steg 5:Markera dörrpanelerna enligt följande figur, och
Machine Translated by Google

2) Montera dörrpanelens justerstång I och positioneringsblocket på
sidokarmen och dörrpanelen med skruvarna H respektive G.
1ÿ Montera dörrpanelen på sidokarmen med skruvarna D2.
9
jag
Installera till vänster
Installera till höger
A
A
jag
Steg 5:
Machine Translated by Google
Installera till vänster
K
L
K
L
Installera till höger
Som visas i figuren är hängkorgen K och hängkorgen L monterade på
sidoramen respektive bottenramen
10
Machine Translated by Google

-Fönsterputsvätska eller liknande rengöringsvätska kan användas för att rengöra ytan.
-För rengöring, torka av ytan med en fuktig (inte våt) trasa eller torka av med en ren luddfri
bomullstrasa.
11
Rengöring
Faktisk monteringseffektritning (installera till höger)
Machine Translated by Google

C/O YH Consulting Limited Office 147, Centurion House, London Road,
Staines-upon-Thames, Surrey, TW18 4AX
Importerad till AUS: SIHAO PTY LTD.
UK REP: YH CONSULTING LIMITED.
EC REP: E-CrossStu GmbH.
Mainzer Landstr.69, 60329 Frankfurt am Main.
Adress: Shuangchenglu 803nong11hao1602A-1609shi, baoshanqu,
shanghai 200000 CN.
Tillverkare: Shanghaimuxinmuyeyouxiangongsi
Importerad till USA: Sanven Technology Ltd.
1 ROKEVA STREETEASTWOOD NSW 2122 Australien
Suite 250, 9166 Anaheim Place, Rancho Cucamonga, CA 91730
12
Machine Translated by Google

Machine Translated by Google


"Ahorrelamitad","mitaddeprecio"ocualquierotraexpresiónsimilarqueutilicemossolorepresenta
unaestimacióndelahorroquepodríaobteneralcomprarciertasherramientasconnosotrosencomparacióncon
lasprincipalesmarcasynonecesariamentesignificaquecubratodaslascategoríasdeherramientasque
ofrecemos.Lerecordamosque,alrealizarunpedidoconnosotros,verifiquecuidadosamentesirealmenteestá
ahorrandolamitadencomparaciónconlasprincipalesmarcas.
Seguimoscomprometidosabrindarleherramientasaprecioscompetitivos.
Soportetécnicoycertificadodegarantíaelectrónicawww.vevor.com/support
ORGANIZADOR
CESTAEXTRAÍBLEPARAESQUINACIEGA
Machine Translated by Google

Machine Translated by Google

1
Modelo:DG900
¿NECESITAAYUDA?¡CONTÁCTENOS!
Organizadordecestas
Extracciónenesquinaciega
¿Tienepreguntassobreelproducto?¿Necesitaasistenciatécnica?Nodudeenponerseencontacto
connosotros:Asistenciatécnicaycertificadodegarantíaelectrónicawww.vevor.com/support
Estassonlasinstruccionesoriginales,leaatentamentetodaslasinstruccionesdelmanualantes
deutilizarelproducto.VEVORsereservaunainterpretaciónclaradenuestromanualdeusuario.
Laaparienciadelproductoestarásujetaalproductoquerecibió.Perdónenospornoinformarle
nuevamentesihayactualizacionesdetecnologíaosoftwareennuestroproducto.
Graciasporadquirirunodenuestrosproductos,leaatentamenteelmanualdeinstrucciones.
Instruccionesantesdelainstalación.
Machine Translated by Google

montaje
modo
obien
montaje
Izquierda
TamañodelproductoModelo
Cargando
33,8"x21"x22"
DG900
(860x535x560)
50libras(máximo)
Capacidad
mm)
≥870x540x600
Instalación
(capaúnica
25libras)
Tamaño(mm)Ancho*Profundidad*Alto
Instalación
Soloproductocompletamenteensamblado.
4.Lacapacidaddepesoyotrascapacidadesdelproductoseaplicanaunusoadecuadoy
5.Mantengaeláreadereuniónlimpiaybieniluminada.
cestayseleccioneelgabinetequecoincidaconoestécercadela
2.Usegafasdeseguridadyguantesdetrabajoresistentesduranteelmontaje.
3.Nosereúnacuandoestécansadoobajolainfluenciadelalcohol,drogasomedicamentos.
unpeligro.
1.Paraelmontaje,sigaestasinstrucciones.Unmontajeincorrectopuedeser
6.Mantengaalostranseúntesfueradeláreaduranteelmontaje.
Tamañodeinstalaciónparalainstalación.
7.Verifiqueeltamañodeinstalacióndelmodelocorrespondientedeltirador.
PRECAUCIONESDEMONTAJE
PARÁMETROSDELPRODUCTO
2
Machine Translated by Google

4.Úselosoloengabinetesdecocinaynolousesoloenelsuelooen
Esteartículo.
3.Inspeccioneelproductoantesdecadauso.Noloutilicesihaypiezassueltasodañadas.
Elmovimientopuedecrearbrevementeunexcesodecarga,provocandofallasenelproducto.
1.Esteproductonoesunjuguete.Nopermitaquelosniñosjueguenconélniseacerquenaél.
2.Utilíceloúnicamenteparaelfinprevisto.Nosesienteniseparesobreelproducto.
PROPINA:
ADVERTENCIA:PARAEVITARLESIONESGRAVESYLAMUERTEPOR
5.Noexcedalacapacidaddepesoindicada.Aprietebientodaslasperillas.
elescritorio.
Antesdeaplicarlacarga,tengacuidadoconlacargadinámica.Lacargarepentina
PRECAUCIONESDEUSO
3
Machine Translated by Google

Figura,primeroelijael
tamañoapropiadodel
gabineteeinstaleelmarco
Benelgabinete.
Paso1:Comosemuestraenla
PASOSDEMONTAJE
LISTADEPIEZAS
B
4
Machine Translated by Google
0,27"/7mm
0,27"/7mm
5
Distanciaentreelmarcolateralyelbordedelgabinete.
Paso2:InstaleelmarcolateralAconeltornilloG,teniendoencuentala
Instalaraladerecha
A
Instalaralaizquierda
A
Machine Translated by Google

Instalaraladerecha
Instalaralaizquierda
Paso3:FijeelenlaceCalmarco
6
Machine Translated by Google

Instalaraladerecha
Instalaralaizquierda
panelesD,comosemuestraenlafigura.
Paso4:Instalelosbloquesdeconexiónparalapuertasuperioreinferior
7
Machine Translated by Google

Instalaralaizquierda
Instalaraladerecha
InstaleelconectordelpaneldelapuertaD1
Paso5:Marquelospanelesdelapuertadeacuerdoconlasiguientefiguray
8
Machine Translated by Google

Instalaraladerecha
A
I
A
I
Instalaralaizquierda
1InstaleelpaneldelapuertaenelmarcolateralusandolostornillosD2.
2)InstalelavarilladeajustedelpaneldelapuertaIyelbloquedeposicionamientoenel
marcolateralyelpaneldelapuertausandolostornillosHyG,respectivamente.
Paso5:
9
Machine Translated by Google

Instalaralaizquierda
yo
yo
K
Instalaraladerecha
K
Comosemuestraenlafigura,lacestacolganteKylacestacolganteLestán
instaladasenelmarcolateralyelmarcoinferiorrespectivamente.
10
Machine Translated by Google
Sepuedeutilizarlíquidolimpiacristalesounlíquidodelimpiezasimilarparalimpiarla
superficie.
Paralimpiar,limpielasuperficieconunpañohúmedo(nomojado)osequeconunpañode
algodónlimpioysinpelusa.
Limpieza
Dibujodelefectodemontajereal(instalaciónaladerecha)
11
Machine Translated by Google

12
C/OYHConsultingLimitedOficina147,CenturionHouse,LondonRoad,
StainesuponThames,Surrey,TW184AX
REPRESENTANTEDELREINOUNIDO:YHCONSULTINGLIMITED.
ImportadoaAUS:SIHAOPTYLTD.
ImportadoaEE.UU.:SanvenTechnologyLtd.
REPRESENTANTECE:ECrossStuGmbH.
MainzerLandstr.69,60329FráncfortdelMeno.
Dirección:Shuangchenglu803nong11hao1602A1609shi,baoshanqu,
shanghai200000CN.
Fabricante:Shanghaimuxinmuyeyouxiangongsi
Suite250,9166AnaheimPlace,RanchoCucamonga,CA91730
1ROKEVASTREETEASTWOODNSW2122Australia
Machine Translated by Google

Machine Translated by Google


CESTELLO ESTRAIBILE PER ANGOLI CIECA
ORGANIZZATORE
Supporto tecnico e certificato di garanzia elettronica www.vevor.com/support
"Risparmia la metà", "Metà prezzo" o qualsiasi altra espressione simile da noi utilizzata rappresenta
solo una stima del risparmio che potresti ottenere acquistando determinati utensili con noi rispetto ai principali
marchi principali e non significa necessariamente coprire tutte le categorie di utensili da noi offerti. Ti
ricordiamo gentilmente di verificare attentamente quando effettui un ordine con noi se stai effettivamente
risparmiando la metà rispetto ai principali marchi principali.
Continuiamo a impegnarci per fornirvi strumenti a prezzi competitivi.
Machine Translated by Google

Machine Translated by Google

istruzioni prima dell'installazione.
Grazie per aver acquistato uno dei nostri prodotti, ti preghiamo di leggere attentamente le istruzioni di montaggio
Questa è l'istruzione originale, si prega di leggere attentamente tutte le istruzioni del manuale prima
di utilizzare. VEVOR si riserva una chiara interpretazione del nostro manuale utente. L'aspetto del
prodotto sarà soggetto al prodotto ricevuto. Vi preghiamo di perdonarci se non vi informeremo di
nuovo se ci sono aggiornamenti tecnologici o software sul nostro prodotto.
Modello: DG-900
HAI BISOGNO DI AIUTO? CONTATTACI!
Organizzatore di cestini
Estrazione angolo cieco
Hai domande sul prodotto? Hai bisogno di supporto tecnico? Non esitare a contattarci:
Supporto tecnico e certificato di garanzia elettronica www.vevor.com/support
1
Machine Translated by Google

4. La capacità di peso e le altre capacità del prodotto si applicano a un prodotto correttamente e
5. Mantenere l'area di assemblaggio pulita e ben illuminata.
solo prodotto completamente assemblato.
7. Controllare le dimensioni di installazione del modello corrispondente del puller
2. Durante il montaggio, indossare occhiali protettivi e guanti da lavoro resistenti.
3. Non riunirsi quando si è stanchi o sotto l'effetto di alcol, droghe o farmaci.
un pericolo.
1. Il montaggio deve seguire queste istruzioni. Un montaggio non corretto può essere
cestino e seleziona il mobile coerente o vicino al
dimensioni di installazione per l'installazione.
6. Tenere gli astanti fuori dall'area durante l'assemblea.
2
Capacità
(860x535x560
Caricamento
Dimensioni: 33,8"x21"x22"
mm)
Modello Dimensioni del prodotto
DG-900
montaggio
Sinistra
Dimensioni schermo: ÿ 870x540x600
modalità
o giusto
Installazione
montaggio
dimensioni (mm)L*P*A
25 libbre)
Installazione
(strato singolo
50 libbre (massimo)
PRECAUZIONI DI MONTAGGIO
PARAMETRI DEL PRODOTTO
Machine Translated by Google

2. Utilizzare solo come previsto. Non sedersi o stare in piedi sul prodotto.
3. Ispezionare prima di ogni utilizzo. Non utilizzarlo se le parti sono allentate o danneggiate.
4. Utilizzare solo sui mobili della cucina e non utilizzarlo da solo sul pavimento o su
il desktop.
1. Questo prodotto non è un giocattolo. Non permettere ai bambini di giocare con esso o di avvicinarsi
questo articolo.
MANCIA:
ATTENZIONE: PER PREVENIRE LESIONI GRAVI E MORTE DA
5. Non superare la capacità di peso indicata. Stringere saldamente tutte le manopole
prima di applicare il carico. Siate consapevoli del carico dinamico! Il carico improvviso
il movimento può creare brevemente un carico eccessivo, causando il guasto del prodotto.
PRECAUZIONI D'USO
3
Machine Translated by Google

figura, per prima cosa scegli
la dimensione appropriata
del mobile e installa il telaio
B nel mobile.
B
Passaggio 1: come mostrato in
FASI DI MONTAGGIO
ELENCO DELLE PARTI
4
Machine Translated by Google

0,27"/7mm
0,27"/7mm
5
Installare a destra
Installare a sinistra
UN
UN
distanza tra il telaio laterale e il bordo del mobile.
Fase 2: Installare il telaio laterale A con la vite G, notando la
Machine Translated by Google

Installare a destra
Installare a sinistra
Fase 3: collegare il collegamento C al telaio
6
Machine Translated by Google

Installare a destra
Installare a sinistra
7
pannelli D, come mostrato in figura.
Fase 4: Installare i blocchi di collegamento per la porta superiore e inferiore
Machine Translated by Google

Installare a sinistra
Installare a destra
8
installare il connettore del pannello della porta D1
Fase 5: contrassegnare i pannelli delle porte secondo la figura seguente e
Machine Translated by Google

IO
Installare a sinistra
Installare a destra
UN
IO
UN
9
2) Installare l'asta di regolazione I del pannello della porta e il blocco di posizionamento sul
telaio laterale e sul pannello della porta utilizzando rispettivamente le viti H e G.
1) Installare il pannello della porta sul telaio laterale utilizzando le viti D2.
Fase 5:
Machine Translated by Google

L
Installare a destra
Installare a sinistra
E
L
E
Come mostrato nella figura, il cestino sospeso K e il cestino sospeso L
sono installati rispettivamente sul telaio laterale e sul telaio inferiore
10
Machine Translated by Google

-Per pulire la superficie è possibile utilizzare un liquido detergente per vetri o un detergente simile.
- Per la pulizia, passare la superficie con un panno umido (non bagnato) oppure asciugarla con un
panno di cotone pulito e privo di pelucchi.
11
Pulizia
Disegno dell'effetto di assemblaggio effettivo (installare a destra)
Machine Translated by Google

12
RAPPRESENTANTE DEL REGNO UNITO: YH CONSULTING LIMITED.
Mainzer Landstr.69, 60329 Francoforte sul Meno.
C/O YH Consulting Limited Ufficio 147, Centurion House, London Road, Staines-
upon-Thames, Surrey, TW18 4AX
1 ROKEVA STREET EASTWOOD NSW 2122 Australia
RAPPRESENTANTE DELLA CE: E-CrossStu GmbH.
Importato in AUS: SIHAO PTY LTD.
Indirizzo: Shuangchenglu 803nong11hao1602A-1609shi, baoshanqu,
shanghai 200000 CN.
Produttore: Shanghaimuxinmuyeyouxiangongsi
Suite 250, 9166 Anaheim Place, Rancho Cucamonga, CA 91730
Importato negli USA: Sanven Technology Ltd.
Machine Translated by Google

Machine Translated by Google


KOSZ WYSUWANY NAROŻNIKOWY
ORGANIZATOR
Wsparcie techniczne i certyfikat gwarancji elektronicznej www.vevor.com/support
„Oszczędź połowę”, „Połowa ceny” lub inne podobne wyrażenia używane przez nas stanowią
jedynie szacunkowe oszczędności, jakie możesz uzyskać, kupując u nas określone narzędzia w porównaniu
z głównymi markami i niekoniecznie oznaczają one objęcie wszystkich kategorii narzędzi oferowanych
przez nas. Uprzejmie przypominamy, aby dokładnie sprawdzić, czy składając u nas zamówienie faktycznie
oszczędzasz połowę w porównaniu z głównymi markami.
Nadal staramy się oferować Państwu narzędzia w konkurencyjnych cenach.
Machine Translated by Google

Machine Translated by Google

To jest oryginalna instrukcja, przed użyciem należy uważnie przeczytać wszystkie instrukcje. VEVOR
zastrzega sobie jasną interpretację naszej instrukcji obsługi. Wygląd produktu będzie zależał od produktu,
który otrzymałeś. Prosimy o wybaczenie, że nie poinformujemy Cię ponownie, jeśli w naszym produkcie
pojawią się jakiekolwiek aktualizacje technologiczne lub oprogramowania.
Dziękujemy za zakup jednego z naszych produktów. Prosimy o dokładne zapoznanie się z instrukcją montażu.
instrukcje przed instalacją.
Organizer do koszyków
POTRZEBUJESZ POMOCY? SKONTAKTUJ SIĘ Z NAMI!
Modele: DG-900
Wysuwany narożnik ślepy
Masz pytania dotyczące produktu? Potrzebujesz wsparcia technicznego? Skontaktuj się
z nami: Wsparcie techniczne i certyfikat E-Gwarancji www.vevor.com/support
1
Machine Translated by Google

4. Nośność i inne możliwości produktu dotyczą prawidłowo i
5. Utrzymuj miejsce zgromadzenia w czystości i zapewnij dobre oświetlenie.
Tylko produkt całkowicie zmontowany.
kosz i wybierz szafkę zgodną z nim lub zbliżoną do niego
2. Podczas montażu należy nosić okulary ochronne i solidne rękawice robocze.
3. Nie przychodź na spotkania, jeśli jesteś zmęczony lub pod wpływem alkoholu, narkotyków
lub leków.
zagrożenie.
1. Montaż musi być zgodny z poniższymi instrukcjami. Nieprawidłowy montaż może być
rozmiar instalacji do instalacji.
6. Podczas montażu nie dopuszczaj osób postronnych na teren montażu.
7. Sprawdź rozmiar montażowy odpowiedniego modelu wyciągu
2
Pojemność
(860x 535x560
Załadunek
33,8"x21"x22"
mm)
Model Rozmiar produktu
DG-900
montowanie
Lewy
870x540x600
tryb
lub w prawo
Instalacja
montowanie
rozmiar (mm) szer.*gł.*wys.
25 funtów)
Instalacja
(pojedyncza warstwa
50 funtów (maks.)
PARAMETRY PRODUKTU
ŚRODKI OSTROŻNOŚCI PODCZAS MONTAŻU
Machine Translated by Google

2. Używać wyłącznie zgodnie z przeznaczeniem. Nie siadać ani nie stawać na produkcie.
3. Przed każdym użyciem sprawdź. Nie używaj, jeśli części są luźne lub uszkodzone.
4. Stosować wyłącznie na szafkach kuchennych i nie używać go samodzielnie na podłodze lub na podłodze.
pulpit.
NAPIWKI:
ten przedmiot.
1. Ten produkt nie jest zabawką. Nie pozwalaj dzieciom bawić się nim ani zbliżać się do niego.
OSTRZEŻENIE: ABY UNIKNĄĆ POWAŻNYCH OBRAŻEŃ I ŚMIERCI
5. Nie przekraczaj podanego udźwigu. Mocno dokręć wszystkie pokrętła.
przed zastosowaniem obciążenia. Bądź świadomy obciążenia dynamicznego! Nagłe obciążenie
ruch może chwilowo spowodować nadmierne obciążenie, powodując uszkodzenie produktu.
ŚRODKI OSTROŻNOŚCI
3
Machine Translated by Google

Najpierw wybierz odpowiedni
rozmiar szafki i zamontuj w
niej ramę B.
B
Krok 1: Jak pokazano na
LISTA CZĘŚCI
KROKI MONTAŻU
4
Machine Translated by Google

0,27"/7mm
0,27"/7mm
5
Zainstaluj po lewej stronie
A
Zainstaluj po prawej stronie
A
odległość między ramą boczną a krawędzią szafki.
Krok 2: Zamontuj ramę boczną A za pomocą śruby G, zwracając uwagę na
Machine Translated by Google

Zainstaluj po prawej stronie
Zainstaluj po lewej stronie
Krok 3: Przymocuj ogniwo C do ramy
6
Machine Translated by Google
Zainstaluj po lewej stronie
Zainstaluj po prawej stronie
7
panele D, jak pokazano na rysunku.
Krok 4: Zamontuj bloki łączące górne i dolne drzwi
Machine Translated by Google

Zainstaluj po lewej stronie
Zainstaluj po prawej stronie
8
zamontuj złącze panelu drzwi D1
Krok 5: Zaznacz panele drzwi zgodnie z poniższym rysunkiem i
Machine Translated by Google

Zainstaluj po prawej stronie
Zainstaluj po lewej stronie
I
A
A
I
9
2) Zamontuj pręt regulacyjny panelu drzwi I i blok pozycjonujący na ramie
bocznej i panelu drzwi, odpowiednio za pomocą śrub H i G.
1) Zamontuj panel drzwiowy na ramie bocznej za pomocą śrub D2.
Krok 5:
Machine Translated by Google

L
Zainstaluj po prawej stronie
Zainstaluj po lewej stronie
K
K
L
Jak pokazano na rysunku, kosz wiszący K i kosz wiszący L są zamontowane
odpowiednio na ramie bocznej i ramie dolnej
10
Machine Translated by Google

- Do czyszczenia należy przecierać powierzchnię wilgotną (nie mokrą) szmatką lub wycierać do sucha czystą,
bawełnianą szmatką, która nie pozostawia włókien.
-Do czyszczenia powierzchni można użyć płynu do mycia okien lub podobnego płynu czyszczącego.
11
Czyszczenie
Rzeczywisty rysunek efektu montażu (instalacja po prawej stronie)
Machine Translated by Google

ODPOWIEDZIALNOŚĆ W WIELKIEJ BRYTANII: YH CONSULTING LIMITED.
Mainzer Landstr.69, 60329 Frankfurt nad Menem.
C/O YH Consulting Limited Biuro 147, Centurion House, London Road, Staines-upon-
Thames, Surrey, TW18 4AX
Adres: Shuangchenglu 803nong11hao1602A-1609shi, baoshanqu, szanghaj 200000 CN.
Importowane do AUS: SIHAO PTY LTD.
Przedstawiciel KE: E-CrossStu GmbH.
Producent: Shanghaimuxinmuyeyouxiangongsi
Importowane do USA: Sanven Technology Ltd.
1 ROKEVA STREETEASTWOOD NSW 2122 Australia
Apartament 250, 9166 Anaheim Place, Rancho Cucamonga, CA 91730
12
Machine Translated by Google

Machine Translated by Google