
Support and E-Warranty Certificate www.vevor.com/support
SLOW JUICER
INSTRUCTION MANUAL
We continue to be committed to provide you tools with competitive price.
"Save Half", "Half Price" or any other similar expressions used by us only represents an
estimate of savings you might benefit from buying certain tools with us compared to the major
top brands and doses not necessarily mean to cover all categories of tools offered by us. You
are kindly reminded to verify carefully when you are placing an order with us if you are
actually saving half in comparison with the top major brands.
- 1 -
MODEL: JS3101
Have product questions? Need technical support? Please feel free to
contact us:
CustomerService@vevor.com
NEED HELP? CONTACT US!
This is the original instruction, please read all manual instructions
carefully before operating. VEVOR reserves a clear interpretation of our
user manual. The appearance of the product shall be subject to the
product you received. Please forgive us that we won't inform you again if
there are any technology or software updates on our product.
SLOW JUICER

- 2 -
IMPORTANT ASSURANCE
When using electrical appliances, basic safety precautions should always be
followed including the following
1. Read all instructions.
2.To protect against the risk of electrical shock, do not put the base in water or
other liquid.
3. This appliance is not intended for use by persons(including children)with
reduced physical sensory, or mental capabilities, or lack of experience and
knowledge, unless they are closely supervised and instructed concerning use of
the appliance by a person responsible for their safety.Close supervision is
necessary when any appliance is used by or near children.Children should be
supervised to ensure that they do not play with the appliance.
4. Input voltage of this product is AC120V/60Hz. Please confirm before use.
5. Be sure to disconnect the power supply before taking apart, packing, or
commissioning any part of this product.
6. This product belongs to Y connection. If power supply cords are damaged,
please contact with the Customer Service Department of this company in order to
avoid risks or come to appointed maintenance point of this company to change.
Be sure not to take apart or repair by yourself.
7. Before use, please check if the power cord, plug, fine strainer, auger, noodle
extruding body and other parts are damaged. Please stop using the product if any
damage is found, and contact our customer service department in time. DO not
disassemble and repair voluntarily in case of danger.
8. If this product needs to be repaired during the application, please contact the
Customer Service Department of this company to avoid risks or come to the
appointed maintenance point of this company to change. Be sure to avoid taking
apart or repairing by yourself to avoid risks.
6. Before switching on the power, please make sure that the removable parts are
fully installed, such as the juicing body, auger, fine strainer, juicing body cover,
etc.
9. During operation, in case of any damage to the operator or the product, it is
strictly forbidden to put fingers or sharp objects into the material inlet to directly
contact the rotating parts such as the auger, etc.; it is strictly forbidden to use any
object to replace pusher rods. It is strictly forbidden to keep eyes close to the
material inlet in case of any accident.
10. The ingredients should be cut into small pieces to be put into the inlet of the

- 3 -
juicing body. If there are fruits and vegetables with kernels, hard seeds, thick skin,
or hard shells, remove them before processing.
11. When ingredients are put in, the force to push the ingredients should not be
so great, and it is advisable that the ingredients can be cut off.
12. It is normal for the fine strainer, juicing body cover, auger, and other parts to
be stained after juicing certain fruits and vegetables. It does not affect the food's
quality and will not harm eaters' health.
13. The product is equipped with an intelligent protection chip, automatically
stopping after 20 minutes of continuous work. At this time, please stop the
operation for 20-30 minutes and then continue to use the motor after cooling. This
method is conducive to extending the service life of the product.
14. The product has a current limiting design. When processing harder
ingredients, the motor will be locked-rotor and the current will increase. When the
current exceeds 2A, the machine will make a “tick” sound and the motor will stop
working. This method can effectively protect the motor from over-current and
extend the service life of the motor.
15. If the motor stops automatically due to current limiting protection or
locked-rotor during operation, the power switch should be transferred to “REV”
state, and the ingredients should be withdrawn. And then the power switch should
be transferred to “ON” state to ensure the normal use of the machine. If it is still
locked-rotor, it is recommended to clean up the ingredients in the auger before
continuing to use. This method is to protect the motor.
16. After use, please wait until the motor and auger stop rotating and make sure
that the power is disconnected before removing the removable parts of the
machine.
17. All parts of this product are not allowed to be disinfected with hot water over
80°C and microwave ovens to avoid thermal deformation damage. Parts and
materials in contact with food ingredients are in line with food hygiene certification,
clean, hygienic and reliable.
18. Do not put the juicer body into water or other liquids, nor flush it with water or
other liquids to avoid damaging the machine body.
19. Not allow to use steel wool, abrasive cleaner, or corrosive liquid (e.g., petrol
or acetone) to wash this product.
20. This product should be stored in a place that children cannot reach. No allow
persons with unsound extremities and sensation or mental disorders and persons
who are short of related experience and knowledge (including children) to use or
play with this product.
21. This product is only applicable to individual or home application.

- 4 -
22.This product is a Class I appliance. The grounding wire of the socket must be
well grounded.
23.To protect against the risk of electrical shock, do not put the plug, power
supply cord, and the driving body in water or other liquid.
24.Turn the appliance OFF. then unplug from the outlet when not in use, before
assembling or disassembling parts and before cleaning. To unplug, grasp the
plug and pull from the outlet. Never pull from the power cord.
25.The use of attachments not recommended or sold by the manufacturer may
cause fire electric shock or injury.
26. Do not let cord hang over edge of table or counter.
27. Avoid contacting moving parts.
28.Do not use outdoors.
29. Always ensure the juicer cover is clamped securely before the motor is turned
on. Do not unfasten clamps while the juicer is in operation.
30.Be sure to turn switch to OFF position after each use of your juicer.Make sure
the motor stops completely before disassembling.
31.Do not put your fingers or other objects into the juicer opening while it is in
operation. If food becomes lodged in the opening, use a food pusher or another
piece of fruit or vegetable to push it down. When this method is impossible, tum
the motor off and disassemble the juicer to remove the remaining food.
32.Do not use the appliance if the rotating sieve is damaged.
33.Do not operate without the pulp container in place.
SAVE THESE INSTRUCTIONS

- 5 -
PARTS
NO.
Name of
parts
Function introduction
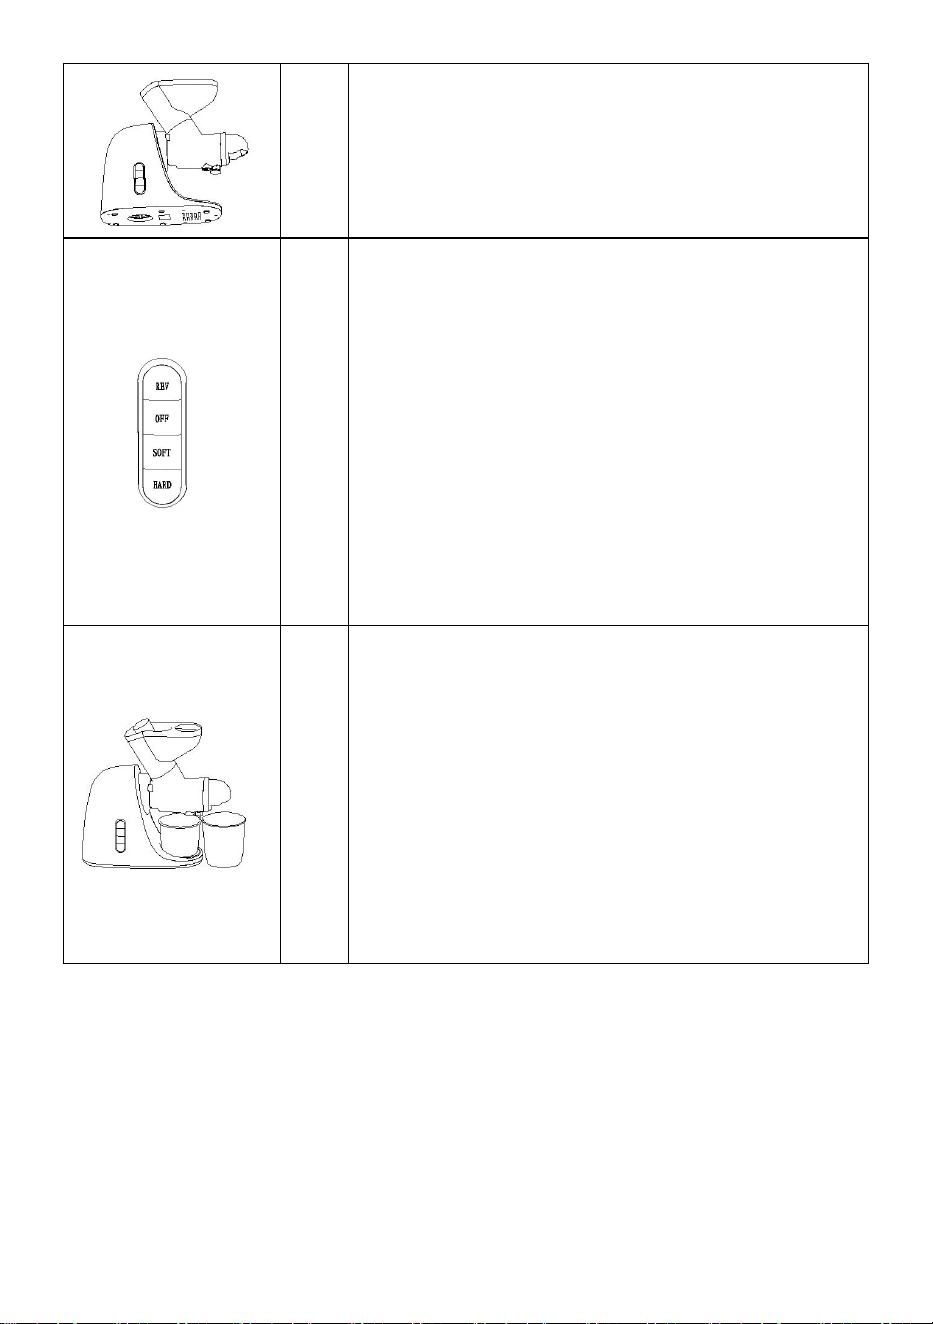
1
Power
Line
Used to power on and provide power.
2
Juicer
Body
The main parts of the machine, including the motor and other parts. It is the
source of this machine and provides power.
3
Power
Switch
Control the working status of the product, including HARD (high-speed gear),
SOFT (low-speed), OFF (suspension), REV (reverse).
4
Button
It is used to lock the juicing body and prevent the body from loosening from
the machine body during operation. When you need to remove the juicing
body from the machine body, you must press and hold the button.
5
Juice
Cup
Catch and collect fruit juice separated from the juicing body.
6
Pomace
Cup
Catch and collect pomace separated from the juice.
7
Pusher
When ingredients are placed, gently push the ingredients so that the
ingredients are in full contact with the auger to increase the juicing efficiency.
8
Juicing
body
It is the main parts of juicing. The ingredients are put in from the inlet on top
of the juicing body, and discharge the juice and pomace through the juice
outlet and pomace outlet.
9
Spin the
lid of
juice.
Prevent the remaining juice from dripping onto the mainframe.

- 6 -
10
Seal ring
of juice
outlet
Put the groove corresponding to the juice outlet of the juice extract, and
cooperate with the rotary cover of the juice outlet to prevent the remaining
juice from dripping onto the main engine.
11
Auger
It is the main parts of juicer, which is used to convey the ingredients and
grind the ingredients together with a juice strainer or squeezer.
12
Fine
strainer
(with
screen
inside)
Run in with the auger to grind the juiced ingredients and filter out the juice.
13
Juicing
body
cover
silicone
loop
It is placed at the joint between the juicing body and the juicing body cover
(to prevent juice from flowing out from the joint) and also to adjust the
tightness of the juicing body and the juicing body cover.
14
Juicing
body
cover
The main components of juicing connects the juicing body to play a role in
security protection.
SPECIFICATIONS
OPERATION INSTRUCTIONS
NOTE: Before using this product for the first time, please thoroughly wash parts
Rated voltage
120V~
Rated power
200W
Rated frequency
60Hz
Continuous Working Hours
≤10 minutes
Interval
≥20 minutes
- 7 -
that touch with foods.
Key operation instructions:
"HARD" key: high-speed working key (suitable for extracting
hard fruits and vegetables such as carrots, apples, pears);
"SOFT" key: low-speed working key (suitable for picking soft
fruits and vegetables such as tomatoes, watermelons,
grapes);
"OFF" key: motor workout key;
"REV" key: when the slag discharge is not smooth or plugged,
the key is used. ( Tip: when the slag discharge is not smooth
or plugged, press this key, the propeller starts to reverse, and
after a few seconds, press the "HARD" or "SOFT" button, and
then the forward turn will continue to work.
Using the appliance
Please install and use the product as follows:
*The picture is for reference only. Please refer to the real thing.
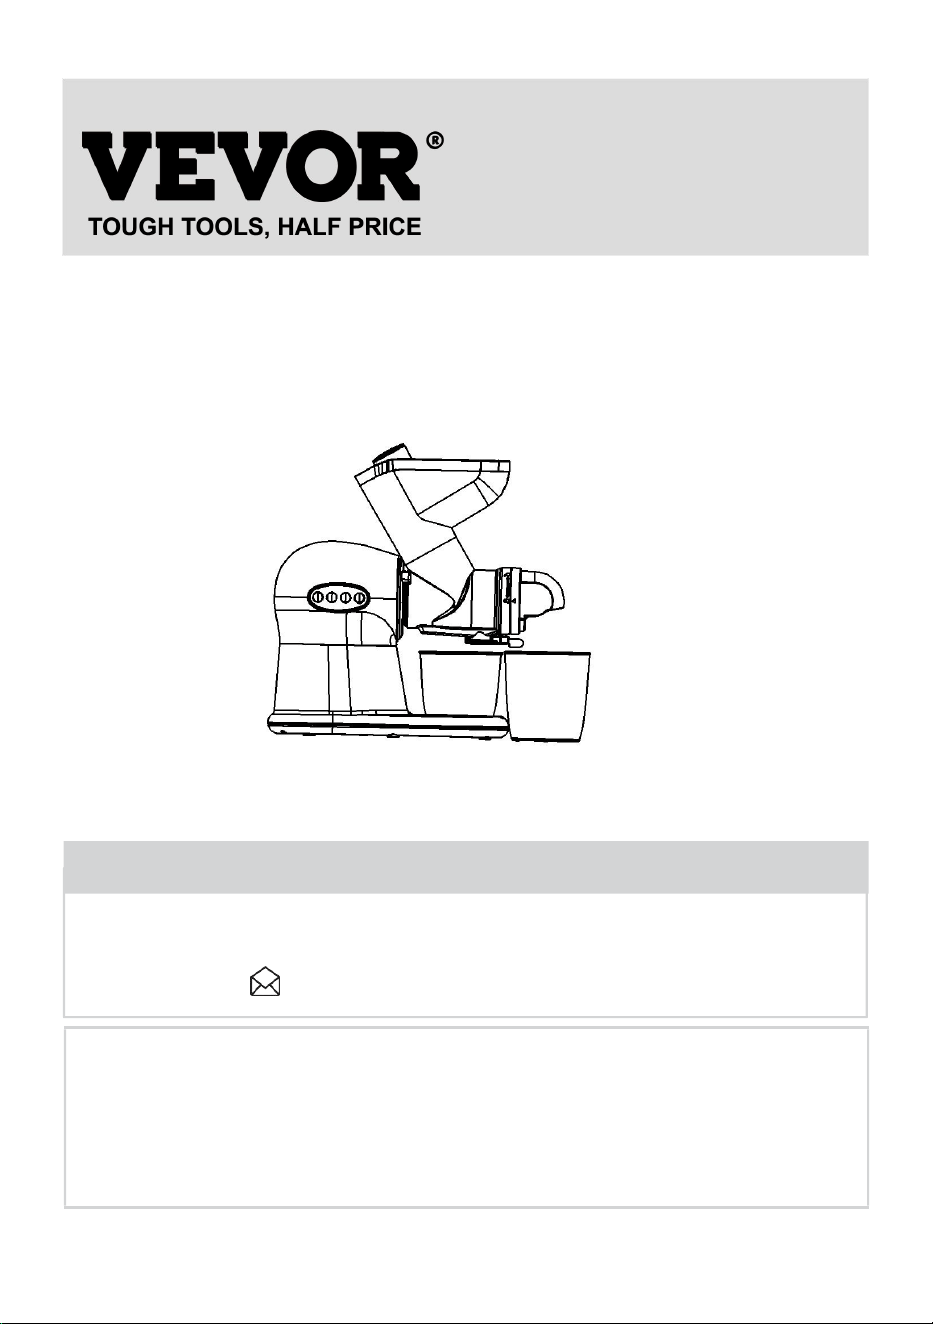
1
Connect the juicing body to the machine body:
1. Put the central position of the juicing body's
inlet to align the "unlocking sign" position on the
machine body (the three fasteners of the juicing
body will be aligned).
2. Then rotate counterclockwise, and when you
hear a "tick" sound, it shows that the juicing body
is fully connected.
2
Point the spiral propeller at the hole in the body
and push it flat to the bottom. (If you're can't, you
can easily point it by turning the propeller slightly)
- 8 -
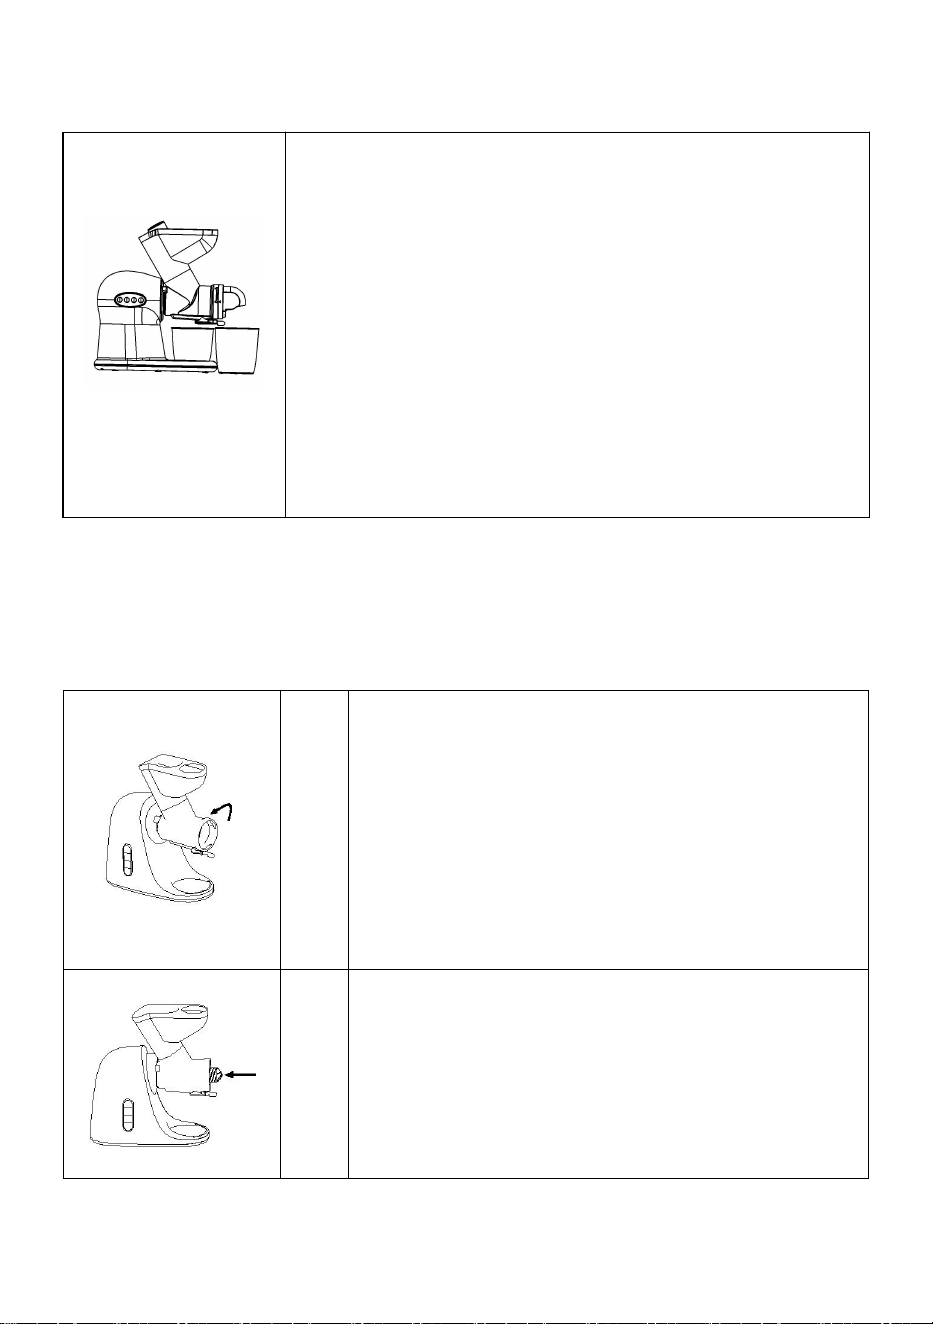
3
Inject the large hole of the juicing mesh from the
propeller's tail, and the juice mesh's positioning
bar is pushed into the slot of the juice squeezer.
4
Displace the three fastening slots on the juicing
body cover from the three fastening slots on the
juicing body, push horizontally, and then rotate
counterclockwise to screw the juicing body cover
and the juicing body tightly.
5
Place the juice cup next to the machine body and
its open aligns the juice mouth of the juicing body.
6
Put the pomace cup under the pomace outlet of
the juicing body, close to the juice cup.
7
Turn on the power and get ready for work. (Make
sure the switch is off before turning on the power)
8
Wash the fruits and vegetables and cut them into
blocks that can be put into the inlet.
Please remove kernels, hard seeds, thick or hard
shell of fruits and vegetables first.
Note: This machine cannot juice fruits such as
sugar cane, guava, and mango.
- 9 -
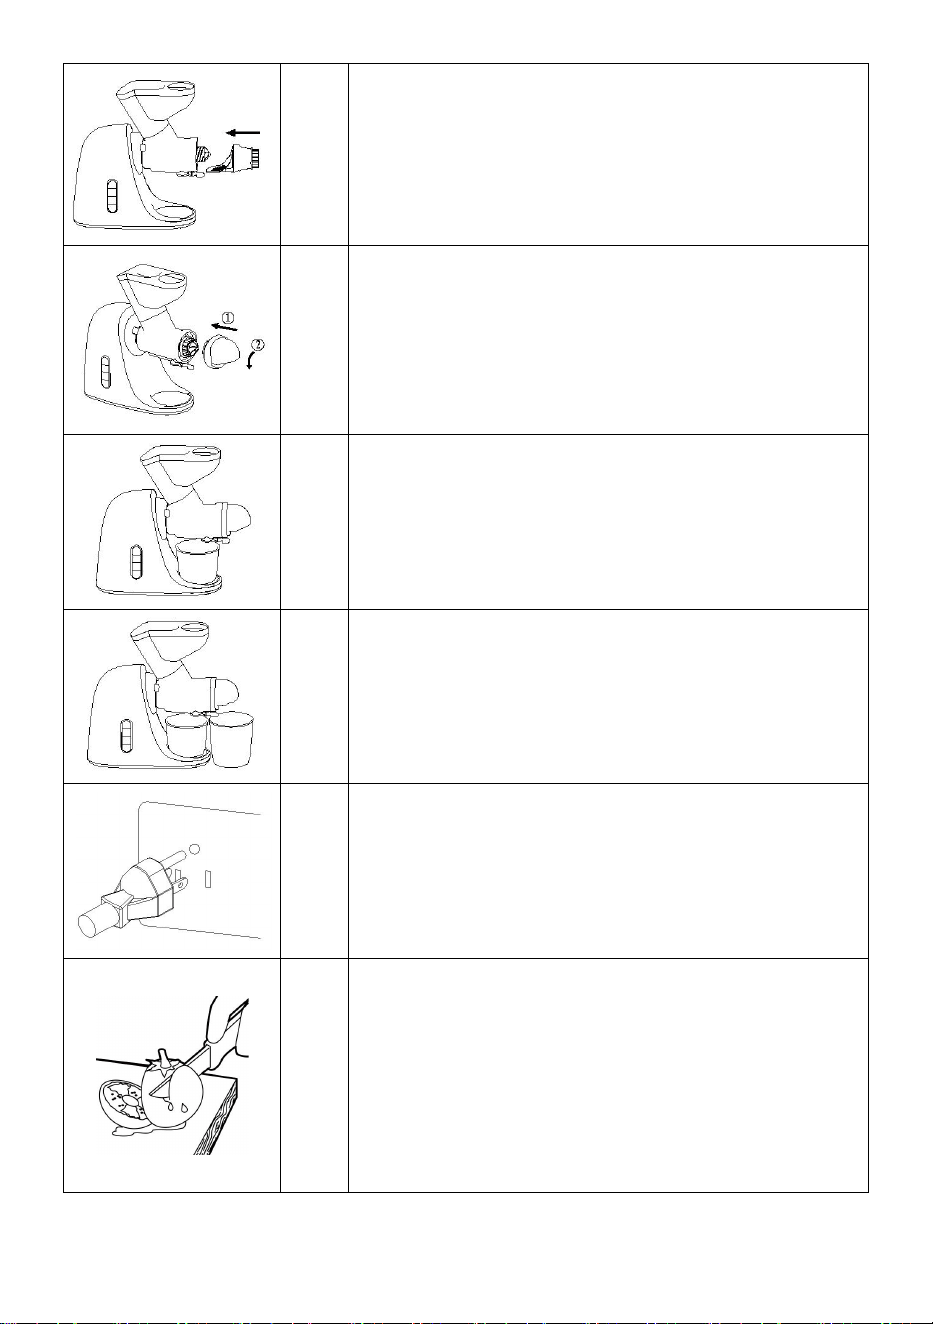
9
Check whether the juice outlet of the juice
squeeze is in an open state (by rotating the lid of
the juice outlet).
10
Press the "SOFT" or "HARD" button of the switch
(users choose according to different fruits, and
the SOFT key is suitable for squeezing soft fruits
and vegetables such as tomatoes, watermelons,
grapes and other vegetables at low speeds; the
HARD key is suitable for extracting hard fruits
and vegetables such as carrots, apples and
pears at high-speed gears). The product starts to
work and the working time is ≤10 minutes.
Do not touch the power switch with wet hands to
avoid electric shock, leakage, or fire.
11
Put the ingredients into the feed inlet of the
juicing body and push the ingredients with the
push rod.
When ingredients are put in, the force to push the
ingredients should not be so great, and it is
advisable that the ingredients just can be cut off.
(Don't put your fingers or other objects into the
feed inlet of the juicing body! If the pomace cup or
juice cup is full, should stop working and clean it
before use.)

- 10 -
12
When the ingredients are processed, the juice
outlet no longer has juice outflow, turn off the
switch, disconnect the power supply, and after
the spiral propeller completely stops turning, turn
out the juice mouth screw cover (the rotary cover
seals the juice mouth), and then take the juice
cup off the juice mouth.
(The fresh juice should be drunk immediately. If it
is exposed to the air for a while, its taste and
nutritional value will be affected.)
Residues cannot be stored for long periods.
Do not touch the power switch with wet hands to
avoid electric shock, electric leakage or fire.
Once you finished using the appliance, dismantle it (reverse as with assembly)
and clean all food contact parts as described in section CLEANING AND
MAINTENANCE
Selection of fruit and vegetables:
1. Select and use fresh fruits and vegetables containing more juice. Particularly
suitable fruits include pineapple, celery sticks, apples, cucumbers, spinach,
melons, tomatoes, oranges, grapes, etc.
2. Instead of paring the thin skin of fruits and vegetables, you only need to pare
the thick skin of fruits and vegetables like oranges, pineapples, etc. Seeds of
citrus fruits also need to be removed because they will bring bitterness to the
juice.
3. Instead of paring the thin skin of fruits and vegetables, you only need to pare
the thick skin of fruits and vegetables like oranges, pineapples, raw beetroots, etc.
Seeds of citrus fruits also need to be removed because they will bring bitterness
to the juice.
4. Freshly juiced apple juice may quickly turn brown, and you can add a few
drops of lemon juice to slow this process.
5. Leaves and leaf stems (such as lettuce) can be juiced with this machine
- 11 -
CLEAN AND MAINTENANCE
1. Turn off the switch and disconnect the power supply before washing this
product.
2. Please timely wash this product after application.
3. The juicer body must not be washed with water. The stains on the body must
be wiped with a rag or cotton clot.
4. Please make sure the product is clean and dry before storage.
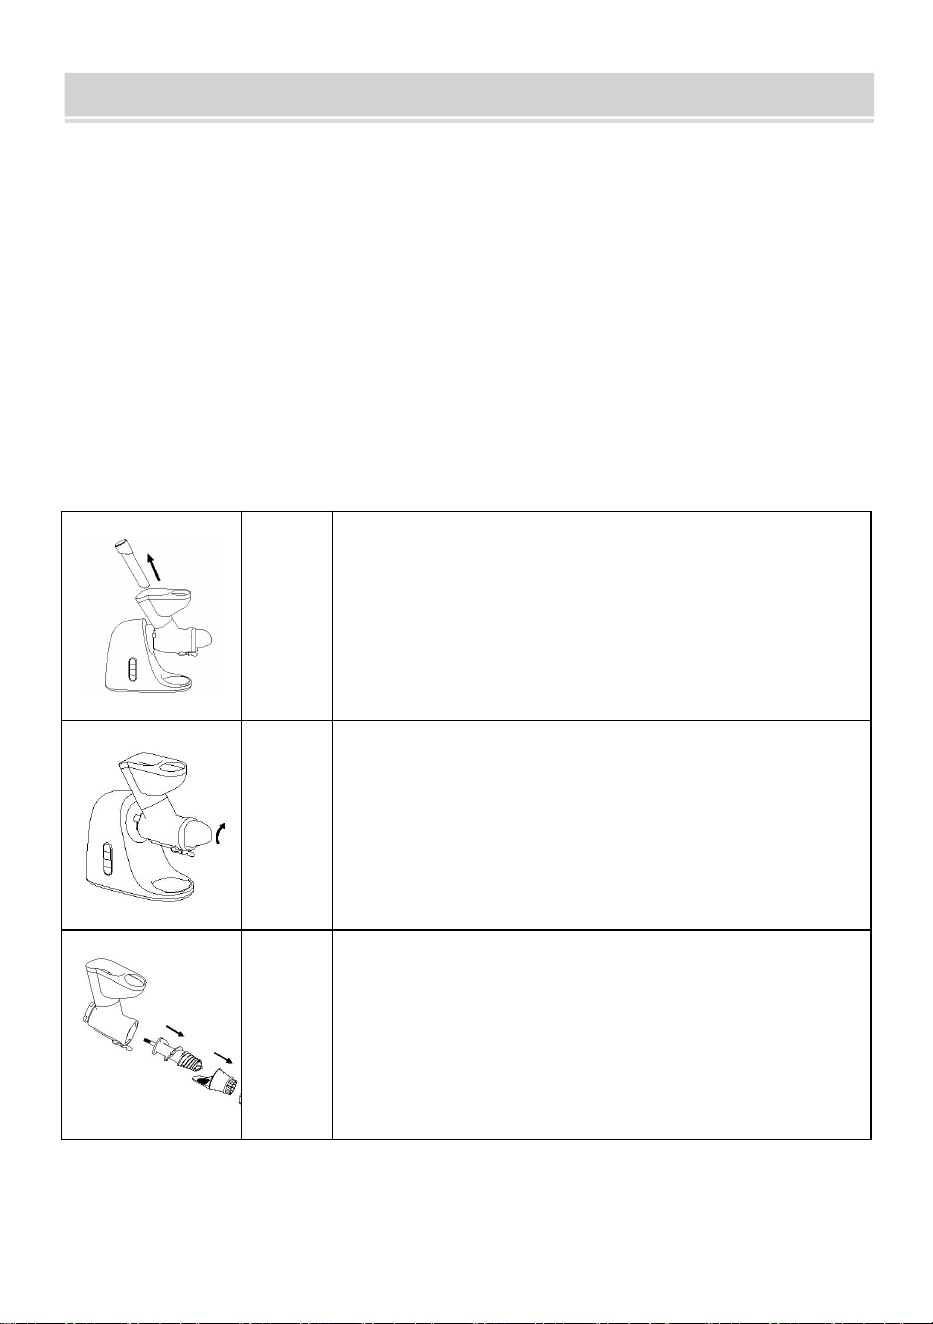
Please refer to the following steps to disassemble the juicer and then clean it:
*The picture is for reference only. Please refer to the real thing.
1
Take the pusher and the juice cup down first.
2
Hold the button near the juicing body down, and at
the same time rotate the juicing body clockwise to
take the body down.The body can't be taken down if
the button is not pressed.
3
After the juicing body is disassembled, take the
juicing body cover, the fine juice strainer, and the
auger down properly, and the removable parts can
be cleaned with clear water.

- 12 -
TROUBLESHOOTING
If any irregularities are found during operation of the appliance, read the table
below to identify the cause and to ind a solution to the problem .
Fault
phenomenon
Analysis of causes
Fault resolution
After
connecting
the power
supply, turn
on the switch,
but this
product
cannot work.
1. The power plug is not
plugged in properly
2. The outlet is in poor
contact
3. The internal cable of
the main unit is off or the
circuit board is damaged.
1. Plug the power plug back in
again
2. Replace the power socket
and try again
When this
product is
used initially,
the motor
smells
terrible.
This is not an abnormal
occurrence
This machine
stops during
the
application.
1. The voltage is too low
2. Excessive or hard
ingredients
3. The continuous
working hour is too long
1. Check if the voltage is too
low
2. Disconnect the power and
remove the excess ingredients
(Sugar cane cannot be juiced.
Hard skin / hard core fruits and
vegetables should be first
removed the hard skin / hard
core before juiced)
3. It is a normal phenomenon,
and the motor will resume
operation after a break

- 13 -
Noise at work
1. The auger and fine
strainer are not fully
installed, resulting in
unsteady operation;
2. The start motor in the
machine body breaks
down.
3. Too noisy when some
ingredients are juiced.
1. Fully install the auger and
fine strainer.
It is difficult to
unscrew the
juicing body
cover after
juicing
1. There is oil stain on the
surface of the juicing
body cover;
2. The ingredients in the
juice net are not juiced
completely;
1. Clean the surface of the
juicing body cover;
2. Continue to turn on the
machine to squeezing all the
ingredients or turn the power
switch to REV gear for a few
seconds to rotate the
ingredients out of the juice
strainer;

- 14 -