
- 1 -
Technical Support and E-Warranty Certificate www.vevor.com/support
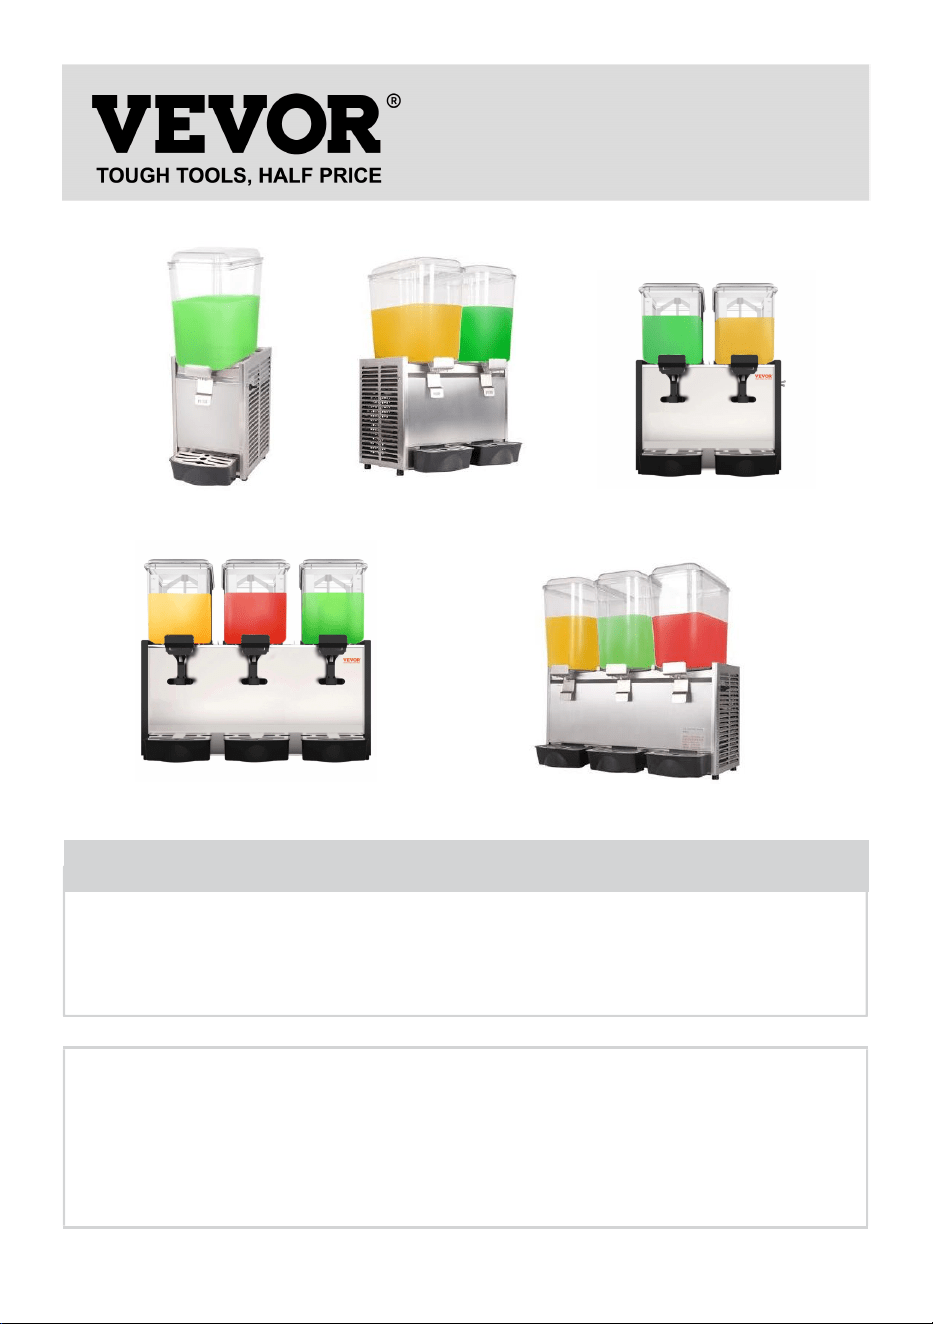
BEVERAGE DISPENSER
OPERATING INSTRUCTION
MODEL:LP18A/LP18X2/LP18X3/LJ12X2/LJ12X3
We continue to be committed to provide you tools with competitive price.
"Save Half", "Half Price" or any other similar expressions used by us only represents an
estimate of savings you might benefit from buying certain tools with us compared to the major
top brands and doses not necessarily mean to cover all categories of tools offered by us. You
are kindly reminded to verify carefully when you are placing an order with us if you are
actually saving half in comparison with the top major brands.
- 2 -
MODEL: LP18A/LP18X2/LP18X3/LJ12X2/LJ12X3
Have product questions? Need technical support? Please feel free to
contact us: Technical Support and E-Warranty Certificate
www.vevor.com/support
NEED HELP? CONTACT US!
This is the original instruction, please read all manual instructions
carefully before operating. VEVOR reserves a clear interpretation of our
user manual. The appearance of the product shall be subject to the
product you received. Please forgive us that we won't inform you again if
there are any technology or software updates on our product.
BEVERAGE
DISPENSER
MODEL: LP18A
MODEL: LP18X2
MODEL: LP18X3
MODEL: LJ12X2
MODEL: LJ12X3
- 3 -
Warning-To reduce the risk of injury, user must read instructions
manual carefully.
FCC statement:
This device complies with Part 15 of the FCC Rules. Operation is
subject to the following two conditions:(1)This device may not cause
harmful interference, and (2)this device must accept any interference
received, including interference that may cause undesired operation.
SAFETY PRECAUTION
Notice:
Prevent water and conductive liquid from entering the machine;
Please do not throw stick and other things into the machine;
When the machine is in moving process, the angle should not be beyond 45° ;
The distance between the ventilation slot and wall should not be less than
20CM to keep good ventilation, dry and clean.
Safety warning:
Read all safety warnings, instructions, illustrations and specifications provided
with this electrical appliances. Failure to follow all instructions listed below may
result in electric shock, fire and/or serious injury.
The machine should be operated by a professional or others who have been
trained;
To ensure personal safety, please keep the machine properly grounded;
Ensure that the power supply is the same as the nameplate and the working
voltage bias between rated voltage is ±10%;
If the power wire is damaged, it should be changed by the professionals
to avoid danger;
When stop using,disassembling or do some cleaning, please cut off the
power;
To avoid electric shock, please do not pour water on the plug, motor and other
electrical components.
Foamed material is flammable; the user may not arbitrarily discard or dispose
- 4 -
of it. It should be under the state's relevant provisions by the designated recycling
department.
This appliance can be used by children aged from 8 years and above and
persons with reduced physical, sensory or mental capabilities or lack of
experience and knowledge if they have been given supervision or instruction
concerning use of the appliance in a safe way and understand the hazards
involved. Children shall not play with the appliance. Cleaning and user
maintenance shall not be made by children without supervision.
SAVE THESE INSTRUCTIONS
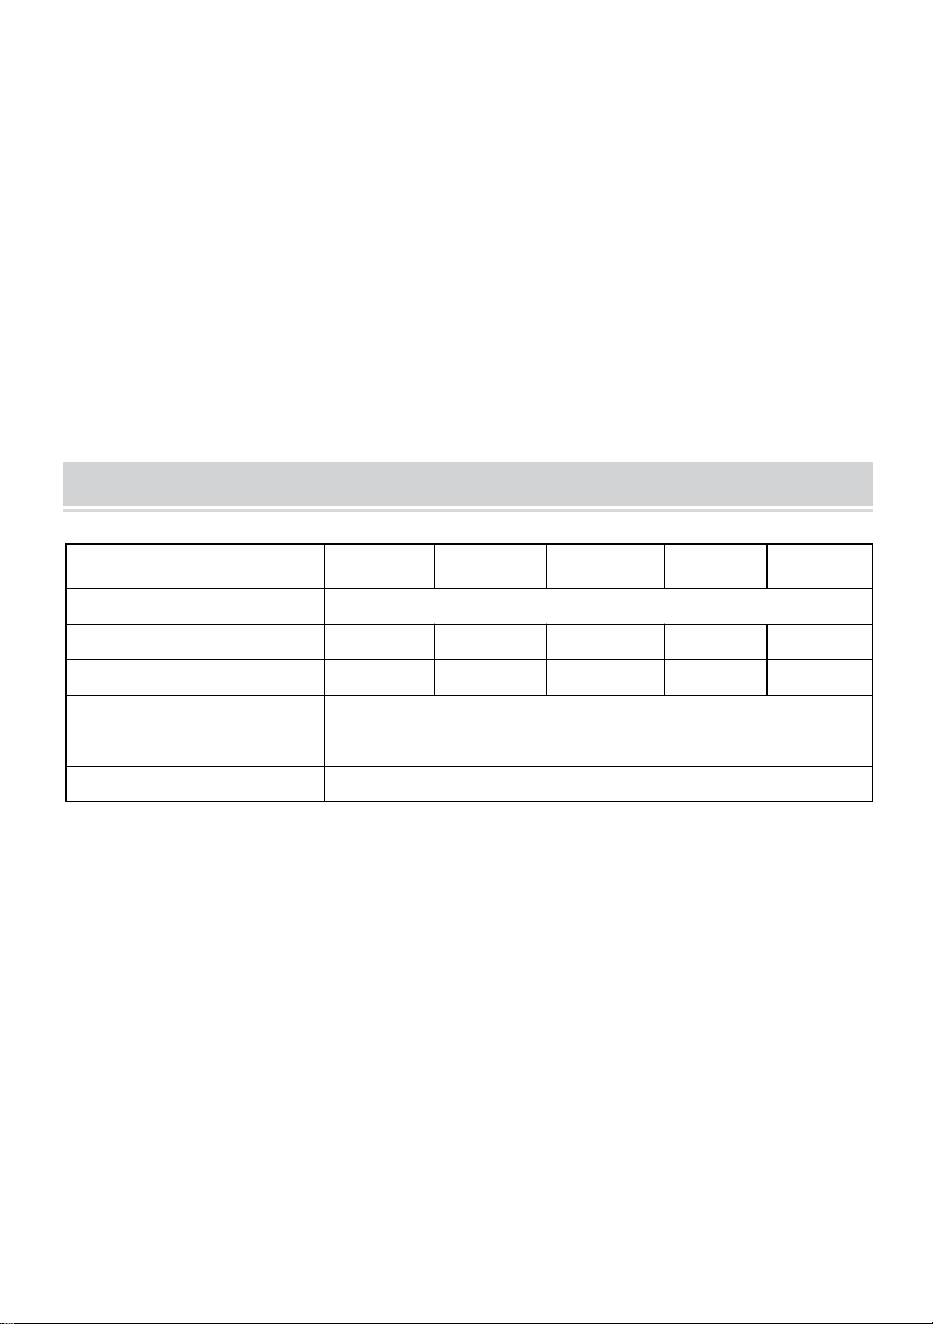
TECHNOLOGY PARAMETERS
Model
LP18A
LP18X2
LP18X3
LJ12X2
LJ12X3
Input
115V~ 60Hz
Refrigeration power
325W
590W
680W
280W
620W
Rated capacity
18L*1
18L*2
18L*3
12L*1
12L*2
Cool the juice
temperature
5-12℃
Working noise
≤65dB(The front side is 1 meter away)
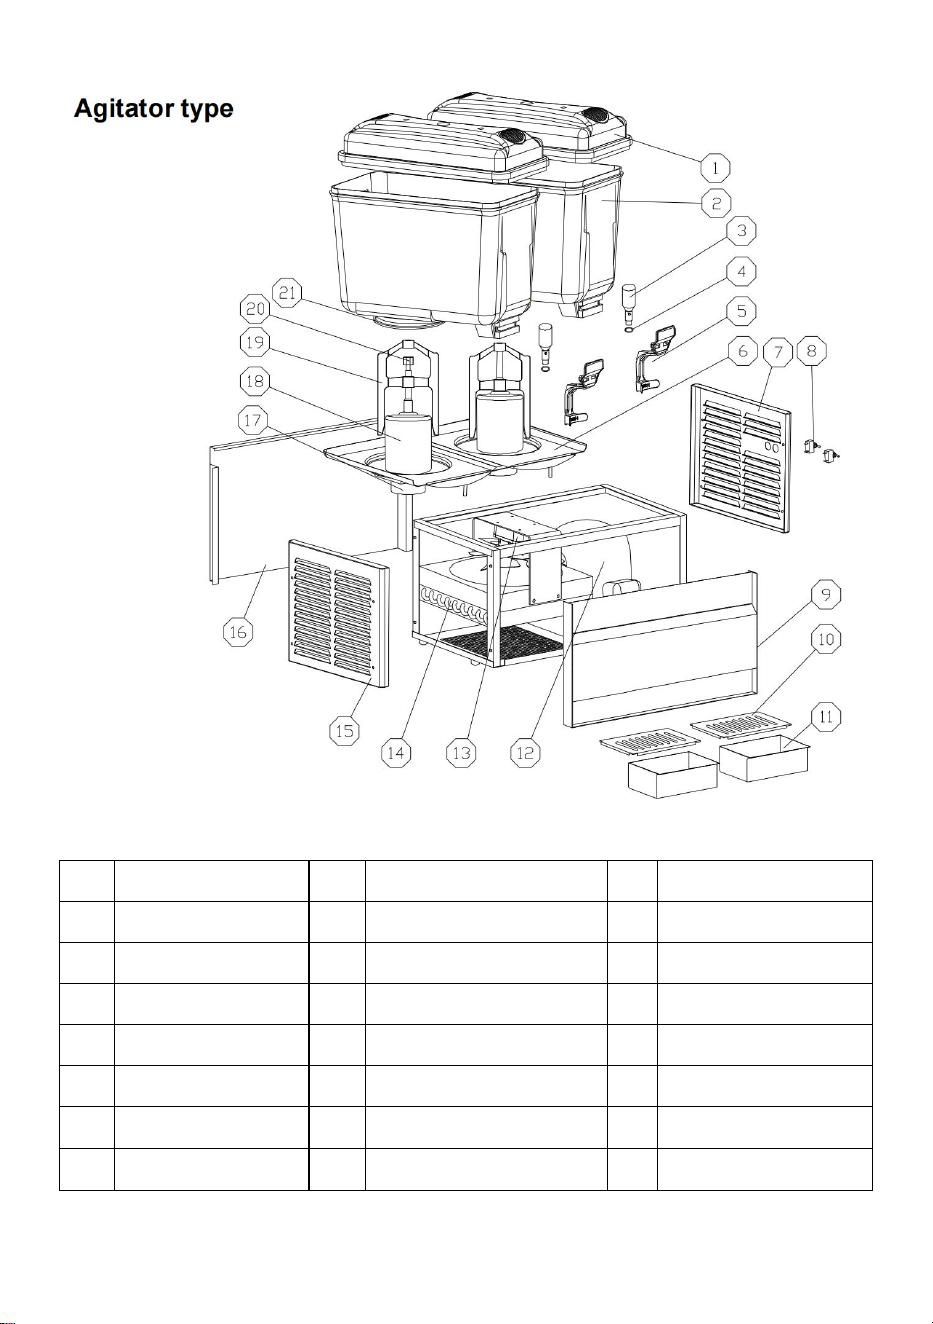
Exploded view (two bowl)
- 5 -
Diagram for reference only, please in kind prevail !
No.
Part name
No.
Part name
No.
Part name
1
Tank cover
8
Switch
15
Side panel (left)
2
Tank
9
Front panel
16
Back panel
3
Dispensing valve
10
Cover for drip tray
17
Beater motor
4
O-ring
11
Drip tray
18
Evaporator
5
Handle
12
Compressor
19
Beater
6
Supporting block
13
Fan motor with blade
20
Shaft for beater
7
Side panel (right)
14
Condenser
21
Gasket for tank

- 6 -
Diagram for reference only, please in kind prevail!
No.
Part name
No.
Part name
No.
Part name
1
Tank cover
9
Evaporator
17
Compressor
2
Pump tube
10
Supporting block
18
Fan motor
3
Tank
11
Pump motor
19
Condenser
4
Gasket of tank
12
Side panel(right)
20
Side panel(left)
5
Pump cover
13
Switch
21
Back panel
6
Dispensing valve
14
Front panel
22
Bearing sleeve
7
O-ring
15
Cover for drip tray
23
Impeller
8
Handle
16
Drip tray
24
Fastener
- 7 -
INSTALLATION AND OPERATION
A. Installation
(1) Remove the package, move the machine to the proper place, and check the
goods according to the packing list. If there exist differences, please get in touch
with a distributor.
(2) Operating environment
a. Ambient temperature range: 10°C〜38°C
b. Ambient humidity: relative humidity≤90%
c. The machine should be placed indoors in a drafty environment for better
ventilation efficiency. More than 20cm of space is required around the machine.
(As shown in Figure 6)
d. Avoid direct sunlight and keep the machine away from the heat source. To
avoid water and other liquid splashing into the machine, do not place it in a
humid or easily-splashing place.
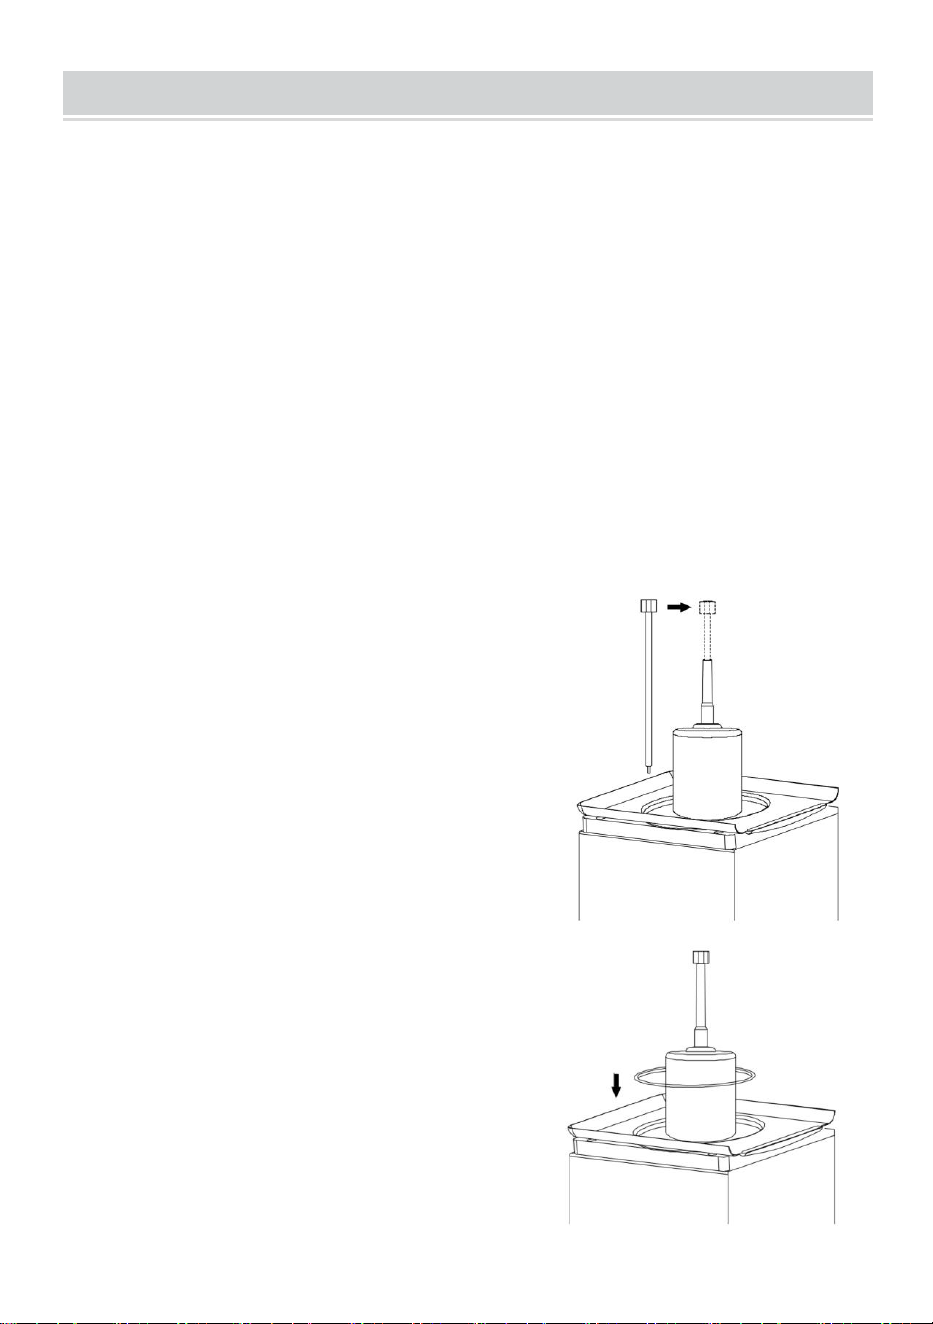
(3) Installation of the Tank Assembly
Agitator type
a. Please clean the beverage-contacted parts
before use.
Embed the mixing shaft into the stationary shaft
at the bottom and rotate it left-right to the proper
position.
a. Fix the bearing sleeve onto the bearing, then
put the impeller mounted on the sleeve with the
blade side up.
b. Fix the sealing ring to the bottom of the
evaporator, and ensure that the sealing and
evaporator fit tightly. During this process, dip the
sealing ring in some water or vase line, which.

- 8 -
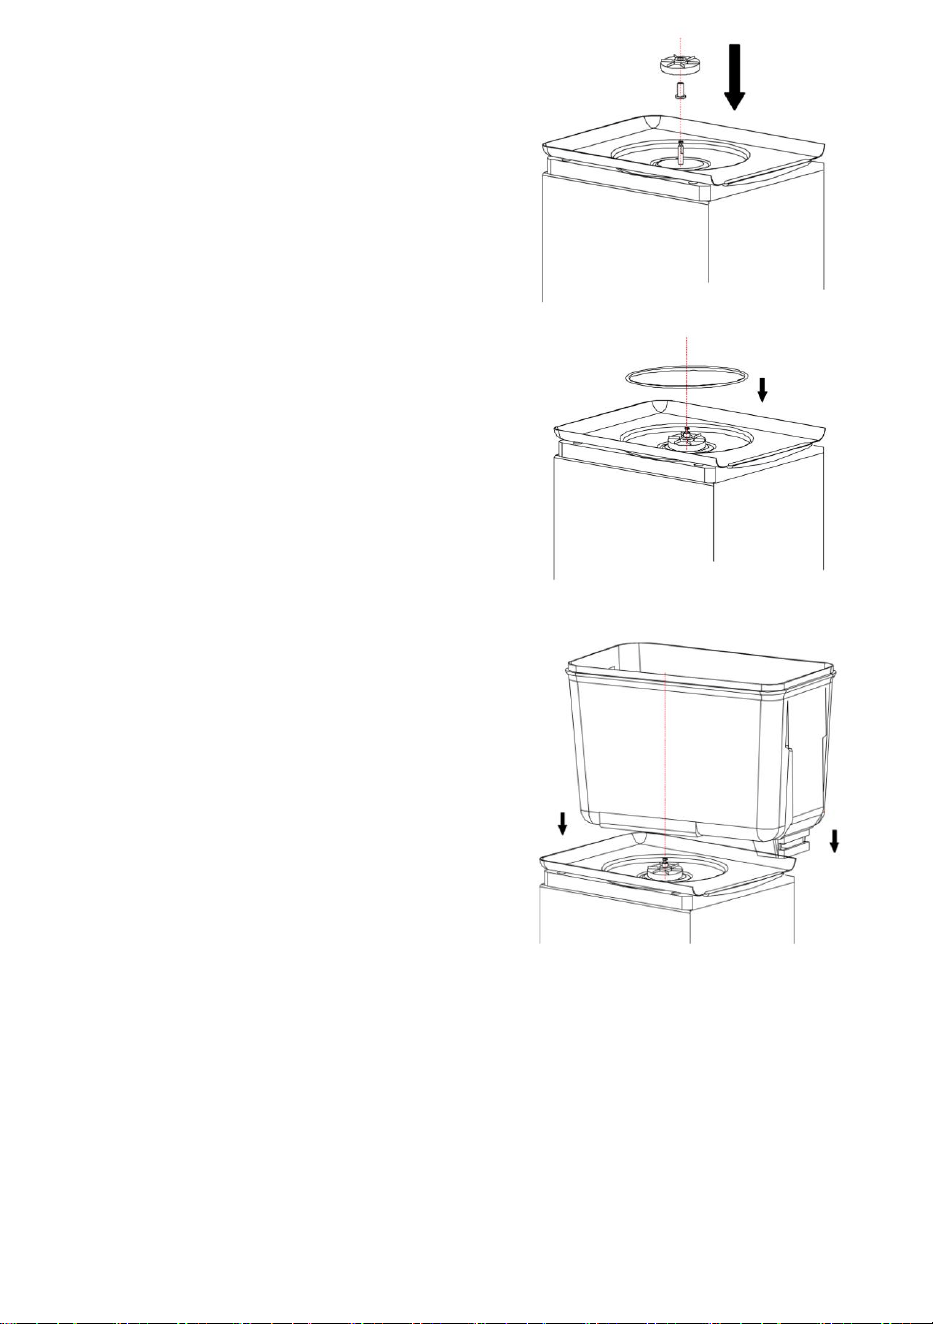
Installation of Tank:
c. Before installing the tank, dip the sealing ring
with some Vase line, which works as lubricant.
Then install the tank to the supporting block, hold
the tank diagonally and press downward evenly, if
succeed, the tank will locked on the right position
and will not tilt.
Installation of beater:
d. Fix the beater onto the mixing shaft, rotate it
left- right until to the right position.Wear the
discharging valve with o-ring and put it in the
discharging hole, and match with discharging
handle.
e. Feed the tank with some water, check the
evaporator chassis and discharging valve, if there
has a leak, please repeat the third step and then
cover the tank lid.
- 9 -
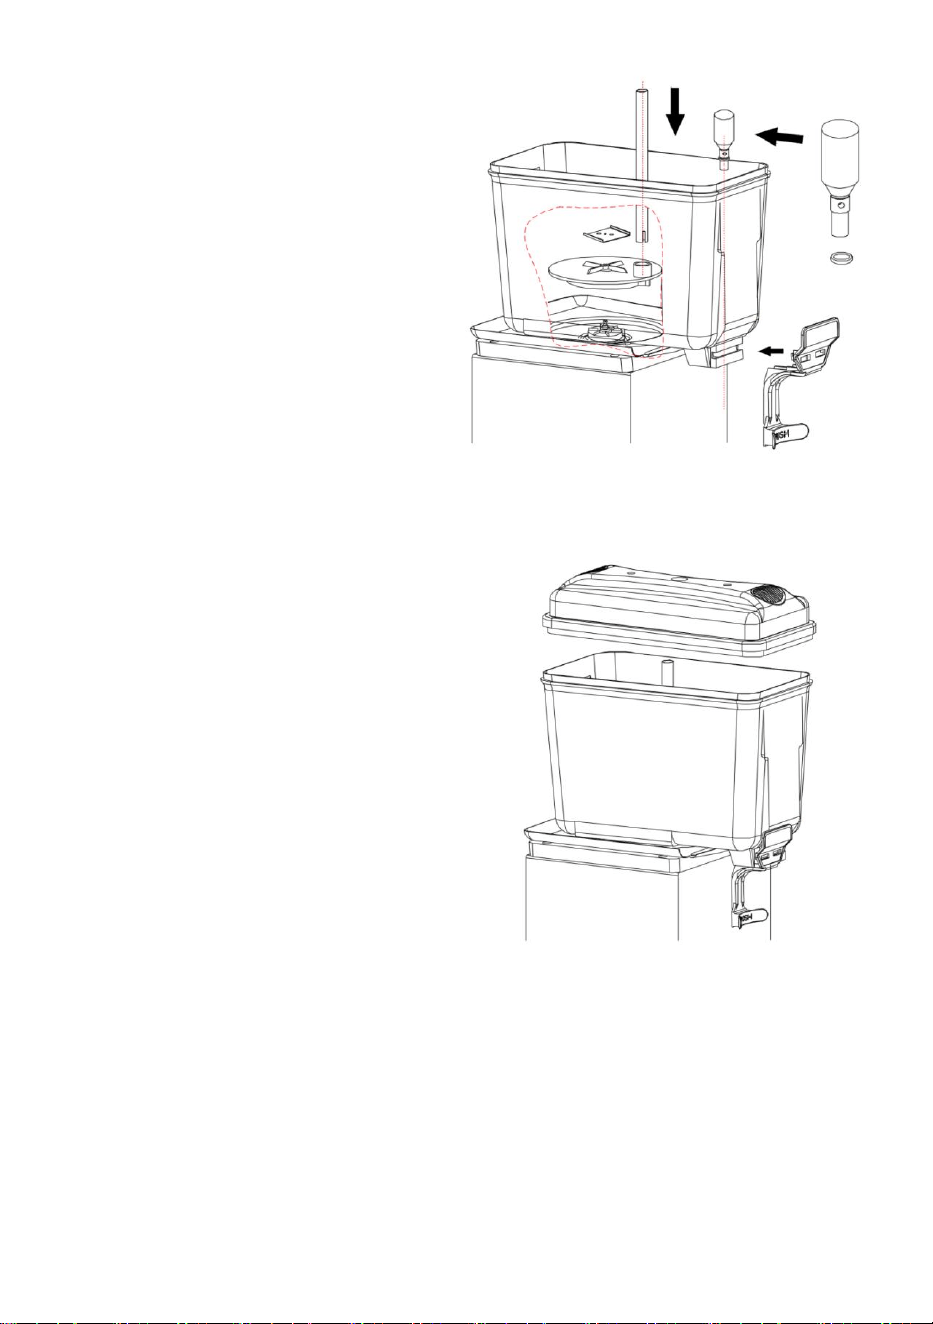
Spray type
a.Fix the bearing sleeve onto the bearing,
and then put the impeller mounted on the
bearing sleeve, with the blade side up.
b.Fix the sealing ring to the bottom of the
evaporator, ensure that the sealing and
evaporator fits tightly. During this process,
dip the sealing ring with some water or
vaseline, which will help further installation.
c.Install the tank to the supporting block, hold
the tank diagonally and press downward
evenly, if succeed, the tank will locked on the
right position and will not tilt.
d.Installation of dispensing valve and handle
① Wear the dispensing valve with O-ring and turn the O-ring to the right position.
② Fix the handle into the two "V" slot and push the handle inside the slot.
③ Lower the dispensing valve (do not drop in) down through the valve hole and
the hole in the handle. When the valve is seated on its O-ring, release the handle.
④ Push the handle in and release it several times to ensure the valve move up
and down freely.
- 10 -
e.Installation of pump cover, fastener
and pump tube
①. Put the pump cover on the bearing
and keep the pump tube in the center
of the tank.
②. Slide the fastener toward the back
of the pump cover and under the head
off the bearing until the neck of the
spindle is completely in the locking
keyway. Turn the fastener1/4 circle
(clock-wise) to lock and release,
then turn 1/4 circle (anti-clock-wise) to
take out the fastener.
③. Put the pump tube into the hole of the pump cover and ensure it fixes tightly.
g.Pour proper amount of water to the
tank , in order to check if there is leakage
in the base of the evaporator and
dispensing hole. If there is leakage, please
repeat the third and fourth step, then cover
the tank cover.
(4) Clean the machine
a. Disassemble the tank assembly, use neutral downy detergent mix with warm
water to wash the parts, use cleaning cloth without tomenta to dip detergent to
wash machine.
b. Use clean flowing water to wash these parts again, and use cleaning cloth
without tomenta to dip water to wash machine again.
c. Use dry cleaning cloth without tomenta to dry the parts.

- 11 -
d. Use detergent to wash drip tray and drip tray cover, then use pure water to
wash them again, after that, install the drip tray on the front panel, and also put the
drip tray cover on the drip tray
(5) Plug in
The socket and other appliance should comply with user’s local electrical
regulations and national rules, also the voltage and current should comply with the
rated value according to nameplate, (if use external plug, should use connection
board with right current),and the machines should be properly grounded. If the
voltage ranges too much(beyond the rated value ±10%), it may cause the machine
can not start, or break the PCB board, or break compressor. In this condition,
adding a appropriate voltage stabilizer is necessary.
B. Testing
When the tank is installed well, firstly pour in a little drinking water. Check the
bottom of the tank and dispensing mouth, if there is a slight leakage on the bottom
of the tank, use your hand diagonally to take the tank and press downward, to
make sure the tank and O-ring into the right place; if there is leakage on the
dispensing mouth, please check the O-ring is in proper place, or change it if it is
necessary. Then add beverage into the bowls and switch on cooling.
INGREDIENTS PREPARATIO
(1) Ingredients include : dried fruit powder, syrup or plum juice and drinking water,
mix the fruit juice and the drinking water according to certain proportion (for
delicious advisable). Stir mixed liquor completely in a clean container, and
particles are not allowed; otherwise the dispensing mouth will be blocked.
(2) The temperature of mixed liquor cannot exceed 35℃.
(3) Please remember that do not use too thick juice or drink with precipitate,
otherwise easily result in water pipe blockage, and not pumping water
properly.
Warning: connect or use drinking water, the formula materials should
conform to the requirements of the food hygiene license.

- 12 -
B. Operation method
(1) Pour the drink into the tank and make sure the drink shall not exceed the
maximum level line, not less than the minimum level line.
(2) Plug the power plug after pouring the drink, turn on the pump and
refrigeration/heating switches to run the machine. When the machine reaches
the set temperature, it will stop refrigeration/heating, but will keep pumping or
rotating.
(3) After turning off the refrigeration switch, it need to wait for 3 minutes for
turning on the switch again, otherwise it will damage the compressor.
(4) Ensure to turn on the pump switch for heating. After stop heating, pump
motor and beater motor should work at least 15 minutes before turning off.
(5) Do not use single cylinder for heating (except for hot beverage machine)
(6) Temperature rage: for cold drink: 2-12℃; for hot drink 30~65℃.
(7) Empty drinks in bowl when it's off business hours to prolong key parts
service lifetime
DAILY CLEAN AND MAINTENANCE
A. Cleaning
(1) Wash all parts of bowl thoroughly in mild detergent and warm water (refer
to page 7 and 8 for disassembly methods).
(2) Rinse in clean running water.
(3) Reassemble all parts of bowl.
(4) Pour sanitizer and water into the bowl. Turn on the beater motor and allow
sanitizer to flow inside the bowl.
(5) Drain liquid through the valve completely and thoroughly during each step
of the cleaning process (wash, rinse, sanitize, rinse).

- 13 -
Notice:
1. The bowls assembly should be cleaned everyday.
2. D-ring and O-ring should be checked after cleaning and replaced if worn.
3. In case of parts heat cracking, with high temperature disinfection is prohibited
and do not use more than 60 C boiled water to clean the tank and components.
B. Maintenance
Use a cleaning cloth or brush to clear away all the dust and attachments on the
surface or inside of the machine regularly. Do not flush the interior of machine with
water directly. Before cleaning, please cut off the power and disconnect the plug; it
is essential.
(1) Cut off the power first, and disassemble all the panels of the machines, then
clear the dust attached to the compressor, copper pipe, and bottom panel.
Using water is forbidden.
(2) After being used over a period of time, the condenser maybe thick with dust,
and this will affect radiating heat and cause bad cooling, so it needs periodic
cleaning (every half year)
(3) Step 1: Disconnected the main power switch.
(4) Step 2: Remove the back panel and side panels.
(5) Step 3: Clean dust with tools such as a vacuum cleaner, high-pressure air,
and hairbrush, be careful while cleaning to avoid damaging the condenser's
fins.
(6) Check all the screws and nuts if they are loose or rusty, and fasten or
replace them to avoid causing noise.
(7) Finally, assemble all the panels, fasten all screws, and clear the surface.
TROUBLE SHOOTING
The following table lists showed the possible machine fault and its reason and
processing method. For general simple fault, can follow the table processing
method and processing, such as the fault is still cannot be ruled out, as well as
more complex fault, please contact professional maintenance staff immediately,
never sloppy handling, so as not to bring you unnecessary loss.

- 14 -
Trouble
Possible cause
Remedy
Compressor runs but
no refrigeration
faulty compressor
replace
loss of refrigerant
charging
faulty fan motor
replace motor
Compressor doesn't
run
faulty thermostat
replace
faulty switches
replace switches
faulty electrical connection
locate and correct
defective overload protect
Check the overload
protector and
replace it
Improper spray
(spray typel)
foreign matter in pump cover
clean
impeller hole wearing
replace new
impeller
wiring error
inspect and
repair
Leaky bowl
Worn of nicked bowl gasket or
improperly installed
Reinstall gasket
or replace gasket
Leaky valve
Worn of nicked valve O-ring
Reinstall or
replace
Leaky dispensing
valve
Handle has not returned
Return handle
Less efficiency
Dust and lint in condenser
Cleaning the fins
of
condenser
Broken fan motor
Replace fan motor
No heating
Faulty switches
replace it
Heating plate is broken
replace it
Time relay is broken
replace it
Temperature sensor is broken
replace a new one
The machine can't stop
cooling or heating
Transformer or PC Board is
broken
replace it
Time relay is broken
replace it
Temperature sensor is broken
replace a new one

- 15 -
TECHNICAL PARAMETER AND WIRING DIAGRAM
A. Technology parameters are on the nameplate
B. The wiring diagram is on the inner panel
Made In China