Warranty
19
2
Safety Precautions
Be sure to observe
To prevent the bodily injury and property damage, please be sure to observe the following safety precautions.
■The following icons show the extent of damage caused by incorrect operations.
Warning: Indicates a potential hazard that, if unavoidable, may result in death or serious injury.
Note: Indicates a potential hazard that, if unavoidable, may result in death or moderate injury.
The classification and interpretation of icons a
re as follows.
This icon indicate that cannot be in progress, i.e. “Prohibited ”.
This icon indicate that it must be executed, i.e. “compulsory”
.
Warning
●Do not use the sealed tank or container in the oven.(In order to avoid the danger of explosion caused by
overpressure of containers during cooking.)
●Do no�nsert anything into the opening o�he oven.
•Especially the metal objects, such as lead wire or electric wire.
(To avoid electric shock or injury caused by abnormal movements.)
●Do no�nstal
l the decora�ve door panels in front o�he oven.
(To avoid the door panels become deformed caused by overhea�ng.)
●Keep away from the appliance while in use or just a�er use. Pay special a�en�on to children.(To avoid scalds)
●Do not place objects other than heat-resistant po�ery in this product.
(To avoid fire caused by high temperature mel�ng.)
Prohibi�on example:
•Flammable objects such as plas�c containers.
•Ar�cles made of aluminium foil, etc.
●Do not use this appliance to hea�he room.
(To avoid causing fire an
d shortening product life.)
●Do not use this appliance to heat unopened canned products.
(To avoid fire, scald or injury cause by explosion due to pressure accumula�on.


4
Safety Precautions
Be sure to observe
Note
●Do not put inflammable materials in the oven.
(So as not to cause a fire when accidentally turning on the oven)
●Do not sit or fall back on open products.
(To avoid damaging the telescopic chute.)
●Do not use irritating, corrosive cleaners or sharp metal scrapers to clean glass doors of oven.
(To avoid scratching the surface, or even causing glass to break.)
●Do not use steam cleaner to clean this product.
(To avoid short circuit or pro
duct failure.)
●Do not touch the bottom of the product after the power is turned on.
(To avoid scalds.)
●During cooking the food with fat or oil release, be sure to be watched by someone.
(To avoid causing fire.)
●Do not replace your hands on either side o�he door when it closes.
Use Precaution
(To avoid injuries caused by clamping fingers when closing the door.)
s
Focus on product
■Before the first use, please remove all the protective film on the product (except rating label).
(To prevent the pro
tective film from melting due to high temperature and scalding after touching.)
■Before first use, please remove packaging material from the oven.
(Grill, cardboard on both sides of the baking tray, cushioning foam in front and rear of the grill and strapping tapes
on the slide rail).
■During operation, the oven become very hot, and heat-resistant gloves should be worn when operating.
(To avoid scalds.)
■During operation, the oven door must be closed and confirm there is n
o object stuck on the oven door.
(To avoid affecting the cooking effect.)
■Do not leave sugary food residues (such as jam) in the oven.
(To avoid damaging the enamel inside the oven.)
■Do not use plastic products in the oven.
(To avoid the melting of plastic will damage the oven cause by high temperature.)
■During using the oven, do not cover the bottom of the oven with aluminum foil, tin foil, or place pans and baking
tray at the bottom of the oven.(To avoid damaging the enamel insi
de the oven.)
■During using the oven, if the surface is still very hot, do not water the baking pan directly.
(In order to avoid steam burn out or damage the enamel surface.)
■Do not use spray cleaner.
(Avoid causing insulation aging ,thereby damaging the oven.)

5
Use Precautions
Slide-in racks Placement Warning
In order to ensure the safe use of the grate or tray, it is necessary to insert in the right direction and place the slide-in
racks correctly.
In addition, you can also refer to the level number displayed in the front of the oven when you open it. (There are five
levels altogether.)
This ensures that food does not slip out of the back during careful removal from the grate or tray.
Before closing the oven door, make sure that the grate
(baking tray) is in place and that the grate (baking tray) does
not touch the glass inside the oven door.
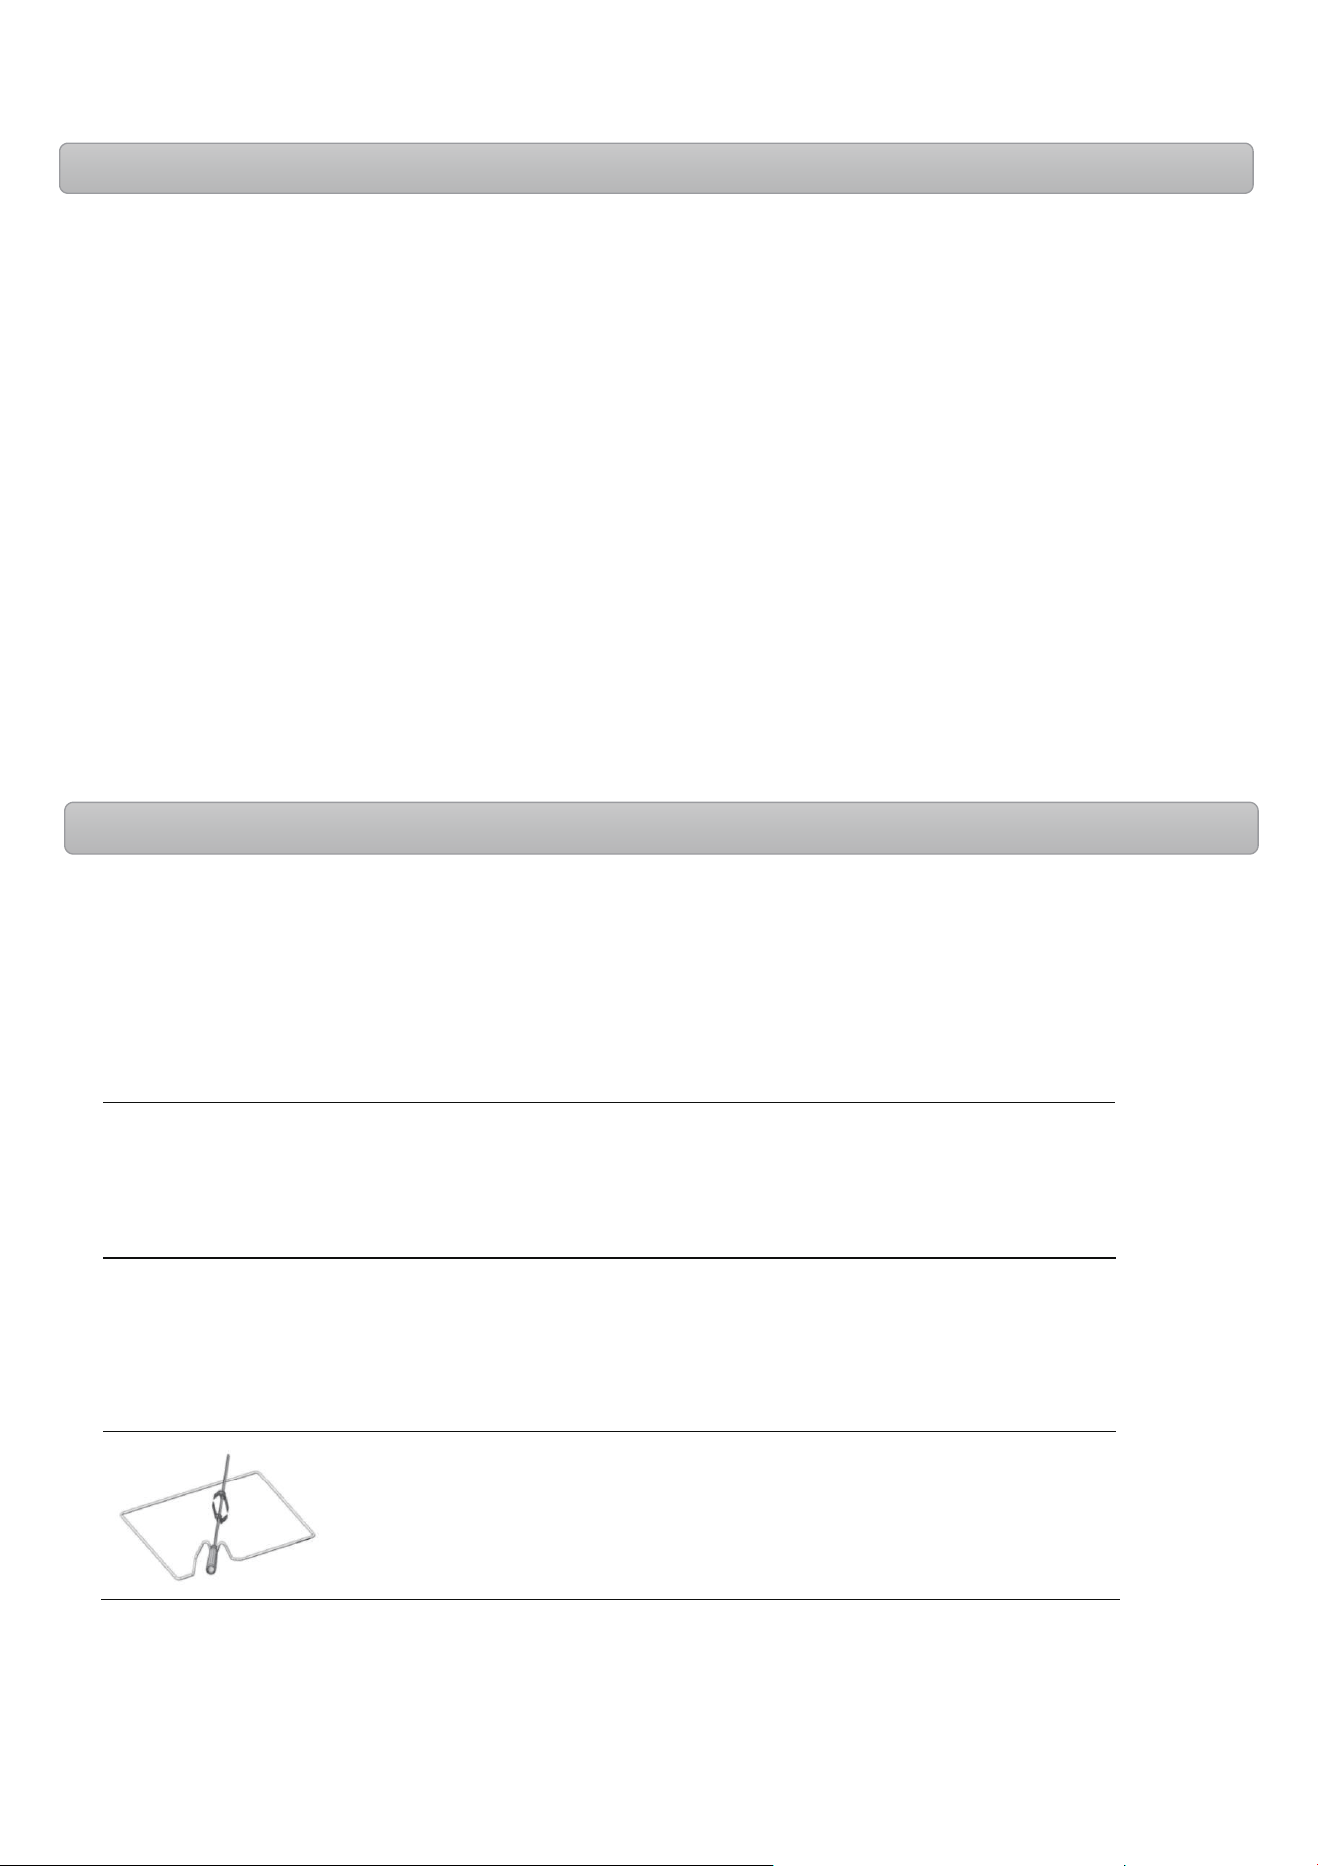
Removal of Packaging Components and Cushioning Materials
Remove packaging materials before use
Before the initial use, please remove the packing material according to the drawing first, the other operations can be
carried out.
Please pay attention to remove the packing materials in th e oven

ϲ
/ŶŝƚŝĂů hƐĞ WƌĞĐĂƵƚŝŽŶƐ
/ŶŝƚŝĂů hƐĞ KƉĞƌĂƚŝŽ
EŽƚĞ tŚĞŶ ƵƐŝŶŐ ŽǀĞŶ ĨŽƌ ƚŚĞ ĨŝƌƐƚ ƚŝŵĞ ƚŚĞƌĞ ŵĂLJ ďĞ Ă ƐŵĂůů ĂŵŽƵŶƚ ŽĨ ƐŵŽŬŝŶŐ ĂŶĚ ŽĚŽƌ ǁŚŝĐŚ ŝƐ Ă ŶŽƌŵĂů ƉŚĞŶŽŵĞŶŽŶ
WůĞĂƐĞ ĂĚũƵƐƚ ƚŚĞ ƚĞŵƉĞƌĂƚƵƌĞ ŽĨ ƚŚĞ ĞŵƉƚLJ ŽǀĞŶ ƚŽ ϮϱϬć / ϰϴϮ°&ĂŶĚ ďĂŬĞ ŝƚ ǁŝƚŚ ƐƚĞƌĞŽƐĐŽƉŝĐ ĨƵŶĐƚŝŽŶ ĨŽƌ ϯϬ ŵŝŶƵƚĞƐ
ďĞĨŽƌĞ
ƵƐŝŶŐ ŝƚ
Ŷ
ZĞŵŽǀĞ Ăůů ĐƵƐŚŝŽŶŝŶŐ ŵĂƚĞƌŝĂů
KƉĞƌĂƚĞ ƚŚĞ ĞŵƉƚLJ ŽǀĞŶ ĨŽƌ ĂďŽƵƚ ϯϬ ŵŝŶƵƚĞƐ ǁŝƚŚ ƚŽƉ ĂŶĚ ďŽƚƚŽŵ ŚĞĂƚ ŵŽĚĞ ĂŶĚ ŵĂdžŝŵƵŵ ƚĞŵƉĞƌĂƚƵƌĞ
dŚĞ ƌĞƐƵůƚŝŶŐ ƚLJƉŝĐĂů ƐŵĞůů ŽĨ Ă ďƌĂŶĚ ŝƐ ƵŶĂǀŽŝĚĂďůĞ WůĞĂƐĞ ǀĞŶƚŝůĂƚĞ ƚŚĞ ƌŽŽŵ
7
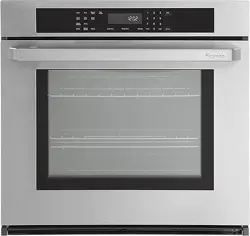
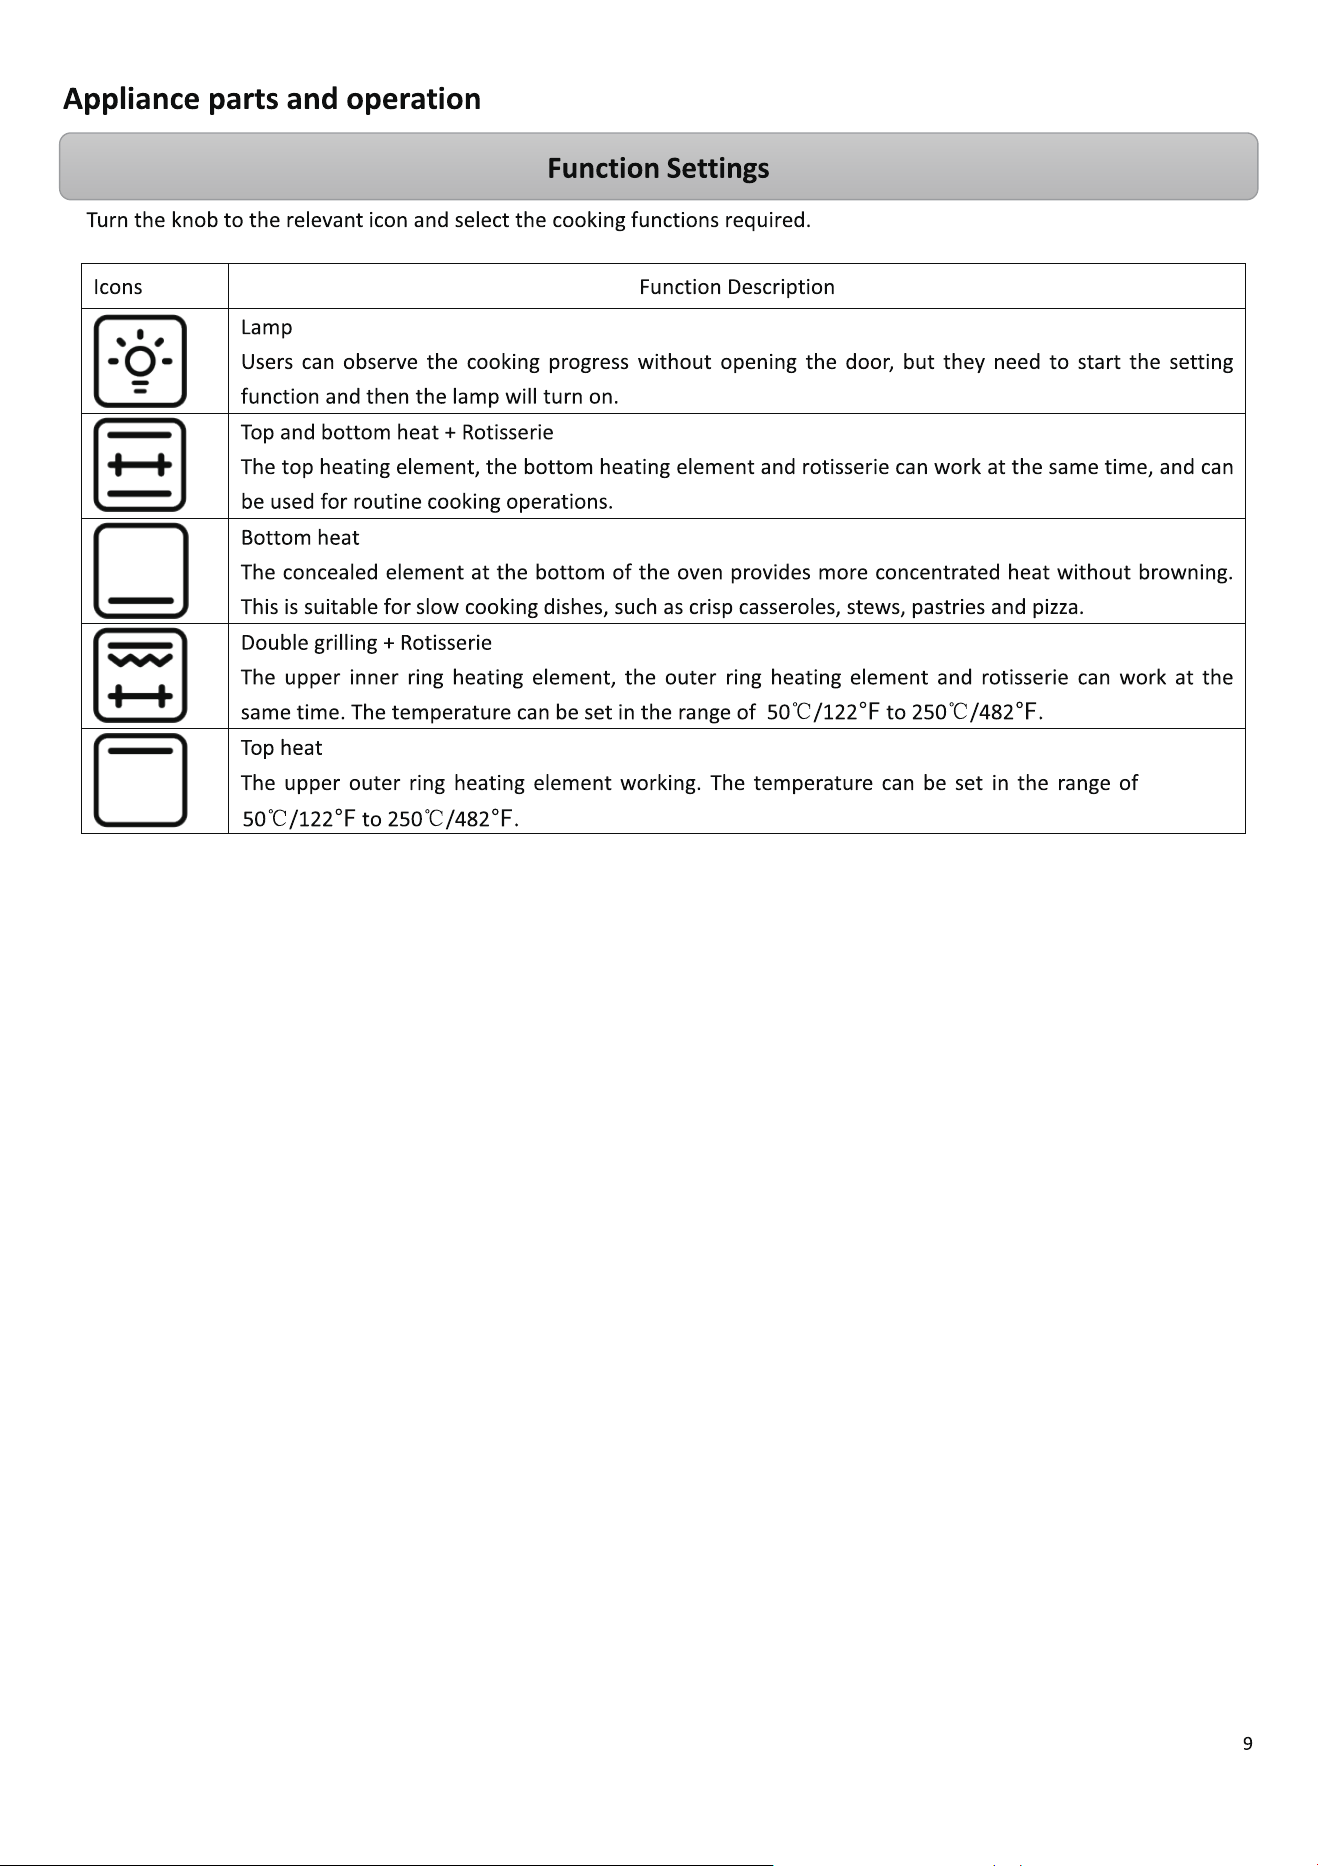
Appliance parts and operation
Oven Component
需
Accessories
·Before first use, please clean all accessories and use soft cloth and neutral detergent to clean the oven.
· Only original accessories can be used.
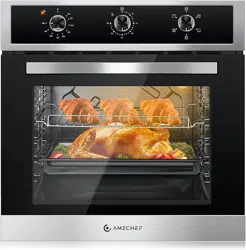
◆ Grate
Used for baking and barbecuing
◆ Enameled baking tray
Used for cooking large amounts of food, such as damp cakes, pastries,
frozen foods, or for collecting fat/spills and gravy
◆ Slide-in racks (except AN6304BXXX-B)
When cleaning the oven wall, the racks on both sides can be removed.
◆ Rotisserie spit (only
available on certain models)
◆ Screw assembly
Screws (2) for fixing product
The kit includes a spit, 2 prongs, a detachable handle, and a cradle that fits
on the third shelf. Please read below for the tutorial for this item.
8
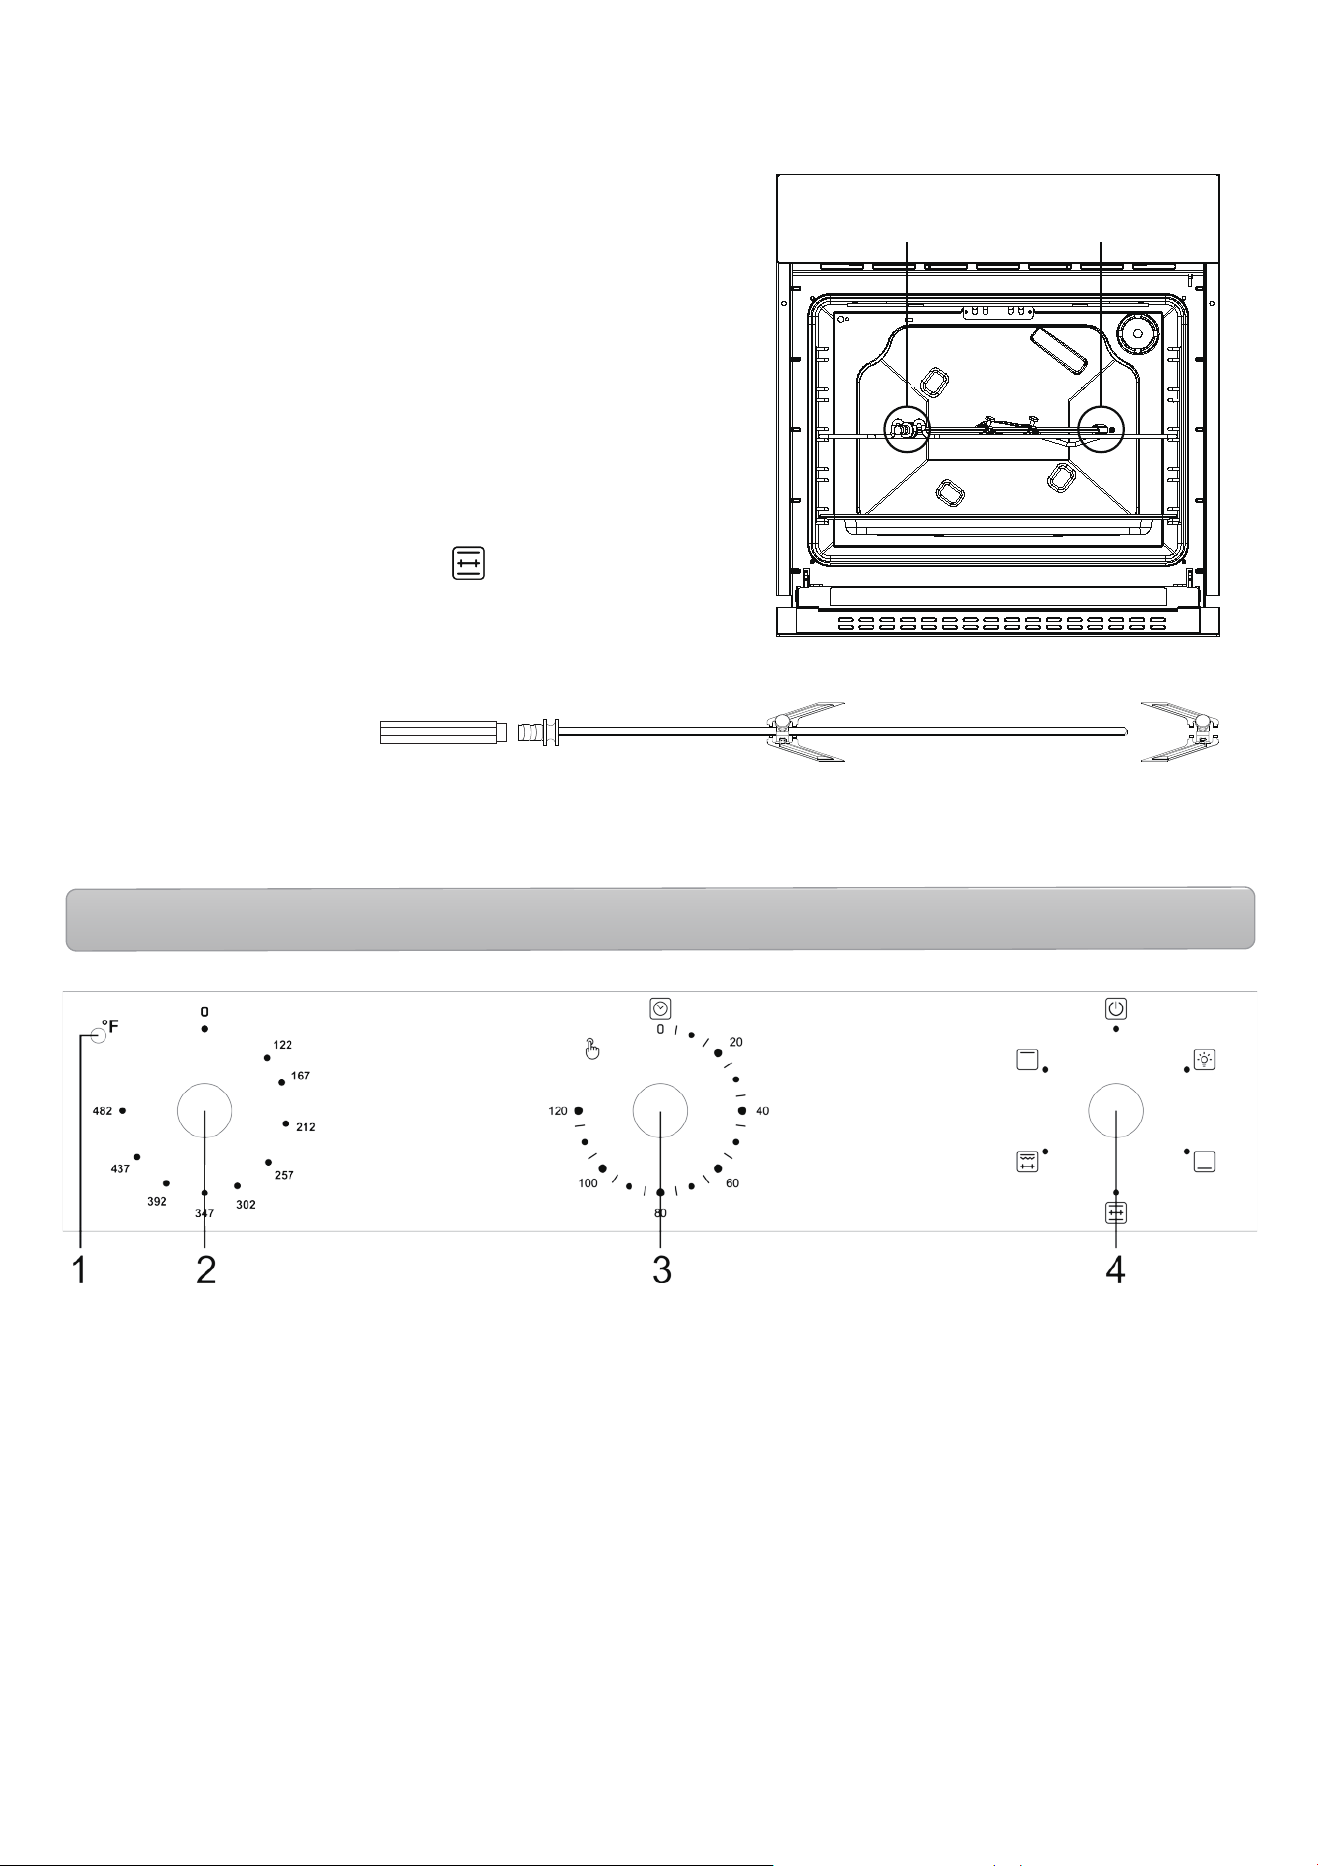
Appliance parts
and opera�on
Control Panel
1. Indicator light
(indicates the hea�ng process, i.e. the opera�on of one or more hea�ng elements)
2. Temperature se�ng knob
• Rotate the knob to select the desired temperature.
3. Timer se�ng knob
• Rotate the knob to select the desired cooking �me. When the set �me is reached, the oven stops working.
The bell rings and the lamp turns off automa�cally. The
in the �mer se�ng knob is the stay on func�on,
rotate counterclockwise to the
icon, the oven stays working.
4. Func�on se�ng knob
• Rotate the knob to select the desired func�on.
To use the ro�sserie,
1. In case handle "A" is loose, screw and �ghten it securely.
2. Unscrew the fork "C".
3. Fit the food on to the spit, and then screw the fork "C" to
clamp the food with the two forks.
4. When the food is secured, fit the end of the spit into the
hole "E".
5. And then fit the support of the spit into the circular groove
"D".
6. Unscrew and remove handle “A” of the spit.
7. Place the baking tray (with a li�le water) on the lowest
shelf.
8. Close the oven door.
9. Switch the knob to func�on ro�sserie .
When the cooking �me is up, screw the handle “A” on the
spit and remove everything from the oven. If necessary, use
an oven glove to avoid any burn.
A B C
D
E
→
Note: If the set �me is under 20 minutes, you should rotate the knob all the way to the maximum before
adjus�ng it to your desired �me.

ϭϭ
hƐĂŐĞ DĞƚŚŽĚ
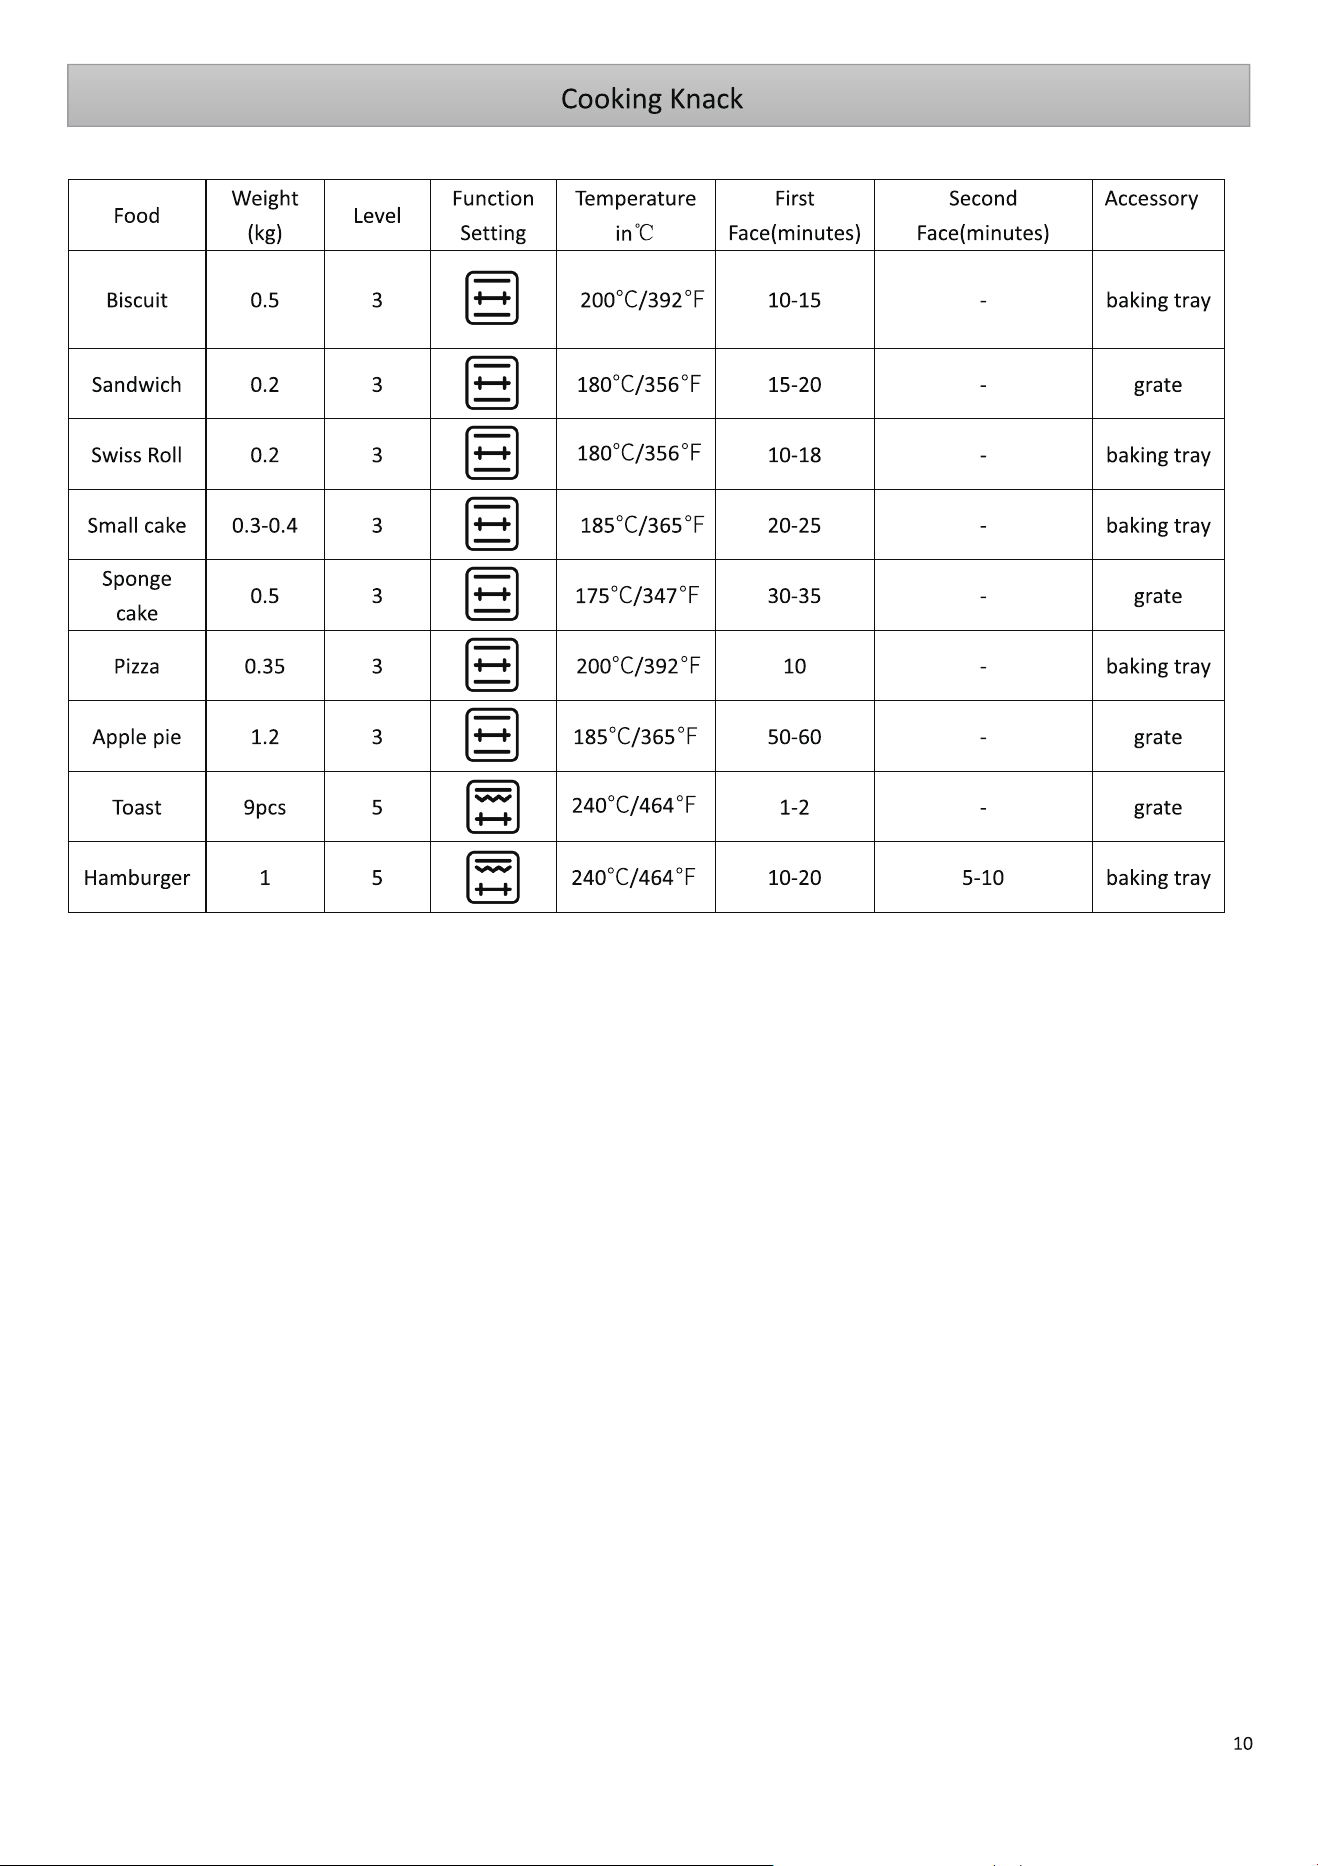
ŽŽŬŝŶŐ ^ƵŐŐĞƐƚŝŽŶƐ ĂŶĚ /ŶƐƚƌƵĐƚŝŽŶƐ
Ƶ EŽƌŵĂů ^ƵŐŐĞƐƚŝŽŶƐ
ЬtĞ ƐƵŐŐĞƐƚ ƚŽ ƉƌĞŚĞĂƚ ƚŚĞ ŽǀĞŶ ďĞĨŽƌĞ ƚŚĞ ĨŽŽĚ ŝƐ ƉƵƚ ŝŶƚŽ ƚŚĞ ŽǀĞŶ
Ь EŽƌŵĂůůLJ ŝƚ ŝƐ ŝŵƉŽƐƐŝďůĞ ƚŽ ƐŚŽƌƚĞŶ ƚŚĞ ĐŽŽŬŝŶŐ ƚŝŵĞ ďLJ ŝŶĐƌĞĂƐŝŶŐ ƚŚĞ ƚĞŵƉĞƌĂƚƵƌĞ ;ĨŽŽĚ ŵĂLJ ďĞ ǁĞůů ĐŽŽŬĞĚ
ŽƵƚƐŝĚĞ ďƵƚ ŶŽƚ LJĞƚ ŝŶƐŝĚĞͿ
Ь/Ĩ ĐŽŽŬŝŶŐ ŝƐ ĚŽŶĞ ŽŶ Ă ŵƵůƚŝͲůĂLJĞƌ Őƌŝůů ǁĞ ƐƵŐŐĞƐƚ ƵƐŝŶŐ Ă ŽŶǀĞŶƚŝŽŶĂů н ĨĂŶ ĨƵŶĐƚŝŽŶ ƐŽ ƚŚĂƚ ƵŶŝĨŽƌŵ ĐŽŽŬŝŶŐ ĐĂŶ
ďĞ ĂĐŚŝĞǀĞĚ Ăƚ Ăůů ŚĞŝŐŚƚƐ
Ь/Ŷ ŽƌĚĞƌ ƚŽ ĂĐŚŝĞǀĞ ƚŚĞ ďĞƐƚ ĐŽŽŬŝŶŐ ĞĨĨĞĐƚ ǁĞ ƐƵŐŐĞƐƚ ƚŚĂƚ ƚŚĞ ƐƵŝƚĂďůĞ ǁĂƌĞ ƐŚŽƵůĚ ďĞ ƉůĂĐĞĚ ŝŶ ƚŚĞ ĐĞŶ
ƚĞƌ ŽĨ ƚŚĞ
Őƌŝůů Žƌ ƚƌĂLJ
Ь/Ŷ ŽƌĚĞƌ ƚŽ ƉƌĞǀĞŶƚ ƚŚĞ ĨŽƌŵĂƚŝŽŶ ŽĨ ĞdžĐĞƐƐŝǀĞ ĐŽŶĚĞŶƐĂƚŝŽŶ ďĞĂĚƐ ŽŶ ƚŚĞ ŝŶŶĞƌ ŐůĂƐƐ ĂĨƚĞƌ ĐŽŽŬŝŶŐ ŚŽƚ ĨŽŽĚ ƐŚŽƵůĚ
ŶŽƚ ďĞ ƉůĂĐĞĚ ŝŶ ƚŚĞ ŽǀĞŶ ĨŽƌ Ă ůŽŶŐ ƚŝŵĞ
Ƶ ^ƵŐŐĞƐƚŝŽŶƐ ŽŶ ŵĞĂƚ ĐŽŽŬŝŶŐ
ЬdŚĞ ĐŽŽŬŝŶŐ ƚŝŵĞ ŽĨ ĨŽŽĚ ĞƐƉĞĐŝĂůůLJ ŵĞĂƚ ǀĂƌŝĞƐ ǁŝƚŚ ƚŚĞ ƚŚŝĐŬŶĞƐƐ ĂŶĚ ƋƵĂůŝƚLJ ŽĨ ƚŚĞ ŵĞĂƚ ĂŶĚ ƚŚĞ ƚĂƐƚĞ ŽĨ ƚŚĞ ƵƐĞƌ
ЬtĞ ƐƵŐŐĞƐƚ ƵƐŝŶŐ ŵĞĂƚ ƚŚĞƌŵŽŵĞƚĞƌƐ ǁŚĞŶ ĐŽŽŬŝŶŐ ŵĞĂƚ ;dŚĞ ƚŚĞƌŵŽŵĞƚĞƌ ŝƐ ŶŽƚ ƐƵƉƉůŝĞĚ ǁŝƚŚ ƚŚĞ ŽǀĞŶͿ
Ь/Ĩ ŶĞĐĞƐƐĂƌLJ ĨŽŽĚ ĐĂŶ ďĞ ǁƌĂƉƉĞĚ ŝŶ ĂůƵŵŝŶƵŵ ĨŽŝů ĨŽƌ ĐŽŽŬŝŶŐ ƚŽ ŵĂŬĞ ƚŚĞ ĨŽŽĚ ŵŽƌĞ ƚĞŶĚĞƌ
Ƶ ^ƵŐŐĞƐƚŝŽŶƐ ŽŶ ĐĂŬĞ ĂŶĚ ďŝƐĐƵŝƚƐ ĐŽŽŬŝŶŐ
ЬĂƌŬ ŵĞƚĂů ŵŽůĚƐ ĐĂŶ ĂďƐŽƌď ŚĞĂƚ ďĞƚƚĞƌ ǁŚĞŶ ďĂŬŝŶŐ ĐĂŬĞƐ
ЬdĞŵƉĞƌĂƚƵƌĞ ĂŶĚ ĐŽŽŬŝŶŐ ƚŝŵĞ ĚĞƉĞŶĚ ŽŶ ƚŚĞ ƋƵĂůŝƚLJ ĂŶĚ ĐŽŶƐŝƐƚĞŶĐLJ ŽĨ ƚŚĞ ŵŝdžƚƵƌĞ
ЬdŽ ĐŚĞĐŬ ƚŚĞ ĐĂŬĞ ŝƐ ƌŝƉĞ Žƌ ŶŽƚ Ăƚ ƚŚĞ ĞŶĚ ŽĨ ĐŽŽŬŝŶŐ ƚŝŵĞ ŝŶƐĞƌƚ ƚŚĞ ŵĞƚĂů ƉŽůĞ ƚŽ ƚŚĞ ƚŽƉ ŽĨ ƚŚĞ ĐĂŬĞ ĂŶĚ ƚŚĞŶ
ǁŝƚŚĚƌĂǁ /Ĩ ƚŚĞ ďĂƚƚĞƌ ĚŽĞƐ ŶŽƚ ƐƚŝĐŬ ƚŽ ƚŚĞ ŵĞƚĂů ƉŽůĞ ƚŚĞ ĐĂŬĞ ŝƐ ƌŝƉĞ
ŶĞƌŐLJ ƐĂǀŝŶŐ ƚŝƉ
Ь/Ĩ ƚŚĞ ĐĂŬĞ ĐŽůůĂƉƐĞƐ ǁŚĞŶ ŝƚ ĐŽŵĞƐ ŽƵƚ ŽĨ ƚŚĞ ŽǀĞŶ ƚŚĞ ŶĞdžƚ LJŽƵ ĐĂŶ ĞdžƚĞŶĚ ƚŚĞ ƚŝŵĞ ĂƉƉƌŽƉƌŝĂƚĞůLJ ŝĨ ŶĞĐĞƐƐĂƌLJ ĐĂŶ
ĂůƐŽ ďĞ ƌĞĚƵĐĞĚ ďLJ ĂďŽƵƚ ϭϬć ϱϬ°& ĨŽƌ ďĂŬŝŶŐ
Ɛ
/Ŷ ŽƌĚĞƌ ƚŽ ƐĂǀĞ ĞŶĞƌŐLJ ŝŶ ƚŚĞ ƵƐĞ ŽĨ ŽǀĞŶƐ ƚŚĞ ĨŽůůŽǁŝŶŐ ŝŶƐƚƌƵĐƚŝŽŶƐ ĐĂŶ ďĞ ĨŽůůŽǁĞĚ
ϭ dŚĞ ĚŽŽƌ ŵƵƐƚ ďĞ ĐŽŵƉůĞƚĞůLJ ĐůŽƐĞĚ ĨŽƌ Ăůů ĐŽŽŬŝŶŐ ŽƉĞƌĂƚŝŽŶƐ
Ϯ WůĞĂƐĞ ĚŽŶƚ ŽƉĞŶ ƚŚĞ ŽǀĞŶ ĚŽŽƌ ĨƌĞƋƵĞŶƚůLJ ǁŚŝůĞ ĐŽŽŬŝŶŐ ďĞĐĂƵƐĞ ŝƚ ǁŝůů ůĞƚ ƚŚĞ ŚĞĂƚ ŽƵƚ ŽĨ ƚŚĞ ŽǀĞŶ
ϯ dƵƌŶ ŽĨĨ ƚŚĞ ƉŽǁĞƌ ĐŽŵƉůĞƚĞůLJ ǁŚĞŶ ŶŽƚ ŝŶ ƵƐĞ
ϰ ůǁĂLJƐ ŬĞĞƉ ƚŚĞ KǀĞŶ ŝŶƚĞƌŝŽƌ ĐůĞĂŶ

12
Cleaning and Maintenance
Oven Interior/Oven Door
xxx
■ Oven door
Glass door should always be clean, to remove stubborn stains with kitchen absorbent paper, wet sponges and
common detergents.
•Do not use a steam cleaner to clean the oven.
•Do not use detergents or corrosive detergents to clean glass door.
•Do not use rough or friction materials or sharp metal scrapers to clean the oven glass door, as they may scratch the
surface.
■ Oven Interior
In order to maintain the oven bet
ter, after cooking, the oven should be fully cooled before cleaning.
•Take out all removable parts.
•In order to facilitate cleaning, the oven door can be removed.( Removal method refers to "Remove the oven
door" below.)
•Steam cleaners should not be used when cleaning.
Remove the Oven Door
Removable oven door allows users to fully touch the oven interior, making maintenance more convenient and fast.
①Open the door to the maximum angle and pull the lock
back at the hinge of th
e door(Figure 1). There are two
locks on both sides of the oven door.
②Close the oven door, at about 15 degree, then lift the
door, and slowly pull out from the oven.(Figure 2)
③After cleaning, perform the above-mentioned operations
in the opposite steps to restore the door to its original condition.
■Note: After using a specific detergent, run the oven for 15-20
minutes with maximum heating settings to remove residues in the oven.
In this process, touchable parts may be hotte
r than usual. Keep
children away from the oven.
13
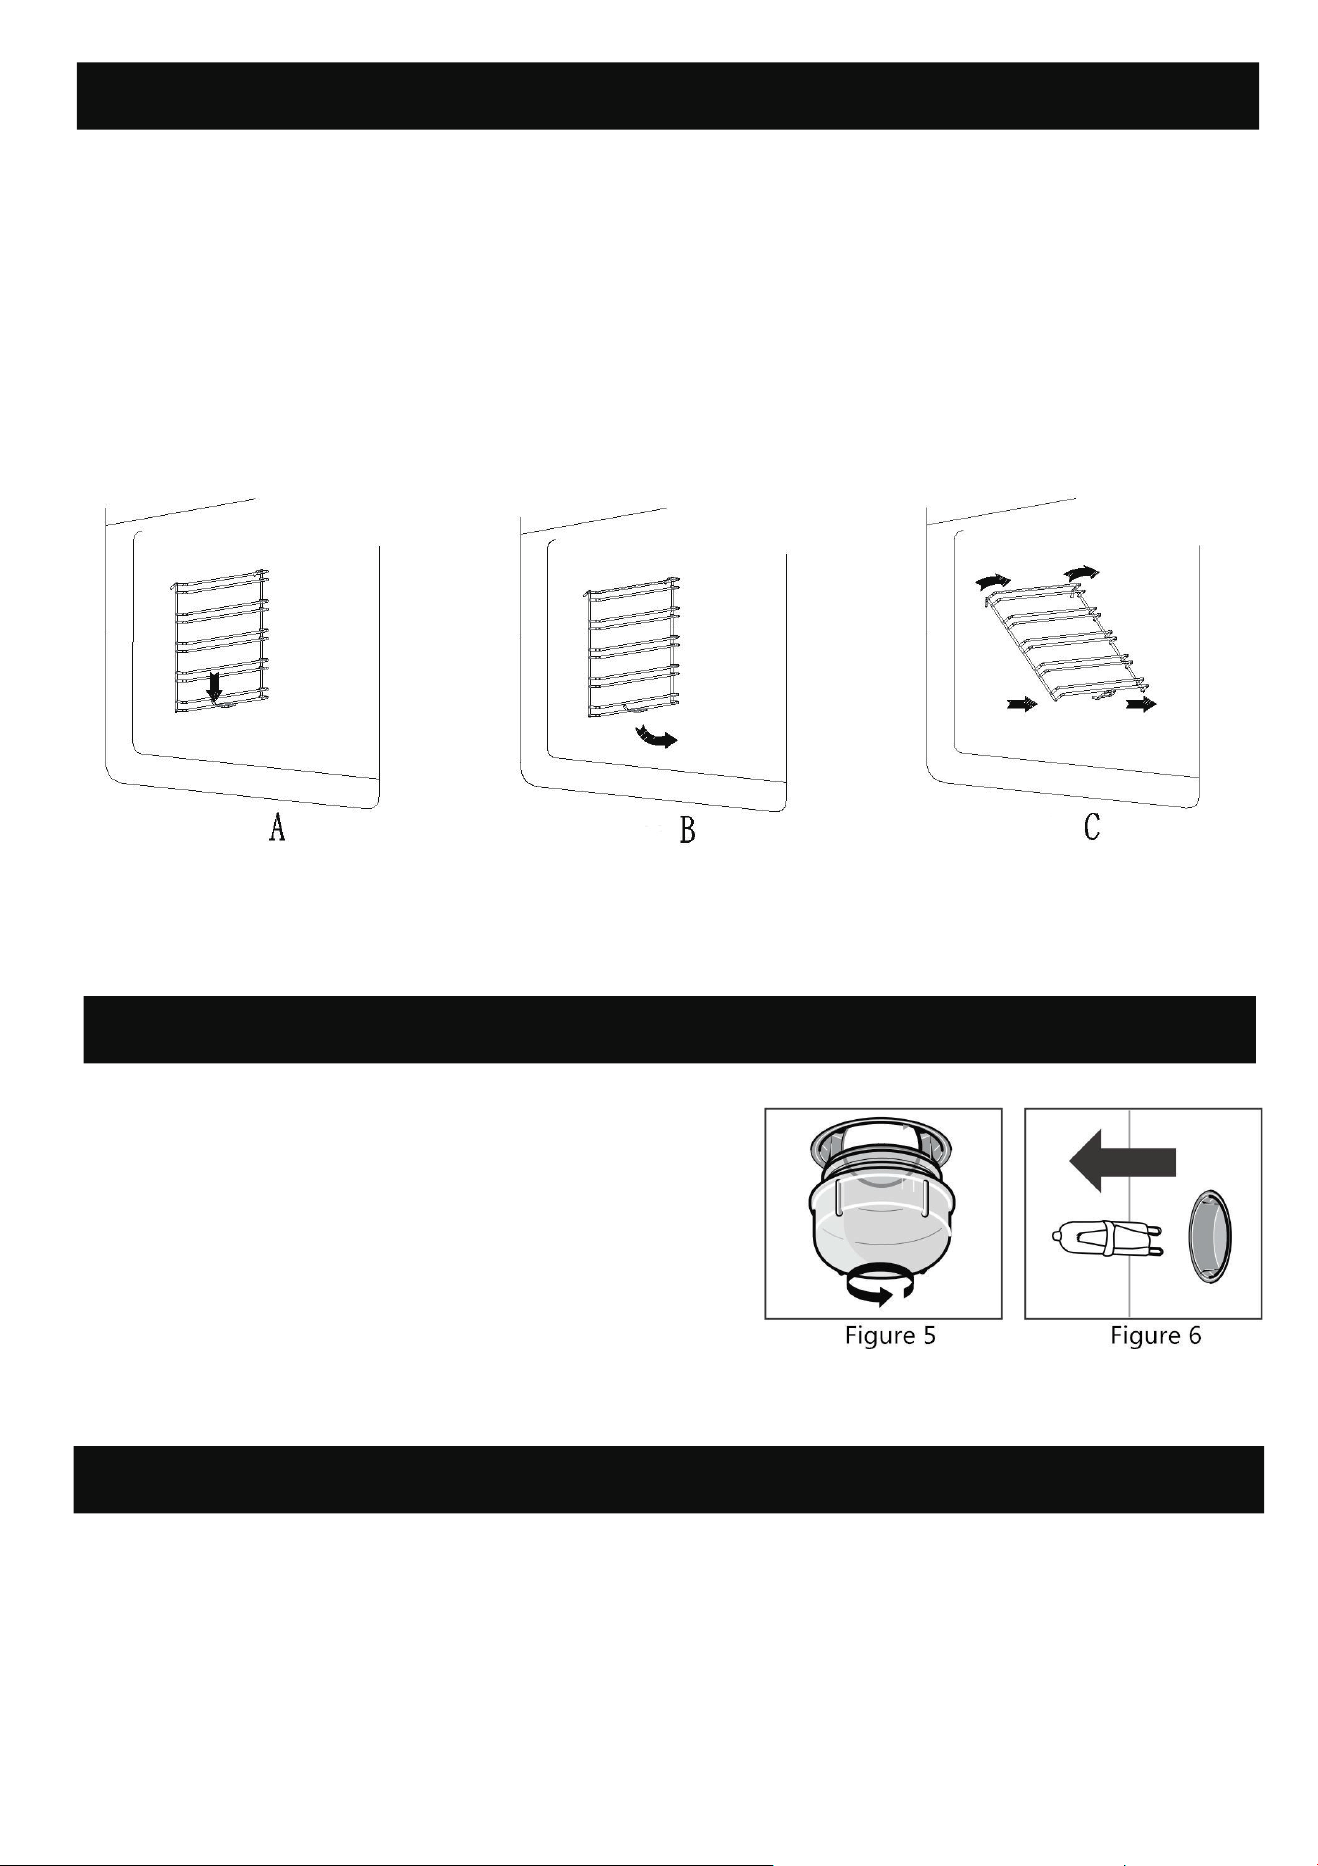
Remove the Slide-in racks (only available on certain models)
Remove the hanger to facilitate cleaning the side wall of the oven. Note: Operate this process must by hand slightly, or it
will damage the enamel.
• Remove all accessories such as grate and baking tray.
• Slightly push down the hook in racks at the clamping point as shown (A).
• Swivel the rack inwards to an angle of approx. 45 degrees(B-C).
• Unhook it at the top and carefully pull it out (C).
• To reinstall after cleanin
g, follow the steps above in reverse order.
After cleaning, perform the above-mentioned operations in reverse steps to restore the components to
their original positions.
Oven Light Replacement
The light used in oven is a special high temperature resistant light
(AC220V/25W).
Therefore, it is necessary to purchase genuine light from authorized
distributors.
The replacement steps are as follows:
Sensor Probe Replacemen
1.Turn the glass cover counterclockwise.(Figure 5)
2.Remove the light and replace it with the same
type.(Figure 6)
3.A�er replacing the light, screw the glass cover clockwise.
t
The probe used in the oven is a mechanical physical probe. Do not replace it without authorization. In case of abnormal
temperature sensing of the sensor probe, please contact the designated repair shop immediately for replacement.
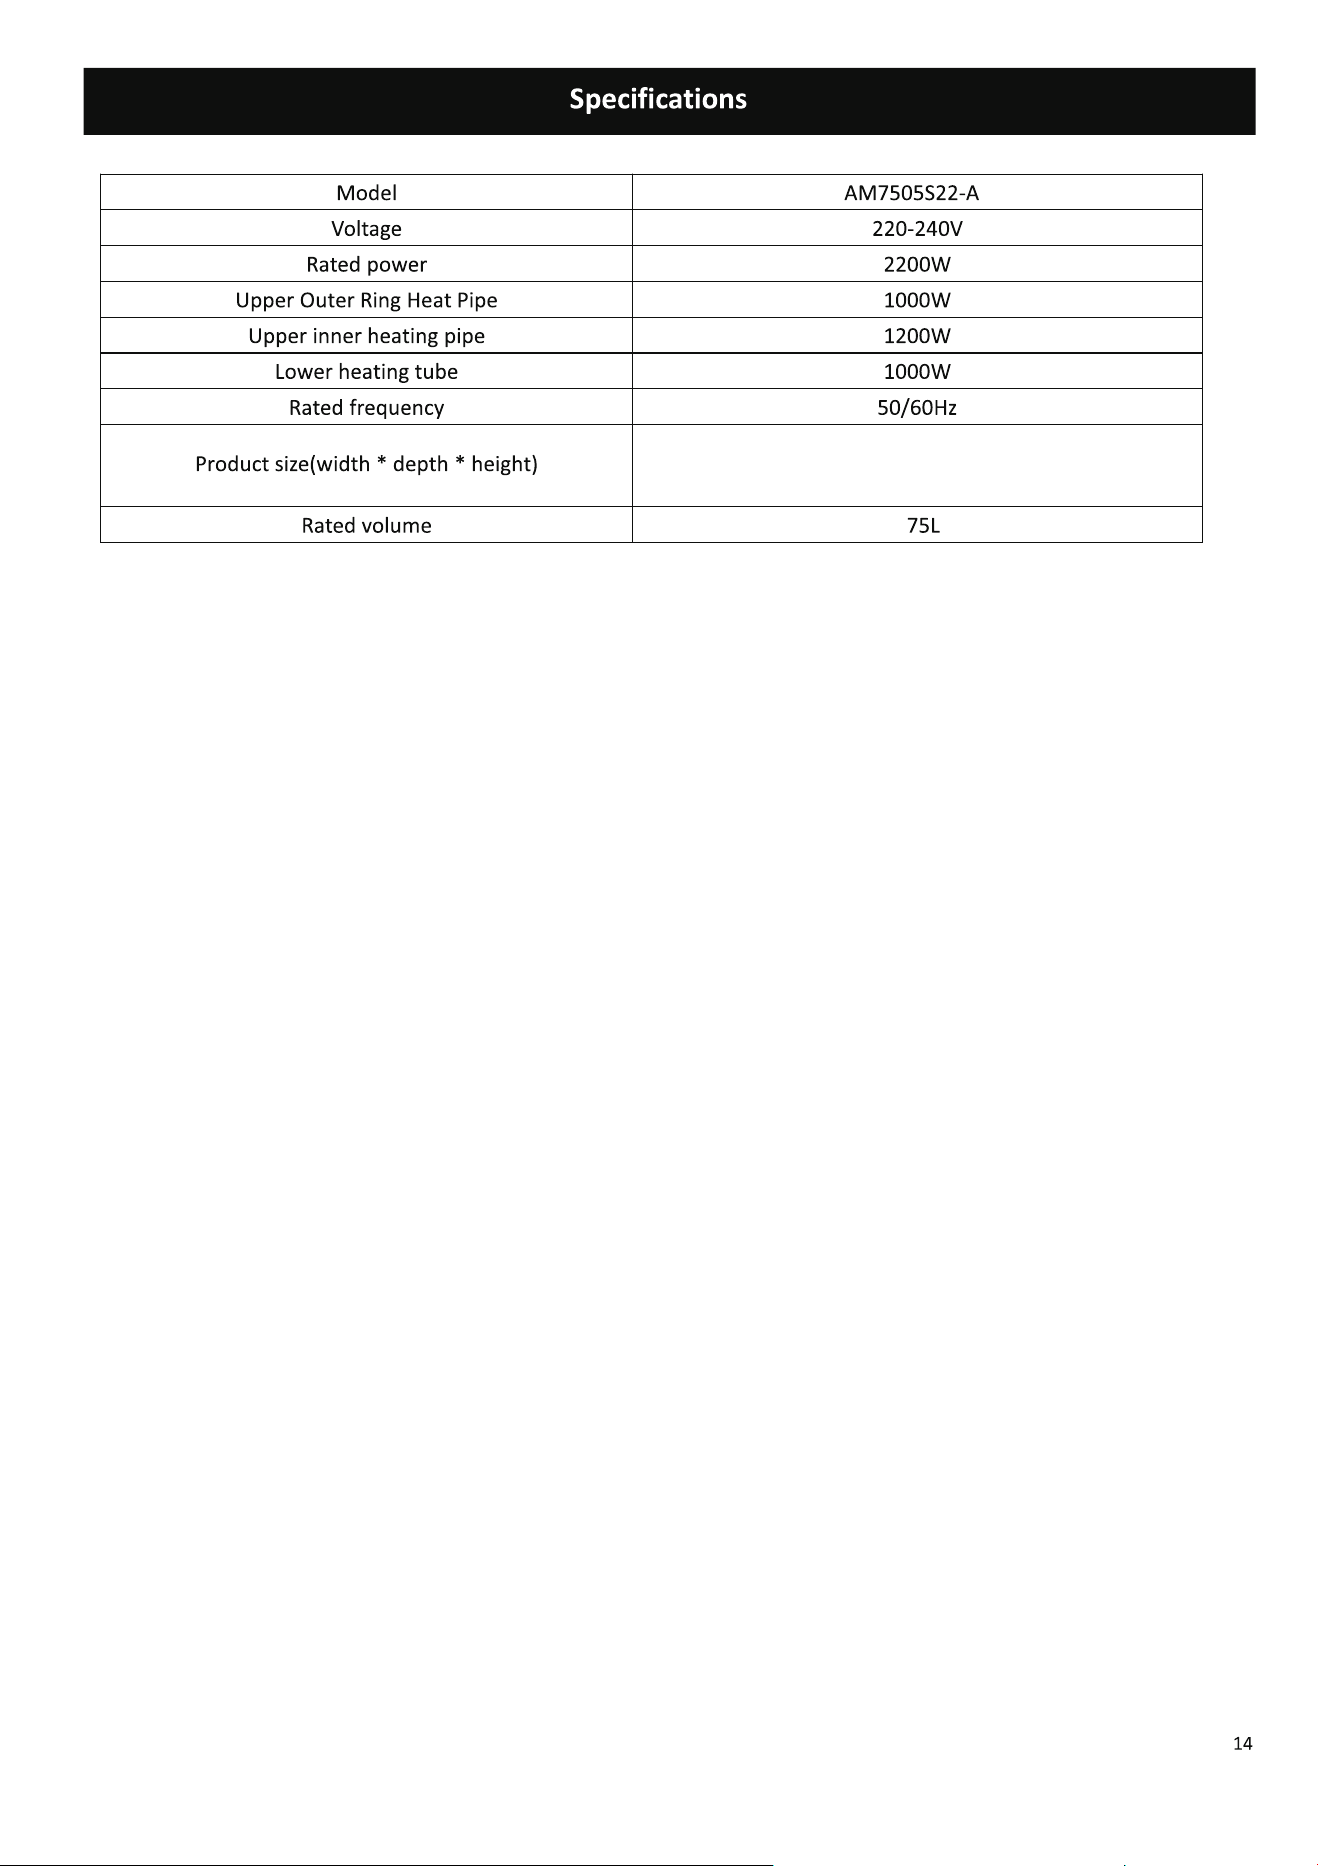
595*565*595 mm
23.4*22.2*23.4 inch

15
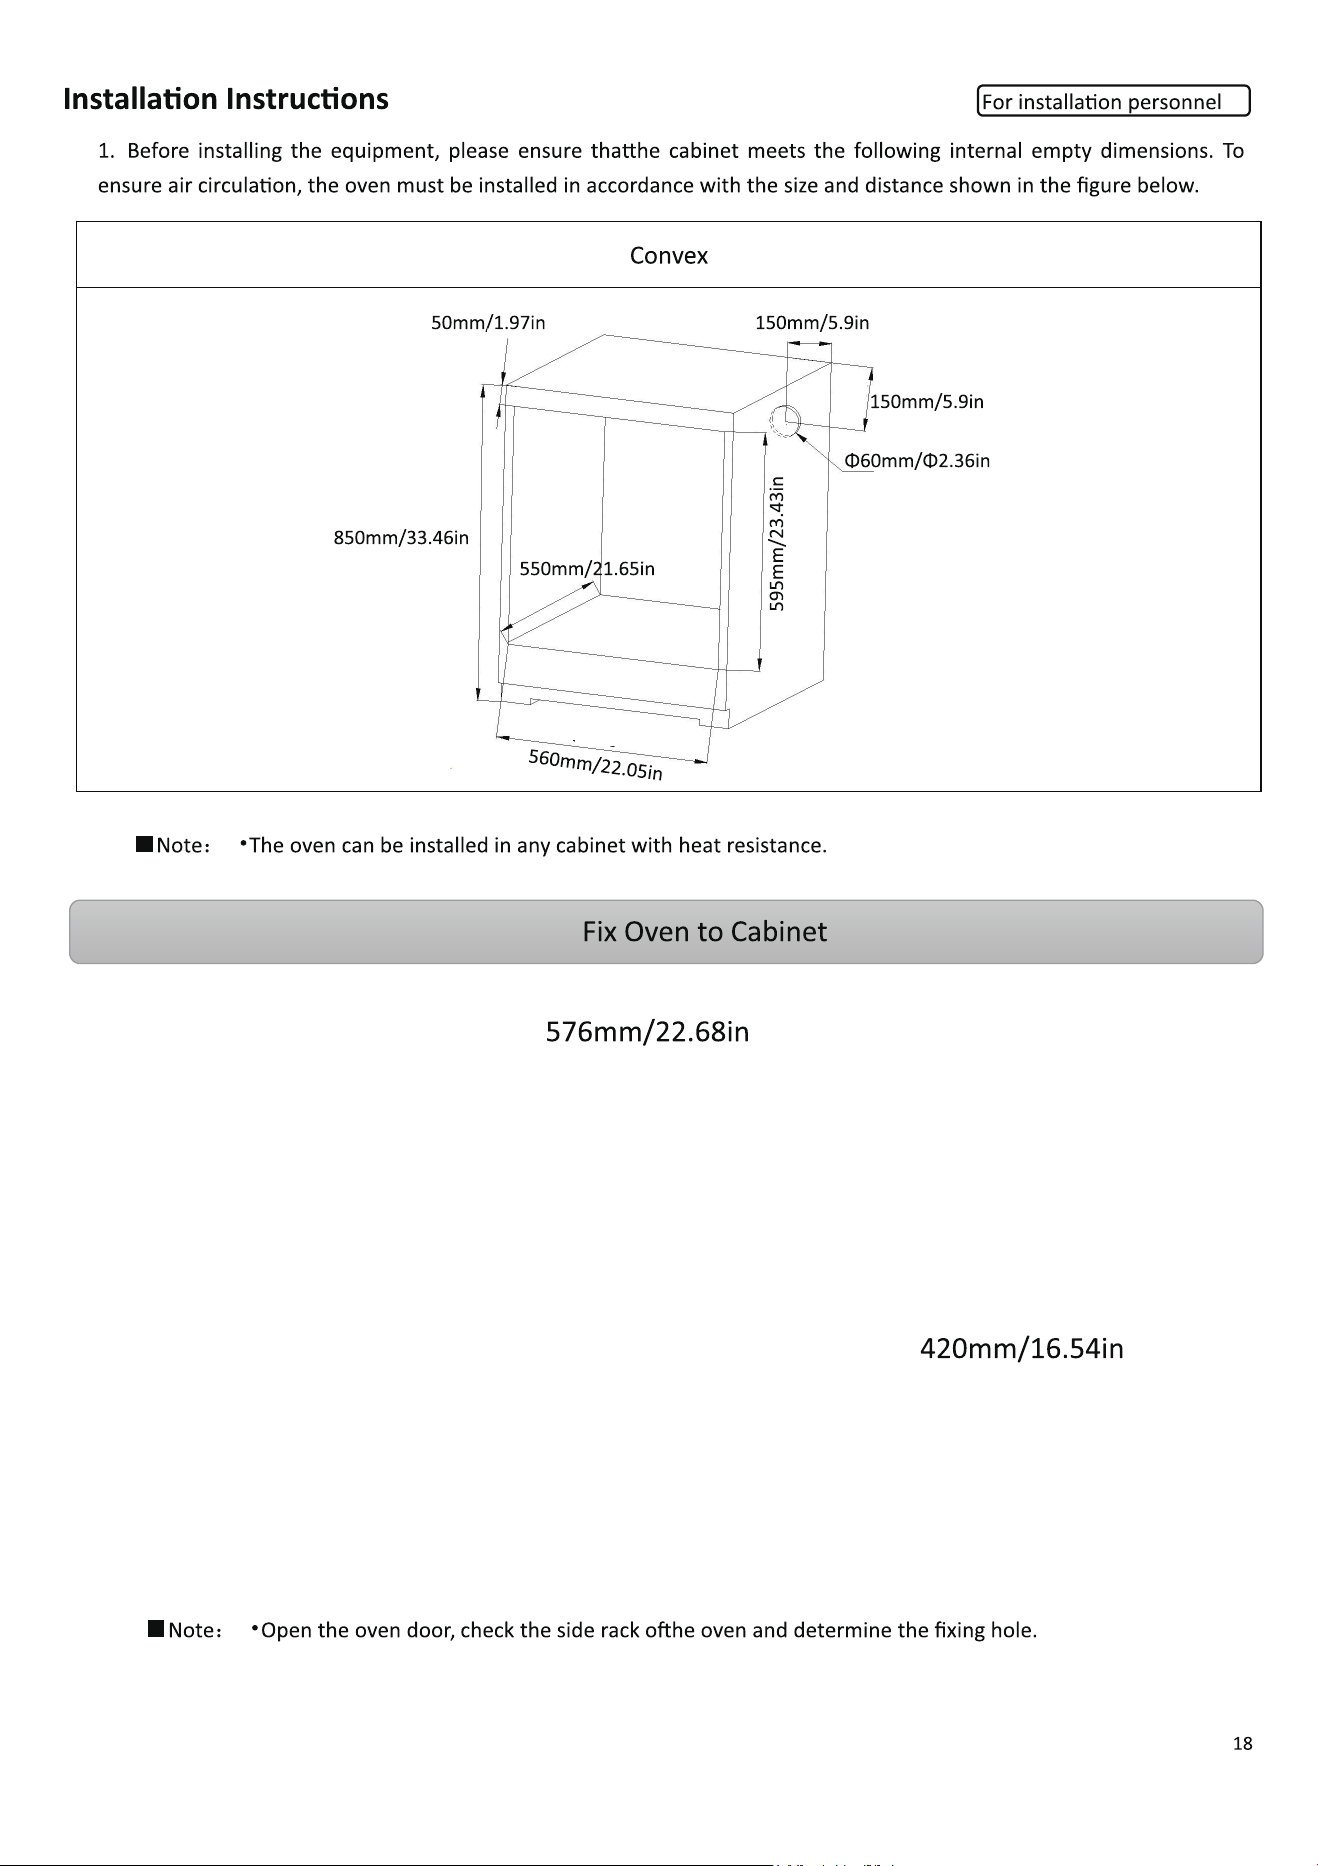
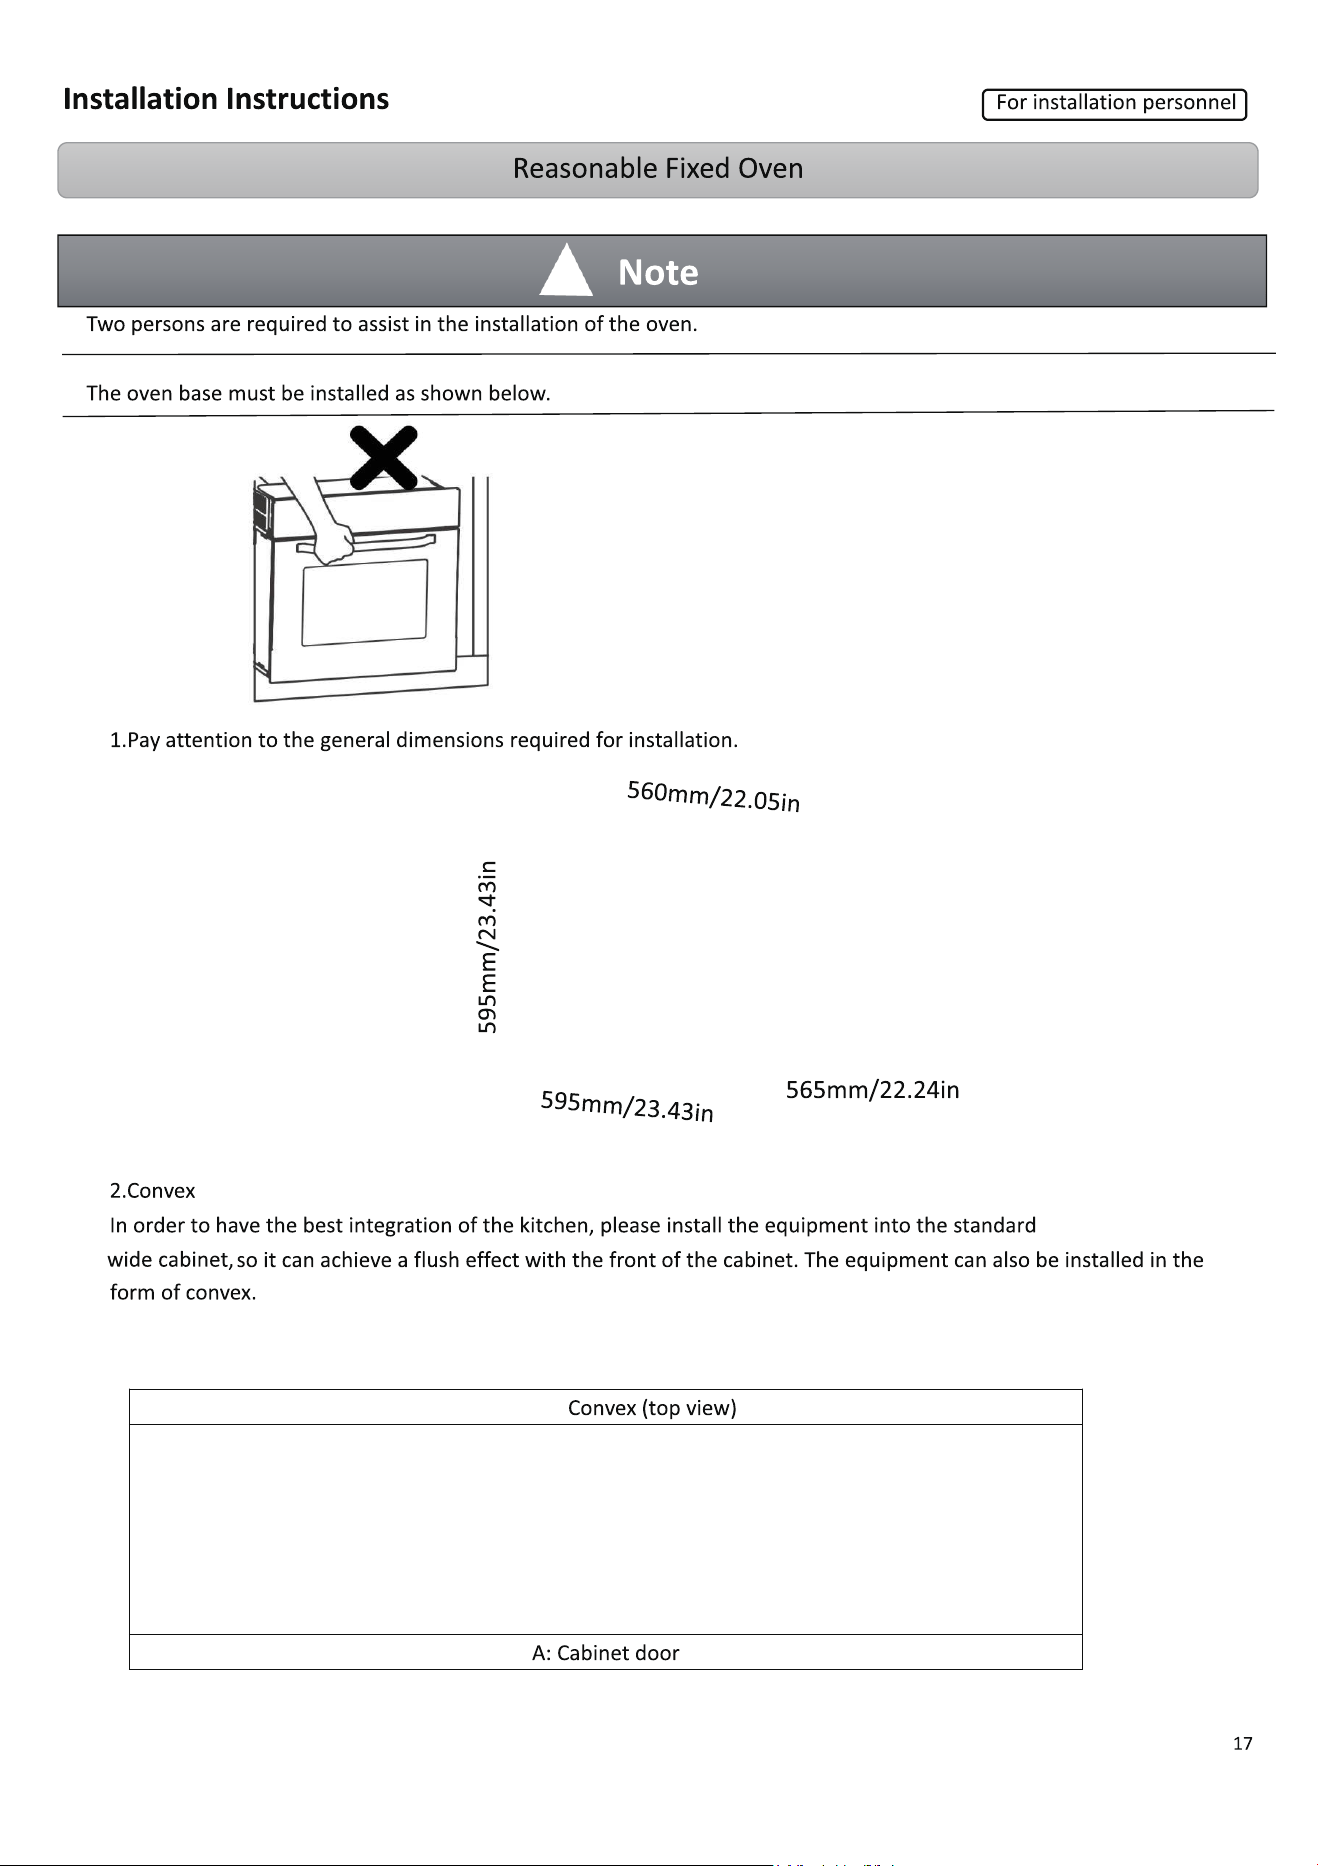
Installation Instructions
For installation personnel
Important note
●The kitchen cover must be suitable to ensure that the oven works properly.
●The panel of kitchen equipment adjacent to the oven must be made of heat-resistant materials. Kitchen equipment
made of plywood shall ensure that the glue can withstand a temperature of at least 120℃/248℉. When plastic
or glue cannot withstand this temperature, the equipment will melt and deform.
●Once the oven is placed in the kitchen equipment, the electrical components must be completely insulated. This is a
statutory safety requirement.
●All furnace covers must be firmly fixed in place and cannot be removed without using special tools.
●Remove the back of the kitchen equipment to ensure the full circulation of air around the oven.
●The oven rack must have at least 45mm/1.57inch rear clearance.
●Because oven handle and sheet metal parts are easy to cut, installers need to wear gloves for installation.
ϭϲ
/ŶƐƚĂůůĂƚŝŽŶ /ŶƐƚƌƵĐƚŝŽŶƐ
&Žƌ ŝŶƐƚĂůůĂƚŝŽŶ ƉĞƌƐŽŶŶĞů
ůĞĐƚƌŝĐĂů ŽŶŶĞĐƚŽƌƐ
tĂƌŶŝŶŐ
dŚĞ ǁŝƌŝŶŐ ŽĨ ŽǀĞŶ ŵƵƐƚ ďĞ ĞƋƵŝƉƉĞĚ ǁŝƚŚ ĂůůͲƉŽůĞ ĚŝƐĐŽŶŶĞĐƚŝŽŶ ĚĞǀŝĐĞ ĂĐĐŽƌĚŝŶŐ ƚŽ ƚŚĞ ǁŝƌŝŶŐ ƌƵůĞƐ
/ŵƉŽƌƚĂŶƚ
ĨƚĞƌ ŝŶƐƚĂůůŝŶŐ ƚŚĞ ĂƉƉůŝĂŶĐĞ ŝƚ ŝƐ ŶĞĐĞƐƐĂƌLJ ƚŽ ŚĂǀĞ ŽƚŚĞƌ ŵĞƚŚŽĚƐ ƚŽ ĚŝƐĐŽŶŶĞĐƚ ƚŚĞ ƉŽǁĞƌ ƐƵƉƉůLJ
ŝŶĨŽƌŵĂƚŝŽŶ
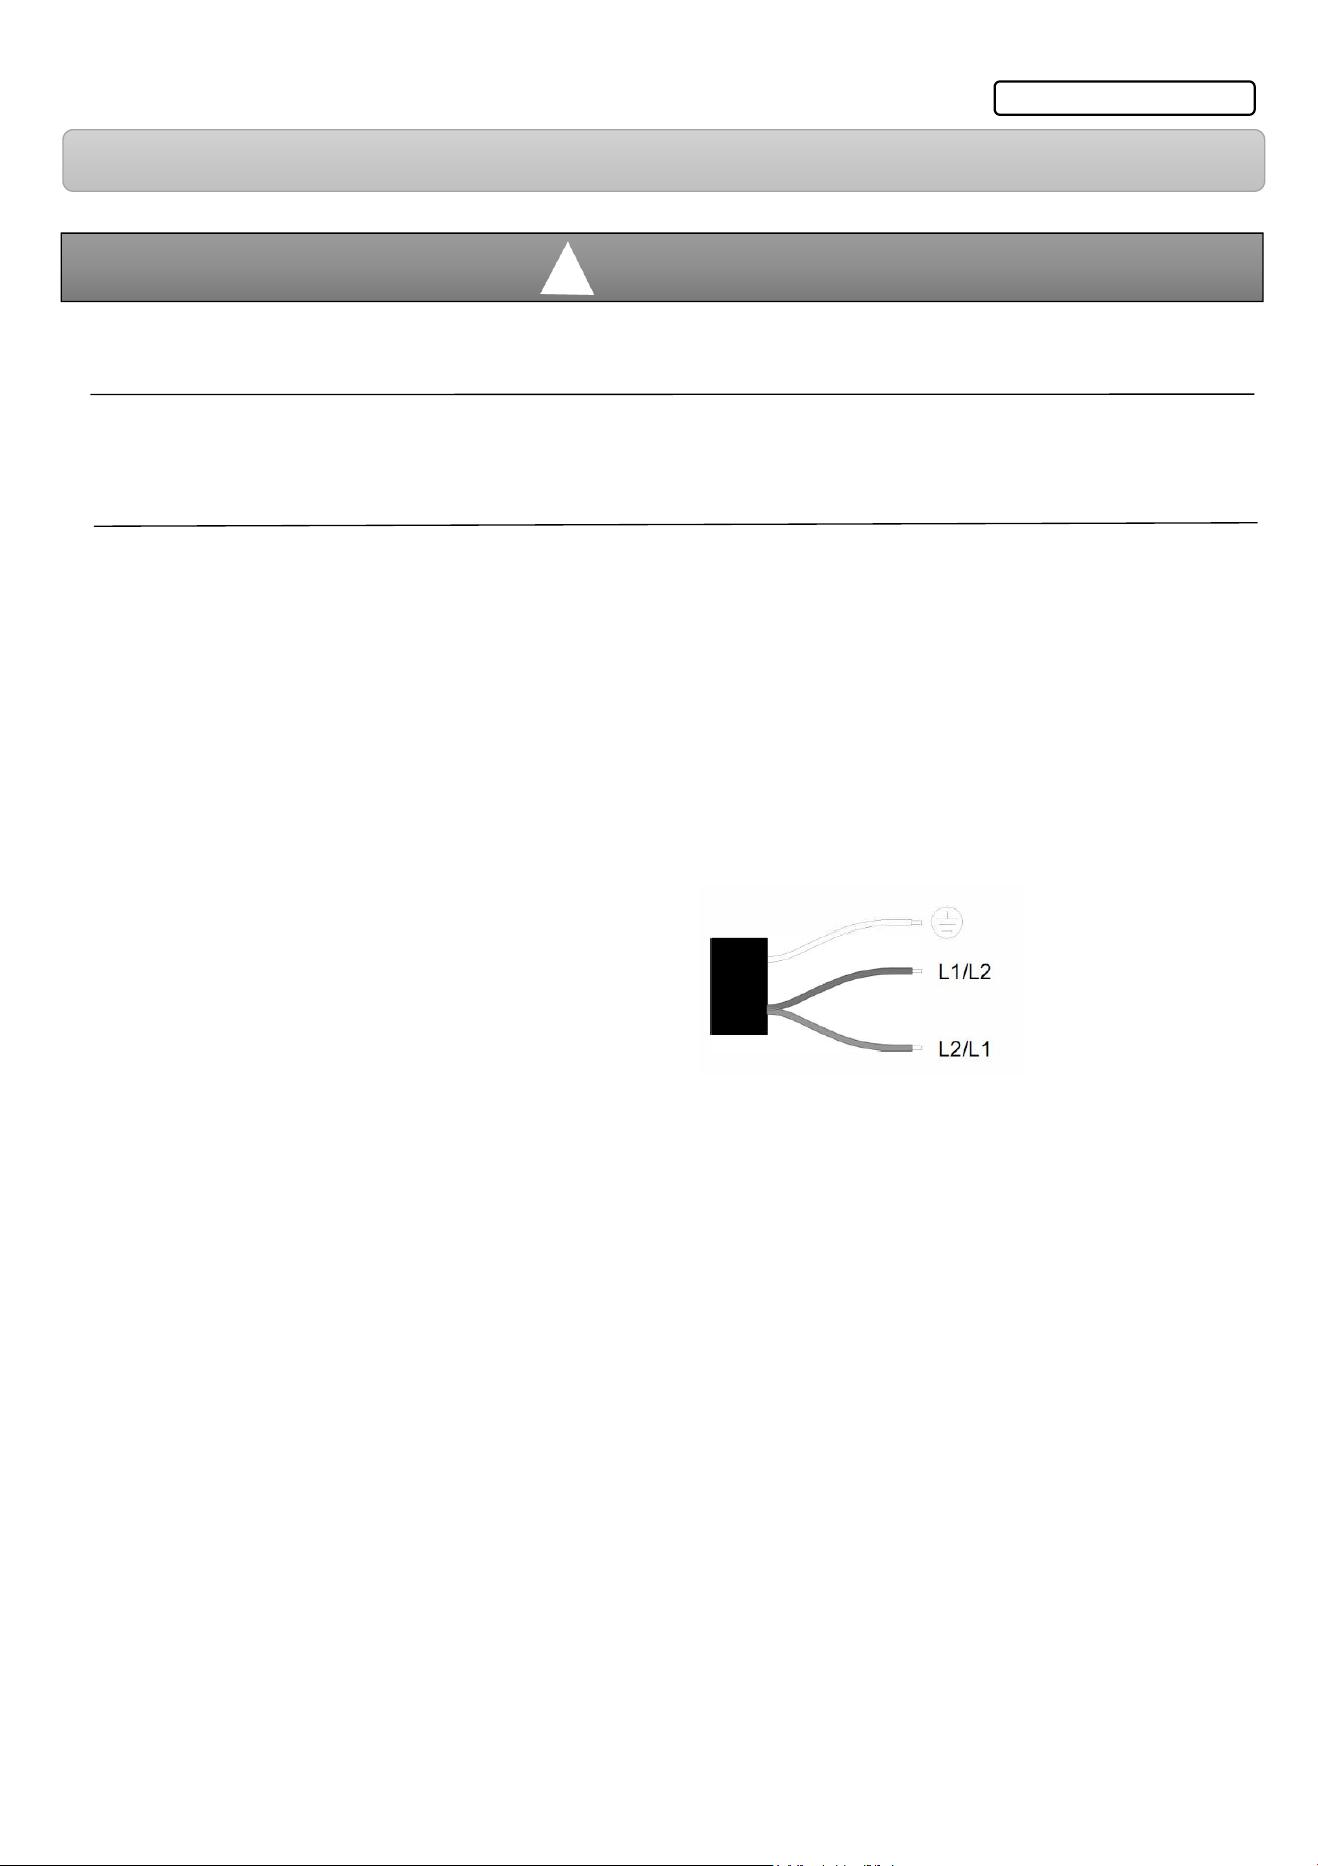
ŽŶŶĞĐƚ ƚŚĞ ǁŝƌĞƐ ŽĨ ƚŚĞ ŵĂŝŶƐ ƉŽǁĞƌ ĐŽƌĚ ŝŶ ĂĐĐŽƌĚĂŶĐĞ ǁŝƚŚ ƚŚĞ ĨŽůůŽǁŝŶŐ ĐŽůŽƵƌ
dŚĞ ĂƉƉůŝĂŶĐĞ ŝƐ ĚĞƐŝŐŶĞĚ ƚŽ ďĞ ƉĞƌŵĂŶĞŶƚůLJ ŝŶƐƚĂůůĞĚ ǁŝƚŚ Ă ƚŚƌĞĞͲƉŝŶ ƉŽǁĞƌ ĐŽƌĚ ĂŶĚ ŵĂLJ ŽŶůLJ ďĞ ĐŽŶŶĞĐƚĞĚ ďLJ Ă
ůŝĐĞŶƐĞĚ ĞdžƉĞƌƚ ŝŶ ĂĐĐŽƌĚĂŶĐĞ ǁŝƚŚ ƚŚĞ ĐŽŶŶĞĐƚŝŽŶ ĚŝĂŐƌĂŵ
KŶůLJ Ă ƋƵĂůŝĨŝĞĚ ĞůĞĐƚƌŝĐŝĂŶ ǁŚŽ ƚĂŬĞƐ ƚŚĞ ƌĞůĞǀĂŶƚ ƌĞŐƵůĂƚŝŽŶƐ ŝŶƚŽ ĂĐĐŽƵŶƚ ŵĂLJ ƌĞƉůĂĐĞ ƚŚĞ ƉŽǁĞƌ ĐŽƌĚ
/Ĩ ƚŚĞ ĐŽŶŶĞĐƚŝŽŶ ŝƐ ŶŽ ůŽŶŐĞƌ ĂĐĐĞƐƐŝďůĞ ĨŽůůŽǁŝŶŐ ŝŶƐƚĂůůĂƚŝŽŶ ĂŶ ĂůůͲƉŝŶ ŝƐŽůĂƚŝŶŐ ƐǁŝƚĐŚ ǁŝƚŚ Ă ĐŽŶƚĂĐƚ ŐĂƉ ŽĨ Ăƚ ůĞĂƐƚ ϯŵŵ
ŵƵƐƚ ďĞ ƉƌŽǀŝĚĞĚ
ĐŽĚŝŶŐ
'ƌĞĂƚ ƌŝƚĂŝŶ ĂŶĚ ƵƐƚƌĂůŝĂ
Ž ŶŽƚ ĐŽŶŶĞĐƚ ƚŚĞ ĂƉƉůŝĂŶĐĞ ƵƐŝŶŐ Ă ϭϯ ƉůƵŐ Žƌ ƉƌŽƚĞĐƚ ŝƚ ǁŝƚŚ Ă ϭϯ ĨƵƐĞ dŚĞ ĂƉƉůŝĂŶĐĞ ŵƵƐƚ ďĞ ƉƌŽƚĞĐƚĞĚ ƵƐŝŶŐ Ă ĨƵƐĞ
ƚŚĂƚ ŝƐ ƌĂƚĞĚ ϭϲ Žƌ ŚŝŐŚĞƌ dŚĞ ĂƉƉůŝĂŶĐĞ ŵƵƐƚ ďĞ ĚŝƐĐŽŶŶĞĐƚĞĚ ĨƌŽŵ ƚŚĞ ƉŽǁĞƌ ƐƵƉƉůLJ ĚƵƌŝŶŐ Ăůů ŝŶƐƚĂůůĂƚŝŽŶ ǁŽƌŬ tŚĞŶ
ƚŚĞ ĂƉƉůŝĂŶĐĞ ŝƐ ŝŶƐƚĂůůĞĚ ƉƌŽƚĞĐƚŝŽŶ ŵƵƐƚ ďĞ ƉƌŽǀŝĚĞĚ ĂŐĂŝŶƐƚ ĂĐĐŝĚĞŶƚĂů ĐŽŶƚĂĐƚ ŝŶ ƚŚĞ ĨƵƚƵƌĞ
*UHHQ (DUWK ZLUH (
5HG%ODFN
/LYH//
600mm/23.6inch