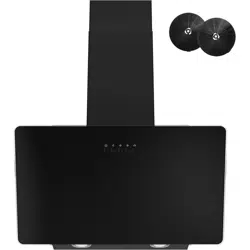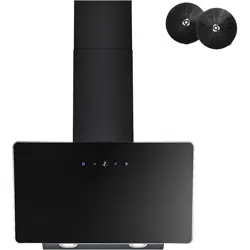
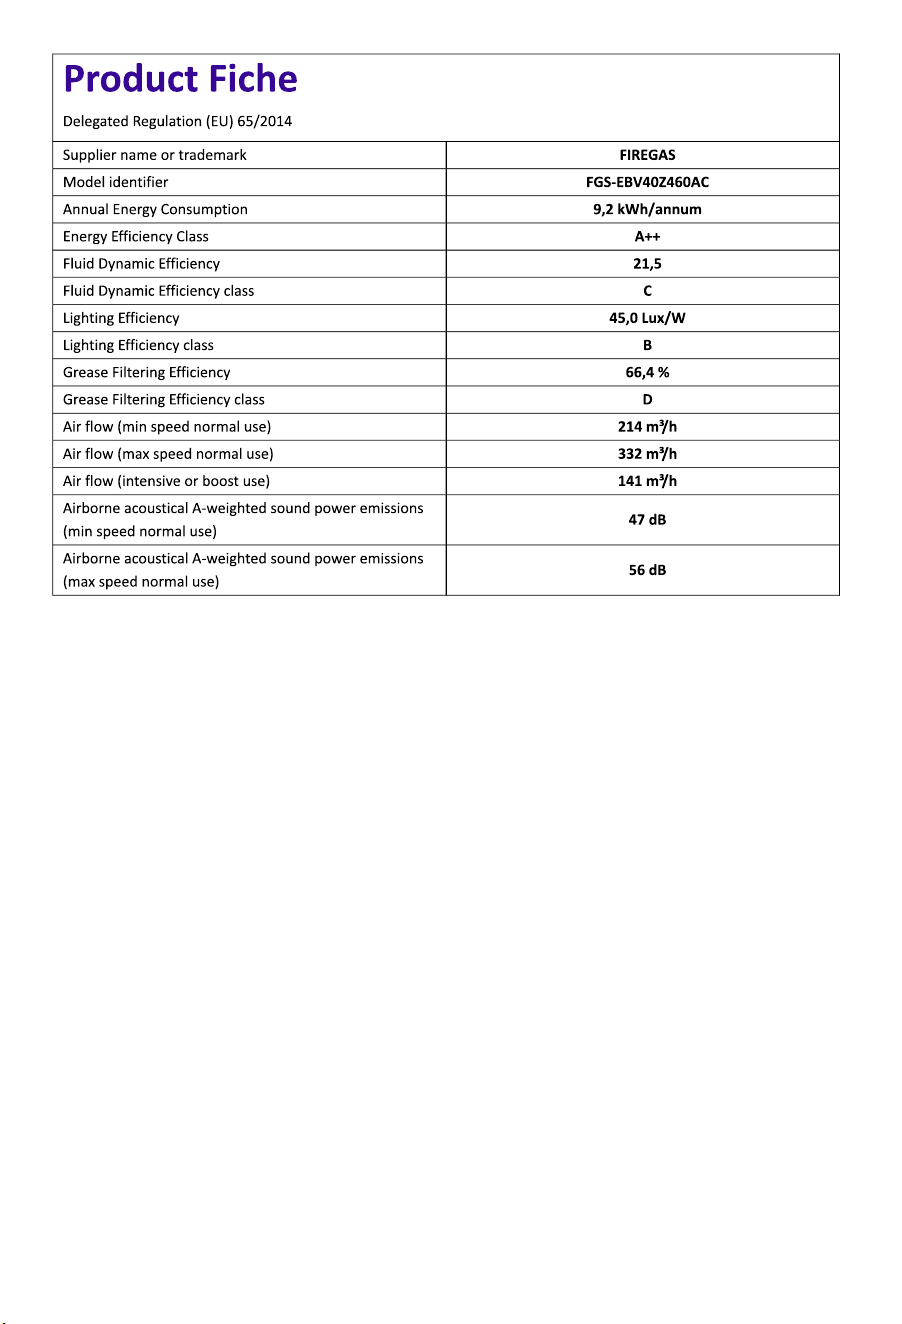
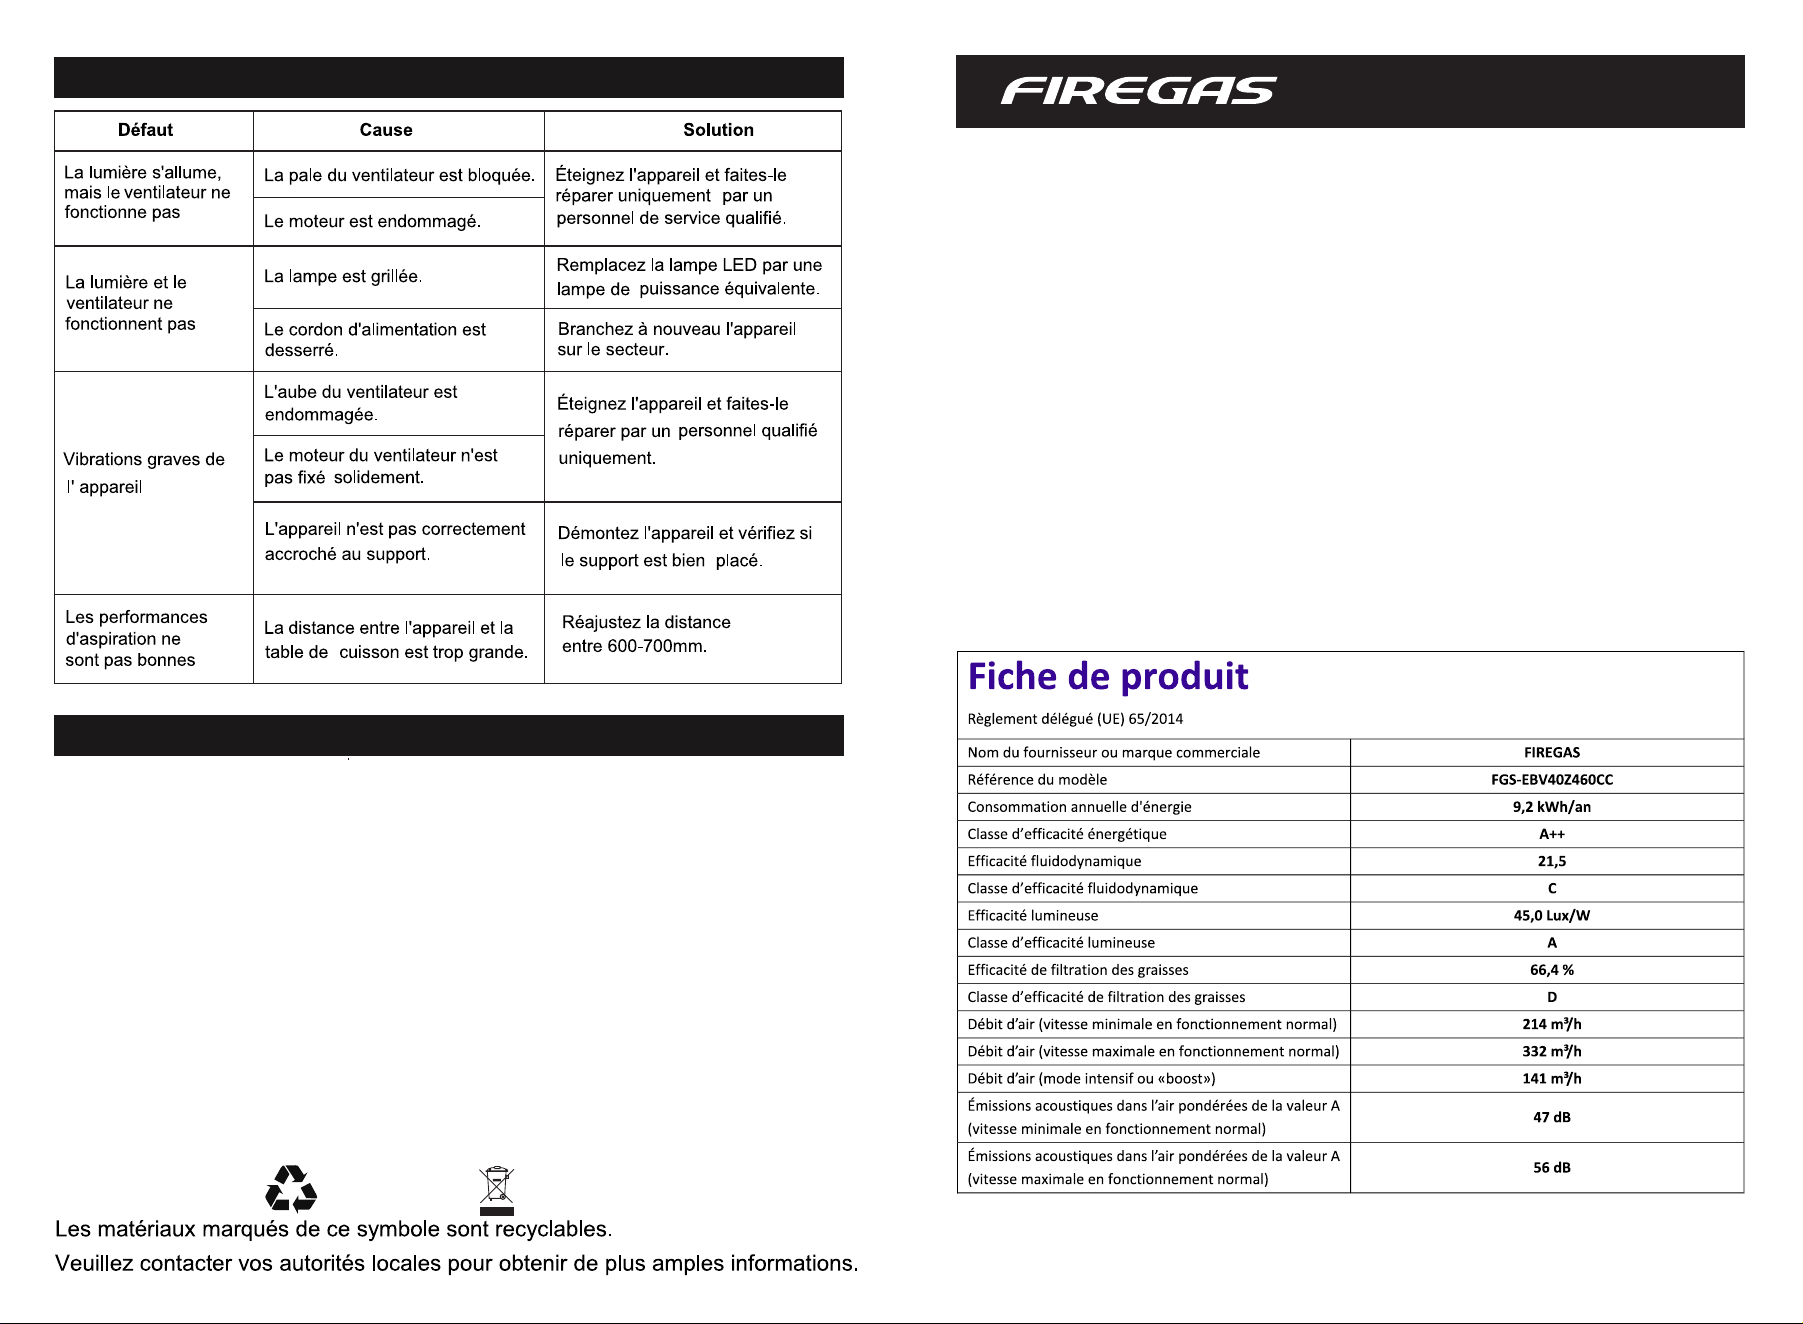
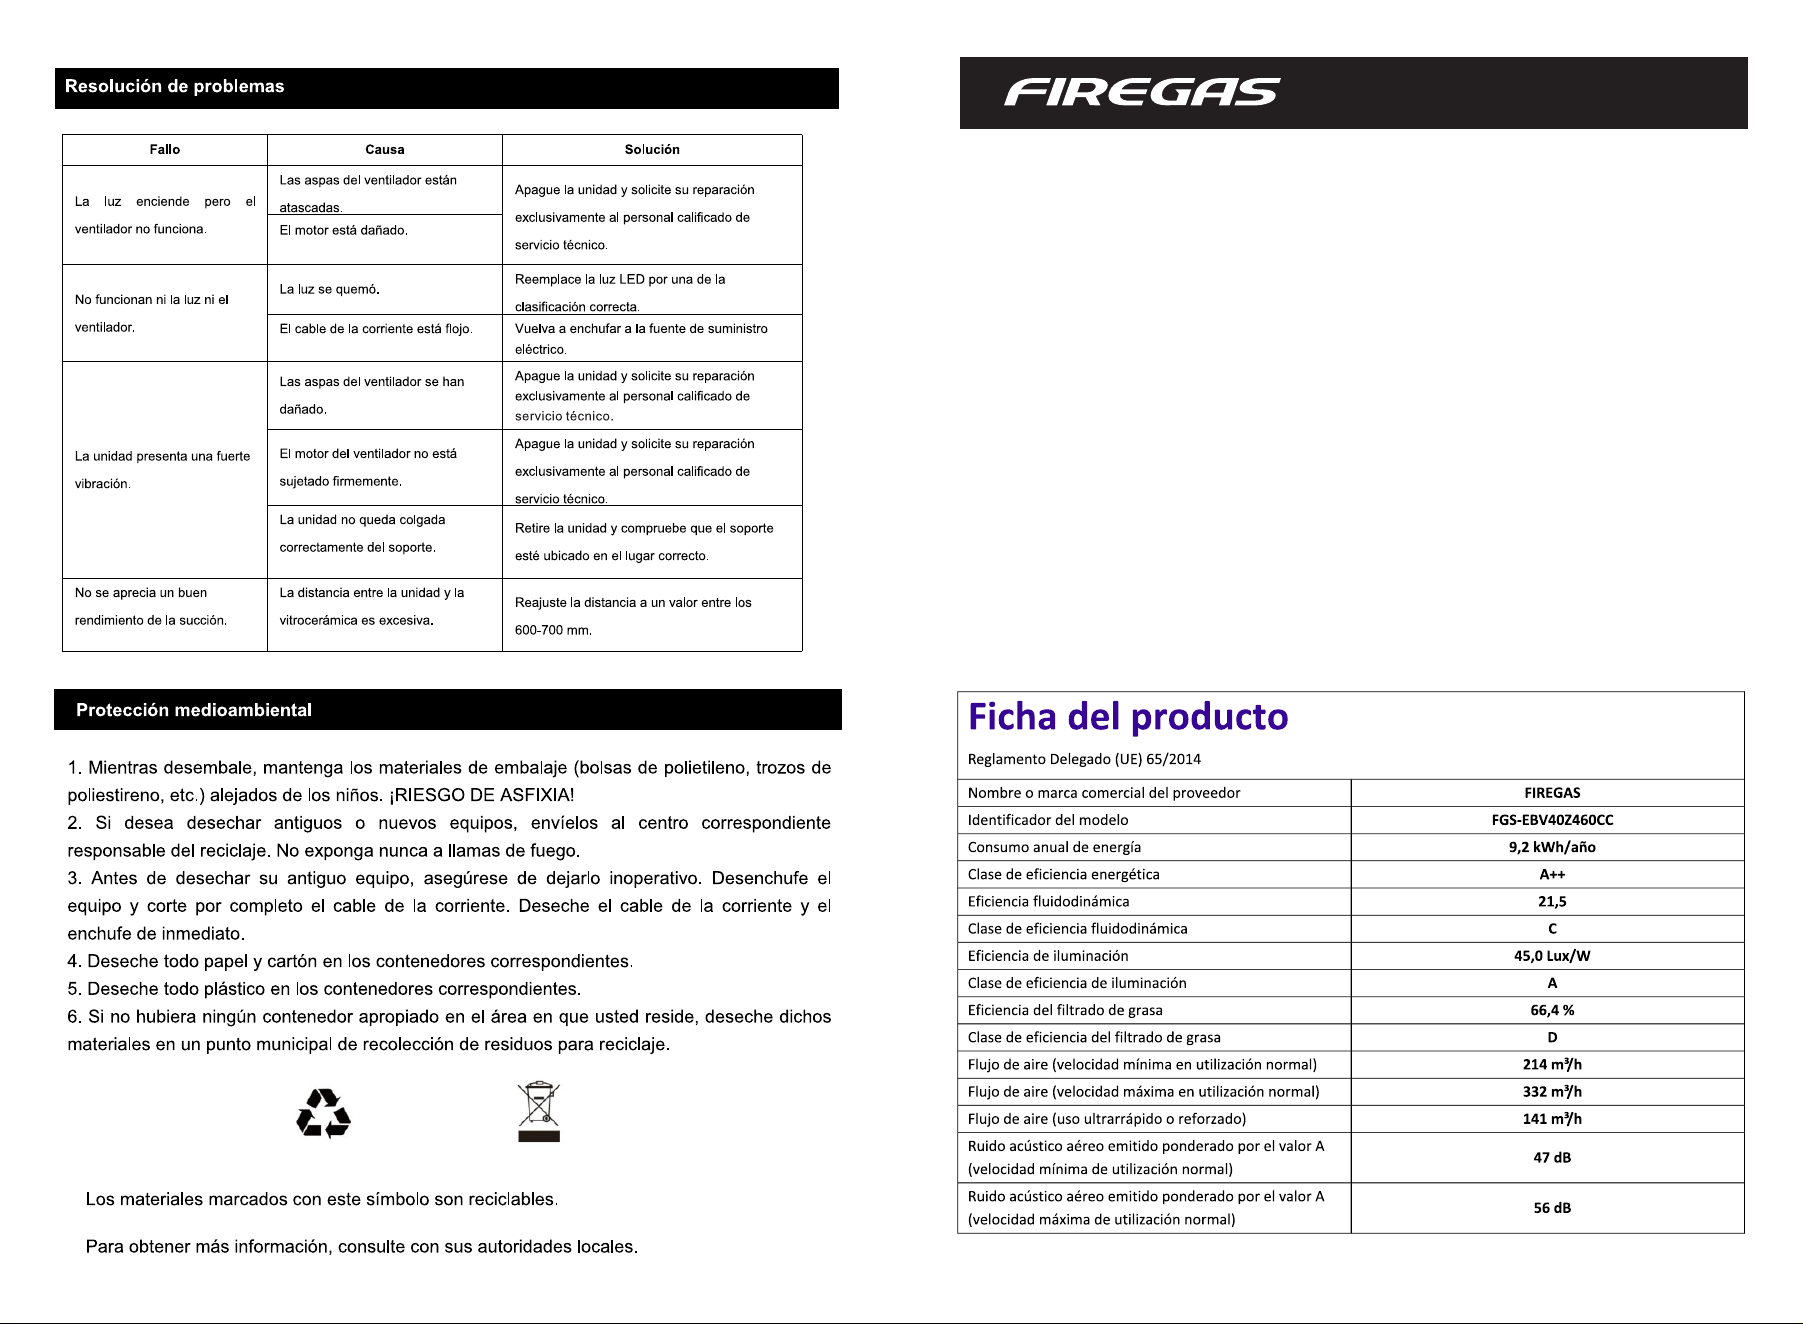
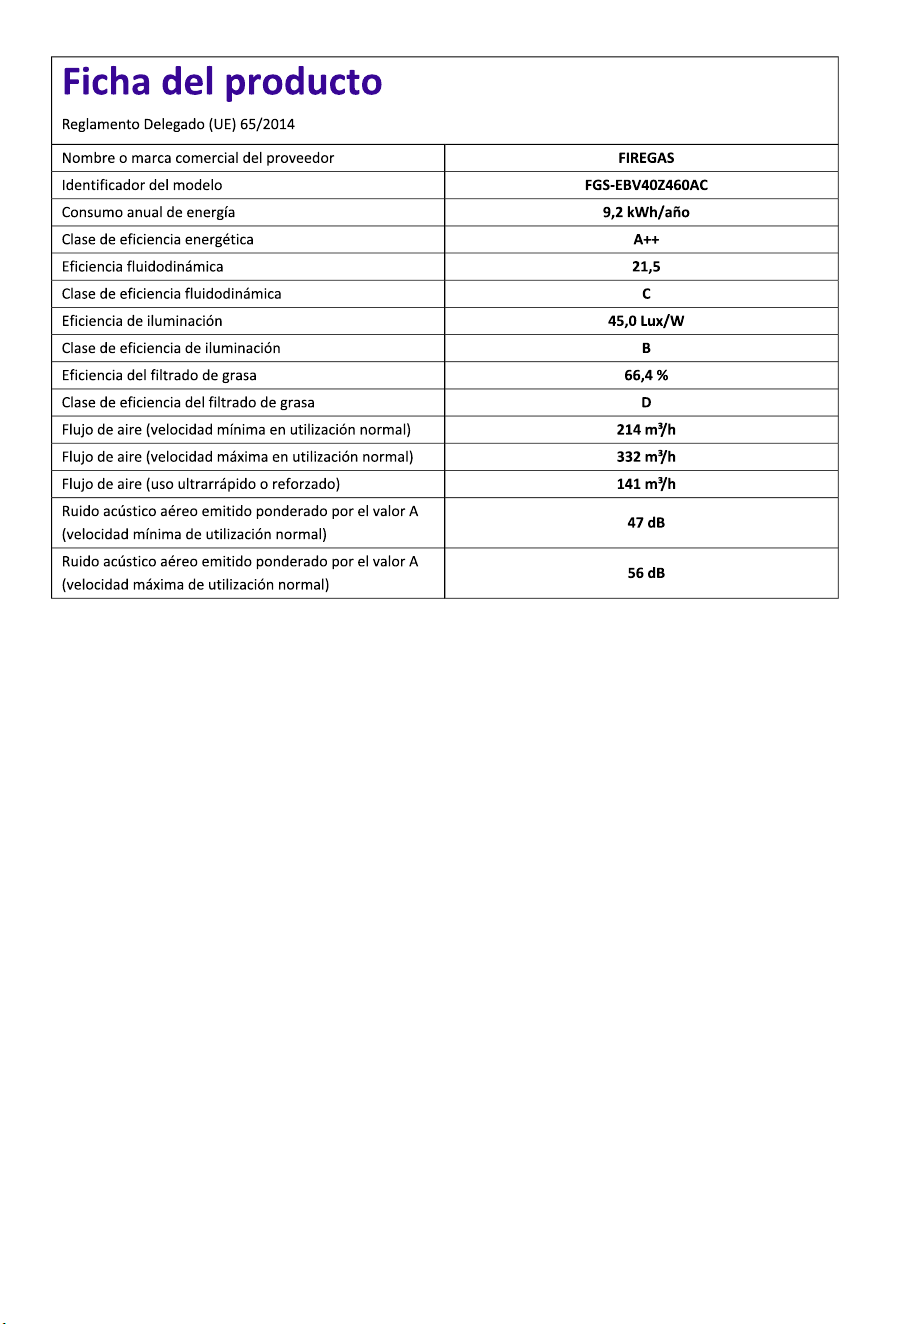
FGS-EBV40Z460CC
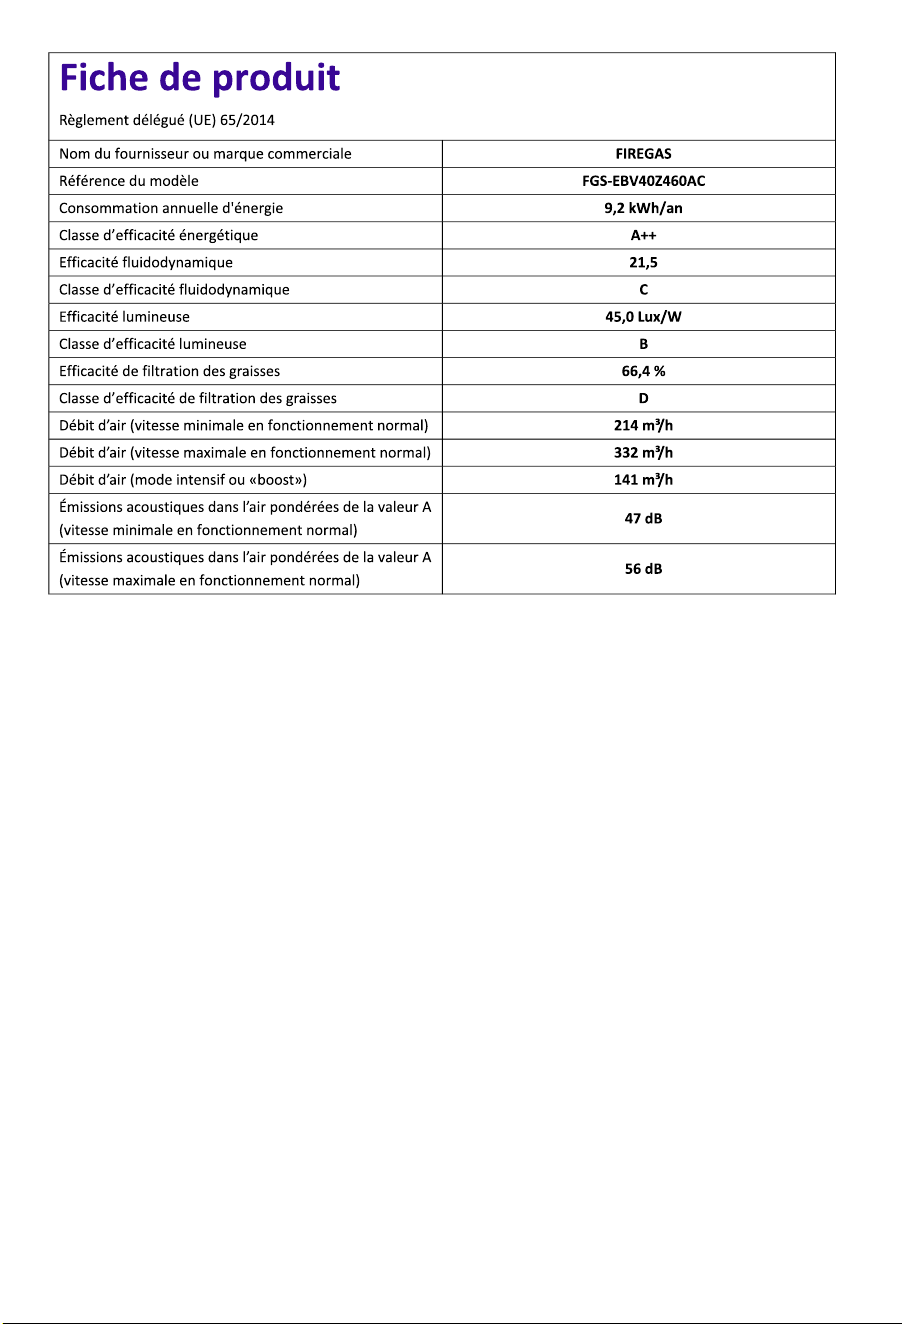
FGS-EBV40Z460AC
MARWAY Consulting UG(haftungsbeschränkt)
Am Maibusch 108-110,45883, Gelsenkirchen, Germany
MARWAY.UG@outlook.com
FIREGAS
Company:Zhongshan Firegas Technology Co.,Ltd
Add.:Room302, of 3rd floor,2nd building of No.1 plant, Kuidongsilu,
Dayan industrial district, Huangpu, Zhongshan,Guangdong,China
E-mail:support01@firegaskitchen.com
IMPORTANT NOTICE:
Read and save these instructions.
Installer: Leave this guide with the homeowner.
Homeowner: Keep this guide for future reference.
21
Introduction
Thank you for choosing this cooker hood.
This instruction manual is designed to provide you with all required
instructions related to the installation, use and maintenance of the
appliance.
In order to operate the unit correctly and safely, please read this
instruction manual carefully before installation and usage.
Accessible parts may become hot when used with cooking appliance.
CAUTION:
Never let the children operate the machine.
Clean the cooker hood according to the instruction manual and keep the
unit from danger of burning. There is a fire risk if cleaning is not carried
out in accordance with the instructions.
Please keep the kitchen room with good ventilation before connecting
this appliance; please check that the power supply cord is undamaged.
A damaged supply cord must be replaced by qualified service personnel
only.
Regulations concerning the discharge of air have to be fulfilled.
This appliance can be used by children aged from 8 years and above
also the persons with reduced physical, sensory or mental capabilities
or lack of experience and knowledge if they have been given supervision
or instruction concerning use of the appliance in a safe way and
understand the hazards involved. Children shall not play with the
appliance. Cleaning and user maintenance shall not be made by
children without supervision.
The cooker hood is for home use only, not suitable for barbecue,
roast shop and other commercial purpose.
If the supply cord is damaged, it must be replaced by the manufacturer,
its service agent or similarly qualified persons in order to avoid a hazard.
Electrical Shock Hazard
Only plug this unit into a properly earthed outlet.
If you have doubts, seek advice from a suitably qualified engineer.
Safety Precaution
................................................ ........
2
...................................
2
...........
...................................................
...........................................................
...........................................................
5
.............................
5-7
...........................................................
Installation
.........
..............
7-8
...........................................................
Operation
....................................................
Introduction
Safety Precaution
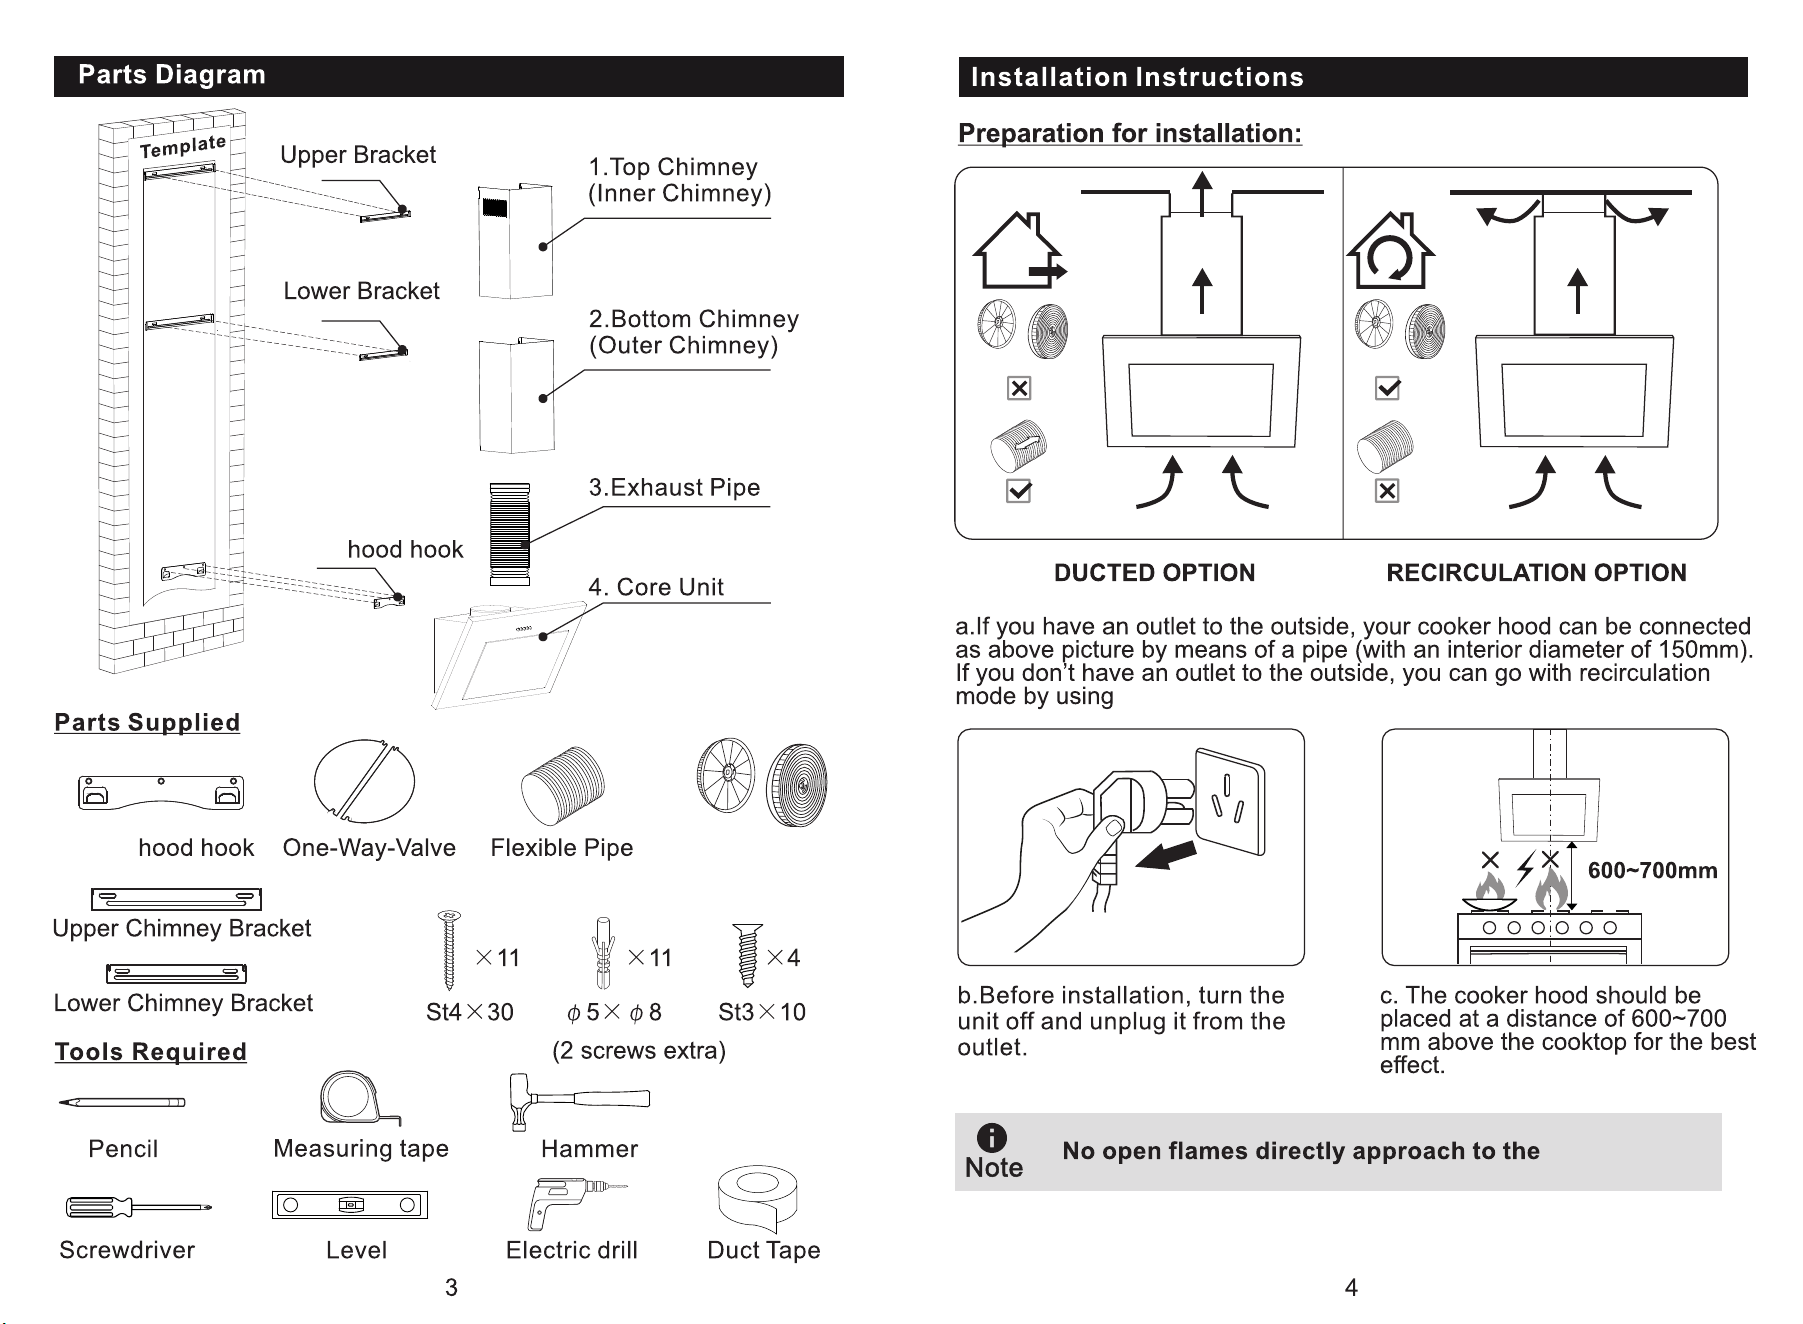
Air Outlet Installation Method
................
4
Installation Instructions
....
CONTENT
....................................................................
3
.
.
.
.
.
.
.
.
.
.
.
.
.
.
.
.
.
.
.
.
.
.
.
.
.
.
.
.
8-10
10
.
.
.
.
.
.
.
.
.
.
.
.
.
.
.
.
.
.
.
.
.
.
.
.
.
.
.
.
.
.
.
.
.
.
.
.
.
.
.
.
.
.
.
.
.
.
.
.
.
.
.
.
.
.
.
.
.
.
.
.
.
.
.
.
.
.
.
.
.
.
.
.
.
.
.
.
.
.
.
.
.
.
.
.
.
.
.
.
.
.
.
.
.
.
.
.
.
.
.
.
.
.
.
.
.
.
.
.
.
.
.
.
.
.
.
.
.
.
Maintenance
Trouble-Shooting
..............
11
...........................................................
Environmental Protection
...........
............
...................
...........
......................
.................................................
..........................................
.................................
.................
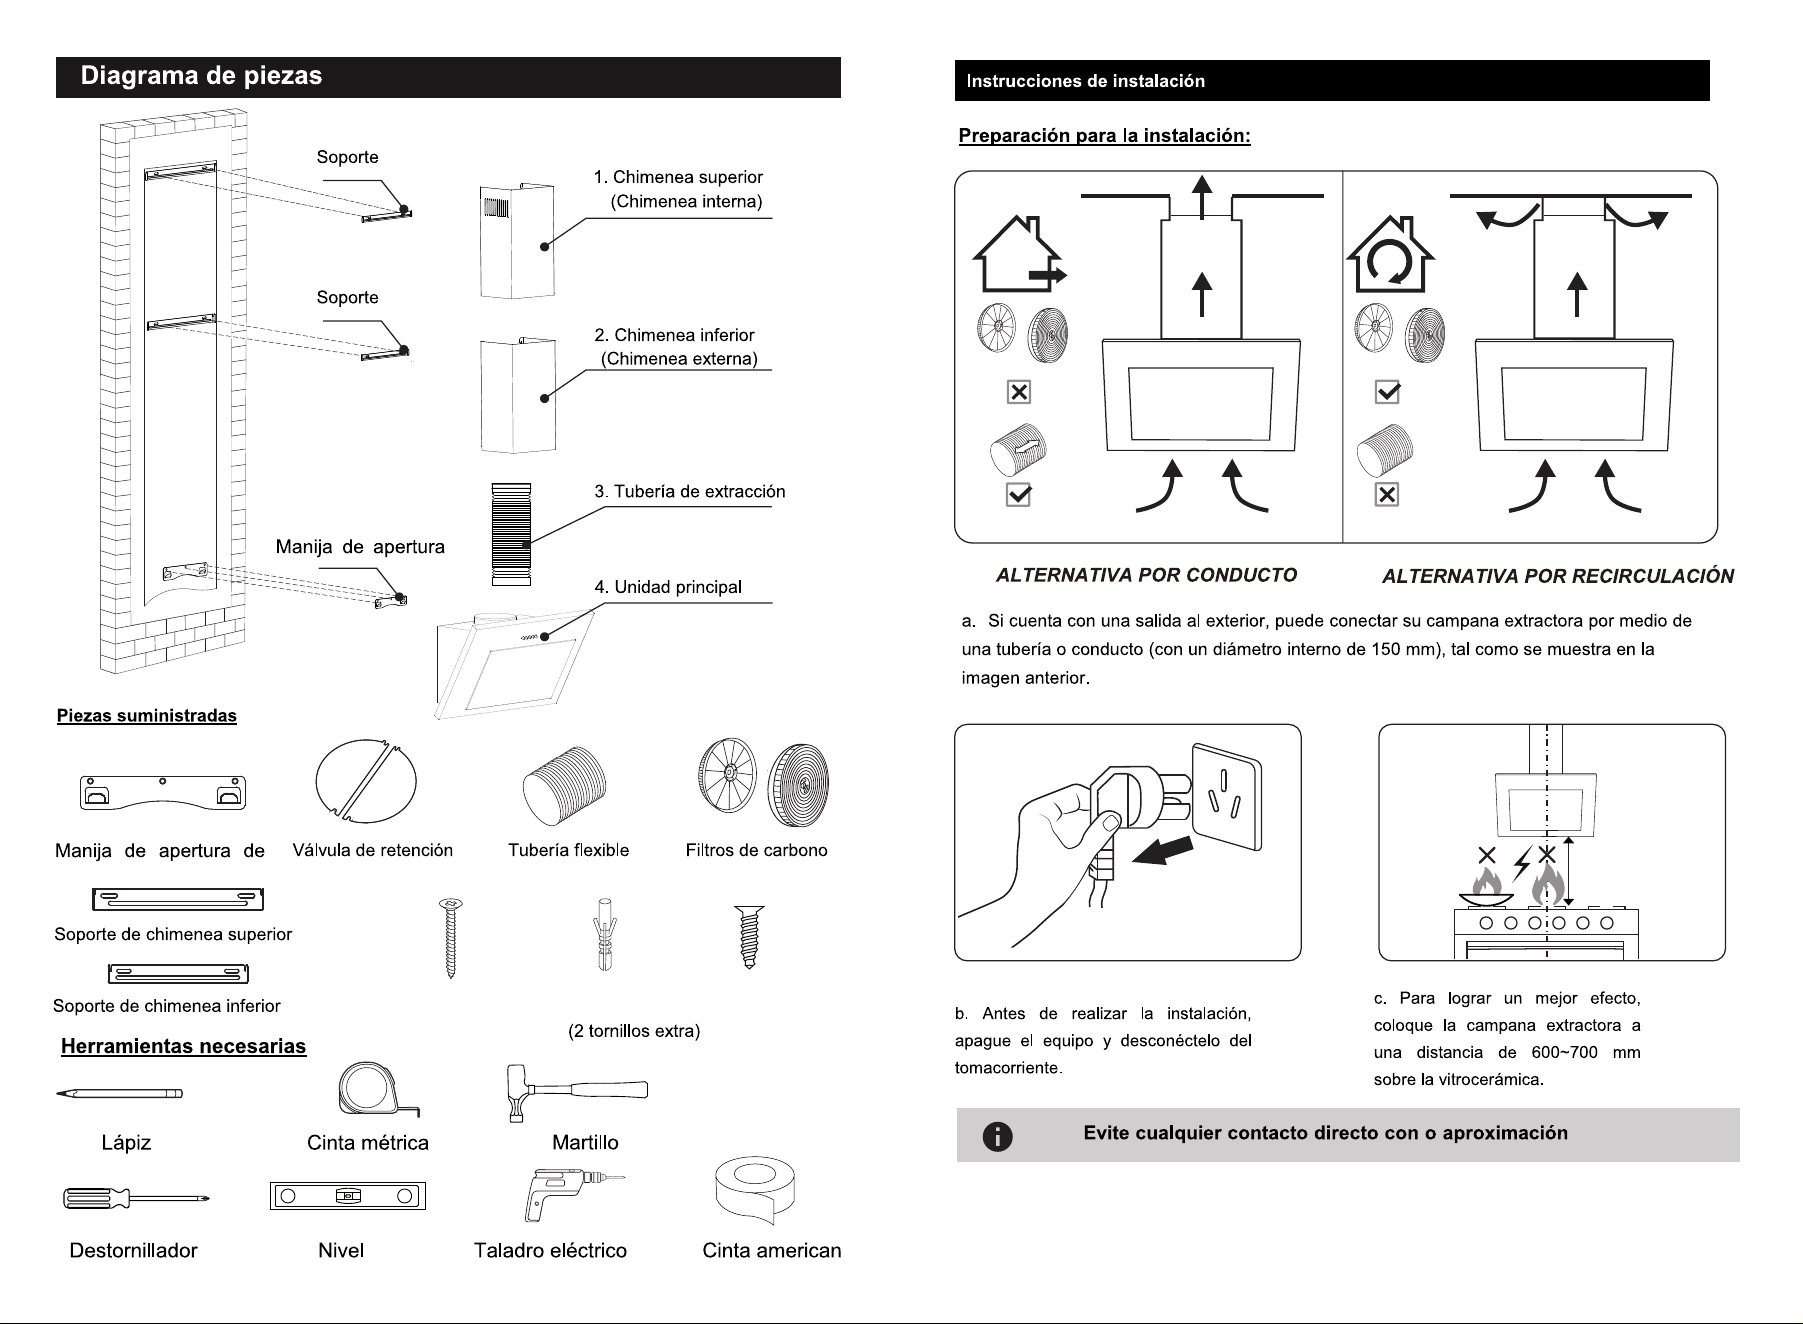
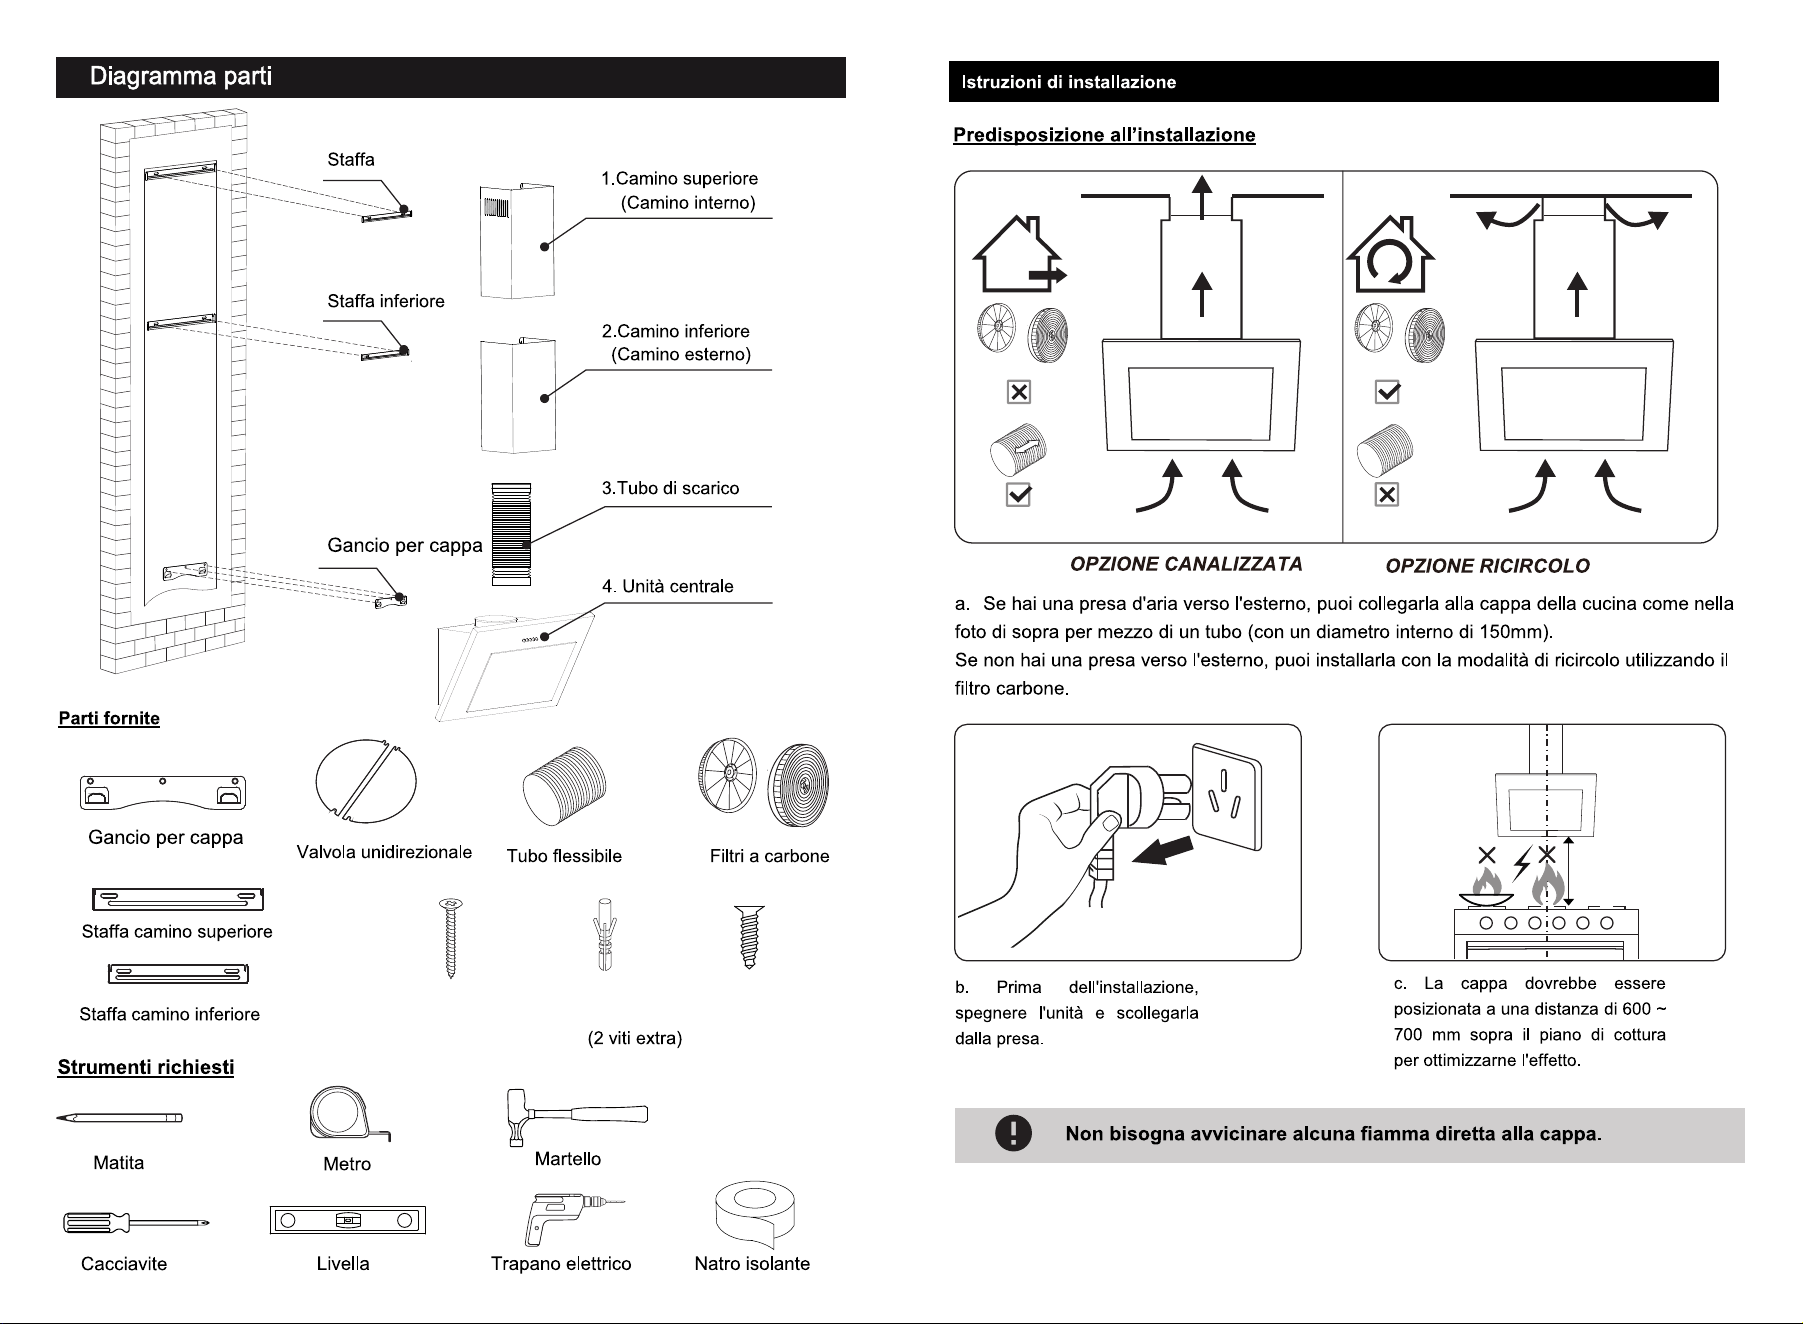
Parts Diagram
........................................
.............. .............................................................................
11
Specification
..................
......
..
....
....
...
.
..
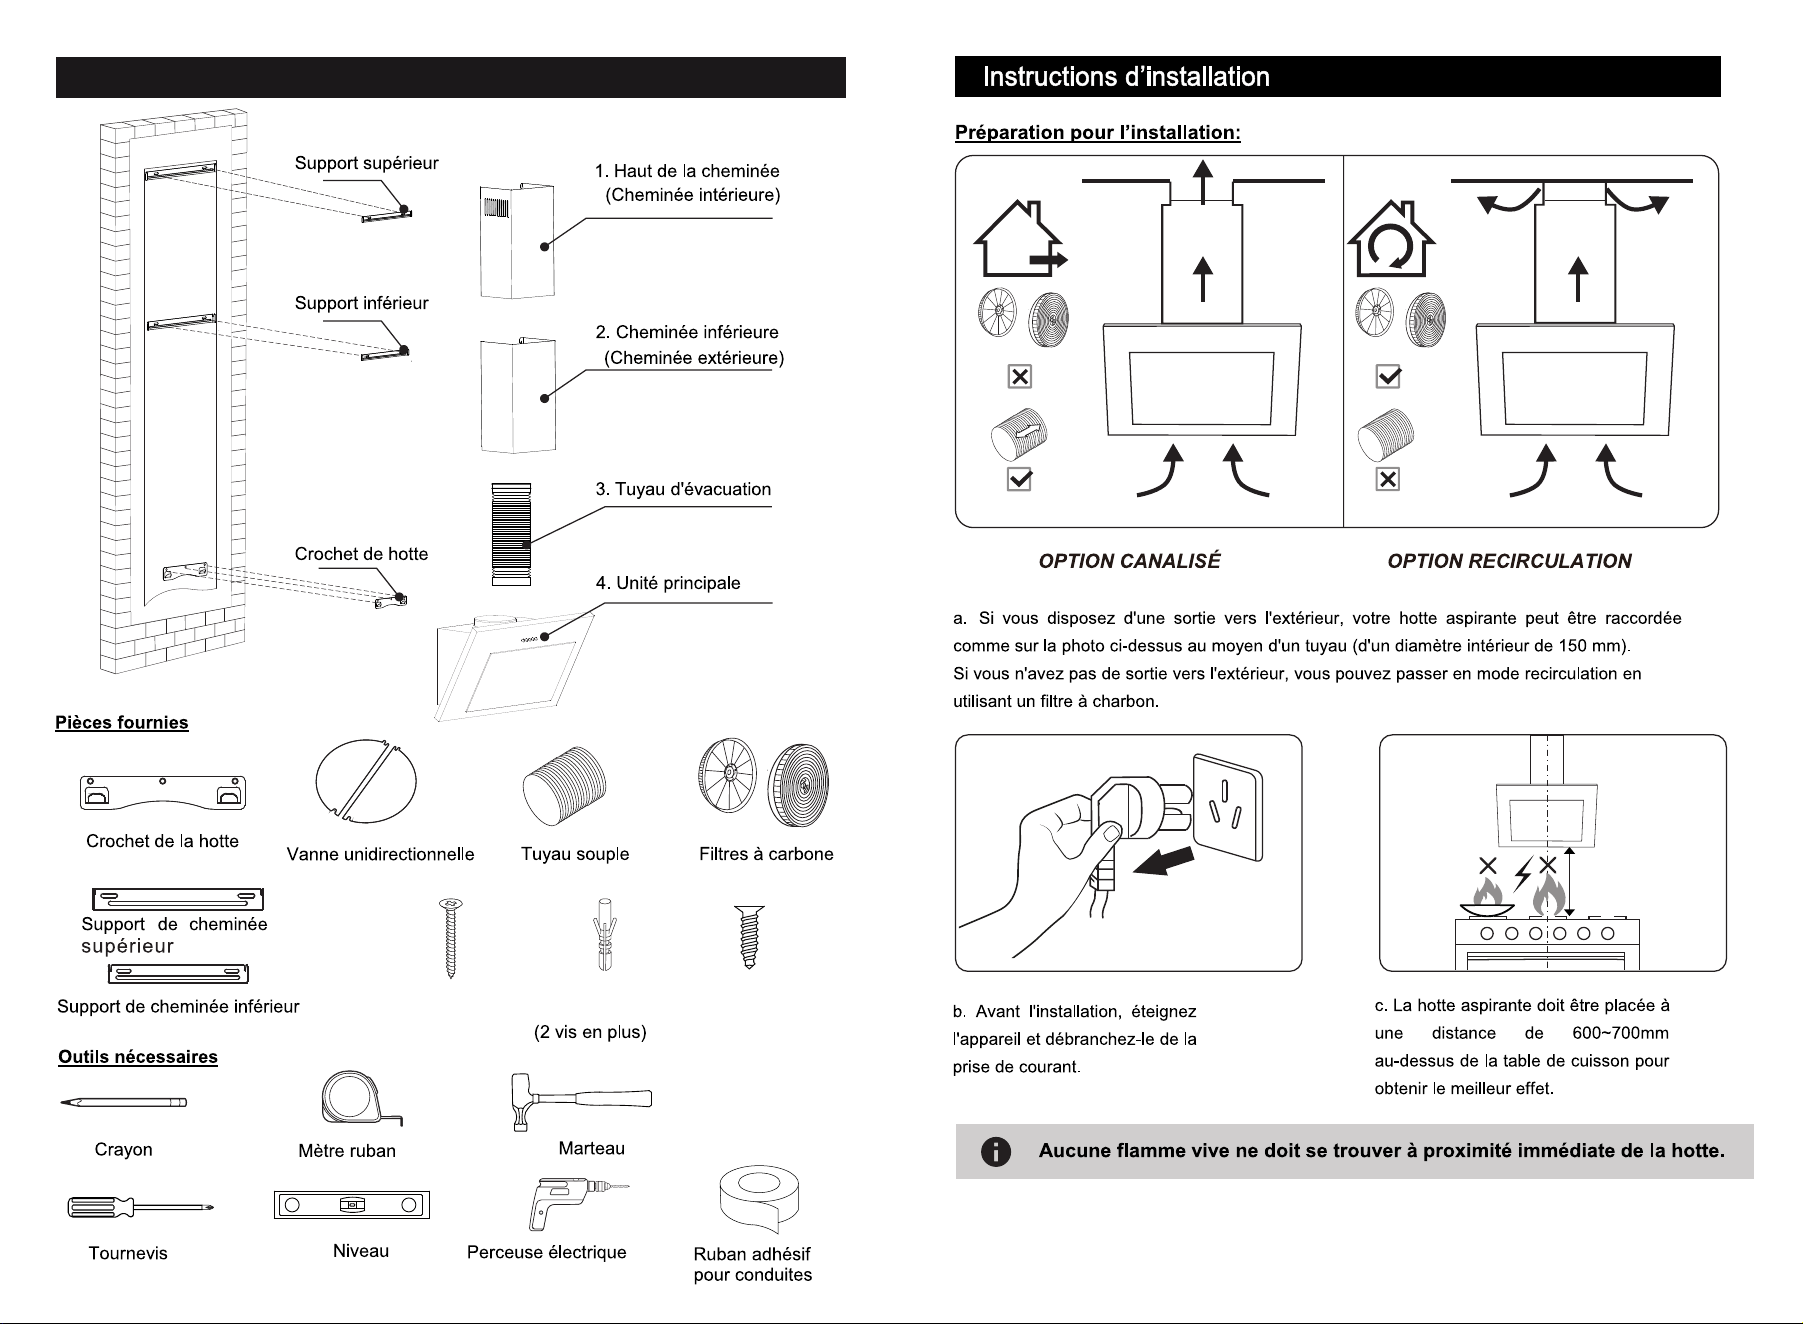
ATTENTION:
Please remove the carbon filter in rainy and humid weather,
and use high speed to exhaust air to prevent condensation
on the surface of the cooker hood.
Charcoal Filters
(Please refer to the model
list on the last page)
charcoal filters.
Cooker
Cooker
cooker hood.

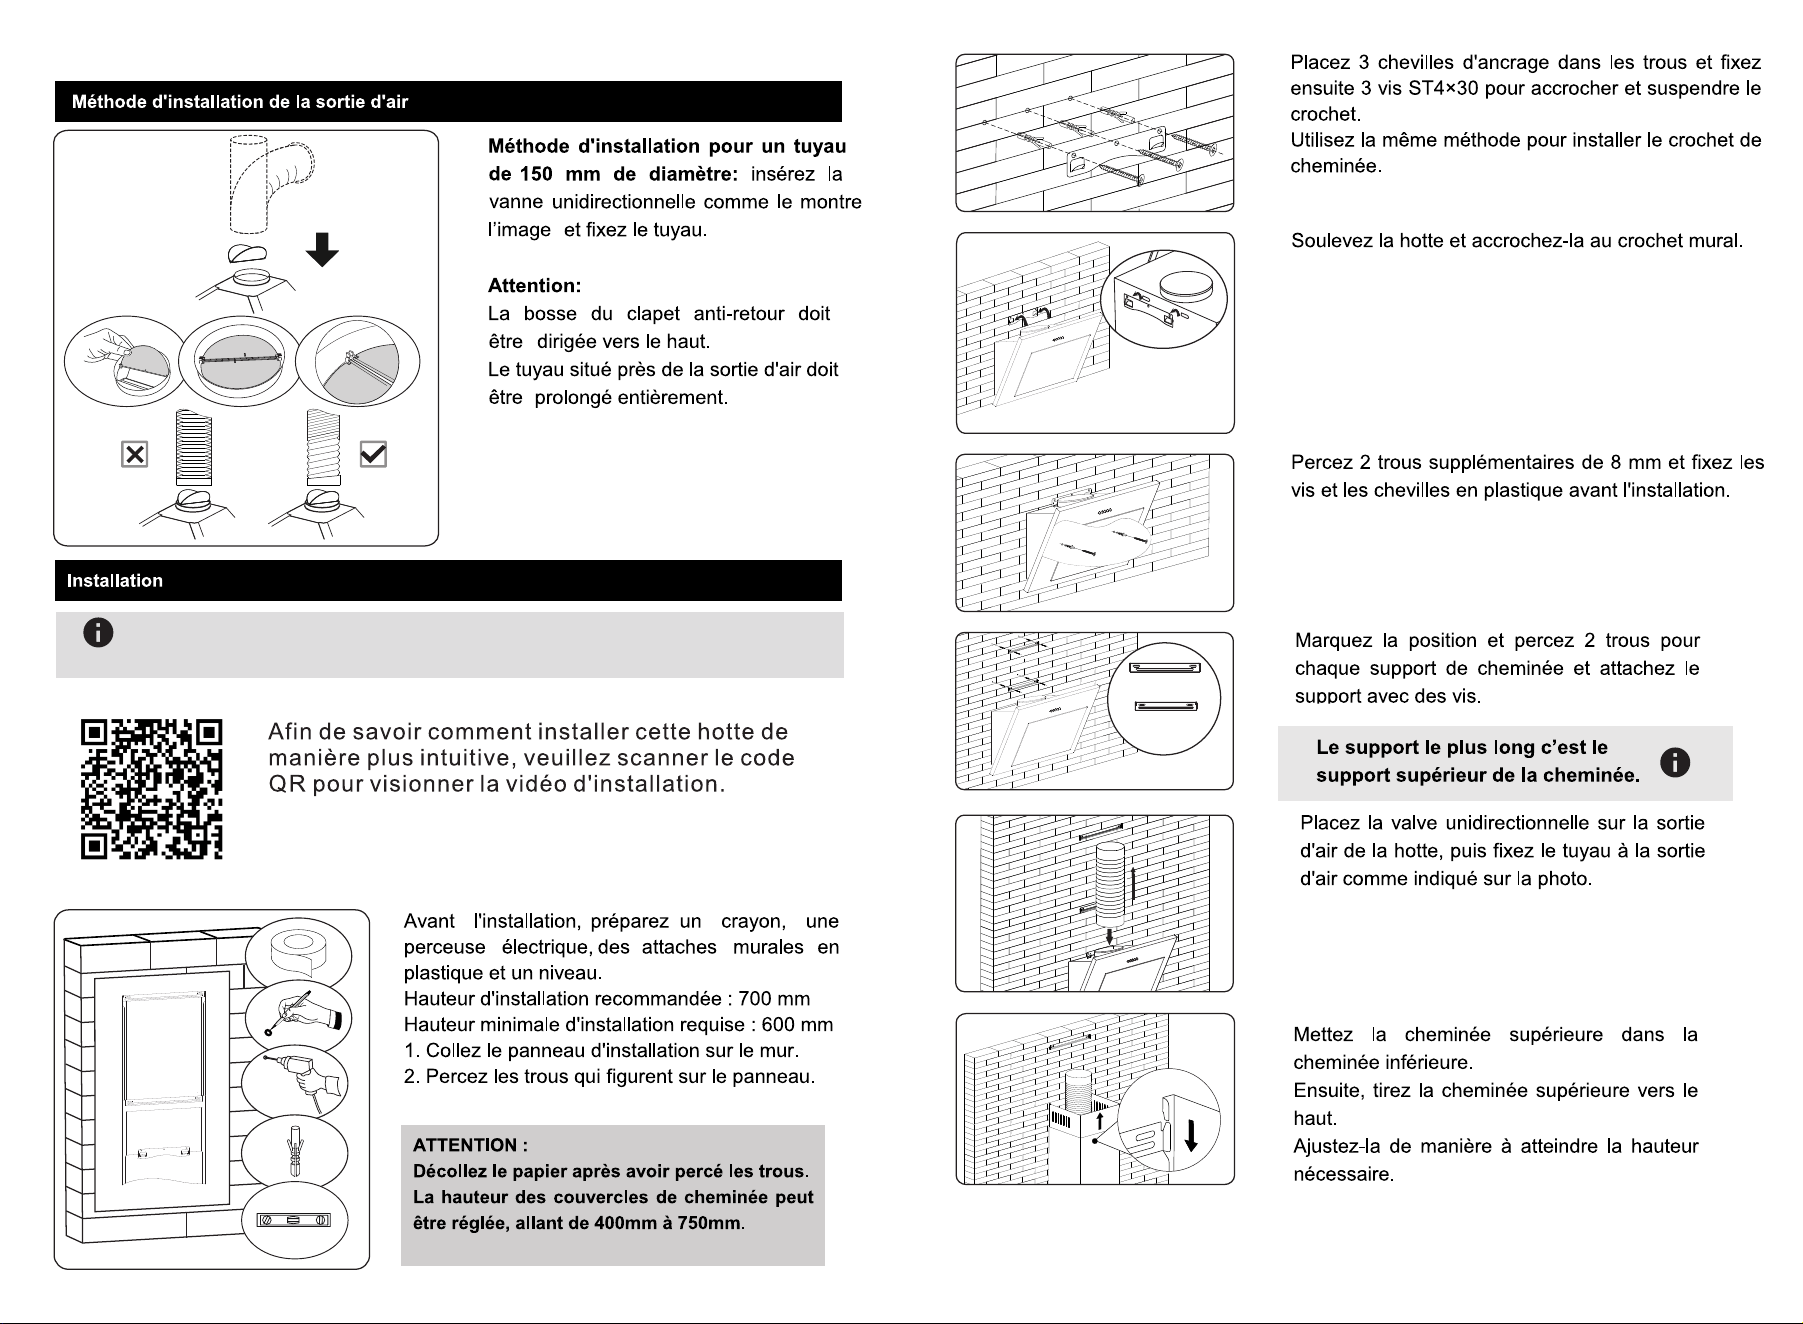
6
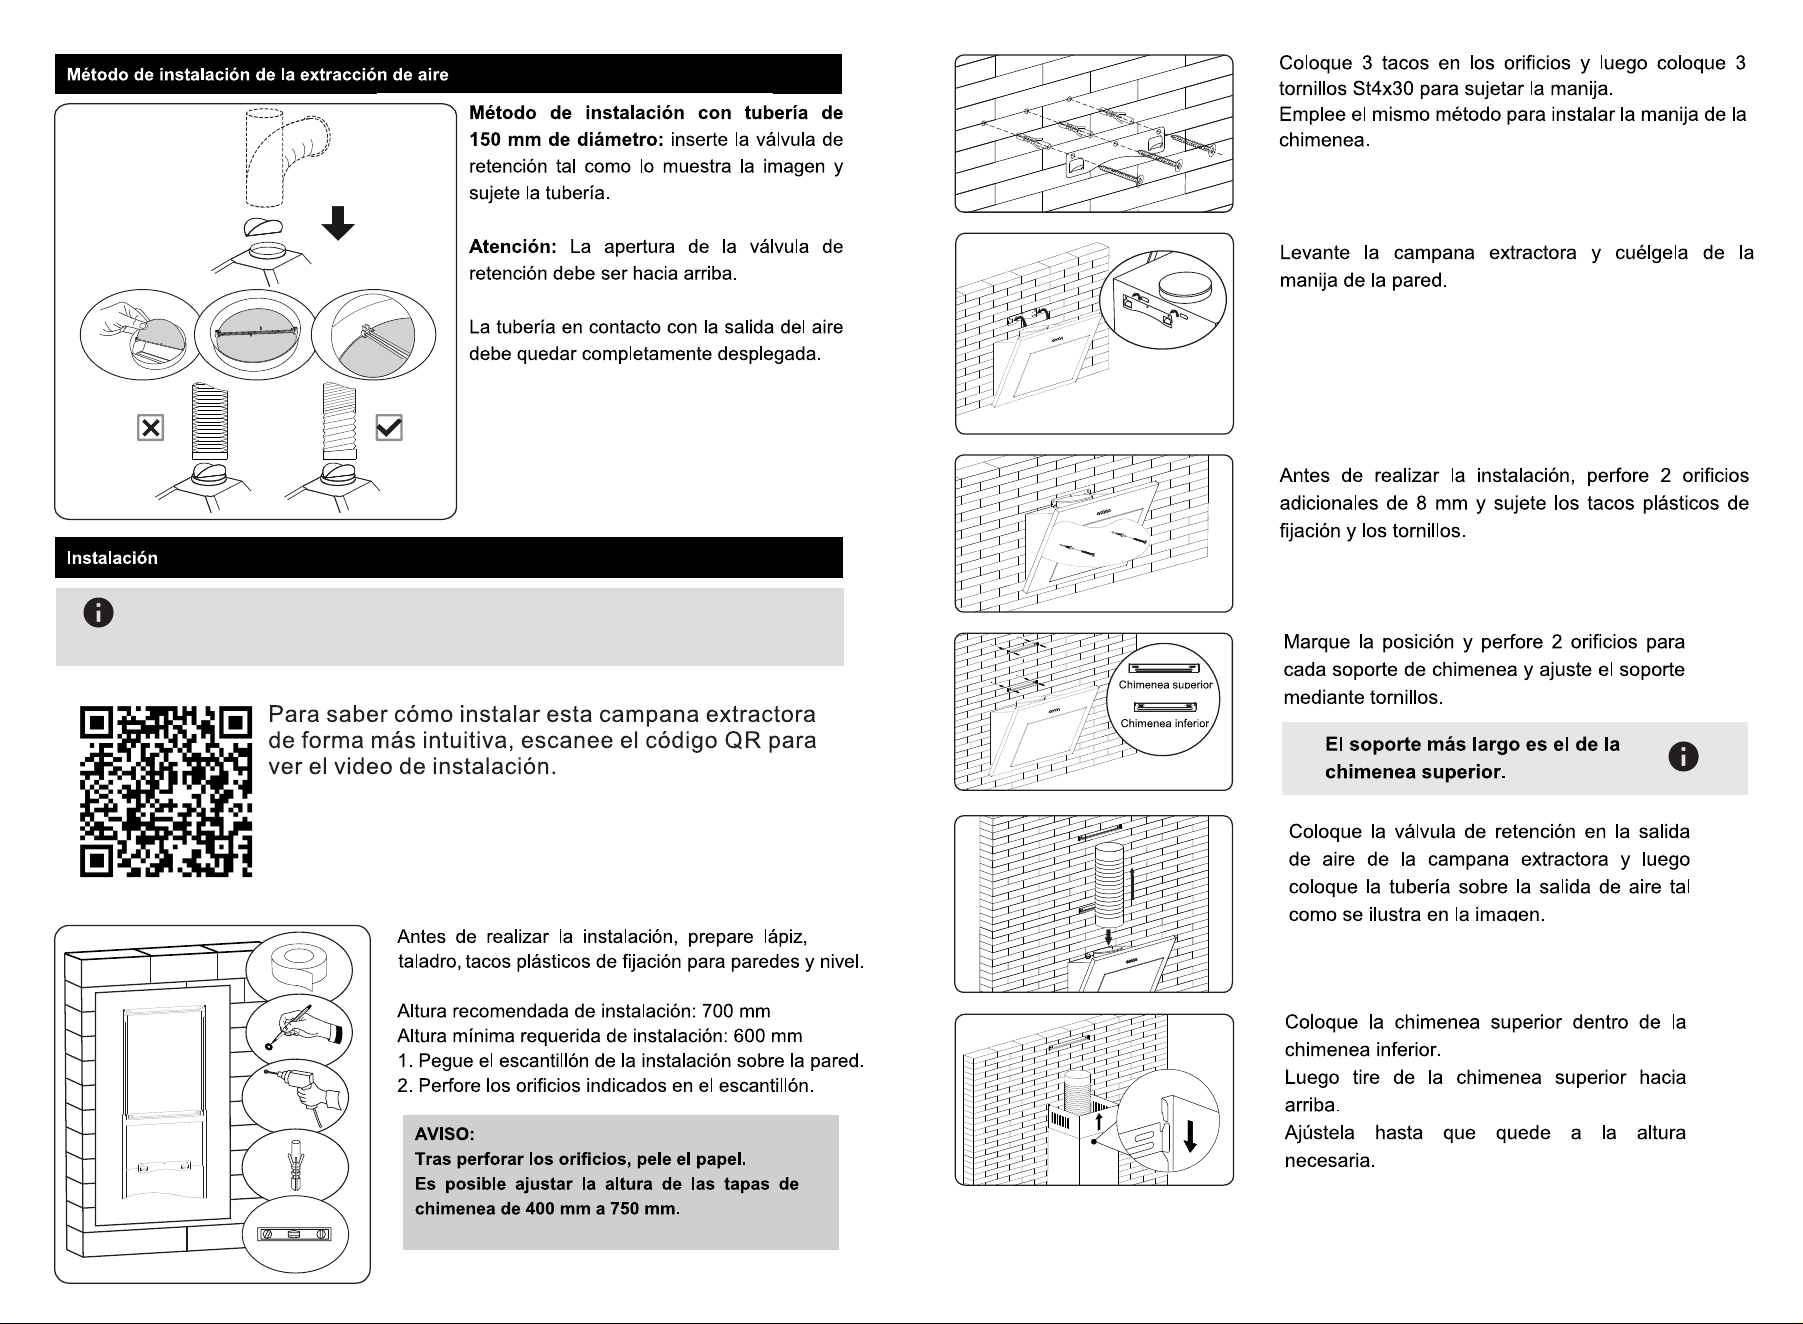
Lift the cooker hood and hang onto the
wall hook.
Drill 2×8mm extra holes and fix screws &
plastic wall anchors before installation.
Mark the position and drill 2 holes for
each chimney bracket and tighten the
bracket with screws.
The longer bracket is upper
chimney bracket.
Note
Put the upper chimney into lower chimney.
Then pull out the upper chimney upwards.
Adjust it to reach the height required.
Fix the one-way-valve to the air outlet
of the cooker hood, and then attach
the pipe onto the air outlet as picture.
Tape 3pcs anchor into the hole and then
fix 3pcs ST4×30 screws to hang the hook.
Using same way to install the chimney
hook.
Upper Chimney
Lower Chimney
Note
Please connect the power supply to test and confirm that the
power is on before installing this wall mount cooker hood.
(1) Watch the installation video:
(2) Refer to the installation instructions:
In order to know how to install this wall mount
cooker hood more intuitively, please scan the
QR code to watch the installation video.
87
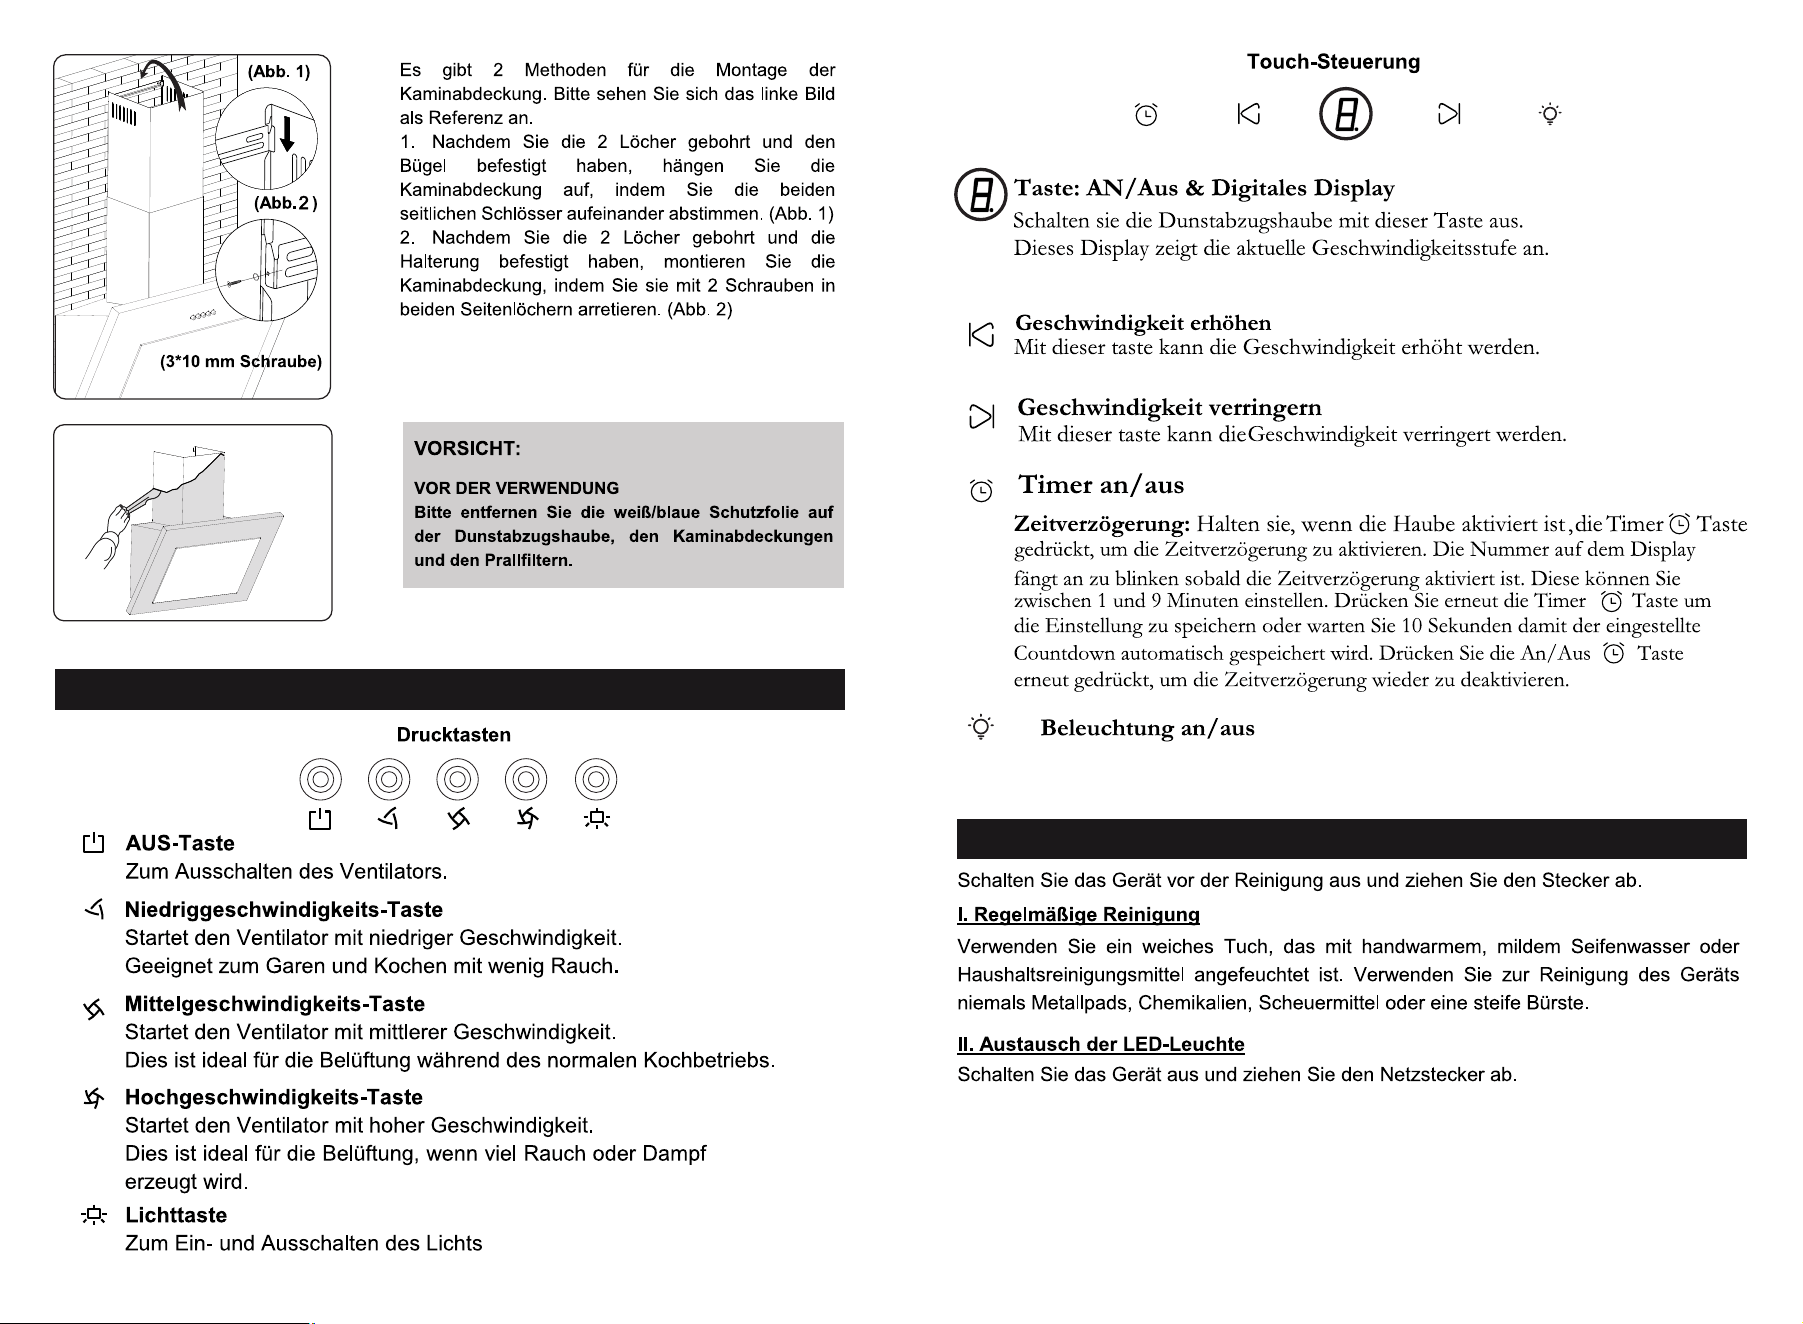
1. After drilling the 2 holes and fixing the
bracket, hang the chimney cover by
matching the both side lock.(Pic 1)
There are 2 methods for installing the
chimney cover. Please check the left
pic for reference.
Please remove the white/blue protective
film on the range hood,chimney covers
and baffle filters.
2. After drilling the 2 holes and fixing the
bracket, install the chimney cover by
locking with 2 screws in both side holes.
(Pic 2)
BEFORE USE
CAUTION:
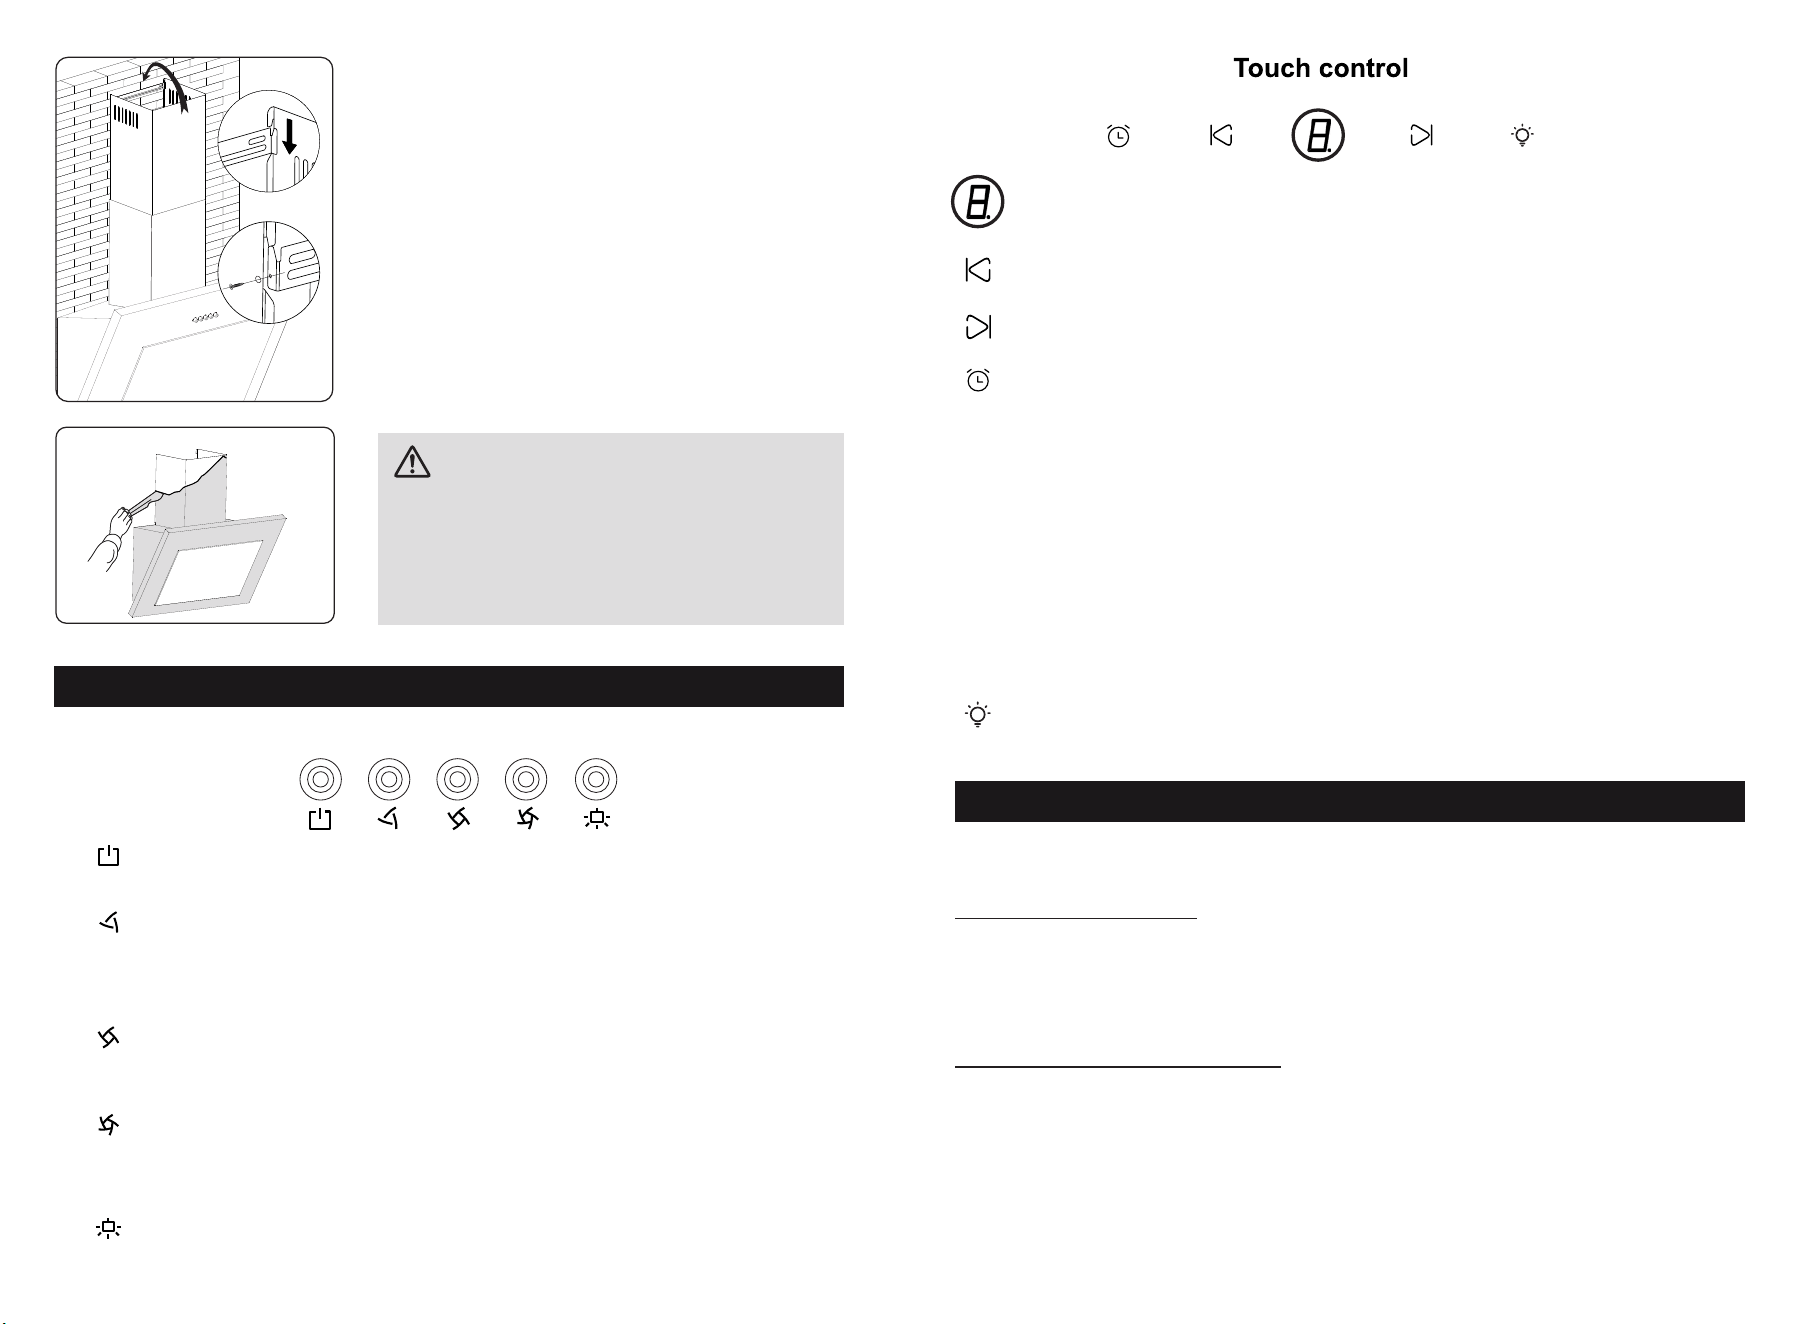
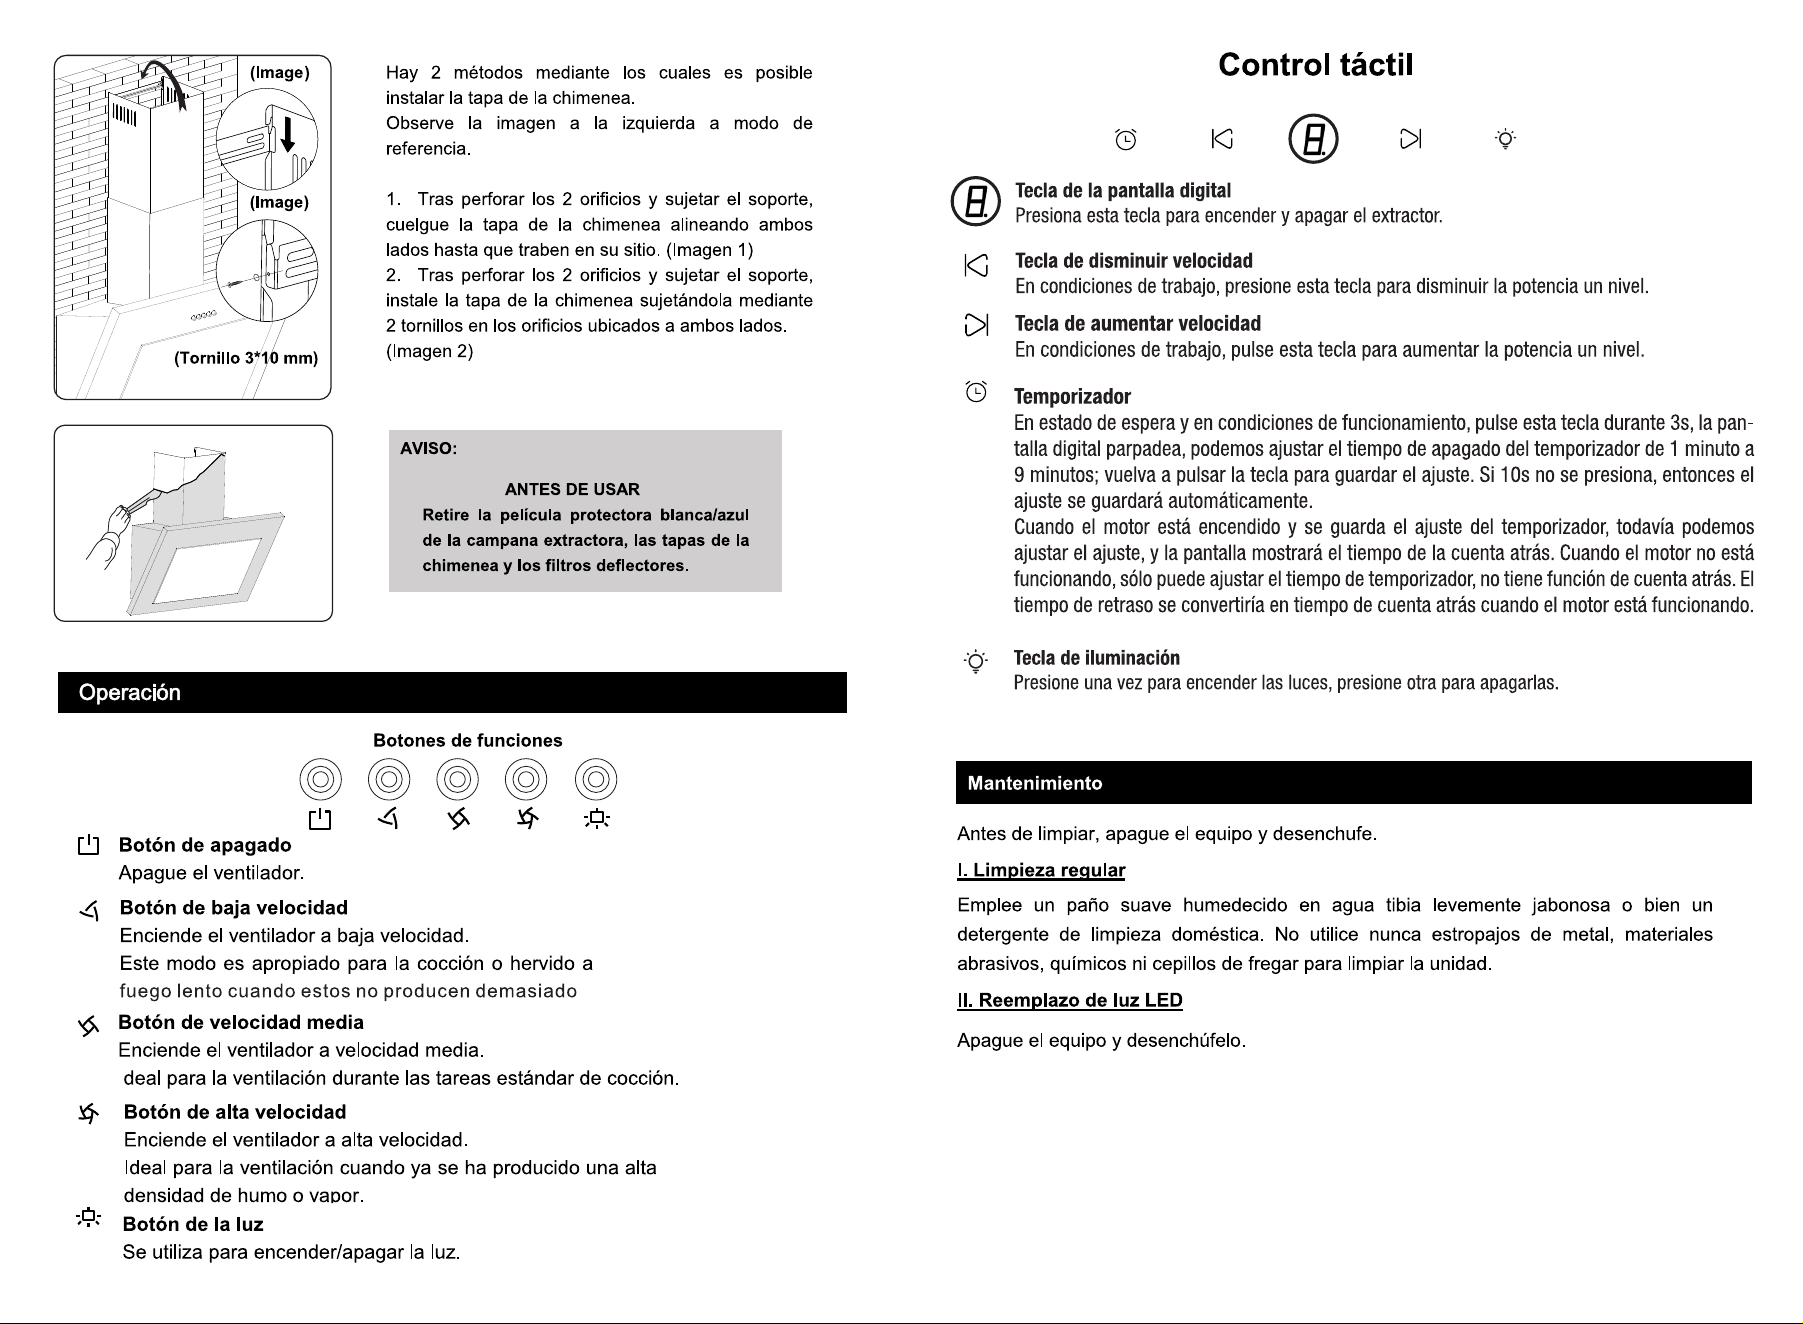
Push Button
OFF Button
Turn off the fan.
Low Speed Button
Start the fan at low speed .
It is suitable for simmering and cooking
which does not make much steam.
Medium Speed Button
Start the fan at medium speed.
This is ideal for ventilation during standard cooking operation.
High Speed Button
Start the fan at high speed.
This is ideal for ventilation when a high density of smoke or
steam has been produced.
Light Button
Used for turning on/off the light.
Operation
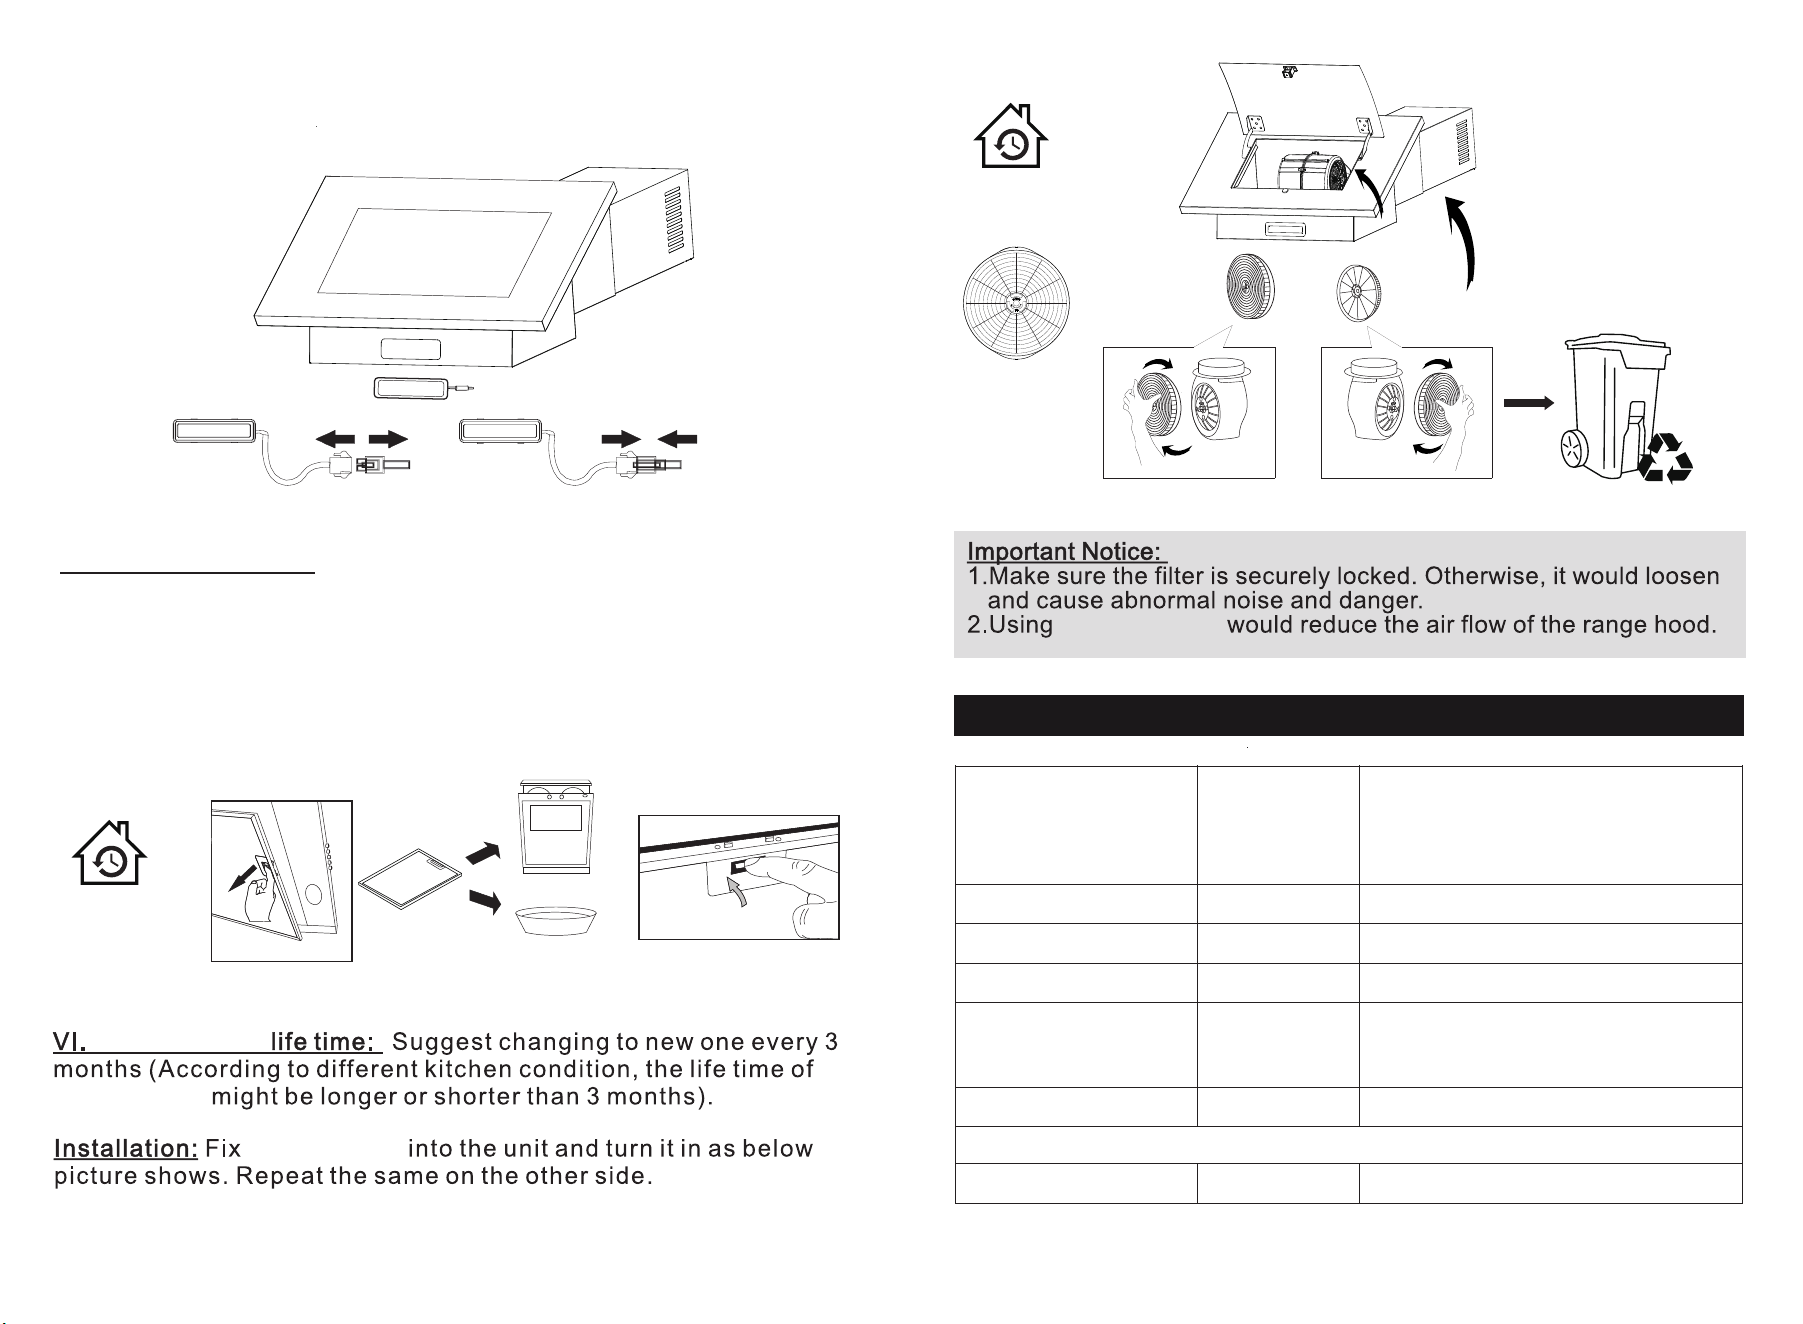
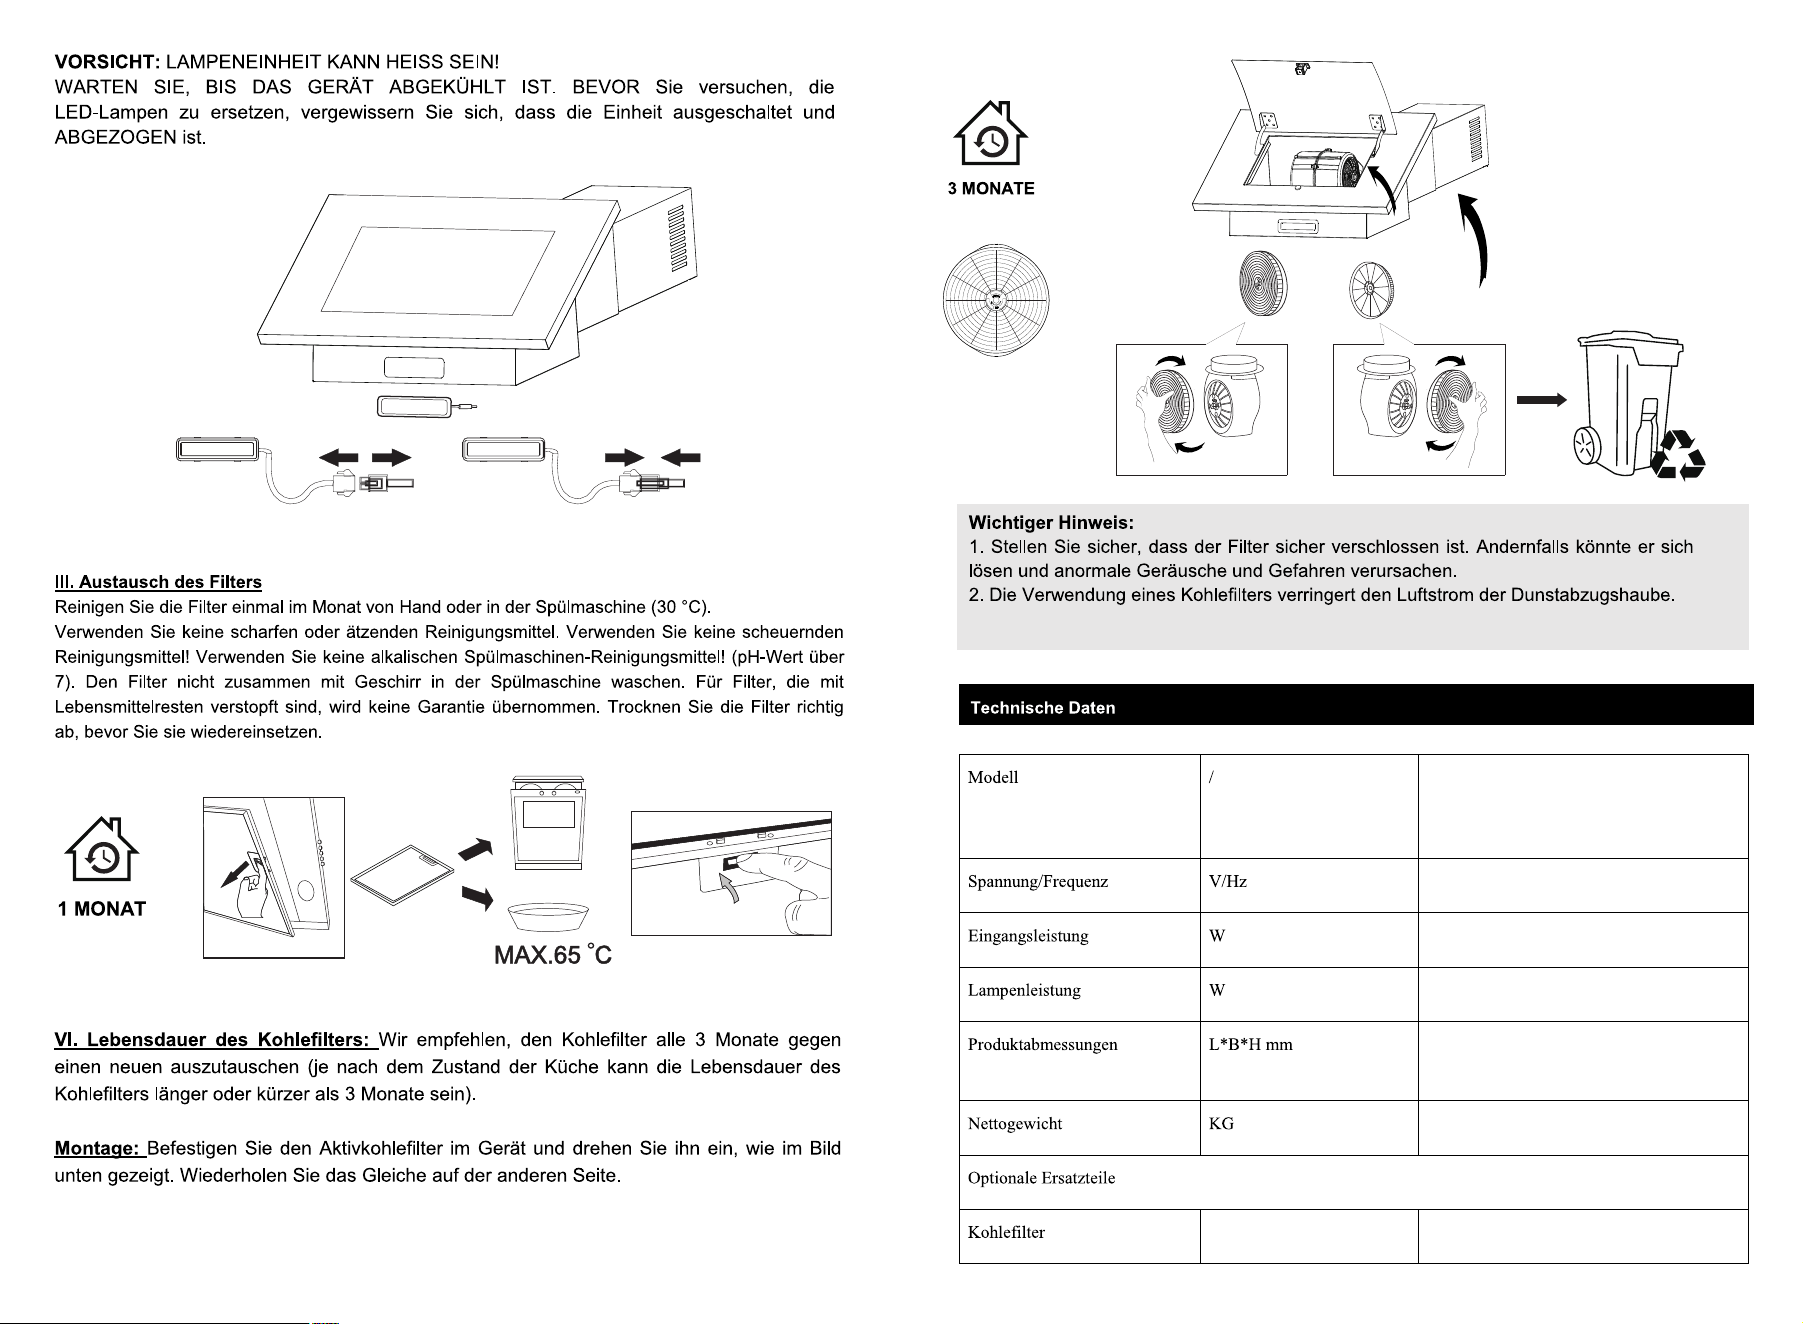
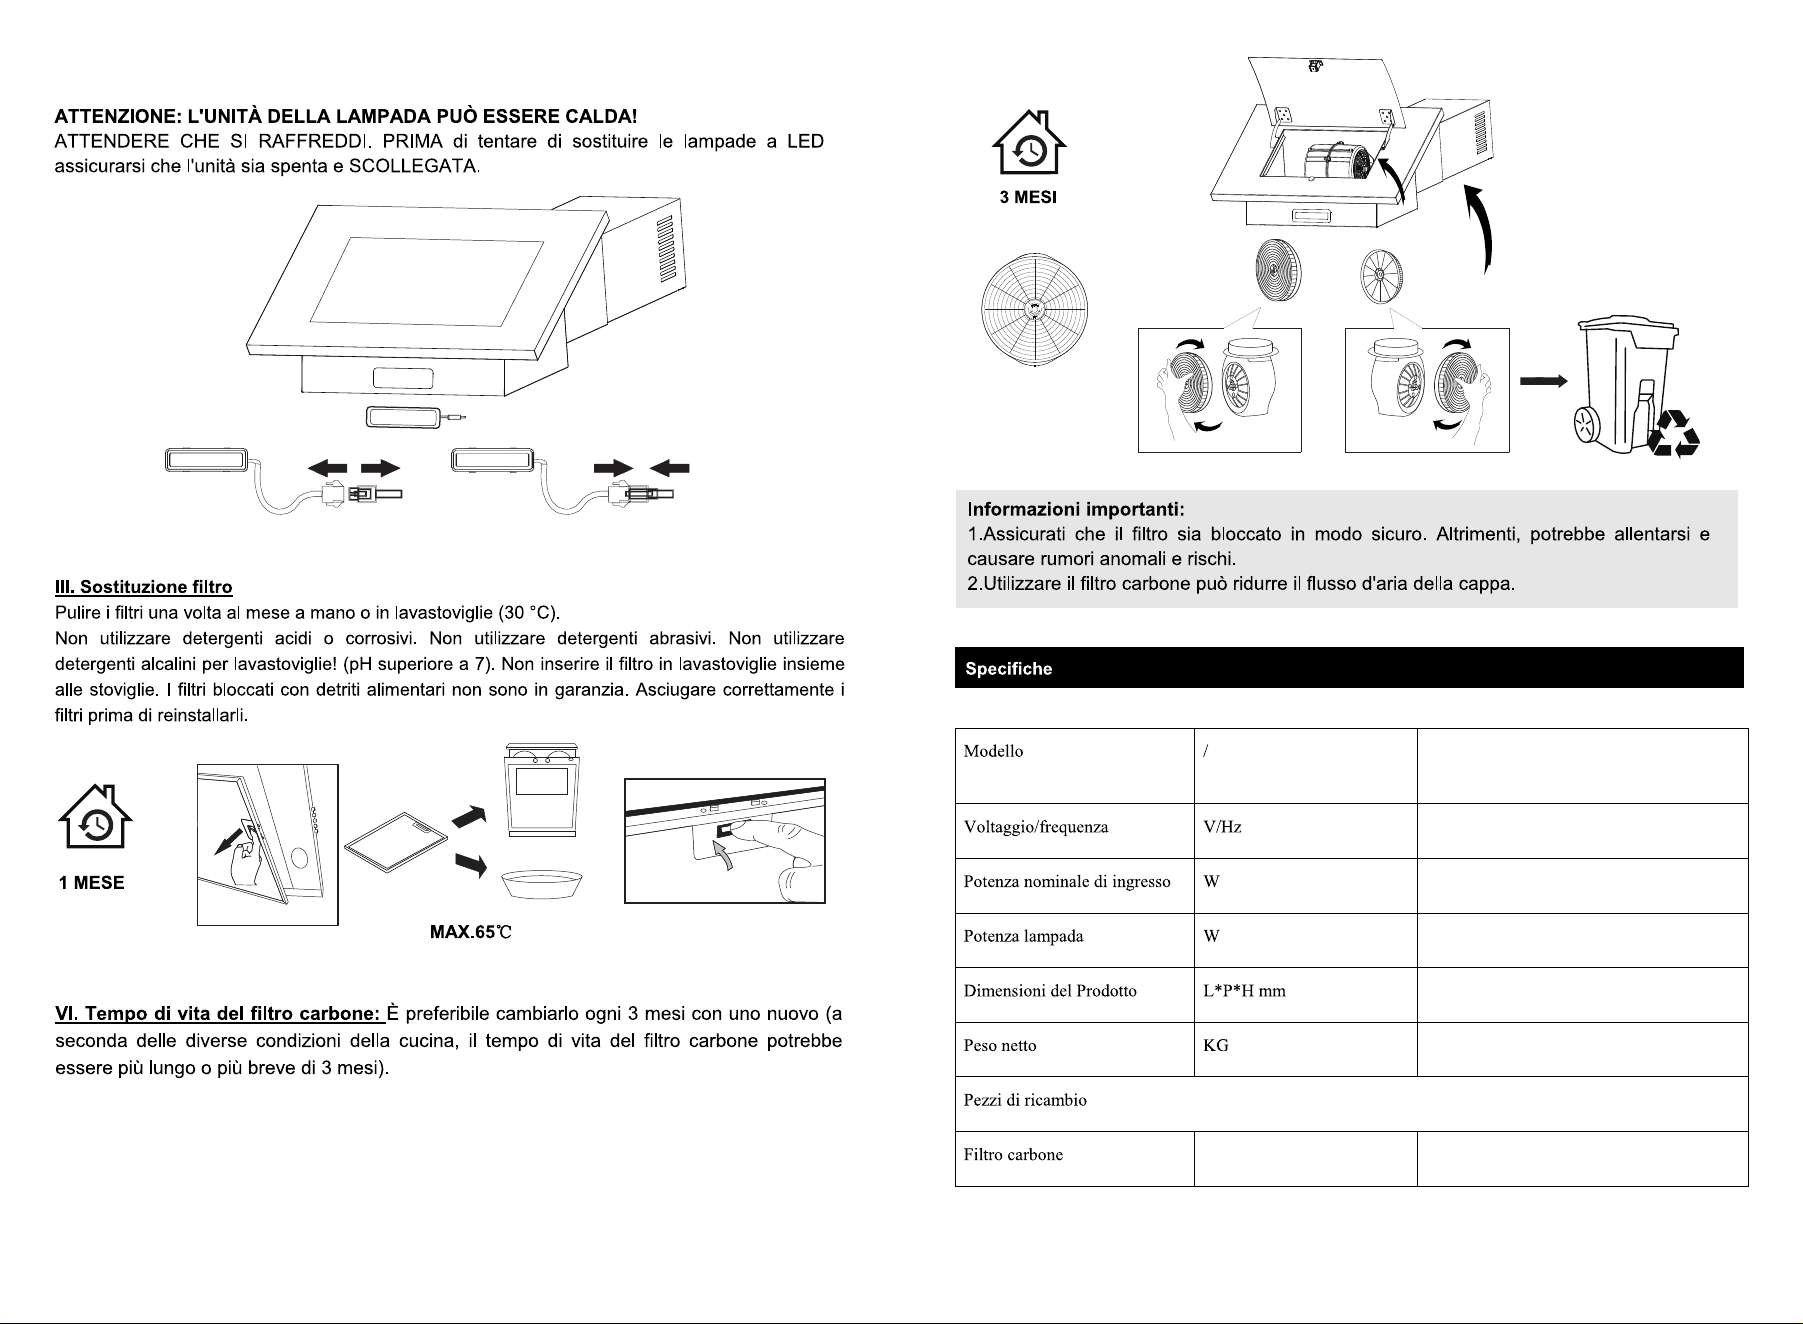
II. LED Light Replacement
Turn the unit off and unplug the appliance.
Maintenance
Before cleaning , turn the unit off and pull out the plug.
I. Regular Cleaning
Use a soft cloth moistened with hand-warm mildly soapy water
or household cleaning detergent. Never use metal pads, chemical,
abrasive material or stiff brush to clean the unit.
(3*10mm screw)
(pic2)
(pic1)
Digital display key
Power down key
Power up key
Delay key
On stand-by and working condition, press the Delay key for 3
seconds, the digital display blinks and you can set the delay
power off time from 1 minute to 9 minutes; press the key again
to save the setting. If you don't press any key, after setting time,
for 10 seconds, then the setting would be saved automatically.
When the motor is on and the delay setting is saved, you can still
adjust the setting, and the display will show the countdown time.
When the motor is not working, you can just set the delay time,
there is no countdown function. The delay time would turn to
countdown time when the motor is working.
Light key
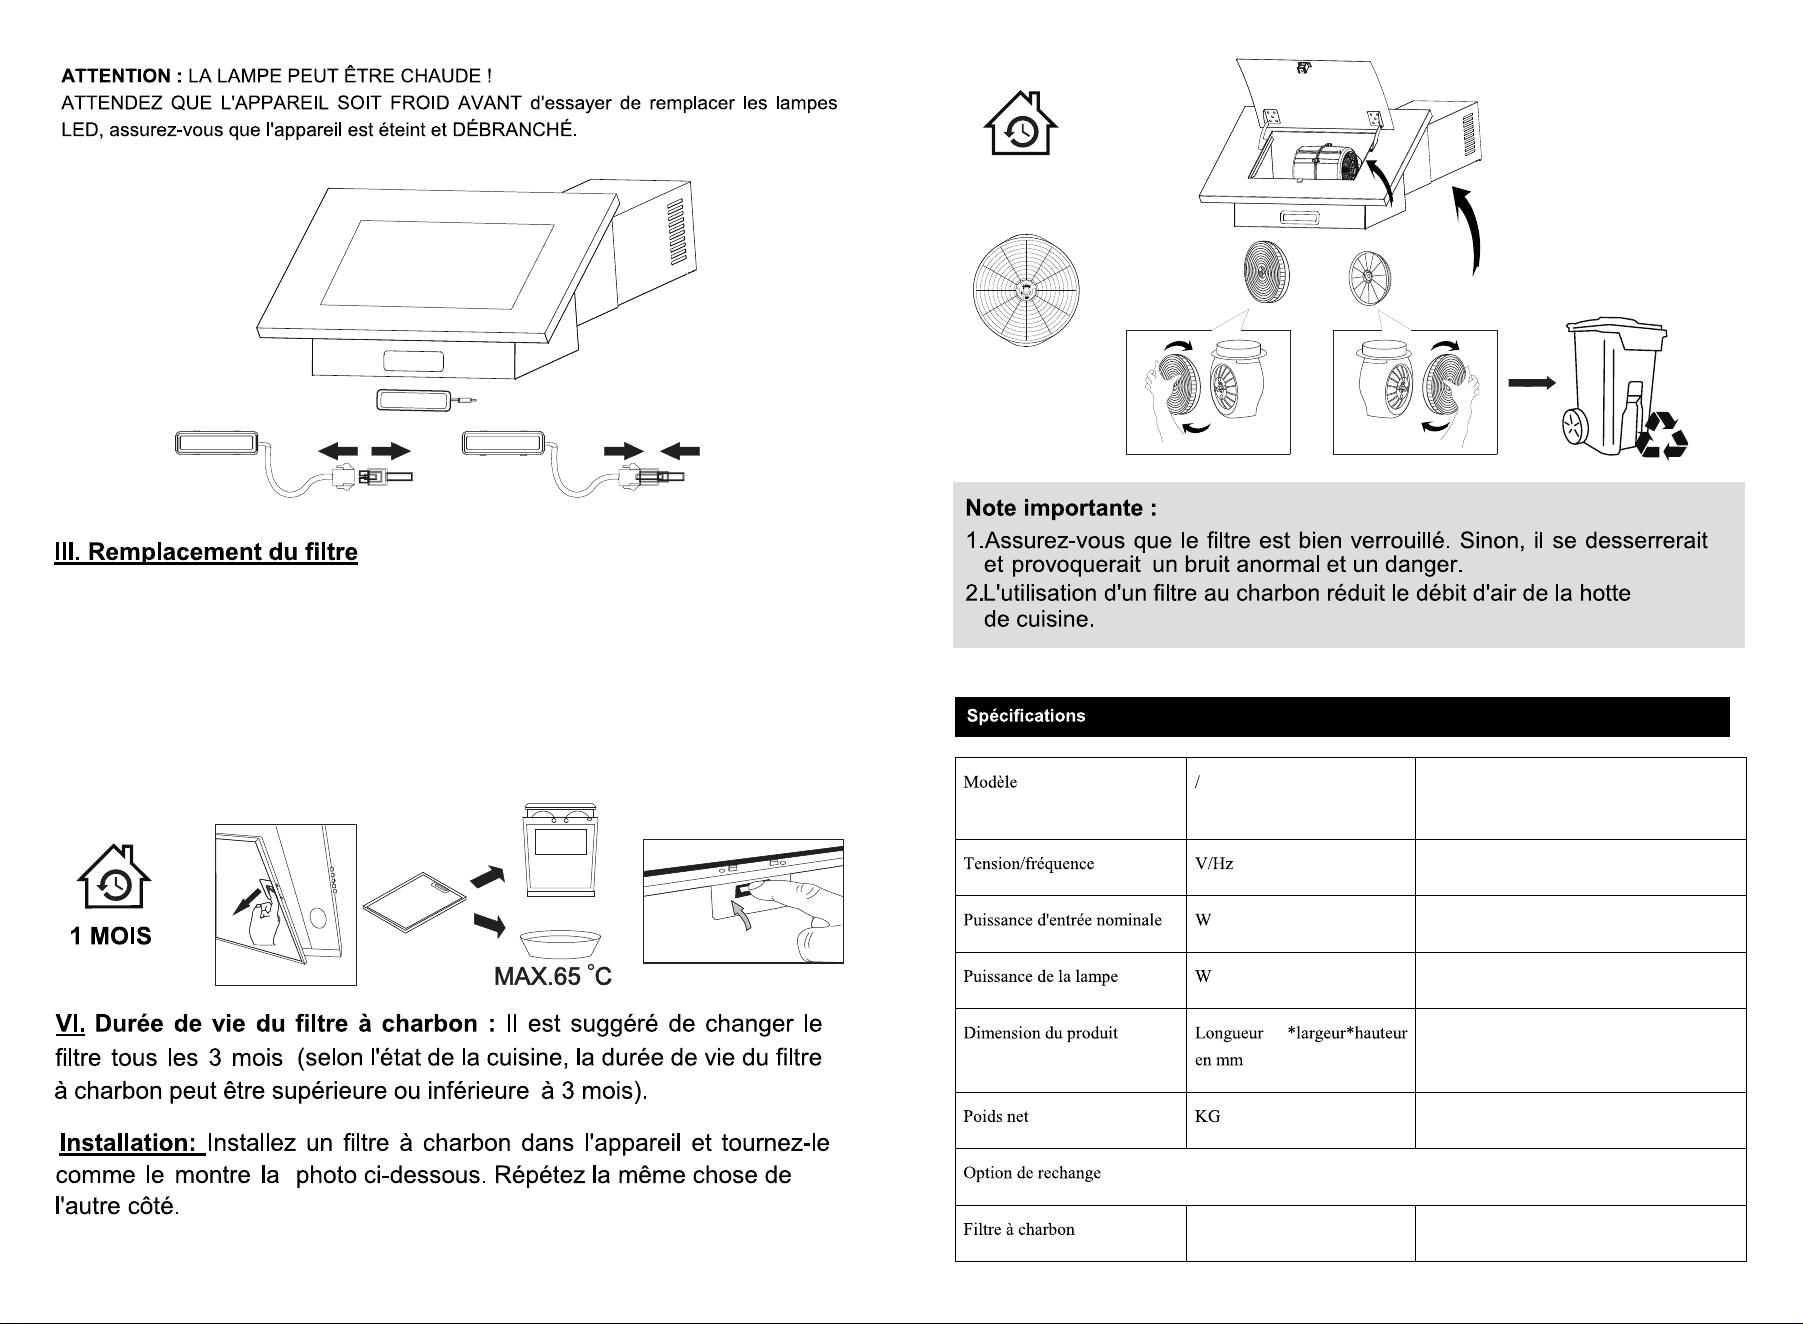
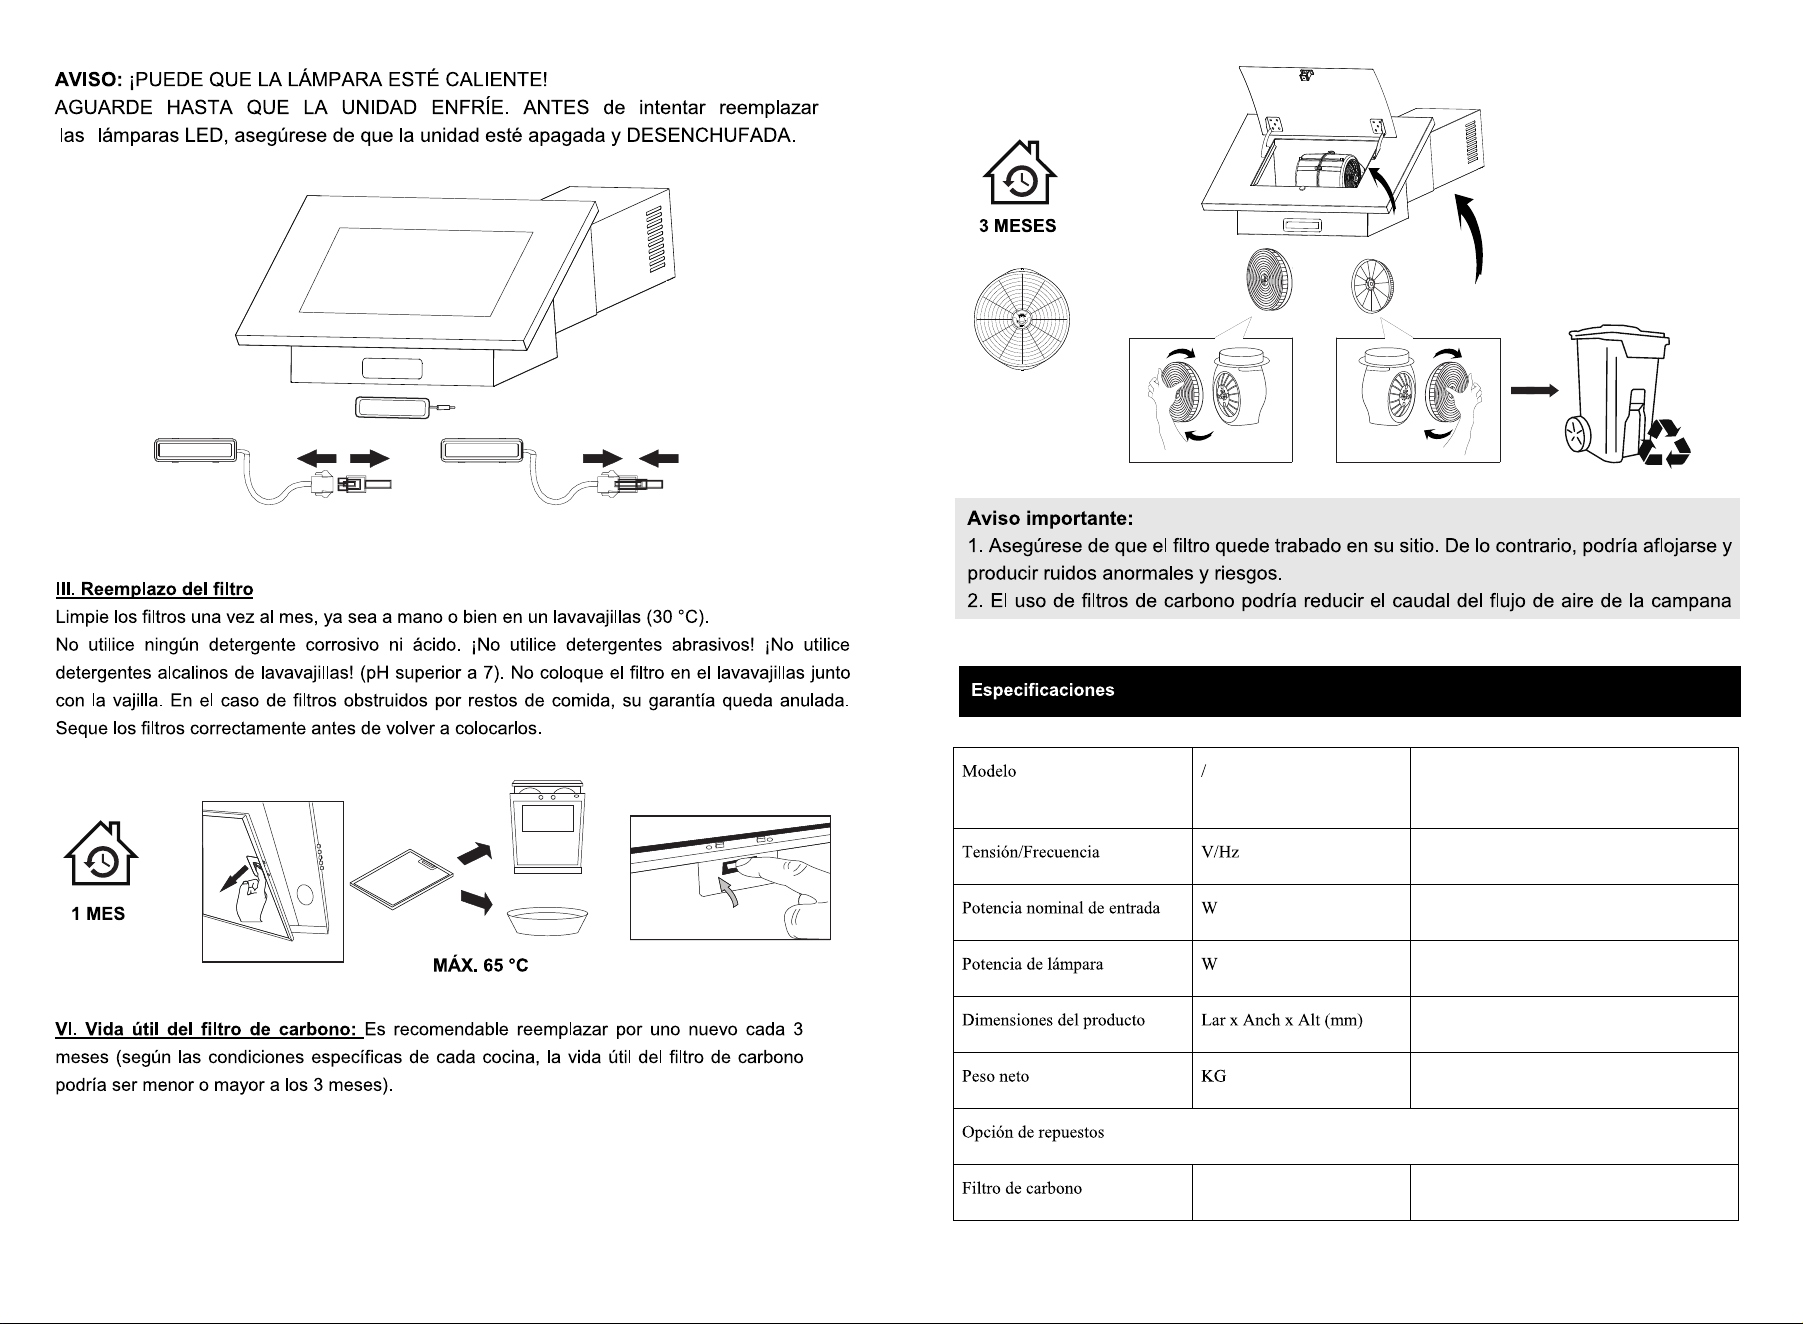
Model
Voltage/Frequency
Rated Input Power
Lamp Power
Product Dimension
N.W
Spares Option
/
V/Hz
W
L*W*H mm
kg
W
220-240/50-60
33
3
595*329*305
9.5
109
III. Filter replacement
CAUTION: LAMP UNIT MAY BE HOT!
WAIT UNTIL THE UNIT IS COOL. BEFORE attempting to replace
the LED lamps make sure the unit is powered off and UNPLUGGED.
Clean the filters once a month by hand or in a dishwasher (30 °C).
Do not use any acrid or corrosive detergents. Do not use any abrasive
detergents! Do not use anyalkaline dishwasher-detergents!
(pH more than 7). Do not put the filter in the dishwasher together with
tableware. Filters which are blocked with food debris do not carry a
guarantee. Dry the filters properly before you reinstall them.
Specification
3 MONTHS
1 MONTHS
MAX.65 C
charcoal filters
charcoal filters
charcoal filters
Charcoal filters
Charcoal Filters
FGS-EBV40Z460CC
FGS-EBV40Z460AC
Fault Cause Solution
The fan blade is jammed.
The motor is damaged.
Light is burnt out.
Power cord is loose.
Light on,but fan
does not work
Both light and fan
do not work
Serious Vibration
of the unit
Suction
performance not
good
Too far distance
between the unit
and the cooktop.
The unit is not hung
properly on the bracket.
The fan motor is not
fixed tightly.
The fan blade is
damaged.
Switch off the unit and
repair by qualified
service personnel only.
Replace the LED light
with correct rating.
Plug into the power
supply again.
Switch off the unit and
repair by qualified
service personnel only.
Take down the unit and
check whether the bracket
is in proper location.
Readjust the distance
between 600-700mm.
Trouble-Shooting
11
Environmental Protection
1. While unpacking, the packaging materials (polythene bags, polystyrene
pieces,etc.) should be kept away from children. CHOKING HAZARD!
2. Old and unused appliances must be sent for disposal to the responsible
recyclingcentre. Never expose to open flames.
3. Before you dispose of an old appliance, render it inoperative. Unplug
the appliance and cut off the entire power cord. Dispose of the power
cord and the plug immediately,
4. Dispose of any paper and cardboard into the corresponding containers.
5. Dispose of any plastics into the corresponding containers.
6. If suitable containers are not available at your residential area, dispose
of these materials at a suitable municipal collection point for
waste-recycling.
7. Receive more detailed information from your retailer or your municipal
facilities.
Materials marked with this symbol are recyclable.
Please contact your local authorities toreceive further information.
Statement
Thank you for purchasing this product. FIREGAS is committed to providing
our customers with professional quality kitchen ventilation. FIREGAS cannot
assume responsibility for any consequences resulting from the use thereof.
Note
This document is designed to act as a quick reference guide for common
scenarios and questions when installing a FIREGAS Range Hood. for more
instructions and details please refer to Installation Guide from www.
firegas kitchen.com
Website: www.firegaskitchen.com Email: support01@firegaskitchen.com
Tech Support
Warranty
For full warranty details on this product please visit: www.firegaskitchen.com
Support > Warranty Registration
FGS-EBV40Z460CC
FGS-EBV40Z460AC
Vorstellung
SICHERHEITSHINWEISE
INHALT
4
8-10
11
11
10
7-8
21
Beachtung:
Bitte entfernen Sie den Kohlefilter, wenn es regnerisch und
feucht ist, und saugen Sie die Luft mit hoher Geschwindigkeit
ab, um Kondensation auf der Oberfläche der Dunstabzugshaube
zu vermeiden.
43
Teileübersicht
V
o
rl
a
ge
St3×10
×4
St4×30
×11
φ5×φ8
×11
(2 screws extra)
600~700mm
(Bitte beachten Sie die
Modellliste auf der letzten Seite)

65
φ150
φ8mm
Die längere Halterung ist die
obere Kaminhalterung.
Hinweis
HINWEIS:
Bitte schließen Sie das Netzteil an, um zu testen und
sicherzustellen, dass die Stromversorgung eingeschaltet ist,
bevor Sie diese Dunstabzugshaube installieren.
(1) Sehen Sie sich das Installationsvideo an:
(2) Beachten Sie die Installationsanweisungen:
87
Betrieb
Wartung
109
220-240/50-60
33
3
595*329*305
9.5
FGS-EBV40Z460CC
FGS-EBV40Z460AC
11
Stellungnahme
Vielen Dank für den Kauf dieses Produkts. FIREGAS ist bestrebt, unseren
Kunden eine professionelle Küchenlüftung in professioneller Qualität zu
bieten. FIREGAS kann keine Verantwortung für Folgen übernehmen,
die sich aus deren Verwendung ergeben.
Notiz
Dieses Dokument dient als Kurzanleitung für allgemeine Szenarien und
Fragen bei der Installation einer FIREGAS-Dunstabzugshaube.
Weitere Anweisungen und Details finden Sie in der Installationsanleitung
von www.firegaskitchen.com
Technischer Support
Website: www.firegaskitchen.com E-Mail: support01@firegaskitchen.com
Garantie
Für vollständige Garantiedetails zu diesem Produkt besuchen Sie bitte:
www.firegaskitchen.com Support > Garantieregistrierung

FGS-EBV40Z460CC
FGS-EBV40Z460AC

21
TABLE DES MATIÈRES
Introduction
PRÉCAUTIONS DE SÉCURITÉ
4
8-10
10
11
11
5-7
7-8
Attention:
Veuillez retirer le filtre à charbon lorsqu'il pleut et s'il fait
humide, et utilisez une vitesse élevée pour évacuer l'air
pour éviter la condensation sur la surface de la hotte.
43
St3×10
×4
St4×30
×11
φ5×φ8
×11
Schéma des pièces
600~700mm
(Veuillez vous référer à la liste des
modèles sur la dernière page)
65
φ150
φ8mm
Conduit supérieur
Conduit inférieur
REMARQUE:
Veuillez connecter l'alimentation pour tester et confirmer que
l'alimentation est allumée avant d'installer cette hotte.
(1)Regardez la vidéo d'installation:
(2) Reportez-vous aux instructions d'installation:
87
Fonctionnement
Entretien
109
Nettoyez les filtres une fois par mois à la main ou dans un
lave-vaisselle (30 °C). N'utilisez pas de détergents acrides ou corrosifs.
N'utilisez pas de détergents abrasifs ! N'utilisez pas de détergents alcalins
pour lave-vaisselle ! (pH supérieur à 7). Ne mettez pas le filtre dans le
lave-vaisselle avec la vaisselle. Les filtres qui sont bloqués par des débris
alimentaires ne sont pas garantis. Faites sécher correctement les filtres
avant de les réinstaller.
3 MOIS
220-240/50-60
33
3
595*329*305
9.5
FGS-EBV40Z460CC
FGS-EBV40Z460AC
11
Dépannage
Protection de l'environnement
1. Lors du déballage, les matériaux d'emballage (sacs en polyéthylène,
pièces en polystyrène, etc.) doivent être tenus hors de portée des enfants.
RISQUE D'ÉTOUFFEMENT !
2. Les appareils anciens et inutilisés doivent être envoyés pour
élimination au centre de recyclage responsable. Ne jamais exposer à
des flammes nues.
3. Avant de vous débarrasser d'un vieil appareil, mettez-le hors service.
Débranchez l'appareil et coupez tout le cordon d'alimentation. Jetez le
cordon d'alimentation et la prise immédiatement,
4. Jetez le papier et le carton dans les conteneurs correspondants.
5. Jetez tout plastique dans les conteneurs correspondants.
6. S'il n'y a pas de conteneurs appropriés dans votre zone résidentielle,
jetez ces matériaux dans un point de collecte municipal approprié pour
le recyclage des déchets.
7. Vous pouvez obtenir des informations plus détaillées auprès de votre
détaillant ou de vos installations municipales.
Déclaration
Merci d'avoir acheté ce produit. FIREGAS s'engage à fournir à ses clients
une ventilation de cuisine de qualité professionnelle. FIREGAS ne peut
assumer la responsabilité des conséquences résultant de son utilisation.
Noter
Ce document est conçu pour servir de guide de référence rapide pour les
scénarios et les questions courants lors de l'installation d'une hotte de
cuisinière FIREGAS. pour plus d'instructions et de détails, veuillez vous
référer au guide d'installation sur www.firegaskitchen.com
Support technique
Site Web : www.firegaskitchen.com Courriel : support01@firegaskitchen.com
garantie
Pour plus de détails sur la garantie de ce produit, veuillez visiter :
www.firegaskitchen.com Support > Enregistrement de la garantie
FGS-EBV40Z460CC
FGS-EBV40Z460AC
21
4
8-10
10
11
11
7-8
Atención:
Retire el filtro de carbón en clima lluvioso y húmedo, y use
alta velocidad para expulsar el aire para evitar la condensación
en la superficie de la campana extractora.
433
St3×10
×4
St4×30
×11
φ5×φ8
×11
600~700mm
(Consulte la lista de modelos
en la última página)
65
φ150
φ8mm
Nota
Conecte la fuente de alimentación para probar y confirmar
que la energía está encendida antes de instalar esta
campana extractora.
(1)Mira el video de instalación:
(2)Consulte las instrucciones de instalación:
87
109
220-240/50-60
33
3
595*329*305
9.5
FGS-EBV40Z460CC
FGS-EBV40Z460AC
11
Dichiarazione
Grazie per aver acquistato questo prodotto. FIREGAS si impegna a fornire ai
nostri clienti una ventilazione della cucina di qualità professionale.
FIREGAS non si assume alcuna responsabilità per eventuali conseguenze
derivanti dall'uso degli stessi.
Nota
Questo documento è progettato per fungere da guida di riferimento rapido per
scenari e domande comuni durante l'installazione di una cappa da cucina
FIREGAS. per ulteriori istruzioni e dettagli, fare riferimento alla Guida
all'installazione da www.firegaskitchen.com
Supporto tecnico
Sito Web: www.firegaskitchen.com E-mail: support01@firegaskitchen.com
Garanzia
Per i dettagli completi sulla garanzia di questo prodotto, visitare:
www.firegaskitchen.com Supporto > Registrazione della garanzia
FGS-EBV40Z460CC
FGS-EBV40Z460AC
21
11
11
10
8-10
7-8
Attenzione:
Rimuovere il filtro al carbone in caso di pioggia e umidità e
utilizzare l'alta velocità per scaricare l'aria per evitare la
condensa sulla superficie della cappa.
43
St3×10
×4
St4×30
×11
φ5×φ8
×11
600~700mm
(Fare riferimento all'elenco
dei modelli nell'ultima pagina)

65
φ150
φ8mm
Nota
Si prega di collegare l'alimentatore per testare e confermare
che l'alimentazione sia accesa prima di installare questa cappa.
(1)Guarda il video di installazione:
(2) Fare riferimento alle istruzioni di installazione:
87
109
220-240/50-60
33
3
595*329*305
9.5
FGS-EBV40Z460CC
FGS-EBV40Z460AC
11
Model List
Cooker Hood Model No. Charcoal Filter Model No.:
FGS-EBV40Z460CC
CC130
Declaración
Gracias por adquirir este producto. FIREGAS se compromete a proporcionar
a nuestros clientes ventilación de cocina de calidad profesional.
FIREGAS no puede asumir ninguna responsabilidad por las consecuencias
derivadas de su uso.
Nota
Este documento está diseñado para actuar como una guía de referencia
rápida para situaciones y preguntas comunes al instalar una campana
extractora FIREGAS. Para obtener más instrucciones y detalles, consulte
la Guía de instalación de www.firegaskitchen.com
Apoyo técnico
Sitio web: www.firegaskitchen.com
Correo electrónico: support01@firegaskitchen.com
Garantía
Para obtener detalles completos sobre la garantía de este producto,
visite: www.firegaskitchen.com Soporte> Registro de garantía
FGS-EBV40Z460AC