Before using your new product, please read these instructions to prevent any damage.
USER GUIDE
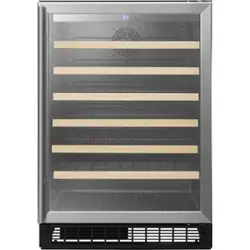
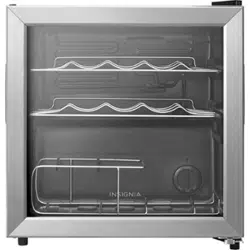
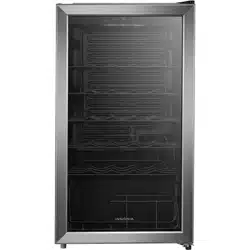
29-Bottle
Wine Cooler
NS-WC29SS26L

www.insigniaproducts.com
2
Contents
IMPORTANT SAFETY INSTRUCTIONS . . . . . . . . . . . . . . . . . . . . . . . . . . . . . . . . . . . . . 3
Features . . . . . . . . . . . . . . . . . . . . . . . . . . . . . . . . . . . . . . . . . . . . . . . . . . . . . . . . . . . . . . . . 5
Package contents . . . . . . . . . . . . . . . . . . . . . . . . . . . . . . . . . . . . . . . . . . . . . . . . . . . 5
Components. . . . . . . . . . . . . . . . . . . . . . . . . . . . . . . . . . . . . . . . . . . . . . . . . . . . . . . .5
Control and display panel . . . . . . . . . . . . . . . . . . . . . . . . . . . . . . . . . . . . . . . . . . . 6
Setting up your cooler. . . . . . . . . . . . . . . . . . . . . . . . . . . . . . . . . . . . . . . . . . . . . . . . . . .6
Before using your cooler . . . . . . . . . . . . . . . . . . . . . . . . . . . . . . . . . . . . . . . . . . . . 6
Finding a suitable location . . . . . . . . . . . . . . . . . . . . . . . . . . . . . . . . . . . . . . . . . . 7
Leveling your cooler . . . . . . . . . . . . . . . . . . . . . . . . . . . . . . . . . . . . . . . . . . . . . . . . 8
Reversing the door. . . . . . . . . . . . . . . . . . . . . . . . . . . . . . . . . . . . . . . . . . . . . . . . . . 9
Grounding requirement . . . . . . . . . . . . . . . . . . . . . . . . . . . . . . . . . . . . . . . . . . . .11
Connecting to power. . . . . . . . . . . . . . . . . . . . . . . . . . . . . . . . . . . . . . . . . . . . . . .11
Using your cooler . . . . . . . . . . . . . . . . . . . . . . . . . . . . . . . . . . . . . . . . . . . . . . . . . . . . . .12
Setting the temperature. . . . . . . . . . . . . . . . . . . . . . . . . . . . . . . . . . . . . . . . . . . .12
Memory function . . . . . . . . . . . . . . . . . . . . . . . . . . . . . . . . . . . . . . . . . . . . . . . . . .12
Using the display. . . . . . . . . . . . . . . . . . . . . . . . . . . . . . . . . . . . . . . . . . . . . . . . . . .12
Lighting your cooler. . . . . . . . . . . . . . . . . . . . . . . . . . . . . . . . . . . . . . . . . . . . . . . .12
Using Quick Cool mode . . . . . . . . . . . . . . . . . . . . . . . . . . . . . . . . . . . . . . . . . . . .12
Using the wine shelves . . . . . . . . . . . . . . . . . . . . . . . . . . . . . . . . . . . . . . . . . . . . .12
Arranging your wine . . . . . . . . . . . . . . . . . . . . . . . . . . . . . . . . . . . . . . . . . . . . . . .13
Serving and storage tips. . . . . . . . . . . . . . . . . . . . . . . . . . . . . . . . . . . . . . . . . . . .13
Maintaining your cooler . . . . . . . . . . . . . . . . . . . . . . . . . . . . . . . . . . . . . . . . . . . . . . . .14
Cleaning the interior of your cooler . . . . . . . . . . . . . . . . . . . . . . . . . . . . . . . . .14
Defrosting your cooler . . . . . . . . . . . . . . . . . . . . . . . . . . . . . . . . . . . . . . . . . . . . .14
Storing your cooler . . . . . . . . . . . . . . . . . . . . . . . . . . . . . . . . . . . . . . . . . . . . . . . . . . . . .14
Moving your cooler. . . . . . . . . . . . . . . . . . . . . . . . . . . . . . . . . . . . . . . . . . . . . . . . . . . . .15
Tips on saving energy . . . . . . . . . . . . . . . . . . . . . . . . . . . . . . . . . . . . . . . . . . . . . . . . . .15
Troubleshooting . . . . . . . . . . . . . . . . . . . . . . . . . . . . . . . . . . . . . . . . . . . . . . . . . . . . . . .16
Error codes . . . . . . . . . . . . . . . . . . . . . . . . . . . . . . . . . . . . . . . . . . . . . . . . . . . . . . . .16
Specifications . . . . . . . . . . . . . . . . . . . . . . . . . . . . . . . . . . . . . . . . . . . . . . . . . . . . . . . . . .19
ONE-YEAR LIMITED WARRANTY . . . . . . . . . . . . . . . . . . . . . . . . . . . . . . . . . . . . . . . . .20
3
29-Bottle Wine Cooler
www.insigniaproducts.com
IMPORTANT SAFETY
INSTRUCTIONS
WARNING
1 Read these instructions.
2 Keep these instructions.
3 Heed all warnings.
4 Follow all instructions.
5 Do not use this appliance near water.
6 Clean only with a damp cloth.
7 Do not block any ventilation openings. Install in accordance with the
manufacturer's instructions.
8 Do not install near any heat sources such as radiators, heat registers, stoves, or
other apparatus (including amplifiers) that produce heat.
9 Do not defeat the safety purpose of the polarized or grounding-type plug. A
polarized plug has two blades with one wider than the other. A grounding
type plug has two blades and a third grounding prong. The wide blade or the
third prong are provided for your safety. If the provided plug does not fit into
your outlet, consult an electrician for replacement of the obsolete outlet.
10 Protect the power cord from being walked on or pinched particularly at plugs,
outlets, and the point where they exit from the appliance.
11 Do not use extension cords or ungrounded (two-prong) adapters.
12 Unplug this appliance during lightning storms or when it will not be used for
long periods of time.
13 Make sure that the available AC power matches the voltage requirements of
this appliance.
14 Do not handle the plug with wet hands. This could result in an electric shock.
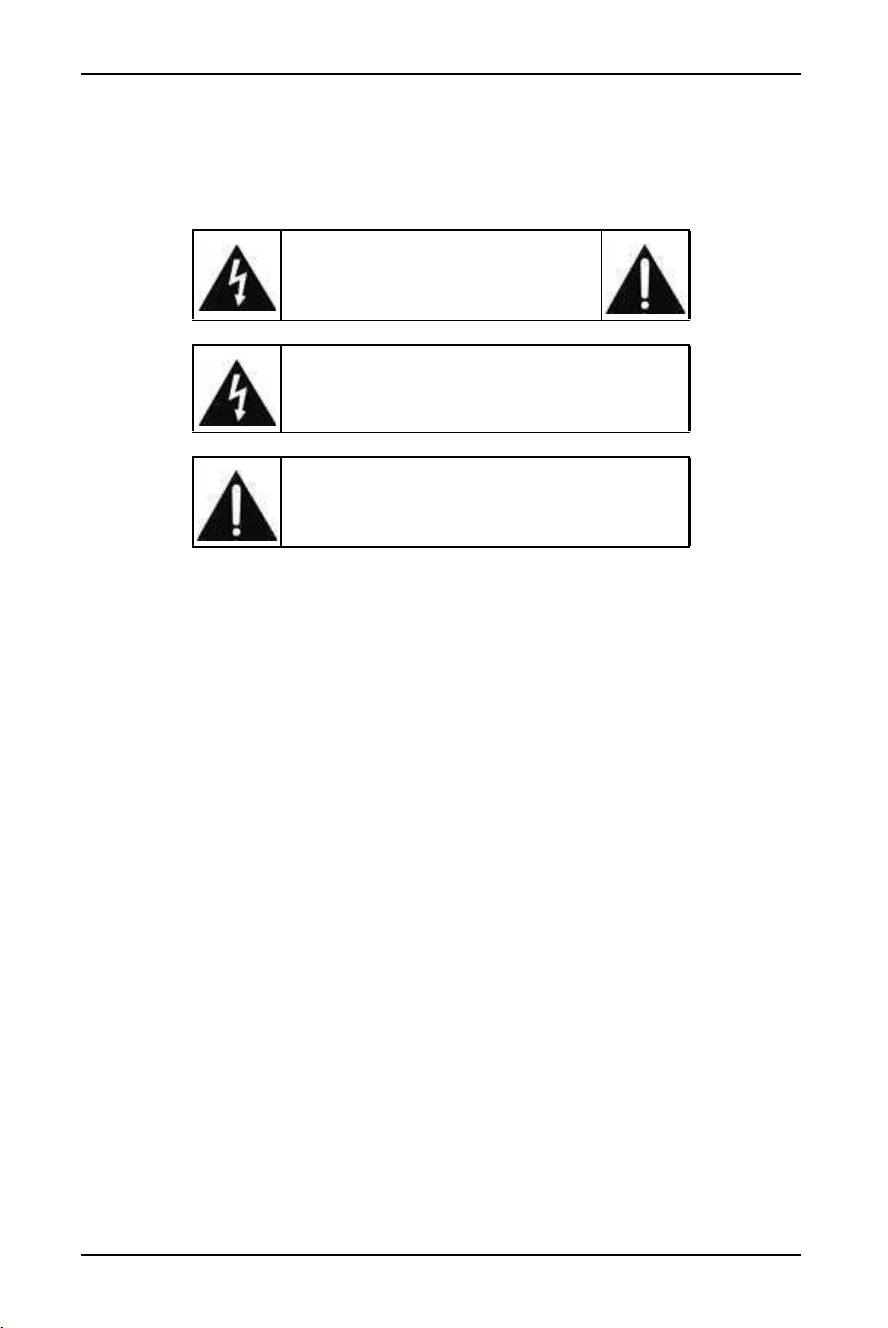
CAUTION
RISK OF ELECTRIC SHOCK
DO NOT OPEN
This symbol indicates that dangerous voltage
constituting a risk of electric shock is present
within your cooler.
This symbol indicates that there are important
operating and maintenance instructions in the
literature accompanying your cooler.
4
www.insigniaproducts.com
15 Unplug the power cord by holding the plug, never by pulling the cord.
16 Do not turn the appliance on or off by plugging or unplugging the power
cord.
17 Turn off the appliance before unplugging it.
18 Refer all servicing to qualified service personnel. Servicing is required when
the appliance has been damaged in any way, such as the power-supply cord
or plug is damaged, liquid has been spilled or objects have fallen into the
appliance, the appliance has been exposed to rain or moisture, does not
operate normally, or has been dropped.
19 To reduce the risk of fire or electric shock, do not expose this appliance to rain,
moisture, dripping, or splashing, and no objects filled with liquids should be
placed on top of it.
WARNING
• This appliance is intended to be used in household and
similar applications such as staff kitchen areas in shops,
offices, and other working environments, farm houses
and by clients in hotels, motels, and other residential
type environments, bed and breakfast type
environments, catering, and similar non-retail
applications.
• This appliance is not intended for use by persons
(including children) with reduced physical, sensory, or mental capabilities, or
lack of experience and knowledge, unless they have been given supervision or
instruction concerning use of the appliance by a person responsible for their
safety.
• Children should be supervised to ensure that they do not play with the
appliance.
• If the supply cord is damaged, it must be replaced by the manufacturer, its
service agent or similarly qualified persons in order to avoid a hazard.
• Do not store explosive substances such as aerosol cans with a flammable
propellant in this appliance.
• The appliance has to be unplugged after use and before carrying out user
maintenance on the appliance.
• WARNING–Keep ventilation openings, in the appliance enclosure or in the
built-in structure, clear of obstruction.
• WARNING–Do not use mechanical devices or other means to accelerate the
defrosting process, other than those recommended by the manufacturer.
• WARNING–Do not damage the refrigerant circuit.
• WARNING–Do not use electrical appliances inside the storage compartment
of your cooler, unless they are of the type recommended by the manufacturer.
• WARNING–Only abandon the cooler in accordance with local regulations. It
uses flammable blowing gas and refrigerant.
• WARNING–When positioning the appliance, make sure that the supply cord is
not trapped or damaged.
• WARNING–Do not locate multiple portable socket-outlets or portable power
supplies at the rear of the appliance.
WARNING
5
29-Bottle Wine Cooler
www.insigniaproducts.com
• Do not use extension cords or ungrounded two prong adapters.
• WARNING–Risk of child entrapment. Before you throw away your old cooler:
• Take off the door.
• Leave the shelves in place so that children may not easily climb inside.
• The cooler must be disconnected from the source of electrical supply before
attempting the installation of any accessory.
• Refrigerant and cyclopentane foaming material used for the appliance are
flammable. Therefore, when the appliance is scrapped, it must be kept away
from any fire source and be recovered by a special recovery company with
corresponding qualification, so as to prevent damage to the environment or
any other harm.
• Doors or lids fitted with locks and keys must have the keys kept out of the
reach of children and not in the vicinity of the refrigerating appliance, in order
to prevent children from being locked inside.
• WARNING–To avoid a hazard due to instability of the appliance, it must be
fixed in accordance with the instructions.
Features
•
29-bottle, 3.3 cu. ft. (0.09 cu m) capacity holds
your favorite wine
• 41 ~ 64° F (5 ~ 18° C) temperature range helps preserve your wine's flavor
• Five removable chrome-plated shelves give you additional storage options
• Touch controls with LED display are clear and easy to use
• White interior lighting helps you find your wine even in a dark room
• Reversible door and adjustable legs offer flexible placement options
• Timeless stainless steel finish matches any décor
Package contents
• 29-Bottle wine cooler
• User Guide
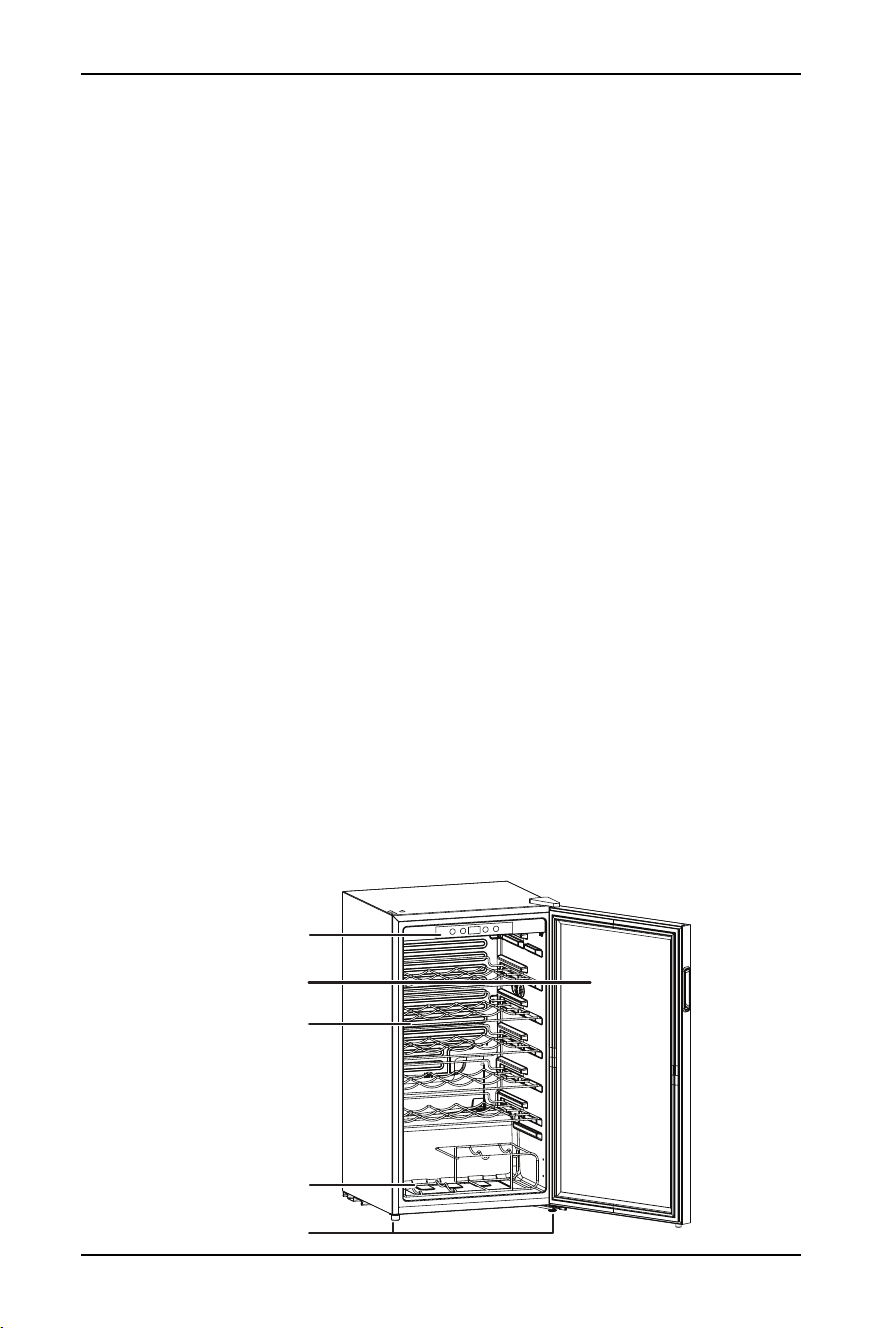
Components
Control and
display panel
Wire basket
Leveling feet
Wire shelf
Glass door
6
www.insigniaproducts.com
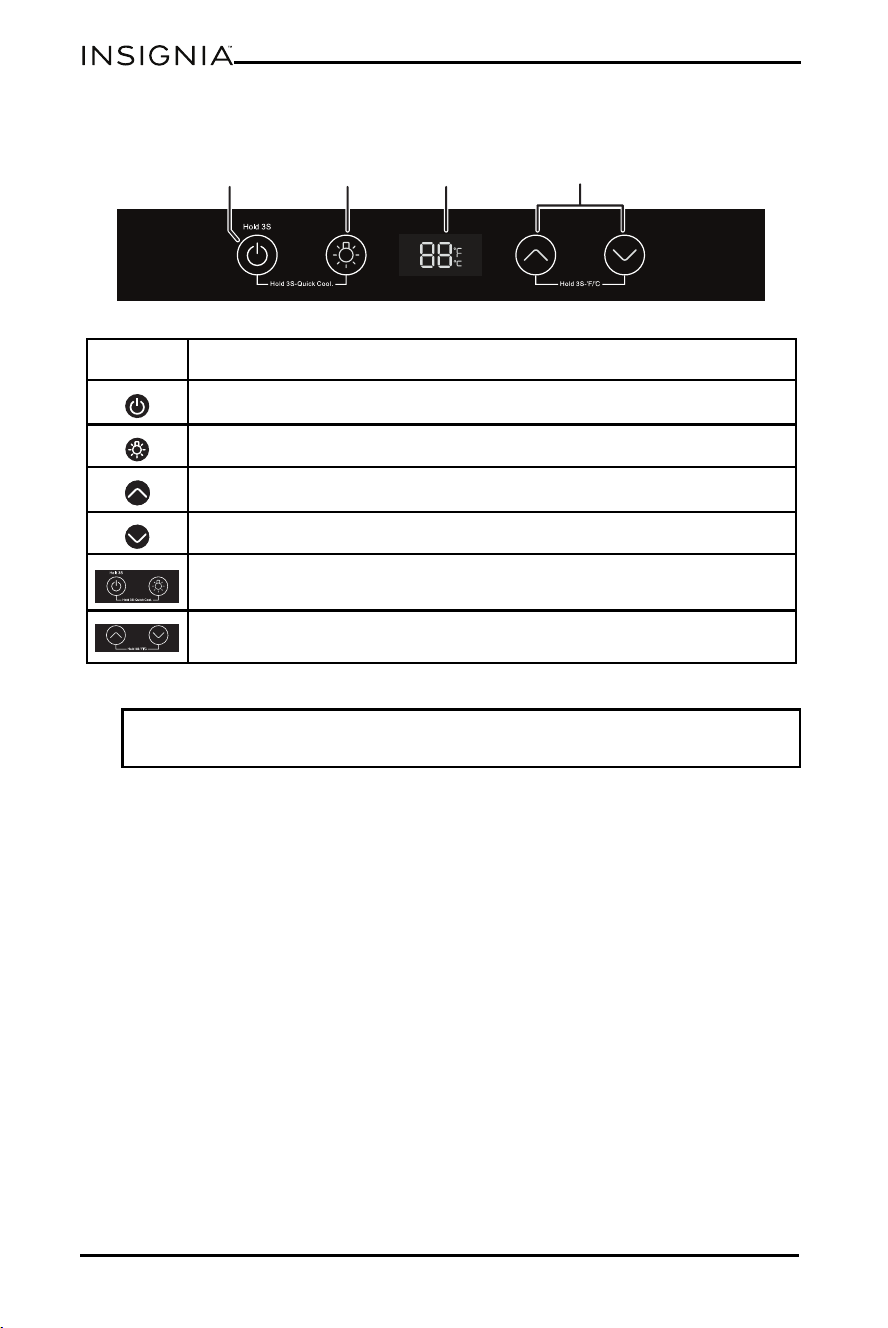
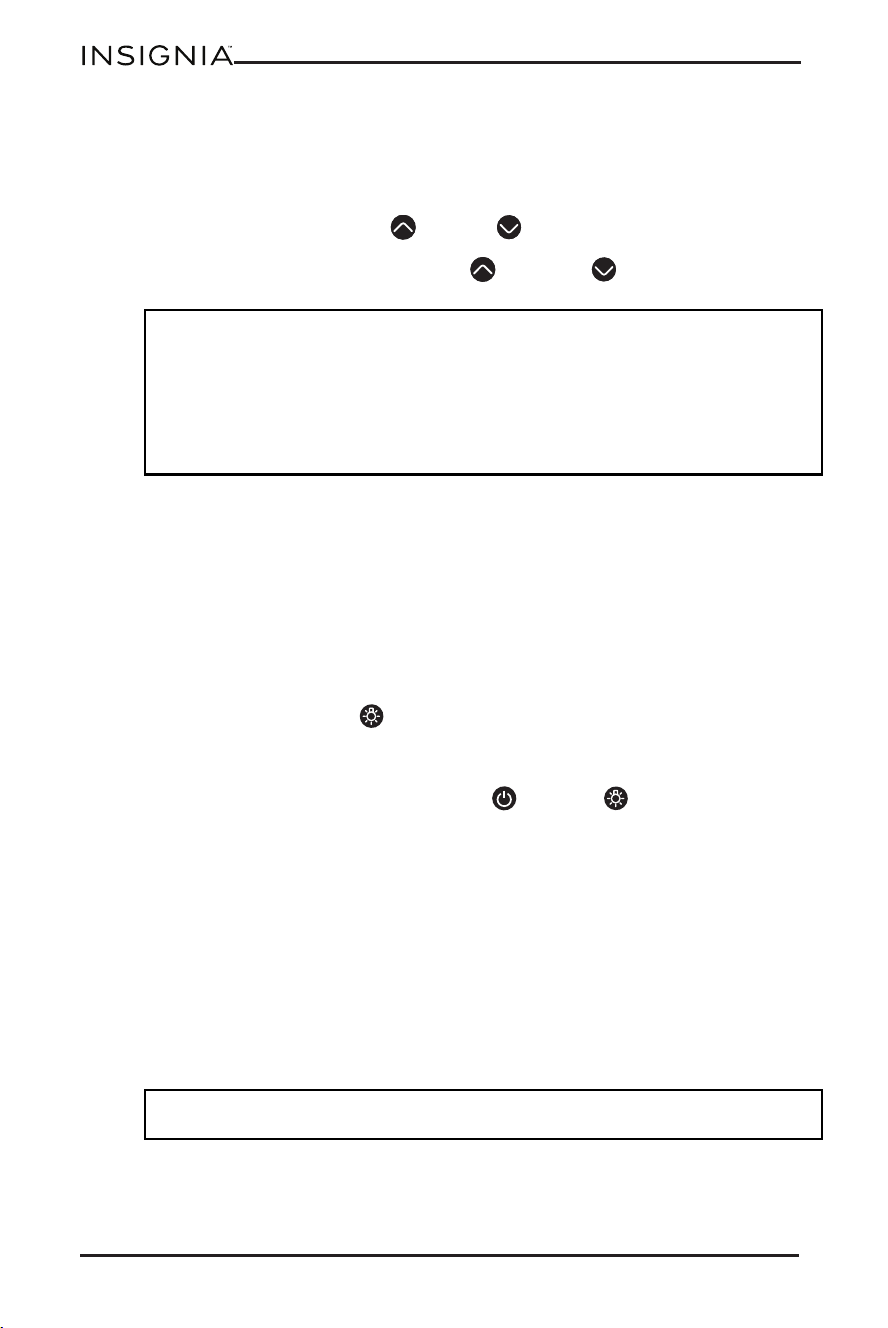
Control and display panel
Setting up your cooler
Before using your cooler
• Remove the exterior and interior packaging.
• Let your cooler stand upright for approximately half an hour before
connecting it to power. This reduces the possibility of a malfunction in the
cooling system from incorrect handling during transportation.
• Clean the interior surface with a damp, warm cloth.
BUTTON FUNCTION
Press and hold for three seconds to turn on or turn off your cooler.
Press to turn the interior light on or off.
Press to increase the temperature by one degree.
Press to decrease the temperature by one degree.
Press and hold both buttons at the same time for three seconds to turn
on “Quick Cool”.
Press and hold both buttons at the same time for three seconds to switch
between Fahrenheit and Celsius.
Notes:
• Touch the control panel lightly when pressing the buttons.
• To avoid scratching the control panel, do not touch it with sharp objects.
LED Display
Power on/Standby
Temperature +/-
Light
7
29-Bottle Wine Cooler
www.insigniaproducts.com
Finding a suitable location
• Your cooler is designed to be free standing only, and it should not be recessed
or built into a countertop or wall.
• Place your cooler on a floor, counter top, or cabinet that is strong enough to
support your cooler when it is fully loaded.
• Allow 4 in. (10 cm) of space on all sides of your cooler to allow for correct air
ventilation.
• Place your cooler away from direct sunlight and sources of heat (such as a
stove, heater, or radiator). Direct sunlight may affect the acrylic coating and
heat sources may increase electrical consumption. Ambient temperature
below 50° F (10° C) or above 85° F (29.4° C) hinders the performance of your
cooler. Your cooler is not designed for use in a garage or any other outside
location.
• Avoid placing your cooler in moist areas.
• Your cooler is not designed to be installed in an RV or used with an inverter.
• Do not stack your cooler.
• For your cooler to operate normally, avoid placing it in areas with high
magnetic fields or high humidity.
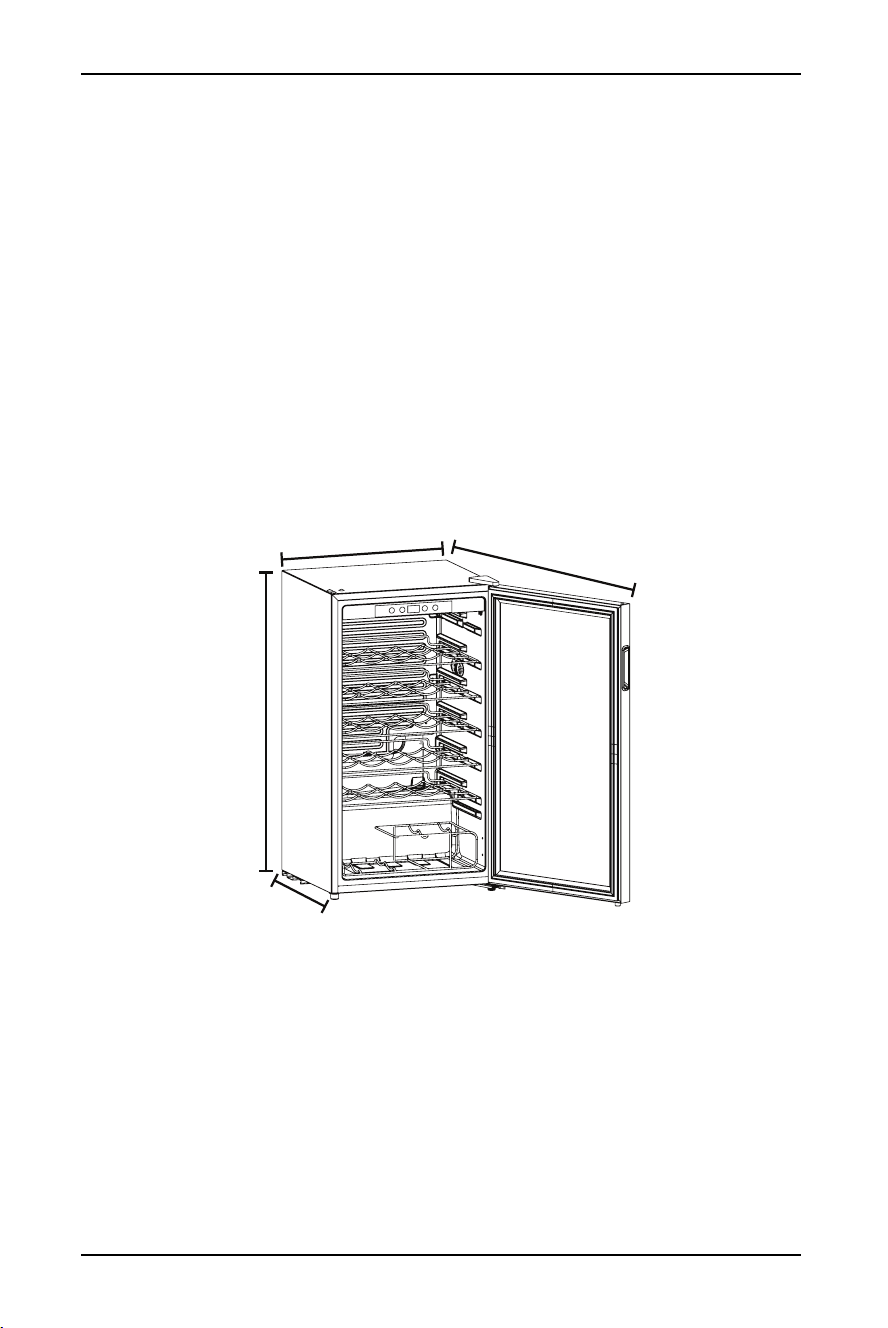
18 1/2 in. (47.0 cm)
33 5/16 in. (84.5 cm)
17 5/16 in. (44.5 cm)
32 5/16 in. (82.1 cm)
8
www.insigniaproducts.com
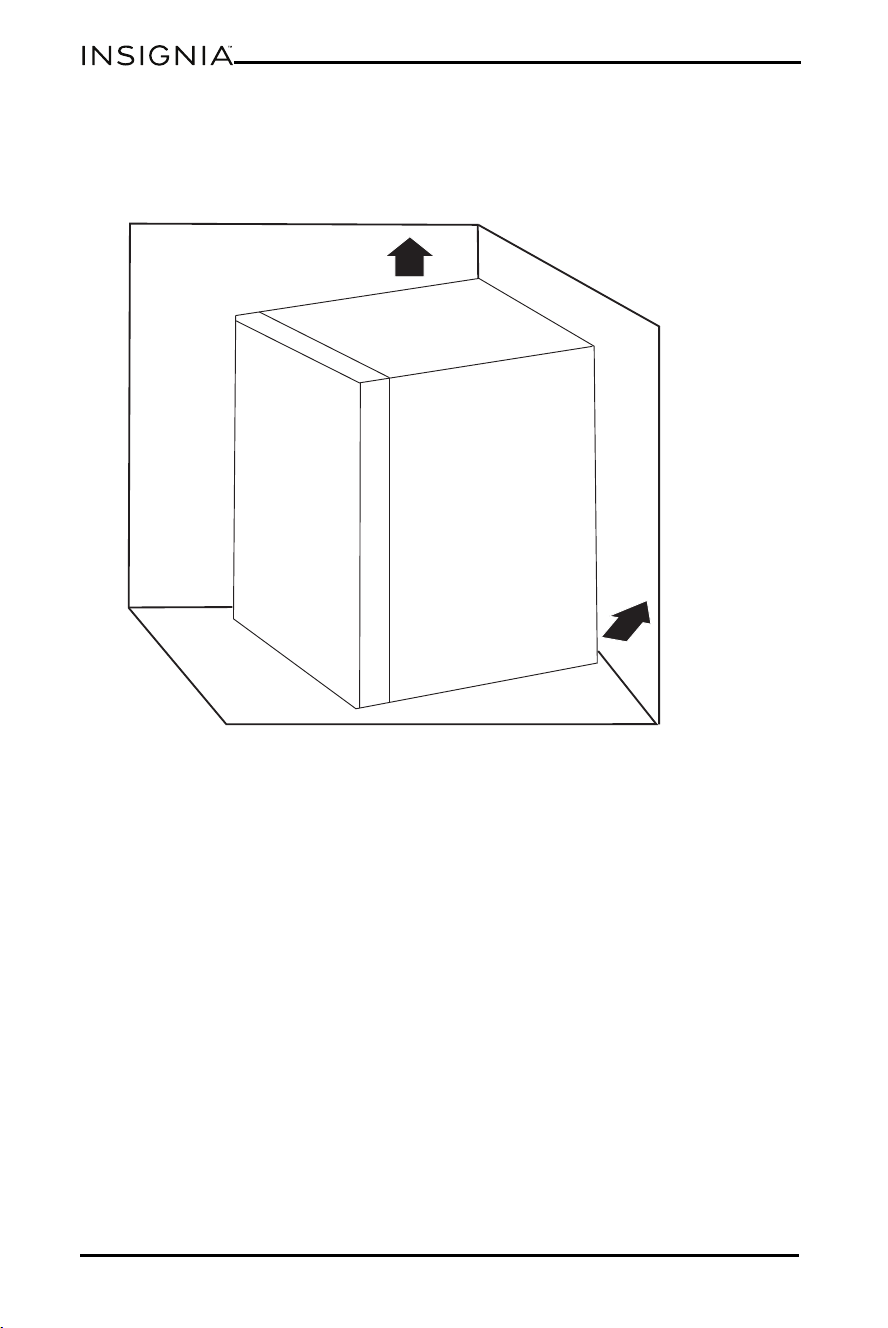
Providing ventilation
Your wine cooler needs at least 4 in. (10 cm) between it and the surrounding walls
and ceiling.
Leveling your cooler
• Your cooler must be level in order to function correctly. If your cooler is not
leveled during installation, the door may not close or seal correctly, causing
cooling, frost, or moisture problems.
• To level your cooler, you may turn either leveling foot clockwise to raise that
side of your cooler or turn it counter-clockwise to lower that side.
4" (10 cm)
4" (10 cm)
9
29-Bottle Wine Cooler
www.insigniaproducts.com
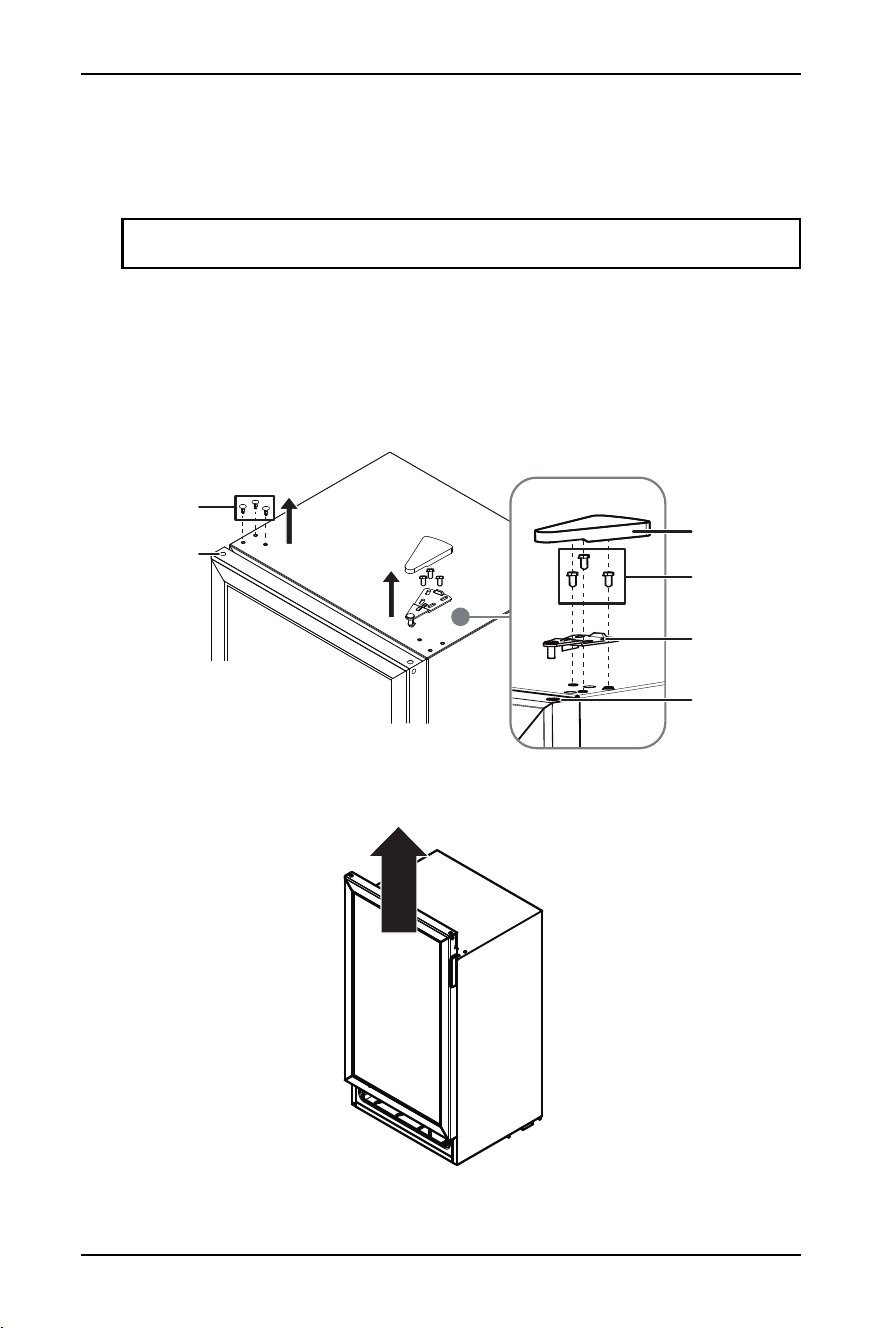
Reversing the door
You need a 8 mm socket wrench and a Phillips screwdriver. Have someone
ava
ilable to assist you in the process. Make sure that you keep all of the parts you
remove to reuse them later.
1 Make sure that your cooler is unplugged and empty.
2 Adjust the leveling feet to their highest positions.
3 Use a blade to remove the rivets.
4 Use a blade to remove the hinge cover, then use a Phillips screwdriver to
remove the hinge bolts.
5 Remove the upper hinge.
6 Remove the door from your cooler.
CAUTION: Do not lay your cooler completely flat as that could damage the coolant
system.
Axle sleeve
Hinge cover
Upper hinge
Hinge bolts
Axle sleeve
Rivets
10
www.insigniaproducts.com
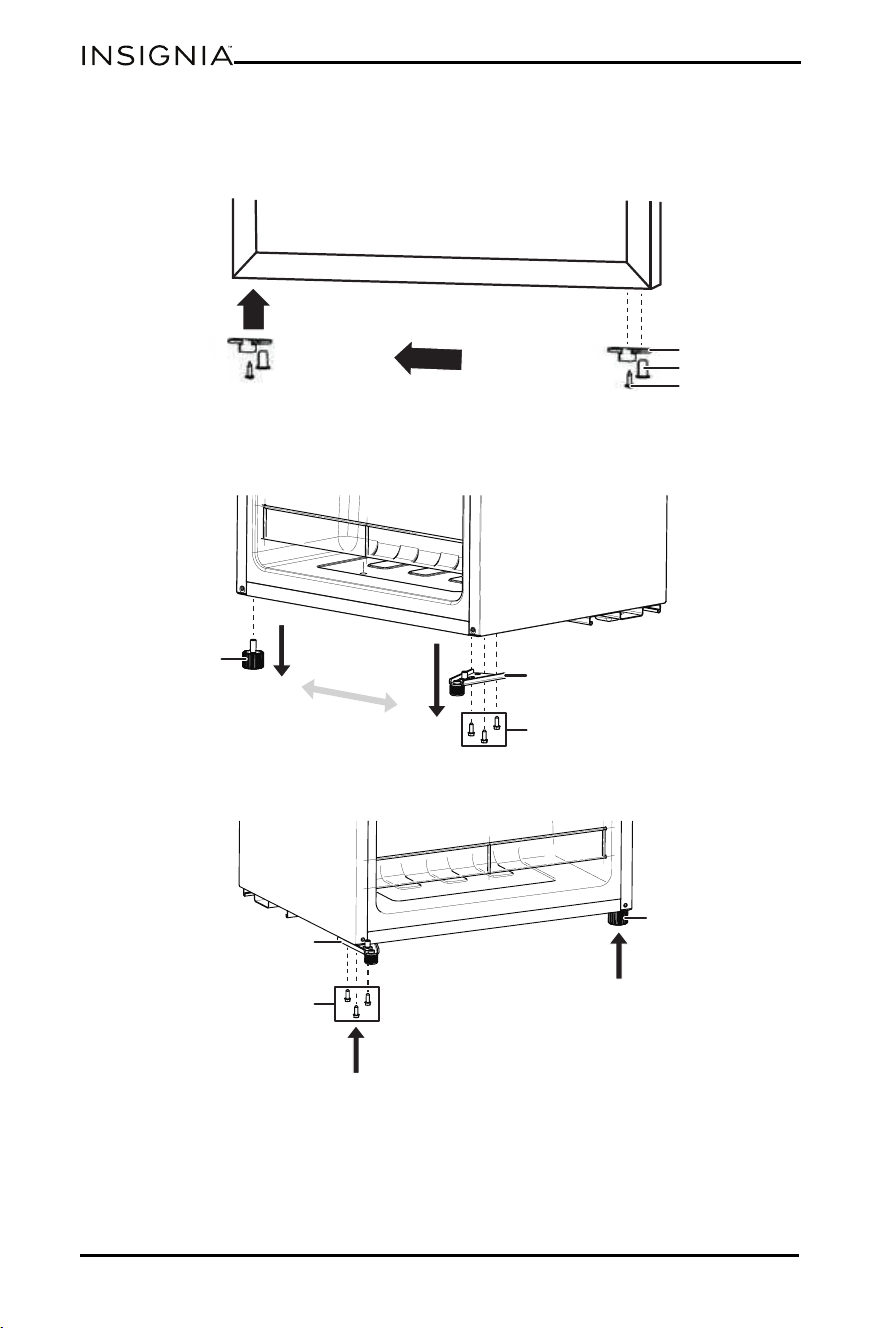
7 Use a Phillips screwdriver to remove the door stopper screws, then move the
door stopper and axle sleeve to the other side of the door and attach with the
screws you just removed.
8 Use a Phillips screwdriver to remove the hinge bolts, then remove the lower
hinge and the leveling feet.
9 Attach the lower hinge and leveling feet to the opposite sides of your cooler.
Door stopper
Axle sleeve
Door stopper screws
Hinge bolts
Lower hinge and
leveling foot
Leveling foot
Leveling foot
Lower hinge and
leveling foot
Hinge bolts
11
29-Bottle Wine Cooler
www.insigniaproducts.com
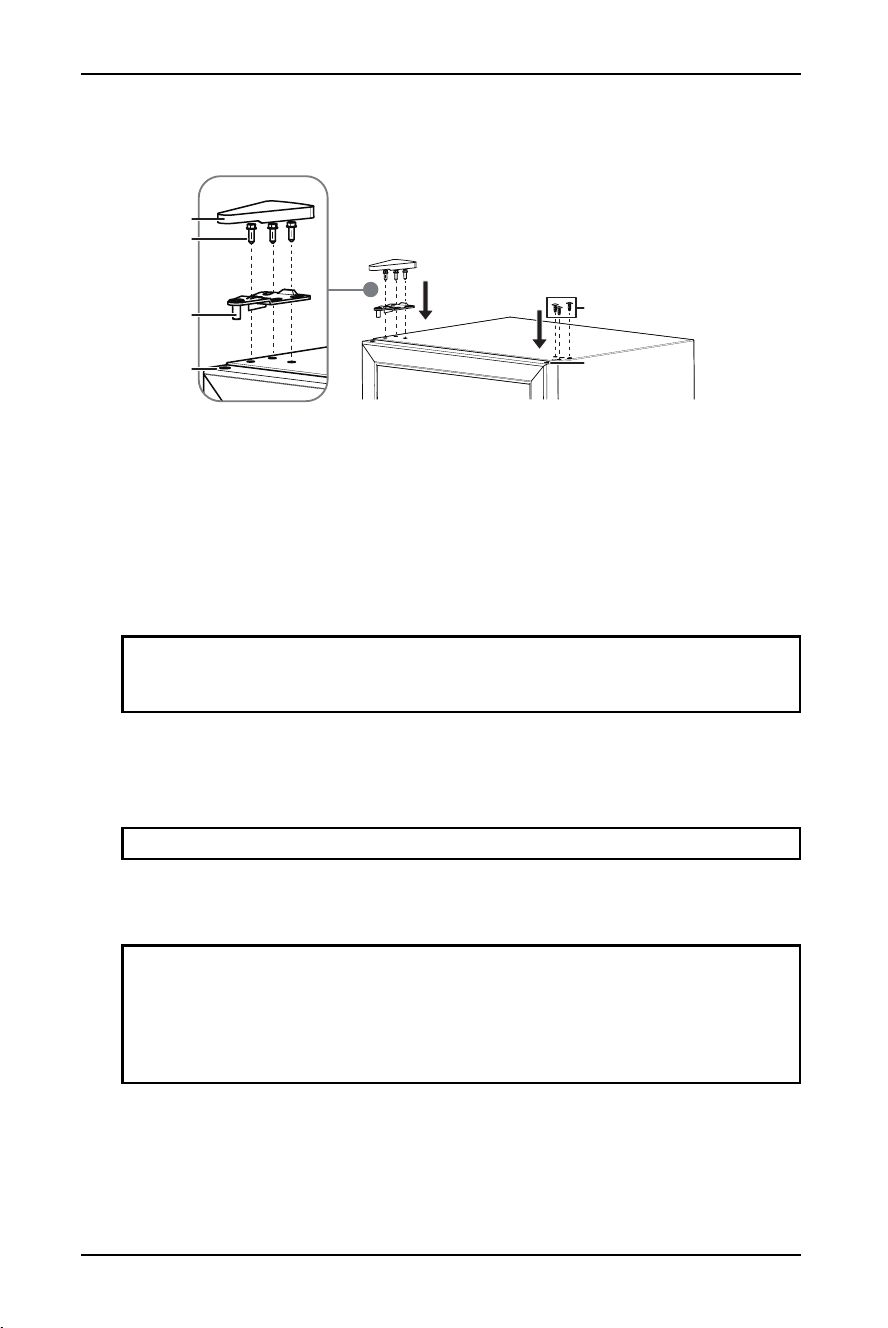
10 Replace the glass door, then reinstall the upper hinge. Make sure that you
align the door and check the tightness of the door gasket.
11 Adjust the leveling feet to level your cooler.
Grounding requirement
Your cooler must be grounded. Your cooler is equipped with a cord having a
grounding wire with a grounding plug. The plug must be inserted into an outlet
that is correctly installed and grounded.
Consult a qualified electrician or service person if you don’t understand the
grounding instructions, or if you aren’t sure whether your cooler is correctly
grounded.
Connecting to power
• Plug your cooler into a dedicated, correctly installed grounded wall outlet.
Your cooler should be operated on a separate electrical circuit from other
operating appliances.
• Plug in and run your cooler for three to four hours before making any
temperature adjustments and before adding wine. This allows your cooler to
reach a stable temperature.
• Do not use an extension cord with your cooler. If the power cord is too short,
have a qualified electrician install an outlet near your cooler. Use of an
extension cord can negatively affect your cooler’s performance.
WARNINGS:
• Incorrect use of the grounding plug can result in a risk of electric shock.
• Do not, under any circumstances, cut or remove the third ground prong from the
supplied power cord.
CAUTION: Your cooler is not designed to be installed in an RV or used with an inverter.
Notes:
• Check your local power source. Your cooler requires a 110V ~ 120V, 60Hz power supply.
• Use a receptacle that accepts the grounding prong. The power cord is equipped with a
3-prong (grounding) plug which plugs into a standard 3-prong (grounding) wall outlet
to minimize the possibility of electric shock hazard from your cooler.
• To prolong the service life of the compressor, wait for at least five minutes before
restarting your cooler after a power failure.
Axle sleeve
Hinge cover
Hinge bolts
Upper hinge
Axle sleeve
Rivets
12
www.insigniaproducts.com
Using your cooler
Setting the temperature
• Press the temperature up or down buttons to increase or decrease the
temperature by one degree. The temperature range is 41° ~ 64° F (5° ~ 18° C).
• Press and hold the temperature up and down buttons at the same
time to switch between Fahrenheit and Celsius.
Memory function
When your cooler is turned off, it remembers the currently set temperature and
returns to that setting when it’s turned back on.
Using the display
• When you plug in your cooler for the first time, the display screen turns on for
three seconds, and you hear a start-up tone.
• In normal mode, the display shows the set temperature.
Lighting your cooler
• Press the light button to turn the interior light on or off. A beep sounds
when the light is turn on or off.
Using Quick Cool mode
• Press and hold the Power on/Standby and Light buttons at the same
time for three seconds to enter or quit the quick cool mode. The display shows
“FC” under Quick Cool mode. The cooler will quit quick cool mode
automatically after a maximum of 24 hours.
Using the wine shelves
• All of the shelves have tabs to engage the cabinet on both sides.
• Any of the shelves can be removed to accommodate larger bottles.
To remove a shelf:
1 Remove all bottles from the shelves.
2 Lift the shelf upward, then gently pull out the shelf.
3 To replace a shelf, place the sides of the shelf back onto the supporting guides
in the cabinet and push back until the shelf tabs slide into place.
Notes:
• A large number of bottles lowers the cooling efficiency of your cooler.
• When you put several bottles of wine in your cooler at one time, the temperature in
your cooler may rise temporarily.
• Adjust the thermostat setting by one increment at a time. Allow several hours for the
temperature to stabilize between adjustments.
• The screen display always shows the set temperature. When adjusting the
temperature, the temperature display blinks to indicate that the temperature is being
adjusted.
CAUTION: Make sure that the tabs are firmly engaged in the supporting guides before
storing any bottles.
13
29-Bottle Wine Cooler
www.insigniaproducts.com
Arranging your wine
In order to maintain good air circulation in your cooler, do not let the bottles
touch the back of your cooler.
Different temperature zones are generated within your cooler because of air
circulation. The upper area’s temperature is the highest while the lower area is the
lowest.
For best performance, store different types of wine within your cooler, in the
following sequence, from top to bottom:
•Strong red wine
• Pink and mild red wine
• White wine
• Champagne and spritzer
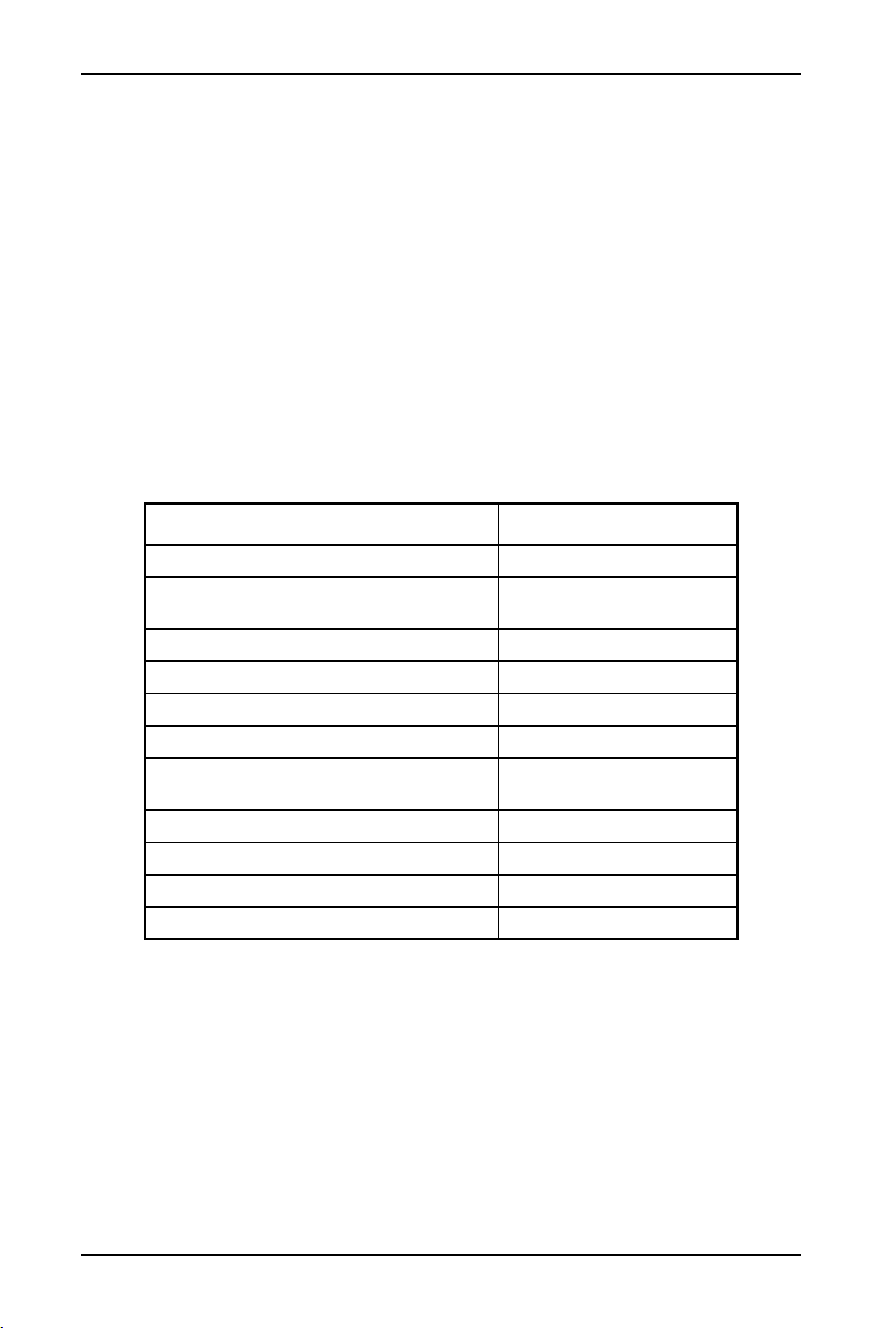
Serving and storage tips
We suggest that you pour wine at a temperature below the ideal serving
temperature, because the wine warms up quickly after it’s been poured into a
glass.
• Do not store bottled wine by the box or case in your cooler.
• The cork of an opened bottle should always be moistened when returning it
to the bottle.
• Red wine should be allowed to breathe (oxygenate) before drinking. We
suggest that you put pink/rose type wines onto the table two to five hours
before drinking and red wine four to five hours before drinking. That also
allows them to reach the suitable serving temperature. White wine, on the
other hand, can be served right away.
• Champagne should always be stored in your cooler and taken out
immediately before drinking.
WINE TYPE IDEAL SERVING TEMP
Red Bordeaux 64.4° F (18° C)
Côtes du Rhône red/Barolo Louis Family
dry red wine/Barolo
62.6° F (17° C)
Burgundy red 60.8° F (16° C)
Port 59° F (15° C)
Young Burgundy Red 57.2° F (14° C)
Young Red Wine 53.6° F (12° C)
Young Beaujolais/All White Wines (low
sugar)
51.8° F (11° C)
Old White Wines/Chardonnay 50° F (10° C)
Sherry 48.2° F (9° C)
Young White Wines (late vintage) 46.4° F (8° C)
White Wines Loire/Entre-deux-Mers 44.6° F (7° C)
14
www.insigniaproducts.com
Maintaining your cooler
Your cooler is designed for year-round use with only minimal cleaning and
maintenance.
When you first receive it, wipe the cabinet with a mild detergent and warm water,
then wipe dry with a dry cloth. Do this periodically to keep your cooler looking
new.
Cleaning the interior of your cooler
1 Unplug your cooler from the wall outlet.
2 Remove all beverages.
3 Wash the interior with a damp, warm cloth.
4 Clean the door gasket (seal) so the door closes correctly.
5 Dry the interior and exterior with a soft cloth.
Defrosting your cooler
The ice build-up on the inner back wall of your cooler automatically defrosts in a
compressor-off cycle.
Defrost water drains out of your cooler, passing through the drain outlet in the
inner back wall into a drain pan located above the compressor. The water
evaporates from the drain pan on its own.
Storing your cooler
1 Turn off your cooler and unplug it from the wall outlet.
2 Remove all beverages.
3 Clean your cooler.
4 Leave the door open slightly to avoid possible formation of condensation,
mold, or odor.
CAUTION:
To prevent damage to the finish, do not use:
• Gasoline, benzine, thinner, or other similar solvents.
•Abrasive cleaners.
Note: We recommend that you soak your cloth in a baking soda solution before washing
the interior. Mix one quart of warm water and two tablespoons of baking soda.
WARNING: Make sure that children do not have access to your cooler. If the door
accidentally closes while a child is inside your cooler, the child may suffocate.

15
29-Bottle Wine Cooler
www.insigniaproducts.com
Moving your cooler
1 Turn off your cooler and unplug it from the wall outlet.
2 Remove all beverages.
3 Securely tape down all loose items inside your cooler.
4 Tape the door shut.
Tips on saving energy
• Locate your cooler in the coolest area of the room, away from heat-producing
appliances or heating ducts, and out of direct sunlight.
• Do not overload your cooler. It forces the compressor to run longer.
• Do not open the door too often, especially if the weather is hot. Close the door
as soon as possible to prevent cool air from escaping.
• Make sure that the door seals completely to keep your cooler running
efficiently.
• Make sure that your cooler is sufficiently ventilated, with adequate air
circulation behind it.
Note: Make sure that your cooler stays in the upright position during transportation.
16
www.insigniaproducts.com
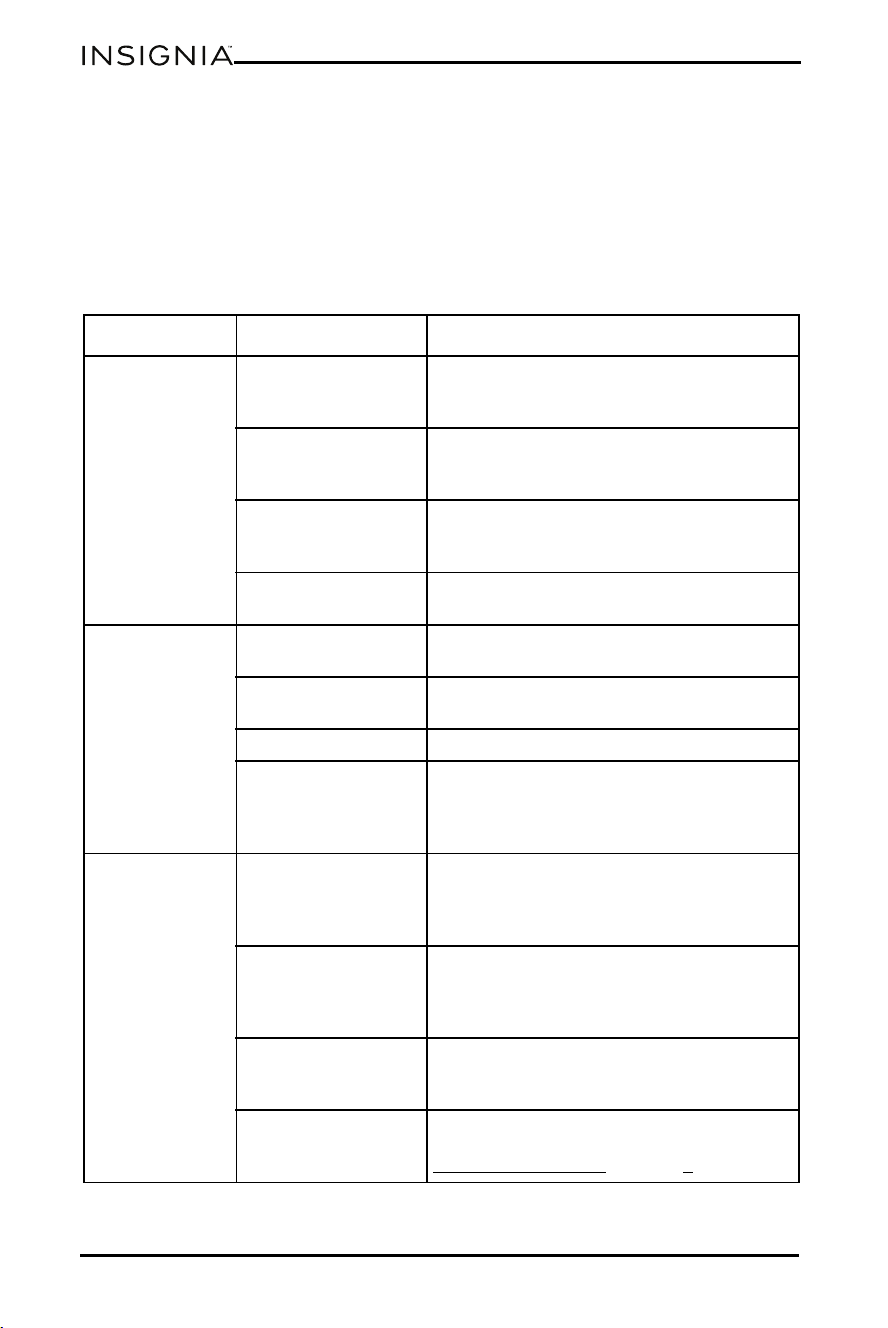
Troubleshooting
Error codes
If a fault is detected, the display shows one of the following codes:
• E1: Temperature sensor fault
• E6: Communication fault
If any of these error codes appears on the display, contact your local dealer or
service center. Do not try to repair your cooler yourself.
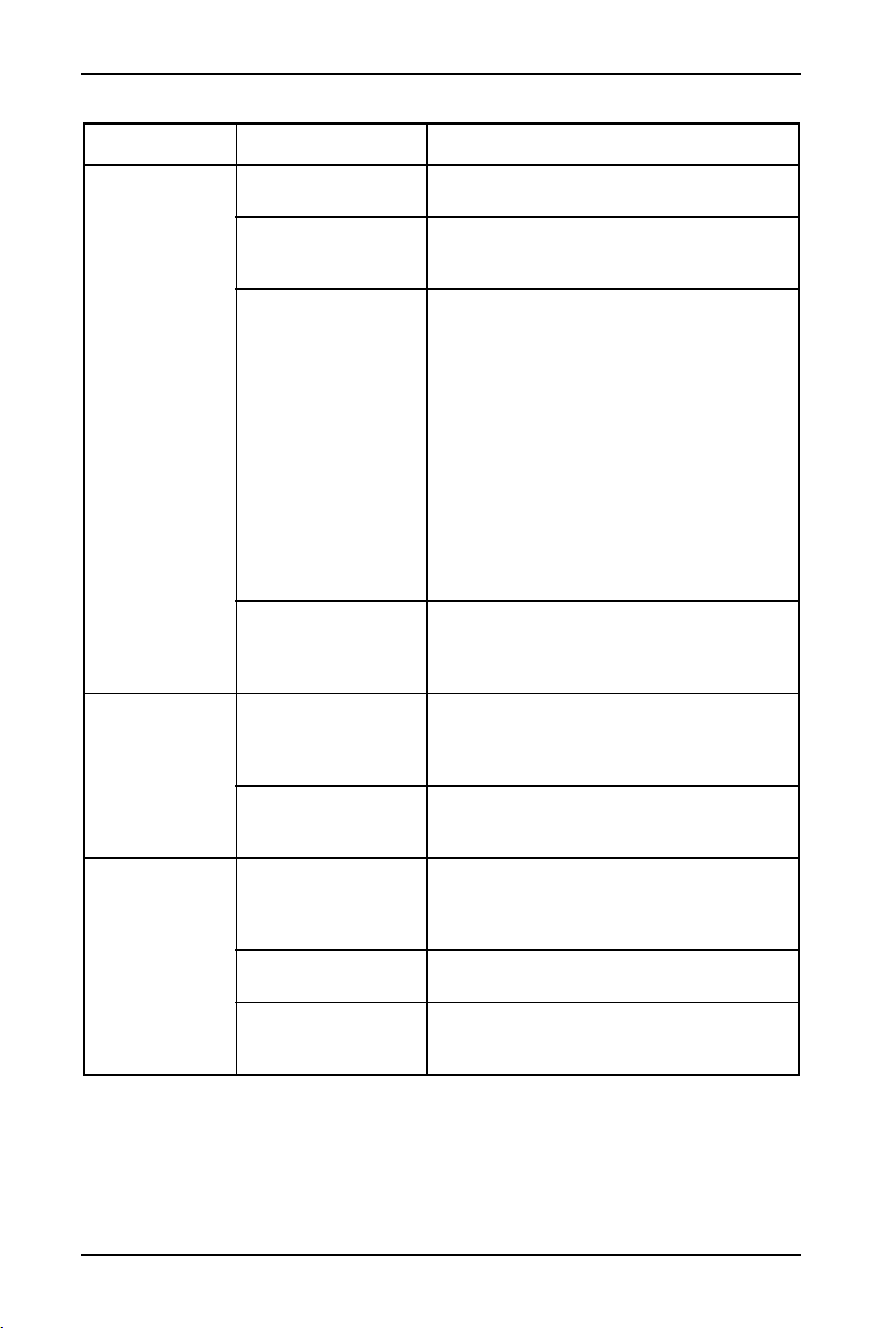
PROBLEM POSSIBLE CAUSE SOLUTION
My cooler does
not operate.
Your beverage cooler
is unplugged.
Make sure that your cooler is plugged in
and that the plug is pushed completely into
the outlet.
The fuse on the circuit
is blown or the circuit
breaker is tripped.
Check the house fuse or circuit breaker box
and replace the fuse or reset the circuit
breaker.
Power failure. If a power failure occurs, your cooler turns
off. Wait until the power is restored, then
turn it on again.
The plug does not fit
the outlet.
Make sure that your power source has the
correct voltage.
The cooler door
does not close
completely.
The shelf is out of
position.
Adjust the shelf correctly.
The door gaskets are
dirty.
Clean the door gaskets.
The cooler is not level. Level your cooler with the leveling feet.
The gasket has
deformed or does not
fit the shape of the
door.
If the door gasket does not seal, try heating
then cooling the seal. You can use an
electric hair dryer to heat the seal.
My cooler is not
cold enough.
The door has been
opened too often or
was not closed
correctly.
Make sure that the door is closed correctly.
You have just added a
large number of
warm beverages to
your cooler.
Allow time for new beverages to cool, then
check again.
The temperature
control is set too
warm.
Set the control to a colder setting.
Your wine cooler does
not have enough
ventilation.
Your wine cooler may not have enough
clearance from walls or the ceiling. See
Providing ventilation
on page 8.
17
29-Bottle Wine Cooler
www.insigniaproducts.com
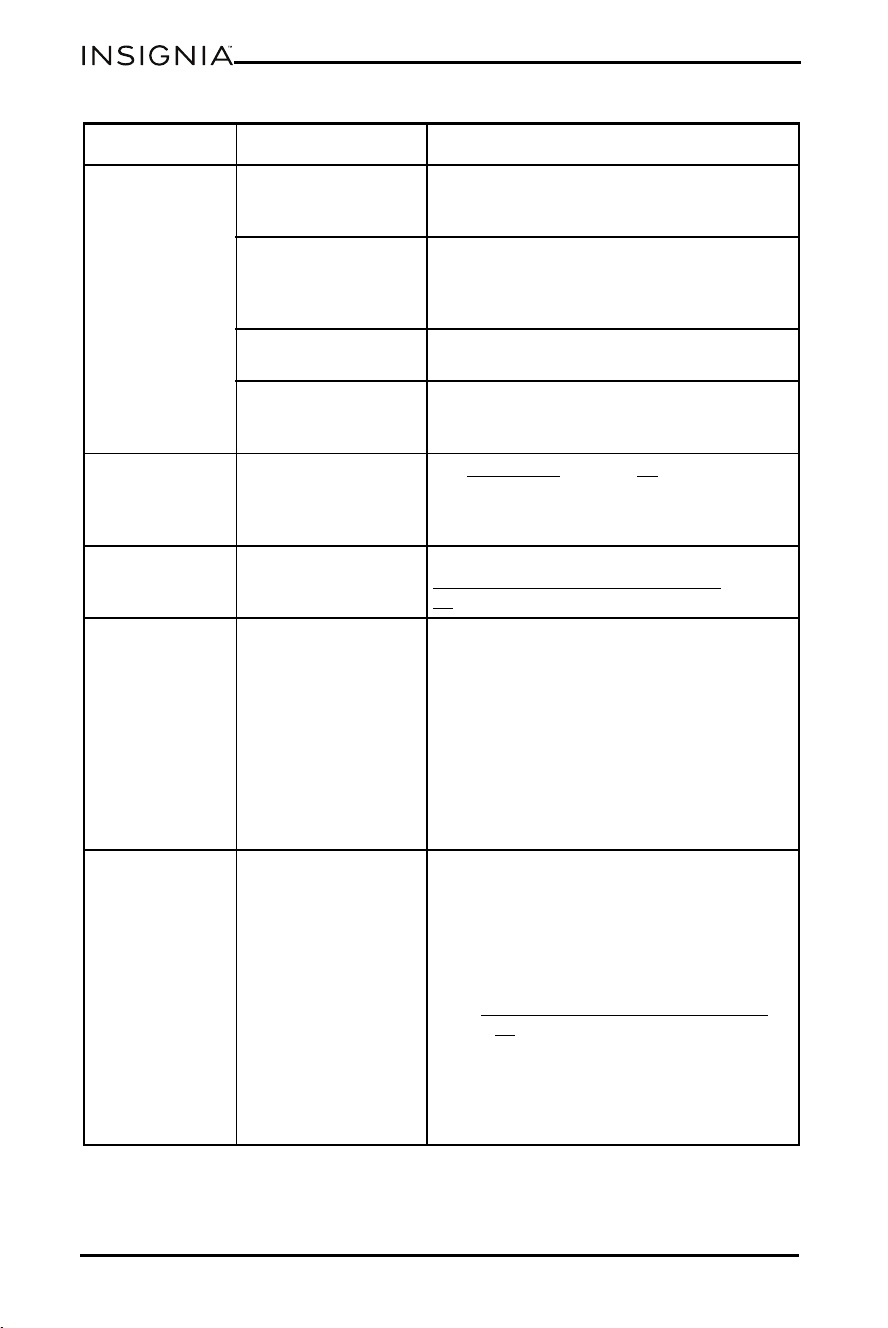
My cooler makes
unusual noises or
vibrates.
Your cooler is not
level.
Level your cooler with the leveling feet.
The body of your
beverage cooler is
touching a wall.
Move your cooler out from the wall.
• A rattling noise may
be heard. This is
caused by the flow
of refrigerant in
your beverage
cooler.
•As each cooling
cycle ends, you may
hear gurgling
sounds.
• Contraction and
expansion of the
inside walls may
cause popping or
crackling noises.
• This is normal.
• Remove any items from the top of your
wine cooler.
• Make sure that the shelves are installed
correctly.
Items inside or on top
of your wine cooler
may be rattling.
• Remove any items from the top of your
wine cooler.
• Make sure that the shelves are installed
correctly.
Moisture is
building up in
the interior of my
cooler.
The door has been
opened too often or
was not closed
correctly.
Make sure that the door is closed correctly.
Your cooler is in a
location that is very
humid.
Move your cooler to a dryer location.
Moisture is
building up on
the exterior of
my cooler.
The door has been
opened too often or
was not closed
correctly.
Make sure that the door is closed properly.
Cold air from inside your cooler may be
leaking.
The door gasket is not
sealing well.
Make sure that the door and gasket are
properly aligned.
Your cooler is in a
location that is very
humid.
• Weather is hot and humid (this is normal).
• Move your cooler to a dryer location.
PROBLEM POSSIBLE CAUSE SOLUTION
18
www.insigniaproducts.com
My cooler turns
on and off
frequently.
The room
temperature is hotter
than normal.
Make sure that your cooler is in a room that
is 50° ~ 85° F (10° ~ 29.4° C) or place your
cooler in a cooler location.
The door has been
opened too often or
was not closed
correctly.
Make sure that the door is closed correctly.
The door gasket is not
sealing well.
Clean the door gaskets.
The temperature
control is set too
warm.
Set the control to a colder setting.
The display
shows an error
code and an
alarm sounds.
Possible equipment
malfunction.
See Error codes
on page 16.
The wine cooler
compartment
has a bad odor.
The interior of your
wine cooler needs to
be cleaned.
Clean the inside of your wine cooler. See
Cleaning the interior of your cooler
on page
14.
The wine cooler
door is hard to
open.
Debris on the door
gasket or low
pressure inside the
wine cooler.
• If the door is hard to open at other times,
try rubbing paraffin wax or petroleum
jelly along the edges of the entire gasket.
Paraffin wax is used for canning and is safe
for use around food.
• When you open the wine cooler door,
warm air rushes inside. When you close
the door, the warm air rushes to the
condenser which causes a vacuum. This
causes the door to be hard to open for
about 10 to 15 seconds after closing.
The compressor
runs for a long
time or turns on
and off
frequently.
Several things could
cause this.
The compressor runs longer if:
• The room temperature is high.
• You just added a large amount of wine.
Wait for the wine to cool, then check
again.
• You open and close the door frequently.
• The door gasket is dirty. Clean the gasket.
See Cleaning the interior of your cooler
on
page 14.
• Your wine cooler has been disconnected
for a period of time. Wait for your wine
cooler to cool (about two to three hours)
before adding wine.
• You have the temperature set too low.
PROBLEM POSSIBLE CAUSE SOLUTION
19
29-Bottle Wine Cooler
www.insigniaproducts.com
ations
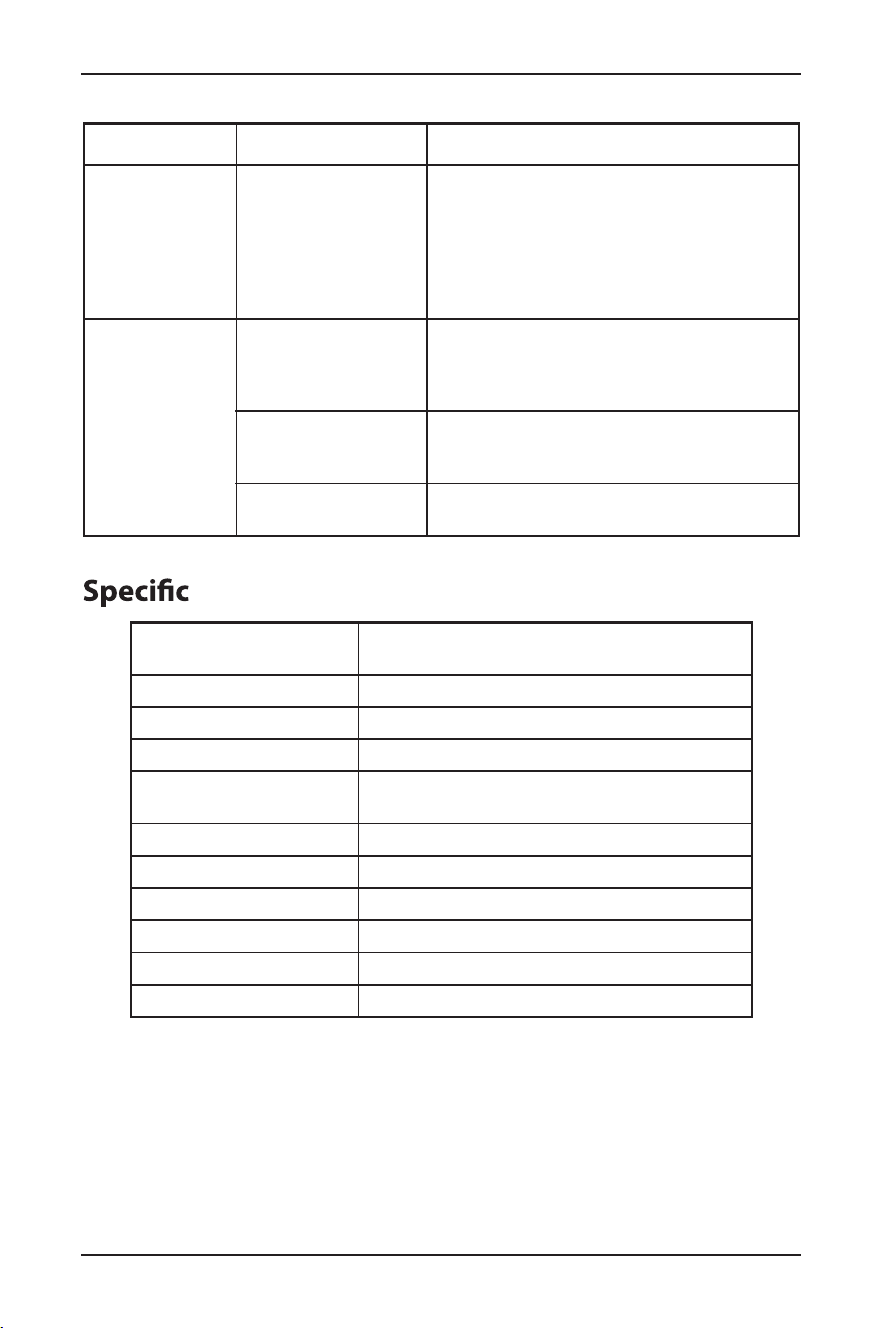
The outside of
my wine cooler is
hot.
Several things could
cause this, including
the location, ambient
temperature, and
number of items in
your cooler.
Heat dissipation from the condenser may
make the outside feel hot. This is normal
and happens if:
• The room temperature is high.
• You have too many items in your wine
cooler.
• You open and close the door excessively.
The humidity
level in my cooler
is too low.
The door has been
opened too often or
was not closed
correctly.
Make sure that the
door is closed correctly.
Your cooler is in a
location that is too
hot.
Move your cooler to a cooler location.
The relative humidity
is too low.
Place a cup of water inside your cooler to
raise the humidity.
Dimensions (HxWxD) 33 5/16 × 18 1/2 × 17 5/16 in.
(84.5 × 47.0
× 44.0 cm)
Weight 54.0 Ibs (24.5 kg)
Power requirements 115V ~ 60Hz, 75W
Current 1A
Ambient operating
temperature
54° ~ 109° F (12° ~ 43° C)
Cooler temperature range 41° ~ 64° F (5° ~ 18° C)
Power cord length 5.4 ft. (1.65 m)
Capacity 3.3 cu. ft. (0.09 cu. m)
Refrigerant type R600a
Noise (Db
) level 40 dB
Annual energy usage 143 kWh/year
PROBLEM POSSIBLE CAUSE SOLUTION
20
www.insigniaproducts.com
ONE-YEAR LIMITED WARRANTY
Denitions:
The Distributor* of Insignia branded products warrants to you, the original purchaser of this
new Insignia-branded product (“Product”), that the Product shall be free of defects in the
original manufacturer of the material or workmanship for a period of one (1) year from the
date of your purchase of the Product (“Warranty Period”).
For this warranty to apply, your Product must be purchased in the United States or Canada
from a Best Buy branded retail store or online at www.bestbuy.com
or www.bestbuy.ca and
is packaged with this warranty statement.
How long does the coverage last?
What does this warranty cover?
During the Warranty Period, if the original manufacture of the material or workmanship of
the Product is determined to be defective by an authorized Insignia repair center or store
personnel, Insignia will (at its sole option): (1) repair the Product with new or rebuilt parts; or
(2) replace the Product at no charge with new or rebuilt comparable products or parts.
Products and parts replaced under this warranty become the property of Insignia and are
not returned to you. If service of Products or parts are required
after the Warranty Period
expires, you must pay all labor and parts charges. This warranty lasts as long as you own your
Insignia Product during the Warranty Period. Warranty coverage terminates if you sell or
otherwise transfer the Product.
How to obtain warranty service?
If you purchased the Product at a Best Buy retail store location or from a Best Buy online
website (www.bestbuy.com
or www.bestbuy.ca), please take your original receipt and the
Product to any Best Buy store. Make sure that you place the Product in its original packaging
or packaging that provides the same amount of protection as the original packaging.
To obtain warranty service, in the United States and Canada call 1-877-467-4289. Call agents
may diagnose and correct the issue over the phone.
Where is the warranty valid?
This warranty is valid only in the United States and Canada at Best Buy branded retail stores
or websites to the original purchaser of the product in the country where the original
purchase was made.
What does the warranty not cover?
This warranty does not cover:
• Food, beverage, and/or medicine loss/spoilage.
• Customer instruction/education
• Installation
• Set up adjustments
• Cosmetic damage
• Damage due to weather, lightning, and other acts of God, such as power surges
• Accidental damage
• Misuse
• Abuse
• Negligence
• Commercial purposes/use, including but not limited to use in a place of business or in
communal areas of a multiple dwelling condominium or apartment complex, or
otherwise used in a place of other than a private home.
• Modication of any part of the Product, including the antenna
• Display
panel damaged by static (non-moving) images applied for lengthy periods
(burn-in).
• Damage due to incorrect operation or maintenance
• Connection to an incorrect voltage or power supply
The Warranty Period lasts for 1 year (365 days) from the date you purchased the Product or
the date of delivery (if later than the date of purchase). Your purchase date is printed on the
receipt you received with the Product. In the event that Authorized Partner ceases to sell the
covered Insignia branded product, this warranty shall terminate for that product and there
shall be no repair or replacement of the Product.

21
29-Bottle Wine Cooler
www.insigniaproducts.com
• Attempted repair by any person not authorized by Insignia to service the Product
• Products sold “as is” or “with all faults”
• Consumables, including but not limited to batteries (i.e. AA, AAA, C etc.)
• Products where the factory applied serial number has been altered or removed
• Loss or Theft of this product or any part of the product
• Display panels containing up to three (3) pixel failures (dots that are dark or incorrectly
illuminated) grouped in an area smaller than one tenth (1/10) of the display size or up to
ve (5) pixel failures throughout the display. (Pixel based displays may contain a
limited
number of pixels that may not function normally.)
• Failures or Damage caused by any contact including but not limited to liquids, gels or
pastes.
REPAIR REPLACEMENT AS PROVIDED UNDER THIS WARRANTY IS YOUR EXCLUSIVE REMEDY
FOR BREACH OF WARRANTY. INSIGNIA SHALL NOT BE LIABLE FOR ANY INCIDENTAL OR
CONSEQUENTIAL DAMAGES FOR THE BREACH OF ANY EXPRESS OR IMPLIED WARRANTY ON
THIS PRODUCT, INCLUDING, BUT NOT LIMITED TO, LOST DATA, LOSS OF USE OF YOUR
PRODUCT, LOST BUSINESS OR LOST PROFITS. INSIGNIA PRODUCTS MAKES NO OTHER
EXPRES
S WARRANTIES WITH RESPECT TO THE PRODUCT, ALL EXPRESS AND IMPLIED
WARRANTIES FOR THE PRODUCT, INCLUDING BUT NOT LIMITED TO ANY IMPLIED
WARRANTIES OF AND CONDITIONS OF MERCHANTABILITY AND FITNESS FOR A PARTICULAR
PURPOSE, ARE LIMITED IN DURATION TO THE WARRANTY PERIOD SET FORTH ABOVE AND
NO WARRANTIES, WHETHER EXPRESS OR IMPLIED, WILL APPLY AFTER THE WARRANTY
PERIOD. SOME STATES, PROVINCES AND JURISDICTIONS DO NOT ALLOW LIMITATIONS ON
HOW LONG AN IMPLIED WARRANTY LASTS, SO THE ABOVE LIMITATION MAY NOT APPLY TO
YOU. THIS WARRANTY GIVES YOU SPECIFIC LEGAL RIGHTS, AND YO
U MAY ALSO HAVE OTHER
RIGHTS, WHICH VARY FROM STATE TO STATE OR PROVINCE TO PROVINCE.
Contac
t Insignia:
1-877-467-4289
www.insigniaproducts.com
INSIGNIA is a trademark of Best Buy and its
liated companies.
*Distributed by Best Buy Purchasing, LLC
7601 Penn Ave South, Rich
eld, MN 55423 U.S.A
©2025 Best Buy. All rights reserved.
22
www.insigniaproducts.com

23
29-Bottle Wine Cooler
www.insigniaproducts.com

www.insigniaproducts.com
1-877-467-4289 (U.S. and Canada)
INSIGNIA is a trademark of Best Buy and its aliated companies.
Distributed by Best Buy Purchasing, LLC
7601 Penn Ave South, Richeld, MN 55423 U.S.A.
©2025 Best Buy. All rights reserved.
V1 ENGLISH
25-0052