
Technical Support and E-Warranty Certificate
www.vevor.com/support
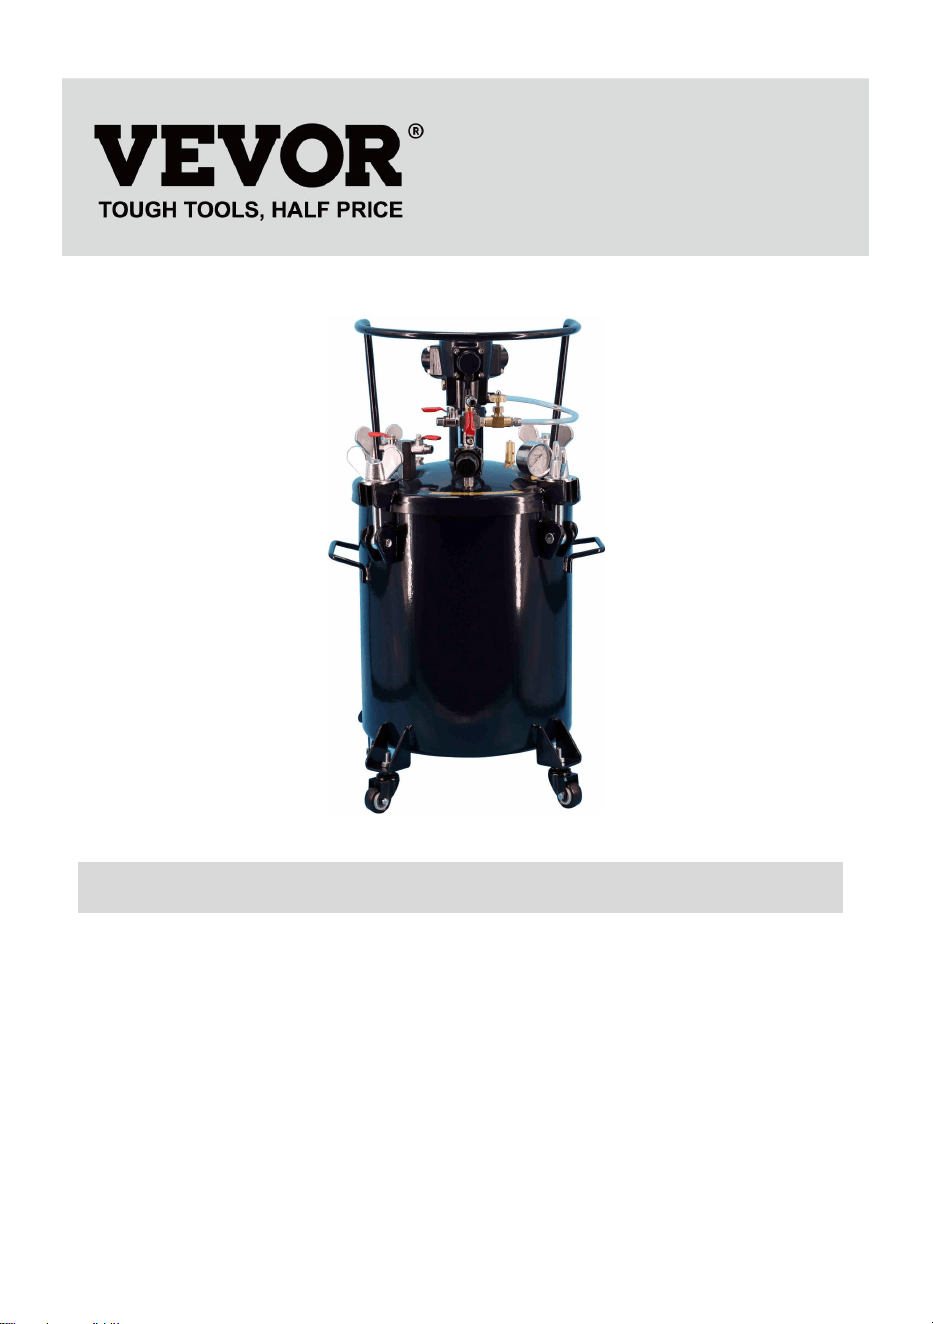
PRESSURE PAINT POT
USER MANUAL
We continue to be committed to provide you tools with competitive price.
"Save Half", "Half Price" or any other similar expressions used by us only
represents an estimate of savings you might benefit from buying certain tools
with us compared to the major top brands and does not necessarily mean to cover
all categories of tools offered by us. You are kindly reminded to verify carefully
when you are placing an order with us if you are actually Saving
Half in comparison with the top major brands.


1
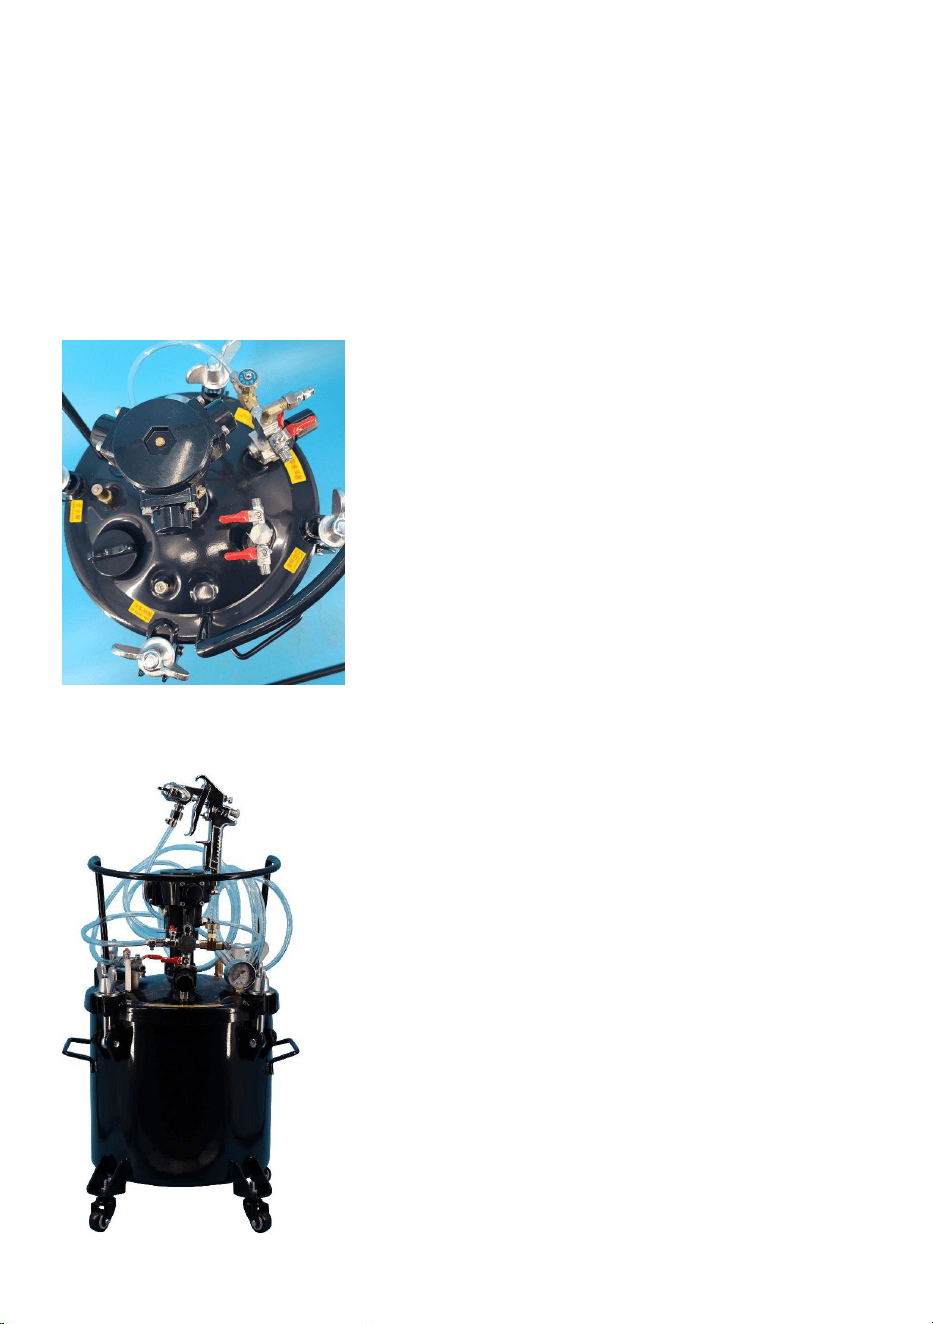
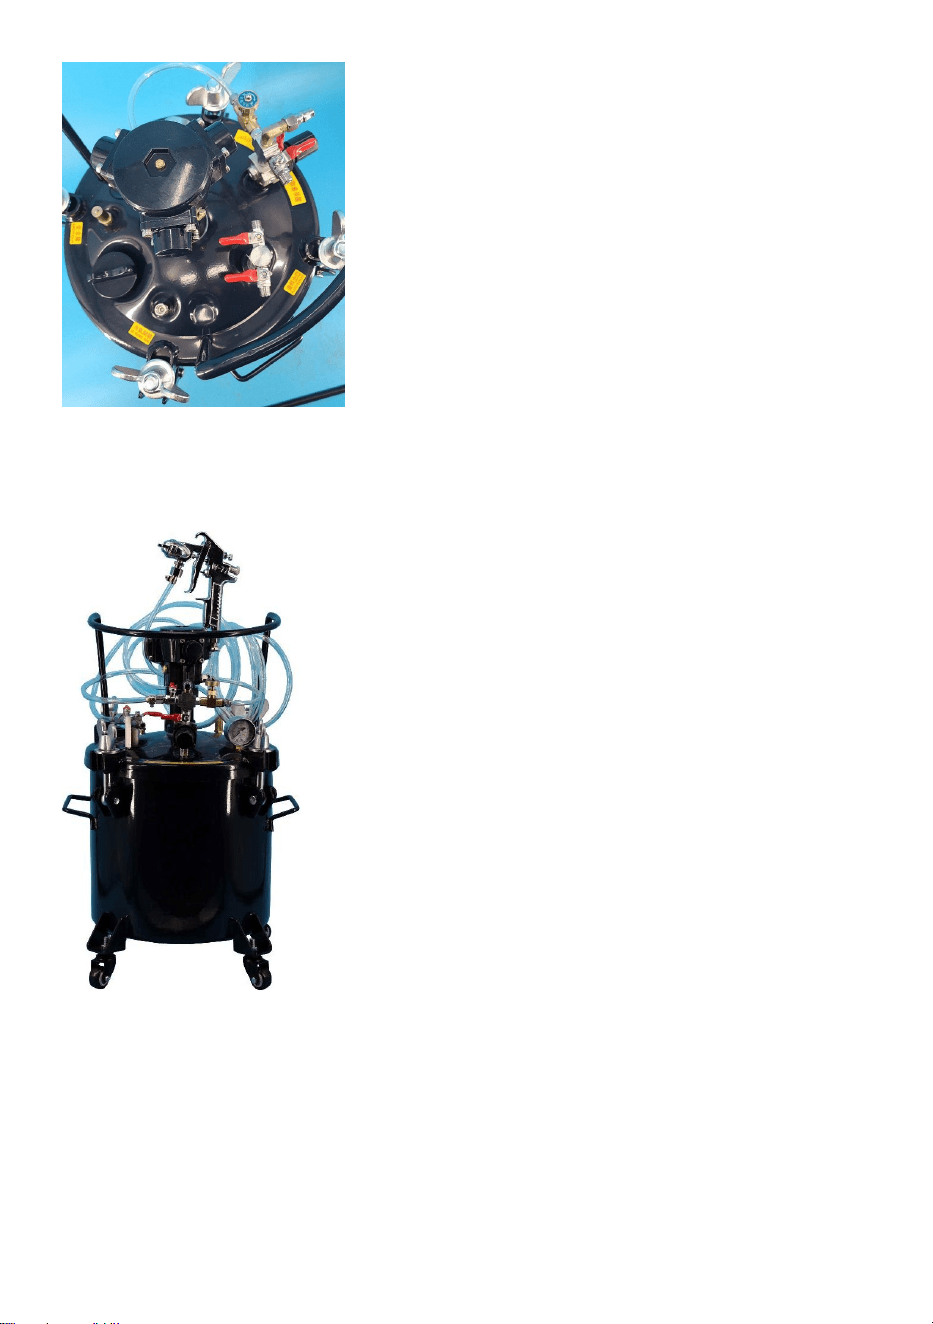
MODEL: JY-ZDS30L
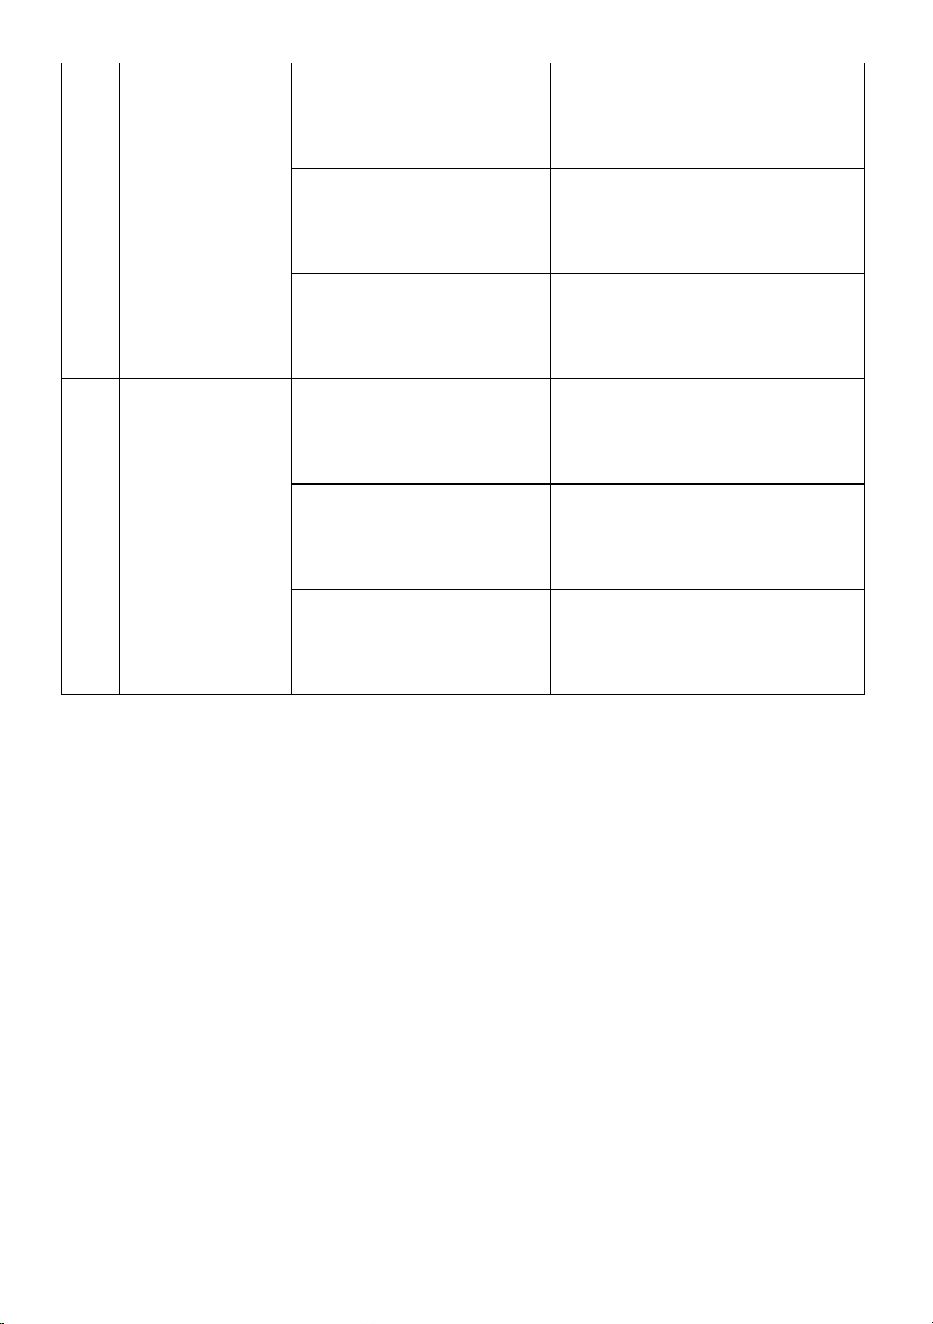
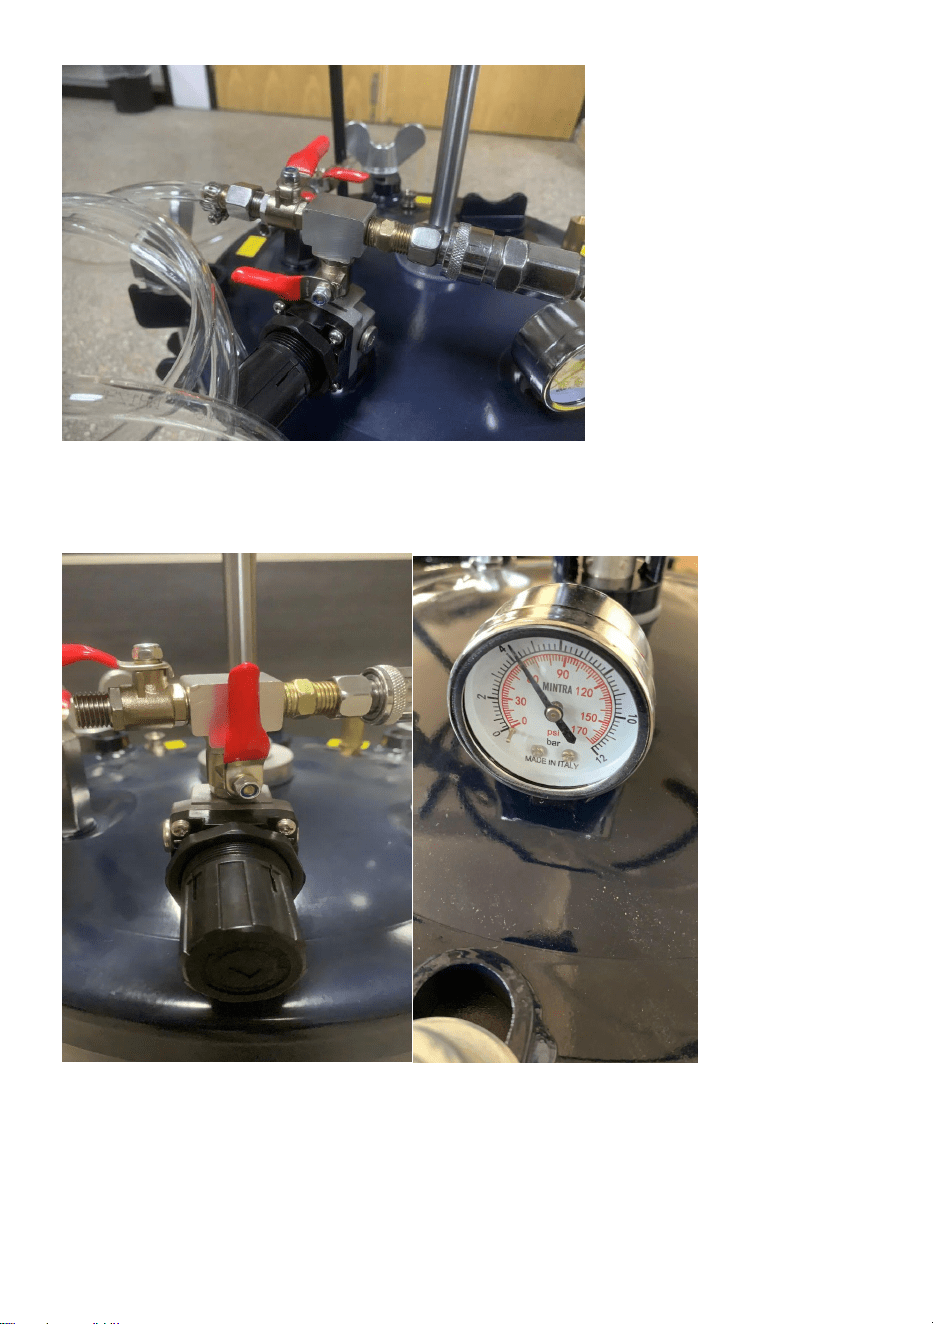
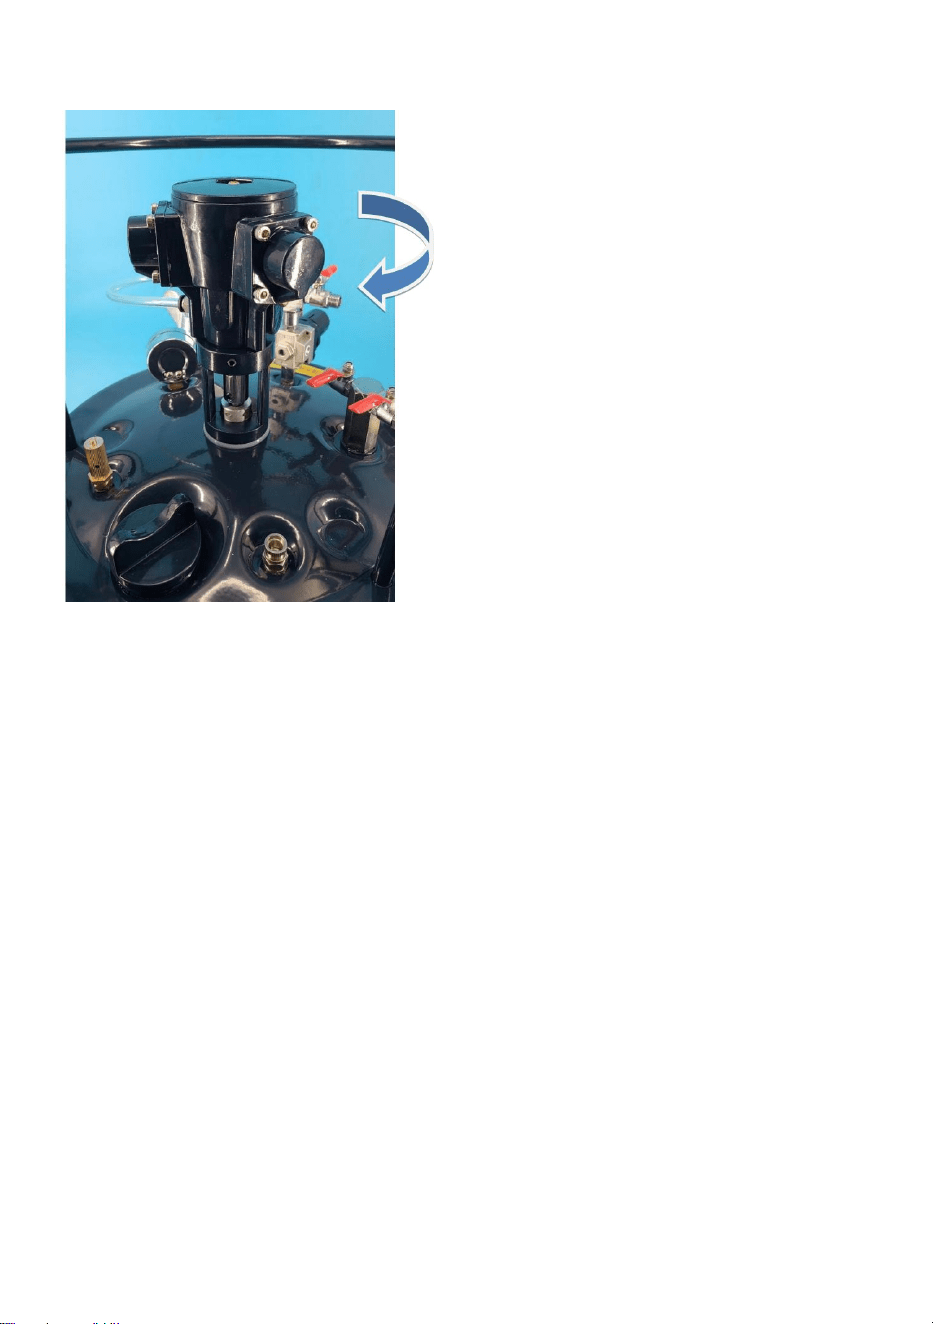
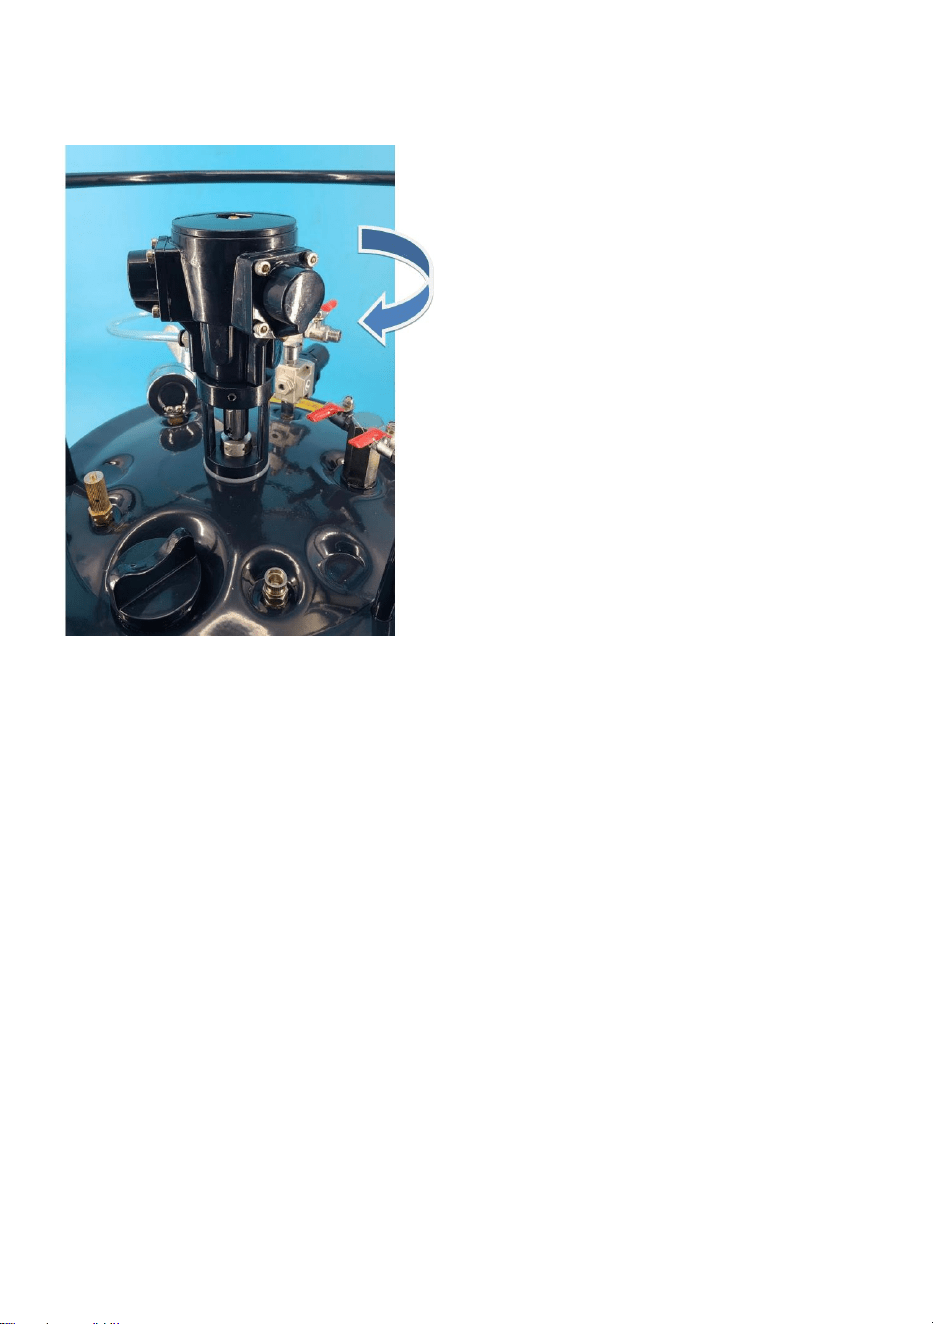
Photo for reference
NEED HELP? CONTACT US!
Have product questions? Need technical support? Please feel free to
contact us:
Technical Support and E-Warranty Certificate
www.vevor.com/support
This is the original instruction, please read all manual instructions
carefully before operating. VEVOR reserves a clear interpretation of our
user manual. The appearance of the product shall be subject to the
product you received. Please forgive us that we won't inform you again if
there are any technology or software updates on our product.
PRESSURE PAINT POT

2
SAFETY INSTRUCTION AND PRECAUTIONS
WARNING:
Read this material before using this product. Failure to do so can result in
serious injury.
1.Assemble only according to these instructions. Improper assembly can
create hazards.
2.Wear ANSI-approved safety goggles and heavy-duty work gloves during
assembly.
3.Keep assembly area clean and well lit.
4.Keep bystanders out of the area during assembly.
5.Do not assemble when tired or when under the influence of alcohol,
drugs or medication.
6.Product capabilities apply to properly and completely assembled product
only.
7.Assemble on a flat, level, hard and smooth surface capable of safely
supporting a fully loaded Pressure Paint Pot.
WARNING:
1. This product is not a toy. Do not allow children to play with or near this
item. Children or persons with physical disabilities are prohibited from
using this product, and people who do not know how to use it safely are
prohibited from operating this product
2. This product 10L allows the paint to be pressurized to 70PSI, and the
maximum operating pressure must not exceed 80PSI, otherwise it will
cause the risk of personal safety.
3. The safety valve on the pressure barrel is used to protect the normal
pressure in the pressure barrel, avoid over pressure of a safety device,
before the product leaves the factory has been set within the allowable
pressure range, in the normal state of use, do not remove at will, do not
adjust at will.

3
4. This product should not perform any form of modification, nor engage in
any dangerous operations such as drilling, welding, etc., which may
produce a tempering effect, damaging the pressure barrel, which affects
the service life of the product.
5. It is strictly forbidden to pour strong acidic and alkaline liquid into this
product to avoid corrosion of the tank body and causing personal injury.
6. Use as intended only.
7. Inspect before every use; do not use if parts are loose or damaged.
8. After spraying with this product, it must be thoroughly cleaned to extend
the service life of the product.
Preface
This paint barrel is composed of air pressure regulating valve, safety valve,
vent valve, discharge port and four movable wheels. All parts are made of
the best materials, and have passed strict quality control, and the
appearance is treated with baking paint, so it can achieve the purpose of
durability.
4
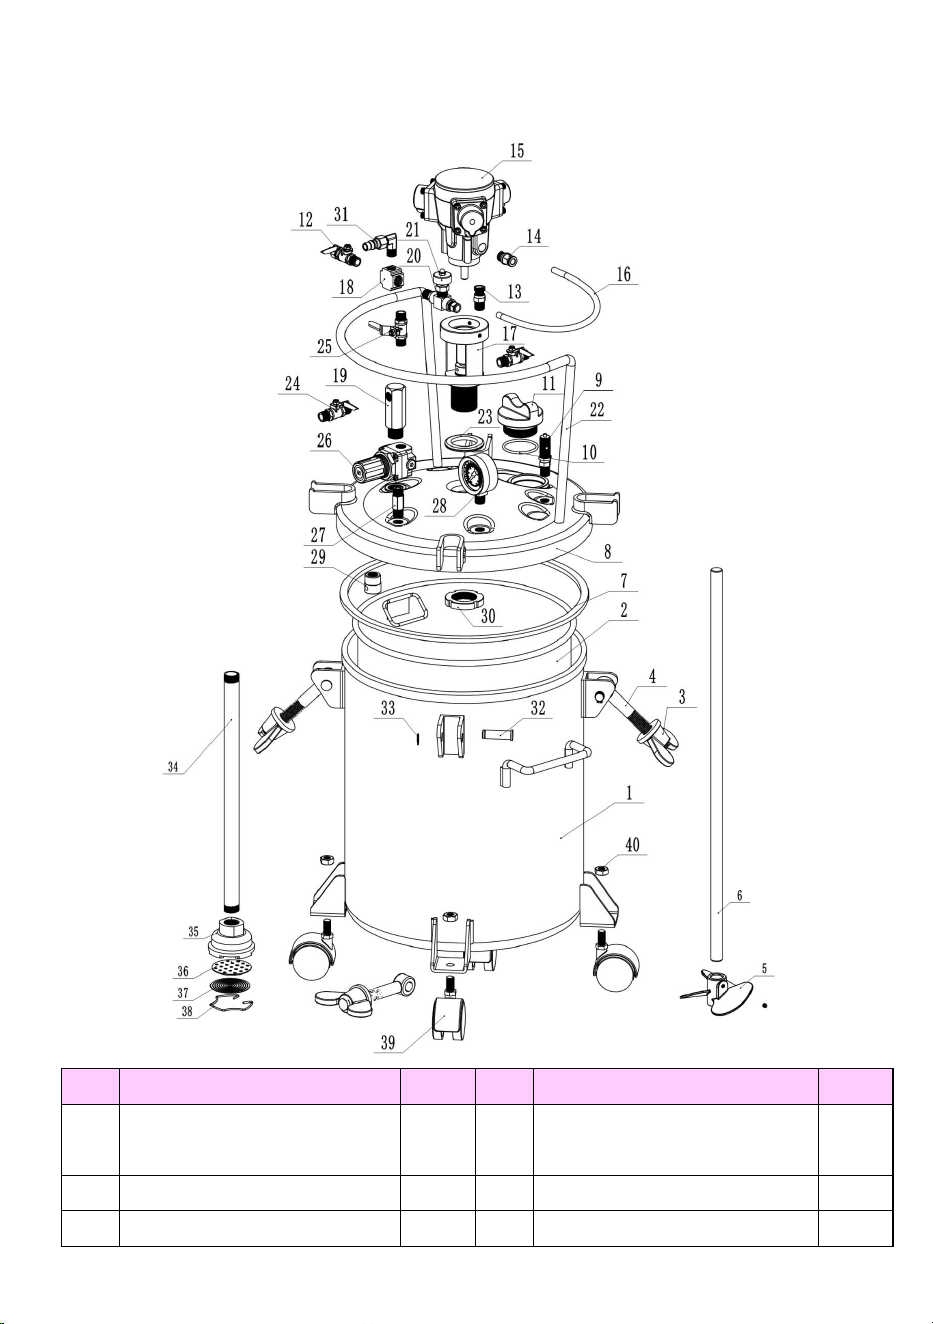
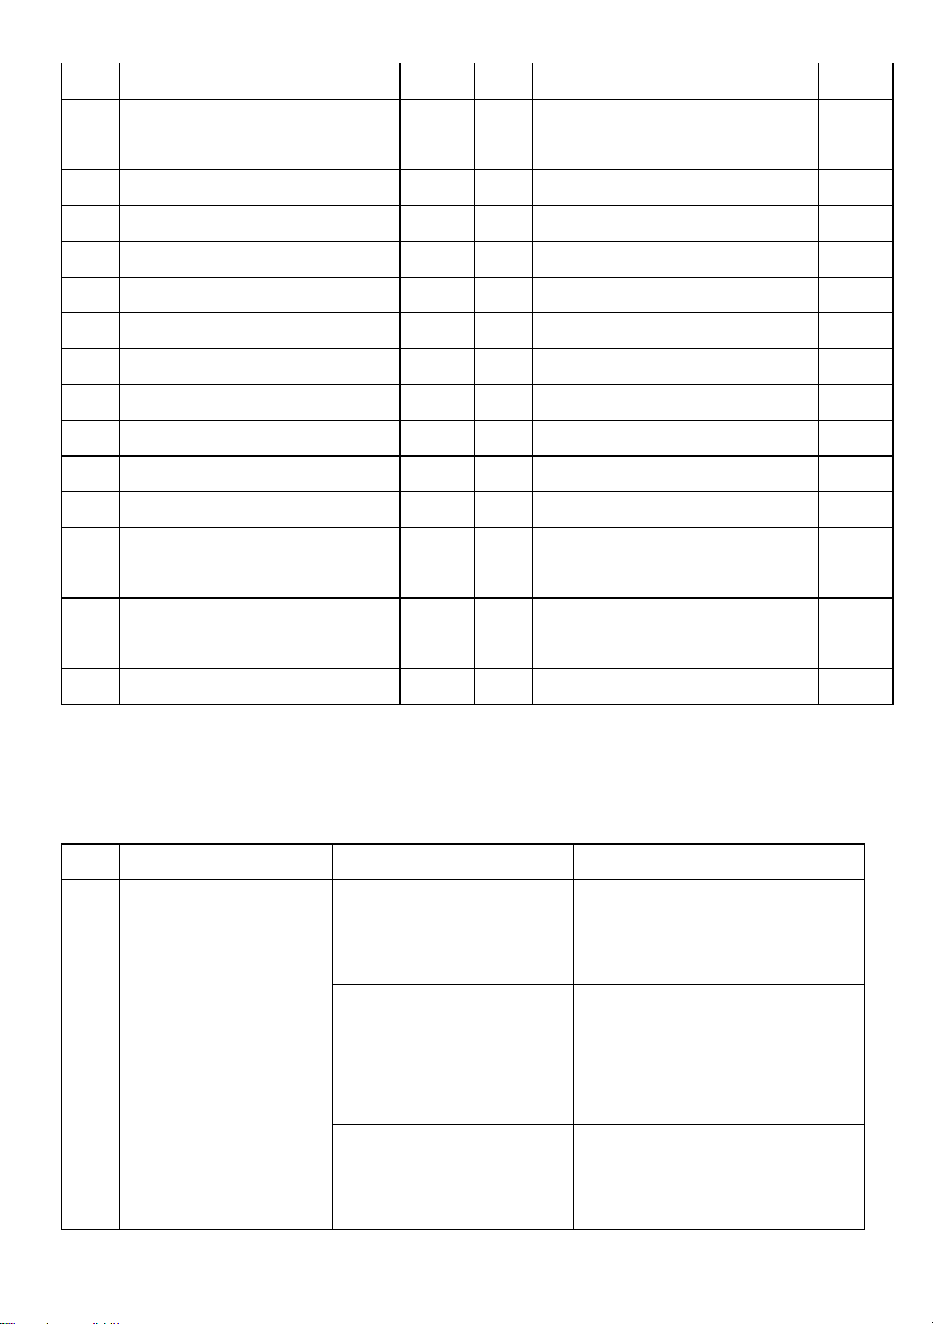
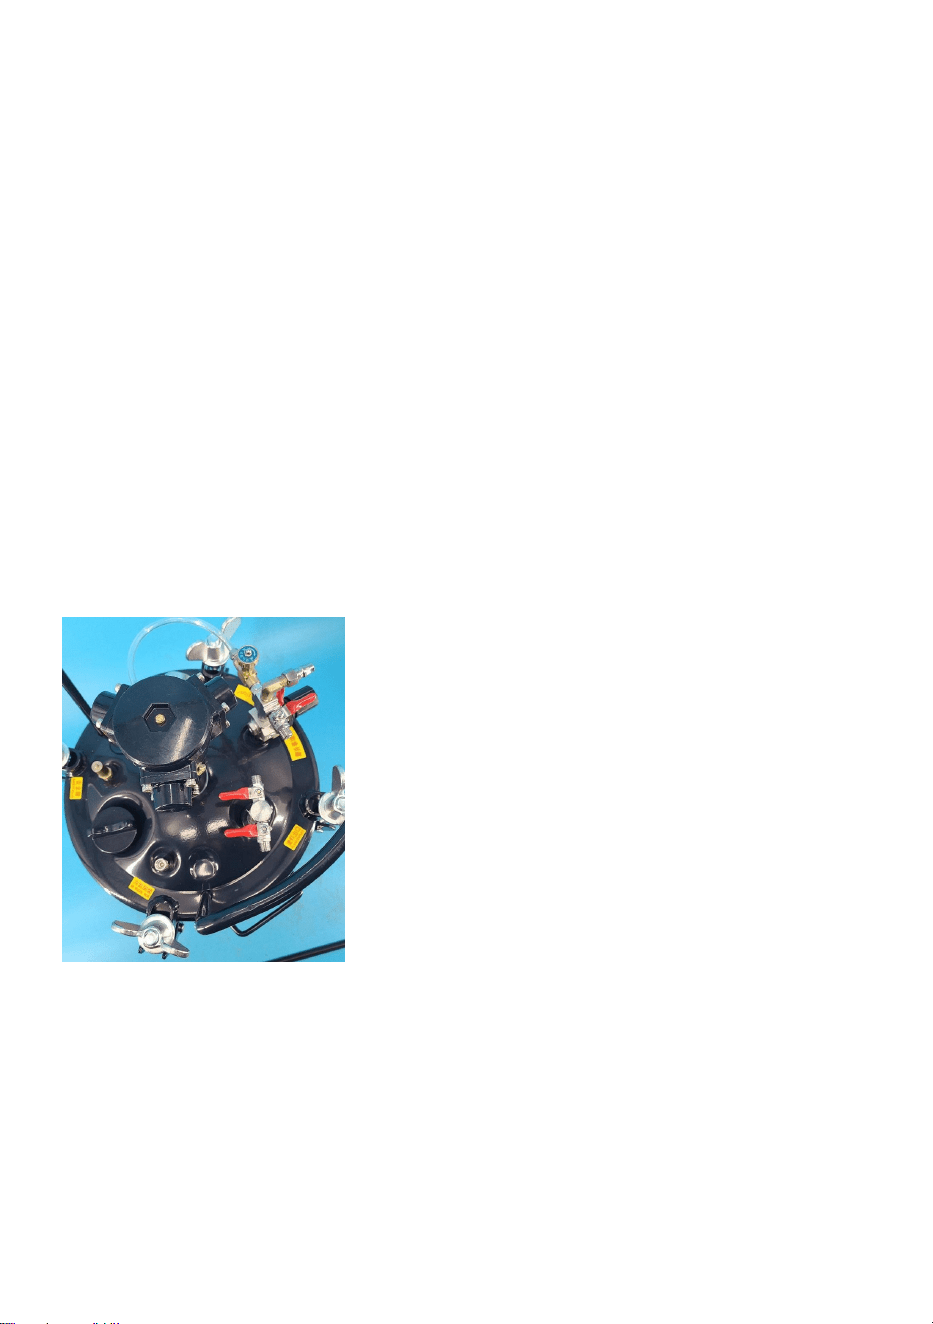
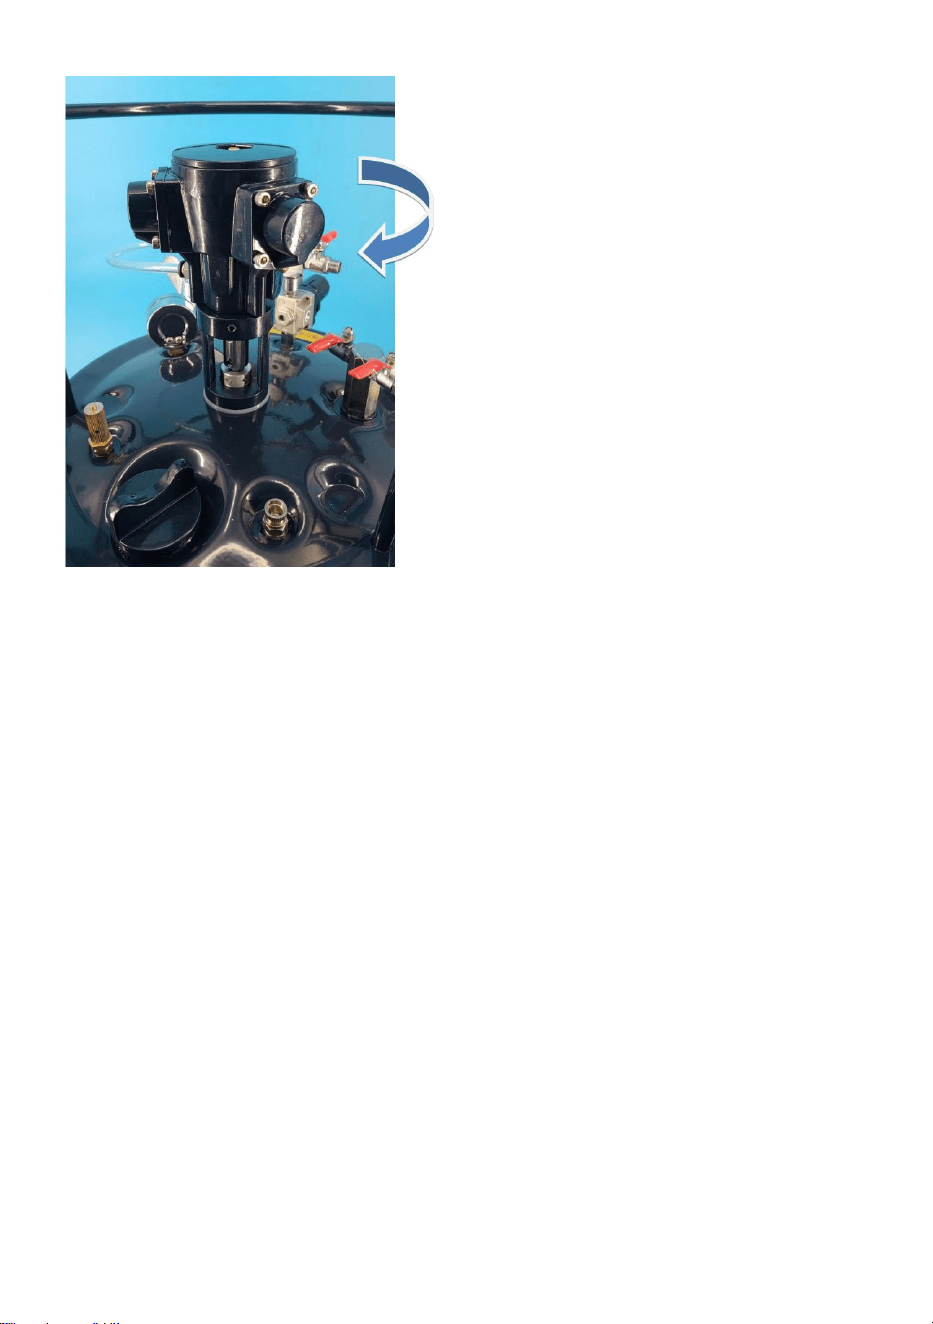
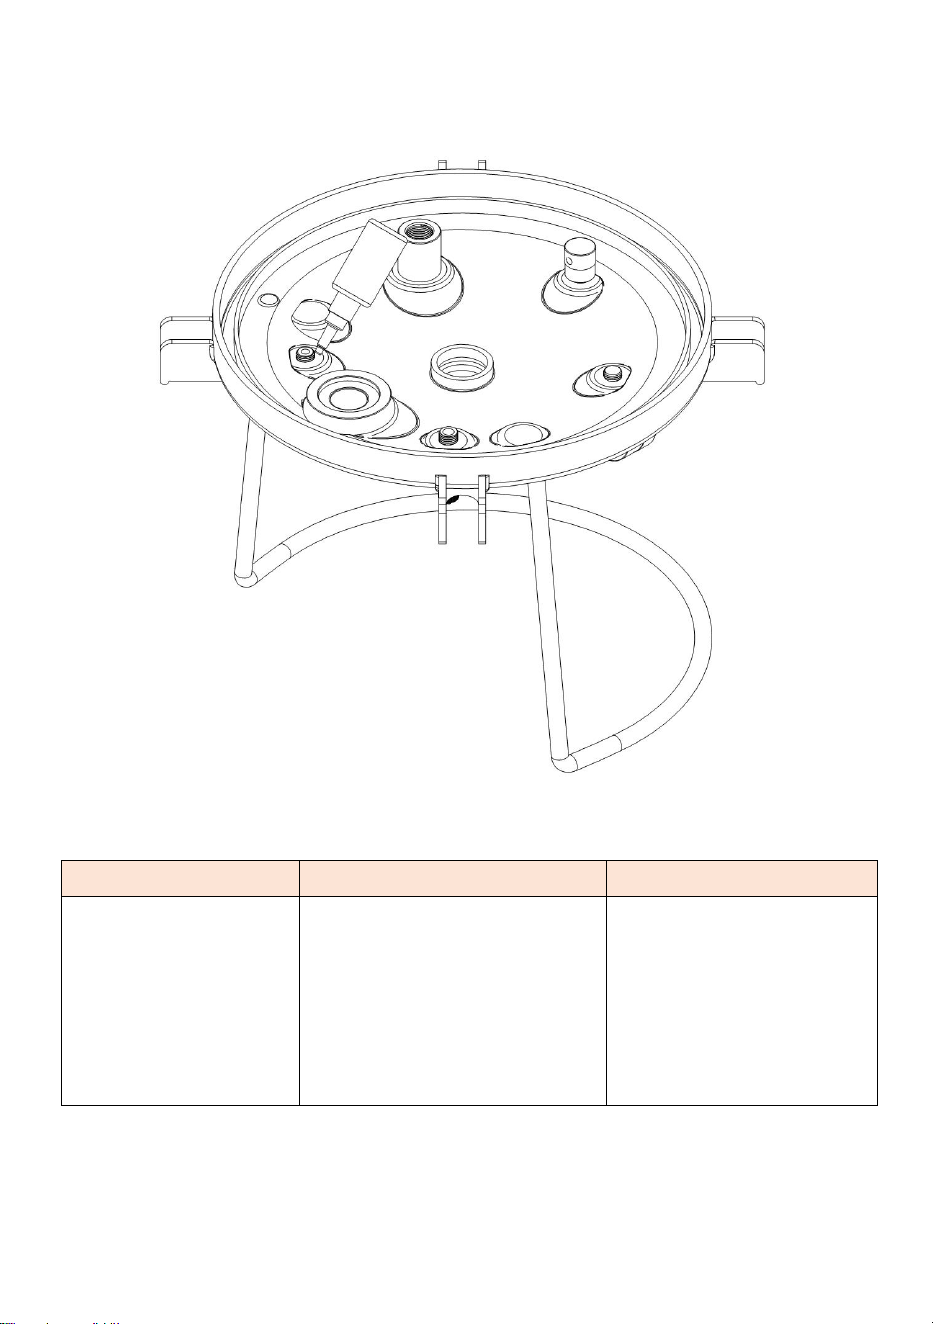
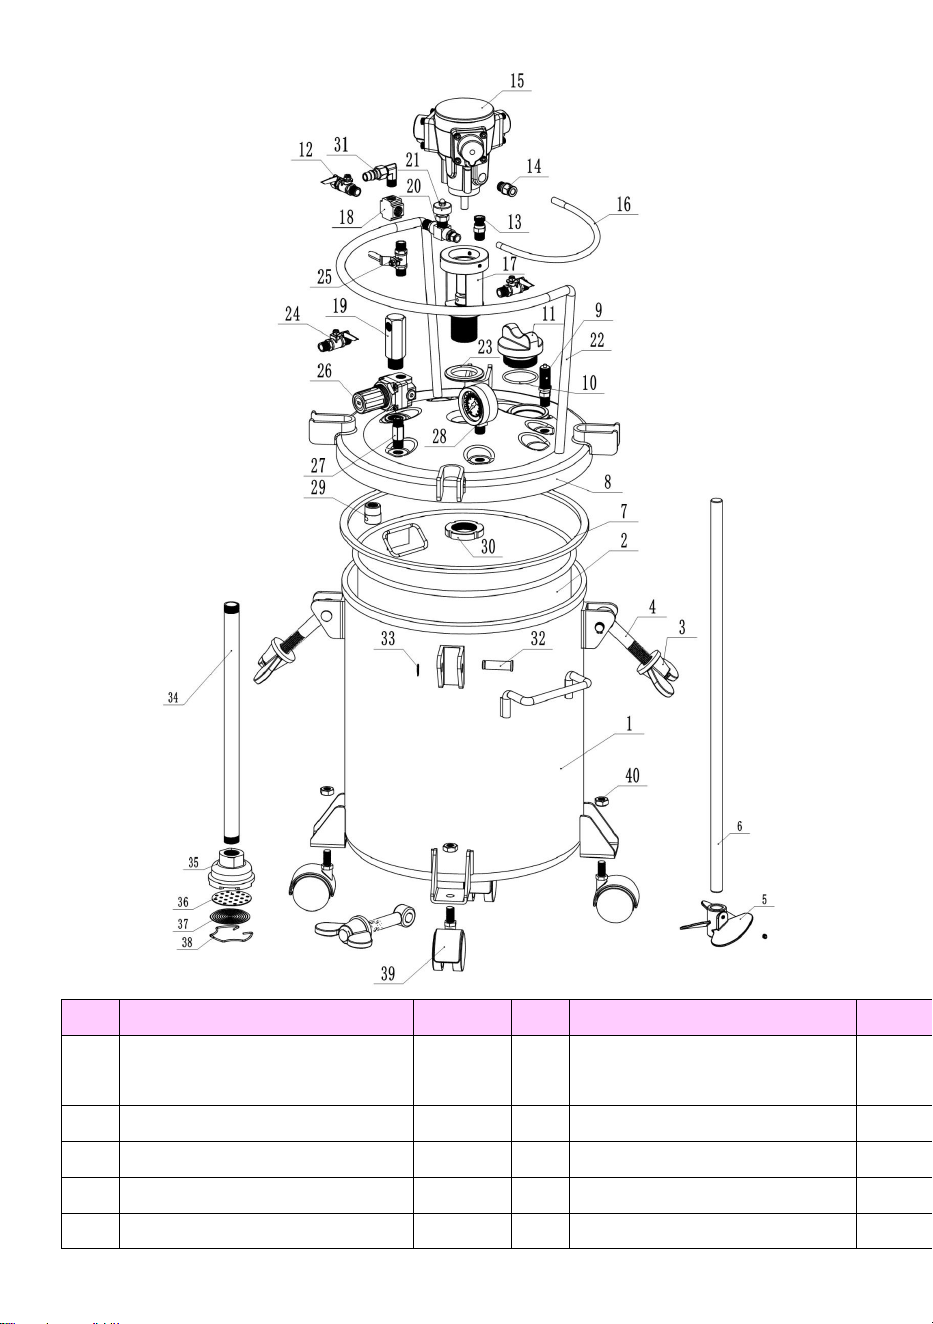
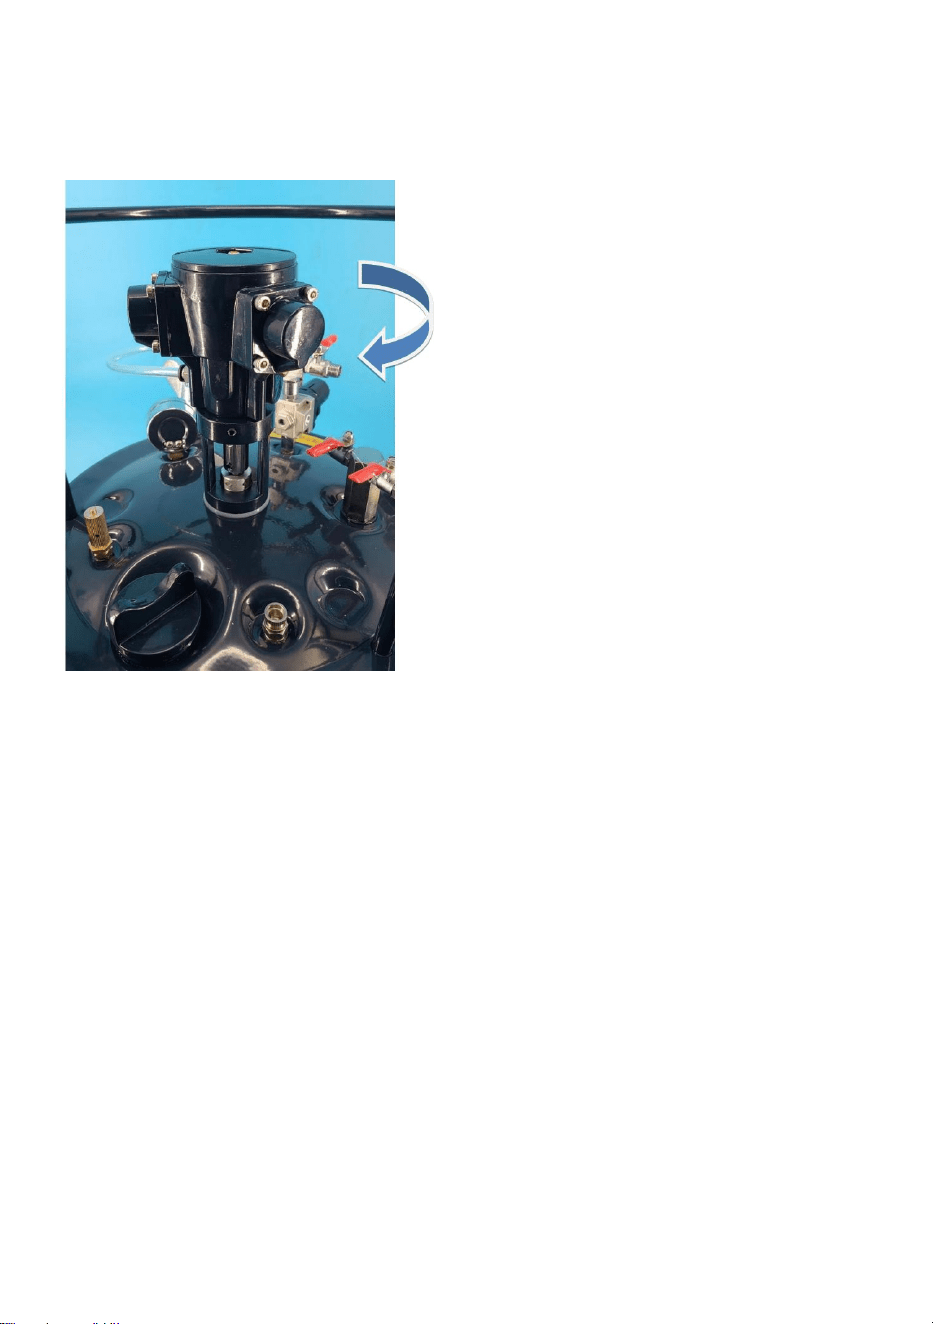
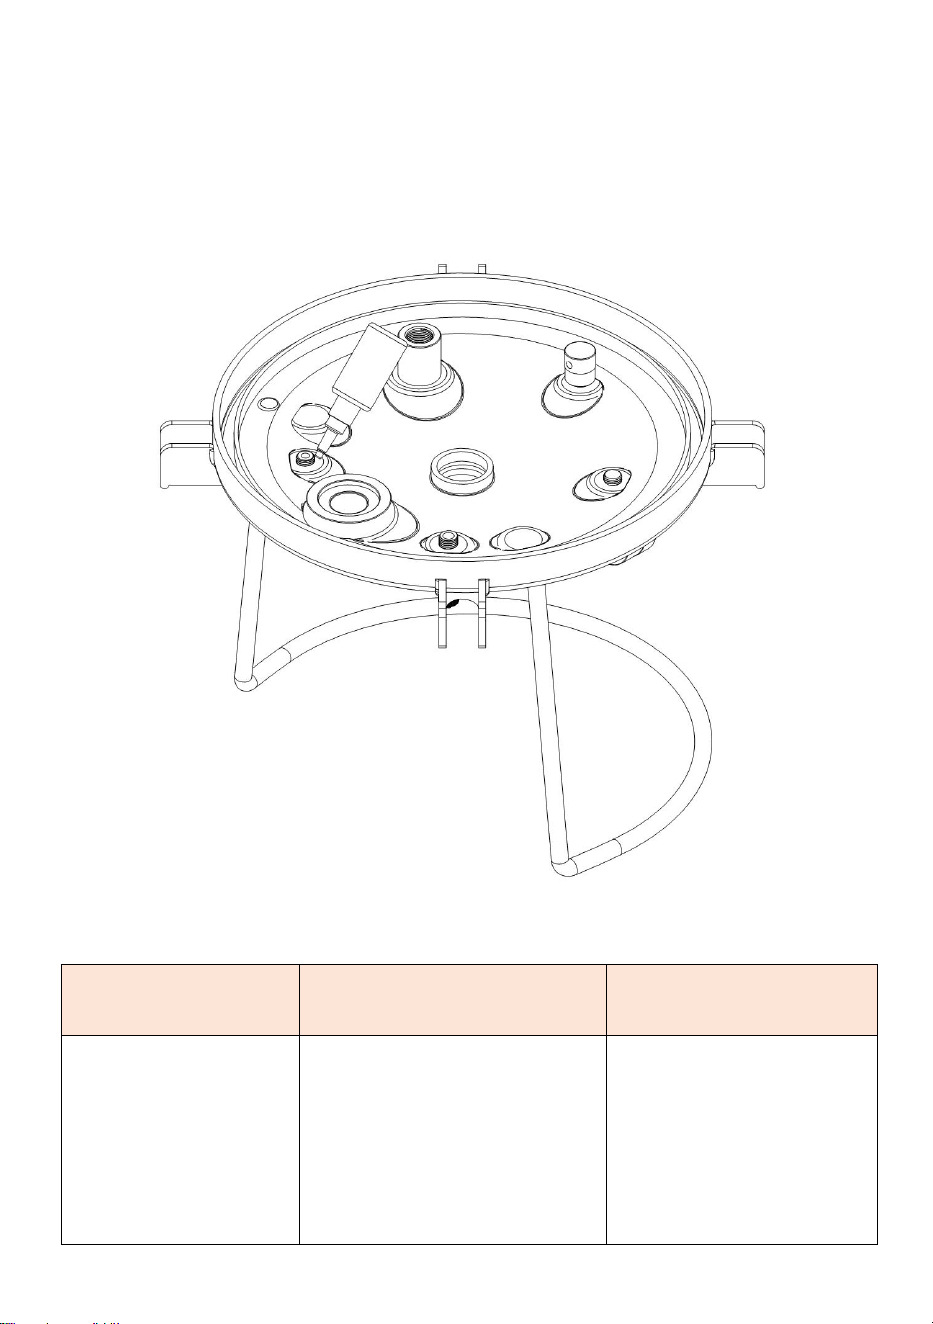
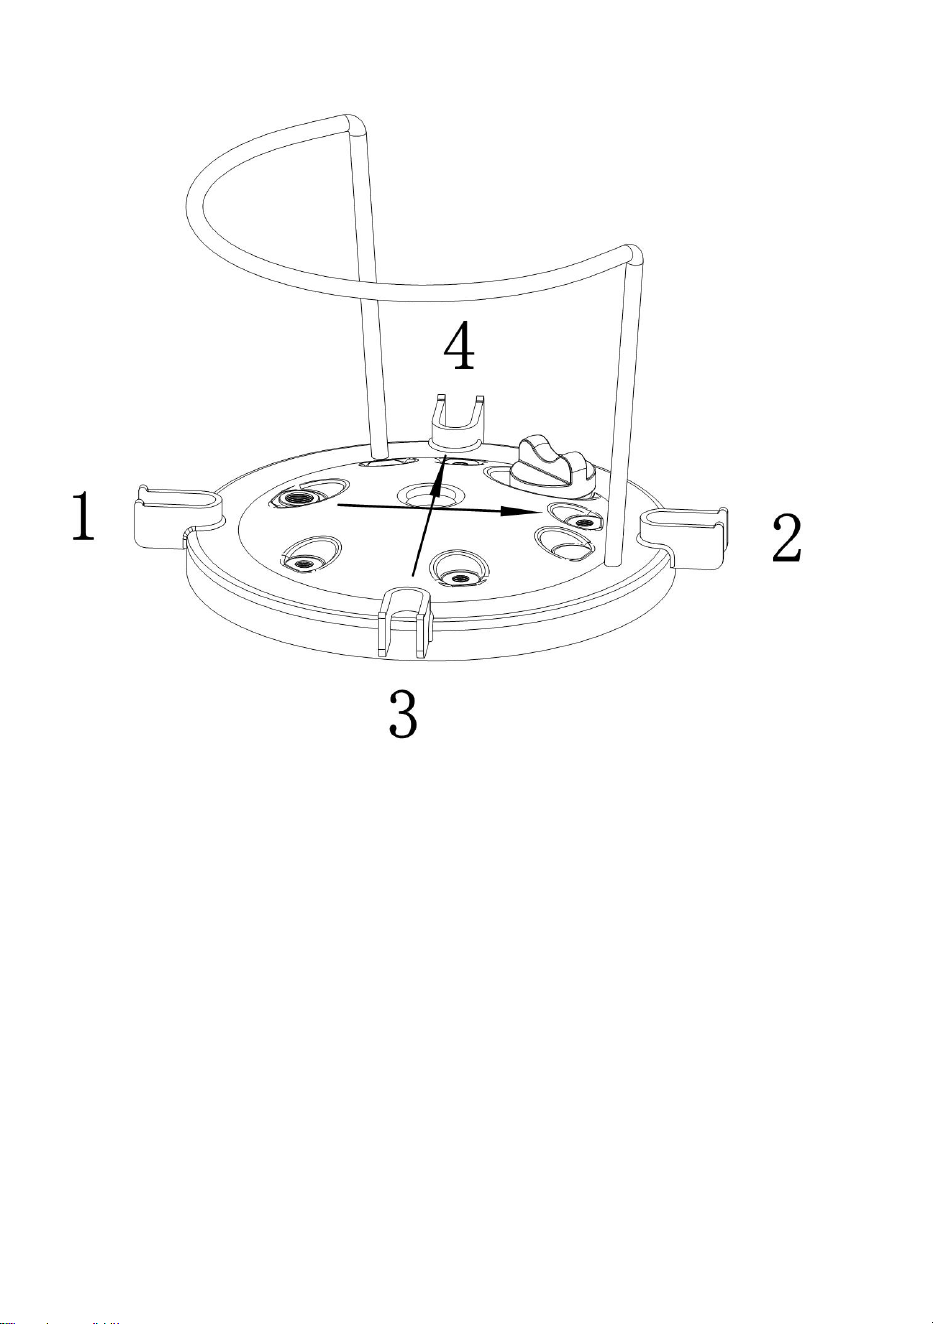
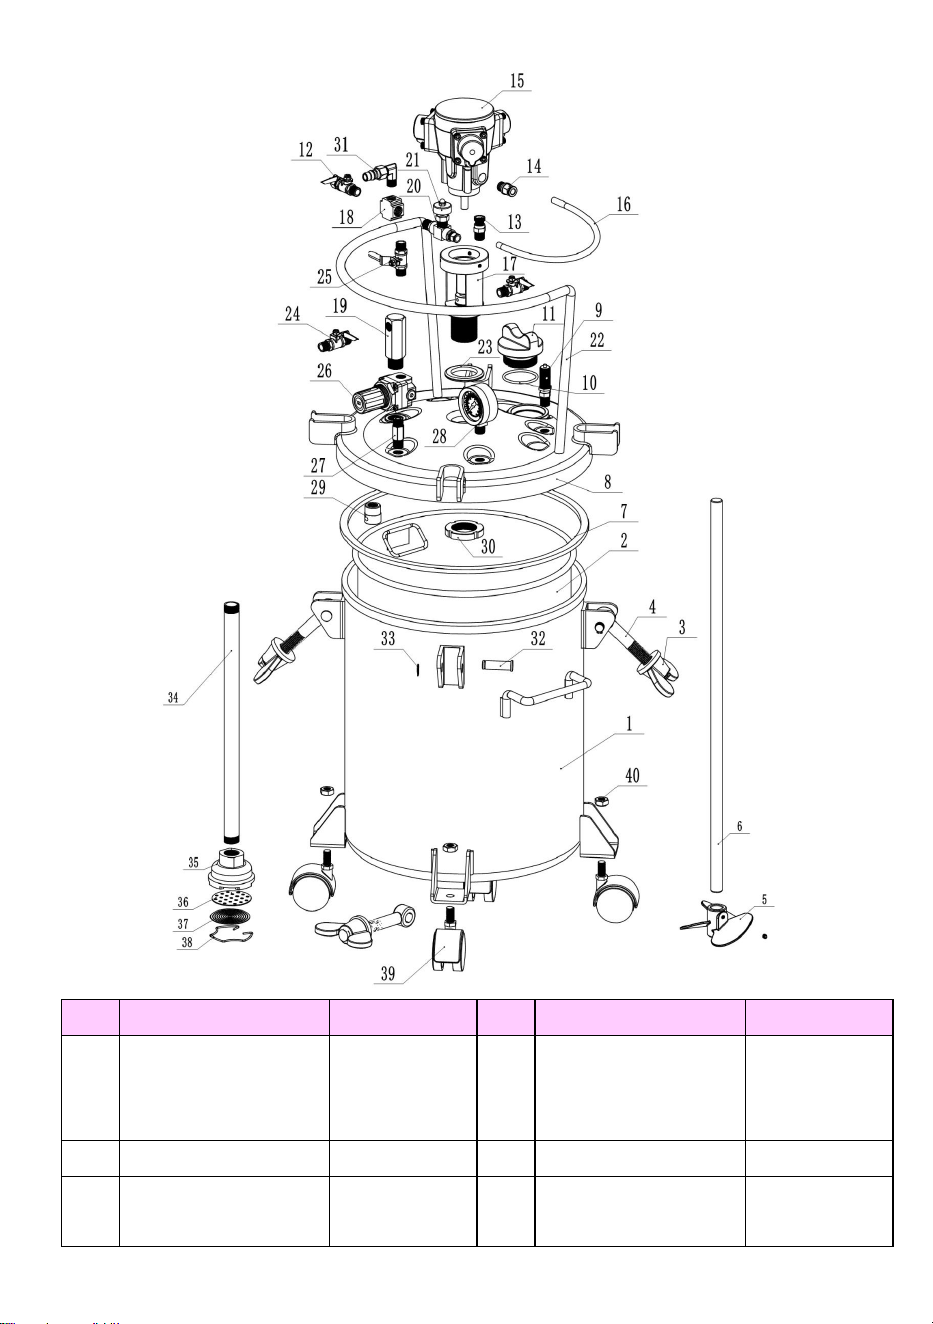
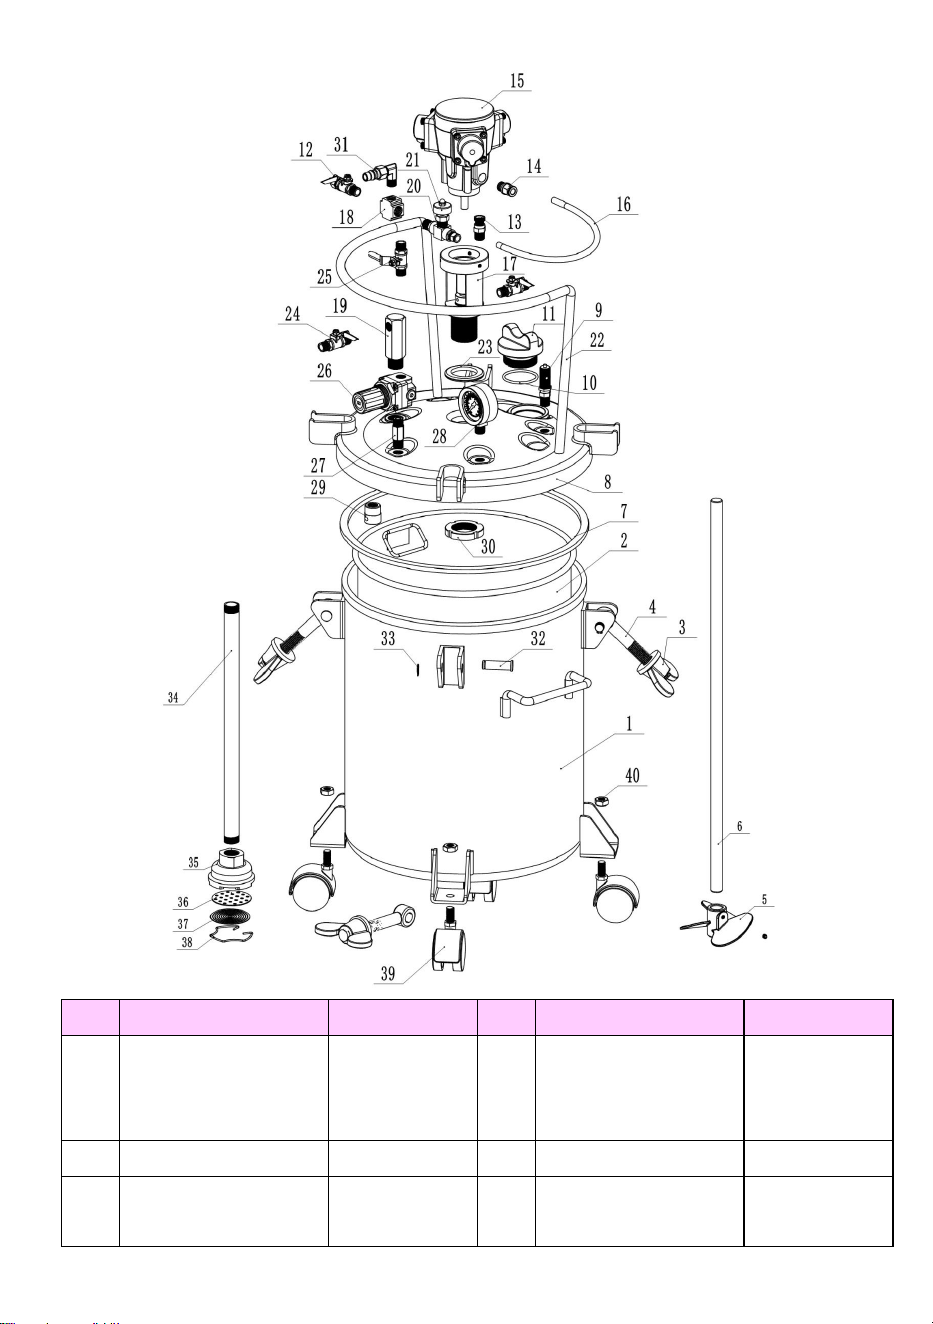
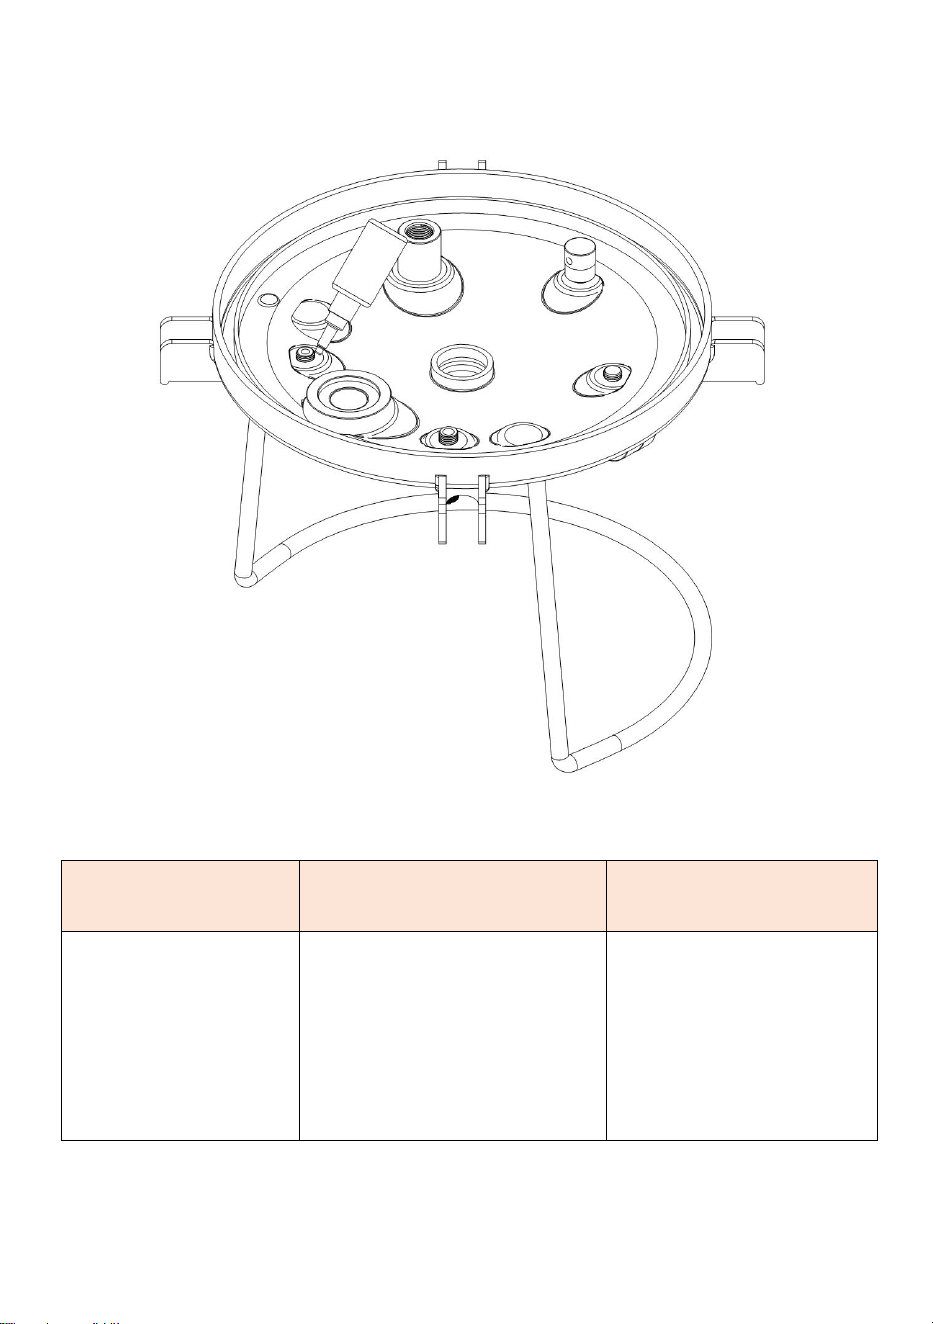
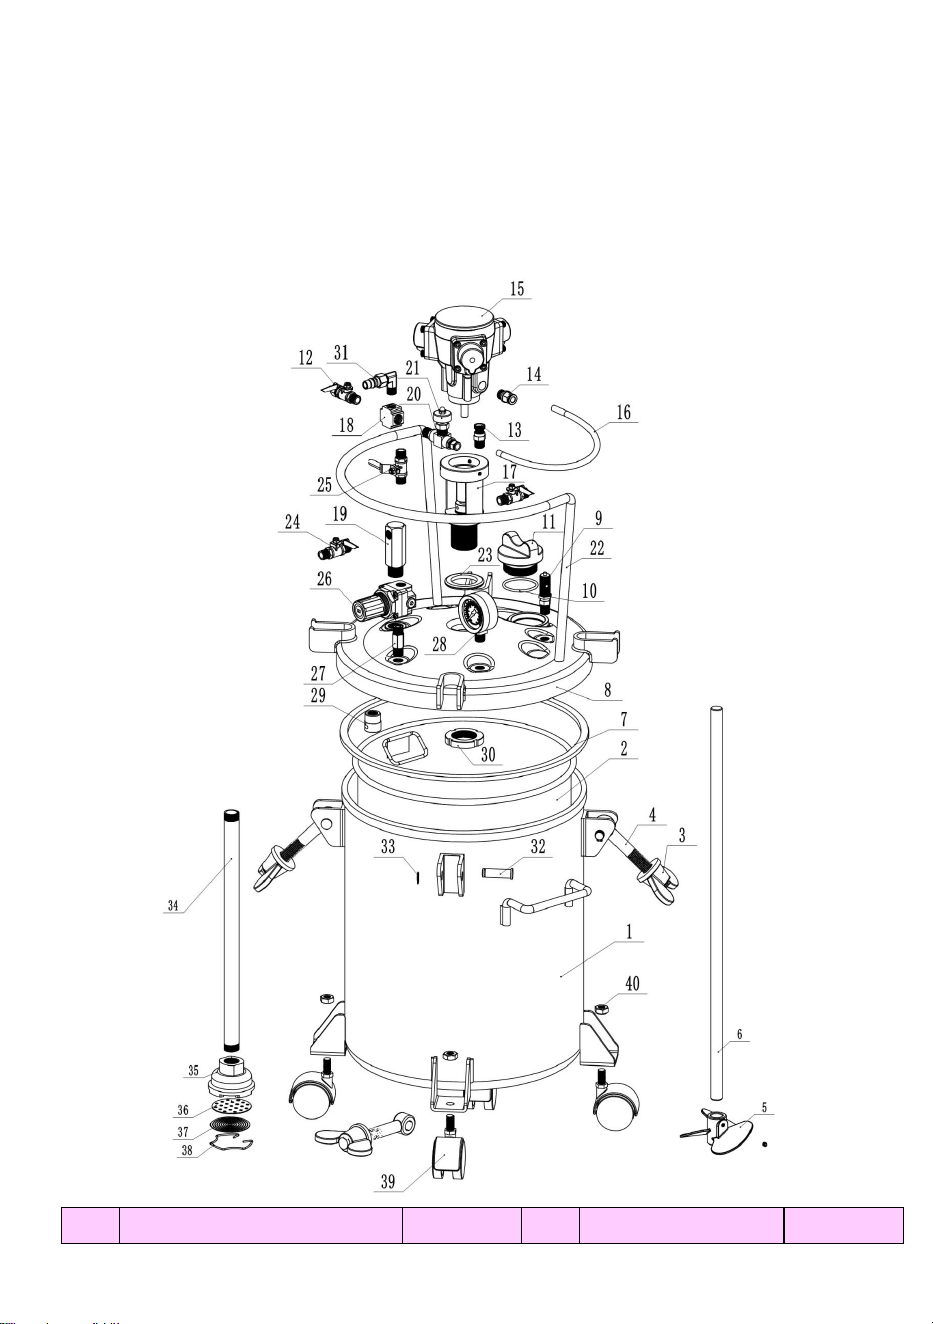
Schematic diagram of JY-ZDS30L decomposition
SN
name
QTY
SN
name
QTY
1
Pressure barrel body
1
21
Pneumatic regulating
valves
1
2
Inner barrel
1
22
handle
1
3
M16 butterfly nut
4
23
Gaskets
1
5
4
M16 union bolts
4
24
Discharge valve
2
5
Stir the blades
1
25
Intake valves
1
6
Mixing shaft
1
26
Regulators
1
7
Barrel lid sealing
gasket
1
27
Hexagonal joints
1
8
Barrel lid
1
28
Pressure gauge
1
9
relief valve
1
29
2 taps
1
10
0-rings
1
30
Round nuts
1
11
Inlet nut
1
31
Quick couplings
1
12
Outlet valve
1
32
Fixed latches
4
13
Bleed valve
1
33
Circlip
4
14
Quick couplings
1
34
Suction tube
1
15
Air motor
1
35
Paint tips
1
16
Trachea
1
36
Filter gaskets
1
17
Motor mounts
1
37
Strainer
1
18
Tee connector
1
38
Spring-loaded snaps
1
19
Hexagonal paint export
1
39
Movable wheels
4
20
Air intake joints
1
40
M10 nut
4
List of user thread specifications:
SN
Sales Market
valve
Thread specifications
1
North
American
Standards
Air intakes
American style
1/4"self-locking quick plug
tubing fitting
Air outlet (including
opening and closing
valve)
American 1/4",threaded
NPS,18teeth
Discharge port (with
opening and closing
valve)
American 3/8",threaded
NPS,18teeth
6
2
European
standard
Air intakes
European style 1/4"
self-locking quick plug
tubing fitting
Air outlet (including
opening and closing
valve)
European 1/4",thread G,
19teeth
Discharge port (with
opening and closing
valve)
European 3/8",thread
G,19teeth
3
Australian
standard
Air intakes
Japanese style 1/4"
self-locking quick plug
tubing fitting
Air outlet (including
opening and closing
valve)
European 1/4",thread G,
19teeth
Discharge port (with
opening and closing
valve)
European 3/8",thread G,
19teeth
7
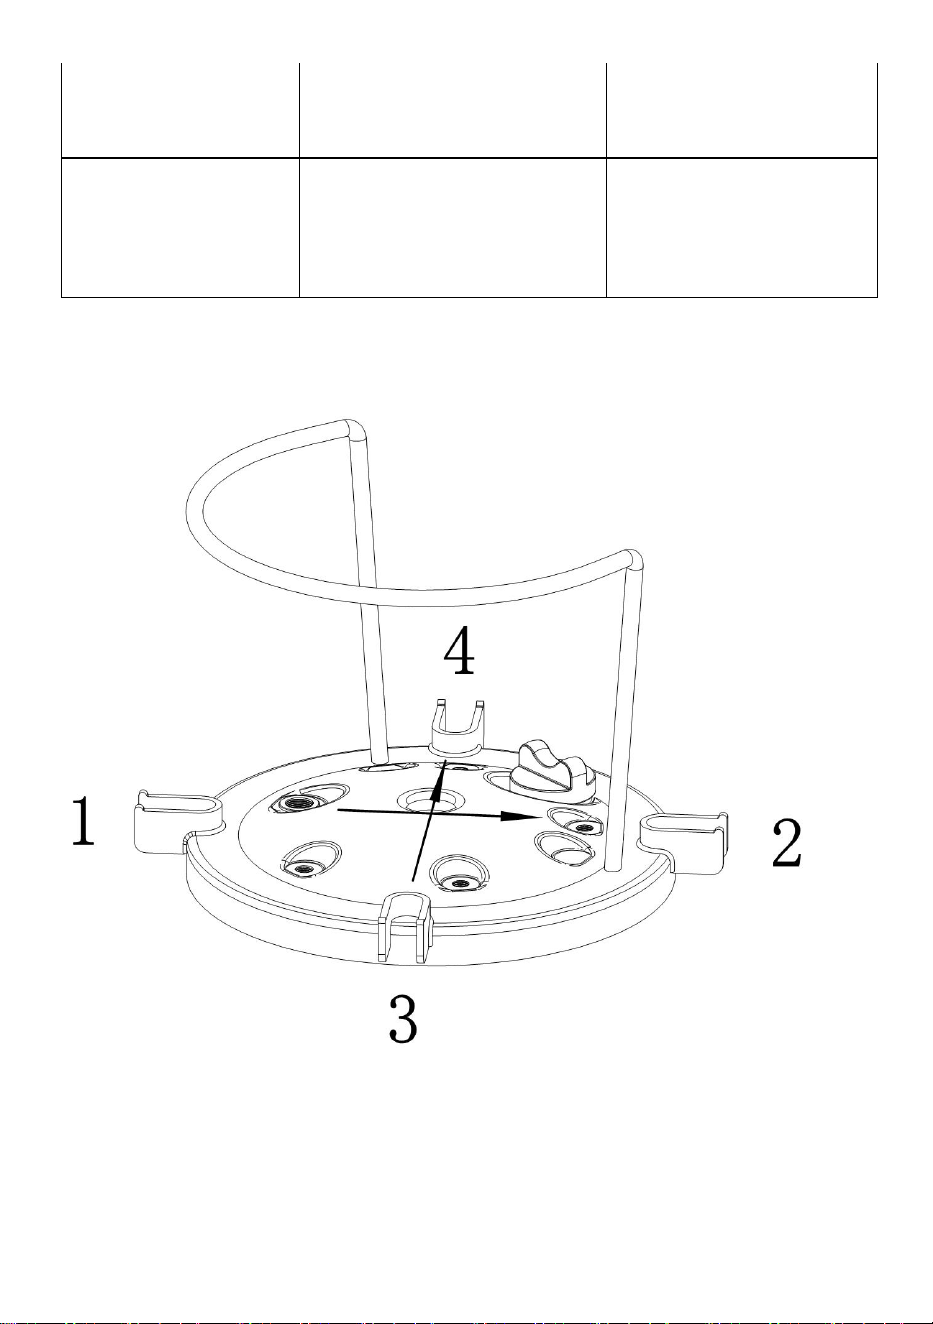
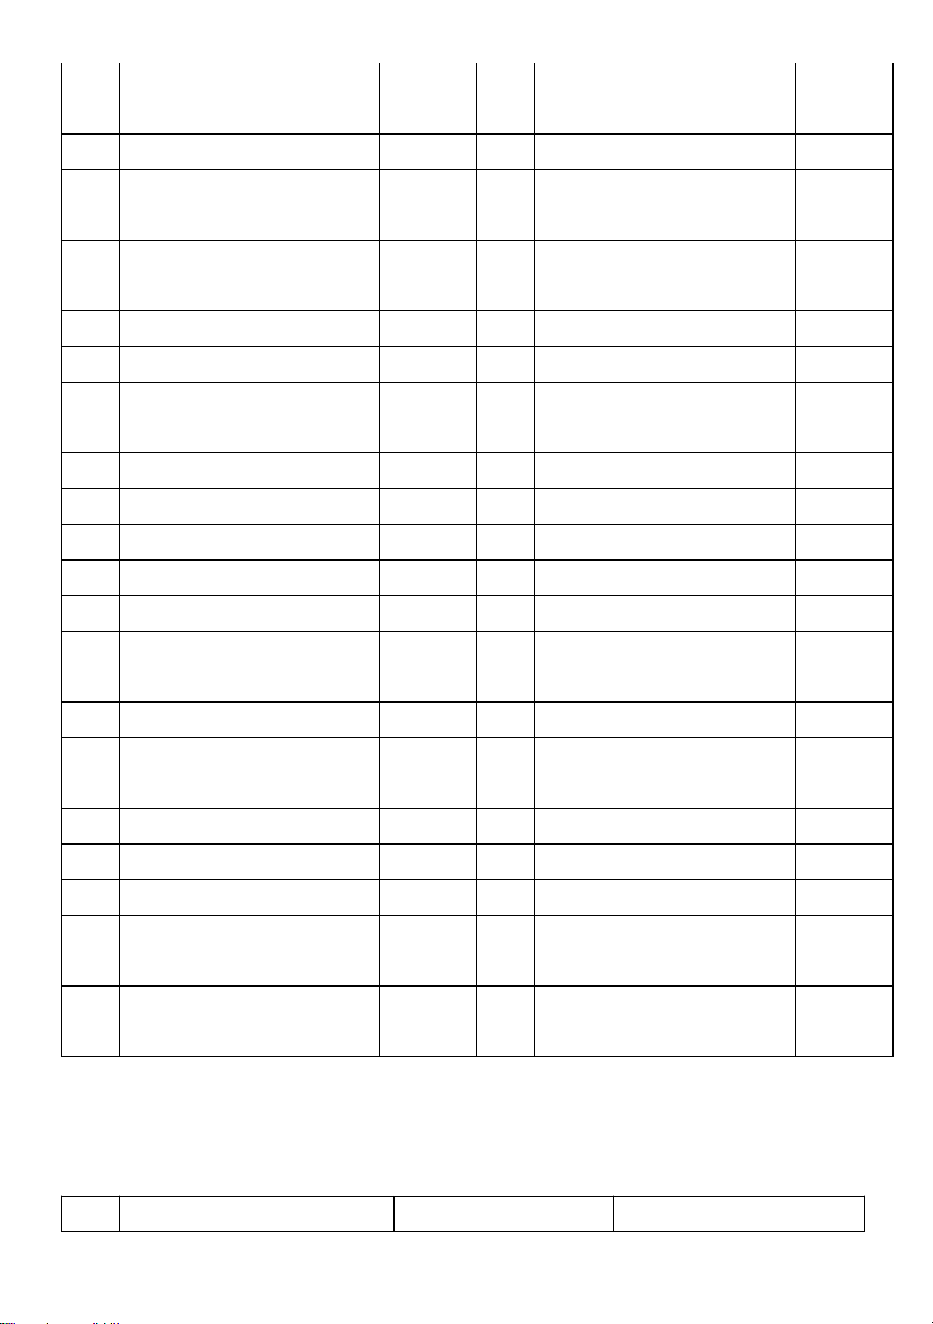
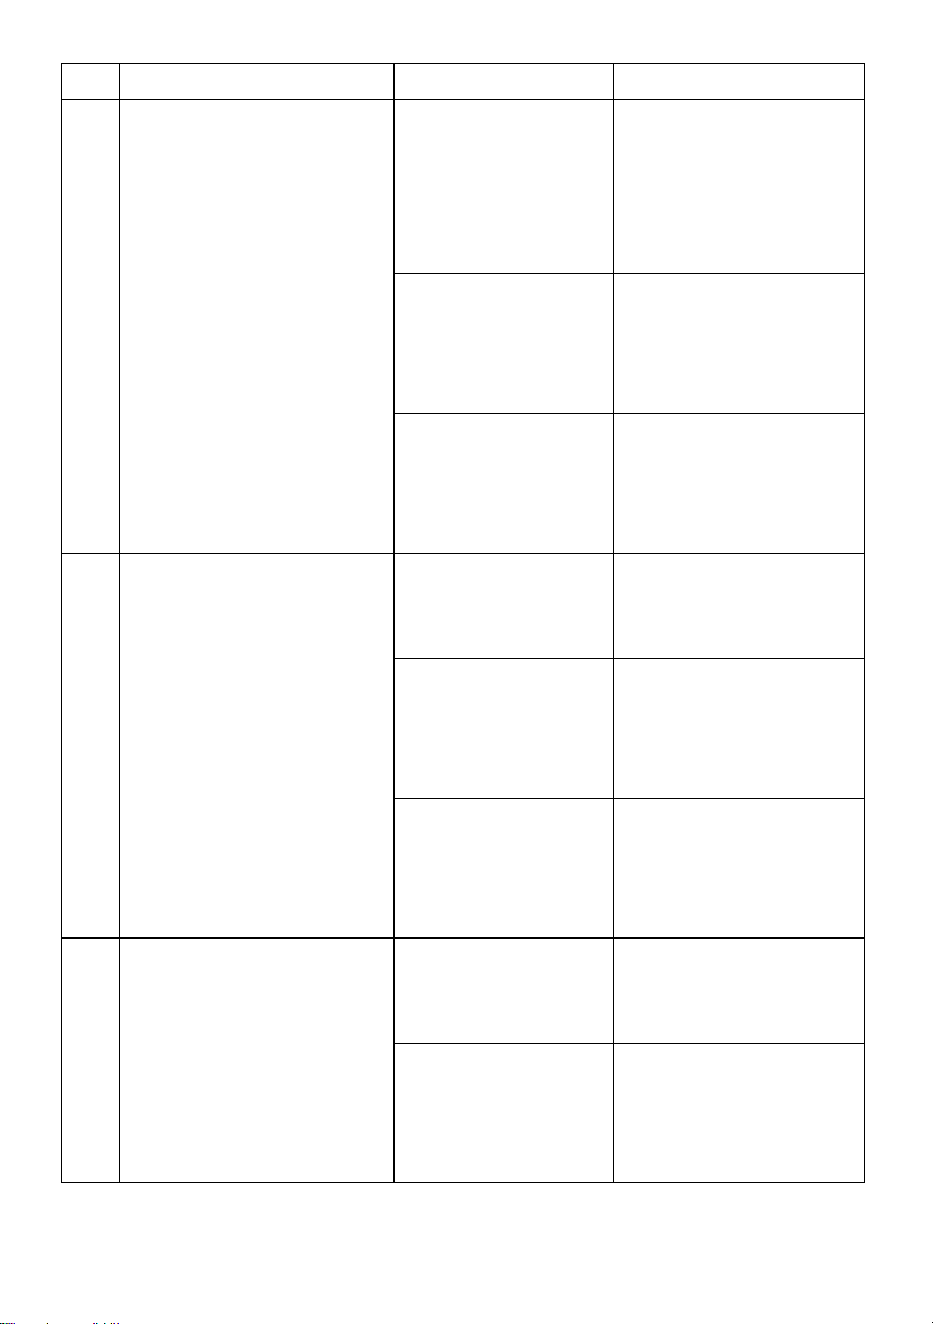
How to use
1.Before use, please make sure that there can be no residual pressure in
the pressure barrel, if there is residual pressure, the operator can pull open
the Red Hat safety valve bleed pull ring on the pressure barrel lid to
completely release the air pressure inside the pressure barrel to ensure
safety.
2.Loosen the wing nut and open the lid after the bolt is unionized
3.Close all valves, the sprayer inlet is connected to the barrel outlet (24),
and the sprayer inlet is connected to the barrel outlet valve (12)
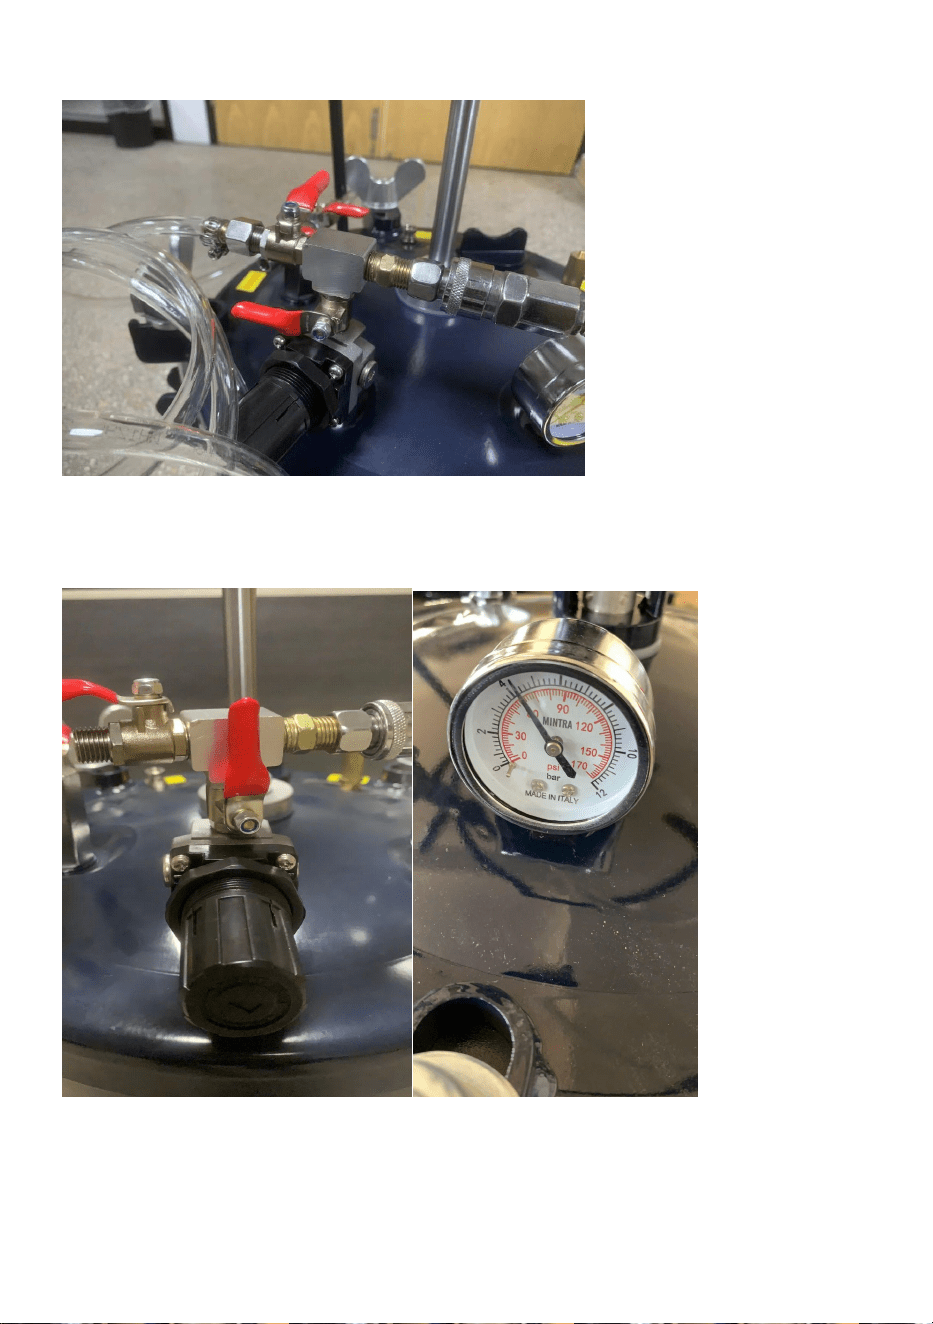
8
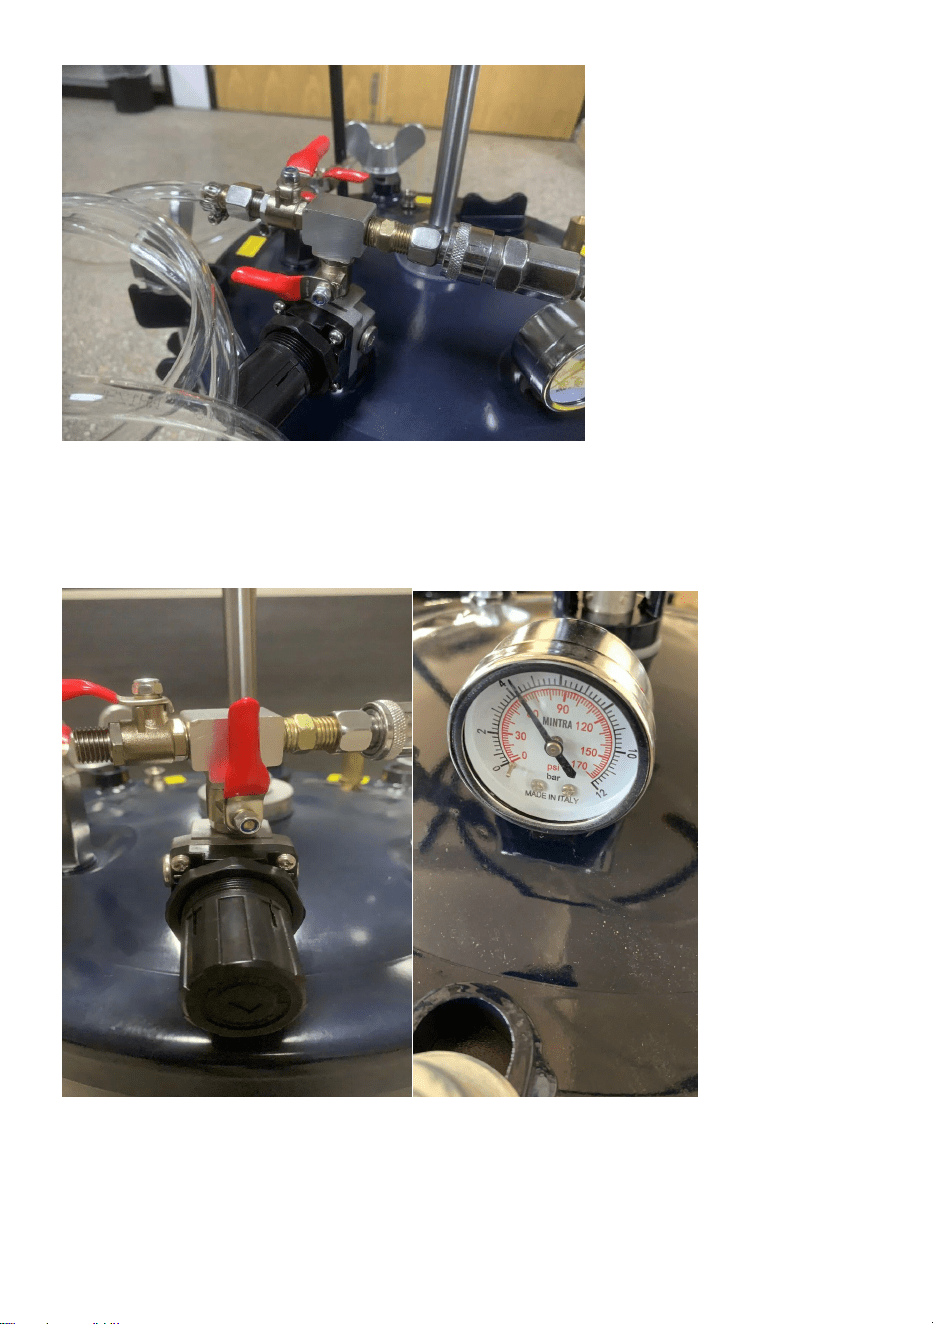
4.Connect the air intake connector (20) and open the air intake valve (25).
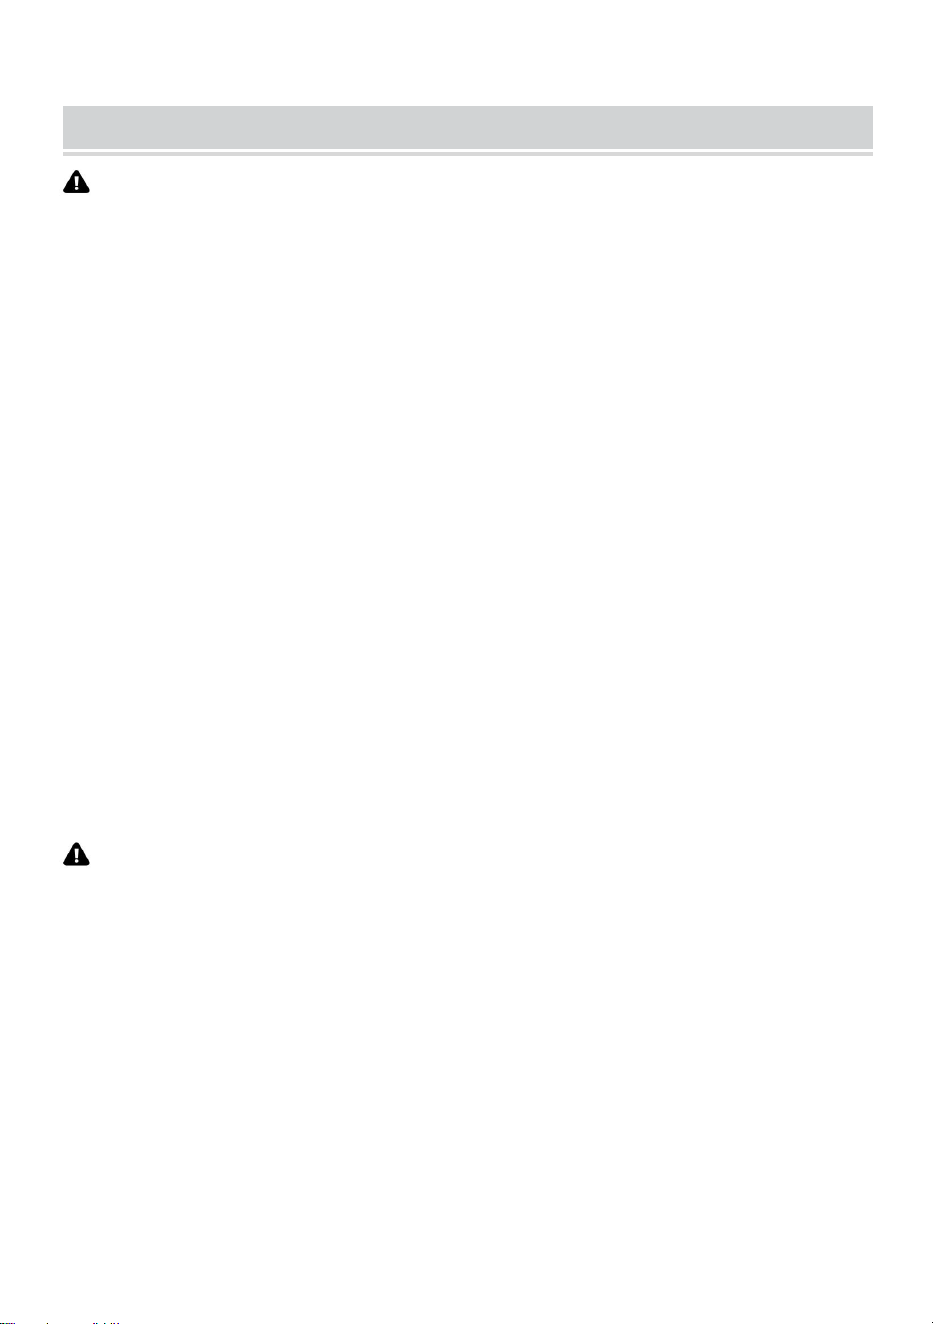
5.Adjust the inlet pressure regulator and rotate clockwise to adjust to the
required working pressure, if you want to reduce the pressure in the barrel,
rotate in a counterclockwise direction.

9
6.Open the outlet valve(12)open the discharge valve(24)
7.If the paint settles, turn on the air motor to stir.
Maintenance
1. After use, cut off the air source. Open the balloon valve switch on the lid to
completely release the air in the barrel, then loosen the butterfly bolt, open the
lid of the barrel, pour out the residual paint in the barrel, and clean all parts that
have been touched by the paint with an appropriate amount of solvent.
2.
Pour the cleaning solvent into the bucket, close the lid to lock it, open the
intake valve, and operate the sprayer until the clean solvent appears.
3.
Safety valves must be kept clean at all times.
Air leakage remedy
Note: If you find air leakage during use, please apply the glue evenly along
here, and then close the lid of the barrel; tighten the screws while the pressure
reaches 15PSI; The time is about 10 seconds, so that the glue completely
penetrates the leakage, close the intake valve, open the pressure relief
plunger, and stand still for 6-8 hours before continuing to use the glue after it is
completely solidified.

10
Troubleshooting
Fault
The cause of the failure
Exclusion method
The pointer of the
pressure gauge
connected to the air
supply does not
move
1. The air source is not
normal
2. The intake valve is not
open
3.Other valves are not
closed
1. Adjust the air source
to normal
2. Open the intake
valve
3. Close other valves
Paint barrel lid
leakage
1. When the barrel lid is
combined with the barrel
body, the butterfly nut is
not tightened diagonally
2. The parts on the barrel
lid are poorly sealed
1. Follow Article 3 of
the Terms of Use
2. Refer to the remedy
for air leakage
11
No paint
1.The discharge valve is
not open
1.0pen the discharge
valve
Poor paint effect
1.The pressure is too high
or too low
2.Spraying equipment
problems
1.Adjust to normal
pressure
2.Repair of spraying
equipment
Make sure to lock the bucket lid diagonally order of operations; 1-2 3-4

Address: Shuangchenglu 803nong11hao1602A-1609shi, baoshanqu,
shanghai 200000 CN.
Imported to AUS: SIHAO PTY LTD. 1 ROKEVA STREETEASTWOOD NSW
2122 Australia
Imported to USA: Sanven Technology Ltd. Suite 250, 9166 Anaheim Place,
Rancho Cucamonga, CA 91730
Made In China
REP
UK
E-CrossStu GmbH
Mainzer Landstr.69, 60329 Frankfurt am Main.
REP
EC
YH CONSULTING LIMITED.
C/O YH Consulting Limited Office 147, Centurion House,
London Road, Staines-upon-Thames, Surrey, TW18 4AX


Assistance technique et certificat de garantie électronique
www.vevor.com/support
POT DE PEINTURE SOUS PRESSION
MANUEL D'UTILISATION
Nous continuons à nous engager à vous fournir des outils à des prix compétitifs.
"Économisez la moitié", "Moitié prix" ou toute autre expression similaire utilisée uniquement
par nous
représente une estimation des économies dont vous pourriez bénéficier en achetant
certains outils
avec nous par rapport aux grandes marques et ne signifie pas nécessairement couverture
toutes les catégories d'outils que nous proposons. Nous vous rappelons de bien vouloir
vérifier soigneusement
lorsque vous passez une commande chez nous si vous êtes réellement Économie
Moitié en comparaison avec les plus grandes marques.


1
MODÈLE: JY-ZDS30L
Photo pour référence
BESOIN D'AIDE ? CONTACTEZ-NOUS!
Vous avez des questions sur les produits ? Besoin d'une assistance
technique ? N'hésitez pas à nous contacter :
Assistance technique et certificat de garantie électronique
www.vevor.com/support
Il s'agit des instructions originales, veuillez lire attentivement toutes les
instructions du manuel avant de l'utiliser. VEVOR se réserve une
interprétation claire de notre manuel d’utilisation. L'apparence du produit
dépend du produit que vous avez reçu. Veuillez nous pardonner que nous
ne vous informerons plus s'il y a des mises à jour technologiques ou
logicielles sur notre produit.
PRESSURE PAINT POT
2
SAFETY INSTRUCTION AND PRECAUTIONS
AVERTISSEMENT:
Lisez ce document avant d'utiliser ce produit. Ne pas le faire peut entraîner
des blessures graves.
1. Assemblez uniquement selon ces instructions. Un assemblage incorrect
peut créer des dangers.
2. Portez des lunettes de sécurité approuvées par l'ANSI et des gants de
travail robustes pendant l'assemblage.
3. Gardez la zone de montage propre et bien éclairée.
4. Gardez les spectateurs hors de la zone pendant l'assemblage.
5. Ne vous rassemblez pas lorsque vous êtes fatigué ou sous l'influence
de l'alcool, de drogues ou de médicaments.
6. Les capacités du produit s'appliquent uniquement au produit
correctement et complètement assemblé.
7. Assemblez sur une surface plane, nivelée, dure et lisse, capable de
supporter en toute sécurité un pot de peinture sous pression entièrement
chargé.
AVERTISSEMENT:
1. Ce produit n’est pas un jouet. Ne laissez pas les enfants jouer avec ou à
proximité de cet article. Il est interdit aux enfants ou aux personnes
handicapées physiques d'utiliser ce produit, et il est interdit aux personnes
qui ne savent pas comment l'utiliser en toute sécurité de faire fonctionner
ce produit.
2. Ce produit 10 L permet à la peinture d'être pressurisée à 7 0PSI, et la
pression de fonctionnement maximale ne doit pas dépasser 8 0PSI, sinon
cela entraînera un risque pour la sécurité personnelle .
3. La soupape de sécurité sur le baril de pression est utilisée pour protéger
la pression normale dans le baril de pression, éviter une pression

3
excessive. La pression d'un dispositif de sécurité, avant que le produit ne
quitte l'usine, a été réglée dans la plage de pression admissible, dans l'état
normal d'utilisation, ne pas retirer à volonté, ne pas ajuster à volonté .
4. Ce produit ne doit effectuer aucune forme de modification, ni s'engager
dans des opérations dangereuses telles que le perçage, le soudage, etc.,
qui pourraient produire un effet de trempe, endommageant le cylindre de
pression, ce qui affecterait la durée de vie du produit.
5. Il est strictement interdit de verser un liquide fortement acide et alcalin
dans ce produit pour éviter la corrosion du corps du réservoir et provoquer
des blessures.
6. Utiliser uniquement comme prévu.
7. Inspectez avant chaque utilisation ; ne pas utiliser si les pièces sont
desserrées ou endommagées.
8. Après avoir pulvérisé ce produit, il doit être soigneusement nettoyé pour
prolonger la durée de vie du produit .
Préface
Ce baril de peinture est composé d'une soupape de régulation de pression
d'air, d'une soupape de sécurité, d'une soupape de ventilation, d'un orifice
de décharge et de quatre roues mobiles. Toutes les pièces sont fabriquées
avec les meilleurs matériaux et ont passé un contrôle de qualité strict, et
l'apparence est traitée avec de la peinture au four, afin de pouvoir atteindre
l'objectif de durabilité .

4
Diagramme schématique de la décomposition du
JY-ZDS30L

5
SN
nom
QTÉ
SN
nom
QTÉ
1
Corps du canon à
pression
1
21
Vannes de régulation
pneumatiques
1
2
Canon intérieur
1
22
poignée
1
3
Écrou papillon M16
4
23
Joints
1
4
Boulons-union M16
4
24
Soupape de décharge
2
5
Remuez les lames
1
25
Soupapes d'admission
1
6
6
Arbre de mélange
1
26
Régulateurs
1
7
Joint d'étanchéité du
couvercle du fût
1
27
Articulations
hexagonales
1
8
Couvercle de baril
1
28
Manomètre
1
9
soupape de décharge
1
29
2 robinets
1
10
0 anneaux
1
30
Noix rondes
1
11
Écrou d'entrée
1
31
Raccords rapides
1
12
Soupape de sortie
1
32
Loquets fixes
4
13
Vanne de purge
1
33
Circlips
4
14
Raccords rapides
1
34
Tube d'aspiration
1
15
Moteur pneumatique
1
35
Conseils de peinture
1
16
Trachée
1
36
Joints de filtre
1
17
Supports moteur
1
37
Passoire
1
18
Connecteur en T
1
38
Boutons-pression à
ressort
1
19
Exportation de peinture
hexagonale
1
39
Roues mobiles
4
20
Joints d'admission d'air
1
40
Écrou M10
4
Liste des spécifications du thread utilisateur :
SN
M arché de vente
soupape
Spécifications du fil
1
Normes
nord-américaines
Prises d'air
Style américain 1/4"
autobloquant raccord de
tube à bouchon rapide
Sortie d'air (y
compris vanne
d'ouverture et de
fermeture)
Américain 1/4", fileté
NPS, 18 dents
Orifice de décharge
(avec vanne
d'ouverture et de
Américain 3/8",fileté
NPS,18dents
7
fermeture)
2
Norme
européenne
Prises d'air
Raccord de tube à prise
rapide autobloquant de
1/4 "de style européen
Sortie d'air (y
compris vanne
d'ouverture et de
fermeture)
Européen 1/4",filetage
G, 19 dents
Orifice de décharge
(avec vanne
d'ouverture et de
fermeture)
Européen 3/8",filetage
G,19dents
3
Norme
australienne
Prises d'air
Raccord de tube à prise
rapide autobloquant 1/4"
de style japonais
Sortie d'air (y
compris vanne
d'ouverture et de
fermeture)
Européen 1/4",filetage
G, 19 dents
Orifice de décharge
(avec vanne
d'ouverture et de
fermeture)
Européen 3/8",filetage
G, 19 dents
8
Comment utiliser
1. Avant utilisation, veuillez vous assurer qu'il ne peut y avoir aucune
pression résiduelle dans le baril de pression. S'il y a une pression
résiduelle, l'opérateur peut ouvrir l'anneau de purge de la soupape de
sécurité Red Hat sur le couvercle du baril de pression pour libérer
complètement la pression de l'air. à l'intérieur du baril de pression pour
assurer la sécurité .
2 . Desserrez l'écrou à oreilles et ouvrez le couvercle une fois le boulon
syndiqué.
3 . Fermez toutes les vannes, l'entrée du pulvérisateur est connectée à la
sortie du baril (24) et l'entrée du pulvérisateur est connectée à la vanne de
sortie du baril (12).

9
4 . Connectez le connecteur d'admission d'air (20) et ouvrez la vanne
d'admission d'air (25).
5 . Ajustez le régulateur de pression d'entrée et tournez dans le sens des
aiguilles d'une montre pour régler la pression de travail requise. Si vous
souhaitez réduire la pression dans le canon, tournez dans le sens inverse
des aiguilles d'une montre.

10
6 . Ouvrir la vanne de sortie (12) ouvrir la vanne de décharge (24)
7 . Si la peinture se dépose, allumez le moteur pneumatique pour remuer.
11
Entretien
2. Après utilisation, coupez la source d'air. Ouvrez l'interrupteur de la valve du
ballon sur le couvercle pour libérer complètement l'air dans le baril, puis
desserrez le boulon papillon, ouvrez le couvercle du baril, versez la peinture
résiduelle dans le baril et nettoyez toutes les pièces qui ont été touchées par la
peinture. avec une quantité appropriée de solvant.
2.
Versez le solvant de nettoyage dans le seau, fermez le couvercle pour le
verrouiller, ouvrez la vanne d'admission et faites fonctionner le pulvérisateur
jusqu'à ce que le solvant propre apparaisse .
3.
Les soupapes de sécurité doivent être maintenues propres à tout moment .
Remède contre les fuites d'air
Remarque : si vous constatez une fuite d'air pendant l'utilisation, veuillez
appliquer la colle uniformément ici, puis fermez le couvercle du baril ; serrez
les vis jusqu'à ce que la pression atteigne 15PSI ; Le temps est d'environ 10
secondes, pour que la colle pénètre complètement dans la fuite, ferme la
soupape d'admission, ouvre le piston de décompression et reste immobile
12
pendant 6 à 8 heures avant de continuer à utiliser la colle une fois qu'elle est
complètement solidifiée .
Dépannage
Faute
La cause de l'échec
Méthode d'exclusion
L'aiguille du
manomètre relié à
l'arrivée d'air ne
bouge pas
1. La source d'air n'est pas
normale
2. La soupape d'admission
n'est pas ouverte
3.Les autres vannes ne
sont pas fermées
1. Réglez la source d'air
à la normale
2. Ouvrez la soupape
d'admission
3. Fermez les autres
vannes
13
Fuite du couvercle
du baril de peinture
1. Lorsque le couvercle du
fût est combiné avec le
corps du fût, l'écrou
papillon n'est pas serré en
diagonale
2. Les pièces sur le
couvercle du fût sont mal
scellées
1. Suivez l'article 3 des
conditions d'utilisation
2. Reportez-vous au
remède en cas de fuite
d'air
Pas de peinture
1. La vanne de décharge
n'est pas ouverte
1.0ouvrir la soupape de
décharge
Mauvais effet de
peinture
1. La pression est trop
élevée ou trop basse
2.Problèmes d’équipement
de pulvérisation
1. Ajuster à la pression
normale
2.Réparation du
matériel de
pulvérisation
Assurez-vous de verrouiller le couvercle du seau en diagonale dans
l'ordre des opérations ; 1-2 3-4

14
Adresse : Shuangchenglu 803nong11hao1602A-1609shi, baoshanqu,
Shanghai 200000 CN.
Importé en Australie : SIHAO PTY LTD. 1 ROKEVA STREETASTWOOD
NSW 2122 Australie
Importé aux États-Unis : Sanven Technology Ltd. Suite 250, 9166 Anaheim
Place, Rancho Cucamonga, CA 91730
Fabriqué en Chine
REP
UK
E-CrossStu GmbH
Mainzer Landstr.69, 60329 Frankfurt am Main.
REP
EC
YH CONSULTING LIMITED.
C/O YH Consulting Limited Office 147, Centurion House,
London Road, Staines-upon-Thames, Surrey, TW18 4AX


Technischer Support und E-Garantie-Zertifikat
www.vevor.com/support
DRUCKFARBTOPF
BENUTZERHANDBUCH
Wir sind weiterhin bestrebt, Ihnen Werkzeuge zu wettbewerbsfähigen Preisen anzubieten.
"Sparen Sie die Hälfte", "Halber Preis" oder andere ähnliche Ausdrücke, die wir nur
verwenden
stellt eine Schätzung der Einsparungen dar, die Sie durch den Kauf bestimmter Werkzeuge
erzielen können
mit uns im Vergleich zu den großen Top-Marken und bedeutet nicht unbedingt, Abdeckung
alle von uns angebotenen Werkzeugkategorien. Wir möchten Sie bitten, zu überprüfen
sorgfältig
wenn Sie bei uns eine Bestellung aufgeben, wenn Sie tatsächlich Speichern
Hälfte im Vergleich mit den Top-Großmarken.


1
MODELL: JY-ZDS30L
Foto als Referenz
Brauchen Sie Hilfe? Kontaktieren Sie uns!
Sie haben Fragen zu unseren Produkten? Sie benötigen technischen
Support? Dann kontaktieren Sie uns gerne:
Technischer Support und E-Garantie-Zertifikat
www.vevor.com/support
Dies ist die Originalanleitung. Bitte lesen Sie alle Anweisungen sorgfältig
durch, bevor Sie das Gerät in Betrieb nehmen. VEVOR behält sich eine
klare Auslegung unserer Bedienungsanleitung vor. Das Erscheinungsbild
des Produkts richtet sich nach dem Produkt, das Sie erhalten haben. Bitte
verzeihen Sie uns, dass wir Sie nicht erneut informieren, wenn es
Technologie- oder Software-Updates für unser Produkt gibt .
PRESSURE PAINT POT

2
SAFETY INSTRUCTION AND PRECAUTIONS
WARNUNG:
Lesen Sie dieses Material, bevor Sie dieses Produkt verwenden.
Andernfalls kann es zu schweren Verletzungen kommen.
1. Führen Sie die Montage ausschließlich gemäß dieser Anleitung durch.
Eine unsachgemäße Montage kann zu Gefahren führen.
2. Tragen Sie während der Montage eine ANSI-geprüfte Schutzbrille und
robuste Arbeitshandschuhe.
3. Halten Sie den Versammlungsbereich sauber und gut beleuchtet.
4. Halten Sie während der Montage unbeteiligte Zuschauer vom Bereich
fern.
5. Nicht zusammenbauen, wenn Sie müde sind oder unter dem Einfluss
von Alkohol, Drogen oder Medikamenten stehen.
6. Die Produktfunktionen gelten nur für ordnungsgemäß und vollständig
montierte Produkte.
7.Auf einer flachen, ebenen, harten und glatten Oberfläche
zusammenbauen, die einen vollständig beladenen Druckfarbtopf sicher
tragen kann.
WARNUNG:
1. Dieses Produkt ist kein Spielzeug. Erlauben Sie Kindern nicht, mit
diesem Produkt zu spielen oder in seiner Nähe zu sein. Kindern oder
Personen mit körperlichen Behinderungen ist die Verwendung dieses
Produkts untersagt, und Personen, die nicht wissen, wie man es sicher
verwendet, ist die Verwendung dieses Produkts untersagt.
2. Mit diesem 10 -Liter-Produkt kann die Farbe auf einen Druck von 70 PSI
gebracht werden. Der maximale Betriebsdruck darf 80 PSI nicht
überschreiten, da sonst eine Gefährdung der persönlichen Sicherheit
entsteht .

3
3. Das Sicherheitsventil am Druckfass dient zum Schutz des Normaldrucks
im Druckfass und zur Vermeidung von Überdruck Der Druck einer
Sicherheitsvorrichtung wurde vor Verlassen des Werks auf den zulässigen
Druckbereich eingestellt. Im normalen Gebrauchszustand darf er nicht
willkürlich entfernt oder verstellt werden .
4. An diesem Produkt dürfen keine Modifikationen oder gefährliche
Vorgänge wie Bohren, Schweißen usw. durchgeführt werden, da dies zu
einer Härtung führen und den Druckbehälter beschädigen könnte, was
wiederum die Lebensdauer des Produkts beeinträchtigt.
5. Es ist strengstens verboten, stark saure oder alkalische Flüssigkeiten in
dieses Produkt zu gießen, um eine Korrosion des Tankkörpers und damit
verbundene Verletzungen zu vermeiden.
6. Nur bestimmungsgemäß verwenden.
7. Vor jedem Gebrauch prüfen; nicht verwenden, wenn Teile lose oder
beschädigt sind.
8. Nach dem Besprühen mit diesem Produkt muss es gründlich gereinigt
werden, um die Lebensdauer des Produkts zu verlängern .
Vorwort
Dieses Farbfass besteht aus einem Luftdruckregelventil, einem
Sicherheitsventil, einem Entlüftungsventil, einem Auslassanschluss und
vier beweglichen Rädern. Alle Teile sind aus den besten Materialien
gefertigt und haben eine strenge Qualitätskontrolle durchlaufen. Das
Erscheinungsbild ist mit Einbrennfarbe behandelt, sodass es den Zweck
der Haltbarkeit erfüllt .

4
Schematische Darstellung der JY-ZDS30L- Zerlegung
5
SN
Name
Menge
SN
Name
Menge
1
Druckfasskörper
1
21
Pneumatische
Regelventile
1
2
Innenlauf
1
22
handhaben
1
3
M16 Flügelmutter
4
23
Dichtungen
1
4
M16 Überwurfschrauben
4
24
Auslassventil
2
5
Rühren Sie die Klingen
1
25
Einlassventile
1
6
6
Mischwelle
1
26
Regulierungsbehörden
1
7
Dichtung für Fassdeckel
1
27
Sechskantverbindungen
1
8
Fassdeckel
1
28
Manometer
1
9
Überdruckventil
1
29
2 Wasserhähne
1
10
0-Ringe
1
30
Rundmuttern
1
11
Einlassmutter
1
31
Schnellkupplungen
1
12
Auslassventil
1
32
Feste Verriegelungen
4
13
Entlüftungsventil
1
33
Sicherungsring
4
14
Schnellkupplungen
1
34
Saugrohr
1
15
Druckluftmotor
1
35
Tipps zum Lackieren
1
16
Luftröhre
1
36
Filterdichtungen
1
17
Motorhalterungen
1
37
Sieb
1
18
T-Stück
1
38
Federbelastete
Druckknöpfe
1
19
Export von
Sechseckfarben
1
39
Bewegliche Räder
4
20
Luftansaugverbindungen
1
40
M10 Mutter
4
Liste der Benutzer-Thread-Spezifikationen :
S
N
Verkaufsmarkt
Ventil
Gewindespezifikationen
1
Nordamerikanisc
he Normen
Lufteinlässe
Amerikanische Bauform 1/4"
selbstsichernd
Schnellsteck-Schlauchverschraub
ung
Luftauslass
(inkl.
Öffnungs-
und
Schließventil
)
Amerikanisch 1/4", Gewinde NPS,
18 Zähne
7
Druckanschl
uss (mit
Öffnungs-
und
Schließventil
)
Amerikanisch 3/8", Gewinde NPS,
18 Zähne
2
Europäische
Norm
Lufteinlässe
Selbstsichernde
1/4"-Schnellsteck-Schlauchversch
raubung im europäischen Stil
Luftauslass
(inkl.
Öffnungs-
und
Schließventil
)
Europäisches 1/4", Gewinde G,
19 Zähne
Druckanschl
uss (mit
Öffnungs-
und
Schließventil
)
Europäisches 3/8", Gewinde G,
19 Zähne
3
Australischer
Standard
Lufteinlässe
Selbstsichernde
1/4"-Schnellsteck-Schlauchverbin
dung im japanischen Stil
Luftauslass
(inkl.
Öffnungs-
und
Schließventil
)
Europäisches 1/4", Gewinde G,
19 Zähne
Druckanschl
uss (mit
Öffnungs-
und
Europäisches 3/8", Gewinde G,
19 Zähne

8
Schließventil
)
Anwendung
1. Stellen Sie vor der Verwendung sicher, dass sich im Druckfass kein
Restdruck befindet. Wenn ein Restdruck vorhanden ist, kann der Bediener
den Entlüftungsring des Red Hat-Sicherheitsventils am Deckel des
Druckfasses öffnen, um den Luftdruck im Druckfass vollständig
abzulassen und so die Sicherheit zu gewährleisten .
2. Lösen Sie die Flügelmutter und öffnen Sie den Deckel, nachdem der
Bolzen befestigt ist
9
3. Alle Ventile schließen , der Spritzeneinlass wird mit dem Fassauslass
(24) verbunden, und der Spritzeneinlass wird mit dem Fassauslassventil
(12) verbunden .
4. Den Luftansauganschluss (20) anschließen und das Luftansaugventil (25)
öffnen.

10
5. Stellen Sie den Eingangsdruckregler ein und drehen Sie ihn im
Uhrzeigersinn, um den erforderlichen Arbeitsdruck einzustellen. Wenn Sie
den Druck im Fass verringern möchten, drehen Sie ihn gegen den
Uhrzeigersinn.
11
6. Öffnen Sie das Auslassventil (12) und das Auslassventil (24) .
7. Wenn sich die Farbe absetzt, schalten Sie den Druckluftmotor zum
Umrühren ein .
Wartung
3. Nach Gebrauch die Luftzufuhr abschalten. Öffnen Sie den
Ballonventilschalter am Deckel, um die Luft im Fass vollständig abzulassen,
lösen Sie dann den Flügelbolzen, öffnen Sie den Fassdeckel, gießen Sie die
restliche Farbe im Fass aus und reinigen Sie alle Teile, die mit der Farbe in
Berührung gekommen sind, mit einer angemessenen Menge Lösungsmittel.
2.
Gießen Sie das Reinigungsmittel in den Eimer, verriegeln Sie ihn mit dem
Deckel, öffnen Sie das Ansaugventil und betätigen Sie die Spritze, bis das
saubere Reinigungsmittel austritt .
3.
Sicherheitsventile müssen stets sauber gehalten werden .
Abhilfe bei Luftlecks
Hinweis: Wenn Sie während des Gebrauchs ein Luftleck feststellen, tragen
Sie den Kleber hier gleichmäßig auf und schließen Sie dann den Deckel des
Fasses. Ziehen Sie die Schrauben fest, während der Druck 15 PSI erreicht.
12
Die Zeit beträgt etwa 10 Sekunden, damit der Kleber das Leck vollständig
durchdringen kann. Schließen Sie das Ansaugventil, öffnen Sie den
Druckentlastungskolben und lassen Sie den Kleber 6–8 Stunden lang ruhig
stehen, bevor Sie ihn weiter verwenden, nachdem er vollständig ausgehärtet
ist .
Fehlerbehebung
Fehler
Die Ursache des
Scheiterns
Ausschlussmethode
Der Zeiger des an
die Luftversorgung
angeschlossenen
Manometers
bewegt sich nicht
1. Die Luftquelle ist nicht
normal
2. Das Einlassventil ist nicht
geöffnet
3.Andere Ventile sind nicht
geschlossen
1. Stellen Sie die
Luftquelle auf normal
2. Öffnen Sie das
Einlassventil
3. Andere Ventile
schließen
13
Undichtigkeit im
Farbfassdeckel
1. Wenn der Fassdeckel
mit dem Fasskörper
kombiniert wird, wird die
Flügelmutter nicht
diagonal angezogen
2. Die Teile am Fassdeckel
sind schlecht abgedichtet
1. Befolgen Sie Artikel 3
der
Nutzungsbedingungen
2. Siehe Abhilfe bei
Luftleckage
Keine Farbe
1.Das Auslassventil ist nicht
geöffnet
1.0Öffnen Sie das
Auslassventil
Schlechter
Lackeffekt
1.Der Druck ist zu hoch
oder zu niedrig
2. Probleme mit der
Sprühausrüstung
1.Auf Normaldruck
einstellen
2.Reparatur von
Spritzgeräten
Achten Sie darauf, den Eimerdeckel diagonal zu verriegeln. Reihenfolge
der Vorgänge: 1-2 3-4
14

Adresse: Shuangchenglu 803nong11hao1602A-1609shi, baoshanqu,
Shanghai 200000 CN.
Nach AUS importiert: SIHAO PTY LTD. 1 ROKEVA STREETEASTWOOD
NSW 2122 Australien
Importiert in die USA: Sanven Technology Ltd. Suite 250, 9166 Anaheim
Place, Rancho Cucamonga, CA 91730
In China hergestellt
REP
UK
E-CrossStu GmbH
Mainzer Landstr.69, 60329 Frankfurt am Main.
REP
EC
YH CONSULTING LIMITED.
C/O YH Consulting Limited Office 147, Centurion House,
London Road, Staines-upon-Thames, Surrey, TW18 4AX


Supporto tecnico e certificato di garanzia elettronica
www.vevor.com/support
VASO PER VERNICE A PRESSIONE
MANUALE D'USO
Continuiamo a impegnarci per fornirvi strumenti a prezzi competitivi.
"Risparmia la metà", "Metà prezzo" o qualsiasi altra espressione simile utilizzata solo da noi
rappresenta una stima del risparmio che potresti trarre dall'acquisto di determinati strumenti
con noi rispetto ai principali marchi più importanti e non significa necessariamente farlo
copertina
tutte le categorie di strumenti da noi offerti. Si ricorda gentilmente di verificare
accuratamente
quando effettui un ordine con noi, se lo sei effettivamente Risparmio
Metà rispetto ai principali marchi.


1
MODELLO: JY-ZDS30L
Foto per riferimento
HAI BISOGNO DI AIUTO? CONTATTACI!
Hai domande sul prodotto? Hai bisogno di supporto tecnico? Non
esitate a contattarci:
Supporto tecnico e certificato di garanzia elettronica
www.vevor.com/support
Queste sono le istruzioni originali, leggere attentamente tutte le istruzioni
del manuale prima dell'uso. VEVOR si riserva una chiara interpretazione
del nostro manuale d'uso. L'aspetto del prodotto sarà soggetto al prodotto
ricevuto. Ti preghiamo di perdonarci se non ti informeremo più se sono
presenti aggiornamenti tecnologici o software sul nostro prodotto.
PRESSURE PAINT POT

2
SAFETY INSTRUCTION AND PRECAUTIONS
AVVERTIMENTO:
Leggere questo materiale prima di utilizzare questo prodotto. In caso
contrario si potrebbero causare lesioni gravi.
1. Assemblare solo secondo queste istruzioni. Un montaggio improprio può
creare pericoli.
2. Indossare occhiali di sicurezza approvati ANSI e guanti da lavoro
pesanti durante il montaggio.
3.Mantenere l'area di assemblaggio pulita e ben illuminata.
4. Tenere gli astanti lontani dall'area durante l'assemblaggio.
5.Non montare in caso di stanchezza o sotto l'effetto di alcol, droghe o
farmaci.
6. Le funzionalità del prodotto si applicano solo al prodotto correttamente e
completamente assemblato.
7.Montare su una superficie piana, livellata, dura e liscia in grado di
sostenere in sicurezza un vaso di vernice a pressione completamente
carico.
AVVERTIMENTO:
1. Q uesto prodotto non è un giocattolo. Non permettere ai bambini di
giocare con o vicino a questo oggetto. Ai bambini o alle persone con
disabilità fisiche è vietato utilizzare questo prodotto e alle persone che non
sanno come utilizzarlo in sicurezza è vietato utilizzare questo prodotto
2. Questo prodotto da 10 L consente di pressurizzare la vernice a 7 0 PSI e
la pressione operativa massima non deve superare 8 0 PSI, altrimenti
causerà rischi per la sicurezza personale .
3. La valvola di sicurezza sul barile di pressione viene utilizzata per
proteggere la pressione normale nel barile di pressione, evitare un
eccesso La pressione di un dispositivo di sicurezza, prima che il prodotto
lasci la fabbrica, sia stata impostata entro l'intervallo di pressione

3
consentito, nel normale stato d'uso, non rimuovere a piacimento, non
regolare a piacimento .
4. Questo prodotto non deve eseguire alcuna forma di modifica, né
impegnarsi in operazioni pericolose come perforazione, saldatura, ecc.,
che potrebbero produrre un effetto di rinvenimento, danneggiando il
cilindro a pressione, che influisce sulla durata del prodotto.
5. È severamente vietato versare liquidi fortemente acidi e alcalini in
questo prodotto per evitare la corrosione del corpo del serbatoio e causare
lesioni personali.
6. Utilizzare solo come previsto.
7. Ispezionare prima di ogni utilizzo; non utilizzare se le parti sono allentate
o danneggiate.
8. Dopo aver spruzzato questo prodotto, è necessario pulirlo
accuratamente per prolungarne la durata .
Prefazione
Questo barile di vernice è composto da valvola di regolazione della
pressione dell'aria, valvola di sicurezza, valvola di sfiato, porta di scarico e
quattro ruote mobili. Tutte le parti sono realizzate con i migliori materiali e
hanno superato severi controlli di qualità e l'aspetto è trattato con vernice
da forno, in modo da poter raggiungere lo scopo di durabilità .

4
Diagramma schematico della decomposizione del
JY-ZDS30L
5
SN
nome
QUANTITÀ
SN
nome
QUANTITÀ
1
Corpo della
canna a
pressione
1
21
Valvole di
regolazione
pneumatiche
1
2
Canna interna
1
22
maniglia
1
3
Dado a farfalla
M16
4
23
Guarnizioni
1
6
4
Bulloni di unione
M16
4
24
Valvola di
scarico
2
5
Mescola le lame
1
25
Valvole di
aspirazione
1
6
Albero di
miscelazione
1
26
Regolatori
1
7
Guarnizione di
tenuta del
coperchio della
canna
1
27
Giunti esagonali
1
8
Coperchio a
botte
1
28
Manometro
1
9
valvola di
sicurezza
1
29
2 rubinetti
1
10
0-anelli
1
30
Noci rotonde
1
11
Dado di ingresso
1
31
Attacchi rapidi
1
12
Valvola di uscita
1
32
Chiusure fisse
4
13
Valvola di
spurgo
1
33
Anello elastico
4
14
Attacchi rapidi
1
34
Tubo di
aspirazione
1
15
Motore
pneumatico
1
35
Suggerimenti per
la pittura
1
16
Trachea
1
36
Guarnizioni filtro
1
17
Supporti motore
1
37
Filtro
1
18
Connettore a T
1
38
Scatti a molla
1
19
Esportazione di
vernice
esagonale
1
39
Ruote mobili
4
20
Giunti di
aspirazione
dell'aria
1
40
Dado M10
4
7
Elenco delle specifiche del thread utente :
SN
Mercato delle
vendite
valvola
Specifiche della filettatura
1
Standard
nordamericani
Prese d'aria
Autobloccante tipo
americano da 1/4".
raccordo rapido per tubo
Uscita dell'aria
(inclusa valvola di
apertura e chiusura)
Americano 1/4", filettato
NPS, 18 denti
Attacco di scarico
(con valvola di
apertura e chiusura)
Americano 3/8", filettato
NPS, 18 denti
2
Norma
europea
Prese d'aria
Raccordo per tubo a
innesto rapido
autobloccante stile
europeo da 1/4".
Uscita dell'aria
(inclusa valvola di
apertura e chiusura)
Europeo 1/4", filettatura
G, 19 denti
Attacco di scarico
(con valvola di
apertura e chiusura)
Filettatura europea 3/8",
G, 19 denti
3
Norma
australiana
Prese d'aria
Raccordo per tubo ad
innesto rapido
autobloccante stile
giapponese da 1/4".
Uscita dell'aria
(inclusa valvola di
apertura e chiusura)
Europeo 1/4", filettatura
G, 19 denti
Attacco di scarico
(con valvola di
apertura e chiusura)
Europeo 3/8", filetto G, 19
denti

8
Come usare
1. Prima dell'uso, assicurarsi che non vi sia pressione residua nel barile di
pressione. Se è presente pressione residua, l'operatore può aprire l'anello
di spurgo della valvola di sicurezza Red Hat sul coperchio del barile di
pressione per rilasciare completamente la pressione dell'aria. all'interno
del barile di pressione per garantire la sicurezza .
2 . Allentare il dado ad alette e aprire il coperchio dopo aver serrato il
bullone

9
3 . Chiudere tutte le valvole, l'ingresso dello spruzzatore è collegato
all'uscita della canna (24) e l'ingresso dello spruzzatore è collegato alla
valvola di uscita della canna (12)
4 . Collegare il connettore di aspirazione dell'aria (20) e aprire la valvola di
aspirazione dell'aria (25).
10
5 . Regolare il regolatore della pressione in ingresso e ruotare in senso
orario per regolare la pressione di lavoro richiesta, se si desidera ridurre la
pressione nella canna, ruotare in senso antiorario.
6 . Aprire la valvola di scarico (12) aprire la valvola di scarico (24)
11
7 . Se la vernice si deposita, accendere il motore dell'aria per mescolare.
Manutenzione
4. Dopo l'uso, interrompere la fonte d'aria. Aprire l'interruttore della valvola del
palloncino sul coperchio per rilasciare completamente l'aria nella canna, quindi
allentare il bullone a farfalla, aprire il coperchio della botte, versare la vernice
residua nella canna e pulire tutte le parti che sono state toccate dalla vernice
con una quantità adeguata di solvente.
2.
Versare il solvente detergente nel secchio, chiudere il coperchio per
bloccarlo, aprire la valvola di aspirazione e azionare lo spruzzatore finché non
appare il solvente pulito .
3.
Le valvole di sicurezza devono essere mantenute sempre pulite .
Rimedio contro le perdite d'aria
Nota: se si riscontrano perdite d'aria durante l'uso, applicare la colla in modo
uniforme qui, quindi chiudere il coperchio del fusto; stringere le viti mentre la
pressione raggiunge i 15PSI; Il tempo è di circa 10 secondi, in modo che la
colla penetri completamente nella perdita, chiuda la valvola di aspirazione,

12
apra lo stantuffo di scarico della pressione e rimanga fermo per 6-8 ore prima
di continuare a utilizzare la colla dopo che si è completamente solidificata .
Risoluzione dei problemi
Colpa
La causa del fallimento
Metodo di esclusione
La lancetta del
manometro
collegato
all'alimentazione
dell'aria non si
muove
1. La fonte d'aria non è
normale
2. La valvola di aspirazione
non è aperta
3.Le altre valvole non sono
chiuse
1. Regolare la fonte
d'aria su normale
2. Aprire la valvola di
aspirazione
3. Chiudere le altre
valvole

13
Perdita dal
coperchio del barile
di vernice
1. Quando il coperchio
della canna è combinato
con il corpo della canna, il
dado a farfalla non viene
serrato in diagonale
2. Le parti sul coperchio
del barile sono
scarsamente sigillate
1. Seguire l'Articolo 3
delle Condizioni d'Uso
2. Fare riferimento alla
soluzione per le perdite
d'aria
Nessuna vernice
1.La valvola di scarico non
è aperta
1.0aprire la valvola di
scarico
Effetto vernice
scadente
1.La pressione è troppo
alta o troppo bassa
2.Problemi alle
attrezzature di spruzzatura
1.Regolare la pressione
normale
2.Riparazione delle
attrezzature di
spruzzatura
Assicurarsi di bloccare il coperchio del secchio in diagonale nell'ordine
delle operazioni; 1-2 3-4

14

Indirizzo: Shuangchenglu 803nong11hao1602A-1609shi, baoshanqu,
shanghai 200000 CN.
Importato in AUS: SIHAO PTY LTD. 1 ROKEVA STREETEASTWOOD NSW
2122 Australia
Importato negli Stati Uniti: Sanven Technology Ltd. Suite 250, 9166
Anaheim Place, Rancho Cucamonga, CA 91730
Made in China
REP
UK
E-CrossStu GmbH
Mainzer Landstr.69, 60329 Frankfurt am Main.
REP
EC
YH CONSULTING LIMITED.
C/O YH Consulting Limited Office 147, Centurion House,
London Road, Staines-upon-Thames, Surrey, TW18 4AX


Soporte técnico y certificado de garantía electrónica
www.vevor.com/support
BOTE DE PINTURA A PRESIÓN
MANUAL DE USUARIO
Seguimos comprometidos a proporcionarle herramientas a precios competitivos.
"Ahorre a mitad de precio", "A mitad de precio" o cualquier otra expresión similar utilizada
únicamente por nosotros
representa una estimación de los ahorros que podría beneficiarse al comprar ciertas
herramientas
con nosotros en comparación con las principales marcas principales y no necesariamente
significa cubrir
todas las categorías de herramientas que ofrecemos. Se le recuerda amablemente verificar
con cuidado
cuando realiza un pedido con nosotros si realmente está Ahorro
Medio en comparación con las principales marcas.


1
MODELO: JY-ZDS30L
Foto como referencia
¿NECESITAR AYUDA? ¡CONTÁCTANOS!
¿Tiene preguntas sobre el producto? ¿Necesita soporte técnico? No
dude en contactarnos:
Soporte técnico y certificado de garantía electrónica
www.vevor.com/support
Estas son las instrucciones originales; lea atentamente todas las
instrucciones del manual antes de operar. VEVOR se reserva una
interpretación clara de nuestro manual de usuario. La apariencia del
producto estará sujeta al producto que recibió. Perdone que no le
informaremos nuevamente si hay actualizaciones de tecnología o
software en nuestro producto.
PRESSURE PAINT POT

2
SAFETY INSTRUCTION AND PRECAUTIONS
ADVERTENCIA:
Lea este material antes de usar este producto. De lo contrario, se pueden
producir lesiones graves.
1. Ensamble únicamente de acuerdo con estas instrucciones. Un montaje
inadecuado puede crear peligros.
2. Utilice gafas de seguridad aprobadas por ANSI y guantes de trabajo
resistentes durante el montaje.
3. Mantenga el área de reunión limpia y bien iluminada.
4. Mantenga a las personas transeúntes fuera del área durante el montaje.
5. No se reúna cuando esté cansado o bajo la influencia de alcohol,
drogas o medicamentos.
6. Las capacidades del producto se aplican únicamente al producto
ensamblado de manera adecuada y completa.
7.Ensamble sobre una superficie plana, nivelada, dura y lisa capaz de
soportar de manera segura un bote de pintura a presión completamente
cargado.
ADVERTENCIA:
1. Este producto no es un juguete. No permita que los niños jueguen con
este artículo o cerca de él. Se prohíbe el uso de este producto a niños o
personas con discapacidades físicas, y se prohíbe a las personas que no
sepan cómo usarlo de forma segura operar este producto.
2. Este producto de 10 L permite presurizar la pintura a 7 0 PSI, y la
presión máxima de funcionamiento no debe exceder los 8 0 PSI, de lo
contrario causará riesgo a la seguridad personal .
3. La válvula de seguridad en el barril de presión se usa para proteger la
presión normal en el barril de presión, evite el exceso. La presión de un
dispositivo de seguridad, antes de que el producto salga de fábrica, se ha

3
establecido dentro del rango de presión permitido, en el estado normal de
uso, no lo retire a voluntad, no lo ajuste a voluntad .
4. Este producto no debe realizar ningún tipo de modificación, ni realizar
operaciones peligrosas como perforación, soldadura, etc., que puedan
producir un efecto de templado, dañando el cilindro de presión, lo que
afecta la vida útil del producto.
5. Está estrictamente prohibido verter líquidos ácidos y alcalinos fuertes en
este producto para evitar la corrosión del cuerpo del tanque y causar
lesiones personales.
6. Úselo únicamente según lo previsto.
7. Inspeccionar antes de cada uso; no lo utilice si las piezas están sueltas
o dañadas.
8. Después de rociar con este producto, se debe limpiar a fondo para
prolongar la vida útil del producto .
Prefacio
Este barril de pintura se compone de una válvula reguladora de presión de
aire, una válvula de seguridad, una válvula de ventilación, un puerto de
descarga y cuatro ruedas móviles. Todas las piezas están hechas de los
mejores materiales, han pasado un estricto control de calidad y la
apariencia se trata con pintura para hornear, para que pueda lograr el
propósito de durabilidad .

4
Diagrama esquemático de la descomposición de
JY-ZDS30L.
5
SN
nombre
CANTIDAD
SN
nombre
CANTIDAD
1
Cuerpo del barril
de presión
1
21
Válvulas
reguladoras
neumáticas
1
2
cañón interior
1
22
manejar
1
3
Tuerca de
mariposa M16
4
23
juntas
1

6
4
Pernos de unión
M16
4
24
Válvula de
descarga
2
5
Revuelva las
cuchillas
1
25
válvulas de
admisión
1
6
Eje mezclador
1
26
Reguladores
1
7
Junta de sellado
de tapa de barril
1
27
Juntas
hexagonales
1
8
tapa del barril
1
28
Manómetro
1
9
válvula de alivio
1
29
2 grifos
1
10
0 anillos
1
30
tuercas
redondas
1
11
Tuerca de
entrada
1
31
Acoplamientos
rápidos
1
12
válvula de salida
1
32
Pestillos fijos
4
13
válvula de purga
1
33
clip de seguridad
4
14
Acoplamientos
rápidos
1
34
tubo de succión
1
15
motor de aire
1
35
Consejos de
pintura
1
16
Tráquea
1
36
Juntas de filtro
1
17
soportes de
motor
1
37
Colador
1
18
Conector en T
1
38
Broches con
resorte
1
19
Exportación de
pintura
hexagonal.
1
39
Ruedas móviles
4
20
Juntas de
entrada de aire
1
40
tuerca m10
4
Lista de especificaciones de subprocesos de usuario :
7
SN
M ercado de
ventas
válvula
Especificaciones del hilo
1
Estándares
norteamericanos
Tomas de aire
Estilo americano
1/4"autoblocante racor
de tubo de enchufe
rápido
Salida de aire
(incluyendo válvula
de apertura y
cierre)
Americana 1/4", rosca
NPS, 18 dientes
Puerto de descarga
(con válvula de
apertura y cierre)
Americana 3/8", rosca
NPS, 18 dientes
2
estándar
europeo
Tomas de aire
Accesorio de tubo de
enchufe rápido
autoblocante de 1/4" de
estilo europeo
Salida de aire
(incluyendo válvula
de apertura y
cierre)
Europea 1/4", rosca G,
19 dientes
Puerto de descarga
(con válvula de
apertura y cierre)
Europea 3/8", rosca G,
19 dientes
3
estándar
australiano
Tomas de aire
Accesorio de tubo de
enchufe rápido
autoblocante de 1/4" de
estilo japonés
Salida de aire
(incluyendo válvula
de apertura y
cierre)
Europea 1/4", rosca G,
19 dientes

8
Puerto de descarga
(con válvula de
apertura y cierre)
Europea 3/8", rosca G,
19 dientes
como usar
1. Antes de usar, asegúrese de que no haya presión residual en el cilindro
de presión; si hay presión residual, el operador puede abrir el anillo de
purga de la válvula de seguridad Red Hat en la tapa del cilindro de presión
para liberar completamente la presión del aire. Dentro del barril de presión
para garantizar la seguridad .
2 . Afloje la tuerca de mariposa y abra la tapa después de unir el perno.

9
3 . Cierra todas las válvulas, la entrada del pulverizador está conectada a
la salida del barril (24) y la entrada del pulverizador está conectada a la
válvula de salida del barril (12).
4 . Conecte el conector de entrada de aire (20) y abra la válvula de entrada
de aire (25).

10
5 . Ajuste el regulador de presión de entrada y gírelo en el sentido de las
agujas del reloj para ajustarlo a la presión de trabajo requerida; si desea
reducir la presión en el barril, gírelo en el sentido contrario a las agujas del
reloj.

11
6 . Abra la válvula de salida (12) abra la válvula de descarga (24)
7 . Si la pintura se asienta, encienda el motor de aire para remover.
Mantenimiento
5. Después del uso, corte la fuente de aire. Abra el interruptor de la válvula de
globo en la tapa para liberar completamente el aire en el barril, luego afloje el
perno de mariposa, abra la tapa del barril, vierta la pintura residual en el barril
y limpie todas las partes que han sido tocadas por la pintura. con una cantidad
adecuada de disolvente.
2.
Vierta el solvente de limpieza en el balde, cierre la tapa para bloquearlo,
abra la válvula de entrada y opere el rociador hasta que aparezca el solvente
limpio .
3.
Las válvulas de seguridad deben mantenerse limpias en todo momento .
Remedio para fugas de aire
Nota: Si encuentra fugas de aire durante el uso, aplique el pegamento
uniformemente aquí y luego cierre la tapa del barril; apriete los tornillos
mientras la presión alcanza los 15 PSI; El tiempo es de aproximadamente 10
segundos, para que el pegamento penetre completamente en la fuga, cierre la
12
válvula de entrada, abra el émbolo de alivio de presión y permanezca quieto
durante 6 a 8 horas antes de continuar usando el pegamento después de que
esté completamente solidificado .
Solución de problemas
Falla
La causa del fracaso.
Método de exclusión
El puntero del
manómetro
conectado al
suministro de aire
no se mueve.
1. La fuente de aire no es
normal.
2. La válvula de admisión
no está abierta.
3.Otras válvulas no están
cerradas
1. Ajuste la fuente de
aire a la normalidad.
2. Abra la válvula de
admisión.
3. Cerrar otras válvulas
13
Fugas en la tapa del
barril de pintura
1. Cuando la tapa del barril
se combina con el cuerpo
del barril, la tuerca
mariposa no se aprieta en
diagonal
2. Las piezas de la tapa del
barril están mal selladas.
1. Siga el artículo 3 de
los Términos de uso.
2. Consulte la solución
para fugas de aire.
sin pintura
1.La válvula de descarga
no está abierta.
1.0abra la válvula de
descarga
Mal efecto de
pintura
1.La presión es demasiado
alta o demasiado baja.
2.Problemas con el equipo
de pulverización
1.Ajustar a la presión
normal
2.Reparación de
equipos de
pulverización.
Asegúrese de cerrar la tapa del cubo en diagonal en el orden de las
operaciones; 1-2 3-4

14

Dirección: Shuangchenglu 803nong11hao1602A-1609shi, baoshanqu,
shanghai 200000 CN.
Importado a AUS: SIHAO PTY LTD. 1 ROKEVA STREETASTWOOD NSW
2122 Australia
Importado a EE. UU.: Sanven Technology Ltd. Suite 250, 9166 Anaheim
Place, Rancho Cucamonga, CA 91730
Hecho en china
REP
UK
E-CrossStu GmbH
Mainzer Landstr.69, 60329 Frankfurt am Main.
REP
EC
YH CONSULTING LIMITED.
C/O YH Consulting Limited Office 147, Centurion House,
London Road, Staines-upon-Thames, Surrey, TW18 4AX


Wsparcie techniczne i certyfikat e-gwarancji
www.vevor.com/support
CIŚNIENIOWY POJEMNIK NA FARBĘ
INSTRUKCJA OBSŁUGI
Nadal dokładamy wszelkich starań, aby zapewnić Państwu narzędzia w konkurencyjnej
cenie.
„Zaoszczędź pół ceny”, „Zaoszczędź połowę ceny” lub inne podobne wyrażenia używane
wyłącznie przez nas
reprezentuje szacunkową oszczędność, jaką możesz zyskać kupując określone narzędzia
z nami w porównaniu z głównymi, najlepszymi markami i niekoniecznie to oznacza okładka
wszystkie kategorie oferowanych przez nas narzędzi. Przypominamy o weryfikacji ostrożnie
kiedy składasz u nas zamówienie, jeśli faktycznie tak jest Oszczędność
Połowa w porównaniu z czołowymi markami.

1
MODEL: JY-ZDS30L
Zdjęcie w celach informacyjnych
POTRZEBUJESZ POMOCY? SKONTAKTUJ SIĘ Z NAMI!
Masz pytania dotyczące produktu? Potrzebujesz wsparcia
technicznego? Zapraszamy do kontaktu z nami:
Wsparcie techniczne i certyfikat e-gwarancji
www.vevor.com/support
To jest oryginalna instrukcja. Przed przystąpieniem do obsługi prosimy o
dokładne zapoznanie się ze wszystkimi instrukcjami. VEVOR zastrzega
sobie jasną interpretację naszej instrukcji obsługi. Wygląd produktu
zależy od produktu, który otrzymałeś. Proszę wybaczyć nam, że nie
będziemy ponownie informować Państwa, jeśli pojawią się jakieś
aktualizacje technologii lub oprogramowania naszego produktu.
PRESSURE PAINT POT

2
SAFETY INSTRUCTION AND PRECAUTIONS
OSTRZEŻENIE:
Przeczytaj ten materiał przed użyciem tego produktu. Niezastosowanie się
do tego może spowodować poważne obrażenia.
1. Montaż wyłącznie zgodnie z niniejszą instrukcją. Nieprawidłowy montaż
może stworzyć zagrożenie.
2. Podczas montażu nosić zatwierdzone przez ANSI okulary ochronne i
wytrzymałe rękawice robocze.
3. Utrzymuj miejsce zbiórki w czystości i dobrze oświetlone.
4. Podczas montażu trzymaj osoby postronne z dala od obszaru.
5. Nie montuj, gdy jesteś zmęczony lub pod wpływem alkoholu,
narkotyków lub leków.
6. Możliwości produktu dotyczą wyłącznie prawidłowo i całkowicie
zmontowanego produktu.
7. Zmontuj na płaskiej, równej, twardej i gładkiej powierzchni, która może
bezpiecznie utrzymać w pełni załadowany zbiornik z farbą ciśnieniową.
OSTRZEŻENIE:
1. Ten produkt nie jest zabawką. Nie pozwalaj dzieciom bawić się tym
przedmiotem lub w jego pobliżu. Dzieciom lub osobom niepełnosprawnym
fizycznie nie wolno używać tego produktu, a osobom, które nie wiedzą, jak
go bezpiecznie używać, nie wolno używać tego produktu
2. Ten produkt 10 L pozwala na ciśnienie farby do 7 0PSI, a maksymalne
ciśnienie robocze nie może przekraczać 8 0PSI, w przeciwnym razie
spowoduje to ryzyko bezpieczeństwa osobistego .
3. Zawór bezpieczeństwa na beczce ciśnieniowej służy do ochrony
normalnego ciśnienia w beczce ciśnieniowej, unikając nadmiernego
ciśnienia ciśnienie urządzenia zabezpieczającego, zanim wyrób opuści
fabrykę, zostało ustawione w dopuszczalnym zakresie, w normalnym

3
stanie użytkowania nie demontuj według własnego uznania, nie reguluj
według własnego uznania .
4. Produktu nie należy poddawać żadnym modyfikacjom ani wykonywać
żadnych niebezpiecznych operacji, takich jak wiercenie, spawanie itp.,
które mogą wywołać efekt odpuszczania i uszkodzić cylinder ciśnieniowy,
co wpłynie na żywotność produktu.
5. Surowo zabrania się wlewania do tego produktu silnie kwaśnej i
zasadowej cieczy, aby uniknąć korozji korpusu zbiornika i spowodowania
obrażeń ciała.
6. Używaj wyłącznie zgodnie z przeznaczeniem.
7. Sprawdź przed każdym użyciem; nie używać, jeśli części są luźne lub
uszkodzone.
8. Po spryskaniu tym produktem należy go dokładnie oczyścić, aby
przedłużyć żywotność produktu .
Przedmowa
Ta beczka z farbą składa się z zaworu regulującego ciśnienie powietrza,
zaworu bezpieczeństwa, zaworu odpowietrzającego, otworu wylotowego i
czterech ruchomych kół. Wszystkie części są wykonane z najlepszych
materiałów i przeszły ścisłą kontrolę jakości, a ich wygląd jest pokryty farbą
do pieczenia, dzięki czemu może osiągnąć cel trwałości .
4
Schematyczny diagram rozkładu JY-ZDS30L
SN
nazwa
ILOŚĆ
SN
nazwa
ILOŚĆ
5
1
Korpus lufy
ciśnieniowej
1
21
Pneumatyczne
zawory regulacyjne
1
2
Lufa wewnętrzna
1
22
uchwyt
1
3
Nakrętka motylkowa
M16
4
23
Uszczelki
1
4
Śruby złączkowe
M16
4
24
Zawór wylotowy
2
5
Wymieszaj ostrza
1
25
Zawory dolotowe
1
6
Wał mieszający
1
26
regulatory
1
7
Uszczelka pokrywy
beczki
1
27
Połączenia
sześciokątne
1
8
Pokrywa beczki
1
28
Ciśnieniomierz
1
9
zawór nadmiarowy
1
29
2 krany
1
10
0-pierścienie
1
30
Okrągłe orzechy
1
11
Nakrętka wlotowa
1
31
Szybkozłącza
1
12
Zawór wylotowy
1
32
Naprawiono zatrzaski
4
13
Zawór
odpowietrzający
1
33
Pierścień
zabezpieczający
4
14
Szybkozłącza
1
34
Rura ssąca
1
15
Silnik powietrzny
1
35
Wskazówki
dotyczące malowania
1
16
Tchawica
1
36
Uszczelki filtrów
1
17
Mocowania silnika
1
37
Filtr
1
18
Złącze trójnikowe
1
38
Zatrzaski sprężynowe
1
19
Eksport farb
sześciokątnych
1
39
Ruchome koła
4
20
Złącza wlotu
powietrza
1
40
Nakrętka M10
4
Lista specyfikacji wątków użytkownika :
SN
Rynek sprzedaży
zawór
Specyfikacje
6
gwintów
1
Normy
północnoamerykańskie
Wloty powietrza
Samoblokujący 1/4"
w stylu
amerykańskim
szybkozłączka do
węża
Wylot powietrza
(wraz z zaworem
otwierającym i
zamykającym)
Amerykański gwint
1/4", NPS, 18 zębów
Port tłoczny (z
zaworem
otwierającym i
zamykającym)
Amerykański gwint
3/8", NPS, 18 zębów
2
Norma europejska
Wloty powietrza
Samoblokująca
szybkozłączka 1/4"
w stylu europejskim
Wylot powietrza
(wraz z zaworem
otwierającym i
zamykającym)
Europejski 1/4",
gwint G, 19 zębów
Port tłoczny (z
zaworem
otwierającym i
zamykającym)
Europejski 3/8",
gwint G, 19 zębów
3
Norma australijska
Wloty powietrza
Samoblokująca
szybkozłączka 1/4"
w stylu japońskim
Wylot powietrza
(wraz z zaworem
otwierającym i
zamykającym)
Europejski 1/4",
gwint G, 19 zębów

7
Port tłoczny (z
zaworem
otwierającym i
zamykającym)
Europejski 3/8",
gwint G, 19 zębów
Jak używać
1. Przed użyciem upewnij się, że w beczce ciśnieniowej nie ma ciśnienia
resztkowego. Jeśli istnieje ciśnienie resztkowe, operator może otworzyć
pierścień odpowietrzający zaworu bezpieczeństwa Red Hat na pokrywie
beczki ciśnieniowej, aby całkowicie uwolnić ciśnienie powietrza wewnątrz
beczki ciśnieniowej, aby zapewnić bezpieczeństwo .
2 . Poluzuj nakrętkę motylkową i otwórz pokrywę po połączeniu śruby

8
3 . C stracić wszystkie zawory, wlot opryskiwacza jest podłączony do
wylotu beczki (24), a wlot opryskiwacza jest podłączony do zaworu
wylotowego beczki (12)
4 . Podłącz złącze wlotu powietrza (20) i otwórz zawór wlotu powietrza
(25).
9
5 . Wyreguluj regulator ciśnienia wlotowego i obracaj w kierunku zgodnym
z ruchem wskazówek zegara, aby ustawić wymagane ciśnienie robocze,
jeśli chcesz zmniejszyć ciśnienie w lufie, obracaj w kierunku przeciwnym
do ruchu wskazówek zegara.
10
6 . Otwórz zawór wylotowy (12) Otwórz zawór wylotowy (24)
7 . Jeśli farba opadnie, włącz silnik pneumatyczny i wymieszaj.
Konserwacja
6. Po użyciu odciąć źródło powietrza. Otwórz przełącznik zaworu balonu na
pokrywie, aby całkowicie wypuścić powietrze z beczki, następnie poluzuj
śrubę motylkową, otwórz pokrywę beczki, wylej resztki farby z beczki i
wyczyść wszystkie części, które zostały dotknięte farbą odpowiednią ilością
rozpuszczalnika.
2.
Wlej rozpuszczalnik czyszczący do wiadra, zamknij pokrywę, aby ją
zablokować, otwórz zawór wlotowy i uruchamiaj opryskiwacz, aż pojawi się
czysty rozpuszczalnik .
3.
Zawory bezpieczeństwa muszą być zawsze utrzymywane w czystości .
Środek do usuwania wycieków powietrza
Uwaga: Jeśli podczas użytkowania zauważysz wyciek powietrza,
równomiernie nałóż klej w tym miejscu, a następnie zamknij pokrywę beczki;
dokręcić śruby, aż ciśnienie osiągnie 15PSI; Czas ten wynosi około 10 sekund,
aby klej całkowicie wniknął w wyciek, zamknij zawór wlotowy, otwórz tłok
11
nadmiarowy ciśnienia i odstaw na 6-8 godzin przed ponownym użyciem kleju
po jego całkowitym zestaleniu .
Rozwiązywanie problemów
Wada
Przyczyna
niepowodzenia
Metoda wykluczenia
Wskazówka
manometru
pod
łą
czonego do
dop
ł
ywu powietrza
nie porusza si
ę
1.
Ź
ród
ł
o powietrza nie
jest normalne
2. Zawór wlotowy nie jest
otwarty
3. Pozosta
ł
e zawory nie s
ą
zamkni
ę
te
1. Ustaw
ź
ród
ł
o
powietrza na normalne
2. Otwórz zawór
wlotowy
3. Zamkn
ąć
pozosta
ł
e
zawory

12
Wyciek pokrywy
beczki z farb
ą
1. Gdy pokrywa lufy jest
po
łą
czona z korpusem
lufy, nakr
ę
tka motylkowa
nie jest dokr
ę
cana po
przek
ą
tnej
2. Cz
ęś
ci pokrywy beczki
s
ą
s
ł
abo uszczelnione
1. Post
ę
puj zgodnie z
art. 3 Warunków
korzystania
2. Zapoznaj si
ę
z
rozwi
ą
zaniem
problemu wycieku
powietrza
Bez farby
1. Zawór wylotowy nie jest
otwarty
1.0 otwórz zawór
spustowy
S
ł
aby efekt
malowania
1. Ci
ś
nienie jest za wysokie
lub za niskie
2. Problemy ze sprz
ę
tem
do natryskiwania
1. Dostosuj do
normalnego ci
ś
nienia
2.Naprawa sprz
ę
tu
natryskowego
Upewnij się, że pokrywa wiadra jest zablokowana po przekątnej, w
kolejności czynności; 1-2 3-4

13

Adres: Shuangchenglu 803nong11hao1602A-1609shi, baoshanqu, szanghaj
200000 CN.
Import do AUS: SIHAO PTY LTD. 1 ROKEVA STREETEASTWOOD NSW
2122 Australia
Import do USA: Sanven Technology Ltd. Suite 250, 9166 Anaheim Place,
Rancho Cucamonga, CA 91730
Wyprodukowano w Chinach
REP
UK
E-CrossStu GmbH
Mainzer Landstr.69, 60329 Frankfurt am Main.
REP
EC
YH CONSULTING LIMITED.
C/O YH Consulting Limited Office 147, Centurion House,
London Road, Staines-upon-Thames, Surrey, TW18 4AX


Technische ondersteuning en e-garantiecertificaat
www.vevor.com/support
DRUKVERFPOT
GEBRUIKERSHANDLEIDING
Wij blijven ons inzetten om u gereedschap te bieden tegen een concurrerende prijs.
"Bespaar de helft", "Halve prijs" of andere soortgelijke uitdrukkingen die alleen door ons
worden gebruikt
vertegenwoordigt een schatting van de besparingen die u zou kunnen opleveren als u
bepaalde hulpmiddelen koopt
bij ons vergeleken met de grote topmerken en dat hoeft niet per se zo te zijn omslag
alle categorieën tools die door ons worden aangeboden. U wordt er vriendelijk aan
herinnerd om dit te verifiëren voorzichtig
wanneer u bij ons een bestelling plaatst, als u dat daadwerkelijk doet Besparing
Half in vergelijking met de belangrijkste grote merken.


1
MODEL: JY-ZDS30L
Foto ter referentie
HULP NODIG? NEEM CONTACT MET ONS OP!
Heeft u productvragen? Technische ondersteuning nodig? Neem gerust
contact met ons op:
Technische ondersteuning en e-garantiecertificaat
www.vevor.com/support
Dit is de originele instructie. Lees alle instructies in de handleiding
zorgvuldig door voordat u ermee aan de slag gaat. VEVOR behoudt zich
een duidelijke interpretatie van onze gebruikershandleiding voor. Het
uiterlijk van het product is afhankelijk van het product dat u heeft
ontvangen. Vergeef ons alstublieft dat we u niet opnieuw zullen
informeren als er technologie- of software-updates zijn voor ons product.
PRESSURE PAINT POT
2
SAFETY INSTRUCTION AND PRECAUTIONS
WAARSCHUWING:
Lees dit materiaal voordat u dit product gebruikt. Als u dit niet doet, kan dit
leiden tot ernstig letsel.
1. Monteer uitsluitend volgens deze instructies. Onjuiste montage kan
gevaren veroorzaken.
2. Draag tijdens de montage een ANSI-goedgekeurde veiligheidsbril en
stevige werkhandschoenen.
3. Houd de verzamelplaats schoon en goed verlicht.
4. Houd omstanders tijdens de montage uit de buurt.
5. Niet monteren als u moe bent of onder invloed bent van alcohol, drugs of
medicijnen.
6.Productmogelijkheden zijn alleen van toepassing op correct en volledig
gemonteerde producten.
7.Monteer op een vlakke, vlakke, harde en gladde ondergrond die een
volledig geladen drukverfpot veilig kan ondersteunen.
WAARSCHUWING:
1. D it product is geen speelgoed. Laat kinderen niet met of in de buurt van
dit artikel spelen. Het is kinderen of personen met een lichamelijke
handicap verboden dit product te gebruiken, en het is verboden voor
mensen die niet weten hoe ze het veilig moeten gebruiken.
2. Met dit product van 10 L kan de verf onder druk worden gebracht tot 7
0PSI, en de maximale werkdruk mag niet hoger zijn dan 8 0PSI, anders
veroorzaakt dit een risico voor de persoonlijke veiligheid .
3. De veiligheidsklep op het drukvat wordt gebruikt om de normale druk in
het drukvat te beschermen, om overbelasting te voorkomen druk van een
veiligheidsvoorziening, voordat het product de fabriek verlaat, is ingesteld

3
binnen het toegestane drukbereik, bij normaal gebruik, niet naar believen
verwijderen, niet naar wens aanpassen .
4. Dit product mag geen enkele vorm van wijziging ondergaan, noch
gevaarlijke handelingen uitvoeren zoals boren, lassen, enz., die een
tempereffect kunnen veroorzaken, waardoor het drukvat beschadigd raakt,
wat de levensduur van het product beïnvloedt.
5. Het is ten strengste verboden om sterk zure en alkalische vloeistoffen in
dit product te gieten om corrosie van het tanklichaam en persoonlijk letsel
te voorkomen.
6. Alleen gebruiken zoals bedoeld.
7. Inspecteer vóór elk gebruik; niet gebruiken als onderdelen los of
beschadigd zijn.
8. Na het spuiten met dit product moet het grondig worden gereinigd om de
levensduur van het product te verlengen .
Voorwoord
Dit verfvat bestaat uit een luchtdrukregelklep, veiligheidsklep,
ontluchtingsklep, afvoerpoort en vier beweegbare wielen. Alle onderdelen
zijn gemaakt van de beste materialen en hebben strenge
kwaliteitscontroles doorstaan, en het uiterlijk is behandeld met bakverf,
zodat het doel van duurzaamheid kan worden bereikt .
4
Schematisch diagram van de ontleding van JY-ZDS30L
SN
naam
AANTAL
SN
naam
AANTAL
5
1
Lichaam van het
drukvat
1
21
Pneumatische
regelkleppen
1
2
Binnenvat
1
22
hendel
1
3
M16 vleugelmoer
4
23
Pakkingen
1
4
M16 wartelbouten
4
24
Afvoerklep
2
5
Roer de messen
1
25
Inlaatkleppen
1
6
Mengschacht
1
26
Regelgevers
1
7
Afdichtingspakking van
het vatdeksel
1
27
Zeshoekige
gewrichten
1
8
Vat deksel
1
28
Manometer
1
9
ontlastklep
1
29
2 kranen
1
10
0-ringen
1
30
Ronde noten
1
11
Inlaatmoer
1
31
Snelkoppelingen
1
12
Uitlaatklep
1
32
Vaste grendels
4
13
Ontluchtingsventiel
1
33
Borgring
4
14
Snelkoppelingen
1
34
Zuigbuis
1
15
Luchtmotor
1
35
Verftips
1
16
Luchtpijp
1
36
Filterpakkingen
1
17
Motorsteunen
1
37
Zeef
1
18
T-connector
1
38
Veerbelaste
drukknopen
1
19
Zeshoekige verfexport
1
39
Beweegbare
wielen
4
20
Luchtinlaatverbindingen
1
40
M10 moer
4
Lijst met gebruikersdraadspecificaties :
SN
Verkoopmarkt
ventiel
Draadspecificaties
1
Noord-Amerikaanse
normen
Luchtinlaten
Amerikaanse stijl 1/4"
zelfremmend snelle
plug-buisfitting
6
Luchtuitlaat
(inclusief
openings- en
sluitklep)
Amerikaans 1/4", NPS
met schroefdraad, 18
tanden
Afvoerpoort (met
openings- en
sluitklep)
Amerikaans 3/8", NPS
met schroefdraad, 18
tanden
2
Europese standaard
Luchtinlaten
Europese stijl 1/4"
zelfborgende
snelplug-buisfitting
Luchtuitlaat
(inclusief
openings- en
sluitklep)
Europees 1/4",
schroefdraad G, 19
tanden
Afvoerpoort (met
openings- en
sluitklep)
Europees 3/8",
schroefdraad G, 19
tanden
3
Australische
standaard
Luchtinlaten
Japanse stijl 1/4"
zelfborgende
snelplug-buisfitting
Luchtuitlaat
(inclusief
openings- en
sluitklep)
Europees 1/4",
schroefdraad G, 19
tanden
Afvoerpoort (met
openings- en
sluitklep)
Europees 3/8",
schroefdraad G, 19
tanden
7
Hoe te gebruiken
1. Zorg er vóór gebruik voor dat er geen restdruk in het drukvat kan zijn.
Als er restdruk is, kan de operator de Red Hat-ontluchtingsring op het
drukvatdeksel opentrekken om de luchtdruk volledig te laten ontsnappen.
binnen het drukvat om de veiligheid te garanderen .
2 . Draai de vleugelmoer los en open het deksel nadat de bout is
vastgemaakt
3 . Sluit alle kleppen, de spuitinlaat is aangesloten op de vatuitlaat (24) en
de spuitinlaat is aangesloten op de vatuitlaatklep (12)
8
4 . Sluit de luchtinlaatconnector (20) aan en open het luchtinlaatventiel
(25).
5 . Stel de inlaatdrukregelaar af en draai deze met de klok mee om de
gewenste werkdruk in te stellen. Als u de druk in het vat wilt verlagen,
draait u deze tegen de klok in.
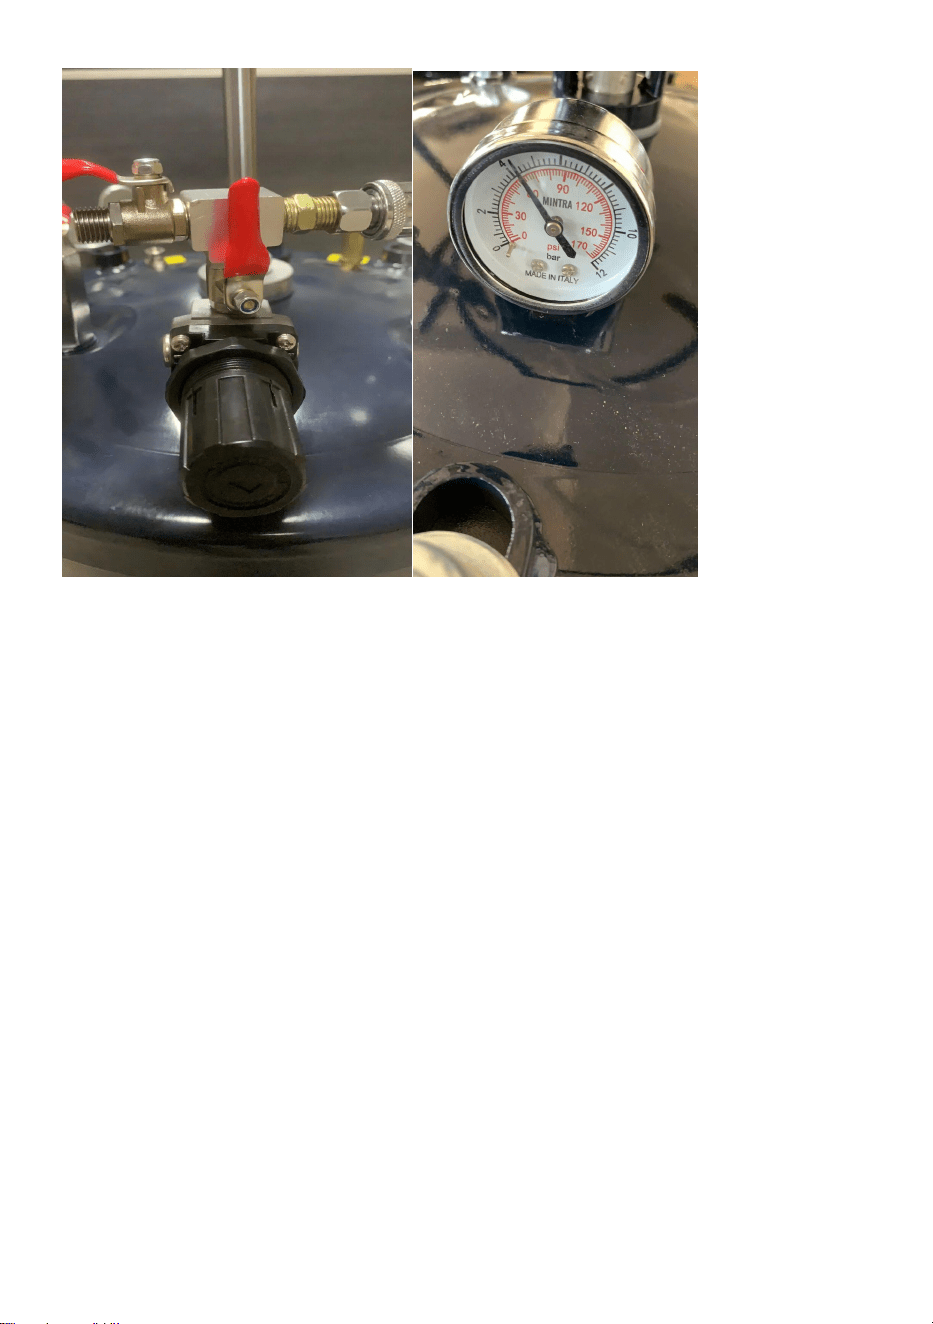
9
6 . Open de uitlaatklep (12) open de uitlaatklep (24)
7 . Als de verf bezinkt, zet u de luchtmotor aan om te roeren.

10
Onderhoud
7. Sluit na gebruik de luchtbron af. Open de ballonventielschakelaar op het
deksel om de lucht in het vat volledig te laten ontsnappen, draai vervolgens de
vlinderbout los, open het deksel van het vat, giet de resterende verf in het vat
weg en reinig alle onderdelen die door de verf zijn aangeraakt met een
geschikte hoeveelheid oplosmiddel.
2.
Giet het reinigingsoplosmiddel in de emmer, sluit het deksel om het te
vergrendelen, open de inlaatklep en bedien de spuit totdat het schone
oplosmiddel verschijnt .
3.
Veiligheidskleppen moeten te allen tijde schoon worden gehouden .
Oplossing voor luchtlekkage
Opmerking: als u tijdens het gebruik luchtlekkage constateert, breng dan de
lijm hier gelijkmatig aan en sluit vervolgens het deksel van het vat; draai de
schroeven vast terwijl de druk 15PSI bereikt; De tijd is ongeveer 10 seconden,
zodat de lijm volledig in de lekkage dringt, sluit de inlaatklep, open de
drukontlastingsplunjer en sta 6-8 uur stil voordat u de lijm verder gebruikt
nadat deze volledig is uitgehard .
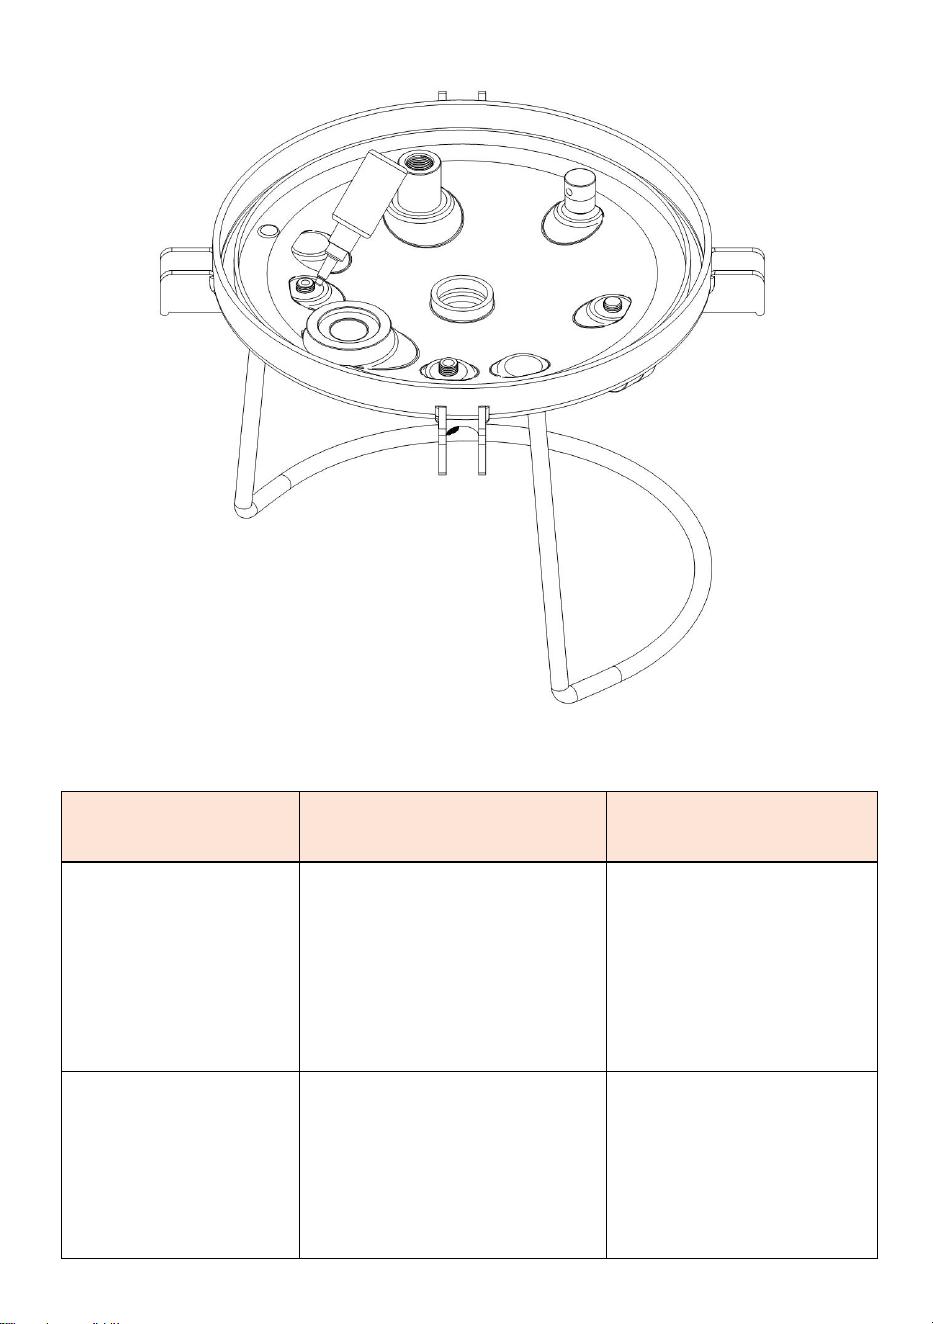
11
Problemen oplossen
Schuld
De oorzaak van de
mislukking
Uitsluitingsmethode
De wijzer van de op
de luchttoevoer
aangesloten
manometer
beweegt niet
1. De luchtbron is niet
normaal
2. De inlaatklep is niet
open
3. Andere kleppen zijn niet
gesloten
1. Stel de luchtbron in
op normaal
2. Open de inlaatklep
3. Sluit andere kranen
Lekkage van het
deksel van het
verfvat
1. Wanneer het vatdeksel
wordt gecombineerd met
het vatlichaam, wordt de
vleugelmoer niet
diagonaal vastgedraaid
1. Volg artikel 3 van de
gebruiksvoorwaarden
2. Zie de oplossing
voor luchtlekkage

12
2. De onderdelen op het
vatdeksel zijn slecht
afgedicht
Geen verf
1. De afvoerklep is niet
open
1.0pen de afvoerklep
Slecht verfeffect
1.De druk is te hoog of te
laag
2. Problemen met de
spuitapparatuur
1. Aanpassen aan
normale druk
2. Reparatie van
spuitapparatuur
Zorg ervoor dat u het deksel van de emmer in diagonale volgorde van
handelingen vergrendelt; 1-2 3-4

13

Adres: Shuangchenglu 803nong11hao1602A-1609shi, baoshanqu, shanghai
200000 CN.
Geïmporteerd naar AUS: SIHAO PTY LTD. 1 ROKEVA
STREETEASTWOOD NSW 2122 Australië
Geïmporteerd naar de VS: Sanven Technology Ltd. Suite 250, 9166 Anaheim
Place, Rancho Cucamonga, CA 91730
Gemaakt in China
REP
UK
E-CrossStu GmbH
Mainzer Landstr.69, 60329 Frankfurt am Main.
REP
EC
YH CONSULTING LIMITED.
C/O YH Consulting Limited Office 147, Centurion House,
London Road, Staines-upon-Thames, Surrey, TW18 4AX


Teknisk support och e-garanticertifikat
www.vevor.com/support
TRYCKFÄRGSKRUKA
ANVÄNDARMANUAL
Vi fortsätter att vara engagerade i att ge dig verktyg till konkurrenskraftiga priser.
"Spara hälften", "Halva priset" eller andra liknande uttryck som endast används av oss
representerar en uppskattning av besparingar du kan dra nytta av att köpa vissa verktyg
med oss jämfört med de stora toppmärkena och betyder inte nödvändigtvis att täcka
alla kategorier av verktyg som erbjuds av oss. Du påminns vänligen om att verifiera
försiktigt
när du gör en beställning hos oss om du faktiskt gör det Sparande
Halv i jämförelse med de främsta varumärkena.


1
MODELL: JY-ZDS30L
Foto för referens
BEHÖVER HJÄLP? KONTAKTA OSS!
Har du produktfrågor? Behöver du teknisk support? Kontakta oss
gärna:
Teknisk support och e-garanticertifikat
www.vevor.com/support
Detta är den ursprungliga instruktionen, läs alla instruktioner noggrant
innan du använder den. VEVOR reserverar sig för en tydlig tolkning av vår
användarmanual. Utseendet på produkten är beroende av den produkt du
fått. Ursäkta oss att vi inte kommer att informera dig igen om det finns
någon teknik eller mjukvaruuppdateringar på vår produkt.
PRESSURE PAINT POT

2
SAFETY INSTRUCTION AND PRECAUTIONS
VARNING:
Läs detta material innan du använder denna produkt. Underlåtenhet att
göra det kan resultera i allvarliga skador.
1. Montera endast enligt dessa instruktioner. Felaktig montering kan skapa
faror.
2. Bär ANSI-godkända skyddsglasögon och kraftiga arbetshandskar vid
montering.
3. Håll monteringsområdet rent och väl upplyst.
4. Håll åskådare borta från området under monteringen.
5. Sätt dig inte ihop när du är trött eller påverkad av alkohol, droger eller
medicin.
6. Produktegenskaper gäller endast för korrekt och färdigmonterad
produkt.
7. Montera på en plan, jämn, hård och slät yta som säkert kan stödja en
fulladdad tryckfärgskruka.
VARNING:
1. D hans produkt är inte en leksak. Låt inte barn leka med eller nära detta
föremål. Barn eller personer med fysiska funktionshinder är förbjudna att
använda denna produkt, och personer som inte vet hur man använder den
på ett säkert sätt är förbjudna att använda denna produkt
2. Denna produkt 10 L tillåter att färgen trycksätts till 7 0PSI, och det
maximala drifttrycket får inte överstiga 8 0PSI, annars kommer det att
orsaka risk för personlig säkerhet .
3. Säkerhetsventilen på tryckcylindern används för att skydda det normala
trycket i tryckcylindern, undvik över trycket på en säkerhetsanordning,
innan produkten lämnar fabriken har ställts in inom det tillåtna
tryckintervallet, i normal användning, ta inte bort efter behag, justera inte
efter behag .

3
4. Denna produkt bör inte utföra någon form av modifiering, inte heller delta
i några farliga operationer såsom borrning, svetsning, etc., som kan ge en
härdningseffekt, skada tryckcylindern, vilket påverkar produktens livslängd.
5. Det är strängt förbjudet att hälla stark sur och alkalisk vätska i denna
produkt för att undvika korrosion av tankkroppen och orsaka personskada.
6. Använd endast på avsett sätt.
7. Inspektera före varje användning; Använd inte om delar är lösa eller
skadade.
8. Efter sprayning med denna produkt måste den rengöras noggrant för att
förlänga produktens livslängd .
Förord
Denna färgfat består av lufttrycksregleringsventil, säkerhetsventil,
avluftningsventil, utloppsport och fyra rörliga hjul. Alla delar är gjorda av de
bästa materialen och har genomgått strikt kvalitetskontroll, och utseendet
är behandlat med bakfärg, så att det kan uppnå syftet med hållbarhet .
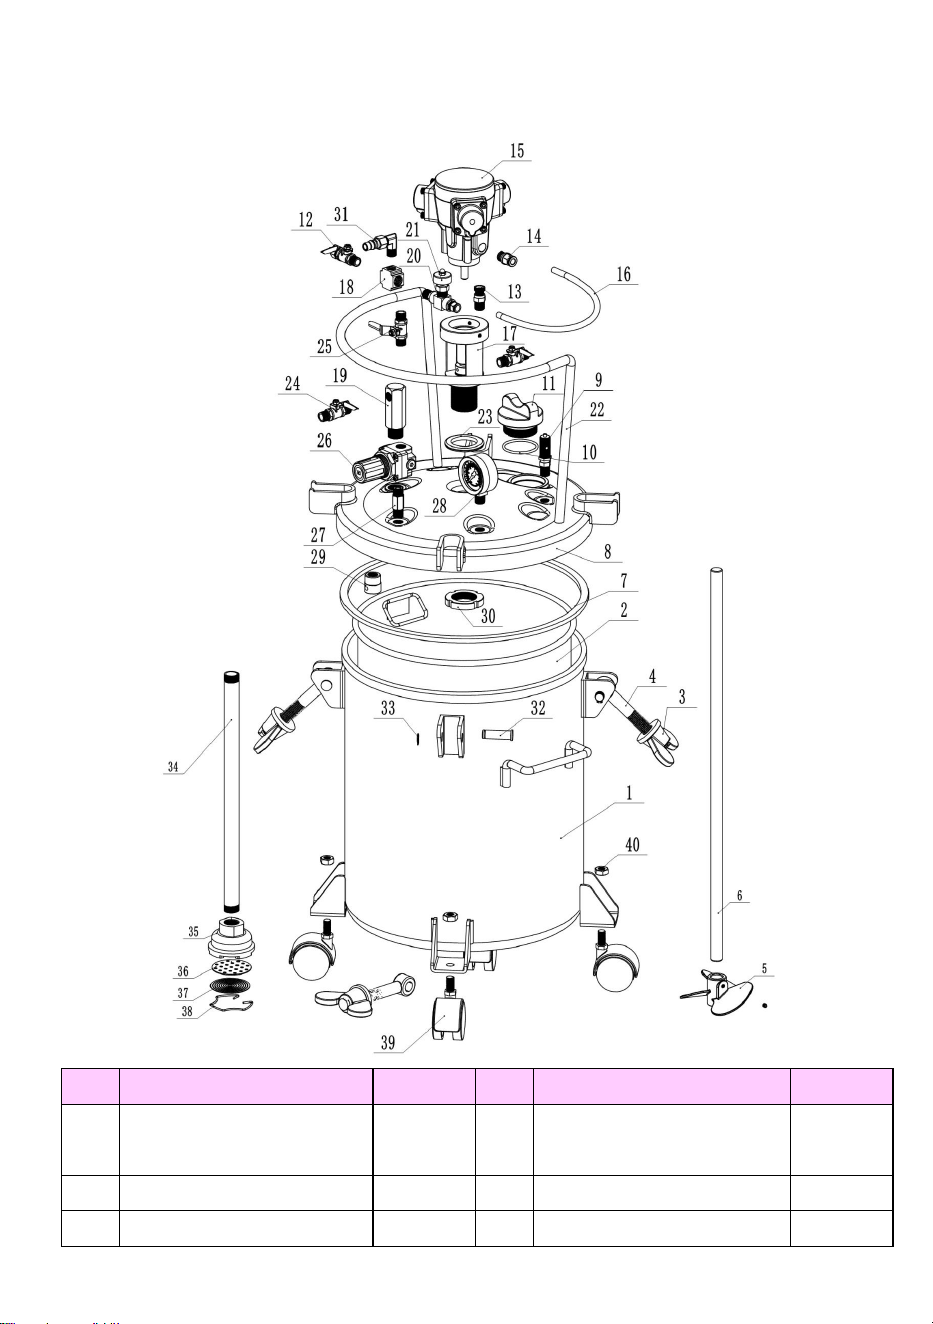
4
Schematiskt diagram över JY-ZDS30L sönderdelning
SN
namn
ANTAL
SN
namn
ANTAL
1
Tryckrörskropp
1
21
Pneumatiska
reglerventiler
1
2
Inre tunna
1
22
hantera
1
3
M16 fjärilsmutter
4
23
Packningar
1
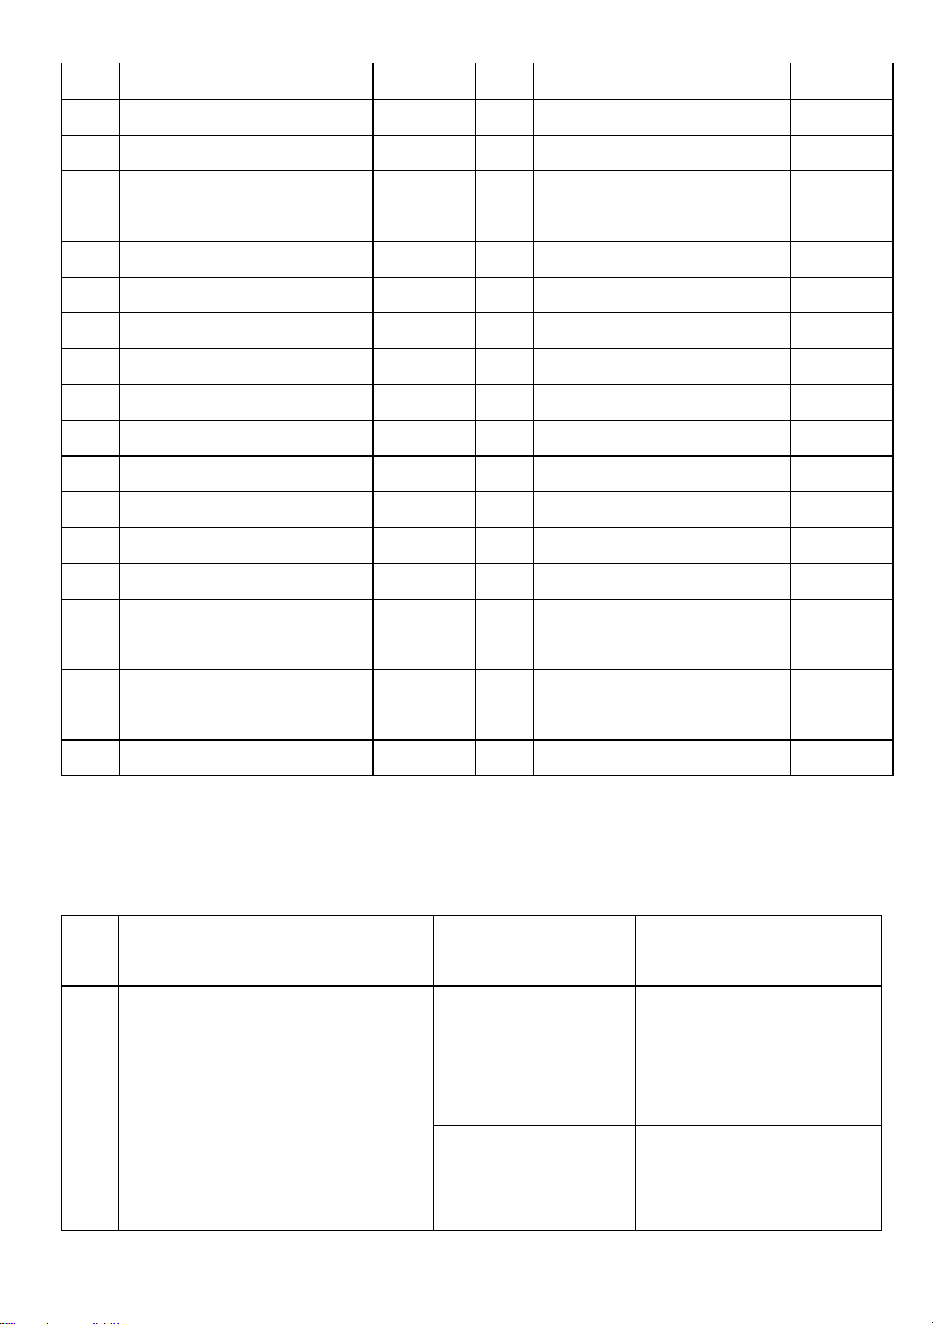
5
4
M16 kopplingsbultar
4
24
Utloppsventil
2
5
Rör om bladen
1
25
Insugningsventiler
1
6
Blandande axel
1
26
Regulatorer
1
7
Tätningspackning för
fatlock
1
27
Sexkantiga leder
1
8
Fatlock
1
28
Tryckmätare
1
9
avlastningsventil
1
29
2 kranar
1
10
0-ringar
1
30
Runda nötter
1
11
Inloppsmutter
1
31
Snabbkopplingar
1
12
Utloppsventil
1
32
Fasta spärrar
4
13
Avluftningsventil
1
33
Låsring
4
14
Snabbkopplingar
1
34
Sugrör
1
15
Luftmotor
1
35
Målartips
1
16
Trakea
1
36
Filterpackningar
1
17
Motorfästen
1
37
Sil
1
18
Tee-kontakt
1
38
Fjäderbelastade
tryckknappar
1
19
Hexagonal
färgexport
1
39
Rörliga hjul
4
20
Luftintagsleder
1
40
M10 mutter
4
Lista över användartrådsspecifikationer :
S
N
Försäljningsmarknad
ventil
Trådspecifikationer
1
Nordamerikanska
standarder
Luftintag
Amerikansk stil 1/4"
självlåsande
snabbkopplingsslan
g
Luftutlopp
(inklusive
öppnings- och
Amerikansk 1/4",
gängad NPS, 18
tänder
6
stängningsventil
)
Utloppsport
(med öppnings-
och
stängningsventil
)
Amerikansk 3/8",
gängad NPS, 18
tänder
2
europeisk standard
Luftintag
Europeisk stil 1/4"
självlåsande
slangkoppling med
snabbplugg
Luftutlopp
(inklusive
öppnings- och
stängningsventil
)
Europeisk 1/4",
gänga G, 19 tänder
Utloppsport
(med öppnings-
och
stängningsventil
)
Europeisk 3/8",
gänga G,19 tänder
3
Australisk standard
Luftintag
Japansk stil 1/4"
självlåsande
slangkoppling med
snabbplugg
Luftutlopp
(inklusive
öppnings- och
stängningsventil
)
Europeisk 1/4",
gänga G, 19 tänder
Utloppsport
(med öppnings-
och
Europeisk 3/8",
gänga G, 19 tänder

7
stängningsventil
)
Hur man använder
1. Före användning, se till att det inte kan finnas något resttryck i
tryckcylindern, om det finns kvarvarande tryck kan operatören dra upp Red
Hat säkerhetsventilens avluftningsdragring på tryckcylinderns lock för att
helt släppa lufttrycket inuti tryckcylindern för att garantera säkerheten .
2 . Lossa vingmuttern och öppna locket efter att bulten är ansluten

8
3 . C tappa alla ventiler, sprutans inlopp är anslutet till cylinderns utlopp (24)
och sprutans inlopp är anslutet till cylinderns utloppsventil (12)
4 . Anslut luftintagsanslutningen (20) och öppna luftintagsventilen (25).
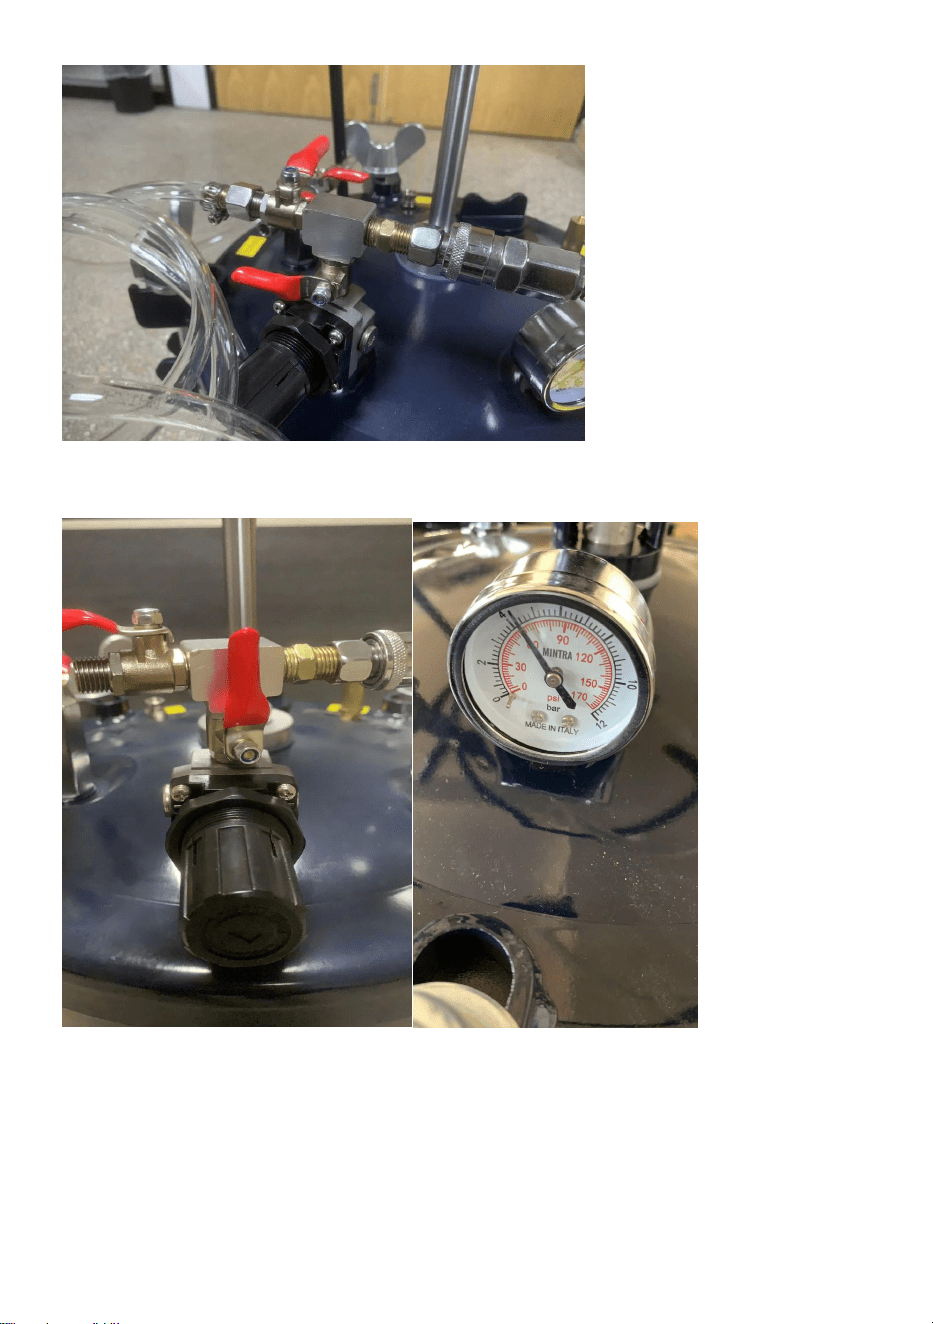
9
5 . Justera inloppstrycksregulatorn och vrid medurs för att justera till önskat
arbetstryck, om du vill minska trycket i cylindern, rotera moturs.
6 . Öppna utloppsventilen (12) och öppna utloppsventilen (24)
7 . Om färgen sätter sig, sätt på luftmotorn för att röra om .

10
Underhåll
8. Efter användning, skär av luftkällan. Öppna ballongventilens omkopplare
på locket för att helt släppa ut luften i tunnan, lossa sedan fjärilsbulten, öppna
locket på tunnan, häll ut resterande färg i tunnan och rengör alla delar som har
berörts av färgen med en lämplig mängd lösningsmedel.
2.
Häll rengöringslösningsmedlet i hinken, stäng locket för att låsa det, öppna
insugningsventilen och kör sprutan tills det rena lösningsmedlet dyker upp .
3.
Säkerhetsventiler måste alltid hållas rena .
Åtgärd för luftläckage
Obs: Om du upptäcker luftläckage under användning, applicera limmet jämnt
här och stäng sedan locket på cylindern; dra åt skruvarna medan trycket når
15PSI; Tiden är cirka 10 sekunder, så att limmet helt penetrerar läckaget,
stäng insugningsventilen, öppna tryckavlastningskolven och stå stilla i 6-8
timmar innan du fortsätter att använda limet efter att det stelnat helt .
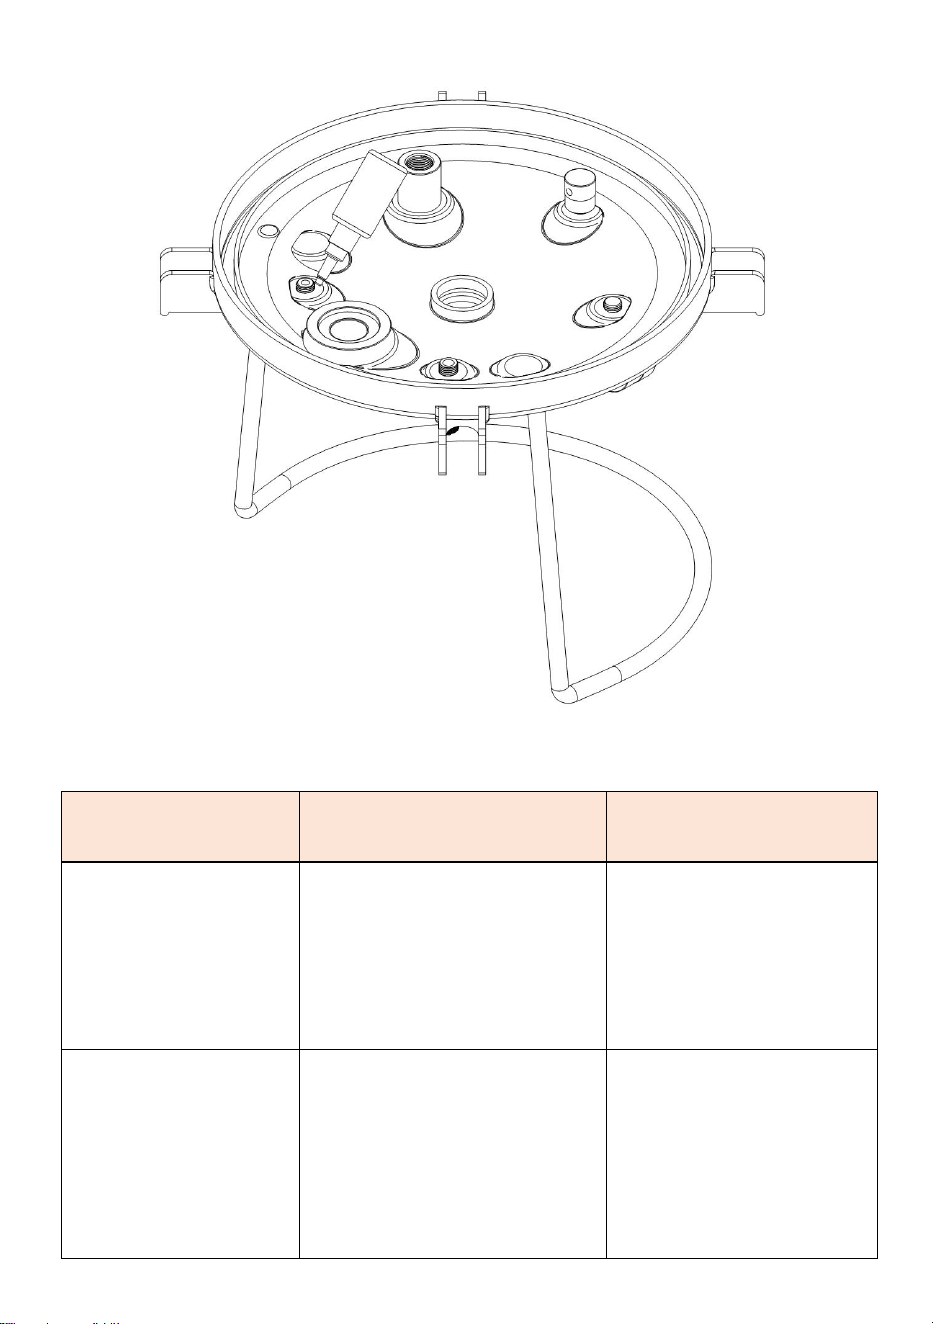
11
Felsökning
Fel
Orsaken till
misslyckandet
Uteslutningsmetod
Pekaren på
tryckmätaren som
är ansluten till
lufttillförseln rör sig
inte
1. Luftkällan är inte normal
2. Insugningsventilen är
inte öppen
3.Andra ventiler är inte
stängda
1. Justera luftkällan till
normal
2. Öppna
insugningsventilen
3. Stäng andra ventiler
Läckage av
färgfatlock
1. När cylinderlocket
kombineras med
cylinderkroppen dras inte
fjärilsmuttern diagonalt
2. Delarna på fatets lock är
dåligt tätade
1. Följ artikel 3 i
användarvillkoren
2. Se åtgärden för
luftläckage
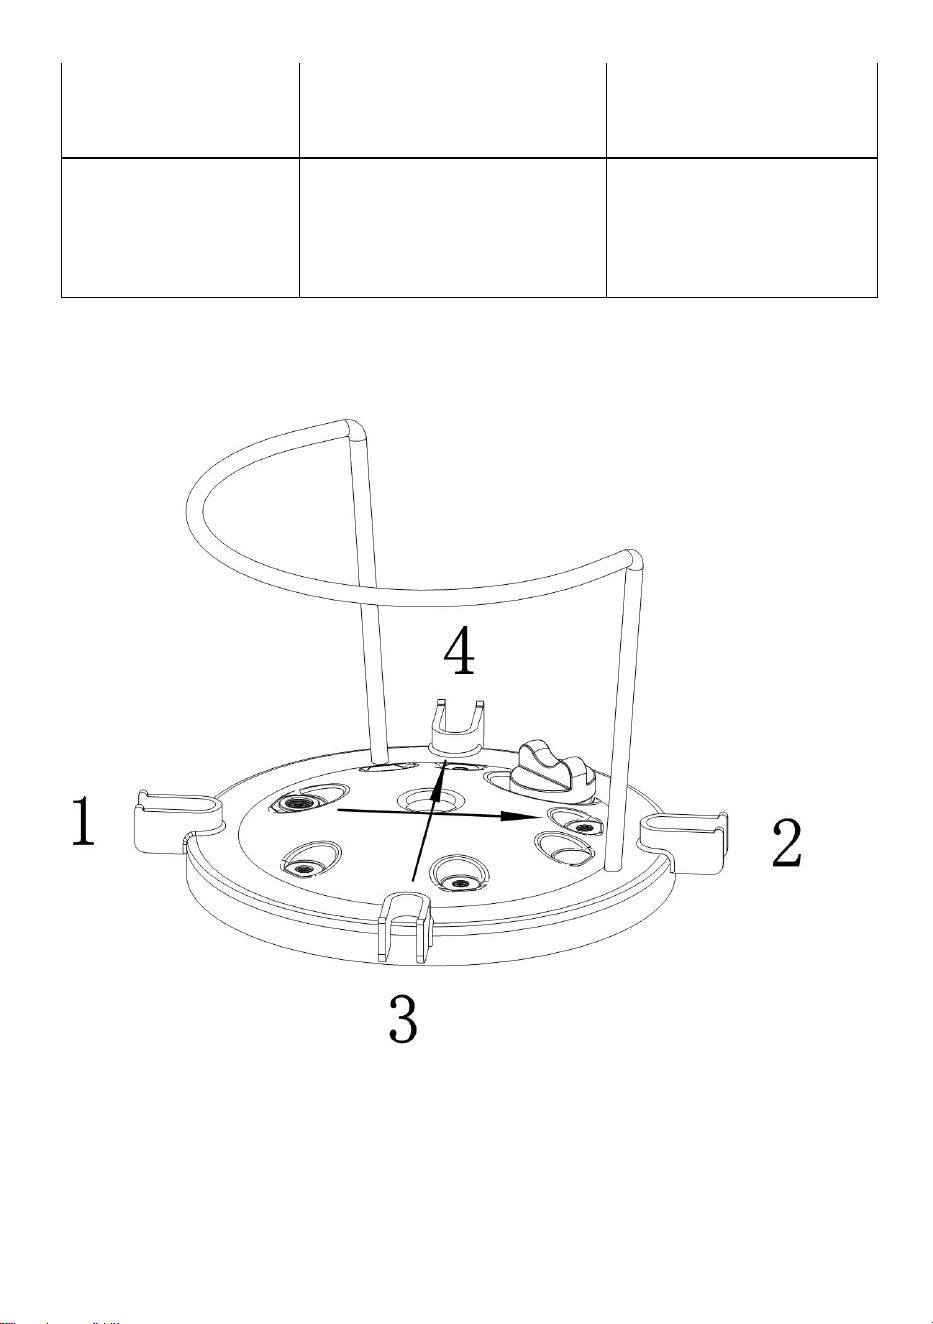
12
Ingen färg
1. Utloppsventilen är inte
öppen
1.0penna
utloppsventilen
Dålig färgeffekt
1. Trycket är för högt eller
för lågt
2. Problem med
sprututrustning
1. Justera till normalt
tryck
2.Reparation av
sprututrustning
Se till att låsa hinkens lock diagonalt i arbetsordningen; 1-2 3-4

Adress: Shuangchenglu 803nong11hao1602A-1609shi, baoshanqu,
shanghai 200000 CN.
Importerad till AUS: SIHAO PTY LTD. 1 ROKEVA STREETEASTWOOD
NSW 2122 Australien
Importerad till USA: Sanven Technology Ltd. Suite 250, 9166 Anaheim Place,
Rancho Cucamonga, CA 91730
Tillverkad i Kina
REP
UK
E-CrossStu GmbH
Mainzer Landstr.69, 60329 Frankfurt am Main.
REP
EC
YH CONSULTING LIMITED.
C/O YH Consulting Limited Office 147, Centurion House,
London Road, Staines-upon-Thames, Surrey, TW18 4AX