
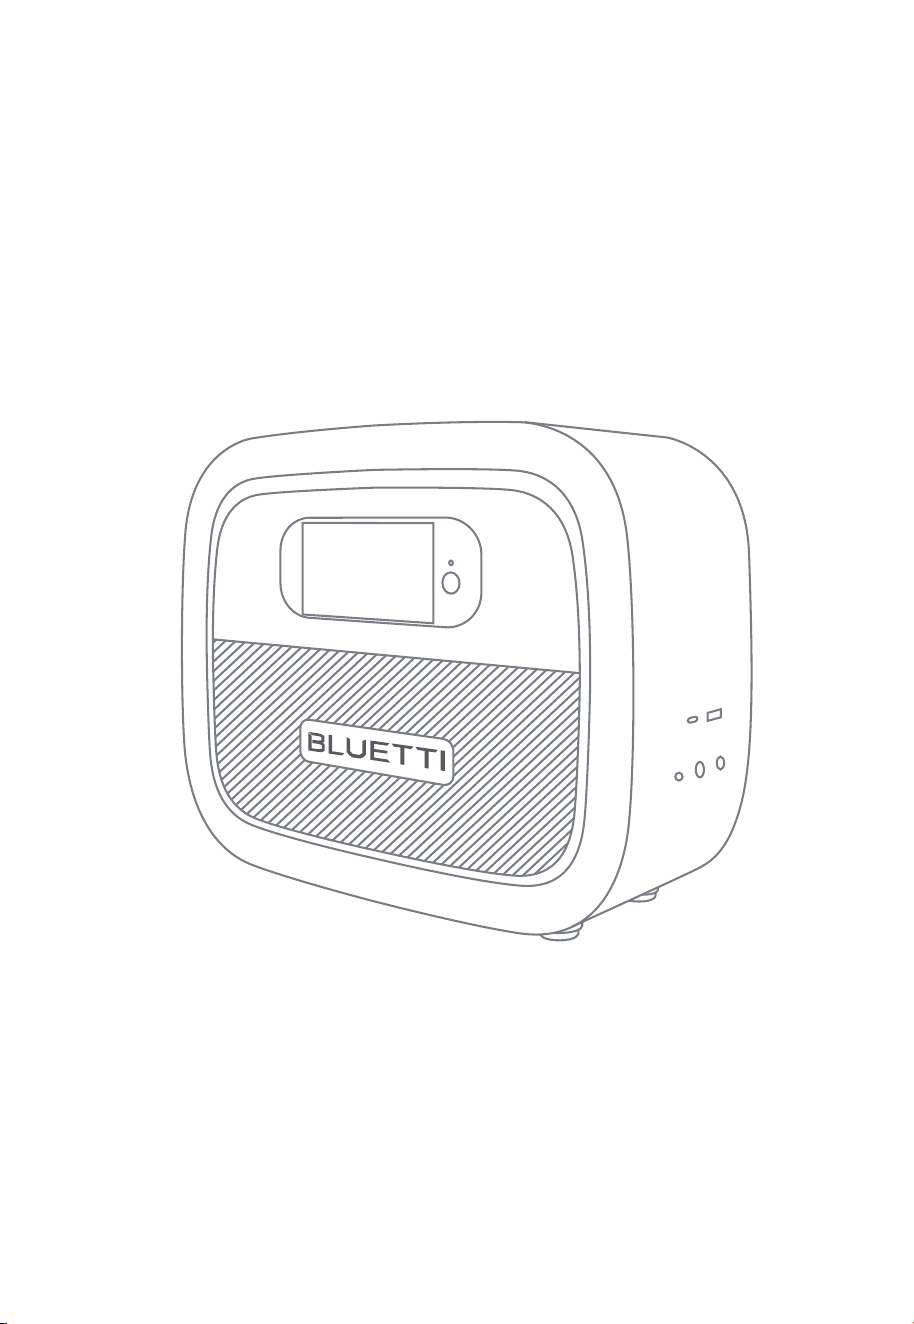
X60
Portable Power Bank
User Manual V6.0
Please read this manual carefully before use and keep it for future reference.

Franch
Germany
Netherlands
Thank You!
Thank you for making BLUETTI a part of your family.
From the very beginning, BLUETTI has tried to stay true to a sustainable future
through green energy storage solutions for both indoor and outdoor use while
delivering an exceptional eco-friendly experience for our homes and our world.
That's why BLUETTI makes its presence in 70+ countries and is trusted by
millions of customers across the globe.

Copyright © BLUETTI Corporation. All rights reserved.
No part of this document may be reproduced or transmitted in any form or by any
means without the prior written consent of BLUETTI Corporation.
Trademark Declaration
is a trademark of BLUETTI Corporation.
All other trademarks mentioned in this manual are owned by the trademark owners.
Notice
BLUETTI's products, services, and features are subject to the agreed-upon terms
and conditions during purchase. Please note that some products, services, or
features described in this manual may not be available under your purchase
contract. Unless otherwise specified in the contract, BLUETTI makes no repre-
sentations or warranties of any kind, express or implied, with respect to the
contents of this manual.
The contents of this manual are subject to change without notice. Please get the
latest version from: https://www.bluettipower.com/pages/user-guides
If you have any questions or concerns about this manual, please contact BLUETTI
support for further assistance.
SHENZHEN POWEROAK NEWENER CO., LTD.
Address: F19, BLD No.1, Kaidaer, Tongsha Rd No.168, Xili Street, Nanshan, Shenzhen,
China
Website: https://www.bluettipower.com
Customer Service
Tel: 800-200-2980 (Monday to Sunday 9:00-17:00)
Email: sale@bluettipower.com (Pre-sales),
service@bluettipower.com (After-sales)

Contents
Safety Instructions
General Safety
Storage and Usage
What’s In The Box
Product Overview
LCD Screen
Operations
Powering On/Off
Charging
Discharging
Set ECO Mode
Specifications
Troubleshooting
Abbreviations
1
1.1
1.2
2
3
4
5
5.1
5.2
5.3
5.4
6
7
8
06
06
08
09
11
12
13
13
13
15
15
16
17
17

1. Safety Instructions
Read this manual for instructions on the proper use and safety information for the unit.
Follow the warnings and instructions marked on the unit and its accessories.
Pay attentionto the "Instruction", "Caution", "Warning" and "Danger" symbols in this
manual, and follow theinstructions carefully to avoid injury or damage. For operations
not covered in the manual, please contact our company if necessary.
BLUETTI will not be
responsible for unauthorized operations.
The Safety Requirements provided herein are for illustrative purposes that include but
are not limited to those listed in this manual. Actual operation shall comply with all
applicable safety standards.
1.1. General Safety
•
Always operate or store the unit in the conditions specified in this manual.
• The installation and ambient conditions must comply with the regulations in the
relevant international, national or regional standards.
• Unauthorized disassembly, alteration of the equipment or modification of the software
code is not allowed.
BLUETTI shall not be liable for the following circumstances:
•
Equipment damage caused by force majeure, such as earthquake, fire, storm, flood,
mudslide, etc.
• Damage or loss during customer's own transportation.
• Damage caused by storage conditions that do not meet the requirements specified in
this manual.
• Damage to the hardware or data of the equipment due to customer negligence,
improper operation or intentional damage.
• Damage to the system caused by a third party or the customer, including handling and
installation that does not meet the requirements specified in this manual.
• Damage caused by adjustment, alteration or removal of identification marks.
Regulate your operations to avoid danger:
•
Do not install, use and maintain the unit in adverse weather conditions such as
lightning, rain, snow and strong breezes (including but not limited to handling and
operating the unit, plugging and unplugging signal connections to outdoor facilities,
working at height, outdoor installations, etc.).
• Always turn off the power sourcebeforestartingany electrical work.
• Do not clean the unit with water.
• Do not disassemble,modify, tamper with or repairthe unit on your own.
• Regularly inspect the unit and its accessories for damage or deterioration.
JUST POWER ON06

• The transportation, wiring and maintenance shall comply with all applicable laws,
regulations and standards.
• User-provided materials and tools required shall meet the requirements specified in
applicable laws, regulations and relevant standards.
• If the unit’s enclosure is cracked during transportation or use, do not use it and contact
BLUETTI support or your local BLUETTI dealers.
• Use a dry powder extinguisher if the unit catches fire.
• In case of fire, EVACUATE the building or affected area immediately, activate the closest
FIRE ALARM system and CALL 9-1-1 or your local emergency phone number.
• Use genuine cables and accessories provided by BLUETTI.
• Keep the unit away from heat sources or high temperatures, and do not expose it to
direct sunlight.
• Do not store the unit with flammable liquids, gases, or explosive materials.
• Make sure the area where you are using the unit is well ventilated and spacious.
• Do not block or cover the vents of the unit as this may cause irreversible damage to it.
• Use the unit for its intended purpose and avoid stacking objects on top of it during
storage or use.
• Do not move the unit during operation as the vibrations and shocks associated with
movement may cause damage to the internal hardware.
• In case of malfunction, turn off the unit immediately and contact BLUETTI support or
your local BLUETTI dealers if this manual cannot adequately explain the malfunction to
you.
• Do not place the unit on an unstable or inclined surface.
• Do not insert foreign objects into any port and vent of the unit.
• Keep away from children and pets.
Legal and Regulatory Requirements
JUST POWER ON 07

1.2. Storage and usage
•
When not using the unit for over 3 months, charge it to 40% to 60% SoC to keep it in
optimal condition.
• Store the unit in a cool and dry place. The ideal temperature range is 10
0
C to 30
0
C. The
unit can be safely charged and discharged at temperatures of -20
0
C to 40
0
C. However,
it’s NOT recommended to store the unit in harsh temperatures for extended periods of
time.
• Fully cycle the unit every 3 months to maintain the battery’s health.
• Clean the unit with a soft dry cloth.
• Before storing the unit, power it off and remove all electrical connections from it.
If the SoC drops to 0 (during operation or upon startup), take the following
actions to safely restart the unit:
1)Shut down immediately.
2)Charging within 48 hours.
3)Battery should be kept at an ambient temperature of 5
0
C to 35
0
C for 24 hours before
charging.
BLUETTI shall not be liable for any equipment damage caused by the violation of above
instructions.
JUST POWER ON08

1
1
1
1
1
1
1
1
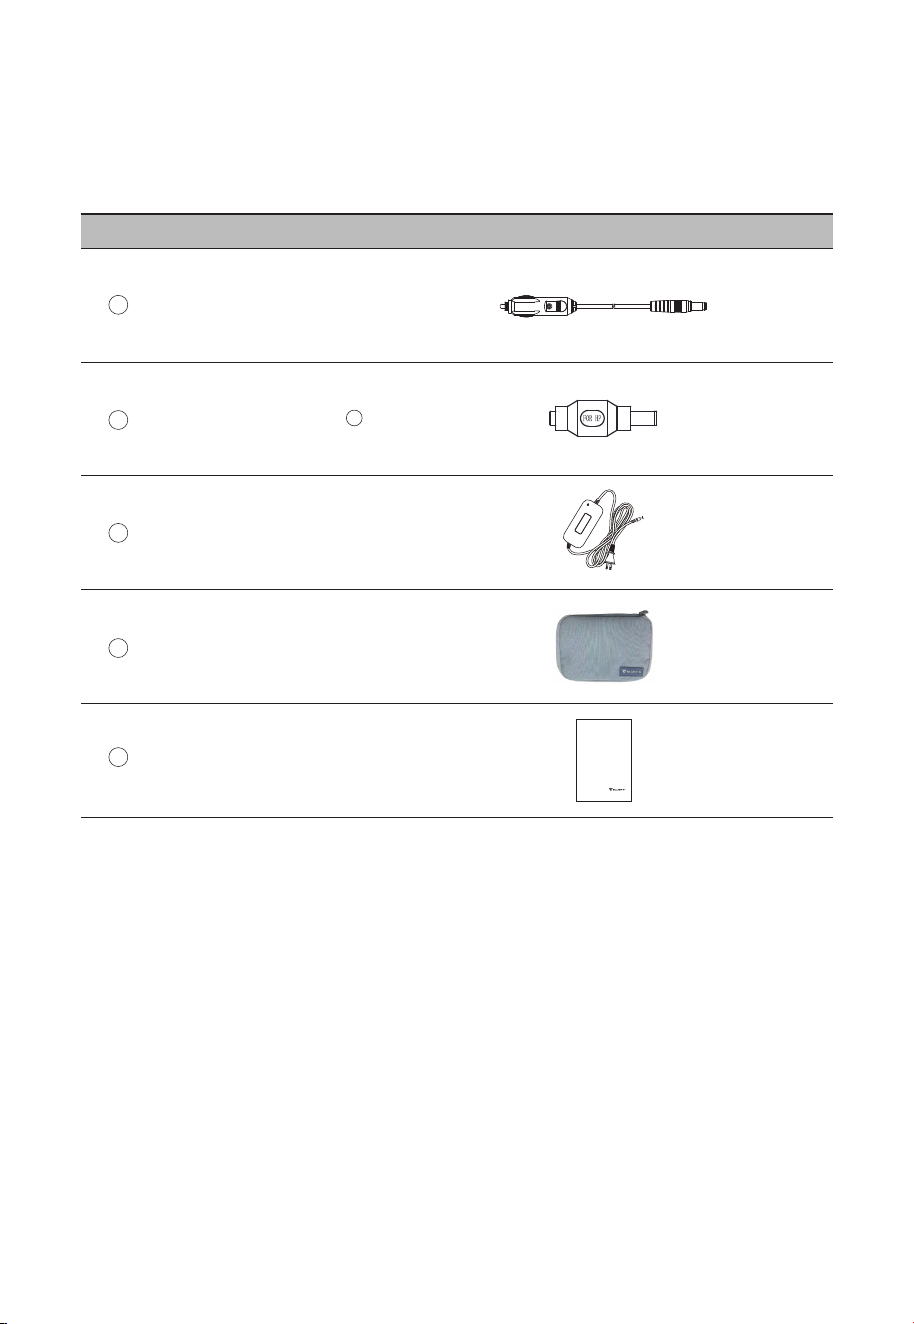
2. What’s In The Box
Standard Packaging
ItemNo. Picture Qty.
DC 12V/5A Power Cable (Ⅱ)
DC 12V/5A Power Cable (
Ⅲ)
DC 16V/4A Power Cable
DC 12V/5A Power Cable (Ⅰ)
DC 24V/4A Power Cable
DC 24V/4A Power Cable
DC 24V/4A Power Cable
1
2
3
4
5
6
7
8
Portable Power Bank
JUST POWER ON 09
1
1
1
1
DC Power Cable
(Cigaratte Lighter to DC 12.5V~26V/8A)
AC Adaptor
(Wall Outlet to DC 12.5V~26V/8A)
Standard Packaging
ItemNo. Picture Qty.
User Manual
Storage Bag
9
10
11
12
13
1
Connector for HP
(Connecting with together
to power AirSense 10)
3
X60
Portable Power Station
User Manual
Please read this manual carefully before use and keep it for future reference.
JUST POWER ON10
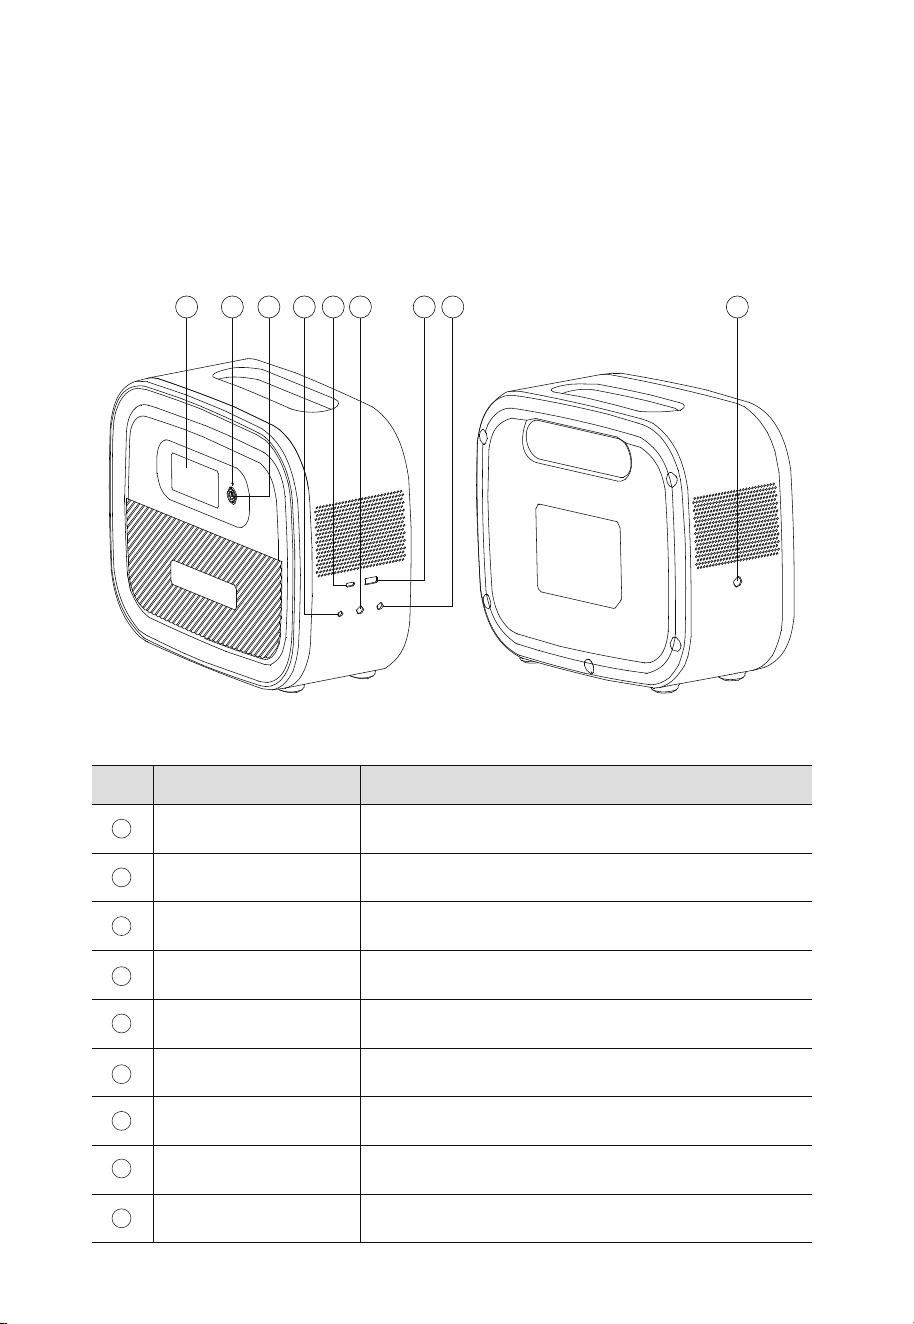
LCD Screen
LED Indicator (Green)
Power Button
DC Output (12V/5A)
USB-C Port
DC Output (16V/4A)
USB-A Port
DC Output (24V/4A)
Charging Port
Power devices with 12V input.
Power supported devices.
Power devices with 16V input.
Power supported devices.
Power devices with 24V input.
Charge X60 through this port.
1
2 3 4 5 6 7 8 9
3. Product Overview
X60 is a DC portable power bank with an internal integrated large capacity battery pack.
With external adapter charging and car charging, LCD screen, USB-A, USB-C and
12V/16V/24V DC output, it is suitable for CPAP power supply and mobile devices
charging. Refer to 6. Specifications for more details of X60.
The keys and interfaces of X60 are shown in the following figure.
Table 3-1 Descriptions of Keys and Interfaces
DescriptionNameNo.
1
2
3
4
5
6
7
8
9
Displays operation information
e.g. SoC and charging/discharging status.
Hold it for 3 seconds to power on/off X60.
Always on: X60 powered on; flashing: charging
JUST POWER ON 11

Fan Running
ECO Mode Enabled
Battery Low
Output Power
Displays when the battery level is ≤5%.
The buzzer will continue to beep. Please charge X60 in time.
The total power of the devices connected to X60.
Battery Level The remaining battery level. Also known as SoC.
Table 4-1 Description of LCD Screen
Firmware Version/
Fault Code
1 2 3
10
9 8 7 6 5
Firmware Version:
Displayed as 00X for 3s after powering on, e.g.
Fault Code:
Displayed as E0X after 3s of powering on, e.g.
4
1
2
3
4
5
6
4. LCD Screen
The LCD screen is lit when X60 is powered on. If X60 is powered off, press and hold the
power button for 3 seconds to turn it on. The display is shown in the following figure.
DescriptionItemNo.
Displays when the fan is running.
Note: The cooling fan inside X60 will run automatically when
the temperature is too high, and it will automatically stop
when the temperature restores.
Displays when ECO mode is enabled.
Note:The battery life can be extended under ECO Mode.
It is recommended to enable this mode if X60 is kept being
charged.
JUST POWER ON12
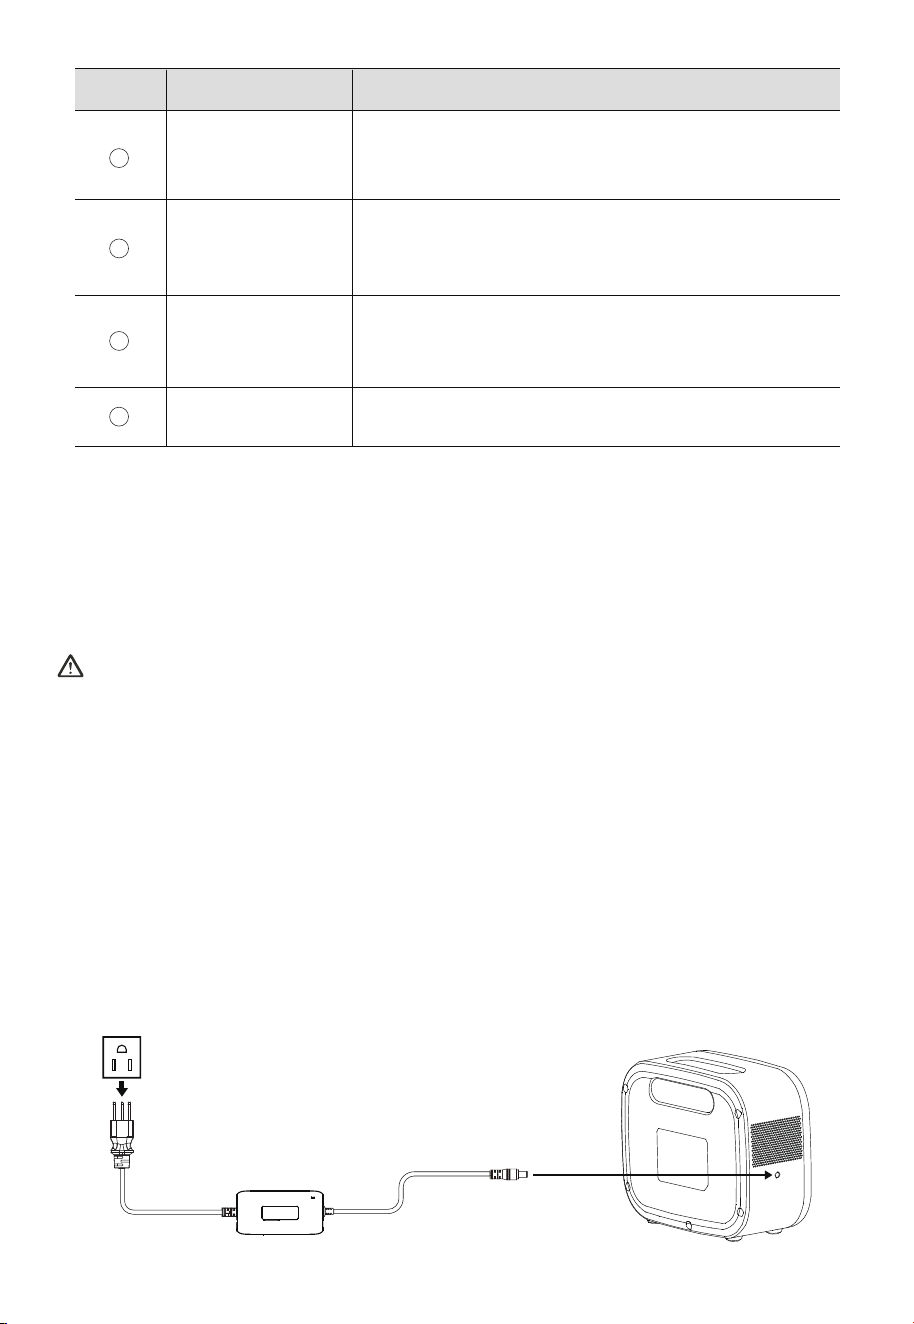
5.2 Charging
The X60 can be charged using an adapter, a car, or a solar panel.
5.2.1 AC adaptor charging
Connect one end of the adaptor to the charging port of X60, and the other end to a wall
outlet. The charging will automatically stop when the battery is fully charged.
Note:
• Press the power button to activate the LCD display when the X60 is on.
• When the X60 is off, unplug it from the wall outlet. Wait for about 20 seconds and then
reconnect to power it back on.
Overload
Short
Temperature
Abnormal
Displays when a short circuit occors.
Disconnect all the loads, and press the Power Button to clear
the fault. Then reconnect the loads.
Displays when X60 is overloaded.
Disconnect all the loads, and press the Power Button to clear
the fault. Then reconnect the loads.
Displays when the temperature of the battery or
mainboard is too high or too low.
Wait until the temperature resumes and try again.
Input Power The charging power of X60.
DescriptionItemNo.
5. Operations
5.1 Powering On/Off
Powering On: Press and hold the power button for 3 seconds, or plug X60 into a
standard wall outlet. The LED indicator and LCD display light up, indicating that the X60
is now on standby.
7
8
9
10
Powering Off: When X60 is on, press and hold the power button for 3 seconds to power it
off. The LCD screen and LED indicator will be turned off.
JUST POWER ON 13
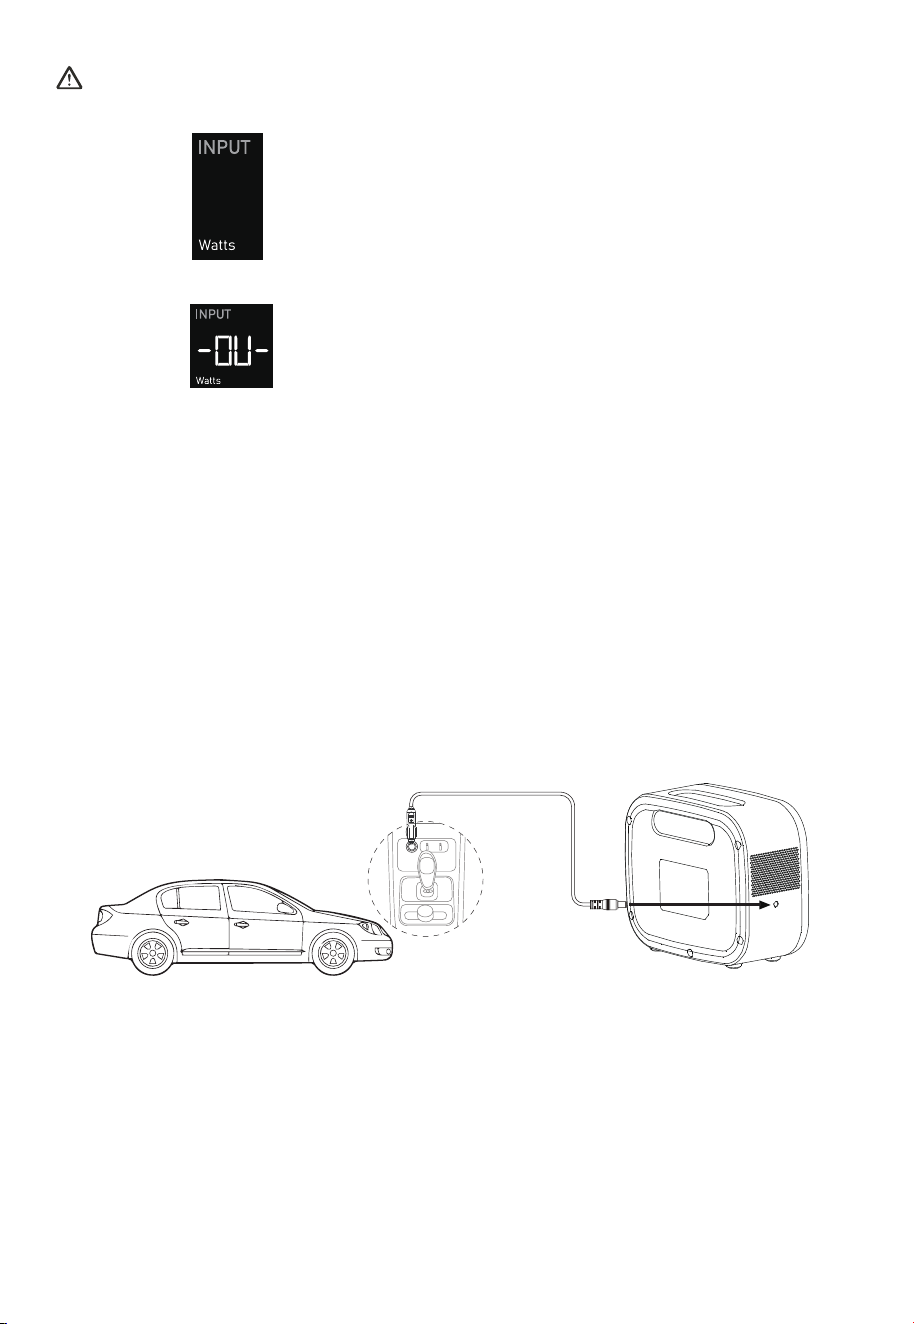
5.2.2 Car charging
Ensure the following two conditions are met when using car charging:
• Power can be output from the vehicle.
• The engine of the vehicle is running.
Connect one end of the cable to the charging port of X60, and the other end to a
cigarette lighter port of the car. The charging will automatically stop when the battery is
fully charged.
Note:
(1) X60 cannot be powered off when it is being charged.
(2) The figure indicates that an adaptor is connected but X60 is not being
charged, and it can be turned off.
(3) The figure indicates that there is an overvoltage of the adaptor. Please
confirm it is the original adaptor of X60.
(4) Restriction of secondary charging : When X60 is charged to 100% and the adapter is
kept connected, it will only be recharged when the battery level drops to 95%. There is no
such restriction if the adapter is replugged.
JUST POWER ON14
5.4 Set ECO Mode
The battery life can be extended under ECO Mode. When enabled, the battery level of
X60 will remain between 60% and 70%.
It is recommended to enable this mode if X60 is kept being charged.
5.4.1 Enable ECO Mode
When X60 is powered on, press the power button twice to enable ECO mode. The ECO
icon will be displayed at the top left of the LCD screen.
5.4.2 Disable ECO Mode
Disable ECO mode by either of the following 3 operations:
• Press the power button twice • Restart X60 • Remove the X60 charger.
When ECO mode is disabled, the ECO icon disappears from the LCD screen.
5.3 Discharging
X60 is equipped with five types of DC output ports: USB-C, USB-A, DC 12V/5A, DC 16V/4A,
and DC 24V/4A.
When X60 is on, use the matching power cable to connect your device and X60.
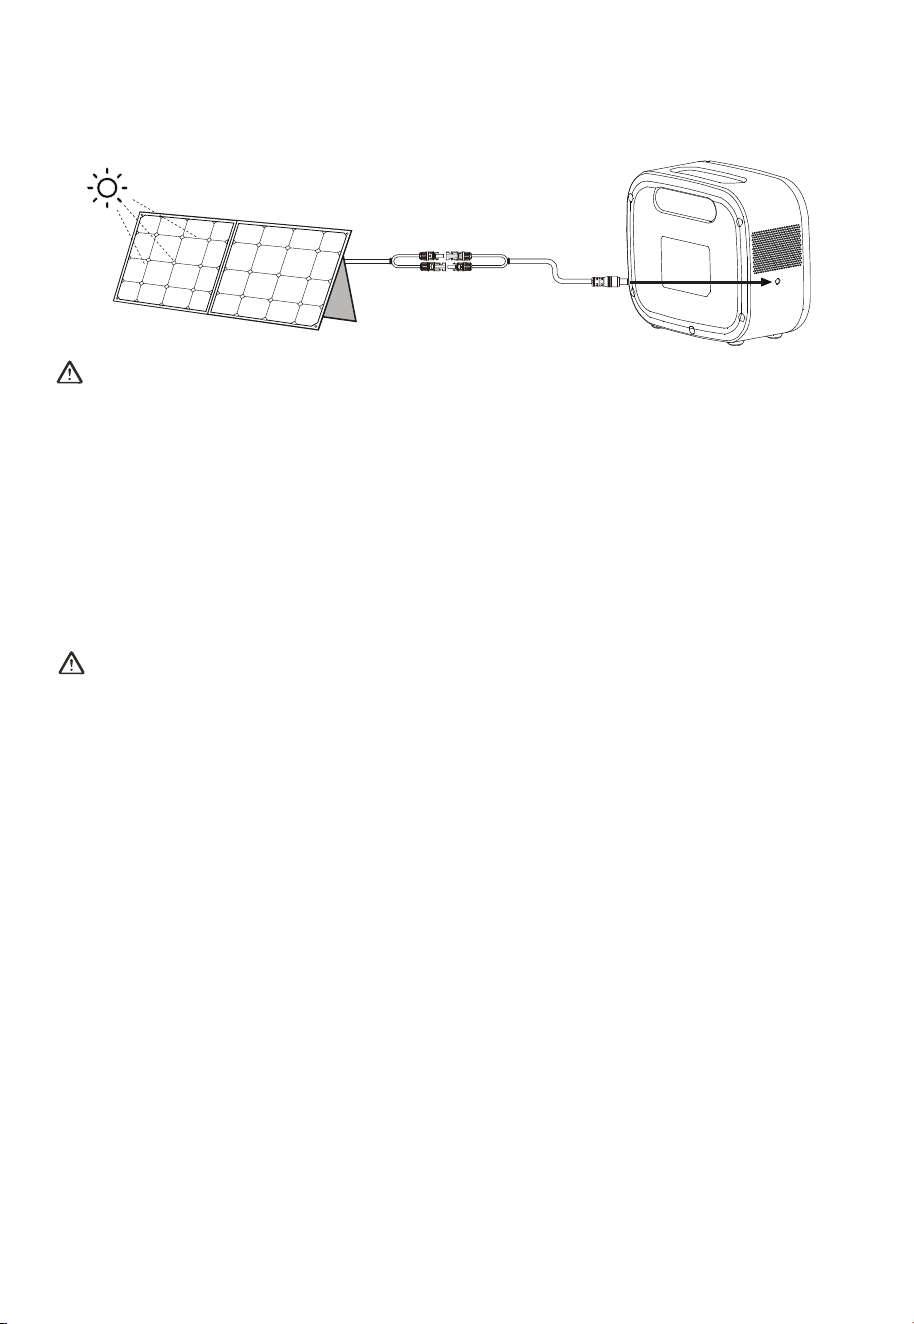
5.2.3 Solar Charging
The X60 charges solely with the BLUETTI PV120 solar panel and stops automatically
when fully charged.
Note:
Only one of the three ports (DC 12V/5A, DC 16V/4A and DC 24V/4A) can be used at a time.
If you need to switch output ports:
(1) Disconnect the device currently in use on the output port.
(2) Wait for 4 seconds.
(3) Connect the device to the corresponding output port.
Note:
• An MC4 to DC7909 cable is required, which can be purchased from the BLUETTI official
website.
• The X60 does not power on automatically when connected to the PV120.
PV120
JUST POWER ON 15

6. Specifications
Battery capacity
Battery cell
Net weight
Dimensions
Charging temperature
Discharging temperature
Storage temperature
Working humidity
Item Specification
General
DC output ports
USB-A
USB-C(Type-C)
5V/3A
5/9/12/15/20V 3A; 20V/5A (eMarker chip built-in)
DC Output
Interface
Input power
Input voltage
DC7909
200W/8A Max
12.5V~26V
DC Input
DC4017 12V/5A
DC6530 16V/4A
DC5525 24V/4A
614Wh
LiFePO
4
About 7kg
305mm×252mm×128mm
0
o
C~40
o
C
-20
o
C~+40
o
C
-20
o
C~+35
o
C
5%~95%
JUST POWER ON16

7. Troubleshooting
E01
E02
E03
E04
E05
E06
E07
E08
E09
E10
Others
Fault Code Defination Recommended Solutions
Unable to charge
Unable to discharge (DC ports)
Unable to charge/discharge
Unable to charge/discharge
Unable to charge/discharge
Unable to charge/discharge
Unable to charge
Unable to charge
Unable to discharge (DC ports)
Unable to discharge (USB-C)
/
Restart X60
Restart X60
Restart X60
Restart X60
Restart X60
Restart X60
Restart X60
Restart X60
Restart X60
Restart X60
Contact technical support.
When a fault occors, the fault code will be displayed on the screen.
Refer to Table 10-1 for details of the fault codes.
Table 10-1 Fault Codes Defination
8. Abbreviations
• DC: Direct Current
• SoC: State of Charge

@ BLUETTI Support
@ BLUETTI Official
@bluetti.inc@ bluetti_inc @bluetti_official service@
bluettipower.com
For more information, please visit:
Web: https://www.bluettipower.com
SHENZHEN POWEROAK NEWENER CO., LTD.
Add: F19, BLD No.1, Kaidaer, Tongsha Rd No.168, Xili Street, Nanshan, Shenzhen, China
Customer Service
Tel: 800-200-2980 (Monday to Sunday 9:00-17:00)
Email: sale@bluettipower.com (Pre-sales),
service@bluettipower.com (After-sales)

Warranty Card
Warranty Instructions
Manufacture Date
Sale Date
File No.
Manufacturer
1. 12-months warranty
2. After-Sale-Service mailbox:service@ bluettipower.com
3. Following situations will go against the warranty terms:
A. Any problems, malfunction or damages due to incorrect using methods
or caused by unauthorized disassembly or repair.
B. The damage caused by force majeure, fire and other extreme abnormal
conditions.
C. Without the warranty card or the card records is not clear, complete, or
without the sales company seal
Certificate
Inspector:
QC:
P/N:17.0303.0589-05A5