Model# GCMW-4750
Wi-Fi Coffee Maker
USER
MANUAL

Model: GCMW-4750
© 2018 Gourmia
www.gourmia.com
The Steelstone Group
Brooklyn, NY
All rights reserved. No portion of this manual may be reproduced by any means
whatsoever without written permission from The Steelstone Group, except for the
inclusion of quotations in a media review.
Although every precaution has been taken in the preparation of this manual, The
Steelstone Group assumes no responsibility for errors or omissions. Nor is any
liability assumed for damages resulting from the use of the information contained
herein. Although every eort has been made to ensure that the information
contained in this manual is complete and accurate, The Steelstone Group is not
engaged in rendering professional advice or services to the individual consumer;
further, The Steelstone Group shall not be held responsible for any loss or damage
allegedly arising from any information or suggestion in this manual.
Read this manual thoroughly
before using and save it for
future reference
2

3
Welcome to the Convenient
and Aromatic World of the
Wi-Fi Coee Maker from Gourmia
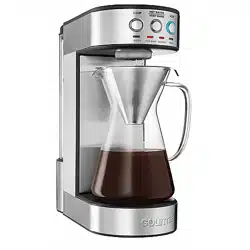
Congratulations on your purchase of the Gourmia Coee Maker, exclusively
designed for coee lovers, to make their favorite coee shop beverages in the
comfort of their own homes! With its sleek design and easy to use features,
this coee maker will become an everyday kitchen appliance. The Coee
Maker grinds the coee beans and creates freshly brewed, aromatic coee
anytime.
We all dream of having a cup of coee made for us and ready to go. Using
the Wi-Fi feature of the Gourmia Coee Maker, you can control the machine
through a mobile app on your smartphone. With the app, you can wake up
and set your machine to have your coee ready by the specic time that you
want it!
The pages of this manual oer full and comprehensive instructions to guide
you through the functions and features of the Gourmia Coee Maker. In this
guide you will also nd information on its modes of operation, complete
step-by-step instructions for the assembly, cleaning,and maintenance of your
appliance.

IMPORTANT SAFEGUARDS
Read all safety and usage instructions before using.
1. Do not use the appliance on wet or hot surfaces, or near a heat source.
2. To protect against re, electrical shock or injury, do not immerse the unit, power cord or
plug in water or any other liquid.
3. Unplug the appliance from the outlet when not in use or before cleaning.
4. To disconnect the appliance, unplug the power cord from the electrical outlet. Do not
disconnect by pulling on the cord.
5. Do not operate the appliance with a damaged power cord or plug. Do not operate the
appliance if it malfunctions or is damaged in any way. Return the appliance to an authorized
service center for examination and repair.
6. Do not use the appliance for other than intended use.
7. Close supervision is necessary when appliance is being used by or near children.
8. This appliance has a polarized plug (one blade is wider than the other). To reduce risk of
electrical shock, this plug is intended to t in a polarized outlet only one way. If the plug
does not t fully into the outlet, reverse the plug. If it still does not t, contact a qualied
electrician. Do not try to modify the plug in any way.
9. Do not let the cord hang over the edge of a counter or table.
10. Do not place the appliance on or near a hot burner or heated oven.
11. Extreme caution must be used when moving items containing hot liquids.
12. Only use fresh and cold water to ll the water tank.
13. Do not touch the surfaces of the appliance, including the warming plate, as they become
very hot.
14. Use the handles when operating the plastic parts and the pot of the coee maker.
15. Hot steam is emitted from the coee lter when the appliance is in use; do not stand
over or touch the steam.
16. Do not use the appliance if the pot appears to be cracked.
17. Only use accessories or attachments that were provided by the manufacturer for this
appliance.
18. Handle with care as the glass is very fragile.
19. Do not operate the coee maker without water in it.
20. Do not place an empty coee pot on the hot plate when the coee maker is run-
ning.
FOR HOUSEHOLD USE ONLY
SAVE THESE INSTRUCTIONS
4
IMPORTANT SAFEGUARDS
TABLE OF CONTENTS
Know Your Wi-Fi Coee Maker ........6
Using Your Wi-Fi Coee Maker ........8
Using Your Wi-Fi Coee Maker........10
Cleaning & Maintenance...............12
Warranty & Services......................15
TABLE OF CONTENTS
5
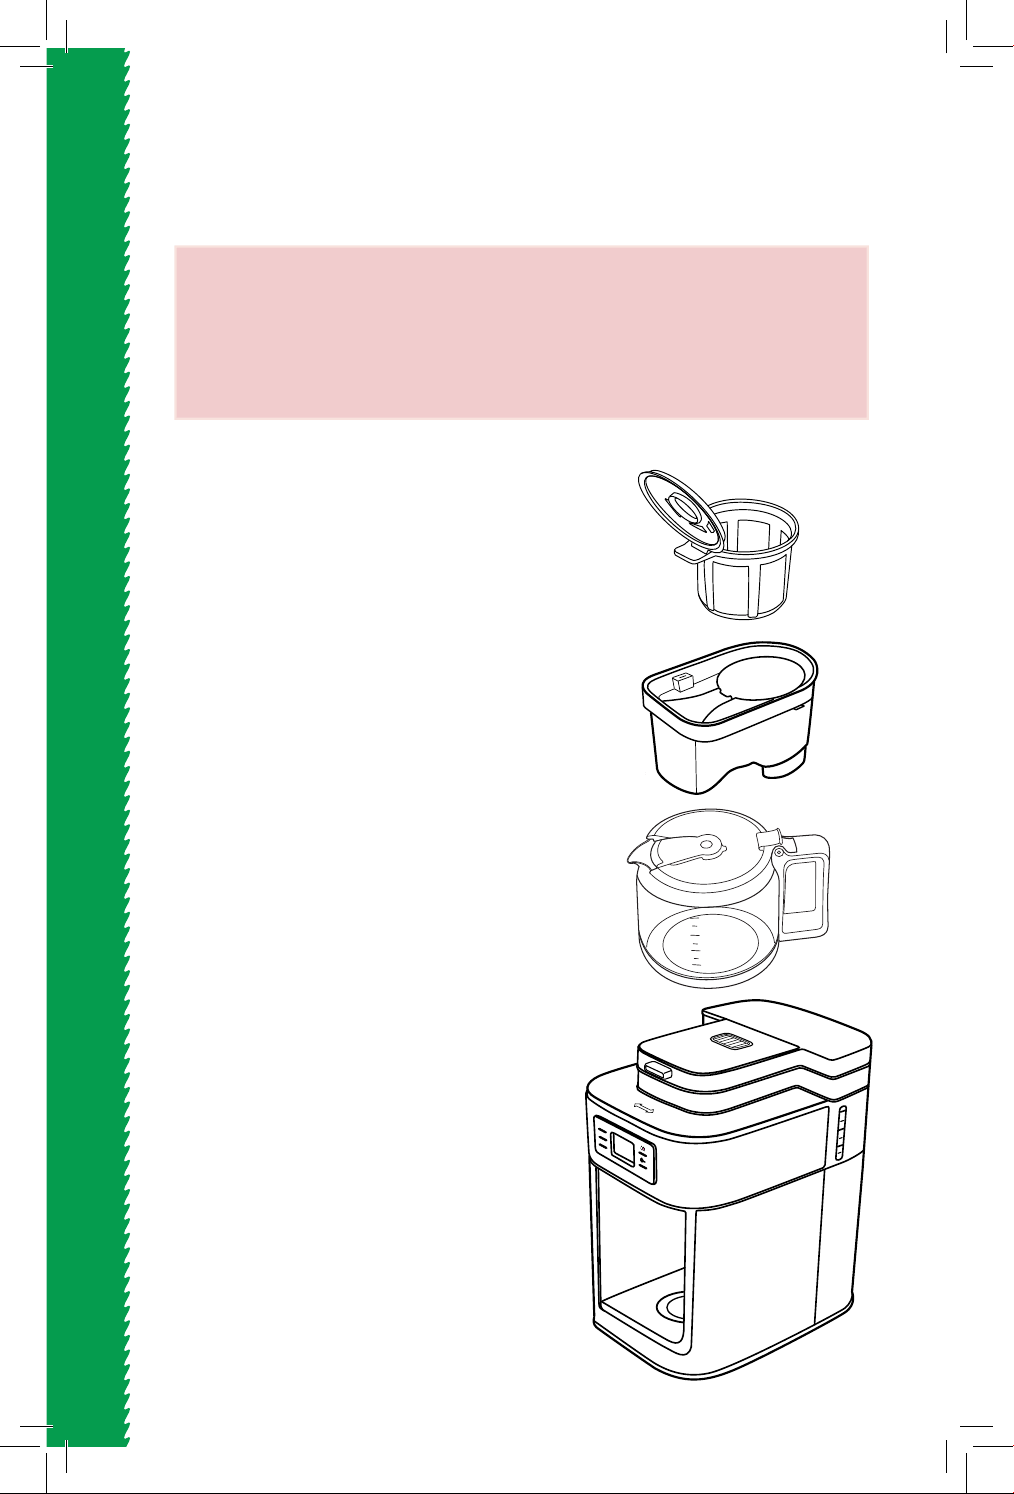
6
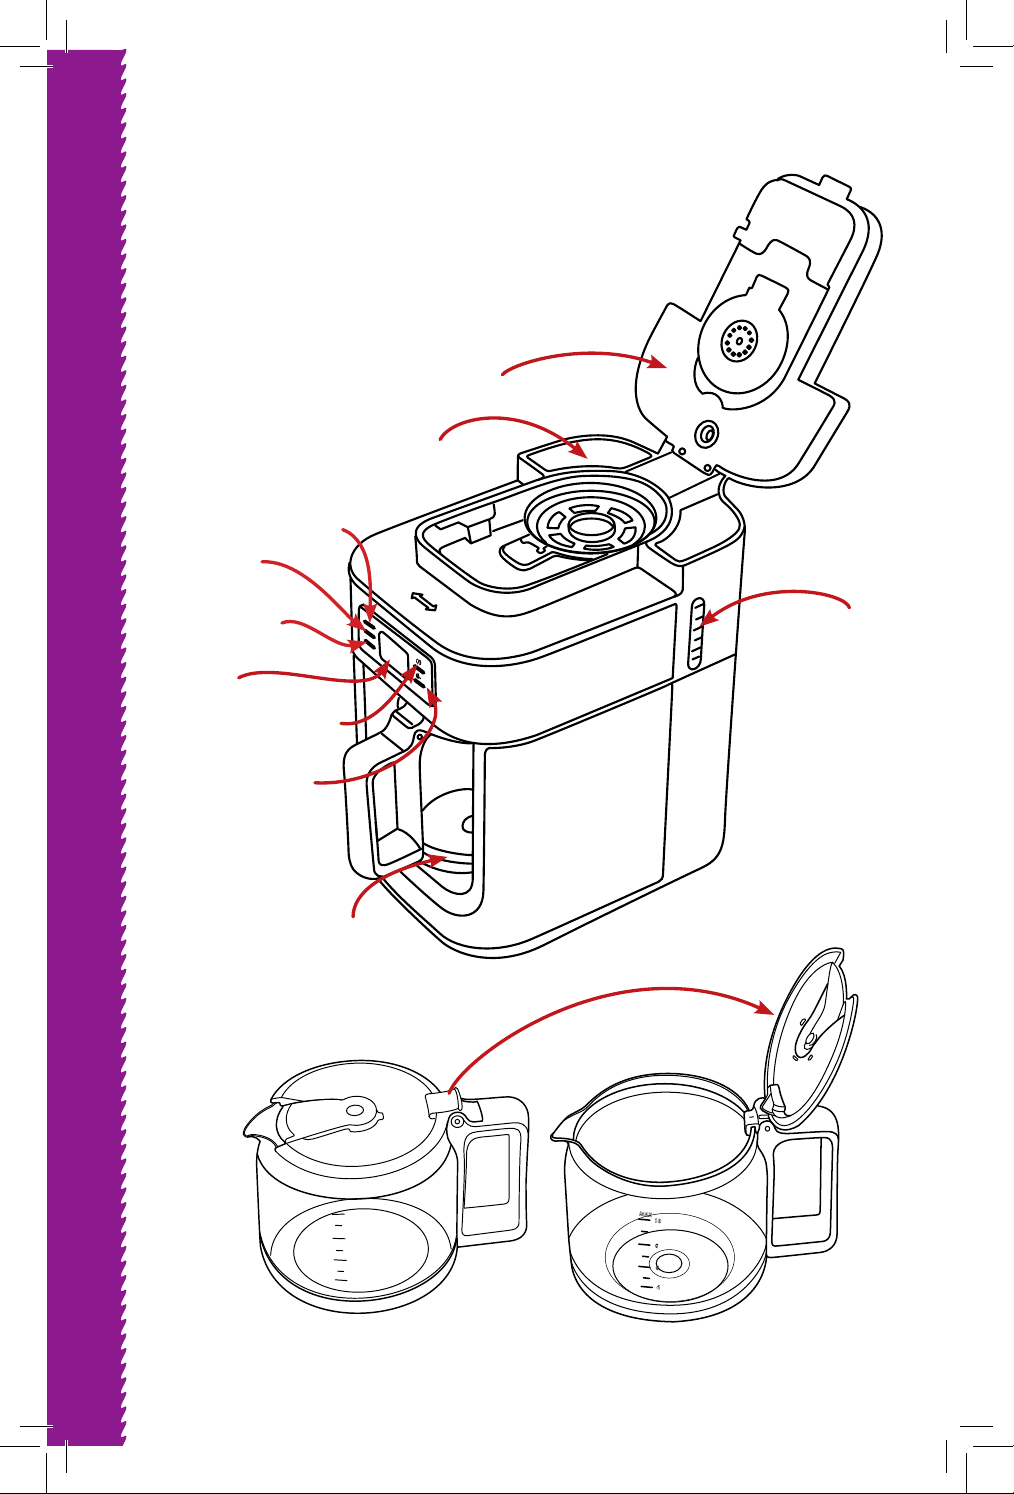
KNOW YOUR COFFEE MAKER
Prog
HR
MIN
Close
Open
10
8
6
4
MAX
MAX
10
8
6
4
Carafe
Carafe
Closed
Carafe
Opened
Program
Button
Cover
Hour
Button
LED
Display
Screen
Ground
Coee
Minute
Button
Coee
Beans
Water
Level
Indicator
Water
Reservoir
KNOW YOUR COFFEE MAKER
7
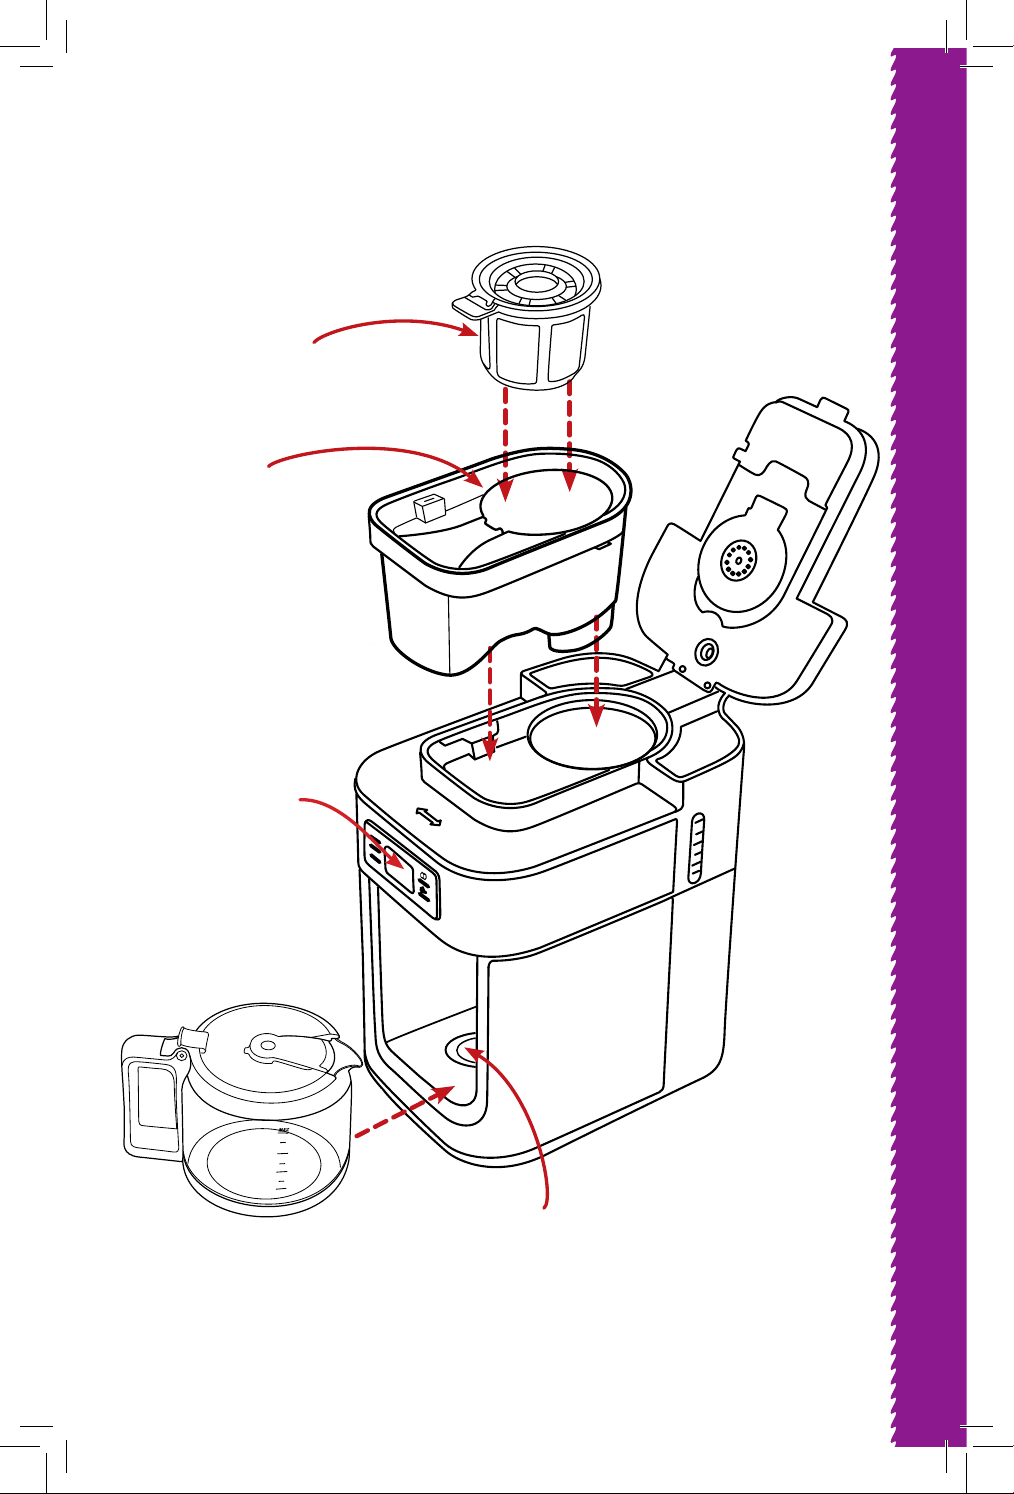
KNOW COFFEE MAKER
Prog
HR
MIN
Close
Open
Filter
Coee
Container
Water
Level
Indicator
Heating
Plate
KNOW YOUR COFFEE MAKER
10
8
6
4
MAX
LCD
Display
Screen
USING YOUR COFFEE MAKER
8
HOW TO BREW COFFEE USING
COFFEE BEANS:
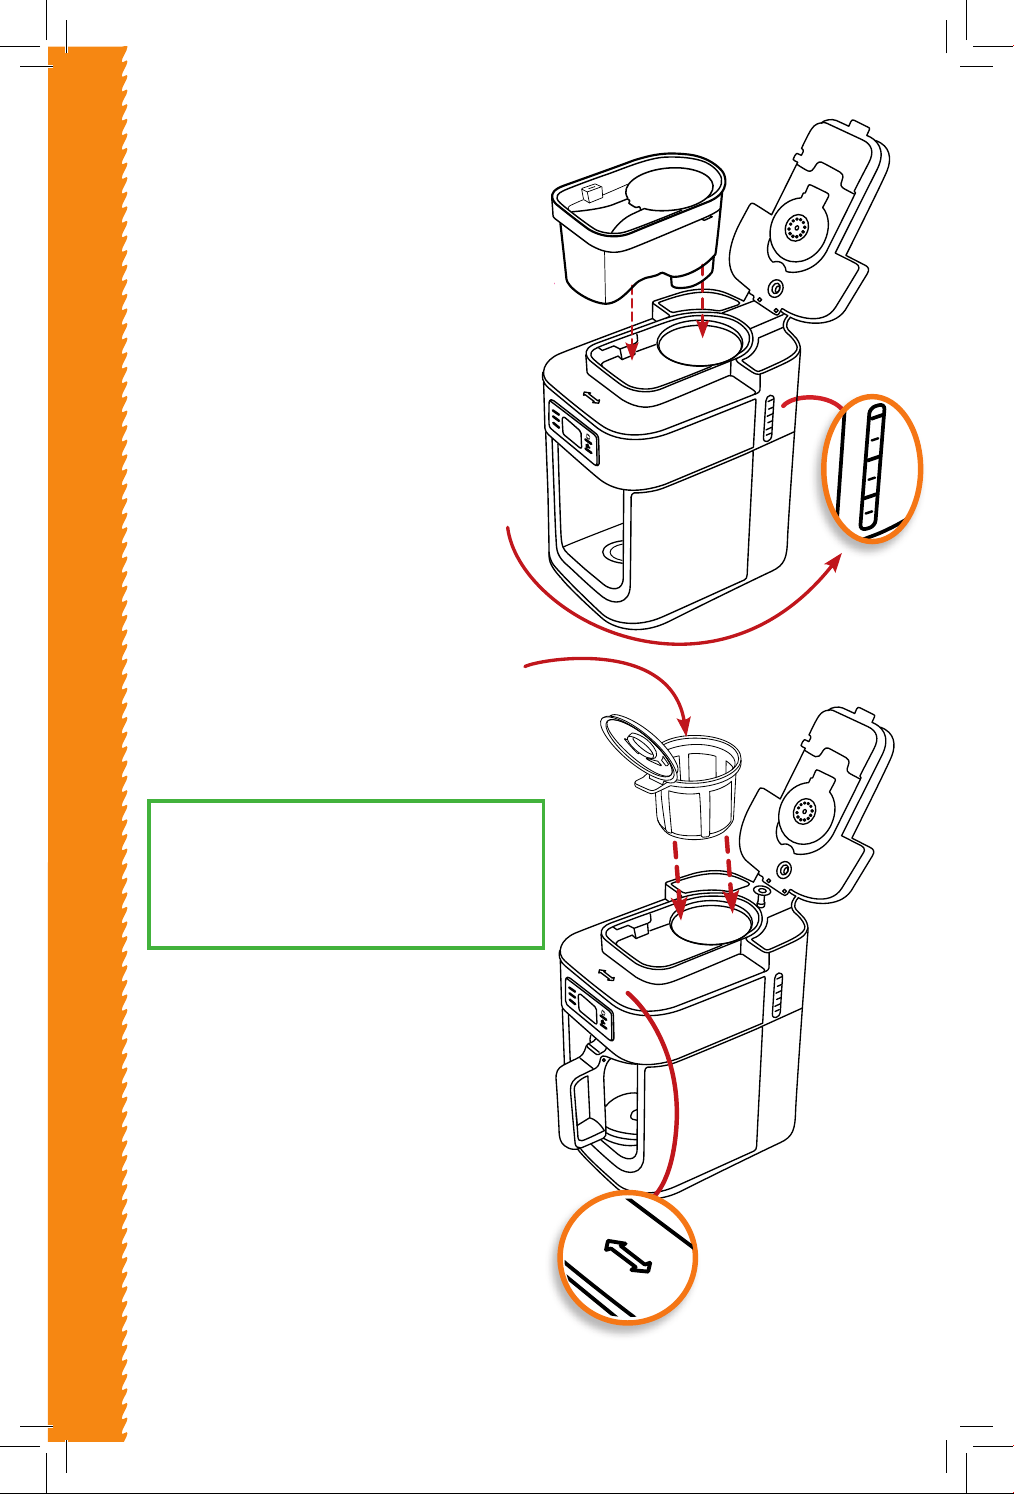
1. Plug the appliance into a wall outlet.
2. Open the lid, by pressing the outer
open close button and lifting the lid
upward. Fill the water reservoir with
water.
Note: The minimum amount of water is
5 cups.
The maximum amount of water is
10 cups.
Note: Do not ll the water tank above
the 10 indicator line.
3. Insert the filter. Then pou
r the coffee
beans into the coffee bean container.
4. Close the lid. Insert the carafe.
NOTE: The machine will not work if
the carafe is not in place
5. Press the grinding button one time to
start grinding the coee beans.
6. When the grinding is complete, the
coee maker will begin to brew
automatically.
7. When the brewing is complete, the
machine will keep the coee warm for
an hour.
NOTE: To open the coee bean container
- twist to left. To close coee bean
container - twist to right and “click”
close.
USING YOUR COFFEE MAKER
Prog
HR
MIN
Close
Open
MAX
10
8
6
Close
Open
Prog
HR
MIN
Note: The maximum capacity of the
coee bean container is about 2.1 oz.
Do not ll the container with coee
beans above the “MAX” line.
Prog
HR
MIN
Close
Open
Prog
HR
MIN
Close
Open
USING YOUR COFFEE MAKER
9
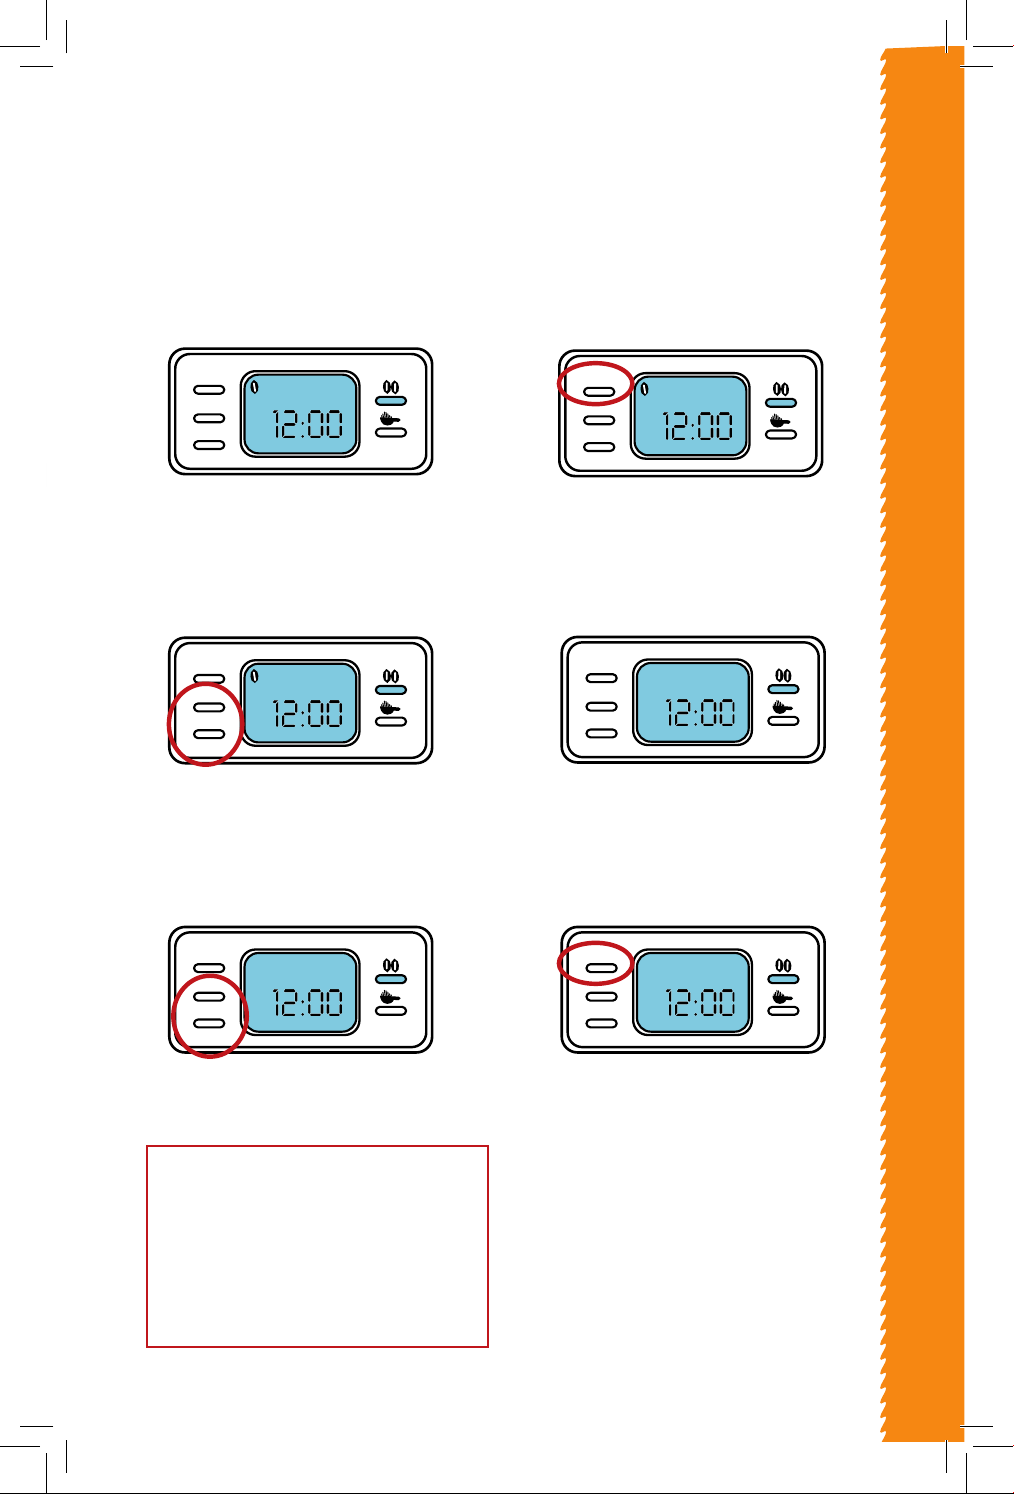
1. Press the grinding button twice.
Then the grinding button indica-
tor light will start ashing.
USING YOUR COFFEE MAKER
MAX
10
8
6
Close
Open
Prog
HR
MIN
HOW TO SET THE TIMER TO AUTOMATICALLY
BREW YOUR COFFEE WITH BEANS:
2. Press the “PROG” button one
time. The LCD will display
“CLOCK” at the top right corner.
3. Set the current time by pressing
the “HR” and “MIN” buttons.
4. After setting the current time,
press the “PROG” button again.
The LED will display “TIMER” at
the top left corner.
5. Press the “HR” and “MIN” buttons to
set the automatic timer.
6. After setting the timer, press the
“PROG” button. Then the grinding
button will ash.
7. When the automatic timer is
activated, the grinding and
brewing process will begin
automatically.
Prog
HR
MIN
CLOCK
Prog
HR
MIN
CLOCK
Prog
HR
MIN
TIMER
Prog
HR
MIN
TIMER
Prog
HR
MIN
Prog
HR
MIN
Prog
HR
MIN
CLOCK
Prog
HR
MIN
CLOCK
Prog
HR
MIN
TIMER
Prog
HR
MIN
TIMER
Prog
HR
MIN
Prog
HR
MIN
Prog
HR
MIN
CLOCK
Prog
HR
MIN
CLOCK
Prog
HR
MIN
TIMER
Prog
HR
MIN
TIMER
Prog
HR
MIN
Prog
HR
MIN
Prog
HR
MIN
CLOCK
Prog
HR
MIN
CLOCK
Prog
HR
MIN
TIMER
Prog
HR
MIN
TIMER
Prog
HR
MIN
Prog
HR
MIN
Prog
HR
MIN
CLOCK
Prog
HR
MIN
CLOCK
Prog
HR
MIN
TIMER
Prog
HR
MIN
TIMER
Prog
HR
MIN
Prog
HR
MIN
Prog
HR
MIN
CLOCK
Prog
HR
MIN
CLOCK
Prog
HR
MIN
TIMER
Prog
HR
MIN
TIMER
Prog
HR
MIN
Prog
HR
MIN
Prog
HR
MIN
CLOCK
Prog
HR
MIN
CLOCK
Prog
HR
MIN
TIMER
Prog
HR
MIN
TIMER
Prog
HR
MIN
Prog
HR
MIN
Note: The heating plate turns o when you
press the grinding button or the coee button
(depending on which function was chosen),
after the brewing is complete. However, it will
take around 30 minutes for the plate to cool
down.
USING YOUR COFFEE MAKER
10
HOW TO BREW COFFEE USING
GROUND COFFEE:
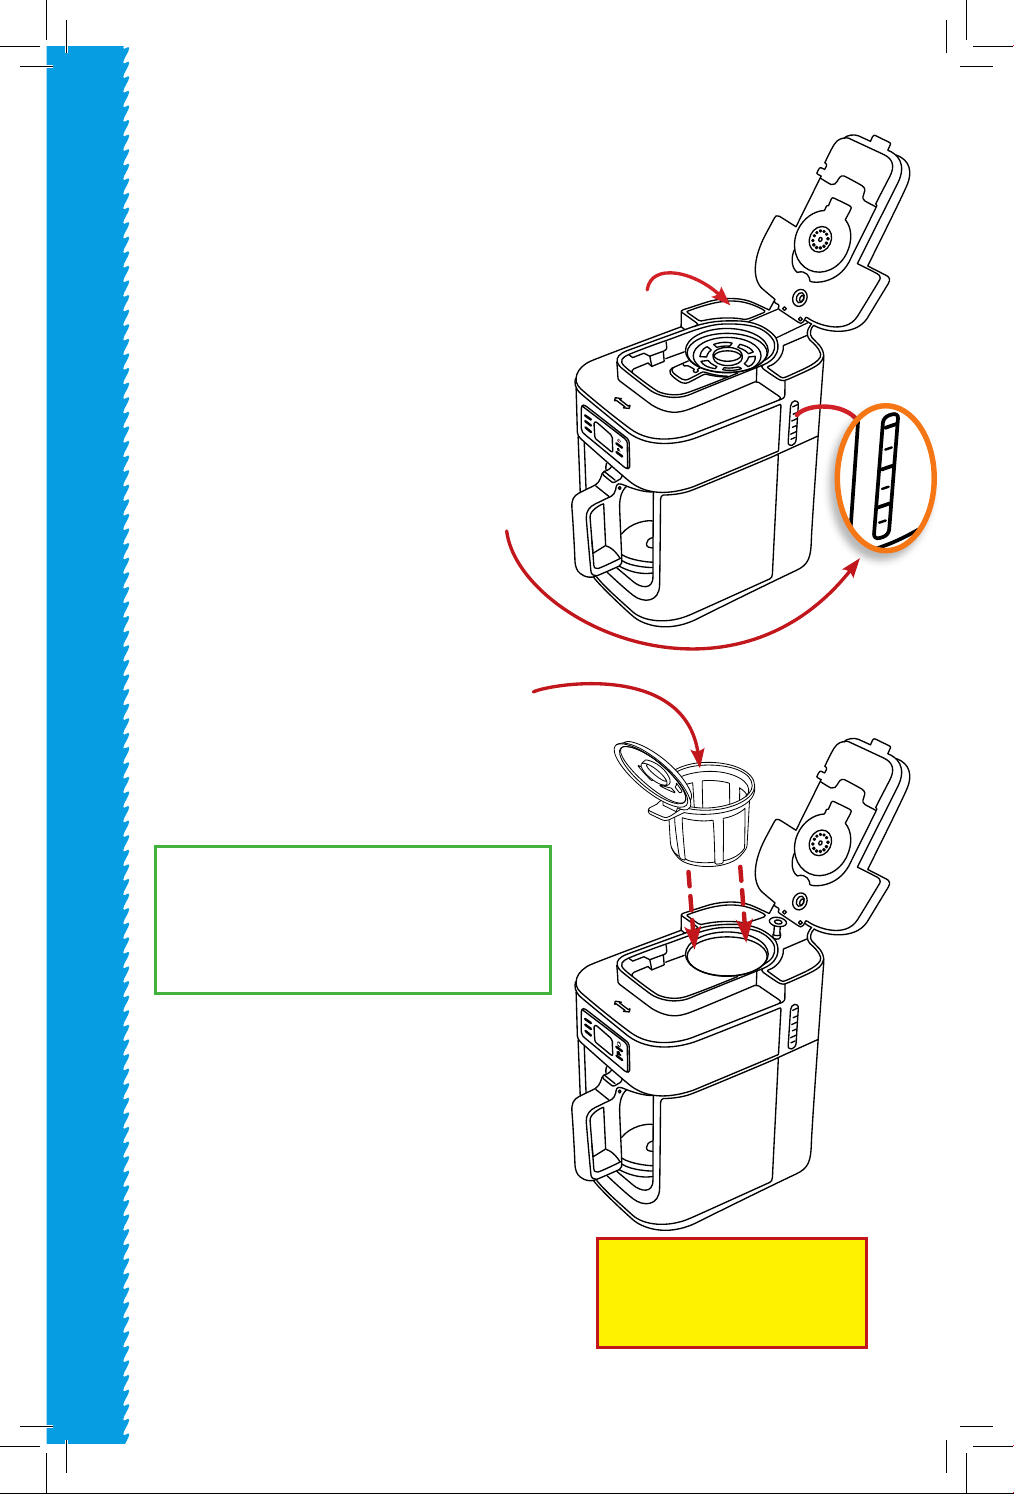
1. Plug the appliance into a wall outlet.
2. Open the lid, by pressing the outer
open close button and lifting the lid
upward. Fill the water reservoir with
water.
Note: Do not lean over the machine
while lling the water reservoir,
steam will escape.
Note: The minimum amount of water
is 5 cups.
The maximum amount of water
is 10 cups.
Note: Do not ll the water tank above
the MAX line.
3. Using the small scoop provided, pour
1-2 scoops of ground coee per cup,
into the coee bean container.
4. Close the lid. Insert the carafe.
NOTE: The machine will not work if
the carafe is not in place
5. Press the coee button once. Then the
indicator light will turn on and the cof-
fee will begin to brew automatically.
6. When the brewing is complete, the
machine will keep the coee warm for
one hour.
USING YOUR COFFEE MAKER
Prog
HR
MIN
Close
Open
Prog
HR
MIN
Close
Open
MAX
10
8
6
Close
Open
Prog
HR
MIN
Water
Reservoir
Note: The maximum capacity of the
coee bean container is about 2.1 oz.
Do not ll the container with coee
beans above the “MAX” line.
NOTE : If the lid is opened while
the coee maker is brewing the
machine will stop.
Note: The scooper is equal to 1 Tablespoon.
Use 1 Tablespoon coee for 1 cup of water
USING YOUR COFFEE MAKER
11
WARNING: Do not stick hands into the coee container
there are sharp blades.
USING YOUR COFFEE MAKER
MAX
10
8
6
Close
Open
Prog
HR
MIN
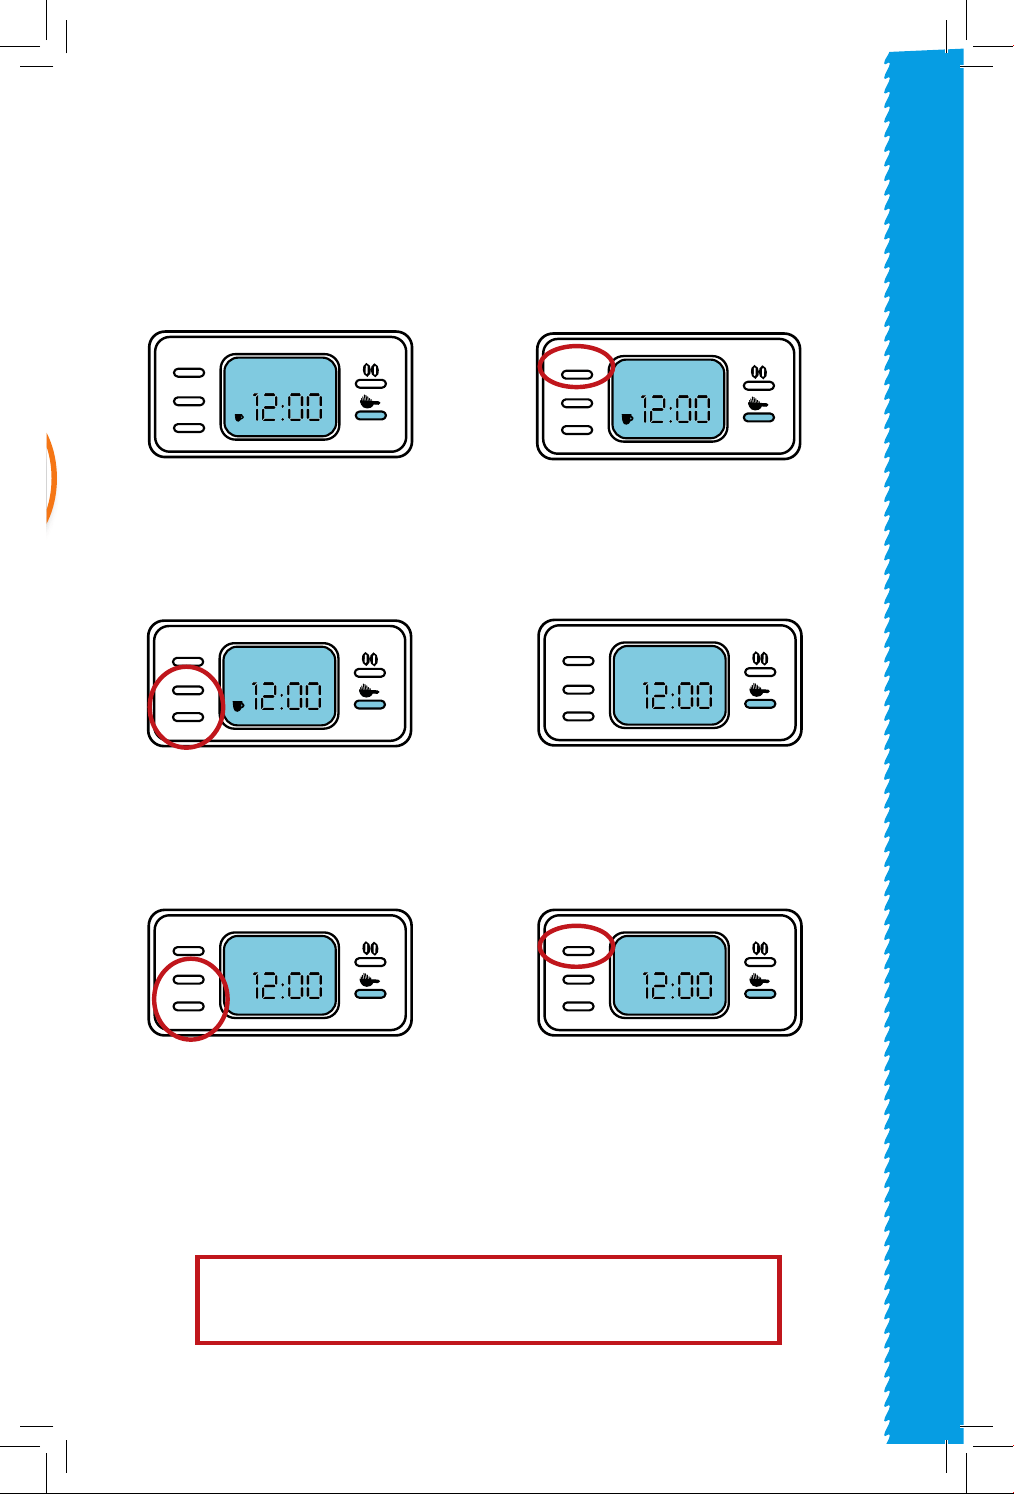
HOW TO SET THE TIMER TO AUTOMATICALLY
BREW COFFEE WITH GROUND COFFEE:
1. Press the coee button or coee
twice. Then the coee button
indicator light will start ashing.
2. Press the “PROG” button one
time. The LCD will display
“CLOCK” at the top right corner.
3. Set the current time by pressing
the “HR” and “MIN” buttons.
4. After setting the current time,
press the “PROG” button again.
The LED will display “TIMER” at
the top left corner.
5. Press the “HR” and “MIN” buttons to
set the automatic timer.
6. After setting the timer, press the
“PROG” button. Then the coee
button will ash.
7. When the automatic timer is
activated, the brewing process
will begin automatically.
Prog
HR
MIN
CLOCK
Prog
HR
MIN
CLOCK
Prog
HR
MIN
TIMER
Prog
HR
MIN
TIMER
Prog
HR
MIN
Prog
HR
MIN
Prog
HR
MIN
CLOCK
Prog
HR
MIN
CLOCK
Prog
HR
MIN
TIMER
Prog
HR
MIN
TIMER
Prog
HR
MIN
Prog
HR
MIN
Prog
HR
MIN
CLOCK
Prog
HR
MIN
CLOCK
Prog
HR
MIN
TIMER
Prog
HR
MIN
TIMER
Prog
HR
MIN
Prog
HR
MIN
Prog
HR
MIN
CLOCK
Prog
HR
MIN
CLOCK
Prog
HR
MIN
TIMER
Prog
HR
MIN
TIMER
Prog
HR
MIN
Prog
HR
MIN
Prog
HR
MIN
CLOCK
Prog
HR
MIN
CLOCK
Prog
HR
MIN
TIMER
Prog
HR
MIN
TIMER
Prog
HR
MIN
Prog
HR
MIN
Prog
HR
MIN
CLOCK
Prog
HR
MIN
CLOCK
Prog
HR
MIN
TIMER
Prog
HR
MIN
TIMER
Prog
HR
MIN
Prog
HR
MIN
Prog
HR
MIN
CLOCK
Prog
HR
MIN
CLOCK
Prog
HR
MIN
TIMER
Prog
HR
MIN
TIMER
Prog
HR
MIN
Prog
HR
MIN
Prog
HR
MIN
CLOCK
Prog
HR
MIN
CLOCK
Prog
HR
MIN
TIMER
Prog
HR
MIN
TIMER
Prog
HR
MIN
Prog
HR
MIN
10
12
• COFFEE CONTAINER: Wash with warm
soapy water and use a soft cloth to dry.
Wash and dry with caution- there
are sharp blades at the bottom.
• FILTER: Wash with warm soapy water
and pat dry.
• CARAFE: Clean the carafe after
each use. Rinse and clean the inner
walls with warm soapy water and a
non-abrasive cloth.
• BASE: Clean the base with a dry cloth.
Do not use harsh cleaning agents
or metal brushes, in order to avoid
scratching the stainless steel surface.
• Use a sponge or non metal brush to
clean the inside and outside of the
coee maker. Then wipe it dry with a
soft cloth.
NOTE: This appliance is NOT dishwasher
safe.
CLEANING AND MAINTENANCE
WARNING: Always remove the plug from the outlet and allow the
appliance to cool before cleaning.
WARNING: Do not immerse the coee maker or base into water or
any other liquid.
CLEANING AND MAINTENANCE
MAX
10
8
6
Close
Open
Prog
HR
MIN
10
8
6
4
MAX
11
13
DESCALING THE COFFEE MAKER
• After using your coee maker for a while, limescale will begin to build up
inside the machine. It is important to descale your appliance every
2-3 months. If the machine is used daily, the descaling process should
be done monthly.
• Plug the appliance into a wall outlet.
• Mix equal parts vinegar and water and pour it into the coee maker.
• Press the coee button to start the brewing process.
• When the brewing process is complete, ll up the coee maker with water
and begin brewing again. This is to rinse it of any remaining vinegar.
• You may have to run one more cycle of brewing water to remove the vinegar odor.
• To remove deep stains from the carafe, clean it with a soft sponge and baking
soda. If the stains have not been removed, mix 1 cup water and 1 cup vinegar
with ¼ cup of baking soda and allow it to sit overnight.
CLEANING AND MAINTENANCE
13

14
14

15
WARRANTY AND SERVICES
WARRANTY & SERVICE
This Limited Warranty is for one full year from the date
of purchase. It is applicable to the original purchaser
only and is not transferable to a third party user. Repair
or replacement of defective parts is solely at the seller’s
discretion. In the event that repair isn’t possible, the
seller will replace the product/part. If product repair/
replacement won’t suce, the seller has the option of
refunding the cash value of the product or component
returned.
Product defects not covered under the Warranty
provisions include normal wear and damage incurred
from use or accidental negligence, misuse of instruction
specications or repair by unauthorized parties.
The manufacturing company is not liable for any
incidental or consequential damages incurred by such
circumstances.

FOR CUSTOMER SERVICE
QUESTIONS OR COMMENTS
VISIT US @ GOURMIA.COM
OR CALL 888.552.0033