USER GUIDE 8.0.0 | March 2021 | 3725-34003-001A
Poly Rove DECT IP Phones
Getting Help
For more information about installing, configuring, and
administering Poly/Polycom products or services, go to
Polycom Support.
Plantronics, Inc. (Poly — formerly Plantronics and Polycom)
345 Encinal Street
Santa Cruz, California
95060
©
2021 Plantronics, Inc. All rights reserved. Poly, the propeller
design, and the Poly logo are trademarks of Plantronics, Inc.
All other trademarks are the property of their respective
owners.

Contents
Before You Begin................................................................................................4
Audience, Purpose, and Required Skills.............................................................................4
Related Poly and Partner Resources..................................................................................4
Getting Started with Poly Rove DECT IP Phones............................................5
Poly Rove DECT IP Phone Hardware Overview.................................................................5
Rove Series Wireless Handset.................................................................................5
Poly Rove Status Indicators..................................................................................... 7
Access the Home Screen.........................................................................................8
Entering Information Using the Dialpad.............................................................................. 8
Accessibility Features......................................................................................................... 9
Users Who Are Deaf or Hard of Hearing..................................................................9
Users with Limited Mobility.......................................................................................9
Users Who Are Blind, Have Low Vision, or Have Limited Vision........................... 10
Audio Calls........................................................................................................11
Placing Calls......................................................................................................................11
Place a Call Using the Default Line........................................................................ 11
Place a Call Using an Alternate Line...................................................................... 11
Place a New Call During an Active Call................................................................. 12
Call a Contact from a Directory.............................................................................. 12
Call a Contact Using Speed Dial............................................................................ 12
Call a Recent Contact............................................................................................ 12
Answering Calls................................................................................................................ 13
Answer an Incoming Call........................................................................................13
Answer an Incoming Call During a Call..................................................................13
Holding and Resuming Calls.............................................................................................13
Hold a Call..............................................................................................................13
Resume a Call........................................................................................................13
Switch Between Calls.............................................................................................14
End a Call..........................................................................................................................14
Transferring Calls..............................................................................................................14
Transfer a Call to Another Wireless Handset......................................................... 14
Blind Transfer a Call to a Contact...........................................................................14
Parking Calls..................................................................................................................... 15
Park a Call on a Extension..................................................................................... 15
View Parked Call Details........................................................................................ 15
1

Retrieve a Call Parked on an Extension.................................................................15
Rejecting Incoming Calls...................................................................................................16
Reject an Incoming Call......................................................................................... 16
Rejecting Calls with Do Not Disturb....................................................................... 16
Forwarding Calls............................................................................................................... 16
Enable Call Forward...............................................................................................16
Quickly Place an Emergency Call..................................................................................... 17
Cancel an Emergency Call or Alarm...................................................................... 17
Conference Calls.............................................................................................. 18
Initiate a Conference Call..................................................................................................18
Join Calls to Create a Conference Call............................................................................. 18
Split a Conference Call..................................................................................................... 18
Shared Lines.....................................................................................................20
Barge In.............................................................................................................................20
Pick Up Held Calls............................................................................................................ 20
Accessing and Broadcasting Messages........................................................21
Access Voicemail Messages.............................................................................................21
Placing Intercom Calls...................................................................................................... 21
Place an Intercom Call .......................................................................................... 21
Place an Intercom Call During a Call..................................................................... 22
Call Lists and Directories................................................................................ 23
Call Lists............................................................................................................................23
View Call Entry Details........................................................................................... 23
Delete a Call List Entry...........................................................................................23
Delete All Call Entries.............................................................................................24
Speed Dial.........................................................................................................................24
Add a Speed Dial Entry.......................................................................................... 24
Contact Directory.............................................................................................................. 24
Adding Contacts..................................................................................................... 24
Edit a Contact in the Contact Directory.................................................................. 25
Delete a Contact from the Contact Directory..........................................................26
Connecting Bluetooth Devices....................................................................... 27
Connect a Bluetooth Headset........................................................................................... 27
Connect a Smartphone over Bluetooth............................................................................. 27
Contents
2

Edit the Name of a Paired Bluetooth Device.....................................................................28
View Information for Paired Bluetooth Devices.................................................................28
Remove Bluetooth Devices...............................................................................................28
Poly Rove DECT IP Phone Settings................................................................29
Set the Time and Date Format..........................................................................................29
Set the Display Language ................................................................................................ 29
Assign LED Indicators.......................................................................................................29
Set Timeout for Power-Saving Mode................................................................................ 30
Set the Screen Saver Display........................................................................................... 30
Audio Adjustments............................................................................................................ 31
Adjust the Ringer and Alert Volume....................................................................... 31
Switch Between the Earpiece and the Speakerphone........................................... 31
Mute or Unmute the Microphone............................................................................31
Function Keys................................................................................................................... 31
Assign a Shortcut to a Function Key...................................................................... 31
Assign a Speed Dial Entry to a Function Key.........................................................32
Reset a Function Key ............................................................................................ 32
Disable a Function Key.......................................................................................... 32
Maintaining Poly Rove DECT IP Phones........................................................33
View Information for the DECT IP Phone..........................................................................33
Clean Your System Components...................................................................................... 33
Restart a Wireless Handset.............................................................................................. 34
Reset Wireless Handset Settings......................................................................................34
Troubleshooting............................................................................................... 35
Wireless Handset Range.................................................................................................. 35
Check the Wireless Handset Signal Strength................................................................... 35
Contents
3

Before You Begin
Topics:
▪ Audience, Purpose, and Required Skills
▪ Related Poly and Partner Resources
This guide contains overview information, procedures, and references you can use to perform tasks with
your Poly Rove DECT IP phone.
This user guide covers the DECT IP phone models listed below:
▪ Poly Rove 30 wireless handset
▪ Poly Rove 40 wireless handset
▪ Poly Rove B2 base station
▪ Poly Rove B4 base station
▪ Poly Rove R8 repeater
Audience, Purpose, and Required Skills
This guide is for beginning users, as well as intermediate and advanced users, who want to learn more
about the features available with Poly Rove DECT IP phones.
Related Poly and Partner Resources
See the following sites for information related to this product.
▪ The Poly Online Support Center is the entry point to online product, service, and solution support
information including Video Tutorials, Documents & Software, Knowledge Base, Community
Discussions, Poly University, and additional services.
▪ The Poly Document Library provides support documentation for active products, services, and
solutions. The documentation displays in responsive HTML5 format so that you can easily access
and view installation, configuration, or administration content from any online device.
▪ The Poly Community provides access to the latest developer and support information. Create an
account to access Poly support personnel and participate in developer and support forums. You can
find the latest information on hardware, software, and partner solutions topics, share ideas, and
solve problems with your colleagues.
▪ The Poly Partner Network is a program where resellers, distributors, solutions providers, and unified
communications providers deliver high-value business solutions that meet critical customer needs,
making it easy for you to communicate face-to-face with the applications and devices you use every
day.
▪ The Poly Services
help your business succeed and get the most out of your investment through the
benefits of collaboration.
4
Getting Started with Poly Rove DECT IP
Phones
Topics:
• Poly Rove DECT IP Phone Hardware Overview
• Entering Information Using the Dialpad
• Accessibility Features
Poly Rove DECT IP phones are standalone IP-based wireless phones that enable you to manage calls to
your line while you’re away from your desk.
Poly Rove DECT IP Phone Hardware Overview
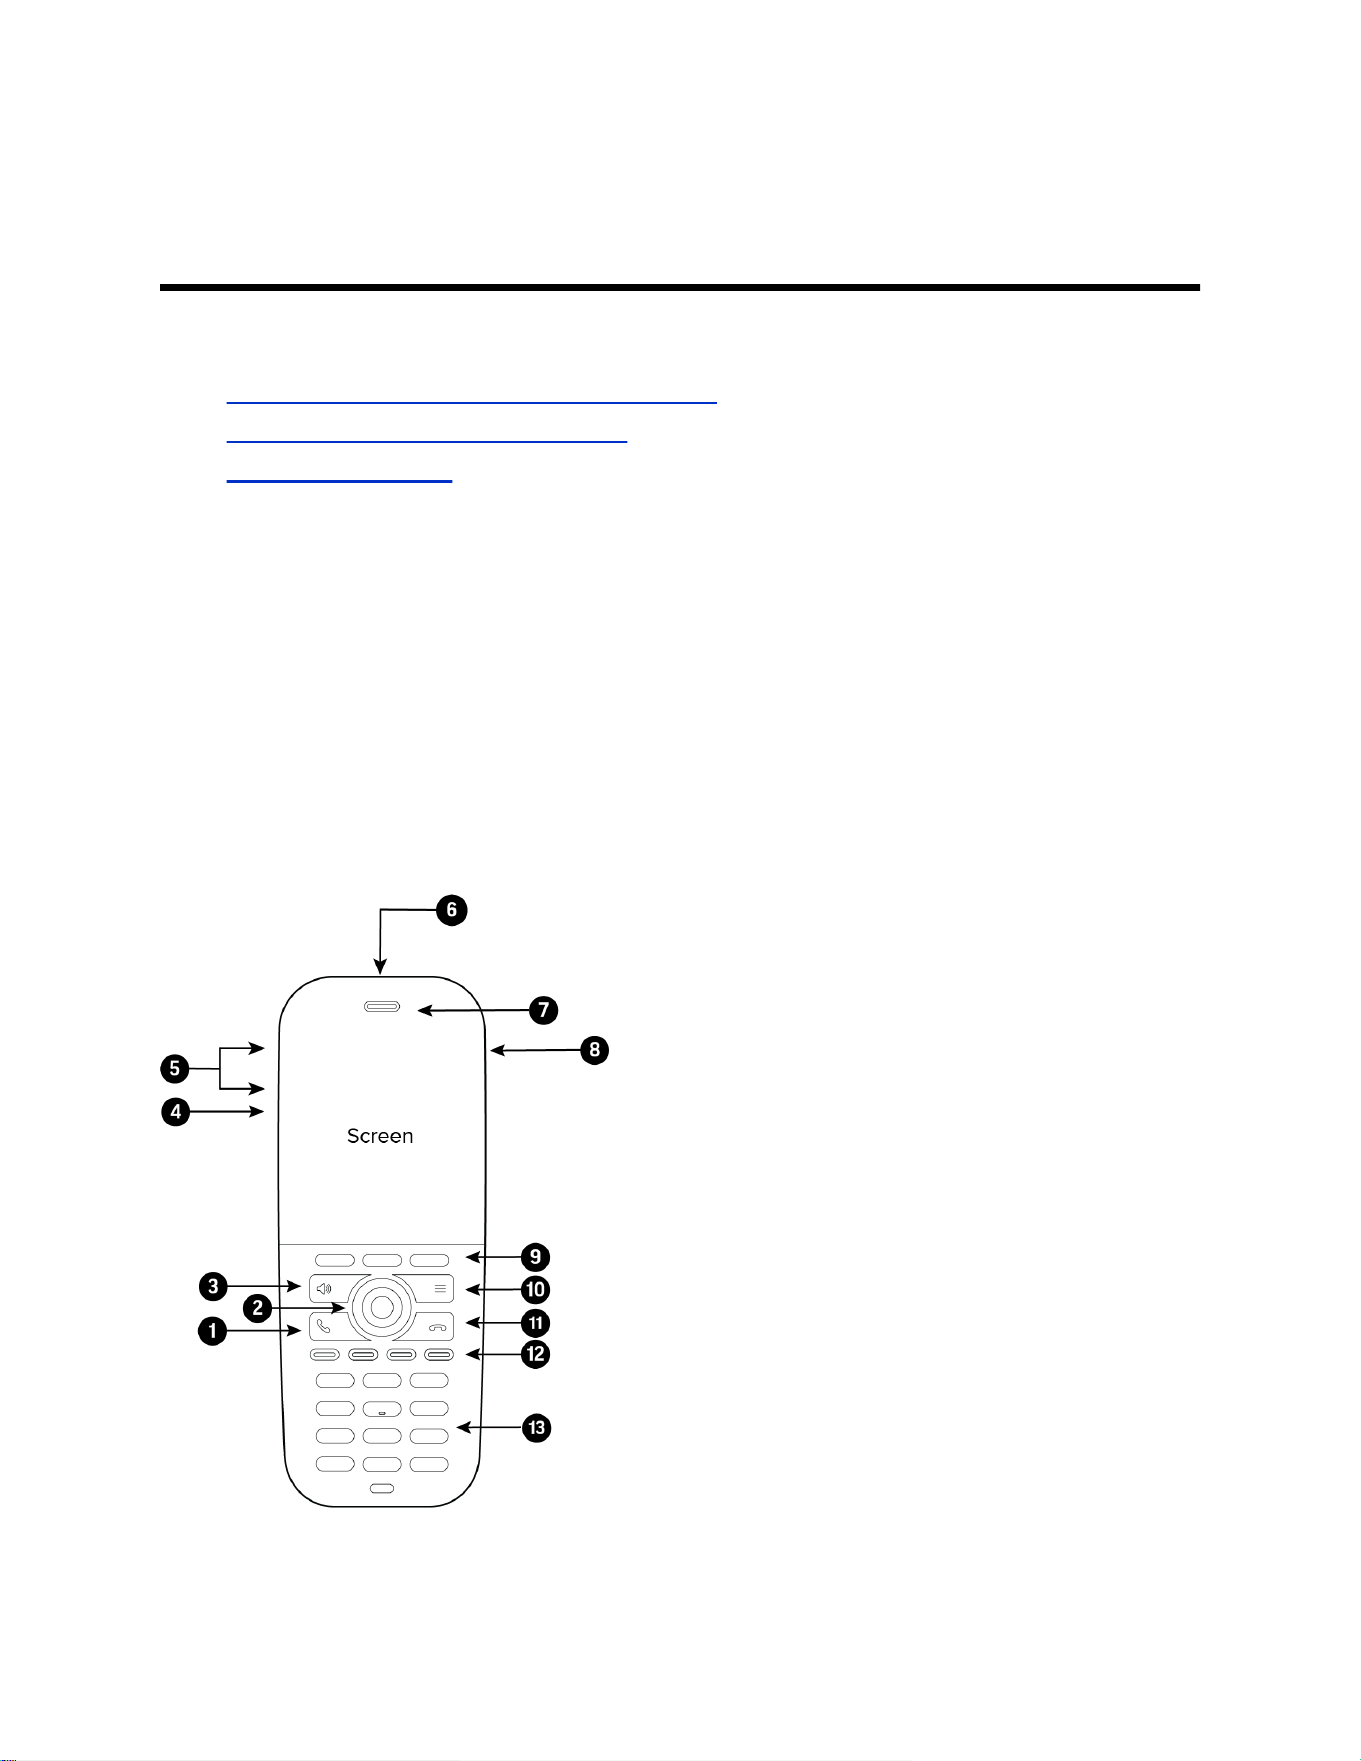
The following figures and tables provide information about hardware features available on your phone.
Rove Series Wireless Handset
The following figure displays the hardware features on Rove 30 and Rove 40 wireless handsets.
The table lists each numbered feature shown in the figure.
Figure 1: Rove Series wireless handset hardware features
5

Rove Series Wireless Handset Hardware Feature Descriptions
Reference Number Feature Feature Description
1 Call key Place a call, answer a call, or view
recent calls.
2 Navigation keys / Select key Scrolls through information or
options displayed on the phone's
screen. Selects a field of displayed
data.
3 Speakerphone key Place or answer a call using the
wireless handset speakerphone,
and switch between the
speakerphone and the earpiece
during a call.
4 Mute key Mute or unmute the microphone
during an active call.
5 Volume keys Adjusts the volume of the handset,
headset, speaker, and ringer.
6 Emergency button (Rove 40 only) Press to call an emergency service
or sound an alarm.
Check with your system
administrator for the functionality of
this feature in your company’s
deployment.
7 Speaker Provides ringer and audio output.
8 Headset port Connect a headset to the phone.
9 Soft keys Enables you to select context
sensitive keys that display along the
bottom of the screen.
10 Menu key Press to view the menu.
11 End key Hang up a call or cancel the
handset software update. Press
and hold to power the wireless
handset on or off.
12 Function keys Select to perform programmed
functions.
Check with your system
administrator for the functionality of
this feature in your company’s
deployment.
Getting Started with Poly Rove DECT IP Phones
6
Reference Number Feature Feature Description
13 Dialpad Enables you to enter numbers,
letters, and special characters. You
can also use the dialpad keys to
select menu items that have index
numbers.
Poly Rove Status Indicators
Poly Rove DECT IP phones have LED indicators that indicate the status of the different phone
components.
Note: You can program the LED indicators on the wireless handset if you want to change them from the
default settings.
The following tables show the LED indicators and the default system states for each of the DECT IP
phone components.
Poly Rove Wireless Handset Status Indicators
LED Indicator Default Status
Green Voice message
Yellow Low battery
Red Missed call
Flashing red and green Software update
Poly Rove Base Station and Repeater Status Indicators
LED Indicator Status
No indicator Powered off
Solid green Registered; good quality signal
Blinking green Searching for nearby base stations
Solid red Powered on, but has an error or no signal
Blinking red Firmware update or factory reset in progress
Solid orange Powered on, but has poor signal quality
Blinking orange Searching for IP address
Getting Started with Poly Rove DECT IP Phones
7
Poly Rove Multicharger Status Indicators
LED Indicator Status
Red Charging
Green Charged
Access the Home Screen
You can access the Home screen from any other screen on the wireless handset.
Procedure
» Do one of the following:
• Press Back repeatedly until you return to the Home screen.
• Press End .
Entering Information Using the Dialpad
You can use the dialpad on the Poly Rove wireless handsets to enter and edit information in text or
numerical fields.
The following table describes how to enter different types of information.
Using the Dialpad to Enter Information
Task Action
Enter uppercase or lowercase letters The wireless handset automatically adjusts for
uppercase and lowercase letters.
Enter numbers in text fields Repeatedly press a key on the dialpad until you get the
number for that key.
Enter a space Press the 0 key.
You can only enter a space in a text field.
Enter special characters Press the !#? soft key.
You can only enter special characters in a text field.
Delete characters Use the arrow keys to position the cursor to the right of
the character, then press the Clear softkey.
Getting Started with Poly Rove DECT IP Phones
8

Accessibility Features
Poly products include a number of features to accommodate users with disabilities.
Users Who Are Deaf or Hard of Hearing
Your device includes accessibility features for users who are deaf or hard of hearing to use the system.
The following table lists the accessibility features for users who are deaf or hard of hearing.
Accessibility Features for Users Who are Deaf or Hard of Hearing
Feature Description
Visual message indicators An indicator light flashes or onscreen icons display to
indicate that you have new messages.
Adjustable call volume While in a call, you can raise or lower the volume of the
device.
Adjustable ringtone and volume You can choose from a variety of ringtones for the
phone. You can also change the volume of the ringer to
suit your needs.
Vibration alert You can set the wireless handset to vibrate and ring or
vibrate only to alert you to incoming calls.
Visual notifications Status and icon indicators let you know when you have
incoming, outgoing, active, or held calls. Indicators also
alert you of the device’s status and when features are
enabled.
Hearing aid compatible (HAC) handsets All Poly device handsets are Hearing Aid Compatible
(HAC) and have telecoils that magnetically couple to
most forms of wearable hearing aids per FCC section
508 (compliant to ADA Section 508 Recommendations:
Subpart B 1194.23).
Users with Limited Mobility
Your device includes accessibility features to enable users with limited mobility to use various device
features.
The following table lists the accessibility features for users with limited mobility.
Accessibility Features for Users with Limited Mobility
Feature Description
Auto-answering You can enable the phone to auto-answer calls.
Built-in speakerphone A built-in speakerphone enables you to hear audio on
the device without having to use a handset or headset.
Getting Started with Poly Rove DECT IP Phones
9

Feature Description
Emergency button (Poly Rove 40 only) The Poly Rove 40 wireless handset has a large,
brightly colored emergency button that you can press to
sound an alarm or call an emergency service.
Users Who Are Blind, Have Low Vision, or Have Limited Vision
Your device includes accessibility features for users who are blind, have low vision, or have limited vision
to use the device.
The following table lists the accessibility features for users who are blind, have low vision, or have limited
vision.
Accessibility Features for Users Who Are Blind, Have Low Vision, or Have Limited Vision
Feature Description
Auto-answering You can enable the phone to auto-answer calls.
Illuminated feature keys Many feature keys illuminate when activated to alert
you when a feature is enabled.
Microphone mute alert An audible alert plays when you mute or unmute the
microphone.
Charging audio alert You can set the wireless handset to play an audio alert
when the battery is low and requires charging.
Tactile “5” key with raised bumps The “5” key has two bumps that enable you discern the
position of other keys on the keypad.
Tactile-discernible number, feature, and navigation keys Keys on the phone console are discernible by their size
and shape.
Emergency button (Poly Rove 40 only) The Poly Rove 40 wireless handset has a large,
brightly colored emergency button that you can press to
sound an alarm or call an emergency service.
Getting Started with Poly Rove DECT IP Phones
10

Audio Calls
Topics:
• Placing Calls
• Answering Calls
• Holding and Resuming Calls
• End a Call
• Transferring Calls
• Parking Calls
• Rejecting Incoming Calls
• Forwarding Calls
• Quickly Place an Emergency Call
Poly Rove DECT IP phones support up to seven concurrent calls per base station and can make or
answer a maximum of two calls.
Placing Calls
You can place a call using the default line or an alternate line.
Place a Call Using the Default Line
Unless you choose an alternate line, the phone uses your default line when you place a call.
Procedure
1. Do one of the following:
• Enter your contact’s number.
• Select a contact from a directory.
• Select a contact from the recent calls list.
• Select a message from the Messages list.
2. Press Call .
Place a Call Using an Alternate Line
You can choose to use an alternate line before placing a call.
Procedure
1. Press Lines and select a line.
2. Do one of the following:
• Enter your contact’s number.
• Select a contact from a directory.
11

• Select a contact from the recent calls list.
3. Select OK.
4. Press Call .
Place a New Call During an Active Call
You can place new calls to contacts during active calls.
Procedure
1. While in an active call, press New Call.
2. Enter a contact’s number or choose a contact from the directory or recent calls.
3. Do one of the following:
• Press Call.
• If the called handset has multiple lines, choose a line and press Call.
Call a Contact from a Directory
You can call any contact stored in the contact directory on the wireless handset.
Procedure
1. Do one of the following:
• From the Home screen, select Contacts.
• Press Menu > Contacts .
2. Choose a contact and select Call.
Call a Contact Using Speed Dial
You can quickly call contacts from the wireless handset using speed dial.
Save the contact as a speed dial entry.
Procedure
» Do one of the following:
• Press and hold the number key for your speed dial entry.
• If programmed for speed dials, press a function key for your speed dial entry.
The phone dials the contact saved for that entry.
Call a Recent Contact
The wireless handset stores a record of all calls placed on the handset, and you can place calls from the
Calls list.
Procedure
1. On the Home screen, select Calls.
By default, the All calls screen displays.
2. Do one of the following:
Audio Calls
12

• Choose a contact in the All Calls list and then select Call.
• Use the navigation keys to view the Answered calls, Missed calls, or Dialed calls lists,
then select a contact and select Call.
Answering Calls
When you get an incoming call on a Poly Rove DECT IP phone, you can choose to answer the call in
various ways.
Answer an Incoming Call
Answer an incoming call from the wireless handset.
Procedure
» Do one of the following:
• Select Call .
• Press the Speakerphone button.
Answer an Incoming Call During a Call
A tone plays when you receive an incoming call during an active call.
Procedure
» Do one of the following:
• Select Call .
• Press the Speakerphone button.
The first call goes on hold automatically.
Holding and Resuming Calls
When you are in a call, you can place an active audio call on hold and resume the call.
Hold a Call
You can place up to two active calls on hold at any time.
Procedure
» During a call, select Options > Hold.
Resume a Call
You can resume any held call on the wireless handset.
Procedure
» Select Options > Resume.
Audio Calls
13

Switch Between Calls
You can switch between calls when you have at least one active call and one held call on the wireless
handset.
Procedure
» With one active call and a held call, press Swap.
End a Call
You can end an active call at any time.
Procedure
» Do one of the following:
• Select End .
• Place the wireless handset in its cradle or the charging cradle.
Transferring Calls
You can transfer a call to another wireless handset, to a directory contact, or to a designated number.
Transfer a Call to Another Wireless Handset
You can transfer a call on your wireless handset to another contact to enable someone else to take the
call or to resume the call on another handset.
Procedure
1. During a call, select Options > Transfer.
2. Enter a number or select a contact from a directory or the recent calls list.
3. Select Call.
4. Talk with your contact, then select Options > Transfer again to complete the transfer.
Blind Transfer a Call to a Contact
Blind transferring a call sends the call to another contact without your speaking to the contact first.
Procedure
1. During a call, select Options > Blind Transfer.
2. Enter a number or select a contact from a directory or the recent calls list.
3. Select Transfer.
The phone transfers the call when the contact answers the call.
Audio Calls
14

Parking Calls
When you park a call, you can put the call on hold and resume it on another wireless handset.
You can park a call locally on the Rove base station or in a parking lot on your service provider’s network,
if available. You can retrieve a parked call on a wireless handset by entering a dedicated retrieval code.
This feature is only available for lines registered with a service that supports call park.
Park a Call on a Extension
You can park active calls from your wireless handset directly onto a contact’s line extension.
When you park a call on an extension, the call is moved from the handset’s line, and the phone notifies
the contact that a call is parked.
Procedure
1. During the call, go to Options > Call Park.
2. Enter the extension where you want to park the call.
For example, enter 6889.
3. Select Park.
View Parked Call Details
If your administrator has enabled enhanced call park, you can view the details of all calls parked in any
parking lot your wireless handset is configured to monitor.
Tip: You can resume a parked call from the Parked Calls screen.
Procedure
1. Do one of the following:
• Select Pick Up and then select Parked Calls.
• Select Menu and then select Parked Calls.
2. Choose a parked call from the list and press the Info softkey.
3. Press the Down Arrow Key to view more details.
Retrieve a Call Parked on an Extension
You can retrieve a parked call from any phone or wireless handset on the network.
You must have the retrieval code for the parked call. The retrieval code is set when parking a call.
Procedure
1. Enter the retrieval code, then enter the extension where you parked the call, followed by a pound
sign (#).
For example, enter *88, then enter 6889#.
2. Press Call
.
Audio Calls
15

Rejecting Incoming Calls
You can reject incoming calls manually via the handset, or automatically by enabling Do Not Disturb
(DND).
Reject an Incoming Call
You can reject rather than answer incoming calls on the wireless handset.
Procedure
» Press End .
Rejecting Calls with Do Not Disturb
Do Not Disturb (DND) enables you to set your phone to automatically reject calls when you don’t want to
be interrupted.
Enable Do Not Disturb
Do Not Disturb (DND) enables you to set your phone to automatically reject calls when you don’t want to
be interrupted.
Procedure
1. On the wireless handset, go to Menu > Do Not Disturb.
2. Select Enable.
Forwarding Calls
You can enable call forwarding for any private lines registered on the wireless handset, and you can
choose to forward an incoming call to the handset.
You can’t enable call forwarding or forward incoming calls on shared lines or lines registered on multiple
phones.
Enable Call Forward
You can enable your wireless handset to forward all incoming calls or forward calls based on the status of
the handset.
Procedure
1. Go to Menu > Call Forward.
2. Choose one of the following options:
• Unconditionally
• No answer
• Busy
3. Select On, then enter the number for your forwarding contact.
Audio Calls
16

4. Optional: If you select No answer as your forwarding option, set the time in seconds when to
forward the call.
5. Select Back to return to the Home screen.
Quickly Place an Emergency Call
Poly Rove 40 wireless handsets have an emergency button that you can press to quickly call an
emergency service, such as 911 or on-site security.
Depending on how your administrator configures the handset, the button may also sound an alarm when
pressed or there may be a slight delay before the call is placed. Check with your administrator for the
exact feature configurations.
Procedure
» Press and hold the Emergency button for 5 seconds.
Cancel an Emergency Call or Alarm
You can cancel an emergency call or an alarm if you accidentally press the button or if the call is no
longer needed.
If configured by your system administrator, a warning displays on screen when you press the Emergency
button, and you have the option to cancel the alarm before the action is initiated.
Procedure
» Press Cancel.
Audio Calls
17

Conference Calls
Topics:
• Initiate a Conference Call
• Join Calls to Create a Conference Call
• Split a Conference Call
You can initiate audio conference calls with various contacts on Poly phones. When you initiate a
conference call, you can manage conference participants, join calls into a conference, or split your
conference into individual calls.
Initiate a Conference Call
You can initiate a conference call with up to two contacts.
Procedure
1. Call your first contact.
2. During the call, go to Options > Conference.
The first call is placed on hold.
3. Enter a number or select a contact from a directory or the recent calls list.
4. Go to Options > Conference.
The two calls are joined into a conference call.
Join Calls to Create a Conference Call
You can join one active call and one held call into a conference call.
Procedure
1. When you have an active call and a held call, go to Options > Conference.
2. Select Select.
The phone joins the calls into a conference call. If you have multiple held calls, the other held calls
on the line remain held.
Split a Conference Call
When you split a conference, you end the conference call and place the other two people on hold.
After you split a conference call, you can resume one of the held calls.
Procedure
» During a conference call, select Split.
18

The conference call ends, and phone places the two participants on hold in two separate calls.
Conference Calls
19

Shared Lines
Topics:
• Barge In
• Pick Up Held Calls
If there’s a shared line for more than one Poly Rove wireless handset, any of the handsets can receive an
incoming call on the line, barge in on other calls, and pick up a held call.
This feature is only available for lines registered with services that support shared lines.
Barge In
You can barge in on an active call on another wireless handset on the shared line.
Procedure
1. During an active call, select Lines.
2. Choose the shared line that contains the active call.
3. Go to Options > Barge In.
Pick Up Held Calls
When you place a call on hold on a shared line, you can pick up and resume the call from your wireless
handset.
Procedure
1. On the wireless handset, select Lines.
2. Choose the shared line that contains the held call.
3. Go to Options > Resume.
20

Accessing and Broadcasting Messages
Topics:
• Access Voicemail Messages
• Placing Intercom Calls
You can access and broadcast a variety of audio messages from a Poly Rove DECT IP phone.
Note: Your phone may not support all of the features described in this section. Check with your
administrator to find out which features are available on your phone.
Access Voicemail Messages
You can access and listen to new voicemail messages from the wireless handset.
Procedure
1. Go to Menu
> Messages.
2. Select Message Center.
3. Choose a line, then press Select.
The wireless handset accesses the message center, and you can listen to new voicemail
messages.
Placing Intercom Calls
Intercom calls enable you to place a call to a contact that the contact’s phone answers automatically as
long as the contact isn’t in an active call.
If the contact is in an active call, the contact can choose to answer the intercom call, or the phone
answers the intercom call automatically after the active call ends.
Place an Intercom Call
You can place an intercom call to quickly relay a message to a contact.
Procedure
1. Go to Menu
> Intercom, then choose the wireless handset you want to connect with.
2. Do one of the following:
• Press the Speakerphone button.
• Select Call.
• Select OK.
3. When you’re done with your message, select End .
21

Place an Intercom Call During a Call
You can place an intercom call to another contact during an active call.
Procedure
1. During a call, go to Options > Hold.
2. Select New Call > Intercom, then choose the wireless handset you want to connect with.
3. When you’re done with your message, select End .
4. Resume the held call.
Accessing and Broadcasting Messages
22

Call Lists and Directories
Topics:
• Call Lists
• Speed Dial
• Contact Directory
You can access your contact directory, enterprise directory, and call lists on your Poly Rove wireless
handset.
Call Lists
Call lists maintain a log of incoming and outgoing calls on the Poly Rove handset.
Poly Rove wireless handsets store up to 50 call entries in the call lists.
You can view the following types of call entries in the call lists:
• Missed calls: Record of calls you missed
• Received callsAnswered: Record of calls you received
• Dialed calls: Record of calls you made or dialed
• Recent callsAll calls: Mixed record of the calls you missed, received, and dialed
View Call Entry Details
You can view information for the call list entries on your phone.
Procedure
1. On the wireless handsets, do one of the following:
• Select Calls.
• Select Menu > Calls .
2. Go to the desired entry.
3. Select Options > View Details.
Delete a Call List Entry
You can delete call list entries on your phone.
Procedure
1. On the wireless handsets, do one of the following:
• Select Calls.
• Select Menu > Calls .
2. Go to the desired entry.
23

3. Select Options > Delete.
4. Select Yes.
Delete All Call Entries
You can delete all entries in a call list at one time.
Procedure
1. On the wireless handsets, do one of the following:
• Select Calls.
• Select Menu > Calls .
2. Select Options > Delete All.
Speed Dial
You can assign a directory entry to a speed dial entry to quickly call a contact from the wireless handset.
Add a Speed Dial Entry
You can add up to eight contacts as speed dial entries on the wireless handset.
Procedure
1. Do one of the following:
• From the Home screen, select Contacts.
• Press Menu > Contacts .
2. Select a contact, then select Options .
3. Select Speed Dial, then choose an index number.
Contact Directory
You can call, view, delete, save, or edit contact information for any contact in the contact directory.
Adding Contacts
Add contacts by manually entering information directly into the contact directory or by using one of the
call lists.
Add a Contact to the Contact Directory
You can add up to 250 contacts to the directory on the wireless handset to quickly place calls to frequent
contacts.
Procedure
1. Do one of the following:
Call Lists and Directories
24

• From the Home screen, select Contacts.
• Press Menu > Contacts .
2. On the Contacts screen, go to Options > Add contact.
3. Enter your contact’s information, then select Save.
Add a Contact to the Directory from a Call List
You can add a new contact to the contact directory from a call list.
Procedure
1. On the wireless handsets, do one of the following:
• Select Calls.
• Select Menu > Calls .
2. Choose a contact and select Options .
3. Select Save as contact, and select a phone number category.
4. Enter your contact’s information, then select Save.
Add Additional Contact Details from a Call List
You can append additional contact details from a call list to an existing contact in the directory.
Procedure
1. On the wireless handsets, do one of the following:
• Select Calls.
• Select Menu > Calls .
2. Choose a contact and select Options .
3. Select Append to contact, then choose an existing contact.
4. Choose a category for the number, select Save, and select Yes.
Edit a Contact in the Contact Directory
After you add a contact to the contact directory, you can update the contact’s information.
Procedure
1. Do one of the following:
• From the Home screen, select Contacts.
• Press Menu > Contacts .
2. Select a contact, then select Edit contact.
3. Select a contact entry field and make your edits.
4. Select Save.
Call Lists and Directories
25

Delete a Contact from the Contact Directory
You can delete any contact from the contact directory.
Procedure
1. Do one of the following:
• From the Home screen, select Contacts.
• Press Menu > Contacts .
2. Choose a contact and select Options .
3. Select Delete contact.
4. Select Yes.
Call Lists and Directories
26

Connecting Bluetooth Devices
Topics:
▪ Connect a Bluetooth Headset
▪ Connect a Smartphone over Bluetooth
▪ Edit the Name of a Paired Bluetooth Device
▪ View Information for Paired Bluetooth Devices
▪ Remove Bluetooth Devices
You can connect up to four Bluetooth devices, including Bluetooth headsets and smartphones, to a Poly
Rove 40 wireless handset.
Poly Rove 30 wireless handsets do not have Bluetooth capabilities.
Connect a Bluetooth Headset
You can connect any Bluetooth-capable headset to the Poly Rove 40 wireless handset.
You can connect up to four Bluetooth devices to the wireless handset.
Procedure
1. Enable Bluetooth.
a. Go to Settings > Bluetooth.
b. Highlight Enable Bluetooth and press the Toggle softkey.
The Enable Bluetooth status changes to On.
2. Select Search for Devices.
3. Select your Bluetooth headset in the list of devices and select Pair.
Connect a Smartphone over Bluetooth
You can connect a smartphone to your Poly Rove 40 wireless handset using Bluetooth.
You can connect up to four Bluetooth devices to the wireless handset.
Procedure
1. Enable Bluetooth.
a. Go to Settings > Bluetooth.
b. Highlight Enable Bluetooth and press the Toggle softkey.
The Enable Bluetooth status changes to On.
2. Select Search for Devices.
3. Enable Bluetooth on your smartphone.
27

4. On the wireless handset, select your smartphone in the list of devices and select Pair.
5. Confirm that the PIN on the wireless handset matches the PIN displayed on your smartphone and
select Yes.
Edit the Name of a Paired Bluetooth Device
You can modify the default name for your Bluetooth device paired with the Poly Rove 40 wireless
handset.
Procedure
1. Go to Settings > Bluetooth.
2. Select Paired Devices then select your Bluetooth device.
3. Select Options > Change Name.
4. Press the Clear softkey to delete the current device name, then use the dialpad to enter a new
device name.
5. Select Save.
View Information for Paired Bluetooth Devices
You can view the status, name, and MAC address for your paired bluetooth devices on the Poly Rove 40
wireless handset.
Procedure
1. Go to Settings > Bluetooth.
2. Select Paired Devices then select your Bluetooth device.
3. Select Options > Info.
Remove Bluetooth Devices
You can remove a Bluetooth device to make room for a new device or remove all paired Bluetooth
devices/
Procedure
1. Go to Settings > Bluetooth.
2. Select Paired Devices.
3. Do one of the following:
▪ Select a Bluetooth device, then select Options > Delete.
▪ Select Options > Delete All, then select Yes.
Connecting Bluetooth Devices
28

Poly Rove DECT IP Phone Settings
Topics:
• Set the Time and Date Format
• Set the Display Language
• Assign LED Indicators
• Set Timeout for Power-Saving Mode
• Set the Screen Saver Display
• Audio Adjustments
• Function Keys
You can configure phone settings and personalize your Poly Rove wireless handset.
Set the Time and Date Format
You can choose how the time and date display on the wireless handset.
Procedure
1. Select Menu > Preferences.
2. Select Time & Date.
3. Do one of the following:
• Select Time > Options and choose a time format.
• Select Date > Options and choose a date format.
4. Select Save.
Set the Display Language
The wireless handsets have a standard set of languages available that you can choose to set for the
display.
Check with your system administrator to find out which languages your phone supports.
Procedure
1. Select Menu > Preferences.
2. Select Language, then choose a language from the list.
Assign LED Indicators
You can choose which LED indicators display for certain features and alerts on the wireless handset.
29

Procedure
1. Select Menu > Preferences.
2. Select LED signal.
3. Select an LED color, then choose one of the following:
• Off
• Missed call
• Voice message
• Low battery
4. Select Back to return to the Home screen.
Set Timeout for Power-Saving Mode
You can set when the wireless handset screen turns off after a period of inactivity to conserve energy
when the handset isn’t in the charging cradle.
By default, the wireless handset goes into power-saving mode after 60 seconds.
Procedure
1. Select Menu > Preferences.
2. Select Power save, then select a time option from 5 seconds to 60 seconds.
3. Select Back to return to the Home screen.
Set the Screen Saver Display
You can choose which screen displays when the wireless handset is idle.
The screen saver automatically starts when your phone is idle for a specified amount of time. You can
stop the screen saver by pressing any key or touching the screen.
Procedure
1. Select Menu > Preferences.
2. Select Screen Saver.
3. Choose one of the following:
• Off
• Idle clock
• Start-up image
• Cradle screen
Poly Rove DECT IP Phone Settings
30

Audio Adjustments
You can control many audio functions on the handset, including using the speakerphone or earpiece,
adjusting the volume, or muting the microphone.
Adjust the Ringer and Alert Volume
You can increase or decrease the volume of the ringtone and audio alerts on your wireless handset.
Procedure
1. Select Menu > Preferences.
2. Select one of the following options:
• Ring volume
• Alert volume
3. Do one of the following:
• Press the Volume Up button to increase the volume.
• Press the Volume Down button to decrease the volume.
Switch Between the Earpiece and the Speakerphone
At any point in a call, you can switch between listening to audio on the speakerphone and the earpiece.
Procedure
» During a call, press the Speakerphone button.
Mute or Unmute the Microphone
You can mute the microphone so other parties cannot hear you.
Procedure
» During a call, press the Mute button to mute or unmute the microphone.
Function Keys
There are four function keys on Poly Rove handsets that you can program for speed dials or shortcuts.
If enabled by your system administrator, you can assign key functions, reset pre-programmed functions,
and disable the keys.
Assign a Shortcut to a Function Key
You can assign shortcuts to a function key to quickly send a message, view the status of the wireless
handset, or access settings.
Check with your system administrator to make sure you can reprogram the function keys. The keys may
have functions already programmed.
Poly Rove DECT IP Phone Settings
31

Procedure
1. On the wireless handset, press the desired function key.
2. Select Yes to continue to assign a key function.
3. Select Shortcuts, then choose a function.
4. Select Back to return to the Home screen.
Assign a Speed Dial Entry to a Function Key
You can assign a speed dial entry to a function key to quickly call a contact.
Check with your system administrator to make sure you can reprogram the function keys. The keys may
have functions already programmed. To assign a speed dial entry to a function key, you must have the
contact already assigned to a speed dial entry.
Procedure
1. On the wireless handset, press the desired function key.
2. Select Speed Dial, then select a contact from the list.
3. Select Back to return to the Home screen.
Reset a Function Key
You can reset a function key to add a new function or remove a shortcut.
Procedure
1. Go to Menu > Settings.
2. Select Function keys, then select a function key option.
3. Select Toggle.
4. Optional: Select Back if you want to reset any other function keys.
5. Select Back to return to the Home screen.
Disable a Function Key
You can deactivate a function key if you don’t want to program functions or if you want to prevent others
from programming functions for that key.
Procedure
1. On the wireless handset, press the desired function key.
2. Select Yes to continue to assign a key function.
3. Select Ignore key press, then select On.
The phone now does nothing when you press the function key.
4. Select Back to return to the Home screen.
Poly Rove DECT IP Phone Settings
32

Maintaining Poly Rove DECT IP Phones
Topics:
• View Information for the DECT IP Phone
• Clean Your System Components
• Restart a Wireless Handset
• Reset Wireless Handset Settings
When the phone isn’t operating properly, you can investigate or troubleshoot issues along with other tasks
your administrator may ask you to perform.
View Information for the DECT IP Phone
You can view information for the wireless handset and paired base station, including the software and
hardware version, IP address, MAC address, battery level, and product name.
Procedure
» On the wireless handset, go to Menu > Info .
All the available handset information displays.
Clean Your System Components
When cleaning your DECT IP phone—handsets, base station, or chargers—be careful to not let any of
the disinfecting solution seep into the phone or accessory.
To effectively clean your Poly Rove system components, use the following items:
• Cotton balls
• Cotton swabs
• 70:30 solution of isopropyl alcohol and water
Caution: Be careful not to wipe ports or cable connections.
Procedure
1. Unplug all cables from the phone and accessories.
2. Dip a cotton ball into the alcohol/water solution and squeeze out any excess liquid.
3. Wipe all hardware surfaces.
4. Dip a cotton swab into the alcohol/water solution and clean around the buttons.
5. Let the phone and accessories air-dry completely before reconnecting any cables.
33

Restart a Wireless Handset
Your system administrator may ask you to restart the phone if it malfunctions or to assist in
troubleshooting.
Procedure
» Remove and then reinsert the handset battery.
The wireless handset restarts and restores connection with the base station.
Reset Wireless Handset Settings
You can return the wireless handset to its default settings.
Contact your system administrator before resetting your handset.
Procedure
1. Select Menu > Settings .
2. Select Reset Settings, then select Yes.
Maintaining Poly Rove DECT IP Phones
34

Troubleshooting
Topics:
• Wireless Handset Range
• Check the Wireless Handset Signal Strength
If you have issues with your Poly Rove wireless handset or the base station, try the following
troubleshooting procedures and solutions to resolve certain issues.
Wireless Handset Range
If you can’t reach your Poly Rove wireless handset from the base station, verify that the handset has
enough signal strength.
• If the handset has enough signal strength, reboot the handset.
• If the handset doesn’t have enough signal strength, move it to a different location with better
reception or consider relocating the base station to give better coverage.
Check the Wireless Handset Signal Strength
If you are experiencing signal issues with a wireless handset, you can check the signal strength.
Good signal strength is 0 dBm; however, anything above -85 dBm is considered fair.
Procedure
1. On the wireless handset, select Menu then press *47*.
2. Select a base station.
The signal strength displays next to RSSI, like shown below.
35

If the signal strength is -85 dBm to 0 dBm (fair to good range) and you still have signal issues, restart the
handset to see if that improves the signal.
Troubleshooting
36