
Technical Support and E-Warranty Certificate www.vevor.com/support
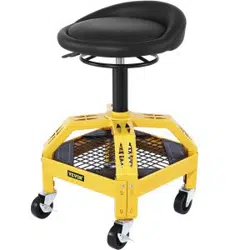
Multi-function Tool Stool
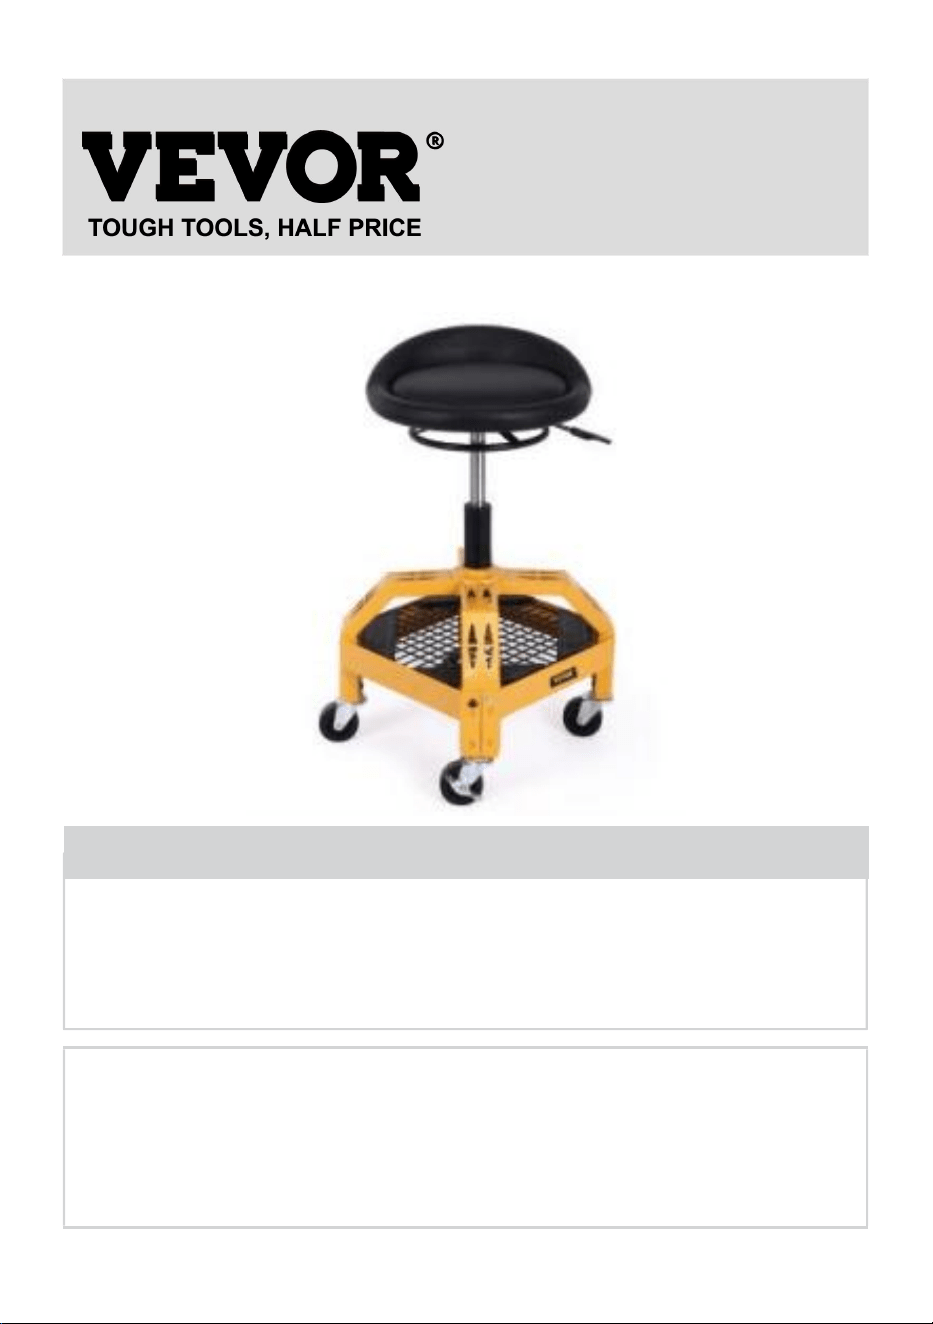
MODEL: BLC9013
We continue to be committed to provide you tools with competitive price.
"Save Half", "Half Price" or any other similar expressions used by us only represents
an estimate of savings you might benefit from buying certain tools with us compared
to the major top brands and does not necessarily mean to cover all categories of tools
offered by us. You are kindly reminded to verify carefully when you are placing an
order with us if you are actually saving half in comparison with the top major brands.
- 1 -
MODEL: BLC9013
Have product questions? Need technical support? Please feel free to
contact us:
Technical Support and E-Warranty Certificate
www.vevor.com/support
NEED HELP? CONTACT US!
This is the original instruction, please read all manual instructions
carefully before operating. VEVOR reserves a clear interpretation of our
user manual. The appearance of the product shall be subject to the
product you received. Please forgive us that we won't inform you again if
there are any technology or software updates on our product.
MULTI-FUNCTION
TOOL STOOL

- 2 -
SAFETY PRECAUTIONS
WARNING:
Read this instruction before using this product. Failure to do so can result in serious
injury.
Assembly precautions
1.Assemble only according to these instructions. Improper assembly can create
hazards.
2. Wear ANSI-approved safety goggles and heavy-duty work gloves during
assembly.
3.Keep the assembly area clean and well-lit.
4.Keep bystanders out of the area during assembly.
5.Do not assemble when tired or when under the influence of alcohol, drugs or
medication.
6.Product capabilities apply to properly and completely assembled products only.
7.Assemble on a flat, level, hard, and smooth surface capable of safely supporting
a fully loaded seat.
Use precautions
TO PREVENT SERIOUS INJURY AND DEATH FROM TIPPING:
1. DO NOT STAND ON THIS ITEM.
2. This product is not a toy. Do not allow children to play with or near this item.
3. Do not exceed weight capacities, evenly distributed from the bottom up. Be
aware of dynamic loading! The sudden load movement may briefly create an
excess load, causing product failure.
4. Use only on a flat, level, hard, and smooth surface capable of safely supporting a
fully loaded seat.
5. Use as intended only.
6. Inspect before every use; do not use if parts are loose or damaged.
SAVE THESE INSTRUCTIONS
- 3 -
TECHNICA PARAMETERS
Model
BLC9013
Rated Load(lbs)
300
product weight(kg)
9.1
product size
(
mm
)
780*400*400
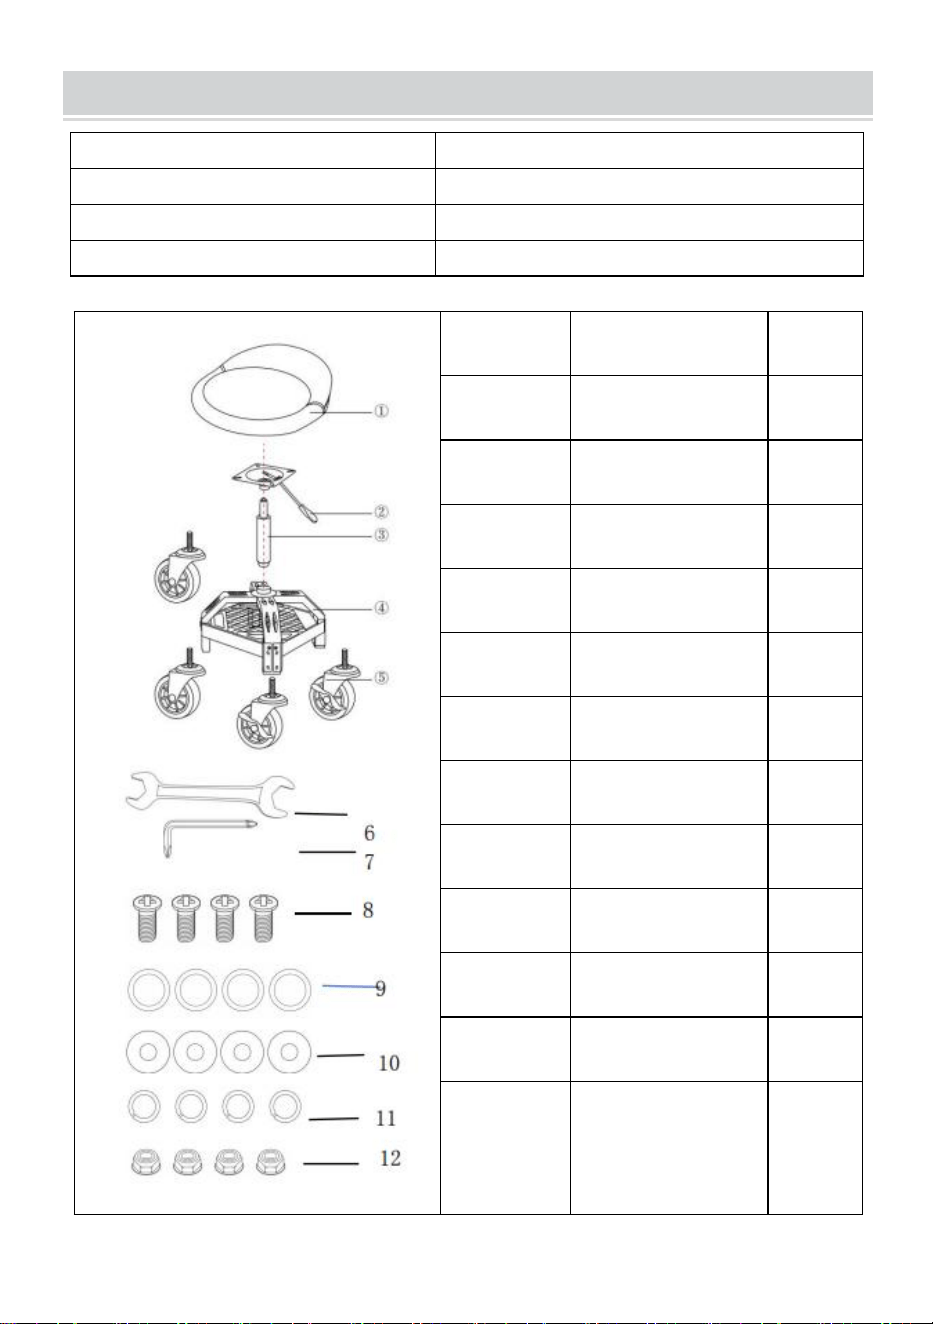
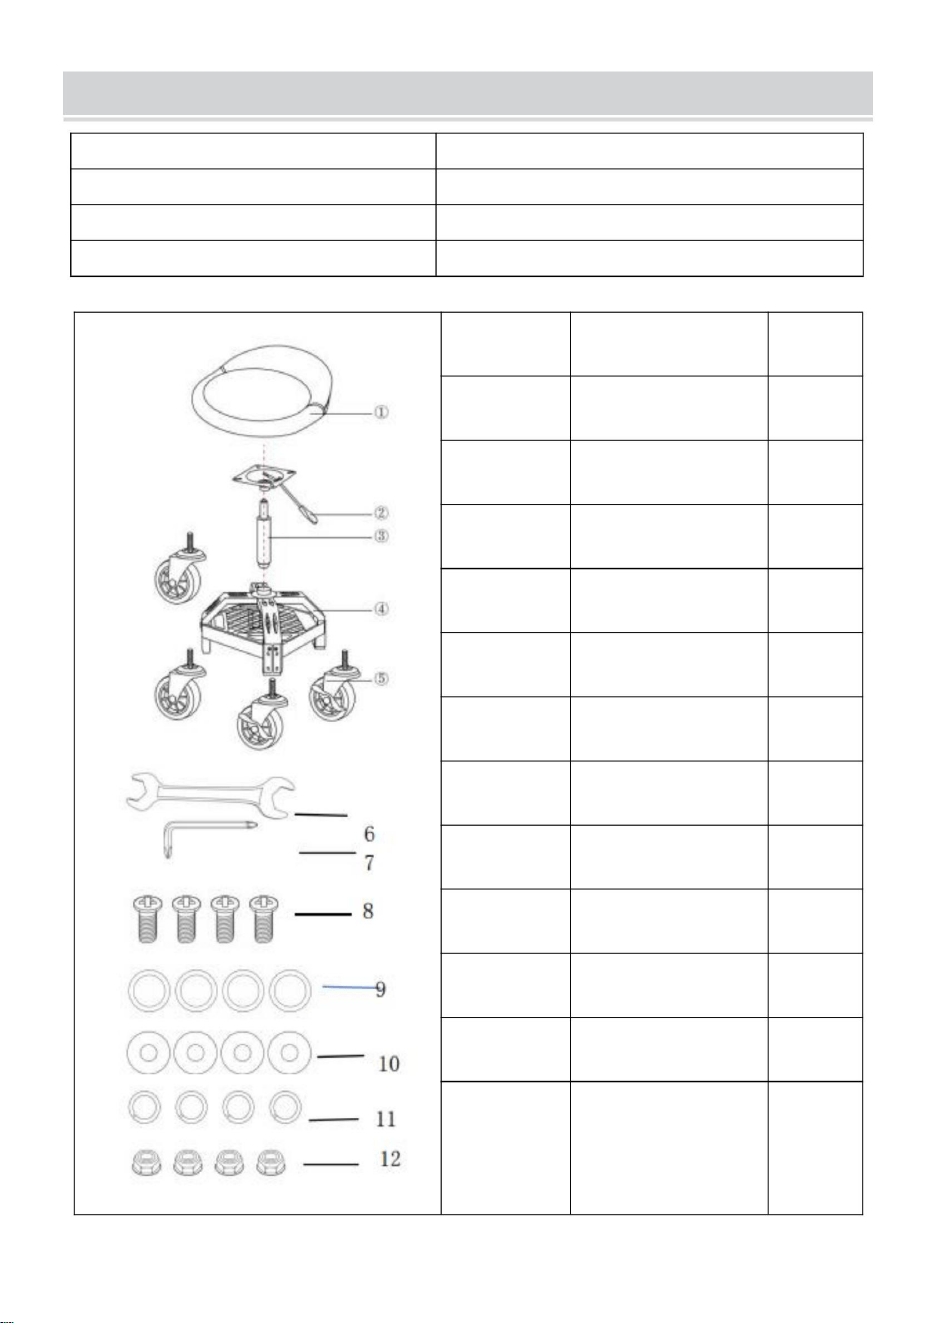
Part
Description
QTY
1
Cushion
1
2
Baseplate
1
3
Air Rod
1
4
Steel Tray
1
5
Casters
4
6
Wrench
1
7
Allen WrencH
1
8
M6 Screw
4
9
M6 Gasket
4
10
M6 Washers
4
11
M6
4
12
M6
4
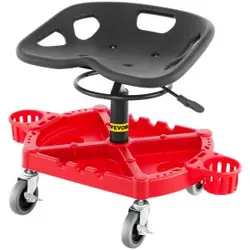
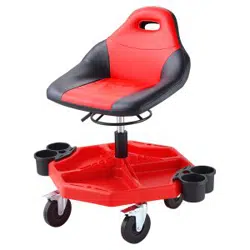
Essential tools for auto beauty and mechanical repair

- 4 -
Suitable for DIY work items in garages, workshops or homes. The multi-function
tool stool is equipped with durable casters and rubber wheels to allow you to slide
easily and quickly in the garage or driveway.
Match the perfect height of the car's side decoration or wheel cleaning. Sit down to
complete the low-altitude work of car quick beauty, polishing, waxing, ceramic
coating, mechanical maintenance, wheel cleaning, tire and rubber. Cleaning, plastic
repair, etc., without standing or bending over to reduce pressure on your back or
knees.
Features:
1. Rubber wheel casters with lock.
2. Steel tray for storing towels, small brushes , and tools.
3. Can hold 4 bottles of 16oz for easy access.
4. Maximum weight 300 lbs.
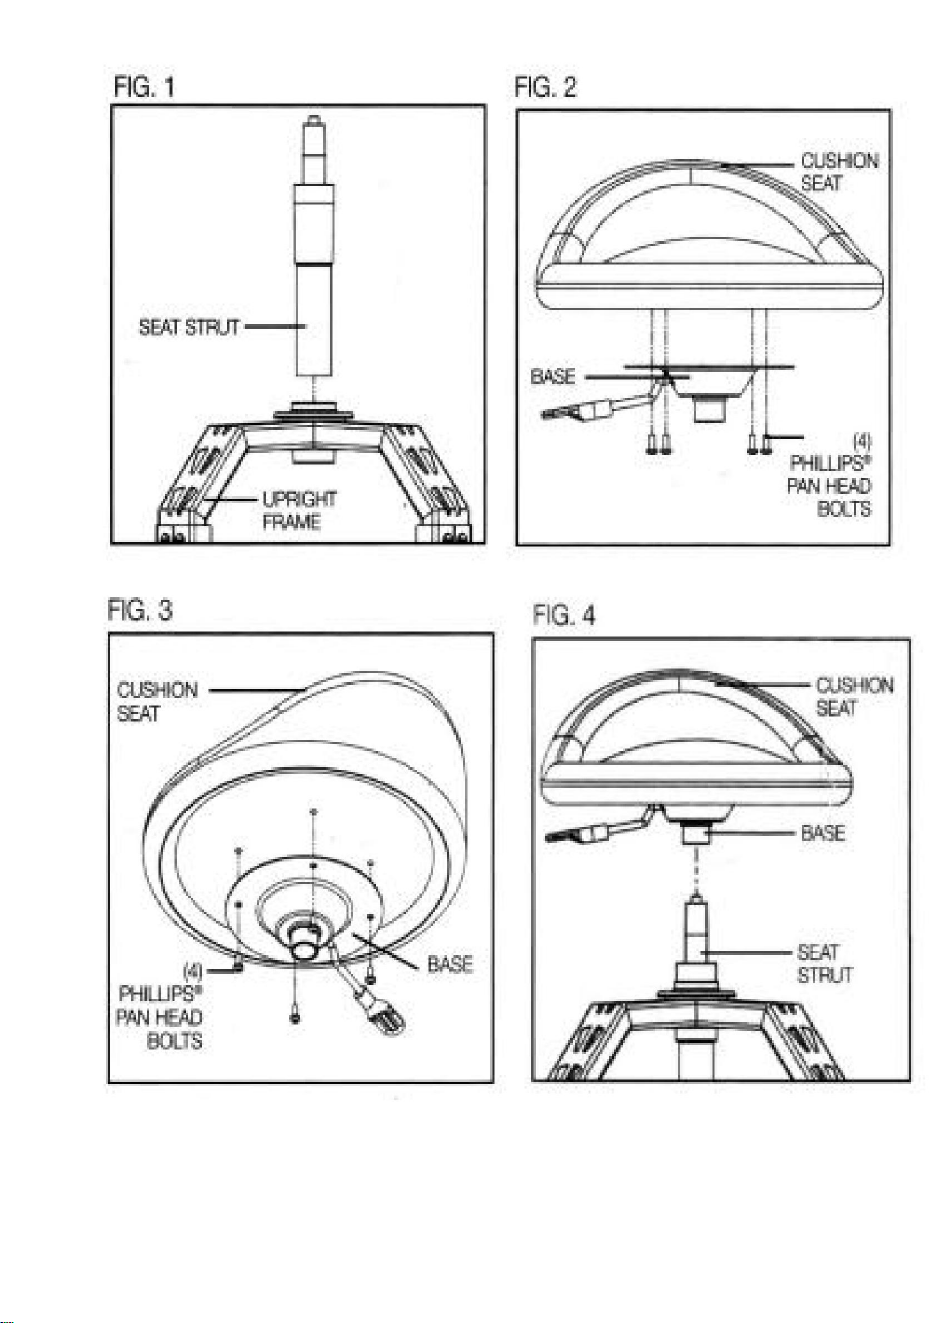
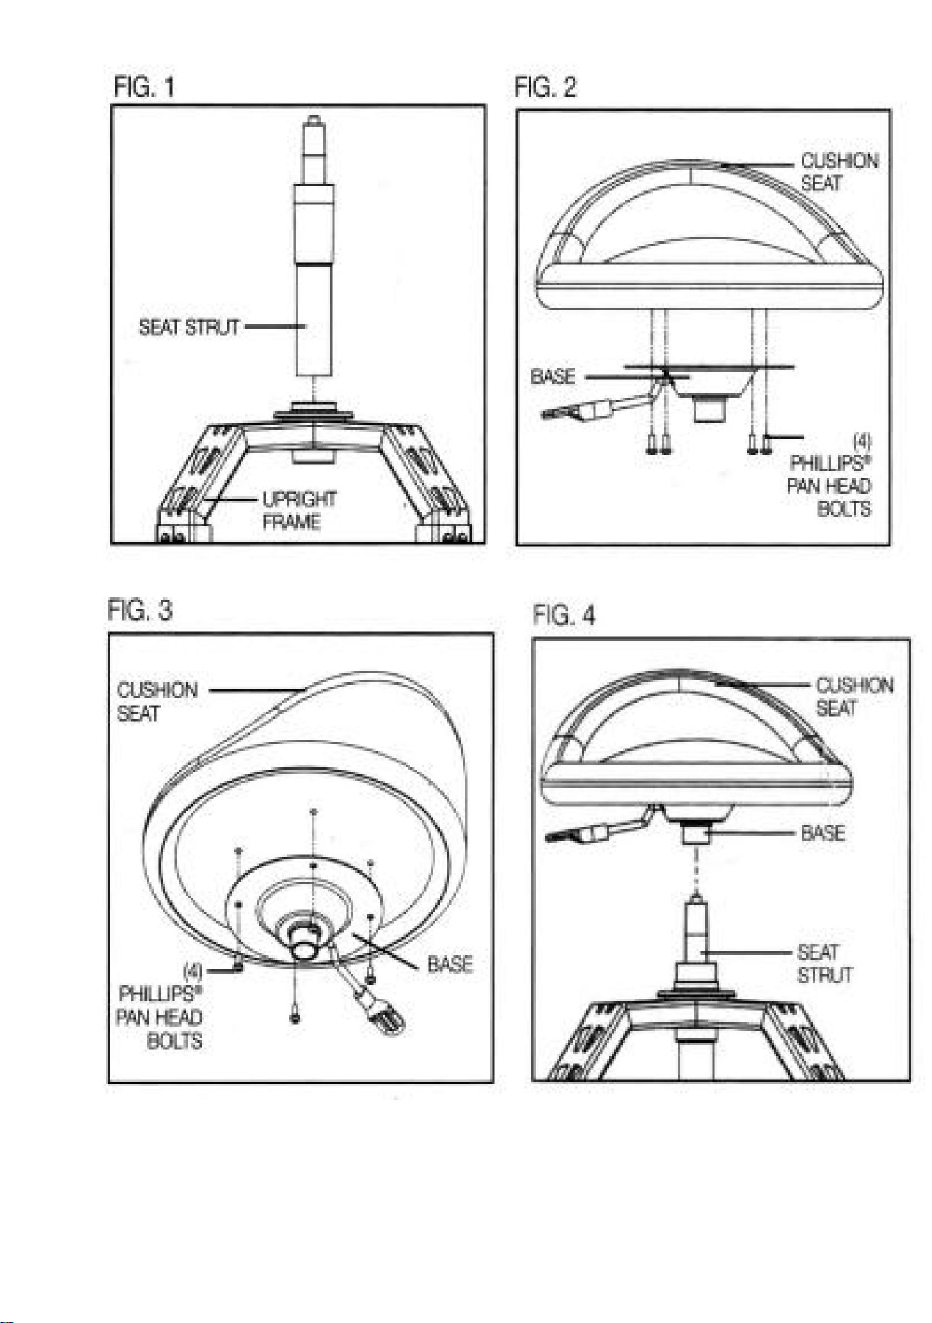
ASSEMBLY STEPS
Step 1. Cushion seat install (Fig.1)
Take the seat strut (air rod) and install it into the frame. Be sure to center the seat
correctly when installing it and firmly push it in.
Step 2. Cushion seat and Base Assembly
Take the base and put it on the bottom of the cushion (Fig.2)
Use the screws and washers to install the base to the cushion (Fig.3)
Step 3. Slip the cushion and base onto the Air rod. (Fig.4)
Firmly push down the center of the cushion to secure it to the air rod.
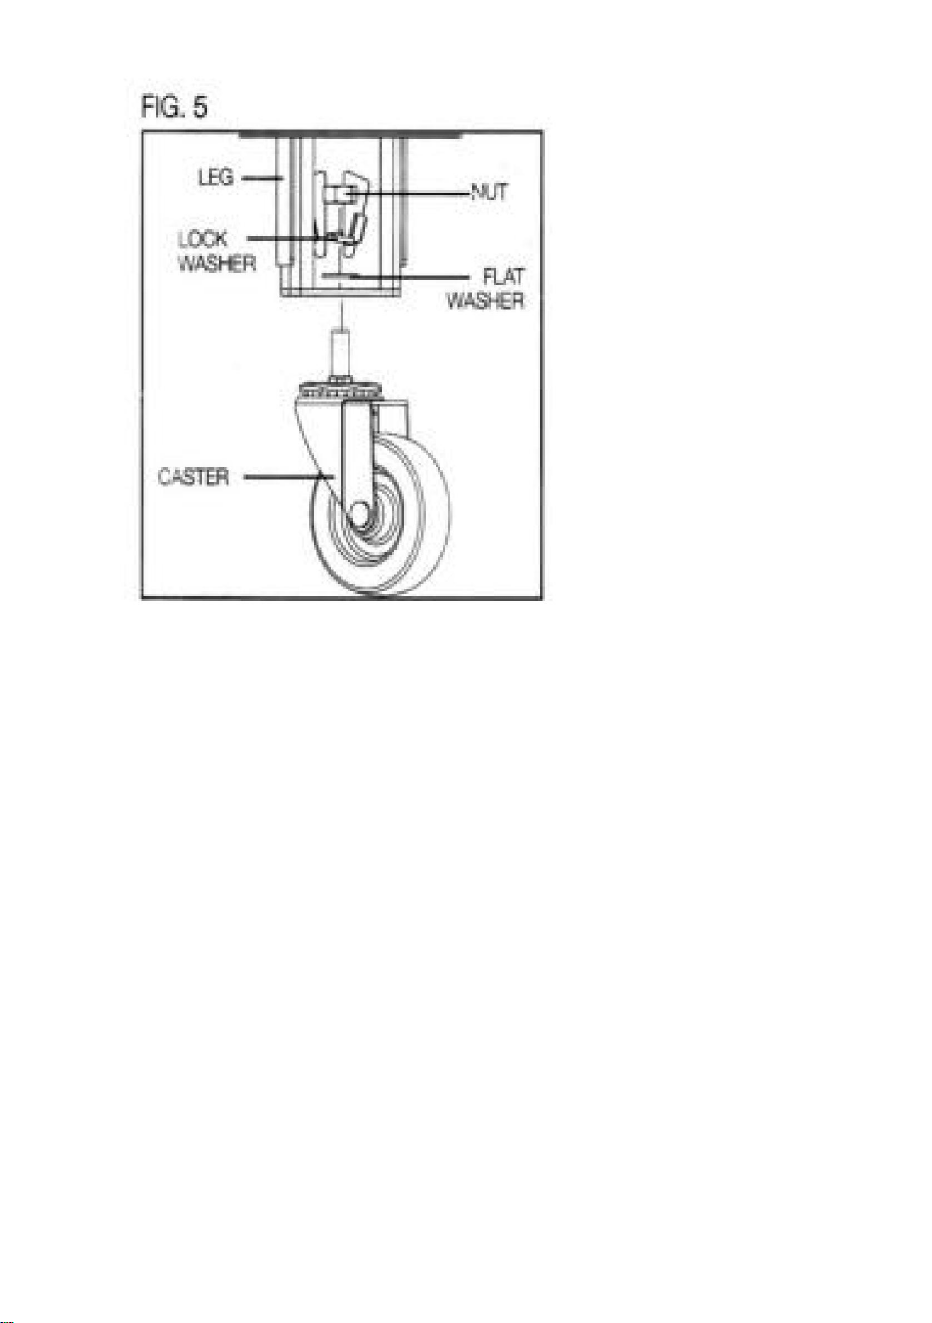
Step 4. Foot assembly instruction (Fig.5)
These the caster into the frame, then put the

- 5 -

- 6 -


MODÈLE:BLC9013
Nouscontinuonsànousengageràvousfournirdesoutilsàdesprixcompétitifs.
«Économisezlamoitié»,«Moitiéprix»outouteautreexpressionsimilaireutiliséeparnousne
représentequ'uneestimationdeséconomiesquevouspourriezréaliserenachetantcertainsoutils
cheznousparrapportauxgrandesmarquesetnecouvrepasnécessairementtouteslescatégories
d'outilsquenousproposons.Nousvousrappelonsdebienvouloirvérifiersoigneusementlorsque
vouspassezunecommandecheznoussivouséconomisezréellementlamoitiéparrapportauxgrandesmarques.
Tabouretàoutilsmultifonctions
Assistancetechniqueetcertificatdegarantieélectroniquewww.vevor.com/support
Machine Translated by Google

1
TABOURETÀOUTILS
MULTIFONCTION
BESOIND'AIDE?CONTACTEZNOUS!
Vousavezdesquestionssurnosproduits?Vousavezbesoind'assistancetechnique?
N'hésitezpas
ànouscontacter:Assistancetechniqueetcertificatdegarantie
électroniquewww.vevor.com/support
MODÈLE:BLC9013
Ils'agitdelanoticed'utilisationd'origine.Veuillezlireattentivementtoutesles
instructionsdumanuelavantdel'utiliser.VEVORseréserveledroitd'interpréterclairement
notremanueld'utilisation.L'apparenceduproduitdépendduproduitquevousavez
reçu.Veuilleznousexcuser,nousnevousinformeronsplusencasdemiseàjourtechnologique
oulogicielledenotreproduit.
Machine Translated by Google

POURÉVITERLESBLESSURESGRAVESETLAMORTRÉSULTANTDUBASCULEMENT:
Attentionàlachargedynamique!Lemouvementsoudaindelachargepeutbrièvementcréerune
blessure.
médicament.
5.Nepasmontersivousêtesfatiguéousousl'influencedel'alcool,dedroguesou
Lisezcesinstructionsavantd'utiliserceproduit.Lenonrespectdecesinstructionspeutentraînerdegravesblessures.
1.Assemblezuniquementseloncesinstructions.Unassemblageincorrectpeutcréer
7.Assemblersurunesurfaceplane,deniveau,dureetlissecapabledesupporterentoutesécurité
3.Nepasdépasserlescapacitésdepoids,répartiesuniformémentdebasenhaut.
4.Utiliseruniquementsurunesurfaceplane,deniveau,dureetlissecapabledesupporterentoutesécuritéun
6.Lescapacitésduproduits'appliquentuniquementauxproduitscorrectementetentièrementassemblés.
chargeexcessive,provoquantunedéfaillanceduproduit.
2.Portezdeslunettesdesécuritéapprouvéesparl'ANSIetdesgantsdetravailrobustespendant
5.Utiliseruniquementcommeprévu.
dangers.
unsiègeentièrementchargé.
siègeentièrementchargé.
1.NEVOUSTENEZPASSURCETOBJET.
4.Gardezlesspectateurshorsdelazonependantl’assemblage.
2.Ceproduitn'estpasunjouet.Nelaissezpaslesenfantsjoueravecouàproximitédecetarticle.
6.Inspectezavantchaqueutilisation;nepasutilisersidespiècessontdesserréesouendommagées.
assemblée.
3.Gardezlazonedemontagepropreetbienéclairée.
2
CONSERVEZCESINSTRUCTIONS
AVERTISSEMENT:
Précautionsdemontage
PRÉCAUTIONSDESÉCURITÉ
Précautionsd'emploi
Machine Translated by Google

300
9.1
BLC9013
Modèle
Chargenominale
(lbs)Poidsduproduit
(kg)Tailleduproduit(mm)
780*400*400
9
10
8
7
11
12
Roulettes
VisM6
1
4
4
4
JointM6
Tigeàair
Clé
Description
M6
1
4
Coussin
Plateauenacier
CléAllen
RondellesM6
2
5
3
Partie
6
Qté
4
1
1
4
1
1
1
4
Plaquedebase
M6
Outilsindispensablespourlabeautéetlaréparationmécaniquedel'automobile
PARAMÈTRESTECHNIQUES
3
Machine Translated by Google

Caractéristiques:
1.Roulettesencaoutchoucavecblocage.
Étape4.Instructionsd'assemblagedupied(Fig.5)
Faitescorrespondrelahauteurparfaitedeladécorationlatéraledelavoitureoudunettoyagedesroues.Asseyezvouspour
4.Poidsmaximum300lb.ÉTAPESD'ASSEMBLAGE
3.Peutcontenir4bouteillesde16ozpourunaccèsfacile.
facilementetrapidementdanslegarageoul'allée.
revêtement,entretienmécanique,nettoyagedesroues,pneusetcaoutchouc.Nettoyage,plastique
Prenezlatigedeselle(tigepneumatique)etinstallezladanslecadre.Assurezvousdecentrerlesiège
Appuyezfermementaucentreducoussinpourlefixeràlatigepneumatique.
terminerletravailàbassealtitudedebeautérapidedelavoiture,polissage,cirage,céramique
Étape1.Installationducoussindesiège(Fig.1)
Étape2.Assemblageducoussind'assiseetdelabase
genoux.
Cesderniersintroduisentlelanceurdanslecadre,puismettentle
réparation,etc.,sanssetenirdeboutousepencherpourréduirelapressionsurvotredosou
correctementlorsdel'installationetpoussezlefermement.
Utilisezlesvisetlesrondellespourinstallerlabasesurlecoussin(Fig.3)
2.Plateauenacierpourrangerlesserviettes,lespetitesbrossesetlesoutils.
Letabouretàoutilsestéquipéderoulettesdurablesetderouesencaoutchoucpourvouspermettredeglisser
Étape3.Glissezlecoussinetlabasesurlatigepneumatique.(Fig.4)
Prenezlabaseetplacezlasurlebasducoussin(Fig.2)
Convientpourlestravauxdebricolagedanslesgarages,lesateliersoulesmaisons.Lemultifonction
4
Machine Translated by Google

5
Machine Translated by Google
6
Machine Translated by Google


MODELL: BLC9013
„Sparen Sie die Hälfte“, „Halber Preis“ oder andere ähnliche Ausdrücke, die wir verwenden, stellen nur
eine Schätzung der Ersparnis dar, die Sie beim Kauf bestimmter Werkzeuge bei uns im Vergleich zu
den großen Topmarken erzielen können, und decken nicht unbedingt alle von uns angebotenen
Werkzeugkategorien ab. Wir möchten Sie freundlich daran erinnern, bei Ihrer Bestellung bei uns
sorgfältig zu prüfen, ob Sie im Vergleich zu den großen Topmarken tatsächlich die Hälfte sparen.
Wir sind weiterhin bestrebt, Ihnen Werkzeuge zu wettbewerbsfähigen Preisen anzubieten.
Multifunktions-Werkzeughocker
Technischer Support und E-Garantie-Zertifikat www.vevor.com/support
Machine Translated by Google

Dies ist die Originalanleitung. Bitte lesen Sie alle Anweisungen sorgfältig durch, bevor
Sie das Gerät in Betrieb nehmen. VEVOR behält sich eine klare Auslegung unserer
Bedienungsanleitung vor. Das Erscheinungsbild des Produkts richtet sich nach dem
Produkt, das Sie erhalten haben. Bitte verzeihen Sie uns, dass wir Sie nicht erneut informieren,
wenn es Technologie- oder Software-Updates für unser Produkt gibt.
MODELL: BLC9013
Haben Sie Fragen zum Produkt? Benötigen Sie technischen Support? Bitte kontaktieren Sie
uns:
Technischer Support und E-Garantie-Zertifikat www.vevor.com/
support
WERKZEUGHOCKER
MULTIFUNKTION
Brauchen Sie Hilfe? Kontaktieren Sie uns!
- 1 -
Machine Translated by Google

BEWAHREN SIE DIESE ANWEISUNGEN AUF
- 2 -
3. Halten Sie den Versammlungsbereich sauber und gut beleuchtet.
6. Vor jedem Gebrauch prüfen; nicht verwenden, wenn Teile lose oder beschädigt sind.
Verletzung.
Medikamente.
Beachten Sie die dynamische Belastung! Die plötzliche Lastbewegung kann kurzzeitig zu
Lesen Sie diese Anleitung, bevor Sie dieses Produkt verwenden. Die Nichtbeachtung kann zu schweren
5. Nicht montieren, wenn Sie müde sind oder unter dem Einfluss von Alkohol, Drogen oder
3. Überschreiten Sie nicht die Gewichtskapazitäten, gleichmäßig von unten nach oben verteilt.
1. Nur gemäß dieser Anleitung zusammenbauen. Unsachgemäßer Zusammenbau kann zu
7.Auf einer flachen, ebenen, harten und glatten Oberfläche montieren, die sicher tragen kann
4. Nur auf einer flachen, ebenen, harten und glatten Oberfläche verwenden, die ein
6. Die Produktfunktionen gelten nur für ordnungsgemäß und vollständig montierte Produkte.
Überlastung, die zu einem Produktausfall führen kann.
2. Tragen Sie ANSI-zugelassene Schutzbrillen und schwere Arbeitshandschuhe während
5. Nur bestimmungsgemäß verwenden.
Gefahren.
ein voll besetzter Sitz.
vollbeladener Sitz.
1. STELLEN SIE SICH NICHT AUF DIESEN GEGENSTAND.
4. Halten Sie während der Montage unbeteiligte Zuschauer vom Bereich fern.
Montage.
UM SCHWERE VERLETZUNGEN UND TOD DURCH KIPPEN ZU VERMEIDEN:
2. Dieses Produkt ist kein Spielzeug. Erlauben Sie Kindern nicht, mit diesem Produkt zu spielen oder sich in seiner Nähe aufzuhalten.
Vorsichtsmaßnahmen bei der Montage
WARNUNG:
SICHERHEITSVORKEHRUNGEN
Vorsichtsmaßnahmen treffen
Machine Translated by Google
2
5
Teil
3
6
4
1
1
4
Menge
1
1
1
4
Grundplatte
M6
Rollen
M6 Schraube
1
4
4
4
1
4
Schlüssel
M6-Dichtung
Beschreibung
Luftstange
M6
M6 Unterlegscheiben
Kissen
Stahltablett
Inbusschlüssel
9
10
8
7
11
12
BLC9013
9.1
300
Modell
Nennlast (lbs)
Produktgewicht (kg)
Produktgröße (mm)
780*400*400
Wichtige Werkzeuge für die Schönheit Ihres Autos und mechanische Reparaturen
TECHNICA-PARAMETER
- 3 -
Machine Translated by Google

Merkmale:
1. Gummirollen mit Feststeller.
Geeignet für Heimwerkerarbeiten in Garagen, Werkstätten oder zu Hause. Die Multifunktions
Passen Sie die perfekte Höhe der Seitendekoration oder der Radreinigung des Autos an. Setzen Sie sich hin
4. Maximales Gewicht 300 Pfund. MONTAGESTRITTE
Schritt 4. Anleitung zur Fußmontage (Abb. 5)
einfach und schnell in der Garage oder Einfahrt.
3. Bietet Platz für 4 Flaschen mit je 16 oz für einfachen Zugriff.
Drücken Sie die Mitte des Kissens fest nach unten, um es an der Luftstange zu befestigen.
Beschichtung, mechanische Wartung, Radreinigung, Reifen und Gummi. Reinigung, Kunststoff
Nehmen Sie die Sitzstrebe (Luftstange) und montieren Sie sie in den Rahmen. Achten Sie darauf, den Sitz zu zentrieren
Erledigen Sie die Arbeiten in geringer Höhe wie schnelle Schönheitspflege, Polieren, Wachsen, Keramik
Schritt 1. Sitzpolster montieren (Abb. 1)
Diese die Rolle in den Rahmen einsetzen, dann die
Knie.
Schritt 2. Sitzpolster und Basismontage
Reparatur usw., ohne zu stehen oder sich zu bücken, um den Druck auf den Rücken zu verringern oder
Achten Sie beim Einbau darauf, dass Sie ihn richtig einsetzen und fest eindrücken.
Befestigen Sie die Basis mit den Schrauben und Unterlegscheiben am Kissen (Abb. 3).
Werkzeughocker ist mit langlebigen Rollen und Gummirädern ausgestattet, damit Sie gleiten können
2. Stahlschale zur Aufbewahrung von Handtüchern, kleinen Bürsten und Werkzeugen.
Nehmen Sie die Basis und legen Sie sie auf die Unterseite des Kissens (Abb. 2).
Schritt 3. Schieben Sie das Kissen und die Basis auf die Luftstange. (Abb. 4)
- 4 -
Machine Translated by Google

- 5 -
Machine Translated by Google

- 6 -
Machine Translated by Google


MODELLO: BLC9013
Continuiamo a impegnarci per fornirvi strumenti a prezzi competitivi.
"Risparmia la metà", "Metà prezzo" o qualsiasi altra espressione simile da noi utilizzata
rappresenta solo una stima del risparmio che potresti ottenere acquistando determinati utensili
con noi rispetto ai principali marchi principali e non significa necessariamente coprire tutte le
categorie di utensili da noi offerti. Ti ricordiamo gentilmente di verificare attentamente
quando effettui un ordine con noi se stai effettivamente risparmiando la metà rispetto ai principali marchi principali.
Sgabello portautensili multifunzione
Supporto tecnico e certificato di garanzia elettronica www.vevor.com/support
Machine Translated by Google

- 1 -
SGABELLO PORTAUTENSILI
MULTIFUNZIONE
HAI BISOGNO DI AIUTO? CONTATTACI!
Hai domande sul prodotto? Hai bisogno di supporto tecnico? Non esitare a contattarci:
Supporto
tecnico e certificato di garanzia elettronica www.vevor.com/
support
MODELLO: BLC9013
Questa è l'istruzione originale, si prega di leggere attentamente tutte le istruzioni del
manuale prima di utilizzare. VEVOR si riserva una chiara interpretazione del nostro manuale
utente. L'aspetto del prodotto sarà soggetto al prodotto ricevuto. Vi preghiamo di
perdonarci se non vi informeremo di nuovo se ci sono aggiornamenti tecnologici o software sul
nostro prodotto.
Machine Translated by Google

PER PREVENIRE LESIONI GRAVI E MORTALI DOVUTE AL RIBALTAMENTO:
consapevole del carico dinamico! Il movimento improvviso del carico può creare brevemente un
infortunio.
farmaco.
5. Non riunirsi quando si è stanchi o sotto l'effetto di alcol, droghe o
Leggere queste istruzioni prima di utilizzare questo prodotto. La mancata osservanza di queste istruzioni può causare gravi
1. Assemblare solo secondo queste istruzioni. Un assemblaggio improprio può creare
7. Montare su una superficie piana, livellata, dura e liscia in grado di sostenere in modo sicuro
3. Non superare le capacità di peso, distribuite uniformemente dal basso verso l'alto.
4. Utilizzare solo su una superficie piana, livellata, dura e liscia in grado di supportare in modo sicuro un
6. Le capacità del prodotto si applicano solo ai prodotti correttamente e completamente assemblati.
carico eccessivo, che causa il guasto del prodotto.
2. Indossare occhiali di sicurezza approvati ANSI e guanti da lavoro resistenti durante
5. Utilizzare solo come previsto.
pericoli.
un sedile completamente carico.
sedile completamente carico.
1. NON SALIRE SULL'OGGETTO.
4. Tenere gli astanti fuori dall'area durante l'assemblaggio.
2. Questo prodotto non è un giocattolo. Non permettere ai bambini di giocare con o vicino a questo articolo.
6. Ispezionare prima di ogni utilizzo; non utilizzare se alcune parti sono allentate o danneggiate.
assemblaggio.
3. Mantenere l'area di assemblaggio pulita e ben illuminata.
- 2 -
SALVA QUESTE ISTRUZIONI
Precauzioni di montaggio
Usare precauzioni
AVVERTIMENTO:
PRECAUZIONI DI SICUREZZA
Machine Translated by Google

300
9.1
Modello BLC9013
Modello
780*400*400
Carico nominale (libbre)
peso del prodotto (kg)
dimensioni del prodotto (mm)
9
10
8
7
11
12
Ruote
Vite M6
1
Piastra di base
4
M6
1
1
1
4
1
4
1
Quantità
4
Parte
3
6
2
5
Rondelle M6
Cuscino
Vassoio in acciaio
Chiave a brugola
1
4
Asta ad aria
Guarnizione M6
Chiave
Descrizione
M6
4
4
PARAMETRI TECNICI
Strumenti essenziali per la bellezza dell'auto e la riparazione meccanica
- 3 -
Machine Translated by Google

Caratteristiche:
Adatto per lavori fai da te in garage, officine o case. Il multifunzione
1. Ruote in gomma con freno.
Abbina l'altezza perfetta della decorazione laterale dell'auto o della pulizia delle ruote. Siediti per
4. Peso massimo 300 libbre. FASI DI MONTAGGIO
Fase 4. Istruzioni per il montaggio del piede (Fig.5)
facilmente e rapidamente nel garage o nel vialetto.
3. Può contenere 4 bottiglie da 16 once per un facile accesso.
Spingere con decisione verso il basso il centro del cuscino per fissarlo all'asta pneumatica.
rivestimento, manutenzione meccanica, pulizia ruote, pneumatici e gomma. Pulizia, plastica
Prendi il montante del sedile (asta pneumatica) e installalo nel telaio. Assicurati di centrare il sedile
completare il lavoro a bassa quota di bellezza rapida dell'auto, lucidatura, ceratura, ceramica
Fase 1. Installazione del cuscino del sedile (Fig.1)
Questi la rotella nel telaio, quindi mettere il
ginocchia.
Fase 2. Assemblaggio del sedile imbottito e della base
riparare, ecc., senza stare in piedi o chinarsi per ridurre la pressione sulla schiena o
correttamente durante l'installazione e spingerlo con fermezza.
Utilizzare le viti e le rondelle per installare la base sul cuscino (Fig.3)
lo sgabello portautensili è dotato di rotelle resistenti e ruote in gomma per consentirti di scivolare
2. Vassoio in acciaio per riporre asciugamani, piccole spazzole e utensili.
Prendi la base e posizionala sul fondo del cuscino (Fig.2)
Fase 3. Far scivolare il cuscino e la base sull'asta dell'aria. (Fig.4)
- 4 -
Machine Translated by Google
- 5 -
Machine Translated by Google

- 6 -
Machine Translated by Google


MODELO:BLC9013
"Ahorrelamitad","mitaddeprecio"ocualquierotraexpresiónsimilarqueutilicemossolorepresenta
unaestimacióndelahorroquepodríaobteneralcomprarciertasherramientasconnosotrosen
comparaciónconlasprincipalesmarcasynonecesariamentesignificaquecubratodaslascategorías
deherramientasqueofrecemos.Lerecordamosque,alrealizarunpedidoconnosotros,
verifiquecuidadosamentesirealmenteestáahorrandolamitadencomparaciónconlasprincipalesmarcas.
Seguimoscomprometidosabrindarleherramientasaprecioscompetitivos.
Taburetemultifunciónparaherramientas
Soportetécnicoycertificadodegarantíaelectrónicawww.vevor.com/support
Machine Translated by Google

1
TABURETEPARAHERRAMIENTAS
MULTIFUNCIÓN
¿NECESITAAYUDA?¡CONTÁCTENOS!
Estassonlasinstruccionesoriginales,leaatentamentetodaslasinstruccionesdel
manualantesdeutilizarelproducto.VEVORsereservaunainterpretaciónclaradenuestro
manualdeusuario.Laaparienciadelproductoestarásujetaalproductoquerecibió.
Perdónenospornoinformarlenuevamentesihayactualizacionesdetecnologíaosoftwareen
nuestroproducto.
MODELO:BLC9013
¿Tienepreguntassobreelproducto?¿Necesitaasistenciatécnica?Nodudeenponerseen
contactocon
nosotros:Asistenciatécnicaycertificadodegarantíaelectrónica
www.vevor.com/support
Machine Translated by Google

PARAEVITARLESIONESGRAVESYLAMUERTEPORVUELCO:
¡Tengacuidadoconlacargadinámica!Elmovimientorepentinodelacargapuedecrearbrevementeuna
medicamento.
lesión.
5.Nosereúnacuandoestécansadoobajolainfluenciadelalcohol,drogaso
Leaestasinstruccionesantesdeutilizaresteproducto.Nohacerlopuedeprovocarlesionesgraves.
1.Realiceelmontajeúnicamentedeacuerdoconestasinstrucciones.Unmontajeinadecuadopuedeprovocar
7.Montarsobreunasuperficieplana,nivelada,duraylisacapazdesoportardeformasegura
3.Noexcedalascapacidadesdepeso,distribuidasuniformementedeabajohaciaarriba.
4.Utilíceloúnicamentesobreunasuperficieplana,nivelada,duraylisacapazdesoportardeformaseguraunpesode100kg.
6.Lascapacidadesdelproductoseaplicanúnicamenteaproductosensambladosdeformacorrectaycompleta.
excesodecarga,provocandofallasenelproducto.
2.UsegafasdeseguridadaprobadasporANSIyguantesdetrabajoresistentesdurante
5.Utilíceloúnicamentesegúnloprevisto.
peligros
unasientocompletamentecargado.
asientocompletamentecargado.
1.NOSEPARESOBREESTEOBJETO.
4.Mantengaalostranseúntesfueradeláreaduranteelmontaje.
2.Esteproductonoesunjuguete.Nopermitaquelosniñosjueguenconesteartículonicercadeél.
6.Inspeccioneantesdecadauso;noutilicesilaspiezasestánsueltasodañadas.
asamblea.
3.Mantengaeláreademontajelimpiaybieniluminada.
2
GUARDEESTASINSTRUCCIONES
Precaucionesdemontaje
ADVERTENCIA:
PRECAUCIONESDESEGURIDAD
Tomeprecauciones
Machine Translated by Google

Ruedas
TornilloM6
1
4
4
4
JuntaM6
Varilladeaire
Llaveinglesa
Descripción
M6
1
4
Almohadón
Bandejadeacero
LlaveAllen
ArandelasM6
2
5
3
Parte
6
CANTIDAD
4
1
1
4
1
1
1
4
Placabase
M6
9
10
8
7
11
12
300
9.1
BLC9013
Modelo
Carganominal(lbs)
Pesodelproducto(kg)
Tamañodelproducto(mm)
780*400*400
PARÁMETROSTÉCNICOS
Herramientasesencialesparalabellezadelautomóvilylareparaciónmecánica.
3
Machine Translated by Google

Características:
Adecuadoparatrabajosdebricolajeengarajes,talleresoviviendas.Laherramientamultifunción
Paso4.Instruccionesdemontajedelpie(Fig.5)
Combinalaalturaperfectaconladecoraciónlateraldelcocheoconellimpiallantas.Siéntatea
4.Pesomáximo300libras.PASOSDEMONTAJE
3.Puedecontener4botellasde16ozparaunfácilacceso.
Fácilyrápidamenteenelgarajeoenlaentrada.
Recubrimiento,mantenimientomecánico,limpiezaderuedas,neumáticosycaucho.Limpieza,plásticos
Tomeelpuntaldelasiento(varilladeaire)einstáleloenelmarco.Asegúresedecentrarelasiento.
Presionefirmementehaciaabajoelcentrodelcojínparaasegurarloalavarilladeaire.
Completartrabajosdebajaalturadebellezarápidadelautomóvil,pulido,encerado,cerámica.
Paso1.Instalacióndelasientoacolchado(Fig.1)
Paso2.Ensamblajedelasientoylabasedelcojín
rodillas.
Coloquelasruedasenelmarcoyluegocoloquelas
reparación,etc.,sinpararseniagacharseparareducirlapresiónenlaespaldao
correctamentealinstalarloyempújelofirmemente.
Utilicelostornillosyarandelasparainstalarlabasealcojín(Fig.3)
Eltabureteparaherramientasestáequipadoconruedasduraderasyruedasdegomaquelepermitendeslizarse
2.Bandejadeaceroparaguardartoallas,cepillospequeñosyherramientas.
Paso3.Desliceelcojínylabasesobrelavarilladeaire.(Fig.4)
Tomelabaseycolóquelaenlaparteinferiordelcojín(Fig.2)
1.Ruedasdegomaconbloqueo.
4
Machine Translated by Google

5
Machine Translated by Google

6
Machine Translated by Google


Wielofunkcyjny stołek narzędziowy
MODEL: BLC9013
Wsparcie techniczne i certyfikat gwarancji elektronicznej www.vevor.com/support
„Oszczędź połowę”, „Połowa ceny” lub inne podobne wyrażenia używane przez nas stanowią
jedynie szacunkowe oszczędności, jakie możesz uzyskać, kupując u nas określone narzędzia
w porównaniu z głównymi markami i niekoniecznie oznaczają one objęcie wszystkich kategorii
narzędzi oferowanych przez nas. Uprzejmie przypominamy, aby dokładnie sprawdzić, czy
składając u nas zamówienie faktycznie oszczędzasz połowę w porównaniu z głównymi markami.
Nadal staramy się oferować Państwu narzędzia w konkurencyjnych cenach.
Machine Translated by Google

Masz pytania dotyczące produktu? Potrzebujesz wsparcia technicznego? Skontaktuj się z
nami: Wsparcie
techniczne i certyfikat E-Gwarancji www.vevor.com/support
MODEL: BLC9013
To jest oryginalna instrukcja, przed użyciem należy uważnie przeczytać wszystkie
instrukcje. VEVOR zastrzega sobie jasną interpretację naszej instrukcji obsługi. Wygląd produktu
będzie zależał od produktu, który otrzymałeś. Prosimy o wybaczenie, że nie poinformujemy
Cię ponownie, jeśli w naszym produkcie pojawią się jakiekolwiek aktualizacje technologiczne lub
oprogramowania.
STOŁEK NARZĘDZIOWY
WIELOFUNKCYJNY
POTRZEBUJESZ POMOCY? SKONTAKTUJ SIĘ Z NAMI!
- 1 -
Machine Translated by Google

ZAPISZ TE INSTRUKCJE
montaż.
lek.
ABY ZAPOBIEC POWAŻNYM OBRAŻENIOM I ŚMIERCI SPOWODOWANEJ PRZEWRÓCENIEM:
3. Utrzymuj miejsce zgromadzenia w czystości i zapewnij dobre oświetlenie.
1. NIE STAWAJ NA TYM PRZEDMIOCIE.
świadomy dynamicznego obciążenia! Nagły ruch obciążenia może na krótko spowodować
6. Przed każdym użyciem należy przeprowadzić kontrolę. Nie należy używać produktu, jeśli jakieś części są luźne lub uszkodzone.
4. Podczas montażu nie dopuszczać osób postronnych na teren montażu.
2. Ten produkt nie jest zabawką. Nie pozwalaj dzieciom bawić się tym przedmiotem ani przebywać w jego pobliżu.
zagrożenia.
w pełni załadowane miejsce.
w pełni załadowane siedzenie.
2. Podczas pracy należy nosić okulary ochronne i wytrzymałe rękawice robocze zgodne z normą ANSI.
5. Używać wyłącznie zgodnie z przeznaczeniem.
6. Możliwości produktu odnoszą się wyłącznie do produktów prawidłowo i kompletnie zmontowanych.
nadmierne obciążenie powodujące uszkodzenie produktu.
1.Montaż należy wykonywać wyłącznie zgodnie z niniejszą instrukcją. Nieprawidłowy montaż może spowodować
7. Montaż należy wykonać na płaskiej, równej, twardej i gładkiej powierzchni, która będzie w stanie bezpiecznie utrzymać ciężar.
4. Używać wyłącznie na płaskiej, równej, twardej i gładkiej powierzchni, która może bezpiecznie utrzymać ciężar.
Przeczytaj tę instrukcję przed użyciem tego produktu. Nieprzestrzeganie jej może skutkować poważnymi konsekwencjami.
5. Nie należy gromadzić się, gdy jest się zmęczonym lub pod wpływem alkoholu, narkotyków lub
3. Nie przekraczaj dopuszczalnego ciężaru, równomiernie rozłożonego od dołu do góry.
obrażenia.
Środki ostrożności podczas montażu
Stosuj środki ostrożności
OSTRZEŻENIE:
ŚRODKI OSTROŻNOŚCI
- 2 -
Machine Translated by Google

Płyta bazowa
Kółka
Śruba M6
M6
1
1
1
4
ILOŚĆ
1
1
4
4
Część
3
6
2
5
Poduszka
Podkładki M6
Taca stalowa
Klucz imbusowy
Opis
Pręt powietrzny
Klucz
Uszczelka M6
M6
1
4
1
4
4
4
- 3 -
300
9.1
BLC9013
Model
780*400*400
Nominalne obciążenie
(funty) waga produktu
(kg) rozmiar produktu (mm)
PARAMETRY TECHNICZNE
Niezbędne narzędzia do pielęgnacji i napraw mechanicznych samochodów
9
12
8
7
11
10
Machine Translated by Google

Cechy:
4. Maksymalna waga 300 funtów.KROKI MONTAŻU
Weź podstawę i połóż ją na spodzie poduszki (rys.2)
Krok 4. Instrukcja montażu stóp (rys.5)
Nadaje się do prac DIY w garażach, warsztatach lub domach. Wielofunkcyjny
1. Gumowe kółka z blokadą.
Za pomocą śrub i podkładek zamontuj podstawę do poduszki (rys.3).
2. Stalowa tacka do przechowywania ręczników, małych szczotek i narzędzi.
stołek narzędziowy wyposażony jest w wytrzymałe kółka i gumowe koła, które umożliwiają przesuwanie
naprawy itp. bez konieczności stania lub pochylania się, aby zmniejszyć nacisk na plecy lub
prawidłowo podczas montażu i mocno dociśnij.
Krok 3. Nasuń poduszkę i podstawę na pręt powietrzny. (Rys. 4)
kolana.
Krok 2. Montaż siedziska i podstawy poduszki
wykonujemy prace niskopodłogowe związane z szybką pielęgnacją samochodu, polerowaniem, woskowaniem, ceramiką
Krok 1. Montaż siedziska z poduszką (rys. 1)
Włóż kółko do ramy, a następnie umieść
powłoka, konserwacja mechaniczna, czyszczenie kół, opon i gumy. Czyszczenie, plastik
Weź rozpórkę siedziska (pręt powietrzny) i zamontuj ją w ramie. Upewnij się, że siedzisko jest wyśrodkowane
łatwo i szybko w garażu lub na podjeździe.
3. Mieści 4 butelki po 16 uncji, co zapewnia łatwy dostęp.
Mocno dociśnij środek poduszki, aby przymocować ją do pręta powietrznego.
Dopasuj idealną wysokość dekoracji bocznej samochodu lub czyszczenia kół. Usiądź, aby
- 4 -
Machine Translated by Google

- 5 -
Machine Translated by Google

- 6 -
Machine Translated by Google


MODEL: BLC9013
Multifunctionele gereedschapskruk
Technische ondersteuning en e-garantiecertificaat www.vevor.com/support
Wij streven er voortdurend naar om u gereedschappen tegen concurrerende prijzen te leveren.
"Save Half", "Half Price" of andere soortgelijke uitdrukkingen die wij gebruiken, geven alleen een schatting van
de besparingen die u kunt behalen door bepaalde gereedschappen bij ons te kopen in vergelijking met de
grote topmerken en betekent niet noodzakelijkerwijs dat alle categorieën gereedschappen die wij aanbieden,
worden gedekt. Wij herinneren u eraan om zorgvuldig te controleren of u daadwerkelijk de helft bespaart
in vergelijking met de grote topmerken wanneer u een bestelling bij ons plaatst.
Machine Translated by Google

Dit is de originele instructie, lees alle handleidingen zorgvuldig door voordat u het
product gebruikt. VEVOR behoudt zich een duidelijke interpretatie van onze gebruikershandleiding
voor. Het uiterlijk van het product is afhankelijk van het product dat u hebt ontvangen.
Vergeef ons dat we u niet opnieuw zullen informeren als er technologie- of software-updates
voor ons product zijn.
MODEL: BLC9013
Heeft u vragen over het product? Heeft u technische ondersteuning nodig? Neem dan gerust
contact met
ons op: Technische ondersteuning en E-garantiecertificaat
www.vevor.com/support
GEREEDSCHAPSKRUK
MULTIFUNCTIONEEL
HULP NODIG? NEEM CONTACT MET ONS OP!
- 1 -
Machine Translated by Google

BEWAAR DEZE INSTRUCTIES
montage.
blessure.
OM ERNSTIG LETSEL EN DE DOOD DOOR KANTELEN TE VOORKOMEN:
3. Zorg ervoor dat de montageplek schoon en goed verlicht is.
1. NIET OP DIT VOORWERP STAAN.
bewust van dynamische belasting! De plotselinge lastbeweging kan kortstondig een
6. Controleer het apparaat voor elk gebruik. Gebruik het niet als er onderdelen loszitten of beschadigd zijn.
4. Houd omstanders uit de buurt tijdens de montage.
2. Dit product is geen speelgoed. Laat kinderen niet met of in de buurt van dit item spelen.
gevaren.
een volgeladen stoel.
volledig beladen stoel.
2. Draag tijdens het werk een door de ANSI goedgekeurde veiligheidsbril en stevige werkhandschoenen.
5. Gebruik het product alleen zoals bedoeld.
6. De producteigenschappen gelden uitsluitend voor correct en volledig gemonteerde producten.
overbelasting, waardoor het product defect raakt.
1. Monteer alleen volgens deze instructies. Onjuiste montage kan leiden tot
7. Monteer op een vlak, egaal, hard en glad oppervlak dat veilig kan worden ondersteund
4. Gebruik het alleen op een vlak, egaal, hard en glad oppervlak dat veilig een
Lees deze instructie voordat u dit product gebruikt. Als u dit niet doet, kan dit leiden tot ernstige
5. Monteer niet als u moe bent of onder invloed van alcohol, drugs of
3. Overschrijd de draagkracht niet, gelijkmatig verdeeld van onder naar boven.
medicatie.
Voorzorgsmaatregelen bij de montage
Neem voorzorgsmaatregelen
WAARSCHUWING:
VEILIGHEIDSMAATREGELEN
- 2 -
Machine Translated by Google

BLC9013
9.1
300
Model
780*400*400
Nominale belasting
(lbs) productgewicht
(kg) productgrootte (mm)
- 3 -
2
5
M6 ringen
Inbussleutel
Kussen
Stalen schaal
1
Beschrijving
Luchtstang
Moersleutel
M6-pakking
4
M6
1
4
4
M6
Grondplaat
Wielen
M6-schroef
4
1
4
1
1
1
4
1
4
Hoeveelheid
Deel
3
6
TECHNISCHE PARAMETERS
Essentiële gereedschappen voor autoschoonheid en mechanische reparatie
9
8
7
12
10
11
Machine Translated by Google

Functies:
4. Maximaal gewicht 300 lbs. MONTAGESTAPPEN
Neem de basis en leg deze op de onderkant van het kussen (Fig. 2)
Stap 4. Montage-instructies voor de voet (Fig. 5)
Geschikt voor doe-het-zelf-werkartikelen in garages, werkplaatsen of huizen. De multifunctionele
1. Rubberen wielen met vergrendeling.
Gebruik de schroeven en ringen om de basis aan het kussen te bevestigen (Fig. 3)
De gereedschapskruk is uitgerust met duurzame wielen en rubberen wielen, zodat u gemakkelijk kunt schuiven
2. Stalen bak voor het opbergen van handdoeken, kleine borstels en gereedschap.
repareren, enz., zonder te staan of te bukken om de druk op uw rug of
Controleer bij het installeren of de dop goed vastzit en druk hem stevig aan.
Stap 3. Schuif het kussen en de basis op de luchtstang. (Fig. 4)
knieën.
Stap 2. Kussenzitting en basismontage
voltooi het werk op lage hoogte van auto's snel schoonheid, polijsten, waxen, keramiek
Stap 1. Kussenzitting installeren (Fig.1)
Deze de caster in het frame, dan de
coating, mechanisch onderhoud, wielreiniging, band en rubber. Reiniging, kunststof
Neem de stoelstang (luchtstang) en installeer deze in het frame. Zorg ervoor dat de stoel gecentreerd is
eenvoudig en snel in de garage of oprit.
3. Geschikt voor 4 flessen van 16oz, voor eenvoudige toegang.
Druk het midden van het kussen stevig naar beneden om het aan de luchtstang te bevestigen.
Pas de perfecte hoogte van de zijversiering van de auto of het reinigen van de wielen aan. Ga zitten om
- 4 -
Machine Translated by Google
- 5 -
Machine Translated by Google

- 6 -
Machine Translated by Google


MODELL: BLC9013
"Spara hälften", "halva priset" eller andra liknande uttryck som används av oss representerar
bara en uppskattning av besparingar du kan dra nytta av att köpa vissa verktyg hos oss
jämfört med de stora toppmärkena och betyder inte nödvändigtvis att täcka alla kategorier av
verktyg som erbjuds av oss. Du påminns vänligen om att noggrant kontrollera när du gör
en beställning hos oss om du faktiskt sparar hälften i jämförelse med de främsta stora varumärkena.
Vi fortsätter att vara engagerade i att ge dig verktyg till konkurrenskraftiga priser.
Multifunktionell verktygspall
Teknisk support och e-garanticertifikat www.vevor.com/support
Machine Translated by Google

Har du produktfrågor? Behöver du teknisk support? Kontakta oss gärna: Teknisk support och
e-
garanticertifikat www.vevor.com/support
MODELL: BLC9013
Detta är den ursprungliga instruktionen, läs alla instruktioner noggrant innan du
använder den. VEVOR reserverar sig för en tydlig tolkning av vår användarmanual. Utseendet
på produkten är beroende av den produkt du fått. Ursäkta oss att vi inte kommer att
informera dig igen om det finns någon teknik eller mjukvaruuppdateringar på vår produkt.
VERKTYGSPALL
MULTIFUNKTION
BEHÖVER HJÄLP? KONTAKTA OSS!
- 1 -
Machine Translated by Google

SPARA DESSA INSTRUKTIONER
- 2 -
6. Produktkapacitet gäller endast för korrekt och färdigmonterade produkter.
2. Bär ANSI-godkända skyddsglasögon och kraftiga arbetshandskar under
överbelastning, vilket orsakar produktfel.
5. Använd endast på avsett sätt.
faror.
ett fullastat säte.
fullastad sits.
1. STÅ INTE PÅ DENNA ARTIKEL.
4. Håll åskådare borta från området under monteringen.
2. Denna produkt är inte en leksak. Låt inte barn leka med eller nära detta föremål.
6. Inspektera före varje användning; Använd inte om delar är lösa eller skadade.
montering.
3.Håll monteringsområdet rent och väl upplyst.
FÖR ATT FÖRHINDRA ALLVARLIGA SKADA OCH DÖDSFALL VID VÄLLNING:
medveten om dynamisk laddning! Den plötsliga laströrelsen kan kortvarigt skapa en
skada.
medicin.
5. Sätt inte ihop när du är trött eller när du är påverkad av alkohol, droger eller
Läs denna instruktion innan du använder denna produkt. Underlåtenhet att göra det kan leda till allvarliga konsekvenser
1. Montera endast enligt dessa instruktioner. Felaktig montering kan skapa
7. Montera på en plan, jämn, hård och slät yta som säkert kan stödja
3. Överskrid inte viktkapaciteten, jämnt fördelad nedifrån och upp. Vara
4. Använd endast på en plan, jämn, hård och slät yta som säkert kan stödja en
Försiktighetsåtgärder vid montering
VARNING:
SÄKERHETSÅTGÄRDER
Använd försiktighetsåtgärder
Machine Translated by Google

300
9.1
BLC9013
Modell
Nominell belastning
ÿlbsÿ produktviktÿkgÿ
produktstorlekÿmmÿ
780*400*400
9
10
8
7
11
12
4
Rycka
Beskrivning
1
4
Luftstav
M6 packning
4
4
1
4
M6
2
5
Dämpa
Stålbricka
Allen WrencH
M6 brickor
ANTAL
1
1
4
4
3
Del
6
Hjul
Grundplatta
M6 Skruv
M6
1
1
1
Viktiga verktyg för bilskönhet och mekanisk reparation
TEKNIKA PARAMETRAR
- 3 -
Machine Translated by Google

Drag:
Steg 1. Installation av sittdyna (Fig.1)
knäna.
Steg 2. Kudde säte och basenhet
Dessa hjulet in i ramen, sätt sedan in
reparera, etc., utan att stå eller böja sig för att minska trycket på ryggen eller
korrekt när du installerar den och tryck in den ordentligt.
Använd skruvarna och brickorna för att installera basen på dynan (Fig.3)
verktygspall är utrustad med slitstarka hjul och gummihjul så att du kan glida
2. Stålbricka för förvaring av handdukar, små borstar och verktyg.
Steg 3. Sätt in dynan och basen på Air rod. (Fig.4)
Ta basen och lägg den på undersidan av dynan (Fig.2)
Lämplig för DIY-arbetsartiklar i garage, verkstäder eller hem. Multifunktionen
1. Gummihjul med lås.
Steg 4. Instruktion för montering av fot (Fig.5)
Matcha den perfekta höjden på bilens sidodekoration eller hjulrengöring. Sätt dig ner till
4. Maxvikt 300lbs.MONTERINGSSTEG
3. Rymmer 4 flaskor à 16 oz för enkel åtkomst.
enkelt och snabbt i garaget eller uppfarten.
beläggning, mekaniskt underhåll, hjulrengöring, däck och gummi. Rengöring, plast
Ta sätesstången (luftstången) och installera den i ramen. Se till att centrera sätet
Tryck ned kuddens mitt bestämt för att fästa den vid luftstången.
slutföra arbete på låg höjd av bilsnabb skönhet, polering, vaxning, keramik
- 4 -
Machine Translated by Google

- 5 -
Machine Translated by Google

- 6 -
Machine Translated by Google