- 1 -
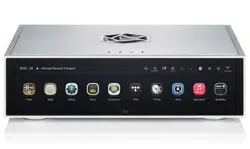
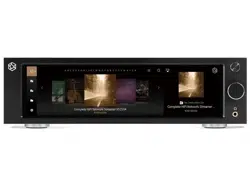
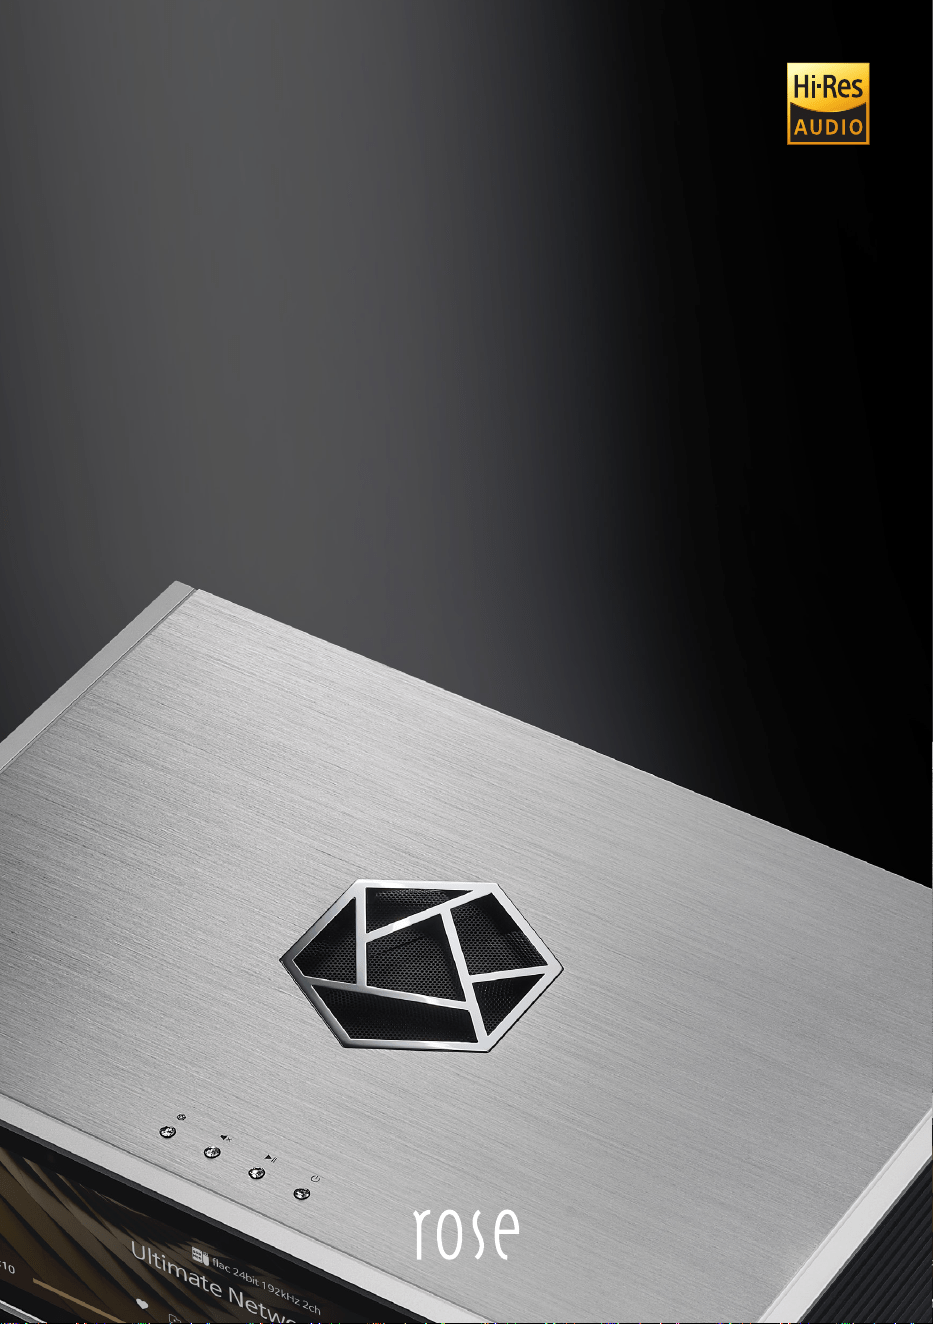
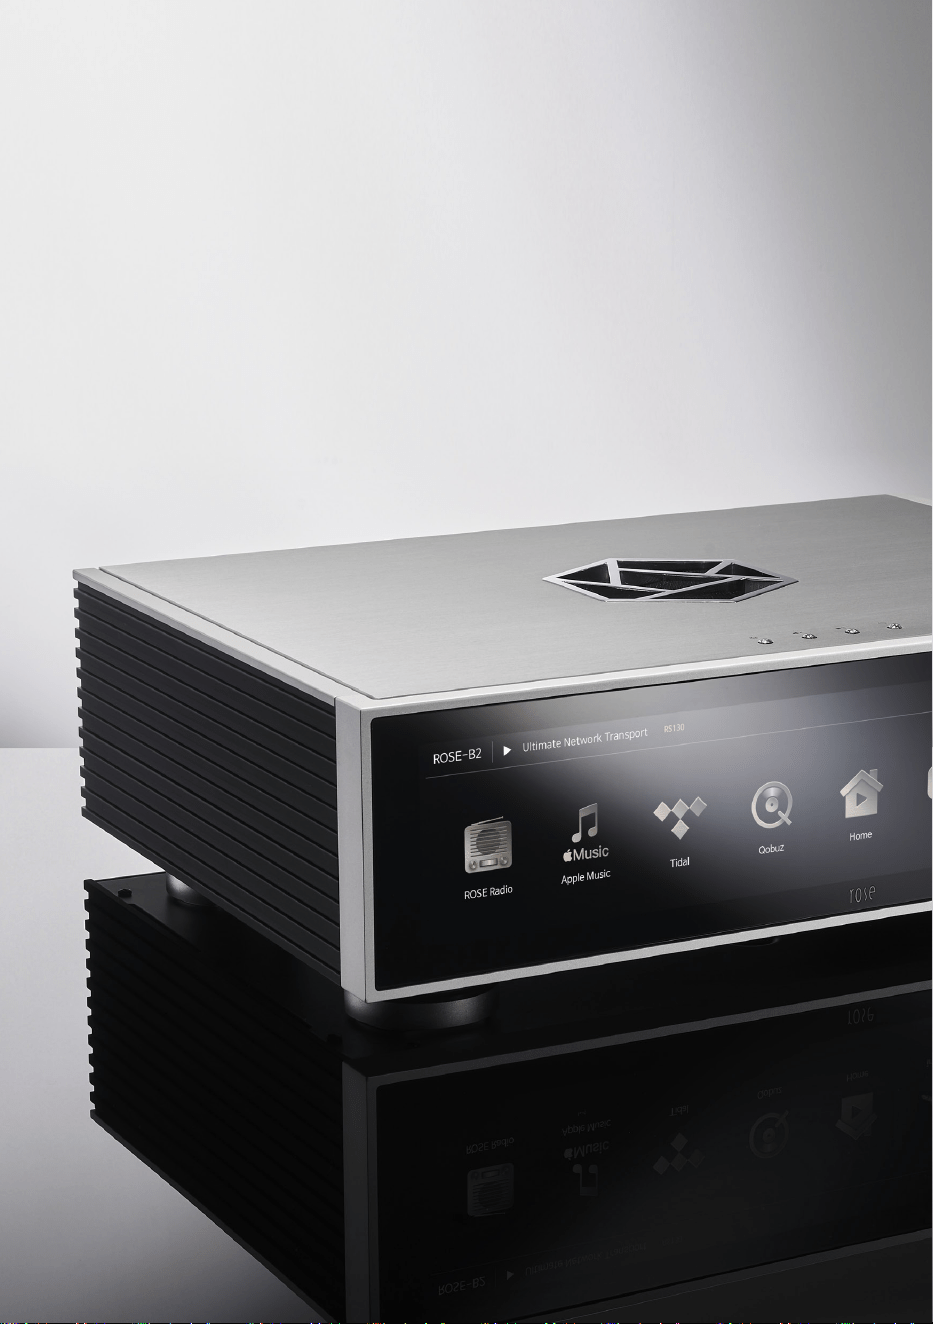
Ultimate Network Transport RS130
Beyond Audio, HiFi ROSE
- 2 -
- 3 -
Beyond Audio, HiFi ROSE
- 4 -
- 5 -
Hi-Res
DSD
Native DSD 512
PCM
32bit/768kHz
In/Out
Port
Digital Out
OPT x 1, COAX x 1, AES/
EBU x 1, I2S-HDMI x 1
USB Audio Out
USB Type-A 2.0
(Isolation)
EXT. Clock
Input
50Ω, 75Ω
In/Out Port HDMI Out
4K
Network
Connection
Ethernet
10/100/1000 BASE-T x 1
(SFP COPPER Type)
WiFi
802.11ac Dualband
USB Wireless LAN Card
(Dongle)
Bluetooth
V4.2 (USB Dongle)
Hi-Res
DSD
Native DSD 512
PCM
32bit/768kHz
In/Out
Port
Digital In
Optical, Coaxial, eARC
Digital Out
Optical, Coaxial
Analog In
Line In
Analog Out
Pre-out_RCA
HDMI Out
4K
In/Out
Port
Speaker
2ch 250W(8Ω)
USB Audio In
USB B Type 2.0
USB Audio Out
USB A Type 3.0
Amp
250W + 250W @ 8Ω, 4Ω
Network
Connection
Ethernet
10/100/1000 BASE-T
WiFi
Optional_dongle
(2.4GHz/5GHz)
Bluetooth
Optional_dongle
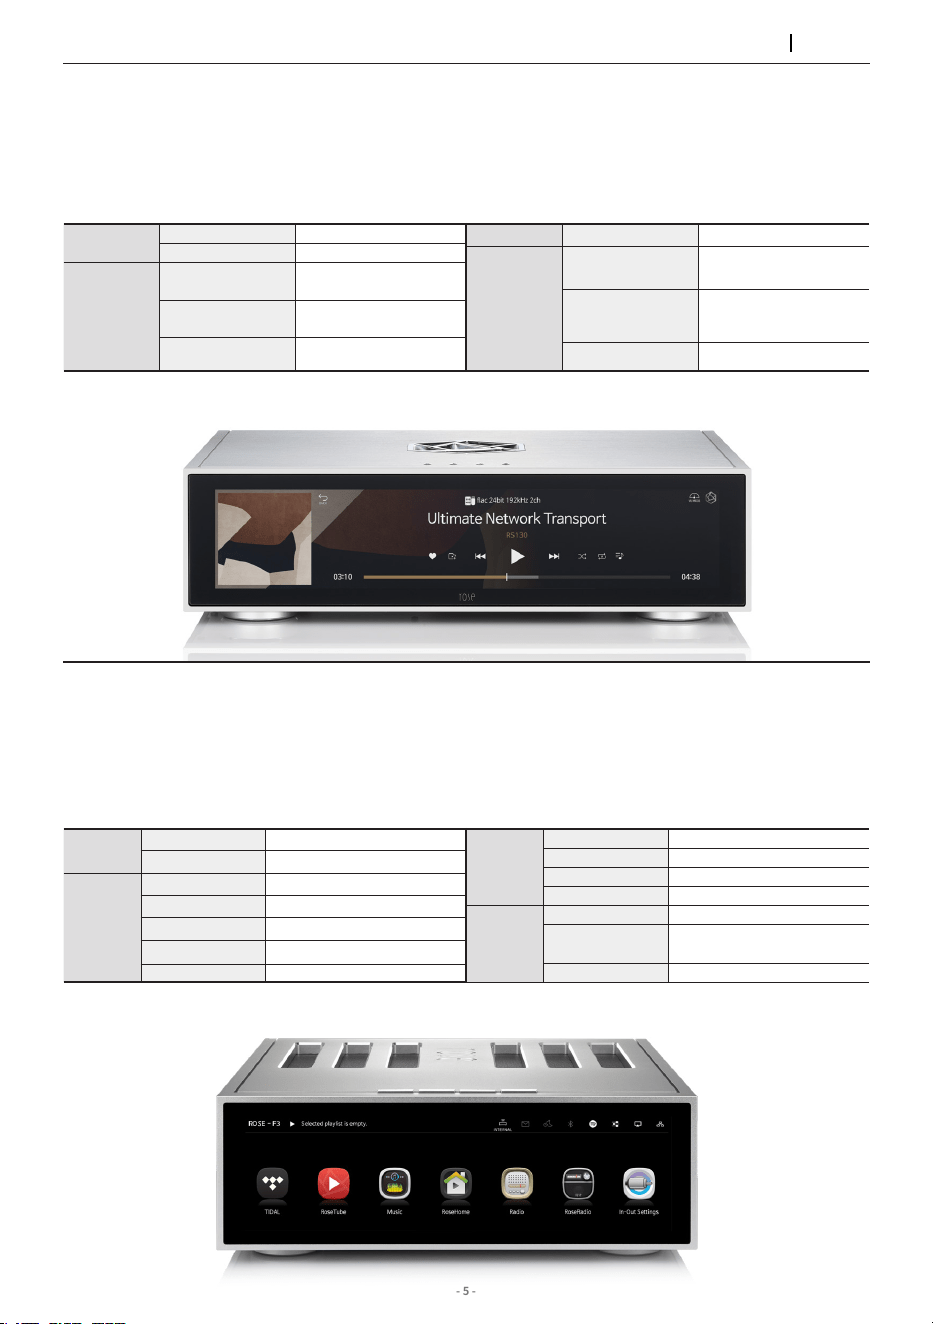
Ultimate Network Transport RS130
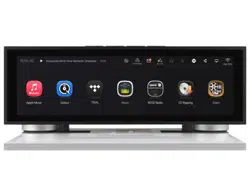
Advanced All-In-One Network Streamer RS520
HiFi ROSE
Products
▪High-precision OCXO clock for Long-Term Jitter Reduction
▪Fiber Optic Ethernet and Fiber Optic USB connectivity
▪Network Streaming with SSD Caching Playback
▪External master clock input
▪Minimize electrical noise with full linear power conguration using Super capacitor
▪Reference Grade All-in-One Network Streamer
▪Network Streamer + DAC + Class AD Amplier with next generation GaN FET
▪High-Resolution Music Playback available(DSD512, PCM32bit/768kHz)
▪A Femto Clock provides Ultra Precision
▪The Special Linear Power Supply Conguration minimizes electrical noise
Connectivity Bluetooth, DLNA, Airplay, Spotify Connect, Roon Ready
Design 430*317*125 mm / 12 kg / 15.4” Wide viewing angle touch screen / Color: Black, Silver
Connectivity Bluetooth, DLNA, Airplay, Spotify Connect, Roon Ready
Design 346*328*127 mm / 8.1 kg / 12.6” Wide viewing angle touch screen / Color: Black, Silver
- 6 -
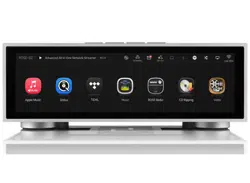
▪Flagship Network Streamer
▪Network Streamer + DAC
▪High-tech DAC design for pure sound with low noise and low distortion
▪High-Resolution Music Playback available(DSD512, PCM32bit/768kHz)
▪A Femto Clock provides Ultra Precision
▪The Special Linear Power Supply Conguration minimizes electrical noise
Connectivity Bluetooth, DLNA, Airplay, Spotify Connect, Roon Ready
Design 430*318*124 mm / 11 kg / 14.9” Wide viewing angle touch screen / Color: Black, Silver
High Performance Network Streamer RS150 Series
Hi-Res
DSD
Native DSD 512
PCM
32bit/768kHz
In/Out
Port
Digital In
Optical, Coaxial, AES/EBU,
HDMI ARC, USB Audio
Digital Out
Optical, Coaxial, AES/EBU,
I2S-DVI, I2S-RJ45
Analog In
Line In
Analog Out
Pre-out_XLR
,
Pre-out_RCA
In/Out
Port
HDMI Out
4K
USB Audio In
USB B Type 2.0
USB Audio Out
USB A Type 3.0
Network
Connection
Ethernet
10/100/1000 BASE-T
WiFi
Optional_dongle
Bluetooth
Optional_dongle
HiFi ROSE
Products
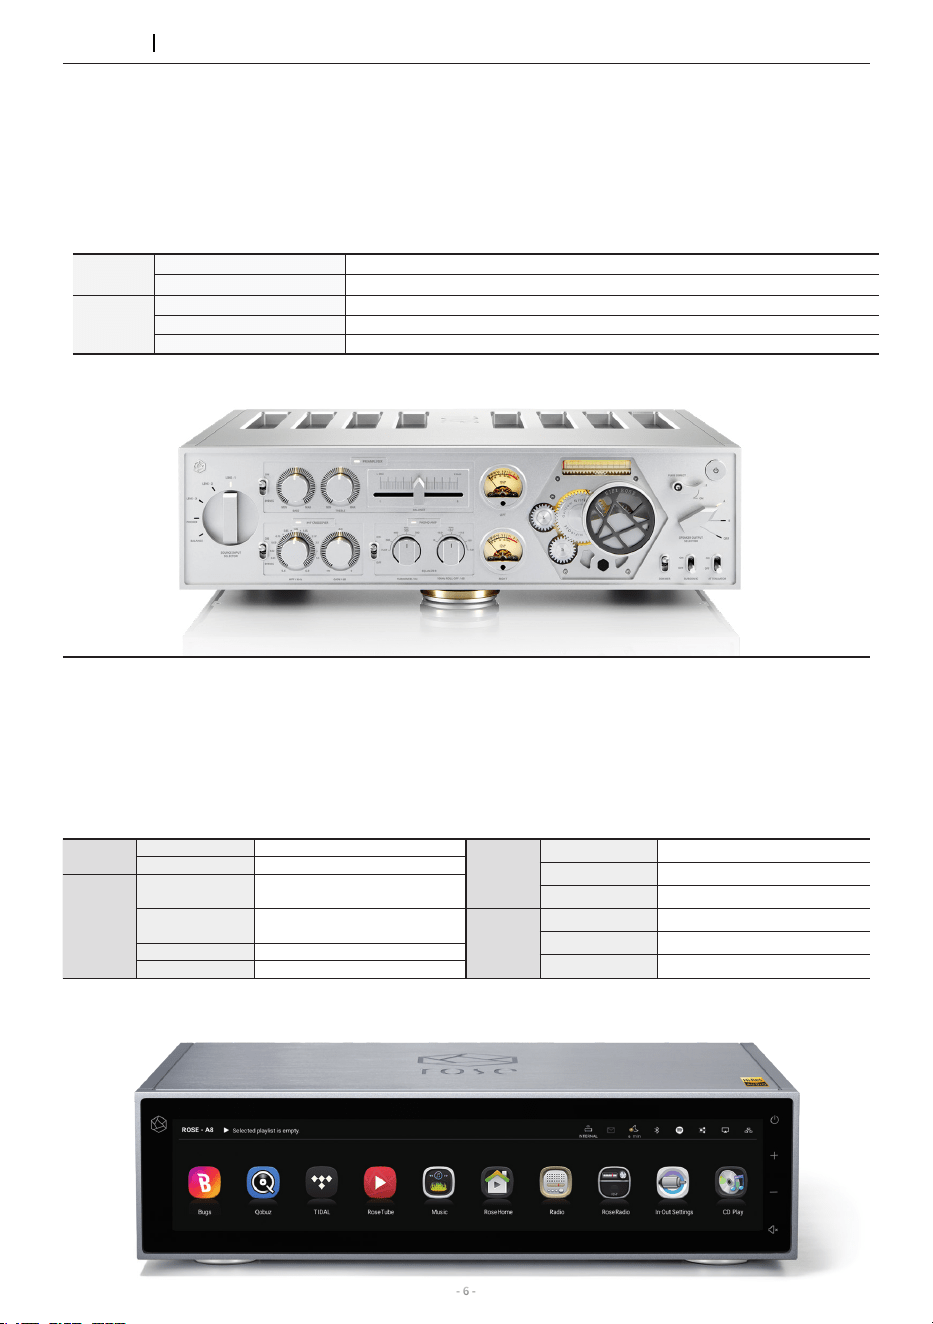
Integrated Amplier
- With Gallium Nitride Amplier built in RA180
▪Class AD Amplier with next generation GaN FET
▪Multi Output Component
▪Designed to play up to the Super Twitter Realm
▪Balanced Power Supply
▪PHONO Amplier with Variable EQ
Design 430*391*124 mm / 16.7 kg / High Purity Aluminum / Color: Silver
In/Out
Port
Analog In
Line1, Line2, Line3(Bypass), Balanced, Phono(MM/MC)
Analog Out
Sub Woofer
Speaker
Stereo(A/B)
4ch 200W(8Ω)
Stereo(A), BTL(B)
Stereo(A): 4ch 200W(8Ω) / BTL(B) : 2ch 400W(8Ω)
BTL(A/B)
BTL(A) : 2ch 400W(8Ω) / BTL(B) : 2ch 400W(8Ω)
- 7 -
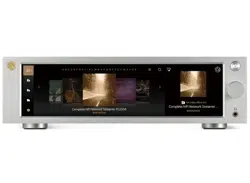
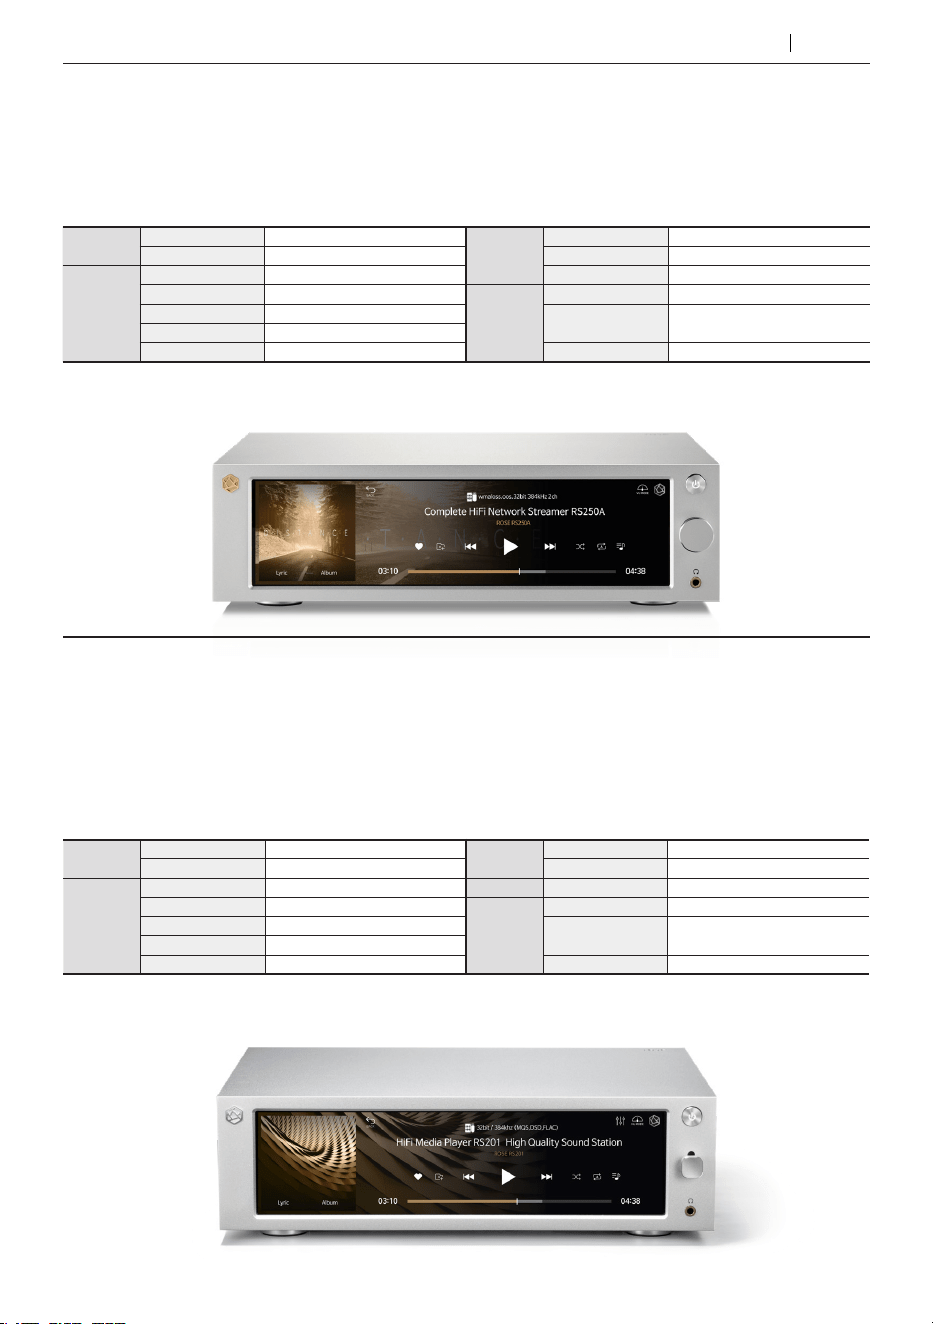
Complete HiFi Network Streamer RS250A
▪Reference Grade All-in-One Network Streamer
▪Network Streamer + DAC
▪High-Resolution Music Playback available(DSD512, PCM32bit/768kHz)
▪A Femto Clock provides Ultra Precision
▪The Special Linear Power Supply Conguration minimizes electrical noise
Connectivity Bluetooth, DLNA, Airplay, Spotify Connect, Roon Ready
Design 278*231*83 mm / 3.2 kg / 8.8” Wide viewing angle touch screen / Color: Black, Silver
Hi-Res
DSD
Native DSD 512
PCM
32bit/768kHz
In/Out
Port
Digital In
Optical, Coaxial
Digital Out
Optical, Coaxial
Analog In
Line In
Analog Out
Pre-out_RCA
HDMI Out
4K
In/Out
Port
Headphone Out
3.5mm
USB Audio In
USB B Type 2.0
USB Audio Out
USB A Type 3.0
Network
Connection
Ethernet
10/100/1000 BASE-T
WiFi
802.11 a/b/g/n/ac
(2.4GHz/5GHz)
Bluetooth
V4.0 / V3.0+HS
HiFi Network Streamer RS201 Series
Connectivity Bluetooth, DLNA, Airplay, Spotify Connect, Roon Ready
Design 278*231*85 mm / 2.3 kg / 8.8” Wide viewing angle touch screen / Color: Silver
▪Reference Grade All-in-One Network Streamer
▪Network Streamer + DAC + AMP
▪Built-in High-Performance Power Amplier(50W*2ch)
▪High-Resolution Music Playback available(DSD256, PCM32bit/384kHz)
▪A Femto Clock provides High Precision
▪Digital equipment, PreAmplier connection available
▪Awarded the world’s three major design awards(Reddot, GOOD DESIGN, PIN-UP)
Hi-Res
DSD
Native DSD 256
PCM
32bit/384kHz
In/Out
Port
Digital In
Optical
Digital Out
Optical
Analog In
Line In
Analog Out
Pre-out_RCA
HDMI Out
4K
In/Out
Port
Headphone Out
3.5mm
USB Out
USB A Type 3.0 / 2.0
AMP AMP
50W X 2CH(4Ω)
Network
Connection
Ethernet
10/100/1000 BASE-T
WiFi
802.11 a/b/g/n/ac
(2.4GHz/5GHz)
Bluetooth
V4.0 / V3.0+HS
HiFi ROSE
Products
- 8 -
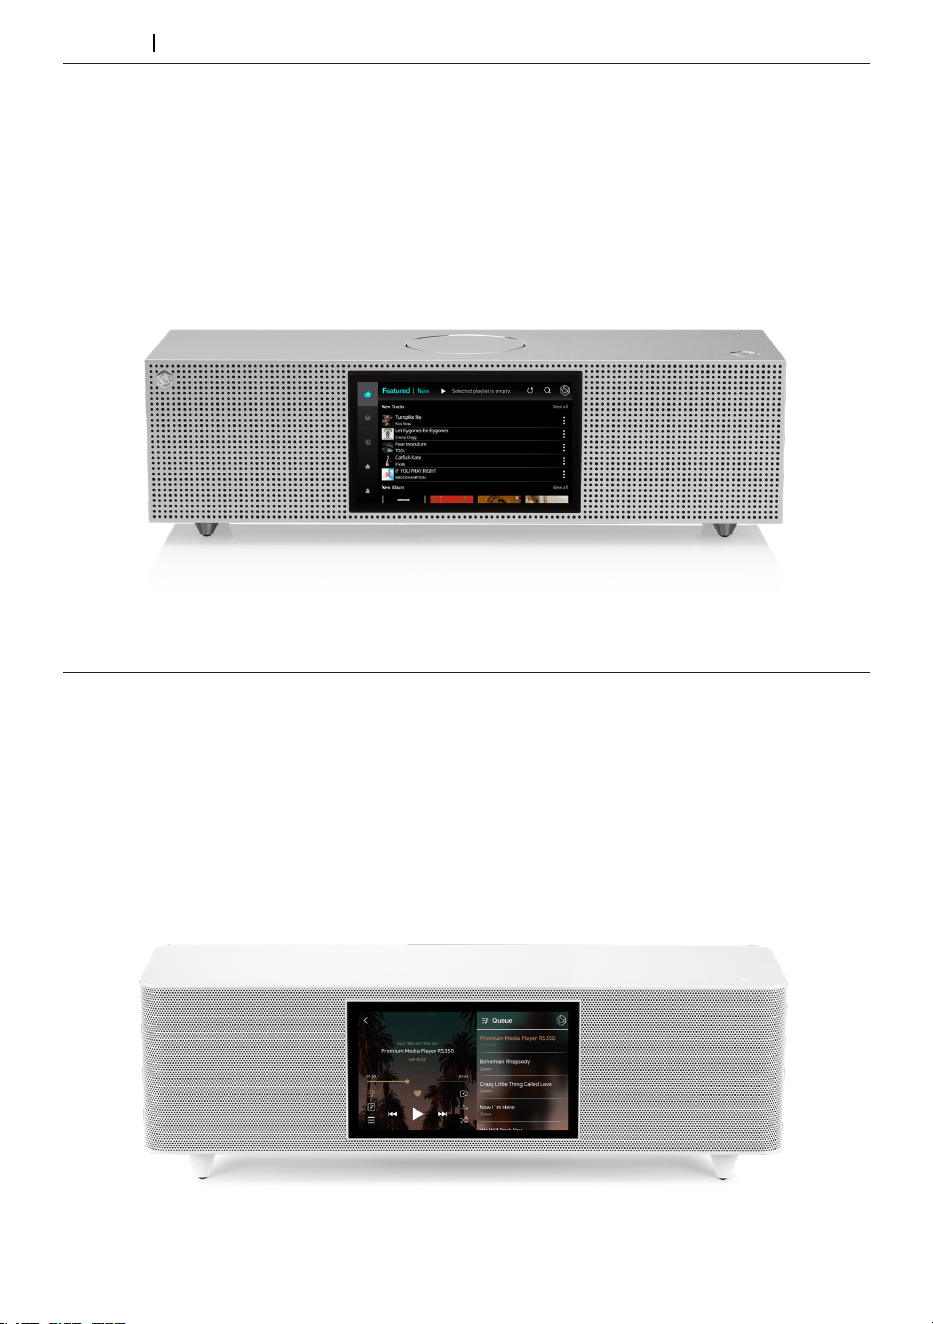
Premium Media Player RS350
▪Casual All-in-One Speaker
▪Network Streamer + DAC + AMP + SPEAKER
▪3-Way full-range speaker conguration
▪Playback of various le formats available(Music, Video, Image)
▪Powerful sound playback with dual passive woofer engine design(Patented technology)
Connectivity WiFi, Bluetooth, DLNA, Airplay
Rear Micro USB, USB A Type, Micro SD, Headphone
Design 364*123*123 mm / 1.5 kg / 5” IPS touch panel / Color: White
HiFi ROSE
Products
HiFi Media Player RS301
▪High-end All-in-One Speaker
▪Network Streamer + DAC + AMP + SPEAKER
▪3-Way full-range speaker conguration
▪High-Resolution Music Playback available(DSD256, PCM32bit/384kHz)
▪Powerful sound playback with dual passive woofer engine design(Patented technology)
▪Awarded the world’s three major design awards(Reddot, PIN-UP, iF)
Connectivity Ethernet, WiFi, Bluetooth, DLNA, Airplay
Rear Micro USB, USB A Type, USB B Type, Micro SD, Headphone, AUX
Design 360*122*119 mm / 1.9 kg / 5” IPS touch panel / Color: Silver
- 9 -
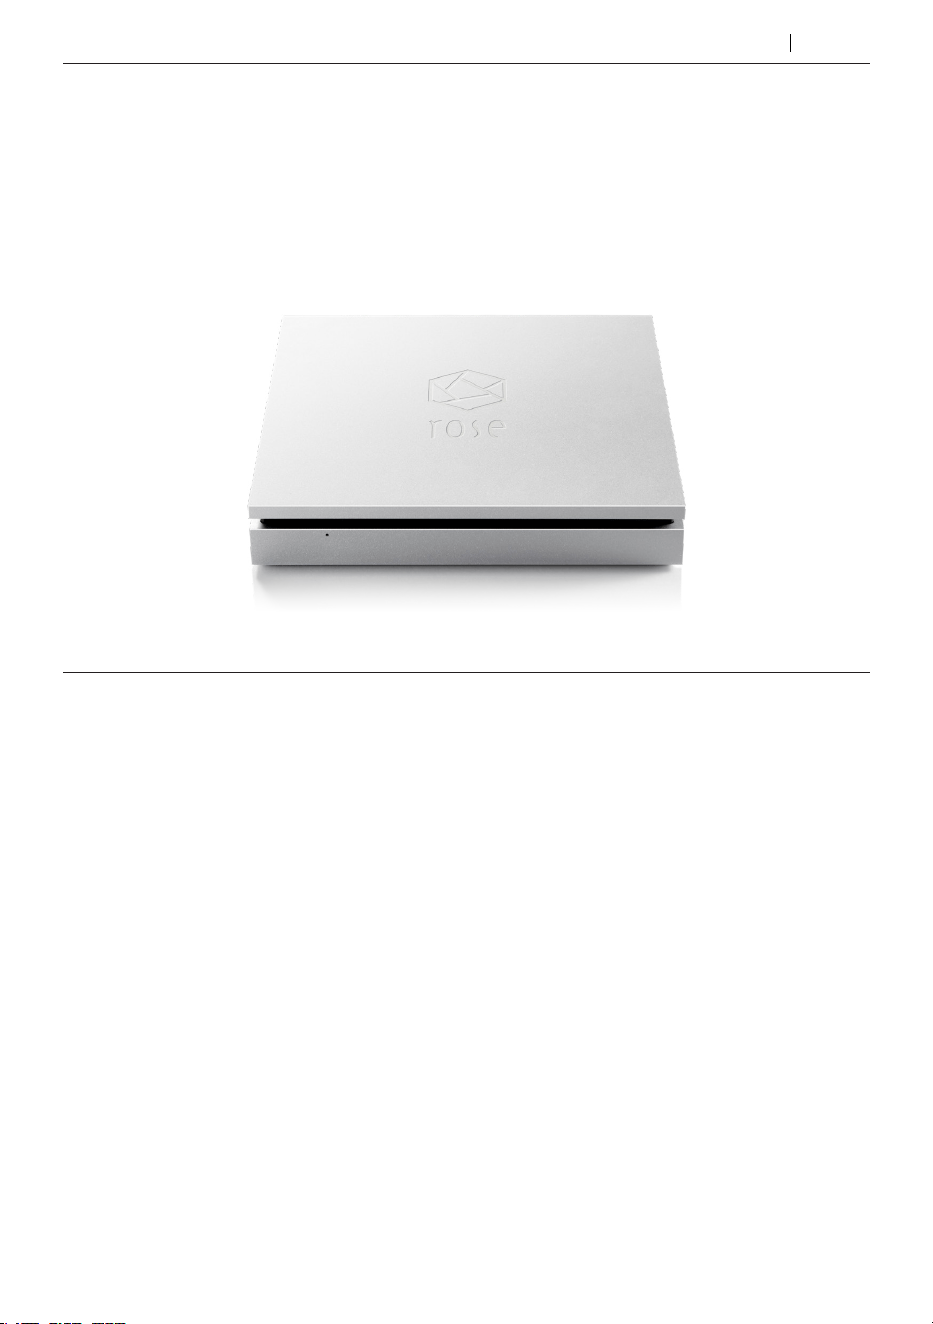
HiFi ROSE CD Drive RSA780 Series
Rear USB B Type
Design 152*152*25 mm / 0.9 kg / Color: Silver
▪USB-isolator Adopted to block motion noise
▪USB-B Type Port Adopted for HiFi Audio
▪900g weight for CD playback without external shaking
▪Minimized Motion Noise by applying Insulators
▪Provides CD Ripping Features
HiFi ROSE
Products
- 10 -
HiFi ROSE
Products
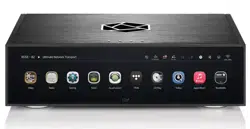
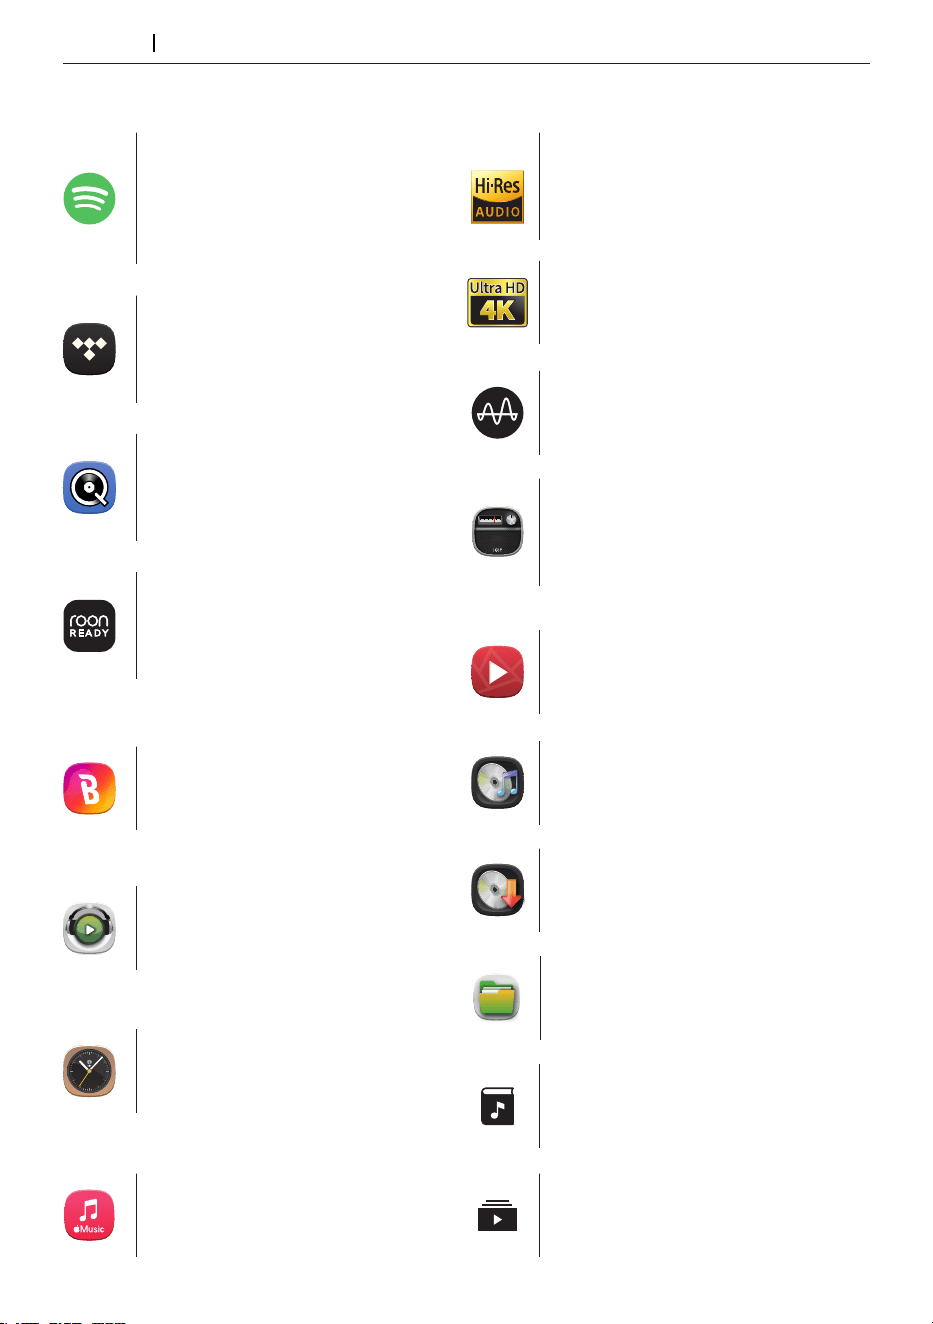
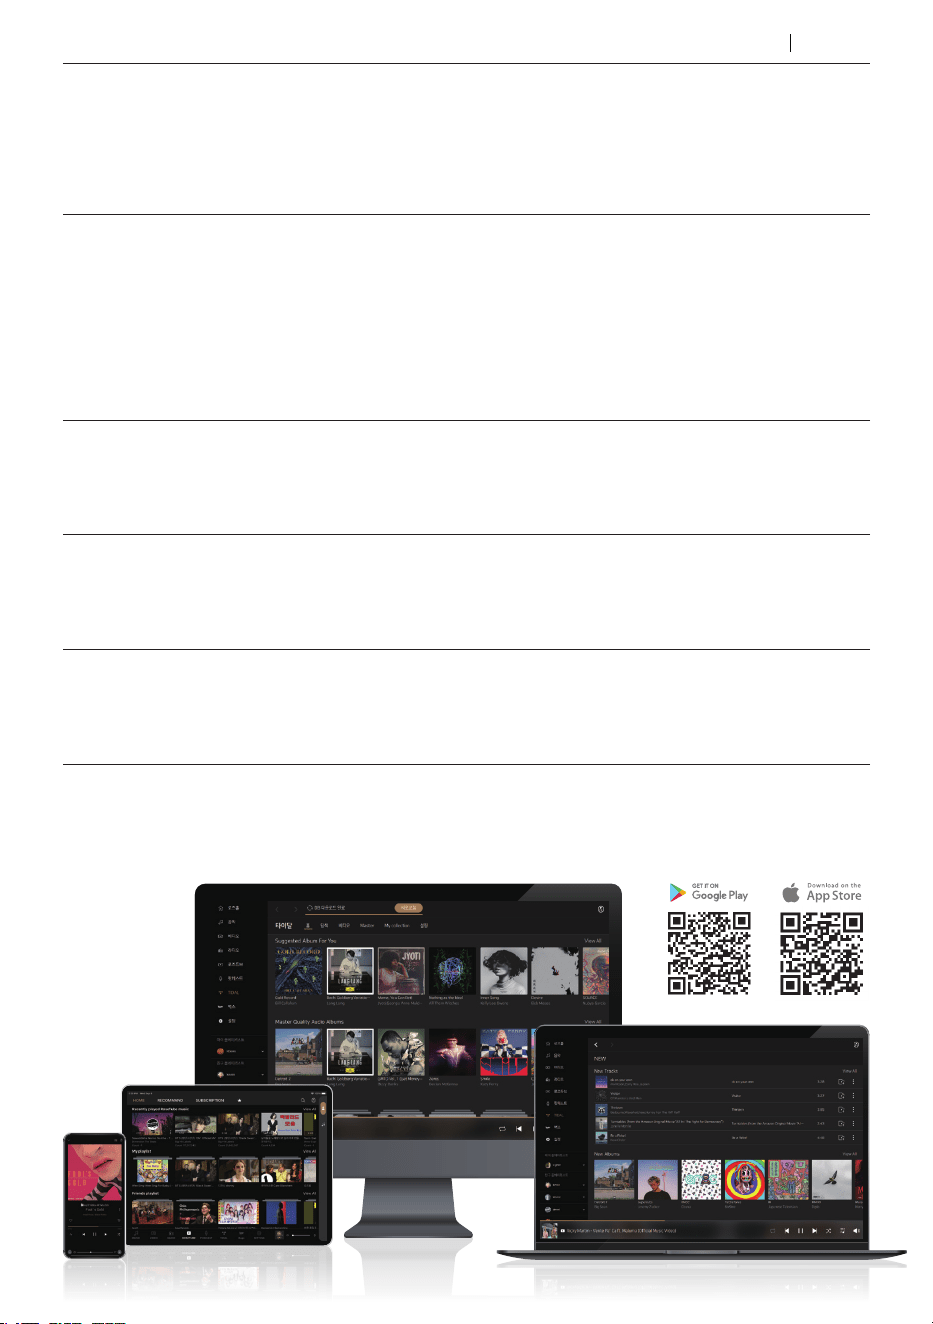
Innovative ROSE OS System
Play CDs by connecting an external
USB CD-ROM.
CD Player
Bugs
Listen to high-resolution music on
Bugs. Easily connects existing functions,
including login, playlists, and playback.
Supports MQA’s Full Decoder.
Enjoy studio mastering sound quality.
MQA
Qobuz
Enjoy music streaming with Qobuz’s
various functions. Support for Hi-Res
Audio(24bit/192kHz) means you can
enjoy high-resolution music.
You can enjoy high-denition videos
on YouTube, TIDAL, and Bugs,
and play video les in various formats.
4K Video
12
6
9 3
1
2
4
5
7
8
10
11
Enjoy music streaming and videos
with TIDAL’s unique features.
Supports MQA Full Decoder, so you
can enjoy high-resolution music.
TIDAL
Create your own playlist. You can also
register your friends and share it with
them.
My Playlist
12
6
9 3
1
2
4
5
7
8
10
11
Various design clock functions are
provided, such as alarms and
weather information.
Enjoy curated playlists divided by Apple
Music’s own musical tastes.
You can enjoy various tracks in Apple Music.
You can perform le and folder management
tasks, such as moving, copying, and deleting,
on storage device.
Clock
Apple Music App
File Manager
Rip CDs by connecting an external
USB CD-ROM and save them on a
storage device.
CD Ripping
You can enjoy all content and music
on YouTube.
Enjoy Rose Radio, which consists of about 30,000
radio channels from 200 countries around the
world. Channels are organized into various
categories, and you can easily search for channels
with lters of genre/region/language.
ROSE Tube
ROSE Radio
12
6
9 3
1
2
4
5
7
8
10
11
Roon Ready
ROSE OS is fully compatible with Roon Core, with
Roon Ready certication in compliance with all
requirements of Roon Labs. You can enjoy HiFi
sound quality on your ROSE device with the
powerful music management capabilities of Roon.
Spotify Connect allows you to play and
wirelessly control Spotify music on your ROSE
OS over a network. With the Spotify Connect
function, you can enjoy a variety of music with
HiFi sound quality on your ROSE device.
Spotify Connect
HiFi ROSE devices are certied with a
‘High-Resolution Audio’ license
from the JAS (Japan Audio Society).
Hi-Res Audio
12
6
9 3
1
2
4
5
7
8
10
11
Listen to various podcasts from
around the world.
ROSE Podcast
Manage your music les under various
categories, such as albums, artists,
and genres.
Music Library
- 11 -
ROSE Connect Remote Application
A dedicated Remote App is provided that allows users to conveniently control and smartly
manage their ROSE device. The Remote App is supported on various platforms, including the
iPhone, iPad, Android phone, and PCs.
You can simply and easily play music stored on your phone on your ROSE device.
Enjoy a lossless, high-quality streaming service.
Streaming
You can create your own playlist.
Make a playlist on Music and ROSE Tube and check it out at Home - My Music.
Playlist
You can freely and conveniently control various HiFi ROSE functions wirelessly.
Control
Remote
Search
Control
You can control a variety of functions remotely including Music, ROSE Tube, TIDAL,
Qobuz, Bugs, Radio, Podcasts, Apple Music and CD Ripping.
ROSE Connect includes the remote control function.
You can conveniently search for a variety of music in the Media Library.
You can share your playlists with your friends or listen to music recommended by them.
Communicate with your friends through music.
Share with Friends
Scan the music in your local memory to organize it into various categories.
Media Library
HiFi ROSE
Products

- 12 -
OWNER’S MANUAL
RS130 Product User Manual

- 13 -
OWNER’S MANUAL
RS130 Product User Manual

- 14 -
Safety Precautions
1. Warnings
2. Precautions
Components List
Location / Function of Buttons and Ports
1. Front Side of the Product
2. Rear Side of the Product
3. Remote Control
How to Install the Product
1. Product Design Method and Recommended Installation Location
2. How to Connect the Power Cord
3-1. How to Connect the Digital Output Port to the Audio Device
(TV or Devices That Provide Digital Input/Output Capabilities)
3-2. I2S Connection
3-3. HDMI Connection
3-4. USB 3.0 FIBER
3-5. Connect to Ethernet SFP
3-6. How to Connect the USB Flash Drive to DAC
3-7. How to Connect the USB Audio Output Port to External DAC
4. External Memory Devices(USB) and SATA Storage Devices
5. How to Connect SSD
5-1. How to Insert SSD
5-2. How to Format after Installing SSD
5-3. How to Copy Files Through the Network
6. Network Connection
6-1. Ethernet Connection(Wired)
6-2. WiFi Connection(Wireless)
7. How to Pair with the Bluetooth Remote Control
8. How to Connect to RoonReady
Table of Contents
16
16
16
17
18
18
19
20
21
21
24
25
26
27
28
28
22
23
29
32
30
33
34

- 15 -
Default Settings
1. Power Button
2. In/Out Setting
2-1. CLOCK INPUT
2-1-1. INTERNAL CLOCK INPUT
2-1-2. EXT CLOCK INPUT
2-2. OUTPUT
2-2-1. USB DAC Output
2-2-1-1. MQA Type
2-2-1-2. PCM Resampling Frequency
2-2-1-3. DSD Mode
2-2-1-4. Softare Volume Control
2-2-1-5. The low 8 bits of a 32-bit sound sources will have corrected
2-2-2. HDMI Output
2-2-2-1. PCM Resampling Frequency
2-2-2-2. DSD Mode
2-2-2-3. Software Volume Control
2-2-2-4. HDMI Passthrough
2-2-3. Digital Output
2-2-3-1. MQA Type
2-2-3-2. I2S OUT(DVI)
2-2-3-3. PCM Resampling Frequency
2-2-3-4. DSD Mode
Playback
1. Default Playback
2. Media Library
2-1. Activate Media Scanning
2-2. After Media Scanning
Additional Information
1. Firmware Update
1-1. Run OTA Update
1-2. Update Via Settings Menu
1-3. How to Install the Firmware When the XMOS / MCU Update Pop-Up Occurs
2. Factory Reset
Product Specications
1. Specications
Quality Guaranteed
43
36
43
43
45
45
48
49
49
50

- 16 -
Safety Precautions
1. Warnings
• Do not apply excessive force on the product, throw it, or strike it with sharp objects.
• Children should only use the product under adult supervision to ensure proper usage.
• Use within a temperature range of 0°C to 40°C and do not use in hot or humid conditions. Install the product in a well-
ventilated area, not an enclosed space. The product may break, corrode, overheat, or catch re in an environment
below 0°C or in a sealed environment with a high temperature, such as a sauna. Moisture or liquid can also damage
the surface of the product and its circuit components.
• Be sure to use a genuine power cable provided by ROSE. Any other cable may cause operational errors or damage
(decreased performance) to the product.
• Do not spill dirt or liquid on the product. It may damage the components and circuits. If the product gets wet, do not
turn it on and contact your nearest service center. However, free repairs are not available in this case.
• Do not connect antennas or accessories that are not certied by ROSE to the product, and do not place the product
on objects that may interfere with radio waves (steel desk, microwave oven, etc.).
• Because the product is sensitive to radio waves, using it near steel or electromagnetic devices can lead to poor
performance.
• How to replace the fuse: After turning o the product, remove the fuse and replace it with a fuse of the same type.
2. Precautions
• The contents of the owner’s manual are described based on the default settings of the product.
• Some contents of this manual may be changed without prior notice to the user in order to improve product performance.
• The features and additional services of the product may vary depending on the country, Software specications,
and policy changes of the service provider.
• Repairs due to user negligence or product failure may erase user data (music les, video les, etc.).
ROSE is not responsible for any damage or loss of data.
• If you use Bluetooth and 2.4GHz band wireless LAN together, the WiFi connection may be slow or audio playback through
Bluetooth may not work properly due to signal interference. If you are using them at the same time, we recommend using
wireless LAN connections in the 5GHz band.
• Do not use chemical solutions (alcohol, thinner, solvents, etc.) or detergent to clean the product. Rubbing the product with a
chemical solution can create heat and cause the product to catch fire. When cleaning the product, wipe it with a soft cloth or towel.
• Do not disassemble, modify or repair the product on your own. If you do, you will no longer qualify for free repairs. If a
malfunction occurs because of this, contact an authorized service center for repairs.
• Only programs provided by the manufacturer are available. Transferring independently created les or user-modied les
to the product can cause operational errors or cause serious problems with the product. ROSE is not responsible for any
problems that arise in this case.
• If the touch screen is damaged, do not touch it with your hands. Contact the service center immediately, as it may cause injury.
• When you‘re not going to use the product for a long time, be sure to unplug the power plug from the AC outlet.
• Even after the power has been shut o (manual standby mode), a minimal current remains in the equipment. Remove the
plug to prevent power consumption.
• After connecting the power plug and turning on the equipment with the power button, it takes about 30 seconds to
complete booting, so please wait for a while.
• Do not power on the device within 10 seconds after shutting o the power and entering manual standby mode. Doing so
may cause noise.
• When the power is first connected, the device enters manual standby mode, and in this mode, you have to press the power button
to boot it up and use it normally. If you press the power button briefly during use, the device enters active standby mode, and it‘s
only in this mode that you can turn on the power with the Bluetooth remote control or the ROSE Connect application.
• Install the product close to an outlet so that it is easy to remove the plug from the outlet.
• It is recommended to use a certied HDMI cable. Otherwise, a connection error may occur, causing problems with
the audio and output screens. In addition, when usi
ng a long HDMI cable, please be sure to use an HDMI repeater
(Signal Amplier) device to connect it.
- 17 -
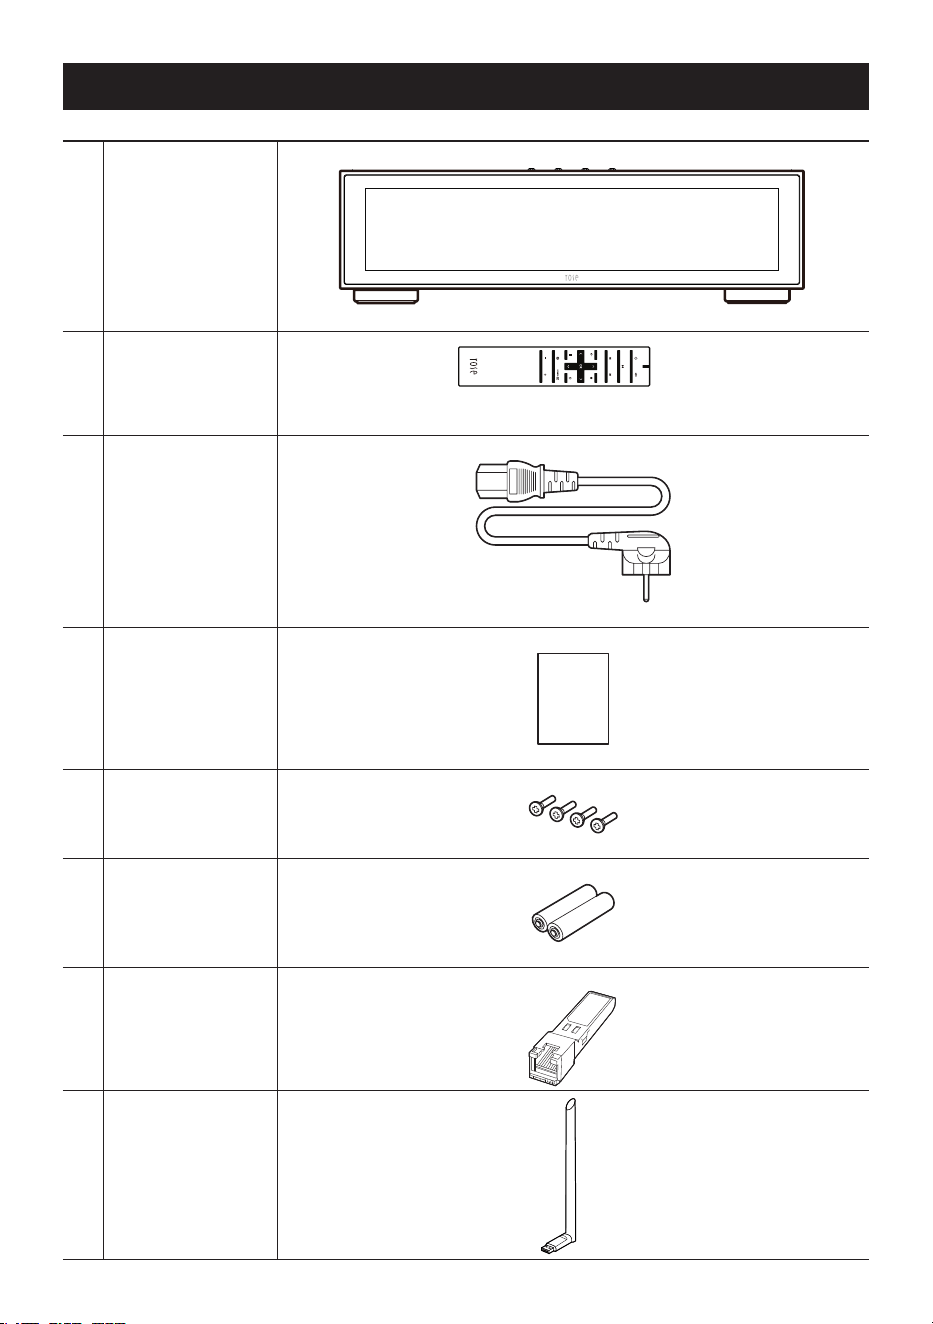
Components List
1 Main Device
2
Bluetooth Remote
Control
(Sold Separately)
3 Power Cable
4 User Manual
MANUAL
5
SSD Mounting
Screws
6
AAA Batteries for
Remote Control
7
SFP RJ45
COPPER
TRANSCEIVER
MODULE
8
WiFi/BT Dongle
(Sold Separately)
- 18 -
Location / Function of Buttons and Ports
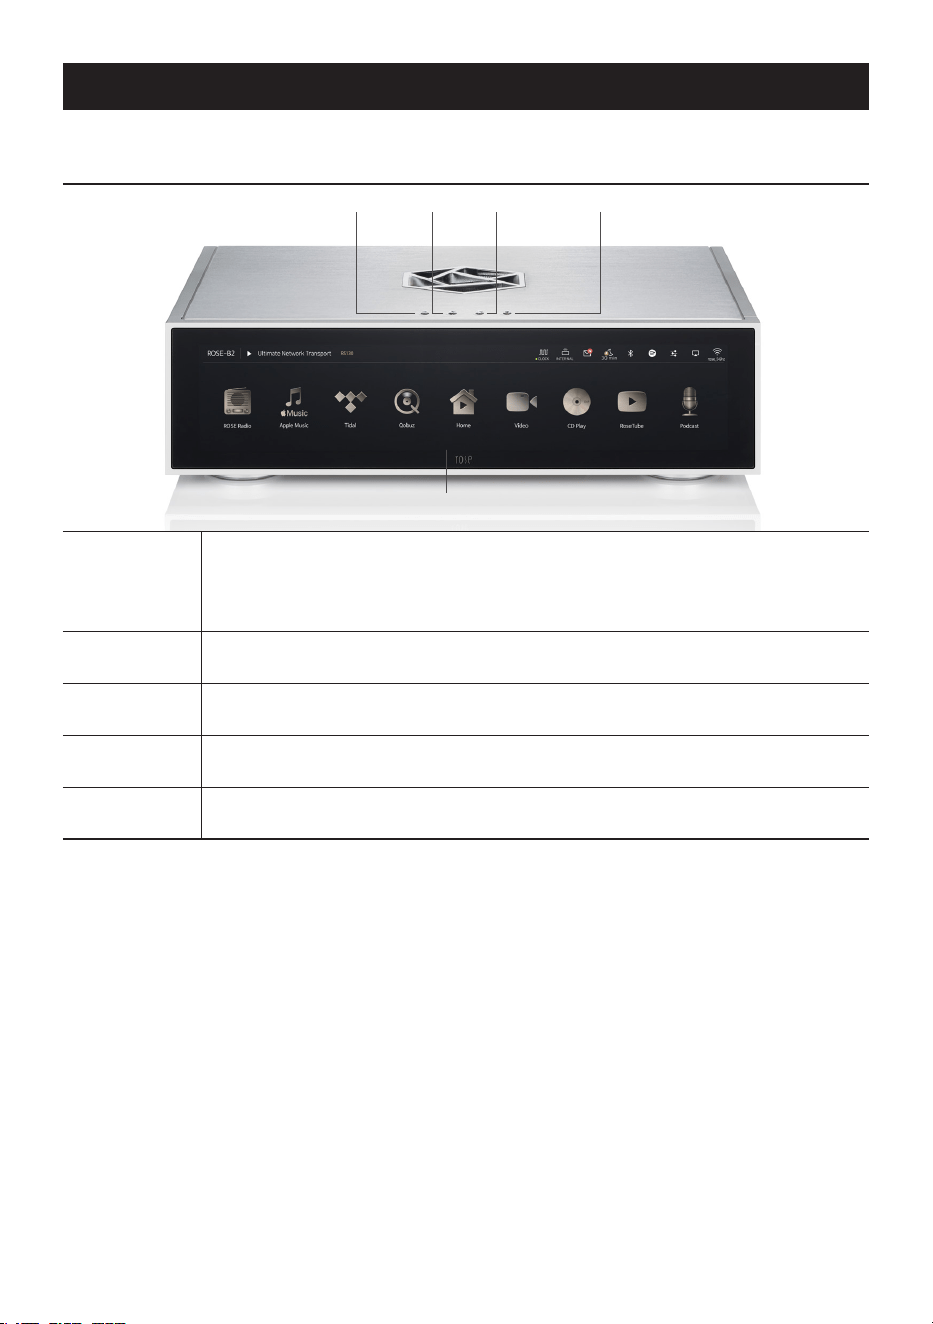
1. Front Side of the Product
Power
When you press the power button, the LCD panel will turn on and the product
will boot.
※ For detailed functions, please refer to “Initial Setup” - “Power Button” (Page 36)
Mute
You can enable / disable sound by pressing the Mute button.
Play / Pause
You can play and pause by clicking the button.
Favorite
Navigate directly to the feature you set under Favorites in System Settings.
IPS Panel
You can move the screen by touching it several times.
PowerMute Play / PauseFavorite
IPS Panel
- 19 -
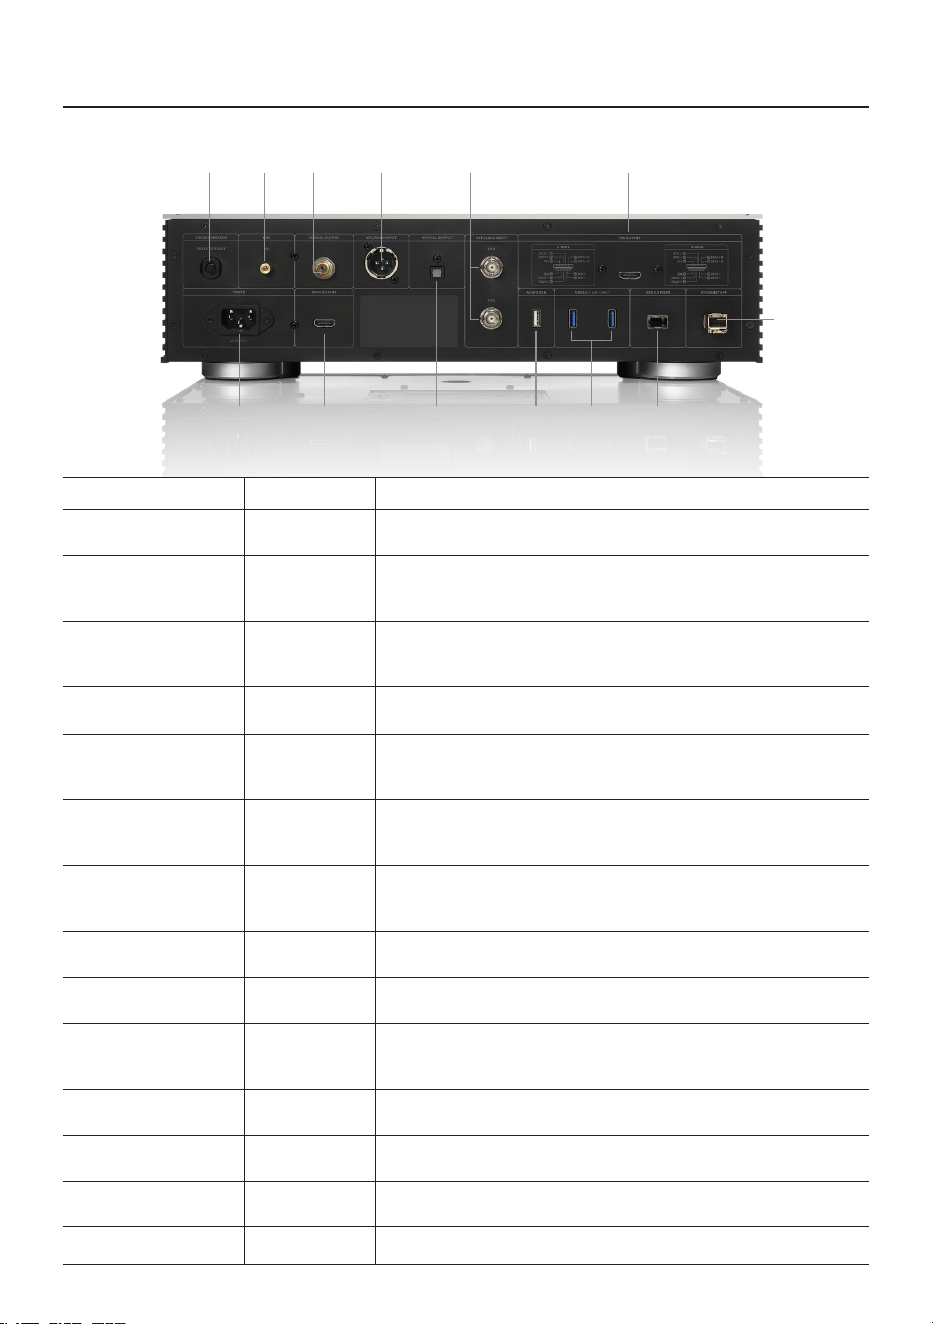
AC Power Inlet
Connect the AC power cable.
Circuit Breaker
This protection terminal prevents damage to the set due to
overvoltage or overcurrent.
COAXIAL Out
Connect the RCA cable to the coaxial port. Digital signals in the
range of sampling frequency (44.1 - 384kHz) are output when
coaxial mode is set in Input/Output Settings.
HDMI Out
Connect a cable that supports HDMI 2.0. The video output
signal (up to 3840 × 2160 pixels, 60 ㎐) can be played on your
TV or monitor by setting TV ON on the top right of the screen.
AES/EBU Out
Connect the XLR cable. Digital signals (44.1 - 384kHz) are
output when AES/EBU mode is set in Input/Output Settings.
OPTICAL Out
Connect the S/PDIF optical cable to the optical out port.
Digital signals (44.1 - 192kHz) are output when optical out
mode is set in Input/Output Settings.
EXT Clock 50ohm
Connect a 50Ω BNC cable to the EXT CLOCK 50Ω port.
You can use it as an external clock input by setting to EXT 50Ω
mode in Input/Output Settings.
EXT Clock 75ohm
Connect a 75Ω BNC cable to the EXT CLOCK 75Ω port.
You can use it as an external clock input by setting to EXT 75Ω
mode in Input/Output Settings.
USB DAC
This port supports only USB 2.0. You can use it by connecting a
USB ash drive or an external audio DAC device.
USB 3.0
You can play music les by connecting a USB ash drive or
using the ripping function by connecting a CD ROM.
USB 3.0 FIBER
This port supports only USB 3.0. It can be used by connecting
the SFP module of this product with an external USB 3.0 ber
hub and an optical cable.
Ethernet
10/100/1000 BASE-T Ethernet can be used by using SFP ber
and copper modules.
I2S Out
Connect the HDMI cable to the I2S port. Digital signals are
output when I2S (A or B mode) is set in Input/Output Settings.
USB WiFi/BT Dongle
Connect the USB dongle to this USB port to use wireless
network and Bluetooth.
GND
This port is used to ground the product and external devices.
AC Inlet
Circuit
Breaker
GND
Coaxial
Out
AES/EBU
Output
Optical
Out
EXT
Clock Input
HDMI
Output
USB3.0USB-DAC
Ethernet
COPPER
or FIBER
USB3.0
FIBER
I2S
Output
2. Rear Side of the Product
AC INPUT ~
USB 3.0
5V / 1A
USB WIFI /BT DONGLE
5V / 1A
- 20 -
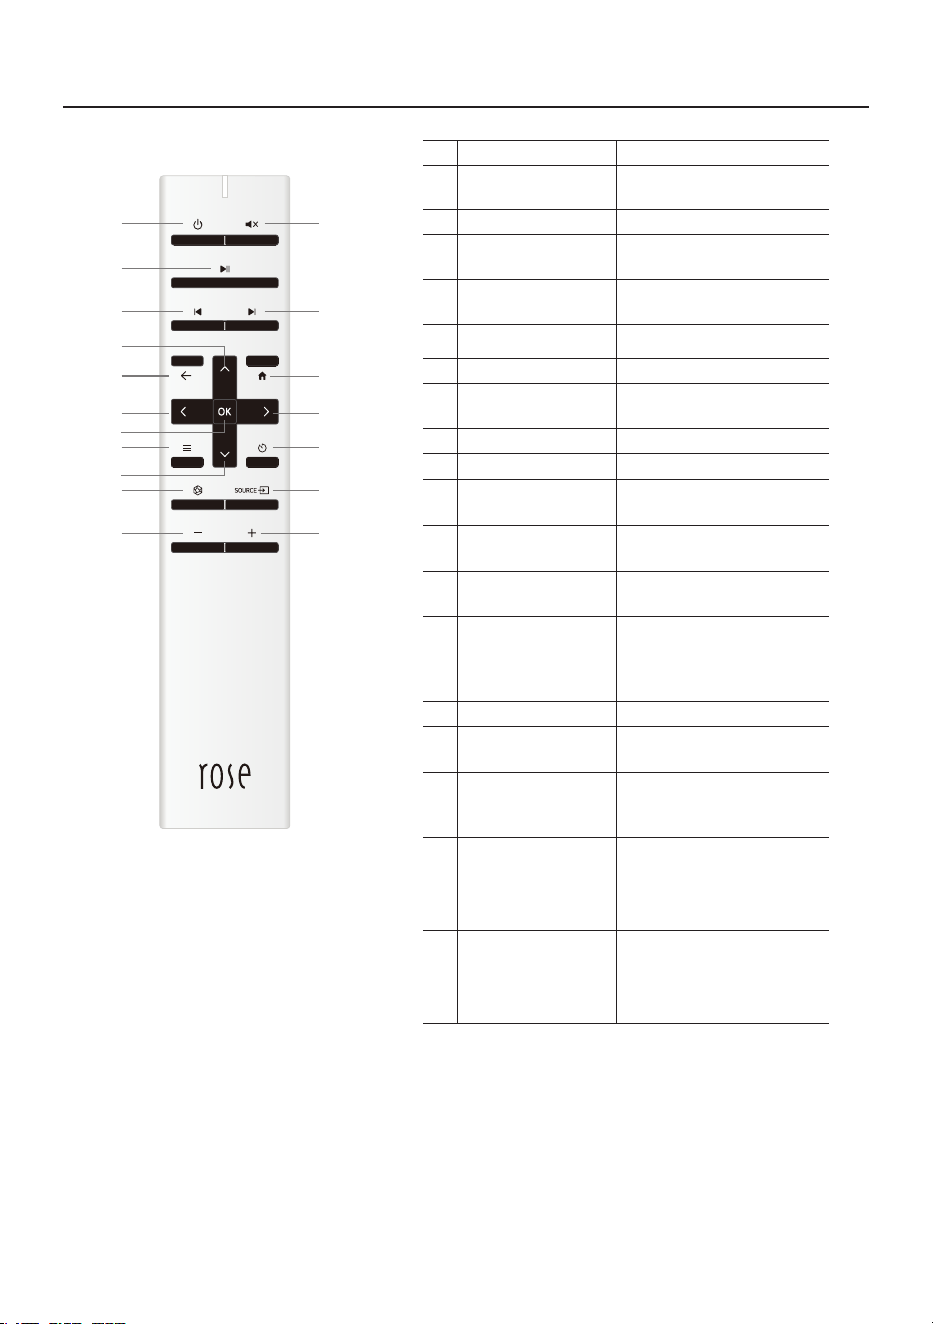
※ The battery life of the Bluetooth remote control is about 3 - 4 months on average, and if the power is
low due to battery consumption, the Bluetooth remote control may malfunction. In this case, replace the
battery before use.
Function Note
1 Power On/O
Sleep Mode On/O
2 Mute
3
Play / Pause
Current Song
4
Play Previous
Song
5 Play Next song
6 Go Back
7
Go to the Home
Screen
8 Move Focus Up
9 Move Focus Left
10 Move Focus Right
11 Move Focus Down
12
Select Current
Focus
13 Option Key
Works only when playing
songs and videos with sub-
options (favorite, queue,
subscribe) in the list
14 Sleep Timer
15
Go to Favorites
Menu
Go to the favorites menu
set on this device
16
Go to External
Input/Output
Menu
Go to Input/Output page
17 Volume Down
Press and hold to adjust
the volume down
You can adjust the volume by
turning on the Software volume
control function
18 Volume Up
Press and hold to adjust
the volume up
You can adjust the volume by
turning on the Software volume
control function
2
5
7
1
3
4
6
8
12
11
13 14
15 16
17 18
109
3. Remote Control
- 21 -
How to Install the Product
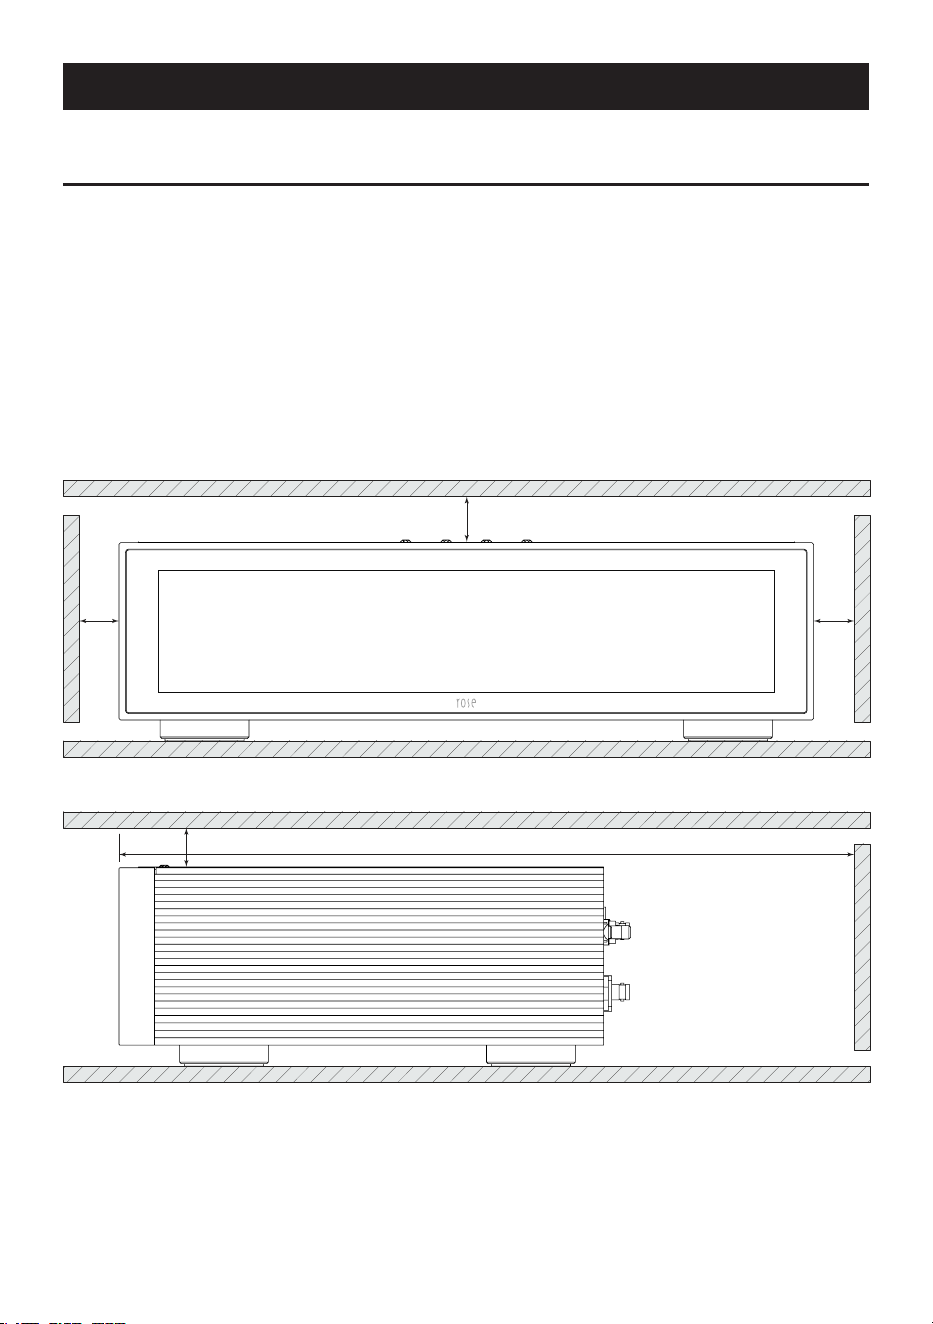
1. Product Design Method and Recommended Installation Location
• This product is designed to be used on a table or shelf.
• This product can malfunction during cold weather or hot weather.
(Operating temperature: 0 to 40℃, Storage temperature: -10 to 50℃)
• If the space where the product is installed is small, provide adequate ventilation for the product.
A longer operating life is ensured when electronics are properly ventilated and maintained so
that they do not overheat more than necessary. Do not install this product directly on a device
that generates a lot of heat, such as a power amplier.
• The gure below shows the minimum ventilation requirements required for the product.
• Keep at least 2.5cm apart on each side of this product to prevent airow from clogging.
• Secure a depth of 40cm for airow and cabling.
25mm
25mm 25mm
400mm25mm
- 22 -
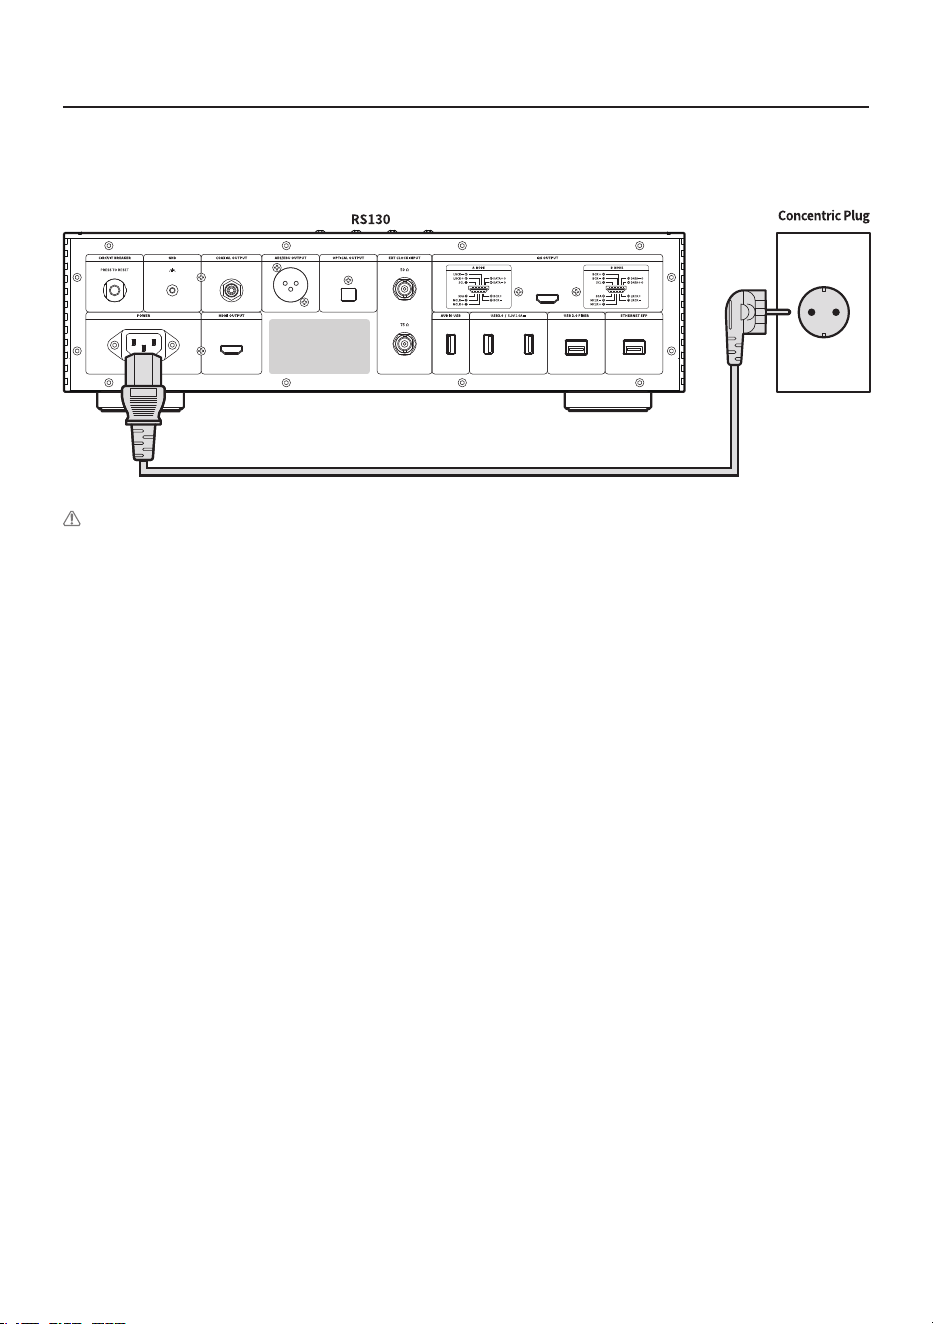
2. How to Connect the Power Cord
• This product includes a removable power cord. Please connect the power cord after connecting
all audio cables.
Caution: When disconnecting the power cord, always disconnect the power outlet rst with the
power switch o.
As 140-179Vac is rated “Blank”, the product cannot operate.
- 23 -
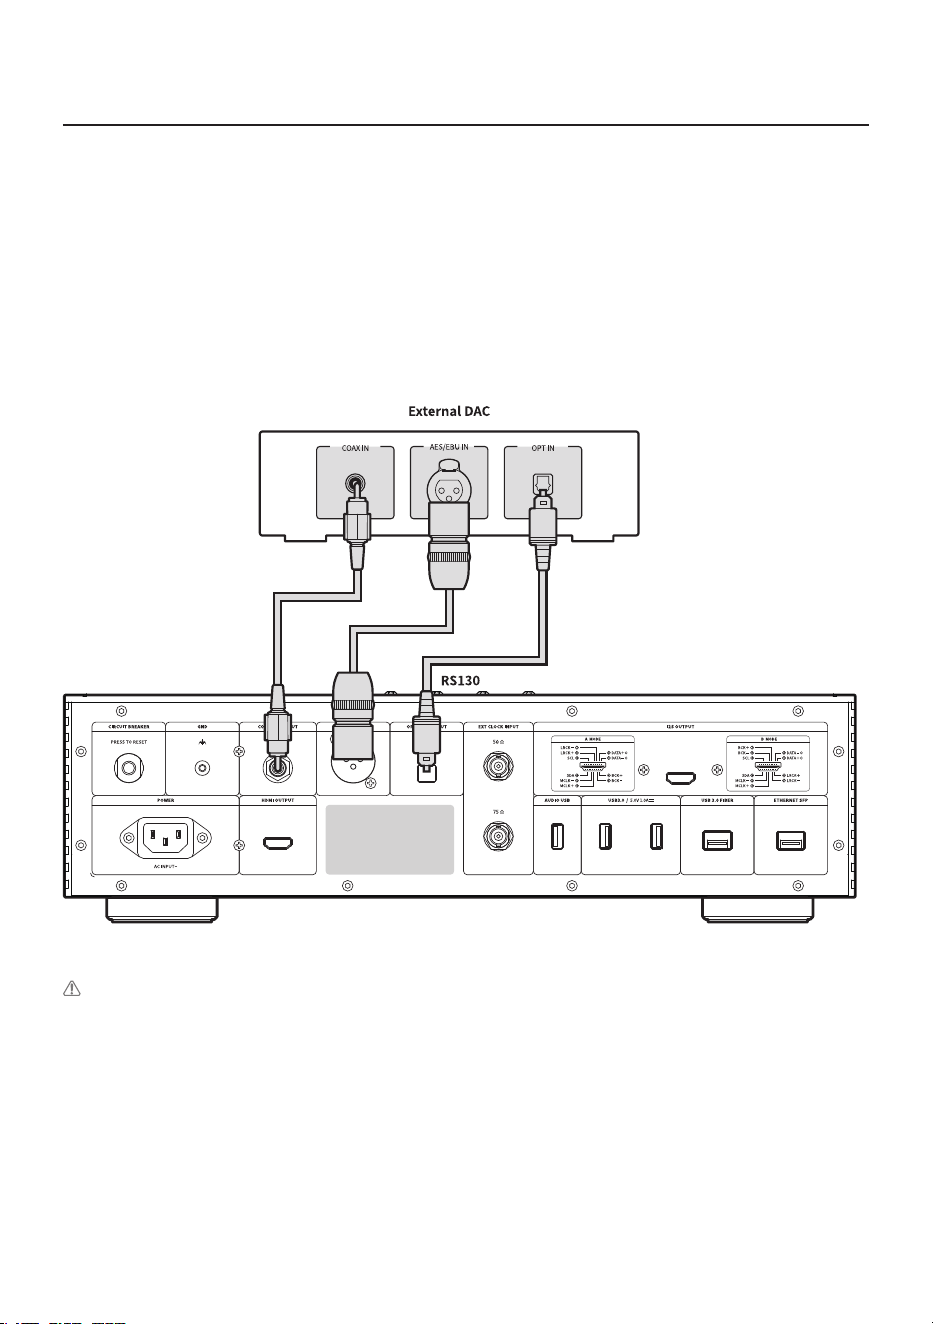
3-1. How to Connect the Digital Output Port to the Audio Device
(TV or Devices That Provide Digital Input/Output Capabilities)
• As shown in the gure below, you can connect the digital input/output device of an external
device to the digital (optical/coaxial) input/output port of this product.
• This product can reproduce linear PCM signals with sampling frequencies of 44.1, 48, 88.2, 96,
176.4, 192, and 384kHz.(However, optical is supported up to 192kHz)
• To export digital output, you must enable output mode as optical out, coaxial out, and AES/EUB
out in Input/Output Settings.
• You can change Input/Output Settings on the Home screen, in Settings, in Settings on the Rose
Connect app, and via the remote control.
CAUTION : Do not input signals other than linear PCM signals, such as Dolby Digital, DTS, and AAC, to
this device. It may cause noise and damage to the speakers.
- 24 -
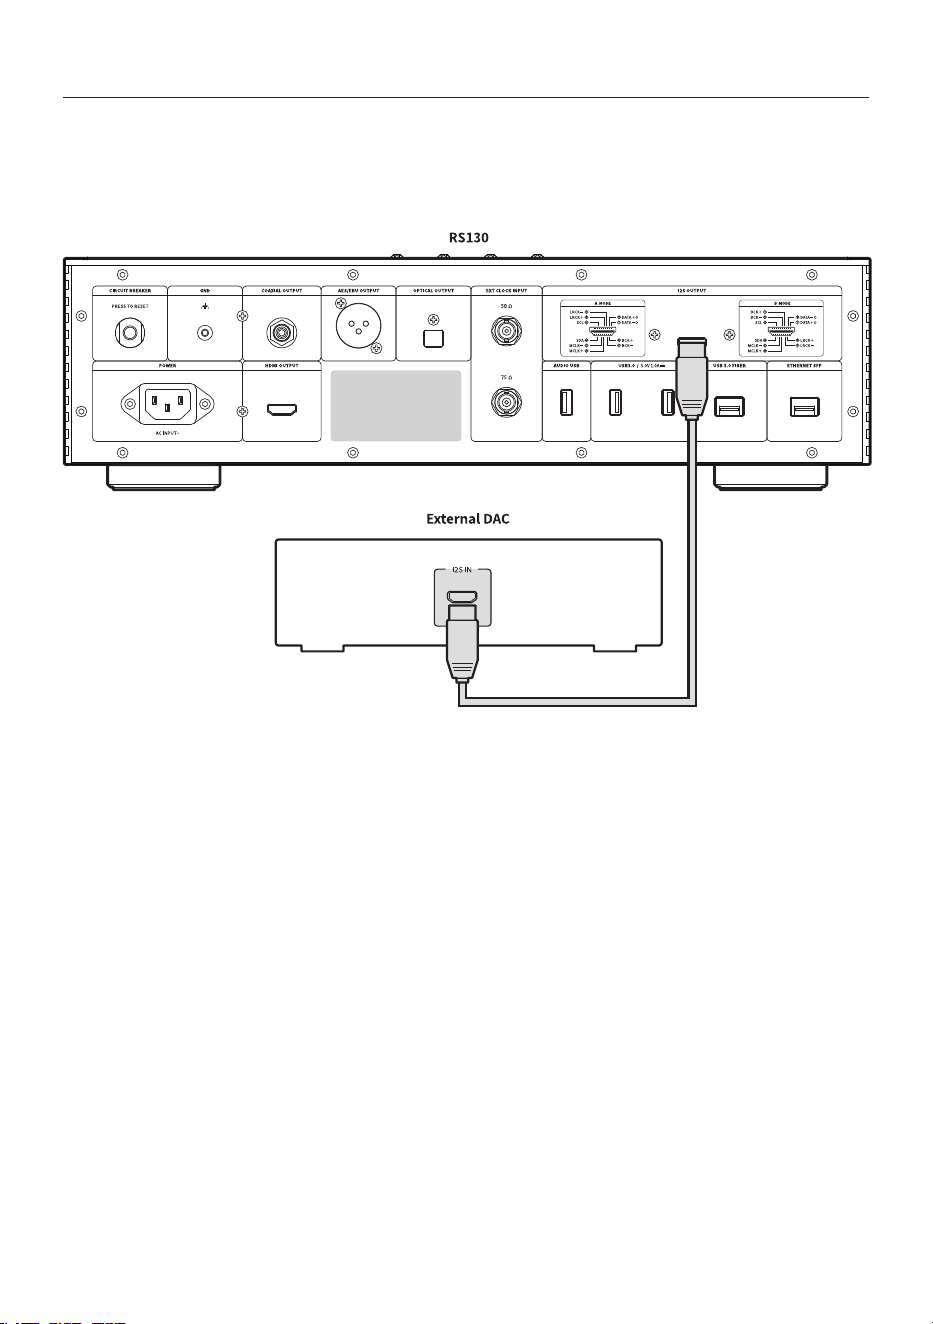
3-2. I2S Connection
• I2S As shown in the gure below, you can use this product by connecting the external DAC input
terminal to the I2S out (HDMI) port of this product.
※ For more information, please refer to “Input/Output Settings” - “OUTPUT” - “Digital Output” (Page 41)
- 25 -
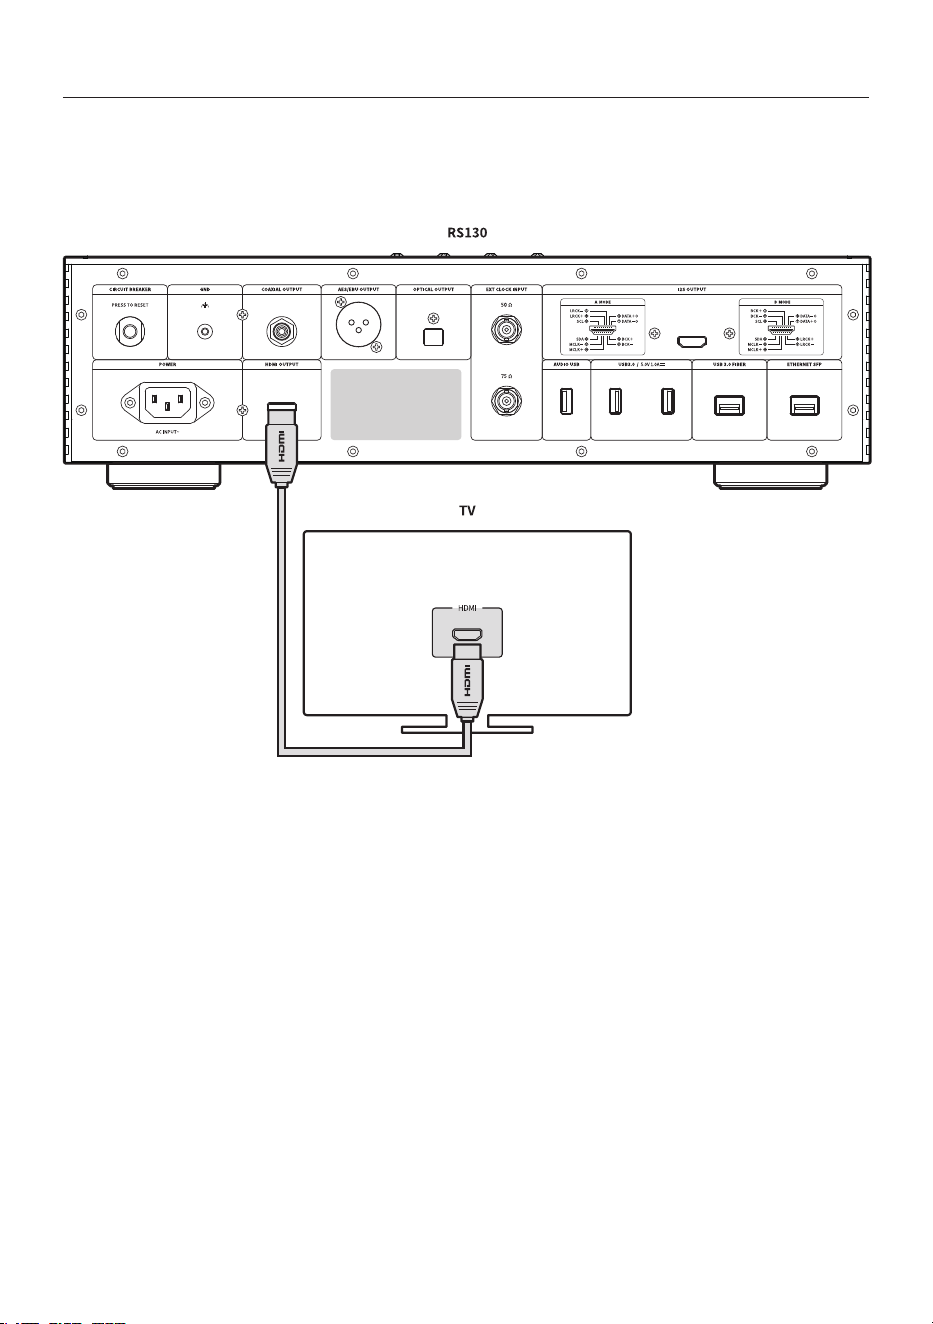
3-3. HDMI Connection
• As shown in the gure below, you can connect your TV to the HDMI port of this product.
• After connecting this product and your TV, click the TV ON button on the top right of the screen to
play video output signals (up to 3840 x 2160 pixels, 60Hz).

- 26 -
3-4. USB 3.0 FIBER
• As shown in the gure below, it can be used by connecting the SFP USB 3.0 module of this
product with an external SFP USB3.0 ber hub.
• Connect this product and an external SFP USB 3.0 ber hub device with an optical cable.
• When a USB ash drive is inserted into the USB ber hub, the device can recognize and use it
through an optical cable.
※ Only USB 3.0 storage devices can be used. USB 2.0 is not supported.
※
The SFP USB3.0 module, external SFP USB3.0 ber hub and other accessories must be purchased
separately.
SFP USB3.0 FIBER HUB
- 27 -
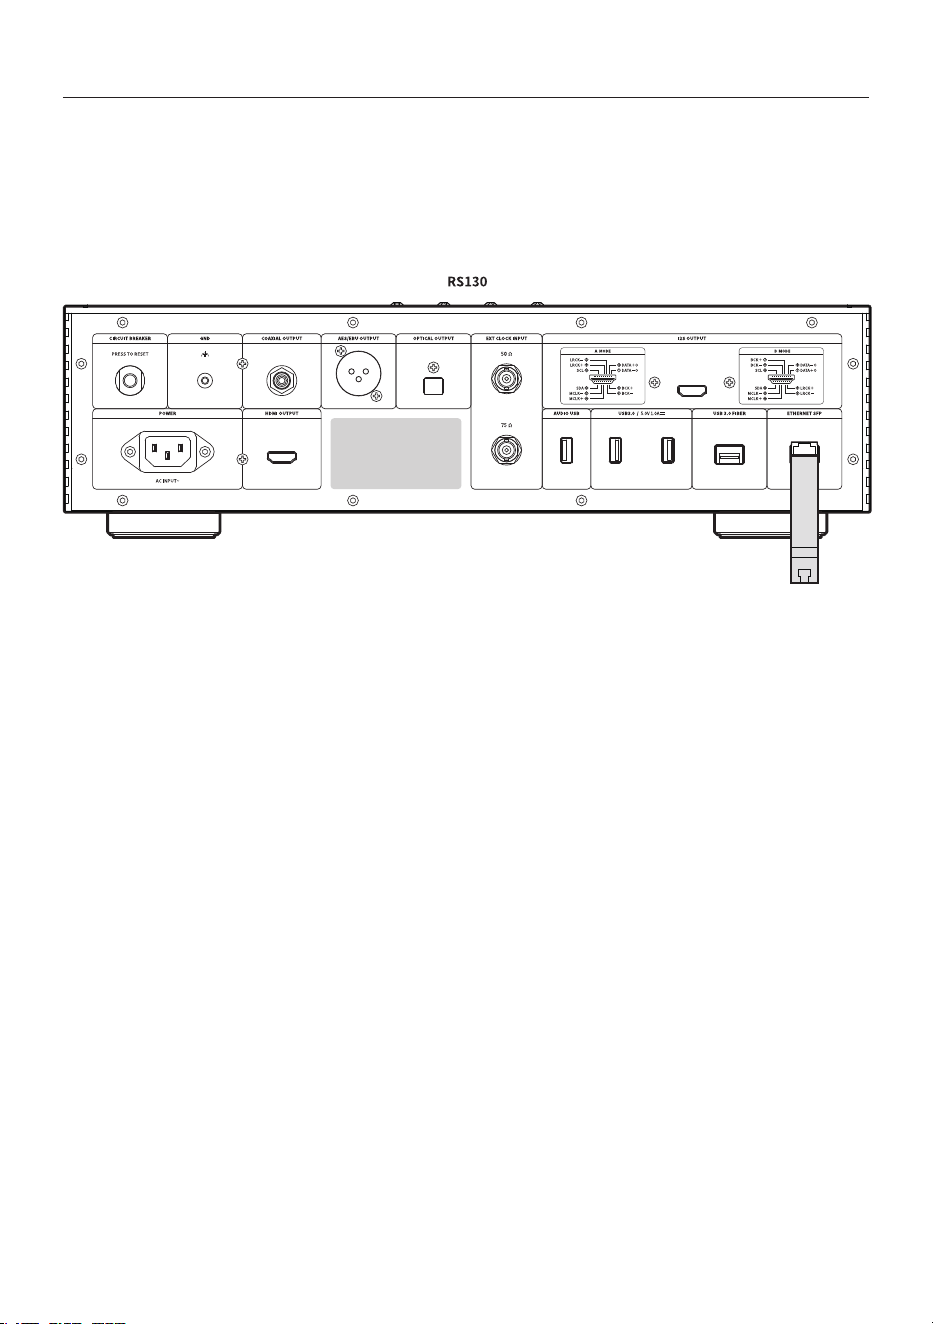
3-5. Connect to Ethernet SFP
• As shown in the gure below, insert the SFP Ethernet copper module on the back of the
product and connect the Ethernet cable (RJ45).
• Before inserting the SFP module, be sure to detach the module with the power o.
• When using other products' SFP Ethernet copper or ber module, use a module that supports
up to 1000BASE-T.

- 28 -
3-6. How to Connect the USB Flash Drive to DAC
• A USB 3.0 / USB 2.0 storage device or Wi-Fi BT module can be connected to the USB port of this
product.
3-7. How to Connect the USB Audio Output Port to External DAC
• Connect the device as shown in the gure below.
• You can connect an external DAC to the USB port of this product.
• After connecting an external USB DAC to the USB 2.0 port of this product, you can select USB
output in the Input/Output Settings and then select the output with the recognized external USB
DAC.
※ This product complies with the USB Audio Class 2.0 specications.

- 29 -
4. External Memory Devices (USB) and
SATA Storage Devices
• This product can connect external memory devices and SATA type storage devices.
• When connecting a storage device using SATA, it is recommended to use an SSD.
• USB storage devices are compatible up to 10TB, SATA storage devices up to 4TB.
※ SSD can be purchased separately, and only 7mm thickness can be used.
※ It has only been tested on SAMSUNG SSD for compatibility, and may not function normally on some SSD(Intel).
- 30 -
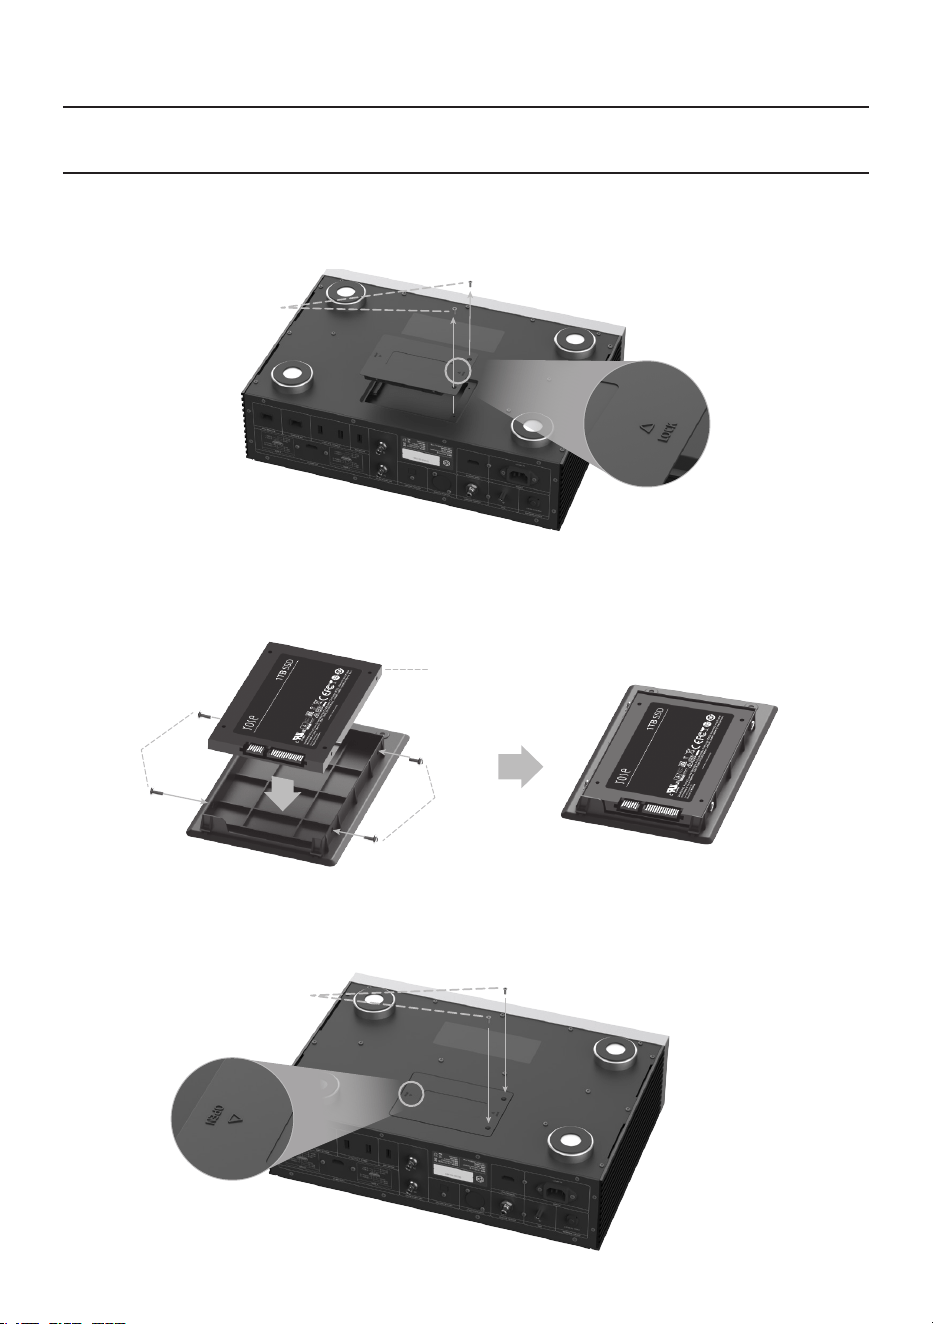
• 5-1-3. Install the SSD in line with the port on the SSD cover.
• 5-1-4. Fix the SSD to the SSD cover with the SSD mounting screws (4 pcs).
• 5-1-5. Assembly the SSD cover with the SSD installed on the main body.
• 5-1-6. Push the part marked LOCK to re-x the screws.
5-1-1.
5-1-2.
5-1-3.
5-1-4.
7mm SSD
5-1-4.
5-1-5.
5-1-6.
5. How to Connect SSD
5-1. How to Insert SSD
• 5-1-1. Remove the SSD cover xing screws (2 pcs) on the bottom of the main body.
• 5-1-2. Remove the SSD cover by pushing the part marked OPEN.

- 31 -
5-2. How to Format After Installing SSD
• You can format the SSD connected to this product from the SSD Format menu in Storage Setting.
5-3. How to Copy Files Through the Network
• Set SMB ID/PW in Storage Settings.
• After entering \\ROSE IP on your PC, enter the ID/PW that you set up in SMB, and the storage
connected with this product will appear and you can copy the les directly from your PC.
※ To connect to the SMB of this product from a PC, both devices must be connected to the same network.
- 32 -
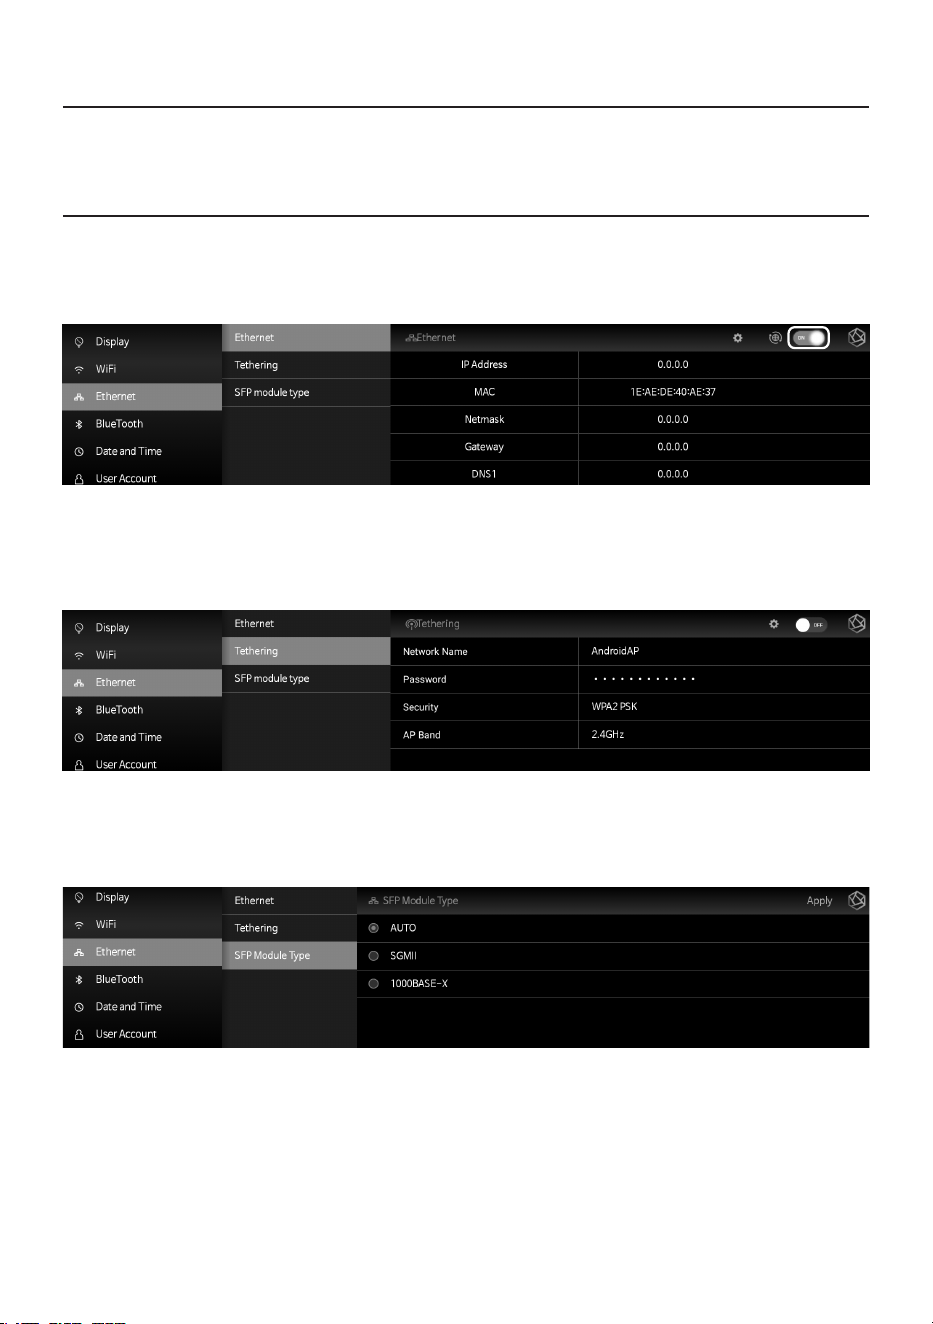
6. Network Connection
• This product can be connected to the network via wired/wireless connection.
6-1. Ethernet Connection (Wired)
• After you connect a LAN to the rear Ethernet port, select ON from the Settings - Ethernet menu to
connect to the network.
• When connected normally, the IP address and other information are automatically received.
• After Ethernet connection, you can use this product as a WiFi hotspot.
After entering the network name and password, you can enable the hotspot function, and other
devices can use the password to connect to this WiFi hotspot.
• SFP Module Type
You can set the SFP module type to Auto/SGMII/1000BASE-X.

- 33 -
6-2. WiFi Connection (Wireless)
※ Wi-Fi/BT dongle connection required.
• When you turn on WiFi from the Settings - WiFi menu, a list of currently accessible SSIDs appears,
and you can select the desired SSID to connect to the network.
※ You can remotely control this product by downloading and installing the ROSE Connect Premium App
supported through the Google Play Store and App Store on your smartphone.
※ To control this product on your smartphone (ROSE Connect Premium), it must be connected to the
same network.(You can congure a single network using wireless network extenders, bridges, etc.)
7. How to Pair with the Bluetooth Remote Control
※ Wi-Fi/BT dongle connection required.
• 7-1. Press the Home( ) and Options buttons( ) on the remote control at the same time for
about 5 seconds.
• 7-2. When the white LED light on the remote control turns on, go the Settings - Bluetooth menu.
Set the Bluetooth switch to ON and then select “Devices Search( )”.
• 7-3. After selecting “ROSE RCU” from the “Scanned Device List”, if you select “ROSE RCU” from
“Paired Devices”, the light will change to gold and the pairing is completed.
- 34 -
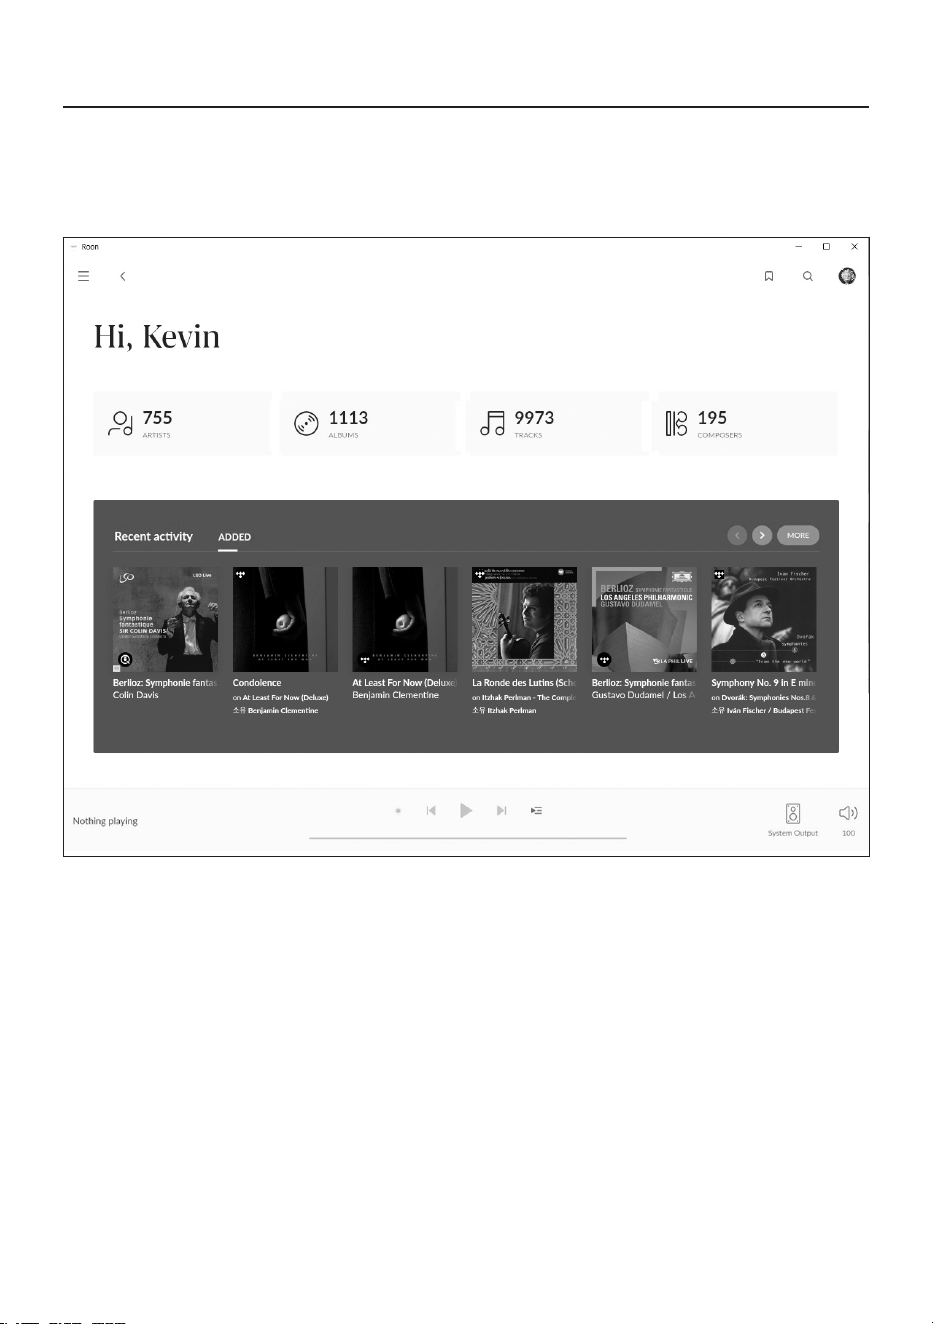
8.How to Connect to RoonReady
• Before using RoonReady, rst access the homepage (http://roonlabs.com) and create an account.
Download RoonCore and install the Software on your PC.
• Various music managed by RoonCore will appear.
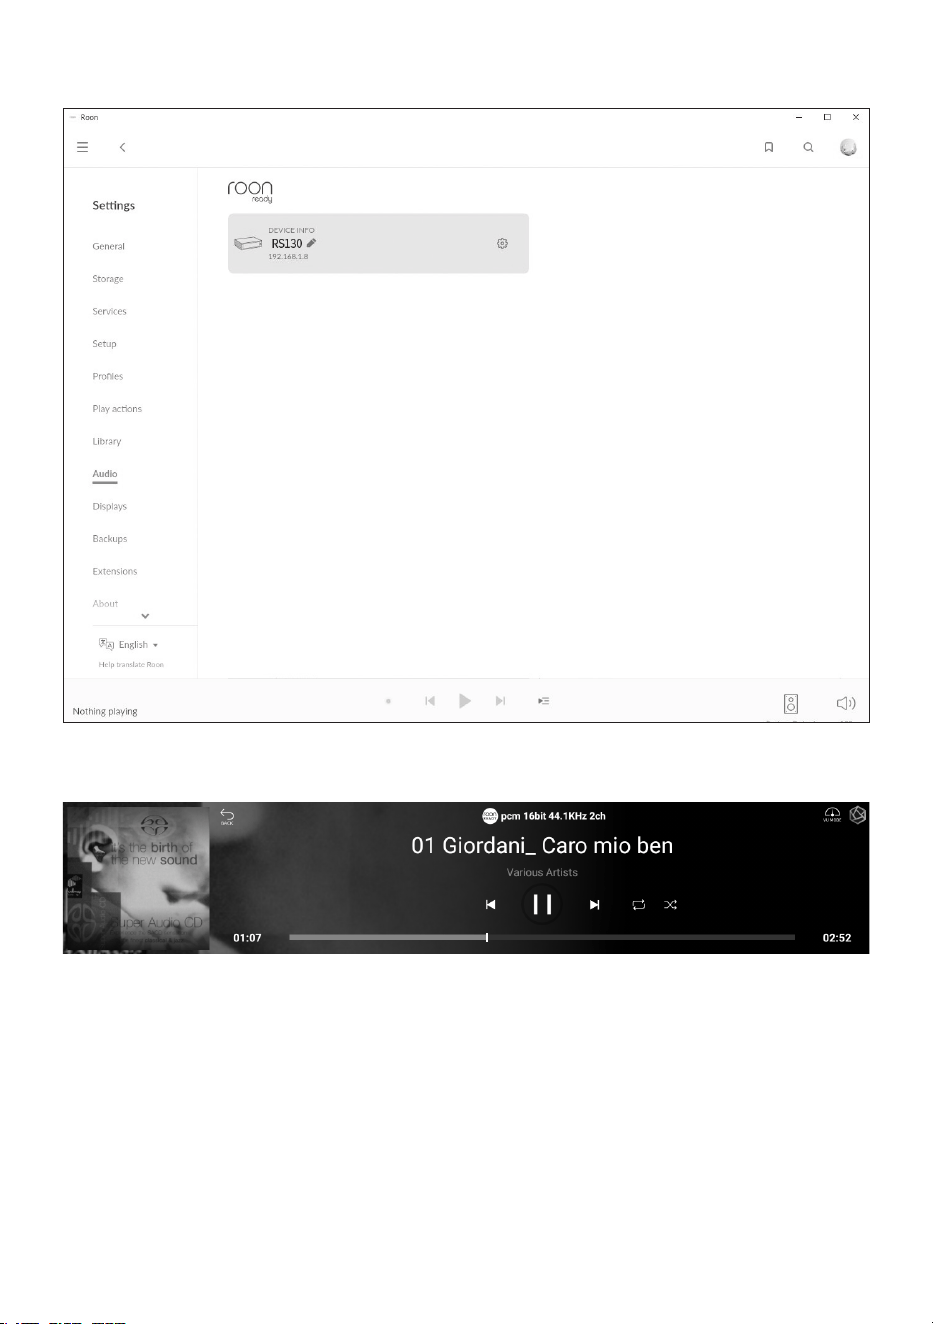
- 35 -
• Select this product from “Select Audio” in Settings - Audio.
• Once the connection with ROSE is complete, you can play and listen to music on the RoonReady.
※ To control this product from RoonReady, both the product and RoonReady must be connected to the
same network.
- 36 -
Default Settings
1. Power Button
• 1-1. You can turn this product on and o by pressing the power button briey.
1-1-1.
If you press the power button briey, the product will enter the standby mode when the
power is on, and the product will be turned on when the power is o.
1-1-2. If you press the power button during booting, the product will turn o.
• 1-2. Press the power button for 3 seconds to display the [LCD OFF | Power OFF | Reboot] menu.
1-2-1.
LCD OFF ( ) : Music is played and only the screen is turned o.
If you press the power button again while the LCD is o, the screen will be turned on.
※
This function can only turn o the screen while using the product.
1-2-2. Power OFF ( ) : The power will be turned o.
1-2-3. Reboot ( ) : The product will be turned o and on and then display the home screen.
※
If you touch a screen other than the menu, it will be canceled.
• 1-3. Press and hold the power button for more than 5 seconds to force a reboot.
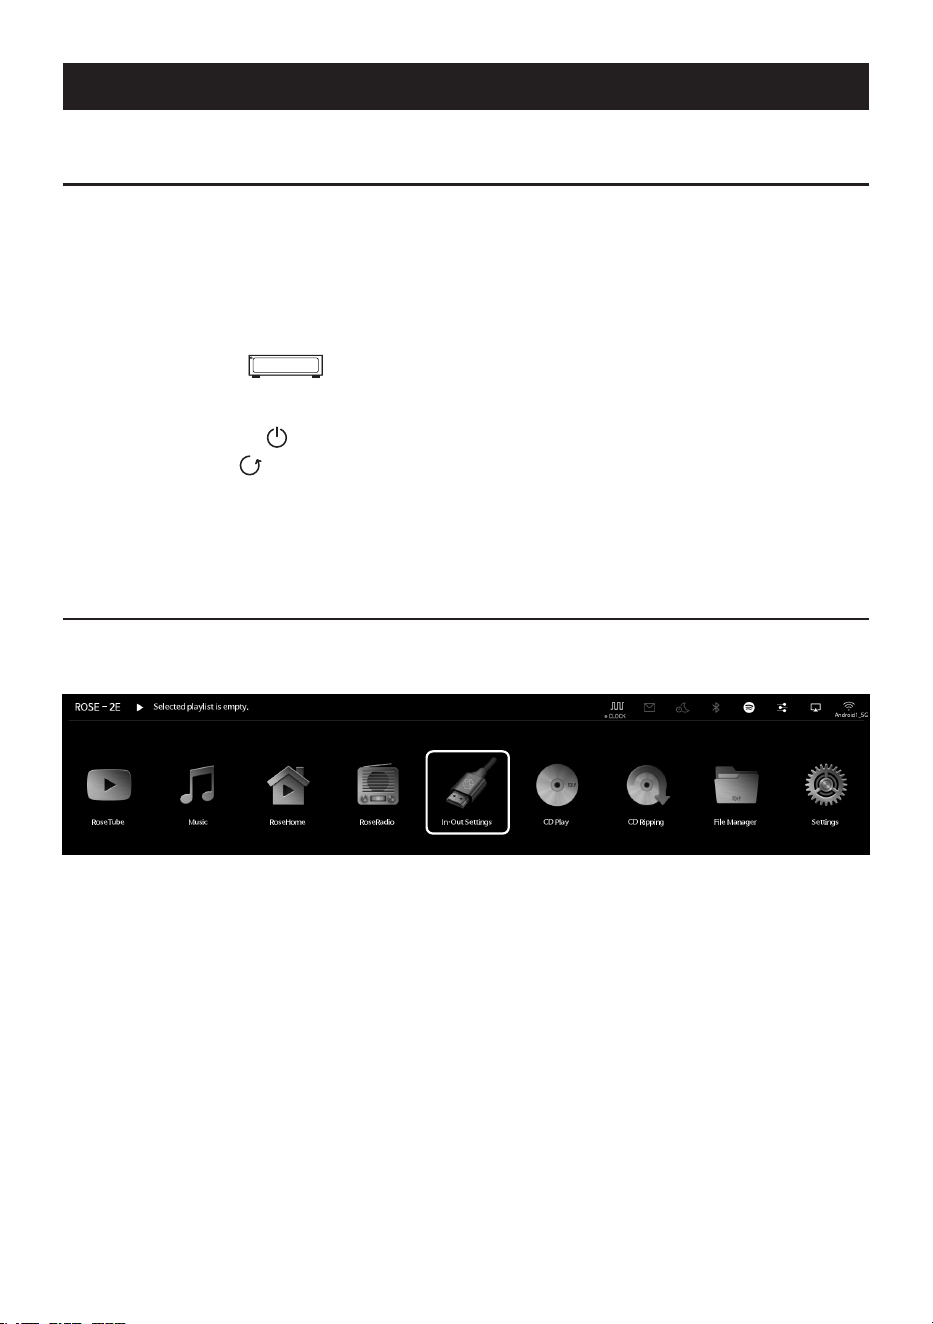
2. In/Out Setting
• Select the “In/Out Setting” icon on the main screen to move to the In/Out Setting menu.
- 37 -
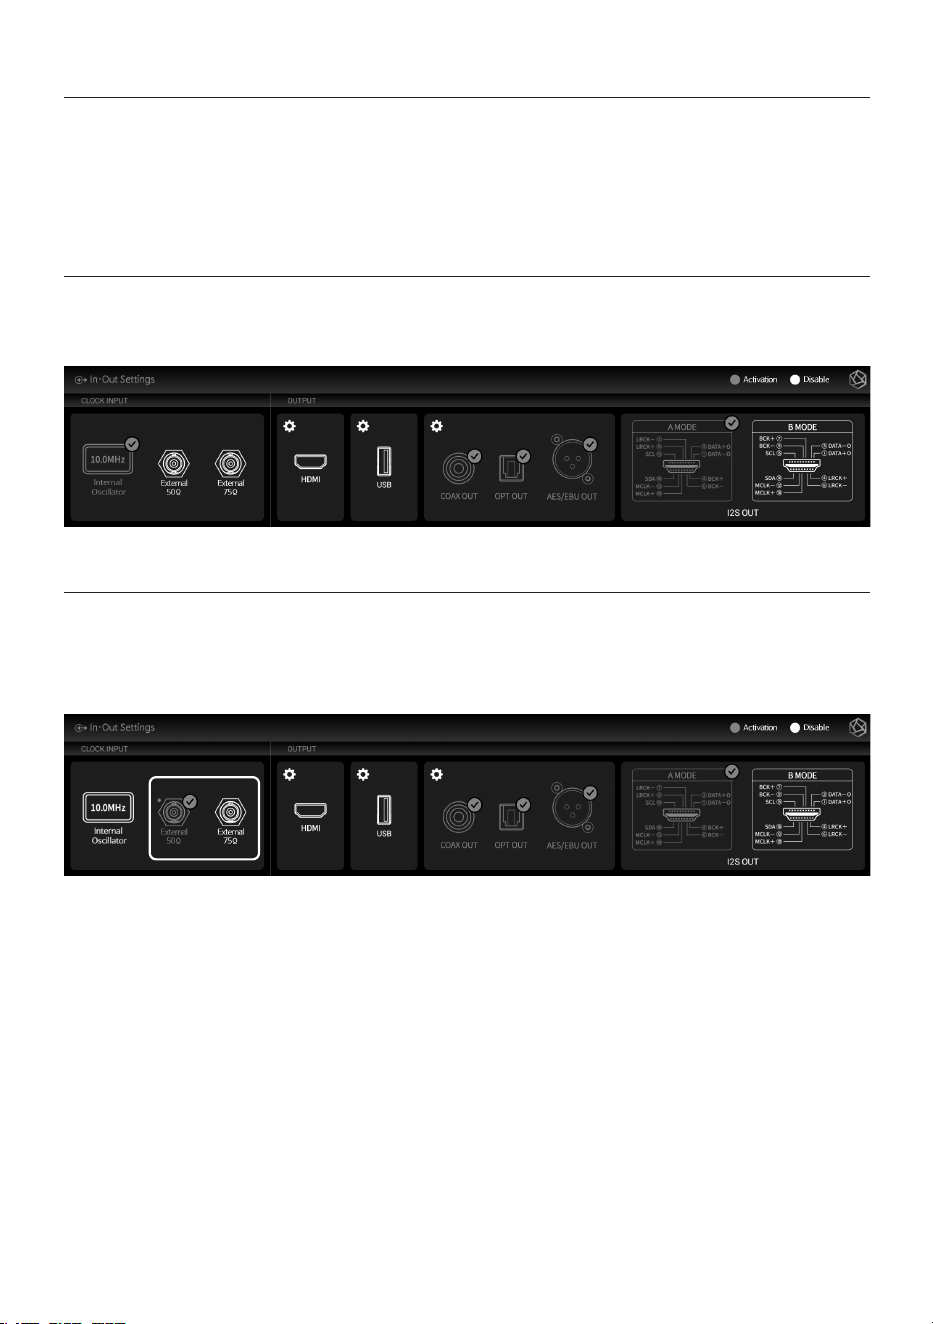
2-1. CLOCK INPUT
• You can choose where to source the system master clock by selecting the icon in the Clock Input
Settings menu. When enabled, the color of the clock source icon changes to gold and a check
mark appears.
※ Only one input can be selected at a time.
2-1-1. INTERNAL CLOCK INPUT
• If you select internal oscillator, it is set to internal clock mode. This is the default setting mode,
and the clock inside the product will be used as the master clock.
2-1-2. EXT CLOCK INPUT
• To use the master clock using an external device, select “50Ω / 75Ω”.
※ Set the correct device impedance value after checking whether the output impedance value of the
external device is 50 Ω or 75 Ω.
- 38 -
2-2. OUTPUT
• You can enable/disable output settings by selecting the icon in the Output Settings menu.
When enabled, this icon changes to a gold color and a check mark appears.
• Only one output of total three groups between HDMI output, USB output, and other digital
output can be selected.
• Within other digital output group, you can enable multiple output ports.
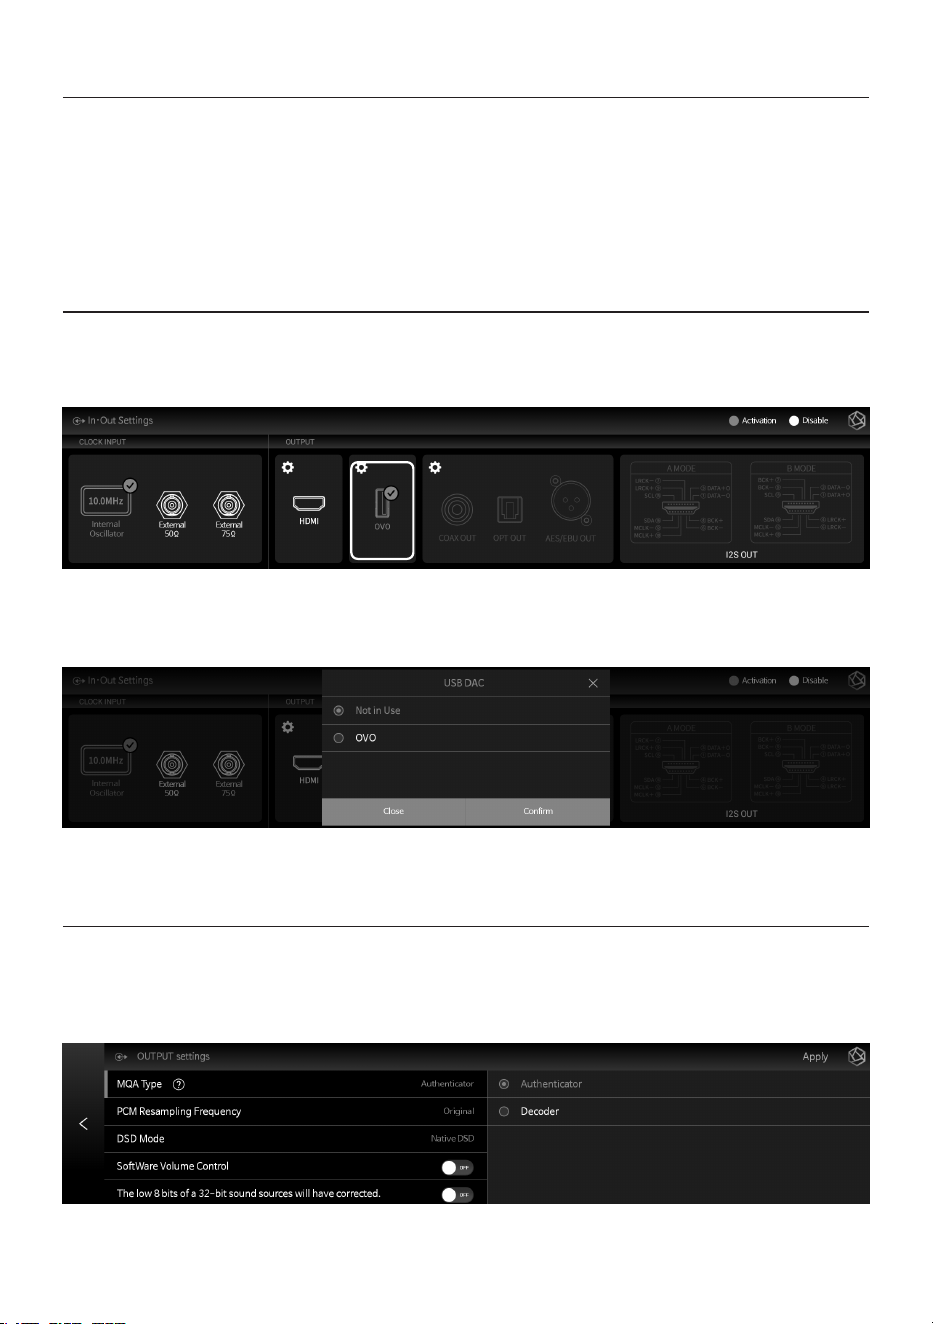
2-2-1. USB DAC Output
• If you select USB after connecting a USB DAC, a list of connected USB DACs appears. Select USB
DAC you wish to use from the list.
• When USB DAC is selected, the model name of the selected USB DAC appears and it becomes
available.
• If you select the USB DAC setting icon (gear icon), the following USB DAC setting screen appears.
2-2-1-1. MQA Type
• This is the menu to set the MQA playback mode. You can select Authenticator or Decoder mode.
Only original sound or decoded audio data can be exported to digital output; full-decoded audio
data cannot be exported.
- 39 -
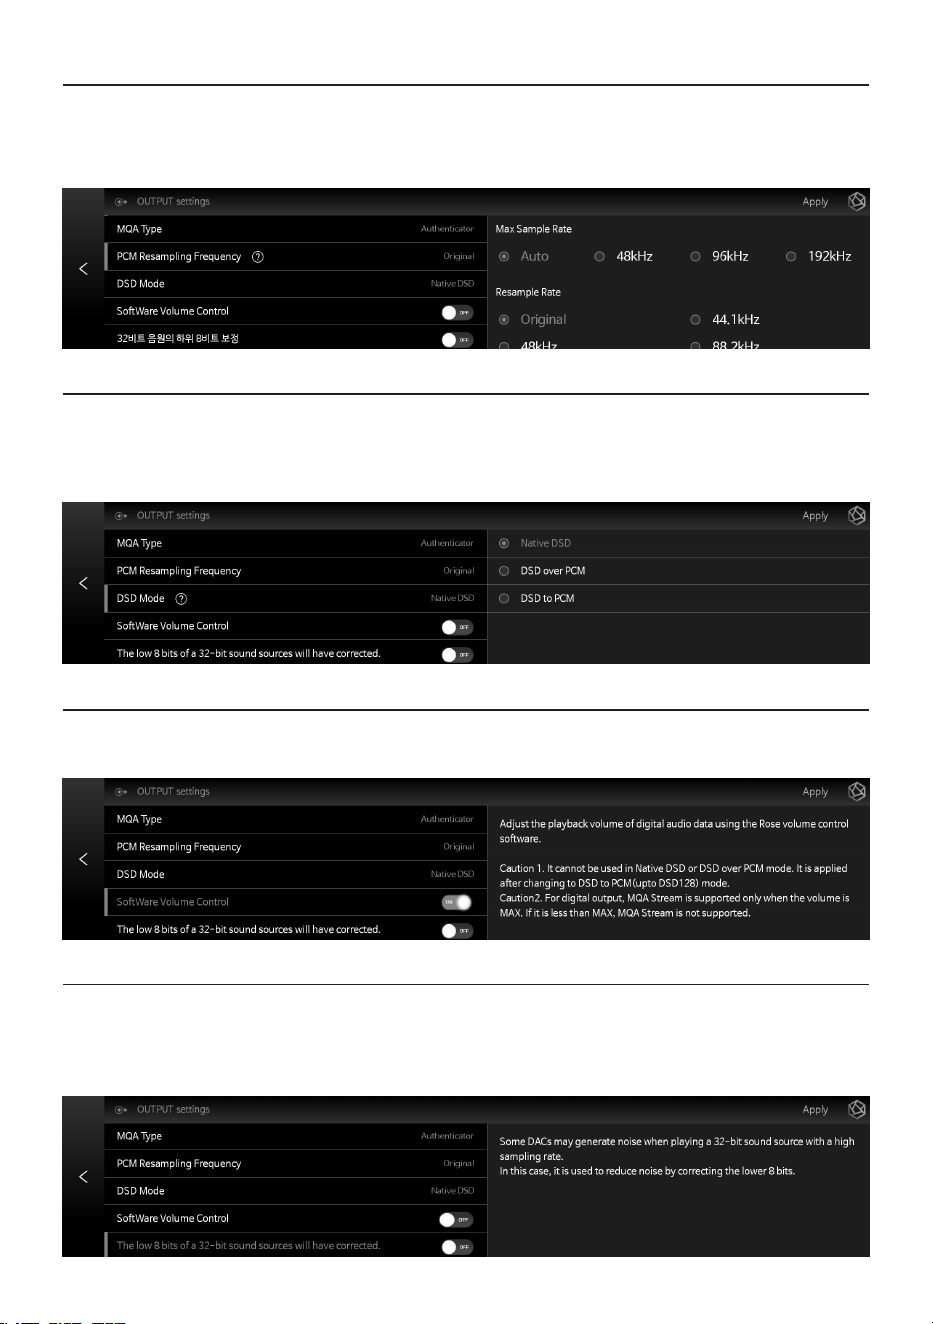
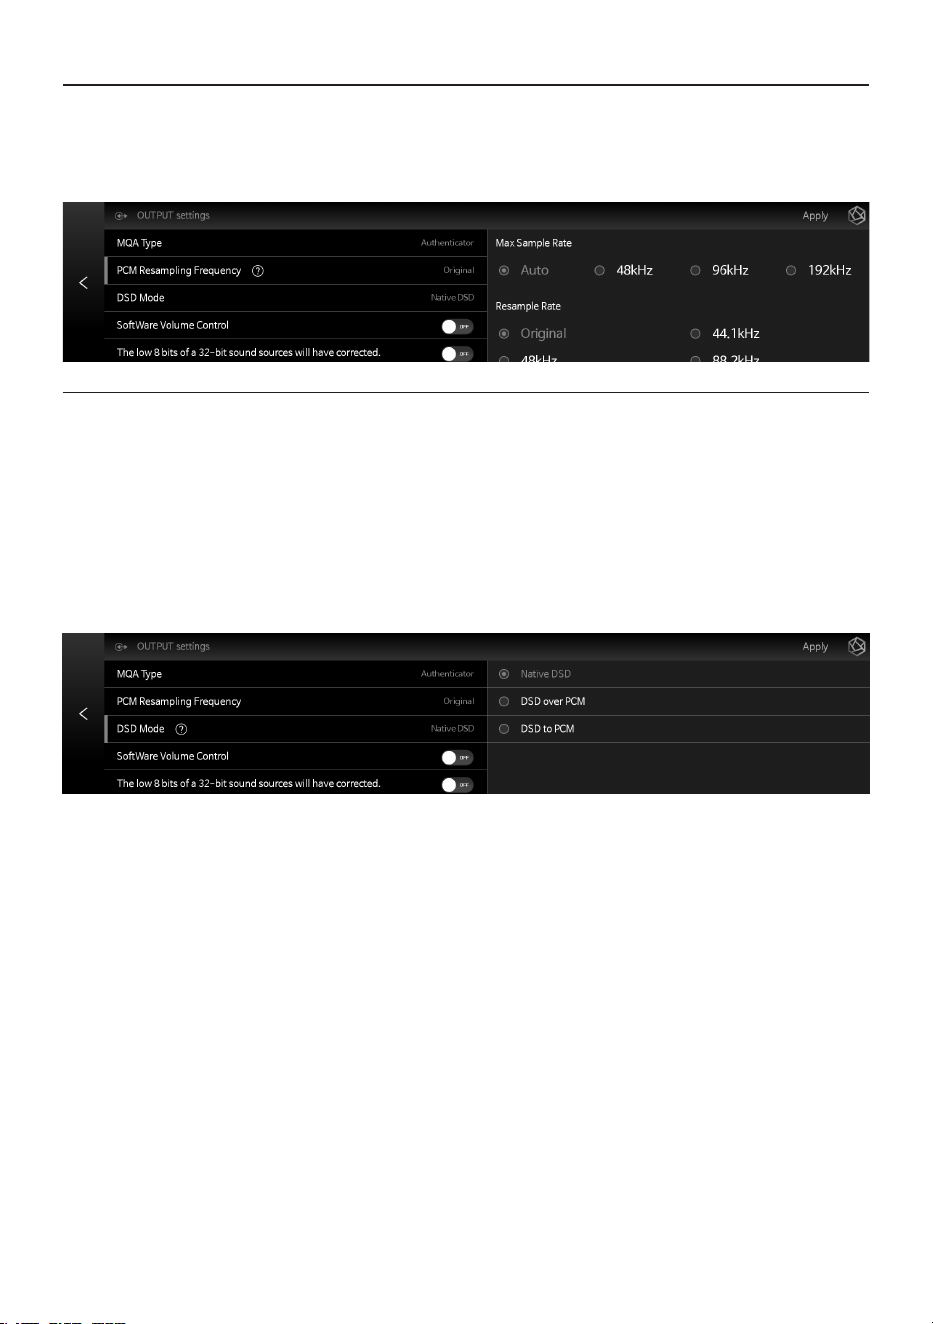
2-2-1-2. PCM Resampling Frequency
• This menu is used to set the sampling frequency. If you want to output the original sound,
select the Original Sampling Rate. If you want to use the resampling function, select the desired
sampling rate (44.1kHz, 48kHz, 88.2kHz, 96kHz, 176.4kHz, 192kHz, 384kHz, etc.).
2-2-1-3. DSD Mode
• This is the menu to select the transmission format (Native, DOP, PCM) of audio samples to be delivered to
the DAC when playing DSD music les. For USB DACs, you need to select and use Native, DOP, and DSD to
PCM to play DSD music les, depending on the type of DAC you connected to.
2-2-1-4. Software Volume Control
• Adjust the playback volume of digital audio data using the Rose volume control Software.
2-2-1-5.The low 8 bits of a 32-bit sound sources will have corrected
• The low 8 bits of a 32-bit sound sources will have corrected.
Some DACs may generate noise when playing a 32-bit sound source with a high sampling rate.
In this case, it is used to reduce noise by correcting the lower 8 bits.
- 40 -
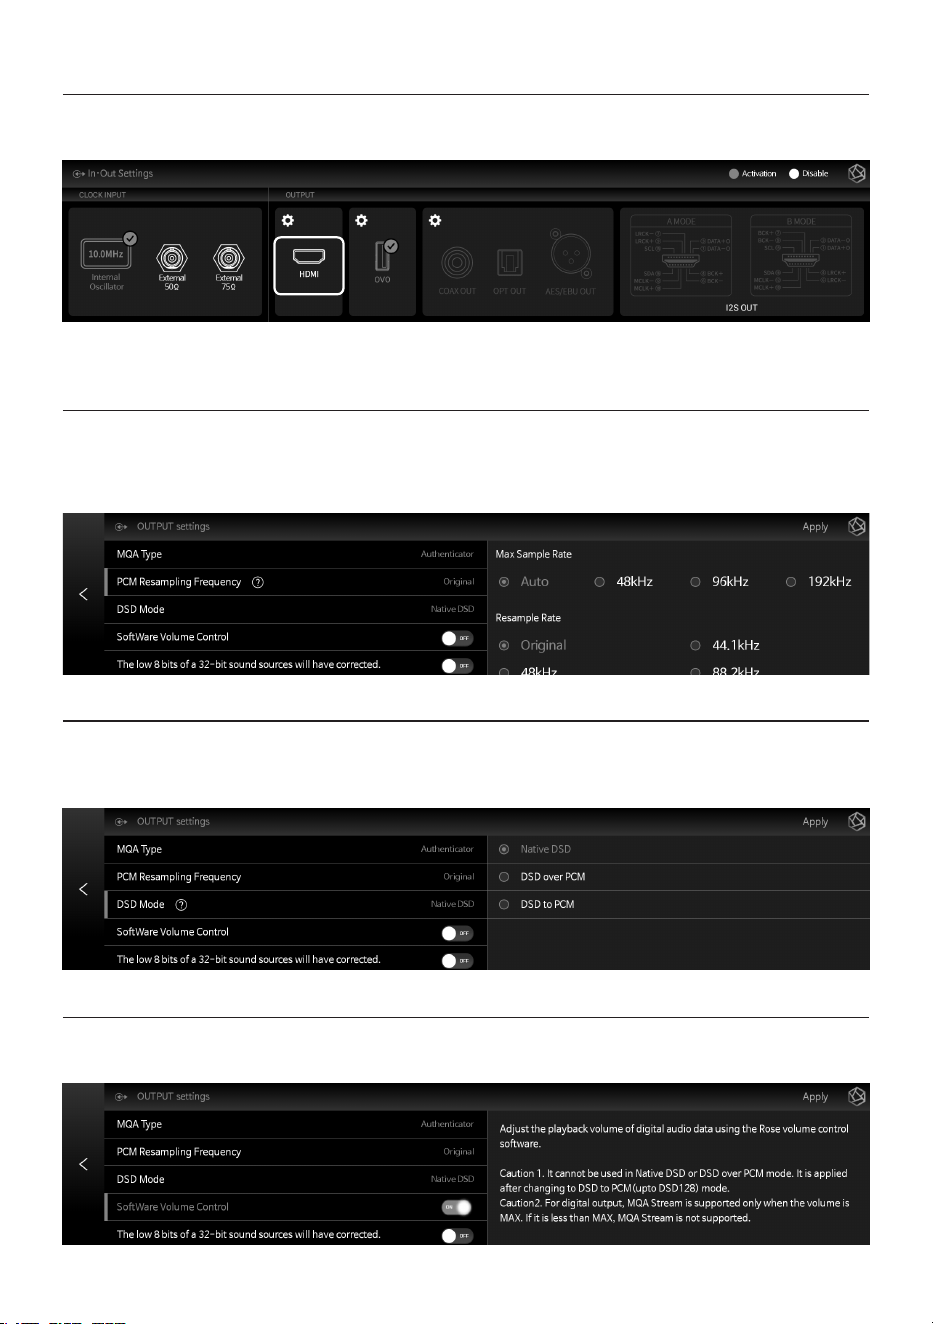
2-2-2. HDMI Output
• You can set up HDMI.
• If you select the HDMI setting icon (gear icon), the HDMI Settings screen appears, as shown below.
2-2-2-1. PCM Resampling Frequency
• This is the menu to set the Sampling Frequency. Select Original Sampling Rate if you want to
output the original sound or select the desired sampling rate (44.1kHz, 48kHz, 88.2kHz, 96kHz,
176.4kHz, or 192kHz) to use the re-sampling function.
2-2-2-2. DSD Mode
• This is the menu to select the transmission format (Native, DOP, PCM) of audio samples to be
delivered to the DAC when playing DSD music les. For HDMI output, only DSD to PCM is possible.
2-2-2-3. Software Volume Control
• Adjust the playback volume of digital audio data using the Rose volume control Software.
- 41 -
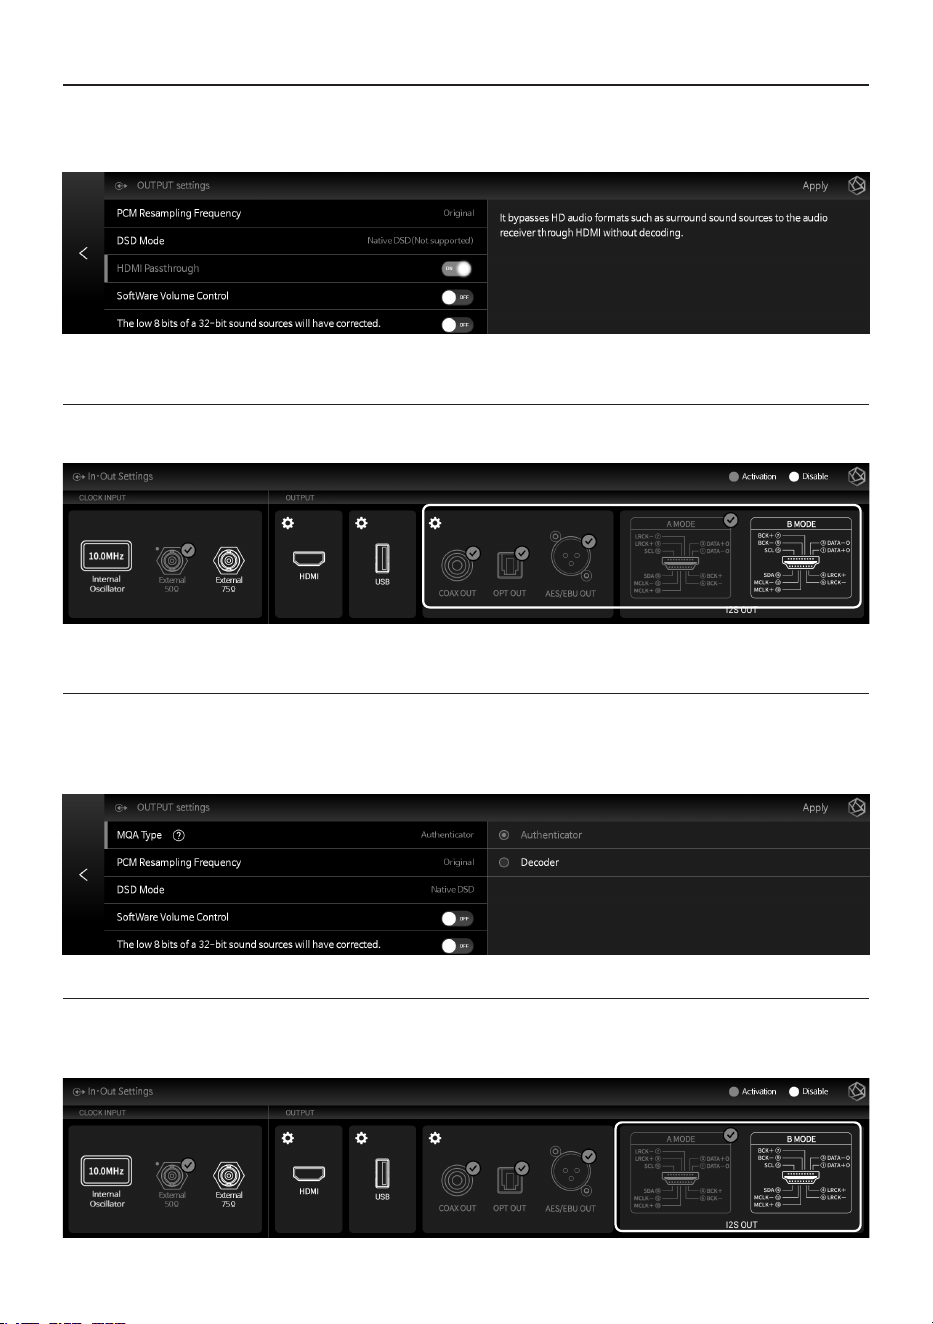
2-2-2-4. HDMI Passthrough
• This function bypasses HD audio format sources, such as surround sound, to the audio receiver
through HDMI without decoding.
2-2-3. Digital Output
• You can set OPT OUT, AES/EBU OUT, I2S OUT(A/B) and COAX OUT.
• If you select the Digital setting icon, the Digital output setting screen appears as follows.
2-2-3-1. MQA Type
• This is the menu to set the MQA playback mode. You can select Authenticator or Decoder mode.
Only original sound or decoded audio data can be exported to digital output; full-decoded audio
data cannot be exported.
2-2-3-2. I2S OUT(HDMI)
• You can output the I2S signal. Select the appropriate mode for the I2S input port you are using by
referring to the pin layout of A and B modes.
- 42 -
2-2-3-3. PCM Resampling Frequency
• This is the menu to set the sampling frequency. Select Original Sampling Rate if you want to
output the original sound or select the desired sampling rate (44.1kHz, 48kHz, 88.2kHz, 96kHz,
176.4kHz, or 192kHz) to use the re-sampling function.
2-2-3-4. DSD Mode
• This menu determines the transmission format (Native, DOP, PCM) of the audio sample to be
delivered to the DAC when playing the DSD sound source.
• Optical output does not support native DSD mode. When using DOP mode, it can support up to
DSD64.
• Coaxial and AES/EBU outputs do not support native DSD mode. When using DOP mode, it can
support up to DSD128.
• I2S output supports up to DSD512 in native mode. In DOP mode, it can support up to DSD256.
• When set to DSD to PCM (up to DSD512) mode, up to DSD512 is supported.
- 43 -
Playback
1. Default Playback
• You can play music and video les by connecting a USB storage device to a USB port on the rear
of this product.
• SATA HDD/SSD can be installed at the bottom of this product.
※ Thickness: 2.5inch / 7mm
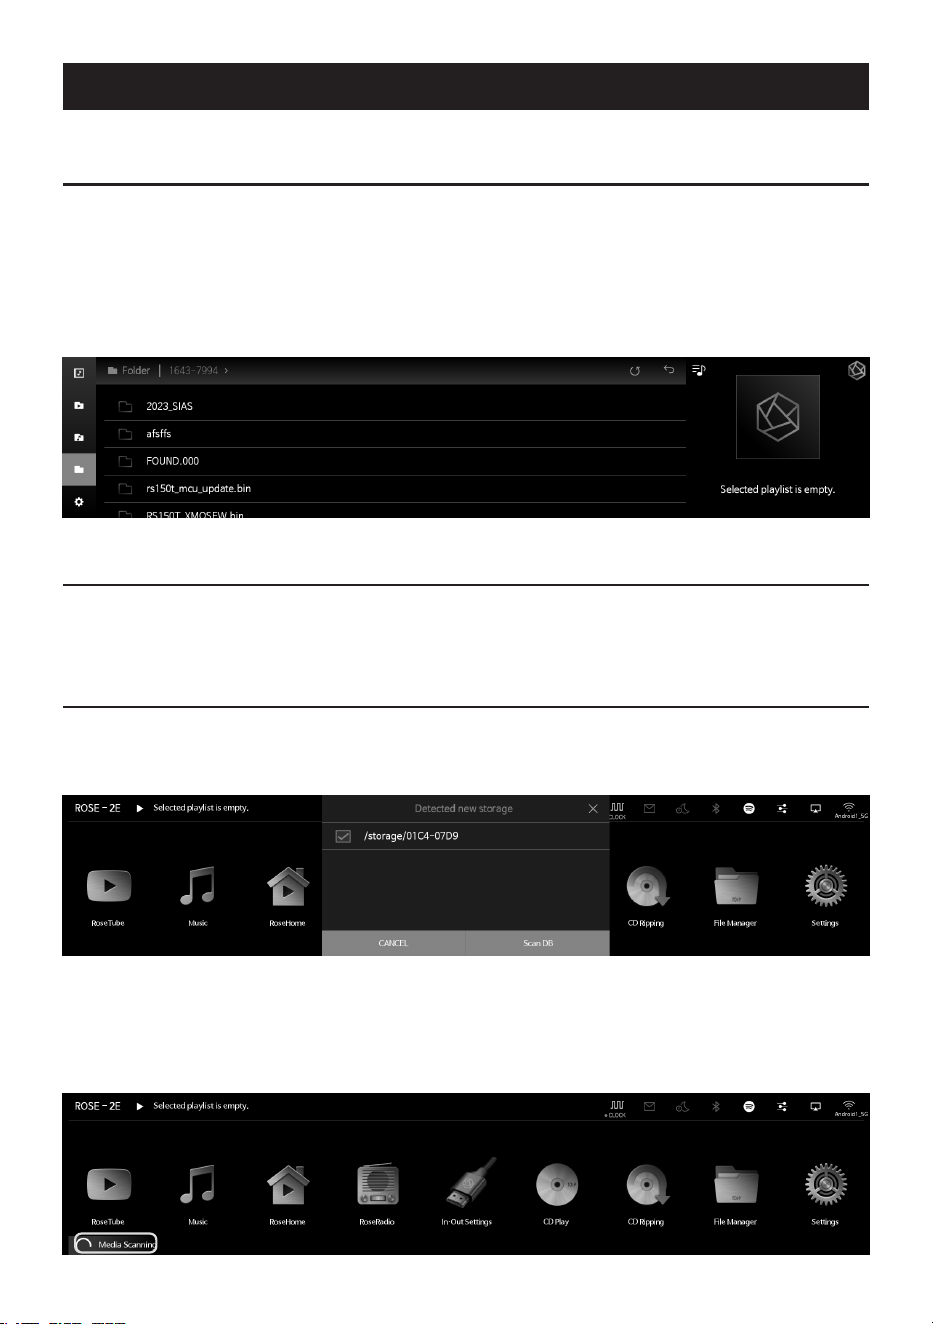
• After selecting Music or Video on the Home screen, you can play music les in the storage device
by entering the Folder tab.
2. Media Library
• You can save the music in storage media or network shared folder as a database (DB) by scanning
the media.
2-1. Activate Media Scanning
• When you connect a new storage device to a USB port on the rear of the device, a new storage
detection pop-up appears.
• When you select the “Scan DB” button in the new storage pop-up, media scanning starts from the
connected storage device. (Depending on storage capacity, media scanning time may vary.)
• During DB scanning, the “Media Scanning” loading image is displayed at the bottom left of the
main screen of this product.
- 44 -
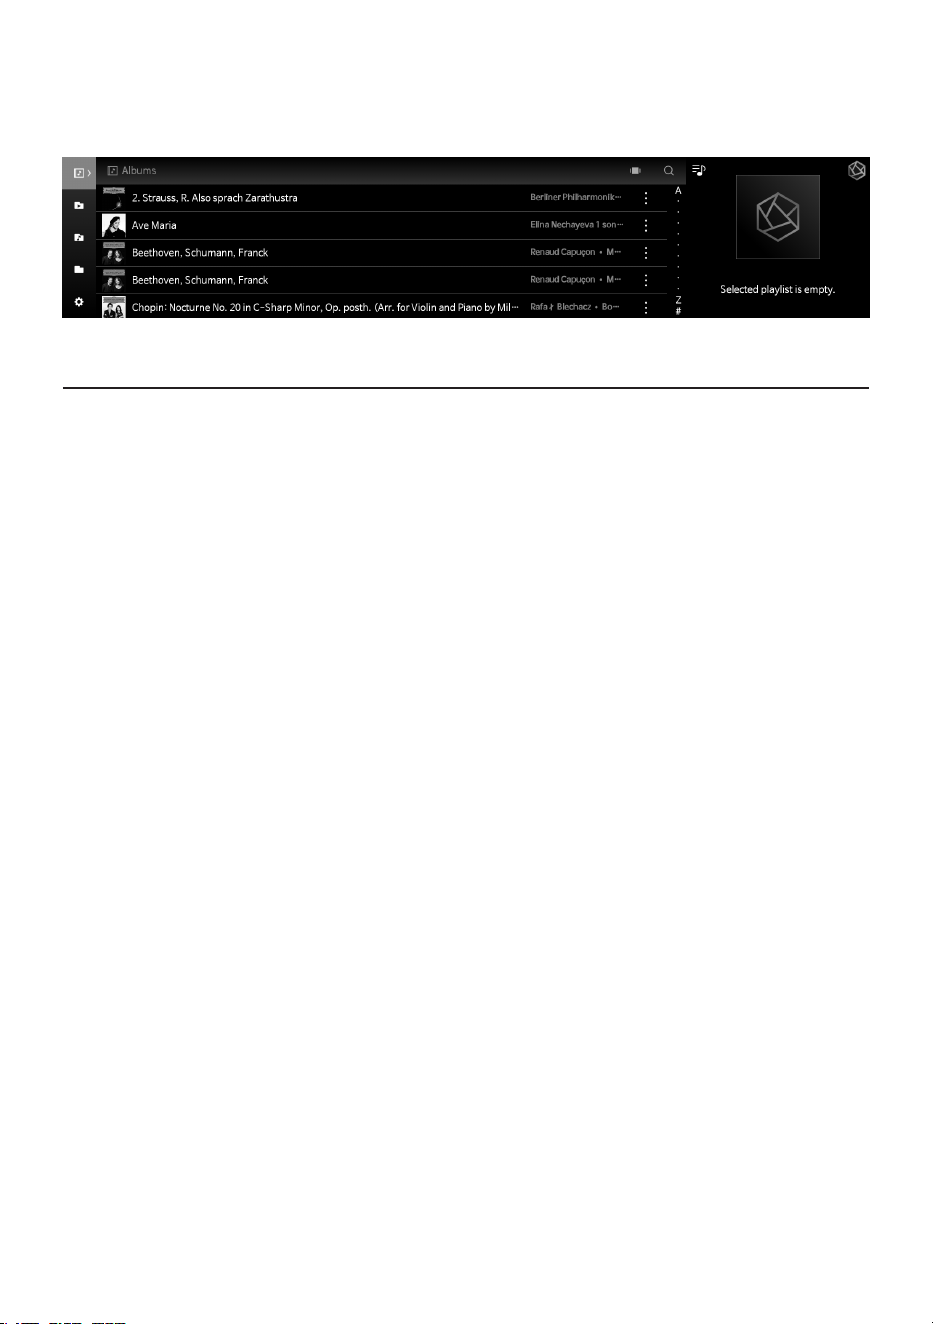
• After the DB scanning is complete, the album art and list of music and videos are displayed, and
you can play the music.
• You can also add, research, and delete DB through the Music/Video and Settings menu.
2-2. After Media Scanning
• The album list is displayed in the form of album art, and you can play the entire list in the album.
• You can sort and play music by album, artist, genre, and composer.
• You can search for music by artist and album name.
• You can save your favorite music and albums using the Playlist and Favorite features.
- 45 -
Additional Information
1. Firmware Update
1-1. Run OTA Update
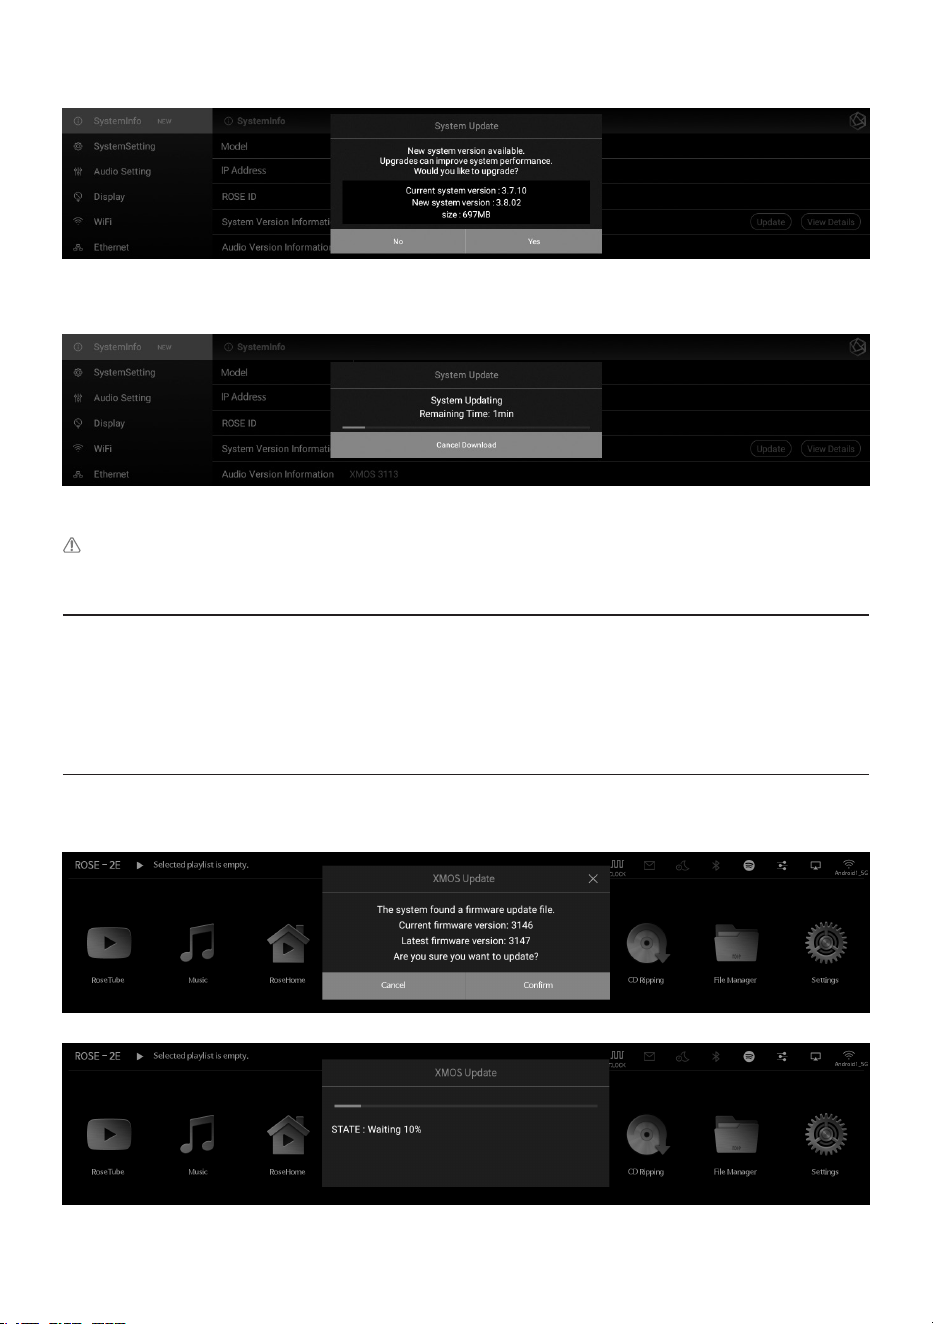
• The system update pop-up appears if the latest version of the update is available while the network is connected.
• If you select the “Yes” button in the system update pop-up, the OTA update is in progress.
• After rebooting, the SW system update is complete.
Caution:
Never remove the power as it may cause problems if you forcibly remove the power during the update.
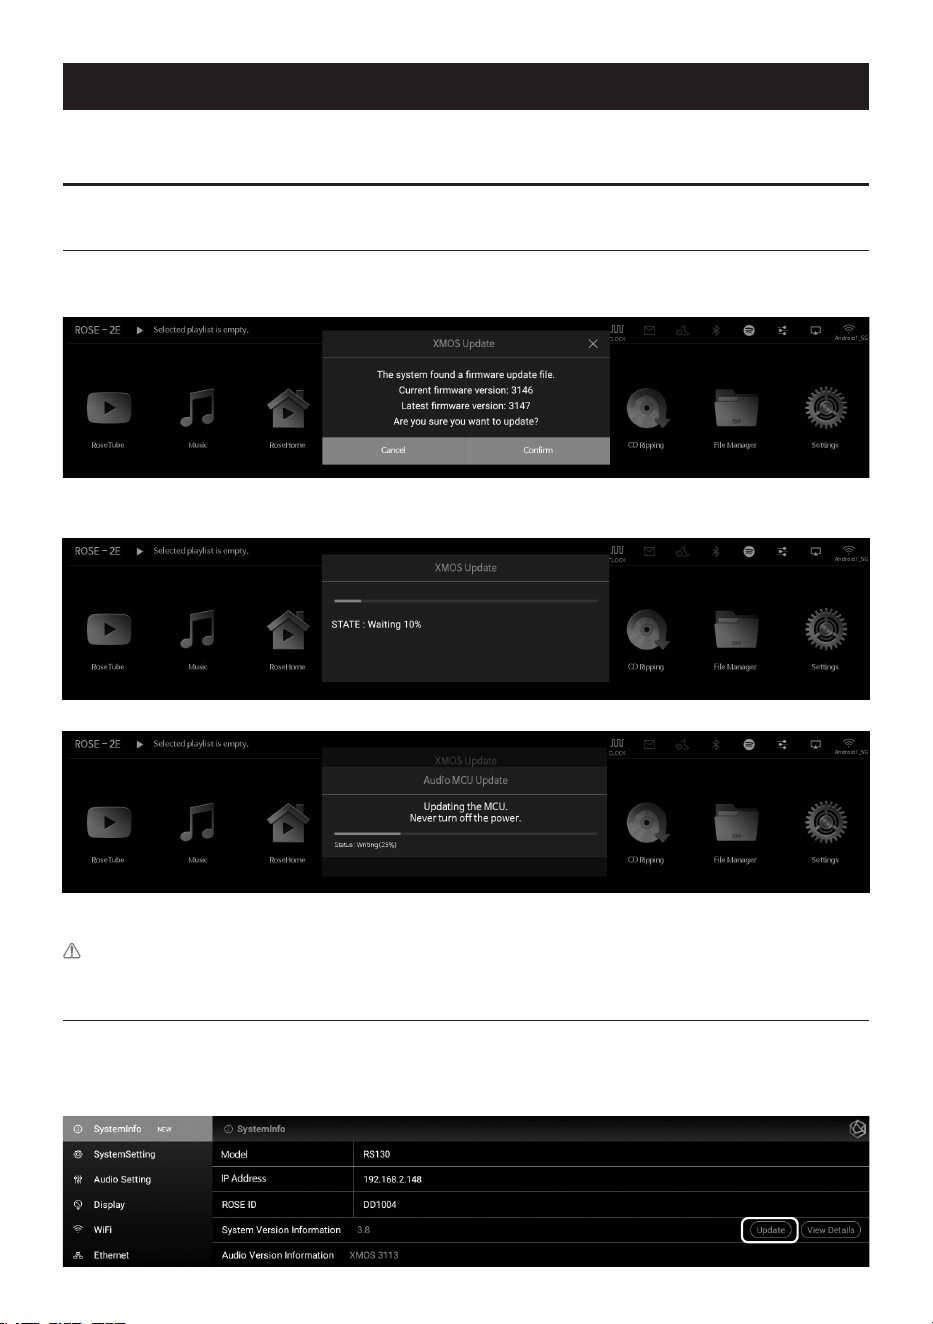
1-2. Update Via Settings Menu
• If an update for the latest version is available, the Update button is displayed in the system
version information on the Settings menu.
- 46 -
• If you select the update button, the system update pop-up is displayed.
• If you select the “Yes” button in the system update pop-up, the OTA update is in progress.
• After rebooting, the SW system update is complete.
Caution:
Never remove the power as it may cause problems if you forcibly remove the power during the update.
1-3. How to Install the Firmware When the XMOS/MCU Update Pop-Up Occurs
• If a rmware update is available after the system update, the update window will automatically
appear and you can proceed with the rmware update.
• Updates can occur in the following cases.
1-3-1. If there is only an XMOS update
• The device automatically reboots after executing the XMOS update.
- 47 -
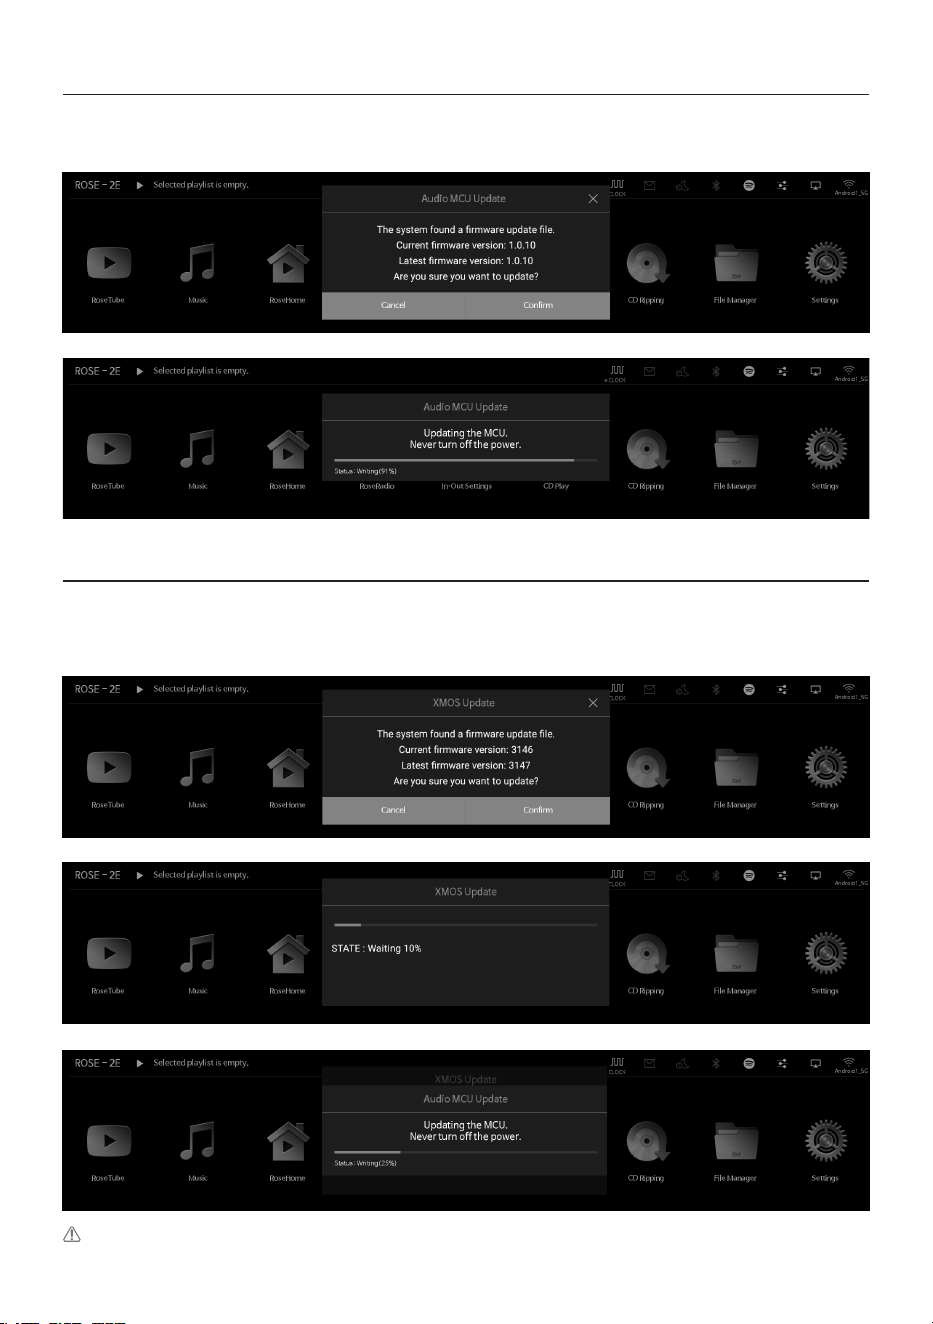
1-3-2. If there is only an Audio MCU update
• The device automatically reboots after executing the Audio MCU update.
1-3-3. When Both XMOS/Audio MCU Updates Are Available
• After completing the XMOS update, the Audio MCU update is automatically executed.
It will then automatically reboot.
Caution:
Never remove the power source as forced removal during the update may cause problems to
arise.

- 48 -
2. Factory Reset
• Factory reset is recommended when this product does not work or rmware update via Internet
fails. Upon factory reset, all custom settings including DB Scan data, settings and storage data
for each app, apps installed through ROSE Store, WiFi network settings, shared les, and saved
playlists are reset. Reset is required after factory reset.
• This product can be reset or restored to default settings.
• You can return the system to the default settings in the “Settings - System Settings - Factory
Reset” menu option.
• After factory reset, be sure to connect to a wired or wireless network and go to the ROSE Store on
the Home screen to update all Software that has not been updated.
- 49 -
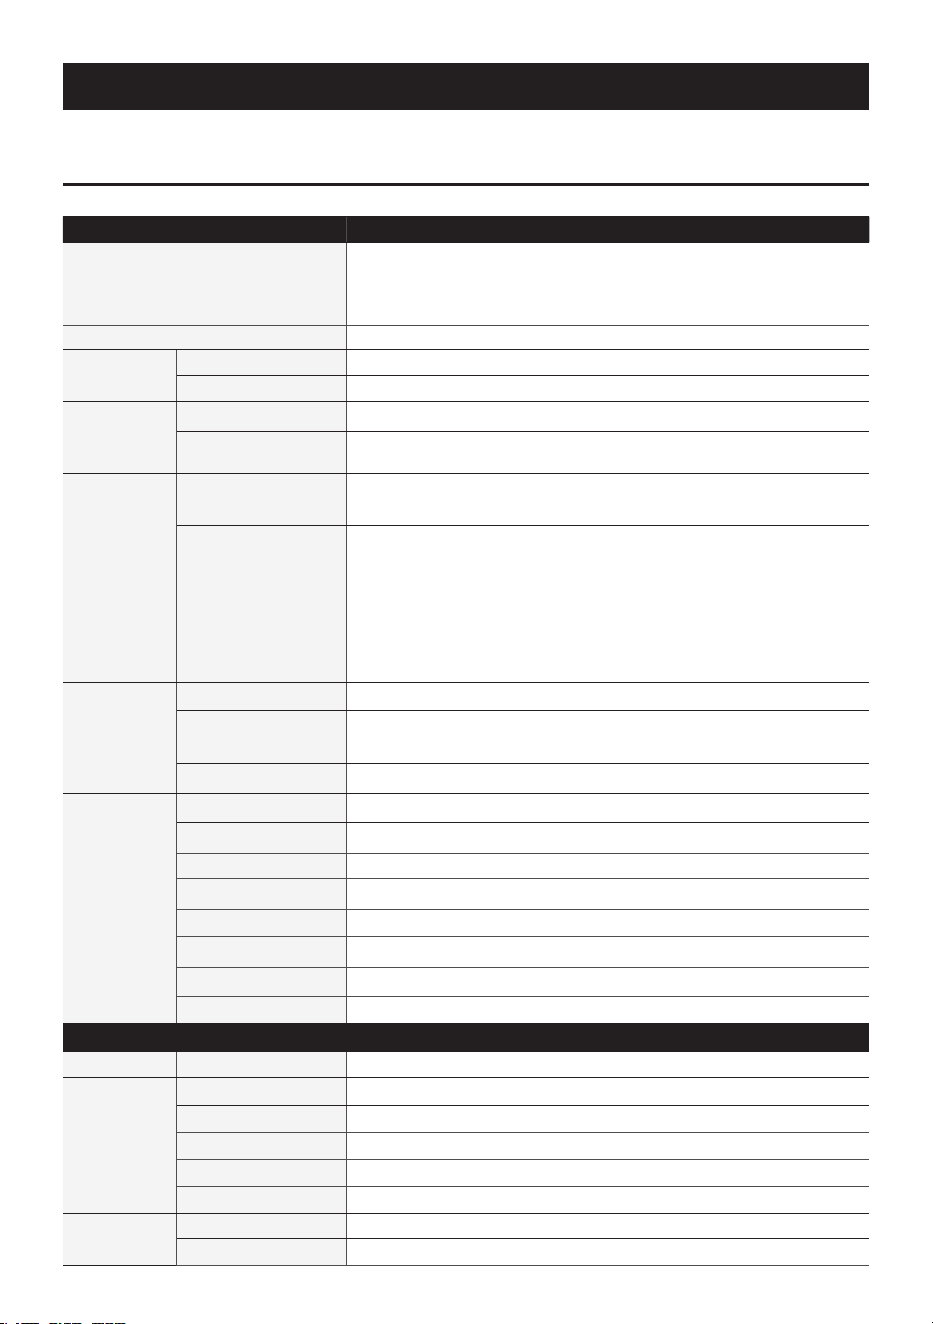
Product Specications
1. Specications
Part Specications
Main Chipset
RK3399(28nm HKMG Process) / Six-Core ARM® 64-bit processor,
up to 2.0GHz Based on Big.Little architecture, Dual-Core
Cortex-A72 and Quad-Core Cortex-A53 with separate NEON
coprocessor / ARM Mali-T860 MP4 Quad-Core GPU
OS
Customized Android 7.1 based ROSE OS
Design
Size
430 (W) x 317 (D) x 125 (H) mm
Weight
12kg
Memory
DRAM
4GB Dual-Channel LPDDR4
Flash
8GHz High-Speed eMMC / M.2 M-key 256MB NVMe / External
SSD Supported
Codec
Video
H.264 / H.265/ VP9 up to 4K x 2K @ 60fps / H.264 / MVC / VP8
Encoders by 1080p @ 30fps
Audio
XU216(XMOS)
- PCM : 8kHz ~ 768kHz (8 / 16 / 24 / 32bits per Sample)
- DSD Native: DSD64(1bit 2.8MHz), Stereo
DSD128(1bit 5.6MHz), Stereo
DSD256(1bit 11.2MHz), Stereo
DSD512(1bit 22.4MHz), Stereo
- SPDIF Output
- USB Audio Class 2.0 device
Front
Button
Power, Mute, Favorites, Play / Pause
LCD & TSP
TFT LCD 15.4” 1920 x 382 pixels(eDP) /
Active area: 381.888 x 75.97mm / Capacitive touch
IR
38kHz IR receiver port
Rear
AC INLET
AC 100~240V
I2S
AES/EBU OUT x 1 / HDMI I2S OUT x 1
SATA
2.5” SSD
SFP Ethernet
10/100/1000 BASE-T x 1 (SFP COPPER Type)
USB3.0
USB3.0 / 1A (V-Type) x 2, SFP x 1
USB2.0
USB2.0 / 500mA Class 2.0 device x 1 (USB-DAC Output)
Optical Out
SPDIF x 1
Coaxial Out
RCA x 1
AUDIO Input / Output Specication
Input BNC
EXT 10MHz 50ohm IN x 1, EXT 10MHz 75ohm IN x 1
Output
HDMI
HDMI2.0 4K x 2K 60Hz display resolutions
I2S (HDMI)
32bit/768kHz sampling rate
SPDIF
24bit/192kHz sampling rate
AES/EBU
32bit/384kHz sampling rate
Coaxial
32bit/384kHz sampling rate
Accessories
Remote Control
IR(38kHz) Bluetooth combo remote control
Power Cord
AC Cord 1.5m

- 50 -
Quality Guaranteed
Model Name
RS130
Date of
Purchase
YYYY / MM / DD
Place of
Purchase
Name of Store
Telephone
Serial No.
Telephone
Term of
Guarantee
1 year from the date of purchase
• Name of the Company that Received the Conformity Assessment: Citech Co., Ltd.
• Manufacturer / Country of Manufacturer: CI Tech Co., Ltd. / Republic of Korea
• Identication Code of the Certied Company: SYH
• Certication No.: R-R-SYH-RS130

- 51 -
Things to Check Before Contacting a Service Center
• Please restart the product if touch does not work or if the screen freezes. Press and hold the
power button for more than 5 seconds to force a reboot.
• In small spaces that are not suitable for product installation conditions (p. 17), heat can cause the
product and aect the life and performance of the product.
• When the device is connected to the Internet, the sound may be cut o during playback if the
radio wave is unstable or weak, or if the Internet usage is heavy, and the wireless Internet may
also be delayed or not received due to the nature of wireless communication, so please move
your device to another location and try to reconnect.
• Content-specic les are optimized according to product characteristics, design specications,
and business needs. Therefore, even with the same content, there may be dierences in volume,
tone, etc. with other manufacturers and other models.
• Precautions for Product Delivery to the Service Center
Be sure to pack the product in the original box and inner protective material to prevent damage
when delivering the product by courier. Please note that we are not responsible for damage to
the product during transportation of the product in other packaging.
• Free repair: Limited to naturally occurring failures within one year from the date of purchase,
which is the warranty period of the product.
• Paid repair: If the warranty period has expired, or even if it is within the warranty period, in the
following cases, the actual cost of repair (including part costs) will be charged.
- Failure due to consumer negligence during use
- Repairs or modications made by persons other than company engineers
- Failure or damage caused by an abnormality in the power supply
- Failure due to a natural disaster
• Repair Service Application Guide
- If a failure occurs during use, stop using it immediately and consult with the place of purchase
or the customer support oce of the company rst.
- Information required for reporting
. Model name and serial number (manufacture date)
. Place and date of purchase
. Consumer information including contact information and address
. Symptoms of failure
. All other matters necessary for repair service
Product Website: www.hirose.com
• Subscribe to our newsletter to get the latest news, events and new products from ROSE.

- 52 -
Memo

- 53 -
Memo

- 54 -
Memo

- 55 -
Memo

- 56 -
Memo