
- 1 -
ENGLISH
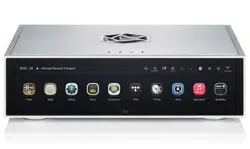
Beyond Audio, HiFi ROSE
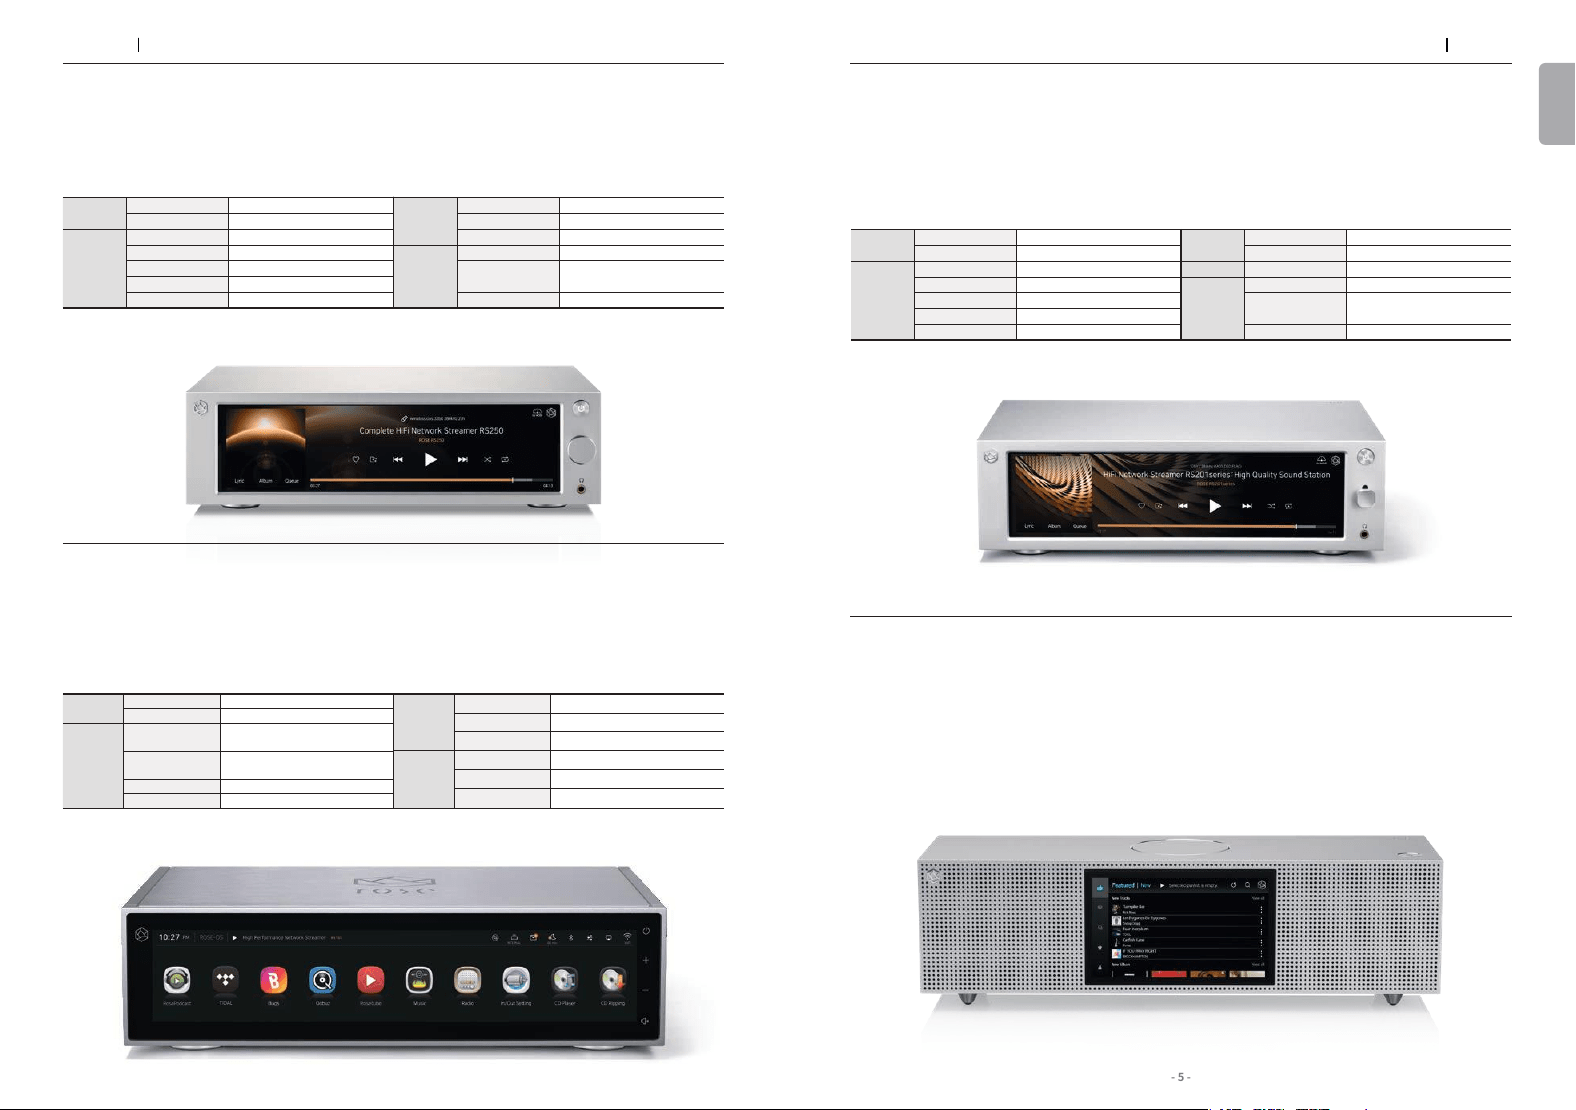
Complete HiFi Network Streamer RS250

- 2 - - 3 -
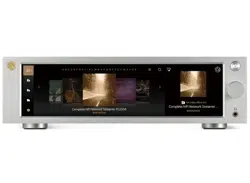
ENGLISH
Beyond Audio, HiFi ROSE
- 4 - - 5 -
ENGLISH
HiFi Network Streamer RS201 Series
▪Flagship Network Streamer
▪Network Streamer + DAC
▪High-tech DAC design for pure sound with low noise and low distortion
▪High-Resolution Music Playback available(DSD512, PCM32bit/768kHz)
▪A Femto Clock provides Ultra Precision
▪The Special Linear Power Supply Conguration minimizes electrical noise
Connectivity Bluetooth, DLNA, Airplay, Spotify Connect, Roon Ready
Design 430*316*123 mm / 13 kg / 14.9” Wide viewing angle touch screen / Color : Black, Silver
Connectivity Bluetooth, DLNA, Airplay, Spotify Connect, Roon Ready
Design 278*202*85 mm / 2.3 kg / 8.8” Wide viewing angle touch screen / Color : Silver
HiFi Media Player RS301
▪High-end All-in-One Speaker
▪Network Streamer + DAC + AMP + SPEAKER
▪3-Way full-range speaker conguration
▪High-Resolution Music Playback available(DSD256, PCM32bit/384kHz)
▪Powerful sound playback with dual passive woofer engine design(Patented technology)
▪Awarded the world’s three major design awards(Reddot, PIN-UP, iF)
HiFi ROSE
Products
HiFi ROSE
Products
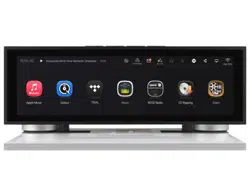
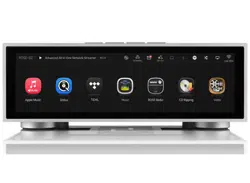
Complete HiFi Network Streamer RS250
▪Reference Grade All-in-One Network Streamer
▪Network Streamer + DAC
▪High-Resolution Music Playback available(DSD512, PCM32bit/768kHz)
▪A Femto Clock provides Ultra Precision
▪The Special Linear Power Supply Conguration minimizes electrical noise
Connectivity Bluetooth, DLNA, Airplay, Spotify Connect, Roon Ready
Design 278*202*85 mm / 3.2 kg / 8.8” Wide viewing angle touch screen / Color : Silver
High Performance Network Streamer RS150
Hi-Res
DSD
Native DSD 512
PCM
32bit / 768kHz
In/Out
Port
Digital In
Optical, Coaxial, AES/EBU,
HDMI ARC, USB Audio
Digital Out
Optical, Coaxial, AES/EBU,
I2S-DVI, I2S-RJ45
Analog In
Line In
Analog Out
Pre-out_XLR
,
Pre-out_RCA
In/Out
Port
HDMI Out
4K
USB Audio In
USB B Type 2.0
USB Audio Out
USB A Type 3.0
Network
Connection
Ethernet
10/100/1000 BASE-T
WiFi
Optional_dongle
Bluetooth
Optional_dongle
Hi-Res
DSD
Native DSD 512
PCM
32bit / 768kHz
In/Out
Port
Digital In
Optical, Coaxial
Digital Out
Optical, Coaxial
Analog In
Line In
Analog Out
Pre-out_RCA
HDMI Out
4K
In/Out
Port
Headphone Out
3.5mm
USB Audio In
USB B Type 2.0
USB Audio Out
USB A Type 3.0
Network
Connection
Ethernet
10/100/1000 BASE-T
WiFi
802.11 a/b/g/n/ac
(2.4GHz/5GHz)
Bluetooth
V4.0 / V3.0+HS
▪Reference Grade All-in-One Network Streamer
▪Network Streamer + DAC + AMP
▪Built-in High-Performance Power Amplier(50W*2ch)
▪High-Resolution Music Playback available(DSD256, PCM32bit/384kHz)
▪A Femto Clock provides High Precision
▪Digital equipment, PreAmplier connection available
▪Awarded the world’s three major design awards(Reddot, GOOD DESIGN, PIN-UP)
Hi-Res
DSD
Native DSD 256
PCM
32bit / 384kHz
In/Out
Port
Digital In
Optical
Digital Out
Optical
Analog In
Line In
Analog Out
Pre-out_RCA
HDMI Out
4K
In/Out
Port
Headphone Out
3.5mm
USB Out
USB A Type 3.0 / 2.0
AMP AMP
50W X 2CH(4Ω)
Network
Connection
Ethernet
10/100/1000 BASE-T
WiFi
802.11 a/b/g/n/ac
(2.4GHz/5GHz)
Bluetooth
V4.0 / V3.0+HS
Connectivity Ethernet, WiFi, Bluetooth, DLNA, Airplay
Rear Micro USB, USB A Type, USB B Type, Micro SD, Headphone, AUX
Design 360*110*108 mm / 1.9 kg / 5” IPS touch panel / Color : Silver
- 6 - - 7 -
ENGLISH
Innovative ROSE OS System
Play CDs by connecting an external
USB CD-ROM.
CD Player
Bugs
Listen to high-resolution music on
Bugs. Easily connects existing functions,
including login, playlists, and playback.
Supports MQA’s Full Decoder.
Enjoy studio mastering sound quality.
MQA
Qobuz
Enjoy music streaming with Qobuz’s
various functions. Support for Hi-Res
Audio(24bit/192kHz) means you can
enjoy high-resolution music.
You can enjoy high-denition videos
on YouTube, TIDAL, and Bugs,
and play video les in various formats.
4K Video
12
6
9 3
1
2
4
5
7
8
10
11
Enjoy music streaming and videos
with TIDAL’s unique features.
Supports MQA Full Decoder, so you
can enjoy high-resolution music.
TIDAL
Create your own playlist. You can also
register your friends and share it with
them.
My Playlist
12
6
9 3
1
2
4
5
7
8
10
11
Various design clock functions are
provided, such as alarms and
weather information.
Clock
12
6
9 3
1
2
4
5
7
8
10
11
Listen to various Internet radio
channels from around the world.
Keep track of your favorite channels.
Radio
Rip CDs by connecting an external
USB CD-ROM and save them on a
storage device.
CD Ripping
Premium Media Player RS350
HiFi ROSE CD Drive RSA780
HiFi ROSE
Products
HiFi ROSE
OS System
You can enjoy all content and music
on YouTube.
ROSE Tube
12
6
9 3
1
2
4
5
7
8
10
11
Roon Ready
ROSE OS is fully compatible with Roon Core, with
Roon Ready certication in compliance with all
requirements of Roon Labs. You can enjoy HiFi
sound quality on your ROSE device with the
powerful music management capabilities of Roon.
Spotify Connect allows you to play and
wirelessly control Spotify music on your ROSE
OS over a network. With the Spotify Connect
function, you can enjoy a variety of music with
HiFi sound quality on your ROSE device.
Spotify Connect
HiFi ROSE devices are certied with a
‘High-Resolution Audio’ license
from the JAS (Japan Audio Society).
Hi-Res Audio
12
6
9 3
1
2
4
5
7
8
10
11
Listen to various podcasts from
around the world.
ROSE Podcast
Manage your music les under various
categories, such as albums, artists,
and genres.
Music Library
▪Casual All-in-One Speaker
▪Network Streamer + DAC + AMP + SPEAKER
▪3-Way full-range speaker conguration
▪Playback of various le formats available(Music, Video, Image)
▪Powerful sound playback with dual passive woofer engine design(Patented technology)
Connectivity WiFi, Bluetooth, DLNA, Airplay
Rear Micro USB, USB A Type, Micro SD, Headphone
Design 364*110*120 mm / 1.5 kg / 5” IPS touch panel / Color : White
Rear USB B Type
Design 152*152*25 mm / 0.9 kg / Color : Silver
▪USB-isolator Adopted to block motion noise
▪USB-B Type Port Adopted for HiFi Audio
▪900g weight for CD playback without external shaking
▪Minimized Motion Noise by applying Insulators
▪Provides CD Ripping Features
- 8 - - 9 -
ENGLISH
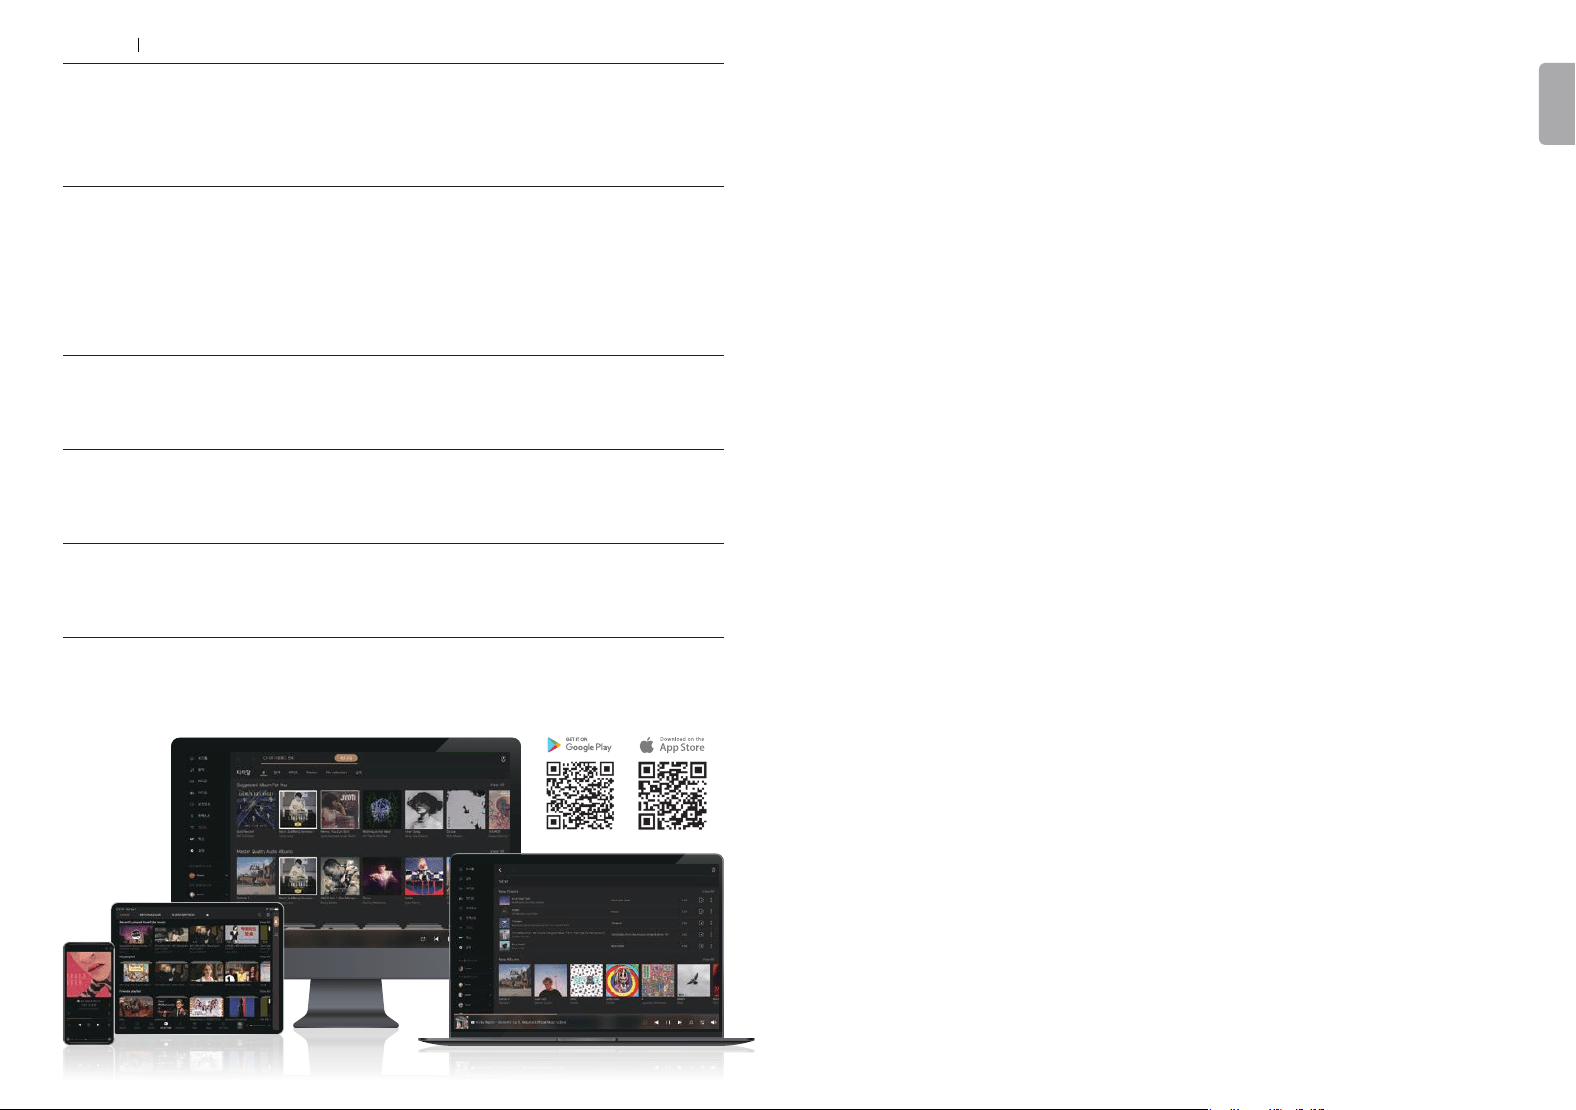
ROSE Connect Remote Application
A dedicated Remote App is provided that allows users to conveniently control and smartly
manage their ROSE device. The Remote App is supported on various platforms, including the
iPhone, iPad, Android phone, and PCs.
You can simply and easily play music stored on your phone on your ROSE device.
Enjoy a lossless, high-quality streaming service.
Streaming
You can create your own playlist.
Make a playlist on Music and ROSE Tube and check it out at Home - My Music.
Playlist
You can freely and conveniently control various HiFi ROSE functions wirelessly.
Control
Remote
Search
Control
You can control a variety of functions remotely including Music, ROSE Tube, TIDAL,
Qobuz, Bugs, Radio, Podcasts, and CD Ripping.
ROSE Connect includes the remote control function.
You can conveniently search for a variety of music in the Media Library.
You can share your playlists with your friends or listen to music recommended by them.
Communicate with your friends through music.
Share with Friends
Scan the music in your local memory to organize it into various categories.
Media Library
HiFi ROSE
Remote App
OWNER’S MANUAL
RS250 Product User Manual
- 10 - - 11 -
ENGLISH
Safety Precautions
1. Warnings
2. Cautions
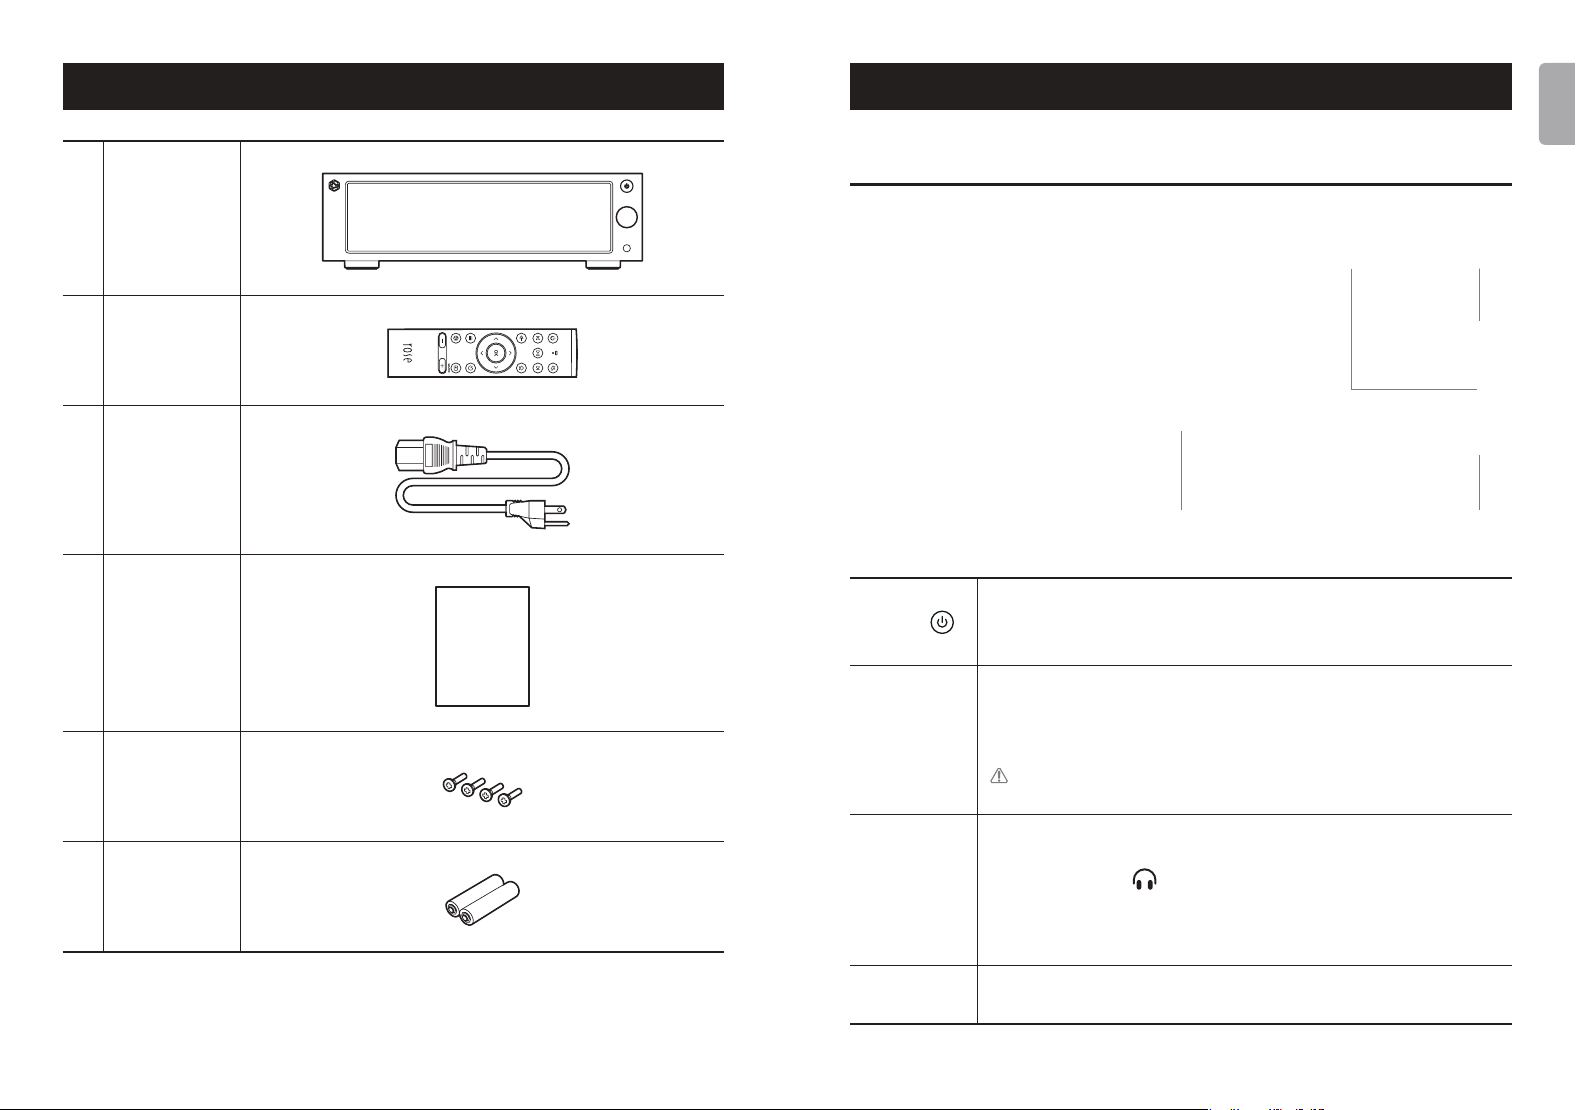
List of Components
Button and Connection Locations / Functions
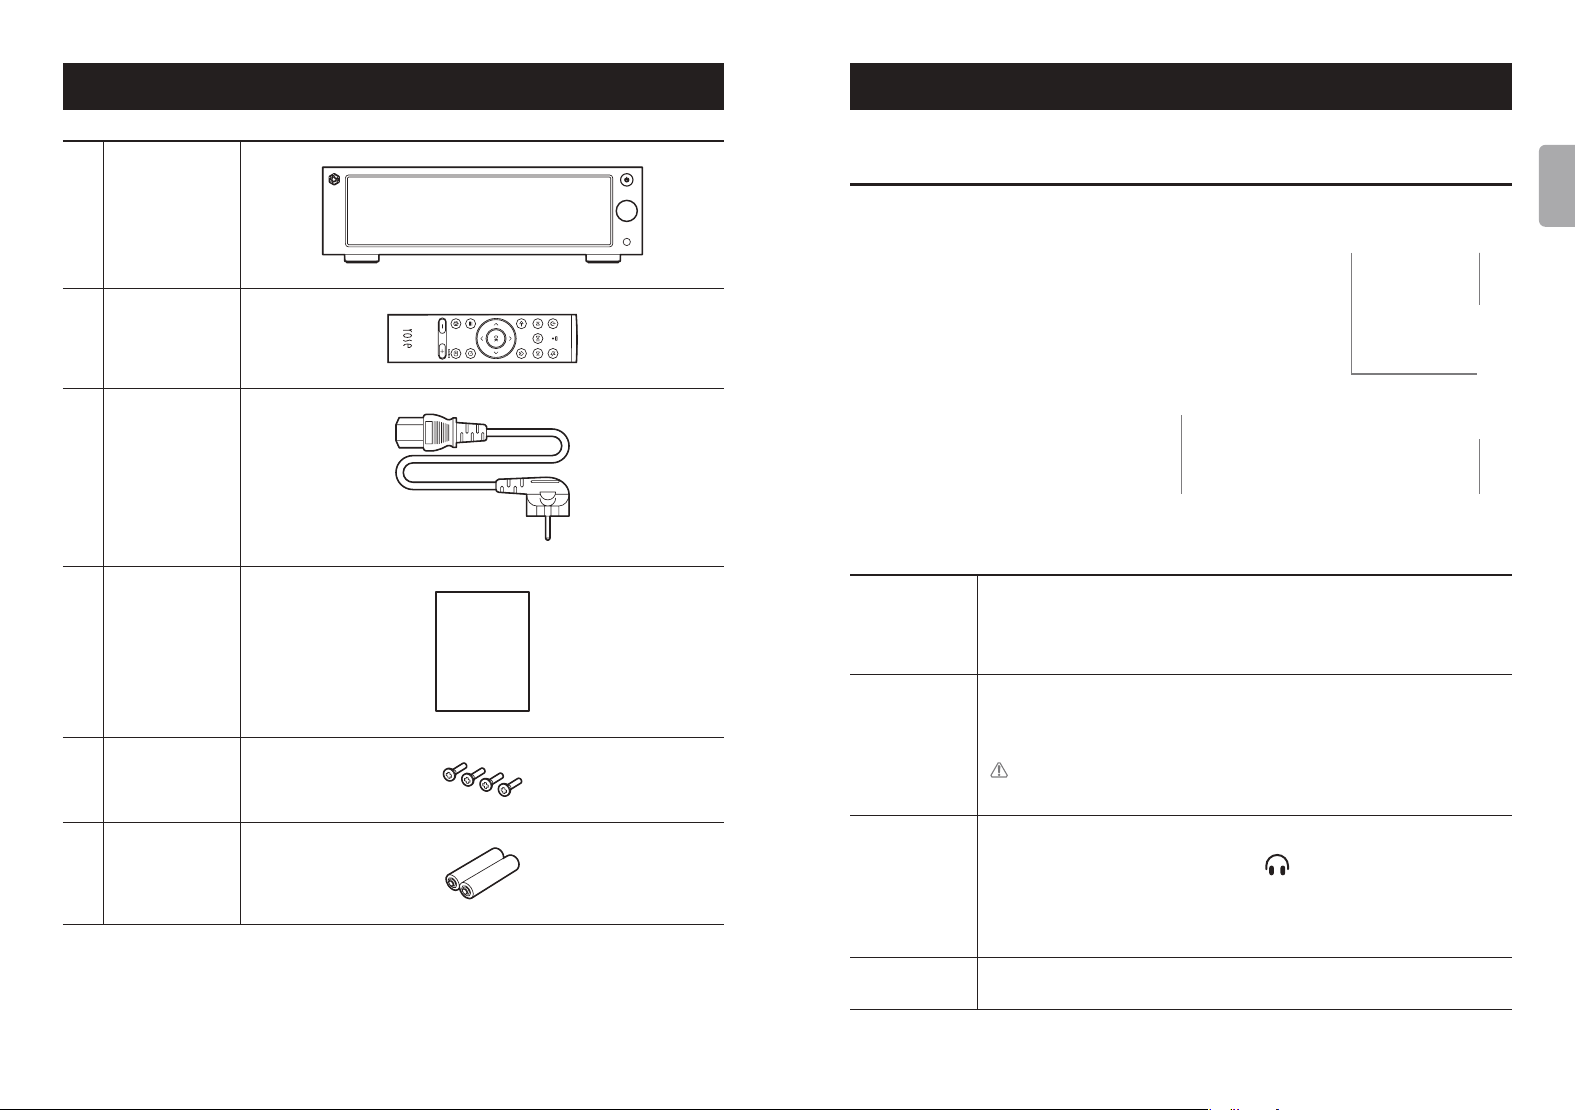
1. Front of the Product
2. Rear of the Product
3. Remote Control
Product Installation
1. Product Design Direction and Installation Location
2. How to connect the Power Cord
3. How to properly connect the Rear Port and the Cable
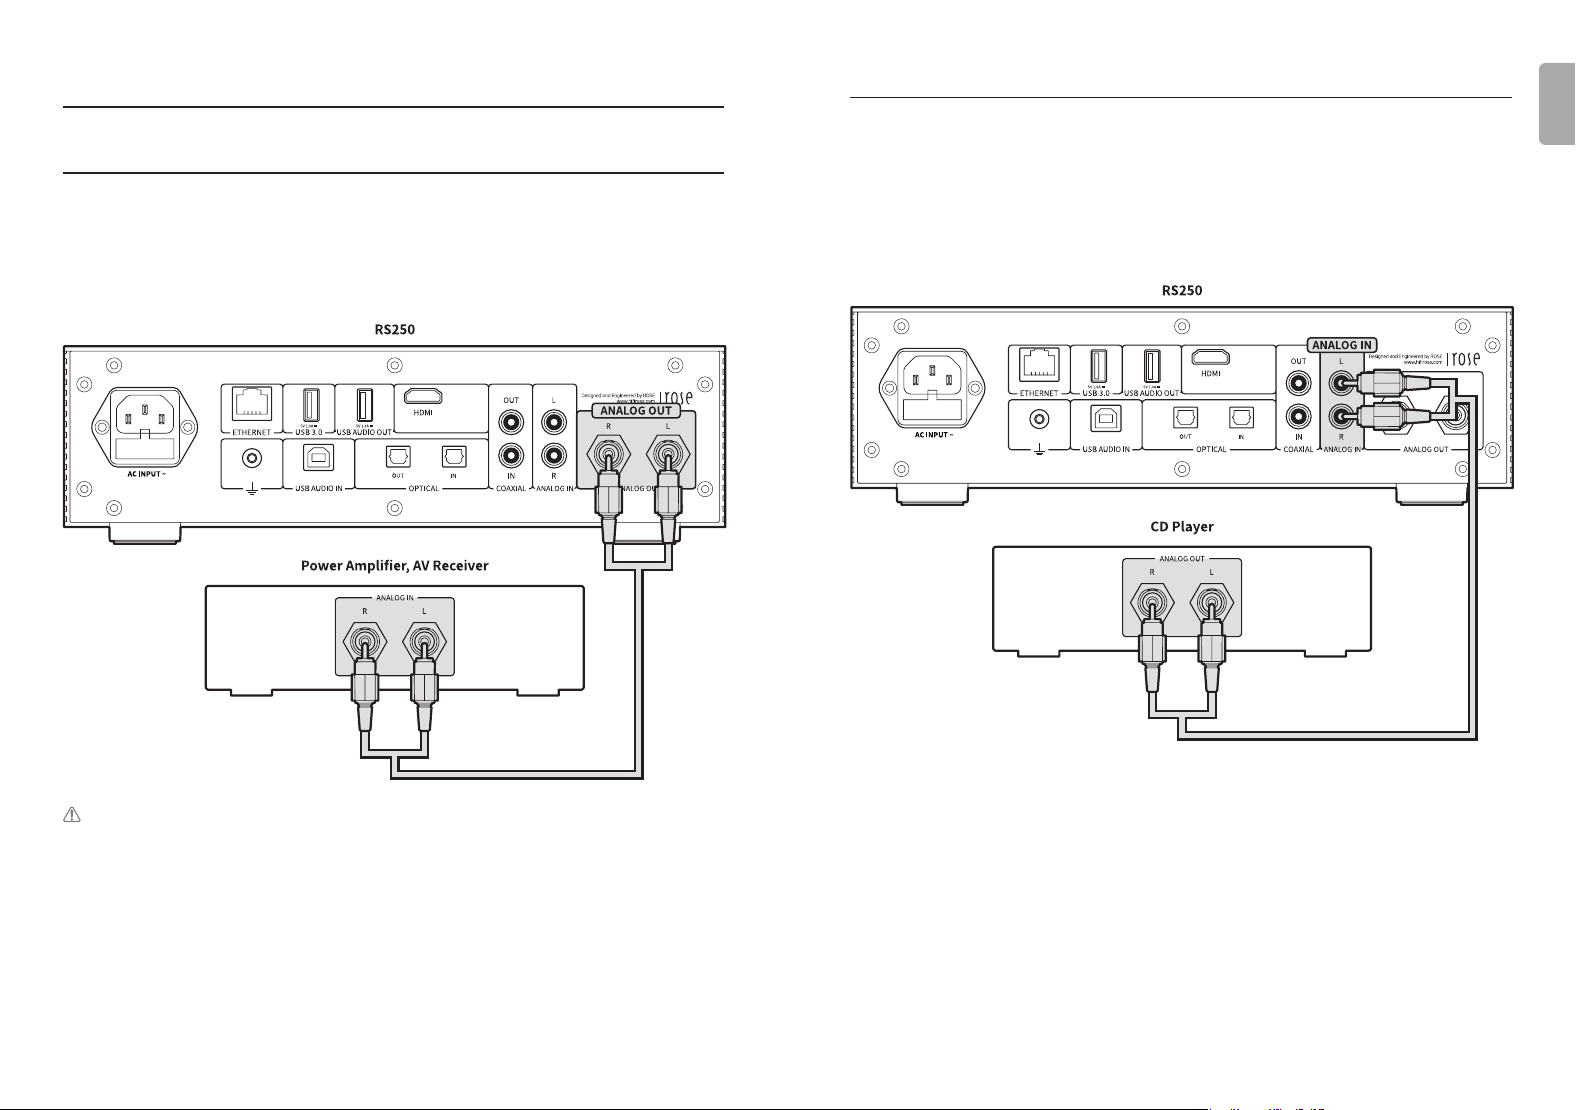
3-1. Connecting the Analog Output Port and the Power Amplier or AV Receiver
3-2. Connecting the Analog Input Port and the Audio Device
3-3.
Connecting the Digital Input/Output Port and the Audio Device(TV or Digital Input/Output Support Device)
3-4. Connecting the USB Audio Output Port and the External DAC
3-5. How to connect the USB Audio In
4. External Memory(USB) and SATA Storage Devices
5. How to Connect an SSD
5-1. How to insert the SSD
5-2. How to format After Installing the SSD
5-3. How to copy Files over the Network
6. Network Connection
6-1. Ethernet Connection(Wired)
6-2. WiFi Connection(Wireless)
7. How to Connect Roon Ready
Initial Settings
1. Power Button
2. Input/Output Settings
2-1. INPUT
2-1-1. RS250
2-1-2. ANALOG IN
2-1-3. COAX IN
2-1-4. OPT IN
2-1-5. USB IN
2-2. OUTPUT
2-2-1. USB DAC
2-2-1-1. MQA Type
2-2-1-2. PCM Resampling Frequency
2-2-1-3. DSD Mode
2-2-1-4. Roon Volume Control
2-2-1-5. OUTPUT Gain
2-2-2. HDMI
2-2-2-1. PCM Resampling Frequency
2-2-2-2. DSD Mode
2-2-2-3. Roon Volume Control
2-2-2-4. HDMI Passthrough
2-2-2-5. OUTPUT Gain
2-2-3. Digital
2-2-3-1. MQA Type
2-2-3-2. PCM Resampling Frequency
2-2-3-3. DSD Mode
2-2-4. Analog
2-2-4-1. Pre-Out Level Settings
2-2-4-2. PCM Resampling Frequency
2-2-4-3. Headphone Output Impedance
2-2-4-4. DSD Mode
Playback
1. Basic Operation
2. Media Library
2-1. Media Scan Operation
2-2. After completing the Media Scan
Supplementary Information
1. Firmware Update
1-1. OTA Update
1-2. Update via the Settings Menu
1-3. How to install XMOS/Audio MCU when an Update Pop-up Appears
2. Factory Reset
Product Specications
1. Specications
2. Analog Audio Specications
Quality Guaranteed
Contents
12
12
13
14
15
15
16
17
18
18
19
20
26
26
29
31
33
33
33
45
45
45
47
47
51
52
52
53
54

- 12 - - 13 -
ENGLISH
Safety Precautions
1. Warnings
• Do not apply excessive force to the product, throw it or impact it using sharp
objects.
• For children, a guardian should explain to the child how to use the product
properly and make sure that he or she is using it correctly.
• Use within a temperature range of 0°C~40°C, and do not use in high-
temperature or high-humidity conditions. If used in an environment below 0°C
or in a high-temperature sealed environment such as a steam room, failure,
corrosion, heat generation, or ignition may occur; therefore, do not place the
product in an enclosed space, but install it in a well-ventilated location. In
addition, moisture or liquid can damage the surface or circuits of the product.
• Be sure to use the genuine power cord provided by ROSE. Any other cord may
cause operational errors or damage the product(leading to a deterioration in
performance).
• Do not spill dust or liquid on the product. This may damage the parts or
circuits. If the product gets wet, contact your nearest service center without
turning on the power. However, the free aftersales repair service will not be
available in this case.
• Do not connect the product to any antenna or accessory that is not guaranteed
by ROSE, and do not place it on top of anything(iron desk, microwave oven,
etc.) that may interfere with radio waves.
• Since the product is sensitive to radio waves, its performance may deteriorate
if it is used in the vicinity of steel materials or equipment using electromagnetic
waves.
• How to replace Fuse : After the power is turned o, disconnect the fuse and
replace the one with same specication.
• The label of this product is located on the bottom of the product.
- 13 -
2. Cautions
• The contents of this instruction manual are based on the initial settings of the
product.
• Some functions of the user manual may be changed without prior notice to the
user in order to improve product performance.
• Product features and supplementary services may vary depending on country,
software specication restrictions, and service provider policy changes.
• User data (music, video les, etc.) may be erased in the case of repair due to the
user’s carelessness or a product malfunction. ROSE is not liable for damages
caused by data loss.
• Using Bluetooth with a 2.4GHz wireless LAN may cause the WiFi connection
to slow down due to signal interference or prevent Bluetooth audio from
operating normally. When using these at the same time, it is recommended that
you use the wireless LAN connection in the 5GHz band.
• Do not use chemical solutions (alcohol, thinner, solvent, etc.) or detergent to
clean the product. Rubbing the product with a chemical solution may generate
heat and cause re. Wipe with a soft cloth or towel when cleaning.
• Do not disassemble, modify or repair the product at on your own. Our free
aftersales services will not be available in such cases. If a malfunction occurs,
please contact a designated service center for repair.
• Only programs provided by the manufacturer are available. Transferring
randomly created les or user-modied les to the product can cause
operational errors or serious product problems. ROSE is not liable for any
issues stemming from such case.
• If the touchscreen is broken, do not touch it with your hands, as it may cause
injury. Contact the service center.
• Install it close to an outlet to easily remove the plug.
- 14 -
ENGLISH
- 15 -
Button and Connection Locations / Functions
1. Front of the Product
Power Button
/ Status LED
Volume
Control
Knob
Headphone
Output Port
IPS Touch
Panel
Power
Button(
)
/ Status LED
When you press the power button, the LED ashes, and when
booting is complete, the LED turns o.
※
See Initial Settings – Power Button for detailed functions.(p. 33)
Volume
Control
Knob
You can adjust the volume by turning the volume control knob
or dragging the volume up/down on the control screen. You
can adjust the volume from 0 ~ 99 in 100steps. Press on the
volume control knob to mute the sound.
Caution :
If you listen to music for a long time at a high volume,
it may cause hearing damage.
Headphone
Output Port
You can connect stereo 3-pole earphones and
headphones(3.5mm). Once connected, check if the
headphone icon( )at the top of the screen lights up.
You can choose the impedance of the headphones you are
connecting on the main body settings menu.
※
Simultaneous speaker and earphone output is not available.
IPS Touch
Panel
You can move the screen with multi-touching.
List of Components
1 Main Body
2
Bluetooth
Remote
Controller
3 Power Cord
4
Instruction
Manual
MANUAL
5
Screws
for SSD
Mounting
6
AAA Batteries
for Remote
Controller

- 16 - - 17 -
ENGLISH
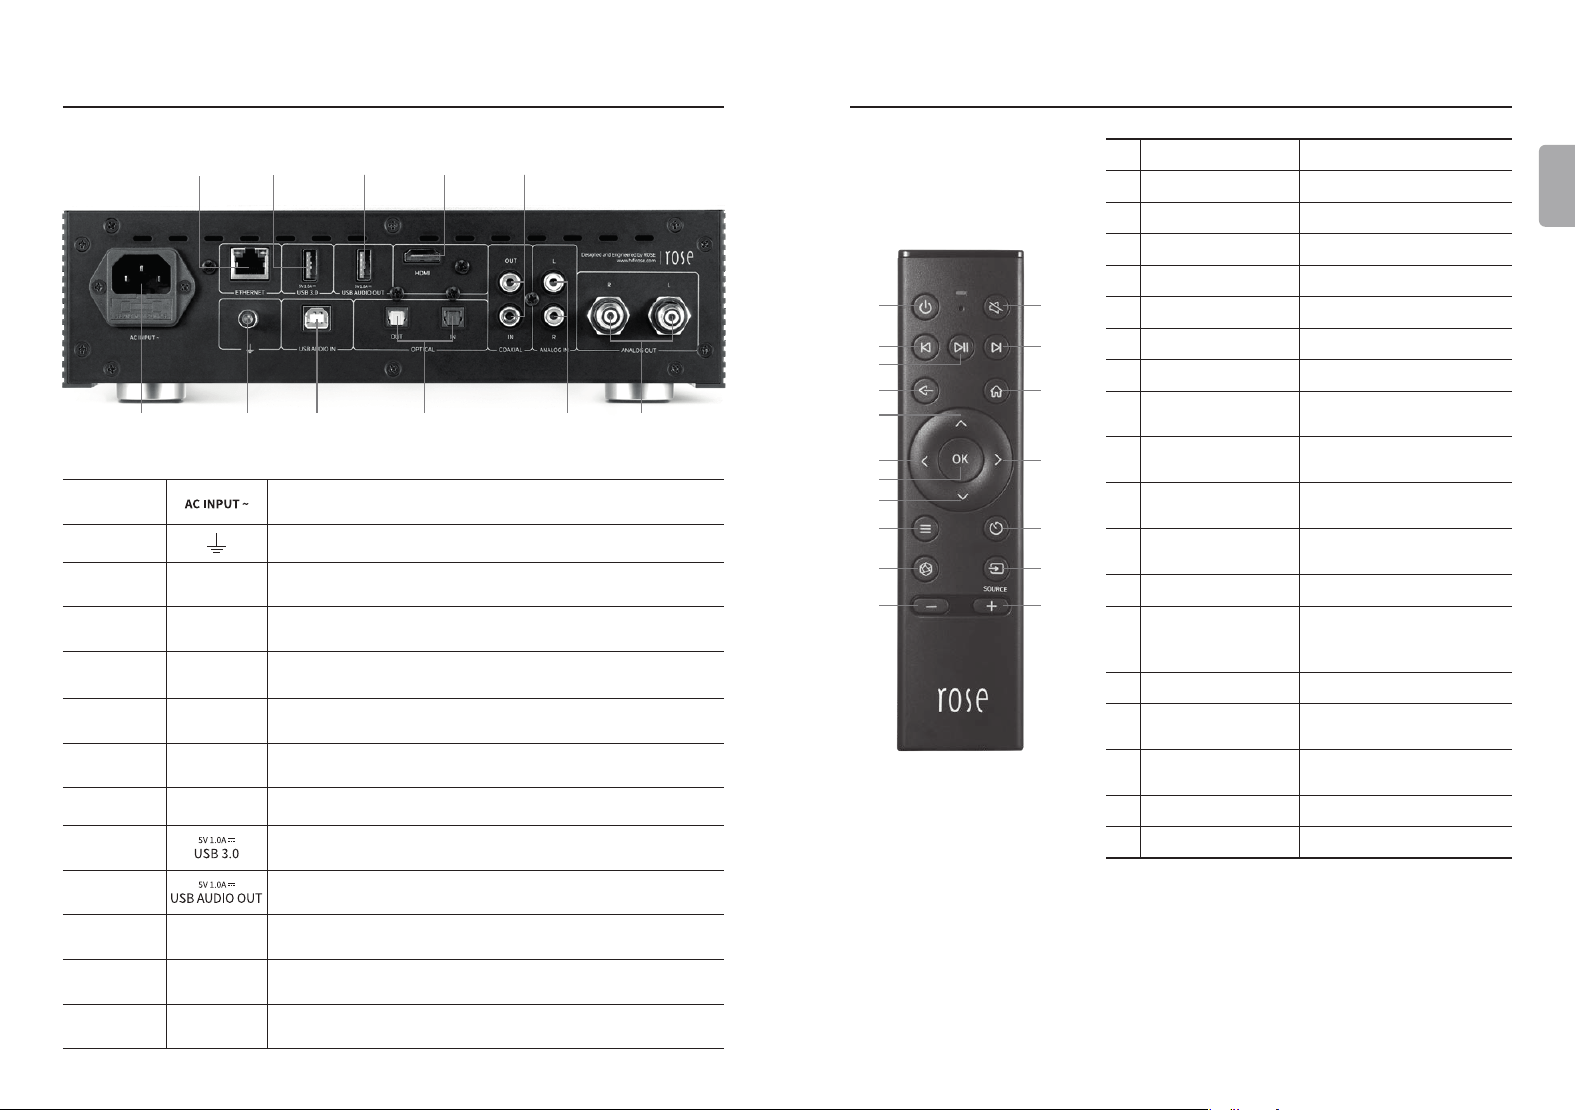
2. Rear of the Product
AC Power
Inlet
Ethernet USB 3.0
USB
Audio Out
HDMI
Coaxial
In/Out
Analog
In
USB
Audio In
Optical
In/Out
Analog
Out
GND
AC Power
Inlet
Connect the AC power cable.
GND
This port is for connecting an external device to the product.
USB Audio
In
-
You can use this product as a USB DAC on your computer
after connecting this port to your computer using a USB B
cable.
Optical In
-
Connect an optical cable to this port to receive digital
signals.(44.1kHz ~ 192kHz).
Optical Out
-
Connect an optical cable to this port to output digital
signals.(44.1kHz ~ 192kHz).
Analog In
-
Connect an RCA cable to this port to receive analog
signals.(max : 9.0dBu / 2.2Vrms).
Analog Out
-
Connect an RCA cable to this port to output analog
signals.(max : 9.0dBu / 2.2Vrms).
Ethernet
- Connect a wired LAN cable to this port.
USB 3.0
Connect a USB storage device to this port to play music
les, or connect a CD-ROM to use the ripping function.
USB Audio
Out
Connect an external USB audio DAC device or a USB
storage device to this port to play music les.
HDMI
-
Connect an HDMI cable to this port to output video
signals.(max. 3840x2160/60Hz) to your TV or monitor.
Coaxial In
-
Connect a coaxial cable to this port to receive digital
signals.(44.1kHz ~ 192kHz).
Coaxial Out
-
Connect a coaxial cable to this port to output digital
signals.(44.1kHz ~ 192kHz).
3. Remote Control
※
The bluetooth remote controller has an average battery life of about 3~4 months.
However, if the power is weak due to battery consumption, the product may
malfunction; in this case, replace the battery before use.
2
5
7
1
3
4
6
8
12
11
13 14
15 16
17 18
109
Function Note
1
Sleep Mode
Function
Power ON/OFF
2 Mute Function
3
Play Previous
Track
Only works on the
playback screen
4
Play or Pause
Current Track
Only works on the
playback screen
5 Play Next Track
Only works on the
playback screen
6 Go Back
7
Go to Home
Screen
8 Move Selection Up
9
Move Selection
Left
10
Move Selection
Right
11
Move Selection
Down
12 Select
13 Option Key
Only works for songs and
videos with sub-options
(favorites, queues,
subscriptions) in the list
14 Sleep Timer
15
Go to Favorites
Menu
Go to the Favorites Menu
set for this product
16
Go to External
Input/Output
Menu
Local, Optical, or Analog
Change
17 Volume Down
Press and hold to adjust
the volume down
18 Volume Up
Press and hold to adjust
the volume up
- 18 - - 19 -
ENGLISH
Product Installation
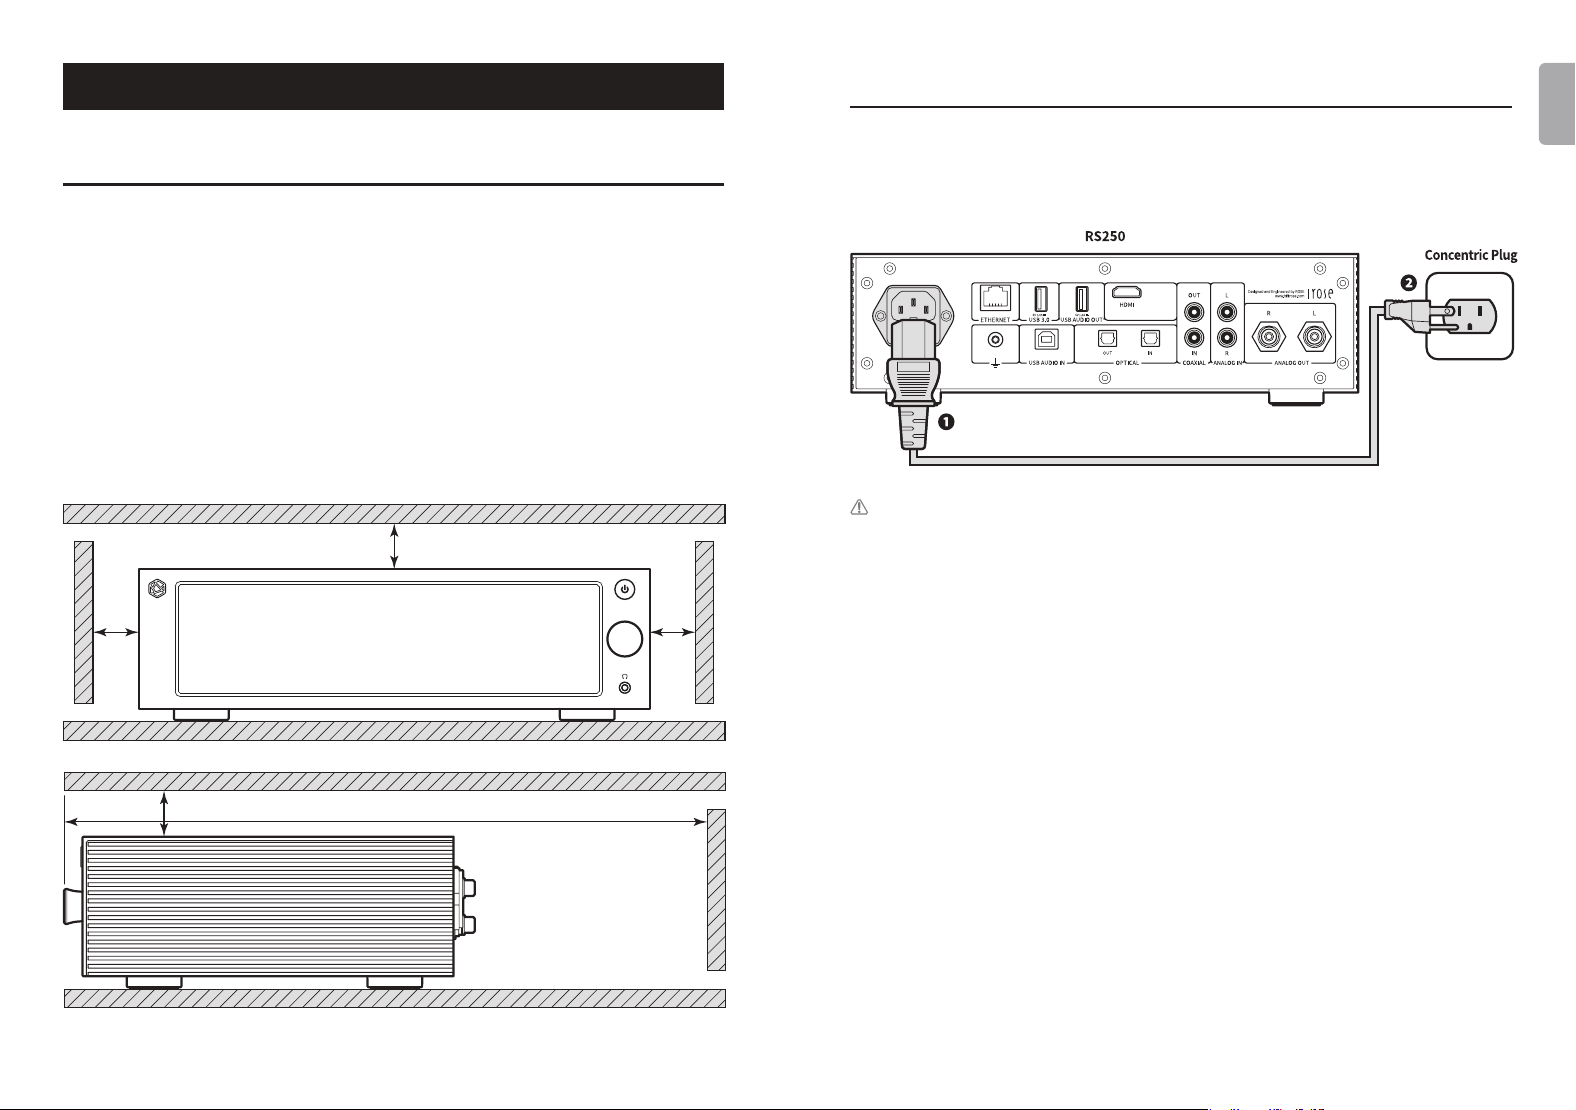
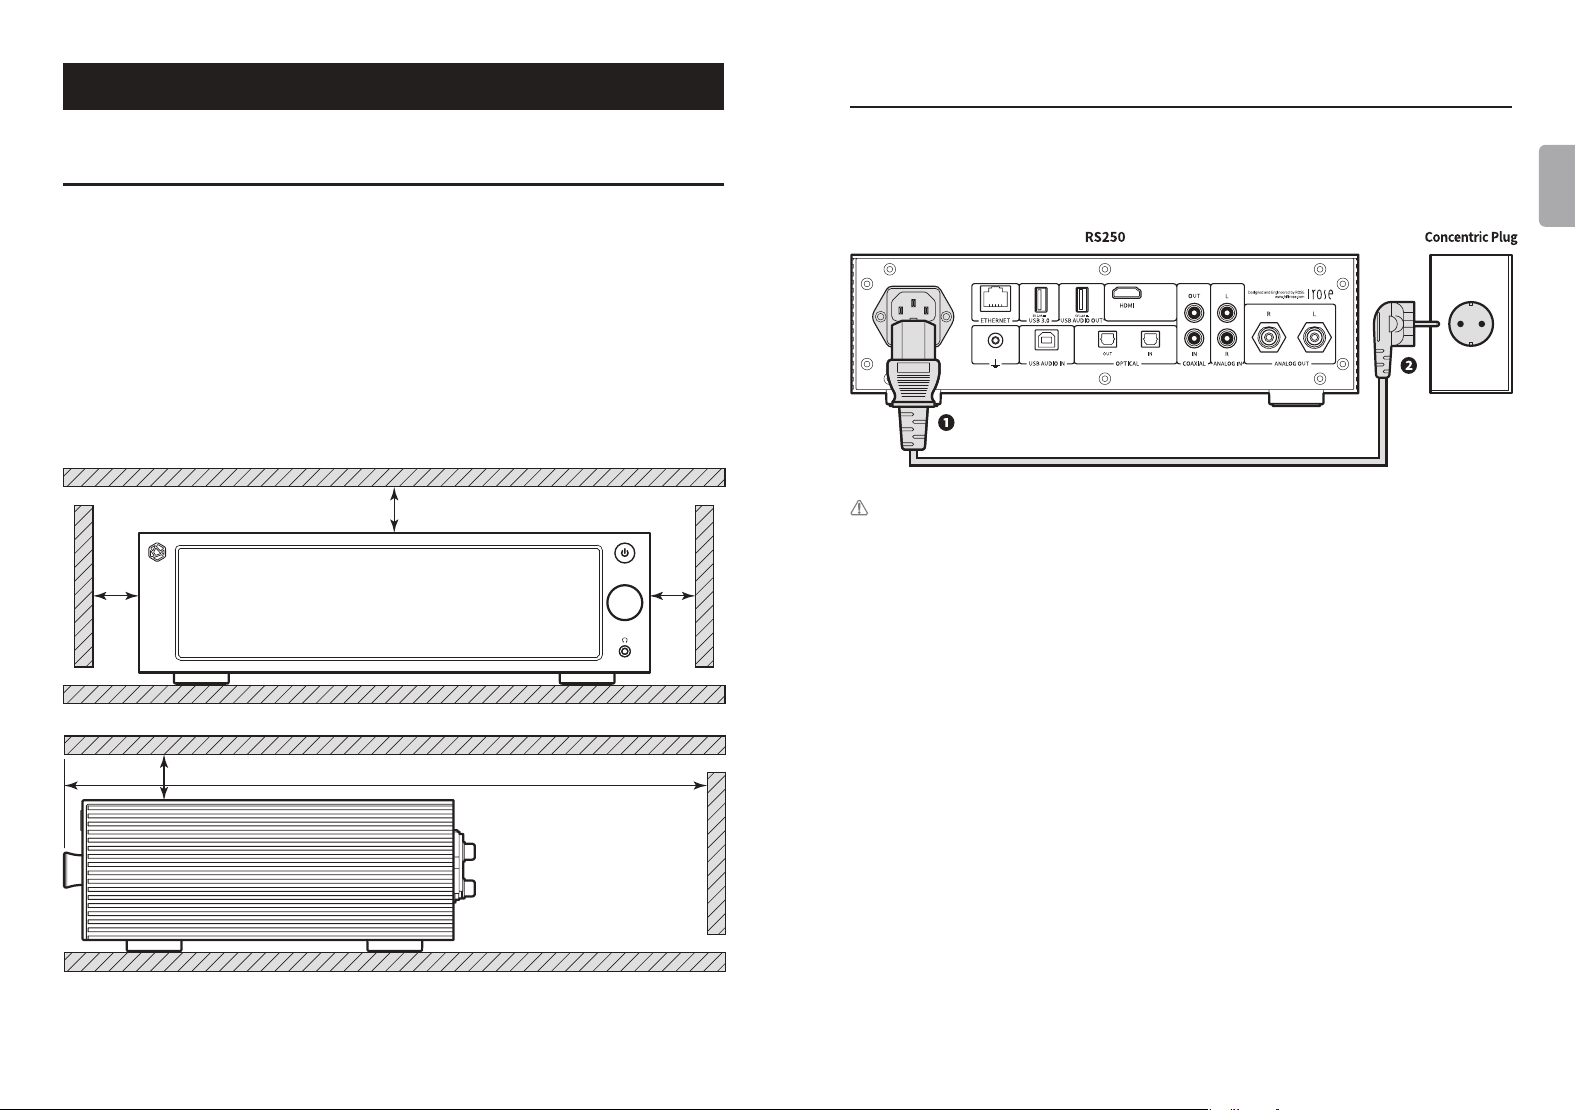
1. Product Design Direction and Installation Location
• This product is designed for proper use on a table or shelf.
• The product may malfunction due to high heat in the winter or summer.
(Operating temperature : 0℃ ~ 40℃ / Storage temperature : -10℃ ~ 50℃)
• If the installation space is small, make sure to provide adequate ventilation.
You can ensure a longer life cycle for electronics by providing proper ventilation
and taking care to avoid excess heat. Do not install this product directly above
devices that produce heat, such as power ampliers.
• The gure below show the minimum ventilation requirements.
• Maintain a gap of at least 2.5cm on each side of the product to prevent
restrictions on air ow.
• Ensure a depth of 35cm for airow and cabling.
25mm
25mm
25mm
25mm
350mm
2. How to connect the Power Cord
• This product contains a removable power cord. Please connect the power cord
after all other connections are completed. First, connect the power cord to the
product’s AC inlet port, and then connect it to an outlet.
Caution :
When disconnecting the power cord, always disconnect the outlet rst.
- 20 - - 21 -
ENGLISH
3-2. Connecting the Analog Input Port and the Audio Device
• As shown in the gure below, you can connect the analog output of an external
device such as a CD player to the analog audio input of this product.
• When using the analog audio input as a source, you must switch the input
source to ‘ANALOG In’ in the Input/Output Settings. Input/Output Settings
can be changed from the home screen, settings, settings of the ROSE Connect
Premium App, and the remote controller.
3. How to properly connect the Rear Port and the Cable
3-1. Connecting the Analog Output Port and the Power Amplier or AV Receiver
• You can connect the analog audio output of this product to the Analog input of
a power amplier or AV receiver as shown below.
• You can select ‘Variable’ or ‘Fixed’ through the pre-out level settings to adjust
the volume of the analog audio output of this product.
Caution :
Before connecting the product to the power amplier, set the volume
to mute or below step 5 and then connect it using an RCA cable.
When music is being played on this product with the volume turned up,
a loud shock sound may occur when the cable is connected.
- 22 - - 23 -
ENGLISH
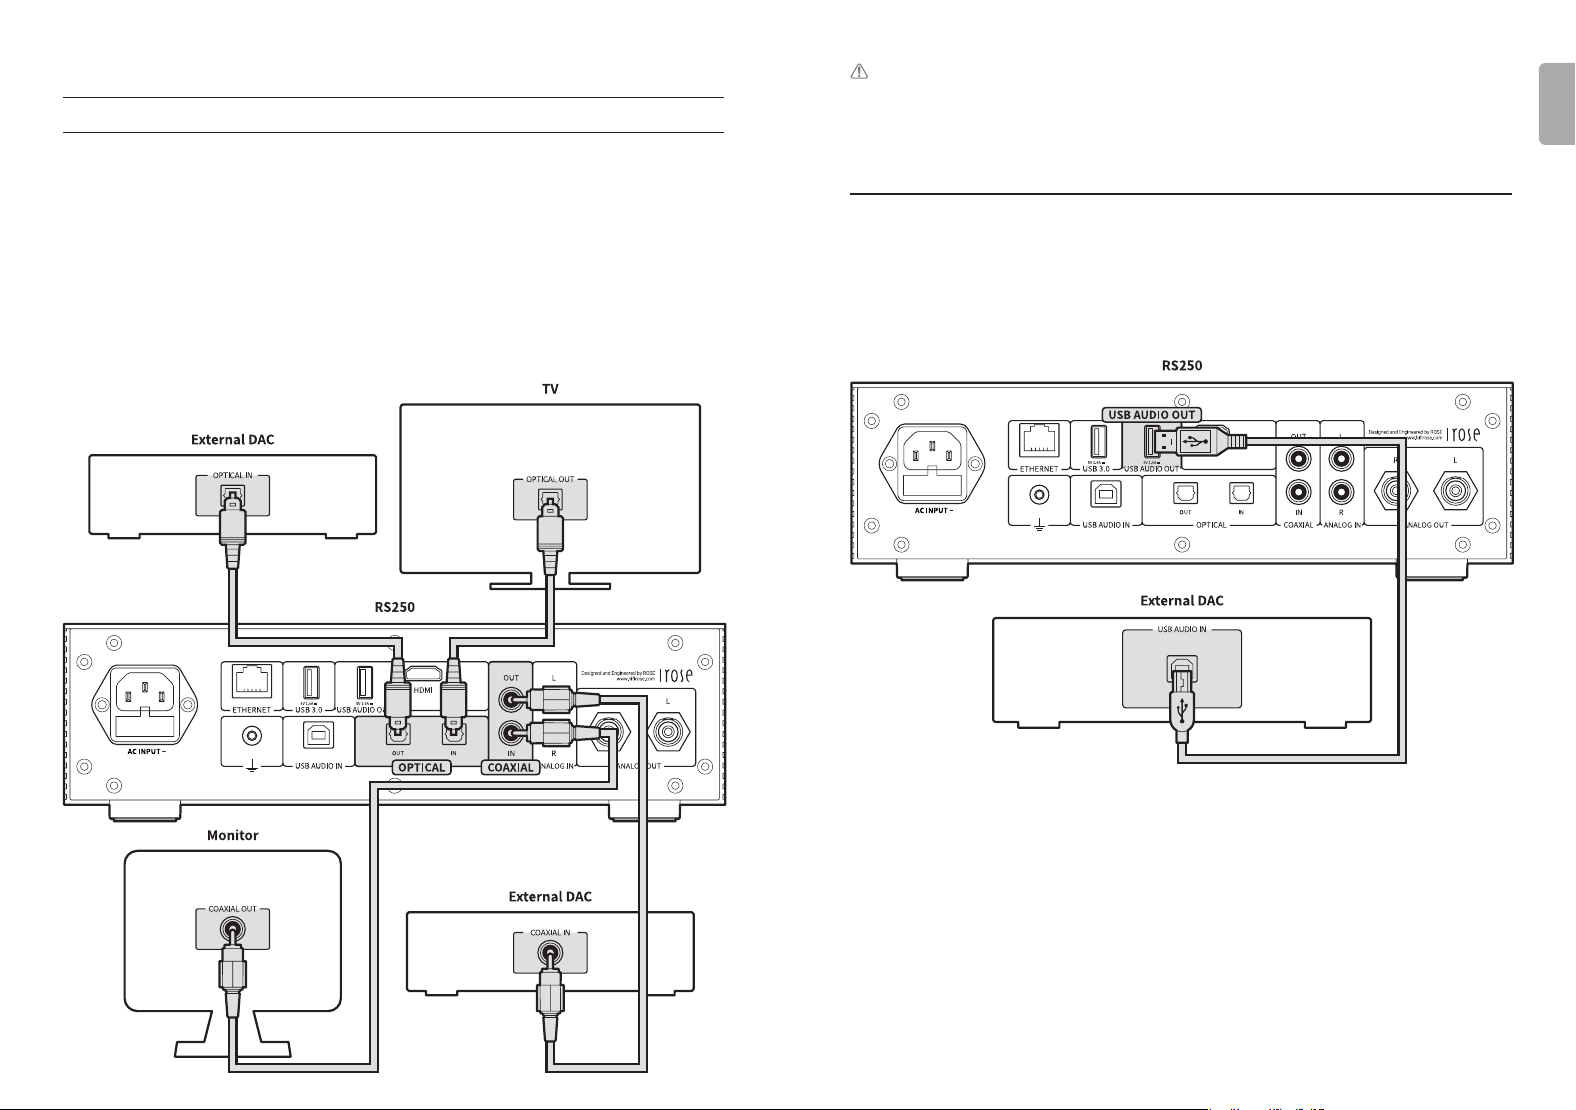
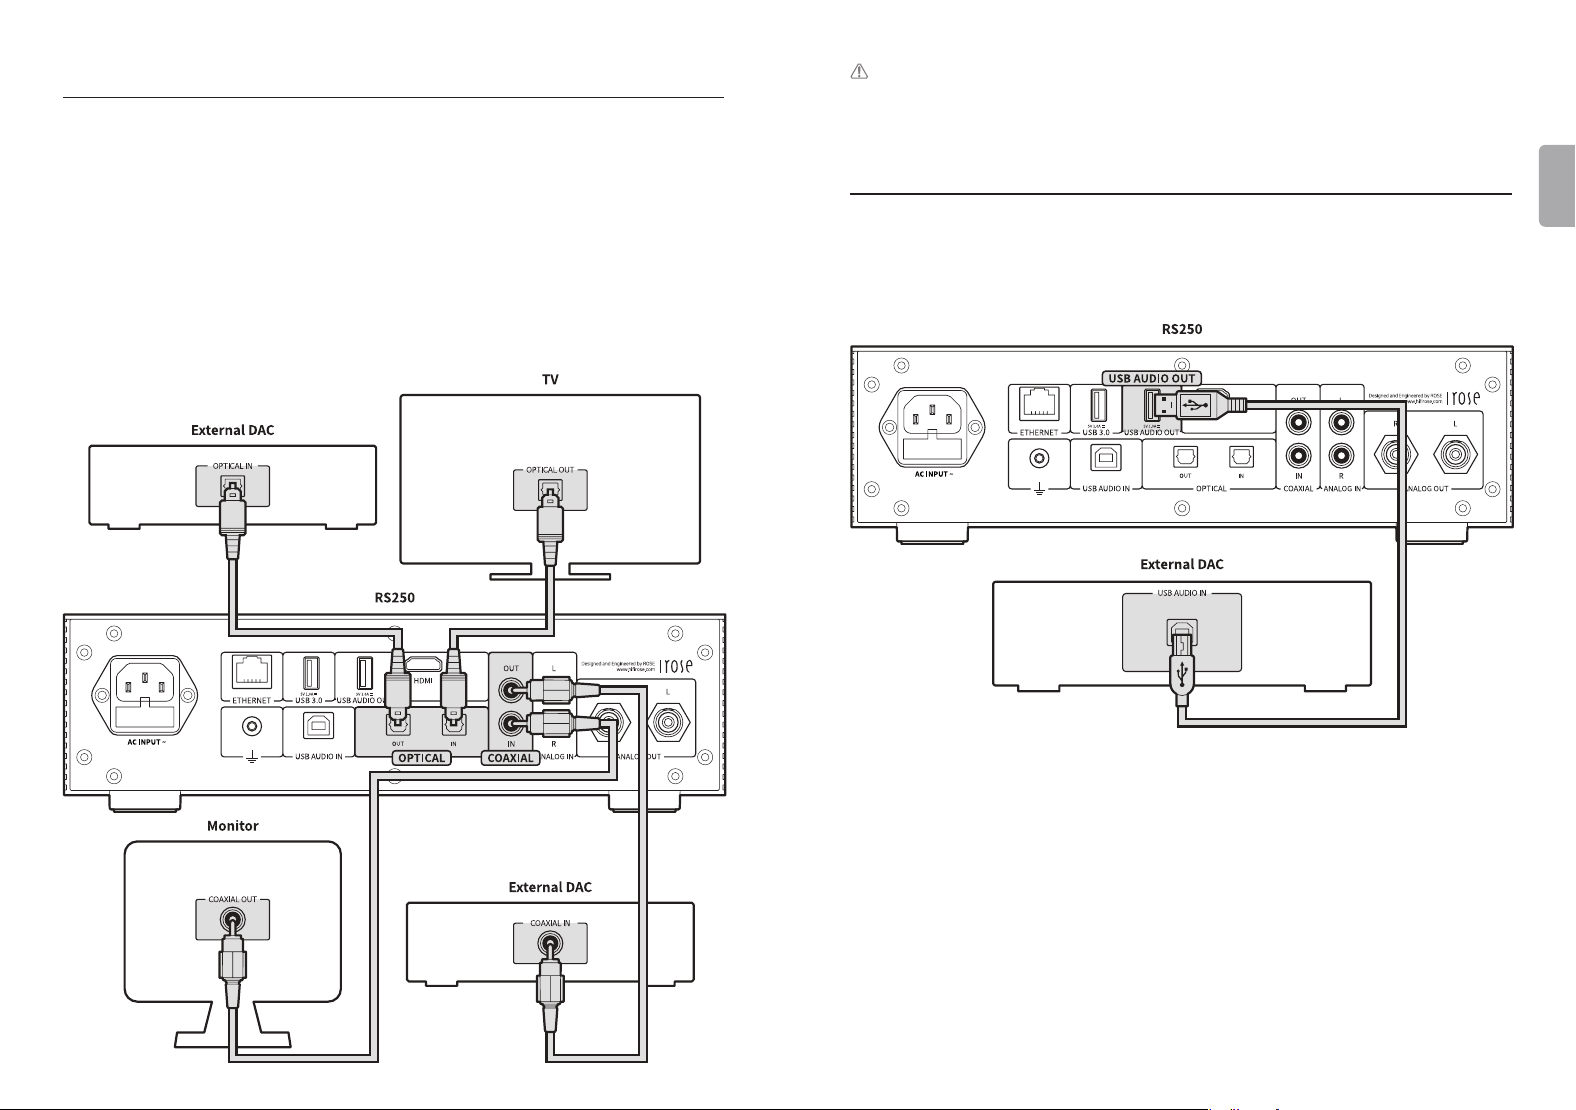
3-4. Connecting the USB Audio Output Port and the External DAC
• This product has a USB Audio Out terminal that allows you to connect a
separate USB DAC.
• After connecting an external USB DAC to the USB Audio Out terminal of the
product, you must activate the output device as an external USB DAC in the
Input/Output Settings.
※
This product complies with the USB Audio Class 2.0 standard.
3-3. Connecting the Digital Input/Output Port and Audio
Device(TV or Digital Input/Output Support Device)
• As shown in the gure below, you can connect the Digital input/output of an external
device to the Digital(Optical/Coaxial) input/output port of this product to use it.
• This product can reproduce linear PCM signals with sampling frequencies of
44.1kHz, 48kHz, 88.2kHz, 96kHz, 176.4kHz and 192kHz.
• When using a Digital input, you need to switch the input source to ‘Optical In’ or
‘Coaxial In’ in the Input/Output Settings.
• To export Digital output, the output mode must be set to ‘Optical Out’ or
‘Coaxial Out’ in the Input/Output Settings.
• Input/Output Settings can be changed from the home screen, Settings, Settings
of the ROSE Connect Premium App, and the Remote Controller.
Caution :
Do not input signals other than linear PCM signals such as Dolby Digital,
DTS, AAC, etc., into this device. Doing so may generate noise and damage
the speaker.
- 24 - - 25 -
ENGLISH
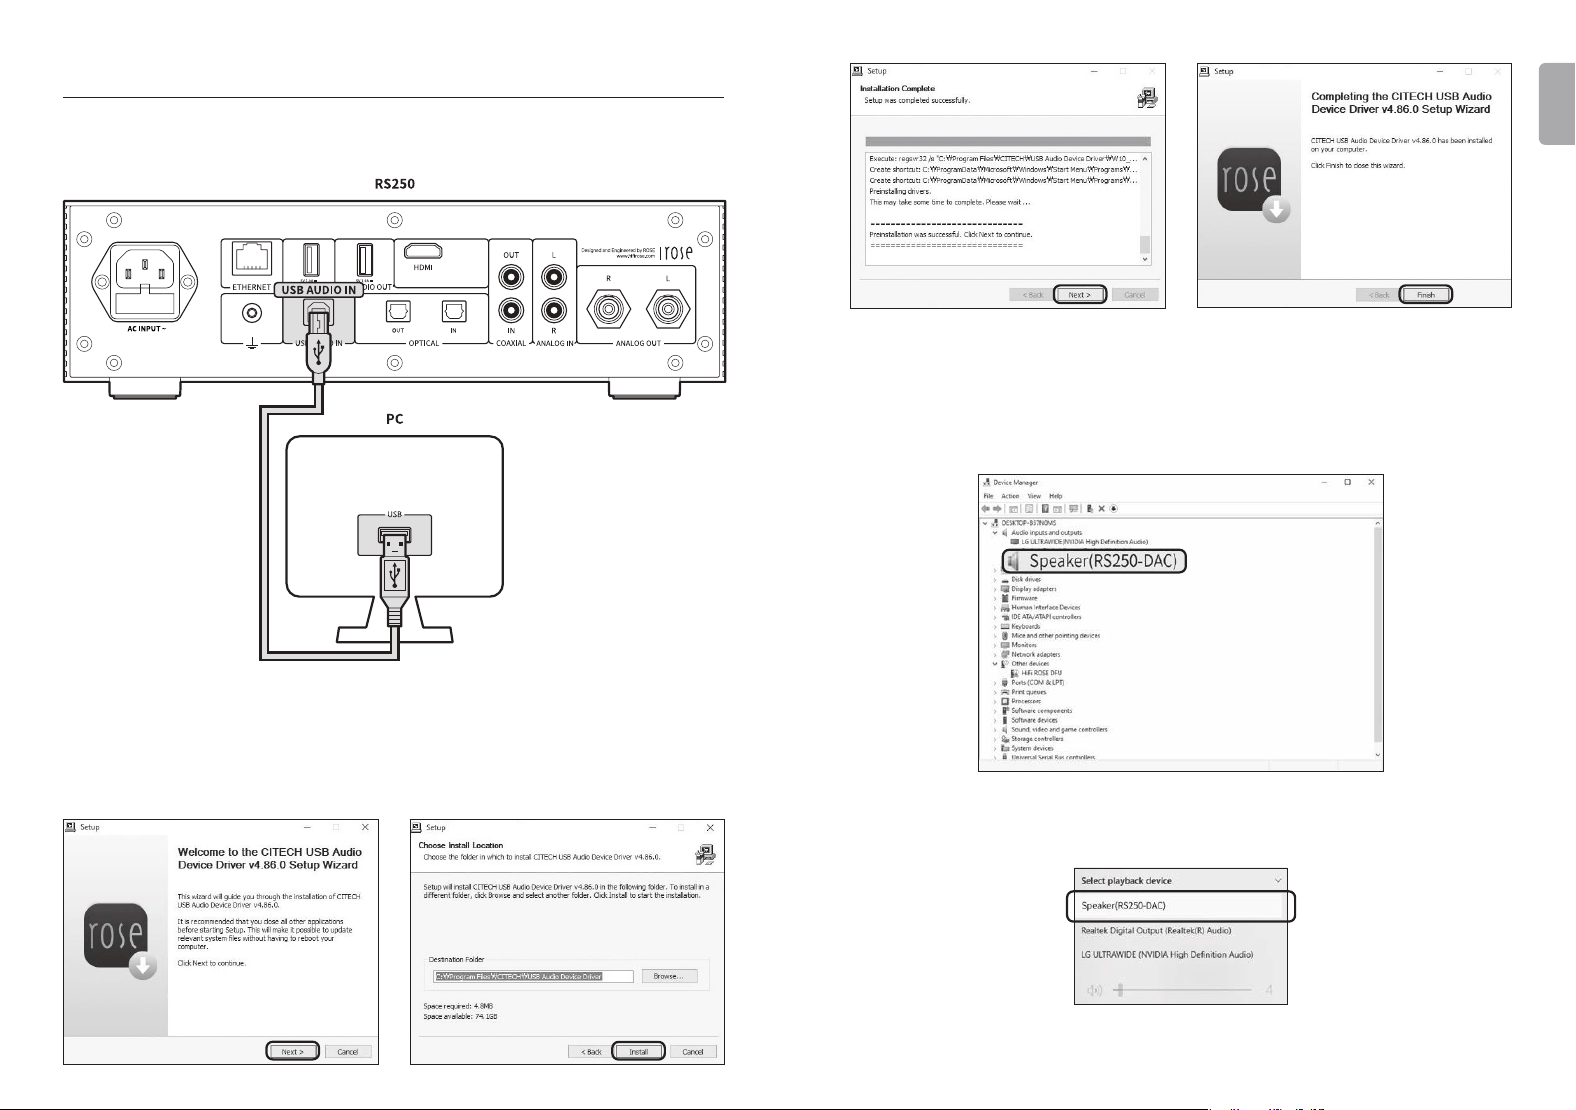
3-5. How to connect the USB Audio In
• Connect the device as shown in the gure below.
• 3-5-1. Download Rose_UsbAudio_v4.86.0.zip from the ROSE website
(www.hirose.com).
• 3-5-2. When you unzip the downloaded Rose_UsbAudio_v4.86.0 le and run
Rose_UsbAudio_v4.860.exe, a screen will appears as shown in the image below.
Select Next.
• 3-5-3. Reboot after installing the USB Audio Sound and Universal Serial Bus
Controller.
• 3-5-4. After driver installation is complete, when you switch the source to
‘USB In’ in the Input/Output Settings, the RS250-DAC will appear on your PC as
shown below.
• 3-5-5. Once you set the sound device to RS250-DAC in the system tray area of
your PC, the USB In is ready for use.
- 26 - - 27 -
ENGLISH
4. External Memory(USB) and SATA Storage
• This product can connect to USB and SATA storage devices.
• When connecting a storage device using the SATA method, it is recommended
that you use an SSD.
• USB storage devices are compatible up to 10TB and SATA storage devices up to
4TB.
※
SSD must be purchased separately and only products of 7mm thickness can be
used.
5. How to connect an SSD
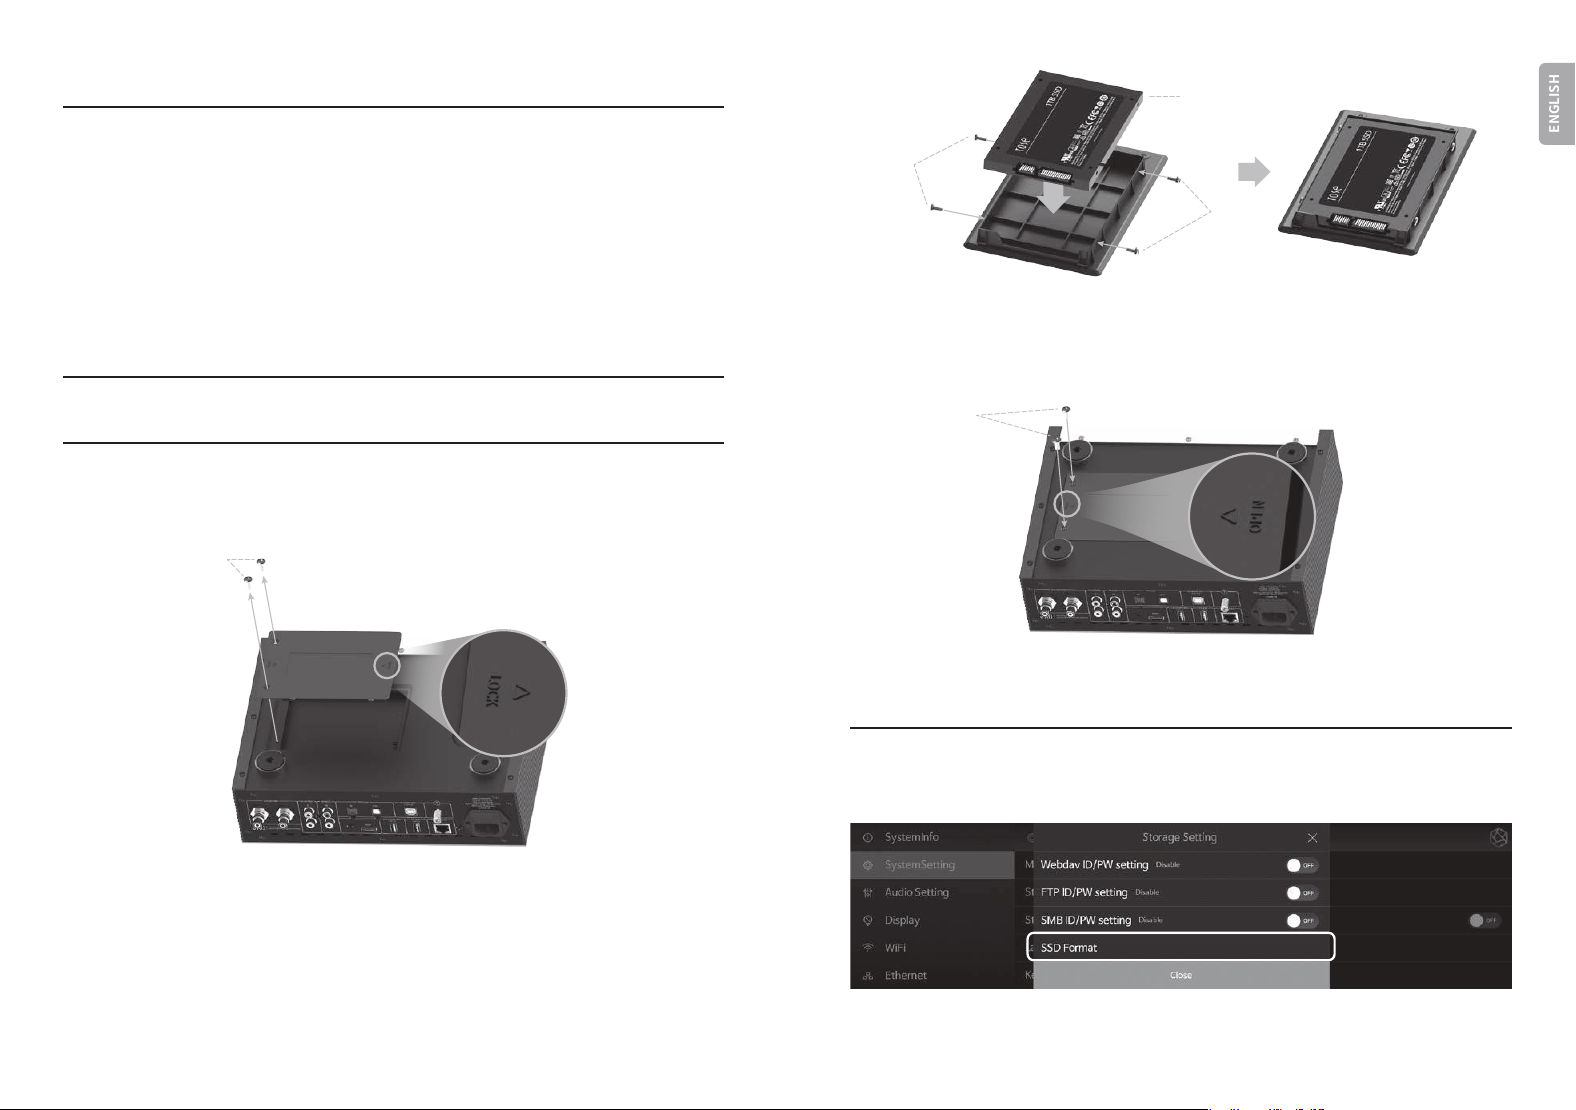
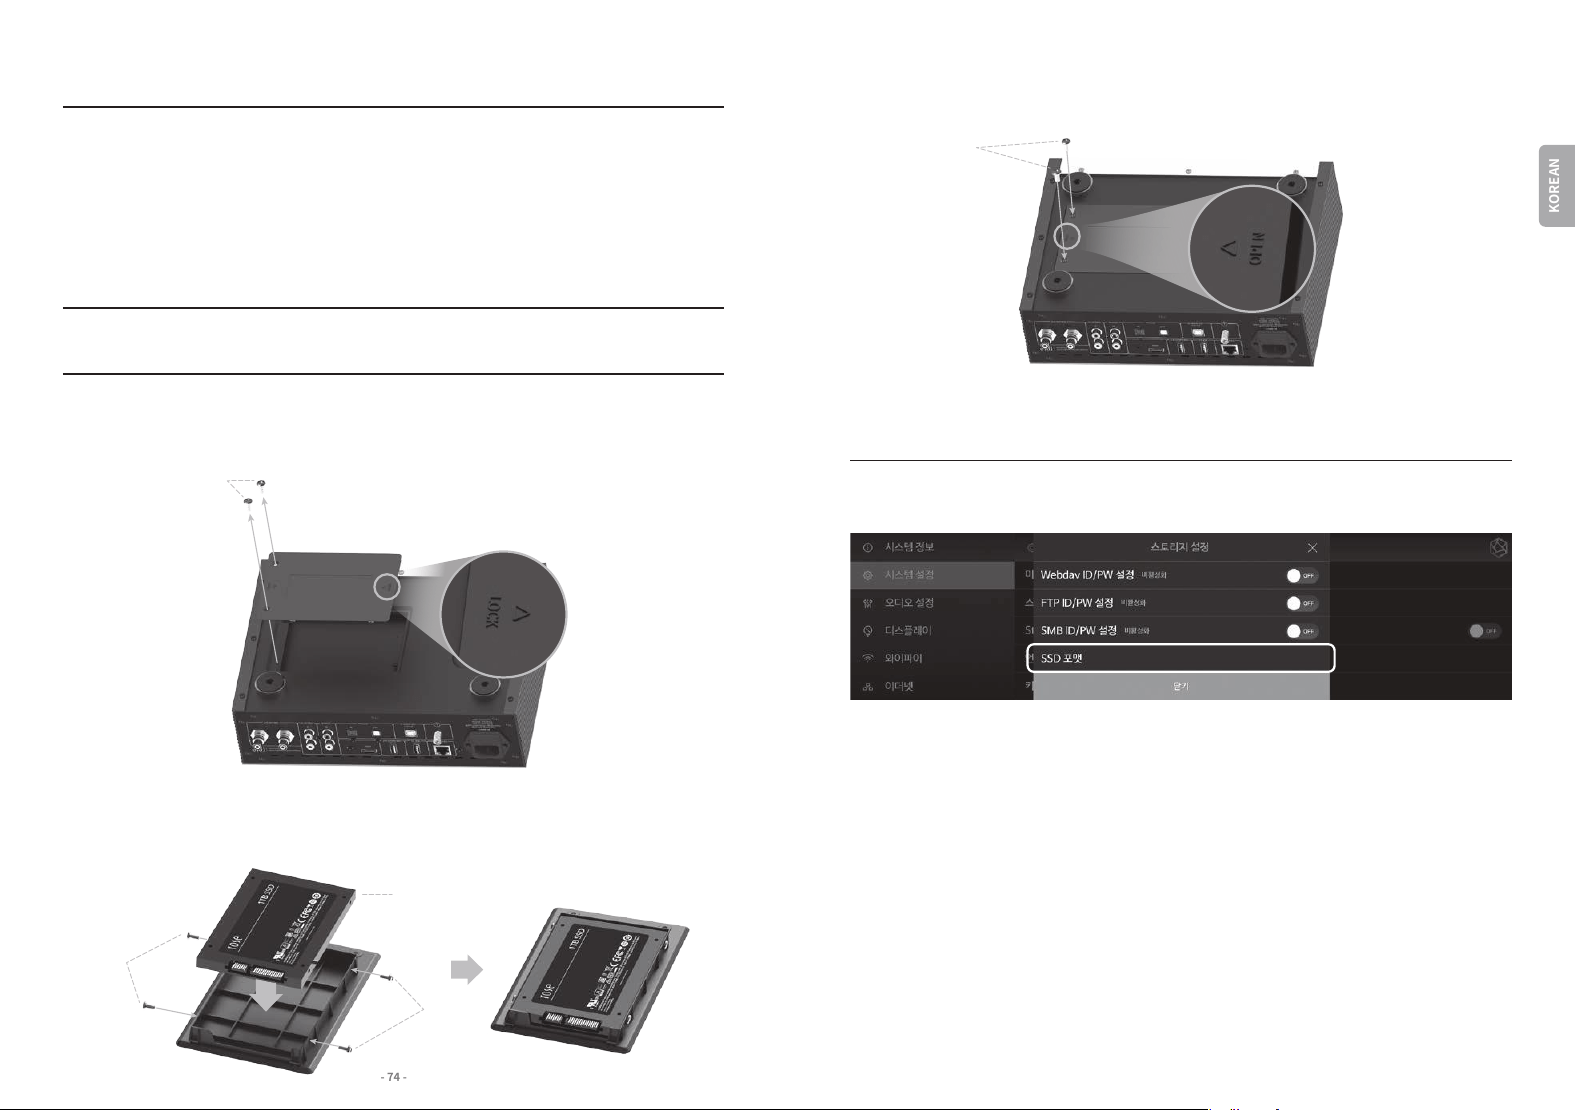
5-1. How to insert the SSD
• 5-1-1. Remove the SSD Cover Screws(2pcs) on the bottom of the main body.
• 5-1-2. Remove the SSD Cover by pushing on the OPEN indicator.
• 5-1-3. Set the SSD to the connection port on the SSD Cover.
• 5-1-4. Fix the SSD to the SSD cover with the SSD Mounting Screws(4pcs).
5-1-1.
5-1-2.
5-1-3.
5-1-4.
7mm SSD
5-1-4.
5-2. How to format After Installing the SSD
• You can format any SSD connected to this product from the SSD Format menu
under System Settings.
• 5-1-5. Assemble SSD cover with the SSD on the main body.
• 5-1-6. Re-x the screws(2pcs) after pushing on the LOCK indicator.
5-1-5.
5-1-6.
- 28 - - 29 -
ENGLISH
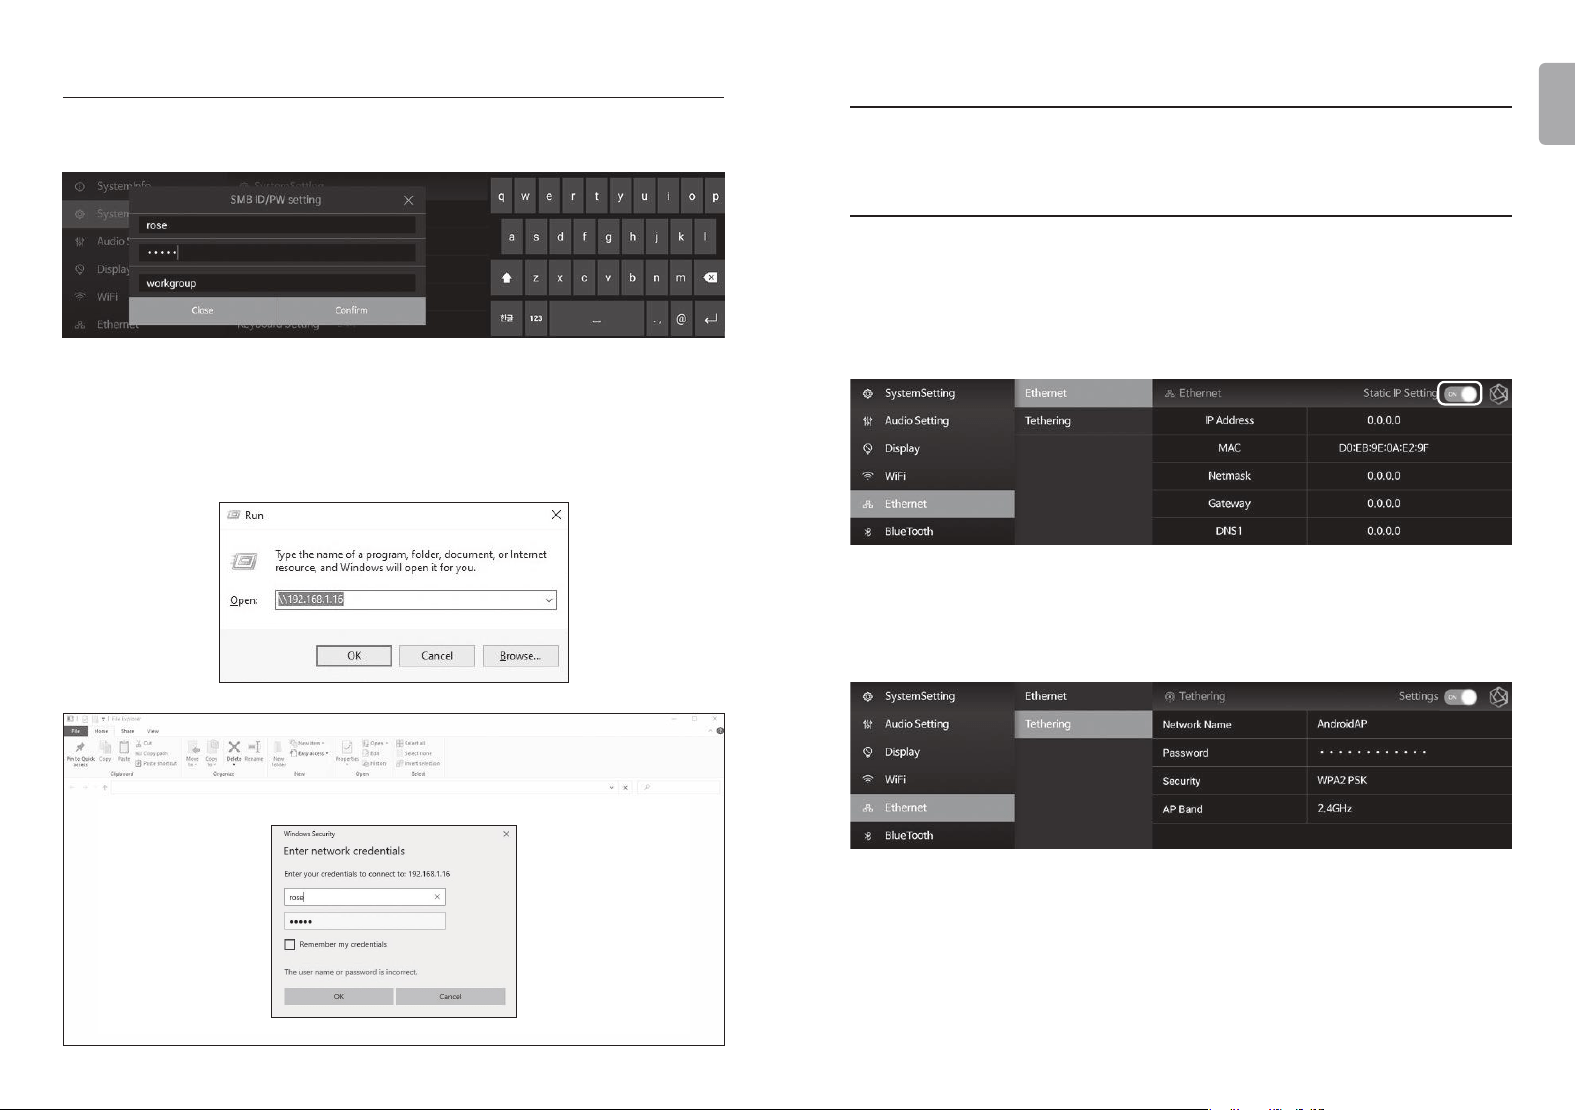
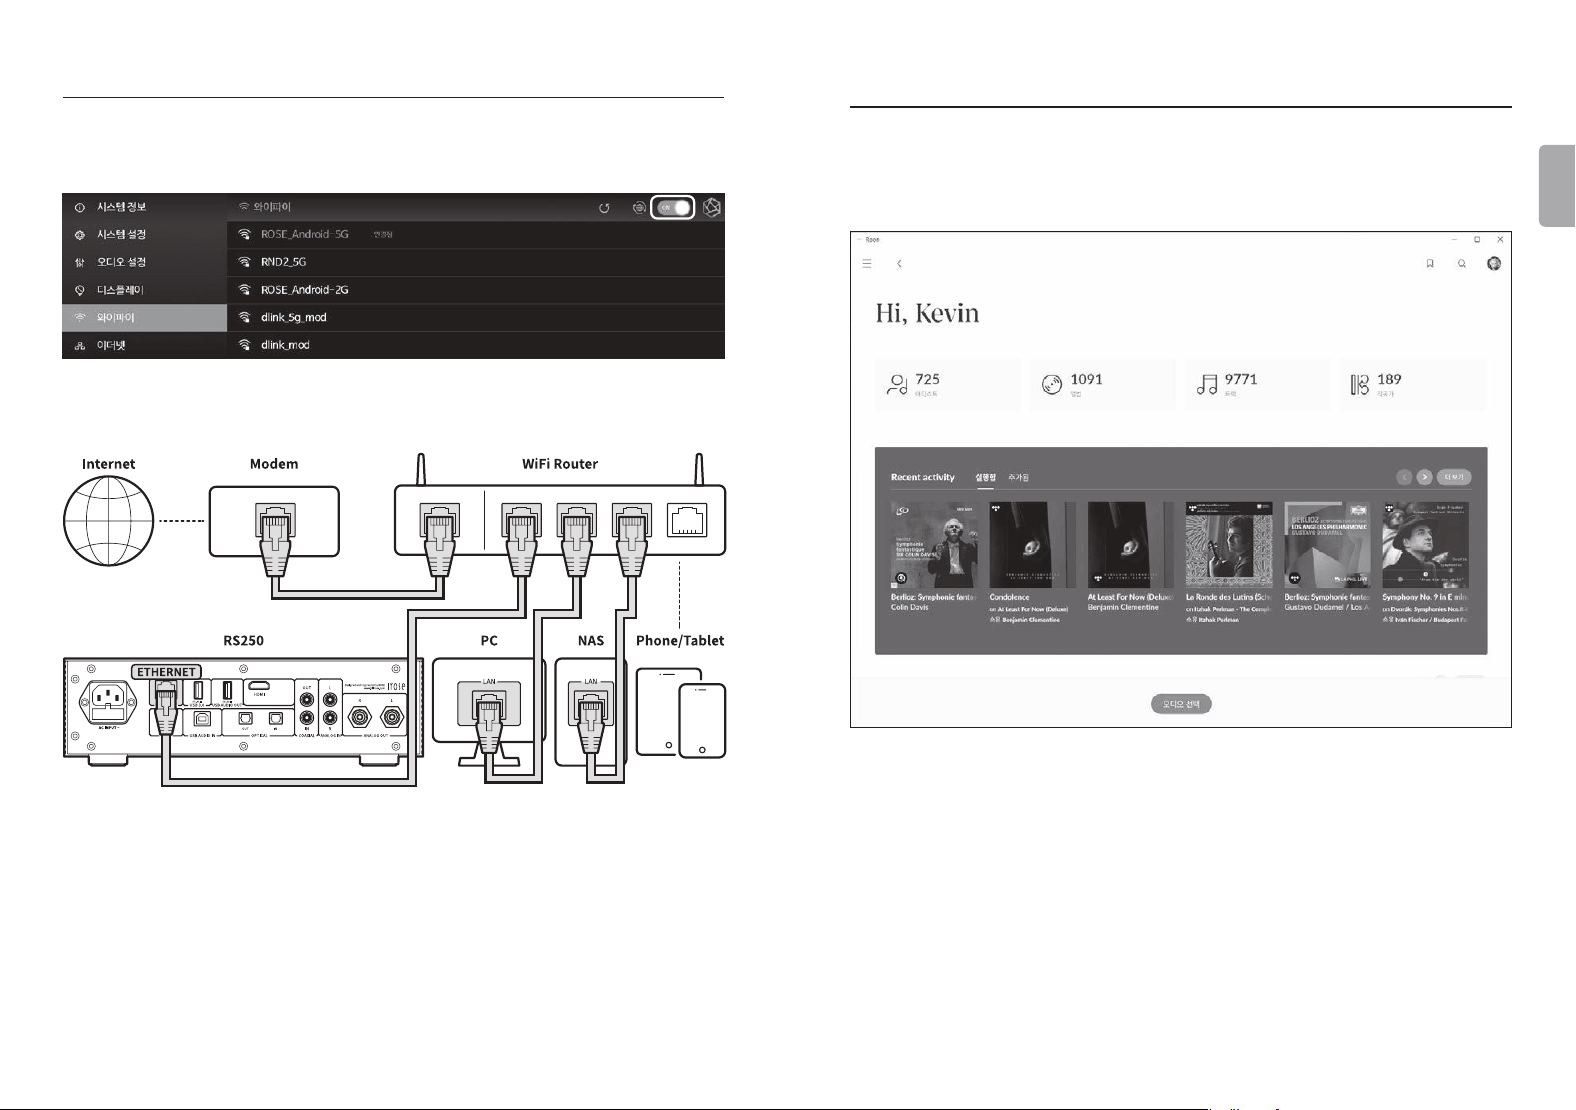
6. Network Connection
• This product can be connected to a network via a wired or wireless connection.
6-1. Ethernet Connection(Wired)
• After connecting a LAN to the rear Ethernet port, select ON from the Settings -
Ethernet menu to connect to the network.
• When connected normally, the IP address and other information are received
automatically.
• 6-1-1. After connecting the Ethernet cable, you will be able to use this product
as a WiFi hotspot. After entering the network name and password, you can
enable the hotspot function to allow other devices to connect to this WiFi
hotspot using the password.
• After entering \\ROSE IP on your PC, enter the ID/PW that you set up for the
SMB. Any storage connected with this product will appear and you will be able
copy the les directly from your PC.
※
To connect to the SMB of this product from a PC, both devices must be connected to
the same network.
5-3. How to copy les over the Network
• Set the SMB ID/PW in Storage Settings under System Settings.
- 30 - - 31 -
ENGLISH
6-2. WiFi Connection(Wireless)
• When WiFi is turned On in the Settings - WiFi menu, currently available SSIDs
appears and the product connects to the network after one of the SSIDs is
selected.
※ Y
ou can remotely control this product by downloading and installing the ROSE
Connect Premium App available through the Google Play Store and App Store on your
smartphone.
※
To control this product on your smartphone(ROSE Connect Premium App), it must
be connected to the same network.(You can congure a single network using wireless
network extenders, bridges, etc.)
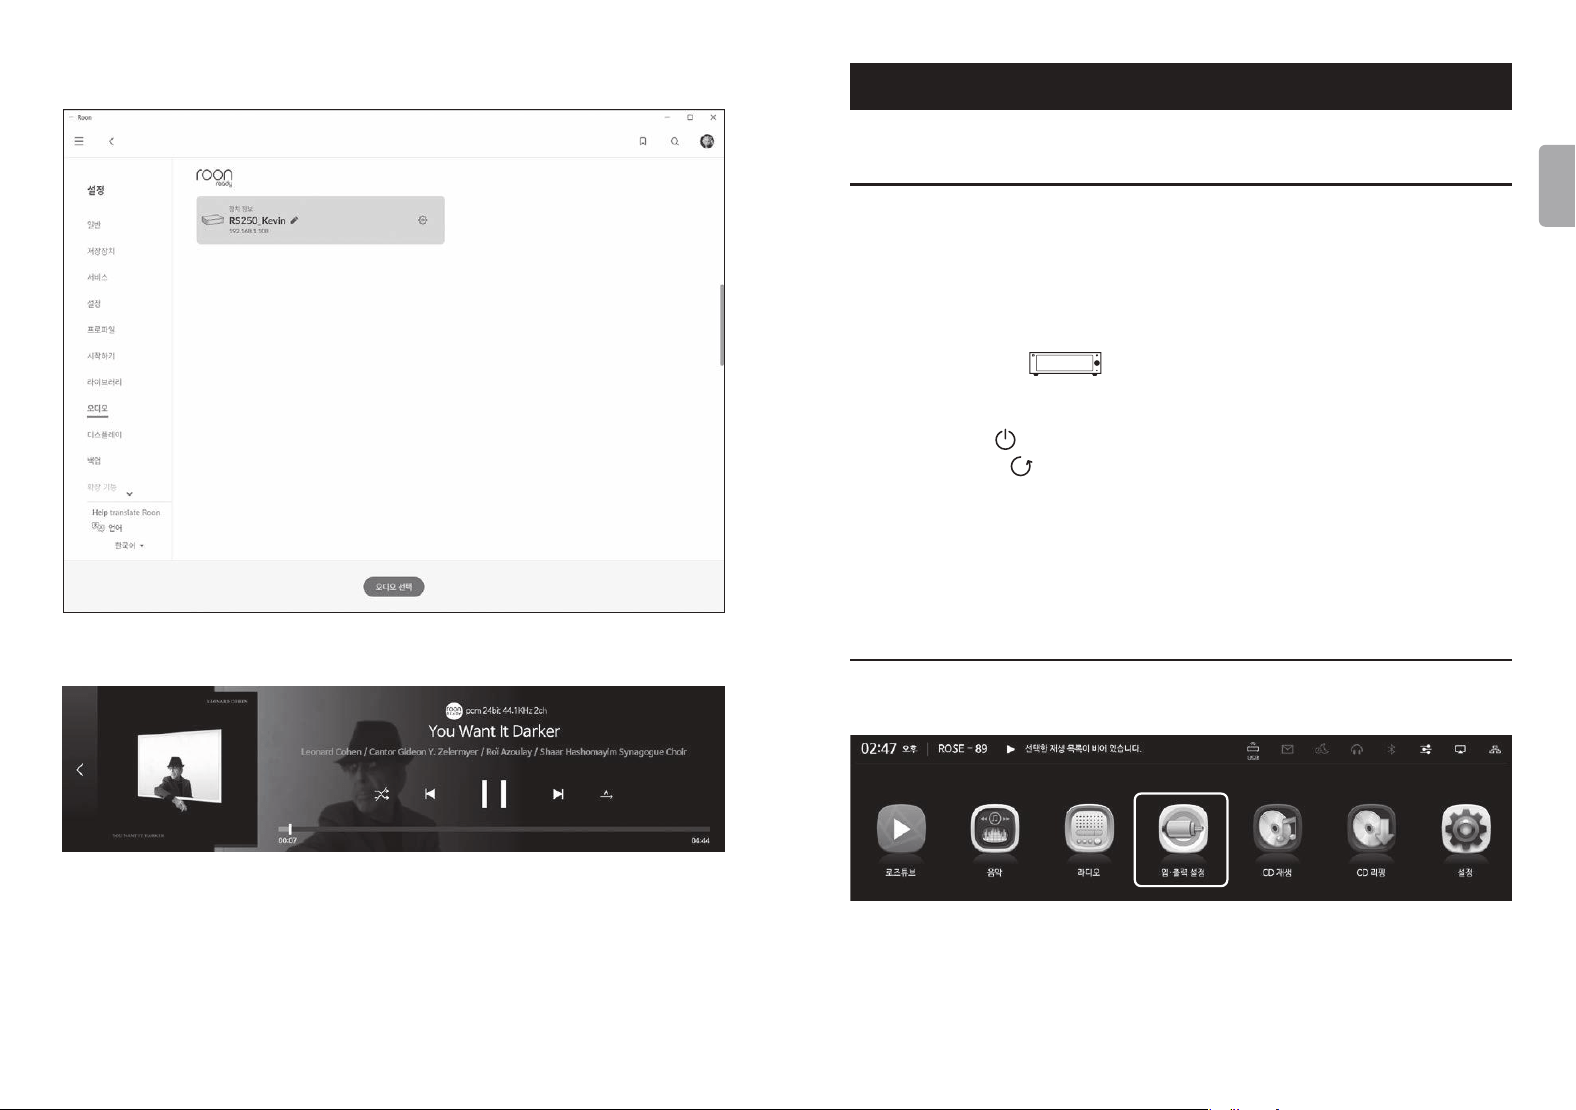
7. How to Connect Roon Ready
• To use Roon, rst access the website(http://roonlabs.com) and create an
account. Download Roon Core and install the software on your PC.
• Various tracks managed by Roon Core will appear.
- 32 - - 33 -
ENGLISH
• Select this product from ‘Select Audio’ under Settings - Audio.
• Once connecting with ROSE is completed, you can control and listen to the
sound source by running the music in Roon.
※
To control this product from Roon, it must be connected to the same network.
Initial Settings
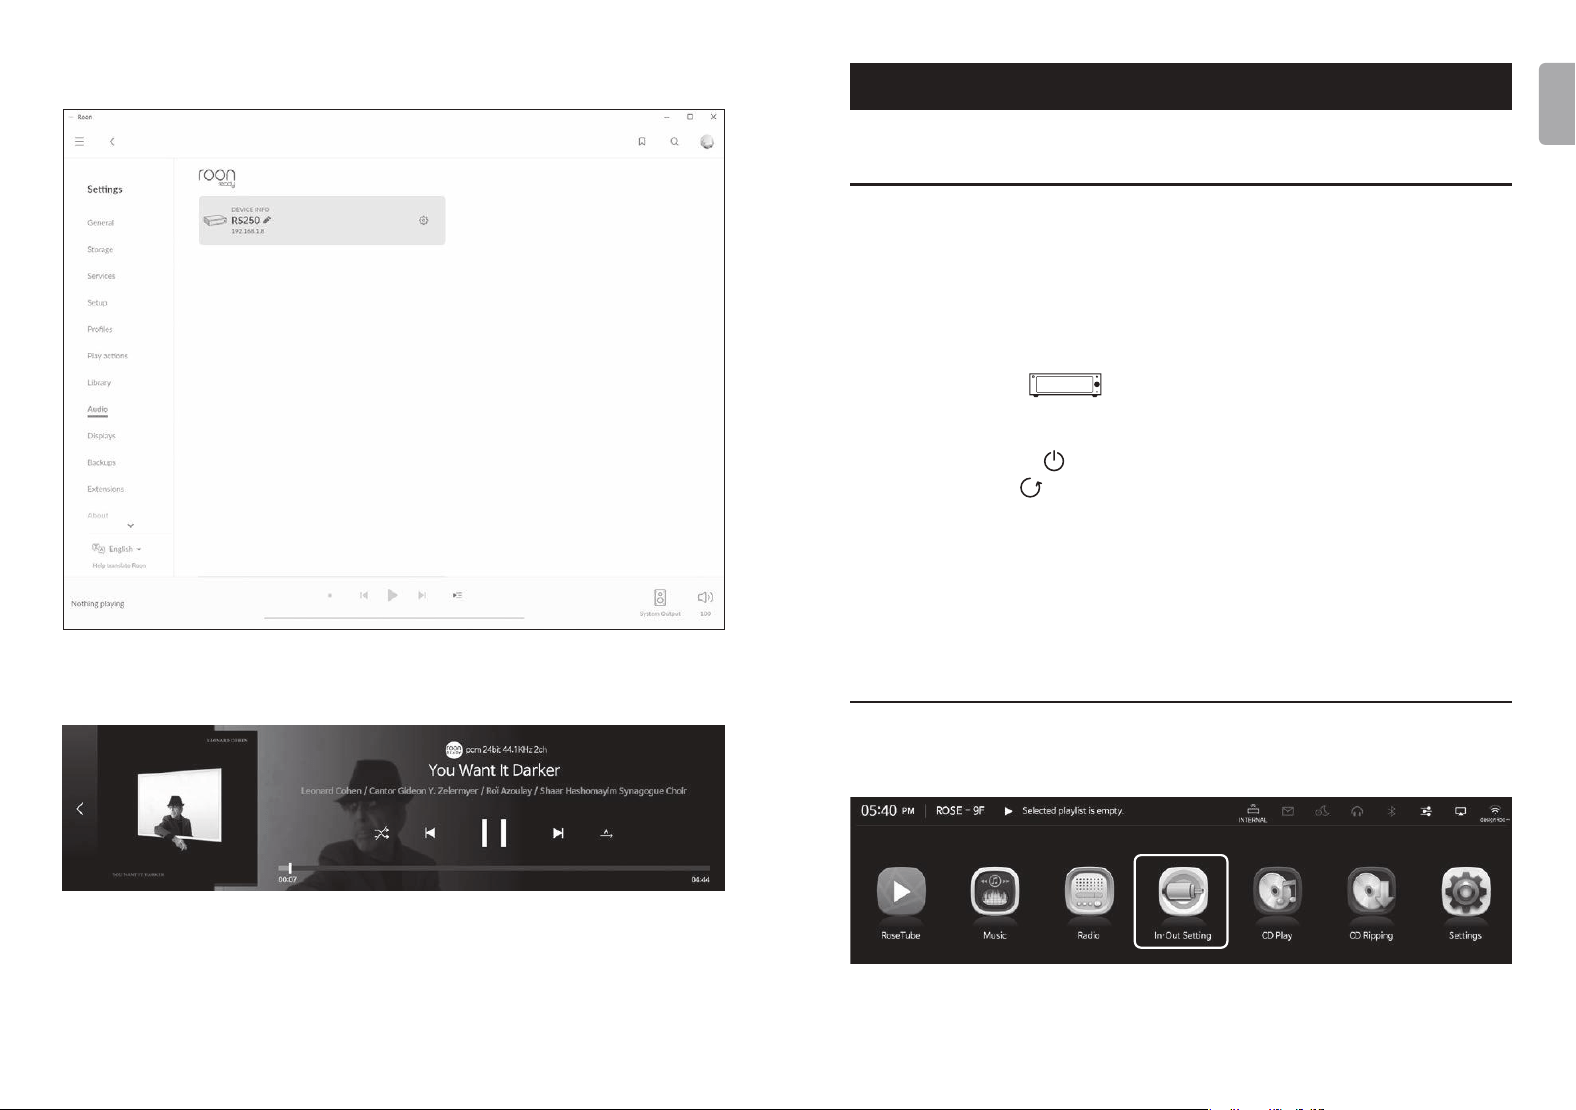
1. Power Button
• 1-1. You can turn this product on and o by pressing the power button briey.
1-1-1. When the power button is pressed briey, the product enters standby
mode when the power is on, or is turned on when the power is o.
1-1-2. If you press the power button during booting, the product will turn o.
• 1-2. Press the power button for 3 seconds to display the
[Screen OFF | Shutdown | Reboot] menu.
1-2-1. LCD OFF( ) : The sound is played and only the screen turns o.
If you press the power button again while the LCD is o, the screen turns on.
※
This function can only turn o the screen while the product is in use.
1-2-2. Shutdown( ) : The power will be turned o.
1-2-3. Reboot(
) : The product will turn o and on and then display the
home screen.
※
If you touch a screen other than the menu, it will be canceled.
• 1-3. Power button LED status : Screen on (LED OFF) / Screen o (LED ON)
• 1-4. Pressing the power button for 5 seconds will force a reboot.
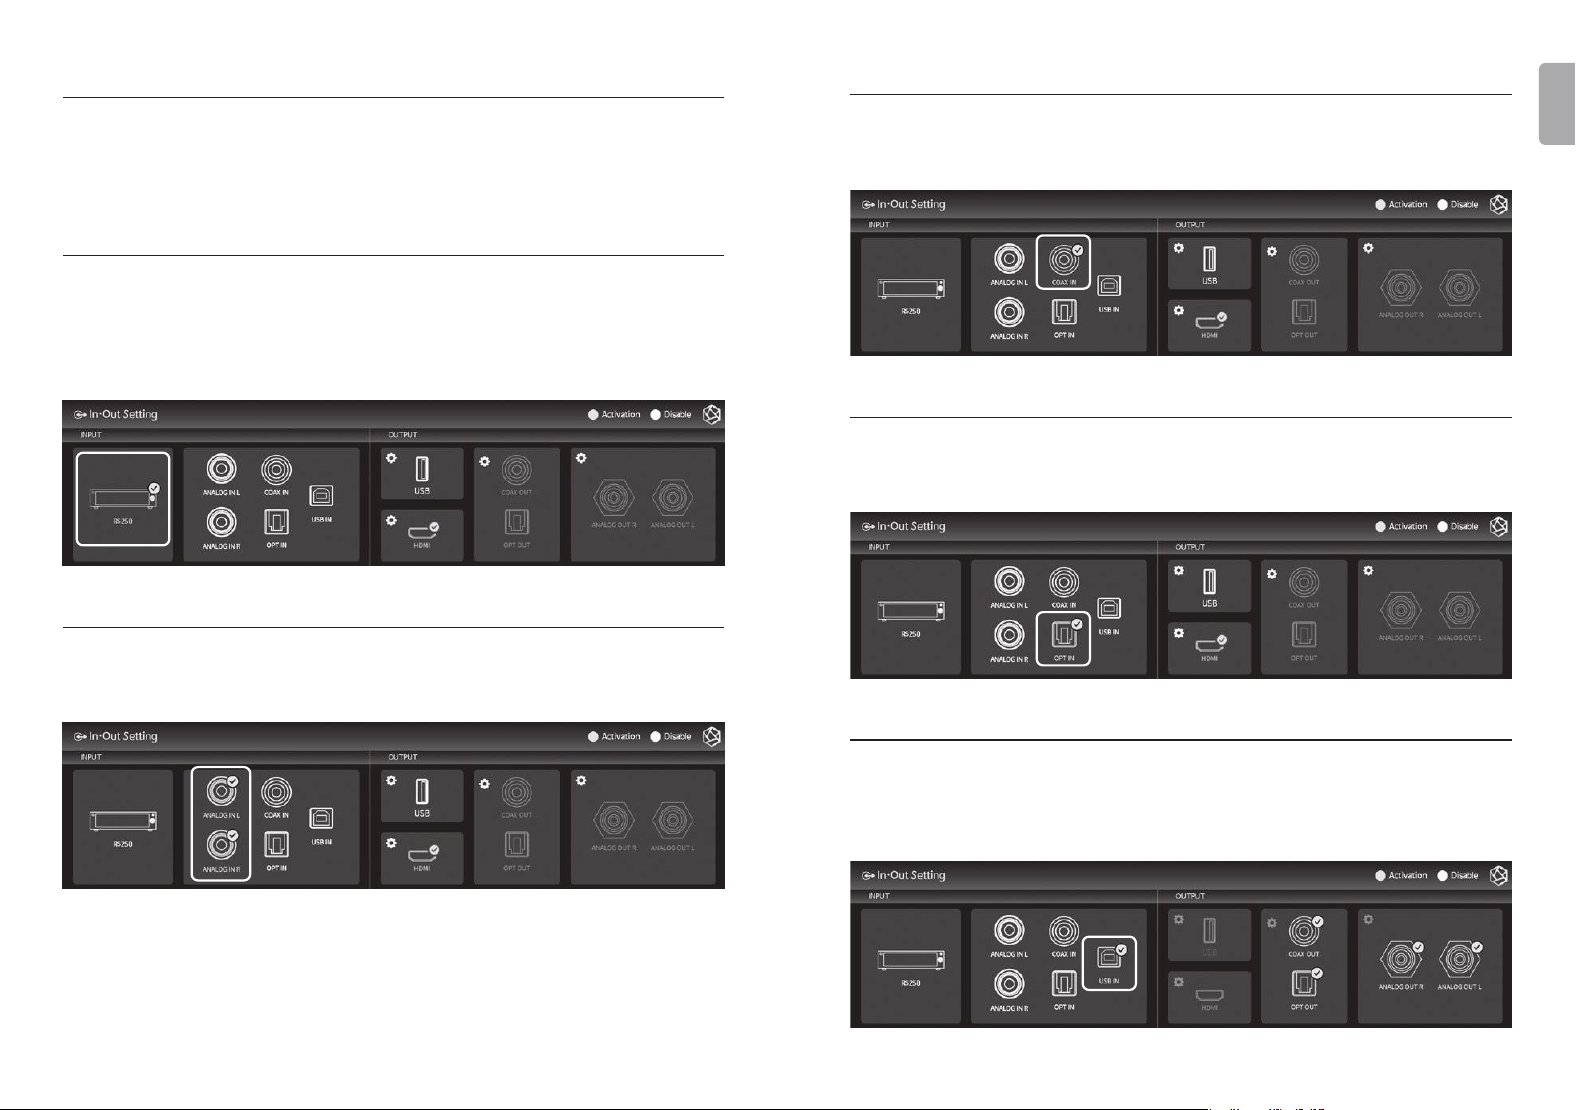
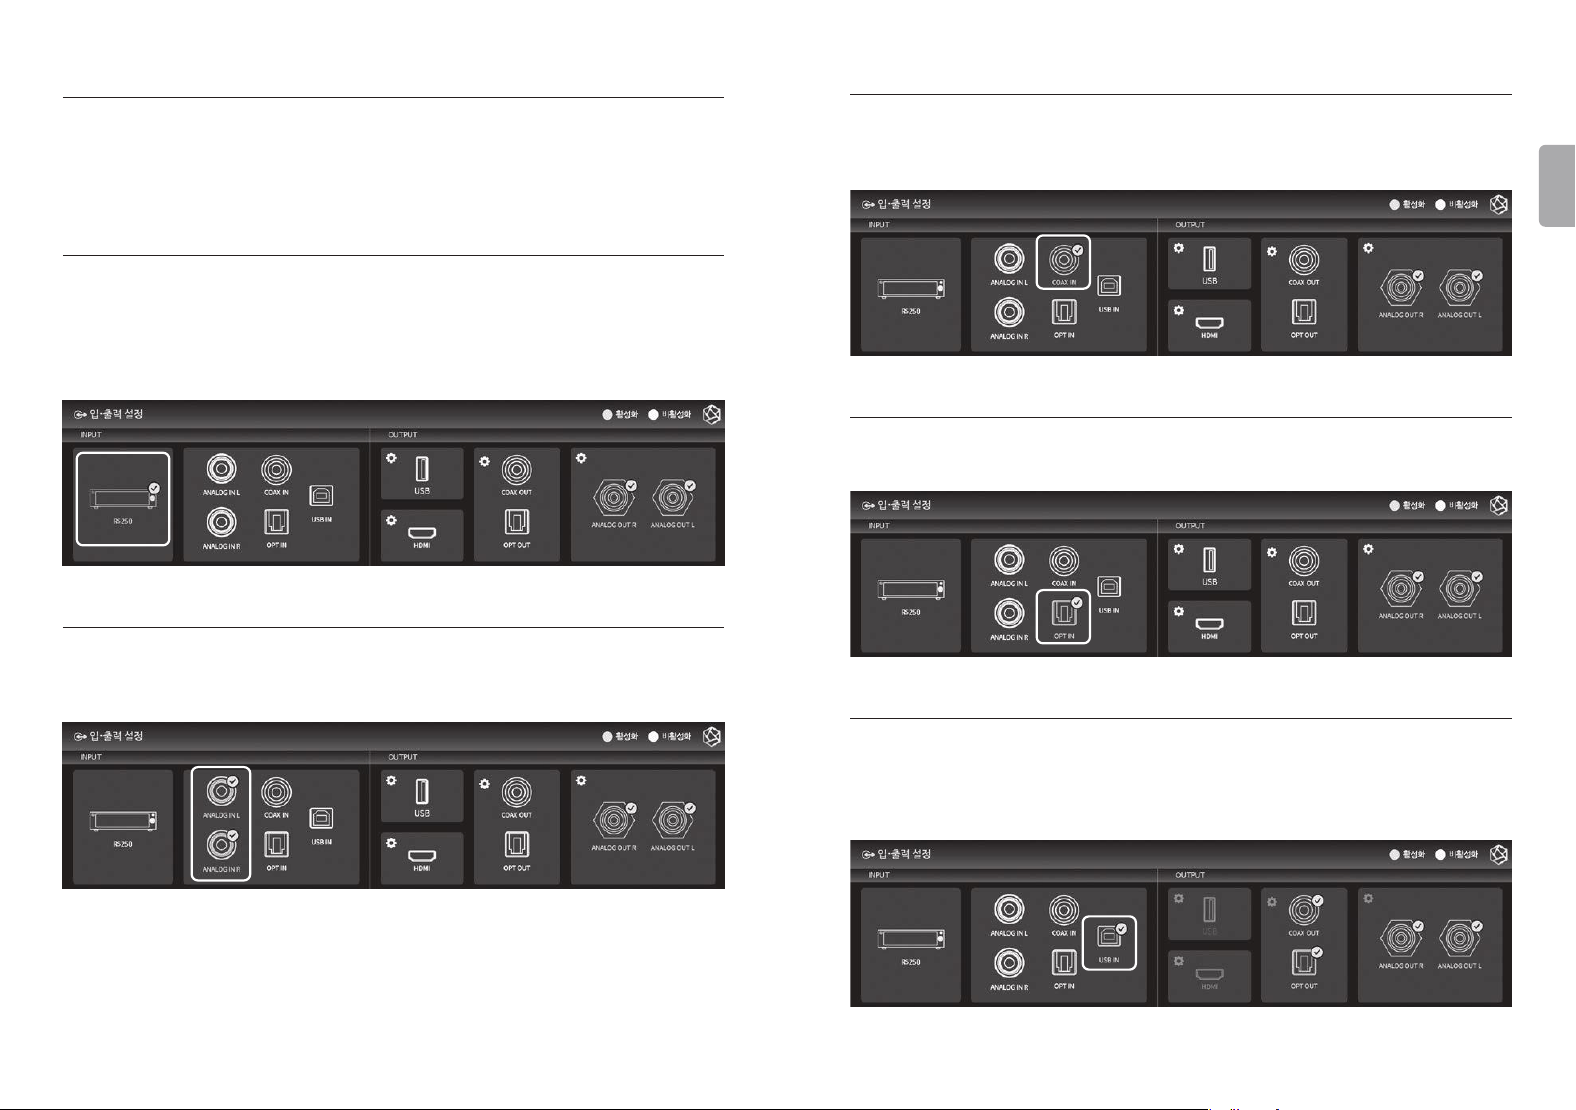
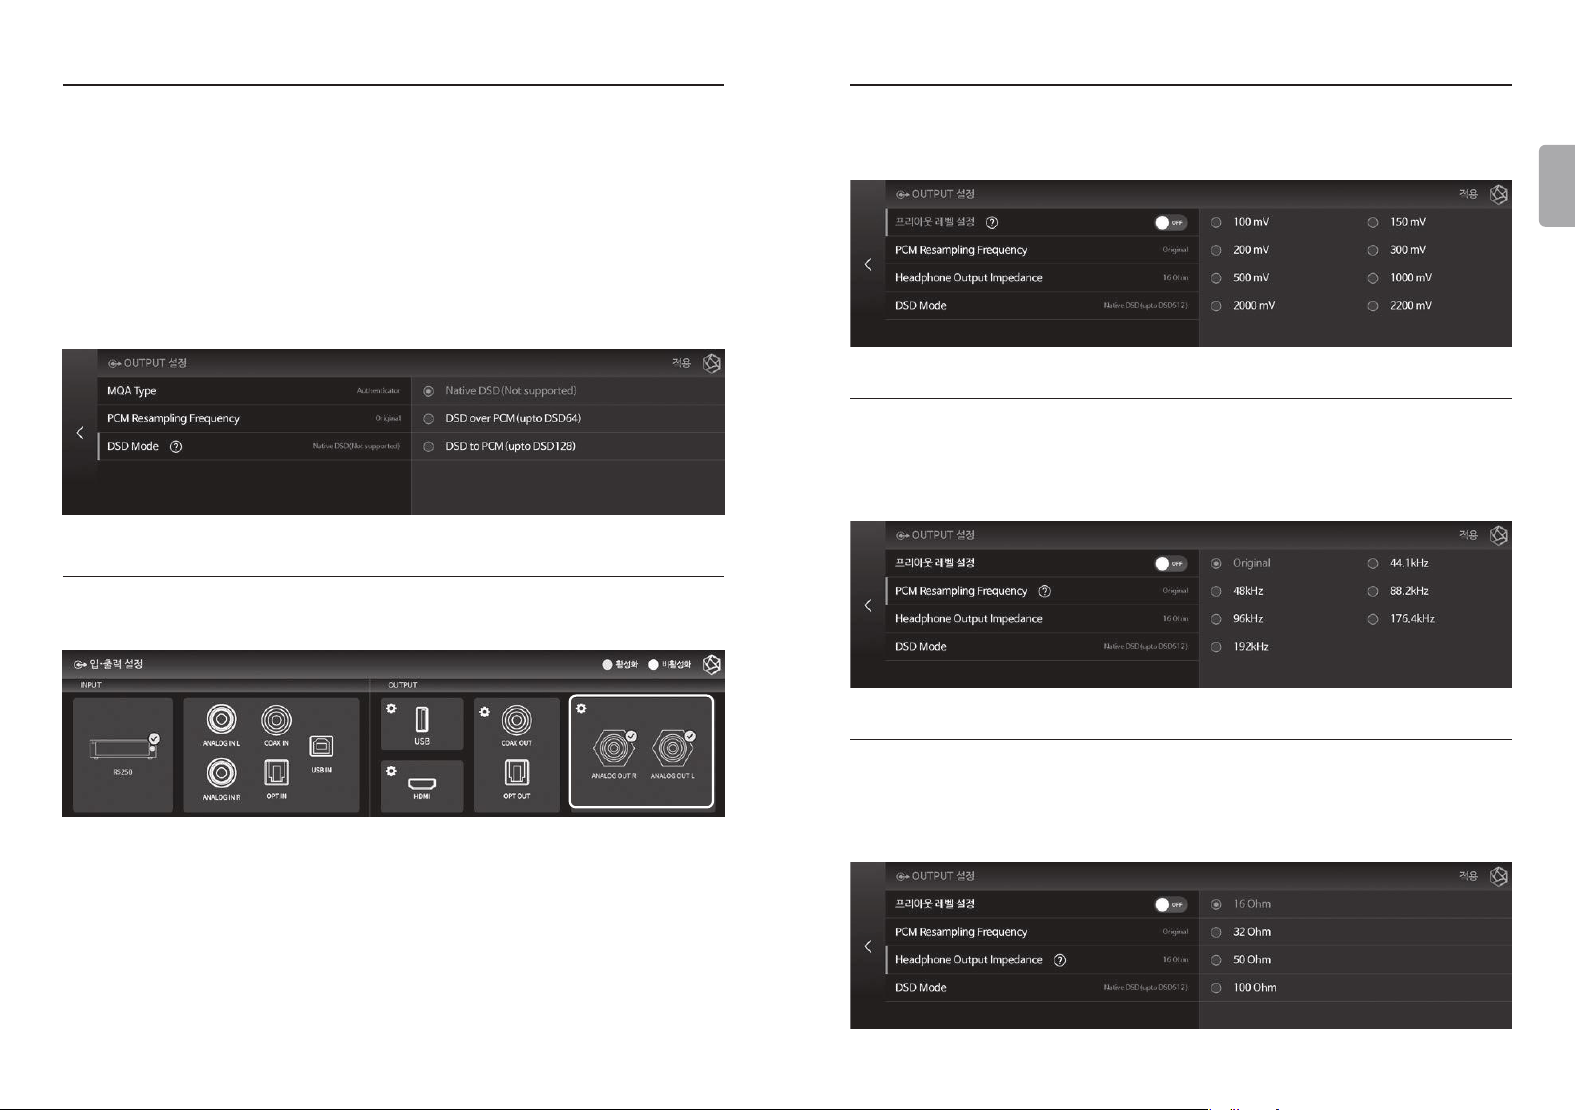
2. Input/Output Settings
• Select the ‘Input/Output Settings’ icon on the main screen to move to the
Input/Output Settings menu.
- 34 - - 35 -
ENGLISH
2-1. INPUT
• You can select an Input by selecting the icon from the INPUT Settings menu.
When activated, the icon color changes to gold and a check mark appears.
※
Only one input can be selected at a time.
2-1-1. RS250
• Set this product to Internal mode. Select this as the default setting mode at
initial startup when using a music or streaming source from a storage device.
• If an external input is in use, it is automatically selected if you play the music or
stream on the storage device.
2-1-2. ANALOG IN
• When using Analog Audio Input as a source, select the input source as ‘ANALOG
In’ under Input/Output Settings.
2-1-3. COAX IN
• When using COAX In as a source, select the input source as ‘COAX In’ under
Input/Output Settings.
2-1-4. OPT IN
• When using OPT In as a source, select the input source as ‘OPT In’ under Input/
Output Settings.
2-1-5. USB IN
• When connecting this product to a PC and using it as a USB DAC, select the
source as USB In under Input/Output Setting.
※
Please refer to ‘Product Installation - How to Connect USB Audio In’.
- 36 - - 37 -
ENGLISH
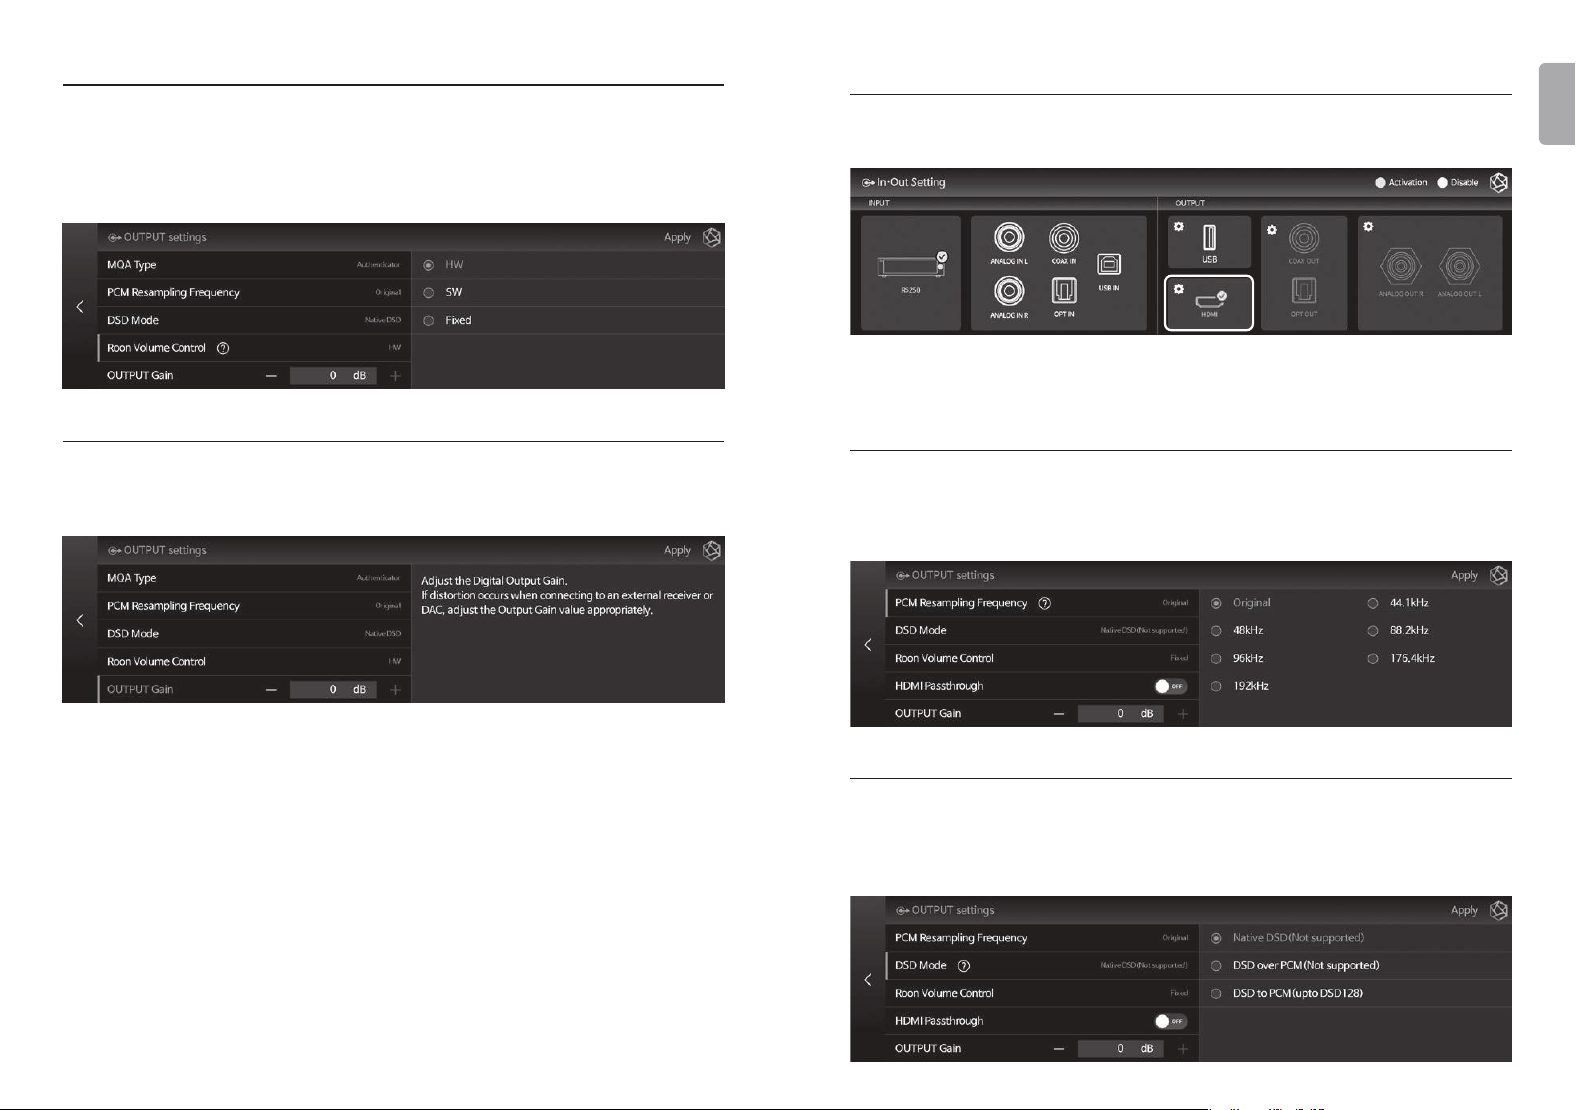
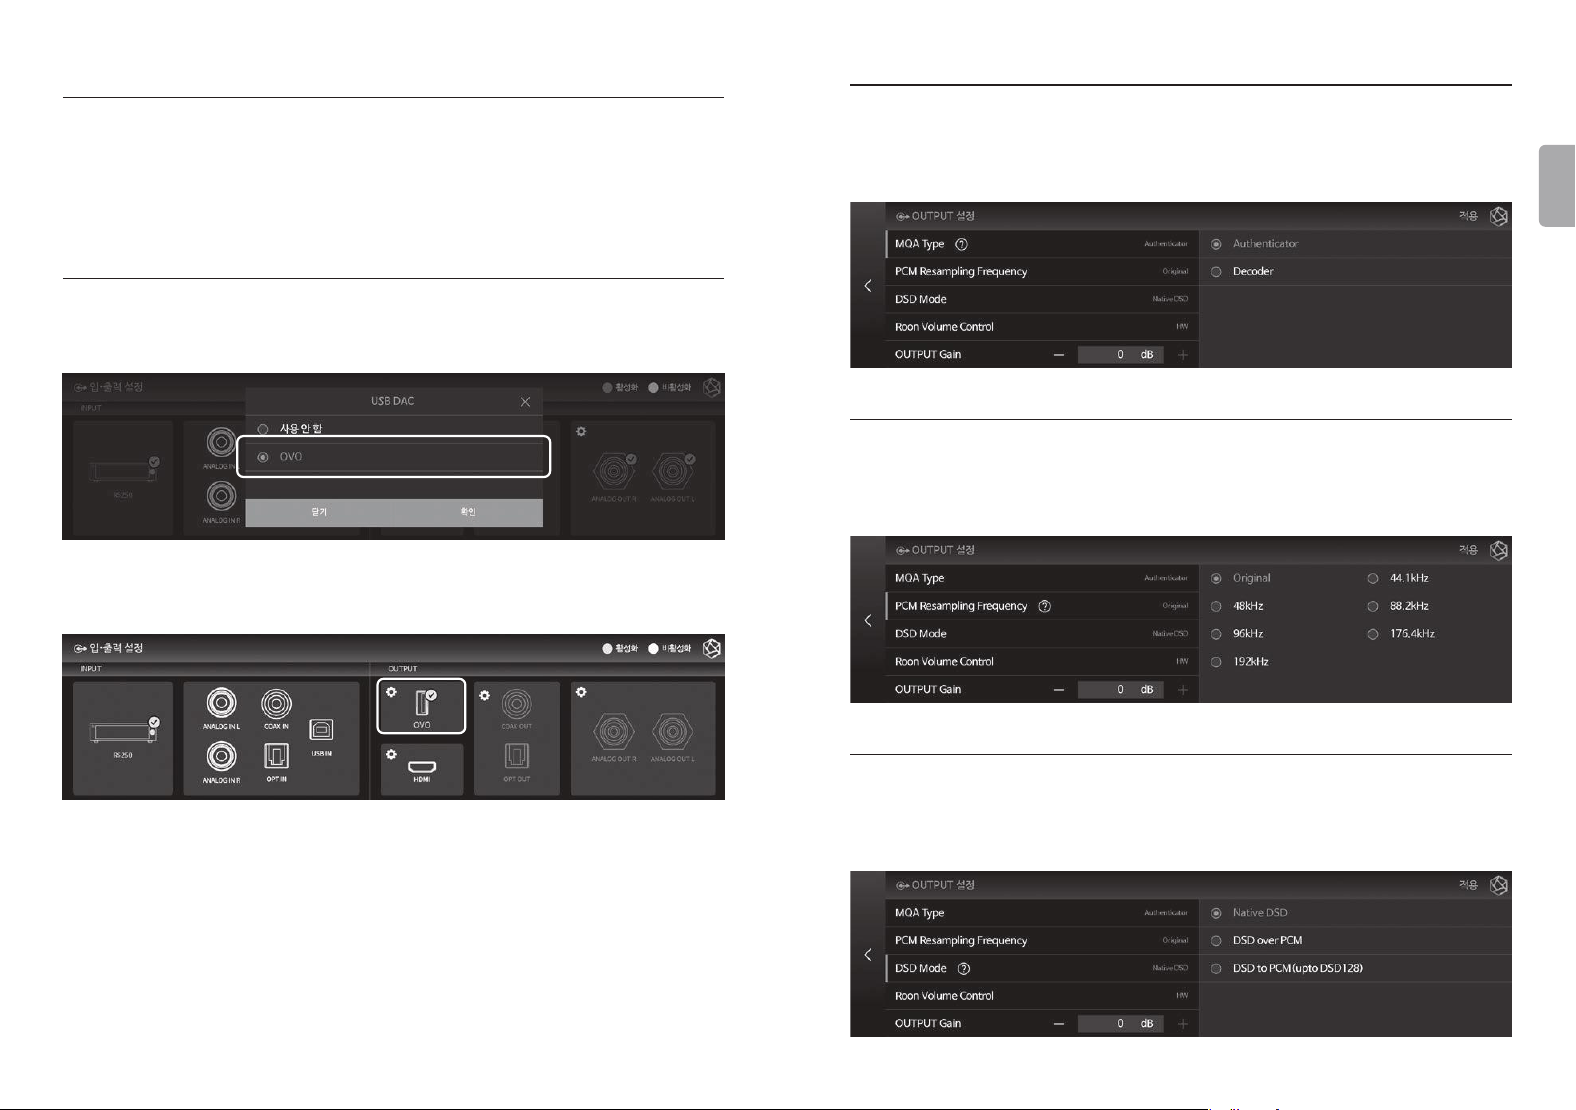
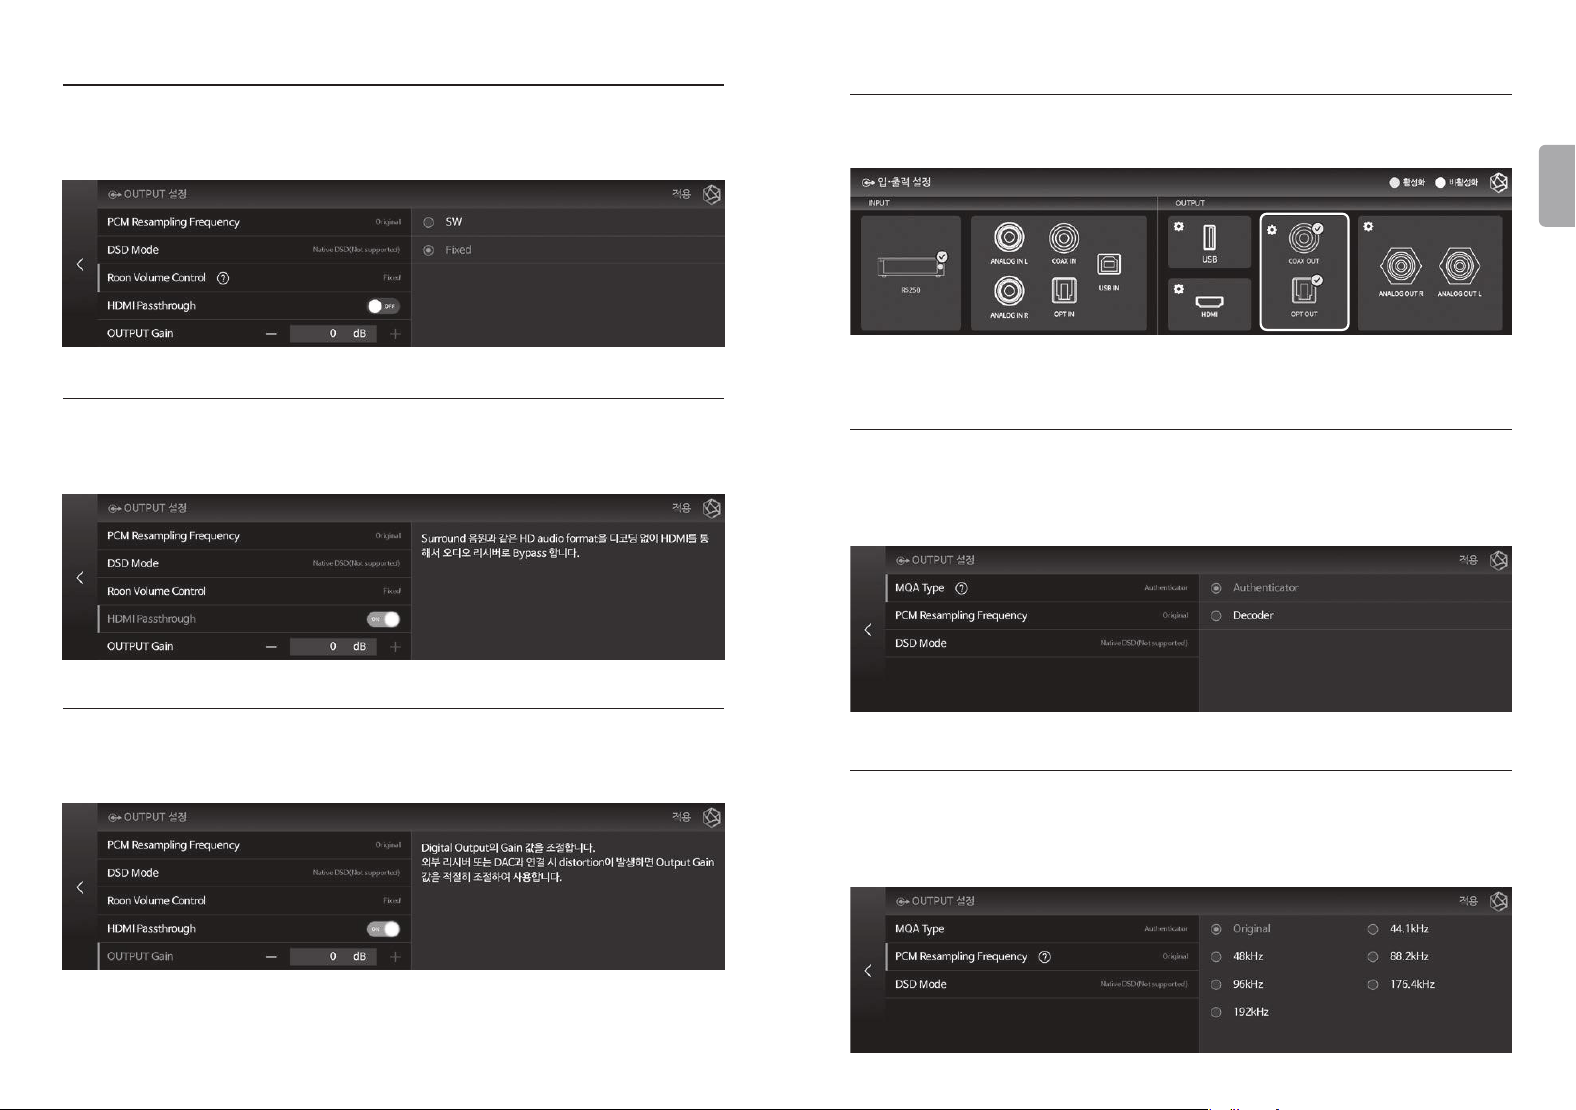
2-2. OUTPUT
• You can enable/disable Output Settings by selecting the icon in the Output
Settings menu.
• When activated, the icon color changes to gold and a check mark appears. Only
one of USB, HDMI, and Internal DAC can be selected.
• For Internal DAC, you can enable multiple output ports.
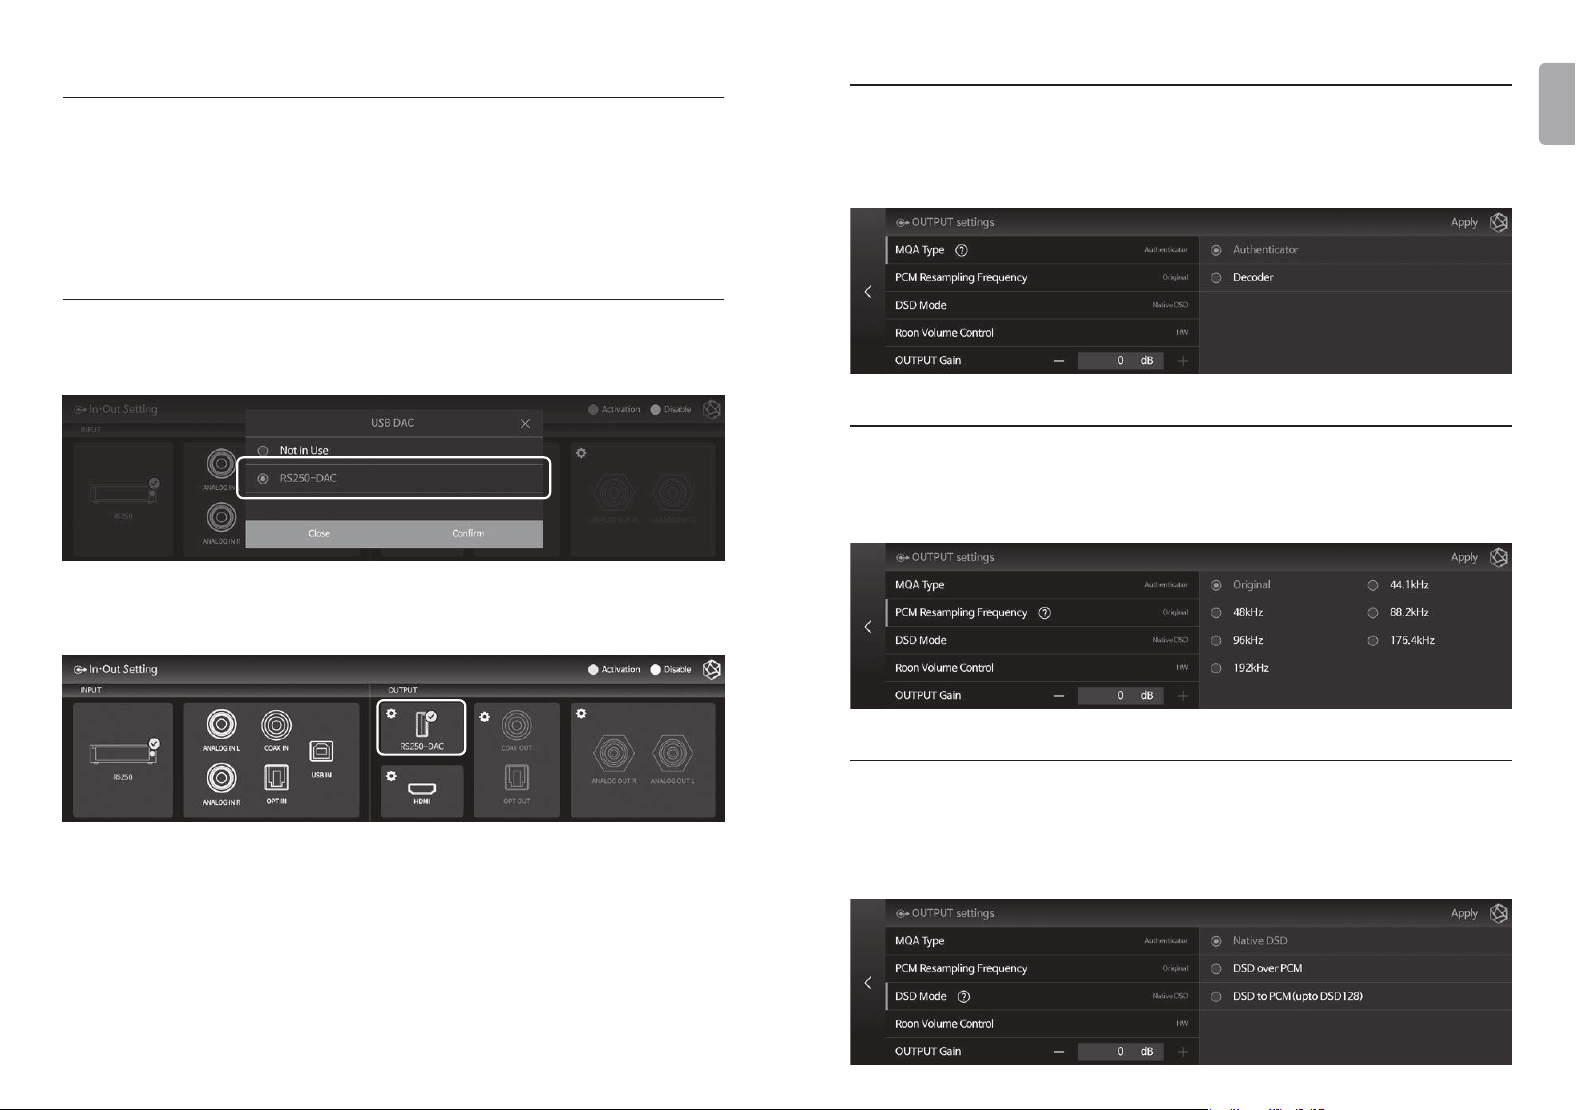
2-2-1. USB DAC
• When you connect a USB DAC and select USB, a list of connected USB DACs
appears. Select the USB DAC you want to use from the list.
• If you select USB DAC, the model name of the selected USB DAC appears and
becomes available.
• If you select the USB DAC Setting icon, the following USB DAC Setting screen
appears.
2-2-1-1. MQA Type
• Set the MQA playback mode. You can select Authenticator or Decoder mode.
• Only original sound or decoded audio data can be exported to Digital output;
full-decoded audio data cannot be exported.
2-2-1-2. PCM Resampling Frequency
• This is the menu for Setting the Sampling Frequency. Select Original Sampling
Rate if you want to output the original sound, or select your desired sampling
rate(48kHz, 96kHz, 192kHz, etc.) to use the re-sampling function.
2-2-1-3. DSD Mode
• Select the transmission format(Native, DOP, PCM) of audio samples to be
delivered to the DAC when playing DSD music les. For USB DACs, you must
select and use Native, DOP, or DSD to PCM to play DSD music les, depending
on whether or not the DAC you connected to is supported.
- 38 - - 39 -
ENGLISH
2-2-1-4. Roon Volume Control
• Select the volume control method(Hardware, Software, Fixed) in Roon Ready
mode. You can select Hardware/Software/Fixed for USB DAC, but if the USB DAC
does not support the hardware volume control function, the volume will not be
adjusted when ‘Hardware’ is selected.
2-2-1-5. OUTPUT Gain
• Adjust the gain value for Digital Output. If distortion occurs when connecting to
an external receiver or DAC, adjust the Output Gain value accordingly.
2-2-2. HDMI
• You can set up HDMI.
• When you select the setting icon for HDMI, the HDMI Settings screen appears as
shown below.
2-2-2-1. PCM Resampling Frequency
• This is the menu for Setting the Sampling Frequency. Select ‘Original Sampling
Rate’ if you want to output the original sound, or select the desired sampling
rate(48kHz, 96kHz, 192kHz, etc.) to use the re-sampling function.
2-2-2-2. DSD Mode
• Select the transmission format(Native, DOP, PCM) of Audio Samples to be
delivered to the DAC when playing DSD music les. For HDMI output, only DSD
to PCM is possible.
- 40 - - 41 -
ENGLISH
2-2-2-3. Roon Volume Control
• Select the volume control method(Hardware, Software, Fixed) in Roon Ready
mode. For HDMI Output, you can select from ‘Software’ or ‘Fixed’.
2-2-2-4. HDMI Passthrough
• This bypasses HD Audio Formats such as Surround Sound Files to the Audio
Receiver through HDMI without decoding.
2-2-2-5. OUTPUT Gain
• Adjust the Gain Value for Digital Output. If distortion occurs when connecting to
an external receiver or DAC, adjust the Output Gain Value accordingly.
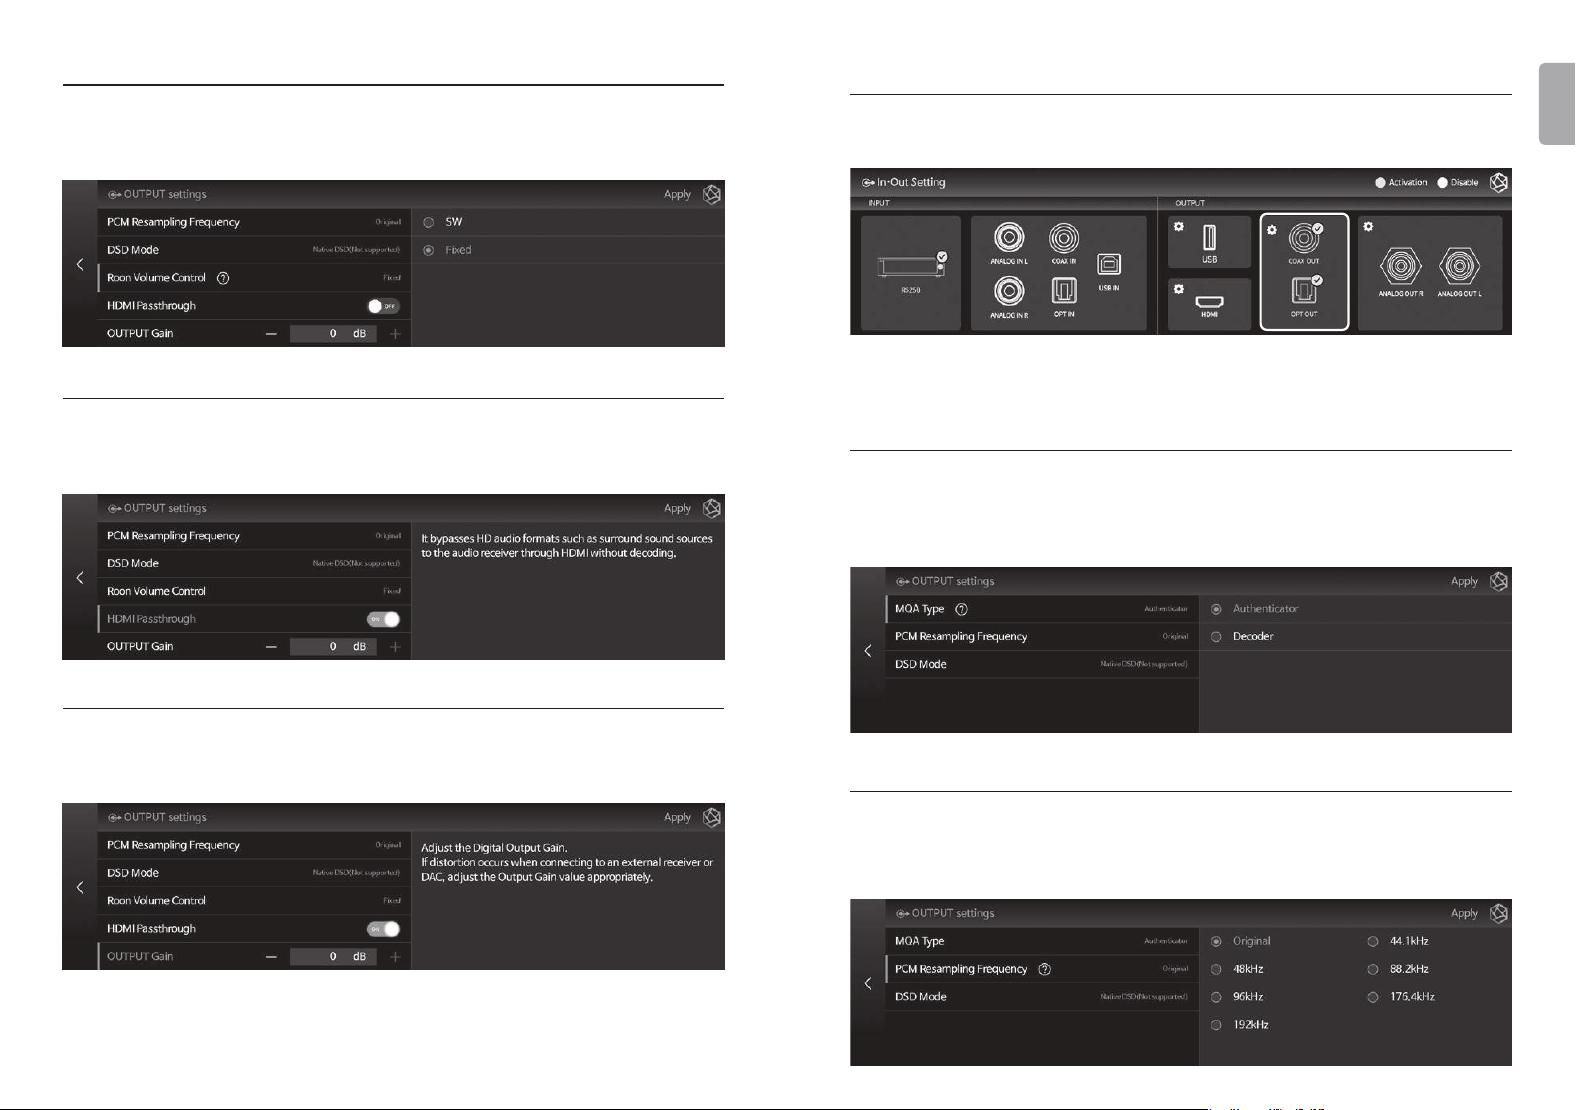
2-2-3. Digital
• Here you can set COAX OUT and OPT OUT.
• If you select the Digital Setting icon, the Digital Output Settings screen appears
as follows.
2-2-3-1. MQA Type
• Set the MQA playback mode. You can select Authenticator or Decoder mode.
Only original sound or decoded audio data can be exported to Digital output;
full-decoded audio data cannot be exported.
2-2-3-2. PCM Resampling Frequency
• This is the menu for setting the sampling frequency. Select ‘Original Sampling
Rate’ if you want to output the original sound, or select the desired sampling
rate(48kHz, 96kHz, 192kHz, etc.) to use the re-sampling function.
- 42 - - 43 -
ENGLISH
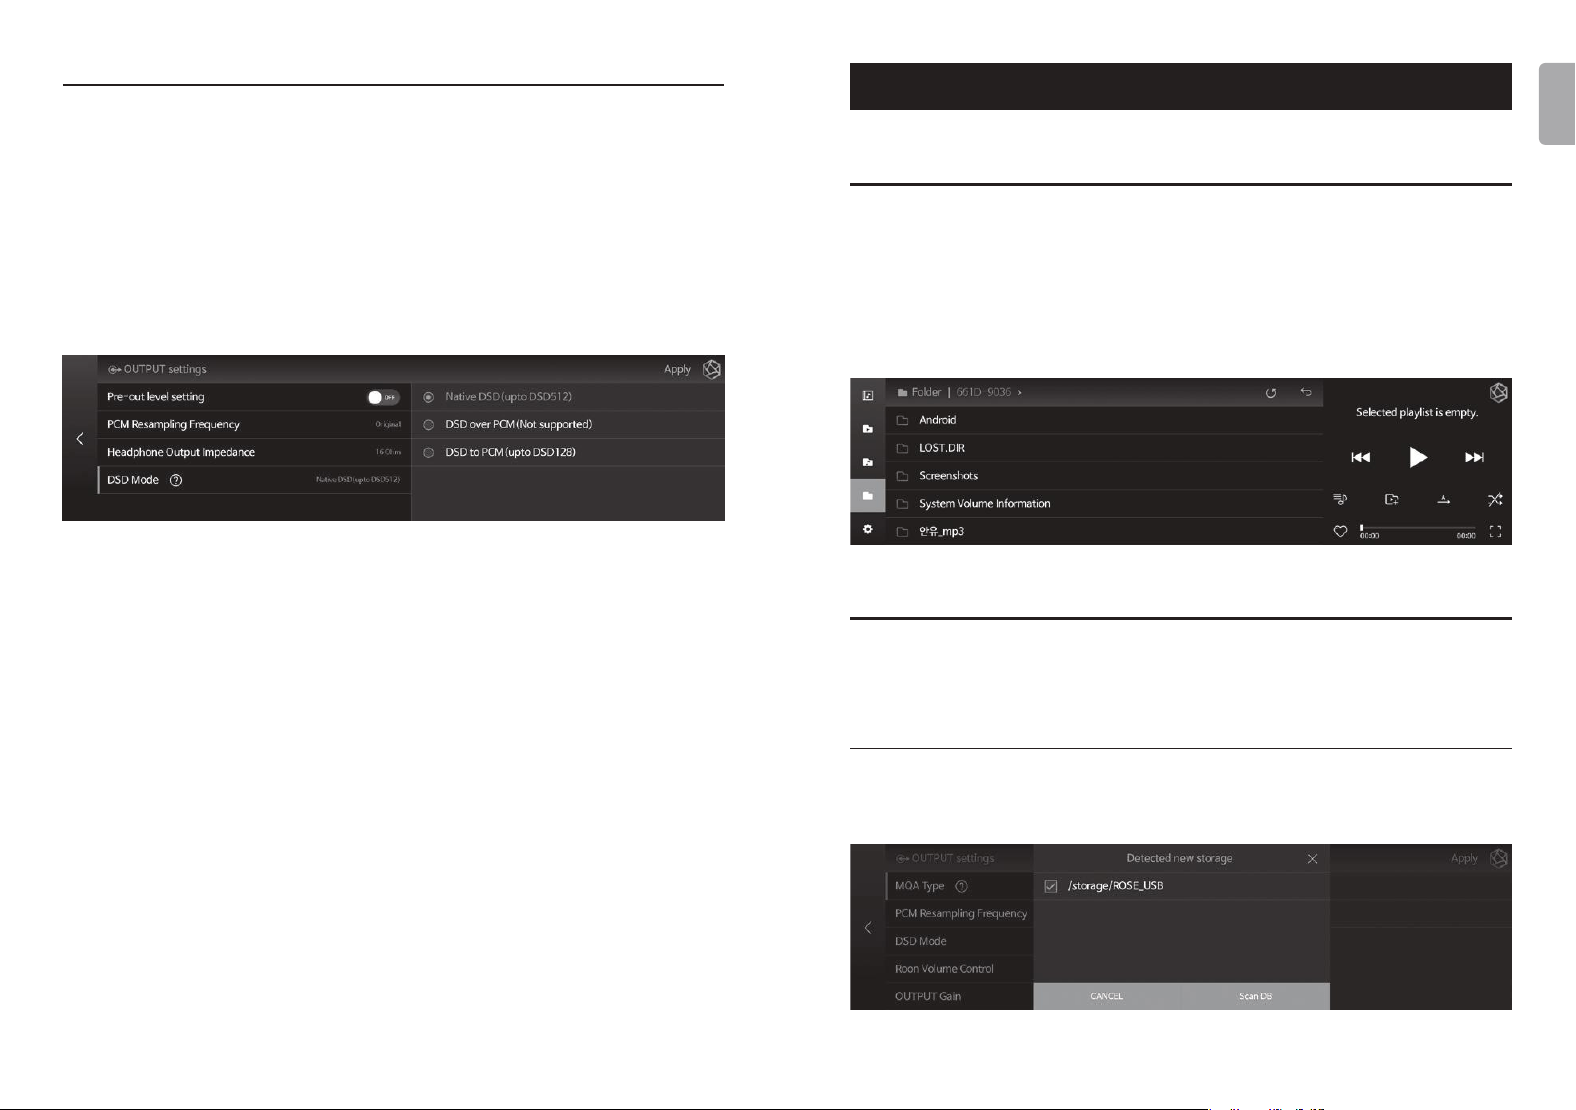
2-2-3-3. DSD Mode
• Select the transmission format(Native, DOP, PCM) of Audio Samples to be
delivered to the DAC when playing DSD music les.
• In Native mode, Analog Output supports up to DSD512 when playing DSD, but
Digital Output does not produce sound.
• In the case of DOP mode, no sound is produced through Analog Output, and
audio data is transmitted up to DSD256 through Digital Output. For Optical and
COAX, up to DSD64 is supported.
• The DSD to PCM mode supports up to DSD128 and sounds simultaneously from
Digital and Analog Outputs.
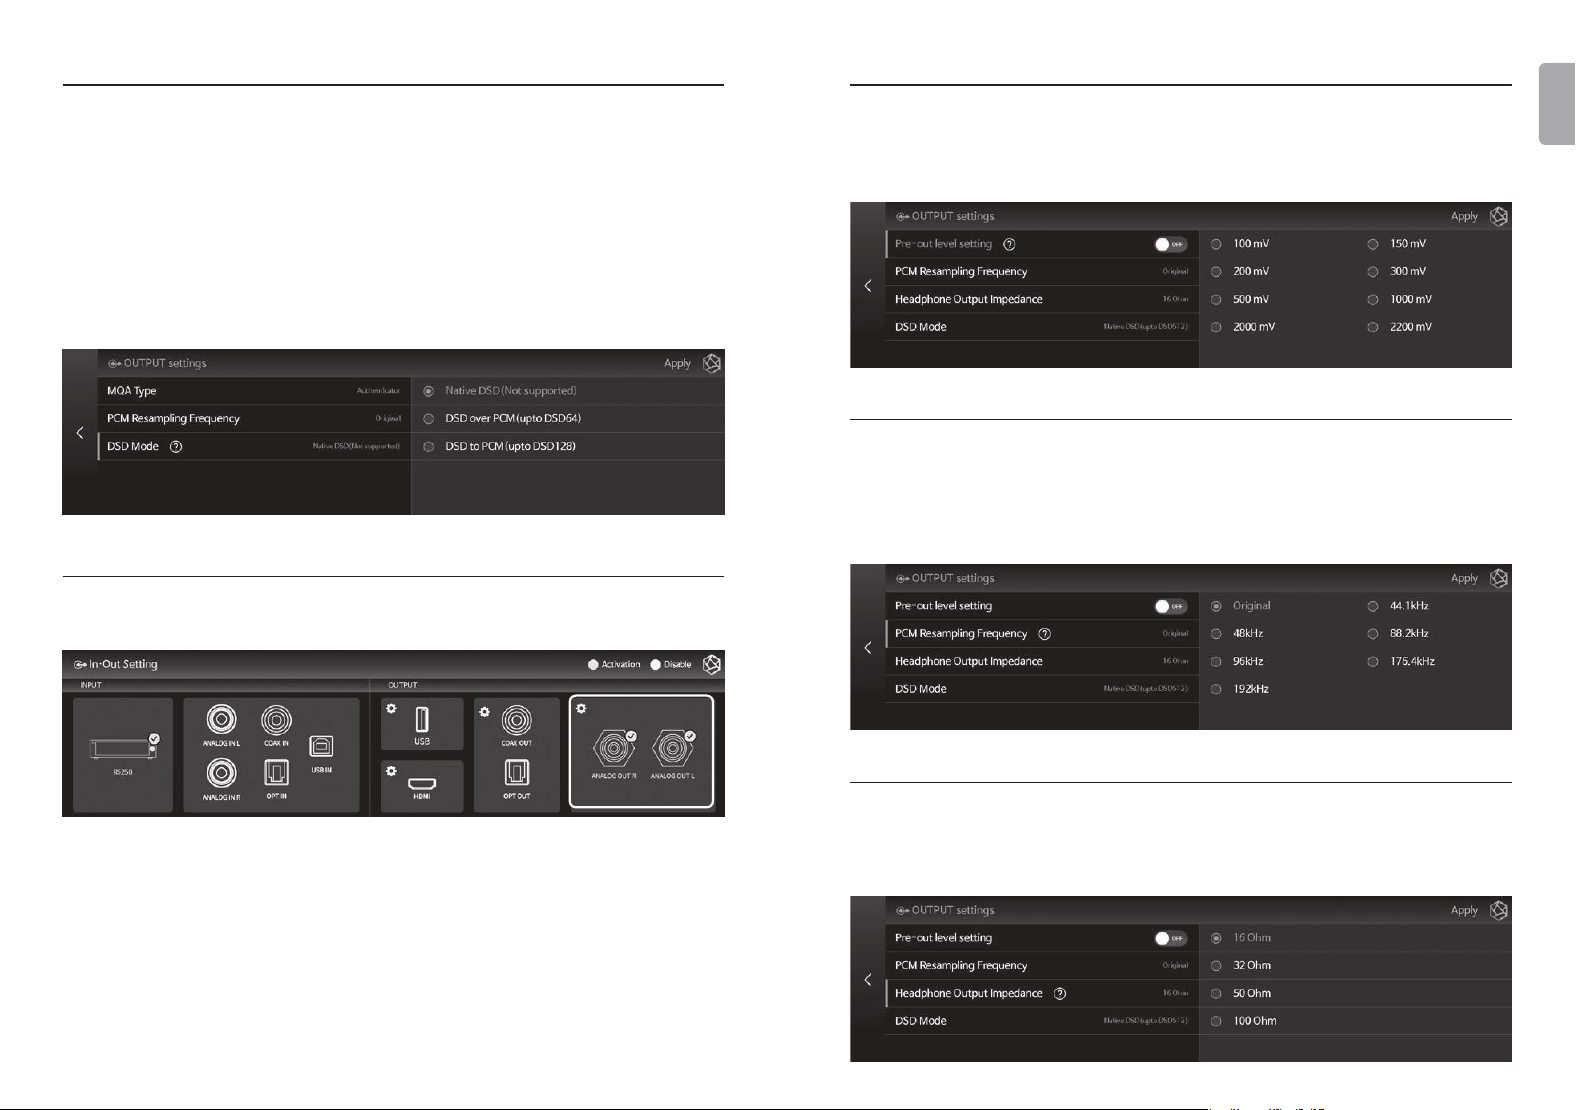
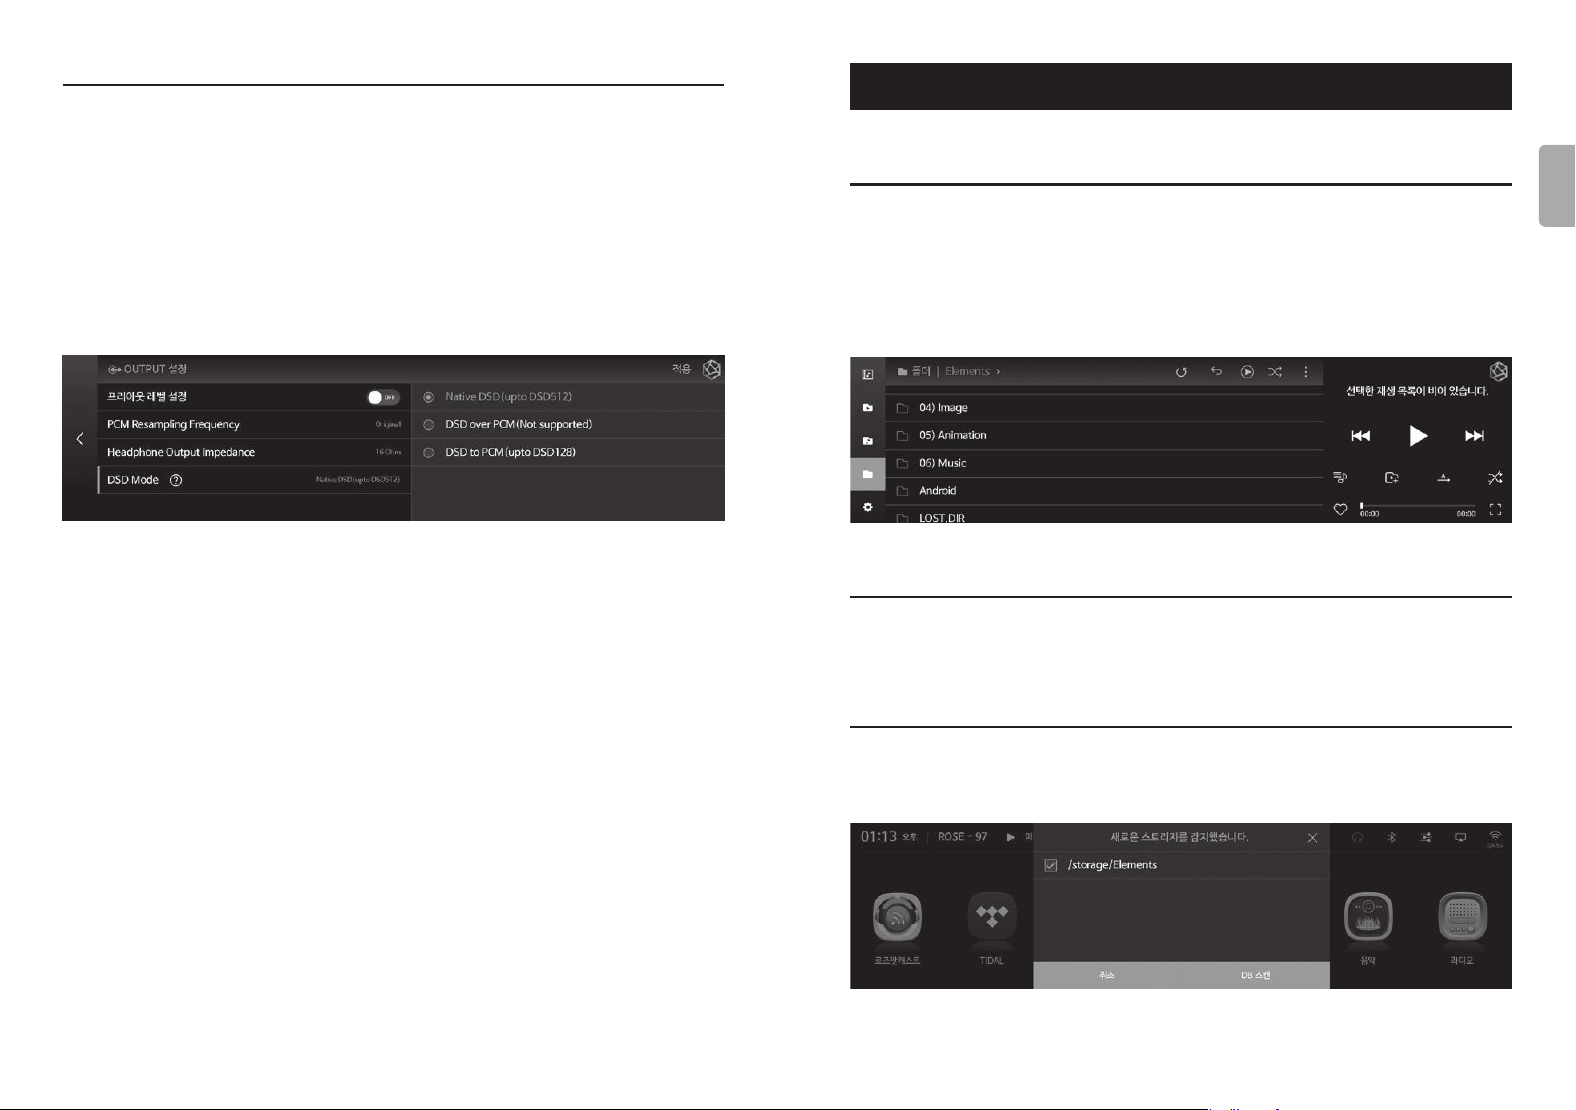
2-2-4. Analog
• You can set up the Analog Out.
• If you select the Analog Setting icon, the Analog Output Settings screen appears
as follows.
2-2-4-1. Pre-Out Level Settings
• This xes the Pre-Output Level. This product can be used by xing the Output
Level with inputs within the acceptable range of the AMP connected, without
using volume control.
2-2-4-2. PCM Resampling Frequency
• This is the menu for setting the Sampling Frequency.
• Select ‘Original Sampling Rate’ if you want to output the original sound, or
select the desired Sampling Rate(48kHz, 96kHz, 192kHz, etc.) to use the re-
sampling function.
2-2-4-3. Headphone Output Impedance
• This is the menu for setting the Output Impedance of your headphones.
• You can enjoy better sound quality by selecting the Output(16Ω, 32Ω, 50Ω, or
100Ω) that matches your headphone specications.
- 44 - - 45 -
ENGLISH
2-2-4-4. DSD Mode
• Select the transmission format(Native, DOP, PCM) of Audio Samples to be
delivered to the DAC when playing DSD music les.
• In Native mode, Analog Output supports up to DSD512 when playing DSD, but
Digital Output does not produce sound.
• In the case of DOP mode, no sound is produced through Analog Output, and
Audio Data is transmitted up to DSD256 through Digital Output. For Optical and
COAX, up to DSD64 is supported.
• DSD to PCM mode supports up to DSD128 and sounds simultaneously from
Digital and Analog outputs.
Playback
1. Basic Operation
• You can play music and video les by connecting a USB storage device to a USB
port on the back of this product.
• SATA HDD/SSD can be installed at the bottom of this product.
※
Thickness : 2.5inch/7mm
• You can play les on the storage device by entering the ‘Music/Video’ - ‘Folder’
tab.
2. Media Library
• You can save music using the storage media or network shared folder as a
Library(DB) by scanning the media.
2-1. Media Scan Operation
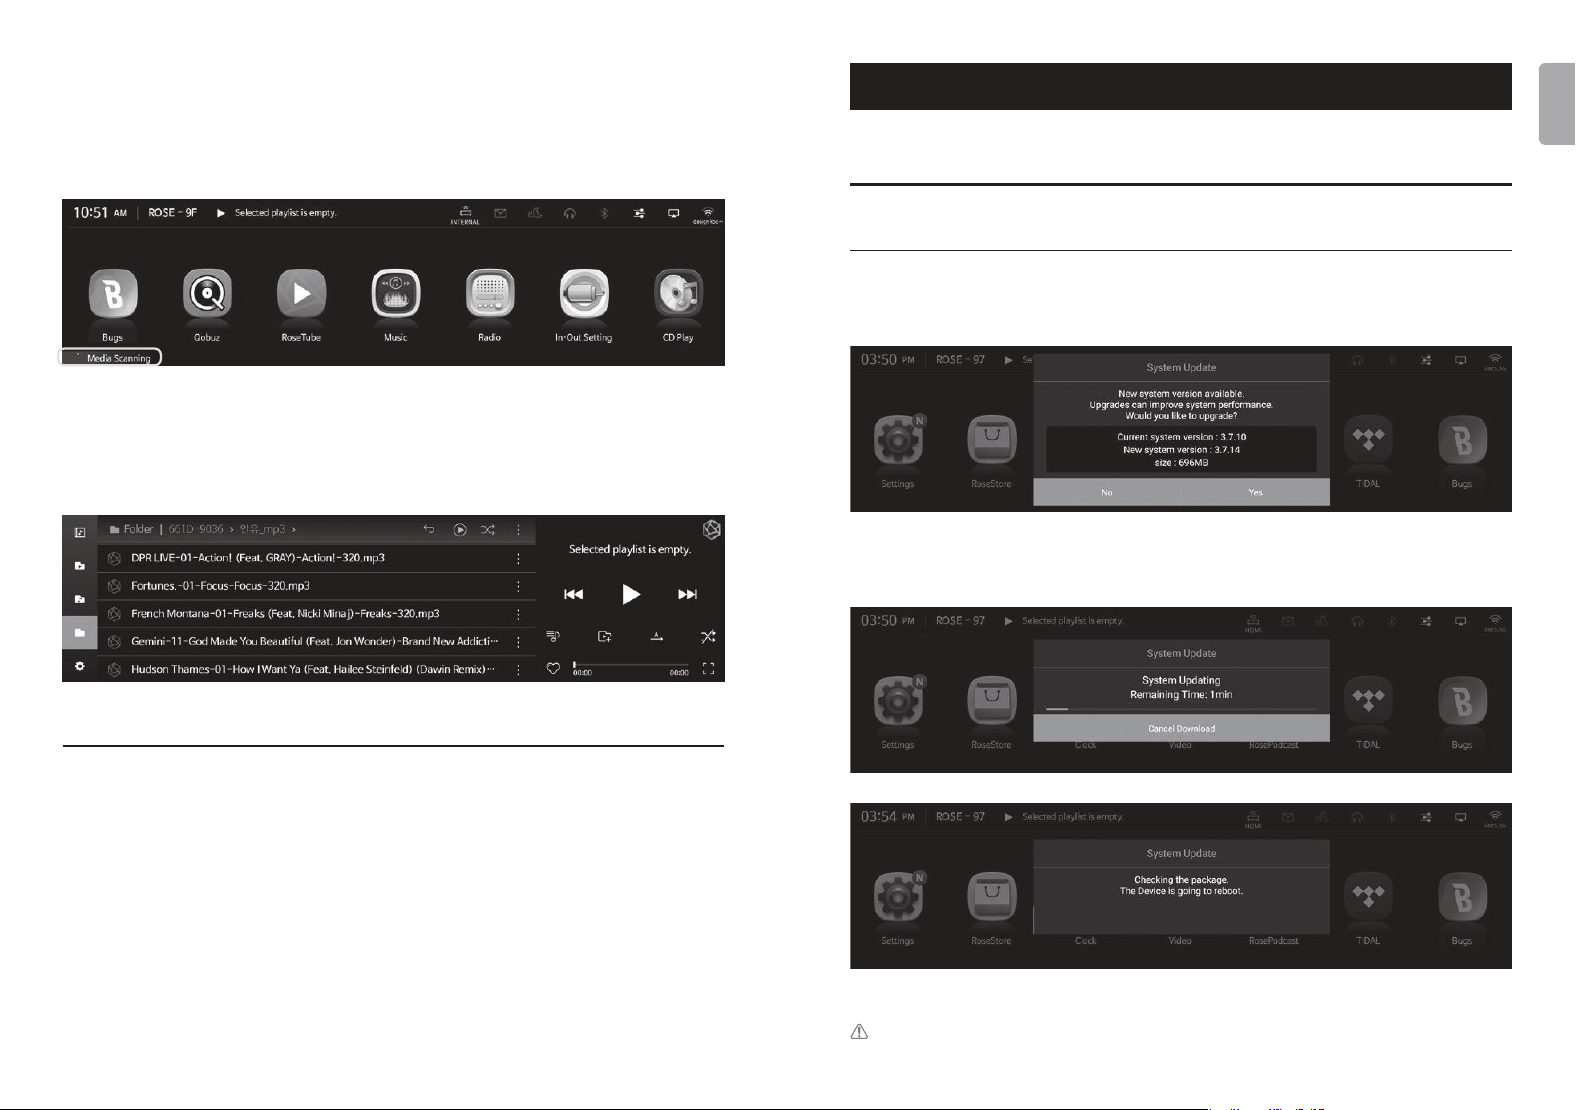
• When you connect a new storage device to a USB port on the rear of the device,
a new storage detection pop-up appears.
- 46 - - 47 -
ENGLISH
• When you select the ‘DB Scan’ button in the new storage pop-up, Media
Scanning of the connected storage device begins. (Depending on storage
capacity, the time to complete Media Scanning may vary.)
• During DB scanning, the ‘Media Scanning’ loading image is displayed at the
bottom left of the main screen of the product.
• After the DB scan is complete, the album art and list of Music and Videos is
displayed, and you can play the music.
• You can also add, research, and delete DBs through the Music/Video and
Settings menus.
2-2. After completing the Media Scan
• The list of albums is displayed using the album art, and you can play the entire
track list for an album.
• You can sort and play music by album, artist, genre, and composer.
• You can search for music by artist and album name.
• You can save your favorite music and albums using the Playlist and Favorite
features.
Supplementary Information
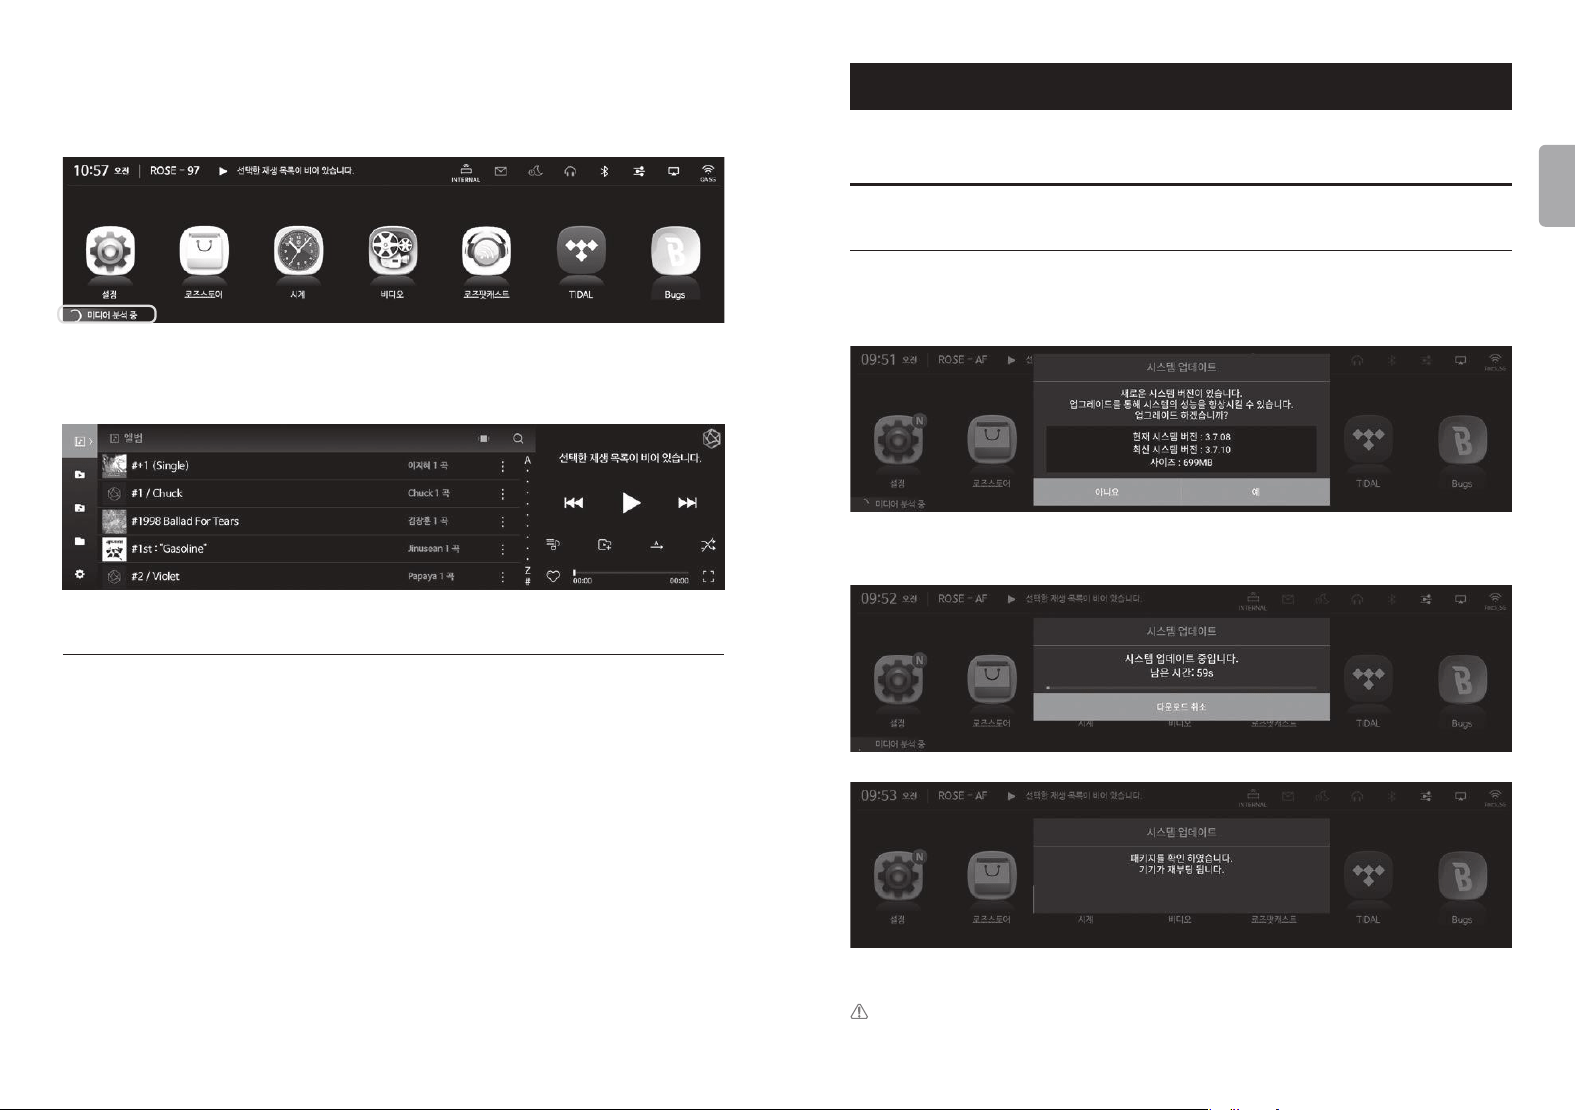
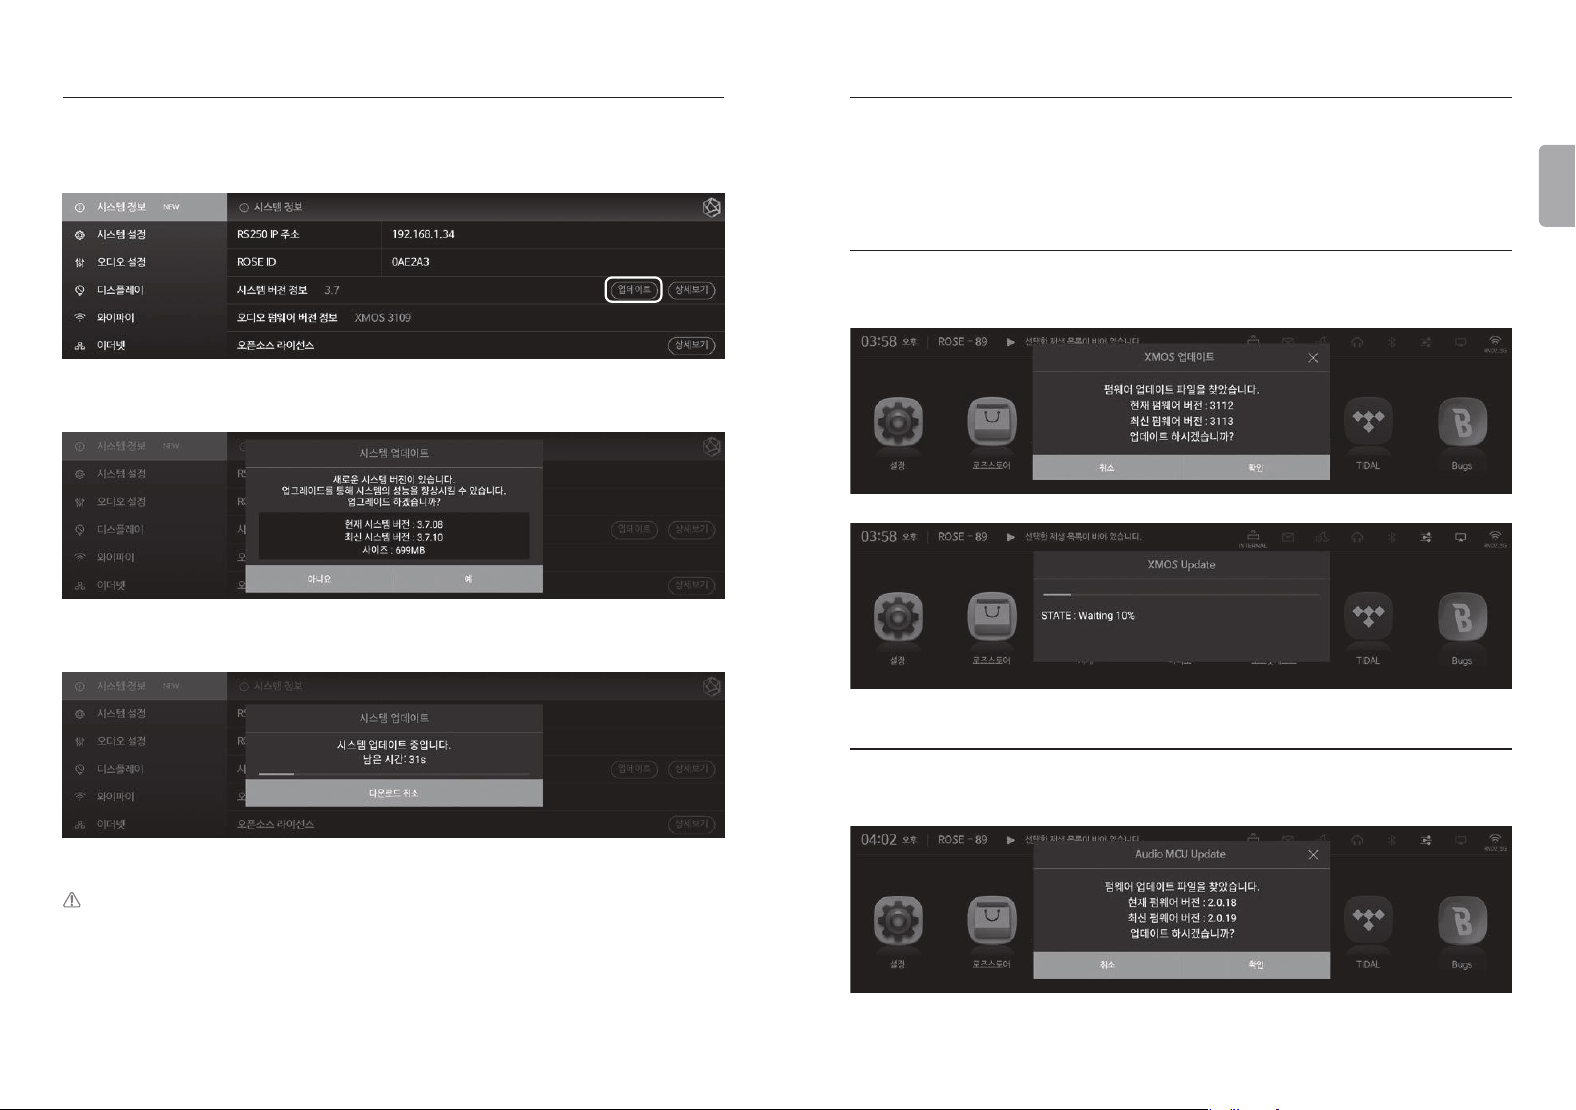
1. Firmware Update
1-1. OTA Update Progress
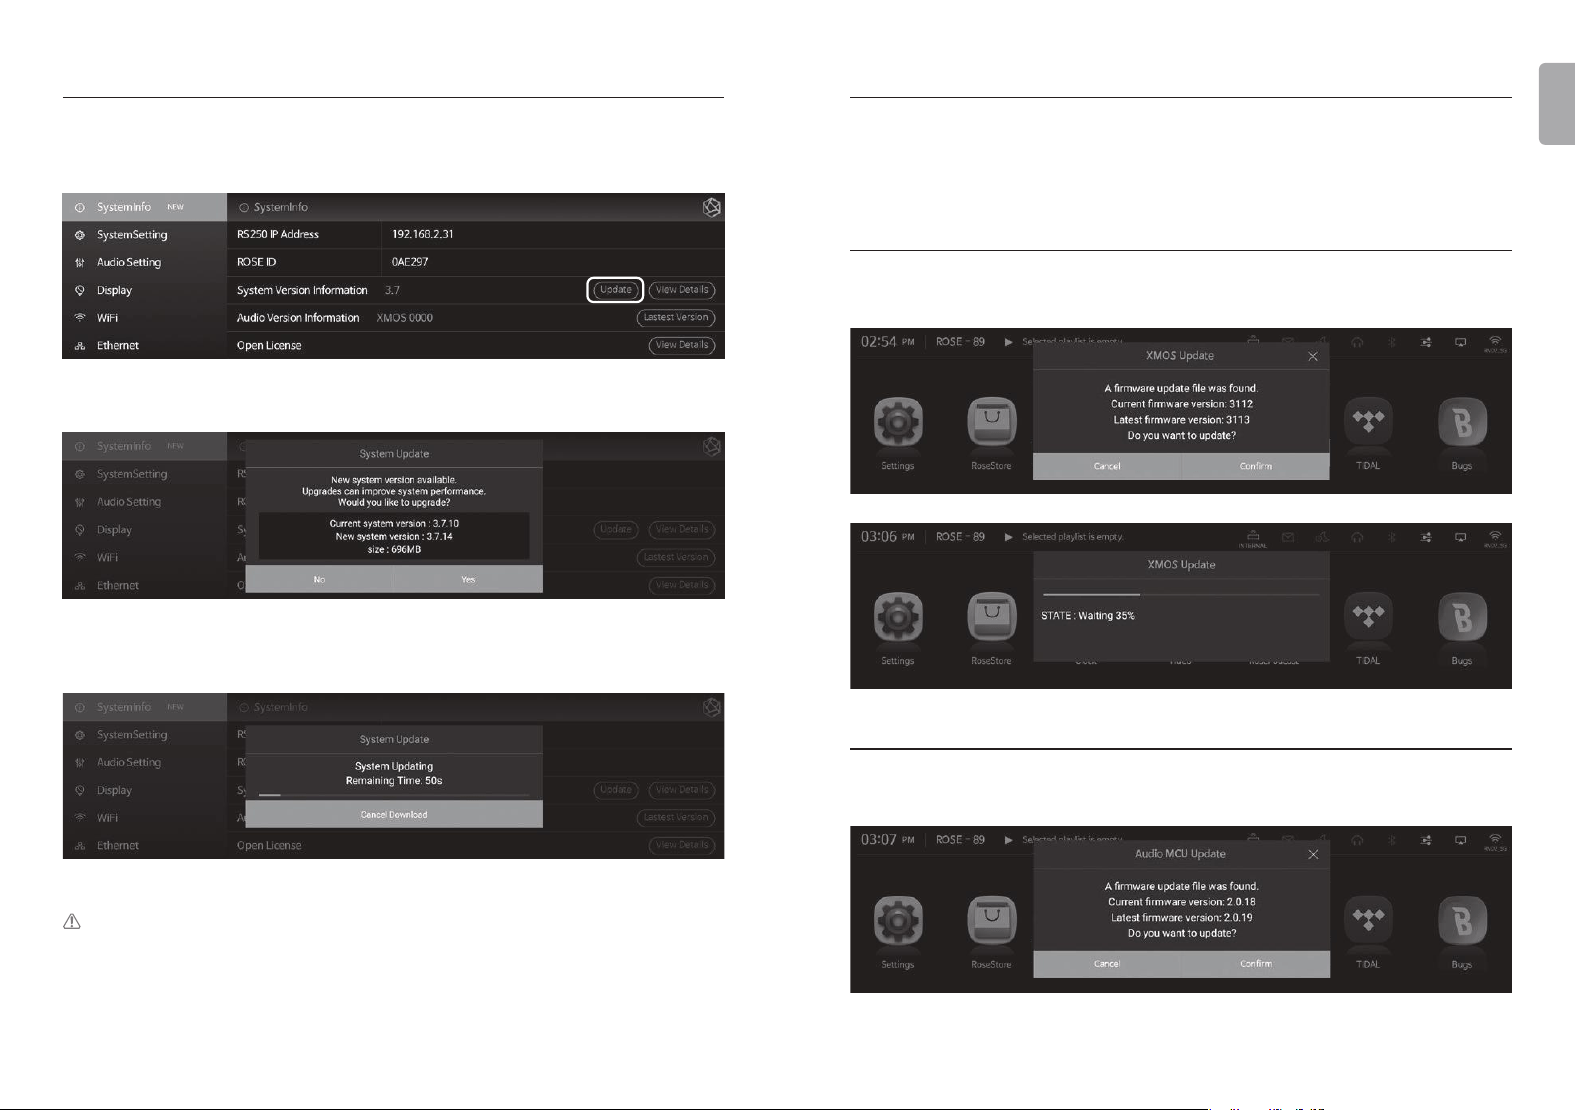
• The system update pop-up appears when connected to the network if a new
update is available.
• If you select the ‘Yes’ button in the system update pop-up, the OTA update will
begin.
• After rebooting, the SW system update is complete.
Caution :
Forcibly turning o the power during the update may cause problems.
- 48 - - 49 -
ENGLISH
1-2. Update via the Settings Menu
• Whenever a newer version is available, the ‘Update’ button is displayed in the
system version information in the Settings menu.
• When you select the update button, the system update pop-up appears.
• If you select the ‘Yes’ button in the system update pop-up, the OTA update will
begin.
• After rebooting, the SW system update is complete.
Caution :
Forcibly turning o the power during the update may cause problems.
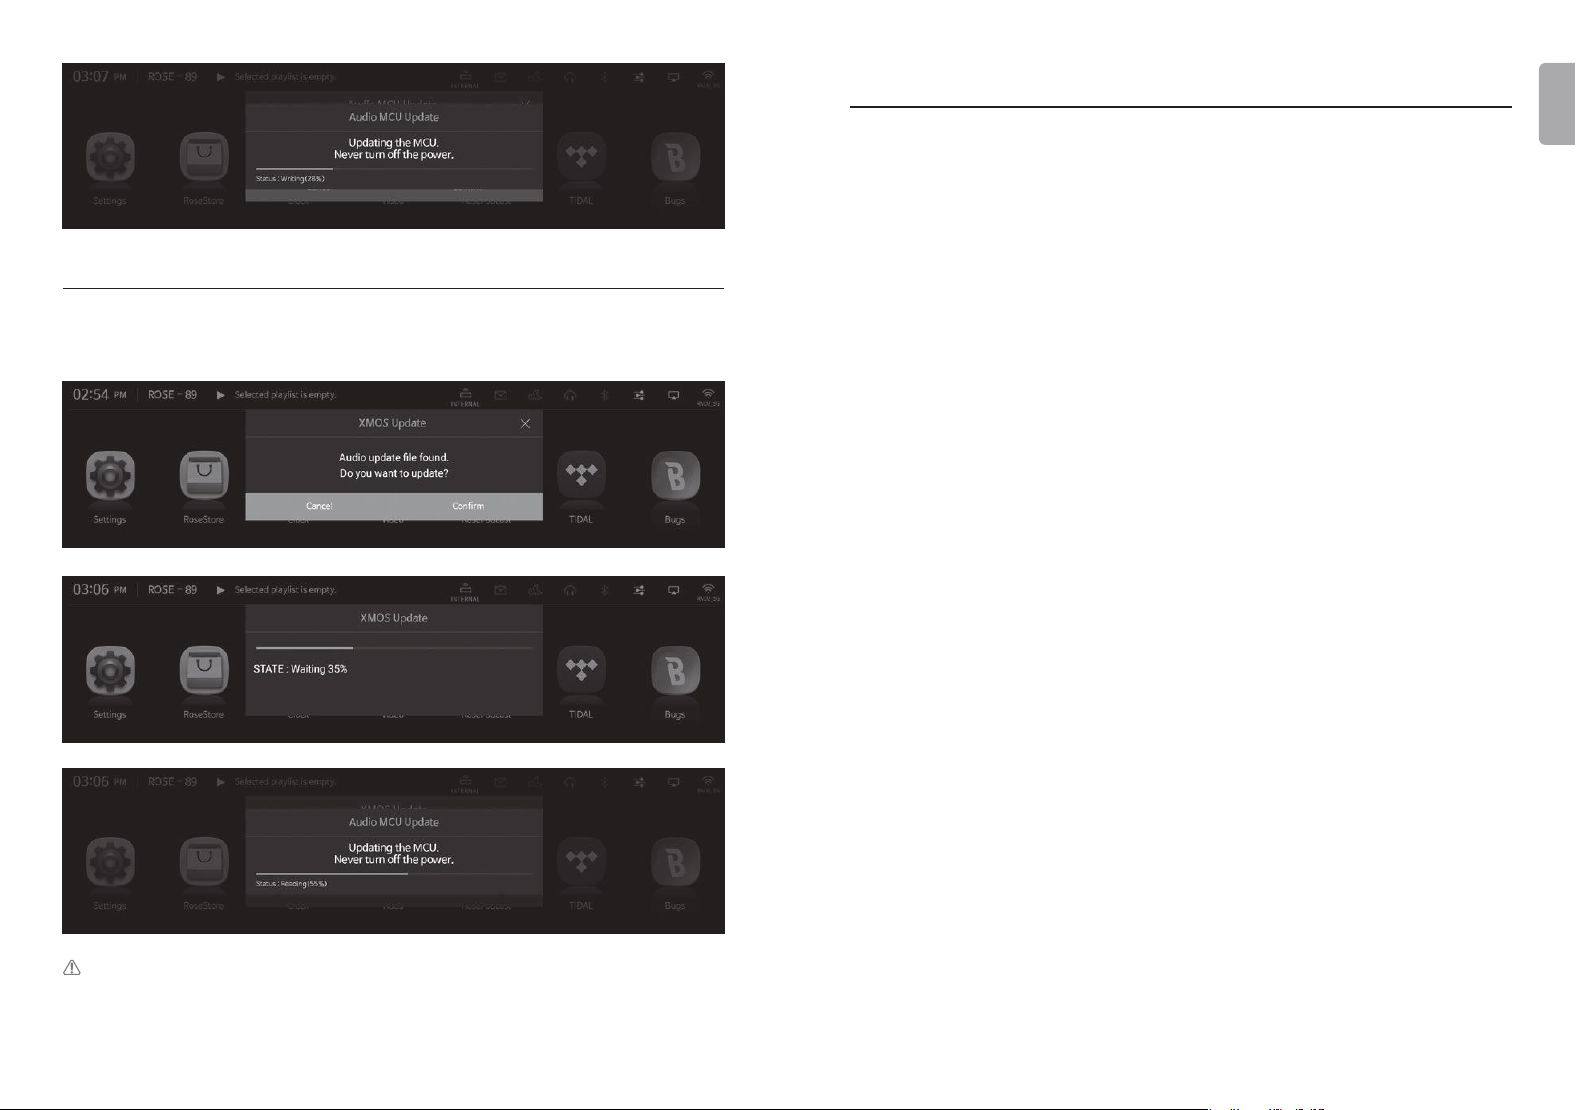
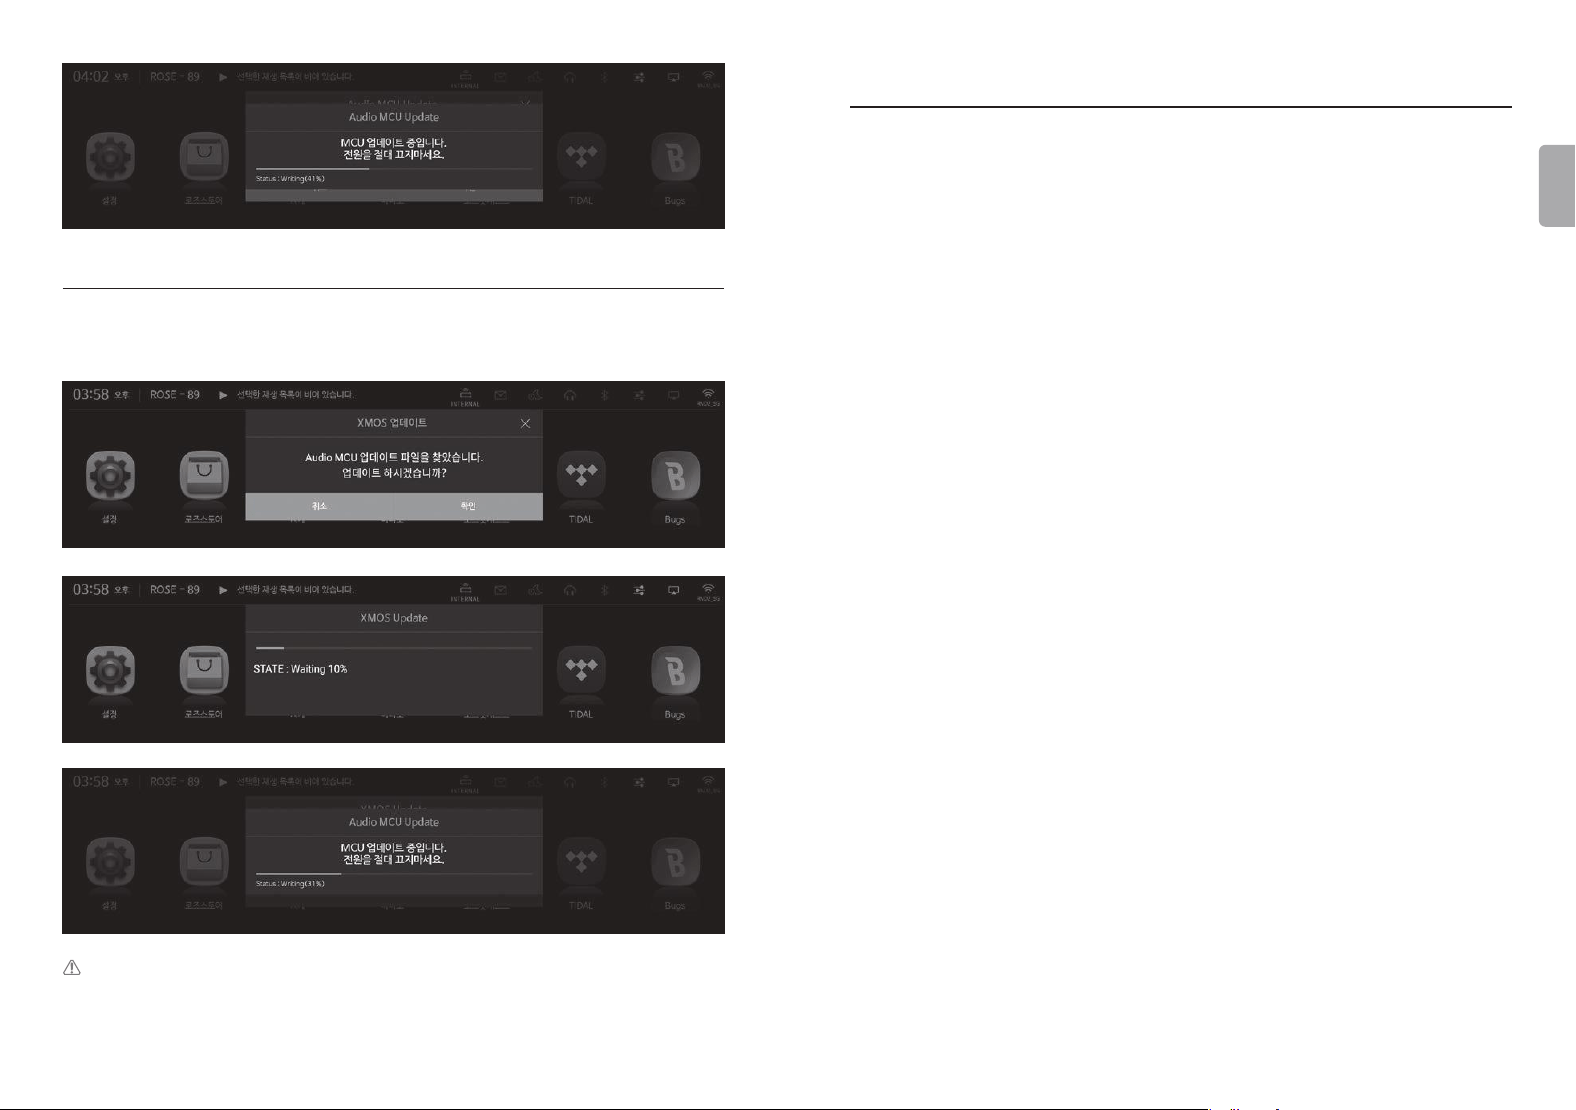
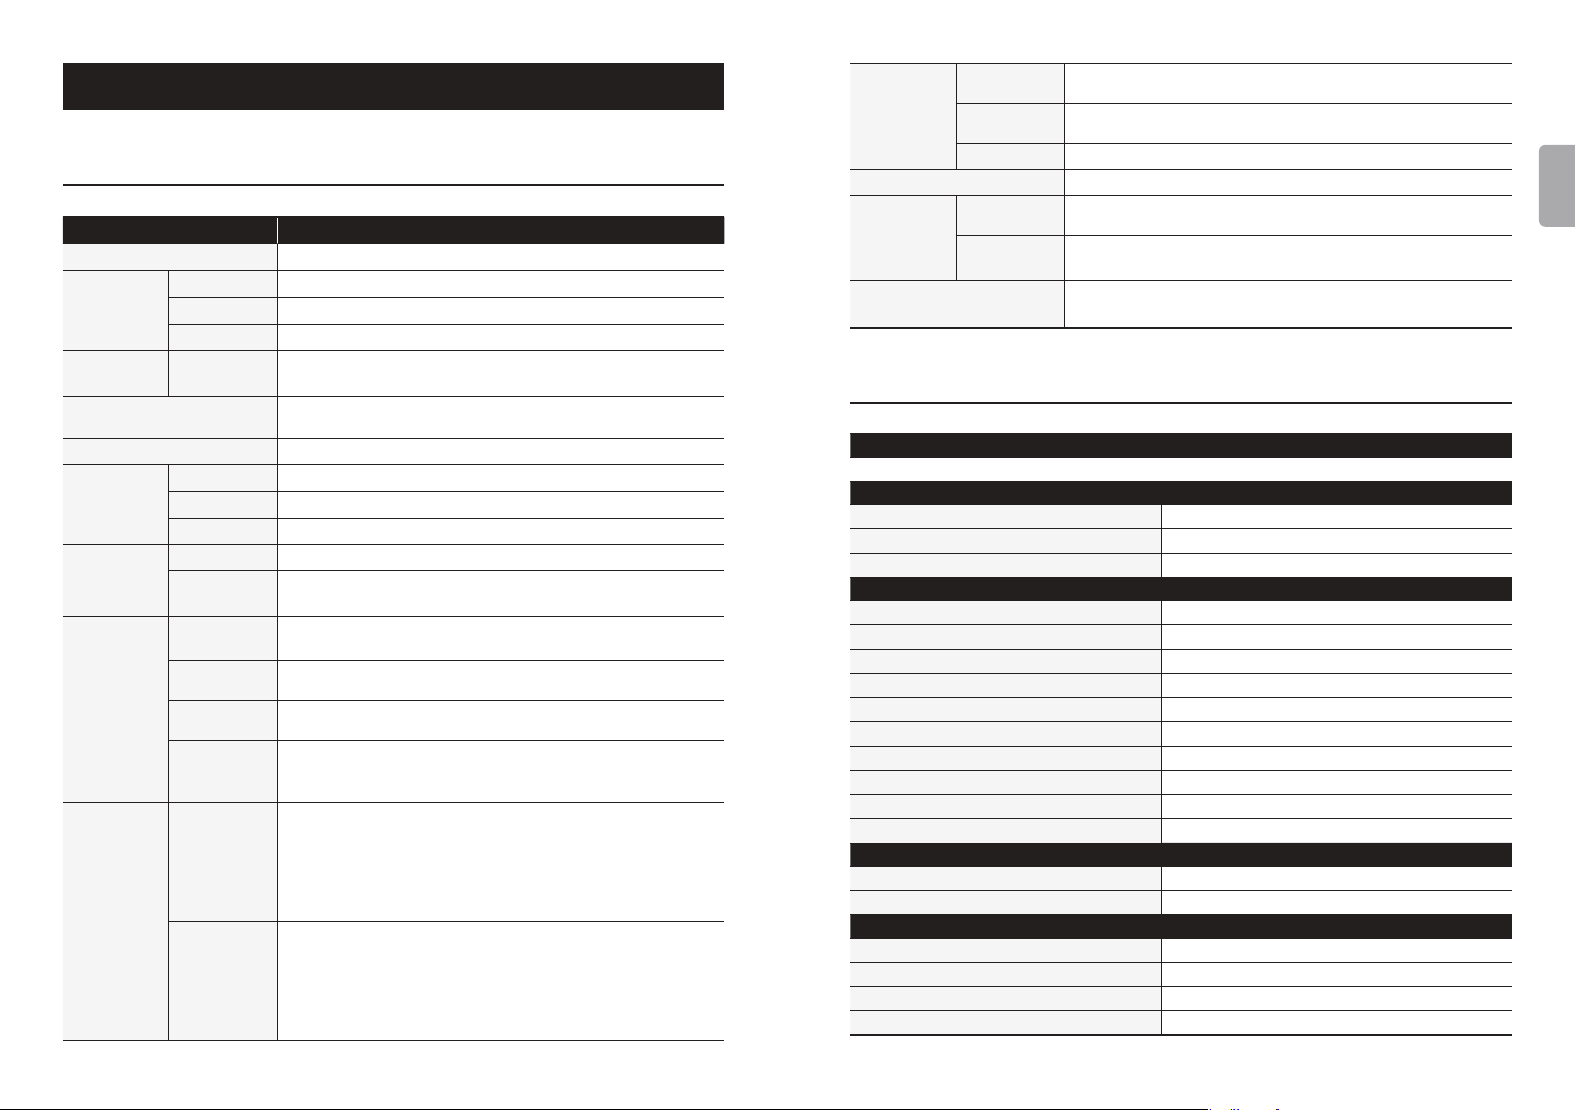
1-3. How to install XMOS/Audio MCU when an Update Pop-up Appears
• If the XMOS/Audio MCU update is required after the system update, the update
window is automatically displayed and you can proceed with the update.
• Updates can occur in the following cases.
1-3-1. If a XMOS update is required
• After the XMOS update, the system is automatically rebooted.
1-3-2. If an Audio MCU update is required
• After the MCU update, the system is automatically rebooted.
- 50 - - 51 -
ENGLISH
2. Factory Reset
• A Factory Reset is recommended when the product does not work or Internet
Firmware Upgrade fails. Upon factory reset, all custom settings, including DB
scan data, settings and storage data for each app, apps installed through the
ROSE Store, WiFi network settings, shared les, and saved playlists, are reset.
Reset is required after a factory reset.
• This product can be reset or restored to its factory settings.
• You can return it to the factory settings by going to Settings - System Settings -
Factory Reset.
1-3-3. If the XMOS and Audio MCU update are required
• After the XMOS update is complete, the Audio MCU update will automatically
proceed and the system is automatically rebooted
Caution :
Forcibly turning o the power during the update may cause problems.
Do not remove power.
- 52 - - 53 -
ENGLISH
Product Specications
1. Specications
Part
Specications
OS
Customized Android 7.1
Design
Size
278(W) x 202(D) x 76(H)mm
Weight
3.2kg
Display
8.8” TFT LCD & Capacitive Touch Screen(MIPI-DSI)
CPU
Hexa Core
CPU
Dual-core Cortex-A72 up to 1.8GHz
Quad-core Cortex-A53 up to 1.4GHz
GPU
Mali-T864 GPU, OpenGL ES1.1/2.0/3.0/3.1,
OpenVG1.1, OpenCL, DX11
Memory
LPDDR3 4GByte
Network
Connection
Ethernet
10/100/1000 BASE-T
WiFi
802.11 a/b/g/n/ac(2.4GHz/5GHz)
Bluetooth
V4.0 / V3.0+HS
Audio
Service
Streaming
Airplay / DLNA / Roon Ready / Spotify Connect
Music
Service
TIDAL / Qobuz / Bugs / ROSE Tube / Internet Radio /
ROSE Podcast
In/Output
Audio
Input
Optical x 1, Coaxial x 1, Analog-In x 1, USB DAC x 1
Audio
Output
Optical x 1, Coaxial x 1, Analog-Out x 1
Video
Output
HDMI 2.0 x 1(up to 3840 x 2160 / 60Hz)
Media
Connection
File System : NTFS / eXfat / FAT32
Network Protocol : SMBv1, SMBv2 / FTP / WebDav
Storage Interface : USB3.0 x 2, SATA x 1
Supported
Codec
Audio
MQA, WAV, FLAC, AIFF, WMA, MP3, OGG, APE, DFF, DSF,
AAC, CDA, AMR, APE, EC3, E-EC3, MID, MPL, MP2, MPC,
MPGA, M4A, ALAC
PCM : 8kHz~768kHz(8/16/24/32bit per Sample)
Native DSD : DSD64(2.8MHz)/DSD128(5.6MHz)/
DSD256(11.2MHz)/ DSD512(22.4MHz)
Video
ASF, AVI, MKV, MP4, WMV, MPEG-1, MPEG-2, MPEG-4
H.263, H.264, H.265, VC-1, VP9, VP8, MVC,
H.264/AVC, Base/Main/High/High10 pro[email protected]
up to 4Kx2K@30fps
H.265/HEVC, Main/Main10 prole@ level 5.1 High-tier
up to 4Kx2K@60fps
Power
Input
Voltage
AC100-120, AC220-240V 50/60Hz
Input
Power
50W
Fuse
T3.15AL / 250V
Update
SW update via internet, USB OTA, ROSE Store
Remote
Control
Feature
Remote
Controller
Bluetooth Remote Controller
Remote
App
ROSE Connect Premium(Android, iOS) /
Google PlayStore, App Store
Accessory
Power Cord x 1, Bluetooth Remote Controller x 1
(AAA Battery x 2), Manual x 1, SSD Screw x 4
DAC Chip
ES9038Q2M(ESS) x 1 (Single Stereo Design)
Analog In
Input Impedance
100kΩ
Input Frequency Response
20Hz to 20,000Hz(+/-0.5dB)
Maximum Input Level(20Hz~20kHz)
Max 2.0Vrms
Preout
DAC Chip
ES9038 Q2M(ESS) x 1(Single Stereo Design)
Output level
Max 2.3Vrms, Unbalanced
THD
0.0002%(1kHz 2.3Vrms Unbalanced output)
THD + N
0.0003%(1kHz 2.3Vrms Unbalanced output)
IMD
-102dB(SMPTE 4 : 1, 60Hz : 7KHz)
Signal to Noise Ratio
116dB(A-wt)
Dynamic Range
Max 126 dB(CCITT lter)
Stereo Crosstalk
Better than -133dB, 20~20kHz
Output Frequency Response
20Hz to 20,000(+/-0.5dB)
Output Impedance
100Ω
Headphone
Output Power
1Vrms/32Ω(MAX 2Vrms/300Ω)
Output Impedance
16~600Ω
Digital Audio Specications
Digital Input Signal Format
SPDIF (PCM)
Digital Input Sample Rate
44.1kHz to 192kHz, 32bit
Coaxial Inputs
0.5V p-p/75Ω
Optical Inputs
-27dbm to -17dbm (TOS Link)
2. Analog Audio Specications
- 54 - - 55 -
ENGLISH
Things to check before contacting a service center
• Please restart the product if touching does not work or if the screen freezes. If you
press and hold the power key for longer than 5 seconds, the product will be forcibly
rebooted.
• In small spaces that are not suitable for product installation conditions(p. 18), heat
can cause the product to heat up and aect the life and performance of the product.
• When the device is connected to the Internet, the sound may be cut o during
playback if the radio waves are unstable or weak, or if Internet usage is heavy, and
there may be delays or lack of connection with wireless Internet due to the nature of
wireless communication. In such a case, please move your device to another location
and try to reconnect.
• Content-specic les are optimized according to product characteristics, design
specications, and business needs. Therefore, even with the same content, there
may be dierences in volume, tone, etc., compared to other manufacturers and other
models.
Product website : www.hirose.com
• Through the newsletter, you can get information
on ROSE’s latest news, events, and new products.
Quality Guaranteed
Model Name
RS250
Date of
Purchase
20 Year Month Date
Place of
Purchase
Firm Name
Telephone
Serial No.
Telephone
Term of
Guarantee
1 Year from the Date of Purchase
• Name of the company that received the Conformity Assessment : Citech Co., Ltd.
• Manufacturer/Country of Manufacturer : Citech Co., Ltd./Korea
• Identication Code of the Certied Company: SYH
• Certication No. : R-R-SYH-RS250
Memo
- 57 -
KOREAN
- 56 -
Memo
OWNER’S MANUAL
RS250 제품 사용설명서
- 58 - - 59 -
KOREAN
안전을 위한 주의 사항
1. 경고 내용
2. 주의 내용
구성품 목록
버튼 및 연결부 위치/기능
1. 제품 앞면
2. 제품 뒷면
3. 리모트 컨트롤
제품 설치
1. 제품 설계 방향 및 설치 위치
2. 전원 코드 연결 방법
3. 후면 단자와 케이블의 올바른 연결 방법
3-1. 아날로그 출력 단자와 파워 앰프, AV 리시버 등 연결
3-2. 아날로그 입력 단자와 오디오 기기 연결
3-3. 디지털 입·출력 단자와 오디오 기기(TV, 디지털 입·출력 지원 기기) 연결
3-4. USB 오디오 출력과 외장 DAC 연결
3-5. USB Audio In 연결 방법
4. 외장 메모리(USB) 및 SATA 저장 장치
5. SSD 연결 방법
5-1. SSD 삽입 방법
5-2. SSD 장착 후 포맷 방법
5-3. 네트워크를 통한 파일 복사 방법
6. 네트워크 연결
6-1. 이더넷 연결(유선)
6-2. WiFi 연결(무선)
7. RoonReady 연결 방법
초기 설정
1. 전원 버튼
2. 입·출력 설정
2-1. INPUT
2-1-1. RS250
2-1-2. ANALOG IN
2-1-3. COAX IN
2-1-4. OPT IN
2-1-5. USB IN
2-2. OUTPUT
2-2-1. USB DAC
2-2-1-1. MQA Type
2-2-1-2. PCM Resampling Frequency
2-2-1-3. DSD Mode
2-2-1-4. Roon Volume Control
2-2-1-5. OUTPUT Gain
2-2-2. HDMI
2-2-2-1. PCM Resampling Frequency
2-2-2-2. DSD Mode
2-2-2-3. Roon Volume Control
2-2-2-4. HDMI Passthrough
2-2-2-5. OUTPUT Gain
2-2-3. Digital
2-2-3-1. MQA Type
2-2-3-2. PCM Resampling Frequency
2-2-3-3. DSD Mode
2-2-4. Analog
2-2-4-1. 프리아웃 레벨 설정
2-2-4-2. PCM Resampling Frequency
2-2-4-3. Headphone Output Impedance
2-2-4-4. DSD Mode
재생
1. 기본 동작
2. 미디어 라이브러리
2-1. 미디어 스캔 동작
2-2. 미디어 스캔 완료 후
보충 정보
1. 펌웨어 업데이트
1-1. OTA 업데이트 진행
1-2. 설정 메뉴를 통한 업데이트
1-3. XMOS/Audio MCU 업데이트 팝업 노출 시 설치 방법
2. 공장 초기화
제품 사양
1. Specications
2. Analog Audio Specications
품질 보증
목 차
60
60
61
62
63
63
64
65
66
66
67
68
74
74
77
79
81
81
81
93
93
93
95
95
99
100
100
101
102

- 60 - - 61 -
KOREAN
안전을 위한 주의 사항
1. 경고 내용
• 제품에 무리한 힘을 가하거나 던지고 날카로운 것으로 충격을 주는 행동을 하지 마십시오.
• 어린이가 사용할 때는 보호자가 바른 사용방법을 알려 주고, 올바로 사용하고 있는지를
확인하십시오.
• 0°C~40°C 이내에서 사용하고, 고온 다습한 환경에서 사용하지 마십시오. 0°C 미만 또는
찜질방과 같이 고온의 밀폐된 환경에서 사용하면 고장이나 부식, 발열, 발화가 일어날 수
있으니 밀폐된 공간에 넣지 마시고 통풍이 잘 되는 장소에 설치하십시오. 또한 습기나
액체 성분은 제품의 표면과 회로 부품에 손상을 줄 수 있습니다.
• 반드시 ROSE에서 제공한 정품 파워코드를 사용하십시오. 그 외의 코드는 작동 오류를
일으키거나 제품이 손상(성능 저하)될 수 있습니다.
• 제품에 오물이나 액체 등을 흘리지 마십시오. 부품 및 회로에 손상을 줄 수 있습니다.
제품이 물에 젖으면 전원을 켜지 않은 상태로 가까운 서비스 센터로 문의하십시오. 단,
이때는 무상 수리를 받을 수 없습니다.
• 제품에 ROSE에서 보증하지 않는 안테나, 액세서리를 연결하지 말고, 전파에 방해를 줄 수
있는 물건(철재 책상, 전자레인지 등) 위에 놓지 마십시오.
• 제품은 전파에 민감하여 철재, 전자파 사용 기기 등의 주변에서 사용하면 성능이 떨어질
수 있습니다.
• 퓨즈 교체 방법 : 전원 종료 후, 퓨즈를 분리하여 동일한 사양의 퓨즈로 교체하십시오.
• 이 제품의 라벨은 제품 하단에 위치해 있습니다.
2. 주의 내용
• 사용설명서의 내용은 제품의 초기 설정값을 기준으로 설명합니다.
• 사용설명서는 제품 성능 개선을 위해서 사용자에게 사전 통보 없이 일부 기능이 변경될 수
있습니다.
• 제품의 기능 및 부가 서비스는 국가, 소프트웨어 사양의 제한, 서비스 제공자의 정책
변경에 따라 달라질 수 있습니다.
• 사용자의 부주의나 제품의 고장으로 인한 수리 시 사용자의 데이터(음악, 동영상 파일
등)가 지워질 수 있습니다. 데이터 손실이나 유실로 발생한 피해에 대해서는 ROSE에서
책임지지 않습니다.
• Bluetooth와 2.4GHz 무선랜을 같이 사용하면, 신호 간섭으로 인해 WiFi 연결이
느려지거나 Bluetooth 오디오가 정상적으로 동작하지 않을 수 있습니다. 동시에
사용하는 경우 무선랜 연결을 5GHz 대역으로 사용하기를 권장합니다.
• 화학 용액(알코올, 시너, 솔벤트 등)이나 세제를 사용하여 제품을 청소하지 마십시오. 화학
용액을 이용하여 문지르면 제품에 열이 발생하여 화재의 원인이 될 수 있습니다. 청소할
때는 부드러운 헝겊이나 수건으로 닦으십시오.
• 제품을 사용자 임의로 분해하거나 개조, 수리하지 마십시오. 무상 수리를 받을 수
없습니다. 만약 고장이 나면 지정 서비스 센터에 문의하여 수리를 받으십시오.
• 제조사가 제공하는 프로그램만 사용할 수 있습니다. 임의로 제작한 파일 또는 사용자가
수정한 파일을 제품에 전송하면 작동 오류를 일으키거나 제품에 심각한 이상이 생길 수
있습니다. 이로 인해 발생하는 문제에 대해서는 ROSE에서 책임지지 않습니다.
• 터치 화면이 파손됐을 때는 다칠 수 있으므로 손으로 만지지 말고 서비스 센터에
문의하십시오.
• 콘센트에서 플러그를 제거하기 가까운 곳에 설치하십시오.
- 62 - - 63 -
KOREAN
- 63 -
버튼 및 연결부 위치/기능
1. 제품 앞면
전원버튼/
상태 표시 LED
볼륨조절 노브
헤드폰
출력 단자
IPS 터치패널
전원 버튼/
상태 표시 LED
전원 버튼을 누르면 LED가 점멸하며, 부팅이 완료되면 LED가
소등됩니다.
※
자세한 기능은 ‘초기 설정’ – ‘전원 버튼’을 참고하십시오.(81p)
볼륨 조절 노브
볼륨 조절 노브를 돌리거나, 볼륨 조절 화면에서 상/하로 드래그하여
볼륨을 조절할 수 있습니다. 볼륨 조절은 100단계로 0~99까지 조절
가능합니다. 볼륨 조절 노브를 누르면 소리가 뮤트 됩니다.
주의 :
볼륨을 높인 상태로 장시간 청취 시, 청력 손상을 유발할 수
있으니 유의하시기 바랍니다.
헤드폰 출력
단자
스테레오 3극 이어폰 및 헤드폰(3.5mm)을 연결할 수 있습니다.
연결되면 화면 상단에 헤드폰 아이콘( )이 활성화되었는지 확인해
주십시오. 연결하시는 헤드폰의 임피던스에 맞게 본체 설정 메뉴에서
선택이 가능합니다.
※
스피커 출력 및 이어폰 출력은 동시에 출력되지 않습니다.
IPS 터치패널
멀티 터치하여 화면을 이동 할 수 있습니다.
구성품 목록
1 본체
2 블루투스 리모컨
3 파워코드
4 사용설명서
MANUAL
5
SSD 장착용
나사
6
리모컨용 AAA
배터리
- 64 - - 65 -
KOREAN
2. 제품 뒷면
AC Power
Inlet
Ethernet USB 3.0
USB
Audio Out
HDMI
Coaxial
In/Out
Analog
In
USB
Audio In
Optical
In/Out
Analog
Out
GND
3. 리모트 컨트롤
※
블루투스 리모컨의 배터리 수명은 평균 약 3~4개월이며 배터리 소모로 인하여 전력이 약할
경우 블루투스 리모컨이 오작동 할 수 있으며, 이때는 배터리를 교체 후에 사용하여 주십시오.
2
5
7
1
3
4
6
8
12
11
13 14
15 16
17 18
109
기능 비고
1 슬립 모드 기능
전원 ON/OFF
2 음소거 기능
3 이전 곡 재생
재생화면에서만 동작
4 현재 곡 재생 및 정지
재생화면에서만 동작
5 다음 곡 재생
재생화면에서만 동작
6 뒤로 가기
7 홈 화면으로 이동
8
포커스 위쪽으로
이동
9
포커스 왼쪽으로
이동
10
포커스 오른쪽으로
이동
11
포커스 아래쪽으로
이동
12 현재 포커스 선택
13 옵션 키
리스트에서 하위옵션
(즐겨찾기, 큐, 구독)이
있는 노래 및 영상만 동작
14 슬립 타이머 기능
15
즐겨찾기 메뉴로
이동
본 제품에서 설정한 즐겨찾기
메뉴로 이동
16
외부 입·출력 메뉴로
이동
Local, Optical, Analog
변경
17 볼륨 다운
누르고 있으면 볼륨조절
18 볼륨 업
누르고 있으면 볼륨조절
AC Power
Inlet
AC 전원 케이블을 연결합니다.
GND
외부 장치와 접지를 연결하는 단자입니다.
USB Audio
In
-
USB B 타입 케이블을 이용하여 단자와 컴퓨터를 연결한 후 본
제품을 컴퓨터의 USB DAC으로 사용할 수 있습니다.
Optical In
-
Optical 케이블을 단자에 연결해 디지털 신호(44.1kHz ~
192kHz)를 입력 받습니다.
Optical
Out
-
Optical 케이블을 단자에 연결해 디지털 신호(44.1kHz ~
192kHz)를 출력합니다.
Analog In
-
RCA 케이블을 단자에 연결해 아날로그(Max : 9.0dBu / 2.2Vrms)
신호를 입력받습니다.
Analog Out
-
RCA 케이블을 단자에 연결해 아날로그(Max : 9.0dBu / 2.2Vrms)
신호를 출력합니다.
Ethernet
- 유선 LAN케이블을 단자에 연결합니다.
USB 3.0
USB 저장 장치를 연결하여 음악 파일을 재생하거나, CD ROM
연결하여 Ripping 기능을 사용할 수 있습니다.
USB Audio
Out
외부 USB AUDIO DAC 장치와 연결하여 재생하거나, USB 저장
장치를 연결하여 음악파일을 재생할 수 있습니다.
HDMI
-
HDMI 케이블을 연결하여 비디오 출력(up to 3840 x 2160/60Hz)
신호를 TV나 모니터로 재생할 수 있습니다.
Coaxial In
-
Coaxial 케이블을 단자에 연결해 디지털 신호(44.1kHz ~
192kHz)를 입력받습니다.
Coaxial
Out
-
Coaxial 케이블을 단자에 연결해 디지털 신호(44.1kHz ~
192kHz)를 출력합니다.
- 66 - - 67 -
KOREAN
제품 설치
1. 제품 설계 방향 및 설치 위치
• 본 제품은 탁자 또는 선반에 바르게 올려두고 사용하도록 설계되었습니다.
• 겨울 혹한기나 여름 혹서기에는 제품이 오동작 할 수 있습니다.
(동작 온도 : 0℃~40℃, 보관 온도 : -10℃~50℃)
• 공간이 협소한 경우 본 제품에 적절한 환기를 제공하십시오. 전자제품은 적절한 환기를
하여 필요 이상 과열되지 않도록 관리하면 가장 긴 작동 수명을 보장합니다. 파워앰프와
같이 발열이 많은 장치 바로 위에 본 제품을 설치하지 마십시오.
• 아래 그림은 최소한의 필요한 환기 요구 사항입니다.
• 본 제품의 각 측면에 2.5cm 이상 간격을 두어 공기 흐름이 막히지 않도록 합니다.
• 공기 흐름 및 케이블 연결을 위해 35cm 깊이를 확보하십시오.
25mm
25mm
25mm
25mm
350mm
2. 전원 코드 연결 방법
• 본 제품에는 탈착식 전원 코드가 포함되어 있습니다. 전원 코드는 모든 연결이 끝난 후에
연결하여 주십시오. 먼저 제품의 AC INLET 터미널에 전원 코드를 연결하고 콘센트에
연결하십시오.
주의 :
전원 코드를 분리할 때는 항상 콘센트 쪽부터 먼저 분리하십시오.

- 68 - - 69 -
KOREAN
3-2. 아날로그 입력 단자와 오디오 기기 연결
• 아래 그림과 같이 본 제품의 아날로그 오디오 입력에 CD플레이어와 같은 외부 기기의
아날로그 출력을 연결할 수 있습니다.
• 아날로그 오디오 입력을 소스로 사용할 경우, 입·출력 설정에서 입력 소스를 ‘ANALOG
IN’으로 전환해야 합니다. 입출력 설정은 홈화면, 설정, 로즈 커넥트 앱의 설정,
리모컨에서도 변경할 수 있습니다.
3. 후면 단자와 케이블의 올바른 연결 방법
3-1. 아날로그 출력 단자와 파워 앰프, AV 리시버 등 연결
• 아래 그림과 같이 본 제품의 아날로그 오디오 출력을 파워앰프 또는 AV 리시버의
아날로그 입력에 연결할 수 있습니다.
• 본 제품의 아날로그 오디오 출력 볼륨 조정은 프리아웃 레벨 설정을 통하여 ‘Variable’과
‘Fixed’로 선택할 수 있습니다.
주의 :
본 제품과 파워앰프를 연결하기 전에 본 제품의 볼륨을 뮤트 또는 단계 5이하로
설정하신 후 RCA 케이블을 사용하여 연결하십시오. 본 제품에서 음악을 재생 중이고
볼륨이 크게 되어 있는 경우 케이블을 연결하면 큰 쇼크음이 날수 있습니다.
- 70 - - 71 -
KOREAN
3-3. 디지털 입·출력 단자와 오디오 기기(TV, 디지털 입·출력 지원 기기) 연결
• 아래 그림과 같이 본 제품의 디지털(Optical/Coaxial) 입·출력 단자에 외부기기의 디지털
입·출력 장치를 연결하여 사용할 수 있습니다.
• 본 제품은 샘플링 주파수가 44.1kHz, 48kHz, 88.2kHz, 96kHz, 176.4kHz, 192kHz인
선형 PCM 신호를 재생할 수 있습니다.
• 디지털 입력을 소스로 사용할 경우, 입·출력 설정에서 입력 소스를 ‘Optical In’ 또는
‘Coaxial In’으로 전환해야 합니다.
• 디지털 출력을 내보내기 위해서는, 입·출력 설정에서 출력 모드를 ‘Optical Out’ 또는
‘Coaxial Out’으로 활성화하여야 합니다.
• 입·출력 설정은 홈화면, 설정, 로즈커넥트 앱의 설정, 리모컨에서도 변경할 수 있습니다.
주의 :
Dolby 디지털, DTS, AAC 등과 같은 선형 PCM 신호 이외의 신호를 이 장치에 입력하지
마십시오. 그렇게 하면 소음이 발생하여 스피커가 손상될 수 있습니다.
3-4. USB 오디오 출력과 외장 DAC 연결
• 본 제품에는 별도의 USB DAC을 연결할 수 있는 USB AUDIO OUT 단자가 있습니다.
• 외장 USB DAC을 본 제품의 USB AUDIO OUT 단자에 연결한 후, 입·출력 설정에서
출력장치를 외장 USB DAC으로 활성화하여야 합니다.
※
본 제품은 USB Audio Class 2.0 규격을 준수합니다.
- 72 - - 73 -
KOREAN
3-5. USB Audio In 연결 방법
• 아래 이미지와 같이 장치를 연결합니다.
• 3-5-1. ROSE 홈페이지(www.hirose.com)에서 Rose_UsbAudio_v4.86.0.zip 을
다운로드합니다.
• 3-5-2. 다운로드한 Rose_UsbAudio_v4.86.0파일을 압축 해제 후 Rose_UsbAudio_
v4.86.0.exe 를 실행시키면 아래의 사진과 같은 화면이 나타납니다. Next를 선택하십시오.
• 3-5-3. UsbAudio사운드, 범용직렬 버스 컨트롤러를 설치한 후 재부팅합니다.
• 3-5-4. 드라이버 설치 완료 후, 입출력 설정에서 소스를 USB In으로 전환하면 PC에서
아래와 같이 RS250-DAC이 나타납니다.
• 3-5-5. PC의 시스템 트레이 영역에서 사운드 장치를 RS250-DAC로 설정 시 USB In에
대한 사용준비가 완료됩니다.
- 74 - - 75 -
KOREAN
4. 외장 메모리(USB) 및 SATA 저장 장치
• 본 제품은 USB 및 SATA 방식의 저장 장치를 연결할 수 있습니다.
• SATA 방식을 이용하여 저장 장치를 연결할 경우, SSD를 사용할 것을 권장합니다.
• USB 저장 장치는 최대 10TB, SATA 저장 장치는 최대 4TB까지 호환됩니다.
※
SSD는 별도 구매 가능하며 반드시 두께가 7mm 규격만 사용 가능합니다.
5. SSD 연결 방법
5-1. SSD 삽입 방법
• 5-1-1. 본체 바닥면의 SSD 커버 고정 나사(2ea) 분리
• 5-1-2. OPEN 표시부를 밀어 SSD 커버 분리
• 5-1-3. SSD 커버에 연결 단자에 맞춰 SSD 안착
• 5-1-4. SSD 장착용 나사(4ea)로 SSD를 SSD 커버에 고정
5-1-1.
5-1-2.
5-1-3.
5-1-4.
두께 7mm SSD
5-1-4.
5-2. SSD 장착 후 포맷 방법
• 시스템 설정의 SSD 포맷 메뉴에서 본 제품과 연결되어 있는 SSD를 포맷할 수 있습니다.
• 5-1-5. SSD가 안착된 SSD 커버를 본체에 조립
• 5-1-6. LOCK 표시부를 밀어 나사(2ea) 재 고정
5-1-5.
5-1-6.
- 76 - - 77 -
KOREAN
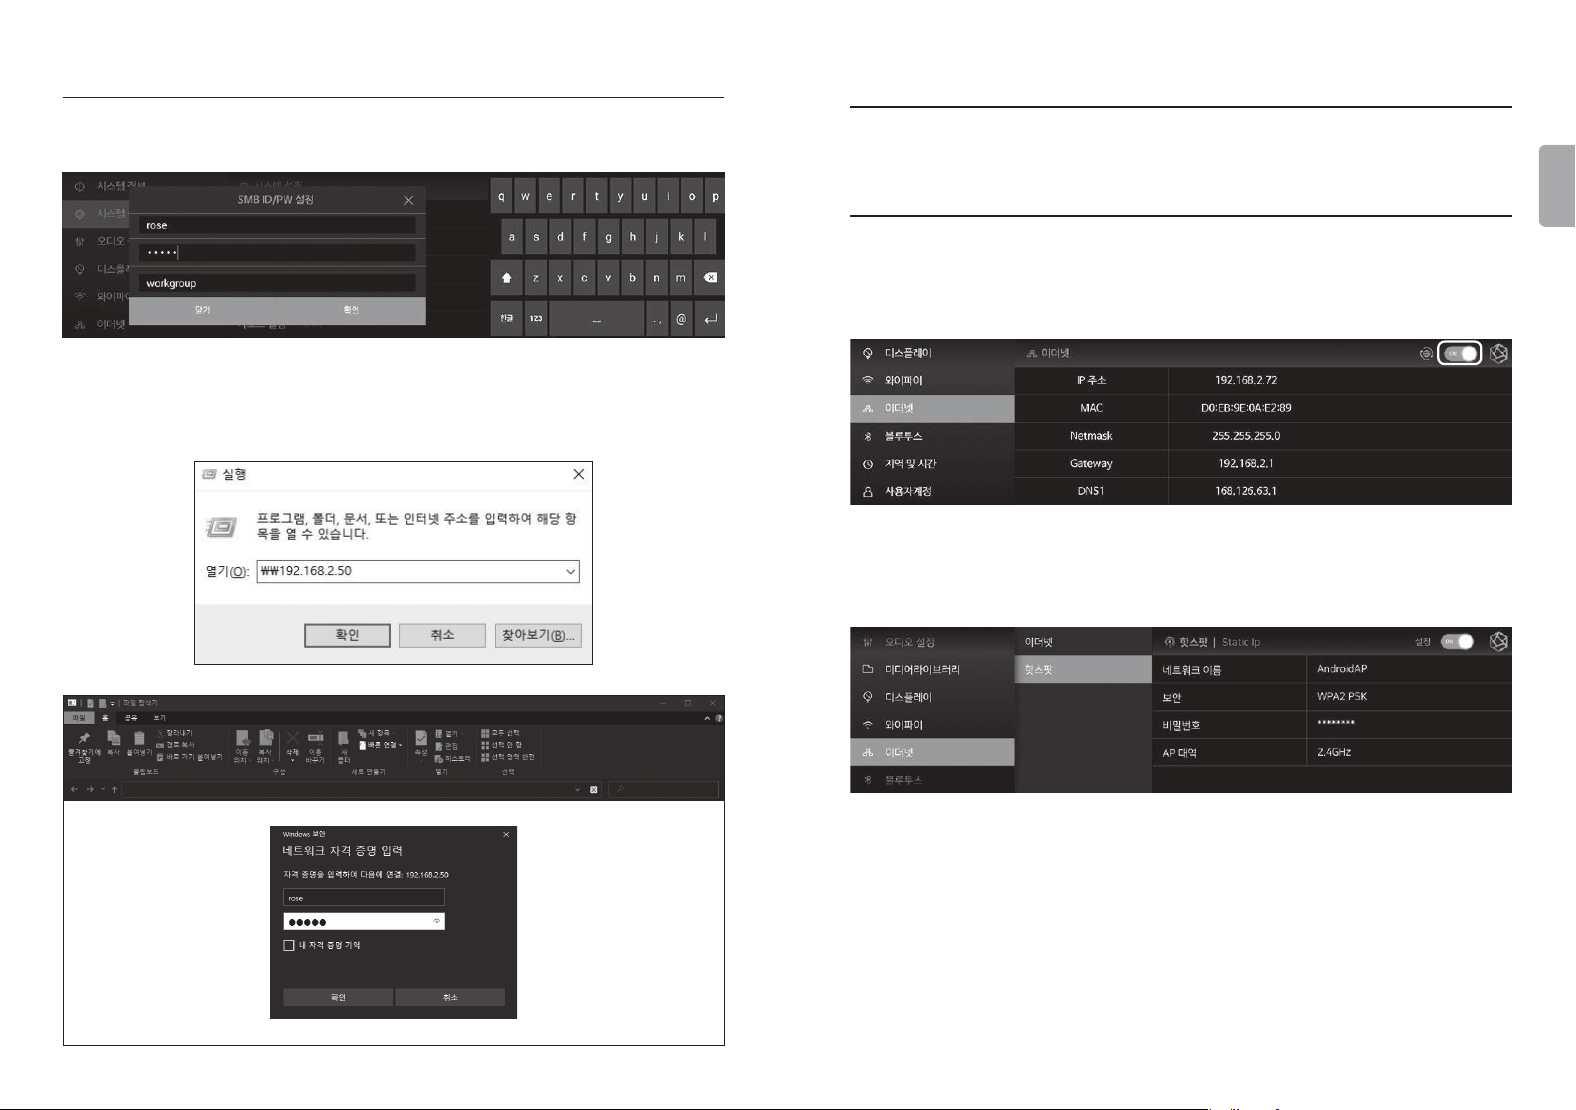
• PC에서 \\로즈 IP를 입력 후, SMB에서 설정했던 ID/PW를 입력하면 본 제품에 연결된
storage가 나타나며 PC에서 바로 파일을 복사할 수 있습니다.
※
PC에서 본 제품의 SMB에 연결하려면 두 장치가 동일한 네트워크에 연결되어 있어야 합니다.
5-3. 네트워크를 통한 파일 복사 방법
• 시스템 설정의 스토리지 설정에서 SMB ID/PW를 설정합니다.
6. 네트워크 연결
• 본 제품은 유/무선으로 네트워크에 연결할 수 있습니다.
6-1. 이더넷 연결(유선)
• 후면 이더넷 단자에 랜선을 연결한 후, 설정 - 이더넷 메뉴에서 ON을 선택하면 네트워크에
연결됩니다.
• 정상적으로 연결되었을 경우 IP 주소와 그 외 정보를 자동으로 받아옵니다.
• 6-1-1. 이더넷 연결 후, 본 제품을 와이파이 핫스팟으로 활용할 수 있습니다.
네트워크 이름과 비밀번호를 입력한 후 핫스팟 기능을 활성화하면, 다른 디바이스에서
비밀번호를 사용해서 이 와이파이 핫스팟에 연결할 수 있습니다.
- 78 - - 79 -
KOREAN
6-2. WiFi 연결(무선)
• 설정 - 와이파이 메뉴에서 ON 시, 현재 접속 가능한 SSID가 나타나며 SSID를 선택 후
연결하면 네트워크에 연결됩니다.
※
구글플레이스토어, 앱스토어를 통해 지원되는 ROSE Connect Premium 앱을 스마트폰에
다운로드 및 설치하여 본 제품을 원격제어할 수 있습니다.
※
스마트폰(ROSE Connect Premium)에서 본 제품을 제어하려면 동일한 네트워크에
연결되어야 합니다. (무선 네트워크 익스텐더, 브릿지 등을 사용하여 한 개의 네트워크 망을
구성할 수 있습니다.)
7. Roon Ready 연결 방법
• Roon을 사용하기 위해 먼저 홈페이지(http://roonlabs.com)에 접속하여 계정을
생성합니다. RoonCore를 다운로드하여 PC에 소프트웨어를 설치합니다.
• RoonCore에서 관리되고 있는 음원이 다양하게 나타납니다.
- 80 - - 81 -
KOREAN
• 설정-오디오에서 ‘오디오 선택’에서 본 제품을 선택합니다.
• ROSE와의 연결이 완료되면 Roon에서 음원을 실행하여 음원제어 및 청취가 가능합니다.
※
Roon에서 본 제품을 제어하려면 동일한 네트워크에 연결되어야 합니다.
초기 설정
1. 전원 버튼
• 1-1. 전원 버튼을 짧게 누르면 본 제품을 켜고 끌 수 있습니다.
1-1-1. 전원 버튼을 짧게 누를 시 전원이 켜져 있을 경우 대기모드로 진입하며,
전원이 꺼져 있을 경우 본 제품을 켤 수 있습니다.
1-1-2. 부팅 중 전원을 누를 시 본제품이 꺼지게 됩니다.
• 1-2. 전원 버튼을 3초간 누르면 [화면OFF|종료|재시작] 메뉴가 표시됩니다.
1-2-1. LCD OFF( ) : 사운드는 재생되고 화면만 꺼집니다.
LCD OFF 상태에서 다시 전원 버튼을 누르면 화면이 켜집니다.
※
제품 사용 중 화면만 끌 수 있는 기능입니다.
1-2-2. 종료( ) : 전원이 꺼지게 됩니다.
1-2-3. 재시작(
) : 본 제품이 꺼졋다가 켜진 후 홈화면으로 이동합니다.
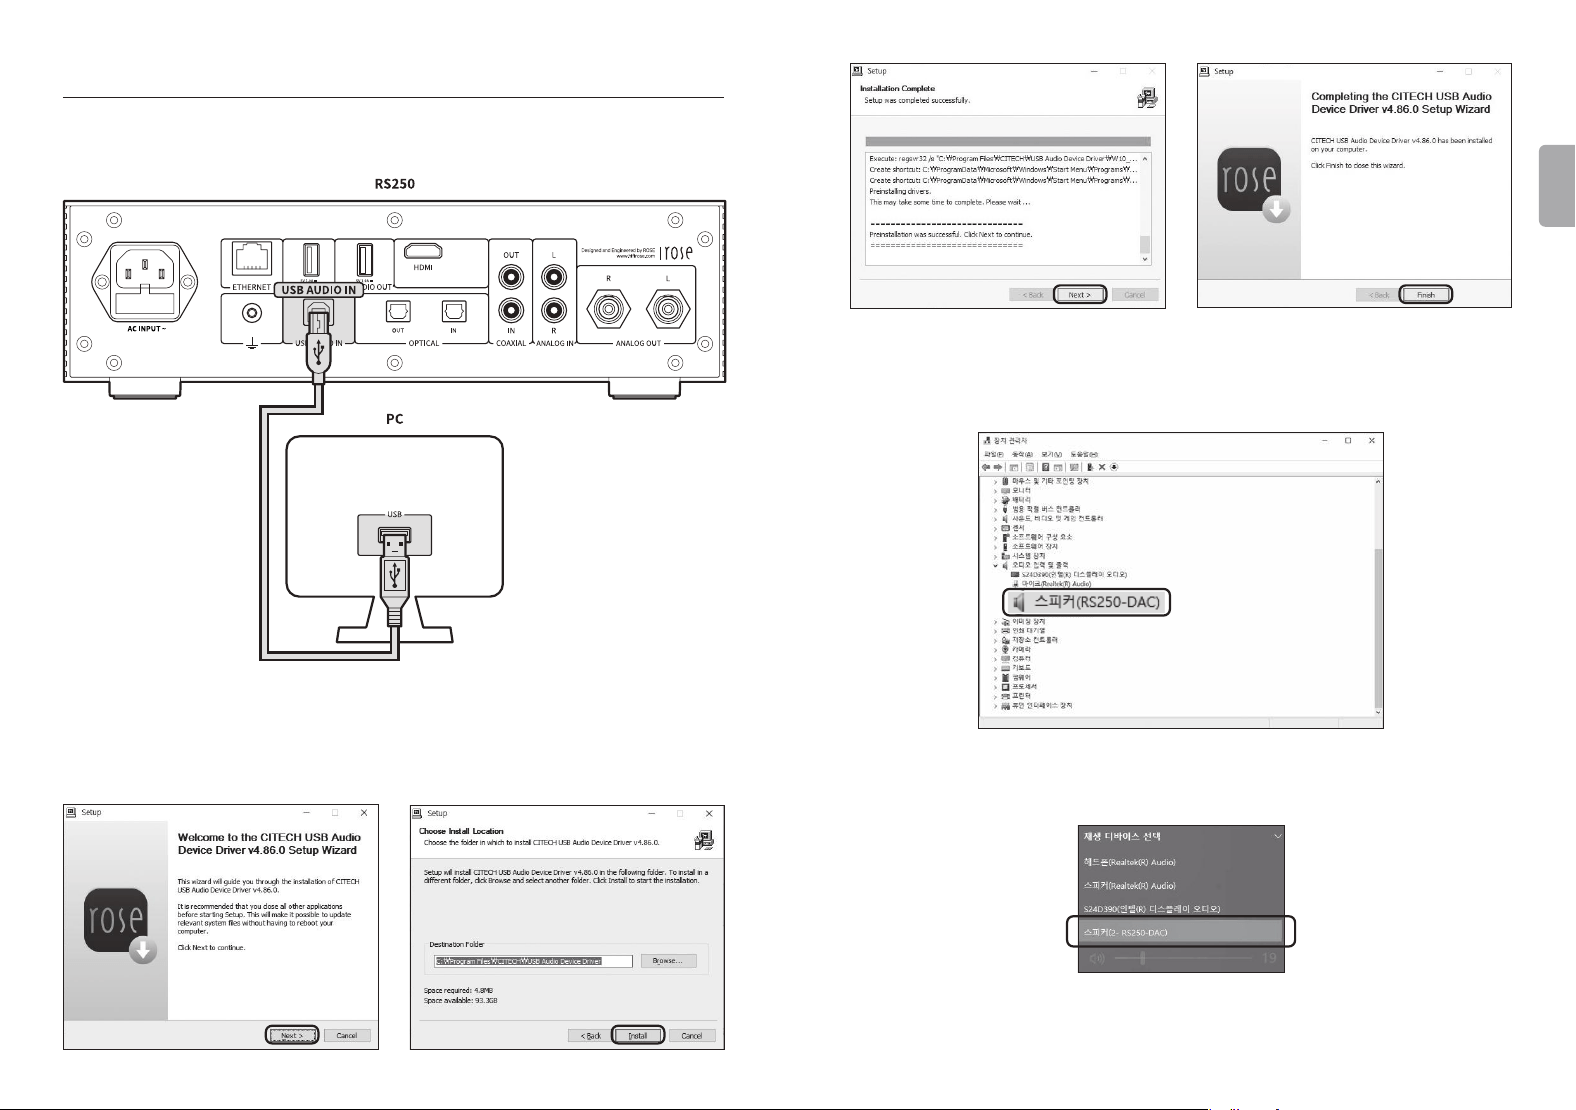
※
메뉴 이외의 화면을 터치하면 취소됩니다.
• 1-3. 전원버튼 LED 상태 : 화면 켜진 상태 (LED OFF) / 화면 꺼진 상태 (LED ON)
• 1-4. 전원버튼을 5초간 누르면 강제 재부팅 됩니다.
2. 입·출력 설정
• 메인 화면에서 ‘입·출력 설정’ 아이콘을 선택하여 입·출력 설정 메뉴로 이동합니다.
- 82 - - 83 -
KOREAN
2-1. INPUT
• INPUT 설정 메뉴에서 아이콘을 선택하여 입력을 선택할 수 있습니다.
활성화되었을 경우 아이콘이 골드색으로 변경되고, 체크 표시가 나타납니다.
※
한 번에 하나의 입력만 선택이 가능합니다.
2-1-1. RS250
• 본 제품을 Internal 모드로 설정합니다. 처음 시작 시 기본 설정 모드로 저장 장치의
음원이나 스트리밍 소스를 사용할 경우 선택합니다.
• 외부 입력을 사용 중 일 경우 저장 장치의 음원이나 스트리밍 소스를 재생할 경우
자동으로 선택됩니다.
2-1-2. ANALOG IN
• 아날로그 오디오 입력을 소스로 사용할 경우, 입·출력 설정에서 입력 소스를 ‘ANALOG
IN’으로 선택합니다.
2-1-3. COAX IN
• COAX IN을 소스로 사용할 경우, 입·출력 설정에서 입력 소스를 ‘COAX IN’으로
선택합니다.
2-1-4. OPT IN
• OPT IN을 소스로 사용할 경우, 입·출력 설정에서 입력 소스를 ‘OPT IN’으로 선택합니다.
2-1-5. USB IN
본 제품을 PC에 연결하여 USB DAC으로 사용할 경우, 입출력 설정에서 소스를 USB IN으로
선택합니다.
※
제품 설치 - USB Audio IN 연결 방법을 참고하십시오.
- 84 - - 85 -
KOREAN
2-2. OUTPUT
• OUTPUT 설정 메뉴에서 아이콘을 선택하여 출력 설정을 활성화/비활성화할 수 있습니다.
• 활성화되었을 경우 아이콘이 골드색으로 변경되고, 체크 표시가 나타납니다.
USB와 HDMI, Internal DAC 중 하나의 출력만 선택이 가능합니다.
• Internal DAC의 경우 다중으로 출력 포트를 활성화할 수 있습니다.
2-2-1. USB DAC
• USB DAC을 연결한 후 USB를 선택하면, 연결되어 있는 USB DAC 목록이 나타납니다.
목록 중에서 사용할 USB DAC를 선택합니다.
• USB DAC을 선택하면, 선택된 USB DAC의 Model명이 나타나며 사용 가능한 상태가
됩니다.
• USB DAC의 설정 아이콘을 선택하면 다음과 같은 USB DAC Setting 화면이 나옵니다.
2-2-1-1. MQA Type
• MQA 재생 모드를 설정합니다. Authenticator 또는 Decoder 모드를 선택할 수 있습니다.
디지털 출력으로는 원음 또는 디코딩된 오디오 데이터만 내보낼 수 있고, 풀디코딩된
오디오 데이터는 내보낼 수 없습니다.
2-2-1-2. PCM Resampling Frequency
• Sampling Frequency를 설정하는 메뉴입니다. 원음 그대로 출력하기를 원하면 Original
Sampling Rate, 리샘플링 기능을 사용하려면 원하는 샘플링 레이트(48kHz, 96kHz,
192kHz 등)를 선택합니다.
2-2-1-3. DSD Mode
• DSD 음원 재생 시 DAC으로 전달할 오디오 샘플의 전송 포맷(Native, DOP, PCM)을
결정합니다. USB DAC의 경우 연결한 DAC의 지원 여부에 따라 Native, DOP, DSD to
PCM을 선택하고 사용해야 DSD 음원을 재생할 수 있습니다.
- 86 - - 87 -
KOREAN
2-2-1-4. Roon Volume Control
• Roon Ready 모드에서 볼륨 조절 방법(Hardware, Software, Fixed)을 선택합니다.
USB DAC의 경우 Hardware/Software/Fixed를 선택할 수 있으나,
USB DAC이 Hardware Volume Control을 지원하지 않는다면 Hardware 선택 시
볼륨이 조절되지 않습니다.
2-2-1-5. OUTPUT Gain
• Digital Output의 Gain 값을 조절합니다. 외부 리시버 또는 DAC과 연결 시 distortion이
발생하면 Output Gain 값을 적절히 조절하여 사용합니다.
2-2-2. HDMI
• HDMI 설정을 할 수 있습니다.
• HDMI의 설정 아이콘을 선택하면 아래와 같이 HDMI Setting 화면이 나옵니다.
2-2-2-1. PCM Resampling Frequency
• Sampling Frequency를 설정하는 메뉴입니다. 원음 그대로 출력하기를 원하면 Original
Sampling Rate, 리샘플링 기능을 사용하려면 원하는 샘플링 레이트(48kHz, 96kHz,
192kHz 등)를 선택합니다.
2-2-2-2. DSD Mode
• DSD 음원 재생 시 DAC으로 전달할 오디오 샘플의 전송 포맷(Native, DOP, PCM)을
결정합니다. HDMI 출력의 경우 DSD to PCM만 가능합니다.
- 88 - - 89 -
KOREAN
2-2-2-3. Roon Volume Control
• Roon Ready 모드에서 볼륨 조절 방법(Hardware, Software, Fixed)을 선택합니다.
HDMI 출력의 경우 Software 또는 Fixed에서 선택할 수 있습니다.
2-2-2-4. HDMI Passthrough
• Surround 음원과 같은 HD audio format을 디코딩 없이 HDMI를 통해서 오디오
리시버로 Bypass 합니다.
2-2-2-5. OUTPUT Gain
• Digital Output의 Gain 값을 조절합니다. 외부 리시버 또는 DAC과 연결 시 distortion이
발생하면 Output Gain 값을 적절히 조절하여 사용합니다.
2-2-3. Digital
• COAX OUT, OPT OUT 설정을 할 수 있습니다.
• Digital의 설정 아이콘을 선택하면 다음과 같이 Digital 출력 설정 화면이 나옵니다.
2-2-3-1. MQA Type
• MQA 재생 모드를 설정합니다. Authenticator 또는 Decoder 모드를 선택할 수 있습니다.
디지털 출력으로는 원음 또는 디코딩된 오디오 데이터만 내보낼 수 있고, 풀디코딩된
오디오 데이터는 내보낼 수 없습니다.
2-2-3-2. PCM Resampling Frequency
• Sampling Frequency를 설정하는 메뉴입니다.
원음 그대로 출력하기를 원하면 Original Sampling Rate, 리샘플링 기능을 사용하려면
원하는 샘플링 레이트(48kHz, 96kHz, 192kHz 등)를 선택합니다.
- 90 - - 91 -
KOREAN
2-2-3-3. DSD Mode
• DSD 음원 재생 시 DAC으로 전달할 오디오 샘플의 전송 포맷(Native, DOP, PCM)을
결정합니다.
• Native 모드 일 경우에는 DSD 재생 시 아날로그 출력으로는 DSD512까지 지원하지만,
디지털 출력으로는 소리가 나지 않습니다.
• DOP 모드일 경우에는 아날로그 출력으로는 소리가 나지 않고, 디지털 출력으로
DSD256까지 오디오 데이터를 전송합니다. Optical, COAX의 경우에는 DSD64까지만
지원합니다.
• DSD to PCM(up to DSD128) 모드의 경우에는 DSD128까지 지원하며 디지털, 아날로그
출력에서 동시에 소리가 납니다.
2-2-4. Analog
• Analog Out 설정을 할 수 있습니다.
• Analog의 설정 아이콘을 선택하면 다음과 같이 Analog 출력 설정 화면이 나옵니다.
2-2-4-1. 프리아웃 레벨 설정
프리아웃 출력 레벨을 고정합니다. 본 제품의 볼륨 제어를 사용하지 않고, 연결한 AMP의
허용 범위 내 입력으로 본 제품의 출력 레벨을 고정하여 사용할 수 있습니다.
2-2-4-2. PCM Resampling Frequency
• Sampling Frequency를 설정하는 메뉴입니다.
• 원음 그대로 출력하기를 원하면 Original Sampling Rate, 리샘플링 기능을 사용하려면
원하는 샘플링 레이트(48kHz, 96kHz, 192kHz 등)를 선택합니다.
2-2-4-3. Headphone Output Impedance
• Headphone의 Output Impedance을 설정하는 메뉴입니다.
• 사용자의 헤드폰 사양에 맞는 출력(16Ω, 32Ω, 50Ω, 100Ω)을 선택하면 더 좋은 음질을
청취할 수 있습니다.
- 92 - - 93 -
KOREAN
2-2-4-4. DSD Mode
• DSD 음원 재생 시 DAC으로 전달할 오디오 샘플의 전송 포맷(Native, DOP, PCM)을
결정합니다.
• Native 모드 일 경우에는 DSD 재생시 아날로그 출력으로는 DSD512까지 지원하지만,
디지털 출력으로는 소리가 나지 않습니다.
• DOP 모드일 경우에는 아날로그 출력으로는 소리가 나지 않고, 디지털 출력으로
DSD256까지 오디오 데이터를 전송합니다. Optical, COAX의 경우에는 DSD64까지만
지원합니다.
• DSD to PCM 모드의경우에는 DSD128까지 지원하며 디지털, 아날로그 출력에서 동시에
소리가 납니다.
재생
1. 기본 동작
• 본 제품 후면부의 USB 포트에 USB 저장 장치를 연결하여 음악 및 비디오 파일을 재생할
수 있습니다.
• 본 제품 하단부에 SATA방식의 HDD/SSD를 장착하여 사용 가능합니다.
※
두께 : 2.5inch/7mm
• ‘음악/비디오’ - ‘폴더’ 탭에 진입하여 저장 장치의 파일을 재생할 수 있습니다.
2. 미디어 라이브러리
• 저장매체 혹은 네트워크 공유 폴더의 음원들을 미디어 스캐닝하여 라이브러리(DB)로
저장할 수 있습니다.
2-1. 미디어 스캔 동작
• 기기 후면부의 USB 포트에 새로운 저장 장치를 연결하면, 신규 스토리지 감지 팝업이
나타납니다.
- 94 - - 95 -
KOREAN
• 신규 스토리지 팝업에서 ‘DB 스캔’ 버튼 선택 시, 연결된 저장 장치에서 미디어 스캐닝을
시작합니다. (스토리지 용량에 따라 미디어 스캐닝 완료 시간에 차이가 있을 수 있습니다.)
• DB 스캔 중에는 본 제품 메인 홈 좌측 하단에 ‘미디어 분석 중’ 로딩 이미지가 표시됩니다.
• DB 스캔 완료 후 음악 및 비디오의 앨범아트 및 목록이 표시되며 재생이 가능합니다.
• 음악/비디오 및 설정 메뉴를 통하여 DB 추가/다시 검색/삭제도 가능합니다.
2-2. 미디어 스캔 완료 후
• 앨범 목록이 앨범 아트 형태로 표시되고, 앨범에 포함되어 있는 목록의 전체 재생이
가능해집니다.
• 앨범, 아티스트, 장르, 작곡가별로 정렬 및 재생이 가능합니다.
• 원하는 아티스트 및 앨범명으로 검색이 가능합니다.
• 플레이리스트/즐겨찾기 기능을 사용하여 좋아하는 음원 및 앨범을 저장할 수 있습니다.
보충 정보
1. 펌웨어 업데이트
1-1. OTA 업데이트 진행
• 네트워크가 연결되어 있는 상태에서 최신 버전의 업데이트가 존재하는 경우 시스템
업데이트 팝업이 노출됩니다.
• 시스템 업데이트 팝업에서 ‘예’ 버튼 선택 시 OTA 업데이트가 진행됩니다.
• 재부팅 후, SW 시스템 업데이트가 완료됩니다.
주의 :
업데이트 중 강제로 전원을 제거하면 문제가 생길 수 있습니다.
- 96 - - 97 -
KOREAN
1-3. XMOS/Audio MCU 업데이트 팝업 노출 시 설치 방법
• 시스템 업데이트 후 XMOS/Audio MCU 업데이트가 있는 경우 업데이트 팝업이 자동으로
노출되며 업데이트를 진행할 수 있습니다.
• 업데이트는 다음과 같은 경우로 발생할 수 있습니다.
1-3-1. XMOS 업데이트만 있는 경우
• XMOS 업데이트 실행 후 자동 재부팅 됩니다.
1-3-2. Audio MCU 업데이트만 있는 경우
• MCU 업데이트 실행 후 자동 재부팅 됩니다.
1-2. 설정 메뉴를 통한 업데이트
• 최신 버전 업데이트가 존재하는 경우, 설정 메뉴의 시스템 버전 정보에서 ‘업데이트’
버튼이 표시됩니다.
• 업데이트 버튼 선택 시, 시스템 업데이트 팝업이 표시됩니다.
• 시스템 업데이트 팝업에서 ‘예’ 버튼 선택 시 OTA 업데이트가 진행됩니다.
• 재부팅 후, SW 시스템 업데이트가 완료됩니다.
주의 :
업데이트 중 강제로 전원을 제거하면 문제가 생길 수 있습니다.
- 98 - - 99 -
KOREAN
2. 공장 초기화
• 본 제품이 작동하지 않거나 인터넷 펌웨어 업그레이드가 실패했을 때는 공장 초기화를
권장합니다. 공장 초기화 시, DB Scan 데이터, 각 앱에서의 설정 및 저장 데이터,
로즈스토어를 통해 설치한 앱, 와이파이 네트워크 설정, 공유 파일 및 저장된 재생 목록을
포함한 모든 사용자 지정 설정이 초기화됩니다. 공장 초기화 이후 재설정이 필요합니다.
• 본 제품은 공장 초기화 또는 초기 설정값 복원이 가능합니다.
• 설정-시스템 설정-공장 초기화 메뉴 옵션에서 초기 설정으로 되돌릴 수 있습니다.
1-3-3. XMOS/Audio MCU 업데이트가 모두 있는 경우
• XMOS 업데이트가 실행되며 완료 후 자동으로 Audio MCU 업데이트가 실행됩니다. 이후
자동으로 재부팅 됩니다.
주의 :
업데이트 중 강제로 전원을 제거하면 문제가 생길 수 있으므로 절대 전원을 제거하시 마세요.
- 100 - - 101 -
KOREAN
제품 사양
1. Specications
Part
Specications
OS
Customized Android 7.1
Design
Size
278(W) x 202(D) x 76(H)mm
Weight
3.2kg
Display
8.8” TFT LCD & Capacitive Touch Screen (MIPI-DSI)
CPU
Hexa Core
CPU
Dual-core Cortex-A72 up to 1.8GHz
Quad-core Cortex-A53 up to 1.4GHz
GPU
Mali-T864 GPU, OpenGL ES1.1/2.0/3.0/3.1,
OpenVG1.1, OpenCL, DX11
Memory
LPDDR3 4GByte
Network
Connection
Ethernet
10/100/1000 BASE-T
WiFi
802.11 a/b/g/n/ac (2.4GHz/5GHz)
Bluetooth
V4.0 / V3.0+HS
Audio
Service
Streaming
Airplay / DLNA / Roon Ready / Spotify Connect
Music
Service
TIDAL / Qobuz / Bugs / ROSE Tube / Internet Radio /
ROSE Podcast
In/Output
Audio
Input
Optical x 1, Coaxial x 1, Analog-In x 1, USB DAC x 1
Audio
Output
Optical x 1, Coaxial x 1, Analog-Out x 1
Video
Output
HDMI 2.0 x 1(up to 3840 x 2160 / 60Hz)
Media
Connection
File System : NTFS / eXfat / FAT32
Network Protocol : SMBv1, SMBv2 / FTP / WebDav
Storage Interface : USB3.0 x 2, SATA x 1
Supported
Codec
Audio
MQA, WAV, FLAC, AIFF, WMA, MP3, OGG, APE, DFF, DSF,
AAC, CDA, AMR, APE, EC3, E-EC3, MID, MPL, MP2, MPC,
MPGA, M4A, ALAC
PCM : 8kHz~768kHz(8/16/24/32bit per Sample)
Native DSD : DSD64(2.8MHz)/DSD128(5.6MHz)/
DSD256(11.2MHz)/ DSD512(22.4MHz)
Video
ASF, AVI, MKV, MP4, WMV, MPEG-1, MPEG-2, MPEG-4
H.263, H.264, H.265, VC-1, VP9, VP8, MVC,
H.264/AVC, Base/Main/High/High10 pro[email protected]
up to 4Kx2K@30fps
H.265/HEVC, Main/Main10 prole@ level 5.1 High-tier
up to 4Kx2K@60fps
Power
Input
Voltage
AC100-120, AC220-240V 50/60Hz
Input
Power
50W
Fuse
T3.15AL / 250V
Update
SW update via internet, USB OTA, ROSE Store
Remote
Control
Feature
Remote
Controller
Bluetooth Remote Controller
Remote
App
ROSE Connect (Android, iOS) /
Google PlayStore, App Store
Accessory
Power Cord x 1, Bluetooth Remote Controller x 1
(AAA Battery x 2), Manual x 1, SSD Screw x 4
DAC Chip
ES9038Q2M(ESS) x 1 (Single Stereo Design)
Analog In
Input Impedance
100kΩ
Input Frequency Response
20Hz to 20,000Hz(+/-0.5dB)
Maximum Input Level(20Hz~20kHz)
Max 2.0Vrms
Preout
DAC Chip
ES9038 Q2M(ESS) x 1(Single Stereo Design)
Output level
Max 2.3Vrms, Unbalanced
THD
0.0002%(1kHz 2.3Vrms Unbalanced output)
THD + N
0.0003%(1kHz 2.3Vrms Unbalanced output)
IMD
-102dB(SMPTE 4 : 1, 60Hz : 7KHz)
Signal to Noise Ratio
116dB(A-wt)
Dynamic Range
Max 126 dB(CCITT lter)
Stereo Crosstalk
Better than -133dB, 20~20kHz
Output Frequency Response
20Hz to 20,000(+/-0.5dB)
Output Impedance
100Ω
Headphone
Output Power
1Vrms/32Ω(MAX 2Vrms/300Ω)
Output Impedance
16~600Ω
Digital Audio Specications
Digital Input Signal Format
SPDIF (PCM)
Digital Input Sample Rate
44.1kHz to 192kHz, 32bit
Coaxial Inputs
0.5V p-p/75Ω
Optical Inputs
-27dbm to -17dbm (TOS Link)
2. Analog Audio Specications
- 102 - - 103 -
KOREAN
서비스 센터에 문의하기 전 확인 사항
• 제품을 사용하는 중에 터치가 되지 않거나 화면이 멈춰 작동하지 않으면 제품을 다시
시작해야 합니다. 전원 키를 5초 이상 길게 누르면 강제 재부팅됩니다.
• 제품 설치 조건(66p)과 달리 협소한 공간에서 장시간 사용할 때는 열이 발생하여 제품이
뜨거워질 수 있고 제품의 수명과 성능을 영향을 줄 수 있습니다.
• 인터넷 연결 순간 전파가 불안정하거나 약한 상태, 또는 인터넷 사용량이 많을 때 청음 중
음이 끊어질 수 있으며 무선 인터넷 역시 무선 통신의 특성상 수신이 지연되거나 수신이
되지 않을 수 있으니 다른 장소로 이동하여 다시 연결을 시도하십시오.
• 콘텐츠별 파일은 제품의 특성, 설계 규격 및 사업자의 요구에 따라 최적화되어 있습니다.
따라서 같은 콘텐츠라도 다른 제조 회사 및 다른 모델과 음량, 음색 등에 차이가 있을 수
있습니다.
문의 전화 1899-6042
• 고객 상담 센터 또는 홈페이지에서 가까운 서비스 센터의 전화번호 및 위치 정보를 확인할
수 있습니다.
제품 홈페이지 www.hirose.com
• 뉴스레터를 통해 ROSE의 최신 소식, 이벤트 및 신상품 정보를 얻을 수 있습니다.
품질 보증
모델명
RS250
구매일시
20 년 월 일
구매처
상호
전화번호
일련번호
전화번호
보증기간
구입일로부터 1년
• 적합성 평가를 받은 자의 상호 : ㈜씨아이테크
• 제조사/제조국가 : ㈜씨아이테크/대한민국
• 인증받은 자의 식별 부호 : SYH
• 인증번호 : R-R-SYH-RS250
Memo
- 104 -
Memo