
WARNING:
Read all instructions and warnings
before using this this product.
WARNINGS:
Read this entire manual before using this product.
This unit is intended for use with 12V SYSTEMS ONLY. Use
on any other system will void the manufacturer’s warranty.
DO NOT use this unit in place of a vehicle’s battery.
DO NOT connect positive and negative clamps to one another.
DO NOT attempt to start a car for more than 30 seconds at a
time. If the vehicle fails to start after three consecutive attempts,
stop and allow the unit to cool for a minimum of five minutes to
avoid potential overheating.
DO NOT expose this unit or any of its components to water,
extreme cold, extreme heat or prolonged high heat.
DO NOT leave this unit unattended while in use or use in or
around flammable objects.
DO NOT use this unit if you notice damage and/or swelling.
DO NOT modify or attempt to disassemble this unit or any
components, as this will immediately render the warranty null
and void and could cause unit damage, user injury, or even fire.
DO NOT attempt to start a vehicle while the unit is being charged.
ALWAYS make sure there is no corrosion or debris on the jump
start cables plug-in before each use.
DO NOT charge unit at below 32°F or above 90°F.
DO NOT leave clamps attached to vehicle battery after vehicle
has been started. Remove immediately.
DO NOT use attachments, cables, clamps, etc. not included
with the unit or not approved by manufacturer. Doing so could
cause damage to unit or even fire.
ALWAYS dispose of batteries and electronic devices properly
and according to all local regulations.
CAUTION:
If damaged or used under extreme conditions the unit could
potentially leak fluid. If this liquid comes in contact with skin,
wash with mild soap and lukewarm water immediately. If liquid
from unit comes in contact with your eyes, rinse with cold water
for 10 minutes and seek medical attention.
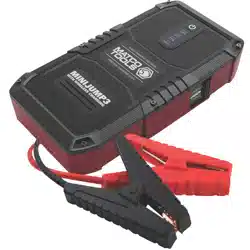
Specifications:
Model: MINIJUMP3
Capacity: 37 Wh
Cranking Amps: 300
Peak Amps: 600
Input: 5V/2A, 9V/2A
Output: 5V/2.1A, 5V/3A and 9V/2A (Quick Charge), 12V (Jump
Start), and 10W (Wireless Charging Dock).
Lifespan: Approximately 1,000 cycles
Components:
MINIJUMP3 power bank and jump starter unit
Smart Cables, jump starting cables
Charging cord
Storage pouch
Functions and Features:
Starting a vehicle:
1. Plug the blue connector end of the jumpstarting cables into
the power outlet port labeled “JUMPER CABLE”, and make
sure the cable indicator light is off.
2. Connect the red clamp to the positive (+) battery terminal
and the black clamp to the negative (-) battery terminal. DO
NOT let the clamps touch each other.
3. At this point, DO NOT press the BOOST button the jump start
cable unit until instructions state you should.
4. If the red light illuminates and buzzing begins, you have
reversed the clamps. Disconnect the clamps and confirm the
clamps are attached to the proper battery terminals.
5. If there is no lights or sound, check the connection of the
clamps before attempting to start the vehicle.
6. When green light is on, it is safe to start the vehicle.
7. When light is blinking, press the BOOST button and start the
vehicle within 30 seconds.
8. Be sure to read the “Explanation of lights and alerts”.
9. If the vehicle does not start after three attempts, stop and
allow the unit to cool for at least two minutes. As this will
assist in not overworking the unit.
10. Once the vehicle has been started. Remove the cables and
unit within 30 seconds to avoid any possible damage to the
unit. The engine should remain running after this step.
Cable Power Unit:
Charging the power unit:
1. Charge the unit using the Quick Charge Input port. DO NOT
charge it by any other means.
2. The charge of the unit should last 6-12 months without use.
It is recommended to charge the unit every 3 month.
Charging devices, such as phones and tablets:
1. Plug the supplied cable into the device you want to charge
and the other end into either the standard 5V/2.1A outlet port
or the Quick Charge Outlet port.
2. The Quick charge outlet port will recognize your device and
charge it accordingly.
3. Once you have connected the device to the unit, you may
press the POWER button on the unit.
Using the wireless charging dock:
1. Place your wireless charging enabled device on the cover of
the unit where is states, “WIRELESS CHARGING DOCK”.
2. Press the POWER button to begin charging.
Using the LED flashlight:
1. Press and hold the POWER button for three seconds.
2. To change modes, press the POWER button again. The three
modes are steady light, strobe and SOS.
Safety features:
Overcharge and over-discharge protection
Reverse polarity protection
Fuse protection
FAQ’s
Q. How do I turn off the power unit?
A. The unit has an automatic shutoff. It shuts down when it
detects no load or when charging is complete.
Q. How long does it typically take to charge the power unit?
A. Approximately 3 hours.
Q. How many times should this jump start a vehicle from a
full charge?
A. It depends on the engine size, but using a 3.0L gasoline
powered V6 as a reference, approximately 20 times.
Q. What is the average lifespan of this power unit?
A. With normal use, usually 3-5 years.
WARRANTY REPAIR/REPLACEMENTS
For repair or replacement, contact customer service at 1-800-537-1077.
DO NOT SHIP UNTIL YOU RECEIVE A RETURN MECHANDISE
AUTHORIZATION (RMA) number from customer service at Horizon
Tool, Inc.
NOTE:
Save proof of purchase, such as a dated store receipt, to establish warranty period.
Without a dated receipt, we will use the manufacturing date code. This warranty for
the jump starter is extended to the original purchaser or user, and it covers defects in
materials and workmanship for one year.
For malfunction due to defects in materials or workmanship prior to 6 months from
the purchase date, we will repair or replace the unit at our discretion after inspection.
LIMITED WARRANTY INFORMATION LIMITED WARRANTY
NOTE:
The battery is covered under separate terms. The battery will be prorated
monthly, over one year, from the end of the first month to the end of the
twelfth month.
This applies only to batteries which have not been misused or abused,
Typical failure modes of misused or abused battery are melted terminals
or signs of overcharging.
This warranty is invalidated if any of the following occurs, but not limited
to this list:
• Failure to follow instructions in the User Manual
• Accidental or unreasonable use or misuse
• Mishandling
• Extended storage without recharging
• Repairs by unauthorized person or modification
• Normal wear or accident
This warranty is in lieu of all other express warranties. Horizon Tool, Inc.
will not be liable for consequential or incidental damages. Some states
do not allow limitations on warranties. In such case, the above limitation
may not apply.
SERVICE ADDRESS
Horizon Tool, Inc.
7918 Industrial Village Road
Greensboro, NC 27409
NOTE:
Whenever returning a product to this address, it must be packaged securely to avoid
shipping damage. Horizon Tool, Inc. will not be responsible for any shipping or
handling damage. Also, all postage or transportation must be prepaid.
CUSTOMER SERVICE CONTACT
Horizon Tool, Inc.
Service Department
Tel: 1-800-537-1077
Fax: 1-800-537-1717
Email: [email protected]
Explanation of lights and alerts:
GREEN LIGHT on – Good connection and the
circuit is working. You may attempt to start the
vehicle at this point.
GREEN LIGHT blinking with buzzing – The
vehicle battery is low. Press the BOOST button.
When the light illuminates a steady green, start
the vehicle within 30 seconds.
RED LIGHT on with buzzing – The
connection is incorrect. The clamps are reverse
of the correct set up. Refer to STEP 2 of the
“Starting a Vehicle” instructions.
Once the GREEN LIGHT is on, it is safe to start
the vehicle.
No light and no buzzing – The vehicle battery
could be damaged or extremely low. Confirm
the cables are properly connected. When the
light illuminates a steady green, start the
vehicle within 30 seconds.
NOTE: If there is no response when pressing the POWER
button, the power unit itself could be low on charge.
Quick Charge
Outlet Port
Charging
Input Port
Standard
Outlet Port
Multi-Mode
LED Flashlight
Power Button
Jump Starting
Outlet Port
Charge Indicator
Lights
Wireless
Charging Dock
Boost
Button
Status
Lights
NEVER charge unattended
and never charge near or
around flammable objects.

ADVERTENCIA:
Lea todas las instrucciones y advertencias
antes de usar este producto.
ADVERTENCIAS:
Lea el manual en su totalidad antes de utilizar el producto.
Esta unidad está diseñada para su uso exclusivo con sistemas de 12 V. El
uso en cualquier otro sistema anulará la garantía del fabricante.
NO use esta unidad en lugar de la batería del vehículo.
NUNCA conecte la pinza positiva a la negativa ni viceversa.
NO intente arrancar un coche durante más de 30 segundos cada vez. Si el
vehículo no arranca después de tres intentos consecutivos, pare y deje
que la unidad se enfríe durante un mínimo de cinco minutos para evitar
posibles sobrecalentamientos.
NO exponga esta unidad ni cualquiera de sus componentes al agua, frío
extremo, calor extremo o temperaturas elevadas durante un tiempo
prolongado.
NO deje esta unidad desatendida mientras se está utilizando o si se está
usando cerca de objetos inflamables.
NO utilice esta unidad si observa daños y/o hinchazón.
NO modifique ni intente desmontar esta unidad ni cualquiera de sus
componentes, ya que esto anulará inmediatamente la garantía y podrían
producirse daños en la unidad, lesiones en el usuario o incluso un
incendio.
NO intentar arrancar un vehículo mientras se está cargando la unidad.
Asegúrese SIEMPRE de que no hay corrosión ni suciedad en los cables
de arranque auxiliar antes de cada uso.
NO cargue la unidad si la temperatura es inferior a 0 ºC o superior a 32 ºC.
NO deje las pinzas conectadas a la batería del vehículo después de
arrancarlo. Retírelas inmediatamente.
NO utilice accesorios, cables, pinzas, etc. no incluidos con la unidad o
aprobados por el fabricante. Si lo hace, podría dañarse la unidad e incluso
producirse un incendio.
Deseche SIEMPRE las baterías y los dispositivos electrónicos
adecuadamente y de acuerdo con las normativas locales.
CUIDADO:
Si esta dañada o usada bajo condiciones extremas, la unidad podría
potencialmente gotear. Si este liquido entra en contacto con la piel, lavar
con jabón suave y agua tibia inmediatamente. Si el liquido de la unidad
entra en contacto con los ojos, enjuagar por 10 minutos con agua fría y
buscar atención medical.
Especificaciones:
Modelo: MINIJUMP3
Capacidad: 37 Wh
Amperios de arranque: 300
Amperios de pico: 600
Entrada: 5 V/2 A, 9 V/2 A
Salida: 5 V/2,1 A, 5 V/3 A y 9 V/2A (carga rápida), 12 V (arranque) y 10 W
(base de carga inalámbrica)
Vida útil: 1000 ciclos, aproximadamente
Componentes:
Batería y unidad de arranque MINIJUMP3
Cables inteligentes, cables de arranque
Cable de carga
Bolsa de almacenamiento
Funciones y aracterísticas:
Para arrancar un vehículo:
1. Conecte el extremo azul del conector de los cables de
arranque al puerto de alimentación con el nombre "JUMPER
CABLE" y asegúrese de que la luz indicadora del cable está apagada.
2. Conecte la pinza roja al borne positivo (+) y la pinza negra al borne
negativo (-) de la batería. NO deje que las pinzas entren en contacto la
una con la otra.
3. En este punto, NO pulse el botón BOOST de la unidad de arranque
hasta que las instrucciones le indiquen que lo haga.
4. Si se enciende la luz roja y escucha un zumbido, las pinzas están
invertidas. Desconecte las pinzas y asegúrese de que están
conectadas a los terminales correctos de la batería.
5. Si no hay luces ni escucha ningún sonido, compruebe la conexión de
las pinzas antes de intentar arrancar el vehículo.
6. Cuando se encienda una luz verde, puede arrancar el vehículo con
seguridad.
7. Si parpadea la luz, pulse el botón BOOST y arranque el vehículo en
menos de 30 segundos.
8. No olvide leer la sección "Explicación de las luces y las alertas".
9. Si el vehículo no arranca después de tres intentos, pare y deje que
launidad se enfríe durante al menos dos minutos. De esta forma,
evitará que la unidad se sobrecargue.
10. Una vez arrancado el vehículo. Retire los cables y la unidad en menos
de 30 segundos para evitar que la unidad sufra posibles daños. El
motor debería permanecer encendido después de este paso
Cable de alimentación de la unidad:
Para cargar la unidad de alimentación:
1. Cargue la unidad mediante el puerto de entrada de carga rápida. NO
la cargue de ninguna otra forma.
2. La carga de la unidad debería durar entre 6 y 12 meses si no se usa.
Se recomienda cargar la unidad cada 3 meses.
Dispositivos de carga, como teléfonos y tabletas:
1. Conecte el cable suministrado al dispositivo que desea cargar y el
otro extremo al puerto de salida estándar de 5 V/2,1 A o al puerto de
salida de carga rápida.
2. El puerto de salida de carga rápida reconocerá el dispositivo y lo
cargará.
3. Una vez conectado el dispositivo a la unidad, puede pulsar el botón
de encendido de la unidad.
Para usar la base de carga inalámbrica:
1. Coloque el dispositivo habilitado para carga inalámbrica en la cubierta
de la unidad donde se indica "BASE DE CARGA INALÁMBRICA".
2. Pulse el botón de encendido para iniciar la carga.
Para usar la linterna LED:
1. Pulse y mantenga pulsado el botón de encendido durante tres
segundos.
2. Para cambiar de modo, vuelva a pulsar el botón de encendido. Los
tres modos son luz continua, luz estroboscópica y SOS.
Funciones de seguridad:
Protección de sobrecargas y descargas
Protección contra polaridad inversa
Protección de fusibles
PREGUNTAS FRECUENTES
P. ¿Cómo desactivo la unidad de alimentación?
R. La unidad dispone de un modo de desconexión automático. Se apaga
cuando no detecta ninguna carga o cuando la carga está completa.
P. ¿Cuánto tiempo se tarda normalmente en cargar la unidad de
alimentación?
R. Unas 3 horas, aproximadamente.
P. ¿Cuántas veces se puede arrancar un vehículo con una carga
completa?
R. Depende del tamaño del motor. Si, por ejemplo, se usa un motor de
gasolina de 3 l y 6 V, aproximadamente 20 veces.
P. ¿Cuál es el promedio de vida útil de la unidad de alimentación?
R. Con un uso normal, generalmente de 3 a 5 años.
REPARACIONES Y REEMPLAZOS DE GARANTÍA
Para REPARACIÓN O REEMPLAZO, comuníquese con Servicio a Cliente al
1-800-537-1077. NO ENVÍE LA UNIDAD HASTA QUE RECIBA UNA
AUTORIZACIÓN DE DEVOLUCIÓN DE MERCANCÍA (RMA, en inglés) de
Servicio al Cliente Horizon Tool Inc.
NOTA:
Guarde el comprobante de compra, así como el recibo de la tienda con fecha, para
determinar el período de garantía. Sin un recibo con fecha, utilizaremos el código de
fecha de fabricación. Esta garantía del Arrancador Auxiliar se extiende al comprador o
al usuario original, y cubre defectos en materiales y mano de obra durante un año.
Por mal funcionamiento debido a defectos en materiales o mano de obra antes de los
6 meses a partir de la fecha compra, repararemos o combiaremos la unidad a
discreción tras la inspección.
GARANTÍA LIMITADA, INFORMACIÓN DE GARANTÍA LIMITADA
NOTA:
La batería está cubierta por términos separados. La batería se evaluará
mensualmente, durante un año, del final del primer mes final del
doceavo mes.
Esto sólo se aplica a baterías que NO hayan sido mal usadas o maltrata-
das. Los modos típicos de fallas de baterías mal usadas o maltraradas
muestran terminales fundidas o señales de sobrecarga.
Esta garantía se invalidará si ocurre cualquiera se siguiente, pero no se
limita a esta lista:
• No seguir las instrucciones en el Manual de Usuario.
• El uso accidental o no razonable o el mal uso.
• Mal manejo.
• Carga excesiva o sobrecarga.
• Almacenamiento extendido sin recarga.
• Reparaciones o modificaciones por personal no authorizado.
• Desgaste normal o accidentes.
Esta garantía sustituye a cualquier otra garantía expresa. Horizon Tool,
Inc. no será responsable por daños incidentales o consecuentes. Algunos
estados no permiten limitaciones en garantias. En tal caso, la limitación
anterior puede no aplicarse.
DIRECCIÓN DE SERVICIO
Horizon Tool, Inc.
7918 Industrial Village Road
Greensboro, NC 27409
NOTA:
Siempre que devuelva un producto a esta dirección, debe empaquetarse de forma
segura para evitar daños durante el transporte. Horizon Tool, Inc. no será responsable
de ningún daño o gastos de envío. Además, todos los envíos o transportes deben
pagarse por adelantado.
CONTACTO DE SERVICIO AL CLIENTE
Horizon Tool, Inc.
Service Department
Tel: 1-800-537-1077
Fax: 1-800-537-1717
Email: [email protected]
Explicación de las luces y las alertas:
GLUZ VERDE encendida: Buena conexión, el
circuito funciona. Puede intentar arrancar el vehículo.
LUZ VERDE parpadeando con zumbidos: El
vehículo tiene la batería baja. Pulse el botón BOOST.
Cuando se encienda una luz verde fija, arranque el
vehículo antes de 30 segundos.
LUZ ROJA encendida con zumbidos: La conexión
es incorrecta. Las pinzas se han conectado de forma
incorrecta. Consulte las instrucciones del PASO 2,
"Para arrancar un vehículo". Cuando se encienda la
LUZ VERDE, puede arrancar el vehículo con seguridad.
Sin luz y sin zumbidos: La batería del vehículo
podría estar dañada o con muy poca carga. Asegúrese
de que los cables están conectados correctamente.
Cuando se encienda una luz verde fija, arranque el
vehículo antes de 30 segundos.
NOTA: Si no hay respuesta al pulsar el botón de encendido, es posible
que la unidad de alimentación tenga poca carga.
Puerto de salida
de carga rápida
Entrada de carga
del puerto
Puerto de
salida estándar
Linterna LED
multimodo
Botón de
alimentación
Puerto de salida
de arranque
Luces de indicación
de carga
Base de carga
inalámbrica
Botón
BOOST
Luces de
estado
No cargue NUNCA desatendida
y nunca carga cerca o alrededor
de objetos inflamables.