User Manual


Table of Contents
2023-06 EN 5020079.40A.04
3
Table of Contents
IMPORTANT SAFETY INSTRUCTIONS .................. 7
Important Information ........................................ 10
1 My bernette ......................................................... 12
1.1 Overview Machine .................................................. 12
Overview Front Controls .............................................. 12
Overview - Front ......................................................... 15
Overview Top .............................................................. 16
Overview - Back Panel ................................................. 16
1.2 Accessory ............................................................... 17
Supplied Accessories ................................................... 17
Overview Presser Feet .................................................. 18
1.3 Overview User Interface .......................................... 19
Overview System Settings ............................................ 19
Overview Functions/Visual Information ........................ 20
Overview Functions and Views .................................... 20
1.4 Needle, Thread, Fabric ............................................ 21
Overview Needles ........................................................ 21
Example for Needle Description ................................... 24
Thread Selection ......................................................... 24
Needle/Thread Combination ........................................ 25
2 Sewing Preparation ............................................. 26
2.1 Connection and Switching On ................................ 26
Connecting the Machine ............................................. 26
Connecting the Foot Control ....................................... 26
Attaching the Knee Lifter of the Free Hand System ...... 27
Switching the Machine On .......................................... 27
Fixing the Touch Screen Pen ........................................ 27
Regulating the Speed via the Foot Control .................. 28
Raising/Lowering the Needle ....................................... 28
Programming the Foot Control Individually .................. 28
2.2 Spool Pin ................................................................ 28
Horizontal Spool Pin .................................................... 28
Second Spool Pin ........................................................ 29
2.3 Freearm .................................................................. 30
2.4 Sewing Table and Accessory Box ............................. 30
2.5 Raising or Lowering the Feed Dog ........................... 31
2.6 Using the Slide-on Table ......................................... 31
2.7 Presser Foot ............................................................ 32
Adjusting the Presser Foot Position via the Knee Lifter
of the Free Hand System ............................................. 32
Changing the Presser Foot .......................................... 32
Having the presser foot sole displayed in the user
interface ..................................................................... 33
Setting the Presser Foot Pressure ................................ 34
2.8 Needle and Stitch Plate .......................................... 34
Changing the Needle .................................................. 34
Selecting the Needle in the User Interface ................... 35
Needle Stop Up/Down (Permanent) ............................ 35
Changing the Stitch Plate ........................................... 35
Checking the Stitch Plate in the User Interface ............ 36
2.9 Threading .............................................................. 37
Preparing the Threading ............................................. 37
Threading the Upper Thread ....................................... 37
Threading the Twin Needle ......................................... 40
Winding the Bobbin Thread ........................................ 42
Threading the Bobbin Thread ..................................... 44
3 Setup Program .................................................... 46
3.1 Sewing Settings ..................................................... 46
Adjusting the Upper Thread Tension ........................... 46
Adjusting the Maximum Sewing Speed ....................... 46
Programming Securing Stitches .................................. 46
Adjusting the Hovering Height of the Presser Foot ...... 47
Programming the Button «Securing» .......................... 47
Programming the Button «Thread Cutter» .................. 48
Adjusting the Presser Foot Position with Needle Stop
Down ......................................................................... 48
Programming the Button «Quick Reverse» .................. 49
Programming the "Needle Up/Down" Button ............. 49
Programming the Foot Control Individually ................. 50
Fabric Thickness Measurement ................................... 50
Adjusting the General Balance .................................... 51
3.2 Embroidery Settings ............................................... 51
Adjusting the Upper Thread Tension ........................... 51
Adjusting the Maximum Embroidering Speed ............. 51
Calibrating the Embroidery Hoop ................................ 52
Deactivating Securing Stitches .................................... 52
Adjusting the Thread Cut ........................................... 53
Adjusting the Height of the Embroidery Presser Foot .. 53
3.3 Selecting Personal Settings ..................................... 54
3.4 Monitoring Functions ............................................. 54
Activating the Upper Thread Indicator ........................ 54
Activating the Bobbin Thread Indicator ....................... 54
3.5 Sound On/Off ........................................................ 55

Table of Contents
4
2023-06 EN 5020079.40A.04
3.6 Machine Settings .................................................... 55
Adjusting the Brightness of the Display ....................... 55
Adjusting the Sewing Light ......................................... 55
Calibrating the Display ................................................ 56
Back to Basic Setting ................................................... 56
Updating the Machine Firmware ................................. 56
Checking the Firmware Version ................................... 57
Reviewing the Total Number of Stitches ...................... 57
Selecting a Language .................................................. 58
4 System Settings ................................................... 59
4.1 Calling Up the Tutorial ............................................ 59
4.2 Using eco Mode ..................................................... 59
4.3 Calling up the Creative Consultant ......................... 60
4.4 Cancelling Any Alterations with «clr» ..................... 61
5 Creative Sewing ................................................... 62
5.1 Overview Selection Menu Sewing ........................... 62
Selecting a Stitch Pattern ............................................. 62
5.2 Dual feed ................................................................ 63
Application of the Dual Feed ....................................... 63
Use the Dual Feed ....................................................... 63
5.3 Regulating the Speed .............................................. 64
5.4 Adjusting the Upper Thread Tension ....................... 64
5.5 Editing Stitch Patterns ............................................. 64
Changing the Stitch Width .......................................... 64
Changing the Stitch Length ......................................... 65
Correcting the Balance ................................................ 65
Programming Pattern Repeat ...................................... 66
Mirror Image of Stitch Patterns .................................... 66
Edit Stitch Pattern Length ............................................ 66
Permanent Quick Reverse ............................................ 67
Backstepping .............................................................. 67
5.6 Combining Stitch Patterns ...................................... 68
Overview Combi Mode ............................................... 68
Creating Stitch Pattern Combinations .......................... 68
Editing a Single Stitch Pattern ...................................... 69
Deleting a Single Stitch Pattern ................................... 69
Adding a Single Stitch Pattern ..................................... 70
Mirroring a Stitch Pattern Combination ....................... 70
Programming Pattern Repeat ...................................... 70
Securing a Stitch Pattern Combination ........................ 71
Saving a Stitch Pattern Combination ........................... 71
Loading a Stitch Pattern Combination ......................... 71
Overwriting a Stitch Pattern Combination ................... 72
Deleting a Stitch Pattern Combination ......................... 72
5.7 Administering Stitch Patterns .................................. 72
Saving Stitch Patterns in Personal Memory .................. 72
Overwriting Stitch Patterns from the Personal Memory 72
Loading Stitch Patterns from the Personal Memory ..... 73
Deleting Stitch Patterns from the Personal Memory .... 73
6 Practical Stitches ................................................. 74
6.1 Overview Practical Stitches ..................................... 74
6.2 Sewing Straight Stitch ............................................ 76
6.3 Securing with the Automatic Securing Program ..... 76
6.4 Sewing in the Zipper .............................................. 77
6.5 Sewing Triple Straight Stitch .................................. 78
6.6 Sewing Triple Zigzag .............................................. 78
6.7 Manual Darning ..................................................... 79
6.8 Reinforced Darning, Automatic .............................. 79
6.9 Finishing Edges ...................................................... 81
6.10 Sewing Double Overlock ........................................ 82
6.11 Sewing Vari Overlock ............................................. 82
6.12 Edgestitching Using the Seam Guide ...................... 82
6.13 Sewing a Narrow Hem ........................................... 83
6.14 Sewing Blind Hems ................................................ 84
6.15 Sewing Visible Hems .............................................. 85
6.16 Sewing Basting Stitches ......................................... 85
6.17 Sew Thick Areas .................................................... 86
6.18 Sewing Corners ..................................................... 86
7 Decorative Stitches ............................................. 87
7.1 Overview Decorative Stitches ................................. 87
7.2 Altering the Stitch Density ..................................... 88
7.3 Sewing Cross Stitches ............................................ 88
8 Alphabets ............................................................ 89
8.1 Overview Alphabet ................................................ 89
8.2 Creating Lettering .................................................. 89
9 Buttonholes ......................................................... 91
9.1 Overview Buttonholes ............................................ 91
9.2 Marking Buttonholes ............................................. 92
9.3 Sewing a Buttonhole Automatically ....................... 93
9.4 Reinforce Buttonhole ............................................. 95
9.5 Sewing On Buttons ................................................ 96
9.6 Sewing Eyelets ....................................................... 97

Table of Contents
2023-06 EN 5020079.40A.04
5
10 Quilting ................................................................. 98
10.1 Overview Quilt Stitches ........................................... 98
10.2 Quilting, Securing Program ..................................... 99
10.3 Sewing Hand-look Quilt Stitches ............................. 99
10.4 Guiding the Quilt Work Freely ................................. 100
11 Stitch Designer ..................................................... 101
11.1 Overview Stitch Designer ........................................ 101
11.2 Creating your Own Stitch Pattern ........................... 101
Creating Stitch Designs Using Screen Dots .................. 102
Free hand drawing ...................................................... 102
11.3 Editing the View ..................................................... 102
11.4 Inserting Points ....................................................... 102
11.5 Relocating the Points .............................................. 103
11.6 Duplicating Points ................................................... 103
11.7 Deleting Points ....................................................... 103
11.8 Activating the Triple Stitch ...................................... 104
12 My bernette Embroidery ..................................... 105
12.1 Overview Embroidery Module ................................. 105
12.2 Overview User Interface .......................................... 106
Overview Functions/Visual Information ........................ 106
Overview System Settings ............................................ 106
Overview Selection Menu Embroidery ......................... 107
12.3 Important Embroidery Information .......................... 107
Upper Thread .............................................................. 107
Bobbin Thread ............................................................ 108
Choosing the Embroidery Design ................................ 108
Embroidery Test .......................................................... 108
Embroidering Designs by Third-party Providers ............ 108
Underlay Stitches ........................................................ 108
The Size of the Embroidery Design .............................. 109
Satin or Leaf Stich ....................................................... 109
Step Stitch .................................................................. 109
Connecting Stitches .................................................... 110
13 Embroidery Preparation ...................................... 111
13.1 Attaching the Embroidery Module .......................... 111
13.2 Embroidery Foot ..................................................... 112
Attaching the Embroidery Foot .................................... 112
Selecting the Embroidery Foot ..................................... 113
13.3 Needle and Stitch Plate ........................................... 114
Inserting the Embroidery Needle .................................. 114
Attaching the Stitch Plate (CutWork/Straight) .............. 114
13.4 Selecting the Embroidery Design ............................. 116
13.5 Embroidery Hoops ................................................. 116
Overview Embroidery Hoop Selection ......................... 116
Selecting the Embroidery Hoop ................................... 116
Tear-away Stabilizers .................................................. 117
Cut-away Stabilizers ................................................... 117
Using Adhesive Spray ................................................. 117
Using Spray Starch ...................................................... 117
Using Iron-on Interfacing ............................................ 117
Using Paper-backed Adhesive Stabilizer ...................... 118
Using Water-soluble Stabilizer .................................... 118
Preparing the Embroidery Hoop .................................. 118
Attaching the Hoop .................................................... 120
Overview Embroidery Functions .................................. 121
Locating the Center of the Embroidery Design ............ 121
Centering the Needle to the Embroidery Hoop ........... 121
Embroidery Arm Return .............................................. 122
Grid On/Off ................................................................ 122
14 Creative Embroidering ....................................... 123
14.1 Overview Embroidering .......................................... 123
Selecting and Changing the Embroidery Design .......... 123
Overview Editing Embroidery Design ........................... 124
Moving the Embroidery Design ................................... 124
14.2 Selecting and Changing the Embroidery Design ..... 125
14.3 Checking the Embroidery Time and the Embroidery
Design Size ............................................................ 125
14.4 Regulating the Speed ............................................. 125
14.5 Editing the Embroidery Design ............................... 126
Overview Editing Embroidery Design ........................... 126
Scaling Up the Embroidery Design View ...................... 126
Downsizing the Embroidery Design ............................. 126
Moving the embroidery design view ........................... 127
Moving the embroidery design in enlarged view ......... 127
Moving the Embroidery Design ................................... 127
Rotating the Embroidery Design ................................. 128
Altering the Embroidery Design Size Proportionally ..... 128
Mirroring Embroidery Designs ..................................... 129
Checking the Size and the Position of the Embroidery
Design ........................................................................ 129
Deleting an Embroidery Design ................................... 130
14.6 Creating Lettering .................................................. 130
Overview Embroidery Alphabets ................................. 130
Creating Words/Sentences .......................................... 130
Editing Words/Sentences ............................................ 131
Bending the Text ........................................................ 132
Altering the Stitch Density .......................................... 133
14.7 Combining Embroidery Designs ............................. 133
Combining Embroidery Designs .................................. 133
Deleting a Single Embroidery Design ........................... 133

Table of Contents
6
2023-06 EN 5020079.40A.04
14.8 Changing the Colors of the Embroidery Design ....... 134
Overview Changing the Color ..................................... 134
Changing the Colors ................................................... 134
Changing the Thread Brand ........................................ 135
14.9 Embroidering the Embroidery Design ...................... 135
Overview Embroidery Menu ........................................ 135
Adding Basting Stitches ............................................... 136
Moving the Hoop ........................................................ 136
Embroidery Sequence Control when the Thread Breaks
.................................................................................... 136
Cutting Connecting Stitches ........................................ 137
Multi-colored Embroidery Design On/Off ..................... 137
Color Indication .......................................................... 137
14.10 Administering Embroidery Designs .......................... 138
Administering Embroidery Designs .............................. 138
Saving Embroidery Designs in the Personal Memory .... 138
Saving the Embroidery Design on the USB Stick ........... 138
Overwriting the Embroidery Design in the Personal
Memory ...................................................................... 139
Loading an Embroidery Design from the Personal
Memory ...................................................................... 139
Loading an Embroidery Design from the USB Stick ...... 139
Deleting an Embroidery Design from the Personal
Memory ...................................................................... 139
Deleting an Embroidery Design from the USB Stick ...... 140
15 Embroidery ........................................................... 141
15.1 Embroidering via the Button «Start/Stop» ............... 141
15.2 Adjusting the Upper Thread Tension ....................... 141
16 BERNINA CutWork Tool ....................................... 143
16.1 Attaching Cutwork Tool ......................................... 143
16.2 Start to Cut ............................................................ 144
17 Maintenance and Cleaning ................................. 145
17.1 Cleaning and Maintenance Intervals ....................... 145
17.2 Cleaning the Display ............................................... 145
17.3 Cleaning the Feed Dog ........................................... 145
17.4 Cleaning the Hook .................................................. 146
17.5 Oiling the Needle Bar .............................................. 147
18 Errors and Faults .................................................. 148
18.1 Troubleshooting ..................................................... 148
18.2 Error Messages ....................................................... 151
19 Technical Data ...................................................... 156
20 Appendix .............................................................. 157
20.1 Overview Stitch Patterns ......................................... 157
Practical Stitches ......................................................... 157
Buttonholes ................................................................ 157
Decorative Stitches ..................................................... 157
Quilt Stitches .............................................................. 159
20.2 Overview Embroidery Desings ................................ 160
Editing the Embroidery Design .................................... 160
Embellishment ............................................................ 160
Quilt Designs .............................................................. 162
Borders and Lace ........................................................ 164
Children ..................................................................... 165
Flowers ....................................................................... 166
Seasons ...................................................................... 168
Asia ............................................................................ 170
Sport/Hobby ............................................................... 171
Animals ...................................................................... 173
CutWork .................................................................... 175
Campaign .................................................................. 176
Index .................................................................... 177

IMPORTANT SAFETY INSTRUCTIONS
7
2023-06 EN 5020079.40A.04
IMPORTANT SAFETY INSTRUCTIONS
Please be aware of the following basic safety instructions when using your
machine. Before using this machine, read instruction manual carefully.
DANGER
To protect against electric shock, the following instructions must be observed.
• Never leave the machine unattended when it is connected to the power
supply.
• Immediately after use and before cleaning, switch off the machine and
disconnect the power cable from the outlet.
In order to protect against injury, the following instructions must be adhered to.
• Do not look directly into the LED lamp with optical instruments
(e.g.magnifying glass).
• If the LED lamp is damaged or defective, have the LED lamp checked or
repaired at your local authorized bernette dealer.
• Switch off the machine before working in the needle area.
• Before starting the machine, close all covers.
WARNING
To reduce the risk of burns, fire, electric shock or injury to persons, the following
instructions must be observed.
General Facts
• This machine may only be used for the purpose described in this instruction
manual.
Working Environment
• Do not use the machine outdoors.
• Only use the machine in dry rooms.
• Do not use the machine in a humid area.
• Do not use the machine in rooms where aerosol products (sprays) are being
used.
• Do not use the machine in rooms where oxygen is dispensed.
Technical Condition
• Never use the machine when it is damp.
• Do not use the machine if it is not working properly.

IMPORTANT SAFETY INSTRUCTIONS
8
2023-06 EN 5020079.40A.04
• Do not use the machine if a cable or the plug is damaged.
• Do not use the machine if it has been dropped, damaged or has fallen into
water.
• If the machine is damaged or does not work properly, have the machine
checked or repaired by your local authorized bernette dealer.
• Keep all ventilation openings of the machine and the foot control free of
lint, dust and loose cloth.
• Do not use the machine if the ventilation openings are blocked.
Accessories and Supplies
• Only use the accessories recommended by the manufacturer.
• Always use the original bernette Stitch Plate.
An incorrect stitch plate can result in needle breakage.
• Use only straight needles of good quality.
Bent or damaged needles can cause needle breakage.
• This machine is double-insulated (except for USA, Canada and Japan).
Use only identical replacement parts. See instructions for Servicing of
double-insulated products.
• To lubricate the machine, only use oil recommended by bernette.
Safety Instructions
• While operating the machine, all protective inserts must be in place and all
covers must be closed.
Appropriate Use
• The machine may be used, cleaned and maintained by children older than
eight or by people with reduced physical, sensory or mental capabilities or if
there is a lack of experience and knowledge as long as they have been given
instructions.
• Furthermore, these persons must be supervised while working with the
machine, and/or they must know the safe operation of the machine and be
aware of the resulting hazards.
• Children are not allowed to play with the system.
• Special care should be taken when the machine is operated by or in the
presence of children.
• Only use the machine with the supplied power cable.
• USA and Canada only: Do not connect power plug NEMA 1-15 to circuits
exceeding 150 volt-to-ground.
• Only use this machine with the supplied foot control of type FC-210.
• Do not insert any objects into the openings of the machine.

IMPORTANT SAFETY INSTRUCTIONS
9
2023-06 EN 5020079.40A.04
• Do not place any objects on the foot control.
• While sewing, guide the fabric gently.
Pulling and pushing the fabric can cause needle breakage.
• Keep fingers away from all moving parts.
• Special care is required in the needle area.
• For activities in the needle area - such as threading the needle, changing the
needle, threading the looper or changing the presser foot - switch off the
machine.
• To switch off, set the power switch to «0».
• When protective covers are removed, when the machine is oiled or when
other cleaning and maintenance operations mentioned in this instruction
manual are carried out, switch off the machine and disconnect the power
plug from the outlet.
• Pull the plug out of the outlet by pulling on the plug. Do not pull on the
cable.

Important Information
10
2023-06 EN 5020079.40A.04
Important Information
Availability of the Instruction Manual
The short manual is part of the machine.
• Keep the short manual of the machine in a suitable place near the machine and have it ready for
reference.
• The latest version of the detailed instruction manual can be downloaded at www.bernette.com.
• When passing on the machine to a third party, enclose the short manual of the machine.
Proper Use
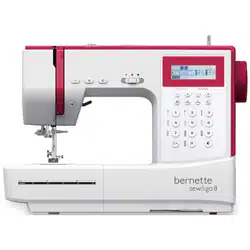
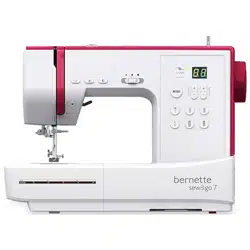
Your bernette machine is conceived and designed for private household use. It is intended for sewing fabrics
and other materials as described in this instruction manual. Any other use is not considered proper. BERNINA
assumes no liability for consequences resulting from improper use.
Equipment and Scope of Delivery
Example images are used in these instructions for the purposes of illustration. The machines shown in the
images and the accessories shown therefore do not always match the actual items included with your
machine. The supplied accessory can vary depending on the country of delivery. You can acquire any
accessories mentioned or shown that are not included in the scope of delivery as optional accessories from a
specialist bernette dealer. Further accessories can be found at www.bernette.com.
For technical reasons and in order to improve the product, changes may be made to the equipment of the
machine and the scope of delivery at any time and without prior notice.
Servicing of Double-insulated Products
In a double-insulated product two systems of insulation are provided instead of grounding. No grounding
means is provided on a double-insulated product nor should a means for grounded be added to the product.
Servicing a double-insulated product requires extreme care and knowledge of the system and should only be
done by qualified service personnel. Replacement parts for a double-insulated product must be identical to
the original parts in the product. A double insulated product is marked with the words: «Double-Insulation»
or «double-insulated».
The symbol may also be marked on the product.
Environmental Protection
BERNINA International AG is committed to environmental protection. We strive to minimize the
environmental impact of our products by continuously improving product design and our technology of
manufacturing.
The machine is labeled with the symbol of the crossed-out wastebin. This means that the machine should
not be disposed of in household waste when it is no longer needed. Improper disposal can result in
dangerous substances getting into the groundwater and thus into our food chain, damaging our health.
The machine must be returned free of charge to a nearby collection point for waste electrical and electronic
equipment or to a collection point for the reuse of the machine. Information on the collection points can be
obtained from your local administration. When purchasing a new machine, the dealer is obliged to take back
the old machine free of charge and dispose of it properly.
If the machine contains personal data, you are responsible for deleting the data yourself before returning the
machine.

Important Information
11
2023-06 EN 5020079.40A.04
Explanation of Symbols
DANGER
Designates a danger with a high risk which can lead to serious injuries or even death unless it is avoided.
WARNING
Designates a medium-risk hazard which can lead to serious injuries if not avoided.
CAUTION
Designates a low-risk hazard which can lead to minor or moderate injuries if not avoided.
NOTICE
Designates a hazard which can lead to material damage if not avoided.
My bernette
12
2023-06 EN 5020079.40A.04
1 My bernette
1.1 Overview Machine
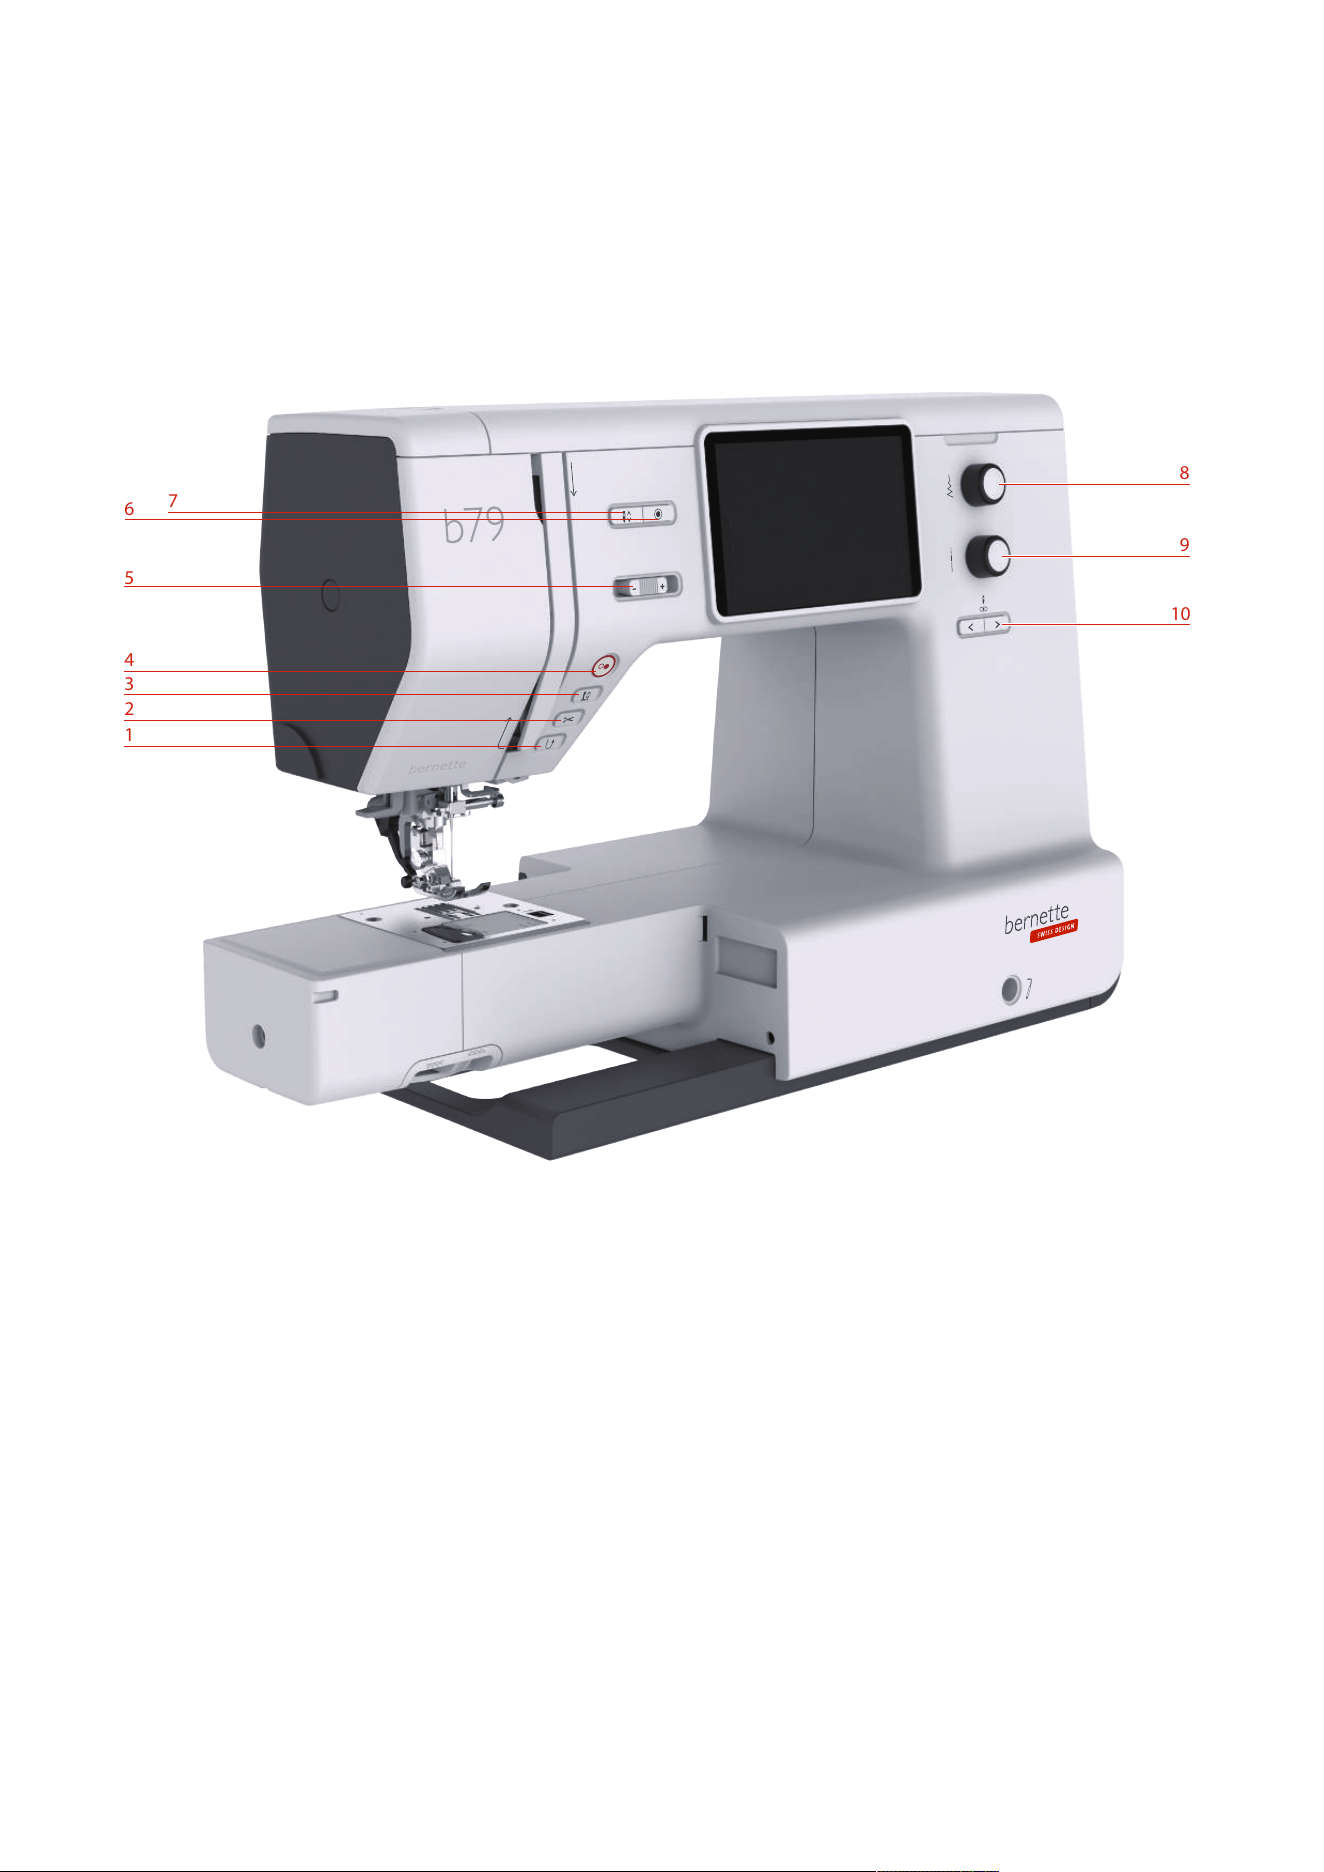
Overview Front Controls
1
2
3
4
6
7
8
9
10
5
1 Quick Reverse 6 Securing Stitches
2 Thread Cutter 7 Needle Up/Down
3 Presser Foot Up/Down 8 Upper Multi-function Knob
4 Start/Stop 9 Lower Multi-function Knob
5 Speed Control 10 Needle Left/Right

My bernette
13
2023-06 EN 5020079.40A.04
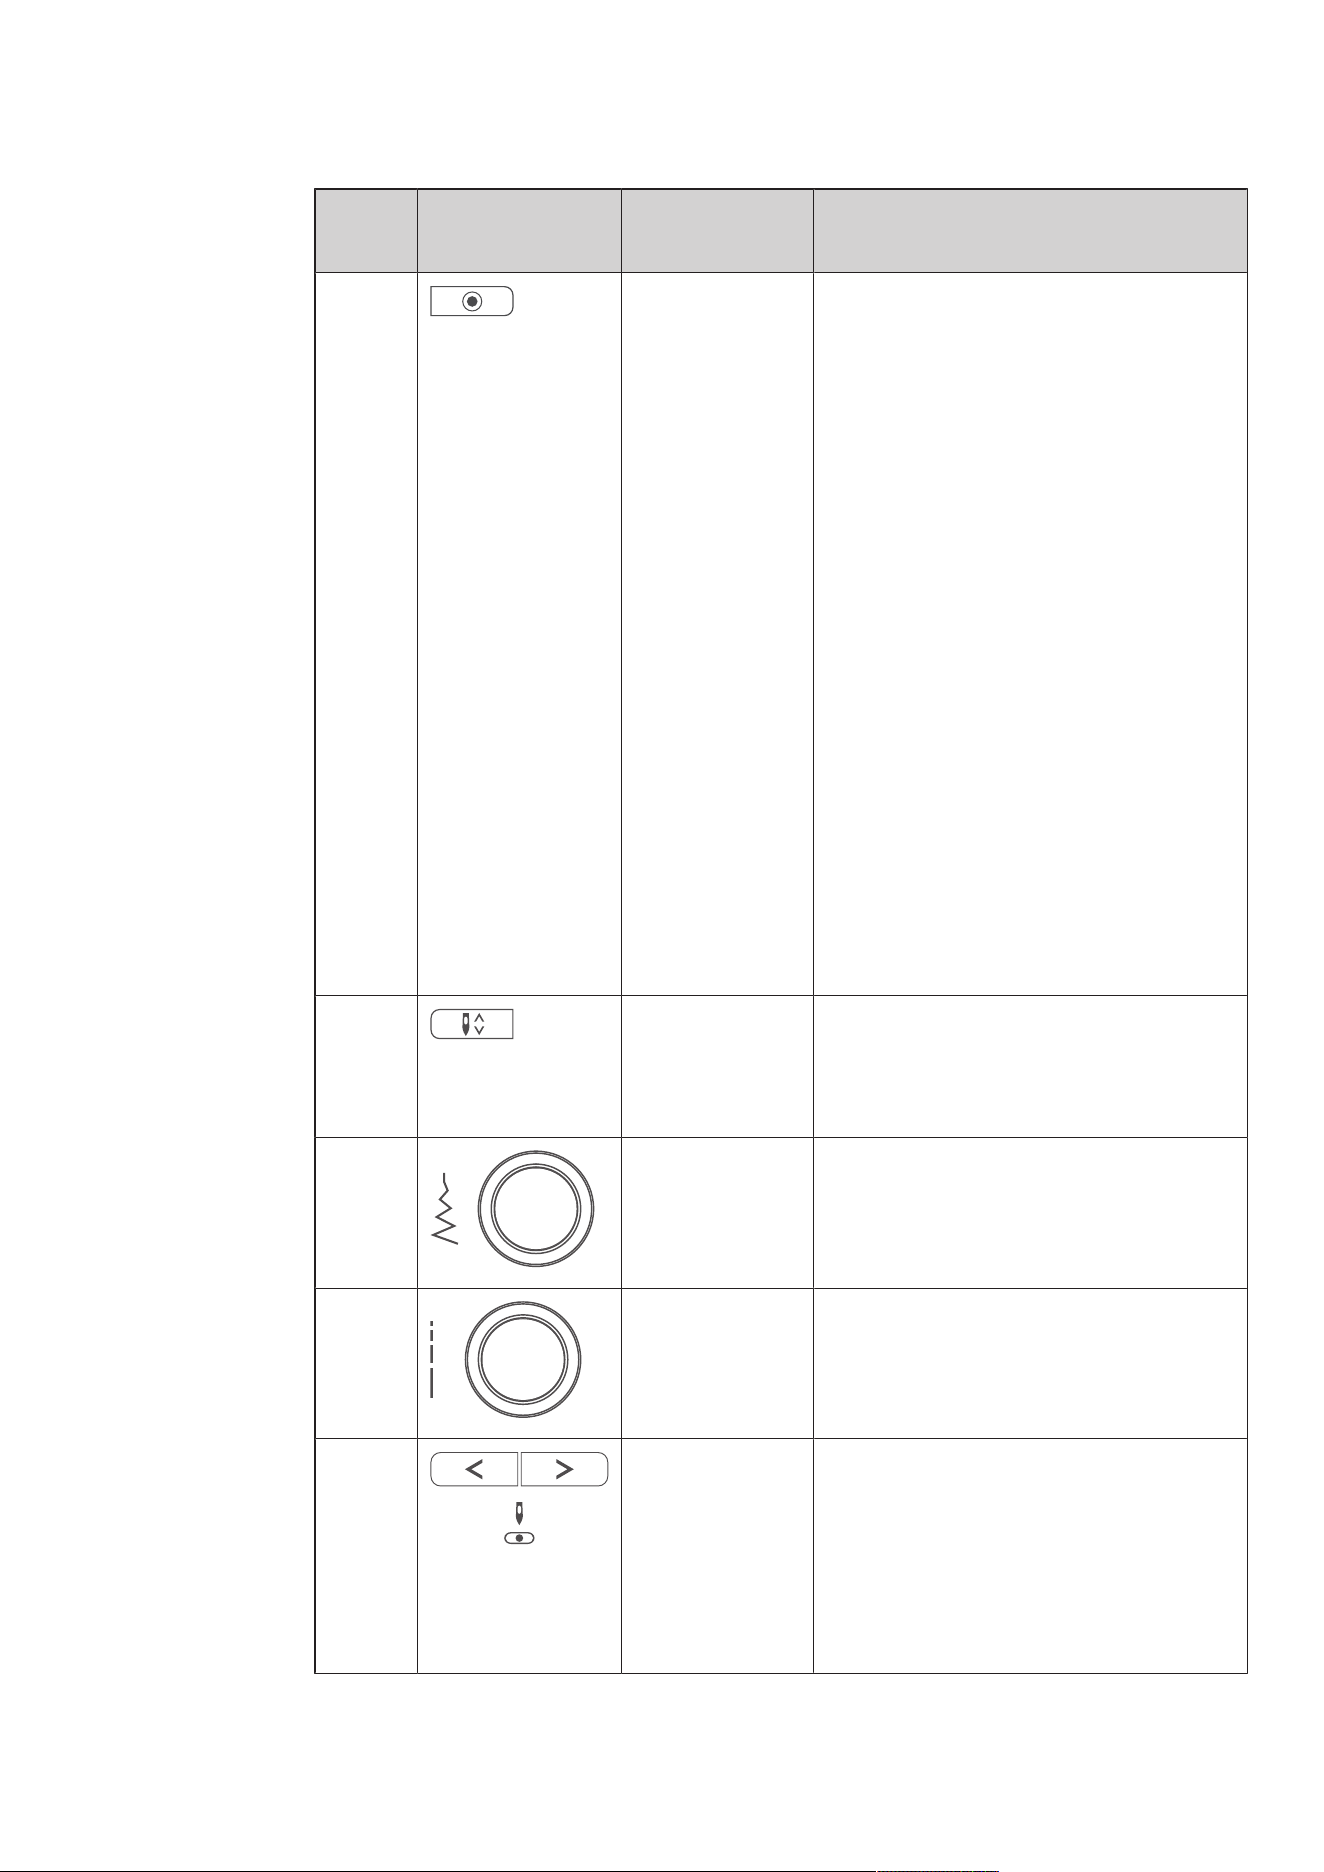
Operating Components
Number Operating
Component
Name Purpose
1 Quick Reverse > To sew backward, press the «Quick
Reverse» button.
> To sew backward permanently, keep the
«Quick Reverse» button pressed.
The «Quick Reverse» button does not work for
stitch patterns 22–24 and for buttonhole
patterns 51–71.
2 Thread Cutter > To cut the upper thread and the lower
thread automatically, press the «Thread
Cutter» button.
2-6 securing stitches can be programmed in
the Setup-Program. They are sewn before the
thread is cut.
3 Presser Foot Up/
Down
> Press the «Presser Foot Up/Down» button
to raise the presser foot into a hovering
position.
> To raise the presser foot, press «Presser
Foot Up/Down».
4 Start/Stop The button «Start/Stop» serves the purpose to
change the presser foot position and to start
the machine.
> To start the machine, keep the button
«Start/Stop» pressed for 2 seconds.
Sewing Mode
> Press the button «Presser Foot Up/Down»
to raise the presser foot into hovering
position.
Embroidery Mode
> Briefly press the «Start/Stop» button to
raise the presser foot into its highest
position in embroidery mode.
> Press the «Start/Stop» button again to raise
the presser foot into hovering position.
5 Speed Control The sewing speed can be adjusted infinitely
variable with the slide.
> Move the slide to the left to reduce the
sewing speed.
> Move the slide to the right to increase the
sewing speed.
My bernette
14
2023-06 EN 5020079.40A.04
Number Operating
Component
Name Purpose
6 Securing Stitches The function «Securing at Sewing Start» is
activated in the Setup by default and can be
deactivated by pressing the button «Securing».
When the function «Securing at Sewing Start»
is not activated in the Setup, it can be
programmed by pressing the button
«Securing».
A securing icon which appears on the display
during sewing indicates that the function is
activated.
The number of securing stitches can be
programmed in the Setup-Program.
> To sew the securing stitches first, press the
button «Securing» before you start sewing.
> To sew the securing stitches at the pattern
end, press the button «Securing» while
sewing.
> To sew securing stitches within a stitch
pattern combination, press the button
«Securing».
– The selected pattern of the combination
is secured according to the setting.
7 Needle Up/Down > Push the button «Needle Up/Down» to
lower the needle.
> Push the «Needle Up/Down» button again
to raise the needle.
8 Upper Multi-
function Knob
With the «Upper Multi-function Knob» setting
values can be changed in the sewing, the
embroidering and the Setup Program.
9 Lower Multi-
function Knob
With the «Lower Multi-function Knob» setting
values can be changed in the sewing, the
embroidering and the Setup Program.
10 Needle Left/Right There is a total of 15 needle positions. The
needle position is indicated by the needle
position number in the display.
> Press the «Needle Left» button to move the
needle to the left.
> Press the «Needle Right» button to move
the needle to the right.

My bernette
15
2023-06 EN 5020079.40A.04
Overview - Front
3
1
4
5
7
9
8
10
13
12
11
2
6
1 Feed Dog Lever 8 Buttonhole Lever
2 Connection for Embroidery Module 9 Thread Cutter
3 Bobbin Cover 10 Thread Take-up Lever
4 Stitch Plate 11 Top Cover
5 Presser Foot 12 LCD Display
6 Sewing Light 13 Connection for Free Hand System
7 Needle Threader 14 Sewing Table and Accessory Box
My bernette
16
2023-06 EN 5020079.40A.04
Overview Top
3
2
1
4
5
7
6
8
1 Thread Take-up Lever 5 Winding Unit and Holder for Second Spool Pin
2 Bobbin Winder Pretension 6 Stopper Winding Unit
3 Thread Guide 7 Touchscreen Pen
4 Spool Pin 8 Thread Cutter
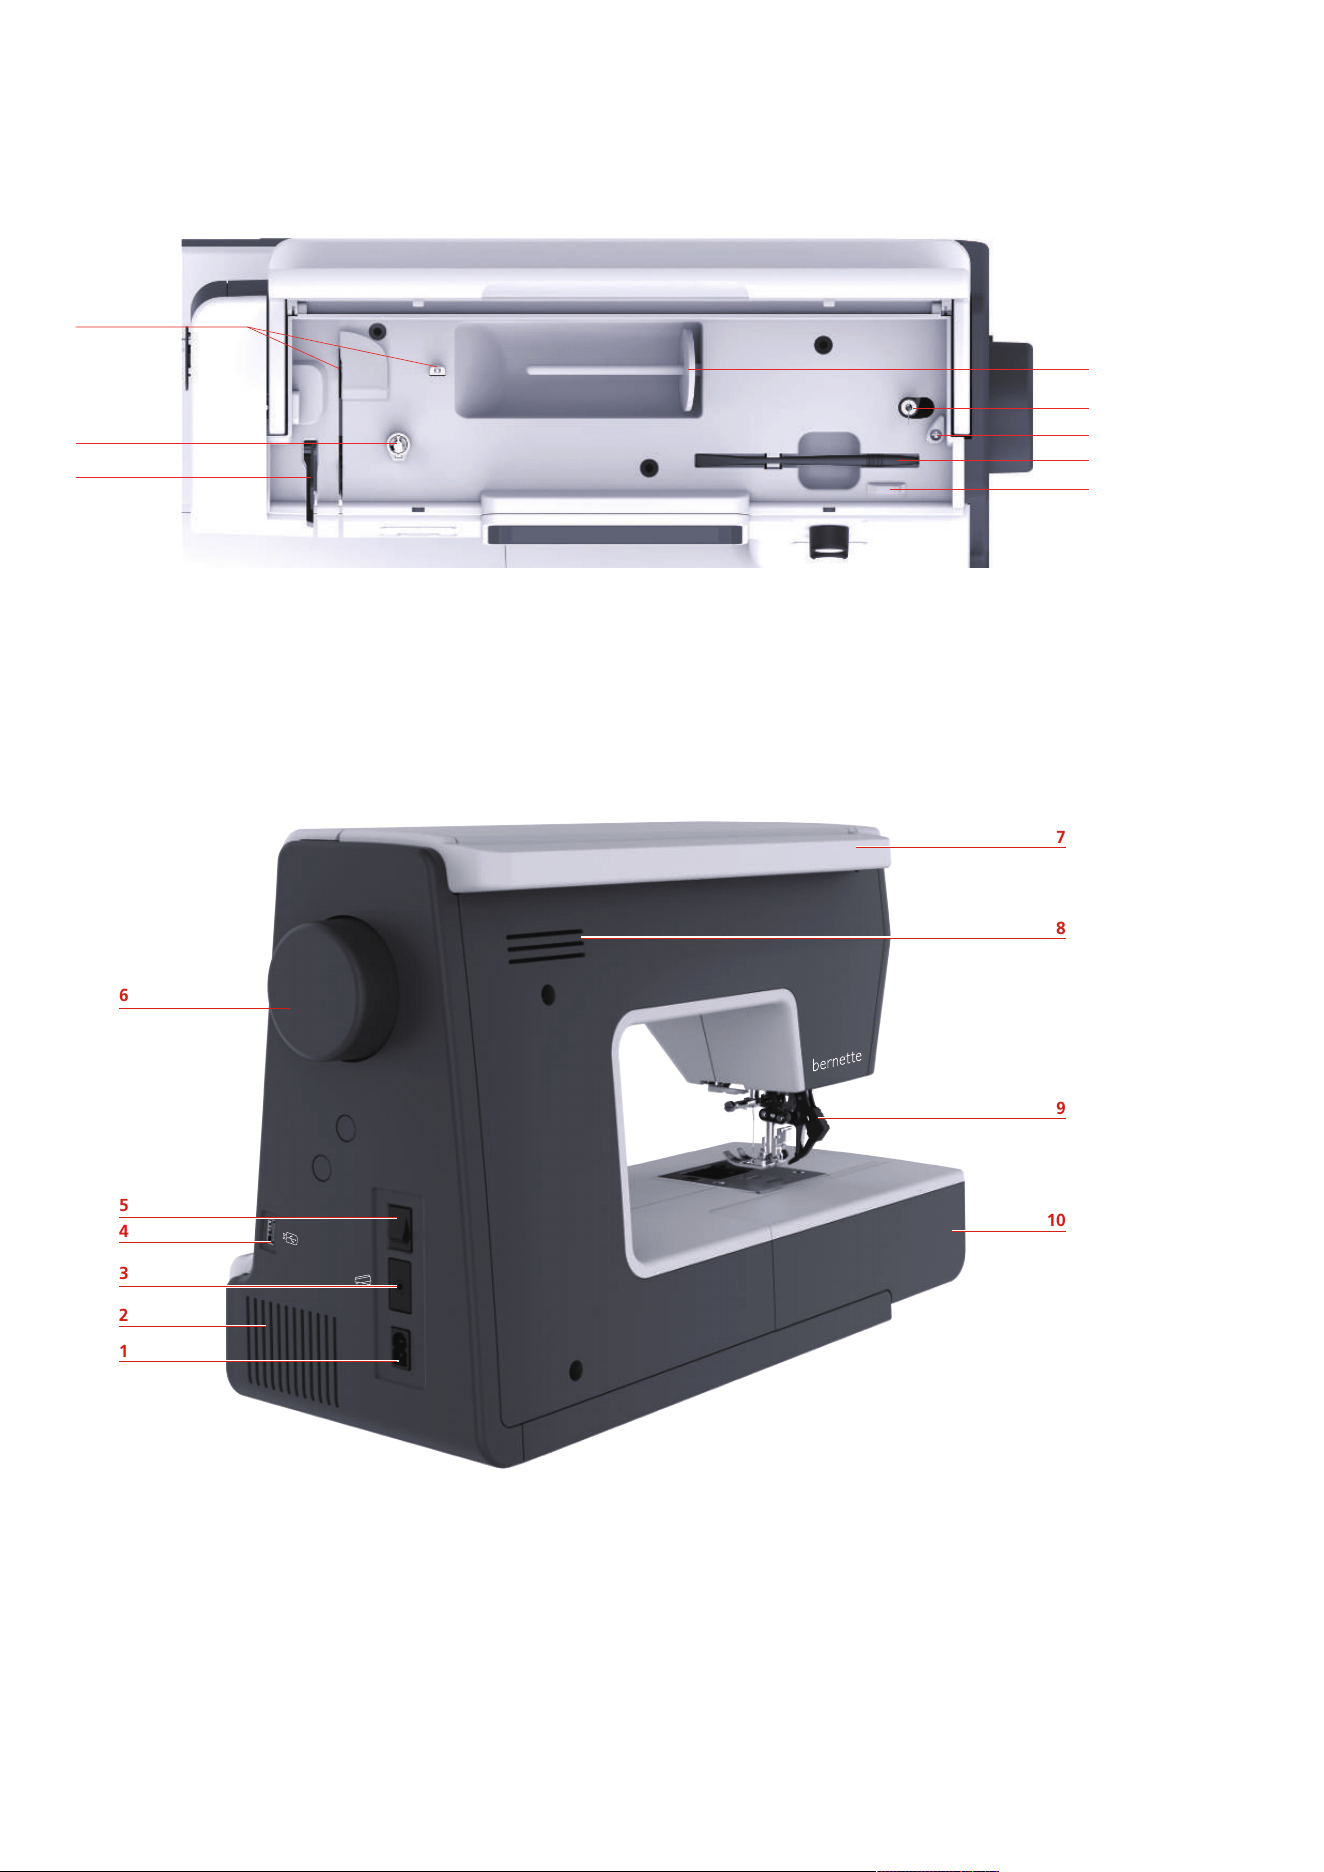
Overview - Back Panel
1
2
3
4
5
6
7
8
9
10
1 Connection for Power Cable 6 Handwheel
2 Air Vents 7 Carrying Handle
3 Connection for Foot Control 8 Air Vents
4 USB Port 9 Dual Feed
5 Power Switch 10 Sewing Table and Accessory Box
My bernette
17
2023-06 EN 5020079.40A.04
1.2 Accessory
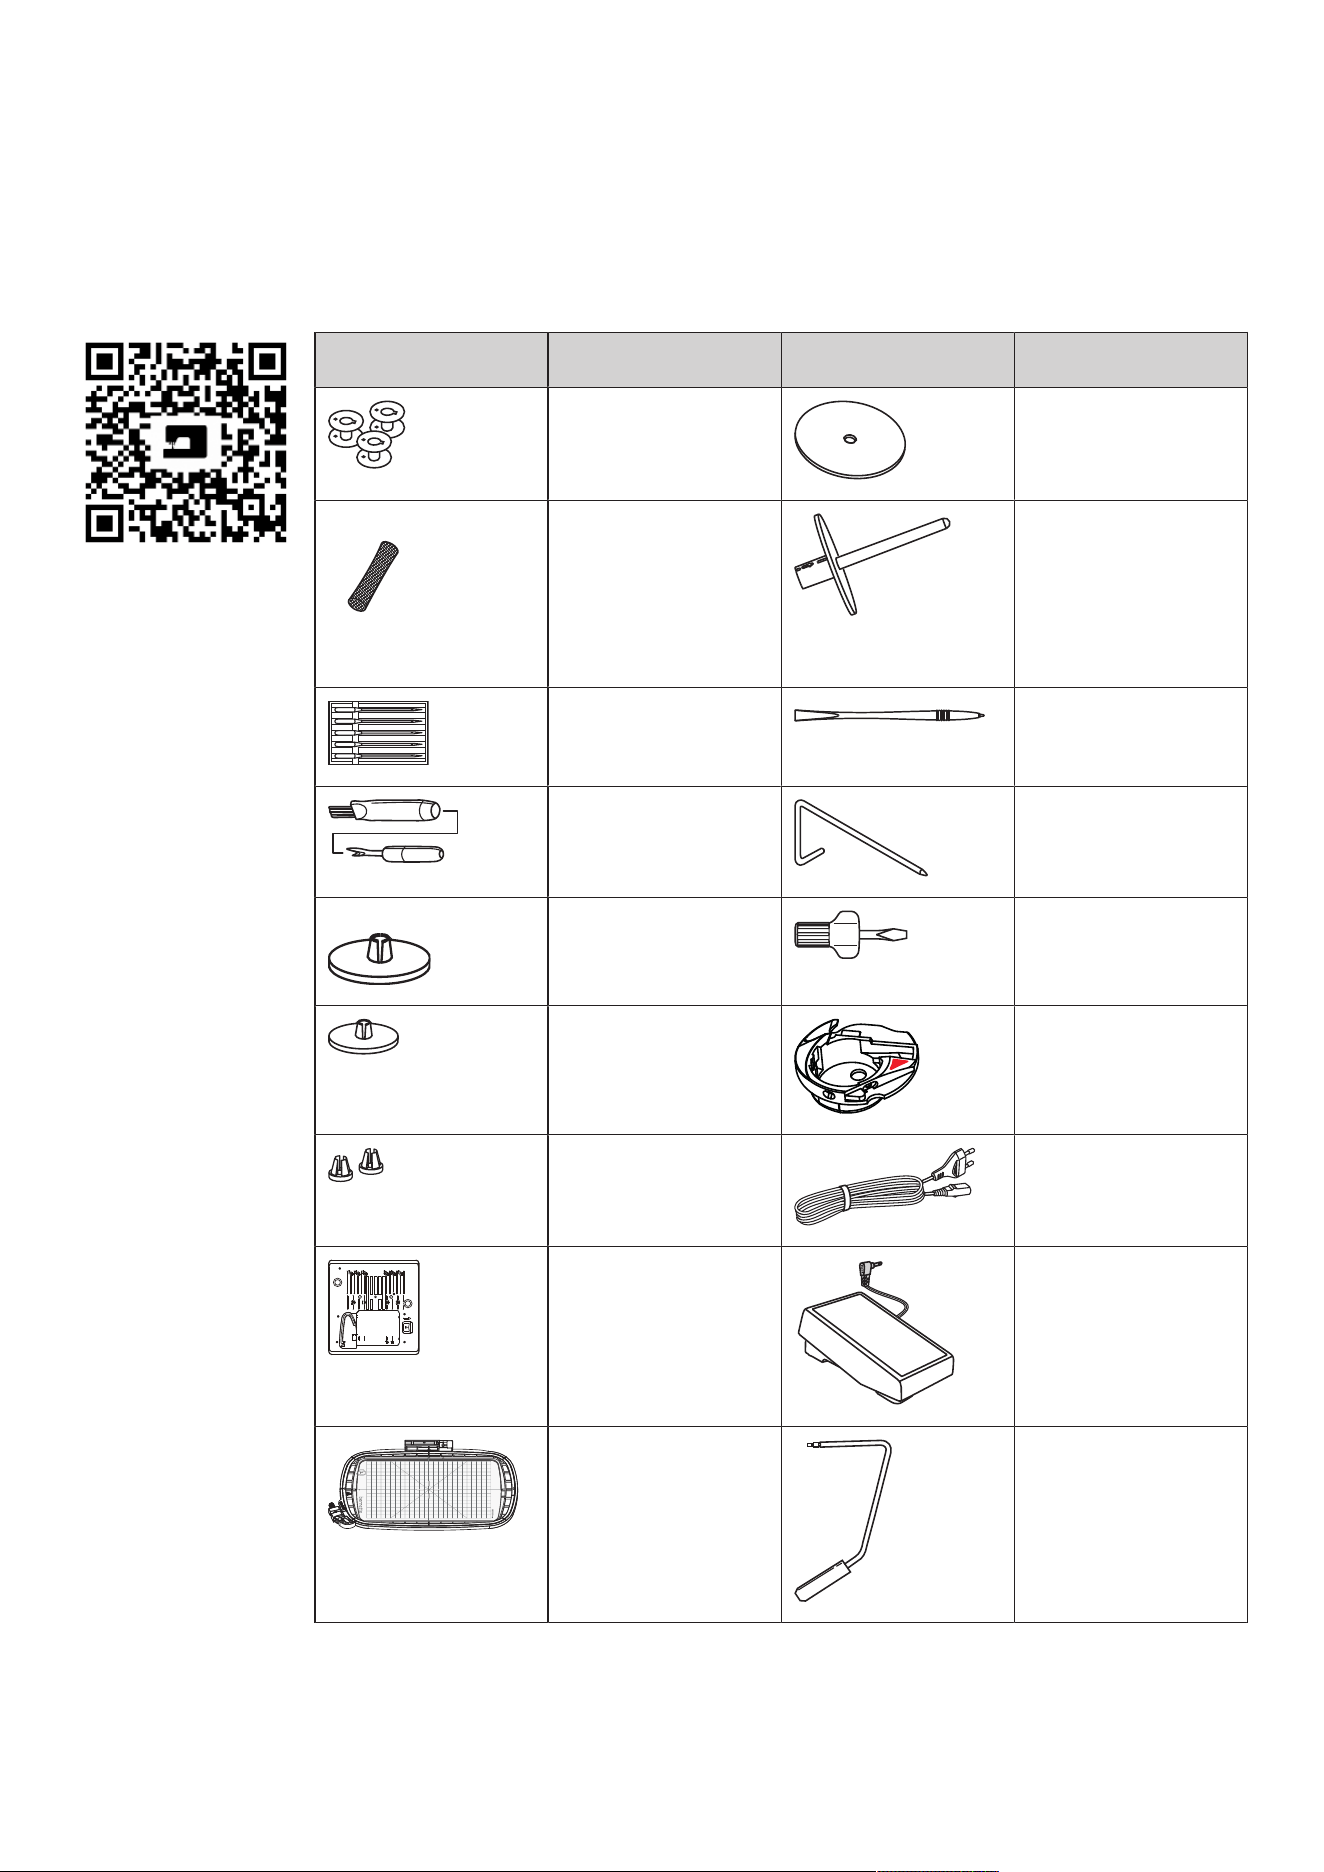
Supplied Accessories
Visit www.mybernette.com/accessories for more accessory information.
Illustration Name Illustration Name
Bobbin (3x) Felt Disc
Spool Net Second Spool Pin
Needle Assortment (2X) Touchscreen Pen
Brush and Seam Ripper Seam Guide
Spool Cap Large Screwdriver
Spool Cap Medium High Thread Tension
Bobbin Case
Spool Cap Small (2x) Power Cable
Straight/CutWork Stitch
Plate
Foot Control
Embroidery Hoop Large,
160x260mm with
Embroidery Template
Presser Foot Lifter

My bernette
18
2023-06 EN 5020079.40A.04
Illustration Name Illustration Name
Embroidery Hoop
Medium,
120x180mm with
Embroidery Template
Lubricator
Embroidery Hoop Small,
50x70 mmwith
Embroidery Template
Slide-on Table
Dust Cover
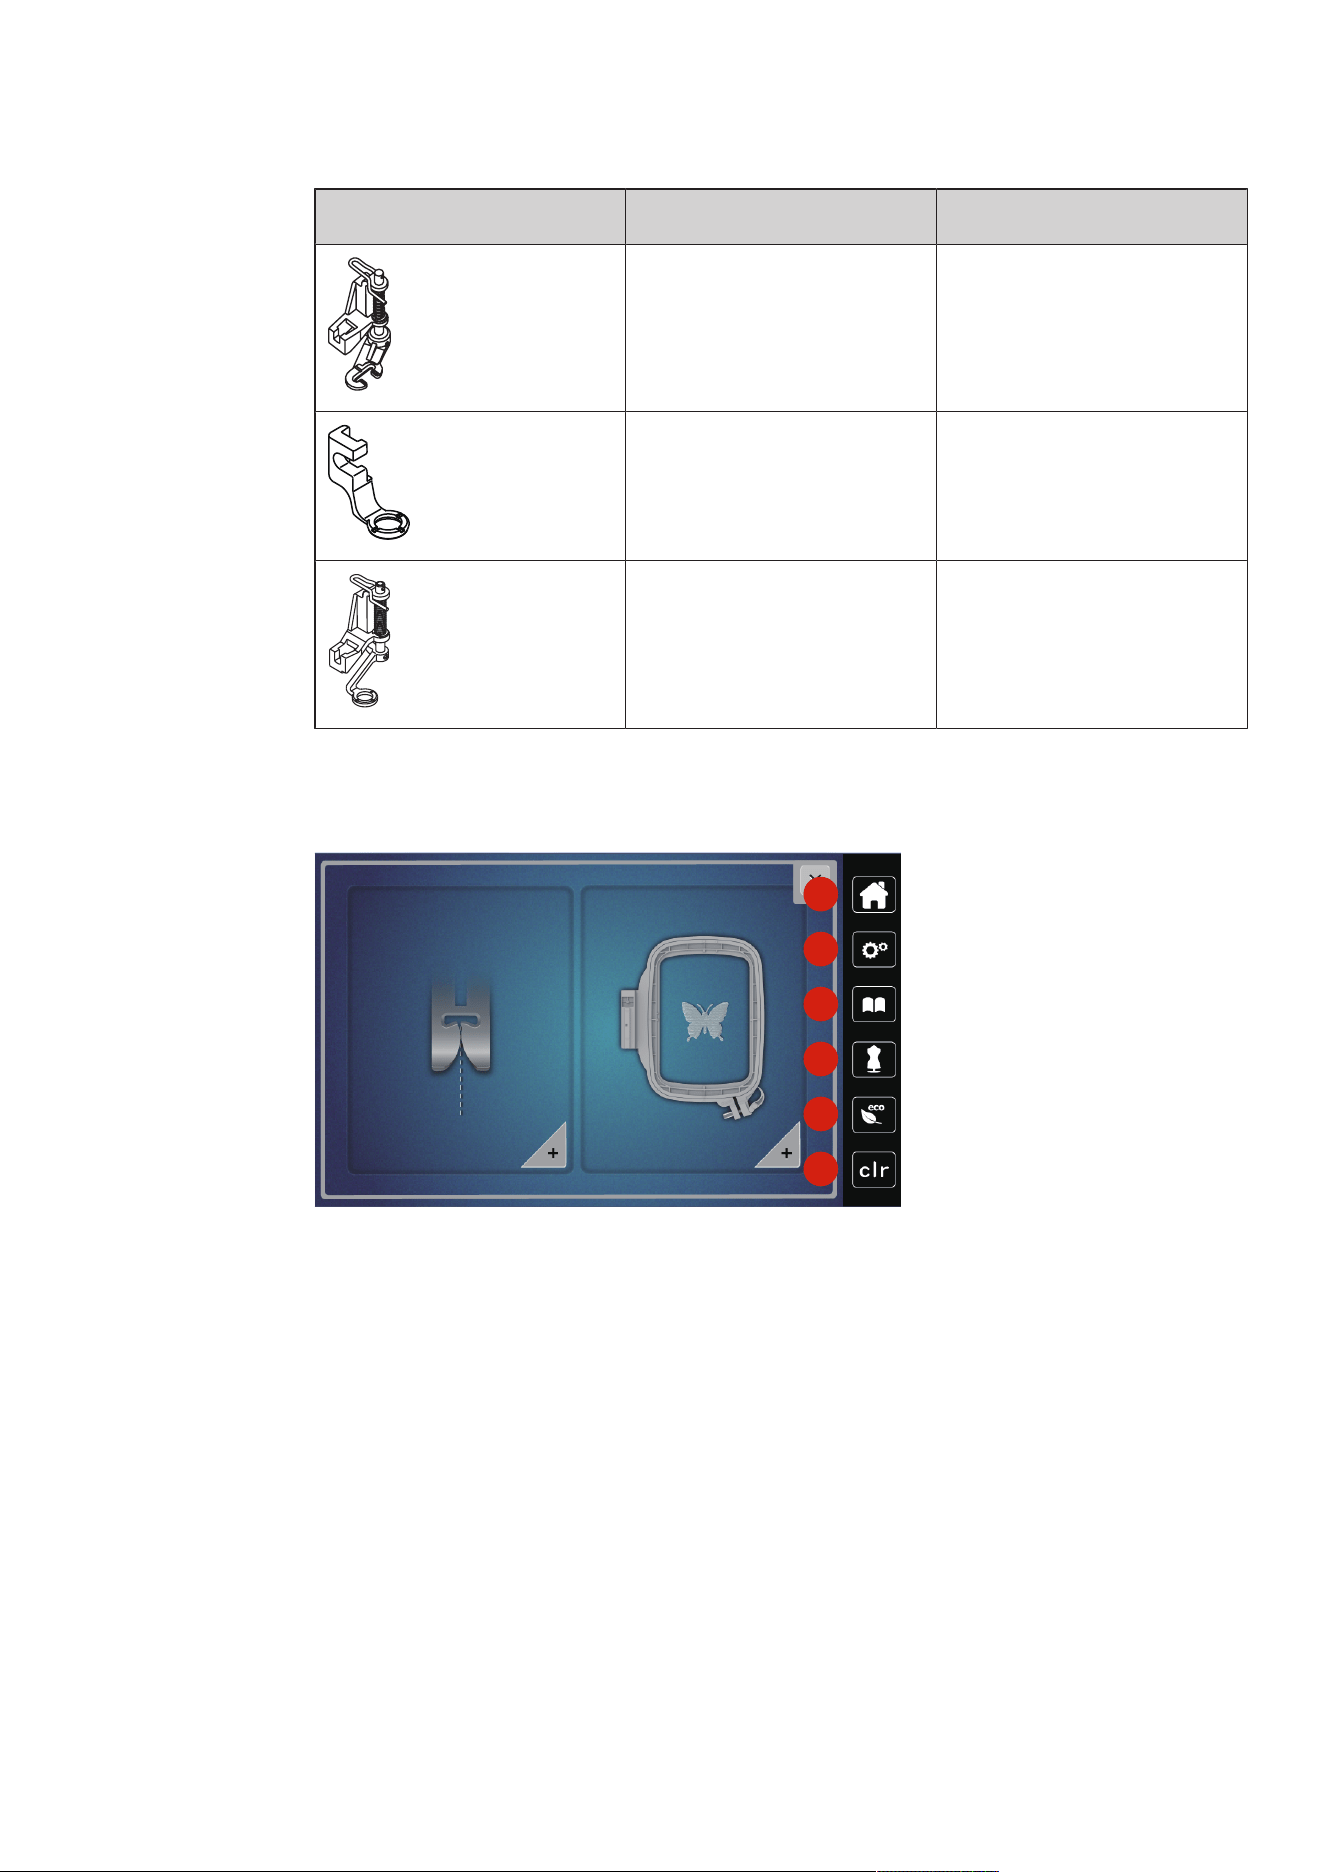
Overview Presser Feet
Illustration Name Purpose
Zigzag Foot (DA) For sewing different practical,
decorative stitches and hems
with Dual Feed.
Embroidery Foot (JK) For sewing satin stitches,
applications and decorative
patterns.
Zipper Foot (JB) For sewing with Dual Feed. For
sewing in the zipper.
Buttonhole Foot with Slide (RJ) For sewing buttonholes.
Blindstitch Foot (DM) For sewing blind-stitch hems
with Dual Feed.
Button Sew-On Foot (RC) For sewing on buttons.
Overlock Foot (DI) For sewing with Dual Feed. For
sewing overlock stitches over the
fabric edge.
My bernette
19
2023-06 EN 5020079.40A.04
Illustration Name Purpose
Free-motion Embroidery Foot
(RX)
For embroidering, darning and
freehand quilting.
Embroidery Foot (JL) For embroidering, darning and
freehand quilting.
Hopper Embroidery Foot (JX) For embroidering, darning and
freehand quilting.
1.3 Overview User Interface
Overview System Settings
1
2
3
4
5
6
1 Home 4 Creative Consultant
2 Setup Program 5 eco Mode
3 Tutorial 6 Back to Default Setting
My bernette
20
2023-06 EN 5020079.40A.04
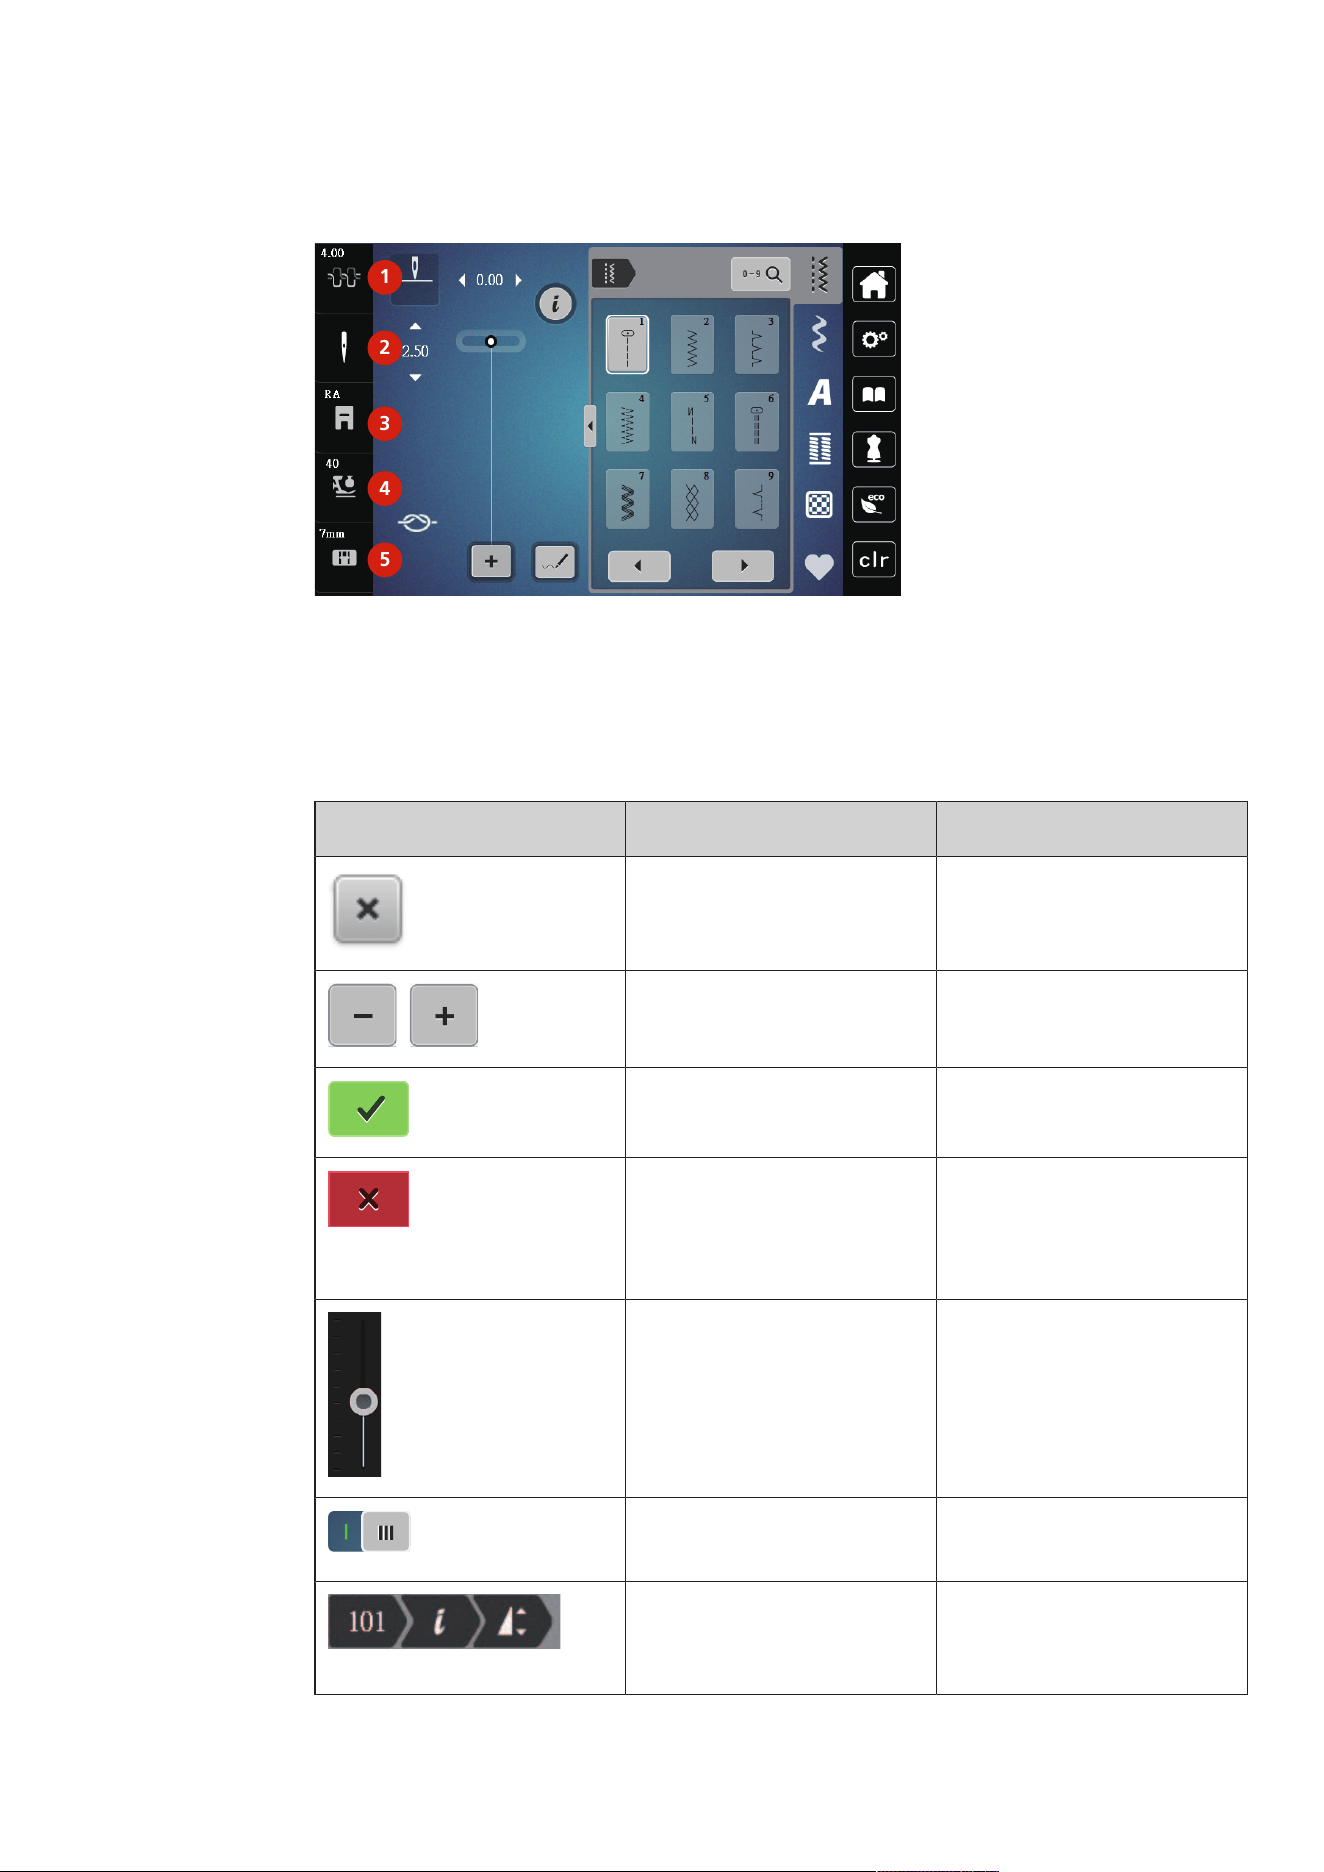
Overview Functions/Visual Information
1
2
3
4
5
1 Upper Thread Tension 4 Foot Pressure
2 Needle Selection 5 Stitch Plate Selection
3 Presser Foot Indicator/Presser Foot Selection
Overview Functions and Views
Illustration Name Purpose
Close The display is closed and the
previously made adjustments are
saved.
«Plus» / «Minus» Change setting values.
Confirm Confirms the previously adjusted
alterations. The display is closed.
Cancel The process is canceled. The
display is closed and the
previously made adjustments are
not saved.
Slide By moving the slide the setting
values are changed.
Switch Activates or deactivates
functions.
Process Navigation With the process navigation, you
can return from any display to
the previous the display.
My bernette
21
2023-06 EN 5020079.40A.04
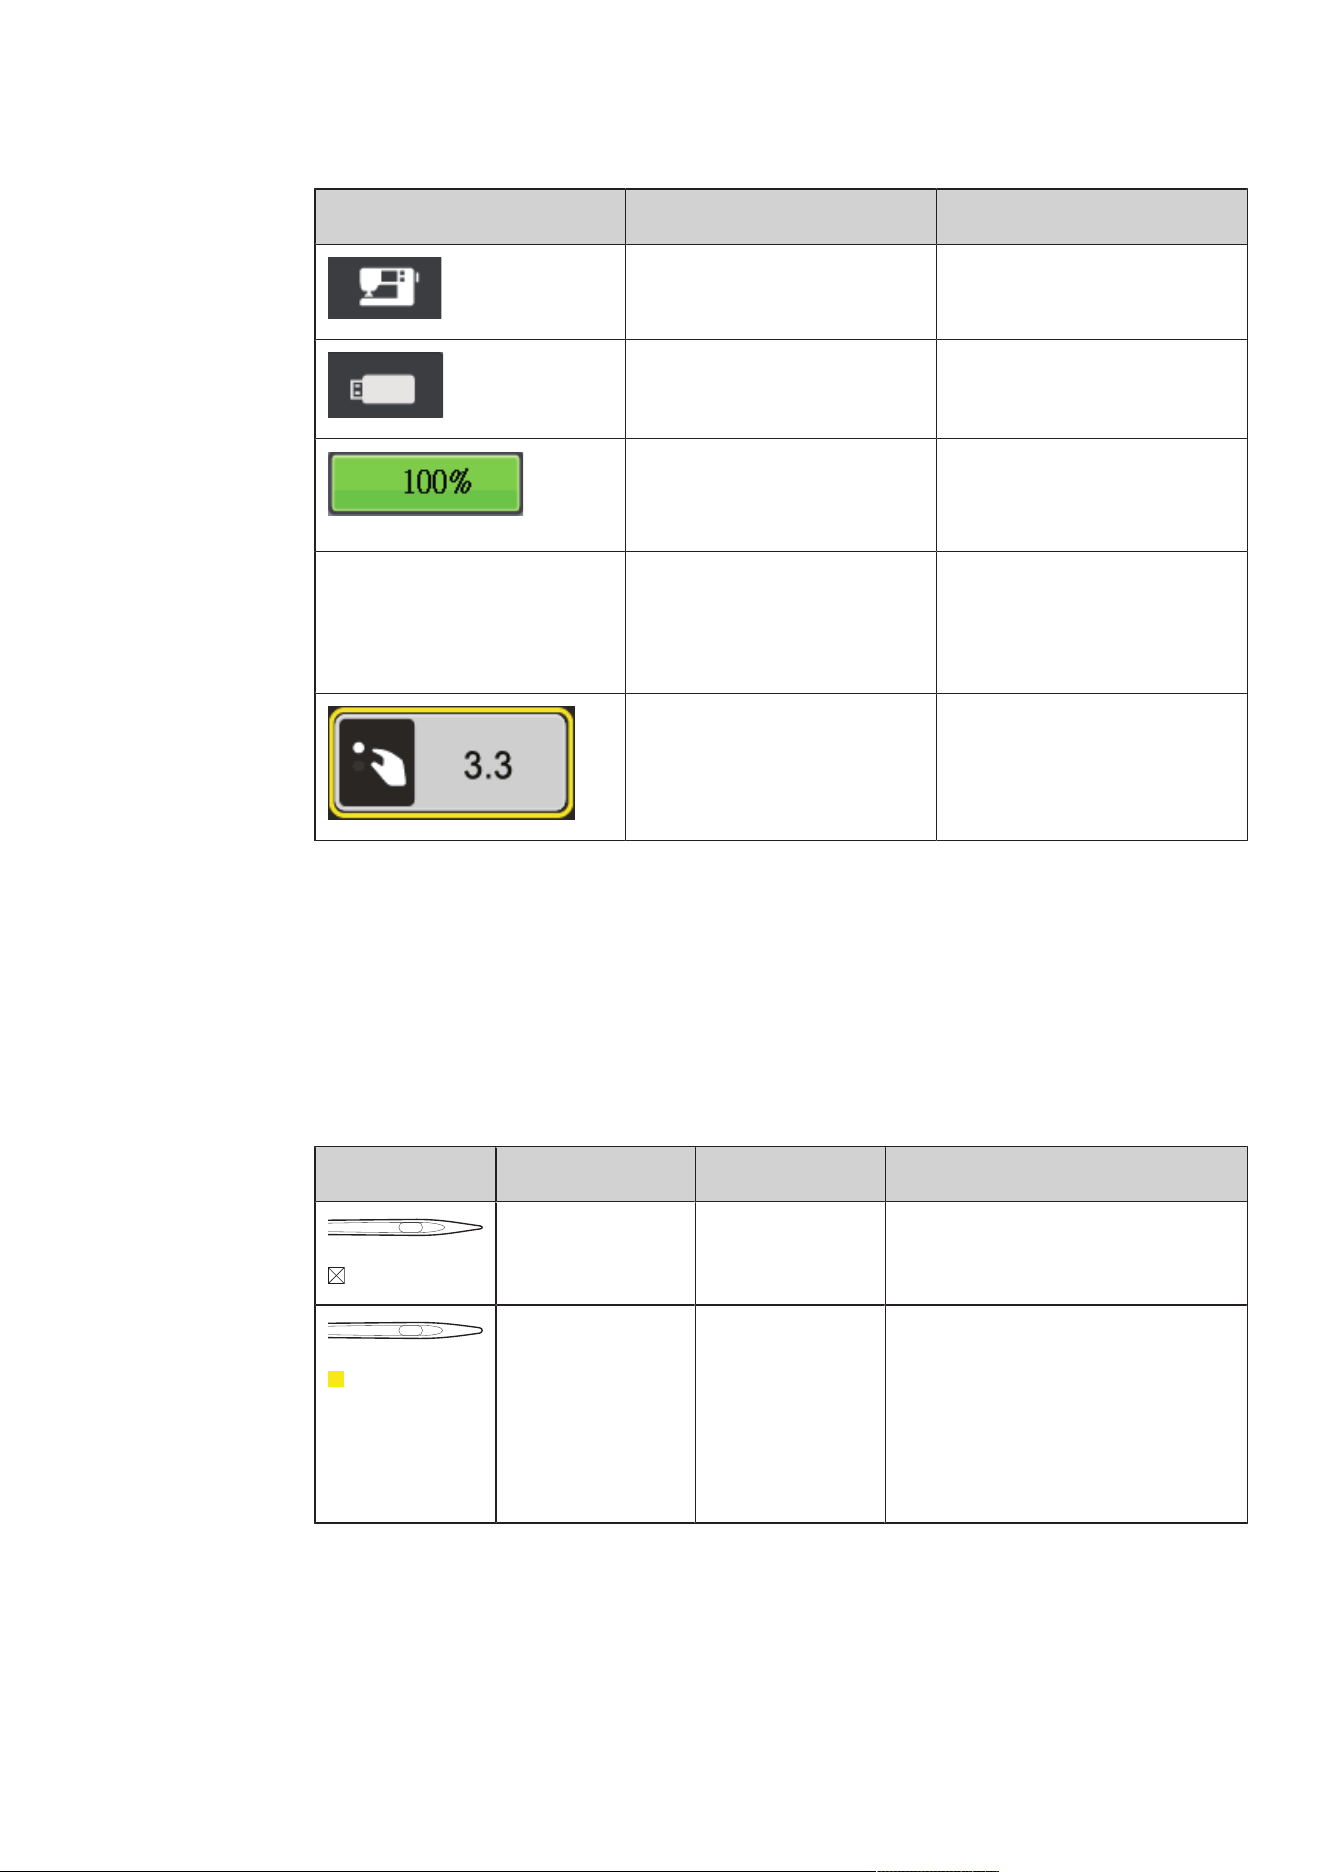
Illustration Name Purpose
Machine To load or save motifs on the
machine.
USB Stick To load or save embroidery
designs on the USB stick.
USB Storage Space The percentage of used USB
storage (%) will be displayed in
the green bar icon.
Swipe Function By swiping the display using the
touchscreen pen or the finger
upwards or downwards, further
functions can be displayed.
Yellow-framed Icon Tap the yellow-framed icon to
reset the changes to the default
setting.
1.4 Needle, Thread, Fabric
Needles will wear down over time. Therefore, the needle should be replaced regularly. Only a perfect point
results in a good stitching result. In general, the thinner the fabric, the finer the needle. The illustrated
needles are either standard or optional accessory, depending on the machine.
• Needle sizes 70, 75: for light-weight fabrics.
• Needle sizes 80, 90: for medium fabrics.
• Needle sizes 100: for heavy fabrics.
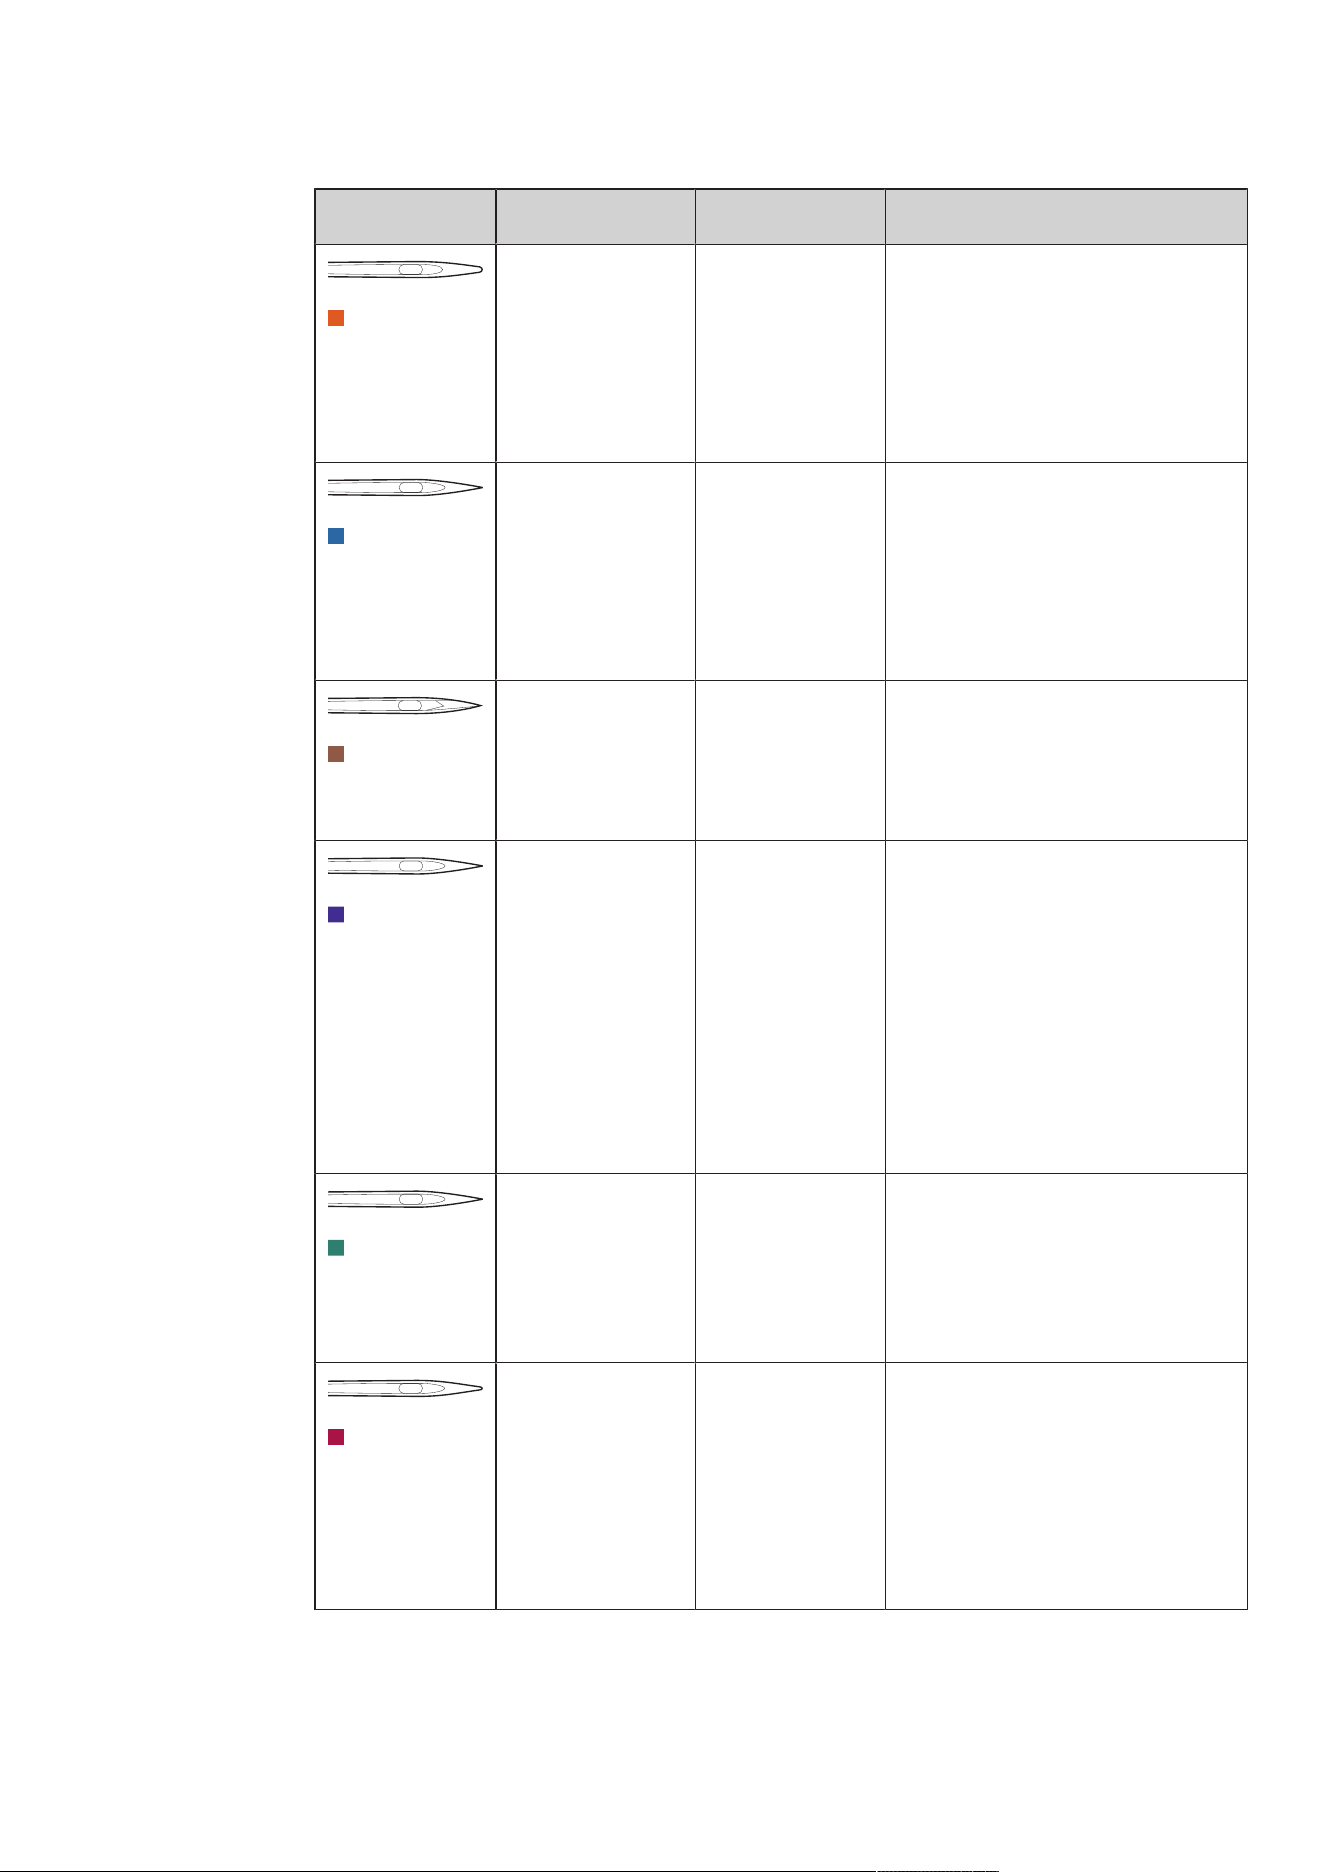
Overview Needles
Illustration Needle Name Needle Description Purpose
Universal Needle
130/705 H 60-110
Slightly rounded
point.
For nearly all natural and synthetic
fabrics (woven and knitted).
Stretch Needle
130/705H-S
75/11 – 90/14
With a medium
ball point.
For knitwear (jersey, tricot, knit and
stretch material).
For general sewing, sewing on buttons
and buttonholes, zippers, hems and
topstitching, decorative sewing,
embroidery.
My bernette
22
2023-06 EN 5020079.40A.04
Illustration Needle Name Needle Description Purpose
Jersey/
Embroidery
Needle
130/705HSUK
80/12
With a medium
ball point.
For woven fabrics (light, medium,
heavy-weight), knitwear, plastic.
For general sewing, sewing on buttons
and buttonholes, zippers, hems and
topstitching, decorative sewing,
embroidery.
Jeans Needle
130/705H-J
80/12 – 110/18
With slim,
particularly acute
point.
Woven fabrics (light, medium, heavy-
weight), leather, jeans/denim.
For general sewing, sewing on buttons
and buttonholes, zippers, hems and
topstitching, decorative sewing,
embroidery, patchwork, quilting.
Leather Needle
Leather Needle
90/14, 100/16
With a cutting
point (LR=special
point to sew
leather).
For leather, imitation leather and other
similar materials.
For zippers, hems and topstitching,
materials that tend to stick.
Microtex Needle
130/705H-M
60/8 – 110/18
With a particularly
pointed and
slender tip.
For woven fabrics (light, medium,
heavy), artificial materials and materials
that are difficult to work with. For silk,
microfibre fabrics, foils, coated and
hard-sliding materials.
For sewing in general, sewing on
buttons and buttonholes, zips, hems
and topstitching and decorative
sewing. For ultra straight stitches when
topstitching edges.
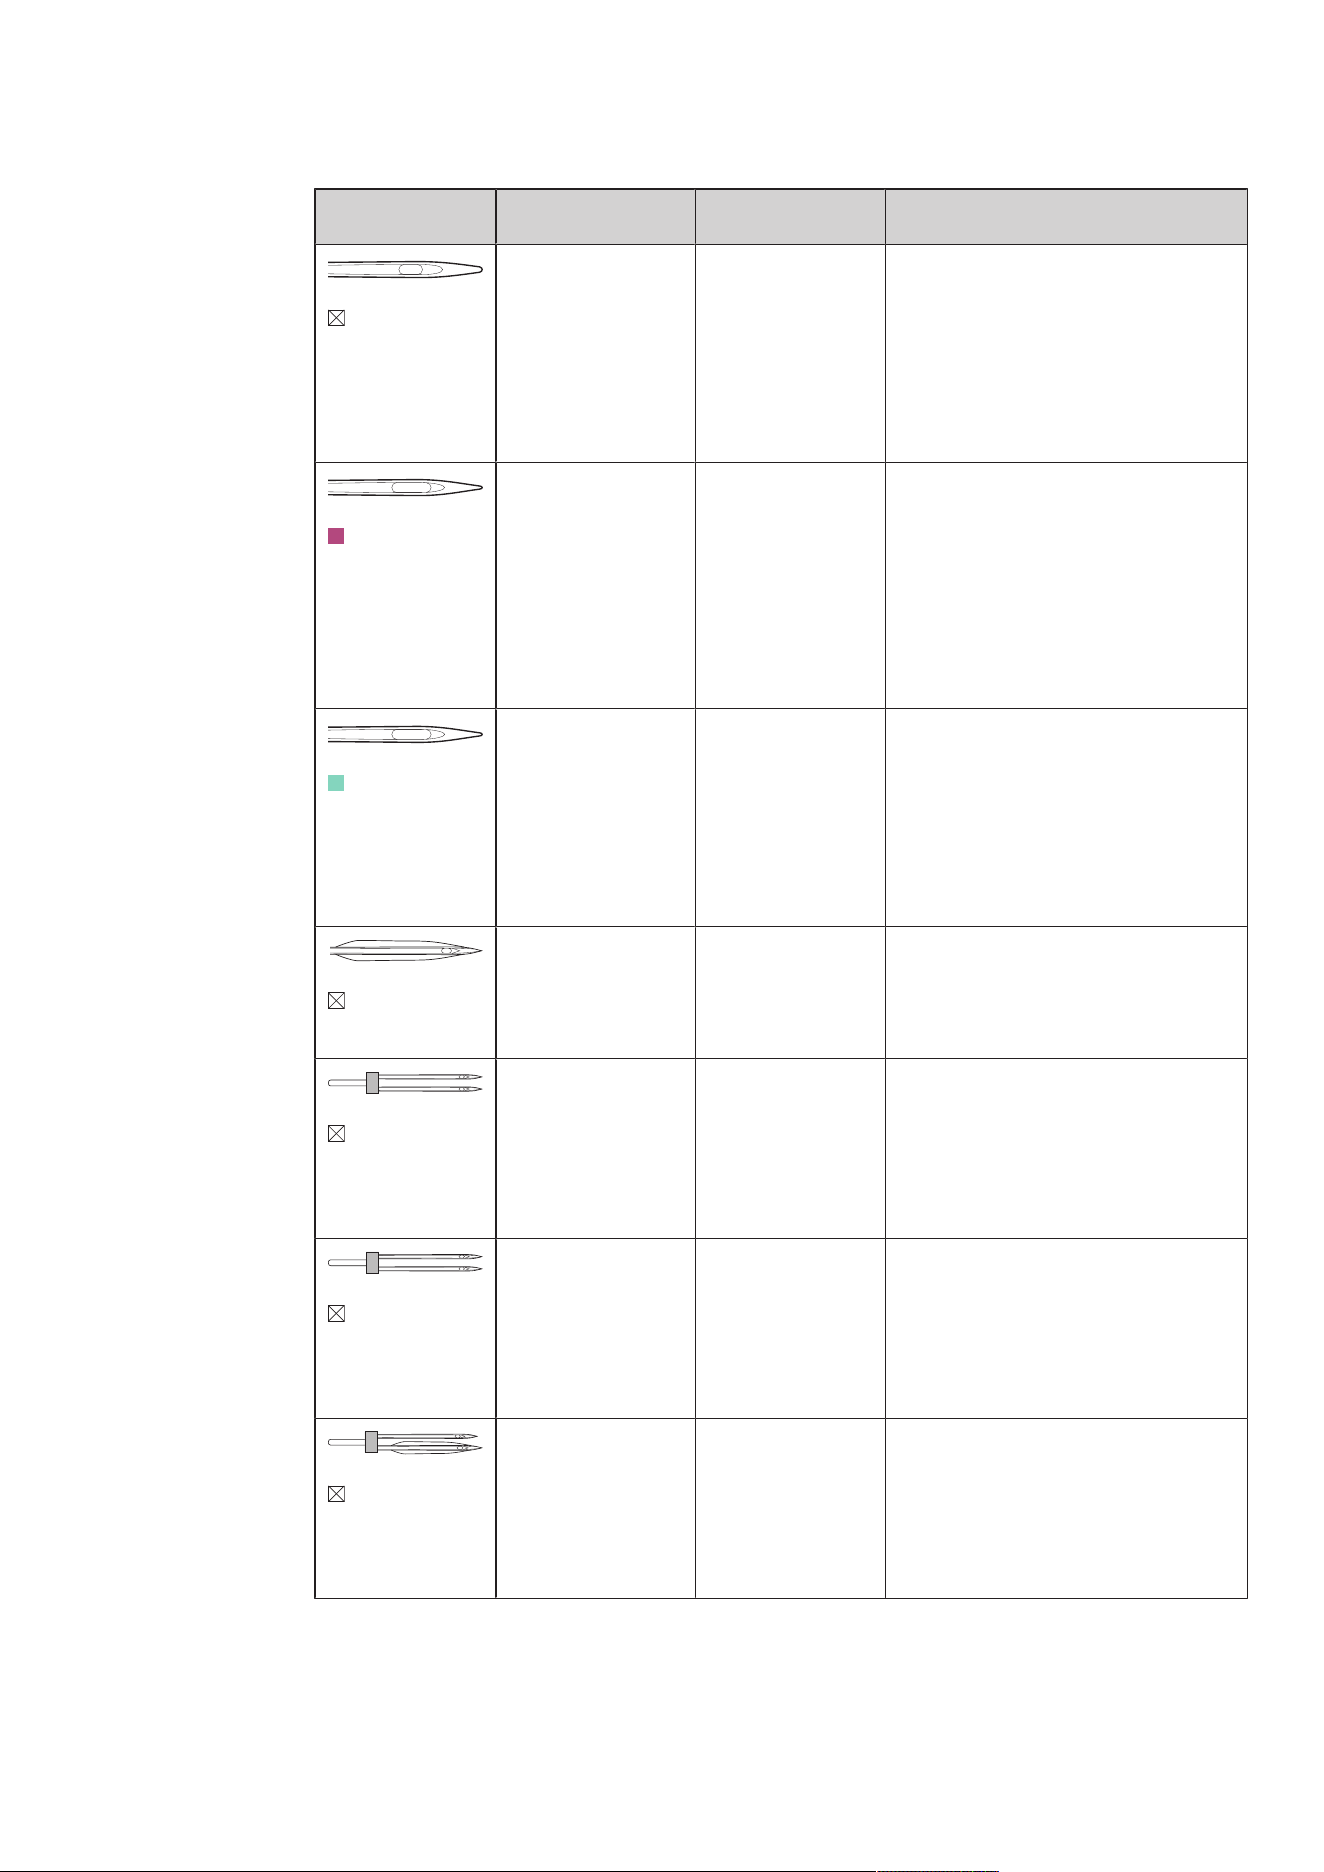
Quilting Needle
130/705H-Q
75/11 – 90/14
With a very slim,
slightly rounded
point.
For woven fabrics (light, medium and
heavy-weight).
Decorative sewing, patchwork,
quilting. For stitching/topstitching
tasks, such as quilting and patchwork.
Embroidery
Needle
130/705H-E
75/11 – 90/14
With a light ball
point and a
particularly wide
eye and wide
groove.
For woven fabrics (light, medium,
heavy-weight), knitwear. For
voluminous and woolen threads.
For general sewing, sewing on buttons
and buttonholes, zippers, hems and
topstitching, decorative sewing,
embroidery.
My bernette
23
2023-06 EN 5020079.40A.04
Illustration Needle Name Needle Description Purpose
Fine Fabrics
Needle
130/705HSES
70/10 – 90/14
With a light ball
point.
For fine, delicate materials, such as
velvet.
For general sewing, sewing on buttons
and buttonholes, zippers, hems and
topstitching, decorative sewing,
embroidery, patchwork, quilting.
Metafil Needle
130/705HMETAFIL
80/12
With medium ball
point and long eye
(2mm).
For woven fabrics (light, medium,
heavy-weight), knitwear. For sewing
with special effects and fancy threads,
especially metallic threads.
For embroidery with metallic thread.
For hems and topstitching, decorative
sewing and embroidery.
Topstitch Needle
130/705H-N
80/12 – 100/16
With medium ball
point and long eye
(2mm).
For woven fabrics (light, medium and
heavy-weight).
For hems and topstitching, decorative
sewing and embroidery. For decorative
and quilting work with several sewing
threads and also for embroidery.
Hemstitch Needle
130/705 H WING
100–110
Wing-like widened
needle shaft (wing)
To sew blind stitches.
Universal Twin
Needle
130/705HZWI
70-100
Needle distance:
1.0/1.6/2.0/2.5/3.0
/4.0/6.0/8.0
For visible hems in stretch fabrics,
pintucks, decorative sewing.
Stretch Twin
Needle
130/705H-SZWI
75
Needle distance:
2.5/4.0
For visible hems in stretch fabrics,
pintucks, decorative sewing.
Hemstitch Twin
Needle
130/705HZWIHO
100
Needle distance:
2.5
For special effects with hemstitch
embroidery.
My bernette
24
2023-06 EN 5020079.40A.04
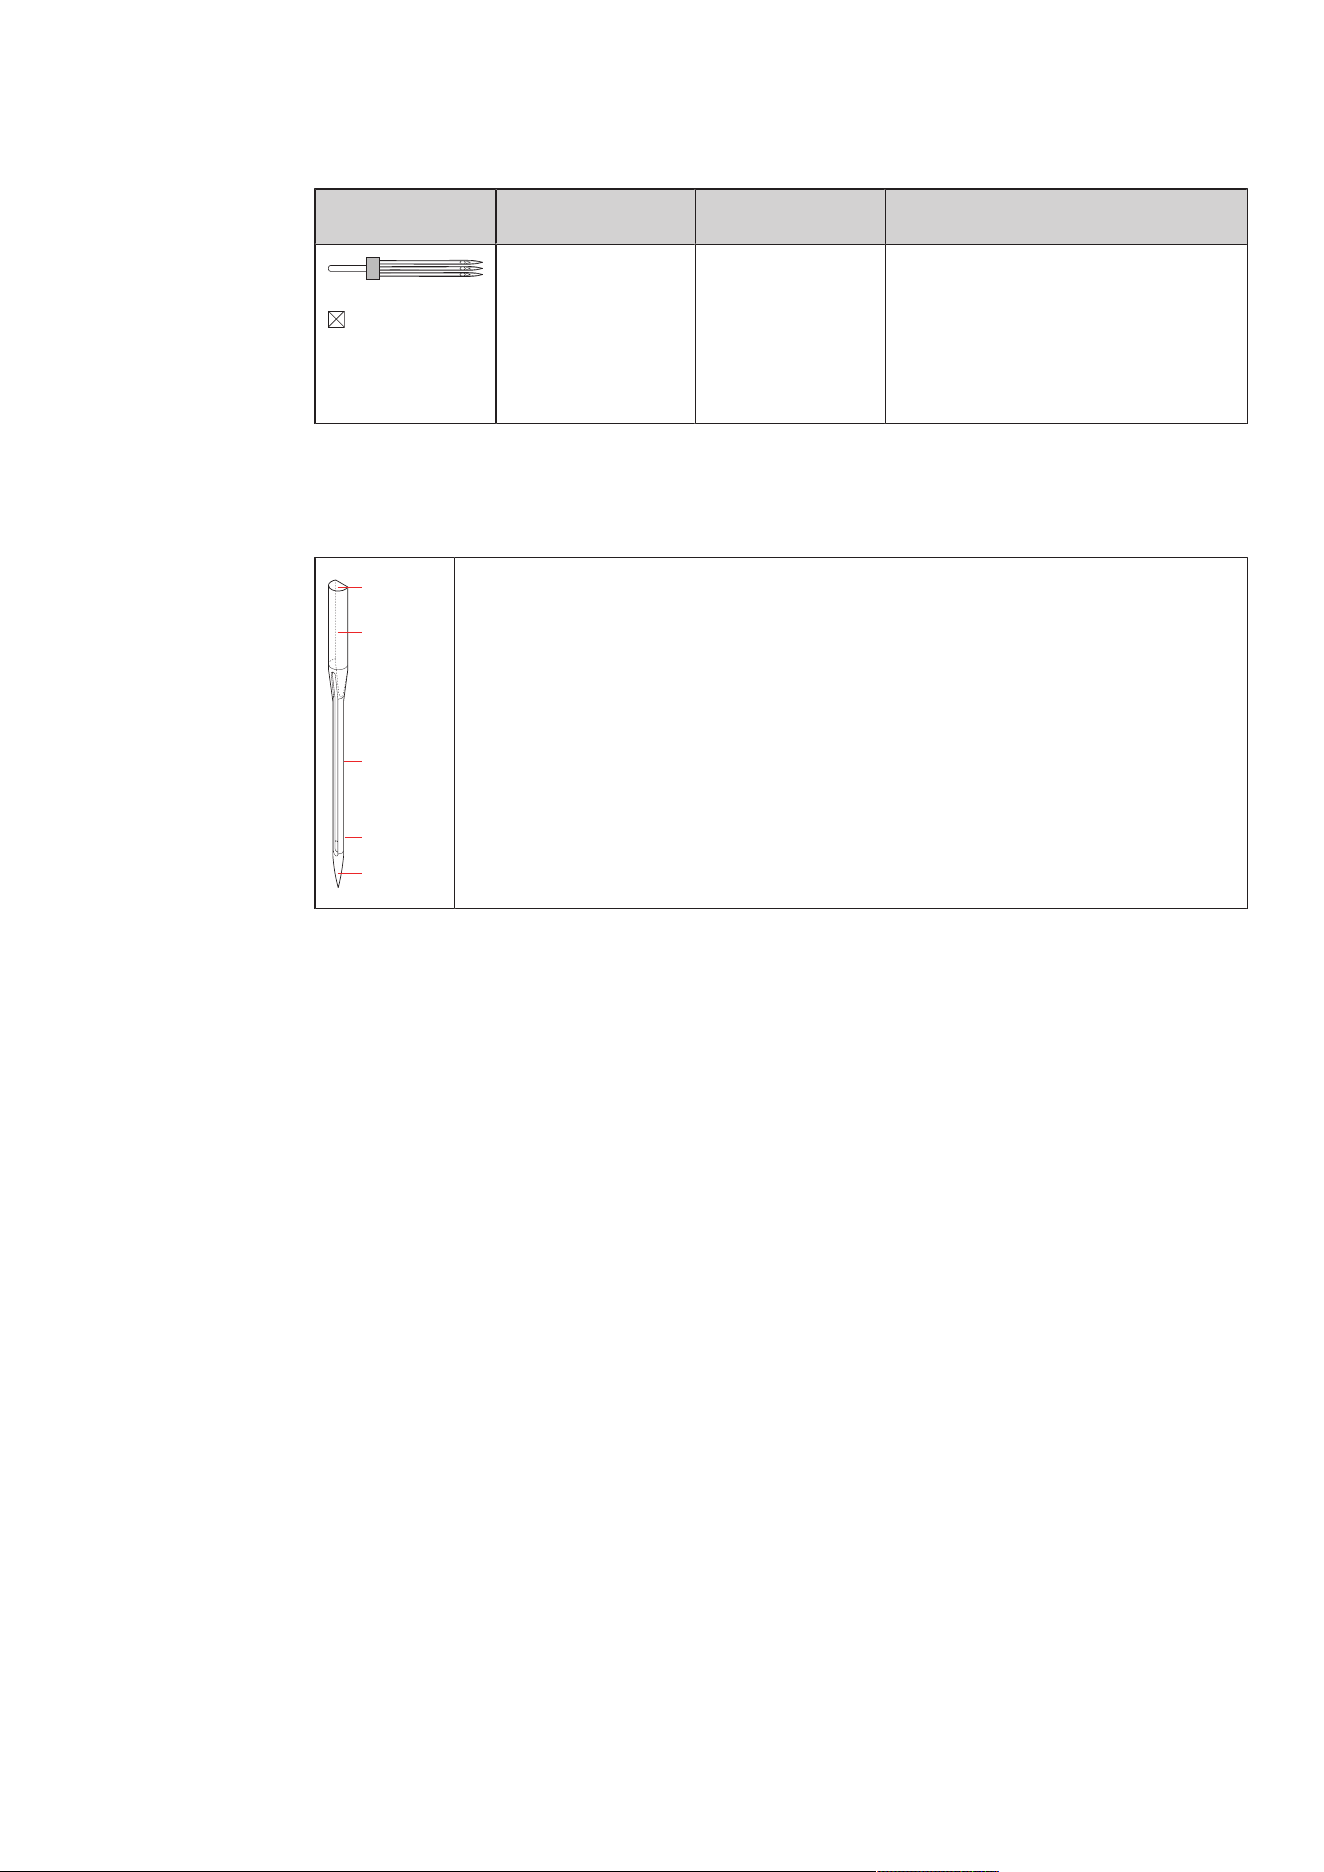
Illustration Needle Name Needle Description Purpose
Universal Triple
Needle
130/705HDRI
80
Needle distance:
3.0
For visible hems in stretch fabrics,
decorative sewing.
Example for Needle Description
The 130/705 system, which is the most common for household machines, is explained by the following
picture of a Jersey/Stretch needle.
2
1
5
3
4
130/705 H-S/70
130 = Shank length (1)
705 = Flat shank (2)
H = Needle scarf (3)
S = Needle point (here medium ball point) (4)
70 = Needle size 0.7mm (5)
Thread Selection
For a perfect sewing result, thread and fabric quality play an important role.
We recommend purchasing quality threads to achieve good sewing results.
• Cotton threads have the advantage of being a natural fiber and therefore are especially suitable for
sewing cotton fabrics.
• Mercerized cotton threads have a slight sheen that is not lost with washing.
• Polyester threads have a high tensile strength and is particularly colorfast.
• Polyester threads are more flexible and are recommended where a strong and elastic seam is required.
• Rayon threads are made of natural fibers and have a brilliant sheen.
• Rayon threads are suitable for decorative stitches and achieve a more beautiful effect.
My bernette
25
2023-06 EN 5020079.40A.04
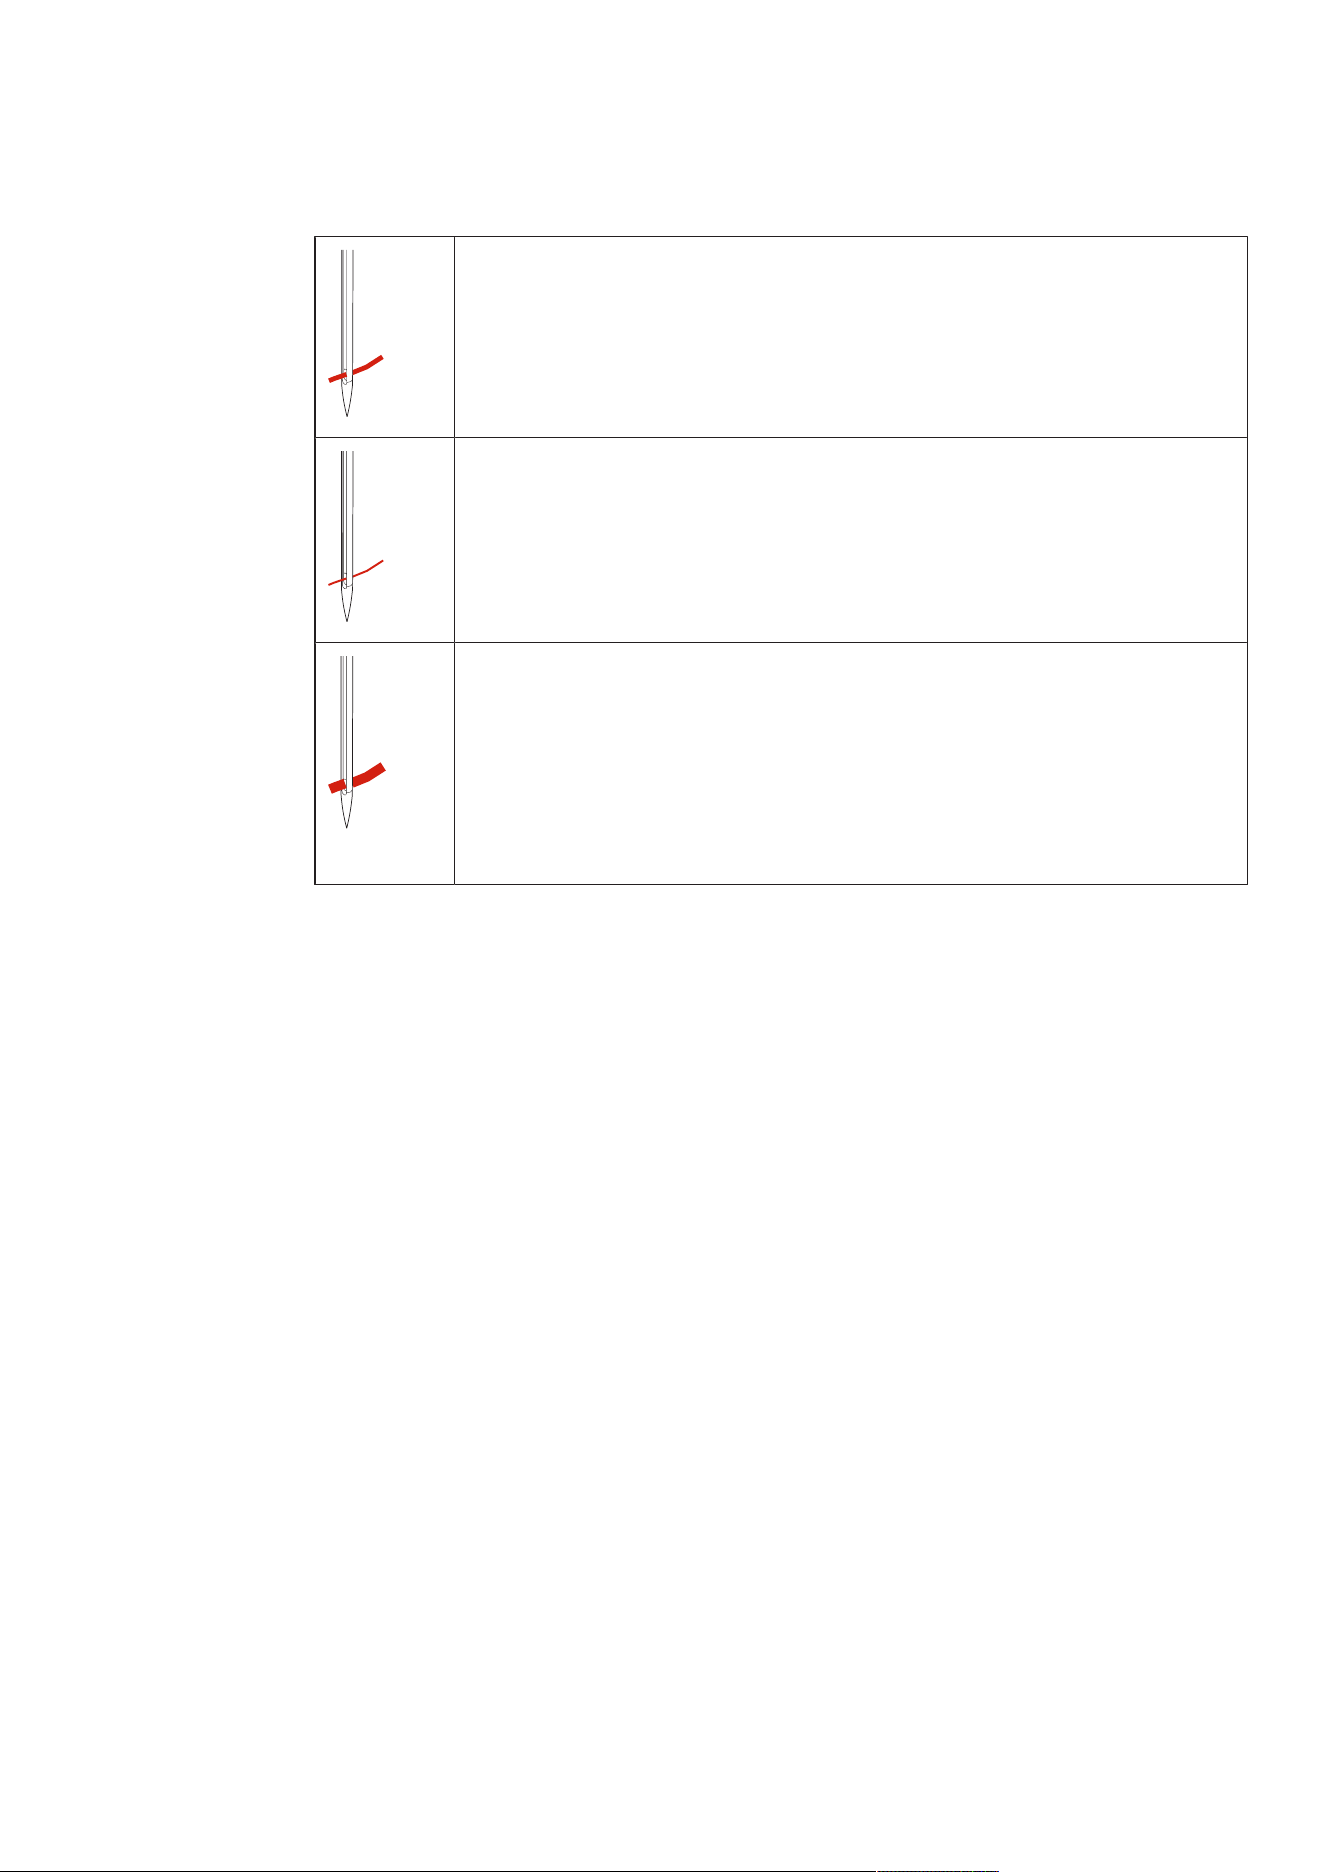
Needle/Thread Combination
The needle/thread combination is correct, when the thread fits perfectly into the long
groove and goes easily through the needle eye. The thread can be optimally sewn.
The thread can break and skipped stitches can occur when there is too much clearance in
the long groove and the needle eye.
The thread can break and get stuck when the thread scrapes against the edge of the long
groove not fit well into the needle eye optimally.
Sewing Preparation
26
2023-06 EN 5020079.40A.04
2 Sewing Preparation
2.1 Connection and Switching On
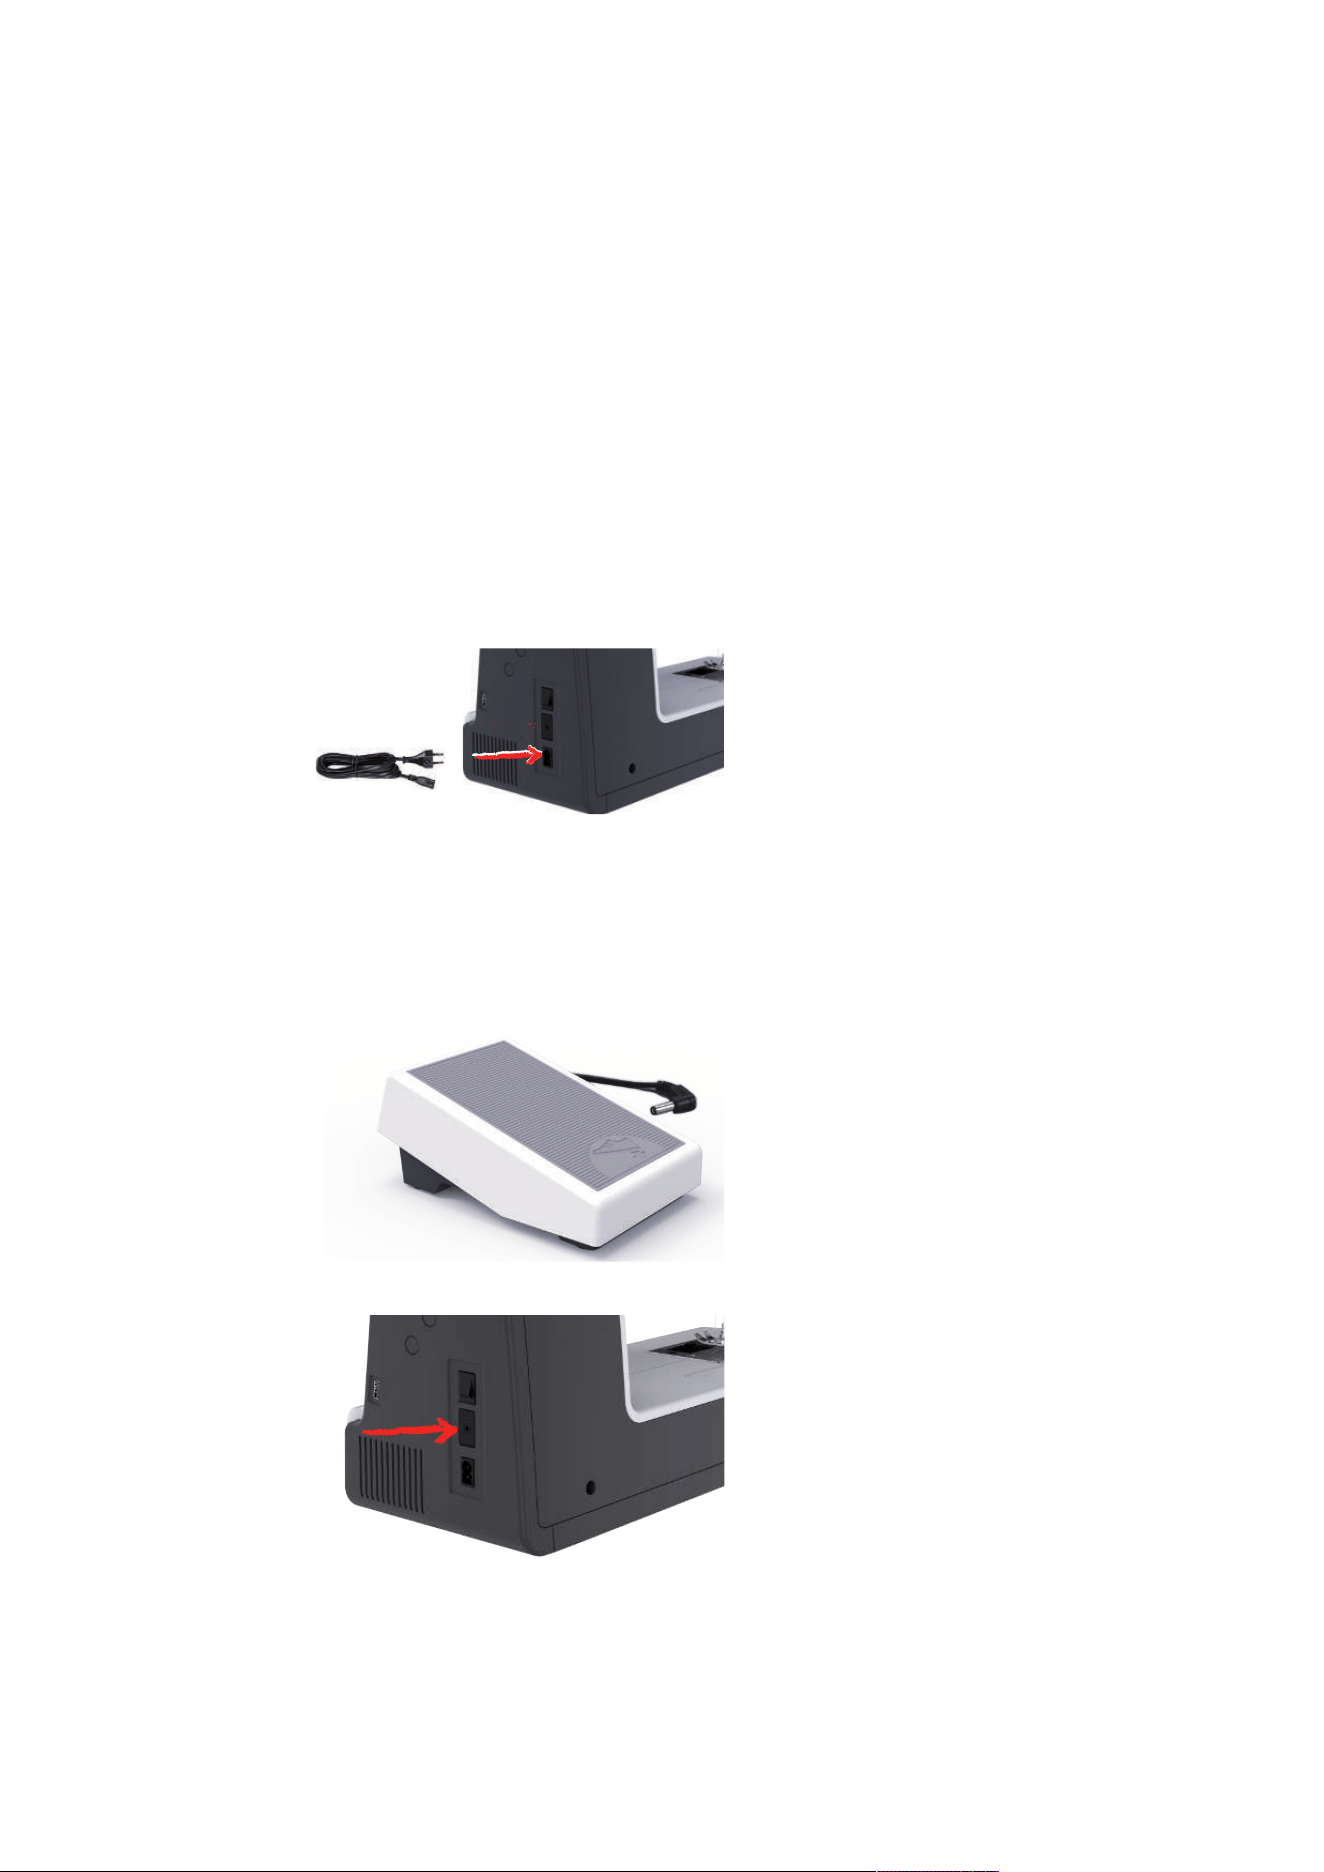
Connecting the Machine
To ensure safe operation of the machine, only the supplied mains cable may be used. The supplied power
cable is designed for the voltage range applicable in the country of use. If the machine is to be used in a
country other than the country of origin, the power cable suitable for that country must be obtained from
the Authorized bernette dealer.
The power cable for the USA and Canada has a polarized power plug (one contact is wider than the other).
To reduce the risk of an electric shock, the plug can only be inserted into the socket in one way. If the power
plug does not fit in the socket, reverse then insert the power plug. If the reversed power plug still does not
fit, an electrician must install an appropriate socket. Do not modify the power plug in any way.
> Insert the device connector of the power cable into the machine's power cable connection.
> Insert the power plug of the power cable into the socket.
Connecting the Foot Control
The cable of the foot control is rolled up on its underside.
> Unroll the cable of the foot control to the desired length and fix it in the cable holders of the foot
control.
> Insert the plug of the cable into the foot control socket of the machine.
> Place the foot control under the table.
> If the cable is too long, roll up the excess length and fix it in the cable holders of the foot control.
Sewing Preparation
27
2023-06 EN 5020079.40A.04
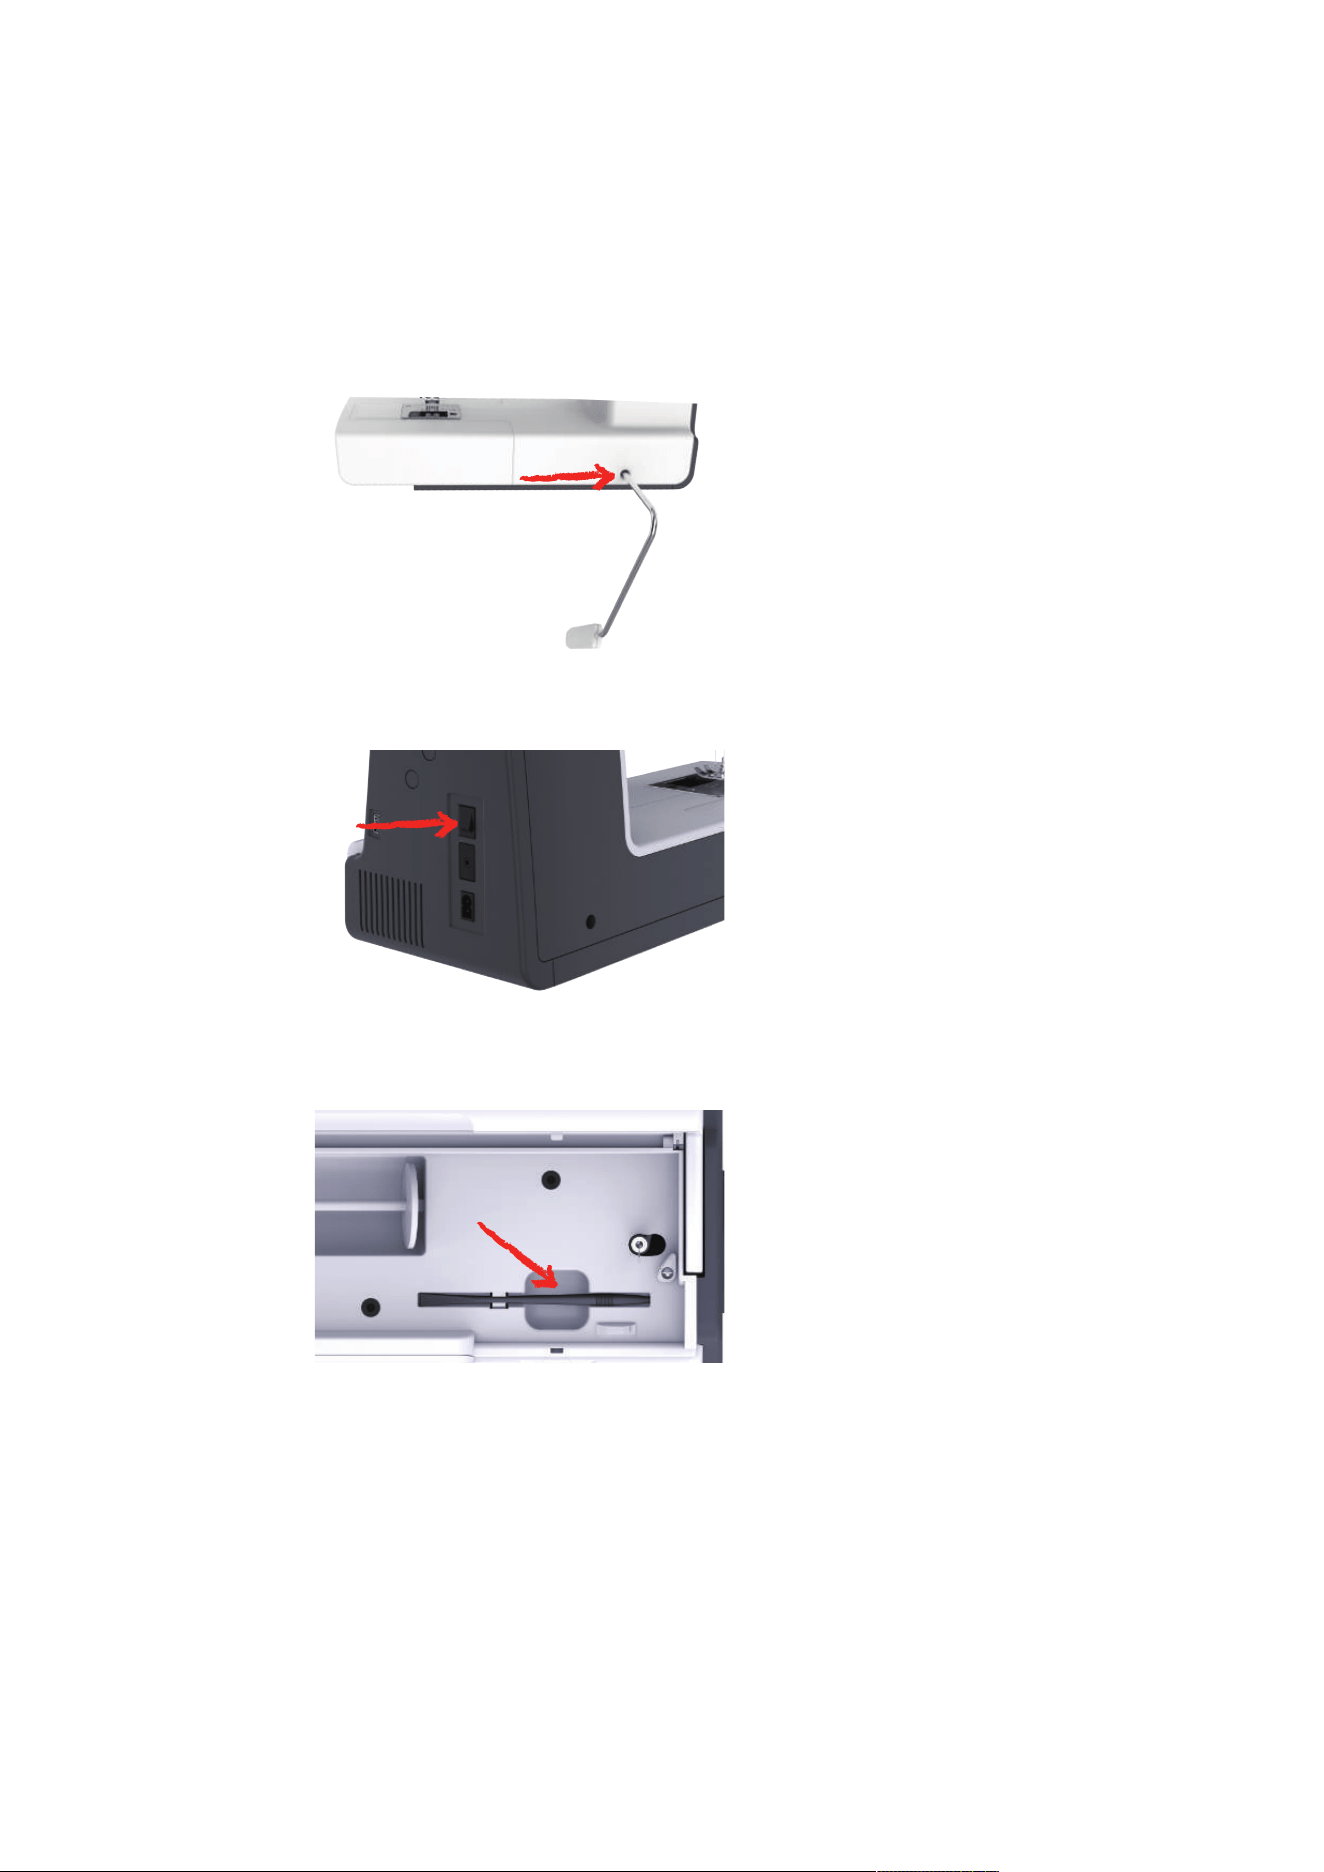
Attaching the Knee Lifter of the Free Hand System
The presser foot may be raised and lowered with the Free Hand System. The knee lifter is extremely helpful
when sewing appliqué, patchwork and quilting since it allows you to handle the fabric while your knee
controls the presser foot.
> Insert the knee lifter into the opening at the front side of the machine.
> Adjust the sitting height so that the knee lifter can be operated with the knee.
Switching the Machine On
> Set the power switch to «I».
Fixing the Touch Screen Pen
> Store the touchscreen pen on the top holder.
Sewing Preparation
28
2023-06 EN 5020079.40A.04
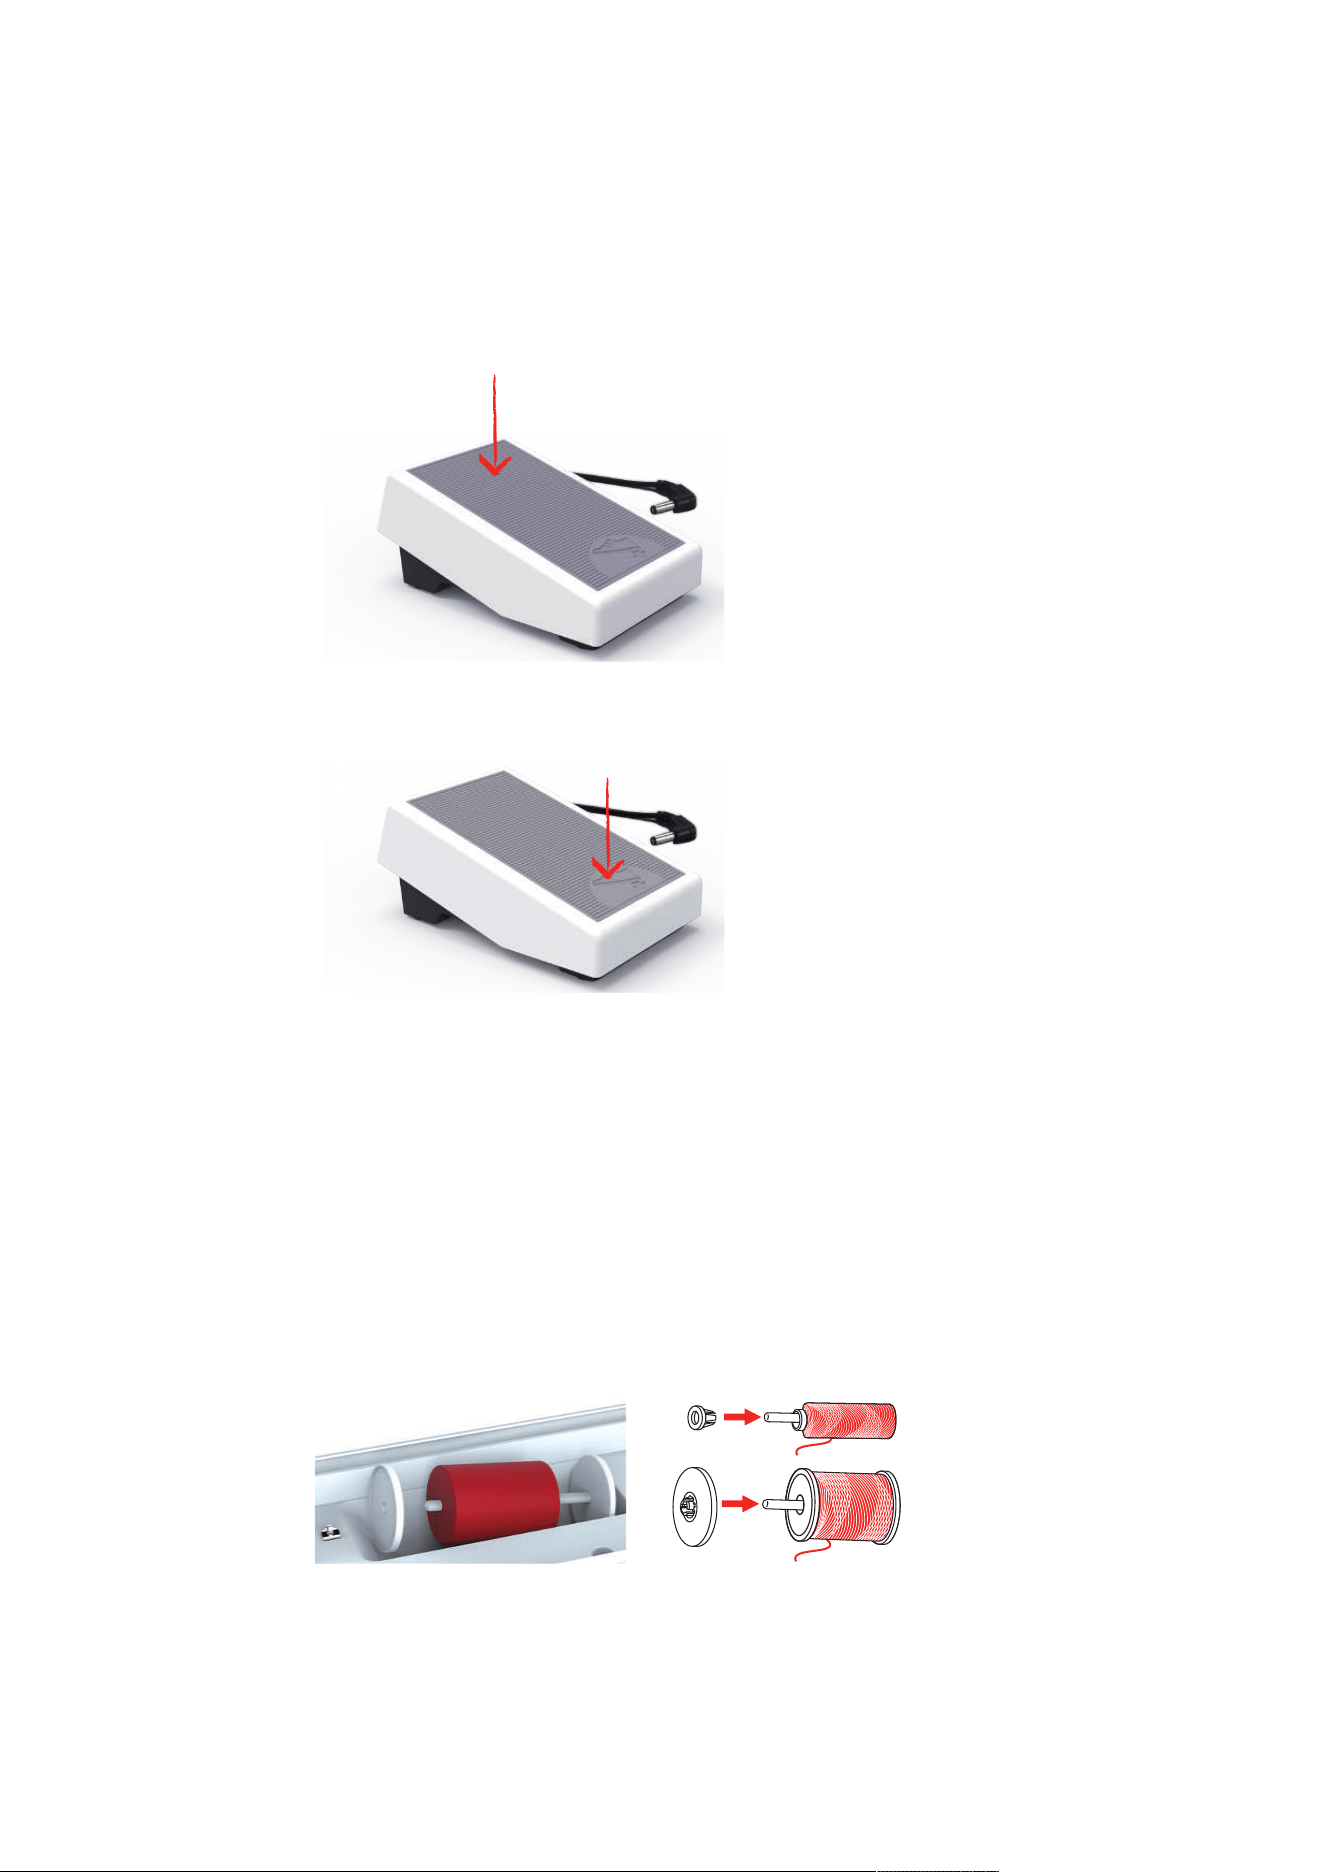
Regulating the Speed via the Foot Control
Via the foot control the speed can be adjusted infinitely variable.
> Press the foot control down carefully to start the machine.
> To sew more quickly, press the foot control further down.
> Release the foot control to stop the machine.
Raising/Lowering the Needle
> Sink the heel back on the foot control to raise/lower the needle.
Programming the Foot Control Individually
The foot control can be programmed individually.
2.2 Spool Pin
Horizontal Spool Pin
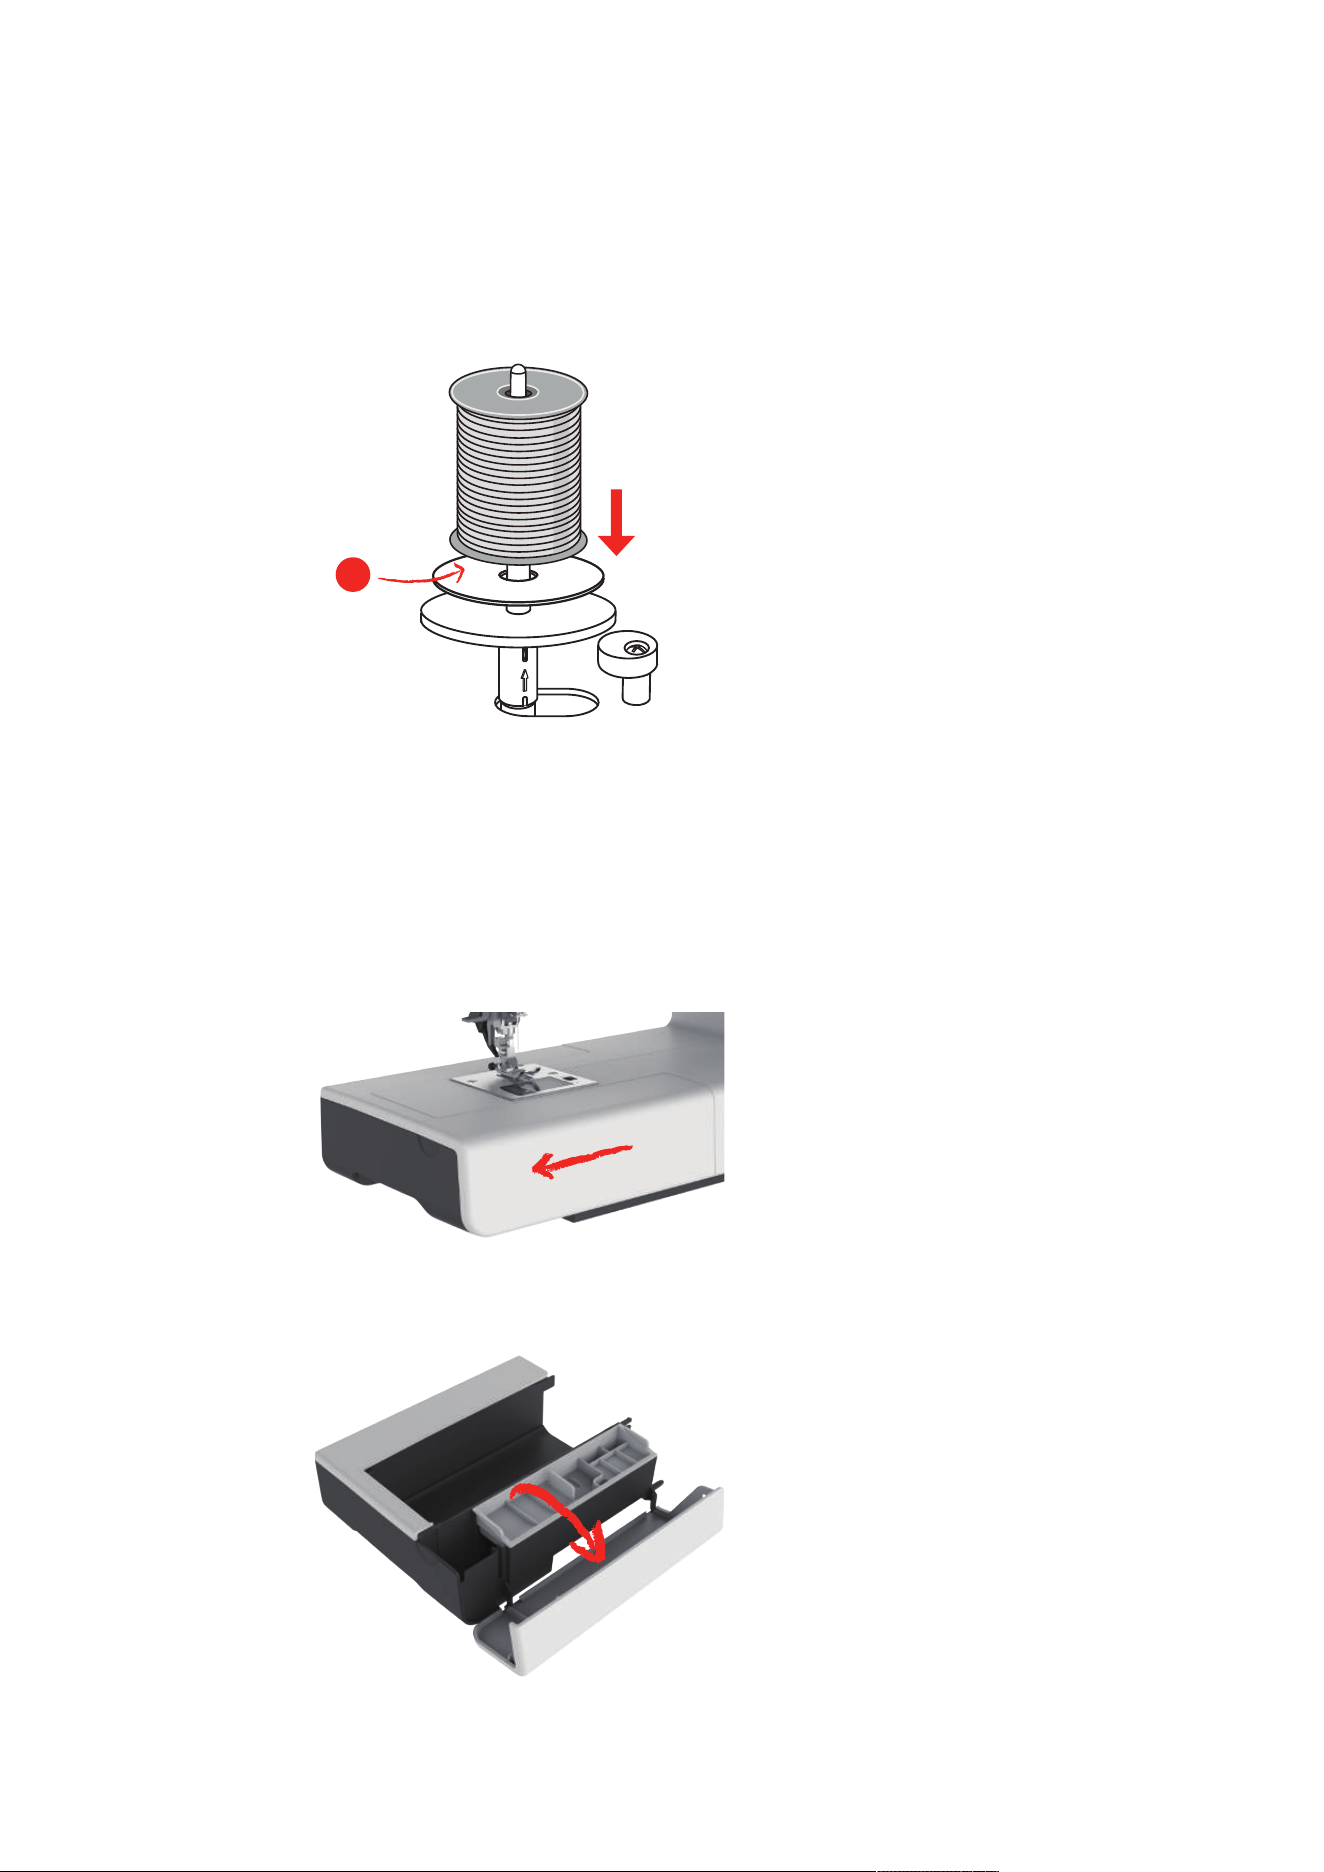
Placing the Thread Spool and the Spool Cap
Spool caps hold the thread spool in place for proper release of thread from the spool.
> Place the thread spool on the spool pin.
> Position the appropriate spool cap on the spool pin so that there is no space between the spool cap and
the thread spool.
Sewing Preparation
29
2023-06 EN 5020079.40A.04
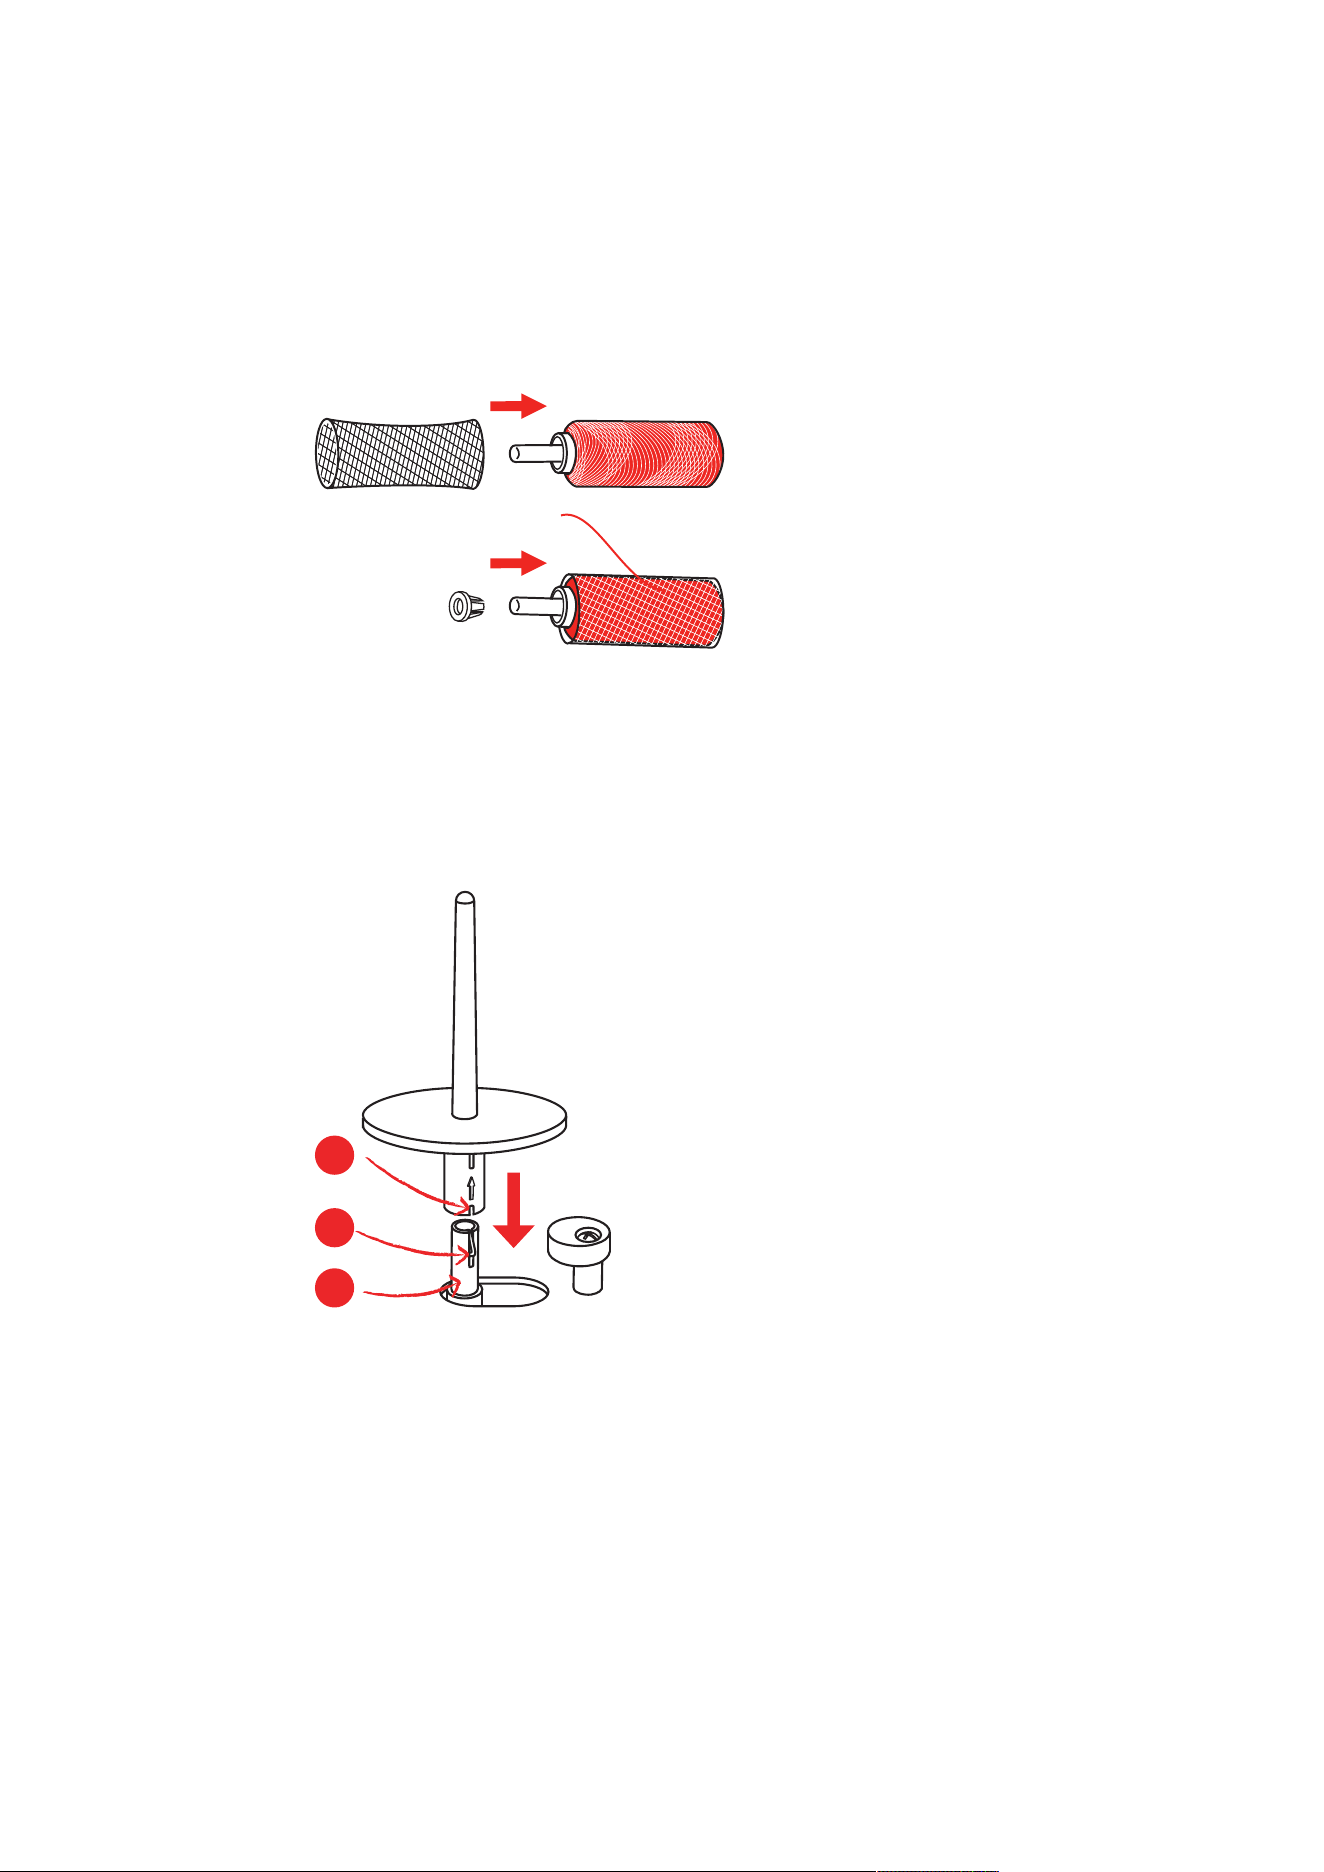
Using the Spool Net
The spool net holds the thread on the thread spool and prevents the thread from knotting and breaking. The
spool net is only used with the horizontal spool holder.
> Pull the spool net over the thread spool. Ensure when doing so that the spool net does not slip off the
thread spool, e.g. double-insert the net over the thread spools or insert a part of the net into the thread
spool at the rear.
Second Spool Pin
Installing the Second Spool Pin
The second spool pin is necessary when several threads are sewn.
> Insert the second spool pin onto the end of the bobbin winding unit (1).
> Align the notch (2) with the spring (3) on the bobbin winding unit.
1
2
3
Sewing Preparation
30
2023-06 EN 5020079.40A.04
Inserting Thread Spool
The felt disc prevents the thread from sticking to the spool pin.
> Place the felt disc (1) on the second spool pin.
> Place the thread spool on the second spool pin.
1
2.3 Freearm
The bernette b79 provides a solidly freearm which offers a lot of space for large project on the right of the
needle.
2.4 Sewing Table and Accessory Box
The sewing table is used as an accessory box.
> To remove the sewing table, hold the sewing table by the handle on the left and pull in the direction of
the arrow.
> To open the accessory box, tilt the cover towards you.
> To close the accessory box, tilt the cover backwards until it clicks into place.
Sewing Preparation
31
2023-06 EN 5020079.40A.04
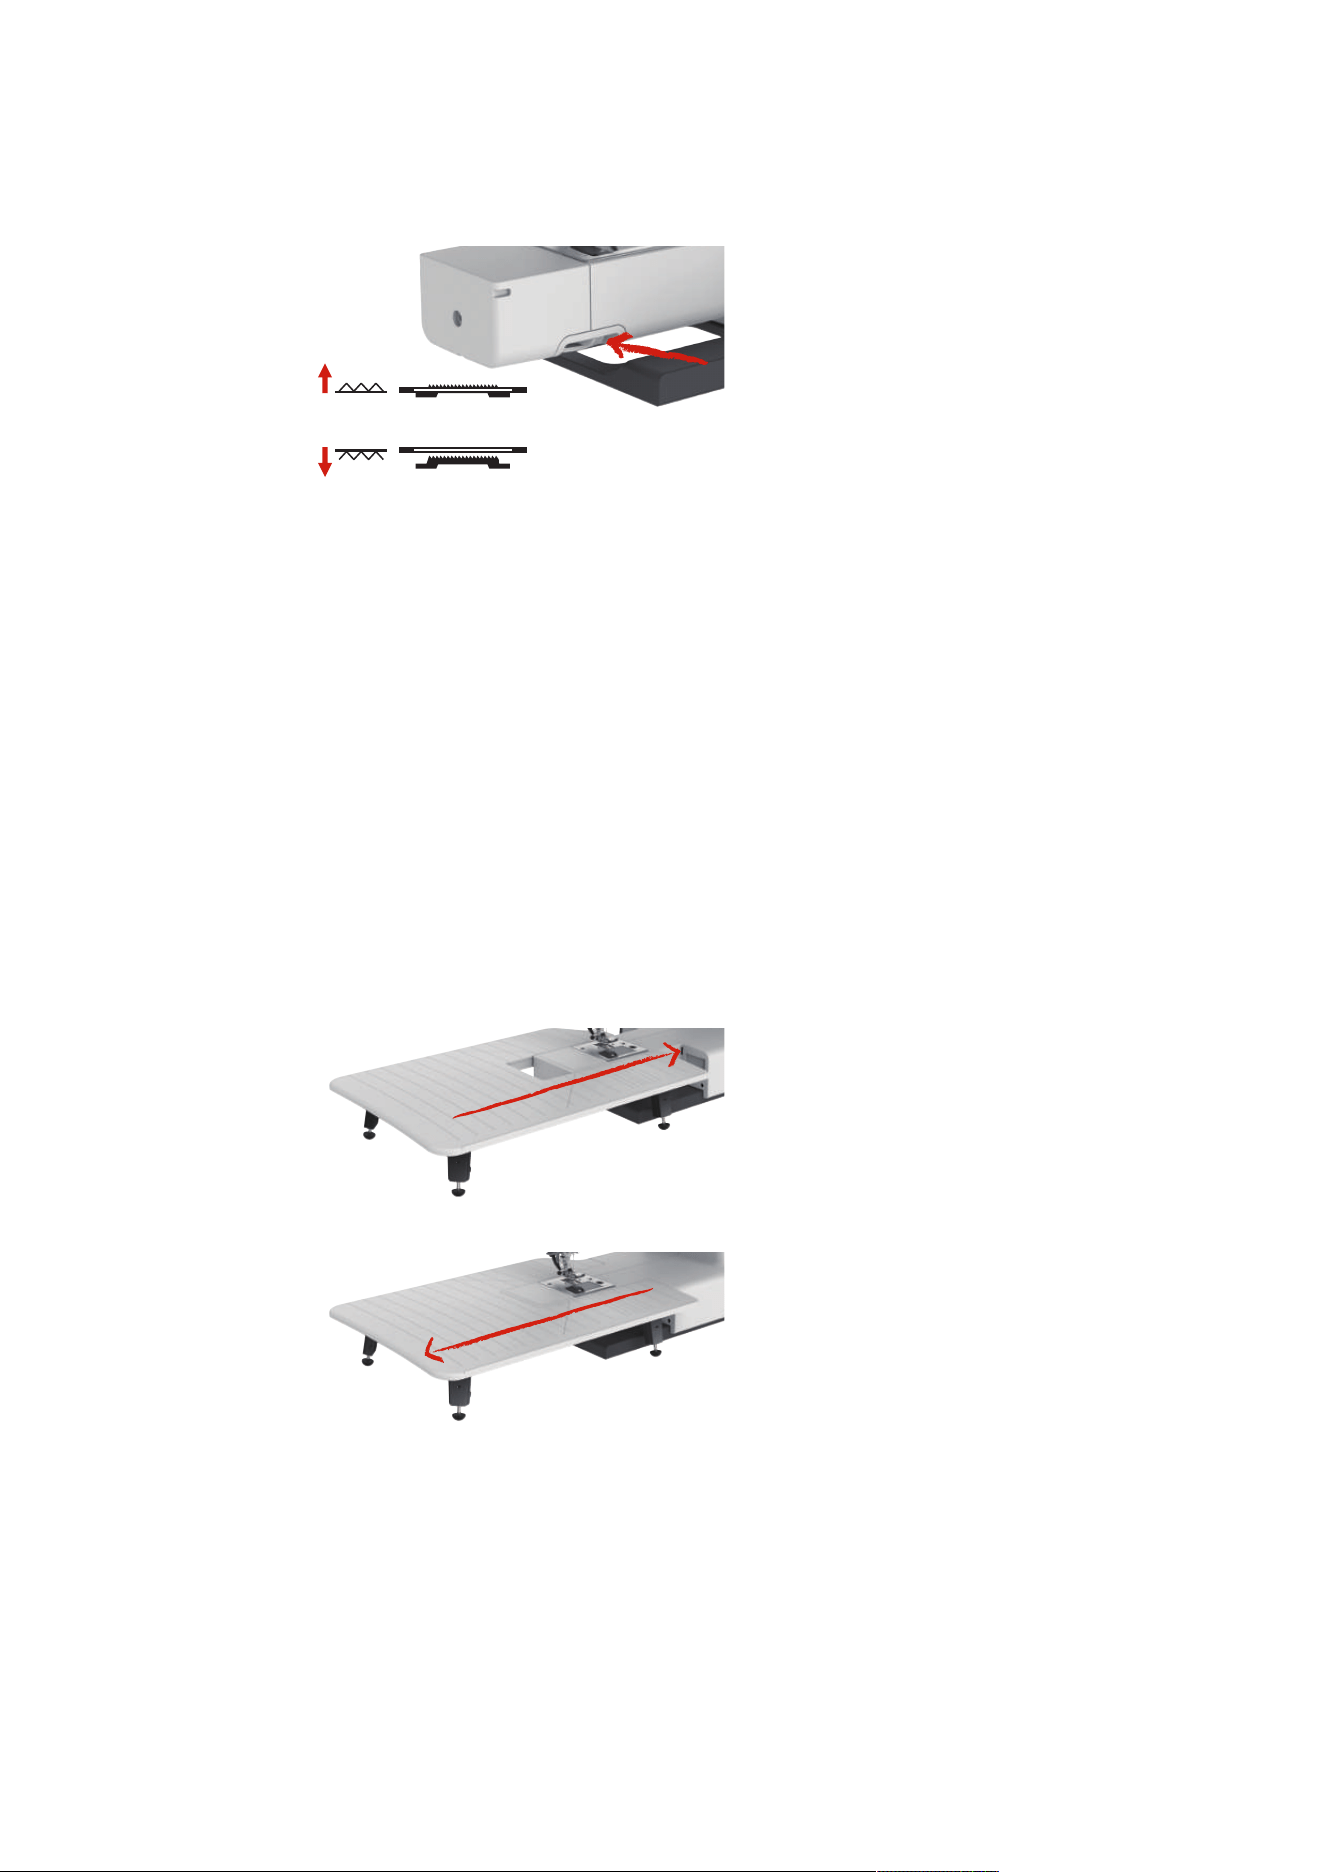
2.5 Raising or Lowering the Feed Dog
> To raise the feed dog, push the feed dog lever to the right.
– The feed dog is raised when the first stitch is sewn.
> Slide the «Feed Dog Lever» left to lower the feed dog.
– The feed dog is lowered.
2.6 Using the Slide-on Table
The Slide-on Freearm Extension Table, attached to the freearm, enables the available sewing area to be
extended.
The height of the extension table can be adjusted by turning the adjustable feet.
Prerequisite:
• The sewing table is removed.
> Raise the needle.
> Raise the presser foot.
> Switch off the machine.
> Unfold the feet on the extension table.
> Push the Slide-on Freearm Extension Table from the left to the right over the freearm until it engages.
> To remove the slide-on table, pull the slide-on table over the freearm to the left.
Sewing Preparation
32
2023-06 EN 5020079.40A.04
2.7 Presser Foot
Adjusting the Presser Foot Position via the Knee Lifter of the Free Hand System
> Adjust the sitting height so that the knee lifter can be operated with the knee.
> Move the knee lifter with the knee to the right to raise the presser foot.
– Simultaneously the thread tension is released.
> Release the knee lifter slowly to lower the presser foot.
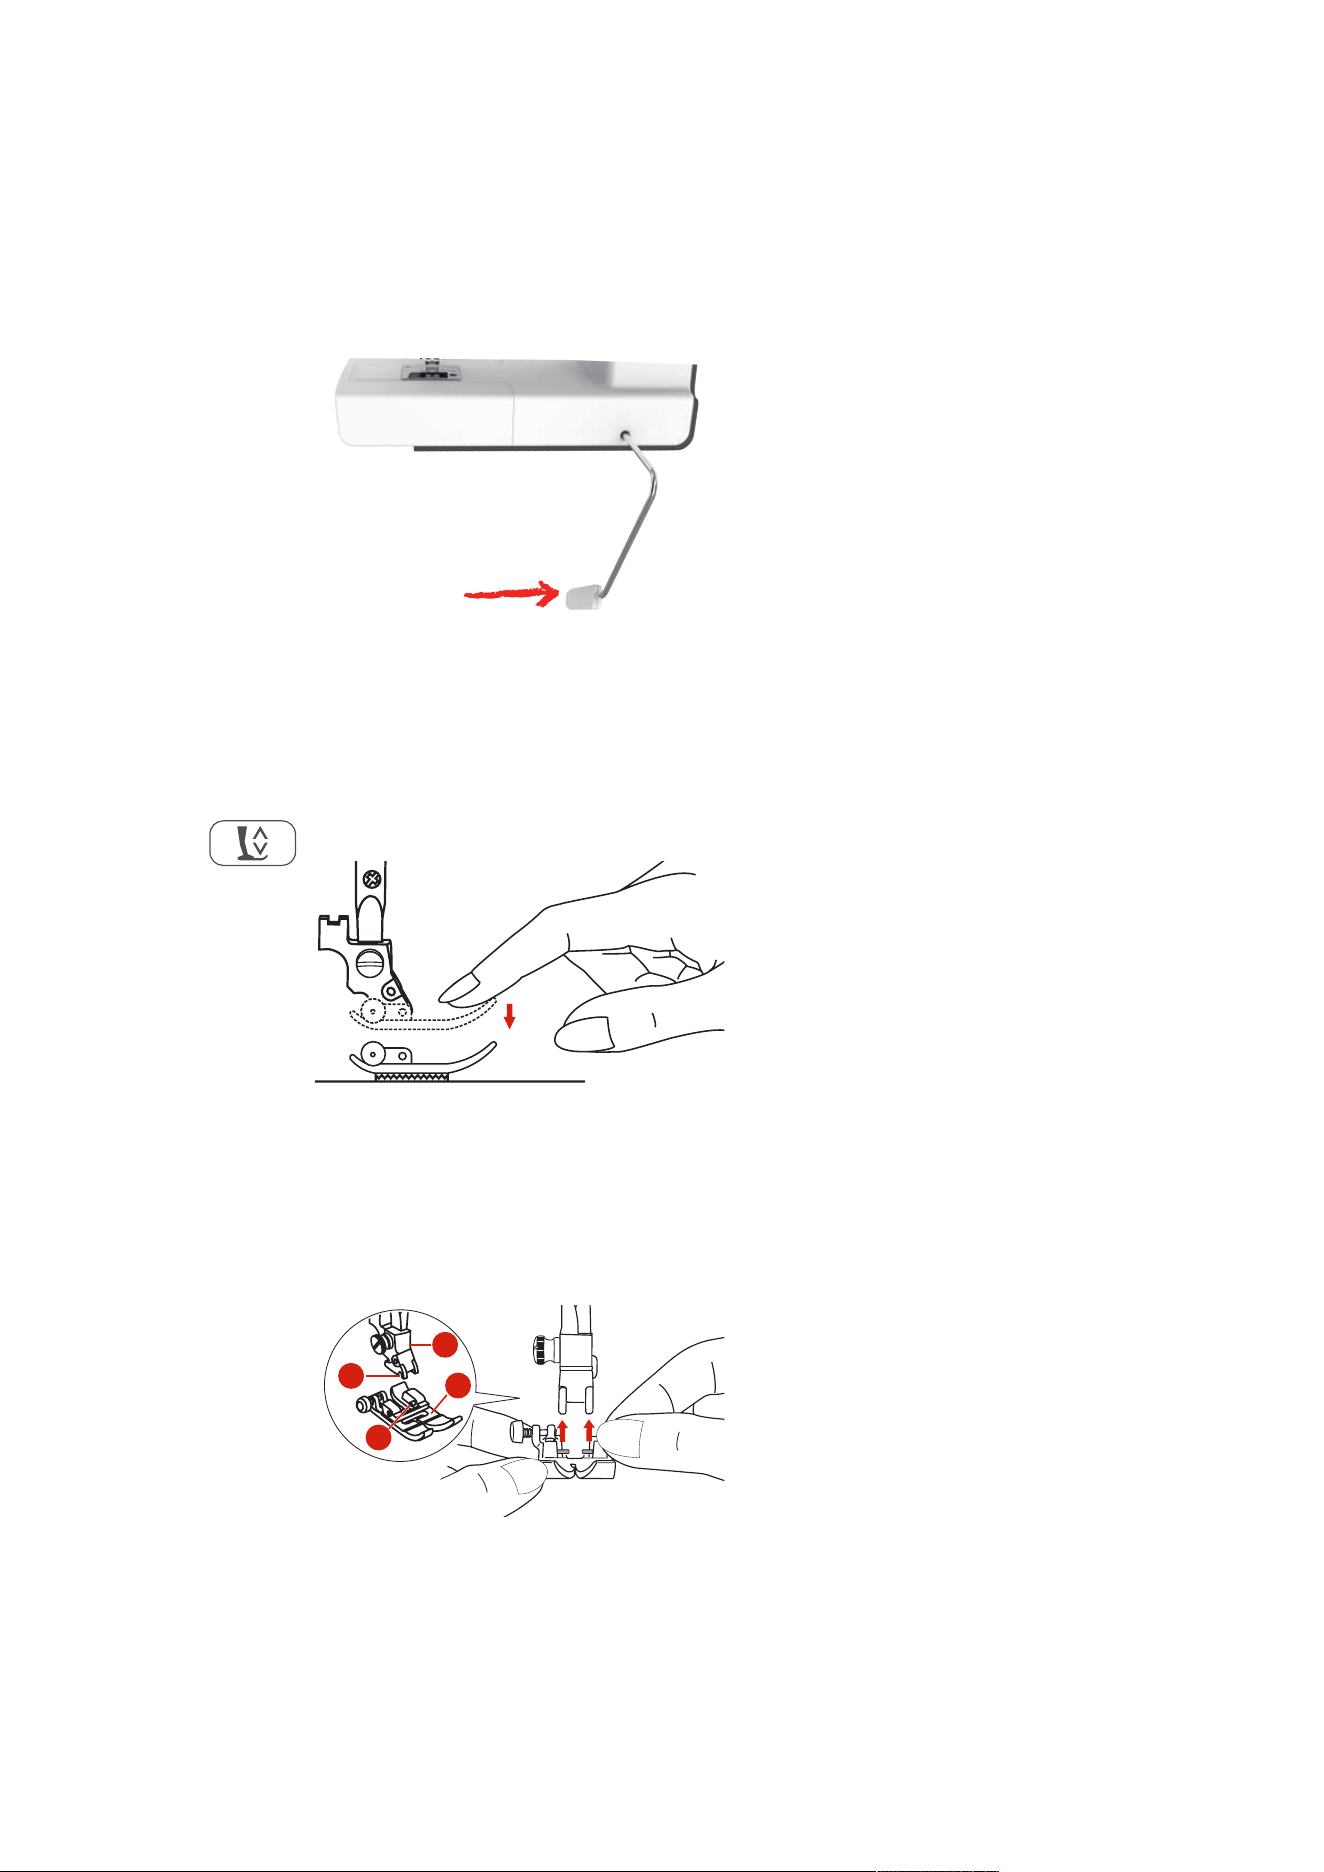
Changing the Presser Foot
Removing the Presser Foot Sole
> Raise the presser foot.
> With the finger press the front edge of the presser foot.
Attaching the Presser Foot Sole
> Raise the presser foot (1).
> Place the presser foot sole (2) under the shaft groove (3) so that the shaft groove is above the presser
foot sole pin (4).
> Then push the new presser foot sole upward until it engages.
3
2
4
1
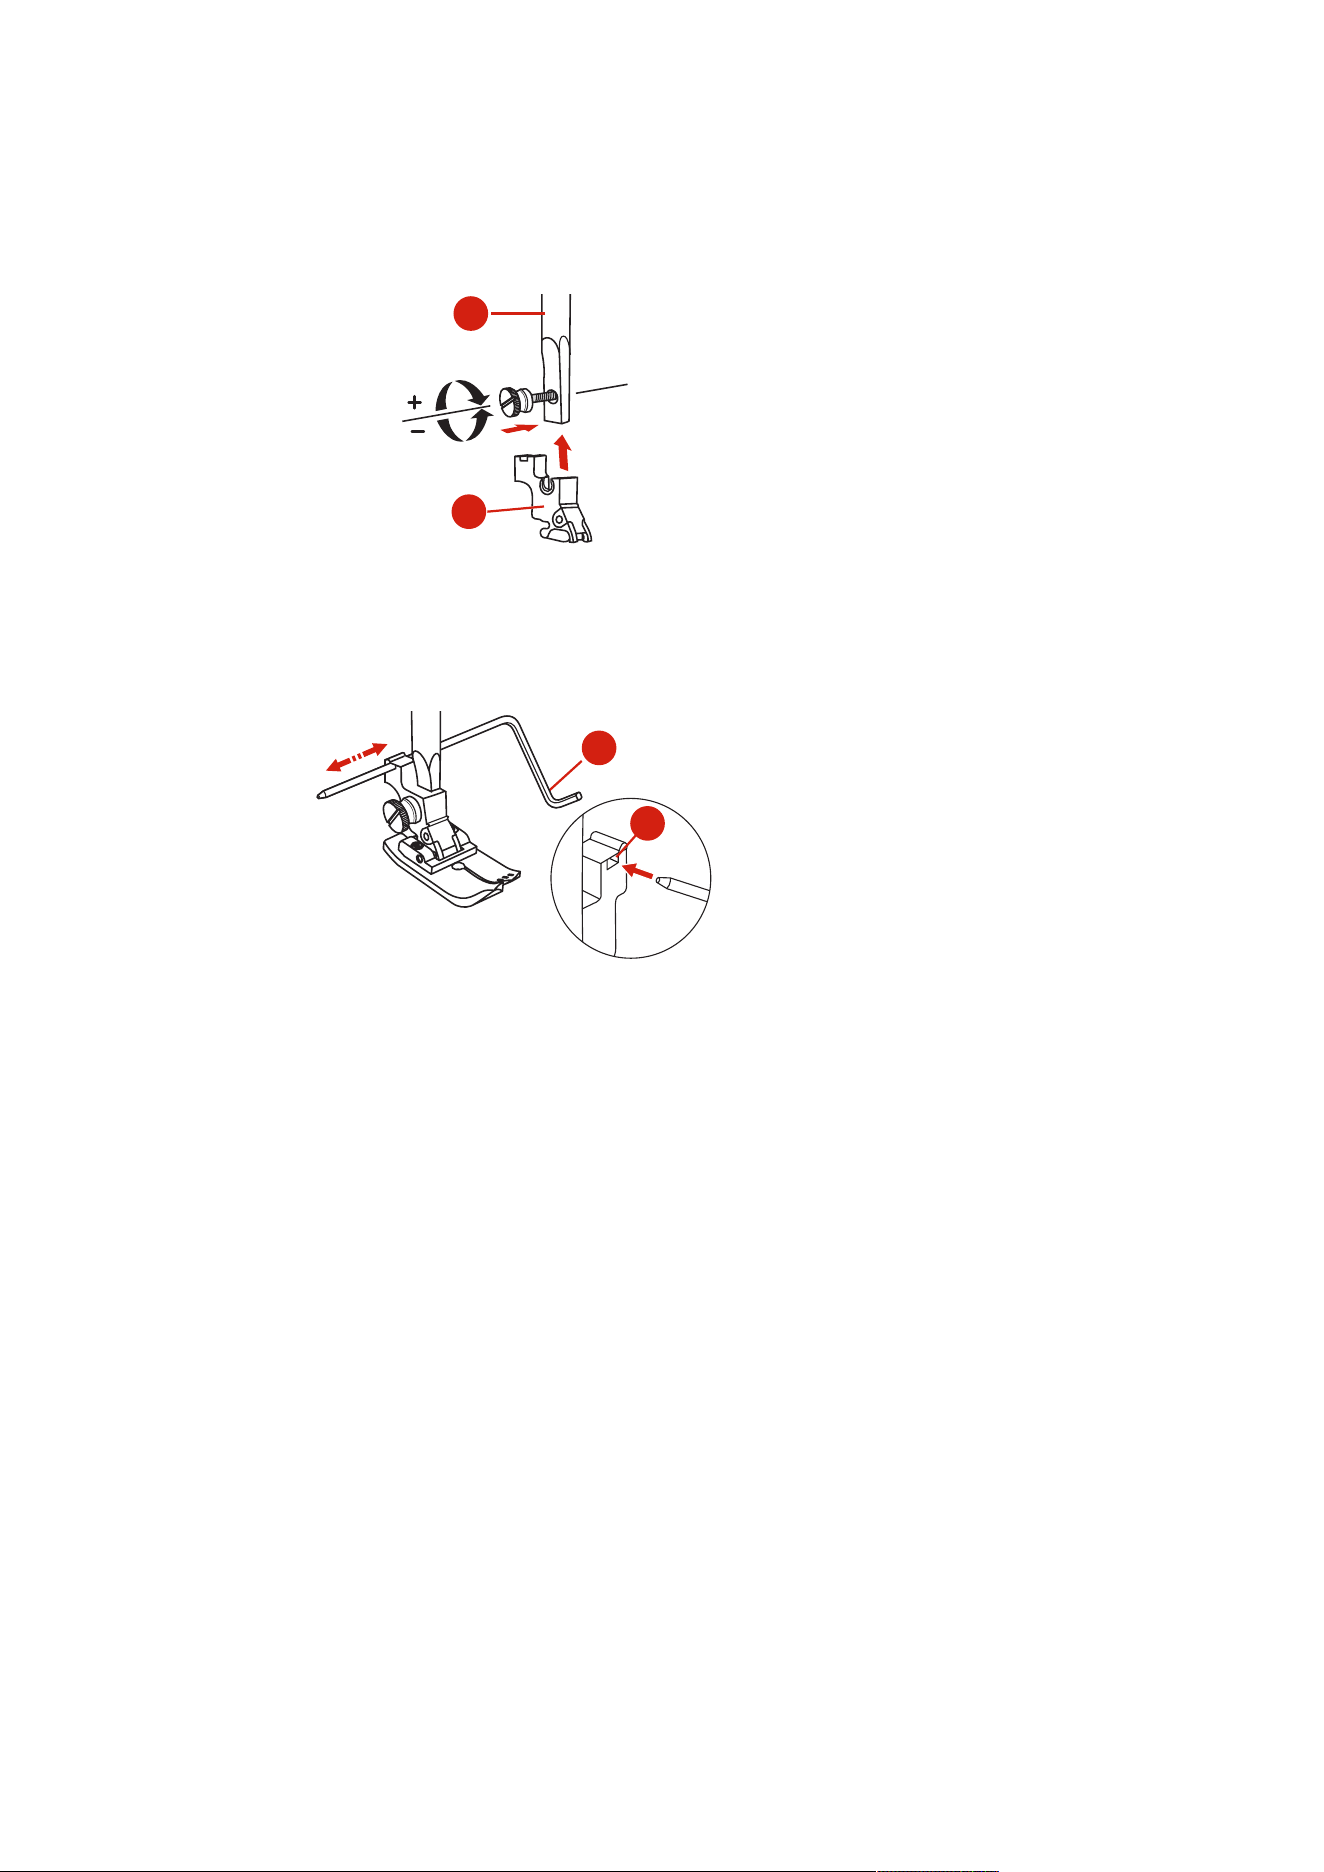
Removing and Inserting the Presser Foot Holder
Prerequisite:
• The presser foot sole is removed.
> Raise the presser foot.
Sewing Preparation
33
2023-06 EN 5020079.40A.04
> Align the presser foot holder (1) with the presser foot bar (2) underneath and to the left.
> Hold the presser foot holder firmly and screw in the screw by hand.
> Tighten the screw using the screwdriver.
1
2
Attaching the Seam Guide
The seam guide is suitable for sewing parallel lines.
> Insert the seam guide (1) in the slot (2).
> Set the required distance to the adjacent seam.
2
1
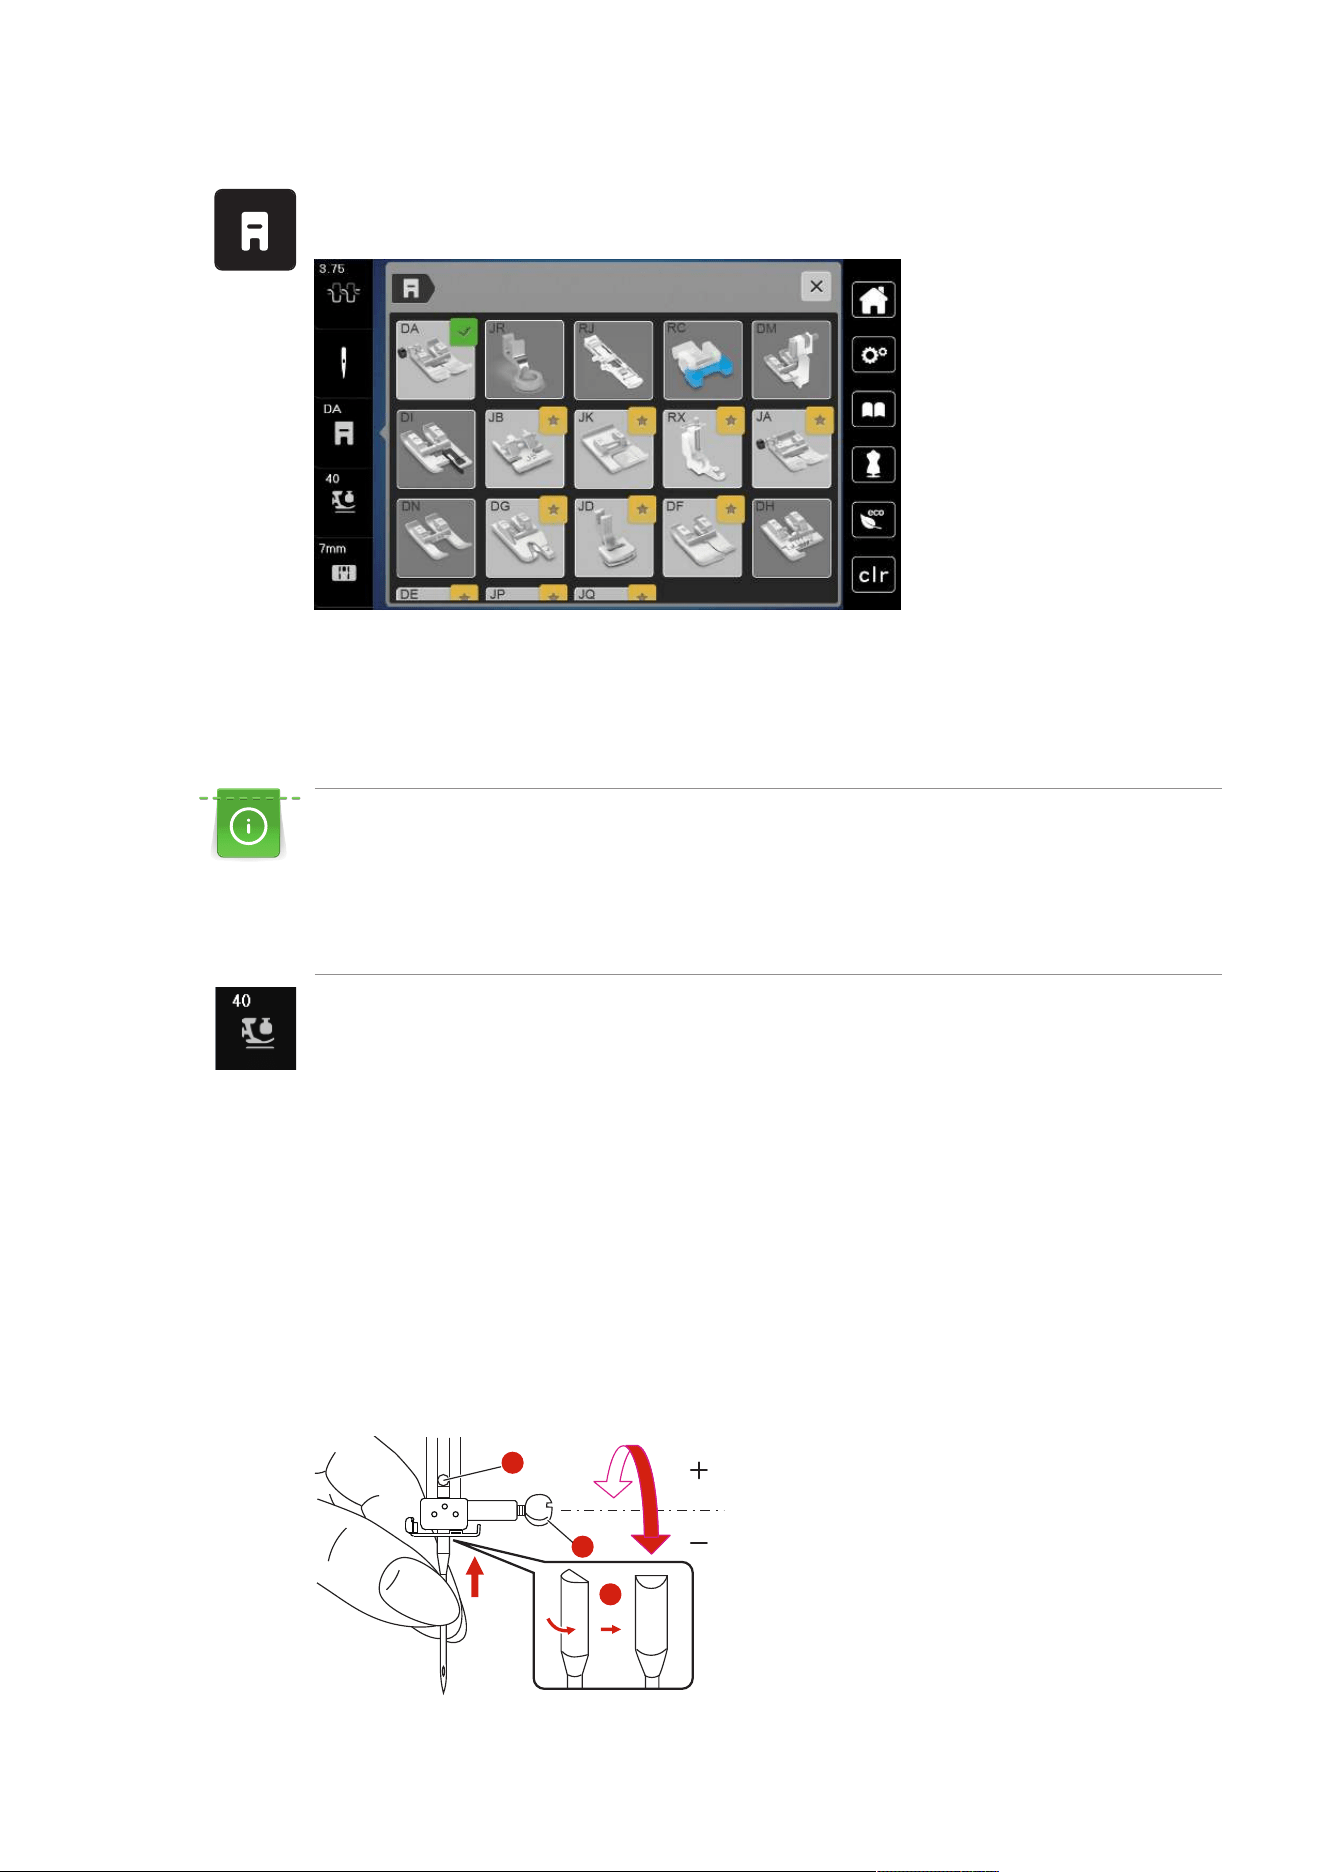
Having the presser foot sole displayed in the user interface
The recommended presser foot sole for the selected stitch is displayed. Moreover, other optimal presser foot
soles can be displayed.
> Switch the machine on.
> Select a stitch pattern.
– The recommended presser foot sole with letter designation is displayed in the «Presser Foot Indicator/
Presser Foot Selection» field.
Sewing Preparation
34
2023-06 EN 5020079.40A.04
> Tap «Presser Foot Indicator/Presser Foot Selection».
– Any presser foot soles are displayed.
– A green tick indicates the recommended presser foot sole.
– A yellow star indicates the presser foot soles which can also be used for this stitch for special
purposes.
Setting the Presser Foot Pressure
The presser foot pressure is designed to adjust the pressure of the presser foot optimally to the fabric
thickness. When working with thick fabrics, it is recommended to reduce the presser foot pressure. This
provides the advantage that the fabric can be moved more easily. When the presser foot pressure is set
below 0, the presser foot even lifts to give more space to the thick fabric. When working with thin
fabrics, it is recommended to increase the presser foot pressure. This provides the advantage that the
fabric cannot be moved too easily under the presser foot.
> Tap «Presser Foot Pressure».
> Adjust the presser foot pressure.
2.8 Needle and Stitch Plate
Changing the Needle
> Raise the presser foot.
> Raise the needle.
> Switch the machine off and disconnect it from the power supply system.
> Loosen the fixing screw (1) with the screwdriver.
> Pull the needle down to remove.
> Hold the new needle (2) with the flat side to the rear. Push the needle upwards into the needle holder as
far as it will go (3).
> Tighten the fixing screw with the screwdriver.
1
3
2
Sewing Preparation
35
2023-06 EN 5020079.40A.04
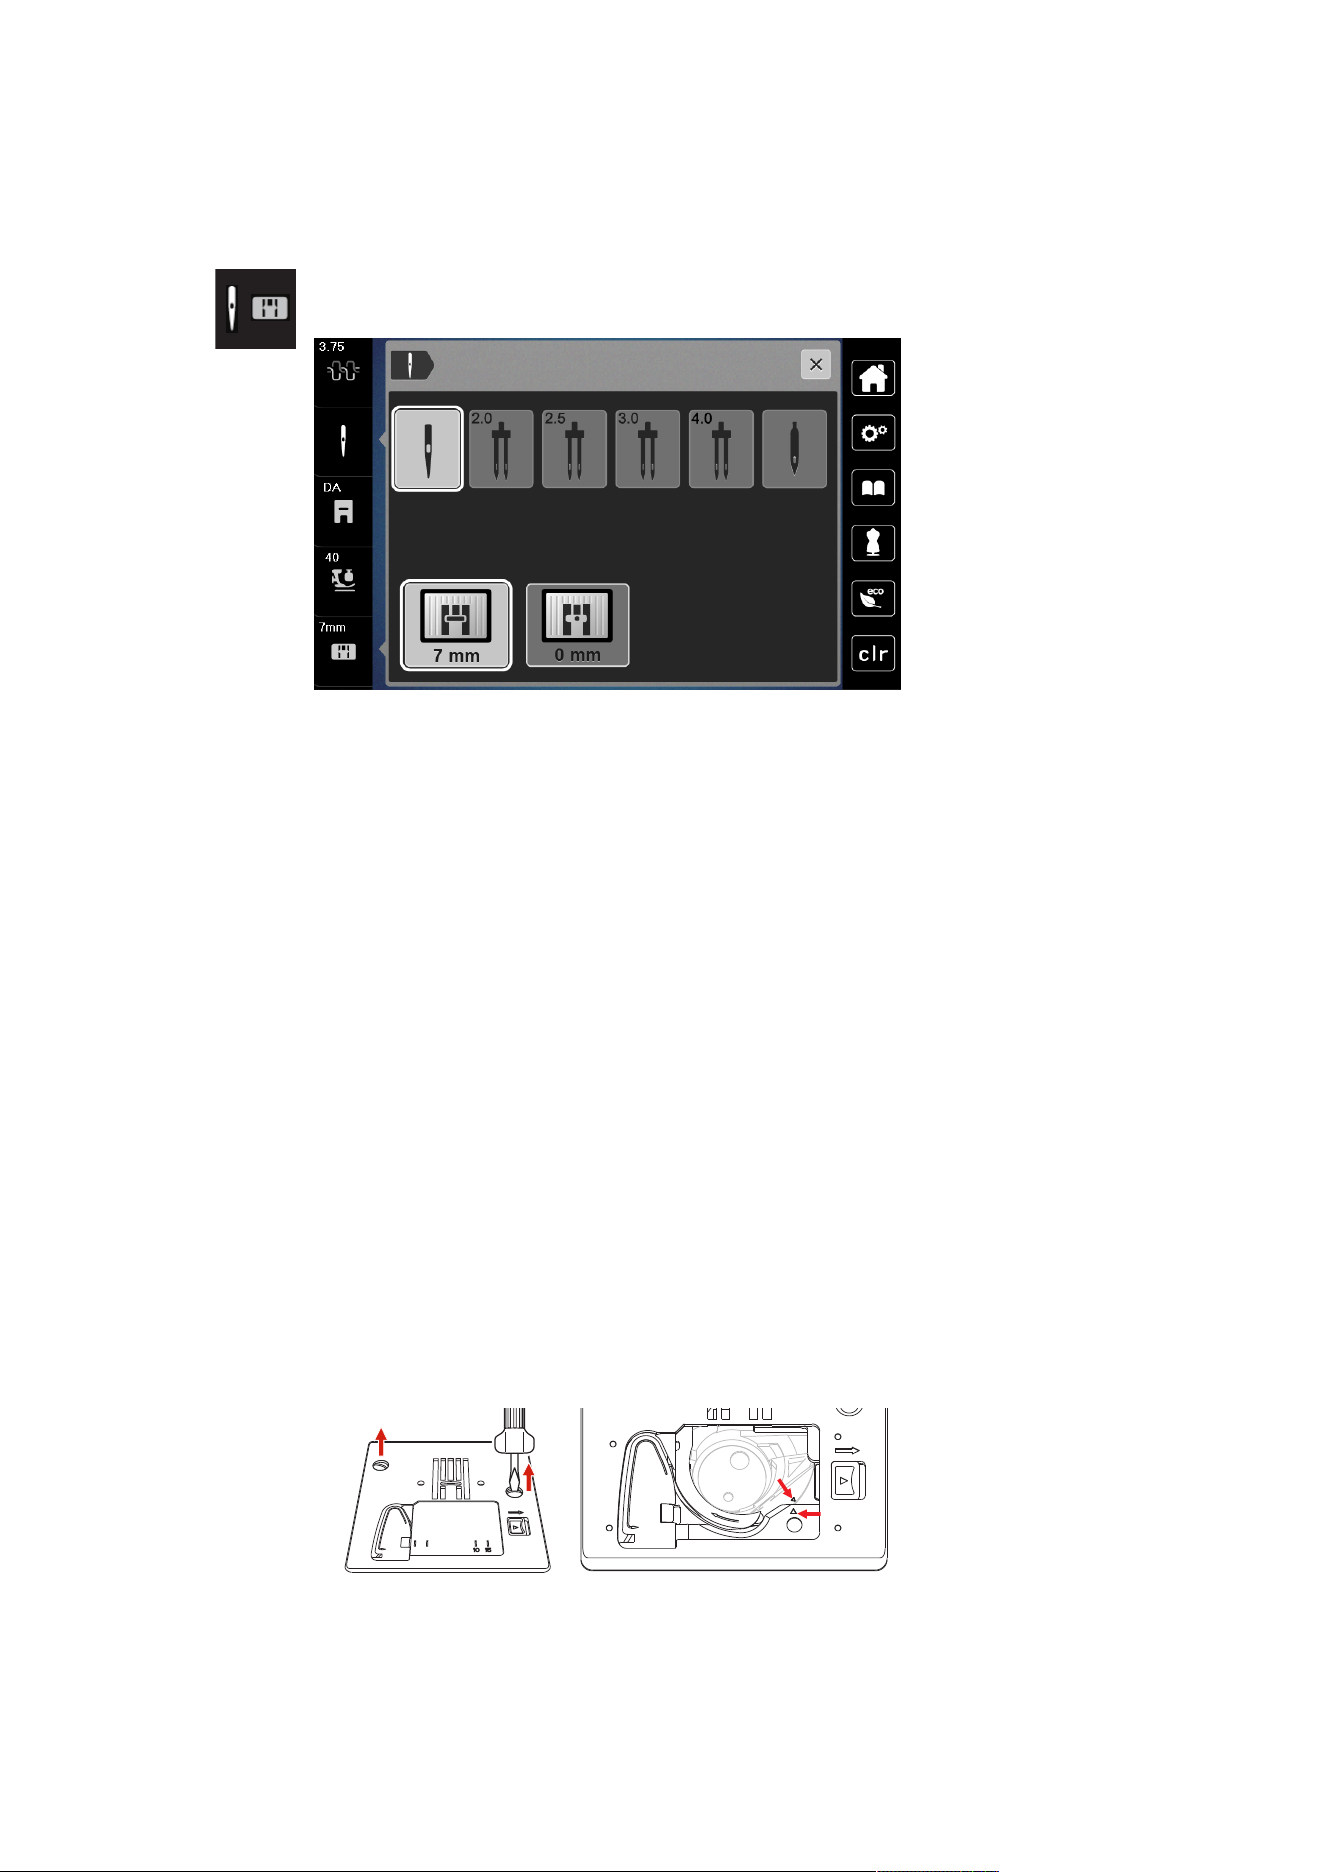
Selecting the Needle in the User Interface
After changing the needle, you can check whether it can be used with the selected stitch plate.
> Tap «Needle Selection» or «Stitch Plate/Needle Selection».
> Select the attached needle.
– When the selected needle matches the selected stitch plate and the presser foot, sewing can be
started.
– If the selected needle does not match with the stitch plate, a red exclamation mark will appear on the
display.
Needle Stop Up/Down (Permanent)
> To set the needle stop position permanently, tap «Needle Stop Up/Down».
– The machine stops with needle position down as soon as the foot control is released or the button
«Start/Stop» has been pushed.
> Tap «Needle Stop Up/Down» again.
– The machine stops with needle position up as soon as the foot control is released or the button
«Start/Stop» has been pushed.
Changing the Stitch Plate
The stitch plate is marked with vertical, horizontal and diagonal lines in millimeters (mm) and inches (inch).
These markings are helpful for sewing or precise top-stitching. Please Note: The markings of the bobbin
case and the stitch plate must be aligned identically.
Prerequisite:
• The feed dog is lowered.
• The machine is switched off and disconnected from the power supply system.
• The bobbin cover, the needle and the presser foot are removed.
> Remove the screws of the stitch plate with the screwdriver.
> Remove the stitch plate.
> Position new stitch plate and tighten screws with screwdriver.
Sewing Preparation
36
2023-06 EN 5020079.40A.04
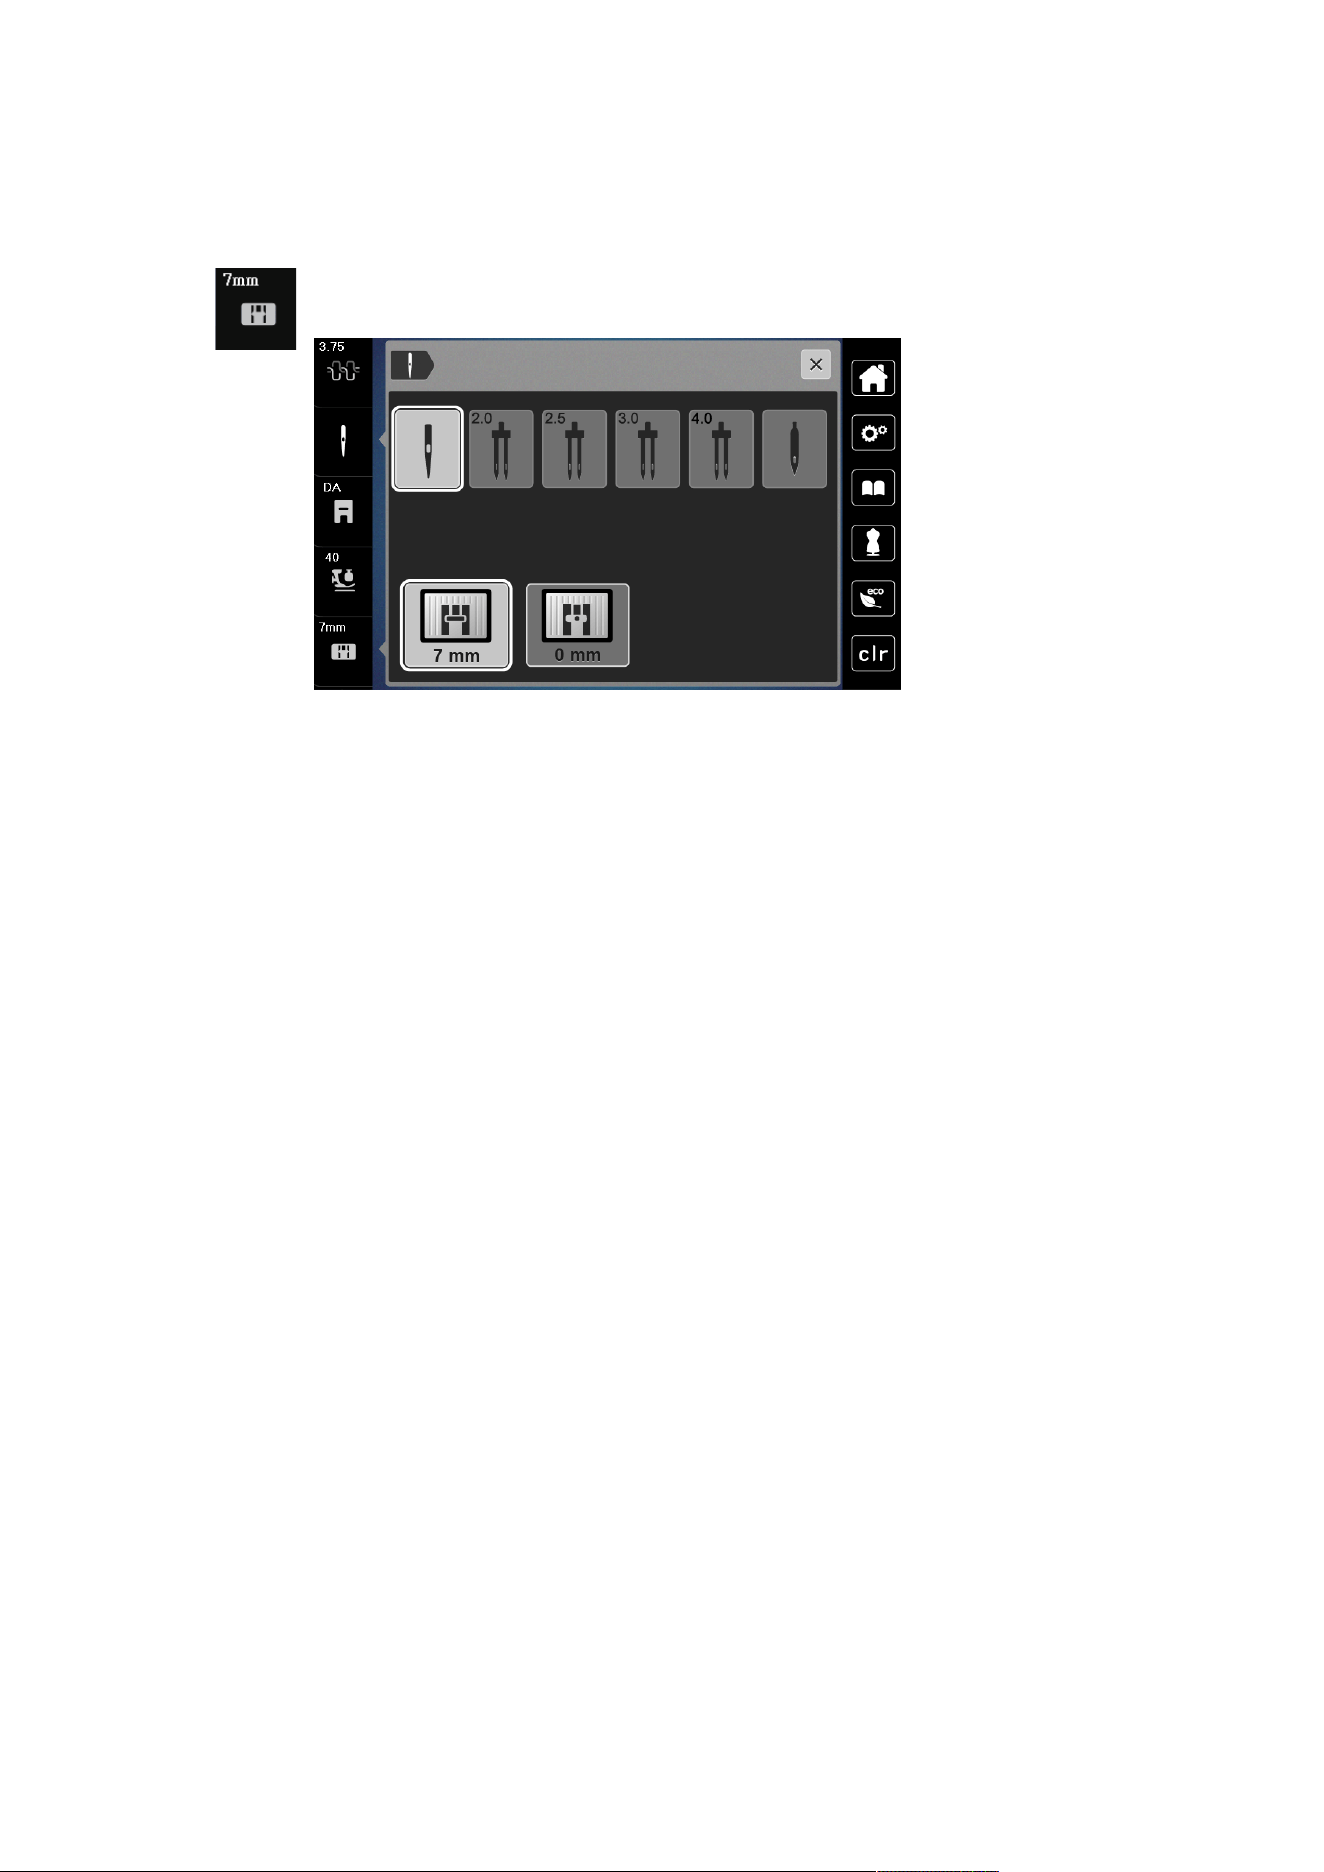
Checking the Stitch Plate in the User Interface
After changing the stitch plate, you can check whether it can be used with the selected needle.
> Tap «Stitch Plate/Needle Selection».
– The mounted stitch plate is automatically detected and shown in the display.
– If the selected stitch plate is suitable to be used in combination with the needle, sewing can begin.
– The stitch width is automatically set to the permissible value.
– If the selected needle does not match with the stitch plate, a red exclamation mark will appear on the
display.
Sewing Preparation
37
2023-06 EN 5020079.40A.04
2.9 Threading
Preparing the Threading
> Press the button «Presser Foot Up/Down » to raise the presser foot.
> Raise the presser foot.
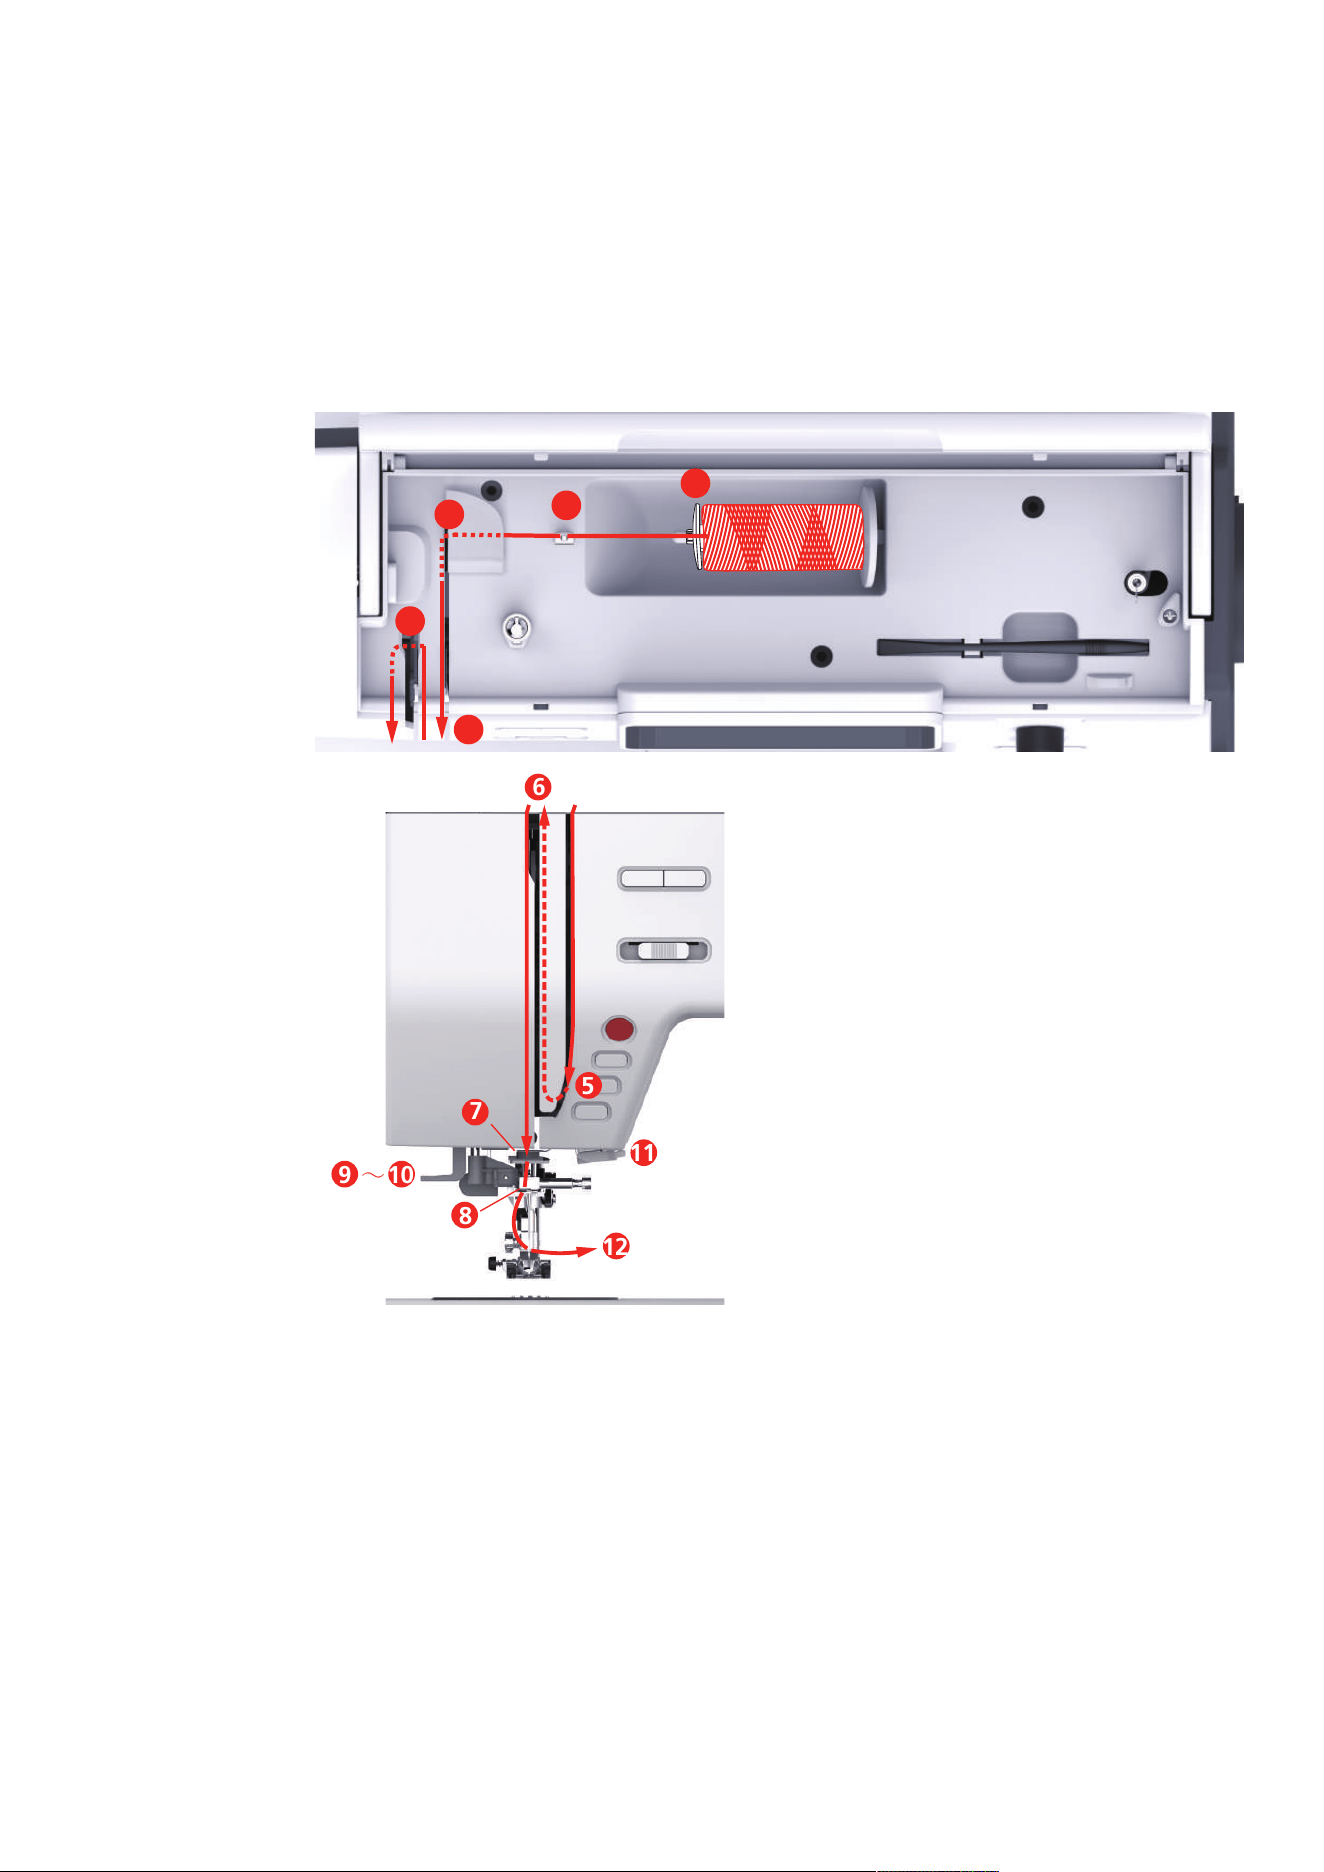
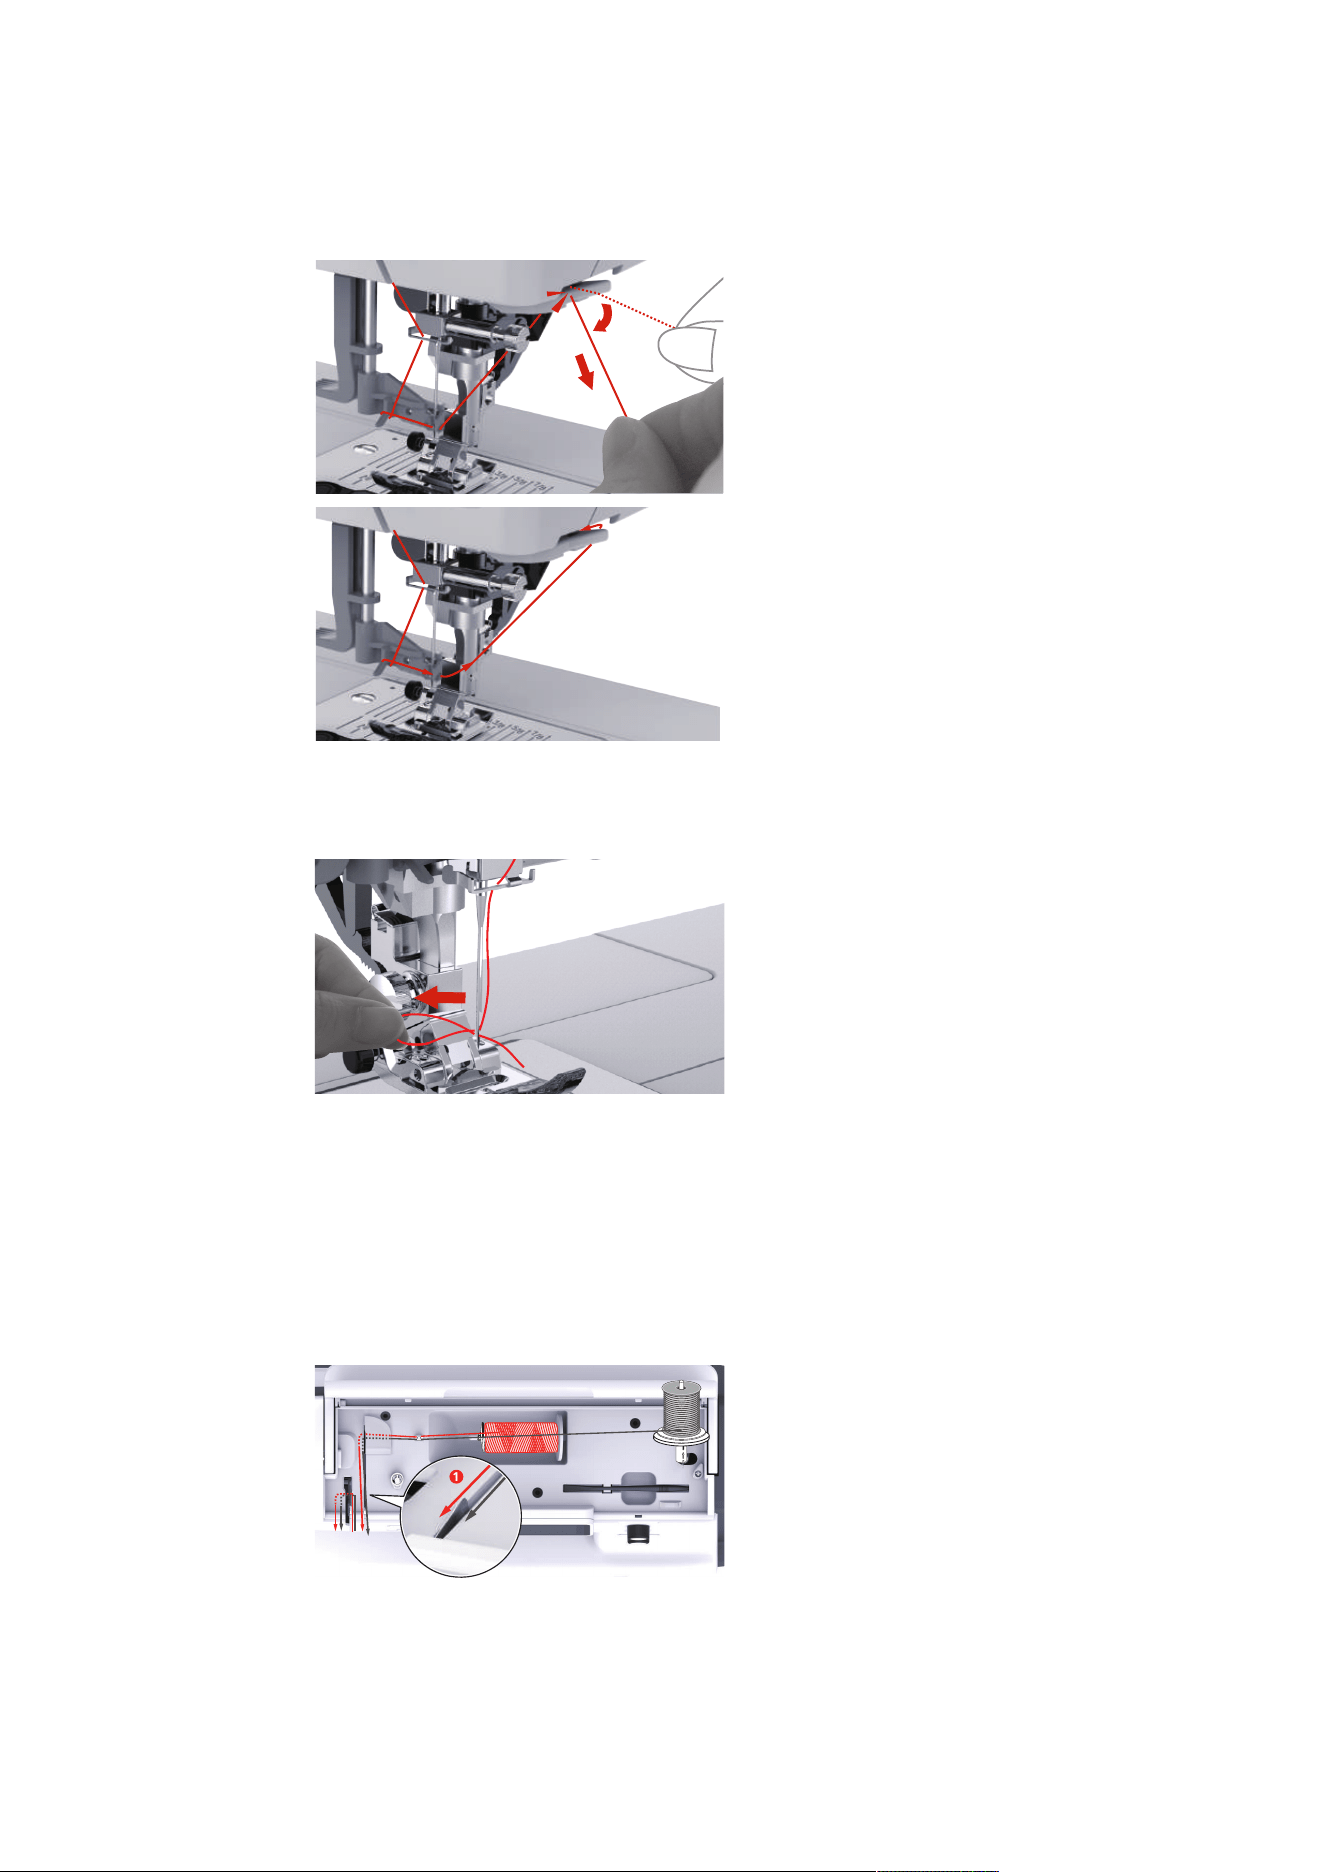
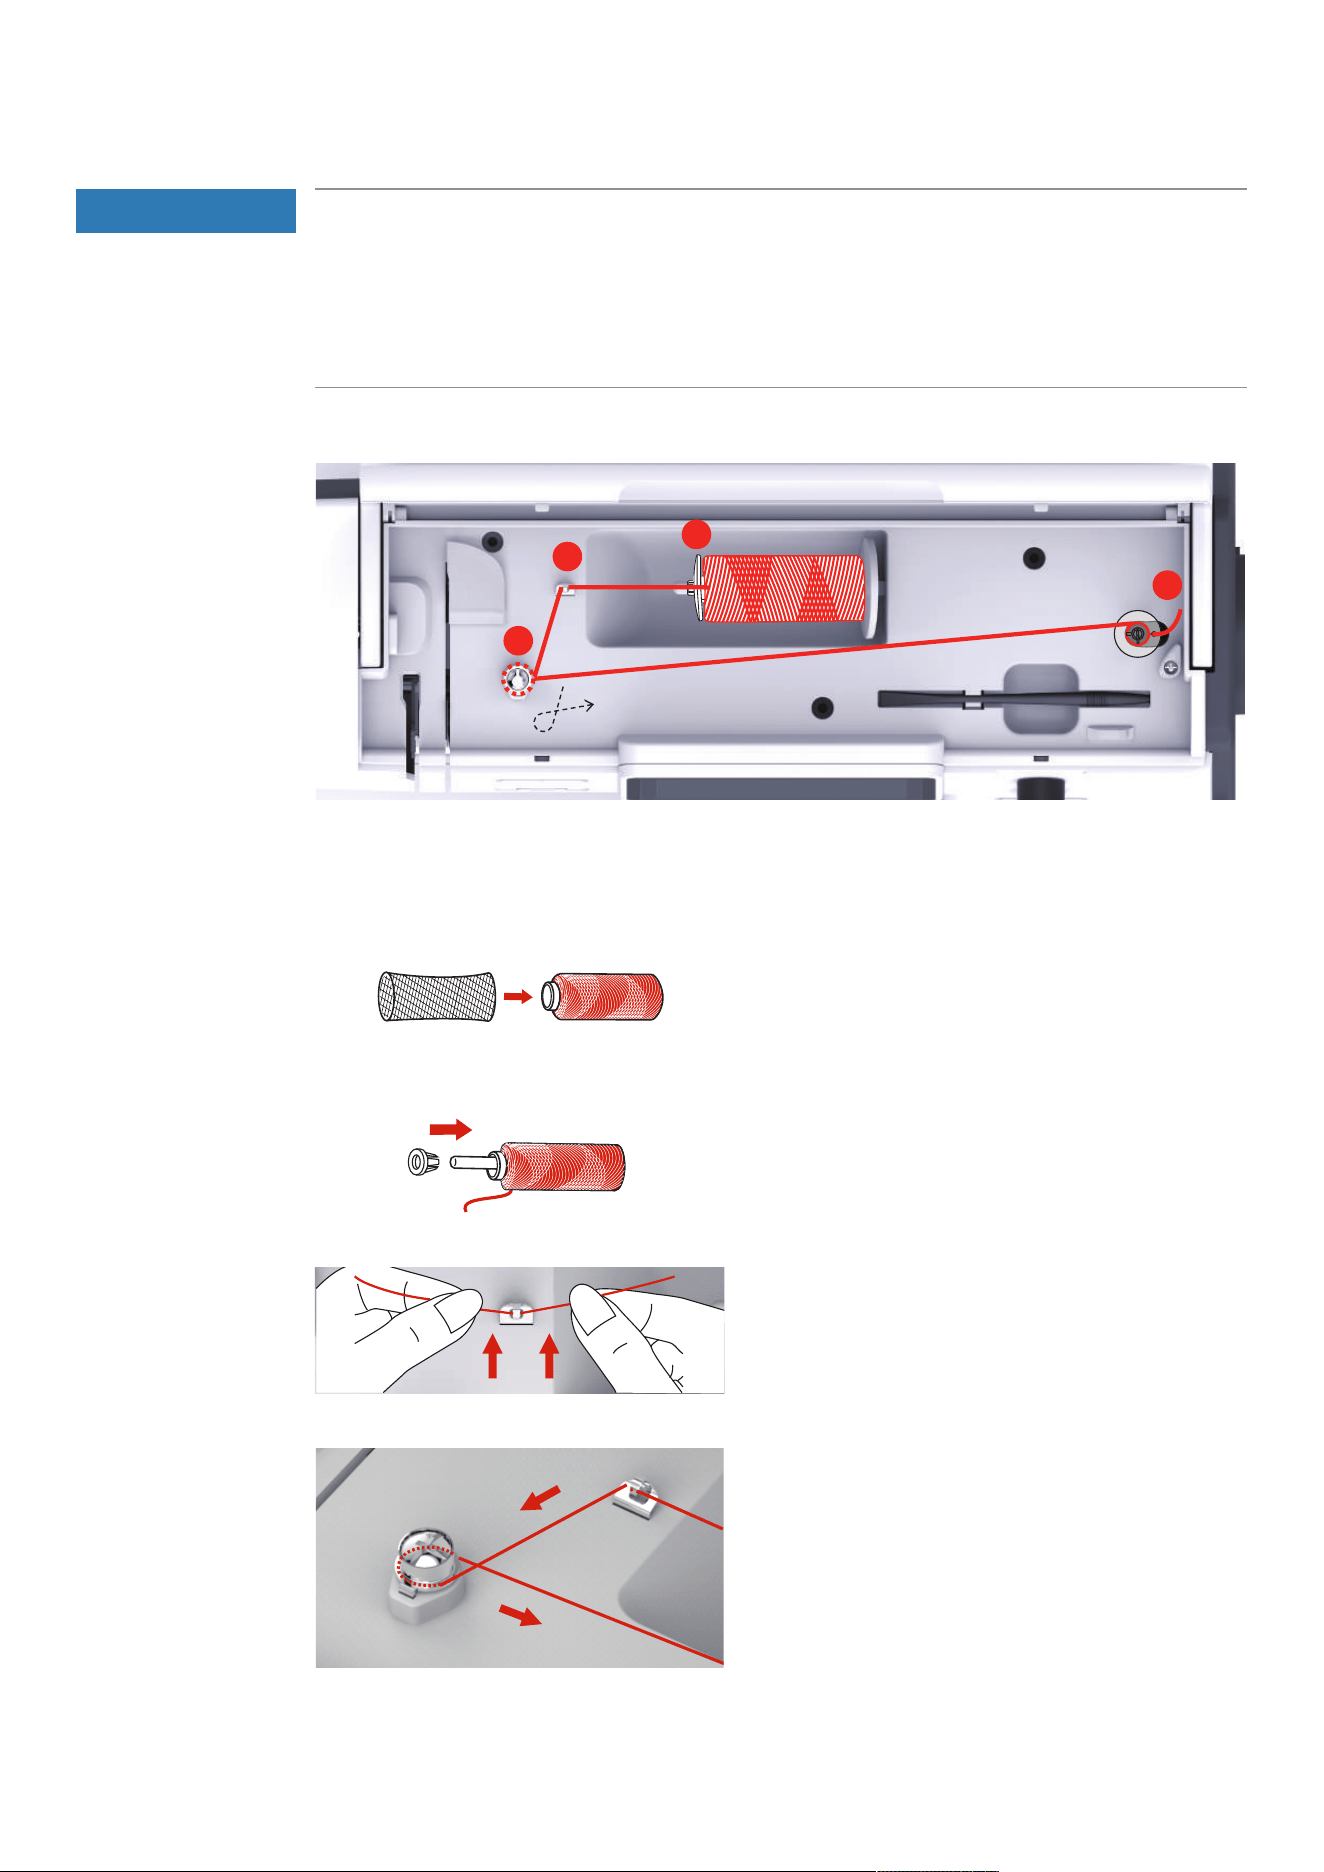
Threading the Upper Thread
1
2
4
6
3
5
6
9 10
12
11
7
8
∼
1 Spool Cap 7 Guide
2 Thread Guide 8 Guide
3 Thread Pretension 9 Thread Lever
4 Thread Tensions Discs 10 Wire Hook
5 Thread Take-up Lever Cover 11 Thread Cutter
6 Thread Take-up Lever 12 Thread
Sewing Preparation
38
2023-06 EN 5020079.40A.04
> Place the thread spool on the spool pin so that the thread unwinds clockwise.
> Fit the spool cap suitable for the spool.
> Feed the thread through the thread guide.
> Guide the thread through the thread pretension.
> Place the end of the thread down along the duct.
> Guide the htread downwards around the thread take-up lever cover.
Sewing Preparation
39
2023-06 EN 5020079.40A.04
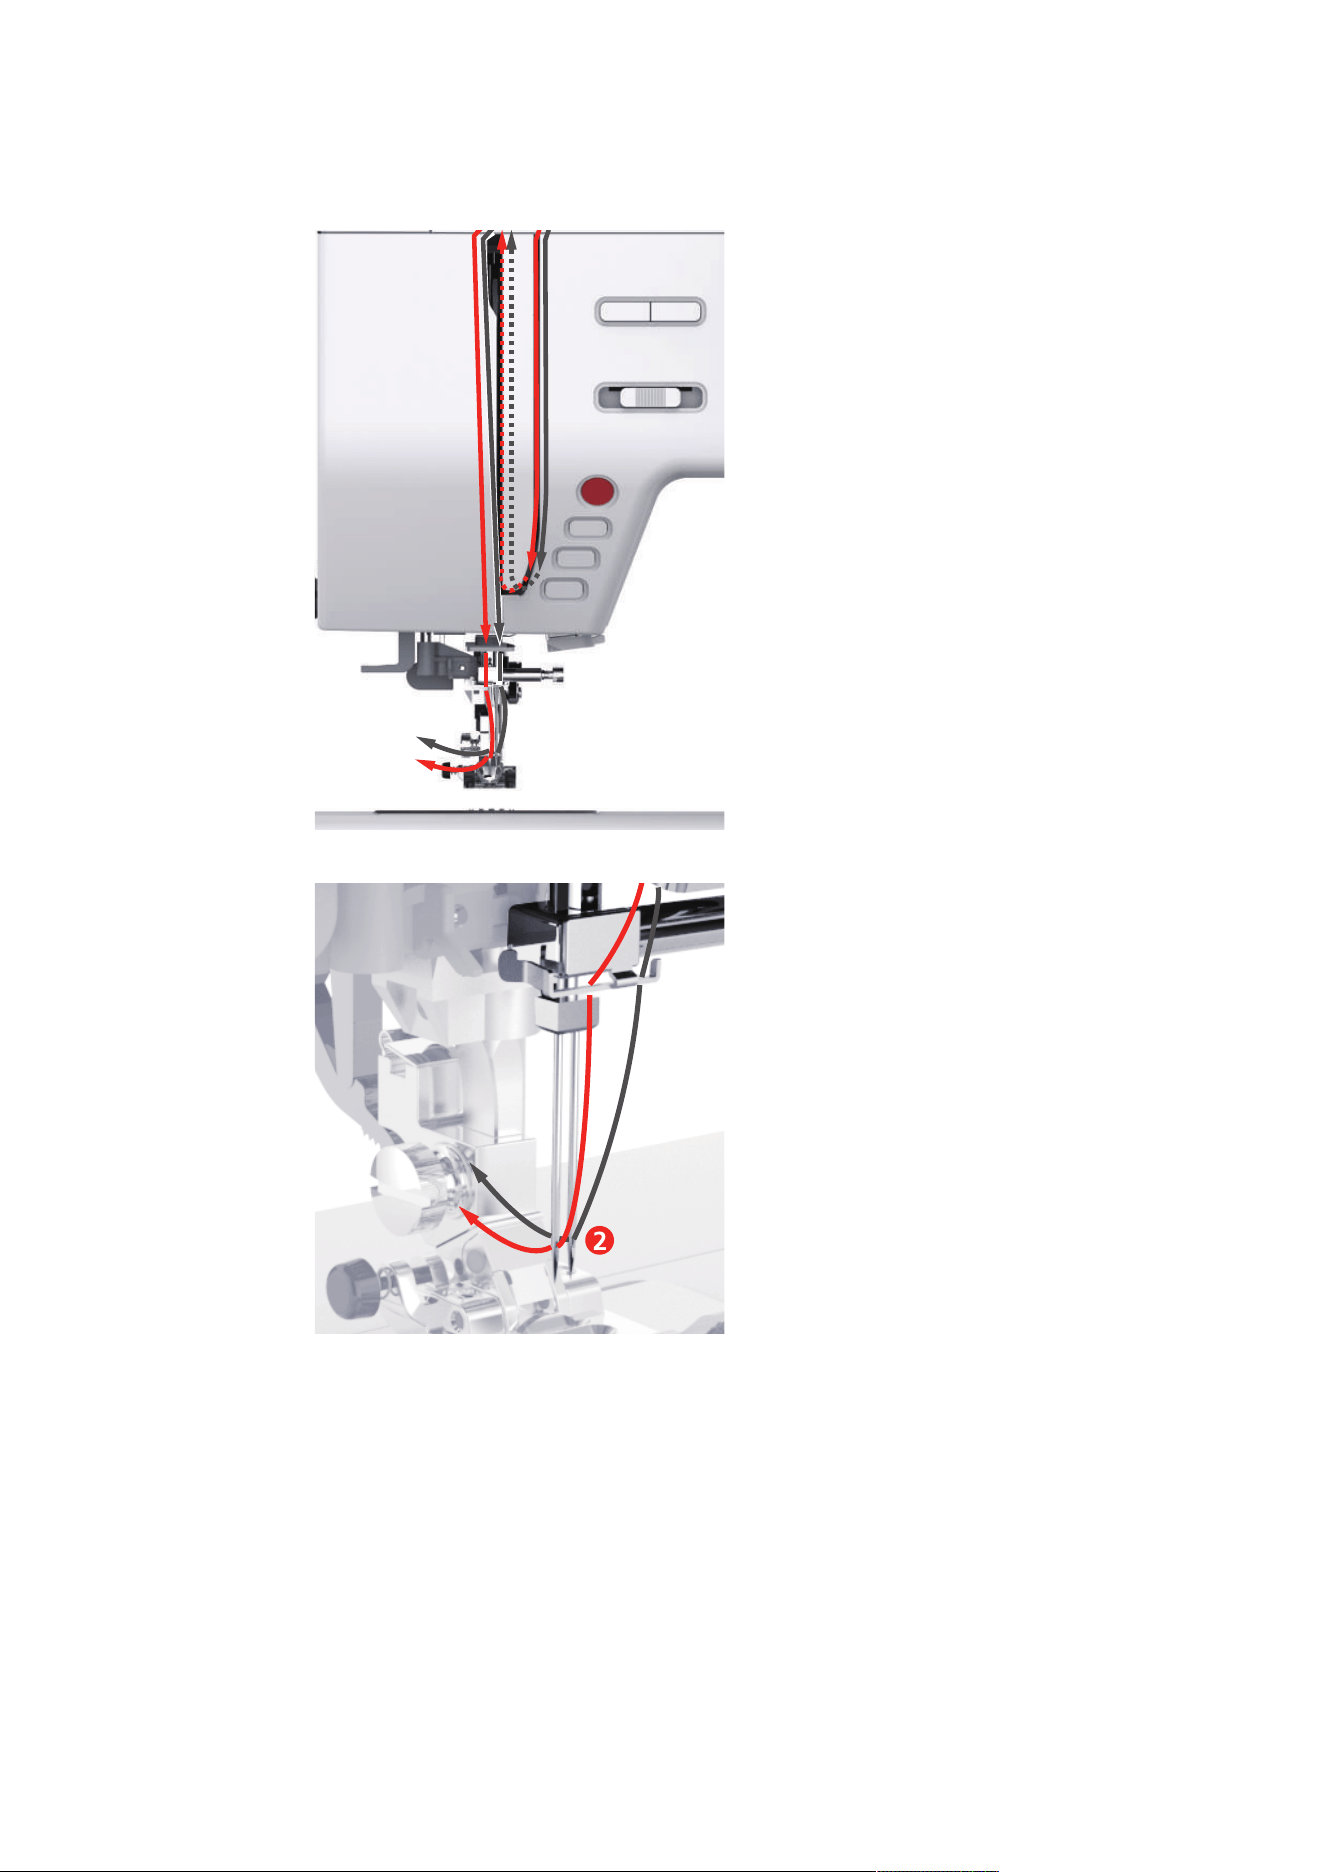
> Guide the thread at the top from rigth to the left through the thread take-up lever and then down again.
> Guide the thread through the guides above the needle.
> Lower the presser foot.
> Press the threading lever down until it clicks into place.
– The wire hook goeas through the eye of the needle.
– To prevent damage to the threader, the presser foot is lowered automatically.
> Feed the thread around the thread guide.
> Guide the thread in front of the needle and underneath the wire hook and hold it.
Sewing Preparation
40
2023-06 EN 5020079.40A.04
> To cut off excess thread, take the thread end and carefully pull it over the thread cutter. Please Note:
Use the right thread cutter only when threading.
> To thread the needle, lift the needle-threading lever. Keep the thread loose when doing so.
– The wire hook moves backwards and pulls the thread through the needle eye into a loop.
> Pull the thread completely through the eye of the needle.
Threading the Twin Needle
Prerequisite:
• The zigzag foot is fitted.
• The twin needle is inserted.
• The second spool pin, felt disc and second spool are fitted.
> Guide the thread from the horizontal spool pin (red) in the direction of the arrow to the left side of the
thread tension disc (1).
1
Sewing Preparation
41
2023-06 EN 5020079.40A.04
> Guide the thread to the thread guide above the needle.
> Thread the thread into the left needle manually.
2
> Guide the thread from the vertical spool pin (blue) in the direction of the arrow to the right side of the
thread tension disc (1).
> Guide the thread to the thread guide above the needle.
> Thread the thread into the right needle manually.
Sewing Preparation
42
2023-06 EN 5020079.40A.04
NOTICE
Needle Breakage Caused by Incorrect Presser Foot, Stitch or Needle Position
If the presser foot, stitch or needle position is incorrect, the needle can collide with the presser foot or stitch
plate and break.
> Fit the zigzag foot.
> Set a straight stitch.
> Set the needle to the center position.
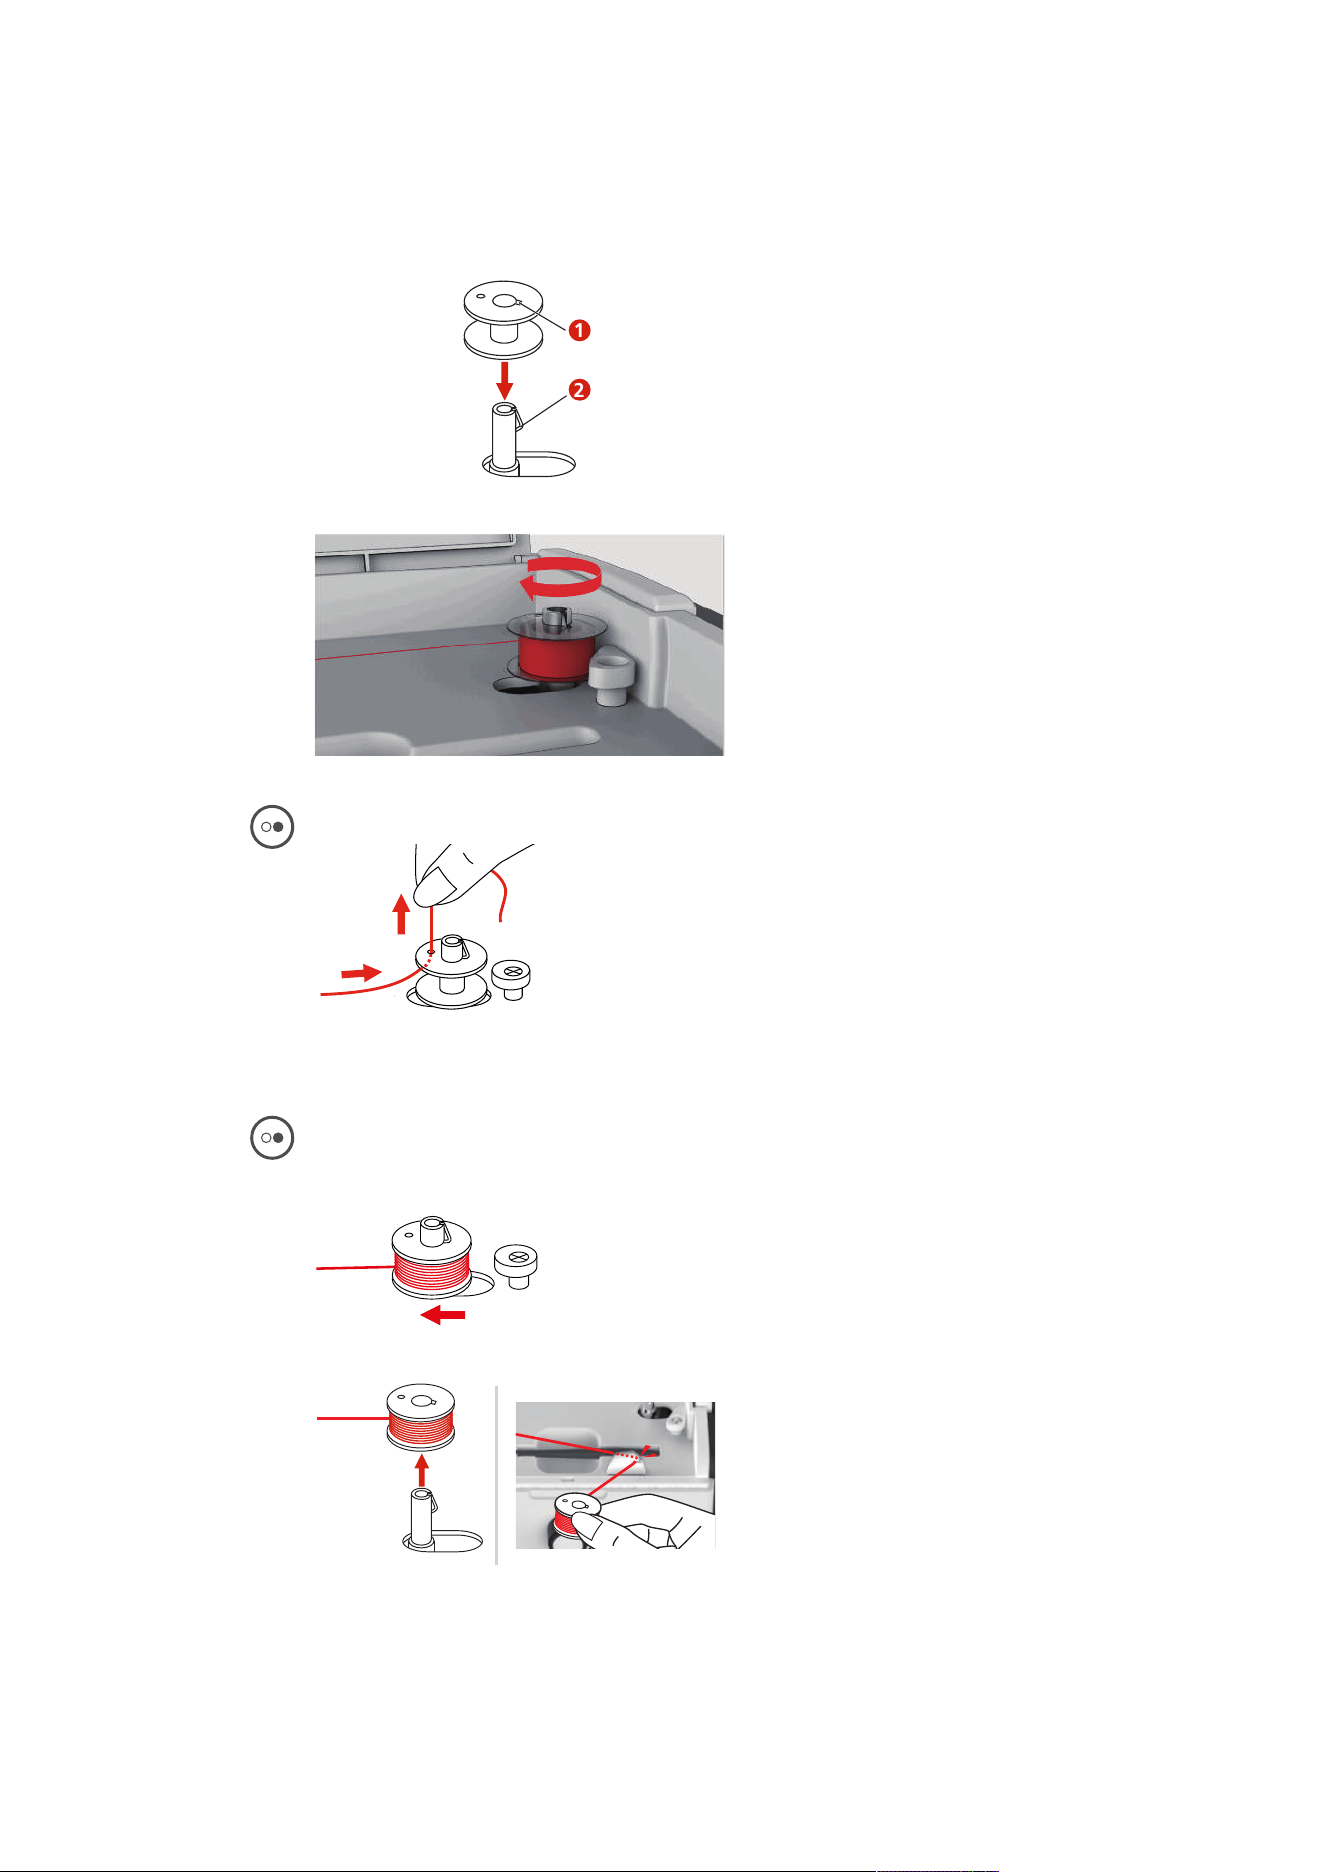
Winding the Bobbin Thread
1
2
4
3
1 Spool Cap 3 Bobbin Winder Pretension
2 Thread Guide 4 Spool Pin
> To prevent slippery threads from catching or breaking, pull the spool net over the spool.
> Place the thread spool and the appropriate spool cap on the spool holder. Use the small spool cap on the
spool holder.
> Feed the thread through the thread guide.
> Guide the thread around the bobbin winder pre-tension in the direction of the arrow.
Sewing Preparation
43
2023-06 EN 5020079.40A.04
> Pull the end of the thread through one of the inner holes on the bobbin and place the empty bobbin on
the bobbin winding unit.
1
2
> Push the bobbin to the rigth-hand position.
– The button «Start/Stop» flashes and the display for winding appears.
> Hold the end of the thread tightly with one hand.
> To start the winding process for a few rotations and then stop, push the button «Start/Stop», so that the
thread is held tight on the bobbin.
> Cut the end of the thread above the inner hole.
> To continue the winding process, push the button «Start/Stop».
> To stop the winding process, push the button «Start/Stopp».
> Push the bobbin winding unit to the left into the starting position.
> Remove the bobbin and cut the thread.
Sewing Preparation
44
2023-06 EN 5020079.40A.04
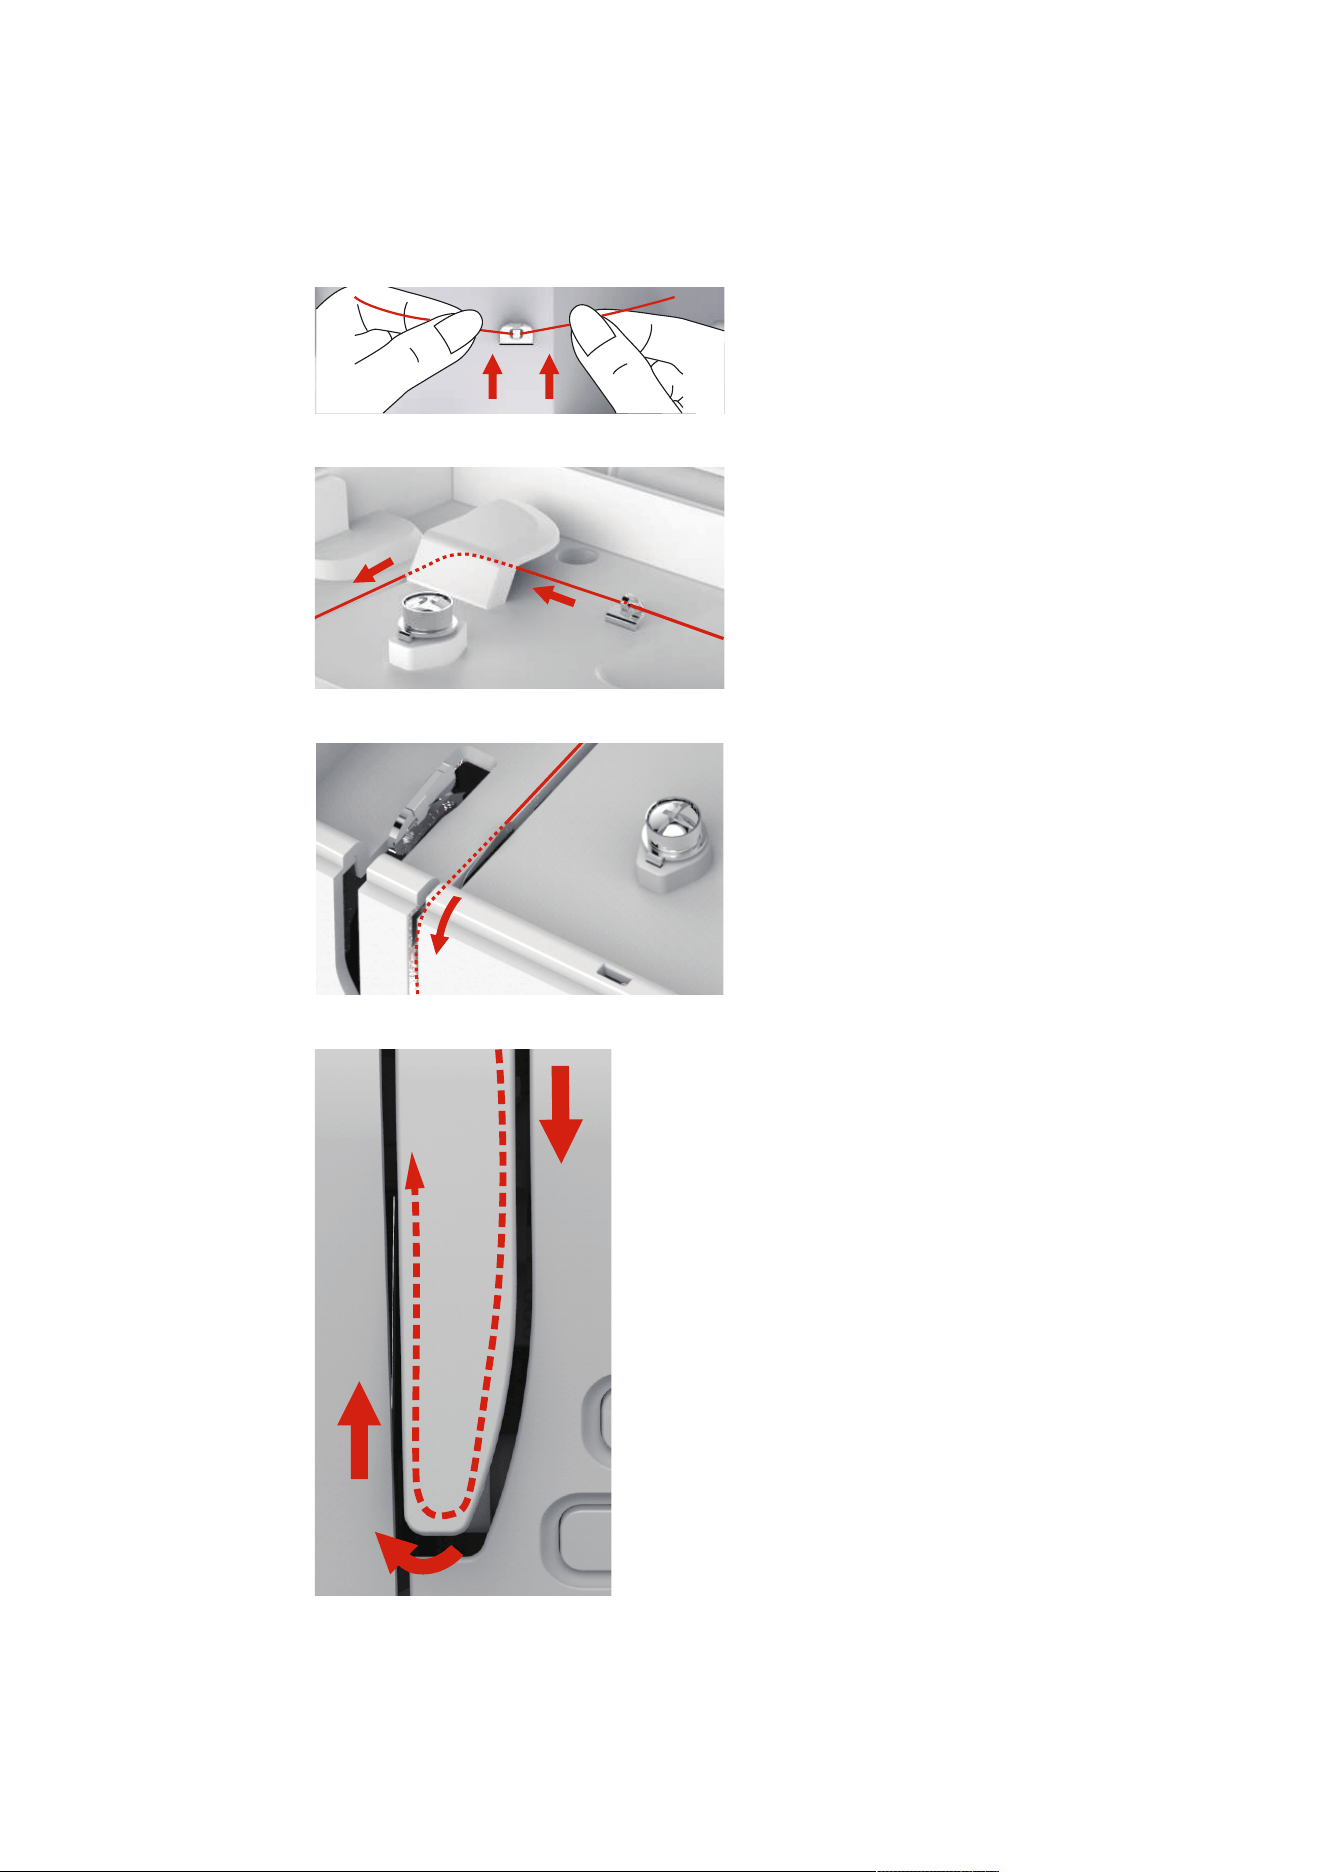
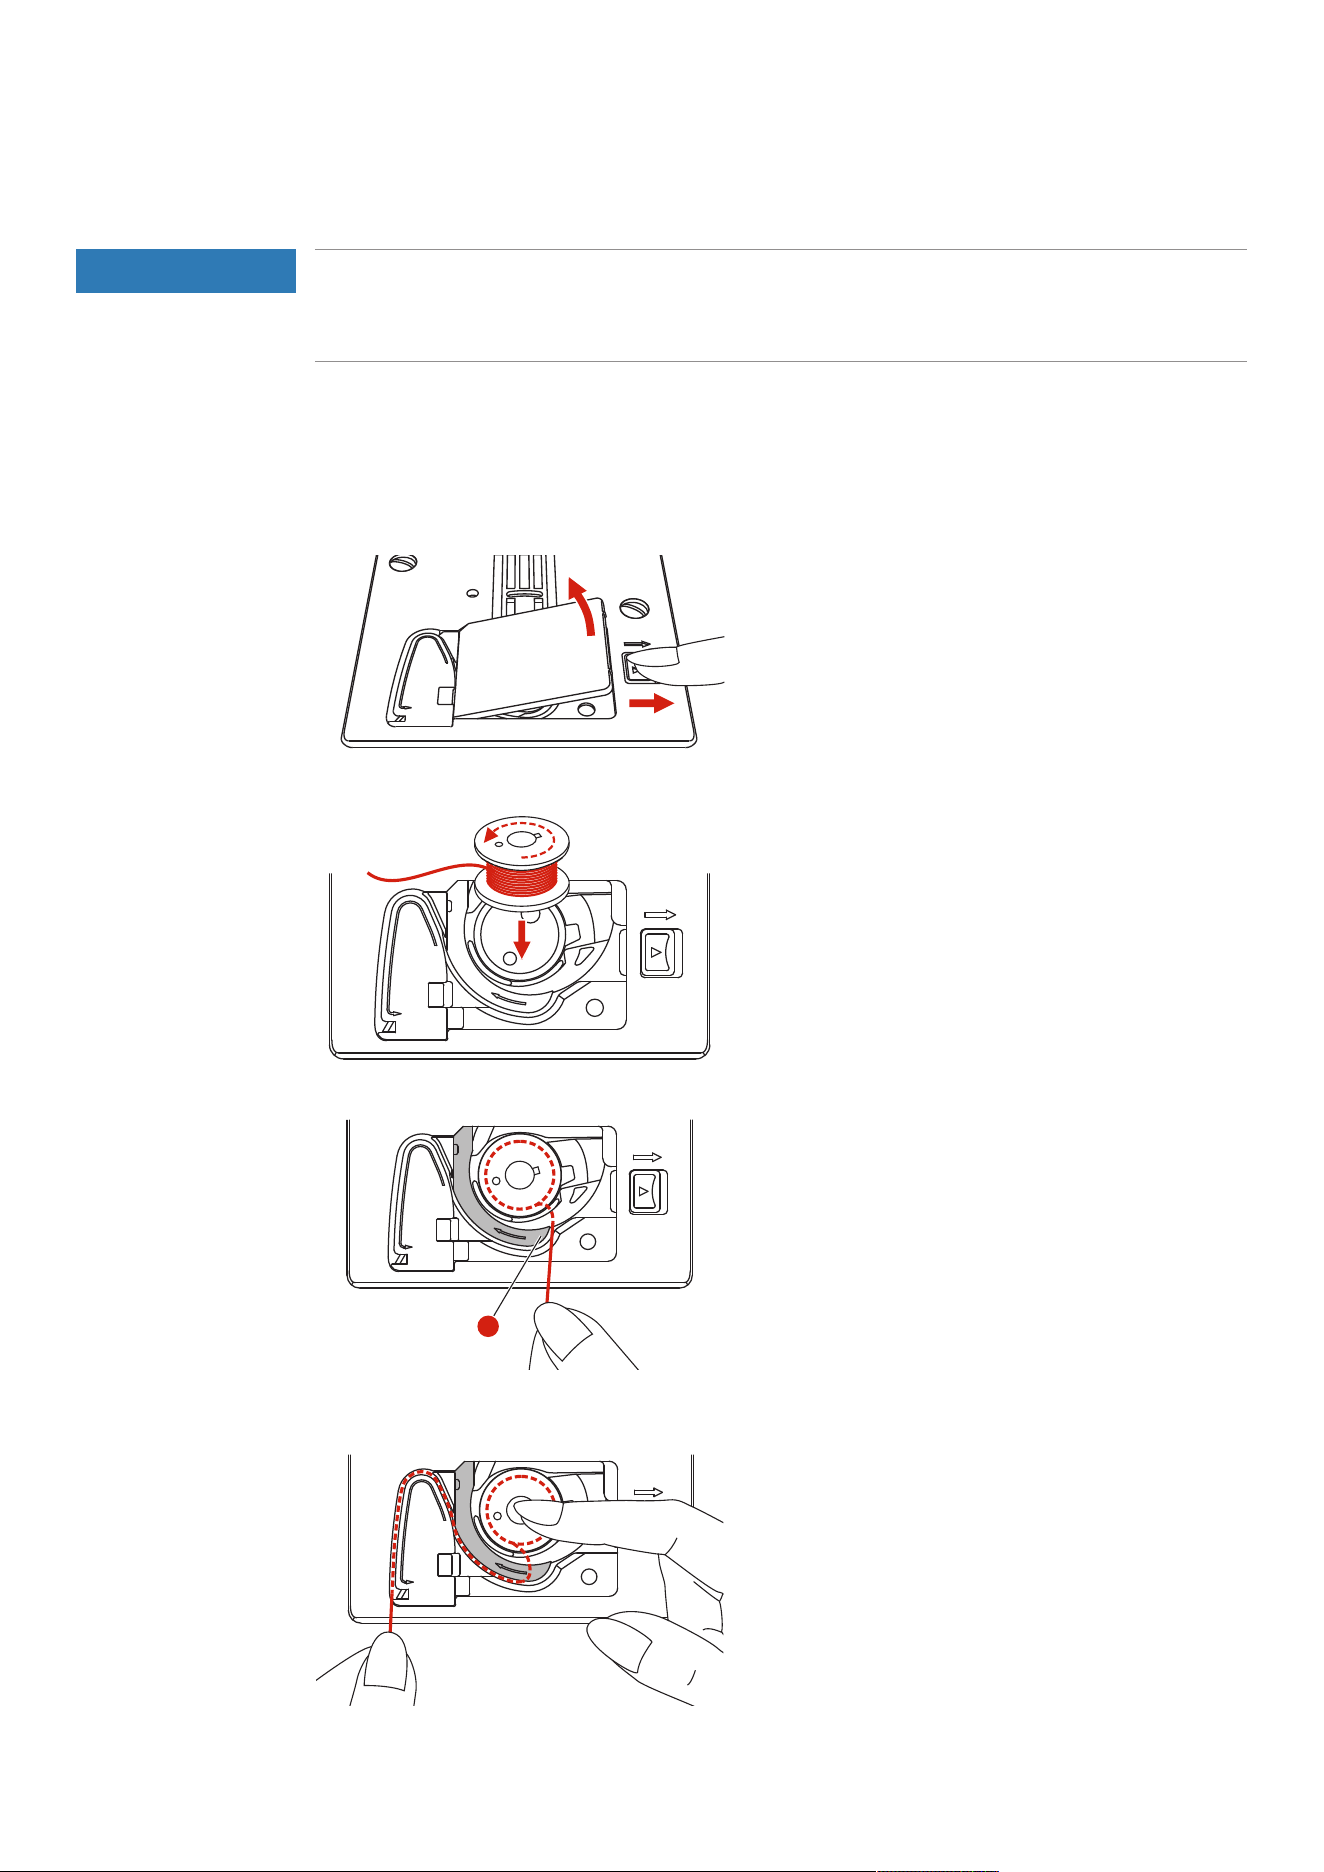
Threading the Bobbin Thread
NOTICE
Needle Breakage Caused by Unevenly Wound Bobbins
Unevenly wound bobbins can lead to incorrect thread tension or cause needles to break.
> Only use evenly wound bobbins.
Prerequisite:
• The needle is raised.
• The presser foot is raised.
• The machine is switched off.
> To open the bobbin cover, push the handle to the right and remove the bobbin cover.
> Insert a new bobbin so that the thread is wound anti-clockwise.
> Pull the thread into the slit (1).
1
> Press gently on the bobbin.
> Follow the arrow markings to bring the thread into the bobbin thread guide.

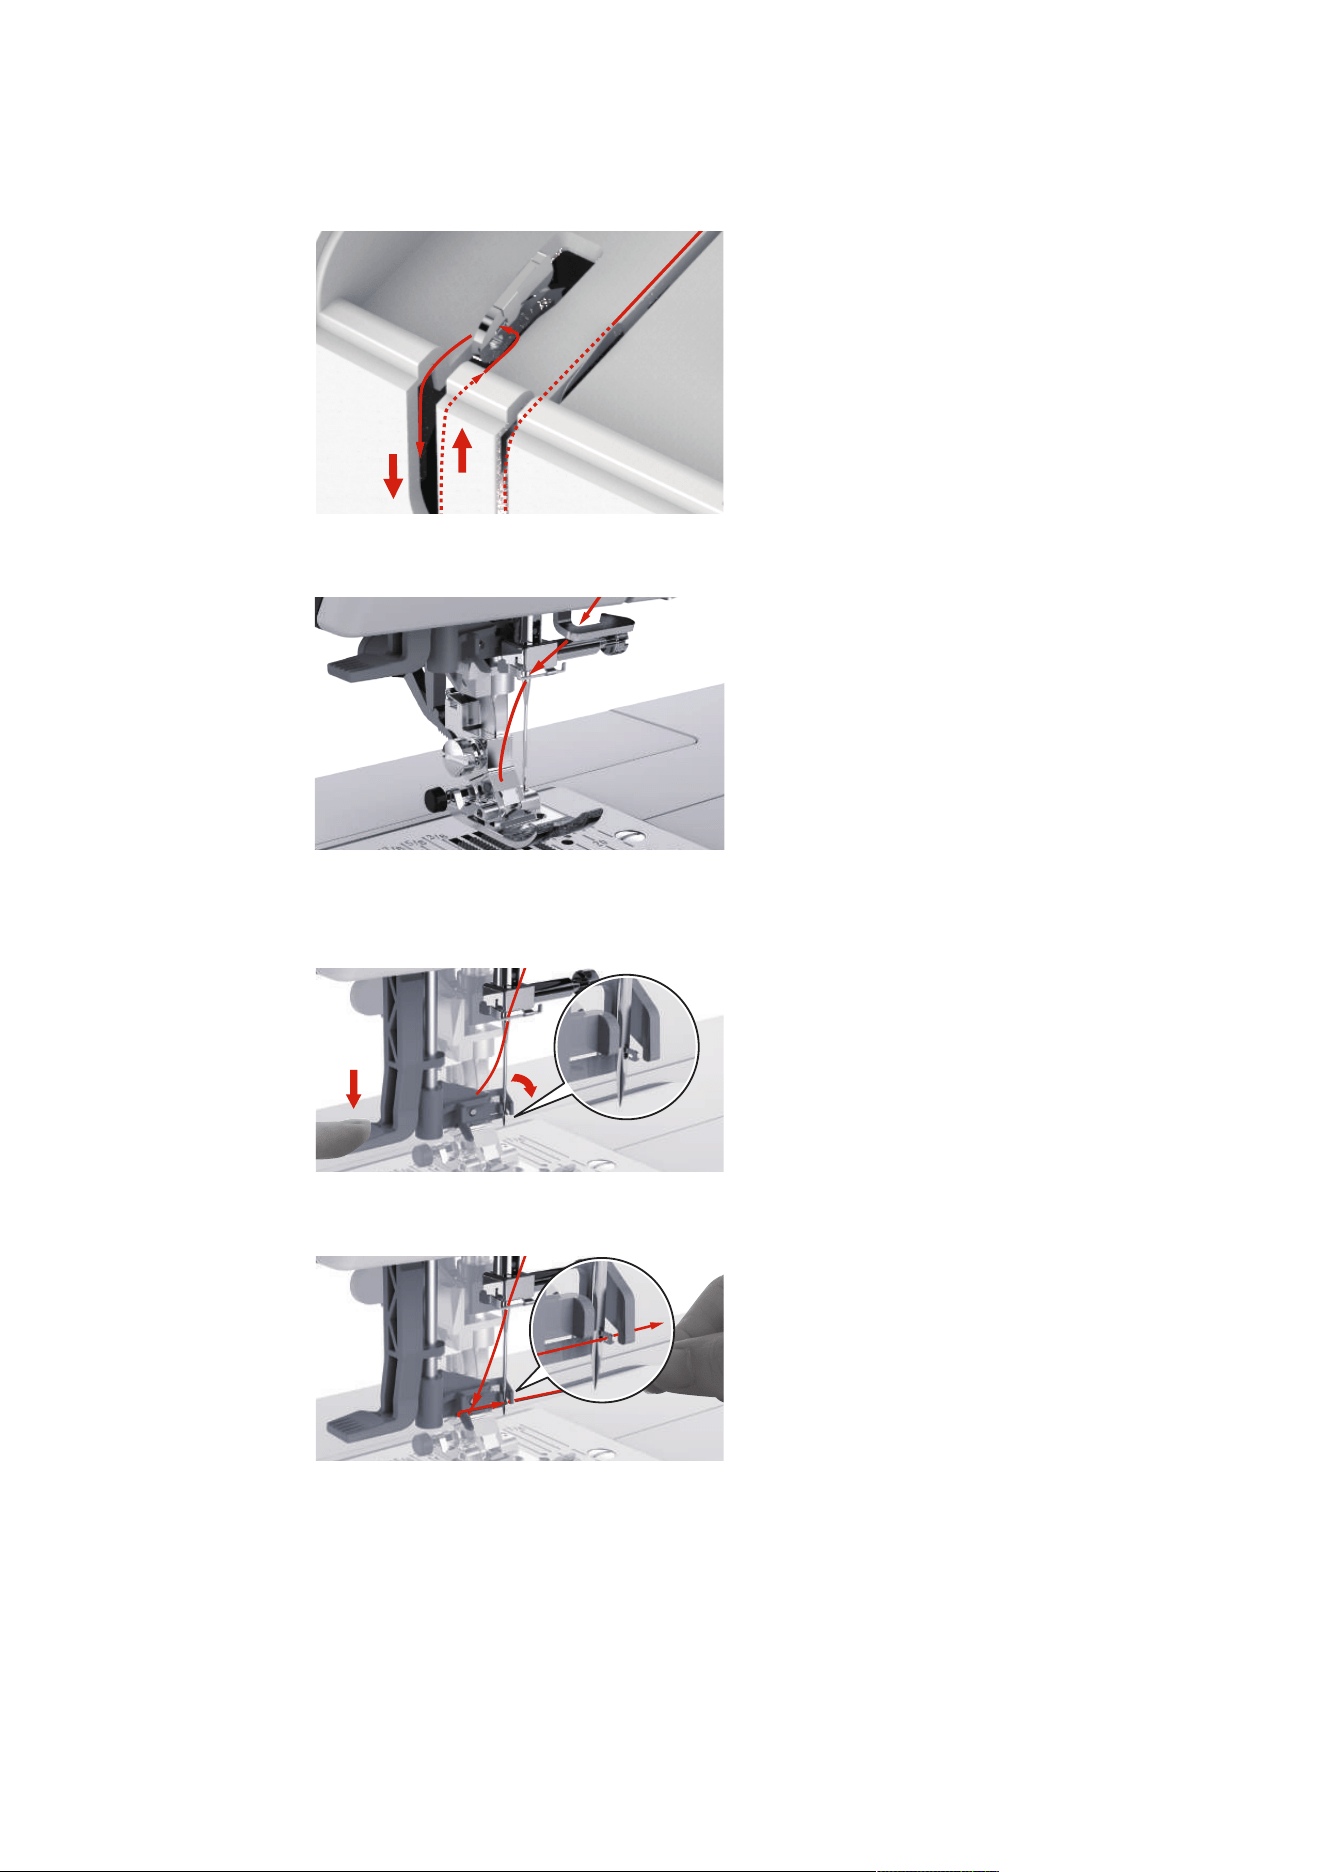
Sewing Preparation
45
2023-06 EN 5020079.40A.04
> To cut off excess thread, take the end of the thread and pull it over the thread cutter (2).
2
> Attach the bobbin cover.
Setup Program
46
2023-06 EN 5020079.40A.04
3 Setup Program
3.1 Sewing Settings
Adjusting the Upper Thread Tension
Changes to the upper thread tension in the Setup Program affect all of the stitch patterns. The setting in the
setup is retained after the machine is switched off.
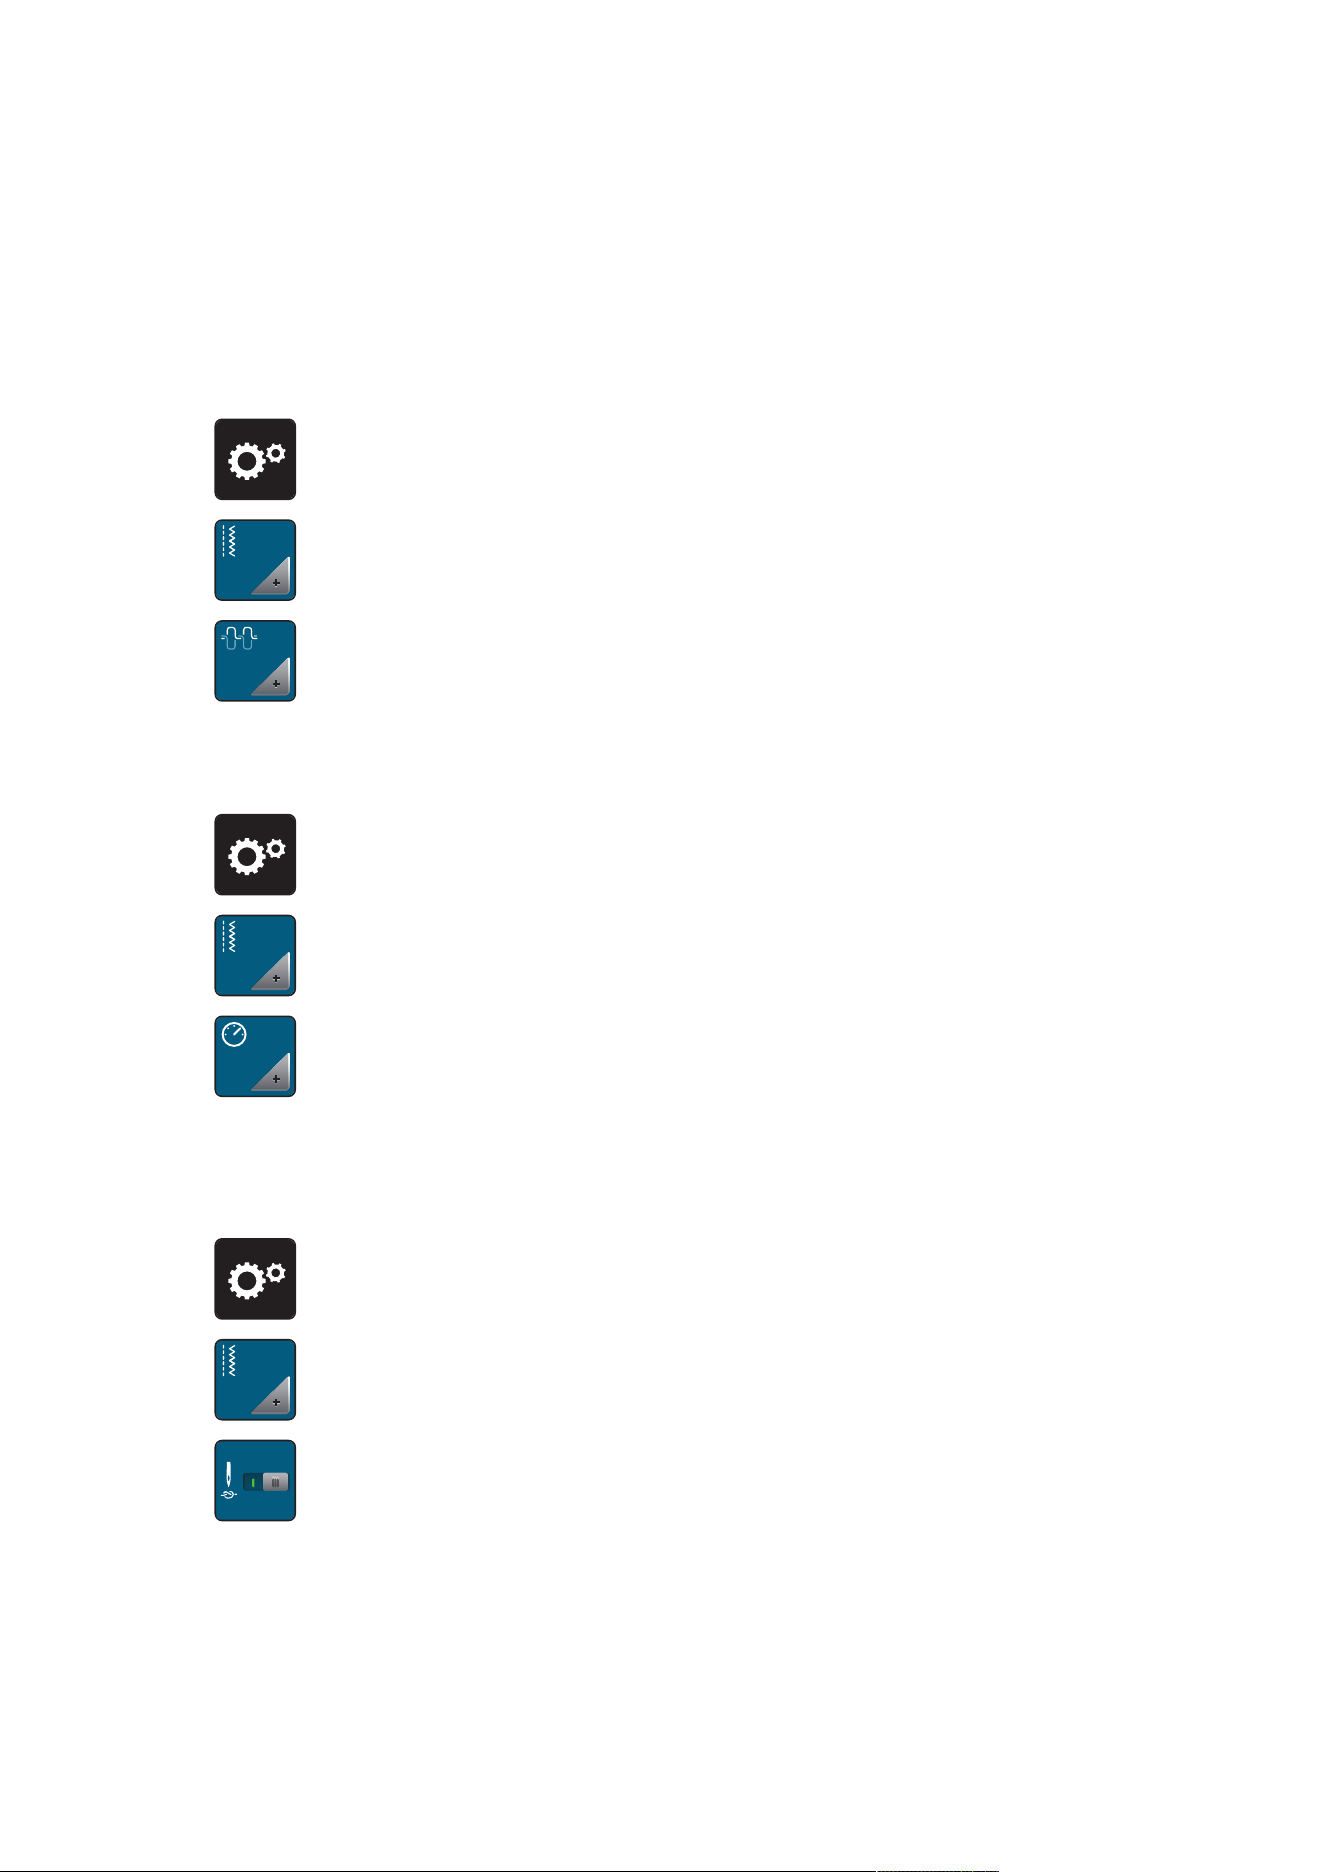
> Tap «Setup Program».
> Tap «Sewing Settings».
> Tap «Adjusting the Upper Thread Tension».
> Adjust the upper thread tension.
Adjusting the Maximum Sewing Speed
The maximum speed can be reduced by this function.
> Tap «Setup Program».
> Tap «Sewing Settings».
RPM
> Tap «Maximum Sewing Speed».
> Set the maximum sewing speed.
Programming Securing Stitches
If the function is switched on, at the start of the pattern, 4 securing stitches are automatically sewn after the
thread cut.
> Tap «Setup Program».
> Tap «Sewing Settings».
> Switch «Securing Stitches at the Start of the Pattern» on or off.
Setup Program
47
2023-06 EN 5020079.40A.04
Adjusting the Hovering Height of the Presser Foot
The hovering height of the presser foot can be adjusted according to the fabric thickness from 1 to maximal
6mm.
> Tap «Setup Program».
> Tap «Sewing Settings».
> Tap «Programming Buttons and Icons».
> Tap «Programming the Hovering Height of the Presser Foot».
> To set the distance between the stitch plate and the presser foot, turn the «Upper Multi-function Knob»
or «Lower Multi-function Knob», or tap «Plus»/«Minus».
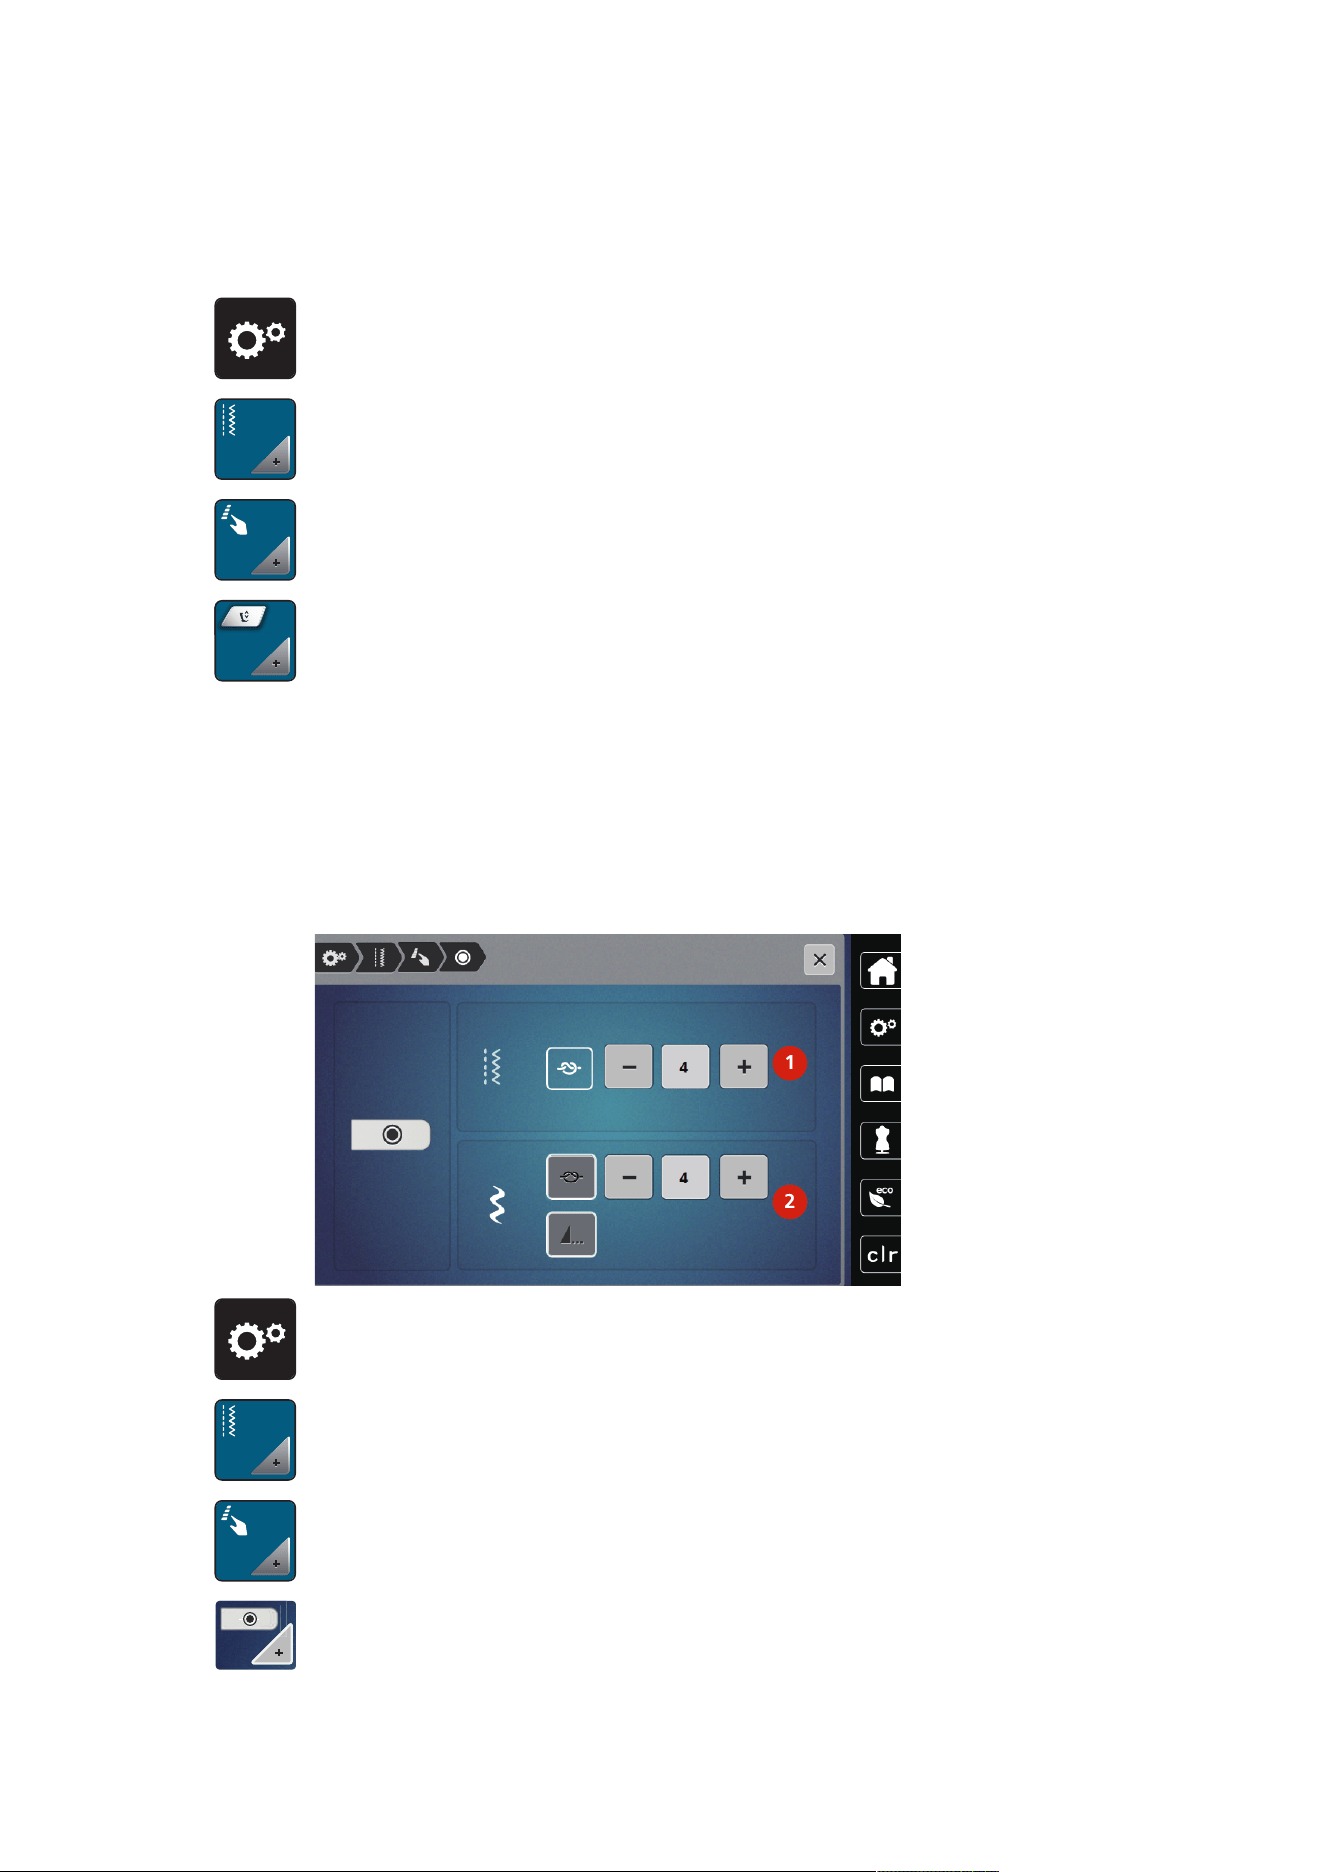
Programming the Button «Securing»
Number and type of securing stitches can be programmed.
The number of securing stitches for practical stitches can be programmed in the upper section of the
display (1).
Securing of decorative stitches or stitch pattern combinations can be programmed in the lower section of the
display (2).
1
2
> Tap «Setup Program».
> Tap «Sewing Settings».
> Tap «Programming Buttons and Icons».
> Tap «Programming the Button Securing».
> To program the number of securing stitches for practical stitches, tap «Plus» or «Minus» in the upper
section of the display (1).
Setup Program
48
2023-06 EN 5020079.40A.04
> To activate automatic securing for decorative stitches and stitch pattern combinations, tap «Securing
Stitches».
> To program the number of securing stitches at short intervals, tap «Plus» or «Minus» in the lower section
of the display (2).
> To deactivate automatic securing for decorative stitches and stitch pattern combinations, tap «Securing
Stitches» again.
> To activate securing for the selected pattern at the end, tap «Pattern End».
– The machine secures and stops at the end of the pattern.
> To deactivate securing at the end of the pattern, tap «Pattern End» again.
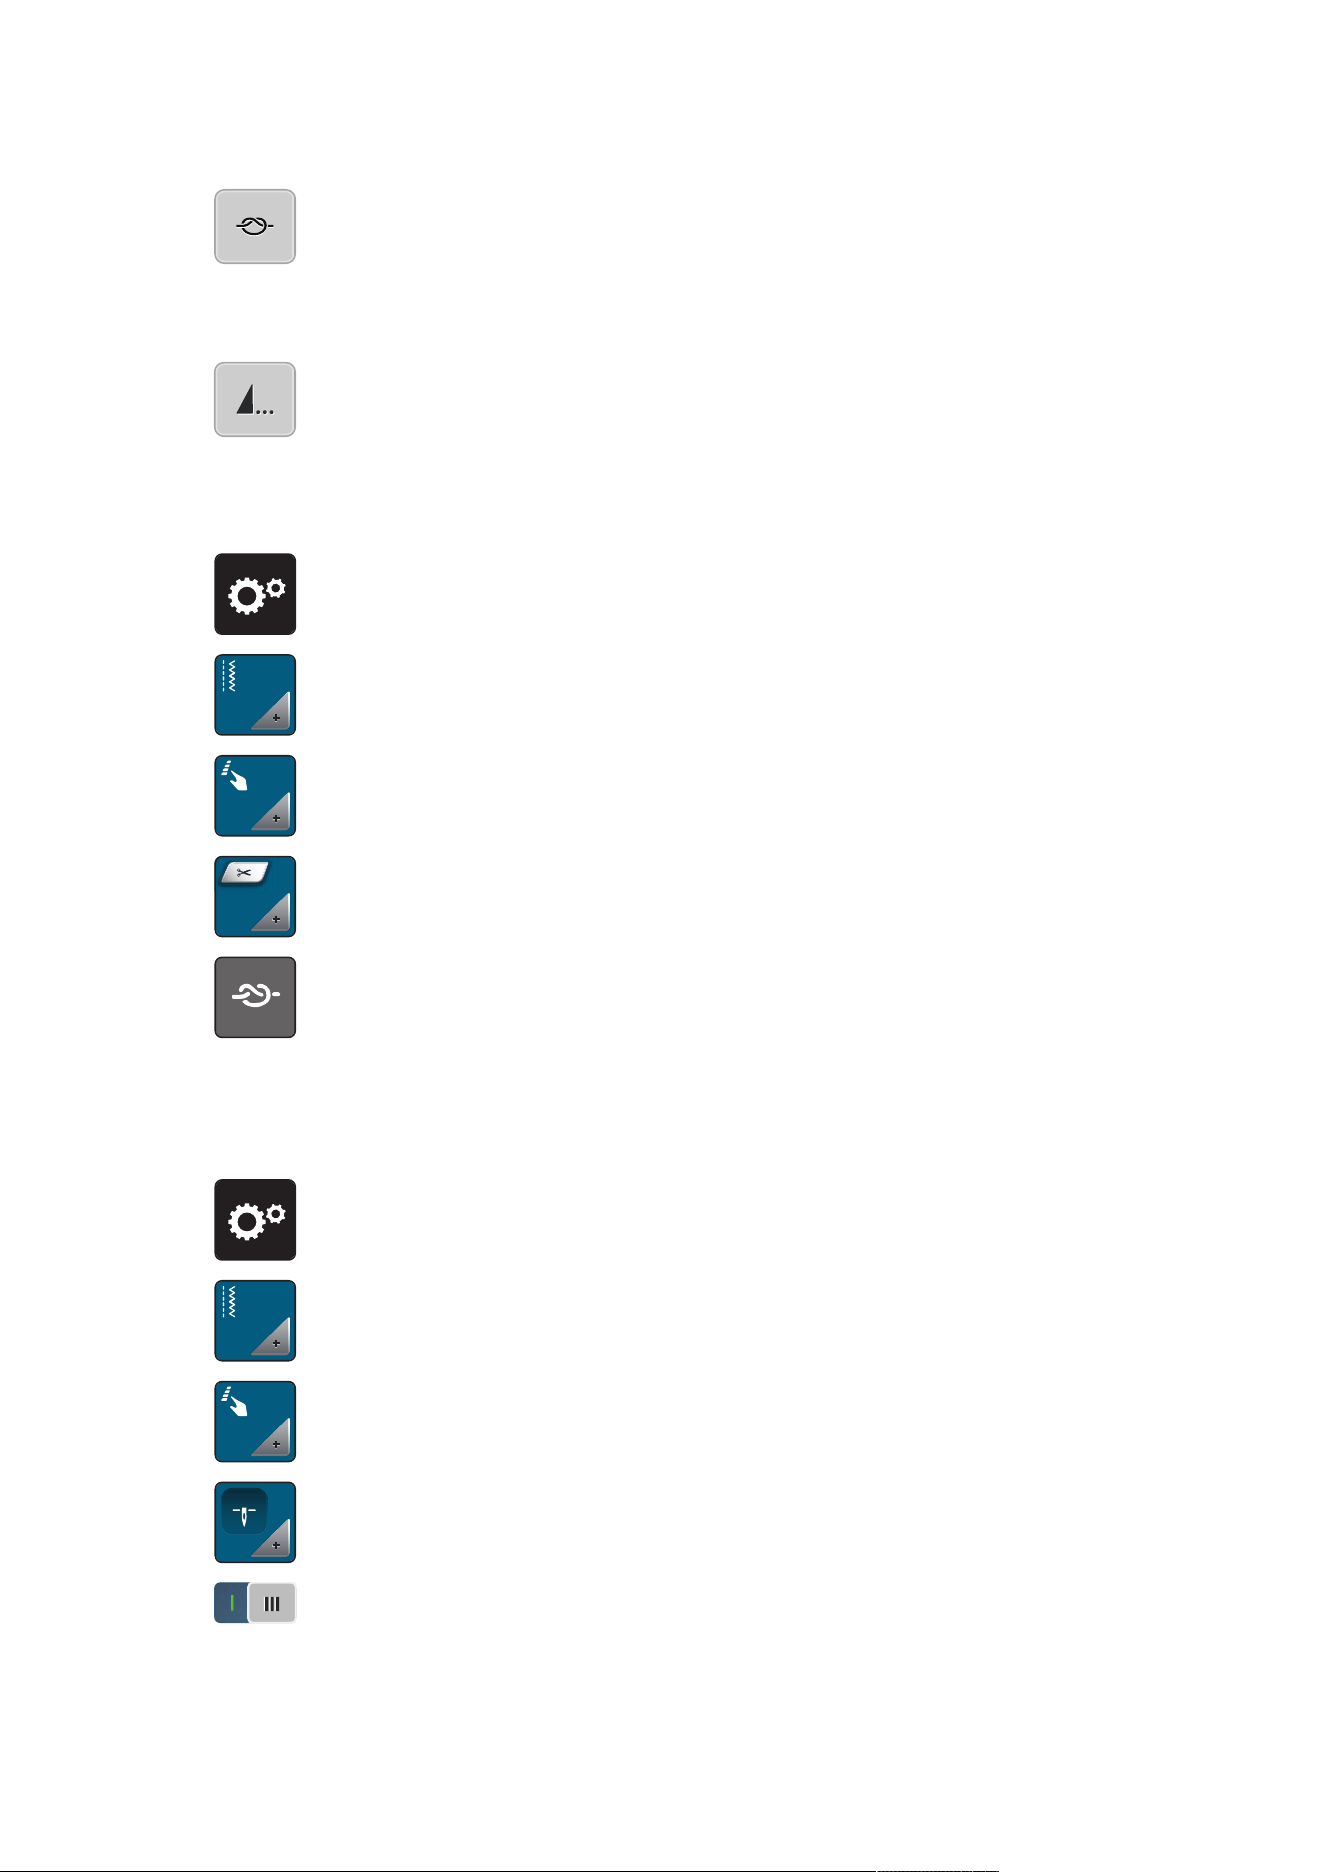
Programming the Button «Thread Cutter»
The automatic securing can be programed before the thread cut takes place.
> Tap «Setup Program».
> Tap «Sewing Settings».
> Tap «Programming Buttons and Icons».
> Tap «Programming the Button Thread Cutter».
> To sew four securing stitches before cutting, tap «Securing Stitches».
> To program the number of securing stitches, tap «Minus» or «Plus».
> To deactivate automatic securing, tap «Securing Stitches» again.
Adjusting the Presser Foot Position with Needle Stop Down
With lowered needle, the presser foot is raised to hovering position when the needle is programmed in the
down position.
> Tap «Setup Program».
> Tap «Sewing Settings».
> Tap «Programming Buttons and Icons».
> Tap «Pressure Foot Position with Needle Stop Down».
> To activate the presser foot raised in the hovering position with needle stop downward, tap the switch.
> To deactivate the presser foot raised in the hovering position with needle stop downward, tap the switch
again.
Setup Program
49
2023-06 EN 5020079.40A.04
Programming the Button «Quick Reverse»
You can choose between «Reverse Sewing» and «Stitch-specific Reverse Sewing».
> Tap «Setup Program».
> Tap «Sewing Settings».
> Tap «Programming Buttons and Icons».
> Tap «Programming the Button Quick Reverse».
> To activate stitch-precise reverse sewing, tap «Back Stepping».
> To activate reverse sewing, tap «Quick Reverse».
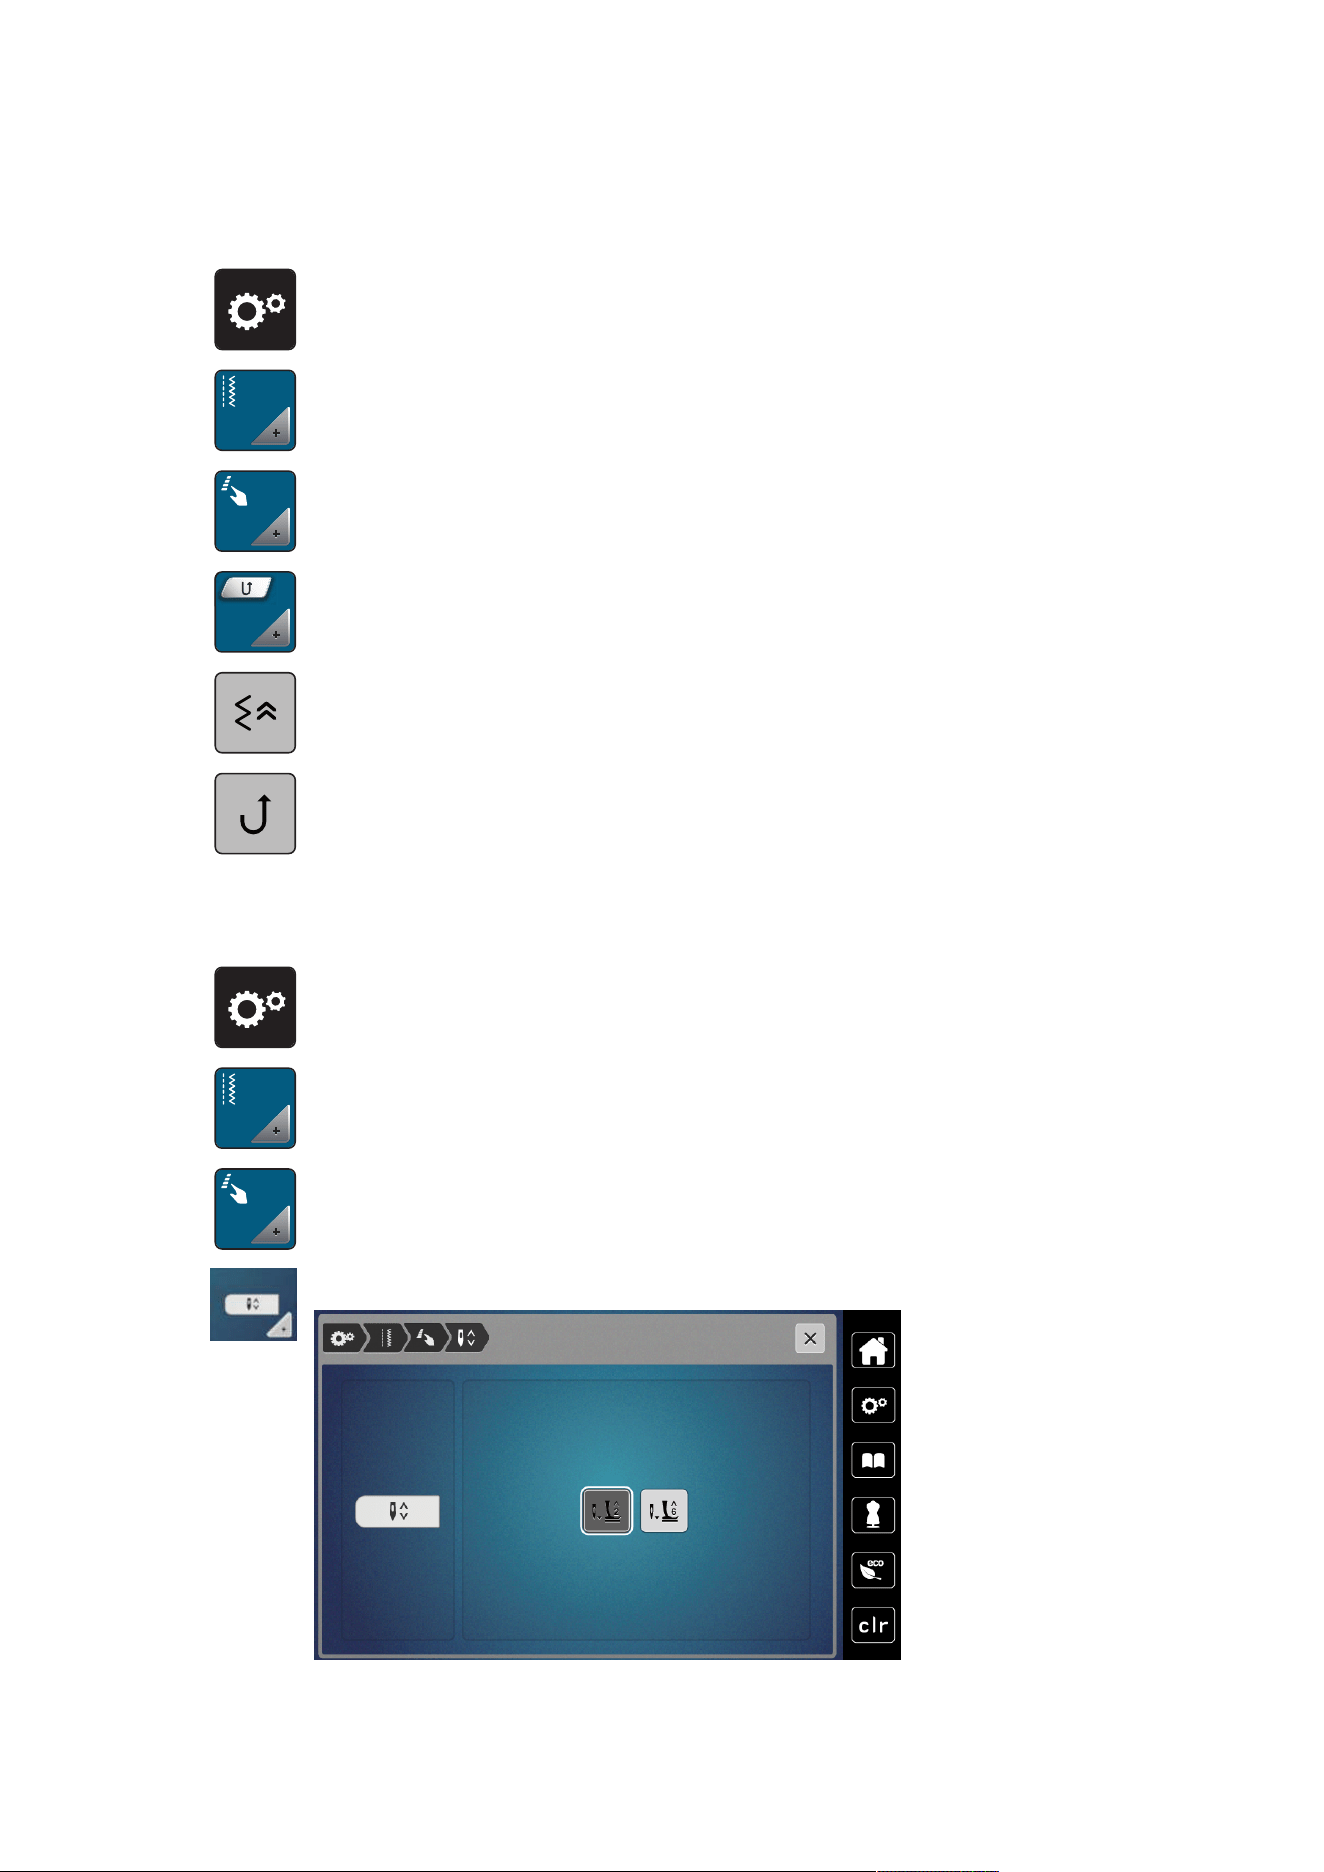
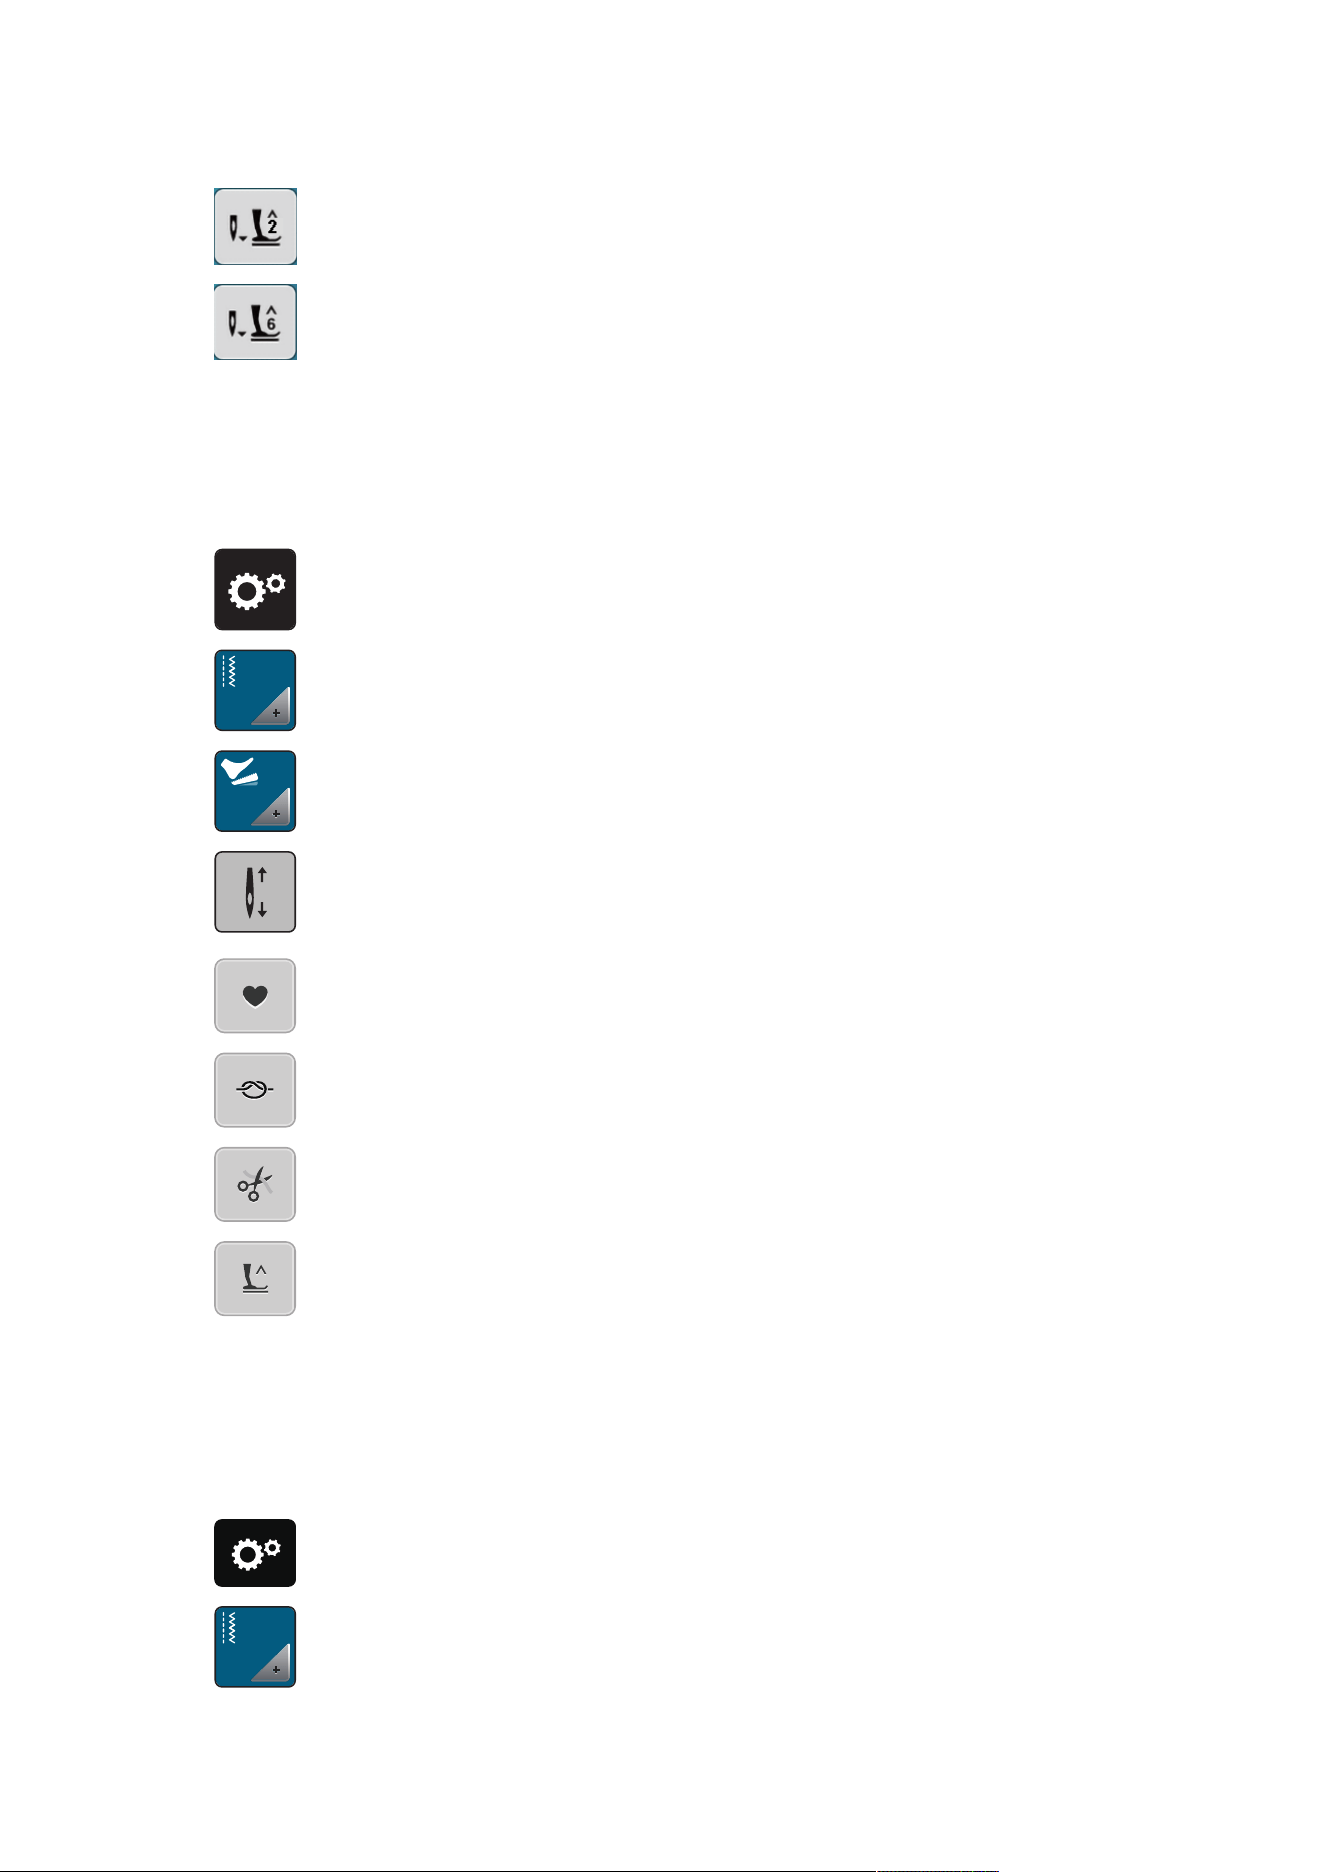
Programming the "Needle Up/Down" Button
The hovering height of the presser foot can be set for the sewing stop with the lower needle.
> Tap «Setup Program».
> Tap «Sewing Settings».
> Tap «Programming Buttons and Icons».
> Tap «Programming the Needle Up/Down Button».
Setup Program
50
2023-06 EN 5020079.40A.04
> To set the hovering height of the lower needle to 2mm, tap «Presser Foot Hovering Height 2».
> To set the hovering height of the lower needle to 6mm, tap «Presser Foot Hovering Height 6».
NOTICE!If the ruler foot is being used, the presser foot hovering height may be maximum 2mm,
in order to avoid a collision with the needle holder.
Programming the Foot Control Individually
If «Needle Up/Down» is activated, the needle is raised or lowered with the back-kick on the foot control.
Alternatively, the presser foot can be positioned, the thread can be cut and the automatic securing can be
programmed.
> Tap «Setup Program».
> Tap «Sewing Settings».
> Tap «Programming the Foot Control».
– «Needle Up/Down» is activated in the default setting.
– The back-kick on the foot control raises or lowers the needle.
51
> To program the Back-kick, tap «Programming the Back-kick».
> To activate automatic securing via the back-kick, tap «Securing Stitches».
> To program the number of securing stitches, tap «Plus» or «Minus».
> To deactivate automatic securing via the back-kick, tap «Securing Stitches» again.
51
> To activate automatic thread-cutting via the back-kick, tap «Automatic Thread Cutter».
> To deactivate automatic thread-cutting via the back-kick, tap «Automatic Thread Cutter» again.
51
> To keep the lowered position of the presser foot via the Back-kick, tap «Needle Up/Down».
> To keep the raised position of the presser foot via the Back-kick, tap «Needle Up/Down» again.
– If only «Needle Up/Down» without «Automatic Thread Cutter» and «Securing Stitches» is activated,
the function can move the presser foot into the hovering position or into the highest position (12
mm).
Fabric Thickness Measurement
While sewing, the machine continuously checks the current fabric thickness and adjusts a proper presser foot
pressure in time to keep a smooth feed of the fabric.
> Tap «Setup Program».
> Tap «Sewing Settings».
Setup Program
51
2023-06 EN 5020079.40A.04
> To activate the automatic foot pressure compensation, tap «Fabric Thickness Measurement».
> To deactivate the automatic foot pressure compensation, tap «Fabric Thickness Measurement» again.
Adjusting the General Balance
Different fabrics, threads and stabilizers can affect the programmed stitch patterns so that they cannot be
sewn out correctly. The electronic balance can correct these deviation and the stitch pattern can be adjusted
optimally to the selected fabric.
> Select a stitch pattern or alphabet.
> Tap «Setup Program».
> Tap «Sewing Settings».
> Tap «Balance».
– A preview of the stitch pattern is displayed.
> To correct the longitudinal direction of the stitch pattern, turn the «Multi-function Knob» until the
preview of the stitch pattern matches the stitch pattern sewn on the fabric.
3.2 Embroidery Settings
Adjusting the Upper Thread Tension
Changes to the upper thread tension in the Setup Program affect all of the embroidery designs.
> Tap «Setup Program».
> Tap «Embroidery Settings».
> Tap «Adjusting the Upper Thread Tension».
> Adjust the upper thread tension.
Adjusting the Maximum Embroidering Speed
The maximum speed can be reduced by this function.
> Tap «Setup Program».
> Tap «Embroidery Settings».
RPM
> Tap «Maximum Embroidery Speed».
> Set the maximum sewing speed.
Setup Program
52
2023-06 EN 5020079.40A.04
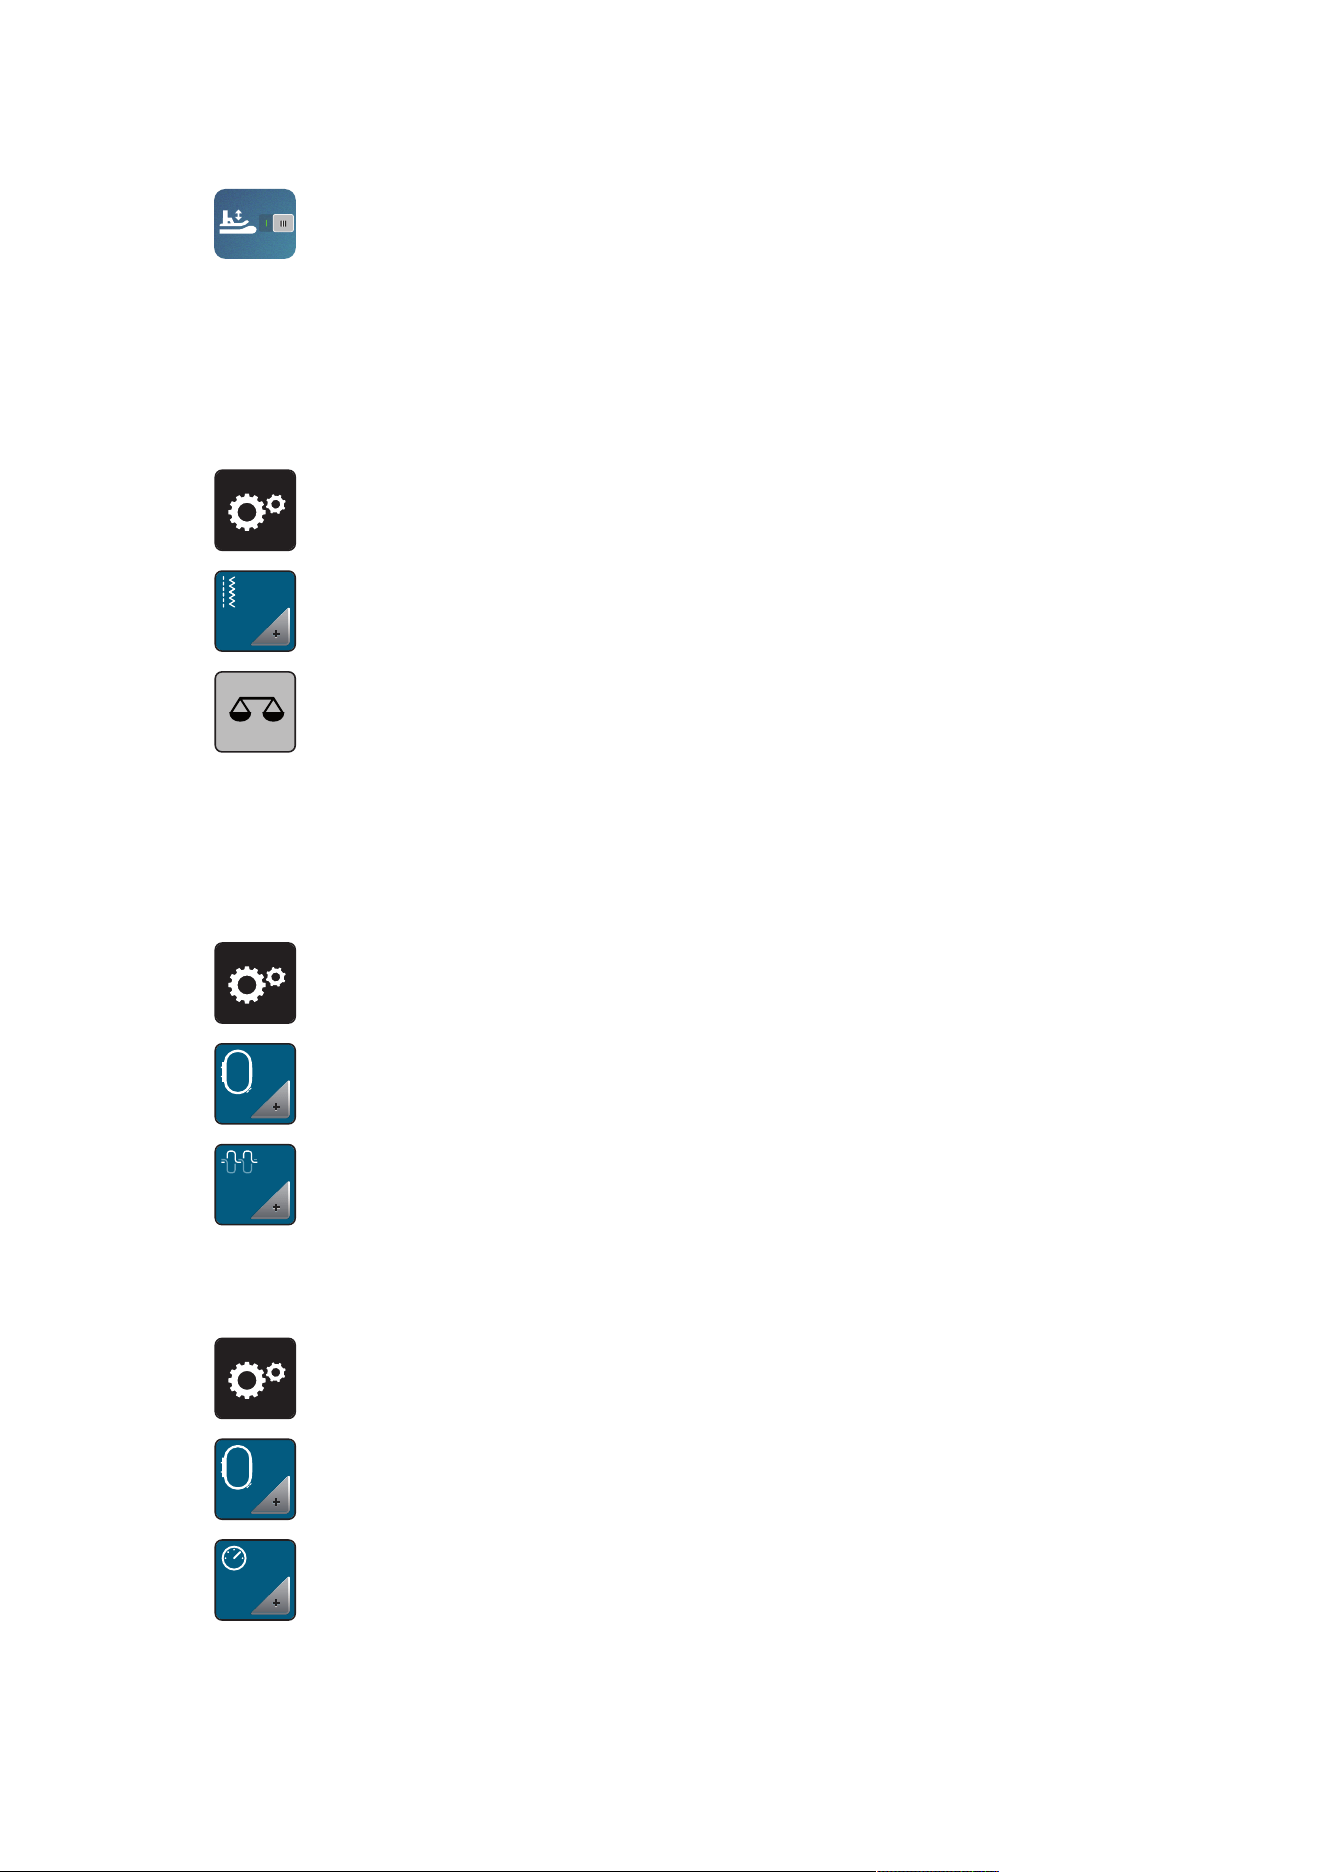
Calibrating the Embroidery Hoop
The calibration of the embroidery hoop is the coordination of the needle to the center of the embroidery
hoop.
Prerequisite:
• The embroidery module is connected and the embroidery hoop with the appropriate embroidery
template is attached.
> Tap «Setup Program».
> Tap «Embroidery Settings».
> Tap «Calibrating the Embroidery Hoop».
– The machine recognizes the size of the attached embroidery hoop automatically and moves to the
center of the hoop.
> Center the needle via the arrow icons on the display and confirm.
Deactivating Securing Stitches
> Tap «Setup Program».
> Tap «Embroidery Settings».
> Tap «Securing Stitches On/Off».
> Tap the switch in the lower left area to deactivate the securing stitches.
– No securing stitches will be sewn and the bobbin thread needs to be brought up manually and held
when embroidering is started.
> Tap the switch again to activate the securing stitches.
Setup Program
53
2023-06 EN 5020079.40A.04
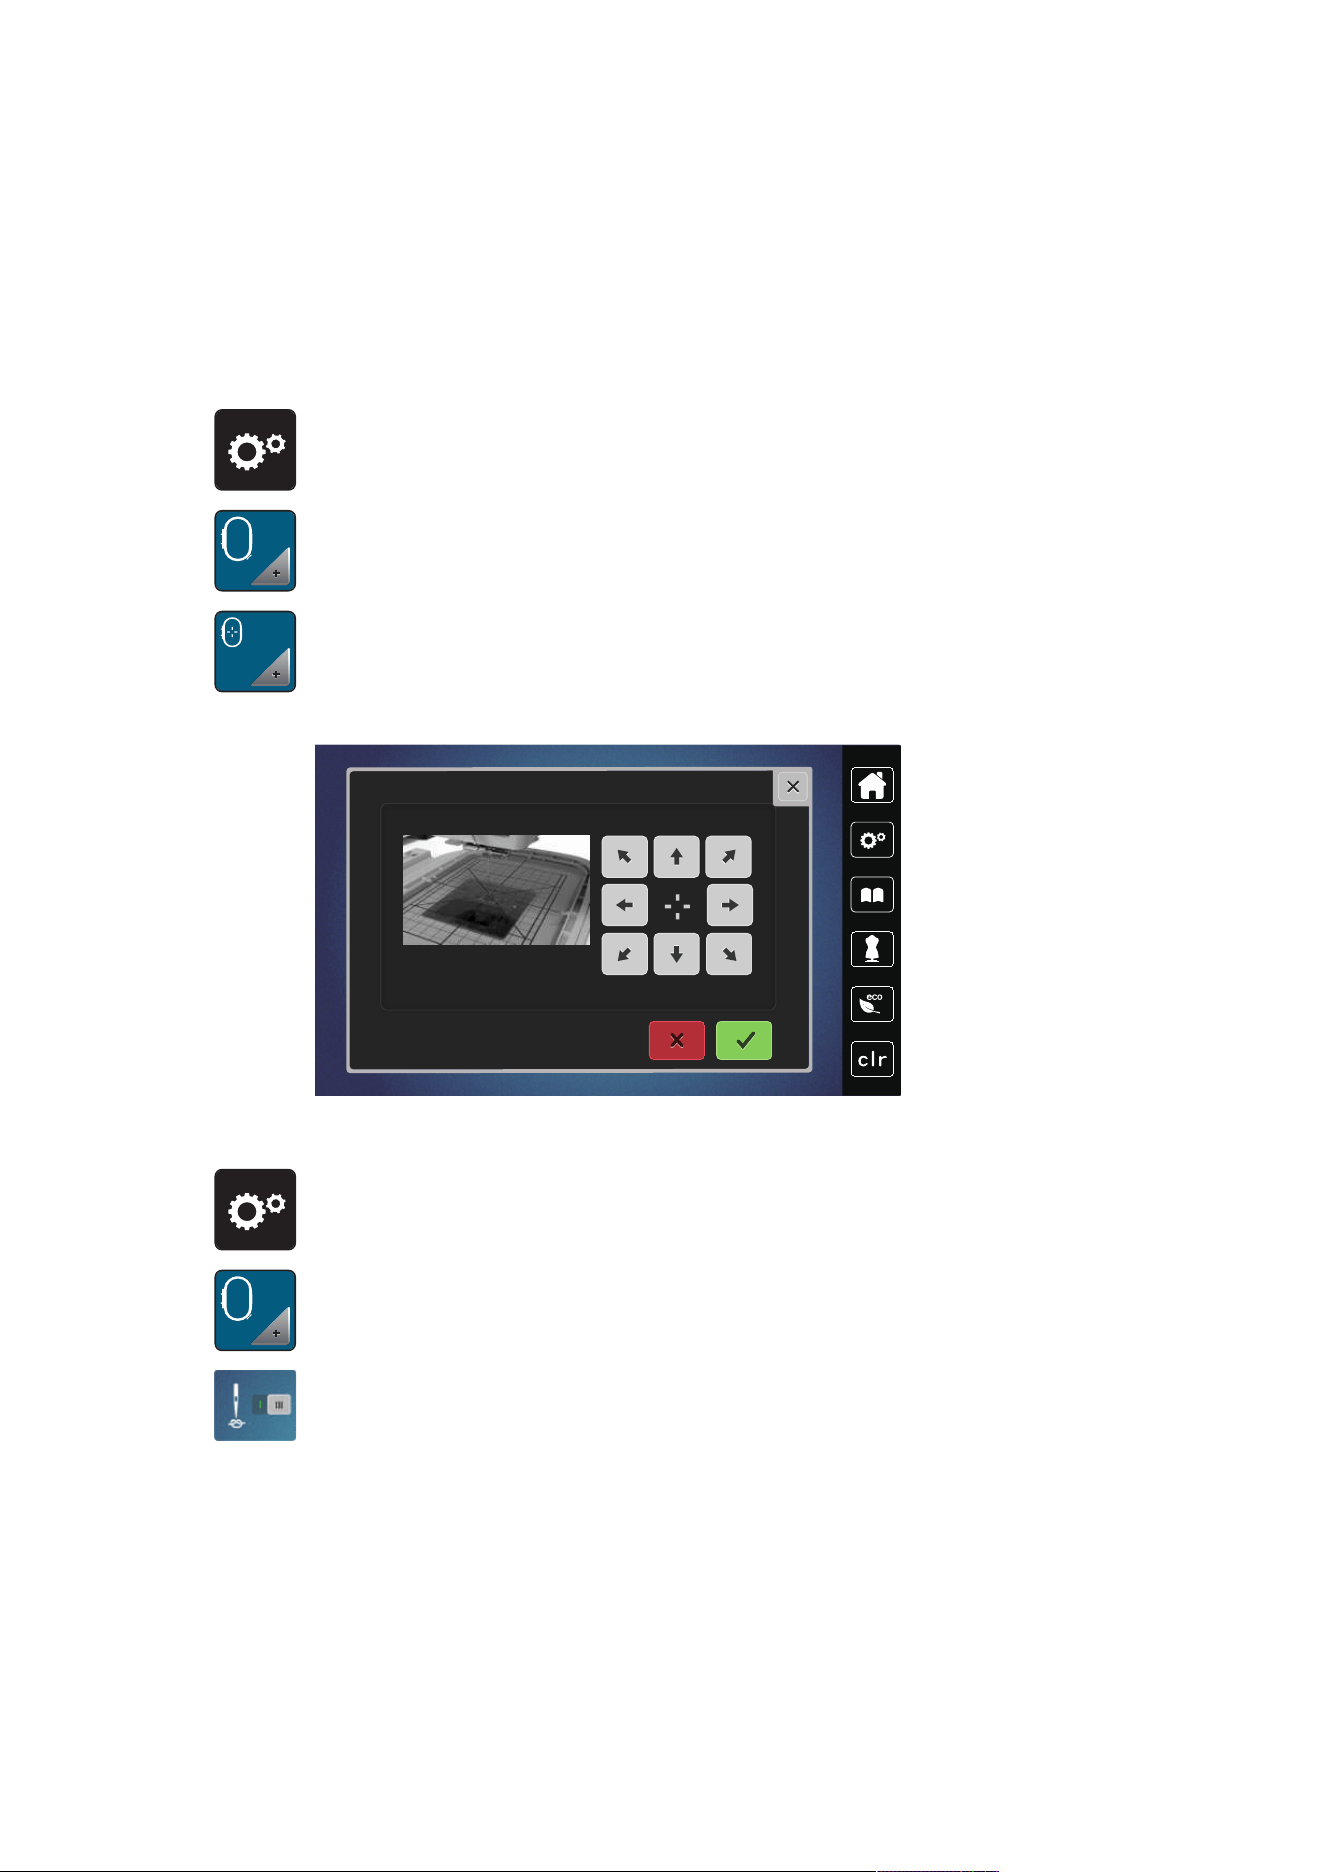
Adjusting the Thread Cut
> Tap «Setup Program».
> Tap «Embroidery Settings».
> Tap «Thread Cut Settings».
> To deactivate the automatic thread cut before changing a thread, tap the switch in the upper section of
the display (1).
> To activate the automatic thread cut before changing a thread, tap the switch in the upper section of the
display (1) again.
> To deactivate the manual thread cut after embroidering, tap the switch in the lower section of the display
(2).
– The machine won't stop for a manual thread cut.
> To activate the manual thread cut after embroidering, tap the switch in the lower section of the display
(2).
– The machine will stop after about 7 stitches.
> Cut the remaining thread with scissors.
1
2
Adjusting the Height of the Embroidery Presser Foot
> Tap «Setup Program».
> Tap «Embroidery Settings».
> Tap «Entering the Fabric Thickness».
> To set the distance between the embroidery foot and the stitch plate, turn the «Upper Multi-function
Knob» or «Lower Multi-function Knob», or tap «Plus» or «Minus».
Setup Program
54
2023-06 EN 5020079.40A.04
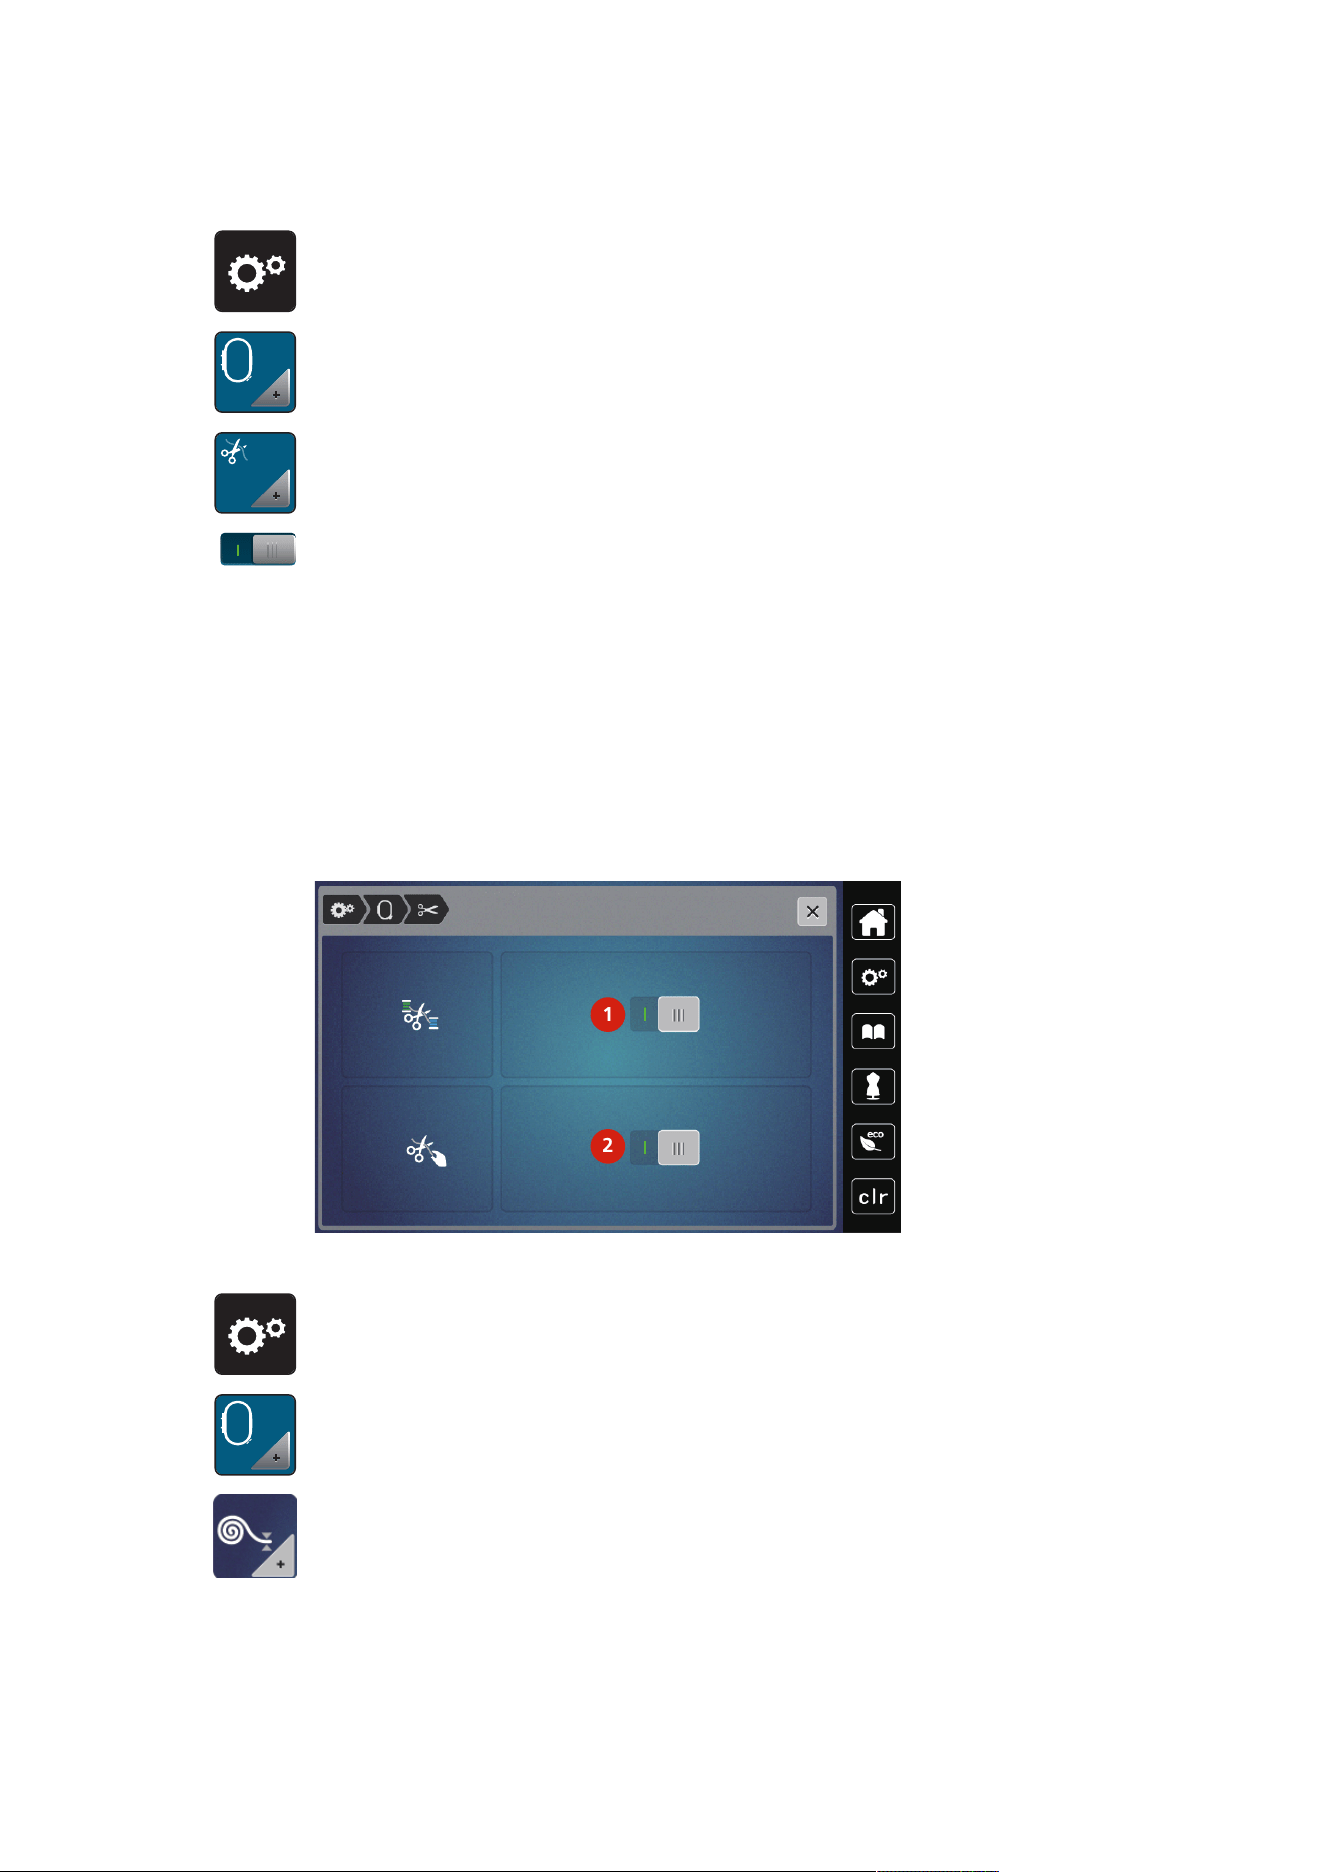
3.3 Selecting Personal Settings
> Tap «Setup Program».
> Tap «Personal Settings».
> Select the desired display color.
3.4 Monitoring Functions
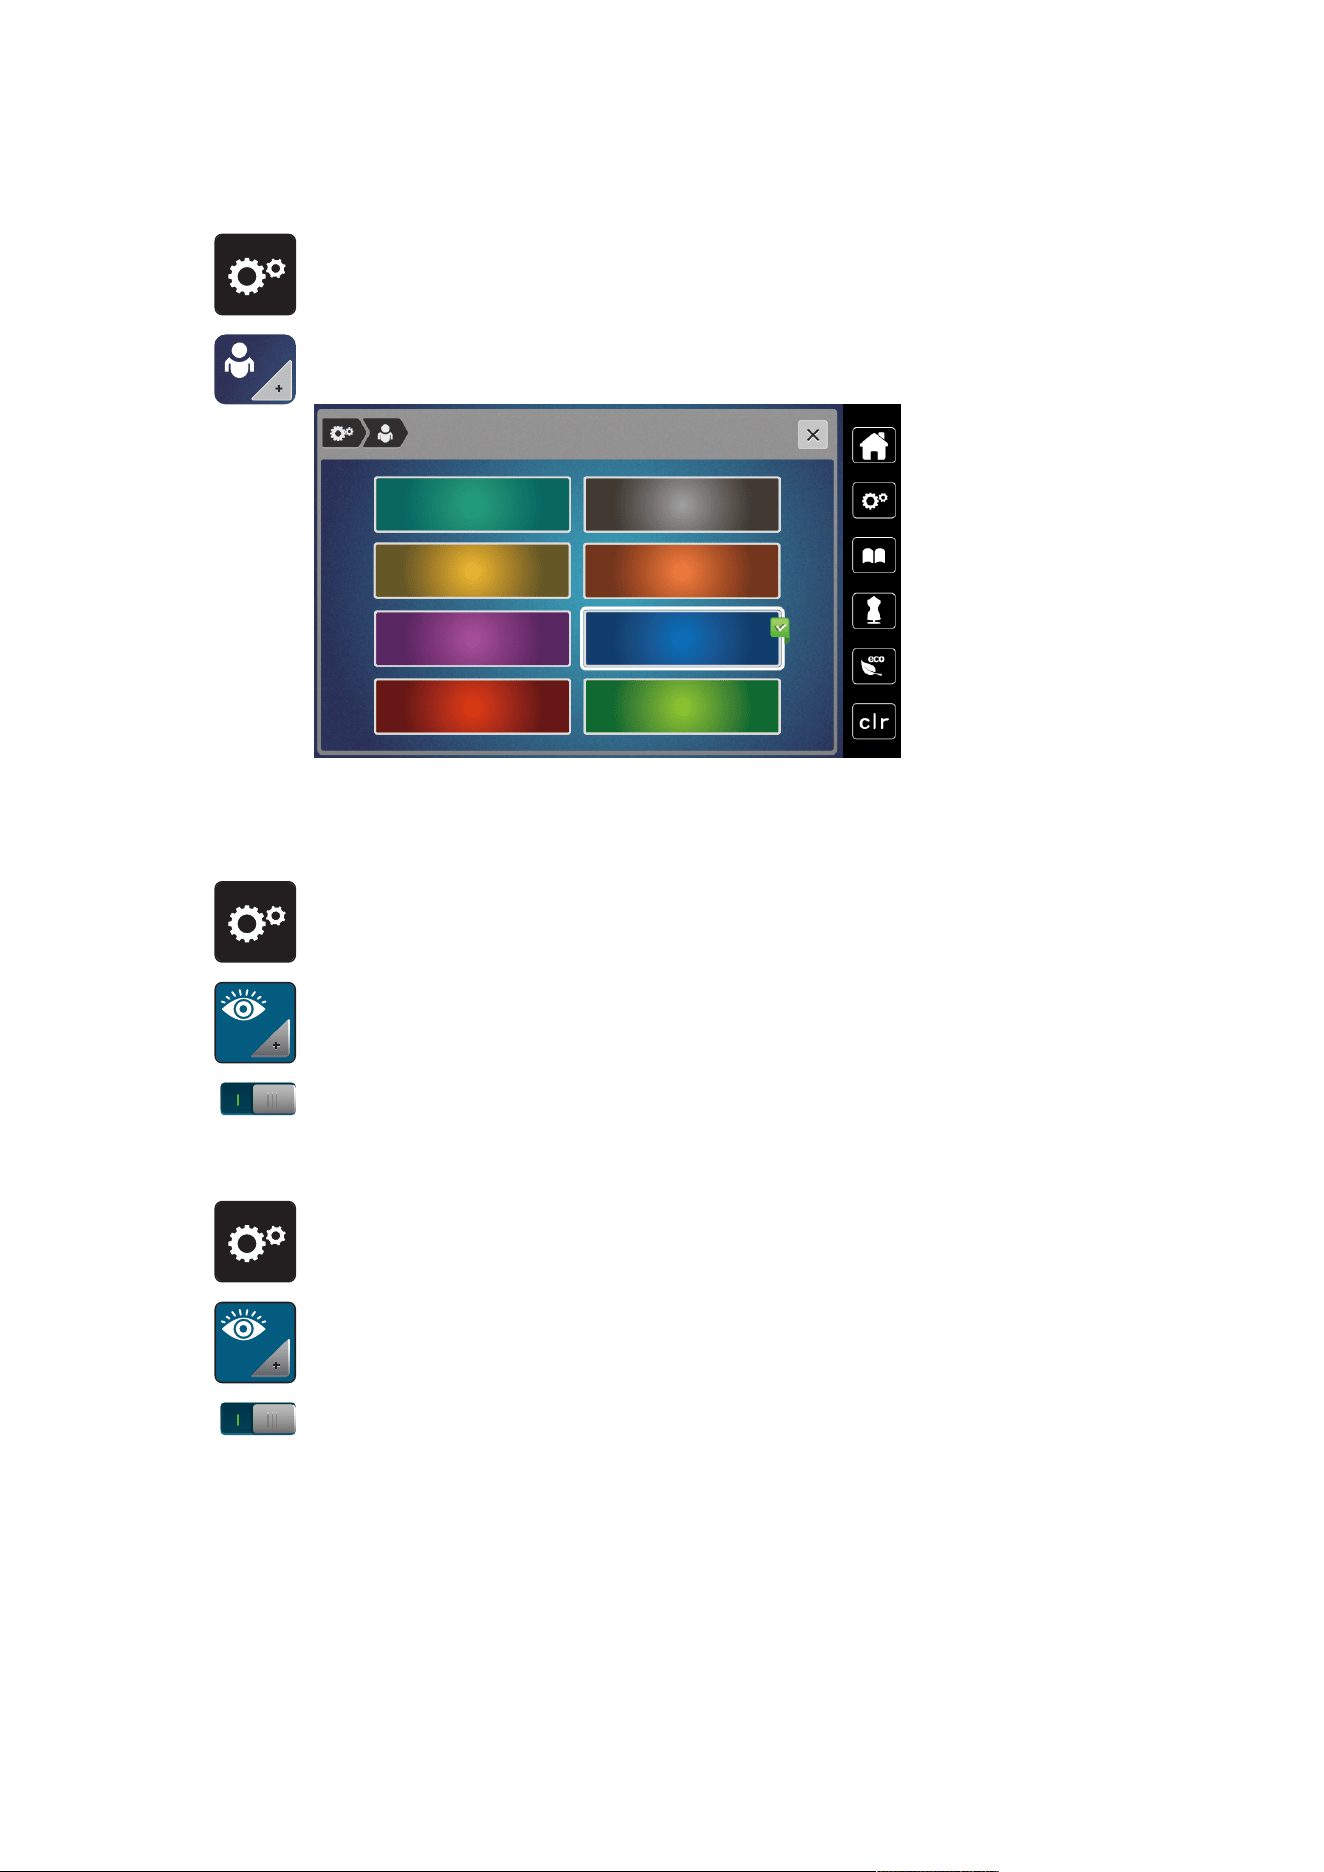
Activating the Upper Thread Indicator
> Tap «Setup Program».
> Tap «Monitoring Functions».
> Tap the switch in the upper section of the display to deactivate the upper thread indicator.
> Tap the switch again to activate the upper thread indicator.
Activating the Bobbin Thread Indicator
> Tap «Setup Program».
> Tap «Monitoring Functions».
> Tap the switch in the lower section of the display to deactivate the bobbin thread indicator.
> Tap the switch again to activate the bobbin thread indicator.
Setup Program
55
2023-06 EN 5020079.40A.04
3.5 Sound On/Off
> Tap «Setup Program».
> To switch off all sounds, tap «Switching Sounds On/Off».
> To switch on all sounds, tap «Switching Sounds On/Off» again.
3.6 Machine Settings
Adjusting the Brightness of the Display
The brightness of the display can be set to meet your individual needs.
> Tap «Setup Program».
> Tap «Machine Settings».
> Tap «Display Settings».
> Adjust the brightness of the display in the upper section of the screen.
Adjusting the Sewing Light
The brightness of the sewing light can be adjusted corresponding to the personal preferences.
> Tap «Setup Program».
> Tap «Machine Settings».
> Tap «Display Settings».
> Adjust the brightness of the sewing light in the lower section of the screen.
> Tap the switch to switch the sewing light off.
> Tap the switch again to switch the sewing light on.
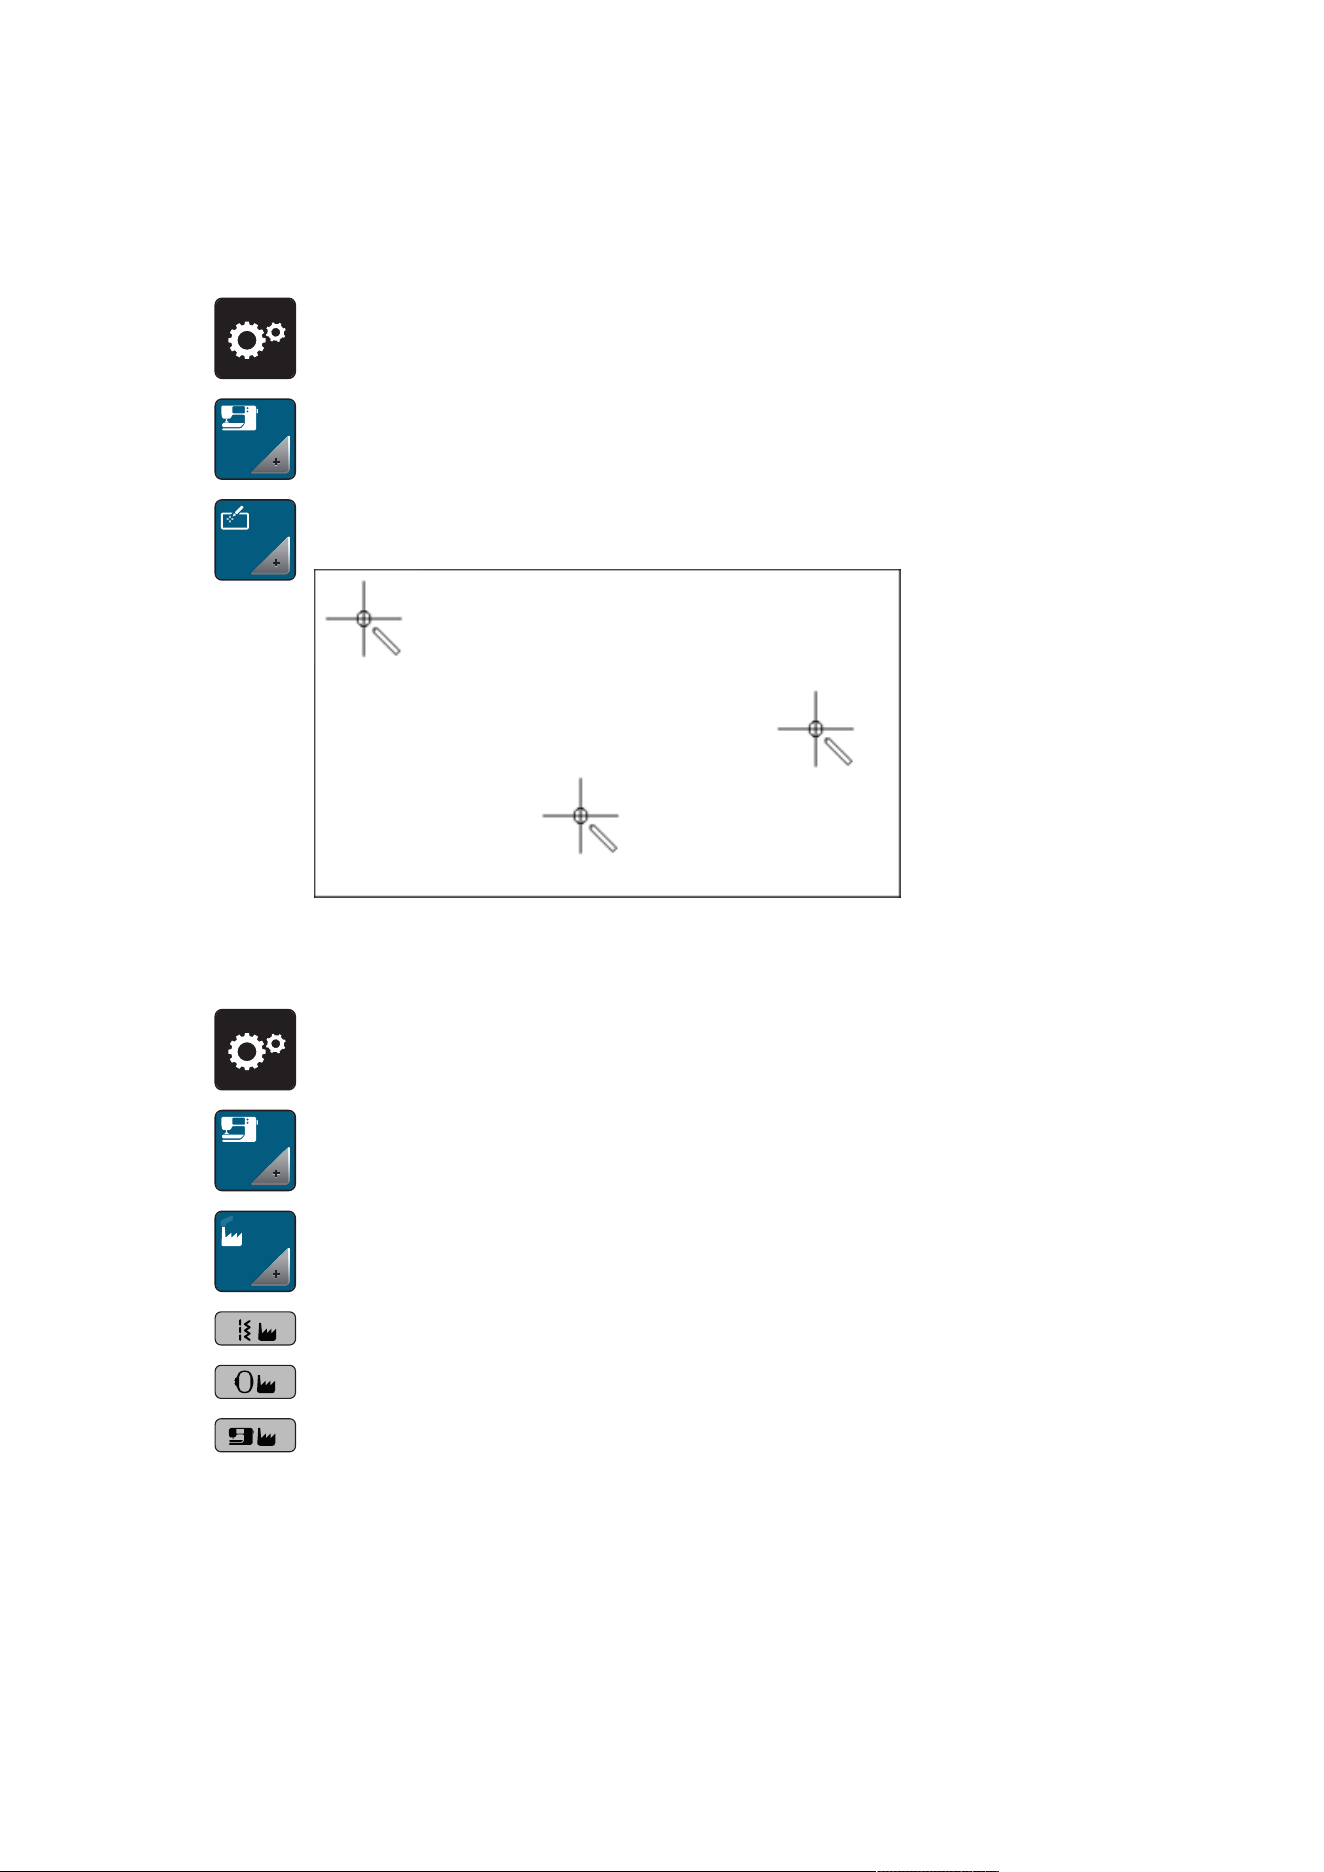
Setup Program
56
2023-06 EN 5020079.40A.04
Calibrating the Display
Please find further information on this topic in the chapter attachment below troubleshooting at the end of
the instruction manual.
> Tap «Setup Program».
> Tap «Machine Settings».
> Tap «Calibrating the Screen».
> Touch the crosses in sequence using the touchscreen pen.
Back to Basic Setting
ATTENTION: Using this function will delete all individually made settings.
> Tap «Setup Program».
> Tap «Machine Settings».
> Tap «Factory Setting».
> To restore all default settings for sewing, tap «Default Setting Sewing» and confirm.
> To restore all default settings for embroidering, tap «Default Setting Embroidering» and confirm.
> To restore all default settings, tap «Default Setting Machine», confirm and restart the machine.
Updating the Machine Firmware
The machine's current firmware and detailed step-by-step instructions for the update process can be
downloaded from https://www.bernette.com Personal data and settings are automatically transferred during
a firmware update.
Setup Program
57
2023-06 EN 5020079.40A.04
NOTICE
USB Stick (Optional Accessory) has been Removed too Early
Firmware has not been updated and the machine cannot be used.
> Remove the USB stick (Optional accessory) only after the saved data has been transferred successfully.
> Insert the BERNINA USB Stick (optional accessory), FAT32 formatted, providing the latest software into
the port.
> Tap «Setup Program».
> Tap «Machine Settings».
> Tap «Machine Data».
> To update the machine firmware, tap «Update».
Checking the Firmware Version
The firmware version of the machine is displayed.
> Tap «Setup Program».
> Tap «Machine Settings».
> Tap «Machine Data».
Reviewing the Total Number of Stitches
The total stitch count of the machine and the number of stitches since the last service performed by a
bernette dealer are displayed.
Four millon stitches after a service, the symbol recommends maintenance by specialized bernette
dealer.
> Tap «Setup Program».
> Tap «Machine Settings».
> Tap «Machine Data».

Setup Program
58
2023-06 EN 5020079.40A.04
Selecting a Language
The user interface can be programmed in different languages according to the customer’s wish.
> Tap «Setup Program».
> Tap «Machine Settings».
> Tap «Language Selection».
> Select a language.

System Settings
59
2023-06 EN 5020079.40A.04
4 System Settings
4.1 Calling Up the Tutorial
The Tutorial gives information and explanations, covering various aspects of sewing, embroidering, and the
different stitches.
> Tap «Tutorial».
> Select the desired topic in order to view information.
4.2 Using eco Mode
If work is interrupted for an extended period, the machine can be put into energy-saving mode. Nothing can
be selected in the display and the machine cannot be started.
> Tap «eco Mode».
– The display goes to sleep. The power consumption is reduced and the sewing light is off.
> Tap «Eco mode» in the display.
– The machine is ready for use.

System Settings
60
2023-06 EN 5020079.40A.04
4.3 Calling up the Creative Consultant
The Creative Consultant provides decision support for sewing projects. After entering the fabric and the
desired sewing project, suggestions for suitable needles, presser feet etc. are displayed.
> Tap «Creative Consultant».
> Select the fabric to be sewn.
1 2 3
4
5 6 7
8
9
10 11
12
1 Light-weight Woven 7 Heavy Knits
2 Medium-weight Woven 8 Fur/Imitation Fur
3 Heavy-weight Woven 9 Toweling
4 Jeans 10 Fabric with a Piled Texture
5 Light Knits 11 Leather and Vinyl
6 Medium-weight Knits 12 Net and Lace
> Select the sewing project.
– The stitch is changed automatically, but all other settings must be done by the user.
1
4
7
2
5
8
3
6
9
1 Seams 6 Decorative Sewing
2 Finishing Edges 7 Machine Quilting
3 Blindstitch Hem 8 Free Motion Sewing
4 Buttonholes 9 Appliqués
5 Zips
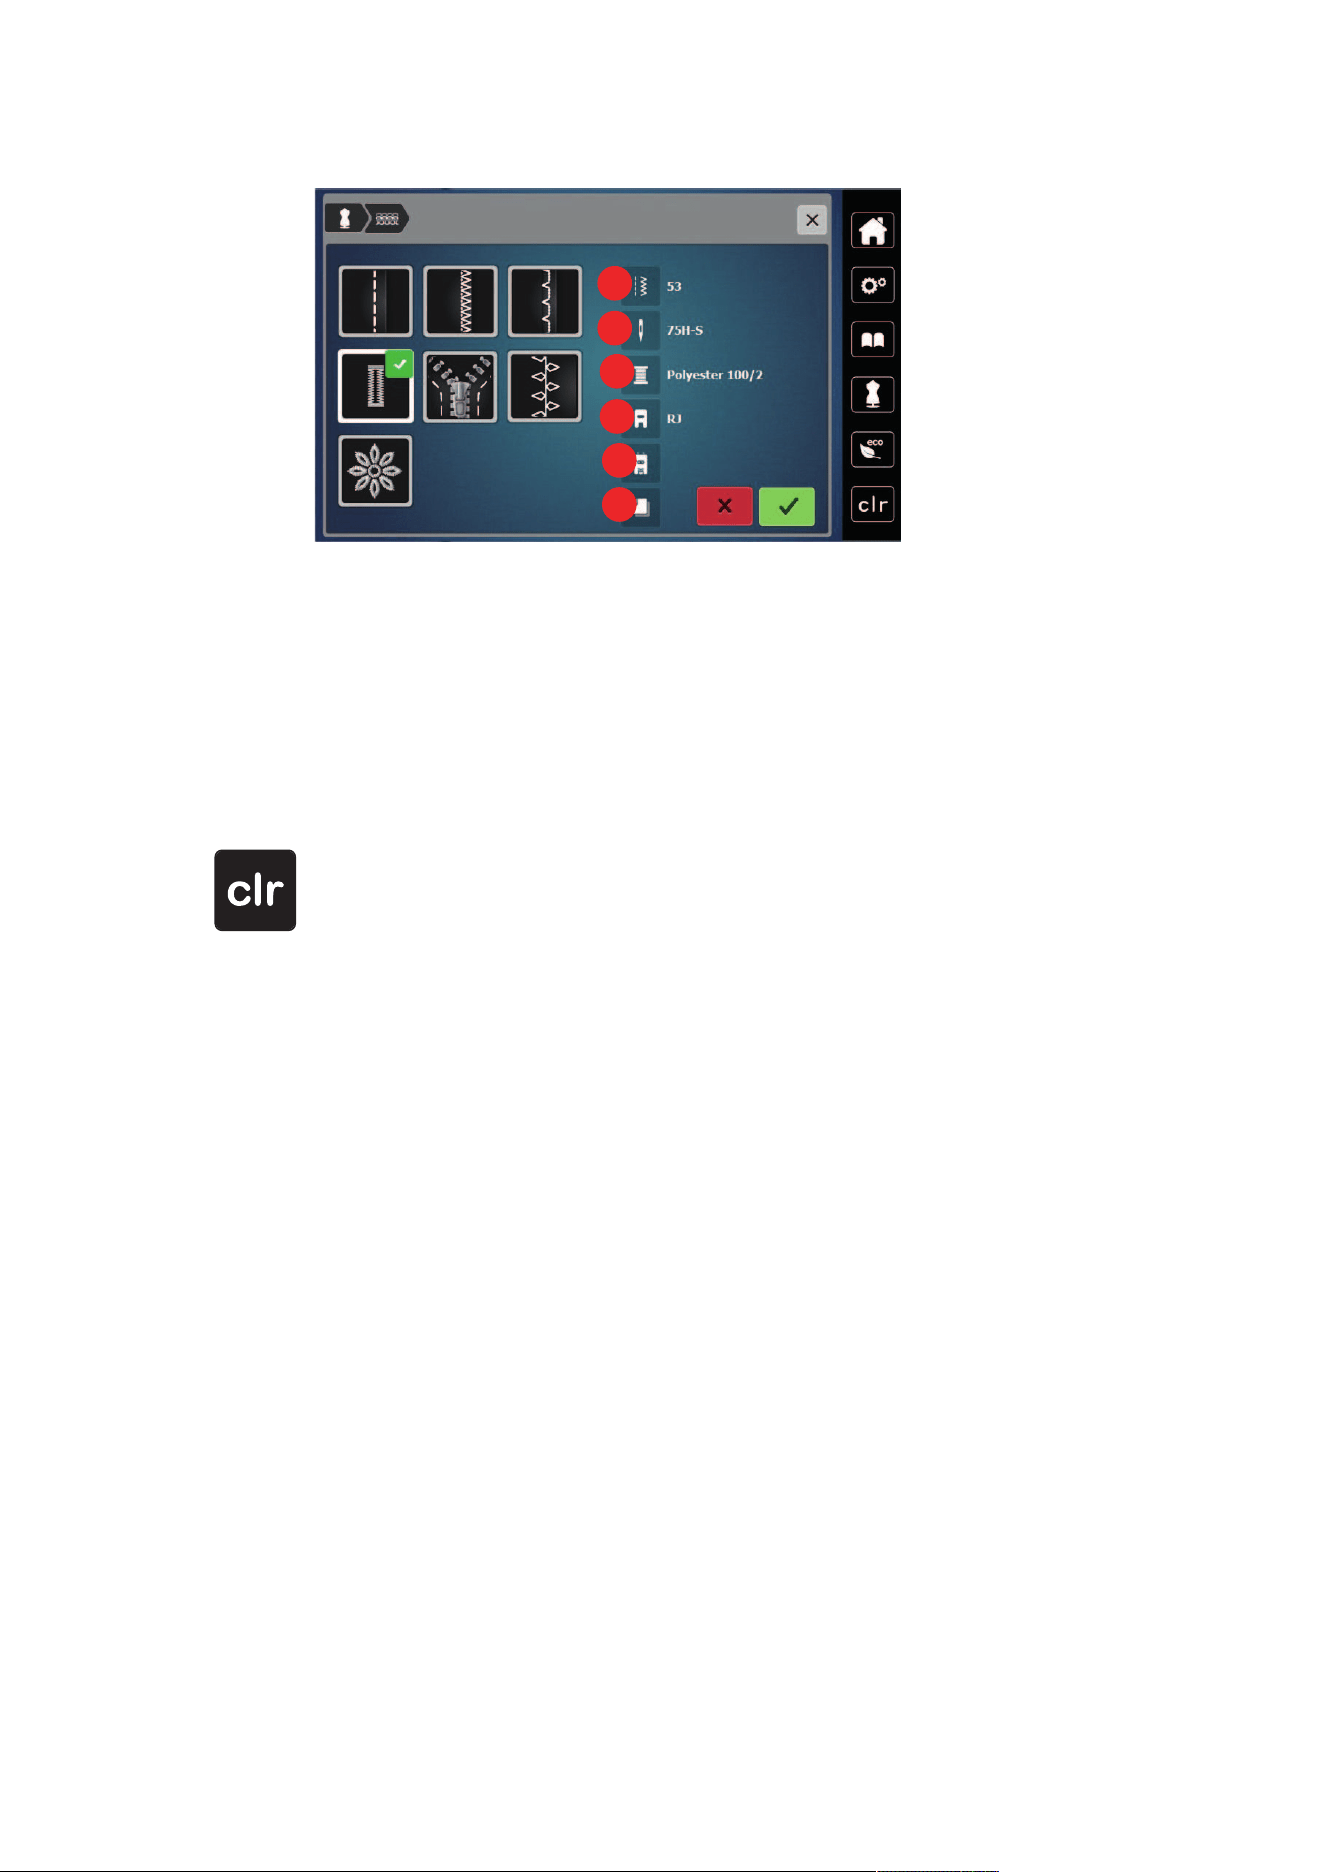
System Settings
61
2023-06 EN 5020079.40A.04
1
2
3
4
5
6
1 Recommended Stitch Number 4 Recommended Presser Foot
2 Recommended Needle 5 Reinforced Buttonhole
3 Recommended Thread 6 Stabilizer Recommended
> Make the settings of the machine according to the instructions.
4.4 Cancelling Any Alterations with «clr»
Any alterations to designs can be reset to basic setting. Exceptions are saved designs which have been filed
in the personal memory and monitoring functions.
> Tap «Clear Settings».
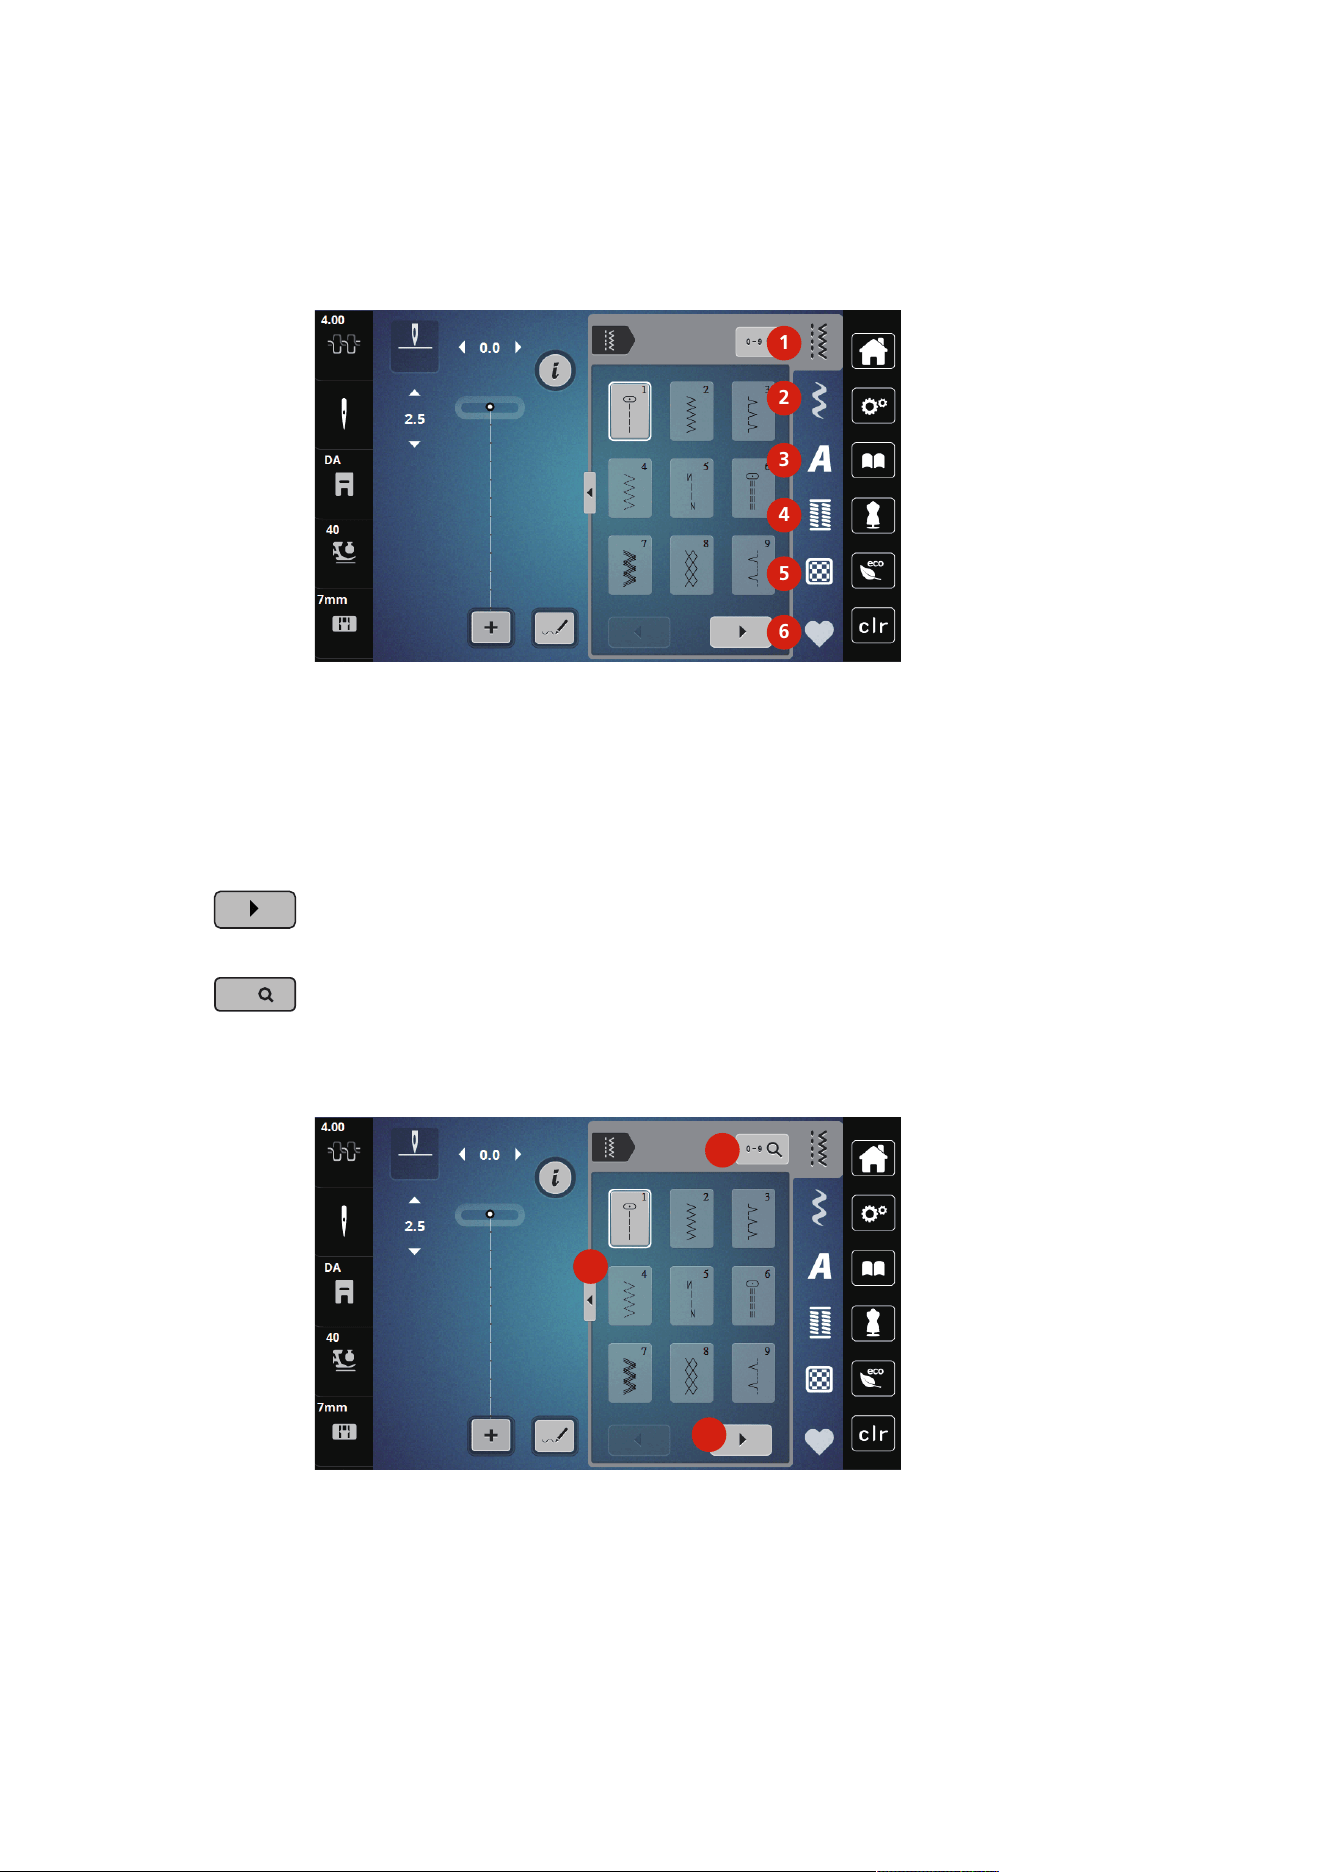
Creative Sewing
62
2023-06 EN 5020079.40A.04
5 Creative Sewing
5.1 Overview Selection Menu Sewing
1
2
3
4
5
6
1 «Practical Stitches» 4 «Buttonholes»
2 «Decorative Stitches» 5 «Quilt Stitches»
3 «Alphabets» 6 «Personal Memory»
Selecting a Stitch Pattern
> Select a stitch pattern, alphabet or buttonhole.
> To display further stitch patterns, scroll to the right (1).
> To increase the view, tap «Increasing/Decreasing the Display Size»(2).
> To minimize the stitch pattern view, tap «Increasing/Decreasing the Display Size» (2) again.
0-9
> To select the stitch pattern by inputting the stitch number, tap «Select Stitch Pattern by Number» (3).
– If «!!!» appear when entering the stitch pattern, the stitch pattern cannot be used in the Combi
mode.
– If «???» appear when entering the stitch pattern, the stitch pattern doesn't exist.
2
3
1
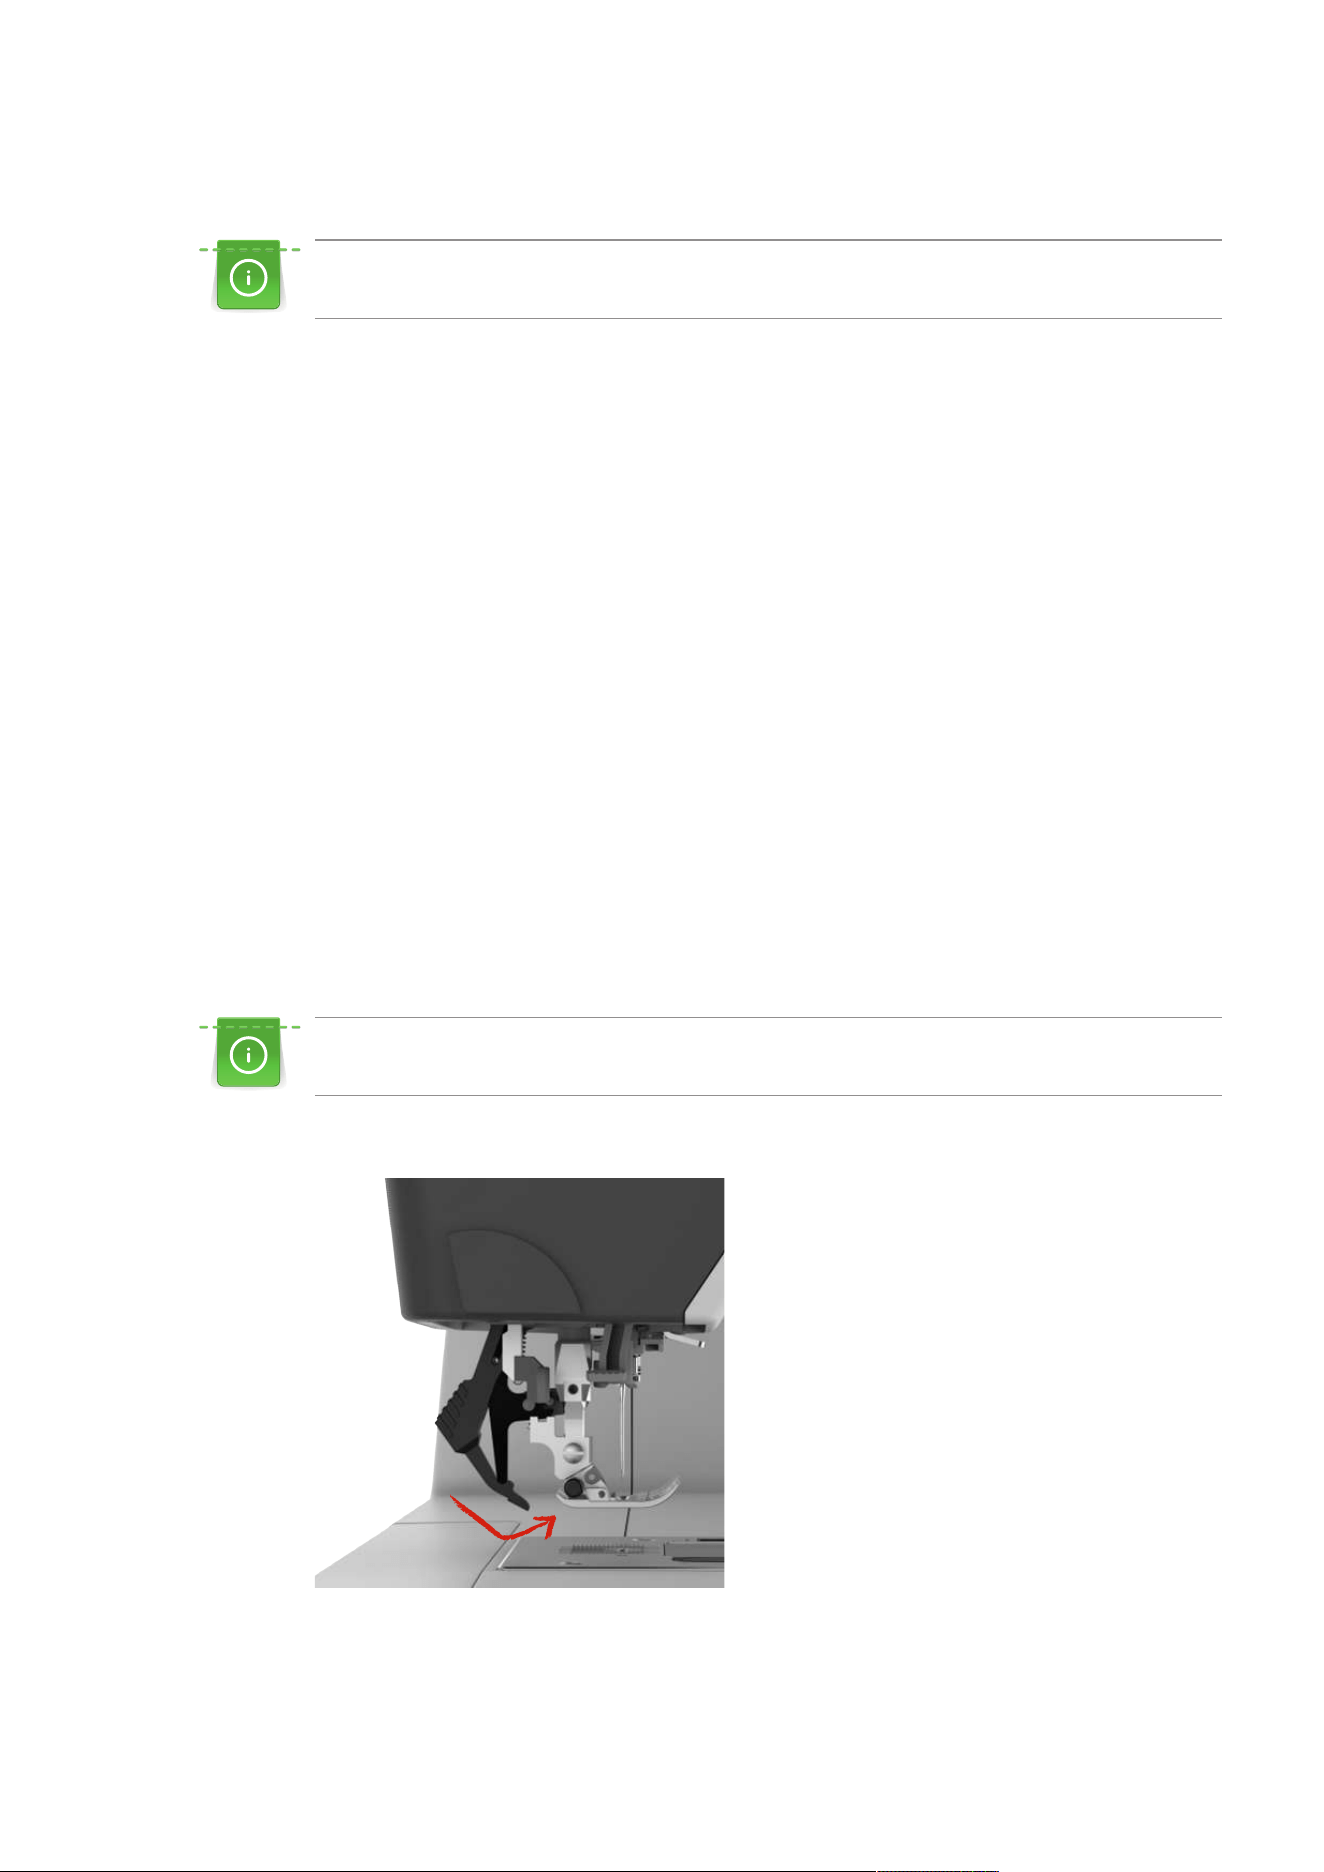
Creative Sewing
63
2023-06 EN 5020079.40A.04
5.2 Dual feed
It is recommended to match the presser foot pressure with the fabric. The thicker the fabric, the lower
the presser foot pressure.
The Dual Feed feeds the fabric from above and from beneath simultaneously. This provides an even and
careful feed forward even for smooth and thin materials. Striped and checkered patterns can be matched
perfectly by even feeding.
Application of the Dual Feed
In general, the Dual Feed is used for the following sewing projects:
• Sewing: All sewing applications with difficult fabrics such as for seams, zippers.
• Patchwork: With accurate stripes, blocks and with decorative stitches up to a stitch width of 7 mm.
• Appliqués: sewing appliques, ribbons and bias binding.
Difficult-to-work-with fabrics are:
• Velvet, normally sewn with the grain
• Toweling
• Jersey, especially when sewing it crosswise to knit
• Fake fur or coated fake fur
• Fleece-types of fabrics
• Batted fabrics
• Stripes and checks
• Curtain fabrics with pattern repeats
«Sticky» fabrics are:
• Imitation leather, coated fabrics
Use the Dual Feed
When working with the Dual Feed, only use presser feet with the rear opening.
> Raise the presser foot.
> Swing the DF mechanism forward under the back of the presser foot until it clicks in position.
> Raise the presser foot.
> Pull down the DF mechanism and swing it to the rear to disengage.
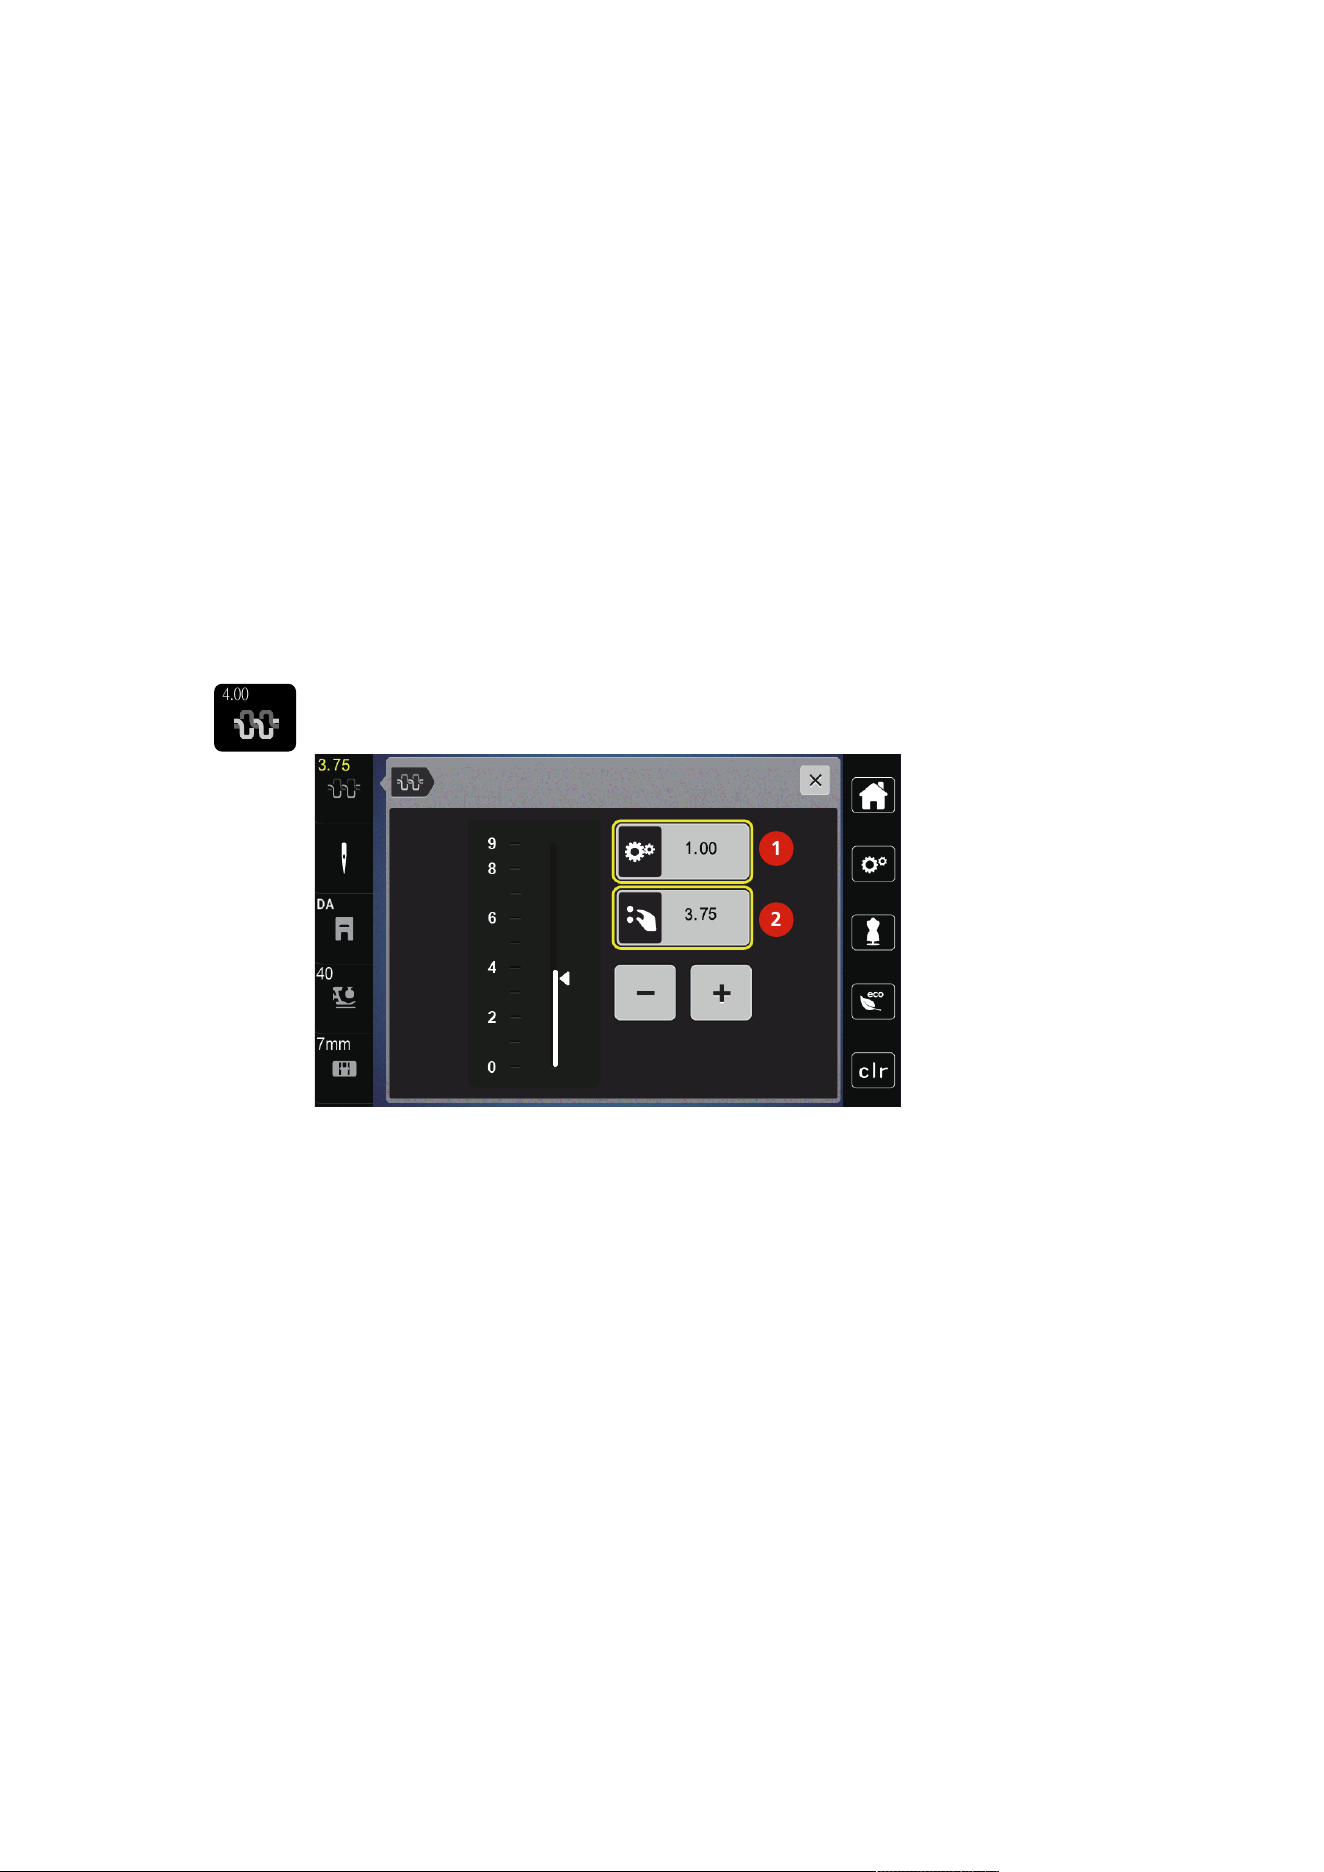
Creative Sewing
64
2023-06 EN 5020079.40A.04
5.3 Regulating the Speed
The sewing speed can be adjusted infinitely variable with the slide.
> Move the slide to the left to reduce the sewing speed.
> Move the slide to the right to increase the sewing speed.
5.4 Adjusting the Upper Thread Tension
The default setting of the upper thread tension is set automatically as soon as a stitch pattern is selected.
When using different types of sewing threads, the upper thread tension may vary. It may therefore be
necessary to adjust the upper thread tension individually according to the sewing project as well as the
desried stitch.
The higher the upper thread tension is set, the tighter the upper thread is tensioned, and the bobbin thread
is pulled deeper into the fabric. When the upper thread tension is low, the upper thread is less tightened,
and the bobbin thread is pulled up less into the fabric.
Alteration of the upper thread tension affect the currently stitch pattern. Permanent alterations of the upper
thread tension for the sewing can be made in the Setup Program.
4.00
> Tap «Upper Thread Tension».
> To increase or decrease the upper thread tension, move the slider.
2
1
1 Permanent Alteration of Thread Tension
2 Thread Tension of the Current Embroidery
Design
5.5 Editing Stitch Patterns
Changing the Stitch Width
> Turn the «Upper Multi-function Knob» to the left to narrow the stitch width.
> Turn the «Upper Multi-function Knob» to the right to widen the stitch width.
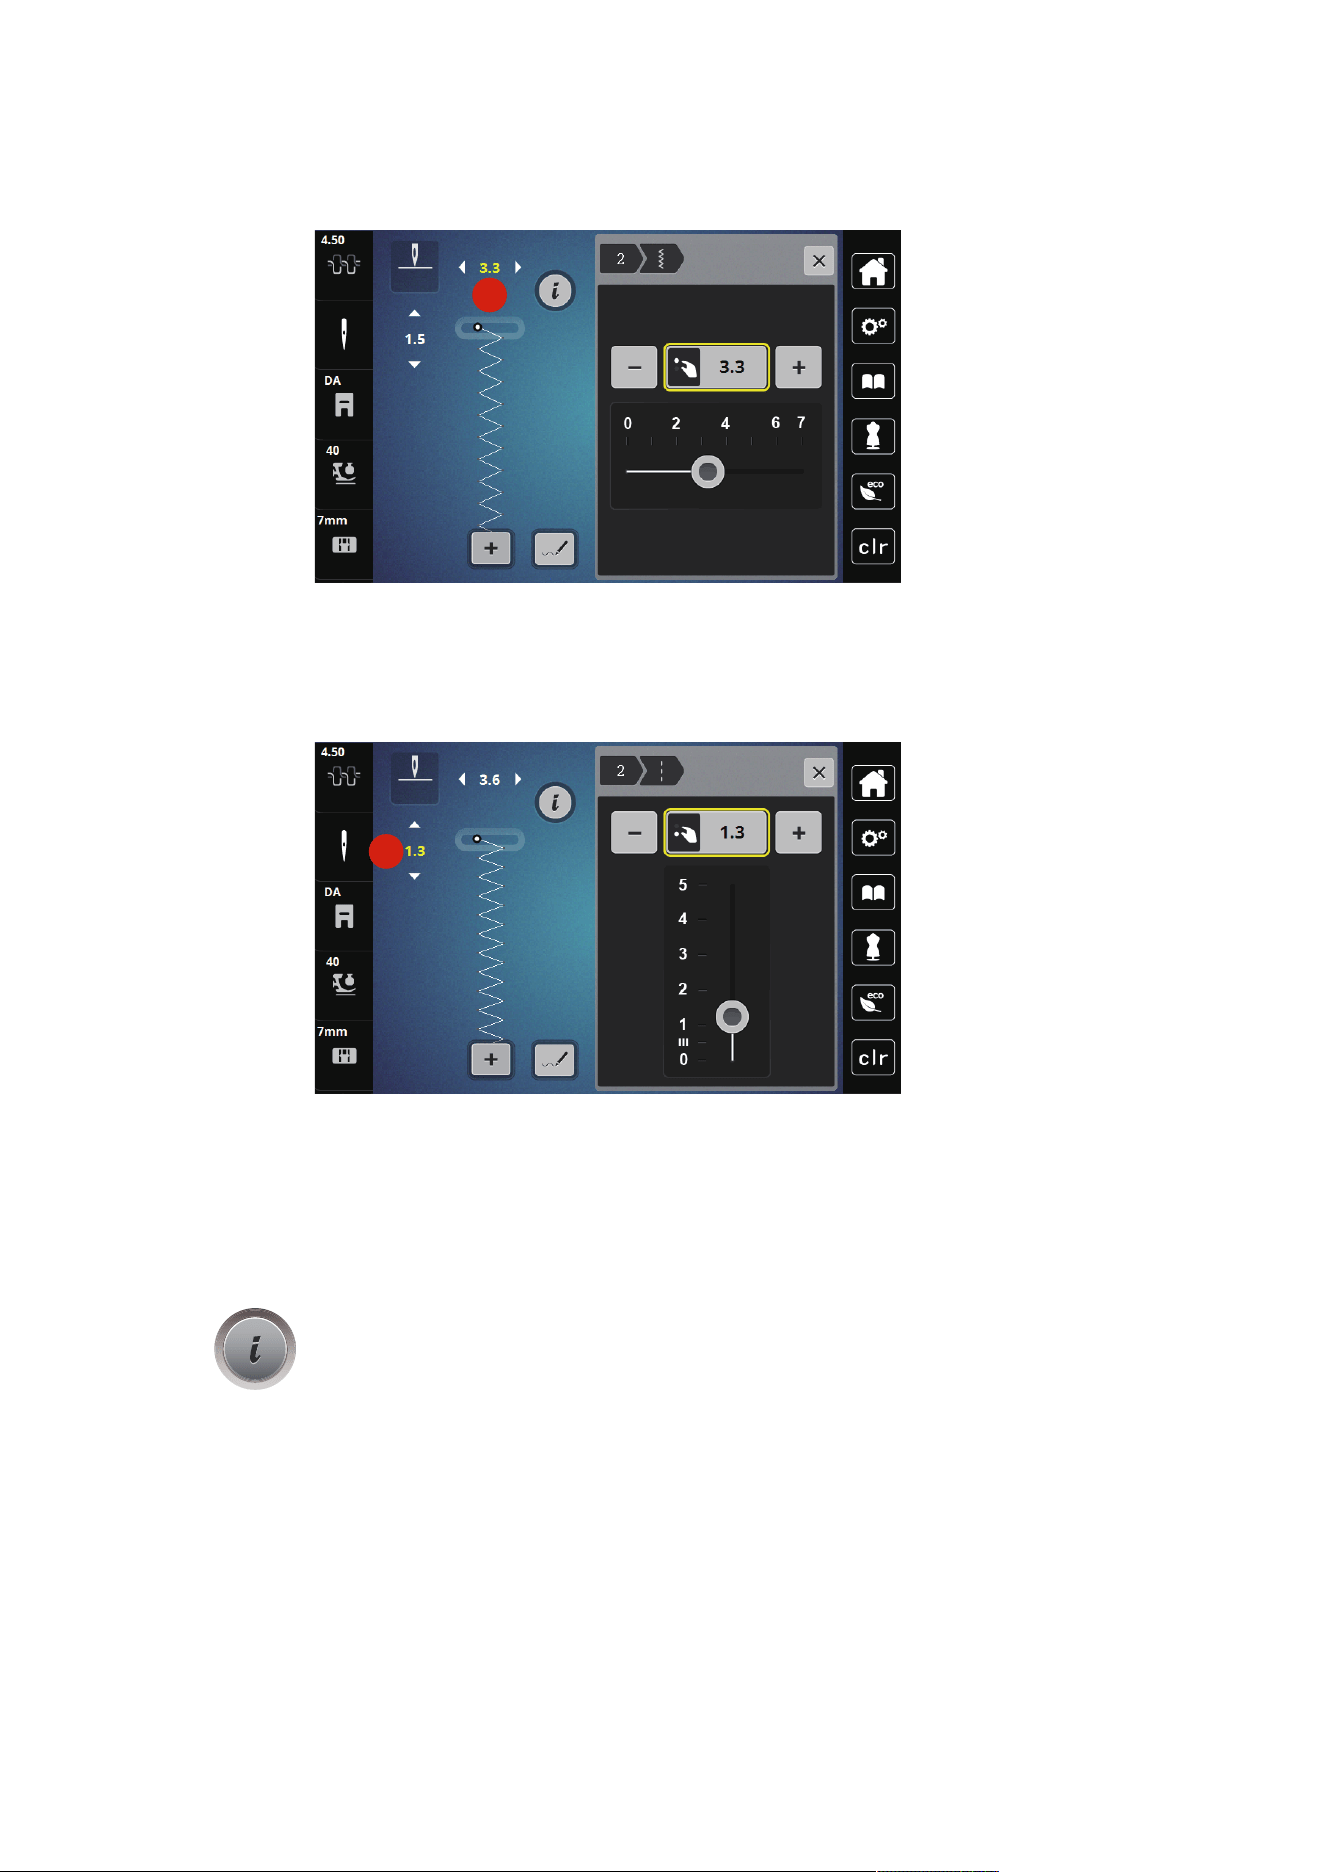
Creative Sewing
65
2023-06 EN 5020079.40A.04
> To call up further setting options, tap the icon «Stitch width» (1).
1
Changing the Stitch Length
> Turn the «Lower Multi-function Knob» to the left to shorten the stitch length.
> Turn the «Lower Multi-function Knob» to the right to elongate the stitch length.
> To call up other setting options, tap «Stitch Length»(1).
1
Correcting the Balance
Different fabrics, threads and stabilizers can affect the programmed stitch patterns so that they cannot be
sewn out correctly. The electronic balance can correct these deviation and the stitch pattern can be adjusted
optimally to the selected fabric.
> Select a stitch pattern or alphabet.
> Sewing stitch pattern.
> Tap «i-Dialog».
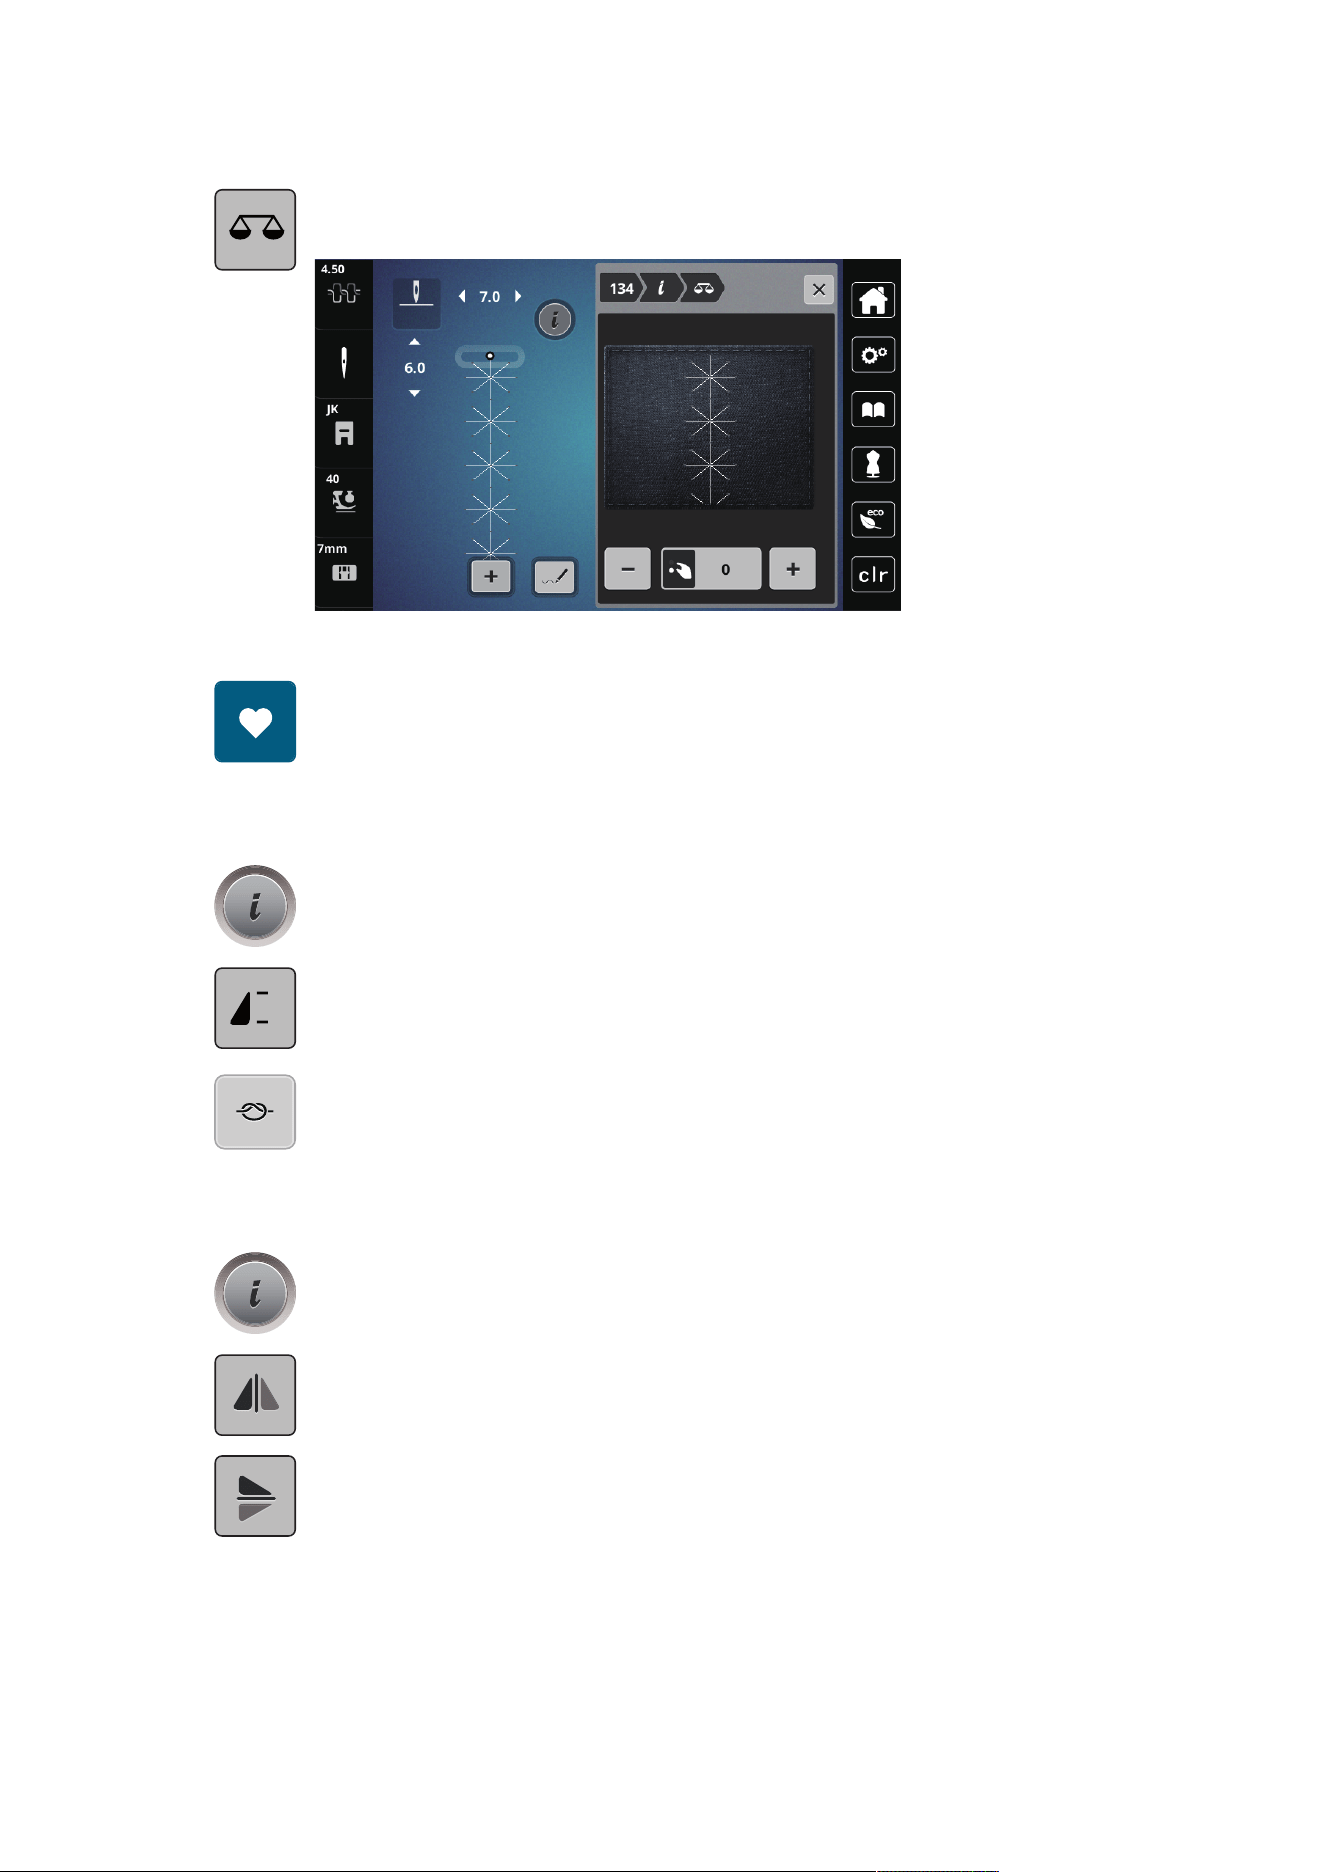
Creative Sewing
66
2023-06 EN 5020079.40A.04
> Tap «Balance».
– A preview of the stitch pattern is displayed.
> To correct the longitudinal direction of the stitch pattern, turn the «Lower Multi-function Knob» until the
preview of the stitch pattern matches the stitch pattern sewn on the fabric.
> Altered Balance settings can be saved for each stitch in the «Personal Memory» .
> Altered Balance settings only remain valid until the «Clear Settings» is pushed or the machine is switched
off.
Programming Pattern Repeat
> Select a stitch pattern or alphabet.
> Tap «i-Dialog».
x
> To repeat the stitch pattern, tap «Pattern Repeat» once.
> To repeat the stitch pattern up to nine times, tap «Pattern Repeat» two to nine times.
– The machine stops automatically after the programmed number of patterns has been sewn.
> To secure a backstitch at the end of sewing, «Securing Stitches» is activated.
> To deactivate securing, tap «Securing Stitches».
Mirror Image of Stitch Patterns
> Select a stitch pattern or alphabet.
> Tap «i-Dialog».
> To mirror the stitch pattern from left to right, tap «Mirror Image Left/Right».
> To mirror the stitch pattern in sewing direction, tap «Mirror Image Up/Down».
Edit Stitch Pattern Length
Stitches from category satin stitch pattern can be lengthwise extended or shortened.
> Select a stitch pattern.
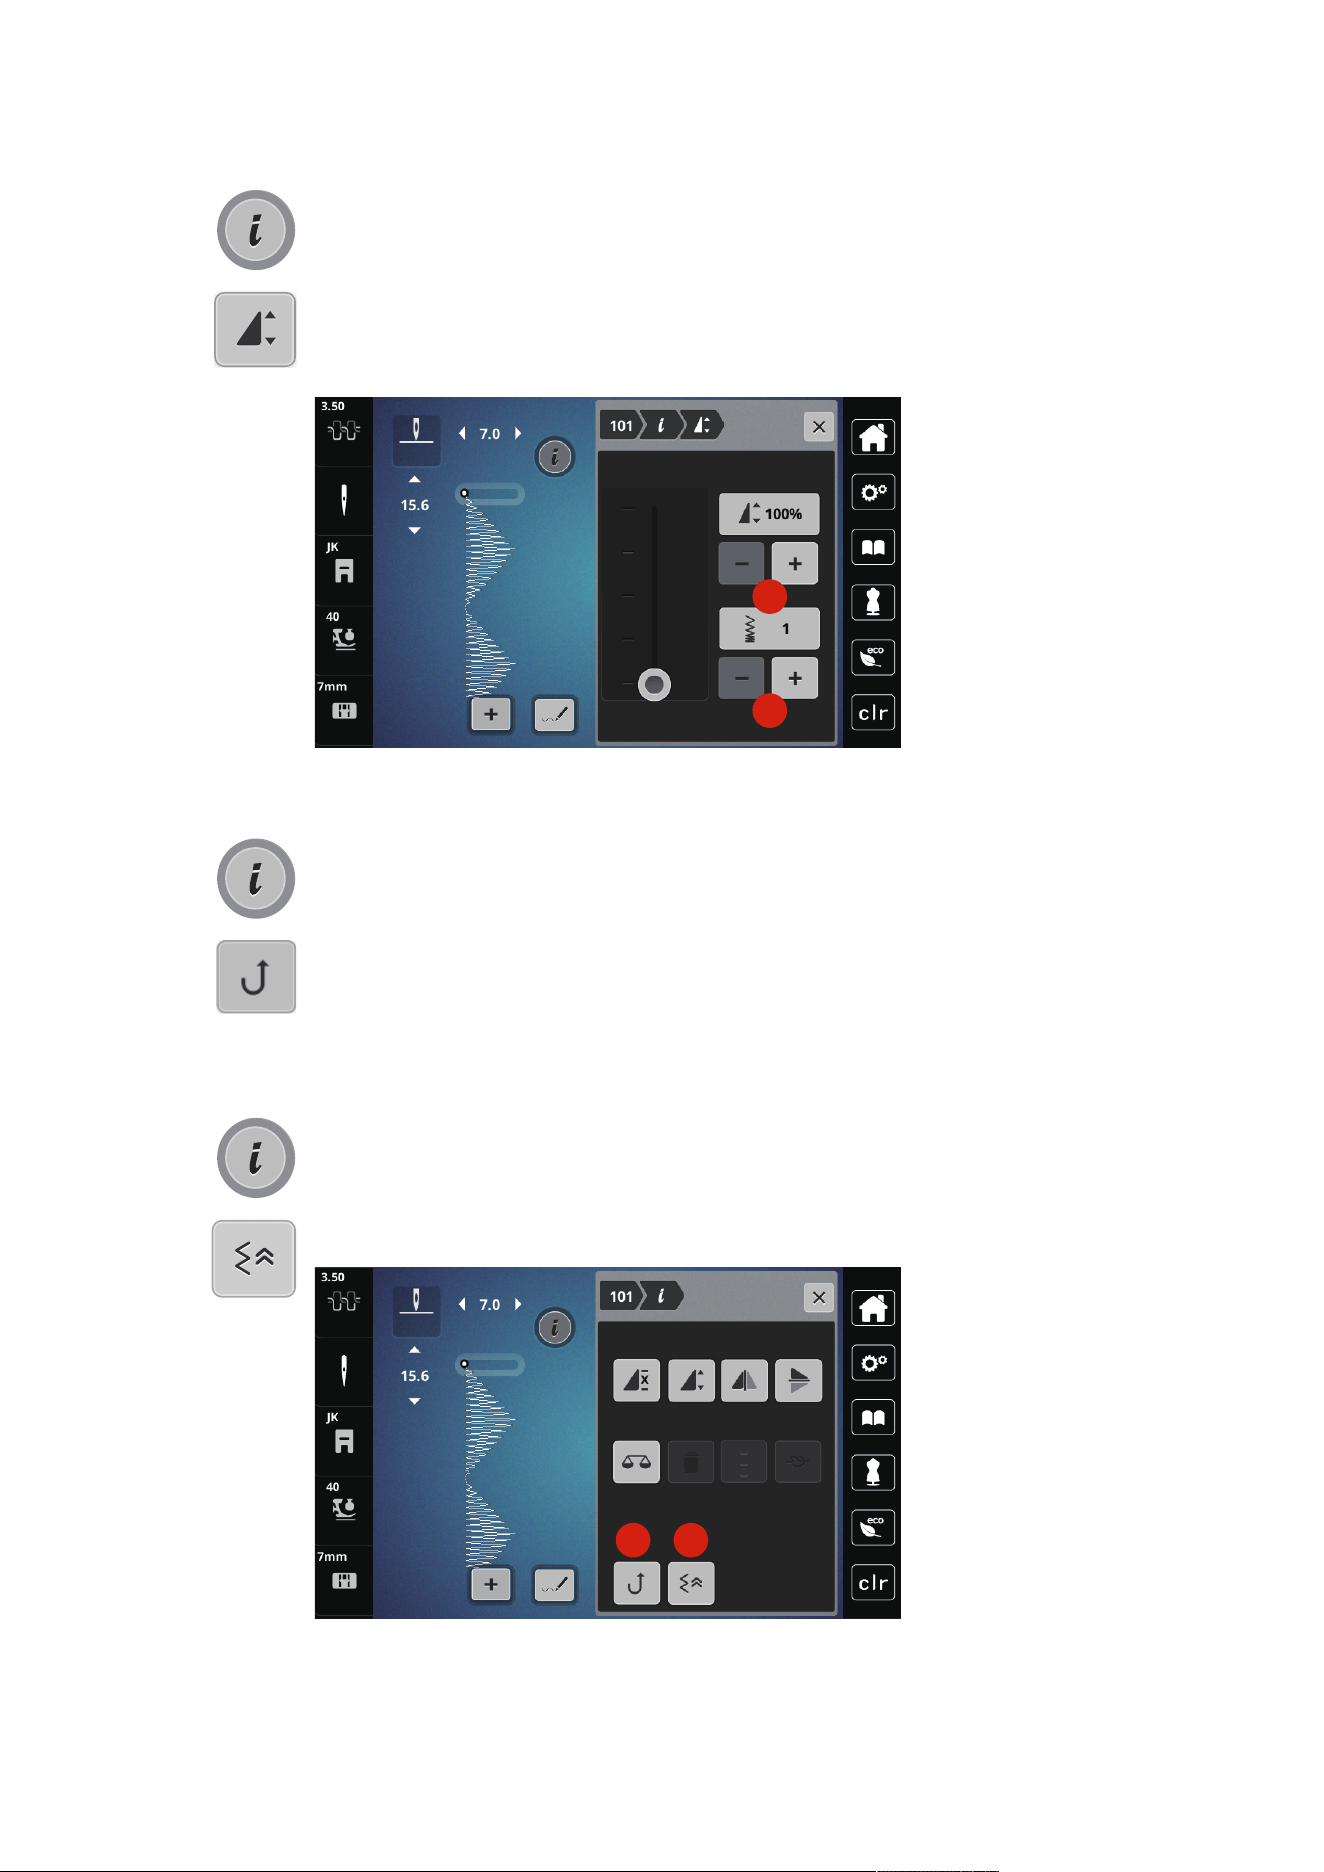
Creative Sewing
67
2023-06 EN 5020079.40A.04
> Tap «i-Dialog».
> Tap «Edit Stitch Pattern Length».
> To set the stitch pattern length, push the slide or tap «Plus»/«Minus» (1).
> To determine the density of the stitch pattern, tap «Plus»/«Minus» (2).
1
2
Permanent Quick Reverse
> Select a stitch pattern or alphabet.
> Tap «i-Dialog».
> To sew backward permanently, tap «Quick Reverse» (1).
Backstepping
> Select a stitch pattern, alphabet or buttonhole.
> Tap «i-Dialog».
> For stitch-precise reverse sewing, tap «Back Stepping» (2).
1 2
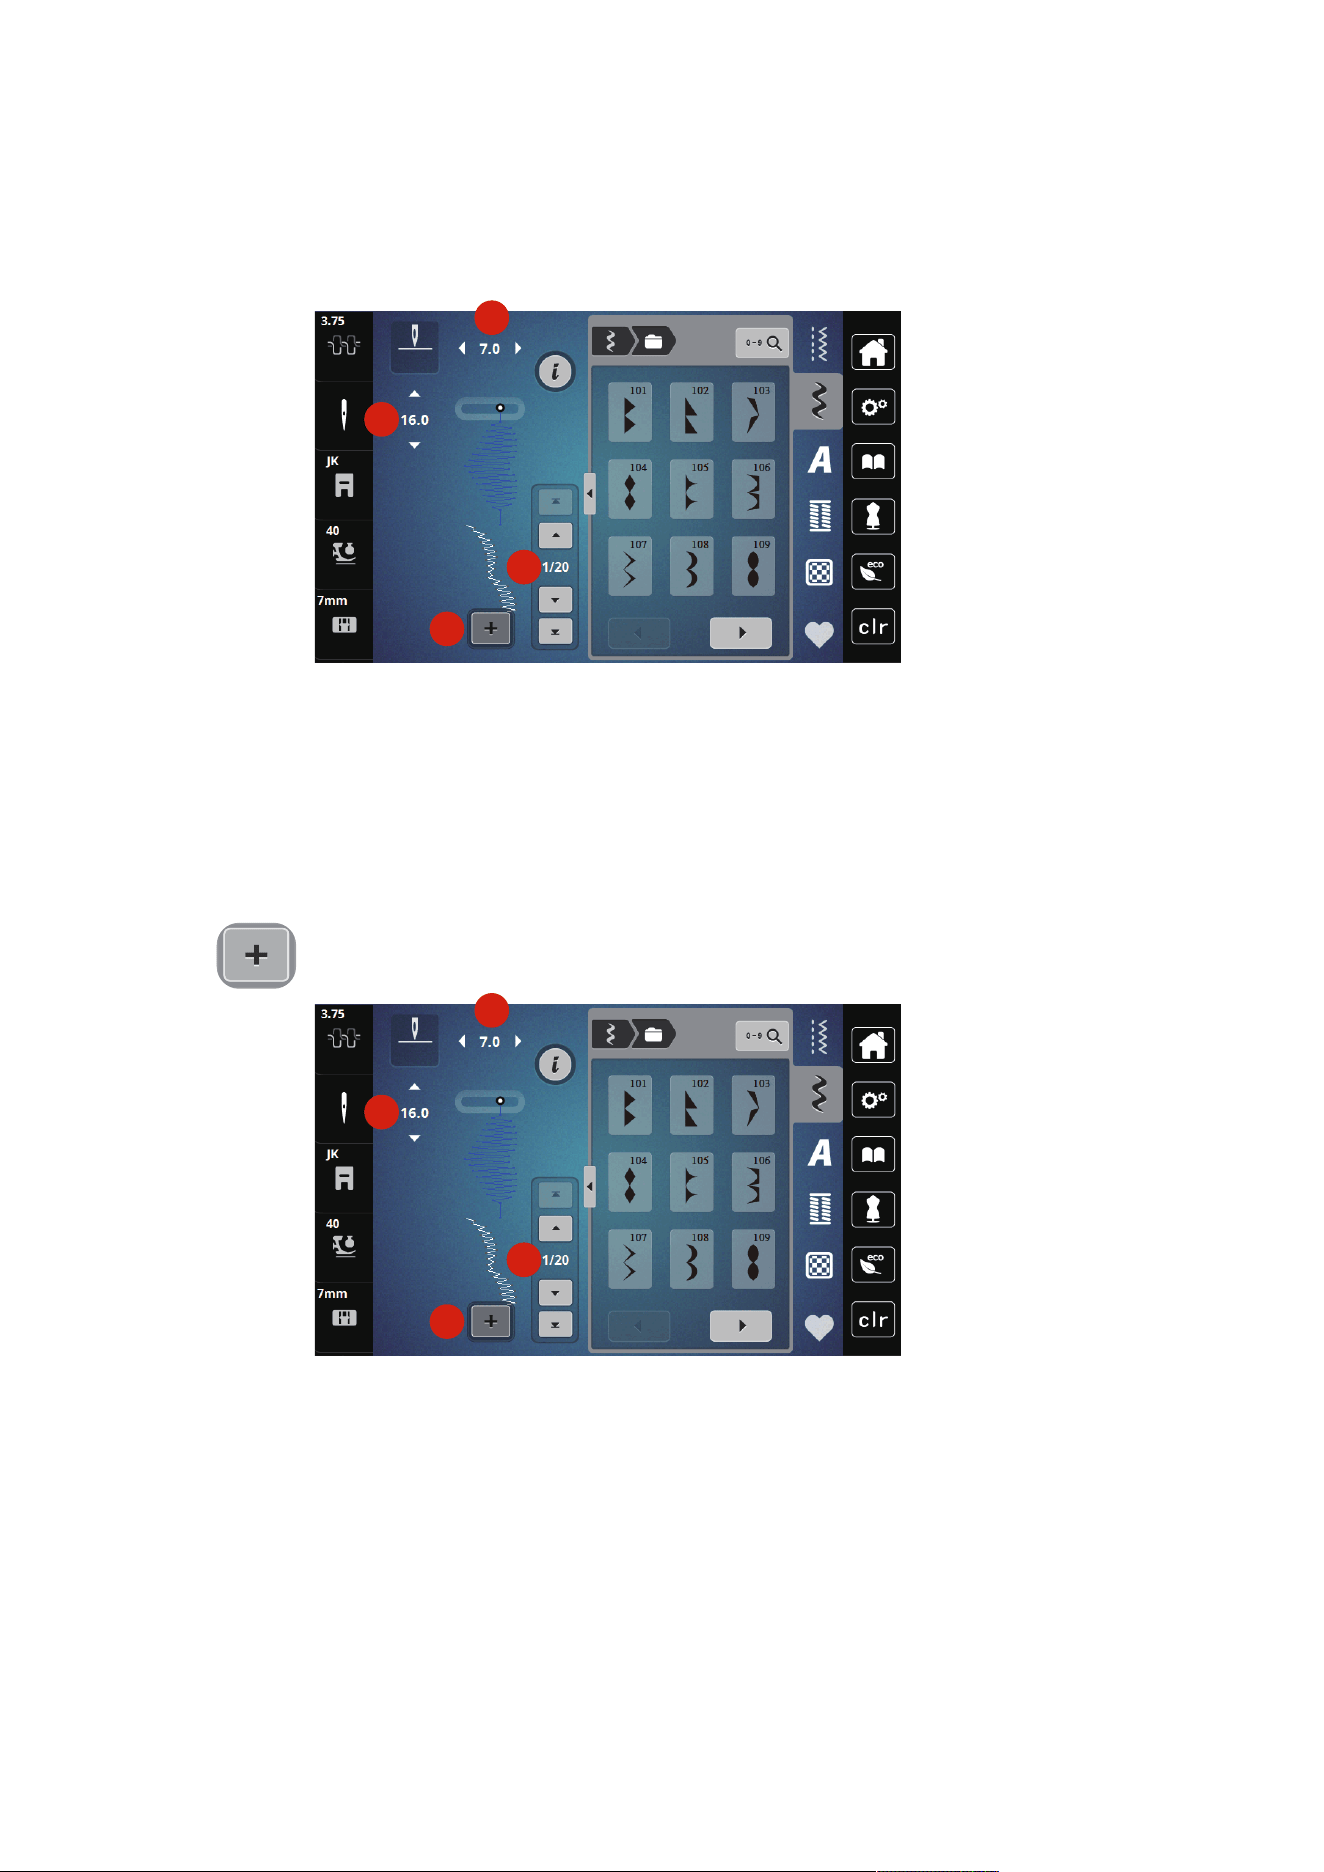
Creative Sewing
68
2023-06 EN 5020079.40A.04
5.6 Combining Stitch Patterns
Overview Combi Mode
1
2
3
4
1 «Stitch Width» 3 «Combination Mode/Single Mode»
2 «Stitch Length» 4 Individual Stitch Pattern within the Combination
Creating Stitch Pattern Combinations
In the Combi mode stitch patterns and alphabets can be combined according to your wish. Each
combination can hold up to 20 stitches. Patterns created in the Stitch Designer cannot be integrated in the
pattern combinations.
> Tap «Combination Mode/Single Mode»(3).
> Select the desired stitch patterns.
1
2
3
4
> To get back to the Single Mode, tap «Combination Mode/Single Mode» again.
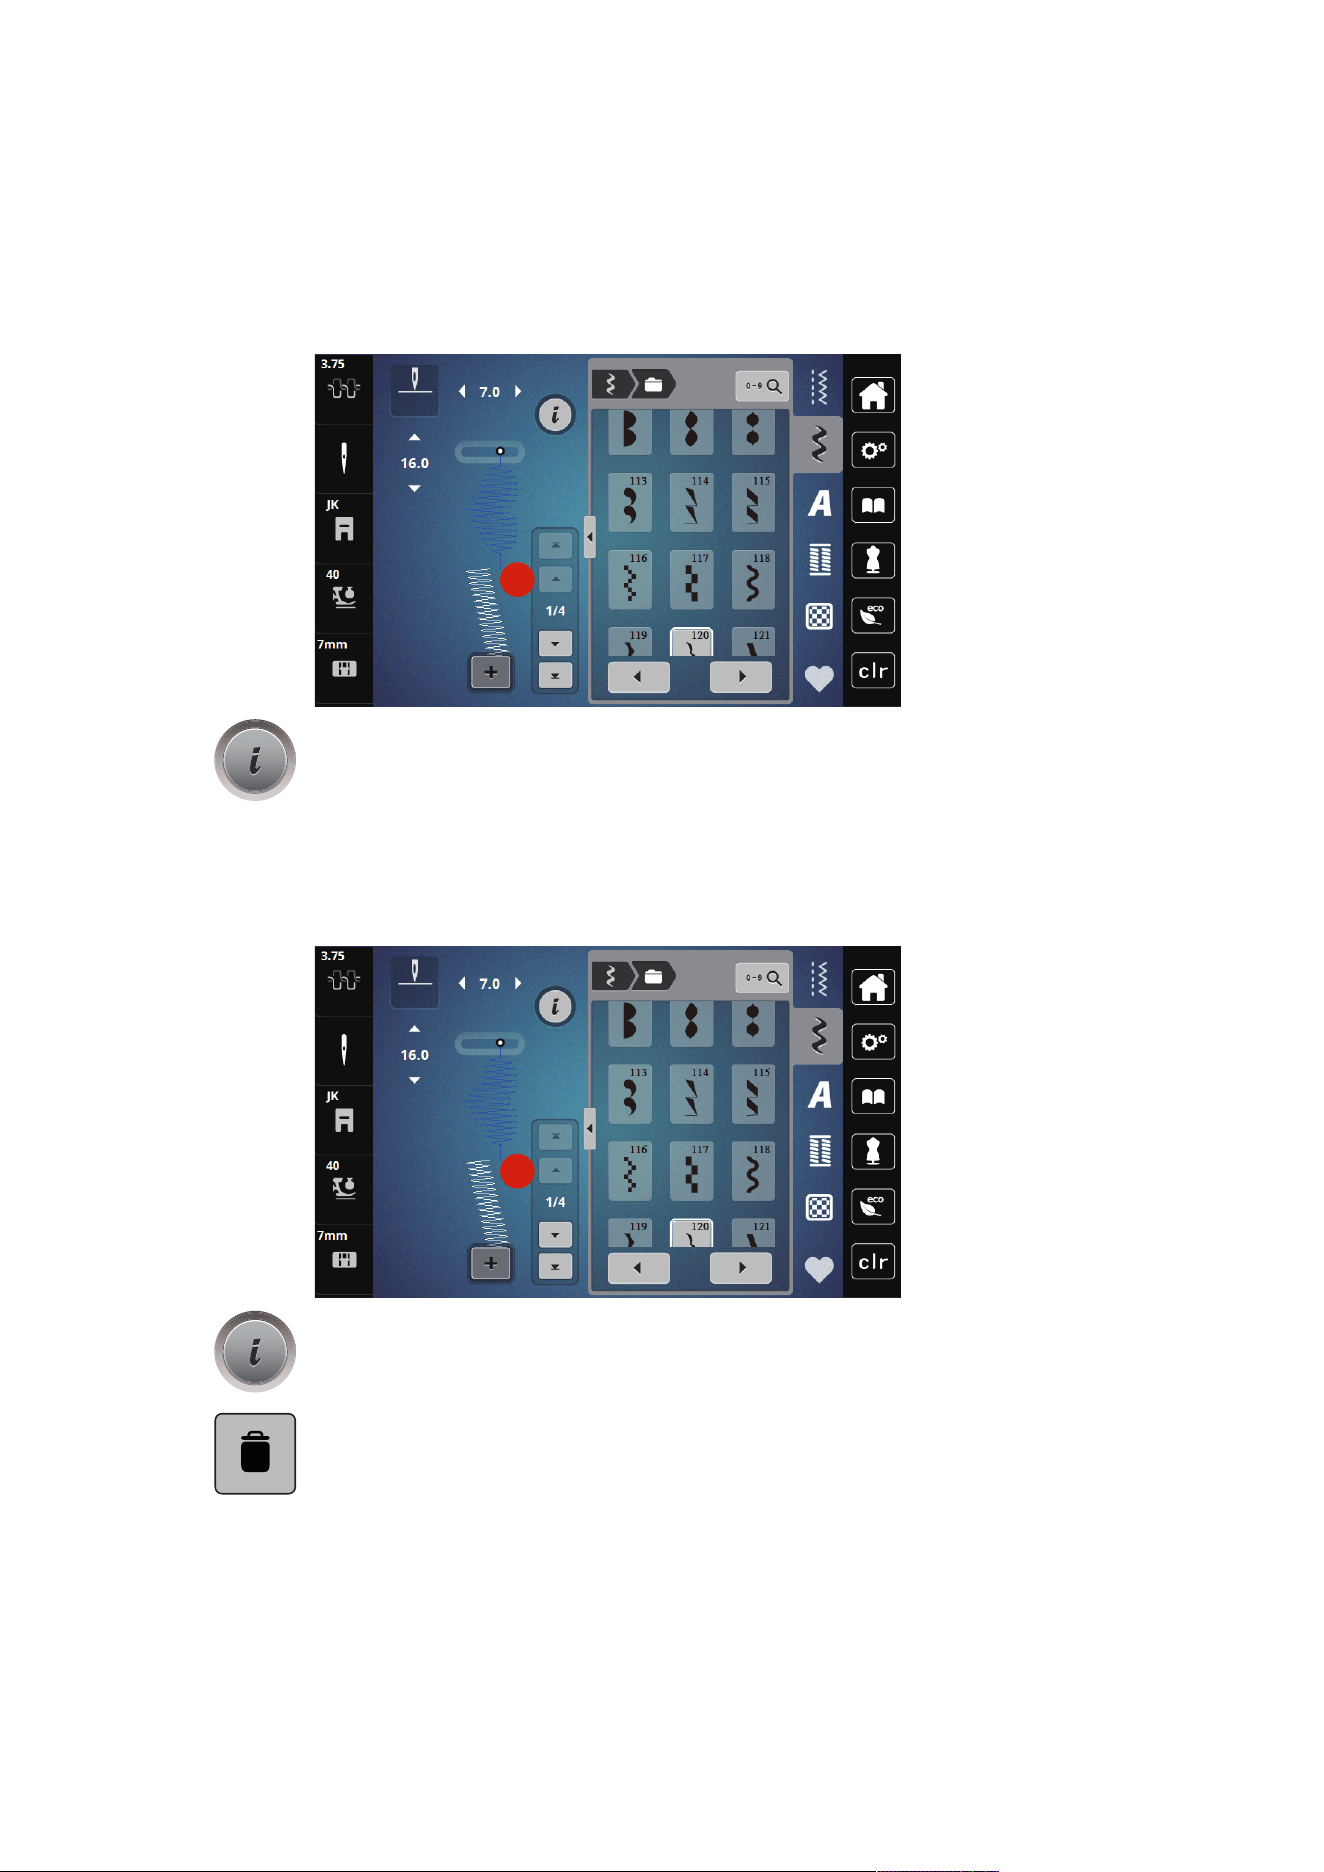
Creative Sewing
69
2023-06 EN 5020079.40A.04
Editing a Single Stitch Pattern
Prerequisite:
• A stitch pattern combination has been created.
> To select a single stitch pattern, tap the desired position(1) within the stitch pattern combination.
1
> To edit the single stitch pattern, tap «i-Dialog».
Deleting a Single Stitch Pattern
> Create a stitch pattern combination.
> To select a single stitch pattern, tap the desired position(1) within the stitch pattern combination.
1
> Tap «i-Dialog».
> To delete the single stitch pattern, tap «Deleting».
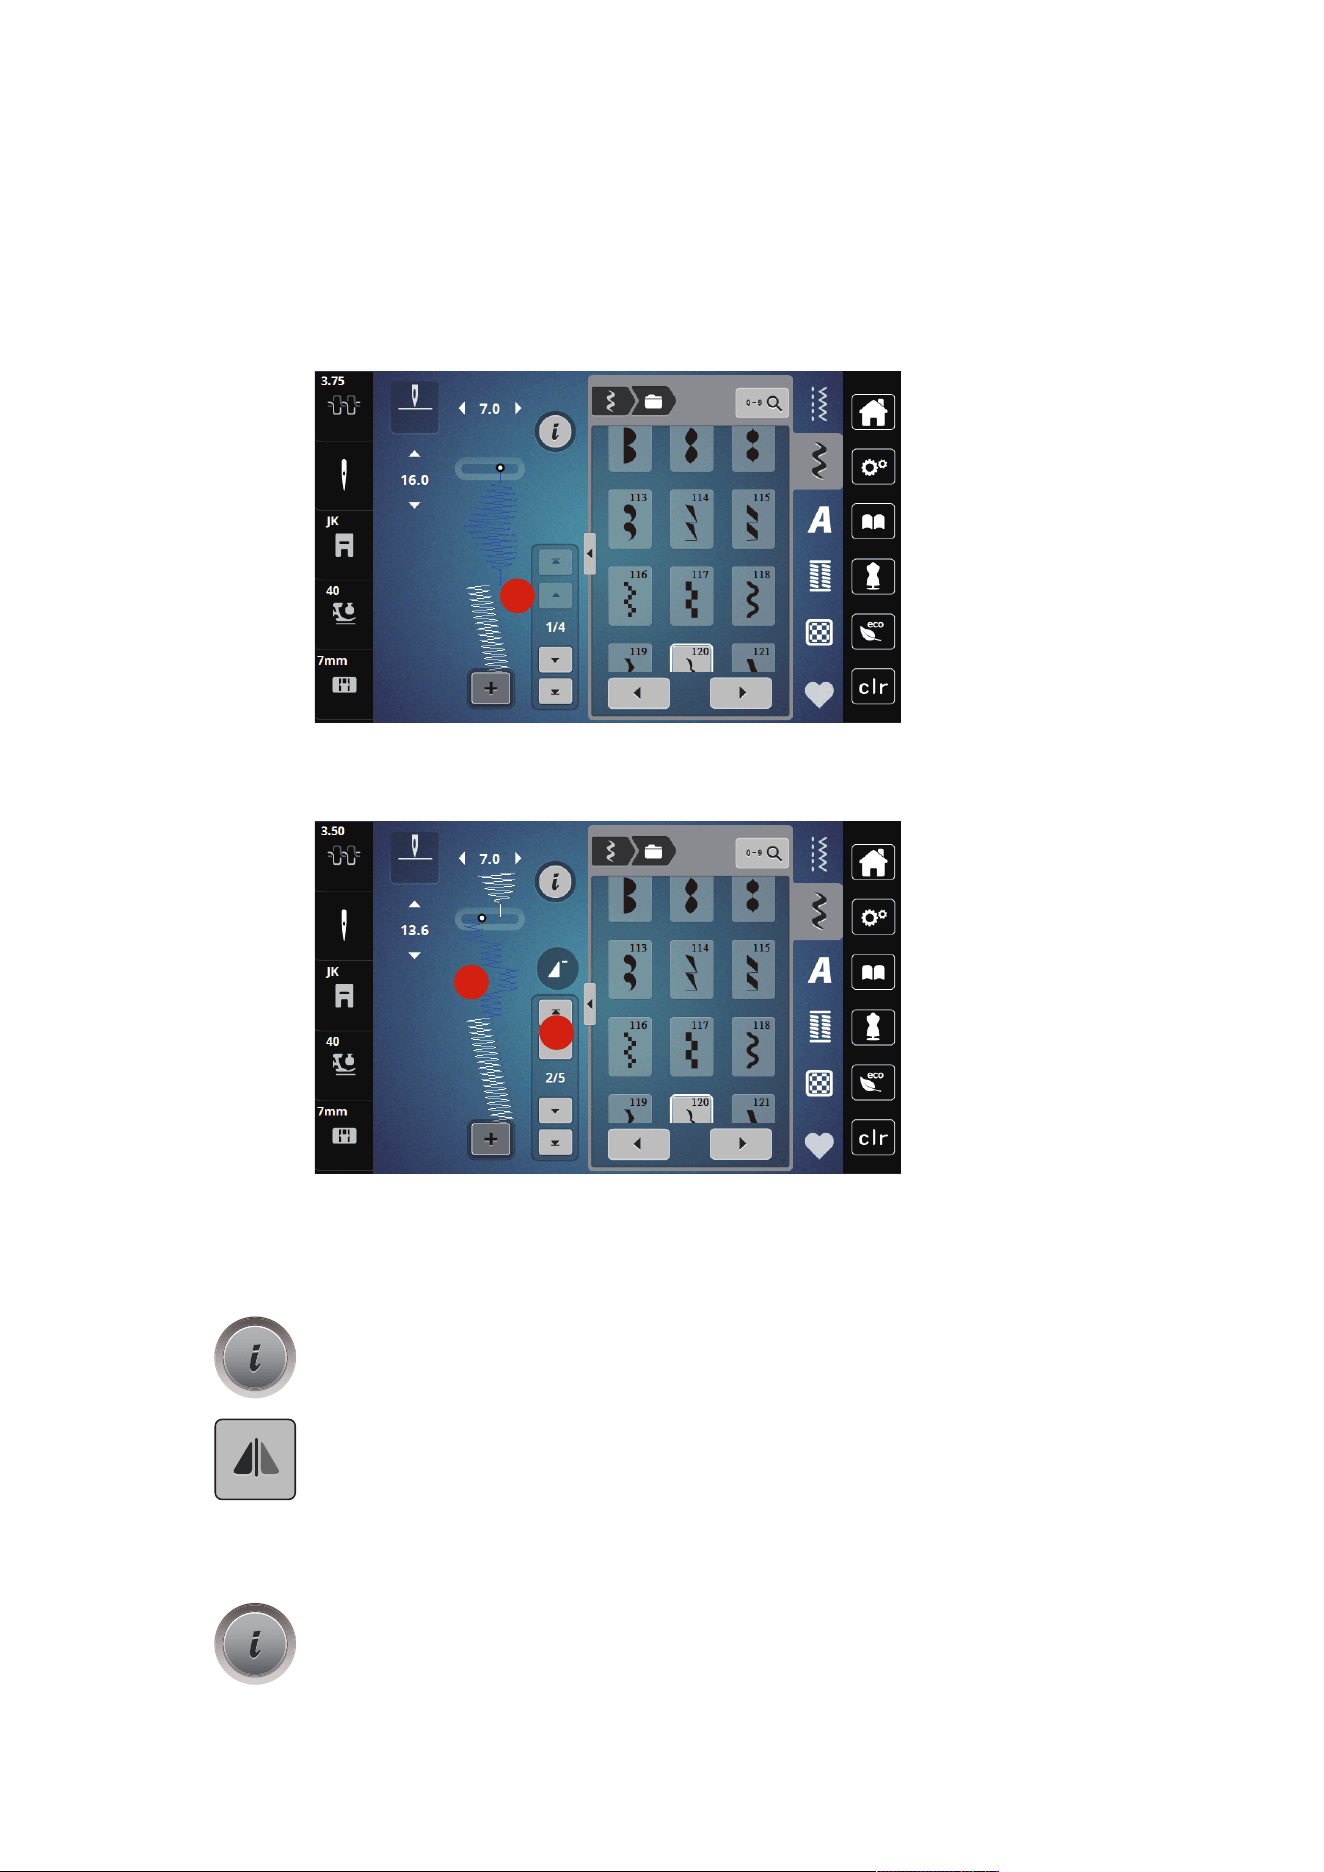
Creative Sewing
70
2023-06 EN 5020079.40A.04
Adding a Single Stitch Pattern
> To add a stitch pattern at the start, go right to the front of the stitch pattern group and tap the second
upper arrow (1).
– Both upper arrows are inactive.
> Add a new stitch pattern.
1
> Create a stitch pattern combination.
> To select a new stitch pattern according to the selected stitch pattern, tap the desired position(2) within
the stitch pattern combination or use the arrow(3).
2
3
Mirroring a Stitch Pattern Combination
Prerequisite:
• A stitch pattern combination has been created.
> Tap «i-Dialog».
> Tap «Edit Entire Combination».
> To mirror the whole stitch pattern combination from left to right, tap, «Mirror Image Left/Right».
> To reset the changes and revert to the default settings, tap «Mirror Image Left/Right».
Programming Pattern Repeat
> Create a stitch pattern combination.
> Tap «i-Dialog».
> Tap «Edit Entire Combination».
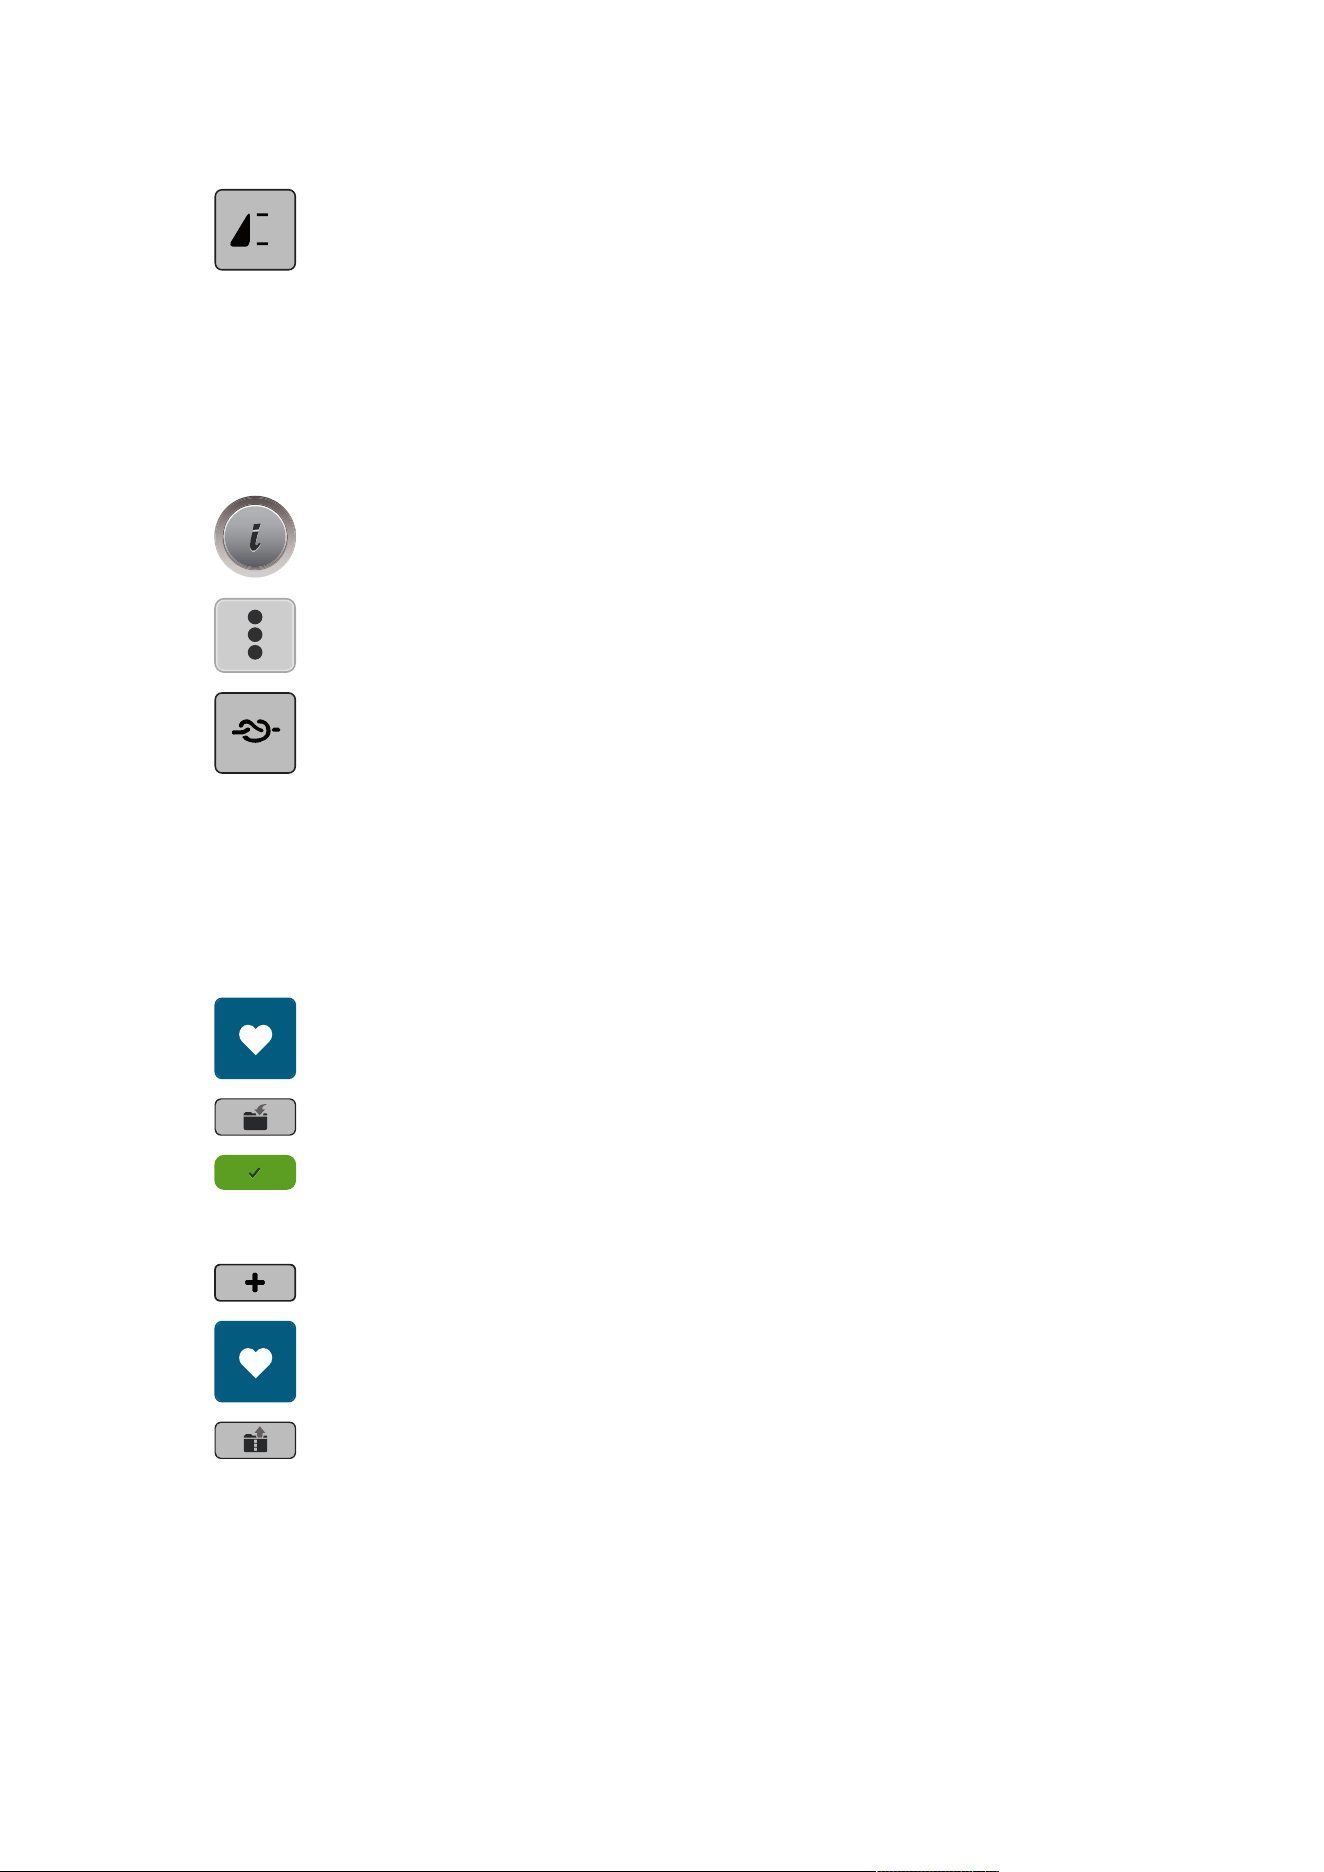
Creative Sewing
71
2023-06 EN 5020079.40A.04
x
> To repeat the stitch pattern combination, tap «Pattern Repeat» once.
– «Securing» at the final end of the combination is activated.
> To repeat the stitch pattern combination up to nine times, tap «Pattern Repeat» again.
> To switch off the pattern repetition, press and hold «Pattern Repeat» until an «X» appears in place of a
number.
Securing a Stitch Pattern Combination
Securing at the end of the stitch pattern combination is deactivated. To activate securing at the end of the
stitch pattern combination:
> Create a stitch pattern combination.
> Tap «i-Dialog».
> Tap «Edit Entire Combination».
> Tap «Securing Stitches».
Saving a Stitch Pattern Combination
To use an individually created stitch pattern combinations again, they can be saved in the folder «Personal
Memory».
Prerequisite:
• A stitch pattern combination has been created.
> Tap «Personal Memory».
> Tap «Save Stitch Pattern».
> To save the stitch pattern combination, tap «Confirm».
Loading a Stitch Pattern Combination
> Tap «Combination Mode/Single Mode».
> Tap «Personal Memory».
> Tap «Loading a Stitch Pattern Combination».
> Select a stitch pattern combination.
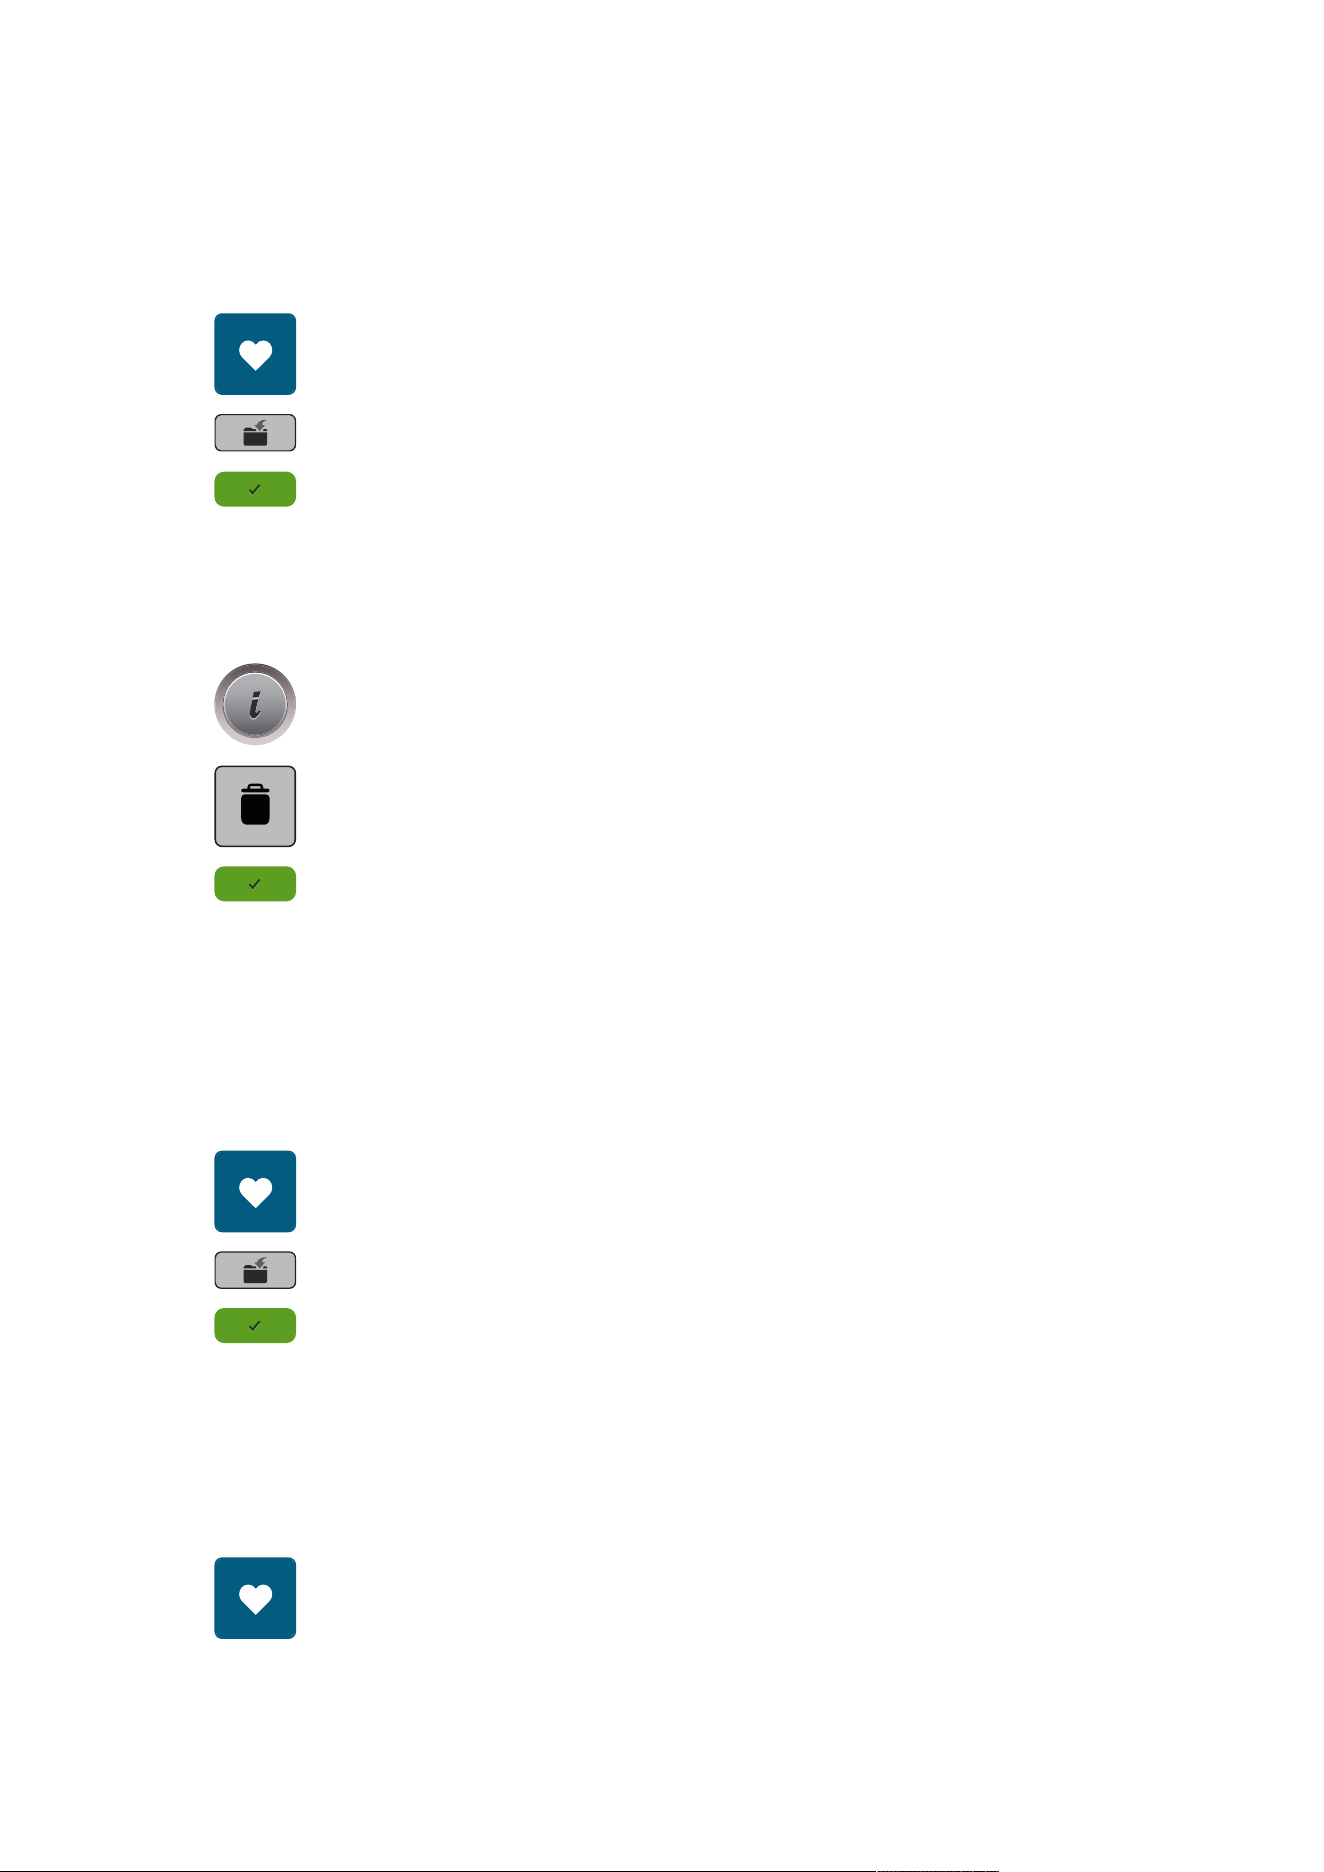
Creative Sewing
72
2023-06 EN 5020079.40A.04
Overwriting a Stitch Pattern Combination
Prerequisite:
• A stitch pattern combination has been created.
> Tap «Personal Memory».
> Tap «Save Stitch Pattern».
> Select the stitch pattern combination which is to be overwritten.
> To overwrite the stitch pattern combination, tap «Confirm».
Deleting a Stitch Pattern Combination
Prerequisite:
• A stitch pattern combination has been created.
> Tap «i-Dialog».
> Tap «Edit Entire Combination».
> Tap «Deleting».
> Tap «Confirm».
5.7 Administering Stitch Patterns
Saving Stitch Patterns in Personal Memory
In the filing system «Personal Memory» any stitch patterns, also those which have been individually edited,
can be saved.
> Select a stitch pattern, alphabet or buttonhole.
> Edit the stitch pattern.
> Tap «Personal Memory».
> Tap «Save Stitch Pattern».
> Tap «Confirm».
Overwriting Stitch Patterns from the Personal Memory
Prerequisite:
• The stitch pattern is saved in the personal memory.
> Select a stitch pattern, alphabet or buttonhole.
> Edit the stitch pattern.
> Tap «Personal Memory».

Creative Sewing
73
2023-06 EN 5020079.40A.04
> Tap «Save Embroidery Design».
> Select the stitch pattern which should be overwritten.
> Tap «Confirm».
Loading Stitch Patterns from the Personal Memory
Prerequisite:
• The stitch pattern is saved in the personal memory.
> Tap «Personal Memory».
> Tap «Load Embroidery Design».
> Select a stitch pattern.
Deleting Stitch Patterns from the Personal Memory
Prerequisite:
• The stitch pattern is saved in the personal memory.
> Tap «Personal Memory».
> Tap «Deleting».
> Select a stitch pattern.
> Tap «Confirm».
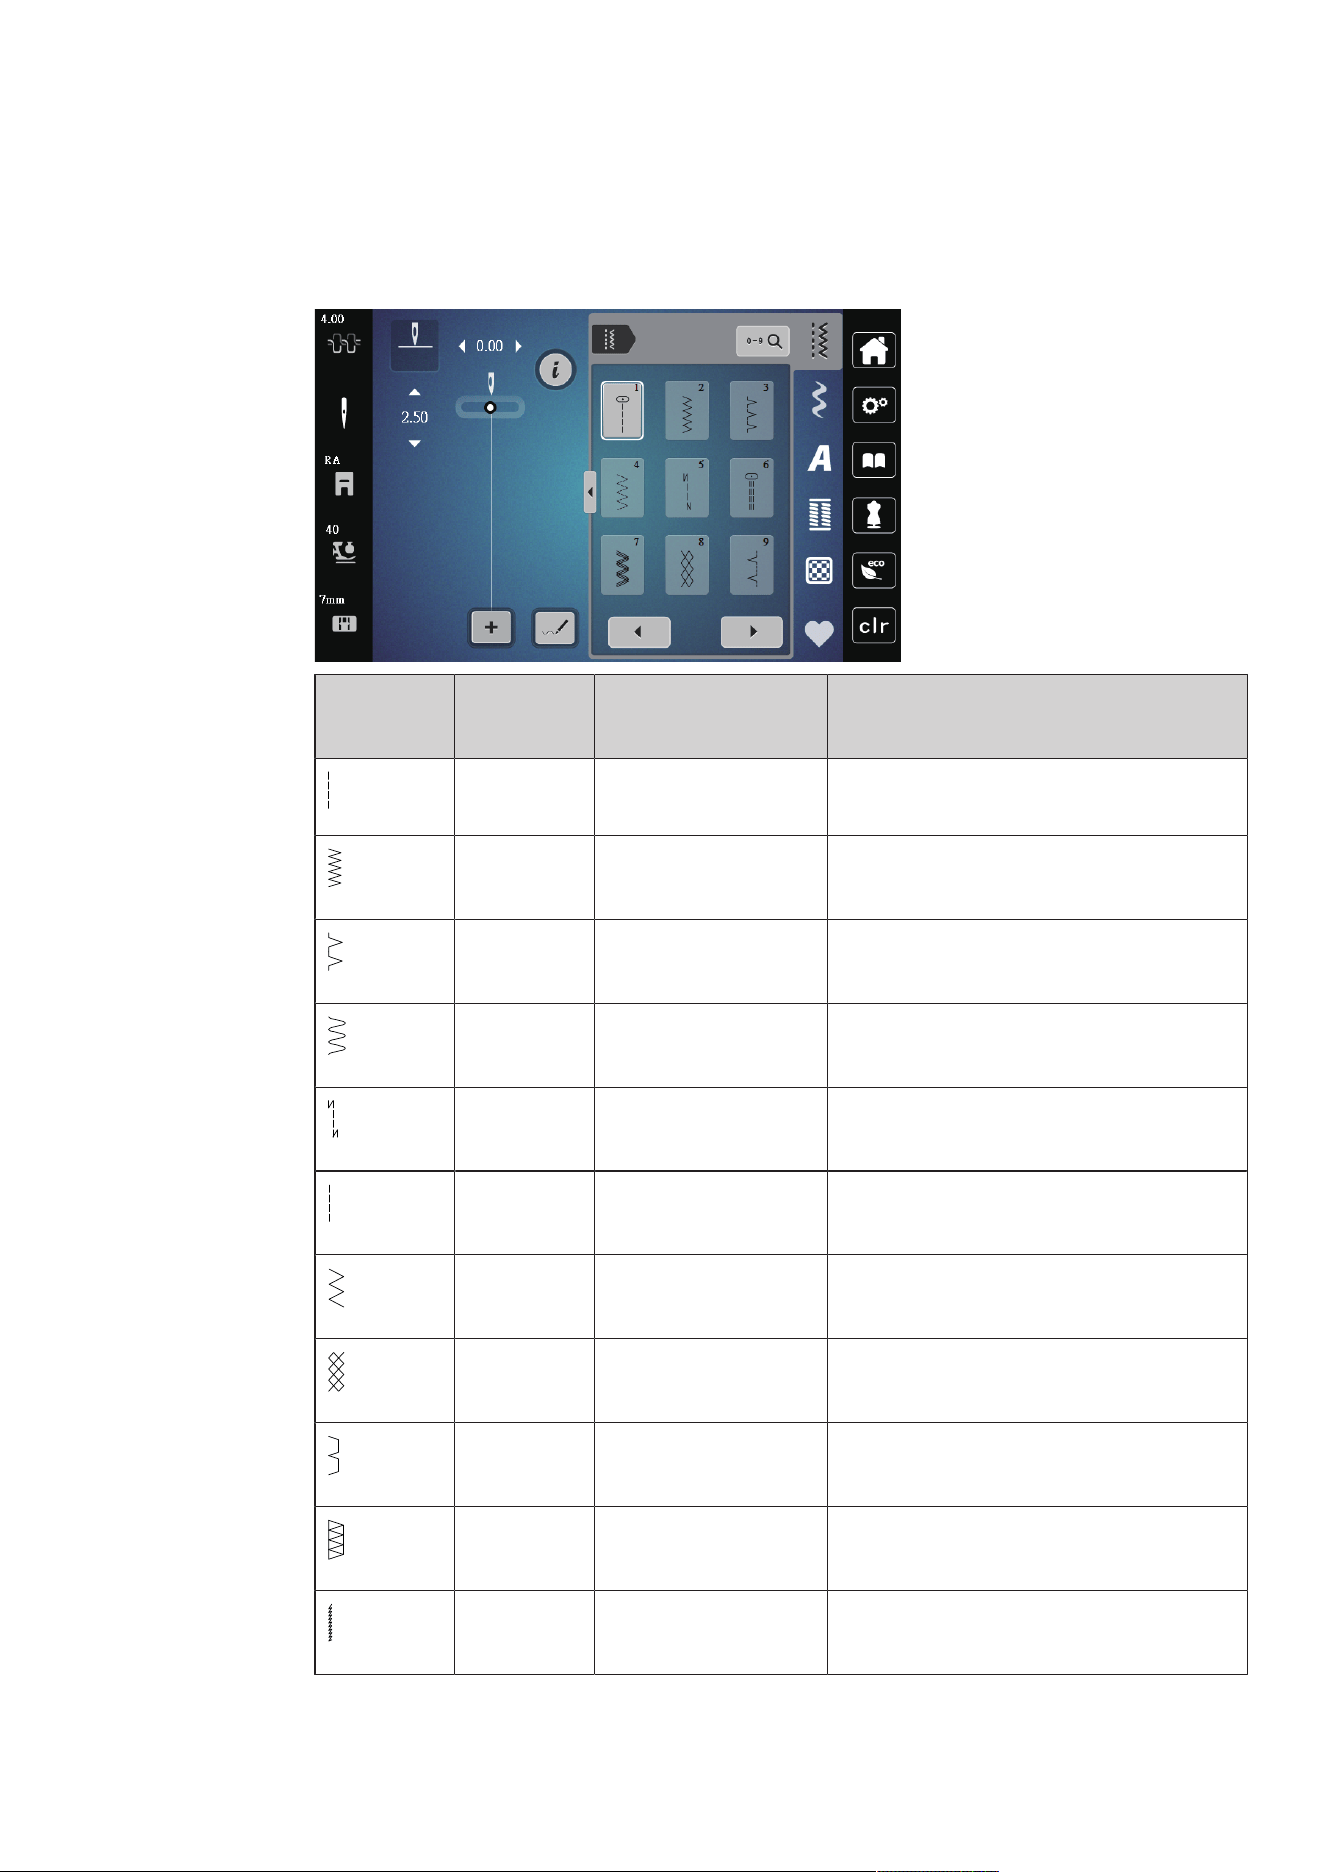
Practical Stitches
74
2023-06 EN 5020079.40A.04
6 Practical Stitches
6.1 Overview Practical Stitches
Stitch
Pattern
Stitch
Number
Name Description
1 Straight Stitch Seams and topstitching.
2 Zigzag Reinforcing seams, overcasting edges, sewing
elastic seams and attaching lace.
3 Vari-Overlock Sewing and finishing in one step of elastic
fabrics.
4 Running Stitch Darning with running stitch, mending fabrics,
reinforcing edges.
5 Securing Program Securing starts and ends of seams by straight
stitching.
6 Triple Straight Stitch Reinforced seams in heavy fabrics; visible
hems and seams.
7 Triple Zigzag Reinforced seams in heavy fabrics; visible
hems and seams.
8 Honeycomb Stitch For stretch fabrics and hems. Is also used with
elastic thread in the bobbin.
9 Blind Stitch Blind hems, shell edging effect on soft jerseys
and fine material, decorative seams.
10 Double Overlock Sewing and finishing in one step of elastic
fabrics.
11 Superstretch Stitch For highly stretch open seams. For all types of
clothing.
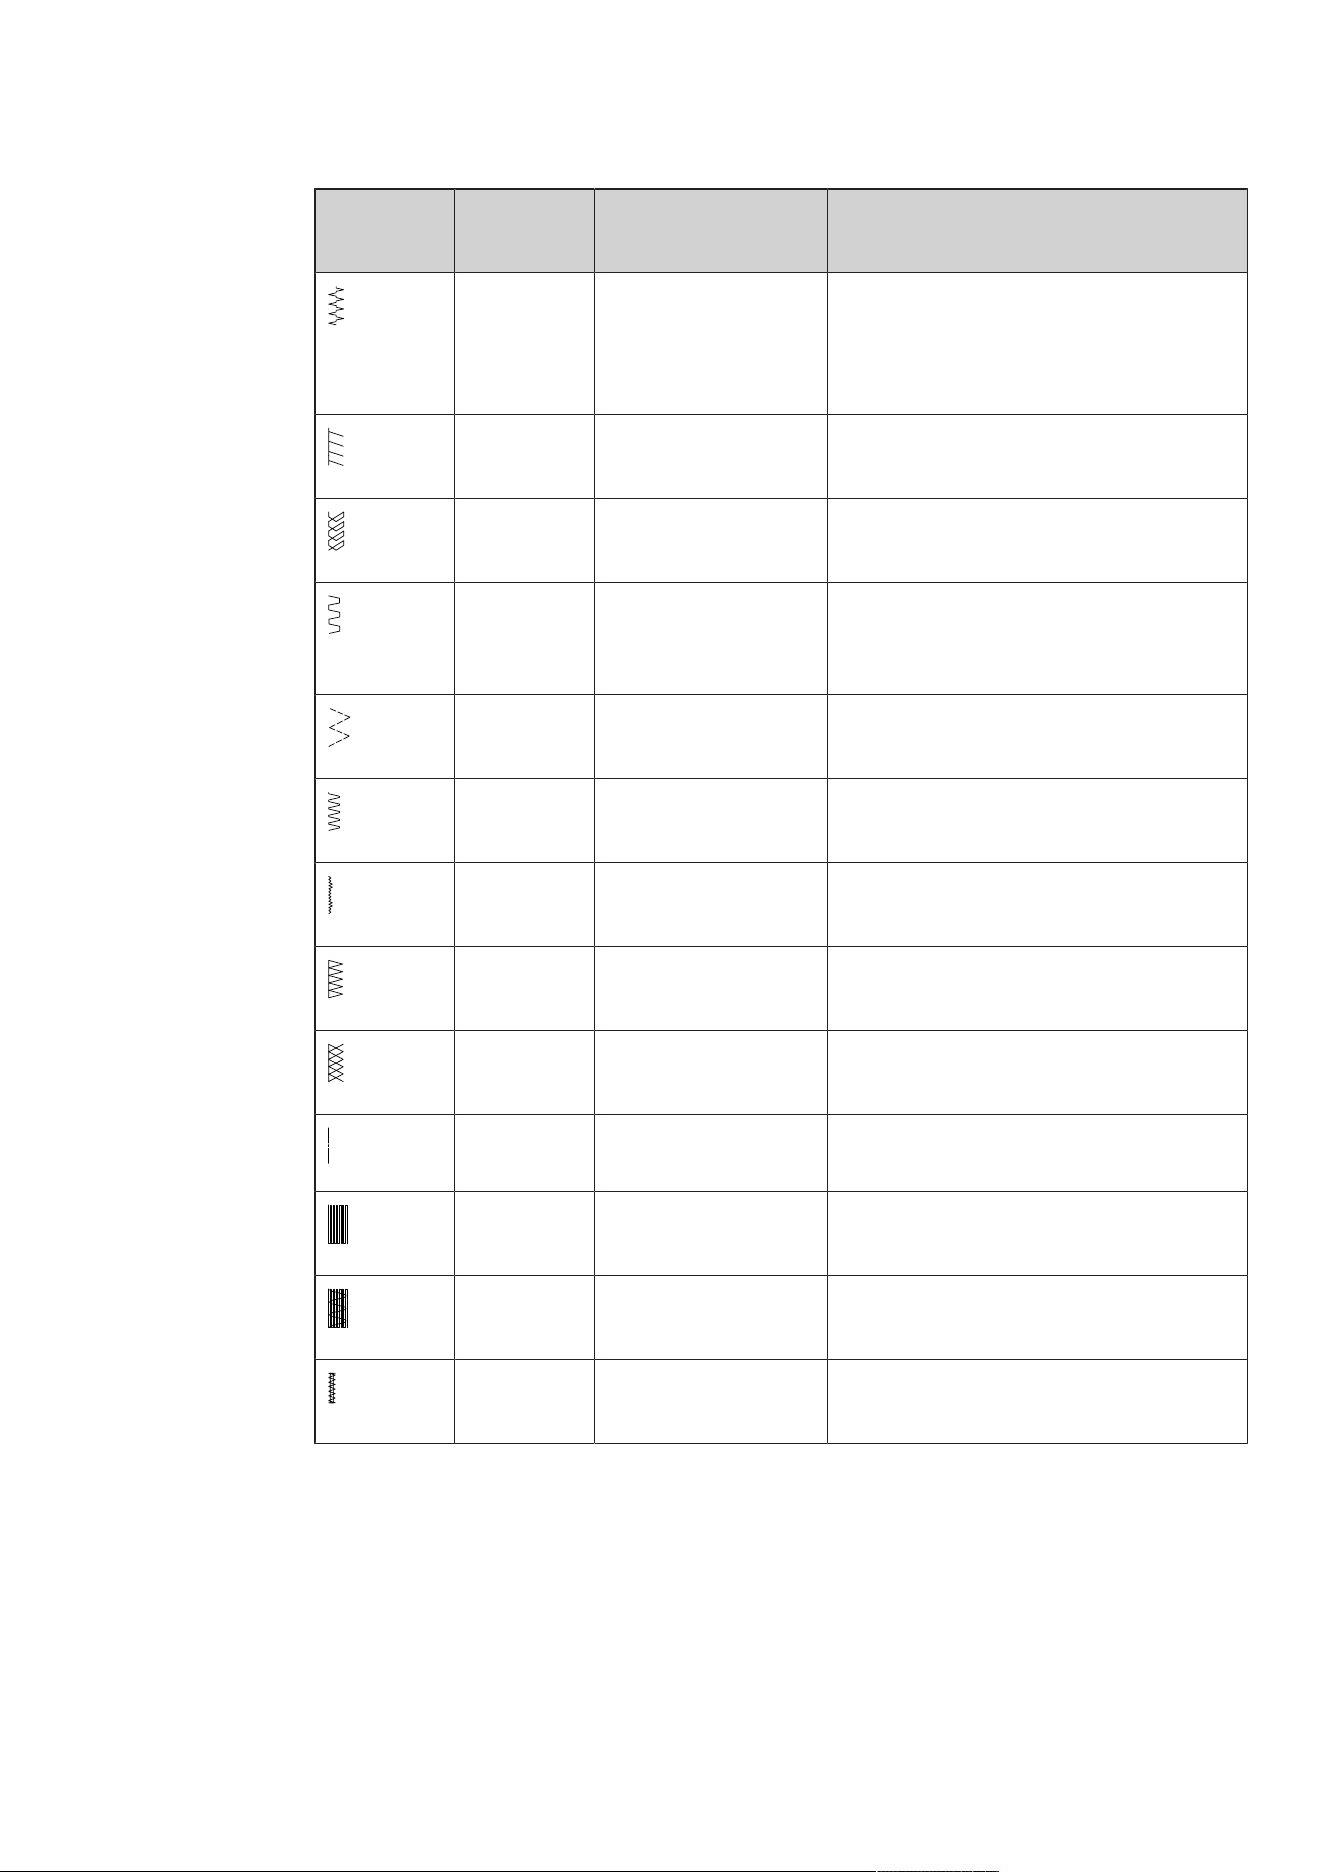
Practical Stitches
75
2023-06 EN 5020079.40A.04
Stitch
Pattern
Stitch
Number
Name Description
12 Gathering Stitch Most types of fabric; gathering with shirring
elastic, butted seams = butting two pressed
edges and sewing together, decorative
stitches.
13 Stretch Overlock Sewing and finishing in one step of elastic
fabrics.
14 Tricot Stitch Visible hems, visible seams in lingerie,
sweaters, mending jersey.
15 Universal Stitch For firm fabrics such as felt and leather. Flat
joining seams, visible seams, attaching elastic,
decorative seams.
16 Sewn-out Zigzag Edge finishing and reinforcing, attaching
elastic, decorative seam.
17 Lycra Stitch For lycra fabrics; flat joining seams and hems,
reinforced seaming on underwear.
18 Stretch Stitch For highly stretch fabrics; open seam for
sportswear.
19 Reinforced Overlock For medium-weight knitware and toweling.
Overlock seams, flat joining seams.
20 Knit Overlock Sewing and finishing in one step of hand and
machine knitten fabrics.
21 Basting Stitch For seams and hems.
22 Simple Darning
Program
Darning of holes and damaged fabric.
23 Reinforced Darning
Program
Reinforcing darning holes and damaged
fabric.
24 Bartack Program Reinforcing pocket openings, sewing belt
loops.
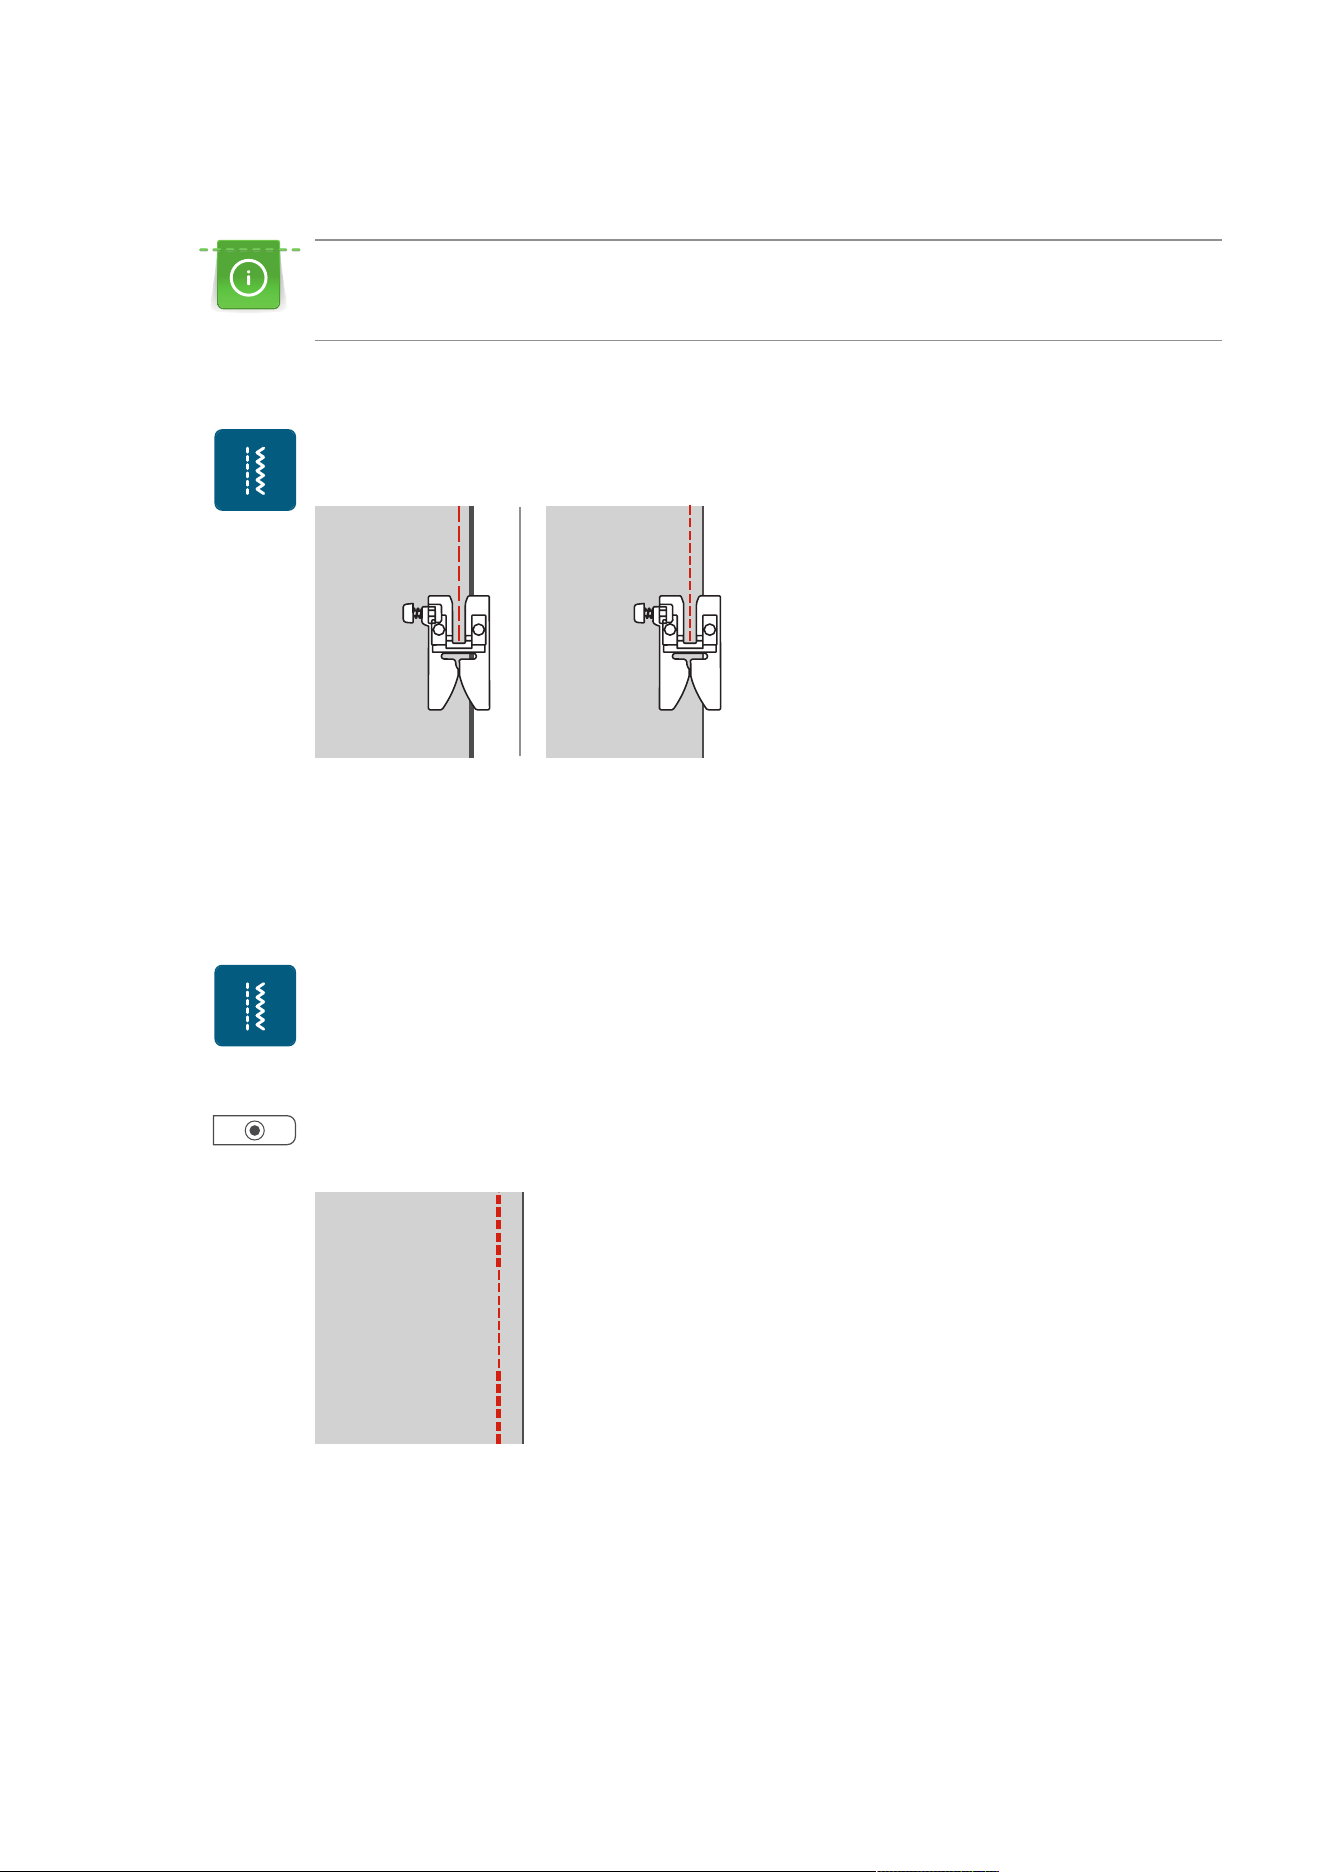
Practical Stitches
76
2023-06 EN 5020079.40A.04
6.2 Sewing Straight Stitch
Adjust the stitch length for the sewing project, e.g. a long stitch for denim (approx. 3–4mm) and a
short stitch for delicate fabric (approx. 2–2.5mm). Adjust the stitch length depending on the thread
thickness, e.g. a long stitch (approx. 3–5mm) for top-stitching with gimp.
Prerequisite:
• The Zigzag Foot (DA) is attached.
> Tap «Practical Stitches».
> Select Straight Stitch No.1.
6.3 Securing with the Automatic Securing Program
Due to a determined number of 6 stitches sewn forwards and 6 stitches sewn in reverse, the securing is
regular.
Prerequisite:
• The Zigzag Foot (DA) is attached.
> Tap «Practical Stitches».
> Select the Securing Program No.5.
> Press the foot control.
– The machine secures automatically.
> Sew the seam in the desired length.
> Push the button «Securing Stitches».
– The machine secures automatically and stops at the end of the securing program.
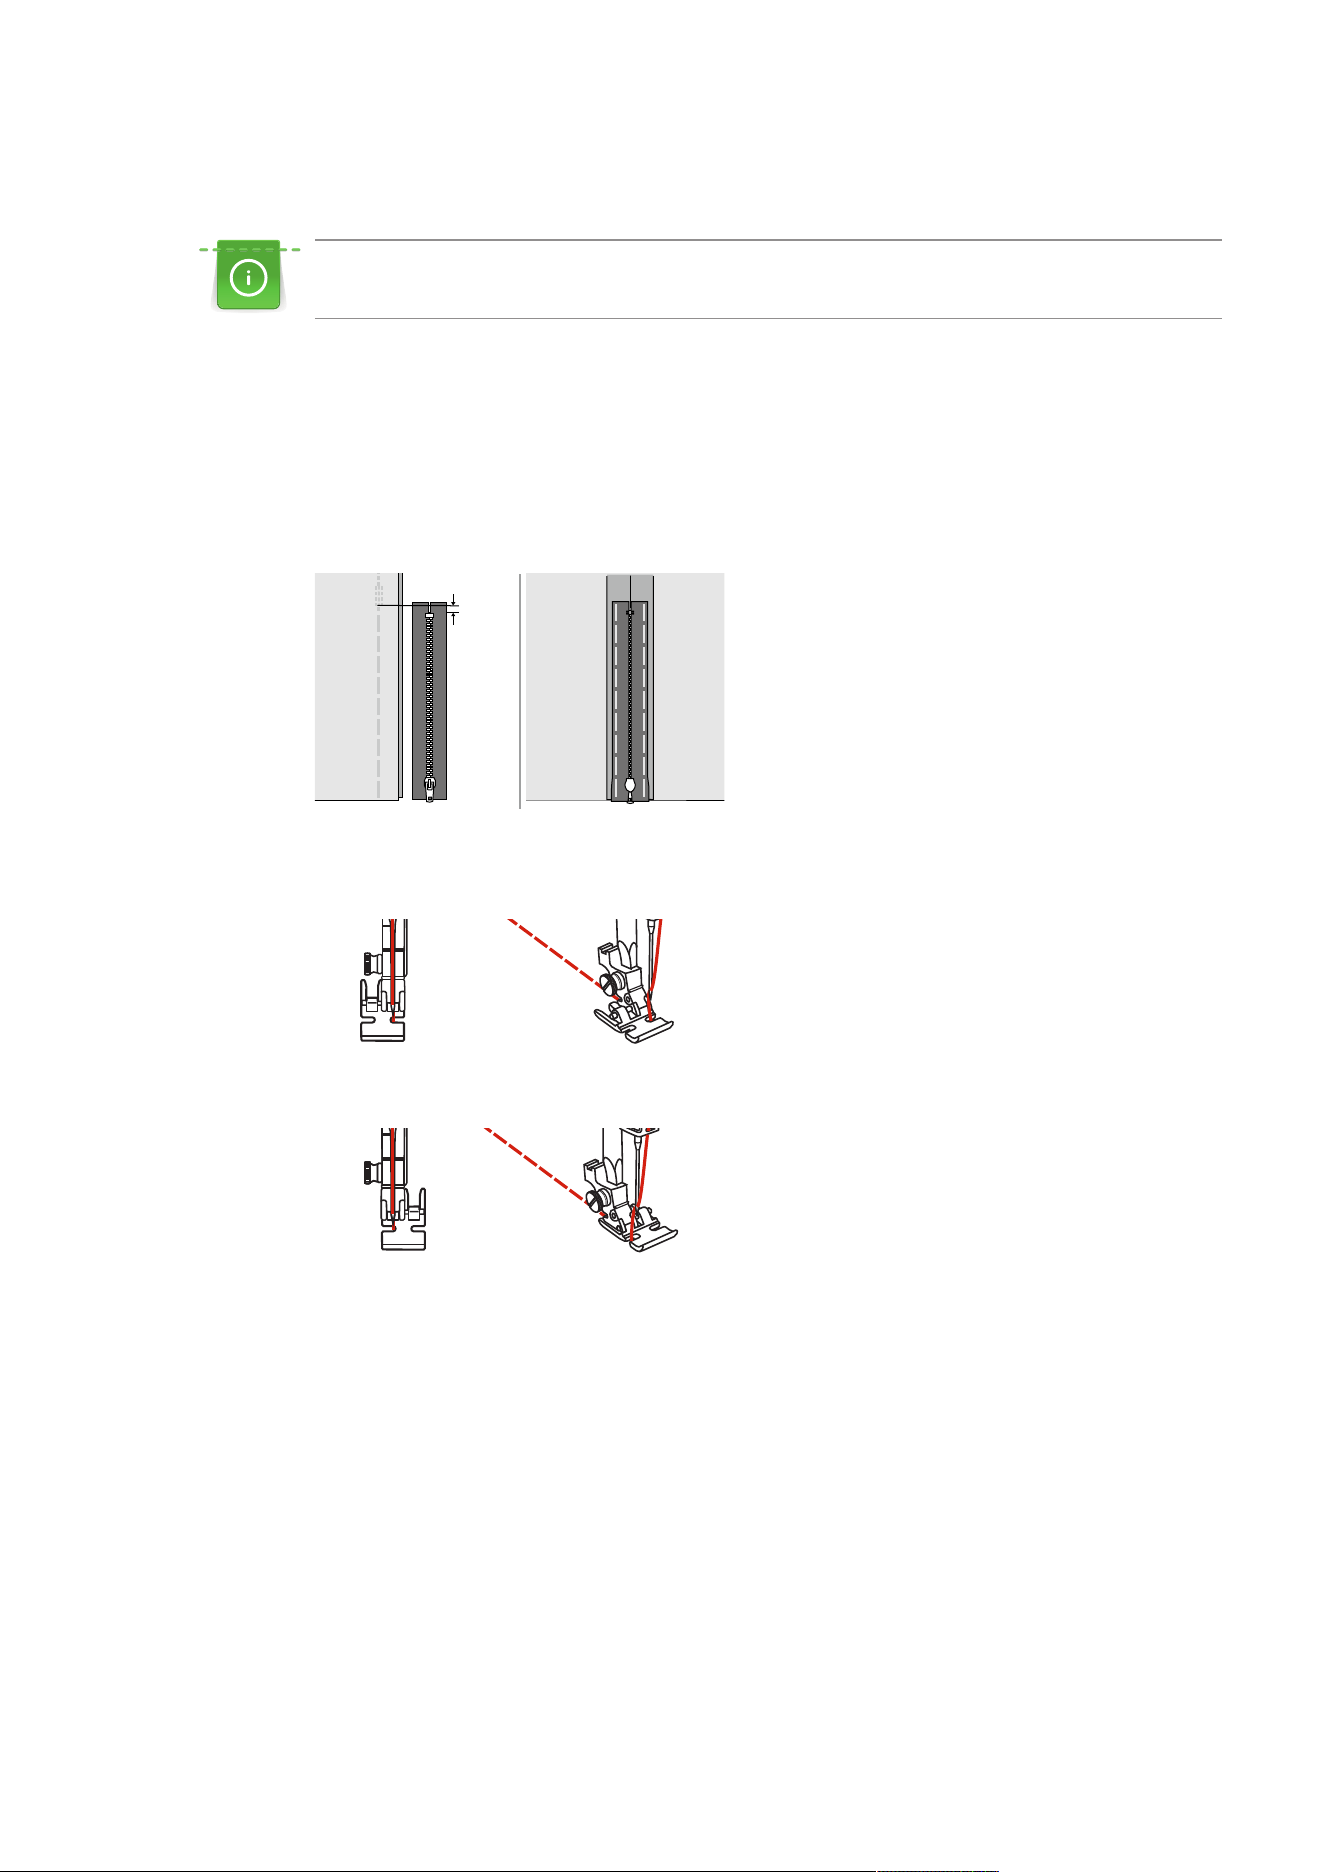
Practical Stitches
77
2023-06 EN 5020079.40A.04
6.4 Sewing in the Zipper
As the fabric feed can be difficult when starting to sew, it is recommended to hold the threads firmly or
to pull the fabric slightly to the back for a few stitches or to sew 1–2cm reverse first.
> Attach the Zigzag Foot (DA).
> Tap «Practical Stitches».
> Select Straight Stitch No.1.
> Close the zipper length with long stitches.
> Finish the seam allowances individually.
> Iron the seam apart.
> Open the zipper length.
> Baste the zipper under the fabric so that the fabric folded edges meet over the center of the zipper.
> Attach the Zipper Foot (JB).
> When sewing the left-hand side of the zipper, secure the right-hand side of the presser foot pin using the
holder.
> When sewing the right-hand side of the zipper, secure the left-hand side of the presser foot pin using the
holder.
> Sew the left-hand side of the open zipper from top to bottom.
> Close the zipper up to approx. 5cm from the end.
> Sew over the lower end and the right-hand side of the zipper.
> Stop before the zipper slider.
> Move the needle into the lower position.
> Raise the presser foot.
> Open the zipper.
> Finish sewing the right side.

Practical Stitches
78
2023-06 EN 5020079.40A.04
> Remoce the tacked seam.
6.5 Sewing Triple Straight Stitch
The triple straight stitch is especially suitable for durable seams and for firm, densely woven fabrics such as
denim and corduroy.
> Attach the Zigzag Foot (DA).
> Tap «Practical Stitches».
> Select the Triple Straight Stitch No.6.
2
1
1 Straight Stitch 2 Triple Straight Stitch
6.6 Sewing Triple Zigzag
In firm fabrics, particularly for denim fabrics, deckchair covers, awnings. Hems on items that are frequently
washed. Finish the seam edges first.
> Attach the Zigzag Foot (DA).
> Tap «Practical Stitches».
> Select the Triple Zigzag No.7.
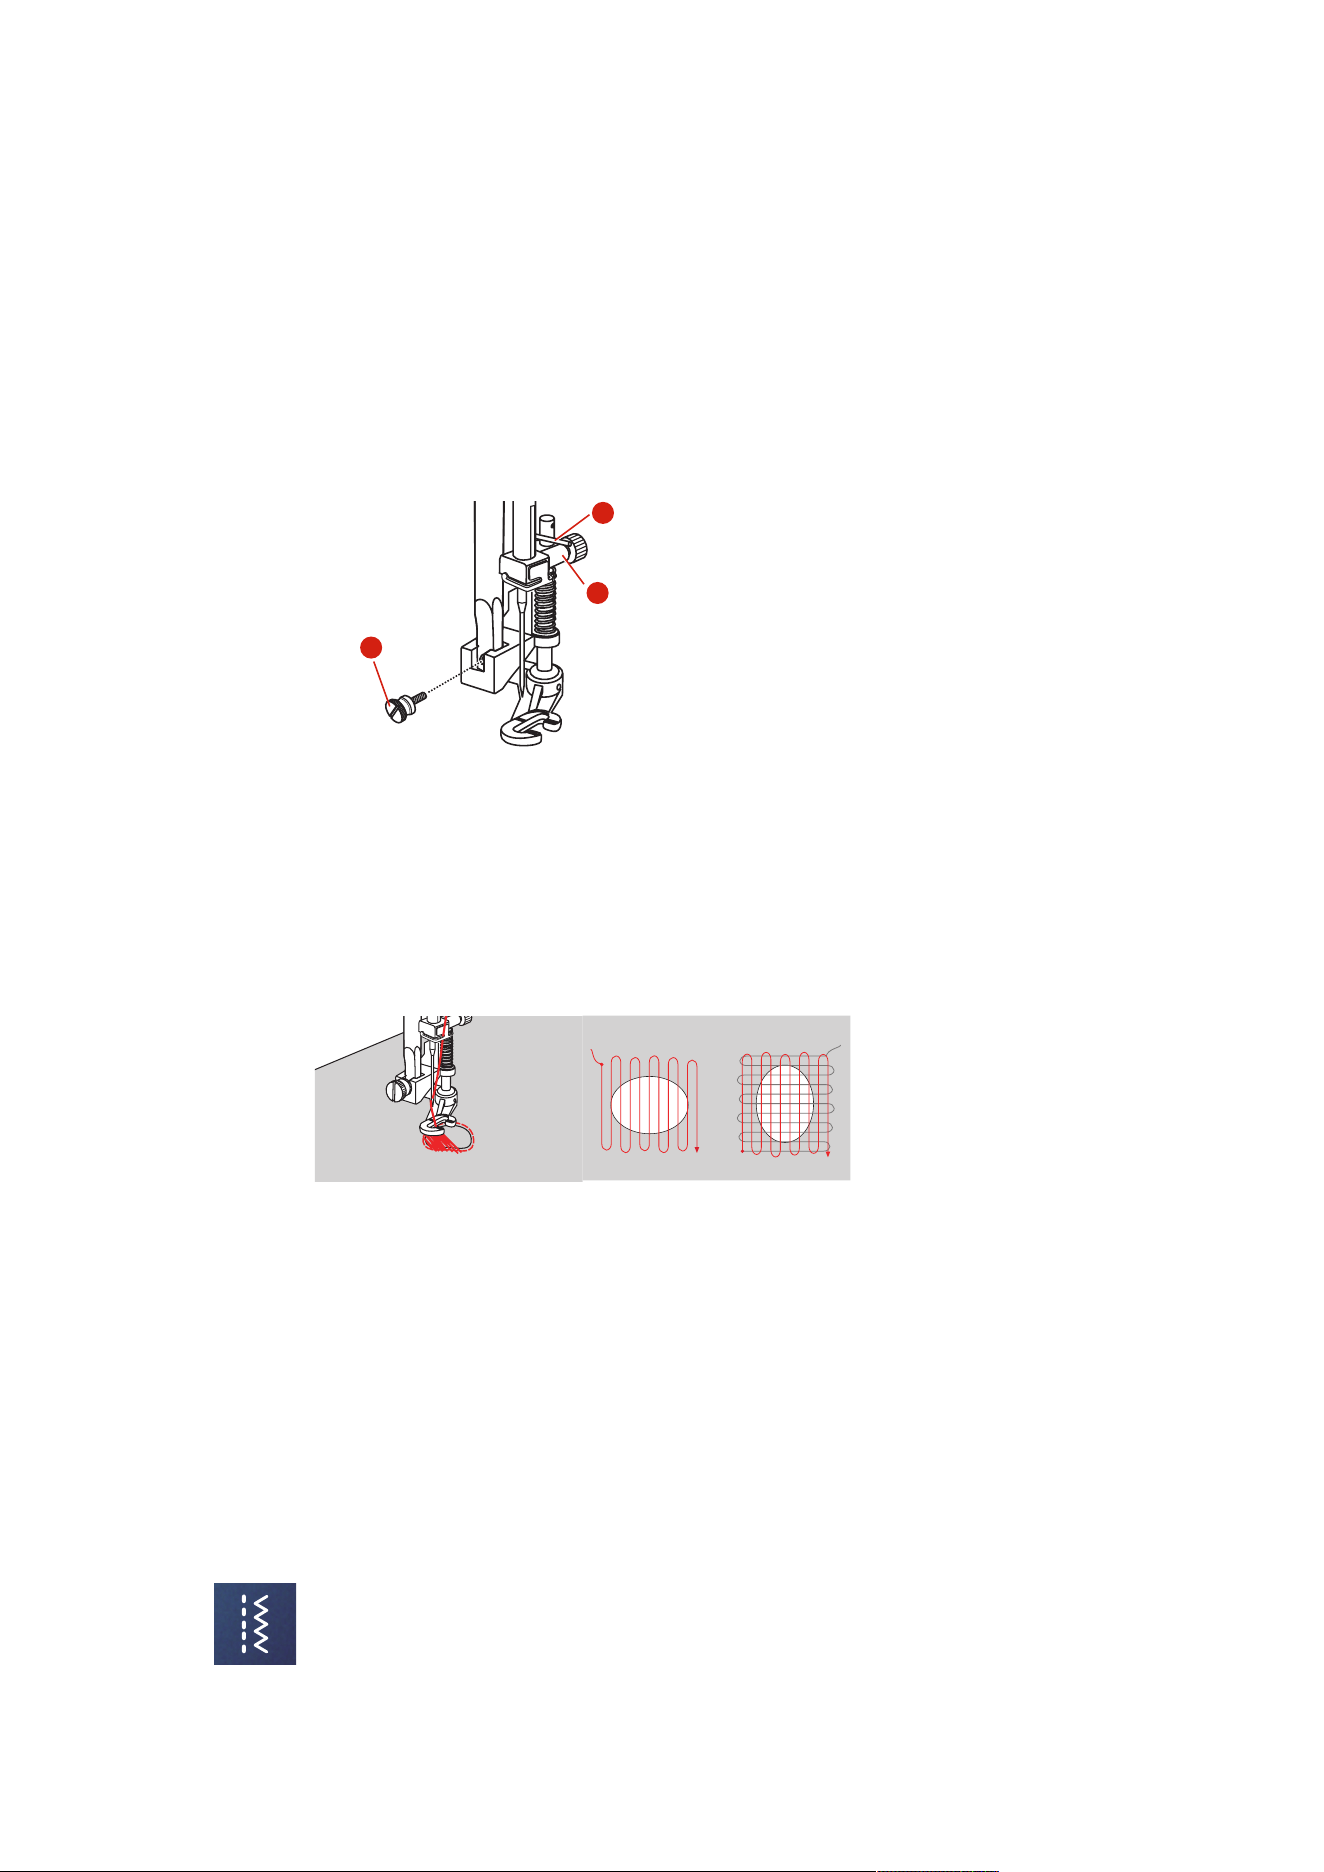
Practical Stitches
79
2023-06 EN 5020079.40A.04
6.7 Manual Darning
Used for darning holes or worn areas in all fabric types.
If the thread is lying on top and a poor stitch formation results, slow down the movement of the sewing
project. If there are knots on the wrong side of the fabric, move the sewing project faster. When the thread
breaks, guide the sewing project more consistently.
> Remove the presser foot holder and attach the free motion foot (RX) to the presser foot holder bar.
– The pin (1) should rest on the upper side of the needle clamping screw (2).
> Press the Free-motion Embroidery Foot (RX) firmly from below with your index finger and tighten the
screw (3).
3
2
1
> Tap «Practical Stitches».
> Select Straight Stitch No.1.
> Lower the feed dog.
> Attach the Slide-on Freearm Extension Table.
> Hoop the sewing project in the round embroidery hoop (optional accessory).
– The darning area remains evenly stretched and cannot be deformed.
> Sew from the left to the right, guide the fabric evenly by hand without using pressure.
> Move in curves when changing the direction to avoid holes and thread breakage.
6.8 Reinforced Darning, Automatic
The simple Darning Program No.22 is especially suitable for quick darning of worn or damaged areas. It is
recommended to use fine material as a backing for the worn and damaged areas or to stick an adhesive
interlining. The simple Darning Program No.22 replaces threads along the lengthwise grain in all materials. If
the darning area becomes distorted, correct with the balance.
The reinforced Darning Program No.23 is especially suitable for quick darning of worn or damaged areas.
The reinforced Darning Program No.23 replaces threads along the lengthwise or transverse grain in all
materials.
Prerequisite:
• The underlay material is fixed with basting stitches.
> Attach the Buttonhole Foot with Slide (RJ).
> Tap «Practical Stitches».
> Select the reinforced Darning Program No.23.
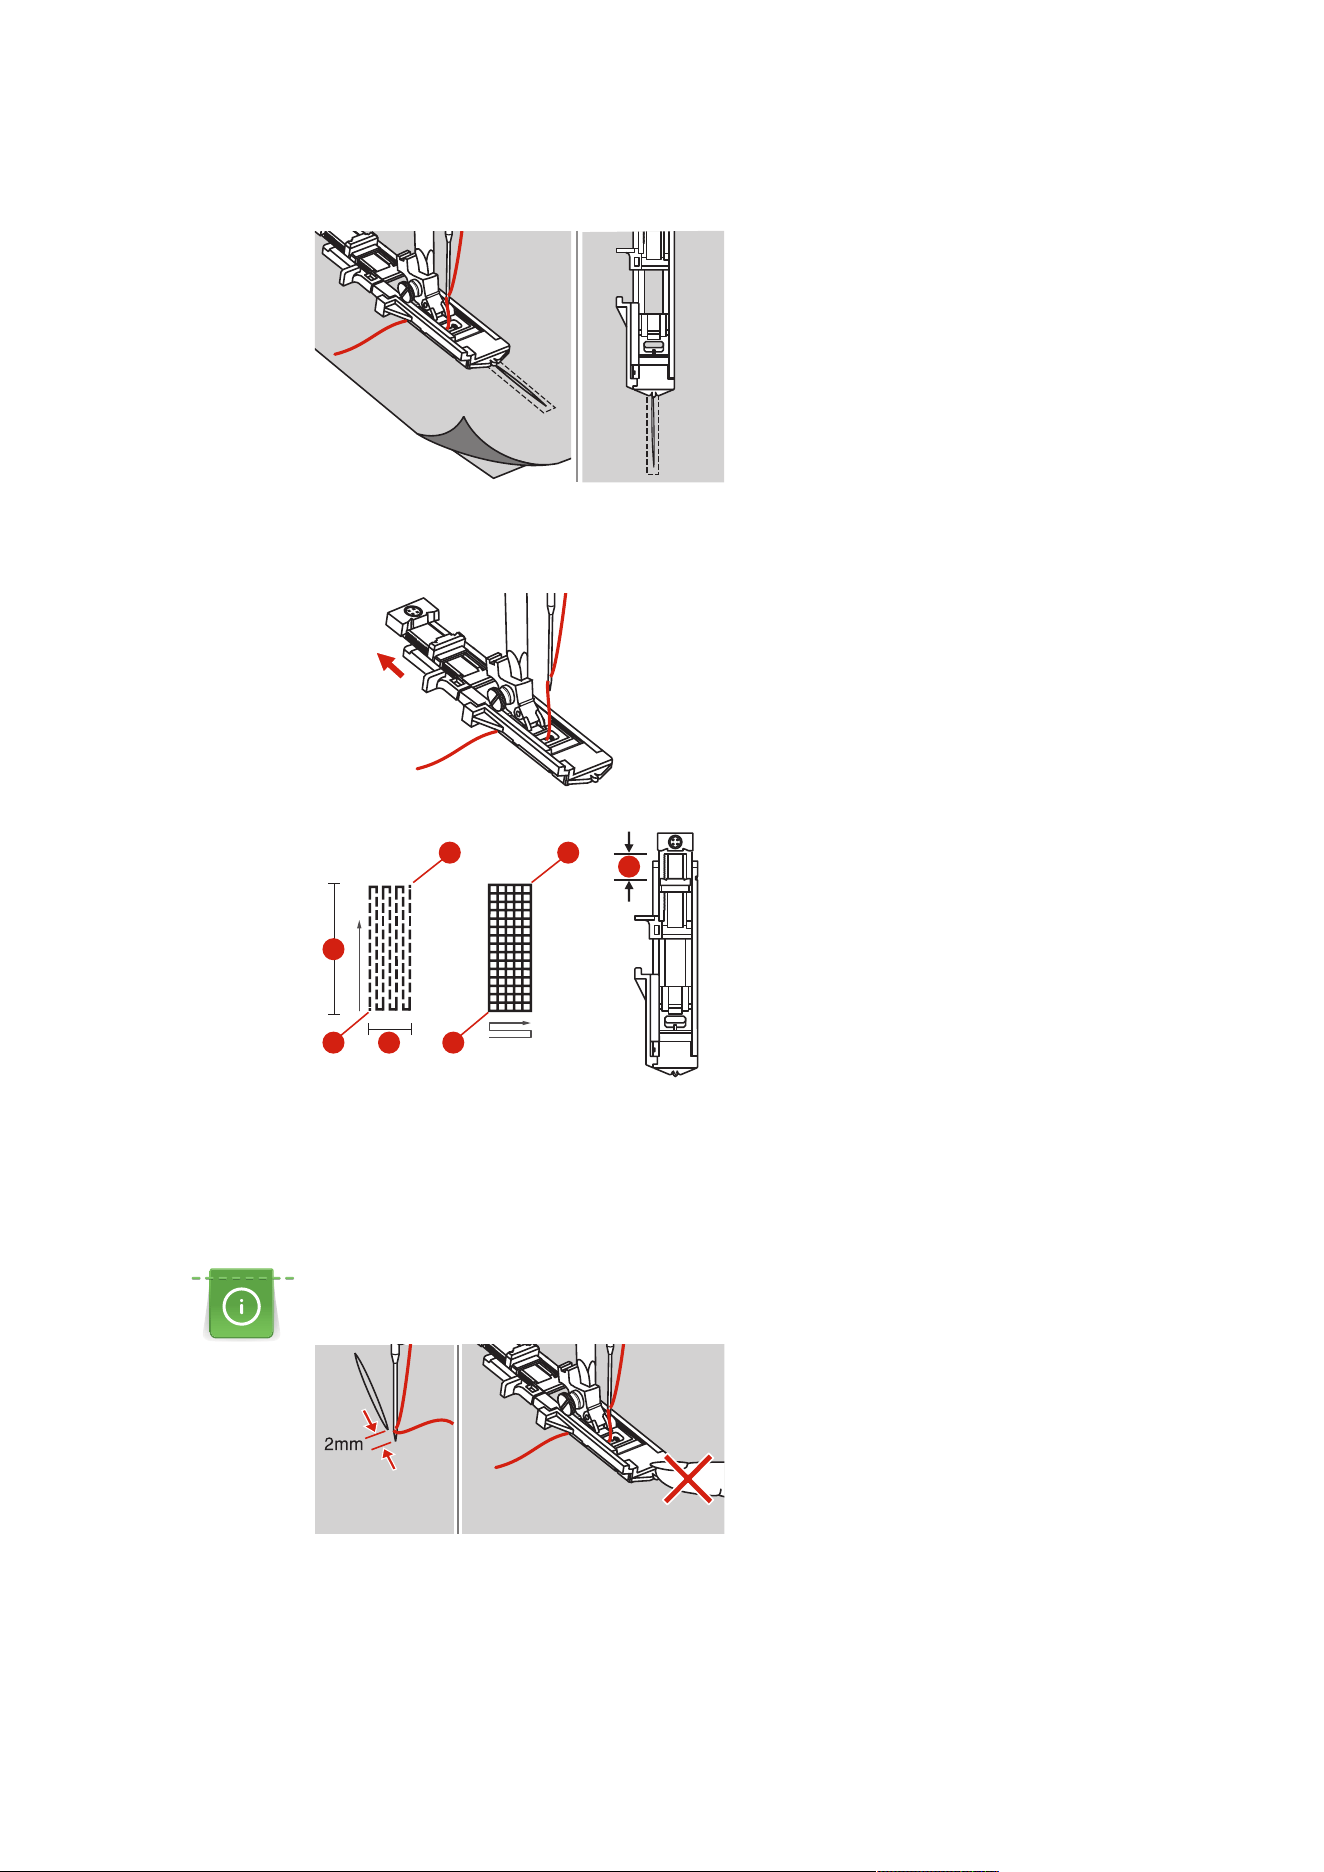
Practical Stitches
80
2023-06 EN 5020079.40A.04
> Lower the presser foot over the center of the tear.
> Adjust the button holder on the buttonhole foot to the desired length. The size of one darning sequence
is variable.
– The maximum sewing length is 2.6cm (1inch) and the maximum sewing width is 7mm (9/32inch).
3 32
1
1
4 4
1 The Length of Sewing 3 Start
2 The Width of Sewing 4 Stop
> Position the fabric so that the needle is 2mm (1/16inch) in front of the area to be darned.
> Lower the presser foot.
When lowering the presser foot, do not push the front of the presser foot, otherwise the darning will not be
sewn in the correct size.
> Lead the upper thread down through the hole in the presser foot.
> Pull down the buttonhole lever as far as possible.
– The buttonhole lever is positioned behind the bracket on the buttonhole foot.
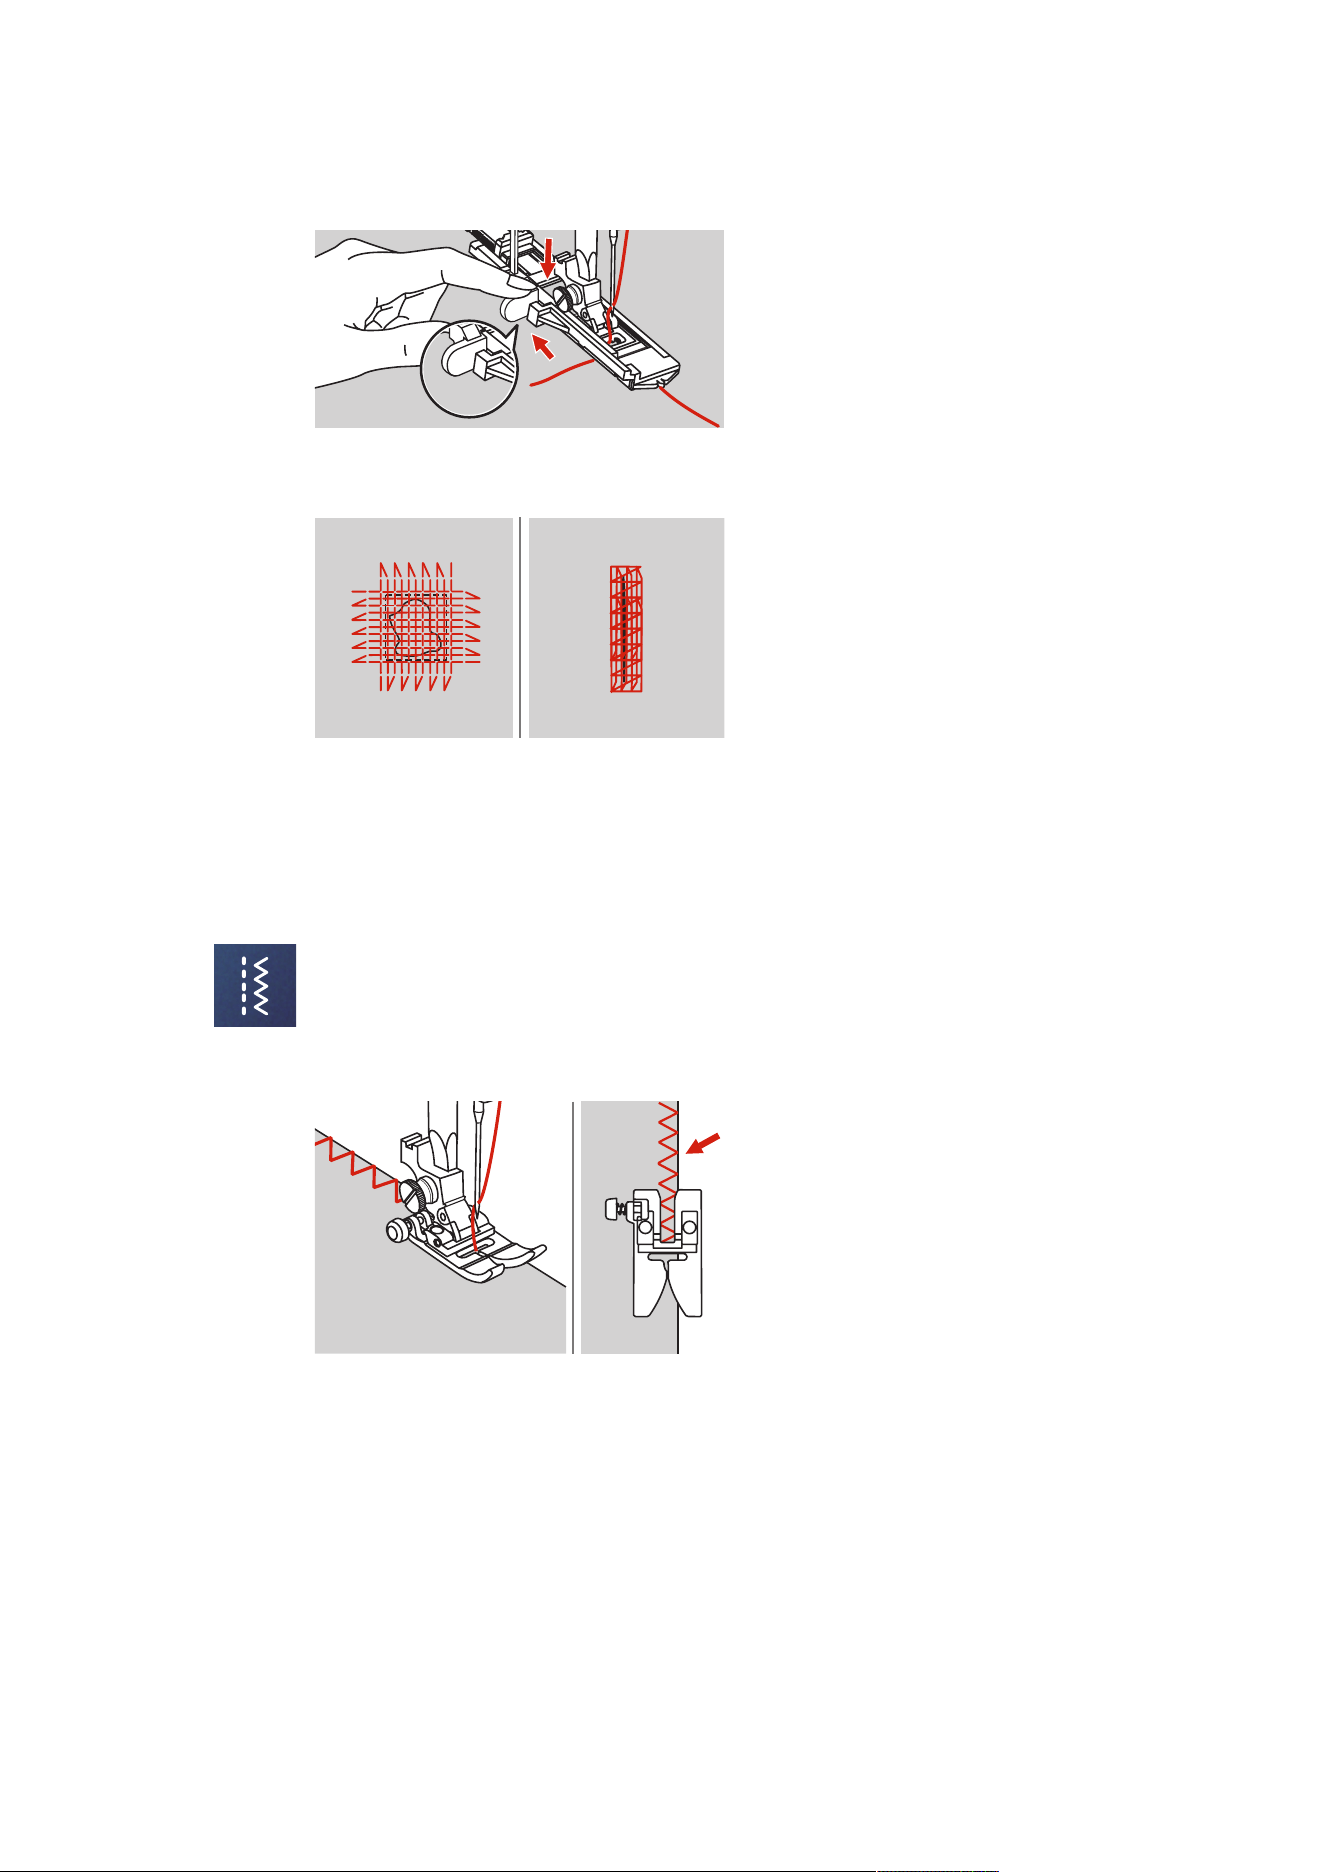
Practical Stitches
81
2023-06 EN 5020079.40A.04
> Hold the upper thread to the left side vertically to the Buttonhole Foot with Slide and start sewing.
> If the sewing range is too big to sew, then we recommend to sew the area several times (or cross sew) to
get better sewing result.
6.9 Finishing Edges
The zigzag stitch is suitable for finishing all types of fabric. Use darning thread for fine materials.
Prerequisite:
• The edge of the fabric should lie flat and not roll.
> Attach the Zigzag Foot (DA).
> Attach the Zigzag Foot (DA).
> Tap «Practical Stitches».
> Neither select too wide a stitch nor too long a stitch.
> Guide the edge of the fabric into the center of the presser foot, so that the needle goes into the fabric
on one side and over the edge into the air on the other side.
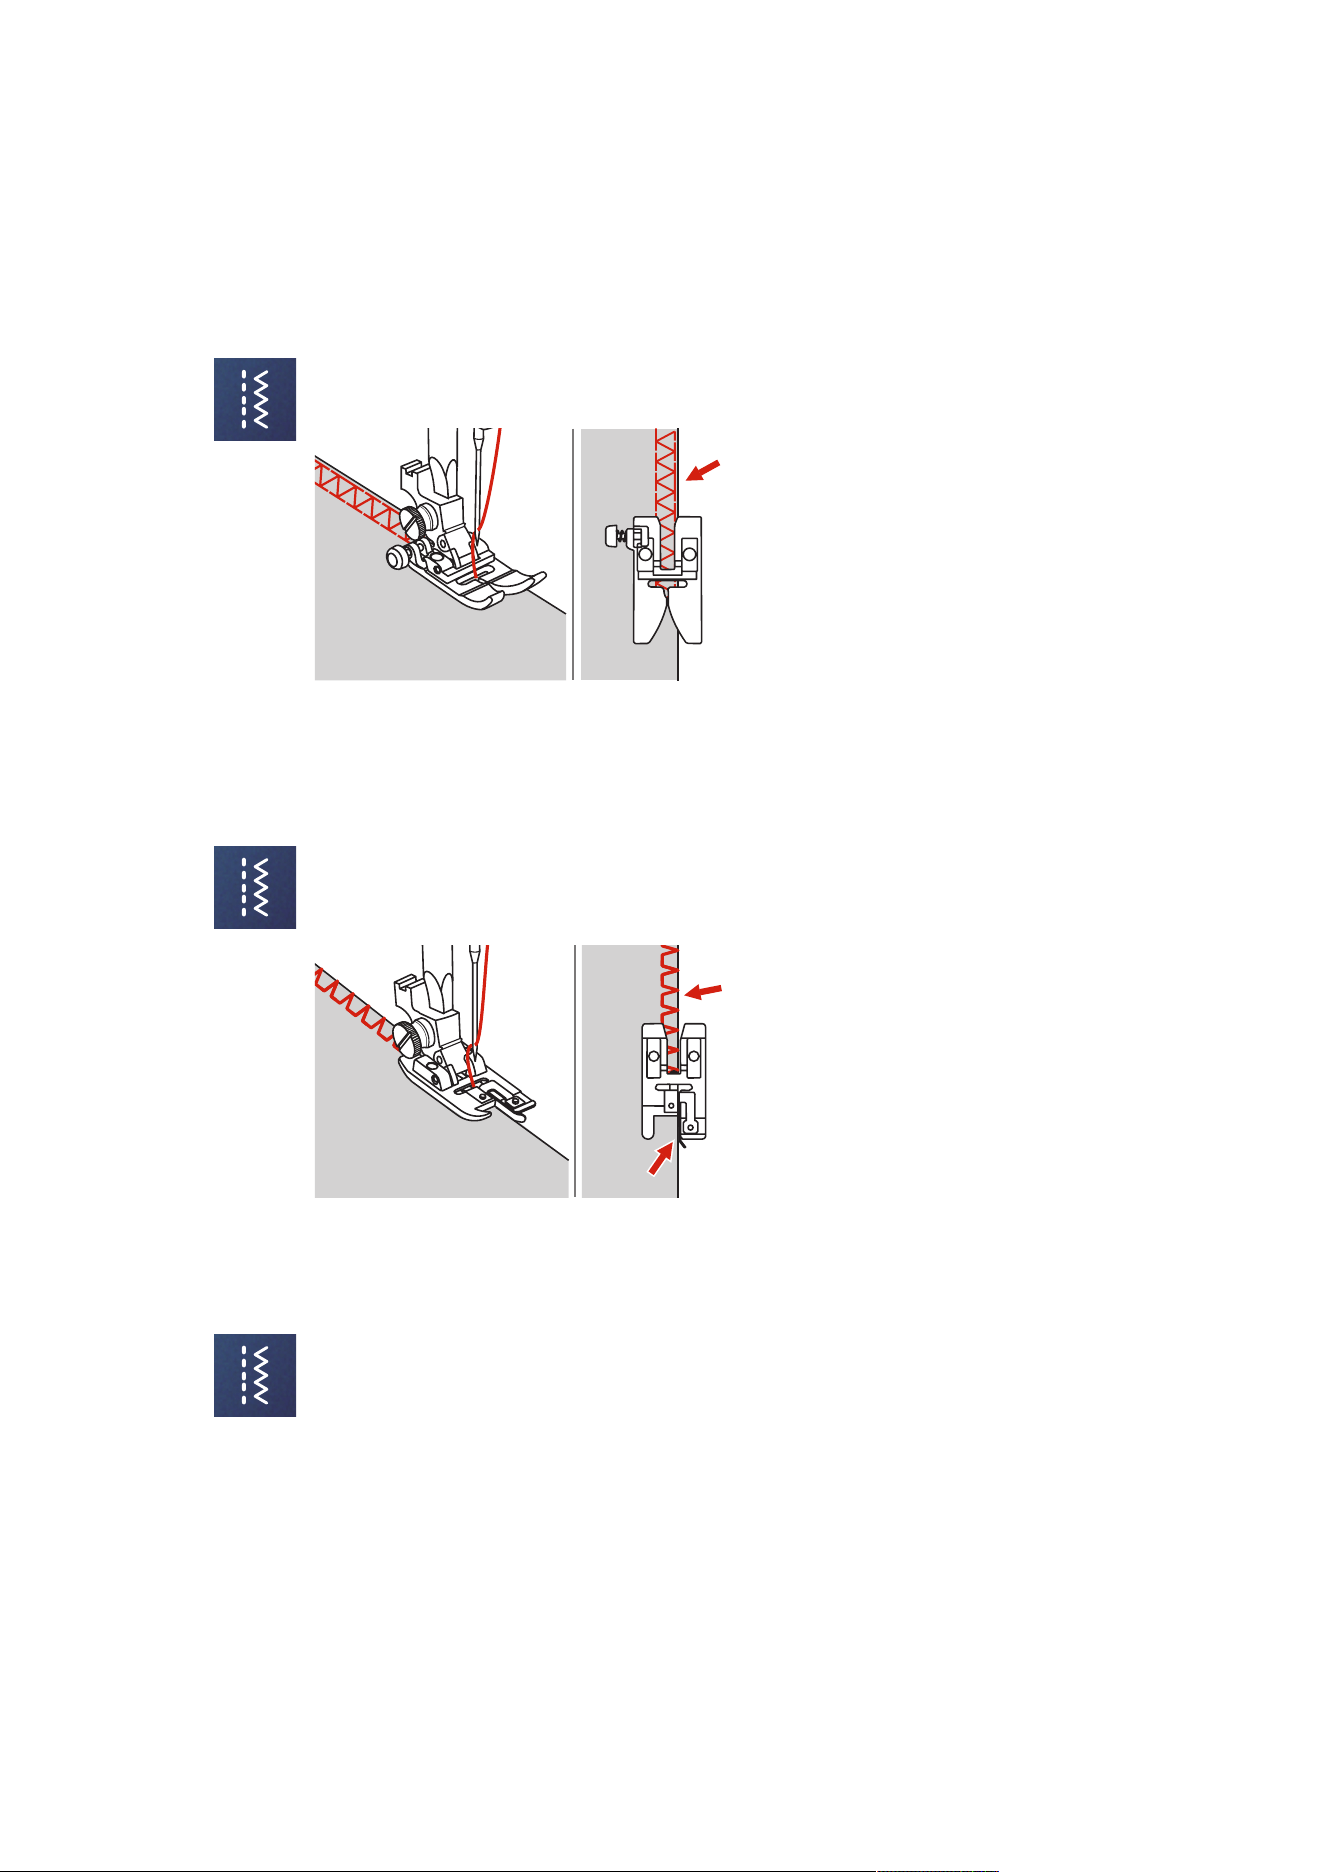
Practical Stitches
82
2023-06 EN 5020079.40A.04
6.10 Sewing Double Overlock
A double overlock seam is suitable for looser knit fabric and for cross seams in woven fabric. When working
with jersey, a jersey needle should be used to prevent damaging the knit fabric. When sewing stretch
materials, use a stretch needle.
> Attach the Zigzag Foot (DA).
> Tap «Practical Stitches».
> Select the Double Overlock No.10.
6.11 Sewing Vari Overlock
Sewing overcasting stitches along the edges of fabric to prevent them from fraying. When sewing stretch
materials, use a stretch needle.
> Attach the Overlock Foot (DI).
> Tap «Practical Stitches».
> Select the Double Overlock No.3.
> Sew the fabric with the fabric edge against the guide of the foot.
6.12 Edgestitching Using the Seam Guide
When sewing parallel wide top-stitching lines, we recommend guiding the seam guide along a sewn line.
> Attach the Zigzag Foot (DA).
> Tap «Practical Stitches».
> Select Straight Stitch No.1.
> Insert the seam guide into the hole of the presser foot.
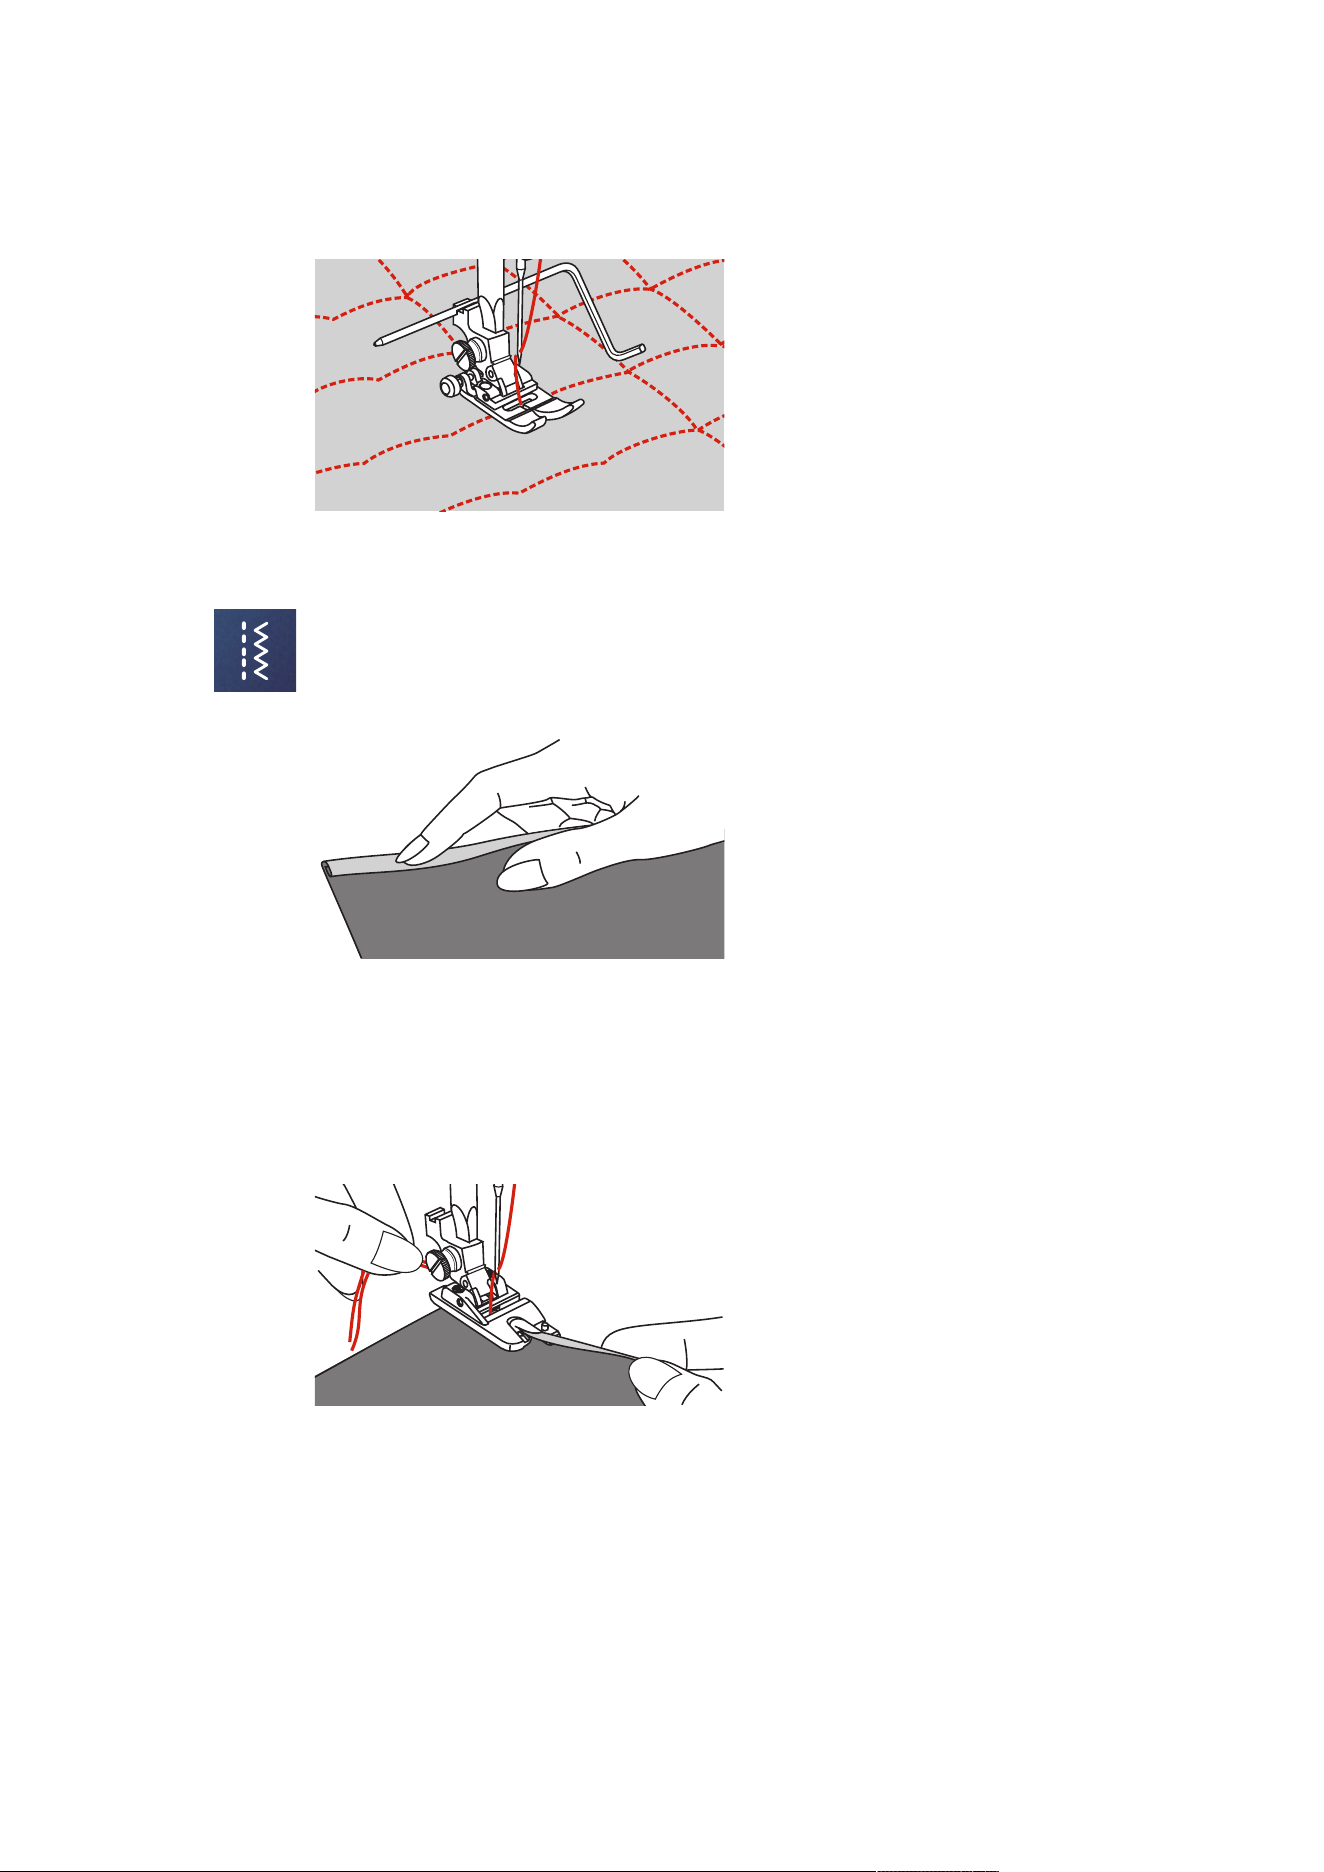
Practical Stitches
83
2023-06 EN 5020079.40A.04
> Sew the first row and move over the fabric to sew subsequent rows with the guide riding along the
previous row of stitching.
6.13 Sewing a Narrow Hem
> Attach the Hemmer Foot (DG) optional accessory.
> Tap «Practical Stitches».
> Select Straight Stitch No.1.
> Fold the edge of the fabric over about 3mm, then fold it over again 3mm for about 5cm along the
edge of the fabric.
> Place the edge of the fabric with the left-hand side of the fabric facing up under the presser foot. The
fabric under the presser foot should be just less than the width of the presser foot.
> Sew 4–5 stitches.
> Raise the needle and presser foot.
> Pull the fabric backwards by about 10–15cm. Do not cut the thread.
> Hold the 4 threads in your left hand. Pull the edge of the fabric into the spiral guide on the hemmer foot
using your right hand.
> Lower the presser foot.
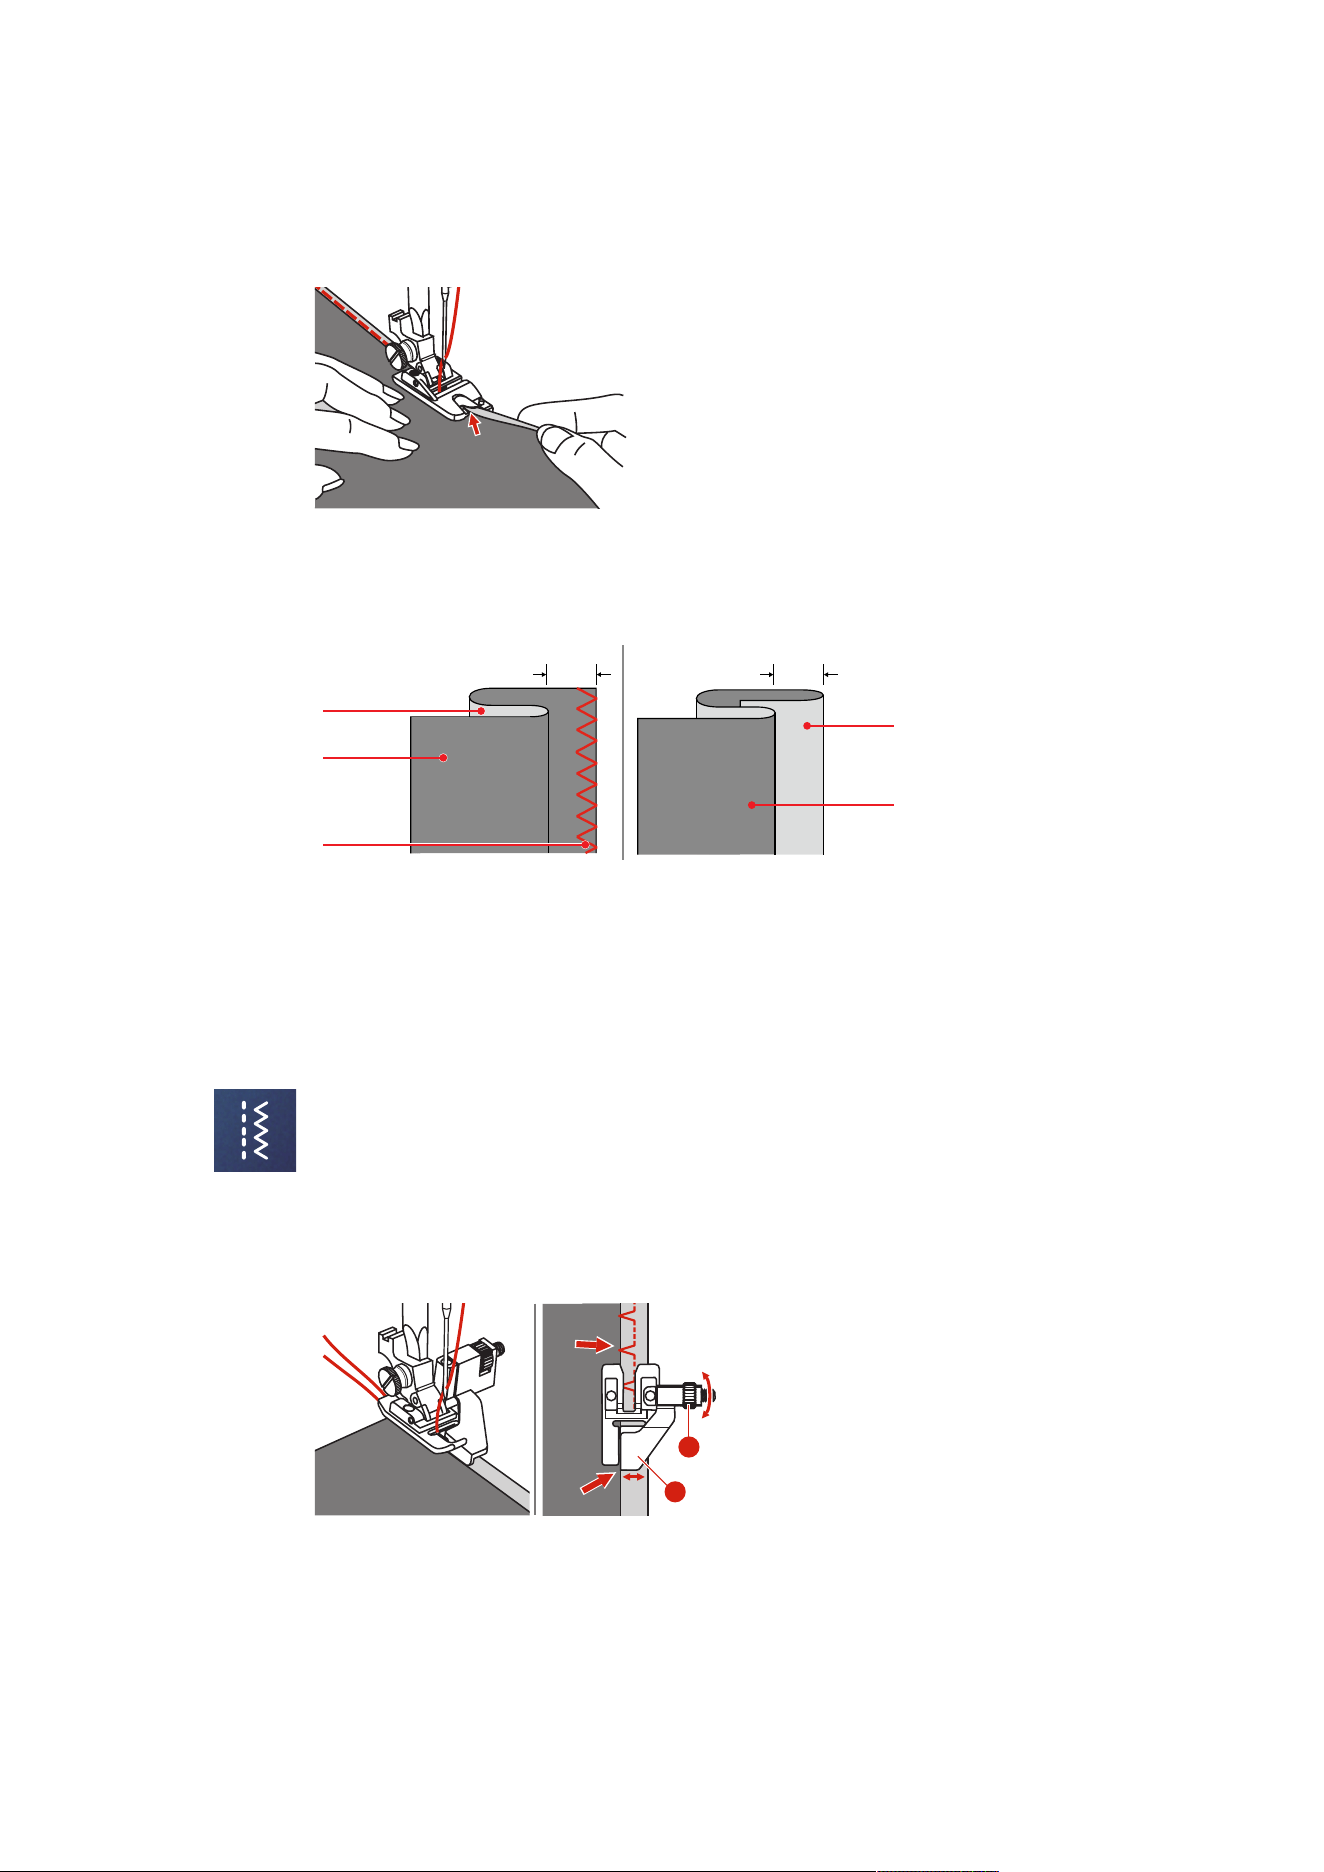
Practical Stitches
84
2023-06 EN 5020079.40A.04
> Continue sewing slowly while slightly folding the cut edge of the fabric in front of the hemmer foot and
holding it to the left. Guide the edge of the fabric evenly into the spiral guide on the hemmer foot and
sew.
6.14 Sewing Blind Hems
For invisible hems in medium to heavy weight cotton, wool and blended materials.
Heavy/medium-weight Fabrics Light Fabrics
5mm
5mm
2
3
1
3
2
1 Finishing Seam 3 Right-hand Fabric Side
2 Left-hand Fabric Side
Prerequisite:
• The fabric edges are finished.
> Attach the Blindstitch Foot (DM).
> Tap «Practical Stitches».
> Select the Blindstitch No.9.
> Fold the fabric as illustrated with the wrong side up.
> Place the fabric beneath the presser foot.
> Turn the handwheel anti-clockwise until the needle is all the way to the left.
The needle should just pierce the fold in the fabric (3). If it does not, adjust the stitch width accordingly.
> Adjust the guide (2) by turning the dial (1) so that the guide is positioned directly against the fold.
2
1
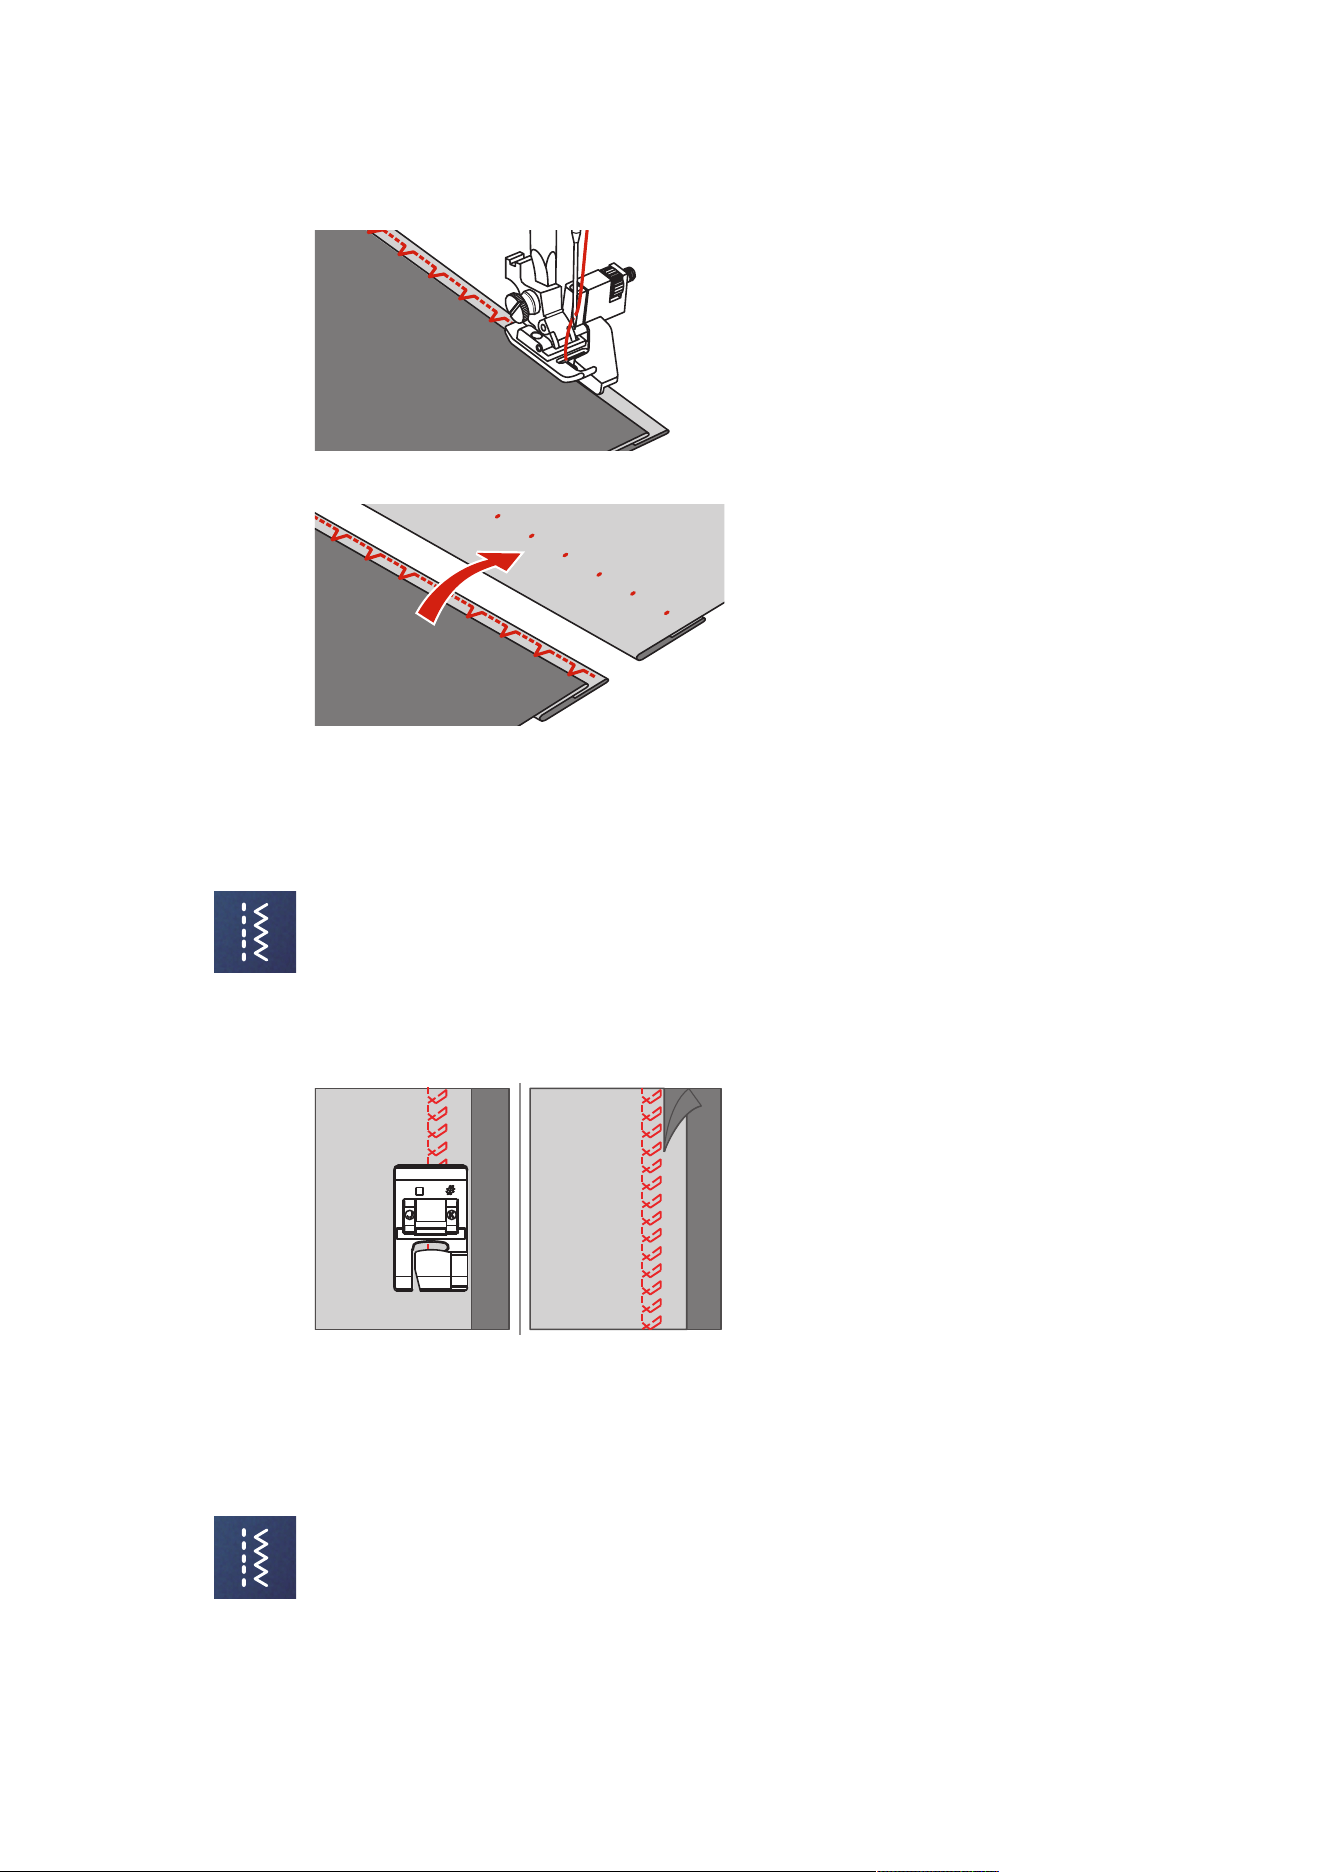
Practical Stitches
85
2023-06 EN 5020079.40A.04
> Sew slowly while guiding the fabric carefully along the edge of the guide.
> Turn over the fabric.
6.15 Sewing Visible Hems
The visible hem is particularly suitable for elastic seams in tricot made of cotton, wool, synthetic and mixed
fibers.
> Attach the Embroidery Foot (JK).
> Tap «Practical Stitches».
> Select the Tricot Stitch No.14.
> Iron the hem and baste if necessary.
> Reduce the presser foot pressure if necessary.
> Sew the hem in the desired depth on the right side of the fabric.
> Trim off the remaining fabric on the wrong side of the fabric.
6.16 Sewing Basting Stitches
When sewing basting stitches, it is recommended to use a fine darning thread. This is easier to remove. The
longest stitch possible is 5mm. The recommended stitch length is 3.5–5mm. The basting stitch is suitable
or sewing projects where a very long stitch length is required.
> Attach the Zigzag Foot (DA).
> Tap «Practical Stitches».
> Select the Basting Stitch No.21.
> Select the stitch length.
> Pin the fabric layers at a right angle to basting direction to prevent the layers from slipping.
> Sew 3–4 securing stitches at the beginning and at the end.
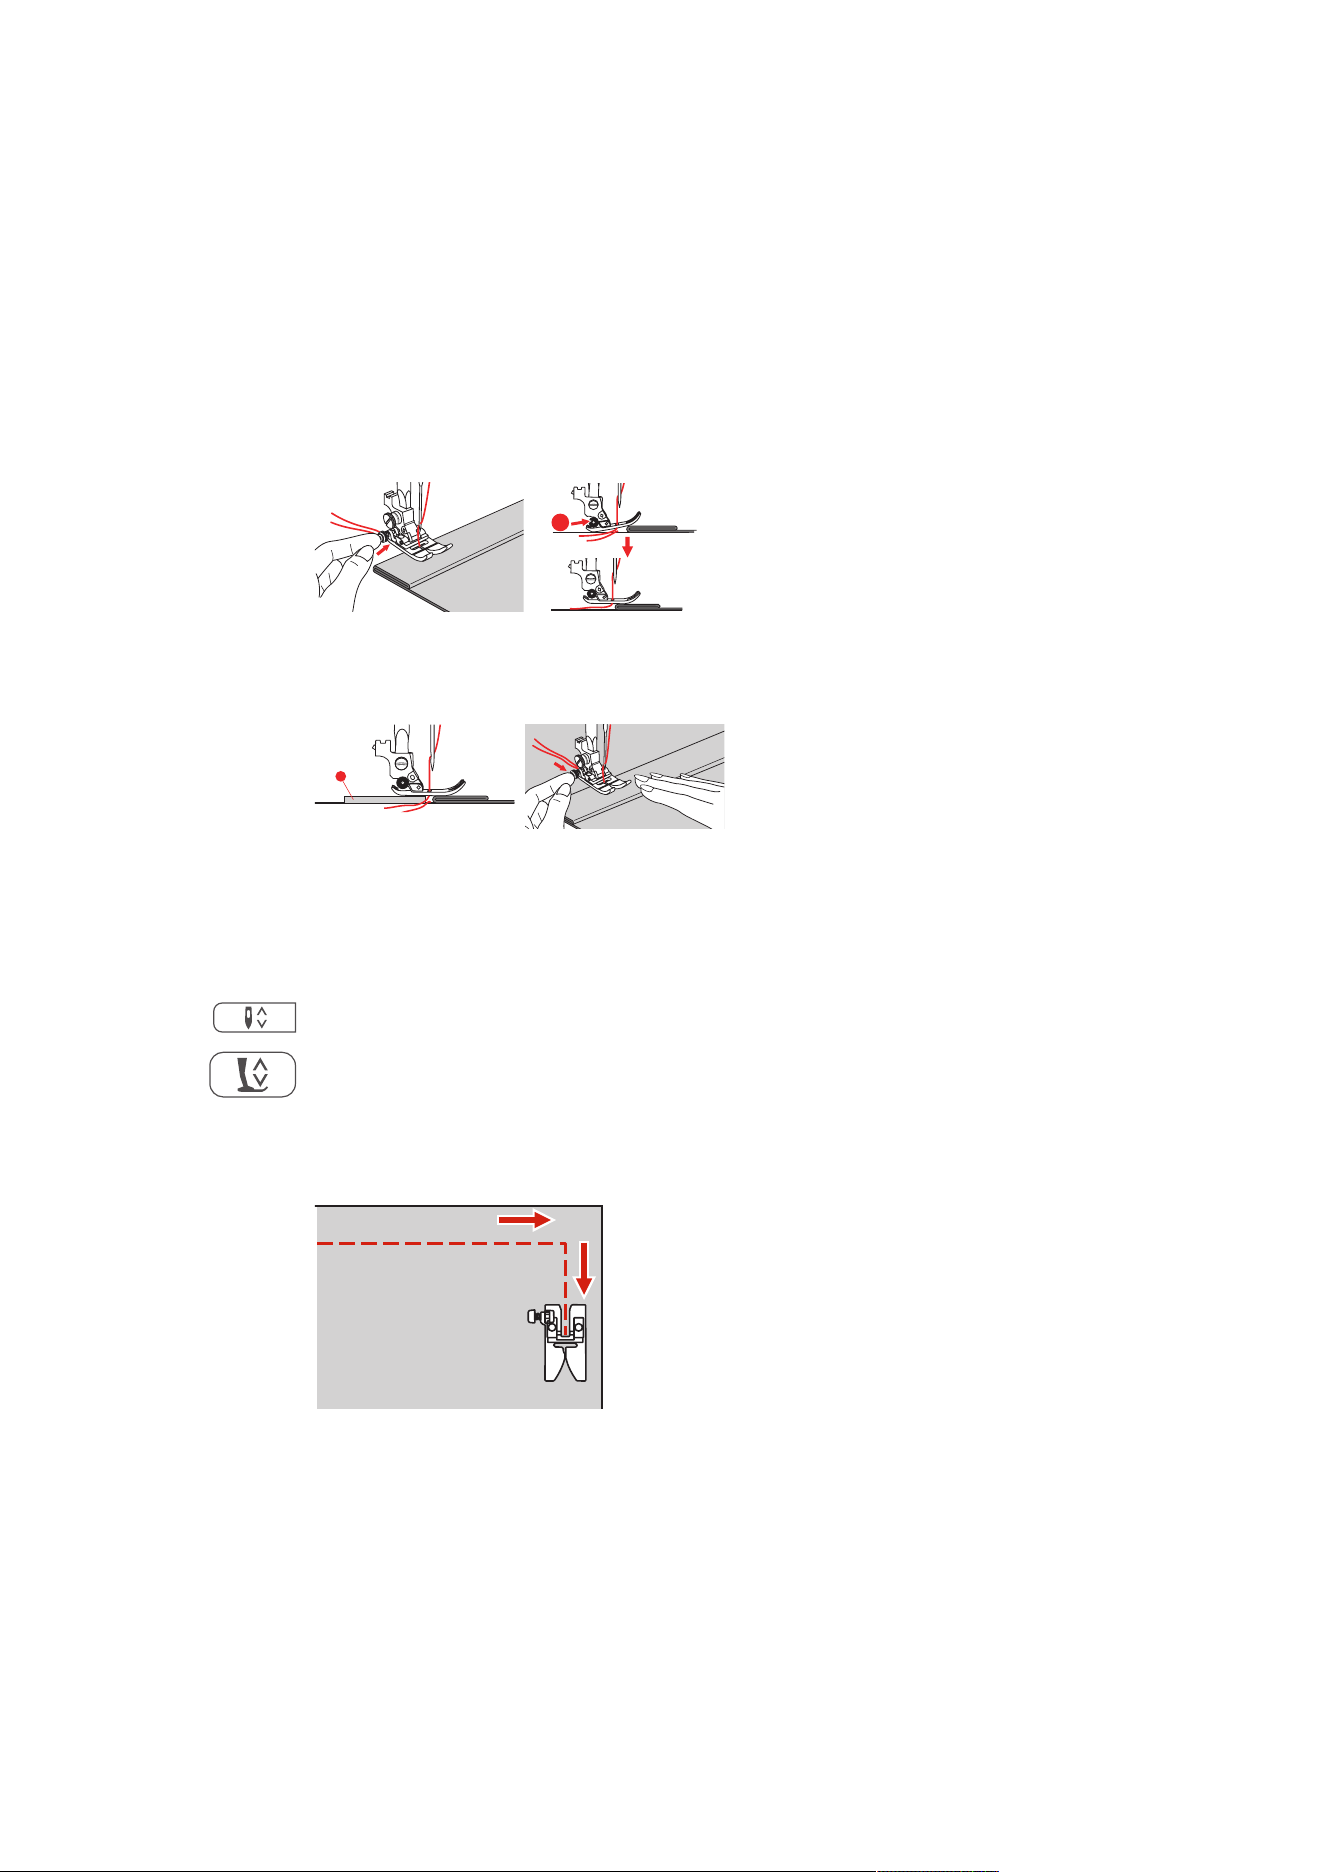
Practical Stitches
86
2023-06 EN 5020079.40A.04
6.17 Sew Thick Areas
> Attach the Zigzag Foot (DA).
– The black button on the left side of the presser foot will lock the presser foot in a horizontal position if
you push it in before lowering the presser foot (1). This ensures even feeding at the beginning of a
seam and helps when sewing multiple layers of fabric such as sewing over seams when hemming
jeans.
> Once the highest point has been reached, lower the needle and raise the presser foot.
> Press the foot tip and the black knob, lower the presser foot and continue sewing.
– The black button releases automatically after sewing few stitches.
1
> To support the presser foot when manually guiding the fabric and sewing from the folded side, place
one, two or three small plates from the height compensating tool (1) behind the needle under the
presser foot.
1
1 Height Compensating Tool
6.18 Sewing Corners
> Stop the machine when the corner is reached.
> Pierce the needle into the fabric.
> Raise the presser foot.
> Use the needle as a pivot and turn the fabric.
> Lower the presser foot and continue sewing.
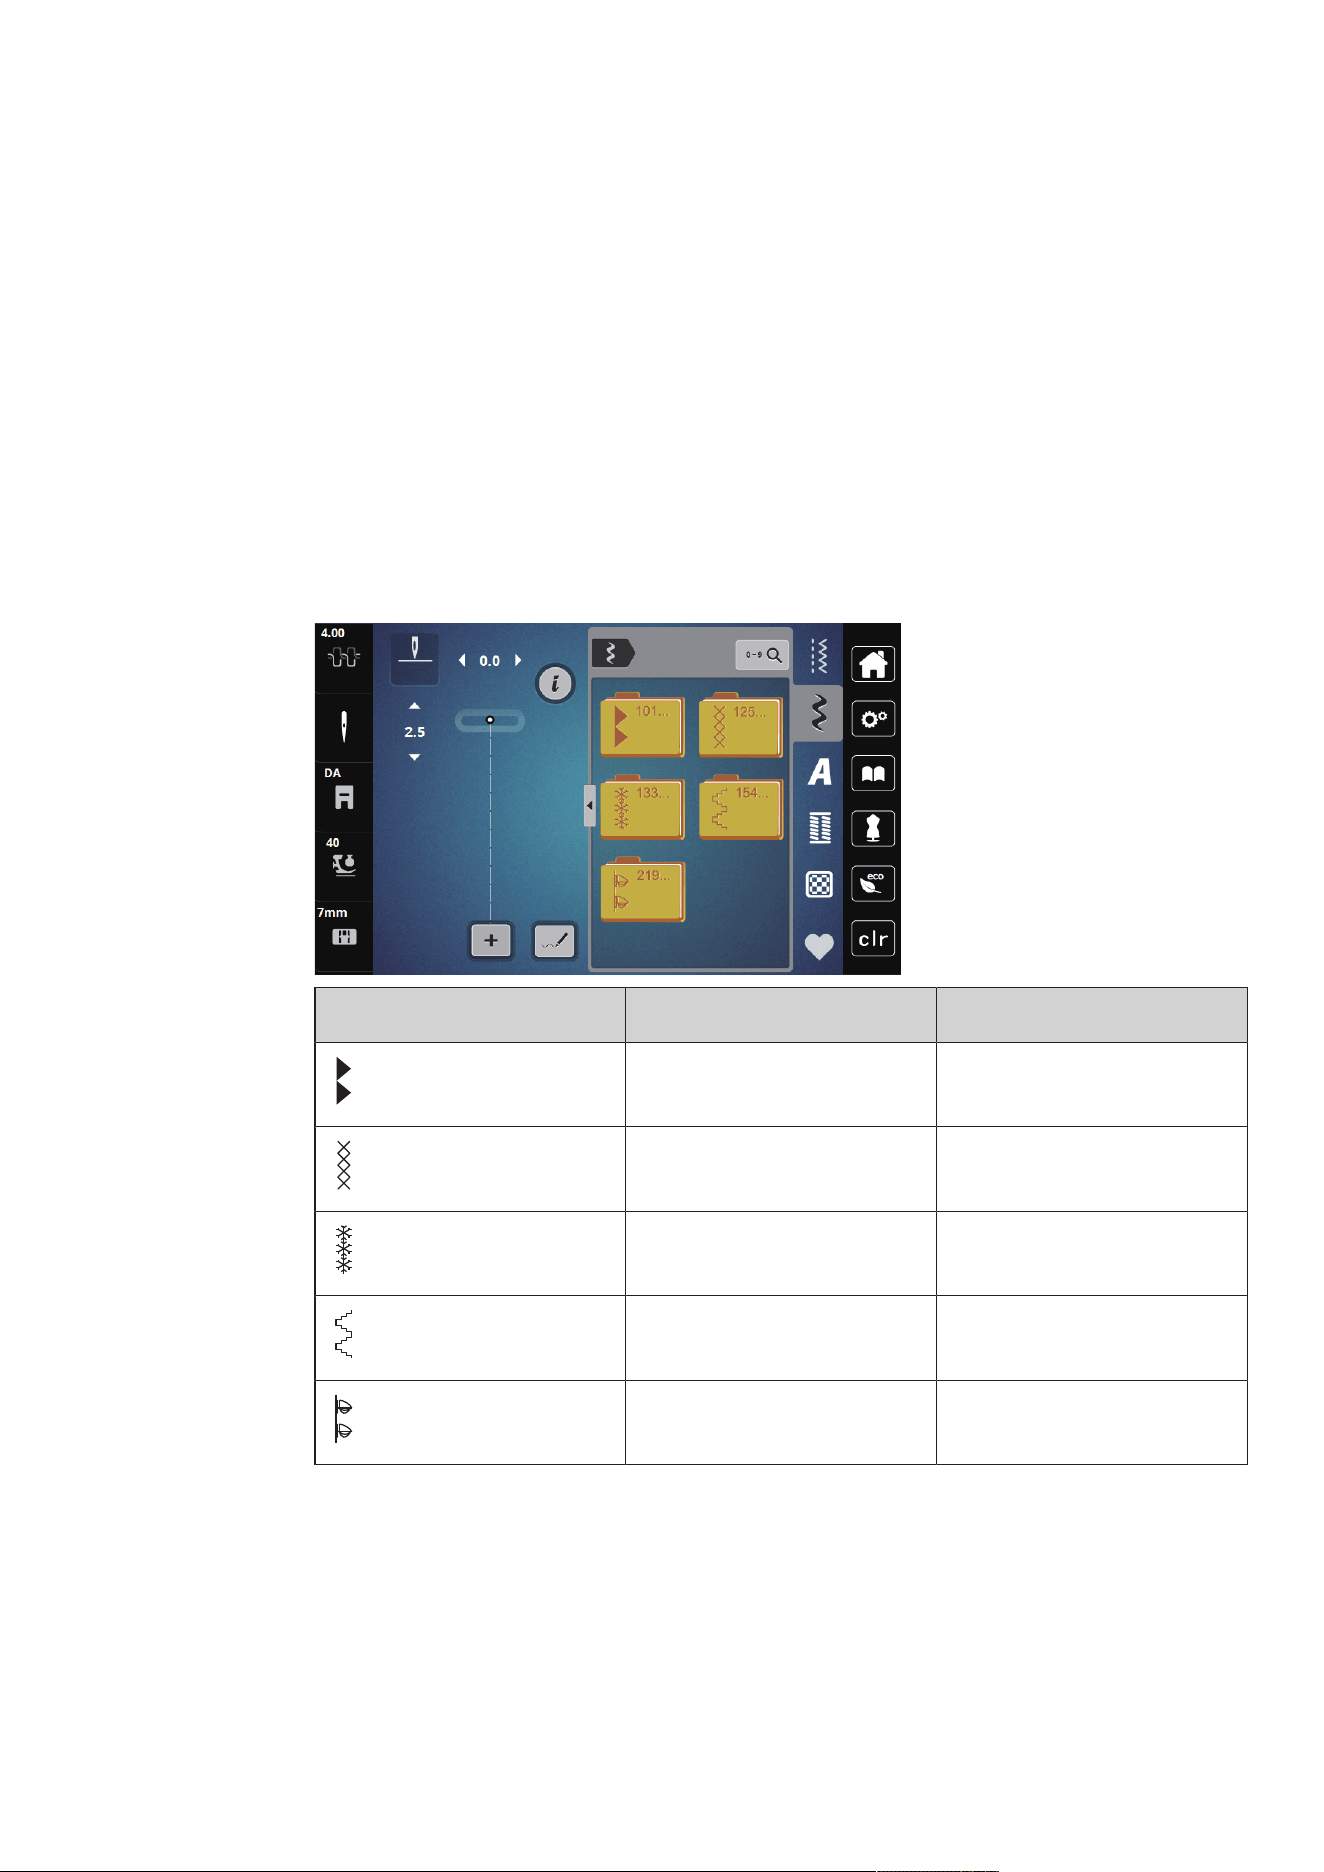
Decorative Stitches
87
2023-06 EN 5020079.40A.04
7 Decorative Stitches
7.1 Overview Decorative Stitches
Easier or more difficult decorative stitches come into their own depending on the type of fabric.
• Decorative stitches which are programmed with simple straight stitches are particularly appropriate for
light-weight materials, e.g. the Decorative stitch No. 142.
• Decorative stitches which are programmed with triple straight stitches or with a few satin stitches are
particularly appropriate for medium-weight materials, e.g. Decorative stitch No. 152.
• Decorative stitches which are programmed with satin stitches are particularly appropriate for medium-
weight materials, e.g. Decorative stitch No. 101.
For a perfect stitch formation, it is of advantage to use the same thread color for upper and bobbin thread
and a stabilizer. With pile or longfiber materials, it is recommended to use an additional water-soluble
stabilizer, which can be easily removed after sewing, on the right side of the fabric.
Decorative Stitch Stitch Number Name
101-124 Satin Stitches
125-132 Cross Stitches
133-153 Nature Stitches
154-218 Geometric Stitches
219-233 Children Stitches
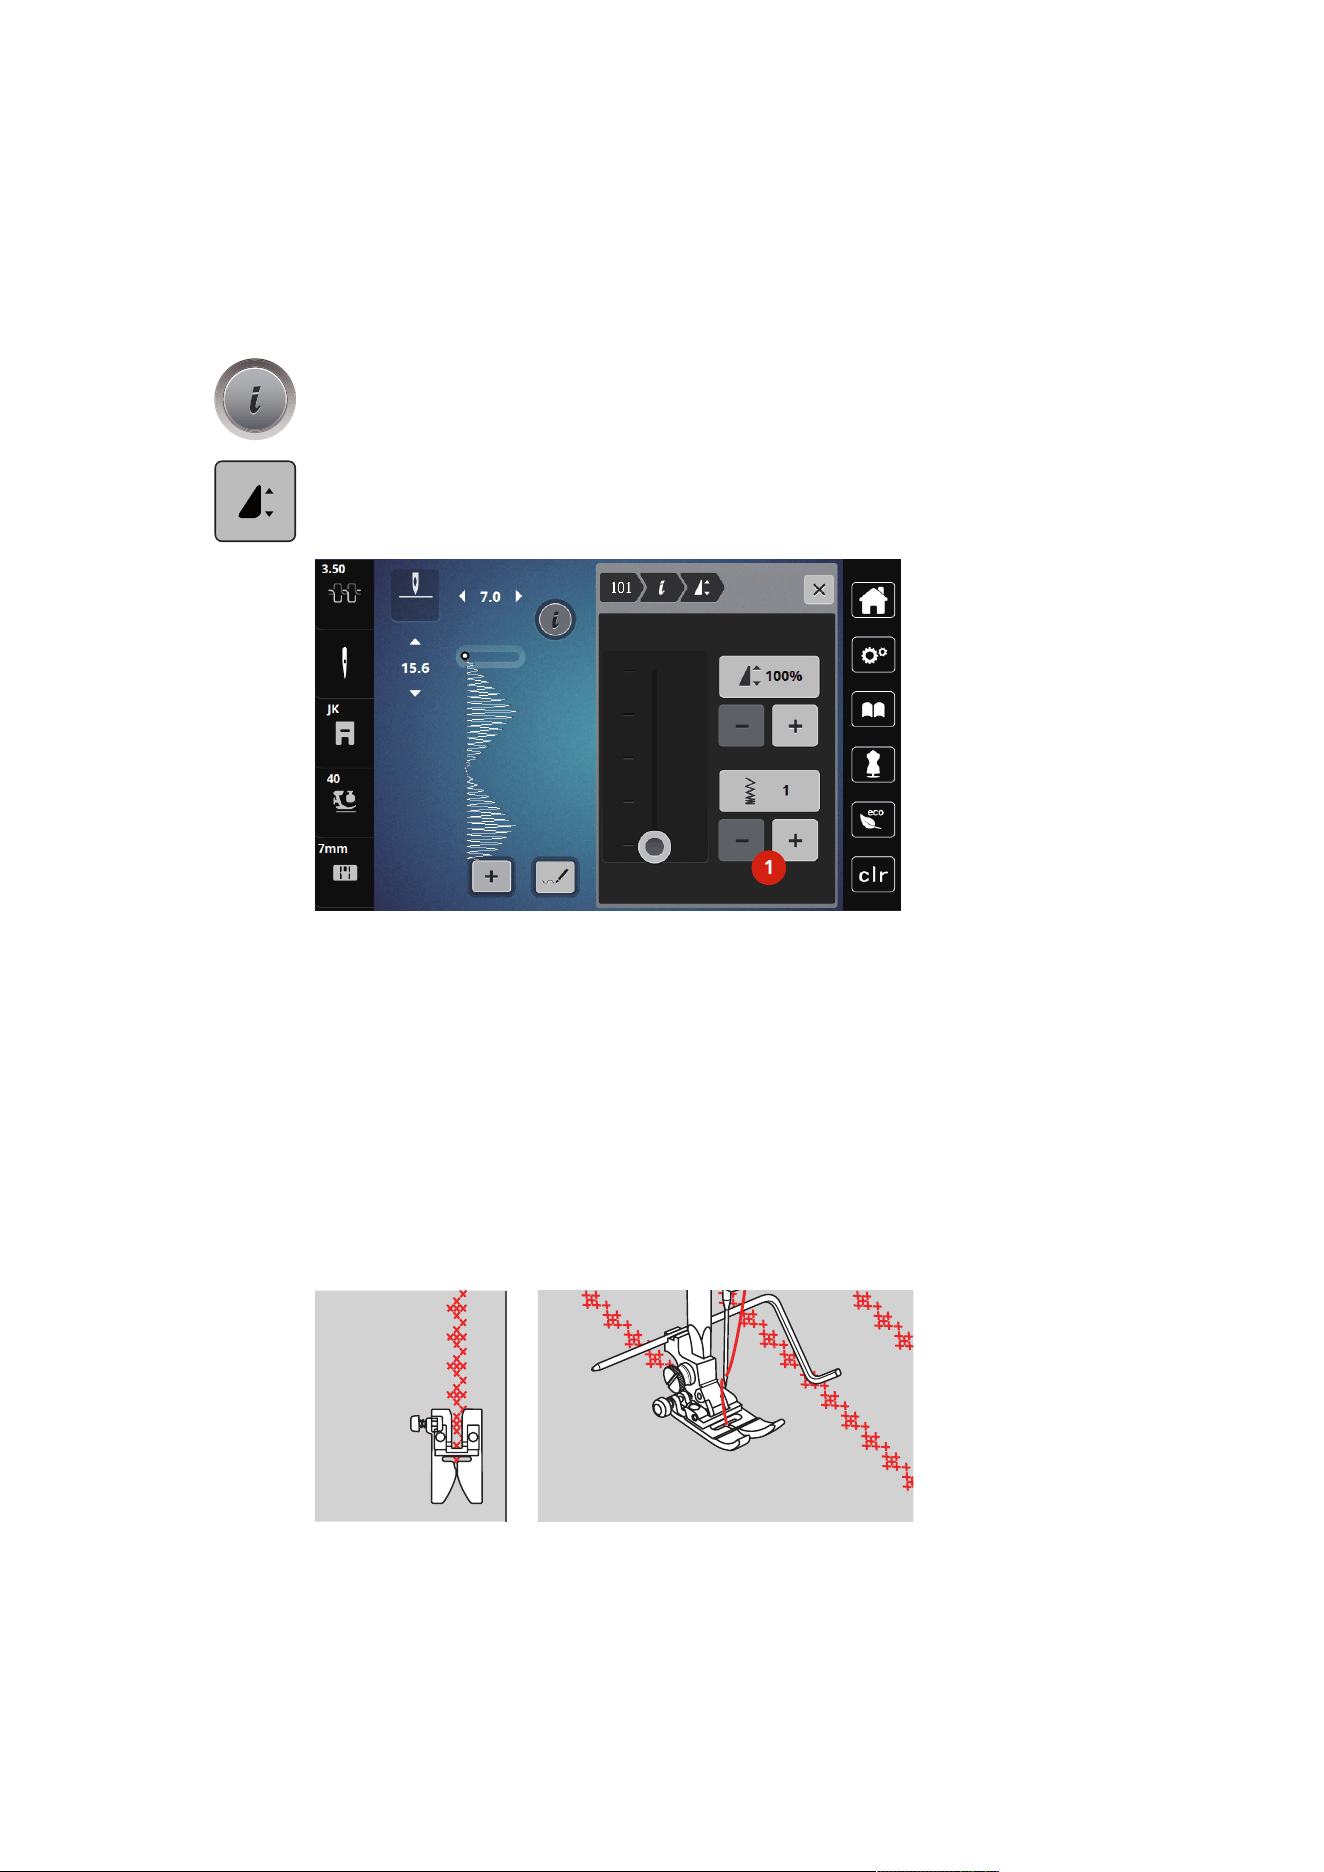
Decorative Stitches
88
2023-06 EN 5020079.40A.04
7.2 Altering the Stitch Density
With satin stitches (e. g. No.101) the stitch density can be altered. A larger number means a larger stitch
distance, i.e. the stitch is sewn less densely. For a high stitch density, the number must be decreased. Stitch
density 1 is the minimum. The set stitch pattern length is not changed by altering the stitch density.
> Select the satin stitch.
> Tap «i-Dialog».
> Tap «Altering the Pattern Length/Stitch Density».
> To increase the stitch density, tap (1) «Minus».
> To reduce the stitch density, tap (1) «Plus».
1
7.3 Sewing Cross Stitches
Cross stitch embroidery is a traditional technique and an addition to the other decorative stitches. If the cross
stitches are sewn on fabrics with a linen structure, they look as if they were hand-stitched. When cross
stitches are sewn with embroidery yarn, the stitch pattern appears fuller. Cross stitches are particularly used
for home furnishing, trimmings on garments and embellishing in general. As every following line refers to
the first row, it is important to stitch the first row in a straight line.
> Attach the Zigzag Foot (DA) or the Embroidery Foot (JK) or the Open embroidery Foot (DN) (optional
accessory).
> Select a cross stitch of the Decorative stitch No. 125-132 and combine it as desired.
> Stitch the first row using the seam guide to sew a straight line.
> Stitch the second row next to the first at a distance of one presser foot‘s width or using the seam guide.
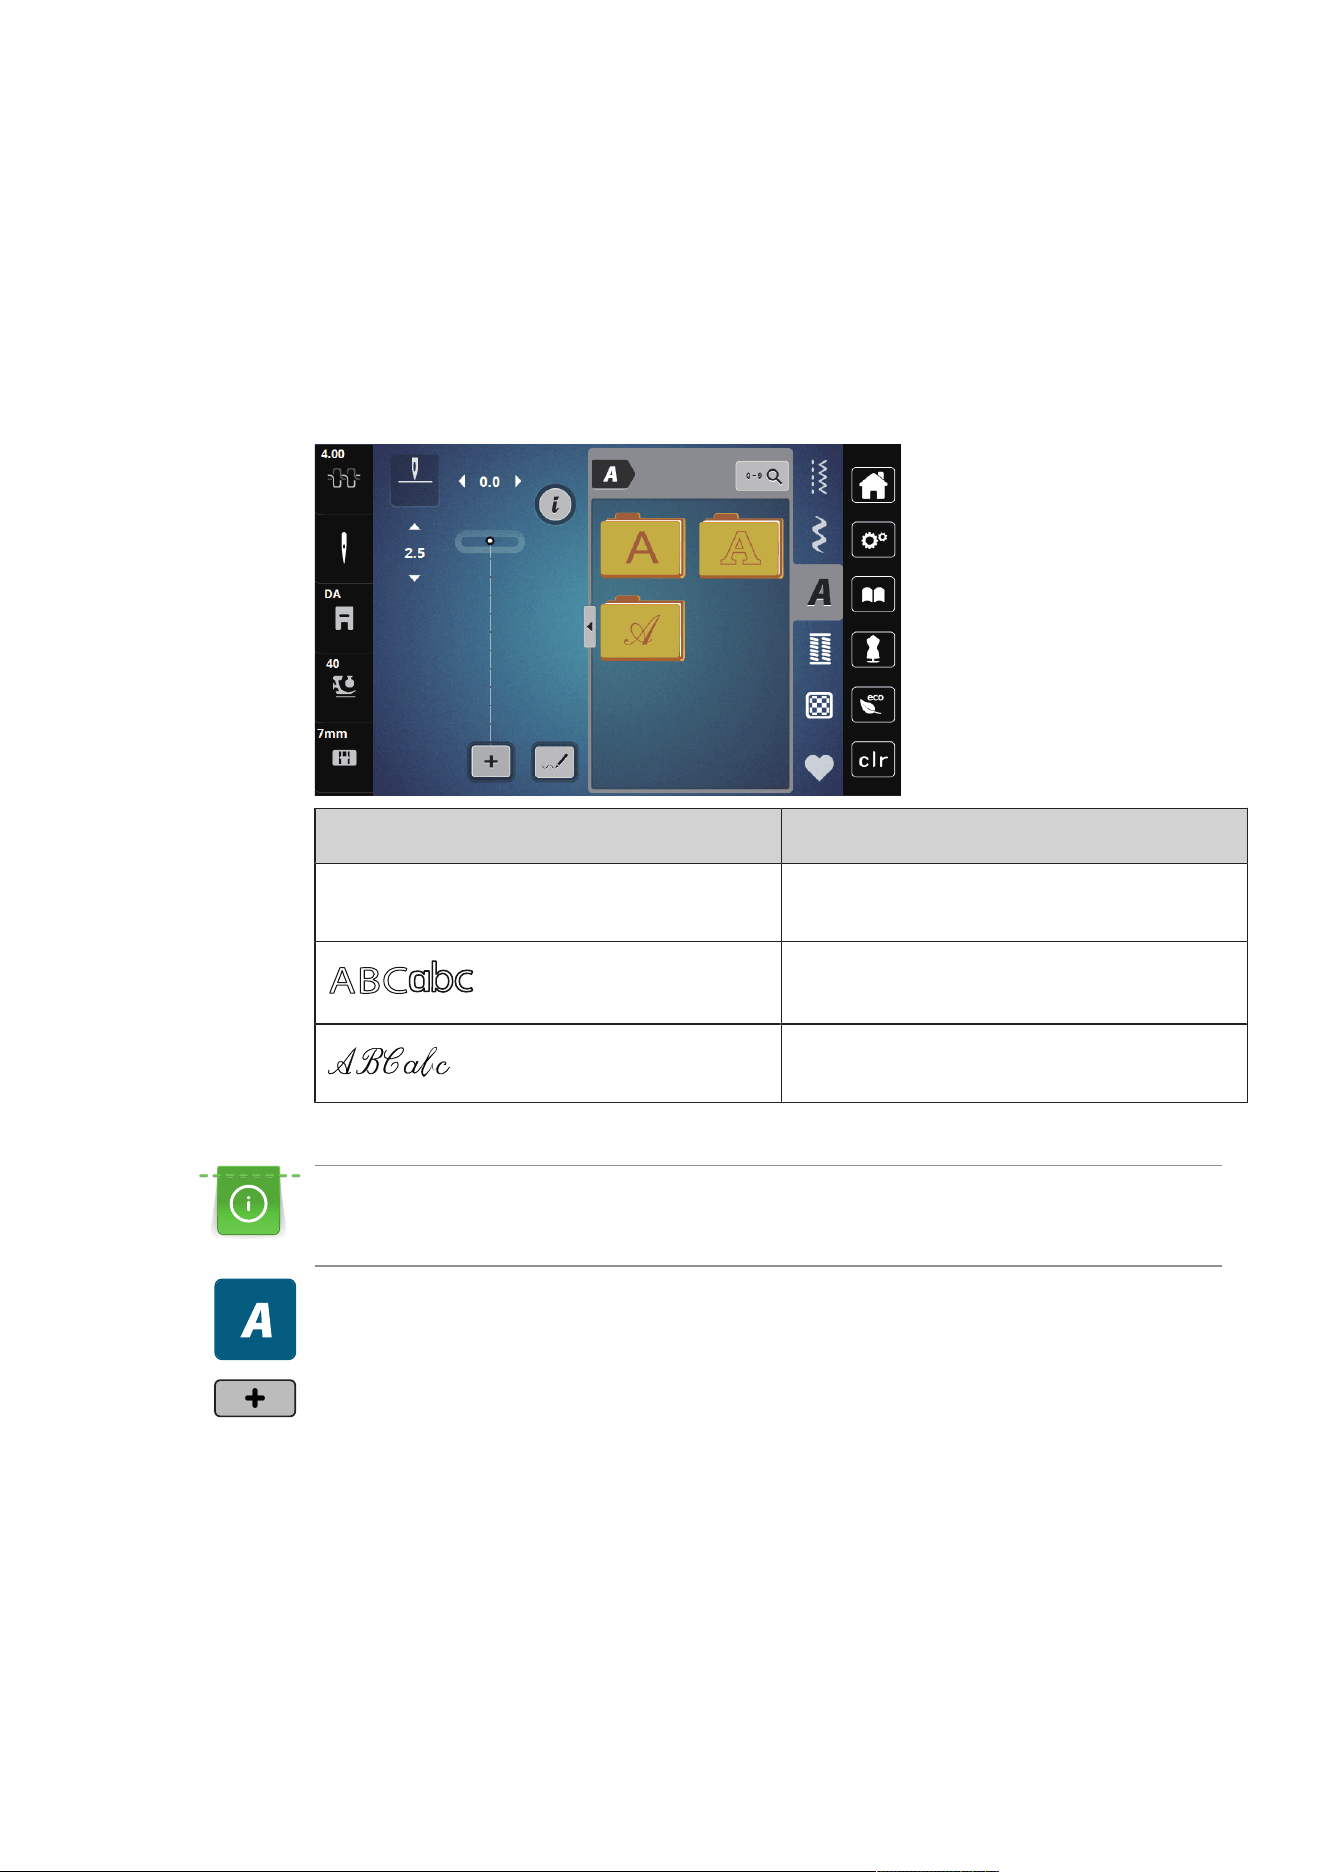
Alphabets
89
2023-06 EN 5020079.40A.04
8 Alphabets
8.1 Overview Alphabet
Block, Double block and Script alphabets can be sewn in two different sizes, in upper and lower case letters.
For a perfect stitch formation, it is recommended to use the same thread color for upper and bobbin threads.
The fabric can be reinforced with embroidery stabilizer on the wrong side. Use an additional, water-soluble
stabilizer on the right side of pile or napped fabrics.
Stitch Pattern Name
A
B
C
a
b
c
Block alphabet
Double-Block
Script (Italics)
8.2 Creating Lettering
Sewing a test sample with the thread, the actual fabric and stabilizer you intend to use is recommended.
Make sure that the fabric is fed evenly and lightly, ensuring that it cannot push against or catch on
anything. The fabric shouldn't be pulled, pushed or held back.
> Select «Alphabets».
> Select the font.
> To create a combination, tap «Combination Mode/Single Mode» (1).
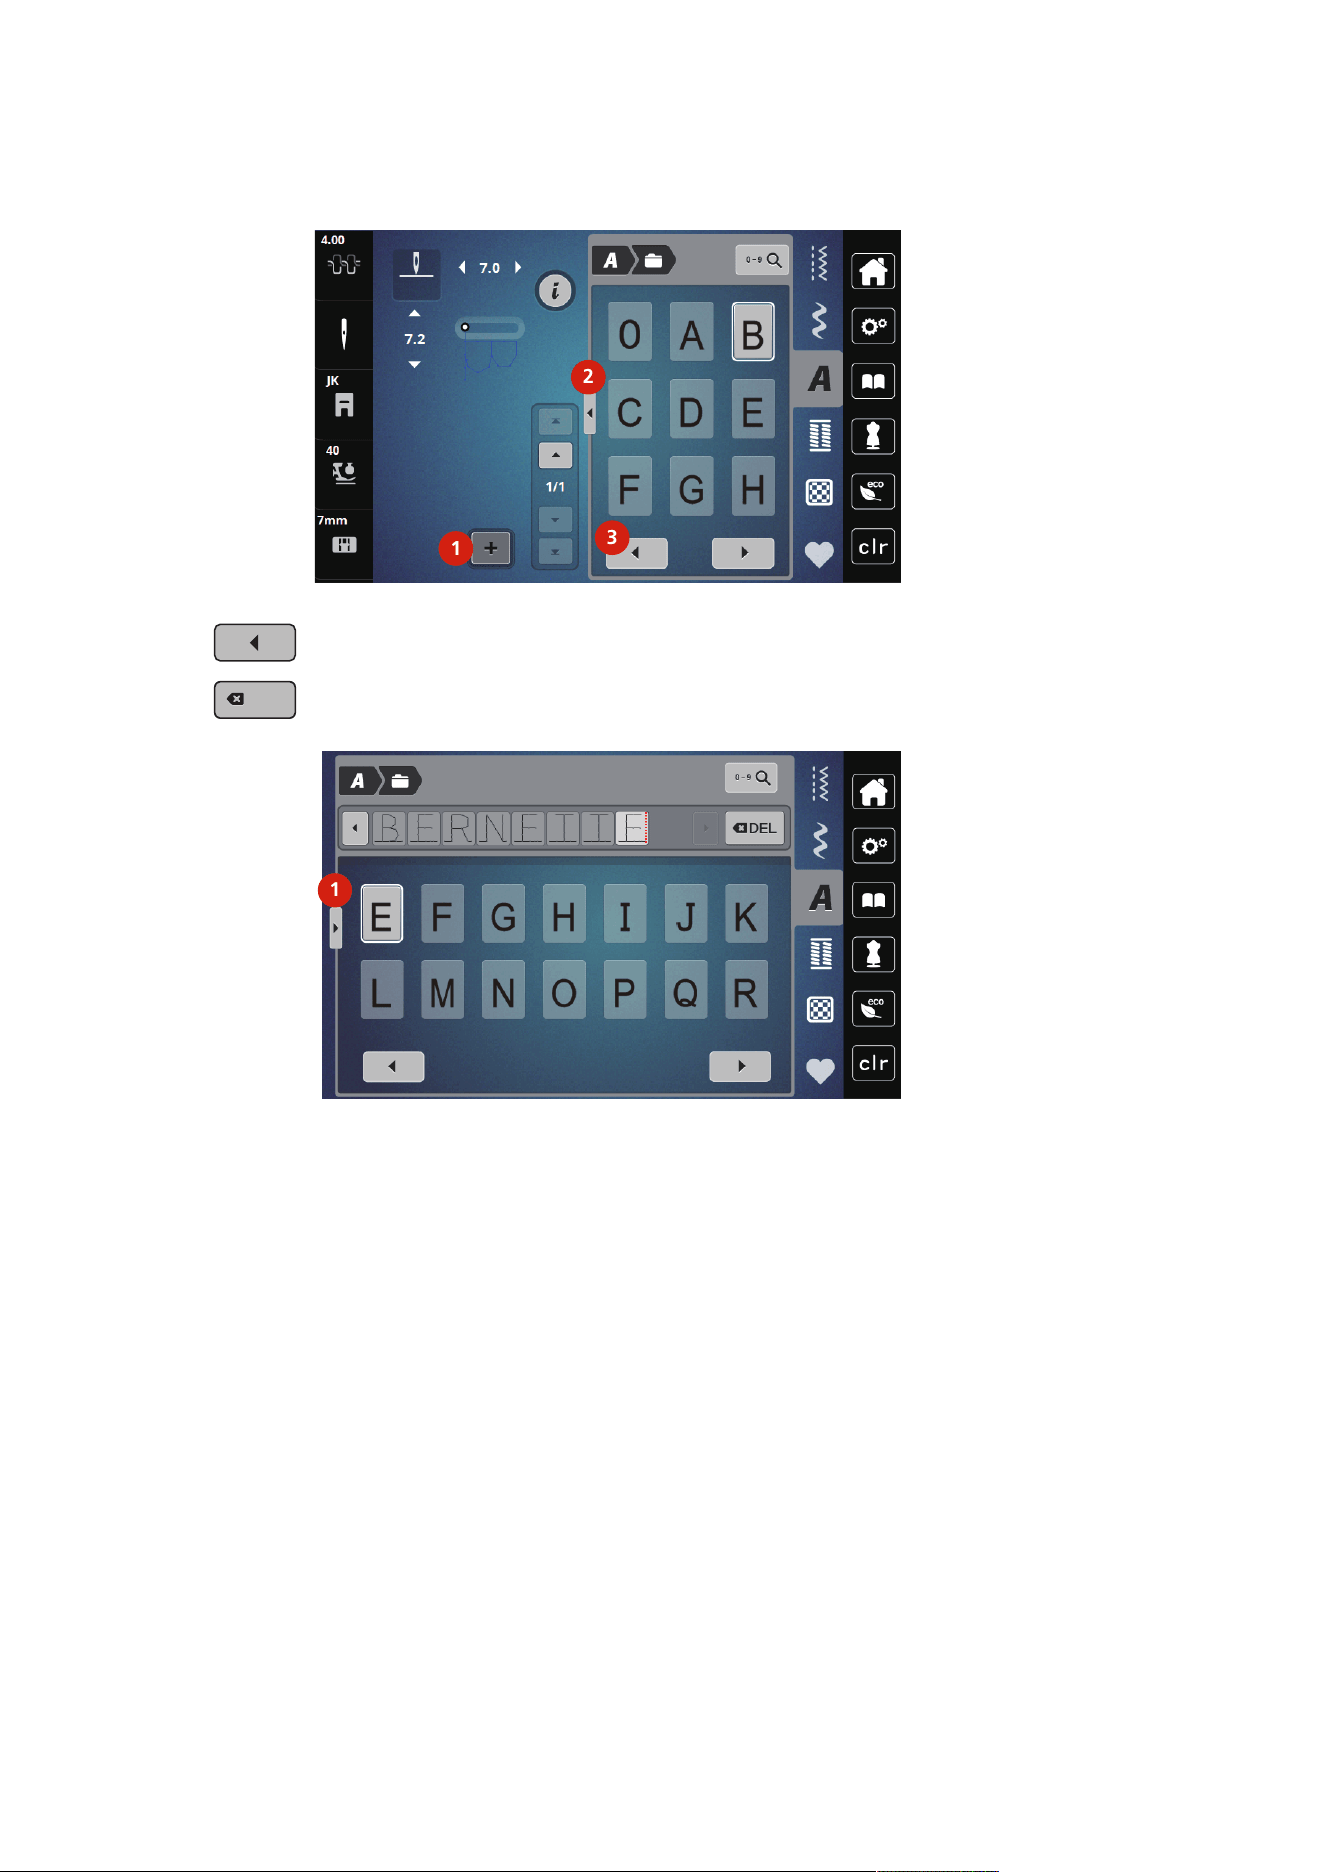
Alphabets
90
2023-06 EN 5020079.40A.04
> To open the expanded input mode, tap «Show Alphabet» (2).
2
1
3
> Select the letters.
> To display further letters, tap «Scroll Left» (3).
DEL
DEL
> To delete single letters of the entered text, tap «Deleting».
> To close the expanded input mode, tap «Show Alphabet» (1) again.
1
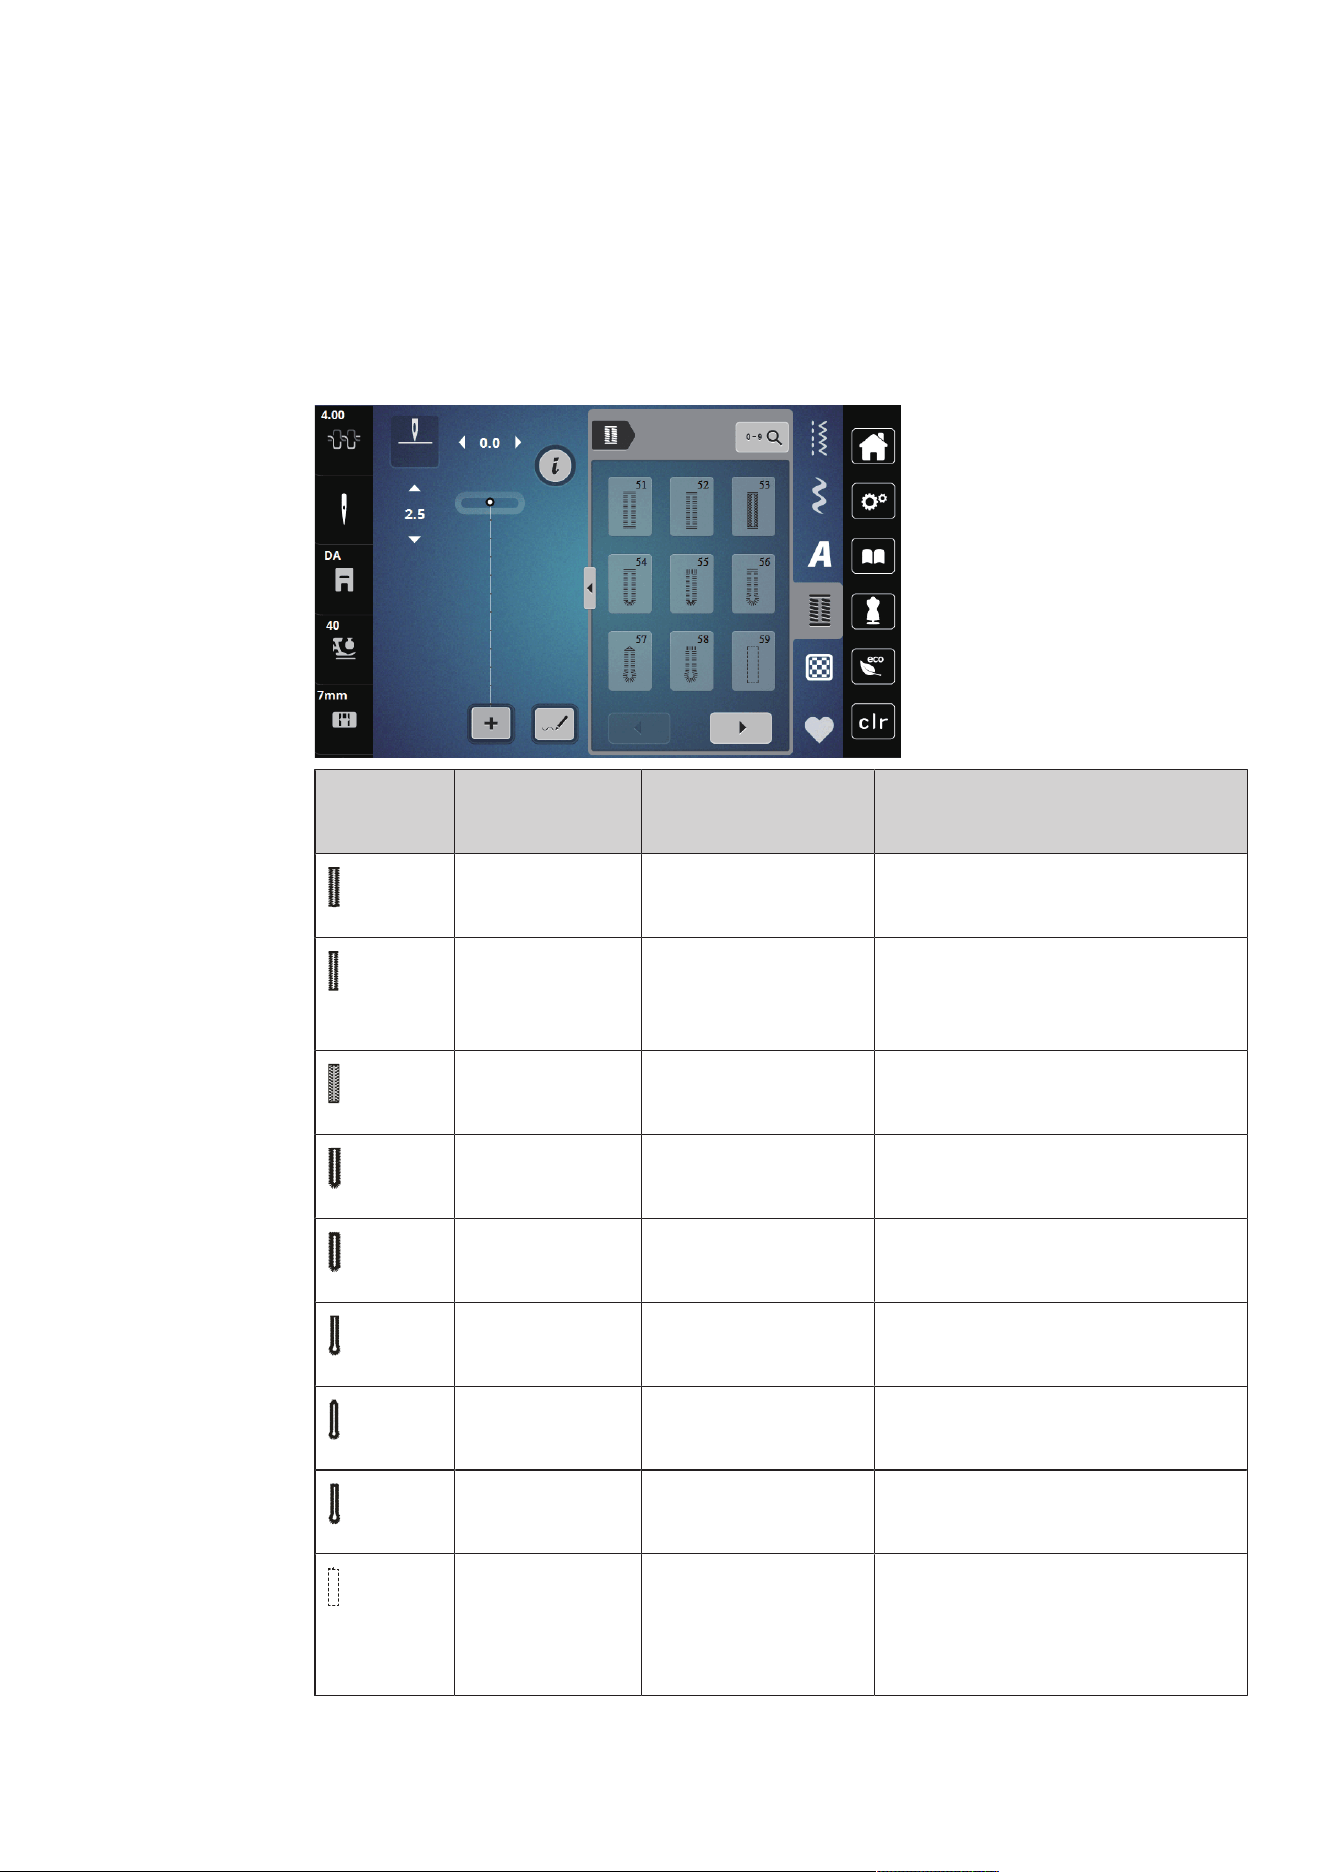
Buttonholes
91
2023-06 EN 5020079.40A.04
9 Buttonholes
9.1 Overview Buttonholes
To be able to create the right buttonhole for every button, every purpose and also for every garment, the
bernette b79 comes with an extensive collection of buttonholes. The corresponding button can be sewn on
automatically. Eyelets can also be sewn.
Buttonhole Buttonhole
Number
Name Description
51 Standard Buttonhole For light to medium-weight fabrics. e.g.
blouses, dresses and bed linen.
52 Standard Buttonhole
Narrow
For light to medium-weight fabrics. e.g.
blouses, dresses, chlidren's and baby
clothes, crafts.
53 Stretch Buttonhole For any highly elastic jersey made from
cotton, wool, silk and synthetic fibers.
54 Round Buttonhole with
Normal Bartack
For medium-weight to heavy fabrics,
dresses, jackets, coats and rainwear.
55 Round Buttonhole with
Horizontal Bartack
For medium to heavy weight fabrics:
dresses, jackets, coats, rainwear.
56 Keyhole Buttonhole For firmer, non-stretch fabrics, jackets,
coats, leisure wear.
57 Keyhole Buttonhole
with Pointed Bartack
For firmer, non-stretch fabrics, jackets,
coats, leisure wear.
58 Keyhole Buttonhole
with Horizontal Bartack
For firm, non-stretch fabrics: jackets,
coats, leisure wear.
59 Straight Stitch
Buttonhole
Program for staystitching buttonholes,
for pocket openings, reinforcing
buttonholes, especially for buttonholes
in leather and imitation leather.
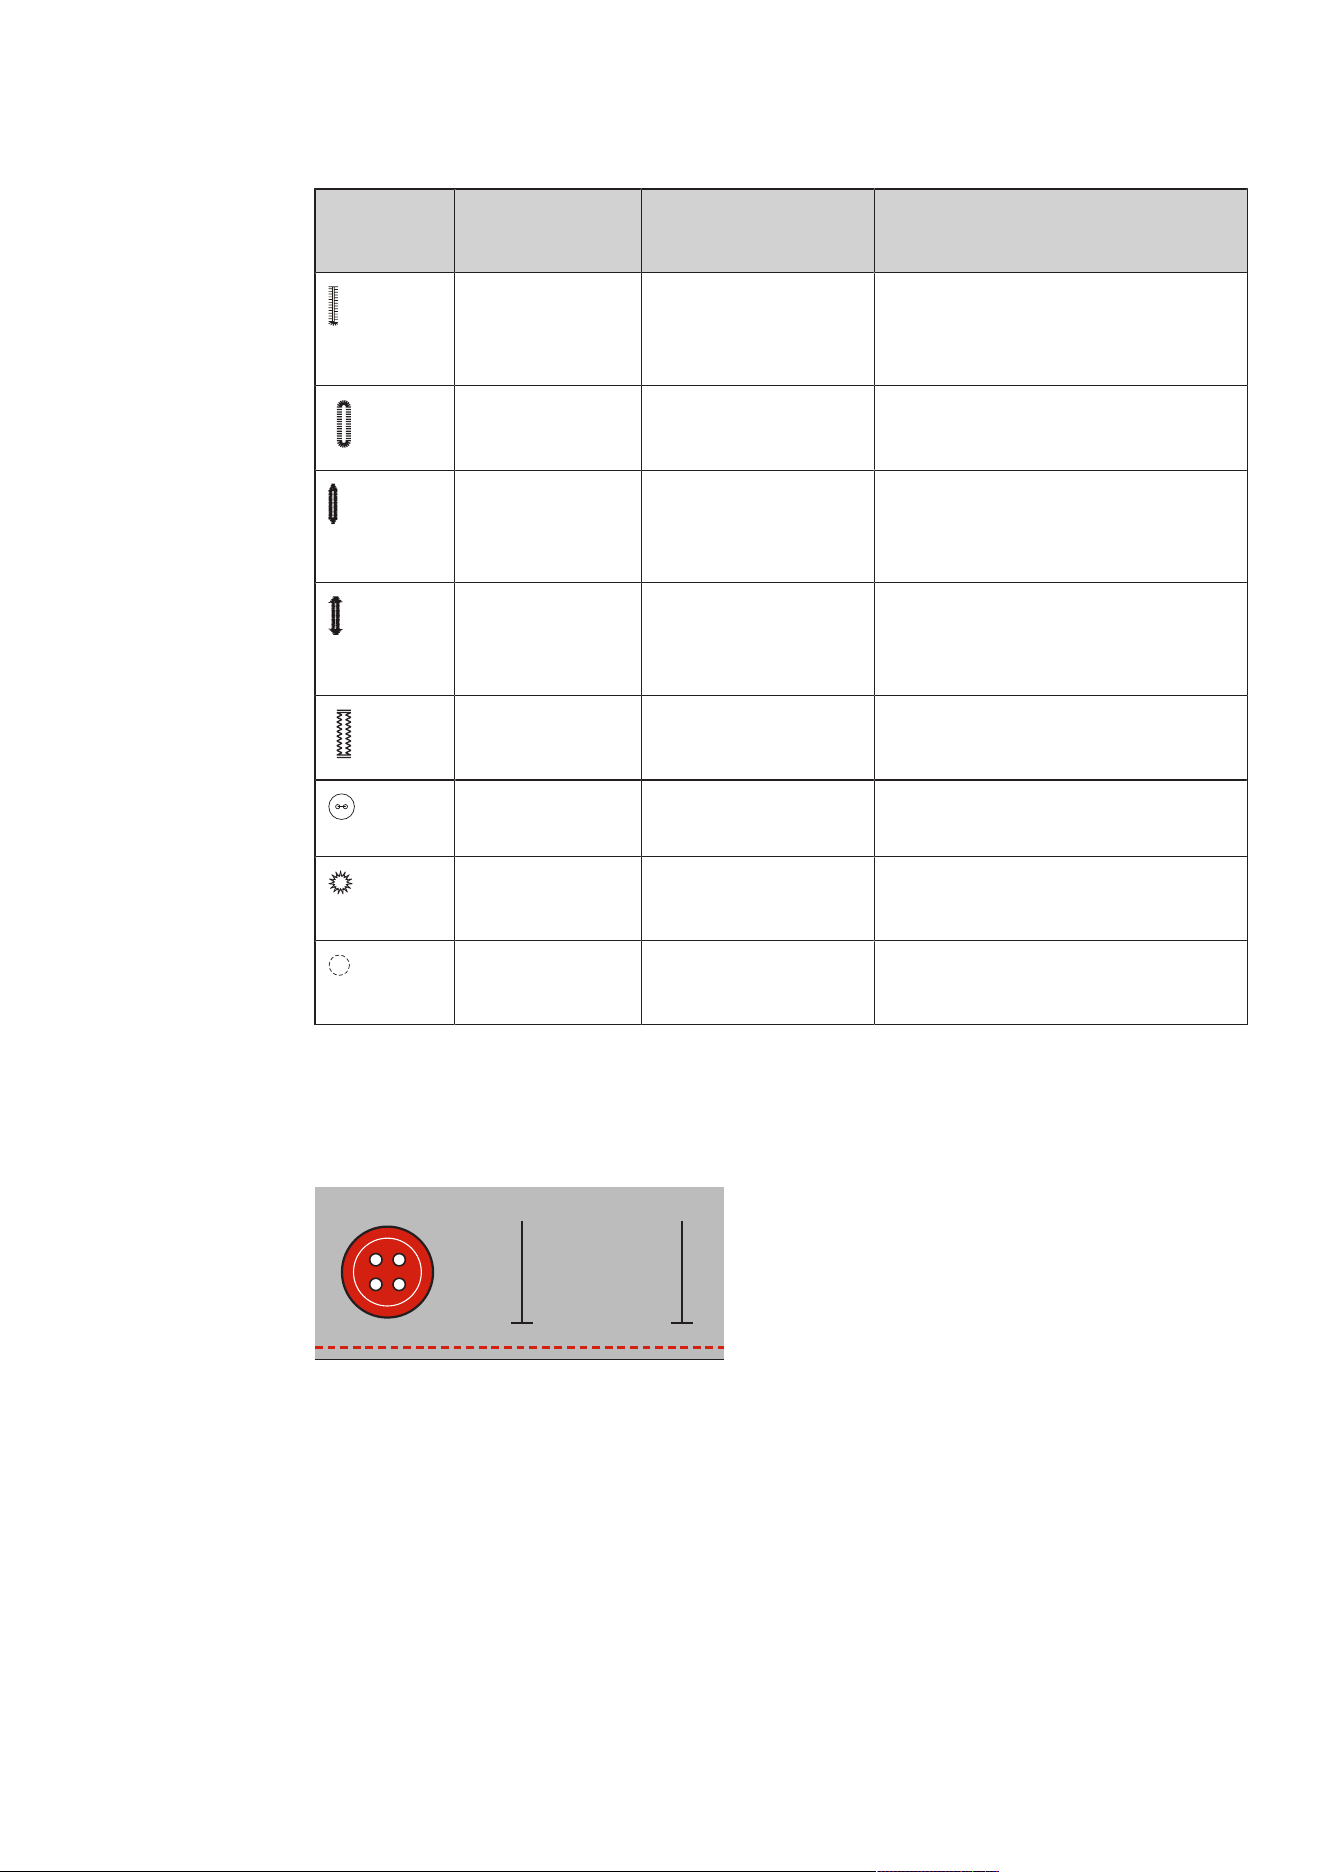
Buttonholes
92
2023-06 EN 5020079.40A.04
Buttonhole Buttonhole
Number
Name Description
63 Heirloom Buttonhole For light to medium-weight woven
fabrics; blouses, dresses, leisure wear,
bedlinen.
64 Double-rounded
Buttonhole
For medium to heavy-weight fabrics in
all kinds of different materials.
66 Buttonhole with Double
Pointed Bartack,
Narrow
Decorative buttonhole for medium
weight fabrics; blouses, dresses, jackets.
69 Decorative Buttonhole
with Double Pointed
Bartack
For decorative buttonholes in firmer,
non-elastic fabrics.
71 Stretch Buttonhole For jeans or stretch fabric with a coarse
weave.
60 Button Sew-on Program For buttons with 2 and 4 holes.
61 Eyelet with Small Zigzag Openings for cords and narrow ribbons,
for decorative work.
62 Eyelet with Straight
Stitch
Openings for cords and narrow ribbons,
for decorative work.
9.2 Marking Buttonholes
> Mark the positions of the buttonhole on the fabric.
– The maximum buttonhole length is 3cm (1 3/16inch). (Total of diameter + thickness of button.)
> The size of the buttonhole is determined by the button inserted in the buttonholder plate.
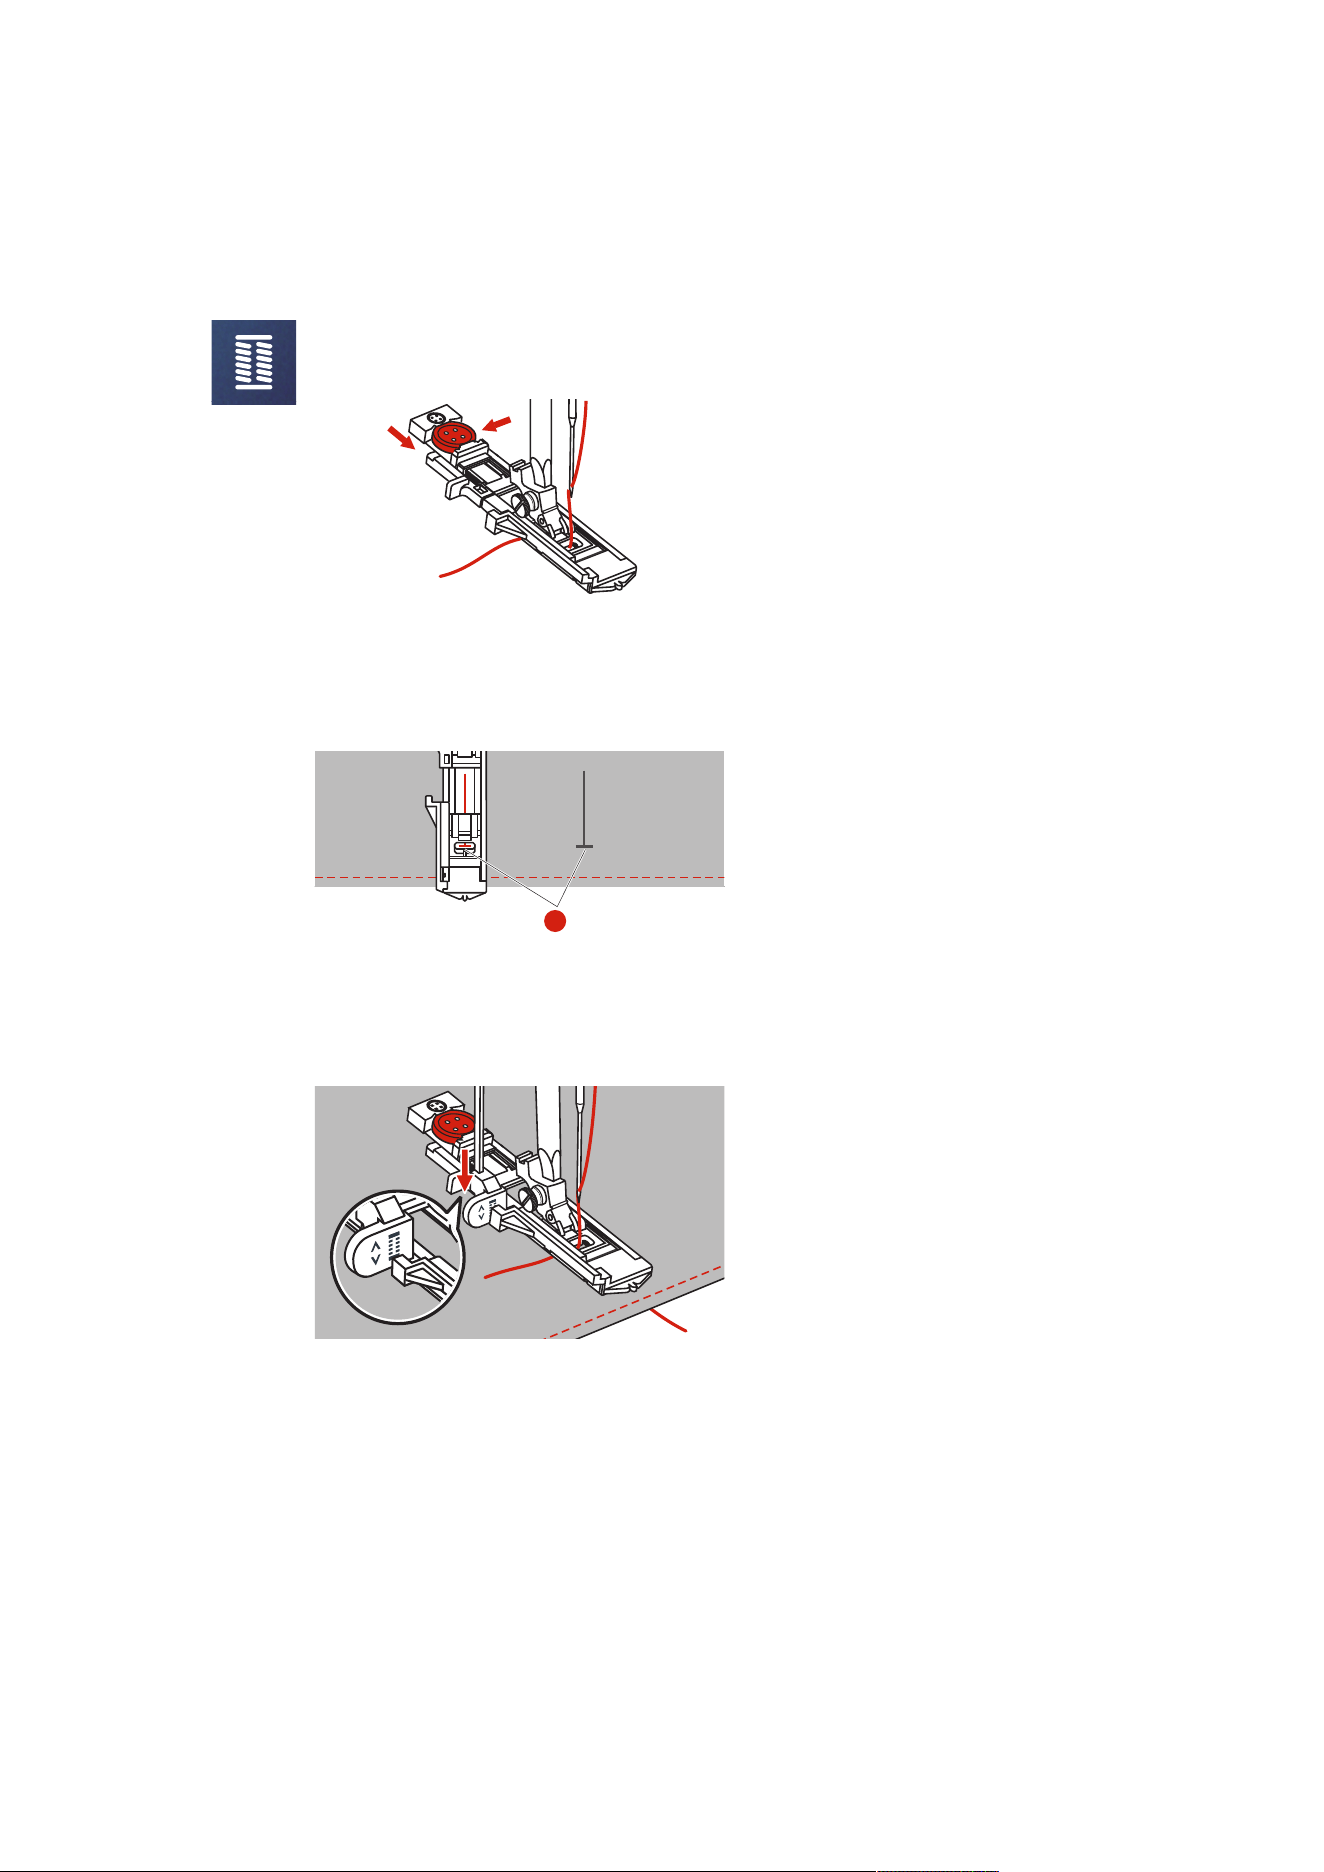
Buttonholes
93
2023-06 EN 5020079.40A.04
9.3 Sewing a Buttonhole Automatically
> Attach the Buttonhole Foot with Slide (RJ).
> Pull out the button holder plate and insert the button.
> Pass the thread through the hole in the presser foot and then place it under the foot.
> Tap «Buttonholes».
> Select the buttonhole stitch.
> Adjust the stitch width and stitch length to the desired width and density.
> Position the fabric under the presser foot so that marking of the centerline is aligned with the starting
point (1).
> Make sure that there is no gap between the presser foot tip and the plastic part.
1
> Push the button «Start/Stop».
– While the buttonhole lever is raised, the display shows an error message to lower the buttonhole
lever.
> Pull the buttonhole lever down as far as possible until it clicks into place.
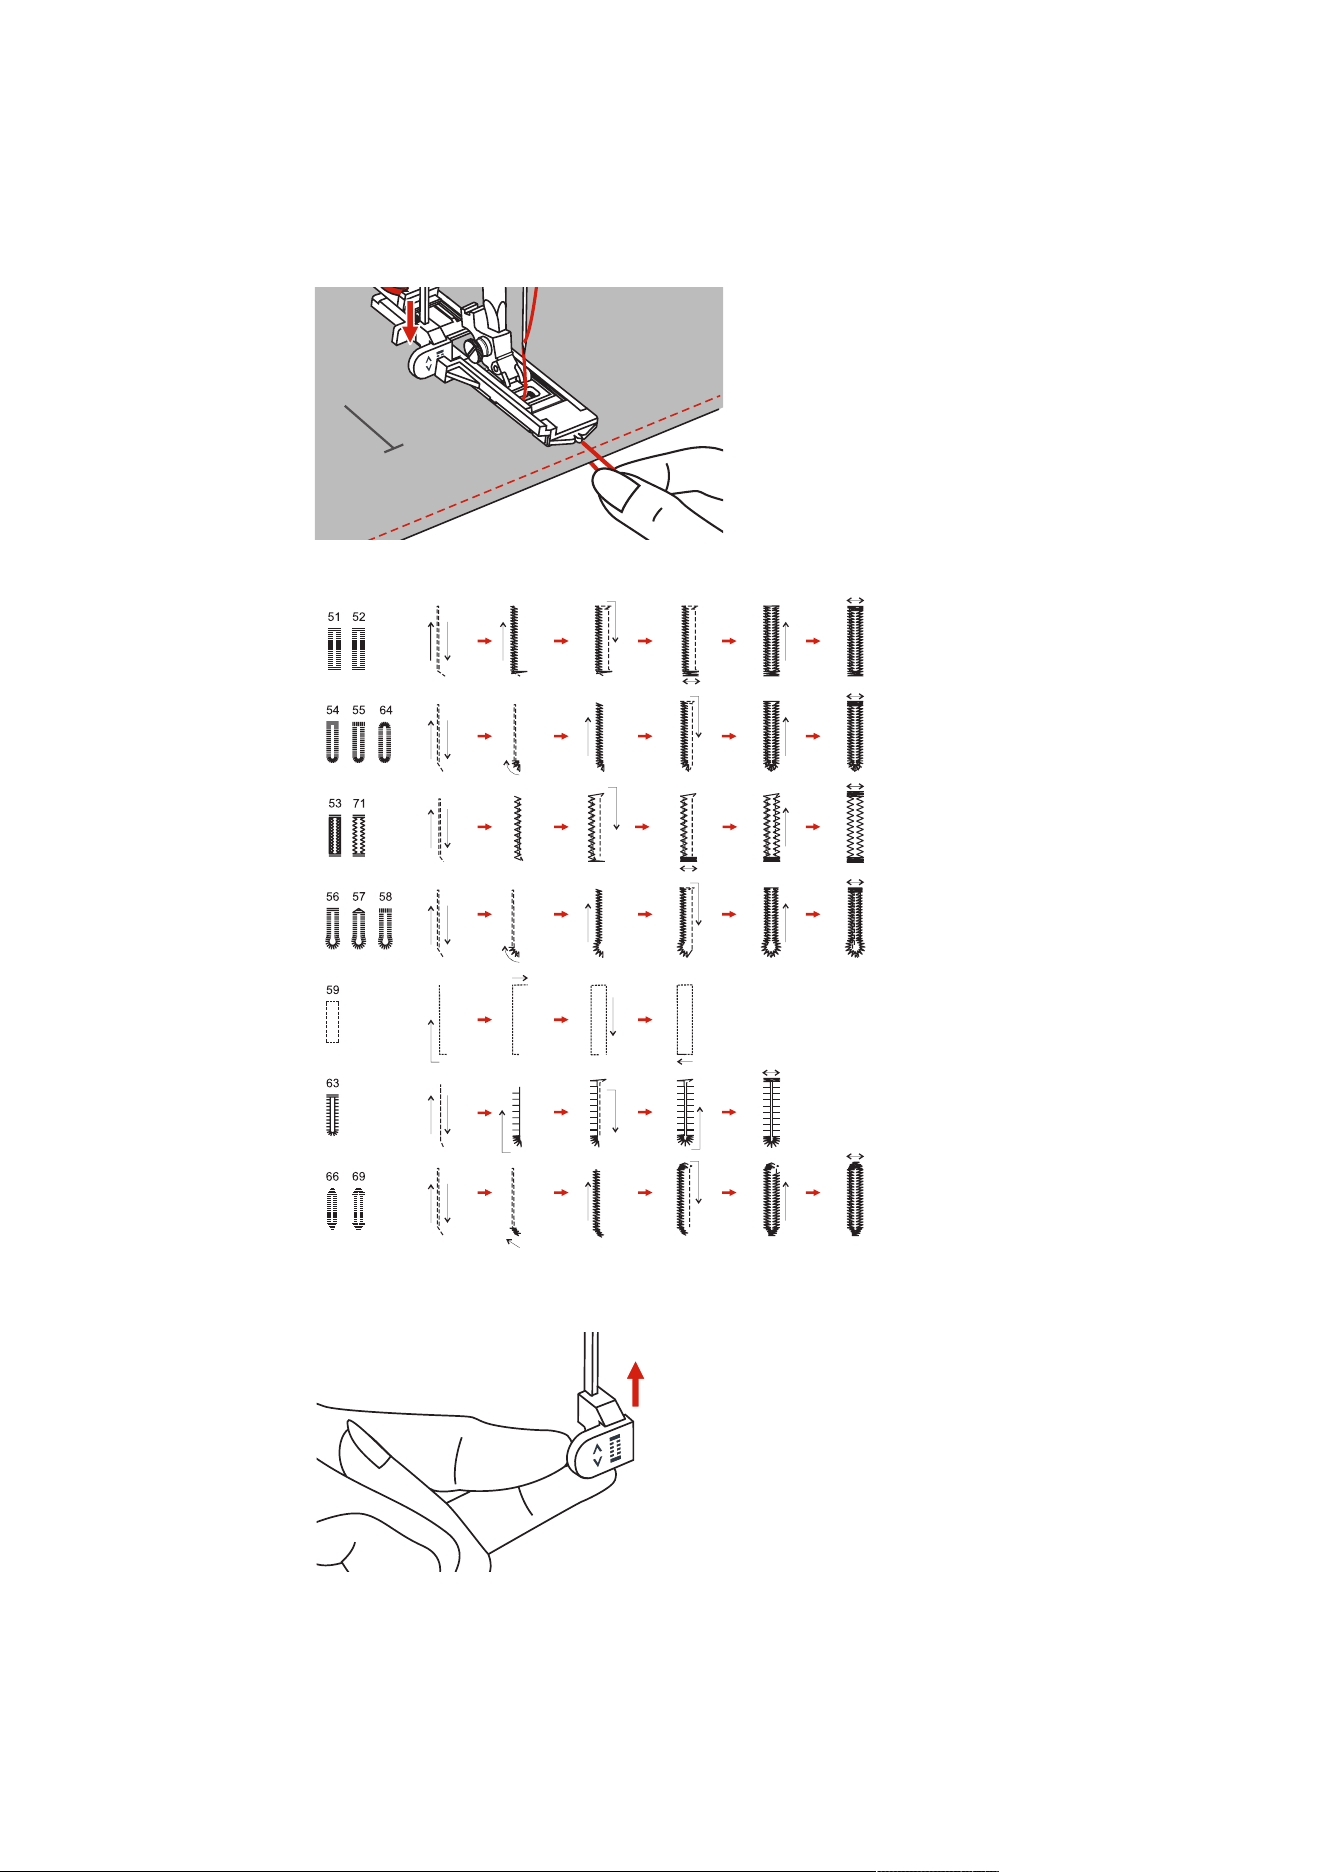
Buttonholes
94
2023-06 EN 5020079.40A.04
> Hold the upper thread vertically to the buttonhole foot with slide and start sewing.
– After the buttonhole has been sewn, the machine automatically sews a securing stitch before
stopping.
– The buttonholes are sewn backwards from the front of the presser foot as illustrated.
> Raise the sewing foot and cut the thread.
> After sewing the buttonhole, raise the buttonhole lever to the stop.
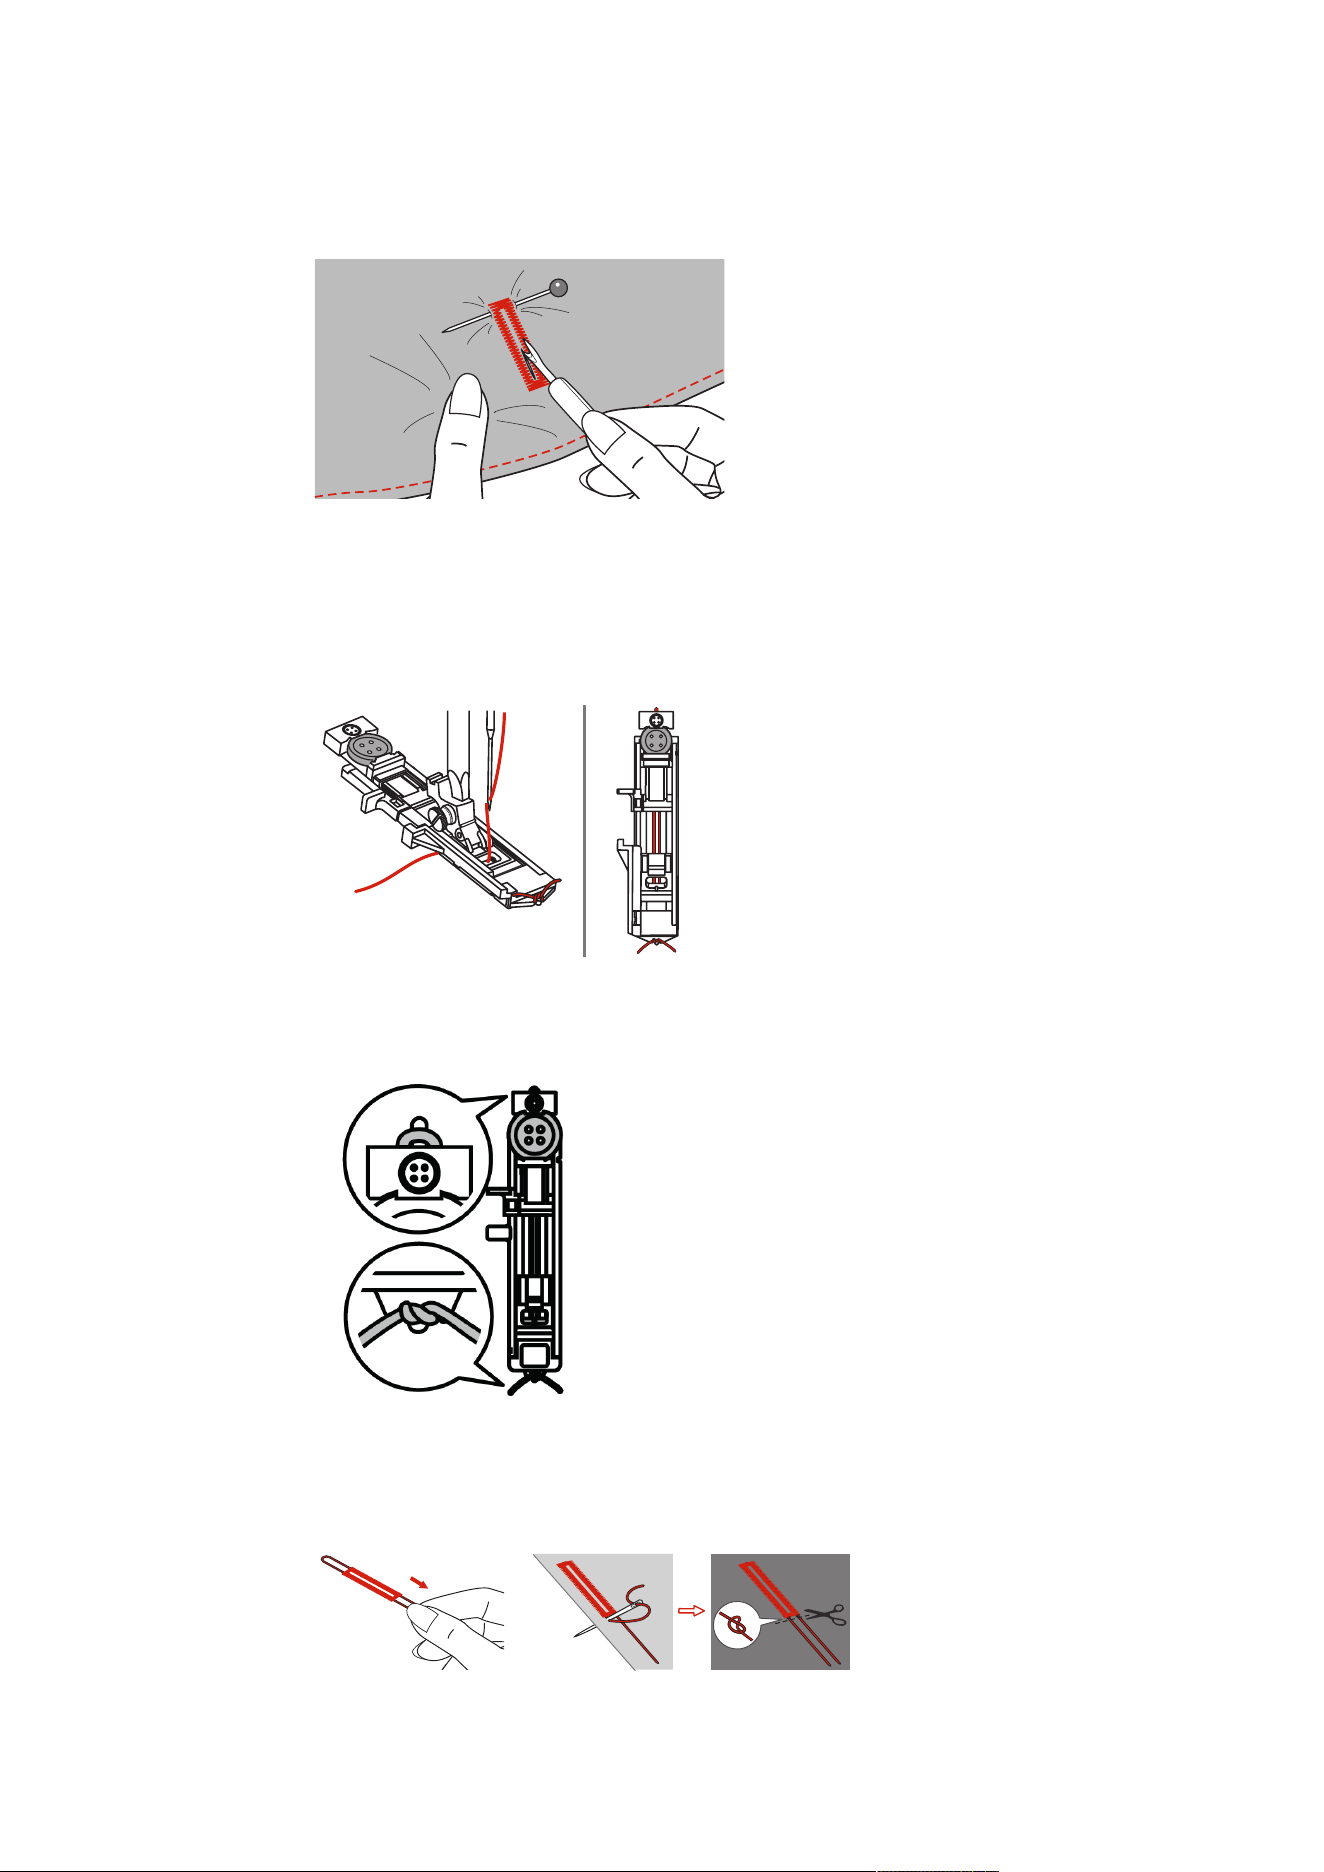
Buttonholes
95
2023-06 EN 5020079.40A.04
> Cut the buttonhole open and make sure that the beads are not cut on either side. Use a pin as a stop at
the bartack to avoid cutting too far.
9.4 Reinforce Buttonhole
When sewing buttonholes on stretch fabric, hook a heavy thread or a cord under the buttonhole foot.
> Attach the Buttonhole Foot with Slide (RJ).
> Pull out the button holder plate and insert the button.
> Pass the thread through the hole in the presser foot and then place it under the foot.
> Bring the two cord ends to the front of the foot and insert them in the grooves, then temporarily tie
them there.
> The stitch width and stitch length has to be adjusted before the sewing starts.
> Lower the presser foot an sew the buttonhole.
– The buttonhole will sew over the cord, covering it.
> Pull the cord loop until the loop disappears in the bartack.
> Pull the cord ends with the sewing needle to the back and knot or secure them.
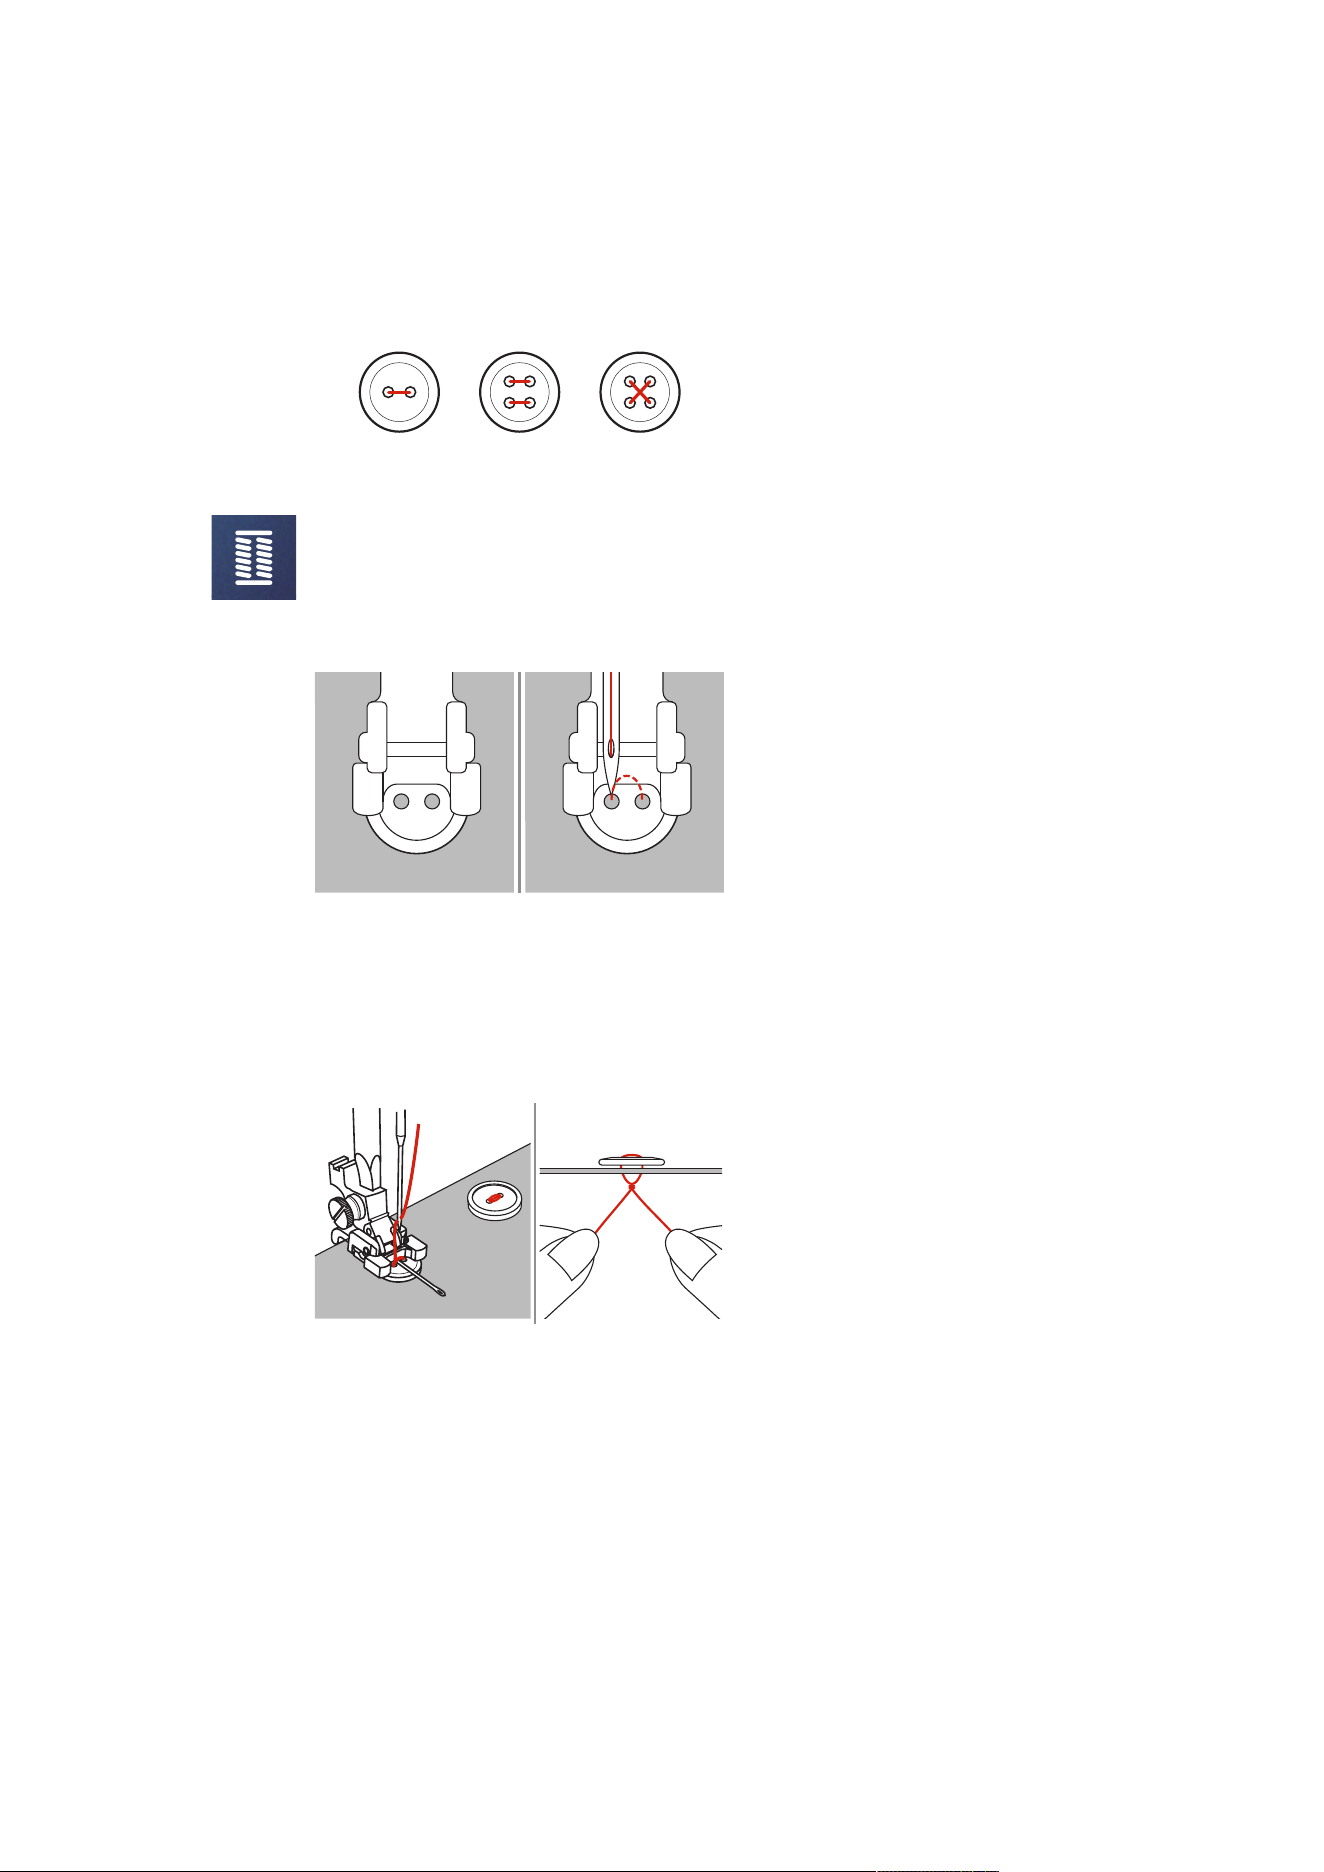
Buttonholes
96
2023-06 EN 5020079.40A.04
9.5 Sewing On Buttons
The Button Sew-on Program can be used to sew on buttons with two or four holes, press studs or snap
fasteners. To enhance the stability, the Button Sew-on Program always stitches into the left hole of the
button. As for a button with 4 holes, the two front holes should be sewn first.
The first securing stitch of the Button Sew-on Program alwasy stitches into the left hole of the button.
> Attach the Button Sew-on Foot (RC).
> Tap «Buttonholes».
> Lower the feed dog.
> Select the Button Sew-on Program No.60.
> Fit the button into the sewing project.
> Check distances between holes with the handwheel. If necessary, alter the stitch width.
> Hold the threads when starting to sew.
– The machine sews the buttonhole program and stops automatically.
– When a stem is needed, place a darning needle on the buttonhole and sew.
> Pull the two bobbin threads until the thread ends of the upper threads are visible on the wrong side of
the fabric.
> Tie the threads manually.
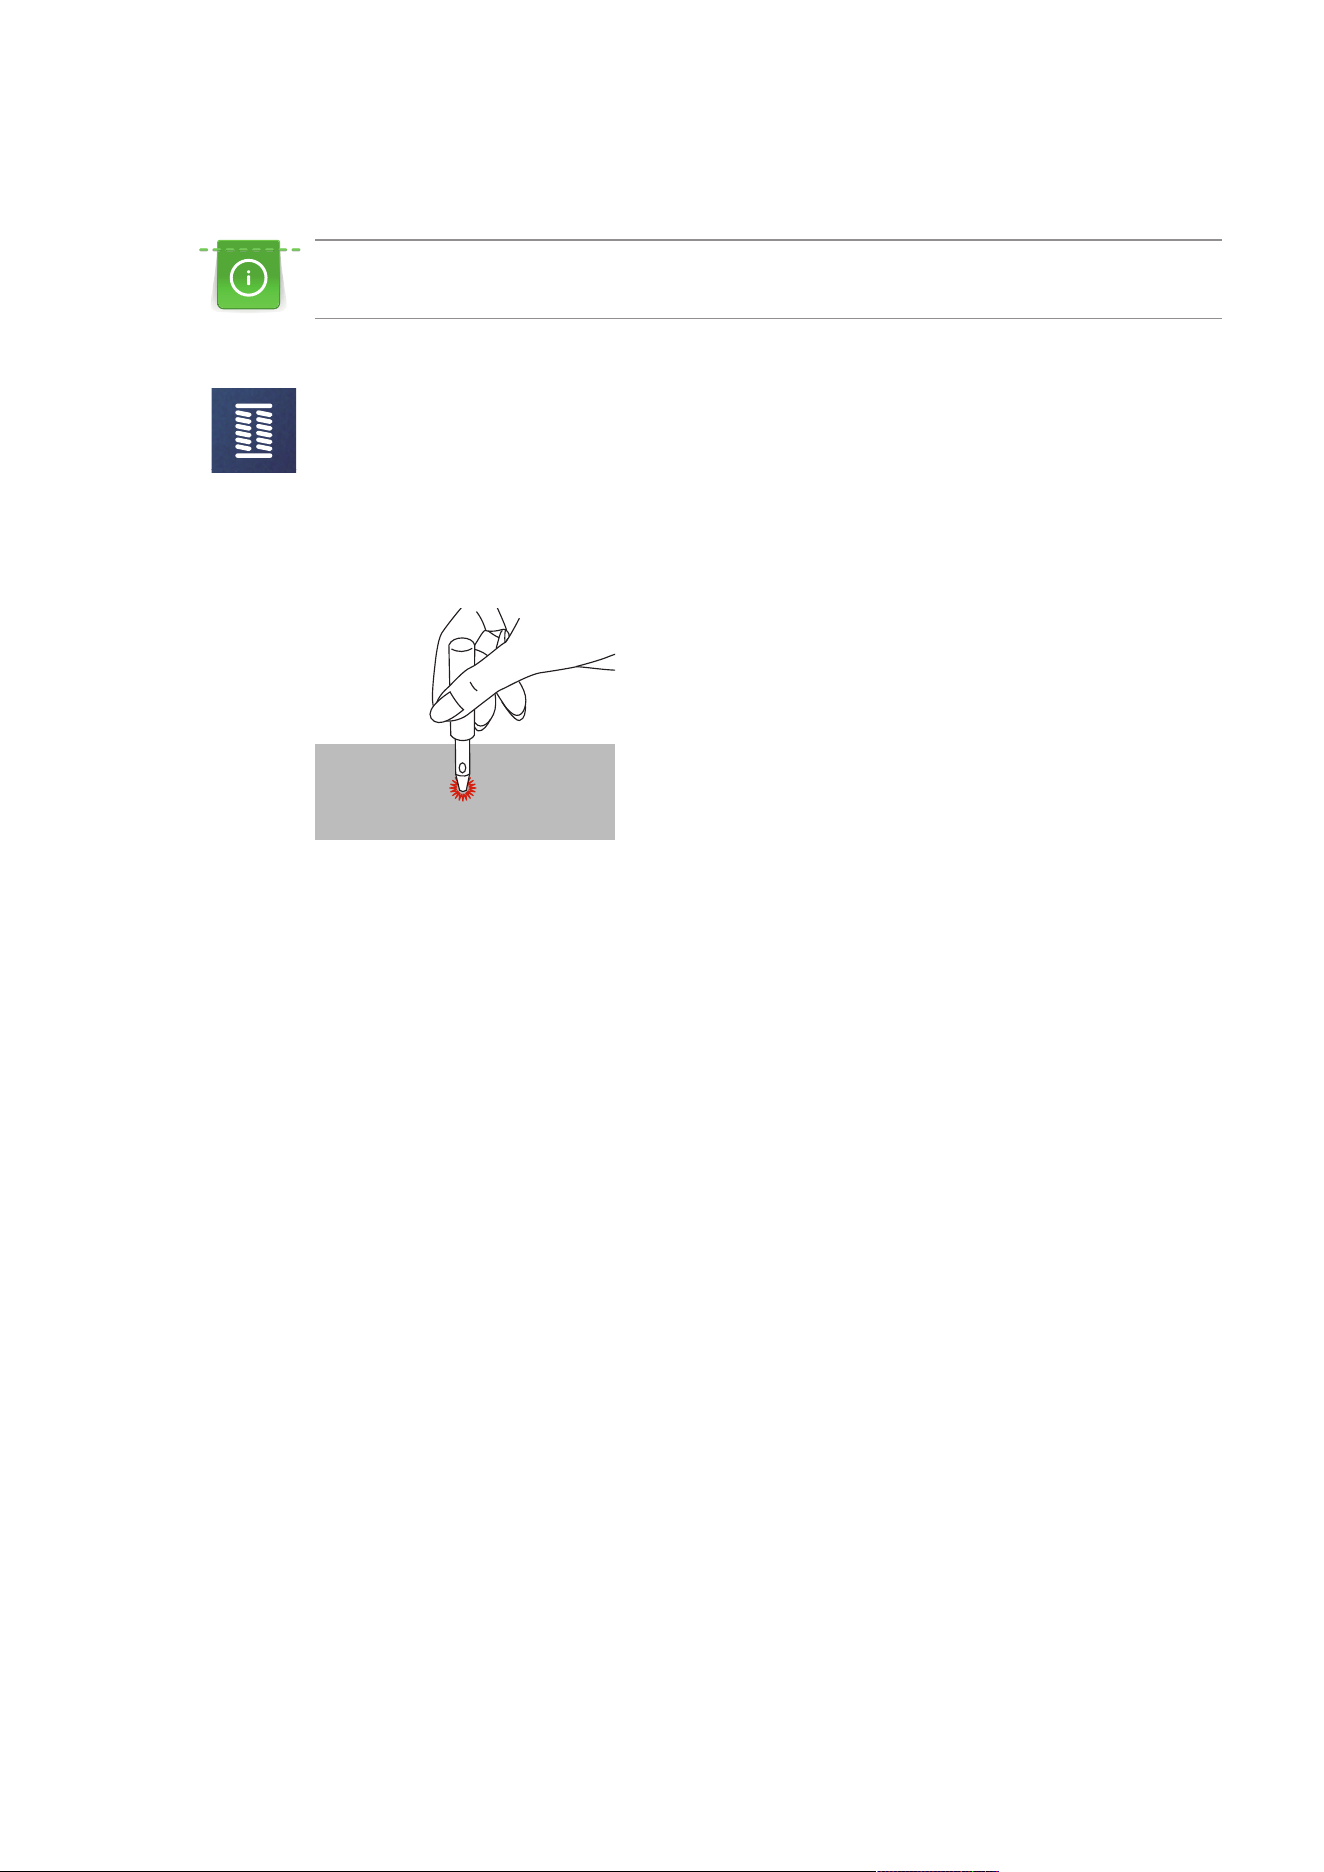
Buttonholes
97
2023-06 EN 5020079.40A.04
9.6 Sewing Eyelets
For increased stability sew the eyelet twice. Adjust stitch with the balance if necessary.
> Attach the Zigzag Foot (DA) or the Embroidery Foot (JK) or the Open embroidery Foot (DN) (optional
accessory).
> Tap «Buttonholes».
> Select the Eyelet Program No.61 or No.62.
> To alter the size of the eyelet, turn the «Upper Multi-function Knob» or the «Lower Multi-function
Knob».
> Sew the Eyelet Program.
– The machine stops automatically at the end of the Eyelet Program.
> Use an awl, punch pliers or a hole punch to open the eyelet.
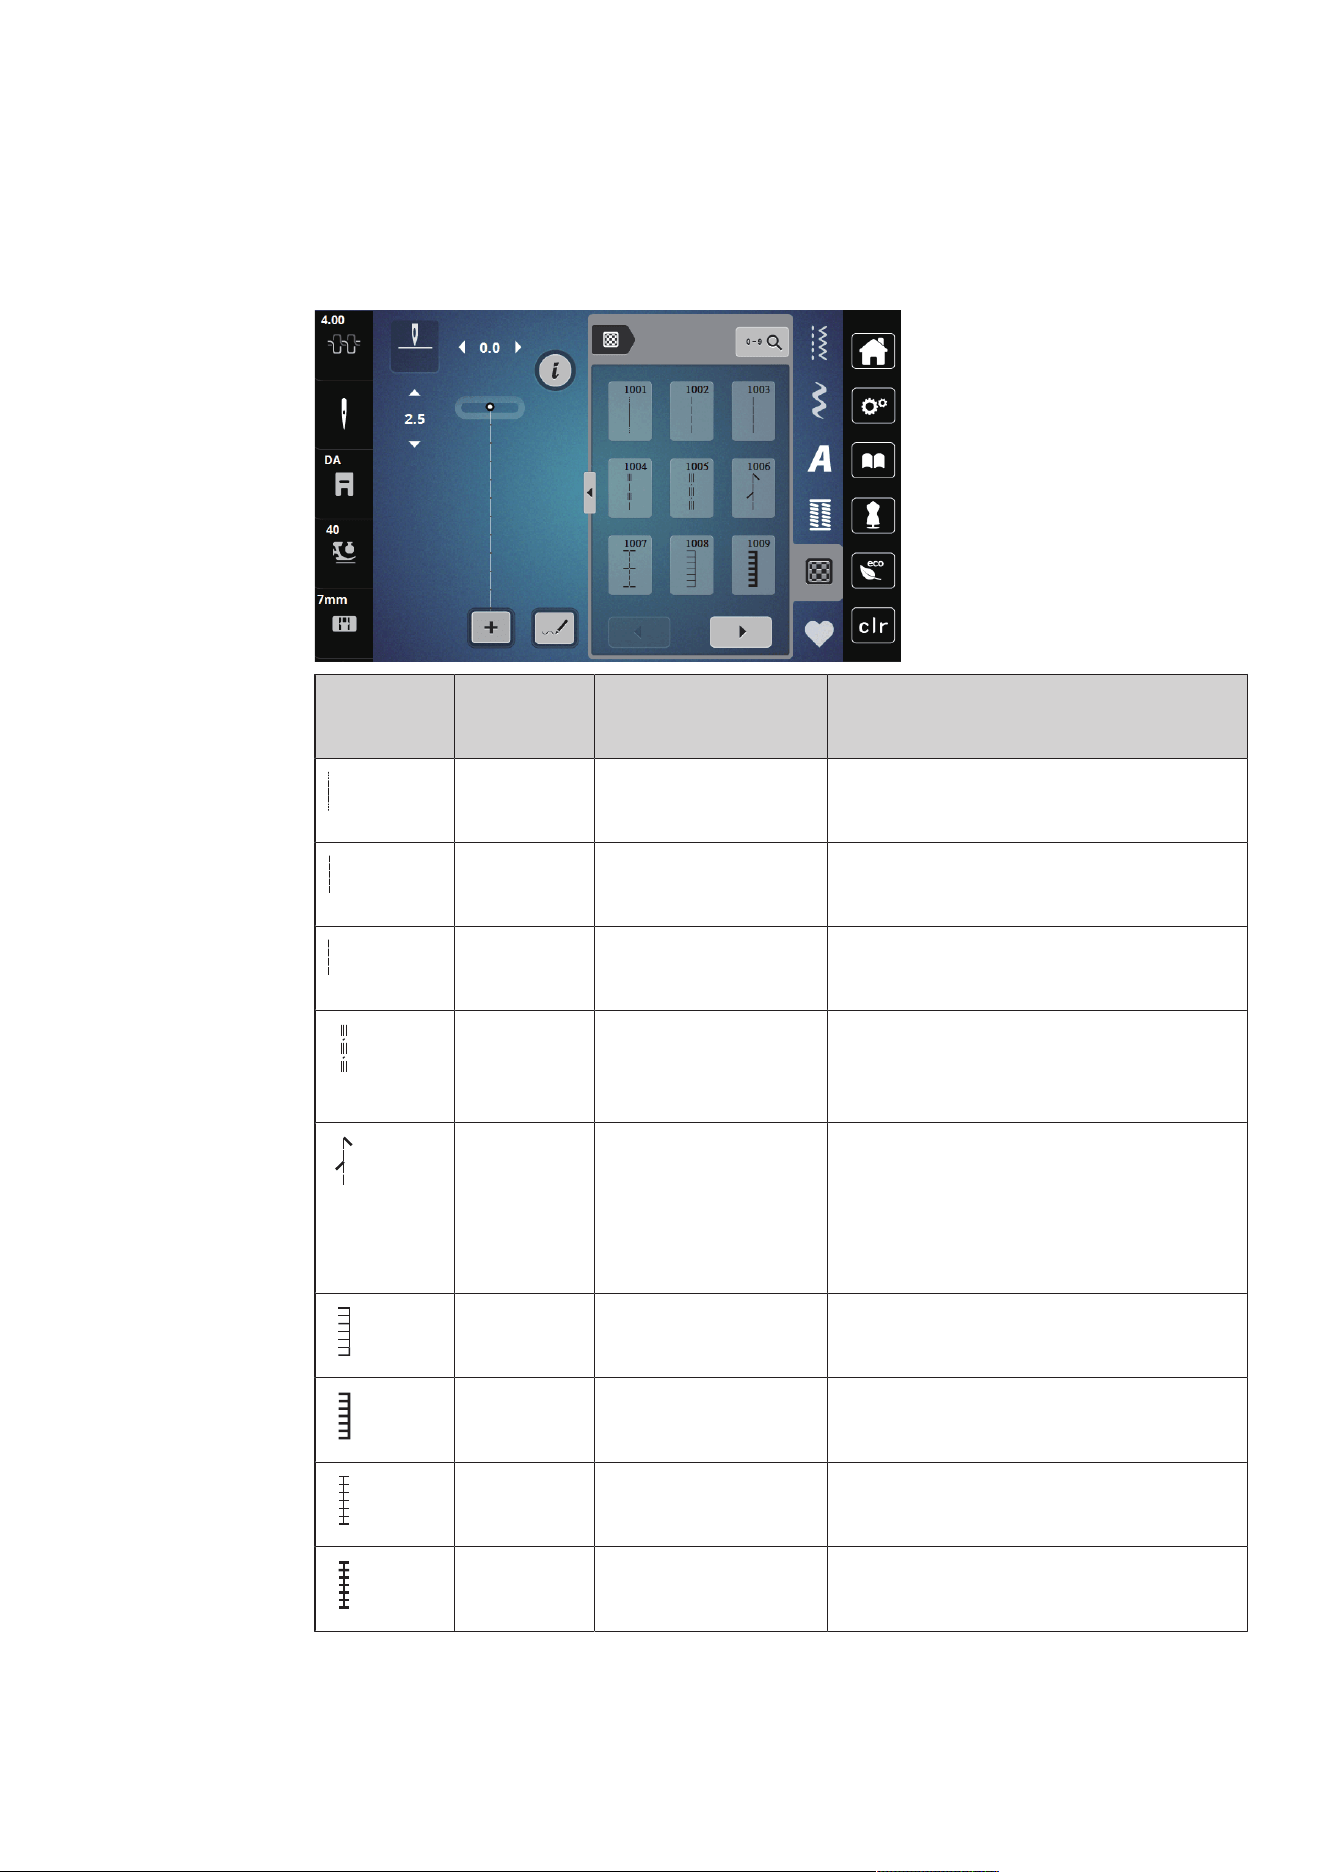
Quilting
98
2023-06 EN 5020079.40A.04
10 Quilting
10.1 Overview Quilt Stitches
Stitch
Pattern
Stitch
Number
Name Description
1001 Quilting, Securing
Program
To secure at the sewing start and sewing end
with short stitches forward.
1002 Quilting, Straight Stitch Straight stitch 2mm stitch length, to join
patchwork parts.
1003 Piecing Stitch/Straight
Stitch
Straight stitch at 3mm stitch length.
1004 Handlook Quilt Stitch
1005, 1030, 1034,
1035
Imitation of handlook quilt stitch with
monofilament.
1006 Decorative Quilt Stitch
Variations
1007, 1010-1012,
1015-1019,
1025-1027, 1031-1032
For "Crazy Patchwork" and embellishing.
1008 Blanket Stitch For appliqué and sewing on ribbons.
1009 Double Blanket Stitch For appliqué and sewing on ribbons.
1013 Dual Blanket Stitch To edgestitch between two appliqués, "Crazy
Patchwork".
1014 Double Blanket Stitch
Dual
To edgestitch between two appliqués, "Crazy
Patchwork".
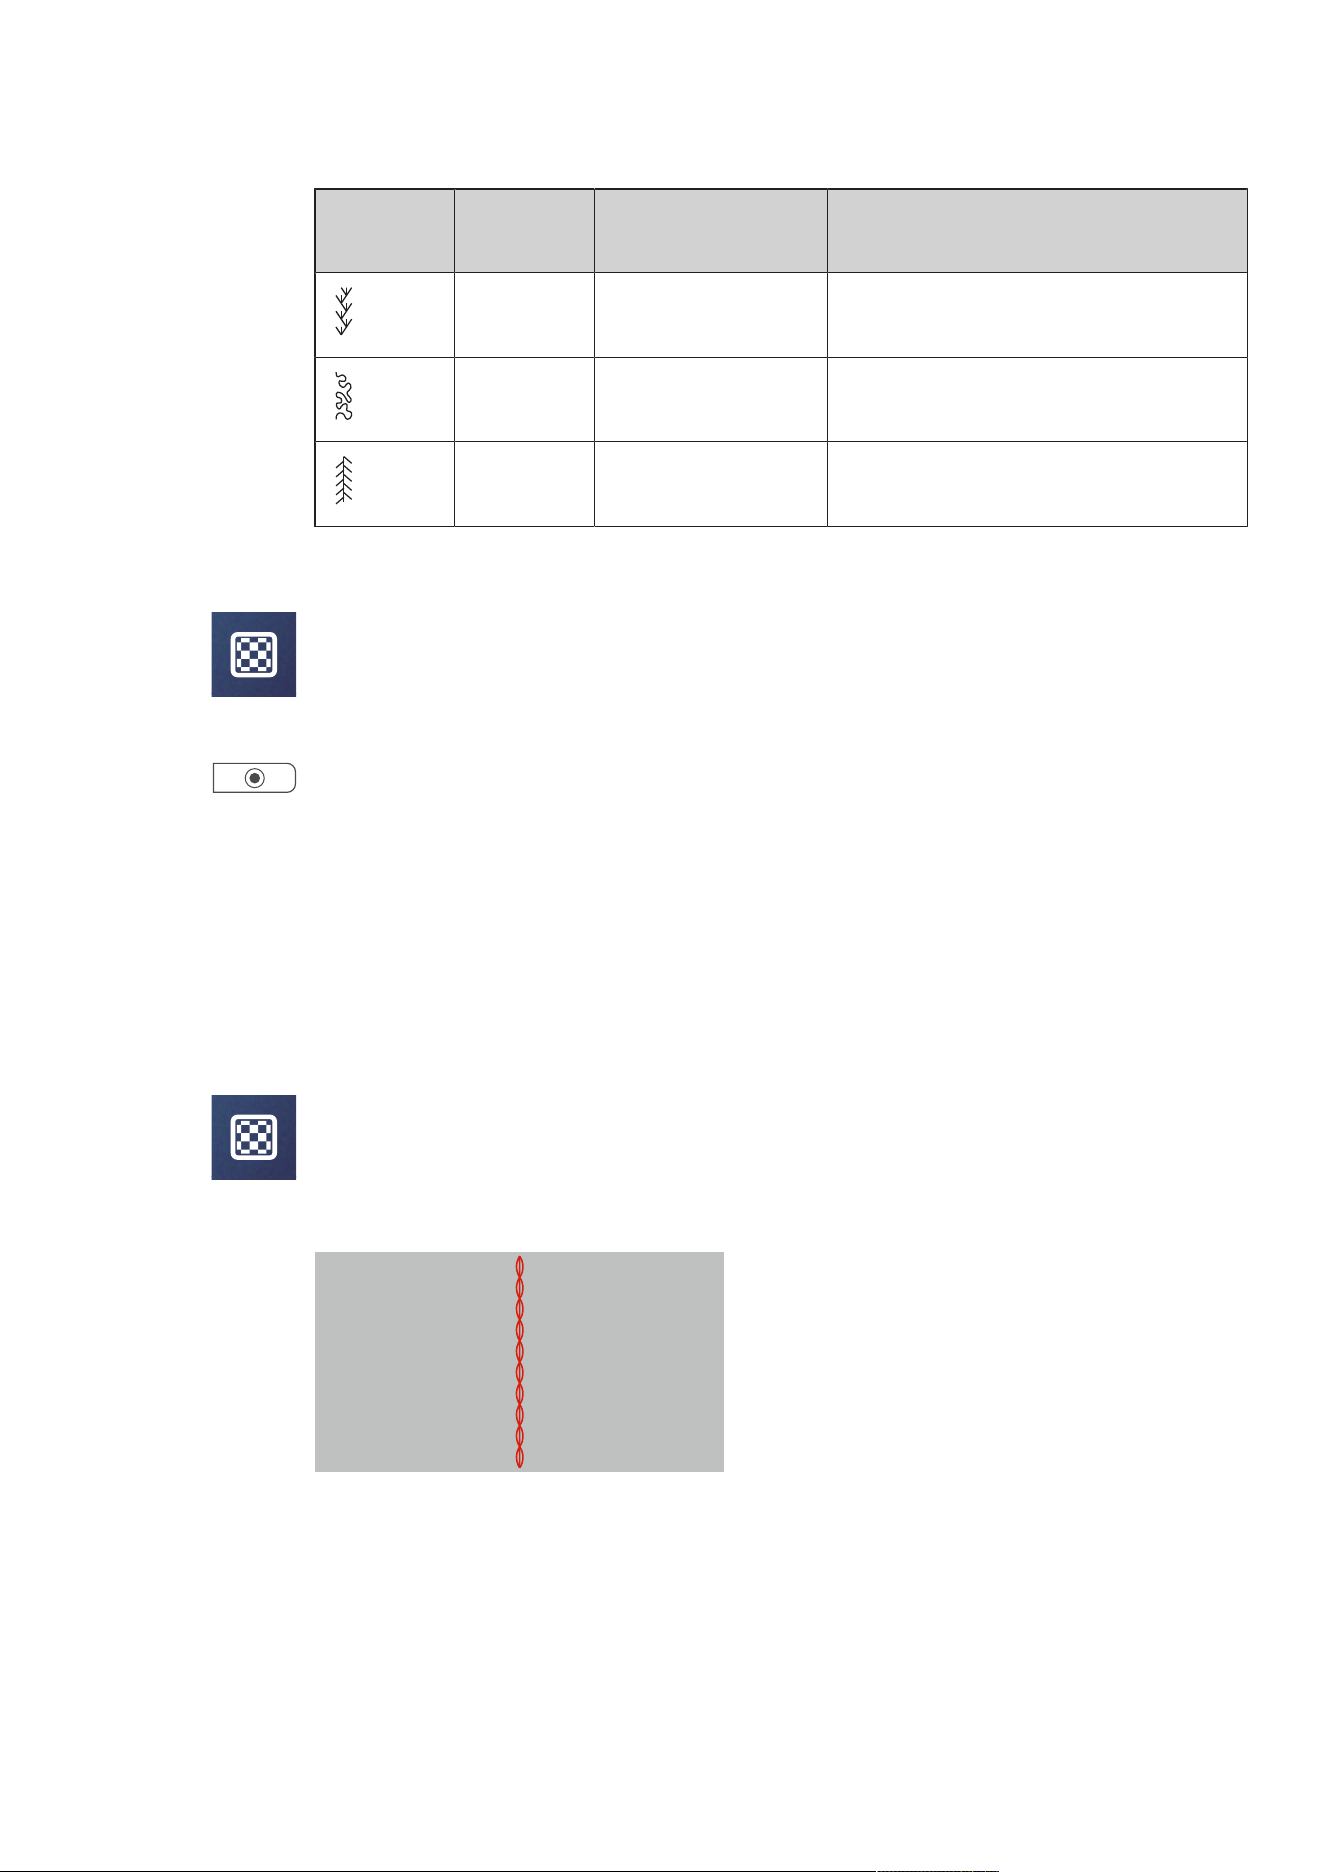
Quilting
99
2023-06 EN 5020079.40A.04
Stitch
Pattern
Stitch
Number
Name Description
1020 Feather Stitch Variations
1021-1023
For "Crazy Patchwork" and embellishing.
1024 Stippling Stitch/
Stippling Quilt Stitch
Imitation of stipple quilting.
1029 Feather Stitch
1028, 1033
For "Crazy Patchwork" and embellishing.
10.2 Quilting, Securing Program
> Attach the Zigzag Foot (DA).
> Tap «Quilt Stitches».
> Select Quilt Stitch Pattern No.1001.
> Press the foot control.
– The machine sews 5 stitches forward automatically when sewing is started.
> Sew the seam in the desired length.
> Push the button «Securing Stitches».
– The machine sews 5 stitches forward automatically and stops automatically at the end of the Securing
Program.
10.3 Sewing Hand-look Quilt Stitches
Hand-look quilt stitches are suitable for all fabrics and sewing projects that should look like hand-sewn. It is
recommended to use a monofilament thread for the upper thread and a cotton embroidery thread for the
bobbin thread. The sewing speed should be moderate to prevent the monofilament from breaking. If
required, the upper thread tension and the balance can be adjusted to the sewing project and the desired
quilt stitch.
> Attach the Embroidery Foot (JK) / Zigzag Foot (DA).
> Tap «Quilt Stitches».
> Select the Hand Quilt Stitch No.1004 or 1005.
> If necessary, adjust the upper thread tension and the balance to suit the sewing project and the desired
quilt stitch.
> To start the machine, press the foot control or push the button «Start/Stop».
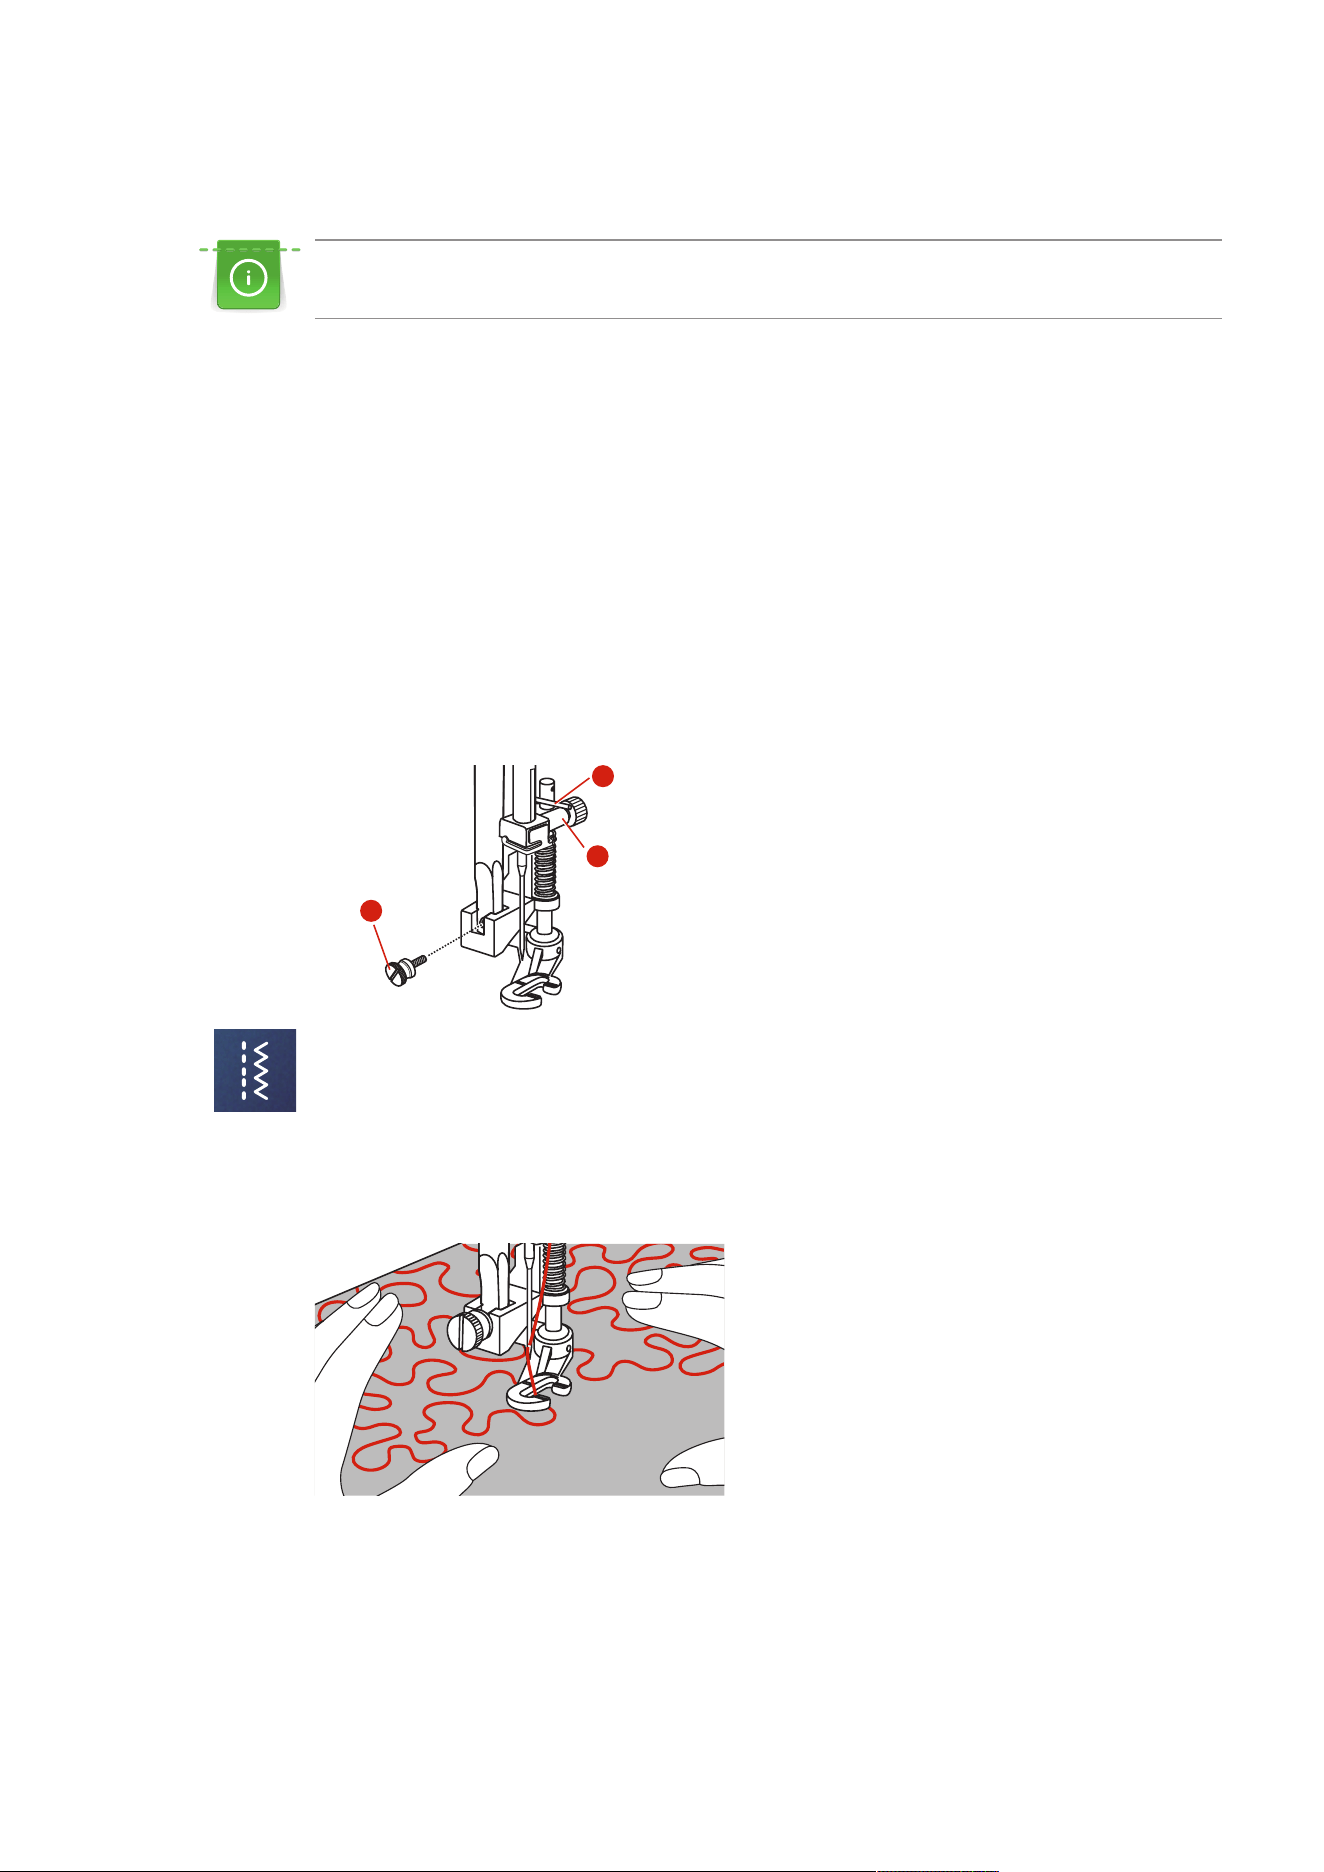
Quilting
100
2023-06 EN 5020079.40A.04
10.4 Guiding the Quilt Work Freely
Quilting gloves with rubber nubs make it easier to guide the fabric.
It is recommended to use the extension table (optional accessory) and the Free Hand System. With free
motion quilting, it is of advantage to quilt from the center outwards and to guide the fabric using smooth,
round movements to form the design of your choice. Free motion quilting and darning are based on the
same free motion principles.
With stipple quilting, entire surfaces of the fabric are filled with quilt stitches. The single lines of stitching are
rounded and never cross one another.
Prerequisite:
• The top layer, the batting and the backing are pinned together or basted.
> Lower the feed dog.
> Attach the Free-motion Embroidery Foot (RX) to the presser foot holder bar.
– The pin (1) should rest on the upper side of the needle clamping screw (2).
> Press the Free-motion Embroidery Foot (RX) firmly from below with your index finger and tighten the
screw (3).
3
2
1
> Tap «Practical Stitches».
> Select Straight Stitch No.1.
> If necessary adjust the upper thread tension according to the sewing project.
> To start the machine, press the foot control or push the button «Start/Stop».
> Hold both hands close to the presser foot like an embroidery hoop to guide the fabric.
> If the thread is lying on top of the fabric, slow down the movement.
> If there are knots on the wrong side of the fabric, move the fabric more quickly.
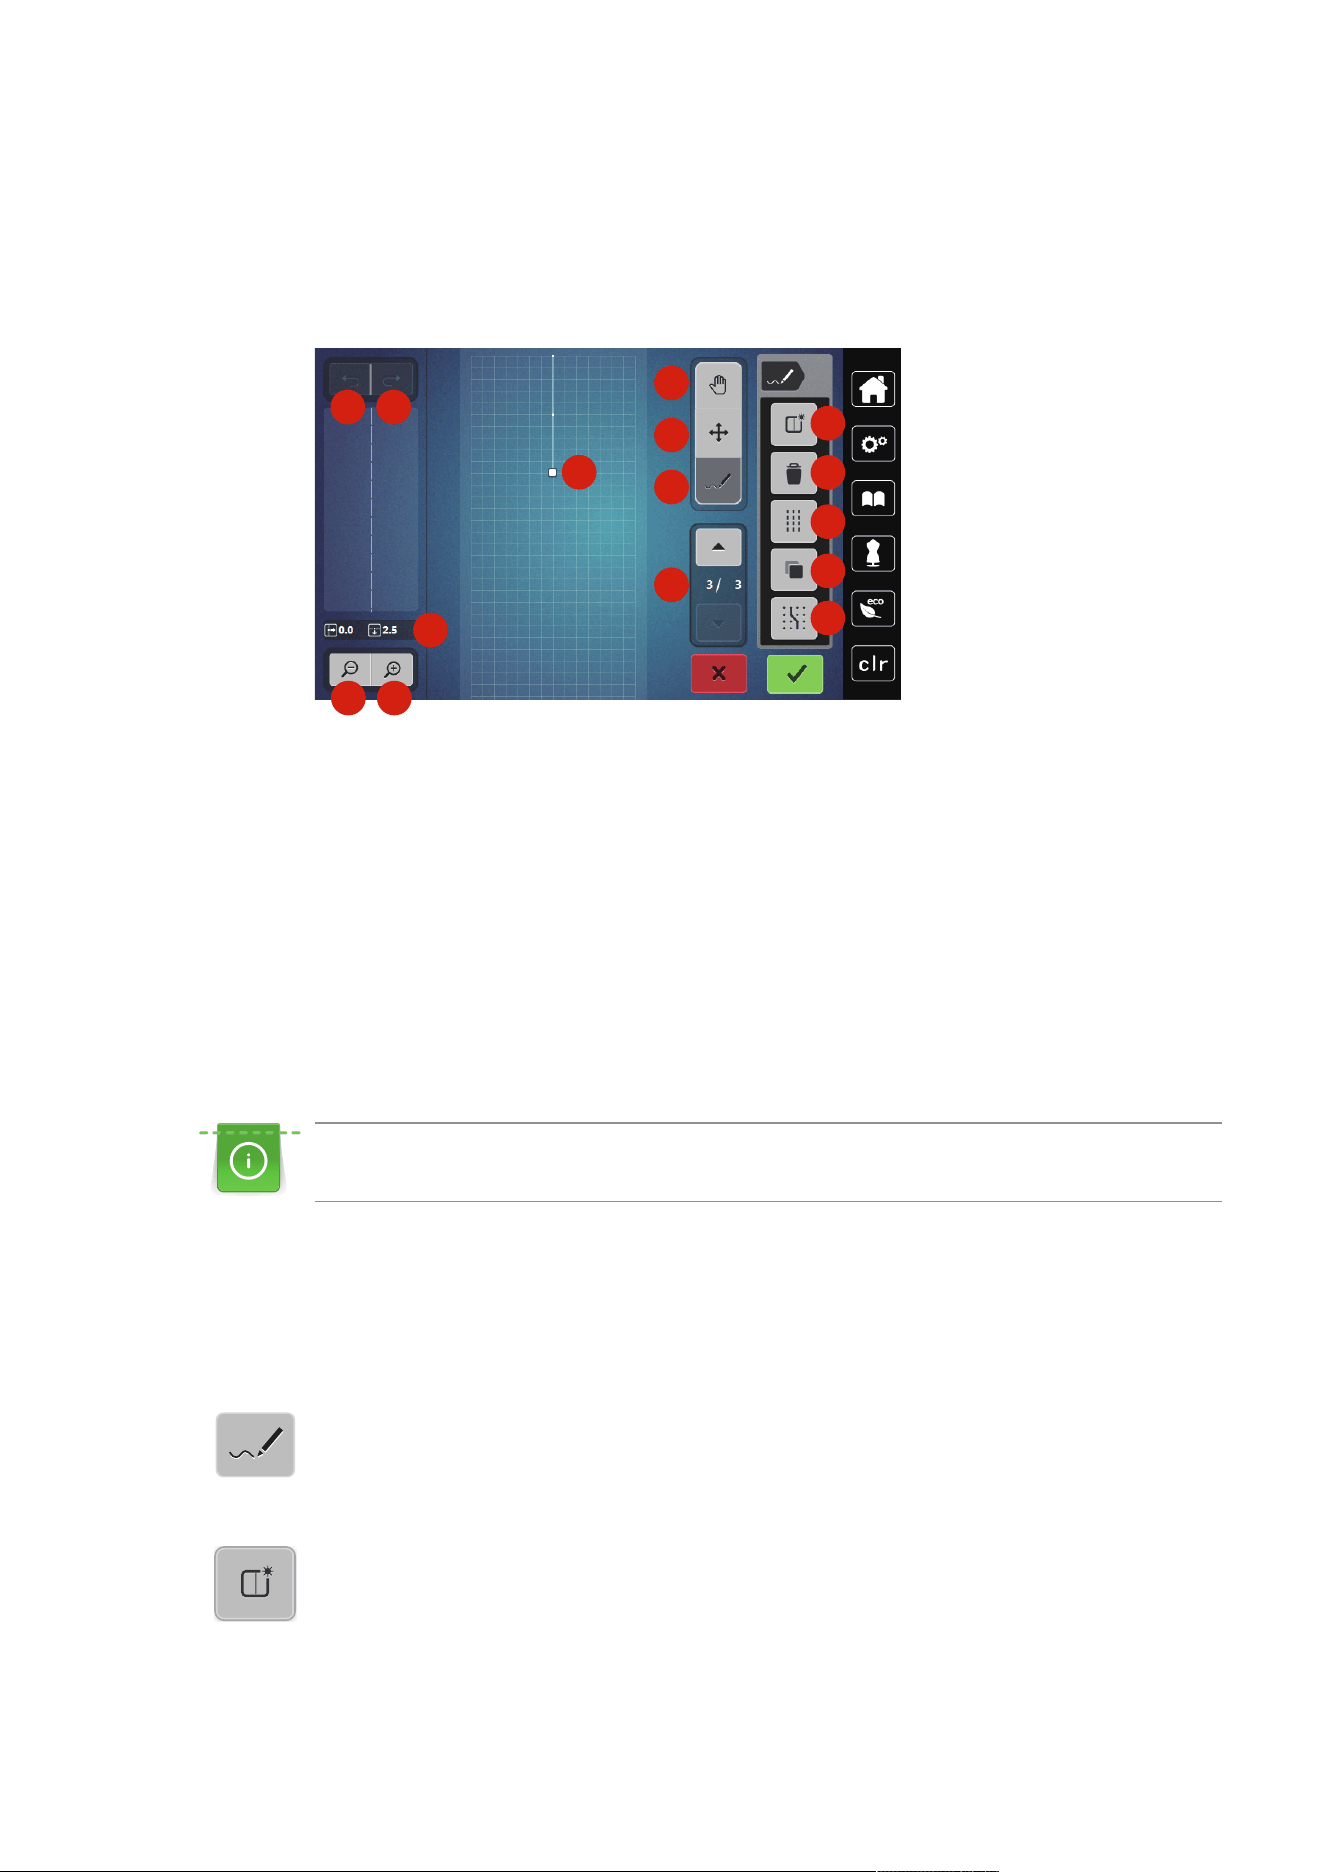
Stitch Designer
101
2023-06 EN 5020079.40A.04
11 Stitch Designer
11.1 Overview Stitch Designer
Buttonholes and darning stitches cannot be edited in the Stitch Designer.
1 2
3
6
7
8
9
10
11
12
13
14
15
4 5
1 Back 9 Inserting/Editing a Stitch
2 Redo 10 Scrolling Through Points
3 Point Position 11 Creating a New Stitch Pattern
4 Zoom Out 12 Deleting
5 Zoom In 13 Triple Stitch
6 Stitch Pattern View 14 Duplicating
7 Move View 15 Engaging at the Grid
8 Relocating Points/Selecting Points
11.2 Creating your Own Stitch Pattern
The stitch patterns which have been created in the Stitch Designer can be saved in your «Personal
memory».
The Stitch Designer allows creating your personal stitch patterns as well as editing existing stitch patterns.
You can create your own stitch patterns on the display by free movement.
The position of the relevant active point is also displayed to the left of the screen. The distance from the
point to the center line in millimeters is displayed horizontally. The vertical distance of the point to the
previous point is also indicated in millimeters.
Buttonholes and darning stitches cannot be edited in the Stitch Designer.
> Tap «Stitch Designer».
– The last active stitch pattern appears in the «Stitch Pattern View» and can be edited.
– The guides are displayed, the spacing is 0.5mm.
– The function «Inserting/Editing a Stitch» is activated.
> To remove the displayed stitch pattern, tap «Create a New Stitch Pattern».
> Add a point on the display.
> Add more points on the display as desired.
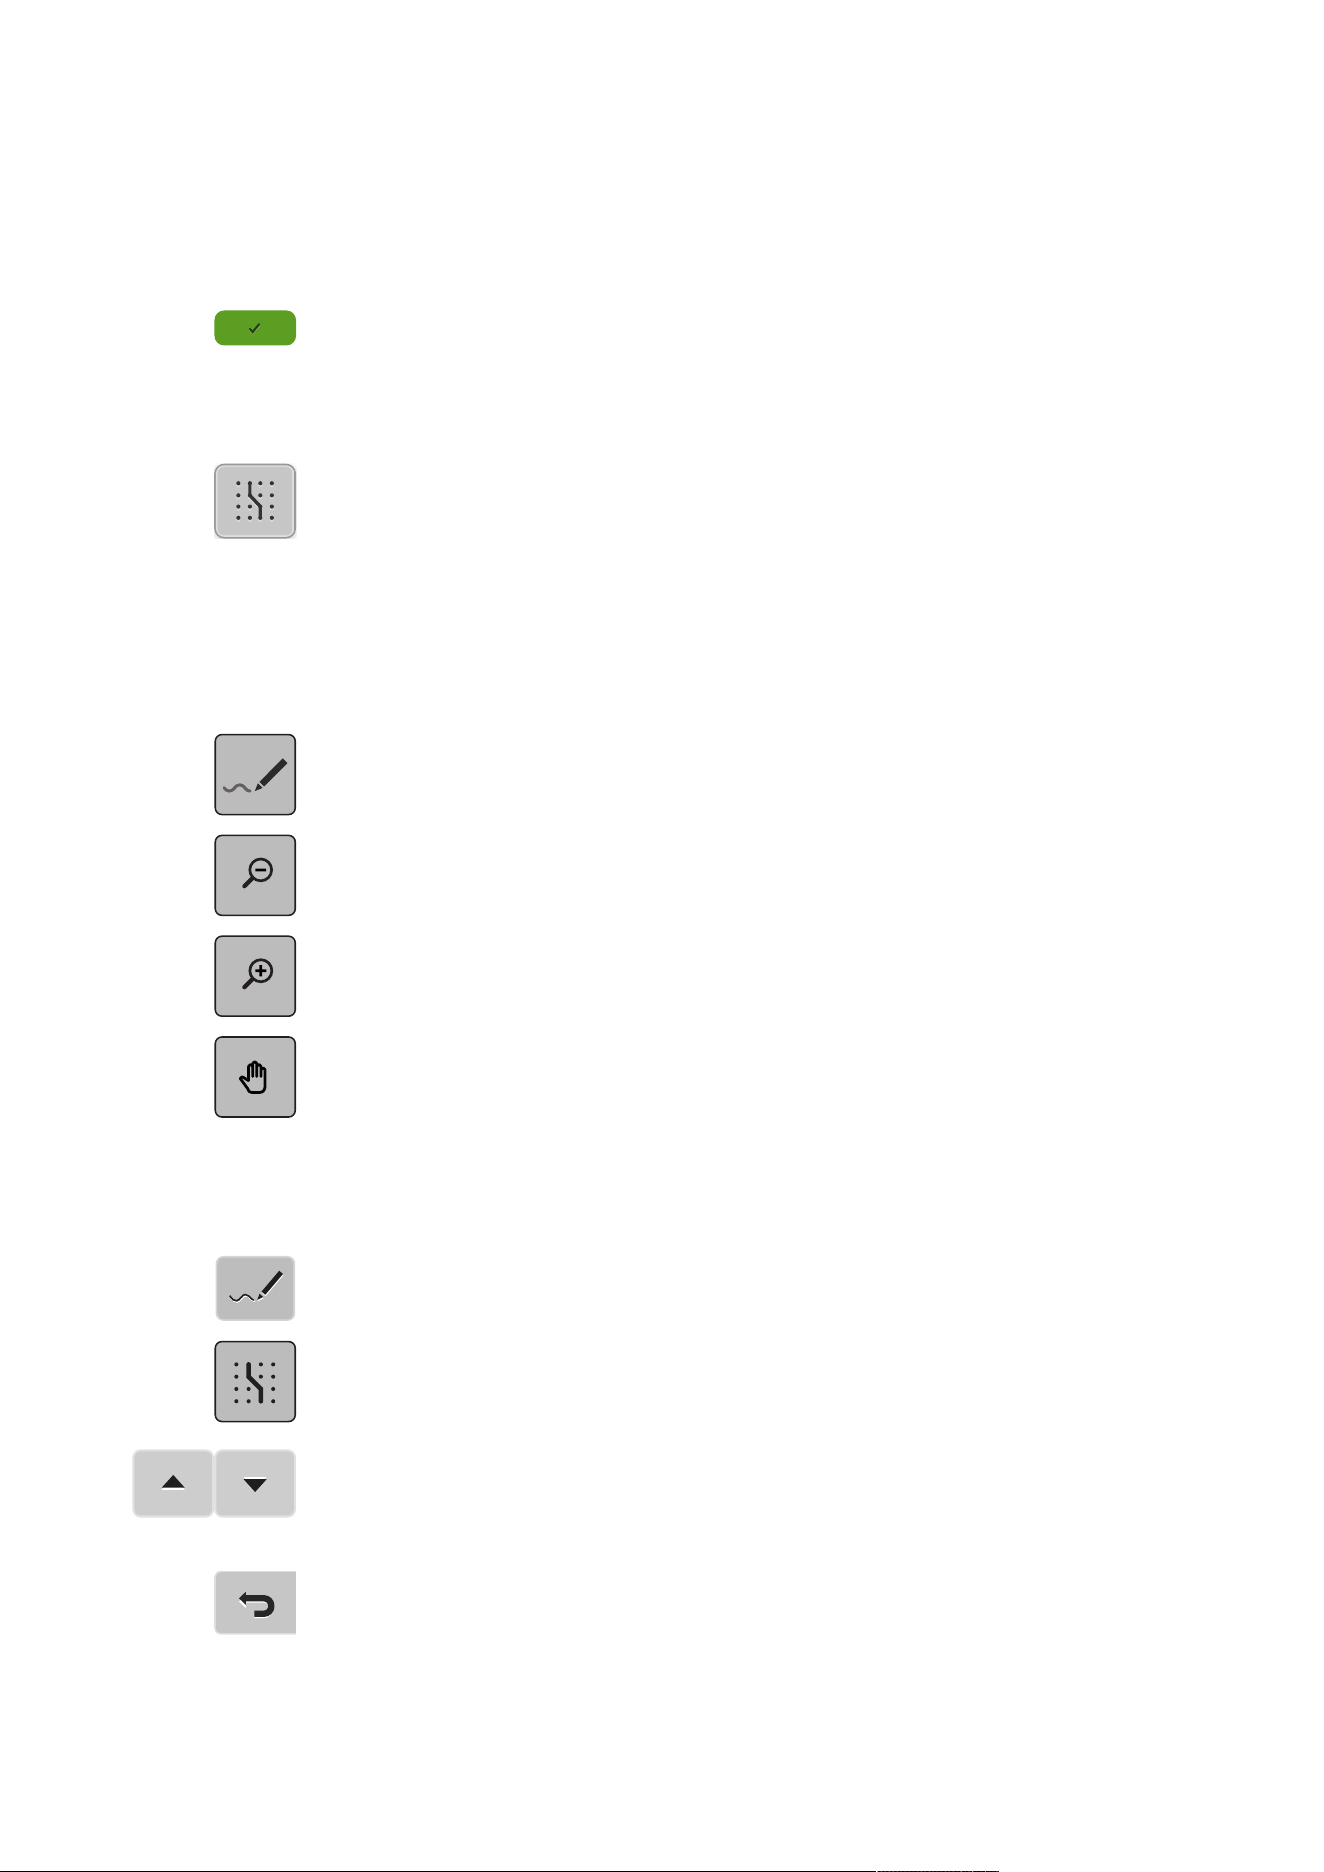
Stitch Designer
102
2023-06 EN 5020079.40A.04
> If a stitch design ends with reverse stitches or is a closed shape, a forward stitch must be inserted on the
same vertical axis as the first stitch so that the design can be sewn continuously.
– The preview window on the left-hand side of the display shows whether a stitch pattern is sewn
continuously or not.
> Tap «Confirm».
– The stitch design is displayed and can be sewn.
– Lines longer than 3mm are automatically divided into sections of equal length.
Creating Stitch Designs Using Screen Dots
> To show grid points, tap «Snap to Grid».
– Every inserted point is automatically placed on the nearest grid point.
Free hand drawing
> Using the finger or the touchscreen pen, touch the stitch pattern view and draw a stitch design.
11.3 Editing the View
> Select a stitch pattern, alphabet or buttonhole.
> Tap «Stitch Designer».
> To minimize the stitch pattern view, tap «Zoom Out».
> To enlarge the minimized stitch pattern view, tap «Zoom In».
> Tap «Move View».
> Moving the view of the design.
11.4 Inserting Points
A new point is inserted after a current position indicated by a white dot.
> Select a stitch pattern or alphabet.
> Tap «Stitch Designer».
> To show grid points, tap «Snap to Grid».
– Every inserted point is automatically placed on the nearest grid point.
> To select the point, tap «Scroll Up» and «Scroll Down».
> Tap the desired position in the «Stitch Pattern View».
– The new point is inserted after the selected point and can be moved to the desired position with the
multi-function knobs.
> To undo the last work step, tap «Undo Entries».
> To redo the last work step, tap «Redo Entries».
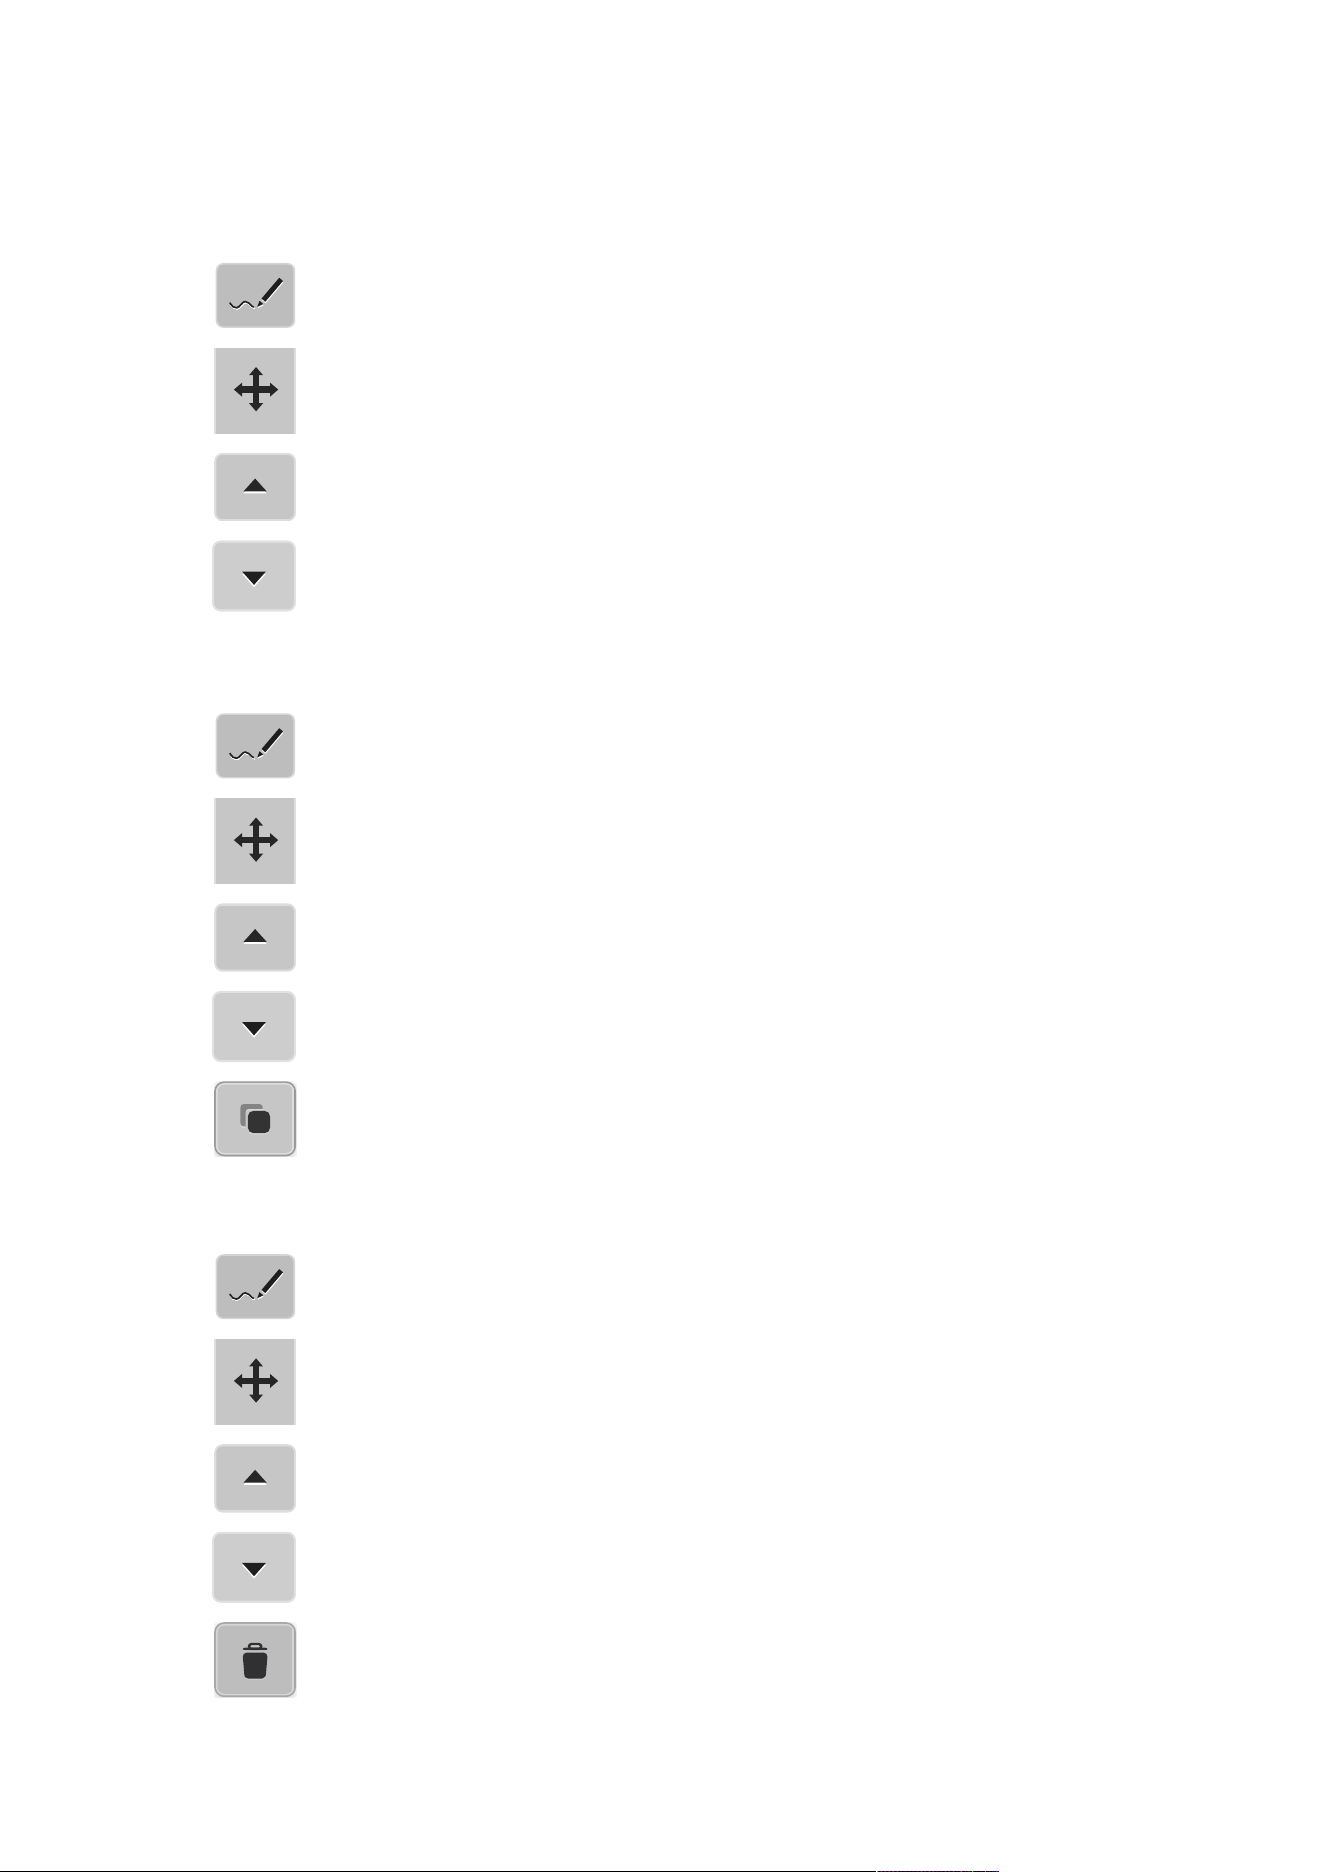
Stitch Designer
103
2023-06 EN 5020079.40A.04
11.5 Relocating the Points
> Select a stitch pattern or alphabet.
> Tap «Stitch Designer».
> Tap «Relocate Points».
> Touch the desired point in the stitch pattern view to select the point.
> To add the previous point to the selection, tap «Scroll Up».
> To add the following point to the selection, tap «Scroll Down».
> Turn the «Upper Multi-function Knob» to relocate the selected points horizontally.
> Turn the «Lower Multi-function Knob» to relocate the selected points vertically.
11.6 Duplicating Points
> Select a stitch pattern or alphabet.
> Tap «Stitch Designer».
> Tap «Relocate Points».
> Touch the desired point in the stitch pattern view to select the point.
> To add the previous point to the selection, tap «Scroll Up».
> To add the previous point to the selection, tap «Scroll Down».
> Tap «Duplicate».
– All selected points are duplicated.
– The direction, type and length of the activated points are transferred.
11.7 Deleting Points
> Select a stitch pattern or alphabet.
> Tap «Stitch Designer».
> Tap «Relocate Points».
> Tap the desired point in the stitch pattern view to select the point.
> To add the previous point to the selection, tap «Scroll Up».
> To add the following point to the selection, tap «Scroll Down».
> To delete all selected points of the stitch pattern, tap «Deleting».

Stitch Designer
104
2023-06 EN 5020079.40A.04
11.8 Activating the Triple Stitch
> Select a stitch pattern or alphabet.
> Tap «Stitch Designer».
> Tap «Relocate Points».
> Touch the desired point in the stitch pattern view to select the point.
> To add the previous point to the selection, tap «Scroll Up».
> To add the following point to the selection, tap «Scroll Down».
> To set the triple stitch for the marked points, tap «Triple Stitch».
– If only one point is selected, the stitch in front of the selected point is activated.
> To deactivate the triple stitch for the marked points, tap «Triple Stitch» again.
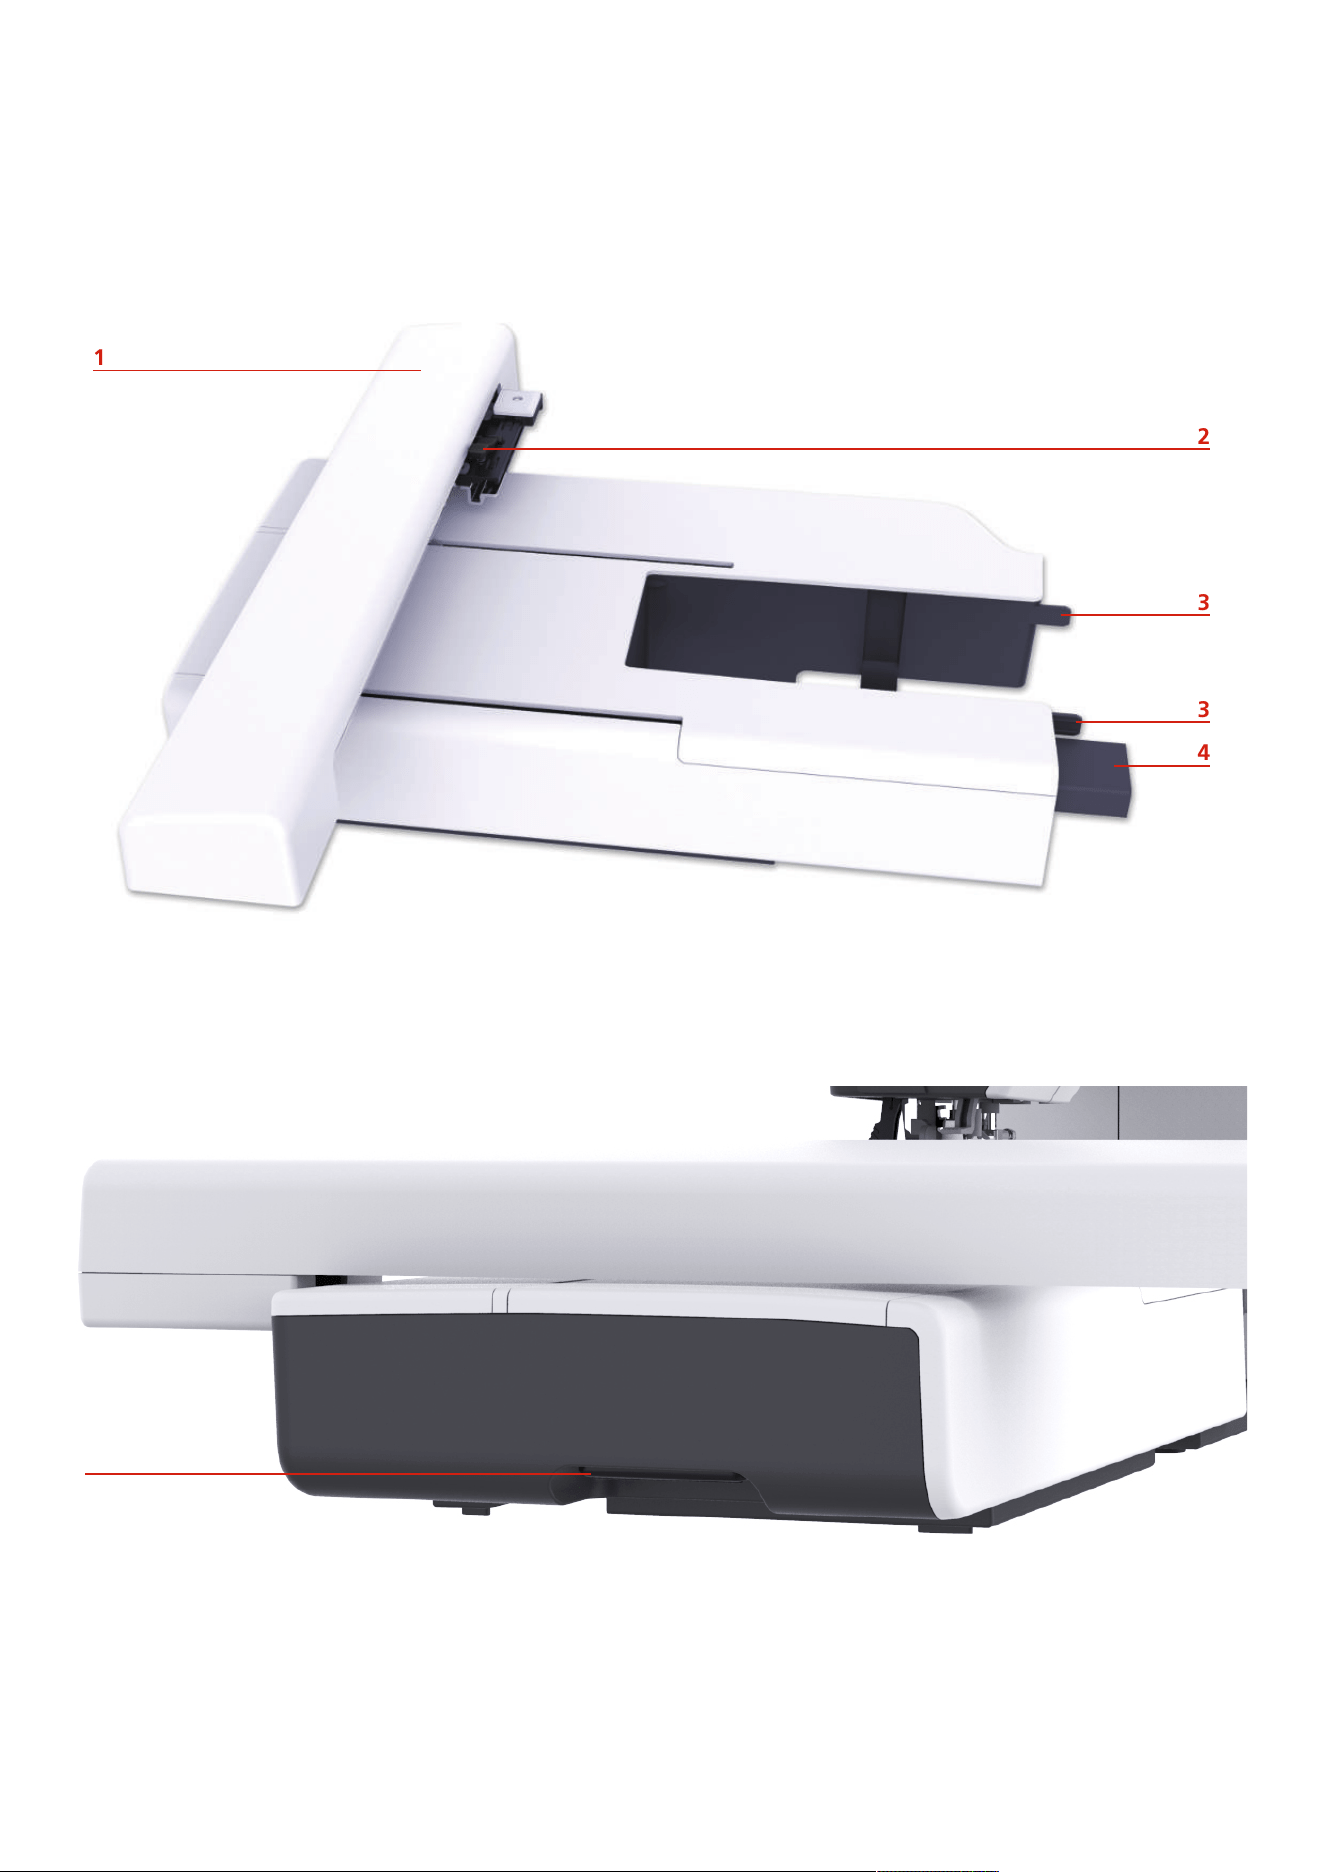
My bernette Embroidery
105
2023-06 EN 5020079.40A.04
12 My bernette Embroidery
12.1 Overview Embroidery Module
1
2
3
3
4
1 Embroidery Arm 4 Connection to the Machine
2 Coupling for Securing the Hoop 5 Release Button
3 Guide Rails for the Machine
5
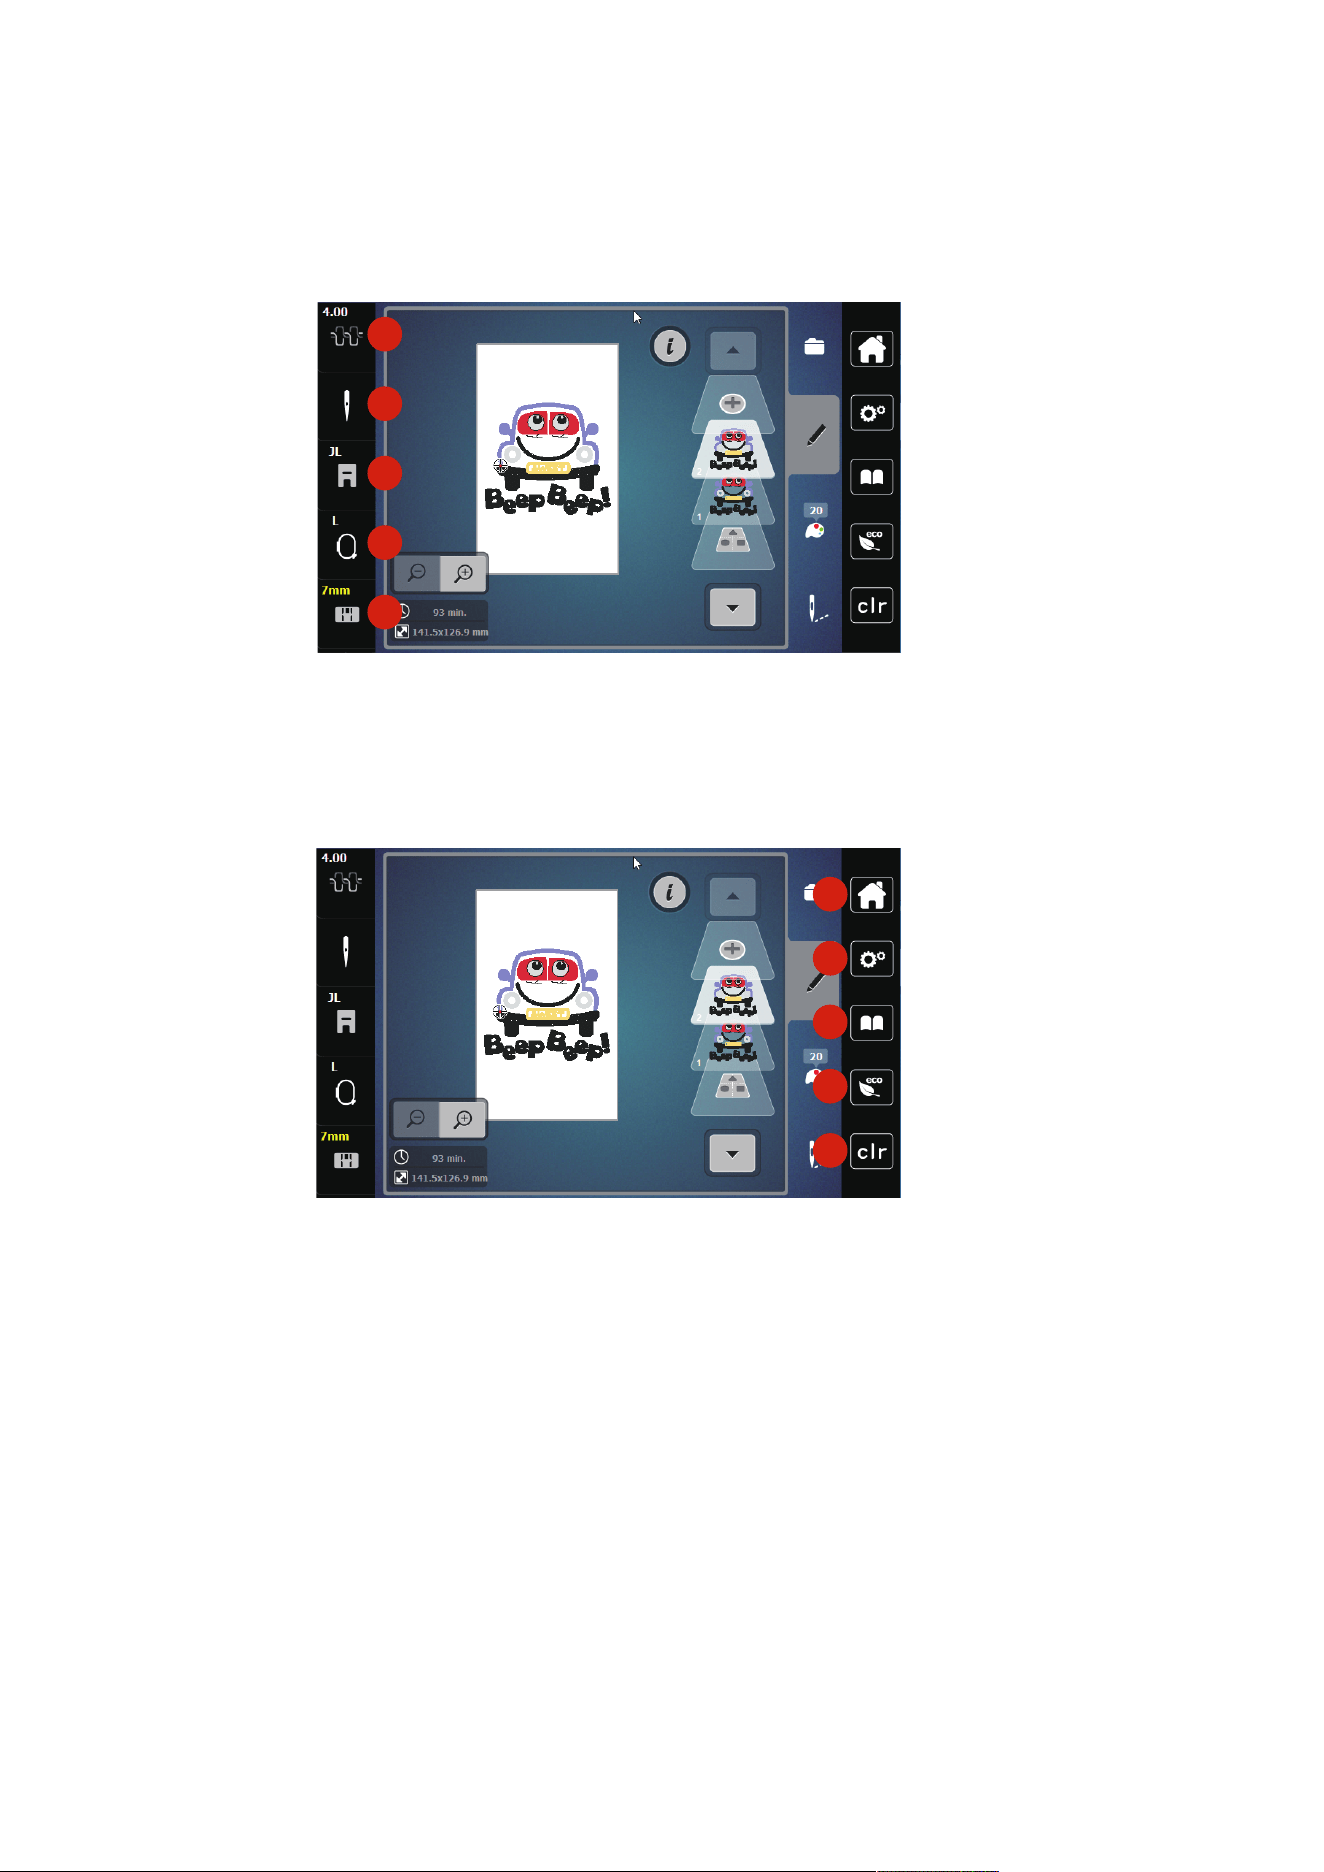
My bernette Embroidery
106
2023-06 EN 5020079.40A.04
12.2 Overview User Interface
Overview Functions/Visual Information
1
2
3
4
5
1 Upper Thread Tension 4 Hoop Indicator/Select Hoop
2 Needle Selection 5 Stitch Plate Selection
3 Presser Foot Indicator/Presser Foot Selection
Overview System Settings
1
2
3
4
5
1 Home 4 eco Mode
2 Setup Program 5 Back to Default Setting
3 Tutorial
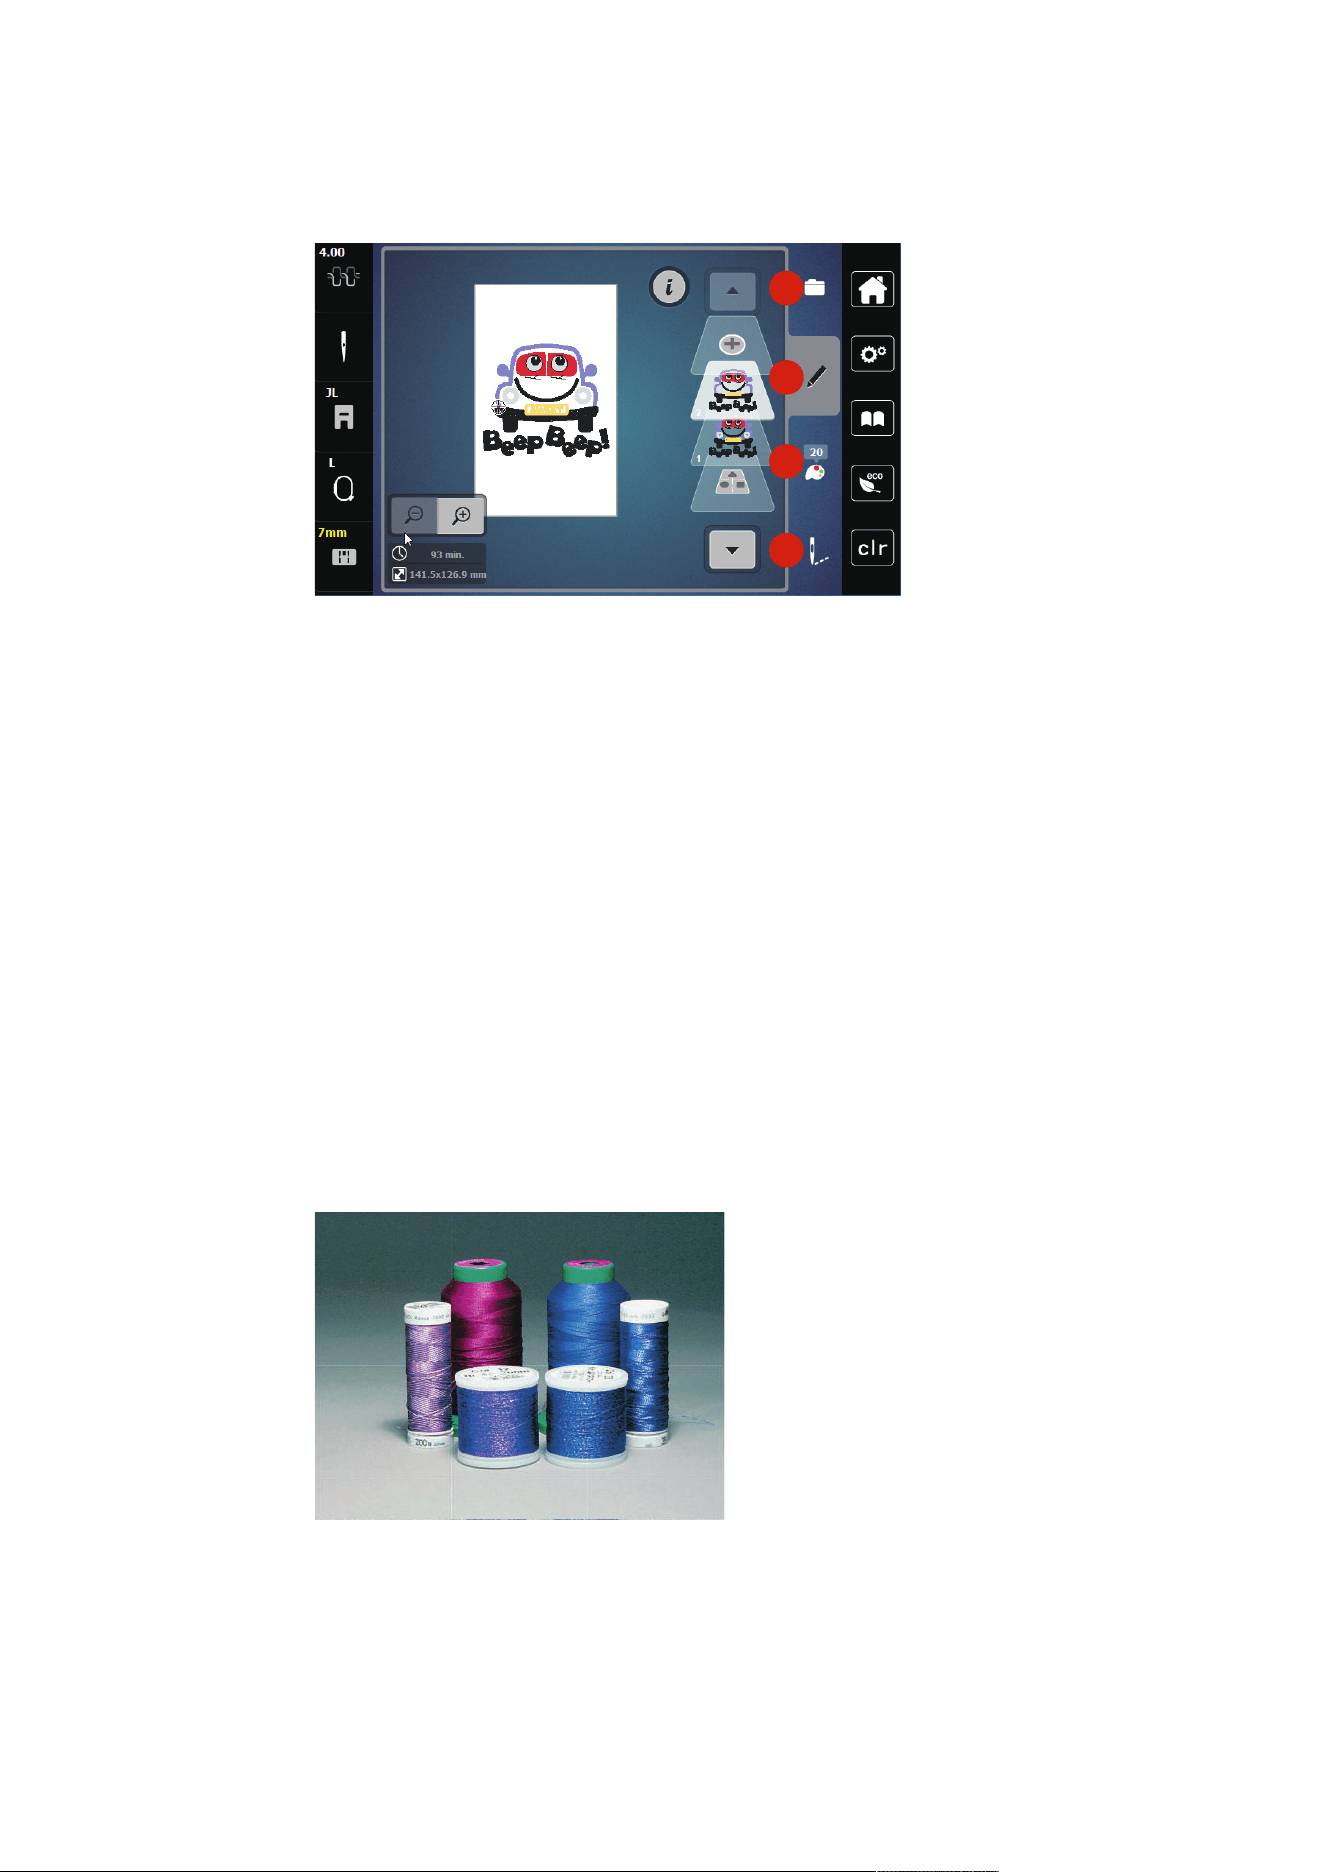
My bernette Embroidery
107
2023-06 EN 5020079.40A.04
Overview Selection Menu Embroidery
1
2
3
4
1 «Selection» 3 «Color Information»
2 «Edit» 4 «Embroidery»
12.3 Important Embroidery Information
Upper Thread
A good quality thread (name-brand manufacturer) is essential for embroidery so that the embroidery is not
affected negatively because of poor thread or thread breakage.
Embroidery is particularly effective if you use 40wt glossy rayon or polyester embroidery threads as upper
threads. They are available in a wide range of colors for beautiful embroidery.
• Polyester with a brilliant sheen is a hard-wearing, colorfast thread and has a high tensile strength which is
suitable for all types of embroidery.
• Rayon is a soft viscose fiber with a brilliant sheen and suitable for fine, delicate embroidery, or items that
will not receive excessive wear and tear.
• Metallic thread is a light to medium-weight thread suitable for special effects in embroidery.
• When working with metallic threads, the automatic bobbin thread cutter should be deactivated. The
other thread cutters shouldn't be used either because the knives are likely to wear off very quickly.
• When using metallic threads, the speed and the upper thread tension should be reduced.
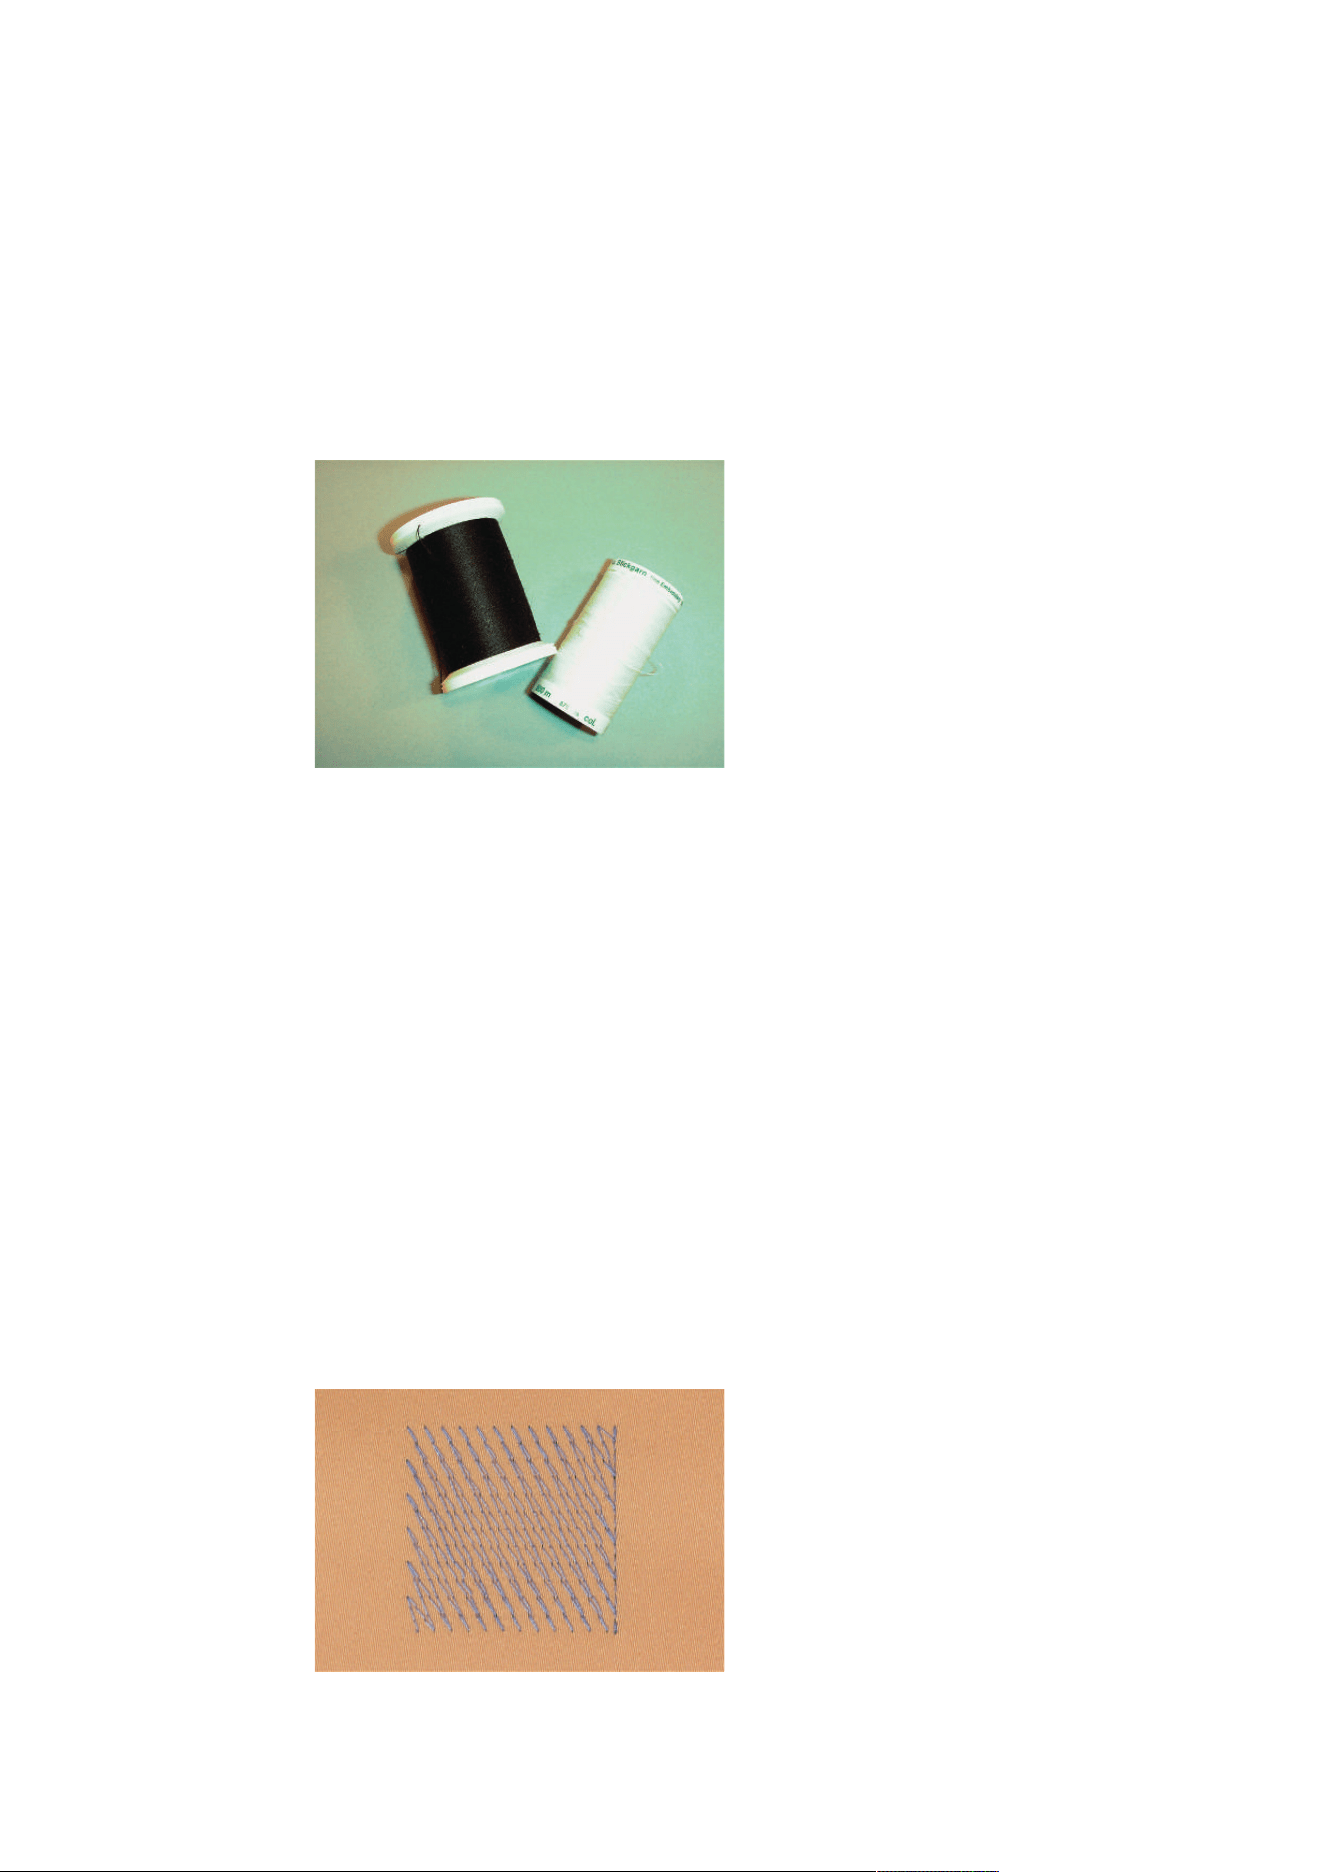
My bernette Embroidery
108
2023-06 EN 5020079.40A.04
Bobbin Thread
In most cases black or white bobbin thread is used for embroidering. When both sides should have the same
look, it is recommended to use the same color for bobbin and upper thread.
• Bobbin Fill is an especially soft and light polyster thread which is suited to be used as bobbin thread. This
special bobbin thread ensures a steady thread tension and an optimal intertwining of the upper and
bobbin thread.
• Darning and embroidery threads are fine mercerized cotton threads which are suitable for embroidery on
cotton.
Choosing the Embroidery Design
Simple designs with a low stitch count are suitable for embroidery on fine material. Densely embroidered
designs, e.g. embroidered designs with multiple color and embroidery direction changes, are suitable for
medium and heavy-weight material.
Embroidery Test
For the embroidery test, always use the original material reinforced with the same stabilizer as will be used
later. For the embroidery test it is recommended to use the same colors, threads and needles which are
planned to be used for the embroidery project.
Embroidering Designs by Third-party Providers
bernette recommends loading an embroidery design in any file format onto a USB stick via the free «ART-
Link» program. Using «ART-Link» ensures that the embroidery design can be read and embroidered
correctly. «ART-Link» can be downloaded for free at www.bernina.com/artlink.
Underlay Stitches
Underlay stitches are the foundation of a motif and are used to stabilize the base material and hold it in
shape. They also prevent the covering stitches of the motif from sinking into the knit or the nap of the
material.
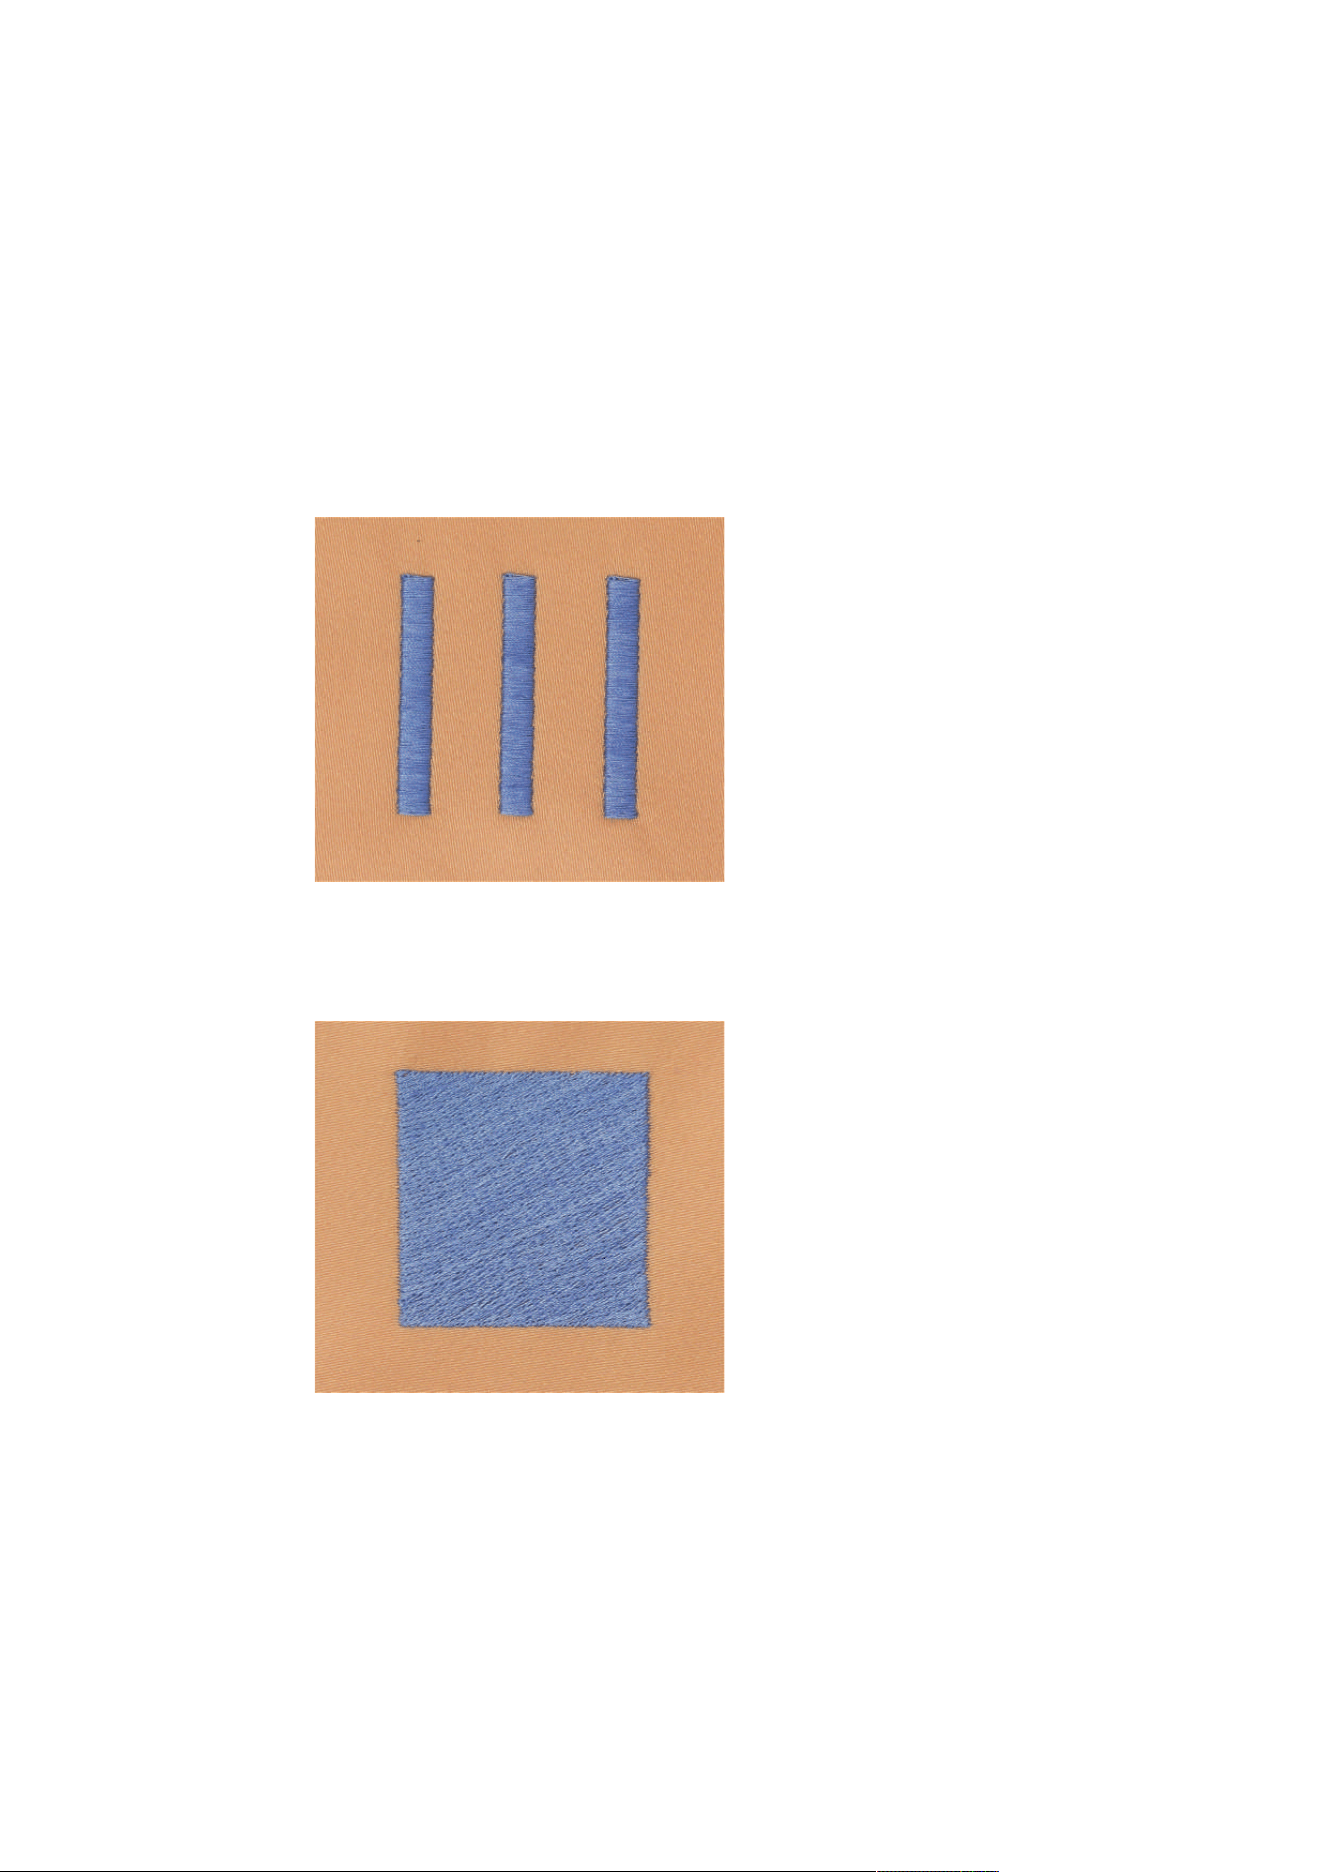
My bernette Embroidery
109
2023-06 EN 5020079.40A.04
The Size of the Embroidery Design
Embroidery designs can be enlarged or downsized on the embroidery machine or on the PC using the
BERNINA Embroidery software (optional accessory). Scaling up/downsizing in a range of +/- 20 % provides
the best results.
Satin or Leaf Stich
The needle moves left to right and vice versa. The result is a very dense, covering zig zag stitching to fill the
shape. Satin stitching fills are ideal for narrow and small shapes. Satin stitching is, however, not suitable for
larger areas, since wide stitches are too loose and do not cover the fabric properly. In addition there is the
risk that with too long stitches the threads could catch on something which would damage the embroidery.
Step Stitch
Many short, equally long stitches are embroidered in offset rows closely next to each other which results in a
densesly filled area.
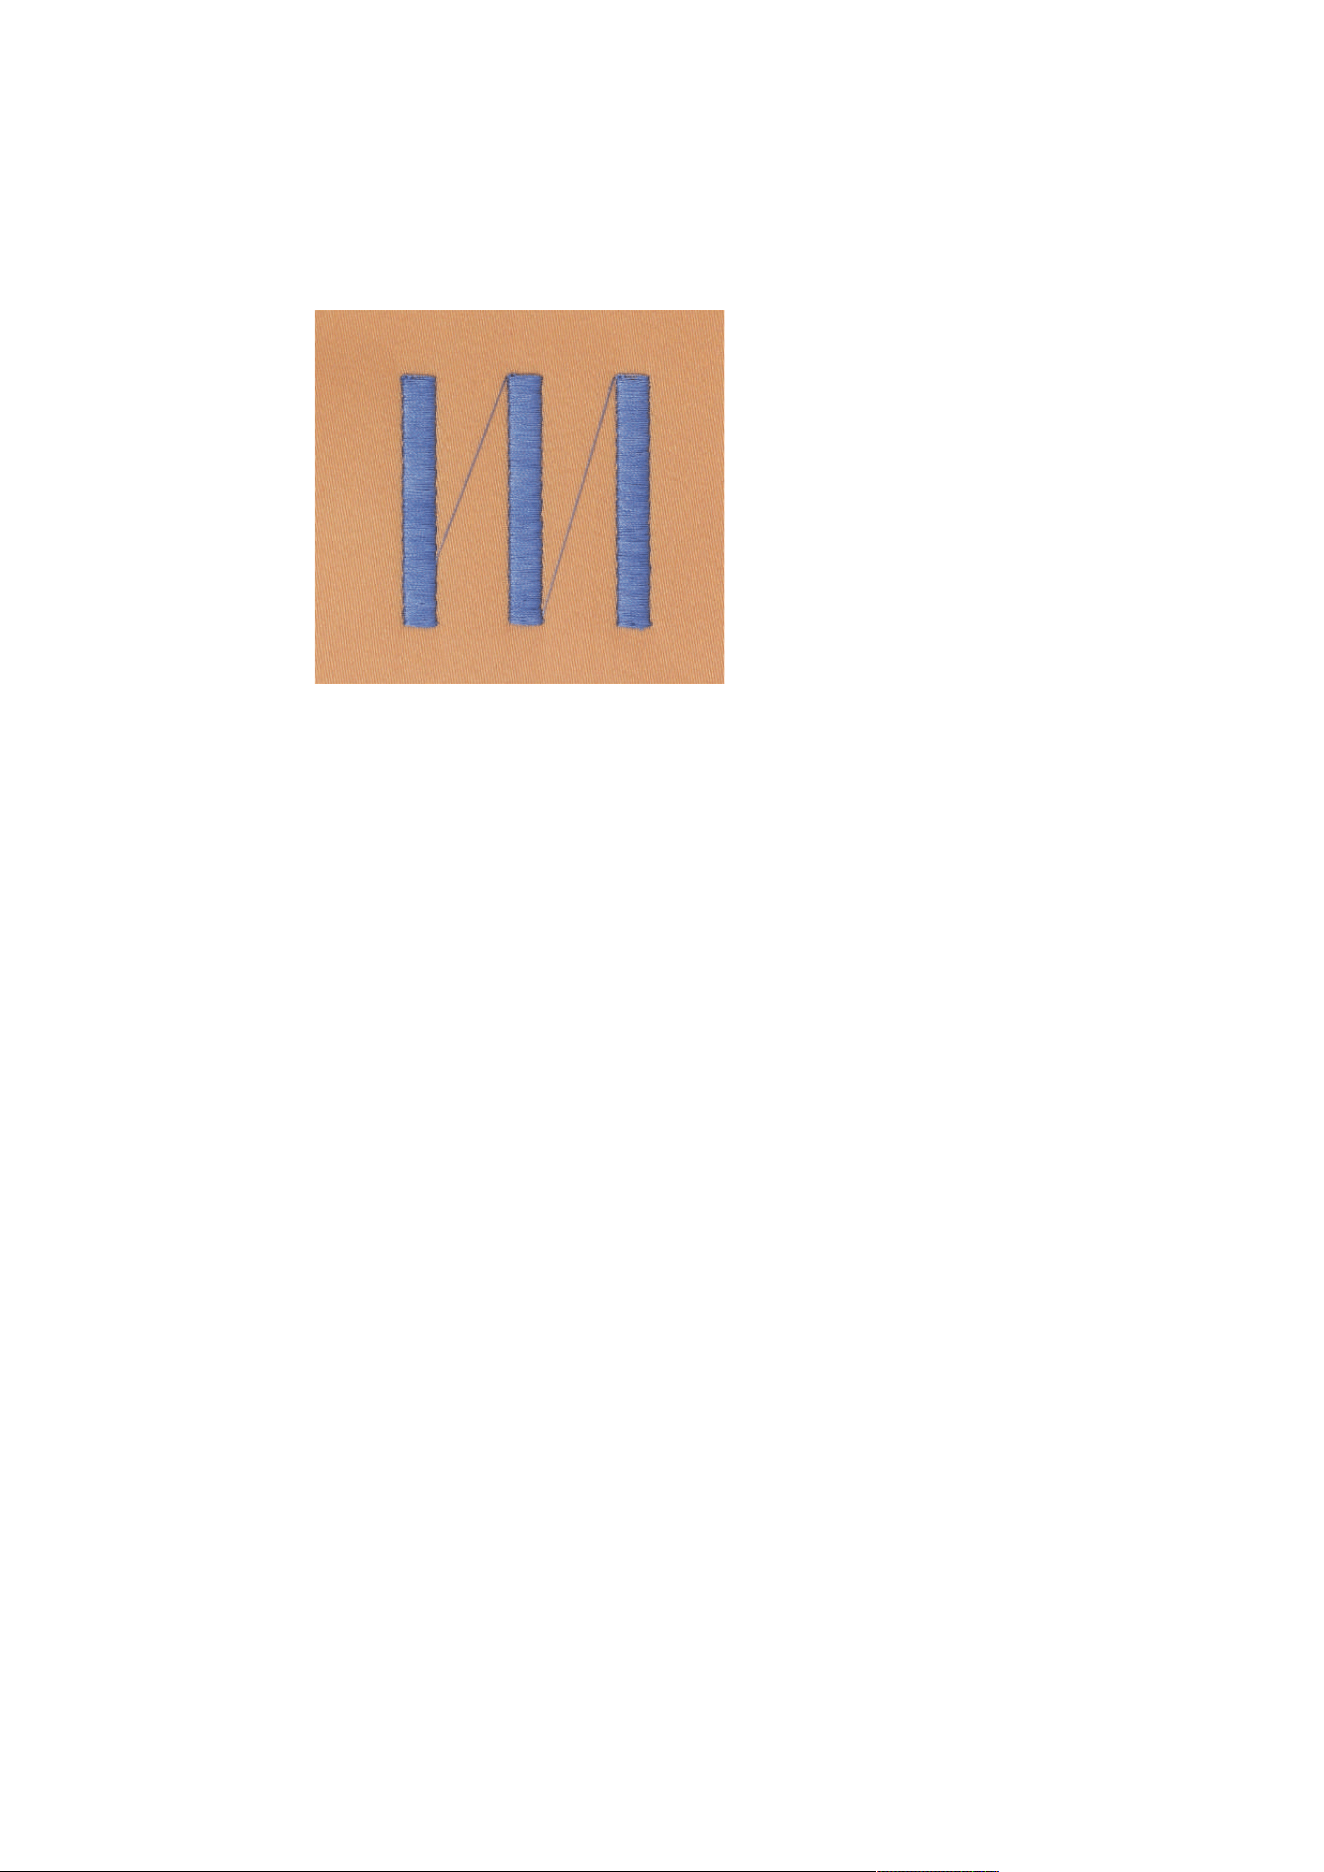
My bernette Embroidery
110
2023-06 EN 5020079.40A.04
Connecting Stitches
Long stitches which are used to get from one part of the motif to the next. Before and after the connecting
stitch securing stitches are sewn. Connecting stitches are trimmed.
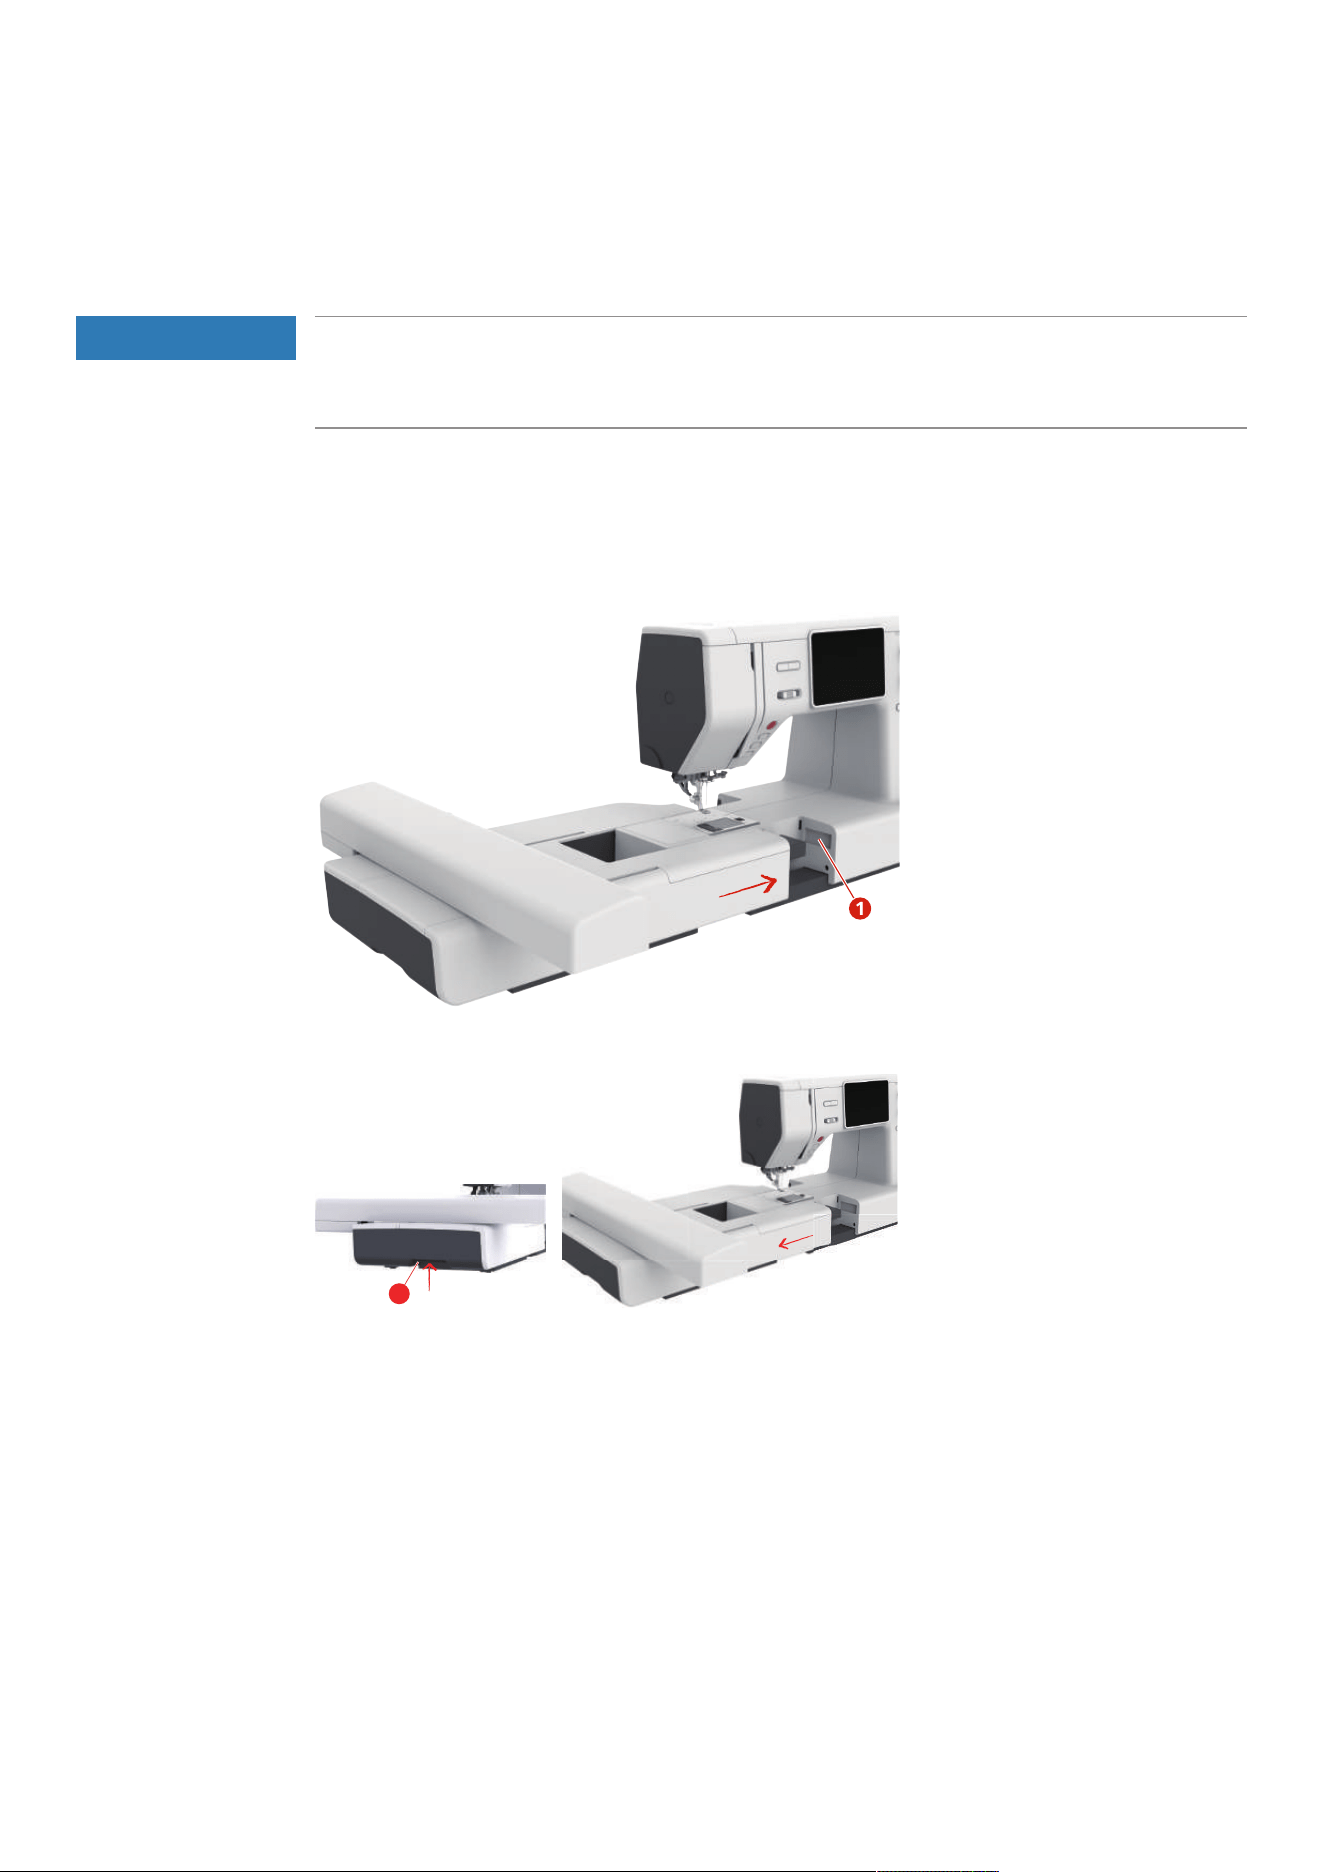
Embroidery Preparation
111
2023-06 EN 5020079.40A.04
13 Embroidery Preparation
13.1 Attaching the Embroidery Module
NOTICE
Transporting the Embroidery Module
Damage to the embroidery module connection and machine.
> Remove the embroidery module before transporting the machine.
> Make sure that the module and the machine are placed on a stable, even surface.
> Ensure that the embroidery arm can move freely.
> Lift the embroidery module on the left side.
> Carefully push the module from left to right into the embroidery module connection (1) of the machine
so that it engages.
1
> Hold the embroidery module, press the release button and pull it out.
2
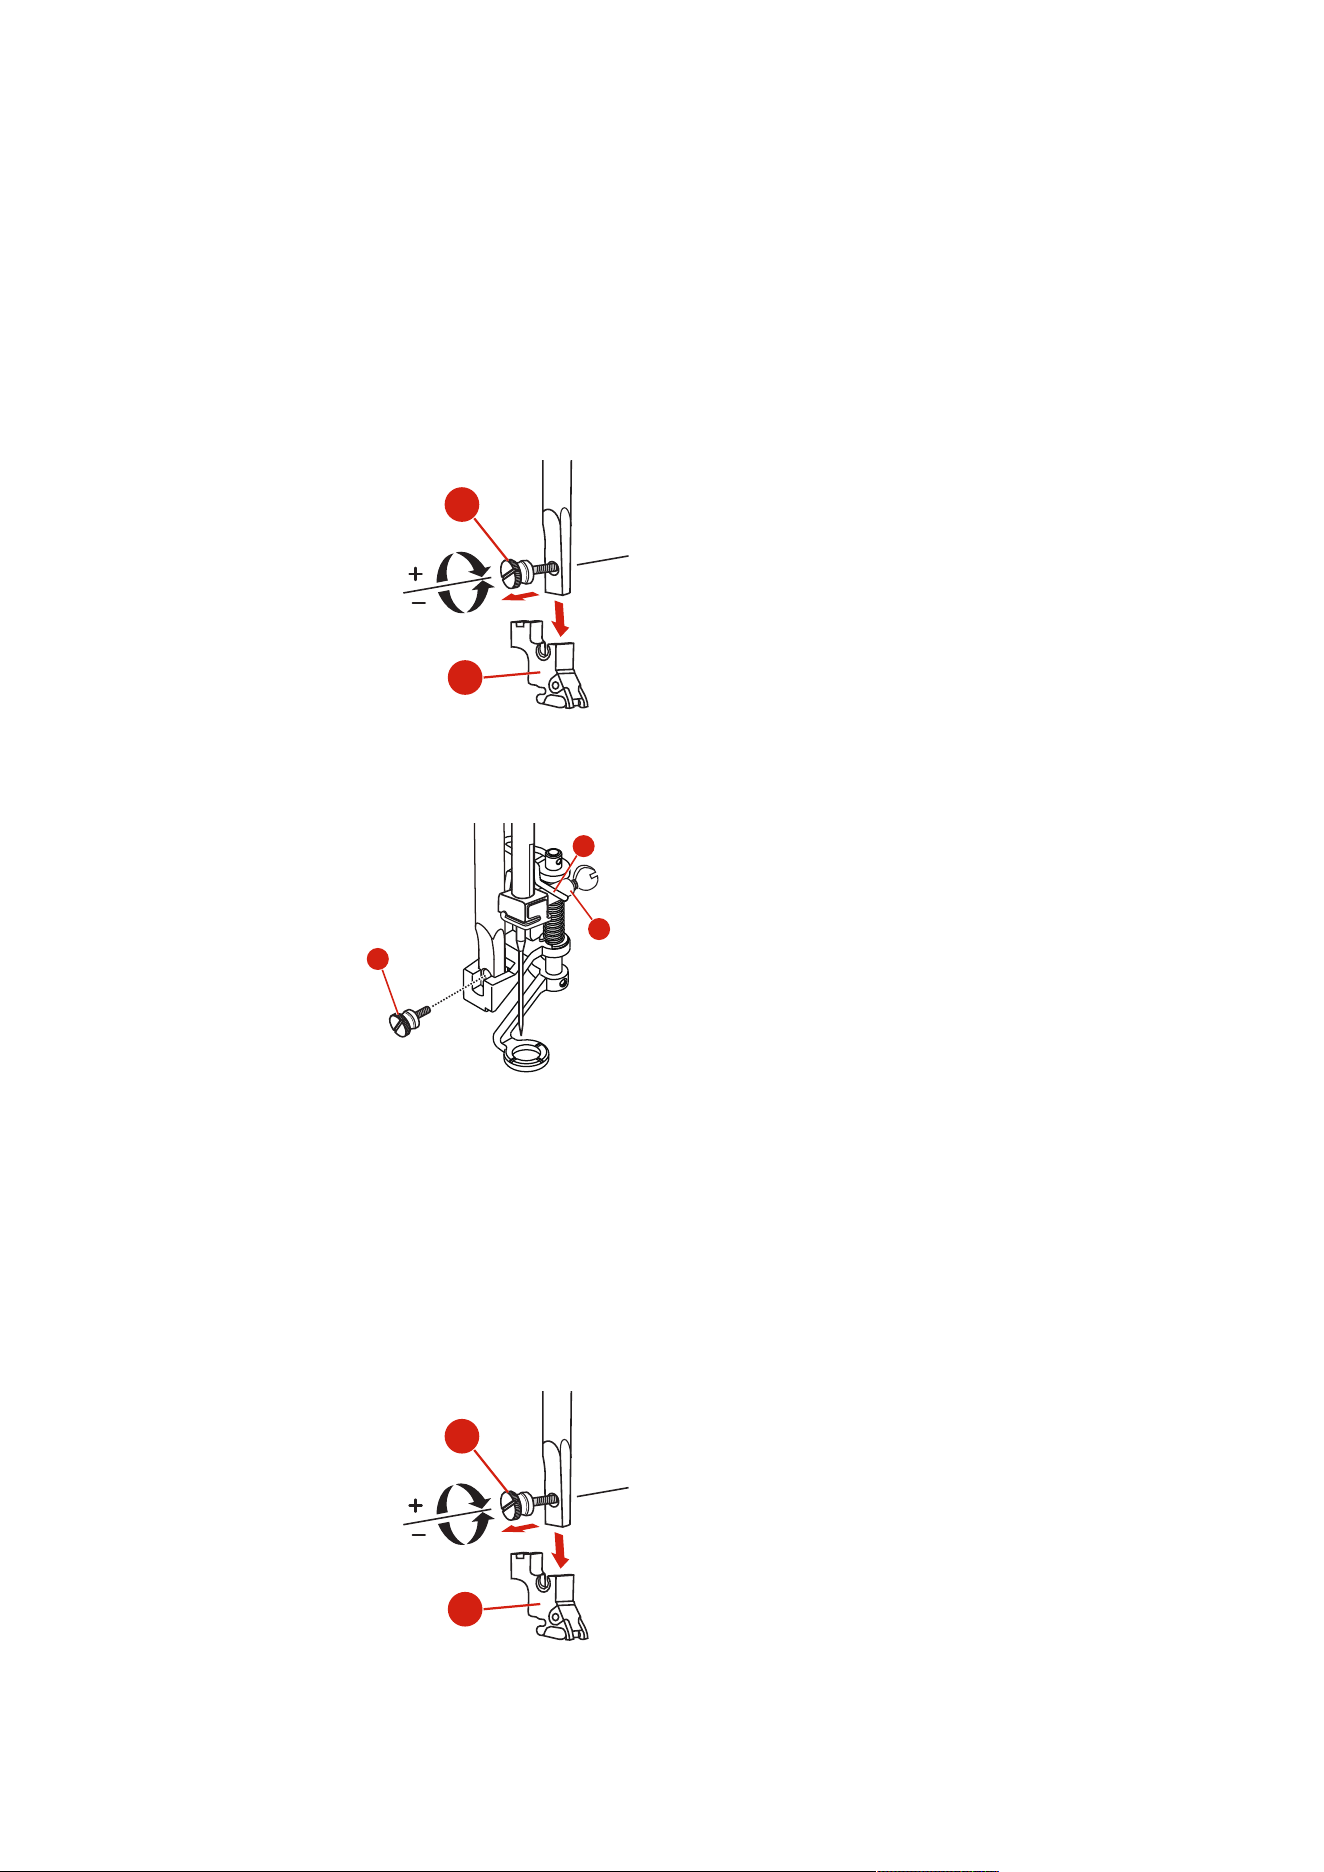
Embroidery Preparation
112
2023-06 EN 5020079.40A.04
13.2 Embroidery Foot
Attaching the Embroidery Foot
Mount the Hopper Embroidery Foot
> Raise the needle.
> Raise the presser foot and dual feed.
> Switch the machine off and disconnect it from the power supply system.
> Remove the presser foot holder (2) by unscrewing the presser foot bar attaching screw (1).
2
1
> Attach the Hopper embroidery Foot (JX) to the presser foot bar, making sure that the spring (3) is over
the needle clamp screw (4).
> Tighten the screw (1).
4
3
1
> After starting the machine, select the embroidery foot in the «Presser Foot Sole Display».
Note: When using thicker materials, the Hopper Embroidery Foot (JX) may touch the edge of the embroidery
hoop. Use the Single Embroidery Foot (JL) in such cases. The needle holder can also be used with a shorter
screw, which is available together with the ruler foot.
Mount the Embroidery Foot
> Raise the needle.
> Raise the presser foot and dual feed.
> Switch the machine off and disconnect it from the power supply system.
> Remove the presser foot holder (2) by unscrewing the presser foot bar attaching screw (1).
2
1
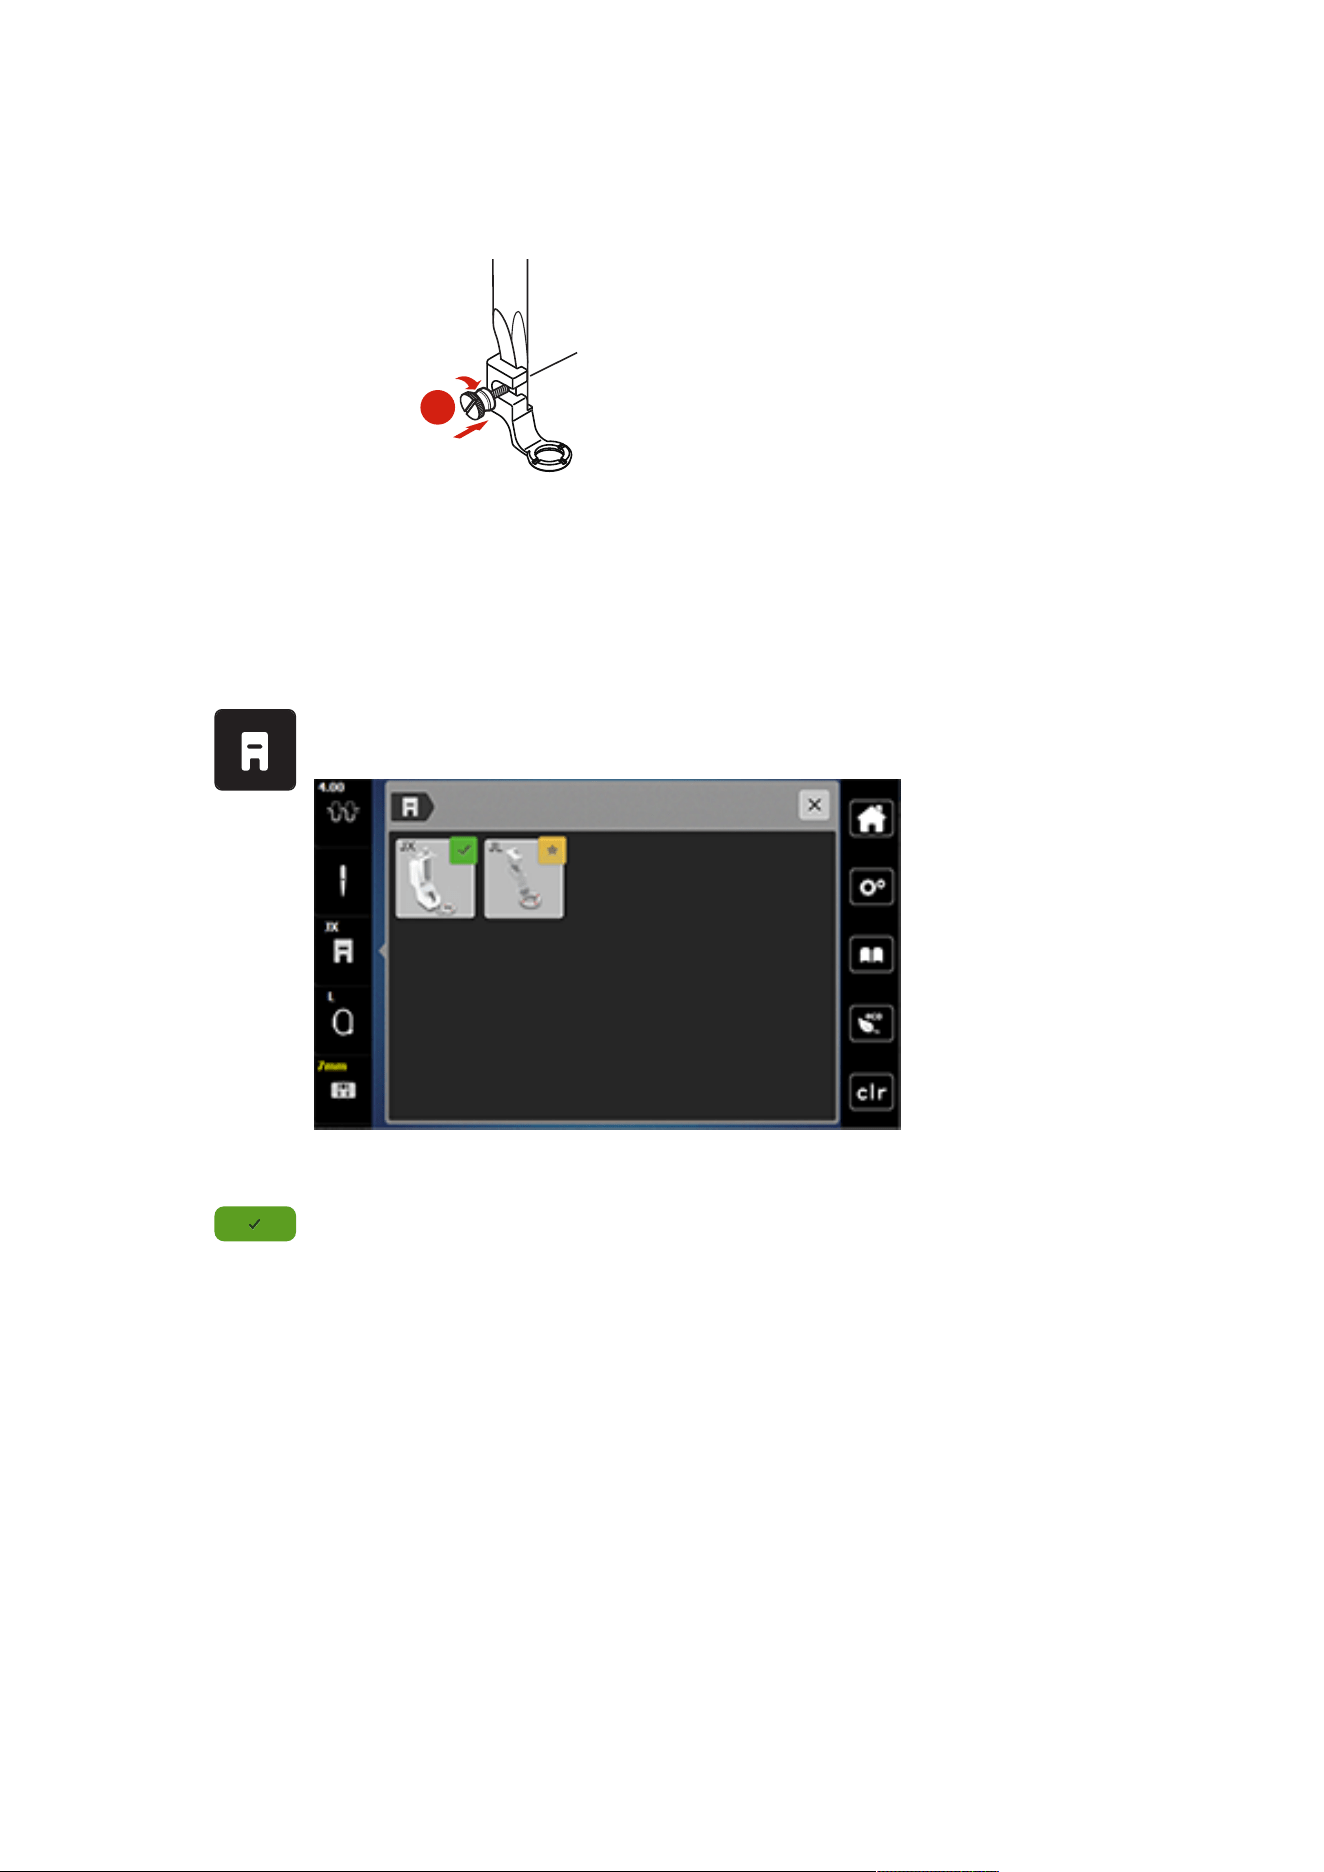
Embroidery Preparation
113
2023-06 EN 5020079.40A.04
> Attach the Embroidery Foot (JL) from the back with the index finger to the presser foot bar and tighten
the screw.
1
> Important: After starting the machine, select the embroidery foot in the «Presser Foot Sole Display».
Selecting the Embroidery Foot
To ensure that the machine can set the correct standard height for the attached embroidery foot, the
embroidery foot must be selected in the «Presser foot sole display».
> Switch the machine on.
> Tap «Presser Foot Indicator/Presser Foot Selection».
– Any presser foot soles are displayed.
> Select the attached embroidery foot.
– A description of the selected embroidery foot is displayed.
> Tap «Confirm».
– The selected embroidery foot is displayed and the standard height is set.
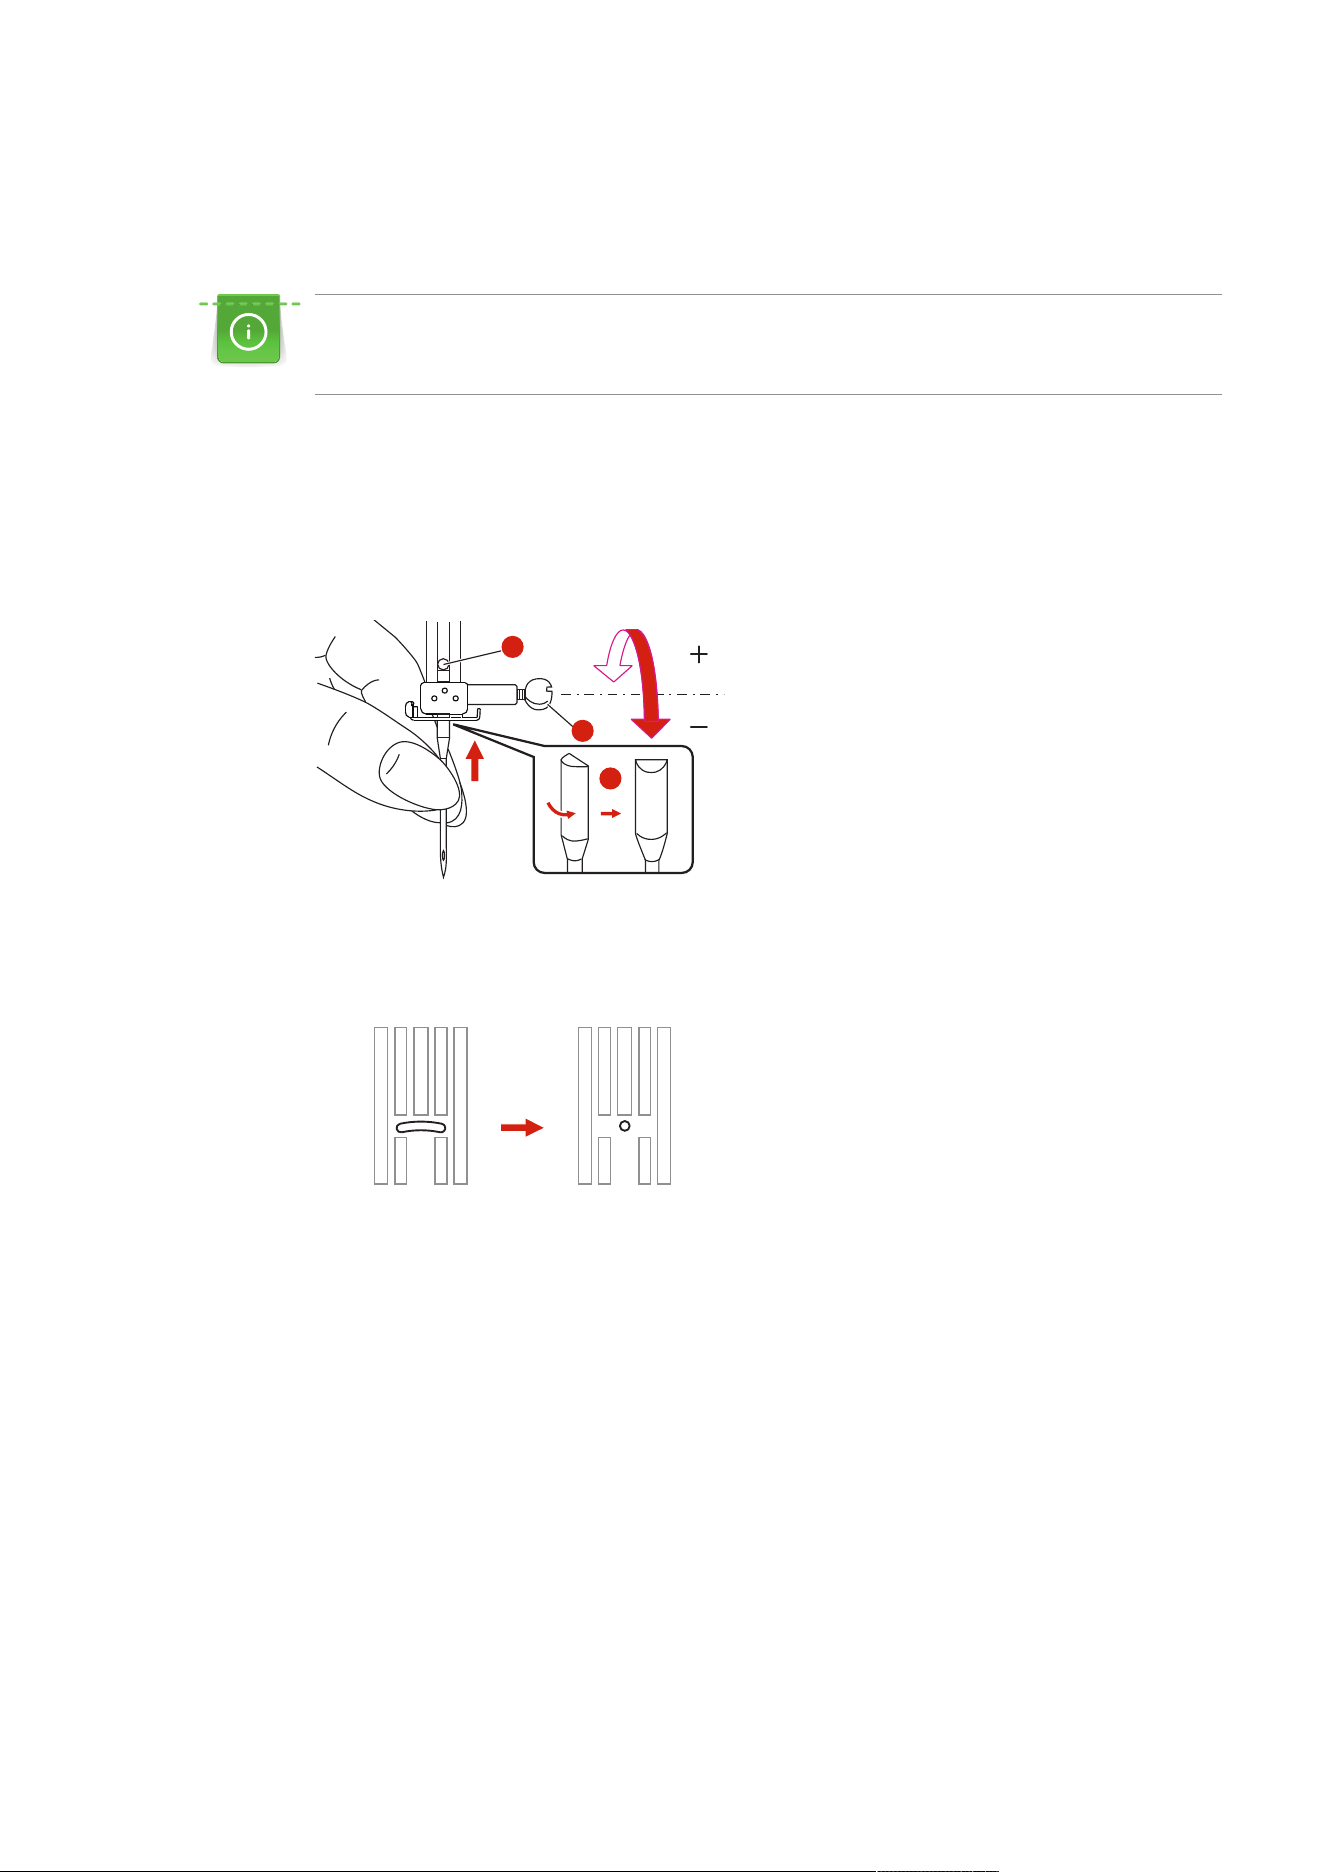
Embroidery Preparation
114
2023-06 EN 5020079.40A.04
13.3 Needle and Stitch Plate
Inserting the Embroidery Needle
Embroidery needles of the type 130/705 H-SUK provide a larger eye and are slightly rounded. This avoids
thread abrasion when using Rayon- and cotton embroidery thread. Depending on the embroidery thread
use a size No.70-SUK to No.90-SUK needle.
> Raise the needle.
> Switch the machine off and disconnect it from the power supply system.
> Remove the presser foot.
> Loosen the needle clamp screw (1) using the screwdriver and remove the needle.
> Hold the needle with the flat side (2) to the back.
> Push the needle up to the stop (3).
> Tighten the needle clamp (1) screw using the screwdriver.
1
3
2
Attaching the Stitch Plate (CutWork/Straight)
The straight/cutwork stitch plate has a small hole in the needle area. The stitch formation (thread knotting of
upper and bobbin thread) is thus optimized. This results in a more beautiful stitch appearance.
> Switch the machine off and disconnect it from the power supply system.
> Remove the needle.
> Remove the presser foot.
> Lower the feed dog and remove the bobbin cover.
> Remove the screws of the stitch plate with the screwdriver.
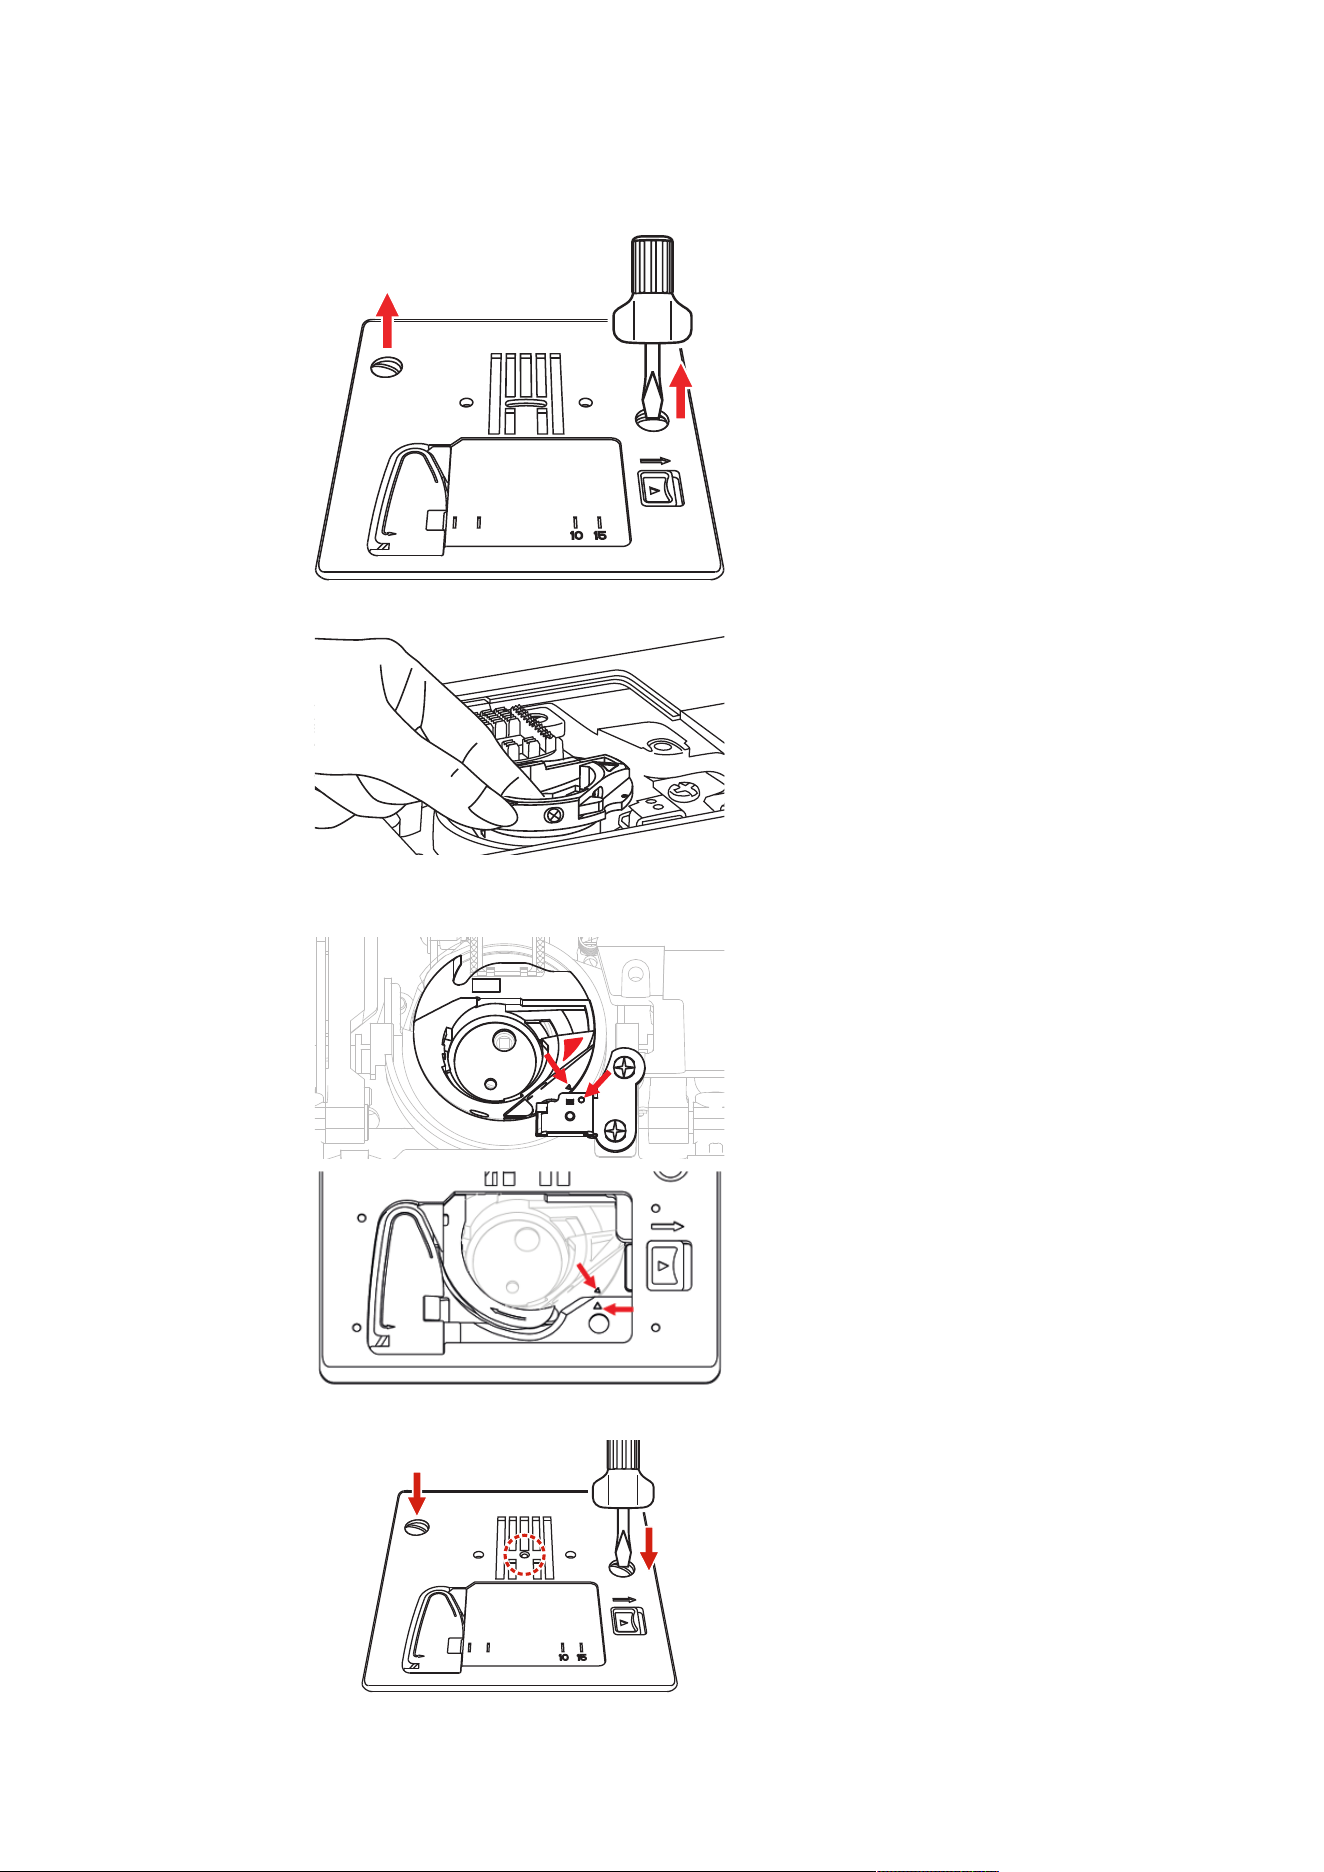
Embroidery Preparation
115
2023-06 EN 5020079.40A.04
> Remove the stitch plate.
> Remove the standard bobbin case.
> To achieve optimum embroidery results, use the high thread tension bobbin case. Make sure that the
markings of the bobbin case and the stitch plate are aligned identically.
> Exchange t he Straight Stitch/CutWork Stitch Plate and tighten the screws with the screwdriver.
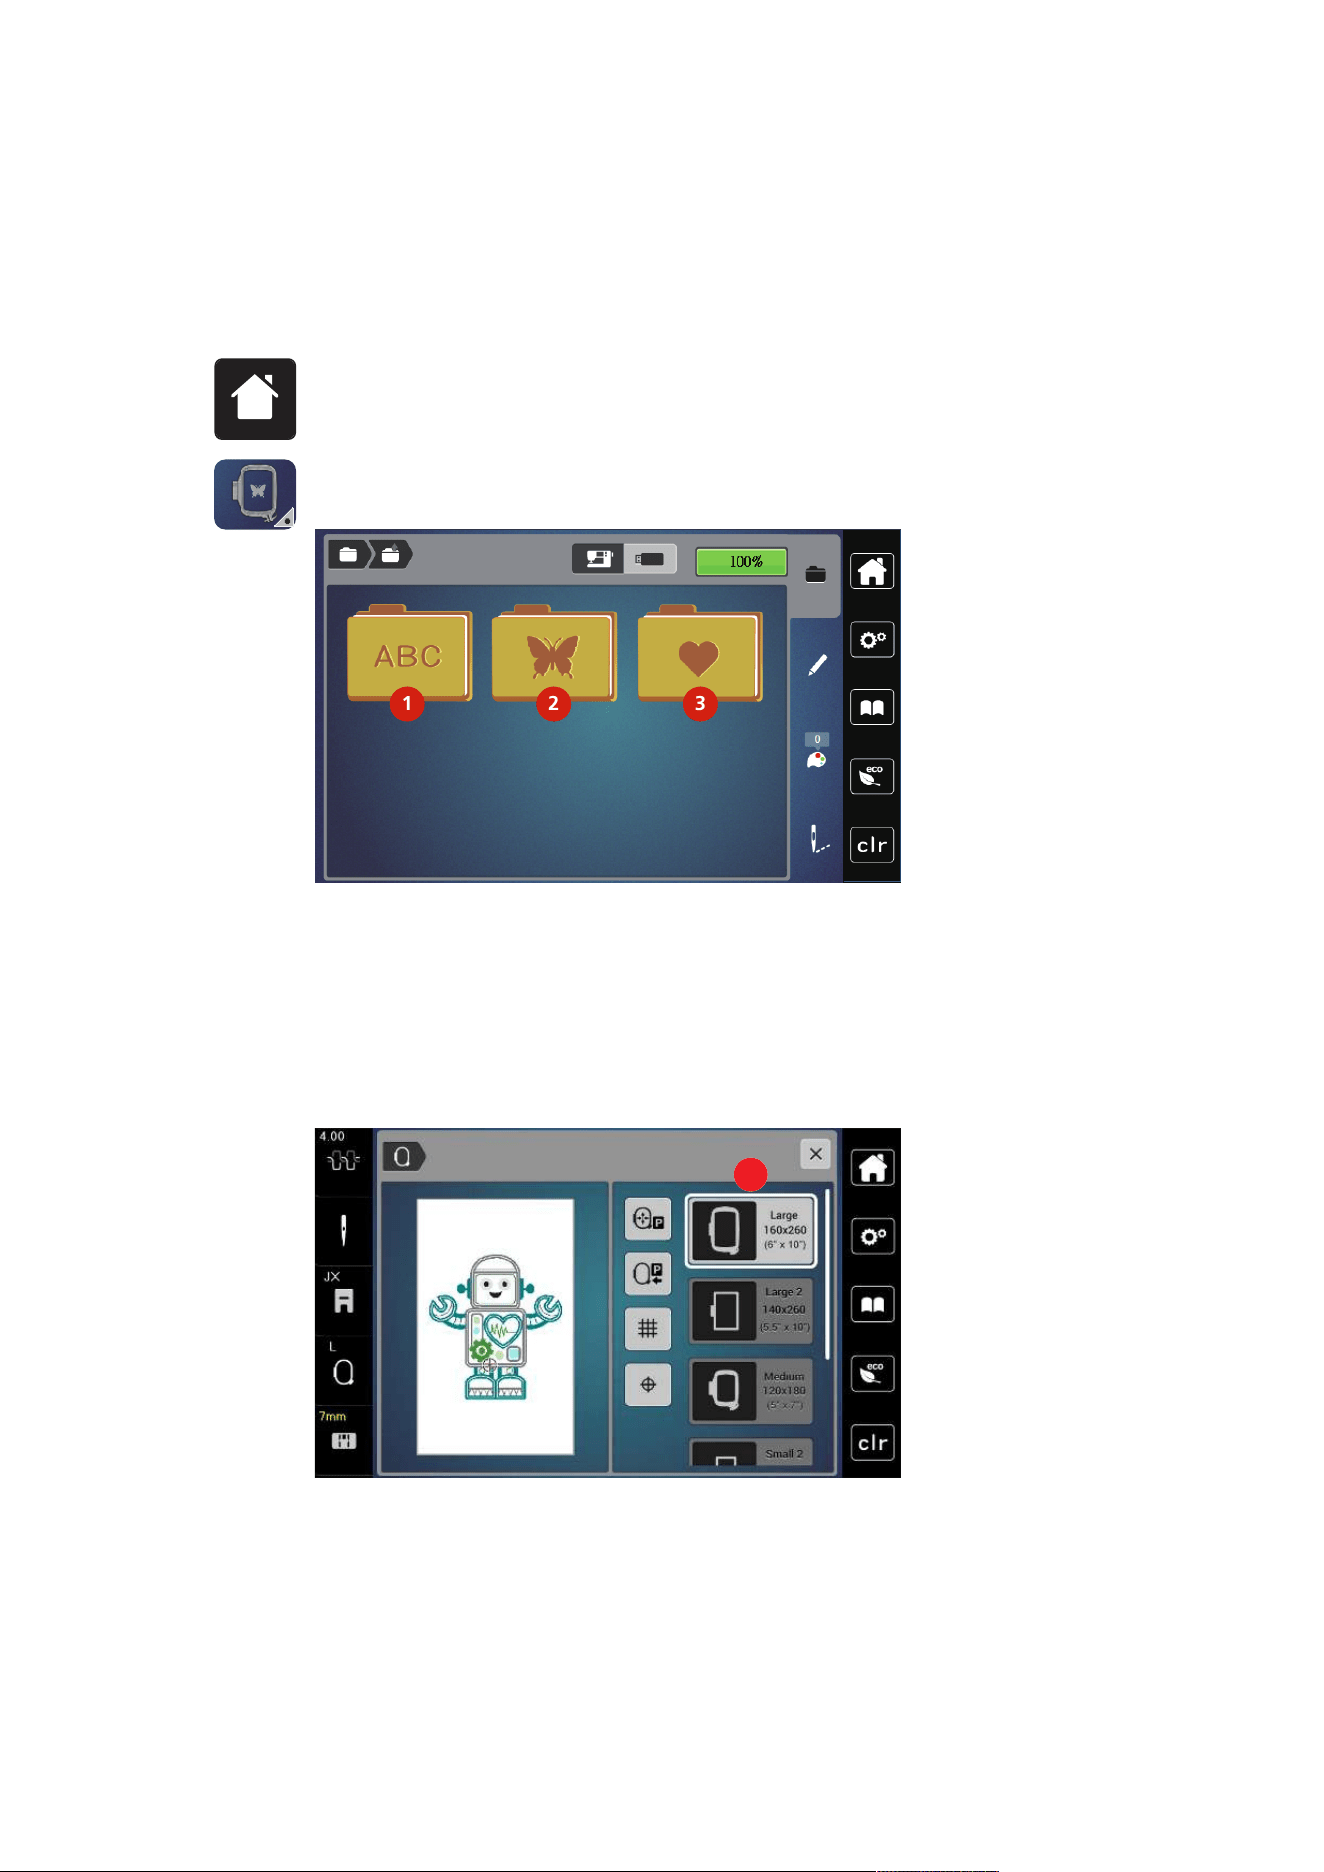
Embroidery Preparation
116
2023-06 EN 5020079.40A.04
13.4 Selecting the Embroidery Design
All of the embroidery designs can be either directly embroidered or can be changed using different functions
offered by the embroidering machine. You can find all embroidery designs at the end of the instruction
manual. In addition to that, embroidery designs can be downloaded from the personal memory or from the
USB stick (optional accessory).
> Tap «Home».
> Tap «Embroidery Mode».
> Select an alphabet, embroidery design or a personal embroidery design from one of the files.
1
2 3
1
2 3
1 Embroidery Alphabet 3 Personal Embroidery Design
2 Embroidery Design
13.5 Embroidery Hoops
Overview Embroidery Hoop Selection
1
1 Hoop Selection
Selecting the Embroidery Hoop
The best embroidery result is achieved when the smallest possible embroidery hoop for the embroidery
design is selected.
The embroidery design has a pre-set size which is displayed.

Embroidery Preparation
117
2023-06 EN 5020079.40A.04
Prerequisite:
• The embroidery design is selected.
đ
> Tap «Hoop Indicator/Select Hoop».
– The presently attached embroidery hoop is displayed.
– The machine selects the optimal embroidery hoop according to the size of the embroidery design
automatically.
– If the preset embroidery hoop is not available, another desired embroidery hoop can be selected.
– When an embroidery hoop is attached which does not correspond with the selected one, the attached
hoop is considered active and the embroidery design area is displayed accordingly.
> Select the desired embroidery hoop.
Tear-away Stabilizers
Using a stabilizer ensure more stability of the embroidery project. A tear-away stabilizer suits all woven and
non-stretch materials. 1–2layers can be used. Stabilizers are available in different weights. With larger areas
to be embroidered the stabilizer will remain under the embroidery thread. The stabilizer is applied to the
wrong side of the fabric with temporary adhesive spray. Carefully cut away excess stabilizer after
embroidering.
Cut-away Stabilizers
Using a stabilizer ensure more stability of the embroidery project. A cut-away stabilizer suits all elastic
materials. 1–2layers can be used. Stabilizers are available in different weights. With larger areas to be
embroidered the stabilizer will remain under the embroidery thread. The stabilizer is applied to the wrong
side of the fabric with temporary adhesive spray. Carefully cut away excess stabilizer after embroidering.
Using Adhesive Spray
The application of spray adhesive is recommended for stretch and smooth materials and knitware. It prevents
the fabric from losing shape and slipping. Appliqués can be exactly positioned with spray adhesive. The spray
adhesive shouldn't be used near the machine to avoid contamination.
> Use the spray adhesive carefully at a distance 25–30cm (9–12inch) when spraying the stabilizer.
> Adhere the sprayed stabilizer to the wrong side of the fabric carefully, smoothing material so there are
no puckers.
> Position smaller parts such as pocket flaps or collars on the stabilizer.
> To avoid the possibility of getting hoop marks when working with napped materials or fleece, don't hoop
the parts but spray the stabilizer and hoop it.
> Adhere the fabric to be embroidered.
> Remove any adhesive residue before starting the machine.
Using Spray Starch
Spray starch is ideal for additional stiffening fine, loosely woven materials. Always use an additional stabilizer
on the wrong side of the material.
> Spray the area to be embroidered.
> Let it dry or press gently with a warm iron if necessary.
Using Iron-on Interfacing
Iron-on interfacings are available in a variety of weights. It is recommended to use an iron-on interfacing
which is easily removable from the basic fabric. An Iron-on interfacing suits all materials that are easily
distorted like stretch fabric such as tricot and jersey.
> Iron-on interfacings are ironed to the wrong side of the material using a warm iron.
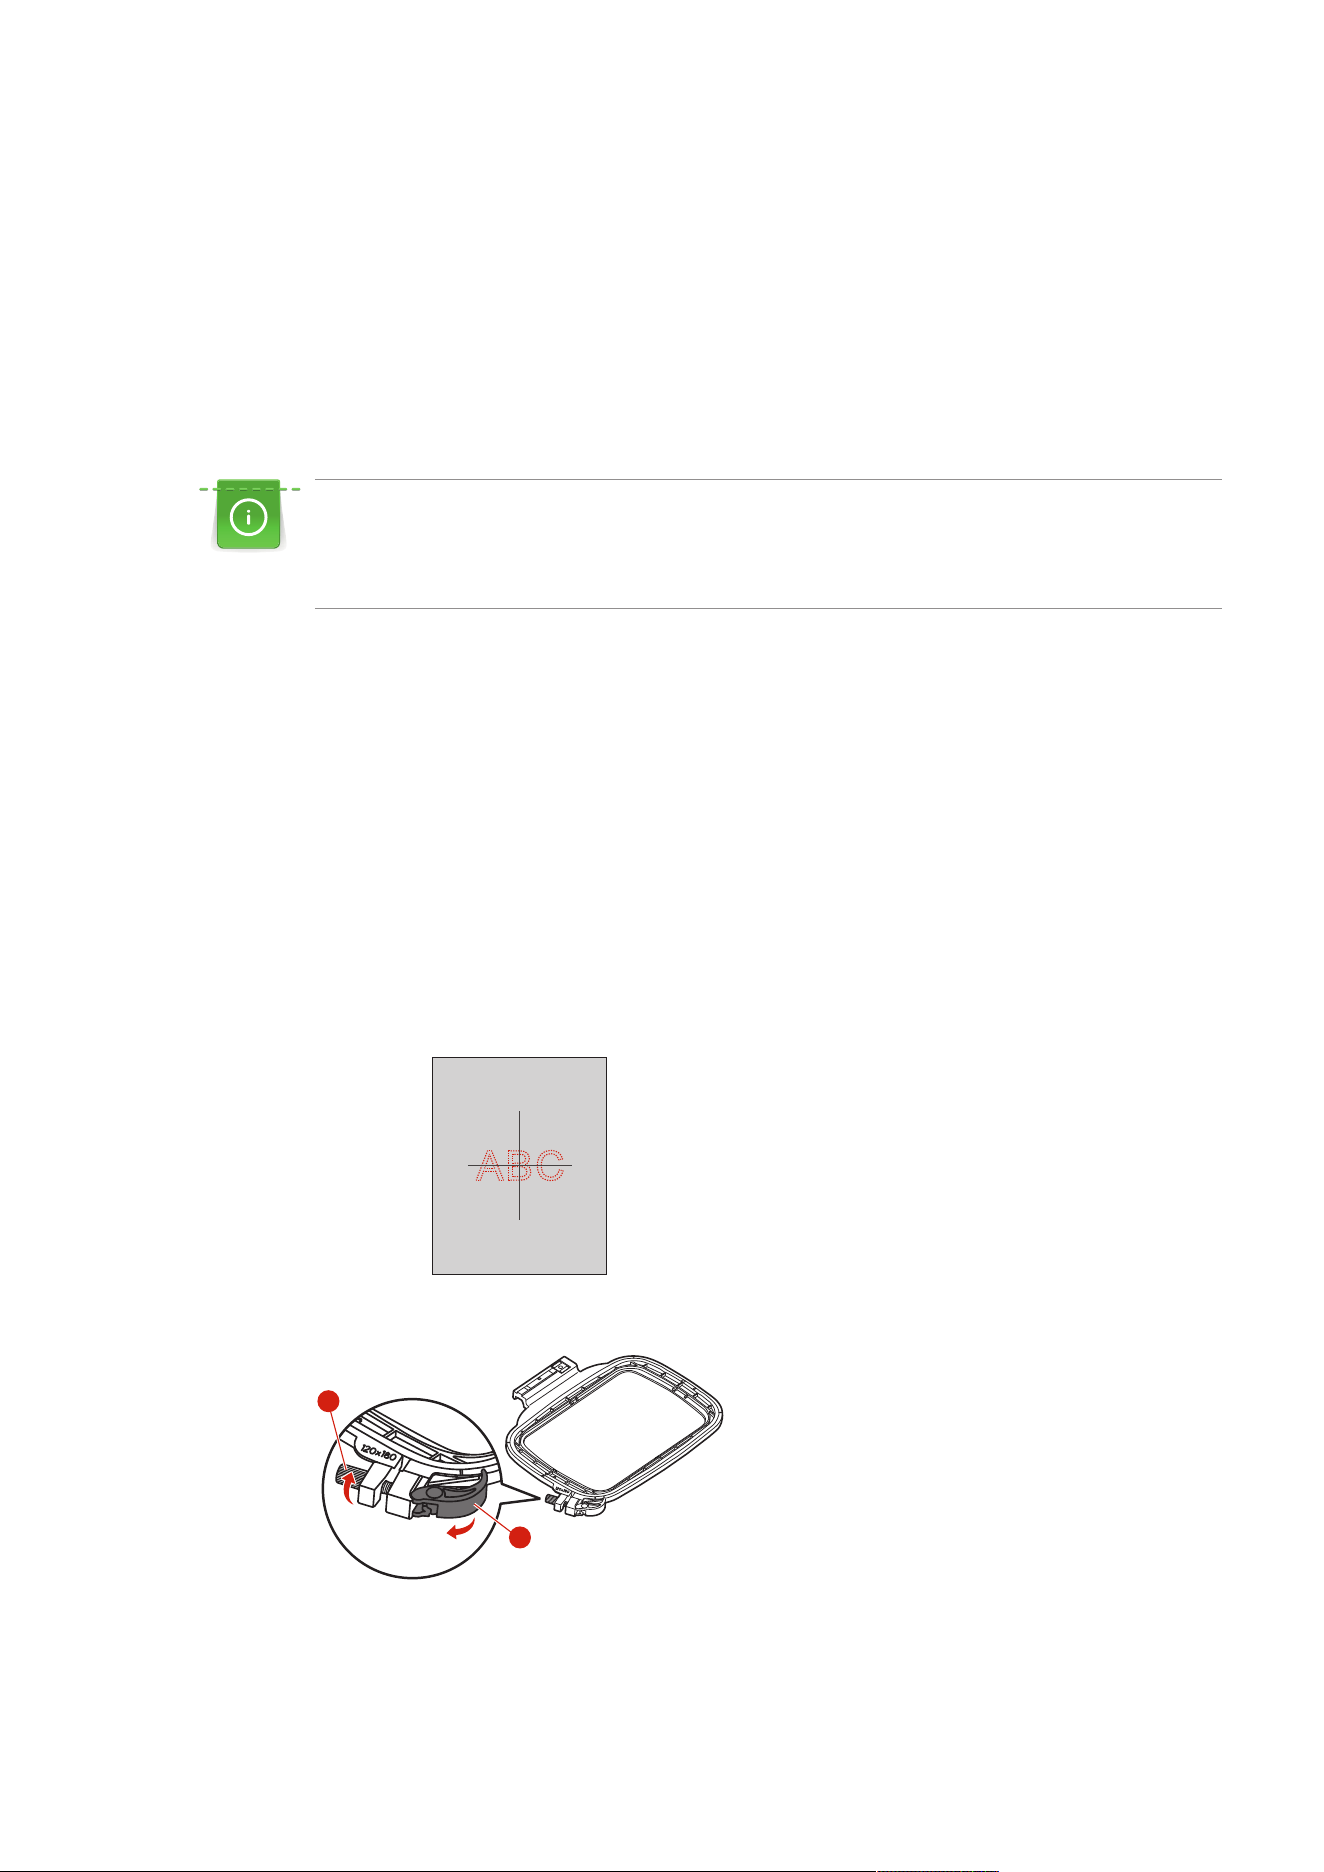
Embroidery Preparation
118
2023-06 EN 5020079.40A.04
Using Paper-backed Adhesive Stabilizer
Paper-backed adhesive stabilizers are intended to be used for fabrics such as jersey and silk as well as for
embroidery projects which are not suited to be hooped in the embroidery hoop.
> Place the stabilizer in the hoop, so that the paper side is up.
> Use a a pair of scissors to score the paper and remove paper in the hoop area.
> Position the fabric to be embroidered on the stabilizer and press it on place.
> Remove any adhesive residue before starting the machine.
Using Water-soluble Stabilizer
For lace embroidery it is recommended to hoop 1 - 3 layers of water-soluble stabilizer in the embroidery
hoop. As the embroidery design is not embroidered on the fabric, only the thread embroidered design is
left. The embroidery designs should be combined with short stitches otherwise the individual designs may
fall out.
Water-soluble stabilizers are ideal for fine, sheer fabrics where other stabilizers may show through the
embroidery stitches as well as for lace embroidery. The stabilizer dissolves in water. Water-soluble stabilizers
are an ideal protection for looped pile fabrics preventing the loops from being damaged. It prevents threads
from sinking into the material and keeps the fabric pile from poking though the embroidery.
> Place the stabilizer on the underside of the material.
> Use adhesive spray to adhere stabilizer if necessary.
> For material with a pile, reinforce with additional, suitable stabilizer on the wrong side.
> Place all the layers together into the embroidery hoop.
> After dissolving, lay the motif down flat and let dry.
Preparing the Embroidery Hoop
The embroidery hoop consists of an outer and an inner hoop. There is a corresponding template for every
hoop. The area to be embroidered is marked in 1 cm (0.39 in) squares. The center is marked with hole and
cross lines. The required marks can be transferred to the material.
> Loosen the screw (1) or open the quick release device (2) on the outer hoop.
– If a new type of fabric is used, the pressure must be adjusted by turning the screw.
1
2
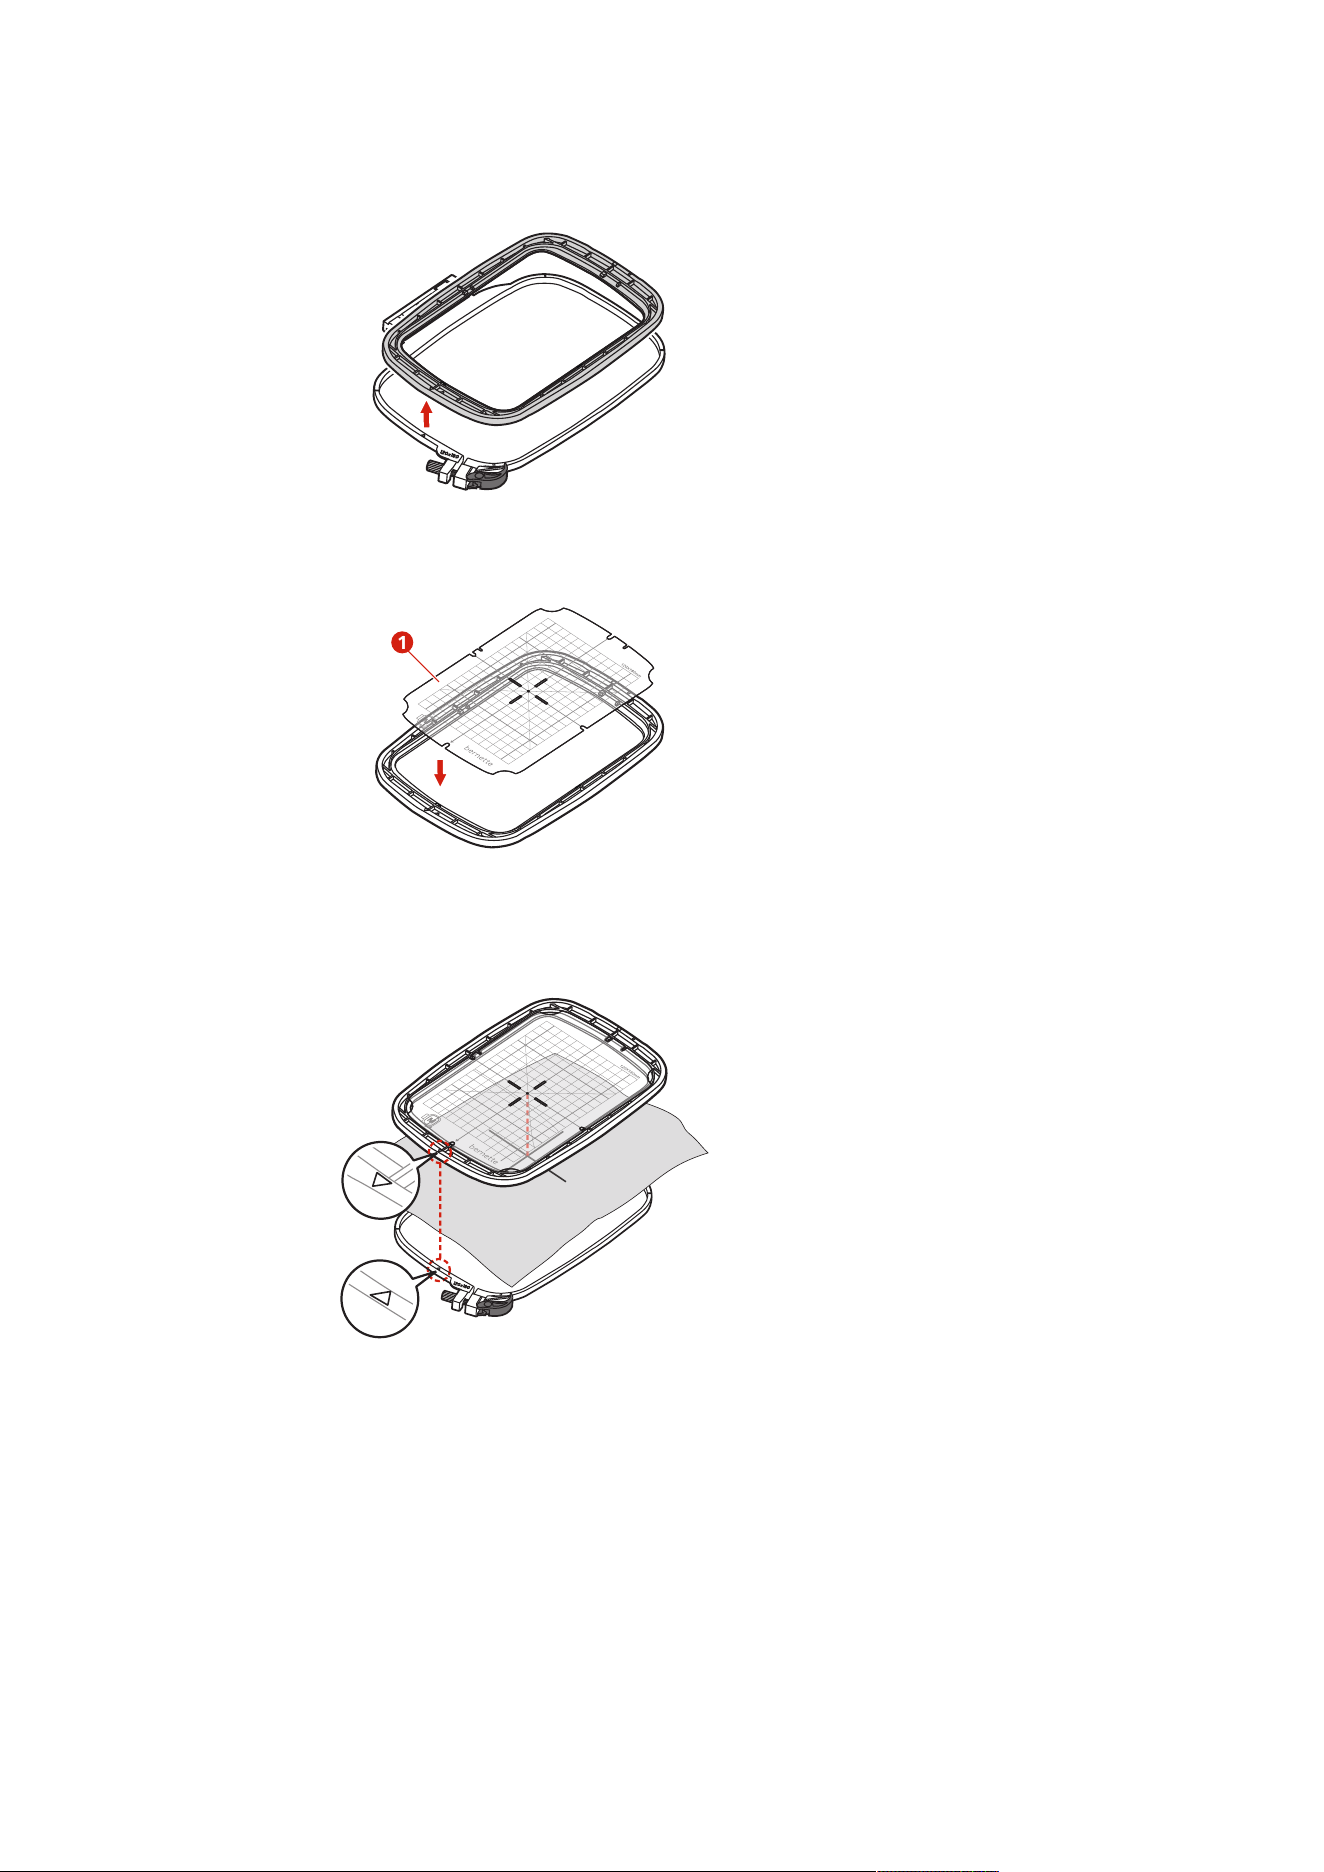
Embroidery Preparation
119
2023-06 EN 5020079.40A.04
> Remove the inner hoop.
> Place the template (1) in the inner hoop, so that the bernette logo is aligned with the arrow marking at
the front edge so that it clicks into place.
1
> Place fabric under the inner frame so that it is at least 2 cm above the hoop.
> Align the center of the embroidery design with the center of the template.
> Place the material and the inner hoop on the outer hoop, so that the arrow markings of both hoops are
aligned.
> Fit the hoops into each other so that the material does not move.
> Hoop the fabric tautly in the embroidery hoop.
> Close the quick release device (2). If necessary, tighten screw (1).
> The inner hoop should protrude about 1 mm on the underside, this prevents the hoop from sticking to
the stitch plate.
> The quick release device (2) is for changing the same type (thickness) fabric easily and quickly.
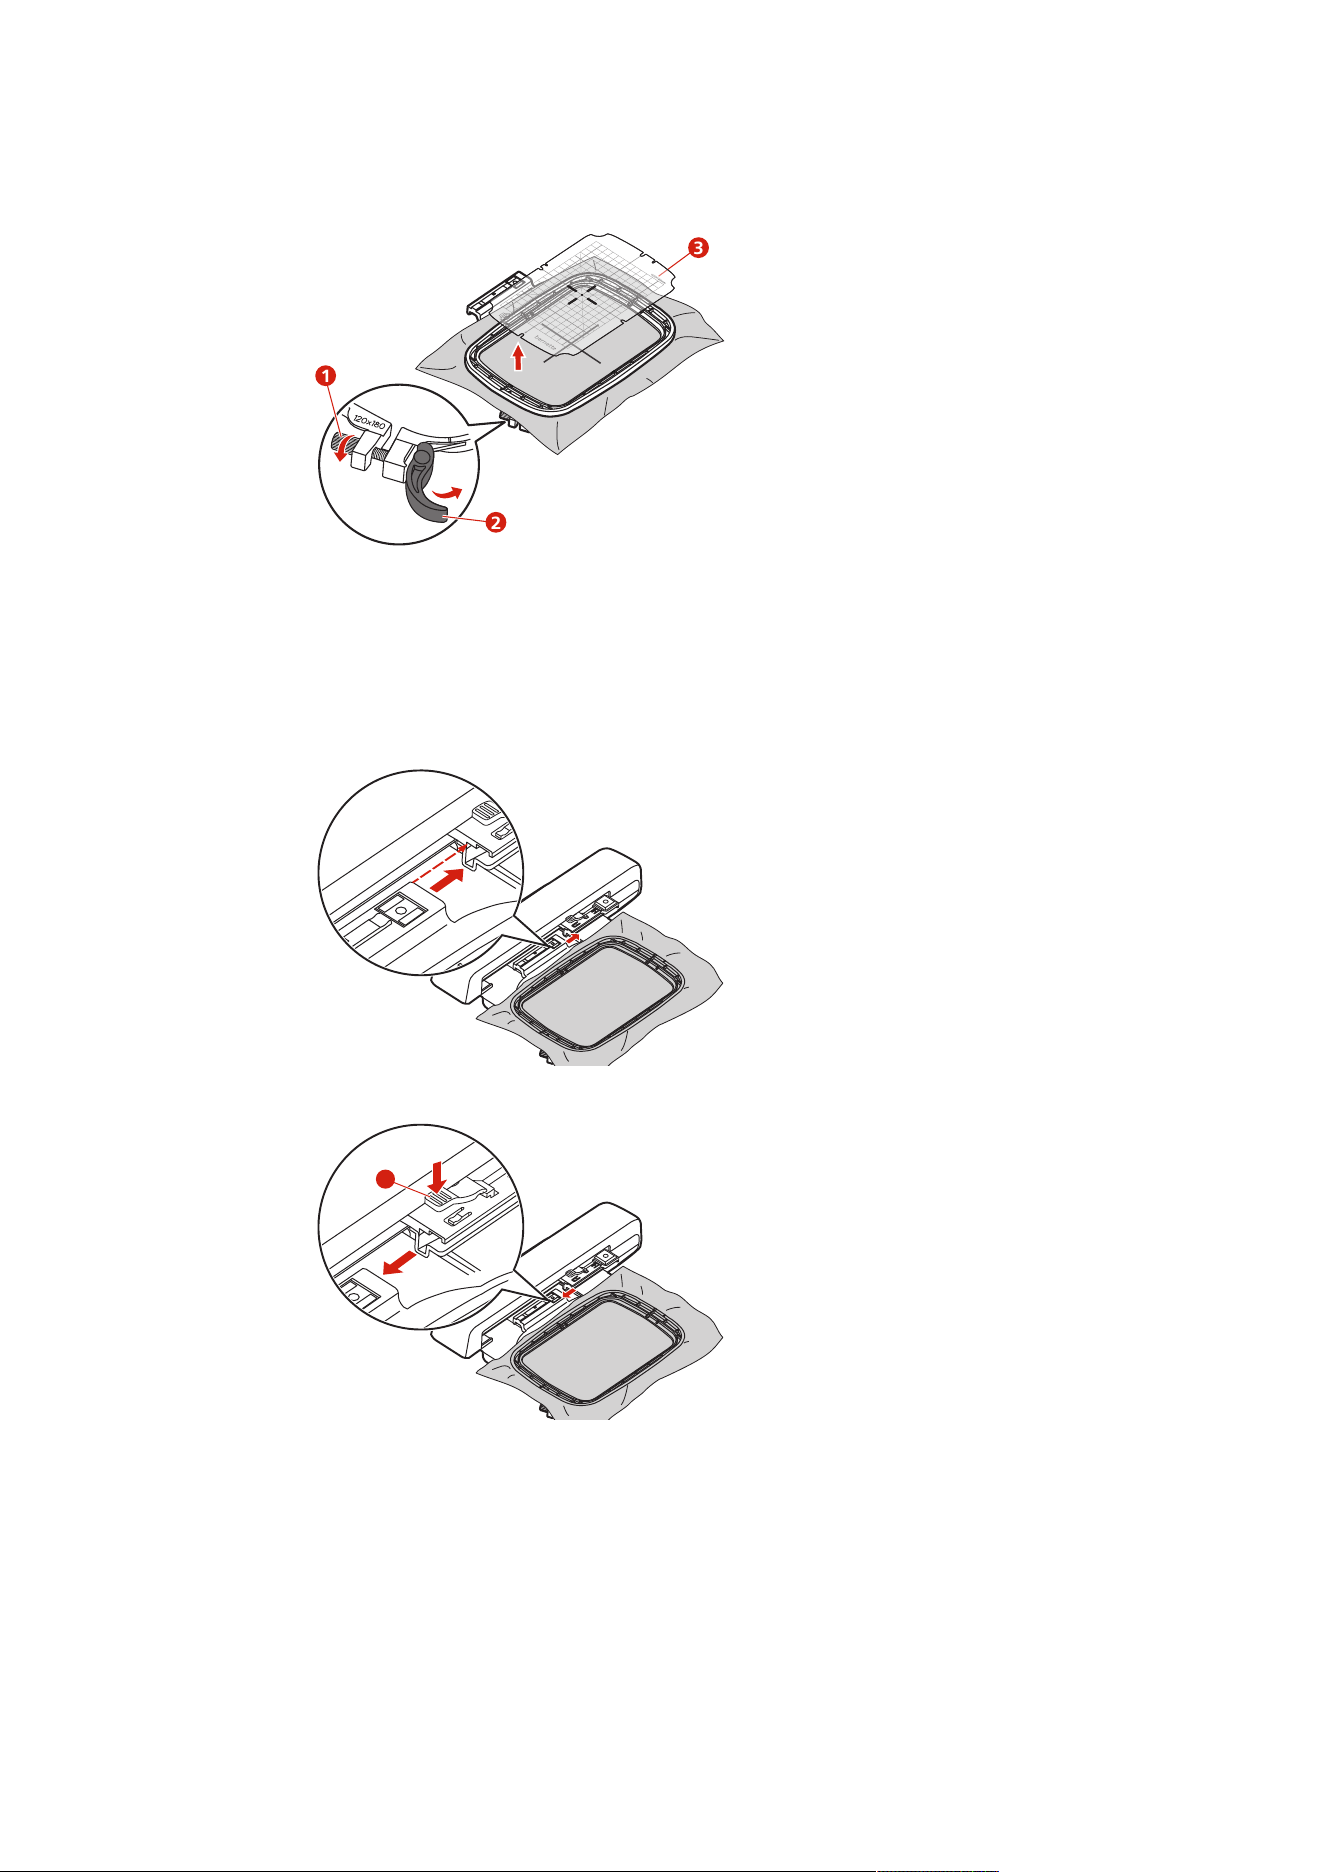
Embroidery Preparation
120
2023-06 EN 5020079.40A.04
> Remove the template (3) from the hoop.
1
3
2
Attaching the Hoop
> Raise the needle.
> Raise the embroidery foot.
> Position the hoop below the embroidery foot.
> Push the embroidery hoop into the embroidery module until it clicks into place.
– The hoop is attached.
> To remove the hoop, press the securing lever and pull the hoop backwards.
1
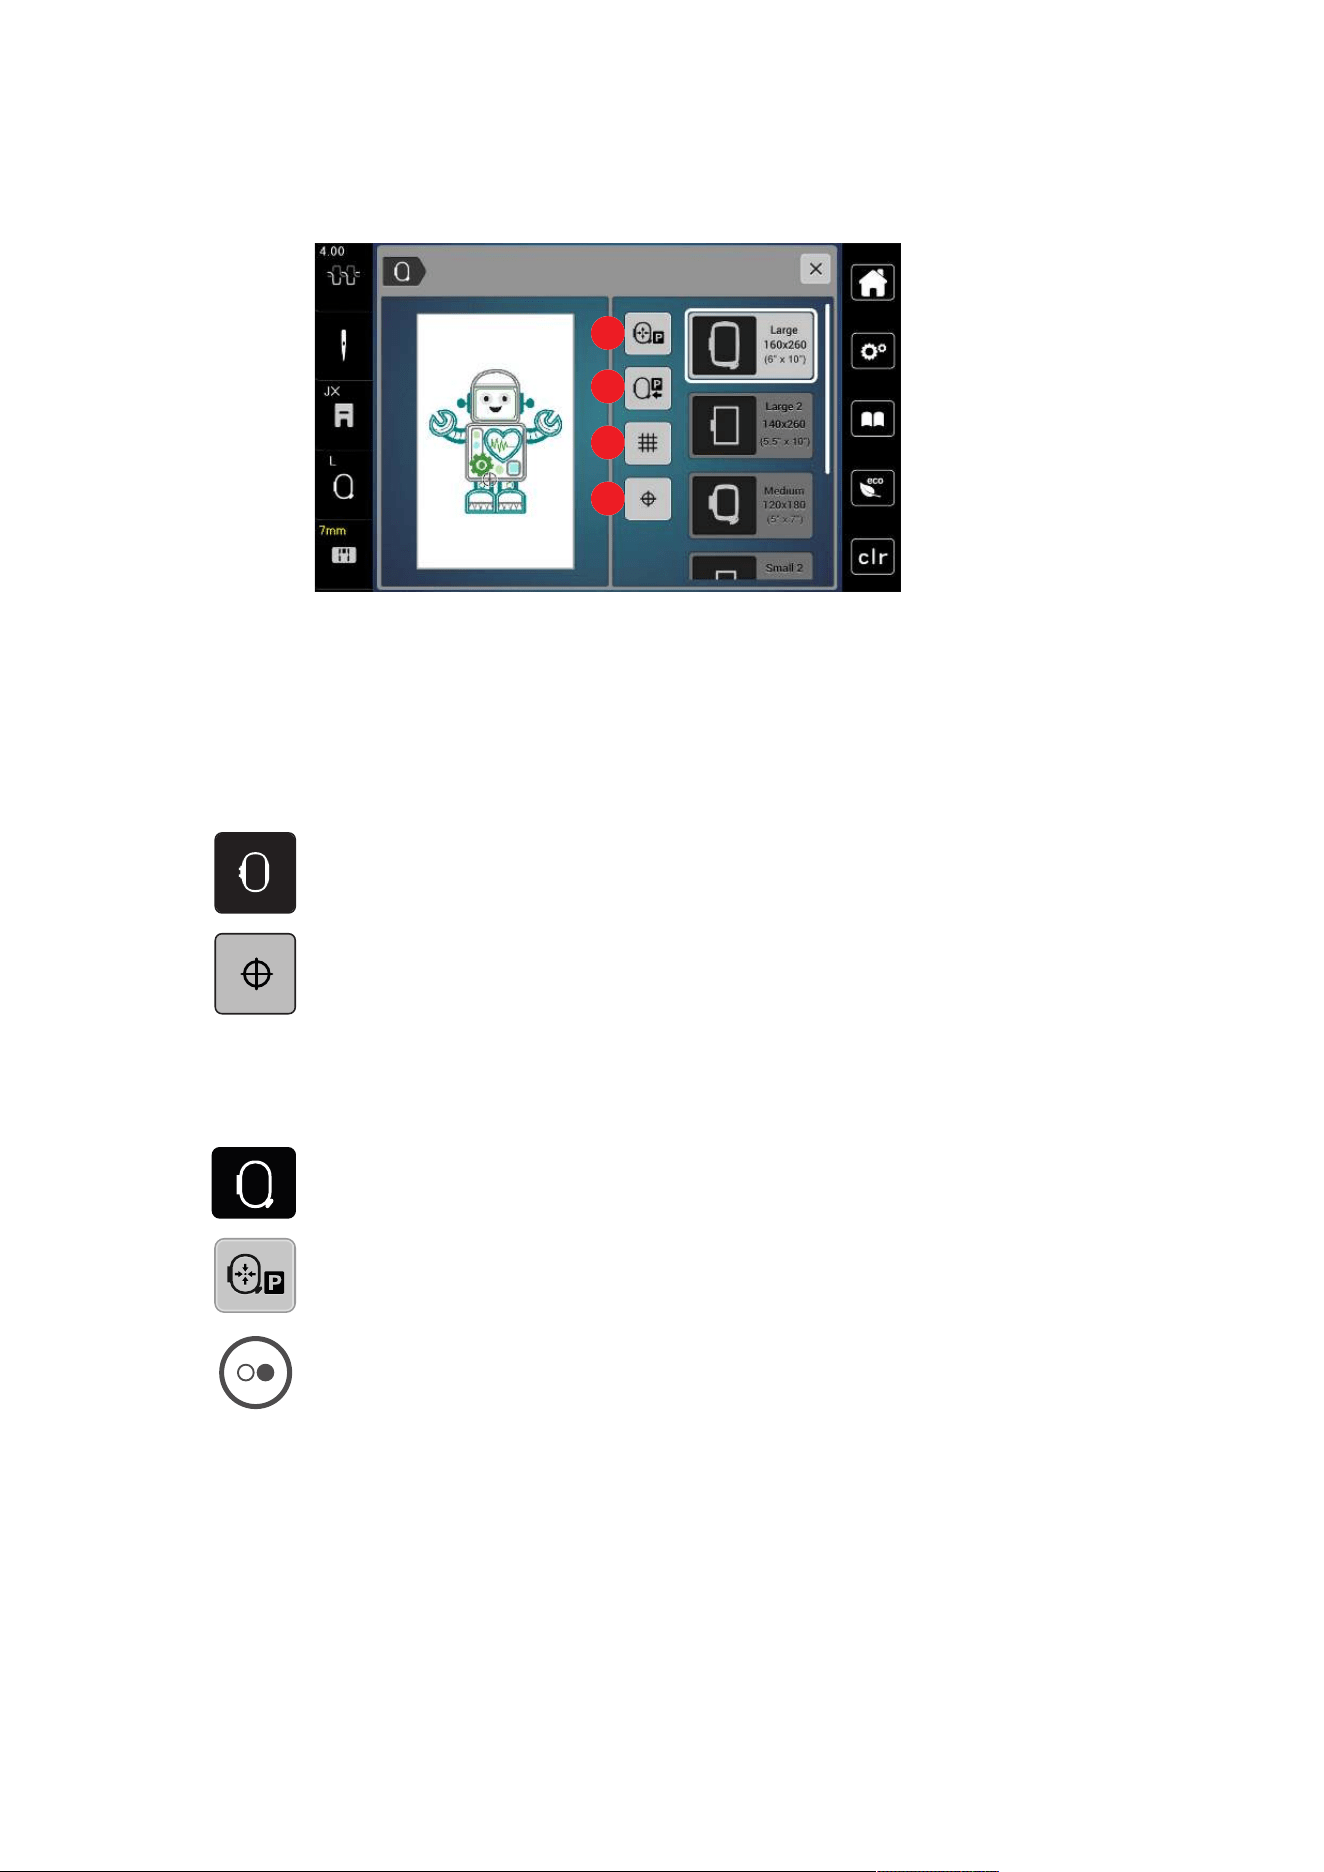
Embroidery Preparation
121
2023-06 EN 5020079.40A.04
Overview Embroidery Functions
1
2
3
4
1 Centering the Needle to the Embroidery
Hoop
3 Grid On/Off
2 Embroidery Arm Return 4 Center of Embroidery Design
Locating the Center of the Embroidery Design
The embroidery hoop is positioned so that the needle is exactly above the center of the embroidery design or
the motif begin.
> Tap «Hoop Indicator/Select Hoop».
> To position the hoop so that the needle is placed exactly over the center of the embroidery design, tap
«Center of Embroidery Design».
> To position the hoop so that the needle is placed exactly over the motif start, tap «Center of Embroidery
Design» again.
Centering the Needle to the Embroidery Hoop
Relocating the embroidery hoop facilitates threading when the needle is close to the embroidery hoop.
đ
> Tap «Hoop Indicator/Select Hoop».
> To move the embroidery hoop to the middle, tap «Center the Needle to the Embroidery Hoop».
> Thread the upper thread.
> To move the hoop back to its previous position, push the button «Start/Stop».
Embroidery Preparation
122
2023-06 EN 5020079.40A.04
Embroidery Arm Return
The embroidery arm can be positioned for storage the embroidery module.
đ
> Tap «Hoop Indicator/Select Hoop».
> Remove the embroidery hoop.
> To move the embroidery arm horizontally to the left, tap «Move Hoop to the Left».
> To move the embroidery arm back to its previous position, press the «Start/Stop» button.
Grid On/Off
When the center of the hoop and the grid are displayed, the embroidery design can be positioned more
exactly.
đ
> Tap «Hoop Indicator/Select Hoop».
> To show the hoop center on the display, tap «Grid On/Off».
> To show the grid lines, tap «Grid On/Off» again.
> To hide the hoop center and the grid lines, tap «Grid On/Off» again.
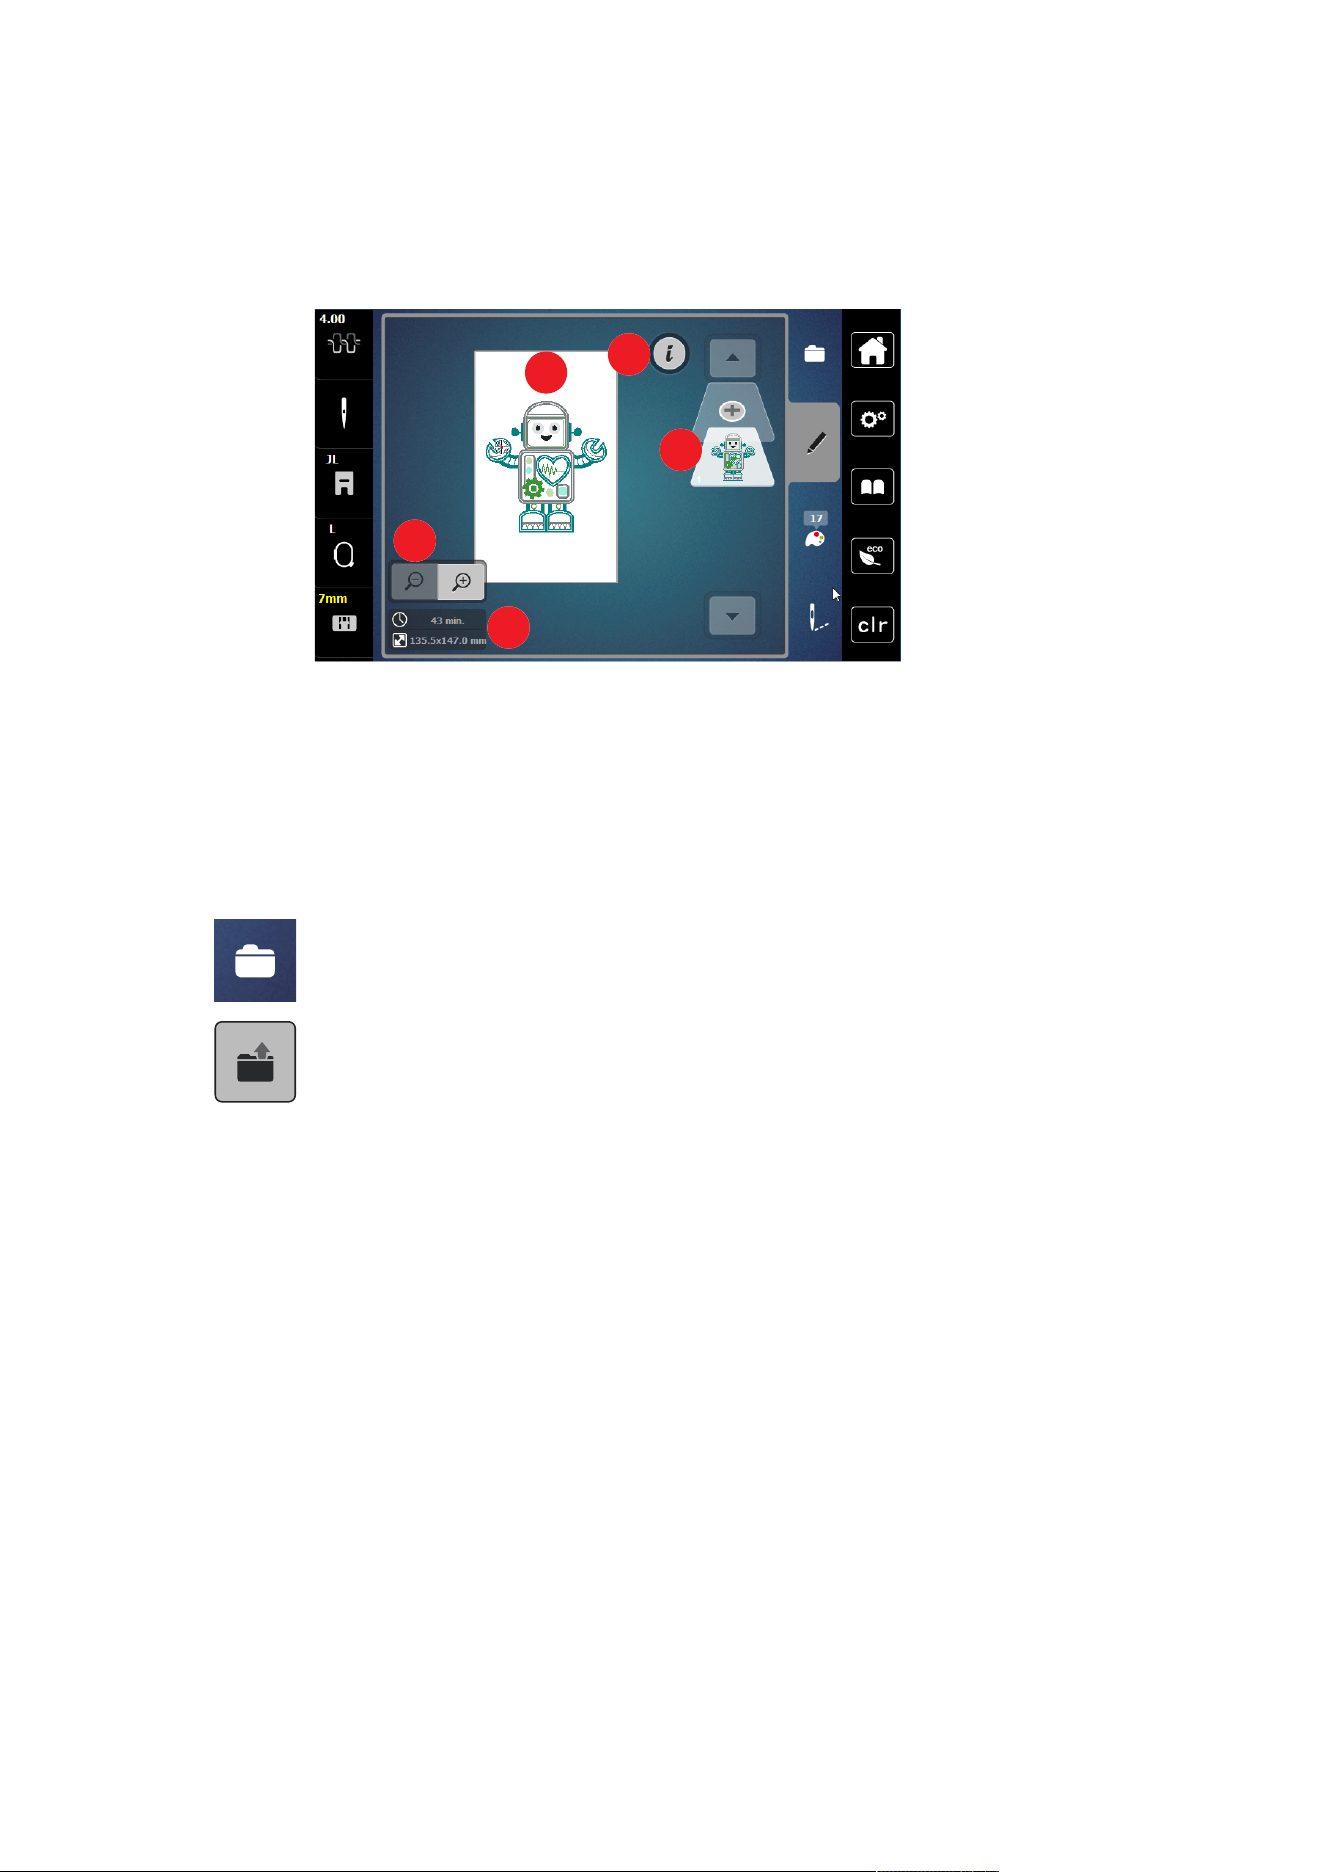
Creative Embroidering
123
2023-06 EN 5020079.40A.04
14 Creative Embroidering
14.1 Overview Embroidering
1
2
3
4
5
1
Scaling up, Downsizing and Moving the
Embroidery Design View
4 i-Dialog
2 Embroidery Time/Embroidery Design Size in mm 5 Adding an Embroidery Design Layer
3 Area to be Embroidered
Selecting and Changing the Embroidery Design
> Tap «Selection».
> Tap «Loading the Embroidery Design».
> Select a new embroidery design.
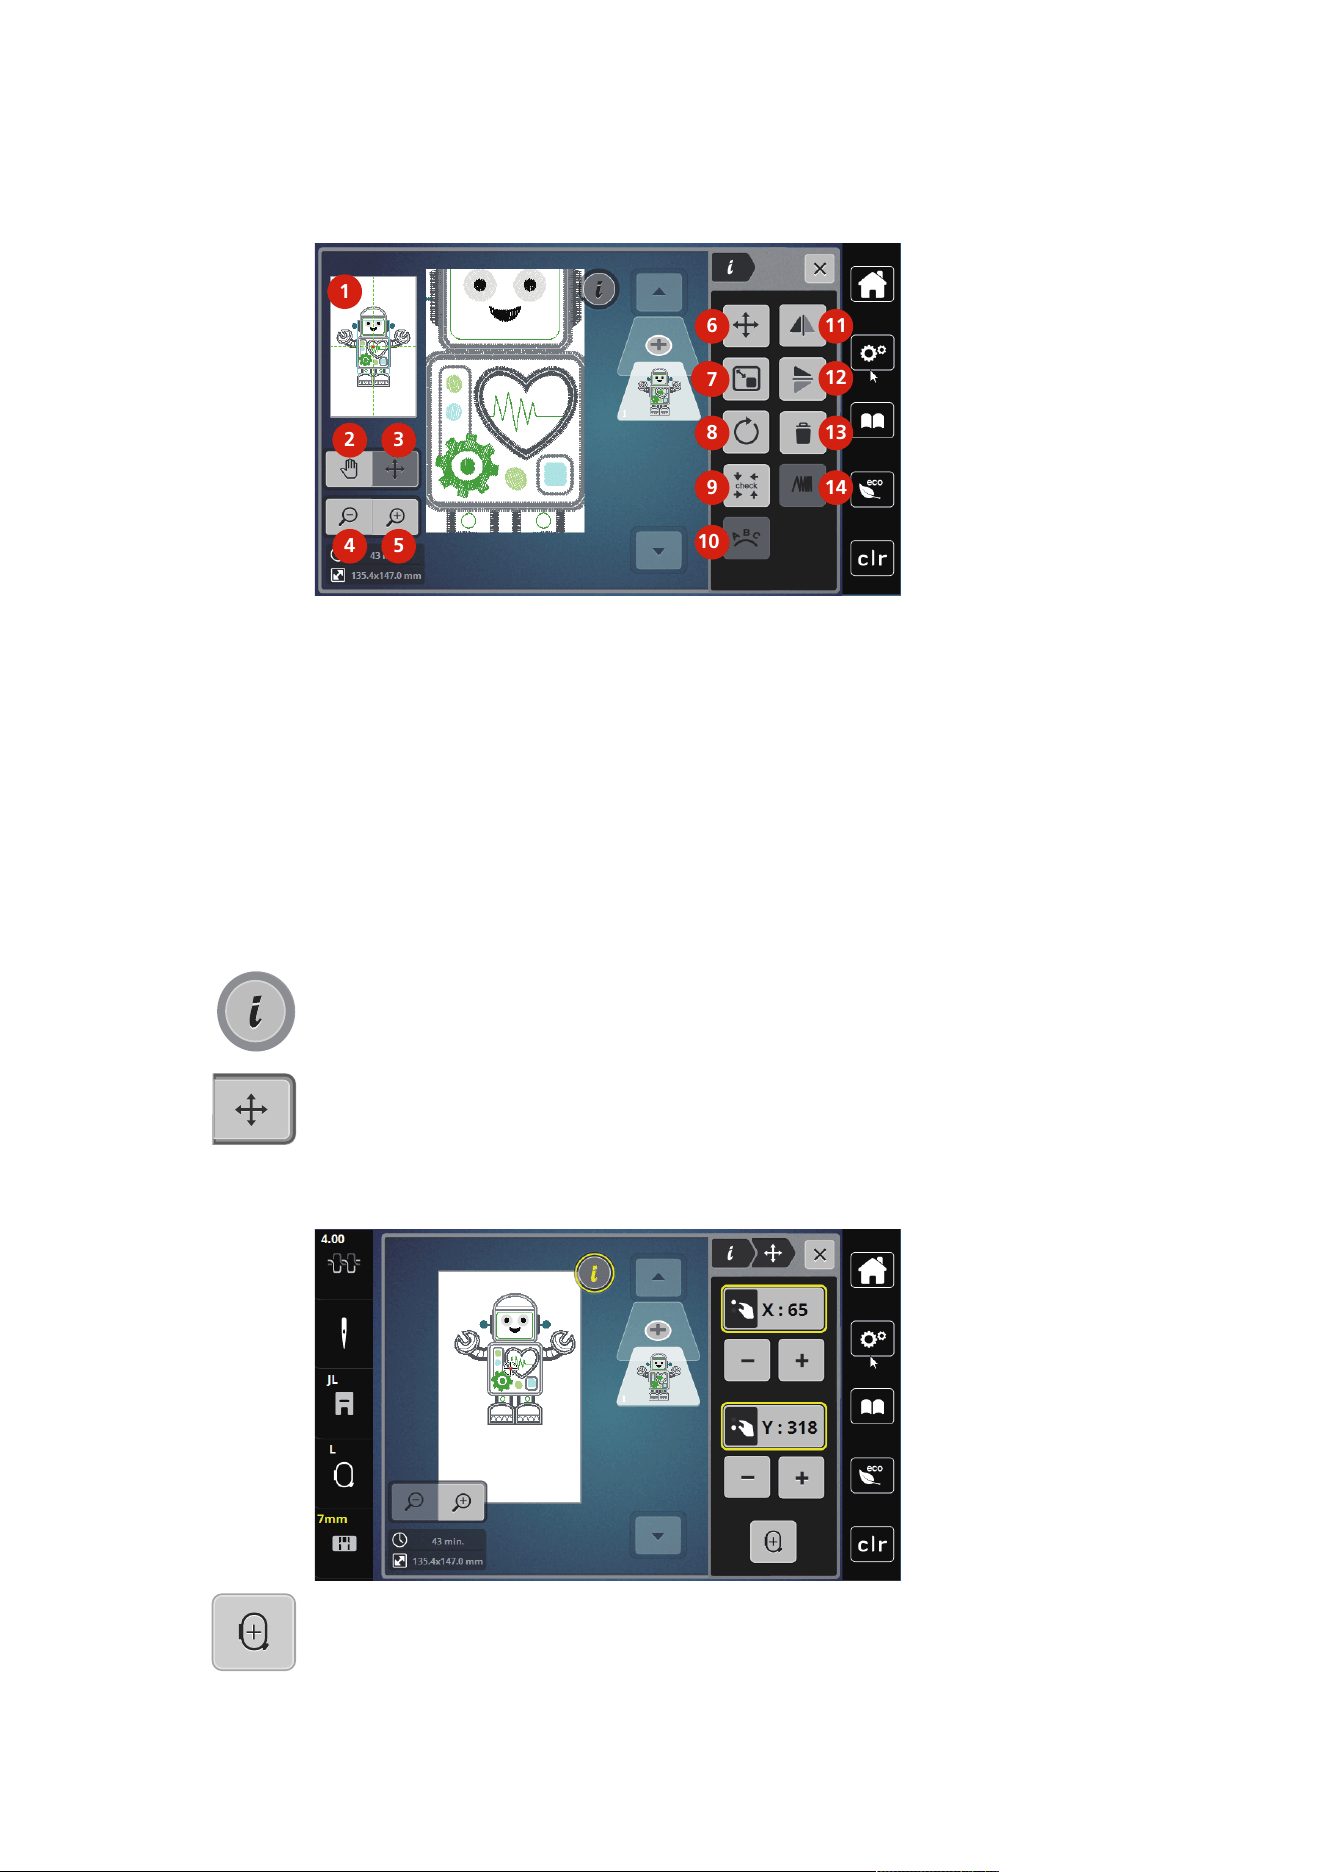
Creative Embroidering
124
2023-06 EN 5020079.40A.04
Overview Editing Embroidery Design
1
2 3
4
5
6
6
7
8
9
10
11
12
13
14
1 Preview all 8 Rotating the Embroidery Design
2 Move View 9 Check Embroidery Design Size
3 Moving the View of the Design 10 Bending the Text
4 Zoom Out 11 Mirror Image Left/Right
5 Zoom In 12 Mirror Image Up/Down
6 Moving the Embroidery Design 13 Deleting
7 Altering the embroidery design proportionally 14 Altering the Stitch Density
Moving the Embroidery Design
> Select the embroidery design.
> Tap «i-Dialog».
> Tap «Move the Embroidery Design».
> Turn the «Upper Multi-function Knob» to move the embroidery design horizontally.
> Turn the «Lower Multifunction knob» to move the embroidery design vertically in 0.5-mm steps or touch
the «+»/«-» icon or touch the embroidery design, keep it pressed and move it as you like.
– The relocation is indicated in the yellow-outlined icons.
> Tap «Center of Embroidery Design».
– The embroidery design is repositioned in the center of the embroidery hoop.
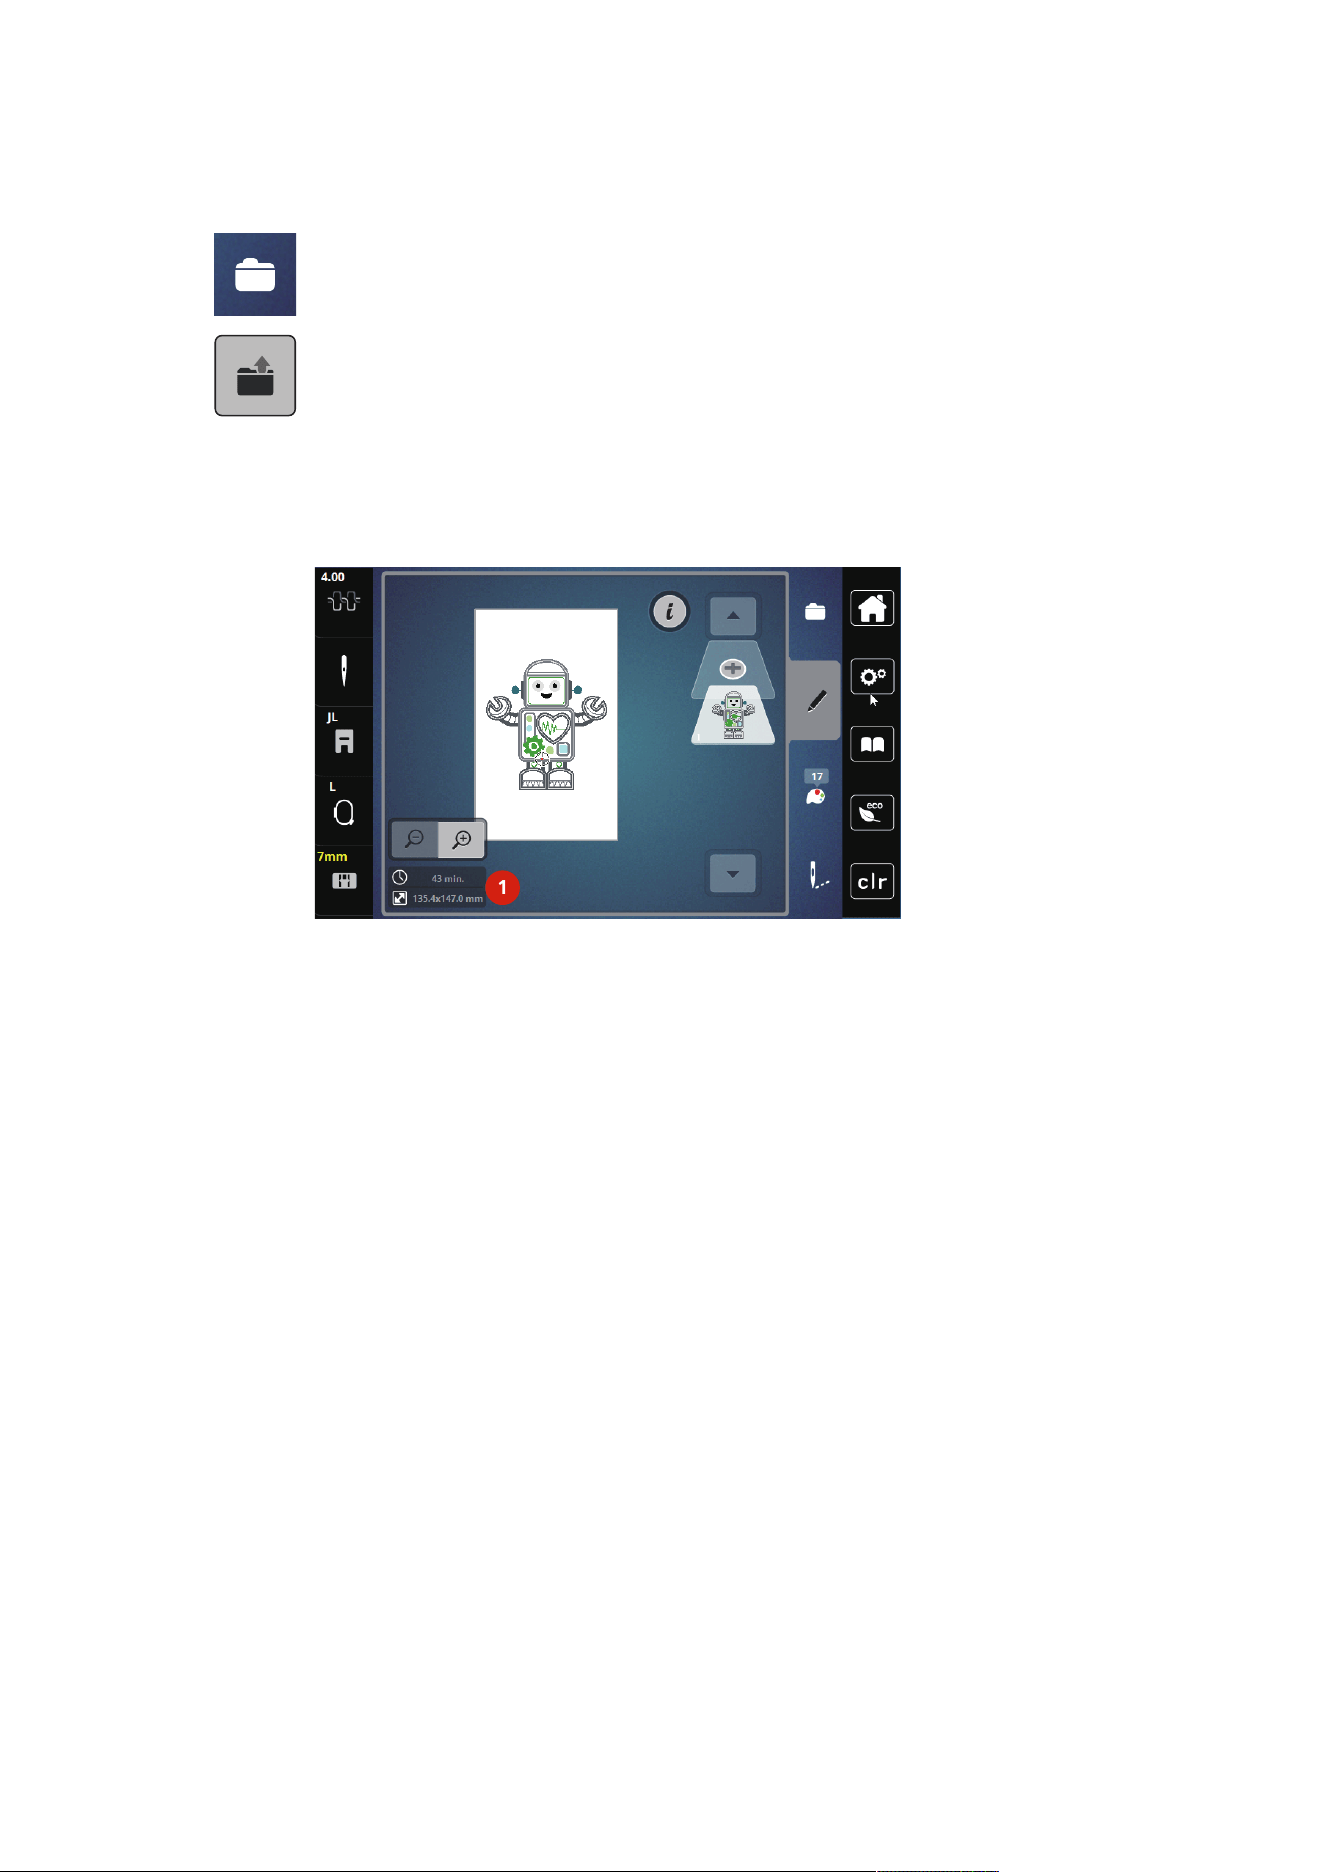
Creative Embroidering
125
2023-06 EN 5020079.40A.04
14.2 Selecting and Changing the Embroidery Design
> Tap «Selection».
> Tap «Loading the Embroidery Design».
> Select a new embroidery design.
14.3 Checking the Embroidery Time and the Embroidery Design Size
In the selection menu «Edit» the estimated embroidery time in minutes as well as the width and height of
the embroidery design is indicated at lower left (1).
1
14.4 Regulating the Speed
The sewing speed can be adjusted infinitely variable with the slide.
> Move the slide to the left to reduce the sewing speed.
> Move the slide to the right to increase the sewing speed.
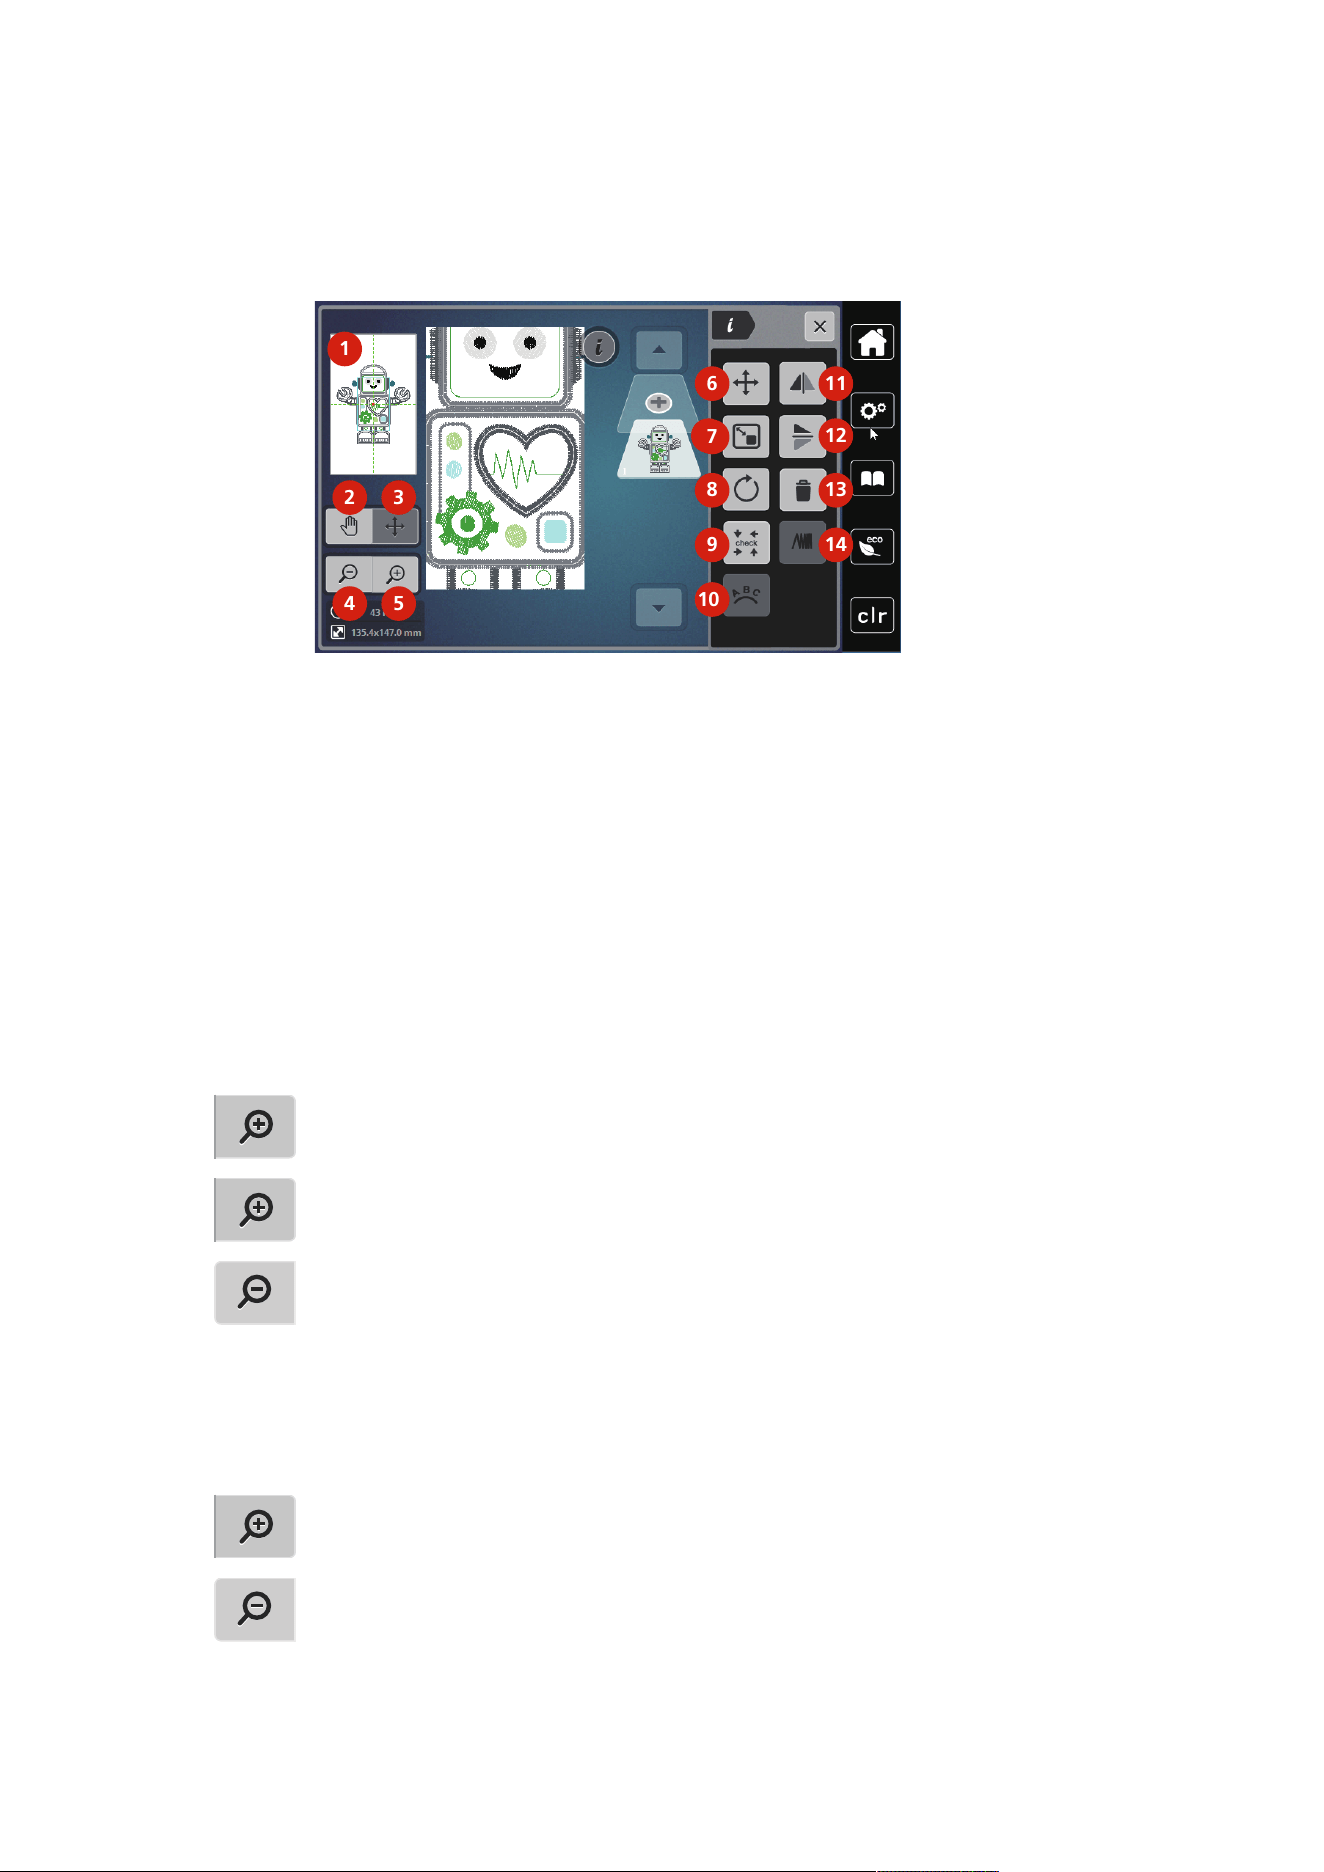
Creative Embroidering
126
2023-06 EN 5020079.40A.04
14.5 Editing the Embroidery Design
Overview Editing Embroidery Design
1
2 3
4
5
6
6
7
8
9
10
11
12
13
14
1 Preview all 8 Rotating the Embroidery Design
2 Move View 9 Check Embroidery Design Size
3 Moving the View of the Design 10 Bending the Text
4 Zoom Out 11 Mirror Image Left/Right
5 Zoom In 12 Mirror Image Up/Down
6 Moving the Embroidery Design 13 Deleting
7 Altering the embroidery design proportionally 14 Altering the Stitch Density
Scaling Up the Embroidery Design View
The view of the embroidery design can be scaled up. In addition to that, the view can be adjusted with or
without changing the embroidery position.
> Select the embroidery design.
> To edit the view of the embroidery design, tap «Zoom In».
> To increase the embroidery design view by one level each time, tap «Zoom In» oneto nine times.
> To return to editing mode, tap «Zoom Out» one to nine times.
Downsizing the Embroidery Design
The view of the embroidery design can be downsized. In addition to that, the view can be adjusted with or
without changing the embroidery position.
> Select the embroidery design.
> To enlarge the view of the embroidery design, tap «Zoom In».
> To minimize the enlarged embroidery design view by one level each time, tap «Zoom Out» oneto nine
times.
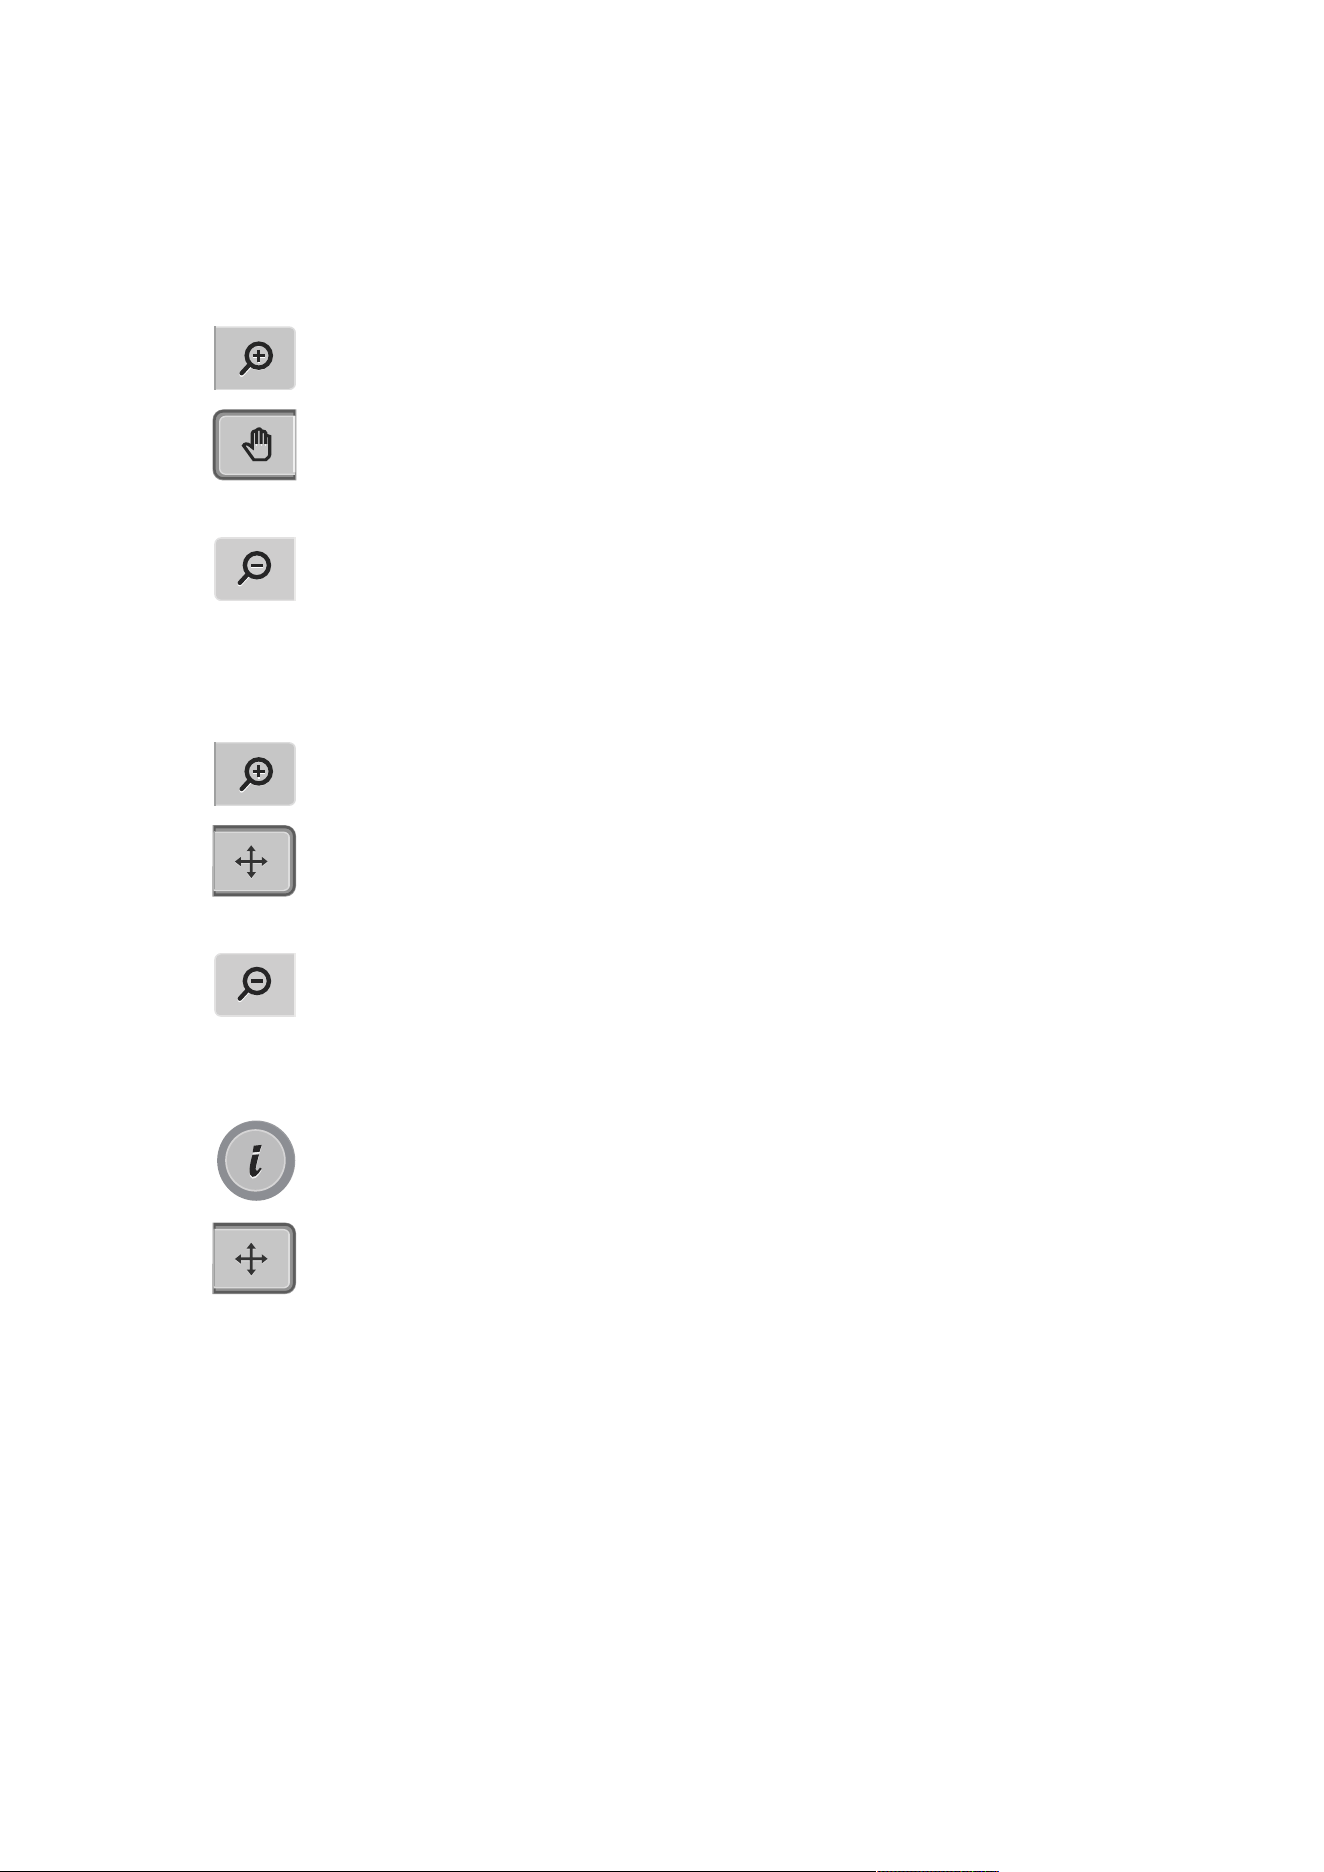
Creative Embroidering
127
2023-06 EN 5020079.40A.04
Moving the embroidery design view
The view of the embroidery design can be moved. In addition to that, the embroidery design position won’t
be changed.
> Select the embroidery design.
> To edit the view of the embroidery design, tap «Zoom In».
> Tap «Move View».
– The icon turns dark gray.
> Alter the view of the embroidery design.
– The embroidery position is not altered.
> To return to the previous view, tap «Zoom Out».
Moving the embroidery design in enlarged view
The view of the embroidery design can be moved when the embroidery position is changed.
> Select the embroidery design.
> To activate «Move the Embroidery Design», tap «Zoom In».
> Tap «Move the Embroidery Design».
– The icon turns dark gray.
> Moving the embroidery design.
– The embroidery design position is altered.
> To return to the previous view, tap «Zoom Out» again.
Moving the Embroidery Design
> Select the embroidery design.
> Tap «i-Dialog».
> Tap «Move the Embroidery Design».
> Turn the «Upper Multi-function Knob» to move the embroidery design horizontally.
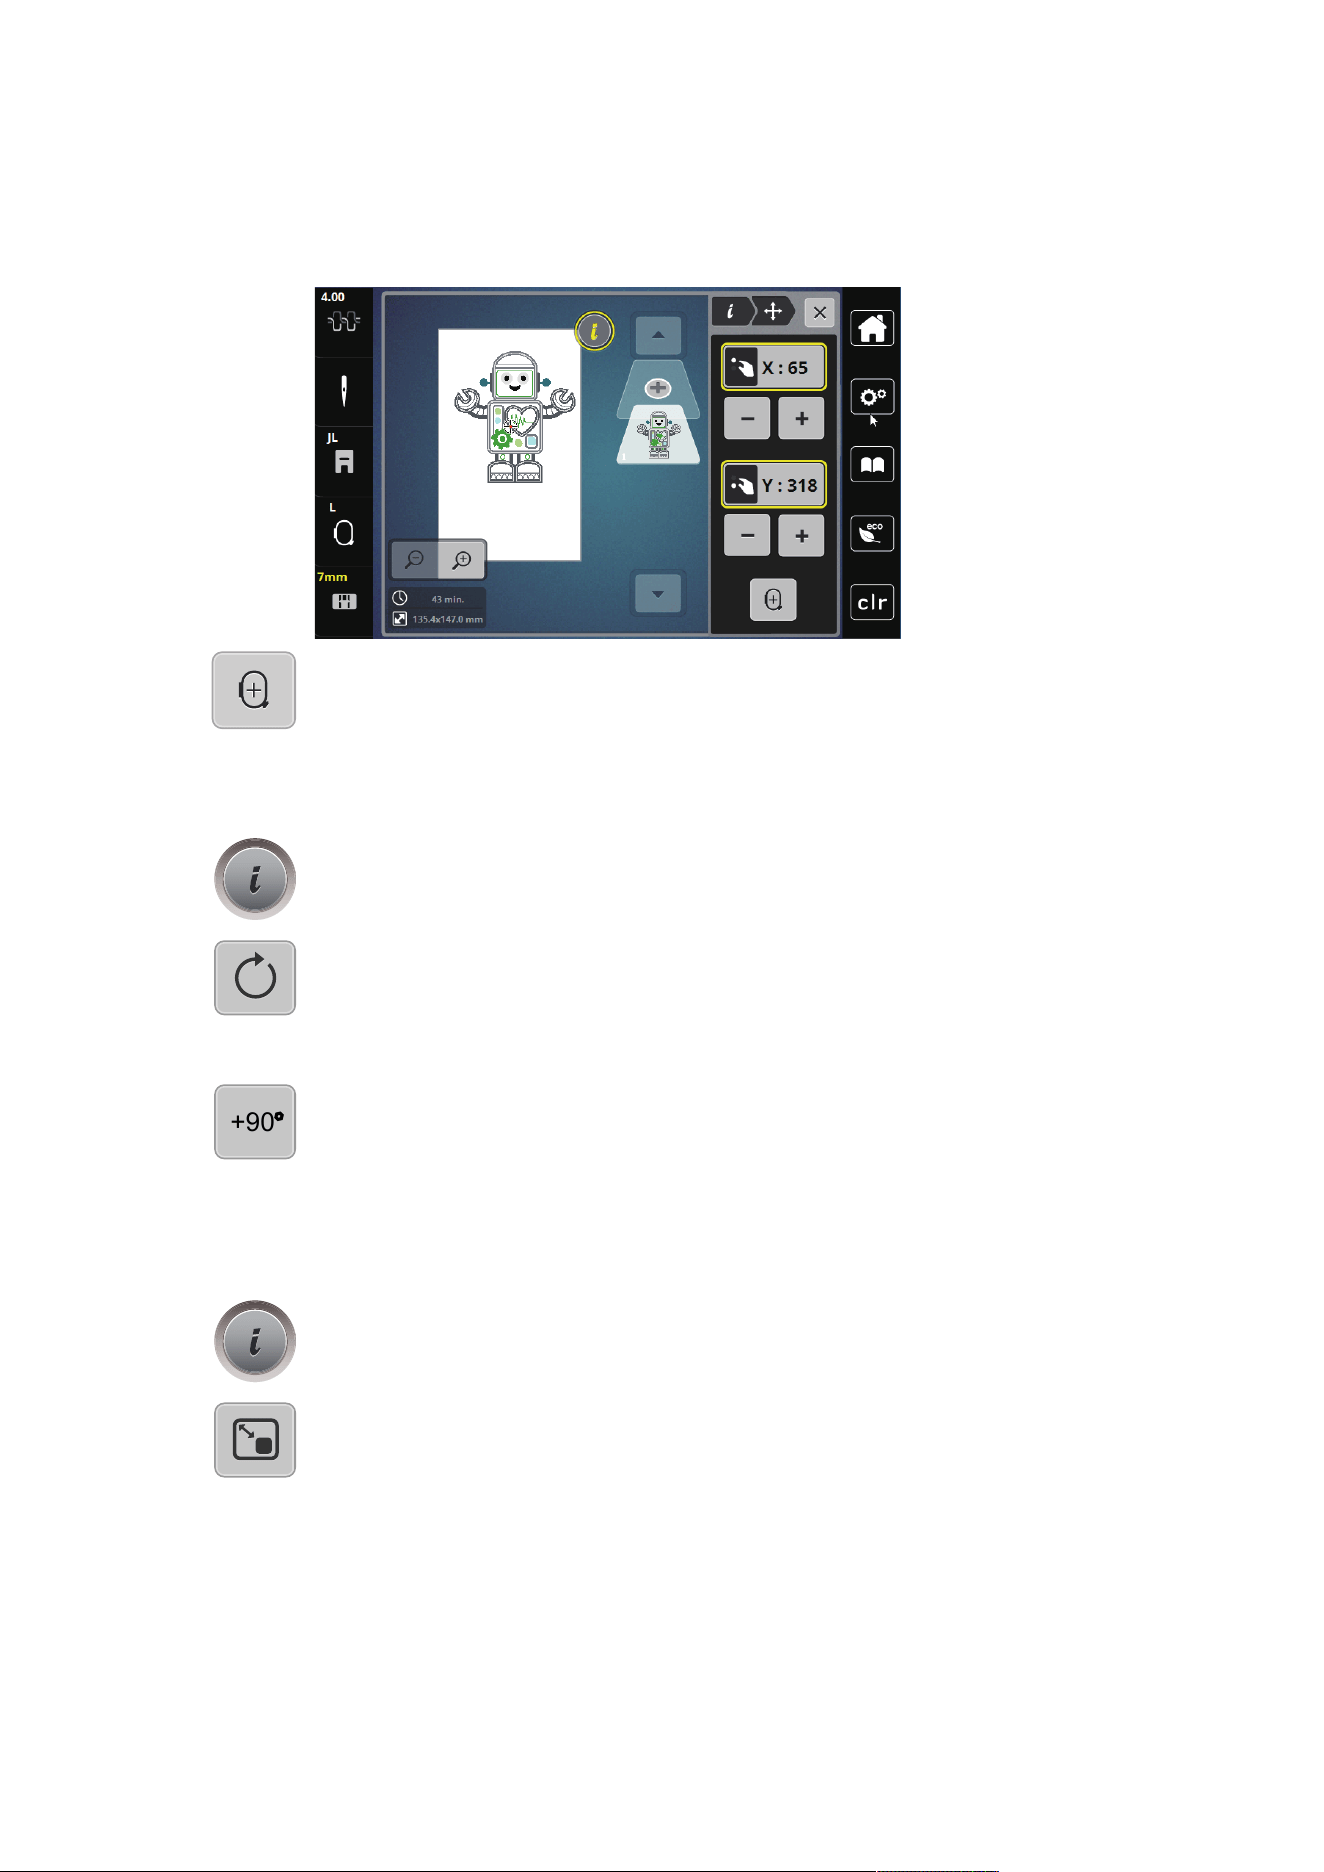
Creative Embroidering
128
2023-06 EN 5020079.40A.04
> Turn the «Lower Multifunction knob» to move the embroidery design vertically in 0.5-mm steps or touch
the «+»/«-» icon or touch the embroidery design, keep it pressed and move it as you like.
– The relocation is indicated in the yellow-outlined icons.
> Tap «Center of Embroidery Design».
– The embroidery design is repositioned in the center of the embroidery hoop.
Rotating the Embroidery Design
> Select the embroidery design.
> Tap «i-Dialog».
> Tap «Rotate the Embroidery Design».
> To rotate the embroidery design clockwise, turn the «Upper Multi-function Knob» or «Lower Multi-
function Knob» to the right, or tap «Plus».
> To rotate the embroidery design counterclockwise, turn the «Upper Multi-function Knob» or «Lower
Multi-function Knob» to the left, or tap «Minus».
+90
> To rotate the embroidery design in 90°-steps, tap «Rotate the Embroidery Design +90°».
Altering the Embroidery Design Size Proportionally
The alteration is limited to +/- 20%.
> Select the embroidery design.
> Tap «i-Dialog».
> Tap «Change Design Size».
> To enlarge the embroidery design in proportion, turn the «Upper Multi-function Knob» or «Lower Multi-
function Knob» to the right, or tap «Plus».
> To minimize the embroidery design in proportion, turn the «Upper Multi-function Knob» or «Lower
Multi-function Knob» to the left, or tap «Minus».
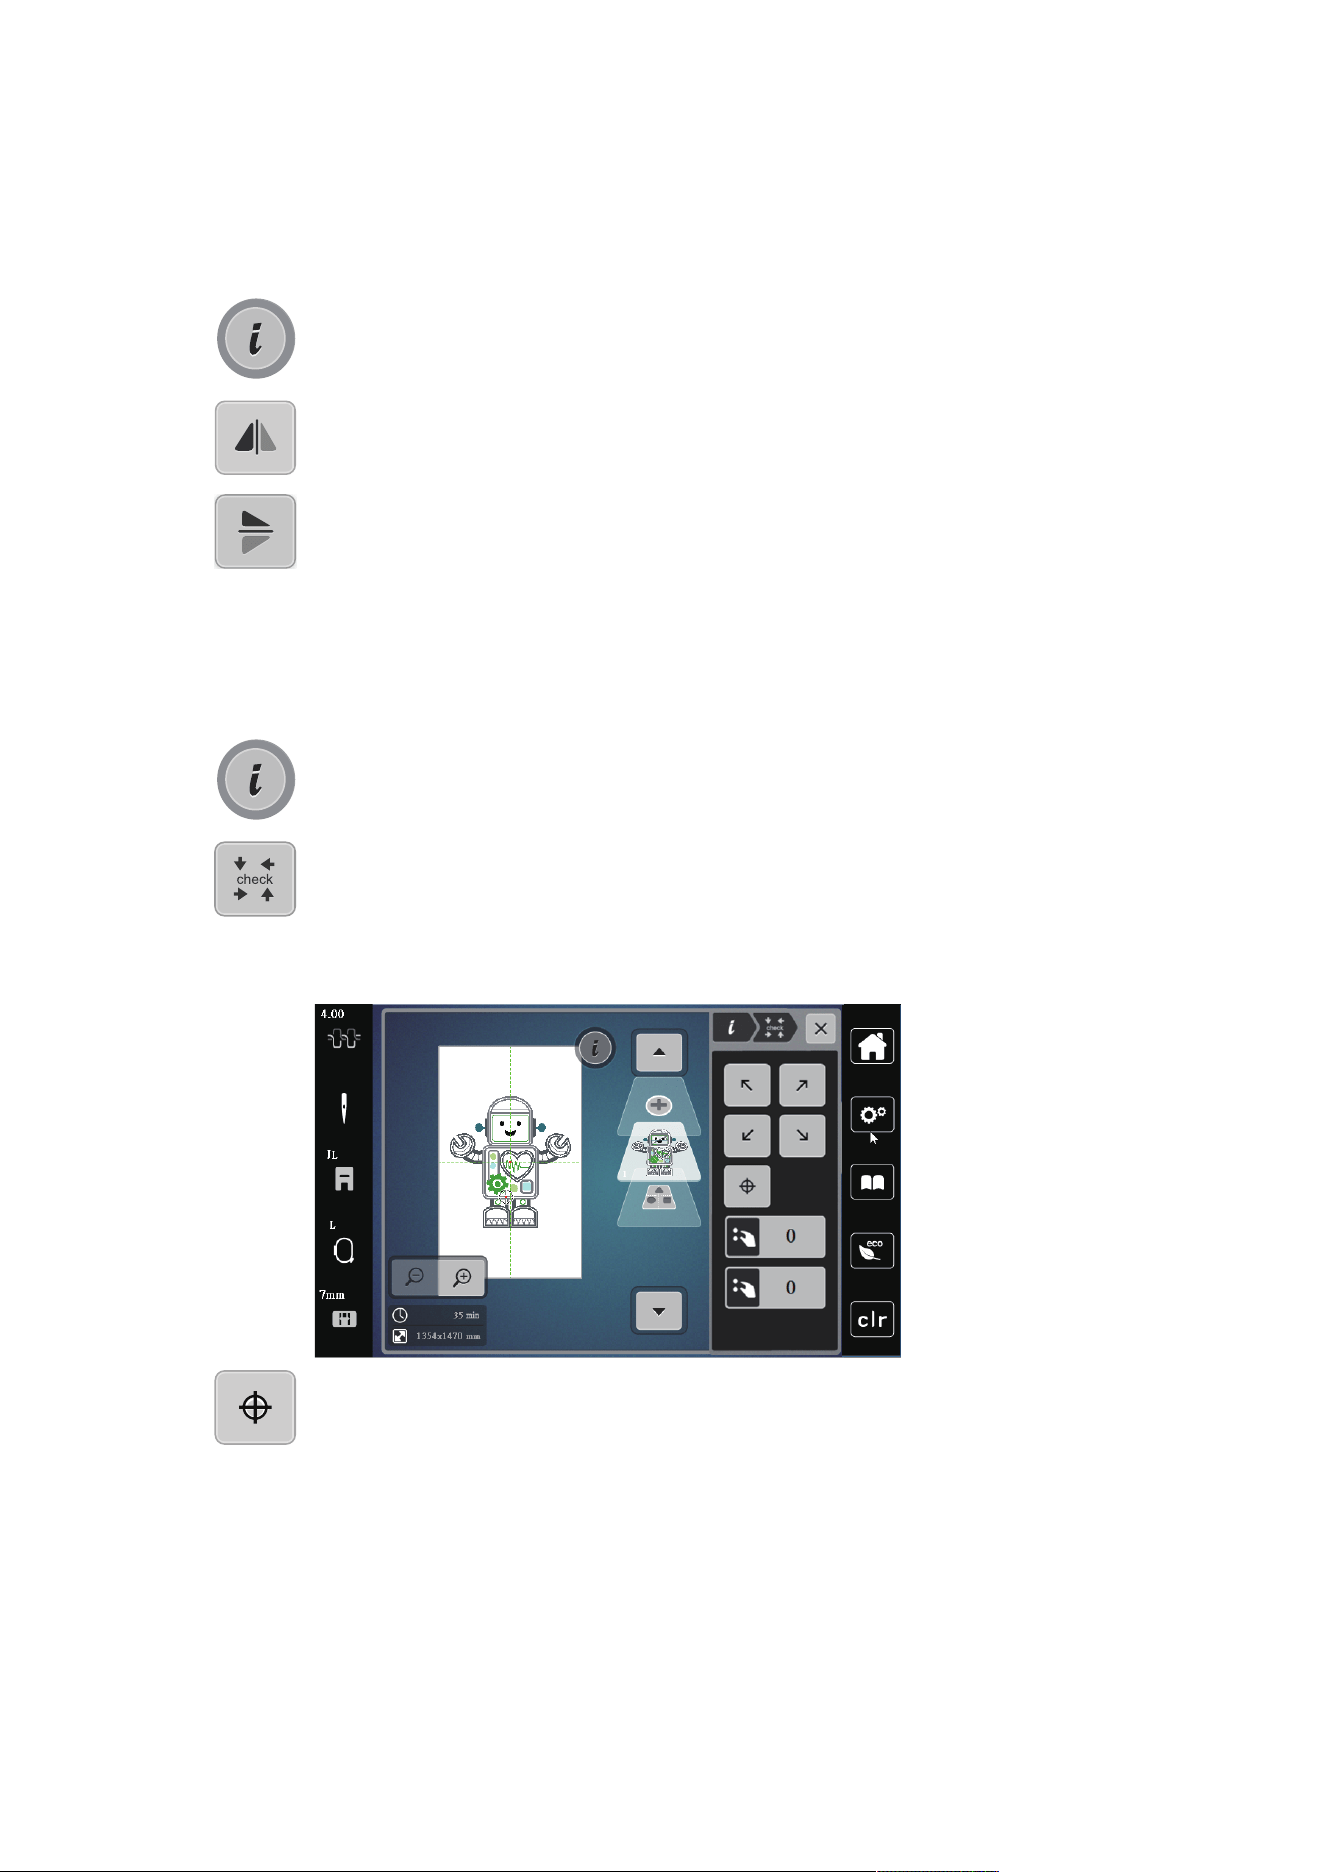
Creative Embroidering
129
2023-06 EN 5020079.40A.04
Mirroring Embroidery Designs
Embroidery designs can be mirror-imaged both vertically and horizontally.
> Select the embroidery design.
> Tap «i-Dialog».
> To mirror-image the embroidery design vertically/perpendicular, tap «Mirror Image Left/Right».
> To mirror-image the embroidery design horizontally/across, tap «Mirror Image Up/Down».
Checking the Size and the Position of the Embroidery Design
It can be checked whether or not the embroidery design matches the designated position/location on the
fabric.
> Select the embroidery design.
> Tap «i-Dialog».
> Tap «Check Embroidery Design Size».
– The embroidery hoop travels all the way until the needle is at the position as it is indicated in the
display.
– If the embroidery design hasn't been positioned correctly yet, the position can be altered via the
«Upper/Lower Multi-function Knobs» and the complete embroidery positions can be checked again.
> To position the needle in the center of the embroidery design, tap «Center of Embroidery Design».
> Turn the «Upper Multi-function Knob» to move the embroidery design horizontally.
> Turn the «Lower Multi-function Knob »to move the embroidery design vertically.
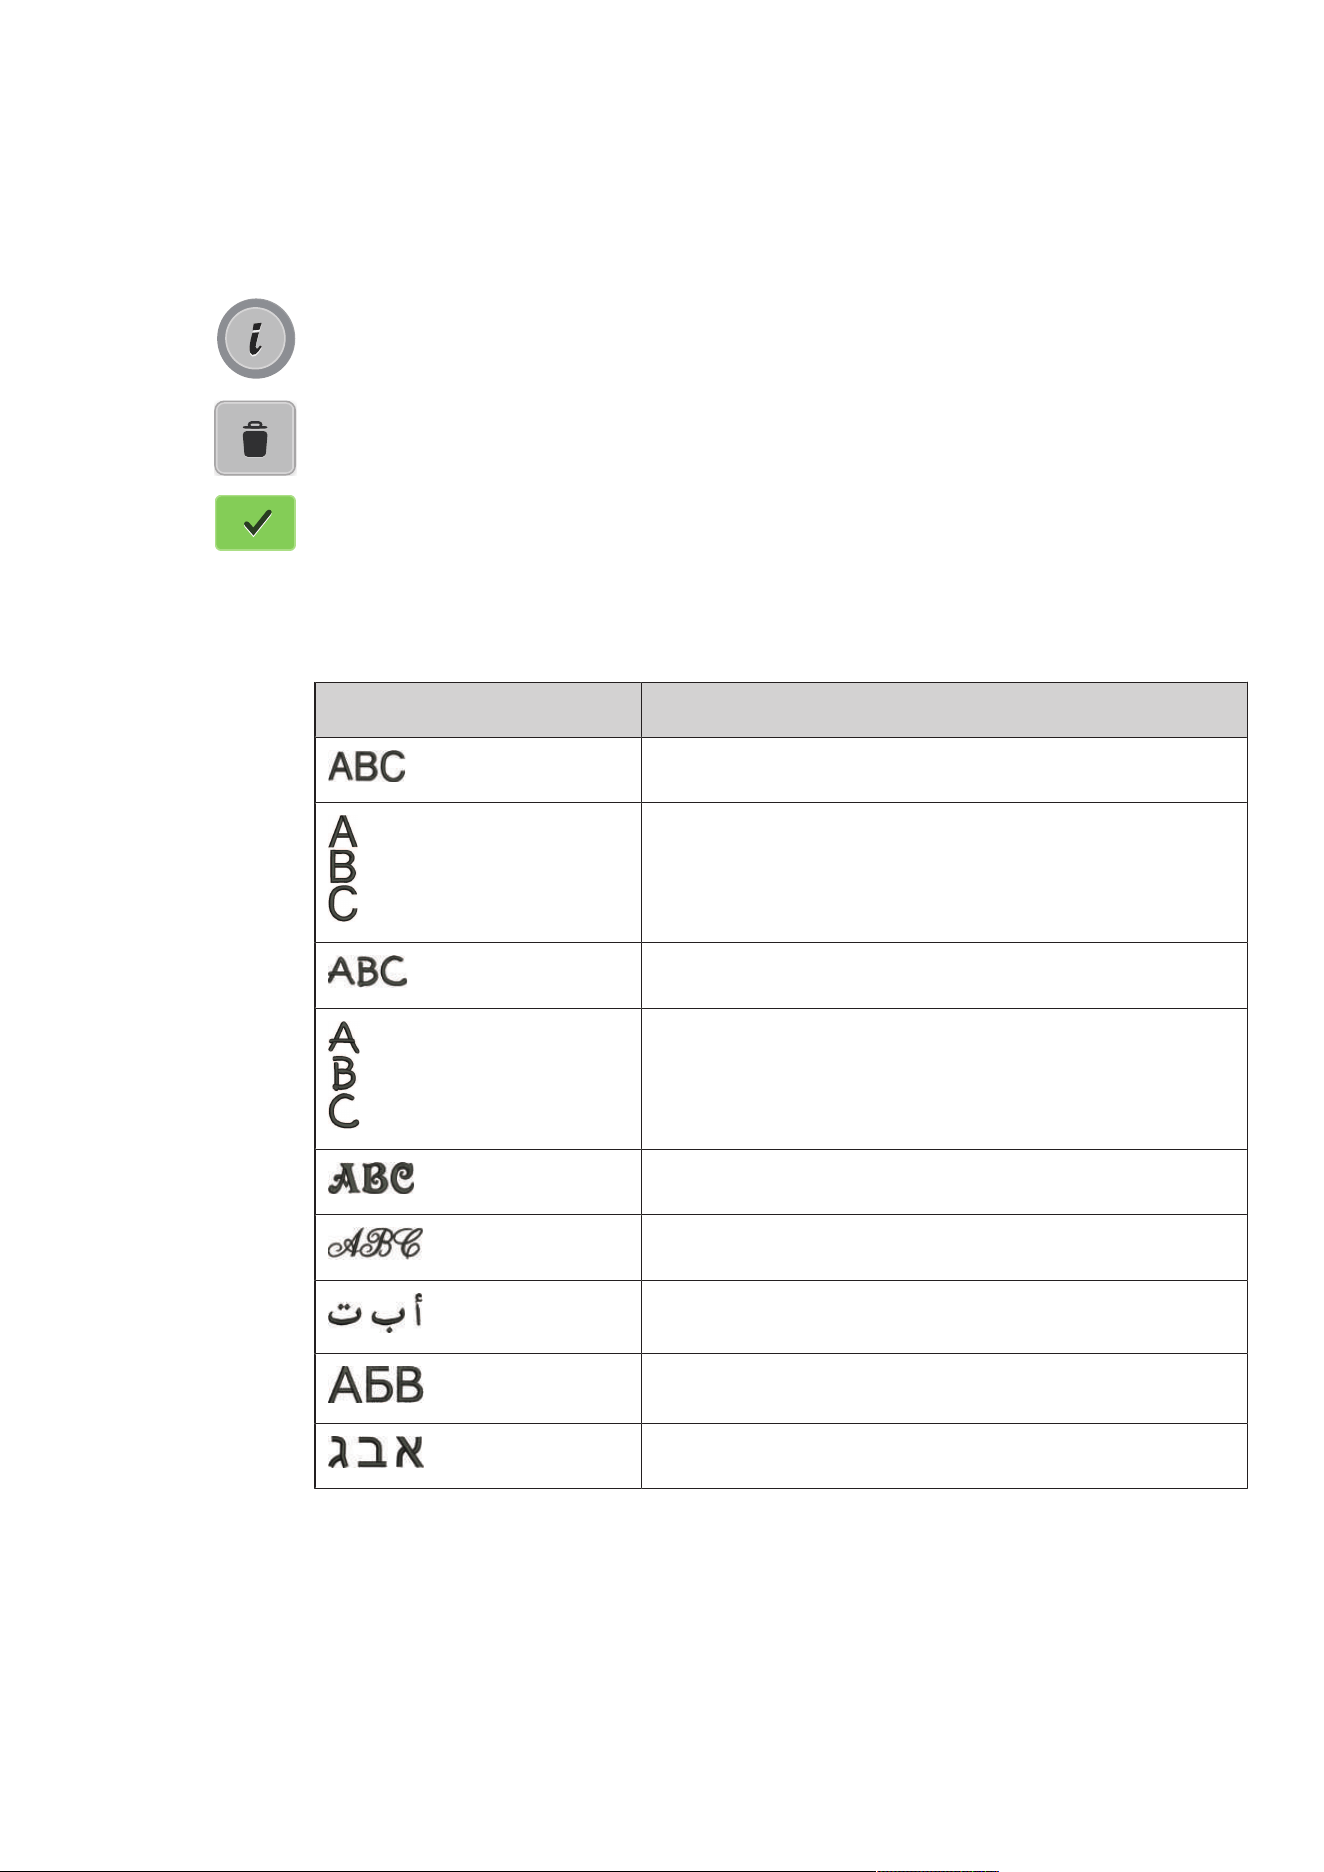
Creative Embroidering
130
2023-06 EN 5020079.40A.04
Deleting an Embroidery Design
The active embroidery design is deleted.
> Select the embroidery design.
> Tap «i-Dialog».
> Tap «Deleting».
> To delete the embroidery design, tap «Confirm».
14.6 Creating Lettering
Overview Embroidery Alphabets
Embroidery Design Name
Swiss Block
Swiss Block vertical
Childs Play
Childs Play vertical
Victoria
Anniversary
Arabic
Cyrillic
Hebrew
Creating Words/Sentences
Lettering can be positioned within the hoop as you like. When the embroidery design is positioned outside
the area to be embroidered, the hoop is outlined in red on the display. With the Hoop Selection, it can be
checked whether or not the embroidery design can be embroidered in another hoop. When the lettering
does not fit in any hoop, two single words can be combined and positioned below each other as the
following example will show.
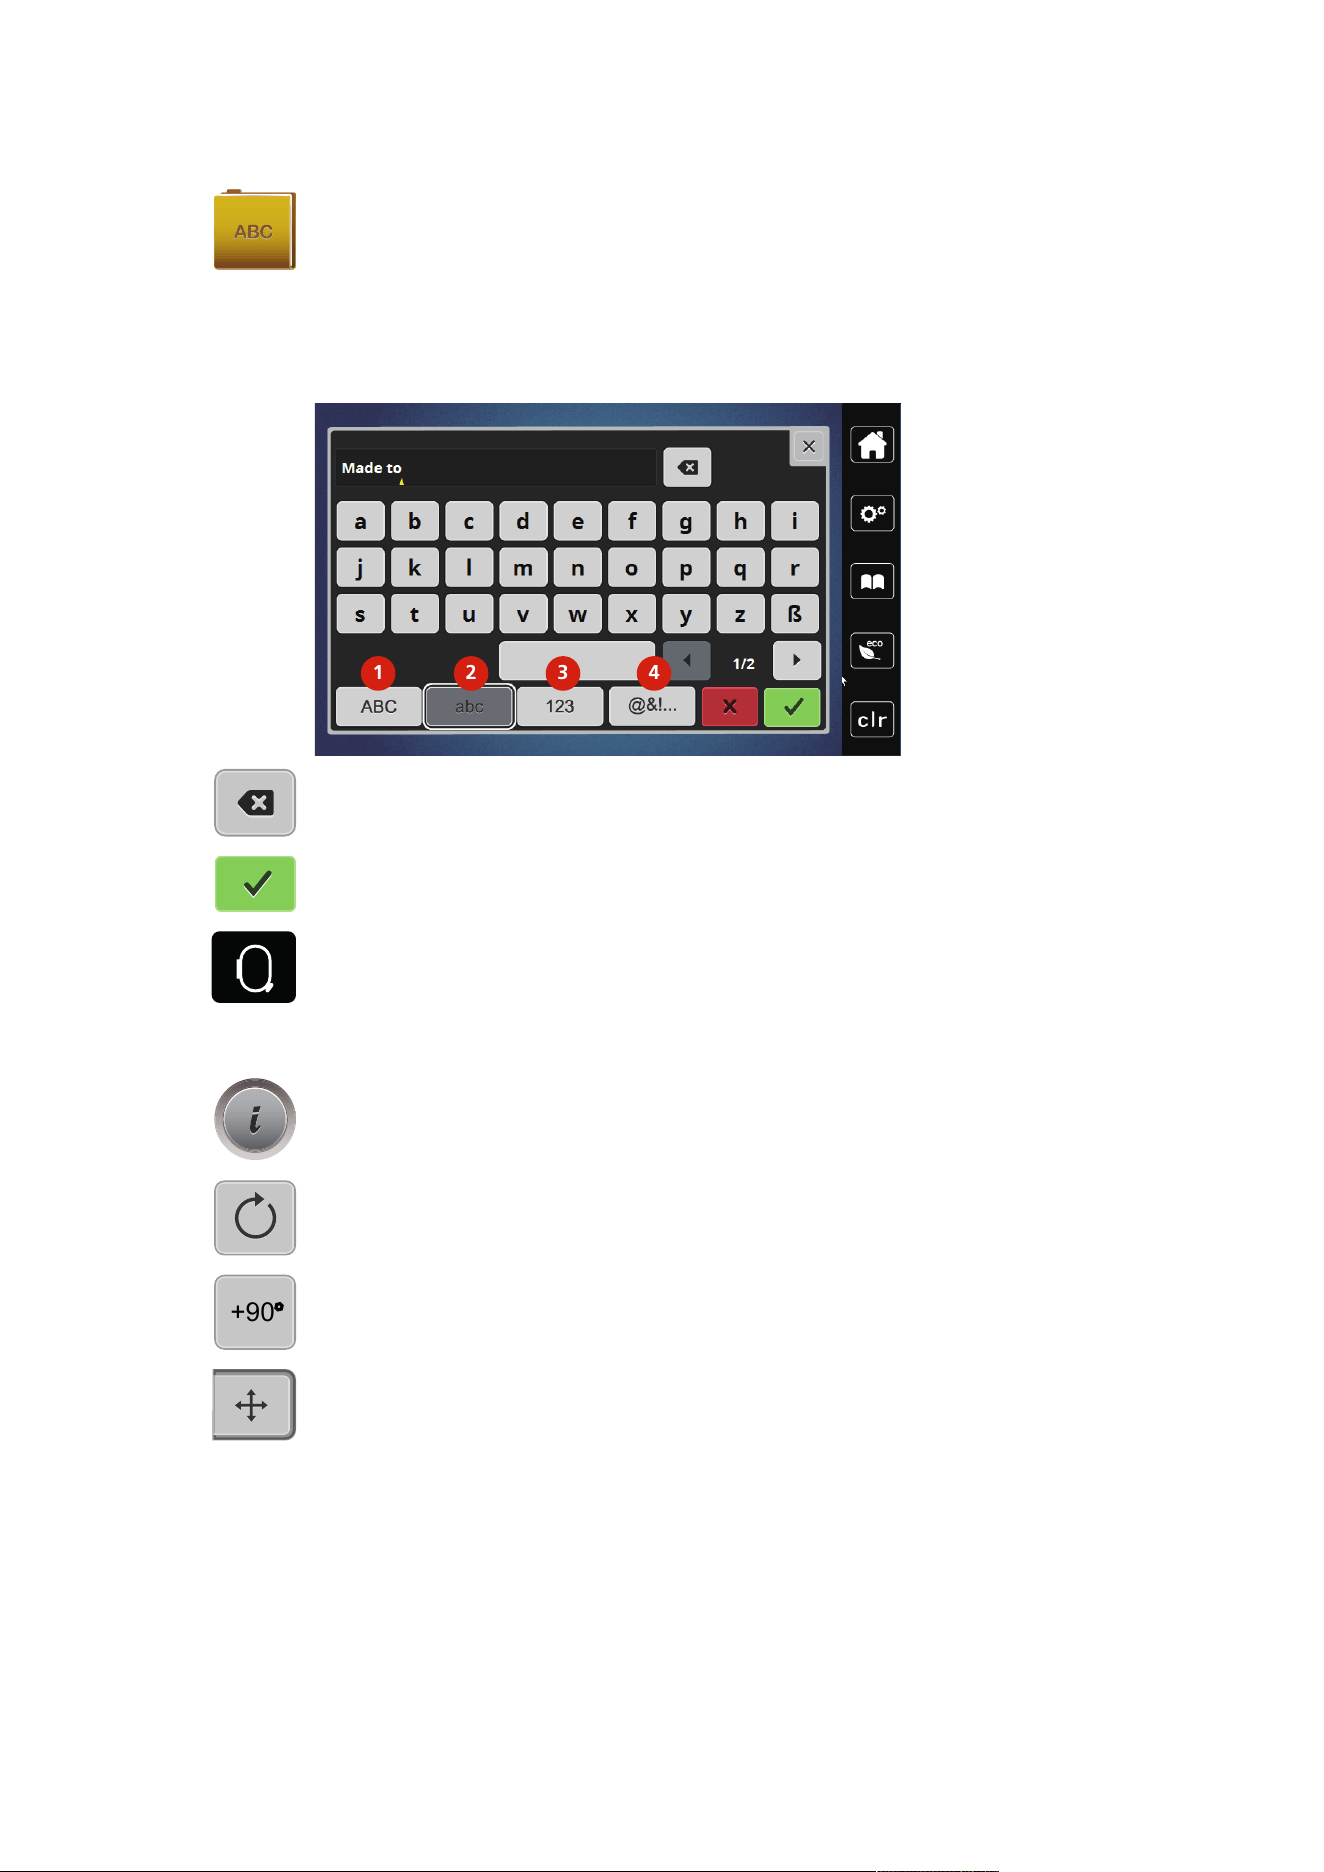
Creative Embroidering
131
2023-06 EN 5020079.40A.04
> Select the «Alphabets» folder.
> Select the font.
> Enter the text «Made to».
> To use large font, tap «Upper Case Characters» (1) (standard setting).
> To use small font, tap «Lower Case Characters» (2).
> To use numbers and mathematical characters, tap «Numbers and Mathematical Characters» (3).
> To use special characters, tap «Special Characters» (4).
1 2 3 4
> To delete single letters of the entered text, tap «Deleting».
> To accept the text, tap «Confirm».
đ
> Tap «Hoop Indicator/Select Hoop».
> Select the hoop.
> To return to editing mode, tap «Hoop Indicator/Select Hoop» again.
Editing Words/Sentences
> Tap «i-Dialog».
> Tap «Rotate the Embroidery Design».
+90
> To rotate the text by 90°, tap «Rotate the Embroidery Design +90°».
> Tap «i»(1).
> Tap «Move the Design».
> Turn the «Upper Multi-function Knob» to move the embroidery design horizontally or tap
«Plus»/«Minus».
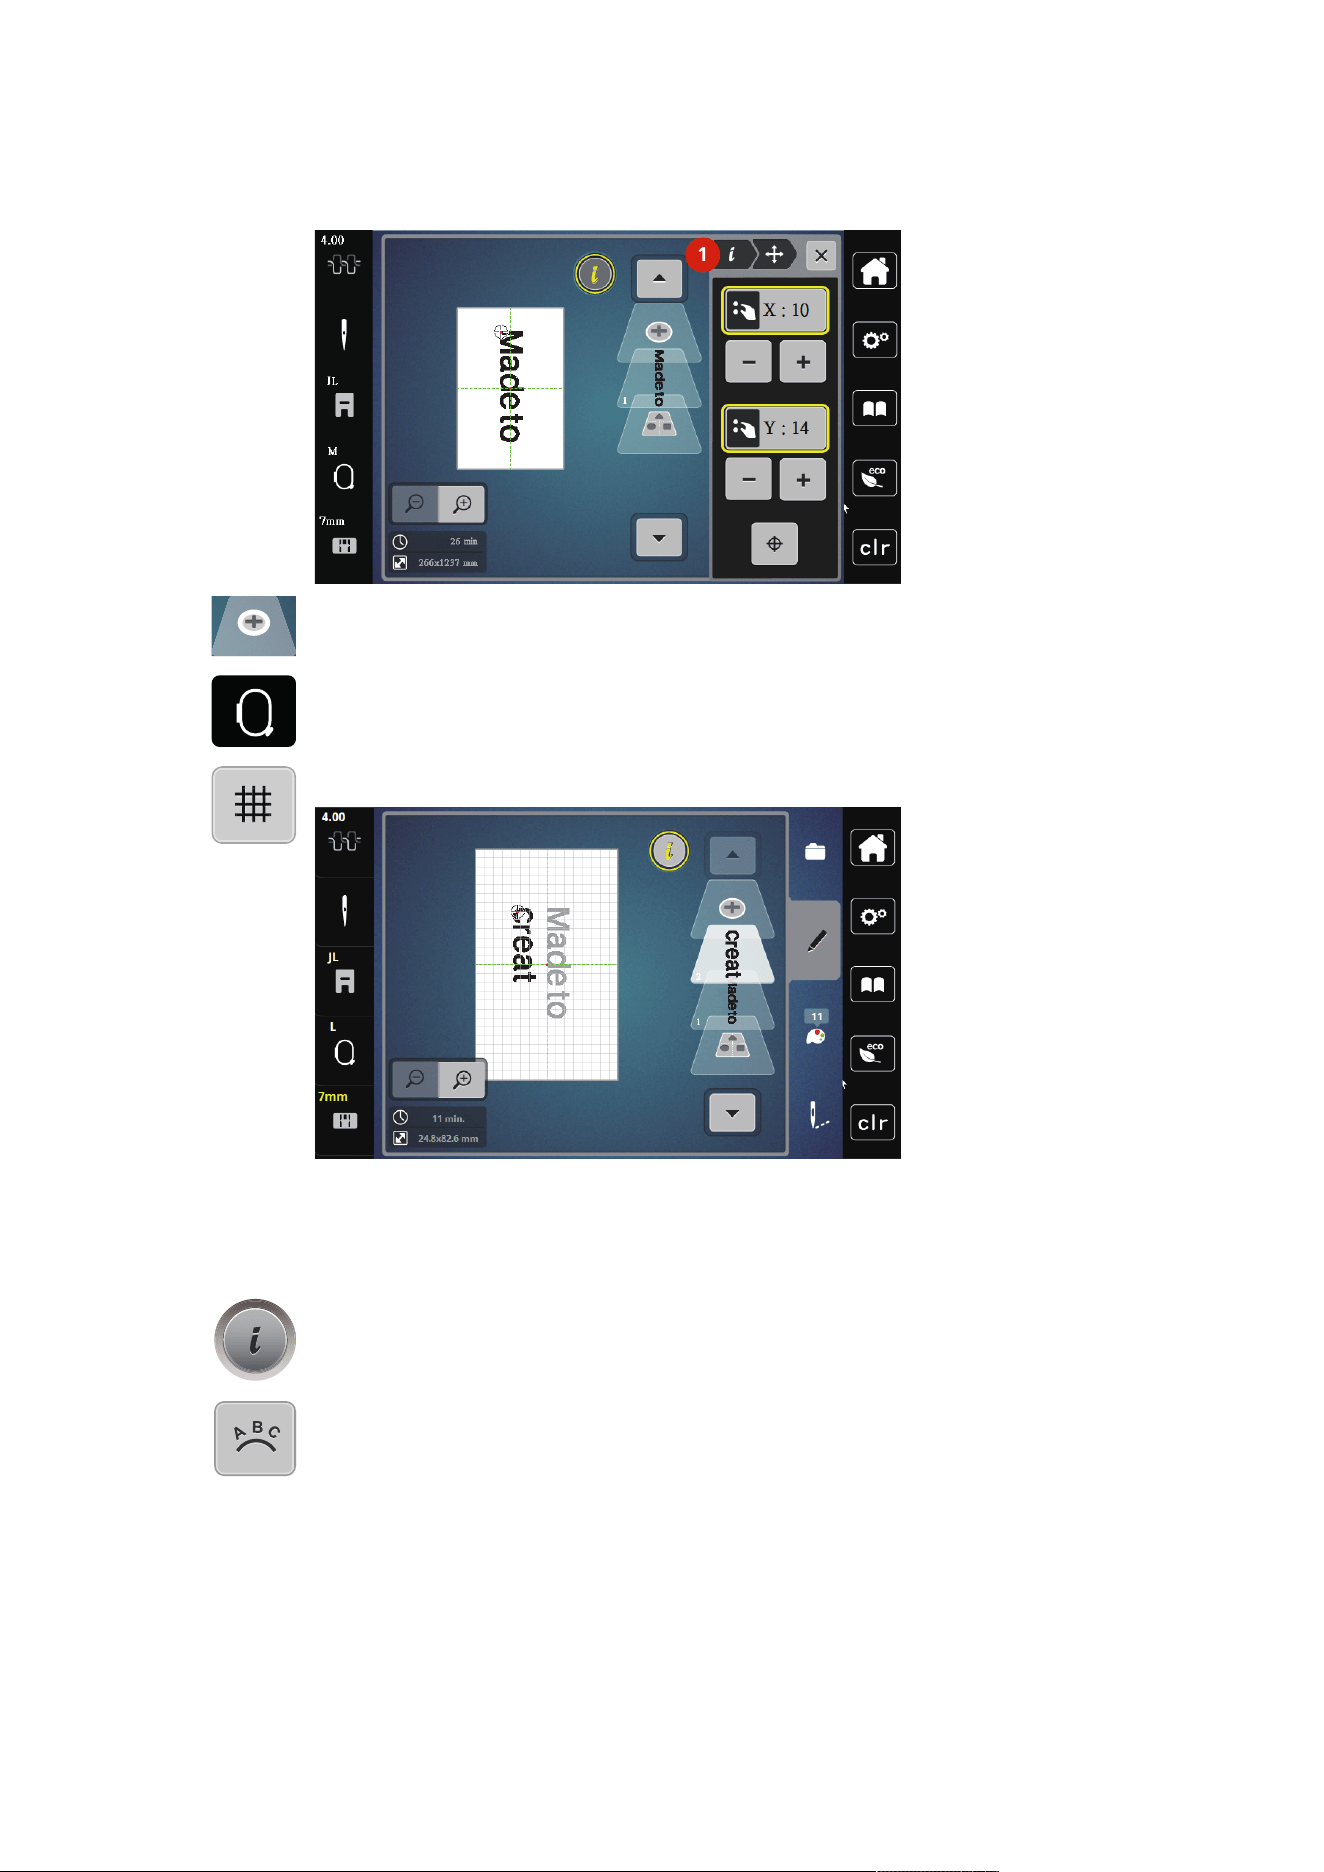
Creative Embroidering
132
2023-06 EN 5020079.40A.04
> Turn the «Lower Multi-function Knob» to move the embroidery design vertically or tap «Plus»/«Minus».
1
1
> Tap «Adding an Embroidery Design».
> Enter and also rotate the text «create».
đ
> Tap «Hoop Indicator/Select Hoop».
> To position the text lines more precisely, tap «Grid On/Off».
Bending the Text
Texts can be arranged and designed arc-shaped. This function is only applicable to alphabets.
> Select an alphabet embroidery design.
> Tap «i-Dialog».
> Tap «Word Art».
> To change the distance between the characters in increments of one millimeter, turn the «Upper Multi-
function Knob» or tap «Plus»/«Minus».
> Turn the «Lower Multi-function Knob» to the left or right to curve the writing upward or downward, or
tap «Plus»/«Minus».
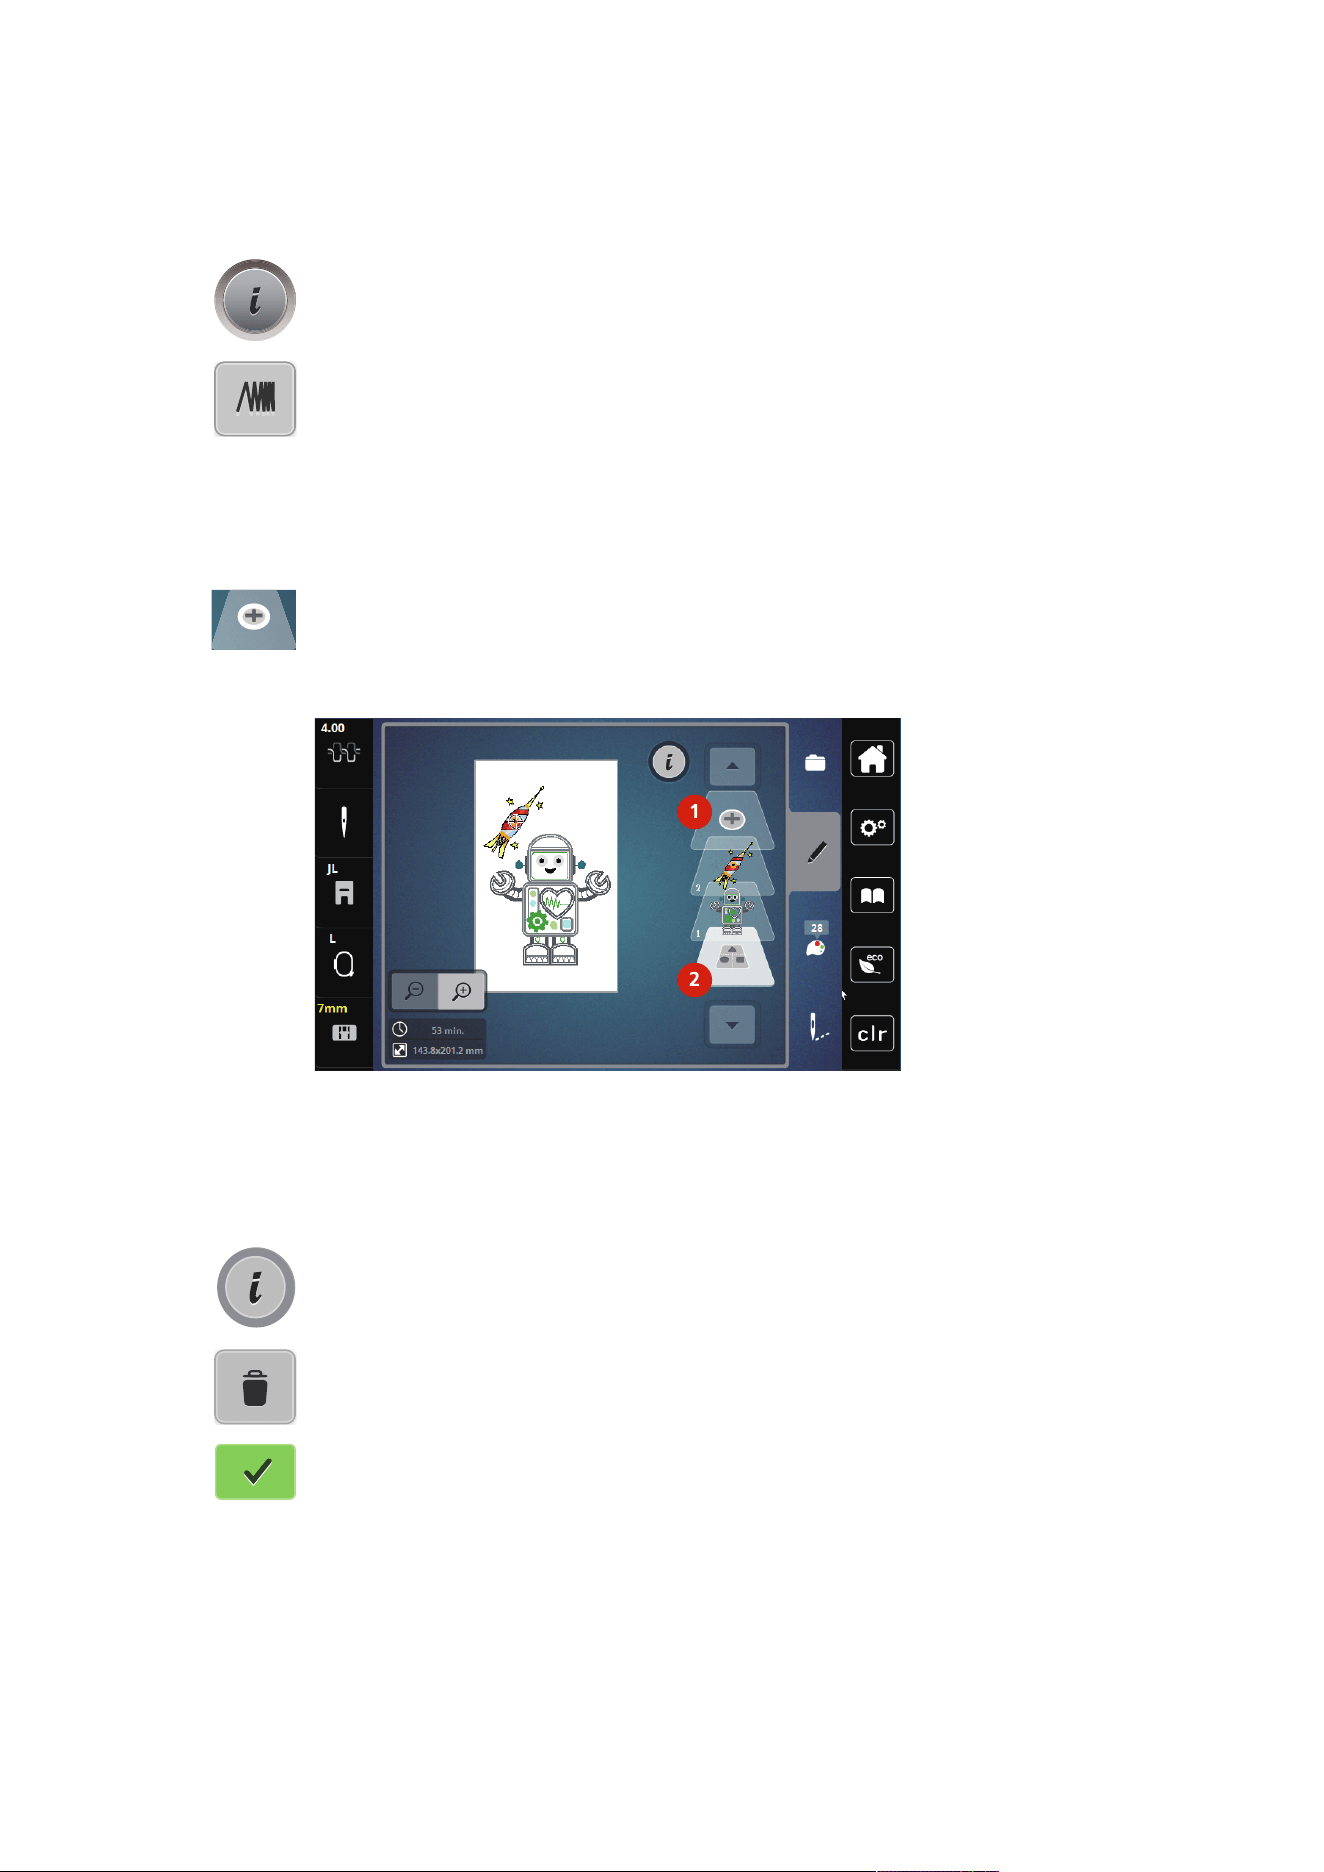
Creative Embroidering
133
2023-06 EN 5020079.40A.04
Altering the Stitch Density
> Select the embroidery design. This function is only applicable to alphabets.
> Select an alphabet embroidery design.
> Tap «i-Dialog».
> Tap «Alter Stitch Type/Stitch Density».
> To set the desired stitch density, tap the «Percent» field.
14.7 Combining Embroidery Designs
Combining Embroidery Designs
> Select the embroidery design.
> Tap «Adding an Embroidery Design»(1).
> Select another embroidery design.
> To select whole embroidery designs, tap «Select all Embroidery Designs».
– The size of the combination cannot be adjusted.
2
1
1 «Adding an Embroidery Design» 2 «Select all Embroidery Designs»
Deleting a Single Embroidery Design
> Select the embroidery design which is to be deleted.
> Tap «i-Dialog».
> Tap «Deleting».
> Tap «Confirm».
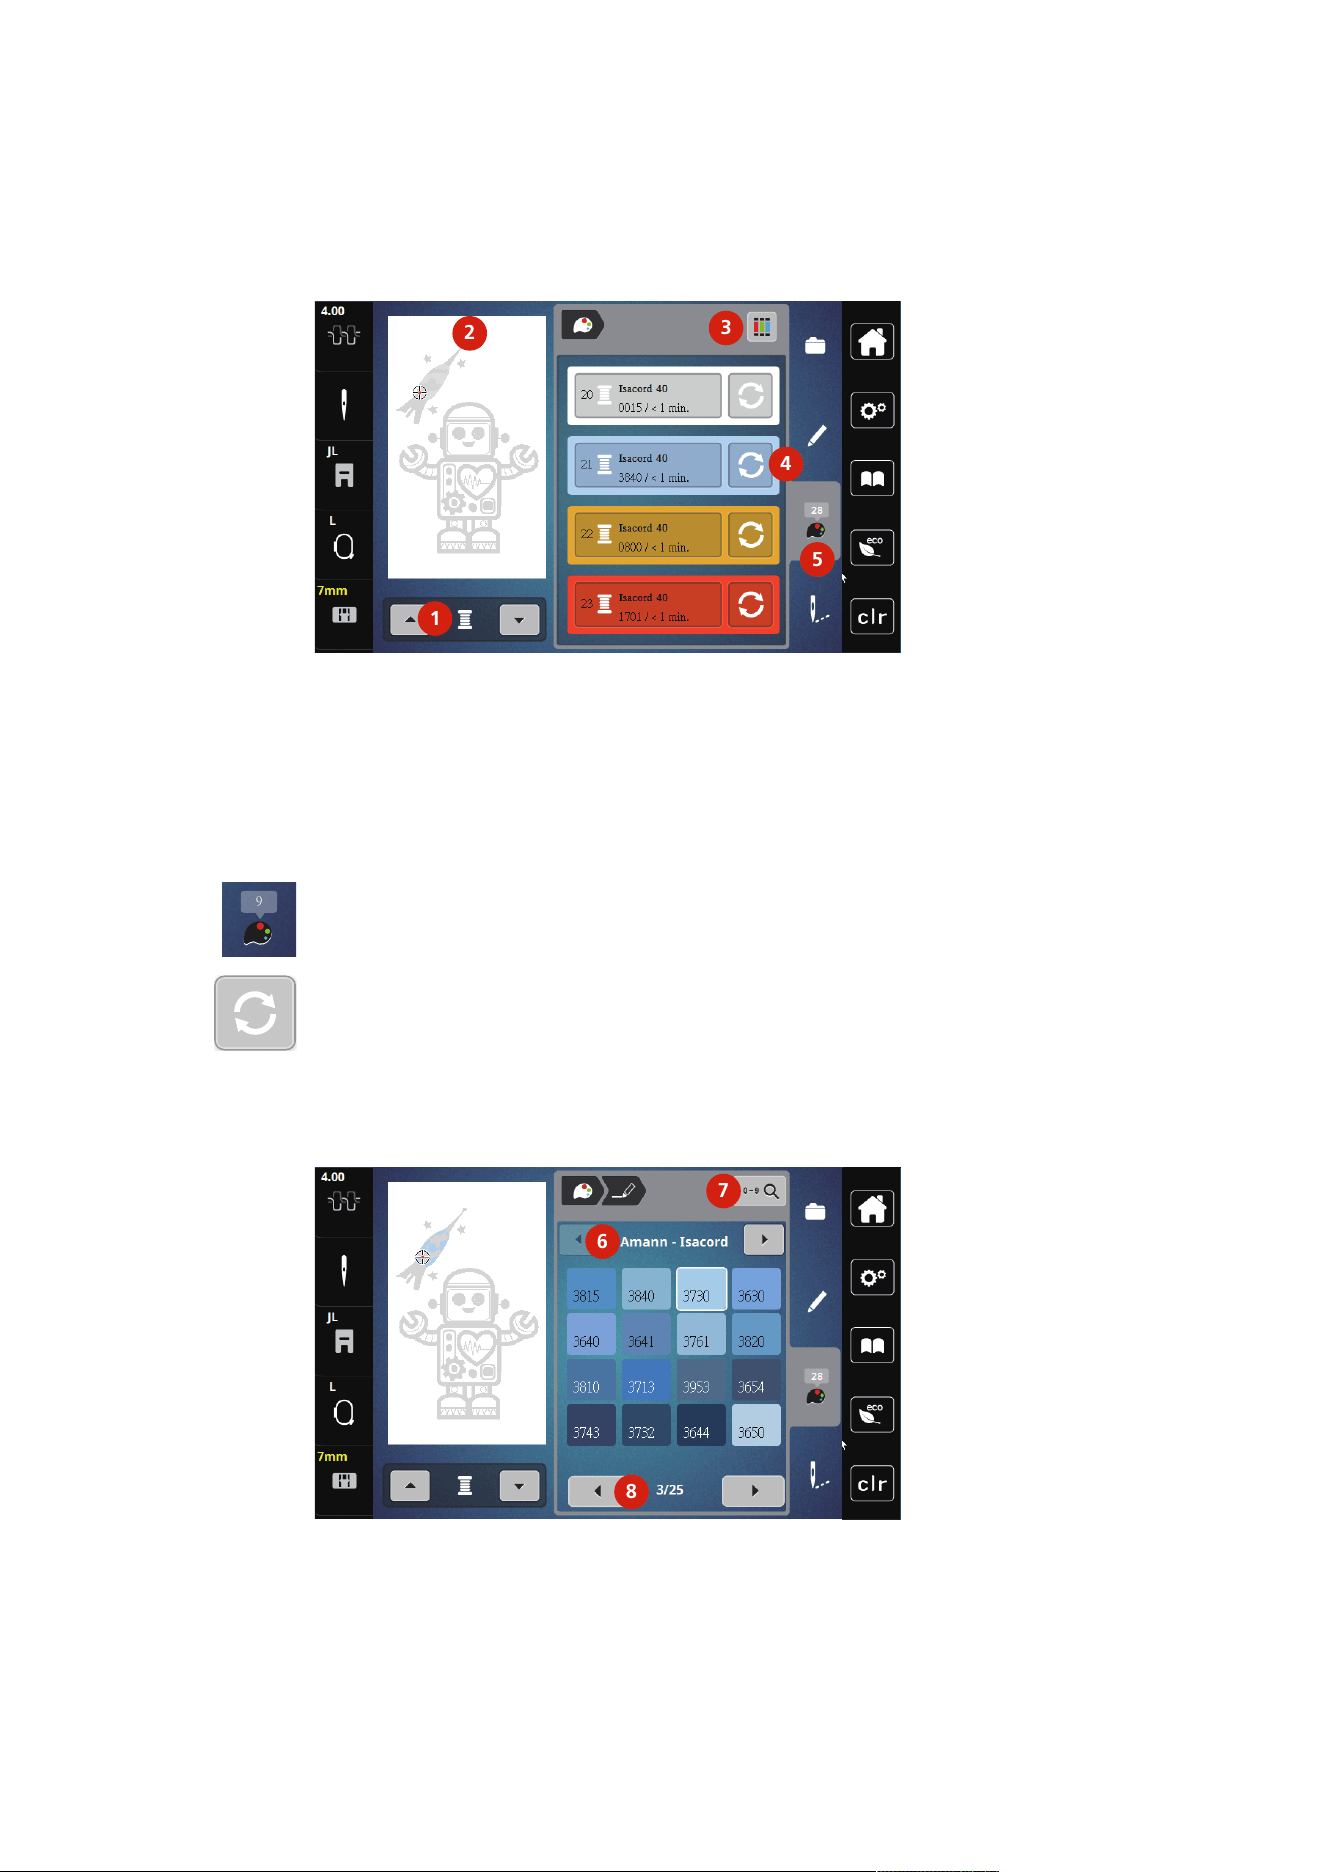
Creative Embroidering
134
2023-06 EN 5020079.40A.04
14.8 Changing the Colors of the Embroidery Design
Overview Changing the Color
5
1
2
3
4
1 Colors of the Embroidery Designs 4 Altering Color
2 Preview for Selected Color 5 Color Information
3 Assign Thread Brand
Changing the Colors
> Select the embroidery design.
9
> Tap «Color Information».
> Tap «Altering Color/Brand» next to the color that needs to be changed.
> Changing colors by searching the theme brand.
– To display other thread brands, tap «Scroll» (6) in the upper right section of the display.
> To select the color by inputting the color number, tap «Color Selection via Number» (7).
> To display further colors, tap «Scroll» (8) in the lower right section of the display.
> Select the desired color.
6
7
8
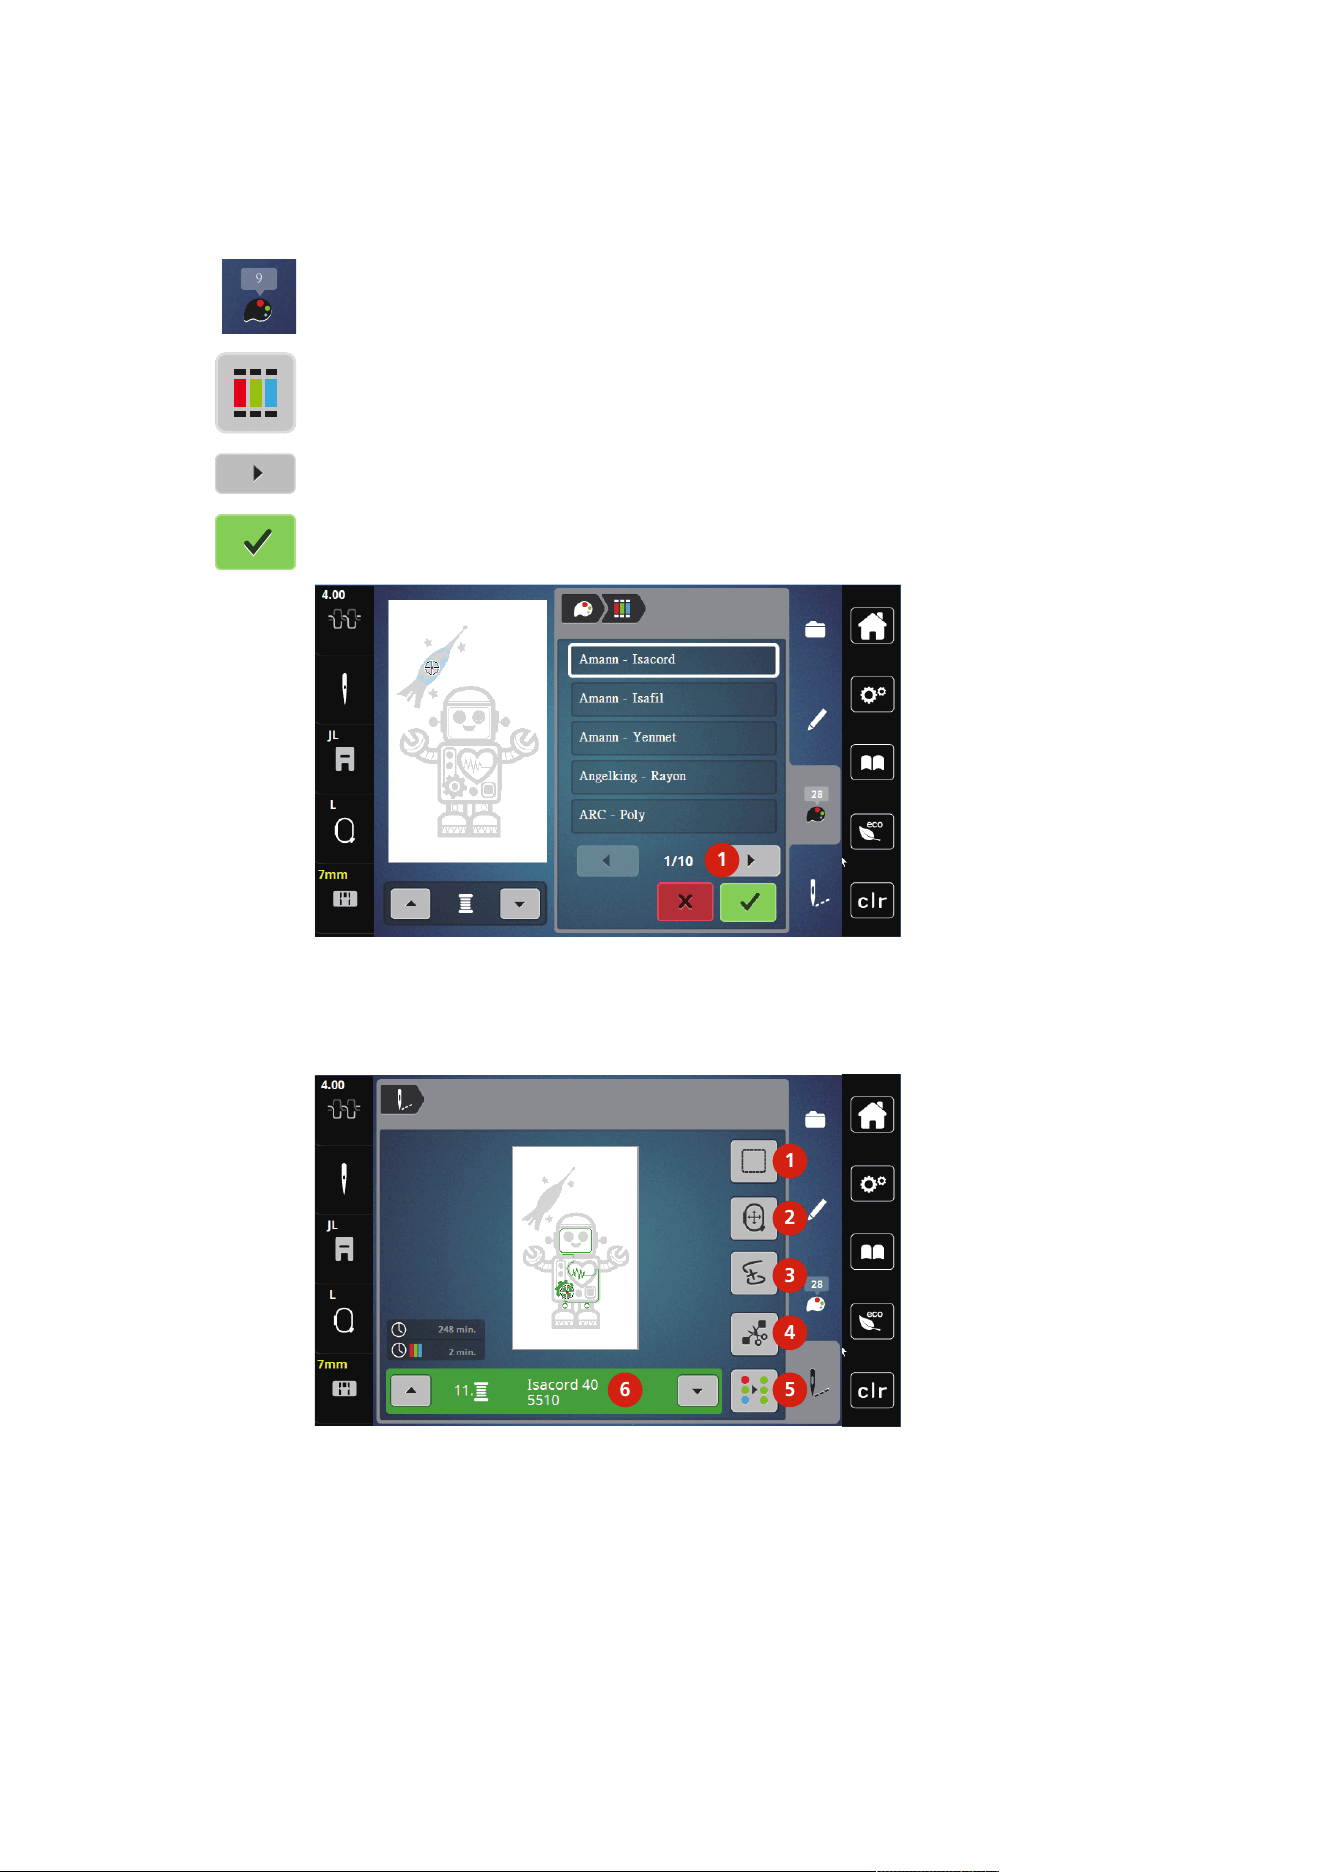
Creative Embroidering
135
2023-06 EN 5020079.40A.04
Changing the Thread Brand
> Select the embroidery design.
9
> Tap «Color Information».
> Tap «Assign Thread Brand».
> To display further thread brands, tap scroll (1).
> Select a thread brand and tap «Confirm».
– Any thread colors of the selected embroidery design will be matched with the selected thread brand.
1
14.9 Embroidering the Embroidery Design
Overview Embroidery Menu
1
2
3
4
56
1 Basting 4 Cut Connecting Stitches
2 Moving the Hoop 5 Multi-colored Embroidery Design On/Off
3 Embroidery Sequence Control 6 Color Indication
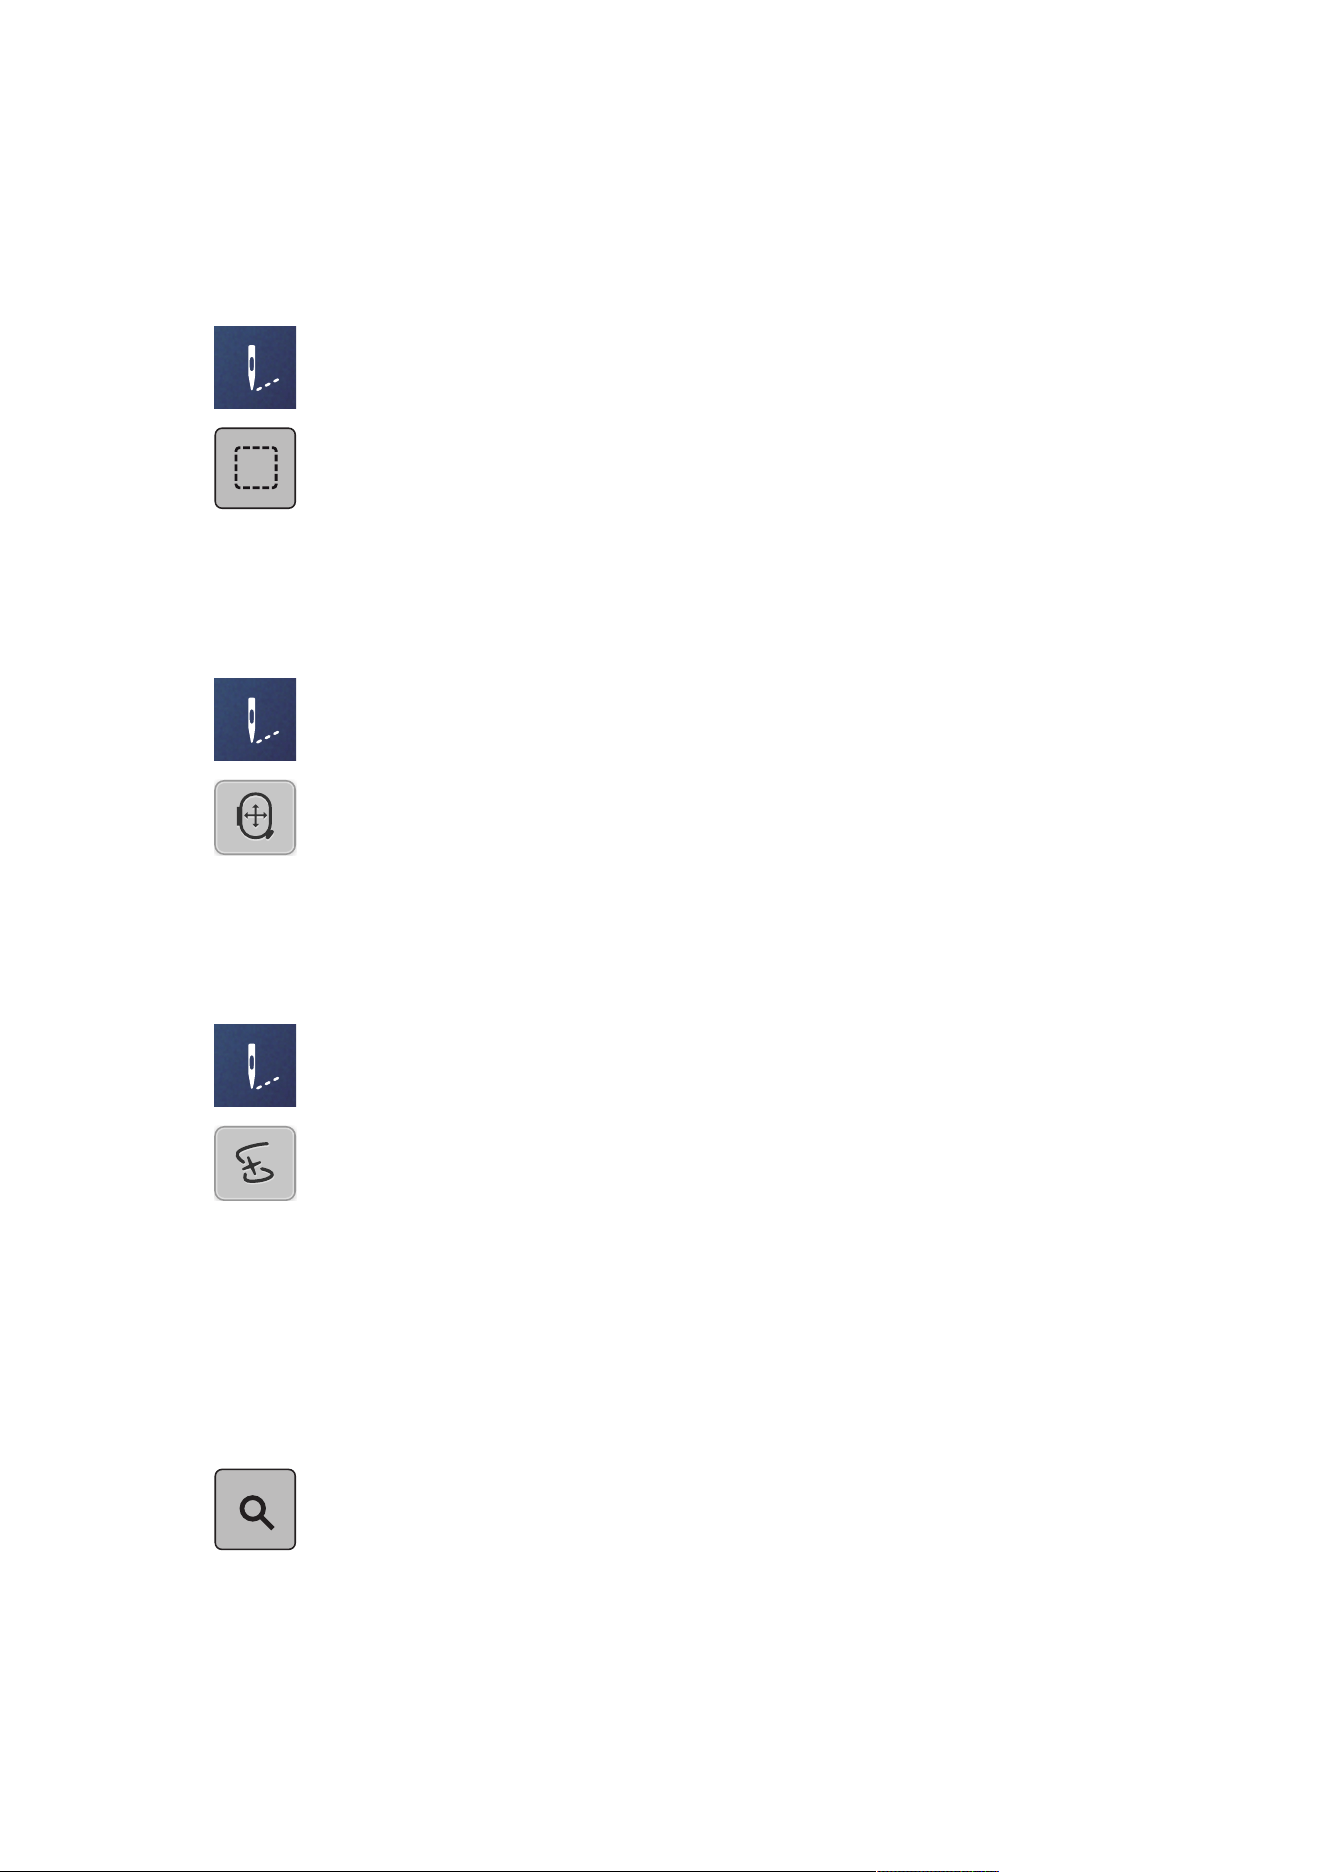
Creative Embroidering
136
2023-06 EN 5020079.40A.04
Adding Basting Stitches
The basting stitches can be embroidered along the embroidery design. As a result, the fabric and the
stabilizer are better fixed together.
> Select the embroidery design.
> Tap «Embroidery».
> To embroider the basting stitches along an embroidery design, tap «Basting».
> To deactivate the basting stitches, tap «Basting» again.
Moving the Hoop
If the embroidery project is so big that repeated rehooping is necessary, the embroidered design can be
moved again.
> Select the embroidery design.
> Tap «Embroidery».
> Tap «Move the Hoop».
> Turn the «Upper Multi-function Knob» to move the hoop horizontally.
> Turn the «Lower Mult-ifunction Knob» to move the hoop vertically.
Embroidery Sequence Control when the Thread Breaks
If the thread breaks, the needle can be repositioned in the embroidery design using the function Embroidery
Sequence Control.
> Select the embroidery design.
> Tap «Embroidery».
> Tap «Embroidery Sequence Control».
– A compact view of the embroidery design appears on the left side of the display. On the right side the
embroidery design is shown in enlarged view.
– Repositioning via Compact View
> Select the desired position in the overall view (1) (2).
– Repositioning via Stitch Bar
> Select the bar in the display (3) (4).
– Repositioning via Multi-function Knobs
> To move the embroidery hoop stitch by stitch, turn the «Upper Multi-function Knob».
> To move the embroidery hoop in large steps, turn the «Lower Multi-function Knob».
– Repositioning via Magnifier
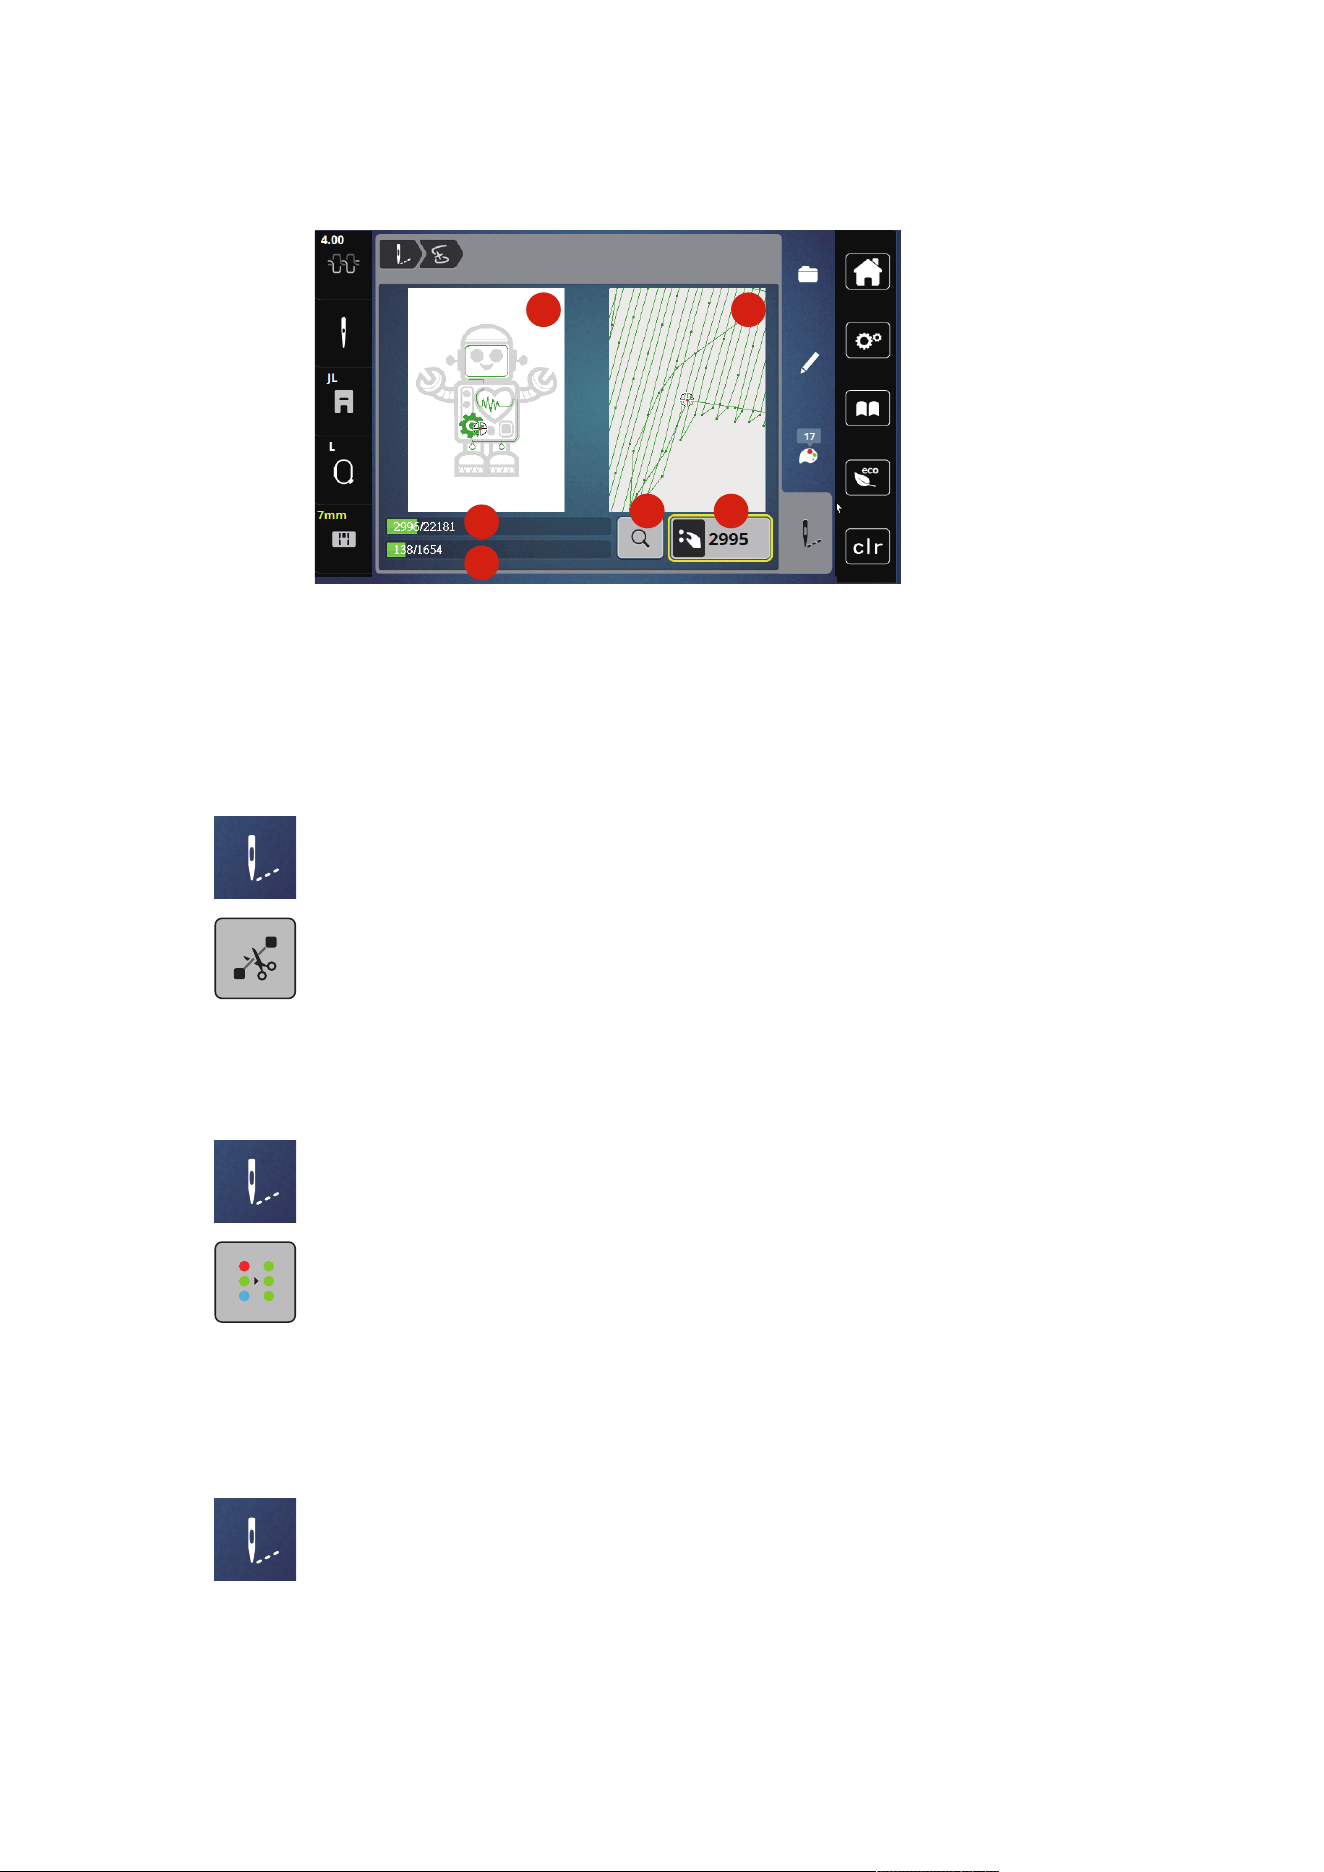
Creative Embroidering
137
2023-06 EN 5020079.40A.04
> To select the desired stitch via the input, tap «Magnifier» (6).
1 2
56
3
4
– The number in the yellow-framed icon (5) indicates the number of stitches of the embroidery process.
> Set the needle position back so that the new start is made a few stitches before the thread has broken.
Cutting Connecting Stitches
The function is activated as standard and the connection stitches are automatically cut. If the function is
deactivated, the connection stitches must be cut by hand.
> Select the embroidery design.
> Tap «Embroidery».
> To switch off the function, tap «Cut Connecting Stitches».
> To switch on the function, tap «Cut Connecting Stitches» again.
Multi-colored Embroidery Design On/Off
Multi-colored embroidery designs can also be embroidered in one color.
> Select the embroidery design.
> Tap «Embroidery».
> Tap «Multi-colored Embroidery Design On/Off».
– The embroidery design is embroidered in one color.
Color Indication
Every color of the embroidery design can be selected individually. The hoop moves to the first stitch of the
current color. The currently active color can be embroidered individually or in another sequence.
> Select the embroidery design.
> Tap «Embroidery».
> Touch the icon Scroll up to select the previous color of the embroidery design.

Creative Embroidering
138
2023-06 EN 5020079.40A.04
14.10 Administering Embroidery Designs
Administering Embroidery Designs
1
2
3
4
1 «Loading the Embroidery Design» 3 «Save Embroidery Design»
2 «Adding an Embroidery Design» 4 «Delete an Embroidery Design»
Saving Embroidery Designs in the Personal Memory
In the file «Save Embroidery Designs» any embroidery designs including individually edited embroidery
designs can be saved.
> Select the embroidery design.
> Edit the embroidery design.
> Tap «Selection».
> Tap «Save Embroidery Design».
– The embroidery design to be saved is outlined in yellow.
– The «Embroidery Machine» is activated.
> Tap «Confirm».
Saving the Embroidery Design on the USB Stick
> Select the embroidery design.
> Edit the embroidery design.
> Tap «Selection».
> Tap «Save Embroidery Design».
– The embroidery design to be saved is outlined in yellow.
> Insert the USB stick into the USB port of the machine.
> Tap «USB Stick».
> Tap «Confirm».
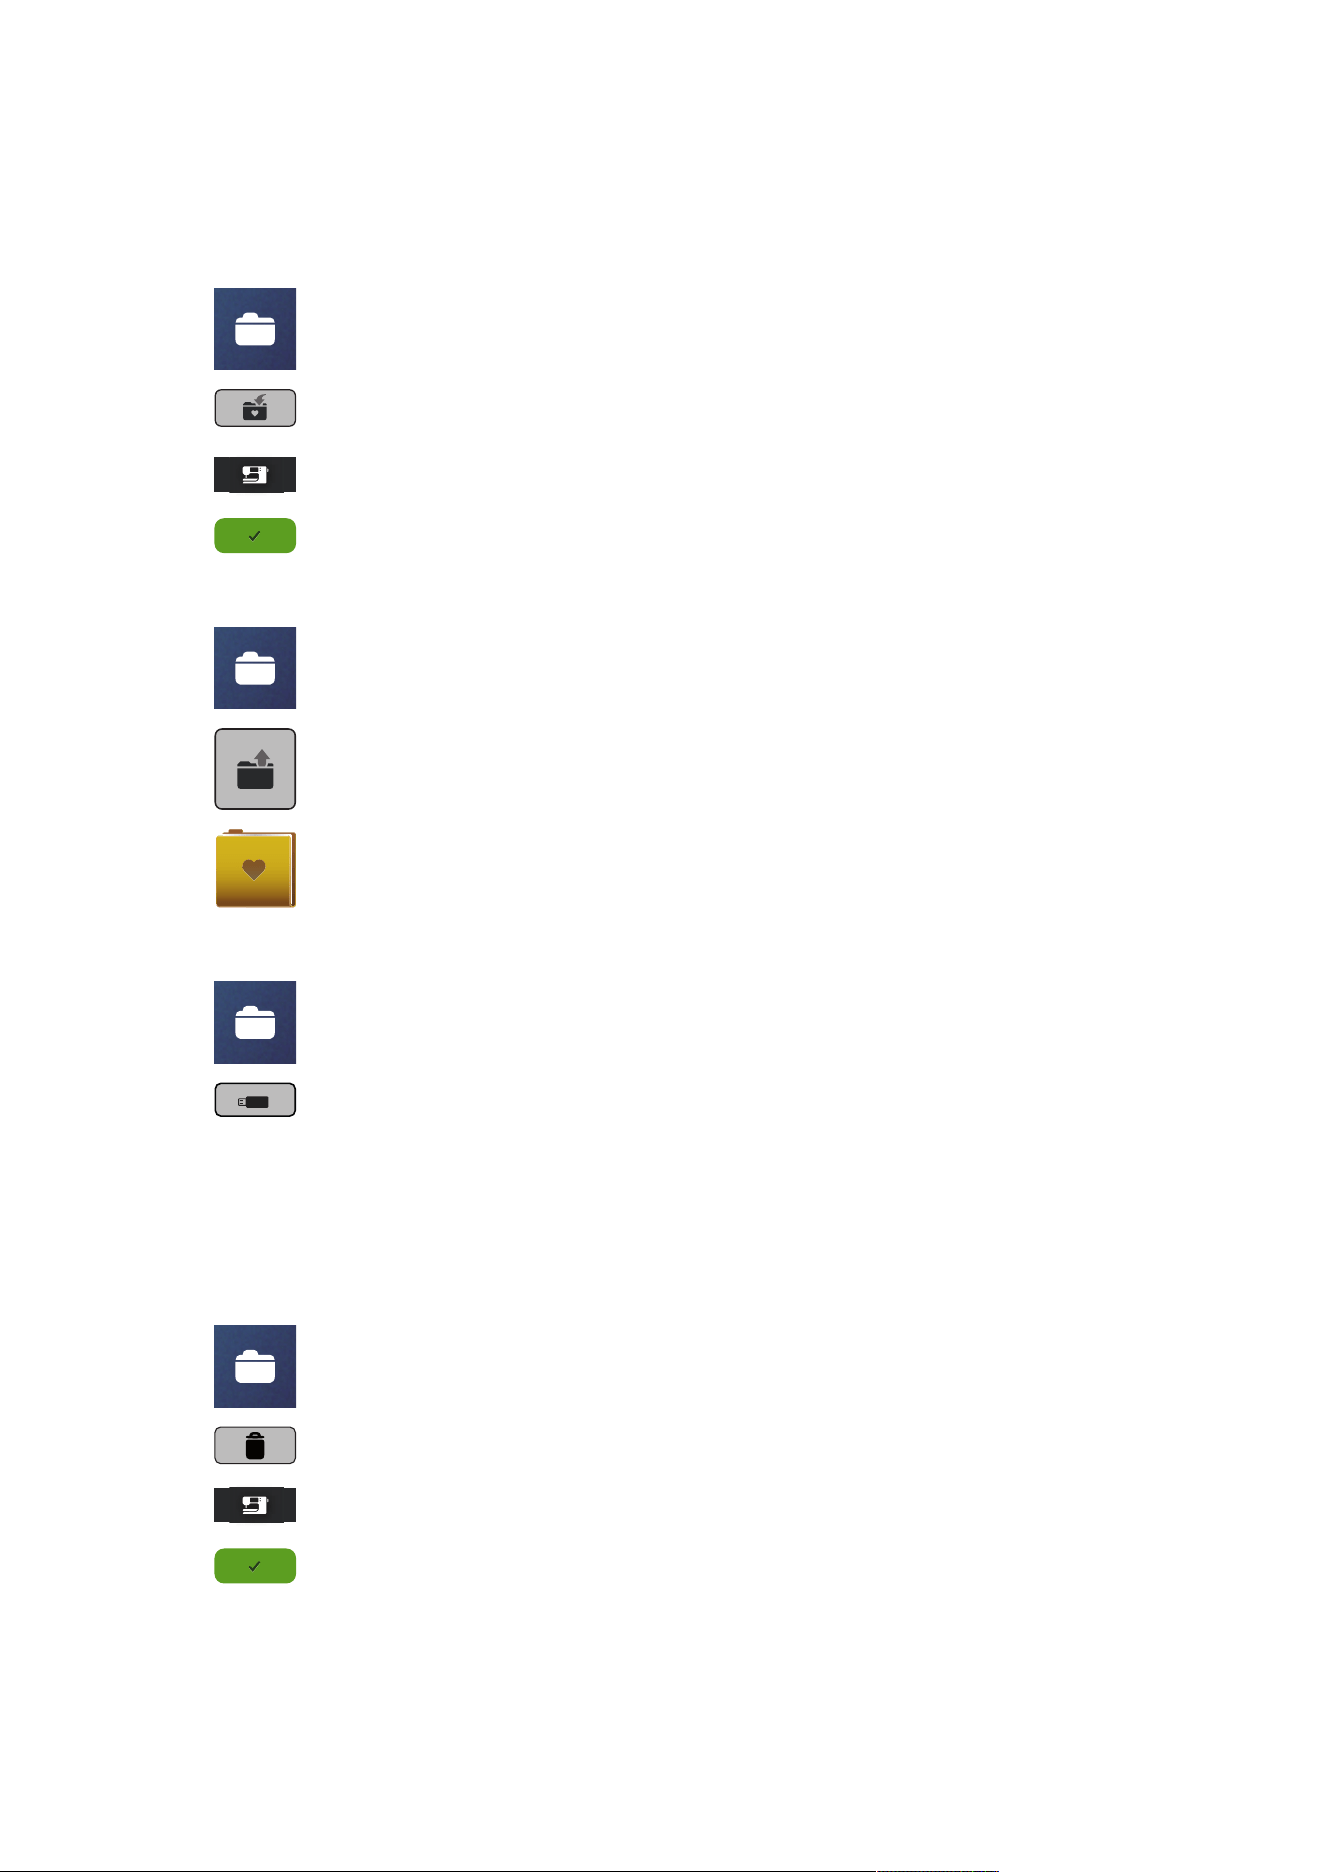
Creative Embroidering
139
2023-06 EN 5020079.40A.04
Overwriting the Embroidery Design in the Personal Memory
> Select the embroidery design.
> Edit the embroidery design.
> Tap «Selection».
> Tap «Save Embroidery Design».
– The embroidery design to be saved is outlined in yellow.
– The «Embroidery Machine» is activated.
> Select the embroidery design which is to be overwritten.
> Tap «Confirm».
Loading an Embroidery Design from the Personal Memory
> Tap «Selection».
> Tap «Loading the Embroidery Design».
> Select «Personal Embroidery Design».
> Select the embroidery design.
Loading an Embroidery Design from the USB Stick
> Tap «Selection».
> Insert the USB stick into the USB port of the machine.
> Tap «USB Stick».
> Select a personal embroidery design.
> You can switch between the embroidery design name and embroidery design image by tapping «Display
Embroidery Design Name/Embroidery Design Image» in the attachment. This is only possible when
loading a design from the USB stick.
Deleting an Embroidery Design from the Personal Memory
The embroidery designs which are saved in the personal memory can be deleted individually.
> Tap «Selection».
> Tap «Deleting».
– The «Embroidery Machine» is activated.
> Select the embroidery design which is to be deleted.
> Tap «Confirm».

Creative Embroidering
140
2023-06 EN 5020079.40A.04
Deleting an Embroidery Design from the USB Stick
> Tap «Selection».
> Tap «Deleting».
> Insert the USB stick into the USB port of the machine.
> Tap «USB Stick».
> Select the embroidery design which is to be deleted.
> Tap «Confirm».
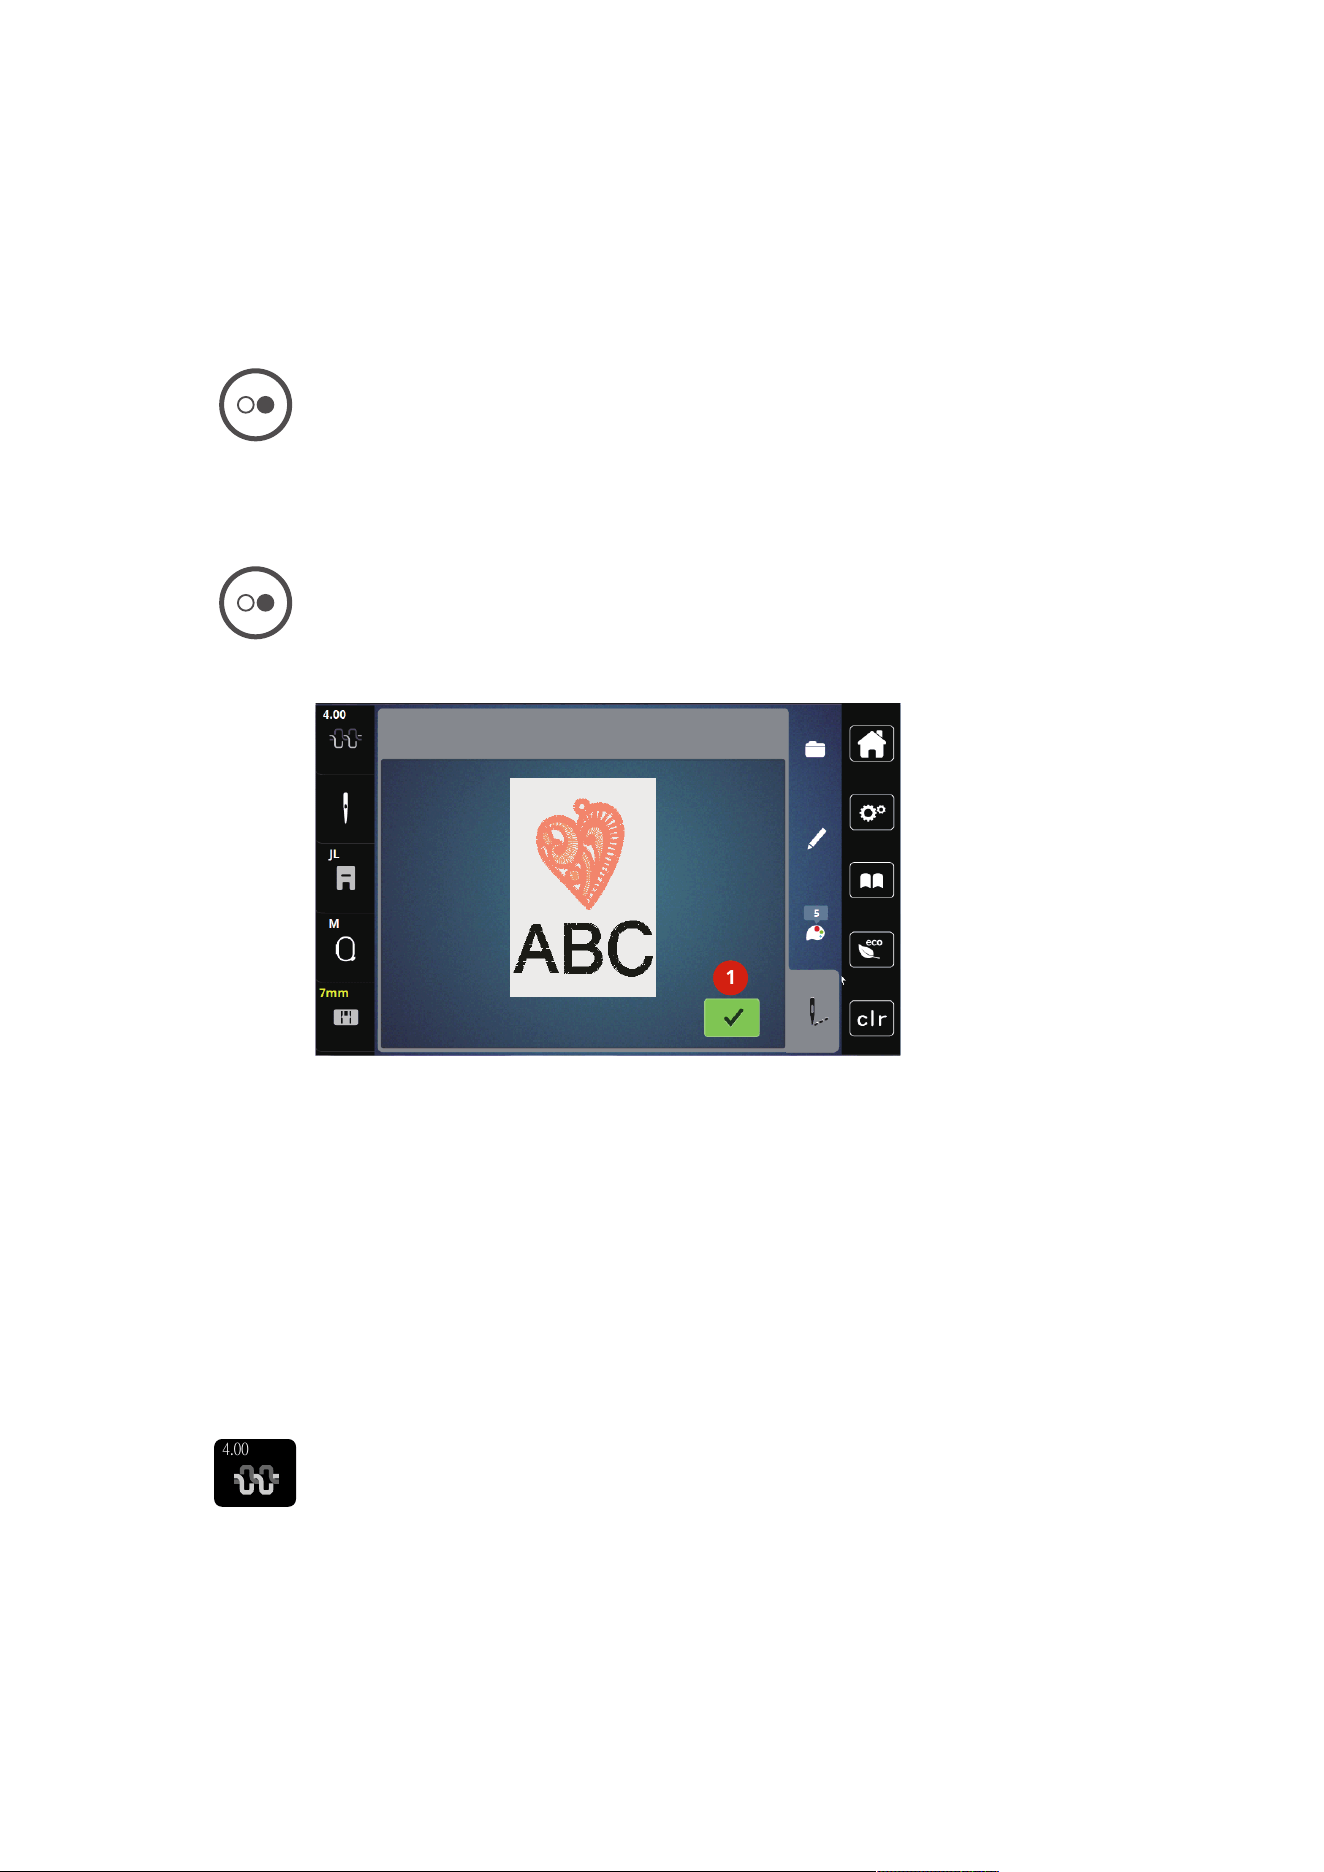
Embroidery
141
2023-06 EN 5020079.40A.04
15 Embroidery
15.1 Embroidering via the Button «Start/Stop»
In case of a power cut the embroidery process is interrupted. After the restart the machine goes to the
position which was embroidered last.
> Push the button «Start/Stop» until the embroidery machine starts.
– All parts of the design being in the current color are embroidered.
– The embroidery machine stops automatically at the end.
– Both threads are cut automatically.
– The embroidery machine switches to the next color automatically.
> Change the upper thread.
> To embroider the new color, push the button «Start/Stop».
– After having completed the embroidery design, the machine stops automatically and the threads are
cut automatically.
> To end the embroidery design, tap «Confirm» (1).
1
1
15.2 Adjusting the Upper Thread Tension
The default setting of the upper thread tension is set automatically as soon as a embroidery design is
selected.
When using different types of embroidery threads, the upper thread tension may vary. It may therefore be
necessary to adjust the upper thread tension individually according to the embroidery project as well as the
desried stitch.
The higher the upper thread tension is set, the tighter the upper thread is tensioned, and the bobbin thread
is pulled deeper into the fabric. When the upper thread tension is low, the upper thread is less tightened,
and the bobbin thread is pulled up less into the fabric.
Alteration of the upper thread tension affect the currently embroidery design. Permanent alterations of the
upper thread tension can be made in the Setup Program.
4.00
> Tap «Upper Thread Tension».
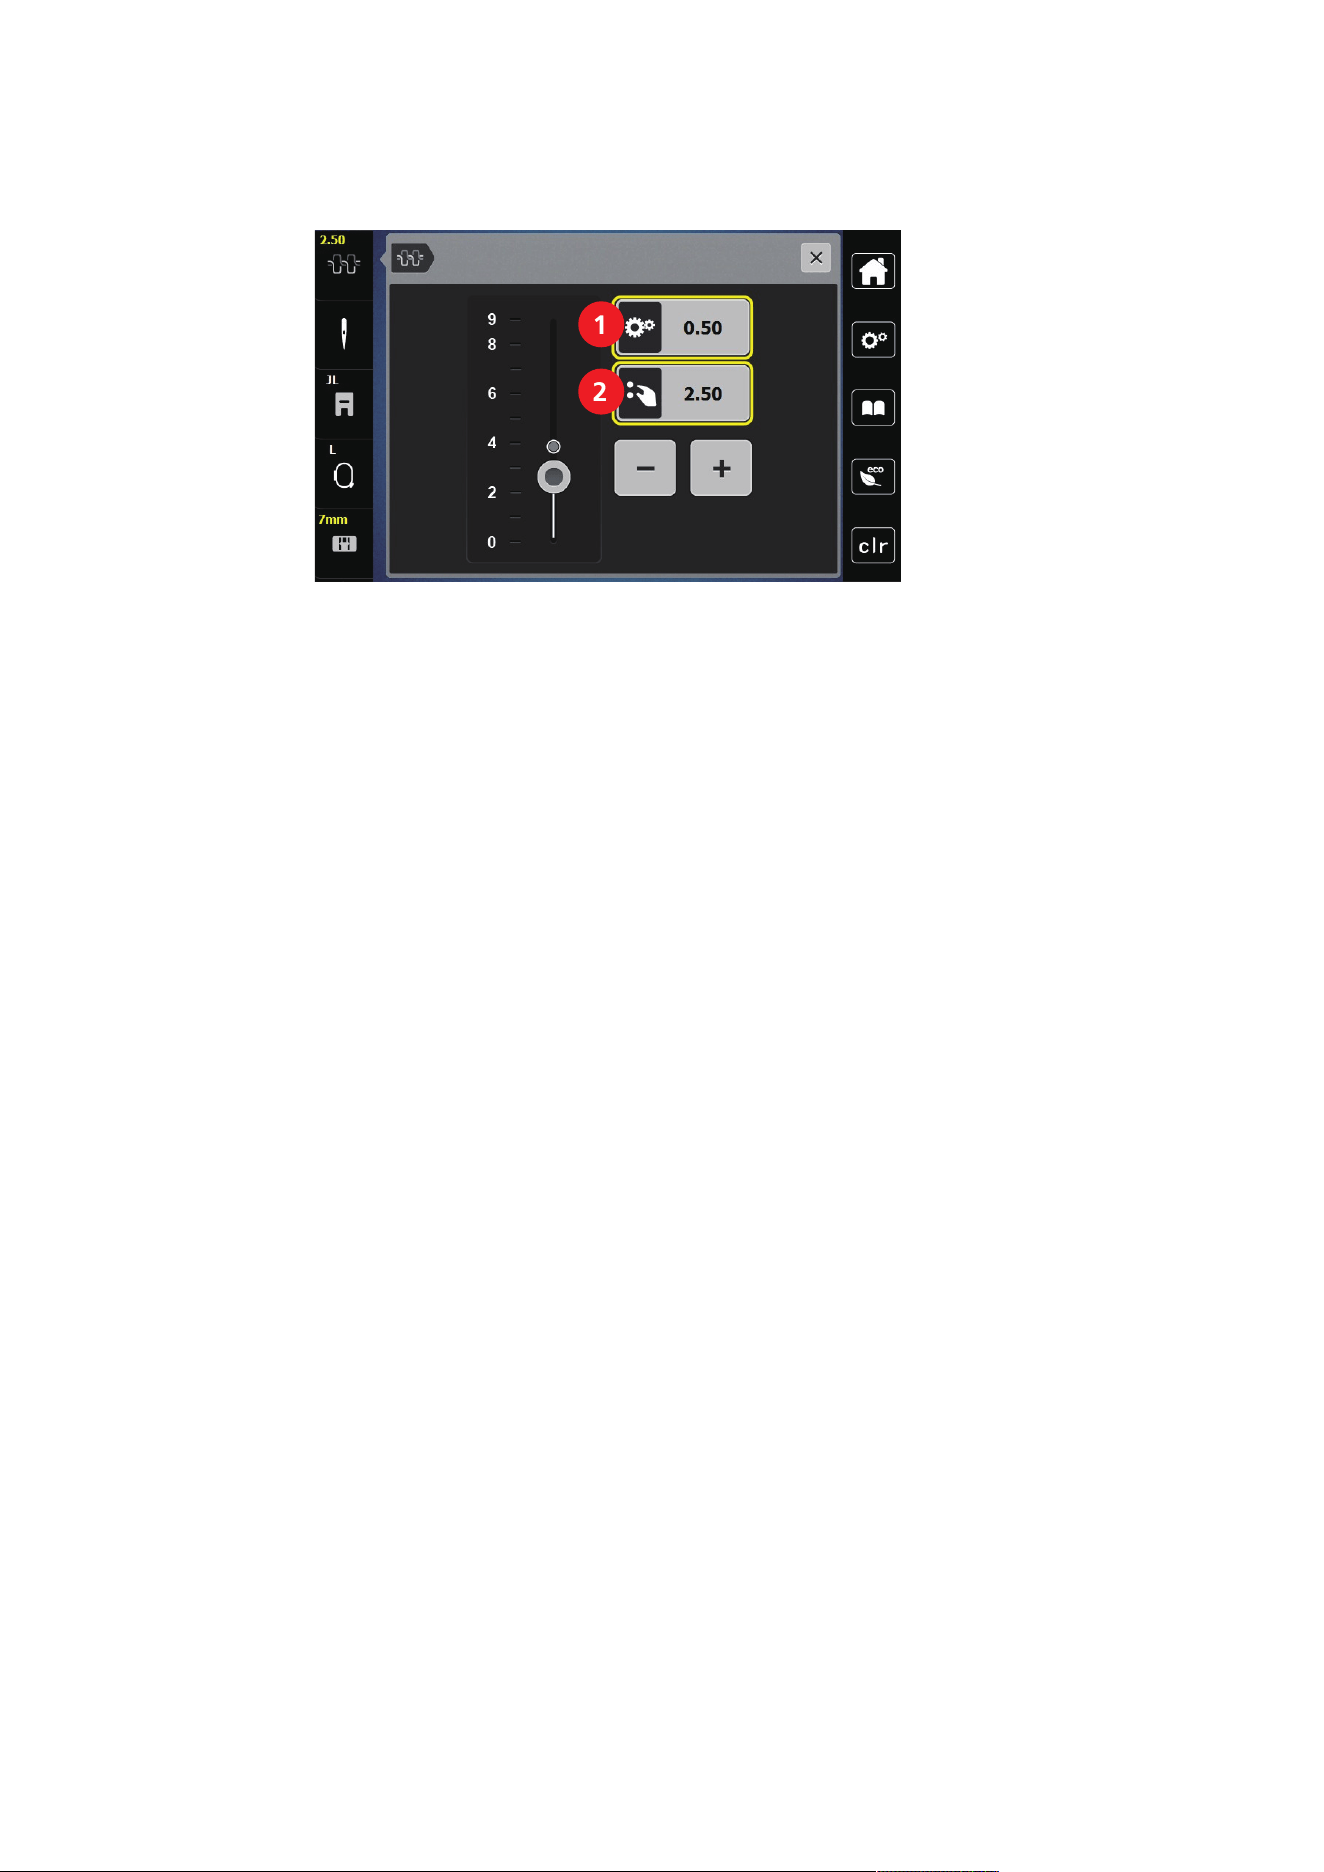
Embroidery
142
2023-06 EN 5020079.40A.04
> To increase or decrease the upper thread tension, move the slider.
1
2
1 Permanent Alteration of Thread Tension 2 Thread Tension of the Current Embroidery
Design
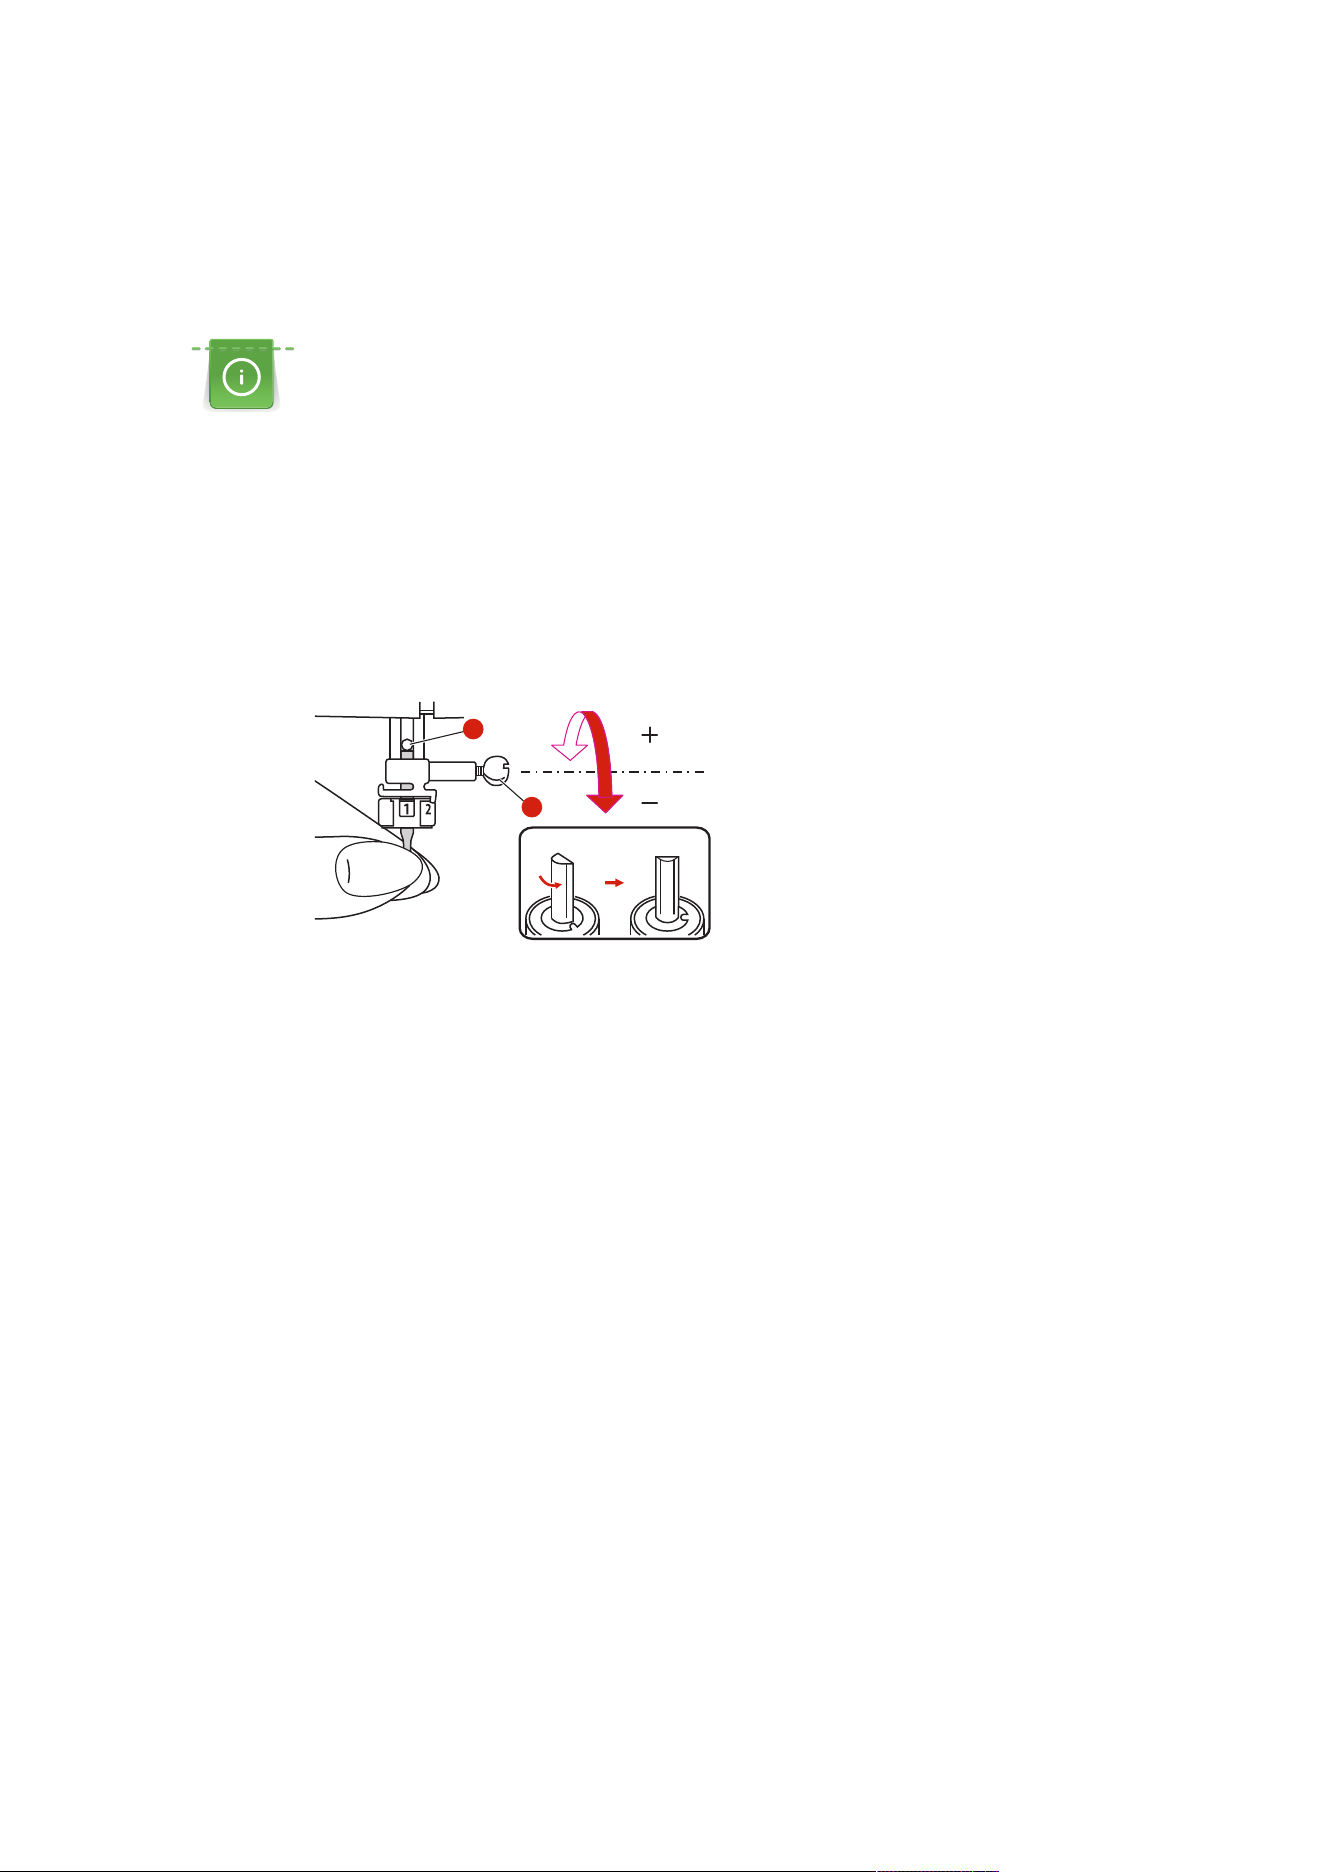
BERNINA CutWork Tool
143
2023-06 EN 5020079.40A.04
16 BERNINA CutWork Tool
16.1 Attaching Cutwork Tool
The CutWork Tool is available optionally. It is not included in the standard delivery of this machine.
The CutWork Tool is a very sharp accessory. Special care is required when working with this tool and keep
fingers away from the sharp knife. You can find more information in the CutWork book, which is packaged
with the CutWork tool.
In CutWork Mode, the upper thread, bobbin thread and thread cut sensor are deactivated.
Prerequisite:
• The stitch plate CutWork/Straight is attached.
> Remove the embroidery foot.
> Remove the needle.
> Insert the CutWork Tool with the flat side to the back as far up as it will go (1). Tighten the fixing screw
(2).
1
2
> Attach the embroidery foot.
> Select the attached embroidery foot in the embroidery foot selection.
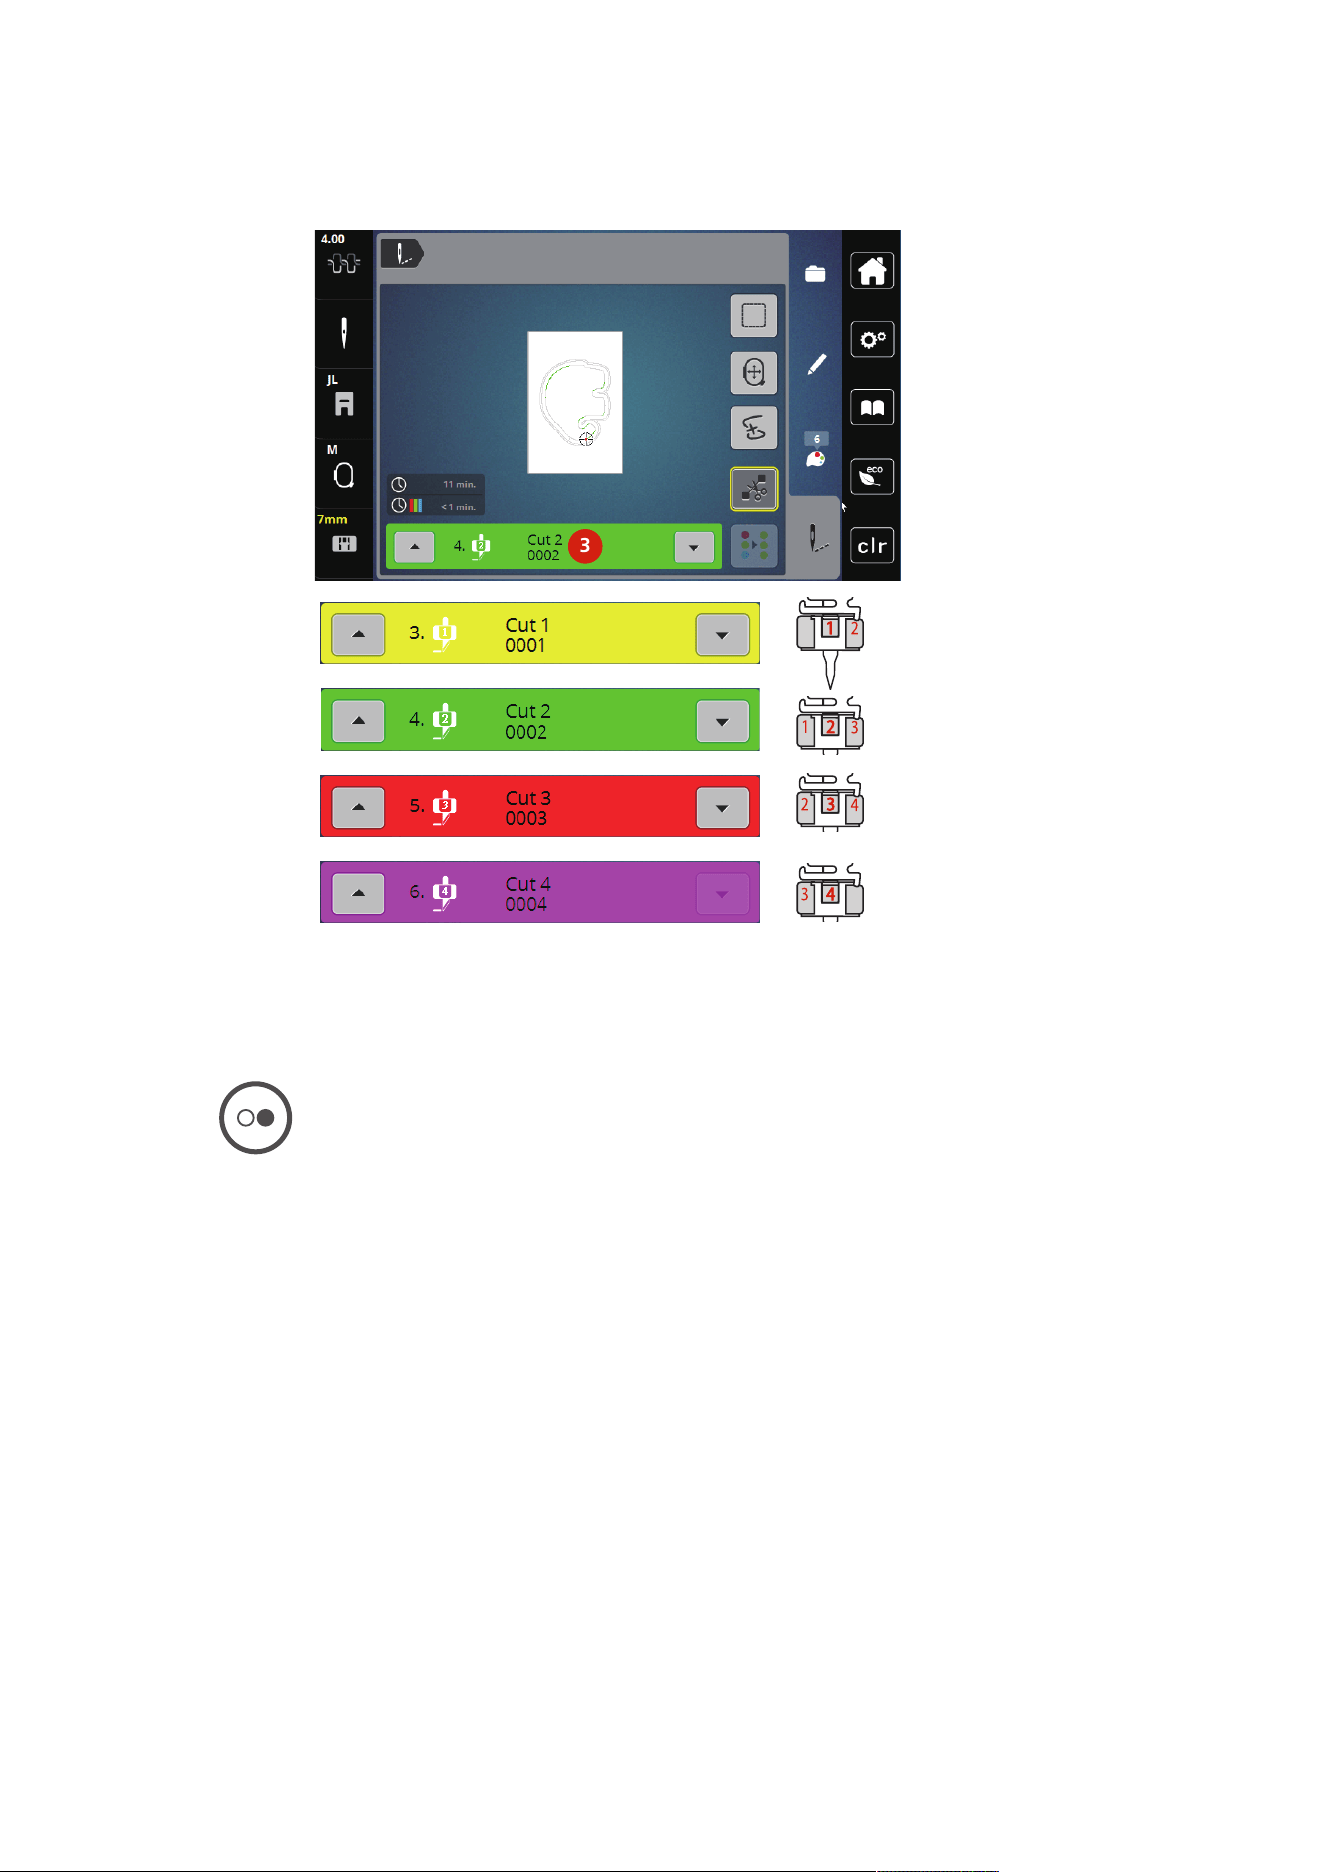
BERNINA CutWork Tool
144
2023-06 EN 5020079.40A.04
> Rotate the CutWork Tool according to the information on the color display (3).
3
16.2 Start to Cut
> Push the button «Start/Stop» and start to cut.
– When it is completed, the machine stops automatically and return to Embroidery menu display.
> Turn the CutWork Tool knife according to the cutting position on the display of Color indication (3).
> Repeat the same actions.
> When the cutting is completed, the machine stops automatically and shows the embroidery finished
screen on the display.
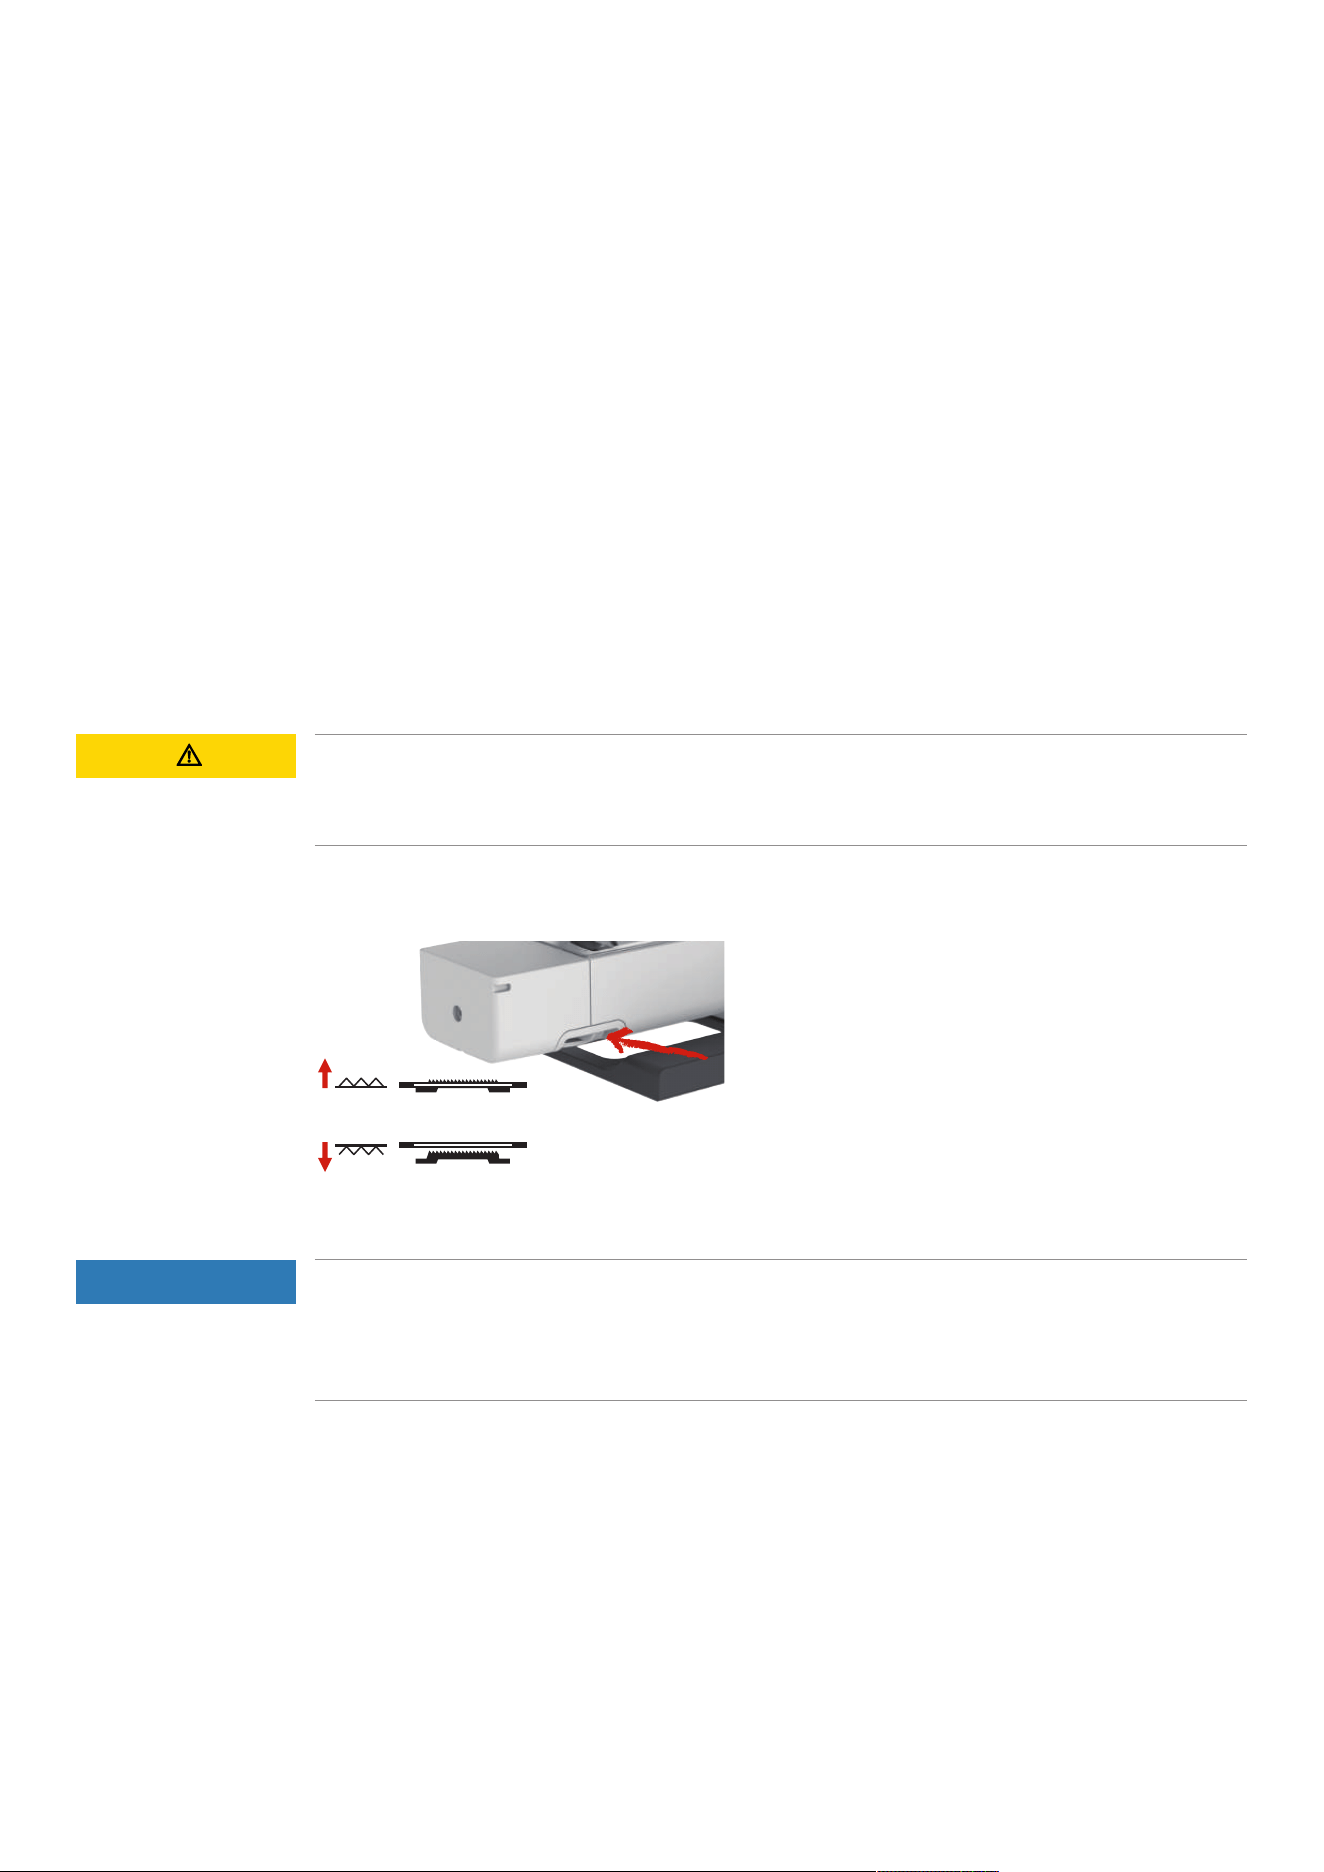
Maintenance and Cleaning
145
2023-06 EN 5020079.40A.04
17 Maintenance and Cleaning
17.1 Cleaning and Maintenance Intervals
To ensure the functionality and sewing quality of the machine, the machine must be cleaned and maintained
regularly. The intervals for cleaning and maintenance of the machine depend on various factors, such as the
fabrics and threads used.
As an advice to clean the machine, a message appears after 500,000 stitches.
As an advice to have the machine maintained, a message appears when 4,000,000 stitches have been sewn
after a service.
17.2 Cleaning the Display
> Clean the display when it is switched off with a soft slightly damp microfiber cloth.
17.3 Cleaning the Feed Dog
Remaining threads under the stitch plate must occasionally be removed.
> Raise the needle and presser foot.
CAUTION
Electronically Driven Components
Risk of injury near the needle and the hook.
> Switch the machine off and disconnect it from the power supply system.
> Remove the needle and presser foot.
> Lower feed dog.
> Remove the stitch plate.
NOTICE
Dust and Thread Residues Inside the Machine
Damage to mechanical and electronic components.
> Use a brush or a soft cloth.
> Do not use compressed air spray.
> Clean the feed dog with the brush.
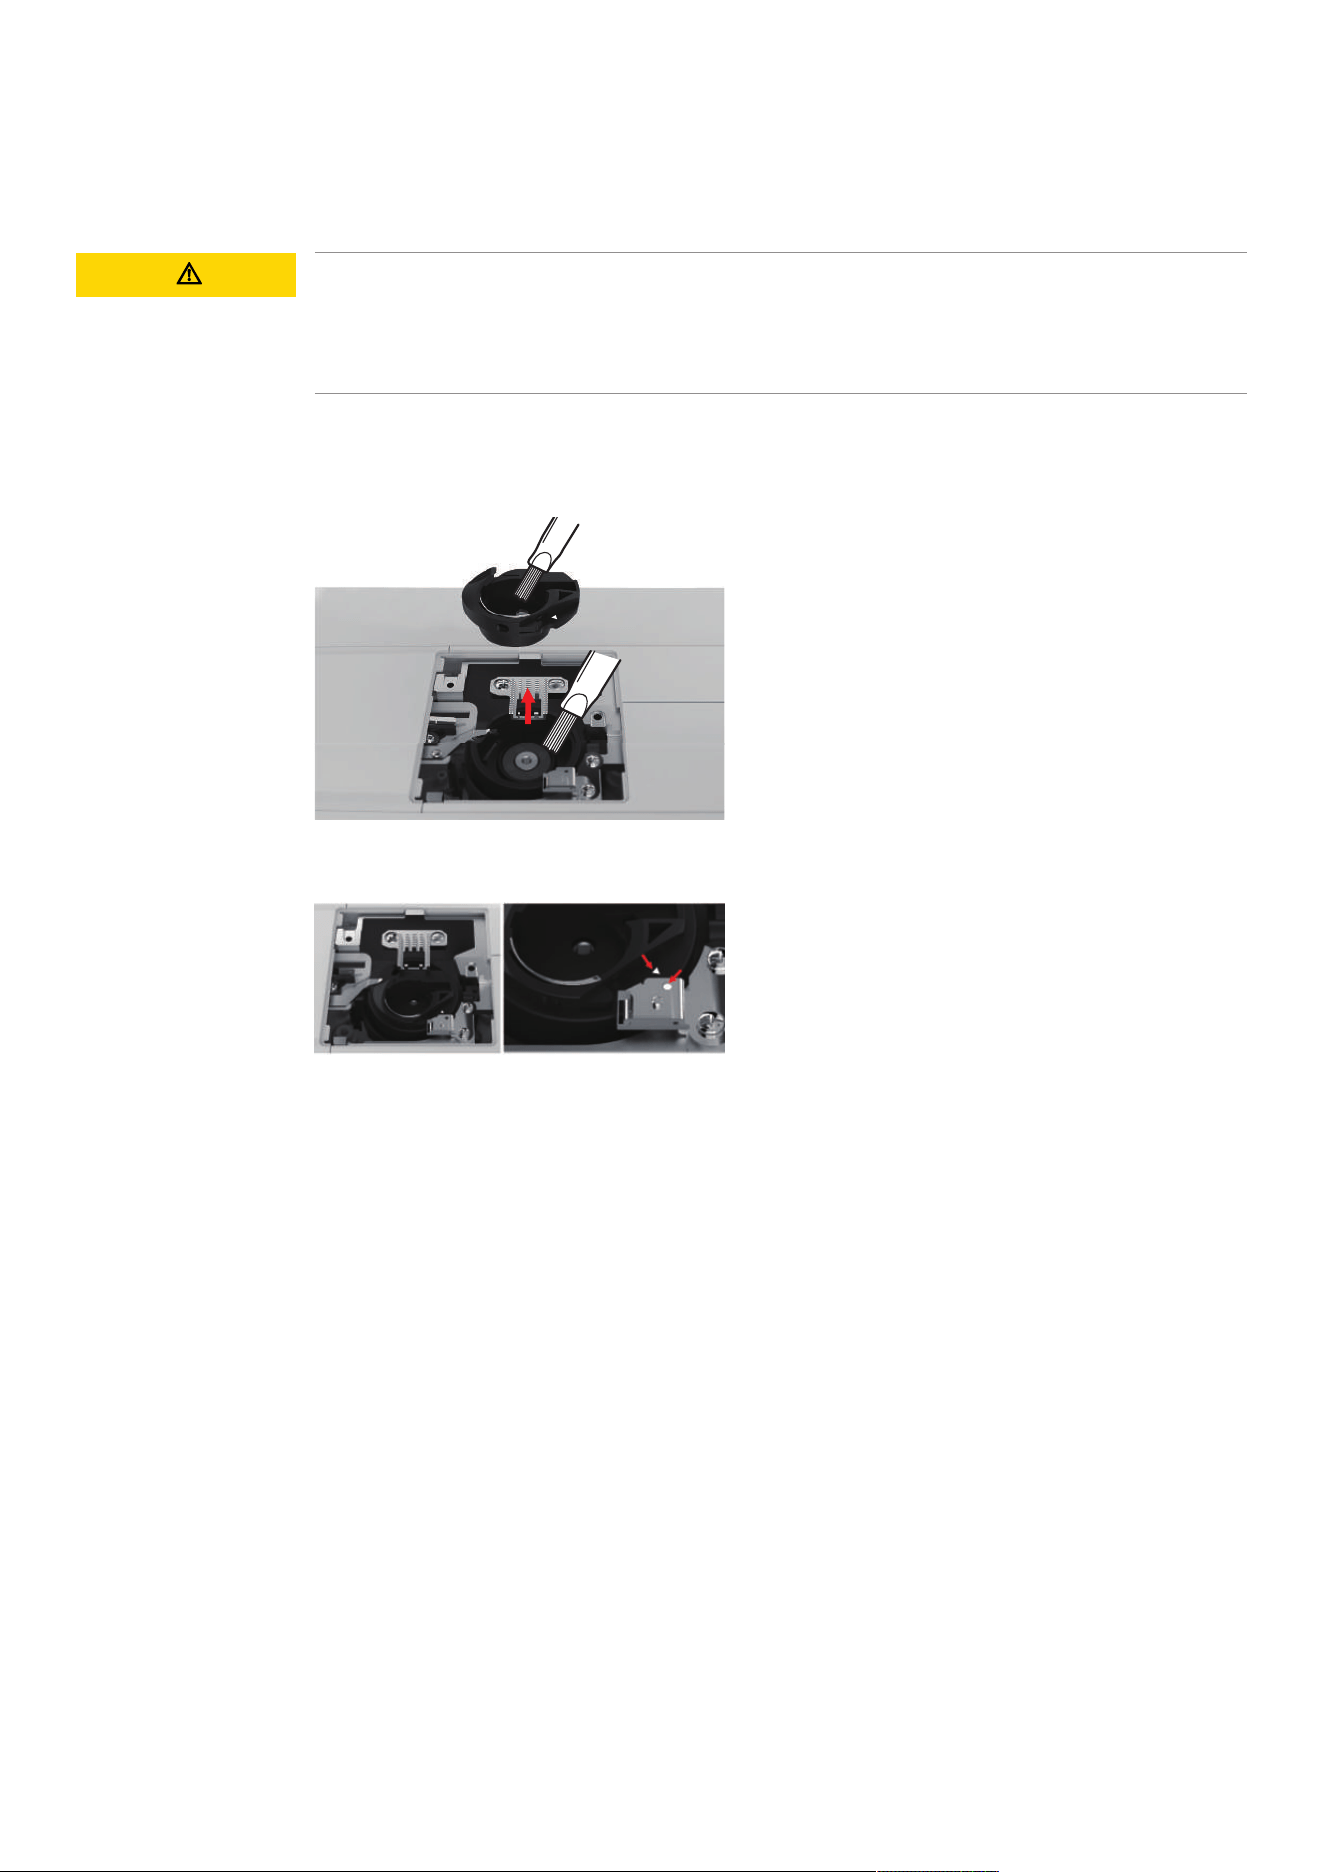
Maintenance and Cleaning
146
2023-06 EN 5020079.40A.04
17.4 Cleaning the Hook
CAUTION
Electronically Driven Components
Risk of injury near the needle and the hook.
> Raise the presser foot.
> Switch the machine off and disconnect it from the power supply system.
> Remove the presser foot and the needle.
> Remove the stitch plate.
> Clean the bobbin case with the brush.
> Set needle to topmost position.
> Remove the bobbin case.
> Clean the shuttle race with the brush.
> Insert the boobin case.
Note: The markings of the bobbin case and the stitch plate must be aligned identically.
> Fit the stitch plate.
> Fit the bobbin cover.
> Fit the needle and presser foot.
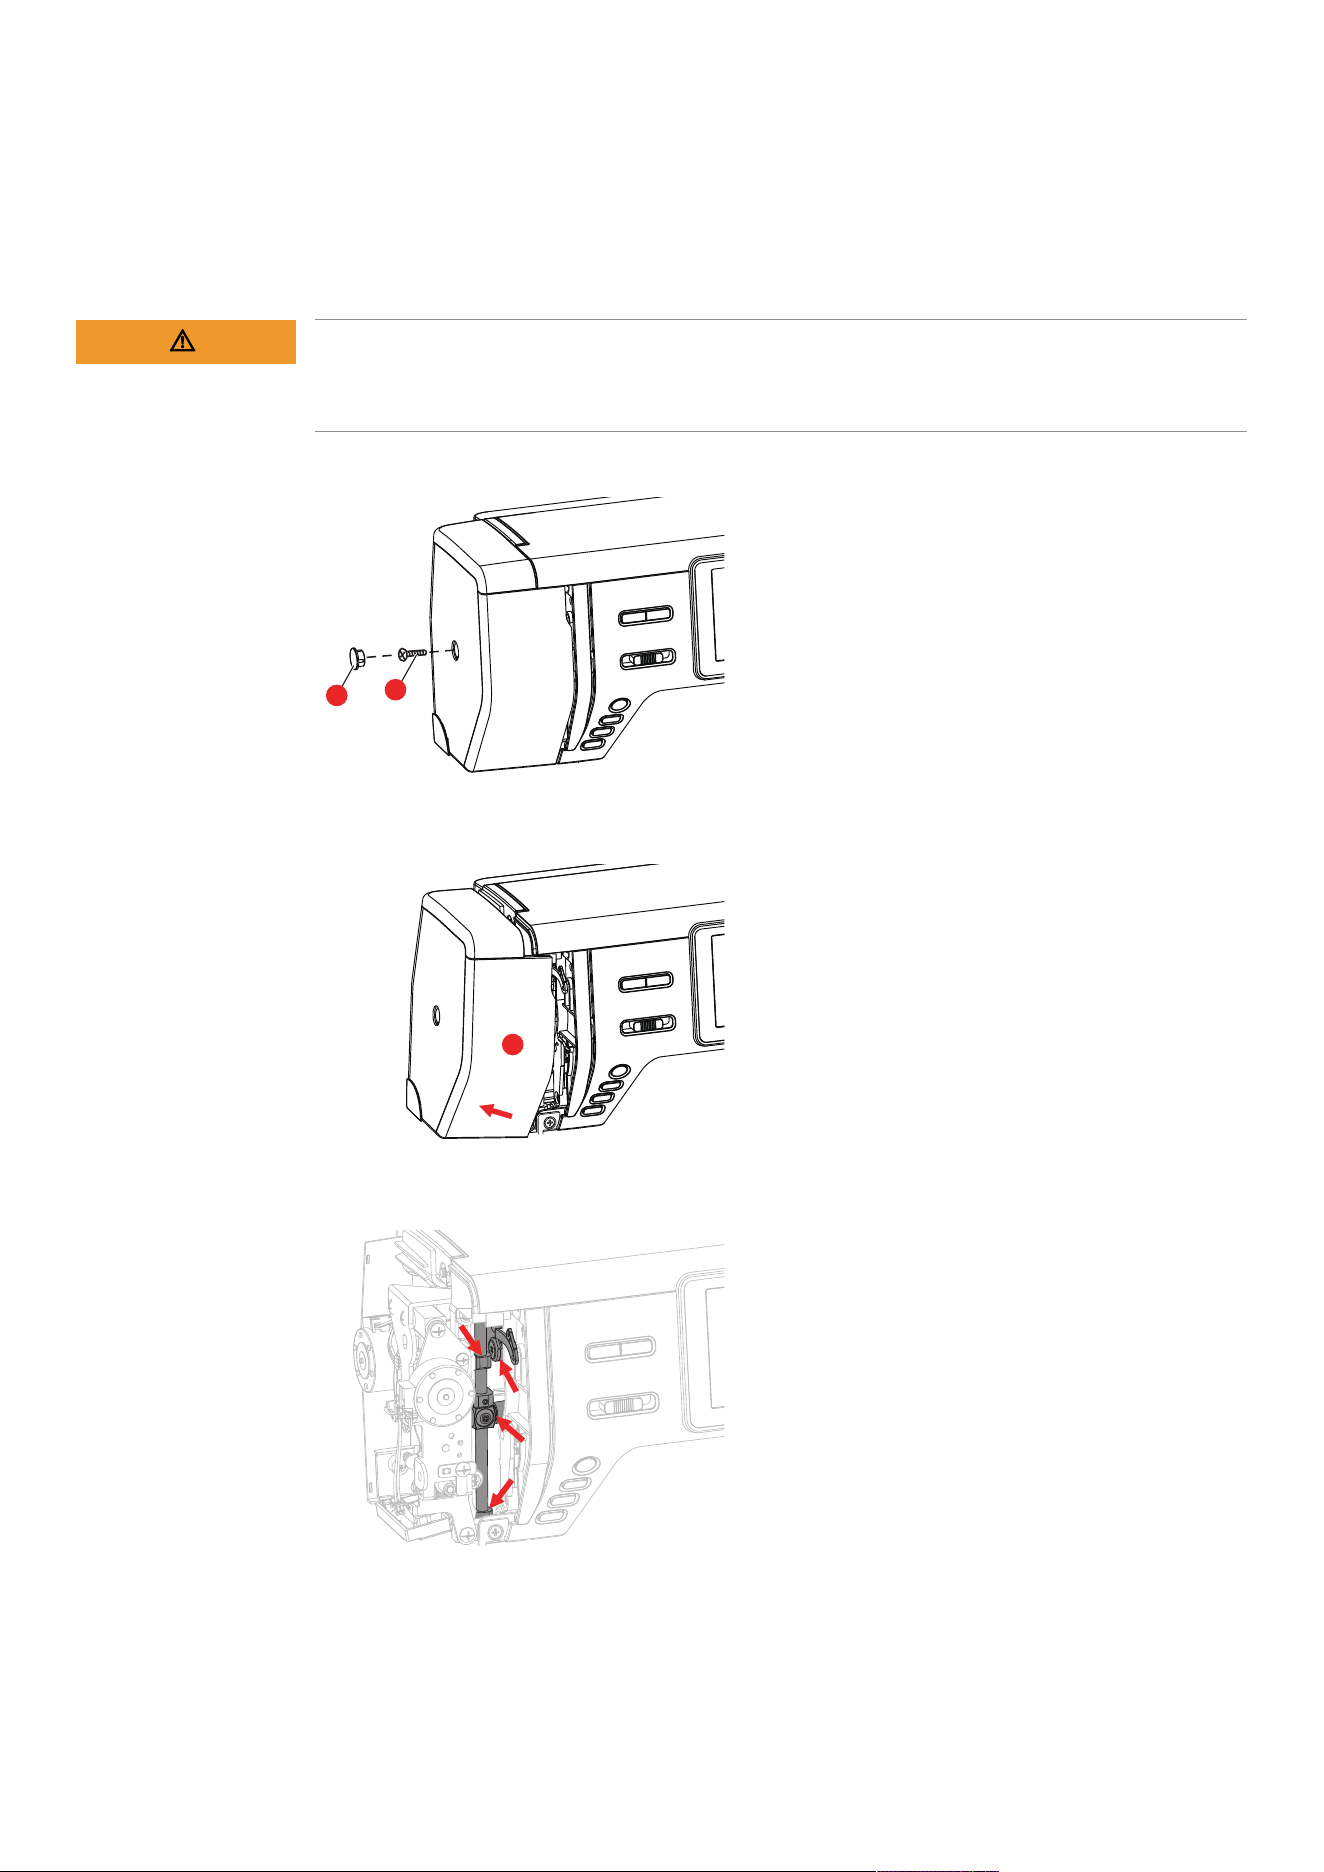
Maintenance and Cleaning
147
2023-06 EN 5020079.40A.04
17.5 Oiling the Needle Bar
The needle bar may not move smoothly without lubrication. If the machine is used frequently, the needle bar
should be oiled every 6 months to prevent blocking.
WARNING
Electronically Driven Components
Risk of injury near the needle bar.
> Switch the machine off and disconnect it from the power supply system.
> Remove the protective cap (1) and screw (2).
1
2
> Remove the headframe cover (3).
– After removing the headframe cover, pay attention to the moving parts.
3
> Apply a drop of oil to the movement mechanism of the needle bar, including the connecting rod/needle
bar, needle bar holder and needle bar holder (apply oil to the points marked with an arrow).
> Remove the presser foot.
> Turn the handwheel a few times and remove any excess oil with a cloth.
> Attach the headframe cover again.

Errors and Faults
148
2023-06 EN 5020079.40A.04
18 Errors and Faults
18.1 Troubleshooting
Fault Cause Solution
Uneven Stitch Formation
Upper thread too tight or too
loose.
> Adjust the upper thread tension.
Needle blunt or bent. > Replace the needle, make sure that a new BERNINA
quality needle is used.
Poor quality needle. > Use a new BERNINA quality needle.
Poor quality thread. > Use quality thread.
Incorrect needle/thread
combination.
> Match the needle with the thread size.
Incorrectly threaded. > Rethread.
Fabric has been pulled. > Feed the fabric evenly.
Dust or thread remnants under
the tension spring of the bobbin
case.
> Remove any dust or thread remnants from under the
tension spring of the bobbin case.
Skipped Stitches
Incorrect needle. > Use the needle system 130/705H.
Needle blunt or bent. > Replace the needle.
Poor quality needle. > Use a new BERNINA quality needle.
The needle is incorrectly inserted. > Insert the needle with the flat side to the back as far up
as it will go into the needle holder and tighten the
screw.
Incorrect needle point. > Match the needle point to the texture of the material.
Faulty Stitching
Thread remnants between the
thread tension discs.
> Fold a piece of thin material and slide the folded edge
(not the raw edges) between the thread tension discs.
Incorrectly threaded. > Rethread.
Thread is caught in the hook. > Remove the upper thread and the bobbin case, turn the
handwheel backwards and forwards by hand and
remove the thread remnants.
Incorrect needle/thread
combination.
> Check the needle/thread combination.

Errors and Faults
149
2023-06 EN 5020079.40A.04
Fault Cause Solution
Upper Thread Breaks
Incorrect needle/thread
combination.
> Match the needle with the thread size.
Upper thread is too tight. > Reduce the upper thread tension.
Incorrectly threaded. > Rethread.
Poor quality thread. > Use quality thread.
The stitch plate or the hook tip is
damaged.
> Contact a specialized bernette dealer to have the
damages repaired.
> Replace the stitch plate.
Lower Thread Breaks
The bobbin is not inserted
correctly.
> Remove and reinsert the bobbin and pull on the thread.
– The thread should run easily.
Bobbin is wound incorrectly. > Check bobbin and thread correctly.
The stitch hole in the stitch plate
is damaged.
> Contact a specialized bernette dealer to have the
damages repaired.
> Replace the stitch plate.
Needle blunt or bent. > Replace the needle.
Needle Breaks
The needle is incorrectly inserted. > Insert the needle with the flat side to the back as far up
as it will go into the needle holder and tighten the
screw.
Fabric has been pulled. > Feed the fabric evenly.
Thick fabric has been pushed. > Use the appropriate presser foot, e.g. Jeans foot, for
thick material.
> Use the height compensating tool when sewing over a
thick seam.
Knotted thread. > Use quality thread.
Display is Inactive
Incorrect calibrating data. > Switch off the machine.
> Switch on the machine, and simultaneously press and
hold the «Needle Position Right/Left» buttons.
> Recalibrate the display.
The eco Mode is active. > Tap «eco Mode».
Stitch Width Not Adjustable
The selected needle and stitch
plate cannot be used in
combination.
> Replace the needle.
> Replace the stitch plate.

Errors and Faults
150
2023-06 EN 5020079.40A.04
Fault Cause Solution
Speed Too Low
Unfavorable room temperature. > Place the machine in a warm room one hour before use.
Settings in the Setup Program. > Adjust the sewing/embroidery speed in the Setup
Program.
> Adjust the slide.
The Machine doesn't Start
Unfavorable room temperature. > Place the machine in a warm room one hour before use.
> Connect the machine and switch it on.
The machine is damaged. > Contact the specialized bernette dealer.
The Light of the Button
«Start-/Stop» doesn't Light Up
Light is defect. > Contact the specialized bernette dealer.
Neither the Sewing Light Nor
the Light on the Freearm
Lights Up
Settings in the Setup Program. > Activate it in the Setup Program.
The sewing light is defect. > Contact the specialized bernette dealer.
Upper Thread Indicator Fails
to Respond
Settings in the Setup Program. > Activate it in the Setup Program.
The upper thread indicator is
defect.
> Contact the specialized bernette dealer.
Bobbin Thread Indicator
doesn't React
Settings in the Setup Program. > Activate it in the Setup Program.
The bobbin thread indicator is
defect.
> Contact the specialized bernette dealer.
Error during Software Update
The update process is blocked
and the hourglass on the display
is inactive.
> Remove the USB stick.
> Switch off the machine.
> Rename the firmware file from «.fw» to «.auto».
> Insert the USB stick.
> Switch the machine on.
– The update starts automatically.
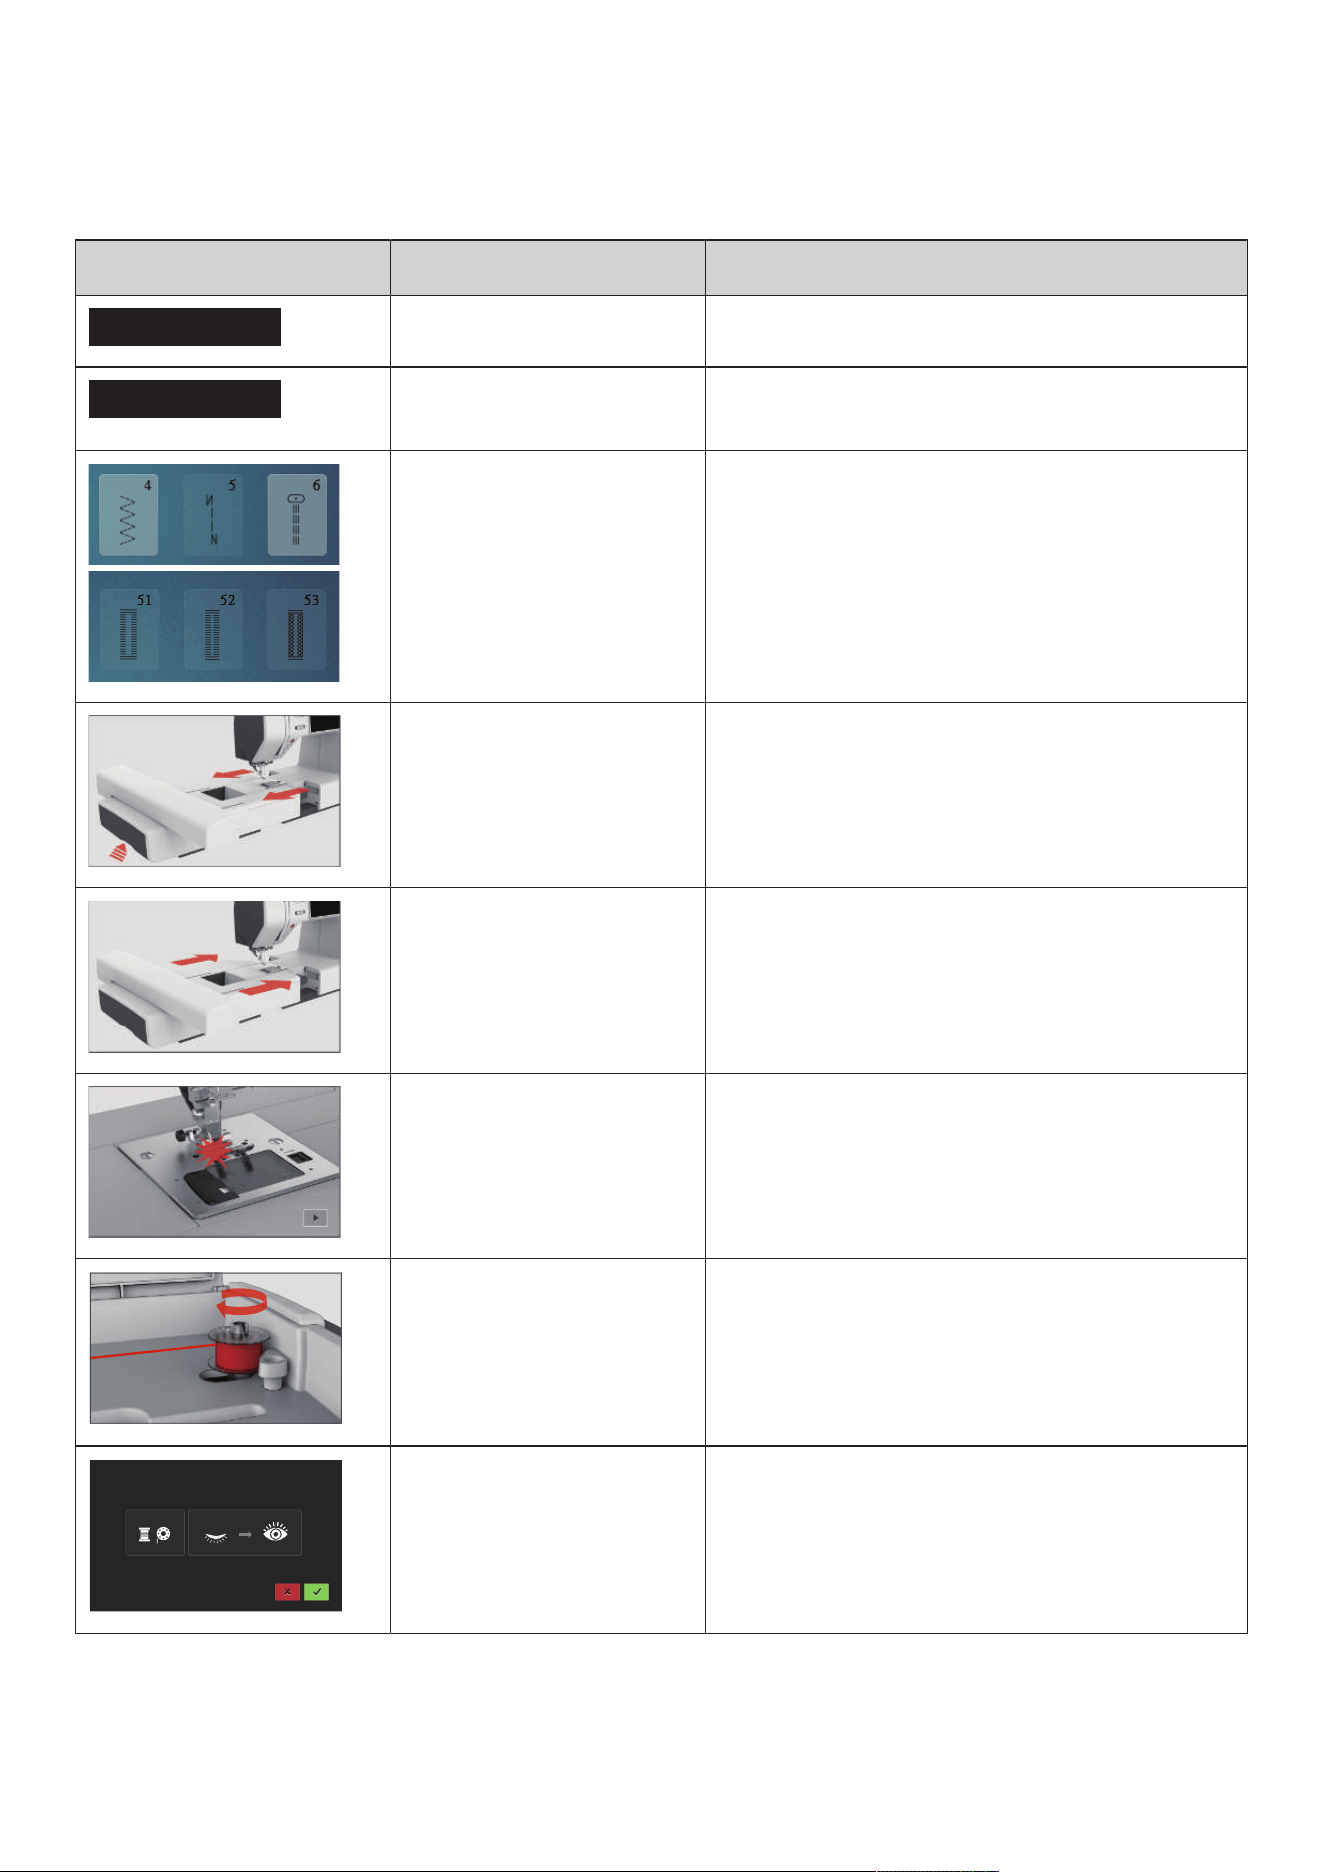
Errors and Faults
151
2023-06 EN 5020079.40A.04
18.2 Error Messages
Message on the Display Cause Solution
???
This stitch number does not exist. > Check the entry and enter the new number.
!!!
The stitch pattern cannot be
selected in the combi mode.
> Check the entry and enter the new number.
The stitch number cannot be
selected in combi mode.
> Select other stitches.
The embroidery module must be
removed.
> Hold the embroidery module, press the release button
and pull the module out.
The embroidery module must be
connected.
> Push the embroidery module carefully from left to right
into the embroidery module connection of the machine.
The selected needle and stitch
plate cannot be used in
combination.
> Check whether the correct needle and stitch plate are
attached.
> Exchange the needle and select it in the user interface.
> Exchange the stitch plate and select it in the user
interface.
The winding unit is activated. > Deactivate the winding unit.
The thread indicator is
deactivated.
> To switch on both thread indicators, tap «Confirm».
> To keep the thread indicators switched off, tap
«Cancel».
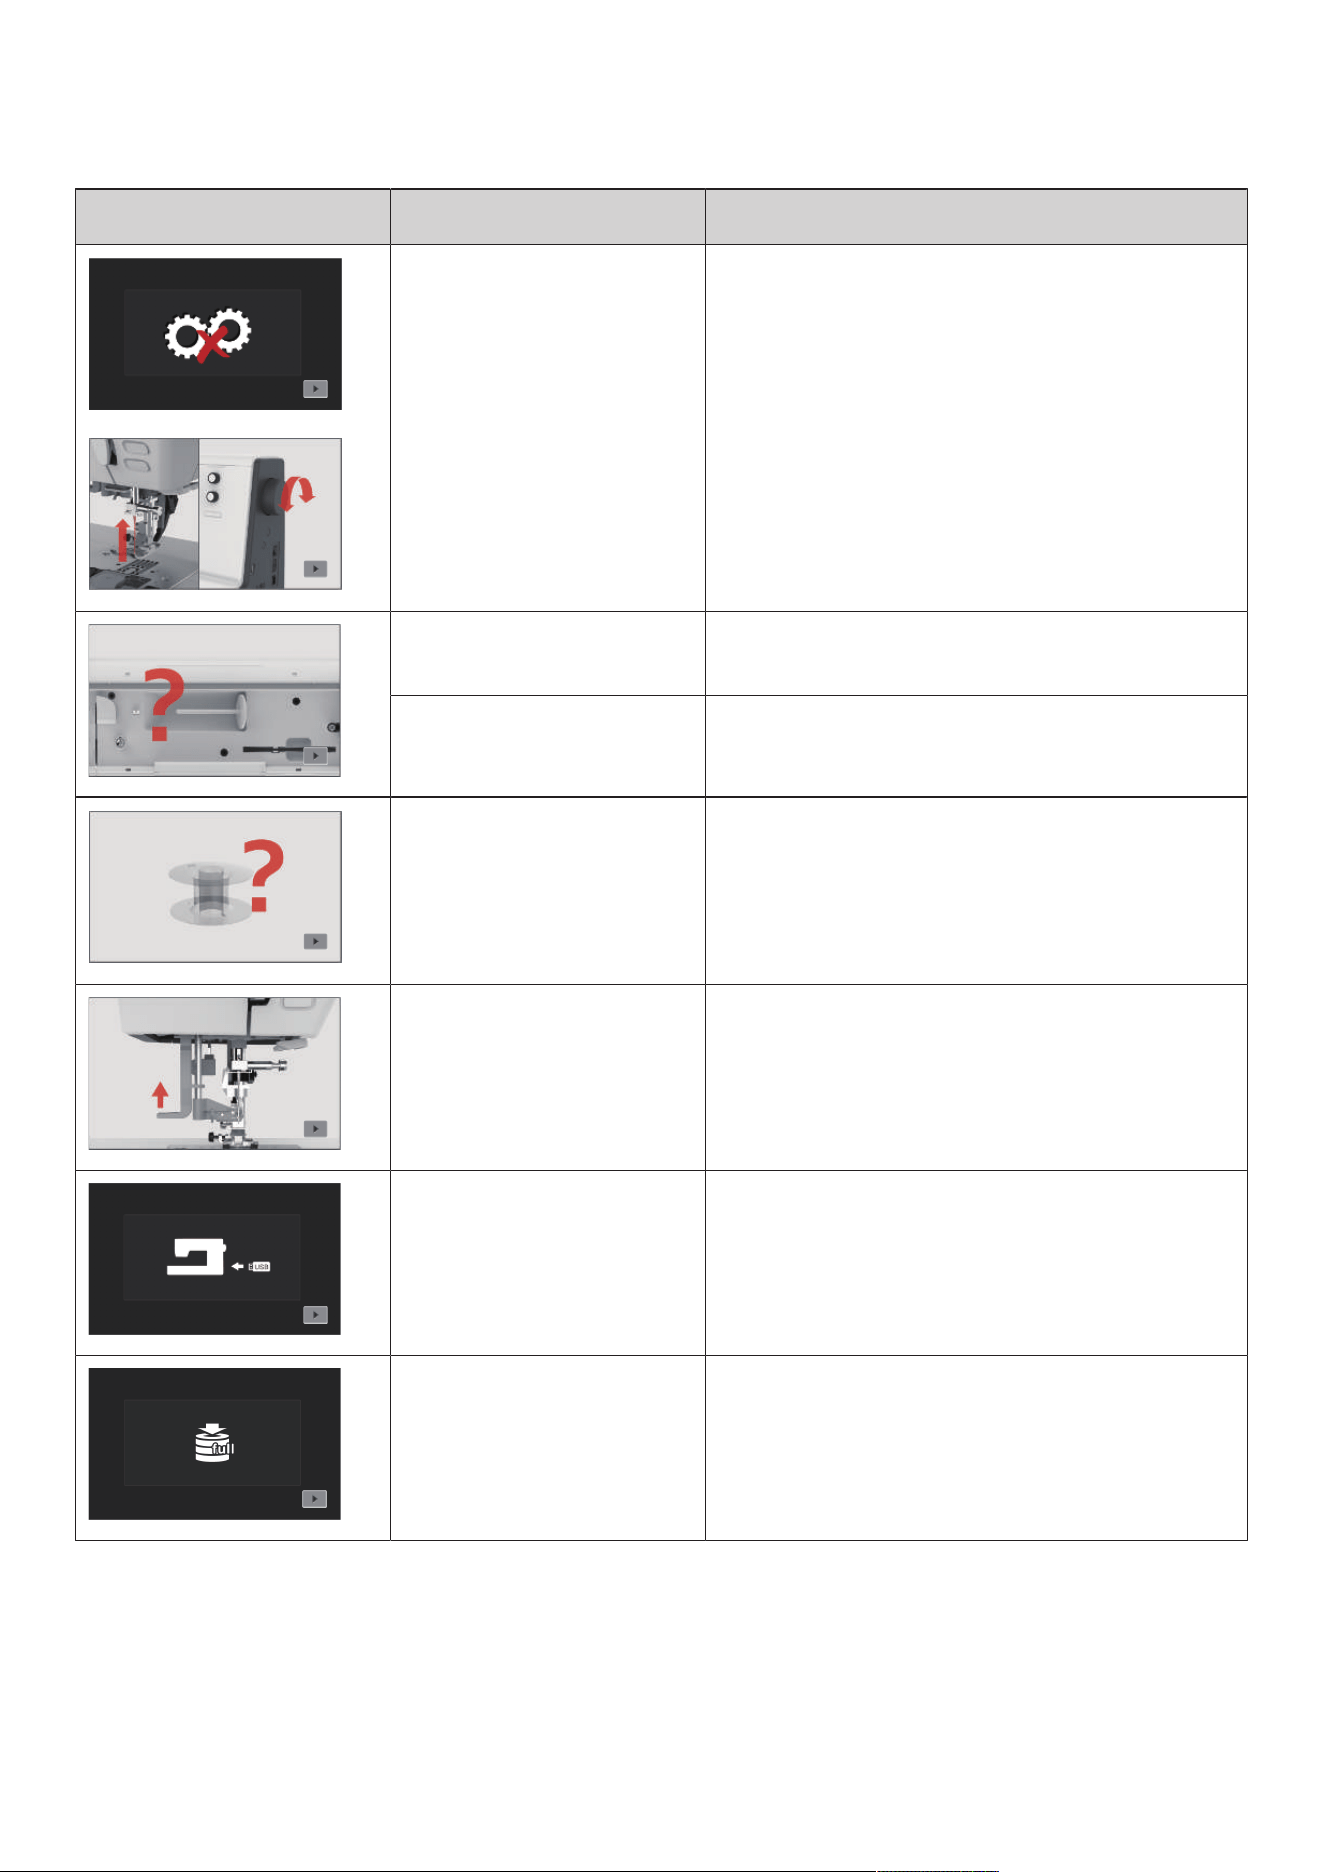
Errors and Faults
152
2023-06 EN 5020079.40A.04
Message on the Display Cause Solution
The main motor isn't running. > Turn the handwheel clockwise until the needle is at its
top position.
> Remove the stitch plate.
> Remove the thread remnants.
> Clean the hook.
> Remove the hook and make sure that there are no
pieces of broken needle points on the magnetic back of
the hook.
The upper thread is used up. > Insert a new thread spool.
> Rethread.
The upper thread has broken. > Rethread.
The bobbin thread is used up. > Remove the empty bobbin, wind it again and reinsert it.
The threader lever is not raised. > Raise the threader lever.
The USB stick is not connected. > Insert the USB stick (optional accessory) into the port.
Not enough free memory
available on the USB stick
(optional accessory).
> Delete data on the USB stick (optional accessory).
> Overwrite data on the USB stick.
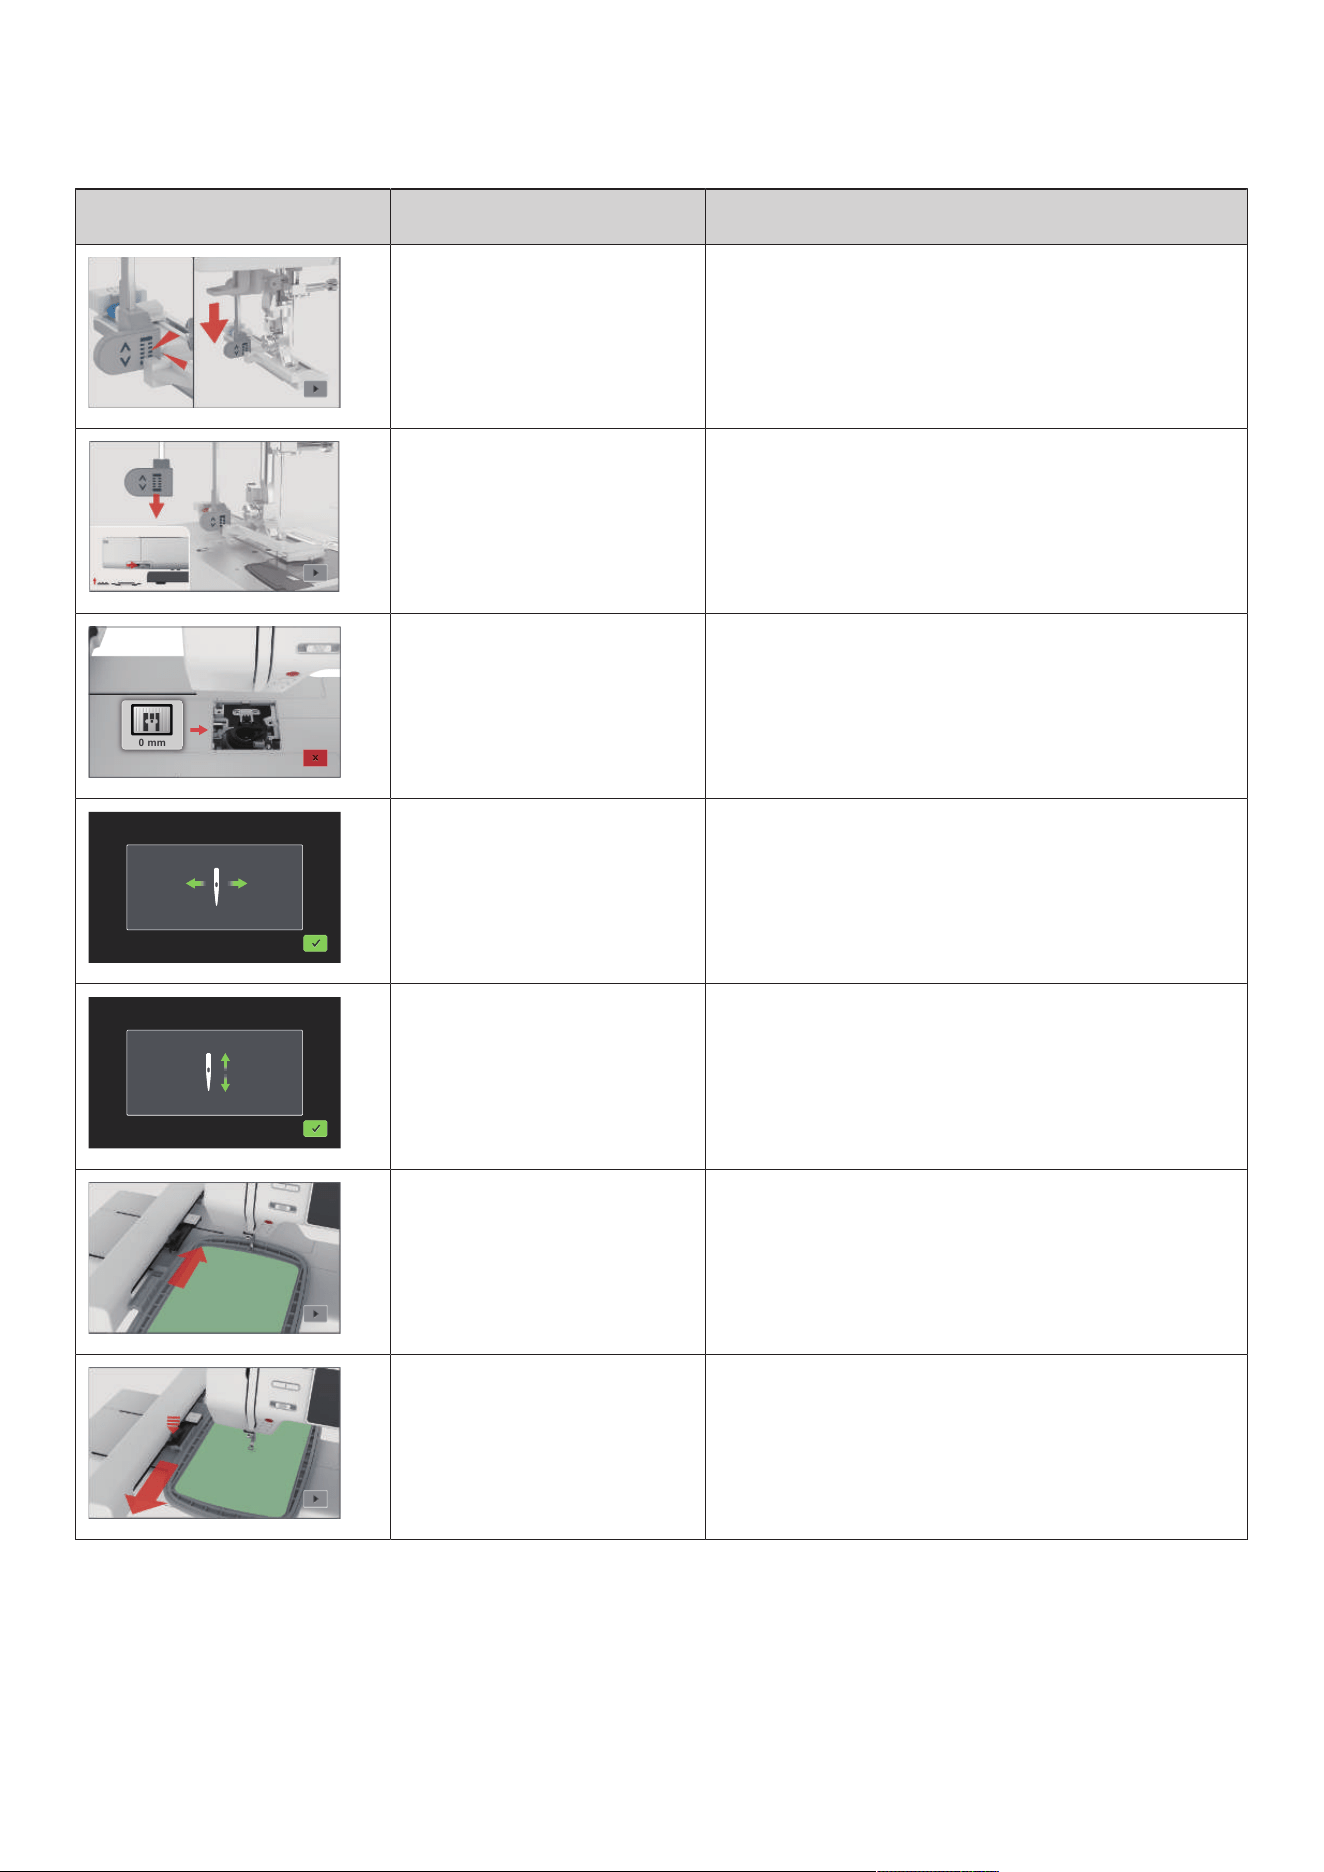
Errors and Faults
153
2023-06 EN 5020079.40A.04
Message on the Display Cause Solution
The buttonhole lever does not
touch the buttonhole foot with
slide (RJ).
> Pull the buttonhole lever down as far as possible until it
engages behind the bracket.
The buttonhole lever is not pulled
down.
The feed dog is lowered.
> Pull the buttonhole lever down as far as possible until it
engages behind the bracket.
> Raise the feed dog.
0 mm
0 mm
Wrong stitch plate is used. > Remove the stitch plate and insert the correct one.
The needle moves sideways. When the stitch plate is exchanged, this illustration appears
because the needle is likely to move.
The needle moves upwards. > Check whether there are any external objects near the
stitch plate.
> To raise the needle, tap «Confirm».
The hoop is not attached. > Attach the hoop.
The hoop is attached. > Remove the embroidery hoop.
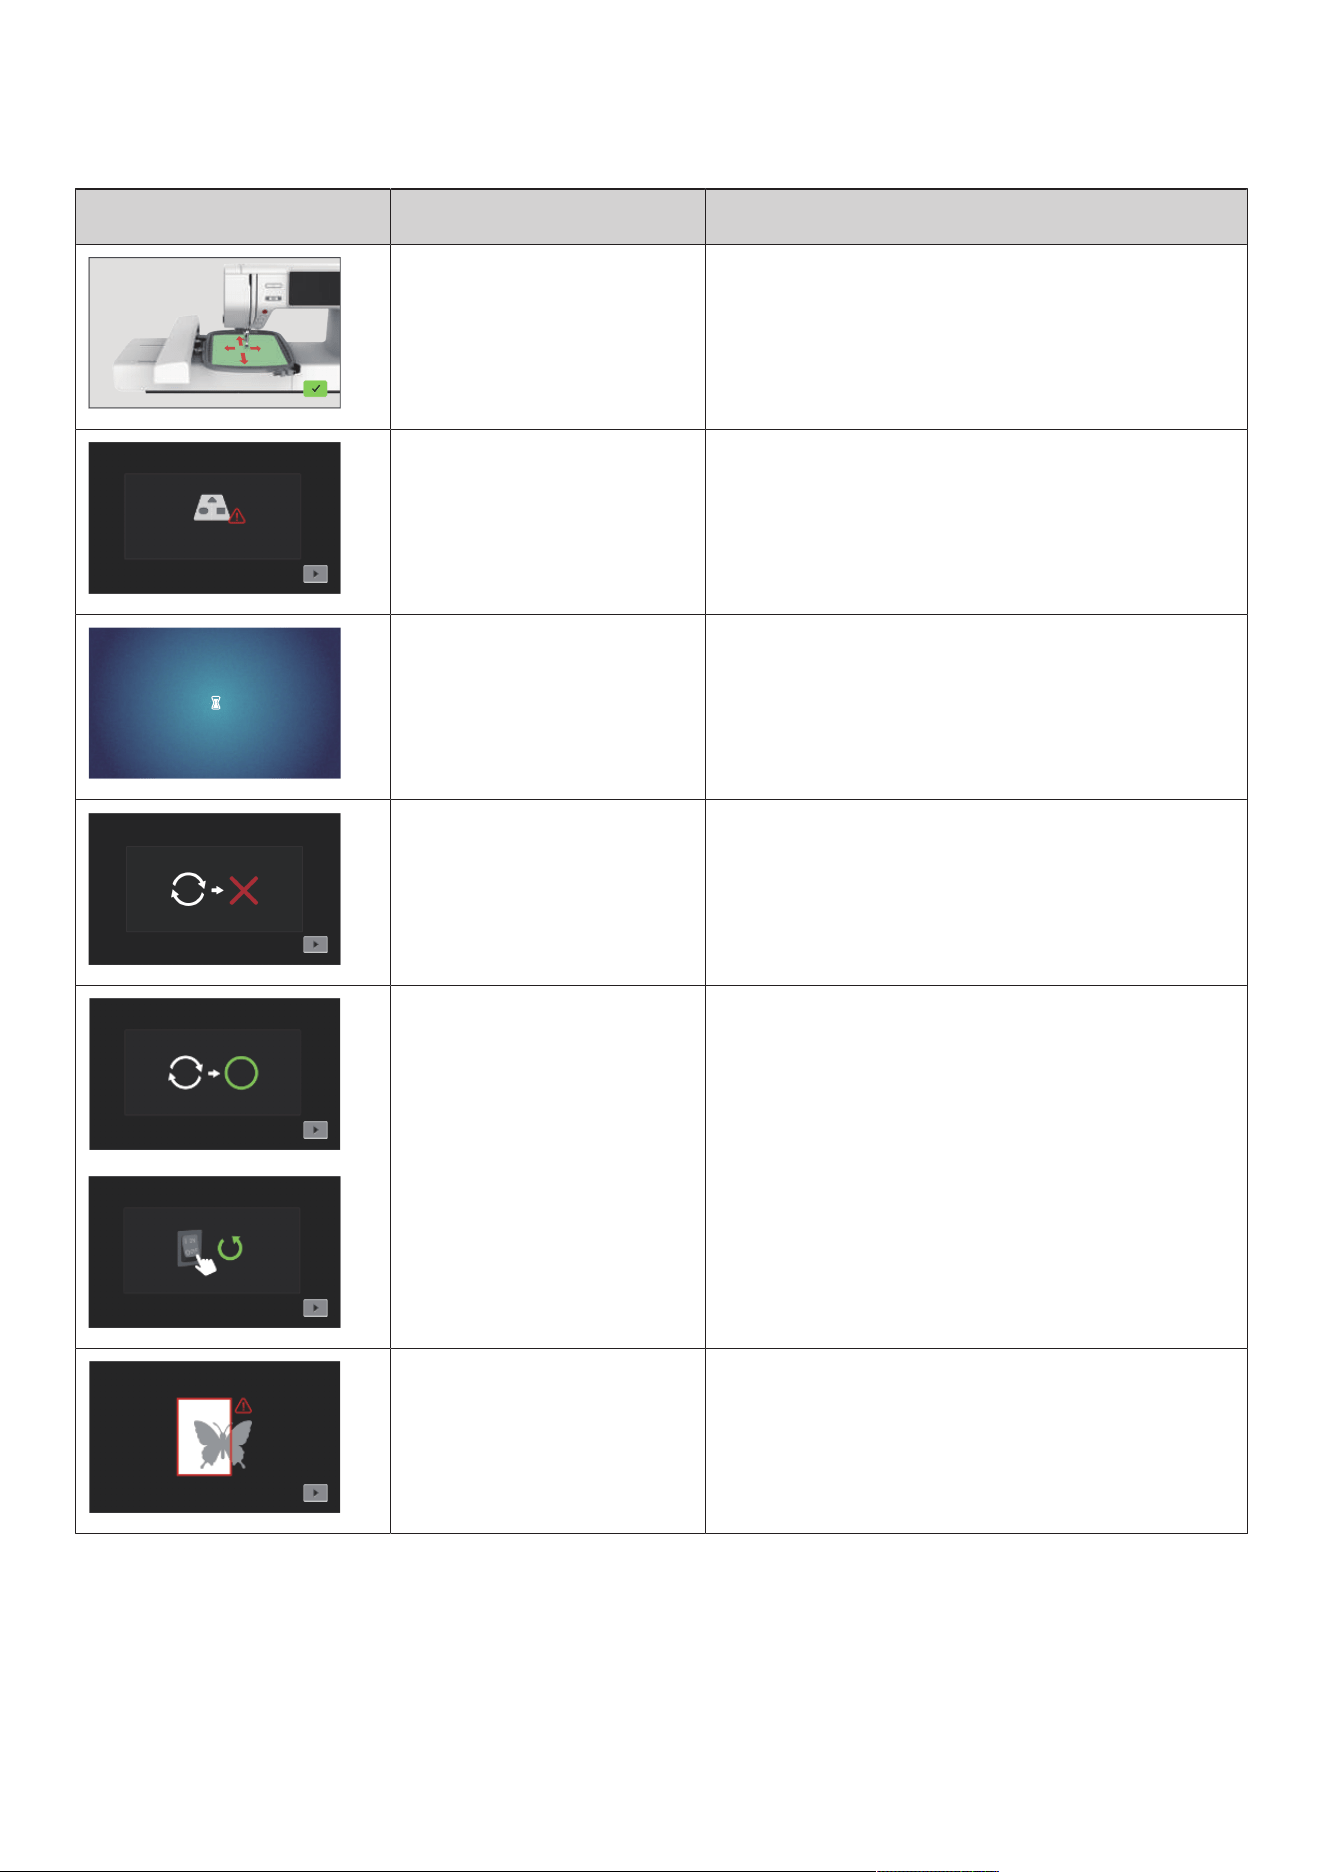
Errors and Faults
154
2023-06 EN 5020079.40A.04
Message on the Display Cause Solution
The embroidery hoop is
calibrated.
> Tap «Confirm».
The maximum number of stitches
of 120,000 is reached.
> Select another pattern with less stitches.
Files are being loaded. > Wait for processing process.
Firmware update failed. > Check the update file on the USB stick.
> Tap «Cancel» and try the update again.
Firmware update successfully
completed.
> Restart the machine.
The embroidery design is partially
outside the embroidery hoop
and/or is too large for the hoop.
> Reduce the size of the embroidery design.
> Reposition the embroidery design.
> Attach a larger hoop.
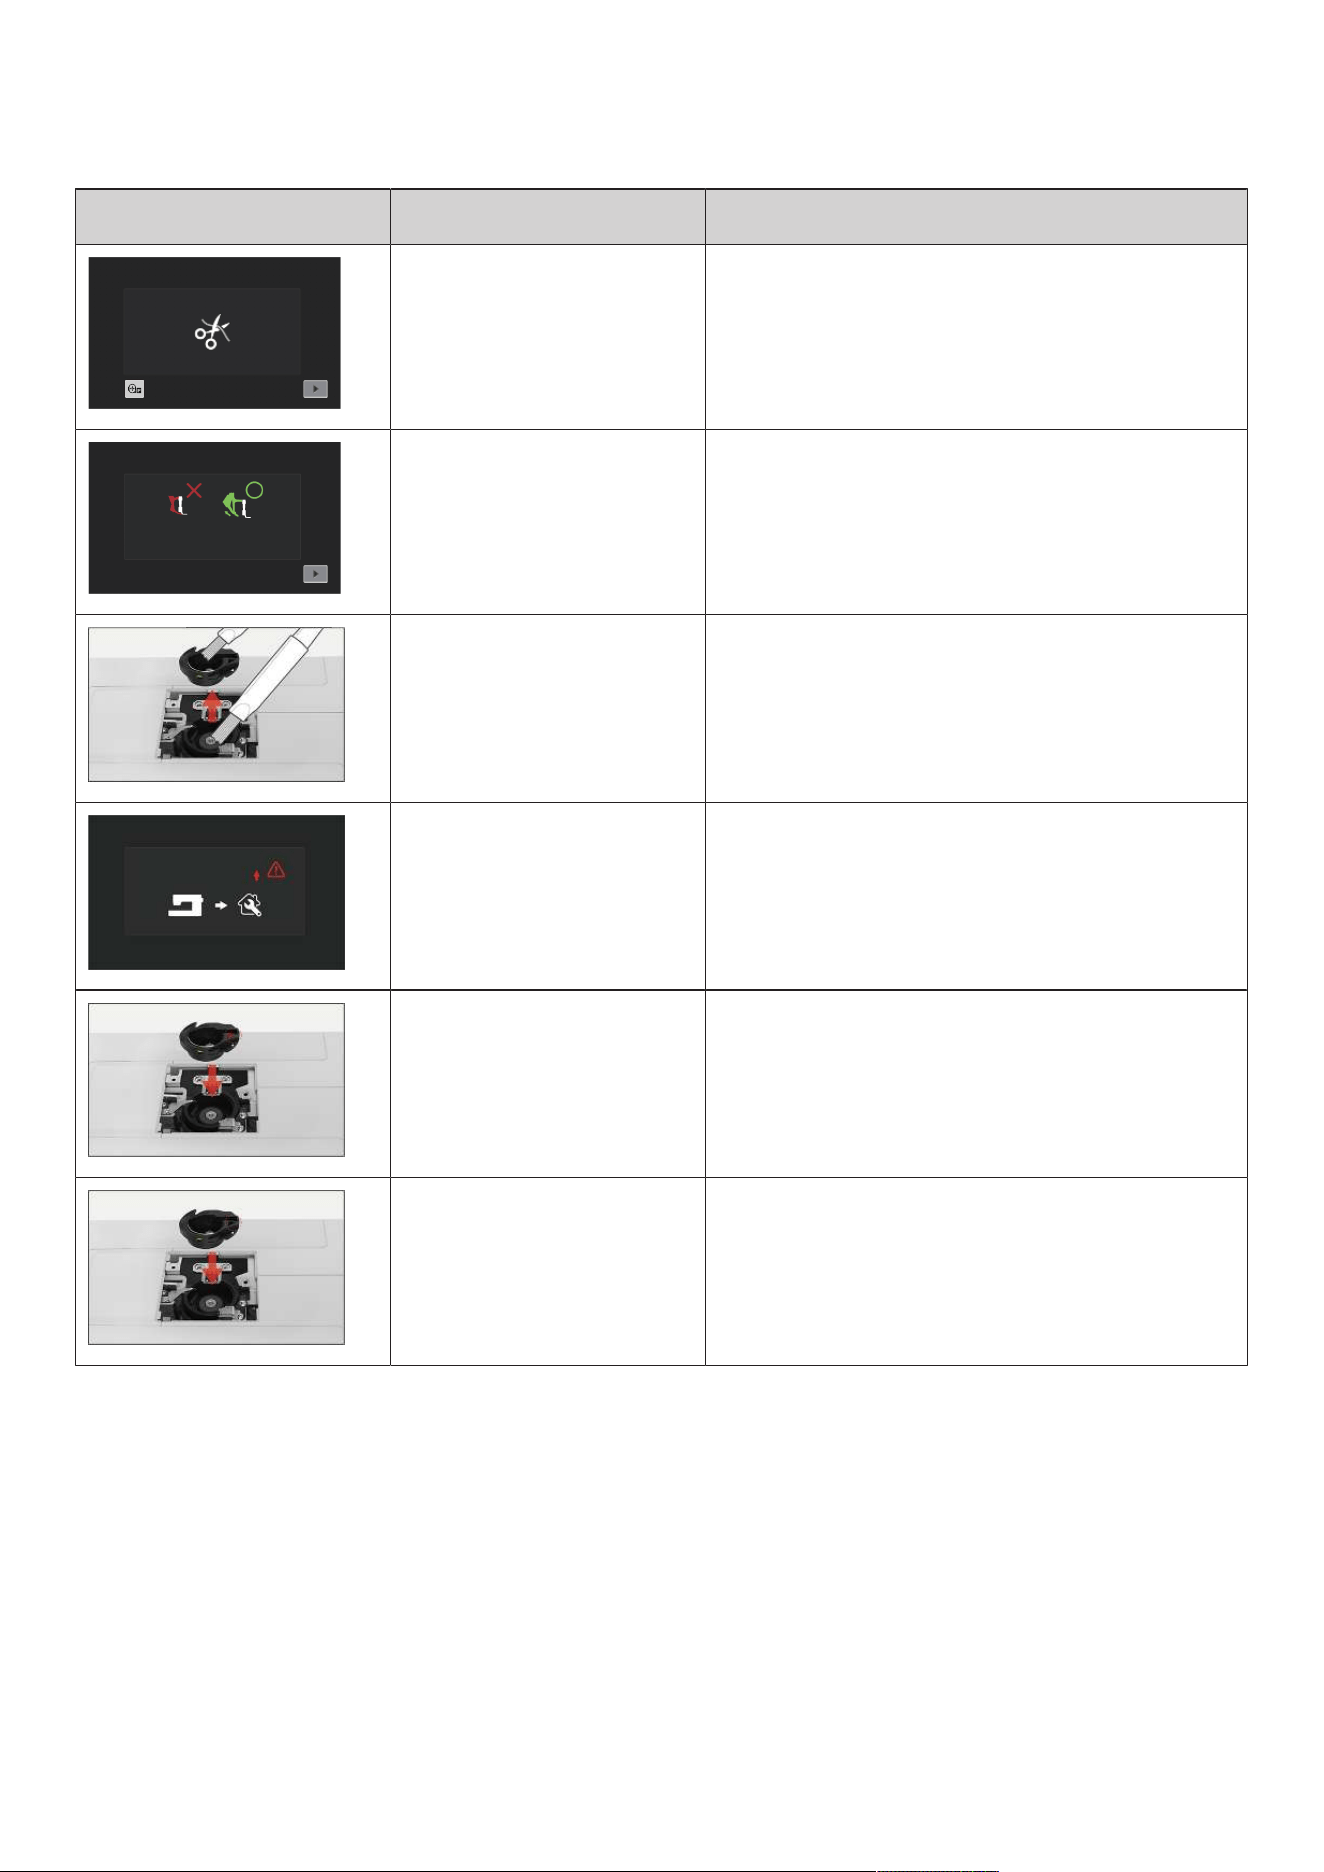
Errors and Faults
155
2023-06 EN 5020079.40A.04
Message on the Display Cause Solution
This message appears when the
thread cutter is adjusted after
embroidery starts.
> Cut the thread manually.
This message is displayed after
switching sewing mode to the
embroidery mode.
> Do not lower the Dual feed.
500,000 stitches have been sewn
with the machine since the last
cleaning advice.
> Clean the machine.
> For reference to cleaning to be made again after
switching on the machine, tap «Cancel».
The machine has reached a stitch
count of 4,000,000 since the last
maintenance by a bernette
dealer.
> Contact your specialized bernette dealer to have the
machine maintained.
> For reference to maintenance to be made again after
switching on the machine, tap «Cancel».
The Embroidery Program has
been selected.
> Insert the high thread tension bobbin case.
The Sewing Program has been
selected.
> Insert the standard bobbin case.

Technical Data
156
2023-06 EN 5020079.40A.04
19 Technical Data
Designation Value Unit
Sewign Light (LED) 300, 2 mA, Watt
Maximum Speed Sewing Mode: 1000
Embroidery Mode: 850
Stitches per Minute
Measurements (w × d × h) Without Embroidery Module: 509 ×
200 × 315
With Embroidery Module: 710 x
475 x 315
mm
Weight Machine: 9.34
Accessory Box: 0.46
Embroidery Module: 3.65
kg
Energy Consumption 90 W
Input Voltage 100 – 240 V
Protection Class (Electrical Engineering) Protection Class II
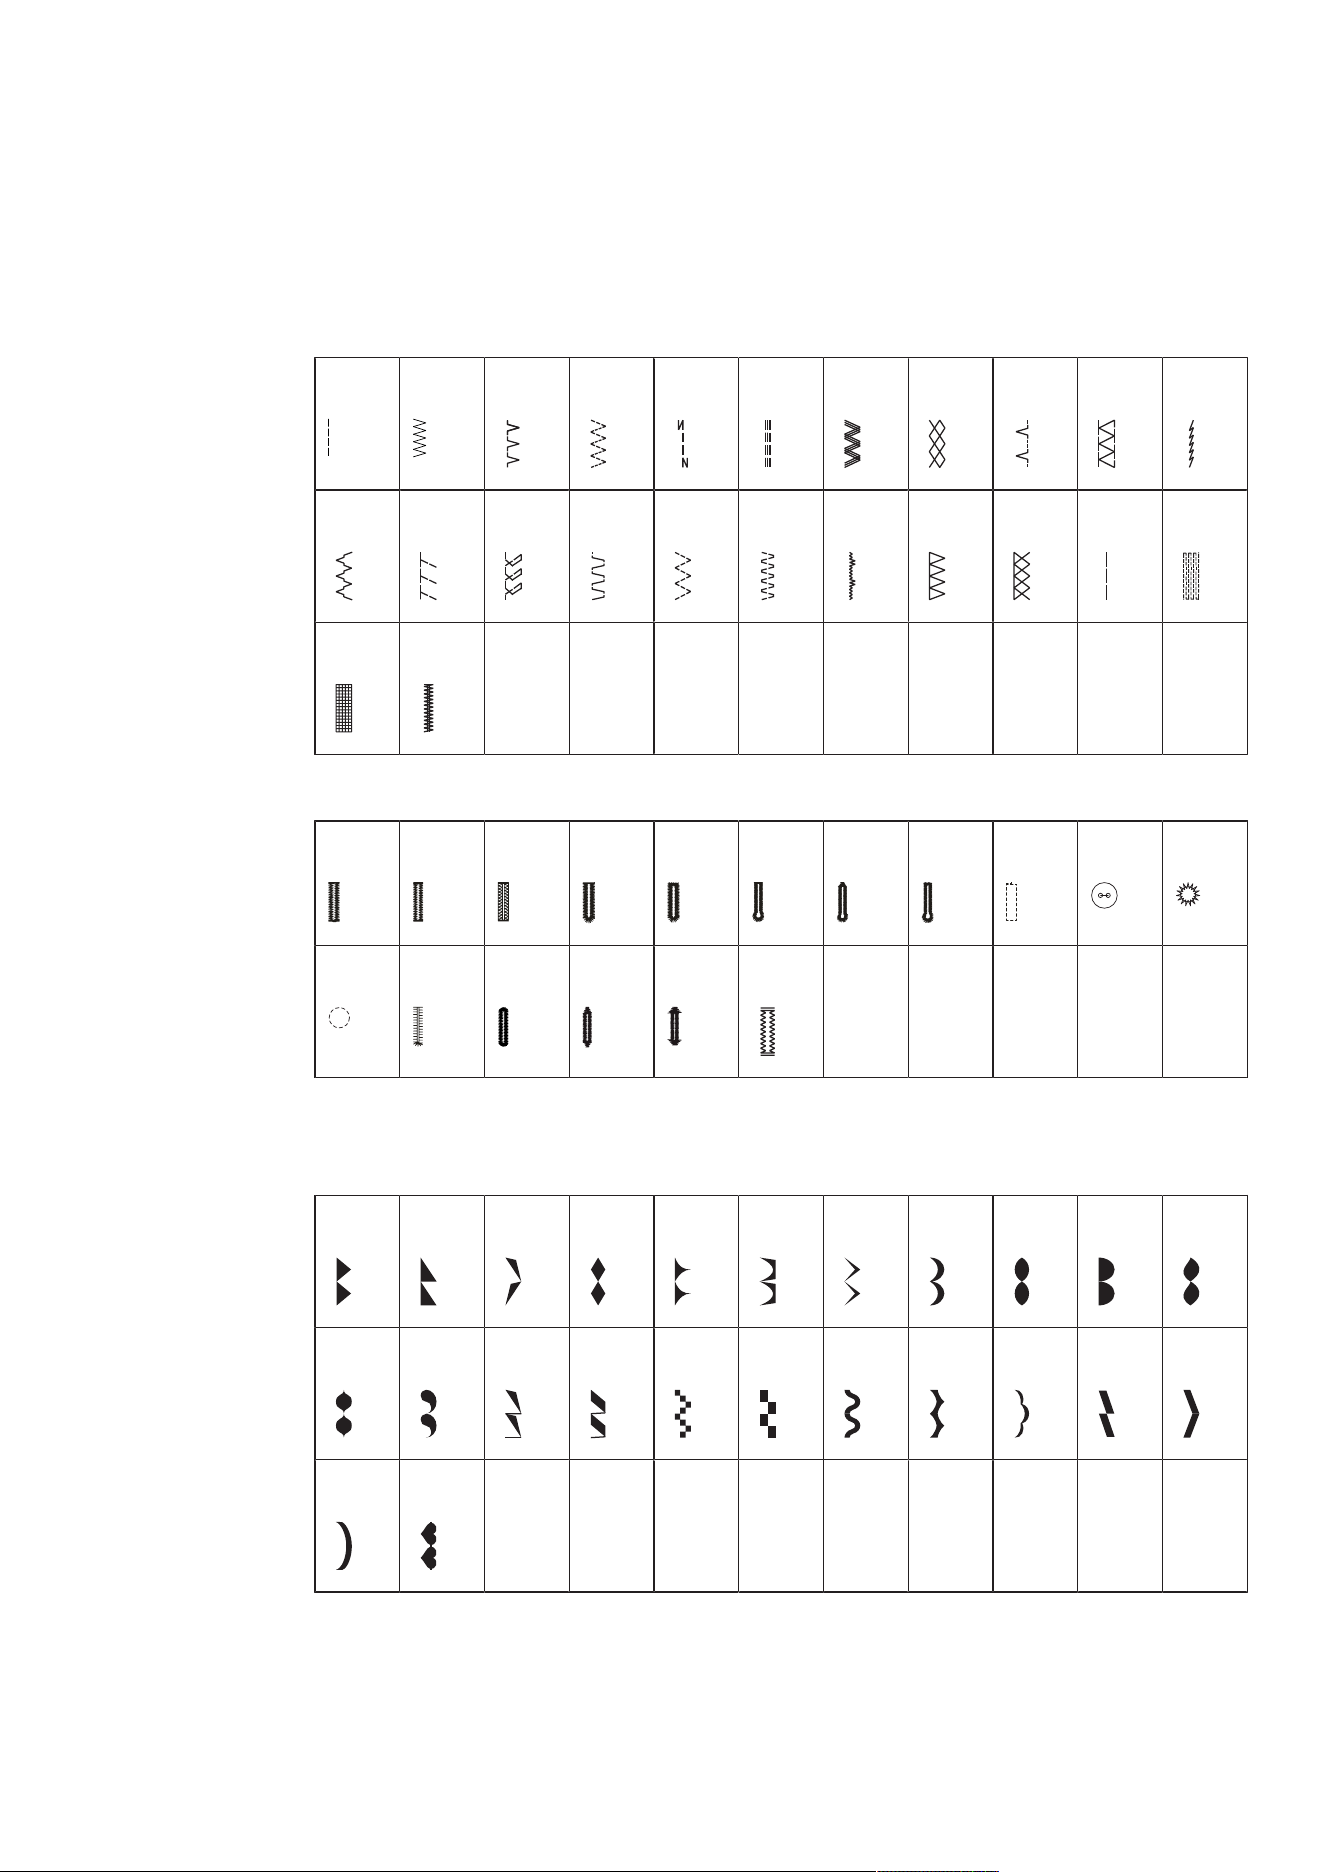
Appendix
157
2023-06 EN 5020079.40A.04
20 Appendix
20.1 Overview Stitch Patterns
Practical Stitches
1 2 3 4 5 6 7 8 9 10 11
12 13 14 15 16 17 18 19 20 21 22
23 24
Buttonholes
51 52 53 54 55 56 57 58 59 60 61
62 63 64 66 69 71
Decorative Stitches
Satin Stitches
101 102 103 104 105 106 107 108 109 110 111
112 113 114 115 116 117 118 119 120 121 122
123 124
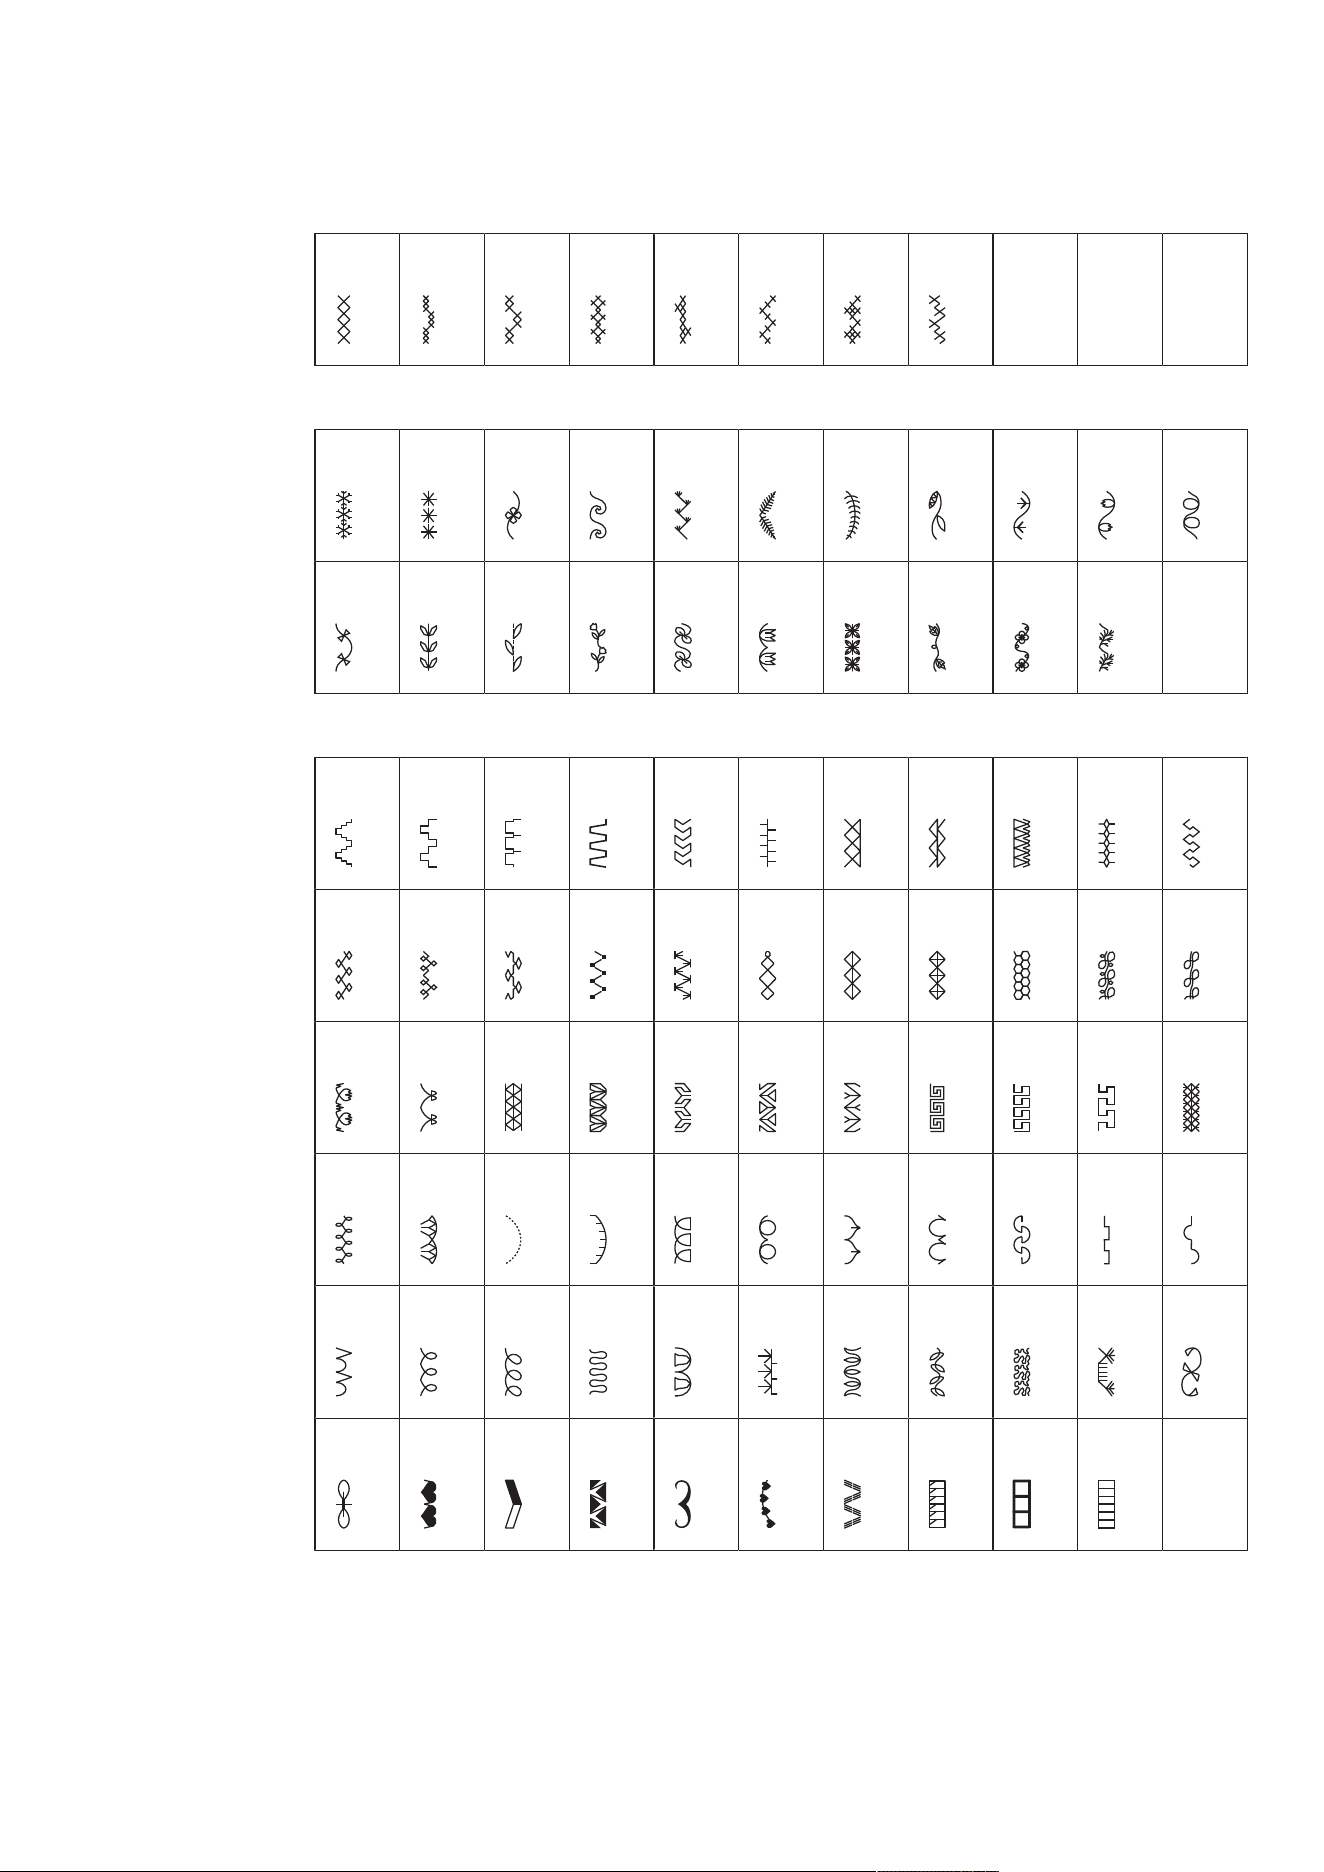
Appendix
158
2023-06 EN 5020079.40A.04
Cross Stitches
125 126 127 128 129 130 131 132
Nature Stitches
133 134 135 136 137 138 139 140 141 142 143
144 145 146 147 148 149 150 151 152 153
Geometric Stitches
154 155 156 157 158 159 160 161 162 163 164
165 166 167 168 169 170 171 172 173 174 175
176 177 178 179 180 181 182 183 184 185 186
187 188 189 190 191 192 193 194 195 196 197
198 199 200 201 202 203 204 205 206 207 208
209 210 211 212 213 214 215 216 217 218
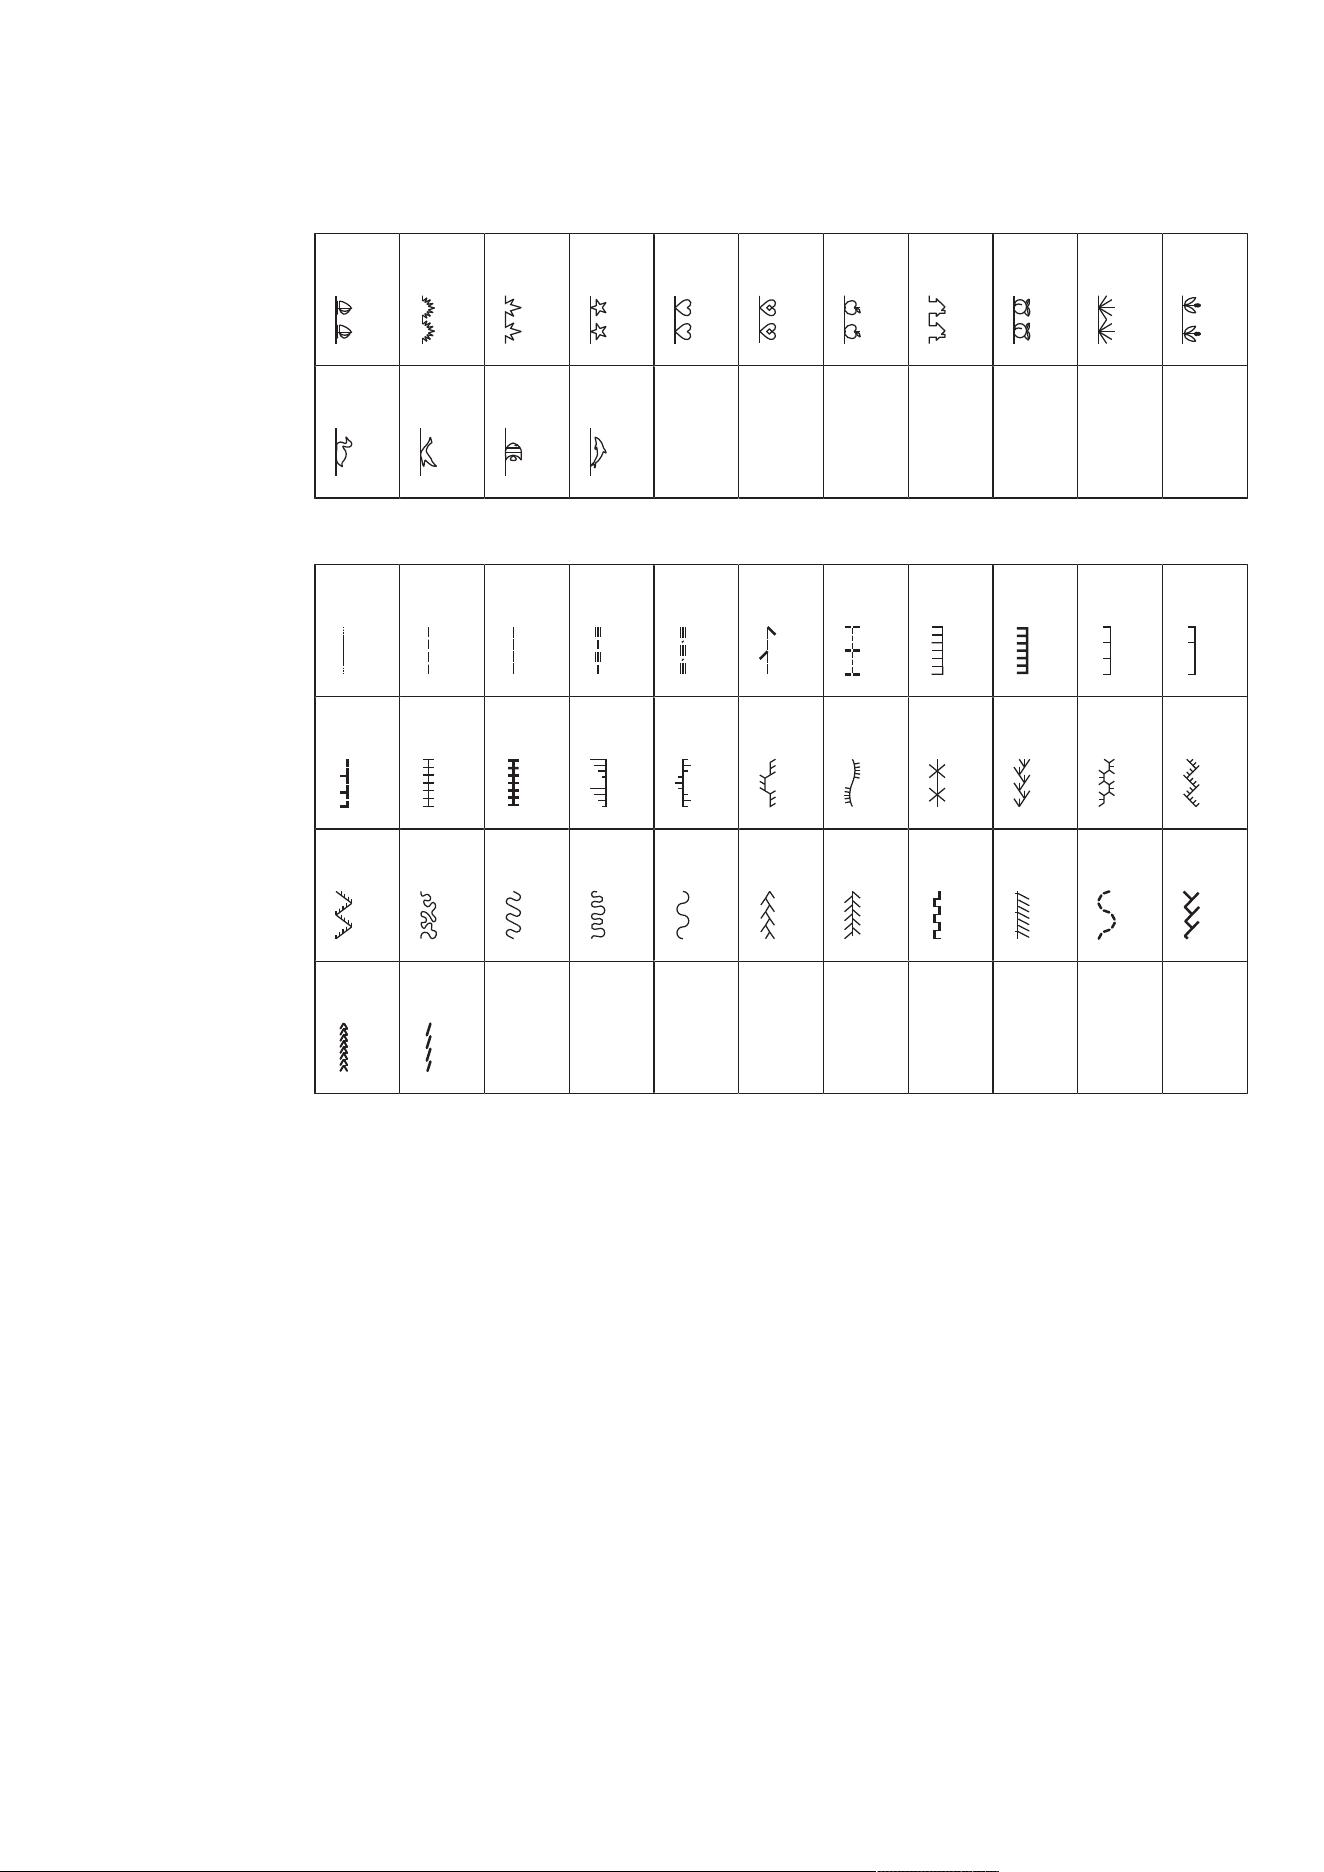
Appendix
159
2023-06 EN 5020079.40A.04
Children Stitches
219 220 221 222 223 224 225 226 227 228 229
230 231 232 233
Quilt Stitches
1001 1002 1003 1004 1005 1006 1007 1008 1009 1010 1011
1012 1013 1014 1015 1016 1017 1018 1019 1020 1021 1022
1023 1024 1025 1026 1027 1028 1029 1030 1031 1032 1033
1034 1035
Appendix
160
2023-06 EN 5020079.40A.04
20.2 Overview Embroidery Desings
Editing the Embroidery Design
Let your creativity run free. A vast selection of embroidery designs is at your disposal.
If you see one of the following pictograms below a number of the embroidery design, you can find
additional information at www.bernina.com/specialeffects.
Detached Point Appliqué
Fringe Embroidery CutWork Design (motif)
Embellishment
No. Embroidery Design
Colors
Width x
Height
in mm
No. Embroidery Design
Colors
Width x
Height
in mm
1
(002_bell)
50.4
103.0
2
(019_swiss)
150.4
129.4
3
(Edelweiss)
102.9
58.5
4
(12383-18)
90.6
171.2
5
(12490-03)
118
113.4
6
(12490-04)
146.4
122.4
7
(12490-05_
sized)
118
97.8
8
(12535-03_
1_sized)
155
116
9
(12490-5_si
zed)
49
100
10
(12587-57)
57.6
20.3
Appendix
161
2023-06 EN 5020079.40A.04
No. Embroidery Design
Colors
Width x
Height
in mm
No. Embroidery Design
Colors
Width x
Height
in mm
11
(12587-58)
52.8
116.2
12
(12587-59)
33
94.8
13
(12587-60)
126.2
126
14
(12606-33)
43
70
15
(12611-27)
136.9
137.3
16
(12611-28)
140
140
17
(12670-03)
121
144.6
18
(12669-03)
109.4
194.6
19
(19999-002
_check_S)
125
136.4
20
(21013-29)
152
40.2
21
(21013-30)
75.8
75.8
22
(21021-04)
123
150.2
23
(21021-05)
118.8
155.6
24
(21027-01_
S)
123
122.2
Appendix
162
2023-06 EN 5020079.40A.04
No. Embroidery Design
Colors
Width x
Height
in mm
No. Embroidery Design
Colors
Width x
Height
in mm
25
(21027-14)
120.8
120.8
26
(32078-02)
123.4
172.9
27
(BE790308_
bernette)
155.2
178.2
28
(FB148_48)
101
89.6
29
(FB158_48)
39.6
53.2
30
(NA597)
56.6
52.8
31
(NA614)
102
101.4
32
(NA617)
96.6
96.6
33
(NB843_48)
87.6
121.2
Quilt Designs
No. Embroidery Design
Colors
Width x
Height
in mm
No. Embroidery Design
Colors
Width x
Height
in mm
1
(12380-04)
83
89.8
2
(12380-22)
110.6
60.8
Appendix
163
2023-06 EN 5020079.40A.04
No. Embroidery Design
Colors
Width x
Height
in mm
No. Embroidery Design
Colors
Width x
Height
in mm
3
(12380-43)
123.6
123.6
4
(12383-09)
113.0
77.2
5
(12607-20)
122.4
122.4
6
(BD298_L_b
ernette)
155
154.6
7
(BD502_48)
61.4
60.8
8
(BD513_48)
63.4
63.4
9
(BD796_48)
47.2
172.7
10
(BD800_48)
126.1
122.3
11
(BD837_48)
123.6
123.6
12
(NB934_48)
132.4
164.8
13
(Quilt 02)
101.8
101.6
14
(Quilt 09)
139.6
139.6
15
(Quilt 10)
139.6
139.6
16
(Quilt 11)
139.6
139.6
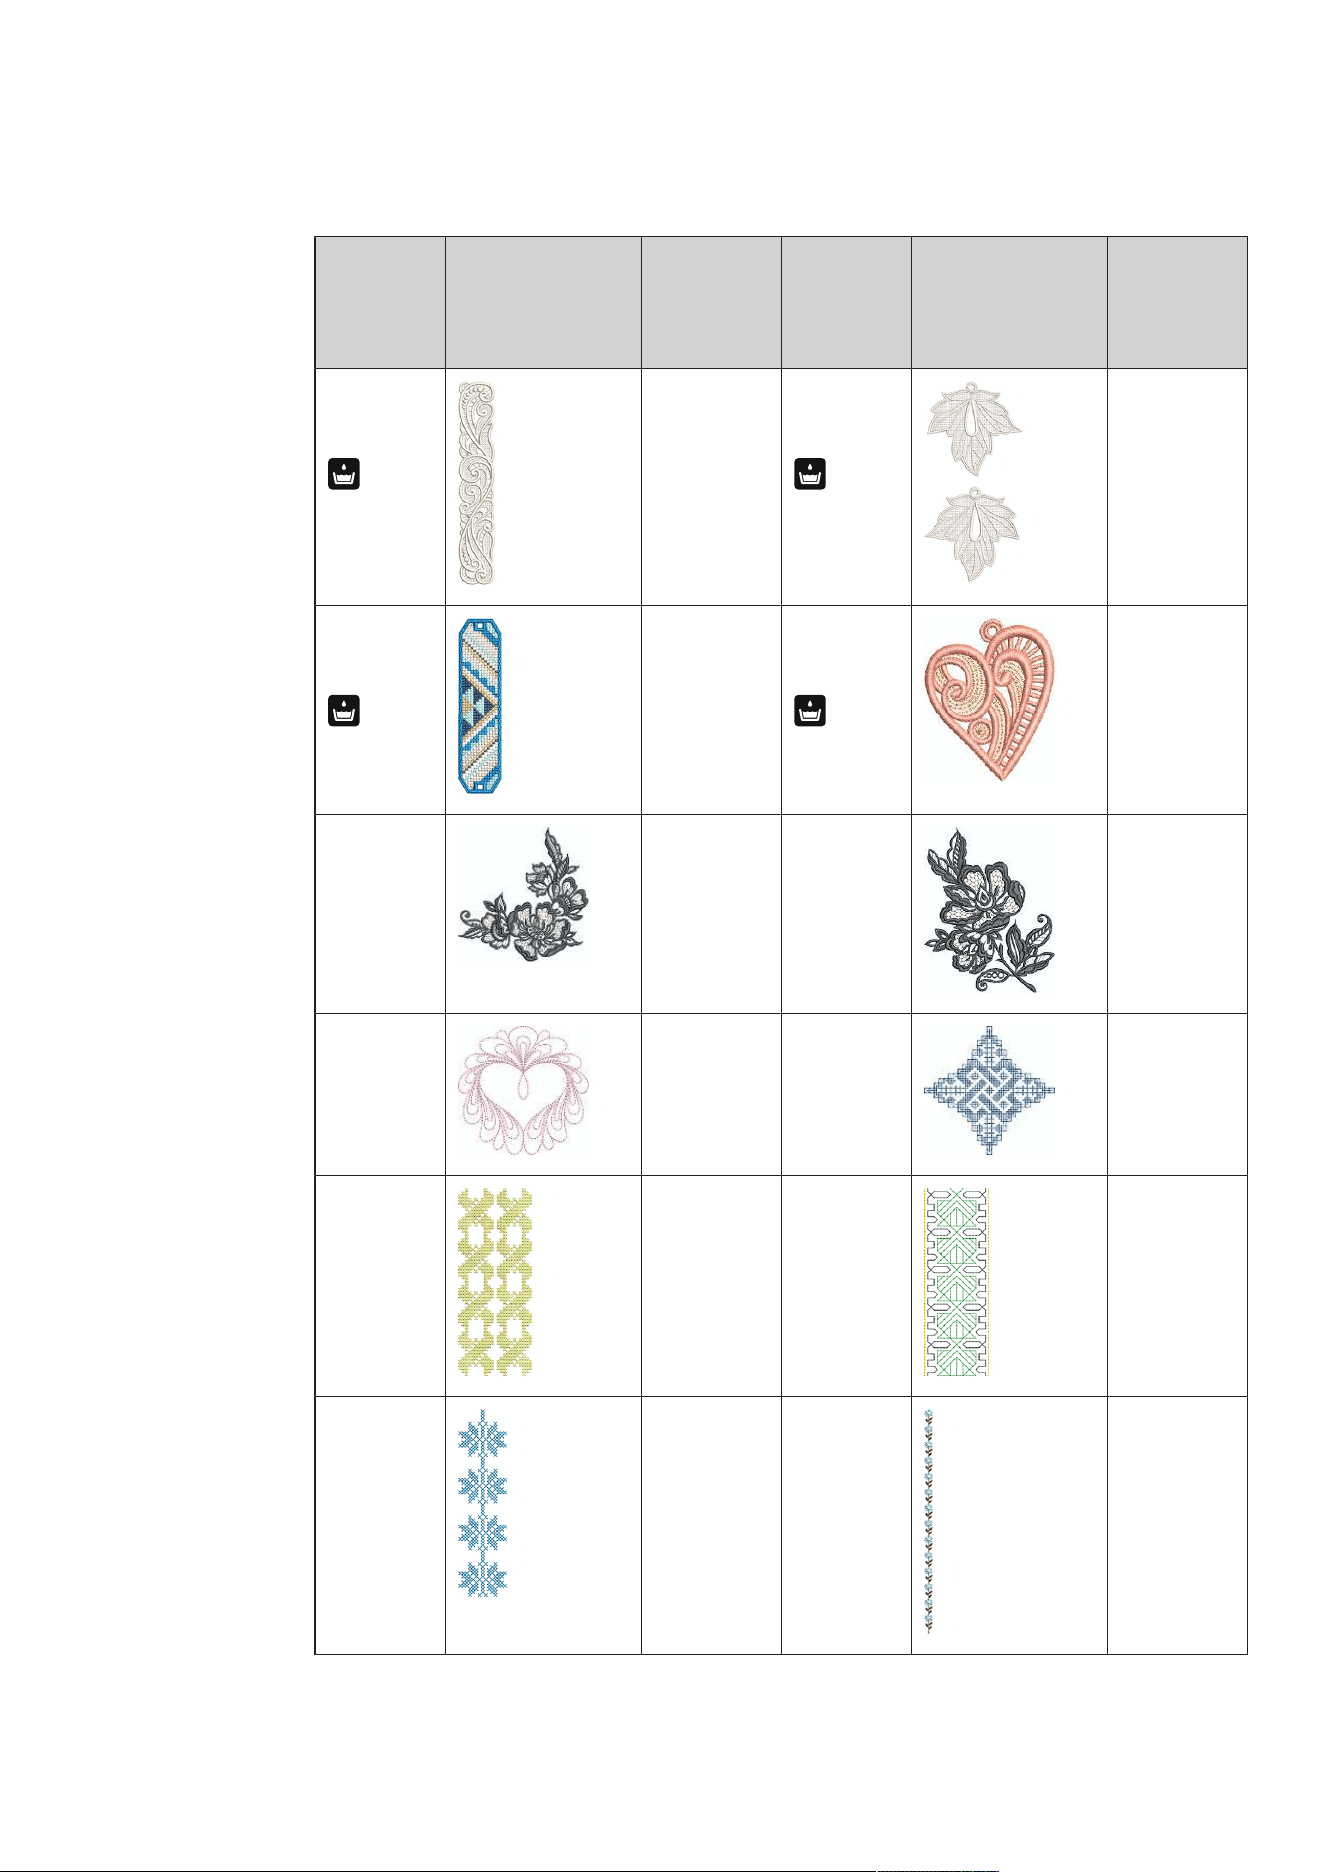
Appendix
164
2023-06 EN 5020079.40A.04
Borders and Lace
No. Embroidery Design
Colors
Width x
Height
in mm
No. Embroidery Design
Colors
Width x
Height
in mm
1
(12398-29)
26.4
153
2
(12410-08)
80.6
168.2
3
(12594-03)
36.4
152
4
(12659-01)
45.2
57.8
5
(BC015105)
118.4
123
6
(BC01506)
103
131.8
7
(BD567_48)
108
108.2
8
(BE790504)
121.4
121.4
9
(BE790702)
73
190.5
10
(BE790704)
72.5
217.7
11
(BE790705)
42.3
169.3
12
(FQ736_48)
7.9
253.2
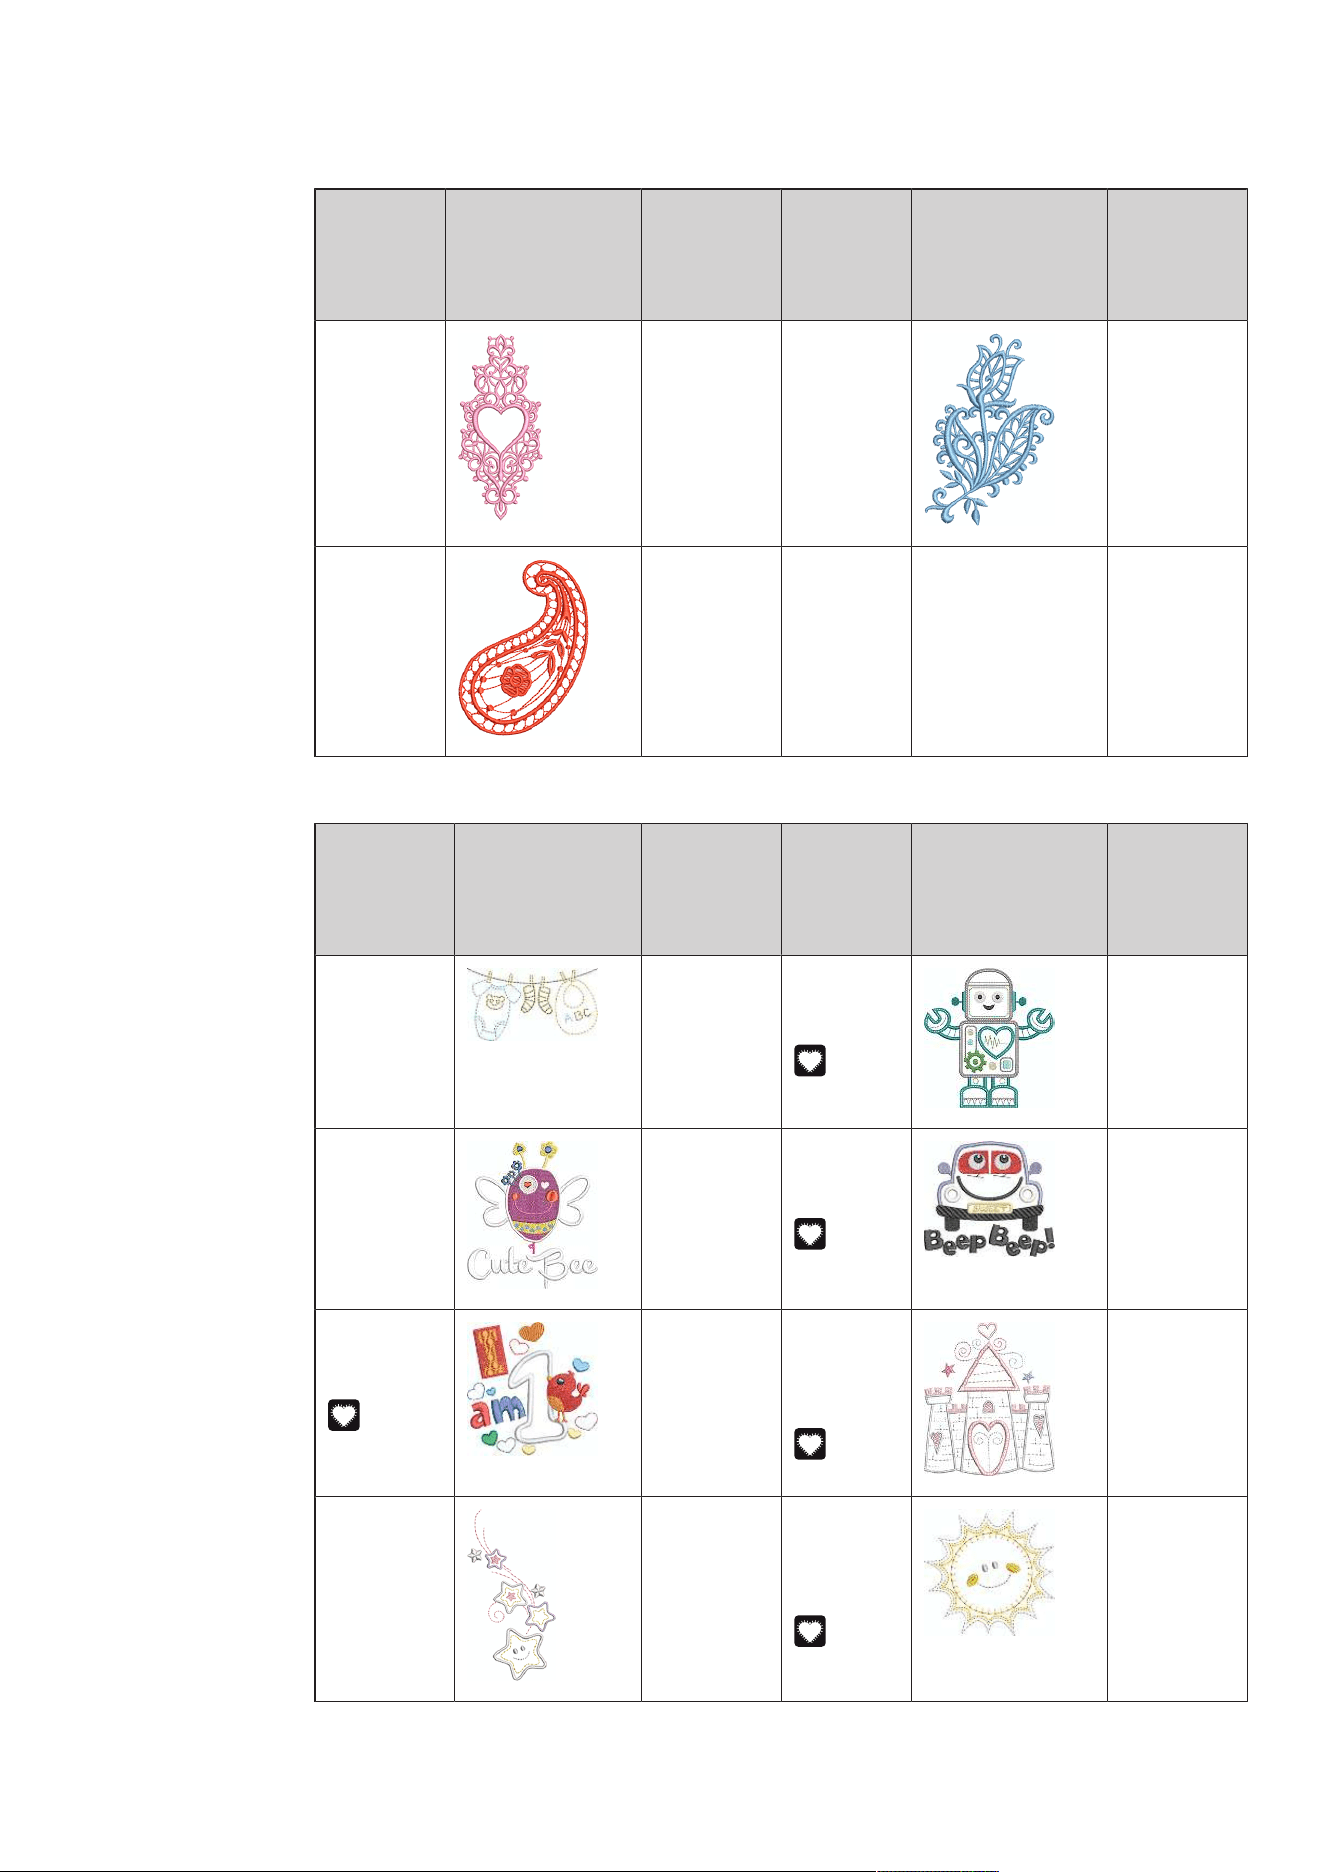
Appendix
165
2023-06 EN 5020079.40A.04
No. Embroidery Design
Colors
Width x
Height
in mm
No. Embroidery Design
Colors
Width x
Height
in mm
13
(NY217)
67
151.6
14
(NX952)
65.6
98.6
15
(NX238)
71.1
97.9
Children
No. Embroidery Design
Colors
Width x
Height
in mm
No. Embroidery Design
Colors
Width x
Height
in mm
1
(12401-17)
98.8
55.2
2
(12590-03)
135.5
147
3
(BE790306)
132.2
151.4
4
(BE790307)
141.5
126.9
5
(BE790313)
99
102.4
6
(CM193_48
)
106.6
127.4
7
(CM368_48)
70.2
140
8
(CM376_48
)
100.4
97.6
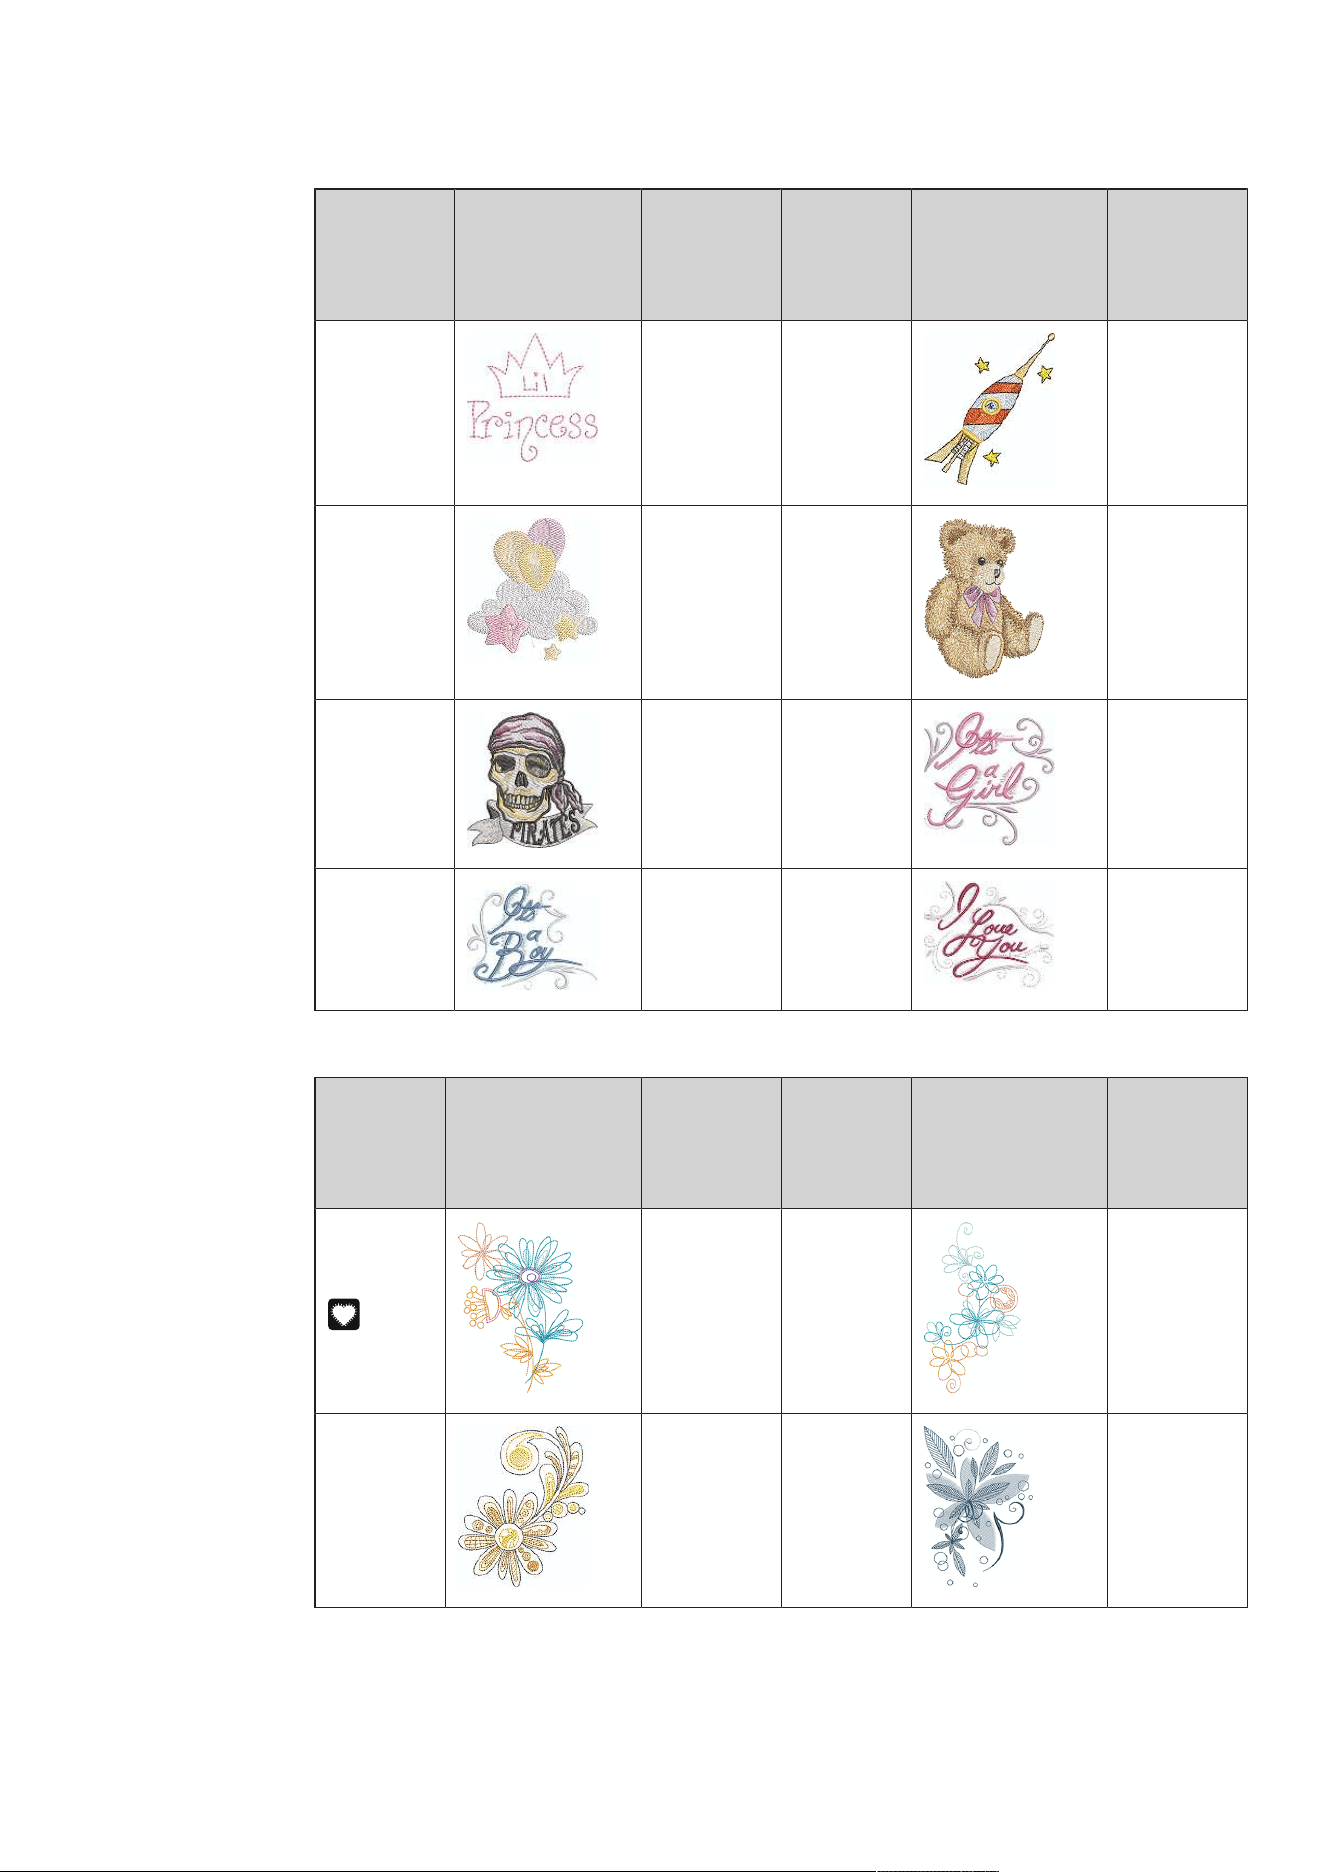
Appendix
166
2023-06 EN 5020079.40A.04
No. Embroidery Design
Colors
Width x
Height
in mm
No. Embroidery Design
Colors
Width x
Height
in mm
9
(NA667)
83.8
83.8
10
(NB302-48)
68.2
80.6
11
(CK229)
88.8
98
12
(CM428_48
)
78.2
106.4
13
(MS974)
94.2
98.6
14
(NZ612)
96
99.6
15
(NZ613)
103
84.1
16
(NZ611)
99.6
81.2
Flowers
No. Embroidery Design
Colors
Width x
Height
in mm
No. Embroidery Design
Colors
Width x
Height
in mm
1
(12392-01)
112.6
157.4
2
(12392-13)
112.6
203.4
3
(21008-24)
97.6
121.6
4
(BE790406)
120.0
180.8
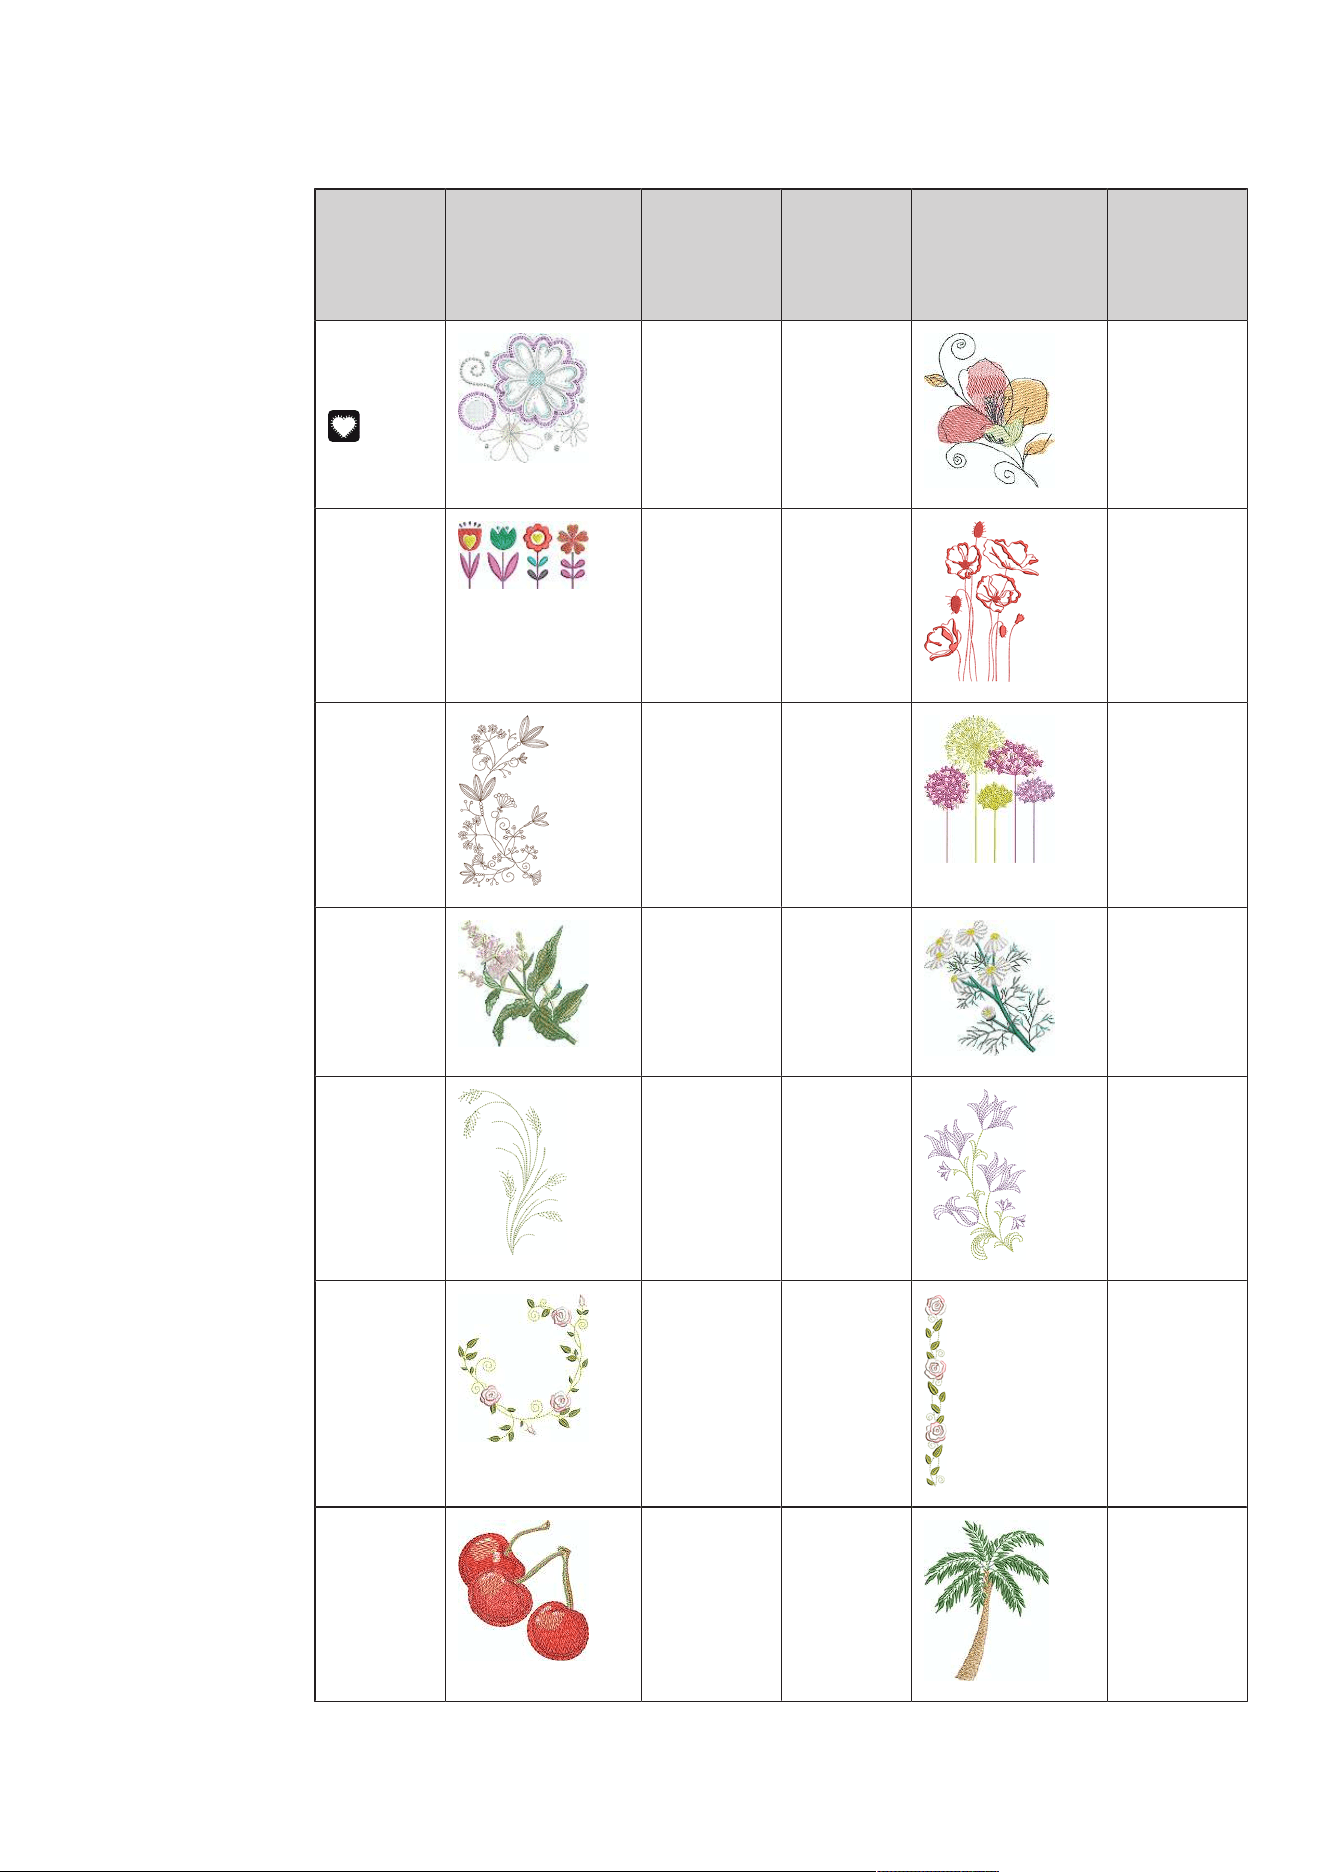
Appendix
167
2023-06 EN 5020079.40A.04
No. Embroidery Design
Colors
Width x
Height
in mm
No. Embroidery Design
Colors
Width x
Height
in mm
5
(21012-04)
123.2
124
6
(80001-23)
85
101.6
7
(BE790304_
sized)
115.2
59.6
8
(BE790401_
bernette)
155.1
220.9
9
(BE790402_
sized)
135.6
259
10
(BE790404_
bernette)
157
180.2
11
(FI135)
88.6
87.1
12
(FI136)
84.7
89.2
13
(FQ527_48)
90.4
141.4
14
(FQ562_48)
90.4
156.4
15
(FQ808_48)
123.8
142.4
16
(FQ810_48)
23.6
206.4
17
(NA146)
63.2
69.3
18
(NB039_48)
97
127
Appendix
168
2023-06 EN 5020079.40A.04
No. Embroidery Design
Colors
Width x
Height
in mm
No. Embroidery Design
Colors
Width x
Height
in mm
19
(Rose_S)
63.9
129.2
20
(Sunflower)
91
88.2
21
(FP005)
80.8
95.2
22
(FM856)
76.2
68.2
23
(FQ681_48)
107
138.8
24
(FP238_S)
61.2
65.4
25
(FQ239_48)
62.6
90.4
Seasons
No. Embroidery Design
Colors
Width x
Height
in mm
No. Embroidery Design
Colors
Width x
Height
in mm
1
(12384-02)
132.8
203.4
2
(12384-11)
84.4
189.8
3
(12400-03)
123.4
161.3
4
(12400-11)
74.2
211.9
Appendix
169
2023-06 EN 5020079.40A.04
No. Embroidery Design
Colors
Width x
Height
in mm
No. Embroidery Design
Colors
Width x
Height
in mm
5
(12427-01)
133.8
167.6
6
(12427-11)
81.6
126.2
7
(12443-03)
120.4
161.4
8
(12443-11)
73.4
193.1
9
(BE790301_
sized)
116.2
81.4
10
(BE790303)
69.6
70.2
11
(NA006)
72.4
91.8
12
(HG747_48
)
124
147.4
13
(12421-03)
45.8
48.4
14
(12421-11)
39.9
43.6
15
(12421-37)
67.4
61
16
(FQ749_48)
77.6
94.8
17
(HE252)
88.1
144.9
18
(HE255)
133.2
127.2
Appendix
170
2023-06 EN 5020079.40A.04
No. Embroidery Design
Colors
Width x
Height
in mm
No. Embroidery Design
Colors
Width x
Height
in mm
19
(HE563)
63.2
129.4
20
(HE919_48)
89.2
69.2
21
(HG053_48
)
122
121.8
22
(HG795_48
)
89.2
164.4
23
(HD382)
66
97.4
24
(HD246)
80.8
99
25
(HE179)
89
95.2
Asia
No. Embroidery Design
Colors
Width x
Height
in mm
No. Embroidery Design
Colors
Width x
Height
in mm
1
(FB276_48_
sized)
115.1
103.2
2
(FB283_48)
102.4
109.4
3
(FQ194_48)
120.2
118.4
4
(NB124_48
_sized
100%)
155
118.6
Appendix
171
2023-06 EN 5020079.40A.04
Sport/Hobby
No. Embroidery Design
Colors
Width x
Height
in mm
No. Embroidery Design
Colors
Width x
Height
in mm
1
(12465-33)
80
79.8
2
(NX688)
92.2
85.6
3
(12611-08)
80
119.7
4
(12611-21)
71.7
155.8
5
(12611-22)
71.7
155.8
6
(12611-23)
71.7
155.8
7
(12677-01_
sized)
117.2
115.2
8
(12677-02)
116.4
115
9
(12677-03_
sized)
117
82.4
10
(80085-25)
134.8
166.2
11
(BE790601_
S)
80.3
80.2
12
(BE790602)
80.2
75.6
13
(BE790603)
80.4
74.8
14
(BE790604)
79.8
80.4
Appendix
172
2023-06 EN 5020079.40A.04
No. Embroidery Design
Colors
Width x
Height
in mm
No. Embroidery Design
Colors
Width x
Height
in mm
15
(BE790604)
79.6
79.6
16
(BE790606_
S)
100.2
86
17
(BE790607)
79.8
74.4
18
(BE790608)
80.4
80
19
(SP980)
63.3
63.6
20
(SP989)
101.6
82.4
21
(CK510)
76.2
60
22
(CK522)
70.8
53.2
23
(CK970)
84.8
81.6
24
(LT749)
99.2
38.4
25
(LT920)
89.1
55.6
26
(CM442_48
)
46.4
47
27
(LT870)
97.6
57
28
(NB759)
98.8
61.6
29
(RC675_S)
101.6
79.6
30
(RC765_48)
100.4
99
Appendix
173
2023-06 EN 5020079.40A.04
No. Embroidery Design
Colors
Width x
Height
in mm
No. Embroidery Design
Colors
Width x
Height
in mm
31
(SR067)
87.6
96.8
32
(SR589)
95.2
66.6
Animals
No. Embroidery Design
Colors
Width x
Height
in mm
No. Embroidery Design
Colors
Width x
Height
in mm
1
(BE790302
)
68.4
66.4
2
(12672-02
)
138
133.4
3
(CM022_4
8)
89.2
97
4
(CM142_4
8)
56.6
66.8
5
(CM211_4
8)
80.6
70.6
6
(CM213_4
8)
58.2
102
7
(CM220_4
8)
71.4
71.8
8
(CM226_4
8)
63.2
63
9
(CM286_4
8)
97.8
82.4
10
(CM362_4
8_sized)
115.1
107.8

Appendix
174
2023-06 EN 5020079.40A.04
No. Embroidery Design
Colors
Width x
Height
in mm
No. Embroidery Design
Colors
Width x
Height
in mm
11
(CM384_4
8)
77.4
80.6
12
(CM465_4
8_sized)
48.2
33
13
(DEC104)
10.4
13
14
(FQ617_
48)
118
198.2
15
(FQ624_48
)
64.5
144.2
16
(FQ945_48
_S)
93.8
95
17
(LJ699)
93.2
98
18
(WM785)
84.6
103.4
19
(WP201_4
8)
76.2
92
20
(WP325_4
8)
77.8
94
21
(WP217_4
8)
93.8
78.2
22
(WP224_4
8)
100.4
111
23
(WP415_4
8)
132.4
148.4
24
(WP421_4
8)
95.8
137.6
Appendix
175
2023-06 EN 5020079.40A.04
No. Embroidery Design
Colors
Width x
Height
in mm
No. Embroidery Design
Colors
Width x
Height
in mm
25
(WS610_4
8_sized)
120
104.4
26
(CM442H
D26748)
65.2
51.4
27
(WM784)
106
114.4
28
(BE790305
)
118.2
145.6
29
(BE790309
)
87.5
149.8
30
(BE790311
)
114.1
152.5
31
(BE790312
)
122
133
CutWork
No. Embroidery Design
Colors
Width x
Height
in mm
No. Embroidery Design
Colors
Width x
Height
in mm
1
(CM594_4
8)
96
75.6
2
(CM594_4
8_CWA01)
90.8
110.0
3
(CM594_4
8_CWA02)
43.6
50.2
4
(FS344_48
)
94.4
101
Appendix
176
2023-06 EN 5020079.40A.04
No. Embroidery Design
Colors
Width x
Height
in mm
No. Embroidery Design
Colors
Width x
Height
in mm
5
(FS345_48
)
92.6
104.9
6
(FS345_48
_CWA)
80.6
72.2
Campaign
No. Embroidery Design
Colors
Width x
Height
in mm
No. Embroidery Design
Colors
Width x
Height
in mm
1
(Campaign
_3_elemen
ts)
118.9
216.7
2
(Campaign
_1_elemen
t )
75.3
69.3
3
(FB060)
75.7
72.9
4
(FB062)
60
91
5
(FB069)
53.1
87.4

Index
177
2023-06 EN 5020079.40A.04
Index
A
Adjusting the Hoop............................................................... 52
Adjusting the Presser Foot Position via the Knee Lifter of the Free
Hand System................................................................... 32
Adjusting the Upper Thread Tension ..................................... 46
Alphabets ............................................................................. 89
Altering the Stitch Density................................................... 133
Attaching the Hoop ............................................................ 120
Attaching the Knee Lifter of the Free Hand System ............... 27
Attaching the Module......................................................... 111
Attaching the Presser Foot Sole............................................. 32
Attaching the Seam Guide.................................................... 33
B
Buttonholes .......................................................................... 91
C
Calibrating the Display.......................................................... 56
Calling up the Creative Consultant........................................ 60
Calling up the Tutorial .......................................................... 59
Changing the Needle............................................................ 34
Changing the Presser Foot .................................................... 32
Changing the Presser Foot Holder......................................... 32
Changing the Stitch Plate...................................................... 35
Checking the Firmware Version............................................. 57
Checking the Stitch Plate in the User Interface ...................... 36
Cleaning the Feed Dog ....................................................... 145
Cleaning the Hook.............................................................. 146
Combination Mode............................................................... 68
Combining Embroidery Designs .......................................... 133
D
Deactivating Securing Stitches............................................... 52
Decorative Stitches................................................................ 87
Dual Feed ............................................................................. 63
E
Embroidery Module ............................................................ 105
Embroidery Test.................................................................. 108
Environmental Protection...................................................... 10
Error Messages ................................................................... 151
Explanation of Symbols......................................................... 11
F
Fabric Thickness Measurement.............................................. 50
Feed Dog Up/Down .............................................................. 31
Fitting the Embroidery Needle............................................. 114
Fitting the Stitch Plate......................................................... 114
Foot Control
Connecting ..................................................................... 26
H
Height Compensating Tool ................................................... 86
I
Indicating the Presser Foot Sole in the User Interface............. 33
Inserting the Spool................................................................ 30
Inserting the Spool Cap ........................................................ 28
M
Maintenance and Cleaning ................................................. 145
N
Needle Stop Up/Down (Permanent)....................................... 35
Needle, Thread, Fabric .......................................................... 21
Needle/Thread Combination ................................................. 25
Needles Overview ................................................................. 21
O
Overview of Embroidery Designs......................................... 160
Overview of the Stitch Patterns ........................................... 157
P
Power Cable ......................................................................... 26
USA/Canada ................................................................... 26
Practical Stitches ................................................................... 74
Preparing the Threading ....................................................... 37
Removing the Presser Foot Sole ............................................ 32
Programming the Securing Stitches....................................... 46
Q
Quilting ................................................................................ 98
R
Raising/Lowering the Needle................................................. 28
Regulating the Speed............................................ 28, 64, 125

Index
178
2023-06 EN 5020079.40A.04
Restoring the Default Settings............................................... 56
Reverse Sewing..................................................................... 49
S
Safety Instructions................................................................... 7
Saving a Stitch Pattern Combination ..................................... 71
Second Spool Pin .................................................................. 29
Selecting a Stitch Pattern ...................................................... 62
Selecting an Embroidery Design .......................................... 116
Selecting the Language......................................................... 58
Setting the Display Brightness ............................................... 55
Setting the Display Color....................................................... 54
Setting the Lower Thread Indicator ....................................... 54
Setting the Presser Foot Pressure........................................... 34
Setting the Sewing Light....................................................... 55
Setting the Upper Thread Indicator ....................................... 54
Sewing Corners .................................................................... 86
Slide-on Freearm Extension Table.......................................... 31
Sound On/Off ...................................................................... 55
Stitch Designer.................................................................... 101
T
Technical Specifications....................................................... 156
Threading the Bobbin Thread................................................ 44
Threading the Twin Needle ................................................... 40
Threading the Upper Thread ................................................. 37
Troubleshooting.................................................................. 148
U
Updating the Machine Firmware........................................... 56
Using eco Mode.................................................................... 59
Using the Spool Net.............................................................. 29
W
Winding the Bobbin Thread .................................................. 42

© BERNINA International AG
Steckborn CH, www.bernina.com
www.mybernette.com/b79
2023-06 EN
5020079.40A.04