
SKU: BRU-14-AZ-HM/BRU-14
MODEL: YC-408B
Instruction Manua
C
F
°
°
BUILT-IN
WINE COOLER
Email: support@euhomy.com
Facebook: @Euhomy.Official


Congratulations
Be sure to register at
www.euhomy.com/register
for updates, warranty, and other relevant information.
Dear Customer:
Welcome to the Euhomy family. Thank you for purchasing one of our products.
Our goal is to provide you with superior service. If there is anything missing from or wrong with
your order, or if you have any questions about using our product, PLEASE contact us.
Email: [email protected]
Facebook: @Euhomy.Official
The Euhomy team is available 24/7 to address your questions, comments, and concerns. Your
satisfaction is our ultimate goal. We want to make everything right so you'll share your positive
experience with other shoppers on Amazon.
If you experience any problems, please send an email to [email protected].
Our mission:
* To be the most trusted appliance brand.
* To create practical, compact appliances that better your life.
TABLE OF CONTENTS
IMPORTANT SAFETY INSTRUCTIONS 3
PRODUCT DIAGRAM 6
INSTALLATION INSTRUCTIONS 7
OPERATION INSTRUCTIONS 10
CARE & MAINTENANCE 13
TROUBLESHOOTING GUIDE 15-16
Before Using Your Wine Cooler 7
Installing the Stainless Steel Handle 7
Installing the Wine Cooler 8
Recommended Temperature Settings 10
Controls 10
Storage 11
Door Lock 11
Shelves 11
Removing a Shelf 11
Reversing the door 12
Cleaning Your Wine Cooler 13
Power Failure 13
While on Vacation 13
Moving Your Wine Cooler 13
Energy Saving Tips 14
Charcoal Filtration System 14
03
IMPORTANT SAFETY INSTRUCTIONS
DANGER
Your safety and the safety of others are very important.
This wine cooler complies with the applicable safety requirements and is safe for daily
use. However, basic safety precautions should always be followed when using an
electrical appliance, to reduce the risk of fire, electric shock, and personal injury.
Plug the cooler into its own electrical outlet with a voltage rating that matches the rating
label on the cooler (115/120V AC only, 60Hz, 10A). Use receptacles that cannot be
turned off by a switch or pull chain. Be sure that the plug is fully inserted into the
receptacle.
Plug into a grounded 3-prong outlet. Do not under any circumstances cut or remove the
third ground prong from the power cord supplied.
To protect against electric shock, do not immerse the wine cooler, plug or cord in water
or other liquids.
Never unplug the cooler by pulling the power cord. To disconnect the wine cooler, always
grip the plug firmly and pull straight out from the wall outlet.
Repair or replace immediately all power cords that have become frayed or otherwise
damaged. Do not use a cord that shows cracks or abrasion damage along its length or at
either end.
Do not connect or disconnect the electric plug when your hands are wet. Do not operate
the cooler with wet hands, while standing on a wet surface or while standing in water.
Unplug the wine cooler or disconnect power before cleaning or servicing. Failure to do so
can result in electrical shock or death.
When moving the wine cooler, be careful not to roll over or damage the power cord.
Never clean wine cooler parts with flammable fluids. These fumes can create a fire
hazard or explosion. And do not store or use gasoline or other flammable vapor and
liquids in the vicinity of this or any other appliance. The fumes can create a fire hazard
or explosion.
Do not attempt to repair or replace any part of your wine cooler unless it is specifically
recommended in this manual. All other servicing should be referred to a qualified
technician.
An empty wine cooler can be dangerous to children. Remove any latches, lids, locks,
and/or doors from unused or discarded wine coolers to prevent child entrapment and
suffocation. Never allow children to operate, play with or crawl inside this wine cooler.
03

1.This appliance is not intended for use by persons (including children) with reduced physical, sensory or
mental capabilities, or lack of experience and knowledge, unless they have received supervision or
instruction onthe use of the appliance by a person responsible for their safety.
2. Children should be supervised to ensure that they do not play with the appliance.
3. This appliance can be used by children aged 8 years and above and persons with reduced physical,
sensory or mental capabilities or lack of experience and knowledge if they have received supervision or
instruction on the safe use of the appliance and understand the hazards involved. Children
shall not play with the appliance. Cleaning and user maintenance shall not be performed by children
without supervision.
4. If the supply cord is damaged, it must be replaced by the manufacturer, its service agent or similarly
qualified person to avoid a hazard.
5. To avoid a hazard due to instability of the appliance, it must be installed in accordance with the
instructions.
6. When positioning the appliance, ensure the supply cord is not trapped or damaged.
7. Do not locate multiple portable socket-outlets or portable power supplies at the rear of the appliance.
8. Keep ventilation openings, in the appliance enclosure or in the built-in structure,clear of obstruction.
9. Do not use mechanical devices or other means to accelerate defrosting,other than those
recommended by the manufacturer.
10. Do not damage the refrigerant circuit.
11. Do not use electrical appliances inside the drink storage compartments of the appliance unless they
are recommended by the manufacturer.
12. Do not store explosive substances such as aerosol cans with a flammable propellant in this appliance.
13. This appliance is intended to be used in household and similar applications such as
– staff kitchen areas in shops, offices and other work environments;
– farm houses and by clients in hotels, motels and other residential environments;
– bed and breakfast environments;
– catering and similar non-retail applications.
14. To avoid contamination of drink, please respect the following instructions:
– Opening the door for long periods can cause a significant increase of the temperature in the
compartments of the appliance.
– Regularly clean surfaces that can come in contact with drink and accessible drainage systems.
– Clean the water tanks if they have not been used for 48 hours; flush the water system connected to a
water
supply if water has not been drawn for 5 days.
– If the refrigerating appliance is left empty for long periods, switch off, defrost, clean, dry, and leave the
door open to keep mold from developing in the appliance.
04
The coolant circuit of this unit contains the refrigerant Isobutane (R600a),a natural gas that is
flammable and of high environmental compatibility.Make sure no parts of the coolant circuit are
damaged during transportation and installation of the appliance.
04
05
WARNING
FLAMMABLE REFRIGERANT GAS
Do not use this wine cooler for other than its intended purpose. For indoor, household
use only.
Moving the wine cooler requires 2 people. Failure to do so can result in injury.
Place the wine cooler in a well-ventilated area with temperatures above 15°C (60°F) and
below 32°C (90°F).
To ensure proper ventilation , the front of the cooler must be completely
unobstructed.
The wine cooler must be installed in an area away from wind, rain, and water spray or drips.
The wine cooler should not be located next to ovens, grills or other sources of high heat.
Do not kink or pinch the power supply cord of wine cooler.
The wine cooler must be leveled in order to work properly. You may need to make
several adjustments to level it.
This wine cooler is designed for storing and cooling wine. Do not store perishable food
or medical products in the cooler.
When disposing of refrigeration wine coolers, special handling is often required. It is the
consumer’s responsibility to comply with federal and local regulations when disposing of
this product.
WARNING: Risk of child entrapment and suffocation. Before you throw away this or an
old cooler, remove the door. Leave the shelves in place, so that children may not easily
climb inside.
DANGER - Risk of fire or explosion. Flammable refrigerant used.
DANGER - Risk of fire or explosion. Flammable refrigerant used. To be repaired only by trained
service personnel. DO NOT puncture refrigerant tubing.
CAUTION - Risk of fire or explosion. Flammable refrigerant used. Consult repair manual / owner’s
guide before attempting to service this product. All safety precautions must be followed.
CAUTION - Risk of fire or explosion. Dispose of property in accordance with federal or local
regulations. Flammable refrigerant used.
CAUTION - Risk of fire or explosion due to puncture of refrigerant tubing. Follow handling
instructions carefully. Flammable refrigerant used.
CAUTION - To prevent a child from being trapped, keep out of reach of children and not in the
vicinity of the cooler.
DO NOT use mechanical devices to defrost refrigerator. DO NOT puncture refrigerant
tubing.
05
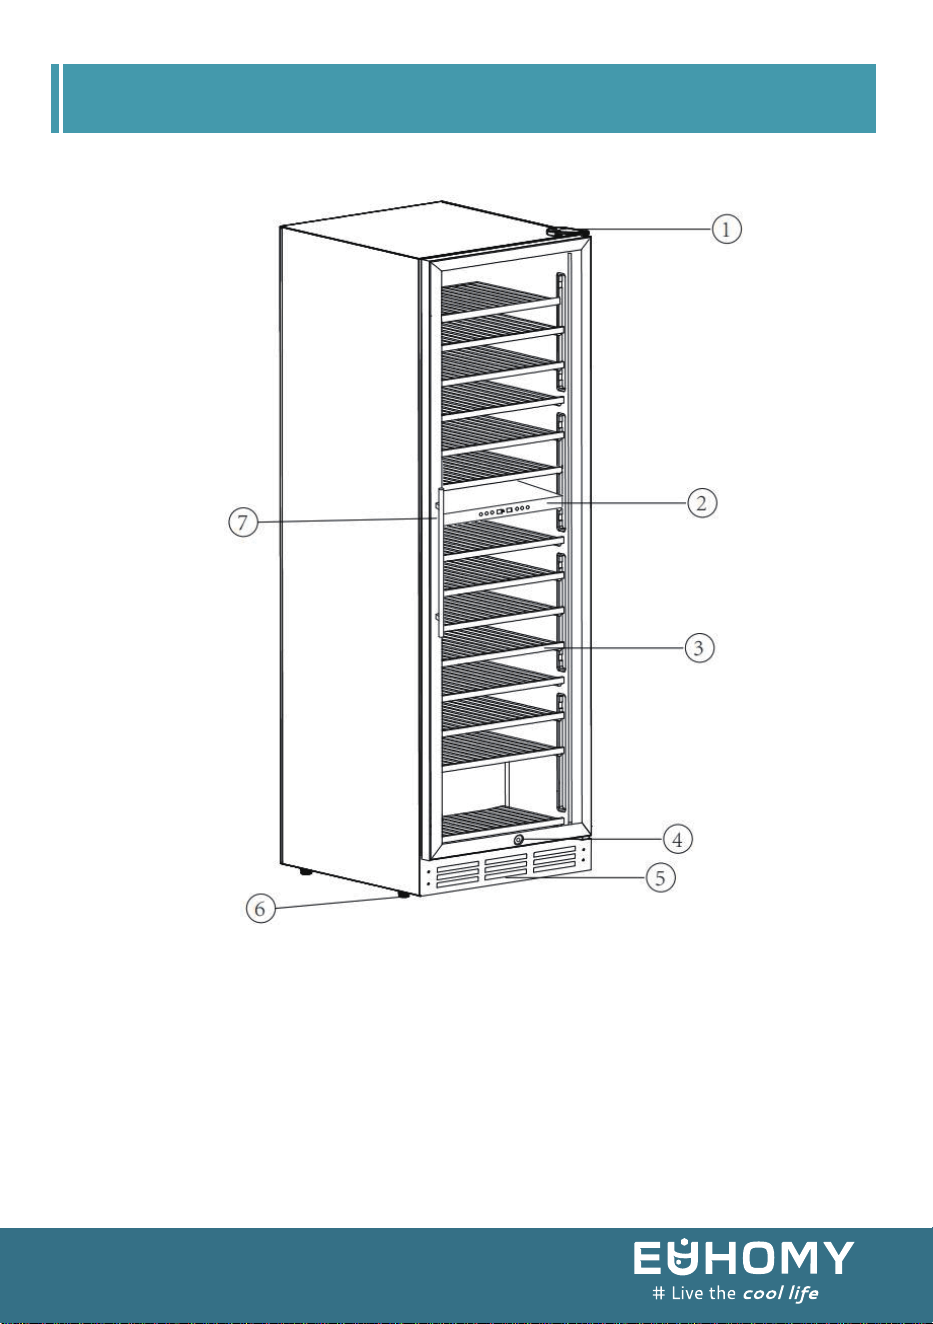
PRODUCT DIAGRAM
1 Top Hinge
2 Control Panel
3 Shelves
4 Lock
5 Exhaust Vent
6 Leveling Legs
7 Glass Door with Handle
06
06

07
INSTALLATION INSTRUCTIONS
Before Using Your Wine Cooler
To Installing the Stainless Steel Handle
- Remove the exterior and interior packaging.
- Check to be sure you have all of the following parts:
- IMPORTANT: Before connecting this wine cooler to a power source, let it stand upright for
approximately 24 hours. This will reduce the possibility of a malfunction cooling
system from handling during transportation.
IMPORTANT
- Clean the interior surface with lukewarm water using a soft cloth.
- Install the handle on the left side of the door.
14 Shelves
1) Pull away the door gasket around where the handle is to be installed, as Illustration #1. The
gasket is easily removed by hand, no tools are necessary.
2) Align the handle with the pre-installed screws on the door frame. Tighten the screws with a
screwdriver until the handles secure tightly against the door frame, as shown inIllustration #2.
(Do NOT over tighten as this will damage the handle assembly).
3) Replace the door gasket in its original position.
Note: This wine cooler includes stainless steel handles that are not required to operate this wine
cooler. If you choose not to use the handle supplied, simply follow step 1 to access the
pre-installed screws and remove them and then place 2 decorative plugs (NOT included) into the
two holes separately. Continue on to step 3 to replace the door gasket to its original position.
07
2 Keys
Stainless Steel Handle
Instruction Manual
2 Extra Screws for Installing Handle

To Installing the Your Wine Cooler
- This wine cooler is designed for freestanding or built-in (fully recessed) installation.
- Place the wine cooler on a solid and level floor that is strong enough to support it when it is
fully loaded. This will ensure vibration- and noise-free operation. Adjust the levelinglegs in
and out to stabilize the cooler horizontally. If the legs are not properly adjusted, the cooler
may be unstable and result in excess noise or vibration.
- Locate the wine cooler away from direct sunlight and sources of heat (stove, heater, radiator,
etc.). Direct sunlight may affect the acrylic coating and heat sources may increase electricity-
consumption. Extremely cold ambient temperatures may also cause the cooler not to perform
properly.
- It is not advisable to install this cooler in a damp area or directly adjacent to a kitchen sink, as
moisture can cause premature corrosion to the components of your new cooler.
- It is recommended you install the wine cooler in a place with temperatures above 60°F
(15°C) and below 90°F (32°C) and humidity under 60%. If the ambient temperature is
above or below the recommended temperatures, the performance of the cooler may be
affected. Placing your cooler in extremely cold or hot conditions may cause interior tempera-
tures to fluctuate, and the temperature range of 5ºC-18ºC (40ºF-65ºF) may not be reached.
- Connect the wine cooler to an exclusive, properly grounded, standard electrical supply (115
V AC only, 60 Hz), in accordance with federal and local electrical codes and ordinances. Any
questions concerning power and/or grounding should be directed to a certified electrician or
an authorized products service center.
08
Illustration #1 Illustration #2
1 Gasket
2 Screw
3 Screw Driver
4 Handle
08

09
Warning : Improper use of the grounded plug can result electrical shock. If the power cord
is damaged, have it replaced by an authorized service center.
The wine cooler should always be plugged into its own individual electrical outlet with a
voltage rating that matches the rating label on the wine cooler. This provides the
best performance and also prevents overloading house wiring circuits,which could cause a
fire hazard from overheating.
Do not under any circumstances cut or remove the third ground prong from the power
cord supplied.
Do not use an extension cord or adapter plug. However, if you must use an extension
cord, it is absolutely necessary that it be a UL-listed, 3-wire grounding extension cord
with a grounding plug and outlet and that the electrical rating of the cord is 10 amperes
(minimum) and 120 volts.
Do not use a cord that shows cracks or abrasion damage along its length or at either end.
If the wine cooler will be used in an area that is prone to power surges/outages,
it is suggested that you use a power surge protector. The surge protector that you select
must have a surge block high enough to protect the wine cooler it is connected to.
Damages due to power surges are not considered a manufacturer covered defect and
will void your product warranty.
09
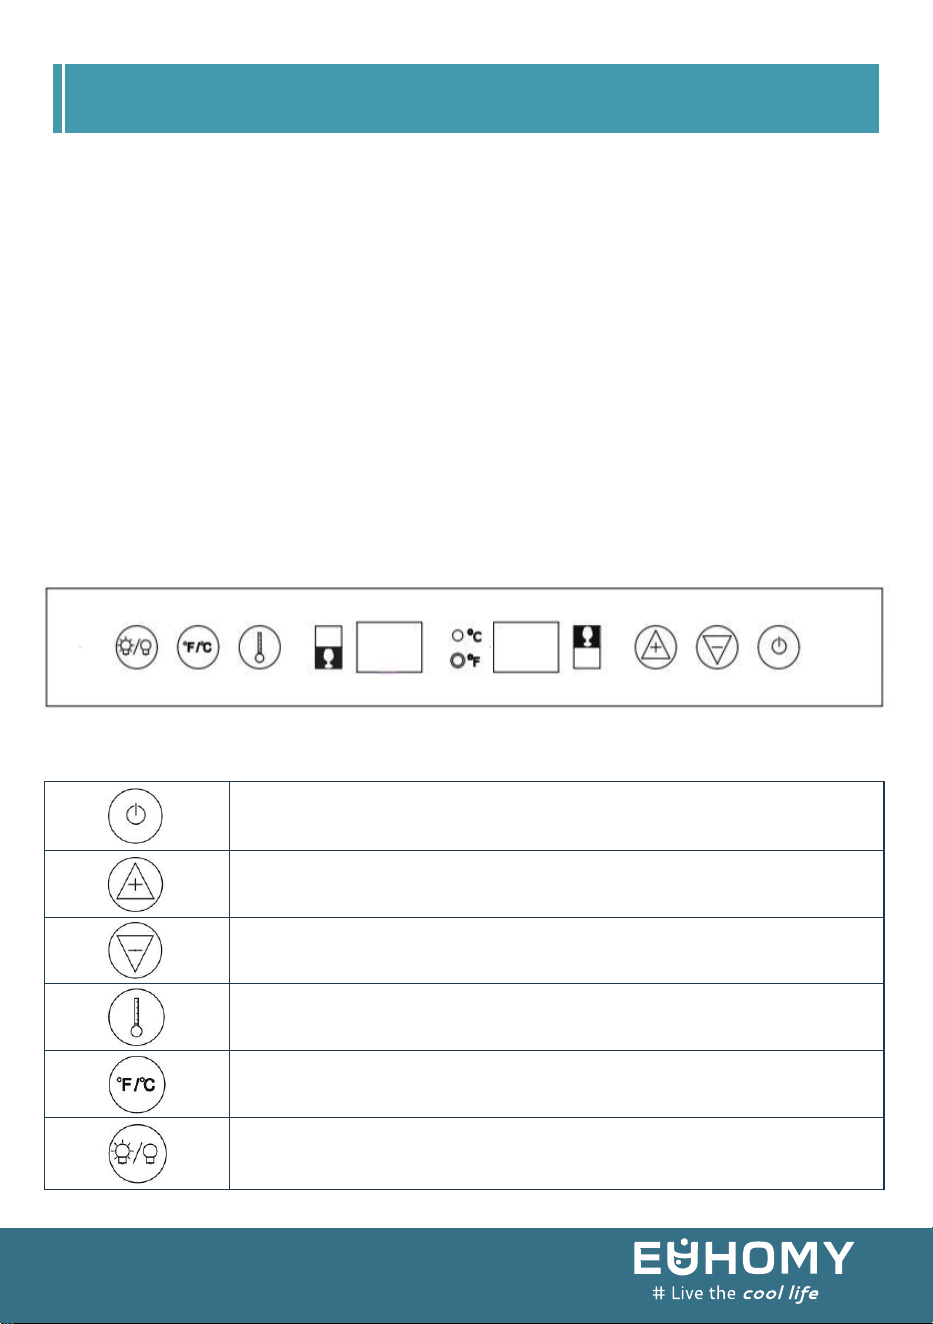
OPERATION INSTRUCTIONS
Recommended temperature settings
Controls
Wine conservation: 12°C-14ºC (53°F-57ºF)
Rose and sparkling wines: 5°C-8ºC (41°F-46ºF)
Dry/white wines: 9°C-12ºC (48°F-53ºF)
Red wines: 14°C-18ºC (59°F-65ºF)
After the wine cooler is plugged into a wall outlet, the cooler will turn on automatically and the
LCD screen will show the temperature inside of the cooler.
After setting your desired cooling temperature, allow the appliance to cool down for 3 to 4 hours
before placing wine bottles inside the cooler.
Temperature setting range: Upper zone:5-13℃(40-55℉) Lower zone:13-18℃(55-65℉)
Press for 3 seconds to turn on /off the appliance
Adjusts the temperature in 1-degree increments
Adjusts the temperature in 1-degree decrements
Press to begin adjusting the temperature for upper or lower zone
Toggles the temperature display between Celsius and Fahrenheit
Turns the interior light on or off
*Temperature ºC may varies between < + 2 ºC
10
10

11
Storage
This wine cooler is designed to store standard Bordeaux 750 ml wine bottles. Many bottles differ
in size and dimensions. As such, the number of bottles you can store may vary. Storing large
and/or oddly shaped bottles (including champagne and sparkling wine bottles) will
decrease the capacity of your wine cooler.
Door Lock
This cooler may be secured with a lock and key. The keys are included with the Instruction
Manual. Insert the key in the lock and turn it clockwise to lock the door, making sure the metal
pin is engaged completely. To unlock the door, do the reverse. Remove the key and put it in a
secure location.
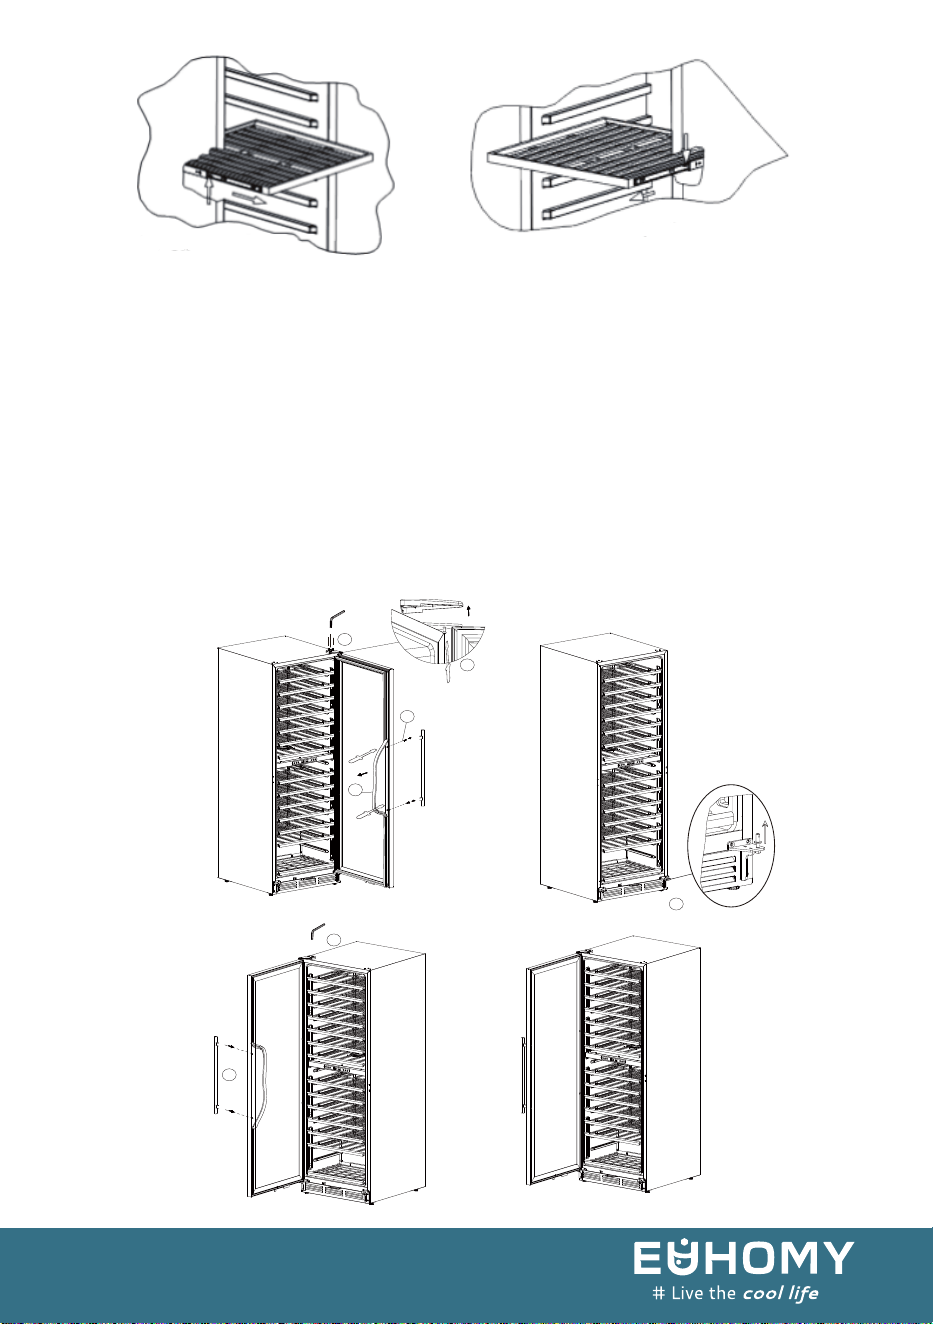
Shelves
To Removing a Shelf
This wine cooler is equipped with a sliding rail assembly where you can move the wooden shelves
out and in smoothly.
The slide-out shelves allow bottles of wine to be viewed and removed more easily. Any of the
shelves can be removed to store larger bottles.
To prevent damaging the door gasket when pulling shelves out of the rail compartment,make sure
the door is completely open. For easy access to the bottles, you may need to pull the shelves
approximately halfway out of the rail compartment.
1. Remove all bottles from the shelf.
2. Pull the shelf out as far as it will go.
3. Adjust the lever on each side of the shelf, as shown below (UP on the left, DOWN on the
right) and at the same time, pull the shelf out completely.
11
12
ĸ
ĸ
ĸ
1
2
3
ĸ
ĸ
ĸ
6
7
5
ĸ
4
Reverse the door
1. Open the door, loosen the screw and take out the upper hinge cover˗then hold the door, loosen the scr ews and
remove the upper hinge. Make sure to hold the door during this step.
2.
Lift the door and take it out f rom the lower hinge and place it on a padded surface to avoid damage and
scratches˗Unscrew and remove the right lower hinge axis.
3.Install the hinge axis to the left lower hinge, and pu t it onto the left side lower hinge and hold it at close
position˗install the hinge axis to
the left lower hinge.
4. Install the handle back to the right side of the door body, pull out the rubber and install the handle.
Reversing the door
1. Open the door, loosen the screw and remove the upper hinge cover; then holding the door, loosen the screws and
remove the upper hinge. Make sure to hold the door during this step.
2. Lift the door release it out from the lower hinge and place it on a padded surface to avoid damage or scratches;
unscrew and remove the right lower hinge axis.
3.Install the hinge axis to the left lower hinge put it onto the left side lower hinge and hold it at the closed
position;install the hinge axis to the left lower hinge.
4.To place the handle back oo the right side of the door body, pull out the gasket and install the handle.
12
up on the left
DOWN on the right
12

13
CARE & MAINTENANCE
Cleaning Your Wine Cooler
Power Failure
IMPORTANT: Always unplug the cooler before cleaning or performing maintenance. Never use
harsh cleansers or scouring pads to clean any part of the cooler.
Most power failures are corrected within a few hours and should not affect the temperature of
your wine cooler. If the power is off for an extended period of time, proper steps should be taken
to protect your contents.
While on Vacation
Moving Your Wine Cooler
Leave the wine cooler operating during vacations of less than three weeks. For longer periods, turn the
wine cooler off and leave the door slightly ajar to prevent odor from building in the cooler.
- Remove all items (bottles) from the cooler;
- Securely tape down any loose items, such as shelves, inside the cooler.
- Turn the adjustable leg up to the base to avoid damage.
Turn off the power, unplug the cooler, and remove all items including shelves.
Wash the inside surfaces with a solution of warm water and baking soda. The solution
should be about 2 tablespoons of baking soda to a quart of water.
Wash the shelves with a mild detergent solution.
Wring excess water out of the sponge or cloth when cleaning the area near any electrical
parts or the controls.
Wash the outside of the cabinet with warm water and a mild liquid detergent. Rinse well
and wipe dry with a clean soft cloth. Do not use steel wool or a steel brush to scrub the
stainless steel, as this will contaminate the stainless steel with steel particles and rusting
may occur.
13
Your wine is a living object that breathes through the cork of the bottle. In order to preserve the
quality and taste of your fine wines, they must be stored at the ideal temperature and ambient
conditions. Your wine cooler is equipped with an active charcoal filtration system to ensure air
purity, and cooling efficiency, and to maintain an odor-free environment for the storage of your fine
wines.
Remove the bottles of wine stored on the two (2)
shelves in front of the filter.
Turn Left to remove filter.
Energy Saving Tips
Charcoal Filtration System
To replace the filter
- The cooler should be located in the coolest area of the room away from heat sources or
direct sunlight.
- Ensure that the cooler is adequately ventilated. Never cover air vents.
- Only open the cooler door for as long as necessary. Frequent opening of the door will
affect internal temperature.
- Tape the door shut.
- Ensure that the wine cooler stays securely in the upright position during transportation.
Protect the outside of the wine cooler with a blanket or a similar item.
14
1
Remove the shelves and set aside to be replaced
once you have changed the filter.
2
Hold the filter and turn it at 45 degrees in the
counter-clockwise direction and then pull it out.
3
Remove the filter and replace with a new one.
4
Put the new filter into the hole and then turn the
filter at 45 degrees in clockwise direction.
5
14

15
TROUBLESHOOTING GUIDE
The wine cooler
does not run.
The wine cooler
is not cold
enough.
The compressor
turns on and off
frequently.
The wine cooler may not be plugged
in, or plug may be loose
Ensure the wine cooler has been
plugged in properly.
Press to turn on the cooler.
House fuse blown or tripped circuit
breaker.
External environment may require a
higher setting.
The wine cooler has recently been
disconnected for a period of time.
Prolonged or frequent door
openings.
The door is not closed completely.
The door gasket does not seal
properly.
The room temperature is hotter than
normal.
A large amount of contents has been
added to the cooler.
Prolonged or frequent door
openings.
The temperature has not been set
correctly.
The door is not closed completely.
The door gasket does not seal
properly.
Check the door gasket. Clean or change
gasket if necessary.
Close the door properly.
Check the door gasket. Clean or change
gasket if necessary.
It’s normal for the wine cooler to work
harder under these conditions.
A large amount of content causes the
wine cooler to run more until the
desired temperature is reached.
Open the door less often.
Press either or to check the
set temperature, and set the
temperature properly.
Close the door properly.
Open the door less often.
It takes 3-4 hours for the wine cooler to
cool down completely.
Set a colder setting. Allow several hours
for the temperature to stabilize.
Check/replace fuse. Reset circuit
breaker.
The wine cooler is turned off.
PROBLEM POSSIBLE CAUSE SOLUTION
15
The light does not
work.
Cooler vibrates.
The cooler seems to
make too much
noise.
The door will not
close properly.
Moisture buildup on
interior or
exterior of the wine
cooler.
Error Code:
E1-E2-E3-E4-E7-E8
Not plugged in.
The cooler is not level.
The cooler is not level.
The cooler is not level.
The door was reversed and
not properly installed.
The gasket is dirty.
The shelves are out of
position.
This is normal during high-
humidity periods.
This is normal in high-
temperature environments.
Prolonged or frequent door
openings.
The door does not seal
completely.
A sensor has failed.
Normal noise from the flow
of the refrigerant
The rattling noise may come from the flow
of the refrigerant, which is normal. As each
cycle ends, you may hear gurgling sounds
caused by the flow of refrigerant in your
cooler. Contraction and expansion of the
inside walls may cause popping and
crackling noises.
The bottles are vibrating.
There is an object under the
cooler.
Check that the cooler is level.
Make sure the bottles don’t touch each
other.
Remove the object under the cooler.
Level the cooler.
Level the cooler.
Clean the door gasket.
Place the shelves properly.
Lower the room humidity.
Move the cooler to a cooler place, and
avoid heat and sunlight.
Open the door less often.
Check door gaskets for proper seal.
Contact customer service
Re-install the door properly.
Plug in the cooler in.
The circuit breaker tripped
or a blown fuse.
The light button is “OFF”.
Check the breaker and/or fuses.
Press to turn the light ON.
16
PROBLEM POSSIBLE CAUSE SOLUTION
16


Email:support@euhomy.com
Facebook:@Euhomy.Official
