the Oracle
™
Jet
Instruction Book – BES985

2
BREVILLE
®
RECOMMENDS
SAFETY FIRST
At Breville
®
we are very
safety conscious. We design
and manufacture appliances
with your safety foremost in
mind. We also ask that you
exercise a degree of care
when using any electrical
appliance and adhere to
the following precautions.
IMPORTANT
SAFEGUARDS
READ ALL INSTRUCTIONS
BEFORE USE AND SAVE
FOR FUTURE REFERENCE
• Remove and discard
any packaging materials
safely before use.
• Ensure the product is properly
assembled before use
and fully unwind the power
cord before operating.
• Before using, ensure that your
electricity supply is the same as
shown on the rating label on the
underside of the appliance. If
you have any concerns, contact
your local electricity company.
• The installation of a residual
current safety switch is
recommended to provide
additional safety when using
all electrical appliances.
Safety switches with a rated
operating current not more
Contents
2 Limited Product Warranty
2 Breville
®
Recommends
Safety First
7 Components
8 Accessories
9 Features
10 Assembly
11 Guide and Settings
12 Care & Cleaning
15 Troubleshooting
Breville’s warranty for this
product covers the repair or
replacement if it’s found to be
defective due to faulty materials,
workmanship, or function within
the warranty period.
All legal warranty rights under
applicable national legislation
will be respected and will not
be impaired by our warranty.
For details on length of warranty,
to obtain a printed copy or to read
full terms and conditions please
scan the QR code or visit
www.breville.com.
Alternatively, call
the Breville Service
Centre (see back
cover for contact
details).
2 YEAR LIMITED
LIMITED PRODUCT
WARRANTY
QR149

3
than 30mA are recommended.
Consult an electrician for
professional advice.
• Regularly inspect the power
cord, plug and appliance
for any damage. If found to
be damaged in any way,
immediately cease use of
the appliance, and return
the entire appliance to the
nearest authorised Breville
Service Centre for examination,
replacement, or repair.
• Do not let the power cord
hang over the edge of a
counter or table. Do not let
the power cord touch hot
surfaces or become knotted.
• Do not touch hot surfaces.
Always ensure the appliance
has been allowed to cool; if
the appliance is to be: left
unattended, cleaned, moved,
assembled, or stored, always
switch o the espresso machine
by pressing the POWER
button to OFF. Switch o at
the power outlet and unplug.
• Children must not play with
the appliance. Do not leave
the appliance unattended
when in use. Do not move the
appliance whilst in operation.
• The appliance is not intended
for use by persons (including
children) with reduced physical,
sensory or mental capabilities,
or lack of experience and
knowledge, unless they have
been given supervision or
instruction concerning use
of the appliance by a person
responsible for their safety.
Cleaning and user maintenance
shall not be made by children.
Keep the appliance and its
cord out of reach of children.
• To eliminate a choking hazard
for young children, discard
the protective cover tted
to the power plug safely.
• Position the appliance on a
stable, heat resistant, level, dry
surface away from the counter
edge, and do not operate on
or near a heat source such as
a hot plate, oven, or gas hob.
• Do not operate the appliance
in an enclosed space,
or inside a cupboard.
• Do not use attachments
other than those provided
with the appliances. The
use of attachments not
sold or recommended by
Breville may cause re,
electric shock, or injury.
• This appliance is for household
use only. Do not use the
appliance for anything other
than its intended purpose. Do
not use in moving vehicles or
boats. Do not use outdoors.
Misuse may cause injury.
• Keep the appliance and
accessories clean. Follow the
cleaning instructions provided
in this book. Servicing other
than cleaning should be
performed at an authorised
Breville Service Centre.

4
• Improper use of the appliance,
incorrectly operated or
unprofessionally repaired
will void any warranty
claim. No warranty for any
damages can be accepted.
• The appliance is not intended
to be operated by means of
an external timer or separate
remote-control system.
• Use caution when operating
machine as metal surfaces
are liable to get hot during use.
Heating element is subject
to residual heat after use.
• Do not open the
programming port, this is
exclusively for authorised
service personnel only.
• Do not operate the grinder
without the hopper lid in
position. Keep ngers,
hands, hair, clothing, and
utensils away from the
hopper during operation.
• Ensure the portalter is rmly
inserted and secured into
the group head before starting
an extraction. Never remove the
portalter during the extraction
process. Failure to follow this
instruction may lead to scalding
by hot steam or hot coee
• Do not ll the water tank or front
top ll with hot water or milk.
• Do not use the appliance
without water in the water tank.
• Use caution after milk texturing,
as the ‘Auto Purge’ function
may purge hot steam when
steam wand is lowered.
• Wipe the outer surface with a
soft cloth. Keep the appliance
and accessories clean.
CAUTION
To prevent damage to the
appliance, do not use alkaline
cleaning agents. Use a
clean soft cloth instead.
WARNING
To avoid the risk of injury, do not
open the brew chamber during
the brew process.
NOTICE TO CUSTOMERS
REGARDING MEMORY
STORAGE
Please note that in order to better
serve our customers, internal
memory storage has been
embedded into your appliance.
This memory storage consists
of a small chip to collect certain
information about your appliance
including the frequency of use
of the appliance and the manner
in which your appliance is being
used. In the event your appliance
is returned for service, the
information collected from the
chip enables us to quickly and
eciently service your appliance.
The information collected also
serves as a valuable resource
in developing future appliances
to better serve the needs of our

5
consumers. The chip does not
collect any information regarding
the individuals who use the
product or the household where
the product is used. If you have
any questions regarding the
memory storage chip please
contact us at
privacy@breville.com
SPECIFIC INSTRUCTIONS
FOR WATER FILTER
• Filter cartridge should be kept
out of reach of children.
• Store lter cartridges in a dry
place in the original packaging.
• Protect cartridges from
heat and direct sunlight.
• Do not use damaged
lter cartridges.
• Do not open lter cartridges.
• If you are absent for a prolonged
period of time, empty the water
tank and replace the cartridge.
WARNING FOR BUTTON
BATTERY
Button battery inside
this product
Keep out of
reach of children
The battery inside the product
shall not be replaced or removed
by the user at any time.
• The battery is hazardous
and is to be kept away
from children (whether the
battery is new or used).
• Swallowing battery may lead
to serious injury in as little
as 2 hours or death, due to
chemical burns and potential
perforation of the oesophagus.
• If you suspect your child
has swallowed or inserted a
button battery, immediately
seek medical attention, or
call the 24-hour Poisons
Information Centre on 13 11
26 for fast, expert advice.
• Tell others about the risks
associated with button
batteries and how to keep
their children safe.
• Dispose of used button
batteries immediately
and safely. Flat batteries
can still be dangerous.

6
FOR HOUSEHOLD USE ONLY
SAVE THESE INSTRUCTIONS
The symbol shown indicates
that this appliance should
not be disposed of in
normal household waste.
It should be taken to a local
authority waste collection centre
designated for this purpose or
to a dealer providing this service.
For more information, please
contact your local council oce.
To protect against re or
electric shock, do not
immerse the power cord,
power plug or appliance in water
or any other liquid.
7
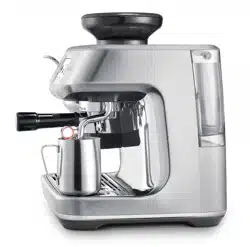
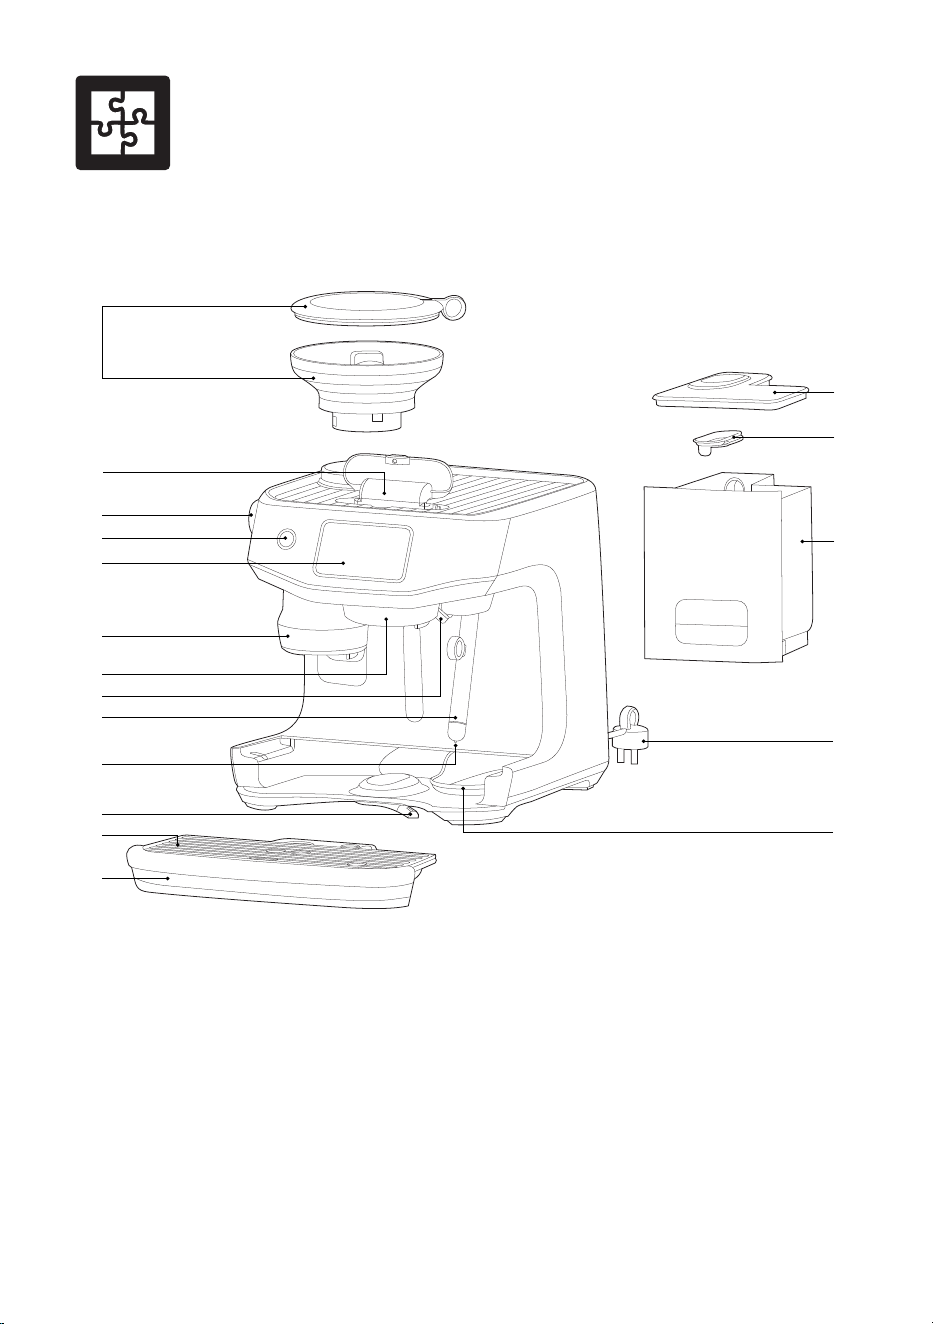
Components
A. 340g bean hopper
B. Front top water fill
C. Grind size adjustment dial
D. Power button
E. 5 inch HD touch screen
F. Grind and tamp outlet
G. Heated 58mm group head
H. Dedicated hot water outlet
I. Auto MilQ™ steam wand
J. Milk temperature sensor
K. Front lever 3rd wheel
L. Drip tray grill
M. Drip tray
N. Water tank lid
O. Water tank mesh lid
P. Water tank
Q. Power cord with storage
R. Hidden tool storage tray
F
I
H
J
K
G
D
E
B
C
A
L
M
Q
R
P
O
N
8
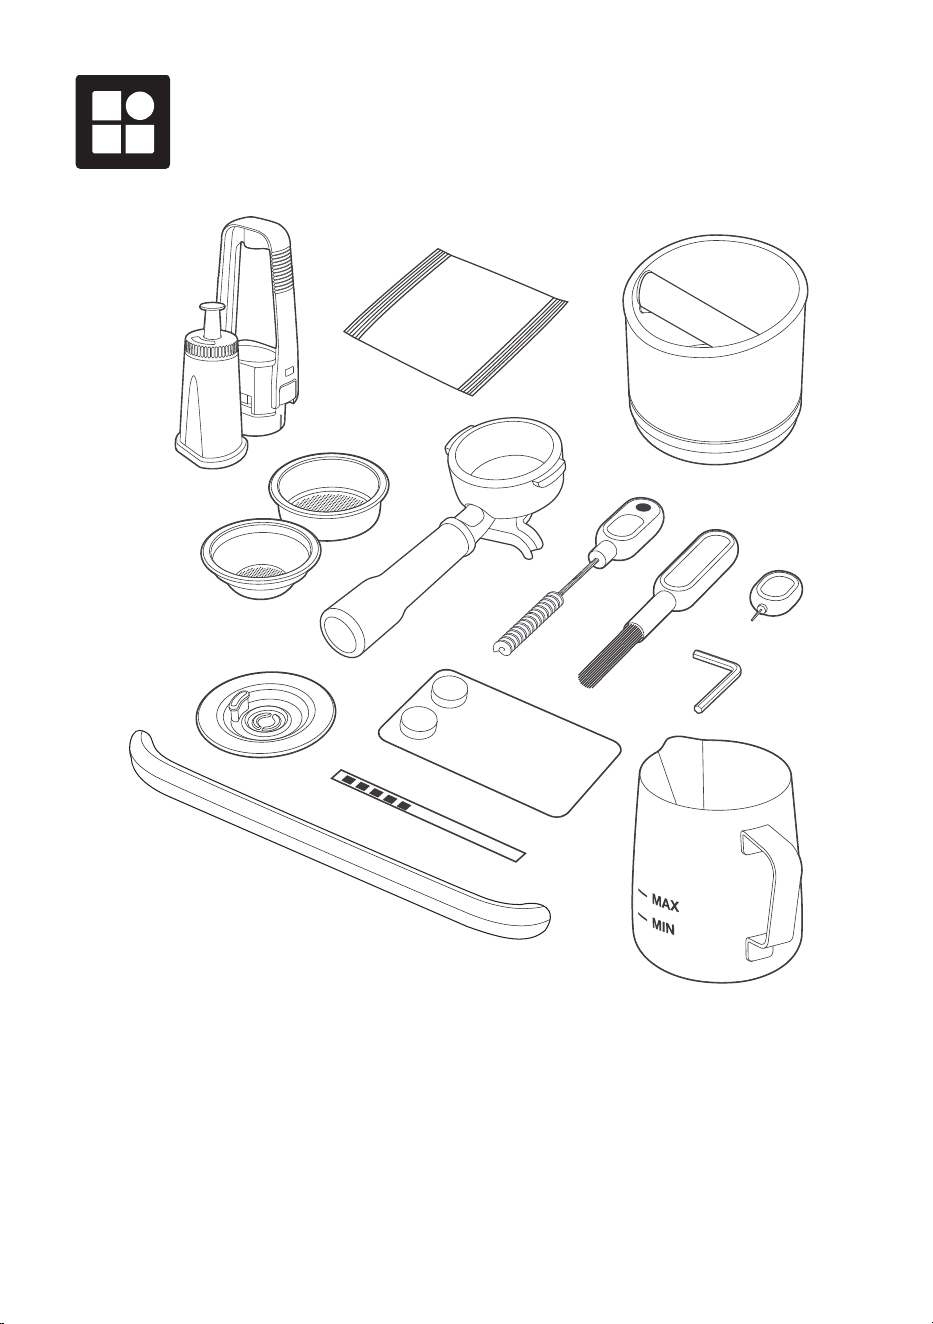
1. Water lter and lter holder
2. Descaling Powder
3. Knock Box™ 10
4. Single wall 1 Cup lter basket
5. Single wall 2 Cup lter basket*
6. 58 mm Stainless Steel Portalter
7. Grind outlet brush and tamp removal magnet
8. Cleaning brush
9. Cleaning tool for steam wand tip
3
2
1
4
5
6
13
14
15
7
8
9
1211
10
10. Hex Key
11. Cleaning disc
12. Cleaning tablets
13. Water hardness strip
14. Drip tray guard (included with machines
in colour only)
15. Stainless steel milk jug
* Single wall 2 Cup lter basket comes
installed in the portalter
Accessories

9
THERMOJET HEATING SYSTEM
The state-of-the-art heating system is our fastest
and most ecient heating system. Ready to go in
seconds.
THERMOJET HEATED GROUP HEAD
Ensuring a stable and optimised extraction that
meets professional level specications. The heated
group head can be customised in +/- 1 degree
celsius increments to suit your taste.
AUTO GRIND DOSE & TAMP
Fully-integrated hardened precision conical
burr grinder automatically grinds, doses and
tamps 22 grams of coee straight into the 58mm
professional style portalter.
AUTO MILQ
Silky smooth microfoam with settings for dairy, soy,
almond and oat. Adjustable temperatures (45°C to
75°C) and 8 texture levels.
BARISTA GUIDANCE
By automatically detecting an over or under
extracted espresso shot, Barista Guidance helps
you adjust the grind size to achieve a more ideal
pour.
5 INCH HD TOUCH SCREEN
A dynamic screen that is 4 times richer and 20
times more powerful than before. You can swipe,
select and enjoy in high denition.
COLD COFFEE
Cold Brew
Brewing at lower temperatures reduces acidic
avour notes that heat retains. This creates
a smooth and mellow avour prole that can
be enjoyed on its own or form the base for your cold
brew experiments!
Cold Espresso
Extract at lower temperature produces a full
avoured crema topped espresso without
the heavy tones. The cold espresso feature
keeps the classic avour while being softer
and lighter in body.
AUTO QUEUE
Auto queue is a feature that allows to sequence the
next function during selected milk based drinks:
• Brew coee rst and queue milk texturing.
• Texture milk rst and queue coee brewing.
PID TEMPERATURE CONTROL
Electronic temperature control delivers precise
water temperature for optimum espresso avour.
DEDICATED HOT WATERSPOUT
Dedicated hot water outlet for making long blacks,
teas, and pre-heating cups.
DOUBLE TAP
Double tap on the grind, brew or steam icons to
automatically purge the system ready for your brew.
Features
10
BEFORE FIRST USE
Machine Preparation
Remove and discard all labels and packaging
materials attached to your espresso machine.
Ensure you have removed all parts and
accessories from the box before discarding the
packaging.
Remove the water tank located at the back of the
machine unlocking the latch and pulling the water
tank from the latch handle.
Clean parts and accessories (water tank,
portalter, lter baskets, milk jug) using warm water
and a gentle dish washing liquid. Rinse well then
dry thoroughly.
NOTE
Machines with colour, drip tray protection guard is
included. DO NOT DISCARD.
INSTALLING THE WATER FILTER
• Remove the water lter and water lter holder
from the plastic bag.
• Soak the lter in cold water for 5 minutes.
• Rinse the lter holder with cold water.
• Set a reminder for replacement. We
recommend to replace lter every 3 months.
• Insert the lter into the two parts of the lter holder.
• To install the assembled lter holder into the water
tank, align the base of the lter holder with the
adapter inside the water tank. Push down to lock
into place.
NOTE
Replacing the water lter every three months will
reduce the need to descale the machine. Filters can
be purchased at www.breville.com
NOTE
Input the water hardness test strip result to the
machine. If result is 4 or 5 bars when tested, we
strongly recommend to change to an alternate water
source. Filtered water will extend both the life of your
built-in lter and descale intervals as well as provide
superior taste. Ensure to test the water hardness of
the alternative water source you've chosen and input
into the machine accordingly. Avoid using overly
ltered water, like RO water unless some mineral
content is being added back to the nal water. Never
use distilled water, or water with no or low mineral
content as this will aect the taste of coee.
Assembly
11
Guide and
Settings
GUIDES
Startup Tutorial - Take you through the startup
tutorial on how to make a coee with the machine.
QR code links - Provides QR code links to areas
such as Support, Machine Registration and
Maintenance Products.
Understanding your Oracle Jet - Describes the
key components of your coee machine.
SETTINGS
Drink Settings
Barista Guidance - Switch on for grind size
recommendations during your extractions.
Brew control settings - Switch between time or
volumetric based brew output.
Temperature settings - Adjust the brew
temperature.
Maintenance
Clean steam wand - Guides you through cleaning
the steam wand to remove any blockage for better
steaming performance.
Clean group head - Cleans the group head of
oils and residue. Will require an Espresso cleaning
tablet or powder.
Descale - Descaling prevents excess mineral and
scale build-up. Will require descaling powder or
solution.
Change water lter - To ensure machine has
clean water to use.
Water hardness test - Congures the water
hardness your machine is using. You will need an
unused test strip.
Machine Settings
Theme - Switch between light or dark mode.
Sound - Adjusts the volume of the interface.
Screen brightness - Adjusts the brightness of the
screen.
Light brightness - Adjust the brightness of the
LED lights.
Units - Switch between imperial and metric units.
Country and Language - Select your region and
preferred language on screen.
Time and Date - Set the time and date on the
machine.
Wi-Fi - Connect to Wi-Fi to receive the latest
software updates.
Demo mode - Looping video to to showcase key
features of the machine.
About the machine - Shows the serial number
and rmware version of the machine.
Reset factory settings - Use this function to
reset all programmable values back to the factory
settings and delete all custom drinks.
WARNING
Do not unplug the machine while it is performing
this function.
12
HD TOUCH SCREEN DISPLAY
Excess dirt and grime can get in the crevices of
your touch screen impairing its functionality. Keep
the touch screen dry and clean to ensure optimal
functionality. Use a screen cleaning wipe or a dry
soft cloth.
CLEANING CYCLE
There will be a message prompt when
a cleaning cycle is required.
This is a backushing cycle and is separate
from descaling. There is also the option to start
the cleaning cycle by choosing ‘Clean Cycle’ in
‘Settings’. The cleaning cycle cleans the shower
screen and back-ushes the group head to remove
the build up of coee and oils.
Follow the instruction on the screen.
DESCALING
There will be a message prompt when a descale
cycle is required.
Even with the provided water lter, it is
recommended to descale if there is scale buildup
in the water tank.
There is also the option to start the descale cycle
by choosing ‘Descale Cycle’ in the 'Settings'.
Follow the instruction on the screen.
CLEANING THE STEAM WAND
• The steam wand should always be cleaned after
texturing milk. Wipe the steam wand
with a damp cloth.
• If any of the holes in the tip of the steam wand
become blocked, it may reduce frothing
performance.
• Go to 'Settings' > 'Steam wand cleaning' and
follow the guide on the screen.
Care & Cleaning
Steam Wand
Tip
NOTE
Ensure the steam wand tip is tightly fastened after
cleaning.

13
CLEANING THE FILTER BASKET
AND PORTAFILTER
• The lter basket and portalter should be rinsed
under hot water after each coee making
session to remove all residual coee oils.
• If the holes in the lter basket become blocked,
dissolve a cleaning tablet in hot water and soak
lter basket and portalter in solution for approx.
20 minutes. Rinse thoroughly.
CLEAR WATER BACKFLUSH
• After each coee making session we
recommend doing a clear water backush
before you turn o the machine. Empty drip tray.
Insert the cleaning disc into the lter basket then
insert the portalter into the group head. Touch
the brew icon button and allow pressure to build
for 20 seconds, then tap the glass image to stop
& release pressure.
CLEANING THE SHOWER SCREEN
• The group head interior and shower screen
should be wiped with a damp cloth to remove
any ground coee particles.
• Periodically purge the machine. Place an empty
lter basket and portalter into the group head.
Tap the brew icon on the screen and run a short
ow of water to rinse out any residual coee.
CLEANING THE DRIP TRAY
& STORAGE TRAY
• The drip tray should be removed, emptied and
cleaned at regular intervals, particularly when
the drip tray is full.
• Remove the grill from the drip tray. Lift the coee
grind separator and dispose of any coee
grounds. Wash all parts in warm soapy water
with a soft cloth. Rinse and dry thoroughly.
• The storage tray (located behind the drip tray)
can be removed and cleaned with a soft, damp
cloth. Do not use abrasive cleansers, pads or
cloths which can scratch the surface.
CLEANING THE OUTER HOUSING
The outer housing can be cleaned with a soft,
damp cloth. Polish with a soft, dry cloth. Do not
use abrasive cleansers, pads or cloths which can
scratch the surface.
NOTE
All parts should be cleaned by hand using warm
water and a gentle dish washing liquid. Do not
use abrasive cleansers, pads or cloths which can
scratch the surface. Do not clean any of the parts
or accessories in the dishwasher.
14
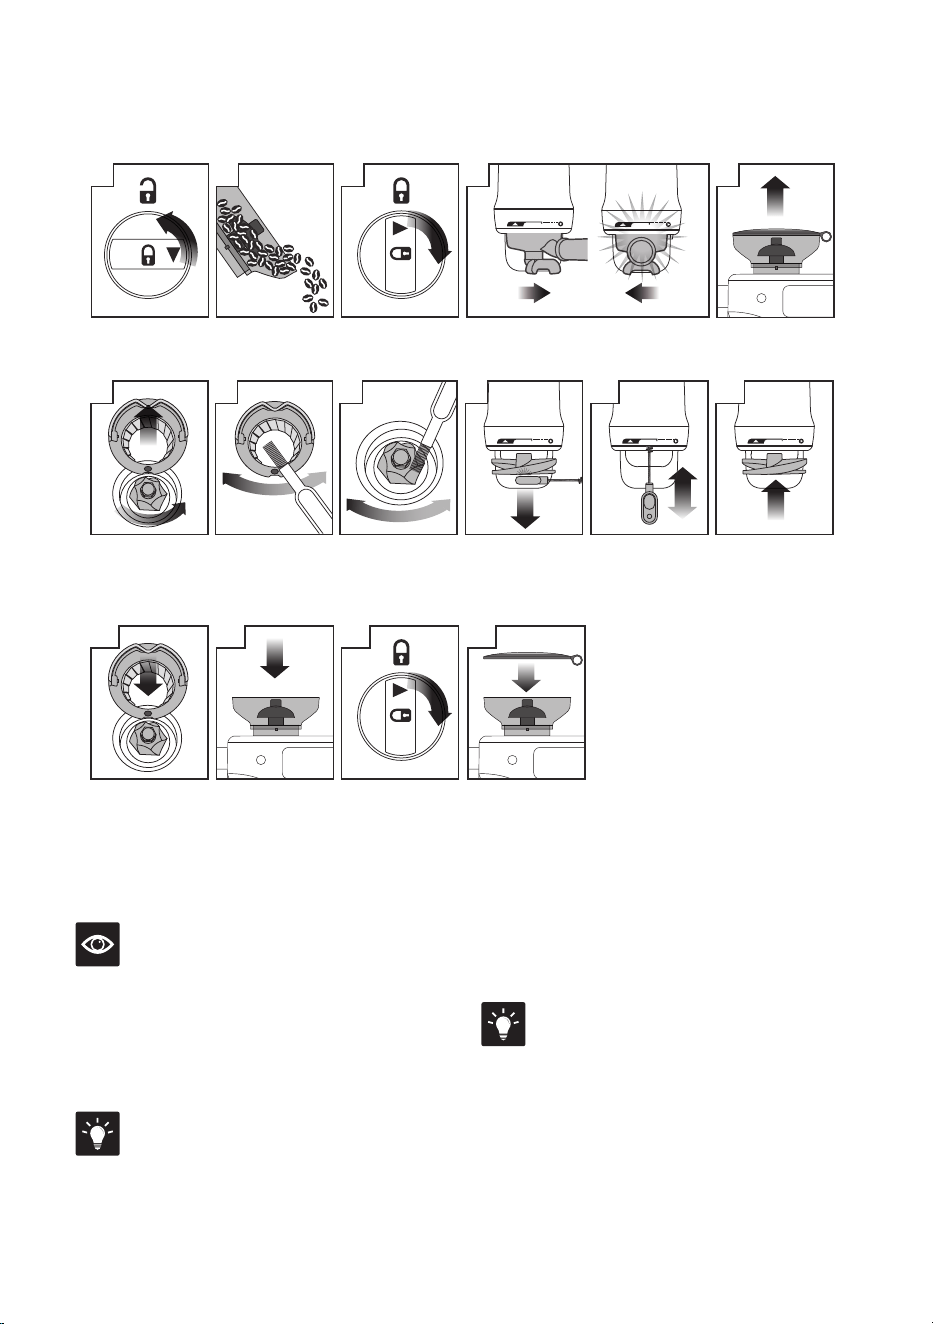
1 2 3 4 5
6 7 88 9 10 11
12
14
15
16
Unlock hopper
Remove upper
burr
Push upper burr
until it clicks and
rmly locked into
position.
Remove beans
Clean upper
burr with
burr brush
With the burr rmly
locked in position,
safely replace the
hopper into the
machine.
Replace & lock
hopper
Clean lower
burr with
burr brush
Lock the hopper Replace the
hopper lid
Run grinder until empty
Remove tamping
fan with tamp
removal magnet
Clean grind
outlet with grind
outlet brush
Unlock & remove
hopper
Replace tamping
fan by hand
NOTE
This machine is designed only for whole roasted
coee beans. Avoid grinding unroasted green and
under-roasted coee beans. These are dense and
not brittle enough to run through a burr grinder. This
will damage or break burr grinders and even pose
a safety risk.
TIP
It is recommend to use quality 100% Arabica
beans with a 'Roasted On' date stamped on the
bag, not a 'Best Before' or 'Use By' date. Coee
beans are best consumed between 5–20 days
after the 'Roasted On' date. Stale coee may pour
too quickly from the portalter spouts and taste
bitter and watery.
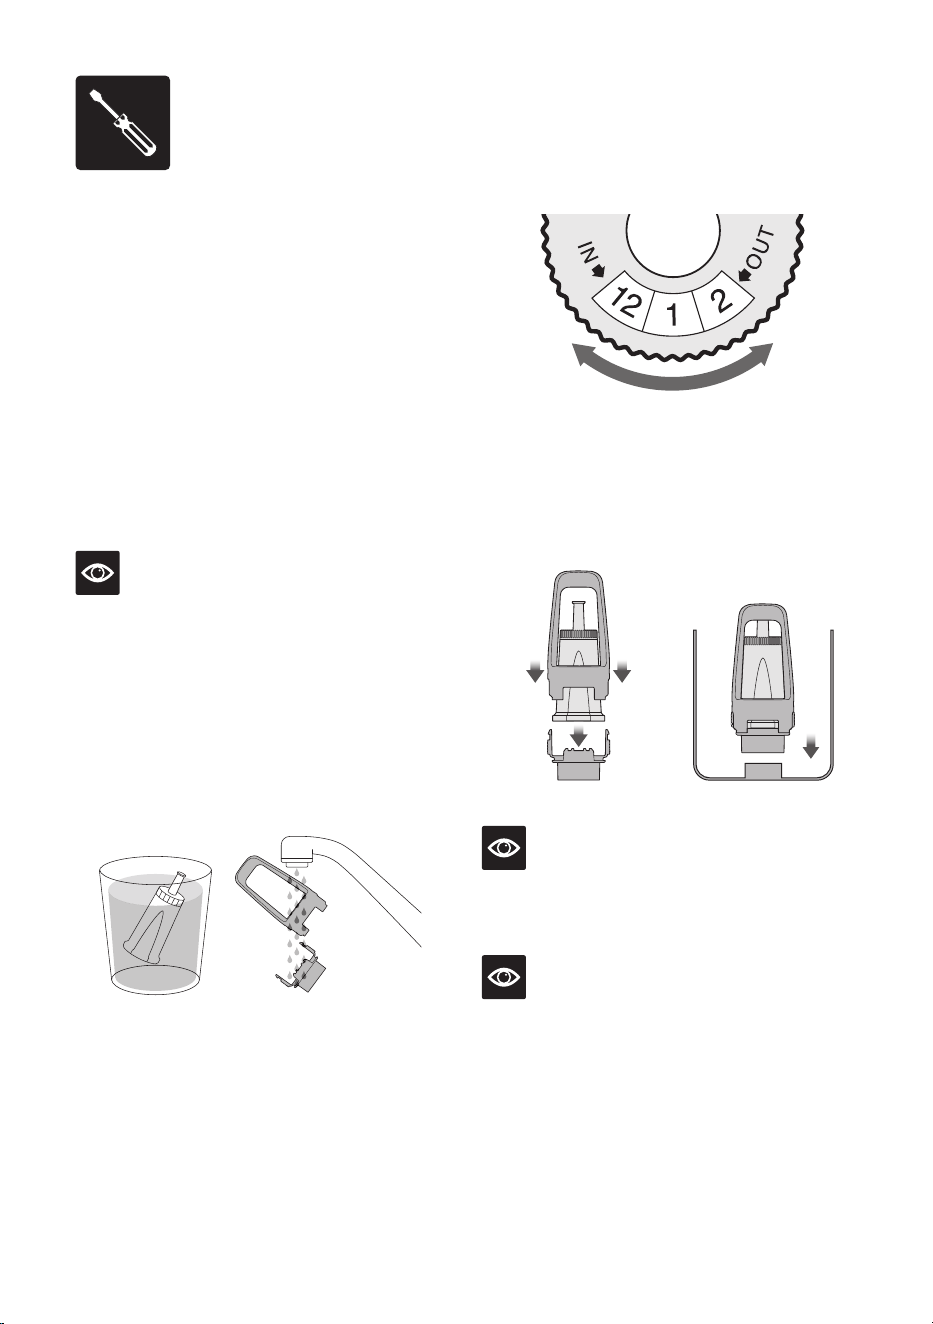
ADJUSTING TAMPING HEIGHT
FROM THE GRIND COLLAR
Turn o and disconnect the machine from the
power source. To adjust the tamping height, use
the hex key provided. Pull the tamping fan down
from the grind collar, and then pull down on the fan
coupling inside the grind collar to remove it. Adjust
the length of the coupling by loosening the fastener
with the hex key and rotating the coupling to the
desired length.
CLEANING CONICAL BURRS
Regular cleaning helps the burrs achieve consistent grinding results which is especially important when
grinding for espresso.

15
Troubleshooting
PROBLEM POSSIBLE CAUSE WHAT TO DO
Grinder Motor starts
but no ground
coee coming
from grind outlet
• No coee beans in
bean hopper.
• Grinder/bean hopper
is blocked.
• Coee bean may have
become stuck in hopper.
• Fill bean hopper with fresh coee beans.
• Remove bean hopper. Inspect bean hopper
& grinding burrs for blockage. Replace
parts and try again.
Grinder Motor starts
but operates with a
loud ‘clicking’ noise
• Grinder is blocked
with foreign item or
chute is blocked.
• Moisture clogging grinder.
• Remove bean hopper, inspect burrs
and remove any foreign objects.
• Clean the burrs and grind outlet.
• Leave burrs to dry thoroughly before
re-assembling. It is possible to use a hair
dryer to blow air into the burr area to
quicken the drying process.
Grinder motor
over heating
• Switch o and unplug from the power outlet
and rest the machine for 5 minutes.
Unable to lock bean
hopper into position
• Coee beans
obstructing bean
hopper locking device.
• Remove bean hopper.
Clear coee beans from top of burrs.
Re-lock bean hopper into position.
Portalter overlls • Tamping fan was
removed for cleaning
and not replaced.
• Check that the tamping fan is properly
assembled, in position, and mounted
correctly to the drive shaft.
Grinder
Emergency stop
• Rotate the portalter to the left to stop
the auto grind, dose & tamp function.
• Unplug power cord from power outlet.
Grinder running
continuously
• No beans in hopper. • Fill hopper with beans.
• Rotate the portalter to the left to stop
the auto grind, dose & tamp function.
• Tamping fan has
been removed.
• Check that the tamping fan is in position
and mounted correctly to the drive shaft.
CONNECTING YOUR ORACLE JET
The Oracle Jet is a Wi-Fi-enabled machine that will
support downloading the latest software version.
If the machine is not connected to a Wi-Fi, the
machine can still be operated in the same way as
an espresso machine with no network connection.
NOTE
We are constantly working to improve the software
that may lead to changes in functionality and setup
steps. Please rely on the instructions in the latest
version by upgrading the software to guide you
through the setup process.

16
PROBLEM POSSIBLE CAUSE WHAT TO DO
Coee is grinding
very coarse,
even at low grind
settings and/or
cannot put the burr
back in place
• Upper burr many not be
aligned and not inserted
properly.
• Move the grind dial to a coarse setting
(i.e. 45), this will make it easier to twist it
counter clockwise to remove the upper burr
holder. Clean grinds from both the upper
and lower burrs. Ensure the dots on the
upper burr are aligned before aligning it
back to the dot on the lower burr by twisting
it clockwise. Move the grind dial back to
the original setting.
Espresso runs out
around the edge
of the portalter
and/or
Portalter comes out
of the group head
during an extraction
• Portalter not inserted in
the group head correctly.
• Ensure portalter is rotated to the right
until the handle is past the centre and is
securely locked in place. Rotating past the
centre will not damage the silicone seal.
• There are coee grounds
around the lter basket rim.
• Clean excess coee from the rim of the
lter basket after grinding to ensure
a proper seal in group head.
• Filter basket rim is wet
or underside of portalter
lugs are wet. Wet surfaces
reduce the friction required
to hold the portalter in
place whilst under pressure
during an extraction.
• Always ensure lter basket and portalter
are dried thoroughly before lling with
coee, tamping and inserting into the
group head.
Pumps continue
to operate / Steam
is very wet / Hot
water outlet leaks
• Using highly ltered,
demineralised or distilled
water which is aecting
how the machine is
designed to function.
• We recommend using cold, ltered water.
We do not recommend using water with
no/low mineral content such as highly
ltered, demineralised or distilled water.
If the problem persists, contact Breville
Consumer Support.

17
PROBLEM POSSIBLE CAUSE WHAT TO DO
Water does not ow
from the group head
• Water tank is empty. • Fill tank. Prime the system by:
1) Touching the ‘Brew’ button to run water
through the group head for 30 seconds.
2) Touching ‘Hot Water’ to run water through
the hot water outlet for 30 seconds.
• Water tank not fully
inserted & locked.
• Push water tank in fully and lock
latch closed.
• Over heated water pump
due to back-to-back
extraction
• Switch o the machine and unplug
from the power outlet and let
the machine cool down.
The machine is ‘On’
but won’t operate
• Switch o the machine, unplug from the
power outlet, then plug the machine to the
power outlet and turn the machine back on.
• If problem persists, call Breville
Consumer Support.
Espresso only
drips from the
portalter spouts,
restricted ow
• Coee is ground
too nely.
• Adjust the grind size to a higher number
to make the grind size slightly coarser.
• There may be a blockage due to scale
build up. Run the descale process.
Espresso ows out
too quickly
• The coee is ground
too coarsely.
• Coee beans are stale.
• Adjust the grind size to a lower number
to make the grind size slightly ner.
• Use freshly roasted coee beans with
a ‘Roasted On’ date and consume
between 5–20 days after that date.
No crema • Coee beans are stale. • Use freshly roasted coee beans with
a ‘Roasted On’ date and consume
between 5–20 days after that date.
Not enough
milk texture
• Steam wand is blocked. • Refer to ‘Cleaning the Steam Wand’.
• There may be a blockage due to scale
build up. Run the descale process.
• Dierent brands and types of milk and milk
alternatives will texture dierently. You may
need to adjust the froth level accordingly.

18
PROBLEM POSSIBLE CAUSE WHAT TO DO
I cannot connect my
machine to the Wi-Fi
• Wrong password entered
for the SSID.
• Check the router proximity,
signal strength might be
weak.
• Unplug and plug the machine into the
powerpoint.
• Retry entering Wi-Fi credentials again.
• Install the router closer to the appliance for
stronger signal strength.
It is taking a long
time to connect
to the cloud and
taking a long time
to initialize
• Router proximity issue. • Unplug and plug the machine into the
powerpoint.
• Reboot the router.
• Retry entering the Wi-Fi credentials again.
• If problem persists, call Breville Consumer
Support.
It is taking a long
time to download
the software update
• Wi-Fi signal strength is
weak.
• Restart the coee machine.
• Move the Wi-Fi router closer to the coee
machine.
Software is
downloaded but
not installing
• Machine requires a reboot • Unplug and plug the machine into the
powerpoint.
• Perform a factory reset.
• If problem persists, call Breville Consumer
Support.
19
Breville-cleansteamwand-bes985
Breville-descale-bes985
Breville-tutorials-bes985
QR Code Links
Clean Steam Wand
https://scan.breville.com/bes985/cleansteamwand
Extraction Guide
https://scan.breville.com/bes985/extraction
Descale
https://scan.breville.com/bes985/descale
Texture Milk
https://scan.breville.com/bes985/milktexturing
Tutorial
https://scan.breville.com/bes985/tutorials
Breville-extraction-bes985
Breville-milktexturing-bes985

Breville, the Breville Logo, is trademark of Breville Pty Ltd (“Breville”) and Breville's products
are distributed in Australia and New Zealand under license.
Copyright Breville Pty. Ltd. 2024.
Due to continued product improvement, the products illustrated/photographed
in this brochure may vary slightly from the actual product.
B##### ANZ – #24
Breville Service Centre
Australian Customers
Phone:
1300 139 798
Web: www.breville.com
New Zealand Customers
Phone:
0800 273 845
Web: www.breville.com
BES985 ANZ – A24