
英
USER MANUAL
V11 Camcorder
Thank you for purchasing our music player.
Please read the manual carefully before using the device.

Contents
English
01-07
Deutsch
08-14
Français
15-21
Italiano
22-28
29-35
Español

①
⑧
⑨
⑩
④
②
③
⑤
⑥
⑦
⑪
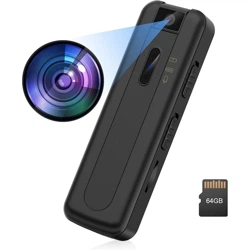
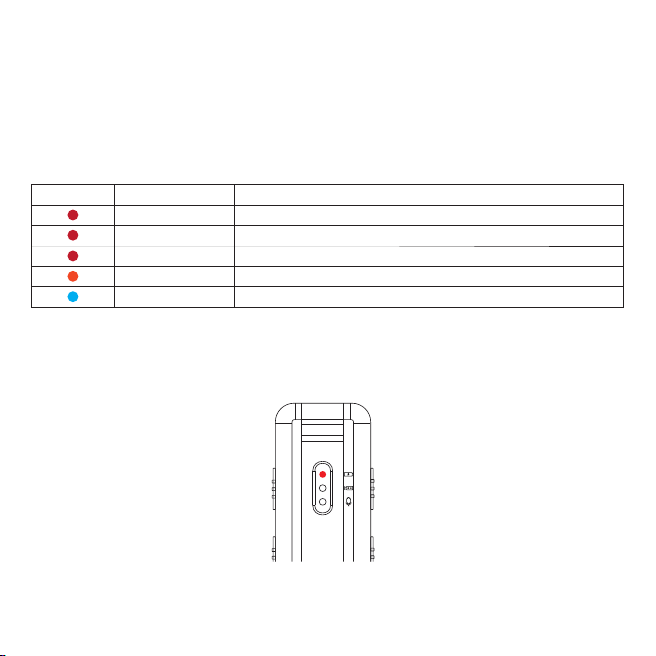
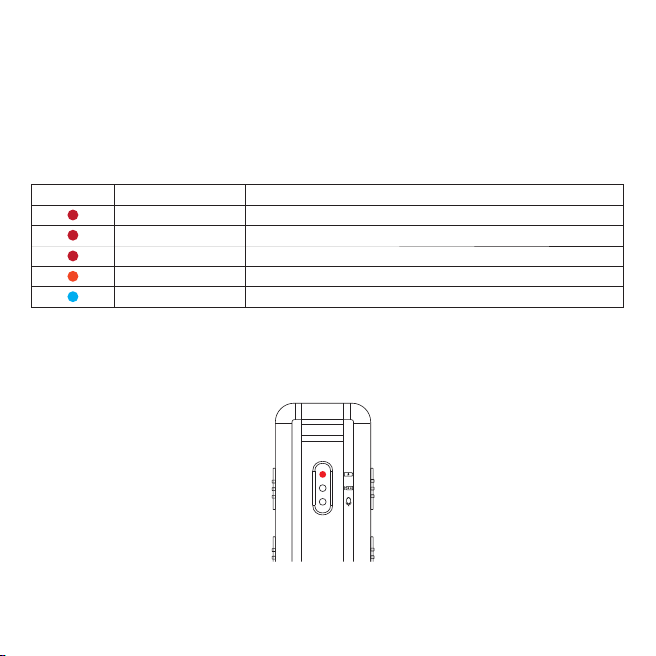
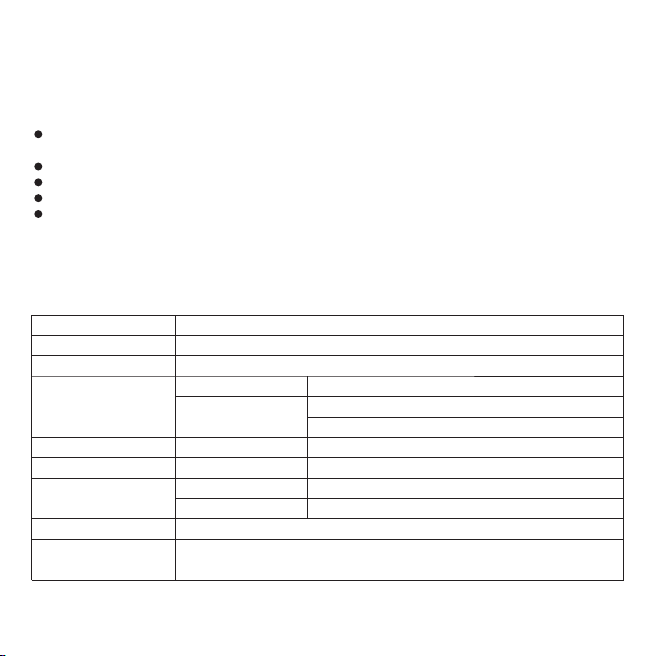
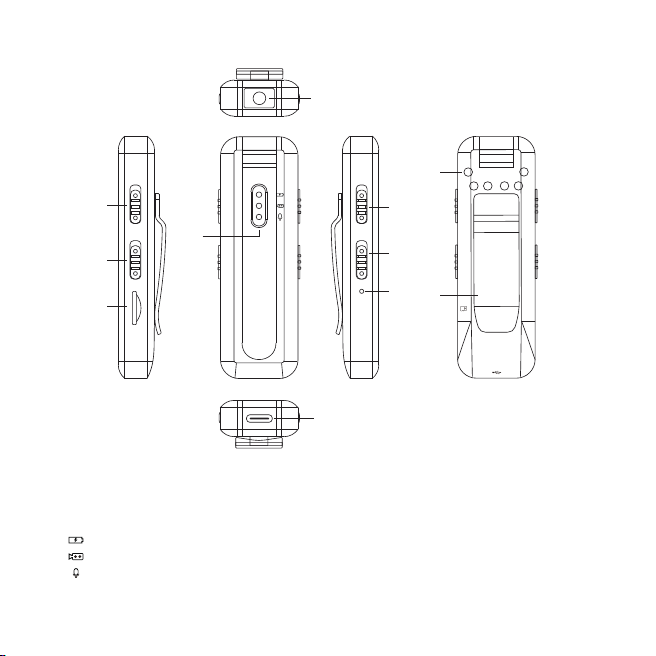
Instruction of Buttons
① CAM: video recording
② REC: voice recording
③ TF card slot: Max. 64GB
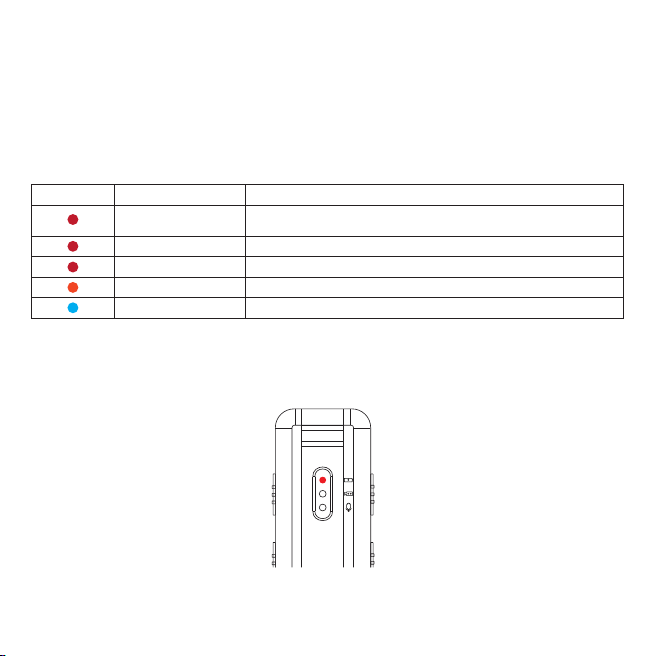
④ LED indicators:
If the device is dead, poke the reset hole with a needle to reset the device.
Power indicator
Video indicator
Recording indicator
⑤ Night vision ON/OFF
⑥ Power/Lights ON/OFF
⑦ RESET
⑧ Night vision infrared light
⑨ Back clip
⑩ Camera
⑪ USB port
01
RESET
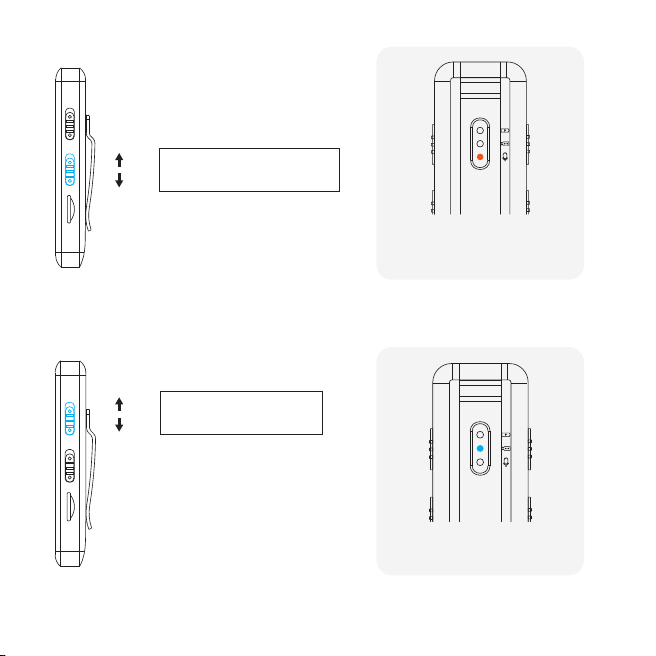
Charging
Indicators
Please use a 5V 1000mAh power adapter that meets the standard.
Charging by connecting to a computer or wall charger are both OK, but charging by computer takes
longer time than wall charger.
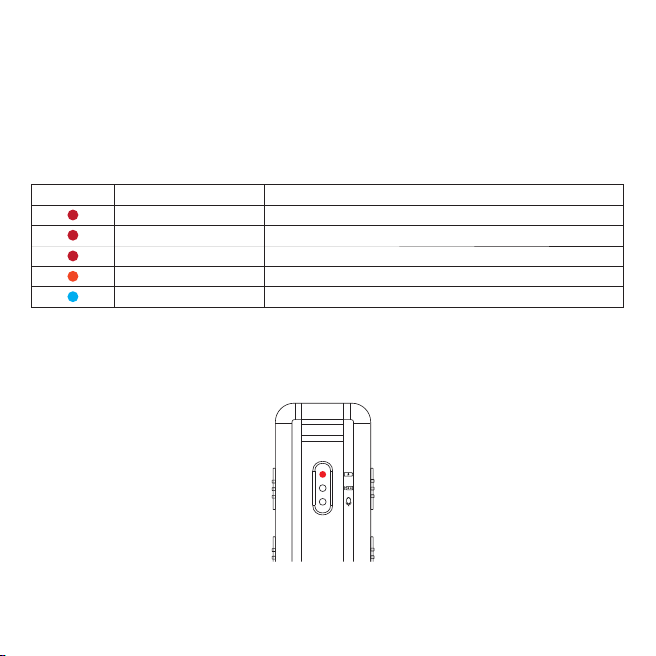
Turn ON/OFF
1.Push up the power button and hold it for about 3 seconds, the indicator keeps red as below
2.Push up the power button and hold on for about 3 seconds, the red indicator flashes and turns off,
the device turns off.
02
LED Color
Blinking mode
Always on
Blinking
Fast flashing
Blinking
Blinking
Machine Status
Standby, Power ON, Charging(turns off when full charged)
Power OFF
Low Power
Voice Recording
Video Recording
Voice Recording & Save
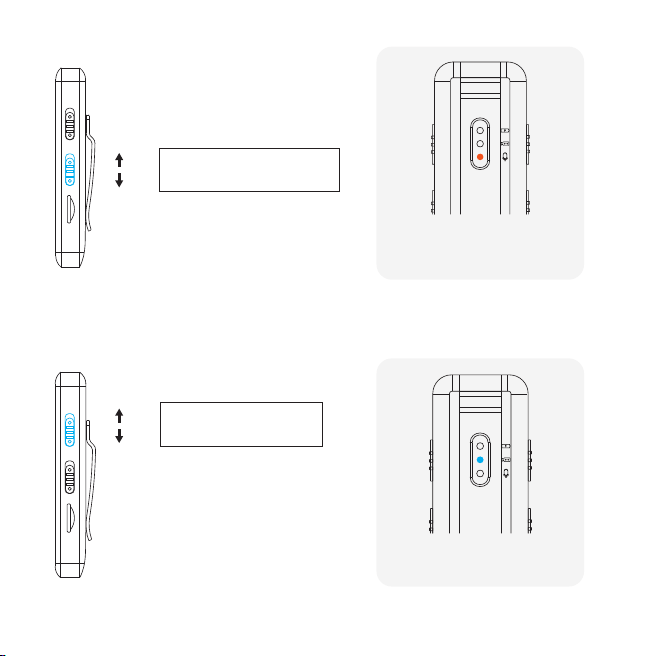
Push up the REC button and start voice recording.
Push down the REC button to save the recording.
The indicator is blinking orange
when recording.
To recording
Save the recording
Video Recording & Save
Push up the CAM button to start video recording, save it by pushing down the button.
The indicator is blinking
Blue when recording.
03
To recording
Save the recording
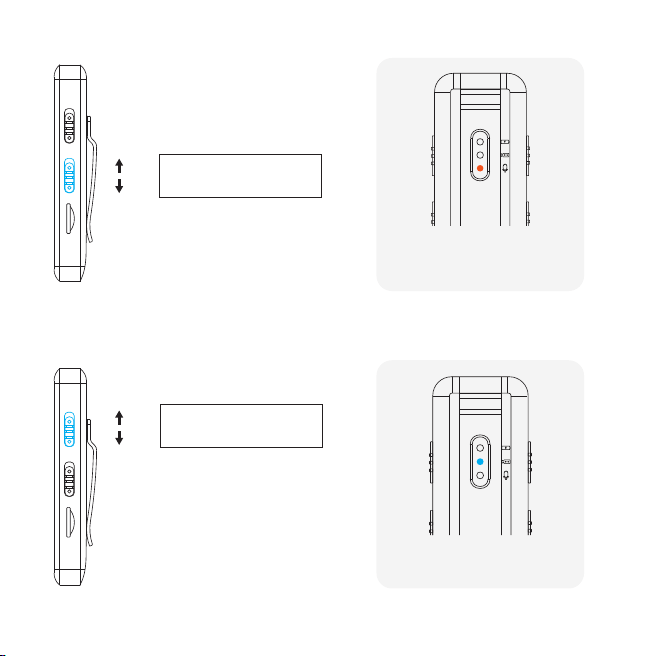
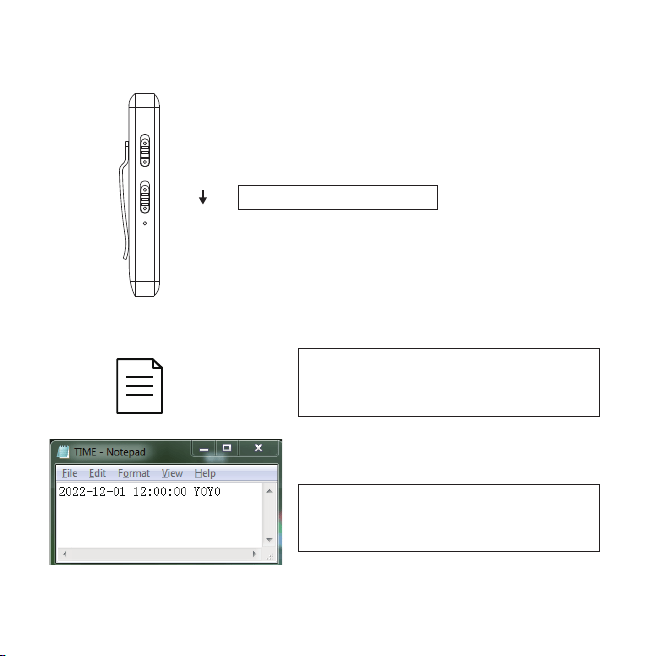
Turn Off the Indicator
Synchronize the System Time
TIME
When standby, recording or videotaping, push down the power button to turn off the indicator.
04
Turn off the LED indicator
Connect this device with the computer,
you will find the TXT file.
Modify the time and save it, then the system
time of this voice recorder is synchronized
Note: If the battery is not charged for a long time, the system time will recover, please reconnect the
computer to modify the synchronization system time!
RESET

Connect to the Computer
As there is no internal memory on the device, please do make sure the memory card has been
inserted before you connect the voice recorder with the computer.
Otherwise, the computer cannot detect the voice recorder!
When connecting the device to your computer, you may be asked to install the driver. Just follow the
instructions to complete.
If your computer prompts for a format, please choose FAT32 for the file to format.
To avoid file system errors caused by formatting operations, we recommend to clean up by deleting
files!
Video Settings
05
TIME
Open the TXT file and modify the Y0Y0
according to your needs.
Note:
The video settings only support the letters and numbers described above.
When there is only about 1.5GB of memory left, the newest video will replace the oldest, and so on
and so forth to ensure that the machine always has enough memory for recording. If you do not want
the video be replaced, please set the cycle mode as N.
Watermark
Clarity
Cycle mode
Image flip
Y: with time watermark
0: 1080P
Y: Circular Coverage
normal
N: without time watermark
1: 720P
N: No circulation, no coverage
180°flip
NO NAME
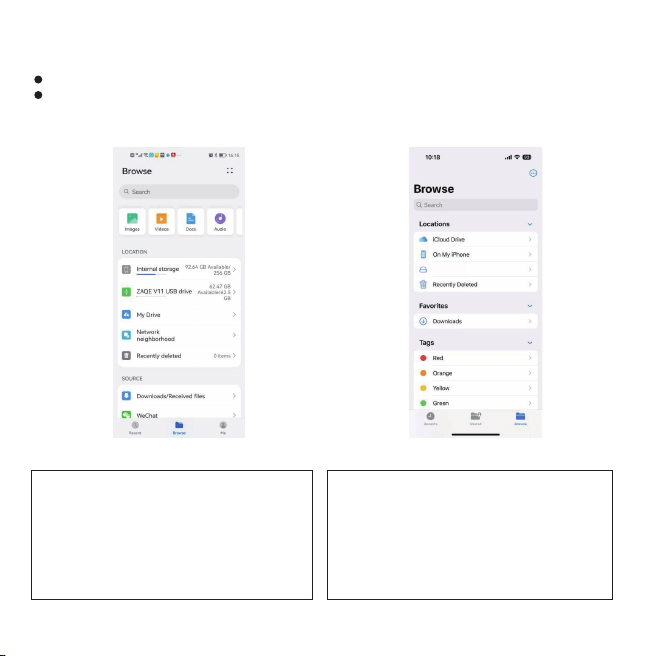
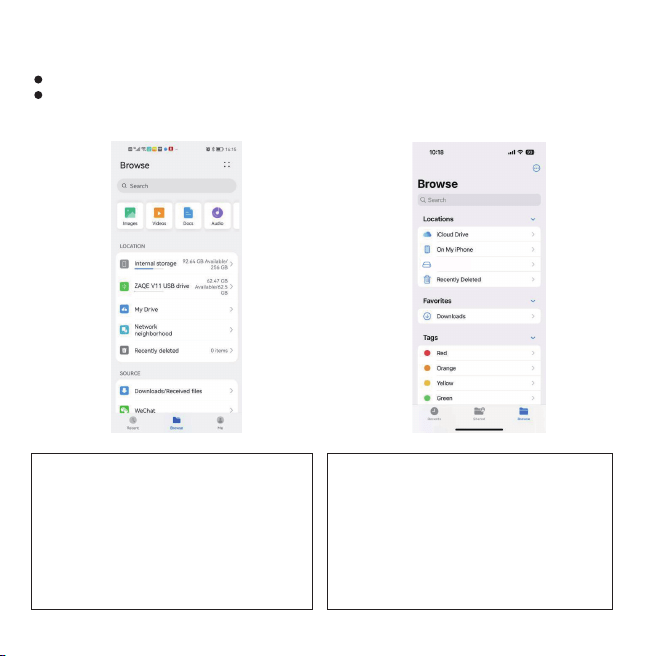
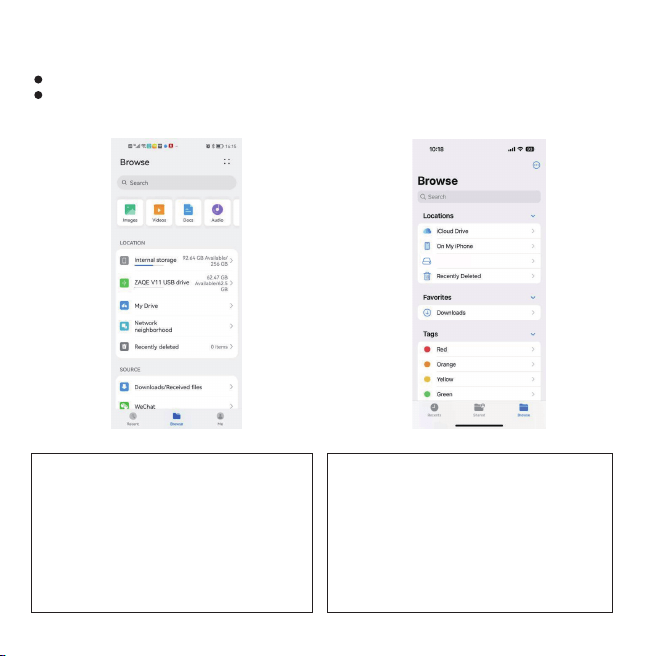
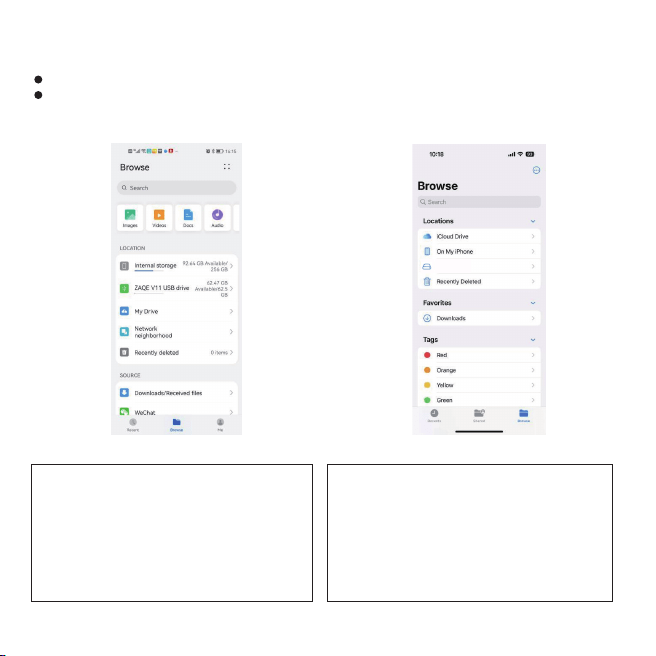
OTG Connection and Playback
1.Before use, please note:
Must have the OTG function on your phone!
Must turn on the OTG function on your phone!
2.OTG Connection
Android
Connect the OTG cable with the mobile phone
and the device, open the Files on your phone.
Select Browse, and you will find the device
ZAQE V11. Hit the device name to browse and play.
Attention: OTG function needs to be turned on
manually on some mobile phones, so be sure
that you’ve turn it on.
06
Apple
Connect the OTG cable with the mobile phone and the
device, open the Files on your phone. Select Browse,
and you will find the device NO NAME. Hit the device
name to browse and play.
Attention: Most versions of Apple phones come with a
file function. If you can't find or don't have the file
function, please search for the Files on the "APP Store"
to download and install it.
3.To Play a File
Android
After connecting to OTG with the phone, find the file in the folder "VIDEO"on the file management
page, select the file to play.
Apple
After connecting to OTG with the phone, if you need to play the videos directly, please download
and install the "OPLAY Video Player"from APP Store.
Then, turn on the OTG function on your phone if needed.
Open the "VIDEO" folder.
Click on the file and select the share button at the bottom left corner.
Select "OPLAY Video Player" to play.
07
OTG Connection and Playback
Size
USB port
Battery
Battery life
(full charged)
Video recording
Recording Format
Video Format
Working Temperature
Max. Storage
Supported OS
87x29.5x17mm (include the back clip)
USB 2.0 Type C
3.7v/500mAh Polymer lithium-ion
Voice recording
WAV
AVI
Voice Recording
Video Recording
-5°C~40°C (23°F~104°F)
Windows 98 Second Edition/Millennium Edition/2000/XP/
Windows 7/ Windows 8/ Windows 10
256kbps
1920*1080P / 1280*720P
2280 minutes
540 minutes
≈240 minutes
≈220 minutes (night vision OFF)
≈100 minutes (night vision ON)

Anweisung von Knöpfen
① CAM: Videoaufnahme
② REC: Sprachaufnahme
③ TF-Kartensteckplatz: max. 64 GB
④ LED-Anzeige:
Wenn das Gerät tot ist, stechen Sie mit einer Nadel in das Reset-Loch, um das Gerät zurückzusetzen.
Betriebsanzeige
Videoanzeige
Aufnahmeanzeige
⑤ Nachtsicht EIN/AUS
⑥ Strom/Lichter EIN/AUS
⑦ ZURÜCKSETZEN
⑧ Nachtsicht Infrarotlicht
⑨ Rückenclip
⑩ Kamera
⑪ USB-Anschluss
08
RESET
①
⑧
⑨
⑩
④
②
③
⑤
⑥
⑦
⑪
Laden
Indikatoren
Bitte verwenden Sie ein 5V 1000mAh Netzteil, das dem Standard entspricht.
Das Aufladen durch Anschluss an einen Computer oder ein Wandladegerät ist in Ordnung, aber das
Aufladen über den Computer dauert länger als das Aufladen über ein Wandladegerät.
An / Ausschalten
1.Drücken Sie den Netzschalter nach oben und halten Sie ihn etwa 3 Sekunden lang gedrückt, die
Anzeige bleibt wie unten rot
2.Drücken Sie den Netzschalter nach oben und halten Sie ihn etwa 3 Sekunden lang gedrückt, die
rote Anzeige blinkt und erlischt, das Gerät schaltet sich aus.
09
LED-Farbe
Blinkmodus
Immer auf
Blinken
Schnelles Blinken
Blinken
Blinken
Maschinenstatus
Standby, Einschalten, Aufladen (schaltet sich aus, wenn es voll aufgeladen ist)
Ausschalten
Geringer Strom
Stimmaufnahme
Videoaufnahme

Sprachaufnahme & Speichern
Drücken Sie die REC-Taste und starten Sie die Sprachaufnahme.
Drücken Sie die REC-Taste, um die Aufnahme zu speichern.
Die Anzeige blinkt während der
Aufnahme orange.
Zur Aufnahme
Speichern Sie die Aufnahme
Videoaufnahme & Speichern
Drücken Sie die CAM-Taste nach oben, um die Videoaufnahme zu starten, und speichern Sie sie,
indem Sie die Taste nach unten drücken.
Die Anzeige blinkt während der
Aufnahme blau.
10
Ein Video drehen
Speichern Sie das Video

Schalten Sie die Anzeige aus
Synchronisieren Sie die Systemzeit
TIME
Drücken Sie im Standby-Modus, beim Aufnehmen oder Aufzeichnen von Videos die Ein-/Aus-Taste,
um die Anzeige auszuschalten.
11
Schalten Sie die LED-Anzeige
Verbinden Sie dieses Gerät mit dem Computer,
Sie finden die TXT-Datei.
Ändern Sie die Uhrzeit und speichern Sie sie,
dann wird die Systemzeit dieses Diktiergeräts
synchronisiert.
Hinweis: Wenn der Akku längere Zeit nicht aufgeladen wird, stellt sich die Systemzeit wieder her.
Schließen Sie den Computer bitte erneut an, um die Synchronisierungssystemzeit zu ändern!
RESET
Verbinden Sie sich mit dem Computer
Da das Gerät über keinen internen Speicher verfügt, vergewissern Sie sich bitte, dass die
Speicherkarte eingelegt ist, bevor Sie das Diktiergerät mit dem Computer verbinden.
Andernfalls kann der Computer das Diktiergerät nicht erkennen!
Wenn Sie das Gerät an Ihren Computer anschließen, werden Sie möglicherweise aufgefordert, den
Treiber zu installieren. Folgen Sie einfach den Anweisungen, um den Vorgang abzuschließen.
Wenn Ihr Computer nach einem Format fragt, wählen Sie bitte FAT32 für die zu formatierende Datei.
Um Dateisystemfehler durch Formatierungsvorgänge zu vermeiden, empfehlen wir die Bereinigung
durch Löschen von Dateien!
Video-Einstellungen
12
TIME
Öffnen Sie die TXT-Datei und ändern
Sie Y0Y0 nach Ihren
Notiz:
Die Videoeinstellungen unterstützen nur die oben beschriebenen Buchstaben und Zahlen.
Wenn nur noch etwa 1,5 GB Speicherplatz übrig sind, ersetzt das neueste Video das älteste usw.,
um sicherzustellen, dass das Gerät immer genügend Speicherplatz für die Aufnahme hat.
Wenn Sie nicht möchten, dass das Video ersetzt wird, stellen Sie den Zyklusmodus bitte auf N ein.
Wasserzeichen
Klarheit
Zyklusmodus
Bildwechsel
Y: mit Zeitwasserzeichen
0: 1080P
Y: Zirkuläre Abdeckung
normal
N: ohne Zeitwasserzeichen
1: 720P
N: Keine Auflage, keine Berichterstattung
180°-Drehung
OTG-Verbindung und -Wiedergabe
1.Bitte beachten Sie vor der Verwendung:
Must die OTG-Funktion auf Ihrem Telefon haben!
Must die OTG-Funktion auf Ihrem Telefon einschalten!
2.OTG-Verbindung
Android
Verbinden Sie das OTG-Kabel mit dem Mobiltelefon
und dem Gerät, öffnen Sie die Dateien auf Ihrem
Telefon.
Wählen Sie Durchsuchen, und Sie finden das Gerät
ZAQE V11. Klicken Sie auf den Gerätenamen, um zu
suchen und zu spielen.
Achtung: Die OTG-Funktion muss bei einigen
Mobiltelefonen manuell eingeschaltet werden, stellen
Sie also sicher, dass Sie sie eingeschaltet haben.
13
Apple
Verbinden Sie das OTG-Kabel mit dem Mobiltelefon und
dem Gerät, öffnen Sie die Dateien auf Ihrem Telefon.
Wählen Sie Durchsuchen und Sie werden das Gerät NO
NAME finden. Klicken Sie auf den Gerätenamen, um zu
suchen und zu spielen.
Achtung: Die meisten Versionen von Apple-Telefonen
verfügen über eine Dateifunktion. Wenn Sie die
Dateifunktion nicht finden können oder nicht haben,
suchen Sie bitte nach den Dateien im “APP Store“, um
sie herunterzuladen und zu installieren.
NO NAME
3.So spielen Sie eine Datei ab
Android
Nachdem Sie sich mit dem Telefon mit OTG verbunden haben, suchen Sie die Datei im Ordner
“VIDEO“ auf der Dateiverwaltungsseite und wählen Sie die Datei zur Wiedergabe aus.
Apple
Nachdem Sie sich mit dem Telefon mit OTG verbunden haben und die Videos direkt abspielen
möchten, laden Sie bitte den "OPLAY Video Player" aus dem APP Store herunter und installieren
Sie ihn.
Schalten Sie dann bei Bedarf die OTG-Funktion auf Ihrem Telefon ein.
Öffnen Sie den Ordner “VIDEO“.
Klicken Sie auf die Datei und wählen Sie die Schaltfläche “Teilen“ in der unteren linken Ecke.
Wählen Sie zum Abspielen “OPLAY Video Player“.
14
Spezifikationen
Größe
USB-Anschluss
Batterie
Batterielebensdauer
(voll aufgeladen)
Videoaufnahme
Aufnahmeformat
Video Format
Arbeitstemperatur
MAX. Lagerung
Unterstütztes
Betriebssystem
87 x 29,5 x 17 mm (einschließlich des hinteren Clips)
USB 2.0 Typ C
3,7 V/500 mAh Polymer-Lithium-Ionen
Stimmaufnahme
.WAV
.AVI
Stimmaufnahme
Videoaufnahme
-5°C~40°C (23°F~104°F)
Windows 98 Second Edition/Millennium Edition/2000/XP/
Windows 7/ Windows 8/ Windows 10
256 kbit/s
1920*1080P / 1280*720P
2280 Minuten
540 Minuten
≈240 Minuten
≈220 Minuten (Nachtsicht AUS)
≈100 Minuten (Nachtsicht EIN)

Instruction des boutons
① CAM : enregistrement vidéo
② REC : enregistrement vocal
③ Fente pour carte TF : max. 64 Go
④ Indicateur LED:
Si l'appareil est mort, percez le trou de réinitialisation avec une aiguille pour réinitialiser l'appareil.
Voyant d'alimentation
ndicateur vidéo
Indicateur d'enregistrement
⑤ Vision nocturne activée/désactivée
⑥ Marche/Arrêt marche/arrêt des lumières
⑦ RÉINITIALISER
⑧ Lumière infrarouge de vision nocturne
⑨ Clip arrière
⑩ Caméra
⑪ Port USB
15
RESET
①
⑧
⑨
⑩
④
②
③
⑤
⑥
⑦
⑪

Mise en charge
Indicateurs
Veuillez utiliser un adaptateur secteur 5V 1000mAh conforme à la norme.
Le chargement en se connectant à un ordinateur ou à un chargeur mural est acceptable, mais le
chargement par ordinateur prend plus de temps que le chargeur mural.
Allume / éteint
1.Appuyez sur le bouton d'alimentation et maintenez-le enfoncé pendant environ 3 secondes,
l'indicateur reste rouge comme ci-dessous
2.Appuyez sur le bouton d'alimentation et maintenez-le enfoncé pendant environ 3 secondes, le
voyant rouge clignote et s'éteint, l'appareil s'éteint.
16
Couleur de la LED
Mode clignotant
Toujours activé
Clignotant
Clignotement rapide
Clignotant
Clignotant
État de l'appareil
Veille, mise sous tension, charge (s'éteint lorsqu'il est complètement chargé)
Éteindre
Batterie faible
Enregistrement vocal
Enregistrement video

Enregistrement vocal et sauvegarde
Appuyez sur le bouton REC et démarrez l'enregistrement vocal.
Appuyez sur le bouton REC pour sauvegarder l'enregistrement.
Le voyant clignote en orange
lors de l'enregistrement.
Vers l'enregistrement
Sauvegarder
Enregistrement vidéo et sauvegarde
Appuyez sur le bouton CAM pour démarrer l'enregistrement vidéo, enregistrez-le en appuyant sur le
bouton.
L'indicateur clignote en bleu
lors de l'enregistrement.
17
Filmez une vidéo
Enregistrez la vidéo

Éteignez l'indicateur
Synchroniser l'heure du système
TIME
En mode veille, enregistrement ou enregistrement vidéo, appuyez sur le bouton d'alimentation pour
éteindre l'indicateur.
18
Éteignez l'indicateur LED
Connectez cet appareil à l'ordinateur,
vous trouverez le fichier TXT.
Modifiez l'heure et enregistrez-la,
puis l'heure système de cet enregistreur
vocal est synchronisée.
Remarque : Si la batterie n'est pas chargée pendant une longue période, l'heure système se
rétablira, veuillez reconnecter l'ordinateur pour modifier l'heure système de synchronisation!
RESET

Se connecter à l'ordinateur
Comme il n'y a pas de mémoire interne sur l'appareil, assurez-vous que la carte mémoire a été
insérée avant de connecter l'enregistreur vocal à l'ordinateur.
Sinon, l'ordinateur ne peut pas détecter l'enregistreur vocal!
Lors de la connexion de l'appareil à votre ordinateur, vous pouvez être invité à installer le pilote.
Suivez simplement les instructions pour terminer.
Si votre ordinateur demande un format, veuillez choisir FAT32 pour le fichier à formater.
Pour éviter les erreurs de système de fichiers causées par les opérations de formatage, nous vous
recommandons de nettoyer en supprimant les fichiers!
Paramètres vidéo
19
TIME
Ouvrez le fichier TXT et modifiez le
Y0Y0 selon vos besoins.
Note:
Les paramètres vidéo ne prennent en charge que les lettres et les chiffres décrits ci-dessus.
Lorsqu'il ne reste plus qu'environ 1,5 Go de mémoire, la vidéo la plus récente remplace la plus
ancienne, et ainsi de suite pour s'assurer que la machine dispose toujours de suffisamment de
mémoire pour l'enregistrement. Si vous ne souhaitez pas que la vidéo soit remplacée, veuillez
définir le mode cycle sur N.
Filigrane
Clarté
Mode cycle
Retournement d'image
Y : avec filigrane temporel
0: 1080P
Y : Remplacer des fichiers en boucle
normal
N : sans filigrane horaire
1: 720P
N : Pas de couverture de la boucle
retournement à 180°
Connexion et lecture OTG
1.Avant utilisation, veuillez noter :
Doit avoir la fonction OTG sur votre téléphone!
Vous devez activer la fonction OTG sur votre téléphone!
2.Connexion OTG
Androïde
Connectez le câble OTG au téléphone mobile et à
l'appareil, ouvrez les fichiers sur votre téléphone.
Sélectionnez Parcourir et vous trouverez l'appareil
ZAQE V11. Appuyez sur le nom de l'appareil pour
parcourir et jouer.
Attention : la fonction OTG doit être activée
manuellement sur certains téléphones portables,
alors assurez-vous de l'avoir activée.
20
Apple
Connectez le câble OTG au téléphone mobile et à
l'appareil, ouvrez les fichiers sur votre téléphone.
Sélectionnez Parcourir et vous trouverez l'appareil NO
NAME. Appuyez sur le nom de l'appareil pour parcourir
et jouer.
Attention : la plupart des versions des téléphones
Apple sont livrées avec une fonction de fichier.
Si vous ne trouvez pas ou n'avez pas la fonction de
fichier, veuillez rechercher les fichiers sur "APP Store"
pour le télécharger et l'installer.
NO NAME
3.Pour lire un fichier
Androïde
Après vous être connecté à OTG avec le téléphone, recherchez le fichier dans le dossier "VIDEO"
sur la page de gestion des fichiers, sélectionnez le fichier à lire.
Apple
Après vous être connecté à OTG avec le téléphone, si vous avez besoin de lire les vidéos
directement, veuillez télécharger et installer le "lecteur vidéo OPLAY" depuis l'APP Store.
Ensuite, activez la fonction OTG sur votre téléphone si nécessaire.
Ouvrez le dossier "VIDEO".
Cliquez sur le fichier et sélectionnez le bouton de partage dans le coin inférieur gauche.
Sélectionnez "OPLAY Video Player" pour jouer.
21
Spécifications
Taille
Port USB
Batterie
Vie de la batterie
(complètement chargé)
Enregistrement video
Format d'enregistrement
Format vidéo
Température de fonctionnement
Max. Stockage
Système d'Exploitation
pris en charge
87x29.5x17mm (inclure le clip arrière)
USB 2.0 Type C
Lithium-ion polymère 3,7 V/500 mAh
Enregistrement vocal
.WAV
.AVI
Enregistrement vocal
Enregistrement video
-5°C~40°C (23°F~104°F)
Windows 98 Second Edition/Millennium Edition/2000/XP/
Windows 7/ Windows 8/ Windows 10
256kbps
1920*1080P / 1280*720P
2280 minutes
540 minutes
≈240 minutes
≈220 minutes (vision nocturne désactivée)
≈100 minutes (vision nocturne activée)

Istruzione dei pulsanti
① CAM: registrazione video
② REC: registrazione vocale
③ Slot per schede TF: max. 64GB
④ Indicatore LED:
Se il dispositivo è morto, colpisci il foro di ripristino con un ago per ripristinare il dispositivo.
Indicatore di energia
Indicatore video
Indicatore di registrazione
⑤ Visione notturna ON/OFF
⑥ Alimentazione/luci ON/OFF
⑦ Resettare
⑧ Luce infrarossa per visione notturna
⑨ Fermaglio posteriore
⑩ Telecamera
⑪ Porta USB
22
RESET
①
⑧
⑨
⑩
④
②
③
⑤
⑥
⑦
⑪
Ricarica
Indicatori
Si prega di utilizzare un alimentatore da 5 V 1000 mAh che soddisfi lo standard.
La ricarica tramite collegamento a un computer o a un caricatore a muro va bene, ma la ricarica
tramite computer richiede più tempo rispetto a un caricatore a muro.
Accendi / spegni
1.Spingere verso l'alto il pulsante di accensione e tenerlo premuto per circa 3 secondi, l'indicatore
rimane rosso come di seguito.
2.Premere il pulsante di accensione e tenere premuto per circa 3 secondi, l'indicatore rosso
lampeggia e si spegne, il dispositivo si spegne.
23
Colore LED
Modalità lampeggiante
Sempre acceso
Lampeggiante
Lampeggio veloce
Lampeggiante
Lampeggiante
Stato macchina
Standby, accensione, ricarica (si spegne quando è completamente carico)
Spegni
Bassa potenza
Registrazione vocale
Registrazione video
Registrazione vocale e salvataggio
Spingere verso l'alto il pulsante REC e avviare la registrazione vocale.
Premere il pulsante REC per salvare la registrazione.
L'indicatore lampeggia in
arancione durante la registrazione.
Alla registrazione
Salva la registrazione
Registrazione video e salvataggio
Spingere verso l'alto il pulsante CAM per avviare la registrazione video, salvarlo premendo il pulsante
verso il basso.
L'indicatore lampeggia in blu
durante la registrazione.
24
per fare un video
Salva il filmato
Spegnere l'indicatore
Sincronizzare l'ora del sistema
TIME
In standby, registrazione o videoregistrazione, premere il pulsante di accensione per spegnere
l'indicatore.
25
Spegnere l'indicatore LED
Collega questo dispositivo al computer,
troverai il file TXT.
Modifica l'ora e salvala, quindi l'ora di sistema
di questo registratore vocale è sincronizzata.
Nota: se la batteria non viene caricata per un lungo periodo, l'ora del sistema verrà ripristinata,
ricollegare il computer per modificare l'ora del sistema di sincronizzazione!
RESET

Connettiti al computer
Poiché il dispositivo non dispone di memoria interna, assicurarsi che la scheda di memoria sia stata
inserita prima di collegare il registratore vocale al computer.
In caso contrario, il computer non è in grado di rilevare il registratore vocale!
Quando si collega il dispositivo al computer, potrebbe essere richiesto di installare il driver. Basta
seguire le istruzioni per completare.
Se il tuo computer richiede un formato, scegli FAT32 per il file da formattare.
Per evitare errori del file system causati dalle operazioni di formattazione, si consiglia di ripulire
eliminando i file!
Impostazioni video
26
TIME
Apri il file TXT e modifica Y0Y0 in base
alle tue esigenze.
Nota:
Le impostazioni video supportano solo le lettere ei numeri sopra descritti.
Quando sono rimasti solo circa 1,5 GB di memoria, il video più recente sostituirà il più vecchio e
così via per garantire che la macchina disponga sempre di memoria sufficiente per la registrazione.
Se non vuoi che il video venga sostituito, imposta la modalità ciclo su N.
Filigrana
Chiarezza
Modalità ciclo
Capovolgimento dell'immagine
Y: con filigrana dell'ora
0: 1080P
Y: Copertura circolare
normale
N: senza filigrana dell'ora
1: 720P
N: Nessuna circolazione, nessuna copertura
Capovolgimento di 180°
Connessione e riproduzione OTG
1.Prima dell'uso, si prega di notare:
Deve avere la funzione OTG sul tuo telefono!
Devi attivare la funzione OTG sul tuo telefono!
2.Connessione OTG
Androide
Collega il cavo OTG con il telefono cellulare e il
dispositivo, apri i file sul tuo telefono. Seleziona
Sfoglia e troverai il dispositivo ZAQE V11. Premi il
nome del dispositivo per navigare e giocare.
Attenzione: la funzione OTG deve essere attivata
manualmente su alcuni telefoni cellulari, quindi
assicurati di averla attivata.
27
Apple
Collega il cavo OTG con il telefono cellulare e il
dispositivo, apri i file sul tuo telefono. Seleziona Sfoglia
e troverai il dispositivo NO NAME. Premi il nome del
dispositivo per navigare e giocare.
Attenzione: la maggior parte delle versioni dei telefoni
Apple è dotata di una funzione file. Se non riesci a
trovare o non hai la funzione file, cerca i file su
"APP Store" per scaricarlo e installarlo.
NO NAME
3.Per riprodurre un file
Androide
Dopo esserti connesso a OTG con il telefono, trova il file nella cartella "VIDEO" nella pagina di
gestione dei file, seleziona il file da riprodurre.
Apple
Dopo esserti connesso a OTG con il telefono, se devi riprodurre direttamente i video, scarica e
installa "OPLAY Video Player" dall'APP Store.
Quindi, se necessario, attiva la funzione OTG sul telefono.
Apri la cartella "VIDEO".
Fare clic sul file e selezionare il pulsante di condivisione nell'angolo in basso a sinistra.
Seleziona "OPLAY Video Player" per giocare.
28
Specifiche
Misurare
Porta USB
Batteria
Durata della batteria
(completamente carico)
Registrazione video
Formato di registrazione
Formato video
Temperatura di lavoro
Massimo. Magazzinaggio
Sistema operativo
supportato
87x29.5x17mm (includere la clip posteriore)
USB 2.0 tipo C
Ioni di litio polimeriche da 3,7 V/500 mAh
Registrazione vocale
.WAV
.AVI
Registrazione vocale
Registrazione video
-5°C~40°C (23°F~104°F)
Windows 98 Second Edition/Millennium Edition/2000/XP/
Windows 7/ Windows 8/ Windows 10
256kbps
1920*1080P / 1280*720P
2280 minuti
540 minuti
≈240 minuti
≈220 minuti (visione notturna disattivata)
≈100 minuti (visione notturna attiva)
Instrucción de botones
① CAM: grabación de vídeo
② REC: grabación de voz
③ Ranura para tarjeta TF: Máx. 64 GB
④ Indicador de vídeo:
Si el dispositivo está inactivo, perfore el orificio de reinicio con una aguja para reiniciar el dispositivo.
Indicador de encendido
Indicador de vídeo
Indicador de grabación
⑤ Visión nocturna ON/OFF
⑥ Encendido/encendido/apagado de luces
⑦ REINICIAR
⑧ Luz infrarroja de visión nocturna
⑨ pinza trasera
⑩ Cámara
⑪ Puerto USB
29
RESET
①
⑧
⑨
⑩
④
②
③
⑤
⑥
⑦
⑪
Cargando
Indicadores
Utilice un adaptador de corriente de 5V 1000mAh que cumpla con el estándar.
La carga mediante la conexión a una computadora o un cargador de pared está bien, pero la carga
con la computadora lleva más tiempo que con el cargador de pared.
Encender / apagar
1.Presione el botón de encendido y manténgalo presionado durante unos 3 segundos, el indicador
se mantiene rojo como se muestra a continuación
2.Presione el botón de encendido y manténgalo presionado durante unos 3 segundos, el indicador
rojo parpadea y se apaga, el dispositivo se apaga.
30
Color LED
Modo intermitente
siempre encendido
Parpadeo
parpadeo rápido
Parpadeo
Parpadeo
Estado de la máquina
En espera, encendido, cargando
(se apaga cuando está completamente cargado)
Apagado
Bajo consumo
Grabación de voz
Grabación de vídeo
Grabación de voz y guardar
Presione el botón REC y comience la grabación de voz.
Presione el botón REC para guardar la grabación.
El indicador parpadea en naranja
durante la grabación.
a la grabación
Guardar la grabación
Grabación de video y guardar
Presione el botón CAM para iniciar la grabación de video, guárdelo presionando el botón.
El indicador parpadea en azul
durante la grabación.
31
grabar un vídeo
guarda el video

Apague el indicador
Sincronizar la hora del sistema
TIME
Cuando esté en modo de espera, grabando o grabando en video, presione el botón de encendido
para apagar el indicador.
32
Apague el indicador LED
Modifique la hora y guárdela, luego se
sincroniza la hora del sistema de esta
grabadora de voz.
Modifica l'ora e salvala, quindi l'ora di sistema
di questo registratore vocale è sincronizzata.
Nota: Si la batería no se carga durante mucho tiempo, la hora del sistema se recuperará.
Vuelva a conectar la computadora para modificar la hora del sistema de sincronización.
RESET
Conectar a la computadora
Como no hay memoria interna en el dispositivo, asegúrese de haber insertado la tarjeta de memoria
antes de conectar la grabadora de voz a la computadora.
¡De lo contrario, la computadora no puede detectar la grabadora de voz!
Al conectar el dispositivo a su computadora, es posible que se le solicite que instale el controlador.
Simplemente siga las instrucciones para completar.
Si su computadora solicita un formato, elija FAT32 para el archivo a formatear.
Para evitar errores en el sistema de archivos causados por las operaciones de formateo,
recomendamos limpiar eliminando archivos.
Ajustes de video
33
TIME
Abra el archivo TXT y modifique el
Y0Y0 según sus necesidades.
Nota:
La configuración de video solo admite las letras y los números descritos anteriormente.
Cuando solo quede alrededor de 1,5 GB de memoria, el video más nuevo reemplazará al más
antiguo, y así sucesivamente para garantizar que la máquina siempre tenga suficiente memoria
para grabar. Si no desea que se reemplace el video, configure el modo de ciclo como N.
Filigrana
Claridad
Modo ciclo
Voltear la imagen
Y: con marca de agua de tiempo
0: 1080P
Y: Cobertura Circular
normal
N: sin marca de agua de tiempo
1: 720P
N: Sin circulación, sin cobertura
giro de 180°

Conexión y reproducción OTG
1.Antes de usar, tenga en cuenta:
¡Debe tener la función OTG en su teléfono!
¡Debe activar la función OTG en su teléfono!
2.Conexión OTG
Androide
Conecte el cable OTG con el teléfono móvil y el
dispositivo, abra los Archivos en su teléfono.
Seleccione Examinar y encontrará el dispositivo
ZAQE V11. Presiona el nombre del dispositivo para
navegar y jugar.
Atención: la función OTG debe activarse
manualmente en algunos teléfonos móviles,
así que asegúrese de activarla.
34
Apple
Conecte el cable OTG con el teléfono móvil y el
dispositivo, abra los Archivos en su teléfono. Seleccione
Examinar y encontrará el dispositivo NO NAME.
Presiona el nombre del dispositivo para navegar y jugar.
Atención: la mayoría de las versiones de teléfonos
Apple vienen con una función de archivo. Si no puede
encontrar o no tiene la función de archivo, busque los
archivos en la "Tienda de aplicaciones" para descargarlo
e instalarlo.
NO NAME

3.Para reproducir un archivo
Androide
Después de conectarse a OTG con el teléfono, busque el archivo en la carpeta "VIDEO" en la
página de administración de archivos, seleccione el archivo para reproducir.
Apple
Después de conectarse a OTG con el teléfono, si necesita reproducir los videos directamente,
descargue e instale el "Reproductor de video OPLAY" de la tienda de aplicaciones.
Luego, active la función OTG en su teléfono si es necesario.
Abra la carpeta "VÍDEO".
Haga clic en el archivo y seleccione el botón de compartir en la esquina inferior izquierda.
Seleccione "OPLAY Video Player" para reproducir.
35
Especificaciones
Tamaño
Puerto USB
Batería
Duración de la batería
(carga completa)
Grabación de vídeo
Formato de grabación
Formato de video
Temperatura de trabajo
máx. Almacenamiento
SO compatibles
87x29,5x17 mm (incluye el clip trasero)
USB 2.0 tipo C
iones de litio de polímero de 3,7 v/500 mAh
Grabación de voz
.WAV
.AVI
Grabación de voz
Grabación de vídeo
-5°C~40°C (23°F~104°F)
Windows 98 Second Edition/Millennium Edition/2000/XP/
Windows 7/ Windows 8/ Windows 10
256kbps
1920*1080P / 1280*720P
2280 minutos
540 minutos
≈240 minutos
≈220 minutos (visión nocturna APAGADA)
≈100 minutos (visión nocturna ON)