Creative
Consumer
Products
Mini Stand Mixer - SM100
READ ALL INSTRUCTIONS BEFORE USE

3
English Manual
Manuel d’utilisation en Français
Gebrauchsanleitung auf Deutsch
Manual de Instrucciones en Español
Manuale D’istruzioni In Italiano
5
15
27
37
47
Contents

4 5
English Manual

6 7
Model: SM100
Rated voltage: 220-240V~50/60Hz
Power consumption: 450W
Protection class: II
This device has been tested according to all relevant current CE guidelines, such as
electromagnetic compatibility and low voltage directives, and has been constructed in
accordance with the latest safety regulations.
Subject to technical changes without prior notice!
Read the operating instructions carefully before use. Keep the instructions including
the warranty, the receipt and, if possible, the box with the internal packing.
- The appliance is designed exclusively for private use and for the envisaged purpose.
This appliance is not t for commercial use. Do not use it outdoors. Keep it away from
sources of heat, direct sunlight, humidity and water. Do not use the appliance with wet
hands. If the appliance is wet unplug it immediately.
- When cleaning and storing the appliance, switch off the appliance and unplug (pull
on the plug, not the cable). If the appliance is not being used, remove the attached
accessories.
- Do not leave the appliance unsupervised.
- Check the appliance and the cable for damage on a regular basis. Do not use the
appliance if it is damaged.
- Do not try to repair the appliance on your own. Always contact an authorized
technician, the manufacturer, our customer service or a qualied person.
- Use only original spare parts.
- Do not interfere with any safety switches.
- Do not insert anything into the rotating hooks while the machine is working.
- Place the machine on a smooth, at and stable working surface.
- Do not allow small children to play with the foil as there is a danger of suffocation.
Specications
General Safety Instructions
- In order to protect children from the hazards of electrical equipment, please ensure
that this device is only used under supervision. This device is not a toy. Do not allow
small children to play with it.
- In order to ensure your children‘s safety, please keep all packaging (plastic bags,
boxes, polystyrene etc.) out of their reach.
- In order to protect children from the hazards of electrical equipment, please ensure
that this device is only used under supervision. This device is not a toy.
Children Safety
- Before cleaning remove the mains lead from the socket.
- Never immerse the housing with motor in water!
- Do not use any sharp or abrasive detergents.
Motor Housing
- Only a damp rinsing cloth should be used to clean the outside of the housing.
Mixing Bowl, Mixing Equipment
CAUTION:
- The components are not suitable for cleaning in a dishwasher. If exposed to heat or
caustic cleaners they might become misshapen or discolored.
- Components that have come into contact with food can be cleaned in soapy water.
- Allow the parts to dry thoroughly before reassembling the device.
- Please apply a small quantity of vegetable oil likely to the screens after they have
dried.
Cleaning

8 9
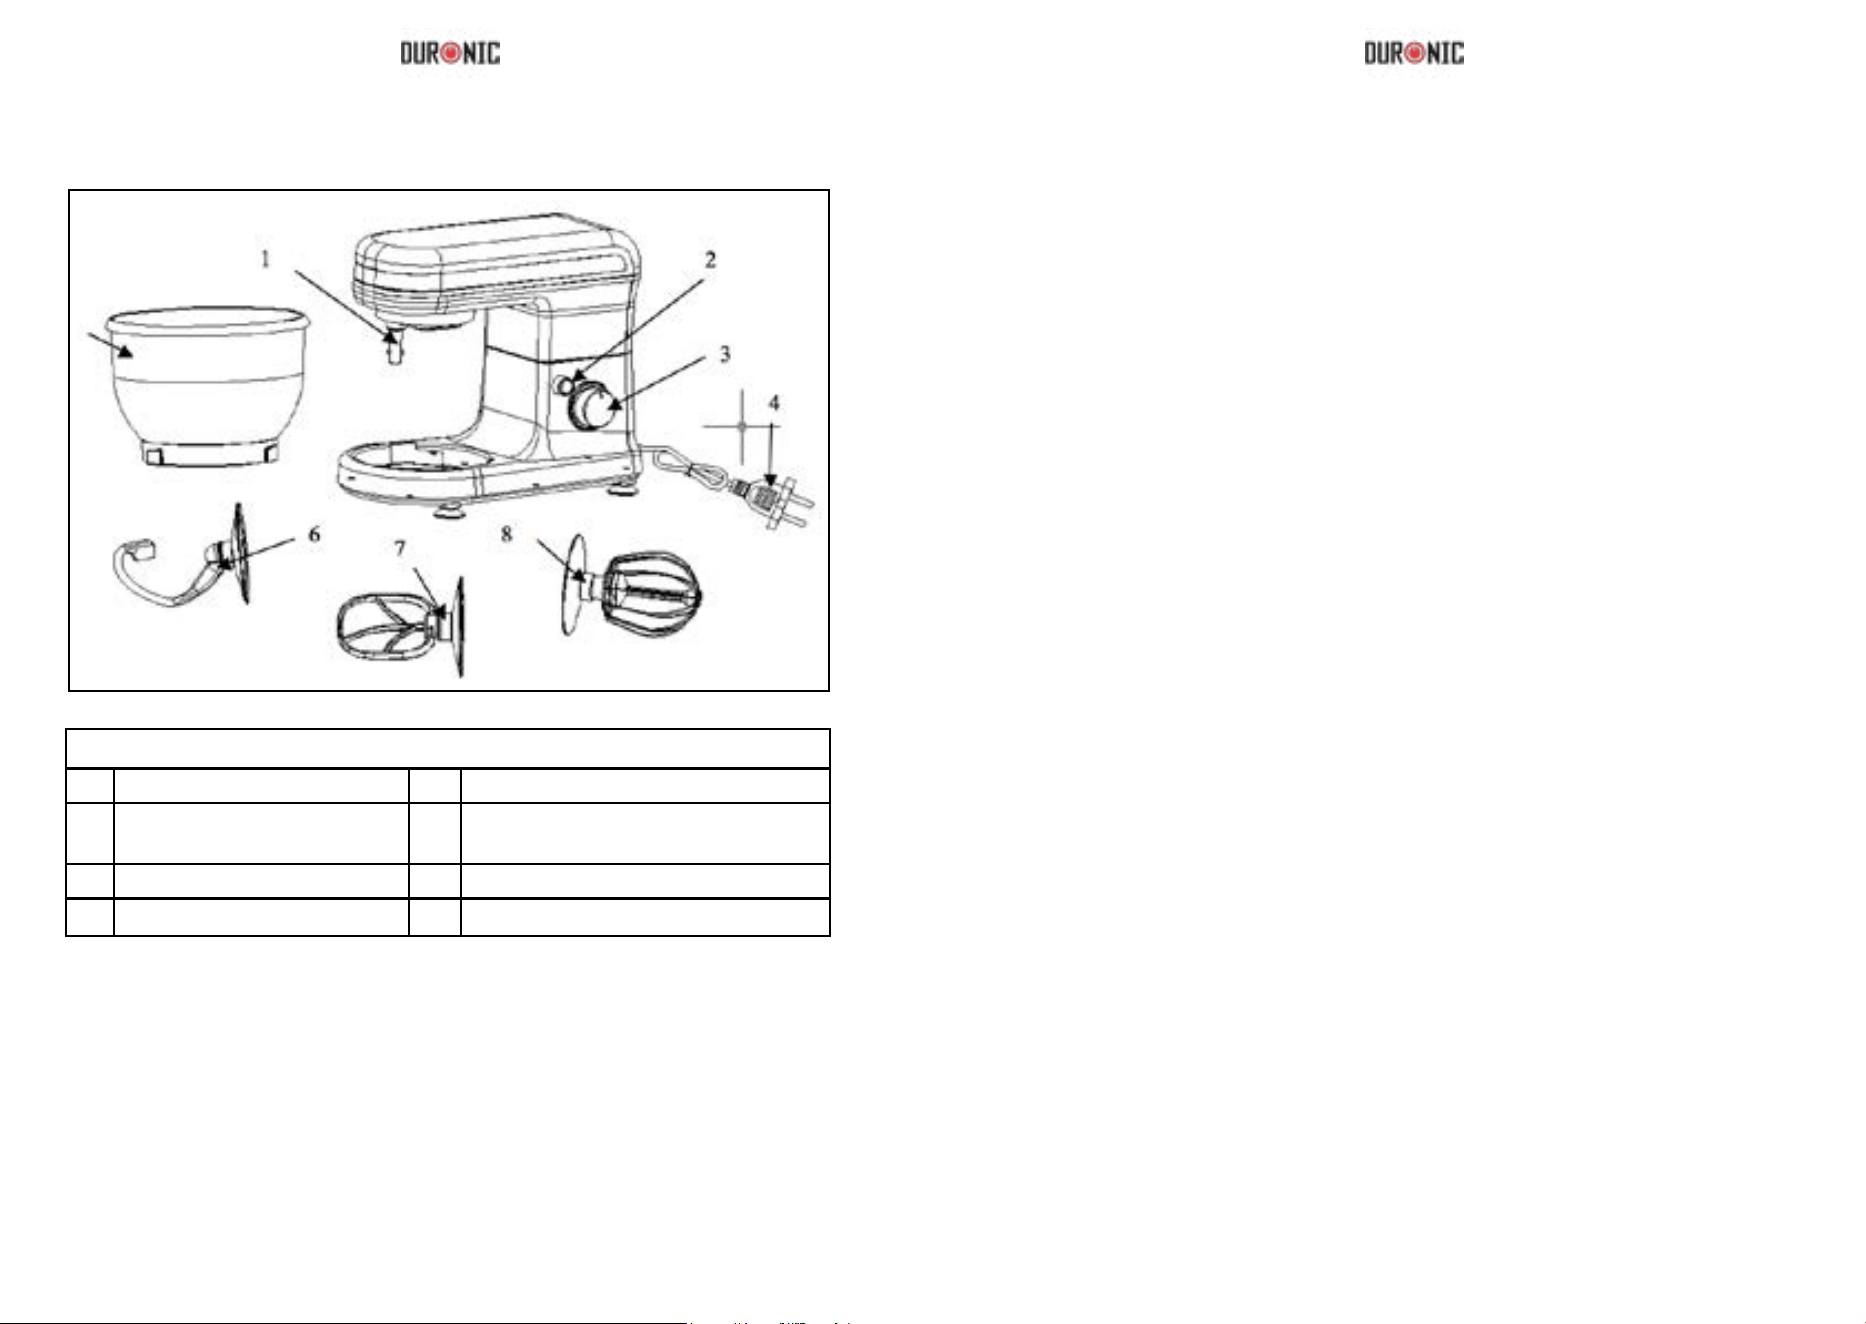
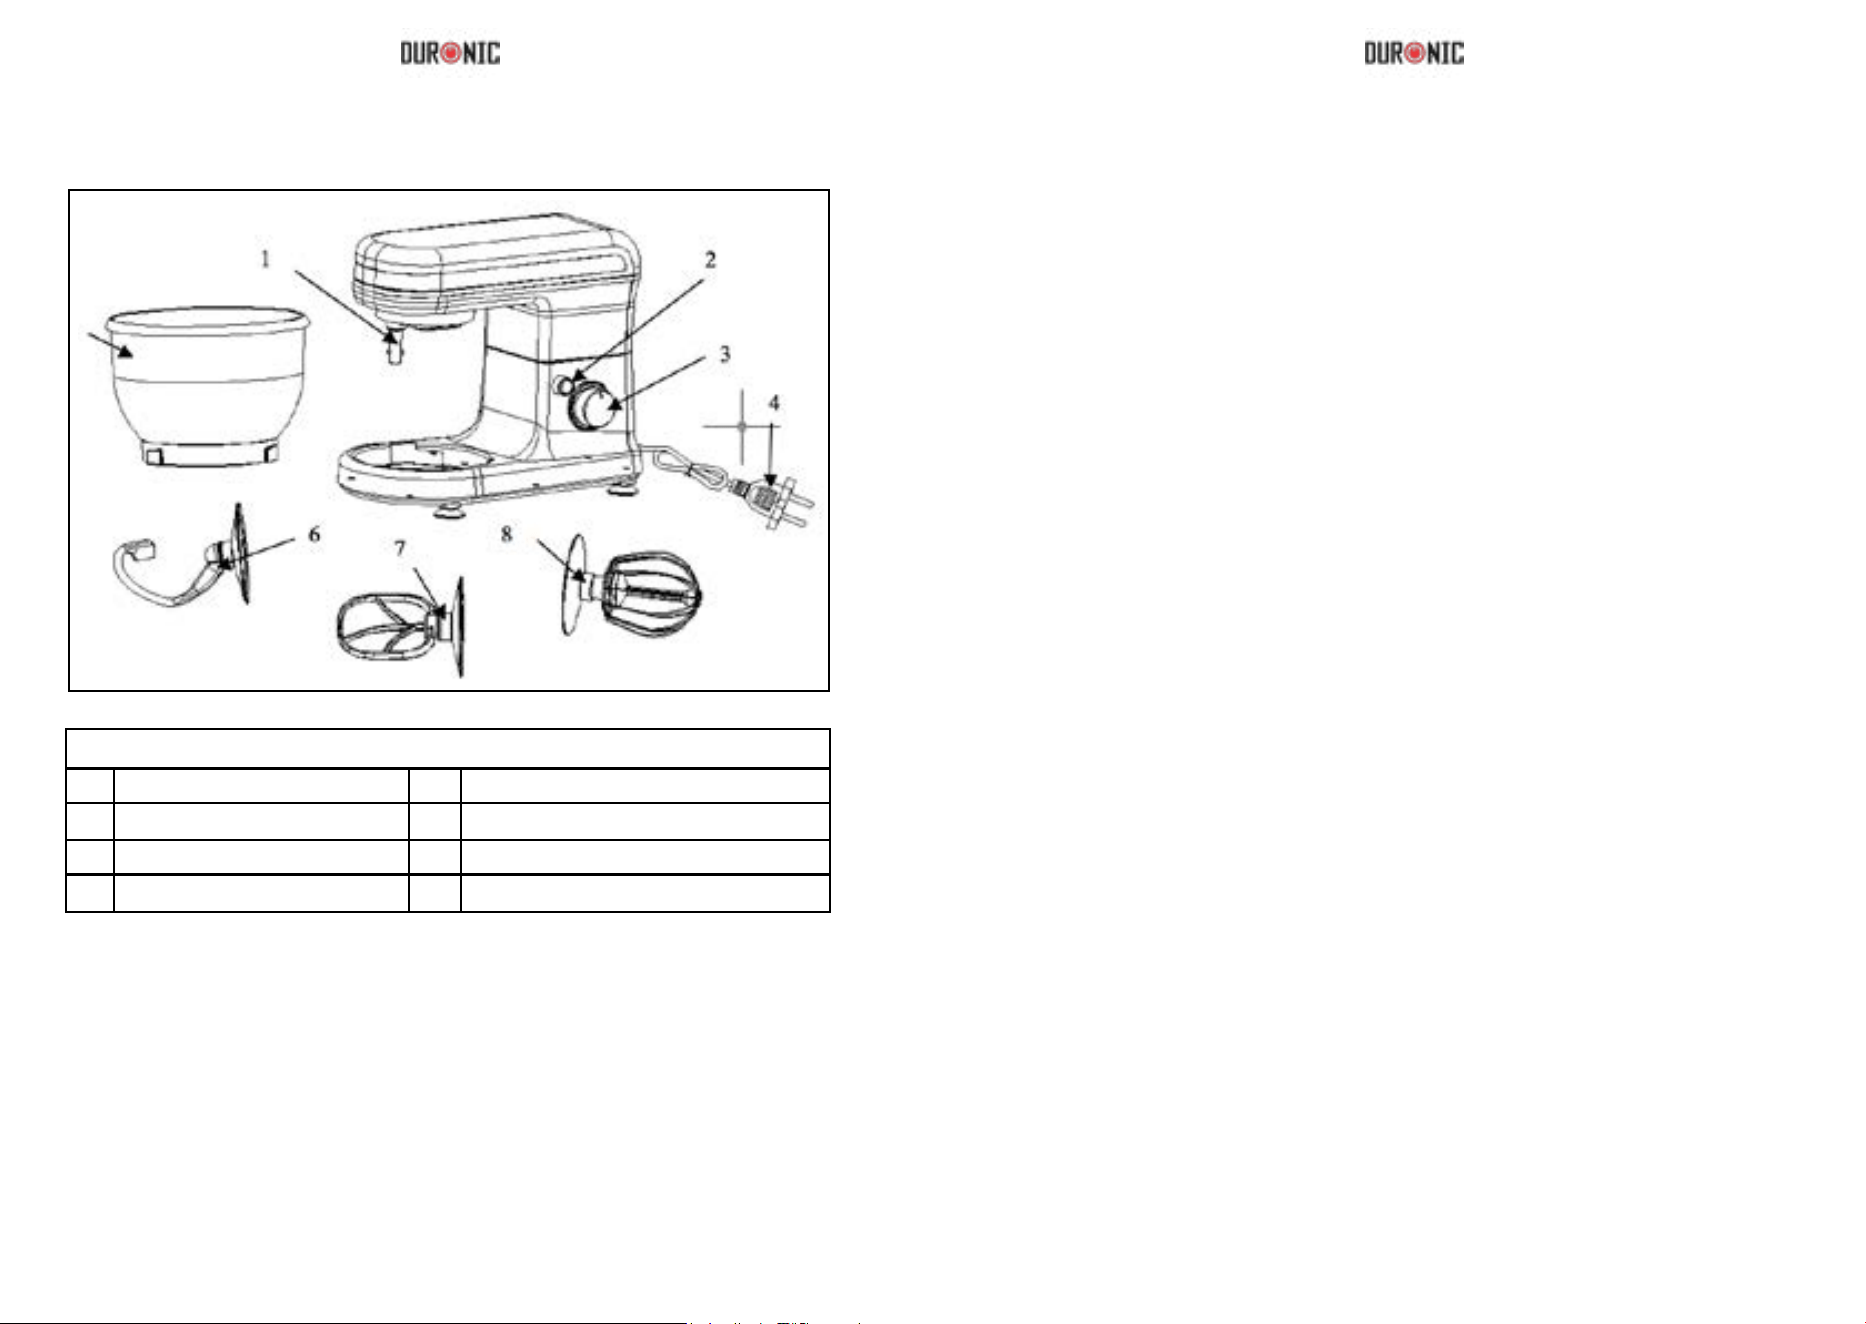
Product Overview
Using The Mixing Bowl
1 Output Shaft 5 Mixing Bowl
2 Rise Button 6 Dough Hook
3 Speed Knob 7 Beater
4 Power Cord 8 Whisk
Main Components and Standard Accessories
5
1. Place the mixing bowl into its holding device and turn the bowl until it locks into
place.
2. In order to lift the arm, push the rise button (2) down. The arm will now move
upwards.
3. Mount the required utensil by inserting the top into the output shaft and locking.
4. Pour in your ingredients.
Do not overll the machine - the maximum quantity of ingredients is 1.2 kg.
5. Lower the arm using the rise button (2).
6. Insert the mains plug into a properly installed 230 V/50 Hz safety power socket.
7. Switch the machine using the speed button to a speed between 1 and 6
(corresponding to the mixture).
8. For pulse operation (kneading at short intervals), turn the switch to the “PULSE”
position. The switch has to be held in this position according to the desired interval
length. When the switch is released it returns automatically to the “0” position.
9. After kneading/stirring turn the speed knob (3) back to the “0” position as soon as
the mixture has formed a ball. Then remove the mains plug.
10. Press the rise button (2) downwards and the arm will be raised.
11. The mixture can now be removed from the mixing bowl with the help of a spatula.
12. The mixing bowl can now be removed.
13. Clean the parts as described under “Cleaning”.
Adjust the levels according to the mixture:
Levels Use Type of Mixture
1-4 Dough hook Heavy mixtures(e.g. bread or short pastry)
3-4 Beater Medium-heavy mixtures(e.g. crepes or sponge mixture)
5-6 Whisk Light mixtures (e.g. cream, egg white, blancmange)
Pulse Whisk Interval (e.g. for mixing under sponge, egg white)
NOTE:
- Maximum operation time: With heavy mixtures, do not operate the machine for more
than ten minutes, and then allow it to cool down for a further ten minutes.

10 11
Suggested Recipes
Sponge Mixture (Basic Recipe), Level 1-4
Ingredients:
200g soft butter or margarine, 200g sugar, 1 packet vanilla sugar, 1 pinch of salt, 4
eggs, 400g wheat our, 1 teaspoon baking powder, approx. 1/8 litre milk.
Preparation:
Beat the eggs into the mixing bowl with the sugar, our, baking powder salt and milk.
Stir with the beater for 30 seconds on level 1, then for approximately 3 minutes on
level 2. Grease a tin or cover with baking paper. Fill in the mixture and bake. Before
the cake is removed from the oven, test to see if it is done. Pierce the centre of the
cake with a knife and If no mixture sticks to it, the cake is cooked. Turn the cake on to
a cooling tray to cool.
Traditional Oven
Insertion height: 2
Heating: electric oven, top and bottom heat 175-200° Celsius; gas oven: level 2-3
Baking time: 50-60 minutes
Depending on taste, this recipe can be changed, for example with 100g raisins or 100g
nuts or 100g grated chocolate.
Linseed Bread Rolls, Level 1-4
Ingredients:
500-550g wheat our, 50g linseed, 3/8 litre water, 1 cube of yeast (40g), 100g low-fat
curd, well drained, 1 tsp salt. For coating: 2 tbsp of water.
Preparation:
Soak the linseed in 1/8 litre of lukewarm water. Transfer the remaining lukewarm water
(1/4 litre) into the mixing bowl, crumble in the yeast, add the curds and mix with the
dough hook on level 2. The yeast must be completely dissolved. Put the our with the
soaked linseed and the salt into the mixing bowl. Knead thoroughly on level 1, then
switch to level 3 and continue kneading for 3-5 minutes. Cover the mixture and allow
to rise in a warm place for 45-60 minutes. Knead thoroughly once more, remove from
the bowl and form sixteen rolls. Cover the baking tin with wet baking paper. Place
the rolls on this and allow to rise for 15 minutes. Coat with lukewarm water and bake.
Traditional Oven:
Insertion height: 2
Heating: electric oven: top and bottom heat 200-220°C (preheated for 5 minutes),gas
oven level 2-3
Baking time: 30-40 minutes
Chocolate Cream, Level 5-6
Ingredients:
200ml sweet cream, 150g semi-bitter chocolate coating, 3 eggs, 50-60g sugar, 1 pinch
of salt, 1 packet of vanilla sugar, 1 tablespoon cognac or rum, chocolate akes.
Preparation:
Beat the cream in the mixing bowl with the whisk until stiff. Remove from the bowl and
place somewhere to cool. Melt the chocolate coating in the microwave at 600W for 3
minutes. In the meantime, beat the eggs, sugar, vanilla sugar, cognac or rum and salt
in the mixing bowl with the whisk on speed 2 to form a foam. Add the melted chocolate
and stir in evenly on speed 5-6. Leave a little of the cream for decoration. Add the
remaining cream to the creamy mixture and stir in briey using the pulse function.
Decorate the chocolate cream and serve well cooled.
Pizza dough, Level 1-4
Ingredients
400g plain our, 250ml warm water, 1/2 tsp sugar, 1 sachet active dried yeast (about
2-1/2 tsp), 1-1/2 tsp olive oil and 1 tsp salt.
Preparation:
Put the our in the bowl. Mix the remaining ingredients in a bowl or jug. Stir the mixer
at speed 1-2, and gradually add the liquid. As the ingredients mix together and the
dough ball becomes more formed, increase the speed to 3-4. Knead for a couple of
minutes on this speed untill the dough ball is smooth. Remove from the bowl and split
into 2-4 pieces. Roll into pizza bases (circles or rectangles) on a oured surface, then
lay them on a baking sheet or pizza tray. Spread the pizza bases with tomato purée
and add your chosen toppings. Top with dried herbs, pieces of mozzarella, and a
drizzle of olive oil. Bake in a preheated oven at 200°C/400°F/gas 6 for 15-20 minutes,
until the toppings are bubbling and golden brown.
Basic White Bread, Level 3-6
Ingredients:
600g strong white bread our, 1 sachet active dried yeast (about 2½ tsp), 345ml warm
water, 1 tbsp sunower oil or butter, 1 tsp sugar, 2 tsp salt
Preparation:
Use the mixing instructions for pizza dough, then put the dough in a bowl, cover and
leave in a warm place until it’s doubled in size (30-40 minutes). Remove the dough and
punch down to remove air. Knead lightly on a oured board, shape it into a loaf, or put
it in a tin, cover, and leave in a warm place to rise for another 30 minutes. Bake in a
preheated oven at 200°C/400°F/gas 6 for 25-30 minutes until golden brown and hollow
sounding on the bottom.
Soft Poppy Seed Rolls , Level 1-3
Ingredients:
570g strong white bread our 1 sachet active dried yeast (about 2½ tsp) 300ml milk
(warmed slightly) 2 eggs (room temperature) 1 tbsp sunower oil 1½ tsp sugar 2 tsp
salt 75g poppy seeds
Preparation:
Mix the milk, eggs, oil, sugar, salt and yeast in a jug or bowl, and leave for 5 minutes.

12 13
Put the our and poppy seeds in the bowl, and mix at speed 1, gradually adding the
liquid, then increase the speed to 2, and mix for ve minutes. Remove the dough to a
oured surface, cut into 8-10 pieces, roll into shape, then put on a greaseproof baking
sheet. Leave in a warm place till doubled in size. Brush with a little egg or milk, and
bake in a preheated oven at 220°C/425°F/gas 7 for 20-25 minutes, till golden brown
and hollow sounding on the base.
Italian Herb Bread
Ingredients:
575g strong white bread our, 1 sachet active dried yeast (about 2½ tsp) ,290ml water
2 tbsp olive oil, 2 tsp sugar 2 tsp salt, 4 tbsp mixed dried herbs
Preparation:
Mix the water, oil, sugar, salt and yeast in a jug or bowl and leave for 5 minutes. Put
the our and dried herbs in the bowl and mix at speed 1, gradually adding the liquid,
then increase the speed to 2, and mix for 5 minutes. Put the dough in a bowl, cover
and leave in a warm place until doubled in size (20-30 minutes). Put on a oured
surface, knead gently to knock out the air, then shape, put on a baking sheet, and
leave in the warm till doubled in size. Bake in a preheated oven at 200°C/400°F/gas 6
for 25 minutes or until golden brown and hollow sounding on the bottom.
Coffee & Brandy Ice Cream, Level 5-6
Ingredients:
3 eggs, 75g caster sugar, 300ml single cream, 2 tbsp instant coffee powder, 300ml
double cream 2½ tbsp brandy.
Preparation:
Add the sugar and eggs to the bowl and process at speed 6 until smooth in texture.
In a saucepan, bring the single cream and coffee just to the boil and stir in the egg
and sugar mixture. Put in a heatproof bowl over a simmering pan of water and cook
gently, stirring well, until thick enough to coat the back of a spoon. Strain into a bowl
and leave to cool. Whip the double cream at speed 6 until soft peaks form, then fold
into the cold egg and sugar mixture, with the brandy. Pour into a container, cover, and
freeze for 2½-3 hours, until partially frozen. Remove, stir well and then freeze again,
until the desired texture is achieved.
Basic Meringues, Level 5-6
Ingredients:
4 egg whites, 100g caster sugar, 100g icing sugar
Preparation:
Put the egg whites in the bowl and process at speed 6 until fairly stiff. Add half the
sugar and whisk again until the mixture is smooth and stiff peaks have formed.
Remove from the bowl and lightly fold in the remaining sugar with a metal spoon. Line
a baking sheet and spoon or pipe the meringue mixture into ovals. Sprinkle with the
remaining sugar and put on the lowest shelf of a cool oven (120°C/250°F/ gas ½) for
1½ hours. Cool on a wire rack. Top with soft fruits, chocolate, and sweetened cream.
Warranty
1 Year Guarantee
NOTE: THESE STATEMENTS DO NOT AFFECT YOUR STATUTORY RIGHTS AS A CONSUMER
This product has been manufactured under the strictest of quality control procedures, and using the highest
quality of materials to ensure excellent performance and reliability. It will give very good
and long lasting service, provided it is properly used and maintained.
The Product is guaranteed for 1 year from the date of original purchase. If any defect arises due to a faulty
materials or poor workmanship, the faulty product must be returned to the original place of purchase.
Refund or replacement is at the discretion of that company.
Duronic products are offered with a 1 year guarantee under the following conditions:
1. The product must be returned to the retailer with original proof of purchase.
2. The product must be installed and used in accordance with the instructions contained in this operating
manual.
3. It must be used only for domestic purposes.
4. It does not cover wear and tear, malicious damage, misuse, neglect, inexpert repairs or consumable
parts.
5. Shine-Mart Ltd has no responsibilities for accidental or consequential loss or damage.
6. Shine-Mart Ltd are not liable to carry out any type of servicing work, under the guarantee
7. Valid in the UK and EU only
This product is tted with BS:1363 plug and fuse
Imported by Shine-Mart Ltd, RM3 8SB
Information on waste Disposal for Consumers of Electrical & Electronic Equipment.
This mark on a product and/or accompanying documents indicates that when it is
to be disposed of, it must be treated as Waste Electrical & Electronic Equipment,
(WEEE). Any WEEE marked products must not be mixed with general household
waste, but kept separate for the treatment, recovery and recycling of the materials
used. For proper treatment, recovery and recycling; please take all WEEE marked
waste to your Local Authority Civic waste site, where it will be accepted free of
charge. If customers dispose of Waste Electrical & Electronic Equipment
correctly, they will be helping to save valuable resources and preventing any
potential negative effects upon human health and the environment, of any
hazardous materials that the waste may contain.

14 15
Manuel d’utilisation en Français

16 17
Modèle SM100
Voltage : 220-240V~50/60Hz
Puissance: 450W
Protection de classe II
Cet appareil a été contrôlé selon les recommandations CE actuelles, telles que la
compatibilité électromagnétique, la directive de basse tension, et a été construit
conformément avec les dernières régulations de sécurité.
Nous nous réservons le droit de toute modication technique sans préavis.
Cet appareil est exclusivement conçu pour un usage privé et pour l’utilisation prévue
à cet effet. Ce produit n’est pas conçu pour une utilisation commerciale.
Cet appareil est exclusivement conçu pour un usage privé et pour l’utilisation prévue
à cet effet. Ce produit n’est pas conçu pour une utilisation commerciale.
N’utilisez pas ce produit à l’extérieur.
Veuillez conserver cet appareil hors de portée de toute source de chaleur, d’humidité,
d’eau et à l’écart de toute exposition directe au soleil.
N’utilisez pas ce produit avec des mains humides. Si l’appareil est humide, veuillez le
débrancher immédiatement.
Lorsque vous procédez au nettoyage ou stockez le produit, éteignez l’appareil et
débranchez-le en tirant la prise et non le câble d’alimentation. Si le produit n’est
utilisé, veuillez enlever les accessoires fournis.
Ne laissez pas cet appareil en fonctionnement sans surveillance.
Vériez régulièrement que ce produit et le câble d’alimentation ne soient pas
endommagés. N’utilisez pas cet appareil s’il est en endommagé.
Ne tentez pas de réparer ce produit par vous-même. Contactez toujours un
technicien autorisé, le fabricant, son service client ou toute personne
qualiée.
Utilisez les pièces originales uniquement.
Ne tentez pas de court-circuiter les mécanismes de sécurité.
Spécications
Instructions de sécurité
N’insérez aucun élément lorsque la machine est en fonctionnement.
Placez la machine sur une surface plate, lisse et stable.
Instructions de sécurité relatives aux enfants
Veuillez conserver l’emballage (sacs plastiques, carton, polystyrène, etc) hors de
portée des enfants.
An de protéger les enfants de tout danger relatif aux équipements électriques,
veuillez-vous assurer que cet appareil soit toujours utilisé sous stricte supervision.
Cet appareil n’est pas un jouet.
Avant de procéder au nettoyage, veuillez débrancher l’appareil.
N’immergez jamais l’appareil dans l’eau.
N’utilisez pas de détergents abrasifs.
Parois extérieures
Seul un tissu doux humide peut être utilisé pour nettoyer les parois extérieures.
Bol, accessoires
Avertissement :
Ces éléments ne sont pas lavables au lave-vaisselle. S’ils sont exposés à la chaleur
ou à des nettoyants caustiques, certaines pièces pourraient être endommagées ou
déformées.
Les éléments qui ont été en contact avec la nourriture peuvent être nettoyés avec de
l’eau savonneuse. Laissez toutes les pièces sécher avant de réassembler l’appareil.
Nettoyage
18 19
Aperçu du produit
Utilisation du bol
1 Arbre de sortie 5 Bol
2 Touche de verrouillage et
de déverrouillage
6 Crochet à pétrir
3 Sélecteur de vitesse 7 Fouet large en silicone
4 Cordon d’alimentation 8 Fouet en métal
Composants principaux et accessoires standards
5
1. Placez le bol dans le socle prévu et tournez le bol jusqu’à ce qu’il soit correctement
verrouillé.
2. An de lever le bras, pressez la touche de déverrouillage vers le bas. Le bras sera
ainsi mobile.
3. Placez l’ustensile requis en insérant la partie supérieure dans l’arbre de sortie et
verrouillez-le.
4. Versez vos ingrédients dans le bol. Ne versez pas une quantité trop importante
d’ingrédients, la quantité maximale est de 1,2 kg.
5. Pressez la touche de verrouillage et baissez le bras.
6. Insérez l’alimentation dans la prise. Vériez que le voltage de votre installation
corresponde au voltage de ce produit.
7. Allumez la machine en utilisant le sélecteur de vitesse en choisissant la vitesse
adéquate.
8. An d’utiliser la fonction « pulse » (fonctionnement par intervalles succinctes),
placez le
sélecteur de vitesse sur « PULSE ». Le sélecteur doit rester enclenché sur cette
position durant toute la durée de fonctionnement désirée. Lorsque vous relâchez le
sélecteur, celui-ci revient automatiquement sur la position « 0 ».
9. Lorsque le contenu est mélangé, replacez le sélecteur de vitesse sur 0.
10. Pressez la touche de déverrouillage et le bras se lèvera.
11. Le mélange peut désormais être versé avec l’aide d’une spatule.
Ajustement des vitesses en fonction du mélange
Vitesse Ustensile Type de mélange
1-4 Crochet à pétrir Mélanges lourds (pain, pâtisserie)
3-4 Fouet large en silicone Mélanges lourds et moyens (crêpes, gâteaux
éponges)
5-6 Fouet en en métal Mélanges légers (crèmes, blanc d’œuf, Blanc-
manger)
Pulse Fouet en métal Intervalles (blanc d’oeuf)
NOTE:
Temps d’opération : pour les mélanges lourds, n’utilisez pas la machine pendant plus
de 10 minutes et laissez le moteur reposer pendant 10 minutes.

20 21
Idées de recet
tes
Génoise (recette basique), vitesses 1-4
Ingrédients :
200 g de beurre mou ou de margarine, 200 g de sucre, 1 paquet de sucre vanillé, 1
pincée de sel, 4 œufs, 400 g de farine de blé, 1 cuillère à café de levure chimique,
environ 1/8 de litre de lait.
Preparation: Battez les œufs dans le bol et ajoutez le sucre, la farine, la levure
chimique, le sel et le lait. Mélangez avec le batteur pendant 30 secondes sur la vitesse
1 puis pendant environ 3 minutes sur la vitesse 2. Prenez un moule et beurrez-le ou
couvrez-le de papier sulfurisé. Versez la préparation et mettez à cuire au centre du
four. Avant de retirer la génoise du four, vériez qu’elle soit bien cuite en perçant son
centre avec un couteau pointu. Si le couteau ressort sec, le gâteau est cuit.
Placez la génoise sur une grille pour la refroidir.
Cuisson : four électrique, 175-200° Celsius ; four à gaz : niveau 2-3 Temps de cuisson
50-60 minutes Vous pouvez modier la recette selon vos goûts en ajoutant par
exemple 100 g de raisins secs, 100 g de noisettes ou 100 g de chocolat râpé.
Petits pains aux graines de lin, vitesses 1-4
Ingrédients :
500-550 g de farine de blé, 50 g de graines de lin, 3/8 de litre d’eau, 1 cube de levure
fraîche (40 g), 100 g de fromage blanc allégé, 1 cuillère à soupe de sel.
Pour faire dorer la croûte
2 cuillères à soupe d’eau.
Préparation: Trempez les graines de lin dans 1/8 de litre d’eau tiède. Versez le reste
de l’eau tiède (1/4 de litre) dans le bol, émiettez la levure, ajoutez le fromage blanc et
mélangez avec le crochet à pétrir sur la vitesse 2. La levure doit être complètement
dissoute. Placez la farine, les graines de lin et le sel dans le bol. Pétrissez la pâte
en vitesse 1, puis passez à la vitesse 3 et continuez à pétrir pendant 3-5 minutes.
Recouvrez la préparation et laissez la pâte lever dans un endroit chaud pendant 45-60
minutes. Pétrissez à nouveau et retirer du bol pour former seize petits pains. Couvrez
le moule avec du papier sulfurisé humide. Placez-y les petits pains et laissez-les lever
pendant 15 minutes. Aspergez d’eau tiède et mettez à cuire.
Four traditionnel : niveau de cuisson 2.
Cuisson : four électrique : 200-220° C (préchauffez le four pendant 5 minutes) ; four
au gaz niveau 2-3
Temps de cuisson : 30-40 minutes
Crème au chocolat, vitesses 5-6
Ingrédients :
200 ml de crème fraîche, 150 g de pastilles de chocolat mi-amer, 3 œufs, 50-60 g de
sucre, 1 pincée de sel, 1 sachet de sucre vanillé, 1 cuillère à soupe de cognac ou de
rhum, copeaux de chocolat.
Préparation : Battez la crème fraîche avec le fouet dans le bol mélangeur jusqu’à
obtention d’une texture ferme. Retirez la crème du bol et réservez. Faites fondre
les pastilles de chocolat au micro-onde à 600 W pendant 3 minutes. Entre-temps,
battez les œufs, le sucre, le sucre vanillé, le cognac ou le rhum et le sel dans le bol
en programmant le fouet sur la vitesse 2 jusqu’à obtention d’une mousse. Ajoutez le
chocolat fondu et mélangez en vitesse 5-6 jusqu’à obtention d’un mélange homogène.
Réservez un peu de crème fraîche pour la garniture. Ajoutez le reste de la crème à
la préparation et mélangez brièvement en utilisant la fonction « Pulse ». Garnissez la
crème au chocolat de crème fraîche et servez bien frais.
Pâte à pizza, vitesses 1-4
Ingrédients :
400 g de farine, 250 ml d’eau chaude, ½ cuillère à café de sucre, 1 sachet de levure
sèche active (environ
2½ cuillères à café), 1½ cuillère à café d’huile d’olive et 1 cuillère à café de sel.
Préparation:
Mettez la farine dans le bol. Mélangez les ingrédients restants dans un bol.
Programmez l’appareil sur la vitesse 1-2 et ajoutez progressivement le liquide. Quand
les ingrédients sont bien mélangés et qu’une boule de pâte commence à se former,
augmentez la vitesse à 3-4. Pétrissez pendant environ deux minutes à cette vitesse
jusqu’à ce que la boule de pâte soit lisse. Retirez la boule de pâte du bol et divisez-
la en 2-4 morceaux. Travaillez la pâte et façonnez les fonds à pizza (en cercle ou en
rectangle) sur une surface
farinée, puis placez-les sur une plaque de cuisson ou un plat à pizza. Recouvrez les
fonds de pizza de purée de tomate et ajoutez les garnitures de votre choix. Ajoutez
des herbes sèches, des morceaux de mozzarella et arrosez d’un let d’huile d’olive.
Faites cuire dans un four préchauffé à 200°C/thermostat 6 pendant 15-20 minutes,
jusqu’à ce que la garniture soit bien cuite et que la pâte soit dorée.
Pain blanc, vitesses 3-6
Ingrédients:
600 g de farine pour pain blanc, 1 sachet de levure sèche active (environ 2½ cuillères
à café), 345 ml d’eau chaude, 1 cuillère à soupe d’huile de tournesol ou de beurre, 1
cuillère à café de sucre, 2 cuillères à café de sel
Préparation :
Suivez les mêmes instructions que pour la pâte à pizza puis placez la pâte dans un
bol, couvrez-la d’un linge et laissez-la lever dans un endroit chaud jusqu’à ce qu’elle
ait doublé de volume (30-40 minutes). Retirez la pâte et dégonez-la en y enfonçant
votre poing. Pétrissez légèrement sur une surface farinée, formez une boule ou placez
dans un moule, couvrez d’un linge et laissez la pâte lever dans un endroit chaud
pendant 30 minutes. Mettez à cuire dans un four préchauffé à 200°C/thermostat 6
pendant 25-30 minutes jusqu’à ce que la croûte soit dorée et que le pain sonne creux
lorsque vous tapez sur le dessous.

22 23
Petits pains aux graines de pavot, vitesses 1-3
Ingrédients:
570 g de farine pour pain blanc, 1 sachet de levure sèche active (environ 2½ cuillères
à café), 300 ml de lait (légèrement chauffé), 2 œufs (à température ambiante), 1
cuillère à soupe d’huile de tournesol, 1½ cuillère à café de sucre, 2 cuillère à café de
sel, 75 g de graines de pavot
Préparation: Mélangez le lait, les œufs, l’huile, le sucre, le sel et la farine dans un bol
et laissez reposer pendant 5 minutes. Mettez la farine et les graines de pavot dans le
bol et mélangez à vitesse 1 en ajoutant graduellement le liquide, puis augmentez la
vitesse à 2 et mélangez pendant 5 minutes. Placez la pâte sur une surface farinée,
divisez-la en 8-10 morceaux, façonnez des boules de pâte, puis placez-les sur du
papier sulfurisé. Laissez lever la pâte dans un endroit chaud jusqu’à ce qu’elle ait
doublé de volume. Badigeonnez les petits pains d’un peu d’eau ou de lait avec un
pinceau et mettez à cuire dans un four préchauffé à 220°C/thermostat 7 pendant 20-
25 minutes jusqu’à ce que la croûte soit dorée et que les petits pains sonnent creux
quand vous tapez sur le dessous.
Pain italien aux herbes, vitesses 3-6
Ingrédients :
575 g de farine pour pain blanc, 1 sachet de levure sèche active (environ 2 ½
cuillères à café), 290 ml d’eau, 2 cuillères à soupe d’huile d’olive, 2 cuillères à café de
sucre, 2 cuillères à café de sel, 4 cuillères à soupe de mélange d’herbes séchées.
Préparation: Mélangez l’eau, l’huile, le sucre, le sel et la levure dans un bol et laissez
reposer
pendant 5 minutes. Placez la farine et les herbes séchées dans le bol mélangeur et
mélangez à la vitesse 1 en ajoutant graduellement le liquide, puis augmentez la
vitesse à 2 et mélangez pendant 5 minutes. Placez la pâte dans un bol, couvrez d’un
linge et laissez reposer dans un endroit chaud jusqu’à ce que la pâte ait doublé de
volume (20-30 minutes). Placez la pâte sur une surface farinée, pétrissez-la
doucement pour la dégoner, façonnez-la puis placez sur une plaque de cuisson et
laissez-la lever jusqu’à ce qu’elle ait doublé de volume. Mettez à cuire dans un four
préchauffé à 200°C/thermostat 6 pendant 25 minutes ou jusqu’à ce que la crote soit
dorée et que la pâte sonne creux quand vous tapez sur le dessous.
Crème glacée au Brandy et au café, vitesses 5-6
Ingrédients :
3 œufs, 75 g de sucre n, 300 ml de crème fraîche, 2 cuillère à café de café soluble,
300 ml de crème fraîche épaisse, 2 ½ cuillère à café de cognac
Préparation : Ajoutez le sucre et les œufs dans le bol et faites battre à la vitesse
6 jusqu’à obtention d’une texture lisse. Dans une casserole, portez à ébullition la
crème fraîche et le café et ajoutez-y la préparation à base d’œufs et de sucre. Passez
le mélange au bain-marie et mélangez continuellement jusqu’à le mélange soit
sufsamment épais pour couvrir le dessous de la cuillère. Versez le mélange dans
un bol et laissez refroidir. Battez la crème épaisse à vitesse 6 jusqu’à ce que des
pics lisses se forment puis mélangez avec le mélange d’œuf et de sucre ainsi que le
cognac. Versez le tout dans un moule, recouvrez puis mettez au freezer pendant 2 ½
-3 heures jusqu’à ce que le mélange soit partiellement glacé. Mélangez à nouveau la
préparation puis mettez le tout au freezer jusqu’à obtention de la texture souhaitée.
Meringues, Vitesses 5-6
Ingrédients :
4 blancs d’œuf, 100 g de sucre en poudre, 100 g de sucre glacé
Préparation : Mettez les blancs d’œuf dans le bol et enclenchez la vitesse 6 pour les
battre en neige. Ajoutez la moitié du sucre et battez-les à nouveau jusqu’à ce que
le mélange soit lisse et que des pics lisses se forment. Enlevez le mélange du bol
puis mélangez lentement le reste du sucre avec une cuillère en métal. Disposez une
feuille de papier sulfurisé sur le plan de travail puis formez des meringues en ovale à
l’aide d’une cuillère ou d’une poche à douille. Saupoudrez le sucre glace et mettez la
plaque au four sur l’étagère inférieure du four (120°C) pendant 1h30. Laissez reposer.
Garnissez de fruits, de chocolat ou de crème chantilly.
1 an de garantie de la part de Shine-Mart Ltd, propriétaire de la marque Duronic.
Note : Ces déclarations n’affectent en rien votre droit statutaire en tant que
consommateur
Ce produit a été produit en suivant les procédures de contrôle de qualité les plus
strictes en utilisant des matériaux de qualité pour assurer une excellente durabilité et
performance. Cette centrifugeuse vous offrira de longues années de service tant que
vous utilisez correctement cette machine et suivez les instructions de maintenance
contenues dans ce manuel.
Ce produit est garanti pour 1 an à partir de la date originale d’achat.
Si ce produit était endommage en raison d’un problème électrique ou d’une fabrication
imparfaite, le produit défectueux peut être remplacé au vendeur à la discrétion de la
marque sous conditions:
1. Le produit doit être retourné avec la preuve originale d’achat.
2. Le produit doit être installé et utilisé en accord avec les instructions contenues dans
ce manuel d’utilisation.
3. Le produit doit être réservé à un usage privé.
Garantie et service après-vente

24 25
4. La garantie ne protège pas contre les dommages dus à l’usure normale, l’utilisation
malveillante, la mauvaise utilisation, la négligence, les réparations conduites par des
non-experts ainsi que les pièces consommables.
5. Shine-Mart Ltd ne porte pas de responsabilité pour tout damage ou perte accidentel
ou conséquent causé par ce produit.
6. Shine-Mart Ltd se dégage de toute responsabilité en matière de réparation durant
la période de garantie.
7. Valide dans toute l’Union Européenne.
Ce produit est fourni avec une prise
européenne et un fusible de 3 ampères.
Importé par Shine-Mart Ltd, RM3 8SB.
Ce symbole apparaît sur le produit et/ou les documents accompagnant
ce produit pour indiquer que pour procéder à la destruction de ce produit,
celui-ci doit être traité comme un déchet électrique et
électronique (WEEE).
Les produits marqués WEEE ne doivent être mélangés avec
les déchets ménagers et doivent être séparés pour
traitement et recyclage des composants.
An de traiter et recycler ce produit, veuillez prendre tous les composants
marqués WEEE au site de recyclage le plus proche où ce produit
sera repris gratuitement. Si les clients jettent les déchets électriques
et électroniques WEEE correctement, ce geste aidera la préservation
des ressources précieuses et prévient les potentiels effets négatifs que
ces composants ou tout autre composant dangereux ont sur la santé
humaine et l’environnement.

26 27
Gebrauchsanleitung auf Deutsch

28 29
Modell: SM100
Netzspannung: 220-240V~50/60Hz
S
tromverbrauch: 450W
Schutzklasse: II
Dieses Gerät wurde nach allen relevanten und aktuellen CE Richtlinien getestet, wie
elektromagnetische Verträglichkeit und Niederspannungsrichtlinien. Das Produkt wurde nach den
aktuellen Sicherheitsmaßnahmen hergestellt.
Technische Änderungen ohne Vorankündigung jederzeit möglich!
Bitte lesen Sie diese Gebrauchsanleitung vor dem Gebrauch sorgfältig durch. Bitte
behalten Sie die Gebrauchsanleitung, die Gewährleistung, die Rechnung und wenn
möglich, die Verpackung.
-Dieses Gerät ist nur für den privaten Gebrauch und für den beschriebenen
Zweck geeignet. Nicht für den kommenzielle Gebrauch.
-Verwendung nur in Innenräumen.
-Halten Sie das Produkt fern von Wärmequellen, direkte Sonnenstrahlen,
Feuchtigkeit und Wasser.
-Nicht ins Wasser tauchen oder unter fließendes Wasser halten.
-Trennen Sie das Gerät vom Strom, bevor Sie es reinigen und largern. Entfernen
Sie nach dem Gebrauch alle Teile.
-Das Gerät nicht unbeaufsichtigt lassen.
-Das Gerät und Kabel auf Schäden überprüfen. Bei Schäden nicht benutzen. -
Das Gerät nicht selbst reparieren. Bei geschädigter Kabel kontaktieren Sie den
Hersteller, den Verkäufer oder eine zuständige Person. Dieser muss das Gerät
neu ersetzen.
-Nur Originalersatzteile des Herstellers verwenden.
-Nicht mit dem Sicherheitsschalter beeinträchtigen.
-Bei Gebrauch fügen Sie nichts zu den rotierenden Teile.
-Das Gerät auf eine horizontale uns stabile Fläche stellen.
Um die Sicherheit Ihres Kindes zu garantieren, bitte alle Verpackungen
(Plastik, Karton, Polystyrol) fern von Kinder halten.
- Kindern müssen beaufsichtigt werden und nicht mit der Maschine
spielen lassen.
Eigenschaften
Sicherheitsanweisungen
Kindersicherheit
-Trennen Sie das Produkt vom Strom vor der Reinigung. -
Das Gehäuse oder Motor nicht ins Wasser tauchen
-Benutzen Sie keine chemikalischen Mitteln zur Reinigung.
Motorgehäuse
-Nur mit einem feuchten Tuch reinigen.
Rührschüssel und Zubehör
WICHTIG:
-Die Teile sind nicht spülmaschinefest. Bei Erheizung können die Utensilien
deformiert oder verfärbt werden.
-Die Utensilen können mit warmen Wasser und Spülmittel gereinigt
werden. -Vor dem Zusammensetzen abtrocknen lassen.
Reinigung
30 31
Position Zubehör
Mischungs Art
1-4 Knethaken
3-4 Rührbesen
Schwere Mischung (z.B. Brot oder Mürbeteig)
Mittlere Mischung (z.B Crepes oder Rührteig)
5-6
Schneebesen Leicht Mischung (z.b Sahne, Eiweiß oder Pudding)
Pulse Schneebesen Puls (z.B. Eiweiß)
Hinweis:
Die maximale Betriebszeit: Bei schweren Mischungen arbeitet das Gerät nicht
länger als 10 Minuten. Lassen Sie den Motor abkühlen.
Produktübersicht
Rührschüssel
1 Abtriebswelle 5 Rührschüssel
2
Erhöhungstaste
6 Knethaken
3 Geschwindigkeitsregler 7 Rührbesen
4 Stromkabel 8 Schneebesen
Bestandteile
5
1.
Stellen Sie die Rührschüssel in die Halterung und drehen Sie bis sie einrastet.
2.
Wenn Sie den Arm erheben möchten, drücken Sie die Erhöhungstaste (2).
Der Arm wird sich automatisch erhöhen.
4.
Füllen Sie Ihre Zutaten in die Schüssel. Maximale Menge 1.2kg - nicht überfüllen!
5.
Senken Sie den Arm mit der Erhöhungstaste (2) .
6.
Verbinden Sie den Kabel mit der 230 V/50 Hz Steckdose.
7.
Schalten Sie die Knetmaschine an, in dem Sie den Geschwindigkeitsregler zwischen 1
und 6 drehen..
8.
Für die PULS-Funktion ( in kurzen Intervallen kneten) drehen Sie den
Geschwindigkeitsregler auf PULSE. Halten Sie den Regler in gewünschter
Länge fest (Abhängig von den Zutaten). Wenn Sie den Regler loslassen, wird die
Maschine automatisch auf "0" positioniert.
9.
Nach dem Kneten positionieren Sie den Regler auf ‚0‘.
10.
Erheben Sie den Arm (2).
11.
Entfernen Sie die Mischung aus der Schüssel.
3.
Das gewünschte Teil an die Antriebswelle befestigen und einrasten.
Die Schüssel kann nun entfernt werden.
12.
13.
Reinigen S
ie die Knetmaschine wie unter "Reinigung".

32 33
Rezeptvorschläge
Rührteig (Einstellung 1-4)
Zutaten:
200g weiche Butter oder Margarine, 200g Zucker, 1 Paket Vanillezucker, 1 Prise
Salz ,4 Eier, 400g Weizenmehl, 1 Teelöffel Backpulver, 1/8 Liter Milch Vorbereitung :
Mischen Sie Eier, Mehl, Backpulver, Salz und Milch. Rühren Sie für 30 Sekunden
bei Geschwindigkeit 1 und erhöhen Sie dann auf Level 2 für 3 Minuten. Füllen Sie
die Mischung in eine Tortenform, den Sie vorher eingefettet haben oder Backpapier
ausgelegt haben. Überprüfen Sie den Teig, bevor Sie die gebackene Mischung aus
dem Ofen nehmen. Lassen Sie den Teig vorher abkühlen.
Traditioneller Backofen: Höhe 2
Elektrischer Ofen: 175-200°
Gasofen: 2-3
Backzeit: 50-60 Minuten
Rezept kann individuelle geändert werden z.B mit 100g Rosinen, Nüsse oder
geriebener Schokolade.
Leinsamen Brötchen (Einstellung 1-4)
Zutaten:
500-550g Weizenmehl, 50g Leinsamen, 3/8 Liter Wasser,1 Würfel Hefe (40g),100g
Magerquark ,1 Esslöffel Salz, 2 Esslöffel Wasser
Vorbereiten:
Die Leinsamen in 1/8 Liter Wasser einweichen lassen. Die verbleibende ¼ Liter
Wasser mit dem Rührbesen mit Hefe und Magerquark bei Geschwindigkeit 2 rühren.
Die Hefe muss komplett aufgelöst werden. Fügen Sie Weizenmehl, Salz und die
Leinsamen hinzu und mischen Sie alles bei Geschwindigkeit 3 für 3-5 Minuten. Die
Mischung bedecken und etwa 45-60 Minuten aufgehen lassen. Kneten Sie den Teig
kräftig und formen Sie16 Teigkugeln. Bedecken Sie den Backblech mit Backpapier.
Lassen Sie die Kugeln für ca.15 Minuten ruhen. Beschichten Sie die Kugeln mit
lauwarmen Wasser.
Traditionelle Ofen: Höhe 2
Elektrische Ofen: 200-220°
Gasofen: 2-3
Backzeit: 30-40 Minuten
Schokocreme (Einstellung 5-6)
Zutaten:
200ml Sahne, 150g Kuvertüre, 3 Eier, 50-60g Zucker, 1 Prise Salz, 1 Paket
Vanillezucker, 1 E
sslöffel Cognac oder Rum, Schokoladenraspeln.
Vorbereitung:
Schlagen Sie die Sahne steif und danach an einem kühlen Ort lagern.
Die Kuvertüre in der Mikrowelle schmelzen lassen und die Eier, Zucker,
Vanillezucker, Cognac oder Rum und Salz in der Rührschüssel bei
Geschwindigkeit 2 rühren. Die geschmolzene Schokolade hinzugeben und
gleichmäßig bei Geschwindigkeit 5-6 rühren. Heben Sie ein wenig Sahne für die
Dekoration auf. Die Sahne hinzugeben und kurz mit der PULS Funktion rühren.
Dekorieren und kalt servieren.
Pizzateig (Einstellung 1-4)
Zutaten
400g Mehl, 250ml warmes Wasser, ½ Teelöffel Zucker,1 Päckchen Trockenhefe , 1
½ Teelöffel Olivenöl, 1 Teelöffel Salz
Vorbereitung:
Mischen Sie alle Zutaten bei Geschwindigkeit 1-2. Wenn der Teig form annimmt,
erhöhen Sie die Geschwindigkeit auf 3-4. Kneten Sie den Teig für 1-2 Minuten bis sie
glatt und weich ist. Den Teig in 2-4 Teilen auf einer mehligen Oberfläche ausrollen.
Den Pizzaboden mit Tomatenpüree bestreichen und dann nach Wunsch belegen und
mit Gewürzen, Käse und Olivenöl garnieren und für 15- 20 Minuten bei 200° backen.
Weißbrot (Einstellung 3-6)
Zutaten:
600g Weizenmehl, 1 Päckchen Trockenhefe, 345ml wames Wasser, 1 Esslöffel
Sonnenblumenöl oder Butter, 1 Teelöffel Zucker, 2 Teelöffel Salz
Vorbereitung:
Folgen Sie den Anweisungen für Pizzateig und bedecken Sie den Teig und lassen
Sie an einem warmen Ort für 30-40 Minuten aufgehen. Drücken Sie den Teig um die
Luft austreten zu lassen und weich kneten. Die Mischung in eine Backform geben und
für 30 Minuten ruhen lassen. Für 25-30 Minuten bei 200° /400°f/ Gas 6 backen bis der
Teig goldbraun ist.
Weiche Mohn-Brötchen (Einstellung 1-3)
Zutaten:
570g Weizenmehl, 1 Päckchen Trockenhefe, 300ml Milch (leicht erwärmt) ,2 Eier
(raumtemperatur), 1 Esslöffel Sonnenblumenöl, 1 ½ Teelöffel Zucker, 2 Teelöffel
Salz, 75g Mohnsamen
Vorbereitung:
Milch mit Eier, Öl, Zucker, Salz und Trockenhefe mischen und für 5 Minuten ruhen
lassen. Mischen Sie Mehl und die Mohnsamen bei Level1 und geben Sie
schrittweise die Flüssigkeit hinzu.
Die Geschwindigkeit auf 2 erhöhen und für 5 Minuten rühren. Den Teig auf einer
mehligen Oberfläche zu 8-10 Kugeln formen. An einem warmen Ort ruhen lassen bis
das Teigvolumen sich verdoppelt hat. Betreichen Sie die Brötchen mit Ei oder Milch
und für 20-25 Minuten bei 220°C/425°F/Gas 7 backen, bis sie goldbraun sind.

34 35
Italienisches Gewürzbrot (Einstellung 3-6)
Zutaten:
575g Weizenmehl, 1 Päckchen Trockenhefe, 290ml Wasser, 2 Esslöffel Oliveöl, 2
Teelöffel Zucker, 2 Teelöffel Salz, 4 Esslöffel Gewürzmischung
Vorbereitung:
Wasser mit Öl, Zucker, Salz und Hefe in einem Rührschüssel für 5 Minuten ruhen
lassen. Mehl und Gewürzmischung bei Gewindigkeit 1 mischen. Die Flüssigkeit
schrittweise hinzugeben und die Geschwindigkeit auf 2 erhöhen und für 5 Minuten
rühren. Decken Sie den Teig ab und an einem warmen Ort für 20-30 Minuten ruhen
lassen bis das Teigvolumen sich verdoppelt hat. Drücken Sie aus dem Teig auf einer
mehligen Oberfläche die Luft aus und lassen Sie die Teigmenge verdoppeln.
Backen Sie den Teig für 25 Minuten bei 200°C/400°F/Gas 6, bis sie goldbraun ist.
Kaffee und Brandy Eis (Einstellung 5-6)
Zutaten:
3 Eier, 75g Krümelzucker, 300ml Sahne, 2 Esslöffel Instantkaffee , 300ml Double
Creme, 2 ½ Esslöffel Brandy
Vorbereitung:
Zucker und Eier bei Geschwindigkeit 6 mischen bis sie glatt ist. Die Sahne und
Kaffee in einem Kochtopf kochen und die Eiermasse einrühren. Die Mischung in
einem hitzebeständige Schüssel in einem Wassenbad kochen und gut umrühren bis
die Masse etwas dickflüssig wird. Die Mischung abkühlen lassen. Die Creme double
schlagen bis sie steif ist und dann die kalte Eiermesse und Brandy unterheben. In
einem Behälter für 2 ½ - 3 Stunden teilweise einfrieren. Rühren Sie die Mischung gut
um und lassen Sie die Eismasse richtig einfrieren.
Baiser (Einstellung 5-6)
Zutaten:
4 Eiweiß, 100g Krümelzucker, 100g Puderzucker
Vorbereitung:
Das Eiweiß bei Geschwindigkeit 6 schlagen bis die Masse steif ist. Die Hälfte des
Zuckers hinzugeben und schlagen bis die Mischung glatt ist. Die Mischung
entfernen und die verbleibendene Zucker mit einem Metallöffel unterheben. Die
Mischung in ovaler Form mit einem Löffel oder Spritze auf Backpapier formen
und mit Zucker bestreuen. Für 1 ½ Stunden bei 120°C/250°F/Gas 1/2 backen.
Servieren Sie mit Früchten, Schokolade oder Sahne.
1 Jahr Gewährleistung von Shine-Mart Ltd, der Markeninhaber von Duronic Produkte.
ZUR BEACHTUNG : DIESE BEDINGUNGEN HABEN KEINE BEEINFLUSSUNG AUF
IHREN GESETZLICHEN RECHTE ALS VERBRAUCHER
Dieses Produkt wurde unter strengen Qualitätskontrollen hergestellt, und wurde aus
hochwertigen Werkstoffen produziert, um ausgezeichnete Leistung und Zuverlässigkeit zu
gewährleisten. Sorfern das Produkt korrekt benutzt und gewartet wird, wird eine langlebige
Lebensdauer garantiert.
Das Produkt ist für 1 Jahr, ab dem Kaufdatum, gewährleistet. Beim Auftreten eines
Schadens, durch schlechten Werkstoffe oder Verarbeitung, sollte das fehlerhafte Produkt
an den ursprünglichen Verkäufer zurückgegeben werden. Eine Rückerstättung oder einen
Umtausch erfolgt nach Vorschriften des Unternehmens.
Duronic Produkte haben 1 Jahr Gewährleistung unter folgenden Bedingungen :
1.
Das Produkt sollte mit dem ursprünglichen Kaufnachweis zurückgegeben werden.
2.
Das Produkt sollte unter den Anweisungen und Anleitungen installiert und benutzt worden
sein.
3.
Die Produkte sind nur für den Hausgebrauch geeignet.
4.
Natürliche Abnutzung oder Schäden, böswillige Beschädigung, Missbrauch,
unsachgemäße Reparaturen von Verschleißteile sind von der Gewährleistung
ausgeschlossen.
5.
Shine-Mart Ltd hat keine Verantwortung für indirekte Verluste oder Folgeschäden.
6.
Shine-Mart Ltd ist nicht für Wartungsarbeiten zuständig. Diese fallen nicht unter die
Gewährleistung.
7. Gultig in der EU
Diese Produkt ist mit tted CE geprüfte Typ-F Euro Stecker/BS Stecker ausgestattet
Von Shine-Mart Ltd, RM3 8SB importiert
Information über Abfalllagerung für Verbraucher von elektronischen Geräten.
Dieses Zeichen auf dem Produkt und/oder auf mitgelieferte Dokumenten zeigt,
dass wenn eine Beseitigung erfolgt, diese an Elektro-Altgeräte (WEEE)- Stellen
beseitigt werden muss. Für weitere Behandlungen und Weiterverarbeitung der
Werkstoffe, dürfen diese WEEE- markierte Produkte nicht mit dem Hausmüll
vermischt werden.
Für die korrekte Behandlung, Aufbereitung und Wiederverwendung bitte alle
WEEE -markierten Produkte zu Ihren kommunalen Abfallbeseitigungsanlage
nehmen. Dort können Sie diese kostenlos abgeben.
Wenn die Beseitigung von Elektro-und Elektronik-Altgeräten richtig beseitigt
wird, werden Sie helfen, wertvolle Ressourcen zu gewinnen und mögliche
negative Auswirkungen auf Gesundheit und der Umwelt zu vermeiden.

36 37
Manual De Instrucciones En Español

38 39
- Con el n de garantizar la seguridad de sus niños, por favor mantenga los materiales
de embalaje (bolsas de plástico, cajas, etc.) fuera de su alcance.
- No permita que niños pequeños jueguen con el papel de aluminio ya que existe un
peligro de asxia!.
- Con el n de proteger a los niños de los peligros de los equipos eléctricos, por
favor, asegúrese de que este dispositivo se utilice únicamente bajo supervisión.
Este dispositivo no es un juguete. No permita que los niños pequeños juegue con el
aparato.
- Solamente opera esta máquina bajo una supervisión.
- No interera con los interruptores de seguridad.
- No inserte nada en los ganchos rotativos mientras la máquina trabaja.
- Coloque la máquina sobre una supercie lisa, plana y estable.
- No conecte el enchufe de la máquina en la tomacorriente sin haber instalado todos
los accesorios necesarios.
-Antes de proceder a la limpieza quite el cable del tomacorriente.
-No sumerja nunca la caja del motor en agua!
-No utilice ningún detergente abrasivos o agudos.
Caja del motor
- Debe utilizarse solamente un paño húmedo para limpiar la parte exterior del motor.
Tazón, Equipos de mezcla
PRECAUCION:
-Los componentes no son adecuados para la limpieza en lavavajillas. Si se expone al
calor o limpiadores cáusticos pueden ser deformados o descoloridos.
-Los elementos que hayan estado en contacto con los alimentos se pueden limpiar
con agua jabonosa.
-Permita que las partes sequen completamente antes de volver a montar el dispositivo
Modelo: SM100
Tensión nominal: 220-240V~50/60Hz
Consumo de energía: 450W
Clase de protección: II
Este dispositivo ha sido probado según las pautas CE, como la compatibilidad
electromagnética y las respectivas de bajo voltaje, y también ha sido construido
conforme a las últimas normas de seguridad.
Sujeto a modicaciones técnicas sin previo aviso!
Lea cuidadosamente las instrucciones de operación antes de poner el aparato
en funcionamiento, guarde las instrucciones incluyendo la garantía, el recibo y,
si es posible, la caja de embalaje. Si es un regalo, también infórmeles de estas
instrucciones.
- El aparato está diseñado exclusivamente para uso privado y para los nes previstos.
Este aparato no es apto para uso comercial. No lo utilice al aire libre (excepto si está
diseñado para ser usado al aire libre). Manténgalo alejado de fuentes de calor, a la
luz directa del sol, humedad (nunca sumerja en ningún líquido) y bordes alados.
No utilice el aparato con las manos mojadas. Si el aparato está húmedo o mojado,
desconecte inmediatamente.
- Al limpiarlo o guardarlo, apague el aparato y tire siempre de la clavija del
tomacorriente (tire del enchufe, no del cable) si el aparato no se está utilizando y
remueva todos los accesorios conectados.
-No opere la máquina sin supervisión. Si usted debe dejar el lugar de trabajo, siempre
apague la máquina o desenchufe del tomacorriente (tirando del enchufe, no del
cable).
- Examine el aparato y el cable para ver si hay daños regularmente. No use el aparato
si esta defectuoso.
- No intente reparar el aparato por su cuenta. Siempre póngase en contacto con un
técnico autorizado. Para evitar la exposición de algún peligro, cables defectuosos
deben ser siempre remplazados por el fabricante, por nuestro servicio al cliente o por
una persona calicada con un cable del mismo tipo.
- Use piezas de repuesto originales solamente.
- Preste mucha atención a las siguientes “instrucciones especiales de seguridad”.
Especicaciones
Instrucciones generales de seguridad Instrucciones de seguridad especiales
Limpieza
Seguridad Para Niños

40 41
Descripción del product
o
Usando el tazón de mezclar
1 Eje de salida 5 Recipiente para mezclar
2 Botón para subir 6 Gancho para mezclar masa
3 Perilla de velocidad 7 Batidor metálica
4 Cable de alimentación 8 Batidor metálica
Componentes Principales Y Accesorios Estándar
5
1. Coloque el tazón en su dispositivo de sujeción y gire el recipiente hasta que encaje
en su lugar.
2. Para levantar el brazo, presione el botón (2). El brazo ahora se moverá hacia arriba
3. Monte el utensilio requerido insertando la cumbre en el eje de la salida y cierre.
4.Ahora llene con sus ingredientes. No sobrecargue la máquina - la cantidad máxima
de los ingredientes es de 1.2kg.
5. Baje el brazo presionando el botón (2) de subida.
6. Inserte el enchufe de la red eléctrica en una instalación correcta de 230V/50 Hz
segura.
7. Puede cambiar la velocidad entre (1 y 6), presionando el botón(3) (correspondiente
a la mezcla).
8. Para la operación del pulso (amasando en intervalos cortos), gire el interruptor a la
posición del “PULSO”. El interruptor tiene que ser sostenido en esta posición según la
longitud del intervalo deseada. Cuando suelte el interruptor, volverá automáticamente
aposición “0”. Ajuste de niveles usando el gancho no más de 1,2kg de mezcla
9. Después de amasar/revolver gire la perilla (3) a posición “0” tan pronto como la
mezcla ha formado una bola. Luego retire el enchufe del tomacorriente
10. Presione el botón(2) de subir para levantar el brazo.
11. La mezcla puede ser liberada con la ayuda de una espátula del recipiente de
mezcla.
12. Puede ahora extraer el recipiente de mezcla.
13. Limpie las piezas tal como se describe en sección “Limpieza”.
Adjust the levels according to the mixture:
Niveles Uso Tipo de mezcla
1-4 Gancho de mezcla
3-4 Batidor plástica
5-6 Batidor metálica
Pulso Batidor metálica
NOTA:
Mezclas espesas (ej. pan o masa)
Mezclas-medianas (ej. crepe o mezcla de esponja)
Mezclas livianas (ej. crema, clara de huevo, manjar blanco) Intervalo (ej. para mezclar
clara de huevo)
- Tiempo corto de operación: Con mezclas espesas, no opere la máquina por más de
diez minutos y luego permita que se enfríe durante otros 10 minutos antes de volver a
usar.

42 43
Recetas Sugeridas
Mezcla de esponja (Receta Básica), Nivel 1-4
Ingredientes:
200g de manteca blanda o margarina, 200g de azúcar, 1 paquete de azúcar de
vainilla o 1 bolsa de Citro-Back, 1 pisca de sal, 4 huevos, 400g de harina de trigo, 1
paquete de levadura en polvo, approx 1/8 litro de leche.
Preparación: Coloque la harina de trigo y el resto de los ingredientes en el recipiente
de mezcla, mezcle con el (batidor metálica) durante 30 segundos en el nivel 1, luego
durante 3 minutos aproximadamente en el nivel 2. Engrase una lata o cubra con papel
de hornear. Rellene la mezcla y hornee. Antes que retire la torta del horno, asegúrese
de probar si está listo. Con un palo de madera perfore en el centro de la torta. Si no
se pega la mezcla signicara que la torta esta lista. Deje que la torta se enfrié.
Horno Tradicional Altura de inserción: 2
Calefacción: horno eléctrico, calor arriba y abajo de 175-200° centígrados, horno de
gas: nivel 2-3
Tiempo de cocción: 50-60 minutos
Dependiendo del gusto, con esta receta puede añadir, por ejemplo 100g de pasas o
nueces o 100g de chocolate rallado. De hecho, las posibilidades son innitas.
Bollos de pan de linaza, Nivel 1-4
Ingredientes:
500-550g harina de trigo, 50g de linaza, 3/8 litros de agua, 1 cubo de levadura (40g),
100g de leche cuajada, bien drenados, 1 cucharadita de sal. Para capa: 2 cucharadas
de agua.
Preparación: Remoje las semillas de lino en1/8 de agua tibia. El resto de agua tibia
(1/4) en el tazon, coloque la levadura, añada la manteca y mezcle con el gancho de
mezclar en el nivel
2. La levadura debe ser disuelto por completo. Colocar la harina con el lino y la sal
en el tazón. Amasar a fondo en el nivel 1, a continuación, cambiar a nivel 3 y seguir
amasando durante 3-5 minutos. Cubra la mezcla y deje que repose en un lugar
caliente durante 45-60 minutos. Amasar a fondo una vez más, saque de la cubeta y
forme dieciséis rollos. Cubrir el molde con papel de hornear. Coloque los rodillos y
permitirá que reposar durante 15 minutos. Cubra con agua tibia y hornee.
Horno Tradicional: Altura de inserción: 2
Calefacción: horno eléctrico: calor de arriba y abajo 200-220°C (precaliente por 5
minutos), horno de gas nivel 2-3
Tiempo de cocción: 30-40 minutos
Crema de Chocolate, Nivel 5-6
Ingredientes:
200ml crema dulce (nata), 150g capa de chocolate semiamarga, 3 huevos, 50-60g
azúcar, 1 pisca
de sal, 1 paquete de azúcar de vainilla, 1 cucharada de coñac o Ron, chocolate
rallado. Preparación: Batir la crema en el tazón con el batidor plástica hasta que esté
espesa. Retire el recipiente y coloque en algún lugar para enfriar. Derretir la cobertura
de chocolate siguiendo las instrucciones en el paquete o en el microondas a 600W
durante 3 minutos. Mientras tanto, batir los huevos, azúcar, azúcar de vainilla, coñac
o Ron y la sal en el tazón para batir con la batidora de metal en la velocidad 2 para
formar una espuma. Agregue el chocolate derretido y revuelva uniformemente en
velocidad 5-6. Deja un poco de la crema para la decoración. Añadir la nata restante
a la mezcla cremosa y agregue brevemente utilizando la función de pulso. Decorar la
crema de chocolate y servir bien frío.
Maza Para Pizza, Nivel 1-4
Ingredientes
400g de harina, 1/2 cucharadita de azúcar, 250ml de agua tibia, levadura seca activa
1sacher (aproximadamente 2-1/2 cucharadita), 1-1/2 cucharadita de aceite de oliva y 1
cucharadita de sal.
Preparación: Ponga la harina en el recipiente. Mezcle los ingredientes restantes en
un recipiente. Ejecute la batidora en velocidad 1-2 y poco a poco agregar el líquido
hasta que los ingredientes se incorporen, la bola de masa se convierte más formada,
aumente la velocidad a 3-4. Amasar un par de minutos a esta velocidad, hasta que la
bola de masa este suave. Retire el recipiente y divida en trozos de 2-4. Haga bases
de pizza (círculos o rectángulos) sobre una supercie enharinada, luego póngalas en
una bandeja para hornear. Difundir las bases de pizza con salsa de tomate y agregue
aderezos – champiñones, jamón, aceitunas, tomates secos, espinacas, alcachofas,
etc. Tapa con hierbas secas, trozos de mozzarella y un chorrito de aceite de oliva.
Hornear en un horno precalentado a 200° C / 400° F/gas 6 durante 15-20 minutos,
hasta que los ingredientes estén burbujeante y oro marrón
Pan Blanco, Nivel 3-6
Ingredientes:
600G harina para pan blanco 1 bolsita de levadura seca activa (alrededor de 2
cucharaditas) 345ml agua caliente 1 cucharada de aceite de girasol o mantequilla 1
cucharadita de azúcar 2 cucharadita de sal
Preparación: Utilice las instrucciones de masa para pizza, luego ponga la masa en
un recipiente, tape y deje en un lugar cálido hasta que se duplique en tamaño (30-40
minutos).
Saque la masa y perfore hasta quitar el aire. Amase ligeramente sobre una tabla
enharinada, forme una barra de pan, o coloque en una lata, tapa y deje en un lugar
cálido por otros 30 minutos. Hornee en un horno precalentado a 200° C / 400° F/gas 6
de 25-30 minutos, hasta que doren y hueco que suena en la parte inferior.
Rollitos de semilla de amapola, Nivel 1-3
Ingredientes:
570g harina para pan blanco 1 bolsita de levadura seca activa (alrededor de 2½

44 45
cucharaditas) 300ml leche (calentar un poco) 2 huevos (temperatura de ambiente)
1 cucharada de aceite de girasol 1 cucharadita de azúcar 2 cucharaditas sal 75g
amapola semillas.
Preparación: Mezcle la leche, huevos, aceite, azúcar, sal y levadura en una jarra o
recipiente y deje durante 5 minutos. Ponga la harina y semillas de amapola en el
recipiente y mezcle a velocidad 1, añadiendo gradualmente el líquido, a continuación,
aumente la velocidad a 2, y mezcle durante cinco minutos. Retire la masa en una
supercie enharinada, corte en 8 ó 10 piezas y forme en rollitos, a continuación,
poner en una bandeja de hornear resistente a la grasa. Deje en un lugar cálido. Con
un cepillo pequeño ponga una capa de huevo o leche sobre los rollitos de amapola, y
cocer en el horno precalentado a 220 °C/ 425 °F/gas 7 de 20 a 25 minutos, hasta que
estén doradas.
Pan de hierbas italiano, Nivel 3-6
Ingredientes:
575g harina para pan blanco, 1 bolsita de levadura seca activa (aproximadamente
2 cucharaditas), 290ml de agua, 2 cucharadas de aceite de oliva, 2 cucharaditas de
azúcar 2 cucharaditas de sal, 4 cucharadas mezclado hierbas secas
Preparación: Mezcle el agua, aceite, azúcar, sal y levadura en una jarra o recipiente
y deje durante 5 minutos. Ponga la harina y hierbas secas en el recipiente y mezcle
a velocidad 1, añadiendo poco a poco el líquido, entonces aumente la velocidad a 2
y mezcle durante 5 minutos. Ponga la masa en un recipiente, tape y deje en un lugar
cálido durante (20-30 minutos). Coloque sobre una supercie enharinada, amasar
suavemente para sacar al
aire, ponga en una bandeja para hornear y deje reposar. Hornee en un horno
precalentado a 200° C / 400° F/gas 6 por 25 minutos o hasta que este dorado/marrón.
Helado de café con Brandy, Nivel 5-6
Ingredientes:
3 huevos 75g de azúcar en polvo, 300ml nata líquida, 2 cucharadas soperas de café
instantáneo en polvo, 300ml crema doble, 2 cucharadas de brandy.
Preparación: Agregue el azúcar y los huevos en el recipiente, luego mezcle en
velocidad 6 hasta tener una suave textura. En una cacerola, ponga la nata líquida y el
café y dele un hervor y mezcle el huevo y la azúcar. Ponga en una cacerola resistente
con agua hirviendo y cocine, revolviendo bien, hasta que este lo sucientemente
gruesa como para cubrir la parte de atrás de una cuchara. Cuele en un recipiente
y deje enfriar. Batir la crema doble a velocidad 6 hasta formar picos suaves, luego,
ponga en la mezcla fria de huevo y azúcar, con el brandy. Ponga en un recipiente,
cubrir y congelar durante 2 ó 3 horas, hasta que congele. Retirar, mezclar bien y luego
congelar de nuevo, hasta la textura deseada.
Merengues, Nivel 5-6
Ingredientes
4 Claras de huevo, 100g de azúcar en polvo, 100g de azúcar glaseada
Preparación: Colocar el huevo en el recipiente y mezcle en velocidad 6 hasta que
este bastante rígida. Agregue la mitad del azúcar y ponga a batir de nuevo hasta que
la mezcla esté suave y pueda formar picos duros. Retire el recipiente, y ligeramente
coloque en el resto del azúcar mezclando con una cuchara de metal. Utilice una
cuchara o un tubo para que la mezcla del merengue haga formas en óvalos.
Espolvorear con el azúcar restante y poner en el estante más bajo de un horno frío
(120 °C/ 250 °F/gas) durante 1 horas y después enfrié. Con frutos rojos, chocolate,
crema y dulces.
Garantía
NOTA: ESTAS DECLARACIONES NO AFECTAN SUS DERECHOS LEGALES COMO CONSUMIDOR
Este producto ha sido fabricado bajo las más estrictas control de calidad y utilizando materiales de alta
calidad para asegurar conabilidad y excelente funcionamiento. Este exprimidor dará buen servicio y una
larga duración, siempre y cuando se utilice correctamente y sea bien mantenido.
El producto está garantizado por 1 año desde la fecha de compra original. Si surge cualquier defecto
debido a un error/defecto de fabricante o mano de obra, entonces el producto debe ser devuelto al lugar
original de compra. Reembolso o reemplazo es a discreción de la compañía.
Productos Duronic se ofrecen con una garantía de 1 año bajo las siguientes condiciones:
1.El producto debe ser devuelto al vendedor con comprobante de compra original.
2. El producto debe instalarse y usarlo según las instrucciones contenidas en este manual.
3. Este aparato es únicamente de uso doméstico.
4. No cubre desgaste, daños maliciosos, uso indebido, negligencia, reparaciones inexpertas o partes
consumibles.
5. Shine-Mart Ltd no será responsable por cualquier pérdida consecuente o daño accidental.
6. Shine-Mart Ltd no es responsable ah llevar a cabo cualquier tipo de servicio, bajo la garantía.
7. Válido solamente dentro de la (EU).
Este producto está equipado con enchufe
EURO 2 pin - y el fusible es importado por Shine-Mart Ltd, RM3 8SB
Información sobre la eliminación de residuos para los consumidores de equipos
eléctricos & electrónico:
Esta marca en un producto y/o documentos adjuntos indica que cuando se va a
desechar, se debe tratar como equipos residuos eléctricos y electrónicos, (RAEE).
Cualquier producto marcado (RAEE) no debe ser mezclado con la basura doméstica,
sino separado para el tratamiento, recuperación y reciclaje de los materiales utilizados.
Para el tratamiento adecuado, recuperación y reciclaje; por favor, tome todos los
productos (RAEE) y llévelo al sitio de residuos de su Autoridad Local, donde será
aceptado de forma gratuita.
Si los clientes desechan los residuos eléctricos y electrónicos correctamente, ayudar a
ahorrar valiosos recursos y prevenir los efectos negativos sobre la salud humana y el
medio ambiente, de materiales peligrosos que pueden contener los residuos.

46 47
Manuale D’istruzioni In Italiano

48 49
Modello: SM100
Voltaggio: 220-240V~50/60Hz
Consumo: 450W
Classe di protezione: II
Questo apparecchio è stato testato secondo le tutte le norme CE vigenti, come la
compatibilità elettromagnetica e le direttive per bassi voltaggi, e fabbricato in accordo
con le norme e ragolamenti di sicurezza più recenti.
Soggetto a rettiche tecniche senza obbligo di preavviso!
Leggere attentamente le seguenti istruzioni prima di operare l’apparecchio.
Conservare il presente manuale di istruzioni compresa la garanzia, la ricevuta
d’acquisto e, se possibile, l’imballo e la confezione originali. Se si cede questo
apparecchio a terzi, si prega di cedere, possibilmente, anche i sopracitati allegati.
- L’apparechio è progettato esclusivamente per uso privato e per l’uso previsto
dale presenti istruzioni. Non utilizzare all’aria aperta (eccezzione fatta se
progettato per essere usato all’aria aperta). Tenere lontano da fonti di calore. Non
esporre l’apparecchio a luce solare diretta, umidità (Mai immergere in nessun
liquido) e superci afliate. Non utilizzare l’apparecchio con le mani bagante. Se
accidentalmente l’apparecchio viene a contatto con qualsiasi liquido, staccare
immediatamente la spina.
- Durante la pulizia, spegnere l’apparecchio e staccare la spina della corrente (tirare lo
spinotto e non il cavo do alimentazione). Se l’apparechio non è in uso rimuovere tutti
gli accessori.
- Non operare l’apparecchio senza la supervisione di un adulto. Se si lascia
l’apparecchio non vigilato, sul piano di lavoro, si prega di rimuovere la spina di
alimentazione.
- Controllare periodicamente che l’apparecchio o il cavo di alimentazione non siano
danneggiati. Non utilizzare l’apparecchio se danneggiato.
- Non tentare di riparare l’apparecchio per conto proprio. Contattare in ogni eventualità
un tecnico autorizzato. Per evitare l’esposiziopne a pericoli, contattare l’assitenza
clienti o il venditore per qualsiasi tipo di manutenzione o sostituzione del cavo di
alimentazione se danneggiato.
- Utilizzare solo parti di ricambio e accessori originali.
- Prestare la dovuta attenzione alle seguenti istruzioni di sicurezza speciali.
Dati tecnici
Istruzioni generali per la sicurezza
- Per garantire la sicurezza dei bambini, tenere tutti gli elementi dell’imballo (buste di
plastica, polistirolo e cartoni) lontano dalla loro portata.
ATTENZIONE! Non lasciare I bambini giocare con la pranstica per evitare rischi di
soffocamento!
- Per proteggere bambini e persone con ridotte capacità di intendere e volere da
rischi di scosse elettriche, si prega di assicurarsi che l’apparecchio sia utilizzato solo
sotto stretta supervision. Questo apparecchio non è un giocattolo. Non consentire a
bambini di giocare con esso.
Istruzioni speciali per la sicurezza dell’apparecchio
Operare l’apparecchio solo sotto la supervision di un adulto responsabile..
- Non interferire con nessun dispositivo di sicurezza dell’apparecchio.
- Non inserire alcun oggetto all’interno dei ganci mentre l’apparecchio è in uso.
- Operare l’apparecchio solo su di un piano di lavoro liscio e piano.
- Non collegare l’apparecchio alla presa di corrente senza aver prima montato tutti gli
accessory necessari alla sua operatività.
- Prima della pulizia staccare sempre la spina dalla presa di corrente.
- Non immergere il corpo motore in acqua!
- Non utilizzare nessun detergente abrasivo.
Corpo motore
- Pulire l’esterno del corpo motore con un panno umido.
Ciotola e accessori.
Attenzione:
- I component non sono adatti ad essere lavati nella lavastoviglie. Se esposto a calore
o detergenti abrasive potrebbero perdere il colore o danneggiarsi.
- Componenti che sono venuti a contatto con cibi possono essere puliti con acqua e
sapone.
- Lasciare che le parti si asciugino adeguatamente prima di riassembrare il prodotto.
- Applicare una piccolo quantità di olio selle parti dopo che saranno asciutte.
Bambini e persone con ridotte
capacità di intendere e volere.
Pulizia

50 51
P a n o r a m i c a d e l p r o d o t t o
U t i l i z z o d e l l a c i o t o l a
1 Albero motore 5 Ciotola
2 Pulsante di sblocco 6 Gancio
3 Manopola della velocità 7 Sbattitore
4 Cavo di alimentazione 8 Frusta
Componenti principali e accessori standard:
5
1. Posizionare la ciotola nel vano predisposto e ruotarla per posizionarla nella
posizione di blocco.
2. Per sollevare il barccio motore premere il pulsante di sblocco(2). Adesso sarà
possibile sollevare il baccio.
3. Montare gli utensili richiesti sulla pala dell’albero motore.
4. Versare nella ciotola gli ingradienti desiderati.
Non sovraccaricare l’apparecchio – la quantità massima di ingradienti è di 1KG.
5. Abbassare il braccio utilizzando il pulsante di sblocco(2).
6. Inserire la spina di alimentazione in una presa di corrente da 230 V/50 Hz.
7. Accendere l’apparecchio usando la manopola della velocità settandola ad una
velocità da 1 a 6 (in base alle necessità del proprio impasto).
8. Per operazione di Pulse (Impastare ad intervallic regolari) girare la manopola nella
posizione “PULSE”. La manopola va tenuta in questa posizione per la durata di tempo
desiderata per l’operazione Pulse. Quando, la manopola, viene rilasciata ritorna
automaticamente in posizione “0”.
9. Dopo aver impastato riportare la manopola della velocità (3) sullo “0”. Quindi
rimuovere la spina di corrente.
10. Premere il pulsante di sblocco (2) Così da sbloccare il braccio e sollevarlo.
11. L’impasto può essere ora travasato con l’aiuto di una spatula e rimosso dalla
ciotola.
12. Rimuovera la ciotola dall’apparecchio.
13. Ripulire e lavare le parti.
Regolare la velocità utilizzando il gancio per l’impastatura per non più di 1.2KG di
impasto:
Livelli Utilizzo Tipo di impasto
1-4 Gancio Impasti duri (Ex. Pasta per pane o pizza)
3-4 Sbattitore Impasti medio-duri (Ex. Crepes o ciambelle)
5-6 Frusta Impasti lisci (Ex. Creme, albumi)
Pulse Frusta Impasto misto (Ex. Consistenze diverse)
NB: Breve period di operatività: Con impasti duri, non operare l’apparecchio per più di
dieci minuti consecutivi, e lasciare che si raffreddi per altri dieci minuti.

52 53
Ricette suggerite
Impasto pan di spagna (Ricetta base), Livello 1-4
Ingradienti:
200gr burro ammorbidito o margarina, 200gr zucchero, 1 bustina di vanillina o aroma
al limone, 1 pizzico di sale, 4 uova, 400gr farina, 1 bustina di lievito in polvere, approx.
150ml di latte.
Preparazione:
Trasferire la farina e gli ingradienti rimanenti nella ciotola, impastare con lo sbattitore
per 30 secondi a velocità 1, poi per 3 minuti a velocità 2. Imburrare una teglia o
ricoprire con la carta da forno. Versare l’impasto e metterlo in forno. Prima di tirare
fuori l’impasto dal forno forare il centro con uno stuzzicadenti; se l’impasto non si
attacca allo stuzzicadenti allora è pronto il pan di spagna. Togliere, quindi, dal forno e
lasciarlo raffreddare.
Forno tradizionale
Cottura: forno elettrico, a 175-200°C
Tempo di cottura: 50-60 minuti
In accordanza con I gusti personali, la ricotta può essere cambiata con l’aggiunta di
100gr di uvetta, o noci, o cioccolata.
Pane integrale ai semi di lino, Livello 1-4
Ingradienti:
500-550g farina, 50g semi di lino, 375ml d’acqua, lievito 40g, 100g caglio, 1 pizzico di
sale. per il rivestimento: 2 cucchiai di acqua.
Preparazione:
Mettere in ammollo i semi di lino. Mettere nella ciotola acqua tiepida, il lievito
ed il caglio e mescolare utilizzando il ganci a velocità 2, nchè il lievito non
saràccompletamente dissolto. Versare nella ciotola la farina, i semi di lino, ed il sale.
Impastare a velocità 1 e poi a velocità 3 per 4-5 minuti. Coprire l’impasto e lasciare
che lieviti a temperature ambiente per 45-60 minuti. Impastare ancora una volta, e
preparare sedici pagnotte. Coprire una teglia con della carta da forno. Posizionare le
pagnotte sullateglia e lsciare riposare per altri 15 minuti. Spennellare le pagnotte con
acqua tiepida e mettere la teglia in forno.
Forno tradizionale:
Cottura: forno elettrico, a 200-220°C (pre riscaldato per 5 minuti)
Tempo di cottura: 30-40 minuti
Crema al cioccolato, Livello 5-6
Ingradienti:
200ml panna per dolci, 150g cacao amaro, 3 uova, 50-60g zucchero, 1 pizzico di sale,
1 bustina di vaniglia, 1 cucchiaio di cognac o rum, scaglie di cioccolato.
Preparazione:
Sbattere la crema nella ciotola con la frusta nchè non sarà compatta. Rimuovere la
ciotola dall’apparecchio e lasciarla riposare. Sciogliere la cioccolata a bagnomaria.
Sbattere le uova con lo zucchero, la vaniglia, il liquore e il sale con la frusta a velocità
2. Aggiungere la cioccolata fusa e amalgamare il tutto a velocità 5-6. Tenere un’pò di
panna separata che servirà per la dsecorazione. Aggiungere il resto della panna al
composto e amagamare il tutto. Decorare con il cioccolato e servire freddo.
Impasto per Pizza, Livello 1-4
ingradienti
400g farina, 250ml acqua tiepida, 1/2 cucchiaio di zucchero, 2 cucchiai di lievito, 1 1/2
cucchiai di olio di oliva, 1 cucchiaio di sale.
Preparazione:
Mettere la farina nella ciotola. Mescolare gli ingradienti rimanenti in una ciotola o
una caraffa. Operare il mixer a velocità 1 e aggiungere gradualmente il contenuto
della caraffa. Mano a mano che gli ingradienti vengono mischiati e si compattano
aumentare la velocità a 3 o a 4. Impastare a questa velocità per un paio di minuti,
nchè l’impasto non sarà liscio ed omogeneo. Rimuovere l’impasto dalla ciotola
e dividerlo in 2 o 4 parti eguali. Stendere la pasta su di una supercie infarinata e
metterla su teglie circorali o rettangolari. Condire la base della pizza con pomodoro
mozzarella e altri ingradienti (tonno, olive, funghi, prosciutto, salami ecc.) Cuocere in
forno a 200°C/400°F per 15-20 minuti, nchè non sarà cotta uniformemente.
Pane bianco, Livello 3-6
Ingradienti:
600g farina, 1 sacchetto di lievito (2½ cucchiaini circa), 345ml acqua tiepida, 1
cucchiaio di olio di oliva o 1 cucchiaio burrobutter, 1 pizzico di sale, 1 cucchiaio di
zucchero.
Preparazione:
Utilizzare le istruzioni per preparare la pasta di pizza e mettere il tutto dentro una
ciotola, coprire e lasciare riposare nchè non lieviterà(30-40min). Rimuovere la pasta
e sbatterla per fare uscire l’aria. Impastare, quindi, su di una supercie infarinata e
preparare delle pagnotte e metterle su di una teglia lasciandole riposare per altri 30
minuti. Cuocere in forno preriscaldato a 200°C/400°F per 25-30 minuti, nchè non
saranno cotte uniformemente.
Pagnotta ai semi di papavero, Livello 1-3
Ingradienti:
570g farina 1 sacchetto di lievito (2½ cucchiaini circa) 300ml latte tiepido 2 uova
a temperatura ambiente 1 cucchiaino di olio di oliva 1½ cucchiaino di zucchero 2
cucchiaini di sale 75g di semi di papavero
Preparazione:
Mescolare il latte, le uova, l’olio, lo zucchero, il sale, il lievito in una caraffa o una
ciotola, e lasciare riposare 5 minuti. Mettere la farina ed i semi di papavero nella
ciotola e mescolare a velocità 1 gradualmente aggiungendo il liquido, quindi portare
la velocità a 2, e mescolare per 5 minuti. Mettere quindi l’impasto su di una supercie

54 55
infarinata, tagliarla in 8-10 pezzi, e creare delle pagnotte e trasferirle sulla carta da
forno e lasciarle riposare nchè non saranno lievitate. Spennellare con l’uovo o il
latte, e cuocere nel forno pre riscaldato a 220°C/425°F per 20-25 minuti, nchè non
risulteranno dorati.
Pane alle erbe italiane, livello 3-6
Ingradienti:
575g farina , 1 sacchetto di lievito (2½ cucchiaini circa),290ml acqua 2 cucchiaini di
olio di oliva, 2 cucchiaini di zucchero 2 cucchiaini di sale, 4 cucchiaini di misto di erbe
Preparazione:
Mescolare l’acqua, l’olio, zucchero, sale e lievito in una caraffa o una ciotola, e
lasciare riposare per 5 minuti. Mettere la farina e le erbe nella ciotola e mescolare a
velocità 1, aggiungendo gradualmente il liquid e aumentare la velocità a 2 e impastare
per 5 minuti. Mettere l’impasto in una ciotola, coprirlo, e lasciarlo riposare per (20-30
minuti). Mettere, quindi, l’impasto su di una supercie infarinata, fare uscire l’aria,
preparare le pagnotte, e metterle sulla carta da forno e lasciarle lievitare. Cuocere
in forno pre-riscaldato 200°C/400°F per 25 minuti nchè non saranno dorate in
supercie.
Gelato al caffe e brandy, Livello 5-6
ingradienti:
3 uova 75g zucchero di canna, 300ml panna liquida2cucchiaini di caffe in polvere,
300ml panna da cucina 2½ cucchiaino di brandy.
Preparazione:
Aggiungere lo zucchero e le uova nella ciotola e impastare a velocità 6 no
a raggiungere una consistenza uniforme e liscia. In una pentola, portare ad
ebollizzione la panna liquida ed il caffè e aggiungere, quindi, il composto di uova e
zucchero. Continuare la cottura a bagnomaria.nchè tutti gli ingradienti non saranno
uniformemente uniti e poi lasciarlo raffreddare. Montare la panna a velocità 6 e
aggiungerla a tutti gli altri ingradienti. Versare tutto l’impasto in una ciotola, coprirla, e
metterla nel freezer per 2½-3 ore, nchè non sarà parzialmente congelata. Mescolare
di nuovo l’impasto e rimetterlo nel freezer.
Meringhe, Livello 5-6
ingradienti:
4 albumi d’uovo, 100g zucchero, 100g zucchero a velo
Preparazione:
Montare a neve gli albumi d’uovo a velocità 6. Aggiungere metà dello zucchero
e impastare ancora no ad avere un compost liscio ed omogeneo. Rimuovere la
ciotola, e aggiungere poco alla volta lo zucchero rimanente con un cucchiaio di
metallo. Formare sulla carta da forno le forme per le meringhe. Sprezzare il rimanente
zucchero a velo. Mettere la teglia sul ripiano più basso del forno a 120°C/250°F per
1½ ora. Lasciare quindi raffreddare. Decorare con frutta cioccolata e crema.
Questo prodotto è garantito per una durata determinata con il distributore a partire dalla data
di acquisto contro ogni difetto derivante da difetti di fabbricazione o dei materiali. Questa
garanzia non copre difetti o danni derivanti da installazione impropria, uso improprio o usura
anomala del prodotto.
L’apparecchio deve essere restituito nella sua confezione originale e accompagnato dalla
ricevuta e deve essere stato utilizzato in modo corretto. È importante rispettare le istruzioni
per l’uso e le precauzioni di sicurezza indicate di seguito. Inoltre, non possiamo garantire
l’apparecchio se è stato modicato o riparato dall’acquirente o da terzi.
1 anno di garanzia da Shine-Mart Ltd, proprietari del marchio commerciale Duronic.
NOTA: QUESTE DICHIARAZIONI NON INFLUISCONO SUI DIRITTI LEGALI DEL
CONSUMATORE
Questo prodotto è stato realizzato con le rigorose procedure del controllo qualità, e
utilizzando materiali di altissima qualità, per garantire afdabilità e prestazioni eccellenti.
Vi regalerà un servizio ottimo e a lungo termine, purchè venga opportunamente usata e
mantenuta.
Il prodotto è garantito per 1 anno dalla data di acquisto. Se sorge qualche difetto a causa di
materiali difettosi o scarsa manodopera, il prodotto difettoso dovrà essere restituito al luogo
originale di acquisto. Il rimborso o la sostituzione sono a discrezione dell’azienda.
I prodotti Duronic offrono 1 anno di garanzia alle seguenti condizioni:
1. Il prodotto deve essere restituito al rivenditore con la prova d’acquisto originale
2. Il prodotto deve essere installato e usato seguendo le istruzioni contenute nel
manuale.
3. Il prodotto va utilizzato solo per scopi domestici. Non è da utilizzarsi per uso
commerciale.
4. La garanzia non copre usura, danni volontari, abuso, negligenza, riparazioni
inesperte o consumo dei materiali.
5. Shine-Mart Ltd non è responsabile per Danni accidentali o consequenziali.
6. Shine-Mart Ltd non è tenuta a eseguire qualsiasi tipo di riparazione, ai sensi
della garanzia.
7. Termini validi in tutta l’unione europea
*Ci riserviamo il diritto di modicare le sopracitate condizioni
Per parti di ricambio si prega di consultare il sito www.duronic.com
Corretto smaltimento del prodotto.
Qusto prodotto è inclusivo di spina certificata EU
importata da Shine-Mart Ltd, RM3 8SB
CONSERVARE QUESTE ISTRUZIONI
QUESTO PRODOTTO E’ SOLO PER USO DOMESTICO!
Questo segno su un prodotto o su documenti indica che quando deve essere smaltito,
deve essere trattato come i riuti elettrici ed elettronici (WEEE)
Tutti I prodotti marcati WEEE non devono essere buttati nei riuti domenistici generici,
ma separati per il trattamento, il recupero e il riciclaggio dei materiali utilizzati.
Per un corretto trattamento, recupero e riciclaggio; si prega di portare tutti I prodotti
marcati WEEE al Vostro centro smaltimenti riuti autorizzato, dove saranno accettati
gratuitamente.
Se i consumatori sono propensi allo smaltimento corretto di riuti elettrici ed elettronici,
aiuteranno a salvare risorse importanti e a prevenire i potenziali effetti negativi sulla
salute umana e sull’ambiente di tutti i materiali pericolosi che i riuti possono contenere.